Creating an agent
There are multiple ways to create an agent:- From a template
- Blank agent
- Anaconda Assistant
- Select Agents from the left-hand navigation.
- Click Create.
- Select a template to create the agent.
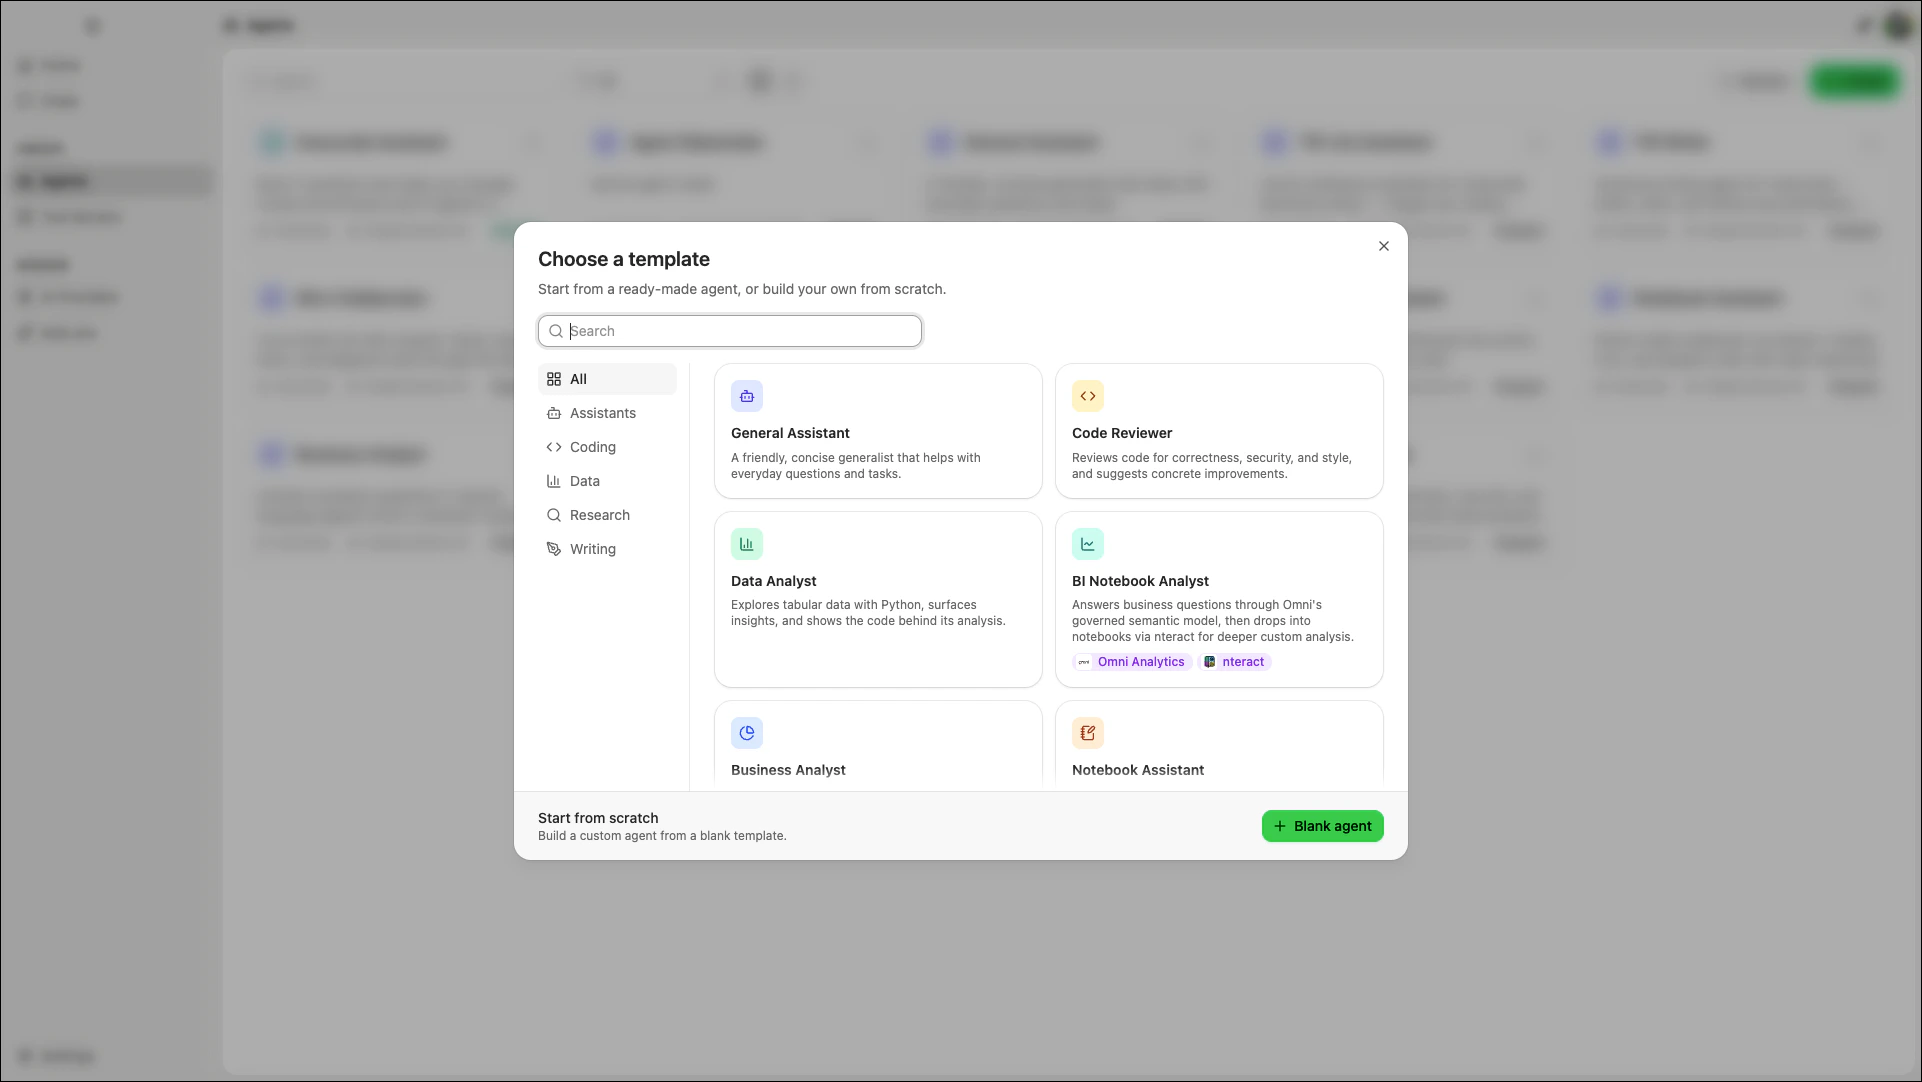
The agent’s configuration page opens automatically after creation.
Configuring your agent
The agent configuration page displays all components that define your agent’s behavior. Select an agent’s card from the Agents page to view its configuration.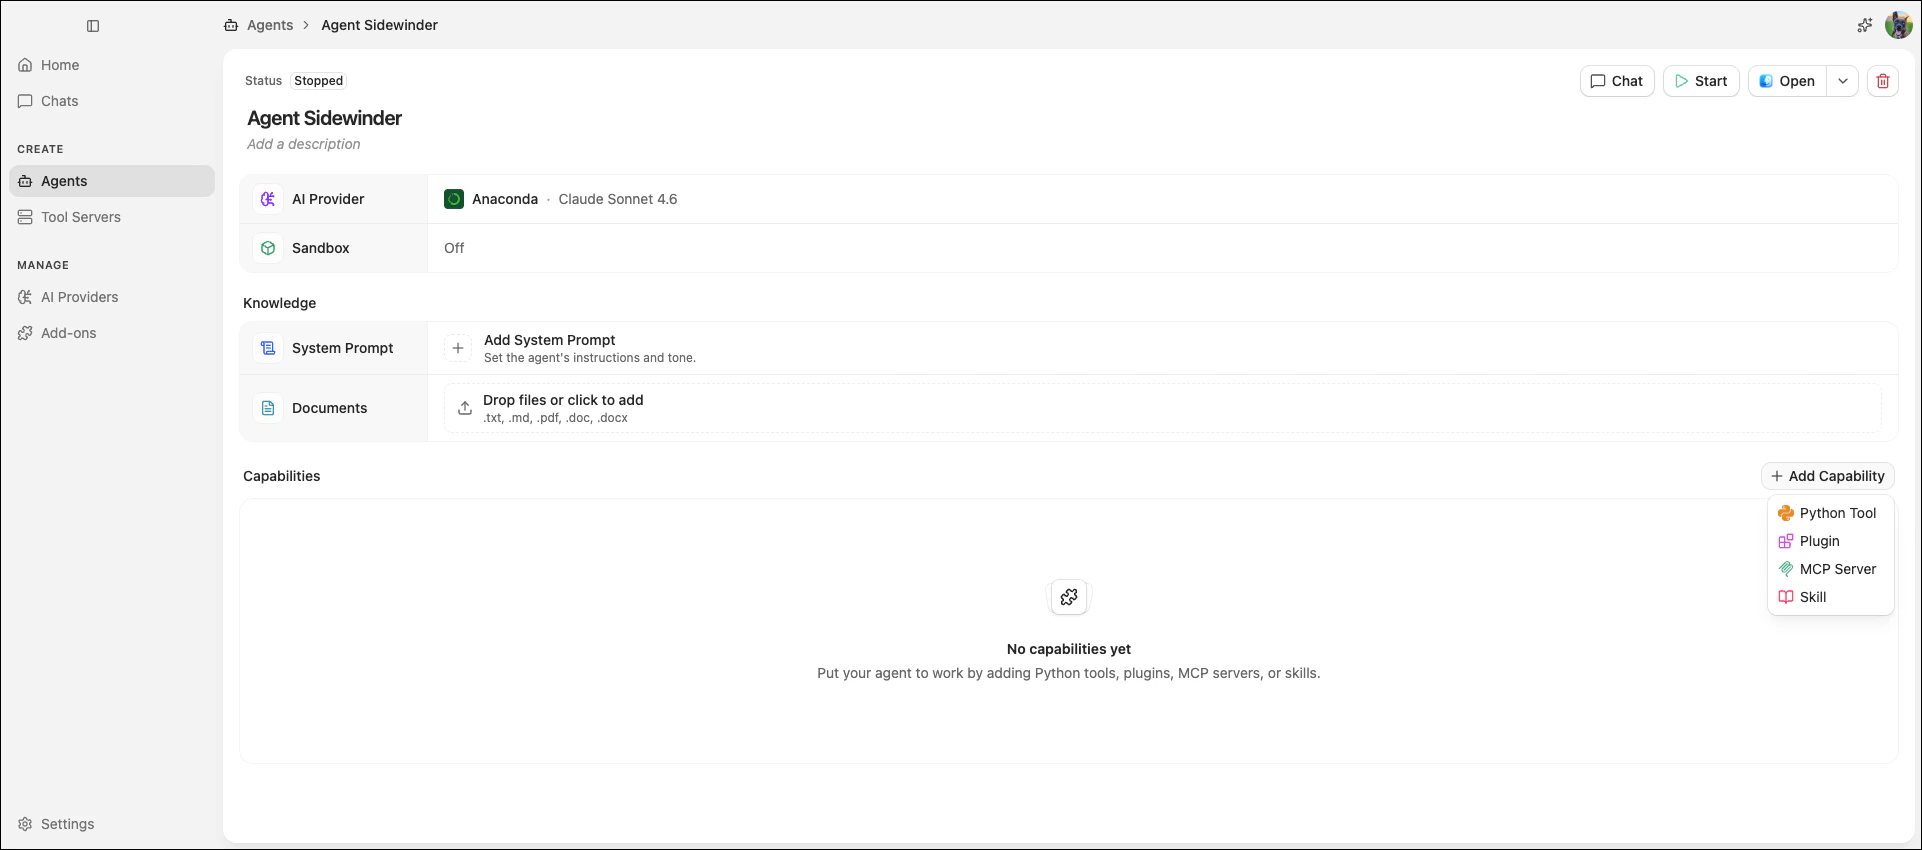
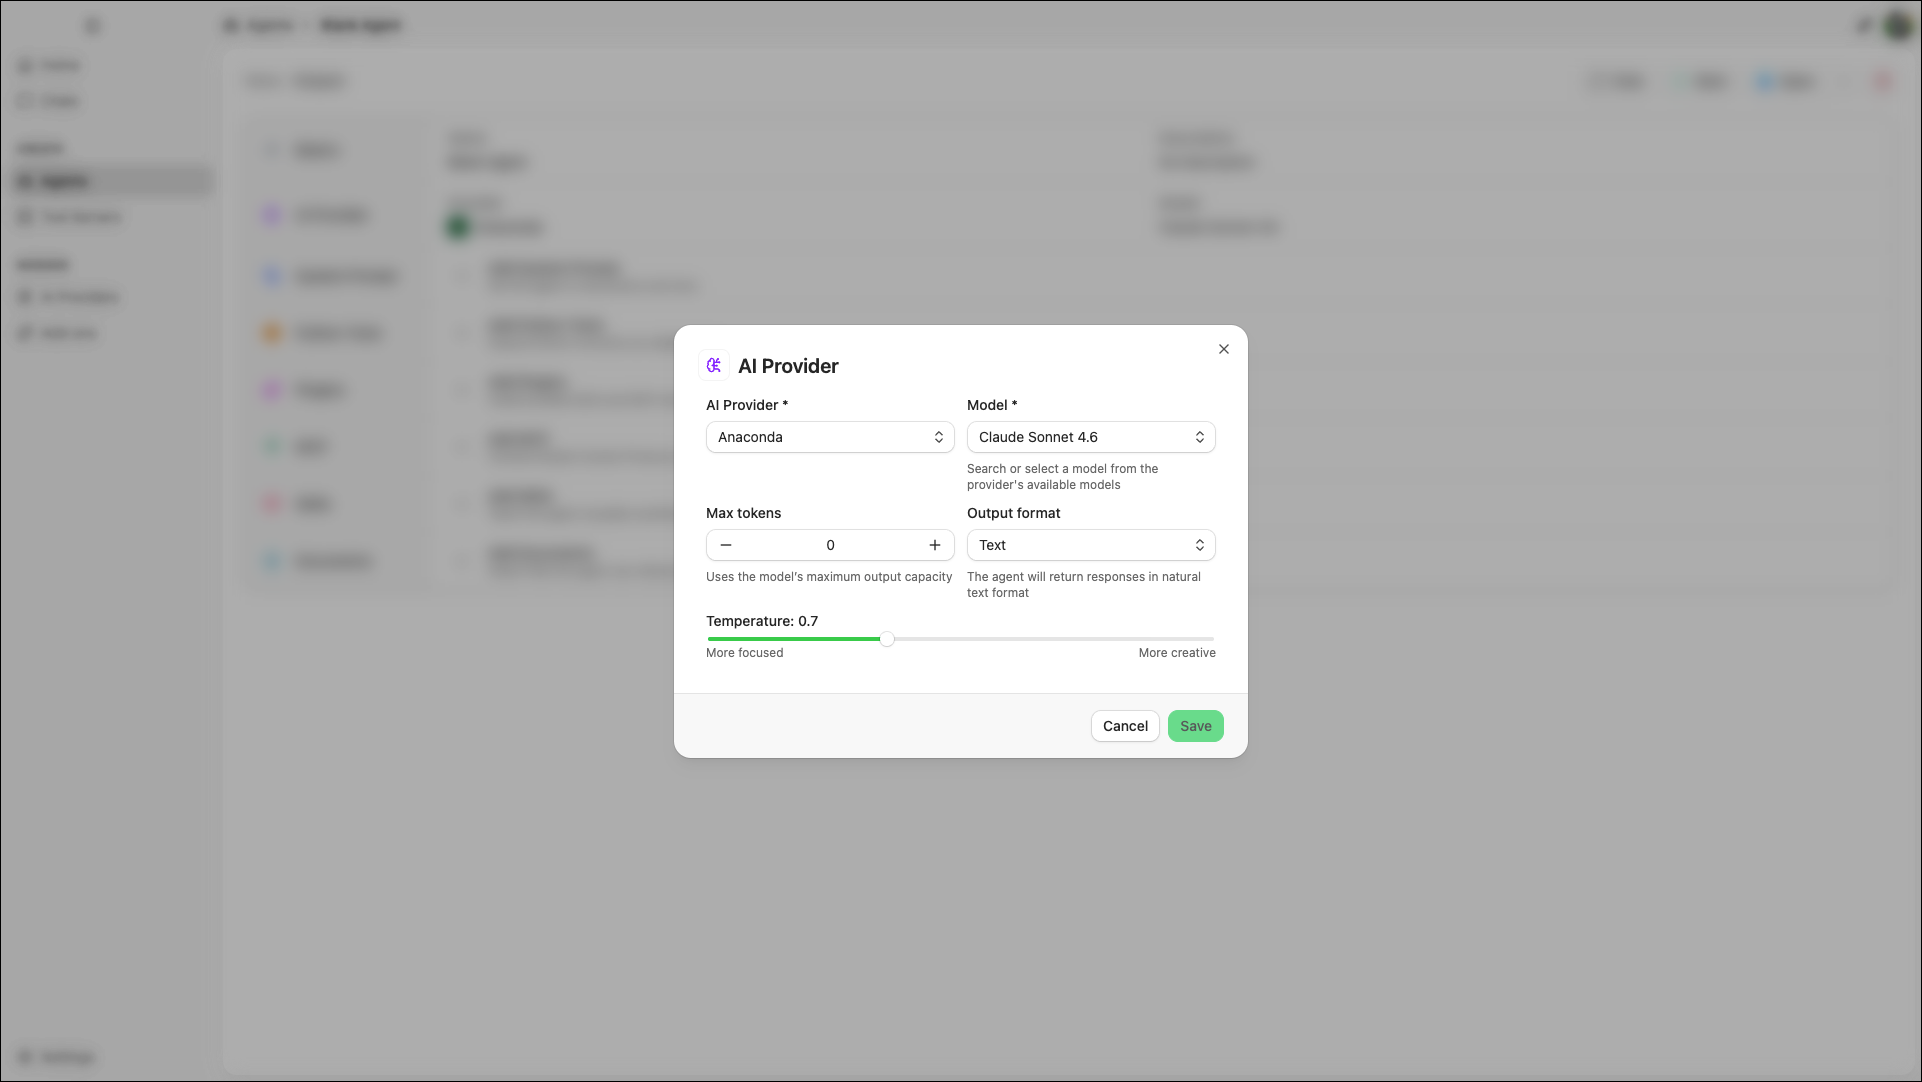
AI provider
The AI Provider row configures which model powers your agent and how it generates responses. To configure your agent’s AI provider:- Click Edit beside AI Provider.
- Select an AI Provider from the dropdown. For more information, see AI providers.
- Select a Model from the chosen provider.
-
Adjust the following settings as needed:
-
Temperature: Controls randomness in responses. Ranges from 0 (most deterministic) to 2 (most creative).
Lower values work well for analytical tasks; higher values suit more creative tasks.
- Max tokens: The maximum number of tokens the model can generate in a single response. Leave blank to use the model’s maximum output length.
- Output format: Choose between Text (default) and JSON for structured output.
-
Temperature: Controls randomness in responses. Ranges from 0 (most deterministic) to 2 (most creative).
-
Click Save.
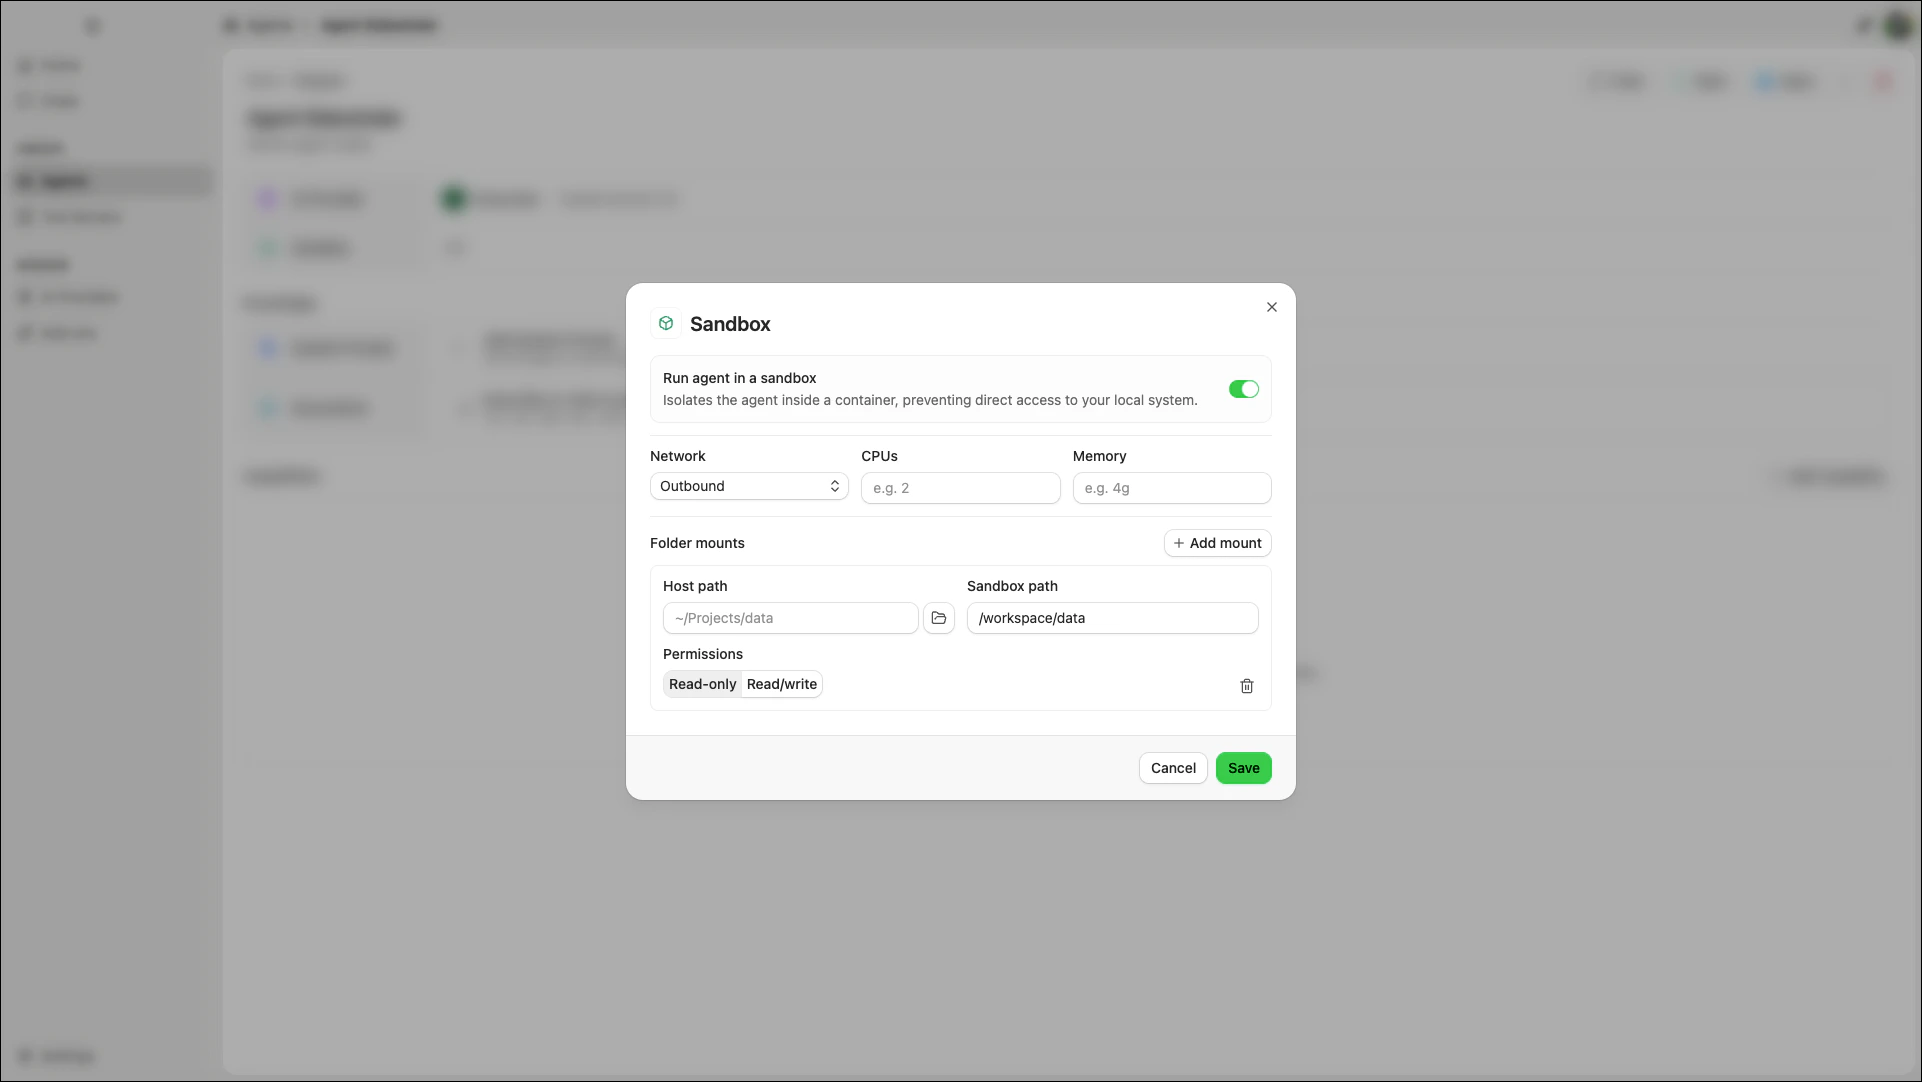
Sandbox
The sandbox runs your agent inside a Docker container, isolating it from your local system. The agent cannot access your filesystem or network unless you explicitly configure folder mounts and networking. To configure the sandbox:- Click Edit beside Sandbox.
- Enable the Run agent in a sandbox toggle to reveal the configuration options.
-
Select a Network mode from the dropdown:
- Outbound (default): The agent can make outgoing network requests. Agent Studio publishes the container’s port to localhost so you can chat with it.
- Isolated: No network access. The agent cannot reach external services or be reached from the host.
- Host network: The agent shares the host’s network namespace directly.
- (Optional) Set CPUs and Memory limits for the container.
-
(Optional) Add folder mounts to give the agent access to specific directories on your machine. Click Add mount, then configure:
- Host path: The directory on your machine to share with the container. Click the folder icon to browse your file system.
- Sandbox path: The location inside the container where the directory is mounted.
- Permissions: Choose Read-only or Read/write.
- Repeat the previous step to add as many folder mounts as your agent requires.
- Click Save.
Knowledge
The Knowledge section shapes what your agent knows before a conversation begins. This includes instructions that guide its behavior and reference material it can draw from when responding.System prompt
The system prompt defines your agent’s role, tone, and behavioral guidelines. It also controls when and how the agent uses its tools. For guidance on writing effective system prompts, see Crafting effective system prompts. To set or edit a system prompt:- Click Add System Prompt, or click Edit beside System Prompt if one already exists.
- Write your instructions in the text field.
- Click Save.
Documents
Documents are reference files that Agent Studio inserts into the agent’s context at the start of each conversation. To add documents, drag and drop files into the upload area on the agent configuration page, or click it to browse your file system. To remove a document, click beside the file name.Maximum file size is 25 MB.
Capabilities
Capabilities extend what your agent can do. Click Add Capability on the agent configuration page to choose from:- Python Tool: Write custom functions your agent can call during a conversation.
- Plugin: Add pre-built integrations that bundle MCP tools and skills together.
- MCP Server: Connect your agent to external services, databases, and APIs.
- Skill: Attach reusable workflows that guide how your agent uses its tools.
Python tools
Python tools are custom functions that your agent can call during a conversation. Tools are organized into modules, which are Python files that group related@tool functions. For example, you might create a module called data_tools that contains tools for querying a database and formatting results.
To add Python tools to your agent, click Add Capability > Python Tool on the agent configuration page.
Creating a Python tool module
- Click New module in the center of the screen, or click in the upper-left corner of the sidebar.
- In the New Python module dialog, enter a name using letters, numbers, and underscores. The name must start with a letter or underscore.
-
Click Create.
Agent Studio creates the module with a sample tool function:
-
Customize the generated function with your tool’s logic and click Save.
The model uses the function name as the tool name, argument names and type hints to build the tool’s input schema, and the docstring as the tool’s description.Write a clear docstring that describes what the tool does, what it accepts, and what it returns.
- Allow: The agent can use this tool without asking for permission.
- Ask: The agent requests approval from the user before using this tool.
- Disabled: The agent cannot use this tool.
- In the Add dependencies dialog, select a package source from the dropdown.
- Enter the name of a package to search for it.
- Click to add the package to the queue.
- Repeat for each package you want to add.
- Click Add packages.
Plugins
Plugins add MCP tools and skills to your agent in a single step. When you add a plugin, its MCP tools and skills are automatically available to your agent. Plugin-managed items are labeled with the plugin name on the MCP and Skills rows so you can identify where they came from. Agent Studio ships with the following plugins:- Atlassian: Access Jira and Confluence for ticket management, sprint tracking, and documentation.
- Miro: Create and edit content on Miro boards, including sticky notes, flows, and diagrams.
- nteract: Work with Jupyter notebooks through MCP, including creating, running, and managing cells and kernels.
- Omni Analytics: Query data using natural language through Omni’s governed semantic model.
- Click Add Capability > Plugin on the agent configuration page.
- Select a plugin from the available options.
- Click Add to agent.
To remove a plugin, return to the plugin configuration page and click Remove from agent.
MCP
MCP (Model Context Protocol) servers connect your agent to external services, databases, and APIs. Before you can enable an MCP server for an agent, it must be registered in Agent Studio. For details on registering servers, see MCP servers. To enable an MCP server for your agent:- Click Add Capability > MCP Server on the agent configuration page. Agent Studio displays a searchable list of registered MCP servers.
- Select an MCP server to expand it and view its tools.
- Set the approval controls for each MCP tool.
- Click Save.
Skills
Skills give your agent reusable workflows and context for when to use its tools. Before you can enable a skill for an agent, it must be added to Agent Studio. For details on adding skills, see Skills. To enable a skill for your agent:- Click Add Capability > Skill on the agent configuration page.
- Select the checkbox beside each skill you want to enable for this agent.
- Click Save.
Starting and chatting with your agent
Once your agent is configured, you can start it and begin a conversation:- From the agent configuration page, click Start.
- Wait for the agent to finish starting. A notification appears when the agent is ready.
- Click Chat to open a conversation with the agent.
If your agent has MCP tools that require authentication, Agent Studio prompts you to authorize access when you start a chat.
If your message or the agent’s response triggers a safety filter (such as PII detection, secrets detection, or prompt injection protection), Agent Studio blocks the response and displays a “Blocked by safety filter” warning in the chat.
If your message or the agent’s response triggers a safety filter (such as PII detection, secrets detection, or prompt injection protection), Agent Studio blocks the response and displays a “Blocked by safety filter” warning in the chat.
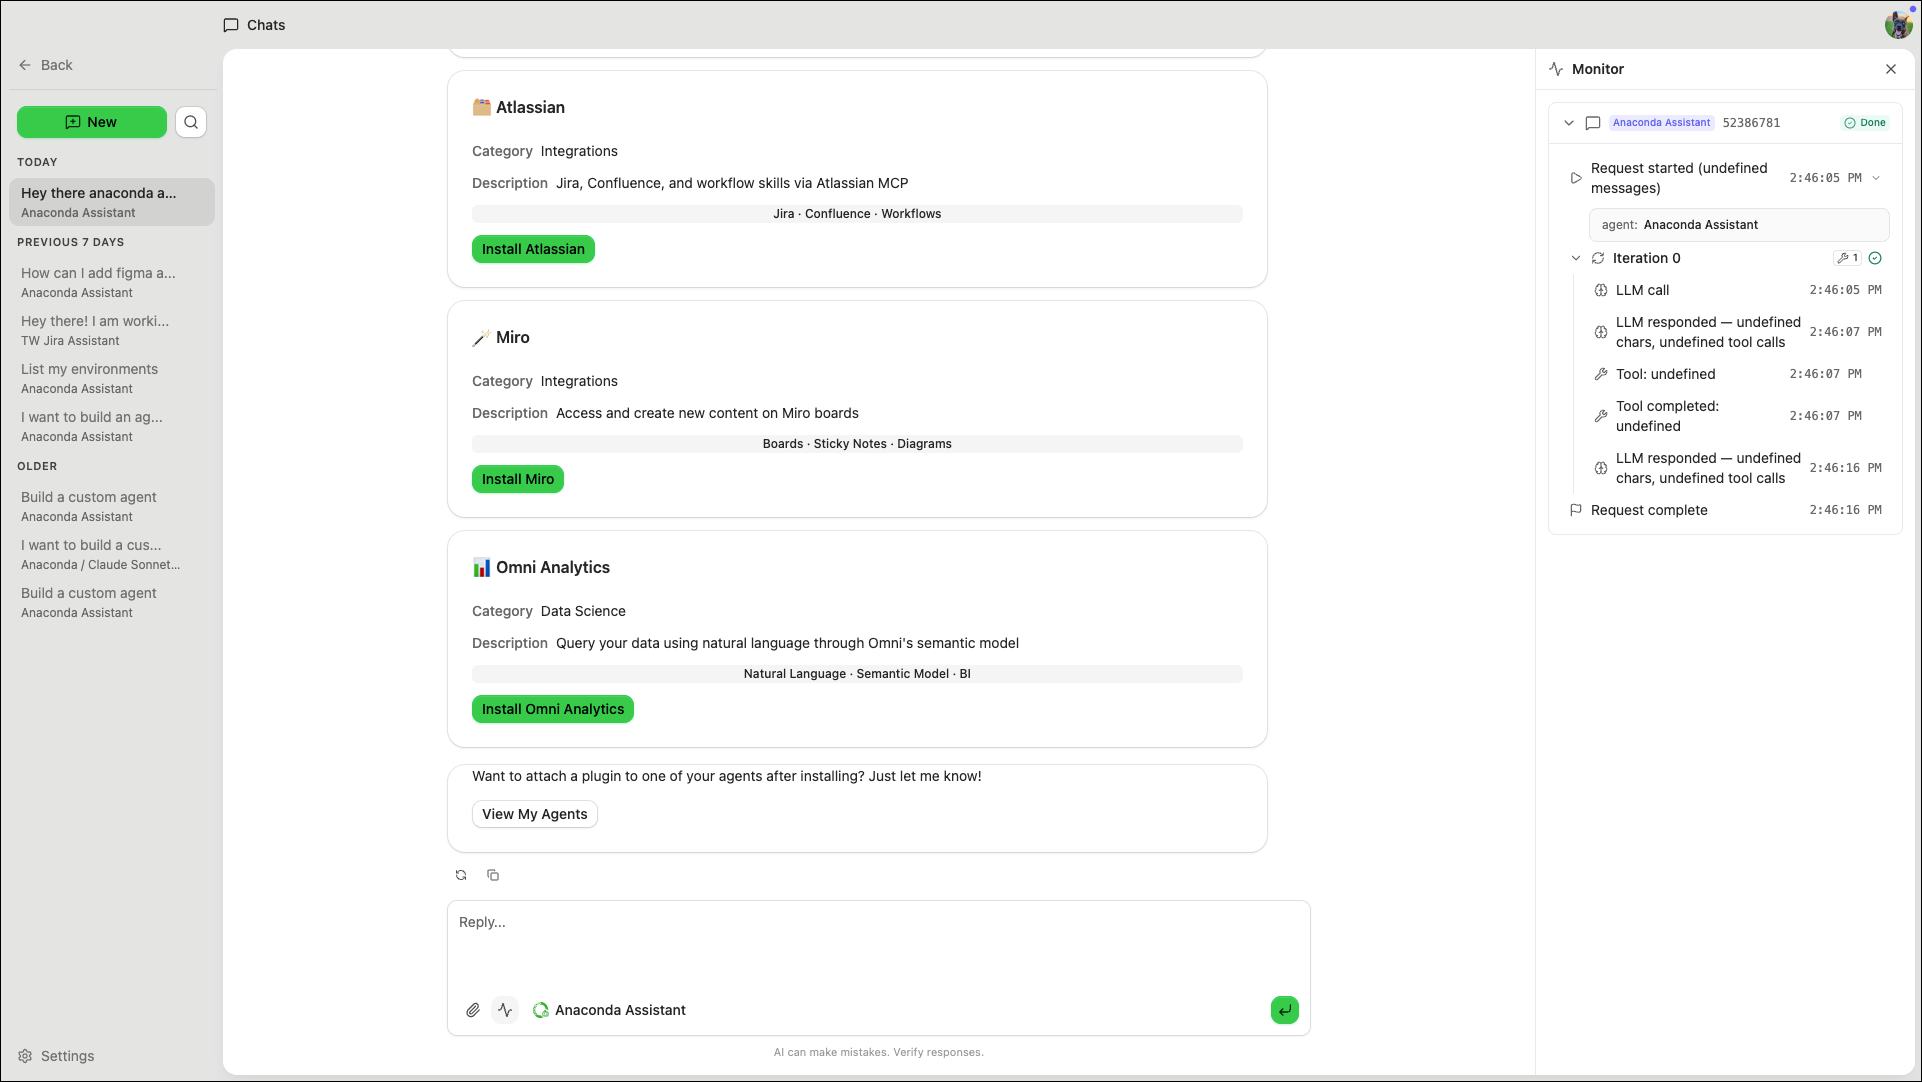
Monitoring agents
The Agent Monitor displays a real-time stream of events from your running agents, including tool calls, model requests, and lifecycle changes. Use it to verify that your agent is behaving as expected or to diagnose unexpected behavior.- From the Agents page
- From a chat
Click Monitor to open the monitor in a dedicated window. This view shows events from all running agents.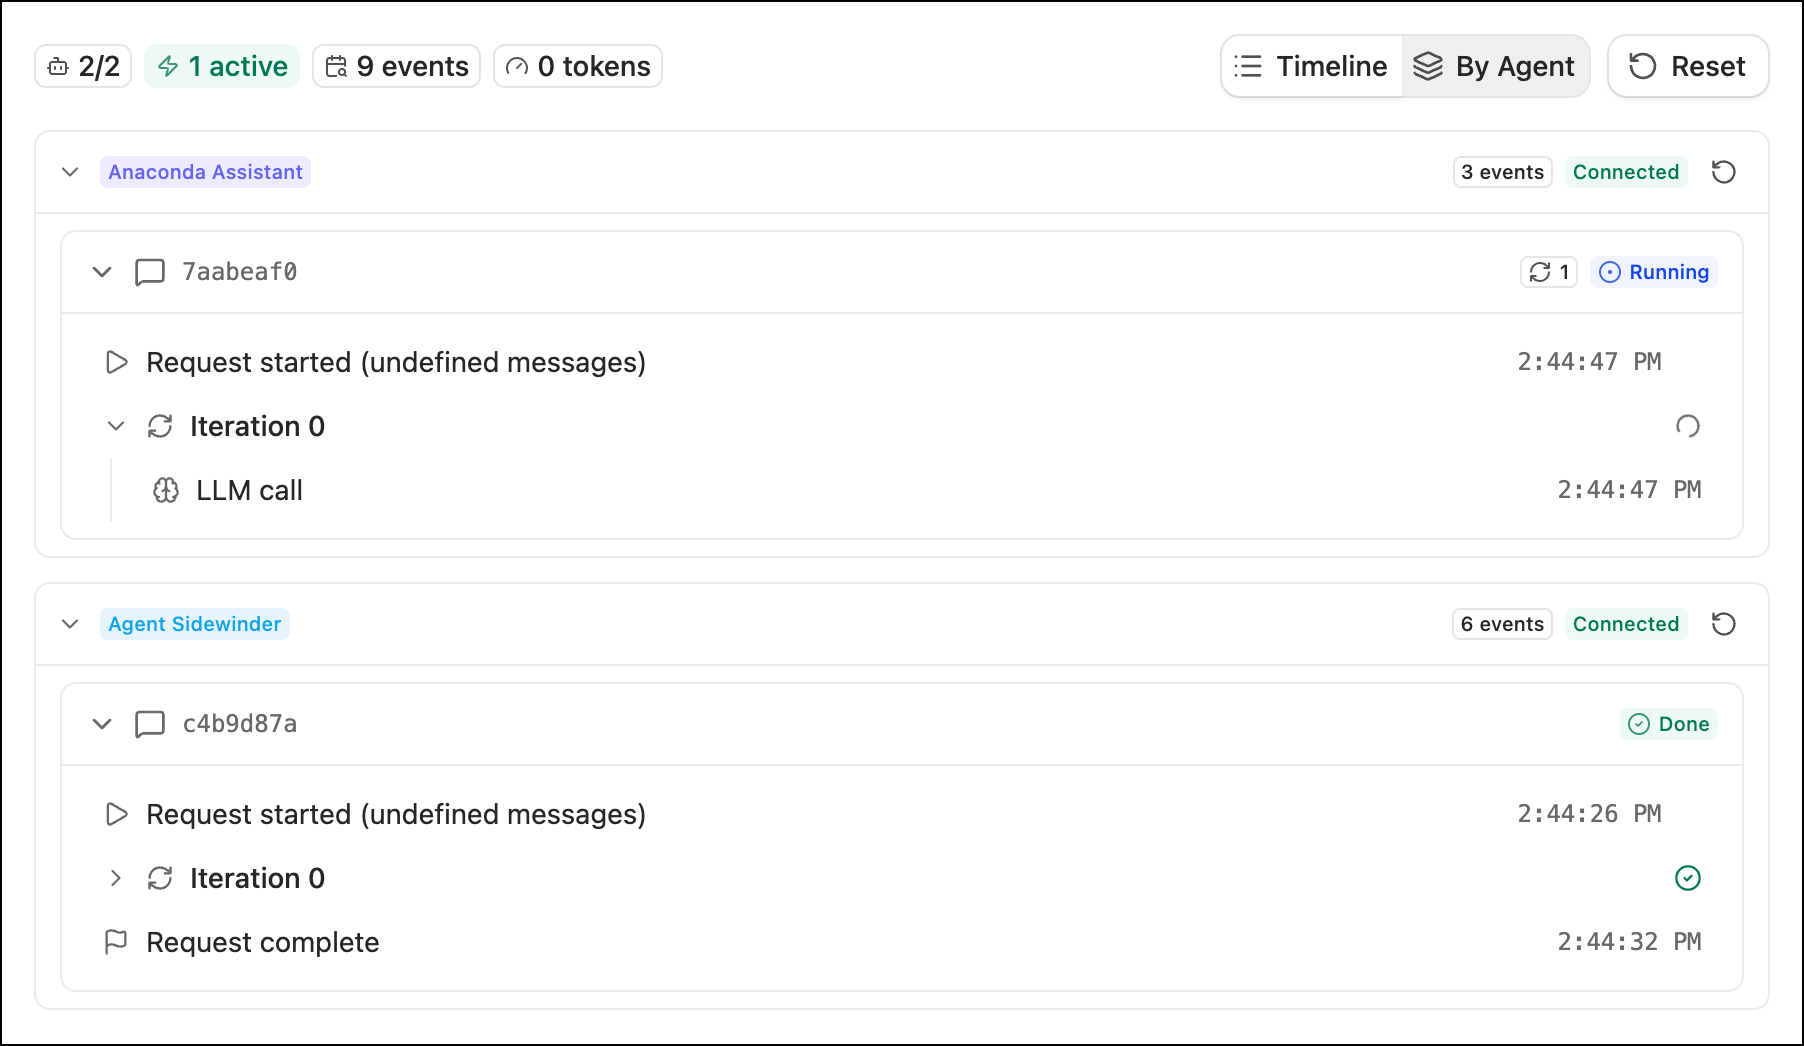
- Timeline: Displays events in chronological order across all agents.
- By Agent: Groups events under each agent.
- Reset: Clears all recorded events from the monitor.
Comparing agents and models
To compare responses from multiple agents or models side by side:- Select Chats from the left-hand navigation.
- Click New, then click Compare Chat.
- Select the checkbox beside two to four agents or models to compare.
- Click Start.
- Enter a message. Agent Studio sends it to all selected agents or models simultaneously and displays their responses in side-by-side columns.
Agents or models that require credentials (such as API keys) are unavailable until their provider is configured. See AI providers.
Connecting to your agent
Every running agent exposes HTTP endpoints that you can use to send messages from scripts, integrate with automation pipelines, or connect from other MCP clients. Once your agent is running, click Connect from the agent configuration page to open the Connection Info dialog. The Connection Info dialog displays the following endpoints:Opening agent files
Click Open to open your agent’s project folder in your file system or an external editor like VS Code. The folder contains the agent definition (agent.yaml), Python tool modules, skills, and project configuration.
Configure which editors appear in the Open menu from Agent Studio’s Settings page.
Multi-agent orchestration
Every running agent in Agent Studio is exposed as an MCP server on your local machine. Any other agent, whether in Agent Studio or in an external tool like Claude Desktop, Cursor, or VS Code, can connect to it and delegate tasks. To connect one agent to another:- Start the target agent.
- Click Connect from the target agent’s configuration page.
- Copy the MCP server (SSE) URL.
- Register the target agent as an MCP server using the SSE URL.
- Enable the MCP server for the calling agent.
Deleting an agent
- Select Agents from the left-hand navigation.
- Click on the agent’s card.
- Select Delete to remove the agent.
Deleting an agent removes its configuration, documents, and tools. This action cannot be undone.