Adding a collaborator to a package
You can add other users that are not part of an organization to collaborate on your packages.- From your dashboard, select the package.
- Select Manage.
- To display the package settings, select the Settings option.
- To display the current collaborators, select the Collaborators option.
- Enter the username of the person you want to add as a collaborator, then click Add.
All collaborators are given full read/write permissions to the package, even for private packages.
Removing a collaborator from a package
To revoke package access previously granted to a collaborator:- From your dashboard, select the package.
- Select Manage.
- To display the package settings, select the Settings option.
- To display the current collaborators, select the Collaborators option.
- Click the red X beside a collaborator to revoke their access.
Transferring a package to a new owner
By default, when you create or add packages, they are attached to your individual profile. You can transfer ownership to another owner account you control, such as an organization profile you manage. To transfer a package to a new owner:- From your dashboard—or the dashboard of an organization you administer—select the package for which you want to transfer ownership.
- Select Manage.
- To display the package settings, select the Settings option.
- Select the Admin option.
- Under Transfer this package to a new owner, click Transfer.
- Select the organization name for the new owner.
- Click Transfer Ownership.
Copying a package
The following command is an example of how to copy a package from theconda-forge channel to a personal channel called jsmith:
conda-forge/glueviz/0.10.4 is a “spec” that can be formatted in one of two ways: user/package/version or user/package/version/filename.
Removing a previous version of a package
To remove a previous version of one of your packages from Anaconda.org:- From your dashboard, select the package.
- Select Manage.
- Navigate to the Files tab.
- Select the checkbox to the left of the version you want to remove.
- In the Actions menu, select Remove.
Replace <USERNAME> with your username.
Replace <PACKAGE> with the package name.
Replace <VERSION_NUMBER> with the preferred version.
Replace <PACKAGE> with the package name.
Replace <VERSION_NUMBER> with the preferred version.
http://anaconda.org/<USERNAME>/<PACKAGE>, where <USERNAME> is your username and <PACKAGE> is the package name.
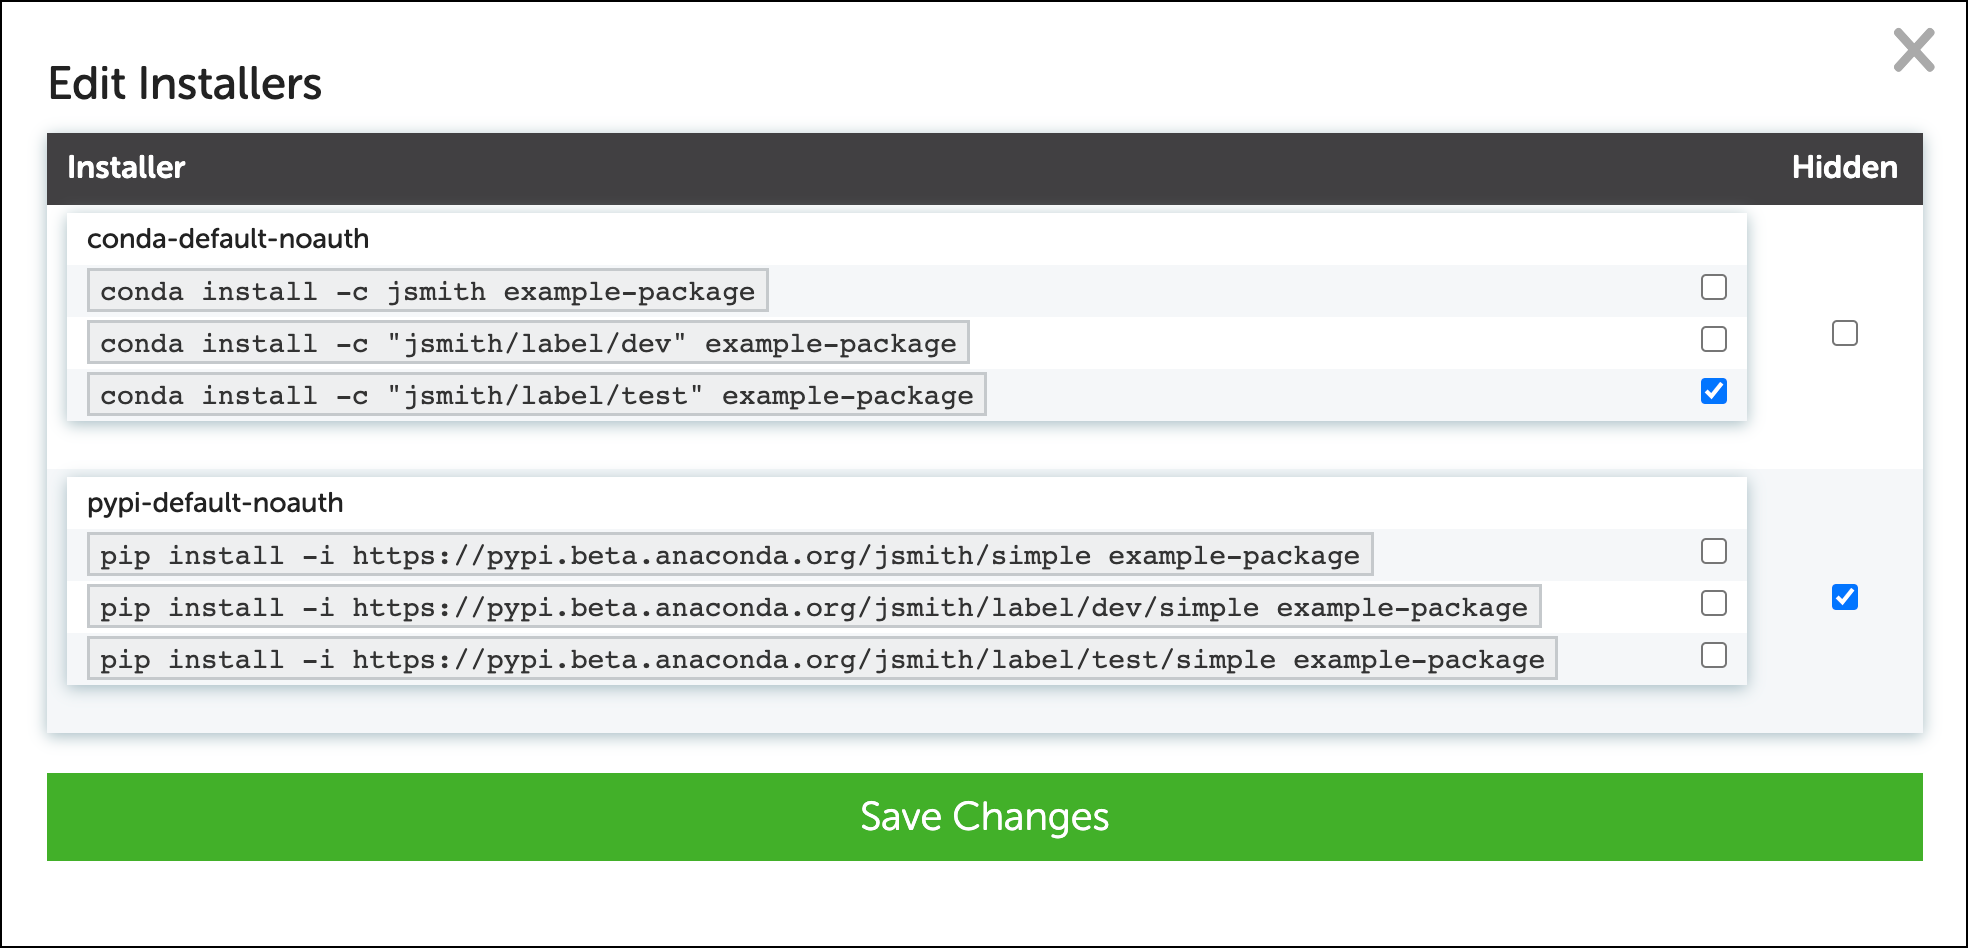
Hiding package install instructions
After you have uploaded packages to an account or organization, you can control what install instructions appear on your package’s download page. Install instructions will vary depending on the package’s labels or package type (conda or standard Python). To edit the visibility of your package install instructions:- From your dashboard, select the package.
- Select Manage.
- Select Edit.
- Select the checkboxes for the instructions you want to hide. You can also select the checkbox on the far right of any group to hide all instructions.
-
Select Save Changes.
Deleting a package
You can delete packages using Anaconda.org’s user interface or by using a command line interface (CLI), such as Anaconda Prompt on Windows or Terminal on macOS/Linux.- Using Anaconda.org
- Using the CLI
To delete a package and all of its versions from Anaconda.org:
- From your dashboard, select the package.
- Select Manage.
- Select the Settings option.
- Select the Admin option.
- Click Delete.
http://anaconda.org/<USERNAME>, where <USERNAME> is your Anaconda.org username.
Updating package metadata
Much of the metadata provided in your package’s meta.yaml file appears on your package’s download page. This is information like your package’s license, description, Git repository URL, and documentation URLs. For more information on what is usually contained in conda-build’s meta.yaml file, see the conda-build documentation. Anaconda Client automatically updates metadata defined in the meta.yaml file of your package upload, as long as the package version number has never been uploaded previously. To update your metadata without needing a new package version, use--force-metadata-update.