 # Security practices for Anaconda Learning
Source: https://anaconda.com/docs/getting-started/anaconda-learning/security-learning
* Make sure you use a highly secure password for your Anaconda.com login. Anaconda recommends using memorable but unguessable passwords of the kind [dreamed up by Randall Munroe of XKCD](https://xkcd.com/936/). There’s even a [Python package to generate them](https://pypi.org/project/xkcdpass/). A good alternative is to use completely random passwords of at least 16 alphanumeric characters and to store them in a password manager like [Keepass](https://keepass.info/).
* Verify your email address to reset your Anaconda.com password if you forget it.
* Look out for phishing. Anaconda will never send you an email asking for your password. Also, check the address bar in your browser before typing in your password!
* Don’t leave a device that’s logged in to Anaconda Notebooks unattended in a public area.
* If working with sensitive information in a public place, use a privacy screen on your device to discourage strangers from viewing your screen.
# Installing Anaconda on an air-gap machine
Source: https://anaconda.com/docs/getting-started/anaconda/advanced-install/air-gap
1. Obtain a local copy of the appropriate Anaconda installer for the non-networked machine. You can copy the Anaconda installer to the target machine using many different methods, including a portable hard drive, USB drive, or CD.
2. After copying the installer to the non-networked machine, follow the detailed installation instructions for your operating system.
# Installing the anaconda metapackage
Source: https://anaconda.com/docs/getting-started/anaconda/advanced-install/install-metapackage
The `anaconda` metapackage is a version-locked collection of packages that were included in an Anaconda Distribution installer. Version-locked packages (also called pinned packages) are tied to a specific version of their software. Conda does not update pinned packages when resolving dependencies if other packages in the environment are added or modified. Because each package in the metapackage is pinned, *any attempt to update the environment will almost certainly result in build conflicts*.
However, it is still possible to install the `anaconda` metapackage and update the environment that contains it. For more information, see [Updating a metapackage environment](#updating-a-metapackage-environment).
# Security practices for Anaconda Learning
Source: https://anaconda.com/docs/getting-started/anaconda-learning/security-learning
* Make sure you use a highly secure password for your Anaconda.com login. Anaconda recommends using memorable but unguessable passwords of the kind [dreamed up by Randall Munroe of XKCD](https://xkcd.com/936/). There’s even a [Python package to generate them](https://pypi.org/project/xkcdpass/). A good alternative is to use completely random passwords of at least 16 alphanumeric characters and to store them in a password manager like [Keepass](https://keepass.info/).
* Verify your email address to reset your Anaconda.com password if you forget it.
* Look out for phishing. Anaconda will never send you an email asking for your password. Also, check the address bar in your browser before typing in your password!
* Don’t leave a device that’s logged in to Anaconda Notebooks unattended in a public area.
* If working with sensitive information in a public place, use a privacy screen on your device to discourage strangers from viewing your screen.
# Installing Anaconda on an air-gap machine
Source: https://anaconda.com/docs/getting-started/anaconda/advanced-install/air-gap
1. Obtain a local copy of the appropriate Anaconda installer for the non-networked machine. You can copy the Anaconda installer to the target machine using many different methods, including a portable hard drive, USB drive, or CD.
2. After copying the installer to the non-networked machine, follow the detailed installation instructions for your operating system.
# Installing the anaconda metapackage
Source: https://anaconda.com/docs/getting-started/anaconda/advanced-install/install-metapackage
The `anaconda` metapackage is a version-locked collection of packages that were included in an Anaconda Distribution installer. Version-locked packages (also called pinned packages) are tied to a specific version of their software. Conda does not update pinned packages when resolving dependencies if other packages in the environment are added or modified. Because each package in the metapackage is pinned, *any attempt to update the environment will almost certainly result in build conflicts*.
However, it is still possible to install the `anaconda` metapackage and update the environment that contains it. For more information, see [Updating a metapackage environment](#updating-a-metapackage-environment).
{children}
| Package Name | linux-64 | linux-aarch64 | linux-s390x | osx-arm64 | osx-64 | win-64 |
|---|---|---|---|---|---|---|
| \_anaconda\_depends | 2024.10 | 2024.10 | 2024.10 | 2024.10 | 2024.10 | 2024.10 |
| \_libgcc\_mutex | 0.1 | 0.1 | 0.1 | |||
| \_openmp\_mutex | 5.1 | 5.1 | 5.1 | |||
| aiobotocore | 2.12.3 | 2.12.3 | 2.12.3 | 2.12.3 | 2.12.3 | 2.12.3 |
| aiohappyeyeballs | 2.4.0 | 2.4.0 | 2.4.0 | 2.4.0 | 2.4.0 | 2.4.0 |
| aiohttp | 3.10.5 | 3.10.5 | 3.10.5 | 3.10.5 | 3.10.5 | 3.10.5 |
| aioitertools | 0.7.1 | 0.7.1 | 0.7.1 | 0.7.1 | 0.7.1 | 0.7.1 |
| aiosignal | 1.2.0 | 1.2.0 | 1.2.0 | 1.2.0 | 1.2.0 | 1.2.0 |
| alabaster | 0.7.16 | 0.7.16 | 0.7.16 | 0.7.16 | 0.7.16 | |
| altair | 5.0.1 | 5.0.1 | 5.0.1 | 5.0.1 | 5.0.1 | |
| anaconda-anon-usage | 0.4.4 | 0.4.4 | 0.4.4 | 0.4.4 | 0.4.4 | 0.4.4 |
| anaconda-catalogs | 0.2.0 | 0.2.0 | 0.2.0 | 0.2.0 | 0.2.0 | 0.2.0 |
| anaconda-client | 1.12.3 | 1.12.3 | 1.12.3 | 1.12.3 | 1.12.3 | 1.12.3 |
| anaconda-cloud-auth | 0.5.1 | 0.5.1 | 0.5.1 | 0.5.1 | 0.5.1 | |
| anaconda-navigator | 2.6.3 | 2.6.3 | 2.6.3 | 2.6.3 | 2.6.3 | |
| anaconda-project | 0.11.1 | 0.11.1 | 0.11.1 | 0.11.1 | 0.11.1 | 0.11.1 |
| anaconda\_powershell\_prompt | 1.1.0 | |||||
| anaconda\_prompt | 1.1.0 | |||||
| annotated-types | 0.6.0 | 0.6.0 | 0.6.0 | 0.6.0 | 0.6.0 | |
| anyio | 4.2.0 | 4.2.0 | 4.2.0 | 4.2.0 | 4.2.0 | |
| aom | 3.6.0 | 3.6.0 | 3.6.0 | 3.6.0 | 3.6.0 | 3.6.0 |
| appdirs | 1.4.4 | 1.4.4 | 1.4.4 | 1.4.4 | 1.4.4 | |
| applaunchservices | 0.3.0 | 0.3.0 | ||||
| appnope | 0.1.3 | 0.1.3 | ||||
| appscript | 1.2.5 | 1.2.5 | ||||
| archspec | 0.2.3 | 0.2.3 | 0.2.3 | 0.2.3 | 0.2.3 | 0.2.3 |
| argon2-cffi | 21.3.0 | 21.3.0 | 21.3.0 | 21.3.0 | 21.3.0 | |
| argon2-cffi-bindings | 21.2.0 | 21.2.0 | 21.2.0 | 21.2.0 | 21.2.0 | |
| arrow | 1.2.3 | 1.2.3 | 1.2.3 | 1.2.3 | 1.2.3 | |
| arrow-cpp | 16.1.0 | 16.1.0 | 16.1.0 | 16.1.0 | 16.1.0 | 16.1.0 |
| astroid | 2.14.2 | 2.14.2 | 2.14.2 | 2.14.2 | 2.14.2 | 2.14.2 |
| astropy | 6.1.3 | 6.1.3 | 6.1.3 | 6.1.3 | 6.1.3 | 6.1.3 |
| astropy-iers-data | 0.2024.9.2.0.33.23 | 0.2024.9.2.0.33.23 | 0.2024.9.2.0.33.23 | 0.2024.9.2.0.33.23 | 0.2024.9.2.0.33.23 | 0.2024.9.2.0.33.23 |
| asttokens | 2.0.5 | 2.0.5 | 2.0.5 | 2.0.5 | 2.0.5 | 2.0.5 |
| async-lru | 2.0.4 | 2.0.4 | 2.0.4 | 2.0.4 | 2.0.4 | |
| atomicwrites | 1.4.0 | 1.4.0 | 1.4.0 | 1.4.0 | 1.4.0 | |
| attrs | 23.1.0 | 23.1.0 | 23.1.0 | 23.1.0 | 23.1.0 | 23.1.0 |
| automat | 20.2.0 | 20.2.0 | 20.2.0 | 20.2.0 | 20.2.0 | |
| autopep8 | 2.0.4 | 2.0.4 | 2.0.4 | 2.0.4 | 2.0.4 | |
| aws-c-auth | 0.6.19 | 0.6.19 | 0.6.19 | 0.6.19 | 0.6.19 | 0.6.19 |
| aws-c-cal | 0.5.20 | 0.5.20 | 0.5.20 | 0.5.20 | 0.5.20 | 0.5.20 |
| aws-c-common | 0.8.5 | 0.8.5 | 0.8.5 | 0.8.5 | 0.8.5 | 0.8.5 |
| aws-c-compression | 0.2.16 | 0.2.16 | 0.2.16 | 0.2.16 | 0.2.16 | 0.2.16 |
| aws-c-event-stream | 0.2.15 | 0.2.15 | 0.2.15 | 0.2.15 | 0.2.15 | 0.2.15 |
| aws-c-http | 0.6.25 | 0.6.25 | 0.6.25 | 0.6.25 | 0.6.25 | 0.6.25 |
| aws-c-io | 0.13.10 | 0.13.10 | 0.13.10 | 0.13.10 | 0.13.10 | 0.13.10 |
| aws-c-mqtt | 0.7.13 | 0.7.13 | 0.7.13 | 0.7.13 | 0.7.13 | 0.7.13 |
| aws-c-s3 | 0.1.51 | 0.1.51 | 0.1.51 | 0.1.51 | 0.1.51 | 0.1.51 |
| aws-c-sdkutils | 0.1.6 | 0.1.6 | 0.1.6 | 0.1.6 | 0.1.6 | 0.1.6 |
| aws-checksums | 0.1.13 | 0.1.13 | 0.1.13 | 0.1.13 | 0.1.13 | 0.1.13 |
| aws-crt-cpp | 0.18.16 | 0.18.16 | 0.18.16 | 0.18.16 | 0.18.16 | 0.18.16 |
| aws-sdk-cpp | 1.10.55 | 1.10.55 | 1.10.55 | 1.10.55 | 1.10.55 | 1.10.55 |
| babel | 2.11.0 | 2.11.0 | 2.11.0 | 2.11.0 | 2.11.0 | |
| bcrypt | 3.2.0 | 3.2.0 | 3.2.0 | 3.2.0 | 3.2.0 | |
| beautifulsoup4 | 4.12.3 | 4.12.3 | 4.12.3 | 4.12.3 | 4.12.3 | 4.12.3 |
| binaryornot | 0.4.4 | 0.4.4 | 0.4.4 | 0.4.4 | 0.4.4 | |
| black | 24.8.0 | 24.8.0 | 24.8.0 | 24.8.0 | 24.8.0 | 24.8.0 |
| blas | 1.0 | 1.0 | 1.0 | 1.0 | 1.0 | 1.0 |
| bleach | 4.1.0 | 4.1.0 | 4.1.0 | 4.1.0 | 4.1.0 | 4.1.0 |
| blinker | 1.6.2 | 1.6.2 | 1.6.2 | 1.6.2 | 1.6.2 | 1.6.2 |
| blosc | 1.21.3 | 1.21.3 | 1.21.3 | 1.21.3 | 1.21.3 | 1.21.3 |
| bokeh | 3.6.0 | 3.6.0 | 3.6.0 | 3.6.0 | 3.6.0 | 3.6.0 |
| boltons | 23.0.0 | 23.0.0 | 23.0.0 | 23.0.0 | 23.0.0 | 23.0.0 |
| boost-cpp | 1.82.0 | 1.82.0 | 1.82.0 | 1.82.0 | 1.82.0 | 1.82.0 |
| botocore | 1.34.69 | 1.34.69 | 1.34.69 | 1.34.69 | 1.34.69 | 1.34.69 |
| bottleneck | 1.3.7 | 1.3.7 | 1.3.7 | 1.3.7 | 1.3.7 | 1.3.7 |
| brotli | 1.0.9 | 1.0.9 | 1.0.9 | 1.0.9 | 1.0.9 | 1.0.9 |
| brotli-bin | 1.0.9 | 1.0.9 | 1.0.9 | 1.0.9 | 1.0.9 | 1.0.9 |
| brotli-python | 1.0.9 | 1.0.9 | 1.0.9 | 1.0.9 | 1.0.9 | 1.0.9 |
| brunsli | 0.1 | 0.1 | 0.1 | 0.1 | ||
| bzip2 | 1.0.8 | 1.0.8 | 1.0.8 | 1.0.8 | 1.0.8 | 1.0.8 |
| c-ares | 1.19.1 | 1.19.1 | 1.19.1 | 1.19.1 | 1.19.1 | 1.19.1 |
| c-blosc2 | 2.12.0 | 2.12.0 | 2.12.0 | 2.12.0 | 2.12.0 | |
| ca-certificates | 2024.9.24 | 2024.9.24 | 2024.9.24 | 2024.9.24 | 2024.9.24 | 2024.9.24 |
| cachetools | 5.3.3 | 5.3.3 | 5.3.3 | 5.3.3 | 5.3.3 | |
| cctools | 949.0.1 | 949.0.1 | ||||
| cctools\_osx-64 | 949.0.1 | |||||
| cctools\_osx-arm64 | 949.0.1 | |||||
| certifi | 2024.8.30 | 2024.8.30 | 2024.8.30 | 2024.8.30 | 2024.8.30 | 2024.8.30 |
| cffi | 1.17.1 | 1.17.1 | 1.17.1 | 1.17.1 | 1.17.1 | 1.17.1 |
| cfitsio | 3.470 | 3.470 | 3.470 | 3.470 | 3.470 | 3.470 |
| chardet | 4.0.0 | 4.0.0 | 4.0.0 | 4.0.0 | 4.0.0 | 4.0.0 |
| charls | 2.2.0 | 2.2.0 | 2.2.0 | 2.2.0 | 2.2.0 | |
| charset-normalizer | 3.3.2 | 3.3.2 | 3.3.2 | 3.3.2 | 3.3.2 | 3.3.2 |
| click | 8.1.7 | 8.1.7 | 8.1.7 | 8.1.7 | 8.1.7 | 8.1.7 |
| cloudpickle | 3.0.0 | 3.0.0 | 3.0.0 | 3.0.0 | 3.0.0 | 3.0.0 |
| colorama | 0.4.6 | 0.4.6 | 0.4.6 | 0.4.6 | 0.4.6 | 0.4.6 |
| colorcet | 3.1.0 | 3.1.0 | 3.1.0 | 3.1.0 | 3.1.0 | |
| comm | 0.2.1 | 0.2.1 | 0.2.1 | 0.2.1 | 0.2.1 | 0.2.1 |
| conda | 24.9.2 | 24.9.2 | 24.9.2 | 24.9.2 | 24.9.2 | 24.9.2 |
| conda-build | 24.9.0 | 24.9.0 | 24.9.0 | 24.9.0 | 24.9.0 | 24.9.0 |
| conda-content-trust | 0.2.0 | 0.2.0 | 0.2.0 | 0.2.0 | 0.2.0 | 0.2.0 |
| conda-index | 0.5.0 | 0.5.0 | 0.4.0 | 0.5.0 | 0.5.0 | 0.5.0 |
| conda-libmamba-solver | 24.9.0 | 24.9.0 | 24.9.0 | 24.9.0 | 24.9.0 | 24.9.0 |
| conda-pack | 0.7.1 | 0.7.1 | 0.7.1 | 0.7.1 | 0.7.1 | 0.7.1 |
| conda-package-handling | 2.3.0 | 2.3.0 | 2.3.0 | 2.3.0 | 2.3.0 | 2.3.0 |
| conda-package-streaming | 0.10.0 | 0.10.0 | 0.10.0 | 0.10.0 | 0.10.0 | 0.10.0 |
| conda-repo-cli | 1.0.114 | 1.0.114 | 1.0.114 | 1.0.114 | 1.0.114 | |
| conda-token | 0.5.0 | 0.5.0 | 0.5.0 | 0.5.0 | 0.5.0 | 0.5.0 |
| constantly | 23.10.4 | 23.10.4 | 23.10.4 | 23.10.4 | 23.10.4 | |
| contourpy | 1.2.0 | 1.2.0 | 1.2.0 | 1.2.0 | 1.2.0 | 1.2.0 |
| cookiecutter | 2.6.0 | 2.6.0 | 2.6.0 | 2.6.0 | 2.6.0 | |
| cryptography | 43.0.0 | 43.0.0 | 43.0.0 | 43.0.0 | 43.0.0 | 43.0.0 |
| cssselect | 1.2.0 | 1.2.0 | 1.2.0 | 1.2.0 | 1.2.0 | |
| curl | 8.9.1 | 8.9.1 | 8.9.1 | 8.9.1 | 8.9.1 | 8.9.1 |
| cycler | 0.11.0 | 0.11.0 | 0.11.0 | 0.11.0 | 0.11.0 | 0.11.0 |
| cyrus-sasl | 2.1.28 | 2.1.28 | 2.1.28 | 2.1.28 | ||
| cytoolz | 0.12.2 | 0.12.2 | 0.12.2 | 0.12.2 | 0.12.2 | 0.12.2 |
| dask | 2024.8.2 | 2024.8.2 | 2024.8.2 | 2024.8.2 | 2024.8.2 | 2024.8.2 |
| dask-core | 2024.8.2 | 2024.8.2 | 2024.8.2 | 2024.8.2 | 2024.8.2 | 2024.8.2 |
| dask-expr | 1.1.13 | 1.1.13 | 1.1.13 | 1.1.13 | 1.1.13 | 1.1.13 |
| datashader | 0.16.3 | 0.16.3 | 0.16.3 | 0.16.3 | 0.16.3 | |
| dav1d | 1.2.1 | 1.2.1 | 1.2.1 | 1.2.1 | 1.2.1 | 1.2.1 |
| dbus | 1.13.18 | 1.13.18 | ||||
| debugpy | 1.6.7 | 1.6.7 | 1.6.7 | 1.6.7 | 1.6.7 | 1.6.7 |
| decorator | 5.1.1 | 5.1.1 | 5.1.1 | 5.1.1 | 5.1.1 | 5.1.1 |
| defusedxml | 0.7.1 | 0.7.1 | 0.7.1 | 0.7.1 | 0.7.1 | 0.7.1 |
| diff-match-patch | 20200713 | 20200713 | 20200713 | 20200713 | 20200713 | |
| dill | 0.3.8 | 0.3.8 | 0.3.8 | 0.3.8 | 0.3.8 | 0.3.8 |
| distributed | 2024.8.2 | 2024.8.2 | 2024.8.2 | 2024.8.2 | 2024.8.2 | 2024.8.2 |
| distro | 1.9.0 | 1.9.0 | 1.9.0 | 1.9.0 | 1.9.0 | 1.9.0 |
| dmglib | 0.9.5 | 0.9.5 | ||||
| docstring-to-markdown | 0.11 | 0.11 | 0.11 | 0.11 | 0.11 | |
| docutils | 0.18.1 | 0.18.1 | 0.18.1 | 0.18.1 | 0.18.1 | |
| et\_xmlfile | 1.1.0 | 1.1.0 | 1.1.0 | 1.1.0 | 1.1.0 | 1.1.0 |
| executing | 0.8.3 | 0.8.3 | 0.8.3 | 0.8.3 | 0.8.3 | 0.8.3 |
| expat | 2.6.3 | 2.6.3 | 2.6.3 | 2.6.3 | 2.6.3 | 2.6.3 |
| filelock | 3.13.1 | 3.13.1 | 3.13.1 | 3.13.1 | 3.13.1 | 3.13.1 |
| flake8 | 7.0.0 | 7.0.0 | 7.0.0 | 7.0.0 | 7.0.0 | |
| flask | 3.0.3 | 3.0.3 | 3.0.3 | 3.0.3 | 3.0.3 | 3.0.3 |
| fmt | 9.1.0 | 9.1.0 | 9.1.0 | 9.1.0 | 9.1.0 | 9.1.0 |
| fontconfig | 2.14.1 | 2.14.1 | ||||
| fonttools | 4.51.0 | 4.51.0 | 4.51.0 | 4.51.0 | 4.51.0 | 4.51.0 |
| freetype | 2.12.1 | 2.12.1 | 2.12.1 | 2.12.1 | 2.12.1 | 2.12.1 |
| frozendict | 2.4.2 | 2.4.2 | 2.4.2 | 2.4.2 | 2.4.2 | 2.4.2 |
| frozenlist | 1.4.0 | 1.4.0 | 1.4.0 | 1.4.0 | 1.4.0 | 1.4.0 |
| fsspec | 2024.6.1 | 2024.6.1 | 2024.6.1 | 2024.6.1 | 2024.6.1 | 2024.6.1 |
| gensim | 4.3.3 | 4.3.3 | 4.3.3 | 4.3.3 | 4.3.3 | |
| gettext | 0.21.0 | 0.21.0 | ||||
| gflags | 2.2.2 | 2.2.2 | 2.2.2 | 2.2.2 | 2.2.2 | 2.2.2 |
| giflib | 5.2.1 | 5.2.1 | 5.2.1 | 5.2.1 | 5.2.1 | 5.2.1 |
| gitdb | 4.0.7 | 4.0.7 | 4.0.7 | 4.0.7 | 4.0.7 | |
| gitpython | 3.1.43 | 3.1.43 | 3.1.43 | 3.1.43 | 3.1.43 | |
| glib | 2.78.4 | 2.78.4 | 2.78.4 | 2.78.4 | ||
| glib-tools | 2.78.4 | 2.78.4 | 2.78.4 | 2.78.4 | ||
| glog | 0.5.0 | 0.5.0 | 0.5.0 | 0.5.0 | 0.5.0 | 0.5.0 |
| greenlet | 3.0.1 | 3.0.1 | 3.0.1 | 3.0.1 | 3.0.1 | 3.0.1 |
| gst-plugins-base | 1.14.1 | 1.14.1 | 1.14.1 | 1.14.1 | ||
| gstreamer | 1.14.1 | 1.14.1 | 1.14.1 | 1.14.1 | ||
| h11 | 0.14.0 | 0.14.0 | 0.14.0 | 0.14.0 | 0.14.0 | |
| h5py | 3.11.0 | 3.11.0 | 3.11.0 | 3.11.0 | 3.11.0 | 3.11.0 |
| hdf5 | 1.12.1 | 1.12.1 | 1.12.1 | 1.12.1 | 1.12.1 | 1.12.1 |
| heapdict | 1.0.1 | 1.0.1 | 1.0.1 | 1.0.1 | 1.0.1 | 1.0.1 |
| holoviews | 1.19.1 | 1.19.1 | 1.19.1 | 1.19.1 | 1.19.1 | |
| httpcore | 1.0.2 | 1.0.2 | 1.0.2 | 1.0.2 | 1.0.2 | |
| httpx | 0.27.0 | 0.27.0 | 0.27.0 | 0.27.0 | 0.27.0 | |
| hvplot | 0.11.0 | 0.11.0 | 0.11.0 | 0.11.0 | 0.11.0 | |
| hyperlink | 21.0.0 | 21.0.0 | 21.0.0 | 21.0.0 | 21.0.0 | |
| icc\_rt | 2022.1.0 | |||||
| icu | 73.1 | 73.1 | 73.1 | 73.1 | 73.1 | 73.1 |
| idna | 3.7 | 3.7 | 3.7 | 3.7 | 3.7 | 3.7 |
| imagecodecs | 2023.1.23 | 2023.1.23 | 2023.1.23 | 2023.1.23 | 2023.1.23 | 2023.1.23 |
| imageio | 2.33.1 | 2.33.1 | 2.33.1 | 2.33.1 | 2.33.1 | 2.33.1 |
| imagesize | 1.4.1 | 1.4.1 | 1.4.1 | 1.4.1 | 1.4.1 | |
| imbalanced-learn | 0.12.3 | 0.12.3 | 0.12.3 | 0.12.3 | 0.12.3 | 0.12.3 |
| importlib-metadata | 7.0.1 | 7.0.1 | 7.0.1 | 7.0.1 | 7.0.1 | |
| incremental | 22.10.0 | 22.10.0 | 22.10.0 | 22.10.0 | 22.10.0 | |
| inflection | 0.5.1 | 0.5.1 | 0.5.1 | 0.5.1 | 0.5.1 | |
| iniconfig | 1.1.1 | 1.1.1 | 1.1.1 | 1.1.1 | 1.1.1 | 1.1.1 |
| intake | 2.0.7 | 2.0.7 | 2.0.7 | 2.0.7 | 2.0.7 | 2.0.7 |
| intel-openmp | 2023.1.0 | 2023.1.0 | ||||
| intervaltree | 3.1.0 | 3.1.0 | 3.1.0 | 3.1.0 | 3.1.0 | |
| ipykernel | 6.28.0 | 6.28.0 | 6.28.0 | 6.28.0 | 6.28.0 | 6.28.0 |
| ipython | 8.27.0 | 8.27.0 | 8.27.0 | 8.27.0 | 8.27.0 | 8.27.0 |
| ipython\_genutils | 0.2.0 | 0.2.0 | 0.2.0 | 0.2.0 | 0.2.0 | |
| ipywidgets | 7.8.1 | 7.8.1 | 7.8.1 | 7.8.1 | 7.8.1 | |
| isort | 5.13.2 | 5.13.2 | 5.13.2 | 5.13.2 | 5.13.2 | 5.13.2 |
| itemadapter | 0.3.0 | 0.3.0 | 0.3.0 | 0.3.0 | 0.3.0 | |
| itemloaders | 1.1.0 | 1.1.0 | 1.1.0 | 1.1.0 | 1.1.0 | |
| itsdangerous | 2.2.0 | 2.2.0 | 2.2.0 | 2.2.0 | 2.2.0 | 2.2.0 |
| jaraco.classes | 3.2.1 | 3.2.1 | 3.2.1 | 3.2.1 | 3.2.1 | |
| jedi | 0.19.1 | 0.19.1 | 0.19.1 | 0.19.1 | 0.19.1 | 0.19.1 |
| jeepney | 0.7.1 | 0.7.1 | ||||
| jellyfish | 1.0.1 | 1.0.1 | 1.0.1 | 1.0.1 | 1.0.1 | |
| jinja2 | 3.1.4 | 3.1.4 | 3.1.4 | 3.1.4 | 3.1.4 | 3.1.4 |
| jmespath | 1.0.1 | 1.0.1 | 1.0.1 | 1.0.1 | 1.0.1 | 1.0.1 |
| joblib | 1.4.2 | 1.4.2 | 1.4.2 | 1.4.2 | 1.4.2 | 1.4.2 |
| jpeg | 9e | 9e | 9e | 9e | 9e | 9e |
| jq | 1.6 | 1.6 | 1.6 | 1.6 | 1.6 | |
| json5 | 0.9.6 | 0.9.6 | 0.9.6 | 0.9.6 | 0.9.6 | |
| jsonpatch | 1.33 | 1.33 | 1.33 | 1.33 | 1.33 | 1.33 |
| jsonpointer | 2.1 | 2.1 | 2.1 | 2.1 | 2.1 | 2.1 |
| jsonschema | 4.23.0 | 4.23.0 | 4.23.0 | 4.23.0 | 4.23.0 | 4.23.0 |
| jsonschema-specifications | 2023.7.1 | 2023.7.1 | 2023.7.1 | 2023.7.1 | 2023.7.1 | 2023.7.1 |
| jupyter | 1.0.0 | 1.0.0 | 1.0.0 | 1.0.0 | 1.0.0 | 1.0.0 |
| jupyter-lsp | 2.2.0 | 2.2.0 | 2.2.0 | 2.2.0 | 2.2.0 | |
| jupyter\_client | 8.6.0 | 8.6.0 | 8.6.0 | 8.6.0 | 8.6.0 | 8.6.0 |
| jupyter\_console | 6.6.3 | 6.6.3 | 6.6.3 | 6.6.3 | 6.6.3 | 6.6.3 |
| jupyter\_core | 5.7.2 | 5.7.2 | 5.7.2 | 5.7.2 | 5.7.2 | 5.7.2 |
| jupyter\_events | 0.10.0 | 0.10.0 | 0.10.0 | 0.10.0 | 0.10.0 | |
| jupyter\_server | 2.14.1 | 2.14.1 | 2.14.1 | 2.14.1 | 2.14.1 | |
| jupyter\_server\_terminals | 0.4.4 | 0.4.4 | 0.4.4 | 0.4.4 | 0.4.4 | |
| jupyterlab | 4.2.5 | 4.2.5 | 4.2.5 | 4.2.5 | 4.2.5 | |
| jupyterlab-variableinspector | 3.1.0 | 3.1.0 | 3.1.0 | 3.1.0 | 3.1.0 | |
| jupyterlab\_pygments | 0.1.2 | 0.1.2 | 0.2.2 | 0.1.2 | 0.1.2 | 0.1.2 |
| jupyterlab\_server | 2.27.3 | 2.27.3 | 2.27.3 | 2.27.3 | 2.27.3 | |
| jupyterlab\_widgets | 1.0.0 | 1.0.0 | 1.0.0 | 1.0.0 | 1.0.0 | |
| jxrlib | 1.1 | 1.1 | 1.1 | 1.1 | 1.1 | |
| keyring | 24.3.1 | 24.3.1 | 24.3.1 | 24.3.1 | 24.3.1 | |
| kiwisolver | 1.4.4 | 1.4.4 | 1.4.4 | 1.4.4 | 1.4.4 | 1.4.4 |
| krb5 | 1.20.1 | 1.20.1 | 1.20.1 | 1.20.1 | 1.20.1 | 1.20.1 |
| lazy-object-proxy | 1.10.0 | 1.10.0 | 1.10.0 | 1.10.0 | 1.10.0 | 1.10.0 |
| lazy\_loader | 0.4 | 0.4 | 0.4 | 0.4 | 0.4 | 0.4 |
| lcms2 | 2.12 | 2.12 | 2.12 | 2.12 | 2.12 | 2.12 |
| ld64 | 530 | 530 | ||||
| ld64\_osx-64 | 530 | |||||
| ld64\_osx-arm64 | 530 | |||||
| ld\_impl\_linux-64 | 2.40 | |||||
| ld\_impl\_linux-aarch64 | 2.40 | |||||
| ld\_impl\_linux-s390x | 2.40 | |||||
| ldid | 2.1.5 | 2.1.5 | ||||
| lerc | 3.0 | 3.0 | 3.0 | 3.0 | 3.0 | 3.0 |
| libabseil | 20240116.2 | 20240116.2 | 20240116.2 | 20240116.2 | 20240116.2 | 20240116.2 |
| libaec | 1.0.4 | 1.0.4 | 1.0.4 | 1.0.4 | 1.0.4 | 1.0.4 |
| libarchive | 3.6.2 | 3.6.2 | 3.7.4 | 3.7.4 | 3.7.4 | 3.7.4 |
| libavif | 0.11.1 | 0.11.1 | 0.11.1 | 0.11.1 | 0.11.1 | 0.11.1 |
| libboost | 1.82.0 | 1.82.0 | 1.82.0 | 1.82.0 | 1.82.0 | 1.82.0 |
| libbrotlicommon | 1.0.9 | 1.0.9 | 1.0.9 | 1.0.9 | 1.0.9 | 1.0.9 |
| libbrotlidec | 1.0.9 | 1.0.9 | 1.0.9 | 1.0.9 | 1.0.9 | 1.0.9 |
| libbrotlienc | 1.0.9 | 1.0.9 | 1.0.9 | 1.0.9 | 1.0.9 | 1.0.9 |
| libclang | 14.0.6 | 14.0.6 | 14.0.6 | 14.0.6 | 14.0.6 | |
| libclang13 | 14.0.6 | 14.0.6 | 14.0.6 | 14.0.6 | 14.0.6 | |
| libcups | 2.4.2 | 2.4.2 | ||||
| libcurl | 8.9.1 | 8.9.1 | 8.9.1 | 8.9.1 | 8.9.1 | 8.9.1 |
| libcxx | 14.0.6 | 14.0.6 | ||||
| libdeflate | 1.17 | 1.17 | 1.17 | 1.17 | 1.17 | 1.17 |
| libedit | 3.1.20230828 | 3.1.20230828 | 3.1.20230828 | 3.1.20230828 | 3.1.20230828 | |
| libev | 4.33 | 4.33 | 4.33 | 4.33 | 4.33 | |
| libevent | 2.1.12 | 2.1.12 | 2.1.12 | 2.1.12 | 2.1.12 | 2.1.12 |
| libffi | 3.4.4 | 3.4.4 | 3.4.4 | 3.4.4 | 3.4.4 | 3.4.4 |
| libgcc-ng | 11.2.0 | 11.2.0 | 11.2.0 | |||
| libgfortran | 5.0.0 | 5.0.0 | ||||
| libgfortran-ng | 11.2.0 | 11.2.0 | 11.2.0 | |||
| libgfortran5 | 11.2.0 | 11.2.0 | 11.2.0 | 11.3.0 | 11.3.0 | |
| libglib | 2.78.4 | 2.78.4 | 2.78.4 | 2.78.4 | ||
| libgomp | 11.2.0 | 11.2.0 | 11.2.0 | |||
| libgrpc | 1.62.2 | 1.62.2 | 1.62.2 | 1.62.2 | 1.62.2 | 1.62.2 |
| libiconv | 1.16 | 1.16 | 1.16 | 1.16 | 1.16 | |
| liblief | 0.12.3 | 0.12.3 | 0.12.3 | 0.12.3 | 0.12.3 | 0.12.3 |
| libllvm14 | 14.0.6 | 14.0.6 | 14.0.6 | 14.0.6 | ||
| libmamba | 1.5.8 | 1.5.8 | 1.5.8 | 1.5.8 | 1.5.8 | 1.5.8 |
| libmambapy | 1.5.8 | 1.5.8 | 1.5.8 | 1.5.8 | 1.5.8 | 1.5.8 |
| libnghttp2 | 1.57.0 | 1.57.0 | 1.57.0 | 1.57.0 | 1.57.0 | |
| libopenblas | 0.3.21 | 0.3.21 | 0.3.21 | 0.3.21 | ||
| libpng | 1.6.39 | 1.6.39 | 1.6.39 | 1.6.39 | 1.6.39 | 1.6.39 |
| libpq | 12.17 | 12.17 | 12.17 | 12.17 | 12.17 | |
| libprotobuf | 4.25.3 | 4.25.3 | 4.25.3 | 4.25.3 | 4.25.3 | 4.25.3 |
| libsodium | 1.0.18 | 1.0.18 | 1.0.18 | 1.0.18 | 1.0.18 | 1.0.18 |
| libsolv | 0.7.24 | 0.7.24 | 0.7.24 | 0.7.24 | 0.7.24 | 0.7.24 |
| libspatialindex | 1.9.3 | 1.9.3 | 1.9.3 | 1.9.3 | 1.9.3 | |
| libssh2 | 1.11.0 | 1.11.0 | 1.11.0 | 1.11.0 | 1.11.0 | 1.11.0 |
| libstdcxx-ng | 11.2.0 | 11.2.0 | 11.2.0 | |||
| libthrift | 0.15.0 | 0.15.0 | 0.15.0 | 0.15.0 | 0.15.0 | 0.15.0 |
| libtiff | 4.5.1 | 4.5.1 | 4.5.1 | 4.5.1 | 4.5.1 | 4.5.1 |
| libuuid | 1.41.5 | 1.41.5 | 1.41.5 | |||
| libwebp-base | 1.3.2 | 1.3.2 | 1.3.2 | 1.3.2 | 1.3.2 | 1.3.2 |
| libxcb | 1.15 | 1.15 | ||||
| libxkbcommon | 1.0.1 | 1.0.1 | ||||
| libxml2 | 2.10.4 | 2.10.4 | 2.13.1 | 2.13.1 | 2.13.1 | 2.13.1 |
| libxslt | 1.1.37 | 1.1.37 | 1.1.41 | 1.1.41 | 1.1.41 | |
| libzopfli | 1.0.3 | 1.0.3 | 1.0.3 | 1.0.3 | 1.0.3 | 1.0.3 |
| linkify-it-py | 2.0.0 | 2.0.0 | 2.0.0 | 2.0.0 | 2.0.0 | |
| llvm-openmp | 14.0.6 | 14.0.6 | ||||
| llvmlite | 0.43.0 | 0.43.0 | 0.43.0 | 0.43.0 | 0.43.0 | |
| locket | 1.0.0 | 1.0.0 | 1.0.0 | 1.0.0 | 1.0.0 | 1.0.0 |
| lxml | 5.2.1 | 5.2.1 | 5.2.1 | 5.2.1 | 5.2.1 | |
| lz4 | 4.3.2 | 4.3.2 | 4.3.2 | 4.3.2 | 4.3.2 | 4.3.2 |
| lz4-c | 1.9.4 | 1.9.4 | 1.9.4 | 1.9.4 | 1.9.4 | 1.9.4 |
| lzo | 2.10 | 2.10 | 2.10 | 2.10 | 2.10 | |
| m2-msys2-runtime | 2.5.0.17080.65c939c | |||||
| m2-patch | 2.7.5 | |||||
| m2w64-libwinpthread-git | 5.0.0.4634.697f757 | |||||
| markdown | 3.4.1 | 3.4.1 | 3.4.1 | 3.4.1 | 3.4.1 | |
| markdown-it-py | 2.2.0 | 2.2.0 | 2.2.0 | 2.2.0 | 2.2.0 | |
| markupsafe | 2.1.3 | 2.1.3 | 2.1.3 | 2.1.3 | 2.1.3 | 2.1.3 |
| matplotlib | 3.9.2 | 3.9.2 | 3.9.2 | 3.9.2 | 3.9.2 | 3.9.2 |
| matplotlib-base | 3.9.2 | 3.9.2 | 3.9.2 | 3.9.2 | 3.9.2 | 3.9.2 |
| matplotlib-inline | 0.1.6 | 0.1.6 | 0.1.6 | 0.1.6 | 0.1.6 | 0.1.6 |
| mccabe | 0.7.0 | 0.7.0 | 0.7.0 | 0.7.0 | 0.7.0 | 0.7.0 |
| mdit-py-plugins | 0.3.0 | 0.3.0 | 0.3.0 | 0.3.0 | 0.3.0 | |
| mdurl | 0.1.0 | 0.1.0 | 0.1.0 | 0.1.0 | 0.1.0 | |
| menuinst | 2.1.2 | 2.1.2 | 2.1.2 | 2.1.2 | 2.1.2 | 2.1.2 |
| mistune | 2.0.4 | 2.0.4 | 2.0.4 | 2.0.4 | 2.0.4 | 2.0.4 |
| mkl | 2023.1.0 | 2023.1.0 | ||||
| mkl-service | 2.4.0 | 2.4.0 | ||||
| mkl\_fft | 1.3.10 | 1.3.10 | ||||
| mkl\_random | 1.2.7 | 1.2.7 | ||||
| more-itertools | 10.3.0 | 10.3.0 | 10.3.0 | 10.3.0 | 10.3.0 | 10.3.0 |
| mpmath | 1.3.0 | 1.3.0 | 1.3.0 | 1.3.0 | 1.3.0 | 1.3.0 |
| msgpack-python | 1.0.3 | 1.0.3 | 1.0.3 | 1.0.3 | 1.0.3 | 1.0.3 |
| msys2-conda-epoch | 20160418 | |||||
| multidict | 6.0.4 | 6.0.4 | 6.0.4 | 6.0.4 | 6.0.4 | 6.0.4 |
| multipledispatch | 0.6.0 | 0.6.0 | 0.6.0 | 0.6.0 | 0.6.0 | |
| mypy | 1.11.2 | 1.11.2 | 1.11.2 | 1.11.2 | 1.11.2 | 1.11.2 |
| mypy\_extensions | 1.0.0 | 1.0.0 | 1.0.0 | 1.0.0 | 1.0.0 | 1.0.0 |
| mysql | 5.7.24 | 5.7.24 | 5.7.24 | 5.7.24 | ||
| navigator-updater | 0.5.1 | 0.5.1 | 0.5.1 | 0.5.1 | 0.5.1 | |
| nbclient | 0.8.0 | 0.8.0 | 0.8.0 | 0.8.0 | 0.8.0 | 0.8.0 |
| nbconvert | 7.16.4 | 7.16.4 | 7.10.0 | 7.16.4 | 7.16.4 | 7.16.4 |
| nbformat | 5.10.4 | 5.10.4 | 5.10.4 | 5.10.4 | 5.10.4 | 5.10.4 |
| ncurses | 6.4 | 6.4 | 6.4 | 6.4 | 6.4 | |
| nest-asyncio | 1.6.0 | 1.6.0 | 1.6.0 | 1.6.0 | 1.6.0 | 1.6.0 |
| networkx | 3.3 | 3.3 | 3.3 | 3.3 | 3.3 | 3.3 |
| nltk | 3.9.1 | 3.9.1 | 3.9.1 | 3.9.1 | 3.9.1 | 3.9.1 |
| notebook | 7.2.2 | 7.2.2 | 7.2.2 | 7.2.2 | 7.2.2 | |
| notebook-shim | 0.2.3 | 0.2.3 | 0.2.3 | 0.2.3 | 0.2.3 | |
| nspr | 4.35 | 4.35 | ||||
| nss | 3.89.1 | 3.89.1 | ||||
| numba | 0.60.0 | 0.60.0 | 0.60.0 | 0.60.0 | 0.60.0 | |
| numexpr | 2.8.7 | 2.8.7 | 2.8.7 | 2.8.7 | 2.8.7 | 2.8.7 |
| numpy | 1.26.4 | 1.26.4 | 1.26.4 | 1.26.4 | 1.26.4 | 1.26.4 |
| numpy-base | 1.26.4 | 1.26.4 | 1.26.4 | 1.26.4 | 1.26.4 | 1.26.4 |
| numpydoc | 1.7.0 | 1.7.0 | 1.7.0 | 1.7.0 | 1.7.0 | |
| oniguruma | 6.9.7.1 | 6.9.7.1 | 6.9.7.1 | 6.9.7.1 | ||
| openjpeg | 2.5.2 | 2.5.2 | 2.5.2 | 2.5.2 | 2.5.2 | 2.5.2 |
| openpyxl | 3.1.5 | 3.1.5 | 3.1.5 | 3.1.5 | 3.1.5 | 3.1.5 |
| openssl | 3.0.15 | 3.0.15 | 3.0.15 | 3.0.15 | 3.0.15 | 3.0.15 |
| orc | 2.0.1 | 2.0.1 | 2.0.1 | 2.0.1 | 2.0.1 | 2.0.1 |
| overrides | 7.4.0 | 7.4.0 | 7.4.0 | 7.4.0 | 7.4.0 | |
| packaging | 24.1 | 24.1 | 24.1 | 24.1 | 24.1 | 24.1 |
| pandas | 2.2.2 | 2.2.2 | 2.2.2 | 2.2.2 | 2.2.2 | 2.2.2 |
| pandocfilters | 1.5.0 | 1.5.0 | 1.5.0 | 1.5.0 | 1.5.0 | 1.5.0 |
| panel | 1.5.2 | 1.5.2 | 1.5.2 | 1.5.2 | 1.5.2 | |
| param | 2.1.1 | 2.1.1 | 2.1.1 | 2.1.1 | 2.1.1 | |
| paramiko | 2.8.1 | |||||
| parsel | 1.8.1 | 1.8.1 | 1.8.1 | 1.8.1 | 1.8.1 | |
| parso | 0.8.3 | 0.8.3 | 0.8.3 | 0.8.3 | 0.8.3 | 0.8.3 |
| partd | 1.4.1 | 1.4.1 | 1.4.1 | 1.4.1 | 1.4.1 | 1.4.1 |
| patch | 2.7.6 | 2.7.6 | 2.7.6 | 2.7.6 | 2.7.6 | |
| patchelf | 0.17.2 | 0.17.2 | 0.17.2 | |||
| pathspec | 0.10.3 | 0.10.3 | 0.10.3 | 0.10.3 | 0.10.3 | 0.10.3 |
| patsy | 0.5.6 | 0.5.6 | 0.5.6 | 0.5.6 | 0.5.6 | 0.5.6 |
| pcre2 | 10.42 | 10.42 | 10.42 | 10.42 | 10.42 | 10.42 |
| pexpect | 4.8.0 | 4.8.0 | 4.8.0 | 4.8.0 | 4.8.0 | 4.8.0 |
| pickleshare | 0.7.5 | 0.7.5 | 0.7.5 | 0.7.5 | 0.7.5 | |
| pillow | 10.4.0 | 10.4.0 | 10.4.0 | 10.4.0 | 10.4.0 | 10.4.0 |
| pip | 24.2 | 24.2 | 24.2 | 24.2 | 24.2 | 24.2 |
| pkce | 1.0.3 | 1.0.3 | 1.0.3 | 1.0.3 | 1.0.3 | |
| pkginfo | 1.10.0 | 1.10.0 | 1.10.0 | 1.10.0 | 1.10.0 | 1.10.0 |
| platformdirs | 3.10.0 | 3.10.0 | 3.10.0 | 3.10.0 | 3.10.0 | 3.10.0 |
| plotly | 5.24.1 | 5.24.1 | 5.24.1 | 5.24.1 | 5.24.1 | 5.24.1 |
| pluggy | 1.0.0 | 1.0.0 | 1.0.0 | 1.0.0 | 1.0.0 | 1.0.0 |
| ply | 3.11 | 3.11 | 3.11 | 3.11 | 3.11 | |
| prometheus\_client | 0.14.1 | 0.14.1 | 0.14.1 | 0.14.1 | 0.14.1 | |
| prompt-toolkit | 3.0.43 | 3.0.43 | 3.0.43 | 3.0.43 | 3.0.43 | 3.0.43 |
| prompt\_toolkit | 3.0.43 | 3.0.43 | 3.0.43 | 3.0.43 | 3.0.43 | 3.0.43 |
| protego | 0.1.16 | 0.1.16 | 0.1.16 | 0.1.16 | 0.1.16 | |
| protobuf | 4.25.3 | 4.25.3 | 4.25.3 | 4.25.3 | 4.25.3 | |
| psutil | 5.9.0 | 5.9.0 | 5.9.0 | 5.9.0 | 5.9.0 | 5.9.0 |
| ptyprocess | 0.7.0 | 0.7.0 | 0.7.0 | 0.7.0 | 0.7.0 | 0.7.0 |
| pure\_eval | 0.2.2 | 0.2.2 | 0.2.2 | 0.2.2 | 0.2.2 | 0.2.2 |
| py-cpuinfo | 9.0.0 | 9.0.0 | 9.0.0 | 9.0.0 | 9.0.0 | |
| py-lief | 0.12.3 | 0.12.3 | 0.12.3 | 0.12.3 | 0.12.3 | 0.12.3 |
| pyarrow | 16.1.0 | 16.1.0 | 16.1.0 | 16.1.0 | 16.1.0 | 16.1.0 |
| pyasn1 | 0.4.8 | 0.4.8 | 0.4.8 | 0.4.8 | 0.4.8 | |
| pyasn1-modules | 0.2.8 | 0.2.8 | 0.2.8 | 0.2.8 | 0.2.8 | |
| pybind11-abi | 5 | 5 | 5 | 5 | 5 | 5 |
| pycodestyle | 2.11.1 | 2.11.1 | 2.11.1 | 2.11.1 | 2.11.1 | 2.11.1 |
| pycosat | 0.6.6 | 0.6.6 | 0.6.6 | 0.6.6 | 0.6.6 | 0.6.6 |
| pycparser | 2.21 | 2.21 | 2.21 | 2.21 | 2.21 | 2.21 |
| pyct | 0.5.0 | 0.5.0 | 0.5.0 | 0.5.0 | 0.5.0 | |
| pycurl | 7.45.3 | 7.45.3 | 7.45.3 | 7.45.3 | 7.45.3 | 7.45.3 |
| pydantic | 2.8.2 | 2.8.2 | 2.8.2 | 2.8.2 | 2.8.2 | |
| pydantic-core | 2.20.1 | 2.20.1 | 2.20.1 | 2.20.1 | 2.20.1 | |
| pydeck | 0.8.0 | 0.8.0 | 0.8.0 | 0.8.0 | 0.8.0 | |
| pydispatcher | 2.0.5 | 2.0.5 | 2.0.5 | 2.0.5 | 2.0.5 | |
| pydocstyle | 6.3.0 | 6.3.0 | 6.3.0 | 6.3.0 | 6.3.0 | |
| pyerfa | 2.0.1.4 | 2.0.1.4 | 2.0.1.4 | 2.0.1.4 | 2.0.1.4 | 2.0.1.4 |
| pyflakes | 3.2.0 | 3.2.0 | 3.2.0 | 3.2.0 | 3.2.0 | 3.2.0 |
| pygments | 2.15.1 | 2.15.1 | 2.15.1 | 2.15.1 | 2.15.1 | 2.15.1 |
| pyjwt | 2.8.0 | 2.8.0 | 2.8.0 | 2.8.0 | 2.8.0 | |
| pylint | 2.16.2 | 2.16.2 | 2.16.2 | 2.16.2 | 2.16.2 | 2.16.2 |
| pylint-venv | 3.0.3 | 3.0.3 | 3.0.3 | 3.0.3 | 3.0.3 | |
| pyls-spyder | 0.4.0 | 0.4.0 | 0.4.0 | 0.4.0 | 0.4.0 | |
| pynacl | 1.5.0 | |||||
| pyobjc-core | 10.1 | 10.1 | ||||
| pyobjc-framework-cocoa | 10.1 | 10.1 | ||||
| pyobjc-framework-coreservices | 10.1 | 10.1 | ||||
| pyobjc-framework-fsevents | 10.1 | 10.1 | ||||
| pyodbc | 5.1.0 | 5.1.0 | 5.1.0 | 5.1.0 | 5.1.0 | 5.1.0 |
| pyopenssl | 24.2.1 | 24.2.1 | 24.2.1 | 24.2.1 | 24.2.1 | |
| pyparsing | 3.1.2 | 3.1.2 | 3.1.2 | 3.1.2 | 3.1.2 | 3.1.2 |
| pyqt | 5.15.10 | 5.15.10 | 5.15.10 | 5.15.10 | 5.15.10 | |
| pyqt5-sip | 12.13.0 | 12.13.0 | 12.13.0 | 12.13.0 | 12.13.0 | |
| pyqtwebengine | 5.15.10 | 5.15.10 | 5.15.10 | 5.15.10 | 5.15.10 | |
| pysocks | 1.7.1 | 1.7.1 | 1.7.1 | 1.7.1 | 1.7.1 | 1.7.1 |
| pytables | 3.10.1 | 3.10.1 | 3.10.1 | 3.10.1 | 3.10.1 | |
| pytest | 7.4.4 | 7.4.4 | 7.4.4 | 7.4.4 | 7.4.4 | 7.4.4 |
| python | 3.12.7 | 3.12.7 | 3.12.7 | 3.12.7 | 3.12.7 | 3.12.7 |
| python-dateutil | 2.9.0post0 | 2.9.0post0 | 2.9.0post0 | 2.9.0post0 | 2.9.0post0 | 2.9.0post0 |
| python-dotenv | 0.21.0 | 0.21.0 | 0.21.0 | 0.21.0 | 0.21.0 | |
| python-fastjsonschema | 2.16.2 | 2.16.2 | 2.16.2 | 2.16.2 | 2.16.2 | 2.16.2 |
| python-json-logger | 2.0.7 | 2.0.7 | 2.0.7 | 2.0.7 | 2.0.7 | |
| python-libarchive-c | 5.1 | 5.1 | 5.1 | 5.1 | 5.1 | 5.1 |
| python-lmdb | 1.4.1 | 1.4.1 | 1.4.1 | 1.4.1 | 1.4.1 | 1.4.1 |
| python-lsp-black | 2.0.0 | 2.0.0 | 2.0.0 | 2.0.0 | 2.0.0 | |
| python-lsp-jsonrpc | 1.1.2 | 1.1.2 | 1.1.2 | 1.1.2 | 1.1.2 | |
| python-lsp-server | 1.10.0 | 1.10.0 | 1.10.0 | 1.10.0 | 1.10.0 | |
| python-slugify | 5.0.2 | 5.0.2 | 5.0.2 | 5.0.2 | 5.0.2 | |
| python-tzdata | 2023.3 | 2023.3 | 2023.3 | 2023.3 | 2023.3 | 2023.3 |
| python.app | 3 | 3 | ||||
| pytoolconfig | 1.2.6 | 1.2.6 | 1.2.6 | 1.2.6 | 1.2.6 | |
| pytz | 2024.1 | 2024.1 | 2024.1 | 2024.1 | 2024.1 | 2024.1 |
| pyviz\_comms | 3.0.2 | 3.0.2 | 3.0.2 | 3.0.2 | 3.0.2 | |
| pywavelets | 1.7.0 | 1.7.0 | 1.7.0 | 1.7.0 | 1.7.0 | 1.7.0 |
| pywin32 | 305 | |||||
| pywin32-ctypes | 0.2.2 | |||||
| pywinpty | 2.0.10 | |||||
| pyxdg | 0.27 | 0.27 | ||||
| pyyaml | 6.0.1 | 6.0.1 | 6.0.1 | 6.0.1 | 6.0.1 | 6.0.1 |
| pyzmq | 25.1.2 | 25.1.2 | 25.1.2 | 25.1.2 | 25.1.2 | 25.1.2 |
| qdarkstyle | 3.2.3 | 3.2.3 | 3.2.3 | 3.2.3 | 3.2.3 | |
| qstylizer | 0.2.2 | 0.2.2 | 0.2.2 | 0.2.2 | 0.2.2 | |
| qt-main | 5.15.2 | 5.15.2 | 5.15.2 | 5.15.2 | 5.15.2 | |
| qt-webengine | 5.15.9 | 5.15.9 | 5.15.9 | 5.15.9 | 5.15.9 | |
| qtawesome | 1.3.1 | 1.3.1 | 1.3.1 | 1.3.1 | 1.3.1 | |
| qtconsole | 5.5.1 | 5.5.1 | 5.5.1 | 5.5.1 | 5.5.1 | |
| qtpy | 2.4.1 | 2.4.1 | 2.4.1 | 2.4.1 | 2.4.1 | |
| queuelib | 1.6.2 | 1.6.2 | 1.6.2 | 1.6.2 | 1.6.2 | |
| re2 | 2022.04.01 | 2022.04.01 | 2022.04.01 | 2022.04.01 | 2022.04.01 | 2022.04.01 |
| readline | 8.2 | 8.2 | 8.2 | 8.2 | 8.2 | |
| referencing | 0.30.2 | 0.30.2 | 0.30.2 | 0.30.2 | 0.30.2 | 0.30.2 |
| regex | 2024.9.11 | 2024.9.11 | 2024.9.11 | 2024.9.11 | 2024.9.11 | 2024.9.11 |
| reproc | 14.2.4 | 14.2.4 | 14.2.4 | 14.2.4 | 14.2.4 | 14.2.4 |
| reproc-cpp | 14.2.4 | 14.2.4 | 14.2.4 | 14.2.4 | 14.2.4 | 14.2.4 |
| requests | 2.32.3 | 2.32.3 | 2.32.3 | 2.32.3 | 2.32.3 | 2.32.3 |
| requests-file | 1.5.1 | 1.5.1 | 1.5.1 | 1.5.1 | 1.5.1 | |
| requests-toolbelt | 1.0.0 | 1.0.0 | 1.0.0 | 1.0.0 | 1.0.0 | 1.0.0 |
| rfc3339-validator | 0.1.4 | 0.1.4 | 0.1.4 | 0.1.4 | 0.1.4 | |
| rfc3986-validator | 0.1.1 | 0.1.1 | 0.1.1 | 0.1.1 | 0.1.1 | |
| rich | 13.7.1 | 13.7.1 | 13.7.1 | 13.7.1 | 13.7.1 | |
| rope | 1.12.0 | 1.12.0 | 1.12.0 | 1.12.0 | 1.12.0 | |
| rpds-py | 0.10.6 | 0.10.6 | 0.10.6 | 0.10.6 | 0.10.6 | 0.10.6 |
| rtree | 1.0.1 | 1.0.1 | 1.0.1 | 1.0.1 | 1.0.1 | |
| ruamel.yaml | 0.18.6 | 0.18.6 | 0.18.6 | 0.18.6 | 0.18.6 | 0.18.6 |
| ruamel.yaml.clib | 0.2.8 | 0.2.8 | 0.2.8 | 0.2.8 | 0.2.8 | 0.2.8 |
| ruamel\_yaml | 0.17.21 | 0.17.21 | 0.17.21 | 0.17.21 | 0.17.21 | 0.17.21 |
| s2n | 1.3.27 | 1.3.27 | 1.3.27 | |||
| s3fs | 2024.6.1 | 2024.6.1 | 2024.6.1 | 2024.6.1 | 2024.6.1 | 2024.6.1 |
| scikit-image | 0.24.0 | 0.24.0 | 0.24.0 | 0.24.0 | 0.24.0 | 0.24.0 |
| scikit-learn | 1.5.1 | 1.5.1 | 1.5.1 | 1.5.1 | 1.5.1 | 1.5.1 |
| scipy | 1.13.1 | 1.13.1 | 1.13.1 | 1.13.1 | 1.13.1 | 1.13.1 |
| scrapy | 2.11.1 | 2.11.1 | 2.11.1 | 2.11.1 | 2.11.1 | |
| seaborn | 0.13.2 | 0.13.2 | 0.13.2 | 0.13.2 | 0.13.2 | 0.13.2 |
| secretstorage | 3.3.1 | 3.3.1 | ||||
| semver | 3.0.2 | 3.0.2 | 3.0.2 | 3.0.2 | 3.0.2 | |
| send2trash | 1.8.2 | 1.8.2 | 1.8.2 | 1.8.2 | 1.8.2 | |
| service\_identity | 18.1.0 | 18.1.0 | 18.1.0 | 18.1.0 | 18.1.0 | |
| setuptools | 75.1.0 | 75.1.0 | 75.1.0 | 75.1.0 | 75.1.0 | 75.1.0 |
| sip | 6.7.12 | 6.7.12 | 6.7.12 | 6.7.12 | 6.7.12 | |
| six | 1.16.0 | 1.16.0 | 1.16.0 | 1.16.0 | 1.16.0 | 1.16.0 |
| smart\_open | 5.2.1 | 5.2.1 | 5.2.1 | 5.2.1 | 5.2.1 | |
| smmap | 4.0.0 | 4.0.0 | 4.0.0 | 4.0.0 | 4.0.0 | |
| snappy | 1.2.1 | 1.2.1 | 1.2.1 | 1.2.1 | 1.2.1 | 1.2.1 |
| sniffio | 1.3.0 | 1.3.0 | 1.3.0 | 1.3.0 | 1.3.0 | |
| snowballstemmer | 2.2.0 | 2.2.0 | 2.2.0 | 2.2.0 | 2.2.0 | 2.2.0 |
| sortedcontainers | 2.4.0 | 2.4.0 | 2.4.0 | 2.4.0 | 2.4.0 | 2.4.0 |
| soupsieve | 2.5 | 2.5 | 2.5 | 2.5 | 2.5 | 2.5 |
| sphinx | 7.3.7 | 7.3.7 | 7.3.7 | 7.3.7 | 7.3.7 | |
| sphinxcontrib-applehelp | 1.0.2 | 1.0.2 | 1.0.2 | 1.0.2 | 1.0.2 | |
| sphinxcontrib-devhelp | 1.0.2 | 1.0.2 | 1.0.2 | 1.0.2 | 1.0.2 | |
| sphinxcontrib-htmlhelp | 2.0.0 | 2.0.0 | 2.0.0 | 2.0.0 | 2.0.0 | |
| sphinxcontrib-jsmath | 1.0.1 | 1.0.1 | 1.0.1 | 1.0.1 | 1.0.1 | |
| sphinxcontrib-qthelp | 1.0.3 | 1.0.3 | 1.0.3 | 1.0.3 | 1.0.3 | |
| sphinxcontrib-serializinghtml | 1.1.10 | 1.1.10 | 1.1.10 | 1.1.10 | 1.1.10 | |
| spyder | 5.5.1 | 5.5.1 | 5.5.1 | 5.5.1 | 5.5.1 | |
| spyder-kernels | 2.5.0 | 2.5.0 | 2.5.0 | 2.5.0 | 2.5.0 | |
| sqlalchemy | 2.0.34 | 2.0.34 | 2.0.34 | 2.0.34 | 2.0.34 | 2.0.34 |
| sqlite | 3.45.3 | 3.45.3 | 3.45.3 | 3.45.3 | 3.45.3 | 3.45.3 |
| stack\_data | 0.2.0 | 0.2.0 | 0.2.0 | 0.2.0 | 0.2.0 | 0.2.0 |
| statsmodels | 0.14.2 | 0.14.2 | 0.14.2 | 0.14.2 | 0.14.2 | 0.14.2 |
| streamlit | 1.37.1 | 1.37.1 | 1.37.1 | 1.37.1 | 1.37.1 | |
| sympy | 1.13.2 | 1.13.2 | 1.13.2 | 1.13.2 | 1.13.2 | 1.13.2 |
| tabulate | 0.9.0 | 0.9.0 | 0.9.0 | 0.9.0 | 0.9.0 | 0.9.0 |
| tapi | 1100.0.11 | 1000.10.8 | ||||
| tbb | 2021.8.0 | 2021.8.0 | 2021.8.0 | 2021.8.0 | 2021.8.0 | |
| tblib | 1.7.0 | 1.7.0 | 1.7.0 | 1.7.0 | 1.7.0 | 1.7.0 |
| tenacity | 8.2.3 | 8.2.3 | 8.2.3 | 8.2.3 | 8.2.3 | 8.2.3 |
| terminado | 0.17.1 | 0.17.1 | 0.17.1 | 0.17.1 | 0.17.1 | |
| text-unidecode | 1.3 | 1.3 | 1.3 | 1.3 | 1.3 | |
| textdistance | 4.2.1 | 4.2.1 | 4.2.1 | 4.2.1 | 4.2.1 | |
| threadpoolctl | 3.5.0 | 3.5.0 | 3.5.0 | 3.5.0 | 3.5.0 | 3.5.0 |
| three-merge | 0.1.1 | 0.1.1 | 0.1.1 | 0.1.1 | 0.1.1 | |
| tifffile | 2023.4.12 | 2023.4.12 | 2023.4.12 | 2023.4.12 | 2023.4.12 | 2023.4.12 |
| tinycss2 | 1.2.1 | 1.2.1 | 1.2.1 | 1.2.1 | 1.2.1 | 1.2.1 |
| tk | 8.6.14 | 8.6.14 | 8.6.14 | 8.6.14 | 8.6.14 | 8.6.14 |
| tldextract | 5.1.2 | 5.1.2 | 5.1.2 | 5.1.2 | 5.1.2 | |
| toml | 0.10.2 | 0.10.2 | 0.10.2 | 0.10.2 | 0.10.2 | |
| tomli | 2.0.1 | 2.0.1 | 2.0.1 | 2.0.1 | 2.0.1 | |
| tomlkit | 0.11.1 | 0.11.1 | 0.11.1 | 0.11.1 | 0.11.1 | 0.11.1 |
| toolz | 0.12.0 | 0.12.0 | 0.12.0 | 0.12.0 | 0.12.0 | 0.12.0 |
| tornado | 6.4.1 | 6.4.1 | 6.4.1 | 6.4.1 | 6.4.1 | 6.4.1 |
| tqdm | 4.66.5 | 4.66.5 | 4.66.5 | 4.66.5 | 4.66.5 | 4.66.5 |
| traitlets | 5.14.3 | 5.14.3 | 5.14.3 | 5.14.3 | 5.14.3 | 5.14.3 |
| truststore | 0.8.0 | 0.8.0 | 0.8.0 | 0.8.0 | 0.8.0 | 0.8.0 |
| twisted | 23.10.0 | 23.10.0 | 23.10.0 | 23.10.0 | 23.10.0 | |
| twisted-iocpsupport | 1.0.2 | |||||
| typing-extensions | 4.11.0 | 4.11.0 | 4.11.0 | 4.11.0 | 4.11.0 | 4.11.0 |
| typing\_extensions | 4.11.0 | 4.11.0 | 4.11.0 | 4.11.0 | 4.11.0 | 4.11.0 |
| tzdata | 2024b | 2024b | 2024b | 2024b | 2024b | 2024b |
| uc-micro-py | 1.0.1 | 1.0.1 | 1.0.1 | 1.0.1 | 1.0.1 | |
| ujson | 5.10.0 | 5.10.0 | 5.10.0 | 5.10.0 | 5.10.0 | |
| unicodedata2 | 15.1.0 | 15.1.0 | 15.1.0 | 15.1.0 | 15.1.0 | 15.1.0 |
| unidecode | 1.3.8 | 1.3.8 | 1.3.8 | 1.3.8 | 1.3.8 | |
| unixodbc | 2.3.11 | 2.3.11 | 2.3.11 | 2.3.11 | 2.3.11 | |
| urllib3 | 2.2.3 | 2.2.3 | 2.2.3 | 2.2.3 | 2.2.3 | 2.2.3 |
| utf8proc | 2.6.1 | 2.6.1 | 2.6.1 | 2.6.1 | 2.6.1 | 2.6.1 |
| vc | 14.40 | |||||
| vs2015\_runtime | 14.40.33807 | |||||
| w3lib | 1.21.0 | 2.1.2 | 2.1.2 | 2.1.2 | 2.1.2 | |
| watchdog | 4.0.1 | 4.0.1 | 4.0.1 | 4.0.1 | 4.0.1 | |
| wcwidth | 0.2.5 | 0.2.5 | 0.2.5 | 0.2.5 | 0.2.5 | 0.2.5 |
| webencodings | 0.5.1 | 0.5.1 | 0.5.1 | 0.5.1 | 0.5.1 | 0.5.1 |
| websocket-client | 1.8.0 | 1.8.0 | 1.8.0 | 1.8.0 | 1.8.0 | |
| werkzeug | 3.0.3 | 3.0.3 | 3.0.3 | 3.0.3 | 3.0.3 | 3.0.3 |
| whatthepatch | 1.0.2 | 1.0.2 | 1.0.2 | 1.0.2 | 1.0.2 | |
| wheel | 0.44.0 | 0.44.0 | 0.44.0 | 0.44.0 | 0.44.0 | 0.44.0 |
| widgetsnbextension | 3.6.6 | 3.6.6 | 3.6.6 | 3.6.6 | 3.6.6 | |
| win\_inet\_pton | 1.1.0 | |||||
| winpty | 0.4.3 | |||||
| wrapt | 1.14.1 | 1.14.1 | 1.14.1 | 1.14.1 | 1.14.1 | 1.14.1 |
| wurlitzer | 3.0.2 | 3.0.2 | 3.0.2 | 3.0.2 | ||
| xarray | 2023.6.0 | 2023.6.0 | 2023.6.0 | 2023.6.0 | 2023.6.0 | |
| xlwings | 0.32.1 | 0.32.1 | 0.32.1 | |||
| xyzservices | 2022.9.0 | 2022.9.0 | 2022.9.0 | 2022.9.0 | 2022.9.0 | 2022.9.0 |
| xz | 5.4.6 | 5.4.6 | 5.4.6 | 5.4.6 | 5.4.6 | 5.4.6 |
| yaml | 0.2.5 | 0.2.5 | 0.2.5 | 0.2.5 | 0.2.5 | 0.2.5 |
| yaml-cpp | 0.8.0 | 0.8.0 | 0.8.0 | 0.8.0 | 0.8.0 | 0.8.0 |
| yapf | 0.40.2 | 0.40.2 | 0.40.2 | 0.40.2 | 0.40.2 | |
| yarl | 1.11.0 | 1.11.0 | 1.11.0 | 1.11.0 | 1.11.0 | 1.11.0 |
| zeromq | 4.3.5 | 4.3.5 | 4.3.5 | 4.3.5 | 4.3.5 | 4.3.5 |
| zfp | 1.0.0 | 1.0.0 | 1.0.0 | 1.0.0 | ||
| zict | 3.0.0 | 3.0.0 | 3.0.0 | 3.0.0 | 3.0.0 | 3.0.0 |
| zipp | 3.17.0 | 3.17.0 | 3.17.0 | 3.17.0 | 3.17.0 | |
| zlib | 1.2.13 | 1.2.13 | 1.2.13 | 1.2.13 | 1.2.13 | 1.2.13 |
| zlib-ng | 2.0.7 | 2.0.7 | 2.0.7 | 2.0.7 | 2.0.7 | |
| zope | 1.0 | 1.0 | 1.0 | 1.0 | 1.0 | |
| zope.interface | 5.4.0 | 5.4.0 | 5.4.0 | 5.4.0 | 5.4.0 | |
| zstandard | 0.23.0 | 0.23.0 | 0.23.0 | 0.23.0 | 0.23.0 | 0.23.0 |
| zstd | 1.5.6 | 1.5.6 | 1.5.6 | 1.5.6 | 1.5.6 | 1.5.6 |
| Package Name | linux-64 | linux-aarch64 | linux-s390x |
|---|---|---|---|
| \_anaconda\_depends | 2024.10 | 2024.10 | 2024.10 |
| \_libgcc\_mutex | 0.1 | 0.1 | 0.1 |
| \_openmp\_mutex | 5.1 | 5.1 | 5.1 |
| aiobotocore | 2.12.3 | 2.12.3 | 2.12.3 |
| aiohappyeyeballs | 2.4.0 | 2.4.0 | 2.4.0 |
| aiohttp | 3.10.5 | 3.10.5 | 3.10.5 |
| aioitertools | 0.7.1 | 0.7.1 | 0.7.1 |
| aiosignal | 1.2.0 | 1.2.0 | 1.2.0 |
| alabaster | 0.7.16 | 0.7.16 | |
| altair | 5.0.1 | 5.0.1 | |
| anaconda-anon-usage | 0.4.4 | 0.4.4 | 0.4.4 |
| anaconda-catalogs | 0.2.0 | 0.2.0 | 0.2.0 |
| anaconda-client | 1.12.3 | 1.12.3 | 1.12.3 |
| anaconda-cloud-auth | 0.5.1 | 0.5.1 | |
| anaconda-navigator | 2.6.3 | 2.6.3 | |
| anaconda-project | 0.11.1 | 0.11.1 | 0.11.1 |
| annotated-types | 0.6.0 | 0.6.0 | |
| anyio | 4.2.0 | 4.2.0 | |
| aom | 3.6.0 | 3.6.0 | 3.6.0 |
| appdirs | 1.4.4 | 1.4.4 | |
| archspec | 0.2.3 | 0.2.3 | 0.2.3 |
| argon2-cffi | 21.3.0 | 21.3.0 | |
| argon2-cffi-bindings | 21.2.0 | 21.2.0 | |
| arrow | 1.2.3 | 1.2.3 | |
| arrow-cpp | 16.1.0 | 16.1.0 | 16.1.0 |
| astroid | 2.14.2 | 2.14.2 | 2.14.2 |
| astropy | 6.1.3 | 6.1.3 | 6.1.3 |
| astropy-iers-data | 0.2024.9.2.0.33.23 | 0.2024.9.2.0.33.23 | 0.2024.9.2.0.33.23 |
| asttokens | 2.0.5 | 2.0.5 | 2.0.5 |
| async-lru | 2.0.4 | 2.0.4 | |
| atomicwrites | 1.4.0 | 1.4.0 | |
| attrs | 23.1.0 | 23.1.0 | 23.1.0 |
| automat | 20.2.0 | 20.2.0 | |
| autopep8 | 2.0.4 | 2.0.4 | |
| aws-c-auth | 0.6.19 | 0.6.19 | 0.6.19 |
| aws-c-cal | 0.5.20 | 0.5.20 | 0.5.20 |
| aws-c-common | 0.8.5 | 0.8.5 | 0.8.5 |
| aws-c-compression | 0.2.16 | 0.2.16 | 0.2.16 |
| aws-c-event-stream | 0.2.15 | 0.2.15 | 0.2.15 |
| aws-c-http | 0.6.25 | 0.6.25 | 0.6.25 |
| aws-c-io | 0.13.10 | 0.13.10 | 0.13.10 |
| aws-c-mqtt | 0.7.13 | 0.7.13 | 0.7.13 |
| aws-c-s3 | 0.1.51 | 0.1.51 | 0.1.51 |
| aws-c-sdkutils | 0.1.6 | 0.1.6 | 0.1.6 |
| aws-checksums | 0.1.13 | 0.1.13 | 0.1.13 |
| aws-crt-cpp | 0.18.16 | 0.18.16 | 0.18.16 |
| aws-sdk-cpp | 1.10.55 | 1.10.55 | 1.10.55 |
| babel | 2.11.0 | 2.11.0 | |
| bcrypt | 3.2.0 | 3.2.0 | |
| beautifulsoup4 | 4.12.3 | 4.12.3 | 4.12.3 |
| binaryornot | 0.4.4 | 0.4.4 | |
| black | 24.8.0 | 24.8.0 | 24.8.0 |
| blas | 1.0 | 1.0 | 1.0 |
| bleach | 4.1.0 | 4.1.0 | 4.1.0 |
| blinker | 1.6.2 | 1.6.2 | 1.6.2 |
| blosc | 1.21.3 | 1.21.3 | 1.21.3 |
| bokeh | 3.6.0 | 3.6.0 | 3.6.0 |
| boltons | 23.0.0 | 23.0.0 | 23.0.0 |
| boost-cpp | 1.82.0 | 1.82.0 | 1.82.0 |
| botocore | 1.34.69 | 1.34.69 | 1.34.69 |
| bottleneck | 1.3.7 | 1.3.7 | 1.3.7 |
| brotli | 1.0.9 | 1.0.9 | 1.0.9 |
| brotli-bin | 1.0.9 | 1.0.9 | 1.0.9 |
| brotli-python | 1.0.9 | 1.0.9 | 1.0.9 |
| brunsli | 0.1 | 0.1 | |
| bzip2 | 1.0.8 | 1.0.8 | 1.0.8 |
| c-ares | 1.19.1 | 1.19.1 | 1.19.1 |
| c-blosc2 | 2.12.0 | 2.12.0 | |
| ca-certificates | 2024.9.24 | 2024.9.24 | 2024.9.24 |
| cachetools | 5.3.3 | 5.3.3 | |
| certifi | 2024.8.30 | 2024.8.30 | 2024.8.30 |
| cffi | 1.17.1 | 1.17.1 | 1.17.1 |
| cfitsio | 3.470 | 3.470 | 3.470 |
| chardet | 4.0.0 | 4.0.0 | 4.0.0 |
| charls | 2.2.0 | 2.2.0 | |
| charset-normalizer | 3.3.2 | 3.3.2 | 3.3.2 |
| click | 8.1.7 | 8.1.7 | 8.1.7 |
| cloudpickle | 3.0.0 | 3.0.0 | 3.0.0 |
| colorama | 0.4.6 | 0.4.6 | 0.4.6 |
| colorcet | 3.1.0 | 3.1.0 | |
| comm | 0.2.1 | 0.2.1 | 0.2.1 |
| conda | 24.9.2 | 24.9.2 | 24.9.2 |
| conda-build | 24.9.0 | 24.9.0 | 24.9.0 |
| conda-content-trust | 0.2.0 | 0.2.0 | 0.2.0 |
| conda-index | 0.5.0 | 0.5.0 | 0.4.0 |
| conda-libmamba-solver | 24.9.0 | 24.9.0 | 24.9.0 |
| conda-pack | 0.7.1 | 0.7.1 | 0.7.1 |
| conda-package-handling | 2.3.0 | 2.3.0 | 2.3.0 |
| conda-package-streaming | 0.10.0 | 0.10.0 | 0.10.0 |
| conda-repo-cli | 1.0.114 | 1.0.114 | |
| conda-token | 0.5.0 | 0.5.0 | 0.5.0 |
| constantly | 23.10.4 | 23.10.4 | |
| contourpy | 1.2.0 | 1.2.0 | 1.2.0 |
| cookiecutter | 2.6.0 | 2.6.0 | |
| cryptography | 43.0.0 | 43.0.0 | 43.0.0 |
| cssselect | 1.2.0 | 1.2.0 | |
| curl | 8.9.1 | 8.9.1 | 8.9.1 |
| cycler | 0.11.0 | 0.11.0 | 0.11.0 |
| cyrus-sasl | 2.1.28 | 2.1.28 | |
| cytoolz | 0.12.2 | 0.12.2 | 0.12.2 |
| dask | 2024.8.2 | 2024.8.2 | 2024.8.2 |
| dask-core | 2024.8.2 | 2024.8.2 | 2024.8.2 |
| dask-expr | 1.1.13 | 1.1.13 | 1.1.13 |
| datashader | 0.16.3 | 0.16.3 | |
| dav1d | 1.2.1 | 1.2.1 | 1.2.1 |
| dbus | 1.13.18 | 1.13.18 | |
| debugpy | 1.6.7 | 1.6.7 | 1.6.7 |
| decorator | 5.1.1 | 5.1.1 | 5.1.1 |
| defusedxml | 0.7.1 | 0.7.1 | 0.7.1 |
| diff-match-patch | 20200713 | 20200713 | |
| dill | 0.3.8 | 0.3.8 | 0.3.8 |
| distributed | 2024.8.2 | 2024.8.2 | 2024.8.2 |
| distro | 1.9.0 | 1.9.0 | 1.9.0 |
| docstring-to-markdown | 0.11 | 0.11 | |
| docutils | 0.18.1 | 0.18.1 | |
| et\_xmlfile | 1.1.0 | 1.1.0 | 1.1.0 |
| executing | 0.8.3 | 0.8.3 | 0.8.3 |
| expat | 2.6.3 | 2.6.3 | 2.6.3 |
| filelock | 3.13.1 | 3.13.1 | 3.13.1 |
| flake8 | 7.0.0 | 7.0.0 | |
| flask | 3.0.3 | 3.0.3 | 3.0.3 |
| fmt | 9.1.0 | 9.1.0 | 9.1.0 |
| fontconfig | 2.14.1 | 2.14.1 | |
| fonttools | 4.51.0 | 4.51.0 | 4.51.0 |
| freetype | 2.12.1 | 2.12.1 | 2.12.1 |
| frozendict | 2.4.2 | 2.4.2 | 2.4.2 |
| frozenlist | 1.4.0 | 1.4.0 | 1.4.0 |
| fsspec | 2024.6.1 | 2024.6.1 | 2024.6.1 |
| gensim | 4.3.3 | 4.3.3 | |
| gflags | 2.2.2 | 2.2.2 | 2.2.2 |
| giflib | 5.2.1 | 5.2.1 | 5.2.1 |
| gitdb | 4.0.7 | 4.0.7 | |
| gitpython | 3.1.43 | 3.1.43 | |
| glib | 2.78.4 | 2.78.4 | |
| glib-tools | 2.78.4 | 2.78.4 | |
| glog | 0.5.0 | 0.5.0 | 0.5.0 |
| greenlet | 3.0.1 | 3.0.1 | 3.0.1 |
| gst-plugins-base | 1.14.1 | 1.14.1 | |
| gstreamer | 1.14.1 | 1.14.1 | |
| h11 | 0.14.0 | 0.14.0 | |
| h5py | 3.11.0 | 3.11.0 | 3.11.0 |
| hdf5 | 1.12.1 | 1.12.1 | 1.12.1 |
| heapdict | 1.0.1 | 1.0.1 | 1.0.1 |
| holoviews | 1.19.1 | 1.19.1 | |
| httpcore | 1.0.2 | 1.0.2 | |
| httpx | 0.27.0 | 0.27.0 | |
| hvplot | 0.11.0 | 0.11.0 | |
| hyperlink | 21.0.0 | 21.0.0 | |
| icu | 73.1 | 73.1 | 73.1 |
| idna | 3.7 | 3.7 | 3.7 |
| imagecodecs | 2023.1.23 | 2023.1.23 | 2023.1.23 |
| imageio | 2.33.1 | 2.33.1 | 2.33.1 |
| imagesize | 1.4.1 | 1.4.1 | |
| imbalanced-learn | 0.12.3 | 0.12.3 | 0.12.3 |
| importlib-metadata | 7.0.1 | 7.0.1 | |
| incremental | 22.10.0 | 22.10.0 | |
| inflection | 0.5.1 | 0.5.1 | |
| iniconfig | 1.1.1 | 1.1.1 | 1.1.1 |
| intake | 2.0.7 | 2.0.7 | 2.0.7 |
| intel-openmp | 2023.1.0 | ||
| intervaltree | 3.1.0 | 3.1.0 | |
| ipykernel | 6.28.0 | 6.28.0 | 6.28.0 |
| ipython | 8.27.0 | 8.27.0 | 8.27.0 |
| ipython\_genutils | 0.2.0 | 0.2.0 | |
| ipywidgets | 7.8.1 | 7.8.1 | |
| isort | 5.13.2 | 5.13.2 | 5.13.2 |
| itemadapter | 0.3.0 | 0.3.0 | |
| itemloaders | 1.1.0 | 1.1.0 | |
| itsdangerous | 2.2.0 | 2.2.0 | 2.2.0 |
| jaraco.classes | 3.2.1 | 3.2.1 | |
| jedi | 0.19.1 | 0.19.1 | 0.19.1 |
| jeepney | 0.7.1 | 0.7.1 | |
| jellyfish | 1.0.1 | 1.0.1 | |
| jinja2 | 3.1.4 | 3.1.4 | 3.1.4 |
| jmespath | 1.0.1 | 1.0.1 | 1.0.1 |
| joblib | 1.4.2 | 1.4.2 | 1.4.2 |
| jpeg | 9e | 9e | 9e |
| jq | 1.6 | 1.6 | |
| json5 | 0.9.6 | 0.9.6 | |
| jsonpatch | 1.33 | 1.33 | 1.33 |
| jsonpointer | 2.1 | 2.1 | 2.1 |
| jsonschema | 4.23.0 | 4.23.0 | 4.23.0 |
| jsonschema-specifications | 2023.7.1 | 2023.7.1 | 2023.7.1 |
| jupyter | 1.0.0 | 1.0.0 | 1.0.0 |
| jupyter-lsp | 2.2.0 | 2.2.0 | |
| jupyter\_client | 8.6.0 | 8.6.0 | 8.6.0 |
| jupyter\_console | 6.6.3 | 6.6.3 | 6.6.3 |
| jupyter\_core | 5.7.2 | 5.7.2 | 5.7.2 |
| jupyter\_events | 0.10.0 | 0.10.0 | |
| jupyter\_server | 2.14.1 | 2.14.1 | |
| jupyter\_server\_terminals | 0.4.4 | 0.4.4 | |
| jupyterlab | 4.2.5 | 4.2.5 | |
| jupyterlab-variableinspector | 3.1.0 | 3.1.0 | |
| jupyterlab\_pygments | 0.1.2 | 0.1.2 | 0.2.2 |
| jupyterlab\_server | 2.27.3 | 2.27.3 | |
| jupyterlab\_widgets | 1.0.0 | 1.0.0 | |
| jxrlib | 1.1 | 1.1 | 1.1 |
| keyring | 24.3.1 | 24.3.1 | |
| kiwisolver | 1.4.4 | 1.4.4 | 1.4.4 |
| krb5 | 1.20.1 | 1.20.1 | 1.20.1 |
| lazy-object-proxy | 1.10.0 | 1.10.0 | 1.10.0 |
| lazy\_loader | 0.4 | 0.4 | 0.4 |
| lcms2 | 2.12 | 2.12 | 2.12 |
| ld\_impl\_linux-64 | 2.40 | ||
| ld\_impl\_linux-aarch64 | 2.40 | ||
| ld\_impl\_linux-s390x | 2.40 | ||
| lerc | 3.0 | 3.0 | 3.0 |
| libabseil | 20240116.2 | 20240116.2 | 20240116.2 |
| libaec | 1.0.4 | 1.0.4 | 1.0.4 |
| libarchive | 3.6.2 | 3.6.2 | 3.7.4 |
| libavif | 0.11.1 | 0.11.1 | 0.11.1 |
| libboost | 1.82.0 | 1.82.0 | 1.82.0 |
| libbrotlicommon | 1.0.9 | 1.0.9 | 1.0.9 |
| libbrotlidec | 1.0.9 | 1.0.9 | 1.0.9 |
| libbrotlienc | 1.0.9 | 1.0.9 | 1.0.9 |
| libclang | 14.0.6 | 14.0.6 | |
| libclang13 | 14.0.6 | 14.0.6 | |
| libcups | 2.4.2 | 2.4.2 | |
| libcurl | 8.9.1 | 8.9.1 | 8.9.1 |
| libdeflate | 1.17 | 1.17 | 1.17 |
| libedit | 3.1.20230828 | 3.1.20230828 | 3.1.20230828 |
| libev | 4.33 | 4.33 | 4.33 |
| libevent | 2.1.12 | 2.1.12 | 2.1.12 |
| libffi | 3.4.4 | 3.4.4 | 3.4.4 |
| libgcc-ng | 11.2.0 | 11.2.0 | 11.2.0 |
| libgfortran-ng | 11.2.0 | 11.2.0 | 11.2.0 |
| libgfortran5 | 11.2.0 | 11.2.0 | 11.2.0 |
| libglib | 2.78.4 | 2.78.4 | |
| libgomp | 11.2.0 | 11.2.0 | 11.2.0 |
| libgrpc | 1.62.2 | 1.62.2 | 1.62.2 |
| libiconv | 1.16 | 1.16 | |
| liblief | 0.12.3 | 0.12.3 | 0.12.3 |
| libllvm14 | 14.0.6 | 14.0.6 | |
| libmamba | 1.5.8 | 1.5.8 | 1.5.8 |
| libmambapy | 1.5.8 | 1.5.8 | 1.5.8 |
| libnghttp2 | 1.57.0 | 1.57.0 | 1.57.0 |
| libopenblas | 0.3.21 | 0.3.21 | |
| libpng | 1.6.39 | 1.6.39 | 1.6.39 |
| libpq | 12.17 | 12.17 | |
| libprotobuf | 4.25.3 | 4.25.3 | 4.25.3 |
| libsodium | 1.0.18 | 1.0.18 | 1.0.18 |
| libsolv | 0.7.24 | 0.7.24 | 0.7.24 |
| libspatialindex | 1.9.3 | 1.9.3 | |
| libssh2 | 1.11.0 | 1.11.0 | 1.11.0 |
| libstdcxx-ng | 11.2.0 | 11.2.0 | 11.2.0 |
| libthrift | 0.15.0 | 0.15.0 | 0.15.0 |
| libtiff | 4.5.1 | 4.5.1 | 4.5.1 |
| libuuid | 1.41.5 | 1.41.5 | 1.41.5 |
| libwebp-base | 1.3.2 | 1.3.2 | 1.3.2 |
| libxcb | 1.15 | 1.15 | |
| libxkbcommon | 1.0.1 | 1.0.1 | |
| libxml2 | 2.10.4 | 2.10.4 | 2.13.1 |
| libxslt | 1.1.37 | 1.1.37 | |
| libzopfli | 1.0.3 | 1.0.3 | 1.0.3 |
| linkify-it-py | 2.0.0 | 2.0.0 | |
| llvmlite | 0.43.0 | 0.43.0 | |
| locket | 1.0.0 | 1.0.0 | 1.0.0 |
| lxml | 5.2.1 | 5.2.1 | |
| lz4 | 4.3.2 | 4.3.2 | 4.3.2 |
| lz4-c | 1.9.4 | 1.9.4 | 1.9.4 |
| lzo | 2.10 | 2.10 | |
| markdown | 3.4.1 | 3.4.1 | |
| markdown-it-py | 2.2.0 | 2.2.0 | |
| markupsafe | 2.1.3 | 2.1.3 | 2.1.3 |
| matplotlib | 3.9.2 | 3.9.2 | 3.9.2 |
| matplotlib-base | 3.9.2 | 3.9.2 | 3.9.2 |
| matplotlib-inline | 0.1.6 | 0.1.6 | 0.1.6 |
| mccabe | 0.7.0 | 0.7.0 | 0.7.0 |
| mdit-py-plugins | 0.3.0 | 0.3.0 | |
| mdurl | 0.1.0 | 0.1.0 | |
| menuinst | 2.1.2 | 2.1.2 | 2.1.2 |
| mistune | 2.0.4 | 2.0.4 | 2.0.4 |
| mkl | 2023.1.0 | ||
| mkl-service | 2.4.0 | ||
| mkl\_fft | 1.3.10 | ||
| mkl\_random | 1.2.7 | ||
| more-itertools | 10.3.0 | 10.3.0 | 10.3.0 |
| mpmath | 1.3.0 | 1.3.0 | 1.3.0 |
| msgpack-python | 1.0.3 | 1.0.3 | 1.0.3 |
| multidict | 6.0.4 | 6.0.4 | 6.0.4 |
| multipledispatch | 0.6.0 | 0.6.0 | |
| mypy | 1.11.2 | 1.11.2 | 1.11.2 |
| mypy\_extensions | 1.0.0 | 1.0.0 | 1.0.0 |
| mysql | 5.7.24 | 5.7.24 | |
| navigator-updater | 0.5.1 | 0.5.1 | |
| nbclient | 0.8.0 | 0.8.0 | 0.8.0 |
| nbconvert | 7.16.4 | 7.16.4 | 7.10.0 |
| nbformat | 5.10.4 | 5.10.4 | 5.10.4 |
| ncurses | 6.4 | 6.4 | 6.4 |
| nest-asyncio | 1.6.0 | 1.6.0 | 1.6.0 |
| networkx | 3.3 | 3.3 | 3.3 |
| nltk | 3.9.1 | 3.9.1 | 3.9.1 |
| notebook | 7.2.2 | 7.2.2 | |
| notebook-shim | 0.2.3 | 0.2.3 | |
| nspr | 4.35 | 4.35 | |
| nss | 3.89.1 | 3.89.1 | |
| numba | 0.60.0 | 0.60.0 | |
| numexpr | 2.8.7 | 2.8.7 | 2.8.7 |
| numpy | 1.26.4 | 1.26.4 | 1.26.4 |
| numpy-base | 1.26.4 | 1.26.4 | 1.26.4 |
| numpydoc | 1.7.0 | 1.7.0 | |
| oniguruma | 6.9.7.1 | 6.9.7.1 | |
| openjpeg | 2.5.2 | 2.5.2 | 2.5.2 |
| openpyxl | 3.1.5 | 3.1.5 | 3.1.5 |
| openssl | 3.0.15 | 3.0.15 | 3.0.15 |
| orc | 2.0.1 | 2.0.1 | 2.0.1 |
| overrides | 7.4.0 | 7.4.0 | |
| packaging | 24.1 | 24.1 | 24.1 |
| pandas | 2.2.2 | 2.2.2 | 2.2.2 |
| pandocfilters | 1.5.0 | 1.5.0 | 1.5.0 |
| panel | 1.5.2 | 1.5.2 | |
| param | 2.1.1 | 2.1.1 | |
| parsel | 1.8.1 | 1.8.1 | |
| parso | 0.8.3 | 0.8.3 | 0.8.3 |
| partd | 1.4.1 | 1.4.1 | 1.4.1 |
| patch | 2.7.6 | 2.7.6 | 2.7.6 |
| patchelf | 0.17.2 | 0.17.2 | 0.17.2 |
| pathspec | 0.10.3 | 0.10.3 | 0.10.3 |
| patsy | 0.5.6 | 0.5.6 | 0.5.6 |
| pcre2 | 10.42 | 10.42 | 10.42 |
| pexpect | 4.8.0 | 4.8.0 | 4.8.0 |
| pickleshare | 0.7.5 | 0.7.5 | |
| pillow | 10.4.0 | 10.4.0 | 10.4.0 |
| pip | 24.2 | 24.2 | 24.2 |
| pkce | 1.0.3 | 1.0.3 | |
| pkginfo | 1.10.0 | 1.10.0 | 1.10.0 |
| platformdirs | 3.10.0 | 3.10.0 | 3.10.0 |
| plotly | 5.24.1 | 5.24.1 | 5.24.1 |
| pluggy | 1.0.0 | 1.0.0 | 1.0.0 |
| ply | 3.11 | 3.11 | |
| prometheus\_client | 0.14.1 | 0.14.1 | |
| prompt-toolkit | 3.0.43 | 3.0.43 | 3.0.43 |
| prompt\_toolkit | 3.0.43 | 3.0.43 | 3.0.43 |
| protego | 0.1.16 | 0.1.16 | |
| protobuf | 4.25.3 | 4.25.3 | |
| psutil | 5.9.0 | 5.9.0 | 5.9.0 |
| ptyprocess | 0.7.0 | 0.7.0 | 0.7.0 |
| pure\_eval | 0.2.2 | 0.2.2 | 0.2.2 |
| py-cpuinfo | 9.0.0 | 9.0.0 | |
| py-lief | 0.12.3 | 0.12.3 | 0.12.3 |
| pyarrow | 16.1.0 | 16.1.0 | 16.1.0 |
| pyasn1 | 0.4.8 | 0.4.8 | |
| pyasn1-modules | 0.2.8 | 0.2.8 | |
| pybind11-abi | 5 | 5 | 5 |
| pycodestyle | 2.11.1 | 2.11.1 | 2.11.1 |
| pycosat | 0.6.6 | 0.6.6 | 0.6.6 |
| pycparser | 2.21 | 2.21 | 2.21 |
| pyct | 0.5.0 | 0.5.0 | |
| pycurl | 7.45.3 | 7.45.3 | 7.45.3 |
| pydantic | 2.8.2 | 2.8.2 | |
| pydantic-core | 2.20.1 | 2.20.1 | |
| pydeck | 0.8.0 | 0.8.0 | |
| pydispatcher | 2.0.5 | 2.0.5 | |
| pydocstyle | 6.3.0 | 6.3.0 | |
| pyerfa | 2.0.1.4 | 2.0.1.4 | 2.0.1.4 |
| pyflakes | 3.2.0 | 3.2.0 | 3.2.0 |
| pygments | 2.15.1 | 2.15.1 | 2.15.1 |
| pyjwt | 2.8.0 | 2.8.0 | |
| pylint | 2.16.2 | 2.16.2 | 2.16.2 |
| pylint-venv | 3.0.3 | 3.0.3 | |
| pyls-spyder | 0.4.0 | 0.4.0 | |
| pyodbc | 5.1.0 | 5.1.0 | 5.1.0 |
| pyopenssl | 24.2.1 | 24.2.1 | |
| pyparsing | 3.1.2 | 3.1.2 | 3.1.2 |
| pyqt | 5.15.10 | 5.15.10 | |
| pyqt5-sip | 12.13.0 | 12.13.0 | |
| pyqtwebengine | 5.15.10 | 5.15.10 | |
| pysocks | 1.7.1 | 1.7.1 | 1.7.1 |
| pytables | 3.10.1 | 3.10.1 | |
| pytest | 7.4.4 | 7.4.4 | 7.4.4 |
| python | 3.12.7 | 3.12.7 | 3.12.7 |
| python-dateutil | 2.9.0post0 | 2.9.0post0 | 2.9.0post0 |
| python-dotenv | 0.21.0 | 0.21.0 | |
| python-fastjsonschema | 2.16.2 | 2.16.2 | 2.16.2 |
| python-json-logger | 2.0.7 | 2.0.7 | |
| python-libarchive-c | 5.1 | 5.1 | 5.1 |
| python-lmdb | 1.4.1 | 1.4.1 | 1.4.1 |
| python-lsp-black | 2.0.0 | 2.0.0 | |
| python-lsp-jsonrpc | 1.1.2 | 1.1.2 | |
| python-lsp-server | 1.10.0 | 1.10.0 | |
| python-slugify | 5.0.2 | 5.0.2 | |
| python-tzdata | 2023.3 | 2023.3 | 2023.3 |
| pytoolconfig | 1.2.6 | 1.2.6 | |
| pytz | 2024.1 | 2024.1 | 2024.1 |
| pyviz\_comms | 3.0.2 | 3.0.2 | |
| pywavelets | 1.7.0 | 1.7.0 | 1.7.0 |
| pyxdg | 0.27 | 0.27 | |
| pyyaml | 6.0.1 | 6.0.1 | 6.0.1 |
| pyzmq | 25.1.2 | 25.1.2 | 25.1.2 |
| qdarkstyle | 3.2.3 | 3.2.3 | |
| qstylizer | 0.2.2 | 0.2.2 | |
| qt-main | 5.15.2 | 5.15.2 | |
| qt-webengine | 5.15.9 | 5.15.9 | |
| qtawesome | 1.3.1 | 1.3.1 | |
| qtconsole | 5.5.1 | 5.5.1 | |
| qtpy | 2.4.1 | 2.4.1 | |
| queuelib | 1.6.2 | 1.6.2 | |
| re2 | 2022.04.01 | 2022.04.01 | 2022.04.01 |
| readline | 8.2 | 8.2 | 8.2 |
| referencing | 0.30.2 | 0.30.2 | 0.30.2 |
| regex | 2024.9.11 | 2024.9.11 | 2024.9.11 |
| reproc | 14.2.4 | 14.2.4 | 14.2.4 |
| reproc-cpp | 14.2.4 | 14.2.4 | 14.2.4 |
| requests | 2.32.3 | 2.32.3 | 2.32.3 |
| requests-file | 1.5.1 | 1.5.1 | |
| requests-toolbelt | 1.0.0 | 1.0.0 | 1.0.0 |
| rfc3339-validator | 0.1.4 | 0.1.4 | |
| rfc3986-validator | 0.1.1 | 0.1.1 | |
| rich | 13.7.1 | 13.7.1 | |
| rope | 1.12.0 | 1.12.0 | |
| rpds-py | 0.10.6 | 0.10.6 | 0.10.6 |
| rtree | 1.0.1 | 1.0.1 | |
| ruamel.yaml | 0.18.6 | 0.18.6 | 0.18.6 |
| ruamel.yaml.clib | 0.2.8 | 0.2.8 | 0.2.8 |
| ruamel\_yaml | 0.17.21 | 0.17.21 | 0.17.21 |
| s2n | 1.3.27 | 1.3.27 | 1.3.27 |
| s3fs | 2024.6.1 | 2024.6.1 | 2024.6.1 |
| scikit-image | 0.24.0 | 0.24.0 | 0.24.0 |
| scikit-learn | 1.5.1 | 1.5.1 | 1.5.1 |
| scipy | 1.13.1 | 1.13.1 | 1.13.1 |
| scrapy | 2.11.1 | 2.11.1 | |
| seaborn | 0.13.2 | 0.13.2 | 0.13.2 |
| secretstorage | 3.3.1 | 3.3.1 | |
| semver | 3.0.2 | 3.0.2 | |
| send2trash | 1.8.2 | 1.8.2 | |
| service\_identity | 18.1.0 | 18.1.0 | |
| setuptools | 75.1.0 | 75.1.0 | 75.1.0 |
| sip | 6.7.12 | 6.7.12 | |
| six | 1.16.0 | 1.16.0 | 1.16.0 |
| smart\_open | 5.2.1 | 5.2.1 | |
| smmap | 4.0.0 | 4.0.0 | |
| snappy | 1.2.1 | 1.2.1 | 1.2.1 |
| sniffio | 1.3.0 | 1.3.0 | |
| snowballstemmer | 2.2.0 | 2.2.0 | 2.2.0 |
| sortedcontainers | 2.4.0 | 2.4.0 | 2.4.0 |
| soupsieve | 2.5 | 2.5 | 2.5 |
| sphinx | 7.3.7 | 7.3.7 | |
| sphinxcontrib-applehelp | 1.0.2 | 1.0.2 | |
| sphinxcontrib-devhelp | 1.0.2 | 1.0.2 | |
| sphinxcontrib-htmlhelp | 2.0.0 | 2.0.0 | |
| sphinxcontrib-jsmath | 1.0.1 | 1.0.1 | |
| sphinxcontrib-qthelp | 1.0.3 | 1.0.3 | |
| sphinxcontrib-serializinghtml | 1.1.10 | 1.1.10 | |
| spyder | 5.5.1 | 5.5.1 | |
| spyder-kernels | 2.5.0 | 2.5.0 | |
| sqlalchemy | 2.0.34 | 2.0.34 | 2.0.34 |
| sqlite | 3.45.3 | 3.45.3 | 3.45.3 |
| stack\_data | 0.2.0 | 0.2.0 | 0.2.0 |
| statsmodels | 0.14.2 | 0.14.2 | 0.14.2 |
| streamlit | 1.37.1 | 1.37.1 | |
| sympy | 1.13.2 | 1.13.2 | 1.13.2 |
| tabulate | 0.9.0 | 0.9.0 | 0.9.0 |
| tbb | 2021.8.0 | 2021.8.0 | |
| tblib | 1.7.0 | 1.7.0 | 1.7.0 |
| tenacity | 8.2.3 | 8.2.3 | 8.2.3 |
| terminado | 0.17.1 | 0.17.1 | |
| text-unidecode | 1.3 | 1.3 | |
| textdistance | 4.2.1 | 4.2.1 | |
| threadpoolctl | 3.5.0 | 3.5.0 | 3.5.0 |
| three-merge | 0.1.1 | 0.1.1 | |
| tifffile | 2023.4.12 | 2023.4.12 | 2023.4.12 |
| tinycss2 | 1.2.1 | 1.2.1 | 1.2.1 |
| tk | 8.6.14 | 8.6.14 | 8.6.14 |
| tldextract | 5.1.2 | 5.1.2 | |
| toml | 0.10.2 | 0.10.2 | |
| tomli | 2.0.1 | 2.0.1 | |
| tomlkit | 0.11.1 | 0.11.1 | 0.11.1 |
| toolz | 0.12.0 | 0.12.0 | 0.12.0 |
| tornado | 6.4.1 | 6.4.1 | 6.4.1 |
| tqdm | 4.66.5 | 4.66.5 | 4.66.5 |
| traitlets | 5.14.3 | 5.14.3 | 5.14.3 |
| truststore | 0.8.0 | 0.8.0 | 0.8.0 |
| twisted | 23.10.0 | 23.10.0 | |
| typing-extensions | 4.11.0 | 4.11.0 | 4.11.0 |
| typing\_extensions | 4.11.0 | 4.11.0 | 4.11.0 |
| tzdata | 2024b | 2024b | 2024b |
| uc-micro-py | 1.0.1 | 1.0.1 | |
| ujson | 5.10.0 | 5.10.0 | |
| unicodedata2 | 15.1.0 | 15.1.0 | 15.1.0 |
| unidecode | 1.3.8 | 1.3.8 | |
| unixodbc | 2.3.11 | 2.3.11 | 2.3.11 |
| urllib3 | 2.2.3 | 2.2.3 | 2.2.3 |
| utf8proc | 2.6.1 | 2.6.1 | 2.6.1 |
| w3lib | 1.21.0 | 2.1.2 | |
| watchdog | 4.0.1 | 4.0.1 | |
| wcwidth | 0.2.5 | 0.2.5 | 0.2.5 |
| webencodings | 0.5.1 | 0.5.1 | 0.5.1 |
| websocket-client | 1.8.0 | 1.8.0 | |
| werkzeug | 3.0.3 | 3.0.3 | 3.0.3 |
| whatthepatch | 1.0.2 | 1.0.2 | |
| wheel | 0.44.0 | 0.44.0 | 0.44.0 |
| widgetsnbextension | 3.6.6 | 3.6.6 | |
| wrapt | 1.14.1 | 1.14.1 | 1.14.1 |
| wurlitzer | 3.0.2 | 3.0.2 | |
| xarray | 2023.6.0 | 2023.6.0 | |
| xyzservices | 2022.9.0 | 2022.9.0 | 2022.9.0 |
| xz | 5.4.6 | 5.4.6 | 5.4.6 |
| yaml | 0.2.5 | 0.2.5 | 0.2.5 |
| yaml-cpp | 0.8.0 | 0.8.0 | 0.8.0 |
| yapf | 0.40.2 | 0.40.2 | |
| yarl | 1.11.0 | 1.11.0 | 1.11.0 |
| zeromq | 4.3.5 | 4.3.5 | 4.3.5 |
| zfp | 1.0.0 | ||
| zict | 3.0.0 | 3.0.0 | 3.0.0 |
| zipp | 3.17.0 | 3.17.0 | |
| zlib | 1.2.13 | 1.2.13 | 1.2.13 |
| zlib-ng | 2.0.7 | 2.0.7 | |
| zope | 1.0 | 1.0 | |
| zope.interface | 5.4.0 | 5.4.0 | |
| zstandard | 0.23.0 | 0.23.0 | 0.23.0 |
| zstd | 1.5.6 | 1.5.6 | 1.5.6 |
| Package Name | osx-arm64 | osx-64 |
|---|---|---|
| \_anaconda\_depends | 2024.10 | 2024.10 |
| aiobotocore | 2.12.3 | 2.12.3 |
| aiohappyeyeballs | 2.4.0 | 2.4.0 |
| aiohttp | 3.10.5 | 3.10.5 |
| aioitertools | 0.7.1 | 0.7.1 |
| aiosignal | 1.2.0 | 1.2.0 |
| alabaster | 0.7.16 | 0.7.16 |
| altair | 5.0.1 | 5.0.1 |
| anaconda-anon-usage | 0.4.4 | 0.4.4 |
| anaconda-catalogs | 0.2.0 | 0.2.0 |
| anaconda-client | 1.12.3 | 1.12.3 |
| anaconda-cloud-auth | 0.5.1 | 0.5.1 |
| anaconda-navigator | 2.6.3 | 2.6.3 |
| anaconda-project | 0.11.1 | 0.11.1 |
| annotated-types | 0.6.0 | 0.6.0 |
| anyio | 4.2.0 | 4.2.0 |
| aom | 3.6.0 | 3.6.0 |
| appdirs | 1.4.4 | 1.4.4 |
| applaunchservices | 0.3.0 | 0.3.0 |
| appnope | 0.1.3 | 0.1.3 |
| appscript | 1.2.5 | 1.2.5 |
| archspec | 0.2.3 | 0.2.3 |
| argon2-cffi | 21.3.0 | 21.3.0 |
| argon2-cffi-bindings | 21.2.0 | 21.2.0 |
| arrow | 1.2.3 | 1.2.3 |
| arrow-cpp | 16.1.0 | 16.1.0 |
| astroid | 2.14.2 | 2.14.2 |
| astropy | 6.1.3 | 6.1.3 |
| astropy-iers-data | 0.2024.9.2.0.33.23 | 0.2024.9.2.0.33.23 |
| asttokens | 2.0.5 | 2.0.5 |
| async-lru | 2.0.4 | 2.0.4 |
| atomicwrites | 1.4.0 | 1.4.0 |
| attrs | 23.1.0 | 23.1.0 |
| automat | 20.2.0 | 20.2.0 |
| autopep8 | 2.0.4 | 2.0.4 |
| aws-c-auth | 0.6.19 | 0.6.19 |
| aws-c-cal | 0.5.20 | 0.5.20 |
| aws-c-common | 0.8.5 | 0.8.5 |
| aws-c-compression | 0.2.16 | 0.2.16 |
| aws-c-event-stream | 0.2.15 | 0.2.15 |
| aws-c-http | 0.6.25 | 0.6.25 |
| aws-c-io | 0.13.10 | 0.13.10 |
| aws-c-mqtt | 0.7.13 | 0.7.13 |
| aws-c-s3 | 0.1.51 | 0.1.51 |
| aws-c-sdkutils | 0.1.6 | 0.1.6 |
| aws-checksums | 0.1.13 | 0.1.13 |
| aws-crt-cpp | 0.18.16 | 0.18.16 |
| aws-sdk-cpp | 1.10.55 | 1.10.55 |
| babel | 2.11.0 | 2.11.0 |
| bcrypt | 3.2.0 | 3.2.0 |
| beautifulsoup4 | 4.12.3 | 4.12.3 |
| binaryornot | 0.4.4 | 0.4.4 |
| black | 24.8.0 | 24.8.0 |
| blas | 1.0 | 1.0 |
| bleach | 4.1.0 | 4.1.0 |
| blinker | 1.6.2 | 1.6.2 |
| blosc | 1.21.3 | 1.21.3 |
| bokeh | 3.6.0 | 3.6.0 |
| boltons | 23.0.0 | 23.0.0 |
| boost-cpp | 1.82.0 | 1.82.0 |
| botocore | 1.34.69 | 1.34.69 |
| bottleneck | 1.3.7 | 1.3.7 |
| brotli | 1.0.9 | 1.0.9 |
| brotli-bin | 1.0.9 | 1.0.9 |
| brotli-python | 1.0.9 | 1.0.9 |
| brunsli | 0.1 | 0.1 |
| bzip2 | 1.0.8 | 1.0.8 |
| c-ares | 1.19.1 | 1.19.1 |
| c-blosc2 | 2.12.0 | 2.12.0 |
| ca-certificates | 2024.9.24 | 2024.9.24 |
| cachetools | 5.3.3 | 5.3.3 |
| cctools | 949.0.1 | 949.0.1 |
| cctools\_osx-64 | 949.0.1 | |
| cctools\_osx-arm64 | 949.0.1 | |
| certifi | 2024.8.30 | 2024.8.30 |
| cffi | 1.17.1 | 1.17.1 |
| cfitsio | 3.470 | 3.470 |
| chardet | 4.0.0 | 4.0.0 |
| charls | 2.2.0 | 2.2.0 |
| charset-normalizer | 3.3.2 | 3.3.2 |
| click | 8.1.7 | 8.1.7 |
| cloudpickle | 3.0.0 | 3.0.0 |
| colorama | 0.4.6 | 0.4.6 |
| colorcet | 3.1.0 | 3.1.0 |
| comm | 0.2.1 | 0.2.1 |
| conda | 24.9.2 | 24.9.2 |
| conda-build | 24.9.0 | 24.9.0 |
| conda-content-trust | 0.2.0 | 0.2.0 |
| conda-index | 0.5.0 | 0.5.0 |
| conda-libmamba-solver | 24.9.0 | 24.9.0 |
| conda-pack | 0.7.1 | 0.7.1 |
| conda-package-handling | 2.3.0 | 2.3.0 |
| conda-package-streaming | 0.10.0 | 0.10.0 |
| conda-repo-cli | 1.0.114 | 1.0.114 |
| conda-token | 0.5.0 | 0.5.0 |
| constantly | 23.10.4 | 23.10.4 |
| contourpy | 1.2.0 | 1.2.0 |
| cookiecutter | 2.6.0 | 2.6.0 |
| cryptography | 43.0.0 | 43.0.0 |
| cssselect | 1.2.0 | 1.2.0 |
| curl | 8.9.1 | 8.9.1 |
| cycler | 0.11.0 | 0.11.0 |
| cyrus-sasl | 2.1.28 | 2.1.28 |
| cytoolz | 0.12.2 | 0.12.2 |
| dask | 2024.8.2 | 2024.8.2 |
| dask-core | 2024.8.2 | 2024.8.2 |
| dask-expr | 1.1.13 | 1.1.13 |
| datashader | 0.16.3 | 0.16.3 |
| dav1d | 1.2.1 | 1.2.1 |
| debugpy | 1.6.7 | 1.6.7 |
| decorator | 5.1.1 | 5.1.1 |
| defusedxml | 0.7.1 | 0.7.1 |
| diff-match-patch | 20200713 | 20200713 |
| dill | 0.3.8 | 0.3.8 |
| distributed | 2024.8.2 | 2024.8.2 |
| distro | 1.9.0 | 1.9.0 |
| dmglib | 0.9.5 | 0.9.5 |
| docstring-to-markdown | 0.11 | 0.11 |
| docutils | 0.18.1 | 0.18.1 |
| et\_xmlfile | 1.1.0 | 1.1.0 |
| executing | 0.8.3 | 0.8.3 |
| expat | 2.6.3 | 2.6.3 |
| filelock | 3.13.1 | 3.13.1 |
| flake8 | 7.0.0 | 7.0.0 |
| flask | 3.0.3 | 3.0.3 |
| fmt | 9.1.0 | 9.1.0 |
| fonttools | 4.51.0 | 4.51.0 |
| freetype | 2.12.1 | 2.12.1 |
| frozendict | 2.4.2 | 2.4.2 |
| frozenlist | 1.4.0 | 1.4.0 |
| fsspec | 2024.6.1 | 2024.6.1 |
| gensim | 4.3.3 | 4.3.3 |
| gettext | 0.21.0 | 0.21.0 |
| gflags | 2.2.2 | 2.2.2 |
| giflib | 5.2.1 | 5.2.1 |
| gitdb | 4.0.7 | 4.0.7 |
| gitpython | 3.1.43 | 3.1.43 |
| glib | 2.78.4 | 2.78.4 |
| glib-tools | 2.78.4 | 2.78.4 |
| glog | 0.5.0 | 0.5.0 |
| greenlet | 3.0.1 | 3.0.1 |
| gst-plugins-base | 1.14.1 | 1.14.1 |
| gstreamer | 1.14.1 | 1.14.1 |
| h11 | 0.14.0 | 0.14.0 |
| h5py | 3.11.0 | 3.11.0 |
| hdf5 | 1.12.1 | 1.12.1 |
| heapdict | 1.0.1 | 1.0.1 |
| holoviews | 1.19.1 | 1.19.1 |
| httpcore | 1.0.2 | 1.0.2 |
| httpx | 0.27.0 | 0.27.0 |
| hvplot | 0.11.0 | 0.11.0 |
| hyperlink | 21.0.0 | 21.0.0 |
| icu | 73.1 | 73.1 |
| idna | 3.7 | 3.7 |
| imagecodecs | 2023.1.23 | 2023.1.23 |
| imageio | 2.33.1 | 2.33.1 |
| imagesize | 1.4.1 | 1.4.1 |
| imbalanced-learn | 0.12.3 | 0.12.3 |
| importlib-metadata | 7.0.1 | 7.0.1 |
| incremental | 22.10.0 | 22.10.0 |
| inflection | 0.5.1 | 0.5.1 |
| iniconfig | 1.1.1 | 1.1.1 |
| intake | 2.0.7 | 2.0.7 |
| intervaltree | 3.1.0 | 3.1.0 |
| ipykernel | 6.28.0 | 6.28.0 |
| ipython | 8.27.0 | 8.27.0 |
| ipython\_genutils | 0.2.0 | 0.2.0 |
| ipywidgets | 7.8.1 | 7.8.1 |
| isort | 5.13.2 | 5.13.2 |
| itemadapter | 0.3.0 | 0.3.0 |
| itemloaders | 1.1.0 | 1.1.0 |
| itsdangerous | 2.2.0 | 2.2.0 |
| jaraco.classes | 3.2.1 | 3.2.1 |
| jedi | 0.19.1 | 0.19.1 |
| jellyfish | 1.0.1 | 1.0.1 |
| jinja2 | 3.1.4 | 3.1.4 |
| jmespath | 1.0.1 | 1.0.1 |
| joblib | 1.4.2 | 1.4.2 |
| jpeg | 9e | 9e |
| jq | 1.6 | 1.6 |
| json5 | 0.9.6 | 0.9.6 |
| jsonpatch | 1.33 | 1.33 |
| jsonpointer | 2.1 | 2.1 |
| jsonschema | 4.23.0 | 4.23.0 |
| jsonschema-specifications | 2023.7.1 | 2023.7.1 |
| jupyter | 1.0.0 | 1.0.0 |
| jupyter-lsp | 2.2.0 | 2.2.0 |
| jupyter\_client | 8.6.0 | 8.6.0 |
| jupyter\_console | 6.6.3 | 6.6.3 |
| jupyter\_core | 5.7.2 | 5.7.2 |
| jupyter\_events | 0.10.0 | 0.10.0 |
| jupyter\_server | 2.14.1 | 2.14.1 |
| jupyter\_server\_terminals | 0.4.4 | 0.4.4 |
| jupyterlab | 4.2.5 | 4.2.5 |
| jupyterlab-variableinspector | 3.1.0 | 3.1.0 |
| jupyterlab\_pygments | 0.1.2 | 0.1.2 |
| jupyterlab\_server | 2.27.3 | 2.27.3 |
| jupyterlab\_widgets | 1.0.0 | 1.0.0 |
| jxrlib | 1.1 | 1.1 |
| keyring | 24.3.1 | 24.3.1 |
| kiwisolver | 1.4.4 | 1.4.4 |
| krb5 | 1.20.1 | 1.20.1 |
| lazy-object-proxy | 1.10.0 | 1.10.0 |
| lazy\_loader | 0.4 | 0.4 |
| lcms2 | 2.12 | 2.12 |
| ld64 | 530 | 530 |
| ld64\_osx-64 | 530 | |
| ld64\_osx-arm64 | 530 | |
| ldid | 2.1.5 | 2.1.5 |
| lerc | 3.0 | 3.0 |
| libabseil | 20240116.2 | 20240116.2 |
| libaec | 1.0.4 | 1.0.4 |
| libarchive | 3.7.4 | 3.7.4 |
| libavif | 0.11.1 | 0.11.1 |
| libboost | 1.82.0 | 1.82.0 |
| libbrotlicommon | 1.0.9 | 1.0.9 |
| libbrotlidec | 1.0.9 | 1.0.9 |
| libbrotlienc | 1.0.9 | 1.0.9 |
| libclang | 14.0.6 | 14.0.6 |
| libclang13 | 14.0.6 | 14.0.6 |
| libcurl | 8.9.1 | 8.9.1 |
| libcxx | 14.0.6 | 14.0.6 |
| libdeflate | 1.17 | 1.17 |
| libedit | 3.1.20230828 | 3.1.20230828 |
| libev | 4.33 | 4.33 |
| libevent | 2.1.12 | 2.1.12 |
| libffi | 3.4.4 | 3.4.4 |
| libgfortran | 5.0.0 | 5.0.0 |
| libgfortran5 | 11.3.0 | 11.3.0 |
| libglib | 2.78.4 | 2.78.4 |
| libgrpc | 1.62.2 | 1.62.2 |
| libiconv | 1.16 | 1.16 |
| liblief | 0.12.3 | 0.12.3 |
| libllvm14 | 14.0.6 | 14.0.6 |
| libmamba | 1.5.8 | 1.5.8 |
| libmambapy | 1.5.8 | 1.5.8 |
| libnghttp2 | 1.57.0 | 1.57.0 |
| libopenblas | 0.3.21 | 0.3.21 |
| libpng | 1.6.39 | 1.6.39 |
| libpq | 12.17 | 12.17 |
| libprotobuf | 4.25.3 | 4.25.3 |
| libsodium | 1.0.18 | 1.0.18 |
| libsolv | 0.7.24 | 0.7.24 |
| libspatialindex | 1.9.3 | 1.9.3 |
| libssh2 | 1.11.0 | 1.11.0 |
| libthrift | 0.15.0 | 0.15.0 |
| libtiff | 4.5.1 | 4.5.1 |
| libwebp-base | 1.3.2 | 1.3.2 |
| libxml2 | 2.13.1 | 2.13.1 |
| libxslt | 1.1.41 | 1.1.41 |
| libzopfli | 1.0.3 | 1.0.3 |
| linkify-it-py | 2.0.0 | 2.0.0 |
| llvm-openmp | 14.0.6 | 14.0.6 |
| llvmlite | 0.43.0 | 0.43.0 |
| locket | 1.0.0 | 1.0.0 |
| lxml | 5.2.1 | 5.2.1 |
| lz4 | 4.3.2 | 4.3.2 |
| lz4-c | 1.9.4 | 1.9.4 |
| lzo | 2.10 | 2.10 |
| markdown | 3.4.1 | 3.4.1 |
| markdown-it-py | 2.2.0 | 2.2.0 |
| markupsafe | 2.1.3 | 2.1.3 |
| matplotlib | 3.9.2 | 3.9.2 |
| matplotlib-base | 3.9.2 | 3.9.2 |
| matplotlib-inline | 0.1.6 | 0.1.6 |
| mccabe | 0.7.0 | 0.7.0 |
| mdit-py-plugins | 0.3.0 | 0.3.0 |
| mdurl | 0.1.0 | 0.1.0 |
| menuinst | 2.1.2 | 2.1.2 |
| mistune | 2.0.4 | 2.0.4 |
| more-itertools | 10.3.0 | 10.3.0 |
| mpmath | 1.3.0 | 1.3.0 |
| msgpack-python | 1.0.3 | 1.0.3 |
| multidict | 6.0.4 | 6.0.4 |
| multipledispatch | 0.6.0 | 0.6.0 |
| mypy | 1.11.2 | 1.11.2 |
| mypy\_extensions | 1.0.0 | 1.0.0 |
| mysql | 5.7.24 | 5.7.24 |
| navigator-updater | 0.5.1 | 0.5.1 |
| nbclient | 0.8.0 | 0.8.0 |
| nbconvert | 7.16.4 | 7.16.4 |
| nbformat | 5.10.4 | 5.10.4 |
| ncurses | 6.4 | 6.4 |
| nest-asyncio | 1.6.0 | 1.6.0 |
| networkx | 3.3 | 3.3 |
| nltk | 3.9.1 | 3.9.1 |
| notebook | 7.2.2 | 7.2.2 |
| notebook-shim | 0.2.3 | 0.2.3 |
| numba | 0.60.0 | 0.60.0 |
| numexpr | 2.8.7 | 2.8.7 |
| numpy | 1.26.4 | 1.26.4 |
| numpy-base | 1.26.4 | 1.26.4 |
| numpydoc | 1.7.0 | 1.7.0 |
| oniguruma | 6.9.7.1 | 6.9.7.1 |
| openjpeg | 2.5.2 | 2.5.2 |
| openpyxl | 3.1.5 | 3.1.5 |
| openssl | 3.0.15 | 3.0.15 |
| orc | 2.0.1 | 2.0.1 |
| overrides | 7.4.0 | 7.4.0 |
| packaging | 24.1 | 24.1 |
| pandas | 2.2.2 | 2.2.2 |
| pandocfilters | 1.5.0 | 1.5.0 |
| panel | 1.5.2 | 1.5.2 |
| param | 2.1.1 | 2.1.1 |
| parsel | 1.8.1 | 1.8.1 |
| parso | 0.8.3 | 0.8.3 |
| partd | 1.4.1 | 1.4.1 |
| patch | 2.7.6 | 2.7.6 |
| pathspec | 0.10.3 | 0.10.3 |
| patsy | 0.5.6 | 0.5.6 |
| pcre2 | 10.42 | 10.42 |
| pexpect | 4.8.0 | 4.8.0 |
| pickleshare | 0.7.5 | 0.7.5 |
| pillow | 10.4.0 | 10.4.0 |
| pip | 24.2 | 24.2 |
| pkce | 1.0.3 | 1.0.3 |
| pkginfo | 1.10.0 | 1.10.0 |
| platformdirs | 3.10.0 | 3.10.0 |
| plotly | 5.24.1 | 5.24.1 |
| pluggy | 1.0.0 | 1.0.0 |
| ply | 3.11 | 3.11 |
| prometheus\_client | 0.14.1 | 0.14.1 |
| prompt-toolkit | 3.0.43 | 3.0.43 |
| prompt\_toolkit | 3.0.43 | 3.0.43 |
| protego | 0.1.16 | 0.1.16 |
| protobuf | 4.25.3 | 4.25.3 |
| psutil | 5.9.0 | 5.9.0 |
| ptyprocess | 0.7.0 | 0.7.0 |
| pure\_eval | 0.2.2 | 0.2.2 |
| py-cpuinfo | 9.0.0 | 9.0.0 |
| py-lief | 0.12.3 | 0.12.3 |
| pyarrow | 16.1.0 | 16.1.0 |
| pyasn1 | 0.4.8 | 0.4.8 |
| pyasn1-modules | 0.2.8 | 0.2.8 |
| pybind11-abi | 5 | 5 |
| pycodestyle | 2.11.1 | 2.11.1 |
| pycosat | 0.6.6 | 0.6.6 |
| pycparser | 2.21 | 2.21 |
| pyct | 0.5.0 | 0.5.0 |
| pycurl | 7.45.3 | 7.45.3 |
| pydantic | 2.8.2 | 2.8.2 |
| pydantic-core | 2.20.1 | 2.20.1 |
| pydeck | 0.8.0 | 0.8.0 |
| pydispatcher | 2.0.5 | 2.0.5 |
| pydocstyle | 6.3.0 | 6.3.0 |
| pyerfa | 2.0.1.4 | 2.0.1.4 |
| pyflakes | 3.2.0 | 3.2.0 |
| pygments | 2.15.1 | 2.15.1 |
| pyjwt | 2.8.0 | 2.8.0 |
| pylint | 2.16.2 | 2.16.2 |
| pylint-venv | 3.0.3 | 3.0.3 |
| pyls-spyder | 0.4.0 | 0.4.0 |
| pyobjc-core | 10.1 | 10.1 |
| pyobjc-framework-cocoa | 10.1 | 10.1 |
| pyobjc-framework-coreservices | 10.1 | 10.1 |
| pyobjc-framework-fsevents | 10.1 | 10.1 |
| pyodbc | 5.1.0 | 5.1.0 |
| pyopenssl | 24.2.1 | 24.2.1 |
| pyparsing | 3.1.2 | 3.1.2 |
| pyqt | 5.15.10 | 5.15.10 |
| pyqt5-sip | 12.13.0 | 12.13.0 |
| pyqtwebengine | 5.15.10 | 5.15.10 |
| pysocks | 1.7.1 | 1.7.1 |
| pytables | 3.10.1 | 3.10.1 |
| pytest | 7.4.4 | 7.4.4 |
| python | 3.12.7 | 3.12.7 |
| python-dateutil | 2.9.0post0 | 2.9.0post0 |
| python-dotenv | 0.21.0 | 0.21.0 |
| python-fastjsonschema | 2.16.2 | 2.16.2 |
| python-json-logger | 2.0.7 | 2.0.7 |
| python-libarchive-c | 5.1 | 5.1 |
| python-lmdb | 1.4.1 | 1.4.1 |
| python-lsp-black | 2.0.0 | 2.0.0 |
| python-lsp-jsonrpc | 1.1.2 | 1.1.2 |
| python-lsp-server | 1.10.0 | 1.10.0 |
| python-slugify | 5.0.2 | 5.0.2 |
| python-tzdata | 2023.3 | 2023.3 |
| python.app | 3 | 3 |
| pytoolconfig | 1.2.6 | 1.2.6 |
| pytz | 2024.1 | 2024.1 |
| pyviz\_comms | 3.0.2 | 3.0.2 |
| pywavelets | 1.7.0 | 1.7.0 |
| pyyaml | 6.0.1 | 6.0.1 |
| pyzmq | 25.1.2 | 25.1.2 |
| qdarkstyle | 3.2.3 | 3.2.3 |
| qstylizer | 0.2.2 | 0.2.2 |
| qt-main | 5.15.2 | 5.15.2 |
| qt-webengine | 5.15.9 | 5.15.9 |
| qtawesome | 1.3.1 | 1.3.1 |
| qtconsole | 5.5.1 | 5.5.1 |
| qtpy | 2.4.1 | 2.4.1 |
| queuelib | 1.6.2 | 1.6.2 |
| re2 | 2022.04.01 | 2022.04.01 |
| readline | 8.2 | 8.2 |
| referencing | 0.30.2 | 0.30.2 |
| regex | 2024.9.11 | 2024.9.11 |
| reproc | 14.2.4 | 14.2.4 |
| reproc-cpp | 14.2.4 | 14.2.4 |
| requests | 2.32.3 | 2.32.3 |
| requests-file | 1.5.1 | 1.5.1 |
| requests-toolbelt | 1.0.0 | 1.0.0 |
| rfc3339-validator | 0.1.4 | 0.1.4 |
| rfc3986-validator | 0.1.1 | 0.1.1 |
| rich | 13.7.1 | 13.7.1 |
| rope | 1.12.0 | 1.12.0 |
| rpds-py | 0.10.6 | 0.10.6 |
| rtree | 1.0.1 | 1.0.1 |
| ruamel.yaml | 0.18.6 | 0.18.6 |
| ruamel.yaml.clib | 0.2.8 | 0.2.8 |
| ruamel\_yaml | 0.17.21 | 0.17.21 |
| s3fs | 2024.6.1 | 2024.6.1 |
| scikit-image | 0.24.0 | 0.24.0 |
| scikit-learn | 1.5.1 | 1.5.1 |
| scipy | 1.13.1 | 1.13.1 |
| scrapy | 2.11.1 | 2.11.1 |
| seaborn | 0.13.2 | 0.13.2 |
| semver | 3.0.2 | 3.0.2 |
| send2trash | 1.8.2 | 1.8.2 |
| service\_identity | 18.1.0 | 18.1.0 |
| setuptools | 75.1.0 | 75.1.0 |
| sip | 6.7.12 | 6.7.12 |
| six | 1.16.0 | 1.16.0 |
| smart\_open | 5.2.1 | 5.2.1 |
| smmap | 4.0.0 | 4.0.0 |
| snappy | 1.2.1 | 1.2.1 |
| sniffio | 1.3.0 | 1.3.0 |
| snowballstemmer | 2.2.0 | 2.2.0 |
| sortedcontainers | 2.4.0 | 2.4.0 |
| soupsieve | 2.5 | 2.5 |
| sphinx | 7.3.7 | 7.3.7 |
| sphinxcontrib-applehelp | 1.0.2 | 1.0.2 |
| sphinxcontrib-devhelp | 1.0.2 | 1.0.2 |
| sphinxcontrib-htmlhelp | 2.0.0 | 2.0.0 |
| sphinxcontrib-jsmath | 1.0.1 | 1.0.1 |
| sphinxcontrib-qthelp | 1.0.3 | 1.0.3 |
| sphinxcontrib-serializinghtml | 1.1.10 | 1.1.10 |
| spyder | 5.5.1 | 5.5.1 |
| spyder-kernels | 2.5.0 | 2.5.0 |
| sqlalchemy | 2.0.34 | 2.0.34 |
| sqlite | 3.45.3 | 3.45.3 |
| stack\_data | 0.2.0 | 0.2.0 |
| statsmodels | 0.14.2 | 0.14.2 |
| streamlit | 1.37.1 | 1.37.1 |
| sympy | 1.13.2 | 1.13.2 |
| tabulate | 0.9.0 | 0.9.0 |
| tapi | 1100.0.11 | 1000.10.8 |
| tbb | 2021.8.0 | 2021.8.0 |
| tblib | 1.7.0 | 1.7.0 |
| tenacity | 8.2.3 | 8.2.3 |
| terminado | 0.17.1 | 0.17.1 |
| text-unidecode | 1.3 | 1.3 |
| textdistance | 4.2.1 | 4.2.1 |
| threadpoolctl | 3.5.0 | 3.5.0 |
| three-merge | 0.1.1 | 0.1.1 |
| tifffile | 2023.4.12 | 2023.4.12 |
| tinycss2 | 1.2.1 | 1.2.1 |
| tk | 8.6.14 | 8.6.14 |
| tldextract | 5.1.2 | 5.1.2 |
| toml | 0.10.2 | 0.10.2 |
| tomli | 2.0.1 | 2.0.1 |
| tomlkit | 0.11.1 | 0.11.1 |
| toolz | 0.12.0 | 0.12.0 |
| tornado | 6.4.1 | 6.4.1 |
| tqdm | 4.66.5 | 4.66.5 |
| traitlets | 5.14.3 | 5.14.3 |
| truststore | 0.8.0 | 0.8.0 |
| twisted | 23.10.0 | 23.10.0 |
| typing-extensions | 4.11.0 | 4.11.0 |
| typing\_extensions | 4.11.0 | 4.11.0 |
| tzdata | 2024b | 2024b |
| uc-micro-py | 1.0.1 | 1.0.1 |
| ujson | 5.10.0 | 5.10.0 |
| unicodedata2 | 15.1.0 | 15.1.0 |
| unidecode | 1.3.8 | 1.3.8 |
| unixodbc | 2.3.11 | 2.3.11 |
| urllib3 | 2.2.3 | 2.2.3 |
| utf8proc | 2.6.1 | 2.6.1 |
| w3lib | 2.1.2 | 2.1.2 |
| watchdog | 4.0.1 | 4.0.1 |
| wcwidth | 0.2.5 | 0.2.5 |
| webencodings | 0.5.1 | 0.5.1 |
| websocket-client | 1.8.0 | 1.8.0 |
| werkzeug | 3.0.3 | 3.0.3 |
| whatthepatch | 1.0.2 | 1.0.2 |
| wheel | 0.44.0 | 0.44.0 |
| widgetsnbextension | 3.6.6 | 3.6.6 |
| wrapt | 1.14.1 | 1.14.1 |
| wurlitzer | 3.0.2 | 3.0.2 |
| xarray | 2023.6.0 | 2023.6.0 |
| xlwings | 0.32.1 | 0.32.1 |
| xyzservices | 2022.9.0 | 2022.9.0 |
| xz | 5.4.6 | 5.4.6 |
| yaml | 0.2.5 | 0.2.5 |
| yaml-cpp | 0.8.0 | 0.8.0 |
| yapf | 0.40.2 | 0.40.2 |
| yarl | 1.11.0 | 1.11.0 |
| zeromq | 4.3.5 | 4.3.5 |
| zfp | 1.0.0 | 1.0.0 |
| zict | 3.0.0 | 3.0.0 |
| zipp | 3.17.0 | 3.17.0 |
| zlib | 1.2.13 | 1.2.13 |
| zlib-ng | 2.0.7 | 2.0.7 |
| zope | 1.0 | 1.0 |
| zope.interface | 5.4.0 | 5.4.0 |
| zstandard | 0.23.0 | 0.23.0 |
| zstd | 1.5.6 | 1.5.6 |
| Package Name | win-64 |
|---|---|
| \_anaconda\_depends | 2024.10 |
| aiobotocore | 2.12.3 |
| aiohappyeyeballs | 2.4.0 |
| aiohttp | 3.10.5 |
| aioitertools | 0.7.1 |
| aiosignal | 1.2.0 |
| alabaster | 0.7.16 |
| altair | 5.0.1 |
| anaconda-anon-usage | 0.4.4 |
| anaconda-catalogs | 0.2.0 |
| anaconda-client | 1.12.3 |
| anaconda-cloud-auth | 0.5.1 |
| anaconda-navigator | 2.6.3 |
| anaconda-project | 0.11.1 |
| anaconda\_powershell\_prompt | 1.1.0 |
| anaconda\_prompt | 1.1.0 |
| annotated-types | 0.6.0 |
| anyio | 4.2.0 |
| aom | 3.6.0 |
| appdirs | 1.4.4 |
| archspec | 0.2.3 |
| argon2-cffi | 21.3.0 |
| argon2-cffi-bindings | 21.2.0 |
| arrow | 1.2.3 |
| arrow-cpp | 16.1.0 |
| astroid | 2.14.2 |
| astropy | 6.1.3 |
| astropy-iers-data | 0.2024.9.2.0.33.23 |
| asttokens | 2.0.5 |
| async-lru | 2.0.4 |
| atomicwrites | 1.4.0 |
| attrs | 23.1.0 |
| automat | 20.2.0 |
| autopep8 | 2.0.4 |
| aws-c-auth | 0.6.19 |
| aws-c-cal | 0.5.20 |
| aws-c-common | 0.8.5 |
| aws-c-compression | 0.2.16 |
| aws-c-event-stream | 0.2.15 |
| aws-c-http | 0.6.25 |
| aws-c-io | 0.13.10 |
| aws-c-mqtt | 0.7.13 |
| aws-c-s3 | 0.1.51 |
| aws-c-sdkutils | 0.1.6 |
| aws-checksums | 0.1.13 |
| aws-crt-cpp | 0.18.16 |
| aws-sdk-cpp | 1.10.55 |
| babel | 2.11.0 |
| bcrypt | 3.2.0 |
| beautifulsoup4 | 4.12.3 |
| binaryornot | 0.4.4 |
| black | 24.8.0 |
| blas | 1.0 |
| bleach | 4.1.0 |
| blinker | 1.6.2 |
| blosc | 1.21.3 |
| bokeh | 3.6.0 |
| boltons | 23.0.0 |
| boost-cpp | 1.82.0 |
| botocore | 1.34.69 |
| bottleneck | 1.3.7 |
| brotli | 1.0.9 |
| brotli-bin | 1.0.9 |
| brotli-python | 1.0.9 |
| bzip2 | 1.0.8 |
| c-ares | 1.19.1 |
| c-blosc2 | 2.12.0 |
| ca-certificates | 2024.9.24 |
| cachetools | 5.3.3 |
| certifi | 2024.8.30 |
| cffi | 1.17.1 |
| cfitsio | 3.470 |
| chardet | 4.0.0 |
| charls | 2.2.0 |
| charset-normalizer | 3.3.2 |
| click | 8.1.7 |
| cloudpickle | 3.0.0 |
| colorama | 0.4.6 |
| colorcet | 3.1.0 |
| comm | 0.2.1 |
| conda | 24.9.2 |
| conda-build | 24.9.0 |
| conda-content-trust | 0.2.0 |
| conda-index | 0.5.0 |
| conda-libmamba-solver | 24.9.0 |
| conda-pack | 0.7.1 |
| conda-package-handling | 2.3.0 |
| conda-package-streaming | 0.10.0 |
| conda-repo-cli | 1.0.114 |
| conda-token | 0.5.0 |
| constantly | 23.10.4 |
| contourpy | 1.2.0 |
| cookiecutter | 2.6.0 |
| cryptography | 43.0.0 |
| cssselect | 1.2.0 |
| curl | 8.9.1 |
| cycler | 0.11.0 |
| cytoolz | 0.12.2 |
| dask | 2024.8.2 |
| dask-core | 2024.8.2 |
| dask-expr | 1.1.13 |
| datashader | 0.16.3 |
| dav1d | 1.2.1 |
| debugpy | 1.6.7 |
| decorator | 5.1.1 |
| defusedxml | 0.7.1 |
| diff-match-patch | 20200713 |
| dill | 0.3.8 |
| distributed | 2024.8.2 |
| distro | 1.9.0 |
| docstring-to-markdown | 0.11 |
| docutils | 0.18.1 |
| et\_xmlfile | 1.1.0 |
| executing | 0.8.3 |
| expat | 2.6.3 |
| filelock | 3.13.1 |
| flake8 | 7.0.0 |
| flask | 3.0.3 |
| fmt | 9.1.0 |
| fonttools | 4.51.0 |
| freetype | 2.12.1 |
| frozendict | 2.4.2 |
| frozenlist | 1.4.0 |
| fsspec | 2024.6.1 |
| gensim | 4.3.3 |
| gflags | 2.2.2 |
| giflib | 5.2.1 |
| gitdb | 4.0.7 |
| gitpython | 3.1.43 |
| glog | 0.5.0 |
| greenlet | 3.0.1 |
| h11 | 0.14.0 |
| h5py | 3.11.0 |
| hdf5 | 1.12.1 |
| heapdict | 1.0.1 |
| holoviews | 1.19.1 |
| httpcore | 1.0.2 |
| httpx | 0.27.0 |
| hvplot | 0.11.0 |
| hyperlink | 21.0.0 |
| icc\_rt | 2022.1.0 |
| icu | 73.1 |
| idna | 3.7 |
| imagecodecs | 2023.1.23 |
| imageio | 2.33.1 |
| imagesize | 1.4.1 |
| imbalanced-learn | 0.12.3 |
| importlib-metadata | 7.0.1 |
| incremental | 22.10.0 |
| inflection | 0.5.1 |
| iniconfig | 1.1.1 |
| intake | 2.0.7 |
| intel-openmp | 2023.1.0 |
| intervaltree | 3.1.0 |
| ipykernel | 6.28.0 |
| ipython | 8.27.0 |
| ipython\_genutils | 0.2.0 |
| ipywidgets | 7.8.1 |
| isort | 5.13.2 |
| itemadapter | 0.3.0 |
| itemloaders | 1.1.0 |
| itsdangerous | 2.2.0 |
| jaraco.classes | 3.2.1 |
| jedi | 0.19.1 |
| jellyfish | 1.0.1 |
| jinja2 | 3.1.4 |
| jmespath | 1.0.1 |
| joblib | 1.4.2 |
| jpeg | 9e |
| jq | 1.6 |
| json5 | 0.9.6 |
| jsonpatch | 1.33 |
| jsonpointer | 2.1 |
| jsonschema | 4.23.0 |
| jsonschema-specifications | 2023.7.1 |
| jupyter | 1.0.0 |
| jupyter-lsp | 2.2.0 |
| jupyter\_client | 8.6.0 |
| jupyter\_console | 6.6.3 |
| jupyter\_core | 5.7.2 |
| jupyter\_events | 0.10.0 |
| jupyter\_server | 2.14.1 |
| jupyter\_server\_terminals | 0.4.4 |
| jupyterlab | 4.2.5 |
| jupyterlab-variableinspector | 3.1.0 |
| jupyterlab\_pygments | 0.1.2 |
| jupyterlab\_server | 2.27.3 |
| jupyterlab\_widgets | 1.0.0 |
| keyring | 24.3.1 |
| kiwisolver | 1.4.4 |
| krb5 | 1.20.1 |
| lazy-object-proxy | 1.10.0 |
| lazy\_loader | 0.4 |
| lcms2 | 2.12 |
| lerc | 3.0 |
| libabseil | 20240116.2 |
| libaec | 1.0.4 |
| libarchive | 3.7.4 |
| libavif | 0.11.1 |
| libboost | 1.82.0 |
| libbrotlicommon | 1.0.9 |
| libbrotlidec | 1.0.9 |
| libbrotlienc | 1.0.9 |
| libclang | 14.0.6 |
| libclang13 | 14.0.6 |
| libcurl | 8.9.1 |
| libdeflate | 1.17 |
| libevent | 2.1.12 |
| libffi | 3.4.4 |
| libgrpc | 1.62.2 |
| libiconv | 1.16 |
| liblief | 0.12.3 |
| libmamba | 1.5.8 |
| libmambapy | 1.5.8 |
| libpng | 1.6.39 |
| libpq | 12.17 |
| libprotobuf | 4.25.3 |
| libsodium | 1.0.18 |
| libsolv | 0.7.24 |
| libspatialindex | 1.9.3 |
| libssh2 | 1.11.0 |
| libthrift | 0.15.0 |
| libtiff | 4.5.1 |
| libwebp-base | 1.3.2 |
| libxml2 | 2.13.1 |
| libxslt | 1.1.41 |
| libzopfli | 1.0.3 |
| linkify-it-py | 2.0.0 |
| llvmlite | 0.43.0 |
| locket | 1.0.0 |
| lxml | 5.2.1 |
| lz4 | 4.3.2 |
| lz4-c | 1.9.4 |
| lzo | 2.10 |
| m2-msys2-runtime | 2.5.0.17080.65c939c |
| m2-patch | 2.7.5 |
| m2w64-libwinpthread-git | 5.0.0.4634.697f757 |
| markdown | 3.4.1 |
| markdown-it-py | 2.2.0 |
| markupsafe | 2.1.3 |
| matplotlib | 3.9.2 |
| matplotlib-base | 3.9.2 |
| matplotlib-inline | 0.1.6 |
| mccabe | 0.7.0 |
| mdit-py-plugins | 0.3.0 |
| mdurl | 0.1.0 |
| menuinst | 2.1.2 |
| mistune | 2.0.4 |
| mkl | 2023.1.0 |
| mkl-service | 2.4.0 |
| mkl\_fft | 1.3.10 |
| mkl\_random | 1.2.7 |
| more-itertools | 10.3.0 |
| mpmath | 1.3.0 |
| msgpack-python | 1.0.3 |
| msys2-conda-epoch | 20160418 |
| multidict | 6.0.4 |
| multipledispatch | 0.6.0 |
| mypy | 1.11.2 |
| mypy\_extensions | 1.0.0 |
| navigator-updater | 0.5.1 |
| nbclient | 0.8.0 |
| nbconvert | 7.16.4 |
| nbformat | 5.10.4 |
| nest-asyncio | 1.6.0 |
| networkx | 3.3 |
| nltk | 3.9.1 |
| notebook | 7.2.2 |
| notebook-shim | 0.2.3 |
| numba | 0.60.0 |
| numexpr | 2.8.7 |
| numpy | 1.26.4 |
| numpy-base | 1.26.4 |
| numpydoc | 1.7.0 |
| openjpeg | 2.5.2 |
| openpyxl | 3.1.5 |
| openssl | 3.0.15 |
| orc | 2.0.1 |
| overrides | 7.4.0 |
| packaging | 24.1 |
| pandas | 2.2.2 |
| pandocfilters | 1.5.0 |
| panel | 1.5.2 |
| param | 2.1.1 |
| paramiko | 2.8.1 |
| parsel | 1.8.1 |
| parso | 0.8.3 |
| partd | 1.4.1 |
| pathspec | 0.10.3 |
| patsy | 0.5.6 |
| pcre2 | 10.42 |
| pexpect | 4.8.0 |
| pickleshare | 0.7.5 |
| pillow | 10.4.0 |
| pip | 24.2 |
| pkce | 1.0.3 |
| pkginfo | 1.10.0 |
| platformdirs | 3.10.0 |
| plotly | 5.24.1 |
| pluggy | 1.0.0 |
| ply | 3.11 |
| prometheus\_client | 0.14.1 |
| prompt-toolkit | 3.0.43 |
| prompt\_toolkit | 3.0.43 |
| protego | 0.1.16 |
| protobuf | 4.25.3 |
| psutil | 5.9.0 |
| ptyprocess | 0.7.0 |
| pure\_eval | 0.2.2 |
| py-cpuinfo | 9.0.0 |
| py-lief | 0.12.3 |
| pyarrow | 16.1.0 |
| pyasn1 | 0.4.8 |
| pyasn1-modules | 0.2.8 |
| pybind11-abi | 5 |
| pycodestyle | 2.11.1 |
| pycosat | 0.6.6 |
| pycparser | 2.21 |
| pyct | 0.5.0 |
| pycurl | 7.45.3 |
| pydantic | 2.8.2 |
| pydantic-core | 2.20.1 |
| pydeck | 0.8.0 |
| pydispatcher | 2.0.5 |
| pydocstyle | 6.3.0 |
| pyerfa | 2.0.1.4 |
| pyflakes | 3.2.0 |
| pygments | 2.15.1 |
| pyjwt | 2.8.0 |
| pylint | 2.16.2 |
| pylint-venv | 3.0.3 |
| pyls-spyder | 0.4.0 |
| pynacl | 1.5.0 |
| pyodbc | 5.1.0 |
| pyopenssl | 24.2.1 |
| pyparsing | 3.1.2 |
| pyqt | 5.15.10 |
| pyqt5-sip | 12.13.0 |
| pyqtwebengine | 5.15.10 |
| pysocks | 1.7.1 |
| pytables | 3.10.1 |
| pytest | 7.4.4 |
| python | 3.12.7 |
| python-dateutil | 2.9.0post0 |
| python-dotenv | 0.21.0 |
| python-fastjsonschema | 2.16.2 |
| python-json-logger | 2.0.7 |
| python-libarchive-c | 5.1 |
| python-lmdb | 1.4.1 |
| python-lsp-black | 2.0.0 |
| python-lsp-jsonrpc | 1.1.2 |
| python-lsp-server | 1.10.0 |
| python-slugify | 5.0.2 |
| python-tzdata | 2023.3 |
| pytoolconfig | 1.2.6 |
| pytz | 2024.1 |
| pyviz\_comms | 3.0.2 |
| pywavelets | 1.7.0 |
| pywin32 | 305 |
| pywin32-ctypes | 0.2.2 |
| pywinpty | 2.0.10 |
| pyyaml | 6.0.1 |
| pyzmq | 25.1.2 |
| qdarkstyle | 3.2.3 |
| qstylizer | 0.2.2 |
| qt-main | 5.15.2 |
| qt-webengine | 5.15.9 |
| qtawesome | 1.3.1 |
| qtconsole | 5.5.1 |
| qtpy | 2.4.1 |
| queuelib | 1.6.2 |
| re2 | 2022.04.01 |
| referencing | 0.30.2 |
| regex | 2024.9.11 |
| reproc | 14.2.4 |
| reproc-cpp | 14.2.4 |
| requests | 2.32.3 |
| requests-file | 1.5.1 |
| requests-toolbelt | 1.0.0 |
| rfc3339-validator | 0.1.4 |
| rfc3986-validator | 0.1.1 |
| rich | 13.7.1 |
| rope | 1.12.0 |
| rpds-py | 0.10.6 |
| rtree | 1.0.1 |
| ruamel.yaml | 0.18.6 |
| ruamel.yaml.clib | 0.2.8 |
| ruamel\_yaml | 0.17.21 |
| s3fs | 2024.6.1 |
| scikit-image | 0.24.0 |
| scikit-learn | 1.5.1 |
| scipy | 1.13.1 |
| scrapy | 2.11.1 |
| seaborn | 0.13.2 |
| semver | 3.0.2 |
| send2trash | 1.8.2 |
| service\_identity | 18.1.0 |
| setuptools | 75.1.0 |
| sip | 6.7.12 |
| six | 1.16.0 |
| smart\_open | 5.2.1 |
| smmap | 4.0.0 |
| snappy | 1.2.1 |
| sniffio | 1.3.0 |
| snowballstemmer | 2.2.0 |
| sortedcontainers | 2.4.0 |
| soupsieve | 2.5 |
| sphinx | 7.3.7 |
| sphinxcontrib-applehelp | 1.0.2 |
| sphinxcontrib-devhelp | 1.0.2 |
| sphinxcontrib-htmlhelp | 2.0.0 |
| sphinxcontrib-jsmath | 1.0.1 |
| sphinxcontrib-qthelp | 1.0.3 |
| sphinxcontrib-serializinghtml | 1.1.10 |
| spyder | 5.5.1 |
| spyder-kernels | 2.5.0 |
| sqlalchemy | 2.0.34 |
| sqlite | 3.45.3 |
| stack\_data | 0.2.0 |
| statsmodels | 0.14.2 |
| streamlit | 1.37.1 |
| sympy | 1.13.2 |
| tabulate | 0.9.0 |
| tbb | 2021.8.0 |
| tblib | 1.7.0 |
| tenacity | 8.2.3 |
| terminado | 0.17.1 |
| text-unidecode | 1.3 |
| textdistance | 4.2.1 |
| threadpoolctl | 3.5.0 |
| three-merge | 0.1.1 |
| tifffile | 2023.4.12 |
| tinycss2 | 1.2.1 |
| tk | 8.6.14 |
| tldextract | 5.1.2 |
| toml | 0.10.2 |
| tomli | 2.0.1 |
| tomlkit | 0.11.1 |
| toolz | 0.12.0 |
| tornado | 6.4.1 |
| tqdm | 4.66.5 |
| traitlets | 5.14.3 |
| truststore | 0.8.0 |
| twisted | 23.10.0 |
| twisted-iocpsupport | 1.0.2 |
| typing-extensions | 4.11.0 |
| typing\_extensions | 4.11.0 |
| tzdata | 2024b |
| uc-micro-py | 1.0.1 |
| ujson | 5.10.0 |
| unicodedata2 | 15.1.0 |
| unidecode | 1.3.8 |
| urllib3 | 2.2.3 |
| utf8proc | 2.6.1 |
| vc | 14.40 |
| vs2015\_runtime | 14.40.33807 |
| w3lib | 2.1.2 |
| watchdog | 4.0.1 |
| wcwidth | 0.2.5 |
| webencodings | 0.5.1 |
| websocket-client | 1.8.0 |
| werkzeug | 3.0.3 |
| whatthepatch | 1.0.2 |
| wheel | 0.44.0 |
| widgetsnbextension | 3.6.6 |
| win\_inet\_pton | 1.1.0 |
| winpty | 0.4.3 |
| wrapt | 1.14.1 |
| xarray | 2023.6.0 |
| xlwings | 0.32.1 |
| xyzservices | 2022.9.0 |
| xz | 5.4.6 |
| yaml | 0.2.5 |
| yaml-cpp | 0.8.0 |
| yapf | 0.40.2 |
| yarl | 1.11.0 |
| zeromq | 4.3.5 |
| zfp | 1.0.0 |
| zict | 3.0.0 |
| zipp | 3.17.0 |
| zlib | 1.2.13 |
| zlib-ng | 2.0.7 |
| zope | 1.0 |
| zope.interface | 5.4.0 |
| zstandard | 0.23.0 |
| zstd | 1.5.6 |
| Package Name | linux-64 | linux-aarch64 | linux-s390x | osx-arm64 | osx-64 | win-64 |
|---|---|---|---|---|---|---|
| \_anaconda\_depends | 2024.06 | 2024.06 | 2024.06 | 2024.06 | 2024.06 | 2024.06 |
| \_libgcc\_mutex | 0.1 | 0.1 | 0.1 | |||
| \_openmp\_mutex | 5.1 | 5.1 | 5.1 | |||
| abseil-cpp | 20211102.0 | 20211102.0 | 20211102.0 | 20230802.0 | 20230802.0 | 20211102.0 |
| aiobotocore | 2.12.3 | 2.12.3 | 2.12.3 | 2.12.3 | 2.12.3 | 2.12.3 |
| aiohttp | 3.9.5 | 3.9.5 | 3.9.5 | 3.9.5 | 3.9.5 | 3.9.5 |
| aioitertools | 0.7.1 | 0.7.1 | 0.7.1 | 0.7.1 | 0.7.1 | 0.7.1 |
| aiosignal | 1.2.0 | 1.2.0 | 1.2.0 | 1.2.0 | 1.2.0 | 1.2.0 |
| alabaster | 0.7.16 | 0.7.16 | 0.7.16 | 0.7.16 | 0.7.16 | |
| altair | 5.0.1 | 5.0.1 | 5.0.1 | 5.0.1 | 5.0.1 | |
| anaconda-anon-usage | 0.4.4 | 0.4.4 | 0.4.4 | 0.4.4 | 0.4.4 | 0.4.4 |
| anaconda-catalogs | 0.2.0 | 0.2.0 | 0.2.0 | 0.2.0 | 0.2.0 | 0.2.0 |
| anaconda-client | 1.12.3 | 1.12.3 | 1.12.3 | 1.12.3 | 1.12.3 | 1.12.3 |
| anaconda-cloud-auth | 0.5.1 | 0.5.1 | 0.5.1 | 0.5.1 | 0.5.1 | |
| anaconda-navigator | 2.6.0 | 2.6.0 | 2.6.0 | 2.6.0 | 2.6.0 | |
| anaconda-project | 0.11.1 | 0.11.1 | 0.11.1 | 0.11.1 | 0.11.1 | 0.11.1 |
| annotated-types | 0.6.0 | 0.6.0 | 0.6.0 | 0.6.0 | 0.6.0 | |
| anyio | 4.2.0 | 4.2.0 | 4.2.0 | 4.2.0 | 4.2.0 | |
| aom | 3.6.0 | 3.6.0 | 3.6.0 | 3.6.0 | 3.6.0 | 3.6.0 |
| appdirs | 1.4.4 | 1.4.4 | 1.4.4 | 1.4.4 | 1.4.4 | 1.4.4 |
| applaunchservices | 0.3.0 | 0.3.0 | ||||
| appnope | 0.1.3 | 0.1.3 | ||||
| appscript | 1.1.2 | 1.1.2 | ||||
| archspec | 0.2.3 | 0.2.3 | 0.2.3 | 0.2.3 | 0.2.3 | 0.2.3 |
| argon2-cffi | 21.3.0 | 21.3.0 | 21.3.0 | 21.3.0 | 21.3.0 | |
| argon2-cffi-bindings | 21.2.0 | 21.2.0 | 21.2.0 | 21.2.0 | 21.2.0 | |
| arrow | 1.2.3 | 1.2.3 | 1.2.3 | 1.2.3 | 1.2.3 | |
| arrow-cpp | 14.0.2 | 14.0.2 | 14.0.2 | 14.0.2 | 14.0.2 | 14.0.2 |
| astroid | 2.14.2 | 2.14.2 | 2.14.2 | 2.14.2 | 2.14.2 | 2.14.2 |
| astropy | 6.1.0 | 6.1.0 | 6.1.0 | 6.1.0 | 6.1.0 | 6.1.0 |
| astropy-iers-data | 0.2024.6.3.0.31.14 | 0.2024.6.3.0.31.14 | 0.2024.6.3.0.31.14 | 0.2024.6.3.0.31.14 | 0.2024.6.3.0.31.14 | 0.2024.6.3.0.31.14 |
| asttokens | 2.0.5 | 2.0.5 | 2.0.5 | 2.0.5 | 2.0.5 | 2.0.5 |
| async-lru | 2.0.4 | 2.0.4 | 2.0.4 | 2.0.4 | 2.0.4 | |
| atomicwrites | 1.4.0 | 1.4.0 | 1.4.0 | 1.4.0 | 1.4.0 | |
| attrs | 23.1.0 | 23.1.0 | 23.1.0 | 23.1.0 | 23.1.0 | 23.1.0 |
| automat | 20.2.0 | 20.2.0 | 20.2.0 | 20.2.0 | 20.2.0 | |
| autopep8 | 2.0.4 | 2.0.4 | 2.0.4 | 2.0.4 | 2.0.4 | |
| aws-c-auth | 0.6.19 | 0.6.19 | 0.6.19 | 0.6.19 | 0.6.19 | 0.6.19 |
| aws-c-cal | 0.5.20 | 0.5.20 | 0.5.20 | 0.5.20 | 0.5.20 | 0.5.20 |
| aws-c-common | 0.8.5 | 0.8.5 | 0.8.5 | 0.8.5 | 0.8.5 | 0.8.5 |
| aws-c-compression | 0.2.16 | 0.2.16 | 0.2.16 | 0.2.16 | 0.2.16 | 0.2.16 |
| aws-c-event-stream | 0.2.15 | 0.2.15 | 0.2.15 | 0.2.15 | 0.2.15 | 0.2.15 |
| aws-c-http | 0.6.25 | 0.6.25 | 0.6.25 | 0.6.25 | 0.6.25 | 0.6.25 |
| aws-c-io | 0.13.10 | 0.13.10 | 0.13.10 | 0.13.10 | 0.13.10 | 0.13.10 |
| aws-c-mqtt | 0.7.13 | 0.7.13 | 0.7.13 | 0.7.13 | 0.7.13 | 0.7.13 |
| aws-c-s3 | 0.1.51 | 0.1.51 | 0.1.51 | 0.1.51 | 0.1.51 | 0.1.51 |
| aws-c-sdkutils | 0.1.6 | 0.1.6 | 0.1.6 | 0.1.6 | 0.1.6 | 0.1.6 |
| aws-checksums | 0.1.13 | 0.1.13 | 0.1.13 | 0.1.13 | 0.1.13 | 0.1.13 |
| aws-crt-cpp | 0.18.16 | 0.18.16 | 0.18.16 | 0.18.16 | 0.18.16 | 0.18.16 |
| aws-sdk-cpp | 1.10.55 | 1.10.55 | 1.10.55 | 1.10.55 | 1.10.55 | 1.10.55 |
| babel | 2.11.0 | 2.11.0 | 2.11.0 | 2.11.0 | 2.11.0 | |
| bcrypt | 3.2.0 | 3.2.0 | 3.2.0 | 3.2.0 | 3.2.0 | |
| beautifulsoup4 | 4.12.3 | 4.12.3 | 4.12.3 | 4.12.3 | 4.12.3 | 4.12.3 |
| binaryornot | 0.4.4 | 0.4.4 | 0.4.4 | 0.4.4 | 0.4.4 | |
| black | 24.4.2 | 24.4.2 | 24.4.2 | 24.4.2 | 24.4.2 | 24.4.2 |
| blas | 1.0 | 1.0 | 1.0 | 1.0 | 1.0 | 1.0 |
| bleach | 4.1.0 | 4.1.0 | 4.1.0 | 4.1.0 | 4.1.0 | 4.1.0 |
| blinker | 1.6.2 | 1.6.2 | 1.6.2 | 1.6.2 | 1.6.2 | 1.6.2 |
| blosc | 1.21.3 | 1.21.3 | 1.21.3 | 1.21.3 | 1.21.3 | 1.21.3 |
| bokeh | 3.4.1 | 3.4.1 | 3.4.1 | 3.4.1 | 3.4.1 | 3.4.1 |
| boltons | 23.0.0 | 23.0.0 | 23.0.0 | 23.0.0 | 23.0.0 | 23.0.0 |
| boost-cpp | 1.82.0 | 1.82.0 | 1.82.0 | 1.82.0 | 1.82.0 | 1.82.0 |
| botocore | 1.34.69 | 1.34.69 | 1.34.69 | 1.34.69 | 1.34.69 | 1.34.69 |
| bottleneck | 1.3.7 | 1.3.7 | 1.3.7 | 1.3.7 | 1.3.7 | 1.3.7 |
| brotli | 1.0.9 | 1.0.9 | 1.0.9 | 1.0.9 | 1.0.9 | 1.0.9 |
| brotli-bin | 1.0.9 | 1.0.9 | 1.0.9 | 1.0.9 | 1.0.9 | 1.0.9 |
| brotli-python | 1.0.9 | 1.0.9 | 1.0.9 | 1.0.9 | 1.0.9 | 1.0.9 |
| brunsli | 0.1 | 0.1 | 0.1 | 0.1 | ||
| bzip2 | 1.0.8 | 1.0.8 | 1.0.8 | 1.0.8 | 1.0.8 | 1.0.8 |
| c-ares | 1.19.1 | 1.19.1 | 1.19.1 | 1.19.1 | 1.19.1 | 1.19.1 |
| c-blosc2 | 2.12.0 | 2.12.0 | 2.12.0 | 2.12.0 | 2.12.0 | |
| ca-certificates | 2024.3.11 | 2024.3.11 | 2024.3.11 | 2024.3.11 | 2024.3.11 | 2024.3.11 |
| cachetools | 5.3.3 | 5.3.3 | 5.3.3 | 5.3.3 | 5.3.3 | |
| cctools | 949.0.1 | 949.0.1 | ||||
| cctools\_osx-64 | 949.0.1 | |||||
| cctools\_osx-arm64 | 949.0.1 | |||||
| certifi | 2024.6.2 | 2024.6.2 | 2024.6.2 | 2024.6.2 | 2024.6.2 | 2024.6.2 |
| cffi | 1.16.0 | 1.16.0 | 1.16.0 | 1.16.0 | 1.16.0 | 1.16.0 |
| cfitsio | 3.470 | 3.470 | 3.470 | 3.470 | 3.470 | 3.470 |
| chardet | 4.0.0 | 4.0.0 | 4.0.0 | 4.0.0 | 4.0.0 | 4.0.0 |
| charls | 2.2.0 | 2.2.0 | 2.2.0 | 2.2.0 | 2.2.0 | |
| charset-normalizer | 2.0.4 | 2.0.4 | 2.0.4 | 2.0.4 | 2.0.4 | 2.0.4 |
| click | 8.1.7 | 8.1.7 | 8.1.7 | 8.1.7 | 8.1.7 | 8.1.7 |
| cloudpickle | 2.2.1 | 2.2.1 | 2.2.1 | 2.2.1 | 2.2.1 | 2.2.1 |
| colorama | 0.4.6 | 0.4.6 | 0.4.6 | 0.4.6 | 0.4.6 | 0.4.6 |
| colorcet | 3.1.0 | 3.1.0 | 3.1.0 | 3.1.0 | 3.1.0 | |
| comm | 0.2.1 | 0.2.1 | 0.2.1 | 0.2.1 | 0.2.1 | 0.2.1 |
| conda | 24.5.0 | 24.5.0 | 24.5.0 | 24.5.0 | 24.5.0 | 24.5.0 |
| conda-build | 24.5.1 | 24.5.1 | 24.5.1 | 24.5.1 | 24.5.1 | 24.5.1 |
| conda-content-trust | 0.2.0 | 0.2.0 | 0.2.0 | 0.2.0 | 0.2.0 | 0.2.0 |
| conda-index | 0.5.0 | 0.5.0 | 0.4.0 | 0.5.0 | 0.5.0 | 0.5.0 |
| conda-libmamba-solver | 24.1.0 | 24.1.0 | 24.1.0 | 24.1.0 | 24.1.0 | 24.1.0 |
| conda-pack | 0.7.1 | 0.7.1 | 0.7.1 | 0.7.1 | 0.7.1 | 0.7.1 |
| conda-package-handling | 2.3.0 | 2.3.0 | 2.3.0 | 2.3.0 | 2.3.0 | 2.3.0 |
| conda-package-streaming | 0.10.0 | 0.10.0 | 0.10.0 | 0.10.0 | 0.10.0 | 0.10.0 |
| conda-repo-cli | 1.0.88 | 1.0.88 | 1.0.88 | 1.0.88 | 1.0.88 | |
| conda-token | 0.5.0 | 0.5.0 | 0.5.0 | 0.5.0 | 0.5.0 | 0.5.0 |
| console\_shortcut | 0.1.1 | |||||
| constantly | 23.10.4 | 23.10.4 | 23.10.4 | 23.10.4 | 23.10.4 | |
| contourpy | 1.2.0 | 1.2.0 | 1.2.0 | 1.2.0 | 1.2.0 | 1.2.0 |
| cookiecutter | 2.6.0 | 2.6.0 | 2.6.0 | 2.6.0 | 2.6.0 | |
| cryptography | 42.0.5 | 42.0.5 | 42.0.5 | 42.0.5 | 42.0.5 | 42.0.5 |
| cssselect | 1.2.0 | 1.2.0 | 1.2.0 | 1.2.0 | 1.2.0 | |
| curl | 8.7.1 | 8.7.1 | 8.7.1 | 8.7.1 | 8.7.1 | 8.7.1 |
| cycler | 0.11.0 | 0.11.0 | 0.11.0 | 0.11.0 | 0.11.0 | 0.11.0 |
| cyrus-sasl | 2.1.28 | 2.1.28 | 2.1.28 | 2.1.28 | ||
| cytoolz | 0.12.2 | 0.12.2 | 0.12.2 | 0.12.2 | 0.12.2 | 0.12.2 |
| dask | 2024.5.0 | 2024.5.0 | 2024.5.0 | 2024.5.0 | 2024.5.0 | 2024.5.0 |
| dask-core | 2024.5.0 | 2024.5.0 | 2024.5.0 | 2024.5.0 | 2024.5.0 | 2024.5.0 |
| dask-expr | 1.1.0 | 1.1.0 | 1.1.0 | 1.1.0 | 1.1.0 | 1.1.0 |
| datashader | 0.16.2 | 0.16.2 | 0.16.2 | 0.16.2 | 0.16.2 | |
| dav1d | 1.2.1 | 1.2.1 | 1.2.1 | 1.2.1 | 1.2.1 | 1.2.1 |
| dbus | 1.13.18 | 1.13.18 | ||||
| debugpy | 1.6.7 | 1.6.7 | 1.6.7 | 1.6.7 | 1.6.7 | 1.6.7 |
| decorator | 5.1.1 | 5.1.1 | 5.1.1 | 5.1.1 | 5.1.1 | 5.1.1 |
| defusedxml | 0.7.1 | 0.7.1 | 0.7.1 | 0.7.1 | 0.7.1 | 0.7.1 |
| diff-match-patch | 20200713 | 20200713 | 20200713 | 20200713 | 20200713 | |
| dill | 0.3.8 | 0.3.8 | 0.3.8 | 0.3.8 | 0.3.8 | 0.3.8 |
| distributed | 2024.5.0 | 2024.5.0 | 2024.5.0 | 2024.5.0 | 2024.5.0 | 2024.5.0 |
| distro | 1.9.0 | 1.9.0 | 1.9.0 | 1.9.0 | 1.9.0 | 1.9.0 |
| docstring-to-markdown | 0.11 | 0.11 | 0.11 | 0.11 | 0.11 | |
| docutils | 0.18.1 | 0.18.1 | 0.18.1 | 0.18.1 | 0.18.1 | |
| entrypoints | 0.4 | 0.4 | 0.4 | 0.4 | 0.4 | 0.4 |
| et\_xmlfile | 1.1.0 | 1.1.0 | 1.1.0 | 1.1.0 | 1.1.0 | 1.1.0 |
| executing | 0.8.3 | 0.8.3 | 0.8.3 | 0.8.3 | 0.8.3 | 0.8.3 |
| expat | 2.6.2 | 2.6.2 | 2.6.2 | 2.6.2 | 2.6.2 | 2.6.2 |
| filelock | 3.13.1 | 3.13.1 | 3.13.1 | 3.13.1 | 3.13.1 | 3.13.1 |
| flake8 | 7.0.0 | 7.0.0 | 7.0.0 | 7.0.0 | 7.0.0 | |
| flask | 3.0.3 | 3.0.3 | 3.0.3 | 3.0.3 | 3.0.3 | 3.0.3 |
| fmt | 9.1.0 | 9.1.0 | 9.1.0 | 9.1.0 | 9.1.0 | 9.1.0 |
| fontconfig | 2.14.1 | 2.14.1 | ||||
| fonttools | 4.51.0 | 4.51.0 | 4.51.0 | 4.51.0 | 4.51.0 | 4.51.0 |
| freetype | 2.12.1 | 2.12.1 | 2.12.1 | 2.12.1 | 2.12.1 | 2.12.1 |
| frozendict | 2.4.2 | 2.4.2 | 2.4.2 | 2.4.2 | 2.4.2 | 2.4.2 |
| frozenlist | 1.4.0 | 1.4.0 | 1.4.0 | 1.4.0 | 1.4.0 | 1.4.0 |
| fsspec | 2024.3.1 | 2024.3.1 | 2024.3.1 | 2024.3.1 | 2024.3.1 | 2024.3.1 |
| gensim | 4.3.2 | 4.3.2 | 4.3.2 | 4.3.2 | 4.3.2 | |
| gettext | 0.21.0 | 0.21.0 | ||||
| gflags | 2.2.2 | 2.2.2 | 2.2.2 | 2.2.2 | 2.2.2 | 2.2.2 |
| giflib | 5.2.1 | 5.2.1 | 5.2.1 | 5.2.1 | 5.2.1 | 5.2.1 |
| gitdb | 4.0.7 | 4.0.7 | 4.0.7 | 4.0.7 | 4.0.7 | |
| gitpython | 3.1.37 | 3.1.37 | 3.1.37 | 3.1.37 | 3.1.37 | |
| glib | 2.78.4 | 2.78.4 | 2.78.4 | 2.78.4 | ||
| glib-tools | 2.78.4 | 2.78.4 | 2.78.4 | 2.78.4 | ||
| glog | 0.5.0 | 0.5.0 | 0.5.0 | 0.5.0 | 0.5.0 | 0.5.0 |
| greenlet | 3.0.1 | 3.0.1 | 3.0.1 | 3.0.1 | 3.0.1 | 3.0.1 |
| grpc-cpp | 1.48.2 | 1.48.2 | 1.48.2 | 1.48.2 | 1.48.2 | 1.48.2 |
| gst-plugins-base | 1.14.1 | 1.14.1 | 1.14.1 | 1.14.1 | ||
| gstreamer | 1.14.1 | 1.14.1 | 1.14.1 | 1.14.1 | ||
| gtest | 1.14.0 | 1.14.0 | ||||
| h5py | 3.11.0 | 3.11.0 | 3.11.0 | 3.11.0 | 3.11.0 | 3.11.0 |
| hdf5 | 1.12.1 | 1.12.1 | 1.12.1 | 1.12.1 | 1.12.1 | 1.12.1 |
| heapdict | 1.0.1 | 1.0.1 | 1.0.1 | 1.0.1 | 1.0.1 | 1.0.1 |
| holoviews | 1.19.0 | 1.19.0 | 1.19.0 | 1.19.0 | 1.19.0 | |
| hvplot | 0.10.0 | 0.10.0 | 0.10.0 | 0.10.0 | 0.10.0 | |
| hyperlink | 21.0.0 | 21.0.0 | 21.0.0 | 21.0.0 | 21.0.0 | |
| icc\_rt | 2022.1.0 | |||||
| icu | 73.1 | 73.1 | 73.1 | 73.1 | 73.1 | 73.1 |
| idna | 3.7 | 3.7 | 3.7 | 3.7 | 3.7 | 3.7 |
| imagecodecs | 2023.1.23 | 2023.1.23 | 2023.1.23 | 2023.1.23 | 2023.1.23 | 2023.1.23 |
| imageio | 2.33.1 | 2.33.1 | 2.33.1 | 2.33.1 | 2.33.1 | 2.33.1 |
| imagesize | 1.4.1 | 1.4.1 | 1.4.1 | 1.4.1 | 1.4.1 | |
| imbalanced-learn | 0.12.3 | 0.12.3 | 0.12.3 | 0.12.3 | 0.12.3 | 0.12.3 |
| importlib-metadata | 7.0.1 | 7.0.1 | 7.0.1 | 7.0.1 | 7.0.1 | |
| incremental | 22.10.0 | 22.10.0 | 22.10.0 | 22.10.0 | 22.10.0 | |
| inflection | 0.5.1 | 0.5.1 | 0.5.1 | 0.5.1 | 0.5.1 | |
| iniconfig | 1.1.1 | 1.1.1 | 1.1.1 | 1.1.1 | 1.1.1 | 1.1.1 |
| intake | 0.7.0 | 0.7.0 | 0.7.0 | 0.7.0 | 0.7.0 | 0.7.0 |
| intel-openmp | 2023.1.0 | 2023.1.0 | ||||
| intervaltree | 3.1.0 | 3.1.0 | 3.1.0 | 3.1.0 | 3.1.0 | |
| ipykernel | 6.28.0 | 6.28.0 | 6.28.0 | 6.28.0 | 6.28.0 | 6.28.0 |
| ipython | 8.25.0 | 8.25.0 | 8.25.0 | 8.25.0 | 8.25.0 | 8.25.0 |
| ipython\_genutils | 0.2.0 | 0.2.0 | 0.2.0 | 0.2.0 | 0.2.0 | |
| ipywidgets | 7.8.1 | 7.8.1 | 7.8.1 | 7.8.1 | 7.8.1 | |
| isort | 5.13.2 | 5.13.2 | 5.13.2 | 5.13.2 | 5.13.2 | 5.13.2 |
| itemadapter | 0.3.0 | 0.3.0 | 0.3.0 | 0.3.0 | 0.3.0 | |
| itemloaders | 1.1.0 | 1.1.0 | 1.1.0 | 1.1.0 | 1.1.0 | |
| itsdangerous | 2.2.0 | 2.2.0 | 2.2.0 | 2.2.0 | 2.2.0 | 2.2.0 |
| jaraco.classes | 3.2.1 | 3.2.1 | 3.2.1 | 3.2.1 | 3.2.1 | |
| jedi | 0.18.1 | 0.18.1 | 0.18.1 | 0.18.1 | 0.18.1 | 0.18.1 |
| jeepney | 0.7.1 | 0.7.1 | ||||
| jellyfish | 1.0.1 | 1.0.1 | 1.0.1 | 1.0.1 | 1.0.1 | |
| jinja2 | 3.1.4 | 3.1.4 | 3.1.4 | 3.1.4 | 3.1.4 | 3.1.4 |
| jmespath | 1.0.1 | 1.0.1 | 1.0.1 | 1.0.1 | 1.0.1 | 1.0.1 |
| joblib | 1.4.2 | 1.4.2 | 1.4.2 | 1.4.2 | 1.4.2 | 1.4.2 |
| jpeg | 9e | 9e | 9e | 9e | 9e | 9e |
| jq | 1.6 | 1.6 | 1.6 | 1.6 | 1.6 | |
| json5 | 0.9.6 | 0.9.6 | 0.9.6 | 0.9.6 | 0.9.6 | |
| jsonpatch | 1.33 | 1.33 | 1.33 | 1.33 | 1.33 | 1.33 |
| jsonpointer | 2.1 | 2.1 | 2.1 | 2.1 | 2.1 | 2.1 |
| jsonschema | 4.19.2 | 4.19.2 | 4.19.2 | 4.19.2 | 4.19.2 | 4.19.2 |
| jsonschema-specifications | 2023.7.1 | 2023.7.1 | 2023.7.1 | 2023.7.1 | 2023.7.1 | 2023.7.1 |
| jupyter | 1.0.0 | 1.0.0 | 1.0.0 | 1.0.0 | 1.0.0 | 1.0.0 |
| jupyter-lsp | 2.2.0 | 2.2.0 | 2.2.0 | 2.2.0 | 2.2.0 | |
| jupyter\_client | 8.6.0 | 8.6.0 | 8.6.0 | 8.6.0 | 8.6.0 | 8.6.0 |
| jupyter\_console | 6.6.3 | 6.6.3 | 6.6.3 | 6.6.3 | 6.6.3 | 6.6.3 |
| jupyter\_core | 5.7.2 | 5.7.2 | 5.7.2 | 5.7.2 | 5.7.2 | 5.7.2 |
| jupyter\_events | 0.10.0 | 0.10.0 | 0.10.0 | 0.10.0 | 0.10.0 | |
| jupyter\_server | 2.14.1 | 2.14.1 | 2.14.1 | 2.14.1 | 2.14.1 | |
| jupyter\_server\_terminals | 0.4.4 | 0.4.4 | 0.4.4 | 0.4.4 | 0.4.4 | |
| jupyterlab | 4.0.11 | 4.0.11 | 4.0.11 | 4.0.11 | 4.0.11 | |
| jupyterlab-variableinspector | 3.1.0 | 3.1.0 | 3.1.0 | 3.1.0 | 3.1.0 | |
| jupyterlab\_pygments | 0.1.2 | 0.1.2 | 0.2.2 | 0.1.2 | 0.1.2 | 0.1.2 |
| jupyterlab\_server | 2.25.1 | 2.25.1 | 2.25.1 | 2.25.1 | 2.25.1 | |
| jupyterlab\_widgets | 1.0.0 | 1.0.0 | 1.0.0 | 1.0.0 | 1.0.0 | |
| jxrlib | 1.1 | 1.1 | 1.1 | 1.1 | 1.1 | |
| keyring | 24.3.1 | 24.3.1 | 24.3.1 | 24.3.1 | 24.3.1 | |
| kiwisolver | 1.4.4 | 1.4.4 | 1.4.4 | 1.4.4 | 1.4.4 | 1.4.4 |
| krb5 | 1.20.1 | 1.20.1 | 1.20.1 | 1.20.1 | 1.20.1 | 1.20.1 |
| lazy-object-proxy | 1.10.0 | 1.10.0 | 1.10.0 | 1.10.0 | 1.10.0 | 1.10.0 |
| lazy\_loader | 0.4 | 0.4 | 0.4 | 0.4 | 0.4 | 0.4 |
| lcms2 | 2.12 | 2.12 | 2.12 | 2.12 | 2.12 | 2.12 |
| ld64 | 530 | 530 | ||||
| ld64\_osx-64 | 530 | |||||
| ld64\_osx-arm64 | 530 | |||||
| ld\_impl\_linux-64 | 2.38 | |||||
| ld\_impl\_linux-aarch64 | 2.38 | |||||
| ld\_impl\_linux-s390x | 2.38 | |||||
| ldid | 2.1.5 | 2.1.5 | ||||
| lerc | 3.0 | 3.0 | 3.0 | 3.0 | 3.0 | 3.0 |
| libaec | 1.0.4 | 1.0.4 | 1.0.4 | 1.0.4 | 1.0.4 | 1.0.4 |
| libarchive | 3.6.2 | 3.6.2 | 3.6.2 | 3.6.2 | 3.6.2 | 3.6.2 |
| libavif | 0.11.1 | 0.11.1 | 0.11.1 | 0.11.1 | 0.11.1 | 0.11.1 |
| libboost | 1.82.0 | 1.82.0 | 1.82.0 | 1.82.0 | 1.82.0 | 1.82.0 |
| libbrotlicommon | 1.0.9 | 1.0.9 | 1.0.9 | 1.0.9 | 1.0.9 | 1.0.9 |
| libbrotlidec | 1.0.9 | 1.0.9 | 1.0.9 | 1.0.9 | 1.0.9 | 1.0.9 |
| libbrotlienc | 1.0.9 | 1.0.9 | 1.0.9 | 1.0.9 | 1.0.9 | 1.0.9 |
| libclang | 14.0.6 | 14.0.6 | 14.0.6 | 14.0.6 | 14.0.6 | |
| libclang13 | 14.0.6 | 14.0.6 | 14.0.6 | 14.0.6 | 14.0.6 | |
| libcups | 2.4.2 | 2.4.2 | ||||
| libcurl | 8.7.1 | 8.7.1 | 8.7.1 | 8.7.1 | 8.7.1 | 8.7.1 |
| libcxx | 14.0.6 | 14.0.6 | ||||
| libdeflate | 1.17 | 1.17 | 1.17 | 1.17 | 1.17 | 1.17 |
| libedit | 3.1.20230828 | 3.1.20230828 | 3.1.20230828 | 3.1.20230828 | 3.1.20230828 | |
| libev | 4.33 | 4.33 | 4.33 | 4.33 | 4.33 | |
| libevent | 2.1.12 | 2.1.12 | 2.1.12 | 2.1.12 | 2.1.12 | 2.1.12 |
| libffi | 3.4.4 | 3.4.4 | 3.4.4 | 3.4.4 | 3.4.4 | 3.4.4 |
| libgcc-ng | 11.2.0 | 11.2.0 | 11.2.0 | |||
| libgfortran | 5.0.0 | 5.0.0 | ||||
| libgfortran-ng | 11.2.0 | 11.2.0 | 11.2.0 | |||
| libgfortran5 | 11.2.0 | 11.2.0 | 11.2.0 | 11.3.0 | 11.3.0 | |
| libglib | 2.78.4 | 2.78.4 | 2.78.4 | 2.78.4 | ||
| libgomp | 11.2.0 | 11.2.0 | 11.2.0 | |||
| libiconv | 1.16 | 1.16 | 1.16 | 1.16 | 1.16 | |
| liblief | 0.12.3 | 0.12.3 | 0.12.3 | 0.12.3 | 0.12.3 | 0.12.3 |
| libllvm14 | 14.0.6 | 14.0.6 | 14.0.6 | 14.0.6 | ||
| libmamba | 1.5.8 | 1.5.8 | 1.5.8 | 1.5.8 | 1.5.8 | 1.5.8 |
| libmambapy | 1.5.8 | 1.5.8 | 1.5.8 | 1.5.8 | 1.5.8 | 1.5.8 |
| libnghttp2 | 1.57.0 | 1.57.0 | 1.57.0 | 1.57.0 | 1.57.0 | |
| libopenblas | 0.3.21 | 0.3.21 | 0.3.21 | 0.3.21 | ||
| libpng | 1.6.39 | 1.6.39 | 1.6.39 | 1.6.39 | 1.6.39 | 1.6.39 |
| libpq | 12.17 | 12.17 | 12.17 | 12.17 | 12.17 | |
| libprotobuf | 3.20.3 | 3.20.3 | 3.20.3 | 3.20.3 | 3.20.3 | 3.20.3 |
| libsodium | 1.0.18 | 1.0.18 | 1.0.18 | 1.0.18 | 1.0.18 | 1.0.18 |
| libsolv | 0.7.24 | 0.7.24 | 0.7.24 | 0.7.24 | 0.7.24 | 0.7.24 |
| libspatialindex | 1.9.3 | 1.9.3 | 1.9.3 | 1.9.3 | 1.9.3 | |
| libssh2 | 1.11.0 | 1.11.0 | 1.11.0 | 1.11.0 | 1.11.0 | 1.11.0 |
| libstdcxx-ng | 11.2.0 | 11.2.0 | 11.2.0 | |||
| libthrift | 0.15.0 | 0.15.0 | 0.15.0 | 0.15.0 | 0.15.0 | 0.15.0 |
| libtiff | 4.5.1 | 4.5.1 | 4.5.1 | 4.5.1 | 4.5.1 | 4.5.1 |
| libuuid | 1.41.5 | 1.41.5 | 1.41.5 | |||
| libwebp-base | 1.3.2 | 1.3.2 | 1.3.2 | 1.3.2 | 1.3.2 | 1.3.2 |
| libxcb | 1.15 | 1.15 | ||||
| libxkbcommon | 1.0.1 | 1.0.1 | ||||
| libxml2 | 2.10.4 | 2.10.4 | 2.10.4 | 2.10.4 | 2.10.4 | 2.10.4 |
| libxslt | 1.1.37 | 1.1.37 | 1.1.37 | 1.1.37 | 1.1.37 | |
| libzopfli | 1.0.3 | 1.0.3 | 1.0.3 | 1.0.3 | 1.0.3 | 1.0.3 |
| linkify-it-py | 2.0.0 | 2.0.0 | 2.0.0 | 2.0.0 | 2.0.0 | |
| llvm-openmp | 14.0.6 | 14.0.6 | ||||
| llvmlite | 0.42.0 | 0.42.0 | 0.42.0 | 0.42.0 | 0.42.0 | |
| locket | 1.0.0 | 1.0.0 | 1.0.0 | 1.0.0 | 1.0.0 | 1.0.0 |
| lxml | 5.2.1 | 5.2.1 | 5.2.1 | 5.2.1 | 5.2.1 | |
| lz4 | 4.3.2 | 4.3.2 | 4.3.2 | 4.3.2 | 4.3.2 | 4.3.2 |
| lz4-c | 1.9.4 | 1.9.4 | 1.9.4 | 1.9.4 | 1.9.4 | 1.9.4 |
| lzo | 2.10 | 2.10 | 2.10 | 2.10 | 2.10 | |
| m2-msys2-runtime | 2.5.0.17080.65c939c | |||||
| m2-patch | 2.7.5 | |||||
| m2w64-libwinpthread-git | 5.0.0.4634.697f757 | |||||
| markdown | 3.4.1 | 3.4.1 | 3.4.1 | 3.4.1 | 3.4.1 | |
| markdown-it-py | 2.2.0 | 2.2.0 | 2.2.0 | 2.2.0 | 2.2.0 | |
| markupsafe | 2.1.3 | 2.1.3 | 2.1.3 | 2.1.3 | 2.1.3 | 2.1.3 |
| matplotlib | 3.8.4 | 3.8.4 | 3.8.4 | 3.8.4 | 3.8.4 | 3.8.4 |
| matplotlib-base | 3.8.4 | 3.8.4 | 3.8.4 | 3.8.4 | 3.8.4 | 3.8.4 |
| matplotlib-inline | 0.1.6 | 0.1.6 | 0.1.6 | 0.1.6 | 0.1.6 | 0.1.6 |
| mccabe | 0.7.0 | 0.7.0 | 0.7.0 | 0.7.0 | 0.7.0 | 0.7.0 |
| mdit-py-plugins | 0.3.0 | 0.3.0 | 0.3.0 | 0.3.0 | 0.3.0 | |
| mdurl | 0.1.0 | 0.1.0 | 0.1.0 | 0.1.0 | 0.1.0 | |
| menuinst | 2.1.1 | 2.1.1 | 2.1.1 | 2.1.1 | 2.1.1 | 2.1.1 |
| mistune | 2.0.4 | 2.0.4 | 2.0.4 | 2.0.4 | 2.0.4 | 2.0.4 |
| mkl | 2023.1.0 | 2023.1.0 | ||||
| mkl-service | 2.4.0 | 2.4.0 | ||||
| mkl\_fft | 1.3.8 | 1.3.8 | ||||
| mkl\_random | 1.2.4 | 1.2.4 | ||||
| more-itertools | 10.1.0 | 10.1.0 | 10.1.0 | 10.1.0 | 10.1.0 | 10.1.0 |
| mpmath | 1.3.0 | 1.3.0 | 1.3.0 | 1.3.0 | 1.3.0 | 1.3.0 |
| msgpack-python | 1.0.3 | 1.0.3 | 1.0.3 | 1.0.3 | 1.0.3 | 1.0.3 |
| msys2-conda-epoch | 20160418 | |||||
| multidict | 6.0.4 | 6.0.4 | 6.0.4 | 6.0.4 | 6.0.4 | 6.0.4 |
| multipledispatch | 0.6.0 | 0.6.0 | 0.6.0 | 0.6.0 | 0.6.0 | |
| mypy | 1.10.0 | 1.10.0 | 1.10.0 | 1.10.0 | 1.10.0 | 1.10.0 |
| mypy\_extensions | 1.0.0 | 1.0.0 | 1.0.0 | 1.0.0 | 1.0.0 | 1.0.0 |
| mysql | 5.7.24 | 5.7.24 | 5.7.24 | 5.7.24 | ||
| navigator-updater | 0.5.1 | 0.5.1 | 0.5.1 | 0.5.1 | 0.5.1 | |
| nbclient | 0.8.0 | 0.8.0 | 0.8.0 | 0.8.0 | 0.8.0 | 0.8.0 |
| nbconvert | 7.10.0 | 7.10.0 | 7.10.0 | 7.10.0 | 7.10.0 | 7.10.0 |
| nbformat | 5.9.2 | 5.9.2 | 5.9.2 | 5.9.2 | 5.9.2 | 5.9.2 |
| ncurses | 6.4 | 6.4 | 6.4 | 6.4 | 6.4 | |
| nest-asyncio | 1.6.0 | 1.6.0 | 1.6.0 | 1.6.0 | 1.6.0 | 1.6.0 |
| networkx | 3.2.1 | 3.2.1 | 3.2.1 | 3.2.1 | 3.2.1 | 3.2.1 |
| nltk | 3.8.1 | 3.8.1 | 3.8.1 | 3.8.1 | 3.8.1 | 3.8.1 |
| notebook | 7.0.8 | 7.0.8 | 7.0.8 | 7.0.8 | 7.0.8 | |
| notebook-shim | 0.2.3 | 0.2.3 | 0.2.3 | 0.2.3 | 0.2.3 | |
| nspr | 4.35 | 4.35 | ||||
| nss | 3.89.1 | 3.89.1 | ||||
| numba | 0.59.1 | 0.59.1 | 0.59.1 | 0.59.1 | 0.59.1 | |
| numexpr | 2.8.7 | 2.8.7 | 2.8.7 | 2.8.7 | 2.8.7 | 2.8.7 |
| numpy | 1.26.4 | 1.26.4 | 1.26.4 | 1.26.4 | 1.26.4 | 1.26.4 |
| numpy-base | 1.26.4 | 1.26.4 | 1.26.4 | 1.26.4 | 1.26.4 | 1.26.4 |
| numpydoc | 1.7.0 | 1.7.0 | 1.7.0 | 1.7.0 | 1.7.0 | |
| oniguruma | 6.9.7.1 | 6.9.7.1 | 6.9.7.1 | 6.9.7.1 | ||
| openjpeg | 2.4.0 | 2.4.0 | 2.4.0 | 2.3.0 | 2.4.0 | 2.4.0 |
| openpyxl | 3.1.2 | 3.1.2 | 3.1.2 | 3.1.2 | 3.1.2 | 3.1.2 |
| openssl | 3.0.14 | 3.0.14 | 3.0.14 | 3.0.14 | 3.0.14 | 3.0.14 |
| orc | 1.7.4 | 1.7.4 | 1.7.4 | 1.7.4 | 1.7.4 | 1.7.4 |
| overrides | 7.4.0 | 7.4.0 | 7.4.0 | 7.4.0 | 7.4.0 | |
| packaging | 23.2 | 23.2 | 23.2 | 23.2 | 23.2 | 23.2 |
| pandas | 2.2.2 | 2.2.2 | 2.2.2 | 2.2.2 | 2.2.2 | 2.2.2 |
| pandocfilters | 1.5.0 | 1.5.0 | 1.5.0 | 1.5.0 | 1.5.0 | 1.5.0 |
| panel | 1.4.4 | 1.4.4 | 1.4.4 | 1.4.4 | 1.4.4 | |
| param | 2.1.0 | 2.1.0 | 2.1.0 | 2.1.0 | 2.1.0 | |
| paramiko | 2.8.1 | |||||
| parsel | 1.8.1 | 1.8.1 | 1.8.1 | 1.8.1 | 1.8.1 | |
| parso | 0.8.3 | 0.8.3 | 0.8.3 | 0.8.3 | 0.8.3 | 0.8.3 |
| partd | 1.4.1 | 1.4.1 | 1.4.1 | 1.4.1 | 1.4.1 | 1.4.1 |
| patch | 2.7.6 | 2.7.6 | 2.7.6 | 2.7.6 | 2.7.6 | |
| patchelf | 0.17.2 | 0.17.2 | 0.17.2 | |||
| pathspec | 0.10.3 | 0.10.3 | 0.10.3 | 0.10.3 | 0.10.3 | 0.10.3 |
| patsy | 0.5.6 | 0.5.6 | 0.5.6 | 0.5.6 | 0.5.6 | 0.5.6 |
| pcre2 | 10.42 | 10.42 | 10.42 | 10.42 | 10.42 | 10.42 |
| pexpect | 4.8.0 | 4.8.0 | 4.8.0 | 4.8.0 | 4.8.0 | 4.8.0 |
| pickleshare | 0.7.5 | 0.7.5 | 0.7.5 | 0.7.5 | 0.7.5 | |
| pillow | 10.3.0 | 10.3.0 | 10.3.0 | 10.3.0 | 10.3.0 | 10.3.0 |
| pip | 24.0 | 24.0 | 24.0 | 24.0 | 24.0 | 24.0 |
| pkce | 1.0.3 | 1.0.3 | 1.0.3 | 1.0.3 | 1.0.3 | |
| pkginfo | 1.10.0 | 1.10.0 | 1.10.0 | 1.10.0 | 1.10.0 | 1.10.0 |
| platformdirs | 3.10.0 | 3.10.0 | 3.10.0 | 3.10.0 | 3.10.0 | 3.10.0 |
| plotly | 5.22.0 | 5.22.0 | 5.22.0 | 5.22.0 | 5.22.0 | 5.22.0 |
| pluggy | 1.0.0 | 1.0.0 | 1.0.0 | 1.0.0 | 1.0.0 | 1.0.0 |
| ply | 3.11 | 3.11 | 3.11 | 3.11 | 3.11 | |
| powershell\_shortcut | 0.0.1 | |||||
| prometheus\_client | 0.14.1 | 0.14.1 | 0.14.1 | 0.14.1 | 0.14.1 | |
| prompt-toolkit | 3.0.43 | 3.0.43 | 3.0.43 | 3.0.43 | 3.0.43 | 3.0.43 |
| prompt\_toolkit | 3.0.43 | 3.0.43 | 3.0.43 | 3.0.43 | 3.0.43 | 3.0.43 |
| protego | 0.1.16 | 0.1.16 | 0.1.16 | 0.1.16 | 0.1.16 | |
| protobuf | 3.20.3 | 3.20.3 | 3.20.3 | 3.20.3 | 3.20.3 | |
| psutil | 5.9.0 | 5.9.0 | 5.9.0 | 5.9.0 | 5.9.0 | 5.9.0 |
| ptyprocess | 0.7.0 | 0.7.0 | 0.7.0 | 0.7.0 | 0.7.0 | 0.7.0 |
| pure\_eval | 0.2.2 | 0.2.2 | 0.2.2 | 0.2.2 | 0.2.2 | 0.2.2 |
| py-cpuinfo | 9.0.0 | 9.0.0 | 9.0.0 | 9.0.0 | 9.0.0 | |
| py-lief | 0.12.3 | 0.12.3 | 0.12.3 | 0.12.3 | 0.12.3 | 0.12.3 |
| pyarrow | 14.0.2 | 14.0.2 | 14.0.2 | 14.0.2 | 14.0.2 | 14.0.2 |
| pyasn1 | 0.4.8 | 0.4.8 | 0.4.8 | 0.4.8 | 0.4.8 | |
| pyasn1-modules | 0.2.8 | 0.2.8 | 0.2.8 | 0.2.8 | 0.2.8 | |
| pybind11-abi | 5 | 5 | 5 | 5 | 5 | 5 |
| pycodestyle | 2.11.1 | 2.11.1 | 2.11.1 | 2.11.1 | 2.11.1 | 2.11.1 |
| pycosat | 0.6.6 | 0.6.6 | 0.6.6 | 0.6.6 | 0.6.6 | 0.6.6 |
| pycparser | 2.21 | 2.21 | 2.21 | 2.21 | 2.21 | 2.21 |
| pyct | 0.5.0 | 0.5.0 | 0.5.0 | 0.5.0 | 0.5.0 | |
| pycurl | 7.45.2 | 7.45.2 | 7.45.2 | 7.45.2 | 7.45.2 | 7.45.2 |
| pydantic | 2.5.3 | 2.5.3 | 2.5.3 | 2.5.3 | 2.5.3 | |
| pydantic-core | 2.14.6 | 2.14.6 | 2.14.6 | 2.14.6 | 2.14.6 | |
| pydeck | 0.8.0 | 0.8.0 | 0.8.0 | 0.8.0 | 0.8.0 | |
| pydispatcher | 2.0.5 | 2.0.5 | 2.0.5 | 2.0.5 | 2.0.5 | |
| pydocstyle | 6.3.0 | 6.3.0 | 6.3.0 | 6.3.0 | 6.3.0 | |
| pyerfa | 2.0.1.4 | 2.0.1.4 | 2.0.1.4 | 2.0.1.4 | 2.0.1.4 | 2.0.1.4 |
| pyflakes | 3.2.0 | 3.2.0 | 3.2.0 | 3.2.0 | 3.2.0 | 3.2.0 |
| pygments | 2.15.1 | 2.15.1 | 2.15.1 | 2.15.1 | 2.15.1 | 2.15.1 |
| pyjwt | 2.8.0 | 2.8.0 | 2.8.0 | 2.8.0 | 2.8.0 | |
| pylint | 2.16.2 | 2.16.2 | 2.16.2 | 2.16.2 | 2.16.2 | 2.16.2 |
| pylint-venv | 3.0.3 | 3.0.3 | 3.0.3 | 3.0.3 | 3.0.3 | |
| pyls-spyder | 0.4.0 | 0.4.0 | 0.4.0 | 0.4.0 | 0.4.0 | |
| pynacl | 1.5.0 | |||||
| pyobjc-core | 10.1 | 10.1 | ||||
| pyobjc-framework-cocoa | 10.1 | 10.1 | ||||
| pyobjc-framework-coreservices | 10.1 | 10.1 | ||||
| pyobjc-framework-fsevents | 10.1 | 10.1 | ||||
| pyodbc | 5.0.1 | 5.0.1 | 5.0.1 | 5.0.1 | 5.0.1 | 5.0.1 |
| pyopenssl | 24.0.0 | 24.0.0 | 24.0.0 | 24.0.0 | 24.0.0 | |
| pyparsing | 3.0.9 | 3.0.9 | 3.0.9 | 3.0.9 | 3.0.9 | 3.0.9 |
| pyqt | 5.15.10 | 5.15.10 | 5.15.10 | 5.15.10 | 5.15.10 | |
| pyqt5-sip | 12.13.0 | 12.13.0 | 12.13.0 | 12.13.0 | 12.13.0 | |
| pyqtwebengine | 5.15.10 | 5.15.10 | 5.15.10 | 5.15.10 | 5.15.10 | |
| pysocks | 1.7.1 | 1.7.1 | 1.7.1 | 1.7.1 | 1.7.1 | 1.7.1 |
| pytables | 3.9.2 | 3.9.2 | 3.9.2 | 3.9.2 | 3.9.2 | |
| pytest | 7.4.4 | 7.4.4 | 7.4.4 | 7.4.4 | 7.4.4 | 7.4.4 |
| python | 3.12.4 | 3.12.4 | 3.12.4 | 3.12.4 | 3.12.4 | 3.12.4 |
| python-dateutil | 2.9.0post0 | 2.9.0post0 | 2.9.0post0 | 2.9.0post0 | 2.9.0post0 | 2.9.0post0 |
| python-dotenv | 0.21.0 | 0.21.0 | 0.21.0 | 0.21.0 | 0.21.0 | |
| python-fastjsonschema | 2.16.2 | 2.16.2 | 2.16.2 | 2.16.2 | 2.16.2 | 2.16.2 |
| python-json-logger | 2.0.7 | 2.0.7 | 2.0.7 | 2.0.7 | 2.0.7 | |
| python-libarchive-c | 2.9 | 2.9 | 2.9 | 2.9 | 2.9 | 2.9 |
| python-lmdb | 1.4.1 | 1.4.1 | 1.4.1 | 1.4.1 | 1.4.1 | 1.4.1 |
| python-lsp-black | 2.0.0 | 2.0.0 | 2.0.0 | 2.0.0 | 2.0.0 | |
| python-lsp-jsonrpc | 1.1.2 | 1.1.2 | 1.1.2 | 1.1.2 | 1.1.2 | |
| python-lsp-server | 1.10.0 | 1.10.0 | 1.10.0 | 1.10.0 | 1.10.0 | |
| python-slugify | 5.0.2 | 5.0.2 | 5.0.2 | 5.0.2 | 5.0.2 | |
| python-snappy | 0.6.1 | 0.6.1 | 0.6.1 | 0.6.1 | 0.6.1 | 0.6.1 |
| python-tzdata | 2023.3 | 2023.3 | 2023.3 | 2023.3 | 2023.3 | 2023.3 |
| python.app | 3 | 3 | ||||
| pytoolconfig | 1.2.6 | 1.2.6 | 1.2.6 | 1.2.6 | 1.2.6 | |
| pytz | 2024.1 | 2024.1 | 2024.1 | 2024.1 | 2024.1 | 2024.1 |
| pyviz\_comms | 3.0.2 | 3.0.2 | 3.0.2 | 3.0.2 | 3.0.2 | |
| pywavelets | 1.5.0 | 1.5.0 | 1.5.0 | 1.5.0 | 1.5.0 | 1.5.0 |
| pywin32 | 305 | |||||
| pywin32-ctypes | 0.2.2 | |||||
| pywinpty | 2.0.10 | |||||
| pyxdg | 0.27 | 0.27 | ||||
| pyyaml | 6.0.1 | 6.0.1 | 6.0.1 | 6.0.1 | 6.0.1 | 6.0.1 |
| pyzmq | 25.1.2 | 25.1.2 | 25.1.2 | 25.1.2 | 25.1.2 | 25.1.2 |
| qdarkstyle | 3.2.3 | 3.2.3 | 3.2.3 | 3.2.3 | 3.2.3 | |
| qstylizer | 0.2.2 | 0.2.2 | 0.2.2 | 0.2.2 | 0.2.2 | |
| qt-main | 5.15.2 | 5.15.2 | 5.15.2 | 5.15.2 | 5.15.2 | |
| qt-webengine | 5.15.9 | 5.15.9 | 5.15.9 | 5.15.9 | 5.15.9 | |
| qtawesome | 1.2.2 | 1.2.2 | 1.2.2 | 1.2.2 | 1.2.2 | |
| qtconsole | 5.5.1 | 5.5.1 | 5.5.1 | 5.5.1 | 5.5.1 | |
| qtpy | 2.4.1 | 2.4.1 | 2.4.1 | 2.4.1 | 2.4.1 | |
| queuelib | 1.6.2 | 1.6.2 | 1.6.2 | 1.6.2 | 1.6.2 | |
| re2 | 2022.04.01 | 2022.04.01 | 2022.04.01 | 2022.04.01 | 2022.04.01 | 2022.04.01 |
| readline | 8.2 | 8.2 | 8.2 | 8.2 | 8.2 | |
| referencing | 0.30.2 | 0.30.2 | 0.30.2 | 0.30.2 | 0.30.2 | 0.30.2 |
| regex | 2023.10.3 | 2023.10.3 | 2023.10.3 | 2023.10.3 | 2023.10.3 | 2023.10.3 |
| reproc | 14.2.4 | 14.2.4 | 14.2.4 | 14.2.4 | 14.2.4 | 14.2.4 |
| reproc-cpp | 14.2.4 | 14.2.4 | 14.2.4 | 14.2.4 | 14.2.4 | 14.2.4 |
| requests | 2.32.2 | 2.32.2 | 2.32.2 | 2.32.2 | 2.32.2 | 2.32.2 |
| requests-file | 1.5.1 | 1.5.1 | 1.5.1 | 1.5.1 | 1.5.1 | |
| requests-toolbelt | 1.0.0 | 1.0.0 | 1.0.0 | 1.0.0 | 1.0.0 | 1.0.0 |
| rfc3339-validator | 0.1.4 | 0.1.4 | 0.1.4 | 0.1.4 | 0.1.4 | |
| rfc3986-validator | 0.1.1 | 0.1.1 | 0.1.1 | 0.1.1 | 0.1.1 | |
| rich | 13.3.5 | 13.3.5 | 13.3.5 | 13.3.5 | 13.3.5 | |
| rope | 1.12.0 | 1.12.0 | 1.12.0 | 1.12.0 | 1.12.0 | |
| rpds-py | 0.10.6 | 0.10.6 | 0.10.6 | 0.10.6 | 0.10.6 | 0.10.6 |
| rtree | 1.0.1 | 1.0.1 | 1.0.1 | 1.0.1 | 1.0.1 | |
| ruamel.yaml | 0.17.21 | 0.17.21 | 0.17.21 | 0.17.21 | 0.17.21 | 0.17.21 |
| ruamel\_yaml | 0.17.21 | 0.17.21 | 0.17.21 | 0.17.21 | 0.17.21 | 0.17.21 |
| s2n | 1.3.27 | 1.3.27 | 1.3.27 | |||
| s3fs | 2024.3.1 | 2024.3.1 | 2024.3.1 | 2024.3.1 | 2024.3.1 | 2024.3.1 |
| scikit-image | 0.23.2 | 0.23.2 | 0.23.2 | 0.23.2 | 0.23.2 | 0.23.2 |
| scikit-learn | 1.4.2 | 1.4.2 | 1.4.2 | 1.4.2 | 1.4.2 | 1.4.2 |
| scipy | 1.13.1 | 1.13.1 | 1.13.1 | 1.13.1 | 1.13.1 | 1.13.1 |
| scrapy | 2.11.1 | 2.11.1 | 2.11.1 | 2.11.1 | 2.11.1 | |
| seaborn | 0.13.2 | 0.13.2 | 0.13.2 | 0.13.2 | 0.13.2 | 0.13.2 |
| secretstorage | 3.3.1 | 3.3.1 | ||||
| semver | 3.0.2 | 3.0.2 | 3.0.2 | 3.0.2 | 3.0.2 | |
| send2trash | 1.8.2 | 1.8.2 | 1.8.2 | 1.8.2 | 1.8.2 | |
| service\_identity | 18.1.0 | 18.1.0 | 18.1.0 | 18.1.0 | 18.1.0 | |
| setuptools | 69.5.1 | 69.5.1 | 69.5.1 | 69.5.1 | 69.5.1 | 69.5.1 |
| sip | 6.7.12 | 6.7.12 | 6.7.12 | 6.7.12 | 6.7.12 | |
| six | 1.16.0 | 1.16.0 | 1.16.0 | 1.16.0 | 1.16.0 | 1.16.0 |
| smart\_open | 5.2.1 | 5.2.1 | 5.2.1 | 5.2.1 | 5.2.1 | |
| smmap | 4.0.0 | 4.0.0 | 4.0.0 | 4.0.0 | 4.0.0 | |
| snappy | 1.1.10 | 1.1.10 | 1.1.10 | 1.1.10 | 1.1.10 | 1.1.10 |
| sniffio | 1.3.0 | 1.3.0 | 1.3.0 | 1.3.0 | 1.3.0 | |
| snowballstemmer | 2.2.0 | 2.2.0 | 2.2.0 | 2.2.0 | 2.2.0 | 2.2.0 |
| sortedcontainers | 2.4.0 | 2.4.0 | 2.4.0 | 2.4.0 | 2.4.0 | 2.4.0 |
| soupsieve | 2.5 | 2.5 | 2.5 | 2.5 | 2.5 | 2.5 |
| sphinx | 7.3.7 | 7.3.7 | 7.3.7 | 7.3.7 | 7.3.7 | |
| sphinxcontrib-applehelp | 1.0.2 | 1.0.2 | 1.0.2 | 1.0.2 | 1.0.2 | |
| sphinxcontrib-devhelp | 1.0.2 | 1.0.2 | 1.0.2 | 1.0.2 | 1.0.2 | |
| sphinxcontrib-htmlhelp | 2.0.0 | 2.0.0 | 2.0.0 | 2.0.0 | 2.0.0 | |
| sphinxcontrib-jsmath | 1.0.1 | 1.0.1 | 1.0.1 | 1.0.1 | 1.0.1 | |
| sphinxcontrib-qthelp | 1.0.3 | 1.0.3 | 1.0.3 | 1.0.3 | 1.0.3 | |
| sphinxcontrib-serializinghtml | 1.1.10 | 1.1.10 | 1.1.10 | 1.1.10 | 1.1.10 | |
| spyder | 5.5.1 | 5.5.1 | 5.5.1 | 5.5.1 | 5.5.1 | |
| spyder-kernels | 2.5.0 | 2.5.0 | 2.5.0 | 2.5.0 | 2.5.0 | |
| sqlalchemy | 2.0.30 | 2.0.30 | 2.0.30 | 2.0.30 | 2.0.30 | 2.0.30 |
| sqlite | 3.45.3 | 3.45.3 | 3.45.3 | 3.45.3 | 3.45.3 | 3.45.3 |
| stack\_data | 0.2.0 | 0.2.0 | 0.2.0 | 0.2.0 | 0.2.0 | 0.2.0 |
| statsmodels | 0.14.2 | 0.14.2 | 0.14.2 | 0.14.2 | 0.14.2 | 0.14.2 |
| streamlit | 1.32.0 | 1.32.0 | 1.32.0 | 1.32.0 | 1.32.0 | |
| sympy | 1.12 | 1.12 | 1.12 | 1.12 | 1.12 | 1.12 |
| tabulate | 0.9.0 | 0.9.0 | 0.9.0 | 0.9.0 | 0.9.0 | 0.9.0 |
| tapi | 1100.0.11 | 1000.10.8 | ||||
| tbb | 2021.8.0 | 2021.8.0 | 2021.8.0 | 2021.8.0 | 2021.8.0 | |
| tblib | 1.7.0 | 1.7.0 | 1.7.0 | 1.7.0 | 1.7.0 | 1.7.0 |
| tenacity | 8.2.2 | 8.2.2 | 8.2.2 | 8.2.2 | 8.2.2 | 8.2.2 |
| terminado | 0.17.1 | 0.17.1 | 0.17.1 | 0.17.1 | 0.17.1 | |
| text-unidecode | 1.3 | 1.3 | 1.3 | 1.3 | 1.3 | |
| textdistance | 4.2.1 | 4.2.1 | 4.2.1 | 4.2.1 | 4.2.1 | |
| threadpoolctl | 2.2.0 | 2.2.0 | 2.2.0 | 2.2.0 | 2.2.0 | 2.2.0 |
| three-merge | 0.1.1 | 0.1.1 | 0.1.1 | 0.1.1 | 0.1.1 | |
| tifffile | 2023.4.12 | 2023.4.12 | 2023.4.12 | 2023.4.12 | 2023.4.12 | 2023.4.12 |
| tinycss2 | 1.2.1 | 1.2.1 | 1.2.1 | 1.2.1 | 1.2.1 | 1.2.1 |
| tk | 8.6.14 | 8.6.14 | 8.6.14 | 8.6.14 | 8.6.14 | 8.6.14 |
| tldextract | 3.2.0 | 3.2.0 | 3.2.0 | 3.2.0 | 3.2.0 | |
| toml | 0.10.2 | 0.10.2 | 0.10.2 | 0.10.2 | 0.10.2 | |
| tomli | 2.0.1 | 2.0.1 | 2.0.1 | 2.0.1 | 2.0.1 | |
| tomlkit | 0.11.1 | 0.11.1 | 0.11.1 | 0.11.1 | 0.11.1 | 0.11.1 |
| toolz | 0.12.0 | 0.12.0 | 0.12.0 | 0.12.0 | 0.12.0 | 0.12.0 |
| tornado | 6.4.1 | 6.4.1 | 6.4.1 | 6.4.1 | 6.4.1 | 6.4.1 |
| tqdm | 4.66.4 | 4.66.4 | 4.66.4 | 4.66.4 | 4.66.4 | 4.66.4 |
| traitlets | 5.14.3 | 5.14.3 | 5.14.3 | 5.14.3 | 5.14.3 | 5.14.3 |
| truststore | 0.8.0 | 0.8.0 | 0.8.0 | 0.8.0 | 0.8.0 | 0.8.0 |
| twisted | 23.10.0 | 23.10.0 | 23.10.0 | 23.10.0 | 23.10.0 | |
| twisted-iocpsupport | 1.0.2 | |||||
| typing-extensions | 4.11.0 | 4.11.0 | 4.11.0 | 4.11.0 | 4.11.0 | 4.11.0 |
| typing\_extensions | 4.11.0 | 4.11.0 | 4.11.0 | 4.11.0 | 4.11.0 | 4.11.0 |
| tzdata | 2024a | 2024a | 2024a | 2024a | 2024a | 2024a |
| uc-micro-py | 1.0.1 | 1.0.1 | 1.0.1 | 1.0.1 | 1.0.1 | |
| ujson | 5.10.0 | 5.10.0 | 5.10.0 | 5.10.0 | 5.10.0 | |
| unicodedata2 | 15.1.0 | 15.1.0 | 15.1.0 | 15.1.0 | 15.1.0 | 15.1.0 |
| unidecode | 1.2.0 | 1.2.0 | 1.2.0 | 1.2.0 | 1.2.0 | |
| unixodbc | 2.3.11 | 2.3.11 | 2.3.11 | 2.3.11 | 2.3.11 | |
| urllib3 | 2.2.2 | 2.2.2 | 2.2.2 | 2.2.2 | 2.2.2 | 2.2.2 |
| utf8proc | 2.6.1 | 2.6.1 | 2.6.1 | 2.6.1 | 2.6.1 | 2.6.1 |
| vc | 14.2 | |||||
| vs2015\_runtime | 14.29.30133 | |||||
| w3lib | 1.21.0 | 2.1.2 | 2.1.2 | 2.1.2 | 2.1.2 | |
| watchdog | 4.0.1 | 4.0.1 | 4.0.1 | 4.0.1 | 4.0.1 | |
| wcwidth | 0.2.5 | 0.2.5 | 0.2.5 | 0.2.5 | 0.2.5 | 0.2.5 |
| webencodings | 0.5.1 | 0.5.1 | 0.5.1 | 0.5.1 | 0.5.1 | 0.5.1 |
| websocket-client | 1.8.0 | 1.8.0 | 1.8.0 | 1.8.0 | 1.8.0 | |
| werkzeug | 3.0.3 | 3.0.3 | 3.0.3 | 3.0.3 | 3.0.3 | 3.0.3 |
| whatthepatch | 1.0.2 | 1.0.2 | 1.0.2 | 1.0.2 | 1.0.2 | |
| wheel | 0.43.0 | 0.43.0 | 0.43.0 | 0.43.0 | 0.43.0 | 0.43.0 |
| widgetsnbextension | 3.6.6 | 3.6.6 | 3.6.6 | 3.6.6 | 3.6.6 | |
| win\_inet\_pton | 1.1.0 | |||||
| winpty | 0.4.3 | |||||
| wrapt | 1.14.1 | 1.14.1 | 1.14.1 | 1.14.1 | 1.14.1 | 1.14.1 |
| wurlitzer | 3.0.2 | 3.0.2 | 3.0.2 | 3.0.2 | ||
| xarray | 2023.6.0 | 2023.6.0 | 2023.6.0 | 2023.6.0 | 2023.6.0 | |
| xlwings | 0.31.4 | 0.31.4 | 0.31.4 | |||
| xyzservices | 2022.9.0 | 2022.9.0 | 2022.9.0 | 2022.9.0 | 2022.9.0 | 2022.9.0 |
| xz | 5.4.6 | 5.4.6 | 5.4.6 | 5.4.6 | 5.4.6 | 5.4.6 |
| yaml | 0.2.5 | 0.2.5 | 0.2.5 | 0.2.5 | 0.2.5 | 0.2.5 |
| yaml-cpp | 0.8.0 | 0.8.0 | 0.8.0 | 0.8.0 | 0.8.0 | 0.8.0 |
| yapf | 0.40.2 | 0.40.2 | 0.40.2 | 0.40.2 | 0.40.2 | |
| yarl | 1.9.3 | 1.9.3 | 1.9.3 | 1.9.3 | 1.9.3 | 1.9.3 |
| zeromq | 4.3.5 | 4.3.5 | 4.3.5 | 4.3.5 | 4.3.5 | 4.3.5 |
| zfp | 1.0.0 | 1.0.0 | 1.0.0 | 1.0.0 | ||
| zict | 3.0.0 | 3.0.0 | 3.0.0 | 3.0.0 | 3.0.0 | 3.0.0 |
| zipp | 3.17.0 | 3.17.0 | 3.17.0 | 3.17.0 | 3.17.0 | |
| zlib | 1.2.13 | 1.2.13 | 1.2.13 | 1.2.13 | 1.2.13 | 1.2.13 |
| zlib-ng | 2.0.7 | 2.0.7 | 2.0.7 | 2.0.7 | 2.0.7 | |
| zope | 1.0 | 1.0 | 1.0 | 1.0 | 1.0 | |
| zope.interface | 5.4.0 | 5.4.0 | 5.4.0 | 5.4.0 | 5.4.0 | |
| zstandard | 0.22.0 | 0.22.0 | 0.22.0 | 0.22.0 | 0.22.0 | 0.22.0 |
| zstd | 1.5.5 | 1.5.5 | 1.5.5 | 1.5.5 | 1.5.5 | 1.5.5 |
| Package Name | linux-64 | linux-aarch64 | linux-s390x |
|---|---|---|---|
| \_anaconda\_depends | 2024.06 | 2024.06 | 2024.06 |
| \_libgcc\_mutex | 0.1 | 0.1 | 0.1 |
| \_openmp\_mutex | 5.1 | 5.1 | 5.1 |
| abseil-cpp | 20211102.0 | 20211102.0 | 20211102.0 |
| aiobotocore | 2.12.3 | 2.12.3 | 2.12.3 |
| aiohttp | 3.9.5 | 3.9.5 | 3.9.5 |
| aioitertools | 0.7.1 | 0.7.1 | 0.7.1 |
| aiosignal | 1.2.0 | 1.2.0 | 1.2.0 |
| alabaster | 0.7.16 | 0.7.16 | |
| altair | 5.0.1 | 5.0.1 | |
| anaconda-anon-usage | 0.4.4 | 0.4.4 | 0.4.4 |
| anaconda-catalogs | 0.2.0 | 0.2.0 | 0.2.0 |
| anaconda-client | 1.12.3 | 1.12.3 | 1.12.3 |
| anaconda-cloud-auth | 0.5.1 | 0.5.1 | |
| anaconda-navigator | 2.6.0 | 2.6.0 | |
| anaconda-project | 0.11.1 | 0.11.1 | 0.11.1 |
| annotated-types | 0.6.0 | 0.6.0 | |
| anyio | 4.2.0 | 4.2.0 | |
| aom | 3.6.0 | 3.6.0 | 3.6.0 |
| appdirs | 1.4.4 | 1.4.4 | 1.4.4 |
| archspec | 0.2.3 | 0.2.3 | 0.2.3 |
| argon2-cffi | 21.3.0 | 21.3.0 | |
| argon2-cffi-bindings | 21.2.0 | 21.2.0 | |
| arrow | 1.2.3 | 1.2.3 | |
| arrow-cpp | 14.0.2 | 14.0.2 | 14.0.2 |
| astroid | 2.14.2 | 2.14.2 | 2.14.2 |
| astropy | 6.1.0 | 6.1.0 | 6.1.0 |
| astropy-iers-data | 0.2024.6.3.0.31.14 | 0.2024.6.3.0.31.14 | 0.2024.6.3.0.31.14 |
| asttokens | 2.0.5 | 2.0.5 | 2.0.5 |
| async-lru | 2.0.4 | 2.0.4 | |
| atomicwrites | 1.4.0 | 1.4.0 | |
| attrs | 23.1.0 | 23.1.0 | 23.1.0 |
| automat | 20.2.0 | 20.2.0 | |
| autopep8 | 2.0.4 | 2.0.4 | |
| aws-c-auth | 0.6.19 | 0.6.19 | 0.6.19 |
| aws-c-cal | 0.5.20 | 0.5.20 | 0.5.20 |
| aws-c-common | 0.8.5 | 0.8.5 | 0.8.5 |
| aws-c-compression | 0.2.16 | 0.2.16 | 0.2.16 |
| aws-c-event-stream | 0.2.15 | 0.2.15 | 0.2.15 |
| aws-c-http | 0.6.25 | 0.6.25 | 0.6.25 |
| aws-c-io | 0.13.10 | 0.13.10 | 0.13.10 |
| aws-c-mqtt | 0.7.13 | 0.7.13 | 0.7.13 |
| aws-c-s3 | 0.1.51 | 0.1.51 | 0.1.51 |
| aws-c-sdkutils | 0.1.6 | 0.1.6 | 0.1.6 |
| aws-checksums | 0.1.13 | 0.1.13 | 0.1.13 |
| aws-crt-cpp | 0.18.16 | 0.18.16 | 0.18.16 |
| aws-sdk-cpp | 1.10.55 | 1.10.55 | 1.10.55 |
| babel | 2.11.0 | 2.11.0 | |
| bcrypt | 3.2.0 | 3.2.0 | |
| beautifulsoup4 | 4.12.3 | 4.12.3 | 4.12.3 |
| binaryornot | 0.4.4 | 0.4.4 | |
| black | 24.4.2 | 24.4.2 | 24.4.2 |
| blas | 1.0 | 1.0 | 1.0 |
| bleach | 4.1.0 | 4.1.0 | 4.1.0 |
| blinker | 1.6.2 | 1.6.2 | 1.6.2 |
| blosc | 1.21.3 | 1.21.3 | 1.21.3 |
| bokeh | 3.4.1 | 3.4.1 | 3.4.1 |
| boltons | 23.0.0 | 23.0.0 | 23.0.0 |
| boost-cpp | 1.82.0 | 1.82.0 | 1.82.0 |
| botocore | 1.34.69 | 1.34.69 | 1.34.69 |
| bottleneck | 1.3.7 | 1.3.7 | 1.3.7 |
| brotli | 1.0.9 | 1.0.9 | 1.0.9 |
| brotli-bin | 1.0.9 | 1.0.9 | 1.0.9 |
| brotli-python | 1.0.9 | 1.0.9 | 1.0.9 |
| brunsli | 0.1 | 0.1 | |
| bzip2 | 1.0.8 | 1.0.8 | 1.0.8 |
| c-ares | 1.19.1 | 1.19.1 | 1.19.1 |
| c-blosc2 | 2.12.0 | 2.12.0 | |
| ca-certificates | 2024.3.11 | 2024.3.11 | 2024.3.11 |
| cachetools | 5.3.3 | 5.3.3 | |
| certifi | 2024.6.2 | 2024.6.2 | 2024.6.2 |
| cffi | 1.16.0 | 1.16.0 | 1.16.0 |
| cfitsio | 3.470 | 3.470 | 3.470 |
| chardet | 4.0.0 | 4.0.0 | 4.0.0 |
| charls | 2.2.0 | 2.2.0 | |
| charset-normalizer | 2.0.4 | 2.0.4 | 2.0.4 |
| click | 8.1.7 | 8.1.7 | 8.1.7 |
| cloudpickle | 2.2.1 | 2.2.1 | 2.2.1 |
| colorama | 0.4.6 | 0.4.6 | 0.4.6 |
| colorcet | 3.1.0 | 3.1.0 | |
| comm | 0.2.1 | 0.2.1 | 0.2.1 |
| conda | 24.5.0 | 24.5.0 | 24.5.0 |
| conda-build | 24.5.1 | 24.5.1 | 24.5.1 |
| conda-content-trust | 0.2.0 | 0.2.0 | 0.2.0 |
| conda-index | 0.5.0 | 0.5.0 | 0.4.0 |
| conda-libmamba-solver | 24.1.0 | 24.1.0 | 24.1.0 |
| conda-pack | 0.7.1 | 0.7.1 | 0.7.1 |
| conda-package-handling | 2.3.0 | 2.3.0 | 2.3.0 |
| conda-package-streaming | 0.10.0 | 0.10.0 | 0.10.0 |
| conda-repo-cli | 1.0.88 | 1.0.88 | |
| conda-token | 0.5.0 | 0.5.0 | 0.5.0 |
| constantly | 23.10.4 | 23.10.4 | |
| contourpy | 1.2.0 | 1.2.0 | 1.2.0 |
| cookiecutter | 2.6.0 | 2.6.0 | |
| cryptography | 42.0.5 | 42.0.5 | 42.0.5 |
| cssselect | 1.2.0 | 1.2.0 | |
| curl | 8.7.1 | 8.7.1 | 8.7.1 |
| cycler | 0.11.0 | 0.11.0 | 0.11.0 |
| cyrus-sasl | 2.1.28 | 2.1.28 | |
| cytoolz | 0.12.2 | 0.12.2 | 0.12.2 |
| dask | 2024.5.0 | 2024.5.0 | 2024.5.0 |
| dask-core | 2024.5.0 | 2024.5.0 | 2024.5.0 |
| dask-expr | 1.1.0 | 1.1.0 | 1.1.0 |
| datashader | 0.16.2 | 0.16.2 | |
| dav1d | 1.2.1 | 1.2.1 | 1.2.1 |
| dbus | 1.13.18 | 1.13.18 | |
| debugpy | 1.6.7 | 1.6.7 | 1.6.7 |
| decorator | 5.1.1 | 5.1.1 | 5.1.1 |
| defusedxml | 0.7.1 | 0.7.1 | 0.7.1 |
| diff-match-patch | 20200713 | 20200713 | |
| dill | 0.3.8 | 0.3.8 | 0.3.8 |
| distributed | 2024.5.0 | 2024.5.0 | 2024.5.0 |
| distro | 1.9.0 | 1.9.0 | 1.9.0 |
| docstring-to-markdown | 0.11 | 0.11 | |
| docutils | 0.18.1 | 0.18.1 | |
| entrypoints | 0.4 | 0.4 | 0.4 |
| et\_xmlfile | 1.1.0 | 1.1.0 | 1.1.0 |
| executing | 0.8.3 | 0.8.3 | 0.8.3 |
| expat | 2.6.2 | 2.6.2 | 2.6.2 |
| filelock | 3.13.1 | 3.13.1 | 3.13.1 |
| flake8 | 7.0.0 | 7.0.0 | |
| flask | 3.0.3 | 3.0.3 | 3.0.3 |
| fmt | 9.1.0 | 9.1.0 | 9.1.0 |
| fontconfig | 2.14.1 | 2.14.1 | |
| fonttools | 4.51.0 | 4.51.0 | 4.51.0 |
| freetype | 2.12.1 | 2.12.1 | 2.12.1 |
| frozendict | 2.4.2 | 2.4.2 | 2.4.2 |
| frozenlist | 1.4.0 | 1.4.0 | 1.4.0 |
| fsspec | 2024.3.1 | 2024.3.1 | 2024.3.1 |
| gensim | 4.3.2 | 4.3.2 | |
| gflags | 2.2.2 | 2.2.2 | 2.2.2 |
| giflib | 5.2.1 | 5.2.1 | 5.2.1 |
| gitdb | 4.0.7 | 4.0.7 | |
| gitpython | 3.1.37 | 3.1.37 | |
| glib | 2.78.4 | 2.78.4 | |
| glib-tools | 2.78.4 | 2.78.4 | |
| glog | 0.5.0 | 0.5.0 | 0.5.0 |
| greenlet | 3.0.1 | 3.0.1 | 3.0.1 |
| grpc-cpp | 1.48.2 | 1.48.2 | 1.48.2 |
| gst-plugins-base | 1.14.1 | 1.14.1 | |
| gstreamer | 1.14.1 | 1.14.1 | |
| h5py | 3.11.0 | 3.11.0 | 3.11.0 |
| hdf5 | 1.12.1 | 1.12.1 | 1.12.1 |
| heapdict | 1.0.1 | 1.0.1 | 1.0.1 |
| holoviews | 1.19.0 | 1.19.0 | |
| hvplot | 0.10.0 | 0.10.0 | |
| hyperlink | 21.0.0 | 21.0.0 | |
| icu | 73.1 | 73.1 | 73.1 |
| idna | 3.7 | 3.7 | 3.7 |
| imagecodecs | 2023.1.23 | 2023.1.23 | 2023.1.23 |
| imageio | 2.33.1 | 2.33.1 | 2.33.1 |
| imagesize | 1.4.1 | 1.4.1 | |
| imbalanced-learn | 0.12.3 | 0.12.3 | 0.12.3 |
| importlib-metadata | 7.0.1 | 7.0.1 | |
| incremental | 22.10.0 | 22.10.0 | |
| inflection | 0.5.1 | 0.5.1 | |
| iniconfig | 1.1.1 | 1.1.1 | 1.1.1 |
| intake | 0.7.0 | 0.7.0 | 0.7.0 |
| intel-openmp | 2023.1.0 | ||
| intervaltree | 3.1.0 | 3.1.0 | |
| ipykernel | 6.28.0 | 6.28.0 | 6.28.0 |
| ipython | 8.25.0 | 8.25.0 | 8.25.0 |
| ipython\_genutils | 0.2.0 | 0.2.0 | |
| ipywidgets | 7.8.1 | 7.8.1 | |
| isort | 5.13.2 | 5.13.2 | 5.13.2 |
| itemadapter | 0.3.0 | 0.3.0 | |
| itemloaders | 1.1.0 | 1.1.0 | |
| itsdangerous | 2.2.0 | 2.2.0 | 2.2.0 |
| jaraco.classes | 3.2.1 | 3.2.1 | |
| jedi | 0.18.1 | 0.18.1 | 0.18.1 |
| jeepney | 0.7.1 | 0.7.1 | |
| jellyfish | 1.0.1 | 1.0.1 | |
| jinja2 | 3.1.4 | 3.1.4 | 3.1.4 |
| jmespath | 1.0.1 | 1.0.1 | 1.0.1 |
| joblib | 1.4.2 | 1.4.2 | 1.4.2 |
| jpeg | 9e | 9e | 9e |
| jq | 1.6 | 1.6 | |
| json5 | 0.9.6 | 0.9.6 | |
| jsonpatch | 1.33 | 1.33 | 1.33 |
| jsonpointer | 2.1 | 2.1 | 2.1 |
| jsonschema | 4.19.2 | 4.19.2 | 4.19.2 |
| jsonschema-specifications | 2023.7.1 | 2023.7.1 | 2023.7.1 |
| jupyter | 1.0.0 | 1.0.0 | 1.0.0 |
| jupyter-lsp | 2.2.0 | 2.2.0 | |
| jupyter\_client | 8.6.0 | 8.6.0 | 8.6.0 |
| jupyter\_console | 6.6.3 | 6.6.3 | 6.6.3 |
| jupyter\_core | 5.7.2 | 5.7.2 | 5.7.2 |
| jupyter\_events | 0.10.0 | 0.10.0 | |
| jupyter\_server | 2.14.1 | 2.14.1 | |
| jupyter\_server\_terminals | 0.4.4 | 0.4.4 | |
| jupyterlab | 4.0.11 | 4.0.11 | |
| jupyterlab-variableinspector | 3.1.0 | 3.1.0 | |
| jupyterlab\_pygments | 0.1.2 | 0.1.2 | 0.2.2 |
| jupyterlab\_server | 2.25.1 | 2.25.1 | |
| jupyterlab\_widgets | 1.0.0 | 1.0.0 | |
| jxrlib | 1.1 | 1.1 | 1.1 |
| keyring | 24.3.1 | 24.3.1 | |
| kiwisolver | 1.4.4 | 1.4.4 | 1.4.4 |
| krb5 | 1.20.1 | 1.20.1 | 1.20.1 |
| lazy-object-proxy | 1.10.0 | 1.10.0 | 1.10.0 |
| lazy\_loader | 0.4 | 0.4 | 0.4 |
| lcms2 | 2.12 | 2.12 | 2.12 |
| ld\_impl\_linux-64 | 2.38 | ||
| ld\_impl\_linux-aarch64 | 2.38 | ||
| ld\_impl\_linux-s390x | 2.38 | ||
| lerc | 3.0 | 3.0 | 3.0 |
| libaec | 1.0.4 | 1.0.4 | 1.0.4 |
| libarchive | 3.6.2 | 3.6.2 | 3.6.2 |
| libavif | 0.11.1 | 0.11.1 | 0.11.1 |
| libboost | 1.82.0 | 1.82.0 | 1.82.0 |
| libbrotlicommon | 1.0.9 | 1.0.9 | 1.0.9 |
| libbrotlidec | 1.0.9 | 1.0.9 | 1.0.9 |
| libbrotlienc | 1.0.9 | 1.0.9 | 1.0.9 |
| libclang | 14.0.6 | 14.0.6 | |
| libclang13 | 14.0.6 | 14.0.6 | |
| libcups | 2.4.2 | 2.4.2 | |
| libcurl | 8.7.1 | 8.7.1 | 8.7.1 |
| libdeflate | 1.17 | 1.17 | 1.17 |
| libedit | 3.1.20230828 | 3.1.20230828 | 3.1.20230828 |
| libev | 4.33 | 4.33 | 4.33 |
| libevent | 2.1.12 | 2.1.12 | 2.1.12 |
| libffi | 3.4.4 | 3.4.4 | 3.4.4 |
| libgcc-ng | 11.2.0 | 11.2.0 | 11.2.0 |
| libgfortran-ng | 11.2.0 | 11.2.0 | 11.2.0 |
| libgfortran5 | 11.2.0 | 11.2.0 | 11.2.0 |
| libglib | 2.78.4 | 2.78.4 | |
| libgomp | 11.2.0 | 11.2.0 | 11.2.0 |
| libiconv | 1.16 | 1.16 | |
| liblief | 0.12.3 | 0.12.3 | 0.12.3 |
| libllvm14 | 14.0.6 | 14.0.6 | |
| libmamba | 1.5.8 | 1.5.8 | 1.5.8 |
| libmambapy | 1.5.8 | 1.5.8 | 1.5.8 |
| libnghttp2 | 1.57.0 | 1.57.0 | 1.57.0 |
| libopenblas | 0.3.21 | 0.3.21 | |
| libpng | 1.6.39 | 1.6.39 | 1.6.39 |
| libpq | 12.17 | 12.17 | |
| libprotobuf | 3.20.3 | 3.20.3 | 3.20.3 |
| libsodium | 1.0.18 | 1.0.18 | 1.0.18 |
| libsolv | 0.7.24 | 0.7.24 | 0.7.24 |
| libspatialindex | 1.9.3 | 1.9.3 | |
| libssh2 | 1.11.0 | 1.11.0 | 1.11.0 |
| libstdcxx-ng | 11.2.0 | 11.2.0 | 11.2.0 |
| libthrift | 0.15.0 | 0.15.0 | 0.15.0 |
| libtiff | 4.5.1 | 4.5.1 | 4.5.1 |
| libuuid | 1.41.5 | 1.41.5 | 1.41.5 |
| libwebp-base | 1.3.2 | 1.3.2 | 1.3.2 |
| libxcb | 1.15 | 1.15 | |
| libxkbcommon | 1.0.1 | 1.0.1 | |
| libxml2 | 2.10.4 | 2.10.4 | 2.10.4 |
| libxslt | 1.1.37 | 1.1.37 | |
| libzopfli | 1.0.3 | 1.0.3 | 1.0.3 |
| linkify-it-py | 2.0.0 | 2.0.0 | |
| llvmlite | 0.42.0 | 0.42.0 | |
| locket | 1.0.0 | 1.0.0 | 1.0.0 |
| lxml | 5.2.1 | 5.2.1 | |
| lz4 | 4.3.2 | 4.3.2 | 4.3.2 |
| lz4-c | 1.9.4 | 1.9.4 | 1.9.4 |
| lzo | 2.10 | 2.10 | |
| markdown | 3.4.1 | 3.4.1 | |
| markdown-it-py | 2.2.0 | 2.2.0 | |
| markupsafe | 2.1.3 | 2.1.3 | 2.1.3 |
| matplotlib | 3.8.4 | 3.8.4 | 3.8.4 |
| matplotlib-base | 3.8.4 | 3.8.4 | 3.8.4 |
| matplotlib-inline | 0.1.6 | 0.1.6 | 0.1.6 |
| mccabe | 0.7.0 | 0.7.0 | 0.7.0 |
| mdit-py-plugins | 0.3.0 | 0.3.0 | |
| mdurl | 0.1.0 | 0.1.0 | |
| menuinst | 2.1.1 | 2.1.1 | 2.1.1 |
| mistune | 2.0.4 | 2.0.4 | 2.0.4 |
| mkl | 2023.1.0 | ||
| mkl-service | 2.4.0 | ||
| mkl\_fft | 1.3.8 | ||
| mkl\_random | 1.2.4 | ||
| more-itertools | 10.1.0 | 10.1.0 | 10.1.0 |
| mpmath | 1.3.0 | 1.3.0 | 1.3.0 |
| msgpack-python | 1.0.3 | 1.0.3 | 1.0.3 |
| multidict | 6.0.4 | 6.0.4 | 6.0.4 |
| multipledispatch | 0.6.0 | 0.6.0 | |
| mypy | 1.10.0 | 1.10.0 | 1.10.0 |
| mypy\_extensions | 1.0.0 | 1.0.0 | 1.0.0 |
| mysql | 5.7.24 | 5.7.24 | |
| navigator-updater | 0.5.1 | 0.5.1 | |
| nbclient | 0.8.0 | 0.8.0 | 0.8.0 |
| nbconvert | 7.10.0 | 7.10.0 | 7.10.0 |
| nbformat | 5.9.2 | 5.9.2 | 5.9.2 |
| ncurses | 6.4 | 6.4 | 6.4 |
| nest-asyncio | 1.6.0 | 1.6.0 | 1.6.0 |
| networkx | 3.2.1 | 3.2.1 | 3.2.1 |
| nltk | 3.8.1 | 3.8.1 | 3.8.1 |
| notebook | 7.0.8 | 7.0.8 | |
| notebook-shim | 0.2.3 | 0.2.3 | |
| nspr | 4.35 | 4.35 | |
| nss | 3.89.1 | 3.89.1 | |
| numba | 0.59.1 | 0.59.1 | |
| numexpr | 2.8.7 | 2.8.7 | 2.8.7 |
| numpy | 1.26.4 | 1.26.4 | 1.26.4 |
| numpy-base | 1.26.4 | 1.26.4 | 1.26.4 |
| numpydoc | 1.7.0 | 1.7.0 | |
| oniguruma | 6.9.7.1 | 6.9.7.1 | |
| openjpeg | 2.4.0 | 2.4.0 | 2.4.0 |
| openpyxl | 3.1.2 | 3.1.2 | 3.1.2 |
| openssl | 3.0.14 | 3.0.14 | 3.0.14 |
| orc | 1.7.4 | 1.7.4 | 1.7.4 |
| overrides | 7.4.0 | 7.4.0 | |
| packaging | 23.2 | 23.2 | 23.2 |
| pandas | 2.2.2 | 2.2.2 | 2.2.2 |
| pandocfilters | 1.5.0 | 1.5.0 | 1.5.0 |
| panel | 1.4.4 | 1.4.4 | |
| param | 2.1.0 | 2.1.0 | |
| parsel | 1.8.1 | 1.8.1 | |
| parso | 0.8.3 | 0.8.3 | 0.8.3 |
| partd | 1.4.1 | 1.4.1 | 1.4.1 |
| patch | 2.7.6 | 2.7.6 | 2.7.6 |
| patchelf | 0.17.2 | 0.17.2 | 0.17.2 |
| pathspec | 0.10.3 | 0.10.3 | 0.10.3 |
| patsy | 0.5.6 | 0.5.6 | 0.5.6 |
| pcre2 | 10.42 | 10.42 | 10.42 |
| pexpect | 4.8.0 | 4.8.0 | 4.8.0 |
| pickleshare | 0.7.5 | 0.7.5 | |
| pillow | 10.3.0 | 10.3.0 | 10.3.0 |
| pip | 24.0 | 24.0 | 24.0 |
| pkce | 1.0.3 | 1.0.3 | |
| pkginfo | 1.10.0 | 1.10.0 | 1.10.0 |
| platformdirs | 3.10.0 | 3.10.0 | 3.10.0 |
| plotly | 5.22.0 | 5.22.0 | 5.22.0 |
| pluggy | 1.0.0 | 1.0.0 | 1.0.0 |
| ply | 3.11 | 3.11 | |
| prometheus\_client | 0.14.1 | 0.14.1 | |
| prompt-toolkit | 3.0.43 | 3.0.43 | 3.0.43 |
| prompt\_toolkit | 3.0.43 | 3.0.43 | 3.0.43 |
| protego | 0.1.16 | 0.1.16 | |
| protobuf | 3.20.3 | 3.20.3 | |
| psutil | 5.9.0 | 5.9.0 | 5.9.0 |
| ptyprocess | 0.7.0 | 0.7.0 | 0.7.0 |
| pure\_eval | 0.2.2 | 0.2.2 | 0.2.2 |
| py-cpuinfo | 9.0.0 | 9.0.0 | |
| py-lief | 0.12.3 | 0.12.3 | 0.12.3 |
| pyarrow | 14.0.2 | 14.0.2 | 14.0.2 |
| pyasn1 | 0.4.8 | 0.4.8 | |
| pyasn1-modules | 0.2.8 | 0.2.8 | |
| pybind11-abi | 5 | 5 | 5 |
| pycodestyle | 2.11.1 | 2.11.1 | 2.11.1 |
| pycosat | 0.6.6 | 0.6.6 | 0.6.6 |
| pycparser | 2.21 | 2.21 | 2.21 |
| pyct | 0.5.0 | 0.5.0 | |
| pycurl | 7.45.2 | 7.45.2 | 7.45.2 |
| pydantic | 2.5.3 | 2.5.3 | |
| pydantic-core | 2.14.6 | 2.14.6 | |
| pydeck | 0.8.0 | 0.8.0 | |
| pydispatcher | 2.0.5 | 2.0.5 | |
| pydocstyle | 6.3.0 | 6.3.0 | |
| pyerfa | 2.0.1.4 | 2.0.1.4 | 2.0.1.4 |
| pyflakes | 3.2.0 | 3.2.0 | 3.2.0 |
| pygments | 2.15.1 | 2.15.1 | 2.15.1 |
| pyjwt | 2.8.0 | 2.8.0 | |
| pylint | 2.16.2 | 2.16.2 | 2.16.2 |
| pylint-venv | 3.0.3 | 3.0.3 | |
| pyls-spyder | 0.4.0 | 0.4.0 | |
| pyodbc | 5.0.1 | 5.0.1 | 5.0.1 |
| pyopenssl | 24.0.0 | 24.0.0 | |
| pyparsing | 3.0.9 | 3.0.9 | 3.0.9 |
| pyqt | 5.15.10 | 5.15.10 | |
| pyqt5-sip | 12.13.0 | 12.13.0 | |
| pyqtwebengine | 5.15.10 | 5.15.10 | |
| pysocks | 1.7.1 | 1.7.1 | 1.7.1 |
| pytables | 3.9.2 | 3.9.2 | |
| pytest | 7.4.4 | 7.4.4 | 7.4.4 |
| python | 3.12.4 | 3.12.4 | 3.12.4 |
| python-dateutil | 2.9.0post0 | 2.9.0post0 | 2.9.0post0 |
| python-dotenv | 0.21.0 | 0.21.0 | |
| python-fastjsonschema | 2.16.2 | 2.16.2 | 2.16.2 |
| python-json-logger | 2.0.7 | 2.0.7 | |
| python-libarchive-c | 2.9 | 2.9 | 2.9 |
| python-lmdb | 1.4.1 | 1.4.1 | 1.4.1 |
| python-lsp-black | 2.0.0 | 2.0.0 | |
| python-lsp-jsonrpc | 1.1.2 | 1.1.2 | |
| python-lsp-server | 1.10.0 | 1.10.0 | |
| python-slugify | 5.0.2 | 5.0.2 | |
| python-snappy | 0.6.1 | 0.6.1 | 0.6.1 |
| python-tzdata | 2023.3 | 2023.3 | 2023.3 |
| pytoolconfig | 1.2.6 | 1.2.6 | |
| pytz | 2024.1 | 2024.1 | 2024.1 |
| pyviz\_comms | 3.0.2 | 3.0.2 | |
| pywavelets | 1.5.0 | 1.5.0 | 1.5.0 |
| pyxdg | 0.27 | 0.27 | |
| pyyaml | 6.0.1 | 6.0.1 | 6.0.1 |
| pyzmq | 25.1.2 | 25.1.2 | 25.1.2 |
| qdarkstyle | 3.2.3 | 3.2.3 | |
| qstylizer | 0.2.2 | 0.2.2 | |
| qt-main | 5.15.2 | 5.15.2 | |
| qt-webengine | 5.15.9 | 5.15.9 | |
| qtawesome | 1.2.2 | 1.2.2 | |
| qtconsole | 5.5.1 | 5.5.1 | |
| qtpy | 2.4.1 | 2.4.1 | |
| queuelib | 1.6.2 | 1.6.2 | |
| re2 | 2022.04.01 | 2022.04.01 | 2022.04.01 |
| readline | 8.2 | 8.2 | 8.2 |
| referencing | 0.30.2 | 0.30.2 | 0.30.2 |
| regex | 2023.10.3 | 2023.10.3 | 2023.10.3 |
| reproc | 14.2.4 | 14.2.4 | 14.2.4 |
| reproc-cpp | 14.2.4 | 14.2.4 | 14.2.4 |
| requests | 2.32.2 | 2.32.2 | 2.32.2 |
| requests-file | 1.5.1 | 1.5.1 | |
| requests-toolbelt | 1.0.0 | 1.0.0 | 1.0.0 |
| rfc3339-validator | 0.1.4 | 0.1.4 | |
| rfc3986-validator | 0.1.1 | 0.1.1 | |
| rich | 13.3.5 | 13.3.5 | |
| rope | 1.12.0 | 1.12.0 | |
| rpds-py | 0.10.6 | 0.10.6 | 0.10.6 |
| rtree | 1.0.1 | 1.0.1 | |
| ruamel.yaml | 0.17.21 | 0.17.21 | 0.17.21 |
| ruamel\_yaml | 0.17.21 | 0.17.21 | 0.17.21 |
| s2n | 1.3.27 | 1.3.27 | 1.3.27 |
| s3fs | 2024.3.1 | 2024.3.1 | 2024.3.1 |
| scikit-image | 0.23.2 | 0.23.2 | 0.23.2 |
| scikit-learn | 1.4.2 | 1.4.2 | 1.4.2 |
| scipy | 1.13.1 | 1.13.1 | 1.13.1 |
| scrapy | 2.11.1 | 2.11.1 | |
| seaborn | 0.13.2 | 0.13.2 | 0.13.2 |
| secretstorage | 3.3.1 | 3.3.1 | |
| semver | 3.0.2 | 3.0.2 | |
| send2trash | 1.8.2 | 1.8.2 | |
| service\_identity | 18.1.0 | 18.1.0 | |
| setuptools | 69.5.1 | 69.5.1 | 69.5.1 |
| sip | 6.7.12 | 6.7.12 | |
| six | 1.16.0 | 1.16.0 | 1.16.0 |
| smart\_open | 5.2.1 | 5.2.1 | |
| smmap | 4.0.0 | 4.0.0 | |
| snappy | 1.1.10 | 1.1.10 | 1.1.10 |
| sniffio | 1.3.0 | 1.3.0 | |
| snowballstemmer | 2.2.0 | 2.2.0 | 2.2.0 |
| sortedcontainers | 2.4.0 | 2.4.0 | 2.4.0 |
| soupsieve | 2.5 | 2.5 | 2.5 |
| sphinx | 7.3.7 | 7.3.7 | |
| sphinxcontrib-applehelp | 1.0.2 | 1.0.2 | |
| sphinxcontrib-devhelp | 1.0.2 | 1.0.2 | |
| sphinxcontrib-htmlhelp | 2.0.0 | 2.0.0 | |
| sphinxcontrib-jsmath | 1.0.1 | 1.0.1 | |
| sphinxcontrib-qthelp | 1.0.3 | 1.0.3 | |
| sphinxcontrib-serializinghtml | 1.1.10 | 1.1.10 | |
| spyder | 5.5.1 | 5.5.1 | |
| spyder-kernels | 2.5.0 | 2.5.0 | |
| sqlalchemy | 2.0.30 | 2.0.30 | 2.0.30 |
| sqlite | 3.45.3 | 3.45.3 | 3.45.3 |
| stack\_data | 0.2.0 | 0.2.0 | 0.2.0 |
| statsmodels | 0.14.2 | 0.14.2 | 0.14.2 |
| streamlit | 1.32.0 | 1.32.0 | |
| sympy | 1.12 | 1.12 | 1.12 |
| tabulate | 0.9.0 | 0.9.0 | 0.9.0 |
| tbb | 2021.8.0 | 2021.8.0 | |
| tblib | 1.7.0 | 1.7.0 | 1.7.0 |
| tenacity | 8.2.2 | 8.2.2 | 8.2.2 |
| terminado | 0.17.1 | 0.17.1 | |
| text-unidecode | 1.3 | 1.3 | |
| textdistance | 4.2.1 | 4.2.1 | |
| threadpoolctl | 2.2.0 | 2.2.0 | 2.2.0 |
| three-merge | 0.1.1 | 0.1.1 | |
| tifffile | 2023.4.12 | 2023.4.12 | 2023.4.12 |
| tinycss2 | 1.2.1 | 1.2.1 | 1.2.1 |
| tk | 8.6.14 | 8.6.14 | 8.6.14 |
| tldextract | 3.2.0 | 3.2.0 | |
| toml | 0.10.2 | 0.10.2 | |
| tomli | 2.0.1 | 2.0.1 | |
| tomlkit | 0.11.1 | 0.11.1 | 0.11.1 |
| toolz | 0.12.0 | 0.12.0 | 0.12.0 |
| tornado | 6.4.1 | 6.4.1 | 6.4.1 |
| tqdm | 4.66.4 | 4.66.4 | 4.66.4 |
| traitlets | 5.14.3 | 5.14.3 | 5.14.3 |
| truststore | 0.8.0 | 0.8.0 | 0.8.0 |
| twisted | 23.10.0 | 23.10.0 | |
| typing-extensions | 4.11.0 | 4.11.0 | 4.11.0 |
| typing\_extensions | 4.11.0 | 4.11.0 | 4.11.0 |
| tzdata | 2024a | 2024a | 2024a |
| uc-micro-py | 1.0.1 | 1.0.1 | |
| ujson | 5.10.0 | 5.10.0 | |
| unicodedata2 | 15.1.0 | 15.1.0 | 15.1.0 |
| unidecode | 1.2.0 | 1.2.0 | |
| unixodbc | 2.3.11 | 2.3.11 | 2.3.11 |
| urllib3 | 2.2.2 | 2.2.2 | 2.2.2 |
| utf8proc | 2.6.1 | 2.6.1 | 2.6.1 |
| w3lib | 1.21.0 | 2.1.2 | |
| watchdog | 4.0.1 | 4.0.1 | |
| wcwidth | 0.2.5 | 0.2.5 | 0.2.5 |
| webencodings | 0.5.1 | 0.5.1 | 0.5.1 |
| websocket-client | 1.8.0 | 1.8.0 | |
| werkzeug | 3.0.3 | 3.0.3 | 3.0.3 |
| whatthepatch | 1.0.2 | 1.0.2 | |
| wheel | 0.43.0 | 0.43.0 | 0.43.0 |
| widgetsnbextension | 3.6.6 | 3.6.6 | |
| wrapt | 1.14.1 | 1.14.1 | 1.14.1 |
| wurlitzer | 3.0.2 | 3.0.2 | |
| xarray | 2023.6.0 | 2023.6.0 | |
| xyzservices | 2022.9.0 | 2022.9.0 | 2022.9.0 |
| xz | 5.4.6 | 5.4.6 | 5.4.6 |
| yaml | 0.2.5 | 0.2.5 | 0.2.5 |
| yaml-cpp | 0.8.0 | 0.8.0 | 0.8.0 |
| yapf | 0.40.2 | 0.40.2 | |
| yarl | 1.9.3 | 1.9.3 | 1.9.3 |
| zeromq | 4.3.5 | 4.3.5 | 4.3.5 |
| zfp | 1.0.0 | ||
| zict | 3.0.0 | 3.0.0 | 3.0.0 |
| zipp | 3.17.0 | 3.17.0 | |
| zlib | 1.2.13 | 1.2.13 | 1.2.13 |
| zlib-ng | 2.0.7 | 2.0.7 | |
| zope | 1.0 | 1.0 | |
| zope.interface | 5.4.0 | 5.4.0 | |
| zstandard | 0.22.0 | 0.22.0 | 0.22.0 |
| zstd | 1.5.5 | 1.5.5 | 1.5.5 |
| Package Name | osx-arm64 | osx-64 |
|---|---|---|
| \_anaconda\_depends | 2024.06 | 2024.06 |
| abseil-cpp | 20230802.0 | 20230802.0 |
| aiobotocore | 2.12.3 | 2.12.3 |
| aiohttp | 3.9.5 | 3.9.5 |
| aioitertools | 0.7.1 | 0.7.1 |
| aiosignal | 1.2.0 | 1.2.0 |
| alabaster | 0.7.16 | 0.7.16 |
| altair | 5.0.1 | 5.0.1 |
| anaconda-anon-usage | 0.4.4 | 0.4.4 |
| anaconda-catalogs | 0.2.0 | 0.2.0 |
| anaconda-client | 1.12.3 | 1.12.3 |
| anaconda-cloud-auth | 0.5.1 | 0.5.1 |
| anaconda-navigator | 2.6.0 | 2.6.0 |
| anaconda-project | 0.11.1 | 0.11.1 |
| annotated-types | 0.6.0 | 0.6.0 |
| anyio | 4.2.0 | 4.2.0 |
| aom | 3.6.0 | 3.6.0 |
| appdirs | 1.4.4 | 1.4.4 |
| applaunchservices | 0.3.0 | 0.3.0 |
| appnope | 0.1.3 | 0.1.3 |
| appscript | 1.1.2 | 1.1.2 |
| archspec | 0.2.3 | 0.2.3 |
| argon2-cffi | 21.3.0 | 21.3.0 |
| argon2-cffi-bindings | 21.2.0 | 21.2.0 |
| arrow | 1.2.3 | 1.2.3 |
| arrow-cpp | 14.0.2 | 14.0.2 |
| astroid | 2.14.2 | 2.14.2 |
| astropy | 6.1.0 | 6.1.0 |
| astropy-iers-data | 0.2024.6.3.0.31.14 | 0.2024.6.3.0.31.14 |
| asttokens | 2.0.5 | 2.0.5 |
| async-lru | 2.0.4 | 2.0.4 |
| atomicwrites | 1.4.0 | 1.4.0 |
| attrs | 23.1.0 | 23.1.0 |
| automat | 20.2.0 | 20.2.0 |
| autopep8 | 2.0.4 | 2.0.4 |
| aws-c-auth | 0.6.19 | 0.6.19 |
| aws-c-cal | 0.5.20 | 0.5.20 |
| aws-c-common | 0.8.5 | 0.8.5 |
| aws-c-compression | 0.2.16 | 0.2.16 |
| aws-c-event-stream | 0.2.15 | 0.2.15 |
| aws-c-http | 0.6.25 | 0.6.25 |
| aws-c-io | 0.13.10 | 0.13.10 |
| aws-c-mqtt | 0.7.13 | 0.7.13 |
| aws-c-s3 | 0.1.51 | 0.1.51 |
| aws-c-sdkutils | 0.1.6 | 0.1.6 |
| aws-checksums | 0.1.13 | 0.1.13 |
| aws-crt-cpp | 0.18.16 | 0.18.16 |
| aws-sdk-cpp | 1.10.55 | 1.10.55 |
| babel | 2.11.0 | 2.11.0 |
| bcrypt | 3.2.0 | 3.2.0 |
| beautifulsoup4 | 4.12.3 | 4.12.3 |
| binaryornot | 0.4.4 | 0.4.4 |
| black | 24.4.2 | 24.4.2 |
| blas | 1.0 | 1.0 |
| bleach | 4.1.0 | 4.1.0 |
| blinker | 1.6.2 | 1.6.2 |
| blosc | 1.21.3 | 1.21.3 |
| bokeh | 3.4.1 | 3.4.1 |
| boltons | 23.0.0 | 23.0.0 |
| boost-cpp | 1.82.0 | 1.82.0 |
| botocore | 1.34.69 | 1.34.69 |
| bottleneck | 1.3.7 | 1.3.7 |
| brotli | 1.0.9 | 1.0.9 |
| brotli-bin | 1.0.9 | 1.0.9 |
| brotli-python | 1.0.9 | 1.0.9 |
| brunsli | 0.1 | 0.1 |
| bzip2 | 1.0.8 | 1.0.8 |
| c-ares | 1.19.1 | 1.19.1 |
| c-blosc2 | 2.12.0 | 2.12.0 |
| ca-certificates | 2024.3.11 | 2024.3.11 |
| cachetools | 5.3.3 | 5.3.3 |
| cctools | 949.0.1 | 949.0.1 |
| cctools\_osx-64 | 949.0.1 | |
| cctools\_osx-arm64 | 949.0.1 | |
| certifi | 2024.6.2 | 2024.6.2 |
| cffi | 1.16.0 | 1.16.0 |
| cfitsio | 3.470 | 3.470 |
| chardet | 4.0.0 | 4.0.0 |
| charls | 2.2.0 | 2.2.0 |
| charset-normalizer | 2.0.4 | 2.0.4 |
| click | 8.1.7 | 8.1.7 |
| cloudpickle | 2.2.1 | 2.2.1 |
| colorama | 0.4.6 | 0.4.6 |
| colorcet | 3.1.0 | 3.1.0 |
| comm | 0.2.1 | 0.2.1 |
| conda | 24.5.0 | 24.5.0 |
| conda-build | 24.5.1 | 24.5.1 |
| conda-content-trust | 0.2.0 | 0.2.0 |
| conda-index | 0.5.0 | 0.5.0 |
| conda-libmamba-solver | 24.1.0 | 24.1.0 |
| conda-pack | 0.7.1 | 0.7.1 |
| conda-package-handling | 2.3.0 | 2.3.0 |
| conda-package-streaming | 0.10.0 | 0.10.0 |
| conda-repo-cli | 1.0.88 | 1.0.88 |
| conda-token | 0.5.0 | 0.5.0 |
| constantly | 23.10.4 | 23.10.4 |
| contourpy | 1.2.0 | 1.2.0 |
| cookiecutter | 2.6.0 | 2.6.0 |
| cryptography | 42.0.5 | 42.0.5 |
| cssselect | 1.2.0 | 1.2.0 |
| curl | 8.7.1 | 8.7.1 |
| cycler | 0.11.0 | 0.11.0 |
| cyrus-sasl | 2.1.28 | 2.1.28 |
| cytoolz | 0.12.2 | 0.12.2 |
| dask | 2024.5.0 | 2024.5.0 |
| dask-core | 2024.5.0 | 2024.5.0 |
| dask-expr | 1.1.0 | 1.1.0 |
| datashader | 0.16.2 | 0.16.2 |
| dav1d | 1.2.1 | 1.2.1 |
| debugpy | 1.6.7 | 1.6.7 |
| decorator | 5.1.1 | 5.1.1 |
| defusedxml | 0.7.1 | 0.7.1 |
| diff-match-patch | 20200713 | 20200713 |
| dill | 0.3.8 | 0.3.8 |
| distributed | 2024.5.0 | 2024.5.0 |
| distro | 1.9.0 | 1.9.0 |
| docstring-to-markdown | 0.11 | 0.11 |
| docutils | 0.18.1 | 0.18.1 |
| entrypoints | 0.4 | 0.4 |
| et\_xmlfile | 1.1.0 | 1.1.0 |
| executing | 0.8.3 | 0.8.3 |
| expat | 2.6.2 | 2.6.2 |
| filelock | 3.13.1 | 3.13.1 |
| flake8 | 7.0.0 | 7.0.0 |
| flask | 3.0.3 | 3.0.3 |
| fmt | 9.1.0 | 9.1.0 |
| fonttools | 4.51.0 | 4.51.0 |
| freetype | 2.12.1 | 2.12.1 |
| frozendict | 2.4.2 | 2.4.2 |
| frozenlist | 1.4.0 | 1.4.0 |
| fsspec | 2024.3.1 | 2024.3.1 |
| gensim | 4.3.2 | 4.3.2 |
| gettext | 0.21.0 | 0.21.0 |
| gflags | 2.2.2 | 2.2.2 |
| giflib | 5.2.1 | 5.2.1 |
| gitdb | 4.0.7 | 4.0.7 |
| gitpython | 3.1.37 | 3.1.37 |
| glib | 2.78.4 | 2.78.4 |
| glib-tools | 2.78.4 | 2.78.4 |
| glog | 0.5.0 | 0.5.0 |
| greenlet | 3.0.1 | 3.0.1 |
| grpc-cpp | 1.48.2 | 1.48.2 |
| gst-plugins-base | 1.14.1 | 1.14.1 |
| gstreamer | 1.14.1 | 1.14.1 |
| gtest | 1.14.0 | 1.14.0 |
| h5py | 3.11.0 | 3.11.0 |
| hdf5 | 1.12.1 | 1.12.1 |
| heapdict | 1.0.1 | 1.0.1 |
| holoviews | 1.19.0 | 1.19.0 |
| hvplot | 0.10.0 | 0.10.0 |
| hyperlink | 21.0.0 | 21.0.0 |
| icu | 73.1 | 73.1 |
| idna | 3.7 | 3.7 |
| imagecodecs | 2023.1.23 | 2023.1.23 |
| imageio | 2.33.1 | 2.33.1 |
| imagesize | 1.4.1 | 1.4.1 |
| imbalanced-learn | 0.12.3 | 0.12.3 |
| importlib-metadata | 7.0.1 | 7.0.1 |
| incremental | 22.10.0 | 22.10.0 |
| inflection | 0.5.1 | 0.5.1 |
| iniconfig | 1.1.1 | 1.1.1 |
| intake | 0.7.0 | 0.7.0 |
| intervaltree | 3.1.0 | 3.1.0 |
| ipykernel | 6.28.0 | 6.28.0 |
| ipython | 8.25.0 | 8.25.0 |
| ipython\_genutils | 0.2.0 | 0.2.0 |
| ipywidgets | 7.8.1 | 7.8.1 |
| isort | 5.13.2 | 5.13.2 |
| itemadapter | 0.3.0 | 0.3.0 |
| itemloaders | 1.1.0 | 1.1.0 |
| itsdangerous | 2.2.0 | 2.2.0 |
| jaraco.classes | 3.2.1 | 3.2.1 |
| jedi | 0.18.1 | 0.18.1 |
| jellyfish | 1.0.1 | 1.0.1 |
| jinja2 | 3.1.4 | 3.1.4 |
| jmespath | 1.0.1 | 1.0.1 |
| joblib | 1.4.2 | 1.4.2 |
| jpeg | 9e | 9e |
| jq | 1.6 | 1.6 |
| json5 | 0.9.6 | 0.9.6 |
| jsonpatch | 1.33 | 1.33 |
| jsonpointer | 2.1 | 2.1 |
| jsonschema | 4.19.2 | 4.19.2 |
| jsonschema-specifications | 2023.7.1 | 2023.7.1 |
| jupyter | 1.0.0 | 1.0.0 |
| jupyter-lsp | 2.2.0 | 2.2.0 |
| jupyter\_client | 8.6.0 | 8.6.0 |
| jupyter\_console | 6.6.3 | 6.6.3 |
| jupyter\_core | 5.7.2 | 5.7.2 |
| jupyter\_events | 0.10.0 | 0.10.0 |
| jupyter\_server | 2.14.1 | 2.14.1 |
| jupyter\_server\_terminals | 0.4.4 | 0.4.4 |
| jupyterlab | 4.0.11 | 4.0.11 |
| jupyterlab-variableinspector | 3.1.0 | 3.1.0 |
| jupyterlab\_pygments | 0.1.2 | 0.1.2 |
| jupyterlab\_server | 2.25.1 | 2.25.1 |
| jupyterlab\_widgets | 1.0.0 | 1.0.0 |
| jxrlib | 1.1 | 1.1 |
| keyring | 24.3.1 | 24.3.1 |
| kiwisolver | 1.4.4 | 1.4.4 |
| krb5 | 1.20.1 | 1.20.1 |
| lazy-object-proxy | 1.10.0 | 1.10.0 |
| lazy\_loader | 0.4 | 0.4 |
| lcms2 | 2.12 | 2.12 |
| ld64 | 530 | 530 |
| ld64\_osx-64 | 530 | |
| ld64\_osx-arm64 | 530 | |
| ldid | 2.1.5 | 2.1.5 |
| lerc | 3.0 | 3.0 |
| libaec | 1.0.4 | 1.0.4 |
| libarchive | 3.6.2 | 3.6.2 |
| libavif | 0.11.1 | 0.11.1 |
| libboost | 1.82.0 | 1.82.0 |
| libbrotlicommon | 1.0.9 | 1.0.9 |
| libbrotlidec | 1.0.9 | 1.0.9 |
| libbrotlienc | 1.0.9 | 1.0.9 |
| libclang | 14.0.6 | 14.0.6 |
| libclang13 | 14.0.6 | 14.0.6 |
| libcurl | 8.7.1 | 8.7.1 |
| libcxx | 14.0.6 | 14.0.6 |
| libdeflate | 1.17 | 1.17 |
| libedit | 3.1.20230828 | 3.1.20230828 |
| libev | 4.33 | 4.33 |
| libevent | 2.1.12 | 2.1.12 |
| libffi | 3.4.4 | 3.4.4 |
| libgfortran | 5.0.0 | 5.0.0 |
| libgfortran5 | 11.3.0 | 11.3.0 |
| libglib | 2.78.4 | 2.78.4 |
| libiconv | 1.16 | 1.16 |
| liblief | 0.12.3 | 0.12.3 |
| libllvm14 | 14.0.6 | 14.0.6 |
| libmamba | 1.5.8 | 1.5.8 |
| libmambapy | 1.5.8 | 1.5.8 |
| libnghttp2 | 1.57.0 | 1.57.0 |
| libopenblas | 0.3.21 | 0.3.21 |
| libpng | 1.6.39 | 1.6.39 |
| libpq | 12.17 | 12.17 |
| libprotobuf | 3.20.3 | 3.20.3 |
| libsodium | 1.0.18 | 1.0.18 |
| libsolv | 0.7.24 | 0.7.24 |
| libspatialindex | 1.9.3 | 1.9.3 |
| libssh2 | 1.11.0 | 1.11.0 |
| libthrift | 0.15.0 | 0.15.0 |
| libtiff | 4.5.1 | 4.5.1 |
| libwebp-base | 1.3.2 | 1.3.2 |
| libxml2 | 2.10.4 | 2.10.4 |
| libxslt | 1.1.37 | 1.1.37 |
| libzopfli | 1.0.3 | 1.0.3 |
| linkify-it-py | 2.0.0 | 2.0.0 |
| llvm-openmp | 14.0.6 | 14.0.6 |
| llvmlite | 0.42.0 | 0.42.0 |
| locket | 1.0.0 | 1.0.0 |
| lxml | 5.2.1 | 5.2.1 |
| lz4 | 4.3.2 | 4.3.2 |
| lz4-c | 1.9.4 | 1.9.4 |
| lzo | 2.10 | 2.10 |
| markdown | 3.4.1 | 3.4.1 |
| markdown-it-py | 2.2.0 | 2.2.0 |
| markupsafe | 2.1.3 | 2.1.3 |
| matplotlib | 3.8.4 | 3.8.4 |
| matplotlib-base | 3.8.4 | 3.8.4 |
| matplotlib-inline | 0.1.6 | 0.1.6 |
| mccabe | 0.7.0 | 0.7.0 |
| mdit-py-plugins | 0.3.0 | 0.3.0 |
| mdurl | 0.1.0 | 0.1.0 |
| menuinst | 2.1.1 | 2.1.1 |
| mistune | 2.0.4 | 2.0.4 |
| more-itertools | 10.1.0 | 10.1.0 |
| mpmath | 1.3.0 | 1.3.0 |
| msgpack-python | 1.0.3 | 1.0.3 |
| multidict | 6.0.4 | 6.0.4 |
| multipledispatch | 0.6.0 | 0.6.0 |
| mypy | 1.10.0 | 1.10.0 |
| mypy\_extensions | 1.0.0 | 1.0.0 |
| mysql | 5.7.24 | 5.7.24 |
| navigator-updater | 0.5.1 | 0.5.1 |
| nbclient | 0.8.0 | 0.8.0 |
| nbconvert | 7.10.0 | 7.10.0 |
| nbformat | 5.9.2 | 5.9.2 |
| ncurses | 6.4 | 6.4 |
| nest-asyncio | 1.6.0 | 1.6.0 |
| networkx | 3.2.1 | 3.2.1 |
| nltk | 3.8.1 | 3.8.1 |
| notebook | 7.0.8 | 7.0.8 |
| notebook-shim | 0.2.3 | 0.2.3 |
| numba | 0.59.1 | 0.59.1 |
| numexpr | 2.8.7 | 2.8.7 |
| numpy | 1.26.4 | 1.26.4 |
| numpy-base | 1.26.4 | 1.26.4 |
| numpydoc | 1.7.0 | 1.7.0 |
| oniguruma | 6.9.7.1 | 6.9.7.1 |
| openjpeg | 2.3.0 | 2.4.0 |
| openpyxl | 3.1.2 | 3.1.2 |
| openssl | 3.0.14 | 3.0.14 |
| orc | 1.7.4 | 1.7.4 |
| overrides | 7.4.0 | 7.4.0 |
| packaging | 23.2 | 23.2 |
| pandas | 2.2.2 | 2.2.2 |
| pandocfilters | 1.5.0 | 1.5.0 |
| panel | 1.4.4 | 1.4.4 |
| param | 2.1.0 | 2.1.0 |
| parsel | 1.8.1 | 1.8.1 |
| parso | 0.8.3 | 0.8.3 |
| partd | 1.4.1 | 1.4.1 |
| patch | 2.7.6 | 2.7.6 |
| pathspec | 0.10.3 | 0.10.3 |
| patsy | 0.5.6 | 0.5.6 |
| pcre2 | 10.42 | 10.42 |
| pexpect | 4.8.0 | 4.8.0 |
| pickleshare | 0.7.5 | 0.7.5 |
| pillow | 10.3.0 | 10.3.0 |
| pip | 24.0 | 24.0 |
| pkce | 1.0.3 | 1.0.3 |
| pkginfo | 1.10.0 | 1.10.0 |
| platformdirs | 3.10.0 | 3.10.0 |
| plotly | 5.22.0 | 5.22.0 |
| pluggy | 1.0.0 | 1.0.0 |
| ply | 3.11 | 3.11 |
| prometheus\_client | 0.14.1 | 0.14.1 |
| prompt-toolkit | 3.0.43 | 3.0.43 |
| prompt\_toolkit | 3.0.43 | 3.0.43 |
| protego | 0.1.16 | 0.1.16 |
| protobuf | 3.20.3 | 3.20.3 |
| psutil | 5.9.0 | 5.9.0 |
| ptyprocess | 0.7.0 | 0.7.0 |
| pure\_eval | 0.2.2 | 0.2.2 |
| py-cpuinfo | 9.0.0 | 9.0.0 |
| py-lief | 0.12.3 | 0.12.3 |
| pyarrow | 14.0.2 | 14.0.2 |
| pyasn1 | 0.4.8 | 0.4.8 |
| pyasn1-modules | 0.2.8 | 0.2.8 |
| pybind11-abi | 5 | 5 |
| pycodestyle | 2.11.1 | 2.11.1 |
| pycosat | 0.6.6 | 0.6.6 |
| pycparser | 2.21 | 2.21 |
| pyct | 0.5.0 | 0.5.0 |
| pycurl | 7.45.2 | 7.45.2 |
| pydantic | 2.5.3 | 2.5.3 |
| pydantic-core | 2.14.6 | 2.14.6 |
| pydeck | 0.8.0 | 0.8.0 |
| pydispatcher | 2.0.5 | 2.0.5 |
| pydocstyle | 6.3.0 | 6.3.0 |
| pyerfa | 2.0.1.4 | 2.0.1.4 |
| pyflakes | 3.2.0 | 3.2.0 |
| pygments | 2.15.1 | 2.15.1 |
| pyjwt | 2.8.0 | 2.8.0 |
| pylint | 2.16.2 | 2.16.2 |
| pylint-venv | 3.0.3 | 3.0.3 |
| pyls-spyder | 0.4.0 | 0.4.0 |
| pyobjc-core | 10.1 | 10.1 |
| pyobjc-framework-cocoa | 10.1 | 10.1 |
| pyobjc-framework-coreservices | 10.1 | 10.1 |
| pyobjc-framework-fsevents | 10.1 | 10.1 |
| pyodbc | 5.0.1 | 5.0.1 |
| pyopenssl | 24.0.0 | 24.0.0 |
| pyparsing | 3.0.9 | 3.0.9 |
| pyqt | 5.15.10 | 5.15.10 |
| pyqt5-sip | 12.13.0 | 12.13.0 |
| pyqtwebengine | 5.15.10 | 5.15.10 |
| pysocks | 1.7.1 | 1.7.1 |
| pytables | 3.9.2 | 3.9.2 |
| pytest | 7.4.4 | 7.4.4 |
| python | 3.12.4 | 3.12.4 |
| python-dateutil | 2.9.0post0 | 2.9.0post0 |
| python-dotenv | 0.21.0 | 0.21.0 |
| python-fastjsonschema | 2.16.2 | 2.16.2 |
| python-json-logger | 2.0.7 | 2.0.7 |
| python-libarchive-c | 2.9 | 2.9 |
| python-lmdb | 1.4.1 | 1.4.1 |
| python-lsp-black | 2.0.0 | 2.0.0 |
| python-lsp-jsonrpc | 1.1.2 | 1.1.2 |
| python-lsp-server | 1.10.0 | 1.10.0 |
| python-slugify | 5.0.2 | 5.0.2 |
| python-snappy | 0.6.1 | 0.6.1 |
| python-tzdata | 2023.3 | 2023.3 |
| python.app | 3 | 3 |
| pytoolconfig | 1.2.6 | 1.2.6 |
| pytz | 2024.1 | 2024.1 |
| pyviz\_comms | 3.0.2 | 3.0.2 |
| pywavelets | 1.5.0 | 1.5.0 |
| pyyaml | 6.0.1 | 6.0.1 |
| pyzmq | 25.1.2 | 25.1.2 |
| qdarkstyle | 3.2.3 | 3.2.3 |
| qstylizer | 0.2.2 | 0.2.2 |
| qt-main | 5.15.2 | 5.15.2 |
| qt-webengine | 5.15.9 | 5.15.9 |
| qtawesome | 1.2.2 | 1.2.2 |
| qtconsole | 5.5.1 | 5.5.1 |
| qtpy | 2.4.1 | 2.4.1 |
| queuelib | 1.6.2 | 1.6.2 |
| re2 | 2022.04.01 | 2022.04.01 |
| readline | 8.2 | 8.2 |
| referencing | 0.30.2 | 0.30.2 |
| regex | 2023.10.3 | 2023.10.3 |
| reproc | 14.2.4 | 14.2.4 |
| reproc-cpp | 14.2.4 | 14.2.4 |
| requests | 2.32.2 | 2.32.2 |
| requests-file | 1.5.1 | 1.5.1 |
| requests-toolbelt | 1.0.0 | 1.0.0 |
| rfc3339-validator | 0.1.4 | 0.1.4 |
| rfc3986-validator | 0.1.1 | 0.1.1 |
| rich | 13.3.5 | 13.3.5 |
| rope | 1.12.0 | 1.12.0 |
| rpds-py | 0.10.6 | 0.10.6 |
| rtree | 1.0.1 | 1.0.1 |
| ruamel.yaml | 0.17.21 | 0.17.21 |
| ruamel\_yaml | 0.17.21 | 0.17.21 |
| s3fs | 2024.3.1 | 2024.3.1 |
| scikit-image | 0.23.2 | 0.23.2 |
| scikit-learn | 1.4.2 | 1.4.2 |
| scipy | 1.13.1 | 1.13.1 |
| scrapy | 2.11.1 | 2.11.1 |
| seaborn | 0.13.2 | 0.13.2 |
| semver | 3.0.2 | 3.0.2 |
| send2trash | 1.8.2 | 1.8.2 |
| service\_identity | 18.1.0 | 18.1.0 |
| setuptools | 69.5.1 | 69.5.1 |
| sip | 6.7.12 | 6.7.12 |
| six | 1.16.0 | 1.16.0 |
| smart\_open | 5.2.1 | 5.2.1 |
| smmap | 4.0.0 | 4.0.0 |
| snappy | 1.1.10 | 1.1.10 |
| sniffio | 1.3.0 | 1.3.0 |
| snowballstemmer | 2.2.0 | 2.2.0 |
| sortedcontainers | 2.4.0 | 2.4.0 |
| soupsieve | 2.5 | 2.5 |
| sphinx | 7.3.7 | 7.3.7 |
| sphinxcontrib-applehelp | 1.0.2 | 1.0.2 |
| sphinxcontrib-devhelp | 1.0.2 | 1.0.2 |
| sphinxcontrib-htmlhelp | 2.0.0 | 2.0.0 |
| sphinxcontrib-jsmath | 1.0.1 | 1.0.1 |
| sphinxcontrib-qthelp | 1.0.3 | 1.0.3 |
| sphinxcontrib-serializinghtml | 1.1.10 | 1.1.10 |
| spyder | 5.5.1 | 5.5.1 |
| spyder-kernels | 2.5.0 | 2.5.0 |
| sqlalchemy | 2.0.30 | 2.0.30 |
| sqlite | 3.45.3 | 3.45.3 |
| stack\_data | 0.2.0 | 0.2.0 |
| statsmodels | 0.14.2 | 0.14.2 |
| streamlit | 1.32.0 | 1.32.0 |
| sympy | 1.12 | 1.12 |
| tabulate | 0.9.0 | 0.9.0 |
| tapi | 1100.0.11 | 1000.10.8 |
| tbb | 2021.8.0 | 2021.8.0 |
| tblib | 1.7.0 | 1.7.0 |
| tenacity | 8.2.2 | 8.2.2 |
| terminado | 0.17.1 | 0.17.1 |
| text-unidecode | 1.3 | 1.3 |
| textdistance | 4.2.1 | 4.2.1 |
| threadpoolctl | 2.2.0 | 2.2.0 |
| three-merge | 0.1.1 | 0.1.1 |
| tifffile | 2023.4.12 | 2023.4.12 |
| tinycss2 | 1.2.1 | 1.2.1 |
| tk | 8.6.14 | 8.6.14 |
| tldextract | 3.2.0 | 3.2.0 |
| toml | 0.10.2 | 0.10.2 |
| tomli | 2.0.1 | 2.0.1 |
| tomlkit | 0.11.1 | 0.11.1 |
| toolz | 0.12.0 | 0.12.0 |
| tornado | 6.4.1 | 6.4.1 |
| tqdm | 4.66.4 | 4.66.4 |
| traitlets | 5.14.3 | 5.14.3 |
| truststore | 0.8.0 | 0.8.0 |
| twisted | 23.10.0 | 23.10.0 |
| typing-extensions | 4.11.0 | 4.11.0 |
| typing\_extensions | 4.11.0 | 4.11.0 |
| tzdata | 2024a | 2024a |
| uc-micro-py | 1.0.1 | 1.0.1 |
| ujson | 5.10.0 | 5.10.0 |
| unicodedata2 | 15.1.0 | 15.1.0 |
| unidecode | 1.2.0 | 1.2.0 |
| unixodbc | 2.3.11 | 2.3.11 |
| urllib3 | 2.2.2 | 2.2.2 |
| utf8proc | 2.6.1 | 2.6.1 |
| w3lib | 2.1.2 | 2.1.2 |
| watchdog | 4.0.1 | 4.0.1 |
| wcwidth | 0.2.5 | 0.2.5 |
| webencodings | 0.5.1 | 0.5.1 |
| websocket-client | 1.8.0 | 1.8.0 |
| werkzeug | 3.0.3 | 3.0.3 |
| whatthepatch | 1.0.2 | 1.0.2 |
| wheel | 0.43.0 | 0.43.0 |
| widgetsnbextension | 3.6.6 | 3.6.6 |
| wrapt | 1.14.1 | 1.14.1 |
| wurlitzer | 3.0.2 | 3.0.2 |
| xarray | 2023.6.0 | 2023.6.0 |
| xlwings | 0.31.4 | 0.31.4 |
| xyzservices | 2022.9.0 | 2022.9.0 |
| xz | 5.4.6 | 5.4.6 |
| yaml | 0.2.5 | 0.2.5 |
| yaml-cpp | 0.8.0 | 0.8.0 |
| yapf | 0.40.2 | 0.40.2 |
| yarl | 1.9.3 | 1.9.3 |
| zeromq | 4.3.5 | 4.3.5 |
| zfp | 1.0.0 | 1.0.0 |
| zict | 3.0.0 | 3.0.0 |
| zipp | 3.17.0 | 3.17.0 |
| zlib | 1.2.13 | 1.2.13 |
| zlib-ng | 2.0.7 | 2.0.7 |
| zope | 1.0 | 1.0 |
| zope.interface | 5.4.0 | 5.4.0 |
| zstandard | 0.22.0 | 0.22.0 |
| zstd | 1.5.5 | 1.5.5 |
| Package Name | win-64 |
|---|---|
| \_anaconda\_depends | 2024.06 |
| abseil-cpp | 20211102.0 |
| aiobotocore | 2.12.3 |
| aiohttp | 3.9.5 |
| aioitertools | 0.7.1 |
| aiosignal | 1.2.0 |
| alabaster | 0.7.16 |
| altair | 5.0.1 |
| anaconda-anon-usage | 0.4.4 |
| anaconda-catalogs | 0.2.0 |
| anaconda-client | 1.12.3 |
| anaconda-cloud-auth | 0.5.1 |
| anaconda-navigator | 2.6.0 |
| anaconda-project | 0.11.1 |
| annotated-types | 0.6.0 |
| anyio | 4.2.0 |
| aom | 3.6.0 |
| appdirs | 1.4.4 |
| archspec | 0.2.3 |
| argon2-cffi | 21.3.0 |
| argon2-cffi-bindings | 21.2.0 |
| arrow | 1.2.3 |
| arrow-cpp | 14.0.2 |
| astroid | 2.14.2 |
| astropy | 6.1.0 |
| astropy-iers-data | 0.2024.6.3.0.31.14 |
| asttokens | 2.0.5 |
| async-lru | 2.0.4 |
| atomicwrites | 1.4.0 |
| attrs | 23.1.0 |
| automat | 20.2.0 |
| autopep8 | 2.0.4 |
| aws-c-auth | 0.6.19 |
| aws-c-cal | 0.5.20 |
| aws-c-common | 0.8.5 |
| aws-c-compression | 0.2.16 |
| aws-c-event-stream | 0.2.15 |
| aws-c-http | 0.6.25 |
| aws-c-io | 0.13.10 |
| aws-c-mqtt | 0.7.13 |
| aws-c-s3 | 0.1.51 |
| aws-c-sdkutils | 0.1.6 |
| aws-checksums | 0.1.13 |
| aws-crt-cpp | 0.18.16 |
| aws-sdk-cpp | 1.10.55 |
| babel | 2.11.0 |
| bcrypt | 3.2.0 |
| beautifulsoup4 | 4.12.3 |
| binaryornot | 0.4.4 |
| black | 24.4.2 |
| blas | 1.0 |
| bleach | 4.1.0 |
| blinker | 1.6.2 |
| blosc | 1.21.3 |
| bokeh | 3.4.1 |
| boltons | 23.0.0 |
| boost-cpp | 1.82.0 |
| botocore | 1.34.69 |
| bottleneck | 1.3.7 |
| brotli | 1.0.9 |
| brotli-bin | 1.0.9 |
| brotli-python | 1.0.9 |
| bzip2 | 1.0.8 |
| c-ares | 1.19.1 |
| c-blosc2 | 2.12.0 |
| ca-certificates | 2024.3.11 |
| cachetools | 5.3.3 |
| certifi | 2024.6.2 |
| cffi | 1.16.0 |
| cfitsio | 3.470 |
| chardet | 4.0.0 |
| charls | 2.2.0 |
| charset-normalizer | 2.0.4 |
| click | 8.1.7 |
| cloudpickle | 2.2.1 |
| colorama | 0.4.6 |
| colorcet | 3.1.0 |
| comm | 0.2.1 |
| conda | 24.5.0 |
| conda-build | 24.5.1 |
| conda-content-trust | 0.2.0 |
| conda-index | 0.5.0 |
| conda-libmamba-solver | 24.1.0 |
| conda-pack | 0.7.1 |
| conda-package-handling | 2.3.0 |
| conda-package-streaming | 0.10.0 |
| conda-repo-cli | 1.0.88 |
| conda-token | 0.5.0 |
| console\_shortcut | 0.1.1 |
| constantly | 23.10.4 |
| contourpy | 1.2.0 |
| cookiecutter | 2.6.0 |
| cryptography | 42.0.5 |
| cssselect | 1.2.0 |
| curl | 8.7.1 |
| cycler | 0.11.0 |
| cytoolz | 0.12.2 |
| dask | 2024.5.0 |
| dask-core | 2024.5.0 |
| dask-expr | 1.1.0 |
| datashader | 0.16.2 |
| dav1d | 1.2.1 |
| debugpy | 1.6.7 |
| decorator | 5.1.1 |
| defusedxml | 0.7.1 |
| diff-match-patch | 20200713 |
| dill | 0.3.8 |
| distributed | 2024.5.0 |
| distro | 1.9.0 |
| docstring-to-markdown | 0.11 |
| docutils | 0.18.1 |
| entrypoints | 0.4 |
| et\_xmlfile | 1.1.0 |
| executing | 0.8.3 |
| expat | 2.6.2 |
| filelock | 3.13.1 |
| flake8 | 7.0.0 |
| flask | 3.0.3 |
| fmt | 9.1.0 |
| fonttools | 4.51.0 |
| freetype | 2.12.1 |
| frozendict | 2.4.2 |
| frozenlist | 1.4.0 |
| fsspec | 2024.3.1 |
| gensim | 4.3.2 |
| gflags | 2.2.2 |
| giflib | 5.2.1 |
| gitdb | 4.0.7 |
| gitpython | 3.1.37 |
| glog | 0.5.0 |
| greenlet | 3.0.1 |
| grpc-cpp | 1.48.2 |
| h5py | 3.11.0 |
| hdf5 | 1.12.1 |
| heapdict | 1.0.1 |
| holoviews | 1.19.0 |
| hvplot | 0.10.0 |
| hyperlink | 21.0.0 |
| icc\_rt | 2022.1.0 |
| icu | 73.1 |
| idna | 3.7 |
| imagecodecs | 2023.1.23 |
| imageio | 2.33.1 |
| imagesize | 1.4.1 |
| imbalanced-learn | 0.12.3 |
| importlib-metadata | 7.0.1 |
| incremental | 22.10.0 |
| inflection | 0.5.1 |
| iniconfig | 1.1.1 |
| intake | 0.7.0 |
| intel-openmp | 2023.1.0 |
| intervaltree | 3.1.0 |
| ipykernel | 6.28.0 |
| ipython | 8.25.0 |
| ipython\_genutils | 0.2.0 |
| ipywidgets | 7.8.1 |
| isort | 5.13.2 |
| itemadapter | 0.3.0 |
| itemloaders | 1.1.0 |
| itsdangerous | 2.2.0 |
| jaraco.classes | 3.2.1 |
| jedi | 0.18.1 |
| jellyfish | 1.0.1 |
| jinja2 | 3.1.4 |
| jmespath | 1.0.1 |
| joblib | 1.4.2 |
| jpeg | 9e |
| jq | 1.6 |
| json5 | 0.9.6 |
| jsonpatch | 1.33 |
| jsonpointer | 2.1 |
| jsonschema | 4.19.2 |
| jsonschema-specifications | 2023.7.1 |
| jupyter | 1.0.0 |
| jupyter-lsp | 2.2.0 |
| jupyter\_client | 8.6.0 |
| jupyter\_console | 6.6.3 |
| jupyter\_core | 5.7.2 |
| jupyter\_events | 0.10.0 |
| jupyter\_server | 2.14.1 |
| jupyter\_server\_terminals | 0.4.4 |
| jupyterlab | 4.0.11 |
| jupyterlab-variableinspector | 3.1.0 |
| jupyterlab\_pygments | 0.1.2 |
| jupyterlab\_server | 2.25.1 |
| jupyterlab\_widgets | 1.0.0 |
| keyring | 24.3.1 |
| kiwisolver | 1.4.4 |
| krb5 | 1.20.1 |
| lazy-object-proxy | 1.10.0 |
| lazy\_loader | 0.4 |
| lcms2 | 2.12 |
| lerc | 3.0 |
| libaec | 1.0.4 |
| libarchive | 3.6.2 |
| libavif | 0.11.1 |
| libboost | 1.82.0 |
| libbrotlicommon | 1.0.9 |
| libbrotlidec | 1.0.9 |
| libbrotlienc | 1.0.9 |
| libclang | 14.0.6 |
| libclang13 | 14.0.6 |
| libcurl | 8.7.1 |
| libdeflate | 1.17 |
| libevent | 2.1.12 |
| libffi | 3.4.4 |
| libiconv | 1.16 |
| liblief | 0.12.3 |
| libmamba | 1.5.8 |
| libmambapy | 1.5.8 |
| libpng | 1.6.39 |
| libpq | 12.17 |
| libprotobuf | 3.20.3 |
| libsodium | 1.0.18 |
| libsolv | 0.7.24 |
| libspatialindex | 1.9.3 |
| libssh2 | 1.11.0 |
| libthrift | 0.15.0 |
| libtiff | 4.5.1 |
| libwebp-base | 1.3.2 |
| libxml2 | 2.10.4 |
| libxslt | 1.1.37 |
| libzopfli | 1.0.3 |
| linkify-it-py | 2.0.0 |
| llvmlite | 0.42.0 |
| locket | 1.0.0 |
| lxml | 5.2.1 |
| lz4 | 4.3.2 |
| lz4-c | 1.9.4 |
| lzo | 2.10 |
| m2-msys2-runtime | 2.5.0.17080.65c939c |
| m2-patch | 2.7.5 |
| m2w64-libwinpthread-git | 5.0.0.4634.697f757 |
| markdown | 3.4.1 |
| markdown-it-py | 2.2.0 |
| markupsafe | 2.1.3 |
| matplotlib | 3.8.4 |
| matplotlib-base | 3.8.4 |
| matplotlib-inline | 0.1.6 |
| mccabe | 0.7.0 |
| mdit-py-plugins | 0.3.0 |
| mdurl | 0.1.0 |
| menuinst | 2.1.1 |
| mistune | 2.0.4 |
| mkl | 2023.1.0 |
| mkl-service | 2.4.0 |
| mkl\_fft | 1.3.8 |
| mkl\_random | 1.2.4 |
| more-itertools | 10.1.0 |
| mpmath | 1.3.0 |
| msgpack-python | 1.0.3 |
| msys2-conda-epoch | 20160418 |
| multidict | 6.0.4 |
| multipledispatch | 0.6.0 |
| mypy | 1.10.0 |
| mypy\_extensions | 1.0.0 |
| navigator-updater | 0.5.1 |
| nbclient | 0.8.0 |
| nbconvert | 7.10.0 |
| nbformat | 5.9.2 |
| nest-asyncio | 1.6.0 |
| networkx | 3.2.1 |
| nltk | 3.8.1 |
| notebook | 7.0.8 |
| notebook-shim | 0.2.3 |
| numba | 0.59.1 |
| numexpr | 2.8.7 |
| numpy | 1.26.4 |
| numpy-base | 1.26.4 |
| numpydoc | 1.7.0 |
| openjpeg | 2.4.0 |
| openpyxl | 3.1.2 |
| openssl | 3.0.14 |
| orc | 1.7.4 |
| overrides | 7.4.0 |
| packaging | 23.2 |
| pandas | 2.2.2 |
| pandocfilters | 1.5.0 |
| panel | 1.4.4 |
| param | 2.1.0 |
| paramiko | 2.8.1 |
| parsel | 1.8.1 |
| parso | 0.8.3 |
| partd | 1.4.1 |
| pathspec | 0.10.3 |
| patsy | 0.5.6 |
| pcre2 | 10.42 |
| pexpect | 4.8.0 |
| pickleshare | 0.7.5 |
| pillow | 10.3.0 |
| pip | 24.0 |
| pkce | 1.0.3 |
| pkginfo | 1.10.0 |
| platformdirs | 3.10.0 |
| plotly | 5.22.0 |
| pluggy | 1.0.0 |
| ply | 3.11 |
| powershell\_shortcut | 0.0.1 |
| prometheus\_client | 0.14.1 |
| prompt-toolkit | 3.0.43 |
| prompt\_toolkit | 3.0.43 |
| protego | 0.1.16 |
| protobuf | 3.20.3 |
| psutil | 5.9.0 |
| ptyprocess | 0.7.0 |
| pure\_eval | 0.2.2 |
| py-cpuinfo | 9.0.0 |
| py-lief | 0.12.3 |
| pyarrow | 14.0.2 |
| pyasn1 | 0.4.8 |
| pyasn1-modules | 0.2.8 |
| pybind11-abi | 5 |
| pycodestyle | 2.11.1 |
| pycosat | 0.6.6 |
| pycparser | 2.21 |
| pyct | 0.5.0 |
| pycurl | 7.45.2 |
| pydantic | 2.5.3 |
| pydantic-core | 2.14.6 |
| pydeck | 0.8.0 |
| pydispatcher | 2.0.5 |
| pydocstyle | 6.3.0 |
| pyerfa | 2.0.1.4 |
| pyflakes | 3.2.0 |
| pygments | 2.15.1 |
| pyjwt | 2.8.0 |
| pylint | 2.16.2 |
| pylint-venv | 3.0.3 |
| pyls-spyder | 0.4.0 |
| pynacl | 1.5.0 |
| pyodbc | 5.0.1 |
| pyopenssl | 24.0.0 |
| pyparsing | 3.0.9 |
| pyqt | 5.15.10 |
| pyqt5-sip | 12.13.0 |
| pyqtwebengine | 5.15.10 |
| pysocks | 1.7.1 |
| pytables | 3.9.2 |
| pytest | 7.4.4 |
| python | 3.12.4 |
| python-dateutil | 2.9.0post0 |
| python-dotenv | 0.21.0 |
| python-fastjsonschema | 2.16.2 |
| python-json-logger | 2.0.7 |
| python-libarchive-c | 2.9 |
| python-lmdb | 1.4.1 |
| python-lsp-black | 2.0.0 |
| python-lsp-jsonrpc | 1.1.2 |
| python-lsp-server | 1.10.0 |
| python-slugify | 5.0.2 |
| python-snappy | 0.6.1 |
| python-tzdata | 2023.3 |
| pytoolconfig | 1.2.6 |
| pytz | 2024.1 |
| pyviz\_comms | 3.0.2 |
| pywavelets | 1.5.0 |
| pywin32 | 305 |
| pywin32-ctypes | 0.2.2 |
| pywinpty | 2.0.10 |
| pyyaml | 6.0.1 |
| pyzmq | 25.1.2 |
| qdarkstyle | 3.2.3 |
| qstylizer | 0.2.2 |
| qt-main | 5.15.2 |
| qt-webengine | 5.15.9 |
| qtawesome | 1.2.2 |
| qtconsole | 5.5.1 |
| qtpy | 2.4.1 |
| queuelib | 1.6.2 |
| re2 | 2022.04.01 |
| referencing | 0.30.2 |
| regex | 2023.10.3 |
| reproc | 14.2.4 |
| reproc-cpp | 14.2.4 |
| requests | 2.32.2 |
| requests-file | 1.5.1 |
| requests-toolbelt | 1.0.0 |
| rfc3339-validator | 0.1.4 |
| rfc3986-validator | 0.1.1 |
| rich | 13.3.5 |
| rope | 1.12.0 |
| rpds-py | 0.10.6 |
| rtree | 1.0.1 |
| ruamel.yaml | 0.17.21 |
| ruamel\_yaml | 0.17.21 |
| s3fs | 2024.3.1 |
| scikit-image | 0.23.2 |
| scikit-learn | 1.4.2 |
| scipy | 1.13.1 |
| scrapy | 2.11.1 |
| seaborn | 0.13.2 |
| semver | 3.0.2 |
| send2trash | 1.8.2 |
| service\_identity | 18.1.0 |
| setuptools | 69.5.1 |
| sip | 6.7.12 |
| six | 1.16.0 |
| smart\_open | 5.2.1 |
| smmap | 4.0.0 |
| snappy | 1.1.10 |
| sniffio | 1.3.0 |
| snowballstemmer | 2.2.0 |
| sortedcontainers | 2.4.0 |
| soupsieve | 2.5 |
| sphinx | 7.3.7 |
| sphinxcontrib-applehelp | 1.0.2 |
| sphinxcontrib-devhelp | 1.0.2 |
| sphinxcontrib-htmlhelp | 2.0.0 |
| sphinxcontrib-jsmath | 1.0.1 |
| sphinxcontrib-qthelp | 1.0.3 |
| sphinxcontrib-serializinghtml | 1.1.10 |
| spyder | 5.5.1 |
| spyder-kernels | 2.5.0 |
| sqlalchemy | 2.0.30 |
| sqlite | 3.45.3 |
| stack\_data | 0.2.0 |
| statsmodels | 0.14.2 |
| streamlit | 1.32.0 |
| sympy | 1.12 |
| tabulate | 0.9.0 |
| tbb | 2021.8.0 |
| tblib | 1.7.0 |
| tenacity | 8.2.2 |
| terminado | 0.17.1 |
| text-unidecode | 1.3 |
| textdistance | 4.2.1 |
| threadpoolctl | 2.2.0 |
| three-merge | 0.1.1 |
| tifffile | 2023.4.12 |
| tinycss2 | 1.2.1 |
| tk | 8.6.14 |
| tldextract | 3.2.0 |
| toml | 0.10.2 |
| tomli | 2.0.1 |
| tomlkit | 0.11.1 |
| toolz | 0.12.0 |
| tornado | 6.4.1 |
| tqdm | 4.66.4 |
| traitlets | 5.14.3 |
| truststore | 0.8.0 |
| twisted | 23.10.0 |
| twisted-iocpsupport | 1.0.2 |
| typing-extensions | 4.11.0 |
| typing\_extensions | 4.11.0 |
| tzdata | 2024a |
| uc-micro-py | 1.0.1 |
| ujson | 5.10.0 |
| unicodedata2 | 15.1.0 |
| unidecode | 1.2.0 |
| urllib3 | 2.2.2 |
| utf8proc | 2.6.1 |
| vc | 14.2 |
| vs2015\_runtime | 14.29.30133 |
| w3lib | 2.1.2 |
| watchdog | 4.0.1 |
| wcwidth | 0.2.5 |
| webencodings | 0.5.1 |
| websocket-client | 1.8.0 |
| werkzeug | 3.0.3 |
| whatthepatch | 1.0.2 |
| wheel | 0.43.0 |
| widgetsnbextension | 3.6.6 |
| win\_inet\_pton | 1.1.0 |
| winpty | 0.4.3 |
| wrapt | 1.14.1 |
| xarray | 2023.6.0 |
| xlwings | 0.31.4 |
| xyzservices | 2022.9.0 |
| xz | 5.4.6 |
| yaml | 0.2.5 |
| yaml-cpp | 0.8.0 |
| yapf | 0.40.2 |
| yarl | 1.9.3 |
| zeromq | 4.3.5 |
| zfp | 1.0.0 |
| zict | 3.0.0 |
| zipp | 3.17.0 |
| zlib | 1.2.13 |
| zlib-ng | 2.0.7 |
| zope | 1.0 |
| zope.interface | 5.4.0 |
| zstandard | 0.22.0 |
| zstd | 1.5.5 |
| Package Name | linux-64 | linux-aarch64 | linux-s390x | osx-arm64 | osx-64 | win-64 |
|---|---|---|---|---|---|---|
| \_anaconda\_depends | 2024.02 | 2024.02 | 2024.02 | 2024.02 | 2024.02 | 2024.02 |
| \_libgcc\_mutex | 0.1 | 0.1 | 0.1 | |||
| \_openmp\_mutex | 5.1 | 5.1 | 5.1 | |||
| abseil-cpp | 20211102.0 | 20211102.0 | 20230802.0 | 20230802.0 | 20211102.0 | |
| aiobotocore | 2.7.0 | 2.7.0 | 2.7.0 | 2.7.0 | 2.7.0 | 2.7.0 |
| aiohttp | 3.9.3 | 3.9.3 | 3.9.3 | 3.9.3 | 3.9.3 | 3.9.3 |
| aioitertools | 0.7.1 | 0.7.1 | 0.7.1 | 0.7.1 | 0.7.1 | 0.7.1 |
| aiosignal | 1.2.0 | 1.2.0 | 1.2.0 | 1.2.0 | 1.2.0 | 1.2.0 |
| alabaster | 0.7.12 | 0.7.12 | 0.7.12 | 0.7.12 | 0.7.12 | |
| altair | 5.0.1 | 5.0.1 | 5.0.1 | 5.0.1 | 5.0.1 | |
| anaconda-anon-usage | 0.4.3 | 0.4.3 | 0.4.3 | 0.4.3 | 0.4.3 | 0.4.3 |
| anaconda-catalogs | 0.2.0 | 0.2.0 | 0.2.0 | 0.2.0 | 0.2.0 | 0.2.0 |
| anaconda-client | 1.12.3 | 1.12.3 | 1.12.3 | 1.12.3 | 1.12.3 | 1.12.3 |
| anaconda-cloud-auth | 0.1.4 | 0.1.4 | 0.1.4 | 0.1.4 | 0.1.4 | |
| anaconda-navigator | 2.5.2 | 2.5.2 | 2.5.2 | 2.5.2 | 2.5.2 | |
| anaconda-project | 0.11.1 | 0.11.1 | 0.11.1 | 0.11.1 | 0.11.1 | 0.11.1 |
| anyio | 4.2.0 | 4.2.0 | 3.5.0 | 4.2.0 | 4.2.0 | 4.2.0 |
| aom | 3.6.0 | 3.6.0 | 3.6.0 | 3.6.0 | 3.6.0 | 3.6.0 |
| appdirs | 1.4.4 | 1.4.4 | 1.4.4 | 1.4.4 | 1.4.4 | 1.4.4 |
| applaunchservices | 0.3.0 | 0.3.0 | ||||
| appnope | 0.1.2 | 0.1.2 | ||||
| appscript | 1.1.2 | 1.1.2 | ||||
| archspec | 0.2.1 | 0.2.1 | 0.2.1 | 0.2.1 | 0.2.1 | 0.2.1 |
| argon2-cffi | 21.3.0 | 21.3.0 | 21.3.0 | 21.3.0 | 21.3.0 | 21.3.0 |
| argon2-cffi-bindings | 21.2.0 | 21.2.0 | 21.2.0 | 21.2.0 | 21.2.0 | 21.2.0 |
| arrow | 1.2.3 | 1.2.3 | 1.2.3 | 1.2.3 | 1.2.3 | |
| arrow-cpp | 14.0.2 | 14.0.2 | 14.0.2 | 14.0.2 | 14.0.2 | |
| astroid | 2.14.2 | 2.14.2 | 2.14.2 | 2.14.2 | 2.14.2 | 2.14.2 |
| astropy | 5.3.4 | 5.3.4 | 5.3.4 | 5.3.4 | 5.3.4 | 5.3.4 |
| asttokens | 2.0.5 | 2.0.5 | 2.0.5 | 2.0.5 | 2.0.5 | 2.0.5 |
| async-lru | 2.0.4 | 2.0.4 | 2.0.4 | 2.0.4 | 2.0.4 | |
| atomicwrites | 1.4.0 | 1.4.0 | 1.4.0 | 1.4.0 | 1.4.0 | |
| attrs | 23.1.0 | 23.1.0 | 23.1.0 | 23.1.0 | 23.1.0 | 23.1.0 |
| automat | 20.2.0 | 20.2.0 | 20.2.0 | 20.2.0 | 20.2.0 | |
| autopep8 | 1.6.0 | 1.6.0 | 1.6.0 | 1.6.0 | 1.6.0 | |
| aws-c-auth | 0.6.19 | 0.6.19 | 0.6.19 | 0.6.19 | 0.6.19 | |
| aws-c-cal | 0.5.20 | 0.5.20 | 0.5.20 | 0.5.20 | 0.5.20 | |
| aws-c-common | 0.8.5 | 0.8.5 | 0.8.5 | 0.8.5 | 0.8.5 | |
| aws-c-compression | 0.2.16 | 0.2.16 | 0.2.16 | 0.2.16 | 0.2.16 | |
| aws-c-event-stream | 0.2.15 | 0.2.15 | 0.2.15 | 0.2.15 | 0.2.15 | |
| aws-c-http | 0.6.25 | 0.6.25 | 0.6.25 | 0.6.25 | 0.6.25 | |
| aws-c-io | 0.13.10 | 0.13.10 | 0.13.10 | 0.13.10 | 0.13.10 | |
| aws-c-mqtt | 0.7.13 | 0.7.13 | 0.7.13 | 0.7.13 | 0.7.13 | |
| aws-c-s3 | 0.1.51 | 0.1.51 | 0.1.51 | 0.1.51 | 0.1.51 | |
| aws-c-sdkutils | 0.1.6 | 0.1.6 | 0.1.6 | 0.1.6 | 0.1.6 | |
| aws-checksums | 0.1.13 | 0.1.13 | 0.1.13 | 0.1.13 | 0.1.13 | |
| aws-crt-cpp | 0.18.16 | 0.18.16 | 0.18.16 | 0.18.16 | 0.18.16 | |
| aws-sdk-cpp | 1.10.55 | 1.10.55 | 1.10.55 | 1.10.55 | 1.10.55 | |
| babel | 2.11.0 | 2.11.0 | 2.11.0 | 2.11.0 | 2.11.0 | |
| backports | 1.1 | 1.1 | 1.1 | 1.1 | 1.1 | 1.1 |
| backports.functools\_lru\_cache | 1.6.4 | 1.6.4 | 1.6.4 | 1.6.4 | 1.6.4 | 1.6.4 |
| backports.tempfile | 1.0 | 1.0 | 1.0 | 1.0 | 1.0 | 1.0 |
| backports.weakref | 1.0.post1 | 1.0.post1 | 1.0.post1 | 1.0.post1 | 1.0.post1 | 1.0.post1 |
| bcrypt | 3.2.0 | 3.2.0 | 3.2.0 | 3.2.0 | 3.2.0 | |
| beautifulsoup4 | 4.12.2 | 4.12.2 | 4.12.2 | 4.12.2 | 4.12.2 | 4.12.2 |
| binaryornot | 0.4.4 | 0.4.4 | 0.4.4 | 0.4.4 | 0.4.4 | |
| black | 23.11.0 | 23.11.0 | 23.11.0 | 23.11.0 | 23.11.0 | 23.11.0 |
| blas | 1.0 | 1.0 | 1.0 | 1.0 | 1.0 | 1.0 |
| bleach | 4.1.0 | 4.1.0 | 4.1.0 | 4.1.0 | 4.1.0 | 4.1.0 |
| blinker | 1.6.2 | 1.6.2 | 1.6.2 | 1.6.2 | 1.6.2 | |
| blosc | 1.21.3 | 1.21.3 | 1.21.3 | 1.21.3 | 1.21.3 | 1.21.3 |
| bokeh | 3.3.4 | 3.3.4 | 2.4.3 | 3.3.4 | 3.3.4 | 3.3.4 |
| boltons | 23.0.0 | 23.0.0 | 23.0.0 | 23.0.0 | 23.0.0 | 23.0.0 |
| boost-cpp | 1.82.0 | 1.82.0 | 1.82.0 | 1.82.0 | 1.82.0 | |
| botocore | 1.31.64 | 1.31.64 | 1.31.64 | 1.31.64 | 1.31.64 | 1.31.64 |
| bottleneck | 1.3.7 | 1.3.7 | 1.3.7 | 1.3.7 | 1.3.7 | 1.3.7 |
| brotli | 1.0.9 | 1.0.9 | 1.0.9 | 1.0.9 | 1.0.9 | 1.0.9 |
| brotli-bin | 1.0.9 | 1.0.9 | 1.0.9 | 1.0.9 | 1.0.9 | 1.0.9 |
| brotli-python | 1.0.9 | 1.0.9 | 1.0.9 | 1.0.9 | 1.0.9 | 1.0.9 |
| brunsli | 0.1 | 0.1 | 0.1 | 0.1 | ||
| bzip2 | 1.0.8 | 1.0.8 | 1.0.8 | 1.0.8 | 1.0.8 | 1.0.8 |
| c-ares | 1.19.1 | 1.19.1 | 1.19.1 | 1.19.1 | 1.19.1 | 1.19.1 |
| c-blosc2 | 2.12.0 | 2.12.0 | 2.12.0 | 2.12.0 | 2.12.0 | |
| ca-certificates | 2023.12.12 | 2023.12.12 | 2023.12.12 | 2023.12.12 | 2023.12.12 | 2023.12.12 |
| cachetools | 4.2.2 | 4.2.2 | 4.2.2 | 4.2.2 | 4.2.2 | |
| cctools | 949.0.1 | 949.0.1 | ||||
| cctools\_osx-64 | 949.0.1 | |||||
| cctools\_osx-arm64 | 949.0.1 | |||||
| certifi | 2024.2.2 | 2024.2.2 | 2024.2.2 | 2024.2.2 | 2024.2.2 | 2024.2.2 |
| cffi | 1.16.0 | 1.16.0 | 1.16.0 | 1.16.0 | 1.16.0 | 1.16.0 |
| cfitsio | 3.470 | 3.470 | 3.470 | 3.470 | 3.470 | 3.470 |
| chardet | 4.0.0 | 4.0.0 | 4.0.0 | 4.0.0 | 4.0.0 | 4.0.0 |
| charls | 2.2.0 | 2.2.0 | 2.2.0 | 2.2.0 | 2.2.0 | |
| charset-normalizer | 2.0.4 | 2.0.4 | 2.0.4 | 2.0.4 | 2.0.4 | 2.0.4 |
| click | 8.1.7 | 8.1.7 | 8.1.7 | 8.1.7 | 8.1.7 | 8.1.7 |
| cloudpickle | 2.2.1 | 2.2.1 | 2.2.1 | 2.2.1 | 2.2.1 | 2.2.1 |
| clyent | 1.2.2 | 1.2.2 | 1.2.2 | 1.2.2 | 1.2.2 | |
| colorama | 0.4.6 | 0.4.6 | 0.4.6 | 0.4.6 | 0.4.6 | 0.4.6 |
| colorcet | 3.0.1 | 3.0.1 | 3.0.1 | 3.0.1 | 3.0.1 | 3.0.1 |
| comm | 0.1.2 | 0.1.2 | 0.1.2 | 0.1.2 | 0.1.2 | 0.1.2 |
| conda | 24.1.2 | 24.1.2 | 24.1.2 | 24.1.2 | 24.1.2 | 24.1.2 |
| conda-build | 24.1.2 | 24.1.2 | 24.1.2 | 24.1.2 | 24.1.2 | 24.1.2 |
| conda-content-trust | 0.2.0 | 0.2.0 | 0.2.0 | 0.2.0 | 0.2.0 | 0.2.0 |
| conda-index | 0.4.0 | 0.4.0 | 0.4.0 | 0.4.0 | 0.4.0 | 0.4.0 |
| conda-libmamba-solver | 24.1.0 | 24.1.0 | 24.1.0 | 24.1.0 | 24.1.0 | 24.1.0 |
| conda-pack | 0.6.0 | 0.6.0 | 0.6.0 | 0.6.0 | 0.6.0 | 0.6.0 |
| conda-package-handling | 2.2.0 | 2.2.0 | 2.2.0 | 2.2.0 | 2.2.0 | 2.2.0 |
| conda-package-streaming | 0.9.0 | 0.9.0 | 0.9.0 | 0.9.0 | 0.9.0 | 0.9.0 |
| conda-repo-cli | 1.0.75 | 1.0.75 | 1.0.75 | 1.0.75 | 1.0.75 | |
| conda-token | 0.4.0 | 0.4.0 | 0.4.0 | 0.4.0 | 0.4.0 | 0.4.0 |
| conda-verify | 3.4.2 | 3.4.2 | 3.4.2 | 3.4.2 | 3.4.2 | 3.4.2 |
| console\_shortcut | 0.1.1 | |||||
| constantly | 23.10.4 | 23.10.4 | 23.10.4 | 23.10.4 | 23.10.4 | |
| contourpy | 1.2.0 | 1.2.0 | 1.2.0 | 1.2.0 | 1.2.0 | 1.2.0 |
| cookiecutter | 2.5.0 | 2.5.0 | 2.5.0 | 2.5.0 | 2.5.0 | |
| cryptography | 42.0.2 | 42.0.2 | 42.0.2 | 42.0.2 | 42.0.2 | 42.0.2 |
| cssselect | 1.2.0 | 1.2.0 | 1.2.0 | 1.2.0 | 1.2.0 | |
| curl | 8.5.0 | 8.5.0 | 8.5.0 | 8.5.0 | 8.5.0 | 8.5.0 |
| cycler | 0.11.0 | 0.11.0 | 0.11.0 | 0.11.0 | 0.11.0 | 0.11.0 |
| cyrus-sasl | 2.1.28 | 2.1.28 | 2.1.28 | 2.1.28 | ||
| cytoolz | 0.12.2 | 0.12.2 | 0.12.2 | 0.12.2 | 0.12.2 | 0.12.2 |
| dask | 2023.11.0 | 2023.11.0 | 2023.11.0 | 2023.11.0 | 2023.11.0 | 2023.11.0 |
| dask-core | 2023.11.0 | 2023.11.0 | 2023.11.0 | 2023.11.0 | 2023.11.0 | 2023.11.0 |
| datashader | 0.16.0 | 0.16.0 | 0.16.0 | 0.16.0 | 0.16.0 | |
| dav1d | 1.2.1 | 1.2.1 | 1.2.1 | 1.2.1 | 1.2.1 | 1.2.1 |
| dbus | 1.13.18 | 1.13.18 | ||||
| debugpy | 1.6.7 | 1.6.7 | 1.6.7 | 1.6.7 | 1.6.7 | 1.6.7 |
| decorator | 5.1.1 | 5.1.1 | 5.1.1 | 5.1.1 | 5.1.1 | 5.1.1 |
| defusedxml | 0.7.1 | 0.7.1 | 0.7.1 | 0.7.1 | 0.7.1 | 0.7.1 |
| diff-match-patch | 20200713 | 20200713 | 20200713 | 20200713 | 20200713 | |
| dill | 0.3.7 | 0.3.7 | 0.3.7 | 0.3.7 | 0.3.7 | 0.3.7 |
| distributed | 2023.11.0 | 2023.11.0 | 2023.11.0 | 2023.11.0 | 2023.11.0 | 2023.11.0 |
| distro | 1.8.0 | 1.8.0 | 1.8.0 | 1.8.0 | 1.8.0 | 1.8.0 |
| docstring-to-markdown | 0.11 | 0.11 | 0.11 | 0.11 | 0.11 | |
| docutils | 0.18.1 | 0.18.1 | 0.18.1 | 0.18.1 | 0.18.1 | |
| entrypoints | 0.4 | 0.4 | 0.4 | 0.4 | 0.4 | 0.4 |
| et\_xmlfile | 1.1.0 | 1.1.0 | 1.1.0 | 1.1.0 | 1.1.0 | 1.1.0 |
| executing | 0.8.3 | 0.8.3 | 0.8.3 | 0.8.3 | 0.8.3 | 0.8.3 |
| expat | 2.5.0 | 2.5.0 | ||||
| filelock | 3.13.1 | 3.13.1 | 3.13.1 | 3.13.1 | 3.13.1 | 3.13.1 |
| flake8 | 6.0.0 | 6.0.0 | 6.0.0 | 6.0.0 | 6.0.0 | |
| flask | 2.2.5 | 2.2.5 | 2.2.5 | 2.2.5 | 2.2.5 | 2.2.5 |
| fmt | 9.1.0 | 9.1.0 | 9.1.0 | 9.1.0 | 9.1.0 | 9.1.0 |
| fontconfig | 2.14.1 | 2.14.1 | ||||
| fonttools | 4.25.0 | 4.25.0 | 4.25.0 | 4.25.0 | 4.25.0 | 4.25.0 |
| freetype | 2.12.1 | 2.12.1 | 2.12.1 | 2.12.1 | 2.12.1 | 2.12.1 |
| frozenlist | 1.4.0 | 1.4.0 | 1.4.0 | 1.4.0 | 1.4.0 | 1.4.0 |
| fsspec | 2023.10.0 | 2023.10.0 | 2023.10.0 | 2023.10.0 | 2023.10.0 | 2023.10.0 |
| future | 0.18.3 | 0.18.3 | 0.18.3 | 0.18.3 | 0.18.3 | 0.18.3 |
| gensim | 4.3.0 | 4.3.0 | 4.3.0 | 4.3.0 | 4.3.0 | |
| gettext | 0.21.0 | 0.21.0 | ||||
| gflags | 2.2.2 | 2.2.2 | 2.2.2 | 2.2.2 | 2.2.2 | |
| giflib | 5.2.1 | 5.2.1 | 5.2.1 | 5.2.1 | 5.2.1 | 5.2.1 |
| gitdb | 4.0.7 | 4.0.7 | 4.0.7 | 4.0.7 | 4.0.7 | |
| gitpython | 3.1.37 | 3.1.37 | 3.1.37 | 3.1.37 | 3.1.37 | |
| glib | 2.78.4 | 2.78.4 | 2.78.4 | 2.78.4 | ||
| glib-tools | 2.78.4 | 2.78.4 | 2.78.4 | 2.78.4 | ||
| glog | 0.5.0 | 0.5.0 | 0.5.0 | 0.5.0 | 0.5.0 | |
| gmp | 6.2.1 | 6.2.1 | 6.2.1 | 6.2.1 | 6.2.1 | |
| gmpy2 | 2.1.2 | 2.1.2 | 2.1.2 | 2.1.2 | 2.1.2 | 2.1.2 |
| greenlet | 3.0.1 | 3.0.1 | 3.0.1 | 3.0.1 | 3.0.1 | 3.0.1 |
| grpc-cpp | 1.48.2 | 1.48.2 | 1.48.2 | 1.48.2 | 1.48.2 | |
| gst-plugins-base | 1.14.1 | 1.14.1 | 1.14.1 | 1.14.1 | ||
| gstreamer | 1.14.1 | 1.14.1 | 1.14.1 | 1.14.1 | ||
| gtest | 1.14.0 | 1.14.0 | ||||
| h5py | 3.9.0 | 3.9.0 | 3.7.0 | 3.9.0 | 3.9.0 | 3.9.0 |
| hdf5 | 1.12.1 | 1.12.1 | 1.10.6 | 1.12.1 | 1.12.1 | 1.12.1 |
| heapdict | 1.0.1 | 1.0.1 | 1.0.1 | 1.0.1 | 1.0.1 | 1.0.1 |
| holoviews | 1.18.3 | 1.18.3 | 1.14.8 | 1.18.3 | 1.18.3 | 1.18.3 |
| hvplot | 0.9.2 | 0.9.2 | 0.7.3 | 0.9.2 | 0.9.2 | 0.9.2 |
| hyperlink | 21.0.0 | 21.0.0 | 21.0.0 | 21.0.0 | 21.0.0 | |
| icc\_rt | 2022.1.0 | |||||
| icu | 73.1 | 73.1 | 73.1 | 73.1 | 73.1 | 73.1 |
| idna | 3.4 | 3.4 | 3.3 | 3.4 | 3.4 | 3.4 |
| imagecodecs | 2023.1.23 | 2023.1.23 | 2023.1.23 | 2023.1.23 | 2023.1.23 | 2023.1.23 |
| imageio | 2.33.1 | 2.33.1 | 2.33.1 | 2.33.1 | 2.33.1 | 2.33.1 |
| imagesize | 1.4.1 | 1.4.1 | 1.4.1 | 1.4.1 | 1.4.1 | |
| imbalanced-learn | 0.11.0 | 0.11.0 | 0.11.0 | 0.11.0 | 0.11.0 | 0.11.0 |
| importlib-metadata | 7.0.1 | 7.0.1 | 7.0.1 | 7.0.1 | 7.0.1 | 7.0.1 |
| importlib\_metadata | 7.0.1 | 7.0.1 | 7.0.1 | 7.0.1 | 7.0.1 | |
| incremental | 22.10.0 | 22.10.0 | 22.10.0 | 22.10.0 | 22.10.0 | |
| inflection | 0.5.1 | 0.5.1 | 0.5.1 | 0.5.1 | 0.5.1 | |
| iniconfig | 1.1.1 | 1.1.1 | 1.1.1 | 1.1.1 | 1.1.1 | 1.1.1 |
| intake | 0.6.8 | 0.6.8 | 0.6.8 | 0.6.8 | 0.6.8 | 0.6.8 |
| intel-openmp | 2023.1.0 | 2023.1.0 | ||||
| intervaltree | 3.1.0 | 3.1.0 | 3.1.0 | 3.1.0 | 3.1.0 | |
| ipykernel | 6.28.0 | 6.28.0 | 6.25.0 | 6.28.0 | 6.28.0 | 6.28.0 |
| ipython | 8.20.0 | 8.20.0 | 8.20.0 | 8.20.0 | 8.20.0 | 8.20.0 |
| ipython\_genutils | 0.2.0 | 0.2.0 | 0.2.0 | 0.2.0 | 0.2.0 | 0.2.0 |
| ipywidgets | 7.6.5 | 7.6.5 | 7.6.5 | 7.6.5 | 7.6.5 | |
| isort | 5.9.3 | 5.9.3 | 5.9.3 | 5.9.3 | 5.9.3 | 5.9.3 |
| itemadapter | 0.3.0 | 0.3.0 | 0.3.0 | 0.3.0 | 0.3.0 | |
| itemloaders | 1.1.0 | 1.1.0 | 1.1.0 | 1.1.0 | 1.1.0 | |
| itsdangerous | 2.0.1 | 2.0.1 | 2.0.1 | 2.0.1 | 2.0.1 | 2.0.1 |
| jaraco.classes | 3.2.1 | 3.2.1 | 3.2.1 | 3.2.1 | 3.2.1 | |
| jedi | 0.18.1 | 0.18.1 | 0.18.1 | 0.18.1 | 0.18.1 | 0.18.1 |
| jeepney | 0.7.1 | 0.7.1 | ||||
| jellyfish | 1.0.1 | 1.0.1 | 1.0.1 | 1.0.1 | 1.0.1 | |
| jinja2 | 3.1.3 | 3.1.3 | 3.1.3 | 3.1.3 | 3.1.3 | 3.1.3 |
| jmespath | 1.0.1 | 1.0.1 | 1.0.1 | 1.0.1 | 1.0.1 | 1.0.1 |
| joblib | 1.2.0 | 1.2.0 | 1.2.0 | 1.2.0 | 1.2.0 | 1.2.0 |
| jpeg | 9e | 9e | 9e | 9e | 9e | 9e |
| jq | 1.6 | 1.6 | 1.6 | 1.6 | 1.6 | |
| json5 | 0.9.6 | 0.9.6 | 0.9.6 | 0.9.6 | 0.9.6 | |
| jsonpatch | 1.32 | 1.32 | 1.32 | 1.32 | 1.32 | 1.32 |
| jsonpointer | 2.1 | 2.1 | 2.1 | 2.1 | 2.1 | 2.1 |
| jsonschema | 4.19.2 | 4.19.2 | 4.19.2 | 4.19.2 | 4.19.2 | 4.19.2 |
| jsonschema-specifications | 2023.7.1 | 2023.7.1 | 2023.7.1 | 2023.7.1 | 2023.7.1 | 2023.7.1 |
| jupyter | 1.0.0 | 1.0.0 | 1.0.0 | 1.0.0 | 1.0.0 | 1.0.0 |
| jupyter-lsp | 2.2.0 | 2.2.0 | 2.2.0 | 2.2.0 | 2.2.0 | |
| jupyter\_client | 8.6.0 | 8.6.0 | 7.4.9 | 8.6.0 | 8.6.0 | 8.6.0 |
| jupyter\_console | 6.6.3 | 6.6.3 | 6.6.3 | 6.6.3 | 6.6.3 | 6.6.3 |
| jupyter\_core | 5.5.0 | 5.5.0 | 5.5.0 | 5.5.0 | 5.5.0 | 5.5.0 |
| jupyter\_events | 0.8.0 | 0.8.0 | 0.8.0 | 0.8.0 | 0.8.0 | |
| jupyter\_server | 2.10.0 | 2.10.0 | 1.23.4 | 2.10.0 | 2.10.0 | 2.10.0 |
| jupyter\_server\_terminals | 0.4.4 | 0.4.4 | 0.4.4 | 0.4.4 | 0.4.4 | |
| jupyterlab | 4.0.11 | 4.0.11 | 4.0.11 | 4.0.11 | 4.0.11 | |
| jupyterlab-variableinspector | 3.1.0 | 3.1.0 | 3.1.0 | 3.1.0 | 3.1.0 | |
| jupyterlab\_pygments | 0.1.2 | 0.1.2 | 0.2.2 | 0.1.2 | 0.1.2 | 0.1.2 |
| jupyterlab\_server | 2.25.1 | 2.25.1 | 2.25.1 | 2.25.1 | 2.25.1 | |
| jupyterlab\_widgets | 3.0.9 | 3.0.9 | 3.0.9 | 3.0.9 | 3.0.9 | |
| jxrlib | 1.1 | 1.1 | 1.1 | 1.1 | 1.1 | |
| keyring | 23.13.1 | 23.13.1 | 23.13.1 | 23.13.1 | 23.13.1 | |
| kiwisolver | 1.4.4 | 1.4.4 | 1.4.4 | 1.4.4 | 1.4.4 | 1.4.4 |
| krb5 | 1.20.1 | 1.20.1 | 1.20.1 | 1.20.1 | 1.20.1 | 1.20.1 |
| lazy-object-proxy | 1.6.0 | 1.6.0 | 1.6.0 | 1.6.0 | 1.6.0 | 1.6.0 |
| lazy\_loader | 0.3 | 0.3 | 0.3 | 0.3 | 0.3 | 0.3 |
| lcms2 | 2.12 | 2.12 | 2.12 | 2.12 | 2.12 | 2.12 |
| ld64 | 530 | 530 | ||||
| ld64\_osx-64 | 530 | |||||
| ld64\_osx-arm64 | 530 | |||||
| ld\_impl\_linux-64 | 2.38 | |||||
| ld\_impl\_linux-aarch64 | 2.38 | |||||
| ld\_impl\_linux-s390x | 2.38 | |||||
| ldid | 2.1.5 | 2.1.5 | ||||
| lerc | 3.0 | 3.0 | 3.0 | 3.0 | 3.0 | 3.0 |
| libaec | 1.0.4 | 1.0.4 | 1.0.4 | 1.0.4 | 1.0.4 | 1.0.4 |
| libarchive | 3.6.2 | 3.6.2 | 3.6.2 | 3.6.2 | 3.6.2 | 3.6.2 |
| libavif | 0.11.1 | 0.11.1 | 0.11.1 | 0.11.1 | 0.11.1 | 0.11.1 |
| libboost | 1.82.0 | 1.82.0 | 1.82.0 | 1.82.0 | 1.82.0 | |
| libbrotlicommon | 1.0.9 | 1.0.9 | 1.0.9 | 1.0.9 | 1.0.9 | 1.0.9 |
| libbrotlidec | 1.0.9 | 1.0.9 | 1.0.9 | 1.0.9 | 1.0.9 | 1.0.9 |
| libbrotlienc | 1.0.9 | 1.0.9 | 1.0.9 | 1.0.9 | 1.0.9 | 1.0.9 |
| libclang | 14.0.6 | 14.0.6 | 14.0.6 | 14.0.6 | 14.0.6 | |
| libclang13 | 14.0.6 | 14.0.6 | 14.0.6 | 14.0.6 | 14.0.6 | |
| libcups | 2.4.2 | 2.4.2 | ||||
| libcurl | 8.5.0 | 8.5.0 | 8.5.0 | 8.5.0 | 8.5.0 | 8.5.0 |
| libcxx | 14.0.6 | 14.0.6 | ||||
| libdeflate | 1.17 | 1.17 | 1.17 | 1.17 | 1.17 | 1.17 |
| libedit | 3.1.20230828 | 3.1.20230828 | 3.1.20230828 | 3.1.20230828 | 3.1.20230828 | |
| libev | 4.33 | 4.33 | 4.33 | 4.33 | 4.33 | |
| libevent | 2.1.12 | 2.1.12 | 2.1.12 | 2.1.12 | 2.1.12 | |
| libffi | 3.4.4 | 3.4.4 | 3.4.2 | 3.4.4 | 3.4.4 | 3.4.4 |
| libgcc-ng | 11.2.0 | 11.2.0 | 11.2.0 | |||
| libgfortran | 5.0.0 | 5.0.0 | ||||
| libgfortran-ng | 11.2.0 | 11.2.0 | 11.2.0 | |||
| libgfortran5 | 11.2.0 | 11.2.0 | 11.2.0 | 11.3.0 | 11.3.0 | |
| libglib | 2.78.4 | 2.78.4 | 2.78.4 | 2.78.4 | ||
| libgomp | 11.2.0 | 11.2.0 | 11.2.0 | |||
| libiconv | 1.16 | 1.16 | 1.16 | 1.16 | 1.16 | |
| liblief | 0.12.3 | 0.12.3 | 0.12.3 | 0.12.3 | 0.12.3 | 0.12.3 |
| libllvm14 | 14.0.6 | 14.0.6 | 14.0.6 | 14.0.6 | ||
| libmamba | 1.5.6 | 1.5.6 | 1.5.6 | 1.5.6 | 1.5.6 | 1.5.6 |
| libmambapy | 1.5.6 | 1.5.6 | 1.5.6 | 1.5.6 | 1.5.6 | 1.5.6 |
| libnghttp2 | 1.57.0 | 1.57.0 | 1.57.0 | 1.57.0 | 1.57.0 | |
| libopenblas | 0.3.21 | 0.3.21 | 0.3.21 | 0.3.21 | ||
| libpng | 1.6.39 | 1.6.39 | 1.6.39 | 1.6.39 | 1.6.39 | 1.6.39 |
| libpq | 12.17 | 12.17 | 12.17 | 12.17 | 12.17 | |
| libprotobuf | 3.20.3 | 3.20.3 | 3.20.3 | 3.20.3 | 3.20.3 | |
| libsodium | 1.0.18 | 1.0.18 | 1.0.18 | 1.0.18 | 1.0.18 | 1.0.18 |
| libsolv | 0.7.24 | 0.7.24 | 0.7.24 | 0.7.24 | 0.7.24 | 0.7.24 |
| libspatialindex | 1.9.3 | 1.9.3 | 1.9.3 | 1.9.3 | 1.9.3 | |
| libssh2 | 1.10.0 | 1.10.0 | 1.10.0 | 1.10.0 | 1.10.0 | 1.10.0 |
| libstdcxx-ng | 11.2.0 | 11.2.0 | 11.2.0 | |||
| libthrift | 0.15.0 | 0.15.0 | 0.15.0 | 0.15.0 | 0.15.0 | |
| libtiff | 4.5.1 | 4.5.1 | 4.5.1 | 4.5.1 | 4.5.1 | 4.5.1 |
| libuuid | 1.41.5 | 1.41.5 | 1.41.5 | |||
| libwebp-base | 1.3.2 | 1.3.2 | 1.3.2 | 1.3.2 | 1.3.2 | 1.3.2 |
| libxcb | 1.15 | 1.15 | ||||
| libxkbcommon | 1.0.1 | 1.0.1 | ||||
| libxml2 | 2.10.4 | 2.10.4 | 2.10.4 | 2.10.4 | 2.10.4 | 2.10.4 |
| libxslt | 1.1.37 | 1.1.37 | 1.1.37 | 1.1.37 | 1.1.37 | |
| libzopfli | 1.0.3 | 1.0.3 | 1.0.3 | 1.0.3 | 1.0.3 | 1.0.3 |
| linkify-it-py | 2.0.0 | 2.0.0 | 2.0.0 | 2.0.0 | 2.0.0 | |
| llvm-openmp | 14.0.6 | 14.0.6 | ||||
| llvmlite | 0.42.0 | 0.42.0 | 0.42.0 | 0.42.0 | 0.42.0 | |
| locket | 1.0.0 | 1.0.0 | 1.0.0 | 1.0.0 | 1.0.0 | 1.0.0 |
| lxml | 4.9.3 | 4.9.3 | 4.9.3 | 4.9.3 | 4.9.3 | |
| lz4 | 4.3.2 | 4.3.2 | 4.3.2 | 4.3.2 | 4.3.2 | 4.3.2 |
| lz4-c | 1.9.4 | 1.9.4 | 1.9.4 | 1.9.4 | 1.9.4 | 1.9.4 |
| lzo | 2.10 | 2.10 | 2.10 | 2.10 | 2.10 | 2.10 |
| m2-msys2-runtime | 2.5.0.17080.65c939c | |||||
| m2-patch | 2.7.5 | |||||
| m2w64-libwinpthread-git | 5.0.0.4634.697f757 | |||||
| markdown | 3.4.1 | 3.4.1 | 3.4.1 | 3.4.1 | 3.4.1 | 3.4.1 |
| markdown-it-py | 2.2.0 | 2.2.0 | 2.2.0 | 2.2.0 | 2.2.0 | |
| markupsafe | 2.1.3 | 2.1.3 | 2.1.3 | 2.1.3 | 2.1.3 | 2.1.3 |
| matplotlib | 3.8.0 | 3.8.0 | 3.8.0 | 3.8.0 | 3.8.0 | 3.8.0 |
| matplotlib-base | 3.8.0 | 3.8.0 | 3.8.0 | 3.8.0 | 3.8.0 | 3.8.0 |
| matplotlib-inline | 0.1.6 | 0.1.6 | 0.1.6 | 0.1.6 | 0.1.6 | 0.1.6 |
| mccabe | 0.7.0 | 0.7.0 | 0.7.0 | 0.7.0 | 0.7.0 | 0.7.0 |
| mdit-py-plugins | 0.3.0 | 0.3.0 | 0.3.0 | 0.3.0 | 0.3.0 | |
| mdurl | 0.1.0 | 0.1.0 | 0.1.0 | 0.1.0 | 0.1.0 | |
| menuinst | 2.0.2 | 2.0.2 | 2.0.2 | 2.0.2 | 2.0.2 | 2.0.2 |
| mistune | 2.0.4 | 2.0.4 | 2.0.4 | 2.0.4 | 2.0.4 | 2.0.4 |
| mkl | 2023.1.0 | 2023.1.0 | ||||
| mkl-service | 2.4.0 | 2.4.0 | ||||
| mkl\_fft | 1.3.8 | 1.3.8 | ||||
| mkl\_random | 1.2.4 | 1.2.4 | ||||
| mock | 4.0.3 | |||||
| more-itertools | 10.1.0 | 10.1.0 | 10.1.0 | 10.1.0 | 10.1.0 | 10.1.0 |
| mpc | 1.1.0 | 1.1.0 | 1.1.0 | 1.1.0 | 1.1.0 | 1.1.0 |
| mpfr | 4.0.2 | 4.0.2 | 4.0.2 | 4.0.2 | 4.0.2 | 4.0.2 |
| mpir | 3.0.0 | |||||
| mpmath | 1.3.0 | 1.3.0 | 1.3.0 | 1.3.0 | 1.3.0 | 1.3.0 |
| msgpack-python | 1.0.3 | 1.0.3 | 1.0.3 | 1.0.3 | 1.0.3 | 1.0.3 |
| msys2-conda-epoch | 20160418 | |||||
| multidict | 6.0.4 | 6.0.4 | 6.0.4 | 6.0.4 | 6.0.4 | 6.0.4 |
| multipledispatch | 0.6.0 | 0.6.0 | 0.6.0 | 0.6.0 | 0.6.0 | |
| munkres | 1.1.4 | 1.1.4 | 1.1.4 | 1.1.4 | 1.1.4 | 1.1.4 |
| mypy | 1.8.0 | 1.8.0 | 1.8.0 | 1.8.0 | 1.8.0 | 1.8.0 |
| mypy\_extensions | 1.0.0 | 1.0.0 | 1.0.0 | 1.0.0 | 1.0.0 | 1.0.0 |
| mysql | 5.7.24 | 5.7.24 | 5.7.24 | 5.7.24 | ||
| navigator-updater | 0.4.0 | 0.4.0 | 0.4.0 | 0.4.0 | 0.4.0 | |
| nbclassic | 1.0.0 | |||||
| nbclient | 0.8.0 | 0.8.0 | 0.8.0 | 0.8.0 | 0.8.0 | 0.8.0 |
| nbconvert | 7.10.0 | 7.10.0 | 7.10.0 | 7.10.0 | 7.10.0 | 7.10.0 |
| nbformat | 5.9.2 | 5.9.2 | 5.9.2 | 5.9.2 | 5.9.2 | 5.9.2 |
| ncurses | 6.4 | 6.4 | 6.4 | 6.4 | 6.4 | |
| nest-asyncio | 1.6.0 | 1.6.0 | 1.6.0 | 1.6.0 | 1.6.0 | 1.6.0 |
| networkx | 3.1 | 3.1 | 3.1 | 3.1 | 3.1 | 3.1 |
| nltk | 3.8.1 | 3.8.1 | 3.8.1 | 3.8.1 | 3.8.1 | 3.8.1 |
| notebook | 7.0.8 | 7.0.8 | 6.5.4 | 7.0.8 | 7.0.8 | 7.0.8 |
| notebook-shim | 0.2.3 | 0.2.3 | 0.2.3 | 0.2.3 | 0.2.3 | 0.2.3 |
| nspr | 4.35 | 4.35 | ||||
| nss | 3.89.1 | 3.89.1 | ||||
| numba | 0.59.0 | 0.59.0 | 0.59.0 | 0.59.0 | 0.59.0 | |
| numexpr | 2.8.7 | 2.8.7 | 2.8.7 | 2.8.7 | 2.8.7 | 2.8.7 |
| numpy | 1.26.4 | 1.26.4 | 1.26.4 | 1.26.4 | 1.26.4 | 1.26.4 |
| numpy-base | 1.26.4 | 1.26.4 | 1.26.4 | 1.26.4 | 1.26.4 | 1.26.4 |
| numpydoc | 1.5.0 | 1.5.0 | 1.5.0 | 1.5.0 | 1.5.0 | |
| oniguruma | 6.9.7.1 | 6.9.7.1 | 6.9.7.1 | 6.9.7.1 | ||
| openjpeg | 2.4.0 | 2.4.0 | 2.4.0 | 2.3.0 | 2.4.0 | 2.4.0 |
| openpyxl | 3.0.10 | 3.0.10 | 3.0.10 | 3.0.10 | 3.0.10 | 3.0.10 |
| openssl | 3.0.13 | 3.0.13 | 3.0.13 | 3.0.13 | 3.0.13 | 3.0.13 |
| orc | 1.7.4 | 1.7.4 | 1.7.4 | 1.7.4 | 1.7.4 | |
| overrides | 7.4.0 | 7.4.0 | 7.4.0 | 7.4.0 | 7.4.0 | |
| packaging | 23.1 | 23.1 | 23.1 | 23.1 | 23.1 | 23.1 |
| pandas | 2.1.4 | 2.1.4 | 2.1.4 | 2.1.4 | 2.1.4 | 2.1.4 |
| pandocfilters | 1.5.0 | 1.5.0 | 1.5.0 | 1.5.0 | 1.5.0 | 1.5.0 |
| panel | 1.3.8 | 1.3.8 | 0.12.6 | 1.3.8 | 1.3.8 | 1.3.8 |
| param | 2.0.2 | 2.0.2 | 1.13.0 | 2.0.2 | 2.0.2 | 2.0.2 |
| paramiko | 2.8.1 | |||||
| parsel | 1.8.1 | 1.8.1 | 1.8.1 | 1.8.1 | 1.8.1 | |
| parso | 0.8.3 | 0.8.3 | 0.8.3 | 0.8.3 | 0.8.3 | 0.8.3 |
| partd | 1.4.1 | 1.4.1 | 1.4.1 | 1.4.1 | 1.4.1 | 1.4.1 |
| patch | 2.7.6 | 2.7.6 | 2.7.6 | 2.7.6 | 2.7.6 | |
| patchelf | 0.17.2 | 0.17.2 | 0.17.2 | |||
| pathlib | 1.0.1 | 1.0.1 | 1.0.1 | 1.0.1 | 1.0.1 | |
| pathspec | 0.10.3 | 0.10.3 | 0.10.3 | 0.10.3 | 0.10.3 | 0.10.3 |
| patsy | 0.5.3 | 0.5.3 | 0.5.3 | 0.5.3 | 0.5.3 | 0.5.3 |
| pcre2 | 10.42 | 10.42 | 10.42 | 10.42 | 10.42 | 10.42 |
| pexpect | 4.8.0 | 4.8.0 | 4.8.0 | 4.8.0 | 4.8.0 | 4.8.0 |
| pickleshare | 0.7.5 | 0.7.5 | 0.7.5 | 0.7.5 | 0.7.5 | |
| pillow | 10.2.0 | 10.2.0 | 10.2.0 | 10.2.0 | 10.2.0 | 10.2.0 |
| pip | 23.3.1 | 23.3.1 | 23.3.1 | 23.3.1 | 23.3.1 | 23.3.1 |
| pkce | 1.0.3 | 1.0.3 | 1.0.3 | 1.0.3 | 1.0.3 | |
| pkginfo | 1.9.6 | 1.9.6 | 1.9.6 | 1.9.6 | 1.9.6 | 1.9.6 |
| platformdirs | 3.10.0 | 3.10.0 | 3.10.0 | 3.10.0 | 3.10.0 | 3.10.0 |
| plotly | 5.9.0 | 5.9.0 | 5.9.0 | 5.9.0 | 5.9.0 | 5.9.0 |
| pluggy | 1.0.0 | 1.0.0 | 1.0.0 | 1.0.0 | 1.0.0 | 1.0.0 |
| ply | 3.11 | 3.11 | 3.11 | 3.11 | 3.11 | |
| powershell\_shortcut | 0.0.1 | |||||
| prometheus\_client | 0.14.1 | 0.14.1 | 0.14.1 | 0.14.1 | 0.14.1 | 0.14.1 |
| prompt-toolkit | 3.0.43 | 3.0.43 | 3.0.43 | 3.0.43 | 3.0.43 | 3.0.43 |
| prompt\_toolkit | 3.0.43 | 3.0.43 | 3.0.43 | 3.0.43 | 3.0.43 | 3.0.43 |
| protego | 0.1.16 | 0.1.16 | 0.1.16 | 0.1.16 | 0.1.16 | |
| protobuf | 3.20.3 | 3.20.3 | 3.20.3 | 3.20.3 | 3.20.3 | |
| psutil | 5.9.0 | 5.9.0 | 5.9.0 | 5.9.0 | 5.9.0 | 5.9.0 |
| ptyprocess | 0.7.0 | 0.7.0 | 0.7.0 | 0.7.0 | 0.7.0 | 0.7.0 |
| pure\_eval | 0.2.2 | 0.2.2 | 0.2.2 | 0.2.2 | 0.2.2 | 0.2.2 |
| py-cpuinfo | 9.0.0 | 9.0.0 | 9.0.0 | 9.0.0 | 9.0.0 | |
| py-lief | 0.12.3 | 0.12.3 | 0.12.3 | 0.12.3 | 0.12.3 | 0.12.3 |
| pyarrow | 14.0.2 | 14.0.2 | 14.0.2 | 14.0.2 | 14.0.2 | |
| pyasn1 | 0.4.8 | 0.4.8 | 0.4.8 | 0.4.8 | 0.4.8 | |
| pyasn1-modules | 0.2.8 | 0.2.8 | 0.2.8 | 0.2.8 | 0.2.8 | |
| pybind11-abi | 4 | 4 | 4 | 4 | 4 | 4 |
| pycodestyle | 2.10.0 | 2.10.0 | 2.11.1 | 2.10.0 | 2.10.0 | 2.10.0 |
| pycosat | 0.6.6 | 0.6.6 | 0.6.6 | 0.6.6 | 0.6.6 | 0.6.6 |
| pycparser | 2.21 | 2.21 | 2.21 | 2.21 | 2.21 | 2.21 |
| pyct | 0.5.0 | 0.5.0 | 0.5.0 | 0.5.0 | 0.5.0 | 0.5.0 |
| pycurl | 7.45.2 | 7.45.2 | 7.45.2 | 7.45.2 | 7.45.2 | 7.45.2 |
| pydantic | 1.10.12 | 1.10.12 | 1.10.12 | 1.10.12 | 1.10.12 | |
| pydeck | 0.8.0 | 0.8.0 | 0.8.0 | 0.8.0 | 0.8.0 | |
| pydispatcher | 2.0.5 | 2.0.5 | 2.0.5 | 2.0.5 | 2.0.5 | |
| pydocstyle | 6.3.0 | 6.3.0 | 6.3.0 | 6.3.0 | 6.3.0 | |
| pyerfa | 2.0.0 | 2.0.0 | 2.0.0 | 2.0.0 | 2.0.0 | 2.0.0 |
| pyflakes | 3.0.1 | 3.0.1 | 3.1.0 | 3.0.1 | 3.0.1 | 3.0.1 |
| pygments | 2.15.1 | 2.15.1 | 2.15.1 | 2.15.1 | 2.15.1 | 2.15.1 |
| pyjwt | 2.4.0 | 2.4.0 | 2.4.0 | 2.4.0 | 2.4.0 | |
| pylint | 2.16.2 | 2.16.2 | 2.16.2 | 2.16.2 | 2.16.2 | 2.16.2 |
| pylint-venv | 2.3.0 | 2.3.0 | 2.3.0 | 2.3.0 | 2.3.0 | |
| pyls-spyder | 0.4.0 | 0.4.0 | 0.4.0 | 0.4.0 | 0.4.0 | |
| pynacl | 1.5.0 | |||||
| pyobjc-core | 9.0 | 9.0 | ||||
| pyobjc-framework-cocoa | 9.0 | 9.0 | ||||
| pyobjc-framework-coreservices | 9.0 | 9.0 | ||||
| pyobjc-framework-fsevents | 9.0 | 9.0 | ||||
| pyodbc | 5.0.1 | 5.0.1 | 5.0.1 | 5.0.1 | 5.0.1 | 5.0.1 |
| pyopenssl | 24.0.0 | 24.0.0 | 24.0.0 | 24.0.0 | 24.0.0 | |
| pyparsing | 3.0.9 | 3.0.9 | 3.0.9 | 3.0.9 | 3.0.9 | 3.0.9 |
| pyqt | 5.15.10 | 5.15.10 | 5.15.10 | 5.15.10 | 5.15.10 | |
| pyqt5-sip | 12.13.0 | 12.13.0 | 12.13.0 | 12.13.0 | 12.13.0 | |
| pyqtwebengine | 5.15.10 | 5.15.10 | 5.15.10 | 5.15.10 | 5.15.10 | |
| pysocks | 1.7.1 | 1.7.1 | 1.7.1 | 1.7.1 | 1.7.1 | 1.7.1 |
| pytables | 3.9.2 | 3.9.2 | 3.7.0 | 3.9.2 | 3.9.2 | 3.9.2 |
| pytest | 7.4.0 | 7.4.0 | 7.4.0 | 7.4.0 | 7.4.0 | 7.4.0 |
| python | 3.11.7 | 3.11.7 | 3.11.7 | 3.11.7 | 3.11.7 | 3.11.7 |
| python-dateutil | 2.8.2 | 2.8.2 | 2.8.2 | 2.8.2 | 2.8.2 | 2.8.2 |
| python-dotenv | 0.21.0 | 0.21.0 | 0.21.0 | 0.21.0 | 0.21.0 | |
| python-fastjsonschema | 2.16.2 | 2.16.2 | 2.16.2 | 2.16.2 | 2.16.2 | 2.16.2 |
| python-json-logger | 2.0.7 | 2.0.7 | 2.0.7 | 2.0.7 | 2.0.7 | |
| python-libarchive-c | 2.9 | 2.9 | 2.9 | 2.9 | 2.9 | 2.9 |
| python-lmdb | 1.4.1 | 1.4.1 | 1.4.1 | 1.4.1 | 1.4.1 | 1.4.1 |
| python-lsp-black | 1.2.1 | 1.2.1 | 1.2.1 | 1.2.1 | 1.2.1 | |
| python-lsp-jsonrpc | 1.0.0 | 1.0.0 | 1.0.0 | 1.0.0 | 1.0.0 | |
| python-lsp-server | 1.7.2 | 1.7.2 | 1.7.2 | 1.7.2 | 1.7.2 | |
| python-slugify | 5.0.2 | 5.0.2 | 5.0.2 | 5.0.2 | 5.0.2 | |
| python-snappy | 0.6.1 | 0.6.1 | 0.6.1 | 0.6.1 | 0.6.1 | 0.6.1 |
| python-tzdata | 2023.3 | 2023.3 | 2023.3 | 2023.3 | 2023.3 | 2023.3 |
| python.app | 3 | 3 | ||||
| pytoolconfig | 1.2.6 | 1.2.6 | 1.2.6 | 1.2.6 | 1.2.6 | |
| pytz | 2023.3.post1 | 2023.3.post1 | 2023.3.post1 | 2023.3.post1 | 2023.3.post1 | 2023.3.post1 |
| pyviz\_comms | 3.0.0 | 3.0.0 | 2.3.0 | 3.0.0 | 3.0.0 | 3.0.0 |
| pywavelets | 1.5.0 | 1.5.0 | 1.5.0 | 1.5.0 | 1.5.0 | 1.5.0 |
| pywin32 | 305 | |||||
| pywin32-ctypes | 0.2.0 | |||||
| pywinpty | 2.0.10 | |||||
| pyxdg | 0.27 | 0.27 | ||||
| pyyaml | 6.0.1 | 6.0.1 | 6.0.1 | 6.0.1 | 6.0.1 | 6.0.1 |
| pyzmq | 25.1.2 | 25.1.2 | 23.2.0 | 25.1.2 | 25.1.2 | 25.1.2 |
| qdarkstyle | 3.0.2 | 3.0.2 | 3.0.2 | 3.0.2 | 3.0.2 | |
| qstylizer | 0.2.2 | 0.2.2 | 0.2.2 | 0.2.2 | 0.2.2 | |
| qt-main | 5.15.2 | 5.15.2 | 5.15.2 | 5.15.2 | 5.15.2 | |
| qt-webengine | 5.15.9 | 5.15.9 | 5.15.9 | 5.15.9 | 5.15.9 | |
| qtawesome | 1.2.2 | 1.2.2 | 1.2.2 | 1.2.2 | 1.2.2 | |
| qtconsole | 5.4.2 | 5.4.2 | 5.4.2 | 5.4.2 | 5.4.2 | |
| qtpy | 2.4.1 | 2.4.1 | 2.4.1 | 2.4.1 | 2.4.1 | |
| queuelib | 1.6.2 | 1.6.2 | 1.6.2 | 1.6.2 | 1.6.2 | |
| re2 | 2022.04.01 | 2022.04.01 | 2022.04.01 | 2022.04.01 | 2022.04.01 | |
| readline | 8.2 | 8.2 | 8.2 | 8.2 | 8.2 | |
| referencing | 0.30.2 | 0.30.2 | 0.30.2 | 0.30.2 | 0.30.2 | 0.30.2 |
| regex | 2023.10.3 | 2023.10.3 | 2023.10.3 | 2023.10.3 | 2023.10.3 | 2023.10.3 |
| reproc | 14.2.4 | 14.2.4 | 14.2.4 | 14.2.4 | 14.2.4 | 14.2.4 |
| reproc-cpp | 14.2.4 | 14.2.4 | 14.2.4 | 14.2.4 | 14.2.4 | 14.2.4 |
| requests | 2.31.0 | 2.31.0 | 2.31.0 | 2.31.0 | 2.31.0 | 2.31.0 |
| requests-file | 1.5.1 | 1.5.1 | 1.5.1 | 1.5.1 | 1.5.1 | |
| requests-toolbelt | 1.0.0 | 1.0.0 | 1.0.0 | 1.0.0 | 1.0.0 | 1.0.0 |
| rfc3339-validator | 0.1.4 | 0.1.4 | 0.1.4 | 0.1.4 | 0.1.4 | |
| rfc3986-validator | 0.1.1 | 0.1.1 | 0.1.1 | 0.1.1 | 0.1.1 | |
| rich | 13.3.5 | 13.3.5 | 13.3.5 | 13.3.5 | 13.3.5 | |
| rope | 1.7.0 | 1.7.0 | 1.7.0 | 1.7.0 | 1.7.0 | |
| rpds-py | 0.10.6 | 0.10.6 | 0.10.6 | 0.10.6 | 0.10.6 | 0.10.6 |
| rtree | 1.0.1 | 1.0.1 | 1.0.1 | 1.0.1 | 1.0.1 | |
| ruamel.yaml | 0.17.21 | 0.17.21 | 0.17.21 | 0.17.21 | 0.17.21 | 0.17.21 |
| ruamel\_yaml | 0.17.21 | 0.17.21 | 0.17.21 | 0.17.21 | 0.17.21 | 0.17.21 |
| s2n | 1.3.27 | 1.3.27 | ||||
| s3fs | 2023.10.0 | 2023.10.0 | 2023.10.0 | 2023.10.0 | 2023.10.0 | 2023.10.0 |
| scikit-image | 0.22.0 | 0.22.0 | 0.22.0 | 0.22.0 | 0.22.0 | 0.22.0 |
| scikit-learn | 1.2.2 | 1.2.2 | 1.2.2 | 1.2.2 | 1.2.2 | 1.2.2 |
| scipy | 1.11.4 | 1.11.4 | 1.11.4 | 1.11.4 | 1.11.4 | 1.11.4 |
| scrapy | 2.8.0 | 2.8.0 | 2.8.0 | 2.8.0 | 2.8.0 | |
| seaborn | 0.12.2 | 0.12.2 | 0.12.2 | 0.12.2 | 0.12.2 | 0.12.2 |
| secretstorage | 3.3.1 | 3.3.1 | ||||
| semver | 2.13.0 | 2.13.0 | 2.13.0 | 2.13.0 | 2.13.0 | |
| send2trash | 1.8.2 | 1.8.2 | 1.8.2 | 1.8.2 | 1.8.2 | 1.8.2 |
| service\_identity | 18.1.0 | 18.1.0 | 18.1.0 | 18.1.0 | 18.1.0 | |
| setuptools | 68.2.2 | 68.2.2 | 68.2.2 | 68.2.2 | 68.2.2 | 68.2.2 |
| sip | 6.7.12 | 6.7.12 | 6.7.12 | 6.7.12 | 6.7.12 | |
| six | 1.16.0 | 1.16.0 | 1.16.0 | 1.16.0 | 1.16.0 | 1.16.0 |
| smart\_open | 5.2.1 | 5.2.1 | 5.2.1 | 5.2.1 | 5.2.1 | |
| smmap | 4.0.0 | 4.0.0 | 4.0.0 | 4.0.0 | 4.0.0 | |
| snappy | 1.1.10 | 1.1.10 | 1.1.10 | 1.1.10 | 1.1.10 | 1.1.10 |
| sniffio | 1.3.0 | 1.3.0 | 1.3.0 | 1.3.0 | 1.3.0 | 1.3.0 |
| snowballstemmer | 2.2.0 | 2.2.0 | 2.2.0 | 2.2.0 | 2.2.0 | 2.2.0 |
| sortedcontainers | 2.4.0 | 2.4.0 | 2.4.0 | 2.4.0 | 2.4.0 | 2.4.0 |
| soupsieve | 2.5 | 2.5 | 2.5 | 2.5 | 2.5 | 2.5 |
| sphinx | 5.0.2 | 5.0.2 | 5.0.2 | 5.0.2 | 5.0.2 | |
| sphinxcontrib-applehelp | 1.0.2 | 1.0.2 | 1.0.2 | 1.0.2 | 1.0.2 | |
| sphinxcontrib-devhelp | 1.0.2 | 1.0.2 | 1.0.2 | 1.0.2 | 1.0.2 | |
| sphinxcontrib-htmlhelp | 2.0.0 | 2.0.0 | 2.0.0 | 2.0.0 | 2.0.0 | |
| sphinxcontrib-jsmath | 1.0.1 | 1.0.1 | 1.0.1 | 1.0.1 | 1.0.1 | |
| sphinxcontrib-qthelp | 1.0.3 | 1.0.3 | 1.0.3 | 1.0.3 | 1.0.3 | |
| sphinxcontrib-serializinghtml | 1.1.5 | 1.1.5 | 1.1.5 | 1.1.5 | 1.1.5 | |
| spyder | 5.4.3 | 5.4.3 | 5.4.3 | 5.4.3 | 5.4.3 | |
| spyder-kernels | 2.4.4 | 2.4.4 | 2.4.4 | 2.4.4 | 2.4.4 | |
| sqlalchemy | 2.0.25 | 2.0.25 | 2.0.25 | 2.0.25 | 2.0.25 | 2.0.25 |
| sqlite | 3.41.2 | 3.41.2 | 3.41.2 | 3.41.2 | 3.41.2 | 3.41.2 |
| stack\_data | 0.2.0 | 0.2.0 | 0.2.0 | 0.2.0 | 0.2.0 | 0.2.0 |
| statsmodels | 0.14.0 | 0.14.0 | 0.14.0 | 0.14.0 | 0.14.0 | 0.14.0 |
| streamlit | 1.30.0 | 1.30.0 | 1.30.0 | 1.30.0 | 1.30.0 | |
| sympy | 1.12 | 1.12 | 1.12 | 1.12 | 1.12 | 1.12 |
| tabulate | 0.9.0 | 0.9.0 | 0.9.0 | 0.9.0 | 0.9.0 | 0.9.0 |
| tapi | 1100.0.11 | 1000.10.8 | ||||
| tbb | 2021.8.0 | 2021.8.0 | 2021.8.0 | 2021.8.0 | 2021.8.0 | |
| tblib | 1.7.0 | 1.7.0 | 1.7.0 | 1.7.0 | 1.7.0 | 1.7.0 |
| tenacity | 8.2.2 | 8.2.2 | 8.2.2 | 8.2.2 | 8.2.2 | 8.2.2 |
| terminado | 0.17.1 | 0.17.1 | 0.17.1 | 0.17.1 | 0.17.1 | 0.17.1 |
| text-unidecode | 1.3 | 1.3 | 1.3 | 1.3 | 1.3 | |
| textdistance | 4.2.1 | 4.2.1 | 4.2.1 | 4.2.1 | 4.2.1 | |
| threadpoolctl | 2.2.0 | 2.2.0 | 2.2.0 | 2.2.0 | 2.2.0 | 2.2.0 |
| three-merge | 0.1.1 | 0.1.1 | 0.1.1 | 0.1.1 | 0.1.1 | |
| tifffile | 2023.4.12 | 2023.4.12 | 2023.4.12 | 2023.4.12 | 2023.4.12 | 2023.4.12 |
| tinycss2 | 1.2.1 | 1.2.1 | 1.2.1 | 1.2.1 | 1.2.1 | 1.2.1 |
| tk | 8.6.12 | 8.6.12 | 8.6.12 | 8.6.12 | 8.6.12 | 8.6.12 |
| tldextract | 3.2.0 | 3.2.0 | 3.2.0 | 3.2.0 | 3.2.0 | |
| toml | 0.10.2 | 0.10.2 | 0.10.2 | 0.10.2 | 0.10.2 | |
| tomlkit | 0.11.1 | 0.11.1 | 0.11.1 | 0.11.1 | 0.11.1 | 0.11.1 |
| toolz | 0.12.0 | 0.12.0 | 0.12.0 | 0.12.0 | 0.12.0 | 0.12.0 |
| tornado | 6.3.3 | 6.3.3 | 6.3.3 | 6.3.3 | 6.3.3 | 6.3.3 |
| tqdm | 4.65.0 | 4.65.0 | 4.65.0 | 4.65.0 | 4.65.0 | 4.65.0 |
| traitlets | 5.7.1 | 5.7.1 | 5.7.1 | 5.7.1 | 5.7.1 | 5.7.1 |
| truststore | 0.8.0 | 0.8.0 | 0.8.0 | 0.8.0 | 0.8.0 | 0.8.0 |
| twisted | 23.10.0 | 23.10.0 | 23.10.0 | 23.10.0 | 23.10.0 | |
| twisted-iocpsupport | 1.0.2 | |||||
| typing-extensions | 4.9.0 | 4.9.0 | 4.9.0 | 4.9.0 | 4.9.0 | 4.9.0 |
| typing\_extensions | 4.9.0 | 4.9.0 | 4.9.0 | 4.9.0 | 4.9.0 | 4.9.0 |
| tzdata | 2023d | 2023d | 2023d | 2023d | 2023d | 2023d |
| tzlocal | 2.1 | 2.1 | 2.1 | 2.1 | 2.1 | |
| uc-micro-py | 1.0.1 | 1.0.1 | 1.0.1 | 1.0.1 | 1.0.1 | |
| ujson | 5.4.0 | 5.4.0 | 5.4.0 | 5.4.0 | 5.4.0 | |
| unidecode | 1.2.0 | 1.2.0 | 1.2.0 | 1.2.0 | 1.2.0 | |
| unixodbc | 2.3.11 | 2.3.11 | 2.3.11 | 2.3.11 | 2.3.11 | |
| urllib3 | 2.0.7 | 2.0.7 | 2.0.7 | 2.0.7 | 2.0.7 | 2.0.7 |
| utf8proc | 2.6.1 | 2.6.1 | 2.6.1 | 2.6.1 | 2.6.1 | |
| validators | 0.18.2 | 0.18.2 | 0.18.2 | 0.18.2 | 0.18.2 | |
| vc | 14.2 | |||||
| vs2015\_runtime | 14.27.29016 | |||||
| w3lib | 2.1.2 | 2.1.2 | 2.1.2 | 2.1.2 | 2.1.2 | |
| watchdog | 2.1.6 | 2.1.6 | 2.1.6 | 2.1.6 | 2.1.6 | |
| wcwidth | 0.2.5 | 0.2.5 | 0.2.5 | 0.2.5 | 0.2.5 | 0.2.5 |
| webencodings | 0.5.1 | 0.5.1 | 0.5.1 | 0.5.1 | 0.5.1 | 0.5.1 |
| websocket-client | 0.58.0 | 0.58.0 | 0.58.0 | 0.58.0 | 0.58.0 | 0.58.0 |
| werkzeug | 2.2.3 | 2.2.3 | 2.3.8 | 2.2.3 | 2.2.3 | 2.2.3 |
| whatthepatch | 1.0.2 | 1.0.2 | 1.0.2 | 1.0.2 | 1.0.2 | |
| wheel | 0.41.2 | 0.41.2 | 0.41.2 | 0.41.2 | 0.41.2 | 0.41.2 |
| widgetsnbextension | 3.5.2 | 3.5.2 | 3.5.2 | 3.5.2 | 3.5.2 | |
| win\_inet\_pton | 1.1.0 | |||||
| winpty | 0.4.3 | |||||
| wrapt | 1.14.1 | 1.14.1 | 1.14.1 | 1.14.1 | 1.14.1 | 1.14.1 |
| wurlitzer | 3.0.2 | 3.0.2 | 3.0.2 | 3.0.2 | ||
| xarray | 2023.6.0 | 2023.6.0 | 2023.6.0 | 2023.6.0 | 2023.6.0 | |
| xlwings | 0.29.1 | 0.29.1 | 0.29.1 | |||
| xyzservices | 2022.9.0 | 2022.9.0 | 2022.9.0 | 2022.9.0 | 2022.9.0 | |
| xz | 5.4.5 | 5.4.5 | 5.4.5 | 5.4.5 | 5.4.5 | 5.4.5 |
| yaml | 0.2.5 | 0.2.5 | 0.2.5 | 0.2.5 | 0.2.5 | 0.2.5 |
| yaml-cpp | 0.8.0 | 0.8.0 | 0.8.0 | 0.8.0 | 0.8.0 | 0.8.0 |
| yapf | 0.31.0 | 0.31.0 | 0.31.0 | 0.31.0 | 0.31.0 | |
| yarl | 1.9.3 | 1.9.3 | 1.9.3 | 1.9.3 | 1.9.3 | 1.9.3 |
| zeromq | 4.3.5 | 4.3.5 | 4.3.5 | 4.3.5 | 4.3.5 | 4.3.5 |
| zfp | 1.0.0 | 1.0.0 | 1.0.0 | 1.0.0 | ||
| zict | 3.0.0 | 3.0.0 | 3.0.0 | 3.0.0 | 3.0.0 | 3.0.0 |
| zipp | 3.17.0 | 3.17.0 | 3.17.0 | 3.17.0 | 3.17.0 | 3.17.0 |
| zlib | 1.2.13 | 1.2.13 | 1.2.13 | 1.2.13 | 1.2.13 | 1.2.13 |
| zlib-ng | 2.0.7 | 2.0.7 | 2.0.7 | 2.0.7 | 2.0.7 | |
| zope | 1.0 | 1.0 | 1.0 | 1.0 | 1.0 | |
| zope.interface | 5.4.0 | 5.4.0 | 5.4.0 | 5.4.0 | 5.4.0 | |
| zstandard | 0.19.0 | 0.19.0 | 0.19.0 | 0.19.0 | 0.19.0 | 0.19.0 |
| zstd | 1.5.5 | 1.5.5 | 1.5.5 | 1.5.5 | 1.5.5 | 1.5.5 |
| Package Name | linux-64 | linux-aarch64 | linux-s390x |
|---|---|---|---|
| \_anaconda\_depends | 2024.02 | 2024.02 | 2024.02 |
| \_libgcc\_mutex | 0.1 | 0.1 | 0.1 |
| \_openmp\_mutex | 5.1 | 5.1 | 5.1 |
| abseil-cpp | 20211102.0 | 20211102.0 | |
| aiobotocore | 2.7.0 | 2.7.0 | 2.7.0 |
| aiohttp | 3.9.3 | 3.9.3 | 3.9.3 |
| aioitertools | 0.7.1 | 0.7.1 | 0.7.1 |
| aiosignal | 1.2.0 | 1.2.0 | 1.2.0 |
| alabaster | 0.7.12 | 0.7.12 | |
| altair | 5.0.1 | 5.0.1 | |
| anaconda-anon-usage | 0.4.3 | 0.4.3 | 0.4.3 |
| anaconda-catalogs | 0.2.0 | 0.2.0 | 0.2.0 |
| anaconda-client | 1.12.3 | 1.12.3 | 1.12.3 |
| anaconda-cloud-auth | 0.1.4 | 0.1.4 | |
| anaconda-navigator | 2.5.2 | 2.5.2 | |
| anaconda-project | 0.11.1 | 0.11.1 | 0.11.1 |
| anyio | 4.2.0 | 4.2.0 | 3.5.0 |
| aom | 3.6.0 | 3.6.0 | 3.6.0 |
| appdirs | 1.4.4 | 1.4.4 | 1.4.4 |
| archspec | 0.2.1 | 0.2.1 | 0.2.1 |
| argon2-cffi | 21.3.0 | 21.3.0 | 21.3.0 |
| argon2-cffi-bindings | 21.2.0 | 21.2.0 | 21.2.0 |
| arrow | 1.2.3 | 1.2.3 | |
| arrow-cpp | 14.0.2 | 14.0.2 | |
| astroid | 2.14.2 | 2.14.2 | 2.14.2 |
| astropy | 5.3.4 | 5.3.4 | 5.3.4 |
| asttokens | 2.0.5 | 2.0.5 | 2.0.5 |
| async-lru | 2.0.4 | 2.0.4 | |
| atomicwrites | 1.4.0 | 1.4.0 | |
| attrs | 23.1.0 | 23.1.0 | 23.1.0 |
| automat | 20.2.0 | 20.2.0 | |
| autopep8 | 1.6.0 | 1.6.0 | |
| aws-c-auth | 0.6.19 | 0.6.19 | |
| aws-c-cal | 0.5.20 | 0.5.20 | |
| aws-c-common | 0.8.5 | 0.8.5 | |
| aws-c-compression | 0.2.16 | 0.2.16 | |
| aws-c-event-stream | 0.2.15 | 0.2.15 | |
| aws-c-http | 0.6.25 | 0.6.25 | |
| aws-c-io | 0.13.10 | 0.13.10 | |
| aws-c-mqtt | 0.7.13 | 0.7.13 | |
| aws-c-s3 | 0.1.51 | 0.1.51 | |
| aws-c-sdkutils | 0.1.6 | 0.1.6 | |
| aws-checksums | 0.1.13 | 0.1.13 | |
| aws-crt-cpp | 0.18.16 | 0.18.16 | |
| aws-sdk-cpp | 1.10.55 | 1.10.55 | |
| babel | 2.11.0 | 2.11.0 | |
| backports | 1.1 | 1.1 | 1.1 |
| backports.functools\_lru\_cache | 1.6.4 | 1.6.4 | 1.6.4 |
| backports.tempfile | 1.0 | 1.0 | 1.0 |
| backports.weakref | 1.0.post1 | 1.0.post1 | 1.0.post1 |
| bcrypt | 3.2.0 | 3.2.0 | |
| beautifulsoup4 | 4.12.2 | 4.12.2 | 4.12.2 |
| binaryornot | 0.4.4 | 0.4.4 | |
| black | 23.11.0 | 23.11.0 | 23.11.0 |
| blas | 1.0 | 1.0 | 1.0 |
| bleach | 4.1.0 | 4.1.0 | 4.1.0 |
| blinker | 1.6.2 | 1.6.2 | |
| blosc | 1.21.3 | 1.21.3 | 1.21.3 |
| bokeh | 3.3.4 | 3.3.4 | 2.4.3 |
| boltons | 23.0.0 | 23.0.0 | 23.0.0 |
| boost-cpp | 1.82.0 | 1.82.0 | |
| botocore | 1.31.64 | 1.31.64 | 1.31.64 |
| bottleneck | 1.3.7 | 1.3.7 | 1.3.7 |
| brotli | 1.0.9 | 1.0.9 | 1.0.9 |
| brotli-bin | 1.0.9 | 1.0.9 | 1.0.9 |
| brotli-python | 1.0.9 | 1.0.9 | 1.0.9 |
| brunsli | 0.1 | 0.1 | |
| bzip2 | 1.0.8 | 1.0.8 | 1.0.8 |
| c-ares | 1.19.1 | 1.19.1 | 1.19.1 |
| c-blosc2 | 2.12.0 | 2.12.0 | |
| ca-certificates | 2023.12.12 | 2023.12.12 | 2023.12.12 |
| cachetools | 4.2.2 | 4.2.2 | |
| certifi | 2024.2.2 | 2024.2.2 | 2024.2.2 |
| cffi | 1.16.0 | 1.16.0 | 1.16.0 |
| cfitsio | 3.470 | 3.470 | 3.470 |
| chardet | 4.0.0 | 4.0.0 | 4.0.0 |
| charls | 2.2.0 | 2.2.0 | |
| charset-normalizer | 2.0.4 | 2.0.4 | 2.0.4 |
| click | 8.1.7 | 8.1.7 | 8.1.7 |
| cloudpickle | 2.2.1 | 2.2.1 | 2.2.1 |
| clyent | 1.2.2 | 1.2.2 | |
| colorama | 0.4.6 | 0.4.6 | 0.4.6 |
| colorcet | 3.0.1 | 3.0.1 | 3.0.1 |
| comm | 0.1.2 | 0.1.2 | 0.1.2 |
| conda | 24.1.2 | 24.1.2 | 24.1.2 |
| conda-build | 24.1.2 | 24.1.2 | 24.1.2 |
| conda-content-trust | 0.2.0 | 0.2.0 | 0.2.0 |
| conda-index | 0.4.0 | 0.4.0 | 0.4.0 |
| conda-libmamba-solver | 24.1.0 | 24.1.0 | 24.1.0 |
| conda-pack | 0.6.0 | 0.6.0 | 0.6.0 |
| conda-package-handling | 2.2.0 | 2.2.0 | 2.2.0 |
| conda-package-streaming | 0.9.0 | 0.9.0 | 0.9.0 |
| conda-repo-cli | 1.0.75 | 1.0.75 | |
| conda-token | 0.4.0 | 0.4.0 | 0.4.0 |
| conda-verify | 3.4.2 | 3.4.2 | 3.4.2 |
| constantly | 23.10.4 | 23.10.4 | |
| contourpy | 1.2.0 | 1.2.0 | 1.2.0 |
| cookiecutter | 2.5.0 | 2.5.0 | |
| cryptography | 42.0.2 | 42.0.2 | 42.0.2 |
| cssselect | 1.2.0 | 1.2.0 | |
| curl | 8.5.0 | 8.5.0 | 8.5.0 |
| cycler | 0.11.0 | 0.11.0 | 0.11.0 |
| cyrus-sasl | 2.1.28 | 2.1.28 | |
| cytoolz | 0.12.2 | 0.12.2 | 0.12.2 |
| dask | 2023.11.0 | 2023.11.0 | 2023.11.0 |
| dask-core | 2023.11.0 | 2023.11.0 | 2023.11.0 |
| datashader | 0.16.0 | 0.16.0 | |
| dav1d | 1.2.1 | 1.2.1 | 1.2.1 |
| dbus | 1.13.18 | 1.13.18 | |
| debugpy | 1.6.7 | 1.6.7 | 1.6.7 |
| decorator | 5.1.1 | 5.1.1 | 5.1.1 |
| defusedxml | 0.7.1 | 0.7.1 | 0.7.1 |
| diff-match-patch | 20200713 | 20200713 | |
| dill | 0.3.7 | 0.3.7 | 0.3.7 |
| distributed | 2023.11.0 | 2023.11.0 | 2023.11.0 |
| distro | 1.8.0 | 1.8.0 | 1.8.0 |
| docstring-to-markdown | 0.11 | 0.11 | |
| docutils | 0.18.1 | 0.18.1 | |
| entrypoints | 0.4 | 0.4 | 0.4 |
| et\_xmlfile | 1.1.0 | 1.1.0 | 1.1.0 |
| executing | 0.8.3 | 0.8.3 | 0.8.3 |
| expat | 2.5.0 | 2.5.0 | |
| filelock | 3.13.1 | 3.13.1 | 3.13.1 |
| flake8 | 6.0.0 | 6.0.0 | |
| flask | 2.2.5 | 2.2.5 | 2.2.5 |
| fmt | 9.1.0 | 9.1.0 | 9.1.0 |
| fontconfig | 2.14.1 | 2.14.1 | |
| fonttools | 4.25.0 | 4.25.0 | 4.25.0 |
| freetype | 2.12.1 | 2.12.1 | 2.12.1 |
| frozenlist | 1.4.0 | 1.4.0 | 1.4.0 |
| fsspec | 2023.10.0 | 2023.10.0 | 2023.10.0 |
| future | 0.18.3 | 0.18.3 | 0.18.3 |
| gensim | 4.3.0 | 4.3.0 | |
| gflags | 2.2.2 | 2.2.2 | |
| giflib | 5.2.1 | 5.2.1 | 5.2.1 |
| gitdb | 4.0.7 | 4.0.7 | |
| gitpython | 3.1.37 | 3.1.37 | |
| glib | 2.78.4 | 2.78.4 | |
| glib-tools | 2.78.4 | 2.78.4 | |
| glog | 0.5.0 | 0.5.0 | |
| gmp | 6.2.1 | 6.2.1 | 6.2.1 |
| gmpy2 | 2.1.2 | 2.1.2 | 2.1.2 |
| greenlet | 3.0.1 | 3.0.1 | 3.0.1 |
| grpc-cpp | 1.48.2 | 1.48.2 | |
| gst-plugins-base | 1.14.1 | 1.14.1 | |
| gstreamer | 1.14.1 | 1.14.1 | |
| h5py | 3.9.0 | 3.9.0 | 3.7.0 |
| hdf5 | 1.12.1 | 1.12.1 | 1.10.6 |
| heapdict | 1.0.1 | 1.0.1 | 1.0.1 |
| holoviews | 1.18.3 | 1.18.3 | 1.14.8 |
| hvplot | 0.9.2 | 0.9.2 | 0.7.3 |
| hyperlink | 21.0.0 | 21.0.0 | |
| icu | 73.1 | 73.1 | 73.1 |
| idna | 3.4 | 3.4 | 3.3 |
| imagecodecs | 2023.1.23 | 2023.1.23 | 2023.1.23 |
| imageio | 2.33.1 | 2.33.1 | 2.33.1 |
| imagesize | 1.4.1 | 1.4.1 | |
| imbalanced-learn | 0.11.0 | 0.11.0 | 0.11.0 |
| importlib-metadata | 7.0.1 | 7.0.1 | 7.0.1 |
| importlib\_metadata | 7.0.1 | 7.0.1 | |
| incremental | 22.10.0 | 22.10.0 | |
| inflection | 0.5.1 | 0.5.1 | |
| iniconfig | 1.1.1 | 1.1.1 | 1.1.1 |
| intake | 0.6.8 | 0.6.8 | 0.6.8 |
| intel-openmp | 2023.1.0 | ||
| intervaltree | 3.1.0 | 3.1.0 | |
| ipykernel | 6.28.0 | 6.28.0 | 6.25.0 |
| ipython | 8.20.0 | 8.20.0 | 8.20.0 |
| ipython\_genutils | 0.2.0 | 0.2.0 | 0.2.0 |
| ipywidgets | 7.6.5 | 7.6.5 | |
| isort | 5.9.3 | 5.9.3 | 5.9.3 |
| itemadapter | 0.3.0 | 0.3.0 | |
| itemloaders | 1.1.0 | 1.1.0 | |
| itsdangerous | 2.0.1 | 2.0.1 | 2.0.1 |
| jaraco.classes | 3.2.1 | 3.2.1 | |
| jedi | 0.18.1 | 0.18.1 | 0.18.1 |
| jeepney | 0.7.1 | 0.7.1 | |
| jellyfish | 1.0.1 | 1.0.1 | |
| jinja2 | 3.1.3 | 3.1.3 | 3.1.3 |
| jmespath | 1.0.1 | 1.0.1 | 1.0.1 |
| joblib | 1.2.0 | 1.2.0 | 1.2.0 |
| jpeg | 9e | 9e | 9e |
| jq | 1.6 | 1.6 | |
| json5 | 0.9.6 | 0.9.6 | |
| jsonpatch | 1.32 | 1.32 | 1.32 |
| jsonpointer | 2.1 | 2.1 | 2.1 |
| jsonschema | 4.19.2 | 4.19.2 | 4.19.2 |
| jsonschema-specifications | 2023.7.1 | 2023.7.1 | 2023.7.1 |
| jupyter | 1.0.0 | 1.0.0 | 1.0.0 |
| jupyter-lsp | 2.2.0 | 2.2.0 | |
| jupyter\_client | 8.6.0 | 8.6.0 | 7.4.9 |
| jupyter\_console | 6.6.3 | 6.6.3 | 6.6.3 |
| jupyter\_core | 5.5.0 | 5.5.0 | 5.5.0 |
| jupyter\_events | 0.8.0 | 0.8.0 | |
| jupyter\_server | 2.10.0 | 2.10.0 | 1.23.4 |
| jupyter\_server\_terminals | 0.4.4 | 0.4.4 | |
| jupyterlab | 4.0.11 | 4.0.11 | |
| jupyterlab-variableinspector | 3.1.0 | 3.1.0 | |
| jupyterlab\_pygments | 0.1.2 | 0.1.2 | 0.2.2 |
| jupyterlab\_server | 2.25.1 | 2.25.1 | |
| jupyterlab\_widgets | 3.0.9 | 3.0.9 | |
| jxrlib | 1.1 | 1.1 | 1.1 |
| keyring | 23.13.1 | 23.13.1 | |
| kiwisolver | 1.4.4 | 1.4.4 | 1.4.4 |
| krb5 | 1.20.1 | 1.20.1 | 1.20.1 |
| lazy-object-proxy | 1.6.0 | 1.6.0 | 1.6.0 |
| lazy\_loader | 0.3 | 0.3 | 0.3 |
| lcms2 | 2.12 | 2.12 | 2.12 |
| ld\_impl\_linux-64 | 2.38 | ||
| ld\_impl\_linux-aarch64 | 2.38 | ||
| ld\_impl\_linux-s390x | 2.38 | ||
| lerc | 3.0 | 3.0 | 3.0 |
| libaec | 1.0.4 | 1.0.4 | 1.0.4 |
| libarchive | 3.6.2 | 3.6.2 | 3.6.2 |
| libavif | 0.11.1 | 0.11.1 | 0.11.1 |
| libboost | 1.82.0 | 1.82.0 | |
| libbrotlicommon | 1.0.9 | 1.0.9 | 1.0.9 |
| libbrotlidec | 1.0.9 | 1.0.9 | 1.0.9 |
| libbrotlienc | 1.0.9 | 1.0.9 | 1.0.9 |
| libclang | 14.0.6 | 14.0.6 | |
| libclang13 | 14.0.6 | 14.0.6 | |
| libcups | 2.4.2 | 2.4.2 | |
| libcurl | 8.5.0 | 8.5.0 | 8.5.0 |
| libdeflate | 1.17 | 1.17 | 1.17 |
| libedit | 3.1.20230828 | 3.1.20230828 | 3.1.20230828 |
| libev | 4.33 | 4.33 | 4.33 |
| libevent | 2.1.12 | 2.1.12 | |
| libffi | 3.4.4 | 3.4.4 | 3.4.2 |
| libgcc-ng | 11.2.0 | 11.2.0 | 11.2.0 |
| libgfortran-ng | 11.2.0 | 11.2.0 | 11.2.0 |
| libgfortran5 | 11.2.0 | 11.2.0 | 11.2.0 |
| libglib | 2.78.4 | 2.78.4 | |
| libgomp | 11.2.0 | 11.2.0 | 11.2.0 |
| libiconv | 1.16 | 1.16 | |
| liblief | 0.12.3 | 0.12.3 | 0.12.3 |
| libllvm14 | 14.0.6 | 14.0.6 | |
| libmamba | 1.5.6 | 1.5.6 | 1.5.6 |
| libmambapy | 1.5.6 | 1.5.6 | 1.5.6 |
| libnghttp2 | 1.57.0 | 1.57.0 | 1.57.0 |
| libopenblas | 0.3.21 | 0.3.21 | |
| libpng | 1.6.39 | 1.6.39 | 1.6.39 |
| libpq | 12.17 | 12.17 | |
| libprotobuf | 3.20.3 | 3.20.3 | |
| libsodium | 1.0.18 | 1.0.18 | 1.0.18 |
| libsolv | 0.7.24 | 0.7.24 | 0.7.24 |
| libspatialindex | 1.9.3 | 1.9.3 | |
| libssh2 | 1.10.0 | 1.10.0 | 1.10.0 |
| libstdcxx-ng | 11.2.0 | 11.2.0 | 11.2.0 |
| libthrift | 0.15.0 | 0.15.0 | |
| libtiff | 4.5.1 | 4.5.1 | 4.5.1 |
| libuuid | 1.41.5 | 1.41.5 | 1.41.5 |
| libwebp-base | 1.3.2 | 1.3.2 | 1.3.2 |
| libxcb | 1.15 | 1.15 | |
| libxkbcommon | 1.0.1 | 1.0.1 | |
| libxml2 | 2.10.4 | 2.10.4 | 2.10.4 |
| libxslt | 1.1.37 | 1.1.37 | |
| libzopfli | 1.0.3 | 1.0.3 | 1.0.3 |
| linkify-it-py | 2.0.0 | 2.0.0 | |
| llvmlite | 0.42.0 | 0.42.0 | |
| locket | 1.0.0 | 1.0.0 | 1.0.0 |
| lxml | 4.9.3 | 4.9.3 | |
| lz4 | 4.3.2 | 4.3.2 | 4.3.2 |
| lz4-c | 1.9.4 | 1.9.4 | 1.9.4 |
| lzo | 2.10 | 2.10 | 2.10 |
| markdown | 3.4.1 | 3.4.1 | 3.4.1 |
| markdown-it-py | 2.2.0 | 2.2.0 | |
| markupsafe | 2.1.3 | 2.1.3 | 2.1.3 |
| matplotlib | 3.8.0 | 3.8.0 | 3.8.0 |
| matplotlib-base | 3.8.0 | 3.8.0 | 3.8.0 |
| matplotlib-inline | 0.1.6 | 0.1.6 | 0.1.6 |
| mccabe | 0.7.0 | 0.7.0 | 0.7.0 |
| mdit-py-plugins | 0.3.0 | 0.3.0 | |
| mdurl | 0.1.0 | 0.1.0 | |
| menuinst | 2.0.2 | 2.0.2 | 2.0.2 |
| mistune | 2.0.4 | 2.0.4 | 2.0.4 |
| mkl | 2023.1.0 | ||
| mkl-service | 2.4.0 | ||
| mkl\_fft | 1.3.8 | ||
| mkl\_random | 1.2.4 | ||
| mock | 4.0.3 | ||
| more-itertools | 10.1.0 | 10.1.0 | 10.1.0 |
| mpc | 1.1.0 | 1.1.0 | 1.1.0 |
| mpfr | 4.0.2 | 4.0.2 | 4.0.2 |
| mpmath | 1.3.0 | 1.3.0 | 1.3.0 |
| msgpack-python | 1.0.3 | 1.0.3 | 1.0.3 |
| multidict | 6.0.4 | 6.0.4 | 6.0.4 |
| multipledispatch | 0.6.0 | 0.6.0 | |
| munkres | 1.1.4 | 1.1.4 | 1.1.4 |
| mypy | 1.8.0 | 1.8.0 | 1.8.0 |
| mypy\_extensions | 1.0.0 | 1.0.0 | 1.0.0 |
| mysql | 5.7.24 | 5.7.24 | |
| navigator-updater | 0.4.0 | 0.4.0 | |
| nbclassic | 1.0.0 | ||
| nbclient | 0.8.0 | 0.8.0 | 0.8.0 |
| nbconvert | 7.10.0 | 7.10.0 | 7.10.0 |
| nbformat | 5.9.2 | 5.9.2 | 5.9.2 |
| ncurses | 6.4 | 6.4 | 6.4 |
| nest-asyncio | 1.6.0 | 1.6.0 | 1.6.0 |
| networkx | 3.1 | 3.1 | 3.1 |
| nltk | 3.8.1 | 3.8.1 | 3.8.1 |
| notebook | 7.0.8 | 7.0.8 | 6.5.4 |
| notebook-shim | 0.2.3 | 0.2.3 | 0.2.3 |
| nspr | 4.35 | 4.35 | |
| nss | 3.89.1 | 3.89.1 | |
| numba | 0.59.0 | 0.59.0 | |
| numexpr | 2.8.7 | 2.8.7 | 2.8.7 |
| numpy | 1.26.4 | 1.26.4 | 1.26.4 |
| numpy-base | 1.26.4 | 1.26.4 | 1.26.4 |
| numpydoc | 1.5.0 | 1.5.0 | |
| oniguruma | 6.9.7.1 | 6.9.7.1 | |
| openjpeg | 2.4.0 | 2.4.0 | 2.4.0 |
| openpyxl | 3.0.10 | 3.0.10 | 3.0.10 |
| openssl | 3.0.13 | 3.0.13 | 3.0.13 |
| orc | 1.7.4 | 1.7.4 | |
| overrides | 7.4.0 | 7.4.0 | |
| packaging | 23.1 | 23.1 | 23.1 |
| pandas | 2.1.4 | 2.1.4 | 2.1.4 |
| pandocfilters | 1.5.0 | 1.5.0 | 1.5.0 |
| panel | 1.3.8 | 1.3.8 | 0.12.6 |
| param | 2.0.2 | 2.0.2 | 1.13.0 |
| parsel | 1.8.1 | 1.8.1 | |
| parso | 0.8.3 | 0.8.3 | 0.8.3 |
| partd | 1.4.1 | 1.4.1 | 1.4.1 |
| patch | 2.7.6 | 2.7.6 | 2.7.6 |
| patchelf | 0.17.2 | 0.17.2 | 0.17.2 |
| pathlib | 1.0.1 | 1.0.1 | |
| pathspec | 0.10.3 | 0.10.3 | 0.10.3 |
| patsy | 0.5.3 | 0.5.3 | 0.5.3 |
| pcre2 | 10.42 | 10.42 | 10.42 |
| pexpect | 4.8.0 | 4.8.0 | 4.8.0 |
| pickleshare | 0.7.5 | 0.7.5 | |
| pillow | 10.2.0 | 10.2.0 | 10.2.0 |
| pip | 23.3.1 | 23.3.1 | 23.3.1 |
| pkce | 1.0.3 | 1.0.3 | |
| pkginfo | 1.9.6 | 1.9.6 | 1.9.6 |
| platformdirs | 3.10.0 | 3.10.0 | 3.10.0 |
| plotly | 5.9.0 | 5.9.0 | 5.9.0 |
| pluggy | 1.0.0 | 1.0.0 | 1.0.0 |
| ply | 3.11 | 3.11 | |
| prometheus\_client | 0.14.1 | 0.14.1 | 0.14.1 |
| prompt-toolkit | 3.0.43 | 3.0.43 | 3.0.43 |
| prompt\_toolkit | 3.0.43 | 3.0.43 | 3.0.43 |
| protego | 0.1.16 | 0.1.16 | |
| protobuf | 3.20.3 | 3.20.3 | |
| psutil | 5.9.0 | 5.9.0 | 5.9.0 |
| ptyprocess | 0.7.0 | 0.7.0 | 0.7.0 |
| pure\_eval | 0.2.2 | 0.2.2 | 0.2.2 |
| py-cpuinfo | 9.0.0 | 9.0.0 | |
| py-lief | 0.12.3 | 0.12.3 | 0.12.3 |
| pyarrow | 14.0.2 | 14.0.2 | |
| pyasn1 | 0.4.8 | 0.4.8 | |
| pyasn1-modules | 0.2.8 | 0.2.8 | |
| pybind11-abi | 4 | 4 | 4 |
| pycodestyle | 2.10.0 | 2.10.0 | 2.11.1 |
| pycosat | 0.6.6 | 0.6.6 | 0.6.6 |
| pycparser | 2.21 | 2.21 | 2.21 |
| pyct | 0.5.0 | 0.5.0 | 0.5.0 |
| pycurl | 7.45.2 | 7.45.2 | 7.45.2 |
| pydantic | 1.10.12 | 1.10.12 | |
| pydeck | 0.8.0 | 0.8.0 | |
| pydispatcher | 2.0.5 | 2.0.5 | |
| pydocstyle | 6.3.0 | 6.3.0 | |
| pyerfa | 2.0.0 | 2.0.0 | 2.0.0 |
| pyflakes | 3.0.1 | 3.0.1 | 3.1.0 |
| pygments | 2.15.1 | 2.15.1 | 2.15.1 |
| pyjwt | 2.4.0 | 2.4.0 | |
| pylint | 2.16.2 | 2.16.2 | 2.16.2 |
| pylint-venv | 2.3.0 | 2.3.0 | |
| pyls-spyder | 0.4.0 | 0.4.0 | |
| pyodbc | 5.0.1 | 5.0.1 | 5.0.1 |
| pyopenssl | 24.0.0 | 24.0.0 | |
| pyparsing | 3.0.9 | 3.0.9 | 3.0.9 |
| pyqt | 5.15.10 | 5.15.10 | |
| pyqt5-sip | 12.13.0 | 12.13.0 | |
| pyqtwebengine | 5.15.10 | 5.15.10 | |
| pysocks | 1.7.1 | 1.7.1 | 1.7.1 |
| pytables | 3.9.2 | 3.9.2 | 3.7.0 |
| pytest | 7.4.0 | 7.4.0 | 7.4.0 |
| python | 3.11.7 | 3.11.7 | 3.11.7 |
| python-dateutil | 2.8.2 | 2.8.2 | 2.8.2 |
| python-dotenv | 0.21.0 | 0.21.0 | |
| python-fastjsonschema | 2.16.2 | 2.16.2 | 2.16.2 |
| python-json-logger | 2.0.7 | 2.0.7 | |
| python-libarchive-c | 2.9 | 2.9 | 2.9 |
| python-lmdb | 1.4.1 | 1.4.1 | 1.4.1 |
| python-lsp-black | 1.2.1 | 1.2.1 | |
| python-lsp-jsonrpc | 1.0.0 | 1.0.0 | |
| python-lsp-server | 1.7.2 | 1.7.2 | |
| python-slugify | 5.0.2 | 5.0.2 | |
| python-snappy | 0.6.1 | 0.6.1 | 0.6.1 |
| python-tzdata | 2023.3 | 2023.3 | 2023.3 |
| pytoolconfig | 1.2.6 | 1.2.6 | |
| pytz | 2023.3.post1 | 2023.3.post1 | 2023.3.post1 |
| pyviz\_comms | 3.0.0 | 3.0.0 | 2.3.0 |
| pywavelets | 1.5.0 | 1.5.0 | 1.5.0 |
| pyxdg | 0.27 | 0.27 | |
| pyyaml | 6.0.1 | 6.0.1 | 6.0.1 |
| pyzmq | 25.1.2 | 25.1.2 | 23.2.0 |
| qdarkstyle | 3.0.2 | 3.0.2 | |
| qstylizer | 0.2.2 | 0.2.2 | |
| qt-main | 5.15.2 | 5.15.2 | |
| qt-webengine | 5.15.9 | 5.15.9 | |
| qtawesome | 1.2.2 | 1.2.2 | |
| qtconsole | 5.4.2 | 5.4.2 | |
| qtpy | 2.4.1 | 2.4.1 | |
| queuelib | 1.6.2 | 1.6.2 | |
| re2 | 2022.04.01 | 2022.04.01 | |
| readline | 8.2 | 8.2 | 8.2 |
| referencing | 0.30.2 | 0.30.2 | 0.30.2 |
| regex | 2023.10.3 | 2023.10.3 | 2023.10.3 |
| reproc | 14.2.4 | 14.2.4 | 14.2.4 |
| reproc-cpp | 14.2.4 | 14.2.4 | 14.2.4 |
| requests | 2.31.0 | 2.31.0 | 2.31.0 |
| requests-file | 1.5.1 | 1.5.1 | |
| requests-toolbelt | 1.0.0 | 1.0.0 | 1.0.0 |
| rfc3339-validator | 0.1.4 | 0.1.4 | |
| rfc3986-validator | 0.1.1 | 0.1.1 | |
| rich | 13.3.5 | 13.3.5 | |
| rope | 1.7.0 | 1.7.0 | |
| rpds-py | 0.10.6 | 0.10.6 | 0.10.6 |
| rtree | 1.0.1 | 1.0.1 | |
| ruamel.yaml | 0.17.21 | 0.17.21 | 0.17.21 |
| ruamel\_yaml | 0.17.21 | 0.17.21 | 0.17.21 |
| s2n | 1.3.27 | 1.3.27 | |
| s3fs | 2023.10.0 | 2023.10.0 | 2023.10.0 |
| scikit-image | 0.22.0 | 0.22.0 | 0.22.0 |
| scikit-learn | 1.2.2 | 1.2.2 | 1.2.2 |
| scipy | 1.11.4 | 1.11.4 | 1.11.4 |
| scrapy | 2.8.0 | 2.8.0 | |
| seaborn | 0.12.2 | 0.12.2 | 0.12.2 |
| secretstorage | 3.3.1 | 3.3.1 | |
| semver | 2.13.0 | 2.13.0 | |
| send2trash | 1.8.2 | 1.8.2 | 1.8.2 |
| service\_identity | 18.1.0 | 18.1.0 | |
| setuptools | 68.2.2 | 68.2.2 | 68.2.2 |
| sip | 6.7.12 | 6.7.12 | |
| six | 1.16.0 | 1.16.0 | 1.16.0 |
| smart\_open | 5.2.1 | 5.2.1 | |
| smmap | 4.0.0 | 4.0.0 | |
| snappy | 1.1.10 | 1.1.10 | 1.1.10 |
| sniffio | 1.3.0 | 1.3.0 | 1.3.0 |
| snowballstemmer | 2.2.0 | 2.2.0 | 2.2.0 |
| sortedcontainers | 2.4.0 | 2.4.0 | 2.4.0 |
| soupsieve | 2.5 | 2.5 | 2.5 |
| sphinx | 5.0.2 | 5.0.2 | |
| sphinxcontrib-applehelp | 1.0.2 | 1.0.2 | |
| sphinxcontrib-devhelp | 1.0.2 | 1.0.2 | |
| sphinxcontrib-htmlhelp | 2.0.0 | 2.0.0 | |
| sphinxcontrib-jsmath | 1.0.1 | 1.0.1 | |
| sphinxcontrib-qthelp | 1.0.3 | 1.0.3 | |
| sphinxcontrib-serializinghtml | 1.1.5 | 1.1.5 | |
| spyder | 5.4.3 | 5.4.3 | |
| spyder-kernels | 2.4.4 | 2.4.4 | |
| sqlalchemy | 2.0.25 | 2.0.25 | 2.0.25 |
| sqlite | 3.41.2 | 3.41.2 | 3.41.2 |
| stack\_data | 0.2.0 | 0.2.0 | 0.2.0 |
| statsmodels | 0.14.0 | 0.14.0 | 0.14.0 |
| streamlit | 1.30.0 | 1.30.0 | |
| sympy | 1.12 | 1.12 | 1.12 |
| tabulate | 0.9.0 | 0.9.0 | 0.9.0 |
| tbb | 2021.8.0 | 2021.8.0 | |
| tblib | 1.7.0 | 1.7.0 | 1.7.0 |
| tenacity | 8.2.2 | 8.2.2 | 8.2.2 |
| terminado | 0.17.1 | 0.17.1 | 0.17.1 |
| text-unidecode | 1.3 | 1.3 | |
| textdistance | 4.2.1 | 4.2.1 | |
| threadpoolctl | 2.2.0 | 2.2.0 | 2.2.0 |
| three-merge | 0.1.1 | 0.1.1 | |
| tifffile | 2023.4.12 | 2023.4.12 | 2023.4.12 |
| tinycss2 | 1.2.1 | 1.2.1 | 1.2.1 |
| tk | 8.6.12 | 8.6.12 | 8.6.12 |
| tldextract | 3.2.0 | 3.2.0 | |
| toml | 0.10.2 | 0.10.2 | |
| tomlkit | 0.11.1 | 0.11.1 | 0.11.1 |
| toolz | 0.12.0 | 0.12.0 | 0.12.0 |
| tornado | 6.3.3 | 6.3.3 | 6.3.3 |
| tqdm | 4.65.0 | 4.65.0 | 4.65.0 |
| traitlets | 5.7.1 | 5.7.1 | 5.7.1 |
| truststore | 0.8.0 | 0.8.0 | 0.8.0 |
| twisted | 23.10.0 | 23.10.0 | |
| typing-extensions | 4.9.0 | 4.9.0 | 4.9.0 |
| typing\_extensions | 4.9.0 | 4.9.0 | 4.9.0 |
| tzdata | 2023d | 2023d | 2023d |
| tzlocal | 2.1 | 2.1 | |
| uc-micro-py | 1.0.1 | 1.0.1 | |
| ujson | 5.4.0 | 5.4.0 | |
| unidecode | 1.2.0 | 1.2.0 | |
| unixodbc | 2.3.11 | 2.3.11 | 2.3.11 |
| urllib3 | 2.0.7 | 2.0.7 | 2.0.7 |
| utf8proc | 2.6.1 | 2.6.1 | |
| validators | 0.18.2 | 0.18.2 | |
| w3lib | 2.1.2 | 2.1.2 | |
| watchdog | 2.1.6 | 2.1.6 | |
| wcwidth | 0.2.5 | 0.2.5 | 0.2.5 |
| webencodings | 0.5.1 | 0.5.1 | 0.5.1 |
| websocket-client | 0.58.0 | 0.58.0 | 0.58.0 |
| werkzeug | 2.2.3 | 2.2.3 | 2.3.8 |
| whatthepatch | 1.0.2 | 1.0.2 | |
| wheel | 0.41.2 | 0.41.2 | 0.41.2 |
| widgetsnbextension | 3.5.2 | 3.5.2 | |
| wrapt | 1.14.1 | 1.14.1 | 1.14.1 |
| wurlitzer | 3.0.2 | 3.0.2 | |
| xarray | 2023.6.0 | 2023.6.0 | |
| xyzservices | 2022.9.0 | 2022.9.0 | |
| xz | 5.4.5 | 5.4.5 | 5.4.5 |
| yaml | 0.2.5 | 0.2.5 | 0.2.5 |
| yaml-cpp | 0.8.0 | 0.8.0 | 0.8.0 |
| yapf | 0.31.0 | 0.31.0 | |
| yarl | 1.9.3 | 1.9.3 | 1.9.3 |
| zeromq | 4.3.5 | 4.3.5 | 4.3.5 |
| zfp | 1.0.0 | ||
| zict | 3.0.0 | 3.0.0 | 3.0.0 |
| zipp | 3.17.0 | 3.17.0 | 3.17.0 |
| zlib | 1.2.13 | 1.2.13 | 1.2.13 |
| zlib-ng | 2.0.7 | 2.0.7 | |
| zope | 1.0 | 1.0 | |
| zope.interface | 5.4.0 | 5.4.0 | |
| zstandard | 0.19.0 | 0.19.0 | 0.19.0 |
| zstd | 1.5.5 | 1.5.5 | 1.5.5 |
| Package Name | osx-arm64 | osx-64 |
|---|---|---|
| \_anaconda\_depends | 2024.02 | 2024.02 |
| abseil-cpp | 20230802.0 | 20230802.0 |
| aiobotocore | 2.7.0 | 2.7.0 |
| aiohttp | 3.9.3 | 3.9.3 |
| aioitertools | 0.7.1 | 0.7.1 |
| aiosignal | 1.2.0 | 1.2.0 |
| alabaster | 0.7.12 | 0.7.12 |
| altair | 5.0.1 | 5.0.1 |
| anaconda-anon-usage | 0.4.3 | 0.4.3 |
| anaconda-catalogs | 0.2.0 | 0.2.0 |
| anaconda-client | 1.12.3 | 1.12.3 |
| anaconda-cloud-auth | 0.1.4 | 0.1.4 |
| anaconda-navigator | 2.5.2 | 2.5.2 |
| anaconda-project | 0.11.1 | 0.11.1 |
| anyio | 4.2.0 | 4.2.0 |
| aom | 3.6.0 | 3.6.0 |
| appdirs | 1.4.4 | 1.4.4 |
| applaunchservices | 0.3.0 | 0.3.0 |
| appnope | 0.1.2 | 0.1.2 |
| appscript | 1.1.2 | 1.1.2 |
| archspec | 0.2.1 | 0.2.1 |
| argon2-cffi | 21.3.0 | 21.3.0 |
| argon2-cffi-bindings | 21.2.0 | 21.2.0 |
| arrow | 1.2.3 | 1.2.3 |
| arrow-cpp | 14.0.2 | 14.0.2 |
| astroid | 2.14.2 | 2.14.2 |
| astropy | 5.3.4 | 5.3.4 |
| asttokens | 2.0.5 | 2.0.5 |
| async-lru | 2.0.4 | 2.0.4 |
| atomicwrites | 1.4.0 | 1.4.0 |
| attrs | 23.1.0 | 23.1.0 |
| automat | 20.2.0 | 20.2.0 |
| autopep8 | 1.6.0 | 1.6.0 |
| aws-c-auth | 0.6.19 | 0.6.19 |
| aws-c-cal | 0.5.20 | 0.5.20 |
| aws-c-common | 0.8.5 | 0.8.5 |
| aws-c-compression | 0.2.16 | 0.2.16 |
| aws-c-event-stream | 0.2.15 | 0.2.15 |
| aws-c-http | 0.6.25 | 0.6.25 |
| aws-c-io | 0.13.10 | 0.13.10 |
| aws-c-mqtt | 0.7.13 | 0.7.13 |
| aws-c-s3 | 0.1.51 | 0.1.51 |
| aws-c-sdkutils | 0.1.6 | 0.1.6 |
| aws-checksums | 0.1.13 | 0.1.13 |
| aws-crt-cpp | 0.18.16 | 0.18.16 |
| aws-sdk-cpp | 1.10.55 | 1.10.55 |
| babel | 2.11.0 | 2.11.0 |
| backports | 1.1 | 1.1 |
| backports.functools\_lru\_cache | 1.6.4 | 1.6.4 |
| backports.tempfile | 1.0 | 1.0 |
| backports.weakref | 1.0.post1 | 1.0.post1 |
| bcrypt | 3.2.0 | 3.2.0 |
| beautifulsoup4 | 4.12.2 | 4.12.2 |
| binaryornot | 0.4.4 | 0.4.4 |
| black | 23.11.0 | 23.11.0 |
| blas | 1.0 | 1.0 |
| bleach | 4.1.0 | 4.1.0 |
| blinker | 1.6.2 | 1.6.2 |
| blosc | 1.21.3 | 1.21.3 |
| bokeh | 3.3.4 | 3.3.4 |
| boltons | 23.0.0 | 23.0.0 |
| boost-cpp | 1.82.0 | 1.82.0 |
| botocore | 1.31.64 | 1.31.64 |
| bottleneck | 1.3.7 | 1.3.7 |
| brotli | 1.0.9 | 1.0.9 |
| brotli-bin | 1.0.9 | 1.0.9 |
| brotli-python | 1.0.9 | 1.0.9 |
| brunsli | 0.1 | 0.1 |
| bzip2 | 1.0.8 | 1.0.8 |
| c-ares | 1.19.1 | 1.19.1 |
| c-blosc2 | 2.12.0 | 2.12.0 |
| ca-certificates | 2023.12.12 | 2023.12.12 |
| cachetools | 4.2.2 | 4.2.2 |
| cctools | 949.0.1 | 949.0.1 |
| cctools\_osx-64 | 949.0.1 | |
| cctools\_osx-arm64 | 949.0.1 | |
| certifi | 2024.2.2 | 2024.2.2 |
| cffi | 1.16.0 | 1.16.0 |
| cfitsio | 3.470 | 3.470 |
| chardet | 4.0.0 | 4.0.0 |
| charls | 2.2.0 | 2.2.0 |
| charset-normalizer | 2.0.4 | 2.0.4 |
| click | 8.1.7 | 8.1.7 |
| cloudpickle | 2.2.1 | 2.2.1 |
| clyent | 1.2.2 | 1.2.2 |
| colorama | 0.4.6 | 0.4.6 |
| colorcet | 3.0.1 | 3.0.1 |
| comm | 0.1.2 | 0.1.2 |
| conda | 24.1.2 | 24.1.2 |
| conda-build | 24.1.2 | 24.1.2 |
| conda-content-trust | 0.2.0 | 0.2.0 |
| conda-index | 0.4.0 | 0.4.0 |
| conda-libmamba-solver | 24.1.0 | 24.1.0 |
| conda-pack | 0.6.0 | 0.6.0 |
| conda-package-handling | 2.2.0 | 2.2.0 |
| conda-package-streaming | 0.9.0 | 0.9.0 |
| conda-repo-cli | 1.0.75 | 1.0.75 |
| conda-token | 0.4.0 | 0.4.0 |
| conda-verify | 3.4.2 | 3.4.2 |
| constantly | 23.10.4 | 23.10.4 |
| contourpy | 1.2.0 | 1.2.0 |
| cookiecutter | 2.5.0 | 2.5.0 |
| cryptography | 42.0.2 | 42.0.2 |
| cssselect | 1.2.0 | 1.2.0 |
| curl | 8.5.0 | 8.5.0 |
| cycler | 0.11.0 | 0.11.0 |
| cyrus-sasl | 2.1.28 | 2.1.28 |
| cytoolz | 0.12.2 | 0.12.2 |
| dask | 2023.11.0 | 2023.11.0 |
| dask-core | 2023.11.0 | 2023.11.0 |
| datashader | 0.16.0 | 0.16.0 |
| dav1d | 1.2.1 | 1.2.1 |
| debugpy | 1.6.7 | 1.6.7 |
| decorator | 5.1.1 | 5.1.1 |
| defusedxml | 0.7.1 | 0.7.1 |
| diff-match-patch | 20200713 | 20200713 |
| dill | 0.3.7 | 0.3.7 |
| distributed | 2023.11.0 | 2023.11.0 |
| distro | 1.8.0 | 1.8.0 |
| docstring-to-markdown | 0.11 | 0.11 |
| docutils | 0.18.1 | 0.18.1 |
| entrypoints | 0.4 | 0.4 |
| et\_xmlfile | 1.1.0 | 1.1.0 |
| executing | 0.8.3 | 0.8.3 |
| filelock | 3.13.1 | 3.13.1 |
| flake8 | 6.0.0 | 6.0.0 |
| flask | 2.2.5 | 2.2.5 |
| fmt | 9.1.0 | 9.1.0 |
| fonttools | 4.25.0 | 4.25.0 |
| freetype | 2.12.1 | 2.12.1 |
| frozenlist | 1.4.0 | 1.4.0 |
| fsspec | 2023.10.0 | 2023.10.0 |
| future | 0.18.3 | 0.18.3 |
| gensim | 4.3.0 | 4.3.0 |
| gettext | 0.21.0 | 0.21.0 |
| gflags | 2.2.2 | 2.2.2 |
| giflib | 5.2.1 | 5.2.1 |
| gitdb | 4.0.7 | 4.0.7 |
| gitpython | 3.1.37 | 3.1.37 |
| glib | 2.78.4 | 2.78.4 |
| glib-tools | 2.78.4 | 2.78.4 |
| glog | 0.5.0 | 0.5.0 |
| gmp | 6.2.1 | 6.2.1 |
| gmpy2 | 2.1.2 | 2.1.2 |
| greenlet | 3.0.1 | 3.0.1 |
| grpc-cpp | 1.48.2 | 1.48.2 |
| gst-plugins-base | 1.14.1 | 1.14.1 |
| gstreamer | 1.14.1 | 1.14.1 |
| gtest | 1.14.0 | 1.14.0 |
| h5py | 3.9.0 | 3.9.0 |
| hdf5 | 1.12.1 | 1.12.1 |
| heapdict | 1.0.1 | 1.0.1 |
| holoviews | 1.18.3 | 1.18.3 |
| hvplot | 0.9.2 | 0.9.2 |
| hyperlink | 21.0.0 | 21.0.0 |
| icu | 73.1 | 73.1 |
| idna | 3.4 | 3.4 |
| imagecodecs | 2023.1.23 | 2023.1.23 |
| imageio | 2.33.1 | 2.33.1 |
| imagesize | 1.4.1 | 1.4.1 |
| imbalanced-learn | 0.11.0 | 0.11.0 |
| importlib-metadata | 7.0.1 | 7.0.1 |
| importlib\_metadata | 7.0.1 | 7.0.1 |
| incremental | 22.10.0 | 22.10.0 |
| inflection | 0.5.1 | 0.5.1 |
| iniconfig | 1.1.1 | 1.1.1 |
| intake | 0.6.8 | 0.6.8 |
| intervaltree | 3.1.0 | 3.1.0 |
| ipykernel | 6.28.0 | 6.28.0 |
| ipython | 8.20.0 | 8.20.0 |
| ipython\_genutils | 0.2.0 | 0.2.0 |
| ipywidgets | 7.6.5 | 7.6.5 |
| isort | 5.9.3 | 5.9.3 |
| itemadapter | 0.3.0 | 0.3.0 |
| itemloaders | 1.1.0 | 1.1.0 |
| itsdangerous | 2.0.1 | 2.0.1 |
| jaraco.classes | 3.2.1 | 3.2.1 |
| jedi | 0.18.1 | 0.18.1 |
| jellyfish | 1.0.1 | 1.0.1 |
| jinja2 | 3.1.3 | 3.1.3 |
| jmespath | 1.0.1 | 1.0.1 |
| joblib | 1.2.0 | 1.2.0 |
| jpeg | 9e | 9e |
| jq | 1.6 | 1.6 |
| json5 | 0.9.6 | 0.9.6 |
| jsonpatch | 1.32 | 1.32 |
| jsonpointer | 2.1 | 2.1 |
| jsonschema | 4.19.2 | 4.19.2 |
| jsonschema-specifications | 2023.7.1 | 2023.7.1 |
| jupyter | 1.0.0 | 1.0.0 |
| jupyter-lsp | 2.2.0 | 2.2.0 |
| jupyter\_client | 8.6.0 | 8.6.0 |
| jupyter\_console | 6.6.3 | 6.6.3 |
| jupyter\_core | 5.5.0 | 5.5.0 |
| jupyter\_events | 0.8.0 | 0.8.0 |
| jupyter\_server | 2.10.0 | 2.10.0 |
| jupyter\_server\_terminals | 0.4.4 | 0.4.4 |
| jupyterlab | 4.0.11 | 4.0.11 |
| jupyterlab-variableinspector | 3.1.0 | 3.1.0 |
| jupyterlab\_pygments | 0.1.2 | 0.1.2 |
| jupyterlab\_server | 2.25.1 | 2.25.1 |
| jupyterlab\_widgets | 3.0.9 | 3.0.9 |
| jxrlib | 1.1 | 1.1 |
| keyring | 23.13.1 | 23.13.1 |
| kiwisolver | 1.4.4 | 1.4.4 |
| krb5 | 1.20.1 | 1.20.1 |
| lazy-object-proxy | 1.6.0 | 1.6.0 |
| lazy\_loader | 0.3 | 0.3 |
| lcms2 | 2.12 | 2.12 |
| ld64 | 530 | 530 |
| ld64\_osx-64 | 530 | |
| ld64\_osx-arm64 | 530 | |
| ldid | 2.1.5 | 2.1.5 |
| lerc | 3.0 | 3.0 |
| libaec | 1.0.4 | 1.0.4 |
| libarchive | 3.6.2 | 3.6.2 |
| libavif | 0.11.1 | 0.11.1 |
| libboost | 1.82.0 | 1.82.0 |
| libbrotlicommon | 1.0.9 | 1.0.9 |
| libbrotlidec | 1.0.9 | 1.0.9 |
| libbrotlienc | 1.0.9 | 1.0.9 |
| libclang | 14.0.6 | 14.0.6 |
| libclang13 | 14.0.6 | 14.0.6 |
| libcurl | 8.5.0 | 8.5.0 |
| libcxx | 14.0.6 | 14.0.6 |
| libdeflate | 1.17 | 1.17 |
| libedit | 3.1.20230828 | 3.1.20230828 |
| libev | 4.33 | 4.33 |
| libevent | 2.1.12 | 2.1.12 |
| libffi | 3.4.4 | 3.4.4 |
| libgfortran | 5.0.0 | 5.0.0 |
| libgfortran5 | 11.3.0 | 11.3.0 |
| libglib | 2.78.4 | 2.78.4 |
| libiconv | 1.16 | 1.16 |
| liblief | 0.12.3 | 0.12.3 |
| libllvm14 | 14.0.6 | 14.0.6 |
| libmamba | 1.5.6 | 1.5.6 |
| libmambapy | 1.5.6 | 1.5.6 |
| libnghttp2 | 1.57.0 | 1.57.0 |
| libopenblas | 0.3.21 | 0.3.21 |
| libpng | 1.6.39 | 1.6.39 |
| libpq | 12.17 | 12.17 |
| libprotobuf | 3.20.3 | 3.20.3 |
| libsodium | 1.0.18 | 1.0.18 |
| libsolv | 0.7.24 | 0.7.24 |
| libspatialindex | 1.9.3 | 1.9.3 |
| libssh2 | 1.10.0 | 1.10.0 |
| libthrift | 0.15.0 | 0.15.0 |
| libtiff | 4.5.1 | 4.5.1 |
| libwebp-base | 1.3.2 | 1.3.2 |
| libxml2 | 2.10.4 | 2.10.4 |
| libxslt | 1.1.37 | 1.1.37 |
| libzopfli | 1.0.3 | 1.0.3 |
| linkify-it-py | 2.0.0 | 2.0.0 |
| llvm-openmp | 14.0.6 | 14.0.6 |
| llvmlite | 0.42.0 | 0.42.0 |
| locket | 1.0.0 | 1.0.0 |
| lxml | 4.9.3 | 4.9.3 |
| lz4 | 4.3.2 | 4.3.2 |
| lz4-c | 1.9.4 | 1.9.4 |
| lzo | 2.10 | 2.10 |
| markdown | 3.4.1 | 3.4.1 |
| markdown-it-py | 2.2.0 | 2.2.0 |
| markupsafe | 2.1.3 | 2.1.3 |
| matplotlib | 3.8.0 | 3.8.0 |
| matplotlib-base | 3.8.0 | 3.8.0 |
| matplotlib-inline | 0.1.6 | 0.1.6 |
| mccabe | 0.7.0 | 0.7.0 |
| mdit-py-plugins | 0.3.0 | 0.3.0 |
| mdurl | 0.1.0 | 0.1.0 |
| menuinst | 2.0.2 | 2.0.2 |
| mistune | 2.0.4 | 2.0.4 |
| more-itertools | 10.1.0 | 10.1.0 |
| mpc | 1.1.0 | 1.1.0 |
| mpfr | 4.0.2 | 4.0.2 |
| mpmath | 1.3.0 | 1.3.0 |
| msgpack-python | 1.0.3 | 1.0.3 |
| multidict | 6.0.4 | 6.0.4 |
| multipledispatch | 0.6.0 | 0.6.0 |
| munkres | 1.1.4 | 1.1.4 |
| mypy | 1.8.0 | 1.8.0 |
| mypy\_extensions | 1.0.0 | 1.0.0 |
| mysql | 5.7.24 | 5.7.24 |
| navigator-updater | 0.4.0 | 0.4.0 |
| nbclient | 0.8.0 | 0.8.0 |
| nbconvert | 7.10.0 | 7.10.0 |
| nbformat | 5.9.2 | 5.9.2 |
| ncurses | 6.4 | 6.4 |
| nest-asyncio | 1.6.0 | 1.6.0 |
| networkx | 3.1 | 3.1 |
| nltk | 3.8.1 | 3.8.1 |
| notebook | 7.0.8 | 7.0.8 |
| notebook-shim | 0.2.3 | 0.2.3 |
| numba | 0.59.0 | 0.59.0 |
| numexpr | 2.8.7 | 2.8.7 |
| numpy | 1.26.4 | 1.26.4 |
| numpy-base | 1.26.4 | 1.26.4 |
| numpydoc | 1.5.0 | 1.5.0 |
| oniguruma | 6.9.7.1 | 6.9.7.1 |
| openjpeg | 2.3.0 | 2.4.0 |
| openpyxl | 3.0.10 | 3.0.10 |
| openssl | 3.0.13 | 3.0.13 |
| orc | 1.7.4 | 1.7.4 |
| overrides | 7.4.0 | 7.4.0 |
| packaging | 23.1 | 23.1 |
| pandas | 2.1.4 | 2.1.4 |
| pandocfilters | 1.5.0 | 1.5.0 |
| panel | 1.3.8 | 1.3.8 |
| param | 2.0.2 | 2.0.2 |
| parsel | 1.8.1 | 1.8.1 |
| parso | 0.8.3 | 0.8.3 |
| partd | 1.4.1 | 1.4.1 |
| patch | 2.7.6 | 2.7.6 |
| pathlib | 1.0.1 | 1.0.1 |
| pathspec | 0.10.3 | 0.10.3 |
| patsy | 0.5.3 | 0.5.3 |
| pcre2 | 10.42 | 10.42 |
| pexpect | 4.8.0 | 4.8.0 |
| pickleshare | 0.7.5 | 0.7.5 |
| pillow | 10.2.0 | 10.2.0 |
| pip | 23.3.1 | 23.3.1 |
| pkce | 1.0.3 | 1.0.3 |
| pkginfo | 1.9.6 | 1.9.6 |
| platformdirs | 3.10.0 | 3.10.0 |
| plotly | 5.9.0 | 5.9.0 |
| pluggy | 1.0.0 | 1.0.0 |
| ply | 3.11 | 3.11 |
| prometheus\_client | 0.14.1 | 0.14.1 |
| prompt-toolkit | 3.0.43 | 3.0.43 |
| prompt\_toolkit | 3.0.43 | 3.0.43 |
| protego | 0.1.16 | 0.1.16 |
| protobuf | 3.20.3 | 3.20.3 |
| psutil | 5.9.0 | 5.9.0 |
| ptyprocess | 0.7.0 | 0.7.0 |
| pure\_eval | 0.2.2 | 0.2.2 |
| py-cpuinfo | 9.0.0 | 9.0.0 |
| py-lief | 0.12.3 | 0.12.3 |
| pyarrow | 14.0.2 | 14.0.2 |
| pyasn1 | 0.4.8 | 0.4.8 |
| pyasn1-modules | 0.2.8 | 0.2.8 |
| pybind11-abi | 4 | 4 |
| pycodestyle | 2.10.0 | 2.10.0 |
| pycosat | 0.6.6 | 0.6.6 |
| pycparser | 2.21 | 2.21 |
| pyct | 0.5.0 | 0.5.0 |
| pycurl | 7.45.2 | 7.45.2 |
| pydantic | 1.10.12 | 1.10.12 |
| pydeck | 0.8.0 | 0.8.0 |
| pydispatcher | 2.0.5 | 2.0.5 |
| pydocstyle | 6.3.0 | 6.3.0 |
| pyerfa | 2.0.0 | 2.0.0 |
| pyflakes | 3.0.1 | 3.0.1 |
| pygments | 2.15.1 | 2.15.1 |
| pyjwt | 2.4.0 | 2.4.0 |
| pylint | 2.16.2 | 2.16.2 |
| pylint-venv | 2.3.0 | 2.3.0 |
| pyls-spyder | 0.4.0 | 0.4.0 |
| pyobjc-core | 9.0 | 9.0 |
| pyobjc-framework-cocoa | 9.0 | 9.0 |
| pyobjc-framework-coreservices | 9.0 | 9.0 |
| pyobjc-framework-fsevents | 9.0 | 9.0 |
| pyodbc | 5.0.1 | 5.0.1 |
| pyopenssl | 24.0.0 | 24.0.0 |
| pyparsing | 3.0.9 | 3.0.9 |
| pyqt | 5.15.10 | 5.15.10 |
| pyqt5-sip | 12.13.0 | 12.13.0 |
| pyqtwebengine | 5.15.10 | 5.15.10 |
| pysocks | 1.7.1 | 1.7.1 |
| pytables | 3.9.2 | 3.9.2 |
| pytest | 7.4.0 | 7.4.0 |
| python | 3.11.7 | 3.11.7 |
| python-dateutil | 2.8.2 | 2.8.2 |
| python-dotenv | 0.21.0 | 0.21.0 |
| python-fastjsonschema | 2.16.2 | 2.16.2 |
| python-json-logger | 2.0.7 | 2.0.7 |
| python-libarchive-c | 2.9 | 2.9 |
| python-lmdb | 1.4.1 | 1.4.1 |
| python-lsp-black | 1.2.1 | 1.2.1 |
| python-lsp-jsonrpc | 1.0.0 | 1.0.0 |
| python-lsp-server | 1.7.2 | 1.7.2 |
| python-slugify | 5.0.2 | 5.0.2 |
| python-snappy | 0.6.1 | 0.6.1 |
| python-tzdata | 2023.3 | 2023.3 |
| python.app | 3 | 3 |
| pytoolconfig | 1.2.6 | 1.2.6 |
| pytz | 2023.3.post1 | 2023.3.post1 |
| pyviz\_comms | 3.0.0 | 3.0.0 |
| pywavelets | 1.5.0 | 1.5.0 |
| pyyaml | 6.0.1 | 6.0.1 |
| pyzmq | 25.1.2 | 25.1.2 |
| qdarkstyle | 3.0.2 | 3.0.2 |
| qstylizer | 0.2.2 | 0.2.2 |
| qt-main | 5.15.2 | 5.15.2 |
| qt-webengine | 5.15.9 | 5.15.9 |
| qtawesome | 1.2.2 | 1.2.2 |
| qtconsole | 5.4.2 | 5.4.2 |
| qtpy | 2.4.1 | 2.4.1 |
| queuelib | 1.6.2 | 1.6.2 |
| re2 | 2022.04.01 | 2022.04.01 |
| readline | 8.2 | 8.2 |
| referencing | 0.30.2 | 0.30.2 |
| regex | 2023.10.3 | 2023.10.3 |
| reproc | 14.2.4 | 14.2.4 |
| reproc-cpp | 14.2.4 | 14.2.4 |
| requests | 2.31.0 | 2.31.0 |
| requests-file | 1.5.1 | 1.5.1 |
| requests-toolbelt | 1.0.0 | 1.0.0 |
| rfc3339-validator | 0.1.4 | 0.1.4 |
| rfc3986-validator | 0.1.1 | 0.1.1 |
| rich | 13.3.5 | 13.3.5 |
| rope | 1.7.0 | 1.7.0 |
| rpds-py | 0.10.6 | 0.10.6 |
| rtree | 1.0.1 | 1.0.1 |
| ruamel.yaml | 0.17.21 | 0.17.21 |
| ruamel\_yaml | 0.17.21 | 0.17.21 |
| s3fs | 2023.10.0 | 2023.10.0 |
| scikit-image | 0.22.0 | 0.22.0 |
| scikit-learn | 1.2.2 | 1.2.2 |
| scipy | 1.11.4 | 1.11.4 |
| scrapy | 2.8.0 | 2.8.0 |
| seaborn | 0.12.2 | 0.12.2 |
| semver | 2.13.0 | 2.13.0 |
| send2trash | 1.8.2 | 1.8.2 |
| service\_identity | 18.1.0 | 18.1.0 |
| setuptools | 68.2.2 | 68.2.2 |
| sip | 6.7.12 | 6.7.12 |
| six | 1.16.0 | 1.16.0 |
| smart\_open | 5.2.1 | 5.2.1 |
| smmap | 4.0.0 | 4.0.0 |
| snappy | 1.1.10 | 1.1.10 |
| sniffio | 1.3.0 | 1.3.0 |
| snowballstemmer | 2.2.0 | 2.2.0 |
| sortedcontainers | 2.4.0 | 2.4.0 |
| soupsieve | 2.5 | 2.5 |
| sphinx | 5.0.2 | 5.0.2 |
| sphinxcontrib-applehelp | 1.0.2 | 1.0.2 |
| sphinxcontrib-devhelp | 1.0.2 | 1.0.2 |
| sphinxcontrib-htmlhelp | 2.0.0 | 2.0.0 |
| sphinxcontrib-jsmath | 1.0.1 | 1.0.1 |
| sphinxcontrib-qthelp | 1.0.3 | 1.0.3 |
| sphinxcontrib-serializinghtml | 1.1.5 | 1.1.5 |
| spyder | 5.4.3 | 5.4.3 |
| spyder-kernels | 2.4.4 | 2.4.4 |
| sqlalchemy | 2.0.25 | 2.0.25 |
| sqlite | 3.41.2 | 3.41.2 |
| stack\_data | 0.2.0 | 0.2.0 |
| statsmodels | 0.14.0 | 0.14.0 |
| streamlit | 1.30.0 | 1.30.0 |
| sympy | 1.12 | 1.12 |
| tabulate | 0.9.0 | 0.9.0 |
| tapi | 1100.0.11 | 1000.10.8 |
| tbb | 2021.8.0 | 2021.8.0 |
| tblib | 1.7.0 | 1.7.0 |
| tenacity | 8.2.2 | 8.2.2 |
| terminado | 0.17.1 | 0.17.1 |
| text-unidecode | 1.3 | 1.3 |
| textdistance | 4.2.1 | 4.2.1 |
| threadpoolctl | 2.2.0 | 2.2.0 |
| three-merge | 0.1.1 | 0.1.1 |
| tifffile | 2023.4.12 | 2023.4.12 |
| tinycss2 | 1.2.1 | 1.2.1 |
| tk | 8.6.12 | 8.6.12 |
| tldextract | 3.2.0 | 3.2.0 |
| toml | 0.10.2 | 0.10.2 |
| tomlkit | 0.11.1 | 0.11.1 |
| toolz | 0.12.0 | 0.12.0 |
| tornado | 6.3.3 | 6.3.3 |
| tqdm | 4.65.0 | 4.65.0 |
| traitlets | 5.7.1 | 5.7.1 |
| truststore | 0.8.0 | 0.8.0 |
| twisted | 23.10.0 | 23.10.0 |
| typing-extensions | 4.9.0 | 4.9.0 |
| typing\_extensions | 4.9.0 | 4.9.0 |
| tzdata | 2023d | 2023d |
| tzlocal | 2.1 | 2.1 |
| uc-micro-py | 1.0.1 | 1.0.1 |
| ujson | 5.4.0 | 5.4.0 |
| unidecode | 1.2.0 | 1.2.0 |
| unixodbc | 2.3.11 | 2.3.11 |
| urllib3 | 2.0.7 | 2.0.7 |
| utf8proc | 2.6.1 | 2.6.1 |
| validators | 0.18.2 | 0.18.2 |
| w3lib | 2.1.2 | 2.1.2 |
| watchdog | 2.1.6 | 2.1.6 |
| wcwidth | 0.2.5 | 0.2.5 |
| webencodings | 0.5.1 | 0.5.1 |
| websocket-client | 0.58.0 | 0.58.0 |
| werkzeug | 2.2.3 | 2.2.3 |
| whatthepatch | 1.0.2 | 1.0.2 |
| wheel | 0.41.2 | 0.41.2 |
| widgetsnbextension | 3.5.2 | 3.5.2 |
| wrapt | 1.14.1 | 1.14.1 |
| wurlitzer | 3.0.2 | 3.0.2 |
| xarray | 2023.6.0 | 2023.6.0 |
| xlwings | 0.29.1 | 0.29.1 |
| xyzservices | 2022.9.0 | 2022.9.0 |
| xz | 5.4.5 | 5.4.5 |
| yaml | 0.2.5 | 0.2.5 |
| yaml-cpp | 0.8.0 | 0.8.0 |
| yapf | 0.31.0 | 0.31.0 |
| yarl | 1.9.3 | 1.9.3 |
| zeromq | 4.3.5 | 4.3.5 |
| zfp | 1.0.0 | 1.0.0 |
| zict | 3.0.0 | 3.0.0 |
| zipp | 3.17.0 | 3.17.0 |
| zlib | 1.2.13 | 1.2.13 |
| zlib-ng | 2.0.7 | 2.0.7 |
| zope | 1.0 | 1.0 |
| zope.interface | 5.4.0 | 5.4.0 |
| zstandard | 0.19.0 | 0.19.0 |
| zstd | 1.5.5 | 1.5.5 |
| Package Name | win-64 |
|---|---|
| \_anaconda\_depends | 2024.02 |
| abseil-cpp | 20211102.0 |
| aiobotocore | 2.7.0 |
| aiohttp | 3.9.3 |
| aioitertools | 0.7.1 |
| aiosignal | 1.2.0 |
| alabaster | 0.7.12 |
| altair | 5.0.1 |
| anaconda-anon-usage | 0.4.3 |
| anaconda-catalogs | 0.2.0 |
| anaconda-client | 1.12.3 |
| anaconda-cloud-auth | 0.1.4 |
| anaconda-navigator | 2.5.2 |
| anaconda-project | 0.11.1 |
| anyio | 4.2.0 |
| aom | 3.6.0 |
| appdirs | 1.4.4 |
| archspec | 0.2.1 |
| argon2-cffi | 21.3.0 |
| argon2-cffi-bindings | 21.2.0 |
| arrow | 1.2.3 |
| arrow-cpp | 14.0.2 |
| astroid | 2.14.2 |
| astropy | 5.3.4 |
| asttokens | 2.0.5 |
| async-lru | 2.0.4 |
| atomicwrites | 1.4.0 |
| attrs | 23.1.0 |
| automat | 20.2.0 |
| autopep8 | 1.6.0 |
| aws-c-auth | 0.6.19 |
| aws-c-cal | 0.5.20 |
| aws-c-common | 0.8.5 |
| aws-c-compression | 0.2.16 |
| aws-c-event-stream | 0.2.15 |
| aws-c-http | 0.6.25 |
| aws-c-io | 0.13.10 |
| aws-c-mqtt | 0.7.13 |
| aws-c-s3 | 0.1.51 |
| aws-c-sdkutils | 0.1.6 |
| aws-checksums | 0.1.13 |
| aws-crt-cpp | 0.18.16 |
| aws-sdk-cpp | 1.10.55 |
| babel | 2.11.0 |
| backports | 1.1 |
| backports.functools\_lru\_cache | 1.6.4 |
| backports.tempfile | 1.0 |
| backports.weakref | 1.0.post1 |
| bcrypt | 3.2.0 |
| beautifulsoup4 | 4.12.2 |
| binaryornot | 0.4.4 |
| black | 23.11.0 |
| blas | 1.0 |
| bleach | 4.1.0 |
| blinker | 1.6.2 |
| blosc | 1.21.3 |
| bokeh | 3.3.4 |
| boltons | 23.0.0 |
| boost-cpp | 1.82.0 |
| botocore | 1.31.64 |
| bottleneck | 1.3.7 |
| brotli | 1.0.9 |
| brotli-bin | 1.0.9 |
| brotli-python | 1.0.9 |
| bzip2 | 1.0.8 |
| c-ares | 1.19.1 |
| c-blosc2 | 2.12.0 |
| ca-certificates | 2023.12.12 |
| cachetools | 4.2.2 |
| certifi | 2024.2.2 |
| cffi | 1.16.0 |
| cfitsio | 3.470 |
| chardet | 4.0.0 |
| charls | 2.2.0 |
| charset-normalizer | 2.0.4 |
| click | 8.1.7 |
| cloudpickle | 2.2.1 |
| clyent | 1.2.2 |
| colorama | 0.4.6 |
| colorcet | 3.0.1 |
| comm | 0.1.2 |
| conda | 24.1.2 |
| conda-build | 24.1.2 |
| conda-content-trust | 0.2.0 |
| conda-index | 0.4.0 |
| conda-libmamba-solver | 24.1.0 |
| conda-pack | 0.6.0 |
| conda-package-handling | 2.2.0 |
| conda-package-streaming | 0.9.0 |
| conda-repo-cli | 1.0.75 |
| conda-token | 0.4.0 |
| conda-verify | 3.4.2 |
| console\_shortcut | 0.1.1 |
| constantly | 23.10.4 |
| contourpy | 1.2.0 |
| cookiecutter | 2.5.0 |
| cryptography | 42.0.2 |
| cssselect | 1.2.0 |
| curl | 8.5.0 |
| cycler | 0.11.0 |
| cytoolz | 0.12.2 |
| dask | 2023.11.0 |
| dask-core | 2023.11.0 |
| datashader | 0.16.0 |
| dav1d | 1.2.1 |
| debugpy | 1.6.7 |
| decorator | 5.1.1 |
| defusedxml | 0.7.1 |
| diff-match-patch | 20200713 |
| dill | 0.3.7 |
| distributed | 2023.11.0 |
| distro | 1.8.0 |
| docstring-to-markdown | 0.11 |
| docutils | 0.18.1 |
| entrypoints | 0.4 |
| et\_xmlfile | 1.1.0 |
| executing | 0.8.3 |
| filelock | 3.13.1 |
| flake8 | 6.0.0 |
| flask | 2.2.5 |
| fmt | 9.1.0 |
| fonttools | 4.25.0 |
| freetype | 2.12.1 |
| frozenlist | 1.4.0 |
| fsspec | 2023.10.0 |
| future | 0.18.3 |
| gensim | 4.3.0 |
| gflags | 2.2.2 |
| giflib | 5.2.1 |
| gitdb | 4.0.7 |
| gitpython | 3.1.37 |
| glog | 0.5.0 |
| gmpy2 | 2.1.2 |
| greenlet | 3.0.1 |
| grpc-cpp | 1.48.2 |
| h5py | 3.9.0 |
| hdf5 | 1.12.1 |
| heapdict | 1.0.1 |
| holoviews | 1.18.3 |
| hvplot | 0.9.2 |
| hyperlink | 21.0.0 |
| icc\_rt | 2022.1.0 |
| icu | 73.1 |
| idna | 3.4 |
| imagecodecs | 2023.1.23 |
| imageio | 2.33.1 |
| imagesize | 1.4.1 |
| imbalanced-learn | 0.11.0 |
| importlib-metadata | 7.0.1 |
| importlib\_metadata | 7.0.1 |
| incremental | 22.10.0 |
| inflection | 0.5.1 |
| iniconfig | 1.1.1 |
| intake | 0.6.8 |
| intel-openmp | 2023.1.0 |
| intervaltree | 3.1.0 |
| ipykernel | 6.28.0 |
| ipython | 8.20.0 |
| ipython\_genutils | 0.2.0 |
| ipywidgets | 7.6.5 |
| isort | 5.9.3 |
| itemadapter | 0.3.0 |
| itemloaders | 1.1.0 |
| itsdangerous | 2.0.1 |
| jaraco.classes | 3.2.1 |
| jedi | 0.18.1 |
| jellyfish | 1.0.1 |
| jinja2 | 3.1.3 |
| jmespath | 1.0.1 |
| joblib | 1.2.0 |
| jpeg | 9e |
| jq | 1.6 |
| json5 | 0.9.6 |
| jsonpatch | 1.32 |
| jsonpointer | 2.1 |
| jsonschema | 4.19.2 |
| jsonschema-specifications | 2023.7.1 |
| jupyter | 1.0.0 |
| jupyter-lsp | 2.2.0 |
| jupyter\_client | 8.6.0 |
| jupyter\_console | 6.6.3 |
| jupyter\_core | 5.5.0 |
| jupyter\_events | 0.8.0 |
| jupyter\_server | 2.10.0 |
| jupyter\_server\_terminals | 0.4.4 |
| jupyterlab | 4.0.11 |
| jupyterlab-variableinspector | 3.1.0 |
| jupyterlab\_pygments | 0.1.2 |
| jupyterlab\_server | 2.25.1 |
| jupyterlab\_widgets | 3.0.9 |
| keyring | 23.13.1 |
| kiwisolver | 1.4.4 |
| krb5 | 1.20.1 |
| lazy-object-proxy | 1.6.0 |
| lazy\_loader | 0.3 |
| lcms2 | 2.12 |
| lerc | 3.0 |
| libaec | 1.0.4 |
| libarchive | 3.6.2 |
| libavif | 0.11.1 |
| libboost | 1.82.0 |
| libbrotlicommon | 1.0.9 |
| libbrotlidec | 1.0.9 |
| libbrotlienc | 1.0.9 |
| libclang | 14.0.6 |
| libclang13 | 14.0.6 |
| libcurl | 8.5.0 |
| libdeflate | 1.17 |
| libevent | 2.1.12 |
| libffi | 3.4.4 |
| libiconv | 1.16 |
| liblief | 0.12.3 |
| libmamba | 1.5.6 |
| libmambapy | 1.5.6 |
| libpng | 1.6.39 |
| libpq | 12.17 |
| libprotobuf | 3.20.3 |
| libsodium | 1.0.18 |
| libsolv | 0.7.24 |
| libspatialindex | 1.9.3 |
| libssh2 | 1.10.0 |
| libthrift | 0.15.0 |
| libtiff | 4.5.1 |
| libwebp-base | 1.3.2 |
| libxml2 | 2.10.4 |
| libxslt | 1.1.37 |
| libzopfli | 1.0.3 |
| linkify-it-py | 2.0.0 |
| llvmlite | 0.42.0 |
| locket | 1.0.0 |
| lxml | 4.9.3 |
| lz4 | 4.3.2 |
| lz4-c | 1.9.4 |
| lzo | 2.10 |
| m2-msys2-runtime | 2.5.0.17080.65c939c |
| m2-patch | 2.7.5 |
| m2w64-libwinpthread-git | 5.0.0.4634.697f757 |
| markdown | 3.4.1 |
| markdown-it-py | 2.2.0 |
| markupsafe | 2.1.3 |
| matplotlib | 3.8.0 |
| matplotlib-base | 3.8.0 |
| matplotlib-inline | 0.1.6 |
| mccabe | 0.7.0 |
| mdit-py-plugins | 0.3.0 |
| mdurl | 0.1.0 |
| menuinst | 2.0.2 |
| mistune | 2.0.4 |
| mkl | 2023.1.0 |
| mkl-service | 2.4.0 |
| mkl\_fft | 1.3.8 |
| mkl\_random | 1.2.4 |
| more-itertools | 10.1.0 |
| mpc | 1.1.0 |
| mpfr | 4.0.2 |
| mpir | 3.0.0 |
| mpmath | 1.3.0 |
| msgpack-python | 1.0.3 |
| msys2-conda-epoch | 20160418 |
| multidict | 6.0.4 |
| multipledispatch | 0.6.0 |
| munkres | 1.1.4 |
| mypy | 1.8.0 |
| mypy\_extensions | 1.0.0 |
| navigator-updater | 0.4.0 |
| nbclient | 0.8.0 |
| nbconvert | 7.10.0 |
| nbformat | 5.9.2 |
| nest-asyncio | 1.6.0 |
| networkx | 3.1 |
| nltk | 3.8.1 |
| notebook | 7.0.8 |
| notebook-shim | 0.2.3 |
| numba | 0.59.0 |
| numexpr | 2.8.7 |
| numpy | 1.26.4 |
| numpy-base | 1.26.4 |
| numpydoc | 1.5.0 |
| openjpeg | 2.4.0 |
| openpyxl | 3.0.10 |
| openssl | 3.0.13 |
| orc | 1.7.4 |
| overrides | 7.4.0 |
| packaging | 23.1 |
| pandas | 2.1.4 |
| pandocfilters | 1.5.0 |
| panel | 1.3.8 |
| param | 2.0.2 |
| paramiko | 2.8.1 |
| parsel | 1.8.1 |
| parso | 0.8.3 |
| partd | 1.4.1 |
| pathlib | 1.0.1 |
| pathspec | 0.10.3 |
| patsy | 0.5.3 |
| pcre2 | 10.42 |
| pexpect | 4.8.0 |
| pickleshare | 0.7.5 |
| pillow | 10.2.0 |
| pip | 23.3.1 |
| pkce | 1.0.3 |
| pkginfo | 1.9.6 |
| platformdirs | 3.10.0 |
| plotly | 5.9.0 |
| pluggy | 1.0.0 |
| ply | 3.11 |
| powershell\_shortcut | 0.0.1 |
| prometheus\_client | 0.14.1 |
| prompt-toolkit | 3.0.43 |
| prompt\_toolkit | 3.0.43 |
| protego | 0.1.16 |
| protobuf | 3.20.3 |
| psutil | 5.9.0 |
| ptyprocess | 0.7.0 |
| pure\_eval | 0.2.2 |
| py-cpuinfo | 9.0.0 |
| py-lief | 0.12.3 |
| pyarrow | 14.0.2 |
| pyasn1 | 0.4.8 |
| pyasn1-modules | 0.2.8 |
| pybind11-abi | 4 |
| pycodestyle | 2.10.0 |
| pycosat | 0.6.6 |
| pycparser | 2.21 |
| pyct | 0.5.0 |
| pycurl | 7.45.2 |
| pydantic | 1.10.12 |
| pydeck | 0.8.0 |
| pydispatcher | 2.0.5 |
| pydocstyle | 6.3.0 |
| pyerfa | 2.0.0 |
| pyflakes | 3.0.1 |
| pygments | 2.15.1 |
| pyjwt | 2.4.0 |
| pylint | 2.16.2 |
| pylint-venv | 2.3.0 |
| pyls-spyder | 0.4.0 |
| pynacl | 1.5.0 |
| pyodbc | 5.0.1 |
| pyopenssl | 24.0.0 |
| pyparsing | 3.0.9 |
| pyqt | 5.15.10 |
| pyqt5-sip | 12.13.0 |
| pyqtwebengine | 5.15.10 |
| pysocks | 1.7.1 |
| pytables | 3.9.2 |
| pytest | 7.4.0 |
| python | 3.11.7 |
| python-dateutil | 2.8.2 |
| python-dotenv | 0.21.0 |
| python-fastjsonschema | 2.16.2 |
| python-json-logger | 2.0.7 |
| python-libarchive-c | 2.9 |
| python-lmdb | 1.4.1 |
| python-lsp-black | 1.2.1 |
| python-lsp-jsonrpc | 1.0.0 |
| python-lsp-server | 1.7.2 |
| python-slugify | 5.0.2 |
| python-snappy | 0.6.1 |
| python-tzdata | 2023.3 |
| pytoolconfig | 1.2.6 |
| pytz | 2023.3.post1 |
| pyviz\_comms | 3.0.0 |
| pywavelets | 1.5.0 |
| pywin32 | 305 |
| pywin32-ctypes | 0.2.0 |
| pywinpty | 2.0.10 |
| pyyaml | 6.0.1 |
| pyzmq | 25.1.2 |
| qdarkstyle | 3.0.2 |
| qstylizer | 0.2.2 |
| qt-main | 5.15.2 |
| qt-webengine | 5.15.9 |
| qtawesome | 1.2.2 |
| qtconsole | 5.4.2 |
| qtpy | 2.4.1 |
| queuelib | 1.6.2 |
| re2 | 2022.04.01 |
| referencing | 0.30.2 |
| regex | 2023.10.3 |
| reproc | 14.2.4 |
| reproc-cpp | 14.2.4 |
| requests | 2.31.0 |
| requests-file | 1.5.1 |
| requests-toolbelt | 1.0.0 |
| rfc3339-validator | 0.1.4 |
| rfc3986-validator | 0.1.1 |
| rich | 13.3.5 |
| rope | 1.7.0 |
| rpds-py | 0.10.6 |
| rtree | 1.0.1 |
| ruamel.yaml | 0.17.21 |
| ruamel\_yaml | 0.17.21 |
| s3fs | 2023.10.0 |
| scikit-image | 0.22.0 |
| scikit-learn | 1.2.2 |
| scipy | 1.11.4 |
| scrapy | 2.8.0 |
| seaborn | 0.12.2 |
| semver | 2.13.0 |
| send2trash | 1.8.2 |
| service\_identity | 18.1.0 |
| setuptools | 68.2.2 |
| sip | 6.7.12 |
| six | 1.16.0 |
| smart\_open | 5.2.1 |
| smmap | 4.0.0 |
| snappy | 1.1.10 |
| sniffio | 1.3.0 |
| snowballstemmer | 2.2.0 |
| sortedcontainers | 2.4.0 |
| soupsieve | 2.5 |
| sphinx | 5.0.2 |
| sphinxcontrib-applehelp | 1.0.2 |
| sphinxcontrib-devhelp | 1.0.2 |
| sphinxcontrib-htmlhelp | 2.0.0 |
| sphinxcontrib-jsmath | 1.0.1 |
| sphinxcontrib-qthelp | 1.0.3 |
| sphinxcontrib-serializinghtml | 1.1.5 |
| spyder | 5.4.3 |
| spyder-kernels | 2.4.4 |
| sqlalchemy | 2.0.25 |
| sqlite | 3.41.2 |
| stack\_data | 0.2.0 |
| statsmodels | 0.14.0 |
| streamlit | 1.30.0 |
| sympy | 1.12 |
| tabulate | 0.9.0 |
| tbb | 2021.8.0 |
| tblib | 1.7.0 |
| tenacity | 8.2.2 |
| terminado | 0.17.1 |
| text-unidecode | 1.3 |
| textdistance | 4.2.1 |
| threadpoolctl | 2.2.0 |
| three-merge | 0.1.1 |
| tifffile | 2023.4.12 |
| tinycss2 | 1.2.1 |
| tk | 8.6.12 |
| tldextract | 3.2.0 |
| toml | 0.10.2 |
| tomlkit | 0.11.1 |
| toolz | 0.12.0 |
| tornado | 6.3.3 |
| tqdm | 4.65.0 |
| traitlets | 5.7.1 |
| truststore | 0.8.0 |
| twisted | 23.10.0 |
| twisted-iocpsupport | 1.0.2 |
| typing-extensions | 4.9.0 |
| typing\_extensions | 4.9.0 |
| tzdata | 2023d |
| tzlocal | 2.1 |
| uc-micro-py | 1.0.1 |
| ujson | 5.4.0 |
| unidecode | 1.2.0 |
| urllib3 | 2.0.7 |
| utf8proc | 2.6.1 |
| validators | 0.18.2 |
| vc | 14.2 |
| vs2015\_runtime | 14.27.29016 |
| w3lib | 2.1.2 |
| watchdog | 2.1.6 |
| wcwidth | 0.2.5 |
| webencodings | 0.5.1 |
| websocket-client | 0.58.0 |
| werkzeug | 2.2.3 |
| whatthepatch | 1.0.2 |
| wheel | 0.41.2 |
| widgetsnbextension | 3.5.2 |
| win\_inet\_pton | 1.1.0 |
| winpty | 0.4.3 |
| wrapt | 1.14.1 |
| xarray | 2023.6.0 |
| xlwings | 0.29.1 |
| xyzservices | 2022.9.0 |
| xz | 5.4.5 |
| yaml | 0.2.5 |
| yaml-cpp | 0.8.0 |
| yapf | 0.31.0 |
| yarl | 1.9.3 |
| zeromq | 4.3.5 |
| zfp | 1.0.0 |
| zict | 3.0.0 |
| zipp | 3.17.0 |
| zlib | 1.2.13 |
| zlib-ng | 2.0.7 |
| zope | 1.0 |
| zope.interface | 5.4.0 |
| zstandard | 0.19.0 |
| zstd | 1.5.5 |
| Package Name | linux-64 | linux-aarch64 | linux-ppc64le | linux-s390x | osx-arm64 | osx-64 | win-64 |
|---|---|---|---|---|---|---|---|
| \_anaconda\_depends | 2023.09 | 2023.09 | 2023.09 | 2023.09 | 2023.09 | 2023.09 | 2023.09 |
| \_libgcc\_mutex | 0.1 | 0.1 | 0.1 | 0.1 | |||
| \_openmp\_mutex | 5.1 | 5.1 | 5.1 | 5.1 | |||
| abseil-cpp | 20211102.0 | 20211102.0 | 20211102.0 | 20211102.0 | 20211102.0 | 20211102.0 | |
| aiobotocore | 2.5.0 | 2.5.0 | 2.5.0 | 2.5.0 | 2.5.0 | 2.5.0 | 2.5.0 |
| aiofiles | 22.1.0 | 22.1.0 | 22.1.0 | 22.1.0 | 22.1.0 | 22.1.0 | |
| aiohttp | 3.8.5 | 3.8.5 | 3.8.5 | 3.8.5 | 3.8.5 | 3.8.5 | 3.8.5 |
| aioitertools | 0.7.1 | 0.7.1 | 0.7.1 | 0.7.1 | 0.7.1 | 0.7.1 | 0.7.1 |
| aiosignal | 1.2.0 | 1.2.0 | 1.2.0 | 1.2.0 | 1.2.0 | 1.2.0 | 1.2.0 |
| aiosqlite | 0.18.0 | 0.18.0 | 0.18.0 | 0.18.0 | 0.18.0 | 0.18.0 | |
| alabaster | 0.7.12 | 0.7.12 | 0.7.12 | 0.7.12 | 0.7.12 | ||
| anaconda-anon-usage | 0.4.2 | 0.4.2 | 0.4.2 | 0.4.2 | 0.4.2 | 0.4.2 | 0.4.2 |
| anaconda-catalogs | 0.2.0 | 0.2.0 | 0.2.0 | 0.2.0 | 0.2.0 | 0.2.0 | 0.2.0 |
| anaconda-client | 1.12.1 | 1.12.1 | 1.12.1 | 1.12.1 | 1.12.1 | 1.12.1 | 1.12.1 |
| anaconda-cloud-auth | 0.1.3 | 0.1.3 | 0.1.3 | 0.1.3 | 0.1.3 | ||
| anaconda-navigator | 2.5.0 | 2.5.0 | 2.5.0 | 2.5.0 | 2.5.0 | ||
| anaconda-project | 0.11.1 | 0.11.1 | 0.11.1 | 0.11.1 | 0.11.1 | 0.11.1 | 0.11.1 |
| anyio | 3.5.0 | 3.5.0 | 3.5.0 | 3.5.0 | 3.5.0 | 3.5.0 | 3.5.0 |
| aom | 3.6.0 | 3.6.0 | 3.6.0 | 3.6.0 | 3.6.0 | 3.6.0 | 3.6.0 |
| appdirs | 1.4.4 | 1.4.4 | 1.4.4 | 1.4.4 | 1.4.4 | 1.4.4 | 1.4.4 |
| applaunchservices | 0.3.0 | 0.3.0 | |||||
| appnope | 0.1.2 | 0.1.2 | |||||
| appscript | 1.1.2 | 1.1.2 | |||||
| argon2-cffi | 21.3.0 | 21.3.0 | 21.3.0 | 21.3.0 | 21.3.0 | 21.3.0 | 21.3.0 |
| argon2-cffi-bindings | 21.2.0 | 21.2.0 | 21.2.0 | 21.2.0 | 21.2.0 | 21.2.0 | 21.2.0 |
| arrow | 1.2.3 | 1.2.3 | 1.2.3 | 1.2.3 | 1.2.3 | ||
| arrow-cpp | 11.0.0 | 11.0.0 | 11.0.0 | 11.0.0 | 11.0.0 | 11.0.0 | |
| astroid | 2.14.2 | 2.14.2 | 2.14.2 | 2.14.2 | 2.14.2 | 2.14.2 | 2.14.2 |
| astropy | 5.1 | 5.1 | 5.1 | 5.1 | 5.1 | 5.1 | 5.1 |
| asttokens | 2.0.5 | 2.0.5 | 2.0.5 | 2.0.5 | 2.0.5 | 2.0.5 | 2.0.5 |
| async-timeout | 4.0.2 | 4.0.2 | 4.0.2 | 4.0.2 | 4.0.2 | 4.0.2 | 4.0.2 |
| atomicwrites | 1.4.0 | 1.4.0 | 1.4.0 | 1.4.0 | 1.4.0 | ||
| attrs | 22.1.0 | 22.1.0 | 22.1.0 | 22.1.0 | 22.1.0 | 22.1.0 | 22.1.0 |
| automat | 20.2.0 | 20.2.0 | 20.2.0 | 20.2.0 | 20.2.0 | 20.2.0 | |
| autopep8 | 1.6.0 | 1.6.0 | 1.6.0 | 1.6.0 | 1.6.0 | ||
| aws-c-common | 0.6.8 | 0.6.8 | 0.6.8 | 0.6.8 | 0.6.8 | 0.6.8 | |
| aws-c-event-stream | 0.1.6 | 0.1.6 | 0.1.6 | 0.1.6 | 0.1.6 | 0.1.6 | |
| aws-checksums | 0.1.11 | 0.1.11 | 0.1.11 | 0.1.11 | 0.1.11 | 0.1.11 | |
| aws-sdk-cpp | 1.8.185 | 1.8.185 | 1.8.185 | 1.8.185 | 1.8.185 | 1.8.185 | |
| babel | 2.11.0 | 2.11.0 | 2.11.0 | 2.11.0 | 2.11.0 | 2.11.0 | 2.11.0 |
| backcall | 0.2.0 | 0.2.0 | 0.2.0 | 0.2.0 | 0.2.0 | 0.2.0 | 0.2.0 |
| backports | 1.1 | 1.1 | 1.1 | 1.1 | 1.1 | 1.1 | 1.1 |
| backports.functools\_lru\_cache | 1.6.4 | 1.6.4 | 1.6.4 | 1.6.4 | 1.6.4 | 1.6.4 | 1.6.4 |
| backports.tempfile | 1.0 | 1.0 | 1.0 | 1.0 | 1.0 | 1.0 | 1.0 |
| backports.weakref | 1.0.post1 | 1.0.post1 | 1.0.post1 | 1.0.post1 | 1.0.post1 | 1.0.post1 | 1.0.post1 |
| bcrypt | 3.2.0 | 3.2.0 | 3.2.0 | 3.2.0 | 3.2.0 | 3.2.0 | |
| beautifulsoup4 | 4.12.2 | 4.12.2 | 4.12.2 | 4.12.2 | 4.12.2 | 4.12.2 | 4.12.2 |
| binaryornot | 0.4.4 | 0.4.4 | 0.4.4 | 0.4.4 | 0.4.4 | ||
| black | 23.3.0 | 23.3.0 | 23.3.0 | 23.3.0 | 23.3.0 | ||
| blas | 1.0 | 1.0 | 1.0 | 1.0 | 1.0 | 1.0 | 1.0 |
| bleach | 4.1.0 | 4.1.0 | 4.1.0 | 4.1.0 | 4.1.0 | 4.1.0 | 4.1.0 |
| blosc | 1.21.3 | 1.21.3 | 1.21.3 | 1.21.3 | 1.21.3 | 1.21.3 | 1.21.3 |
| bokeh | 3.2.1 | 3.2.1 | 3.2.1 | 2.4.3 | 3.2.1 | 3.2.1 | 3.2.1 |
| boltons | 23.0.0 | 23.0.0 | 23.0.0 | 23.0.0 | 23.0.0 | 23.0.0 | 23.0.0 |
| boost-cpp | 1.73.0 | 1.73.0 | 1.82.0 | 1.73.0 | 1.73.0 | 1.82.0 | |
| boto3 | 1.26.76 | ||||||
| botocore | 1.29.76 | 1.29.76 | 1.29.76 | 1.29.76 | 1.29.76 | 1.29.76 | 1.29.76 |
| bottleneck | 1.3.5 | 1.3.5 | 1.3.5 | 1.3.5 | 1.3.5 | 1.3.5 | 1.3.5 |
| brotli | 1.0.9 | 1.0.9 | 1.0.9 | 1.0.9 | 1.0.9 | 1.0.9 | 1.0.9 |
| brotli-bin | 1.0.9 | 1.0.9 | 1.0.9 | 1.0.9 | 1.0.9 | 1.0.9 | 1.0.9 |
| brotlipy | 0.7.0 | 0.7.0 | 0.7.0 | 0.7.0 | 0.7.0 | 0.7.0 | 0.7.0 |
| brunsli | 0.1 | 0.1 | 0.1 | 0.1 | 0.1 | ||
| bzip2 | 1.0.8 | 1.0.8 | 1.0.8 | 1.0.8 | 1.0.8 | 1.0.8 | 1.0.8 |
| c-ares | 1.19.1 | 1.19.1 | 1.19.1 | 1.19.1 | 1.19.1 | 1.19.1 | 1.19.1 |
| c-blosc2 | 2.8.0 | 2.8.0 | 2.8.0 | 2.8.0 | 2.8.0 | 2.8.0 | |
| ca-certificates | 2023.08.22 | 2023.08.22 | 2023.08.22 | 2023.08.22 | 2023.08.22 | 2023.08.22 | 2023.08.22 |
| cctools | 949.0.1 | 949.0.1 | |||||
| cctools\_osx-64 | 949.0.1 | ||||||
| cctools\_osx-arm64 | 949.0.1 | ||||||
| certifi | 2023.7.22 | 2023.7.22 | 2023.7.22 | 2023.7.22 | 2023.7.22 | 2023.7.22 | 2023.7.22 |
| cffi | 1.15.1 | 1.15.1 | 1.15.1 | 1.15.1 | 1.15.1 | 1.15.1 | 1.15.1 |
| cfitsio | 3.470 | 3.470 | 3.470 | 3.470 | 3.470 | 3.470 | 3.470 |
| chardet | 4.0.0 | 4.0.0 | 4.0.0 | 4.0.0 | 4.0.0 | 4.0.0 | 4.0.0 |
| charls | 2.2.0 | 2.2.0 | 2.2.0 | 2.2.0 | 2.2.0 | 2.2.0 | |
| charset-normalizer | 2.0.4 | 2.0.4 | 2.0.4 | 2.0.4 | 2.0.4 | 2.0.4 | 2.0.4 |
| click | 8.0.4 | 8.0.4 | 8.0.4 | 8.0.4 | 8.0.4 | 8.0.4 | 8.0.4 |
| cloudpickle | 2.2.1 | 2.2.1 | 2.2.1 | 2.2.1 | 2.2.1 | 2.2.1 | 2.2.1 |
| clyent | 1.2.2 | 1.2.2 | 1.2.2 | 1.2.2 | 1.2.2 | 1.2.2 | 1.2.2 |
| colorama | 0.4.6 | 0.4.6 | 0.4.6 | 0.4.6 | 0.4.6 | 0.4.6 | 0.4.6 |
| colorcet | 3.0.1 | 3.0.1 | 3.0.1 | 3.0.1 | 3.0.1 | 3.0.1 | 3.0.1 |
| comm | 0.1.2 | 0.1.2 | 0.1.2 | 0.1.2 | 0.1.2 | 0.1.2 | 0.1.2 |
| conda | 23.7.4 | 23.7.4 | 23.7.4 | 23.7.4 | 23.7.4 | 23.7.4 | 23.7.4 |
| conda-build | 3.26.1 | 3.26.1 | 3.26.1 | 3.26.1 | 3.26.1 | 3.26.1 | 3.26.1 |
| conda-content-trust | 0.2.0 | 0.2.0 | 0.2.0 | 0.2.0 | 0.2.0 | 0.2.0 | 0.2.0 |
| conda-index | 0.3.0 | 0.3.0 | 0.3.0 | 0.3.0 | 0.3.0 | 0.3.0 | 0.3.0 |
| conda-libmamba-solver | 23.7.0 | 23.7.0 | 23.7.0 | 23.7.0 | 23.7.0 | 23.7.0 | 23.7.0 |
| conda-pack | 0.6.0 | 0.6.0 | 0.6.0 | 0.6.0 | 0.6.0 | 0.6.0 | 0.6.0 |
| conda-package-handling | 2.2.0 | 2.2.0 | 2.2.0 | 2.2.0 | 2.2.0 | 2.2.0 | 2.2.0 |
| conda-package-streaming | 0.9.0 | 0.9.0 | 0.9.0 | 0.9.0 | 0.9.0 | 0.9.0 | 0.9.0 |
| conda-repo-cli | 1.0.75 | 1.0.75 | 1.0.75 | 1.0.75 | 1.0.75 | ||
| conda-token | 0.4.0 | 0.4.0 | 0.4.0 | 0.4.0 | 0.4.0 | 0.4.0 | 0.4.0 |
| conda-verify | 3.4.2 | 3.4.2 | 3.4.2 | 3.4.2 | 3.4.2 | 3.4.2 | 3.4.2 |
| console\_shortcut | 0.1.1 | ||||||
| constantly | 15.1.0 | 15.1.0 | 15.1.0 | 15.1.0 | 15.1.0 | 15.1.0 | |
| contourpy | 1.0.5 | 1.0.5 | 1.0.5 | 1.0.5 | 1.0.5 | 1.0.5 | 1.0.5 |
| cookiecutter | 1.7.3 | 1.7.3 | 1.7.3 | 1.7.3 | 1.7.3 | ||
| cryptography | 41.0.3 | 41.0.3 | 41.0.3 | 41.0.3 | 41.0.3 | 41.0.3 | 41.0.3 |
| cssselect | 1.1.0 | 1.1.0 | 1.1.0 | 1.1.0 | 1.1.0 | 1.1.0 | |
| curl | 8.2.1 | 8.2.1 | 8.2.1 | 8.2.1 | 8.2.1 | 8.2.1 | 8.1.1 |
| cycler | 0.11.0 | 0.11.0 | 0.11.0 | 0.11.0 | 0.11.0 | 0.11.0 | 0.11.0 |
| cyrus-sasl | 2.1.28 | 2.1.28 | 2.1.28 | 2.1.28 | |||
| cytoolz | 0.12.0 | 0.12.0 | 0.12.0 | 0.12.0 | 0.12.0 | 0.12.0 | 0.12.0 |
| daal4py | 2023.1.1 | 2023.1.1 | |||||
| dal | 2023.1.1 | 2023.1.1 | |||||
| dask | 2023.6.0 | 2023.6.0 | 2023.6.0 | 2023.6.0 | 2023.6.0 | 2023.6.0 | 2023.6.0 |
| dask-core | 2023.6.0 | 2023.6.0 | 2023.6.0 | 2023.6.0 | 2023.6.0 | 2023.6.0 | 2023.6.0 |
| datasets | 2.12.0 | 2.12.0 | 2.12.0 | 2.12.0 | 2.12.0 | 2.12.0 | |
| datashader | 0.15.2 | 0.15.2 | 0.15.2 | 0.15.2 | 0.15.2 | 0.15.2 | |
| datashape | 0.5.4 | 0.5.4 | 0.5.4 | 0.5.4 | 0.5.4 | 0.5.4 | |
| dav1d | 1.2.1 | 1.2.1 | 1.2.1 | 1.2.1 | 1.2.1 | 1.2.1 | 1.2.1 |
| dbus | 1.13.18 | 1.13.18 | |||||
| debugpy | 1.6.7 | 1.6.7 | 1.6.7 | 1.6.7 | 1.6.7 | 1.6.7 | 1.6.7 |
| decorator | 5.1.1 | 5.1.1 | 5.1.1 | 5.1.1 | 5.1.1 | 5.1.1 | 5.1.1 |
| defusedxml | 0.7.1 | 0.7.1 | 0.7.1 | 0.7.1 | 0.7.1 | 0.7.1 | 0.7.1 |
| diff-match-patch | 20200713 | 20200713 | 20200713 | 20200713 | 20200713 | ||
| dill | 0.3.6 | 0.3.6 | 0.3.6 | 0.3.7 | 0.3.6 | 0.3.6 | 0.3.6 |
| distributed | 2023.6.0 | 2023.6.0 | 2023.6.0 | 2023.6.0 | 2023.6.0 | 2023.6.0 | 2023.6.0 |
| docstring-to-markdown | 0.11 | 0.11 | 0.11 | 0.11 | 0.11 | ||
| docutils | 0.18.1 | 0.18.1 | 0.18.1 | 0.18.1 | 0.18.1 | ||
| entrypoints | 0.4 | 0.4 | 0.4 | 0.4 | 0.4 | 0.4 | 0.4 |
| et\_xmlfile | 1.1.0 | 1.1.0 | 1.1.0 | 1.1.0 | 1.1.0 | 1.1.0 | 1.1.0 |
| executing | 0.8.3 | 0.8.3 | 0.8.3 | 0.8.3 | 0.8.3 | 0.8.3 | 0.8.3 |
| expat | 2.5.0 | 2.5.0 | |||||
| filelock | 3.9.0 | 3.9.0 | 3.9.0 | 3.9.0 | 3.9.0 | 3.9.0 | 3.9.0 |
| flake8 | 6.0.0 | 6.0.0 | 6.0.0 | 6.0.0 | 6.0.0 | ||
| flask | 2.2.2 | 2.2.2 | 2.2.2 | 2.2.2 | 2.2.2 | 2.2.2 | 2.2.2 |
| fmt | 9.1.0 | 9.1.0 | 9.1.0 | 9.1.0 | 9.1.0 | 9.1.0 | 9.1.0 |
| font-ttf-dejavu-sans-mono | 2.37 | 2.37 | |||||
| font-ttf-inconsolata | 2.001 | 2.001 | |||||
| font-ttf-source-code-pro | 2.030 | 2.030 | |||||
| font-ttf-ubuntu | 0.83 | 0.83 | |||||
| fontconfig | 2.14.1 | 2.14.1 | |||||
| fonts-anaconda | 1 | 1 | |||||
| fonttools | 4.25.0 | 4.25.0 | 4.25.0 | 4.25.0 | 4.25.0 | 4.25.0 | 4.25.0 |
| freetype | 2.12.1 | 2.12.1 | 2.12.1 | 2.12.1 | 2.12.1 | 2.12.1 | 2.12.1 |
| frozenlist | 1.3.3 | 1.3.3 | 1.3.3 | 1.3.3 | 1.3.3 | 1.3.3 | 1.3.3 |
| fsspec | 2023.4.0 | 2023.4.0 | 2023.4.0 | 2023.4.0 | 2023.4.0 | 2023.4.0 | 2023.4.0 |
| future | 0.18.3 | 0.18.3 | 0.18.3 | 0.18.3 | 0.18.3 | 0.18.3 | 0.18.3 |
| gensim | 4.3.0 | 4.3.0 | 4.3.0 | 4.3.0 | 4.3.0 | 4.3.0 | |
| gettext | 0.21.0 | 0.21.0 | |||||
| gflags | 2.2.2 | 2.2.2 | 2.2.2 | 2.2.2 | 2.2.2 | 2.2.2 | |
| giflib | 5.2.1 | 5.2.1 | 5.2.1 | 5.2.1 | 5.2.1 | 5.2.1 | 5.2.1 |
| glib | 2.69.1 | 2.69.1 | 2.69.1 | 2.69.1 | 2.69.1 | ||
| glob2 | 0.7 | 0.7 | 0.7 | 0.7 | 0.7 | 0.7 | 0.7 |
| glog | 0.5.0 | 0.5.0 | 0.5.0 | 0.5.0 | 0.5.0 | 0.5.0 | |
| gmp | 6.2.1 | 6.2.1 | 6.2.1 | 6.2.1 | 6.2.1 | 6.2.1 | |
| gmpy2 | 2.1.2 | 2.1.2 | 2.1.2 | 2.1.2 | 2.1.2 | 2.1.2 | |
| greenlet | 2.0.1 | 2.0.1 | 2.0.1 | 2.0.1 | 2.0.1 | 2.0.1 | 2.0.1 |
| grpc-cpp | 1.48.2 | 1.48.2 | 1.48.2 | 1.48.2 | 1.48.2 | 1.48.2 | |
| gst-plugins-base | 1.14.1 | 1.14.1 | 1.14.1 | 1.14.1 | |||
| gstreamer | 1.14.1 | 1.14.1 | 1.14.1 | 1.14.1 | |||
| h5py | 3.9.0 | 3.9.0 | 3.9.0 | 3.7.0 | 3.9.0 | 3.9.0 | 3.9.0 |
| hdf5 | 1.12.1 | 1.12.1 | 1.12.1 | 1.10.6 | 1.12.1 | 1.12.1 | 1.12.1 |
| heapdict | 1.0.1 | 1.0.1 | 1.0.1 | 1.0.1 | 1.0.1 | 1.0.1 | 1.0.1 |
| holoviews | 1.17.1 | 1.17.1 | 1.17.1 | 1.14.8 | 1.17.1 | 1.17.1 | 1.17.1 |
| huggingface\_hub | 0.15.1 | 0.15.1 | 0.15.1 | 0.15.1 | 0.15.1 | 0.15.1 | |
| hvplot | 0.8.4 | 0.8.4 | 0.8.4 | 0.7.3 | 0.8.4 | 0.8.4 | 0.8.4 |
| hyperlink | 21.0.0 | 21.0.0 | 21.0.0 | 21.0.0 | 21.0.0 | 21.0.0 | |
| icc\_rt | 2022.1.0 | ||||||
| icu | 58.2 | 68.1 | 73.1 | 73.1 | 68.1 | 58.2 | 58.2 |
| idna | 3.4 | 3.4 | 3.4 | 3.3 | 3.4 | 3.4 | 3.4 |
| imagecodecs | 2023.1.23 | 2023.1.23 | 2023.1.23 | 2023.1.23 | 2023.1.23 | 2023.1.23 | 2023.1.23 |
| imageio | 2.31.1 | 2.31.1 | 2.31.1 | 2.26.0 | 2.31.1 | 2.31.1 | 2.26.0 |
| imagesize | 1.4.1 | 1.4.1 | 1.4.1 | 1.4.1 | 1.4.1 | ||
| imbalanced-learn | 0.10.1 | 0.10.1 | 0.10.1 | 0.10.1 | 0.10.1 | 0.10.1 | 0.10.1 |
| importlib-metadata | 6.0.0 | 6.0.0 | 6.0.0 | 6.0.0 | 6.0.0 | 6.0.0 | 6.0.0 |
| importlib\_metadata | 6.0.0 | 6.0.0 | 6.0.0 | 6.0.0 | 6.0.0 | ||
| incremental | 21.3.0 | 21.3.0 | 21.3.0 | 21.3.0 | 21.3.0 | 21.3.0 | |
| inflection | 0.5.1 | 0.5.1 | 0.5.1 | 0.5.1 | 0.5.1 | ||
| iniconfig | 1.1.1 | 1.1.1 | 1.1.1 | 1.1.1 | 1.1.1 | 1.1.1 | 1.1.1 |
| intake | 0.6.8 | 0.6.8 | 0.6.8 | 0.6.8 | 0.6.8 | 0.6.8 | 0.6.8 |
| intel-openmp | 2023.1.0 | 2023.1.0 | |||||
| intervaltree | 3.1.0 | 3.1.0 | 3.1.0 | 3.1.0 | 3.1.0 | ||
| ipykernel | 6.25.0 | 6.25.0 | 6.25.0 | 6.25.0 | 6.25.0 | 6.25.0 | 6.25.0 |
| ipython | 8.15.0 | 8.15.0 | 8.15.0 | 8.15.0 | 8.15.0 | 8.15.0 | 8.15.0 |
| ipython\_genutils | 0.2.0 | 0.2.0 | 0.2.0 | 0.2.0 | 0.2.0 | 0.2.0 | 0.2.0 |
| ipywidgets | 8.0.4 | 8.0.4 | 8.0.4 | 8.0.4 | 8.0.4 | 8.0.4 | 8.0.4 |
| isort | 5.9.3 | 5.9.3 | 5.9.3 | 5.9.3 | 5.9.3 | 5.9.3 | 5.9.3 |
| itemadapter | 0.3.0 | 0.3.0 | 0.3.0 | 0.3.0 | 0.3.0 | 0.3.0 | |
| itemloaders | 1.0.4 | 1.0.4 | 1.0.4 | 1.0.4 | 1.0.4 | 1.0.4 | |
| itsdangerous | 2.0.1 | 2.0.1 | 2.0.1 | 2.0.1 | 2.0.1 | 2.0.1 | 2.0.1 |
| jaraco.classes | 3.2.1 | 3.2.1 | 3.2.1 | 3.2.1 | 3.2.1 | ||
| jedi | 0.18.1 | 0.18.1 | 0.18.1 | 0.18.1 | 0.18.1 | 0.18.1 | 0.18.1 |
| jeepney | 0.7.1 | 0.7.1 | |||||
| jellyfish | 1.0.1 | 1.0.1 | 1.0.1 | 1.0.1 | 1.0.1 | ||
| jinja2 | 3.1.2 | 3.1.2 | 3.1.2 | 3.1.2 | 3.1.2 | 3.1.2 | 3.1.2 |
| jinja2-time | 0.2.0 | 0.2.0 | 0.2.0 | 0.2.0 | 0.2.0 | ||
| jmespath | 0.10.0 | 0.10.0 | 0.10.0 | 0.10.0 | 0.10.0 | 0.10.0 | 0.10.0 |
| joblib | 1.2.0 | 1.2.0 | 1.2.0 | 1.2.0 | 1.2.0 | 1.2.0 | 1.2.0 |
| jpeg | 9e | 9e | 9e | 9e | 9e | 9e | 9e |
| jq | 1.6 | 1.6 | 1.6 | 1.6 | 1.6 | 1.6 | |
| json5 | 0.9.6 | 0.9.6 | 0.9.6 | 0.9.6 | 0.9.6 | 0.9.6 | 0.9.6 |
| jsonpatch | 1.32 | 1.32 | 1.32 | 1.32 | 1.32 | 1.32 | 1.32 |
| jsonpointer | 2.1 | 2.1 | 2.1 | 2.1 | 2.1 | 2.1 | 2.1 |
| jsonschema | 4.17.3 | 4.17.3 | 4.17.3 | 4.17.3 | 4.17.3 | 4.17.3 | 4.17.3 |
| jupyter | 1.0.0 | 1.0.0 | 1.0.0 | 1.0.0 | 1.0.0 | 1.0.0 | 1.0.0 |
| jupyter\_client | 7.4.9 | 7.4.9 | 7.4.9 | 7.4.9 | 7.4.9 | 7.4.9 | 7.4.9 |
| jupyter\_console | 6.6.3 | 6.6.3 | 6.6.3 | 6.6.3 | 6.6.3 | 6.6.3 | 6.6.3 |
| jupyter\_core | 5.3.0 | 5.3.0 | 5.3.0 | 5.3.0 | 5.3.0 | 5.3.0 | 5.3.0 |
| jupyter\_events | 0.6.3 | 0.6.3 | 0.6.3 | 0.6.3 | 0.6.3 | 0.6.3 | |
| jupyter\_server | 1.23.4 | 1.23.4 | 1.23.4 | 1.23.4 | 1.23.4 | 1.23.4 | 1.23.4 |
| jupyter\_server\_fileid | 0.9.0 | 0.9.0 | 0.9.0 | 0.9.0 | 0.9.0 | 0.9.0 | |
| jupyter\_server\_ydoc | 0.8.0 | 0.8.0 | 0.8.0 | 0.8.0 | 0.8.0 | 0.8.0 | |
| jupyter\_ydoc | 0.2.4 | 0.2.4 | 0.2.4 | 0.2.4 | 0.2.4 | 0.2.4 | |
| jupyterlab | 3.6.3 | 3.6.3 | 3.6.3 | 3.3.2 | 3.6.3 | 3.6.3 | 3.6.3 |
| jupyterlab\_pygments | 0.1.2 | 0.1.2 | 0.1.2 | 0.1.2 | 0.1.2 | 0.1.2 | 0.1.2 |
| jupyterlab\_server | 2.22.0 | 2.22.0 | 2.22.0 | 2.21.0 | 2.22.0 | 2.22.0 | 2.22.0 |
| jupyterlab\_widgets | 3.0.5 | 3.0.5 | 3.0.5 | 3.0.5 | 3.0.5 | 3.0.5 | 3.0.5 |
| jxrlib | 1.1 | 1.1 | 1.1 | 1.1 | 1.1 | 1.1 | |
| kaleido-core | 0.2.1 | 0.2.1 | 0.2.1 | 0.2.1 | 0.2.1 | ||
| keyring | 23.13.1 | 23.13.1 | 23.13.1 | 23.13.1 | 23.13.1 | ||
| kiwisolver | 1.4.4 | 1.4.4 | 1.4.4 | 1.4.4 | 1.4.4 | 1.4.4 | 1.4.4 |
| krb5 | 1.20.1 | 1.20.1 | 1.20.1 | 1.20.1 | 1.20.1 | 1.20.1 | 1.20.1 |
| lazy-object-proxy | 1.6.0 | 1.6.0 | 1.6.0 | 1.6.0 | 1.6.0 | 1.6.0 | 1.6.0 |
| lazy\_loader | 0.2 | 0.2 | 0.2 | 0.1 | 0.2 | 0.2 | 0.2 |
| lcms2 | 2.12 | 2.12 | 2.12 | 2.12 | 2.12 | 2.12 | 2.12 |
| ld64 | 530 | 530 | |||||
| ld64\_osx-64 | 530 | ||||||
| ld64\_osx-arm64 | 530 | ||||||
| ld\_impl\_linux-64 | 2.38 | ||||||
| ld\_impl\_linux-aarch64 | 2.38 | ||||||
| ld\_impl\_linux-ppc64le | 2.38 | ||||||
| ld\_impl\_linux-s390x | 2.38 | ||||||
| ldid | 2.1.5 | 2.1.5 | |||||
| lerc | 3.0 | 3.0 | 3.0 | 3.0 | 3.0 | 3.0 | 3.0 |
| libaec | 1.0.4 | 1.0.4 | 1.0.4 | 1.0.4 | 1.0.4 | 1.0.4 | 1.0.4 |
| libarchive | 3.6.2 | 3.6.2 | 3.6.2 | 3.6.2 | 3.6.2 | 3.6.2 | 3.6.2 |
| libavif | 0.11.1 | 0.11.1 | 0.11.1 | 0.11.1 | 0.11.1 | 0.11.1 | 0.11.1 |
| libboost | 1.73.0 | 1.73.0 | 1.82.0 | 1.73.0 | 1.73.0 | 1.82.0 | |
| libbrotlicommon | 1.0.9 | 1.0.9 | 1.0.9 | 1.0.9 | 1.0.9 | 1.0.9 | 1.0.9 |
| libbrotlidec | 1.0.9 | 1.0.9 | 1.0.9 | 1.0.9 | 1.0.9 | 1.0.9 | 1.0.9 |
| libbrotlienc | 1.0.9 | 1.0.9 | 1.0.9 | 1.0.9 | 1.0.9 | 1.0.9 | 1.0.9 |
| libclang | 14.0.6 | 14.0.6 | 14.0.6 | 14.0.6 | 14.0.6 | ||
| libclang13 | 14.0.6 | 14.0.6 | 14.0.6 | 14.0.6 | 14.0.6 | ||
| libcups | 2.4.2 | 2.4.2 | |||||
| libcurl | 8.2.1 | 8.2.1 | 8.2.1 | 8.2.1 | 8.2.1 | 8.2.1 | 8.1.1 |
| libcxx | 14.0.6 | 14.0.6 | |||||
| libdeflate | 1.17 | 1.17 | 1.17 | 1.17 | 1.17 | 1.17 | 1.17 |
| libedit | 3.1.20221030 | 3.1.20221030 | 3.1.20221030 | 3.1.20221030 | 3.1.20221030 | 3.1.20221030 | |
| libev | 4.33 | 4.33 | 4.33 | 4.33 | 4.33 | 4.33 | |
| libevent | 2.1.12 | 2.1.12 | 2.1.12 | 2.1.12 | 2.1.12 | 2.1.12 | |
| libffi | 3.4.4 | 3.4.4 | 3.4.4 | 3.4.2 | 3.4.4 | 3.4.4 | 3.4.4 |
| libgcc-ng | 11.2.0 | 11.2.0 | 11.2.0 | 11.2.0 | |||
| libgfortran | 5.0.0 | 5.0.0 | |||||
| libgfortran-ng | 11.2.0 | 11.2.0 | 11.2.0 | 11.2.0 | |||
| libgfortran5 | 11.2.0 | 11.2.0 | 11.2.0 | 11.2.0 | 11.3.0 | 11.3.0 | |
| libgomp | 11.2.0 | 11.2.0 | 11.2.0 | 11.2.0 | |||
| libiconv | 1.16 | 1.16 | 1.16 | ||||
| liblief | 0.12.3 | 0.12.3 | 0.12.3 | 0.12.3 | 0.12.3 | 0.12.3 | 0.12.3 |
| libllvm14 | 14.0.6 | 14.0.6 | 14.0.6 | 14.0.6 | 14.0.6 | ||
| libmamba | 1.5.1 | 1.5.1 | 1.5.1 | 1.5.1 | 1.5.1 | 1.5.1 | 1.5.1 |
| libmambapy | 1.5.1 | 1.5.1 | 1.5.1 | 1.5.1 | 1.5.1 | 1.5.1 | 1.5.1 |
| libnghttp2 | 1.52.0 | 1.52.0 | 1.52.0 | 1.52.0 | 1.52.0 | 1.52.0 | |
| libopenblas | 0.3.21 | 0.3.21 | 0.3.21 | 0.3.21 | 0.3.21 | ||
| libpng | 1.6.39 | 1.6.39 | 1.6.39 | 1.6.39 | 1.6.39 | 1.6.39 | 1.6.39 |
| libpq | 12.15 | 12.15 | 12.15 | 12.15 | 12.15 | ||
| libprotobuf | 3.20.3 | 3.20.3 | 3.20.3 | 3.20.3 | 3.20.3 | 3.20.3 | |
| libsodium | 1.0.18 | 1.0.18 | 1.0.18 | 1.0.18 | 1.0.18 | 1.0.18 | 1.0.18 |
| libsolv | 0.7.24 | 0.7.24 | 0.7.24 | 0.7.24 | 0.7.24 | 0.7.24 | 0.7.24 |
| libspatialindex | 1.9.3 | 1.9.3 | 1.9.3 | 1.9.3 | 1.9.3 | ||
| libssh2 | 1.10.0 | 1.10.0 | 1.10.0 | 1.10.0 | 1.10.0 | 1.10.0 | 1.10.0 |
| libstdcxx-ng | 11.2.0 | 11.2.0 | 11.2.0 | 11.2.0 | |||
| libthrift | 0.15.0 | 0.15.0 | 0.15.0 | 0.15.0 | 0.15.0 | 0.15.0 | |
| libtiff | 4.5.1 | 4.5.1 | 4.5.1 | 4.5.1 | 4.5.1 | 4.5.1 | 4.5.1 |
| libuuid | 1.41.5 | 1.41.5 | 1.41.5 | 1.41.5 | |||
| libwebp | 1.3.2 | 1.3.2 | 1.3.2 | 1.3.2 | 1.3.2 | 1.3.2 | 1.3.2 |
| libwebp-base | 1.3.2 | 1.3.2 | 1.3.2 | 1.3.2 | 1.3.2 | 1.3.2 | 1.3.2 |
| libxcb | 1.15 | 1.15 | |||||
| libxkbcommon | 1.0.1 | 1.0.1 | |||||
| libxml2 | 2.10.4 | 2.10.4 | 2.10.4 | 2.10.4 | 2.10.4 | 2.10.4 | 2.10.4 |
| libxslt | 1.1.37 | 1.1.37 | 1.1.37 | 1.1.37 | 1.1.37 | 1.1.37 | 1.1.37 |
| libzopfli | 1.0.3 | 1.0.3 | 1.0.3 | 1.0.3 | 1.0.3 | 1.0.3 | 1.0.3 |
| linkify-it-py | 2.0.0 | 2.0.0 | 2.0.0 | 2.0.0 | 2.0.0 | 2.0.0 | |
| llvm-openmp | 14.0.6 | 14.0.6 | |||||
| llvmlite | 0.40.0 | 0.40.0 | 0.40.0 | 0.40.0 | 0.40.0 | 0.40.0 | |
| locket | 1.0.0 | 1.0.0 | 1.0.0 | 1.0.0 | 1.0.0 | 1.0.0 | 1.0.0 |
| lxml | 4.9.3 | 4.9.3 | 4.9.3 | 4.9.3 | 4.9.3 | 4.9.3 | 4.9.3 |
| lz4 | 4.3.2 | 4.3.2 | 4.3.2 | 4.3.2 | 4.3.2 | 4.3.2 | 4.3.2 |
| lz4-c | 1.9.4 | 1.9.4 | 1.9.4 | 1.9.4 | 1.9.4 | 1.9.4 | 1.9.4 |
| lzo | 2.10 | 2.10 | 2.10 | 2.10 | 2.10 | 2.10 | 2.10 |
| m2-msys2-runtime | 2.5.0.17080.65c939c | ||||||
| m2-patch | 2.7.5 | ||||||
| m2w64-libwinpthread-git | 5.0.0.4634.697f757 | ||||||
| markdown | 3.4.1 | 3.4.1 | 3.4.1 | 3.4.1 | 3.4.1 | 3.4.1 | 3.4.1 |
| markdown-it-py | 2.2.0 | 2.2.0 | 2.2.0 | 2.2.0 | 2.2.0 | 2.2.0 | |
| markupsafe | 2.1.1 | 2.1.1 | 2.1.1 | 2.1.1 | 2.1.1 | 2.1.1 | 2.1.1 |
| mathjax | 2.7.5 | 2.7.5 | 2.7.5 | 2.7.5 | 2.7.5 | ||
| matplotlib | 3.7.2 | 3.7.2 | 3.7.2 | 3.7.2 | 3.7.2 | 3.7.2 | 3.7.2 |
| matplotlib-base | 3.7.2 | 3.7.2 | 3.7.2 | 3.7.2 | 3.7.2 | 3.7.2 | 3.7.2 |
| matplotlib-inline | 0.1.6 | 0.1.6 | 0.1.6 | 0.1.6 | 0.1.6 | 0.1.6 | 0.1.6 |
| mccabe | 0.7.0 | 0.7.0 | 0.7.0 | 0.7.0 | 0.7.0 | 0.7.0 | 0.7.0 |
| mdit-py-plugins | 0.3.0 | 0.3.0 | 0.3.0 | 0.3.0 | 0.3.0 | 0.3.0 | |
| mdurl | 0.1.0 | 0.1.0 | 0.1.0 | 0.1.0 | 0.1.0 | 0.1.0 | |
| menuinst | 1.4.19 | ||||||
| mistune | 0.8.4 | 0.8.4 | 0.8.4 | 0.8.4 | 0.8.4 | 0.8.4 | 0.8.4 |
| mkl | 2023.1.0 | 2023.1.0 | |||||
| mkl-service | 2.4.0 | 2.4.0 | |||||
| mkl\_fft | 1.3.8 | 1.3.8 | |||||
| mkl\_random | 1.2.4 | 1.2.4 | |||||
| mock | 4.0.3 | ||||||
| more-itertools | 8.12.0 | 8.12.0 | 8.12.0 | 8.12.0 | 8.12.0 | 8.12.0 | 8.12.0 |
| mpc | 1.1.0 | 1.1.0 | 1.1.0 | 1.1.0 | 1.1.0 | 1.1.0 | |
| mpfr | 4.0.2 | 4.0.2 | 4.0.2 | 4.0.2 | 4.0.2 | 4.0.2 | |
| mpi | 1.0 | ||||||
| mpich | 4.1.1 | ||||||
| mpmath | 1.3.0 | 1.3.0 | 1.3.0 | 1.3.0 | 1.3.0 | 1.3.0 | 1.3.0 |
| msgpack-python | 1.0.3 | 1.0.3 | 1.0.3 | 1.0.3 | 1.0.3 | 1.0.3 | 1.0.3 |
| msys2-conda-epoch | 20160418 | ||||||
| multidict | 6.0.2 | 6.0.2 | 6.0.2 | 6.0.2 | 6.0.2 | 6.0.2 | 6.0.2 |
| multipledispatch | 0.6.0 | 0.6.0 | 0.6.0 | 0.6.0 | 0.6.0 | 0.6.0 | |
| multiprocess | 0.70.14 | 0.70.14 | 0.70.14 | 0.70.14 | 0.70.14 | 0.70.14 | |
| munkres | 1.1.4 | 1.1.4 | 1.1.4 | 1.1.4 | 1.1.4 | 1.1.4 | 1.1.4 |
| mypy\_extensions | 1.0.0 | 1.0.0 | 1.0.0 | 1.0.0 | 1.0.0 | ||
| mysql | 5.7.24 | 5.7.24 | 5.7.24 | 5.7.24 | |||
| navigator-updater | 0.4.0 | 0.4.0 | 0.4.0 | 0.4.0 | 0.4.0 | ||
| nbclassic | 0.5.5 | 0.5.5 | 0.5.5 | 0.5.5 | 0.5.5 | 0.5.5 | 0.5.5 |
| nbclient | 0.5.13 | 0.5.13 | 0.5.13 | 0.5.13 | 0.5.13 | 0.5.13 | 0.5.13 |
| nbconvert | 6.5.4 | 6.5.4 | 6.5.4 | 6.5.4 | 6.5.4 | 6.5.4 | 6.5.4 |
| nbformat | 5.9.2 | 5.9.2 | 5.9.2 | 5.9.2 | 5.9.2 | 5.9.2 | 5.9.2 |
| ncurses | 6.4 | 6.4 | 6.4 | 6.4 | 6.4 | 6.4 | |
| nest-asyncio | 1.5.6 | 1.5.6 | 1.5.6 | 1.5.6 | 1.5.6 | 1.5.6 | 1.5.6 |
| networkx | 3.1 | 3.1 | 3.1 | 3.1 | 3.1 | 3.1 | 3.1 |
| nltk | 3.8.1 | 3.8.1 | 3.8.1 | 3.8.1 | 3.8.1 | 3.8.1 | 3.8.1 |
| notebook | 6.5.4 | 6.5.4 | 6.5.4 | 6.5.4 | 6.5.4 | 6.5.4 | 6.5.4 |
| notebook-shim | 0.2.2 | 0.2.2 | 0.2.2 | 0.2.2 | 0.2.2 | 0.2.2 | 0.2.2 |
| nspr | 4.35 | 4.35 | |||||
| nss | 3.89.1 | 3.89.1 | |||||
| numba | 0.57.1 | 0.57.1 | 0.57.1 | 0.57.1 | 0.57.0 | 0.57.1 | |
| numexpr | 2.8.4 | 2.8.4 | 2.8.4 | 2.8.4 | 2.8.4 | 2.8.4 | 2.8.4 |
| numpy | 1.24.3 | 1.24.3 | 1.24.3 | 1.25.2 | 1.24.3 | 1.24.3 | 1.24.3 |
| numpy-base | 1.24.3 | 1.24.3 | 1.24.3 | 1.25.2 | 1.24.3 | 1.24.3 | 1.24.3 |
| numpydoc | 1.5.0 | 1.5.0 | 1.5.0 | 1.5.0 | 1.5.0 | ||
| oniguruma | 6.9.7.1 | 6.9.7.1 | 6.9.7.1 | 6.9.7.1 | 6.9.7.1 | ||
| openjpeg | 2.4.0 | 2.4.0 | 2.4.0 | 2.4.0 | 2.3.0 | 2.4.0 | 2.4.0 |
| openpyxl | 3.0.10 | 3.0.10 | 3.0.10 | 3.0.10 | 3.0.10 | 3.0.10 | 3.0.10 |
| openssl | 3.0.10 | 3.0.10 | 3.0.10 | 3.0.10 | 3.0.10 | 3.0.10 | 3.0.10 |
| orc | 1.7.4 | 1.7.4 | 1.7.4 | 1.7.4 | 1.7.4 | 1.7.4 | |
| packaging | 23.1 | 23.1 | 23.1 | 23.1 | 23.1 | 23.1 | 23.1 |
| pandas | 2.0.3 | 2.0.3 | 2.0.3 | 2.0.3 | 2.0.3 | 2.0.3 | 2.0.3 |
| pandocfilters | 1.5.0 | 1.5.0 | 1.5.0 | 1.5.0 | 1.5.0 | 1.5.0 | 1.5.0 |
| panel | 1.2.3 | 1.2.3 | 1.2.3 | 0.12.6 | 1.2.3 | 1.2.3 | 1.2.3 |
| param | 1.13.0 | 1.13.0 | 1.13.0 | 1.13.0 | 1.13.0 | 1.13.0 | 1.13.0 |
| paramiko | 2.8.1 | ||||||
| parsel | 1.6.0 | 1.6.0 | 1.6.0 | 1.6.0 | 1.6.0 | 1.6.0 | |
| parso | 0.8.3 | 0.8.3 | 0.8.3 | 0.8.3 | 0.8.3 | 0.8.3 | 0.8.3 |
| partd | 1.4.0 | 1.4.0 | 1.4.0 | 1.4.0 | 1.4.0 | 1.4.0 | 1.4.0 |
| patch | 2.7.6 | 2.7.6 | 2.7.6 | 2.7.6 | 2.7.6 | 2.7.6 | |
| patchelf | 0.17.2 | 0.17.2 | 0.17.2 | 0.17.2 | |||
| pathlib | 1.0.1 | 1.0.1 | 1.0.1 | 1.0.1 | 1.0.1 | ||
| pathspec | 0.10.3 | 0.10.3 | 0.10.3 | 0.10.3 | 0.10.3 | ||
| patsy | 0.5.3 | 0.5.3 | 0.5.3 | 0.5.3 | 0.5.3 | 0.5.3 | 0.5.3 |
| pcre | 8.45 | 8.45 | 8.45 | 8.45 | 8.45 | ||
| pcre2 | 10.42 | 10.42 | 10.42 | 10.42 | 10.42 | 10.42 | 10.42 |
| pep8 | 1.7.1 | 1.7.1 | 1.7.1 | 1.7.1 | 1.7.1 | 1.7.1 | 1.7.1 |
| pexpect | 4.8.0 | 4.8.0 | 4.8.0 | 4.8.0 | 4.8.0 | 4.8.0 | 4.8.0 |
| pickleshare | 0.7.5 | 0.7.5 | 0.7.5 | 0.7.5 | 0.7.5 | 0.7.5 | 0.7.5 |
| pillow | 9.4.0 | 9.4.0 | 9.4.0 | 9.4.0 | 9.4.0 | 9.4.0 | 9.4.0 |
| pip | 23.2.1 | 23.2.1 | 23.2.1 | 23.2.1 | 23.2.1 | 23.2.1 | 23.2.1 |
| pkce | 1.0.3 | 1.0.3 | 1.0.3 | 1.0.3 | 1.0.3 | ||
| pkginfo | 1.9.6 | 1.9.6 | 1.9.6 | 1.9.6 | 1.9.6 | 1.9.6 | 1.9.6 |
| platformdirs | 3.10.0 | 3.10.0 | 3.10.0 | 3.10.0 | 3.10.0 | 3.10.0 | 3.10.0 |
| plotly | 5.9.0 | 5.9.0 | 5.9.0 | 5.9.0 | 5.9.0 | 5.9.0 | 5.9.0 |
| pluggy | 1.0.0 | 1.0.0 | 1.0.0 | 1.0.0 | 1.0.0 | 1.0.0 | 1.0.0 |
| ply | 3.11 | 3.11 | 3.11 | 3.11 | 3.11 | ||
| powershell\_shortcut | 0.0.1 | ||||||
| poyo | 0.5.0 | 0.5.0 | 0.5.0 | 0.5.0 | 0.5.0 | ||
| prometheus\_client | 0.14.1 | 0.14.1 | 0.14.1 | 0.14.1 | 0.14.1 | 0.14.1 | 0.14.1 |
| prompt-toolkit | 3.0.36 | 3.0.36 | 3.0.36 | 3.0.36 | 3.0.36 | 3.0.36 | 3.0.36 |
| prompt\_toolkit | 3.0.36 | 3.0.36 | 3.0.36 | 3.0.36 | 3.0.36 | 3.0.36 | 3.0.36 |
| protego | 0.1.16 | 0.1.16 | 0.1.16 | 0.1.16 | 0.1.16 | 0.1.16 | |
| psutil | 5.9.0 | 5.9.0 | 5.9.0 | 5.9.0 | 5.9.0 | 5.9.0 | 5.9.0 |
| ptyprocess | 0.7.0 | 0.7.0 | 0.7.0 | 0.7.0 | 0.7.0 | 0.7.0 | 0.7.0 |
| pure\_eval | 0.2.2 | 0.2.2 | 0.2.2 | 0.2.2 | 0.2.2 | 0.2.2 | 0.2.2 |
| py-cpuinfo | 8.0.0 | 8.0.0 | 8.0.0 | 8.0.0 | 8.0.0 | 8.0.0 | |
| py-lief | 0.12.3 | 0.12.3 | 0.12.3 | 0.12.3 | 0.12.3 | 0.12.3 | 0.12.3 |
| pyarrow | 11.0.0 | 11.0.0 | 11.0.0 | 11.0.0 | 11.0.0 | 11.0.0 | |
| pyasn1 | 0.4.8 | 0.4.8 | 0.4.8 | 0.4.8 | 0.4.8 | 0.4.8 | |
| pyasn1-modules | 0.2.8 | 0.2.8 | 0.2.8 | 0.2.8 | 0.2.8 | 0.2.8 | |
| pybind11-abi | 4 | 4 | 4 | 4 | 4 | 4 | 4 |
| pycodestyle | 2.10.0 | 2.10.0 | 2.10.0 | 2.10.0 | 2.10.0 | ||
| pycosat | 0.6.4 | 0.6.4 | 0.6.4 | 0.6.4 | 0.6.4 | 0.6.4 | 0.6.4 |
| pycparser | 2.21 | 2.21 | 2.21 | 2.21 | 2.21 | 2.21 | 2.21 |
| pyct | 0.5.0 | 0.5.0 | 0.5.0 | 0.5.0 | 0.5.0 | 0.5.0 | 0.5.0 |
| pycurl | 7.45.2 | 7.45.2 | 7.45.2 | 7.45.2 | 7.45.2 | 7.45.2 | 7.45.2 |
| pydantic | 1.10.8 | 1.10.8 | 1.10.8 | 1.10.8 | 1.10.8 | ||
| pydispatcher | 2.0.5 | 2.0.5 | 2.0.5 | 2.0.5 | 2.0.5 | 2.0.5 | |
| pydocstyle | 6.3.0 | 6.3.0 | 6.3.0 | 6.3.0 | 6.3.0 | ||
| pyerfa | 2.0.0 | 2.0.0 | 2.0.0 | 2.0.0 | 2.0.0 | 2.0.0 | 2.0.0 |
| pyflakes | 3.0.1 | 3.0.1 | 3.0.1 | 3.0.1 | 3.0.1 | 3.0.1 | 3.0.1 |
| pygments | 2.15.1 | 2.15.1 | 2.15.1 | 2.15.1 | 2.15.1 | 2.15.1 | 2.15.1 |
| pyjwt | 2.4.0 | 2.4.0 | 2.4.0 | 2.4.0 | 2.4.0 | ||
| pylint | 2.16.2 | 2.16.2 | 2.16.2 | 2.16.2 | 2.16.2 | 2.16.2 | 2.16.2 |
| pylint-venv | 2.3.0 | 2.3.0 | 2.3.0 | 2.3.0 | 2.3.0 | ||
| pyls-spyder | 0.4.0 | 0.4.0 | 0.4.0 | 0.4.0 | 0.4.0 | ||
| pynacl | 1.5.0 | ||||||
| pyobjc-core | 9.0 | 9.0 | |||||
| pyobjc-framework-cocoa | 9.0 | 9.0 | |||||
| pyobjc-framework-coreservices | 9.0 | 9.0 | |||||
| pyobjc-framework-fsevents | 9.0 | 9.0 | |||||
| pyodbc | 4.0.34 | 4.0.34 | 4.0.34 | 4.0.34 | 4.0.34 | 4.0.34 | 4.0.34 |
| pyopenssl | 23.2.0 | 23.2.0 | 23.2.0 | 23.2.0 | 23.2.0 | 23.2.0 | 23.2.0 |
| pyparsing | 3.0.9 | 3.0.9 | 3.0.9 | 3.0.9 | 3.0.9 | 3.0.9 | 3.0.9 |
| pyqt | 5.15.7 | 5.15.7 | 5.15.7 | 5.15.7 | 5.15.7 | ||
| pyqt5-sip | 12.11.0 | 12.11.0 | 12.11.0 | 12.11.0 | 12.11.0 | ||
| pyqtwebengine | 5.15.7 | 5.15.7 | 5.15.7 | 5.15.7 | 5.15.7 | ||
| pyrsistent | 0.18.0 | 0.18.0 | 0.18.0 | 0.18.0 | 0.18.0 | 0.18.0 | 0.18.0 |
| pysocks | 1.7.1 | 1.7.1 | 1.7.1 | 1.7.1 | 1.7.1 | 1.7.1 | 1.7.1 |
| pytables | 3.8.0 | 3.8.0 | 3.8.0 | 3.7.0 | 3.8.0 | 3.8.0 | 3.8.0 |
| pytest | 7.4.0 | 7.4.0 | 7.4.0 | 7.4.0 | 7.4.0 | 7.4.0 | 7.4.0 |
| python | 3.11.5 | 3.11.5 | 3.11.5 | 3.11.5 | 3.11.5 | 3.11.5 | 3.11.5 |
| python-dateutil | 2.8.2 | 2.8.2 | 2.8.2 | 2.8.2 | 2.8.2 | 2.8.2 | 2.8.2 |
| python-dotenv | 0.21.0 | 0.21.0 | 0.21.0 | 0.21.0 | 0.21.0 | ||
| python-fastjsonschema | 2.16.2 | 2.16.2 | 2.16.2 | 2.16.2 | 2.16.2 | 2.16.2 | 2.16.2 |
| python-json-logger | 2.0.7 | 2.0.7 | 2.0.7 | 2.0.7 | 2.0.7 | 2.0.7 | |
| python-kaleido | 0.2.1 | 0.2.1 | 0.2.1 | 0.2.1 | 0.2.1 | ||
| python-libarchive-c | 2.9 | 2.9 | 2.9 | 2.9 | 2.9 | 2.9 | 2.9 |
| python-lmdb | 1.4.1 | 1.4.1 | 1.4.1 | 1.4.1 | 1.4.1 | 1.4.1 | 1.4.1 |
| python-lsp-black | 1.2.1 | 1.2.1 | 1.2.1 | 1.2.1 | 1.2.1 | ||
| python-lsp-jsonrpc | 1.0.0 | 1.0.0 | 1.0.0 | 1.0.0 | 1.0.0 | ||
| python-lsp-server | 1.7.2 | 1.7.2 | 1.7.2 | 1.7.2 | 1.7.2 | ||
| python-slugify | 5.0.2 | 5.0.2 | 5.0.2 | 5.0.2 | 5.0.2 | ||
| python-snappy | 0.6.1 | 0.6.1 | 0.6.1 | 0.6.1 | 0.6.1 | 0.6.1 | 0.6.1 |
| python-tzdata | 2023.3 | 2023.3 | 2023.3 | 2023.3 | 2023.3 | 2023.3 | 2023.3 |
| python-xxhash | 2.0.2 | 2.0.2 | 2.0.2 | 2.0.2 | 2.0.2 | 2.0.2 | |
| python.app | 3 | 3 | |||||
| pytoolconfig | 1.2.5 | 1.2.5 | 1.2.5 | 1.2.5 | 1.2.5 | ||
| pytz | 2023.3.post1 | 2023.3.post1 | 2023.3.post1 | 2023.3.post1 | 2023.3.post1 | 2023.3.post1 | 2023.3.post1 |
| pyviz\_comms | 2.3.0 | 2.3.0 | 2.3.0 | 2.3.0 | 2.3.0 | 2.3.0 | 2.3.0 |
| pywavelets | 1.4.1 | 1.4.1 | 1.4.1 | 1.4.1 | 1.4.1 | 1.4.1 | 1.4.1 |
| pywin32 | 305 | ||||||
| pywin32-ctypes | 0.2.0 | ||||||
| pywinpty | 2.0.10 | ||||||
| pyxdg | 0.27 | 0.27 | |||||
| pyyaml | 6.0 | 6.0 | 6.0 | 6.0 | 6.0 | 6.0 | 6.0 |
| pyzmq | 23.2.0 | 23.2.0 | 23.2.0 | 23.2.0 | 23.2.0 | 23.2.0 | 23.2.0 |
| qdarkstyle | 3.0.2 | 3.0.2 | 3.0.2 | 3.0.2 | 3.0.2 | ||
| qstylizer | 0.2.2 | 0.2.2 | 0.2.2 | 0.2.2 | 0.2.2 | ||
| qt-main | 5.15.2 | 5.15.2 | 5.15.2 | 5.15.2 | 5.15.2 | ||
| qt-webengine | 5.15.9 | 5.15.9 | 5.15.9 | 5.15.9 | 5.15.9 | ||
| qtawesome | 1.2.2 | 1.2.2 | 1.2.2 | 1.2.2 | 1.2.2 | ||
| qtconsole | 5.4.2 | 5.4.2 | 5.4.2 | 5.4.2 | 5.4.2 | ||
| qtpy | 2.2.0 | 2.2.0 | 2.2.0 | 2.2.0 | 2.2.0 | ||
| qtwebkit | 5.212 | 5.212 | 5.212 | 5.212 | 5.212 | ||
| queuelib | 1.5.0 | 1.5.0 | 1.5.0 | 1.5.0 | 1.5.0 | 1.5.0 | |
| re2 | 2022.04.01 | 2022.04.01 | 2022.04.01 | 2022.04.01 | 2022.04.01 | 2022.04.01 | |
| readline | 8.2 | 8.2 | 8.2 | 8.2 | 8.2 | 8.2 | |
| regex | 2022.7.9 | 2022.7.9 | 2022.7.9 | 2022.7.9 | 2022.7.9 | 2022.7.9 | 2022.7.9 |
| reproc | 14.2.4 | 14.2.4 | 14.2.4 | 14.2.4 | 14.2.4 | 14.2.4 | 14.2.4 |
| reproc-cpp | 14.2.4 | 14.2.4 | 14.2.4 | 14.2.4 | 14.2.4 | 14.2.4 | 14.2.4 |
| requests | 2.31.0 | 2.31.0 | 2.31.0 | 2.31.0 | 2.31.0 | 2.31.0 | 2.31.0 |
| requests-file | 1.5.1 | 1.5.1 | 1.5.1 | 1.5.1 | 1.5.1 | 1.5.1 | |
| requests-toolbelt | 1.0.0 | 1.0.0 | 1.0.0 | 1.0.0 | 1.0.0 | 1.0.0 | 1.0.0 |
| responses | 0.13.3 | 0.13.3 | 0.13.3 | 0.13.3 | 0.13.3 | 0.13.3 | |
| rfc3339-validator | 0.1.4 | 0.1.4 | 0.1.4 | 0.1.4 | 0.1.4 | 0.1.4 | |
| rfc3986-validator | 0.1.1 | 0.1.1 | 0.1.1 | 0.1.1 | 0.1.1 | 0.1.1 | |
| rope | 1.7.0 | 1.7.0 | 1.7.0 | 1.7.0 | 1.7.0 | ||
| rtree | 1.0.1 | 1.0.1 | 1.0.1 | 1.0.1 | 1.0.1 | ||
| ruamel.yaml | 0.17.21 | 0.17.21 | 0.17.21 | 0.17.21 | 0.17.21 | 0.17.21 | 0.17.21 |
| ruamel\_yaml | 0.17.21 | 0.17.21 | 0.17.21 | 0.17.21 | 0.17.21 | 0.17.21 | 0.17.21 |
| s3fs | 2023.4.0 | 2023.4.0 | 2023.4.0 | 2023.4.0 | 2023.4.0 | 2023.4.0 | 2023.4.0 |
| s3transfer | 0.6.0 | ||||||
| sacremoses | 0.0.43 | ||||||
| safetensors | 0.3.2 | 0.3.2 | 0.3.2 | 0.3.2 | 0.3.2 | 0.3.2 | |
| scikit-image | 0.20.0 | 0.20.0 | 0.20.0 | 0.20.0 | 0.20.0 | 0.20.0 | 0.20.0 |
| scikit-learn | 1.3.0 | 1.3.0 | 1.3.0 | 1.2.2 | 1.3.0 | 1.3.0 | 1.3.0 |
| scikit-learn-intelex | 2023.1.1 | 2023.1.1 | |||||
| scipy | 1.11.1 | 1.11.1 | 1.11.1 | 1.11.1 | 1.11.1 | 1.11.1 | 1.11.1 |
| scrapy | 2.8.0 | 2.8.0 | 2.8.0 | 2.8.0 | 2.8.0 | 2.8.0 | |
| seaborn | 0.12.2 | 0.12.2 | 0.12.2 | 0.12.2 | 0.12.2 | 0.12.2 | 0.12.2 |
| secretstorage | 3.3.1 | 3.3.1 | |||||
| send2trash | 1.8.0 | 1.8.0 | 1.8.0 | 1.8.0 | 1.8.0 | 1.8.0 | 1.8.0 |
| service\_identity | 18.1.0 | 18.1.0 | 18.1.0 | 18.1.0 | 18.1.0 | 18.1.0 | |
| setuptools | 68.0.0 | 68.0.0 | 68.0.0 | 68.0.0 | 68.0.0 | 68.0.0 | 68.0.0 |
| sip | 6.6.2 | 6.6.2 | 6.6.2 | 6.6.2 | 6.6.2 | ||
| six | 1.16.0 | 1.16.0 | 1.16.0 | 1.16.0 | 1.16.0 | 1.16.0 | 1.16.0 |
| smart\_open | 5.2.1 | 5.2.1 | 5.2.1 | 5.2.1 | 5.2.1 | 5.2.1 | |
| snappy | 1.1.9 | 1.1.9 | 1.1.9 | 1.1.9 | 1.1.9 | 1.1.9 | 1.1.9 |
| sniffio | 1.2.0 | 1.2.0 | 1.2.0 | 1.2.0 | 1.2.0 | 1.2.0 | 1.2.0 |
| snowballstemmer | 2.2.0 | 2.2.0 | 2.2.0 | 2.2.0 | 2.2.0 | 2.2.0 | 2.2.0 |
| sortedcontainers | 2.4.0 | 2.4.0 | 2.4.0 | 2.4.0 | 2.4.0 | 2.4.0 | 2.4.0 |
| soupsieve | 2.4 | 2.4 | 2.4 | 2.4 | 2.4 | 2.4 | 2.4 |
| sphinx | 5.0.2 | 5.0.2 | 5.0.2 | 5.0.2 | 5.0.2 | ||
| sphinxcontrib-applehelp | 1.0.2 | 1.0.2 | 1.0.2 | 1.0.2 | 1.0.2 | ||
| sphinxcontrib-devhelp | 1.0.2 | 1.0.2 | 1.0.2 | 1.0.2 | 1.0.2 | ||
| sphinxcontrib-htmlhelp | 2.0.0 | 2.0.0 | 2.0.0 | 2.0.0 | 2.0.0 | ||
| sphinxcontrib-jsmath | 1.0.1 | 1.0.1 | 1.0.1 | 1.0.1 | 1.0.1 | ||
| sphinxcontrib-qthelp | 1.0.3 | 1.0.3 | 1.0.3 | 1.0.3 | 1.0.3 | ||
| sphinxcontrib-serializinghtml | 1.1.5 | 1.1.5 | 1.1.5 | 1.1.5 | 1.1.5 | ||
| spyder | 5.4.3 | 5.4.3 | 5.4.3 | 5.4.3 | 5.4.3 | ||
| spyder-kernels | 2.4.4 | 2.4.4 | 2.4.4 | 2.4.4 | 2.4.4 | ||
| sqlalchemy | 1.4.39 | 1.4.39 | 1.4.39 | 1.4.39 | 1.4.39 | 1.4.39 | 1.4.39 |
| sqlite | 3.41.2 | 3.41.2 | 3.41.2 | 3.41.2 | 3.41.2 | 3.41.2 | 3.41.2 |
| stack\_data | 0.2.0 | 0.2.0 | 0.2.0 | 0.2.0 | 0.2.0 | 0.2.0 | 0.2.0 |
| statsmodels | 0.14.0 | 0.14.0 | 0.14.0 | 0.14.0 | 0.14.0 | 0.14.0 | 0.14.0 |
| sympy | 1.11.1 | 1.11.1 | 1.11.1 | 1.11.1 | 1.11.1 | 1.11.1 | 1.11.1 |
| tabulate | 0.8.10 | 0.8.10 | 0.8.10 | 0.8.10 | 0.8.10 | 0.8.10 | 0.8.10 |
| tapi | 1100.0.11 | 1000.10.8 | |||||
| tbb | 2021.8.0 | 2021.8.0 | 2021.8.0 | 2021.8.0 | 2021.8.0 | 2021.8.0 | |
| tbb4py | 2021.8.0 | 2021.8.0 | |||||
| tblib | 1.7.0 | 1.7.0 | 1.7.0 | 1.7.0 | 1.7.0 | 1.7.0 | 1.7.0 |
| tenacity | 8.2.2 | 8.2.2 | 8.2.2 | 8.2.2 | 8.2.2 | 8.2.2 | 8.2.2 |
| terminado | 0.17.1 | 0.17.1 | 0.17.1 | 0.17.1 | 0.17.1 | 0.17.1 | 0.17.1 |
| text-unidecode | 1.3 | 1.3 | 1.3 | 1.3 | 1.3 | ||
| textdistance | 4.2.1 | 4.2.1 | 4.2.1 | 4.2.1 | 4.2.1 | ||
| threadpoolctl | 2.2.0 | 2.2.0 | 2.2.0 | 2.2.0 | 2.2.0 | 2.2.0 | 2.2.0 |
| three-merge | 0.1.1 | 0.1.1 | 0.1.1 | 0.1.1 | 0.1.1 | ||
| tifffile | 2023.4.12 | 2023.4.12 | 2023.4.12 | 2023.4.12 | 2023.4.12 | 2023.4.12 | 2023.4.12 |
| tinycss2 | 1.2.1 | 1.2.1 | 1.2.1 | 1.2.1 | 1.2.1 | 1.2.1 | 1.2.1 |
| tk | 8.6.12 | 8.6.12 | 8.6.12 | 8.6.12 | 8.6.12 | 8.6.12 | 8.6.12 |
| tldextract | 3.2.0 | 3.2.0 | 3.2.0 | 3.2.0 | 3.2.0 | 3.2.0 | |
| tokenizers | 0.13.2 | 0.13.2 | 0.13.2 | 0.13.2 | 0.13.2 | 0.13.2 | |
| toml | 0.10.2 | 0.10.2 | 0.10.2 | 0.10.2 | 0.10.2 | ||
| tomlkit | 0.11.1 | 0.11.1 | 0.11.1 | 0.11.1 | 0.11.1 | 0.11.1 | 0.11.1 |
| toolz | 0.12.0 | 0.12.0 | 0.12.0 | 0.12.0 | 0.12.0 | 0.12.0 | 0.12.0 |
| tornado | 6.3.2 | 6.3.2 | 6.3.2 | 6.3.2 | 6.3.2 | 6.3.2 | 6.3.2 |
| tqdm | 4.65.0 | 4.65.0 | 4.65.0 | 4.65.0 | 4.65.0 | 4.65.0 | 4.65.0 |
| traitlets | 5.7.1 | 5.7.1 | 5.7.1 | 5.7.1 | 5.7.1 | 5.7.1 | 5.7.1 |
| transformers | 4.32.1 | 4.32.1 | 4.32.1 | 2.1.1 | 4.32.1 | 4.32.1 | 4.32.1 |
| twisted | 22.10.0 | 22.10.0 | 22.10.0 | 22.10.0 | 22.10.0 | 22.10.0 | |
| twisted-iocpsupport | 1.0.2 | ||||||
| typing-extensions | 4.7.1 | 4.7.1 | 4.7.1 | 4.7.1 | 4.7.1 | 4.7.1 | 4.7.1 |
| typing\_extensions | 4.7.1 | 4.7.1 | 4.7.1 | 4.7.1 | 4.7.1 | 4.7.1 | 4.7.1 |
| tzdata | 2023c | 2023c | 2023c | 2023c | 2023c | 2023c | 2023c |
| uc-micro-py | 1.0.1 | 1.0.1 | 1.0.1 | 1.0.1 | 1.0.1 | 1.0.1 | |
| ujson | 5.4.0 | 5.4.0 | 5.4.0 | 5.4.0 | 5.4.0 | ||
| unidecode | 1.2.0 | 1.2.0 | 1.2.0 | 1.2.0 | 1.2.0 | ||
| unixodbc | 2.3.11 | 2.3.11 | 2.3.11 | 2.3.11 | 2.3.11 | 2.3.11 | |
| urllib3 | 1.26.16 | 1.26.16 | 1.26.16 | 1.26.16 | 1.26.16 | 1.26.16 | 1.26.16 |
| utf8proc | 2.6.1 | 2.6.1 | 2.6.1 | 2.6.1 | 2.6.1 | 2.6.1 | |
| vc | 14.2 | ||||||
| vs2015\_runtime | 14.27.29016 | ||||||
| w3lib | 1.21.0 | 1.21.0 | 1.21.0 | 1.21.0 | 1.21.0 | 1.21.0 | |
| watchdog | 2.1.6 | 2.1.6 | 2.1.6 | 2.1.6 | 2.1.6 | ||
| wcwidth | 0.2.5 | 0.2.5 | 0.2.5 | 0.2.5 | 0.2.5 | 0.2.5 | 0.2.5 |
| webencodings | 0.5.1 | 0.5.1 | 0.5.1 | 0.5.1 | 0.5.1 | 0.5.1 | 0.5.1 |
| websocket-client | 0.58.0 | 0.58.0 | 0.58.0 | 0.58.0 | 0.58.0 | 0.58.0 | 0.58.0 |
| werkzeug | 2.2.3 | 2.2.3 | 2.2.3 | 2.2.3 | 2.2.3 | 2.2.3 | 2.2.3 |
| whatthepatch | 1.0.2 | 1.0.2 | 1.0.2 | 1.0.2 | 1.0.2 | ||
| wheel | 0.38.4 | 0.38.4 | 0.38.4 | 0.38.4 | 0.38.4 | 0.38.4 | 0.38.4 |
| widgetsnbextension | 4.0.5 | 4.0.5 | 4.0.5 | 4.0.5 | 4.0.5 | 4.0.5 | 4.0.5 |
| win\_inet\_pton | 1.1.0 | ||||||
| winpty | 0.4.3 | ||||||
| wrapt | 1.14.1 | 1.14.1 | 1.14.1 | 1.14.1 | 1.14.1 | 1.14.1 | 1.14.1 |
| wurlitzer | 3.0.2 | 3.0.2 | 3.0.2 | 3.0.2 | |||
| xarray | 2023.6.0 | 2023.6.0 | 2023.6.0 | 2023.6.0 | 2023.6.0 | 2023.6.0 | |
| xlwings | 0.29.1 | 0.29.1 | 0.29.1 | ||||
| xxhash | 0.8.0 | 0.8.0 | 0.8.0 | 0.8.0 | 0.8.0 | 0.8.0 | |
| xyzservices | 2022.9.0 | 2022.9.0 | 2022.9.0 | 2022.9.0 | 2022.9.0 | 2022.9.0 | |
| xz | 5.4.2 | 5.4.2 | 5.4.2 | 5.4.2 | 5.4.2 | 5.4.2 | 5.4.2 |
| y-py | 0.5.9 | 0.5.9 | 0.5.9 | 0.5.9 | 0.5.9 | 0.5.9 | |
| yaml | 0.2.5 | 0.2.5 | 0.2.5 | 0.2.5 | 0.2.5 | 0.2.5 | 0.2.5 |
| yaml-cpp | 0.7.0 | 0.7.0 | 0.7.0 | 0.7.0 | 0.7.0 | 0.7.0 | 0.7.0 |
| yapf | 0.31.0 | 0.31.0 | 0.31.0 | 0.31.0 | 0.31.0 | ||
| yarl | 1.8.1 | 1.8.1 | 1.8.1 | 1.8.1 | 1.8.1 | 1.8.1 | 1.8.1 |
| ypy-websocket | 0.8.2 | 0.8.2 | 0.8.2 | 0.8.2 | 0.8.2 | 0.8.2 | |
| zeromq | 4.3.4 | 4.3.4 | 4.3.4 | 4.3.4 | 4.3.4 | 4.3.4 | 4.3.4 |
| zfp | 1.0.0 | 1.0.0 | 1.0.0 | 1.0.0 | 1.0.0 | ||
| zict | 2.2.0 | 2.2.0 | 2.2.0 | 2.2.0 | 2.2.0 | 2.2.0 | 2.2.0 |
| zipp | 3.11.0 | 3.11.0 | 3.11.0 | 3.11.0 | 3.11.0 | 3.11.0 | 3.11.0 |
| zlib | 1.2.13 | 1.2.13 | 1.2.13 | 1.2.13 | 1.2.13 | 1.2.13 | 1.2.13 |
| zlib-ng | 2.0.7 | 2.0.7 | 2.0.7 | 2.0.7 | 2.0.7 | 2.0.7 | |
| zope | 1.0 | 1.0 | 1.0 | 1.0 | 1.0 | 1.0 | |
| zope.interface | 5.4.0 | 5.4.0 | 5.4.0 | 5.4.0 | 5.4.0 | 5.4.0 | |
| zstandard | 0.19.0 | 0.19.0 | 0.19.0 | 0.19.0 | 0.19.0 | 0.19.0 | 0.19.0 |
| zstd | 1.5.5 | 1.5.5 | 1.5.5 | 1.5.5 | 1.5.5 | 1.5.5 | 1.5.5 |
| Package Name | linux-64 | linux-aarch64 | linux-ppc64le | linux-s390x |
|---|---|---|---|---|
| \_anaconda\_depends | 2023.09 | 2023.09 | 2023.09 | 2023.09 |
| \_libgcc\_mutex | 0.1 | 0.1 | 0.1 | 0.1 |
| \_openmp\_mutex | 5.1 | 5.1 | 5.1 | 5.1 |
| abseil-cpp | 20211102.0 | 20211102.0 | 20211102.0 | |
| aiobotocore | 2.5.0 | 2.5.0 | 2.5.0 | 2.5.0 |
| aiofiles | 22.1.0 | 22.1.0 | 22.1.0 | |
| aiohttp | 3.8.5 | 3.8.5 | 3.8.5 | 3.8.5 |
| aioitertools | 0.7.1 | 0.7.1 | 0.7.1 | 0.7.1 |
| aiosignal | 1.2.0 | 1.2.0 | 1.2.0 | 1.2.0 |
| aiosqlite | 0.18.0 | 0.18.0 | 0.18.0 | |
| alabaster | 0.7.12 | 0.7.12 | ||
| anaconda-anon-usage | 0.4.2 | 0.4.2 | 0.4.2 | 0.4.2 |
| anaconda-catalogs | 0.2.0 | 0.2.0 | 0.2.0 | 0.2.0 |
| anaconda-client | 1.12.1 | 1.12.1 | 1.12.1 | 1.12.1 |
| anaconda-cloud-auth | 0.1.3 | 0.1.3 | ||
| anaconda-navigator | 2.5.0 | 2.5.0 | ||
| anaconda-project | 0.11.1 | 0.11.1 | 0.11.1 | 0.11.1 |
| anyio | 3.5.0 | 3.5.0 | 3.5.0 | 3.5.0 |
| aom | 3.6.0 | 3.6.0 | 3.6.0 | 3.6.0 |
| appdirs | 1.4.4 | 1.4.4 | 1.4.4 | 1.4.4 |
| argon2-cffi | 21.3.0 | 21.3.0 | 21.3.0 | 21.3.0 |
| argon2-cffi-bindings | 21.2.0 | 21.2.0 | 21.2.0 | 21.2.0 |
| arrow | 1.2.3 | 1.2.3 | ||
| arrow-cpp | 11.0.0 | 11.0.0 | 11.0.0 | |
| astroid | 2.14.2 | 2.14.2 | 2.14.2 | 2.14.2 |
| astropy | 5.1 | 5.1 | 5.1 | 5.1 |
| asttokens | 2.0.5 | 2.0.5 | 2.0.5 | 2.0.5 |
| async-timeout | 4.0.2 | 4.0.2 | 4.0.2 | 4.0.2 |
| atomicwrites | 1.4.0 | 1.4.0 | ||
| attrs | 22.1.0 | 22.1.0 | 22.1.0 | 22.1.0 |
| automat | 20.2.0 | 20.2.0 | 20.2.0 | |
| autopep8 | 1.6.0 | 1.6.0 | ||
| aws-c-common | 0.6.8 | 0.6.8 | 0.6.8 | |
| aws-c-event-stream | 0.1.6 | 0.1.6 | 0.1.6 | |
| aws-checksums | 0.1.11 | 0.1.11 | 0.1.11 | |
| aws-sdk-cpp | 1.8.185 | 1.8.185 | 1.8.185 | |
| babel | 2.11.0 | 2.11.0 | 2.11.0 | 2.11.0 |
| backcall | 0.2.0 | 0.2.0 | 0.2.0 | 0.2.0 |
| backports | 1.1 | 1.1 | 1.1 | 1.1 |
| backports.functools\_lru\_cache | 1.6.4 | 1.6.4 | 1.6.4 | 1.6.4 |
| backports.tempfile | 1.0 | 1.0 | 1.0 | 1.0 |
| backports.weakref | 1.0.post1 | 1.0.post1 | 1.0.post1 | 1.0.post1 |
| bcrypt | 3.2.0 | 3.2.0 | 3.2.0 | |
| beautifulsoup4 | 4.12.2 | 4.12.2 | 4.12.2 | 4.12.2 |
| binaryornot | 0.4.4 | 0.4.4 | ||
| black | 23.3.0 | 23.3.0 | ||
| blas | 1.0 | 1.0 | 1.0 | 1.0 |
| bleach | 4.1.0 | 4.1.0 | 4.1.0 | 4.1.0 |
| blosc | 1.21.3 | 1.21.3 | 1.21.3 | 1.21.3 |
| bokeh | 3.2.1 | 3.2.1 | 3.2.1 | 2.4.3 |
| boltons | 23.0.0 | 23.0.0 | 23.0.0 | 23.0.0 |
| boost-cpp | 1.73.0 | 1.73.0 | 1.82.0 | |
| boto3 | 1.26.76 | |||
| botocore | 1.29.76 | 1.29.76 | 1.29.76 | 1.29.76 |
| bottleneck | 1.3.5 | 1.3.5 | 1.3.5 | 1.3.5 |
| brotli | 1.0.9 | 1.0.9 | 1.0.9 | 1.0.9 |
| brotli-bin | 1.0.9 | 1.0.9 | 1.0.9 | 1.0.9 |
| brotlipy | 0.7.0 | 0.7.0 | 0.7.0 | 0.7.0 |
| brunsli | 0.1 | 0.1 | 0.1 | |
| bzip2 | 1.0.8 | 1.0.8 | 1.0.8 | 1.0.8 |
| c-ares | 1.19.1 | 1.19.1 | 1.19.1 | 1.19.1 |
| c-blosc2 | 2.8.0 | 2.8.0 | 2.8.0 | |
| ca-certificates | 2023.08.22 | 2023.08.22 | 2023.08.22 | 2023.08.22 |
| certifi | 2023.7.22 | 2023.7.22 | 2023.7.22 | 2023.7.22 |
| cffi | 1.15.1 | 1.15.1 | 1.15.1 | 1.15.1 |
| cfitsio | 3.470 | 3.470 | 3.470 | 3.470 |
| chardet | 4.0.0 | 4.0.0 | 4.0.0 | 4.0.0 |
| charls | 2.2.0 | 2.2.0 | 2.2.0 | |
| charset-normalizer | 2.0.4 | 2.0.4 | 2.0.4 | 2.0.4 |
| click | 8.0.4 | 8.0.4 | 8.0.4 | 8.0.4 |
| cloudpickle | 2.2.1 | 2.2.1 | 2.2.1 | 2.2.1 |
| clyent | 1.2.2 | 1.2.2 | 1.2.2 | 1.2.2 |
| colorama | 0.4.6 | 0.4.6 | 0.4.6 | 0.4.6 |
| colorcet | 3.0.1 | 3.0.1 | 3.0.1 | 3.0.1 |
| comm | 0.1.2 | 0.1.2 | 0.1.2 | 0.1.2 |
| conda | 23.7.4 | 23.7.4 | 23.7.4 | 23.7.4 |
| conda-build | 3.26.1 | 3.26.1 | 3.26.1 | 3.26.1 |
| conda-content-trust | 0.2.0 | 0.2.0 | 0.2.0 | 0.2.0 |
| conda-index | 0.3.0 | 0.3.0 | 0.3.0 | 0.3.0 |
| conda-libmamba-solver | 23.7.0 | 23.7.0 | 23.7.0 | 23.7.0 |
| conda-pack | 0.6.0 | 0.6.0 | 0.6.0 | 0.6.0 |
| conda-package-handling | 2.2.0 | 2.2.0 | 2.2.0 | 2.2.0 |
| conda-package-streaming | 0.9.0 | 0.9.0 | 0.9.0 | 0.9.0 |
| conda-repo-cli | 1.0.75 | 1.0.75 | ||
| conda-token | 0.4.0 | 0.4.0 | 0.4.0 | 0.4.0 |
| conda-verify | 3.4.2 | 3.4.2 | 3.4.2 | 3.4.2 |
| constantly | 15.1.0 | 15.1.0 | 15.1.0 | |
| contourpy | 1.0.5 | 1.0.5 | 1.0.5 | 1.0.5 |
| cookiecutter | 1.7.3 | 1.7.3 | ||
| cryptography | 41.0.3 | 41.0.3 | 41.0.3 | 41.0.3 |
| cssselect | 1.1.0 | 1.1.0 | 1.1.0 | |
| curl | 8.2.1 | 8.2.1 | 8.2.1 | 8.2.1 |
| cycler | 0.11.0 | 0.11.0 | 0.11.0 | 0.11.0 |
| cyrus-sasl | 2.1.28 | 2.1.28 | ||
| cytoolz | 0.12.0 | 0.12.0 | 0.12.0 | 0.12.0 |
| daal4py | 2023.1.1 | |||
| dal | 2023.1.1 | |||
| dask | 2023.6.0 | 2023.6.0 | 2023.6.0 | 2023.6.0 |
| dask-core | 2023.6.0 | 2023.6.0 | 2023.6.0 | 2023.6.0 |
| datasets | 2.12.0 | 2.12.0 | 2.12.0 | |
| datashader | 0.15.2 | 0.15.2 | 0.15.2 | |
| datashape | 0.5.4 | 0.5.4 | 0.5.4 | |
| dav1d | 1.2.1 | 1.2.1 | 1.2.1 | 1.2.1 |
| dbus | 1.13.18 | 1.13.18 | ||
| debugpy | 1.6.7 | 1.6.7 | 1.6.7 | 1.6.7 |
| decorator | 5.1.1 | 5.1.1 | 5.1.1 | 5.1.1 |
| defusedxml | 0.7.1 | 0.7.1 | 0.7.1 | 0.7.1 |
| diff-match-patch | 20200713 | 20200713 | ||
| dill | 0.3.6 | 0.3.6 | 0.3.6 | 0.3.7 |
| distributed | 2023.6.0 | 2023.6.0 | 2023.6.0 | 2023.6.0 |
| docstring-to-markdown | 0.11 | 0.11 | ||
| docutils | 0.18.1 | 0.18.1 | ||
| entrypoints | 0.4 | 0.4 | 0.4 | 0.4 |
| et\_xmlfile | 1.1.0 | 1.1.0 | 1.1.0 | 1.1.0 |
| executing | 0.8.3 | 0.8.3 | 0.8.3 | 0.8.3 |
| expat | 2.5.0 | 2.5.0 | ||
| filelock | 3.9.0 | 3.9.0 | 3.9.0 | 3.9.0 |
| flake8 | 6.0.0 | 6.0.0 | ||
| flask | 2.2.2 | 2.2.2 | 2.2.2 | 2.2.2 |
| fmt | 9.1.0 | 9.1.0 | 9.1.0 | 9.1.0 |
| font-ttf-dejavu-sans-mono | 2.37 | 2.37 | ||
| font-ttf-inconsolata | 2.001 | 2.001 | ||
| font-ttf-source-code-pro | 2.030 | 2.030 | ||
| font-ttf-ubuntu | 0.83 | 0.83 | ||
| fontconfig | 2.14.1 | 2.14.1 | ||
| fonts-anaconda | 1 | 1 | ||
| fonttools | 4.25.0 | 4.25.0 | 4.25.0 | 4.25.0 |
| freetype | 2.12.1 | 2.12.1 | 2.12.1 | 2.12.1 |
| frozenlist | 1.3.3 | 1.3.3 | 1.3.3 | 1.3.3 |
| fsspec | 2023.4.0 | 2023.4.0 | 2023.4.0 | 2023.4.0 |
| future | 0.18.3 | 0.18.3 | 0.18.3 | 0.18.3 |
| gensim | 4.3.0 | 4.3.0 | 4.3.0 | |
| gflags | 2.2.2 | 2.2.2 | 2.2.2 | |
| giflib | 5.2.1 | 5.2.1 | 5.2.1 | 5.2.1 |
| glib | 2.69.1 | 2.69.1 | ||
| glob2 | 0.7 | 0.7 | 0.7 | 0.7 |
| glog | 0.5.0 | 0.5.0 | 0.5.0 | |
| gmp | 6.2.1 | 6.2.1 | 6.2.1 | 6.2.1 |
| gmpy2 | 2.1.2 | 2.1.2 | 2.1.2 | 2.1.2 |
| greenlet | 2.0.1 | 2.0.1 | 2.0.1 | 2.0.1 |
| grpc-cpp | 1.48.2 | 1.48.2 | 1.48.2 | |
| gst-plugins-base | 1.14.1 | 1.14.1 | ||
| gstreamer | 1.14.1 | 1.14.1 | ||
| h5py | 3.9.0 | 3.9.0 | 3.9.0 | 3.7.0 |
| hdf5 | 1.12.1 | 1.12.1 | 1.12.1 | 1.10.6 |
| heapdict | 1.0.1 | 1.0.1 | 1.0.1 | 1.0.1 |
| holoviews | 1.17.1 | 1.17.1 | 1.17.1 | 1.14.8 |
| huggingface\_hub | 0.15.1 | 0.15.1 | 0.15.1 | |
| hvplot | 0.8.4 | 0.8.4 | 0.8.4 | 0.7.3 |
| hyperlink | 21.0.0 | 21.0.0 | 21.0.0 | |
| icu | 58.2 | 68.1 | 73.1 | 73.1 |
| idna | 3.4 | 3.4 | 3.4 | 3.3 |
| imagecodecs | 2023.1.23 | 2023.1.23 | 2023.1.23 | 2023.1.23 |
| imageio | 2.31.1 | 2.31.1 | 2.31.1 | 2.26.0 |
| imagesize | 1.4.1 | 1.4.1 | ||
| imbalanced-learn | 0.10.1 | 0.10.1 | 0.10.1 | 0.10.1 |
| importlib-metadata | 6.0.0 | 6.0.0 | 6.0.0 | 6.0.0 |
| importlib\_metadata | 6.0.0 | 6.0.0 | ||
| incremental | 21.3.0 | 21.3.0 | 21.3.0 | |
| inflection | 0.5.1 | 0.5.1 | ||
| iniconfig | 1.1.1 | 1.1.1 | 1.1.1 | 1.1.1 |
| intake | 0.6.8 | 0.6.8 | 0.6.8 | 0.6.8 |
| intel-openmp | 2023.1.0 | |||
| intervaltree | 3.1.0 | 3.1.0 | ||
| ipykernel | 6.25.0 | 6.25.0 | 6.25.0 | 6.25.0 |
| ipython | 8.15.0 | 8.15.0 | 8.15.0 | 8.15.0 |
| ipython\_genutils | 0.2.0 | 0.2.0 | 0.2.0 | 0.2.0 |
| ipywidgets | 8.0.4 | 8.0.4 | 8.0.4 | 8.0.4 |
| isort | 5.9.3 | 5.9.3 | 5.9.3 | 5.9.3 |
| itemadapter | 0.3.0 | 0.3.0 | 0.3.0 | |
| itemloaders | 1.0.4 | 1.0.4 | 1.0.4 | |
| itsdangerous | 2.0.1 | 2.0.1 | 2.0.1 | 2.0.1 |
| jaraco.classes | 3.2.1 | 3.2.1 | ||
| jedi | 0.18.1 | 0.18.1 | 0.18.1 | 0.18.1 |
| jeepney | 0.7.1 | 0.7.1 | ||
| jellyfish | 1.0.1 | 1.0.1 | ||
| jinja2 | 3.1.2 | 3.1.2 | 3.1.2 | 3.1.2 |
| jinja2-time | 0.2.0 | 0.2.0 | ||
| jmespath | 0.10.0 | 0.10.0 | 0.10.0 | 0.10.0 |
| joblib | 1.2.0 | 1.2.0 | 1.2.0 | 1.2.0 |
| jpeg | 9e | 9e | 9e | 9e |
| jq | 1.6 | 1.6 | 1.6 | |
| json5 | 0.9.6 | 0.9.6 | 0.9.6 | 0.9.6 |
| jsonpatch | 1.32 | 1.32 | 1.32 | 1.32 |
| jsonpointer | 2.1 | 2.1 | 2.1 | 2.1 |
| jsonschema | 4.17.3 | 4.17.3 | 4.17.3 | 4.17.3 |
| jupyter | 1.0.0 | 1.0.0 | 1.0.0 | 1.0.0 |
| jupyter\_client | 7.4.9 | 7.4.9 | 7.4.9 | 7.4.9 |
| jupyter\_console | 6.6.3 | 6.6.3 | 6.6.3 | 6.6.3 |
| jupyter\_core | 5.3.0 | 5.3.0 | 5.3.0 | 5.3.0 |
| jupyter\_events | 0.6.3 | 0.6.3 | 0.6.3 | |
| jupyter\_server | 1.23.4 | 1.23.4 | 1.23.4 | 1.23.4 |
| jupyter\_server\_fileid | 0.9.0 | 0.9.0 | 0.9.0 | |
| jupyter\_server\_ydoc | 0.8.0 | 0.8.0 | 0.8.0 | |
| jupyter\_ydoc | 0.2.4 | 0.2.4 | 0.2.4 | |
| jupyterlab | 3.6.3 | 3.6.3 | 3.6.3 | 3.3.2 |
| jupyterlab\_pygments | 0.1.2 | 0.1.2 | 0.1.2 | 0.1.2 |
| jupyterlab\_server | 2.22.0 | 2.22.0 | 2.22.0 | 2.21.0 |
| jupyterlab\_widgets | 3.0.5 | 3.0.5 | 3.0.5 | 3.0.5 |
| jxrlib | 1.1 | 1.1 | 1.1 | 1.1 |
| kaleido-core | 0.2.1 | 0.2.1 | ||
| keyring | 23.13.1 | 23.13.1 | ||
| kiwisolver | 1.4.4 | 1.4.4 | 1.4.4 | 1.4.4 |
| krb5 | 1.20.1 | 1.20.1 | 1.20.1 | 1.20.1 |
| lazy-object-proxy | 1.6.0 | 1.6.0 | 1.6.0 | 1.6.0 |
| lazy\_loader | 0.2 | 0.2 | 0.2 | 0.1 |
| lcms2 | 2.12 | 2.12 | 2.12 | 2.12 |
| ld\_impl\_linux-64 | 2.38 | |||
| ld\_impl\_linux-aarch64 | 2.38 | |||
| ld\_impl\_linux-ppc64le | 2.38 | |||
| ld\_impl\_linux-s390x | 2.38 | |||
| lerc | 3.0 | 3.0 | 3.0 | 3.0 |
| libaec | 1.0.4 | 1.0.4 | 1.0.4 | 1.0.4 |
| libarchive | 3.6.2 | 3.6.2 | 3.6.2 | 3.6.2 |
| libavif | 0.11.1 | 0.11.1 | 0.11.1 | 0.11.1 |
| libboost | 1.73.0 | 1.73.0 | 1.82.0 | |
| libbrotlicommon | 1.0.9 | 1.0.9 | 1.0.9 | 1.0.9 |
| libbrotlidec | 1.0.9 | 1.0.9 | 1.0.9 | 1.0.9 |
| libbrotlienc | 1.0.9 | 1.0.9 | 1.0.9 | 1.0.9 |
| libclang | 14.0.6 | 14.0.6 | ||
| libclang13 | 14.0.6 | 14.0.6 | ||
| libcups | 2.4.2 | 2.4.2 | ||
| libcurl | 8.2.1 | 8.2.1 | 8.2.1 | 8.2.1 |
| libdeflate | 1.17 | 1.17 | 1.17 | 1.17 |
| libedit | 3.1.20221030 | 3.1.20221030 | 3.1.20221030 | 3.1.20221030 |
| libev | 4.33 | 4.33 | 4.33 | 4.33 |
| libevent | 2.1.12 | 2.1.12 | 2.1.12 | |
| libffi | 3.4.4 | 3.4.4 | 3.4.4 | 3.4.2 |
| libgcc-ng | 11.2.0 | 11.2.0 | 11.2.0 | 11.2.0 |
| libgfortran-ng | 11.2.0 | 11.2.0 | 11.2.0 | 11.2.0 |
| libgfortran5 | 11.2.0 | 11.2.0 | 11.2.0 | 11.2.0 |
| libgomp | 11.2.0 | 11.2.0 | 11.2.0 | 11.2.0 |
| liblief | 0.12.3 | 0.12.3 | 0.12.3 | 0.12.3 |
| libllvm14 | 14.0.6 | 14.0.6 | 14.0.6 | |
| libmamba | 1.5.1 | 1.5.1 | 1.5.1 | 1.5.1 |
| libmambapy | 1.5.1 | 1.5.1 | 1.5.1 | 1.5.1 |
| libnghttp2 | 1.52.0 | 1.52.0 | 1.52.0 | 1.52.0 |
| libopenblas | 0.3.21 | 0.3.21 | 0.3.21 | |
| libpng | 1.6.39 | 1.6.39 | 1.6.39 | 1.6.39 |
| libpq | 12.15 | 12.15 | ||
| libprotobuf | 3.20.3 | 3.20.3 | 3.20.3 | |
| libsodium | 1.0.18 | 1.0.18 | 1.0.18 | 1.0.18 |
| libsolv | 0.7.24 | 0.7.24 | 0.7.24 | 0.7.24 |
| libspatialindex | 1.9.3 | 1.9.3 | ||
| libssh2 | 1.10.0 | 1.10.0 | 1.10.0 | 1.10.0 |
| libstdcxx-ng | 11.2.0 | 11.2.0 | 11.2.0 | 11.2.0 |
| libthrift | 0.15.0 | 0.15.0 | 0.15.0 | |
| libtiff | 4.5.1 | 4.5.1 | 4.5.1 | 4.5.1 |
| libuuid | 1.41.5 | 1.41.5 | 1.41.5 | 1.41.5 |
| libwebp | 1.3.2 | 1.3.2 | 1.3.2 | 1.3.2 |
| libwebp-base | 1.3.2 | 1.3.2 | 1.3.2 | 1.3.2 |
| libxcb | 1.15 | 1.15 | ||
| libxkbcommon | 1.0.1 | 1.0.1 | ||
| libxml2 | 2.10.4 | 2.10.4 | 2.10.4 | 2.10.4 |
| libxslt | 1.1.37 | 1.1.37 | 1.1.37 | 1.1.37 |
| libzopfli | 1.0.3 | 1.0.3 | 1.0.3 | 1.0.3 |
| linkify-it-py | 2.0.0 | 2.0.0 | 2.0.0 | |
| llvmlite | 0.40.0 | 0.40.0 | 0.40.0 | |
| locket | 1.0.0 | 1.0.0 | 1.0.0 | 1.0.0 |
| lxml | 4.9.3 | 4.9.3 | 4.9.3 | 4.9.3 |
| lz4 | 4.3.2 | 4.3.2 | 4.3.2 | 4.3.2 |
| lz4-c | 1.9.4 | 1.9.4 | 1.9.4 | 1.9.4 |
| lzo | 2.10 | 2.10 | 2.10 | 2.10 |
| markdown | 3.4.1 | 3.4.1 | 3.4.1 | 3.4.1 |
| markdown-it-py | 2.2.0 | 2.2.0 | 2.2.0 | |
| markupsafe | 2.1.1 | 2.1.1 | 2.1.1 | 2.1.1 |
| mathjax | 2.7.5 | 2.7.5 | ||
| matplotlib | 3.7.2 | 3.7.2 | 3.7.2 | 3.7.2 |
| matplotlib-base | 3.7.2 | 3.7.2 | 3.7.2 | 3.7.2 |
| matplotlib-inline | 0.1.6 | 0.1.6 | 0.1.6 | 0.1.6 |
| mccabe | 0.7.0 | 0.7.0 | 0.7.0 | 0.7.0 |
| mdit-py-plugins | 0.3.0 | 0.3.0 | 0.3.0 | |
| mdurl | 0.1.0 | 0.1.0 | 0.1.0 | |
| mistune | 0.8.4 | 0.8.4 | 0.8.4 | 0.8.4 |
| mkl | 2023.1.0 | |||
| mkl-service | 2.4.0 | |||
| mkl\_fft | 1.3.8 | |||
| mkl\_random | 1.2.4 | |||
| mock | 4.0.3 | |||
| more-itertools | 8.12.0 | 8.12.0 | 8.12.0 | 8.12.0 |
| mpc | 1.1.0 | 1.1.0 | 1.1.0 | 1.1.0 |
| mpfr | 4.0.2 | 4.0.2 | 4.0.2 | 4.0.2 |
| mpi | 1.0 | |||
| mpich | 4.1.1 | |||
| mpmath | 1.3.0 | 1.3.0 | 1.3.0 | 1.3.0 |
| msgpack-python | 1.0.3 | 1.0.3 | 1.0.3 | 1.0.3 |
| multidict | 6.0.2 | 6.0.2 | 6.0.2 | 6.0.2 |
| multipledispatch | 0.6.0 | 0.6.0 | 0.6.0 | |
| multiprocess | 0.70.14 | 0.70.14 | 0.70.14 | |
| munkres | 1.1.4 | 1.1.4 | 1.1.4 | 1.1.4 |
| mypy\_extensions | 1.0.0 | 1.0.0 | ||
| mysql | 5.7.24 | 5.7.24 | ||
| navigator-updater | 0.4.0 | 0.4.0 | ||
| nbclassic | 0.5.5 | 0.5.5 | 0.5.5 | 0.5.5 |
| nbclient | 0.5.13 | 0.5.13 | 0.5.13 | 0.5.13 |
| nbconvert | 6.5.4 | 6.5.4 | 6.5.4 | 6.5.4 |
| nbformat | 5.9.2 | 5.9.2 | 5.9.2 | 5.9.2 |
| ncurses | 6.4 | 6.4 | 6.4 | 6.4 |
| nest-asyncio | 1.5.6 | 1.5.6 | 1.5.6 | 1.5.6 |
| networkx | 3.1 | 3.1 | 3.1 | 3.1 |
| nltk | 3.8.1 | 3.8.1 | 3.8.1 | 3.8.1 |
| notebook | 6.5.4 | 6.5.4 | 6.5.4 | 6.5.4 |
| notebook-shim | 0.2.2 | 0.2.2 | 0.2.2 | 0.2.2 |
| nspr | 4.35 | 4.35 | ||
| nss | 3.89.1 | 3.89.1 | ||
| numba | 0.57.1 | 0.57.1 | 0.57.1 | |
| numexpr | 2.8.4 | 2.8.4 | 2.8.4 | 2.8.4 |
| numpy | 1.24.3 | 1.24.3 | 1.24.3 | 1.25.2 |
| numpy-base | 1.24.3 | 1.24.3 | 1.24.3 | 1.25.2 |
| numpydoc | 1.5.0 | 1.5.0 | ||
| oniguruma | 6.9.7.1 | 6.9.7.1 | 6.9.7.1 | |
| openjpeg | 2.4.0 | 2.4.0 | 2.4.0 | 2.4.0 |
| openpyxl | 3.0.10 | 3.0.10 | 3.0.10 | 3.0.10 |
| openssl | 3.0.10 | 3.0.10 | 3.0.10 | 3.0.10 |
| orc | 1.7.4 | 1.7.4 | 1.7.4 | |
| packaging | 23.1 | 23.1 | 23.1 | 23.1 |
| pandas | 2.0.3 | 2.0.3 | 2.0.3 | 2.0.3 |
| pandocfilters | 1.5.0 | 1.5.0 | 1.5.0 | 1.5.0 |
| panel | 1.2.3 | 1.2.3 | 1.2.3 | 0.12.6 |
| param | 1.13.0 | 1.13.0 | 1.13.0 | 1.13.0 |
| parsel | 1.6.0 | 1.6.0 | 1.6.0 | |
| parso | 0.8.3 | 0.8.3 | 0.8.3 | 0.8.3 |
| partd | 1.4.0 | 1.4.0 | 1.4.0 | 1.4.0 |
| patch | 2.7.6 | 2.7.6 | 2.7.6 | 2.7.6 |
| patchelf | 0.17.2 | 0.17.2 | 0.17.2 | 0.17.2 |
| pathlib | 1.0.1 | 1.0.1 | ||
| pathspec | 0.10.3 | 0.10.3 | ||
| patsy | 0.5.3 | 0.5.3 | 0.5.3 | 0.5.3 |
| pcre | 8.45 | 8.45 | ||
| pcre2 | 10.42 | 10.42 | 10.42 | 10.42 |
| pep8 | 1.7.1 | 1.7.1 | 1.7.1 | 1.7.1 |
| pexpect | 4.8.0 | 4.8.0 | 4.8.0 | 4.8.0 |
| pickleshare | 0.7.5 | 0.7.5 | 0.7.5 | 0.7.5 |
| pillow | 9.4.0 | 9.4.0 | 9.4.0 | 9.4.0 |
| pip | 23.2.1 | 23.2.1 | 23.2.1 | 23.2.1 |
| pkce | 1.0.3 | 1.0.3 | ||
| pkginfo | 1.9.6 | 1.9.6 | 1.9.6 | 1.9.6 |
| platformdirs | 3.10.0 | 3.10.0 | 3.10.0 | 3.10.0 |
| plotly | 5.9.0 | 5.9.0 | 5.9.0 | 5.9.0 |
| pluggy | 1.0.0 | 1.0.0 | 1.0.0 | 1.0.0 |
| ply | 3.11 | 3.11 | ||
| poyo | 0.5.0 | 0.5.0 | ||
| prometheus\_client | 0.14.1 | 0.14.1 | 0.14.1 | 0.14.1 |
| prompt-toolkit | 3.0.36 | 3.0.36 | 3.0.36 | 3.0.36 |
| prompt\_toolkit | 3.0.36 | 3.0.36 | 3.0.36 | 3.0.36 |
| protego | 0.1.16 | 0.1.16 | 0.1.16 | |
| psutil | 5.9.0 | 5.9.0 | 5.9.0 | 5.9.0 |
| ptyprocess | 0.7.0 | 0.7.0 | 0.7.0 | 0.7.0 |
| pure\_eval | 0.2.2 | 0.2.2 | 0.2.2 | 0.2.2 |
| py-cpuinfo | 8.0.0 | 8.0.0 | 8.0.0 | |
| py-lief | 0.12.3 | 0.12.3 | 0.12.3 | 0.12.3 |
| pyarrow | 11.0.0 | 11.0.0 | 11.0.0 | |
| pyasn1 | 0.4.8 | 0.4.8 | 0.4.8 | |
| pyasn1-modules | 0.2.8 | 0.2.8 | 0.2.8 | |
| pybind11-abi | 4 | 4 | 4 | 4 |
| pycodestyle | 2.10.0 | 2.10.0 | ||
| pycosat | 0.6.4 | 0.6.4 | 0.6.4 | 0.6.4 |
| pycparser | 2.21 | 2.21 | 2.21 | 2.21 |
| pyct | 0.5.0 | 0.5.0 | 0.5.0 | 0.5.0 |
| pycurl | 7.45.2 | 7.45.2 | 7.45.2 | 7.45.2 |
| pydantic | 1.10.8 | 1.10.8 | ||
| pydispatcher | 2.0.5 | 2.0.5 | 2.0.5 | |
| pydocstyle | 6.3.0 | 6.3.0 | ||
| pyerfa | 2.0.0 | 2.0.0 | 2.0.0 | 2.0.0 |
| pyflakes | 3.0.1 | 3.0.1 | 3.0.1 | 3.0.1 |
| pygments | 2.15.1 | 2.15.1 | 2.15.1 | 2.15.1 |
| pyjwt | 2.4.0 | 2.4.0 | ||
| pylint | 2.16.2 | 2.16.2 | 2.16.2 | 2.16.2 |
| pylint-venv | 2.3.0 | 2.3.0 | ||
| pyls-spyder | 0.4.0 | 0.4.0 | ||
| pyodbc | 4.0.34 | 4.0.34 | 4.0.34 | 4.0.34 |
| pyopenssl | 23.2.0 | 23.2.0 | 23.2.0 | 23.2.0 |
| pyparsing | 3.0.9 | 3.0.9 | 3.0.9 | 3.0.9 |
| pyqt | 5.15.7 | 5.15.7 | ||
| pyqt5-sip | 12.11.0 | 12.11.0 | ||
| pyqtwebengine | 5.15.7 | 5.15.7 | ||
| pyrsistent | 0.18.0 | 0.18.0 | 0.18.0 | 0.18.0 |
| pysocks | 1.7.1 | 1.7.1 | 1.7.1 | 1.7.1 |
| pytables | 3.8.0 | 3.8.0 | 3.8.0 | 3.7.0 |
| pytest | 7.4.0 | 7.4.0 | 7.4.0 | 7.4.0 |
| python | 3.11.5 | 3.11.5 | 3.11.5 | 3.11.5 |
| python-dateutil | 2.8.2 | 2.8.2 | 2.8.2 | 2.8.2 |
| python-dotenv | 0.21.0 | 0.21.0 | ||
| python-fastjsonschema | 2.16.2 | 2.16.2 | 2.16.2 | 2.16.2 |
| python-json-logger | 2.0.7 | 2.0.7 | 2.0.7 | |
| python-kaleido | 0.2.1 | 0.2.1 | ||
| python-libarchive-c | 2.9 | 2.9 | 2.9 | 2.9 |
| python-lmdb | 1.4.1 | 1.4.1 | 1.4.1 | 1.4.1 |
| python-lsp-black | 1.2.1 | 1.2.1 | ||
| python-lsp-jsonrpc | 1.0.0 | 1.0.0 | ||
| python-lsp-server | 1.7.2 | 1.7.2 | ||
| python-slugify | 5.0.2 | 5.0.2 | ||
| python-snappy | 0.6.1 | 0.6.1 | 0.6.1 | 0.6.1 |
| python-tzdata | 2023.3 | 2023.3 | 2023.3 | 2023.3 |
| python-xxhash | 2.0.2 | 2.0.2 | 2.0.2 | |
| pytoolconfig | 1.2.5 | 1.2.5 | ||
| pytz | 2023.3.post1 | 2023.3.post1 | 2023.3.post1 | 2023.3.post1 |
| pyviz\_comms | 2.3.0 | 2.3.0 | 2.3.0 | 2.3.0 |
| pywavelets | 1.4.1 | 1.4.1 | 1.4.1 | 1.4.1 |
| pyxdg | 0.27 | 0.27 | ||
| pyyaml | 6.0 | 6.0 | 6.0 | 6.0 |
| pyzmq | 23.2.0 | 23.2.0 | 23.2.0 | 23.2.0 |
| qdarkstyle | 3.0.2 | 3.0.2 | ||
| qstylizer | 0.2.2 | 0.2.2 | ||
| qt-main | 5.15.2 | 5.15.2 | ||
| qt-webengine | 5.15.9 | 5.15.9 | ||
| qtawesome | 1.2.2 | 1.2.2 | ||
| qtconsole | 5.4.2 | 5.4.2 | ||
| qtpy | 2.2.0 | 2.2.0 | ||
| qtwebkit | 5.212 | 5.212 | ||
| queuelib | 1.5.0 | 1.5.0 | 1.5.0 | |
| re2 | 2022.04.01 | 2022.04.01 | 2022.04.01 | |
| readline | 8.2 | 8.2 | 8.2 | 8.2 |
| regex | 2022.7.9 | 2022.7.9 | 2022.7.9 | 2022.7.9 |
| reproc | 14.2.4 | 14.2.4 | 14.2.4 | 14.2.4 |
| reproc-cpp | 14.2.4 | 14.2.4 | 14.2.4 | 14.2.4 |
| requests | 2.31.0 | 2.31.0 | 2.31.0 | 2.31.0 |
| requests-file | 1.5.1 | 1.5.1 | 1.5.1 | |
| requests-toolbelt | 1.0.0 | 1.0.0 | 1.0.0 | 1.0.0 |
| responses | 0.13.3 | 0.13.3 | 0.13.3 | |
| rfc3339-validator | 0.1.4 | 0.1.4 | 0.1.4 | |
| rfc3986-validator | 0.1.1 | 0.1.1 | 0.1.1 | |
| rope | 1.7.0 | 1.7.0 | ||
| rtree | 1.0.1 | 1.0.1 | ||
| ruamel.yaml | 0.17.21 | 0.17.21 | 0.17.21 | 0.17.21 |
| ruamel\_yaml | 0.17.21 | 0.17.21 | 0.17.21 | 0.17.21 |
| s3fs | 2023.4.0 | 2023.4.0 | 2023.4.0 | 2023.4.0 |
| s3transfer | 0.6.0 | |||
| sacremoses | 0.0.43 | |||
| safetensors | 0.3.2 | 0.3.2 | 0.3.2 | |
| scikit-image | 0.20.0 | 0.20.0 | 0.20.0 | 0.20.0 |
| scikit-learn | 1.3.0 | 1.3.0 | 1.3.0 | 1.2.2 |
| scikit-learn-intelex | 2023.1.1 | |||
| scipy | 1.11.1 | 1.11.1 | 1.11.1 | 1.11.1 |
| scrapy | 2.8.0 | 2.8.0 | 2.8.0 | |
| seaborn | 0.12.2 | 0.12.2 | 0.12.2 | 0.12.2 |
| secretstorage | 3.3.1 | 3.3.1 | ||
| send2trash | 1.8.0 | 1.8.0 | 1.8.0 | 1.8.0 |
| service\_identity | 18.1.0 | 18.1.0 | 18.1.0 | |
| setuptools | 68.0.0 | 68.0.0 | 68.0.0 | 68.0.0 |
| sip | 6.6.2 | 6.6.2 | ||
| six | 1.16.0 | 1.16.0 | 1.16.0 | 1.16.0 |
| smart\_open | 5.2.1 | 5.2.1 | 5.2.1 | |
| snappy | 1.1.9 | 1.1.9 | 1.1.9 | 1.1.9 |
| sniffio | 1.2.0 | 1.2.0 | 1.2.0 | 1.2.0 |
| snowballstemmer | 2.2.0 | 2.2.0 | 2.2.0 | 2.2.0 |
| sortedcontainers | 2.4.0 | 2.4.0 | 2.4.0 | 2.4.0 |
| soupsieve | 2.4 | 2.4 | 2.4 | 2.4 |
| sphinx | 5.0.2 | 5.0.2 | ||
| sphinxcontrib-applehelp | 1.0.2 | 1.0.2 | ||
| sphinxcontrib-devhelp | 1.0.2 | 1.0.2 | ||
| sphinxcontrib-htmlhelp | 2.0.0 | 2.0.0 | ||
| sphinxcontrib-jsmath | 1.0.1 | 1.0.1 | ||
| sphinxcontrib-qthelp | 1.0.3 | 1.0.3 | ||
| sphinxcontrib-serializinghtml | 1.1.5 | 1.1.5 | ||
| spyder | 5.4.3 | 5.4.3 | ||
| spyder-kernels | 2.4.4 | 2.4.4 | ||
| sqlalchemy | 1.4.39 | 1.4.39 | 1.4.39 | 1.4.39 |
| sqlite | 3.41.2 | 3.41.2 | 3.41.2 | 3.41.2 |
| stack\_data | 0.2.0 | 0.2.0 | 0.2.0 | 0.2.0 |
| statsmodels | 0.14.0 | 0.14.0 | 0.14.0 | 0.14.0 |
| sympy | 1.11.1 | 1.11.1 | 1.11.1 | 1.11.1 |
| tabulate | 0.8.10 | 0.8.10 | 0.8.10 | 0.8.10 |
| tbb | 2021.8.0 | 2021.8.0 | 2021.8.0 | |
| tbb4py | 2021.8.0 | |||
| tblib | 1.7.0 | 1.7.0 | 1.7.0 | 1.7.0 |
| tenacity | 8.2.2 | 8.2.2 | 8.2.2 | 8.2.2 |
| terminado | 0.17.1 | 0.17.1 | 0.17.1 | 0.17.1 |
| text-unidecode | 1.3 | 1.3 | ||
| textdistance | 4.2.1 | 4.2.1 | ||
| threadpoolctl | 2.2.0 | 2.2.0 | 2.2.0 | 2.2.0 |
| three-merge | 0.1.1 | 0.1.1 | ||
| tifffile | 2023.4.12 | 2023.4.12 | 2023.4.12 | 2023.4.12 |
| tinycss2 | 1.2.1 | 1.2.1 | 1.2.1 | 1.2.1 |
| tk | 8.6.12 | 8.6.12 | 8.6.12 | 8.6.12 |
| tldextract | 3.2.0 | 3.2.0 | 3.2.0 | |
| tokenizers | 0.13.2 | 0.13.2 | 0.13.2 | |
| toml | 0.10.2 | 0.10.2 | ||
| tomlkit | 0.11.1 | 0.11.1 | 0.11.1 | 0.11.1 |
| toolz | 0.12.0 | 0.12.0 | 0.12.0 | 0.12.0 |
| tornado | 6.3.2 | 6.3.2 | 6.3.2 | 6.3.2 |
| tqdm | 4.65.0 | 4.65.0 | 4.65.0 | 4.65.0 |
| traitlets | 5.7.1 | 5.7.1 | 5.7.1 | 5.7.1 |
| transformers | 4.32.1 | 4.32.1 | 4.32.1 | 2.1.1 |
| twisted | 22.10.0 | 22.10.0 | 22.10.0 | |
| typing-extensions | 4.7.1 | 4.7.1 | 4.7.1 | 4.7.1 |
| typing\_extensions | 4.7.1 | 4.7.1 | 4.7.1 | 4.7.1 |
| tzdata | 2023c | 2023c | 2023c | 2023c |
| uc-micro-py | 1.0.1 | 1.0.1 | 1.0.1 | |
| ujson | 5.4.0 | 5.4.0 | ||
| unidecode | 1.2.0 | 1.2.0 | ||
| unixodbc | 2.3.11 | 2.3.11 | 2.3.11 | 2.3.11 |
| urllib3 | 1.26.16 | 1.26.16 | 1.26.16 | 1.26.16 |
| utf8proc | 2.6.1 | 2.6.1 | 2.6.1 | |
| w3lib | 1.21.0 | 1.21.0 | 1.21.0 | |
| watchdog | 2.1.6 | 2.1.6 | ||
| wcwidth | 0.2.5 | 0.2.5 | 0.2.5 | 0.2.5 |
| webencodings | 0.5.1 | 0.5.1 | 0.5.1 | 0.5.1 |
| websocket-client | 0.58.0 | 0.58.0 | 0.58.0 | 0.58.0 |
| werkzeug | 2.2.3 | 2.2.3 | 2.2.3 | 2.2.3 |
| whatthepatch | 1.0.2 | 1.0.2 | ||
| wheel | 0.38.4 | 0.38.4 | 0.38.4 | 0.38.4 |
| widgetsnbextension | 4.0.5 | 4.0.5 | 4.0.5 | 4.0.5 |
| wrapt | 1.14.1 | 1.14.1 | 1.14.1 | 1.14.1 |
| wurlitzer | 3.0.2 | 3.0.2 | ||
| xarray | 2023.6.0 | 2023.6.0 | 2023.6.0 | |
| xxhash | 0.8.0 | 0.8.0 | 0.8.0 | |
| xyzservices | 2022.9.0 | 2022.9.0 | 2022.9.0 | |
| xz | 5.4.2 | 5.4.2 | 5.4.2 | 5.4.2 |
| y-py | 0.5.9 | 0.5.9 | 0.5.9 | |
| yaml | 0.2.5 | 0.2.5 | 0.2.5 | 0.2.5 |
| yaml-cpp | 0.7.0 | 0.7.0 | 0.7.0 | 0.7.0 |
| yapf | 0.31.0 | 0.31.0 | ||
| yarl | 1.8.1 | 1.8.1 | 1.8.1 | 1.8.1 |
| ypy-websocket | 0.8.2 | 0.8.2 | 0.8.2 | |
| zeromq | 4.3.4 | 4.3.4 | 4.3.4 | 4.3.4 |
| zfp | 1.0.0 | 1.0.0 | ||
| zict | 2.2.0 | 2.2.0 | 2.2.0 | 2.2.0 |
| zipp | 3.11.0 | 3.11.0 | 3.11.0 | 3.11.0 |
| zlib | 1.2.13 | 1.2.13 | 1.2.13 | 1.2.13 |
| zlib-ng | 2.0.7 | 2.0.7 | 2.0.7 | |
| zope | 1.0 | 1.0 | 1.0 | |
| zope.interface | 5.4.0 | 5.4.0 | 5.4.0 | |
| zstandard | 0.19.0 | 0.19.0 | 0.19.0 | 0.19.0 |
| zstd | 1.5.5 | 1.5.5 | 1.5.5 | 1.5.5 |
| Package Name | osx-arm64 | osx-64 |
|---|---|---|
| \_anaconda\_depends | 2023.09 | 2023.09 |
| abseil-cpp | 20211102.0 | 20211102.0 |
| aiobotocore | 2.5.0 | 2.5.0 |
| aiofiles | 22.1.0 | 22.1.0 |
| aiohttp | 3.8.5 | 3.8.5 |
| aioitertools | 0.7.1 | 0.7.1 |
| aiosignal | 1.2.0 | 1.2.0 |
| aiosqlite | 0.18.0 | 0.18.0 |
| alabaster | 0.7.12 | 0.7.12 |
| anaconda-anon-usage | 0.4.2 | 0.4.2 |
| anaconda-catalogs | 0.2.0 | 0.2.0 |
| anaconda-client | 1.12.1 | 1.12.1 |
| anaconda-cloud-auth | 0.1.3 | 0.1.3 |
| anaconda-navigator | 2.5.0 | 2.5.0 |
| anaconda-project | 0.11.1 | 0.11.1 |
| anyio | 3.5.0 | 3.5.0 |
| aom | 3.6.0 | 3.6.0 |
| appdirs | 1.4.4 | 1.4.4 |
| applaunchservices | 0.3.0 | 0.3.0 |
| appnope | 0.1.2 | 0.1.2 |
| appscript | 1.1.2 | 1.1.2 |
| argon2-cffi | 21.3.0 | 21.3.0 |
| argon2-cffi-bindings | 21.2.0 | 21.2.0 |
| arrow | 1.2.3 | 1.2.3 |
| arrow-cpp | 11.0.0 | 11.0.0 |
| astroid | 2.14.2 | 2.14.2 |
| astropy | 5.1 | 5.1 |
| asttokens | 2.0.5 | 2.0.5 |
| async-timeout | 4.0.2 | 4.0.2 |
| atomicwrites | 1.4.0 | 1.4.0 |
| attrs | 22.1.0 | 22.1.0 |
| automat | 20.2.0 | 20.2.0 |
| autopep8 | 1.6.0 | 1.6.0 |
| aws-c-common | 0.6.8 | 0.6.8 |
| aws-c-event-stream | 0.1.6 | 0.1.6 |
| aws-checksums | 0.1.11 | 0.1.11 |
| aws-sdk-cpp | 1.8.185 | 1.8.185 |
| babel | 2.11.0 | 2.11.0 |
| backcall | 0.2.0 | 0.2.0 |
| backports | 1.1 | 1.1 |
| backports.functools\_lru\_cache | 1.6.4 | 1.6.4 |
| backports.tempfile | 1.0 | 1.0 |
| backports.weakref | 1.0.post1 | 1.0.post1 |
| bcrypt | 3.2.0 | 3.2.0 |
| beautifulsoup4 | 4.12.2 | 4.12.2 |
| binaryornot | 0.4.4 | 0.4.4 |
| black | 23.3.0 | 23.3.0 |
| blas | 1.0 | 1.0 |
| bleach | 4.1.0 | 4.1.0 |
| blosc | 1.21.3 | 1.21.3 |
| bokeh | 3.2.1 | 3.2.1 |
| boltons | 23.0.0 | 23.0.0 |
| boost-cpp | 1.73.0 | 1.73.0 |
| botocore | 1.29.76 | 1.29.76 |
| bottleneck | 1.3.5 | 1.3.5 |
| brotli | 1.0.9 | 1.0.9 |
| brotli-bin | 1.0.9 | 1.0.9 |
| brotlipy | 0.7.0 | 0.7.0 |
| brunsli | 0.1 | 0.1 |
| bzip2 | 1.0.8 | 1.0.8 |
| c-ares | 1.19.1 | 1.19.1 |
| c-blosc2 | 2.8.0 | 2.8.0 |
| ca-certificates | 2023.08.22 | 2023.08.22 |
| cctools | 949.0.1 | 949.0.1 |
| cctools\_osx-64 | 949.0.1 | |
| cctools\_osx-arm64 | 949.0.1 | |
| certifi | 2023.7.22 | 2023.7.22 |
| cffi | 1.15.1 | 1.15.1 |
| cfitsio | 3.470 | 3.470 |
| chardet | 4.0.0 | 4.0.0 |
| charls | 2.2.0 | 2.2.0 |
| charset-normalizer | 2.0.4 | 2.0.4 |
| click | 8.0.4 | 8.0.4 |
| cloudpickle | 2.2.1 | 2.2.1 |
| clyent | 1.2.2 | 1.2.2 |
| colorama | 0.4.6 | 0.4.6 |
| colorcet | 3.0.1 | 3.0.1 |
| comm | 0.1.2 | 0.1.2 |
| conda | 23.7.4 | 23.7.4 |
| conda-build | 3.26.1 | 3.26.1 |
| conda-content-trust | 0.2.0 | 0.2.0 |
| conda-index | 0.3.0 | 0.3.0 |
| conda-libmamba-solver | 23.7.0 | 23.7.0 |
| conda-pack | 0.6.0 | 0.6.0 |
| conda-package-handling | 2.2.0 | 2.2.0 |
| conda-package-streaming | 0.9.0 | 0.9.0 |
| conda-repo-cli | 1.0.75 | 1.0.75 |
| conda-token | 0.4.0 | 0.4.0 |
| conda-verify | 3.4.2 | 3.4.2 |
| constantly | 15.1.0 | 15.1.0 |
| contourpy | 1.0.5 | 1.0.5 |
| cookiecutter | 1.7.3 | 1.7.3 |
| cryptography | 41.0.3 | 41.0.3 |
| cssselect | 1.1.0 | 1.1.0 |
| curl | 8.2.1 | 8.2.1 |
| cycler | 0.11.0 | 0.11.0 |
| cyrus-sasl | 2.1.28 | 2.1.28 |
| cytoolz | 0.12.0 | 0.12.0 |
| dask | 2023.6.0 | 2023.6.0 |
| dask-core | 2023.6.0 | 2023.6.0 |
| datasets | 2.12.0 | 2.12.0 |
| datashader | 0.15.2 | 0.15.2 |
| datashape | 0.5.4 | 0.5.4 |
| dav1d | 1.2.1 | 1.2.1 |
| debugpy | 1.6.7 | 1.6.7 |
| decorator | 5.1.1 | 5.1.1 |
| defusedxml | 0.7.1 | 0.7.1 |
| diff-match-patch | 20200713 | 20200713 |
| dill | 0.3.6 | 0.3.6 |
| distributed | 2023.6.0 | 2023.6.0 |
| docstring-to-markdown | 0.11 | 0.11 |
| docutils | 0.18.1 | 0.18.1 |
| entrypoints | 0.4 | 0.4 |
| et\_xmlfile | 1.1.0 | 1.1.0 |
| executing | 0.8.3 | 0.8.3 |
| filelock | 3.9.0 | 3.9.0 |
| flake8 | 6.0.0 | 6.0.0 |
| flask | 2.2.2 | 2.2.2 |
| fmt | 9.1.0 | 9.1.0 |
| fonttools | 4.25.0 | 4.25.0 |
| freetype | 2.12.1 | 2.12.1 |
| frozenlist | 1.3.3 | 1.3.3 |
| fsspec | 2023.4.0 | 2023.4.0 |
| future | 0.18.3 | 0.18.3 |
| gensim | 4.3.0 | 4.3.0 |
| gettext | 0.21.0 | 0.21.0 |
| gflags | 2.2.2 | 2.2.2 |
| giflib | 5.2.1 | 5.2.1 |
| glib | 2.69.1 | 2.69.1 |
| glob2 | 0.7 | 0.7 |
| glog | 0.5.0 | 0.5.0 |
| gmp | 6.2.1 | 6.2.1 |
| gmpy2 | 2.1.2 | 2.1.2 |
| greenlet | 2.0.1 | 2.0.1 |
| grpc-cpp | 1.48.2 | 1.48.2 |
| gst-plugins-base | 1.14.1 | 1.14.1 |
| gstreamer | 1.14.1 | 1.14.1 |
| h5py | 3.9.0 | 3.9.0 |
| hdf5 | 1.12.1 | 1.12.1 |
| heapdict | 1.0.1 | 1.0.1 |
| holoviews | 1.17.1 | 1.17.1 |
| huggingface\_hub | 0.15.1 | 0.15.1 |
| hvplot | 0.8.4 | 0.8.4 |
| hyperlink | 21.0.0 | 21.0.0 |
| icu | 68.1 | 58.2 |
| idna | 3.4 | 3.4 |
| imagecodecs | 2023.1.23 | 2023.1.23 |
| imageio | 2.31.1 | 2.31.1 |
| imagesize | 1.4.1 | 1.4.1 |
| imbalanced-learn | 0.10.1 | 0.10.1 |
| importlib-metadata | 6.0.0 | 6.0.0 |
| importlib\_metadata | 6.0.0 | 6.0.0 |
| incremental | 21.3.0 | 21.3.0 |
| inflection | 0.5.1 | 0.5.1 |
| iniconfig | 1.1.1 | 1.1.1 |
| intake | 0.6.8 | 0.6.8 |
| intervaltree | 3.1.0 | 3.1.0 |
| ipykernel | 6.25.0 | 6.25.0 |
| ipython | 8.15.0 | 8.15.0 |
| ipython\_genutils | 0.2.0 | 0.2.0 |
| ipywidgets | 8.0.4 | 8.0.4 |
| isort | 5.9.3 | 5.9.3 |
| itemadapter | 0.3.0 | 0.3.0 |
| itemloaders | 1.0.4 | 1.0.4 |
| itsdangerous | 2.0.1 | 2.0.1 |
| jaraco.classes | 3.2.1 | 3.2.1 |
| jedi | 0.18.1 | 0.18.1 |
| jellyfish | 1.0.1 | 1.0.1 |
| jinja2 | 3.1.2 | 3.1.2 |
| jinja2-time | 0.2.0 | 0.2.0 |
| jmespath | 0.10.0 | 0.10.0 |
| joblib | 1.2.0 | 1.2.0 |
| jpeg | 9e | 9e |
| jq | 1.6 | 1.6 |
| json5 | 0.9.6 | 0.9.6 |
| jsonpatch | 1.32 | 1.32 |
| jsonpointer | 2.1 | 2.1 |
| jsonschema | 4.17.3 | 4.17.3 |
| jupyter | 1.0.0 | 1.0.0 |
| jupyter\_client | 7.4.9 | 7.4.9 |
| jupyter\_console | 6.6.3 | 6.6.3 |
| jupyter\_core | 5.3.0 | 5.3.0 |
| jupyter\_events | 0.6.3 | 0.6.3 |
| jupyter\_server | 1.23.4 | 1.23.4 |
| jupyter\_server\_fileid | 0.9.0 | 0.9.0 |
| jupyter\_server\_ydoc | 0.8.0 | 0.8.0 |
| jupyter\_ydoc | 0.2.4 | 0.2.4 |
| jupyterlab | 3.6.3 | 3.6.3 |
| jupyterlab\_pygments | 0.1.2 | 0.1.2 |
| jupyterlab\_server | 2.22.0 | 2.22.0 |
| jupyterlab\_widgets | 3.0.5 | 3.0.5 |
| jxrlib | 1.1 | 1.1 |
| kaleido-core | 0.2.1 | 0.2.1 |
| keyring | 23.13.1 | 23.13.1 |
| kiwisolver | 1.4.4 | 1.4.4 |
| krb5 | 1.20.1 | 1.20.1 |
| lazy-object-proxy | 1.6.0 | 1.6.0 |
| lazy\_loader | 0.2 | 0.2 |
| lcms2 | 2.12 | 2.12 |
| ld64 | 530 | 530 |
| ld64\_osx-64 | 530 | |
| ld64\_osx-arm64 | 530 | |
| ldid | 2.1.5 | 2.1.5 |
| lerc | 3.0 | 3.0 |
| libaec | 1.0.4 | 1.0.4 |
| libarchive | 3.6.2 | 3.6.2 |
| libavif | 0.11.1 | 0.11.1 |
| libboost | 1.73.0 | 1.73.0 |
| libbrotlicommon | 1.0.9 | 1.0.9 |
| libbrotlidec | 1.0.9 | 1.0.9 |
| libbrotlienc | 1.0.9 | 1.0.9 |
| libclang | 14.0.6 | 14.0.6 |
| libclang13 | 14.0.6 | 14.0.6 |
| libcurl | 8.2.1 | 8.2.1 |
| libcxx | 14.0.6 | 14.0.6 |
| libdeflate | 1.17 | 1.17 |
| libedit | 3.1.20221030 | 3.1.20221030 |
| libev | 4.33 | 4.33 |
| libevent | 2.1.12 | 2.1.12 |
| libffi | 3.4.4 | 3.4.4 |
| libgfortran | 5.0.0 | 5.0.0 |
| libgfortran5 | 11.3.0 | 11.3.0 |
| libiconv | 1.16 | 1.16 |
| liblief | 0.12.3 | 0.12.3 |
| libllvm14 | 14.0.6 | 14.0.6 |
| libmamba | 1.5.1 | 1.5.1 |
| libmambapy | 1.5.1 | 1.5.1 |
| libnghttp2 | 1.52.0 | 1.52.0 |
| libopenblas | 0.3.21 | 0.3.21 |
| libpng | 1.6.39 | 1.6.39 |
| libpq | 12.15 | 12.15 |
| libprotobuf | 3.20.3 | 3.20.3 |
| libsodium | 1.0.18 | 1.0.18 |
| libsolv | 0.7.24 | 0.7.24 |
| libspatialindex | 1.9.3 | 1.9.3 |
| libssh2 | 1.10.0 | 1.10.0 |
| libthrift | 0.15.0 | 0.15.0 |
| libtiff | 4.5.1 | 4.5.1 |
| libwebp | 1.3.2 | 1.3.2 |
| libwebp-base | 1.3.2 | 1.3.2 |
| libxml2 | 2.10.4 | 2.10.4 |
| libxslt | 1.1.37 | 1.1.37 |
| libzopfli | 1.0.3 | 1.0.3 |
| linkify-it-py | 2.0.0 | 2.0.0 |
| llvm-openmp | 14.0.6 | 14.0.6 |
| llvmlite | 0.40.0 | 0.40.0 |
| locket | 1.0.0 | 1.0.0 |
| lxml | 4.9.3 | 4.9.3 |
| lz4 | 4.3.2 | 4.3.2 |
| lz4-c | 1.9.4 | 1.9.4 |
| lzo | 2.10 | 2.10 |
| markdown | 3.4.1 | 3.4.1 |
| markdown-it-py | 2.2.0 | 2.2.0 |
| markupsafe | 2.1.1 | 2.1.1 |
| mathjax | 2.7.5 | 2.7.5 |
| matplotlib | 3.7.2 | 3.7.2 |
| matplotlib-base | 3.7.2 | 3.7.2 |
| matplotlib-inline | 0.1.6 | 0.1.6 |
| mccabe | 0.7.0 | 0.7.0 |
| mdit-py-plugins | 0.3.0 | 0.3.0 |
| mdurl | 0.1.0 | 0.1.0 |
| mistune | 0.8.4 | 0.8.4 |
| more-itertools | 8.12.0 | 8.12.0 |
| mpc | 1.1.0 | 1.1.0 |
| mpfr | 4.0.2 | 4.0.2 |
| mpmath | 1.3.0 | 1.3.0 |
| msgpack-python | 1.0.3 | 1.0.3 |
| multidict | 6.0.2 | 6.0.2 |
| multipledispatch | 0.6.0 | 0.6.0 |
| multiprocess | 0.70.14 | 0.70.14 |
| munkres | 1.1.4 | 1.1.4 |
| mypy\_extensions | 1.0.0 | 1.0.0 |
| mysql | 5.7.24 | 5.7.24 |
| navigator-updater | 0.4.0 | 0.4.0 |
| nbclassic | 0.5.5 | 0.5.5 |
| nbclient | 0.5.13 | 0.5.13 |
| nbconvert | 6.5.4 | 6.5.4 |
| nbformat | 5.9.2 | 5.9.2 |
| ncurses | 6.4 | 6.4 |
| nest-asyncio | 1.5.6 | 1.5.6 |
| networkx | 3.1 | 3.1 |
| nltk | 3.8.1 | 3.8.1 |
| notebook | 6.5.4 | 6.5.4 |
| notebook-shim | 0.2.2 | 0.2.2 |
| numba | 0.57.1 | 0.57.0 |
| numexpr | 2.8.4 | 2.8.4 |
| numpy | 1.24.3 | 1.24.3 |
| numpy-base | 1.24.3 | 1.24.3 |
| numpydoc | 1.5.0 | 1.5.0 |
| oniguruma | 6.9.7.1 | 6.9.7.1 |
| openjpeg | 2.3.0 | 2.4.0 |
| openpyxl | 3.0.10 | 3.0.10 |
| openssl | 3.0.10 | 3.0.10 |
| orc | 1.7.4 | 1.7.4 |
| packaging | 23.1 | 23.1 |
| pandas | 2.0.3 | 2.0.3 |
| pandocfilters | 1.5.0 | 1.5.0 |
| panel | 1.2.3 | 1.2.3 |
| param | 1.13.0 | 1.13.0 |
| parsel | 1.6.0 | 1.6.0 |
| parso | 0.8.3 | 0.8.3 |
| partd | 1.4.0 | 1.4.0 |
| patch | 2.7.6 | 2.7.6 |
| pathlib | 1.0.1 | 1.0.1 |
| pathspec | 0.10.3 | 0.10.3 |
| patsy | 0.5.3 | 0.5.3 |
| pcre | 8.45 | 8.45 |
| pcre2 | 10.42 | 10.42 |
| pep8 | 1.7.1 | 1.7.1 |
| pexpect | 4.8.0 | 4.8.0 |
| pickleshare | 0.7.5 | 0.7.5 |
| pillow | 9.4.0 | 9.4.0 |
| pip | 23.2.1 | 23.2.1 |
| pkce | 1.0.3 | 1.0.3 |
| pkginfo | 1.9.6 | 1.9.6 |
| platformdirs | 3.10.0 | 3.10.0 |
| plotly | 5.9.0 | 5.9.0 |
| pluggy | 1.0.0 | 1.0.0 |
| ply | 3.11 | 3.11 |
| poyo | 0.5.0 | 0.5.0 |
| prometheus\_client | 0.14.1 | 0.14.1 |
| prompt-toolkit | 3.0.36 | 3.0.36 |
| prompt\_toolkit | 3.0.36 | 3.0.36 |
| protego | 0.1.16 | 0.1.16 |
| psutil | 5.9.0 | 5.9.0 |
| ptyprocess | 0.7.0 | 0.7.0 |
| pure\_eval | 0.2.2 | 0.2.2 |
| py-cpuinfo | 8.0.0 | 8.0.0 |
| py-lief | 0.12.3 | 0.12.3 |
| pyarrow | 11.0.0 | 11.0.0 |
| pyasn1 | 0.4.8 | 0.4.8 |
| pyasn1-modules | 0.2.8 | 0.2.8 |
| pybind11-abi | 4 | 4 |
| pycodestyle | 2.10.0 | 2.10.0 |
| pycosat | 0.6.4 | 0.6.4 |
| pycparser | 2.21 | 2.21 |
| pyct | 0.5.0 | 0.5.0 |
| pycurl | 7.45.2 | 7.45.2 |
| pydantic | 1.10.8 | 1.10.8 |
| pydispatcher | 2.0.5 | 2.0.5 |
| pydocstyle | 6.3.0 | 6.3.0 |
| pyerfa | 2.0.0 | 2.0.0 |
| pyflakes | 3.0.1 | 3.0.1 |
| pygments | 2.15.1 | 2.15.1 |
| pyjwt | 2.4.0 | 2.4.0 |
| pylint | 2.16.2 | 2.16.2 |
| pylint-venv | 2.3.0 | 2.3.0 |
| pyls-spyder | 0.4.0 | 0.4.0 |
| pyobjc-core | 9.0 | 9.0 |
| pyobjc-framework-cocoa | 9.0 | 9.0 |
| pyobjc-framework-coreservices | 9.0 | 9.0 |
| pyobjc-framework-fsevents | 9.0 | 9.0 |
| pyodbc | 4.0.34 | 4.0.34 |
| pyopenssl | 23.2.0 | 23.2.0 |
| pyparsing | 3.0.9 | 3.0.9 |
| pyqt | 5.15.7 | 5.15.7 |
| pyqt5-sip | 12.11.0 | 12.11.0 |
| pyqtwebengine | 5.15.7 | 5.15.7 |
| pyrsistent | 0.18.0 | 0.18.0 |
| pysocks | 1.7.1 | 1.7.1 |
| pytables | 3.8.0 | 3.8.0 |
| pytest | 7.4.0 | 7.4.0 |
| python | 3.11.5 | 3.11.5 |
| python-dateutil | 2.8.2 | 2.8.2 |
| python-dotenv | 0.21.0 | 0.21.0 |
| python-fastjsonschema | 2.16.2 | 2.16.2 |
| python-json-logger | 2.0.7 | 2.0.7 |
| python-kaleido | 0.2.1 | 0.2.1 |
| python-libarchive-c | 2.9 | 2.9 |
| python-lmdb | 1.4.1 | 1.4.1 |
| python-lsp-black | 1.2.1 | 1.2.1 |
| python-lsp-jsonrpc | 1.0.0 | 1.0.0 |
| python-lsp-server | 1.7.2 | 1.7.2 |
| python-slugify | 5.0.2 | 5.0.2 |
| python-snappy | 0.6.1 | 0.6.1 |
| python-tzdata | 2023.3 | 2023.3 |
| python-xxhash | 2.0.2 | 2.0.2 |
| python.app | 3 | 3 |
| pytoolconfig | 1.2.5 | 1.2.5 |
| pytz | 2023.3.post1 | 2023.3.post1 |
| pyviz\_comms | 2.3.0 | 2.3.0 |
| pywavelets | 1.4.1 | 1.4.1 |
| pyyaml | 6.0 | 6.0 |
| pyzmq | 23.2.0 | 23.2.0 |
| qdarkstyle | 3.0.2 | 3.0.2 |
| qstylizer | 0.2.2 | 0.2.2 |
| qt-main | 5.15.2 | 5.15.2 |
| qt-webengine | 5.15.9 | 5.15.9 |
| qtawesome | 1.2.2 | 1.2.2 |
| qtconsole | 5.4.2 | 5.4.2 |
| qtpy | 2.2.0 | 2.2.0 |
| qtwebkit | 5.212 | 5.212 |
| queuelib | 1.5.0 | 1.5.0 |
| re2 | 2022.04.01 | 2022.04.01 |
| readline | 8.2 | 8.2 |
| regex | 2022.7.9 | 2022.7.9 |
| reproc | 14.2.4 | 14.2.4 |
| reproc-cpp | 14.2.4 | 14.2.4 |
| requests | 2.31.0 | 2.31.0 |
| requests-file | 1.5.1 | 1.5.1 |
| requests-toolbelt | 1.0.0 | 1.0.0 |
| responses | 0.13.3 | 0.13.3 |
| rfc3339-validator | 0.1.4 | 0.1.4 |
| rfc3986-validator | 0.1.1 | 0.1.1 |
| rope | 1.7.0 | 1.7.0 |
| rtree | 1.0.1 | 1.0.1 |
| ruamel.yaml | 0.17.21 | 0.17.21 |
| ruamel\_yaml | 0.17.21 | 0.17.21 |
| s3fs | 2023.4.0 | 2023.4.0 |
| safetensors | 0.3.2 | 0.3.2 |
| scikit-image | 0.20.0 | 0.20.0 |
| scikit-learn | 1.3.0 | 1.3.0 |
| scipy | 1.11.1 | 1.11.1 |
| scrapy | 2.8.0 | 2.8.0 |
| seaborn | 0.12.2 | 0.12.2 |
| send2trash | 1.8.0 | 1.8.0 |
| service\_identity | 18.1.0 | 18.1.0 |
| setuptools | 68.0.0 | 68.0.0 |
| sip | 6.6.2 | 6.6.2 |
| six | 1.16.0 | 1.16.0 |
| smart\_open | 5.2.1 | 5.2.1 |
| snappy | 1.1.9 | 1.1.9 |
| sniffio | 1.2.0 | 1.2.0 |
| snowballstemmer | 2.2.0 | 2.2.0 |
| sortedcontainers | 2.4.0 | 2.4.0 |
| soupsieve | 2.4 | 2.4 |
| sphinx | 5.0.2 | 5.0.2 |
| sphinxcontrib-applehelp | 1.0.2 | 1.0.2 |
| sphinxcontrib-devhelp | 1.0.2 | 1.0.2 |
| sphinxcontrib-htmlhelp | 2.0.0 | 2.0.0 |
| sphinxcontrib-jsmath | 1.0.1 | 1.0.1 |
| sphinxcontrib-qthelp | 1.0.3 | 1.0.3 |
| sphinxcontrib-serializinghtml | 1.1.5 | 1.1.5 |
| spyder | 5.4.3 | 5.4.3 |
| spyder-kernels | 2.4.4 | 2.4.4 |
| sqlalchemy | 1.4.39 | 1.4.39 |
| sqlite | 3.41.2 | 3.41.2 |
| stack\_data | 0.2.0 | 0.2.0 |
| statsmodels | 0.14.0 | 0.14.0 |
| sympy | 1.11.1 | 1.11.1 |
| tabulate | 0.8.10 | 0.8.10 |
| tapi | 1100.0.11 | 1000.10.8 |
| tbb | 2021.8.0 | 2021.8.0 |
| tblib | 1.7.0 | 1.7.0 |
| tenacity | 8.2.2 | 8.2.2 |
| terminado | 0.17.1 | 0.17.1 |
| text-unidecode | 1.3 | 1.3 |
| textdistance | 4.2.1 | 4.2.1 |
| threadpoolctl | 2.2.0 | 2.2.0 |
| three-merge | 0.1.1 | 0.1.1 |
| tifffile | 2023.4.12 | 2023.4.12 |
| tinycss2 | 1.2.1 | 1.2.1 |
| tk | 8.6.12 | 8.6.12 |
| tldextract | 3.2.0 | 3.2.0 |
| tokenizers | 0.13.2 | 0.13.2 |
| toml | 0.10.2 | 0.10.2 |
| tomlkit | 0.11.1 | 0.11.1 |
| toolz | 0.12.0 | 0.12.0 |
| tornado | 6.3.2 | 6.3.2 |
| tqdm | 4.65.0 | 4.65.0 |
| traitlets | 5.7.1 | 5.7.1 |
| transformers | 4.32.1 | 4.32.1 |
| twisted | 22.10.0 | 22.10.0 |
| typing-extensions | 4.7.1 | 4.7.1 |
| typing\_extensions | 4.7.1 | 4.7.1 |
| tzdata | 2023c | 2023c |
| uc-micro-py | 1.0.1 | 1.0.1 |
| ujson | 5.4.0 | 5.4.0 |
| unidecode | 1.2.0 | 1.2.0 |
| unixodbc | 2.3.11 | 2.3.11 |
| urllib3 | 1.26.16 | 1.26.16 |
| utf8proc | 2.6.1 | 2.6.1 |
| w3lib | 1.21.0 | 1.21.0 |
| watchdog | 2.1.6 | 2.1.6 |
| wcwidth | 0.2.5 | 0.2.5 |
| webencodings | 0.5.1 | 0.5.1 |
| websocket-client | 0.58.0 | 0.58.0 |
| werkzeug | 2.2.3 | 2.2.3 |
| whatthepatch | 1.0.2 | 1.0.2 |
| wheel | 0.38.4 | 0.38.4 |
| widgetsnbextension | 4.0.5 | 4.0.5 |
| wrapt | 1.14.1 | 1.14.1 |
| wurlitzer | 3.0.2 | 3.0.2 |
| xarray | 2023.6.0 | 2023.6.0 |
| xlwings | 0.29.1 | 0.29.1 |
| xxhash | 0.8.0 | 0.8.0 |
| xyzservices | 2022.9.0 | 2022.9.0 |
| xz | 5.4.2 | 5.4.2 |
| y-py | 0.5.9 | 0.5.9 |
| yaml | 0.2.5 | 0.2.5 |
| yaml-cpp | 0.7.0 | 0.7.0 |
| yapf | 0.31.0 | 0.31.0 |
| yarl | 1.8.1 | 1.8.1 |
| ypy-websocket | 0.8.2 | 0.8.2 |
| zeromq | 4.3.4 | 4.3.4 |
| zfp | 1.0.0 | 1.0.0 |
| zict | 2.2.0 | 2.2.0 |
| zipp | 3.11.0 | 3.11.0 |
| zlib | 1.2.13 | 1.2.13 |
| zlib-ng | 2.0.7 | 2.0.7 |
| zope | 1.0 | 1.0 |
| zope.interface | 5.4.0 | 5.4.0 |
| zstandard | 0.19.0 | 0.19.0 |
| zstd | 1.5.5 | 1.5.5 |
| Package Name | win-64 |
|---|---|
| \_anaconda\_depends | 2023.09 |
| abseil-cpp | 20211102.0 |
| aiobotocore | 2.5.0 |
| aiofiles | 22.1.0 |
| aiohttp | 3.8.5 |
| aioitertools | 0.7.1 |
| aiosignal | 1.2.0 |
| aiosqlite | 0.18.0 |
| alabaster | 0.7.12 |
| anaconda-anon-usage | 0.4.2 |
| anaconda-catalogs | 0.2.0 |
| anaconda-client | 1.12.1 |
| anaconda-cloud-auth | 0.1.3 |
| anaconda-navigator | 2.5.0 |
| anaconda-project | 0.11.1 |
| anyio | 3.5.0 |
| aom | 3.6.0 |
| appdirs | 1.4.4 |
| argon2-cffi | 21.3.0 |
| argon2-cffi-bindings | 21.2.0 |
| arrow | 1.2.3 |
| arrow-cpp | 11.0.0 |
| astroid | 2.14.2 |
| astropy | 5.1 |
| asttokens | 2.0.5 |
| async-timeout | 4.0.2 |
| atomicwrites | 1.4.0 |
| attrs | 22.1.0 |
| automat | 20.2.0 |
| autopep8 | 1.6.0 |
| aws-c-common | 0.6.8 |
| aws-c-event-stream | 0.1.6 |
| aws-checksums | 0.1.11 |
| aws-sdk-cpp | 1.8.185 |
| babel | 2.11.0 |
| backcall | 0.2.0 |
| backports | 1.1 |
| backports.functools\_lru\_cache | 1.6.4 |
| backports.tempfile | 1.0 |
| backports.weakref | 1.0.post1 |
| bcrypt | 3.2.0 |
| beautifulsoup4 | 4.12.2 |
| binaryornot | 0.4.4 |
| black | 23.3.0 |
| blas | 1.0 |
| bleach | 4.1.0 |
| blosc | 1.21.3 |
| bokeh | 3.2.1 |
| boltons | 23.0.0 |
| boost-cpp | 1.82.0 |
| botocore | 1.29.76 |
| bottleneck | 1.3.5 |
| brotli | 1.0.9 |
| brotli-bin | 1.0.9 |
| brotlipy | 0.7.0 |
| bzip2 | 1.0.8 |
| c-ares | 1.19.1 |
| c-blosc2 | 2.8.0 |
| ca-certificates | 2023.08.22 |
| certifi | 2023.7.22 |
| cffi | 1.15.1 |
| cfitsio | 3.470 |
| chardet | 4.0.0 |
| charls | 2.2.0 |
| charset-normalizer | 2.0.4 |
| click | 8.0.4 |
| cloudpickle | 2.2.1 |
| clyent | 1.2.2 |
| colorama | 0.4.6 |
| colorcet | 3.0.1 |
| comm | 0.1.2 |
| conda | 23.7.4 |
| conda-build | 3.26.1 |
| conda-content-trust | 0.2.0 |
| conda-index | 0.3.0 |
| conda-libmamba-solver | 23.7.0 |
| conda-pack | 0.6.0 |
| conda-package-handling | 2.2.0 |
| conda-package-streaming | 0.9.0 |
| conda-repo-cli | 1.0.75 |
| conda-token | 0.4.0 |
| conda-verify | 3.4.2 |
| console\_shortcut | 0.1.1 |
| constantly | 15.1.0 |
| contourpy | 1.0.5 |
| cookiecutter | 1.7.3 |
| cryptography | 41.0.3 |
| cssselect | 1.1.0 |
| curl | 8.1.1 |
| cycler | 0.11.0 |
| cytoolz | 0.12.0 |
| daal4py | 2023.1.1 |
| dal | 2023.1.1 |
| dask | 2023.6.0 |
| dask-core | 2023.6.0 |
| datasets | 2.12.0 |
| datashader | 0.15.2 |
| datashape | 0.5.4 |
| dav1d | 1.2.1 |
| debugpy | 1.6.7 |
| decorator | 5.1.1 |
| defusedxml | 0.7.1 |
| diff-match-patch | 20200713 |
| dill | 0.3.6 |
| distributed | 2023.6.0 |
| docstring-to-markdown | 0.11 |
| docutils | 0.18.1 |
| entrypoints | 0.4 |
| et\_xmlfile | 1.1.0 |
| executing | 0.8.3 |
| filelock | 3.9.0 |
| flake8 | 6.0.0 |
| flask | 2.2.2 |
| fmt | 9.1.0 |
| fonttools | 4.25.0 |
| freetype | 2.12.1 |
| frozenlist | 1.3.3 |
| fsspec | 2023.4.0 |
| future | 0.18.3 |
| gensim | 4.3.0 |
| gflags | 2.2.2 |
| giflib | 5.2.1 |
| glib | 2.69.1 |
| glob2 | 0.7 |
| glog | 0.5.0 |
| greenlet | 2.0.1 |
| grpc-cpp | 1.48.2 |
| h5py | 3.9.0 |
| hdf5 | 1.12.1 |
| heapdict | 1.0.1 |
| holoviews | 1.17.1 |
| huggingface\_hub | 0.15.1 |
| hvplot | 0.8.4 |
| hyperlink | 21.0.0 |
| icc\_rt | 2022.1.0 |
| icu | 58.2 |
| idna | 3.4 |
| imagecodecs | 2023.1.23 |
| imageio | 2.26.0 |
| imagesize | 1.4.1 |
| imbalanced-learn | 0.10.1 |
| importlib-metadata | 6.0.0 |
| importlib\_metadata | 6.0.0 |
| incremental | 21.3.0 |
| inflection | 0.5.1 |
| iniconfig | 1.1.1 |
| intake | 0.6.8 |
| intel-openmp | 2023.1.0 |
| intervaltree | 3.1.0 |
| ipykernel | 6.25.0 |
| ipython | 8.15.0 |
| ipython\_genutils | 0.2.0 |
| ipywidgets | 8.0.4 |
| isort | 5.9.3 |
| itemadapter | 0.3.0 |
| itemloaders | 1.0.4 |
| itsdangerous | 2.0.1 |
| jaraco.classes | 3.2.1 |
| jedi | 0.18.1 |
| jellyfish | 1.0.1 |
| jinja2 | 3.1.2 |
| jinja2-time | 0.2.0 |
| jmespath | 0.10.0 |
| joblib | 1.2.0 |
| jpeg | 9e |
| jq | 1.6 |
| json5 | 0.9.6 |
| jsonpatch | 1.32 |
| jsonpointer | 2.1 |
| jsonschema | 4.17.3 |
| jupyter | 1.0.0 |
| jupyter\_client | 7.4.9 |
| jupyter\_console | 6.6.3 |
| jupyter\_core | 5.3.0 |
| jupyter\_events | 0.6.3 |
| jupyter\_server | 1.23.4 |
| jupyter\_server\_fileid | 0.9.0 |
| jupyter\_server\_ydoc | 0.8.0 |
| jupyter\_ydoc | 0.2.4 |
| jupyterlab | 3.6.3 |
| jupyterlab\_pygments | 0.1.2 |
| jupyterlab\_server | 2.22.0 |
| jupyterlab\_widgets | 3.0.5 |
| kaleido-core | 0.2.1 |
| keyring | 23.13.1 |
| kiwisolver | 1.4.4 |
| krb5 | 1.20.1 |
| lazy-object-proxy | 1.6.0 |
| lazy\_loader | 0.2 |
| lcms2 | 2.12 |
| lerc | 3.0 |
| libaec | 1.0.4 |
| libarchive | 3.6.2 |
| libavif | 0.11.1 |
| libboost | 1.82.0 |
| libbrotlicommon | 1.0.9 |
| libbrotlidec | 1.0.9 |
| libbrotlienc | 1.0.9 |
| libclang | 14.0.6 |
| libclang13 | 14.0.6 |
| libcurl | 8.1.1 |
| libdeflate | 1.17 |
| libevent | 2.1.12 |
| libffi | 3.4.4 |
| libiconv | 1.16 |
| liblief | 0.12.3 |
| libmamba | 1.5.1 |
| libmambapy | 1.5.1 |
| libpng | 1.6.39 |
| libpq | 12.15 |
| libprotobuf | 3.20.3 |
| libsodium | 1.0.18 |
| libsolv | 0.7.24 |
| libspatialindex | 1.9.3 |
| libssh2 | 1.10.0 |
| libthrift | 0.15.0 |
| libtiff | 4.5.1 |
| libwebp | 1.3.2 |
| libwebp-base | 1.3.2 |
| libxml2 | 2.10.4 |
| libxslt | 1.1.37 |
| libzopfli | 1.0.3 |
| linkify-it-py | 2.0.0 |
| llvmlite | 0.40.0 |
| locket | 1.0.0 |
| lxml | 4.9.3 |
| lz4 | 4.3.2 |
| lz4-c | 1.9.4 |
| lzo | 2.10 |
| m2-msys2-runtime | 2.5.0.17080.65c939c |
| m2-patch | 2.7.5 |
| m2w64-libwinpthread-git | 5.0.0.4634.697f757 |
| markdown | 3.4.1 |
| markdown-it-py | 2.2.0 |
| markupsafe | 2.1.1 |
| mathjax | 2.7.5 |
| matplotlib | 3.7.2 |
| matplotlib-base | 3.7.2 |
| matplotlib-inline | 0.1.6 |
| mccabe | 0.7.0 |
| mdit-py-plugins | 0.3.0 |
| mdurl | 0.1.0 |
| menuinst | 1.4.19 |
| mistune | 0.8.4 |
| mkl | 2023.1.0 |
| mkl-service | 2.4.0 |
| mkl\_fft | 1.3.8 |
| mkl\_random | 1.2.4 |
| more-itertools | 8.12.0 |
| mpmath | 1.3.0 |
| msgpack-python | 1.0.3 |
| msys2-conda-epoch | 20160418 |
| multidict | 6.0.2 |
| multipledispatch | 0.6.0 |
| multiprocess | 0.70.14 |
| munkres | 1.1.4 |
| mypy\_extensions | 1.0.0 |
| navigator-updater | 0.4.0 |
| nbclassic | 0.5.5 |
| nbclient | 0.5.13 |
| nbconvert | 6.5.4 |
| nbformat | 5.9.2 |
| nest-asyncio | 1.5.6 |
| networkx | 3.1 |
| nltk | 3.8.1 |
| notebook | 6.5.4 |
| notebook-shim | 0.2.2 |
| numba | 0.57.1 |
| numexpr | 2.8.4 |
| numpy | 1.24.3 |
| numpy-base | 1.24.3 |
| numpydoc | 1.5.0 |
| openjpeg | 2.4.0 |
| openpyxl | 3.0.10 |
| openssl | 3.0.10 |
| orc | 1.7.4 |
| packaging | 23.1 |
| pandas | 2.0.3 |
| pandocfilters | 1.5.0 |
| panel | 1.2.3 |
| param | 1.13.0 |
| paramiko | 2.8.1 |
| parsel | 1.6.0 |
| parso | 0.8.3 |
| partd | 1.4.0 |
| pathlib | 1.0.1 |
| pathspec | 0.10.3 |
| patsy | 0.5.3 |
| pcre | 8.45 |
| pcre2 | 10.42 |
| pep8 | 1.7.1 |
| pexpect | 4.8.0 |
| pickleshare | 0.7.5 |
| pillow | 9.4.0 |
| pip | 23.2.1 |
| pkce | 1.0.3 |
| pkginfo | 1.9.6 |
| platformdirs | 3.10.0 |
| plotly | 5.9.0 |
| pluggy | 1.0.0 |
| ply | 3.11 |
| powershell\_shortcut | 0.0.1 |
| poyo | 0.5.0 |
| prometheus\_client | 0.14.1 |
| prompt-toolkit | 3.0.36 |
| prompt\_toolkit | 3.0.36 |
| protego | 0.1.16 |
| psutil | 5.9.0 |
| ptyprocess | 0.7.0 |
| pure\_eval | 0.2.2 |
| py-cpuinfo | 8.0.0 |
| py-lief | 0.12.3 |
| pyarrow | 11.0.0 |
| pyasn1 | 0.4.8 |
| pyasn1-modules | 0.2.8 |
| pybind11-abi | 4 |
| pycodestyle | 2.10.0 |
| pycosat | 0.6.4 |
| pycparser | 2.21 |
| pyct | 0.5.0 |
| pycurl | 7.45.2 |
| pydantic | 1.10.8 |
| pydispatcher | 2.0.5 |
| pydocstyle | 6.3.0 |
| pyerfa | 2.0.0 |
| pyflakes | 3.0.1 |
| pygments | 2.15.1 |
| pyjwt | 2.4.0 |
| pylint | 2.16.2 |
| pylint-venv | 2.3.0 |
| pyls-spyder | 0.4.0 |
| pynacl | 1.5.0 |
| pyodbc | 4.0.34 |
| pyopenssl | 23.2.0 |
| pyparsing | 3.0.9 |
| pyqt | 5.15.7 |
| pyqt5-sip | 12.11.0 |
| pyqtwebengine | 5.15.7 |
| pyrsistent | 0.18.0 |
| pysocks | 1.7.1 |
| pytables | 3.8.0 |
| pytest | 7.4.0 |
| python | 3.11.5 |
| python-dateutil | 2.8.2 |
| python-dotenv | 0.21.0 |
| python-fastjsonschema | 2.16.2 |
| python-json-logger | 2.0.7 |
| python-kaleido | 0.2.1 |
| python-libarchive-c | 2.9 |
| python-lmdb | 1.4.1 |
| python-lsp-black | 1.2.1 |
| python-lsp-jsonrpc | 1.0.0 |
| python-lsp-server | 1.7.2 |
| python-slugify | 5.0.2 |
| python-snappy | 0.6.1 |
| python-tzdata | 2023.3 |
| python-xxhash | 2.0.2 |
| pytoolconfig | 1.2.5 |
| pytz | 2023.3.post1 |
| pyviz\_comms | 2.3.0 |
| pywavelets | 1.4.1 |
| pywin32 | 305 |
| pywin32-ctypes | 0.2.0 |
| pywinpty | 2.0.10 |
| pyyaml | 6.0 |
| pyzmq | 23.2.0 |
| qdarkstyle | 3.0.2 |
| qstylizer | 0.2.2 |
| qt-main | 5.15.2 |
| qt-webengine | 5.15.9 |
| qtawesome | 1.2.2 |
| qtconsole | 5.4.2 |
| qtpy | 2.2.0 |
| qtwebkit | 5.212 |
| queuelib | 1.5.0 |
| re2 | 2022.04.01 |
| regex | 2022.7.9 |
| reproc | 14.2.4 |
| reproc-cpp | 14.2.4 |
| requests | 2.31.0 |
| requests-file | 1.5.1 |
| requests-toolbelt | 1.0.0 |
| responses | 0.13.3 |
| rfc3339-validator | 0.1.4 |
| rfc3986-validator | 0.1.1 |
| rope | 1.7.0 |
| rtree | 1.0.1 |
| ruamel.yaml | 0.17.21 |
| ruamel\_yaml | 0.17.21 |
| s3fs | 2023.4.0 |
| safetensors | 0.3.2 |
| scikit-image | 0.20.0 |
| scikit-learn | 1.3.0 |
| scikit-learn-intelex | 2023.1.1 |
| scipy | 1.11.1 |
| scrapy | 2.8.0 |
| seaborn | 0.12.2 |
| send2trash | 1.8.0 |
| service\_identity | 18.1.0 |
| setuptools | 68.0.0 |
| sip | 6.6.2 |
| six | 1.16.0 |
| smart\_open | 5.2.1 |
| snappy | 1.1.9 |
| sniffio | 1.2.0 |
| snowballstemmer | 2.2.0 |
| sortedcontainers | 2.4.0 |
| soupsieve | 2.4 |
| sphinx | 5.0.2 |
| sphinxcontrib-applehelp | 1.0.2 |
| sphinxcontrib-devhelp | 1.0.2 |
| sphinxcontrib-htmlhelp | 2.0.0 |
| sphinxcontrib-jsmath | 1.0.1 |
| sphinxcontrib-qthelp | 1.0.3 |
| sphinxcontrib-serializinghtml | 1.1.5 |
| spyder | 5.4.3 |
| spyder-kernels | 2.4.4 |
| sqlalchemy | 1.4.39 |
| sqlite | 3.41.2 |
| stack\_data | 0.2.0 |
| statsmodels | 0.14.0 |
| sympy | 1.11.1 |
| tabulate | 0.8.10 |
| tbb | 2021.8.0 |
| tbb4py | 2021.8.0 |
| tblib | 1.7.0 |
| tenacity | 8.2.2 |
| terminado | 0.17.1 |
| text-unidecode | 1.3 |
| textdistance | 4.2.1 |
| threadpoolctl | 2.2.0 |
| three-merge | 0.1.1 |
| tifffile | 2023.4.12 |
| tinycss2 | 1.2.1 |
| tk | 8.6.12 |
| tldextract | 3.2.0 |
| tokenizers | 0.13.2 |
| toml | 0.10.2 |
| tomlkit | 0.11.1 |
| toolz | 0.12.0 |
| tornado | 6.3.2 |
| tqdm | 4.65.0 |
| traitlets | 5.7.1 |
| transformers | 4.32.1 |
| twisted | 22.10.0 |
| twisted-iocpsupport | 1.0.2 |
| typing-extensions | 4.7.1 |
| typing\_extensions | 4.7.1 |
| tzdata | 2023c |
| uc-micro-py | 1.0.1 |
| ujson | 5.4.0 |
| unidecode | 1.2.0 |
| urllib3 | 1.26.16 |
| utf8proc | 2.6.1 |
| vc | 14.2 |
| vs2015\_runtime | 14.27.29016 |
| w3lib | 1.21.0 |
| watchdog | 2.1.6 |
| wcwidth | 0.2.5 |
| webencodings | 0.5.1 |
| websocket-client | 0.58.0 |
| werkzeug | 2.2.3 |
| whatthepatch | 1.0.2 |
| wheel | 0.38.4 |
| widgetsnbextension | 4.0.5 |
| win\_inet\_pton | 1.1.0 |
| winpty | 0.4.3 |
| wrapt | 1.14.1 |
| xarray | 2023.6.0 |
| xlwings | 0.29.1 |
| xxhash | 0.8.0 |
| xyzservices | 2022.9.0 |
| xz | 5.4.2 |
| y-py | 0.5.9 |
| yaml | 0.2.5 |
| yaml-cpp | 0.7.0 |
| yapf | 0.31.0 |
| yarl | 1.8.1 |
| ypy-websocket | 0.8.2 |
| zeromq | 4.3.4 |
| zfp | 1.0.0 |
| zict | 2.2.0 |
| zipp | 3.11.0 |
| zlib | 1.2.13 |
| zlib-ng | 2.0.7 |
| zope | 1.0 |
| zope.interface | 5.4.0 |
| zstandard | 0.19.0 |
| zstd | 1.5.5 |
| Package Name | linux-64 | linux-aarch64 | linux-ppc64le | linux-s390x | osx-arm64 | osx-64 | win-64 |
|---|---|---|---|---|---|---|---|
| \_anaconda\_depends | 2023.07 | 2023.07 | 2023.07 | 2023.07 | 2023.07 | 2023.07 | 2023.07 |
| \_libgcc\_mutex | 0.1 | 0.1 | 0.1 | 0.1 | |||
| \_openmp\_mutex | 5.1 | 5.1 | 5.1 | 5.1 | |||
| abseil-cpp | 20211102.0 | 20211102.0 | 20211102.0 | 20211102.0 | 20211102.0 | 20211102.0 | |
| aiobotocore | 2.5.0 | 2.5.0 | 2.4.2 | 2.4.2 | 2.5.0 | 2.4.2 | 2.4.2 |
| aiofiles | 22.1.0 | 22.1.0 | 22.1.0 | 22.1.0 | 22.1.0 | 22.1.0 | |
| aiohttp | 3.8.3 | 3.8.3 | 3.8.3 | 3.8.3 | 3.8.3 | 3.8.3 | 3.8.3 |
| aioitertools | 0.7.1 | 0.7.1 | 0.7.1 | 0.7.1 | 0.7.1 | 0.7.1 | 0.7.1 |
| aiosignal | 1.2.0 | 1.2.0 | 1.2.0 | 1.2.0 | 1.2.0 | 1.2.0 | 1.2.0 |
| aiosqlite | 0.18.0 | 0.18.0 | 0.18.0 | 0.18.0 | 0.18.0 | 0.18.0 | |
| alabaster | 0.7.12 | 0.7.12 | 0.7.12 | 0.7.12 | 0.7.12 | ||
| anaconda-catalogs | 0.2.0 | 0.2.0 | 0.2.0 | 0.2.0 | 0.2.0 | 0.2.0 | 0.2.0 |
| anaconda-client | 1.12.0 | 1.12.0 | 1.12.0 | 1.12.0 | 1.12.0 | 1.12.0 | 1.12.0 |
| anaconda-navigator | 2.4.2 | 2.4.2 | 2.4.2 | 2.4.2 | 2.4.2 | ||
| anaconda-project | 0.11.1 | 0.11.1 | 0.11.1 | 0.11.1 | 0.11.1 | 0.11.1 | 0.11.1 |
| anyio | 3.5.0 | 3.5.0 | 3.5.0 | 3.5.0 | 3.5.0 | 3.5.0 | 3.5.0 |
| appdirs | 1.4.4 | 1.4.4 | 1.4.4 | 1.4.4 | 1.4.4 | 1.4.4 | 1.4.4 |
| applaunchservices | 0.3.0 | 0.3.0 | |||||
| appnope | 0.1.2 | 0.1.2 | |||||
| appscript | 1.1.2 | 1.1.2 | |||||
| argon2-cffi | 21.3.0 | 21.3.0 | 21.3.0 | 21.3.0 | 21.3.0 | 21.3.0 | 21.3.0 |
| argon2-cffi-bindings | 21.2.0 | 21.2.0 | 21.2.0 | 21.2.0 | 21.2.0 | 21.2.0 | 21.2.0 |
| arrow | 1.2.3 | 1.2.3 | 1.2.3 | 1.2.3 | 1.2.3 | ||
| arrow-cpp | 11.0.0 | 11.0.0 | 11.0.0 | 11.0.0 | 11.0.0 | 11.0.0 | |
| astroid | 2.14.2 | 2.14.2 | 2.14.2 | 2.14.2 | 2.14.2 | 2.14.2 | 2.14.2 |
| astropy | 5.1 | 5.1 | 5.1 | 5.1 | 5.1 | 5.1 | 5.1 |
| asttokens | 2.0.5 | 2.0.5 | 2.0.5 | 2.0.5 | 2.0.5 | 2.0.5 | 2.0.5 |
| async-timeout | 4.0.2 | 4.0.2 | 4.0.2 | 4.0.2 | 4.0.2 | 4.0.2 | 4.0.2 |
| atomicwrites | 1.4.0 | 1.4.0 | 1.4.0 | 1.4.0 | 1.4.0 | ||
| attrs | 22.1.0 | 22.1.0 | 22.1.0 | 22.1.0 | 22.1.0 | 22.1.0 | 22.1.0 |
| automat | 20.2.0 | 20.2.0 | 20.2.0 | 20.2.0 | 20.2.0 | 20.2.0 | |
| autopep8 | 1.6.0 | 1.6.0 | 1.6.0 | 1.6.0 | 1.6.0 | ||
| aws-c-common | 0.4.57 | 0.5.11 | 0.4.57 | 0.6.8 | 0.4.57 | 0.4.57 | |
| aws-c-event-stream | 0.1.6 | 0.1.6 | 0.1.6 | 0.1.6 | 0.1.6 | 0.1.6 | |
| aws-checksums | 0.1.9 | 0.1.11 | 0.1.9 | 0.1.11 | 0.1.9 | 0.1.9 | |
| aws-sdk-cpp | 1.8.185 | 1.8.185 | 1.8.185 | 1.8.185 | 1.8.185 | 1.8.185 | |
| babel | 2.11.0 | 2.11.0 | 2.11.0 | 2.11.0 | 2.11.0 | 2.11.0 | 2.11.0 |
| backcall | 0.2.0 | 0.2.0 | 0.2.0 | 0.2.0 | 0.2.0 | 0.2.0 | 0.2.0 |
| backports | 1.1 | 1.1 | 1.1 | 1.1 | 1.1 | 1.1 | 1.1 |
| backports.functools\_lru\_cache | 1.6.4 | 1.6.4 | 1.6.4 | 1.6.4 | 1.6.4 | 1.6.4 | 1.6.4 |
| backports.tempfile | 1.0 | 1.0 | 1.0 | 1.0 | 1.0 | 1.0 | 1.0 |
| backports.weakref | 1.0.post1 | 1.0.post1 | 1.0.post1 | 1.0.post1 | 1.0.post1 | 1.0.post1 | 1.0.post1 |
| bcrypt | 3.2.0 | 3.2.0 | 3.2.0 | 3.2.0 | 3.2.0 | 3.2.0 | |
| beautifulsoup4 | 4.12.2 | 4.12.2 | 4.12.2 | 4.12.2 | 4.12.2 | 4.12.2 | 4.12.2 |
| binaryornot | 0.4.4 | 0.4.4 | 0.4.4 | 0.4.4 | 0.4.4 | ||
| black | 23.3.0 | 23.3.0 | 23.3.0 | 23.3.0 | 23.3.0 | ||
| blas | 1.0 | 1.0 | 1.0 | 1.0 | 1.0 | 1.0 | 1.0 |
| bleach | 4.1.0 | 4.1.0 | 4.1.0 | 4.1.0 | 4.1.0 | 4.1.0 | 4.1.0 |
| blosc | 1.21.3 | 1.21.3 | 1.21.3 | 1.21.3 | 1.21.3 | 1.21.3 | 1.21.3 |
| bokeh | 3.2.1 | 2.4.3 | 3.2.1 | 2.4.3 | 3.2.1 | 3.2.1 | 3.2.1 |
| boltons | 23.0.0 | 23.0.0 | 23.0.0 | 23.0.0 | 23.0.0 | 23.0.0 | 23.0.0 |
| boost-cpp | 1.73.0 | 1.73.0 | 1.73.0 | 1.73.0 | 1.73.0 | 1.73.0 | |
| boto3 | 1.24.28 | 1.24.28 | 1.24.28 | 1.24.28 | |||
| botocore | 1.29.76 | 1.29.76 | 1.27.59 | 1.27.59 | 1.29.76 | 1.27.59 | 1.27.59 |
| bottleneck | 1.3.5 | 1.3.5 | 1.3.5 | 1.3.5 | 1.3.5 | 1.3.5 | 1.3.5 |
| brotli | 1.0.9 | 1.0.9 | 1.0.9 | 1.0.9 | 1.0.9 | 1.0.9 | 1.0.9 |
| brotli-bin | 1.0.9 | 1.0.9 | 1.0.9 | 1.0.9 | 1.0.9 | 1.0.9 | 1.0.9 |
| brotlipy | 0.7.0 | 0.7.0 | 0.7.0 | 0.7.0 | 0.7.0 | 0.7.0 | 0.7.0 |
| brunsli | 0.1 | 0.1 | 0.1 | 0.1 | 0.1 | ||
| bzip2 | 1.0.8 | 1.0.8 | 1.0.8 | 1.0.8 | 1.0.8 | 1.0.8 | 1.0.8 |
| c-ares | 1.19.0 | 1.19.0 | 1.19.0 | 1.19.0 | 1.19.0 | 1.19.0 | 1.19.0 |
| c-blosc2 | 2.8.0 | 2.8.0 | 2.8.0 | 2.8.0 | 2.8.0 | 2.8.0 | |
| ca-certificates | 2023.05.30 | 2023.05.30 | 2023.05.30 | 2023.05.30 | 2023.05.30 | 2023.05.30 | 2023.05.30 |
| cctools | 949.0.1 | 949.0.1 | |||||
| cctools\_osx-64 | 949.0.1 | ||||||
| cctools\_osx-arm64 | 949.0.1 | ||||||
| certifi | 2023.7.22 | 2023.7.22 | 2023.7.22 | 2023.7.22 | 2023.7.22 | 2023.7.22 | 2023.7.22 |
| cffi | 1.15.1 | 1.15.1 | 1.15.1 | 1.15.1 | 1.15.1 | 1.15.1 | 1.15.1 |
| cfitsio | 3.470 | 3.470 | 3.470 | 3.470 | 3.470 | 3.470 | 3.470 |
| chardet | 4.0.0 | 4.0.0 | 4.0.0 | 4.0.0 | 4.0.0 | 4.0.0 | 4.0.0 |
| charls | 2.2.0 | 2.2.0 | 2.2.0 | 2.2.0 | 2.2.0 | 2.2.0 | |
| charset-normalizer | 2.0.4 | 2.0.4 | 2.0.4 | 2.0.4 | 2.0.4 | 2.0.4 | 2.0.4 |
| click | 8.0.4 | 8.0.4 | 8.0.4 | 8.0.4 | 8.0.4 | 8.0.4 | 8.0.4 |
| cloudpickle | 2.2.1 | 2.2.1 | 2.2.1 | 2.2.1 | 2.2.1 | 2.2.1 | 2.2.1 |
| clyent | 1.2.2 | 1.2.2 | 1.2.2 | 1.2.2 | 1.2.2 | 1.2.2 | 1.2.2 |
| colorama | 0.4.6 | 0.4.6 | 0.4.6 | 0.4.6 | 0.4.6 | 0.4.6 | 0.4.6 |
| colorcet | 3.0.1 | 3.0.1 | 3.0.1 | 3.0.1 | 3.0.1 | 3.0.1 | 3.0.1 |
| comm | 0.1.2 | 0.1.2 | 0.1.2 | 0.1.2 | 0.1.2 | 0.1.2 | 0.1.2 |
| conda | 23.7.2 | 23.7.2 | 23.7.2 | 23.7.2 | 23.7.2 | 23.7.2 | 23.7.2 |
| conda-build | 3.26.0 | 3.26.0 | 3.26.0 | 3.26.0 | 3.26.0 | 3.26.0 | 3.26.0 |
| conda-content-trust | 0.1.1 | 0.1.1 | 0.1.3 | 0.1.1 | 0.1.1 | 0.1.1 | 0.1.1 |
| conda-index | 0.2.3 | 0.2.3 | 0.2.3 | 0.2.3 | 0.2.3 | 0.2.3 | 0.2.3 |
| conda-libmamba-solver | 23.5.0 | 23.5.0 | 23.5.0 | 23.5.0 | 23.5.0 | 23.5.0 | 23.5.0 |
| conda-pack | 0.6.0 | 0.6.0 | 0.6.0 | 0.6.0 | 0.6.0 | 0.6.0 | 0.6.0 |
| conda-package-handling | 2.2.0 | 2.2.0 | 2.2.0 | 2.2.0 | 2.2.0 | 2.2.0 | 2.2.0 |
| conda-package-streaming | 0.9.0 | 0.9.0 | 0.9.0 | 0.9.0 | 0.9.0 | 0.9.0 | 0.9.0 |
| conda-repo-cli | 1.0.41 | 1.0.41 | 1.0.41 | 1.0.41 | 1.0.41 | ||
| conda-token | 0.4.0 | 0.4.0 | 0.4.0 | 0.4.0 | 0.4.0 | 0.4.0 | 0.4.0 |
| conda-verify | 3.4.2 | 3.4.2 | 3.4.2 | 3.4.2 | 3.4.2 | 3.4.2 | 3.4.2 |
| console\_shortcut | 0.1.1 | ||||||
| constantly | 15.1.0 | 15.1.0 | 15.1.0 | 15.1.0 | 15.1.0 | 15.1.0 | |
| contourpy | 1.0.5 | 1.0.5 | 1.0.5 | 1.0.5 | 1.0.5 | 1.0.5 | 1.0.5 |
| cookiecutter | 1.7.3 | 1.7.3 | 1.7.3 | 1.7.3 | 1.7.3 | ||
| cryptography | 41.0.2 | 41.0.2 | 39.0.1 | 41.0.2 | 41.0.2 | 41.0.2 | 41.0.2 |
| cssselect | 1.1.0 | 1.1.0 | 1.1.0 | 1.1.0 | 1.1.0 | 1.1.0 | |
| curl | 8.1.1 | 8.1.1 | 8.1.1 | 8.1.1 | 8.1.1 | 8.1.1 | 8.1.1 |
| cycler | 0.11.0 | 0.11.0 | 0.11.0 | 0.11.0 | 0.11.0 | 0.11.0 | 0.11.0 |
| cytoolz | 0.12.0 | 0.12.0 | 0.12.0 | 0.12.0 | 0.12.0 | 0.12.0 | 0.12.0 |
| daal4py | 2023.1.1 | 2023.1.1 | |||||
| dal | 2023.1.1 | 2023.1.1 | |||||
| dask | 2023.6.0 | 2023.4.1 | 2023.6.0 | 2023.6.0 | 2023.6.0 | 2023.6.0 | 2023.6.0 |
| dask-core | 2023.6.0 | 2023.4.1 | 2023.6.0 | 2023.6.0 | 2023.6.0 | 2023.6.0 | 2023.6.0 |
| datasets | 2.12.0 | 2.12.0 | 2.12.0 | ||||
| datashader | 0.15.1 | 0.15.1 | 0.15.1 | 0.15.1 | 0.15.1 | 0.15.1 | |
| datashape | 0.5.4 | 0.5.4 | 0.5.4 | 0.5.4 | 0.5.4 | 0.5.4 | |
| dbus | 1.13.18 | 1.13.18 | |||||
| debugpy | 1.6.7 | 1.6.7 | 1.6.7 | 1.6.7 | 1.6.7 | 1.6.7 | 1.6.7 |
| decorator | 5.1.1 | 5.1.1 | 5.1.1 | 5.1.1 | 5.1.1 | 5.1.1 | 5.1.1 |
| defusedxml | 0.7.1 | 0.7.1 | 0.7.1 | 0.7.1 | 0.7.1 | 0.7.1 | 0.7.1 |
| diff-match-patch | 20200713 | 20200713 | 20200713 | 20200713 | 20200713 | ||
| dill | 0.3.6 | 0.3.6 | 0.3.6 | 0.3.6 | 0.3.6 | 0.3.6 | 0.3.6 |
| distributed | 2023.6.0 | 2023.4.1 | 2023.6.0 | 2023.6.0 | 2023.6.0 | 2023.6.0 | 2023.6.0 |
| docstring-to-markdown | 0.11 | 0.11 | 0.11 | 0.11 | 0.11 | ||
| docutils | 0.18.1 | 0.18.1 | 0.18.1 | 0.18.1 | 0.18.1 | ||
| entrypoints | 0.4 | 0.4 | 0.4 | 0.4 | 0.4 | 0.4 | 0.4 |
| et\_xmlfile | 1.1.0 | 1.1.0 | 1.1.0 | 1.1.0 | 1.1.0 | 1.1.0 | 1.1.0 |
| executing | 0.8.3 | 0.8.3 | 0.8.3 | 0.8.3 | 0.8.3 | 0.8.3 | 0.8.3 |
| expat | 2.4.9 | 2.4.9 | |||||
| filelock | 3.9.0 | 3.9.0 | 3.9.0 | 3.9.0 | 3.9.0 | 3.9.0 | 3.9.0 |
| flake8 | 6.0.0 | 6.0.0 | 6.0.0 | 6.0.0 | 6.0.0 | ||
| flask | 2.2.2 | 2.2.2 | 2.2.2 | 2.2.2 | 2.2.2 | 2.2.2 | 2.2.2 |
| fmt | 9.1.0 | 9.1.0 | 9.1.0 | 9.1.0 | 9.1.0 | 9.1.0 | 9.1.0 |
| fontconfig | 2.14.1 | 2.14.1 | |||||
| fonttools | 4.25.0 | 4.25.0 | 4.25.0 | 4.25.0 | 4.25.0 | 4.25.0 | 4.25.0 |
| freetype | 2.12.1 | 2.12.1 | 2.12.1 | 2.12.1 | 2.12.1 | 2.12.1 | 2.12.1 |
| frozenlist | 1.3.3 | 1.3.3 | 1.3.3 | 1.3.3 | 1.3.3 | 1.3.3 | 1.3.3 |
| fsspec | 2023.4.0 | 2023.4.0 | 2023.3.0 | 2023.3.0 | 2023.4.0 | 2023.3.0 | 2023.3.0 |
| future | 0.18.3 | 0.18.3 | 0.18.3 | 0.18.3 | 0.18.3 | 0.18.3 | 0.18.3 |
| gensim | 4.3.0 | 4.3.0 | 4.3.0 | 4.3.0 | 4.3.0 | 4.3.0 | |
| gettext | 0.21.0 | 0.21.0 | |||||
| gflags | 2.2.2 | 2.2.2 | 2.2.2 | 2.2.2 | 2.2.2 | 2.2.2 | |
| giflib | 5.2.1 | 5.2.1 | 5.2.1 | 5.2.1 | 5.2.1 | 5.2.1 | 5.2.1 |
| glib | 2.69.1 | 2.69.1 | 2.69.1 | 2.69.1 | 2.69.1 | ||
| glob2 | 0.7 | 0.7 | 0.7 | 0.7 | 0.7 | 0.7 | 0.7 |
| glog | 0.5.0 | 0.5.0 | 0.5.0 | 0.5.0 | 0.5.0 | 0.5.0 | |
| gmp | 6.2.1 | 6.2.1 | 6.2.1 | 6.2.1 | 6.2.1 | 6.2.1 | |
| gmpy2 | 2.1.2 | 2.1.2 | 2.1.2 | 2.1.2 | 2.1.2 | 2.1.2 | |
| greenlet | 2.0.1 | 2.0.1 | 2.0.1 | 2.0.1 | 2.0.1 | 2.0.1 | 2.0.1 |
| grpc-cpp | 1.46.1 | 1.46.1 | 1.46.1 | 1.46.1 | 1.46.1 | ||
| gst-plugins-base | 1.14.1 | 1.14.1 | 1.14.1 | 1.14.1 | 1.18.5 | ||
| gstreamer | 1.14.1 | 1.14.1 | 1.14.1 | 1.14.1 | 1.18.5 | ||
| h5py | 3.7.0 | 3.7.0 | 3.7.0 | 3.7.0 | 3.7.0 | 3.7.0 | 3.7.0 |
| hdf5 | 1.10.6 | 1.10.6 | 1.10.6 | 1.10.6 | 1.12.1 | 1.10.6 | 1.10.6 |
| heapdict | 1.0.1 | 1.0.1 | 1.0.1 | 1.0.1 | 1.0.1 | 1.0.1 | 1.0.1 |
| holoviews | 1.17.0 | 1.17.0 | 1.17.0 | 1.14.8 | 1.17.0 | 1.17.0 | 1.17.0 |
| huggingface\_hub | 0.15.1 | 0.15.1 | 0.15.1 | ||||
| hvplot | 0.8.4 | 0.8.4 | 0.8.4 | 0.7.3 | 0.8.4 | 0.8.4 | 0.8.4 |
| hyperlink | 21.0.0 | 21.0.0 | 21.0.0 | 21.0.0 | 21.0.0 | 21.0.0 | |
| icc\_rt | 2022.1.0 | ||||||
| icu | 58.2 | 68.1 | 58.2 | 68.1 | 68.1 | 58.2 | 58.2 |
| idna | 3.4 | 3.4 | 3.4 | 3.3 | 3.4 | 3.4 | 3.4 |
| imagecodecs | 2021.8.26 | 2021.8.26 | 2021.8.26 | 2021.8.26 | 2021.8.26 | 2021.8.26 | 2021.8.26 |
| imageio | 2.31.1 | 2.31.1 | 2.31.1 | 2.26.0 | 2.31.1 | 2.31.1 | 2.26.0 |
| imagesize | 1.4.1 | 1.4.1 | 1.4.1 | 1.4.1 | 1.4.1 | ||
| imbalanced-learn | 0.10.1 | 0.10.1 | 0.10.1 | 0.10.1 | 0.10.1 | 0.10.1 | 0.10.1 |
| importlib-metadata | 6.0.0 | 6.0.0 | 6.0.0 | 6.0.0 | 6.0.0 | 6.0.0 | 6.0.0 |
| importlib\_metadata | 6.0.0 | 6.0.0 | 6.0.0 | 6.0.0 | 6.0.0 | ||
| incremental | 21.3.0 | 21.3.0 | 21.3.0 | 21.3.0 | 21.3.0 | 21.3.0 | |
| inflection | 0.5.1 | 0.5.1 | 0.5.1 | 0.5.1 | 0.5.1 | ||
| iniconfig | 1.1.1 | 1.1.1 | 1.1.1 | 1.1.1 | 1.1.1 | 1.1.1 | 1.1.1 |
| intake | 0.6.8 | 0.6.8 | 0.6.8 | 0.6.8 | 0.6.8 | 0.6.8 | 0.6.8 |
| intel-openmp | 2023.1.0 | 2023.1.0 | |||||
| intervaltree | 3.1.0 | 3.1.0 | 3.1.0 | 3.1.0 | 3.1.0 | ||
| ipykernel | 6.19.2 | 6.19.2 | 6.19.2 | 6.19.2 | 6.19.2 | 6.19.2 | 6.19.2 |
| ipython | 8.12.0 | 8.12.0 | 8.12.0 | 8.12.0 | 8.12.0 | 8.12.0 | 8.12.0 |
| ipython\_genutils | 0.2.0 | 0.2.0 | 0.2.0 | 0.2.0 | 0.2.0 | 0.2.0 | 0.2.0 |
| ipywidgets | 8.0.4 | 8.0.4 | 8.0.4 | 8.0.4 | 8.0.4 | 8.0.4 | 8.0.4 |
| isort | 5.9.3 | 5.9.3 | 5.9.3 | 5.9.3 | 5.9.3 | 5.9.3 | 5.9.3 |
| itemadapter | 0.3.0 | 0.3.0 | 0.3.0 | 0.3.0 | 0.3.0 | 0.3.0 | |
| itemloaders | 1.0.4 | 1.0.4 | 1.0.4 | 1.0.4 | 1.0.4 | 1.0.4 | |
| itsdangerous | 2.0.1 | 2.0.1 | 2.0.1 | 2.0.1 | 2.0.1 | 2.0.1 | 2.0.1 |
| jaraco.classes | 3.2.1 | 3.2.1 | 3.2.1 | 3.2.1 | 3.2.1 | ||
| jedi | 0.18.1 | 0.18.1 | 0.18.1 | 0.18.1 | 0.18.1 | 0.18.1 | 0.18.1 |
| jeepney | 0.7.1 | 0.7.1 | |||||
| jellyfish | 0.9.0 | 0.9.0 | 0.9.0 | 0.9.0 | 0.9.0 | ||
| jinja2 | 3.1.2 | 3.1.2 | 3.1.2 | 3.1.2 | 3.1.2 | 3.1.2 | 3.1.2 |
| jinja2-time | 0.2.0 | 0.2.0 | 0.2.0 | 0.2.0 | 0.2.0 | ||
| jmespath | 0.10.0 | 0.10.0 | 0.10.0 | 0.10.0 | 0.10.0 | 0.10.0 | 0.10.0 |
| joblib | 1.2.0 | 1.2.0 | 1.2.0 | 1.2.0 | 1.2.0 | 1.2.0 | 1.2.0 |
| jpeg | 9e | 9e | 9e | 9e | 9e | 9e | 9e |
| jq | 1.6 | 1.6 | 1.6 | 1.6 | 1.6 | 1.6 | |
| json5 | 0.9.6 | 0.9.6 | 0.9.6 | 0.9.6 | 0.9.6 | 0.9.6 | 0.9.6 |
| jsonpatch | 1.32 | 1.32 | 1.32 | 1.32 | 1.32 | 1.32 | 1.32 |
| jsonpointer | 2.1 | 2.1 | 2.1 | 2.1 | 2.1 | 2.1 | 2.1 |
| jsonschema | 4.17.3 | 4.17.3 | 4.17.3 | 4.17.3 | 4.17.3 | 4.17.3 | 4.17.3 |
| jupyter | 1.0.0 | 1.0.0 | 1.0.0 | 1.0.0 | 1.0.0 | 1.0.0 | 1.0.0 |
| jupyter\_client | 7.4.9 | 7.4.9 | 7.4.9 | 7.4.9 | 7.4.9 | 7.4.9 | 7.4.9 |
| jupyter\_console | 6.6.3 | 6.6.3 | 6.6.3 | 6.6.3 | 6.6.3 | 6.6.3 | 6.6.3 |
| jupyter\_core | 5.3.0 | 5.3.0 | 5.3.0 | 5.3.0 | 5.3.0 | 5.3.0 | 5.3.0 |
| jupyter\_events | 0.6.3 | 0.6.3 | 0.6.3 | 0.6.3 | 0.6.3 | 0.6.3 | |
| jupyter\_server | 1.23.4 | 1.23.4 | 1.23.4 | 1.23.4 | 1.23.4 | 1.23.4 | 1.23.4 |
| jupyter\_server\_fileid | 0.9.0 | 0.9.0 | 0.9.0 | 0.9.0 | 0.9.0 | 0.9.0 | |
| jupyter\_server\_ydoc | 0.8.0 | 0.8.0 | 0.8.0 | 0.8.0 | 0.8.0 | 0.8.0 | |
| jupyter\_ydoc | 0.2.4 | 0.2.4 | 0.2.4 | 0.2.4 | 0.2.4 | 0.2.4 | |
| jupyterlab | 3.6.3 | 3.6.3 | 3.6.3 | 3.3.2 | 3.6.3 | 3.6.3 | 3.6.3 |
| jupyterlab\_pygments | 0.1.2 | 0.1.2 | 0.1.2 | 0.1.2 | 0.1.2 | 0.1.2 | 0.1.2 |
| jupyterlab\_server | 2.22.0 | 2.22.0 | 2.22.0 | 2.21.0 | 2.22.0 | 2.22.0 | 2.22.0 |
| jupyterlab\_widgets | 3.0.5 | 3.0.5 | 3.0.5 | 3.0.5 | 3.0.5 | 3.0.5 | 3.0.5 |
| jxrlib | 1.1 | 1.1 | 1.1 | 1.1 | 1.1 | 1.1 | 1.1 |
| keyring | 23.13.1 | 23.13.1 | 23.13.1 | 23.13.1 | 23.13.1 | ||
| kiwisolver | 1.4.4 | 1.4.4 | 1.4.4 | 1.4.4 | 1.4.4 | 1.4.4 | 1.4.4 |
| krb5 | 1.20.1 | 1.20.1 | 1.20.1 | 1.20.1 | 1.20.1 | 1.20.1 | 1.19.4 |
| lazy-object-proxy | 1.6.0 | 1.6.0 | 1.6.0 | 1.6.0 | 1.6.0 | 1.6.0 | 1.6.0 |
| lazy\_loader | 0.2 | 0.2 | 0.2 | 0.1 | 0.2 | 0.2 | 0.2 |
| lcms2 | 2.12 | 2.12 | 2.12 | 2.12 | 2.12 | 2.12 | 2.12 |
| ld64 | 530 | 530 | |||||
| ld64\_osx-64 | 530 | ||||||
| ld64\_osx-arm64 | 530 | ||||||
| ld\_impl\_linux-64 | 2.38 | ||||||
| ld\_impl\_linux-aarch64 | 2.38 | ||||||
| ld\_impl\_linux-ppc64le | 2.38 | ||||||
| ld\_impl\_linux-s390x | 2.38 | ||||||
| ldid | 2.1.5 | 2.1.5 | |||||
| lerc | 3.0 | 3.0 | 3.0 | 3.0 | 3.0 | 3.0 | 3.0 |
| libaec | 1.0.4 | 1.0.4 | 1.0.4 | 1.0.4 | 1.0.4 | 1.0.4 | 1.0.4 |
| libarchive | 3.6.2 | 3.6.2 | 3.6.2 | 3.6.2 | 3.6.2 | 3.6.2 | 3.6.2 |
| libboost | 1.73.0 | 1.73.0 | 1.73.0 | 1.73.0 | 1.73.0 | 1.73.0 | |
| libbrotlicommon | 1.0.9 | 1.0.9 | 1.0.9 | 1.0.9 | 1.0.9 | 1.0.9 | 1.0.9 |
| libbrotlidec | 1.0.9 | 1.0.9 | 1.0.9 | 1.0.9 | 1.0.9 | 1.0.9 | 1.0.9 |
| libbrotlienc | 1.0.9 | 1.0.9 | 1.0.9 | 1.0.9 | 1.0.9 | 1.0.9 | 1.0.9 |
| libclang | 10.0.1 | 10.0.1 | 12.0.0 | 12.0.0 | 14.0.6 | ||
| libclang13 | 14.0.6 | ||||||
| libcurl | 8.1.1 | 8.1.1 | 8.1.1 | 8.1.1 | 8.1.1 | 8.1.1 | 8.1.1 |
| libcxx | 14.0.6 | 14.0.6 | |||||
| libdeflate | 1.17 | 1.17 | 1.17 | 1.17 | 1.17 | 1.17 | 1.17 |
| libedit | 3.1.20221030 | 3.1.20221030 | 3.1.20221030 | 3.1.20221030 | 3.1.20221030 | 3.1.20221030 | |
| libev | 4.33 | 4.33 | 4.33 | 4.33 | 4.33 | 4.33 | |
| libevent | 2.1.12 | 2.1.12 | 2.1.12 | 2.1.12 | 2.1.12 | 2.1.12 | |
| libffi | 3.4.4 | 3.4.4 | 3.4.4 | 3.4.2 | 3.4.4 | 3.4.4 | 3.4.4 |
| libgcc-ng | 11.2.0 | 11.2.0 | 11.2.0 | 11.2.0 | |||
| libgfortran | 5.0.0 | 5.0.0 | |||||
| libgfortran-ng | 11.2.0 | 11.2.0 | 11.2.0 | 11.2.0 | |||
| libgfortran5 | 11.2.0 | 11.2.0 | 11.2.0 | 11.2.0 | 11.3.0 | 11.3.0 | |
| libgomp | 11.2.0 | 11.2.0 | 11.2.0 | 11.2.0 | |||
| libiconv | 1.16 | 1.16 | 1.16 | ||||
| liblief | 0.12.3 | 0.12.3 | 0.12.3 | 0.12.3 | 0.12.3 | 0.12.3 | 0.12.3 |
| libllvm10 | 10.0.1 | 10.0.1 | |||||
| libllvm12 | 12.0.0 | 12.0.0 | |||||
| libllvm14 | 14.0.6 | 14.0.6 | 14.0.6 | 14.0.6 | 14.0.6 | 14.0.6 | |
| libmamba | 1.4.1 | 1.4.1 | 1.4.1 | 1.4.1 | 1.4.1 | 1.4.1 | 1.4.1 |
| libmambapy | 1.4.1 | 1.4.1 | 1.4.1 | 1.4.1 | 1.4.1 | 1.4.1 | 1.4.1 |
| libnghttp2 | 1.52.0 | 1.52.0 | 1.52.0 | 1.52.0 | 1.52.0 | 1.52.0 | |
| libogg | 1.3.5 | ||||||
| libopenblas | 0.3.21 | 0.3.21 | 0.3.21 | 0.3.21 | 0.3.21 | ||
| libpng | 1.6.39 | 1.6.39 | 1.6.39 | 1.6.39 | 1.6.39 | 1.6.39 | 1.6.39 |
| libpq | 12.15 | 12.15 | 12.15 | 12.15 | |||
| libprotobuf | 3.20.3 | 3.20.3 | 3.20.3 | 3.20.3 | 3.20.3 | 3.20.3 | |
| libsodium | 1.0.18 | 1.0.18 | 1.0.18 | 1.0.18 | 1.0.18 | 1.0.18 | 1.0.18 |
| libsolv | 0.7.22 | 0.7.22 | 0.7.22 | 0.7.22 | 0.7.22 | 0.7.22 | 0.7.22 |
| libspatialindex | 1.9.3 | 1.9.3 | 1.9.3 | 1.9.3 | 1.9.3 | ||
| libssh2 | 1.10.0 | 1.10.0 | 1.10.0 | 1.10.0 | 1.10.0 | 1.10.0 | 1.10.0 |
| libstdcxx-ng | 11.2.0 | 11.2.0 | 11.2.0 | 11.2.0 | |||
| libthrift | 0.15.0 | 0.15.0 | 0.15.0 | 0.13.0 | 0.15.0 | 0.15.0 | |
| libtiff | 4.5.0 | 4.5.0 | 4.5.0 | 4.5.0 | 4.5.0 | 4.5.0 | 4.5.0 |
| libuuid | 1.41.5 | 1.41.5 | 1.41.5 | 1.41.5 | |||
| libuv | 1.44.2 | ||||||
| libvorbis | 1.3.7 | ||||||
| libwebp | 1.2.4 | 1.2.4 | 1.2.4 | 1.2.4 | 1.2.4 | 1.2.4 | 1.2.4 |
| libwebp-base | 1.2.4 | 1.2.4 | 1.2.4 | 1.2.4 | 1.2.4 | 1.2.4 | 1.2.4 |
| libxcb | 1.15 | 1.15 | |||||
| libxkbcommon | 1.0.1 | 1.0.1 | |||||
| libxml2 | 2.9.14 | 2.9.14 | 2.10.3 | 2.10.3 | 2.10.3 | 2.10.3 | 2.10.3 |
| libxslt | 1.1.35 | 1.1.35 | 1.1.37 | 1.1.37 | 1.1.37 | 1.1.37 | 1.1.37 |
| libzopfli | 1.0.3 | 1.0.3 | 1.0.3 | 1.0.3 | 1.0.3 | 1.0.3 | 1.0.3 |
| linkify-it-py | 2.0.0 | 2.0.0 | 2.0.0 | 2.0.0 | 2.0.0 | ||
| llvm-openmp | 14.0.6 | 14.0.6 | |||||
| llvmlite | 0.40.0 | 0.40.0 | 0.40.0 | 0.40.0 | 0.40.0 | 0.40.0 | |
| locket | 1.0.0 | 1.0.0 | 1.0.0 | 1.0.0 | 1.0.0 | 1.0.0 | 1.0.0 |
| lxml | 4.9.1 | 4.9.1 | 4.9.2 | 4.9.2 | 4.9.2 | 4.9.2 | 4.9.2 |
| lz4 | 4.3.2 | 4.3.2 | 4.3.2 | 4.3.2 | 4.3.2 | 4.3.2 | |
| lz4-c | 1.9.4 | 1.9.4 | 1.9.4 | 1.9.4 | 1.9.4 | 1.9.4 | 1.9.4 |
| lzo | 2.10 | 2.10 | 2.10 | 2.10 | 2.10 | 2.10 | 2.10 |
| m2-msys2-runtime | 2.5.0.17080.65c939c | ||||||
| m2-patch | 2.7.5 | ||||||
| m2w64-libwinpthread-git | 5.0.0.4634.697f757 | ||||||
| markdown | 3.4.1 | 3.4.1 | 3.4.1 | 3.4.1 | 3.4.1 | 3.4.1 | 3.4.1 |
| markdown-it-py | 2.2.0 | 2.2.0 | 2.2.0 | 2.2.0 | 2.2.0 | ||
| markupsafe | 2.1.1 | 2.1.1 | 2.1.1 | 2.1.1 | 2.1.1 | 2.1.1 | 2.1.1 |
| matplotlib | 3.7.1 | 3.7.1 | 3.7.1 | 3.7.1 | 3.7.1 | 3.7.1 | 3.7.1 |
| matplotlib-base | 3.7.1 | 3.7.1 | 3.7.1 | 3.7.1 | 3.7.1 | 3.7.1 | 3.7.1 |
| matplotlib-inline | 0.1.6 | 0.1.6 | 0.1.6 | 0.1.6 | 0.1.6 | 0.1.6 | 0.1.6 |
| mccabe | 0.7.0 | 0.7.0 | 0.7.0 | 0.7.0 | 0.7.0 | 0.7.0 | 0.7.0 |
| mdit-py-plugins | 0.3.0 | 0.3.0 | 0.3.0 | 0.3.0 | 0.3.0 | ||
| mdurl | 0.1.0 | 0.1.0 | 0.1.0 | 0.1.0 | 0.1.0 | ||
| menuinst | 1.4.19 | ||||||
| mistune | 0.8.4 | 0.8.4 | 0.8.4 | 0.8.4 | 0.8.4 | 0.8.4 | 0.8.4 |
| mkl | 2023.1.0 | 2023.1.0 | |||||
| mkl-service | 2.4.0 | 2.4.0 | |||||
| mkl\_fft | 1.3.6 | 1.3.6 | |||||
| mkl\_random | 1.2.2 | 1.2.2 | |||||
| mock | 4.0.3 | ||||||
| more-itertools | 8.12.0 | 8.12.0 | 8.12.0 | 8.12.0 | 8.12.0 | 8.12.0 | 8.12.0 |
| mpc | 1.1.0 | 1.1.0 | 1.1.0 | 1.1.0 | 1.1.0 | 1.1.0 | |
| mpfr | 4.0.2 | 4.0.2 | 4.0.2 | 4.0.2 | 4.0.2 | 4.0.2 | |
| mpi | 1.0 | ||||||
| mpich | 4.1.1 | ||||||
| mpmath | 1.3.0 | 1.3.0 | 1.3.0 | 1.3.0 | 1.3.0 | 1.3.0 | 1.3.0 |
| msgpack-python | 1.0.3 | 1.0.3 | 1.0.3 | 1.0.3 | 1.0.3 | 1.0.3 | 1.0.3 |
| msys2-conda-epoch | 20160418 | ||||||
| multidict | 6.0.2 | 6.0.2 | 6.0.2 | 6.0.2 | 6.0.2 | 6.0.2 | 6.0.2 |
| multipledispatch | 0.6.0 | 0.6.0 | 0.6.0 | 0.6.0 | 0.6.0 | 0.6.0 | |
| multiprocess | 0.70.14 | 0.70.14 | 0.70.14 | ||||
| munkres | 1.1.4 | 1.1.4 | 1.1.4 | 1.1.4 | 1.1.4 | 1.1.4 | 1.1.4 |
| mypy\_extensions | 0.4.3 | 0.4.3 | 0.4.3 | 0.4.3 | 0.4.3 | ||
| navigator-updater | 0.4.0 | 0.4.0 | 0.4.0 | 0.4.0 | 0.4.0 | ||
| nbclassic | 0.5.5 | 0.5.5 | 0.5.5 | 0.5.5 | 0.5.5 | 0.5.5 | 0.5.5 |
| nbclient | 0.5.13 | 0.5.13 | 0.5.13 | 0.5.13 | 0.5.13 | 0.5.13 | 0.5.13 |
| nbconvert | 6.5.4 | 6.5.4 | 6.5.4 | 6.5.4 | 6.5.4 | 6.5.4 | 6.5.4 |
| nbformat | 5.7.0 | 5.7.0 | 5.7.0 | 5.7.0 | 5.7.0 | 5.7.0 | 5.7.0 |
| ncurses | 6.4 | 6.4 | 6.4 | 6.4 | 6.4 | 6.4 | |
| nest-asyncio | 1.5.6 | 1.5.6 | 1.5.6 | 1.5.6 | 1.5.6 | 1.5.6 | 1.5.6 |
| networkx | 3.1 | 3.1 | 3.1 | 3.1 | 3.1 | 3.1 | 3.1 |
| ninja | 1.10.2 | 1.10.2 | 1.10.2 | ||||
| ninja-base | 1.10.2 | 1.10.2 | 1.10.2 | ||||
| nltk | 3.8.1 | 3.8.1 | 3.8.1 | 3.8.1 | 3.8.1 | 3.8.1 | 3.8.1 |
| notebook | 6.5.4 | 6.5.4 | 6.5.4 | 6.5.4 | 6.5.4 | 6.5.4 | 6.5.4 |
| notebook-shim | 0.2.2 | 0.2.2 | 0.2.2 | 0.2.2 | 0.2.2 | 0.2.2 | 0.2.2 |
| nspr | 4.35 | 4.35 | 4.35 | 4.35 | |||
| nss | 3.89.1 | 3.89.1 | 3.89.1 | 3.89.1 | |||
| numba | 0.57.0 | 0.57.0 | 0.57.0 | 0.57.0 | 0.57.0 | 0.57.0 | |
| numexpr | 2.8.4 | 2.8.4 | 2.8.4 | 2.8.4 | 2.8.4 | 2.8.4 | 2.8.4 |
| numpy | 1.24.3 | 1.24.3 | 1.24.3 | 1.25.0 | 1.24.3 | 1.24.3 | 1.24.3 |
| numpy-base | 1.24.3 | 1.24.3 | 1.24.3 | 1.25.0 | 1.24.3 | 1.24.3 | 1.24.3 |
| numpydoc | 1.5.0 | 1.5.0 | 1.5.0 | 1.5.0 | 1.5.0 | ||
| oniguruma | 6.9.7.1 | 6.9.7.1 | 6.9.7.1 | 6.9.7.1 | 6.9.7.1 | ||
| openjpeg | 2.4.0 | 2.4.0 | 2.4.0 | 2.4.0 | 2.3.0 | 2.4.0 | 2.4.0 |
| openpyxl | 3.0.10 | 3.0.10 | 3.0.10 | 3.0.10 | 3.0.10 | 3.0.10 | 3.0.10 |
| openssl | 1.1.1u | 1.1.1u | 1.1.1u | 1.1.1u | 1.1.1u | 1.1.1u | 1.1.1u |
| orc | 1.7.4 | 1.7.4 | 1.7.4 | 1.7.4 | 1.7.4 | 1.7.4 | |
| packaging | 23.0 | 23.0 | 23.0 | 23.0 | 23.0 | 23.0 | 23.0 |
| pandas | 1.5.3 | 1.5.3 | 1.5.3 | 1.5.3 | 1.5.3 | 1.5.3 | 1.5.3 |
| pandocfilters | 1.5.0 | 1.5.0 | 1.5.0 | 1.5.0 | 1.5.0 | 1.5.0 | 1.5.0 |
| panel | 1.2.1 | 0.14.3 | 1.2.1 | 0.12.6 | 1.2.1 | 1.2.1 | 1.2.1 |
| param | 1.13.0 | 1.13.0 | 1.13.0 | 1.13.0 | 1.13.0 | 1.13.0 | 1.13.0 |
| paramiko | 2.8.1 | ||||||
| parsel | 1.6.0 | 1.6.0 | 1.6.0 | 1.6.0 | 1.6.0 | 1.6.0 | |
| parso | 0.8.3 | 0.8.3 | 0.8.3 | 0.8.3 | 0.8.3 | 0.8.3 | 0.8.3 |
| partd | 1.2.0 | 1.2.0 | 1.2.0 | 1.2.0 | 1.2.0 | 1.2.0 | 1.2.0 |
| patch | 2.7.6 | 2.7.6 | 2.7.6 | 2.7.6 | 2.7.6 | 2.7.6 | |
| patchelf | 0.17.2 | 0.17.2 | 0.17.2 | 0.17.2 | |||
| pathlib | 1.0.1 | 1.0.1 | 1.0.1 | 1.0.1 | 1.0.1 | ||
| pathspec | 0.10.3 | 0.10.3 | 0.10.3 | 0.10.3 | 0.10.3 | ||
| patsy | 0.5.3 | 0.5.3 | 0.5.3 | 0.5.3 | 0.5.3 | 0.5.3 | 0.5.3 |
| pcre | 8.45 | 8.45 | 8.45 | 8.45 | 8.45 | ||
| pcre2 | 10.37 | 10.37 | 10.37 | 10.37 | 10.37 | 10.37 | 10.37 |
| pep8 | 1.7.1 | 1.7.1 | 1.7.1 | 1.7.1 | 1.7.1 | 1.7.1 | 1.7.1 |
| pexpect | 4.8.0 | 4.8.0 | 4.8.0 | 4.8.0 | 4.8.0 | 4.8.0 | 4.8.0 |
| pickleshare | 0.7.5 | 0.7.5 | 0.7.5 | 0.7.5 | 0.7.5 | 0.7.5 | 0.7.5 |
| pillow | 9.4.0 | 9.4.0 | 9.4.0 | 9.4.0 | 9.4.0 | 9.4.0 | 9.4.0 |
| pip | 23.2.1 | 23.2.1 | 23.2.1 | 23.2.1 | 23.2.1 | 23.2.1 | 23.2.1 |
| pkginfo | 1.9.6 | 1.9.6 | 1.9.6 | 1.9.6 | 1.9.6 | 1.9.6 | 1.9.6 |
| platformdirs | 2.5.2 | 2.5.2 | 2.5.2 | 2.5.2 | 2.5.2 | 2.5.2 | 2.5.2 |
| plotly | 5.9.0 | 5.9.0 | 5.9.0 | 5.9.0 | 5.9.0 | 5.9.0 | 5.9.0 |
| pluggy | 1.0.0 | 1.0.0 | 1.0.0 | 1.0.0 | 1.0.0 | 1.0.0 | 1.0.0 |
| ply | 3.11 | 3.11 | 3.11 | 3.11 | 3.11 | ||
| pooch | 1.4.0 | 1.4.0 | 1.4.0 | 1.4.0 | 1.4.0 | 1.4.0 | 1.4.0 |
| powershell\_shortcut | 0.0.1 | ||||||
| poyo | 0.5.0 | 0.5.0 | 0.5.0 | 0.5.0 | 0.5.0 | ||
| prometheus\_client | 0.14.1 | 0.14.1 | 0.14.1 | 0.14.1 | 0.14.1 | 0.14.1 | 0.14.1 |
| prompt-toolkit | 3.0.36 | 3.0.36 | 3.0.36 | 3.0.36 | 3.0.36 | 3.0.36 | 3.0.36 |
| prompt\_toolkit | 3.0.36 | 3.0.36 | 3.0.36 | 3.0.36 | 3.0.36 | 3.0.36 | 3.0.36 |
| protego | 0.1.16 | 0.1.16 | 0.1.16 | 0.1.16 | 0.1.16 | 0.1.16 | |
| psutil | 5.9.0 | 5.9.0 | 5.9.0 | 5.9.0 | 5.9.0 | 5.9.0 | 5.9.0 |
| ptyprocess | 0.7.0 | 0.7.0 | 0.7.0 | 0.7.0 | 0.7.0 | 0.7.0 | 0.7.0 |
| pure\_eval | 0.2.2 | 0.2.2 | 0.2.2 | 0.2.2 | 0.2.2 | 0.2.2 | 0.2.2 |
| py-cpuinfo | 8.0.0 | 8.0.0 | 8.0.0 | 8.0.0 | 8.0.0 | 8.0.0 | |
| py-lief | 0.12.3 | 0.12.3 | 0.12.3 | 0.12.3 | 0.12.3 | 0.12.3 | 0.12.3 |
| pyarrow | 11.0.0 | 11.0.0 | 11.0.0 | 11.0.0 | 11.0.0 | 11.0.0 | |
| pyasn1 | 0.4.8 | 0.4.8 | 0.4.8 | 0.4.8 | 0.4.8 | 0.4.8 | |
| pyasn1-modules | 0.2.8 | 0.2.8 | 0.2.8 | 0.2.8 | 0.2.8 | 0.2.8 | |
| pybind11-abi | 4 | 4 | 4 | 4 | 4 | 4 | 4 |
| pycodestyle | 2.10.0 | 2.10.0 | 2.10.0 | 2.10.0 | 2.10.0 | ||
| pycosat | 0.6.4 | 0.6.4 | 0.6.4 | 0.6.4 | 0.6.4 | 0.6.4 | 0.6.4 |
| pycparser | 2.21 | 2.21 | 2.21 | 2.21 | 2.21 | 2.21 | 2.21 |
| pyct | 0.5.0 | 0.5.0 | 0.5.0 | 0.5.0 | 0.5.0 | 0.5.0 | 0.5.0 |
| pycurl | 7.45.2 | 7.45.2 | 7.45.2 | 7.45.2 | 7.45.2 | 7.45.2 | 7.45.2 |
| pydispatcher | 2.0.5 | 2.0.5 | 2.0.5 | 2.0.5 | 2.0.5 | 2.0.5 | |
| pydocstyle | 6.3.0 | 6.3.0 | 6.3.0 | 6.3.0 | 6.3.0 | ||
| pyerfa | 2.0.0 | 2.0.0 | 2.0.0 | 2.0.0 | 2.0.0 | 2.0.0 | 2.0.0 |
| pyflakes | 3.0.1 | 3.0.1 | 3.0.1 | 3.0.1 | 3.0.1 | 3.0.1 | 3.0.1 |
| pygments | 2.15.1 | 2.15.1 | 2.15.1 | 2.15.1 | 2.15.1 | 2.15.1 | 2.15.1 |
| pyjwt | 2.4.0 | 2.4.0 | 2.4.0 | 2.4.0 | 2.4.0 | ||
| pylint | 2.16.2 | 2.16.2 | 2.16.2 | 2.16.2 | 2.16.2 | 2.16.2 | 2.16.2 |
| pylint-venv | 2.3.0 | 2.3.0 | 2.3.0 | 2.3.0 | 2.3.0 | ||
| pyls-spyder | 0.4.0 | 0.4.0 | 0.4.0 | 0.4.0 | 0.4.0 | ||
| pynacl | 1.5.0 | ||||||
| pyobjc-core | 9.0 | 9.0 | |||||
| pyobjc-framework-cocoa | 9.0 | 9.0 | |||||
| pyobjc-framework-coreservices | 9.0 | 9.0 | |||||
| pyobjc-framework-fsevents | 9.0 | 9.0 | |||||
| pyodbc | 4.0.34 | 4.0.34 | 4.0.34 | 4.0.34 | 4.0.34 | 4.0.34 | 4.0.34 |
| pyopenssl | 23.2.0 | 23.2.0 | 23.2.0 | 23.2.0 | 23.2.0 | 23.2.0 | 23.2.0 |
| pyparsing | 3.0.9 | 3.0.9 | 3.0.9 | 3.0.9 | 3.0.9 | 3.0.9 | 3.0.9 |
| pyqt | 5.15.7 | 5.15.7 | 5.15.7 | 5.15.7 | 5.15.7 | ||
| pyqt5-sip | 12.11.0 | 12.11.0 | 12.11.0 | 12.11.0 | 12.11.0 | ||
| pyqtwebengine | 5.15.7 | 5.15.7 | 5.15.7 | 5.15.7 | 5.15.7 | ||
| pyrsistent | 0.18.0 | 0.18.0 | 0.18.0 | 0.18.0 | 0.18.0 | 0.18.0 | 0.18.0 |
| pysocks | 1.7.1 | 1.7.1 | 1.7.1 | 1.7.1 | 1.7.1 | 1.7.1 | 1.7.1 |
| pytables | 3.8.0 | 3.8.0 | 3.8.0 | 3.7.0 | 3.8.0 | 3.8.0 | 3.8.0 |
| pytest | 7.4.0 | 7.4.0 | 7.4.0 | 7.4.0 | 7.4.0 | 7.4.0 | 7.4.0 |
| python | 3.11.4 | 3.11.4 | 3.11.4 | 3.11.4 | 3.11.4 | 3.11.4 | 3.11.4 |
| python-dateutil | 2.8.2 | 2.8.2 | 2.8.2 | 2.8.2 | 2.8.2 | 2.8.2 | 2.8.2 |
| python-fastjsonschema | 2.16.2 | 2.16.2 | 2.16.2 | 2.16.2 | 2.16.2 | 2.16.2 | 2.16.2 |
| python-json-logger | 2.0.7 | 2.0.7 | 2.0.7 | 2.0.7 | 2.0.7 | 2.0.7 | |
| python-libarchive-c | 2.9 | 2.9 | 2.9 | 2.9 | 2.9 | 2.9 | 2.9 |
| python-lmdb | 1.4.1 | 1.4.1 | 1.4.1 | 1.4.1 | 1.4.1 | 1.4.1 | 1.4.1 |
| python-lsp-black | 1.2.1 | 1.2.1 | 1.2.1 | 1.2.1 | 1.2.1 | ||
| python-lsp-jsonrpc | 1.0.0 | 1.0.0 | 1.0.0 | 1.0.0 | 1.0.0 | ||
| python-lsp-server | 1.7.2 | 1.7.2 | 1.7.2 | 1.7.2 | 1.7.2 | ||
| python-slugify | 5.0.2 | 5.0.2 | 5.0.2 | 5.0.2 | 5.0.2 | ||
| python-snappy | 0.6.1 | 0.6.1 | 0.6.1 | 0.6.1 | 0.6.1 | 0.6.1 | 0.6.1 |
| python-xxhash | 2.0.2 | 2.0.2 | 2.0.2 | ||||
| python.app | 3 | 3 | |||||
| pytoolconfig | 1.2.5 | 1.2.5 | 1.2.5 | 1.2.5 | 1.2.5 | ||
| pytorch | 2.0.1 | 2.0.1 | 2.0.1 | ||||
| pytz | 2022.7 | 2022.7 | 2022.7 | 2022.7 | 2022.7 | 2022.7 | 2022.7 |
| pyviz\_comms | 2.3.0 | 2.3.0 | 2.3.0 | 2.3.0 | 2.3.0 | 2.3.0 | 2.3.0 |
| pywavelets | 1.4.1 | 1.4.1 | 1.4.1 | 1.4.1 | 1.4.1 | 1.4.1 | 1.4.1 |
| pywin32 | 305 | ||||||
| pywin32-ctypes | 0.2.0 | ||||||
| pywinpty | 2.0.10 | ||||||
| pyxdg | 0.27 | 0.27 | |||||
| pyyaml | 6.0 | 6.0 | 6.0 | 6.0 | 6.0 | 6.0 | 6.0 |
| pyzmq | 23.2.0 | 23.2.0 | 23.2.0 | 23.2.0 | 23.2.0 | 23.2.0 | 23.2.0 |
| qdarkstyle | 3.0.2 | 3.0.2 | 3.0.2 | 3.0.2 | 3.0.2 | ||
| qstylizer | 0.2.2 | 0.2.2 | 0.2.2 | 0.2.2 | 0.2.2 | ||
| qt-main | 5.15.2 | 5.15.2 | 5.15.2 | 5.15.2 | 5.15.2 | ||
| qt-webengine | 5.15.9 | 5.15.9 | 5.15.9 | 5.15.9 | 5.15.9 | ||
| qtawesome | 1.2.2 | 1.2.2 | 1.2.2 | 1.2.2 | 1.2.2 | ||
| qtconsole | 5.4.2 | 5.4.2 | 5.4.2 | 5.4.2 | 5.4.2 | ||
| qtpy | 2.2.0 | 2.2.0 | 2.2.0 | 2.2.0 | 2.2.0 | ||
| qtwebkit | 5.212 | 5.212 | 5.212 | 5.212 | 5.212 | ||
| queuelib | 1.5.0 | 1.5.0 | 1.5.0 | 1.5.0 | 1.5.0 | 1.5.0 | |
| re2 | 2022.04.01 | 2022.04.01 | 2022.04.01 | 2022.04.01 | 2022.04.01 | 2022.04.01 | |
| readline | 8.2 | 8.2 | 8.2 | 8.2 | 8.2 | 8.2 | |
| regex | 2022.7.9 | 2022.7.9 | 2022.7.9 | 2022.7.9 | 2022.7.9 | 2022.7.9 | 2022.7.9 |
| reproc | 14.2.4 | 14.2.4 | 14.2.4 | 14.2.4 | 14.2.4 | 14.2.4 | 14.2.4 |
| reproc-cpp | 14.2.4 | 14.2.4 | 14.2.4 | 14.2.4 | 14.2.4 | 14.2.4 | 14.2.4 |
| requests | 2.31.0 | 2.31.0 | 2.31.0 | 2.31.0 | 2.31.0 | 2.31.0 | 2.31.0 |
| requests-file | 1.5.1 | 1.5.1 | 1.5.1 | 1.5.1 | 1.5.1 | 1.5.1 | |
| requests-toolbelt | 1.0.0 | 1.0.0 | 1.0.0 | 1.0.0 | 1.0.0 | 1.0.0 | 1.0.0 |
| responses | 0.13.3 | 0.13.3 | 0.13.3 | ||||
| rfc3339-validator | 0.1.4 | 0.1.4 | 0.1.4 | 0.1.4 | 0.1.4 | 0.1.4 | |
| rfc3986-validator | 0.1.1 | 0.1.1 | 0.1.1 | 0.1.1 | 0.1.1 | 0.1.1 | |
| rope | 1.7.0 | 1.7.0 | 1.7.0 | 1.7.0 | 1.7.0 | ||
| rtree | 1.0.1 | 1.0.1 | 1.0.1 | 1.0.1 | 1.0.1 | ||
| ruamel.yaml | 0.17.21 | 0.17.21 | 0.17.21 | 0.17.21 | 0.17.21 | 0.17.21 | 0.17.21 |
| ruamel\_yaml | 0.17.21 | 0.17.21 | 0.17.21 | 0.17.21 | 0.17.21 | 0.17.21 | 0.17.21 |
| s3fs | 2023.4.0 | 2023.4.0 | 2023.3.0 | 2023.3.0 | 2023.4.0 | 2023.3.0 | 2023.3.0 |
| s3transfer | 0.6.0 | 0.6.0 | 0.6.0 | 0.6.0 | |||
| sacremoses | 0.0.43 | 0.0.43 | 0.0.43 | 0.0.43 | 0.0.43 | 0.0.43 | 0.0.43 |
| scikit-image | 0.20.0 | 0.20.0 | 0.20.0 | 0.20.0 | 0.20.0 | 0.20.0 | 0.20.0 |
| scikit-learn | 1.3.0 | 1.3.0 | 1.3.0 | 1.2.2 | 1.3.0 | 1.3.0 | 1.3.0 |
| scikit-learn-intelex | 2023.1.1 | 2023.1.1 | |||||
| scipy | 1.10.1 | 1.10.1 | 1.10.1 | 1.10.1 | 1.10.1 | 1.10.1 | 1.10.1 |
| scrapy | 2.8.0 | 2.8.0 | 2.8.0 | 2.8.0 | 2.8.0 | 2.8.0 | |
| seaborn | 0.12.2 | 0.12.2 | 0.12.2 | 0.12.2 | 0.12.2 | 0.12.2 | 0.12.2 |
| secretstorage | 3.3.1 | 3.3.1 | |||||
| send2trash | 1.8.0 | 1.8.0 | 1.8.0 | 1.8.0 | 1.8.0 | 1.8.0 | 1.8.0 |
| service\_identity | 18.1.0 | 18.1.0 | 18.1.0 | 18.1.0 | 18.1.0 | 18.1.0 | |
| setuptools | 68.0.0 | 68.0.0 | 68.0.0 | 68.0.0 | 68.0.0 | 68.0.0 | 68.0.0 |
| sip | 6.6.2 | 6.6.2 | 6.6.2 | 6.6.2 | 6.6.2 | ||
| six | 1.16.0 | 1.16.0 | 1.16.0 | 1.16.0 | 1.16.0 | 1.16.0 | 1.16.0 |
| sleef | 3.5.1 | ||||||
| smart\_open | 5.2.1 | 5.2.1 | 5.2.1 | 5.2.1 | 5.2.1 | 5.2.1 | |
| snappy | 1.1.9 | 1.1.9 | 1.1.9 | 1.1.9 | 1.1.9 | 1.1.9 | 1.1.9 |
| sniffio | 1.2.0 | 1.2.0 | 1.2.0 | 1.2.0 | 1.2.0 | 1.2.0 | 1.2.0 |
| snowballstemmer | 2.2.0 | 2.2.0 | 2.2.0 | 2.2.0 | 2.2.0 | 2.2.0 | 2.2.0 |
| sortedcontainers | 2.4.0 | 2.4.0 | 2.4.0 | 2.4.0 | 2.4.0 | 2.4.0 | 2.4.0 |
| soupsieve | 2.4 | 2.4 | 2.4 | 2.4 | 2.4 | 2.4 | 2.4 |
| sphinx | 5.0.2 | 5.0.2 | 5.0.2 | 5.0.2 | 5.0.2 | ||
| sphinxcontrib-applehelp | 1.0.2 | 1.0.2 | 1.0.2 | 1.0.2 | 1.0.2 | ||
| sphinxcontrib-devhelp | 1.0.2 | 1.0.2 | 1.0.2 | 1.0.2 | 1.0.2 | ||
| sphinxcontrib-htmlhelp | 2.0.0 | 2.0.0 | 2.0.0 | 2.0.0 | 2.0.0 | ||
| sphinxcontrib-jsmath | 1.0.1 | 1.0.1 | 1.0.1 | 1.0.1 | 1.0.1 | ||
| sphinxcontrib-qthelp | 1.0.3 | 1.0.3 | 1.0.3 | 1.0.3 | 1.0.3 | ||
| sphinxcontrib-serializinghtml | 1.1.5 | 1.1.5 | 1.1.5 | 1.1.5 | 1.1.5 | ||
| spyder | 5.4.3 | 5.4.3 | 5.4.3 | 5.4.3 | 5.4.3 | ||
| spyder-kernels | 2.4.3 | 2.4.3 | 2.4.3 | 2.4.3 | 2.4.3 | ||
| sqlalchemy | 1.4.39 | 1.4.39 | 1.4.39 | 1.4.39 | 1.4.39 | 1.4.39 | 1.4.39 |
| sqlite | 3.41.2 | 3.41.2 | 3.41.2 | 3.41.2 | 3.41.2 | 3.41.2 | 3.41.2 |
| stack\_data | 0.2.0 | 0.2.0 | 0.2.0 | 0.2.0 | 0.2.0 | 0.2.0 | 0.2.0 |
| statsmodels | 0.14.0 | 0.14.0 | 0.14.0 | 0.14.0 | 0.14.0 | 0.14.0 | 0.14.0 |
| sympy | 1.11.1 | 1.11.1 | 1.11.1 | 1.11.1 | 1.11.1 | 1.11.1 | 1.11.1 |
| tabulate | 0.8.10 | 0.8.10 | 0.8.10 | 0.8.10 | 0.8.10 | 0.8.10 | 0.8.10 |
| tapi | 1100.0.11 | 1000.10.8 | |||||
| tbb | 2021.8.0 | 2021.8.0 | 2021.8.0 | 2021.8.0 | 2021.8.0 | 2021.8.0 | 2021.8.0 |
| tbb4py | 2021.8.0 | 2021.8.0 | 2021.8.0 | 2021.8.0 | 2021.8.0 | 2021.8.0 | 2021.8.0 |
| tblib | 1.7.0 | 1.7.0 | 1.7.0 | 1.7.0 | 1.7.0 | 1.7.0 | 1.7.0 |
| tenacity | 8.2.2 | 8.2.2 | 8.2.2 | 8.2.2 | 8.2.2 | 8.2.2 | 8.2.2 |
| terminado | 0.17.1 | 0.17.1 | 0.17.1 | 0.17.1 | 0.17.1 | 0.17.1 | 0.17.1 |
| text-unidecode | 1.3 | 1.3 | 1.3 | 1.3 | 1.3 | ||
| textdistance | 4.2.1 | 4.2.1 | 4.2.1 | 4.2.1 | 4.2.1 | ||
| threadpoolctl | 2.2.0 | 2.2.0 | 2.2.0 | 2.2.0 | 2.2.0 | 2.2.0 | 2.2.0 |
| three-merge | 0.1.1 | 0.1.1 | 0.1.1 | 0.1.1 | 0.1.1 | ||
| tifffile | 2021.7.2 | 2021.7.2 | 2021.7.2 | 2021.7.2 | 2021.7.2 | 2021.7.2 | 2021.7.2 |
| tinycss2 | 1.2.1 | 1.2.1 | 1.2.1 | 1.2.1 | 1.2.1 | 1.2.1 | 1.2.1 |
| tk | 8.6.12 | 8.6.12 | 8.6.12 | 8.6.12 | 8.6.12 | 8.6.12 | 8.6.12 |
| tldextract | 3.2.0 | 3.2.0 | 3.2.0 | 3.2.0 | 3.2.0 | 3.2.0 | |
| tokenizers | 0.13.2 | 0.13.2 | 0.13.2 | ||||
| toml | 0.10.2 | 0.10.2 | 0.10.2 | 0.10.2 | 0.10.2 | ||
| tomlkit | 0.11.1 | 0.11.1 | 0.11.1 | 0.11.1 | 0.11.1 | 0.11.1 | 0.11.1 |
| toolz | 0.12.0 | 0.12.0 | 0.12.0 | 0.12.0 | 0.12.0 | 0.12.0 | 0.12.0 |
| tornado | 6.3.2 | 6.3.2 | 6.3.2 | 6.3.2 | 6.3.2 | 6.3.2 | 6.3.2 |
| tqdm | 4.65.0 | 4.65.0 | 4.65.0 | 4.65.0 | 4.65.0 | 4.65.0 | 4.65.0 |
| traitlets | 5.7.1 | 5.7.1 | 5.7.1 | 5.7.1 | 5.7.1 | 5.7.1 | 5.7.1 |
| transformers | 4.29.2 | 4.29.2 | 2.1.1 | 2.1.1 | 4.29.2 | 2.1.1 | 2.1.1 |
| twisted | 22.10.0 | 22.10.0 | 22.10.0 | 22.10.0 | 22.10.0 | 22.10.0 | |
| twisted-iocpsupport | 1.0.2 | ||||||
| typing-extensions | 4.7.1 | 4.7.1 | 4.7.1 | 4.7.1 | 4.7.1 | 4.7.1 | 4.7.1 |
| typing\_extensions | 4.7.1 | 4.7.1 | 4.7.1 | 4.7.1 | 4.7.1 | 4.7.1 | 4.7.1 |
| tzdata | 2023c | 2023c | 2023c | 2023c | 2023c | 2023c | 2023c |
| uc-micro-py | 1.0.1 | 1.0.1 | 1.0.1 | 1.0.1 | 1.0.1 | ||
| ujson | 5.4.0 | 5.4.0 | 5.4.0 | 5.4.0 | 5.4.0 | ||
| unidecode | 1.2.0 | 1.2.0 | 1.2.0 | 1.2.0 | 1.2.0 | ||
| unixodbc | 2.3.11 | 2.3.11 | 2.3.11 | 2.3.11 | 2.3.11 | 2.3.11 | |
| urllib3 | 1.26.16 | 1.26.16 | 1.26.16 | 1.26.16 | 1.26.16 | 1.26.16 | 1.26.16 |
| utf8proc | 2.6.1 | 2.6.1 | 2.6.1 | 2.6.1 | 2.6.1 | 2.6.1 | |
| vc | 14.2 | ||||||
| vs2015\_runtime | 14.27.29016 | ||||||
| w3lib | 1.21.0 | 1.21.0 | 1.21.0 | 1.21.0 | 1.21.0 | 1.21.0 | |
| watchdog | 2.1.6 | 2.1.6 | 2.1.6 | 2.1.6 | 2.1.6 | ||
| wcwidth | 0.2.5 | 0.2.5 | 0.2.5 | 0.2.5 | 0.2.5 | 0.2.5 | 0.2.5 |
| webencodings | 0.5.1 | 0.5.1 | 0.5.1 | 0.5.1 | 0.5.1 | 0.5.1 | 0.5.1 |
| websocket-client | 0.58.0 | 0.58.0 | 0.58.0 | 0.58.0 | 0.58.0 | 0.58.0 | 0.58.0 |
| werkzeug | 2.2.3 | 2.2.3 | 2.2.3 | 2.2.3 | 2.2.3 | 2.2.3 | 2.2.3 |
| whatthepatch | 1.0.2 | 1.0.2 | 1.0.2 | 1.0.2 | 1.0.2 | ||
| wheel | 0.38.4 | 0.38.4 | 0.38.4 | 0.38.4 | 0.38.4 | 0.38.4 | 0.38.4 |
| widgetsnbextension | 4.0.5 | 4.0.5 | 4.0.5 | 4.0.5 | 4.0.5 | 4.0.5 | 4.0.5 |
| win\_inet\_pton | 1.1.0 | ||||||
| winpty | 0.4.3 | ||||||
| wrapt | 1.14.1 | 1.14.1 | 1.14.1 | 1.14.1 | 1.14.1 | 1.14.1 | 1.14.1 |
| wurlitzer | 3.0.2 | 3.0.2 | 3.0.2 | 3.0.2 | |||
| xarray | 2023.6.0 | 2023.6.0 | 2023.6.0 | 2023.6.0 | 2023.6.0 | 2023.6.0 | |
| xlwings | 0.29.1 | 0.29.1 | 0.29.1 | ||||
| xxhash | 0.8.0 | 0.8.0 | 0.8.0 | ||||
| xyzservices | 2022.9.0 | 2022.9.0 | 2022.9.0 | 2022.9.0 | 2022.9.0 | ||
| xz | 5.4.2 | 5.4.2 | 5.4.2 | 5.4.2 | 5.4.2 | 5.4.2 | 5.4.2 |
| y-py | 0.5.9 | 0.5.9 | 0.5.9 | 0.5.9 | 0.5.9 | 0.5.9 | |
| yaml | 0.2.5 | 0.2.5 | 0.2.5 | 0.2.5 | 0.2.5 | 0.2.5 | 0.2.5 |
| yaml-cpp | 0.7.0 | 0.7.0 | 0.7.0 | 0.7.0 | 0.7.0 | 0.7.0 | 0.7.0 |
| yapf | 0.31.0 | 0.31.0 | 0.31.0 | 0.31.0 | 0.31.0 | ||
| yarl | 1.8.1 | 1.8.1 | 1.8.1 | 1.8.1 | 1.8.1 | 1.8.1 | 1.8.1 |
| ypy-websocket | 0.8.2 | 0.8.2 | 0.8.2 | 0.8.2 | 0.8.2 | 0.8.2 | |
| zeromq | 4.3.4 | 4.3.4 | 4.3.4 | 4.3.4 | 4.3.4 | 4.3.4 | 4.3.4 |
| zfp | 0.5.5 | 0.5.5 | 0.5.5 | 0.5.5 | 0.5.5 | ||
| zict | 2.2.0 | 2.2.0 | 2.2.0 | 2.2.0 | 2.2.0 | 2.2.0 | 2.2.0 |
| zipp | 3.11.0 | 3.11.0 | 3.11.0 | 3.11.0 | 3.11.0 | 3.11.0 | 3.11.0 |
| zlib | 1.2.13 | 1.2.13 | 1.2.13 | 1.2.13 | 1.2.13 | 1.2.13 | 1.2.13 |
| zlib-ng | 2.0.7 | 2.0.7 | 2.0.7 | 2.0.7 | 2.0.7 | 2.0.7 | |
| zope | 1.0 | 1.0 | 1.0 | 1.0 | 1.0 | 1.0 | |
| zope.interface | 5.4.0 | 5.4.0 | 5.4.0 | 5.4.0 | 5.4.0 | 5.4.0 | |
| zstandard | 0.19.0 | 0.19.0 | 0.19.0 | 0.19.0 | 0.19.0 | 0.19.0 | 0.19.0 |
| zstd | 1.5.5 | 1.5.5 | 1.5.5 | 1.5.5 | 1.5.5 | 1.5.5 | 1.5.5 |
| Package Name | linux-64 | linux-aarch64 | linux-ppc64le | linux-s390x |
|---|---|---|---|---|
| \_anaconda\_depends | 2023.07 | 2023.07 | 2023.07 | 2023.07 |
| \_libgcc\_mutex | 0.1 | 0.1 | 0.1 | 0.1 |
| \_openmp\_mutex | 5.1 | 5.1 | 5.1 | 5.1 |
| abseil-cpp | 20211102.0 | 20211102.0 | 20211102.0 | |
| aiobotocore | 2.5.0 | 2.5.0 | 2.4.2 | 2.4.2 |
| aiofiles | 22.1.0 | 22.1.0 | 22.1.0 | |
| aiohttp | 3.8.3 | 3.8.3 | 3.8.3 | 3.8.3 |
| aioitertools | 0.7.1 | 0.7.1 | 0.7.1 | 0.7.1 |
| aiosignal | 1.2.0 | 1.2.0 | 1.2.0 | 1.2.0 |
| aiosqlite | 0.18.0 | 0.18.0 | 0.18.0 | |
| alabaster | 0.7.12 | 0.7.12 | ||
| anaconda-catalogs | 0.2.0 | 0.2.0 | 0.2.0 | 0.2.0 |
| anaconda-client | 1.12.0 | 1.12.0 | 1.12.0 | 1.12.0 |
| anaconda-navigator | 2.4.2 | 2.4.2 | ||
| anaconda-project | 0.11.1 | 0.11.1 | 0.11.1 | 0.11.1 |
| anyio | 3.5.0 | 3.5.0 | 3.5.0 | 3.5.0 |
| appdirs | 1.4.4 | 1.4.4 | 1.4.4 | 1.4.4 |
| argon2-cffi | 21.3.0 | 21.3.0 | 21.3.0 | 21.3.0 |
| argon2-cffi-bindings | 21.2.0 | 21.2.0 | 21.2.0 | 21.2.0 |
| arrow | 1.2.3 | 1.2.3 | ||
| arrow-cpp | 11.0.0 | 11.0.0 | 11.0.0 | |
| astroid | 2.14.2 | 2.14.2 | 2.14.2 | 2.14.2 |
| astropy | 5.1 | 5.1 | 5.1 | 5.1 |
| asttokens | 2.0.5 | 2.0.5 | 2.0.5 | 2.0.5 |
| async-timeout | 4.0.2 | 4.0.2 | 4.0.2 | 4.0.2 |
| atomicwrites | 1.4.0 | 1.4.0 | ||
| attrs | 22.1.0 | 22.1.0 | 22.1.0 | 22.1.0 |
| automat | 20.2.0 | 20.2.0 | 20.2.0 | |
| autopep8 | 1.6.0 | 1.6.0 | ||
| aws-c-common | 0.4.57 | 0.5.11 | 0.4.57 | |
| aws-c-event-stream | 0.1.6 | 0.1.6 | 0.1.6 | |
| aws-checksums | 0.1.9 | 0.1.11 | 0.1.9 | |
| aws-sdk-cpp | 1.8.185 | 1.8.185 | 1.8.185 | |
| babel | 2.11.0 | 2.11.0 | 2.11.0 | 2.11.0 |
| backcall | 0.2.0 | 0.2.0 | 0.2.0 | 0.2.0 |
| backports | 1.1 | 1.1 | 1.1 | 1.1 |
| backports.functools\_lru\_cache | 1.6.4 | 1.6.4 | 1.6.4 | 1.6.4 |
| backports.tempfile | 1.0 | 1.0 | 1.0 | 1.0 |
| backports.weakref | 1.0.post1 | 1.0.post1 | 1.0.post1 | 1.0.post1 |
| bcrypt | 3.2.0 | 3.2.0 | 3.2.0 | |
| beautifulsoup4 | 4.12.2 | 4.12.2 | 4.12.2 | 4.12.2 |
| binaryornot | 0.4.4 | 0.4.4 | ||
| black | 23.3.0 | 23.3.0 | ||
| blas | 1.0 | 1.0 | 1.0 | 1.0 |
| bleach | 4.1.0 | 4.1.0 | 4.1.0 | 4.1.0 |
| blosc | 1.21.3 | 1.21.3 | 1.21.3 | 1.21.3 |
| bokeh | 3.2.1 | 2.4.3 | 3.2.1 | 2.4.3 |
| boltons | 23.0.0 | 23.0.0 | 23.0.0 | 23.0.0 |
| boost-cpp | 1.73.0 | 1.73.0 | 1.73.0 | |
| boto3 | 1.24.28 | 1.24.28 | ||
| botocore | 1.29.76 | 1.29.76 | 1.27.59 | 1.27.59 |
| bottleneck | 1.3.5 | 1.3.5 | 1.3.5 | 1.3.5 |
| brotli | 1.0.9 | 1.0.9 | 1.0.9 | 1.0.9 |
| brotli-bin | 1.0.9 | 1.0.9 | 1.0.9 | 1.0.9 |
| brotlipy | 0.7.0 | 0.7.0 | 0.7.0 | 0.7.0 |
| brunsli | 0.1 | 0.1 | 0.1 | |
| bzip2 | 1.0.8 | 1.0.8 | 1.0.8 | 1.0.8 |
| c-ares | 1.19.0 | 1.19.0 | 1.19.0 | 1.19.0 |
| c-blosc2 | 2.8.0 | 2.8.0 | 2.8.0 | |
| ca-certificates | 2023.05.30 | 2023.05.30 | 2023.05.30 | 2023.05.30 |
| certifi | 2023.7.22 | 2023.7.22 | 2023.7.22 | 2023.7.22 |
| cffi | 1.15.1 | 1.15.1 | 1.15.1 | 1.15.1 |
| cfitsio | 3.470 | 3.470 | 3.470 | 3.470 |
| chardet | 4.0.0 | 4.0.0 | 4.0.0 | 4.0.0 |
| charls | 2.2.0 | 2.2.0 | 2.2.0 | |
| charset-normalizer | 2.0.4 | 2.0.4 | 2.0.4 | 2.0.4 |
| click | 8.0.4 | 8.0.4 | 8.0.4 | 8.0.4 |
| cloudpickle | 2.2.1 | 2.2.1 | 2.2.1 | 2.2.1 |
| clyent | 1.2.2 | 1.2.2 | 1.2.2 | 1.2.2 |
| colorama | 0.4.6 | 0.4.6 | 0.4.6 | 0.4.6 |
| colorcet | 3.0.1 | 3.0.1 | 3.0.1 | 3.0.1 |
| comm | 0.1.2 | 0.1.2 | 0.1.2 | 0.1.2 |
| conda | 23.7.2 | 23.7.2 | 23.7.2 | 23.7.2 |
| conda-build | 3.26.0 | 3.26.0 | 3.26.0 | 3.26.0 |
| conda-content-trust | 0.1.1 | 0.1.1 | 0.1.3 | 0.1.1 |
| conda-index | 0.2.3 | 0.2.3 | 0.2.3 | 0.2.3 |
| conda-libmamba-solver | 23.5.0 | 23.5.0 | 23.5.0 | 23.5.0 |
| conda-pack | 0.6.0 | 0.6.0 | 0.6.0 | 0.6.0 |
| conda-package-handling | 2.2.0 | 2.2.0 | 2.2.0 | 2.2.0 |
| conda-package-streaming | 0.9.0 | 0.9.0 | 0.9.0 | 0.9.0 |
| conda-repo-cli | 1.0.41 | 1.0.41 | ||
| conda-token | 0.4.0 | 0.4.0 | 0.4.0 | 0.4.0 |
| conda-verify | 3.4.2 | 3.4.2 | 3.4.2 | 3.4.2 |
| constantly | 15.1.0 | 15.1.0 | 15.1.0 | |
| contourpy | 1.0.5 | 1.0.5 | 1.0.5 | 1.0.5 |
| cookiecutter | 1.7.3 | 1.7.3 | ||
| cryptography | 41.0.2 | 41.0.2 | 39.0.1 | 41.0.2 |
| cssselect | 1.1.0 | 1.1.0 | 1.1.0 | |
| curl | 8.1.1 | 8.1.1 | 8.1.1 | 8.1.1 |
| cycler | 0.11.0 | 0.11.0 | 0.11.0 | 0.11.0 |
| cytoolz | 0.12.0 | 0.12.0 | 0.12.0 | 0.12.0 |
| daal4py | 2023.1.1 | |||
| dal | 2023.1.1 | |||
| dask | 2023.6.0 | 2023.4.1 | 2023.6.0 | 2023.6.0 |
| dask-core | 2023.6.0 | 2023.4.1 | 2023.6.0 | 2023.6.0 |
| datasets | 2.12.0 | 2.12.0 | ||
| datashader | 0.15.1 | 0.15.1 | 0.15.1 | |
| datashape | 0.5.4 | 0.5.4 | 0.5.4 | |
| dbus | 1.13.18 | 1.13.18 | ||
| debugpy | 1.6.7 | 1.6.7 | 1.6.7 | 1.6.7 |
| decorator | 5.1.1 | 5.1.1 | 5.1.1 | 5.1.1 |
| defusedxml | 0.7.1 | 0.7.1 | 0.7.1 | 0.7.1 |
| diff-match-patch | 20200713 | 20200713 | ||
| dill | 0.3.6 | 0.3.6 | 0.3.6 | 0.3.6 |
| distributed | 2023.6.0 | 2023.4.1 | 2023.6.0 | 2023.6.0 |
| docstring-to-markdown | 0.11 | 0.11 | ||
| docutils | 0.18.1 | 0.18.1 | ||
| entrypoints | 0.4 | 0.4 | 0.4 | 0.4 |
| et\_xmlfile | 1.1.0 | 1.1.0 | 1.1.0 | 1.1.0 |
| executing | 0.8.3 | 0.8.3 | 0.8.3 | 0.8.3 |
| expat | 2.4.9 | 2.4.9 | ||
| filelock | 3.9.0 | 3.9.0 | 3.9.0 | 3.9.0 |
| flake8 | 6.0.0 | 6.0.0 | ||
| flask | 2.2.2 | 2.2.2 | 2.2.2 | 2.2.2 |
| fmt | 9.1.0 | 9.1.0 | 9.1.0 | 9.1.0 |
| fontconfig | 2.14.1 | 2.14.1 | ||
| fonttools | 4.25.0 | 4.25.0 | 4.25.0 | 4.25.0 |
| freetype | 2.12.1 | 2.12.1 | 2.12.1 | 2.12.1 |
| frozenlist | 1.3.3 | 1.3.3 | 1.3.3 | 1.3.3 |
| fsspec | 2023.4.0 | 2023.4.0 | 2023.3.0 | 2023.3.0 |
| future | 0.18.3 | 0.18.3 | 0.18.3 | 0.18.3 |
| gensim | 4.3.0 | 4.3.0 | 4.3.0 | |
| gflags | 2.2.2 | 2.2.2 | 2.2.2 | |
| giflib | 5.2.1 | 5.2.1 | 5.2.1 | 5.2.1 |
| glib | 2.69.1 | 2.69.1 | ||
| glob2 | 0.7 | 0.7 | 0.7 | 0.7 |
| glog | 0.5.0 | 0.5.0 | 0.5.0 | |
| gmp | 6.2.1 | 6.2.1 | 6.2.1 | 6.2.1 |
| gmpy2 | 2.1.2 | 2.1.2 | 2.1.2 | 2.1.2 |
| greenlet | 2.0.1 | 2.0.1 | 2.0.1 | 2.0.1 |
| grpc-cpp | 1.46.1 | 1.46.1 | 1.46.1 | |
| gst-plugins-base | 1.14.1 | 1.14.1 | ||
| gstreamer | 1.14.1 | 1.14.1 | ||
| h5py | 3.7.0 | 3.7.0 | 3.7.0 | 3.7.0 |
| hdf5 | 1.10.6 | 1.10.6 | 1.10.6 | 1.10.6 |
| heapdict | 1.0.1 | 1.0.1 | 1.0.1 | 1.0.1 |
| holoviews | 1.17.0 | 1.17.0 | 1.17.0 | 1.14.8 |
| huggingface\_hub | 0.15.1 | 0.15.1 | ||
| hvplot | 0.8.4 | 0.8.4 | 0.8.4 | 0.7.3 |
| hyperlink | 21.0.0 | 21.0.0 | 21.0.0 | |
| icu | 58.2 | 68.1 | 58.2 | 68.1 |
| idna | 3.4 | 3.4 | 3.4 | 3.3 |
| imagecodecs | 2021.8.26 | 2021.8.26 | 2021.8.26 | 2021.8.26 |
| imageio | 2.31.1 | 2.31.1 | 2.31.1 | 2.26.0 |
| imagesize | 1.4.1 | 1.4.1 | ||
| imbalanced-learn | 0.10.1 | 0.10.1 | 0.10.1 | 0.10.1 |
| importlib-metadata | 6.0.0 | 6.0.0 | 6.0.0 | 6.0.0 |
| importlib\_metadata | 6.0.0 | 6.0.0 | ||
| incremental | 21.3.0 | 21.3.0 | 21.3.0 | |
| inflection | 0.5.1 | 0.5.1 | ||
| iniconfig | 1.1.1 | 1.1.1 | 1.1.1 | 1.1.1 |
| intake | 0.6.8 | 0.6.8 | 0.6.8 | 0.6.8 |
| intel-openmp | 2023.1.0 | |||
| intervaltree | 3.1.0 | 3.1.0 | ||
| ipykernel | 6.19.2 | 6.19.2 | 6.19.2 | 6.19.2 |
| ipython | 8.12.0 | 8.12.0 | 8.12.0 | 8.12.0 |
| ipython\_genutils | 0.2.0 | 0.2.0 | 0.2.0 | 0.2.0 |
| ipywidgets | 8.0.4 | 8.0.4 | 8.0.4 | 8.0.4 |
| isort | 5.9.3 | 5.9.3 | 5.9.3 | 5.9.3 |
| itemadapter | 0.3.0 | 0.3.0 | 0.3.0 | |
| itemloaders | 1.0.4 | 1.0.4 | 1.0.4 | |
| itsdangerous | 2.0.1 | 2.0.1 | 2.0.1 | 2.0.1 |
| jaraco.classes | 3.2.1 | 3.2.1 | ||
| jedi | 0.18.1 | 0.18.1 | 0.18.1 | 0.18.1 |
| jeepney | 0.7.1 | 0.7.1 | ||
| jellyfish | 0.9.0 | 0.9.0 | ||
| jinja2 | 3.1.2 | 3.1.2 | 3.1.2 | 3.1.2 |
| jinja2-time | 0.2.0 | 0.2.0 | ||
| jmespath | 0.10.0 | 0.10.0 | 0.10.0 | 0.10.0 |
| joblib | 1.2.0 | 1.2.0 | 1.2.0 | 1.2.0 |
| jpeg | 9e | 9e | 9e | 9e |
| jq | 1.6 | 1.6 | 1.6 | |
| json5 | 0.9.6 | 0.9.6 | 0.9.6 | 0.9.6 |
| jsonpatch | 1.32 | 1.32 | 1.32 | 1.32 |
| jsonpointer | 2.1 | 2.1 | 2.1 | 2.1 |
| jsonschema | 4.17.3 | 4.17.3 | 4.17.3 | 4.17.3 |
| jupyter | 1.0.0 | 1.0.0 | 1.0.0 | 1.0.0 |
| jupyter\_client | 7.4.9 | 7.4.9 | 7.4.9 | 7.4.9 |
| jupyter\_console | 6.6.3 | 6.6.3 | 6.6.3 | 6.6.3 |
| jupyter\_core | 5.3.0 | 5.3.0 | 5.3.0 | 5.3.0 |
| jupyter\_events | 0.6.3 | 0.6.3 | 0.6.3 | |
| jupyter\_server | 1.23.4 | 1.23.4 | 1.23.4 | 1.23.4 |
| jupyter\_server\_fileid | 0.9.0 | 0.9.0 | 0.9.0 | |
| jupyter\_server\_ydoc | 0.8.0 | 0.8.0 | 0.8.0 | |
| jupyter\_ydoc | 0.2.4 | 0.2.4 | 0.2.4 | |
| jupyterlab | 3.6.3 | 3.6.3 | 3.6.3 | 3.3.2 |
| jupyterlab\_pygments | 0.1.2 | 0.1.2 | 0.1.2 | 0.1.2 |
| jupyterlab\_server | 2.22.0 | 2.22.0 | 2.22.0 | 2.21.0 |
| jupyterlab\_widgets | 3.0.5 | 3.0.5 | 3.0.5 | 3.0.5 |
| jxrlib | 1.1 | 1.1 | 1.1 | 1.1 |
| keyring | 23.13.1 | 23.13.1 | ||
| kiwisolver | 1.4.4 | 1.4.4 | 1.4.4 | 1.4.4 |
| krb5 | 1.20.1 | 1.20.1 | 1.20.1 | 1.20.1 |
| lazy-object-proxy | 1.6.0 | 1.6.0 | 1.6.0 | 1.6.0 |
| lazy\_loader | 0.2 | 0.2 | 0.2 | 0.1 |
| lcms2 | 2.12 | 2.12 | 2.12 | 2.12 |
| ld\_impl\_linux-64 | 2.38 | |||
| ld\_impl\_linux-aarch64 | 2.38 | |||
| ld\_impl\_linux-ppc64le | 2.38 | |||
| ld\_impl\_linux-s390x | 2.38 | |||
| lerc | 3.0 | 3.0 | 3.0 | 3.0 |
| libaec | 1.0.4 | 1.0.4 | 1.0.4 | 1.0.4 |
| libarchive | 3.6.2 | 3.6.2 | 3.6.2 | 3.6.2 |
| libboost | 1.73.0 | 1.73.0 | 1.73.0 | |
| libbrotlicommon | 1.0.9 | 1.0.9 | 1.0.9 | 1.0.9 |
| libbrotlidec | 1.0.9 | 1.0.9 | 1.0.9 | 1.0.9 |
| libbrotlienc | 1.0.9 | 1.0.9 | 1.0.9 | 1.0.9 |
| libclang | 10.0.1 | 10.0.1 | ||
| libcurl | 8.1.1 | 8.1.1 | 8.1.1 | 8.1.1 |
| libdeflate | 1.17 | 1.17 | 1.17 | 1.17 |
| libedit | 3.1.20221030 | 3.1.20221030 | 3.1.20221030 | 3.1.20221030 |
| libev | 4.33 | 4.33 | 4.33 | 4.33 |
| libevent | 2.1.12 | 2.1.12 | 2.1.12 | |
| libffi | 3.4.4 | 3.4.4 | 3.4.4 | 3.4.2 |
| libgcc-ng | 11.2.0 | 11.2.0 | 11.2.0 | 11.2.0 |
| libgfortran-ng | 11.2.0 | 11.2.0 | 11.2.0 | 11.2.0 |
| libgfortran5 | 11.2.0 | 11.2.0 | 11.2.0 | 11.2.0 |
| libgomp | 11.2.0 | 11.2.0 | 11.2.0 | 11.2.0 |
| liblief | 0.12.3 | 0.12.3 | 0.12.3 | 0.12.3 |
| libllvm10 | 10.0.1 | 10.0.1 | ||
| libllvm14 | 14.0.6 | 14.0.6 | 14.0.6 | |
| libmamba | 1.4.1 | 1.4.1 | 1.4.1 | 1.4.1 |
| libmambapy | 1.4.1 | 1.4.1 | 1.4.1 | 1.4.1 |
| libnghttp2 | 1.52.0 | 1.52.0 | 1.52.0 | 1.52.0 |
| libopenblas | 0.3.21 | 0.3.21 | 0.3.21 | |
| libpng | 1.6.39 | 1.6.39 | 1.6.39 | 1.6.39 |
| libpq | 12.15 | 12.15 | ||
| libprotobuf | 3.20.3 | 3.20.3 | 3.20.3 | |
| libsodium | 1.0.18 | 1.0.18 | 1.0.18 | 1.0.18 |
| libsolv | 0.7.22 | 0.7.22 | 0.7.22 | 0.7.22 |
| libspatialindex | 1.9.3 | 1.9.3 | ||
| libssh2 | 1.10.0 | 1.10.0 | 1.10.0 | 1.10.0 |
| libstdcxx-ng | 11.2.0 | 11.2.0 | 11.2.0 | 11.2.0 |
| libthrift | 0.15.0 | 0.15.0 | 0.15.0 | |
| libtiff | 4.5.0 | 4.5.0 | 4.5.0 | 4.5.0 |
| libuuid | 1.41.5 | 1.41.5 | 1.41.5 | 1.41.5 |
| libwebp | 1.2.4 | 1.2.4 | 1.2.4 | 1.2.4 |
| libwebp-base | 1.2.4 | 1.2.4 | 1.2.4 | 1.2.4 |
| libxcb | 1.15 | 1.15 | ||
| libxkbcommon | 1.0.1 | 1.0.1 | ||
| libxml2 | 2.9.14 | 2.9.14 | 2.10.3 | 2.10.3 |
| libxslt | 1.1.35 | 1.1.35 | 1.1.37 | 1.1.37 |
| libzopfli | 1.0.3 | 1.0.3 | 1.0.3 | 1.0.3 |
| linkify-it-py | 2.0.0 | 2.0.0 | ||
| llvmlite | 0.40.0 | 0.40.0 | 0.40.0 | |
| locket | 1.0.0 | 1.0.0 | 1.0.0 | 1.0.0 |
| lxml | 4.9.1 | 4.9.1 | 4.9.2 | 4.9.2 |
| lz4 | 4.3.2 | 4.3.2 | 4.3.2 | |
| lz4-c | 1.9.4 | 1.9.4 | 1.9.4 | 1.9.4 |
| lzo | 2.10 | 2.10 | 2.10 | 2.10 |
| markdown | 3.4.1 | 3.4.1 | 3.4.1 | 3.4.1 |
| markdown-it-py | 2.2.0 | 2.2.0 | ||
| markupsafe | 2.1.1 | 2.1.1 | 2.1.1 | 2.1.1 |
| matplotlib | 3.7.1 | 3.7.1 | 3.7.1 | 3.7.1 |
| matplotlib-base | 3.7.1 | 3.7.1 | 3.7.1 | 3.7.1 |
| matplotlib-inline | 0.1.6 | 0.1.6 | 0.1.6 | 0.1.6 |
| mccabe | 0.7.0 | 0.7.0 | 0.7.0 | 0.7.0 |
| mdit-py-plugins | 0.3.0 | 0.3.0 | ||
| mdurl | 0.1.0 | 0.1.0 | ||
| mistune | 0.8.4 | 0.8.4 | 0.8.4 | 0.8.4 |
| mkl | 2023.1.0 | |||
| mkl-service | 2.4.0 | |||
| mkl\_fft | 1.3.6 | |||
| mkl\_random | 1.2.2 | |||
| mock | 4.0.3 | |||
| more-itertools | 8.12.0 | 8.12.0 | 8.12.0 | 8.12.0 |
| mpc | 1.1.0 | 1.1.0 | 1.1.0 | 1.1.0 |
| mpfr | 4.0.2 | 4.0.2 | 4.0.2 | 4.0.2 |
| mpi | 1.0 | |||
| mpich | 4.1.1 | |||
| mpmath | 1.3.0 | 1.3.0 | 1.3.0 | 1.3.0 |
| msgpack-python | 1.0.3 | 1.0.3 | 1.0.3 | 1.0.3 |
| multidict | 6.0.2 | 6.0.2 | 6.0.2 | 6.0.2 |
| multipledispatch | 0.6.0 | 0.6.0 | 0.6.0 | |
| multiprocess | 0.70.14 | 0.70.14 | ||
| munkres | 1.1.4 | 1.1.4 | 1.1.4 | 1.1.4 |
| mypy\_extensions | 0.4.3 | 0.4.3 | ||
| navigator-updater | 0.4.0 | 0.4.0 | ||
| nbclassic | 0.5.5 | 0.5.5 | 0.5.5 | 0.5.5 |
| nbclient | 0.5.13 | 0.5.13 | 0.5.13 | 0.5.13 |
| nbconvert | 6.5.4 | 6.5.4 | 6.5.4 | 6.5.4 |
| nbformat | 5.7.0 | 5.7.0 | 5.7.0 | 5.7.0 |
| ncurses | 6.4 | 6.4 | 6.4 | 6.4 |
| nest-asyncio | 1.5.6 | 1.5.6 | 1.5.6 | 1.5.6 |
| networkx | 3.1 | 3.1 | 3.1 | 3.1 |
| ninja | 1.10.2 | 1.10.2 | ||
| ninja-base | 1.10.2 | 1.10.2 | ||
| nltk | 3.8.1 | 3.8.1 | 3.8.1 | 3.8.1 |
| notebook | 6.5.4 | 6.5.4 | 6.5.4 | 6.5.4 |
| notebook-shim | 0.2.2 | 0.2.2 | 0.2.2 | 0.2.2 |
| nspr | 4.35 | 4.35 | ||
| nss | 3.89.1 | 3.89.1 | ||
| numba | 0.57.0 | 0.57.0 | 0.57.0 | |
| numexpr | 2.8.4 | 2.8.4 | 2.8.4 | 2.8.4 |
| numpy | 1.24.3 | 1.24.3 | 1.24.3 | 1.25.0 |
| numpy-base | 1.24.3 | 1.24.3 | 1.24.3 | 1.25.0 |
| numpydoc | 1.5.0 | 1.5.0 | ||
| oniguruma | 6.9.7.1 | 6.9.7.1 | 6.9.7.1 | |
| openjpeg | 2.4.0 | 2.4.0 | 2.4.0 | 2.4.0 |
| openpyxl | 3.0.10 | 3.0.10 | 3.0.10 | 3.0.10 |
| openssl | 1.1.1u | 1.1.1u | 1.1.1u | 1.1.1u |
| orc | 1.7.4 | 1.7.4 | 1.7.4 | |
| packaging | 23.0 | 23.0 | 23.0 | 23.0 |
| pandas | 1.5.3 | 1.5.3 | 1.5.3 | 1.5.3 |
| pandocfilters | 1.5.0 | 1.5.0 | 1.5.0 | 1.5.0 |
| panel | 1.2.1 | 0.14.3 | 1.2.1 | 0.12.6 |
| param | 1.13.0 | 1.13.0 | 1.13.0 | 1.13.0 |
| parsel | 1.6.0 | 1.6.0 | 1.6.0 | |
| parso | 0.8.3 | 0.8.3 | 0.8.3 | 0.8.3 |
| partd | 1.2.0 | 1.2.0 | 1.2.0 | 1.2.0 |
| patch | 2.7.6 | 2.7.6 | 2.7.6 | 2.7.6 |
| patchelf | 0.17.2 | 0.17.2 | 0.17.2 | 0.17.2 |
| pathlib | 1.0.1 | 1.0.1 | ||
| pathspec | 0.10.3 | 0.10.3 | ||
| patsy | 0.5.3 | 0.5.3 | 0.5.3 | 0.5.3 |
| pcre | 8.45 | 8.45 | ||
| pcre2 | 10.37 | 10.37 | 10.37 | 10.37 |
| pep8 | 1.7.1 | 1.7.1 | 1.7.1 | 1.7.1 |
| pexpect | 4.8.0 | 4.8.0 | 4.8.0 | 4.8.0 |
| pickleshare | 0.7.5 | 0.7.5 | 0.7.5 | 0.7.5 |
| pillow | 9.4.0 | 9.4.0 | 9.4.0 | 9.4.0 |
| pip | 23.2.1 | 23.2.1 | 23.2.1 | 23.2.1 |
| pkginfo | 1.9.6 | 1.9.6 | 1.9.6 | 1.9.6 |
| platformdirs | 2.5.2 | 2.5.2 | 2.5.2 | 2.5.2 |
| plotly | 5.9.0 | 5.9.0 | 5.9.0 | 5.9.0 |
| pluggy | 1.0.0 | 1.0.0 | 1.0.0 | 1.0.0 |
| ply | 3.11 | 3.11 | ||
| pooch | 1.4.0 | 1.4.0 | 1.4.0 | 1.4.0 |
| poyo | 0.5.0 | 0.5.0 | ||
| prometheus\_client | 0.14.1 | 0.14.1 | 0.14.1 | 0.14.1 |
| prompt-toolkit | 3.0.36 | 3.0.36 | 3.0.36 | 3.0.36 |
| prompt\_toolkit | 3.0.36 | 3.0.36 | 3.0.36 | 3.0.36 |
| protego | 0.1.16 | 0.1.16 | 0.1.16 | |
| psutil | 5.9.0 | 5.9.0 | 5.9.0 | 5.9.0 |
| ptyprocess | 0.7.0 | 0.7.0 | 0.7.0 | 0.7.0 |
| pure\_eval | 0.2.2 | 0.2.2 | 0.2.2 | 0.2.2 |
| py-cpuinfo | 8.0.0 | 8.0.0 | 8.0.0 | |
| py-lief | 0.12.3 | 0.12.3 | 0.12.3 | 0.12.3 |
| pyarrow | 11.0.0 | 11.0.0 | 11.0.0 | |
| pyasn1 | 0.4.8 | 0.4.8 | 0.4.8 | |
| pyasn1-modules | 0.2.8 | 0.2.8 | 0.2.8 | |
| pybind11-abi | 4 | 4 | 4 | 4 |
| pycodestyle | 2.10.0 | 2.10.0 | ||
| pycosat | 0.6.4 | 0.6.4 | 0.6.4 | 0.6.4 |
| pycparser | 2.21 | 2.21 | 2.21 | 2.21 |
| pyct | 0.5.0 | 0.5.0 | 0.5.0 | 0.5.0 |
| pycurl | 7.45.2 | 7.45.2 | 7.45.2 | 7.45.2 |
| pydispatcher | 2.0.5 | 2.0.5 | 2.0.5 | |
| pydocstyle | 6.3.0 | 6.3.0 | ||
| pyerfa | 2.0.0 | 2.0.0 | 2.0.0 | 2.0.0 |
| pyflakes | 3.0.1 | 3.0.1 | 3.0.1 | 3.0.1 |
| pygments | 2.15.1 | 2.15.1 | 2.15.1 | 2.15.1 |
| pyjwt | 2.4.0 | 2.4.0 | ||
| pylint | 2.16.2 | 2.16.2 | 2.16.2 | 2.16.2 |
| pylint-venv | 2.3.0 | 2.3.0 | ||
| pyls-spyder | 0.4.0 | 0.4.0 | ||
| pyodbc | 4.0.34 | 4.0.34 | 4.0.34 | 4.0.34 |
| pyopenssl | 23.2.0 | 23.2.0 | 23.2.0 | 23.2.0 |
| pyparsing | 3.0.9 | 3.0.9 | 3.0.9 | 3.0.9 |
| pyqt | 5.15.7 | 5.15.7 | ||
| pyqt5-sip | 12.11.0 | 12.11.0 | ||
| pyqtwebengine | 5.15.7 | 5.15.7 | ||
| pyrsistent | 0.18.0 | 0.18.0 | 0.18.0 | 0.18.0 |
| pysocks | 1.7.1 | 1.7.1 | 1.7.1 | 1.7.1 |
| pytables | 3.8.0 | 3.8.0 | 3.8.0 | 3.7.0 |
| pytest | 7.4.0 | 7.4.0 | 7.4.0 | 7.4.0 |
| python | 3.11.4 | 3.11.4 | 3.11.4 | 3.11.4 |
| python-dateutil | 2.8.2 | 2.8.2 | 2.8.2 | 2.8.2 |
| python-fastjsonschema | 2.16.2 | 2.16.2 | 2.16.2 | 2.16.2 |
| python-json-logger | 2.0.7 | 2.0.7 | 2.0.7 | |
| python-libarchive-c | 2.9 | 2.9 | 2.9 | 2.9 |
| python-lmdb | 1.4.1 | 1.4.1 | 1.4.1 | 1.4.1 |
| python-lsp-black | 1.2.1 | 1.2.1 | ||
| python-lsp-jsonrpc | 1.0.0 | 1.0.0 | ||
| python-lsp-server | 1.7.2 | 1.7.2 | ||
| python-slugify | 5.0.2 | 5.0.2 | ||
| python-snappy | 0.6.1 | 0.6.1 | 0.6.1 | 0.6.1 |
| python-xxhash | 2.0.2 | 2.0.2 | ||
| pytoolconfig | 1.2.5 | 1.2.5 | ||
| pytorch | 2.0.1 | 2.0.1 | ||
| pytz | 2022.7 | 2022.7 | 2022.7 | 2022.7 |
| pyviz\_comms | 2.3.0 | 2.3.0 | 2.3.0 | 2.3.0 |
| pywavelets | 1.4.1 | 1.4.1 | 1.4.1 | 1.4.1 |
| pyxdg | 0.27 | 0.27 | ||
| pyyaml | 6.0 | 6.0 | 6.0 | 6.0 |
| pyzmq | 23.2.0 | 23.2.0 | 23.2.0 | 23.2.0 |
| qdarkstyle | 3.0.2 | 3.0.2 | ||
| qstylizer | 0.2.2 | 0.2.2 | ||
| qt-main | 5.15.2 | 5.15.2 | ||
| qt-webengine | 5.15.9 | 5.15.9 | ||
| qtawesome | 1.2.2 | 1.2.2 | ||
| qtconsole | 5.4.2 | 5.4.2 | ||
| qtpy | 2.2.0 | 2.2.0 | ||
| qtwebkit | 5.212 | 5.212 | ||
| queuelib | 1.5.0 | 1.5.0 | 1.5.0 | |
| re2 | 2022.04.01 | 2022.04.01 | 2022.04.01 | |
| readline | 8.2 | 8.2 | 8.2 | 8.2 |
| regex | 2022.7.9 | 2022.7.9 | 2022.7.9 | 2022.7.9 |
| reproc | 14.2.4 | 14.2.4 | 14.2.4 | 14.2.4 |
| reproc-cpp | 14.2.4 | 14.2.4 | 14.2.4 | 14.2.4 |
| requests | 2.31.0 | 2.31.0 | 2.31.0 | 2.31.0 |
| requests-file | 1.5.1 | 1.5.1 | 1.5.1 | |
| requests-toolbelt | 1.0.0 | 1.0.0 | 1.0.0 | 1.0.0 |
| responses | 0.13.3 | 0.13.3 | ||
| rfc3339-validator | 0.1.4 | 0.1.4 | 0.1.4 | |
| rfc3986-validator | 0.1.1 | 0.1.1 | 0.1.1 | |
| rope | 1.7.0 | 1.7.0 | ||
| rtree | 1.0.1 | 1.0.1 | ||
| ruamel.yaml | 0.17.21 | 0.17.21 | 0.17.21 | 0.17.21 |
| ruamel\_yaml | 0.17.21 | 0.17.21 | 0.17.21 | 0.17.21 |
| s3fs | 2023.4.0 | 2023.4.0 | 2023.3.0 | 2023.3.0 |
| s3transfer | 0.6.0 | 0.6.0 | ||
| sacremoses | 0.0.43 | 0.0.43 | 0.0.43 | 0.0.43 |
| scikit-image | 0.20.0 | 0.20.0 | 0.20.0 | 0.20.0 |
| scikit-learn | 1.3.0 | 1.3.0 | 1.3.0 | 1.2.2 |
| scikit-learn-intelex | 2023.1.1 | |||
| scipy | 1.10.1 | 1.10.1 | 1.10.1 | 1.10.1 |
| scrapy | 2.8.0 | 2.8.0 | 2.8.0 | |
| seaborn | 0.12.2 | 0.12.2 | 0.12.2 | 0.12.2 |
| secretstorage | 3.3.1 | 3.3.1 | ||
| send2trash | 1.8.0 | 1.8.0 | 1.8.0 | 1.8.0 |
| service\_identity | 18.1.0 | 18.1.0 | 18.1.0 | |
| setuptools | 68.0.0 | 68.0.0 | 68.0.0 | 68.0.0 |
| sip | 6.6.2 | 6.6.2 | ||
| six | 1.16.0 | 1.16.0 | 1.16.0 | 1.16.0 |
| smart\_open | 5.2.1 | 5.2.1 | 5.2.1 | |
| snappy | 1.1.9 | 1.1.9 | 1.1.9 | 1.1.9 |
| sniffio | 1.2.0 | 1.2.0 | 1.2.0 | 1.2.0 |
| snowballstemmer | 2.2.0 | 2.2.0 | 2.2.0 | 2.2.0 |
| sortedcontainers | 2.4.0 | 2.4.0 | 2.4.0 | 2.4.0 |
| soupsieve | 2.4 | 2.4 | 2.4 | 2.4 |
| sphinx | 5.0.2 | 5.0.2 | ||
| sphinxcontrib-applehelp | 1.0.2 | 1.0.2 | ||
| sphinxcontrib-devhelp | 1.0.2 | 1.0.2 | ||
| sphinxcontrib-htmlhelp | 2.0.0 | 2.0.0 | ||
| sphinxcontrib-jsmath | 1.0.1 | 1.0.1 | ||
| sphinxcontrib-qthelp | 1.0.3 | 1.0.3 | ||
| sphinxcontrib-serializinghtml | 1.1.5 | 1.1.5 | ||
| spyder | 5.4.3 | 5.4.3 | ||
| spyder-kernels | 2.4.3 | 2.4.3 | ||
| sqlalchemy | 1.4.39 | 1.4.39 | 1.4.39 | 1.4.39 |
| sqlite | 3.41.2 | 3.41.2 | 3.41.2 | 3.41.2 |
| stack\_data | 0.2.0 | 0.2.0 | 0.2.0 | 0.2.0 |
| statsmodels | 0.14.0 | 0.14.0 | 0.14.0 | 0.14.0 |
| sympy | 1.11.1 | 1.11.1 | 1.11.1 | 1.11.1 |
| tabulate | 0.8.10 | 0.8.10 | 0.8.10 | 0.8.10 |
| tbb | 2021.8.0 | 2021.8.0 | 2021.8.0 | 2021.8.0 |
| tbb4py | 2021.8.0 | 2021.8.0 | 2021.8.0 | 2021.8.0 |
| tblib | 1.7.0 | 1.7.0 | 1.7.0 | 1.7.0 |
| tenacity | 8.2.2 | 8.2.2 | 8.2.2 | 8.2.2 |
| terminado | 0.17.1 | 0.17.1 | 0.17.1 | 0.17.1 |
| text-unidecode | 1.3 | 1.3 | ||
| textdistance | 4.2.1 | 4.2.1 | ||
| threadpoolctl | 2.2.0 | 2.2.0 | 2.2.0 | 2.2.0 |
| three-merge | 0.1.1 | 0.1.1 | ||
| tifffile | 2021.7.2 | 2021.7.2 | 2021.7.2 | 2021.7.2 |
| tinycss2 | 1.2.1 | 1.2.1 | 1.2.1 | 1.2.1 |
| tk | 8.6.12 | 8.6.12 | 8.6.12 | 8.6.12 |
| tldextract | 3.2.0 | 3.2.0 | 3.2.0 | |
| tokenizers | 0.13.2 | 0.13.2 | ||
| toml | 0.10.2 | 0.10.2 | ||
| tomlkit | 0.11.1 | 0.11.1 | 0.11.1 | 0.11.1 |
| toolz | 0.12.0 | 0.12.0 | 0.12.0 | 0.12.0 |
| tornado | 6.3.2 | 6.3.2 | 6.3.2 | 6.3.2 |
| tqdm | 4.65.0 | 4.65.0 | 4.65.0 | 4.65.0 |
| traitlets | 5.7.1 | 5.7.1 | 5.7.1 | 5.7.1 |
| transformers | 4.29.2 | 4.29.2 | 2.1.1 | 2.1.1 |
| twisted | 22.10.0 | 22.10.0 | 22.10.0 | |
| typing-extensions | 4.7.1 | 4.7.1 | 4.7.1 | 4.7.1 |
| typing\_extensions | 4.7.1 | 4.7.1 | 4.7.1 | 4.7.1 |
| tzdata | 2023c | 2023c | 2023c | 2023c |
| uc-micro-py | 1.0.1 | 1.0.1 | ||
| ujson | 5.4.0 | 5.4.0 | ||
| unidecode | 1.2.0 | 1.2.0 | ||
| unixodbc | 2.3.11 | 2.3.11 | 2.3.11 | 2.3.11 |
| urllib3 | 1.26.16 | 1.26.16 | 1.26.16 | 1.26.16 |
| utf8proc | 2.6.1 | 2.6.1 | 2.6.1 | |
| w3lib | 1.21.0 | 1.21.0 | 1.21.0 | |
| watchdog | 2.1.6 | 2.1.6 | ||
| wcwidth | 0.2.5 | 0.2.5 | 0.2.5 | 0.2.5 |
| webencodings | 0.5.1 | 0.5.1 | 0.5.1 | 0.5.1 |
| websocket-client | 0.58.0 | 0.58.0 | 0.58.0 | 0.58.0 |
| werkzeug | 2.2.3 | 2.2.3 | 2.2.3 | 2.2.3 |
| whatthepatch | 1.0.2 | 1.0.2 | ||
| wheel | 0.38.4 | 0.38.4 | 0.38.4 | 0.38.4 |
| widgetsnbextension | 4.0.5 | 4.0.5 | 4.0.5 | 4.0.5 |
| wrapt | 1.14.1 | 1.14.1 | 1.14.1 | 1.14.1 |
| wurlitzer | 3.0.2 | 3.0.2 | ||
| xarray | 2023.6.0 | 2023.6.0 | 2023.6.0 | |
| xxhash | 0.8.0 | 0.8.0 | ||
| xyzservices | 2022.9.0 | 2022.9.0 | ||
| xz | 5.4.2 | 5.4.2 | 5.4.2 | 5.4.2 |
| y-py | 0.5.9 | 0.5.9 | 0.5.9 | |
| yaml | 0.2.5 | 0.2.5 | 0.2.5 | 0.2.5 |
| yaml-cpp | 0.7.0 | 0.7.0 | 0.7.0 | 0.7.0 |
| yapf | 0.31.0 | 0.31.0 | ||
| yarl | 1.8.1 | 1.8.1 | 1.8.1 | 1.8.1 |
| ypy-websocket | 0.8.2 | 0.8.2 | 0.8.2 | |
| zeromq | 4.3.4 | 4.3.4 | 4.3.4 | 4.3.4 |
| zfp | 0.5.5 | 0.5.5 | ||
| zict | 2.2.0 | 2.2.0 | 2.2.0 | 2.2.0 |
| zipp | 3.11.0 | 3.11.0 | 3.11.0 | 3.11.0 |
| zlib | 1.2.13 | 1.2.13 | 1.2.13 | 1.2.13 |
| zlib-ng | 2.0.7 | 2.0.7 | 2.0.7 | |
| zope | 1.0 | 1.0 | 1.0 | |
| zope.interface | 5.4.0 | 5.4.0 | 5.4.0 | |
| zstandard | 0.19.0 | 0.19.0 | 0.19.0 | 0.19.0 |
| zstd | 1.5.5 | 1.5.5 | 1.5.5 | 1.5.5 |
| Package Name | osx-arm64 | osx-64 |
|---|---|---|
| \_anaconda\_depends | 2023.07 | 2023.07 |
| abseil-cpp | 20211102.0 | 20211102.0 |
| aiobotocore | 2.5.0 | 2.4.2 |
| aiofiles | 22.1.0 | 22.1.0 |
| aiohttp | 3.8.3 | 3.8.3 |
| aioitertools | 0.7.1 | 0.7.1 |
| aiosignal | 1.2.0 | 1.2.0 |
| aiosqlite | 0.18.0 | 0.18.0 |
| alabaster | 0.7.12 | 0.7.12 |
| anaconda-catalogs | 0.2.0 | 0.2.0 |
| anaconda-client | 1.12.0 | 1.12.0 |
| anaconda-navigator | 2.4.2 | 2.4.2 |
| anaconda-project | 0.11.1 | 0.11.1 |
| anyio | 3.5.0 | 3.5.0 |
| appdirs | 1.4.4 | 1.4.4 |
| applaunchservices | 0.3.0 | 0.3.0 |
| appnope | 0.1.2 | 0.1.2 |
| appscript | 1.1.2 | 1.1.2 |
| argon2-cffi | 21.3.0 | 21.3.0 |
| argon2-cffi-bindings | 21.2.0 | 21.2.0 |
| arrow | 1.2.3 | 1.2.3 |
| arrow-cpp | 11.0.0 | 11.0.0 |
| astroid | 2.14.2 | 2.14.2 |
| astropy | 5.1 | 5.1 |
| asttokens | 2.0.5 | 2.0.5 |
| async-timeout | 4.0.2 | 4.0.2 |
| atomicwrites | 1.4.0 | 1.4.0 |
| attrs | 22.1.0 | 22.1.0 |
| automat | 20.2.0 | 20.2.0 |
| autopep8 | 1.6.0 | 1.6.0 |
| aws-c-common | 0.6.8 | 0.4.57 |
| aws-c-event-stream | 0.1.6 | 0.1.6 |
| aws-checksums | 0.1.11 | 0.1.9 |
| aws-sdk-cpp | 1.8.185 | 1.8.185 |
| babel | 2.11.0 | 2.11.0 |
| backcall | 0.2.0 | 0.2.0 |
| backports | 1.1 | 1.1 |
| backports.functools\_lru\_cache | 1.6.4 | 1.6.4 |
| backports.tempfile | 1.0 | 1.0 |
| backports.weakref | 1.0.post1 | 1.0.post1 |
| bcrypt | 3.2.0 | 3.2.0 |
| beautifulsoup4 | 4.12.2 | 4.12.2 |
| binaryornot | 0.4.4 | 0.4.4 |
| black | 23.3.0 | 23.3.0 |
| blas | 1.0 | 1.0 |
| bleach | 4.1.0 | 4.1.0 |
| blosc | 1.21.3 | 1.21.3 |
| bokeh | 3.2.1 | 3.2.1 |
| boltons | 23.0.0 | 23.0.0 |
| boost-cpp | 1.73.0 | 1.73.0 |
| boto3 | 1.24.28 | |
| botocore | 1.29.76 | 1.27.59 |
| bottleneck | 1.3.5 | 1.3.5 |
| brotli | 1.0.9 | 1.0.9 |
| brotli-bin | 1.0.9 | 1.0.9 |
| brotlipy | 0.7.0 | 0.7.0 |
| brunsli | 0.1 | 0.1 |
| bzip2 | 1.0.8 | 1.0.8 |
| c-ares | 1.19.0 | 1.19.0 |
| c-blosc2 | 2.8.0 | 2.8.0 |
| ca-certificates | 2023.05.30 | 2023.05.30 |
| cctools | 949.0.1 | 949.0.1 |
| cctools\_osx-64 | 949.0.1 | |
| cctools\_osx-arm64 | 949.0.1 | |
| certifi | 2023.7.22 | 2023.7.22 |
| cffi | 1.15.1 | 1.15.1 |
| cfitsio | 3.470 | 3.470 |
| chardet | 4.0.0 | 4.0.0 |
| charls | 2.2.0 | 2.2.0 |
| charset-normalizer | 2.0.4 | 2.0.4 |
| click | 8.0.4 | 8.0.4 |
| cloudpickle | 2.2.1 | 2.2.1 |
| clyent | 1.2.2 | 1.2.2 |
| colorama | 0.4.6 | 0.4.6 |
| colorcet | 3.0.1 | 3.0.1 |
| comm | 0.1.2 | 0.1.2 |
| conda | 23.7.2 | 23.7.2 |
| conda-build | 3.26.0 | 3.26.0 |
| conda-content-trust | 0.1.1 | 0.1.1 |
| conda-index | 0.2.3 | 0.2.3 |
| conda-libmamba-solver | 23.5.0 | 23.5.0 |
| conda-pack | 0.6.0 | 0.6.0 |
| conda-package-handling | 2.2.0 | 2.2.0 |
| conda-package-streaming | 0.9.0 | 0.9.0 |
| conda-repo-cli | 1.0.41 | 1.0.41 |
| conda-token | 0.4.0 | 0.4.0 |
| conda-verify | 3.4.2 | 3.4.2 |
| constantly | 15.1.0 | 15.1.0 |
| contourpy | 1.0.5 | 1.0.5 |
| cookiecutter | 1.7.3 | 1.7.3 |
| cryptography | 41.0.2 | 41.0.2 |
| cssselect | 1.1.0 | 1.1.0 |
| curl | 8.1.1 | 8.1.1 |
| cycler | 0.11.0 | 0.11.0 |
| cytoolz | 0.12.0 | 0.12.0 |
| dask | 2023.6.0 | 2023.6.0 |
| dask-core | 2023.6.0 | 2023.6.0 |
| datasets | 2.12.0 | |
| datashader | 0.15.1 | 0.15.1 |
| datashape | 0.5.4 | 0.5.4 |
| debugpy | 1.6.7 | 1.6.7 |
| decorator | 5.1.1 | 5.1.1 |
| defusedxml | 0.7.1 | 0.7.1 |
| diff-match-patch | 20200713 | 20200713 |
| dill | 0.3.6 | 0.3.6 |
| distributed | 2023.6.0 | 2023.6.0 |
| docstring-to-markdown | 0.11 | 0.11 |
| docutils | 0.18.1 | 0.18.1 |
| entrypoints | 0.4 | 0.4 |
| et\_xmlfile | 1.1.0 | 1.1.0 |
| executing | 0.8.3 | 0.8.3 |
| filelock | 3.9.0 | 3.9.0 |
| flake8 | 6.0.0 | 6.0.0 |
| flask | 2.2.2 | 2.2.2 |
| fmt | 9.1.0 | 9.1.0 |
| fonttools | 4.25.0 | 4.25.0 |
| freetype | 2.12.1 | 2.12.1 |
| frozenlist | 1.3.3 | 1.3.3 |
| fsspec | 2023.4.0 | 2023.3.0 |
| future | 0.18.3 | 0.18.3 |
| gensim | 4.3.0 | 4.3.0 |
| gettext | 0.21.0 | 0.21.0 |
| gflags | 2.2.2 | 2.2.2 |
| giflib | 5.2.1 | 5.2.1 |
| glib | 2.69.1 | 2.69.1 |
| glob2 | 0.7 | 0.7 |
| glog | 0.5.0 | 0.5.0 |
| gmp | 6.2.1 | 6.2.1 |
| gmpy2 | 2.1.2 | 2.1.2 |
| greenlet | 2.0.1 | 2.0.1 |
| grpc-cpp | 1.46.1 | 1.46.1 |
| gst-plugins-base | 1.14.1 | 1.14.1 |
| gstreamer | 1.14.1 | 1.14.1 |
| h5py | 3.7.0 | 3.7.0 |
| hdf5 | 1.12.1 | 1.10.6 |
| heapdict | 1.0.1 | 1.0.1 |
| holoviews | 1.17.0 | 1.17.0 |
| huggingface\_hub | 0.15.1 | |
| hvplot | 0.8.4 | 0.8.4 |
| hyperlink | 21.0.0 | 21.0.0 |
| icu | 68.1 | 58.2 |
| idna | 3.4 | 3.4 |
| imagecodecs | 2021.8.26 | 2021.8.26 |
| imageio | 2.31.1 | 2.31.1 |
| imagesize | 1.4.1 | 1.4.1 |
| imbalanced-learn | 0.10.1 | 0.10.1 |
| importlib-metadata | 6.0.0 | 6.0.0 |
| importlib\_metadata | 6.0.0 | 6.0.0 |
| incremental | 21.3.0 | 21.3.0 |
| inflection | 0.5.1 | 0.5.1 |
| iniconfig | 1.1.1 | 1.1.1 |
| intake | 0.6.8 | 0.6.8 |
| intervaltree | 3.1.0 | 3.1.0 |
| ipykernel | 6.19.2 | 6.19.2 |
| ipython | 8.12.0 | 8.12.0 |
| ipython\_genutils | 0.2.0 | 0.2.0 |
| ipywidgets | 8.0.4 | 8.0.4 |
| isort | 5.9.3 | 5.9.3 |
| itemadapter | 0.3.0 | 0.3.0 |
| itemloaders | 1.0.4 | 1.0.4 |
| itsdangerous | 2.0.1 | 2.0.1 |
| jaraco.classes | 3.2.1 | 3.2.1 |
| jedi | 0.18.1 | 0.18.1 |
| jellyfish | 0.9.0 | 0.9.0 |
| jinja2 | 3.1.2 | 3.1.2 |
| jinja2-time | 0.2.0 | 0.2.0 |
| jmespath | 0.10.0 | 0.10.0 |
| joblib | 1.2.0 | 1.2.0 |
| jpeg | 9e | 9e |
| jq | 1.6 | 1.6 |
| json5 | 0.9.6 | 0.9.6 |
| jsonpatch | 1.32 | 1.32 |
| jsonpointer | 2.1 | 2.1 |
| jsonschema | 4.17.3 | 4.17.3 |
| jupyter | 1.0.0 | 1.0.0 |
| jupyter\_client | 7.4.9 | 7.4.9 |
| jupyter\_console | 6.6.3 | 6.6.3 |
| jupyter\_core | 5.3.0 | 5.3.0 |
| jupyter\_events | 0.6.3 | 0.6.3 |
| jupyter\_server | 1.23.4 | 1.23.4 |
| jupyter\_server\_fileid | 0.9.0 | 0.9.0 |
| jupyter\_server\_ydoc | 0.8.0 | 0.8.0 |
| jupyter\_ydoc | 0.2.4 | 0.2.4 |
| jupyterlab | 3.6.3 | 3.6.3 |
| jupyterlab\_pygments | 0.1.2 | 0.1.2 |
| jupyterlab\_server | 2.22.0 | 2.22.0 |
| jupyterlab\_widgets | 3.0.5 | 3.0.5 |
| jxrlib | 1.1 | 1.1 |
| keyring | 23.13.1 | 23.13.1 |
| kiwisolver | 1.4.4 | 1.4.4 |
| krb5 | 1.20.1 | 1.20.1 |
| lazy-object-proxy | 1.6.0 | 1.6.0 |
| lazy\_loader | 0.2 | 0.2 |
| lcms2 | 2.12 | 2.12 |
| ld64 | 530 | 530 |
| ld64\_osx-64 | 530 | |
| ld64\_osx-arm64 | 530 | |
| ldid | 2.1.5 | 2.1.5 |
| lerc | 3.0 | 3.0 |
| libaec | 1.0.4 | 1.0.4 |
| libarchive | 3.6.2 | 3.6.2 |
| libboost | 1.73.0 | 1.73.0 |
| libbrotlicommon | 1.0.9 | 1.0.9 |
| libbrotlidec | 1.0.9 | 1.0.9 |
| libbrotlienc | 1.0.9 | 1.0.9 |
| libclang | 12.0.0 | 12.0.0 |
| libcurl | 8.1.1 | 8.1.1 |
| libcxx | 14.0.6 | 14.0.6 |
| libdeflate | 1.17 | 1.17 |
| libedit | 3.1.20221030 | 3.1.20221030 |
| libev | 4.33 | 4.33 |
| libevent | 2.1.12 | 2.1.12 |
| libffi | 3.4.4 | 3.4.4 |
| libgfortran | 5.0.0 | 5.0.0 |
| libgfortran5 | 11.3.0 | 11.3.0 |
| libiconv | 1.16 | 1.16 |
| liblief | 0.12.3 | 0.12.3 |
| libllvm12 | 12.0.0 | 12.0.0 |
| libllvm14 | 14.0.6 | 14.0.6 |
| libmamba | 1.4.1 | 1.4.1 |
| libmambapy | 1.4.1 | 1.4.1 |
| libnghttp2 | 1.52.0 | 1.52.0 |
| libopenblas | 0.3.21 | 0.3.21 |
| libpng | 1.6.39 | 1.6.39 |
| libpq | 12.15 | 12.15 |
| libprotobuf | 3.20.3 | 3.20.3 |
| libsodium | 1.0.18 | 1.0.18 |
| libsolv | 0.7.22 | 0.7.22 |
| libspatialindex | 1.9.3 | 1.9.3 |
| libssh2 | 1.10.0 | 1.10.0 |
| libthrift | 0.13.0 | 0.15.0 |
| libtiff | 4.5.0 | 4.5.0 |
| libuv | 1.44.2 | |
| libwebp | 1.2.4 | 1.2.4 |
| libwebp-base | 1.2.4 | 1.2.4 |
| libxml2 | 2.10.3 | 2.10.3 |
| libxslt | 1.1.37 | 1.1.37 |
| libzopfli | 1.0.3 | 1.0.3 |
| linkify-it-py | 2.0.0 | 2.0.0 |
| llvm-openmp | 14.0.6 | 14.0.6 |
| llvmlite | 0.40.0 | 0.40.0 |
| locket | 1.0.0 | 1.0.0 |
| lxml | 4.9.2 | 4.9.2 |
| lz4 | 4.3.2 | 4.3.2 |
| lz4-c | 1.9.4 | 1.9.4 |
| lzo | 2.10 | 2.10 |
| markdown | 3.4.1 | 3.4.1 |
| markdown-it-py | 2.2.0 | 2.2.0 |
| markupsafe | 2.1.1 | 2.1.1 |
| matplotlib | 3.7.1 | 3.7.1 |
| matplotlib-base | 3.7.1 | 3.7.1 |
| matplotlib-inline | 0.1.6 | 0.1.6 |
| mccabe | 0.7.0 | 0.7.0 |
| mdit-py-plugins | 0.3.0 | 0.3.0 |
| mdurl | 0.1.0 | 0.1.0 |
| mistune | 0.8.4 | 0.8.4 |
| more-itertools | 8.12.0 | 8.12.0 |
| mpc | 1.1.0 | 1.1.0 |
| mpfr | 4.0.2 | 4.0.2 |
| mpmath | 1.3.0 | 1.3.0 |
| msgpack-python | 1.0.3 | 1.0.3 |
| multidict | 6.0.2 | 6.0.2 |
| multipledispatch | 0.6.0 | 0.6.0 |
| multiprocess | 0.70.14 | |
| munkres | 1.1.4 | 1.1.4 |
| mypy\_extensions | 0.4.3 | 0.4.3 |
| navigator-updater | 0.4.0 | 0.4.0 |
| nbclassic | 0.5.5 | 0.5.5 |
| nbclient | 0.5.13 | 0.5.13 |
| nbconvert | 6.5.4 | 6.5.4 |
| nbformat | 5.7.0 | 5.7.0 |
| ncurses | 6.4 | 6.4 |
| nest-asyncio | 1.5.6 | 1.5.6 |
| networkx | 3.1 | 3.1 |
| ninja | 1.10.2 | |
| ninja-base | 1.10.2 | |
| nltk | 3.8.1 | 3.8.1 |
| notebook | 6.5.4 | 6.5.4 |
| notebook-shim | 0.2.2 | 0.2.2 |
| nspr | 4.35 | 4.35 |
| nss | 3.89.1 | 3.89.1 |
| numba | 0.57.0 | 0.57.0 |
| numexpr | 2.8.4 | 2.8.4 |
| numpy | 1.24.3 | 1.24.3 |
| numpy-base | 1.24.3 | 1.24.3 |
| numpydoc | 1.5.0 | 1.5.0 |
| oniguruma | 6.9.7.1 | 6.9.7.1 |
| openjpeg | 2.3.0 | 2.4.0 |
| openpyxl | 3.0.10 | 3.0.10 |
| openssl | 1.1.1u | 1.1.1u |
| orc | 1.7.4 | 1.7.4 |
| packaging | 23.0 | 23.0 |
| pandas | 1.5.3 | 1.5.3 |
| pandocfilters | 1.5.0 | 1.5.0 |
| panel | 1.2.1 | 1.2.1 |
| param | 1.13.0 | 1.13.0 |
| parsel | 1.6.0 | 1.6.0 |
| parso | 0.8.3 | 0.8.3 |
| partd | 1.2.0 | 1.2.0 |
| patch | 2.7.6 | 2.7.6 |
| pathlib | 1.0.1 | 1.0.1 |
| pathspec | 0.10.3 | 0.10.3 |
| patsy | 0.5.3 | 0.5.3 |
| pcre | 8.45 | 8.45 |
| pcre2 | 10.37 | 10.37 |
| pep8 | 1.7.1 | 1.7.1 |
| pexpect | 4.8.0 | 4.8.0 |
| pickleshare | 0.7.5 | 0.7.5 |
| pillow | 9.4.0 | 9.4.0 |
| pip | 23.2.1 | 23.2.1 |
| pkginfo | 1.9.6 | 1.9.6 |
| platformdirs | 2.5.2 | 2.5.2 |
| plotly | 5.9.0 | 5.9.0 |
| pluggy | 1.0.0 | 1.0.0 |
| ply | 3.11 | 3.11 |
| pooch | 1.4.0 | 1.4.0 |
| poyo | 0.5.0 | 0.5.0 |
| prometheus\_client | 0.14.1 | 0.14.1 |
| prompt-toolkit | 3.0.36 | 3.0.36 |
| prompt\_toolkit | 3.0.36 | 3.0.36 |
| protego | 0.1.16 | 0.1.16 |
| psutil | 5.9.0 | 5.9.0 |
| ptyprocess | 0.7.0 | 0.7.0 |
| pure\_eval | 0.2.2 | 0.2.2 |
| py-cpuinfo | 8.0.0 | 8.0.0 |
| py-lief | 0.12.3 | 0.12.3 |
| pyarrow | 11.0.0 | 11.0.0 |
| pyasn1 | 0.4.8 | 0.4.8 |
| pyasn1-modules | 0.2.8 | 0.2.8 |
| pybind11-abi | 4 | 4 |
| pycodestyle | 2.10.0 | 2.10.0 |
| pycosat | 0.6.4 | 0.6.4 |
| pycparser | 2.21 | 2.21 |
| pyct | 0.5.0 | 0.5.0 |
| pycurl | 7.45.2 | 7.45.2 |
| pydispatcher | 2.0.5 | 2.0.5 |
| pydocstyle | 6.3.0 | 6.3.0 |
| pyerfa | 2.0.0 | 2.0.0 |
| pyflakes | 3.0.1 | 3.0.1 |
| pygments | 2.15.1 | 2.15.1 |
| pyjwt | 2.4.0 | 2.4.0 |
| pylint | 2.16.2 | 2.16.2 |
| pylint-venv | 2.3.0 | 2.3.0 |
| pyls-spyder | 0.4.0 | 0.4.0 |
| pyobjc-core | 9.0 | 9.0 |
| pyobjc-framework-cocoa | 9.0 | 9.0 |
| pyobjc-framework-coreservices | 9.0 | 9.0 |
| pyobjc-framework-fsevents | 9.0 | 9.0 |
| pyodbc | 4.0.34 | 4.0.34 |
| pyopenssl | 23.2.0 | 23.2.0 |
| pyparsing | 3.0.9 | 3.0.9 |
| pyqt | 5.15.7 | 5.15.7 |
| pyqt5-sip | 12.11.0 | 12.11.0 |
| pyqtwebengine | 5.15.7 | 5.15.7 |
| pyrsistent | 0.18.0 | 0.18.0 |
| pysocks | 1.7.1 | 1.7.1 |
| pytables | 3.8.0 | 3.8.0 |
| pytest | 7.4.0 | 7.4.0 |
| python | 3.11.4 | 3.11.4 |
| python-dateutil | 2.8.2 | 2.8.2 |
| python-fastjsonschema | 2.16.2 | 2.16.2 |
| python-json-logger | 2.0.7 | 2.0.7 |
| python-libarchive-c | 2.9 | 2.9 |
| python-lmdb | 1.4.1 | 1.4.1 |
| python-lsp-black | 1.2.1 | 1.2.1 |
| python-lsp-jsonrpc | 1.0.0 | 1.0.0 |
| python-lsp-server | 1.7.2 | 1.7.2 |
| python-slugify | 5.0.2 | 5.0.2 |
| python-snappy | 0.6.1 | 0.6.1 |
| python-xxhash | 2.0.2 | |
| python.app | 3 | 3 |
| pytoolconfig | 1.2.5 | 1.2.5 |
| pytorch | 2.0.1 | |
| pytz | 2022.7 | 2022.7 |
| pyviz\_comms | 2.3.0 | 2.3.0 |
| pywavelets | 1.4.1 | 1.4.1 |
| pyyaml | 6.0 | 6.0 |
| pyzmq | 23.2.0 | 23.2.0 |
| qdarkstyle | 3.0.2 | 3.0.2 |
| qstylizer | 0.2.2 | 0.2.2 |
| qt-main | 5.15.2 | 5.15.2 |
| qt-webengine | 5.15.9 | 5.15.9 |
| qtawesome | 1.2.2 | 1.2.2 |
| qtconsole | 5.4.2 | 5.4.2 |
| qtpy | 2.2.0 | 2.2.0 |
| qtwebkit | 5.212 | 5.212 |
| queuelib | 1.5.0 | 1.5.0 |
| re2 | 2022.04.01 | 2022.04.01 |
| readline | 8.2 | 8.2 |
| regex | 2022.7.9 | 2022.7.9 |
| reproc | 14.2.4 | 14.2.4 |
| reproc-cpp | 14.2.4 | 14.2.4 |
| requests | 2.31.0 | 2.31.0 |
| requests-file | 1.5.1 | 1.5.1 |
| requests-toolbelt | 1.0.0 | 1.0.0 |
| responses | 0.13.3 | |
| rfc3339-validator | 0.1.4 | 0.1.4 |
| rfc3986-validator | 0.1.1 | 0.1.1 |
| rope | 1.7.0 | 1.7.0 |
| rtree | 1.0.1 | 1.0.1 |
| ruamel.yaml | 0.17.21 | 0.17.21 |
| ruamel\_yaml | 0.17.21 | 0.17.21 |
| s3fs | 2023.4.0 | 2023.3.0 |
| s3transfer | 0.6.0 | |
| sacremoses | 0.0.43 | 0.0.43 |
| scikit-image | 0.20.0 | 0.20.0 |
| scikit-learn | 1.3.0 | 1.3.0 |
| scipy | 1.10.1 | 1.10.1 |
| scrapy | 2.8.0 | 2.8.0 |
| seaborn | 0.12.2 | 0.12.2 |
| send2trash | 1.8.0 | 1.8.0 |
| service\_identity | 18.1.0 | 18.1.0 |
| setuptools | 68.0.0 | 68.0.0 |
| sip | 6.6.2 | 6.6.2 |
| six | 1.16.0 | 1.16.0 |
| sleef | 3.5.1 | |
| smart\_open | 5.2.1 | 5.2.1 |
| snappy | 1.1.9 | 1.1.9 |
| sniffio | 1.2.0 | 1.2.0 |
| snowballstemmer | 2.2.0 | 2.2.0 |
| sortedcontainers | 2.4.0 | 2.4.0 |
| soupsieve | 2.4 | 2.4 |
| sphinx | 5.0.2 | 5.0.2 |
| sphinxcontrib-applehelp | 1.0.2 | 1.0.2 |
| sphinxcontrib-devhelp | 1.0.2 | 1.0.2 |
| sphinxcontrib-htmlhelp | 2.0.0 | 2.0.0 |
| sphinxcontrib-jsmath | 1.0.1 | 1.0.1 |
| sphinxcontrib-qthelp | 1.0.3 | 1.0.3 |
| sphinxcontrib-serializinghtml | 1.1.5 | 1.1.5 |
| spyder | 5.4.3 | 5.4.3 |
| spyder-kernels | 2.4.3 | 2.4.3 |
| sqlalchemy | 1.4.39 | 1.4.39 |
| sqlite | 3.41.2 | 3.41.2 |
| stack\_data | 0.2.0 | 0.2.0 |
| statsmodels | 0.14.0 | 0.14.0 |
| sympy | 1.11.1 | 1.11.1 |
| tabulate | 0.8.10 | 0.8.10 |
| tapi | 1100.0.11 | 1000.10.8 |
| tbb | 2021.8.0 | 2021.8.0 |
| tbb4py | 2021.8.0 | 2021.8.0 |
| tblib | 1.7.0 | 1.7.0 |
| tenacity | 8.2.2 | 8.2.2 |
| terminado | 0.17.1 | 0.17.1 |
| text-unidecode | 1.3 | 1.3 |
| textdistance | 4.2.1 | 4.2.1 |
| threadpoolctl | 2.2.0 | 2.2.0 |
| three-merge | 0.1.1 | 0.1.1 |
| tifffile | 2021.7.2 | 2021.7.2 |
| tinycss2 | 1.2.1 | 1.2.1 |
| tk | 8.6.12 | 8.6.12 |
| tldextract | 3.2.0 | 3.2.0 |
| tokenizers | 0.13.2 | |
| toml | 0.10.2 | 0.10.2 |
| tomlkit | 0.11.1 | 0.11.1 |
| toolz | 0.12.0 | 0.12.0 |
| tornado | 6.3.2 | 6.3.2 |
| tqdm | 4.65.0 | 4.65.0 |
| traitlets | 5.7.1 | 5.7.1 |
| transformers | 4.29.2 | 2.1.1 |
| twisted | 22.10.0 | 22.10.0 |
| typing-extensions | 4.7.1 | 4.7.1 |
| typing\_extensions | 4.7.1 | 4.7.1 |
| tzdata | 2023c | 2023c |
| uc-micro-py | 1.0.1 | 1.0.1 |
| ujson | 5.4.0 | 5.4.0 |
| unidecode | 1.2.0 | 1.2.0 |
| unixodbc | 2.3.11 | 2.3.11 |
| urllib3 | 1.26.16 | 1.26.16 |
| utf8proc | 2.6.1 | 2.6.1 |
| w3lib | 1.21.0 | 1.21.0 |
| watchdog | 2.1.6 | 2.1.6 |
| wcwidth | 0.2.5 | 0.2.5 |
| webencodings | 0.5.1 | 0.5.1 |
| websocket-client | 0.58.0 | 0.58.0 |
| werkzeug | 2.2.3 | 2.2.3 |
| whatthepatch | 1.0.2 | 1.0.2 |
| wheel | 0.38.4 | 0.38.4 |
| widgetsnbextension | 4.0.5 | 4.0.5 |
| wrapt | 1.14.1 | 1.14.1 |
| wurlitzer | 3.0.2 | 3.0.2 |
| xarray | 2023.6.0 | 2023.6.0 |
| xlwings | 0.29.1 | 0.29.1 |
| xxhash | 0.8.0 | |
| xyzservices | 2022.9.0 | 2022.9.0 |
| xz | 5.4.2 | 5.4.2 |
| y-py | 0.5.9 | 0.5.9 |
| yaml | 0.2.5 | 0.2.5 |
| yaml-cpp | 0.7.0 | 0.7.0 |
| yapf | 0.31.0 | 0.31.0 |
| yarl | 1.8.1 | 1.8.1 |
| ypy-websocket | 0.8.2 | 0.8.2 |
| zeromq | 4.3.4 | 4.3.4 |
| zfp | 0.5.5 | 0.5.5 |
| zict | 2.2.0 | 2.2.0 |
| zipp | 3.11.0 | 3.11.0 |
| zlib | 1.2.13 | 1.2.13 |
| zlib-ng | 2.0.7 | 2.0.7 |
| zope | 1.0 | 1.0 |
| zope.interface | 5.4.0 | 5.4.0 |
| zstandard | 0.19.0 | 0.19.0 |
| zstd | 1.5.5 | 1.5.5 |
| Package Name | win-64 |
|---|---|
| \_anaconda\_depends | 2023.07 |
| abseil-cpp | 20211102.0 |
| aiobotocore | 2.4.2 |
| aiofiles | 22.1.0 |
| aiohttp | 3.8.3 |
| aioitertools | 0.7.1 |
| aiosignal | 1.2.0 |
| aiosqlite | 0.18.0 |
| alabaster | 0.7.12 |
| anaconda-catalogs | 0.2.0 |
| anaconda-client | 1.12.0 |
| anaconda-navigator | 2.4.2 |
| anaconda-project | 0.11.1 |
| anyio | 3.5.0 |
| appdirs | 1.4.4 |
| argon2-cffi | 21.3.0 |
| argon2-cffi-bindings | 21.2.0 |
| arrow | 1.2.3 |
| arrow-cpp | 11.0.0 |
| astroid | 2.14.2 |
| astropy | 5.1 |
| asttokens | 2.0.5 |
| async-timeout | 4.0.2 |
| atomicwrites | 1.4.0 |
| attrs | 22.1.0 |
| automat | 20.2.0 |
| autopep8 | 1.6.0 |
| aws-c-common | 0.4.57 |
| aws-c-event-stream | 0.1.6 |
| aws-checksums | 0.1.9 |
| aws-sdk-cpp | 1.8.185 |
| babel | 2.11.0 |
| backcall | 0.2.0 |
| backports | 1.1 |
| backports.functools\_lru\_cache | 1.6.4 |
| backports.tempfile | 1.0 |
| backports.weakref | 1.0.post1 |
| bcrypt | 3.2.0 |
| beautifulsoup4 | 4.12.2 |
| binaryornot | 0.4.4 |
| black | 23.3.0 |
| blas | 1.0 |
| bleach | 4.1.0 |
| blosc | 1.21.3 |
| bokeh | 3.2.1 |
| boltons | 23.0.0 |
| boost-cpp | 1.73.0 |
| boto3 | 1.24.28 |
| botocore | 1.27.59 |
| bottleneck | 1.3.5 |
| brotli | 1.0.9 |
| brotli-bin | 1.0.9 |
| brotlipy | 0.7.0 |
| bzip2 | 1.0.8 |
| c-ares | 1.19.0 |
| c-blosc2 | 2.8.0 |
| ca-certificates | 2023.05.30 |
| certifi | 2023.7.22 |
| cffi | 1.15.1 |
| cfitsio | 3.470 |
| chardet | 4.0.0 |
| charls | 2.2.0 |
| charset-normalizer | 2.0.4 |
| click | 8.0.4 |
| cloudpickle | 2.2.1 |
| clyent | 1.2.2 |
| colorama | 0.4.6 |
| colorcet | 3.0.1 |
| comm | 0.1.2 |
| conda | 23.7.2 |
| conda-build | 3.26.0 |
| conda-content-trust | 0.1.1 |
| conda-index | 0.2.3 |
| conda-libmamba-solver | 23.5.0 |
| conda-pack | 0.6.0 |
| conda-package-handling | 2.2.0 |
| conda-package-streaming | 0.9.0 |
| conda-repo-cli | 1.0.41 |
| conda-token | 0.4.0 |
| conda-verify | 3.4.2 |
| console\_shortcut | 0.1.1 |
| constantly | 15.1.0 |
| contourpy | 1.0.5 |
| cookiecutter | 1.7.3 |
| cryptography | 41.0.2 |
| cssselect | 1.1.0 |
| curl | 8.1.1 |
| cycler | 0.11.0 |
| cytoolz | 0.12.0 |
| daal4py | 2023.1.1 |
| dal | 2023.1.1 |
| dask | 2023.6.0 |
| dask-core | 2023.6.0 |
| datashader | 0.15.1 |
| datashape | 0.5.4 |
| debugpy | 1.6.7 |
| decorator | 5.1.1 |
| defusedxml | 0.7.1 |
| diff-match-patch | 20200713 |
| dill | 0.3.6 |
| distributed | 2023.6.0 |
| docstring-to-markdown | 0.11 |
| docutils | 0.18.1 |
| entrypoints | 0.4 |
| et\_xmlfile | 1.1.0 |
| executing | 0.8.3 |
| filelock | 3.9.0 |
| flake8 | 6.0.0 |
| flask | 2.2.2 |
| fmt | 9.1.0 |
| fonttools | 4.25.0 |
| freetype | 2.12.1 |
| frozenlist | 1.3.3 |
| fsspec | 2023.3.0 |
| future | 0.18.3 |
| gensim | 4.3.0 |
| gflags | 2.2.2 |
| giflib | 5.2.1 |
| glib | 2.69.1 |
| glob2 | 0.7 |
| glog | 0.5.0 |
| greenlet | 2.0.1 |
| gst-plugins-base | 1.18.5 |
| gstreamer | 1.18.5 |
| h5py | 3.7.0 |
| hdf5 | 1.10.6 |
| heapdict | 1.0.1 |
| holoviews | 1.17.0 |
| hvplot | 0.8.4 |
| hyperlink | 21.0.0 |
| icc\_rt | 2022.1.0 |
| icu | 58.2 |
| idna | 3.4 |
| imagecodecs | 2021.8.26 |
| imageio | 2.26.0 |
| imagesize | 1.4.1 |
| imbalanced-learn | 0.10.1 |
| importlib-metadata | 6.0.0 |
| importlib\_metadata | 6.0.0 |
| incremental | 21.3.0 |
| inflection | 0.5.1 |
| iniconfig | 1.1.1 |
| intake | 0.6.8 |
| intel-openmp | 2023.1.0 |
| intervaltree | 3.1.0 |
| ipykernel | 6.19.2 |
| ipython | 8.12.0 |
| ipython\_genutils | 0.2.0 |
| ipywidgets | 8.0.4 |
| isort | 5.9.3 |
| itemadapter | 0.3.0 |
| itemloaders | 1.0.4 |
| itsdangerous | 2.0.1 |
| jaraco.classes | 3.2.1 |
| jedi | 0.18.1 |
| jellyfish | 0.9.0 |
| jinja2 | 3.1.2 |
| jinja2-time | 0.2.0 |
| jmespath | 0.10.0 |
| joblib | 1.2.0 |
| jpeg | 9e |
| jq | 1.6 |
| json5 | 0.9.6 |
| jsonpatch | 1.32 |
| jsonpointer | 2.1 |
| jsonschema | 4.17.3 |
| jupyter | 1.0.0 |
| jupyter\_client | 7.4.9 |
| jupyter\_console | 6.6.3 |
| jupyter\_core | 5.3.0 |
| jupyter\_events | 0.6.3 |
| jupyter\_server | 1.23.4 |
| jupyter\_server\_fileid | 0.9.0 |
| jupyter\_server\_ydoc | 0.8.0 |
| jupyter\_ydoc | 0.2.4 |
| jupyterlab | 3.6.3 |
| jupyterlab\_pygments | 0.1.2 |
| jupyterlab\_server | 2.22.0 |
| jupyterlab\_widgets | 3.0.5 |
| jxrlib | 1.1 |
| keyring | 23.13.1 |
| kiwisolver | 1.4.4 |
| krb5 | 1.19.4 |
| lazy-object-proxy | 1.6.0 |
| lazy\_loader | 0.2 |
| lcms2 | 2.12 |
| lerc | 3.0 |
| libaec | 1.0.4 |
| libarchive | 3.6.2 |
| libboost | 1.73.0 |
| libbrotlicommon | 1.0.9 |
| libbrotlidec | 1.0.9 |
| libbrotlienc | 1.0.9 |
| libclang | 14.0.6 |
| libclang13 | 14.0.6 |
| libcurl | 8.1.1 |
| libdeflate | 1.17 |
| libevent | 2.1.12 |
| libffi | 3.4.4 |
| libiconv | 1.16 |
| liblief | 0.12.3 |
| libllvm14 | 14.0.6 |
| libmamba | 1.4.1 |
| libmambapy | 1.4.1 |
| libogg | 1.3.5 |
| libpng | 1.6.39 |
| libprotobuf | 3.20.3 |
| libsodium | 1.0.18 |
| libsolv | 0.7.22 |
| libspatialindex | 1.9.3 |
| libssh2 | 1.10.0 |
| libthrift | 0.15.0 |
| libtiff | 4.5.0 |
| libvorbis | 1.3.7 |
| libwebp | 1.2.4 |
| libwebp-base | 1.2.4 |
| libxml2 | 2.10.3 |
| libxslt | 1.1.37 |
| libzopfli | 1.0.3 |
| linkify-it-py | 2.0.0 |
| llvmlite | 0.40.0 |
| locket | 1.0.0 |
| lxml | 4.9.2 |
| lz4 | 4.3.2 |
| lz4-c | 1.9.4 |
| lzo | 2.10 |
| m2-msys2-runtime | 2.5.0.17080.65c939c |
| m2-patch | 2.7.5 |
| m2w64-libwinpthread-git | 5.0.0.4634.697f757 |
| markdown | 3.4.1 |
| markdown-it-py | 2.2.0 |
| markupsafe | 2.1.1 |
| matplotlib | 3.7.1 |
| matplotlib-base | 3.7.1 |
| matplotlib-inline | 0.1.6 |
| mccabe | 0.7.0 |
| mdit-py-plugins | 0.3.0 |
| mdurl | 0.1.0 |
| menuinst | 1.4.19 |
| mistune | 0.8.4 |
| mkl | 2023.1.0 |
| mkl-service | 2.4.0 |
| mkl\_fft | 1.3.6 |
| mkl\_random | 1.2.2 |
| more-itertools | 8.12.0 |
| mpmath | 1.3.0 |
| msgpack-python | 1.0.3 |
| msys2-conda-epoch | 20160418 |
| multidict | 6.0.2 |
| multipledispatch | 0.6.0 |
| munkres | 1.1.4 |
| mypy\_extensions | 0.4.3 |
| navigator-updater | 0.4.0 |
| nbclassic | 0.5.5 |
| nbclient | 0.5.13 |
| nbconvert | 6.5.4 |
| nbformat | 5.7.0 |
| nest-asyncio | 1.5.6 |
| networkx | 3.1 |
| nltk | 3.8.1 |
| notebook | 6.5.4 |
| notebook-shim | 0.2.2 |
| numba | 0.57.0 |
| numexpr | 2.8.4 |
| numpy | 1.24.3 |
| numpy-base | 1.24.3 |
| numpydoc | 1.5.0 |
| openjpeg | 2.4.0 |
| openpyxl | 3.0.10 |
| openssl | 1.1.1u |
| orc | 1.7.4 |
| packaging | 23.0 |
| pandas | 1.5.3 |
| pandocfilters | 1.5.0 |
| panel | 1.2.1 |
| param | 1.13.0 |
| paramiko | 2.8.1 |
| parsel | 1.6.0 |
| parso | 0.8.3 |
| partd | 1.2.0 |
| pathlib | 1.0.1 |
| pathspec | 0.10.3 |
| patsy | 0.5.3 |
| pcre | 8.45 |
| pcre2 | 10.37 |
| pep8 | 1.7.1 |
| pexpect | 4.8.0 |
| pickleshare | 0.7.5 |
| pillow | 9.4.0 |
| pip | 23.2.1 |
| pkginfo | 1.9.6 |
| platformdirs | 2.5.2 |
| plotly | 5.9.0 |
| pluggy | 1.0.0 |
| ply | 3.11 |
| pooch | 1.4.0 |
| powershell\_shortcut | 0.0.1 |
| poyo | 0.5.0 |
| prometheus\_client | 0.14.1 |
| prompt-toolkit | 3.0.36 |
| prompt\_toolkit | 3.0.36 |
| protego | 0.1.16 |
| psutil | 5.9.0 |
| ptyprocess | 0.7.0 |
| pure\_eval | 0.2.2 |
| py-cpuinfo | 8.0.0 |
| py-lief | 0.12.3 |
| pyarrow | 11.0.0 |
| pyasn1 | 0.4.8 |
| pyasn1-modules | 0.2.8 |
| pybind11-abi | 4 |
| pycodestyle | 2.10.0 |
| pycosat | 0.6.4 |
| pycparser | 2.21 |
| pyct | 0.5.0 |
| pycurl | 7.45.2 |
| pydispatcher | 2.0.5 |
| pydocstyle | 6.3.0 |
| pyerfa | 2.0.0 |
| pyflakes | 3.0.1 |
| pygments | 2.15.1 |
| pyjwt | 2.4.0 |
| pylint | 2.16.2 |
| pylint-venv | 2.3.0 |
| pyls-spyder | 0.4.0 |
| pynacl | 1.5.0 |
| pyodbc | 4.0.34 |
| pyopenssl | 23.2.0 |
| pyparsing | 3.0.9 |
| pyqt | 5.15.7 |
| pyqt5-sip | 12.11.0 |
| pyqtwebengine | 5.15.7 |
| pyrsistent | 0.18.0 |
| pysocks | 1.7.1 |
| pytables | 3.8.0 |
| pytest | 7.4.0 |
| python | 3.11.4 |
| python-dateutil | 2.8.2 |
| python-fastjsonschema | 2.16.2 |
| python-json-logger | 2.0.7 |
| python-libarchive-c | 2.9 |
| python-lmdb | 1.4.1 |
| python-lsp-black | 1.2.1 |
| python-lsp-jsonrpc | 1.0.0 |
| python-lsp-server | 1.7.2 |
| python-slugify | 5.0.2 |
| python-snappy | 0.6.1 |
| pytoolconfig | 1.2.5 |
| pytz | 2022.7 |
| pyviz\_comms | 2.3.0 |
| pywavelets | 1.4.1 |
| pywin32 | 305 |
| pywin32-ctypes | 0.2.0 |
| pywinpty | 2.0.10 |
| pyyaml | 6.0 |
| pyzmq | 23.2.0 |
| qdarkstyle | 3.0.2 |
| qstylizer | 0.2.2 |
| qt-main | 5.15.2 |
| qt-webengine | 5.15.9 |
| qtawesome | 1.2.2 |
| qtconsole | 5.4.2 |
| qtpy | 2.2.0 |
| qtwebkit | 5.212 |
| queuelib | 1.5.0 |
| re2 | 2022.04.01 |
| regex | 2022.7.9 |
| reproc | 14.2.4 |
| reproc-cpp | 14.2.4 |
| requests | 2.31.0 |
| requests-file | 1.5.1 |
| requests-toolbelt | 1.0.0 |
| rfc3339-validator | 0.1.4 |
| rfc3986-validator | 0.1.1 |
| rope | 1.7.0 |
| rtree | 1.0.1 |
| ruamel.yaml | 0.17.21 |
| ruamel\_yaml | 0.17.21 |
| s3fs | 2023.3.0 |
| s3transfer | 0.6.0 |
| sacremoses | 0.0.43 |
| scikit-image | 0.20.0 |
| scikit-learn | 1.3.0 |
| scikit-learn-intelex | 2023.1.1 |
| scipy | 1.10.1 |
| scrapy | 2.8.0 |
| seaborn | 0.12.2 |
| send2trash | 1.8.0 |
| service\_identity | 18.1.0 |
| setuptools | 68.0.0 |
| sip | 6.6.2 |
| six | 1.16.0 |
| smart\_open | 5.2.1 |
| snappy | 1.1.9 |
| sniffio | 1.2.0 |
| snowballstemmer | 2.2.0 |
| sortedcontainers | 2.4.0 |
| soupsieve | 2.4 |
| sphinx | 5.0.2 |
| sphinxcontrib-applehelp | 1.0.2 |
| sphinxcontrib-devhelp | 1.0.2 |
| sphinxcontrib-htmlhelp | 2.0.0 |
| sphinxcontrib-jsmath | 1.0.1 |
| sphinxcontrib-qthelp | 1.0.3 |
| sphinxcontrib-serializinghtml | 1.1.5 |
| spyder | 5.4.3 |
| spyder-kernels | 2.4.3 |
| sqlalchemy | 1.4.39 |
| sqlite | 3.41.2 |
| stack\_data | 0.2.0 |
| statsmodels | 0.14.0 |
| sympy | 1.11.1 |
| tabulate | 0.8.10 |
| tbb | 2021.8.0 |
| tbb4py | 2021.8.0 |
| tblib | 1.7.0 |
| tenacity | 8.2.2 |
| terminado | 0.17.1 |
| text-unidecode | 1.3 |
| textdistance | 4.2.1 |
| threadpoolctl | 2.2.0 |
| three-merge | 0.1.1 |
| tifffile | 2021.7.2 |
| tinycss2 | 1.2.1 |
| tk | 8.6.12 |
| tldextract | 3.2.0 |
| toml | 0.10.2 |
| tomlkit | 0.11.1 |
| toolz | 0.12.0 |
| tornado | 6.3.2 |
| tqdm | 4.65.0 |
| traitlets | 5.7.1 |
| transformers | 2.1.1 |
| twisted | 22.10.0 |
| twisted-iocpsupport | 1.0.2 |
| typing-extensions | 4.7.1 |
| typing\_extensions | 4.7.1 |
| tzdata | 2023c |
| uc-micro-py | 1.0.1 |
| ujson | 5.4.0 |
| unidecode | 1.2.0 |
| urllib3 | 1.26.16 |
| utf8proc | 2.6.1 |
| vc | 14.2 |
| vs2015\_runtime | 14.27.29016 |
| w3lib | 1.21.0 |
| watchdog | 2.1.6 |
| wcwidth | 0.2.5 |
| webencodings | 0.5.1 |
| websocket-client | 0.58.0 |
| werkzeug | 2.2.3 |
| whatthepatch | 1.0.2 |
| wheel | 0.38.4 |
| widgetsnbextension | 4.0.5 |
| win\_inet\_pton | 1.1.0 |
| winpty | 0.4.3 |
| wrapt | 1.14.1 |
| xarray | 2023.6.0 |
| xlwings | 0.29.1 |
| xyzservices | 2022.9.0 |
| xz | 5.4.2 |
| y-py | 0.5.9 |
| yaml | 0.2.5 |
| yaml-cpp | 0.7.0 |
| yapf | 0.31.0 |
| yarl | 1.8.1 |
| ypy-websocket | 0.8.2 |
| zeromq | 4.3.4 |
| zfp | 0.5.5 |
| zict | 2.2.0 |
| zipp | 3.11.0 |
| zlib | 1.2.13 |
| zlib-ng | 2.0.7 |
| zope | 1.0 |
| zope.interface | 5.4.0 |
| zstandard | 0.19.0 |
| zstd | 1.5.5 |
| Package Name | linux-64 | linux-aarch64 | linux-ppc64le | linux-s390x | osx-arm64 | osx-64 | win-64 |
|---|---|---|---|---|---|---|---|
| \_anaconda\_depends | 2023.07 | 2023.07 | 2023.07 | 2023.07 | 2023.07 | 2023.07 | 2023.07 |
| \_libgcc\_mutex | 0.1 | 0.1 | 0.1 | 0.1 | |||
| \_openmp\_mutex | 5.1 | 5.1 | 5.1 | 5.1 | |||
| abseil-cpp | 20211102.0 | 20211102.0 | 20211102.0 | 20211102.0 | 20211102.0 | 20211102.0 | |
| aiobotocore | 2.5.0 | 2.5.0 | 2.4.2 | 2.4.2 | 2.5.0 | 2.4.2 | 2.4.2 |
| aiofiles | 22.1.0 | 22.1.0 | 22.1.0 | 22.1.0 | 22.1.0 | 22.1.0 | |
| aiohttp | 3.8.3 | 3.8.3 | 3.8.3 | 3.8.3 | 3.8.3 | 3.8.3 | 3.8.3 |
| aioitertools | 0.7.1 | 0.7.1 | 0.7.1 | 0.7.1 | 0.7.1 | 0.7.1 | 0.7.1 |
| aiosignal | 1.2.0 | 1.2.0 | 1.2.0 | 1.2.0 | 1.2.0 | 1.2.0 | 1.2.0 |
| aiosqlite | 0.18.0 | 0.18.0 | 0.18.0 | 0.18.0 | 0.18.0 | 0.18.0 | |
| alabaster | 0.7.12 | 0.7.12 | 0.7.12 | 0.7.12 | 0.7.12 | ||
| anaconda-catalogs | 0.2.0 | 0.2.0 | 0.2.0 | 0.2.0 | 0.2.0 | 0.2.0 | 0.2.0 |
| anaconda-client | 1.11.3 | 1.11.3 | 1.11.3 | 1.11.3 | 1.11.3 | 1.11.3 | 1.11.3 |
| anaconda-navigator | 2.4.2 | 2.4.2 | 2.4.2 | 2.4.2 | 2.4.2 | ||
| anaconda-project | 0.11.1 | 0.11.1 | 0.11.1 | 0.11.1 | 0.11.1 | 0.11.1 | 0.11.1 |
| anyio | 3.5.0 | 3.5.0 | 3.5.0 | 3.5.0 | 3.5.0 | 3.5.0 | 3.5.0 |
| appdirs | 1.4.4 | 1.4.4 | 1.4.4 | 1.4.4 | 1.4.4 | 1.4.4 | 1.4.4 |
| applaunchservices | 0.3.0 | 0.3.0 | |||||
| appnope | 0.1.2 | 0.1.2 | |||||
| appscript | 1.1.2 | 1.1.2 | |||||
| argon2-cffi | 21.3.0 | 21.3.0 | 21.3.0 | 21.3.0 | 21.3.0 | 21.3.0 | 21.3.0 |
| argon2-cffi-bindings | 21.2.0 | 21.2.0 | 21.2.0 | 21.2.0 | 21.2.0 | 21.2.0 | 21.2.0 |
| arrow | 1.2.3 | 1.2.3 | 1.2.3 | 1.2.3 | 1.2.3 | ||
| arrow-cpp | 11.0.0 | 11.0.0 | 11.0.0 | 11.0.0 | 11.0.0 | 11.0.0 | |
| astroid | 2.14.2 | 2.14.2 | 2.14.2 | 2.14.2 | 2.14.2 | 2.14.2 | 2.14.2 |
| astropy | 5.1 | 5.1 | 5.1 | 5.1 | 5.1 | 5.1 | 5.1 |
| asttokens | 2.0.5 | 2.0.5 | 2.0.5 | 2.0.5 | 2.0.5 | 2.0.5 | 2.0.5 |
| async-timeout | 4.0.2 | 4.0.2 | 4.0.2 | 4.0.2 | 4.0.2 | 4.0.2 | 4.0.2 |
| atomicwrites | 1.4.0 | 1.4.0 | 1.4.0 | 1.4.0 | 1.4.0 | ||
| attrs | 22.1.0 | 22.1.0 | 22.1.0 | 22.1.0 | 22.1.0 | 22.1.0 | 22.1.0 |
| automat | 20.2.0 | 20.2.0 | 20.2.0 | 20.2.0 | 20.2.0 | 20.2.0 | |
| autopep8 | 1.6.0 | 1.6.0 | 1.6.0 | 1.6.0 | 1.6.0 | ||
| aws-c-common | 0.4.57 | 0.5.11 | 0.4.57 | 0.6.8 | 0.4.57 | 0.4.57 | |
| aws-c-event-stream | 0.1.6 | 0.1.6 | 0.1.6 | 0.1.6 | 0.1.6 | 0.1.6 | |
| aws-checksums | 0.1.9 | 0.1.11 | 0.1.9 | 0.1.11 | 0.1.9 | 0.1.9 | |
| aws-sdk-cpp | 1.8.185 | 1.8.185 | 1.8.185 | 1.8.185 | 1.8.185 | 1.8.185 | |
| babel | 2.11.0 | 2.11.0 | 2.11.0 | 2.11.0 | 2.11.0 | 2.11.0 | 2.11.0 |
| backcall | 0.2.0 | 0.2.0 | 0.2.0 | 0.2.0 | 0.2.0 | 0.2.0 | 0.2.0 |
| backports | 1.1 | 1.1 | 1.1 | 1.1 | 1.1 | 1.1 | 1.1 |
| backports.functools\_lru\_cache | 1.6.4 | 1.6.4 | 1.6.4 | 1.6.4 | 1.6.4 | 1.6.4 | 1.6.4 |
| backports.tempfile | 1.0 | 1.0 | 1.0 | 1.0 | 1.0 | 1.0 | 1.0 |
| backports.weakref | 1.0.post1 | 1.0.post1 | 1.0.post1 | 1.0.post1 | 1.0.post1 | 1.0.post1 | 1.0.post1 |
| bcrypt | 3.2.0 | 3.2.0 | 3.2.0 | 3.2.0 | 3.2.0 | 3.2.0 | |
| beautifulsoup4 | 4.12.2 | 4.12.2 | 4.12.2 | 4.12.2 | 4.12.2 | 4.12.2 | 4.12.2 |
| binaryornot | 0.4.4 | 0.4.4 | 0.4.4 | 0.4.4 | 0.4.4 | ||
| black | 23.3.0 | 23.3.0 | 23.3.0 | 23.3.0 | 23.3.0 | ||
| blas | 1.0 | 1.0 | 1.0 | 1.0 | 1.0 | 1.0 | 1.0 |
| bleach | 4.1.0 | 4.1.0 | 4.1.0 | 4.1.0 | 4.1.0 | 4.1.0 | 4.1.0 |
| blosc | 1.21.3 | 1.21.3 | 1.21.3 | 1.21.3 | 1.21.3 | 1.21.3 | 1.21.3 |
| bokeh | 3.1.1 | 2.4.3 | 3.1.1 | 2.4.3 | 3.1.1 | 3.1.1 | 3.1.1 |
| boltons | 23.0.0 | 23.0.0 | 23.0.0 | 23.0.0 | 23.0.0 | 23.0.0 | 23.0.0 |
| boost-cpp | 1.73.0 | 1.73.0 | 1.73.0 | 1.73.0 | 1.73.0 | 1.73.0 | |
| boto3 | 1.24.28 | 1.24.28 | 1.24.28 | 1.24.28 | |||
| botocore | 1.29.76 | 1.29.76 | 1.27.59 | 1.27.59 | 1.29.76 | 1.27.59 | 1.27.59 |
| bottleneck | 1.3.5 | 1.3.5 | 1.3.5 | 1.3.5 | 1.3.5 | 1.3.5 | 1.3.5 |
| brotli | 1.0.9 | 1.0.9 | 1.0.9 | 1.0.9 | 1.0.9 | 1.0.9 | 1.0.9 |
| brotli-bin | 1.0.9 | 1.0.9 | 1.0.9 | 1.0.9 | 1.0.9 | 1.0.9 | 1.0.9 |
| brotlipy | 0.7.0 | 0.7.0 | 0.7.0 | 0.7.0 | 0.7.0 | 0.7.0 | 0.7.0 |
| brunsli | 0.1 | 0.1 | 0.1 | 0.1 | 0.1 | ||
| bzip2 | 1.0.8 | 1.0.8 | 1.0.8 | 1.0.8 | 1.0.8 | 1.0.8 | 1.0.8 |
| c-ares | 1.19.0 | 1.19.0 | 1.19.0 | 1.19.0 | 1.19.0 | 1.19.0 | 1.19.0 |
| c-blosc2 | 2.8.0 | 2.8.0 | 2.8.0 | 2.8.0 | 2.8.0 | 2.8.0 | |
| ca-certificates | 2023.05.30 | 2023.05.30 | 2023.05.30 | 2023.05.30 | 2023.05.30 | 2023.05.30 | 2023.05.30 |
| cctools | 949.0.1 | 949.0.1 | |||||
| cctools\_osx-64 | 949.0.1 | ||||||
| cctools\_osx-arm64 | 949.0.1 | ||||||
| certifi | 2023.5.7 | 2023.5.7 | 2023.5.7 | 2023.5.7 | 2023.5.7 | 2023.5.7 | 2023.5.7 |
| cffi | 1.15.1 | 1.15.1 | 1.15.1 | 1.15.1 | 1.15.1 | 1.15.1 | 1.15.1 |
| cfitsio | 3.470 | 3.470 | 3.470 | 3.470 | 3.470 | 3.470 | 3.470 |
| chardet | 4.0.0 | 4.0.0 | 4.0.0 | 4.0.0 | 4.0.0 | 4.0.0 | 4.0.0 |
| charls | 2.2.0 | 2.2.0 | 2.2.0 | 2.2.0 | 2.2.0 | 2.2.0 | |
| charset-normalizer | 2.0.4 | 2.0.4 | 2.0.4 | 2.0.4 | 2.0.4 | 2.0.4 | 2.0.4 |
| click | 8.0.4 | 8.0.4 | 8.0.4 | 8.0.4 | 8.0.4 | 8.0.4 | 8.0.4 |
| cloudpickle | 2.2.1 | 2.2.1 | 2.2.1 | 2.2.1 | 2.2.1 | 2.2.1 | 2.2.1 |
| clyent | 1.2.2 | 1.2.2 | 1.2.2 | 1.2.2 | 1.2.2 | 1.2.2 | 1.2.2 |
| colorama | 0.4.6 | 0.4.6 | 0.4.6 | 0.4.6 | 0.4.6 | 0.4.6 | 0.4.6 |
| colorcet | 3.0.1 | 3.0.1 | 3.0.1 | 3.0.1 | 3.0.1 | 3.0.1 | 3.0.1 |
| comm | 0.1.2 | 0.1.2 | 0.1.2 | 0.1.2 | 0.1.2 | 0.1.2 | 0.1.2 |
| conda | 23.5.2 | 23.5.2 | 23.5.2 | 23.5.2 | 23.5.2 | 23.5.2 | 23.5.2 |
| conda-build | 3.25.0 | 3.25.0 | 3.25.0 | 3.25.0 | 3.25.0 | 3.25.0 | 3.25.0 |
| conda-content-trust | 0.1.3 | 0.1.3 | 0.1.3 | 0.1.3 | 0.1.3 | 0.1.3 | 0.1.3 |
| conda-index | 0.2.3 | 0.2.3 | 0.2.3 | 0.2.3 | 0.2.3 | 0.2.3 | 0.2.3 |
| conda-libmamba-solver | 23.5.0 | 23.5.0 | 23.5.0 | 23.5.0 | 23.5.0 | 23.5.0 | 23.5.0 |
| conda-pack | 0.6.0 | 0.6.0 | 0.6.0 | 0.6.0 | 0.6.0 | 0.6.0 | 0.6.0 |
| conda-package-handling | 2.1.0 | 2.1.0 | 2.1.0 | 2.1.0 | 2.1.0 | 2.1.0 | 2.1.0 |
| conda-package-streaming | 0.8.0 | 0.8.0 | 0.8.0 | 0.8.0 | 0.8.0 | 0.8.0 | 0.8.0 |
| conda-repo-cli | 1.0.41 | 1.0.41 | 1.0.41 | 1.0.41 | 1.0.41 | ||
| conda-token | 0.4.0 | 0.4.0 | 0.4.0 | 0.4.0 | 0.4.0 | 0.4.0 | 0.4.0 |
| conda-verify | 3.4.2 | 3.4.2 | 3.4.2 | 3.4.2 | 3.4.2 | 3.4.2 | 3.4.2 |
| console\_shortcut | 0.1.1 | ||||||
| constantly | 15.1.0 | 15.1.0 | 15.1.0 | 15.1.0 | 15.1.0 | 15.1.0 | |
| contourpy | 1.0.5 | 1.0.5 | 1.0.5 | 1.0.5 | 1.0.5 | 1.0.5 | 1.0.5 |
| cookiecutter | 1.7.3 | 1.7.3 | 1.7.3 | 1.7.3 | 1.7.3 | ||
| cryptography | 39.0.1 | 39.0.1 | 39.0.1 | 39.0.1 | 39.0.1 | 39.0.1 | 39.0.1 |
| cssselect | 1.1.0 | 1.1.0 | 1.1.0 | 1.1.0 | 1.1.0 | 1.1.0 | |
| curl | 8.1.1 | 8.1.1 | 8.1.1 | 8.1.1 | 8.1.1 | 8.1.1 | 8.1.1 |
| cycler | 0.11.0 | 0.11.0 | 0.11.0 | 0.11.0 | 0.11.0 | 0.11.0 | 0.11.0 |
| cytoolz | 0.12.0 | 0.12.0 | 0.12.0 | 0.12.0 | 0.12.0 | 0.12.0 | 0.12.0 |
| daal4py | 2023.1.1 | 2023.1.1 | |||||
| dal | 2023.1.1 | 2023.1.1 | |||||
| dask | 2023.6.0 | 2023.4.1 | 2023.6.0 | 2023.6.0 | 2023.6.0 | 2023.6.0 | 2023.6.0 |
| dask-core | 2023.6.0 | 2023.4.1 | 2023.6.0 | 2023.6.0 | 2023.6.0 | 2023.6.0 | 2023.6.0 |
| datasets | 2.12.0 | 2.12.0 | 2.12.0 | ||||
| datashader | 0.15.0 | 0.15.0 | 0.15.0 | 0.15.0 | 0.15.0 | 0.15.0 | |
| datashape | 0.5.4 | 0.5.4 | 0.5.4 | 0.5.4 | 0.5.4 | 0.5.4 | |
| dbus | 1.13.18 | 1.13.18 | |||||
| debugpy | 1.5.1 | 1.5.1 | 1.5.1 | 1.5.1 | 1.5.1 | 1.5.1 | 1.5.1 |
| decorator | 5.1.1 | 5.1.1 | 5.1.1 | 5.1.1 | 5.1.1 | 5.1.1 | 5.1.1 |
| defusedxml | 0.7.1 | 0.7.1 | 0.7.1 | 0.7.1 | 0.7.1 | 0.7.1 | 0.7.1 |
| diff-match-patch | 20200713 | 20200713 | 20200713 | 20200713 | 20200713 | ||
| dill | 0.3.6 | 0.3.6 | 0.3.6 | 0.3.6 | 0.3.6 | 0.3.6 | 0.3.6 |
| distributed | 2023.6.0 | 2023.4.1 | 2023.6.0 | 2023.6.0 | 2023.6.0 | 2023.6.0 | 2023.6.0 |
| docstring-to-markdown | 0.11 | 0.11 | 0.11 | 0.11 | 0.11 | ||
| docutils | 0.18.1 | 0.18.1 | 0.18.1 | 0.18.1 | 0.18.1 | ||
| entrypoints | 0.4 | 0.4 | 0.4 | 0.4 | 0.4 | 0.4 | 0.4 |
| et\_xmlfile | 1.1.0 | 1.1.0 | 1.1.0 | 1.1.0 | 1.1.0 | 1.1.0 | 1.1.0 |
| executing | 0.8.3 | 0.8.3 | 0.8.3 | 0.8.3 | 0.8.3 | 0.8.3 | 0.8.3 |
| expat | 2.4.9 | 2.4.9 | |||||
| filelock | 3.9.0 | 3.9.0 | 3.9.0 | 3.9.0 | 3.9.0 | 3.9.0 | 3.9.0 |
| flake8 | 6.0.0 | 6.0.0 | 6.0.0 | 6.0.0 | 6.0.0 | ||
| flask | 2.2.2 | 2.2.2 | 2.2.2 | 2.2.2 | 2.2.2 | 2.2.2 | 2.2.2 |
| fmt | 9.1.0 | 9.1.0 | 9.1.0 | 9.1.0 | 9.1.0 | 9.1.0 | 9.1.0 |
| fontconfig | 2.14.1 | 2.14.1 | |||||
| fonttools | 4.25.0 | 4.25.0 | 4.25.0 | 4.25.0 | 4.25.0 | 4.25.0 | 4.25.0 |
| freetype | 2.12.1 | 2.12.1 | 2.12.1 | 2.12.1 | 2.12.1 | 2.12.1 | 2.12.1 |
| frozenlist | 1.3.3 | 1.3.3 | 1.3.3 | 1.3.3 | 1.3.3 | 1.3.3 | 1.3.3 |
| fsspec | 2023.4.0 | 2023.4.0 | 2023.3.0 | 2023.3.0 | 2023.4.0 | 2023.3.0 | 2023.3.0 |
| future | 0.18.3 | 0.18.3 | 0.18.3 | 0.18.3 | 0.18.3 | 0.18.3 | 0.18.3 |
| gensim | 4.3.0 | 4.3.0 | 4.3.0 | 4.3.0 | 4.3.0 | 4.3.0 | |
| gettext | 0.21.0 | 0.21.0 | |||||
| gflags | 2.2.2 | 2.2.2 | 2.2.2 | 2.2.2 | 2.2.2 | 2.2.2 | |
| giflib | 5.2.1 | 5.2.1 | 5.2.1 | 5.2.1 | 5.2.1 | 5.2.1 | 5.2.1 |
| glib | 2.69.1 | 2.69.1 | 2.69.1 | 2.69.1 | 2.69.1 | ||
| glob2 | 0.7 | 0.7 | 0.7 | 0.7 | 0.7 | 0.7 | 0.7 |
| glog | 0.5.0 | 0.5.0 | 0.5.0 | 0.5.0 | 0.5.0 | 0.5.0 | |
| gmp | 6.2.1 | 6.2.1 | 6.2.1 | 6.2.1 | 6.2.1 | 6.2.1 | |
| gmpy2 | 2.1.2 | 2.1.2 | 2.1.2 | 2.1.2 | 2.1.2 | 2.1.2 | |
| greenlet | 2.0.1 | 2.0.1 | 2.0.1 | 2.0.1 | 2.0.1 | 2.0.1 | 2.0.1 |
| grpc-cpp | 1.46.1 | 1.46.1 | 1.46.1 | 1.46.1 | 1.46.1 | ||
| gst-plugins-base | 1.14.1 | 1.14.1 | 1.14.1 | 1.14.1 | 1.18.5 | ||
| gstreamer | 1.14.1 | 1.14.1 | 1.14.1 | 1.14.1 | 1.18.5 | ||
| h5py | 3.7.0 | 3.7.0 | 3.7.0 | 3.7.0 | 3.7.0 | 3.7.0 | 3.7.0 |
| hdf5 | 1.10.6 | 1.10.6 | 1.10.6 | 1.10.6 | 1.12.1 | 1.10.6 | 1.10.6 |
| heapdict | 1.0.1 | 1.0.1 | 1.0.1 | 1.0.1 | 1.0.1 | 1.0.1 | 1.0.1 |
| holoviews | 1.16.2 | 1.16.2 | 1.16.2 | 1.14.8 | 1.16.2 | 1.16.2 | 1.16.2 |
| huggingface\_hub | 0.15.1 | 0.15.1 | 0.15.1 | ||||
| hvplot | 0.8.4 | 0.8.4 | 0.8.4 | 0.7.3 | 0.8.4 | 0.8.4 | 0.8.4 |
| hyperlink | 21.0.0 | 21.0.0 | 21.0.0 | 21.0.0 | 21.0.0 | 21.0.0 | |
| icc\_rt | 2022.1.0 | ||||||
| icu | 58.2 | 68.1 | 58.2 | 68.1 | 68.1 | 58.2 | 58.2 |
| idna | 3.4 | 3.4 | 3.4 | 3.3 | 3.4 | 3.4 | 3.4 |
| imagecodecs | 2021.8.26 | 2021.8.26 | 2021.8.26 | 2021.8.26 | 2021.8.26 | 2021.8.26 | 2021.8.26 |
| imageio | 2.31.1 | 2.31.1 | 2.31.1 | 2.26.0 | 2.31.1 | 2.31.1 | 2.26.0 |
| imagesize | 1.4.1 | 1.4.1 | 1.4.1 | 1.4.1 | 1.4.1 | ||
| imbalanced-learn | 0.10.1 | 0.10.1 | 0.10.1 | 0.10.1 | 0.10.1 | 0.10.1 | 0.10.1 |
| importlib-metadata | 6.0.0 | 6.0.0 | 6.0.0 | 6.0.0 | 6.0.0 | 6.0.0 | 6.0.0 |
| importlib\_metadata | 6.0.0 | 6.0.0 | 6.0.0 | 6.0.0 | 6.0.0 | ||
| incremental | 21.3.0 | 21.3.0 | 21.3.0 | 21.3.0 | 21.3.0 | 21.3.0 | |
| inflection | 0.5.1 | 0.5.1 | 0.5.1 | 0.5.1 | 0.5.1 | ||
| iniconfig | 1.1.1 | 1.1.1 | 1.1.1 | 1.1.1 | 1.1.1 | 1.1.1 | 1.1.1 |
| intake | 0.6.8 | 0.6.8 | 0.6.8 | 0.6.8 | 0.6.8 | 0.6.8 | 0.6.8 |
| intel-openmp | 2023.1.0 | 2023.1.0 | |||||
| intervaltree | 3.1.0 | 3.1.0 | 3.1.0 | 3.1.0 | 3.1.0 | ||
| ipykernel | 6.19.2 | 6.19.2 | 6.19.2 | 6.19.2 | 6.19.2 | 6.19.2 | 6.19.2 |
| ipython | 8.12.0 | 8.12.0 | 8.12.0 | 8.12.0 | 8.12.0 | 8.12.0 | 8.12.0 |
| ipython\_genutils | 0.2.0 | 0.2.0 | 0.2.0 | 0.2.0 | 0.2.0 | 0.2.0 | 0.2.0 |
| ipywidgets | 8.0.4 | 8.0.4 | 8.0.4 | 8.0.4 | 8.0.4 | 8.0.4 | 8.0.4 |
| isort | 5.9.3 | 5.9.3 | 5.9.3 | 5.9.3 | 5.9.3 | 5.9.3 | 5.9.3 |
| itemadapter | 0.3.0 | 0.3.0 | 0.3.0 | 0.3.0 | 0.3.0 | 0.3.0 | |
| itemloaders | 1.0.4 | 1.0.4 | 1.0.4 | 1.0.4 | 1.0.4 | 1.0.4 | |
| itsdangerous | 2.0.1 | 2.0.1 | 2.0.1 | 2.0.1 | 2.0.1 | 2.0.1 | 2.0.1 |
| jaraco.classes | 3.2.1 | 3.2.1 | 3.2.1 | 3.2.1 | 3.2.1 | ||
| jedi | 0.18.1 | 0.18.1 | 0.18.1 | 0.18.1 | 0.18.1 | 0.18.1 | 0.18.1 |
| jeepney | 0.7.1 | 0.7.1 | |||||
| jellyfish | 0.9.0 | 0.9.0 | 0.9.0 | 0.9.0 | 0.9.0 | ||
| jinja2 | 3.1.2 | 3.1.2 | 3.1.2 | 3.1.2 | 3.1.2 | 3.1.2 | 3.1.2 |
| jinja2-time | 0.2.0 | 0.2.0 | 0.2.0 | 0.2.0 | 0.2.0 | ||
| jmespath | 0.10.0 | 0.10.0 | 0.10.0 | 0.10.0 | 0.10.0 | 0.10.0 | 0.10.0 |
| joblib | 1.2.0 | 1.2.0 | 1.2.0 | 1.2.0 | 1.2.0 | 1.2.0 | 1.2.0 |
| jpeg | 9e | 9e | 9e | 9e | 9e | 9e | 9e |
| jq | 1.6 | 1.6 | 1.6 | 1.6 | 1.6 | 1.6 | |
| json5 | 0.9.6 | 0.9.6 | 0.9.6 | 0.9.6 | 0.9.6 | 0.9.6 | 0.9.6 |
| jsonpatch | 1.32 | 1.32 | 1.32 | 1.32 | 1.32 | 1.32 | 1.32 |
| jsonpointer | 2.1 | 2.1 | 2.1 | 2.1 | 2.1 | 2.1 | 2.1 |
| jsonschema | 4.17.3 | 4.17.3 | 4.17.3 | 4.17.3 | 4.17.3 | 4.17.3 | 4.17.3 |
| jupyter | 1.0.0 | 1.0.0 | 1.0.0 | 1.0.0 | 1.0.0 | 1.0.0 | 1.0.0 |
| jupyter\_client | 8.1.0 | 8.1.0 | 8.1.0 | 8.1.0 | 8.1.0 | 8.1.0 | 8.1.0 |
| jupyter\_console | 6.6.3 | 6.6.3 | 6.6.3 | 6.6.3 | 6.6.3 | 6.6.3 | 6.6.3 |
| jupyter\_core | 5.3.0 | 5.3.0 | 5.3.0 | 5.3.0 | 5.3.0 | 5.3.0 | 5.3.0 |
| jupyter\_events | 0.6.3 | 0.6.3 | 0.6.3 | 0.6.3 | 0.6.3 | 0.6.3 | |
| jupyter\_server | 2.5.0 | 2.5.0 | 2.5.0 | 1.23.4 | 2.5.0 | 2.5.0 | 2.5.0 |
| jupyter\_server\_fileid | 0.9.0 | 0.9.0 | 0.9.0 | 0.9.0 | 0.9.0 | 0.9.0 | |
| jupyter\_server\_terminals | 0.4.4 | 0.4.4 | 0.4.4 | 0.4.4 | 0.4.4 | 0.4.4 | |
| jupyter\_server\_ydoc | 0.8.0 | 0.8.0 | 0.8.0 | 0.8.0 | 0.8.0 | 0.8.0 | |
| jupyter\_ydoc | 0.2.4 | 0.2.4 | 0.2.4 | 0.2.4 | 0.2.4 | 0.2.4 | |
| jupyterlab | 3.6.3 | 3.6.3 | 3.6.3 | 3.3.2 | 3.6.3 | 3.6.3 | 3.6.3 |
| jupyterlab\_pygments | 0.1.2 | 0.1.2 | 0.1.2 | 0.1.2 | 0.1.2 | 0.1.2 | 0.1.2 |
| jupyterlab\_server | 2.22.0 | 2.22.0 | 2.22.0 | 2.21.0 | 2.22.0 | 2.22.0 | 2.22.0 |
| jupyterlab\_widgets | 3.0.5 | 3.0.5 | 3.0.5 | 3.0.5 | 3.0.5 | 3.0.5 | 3.0.5 |
| jxrlib | 1.1 | 1.1 | 1.1 | 1.1 | 1.1 | 1.1 | 1.1 |
| keyring | 23.13.1 | 23.13.1 | 23.13.1 | 23.13.1 | 23.13.1 | ||
| kiwisolver | 1.4.4 | 1.4.4 | 1.4.4 | 1.4.4 | 1.4.4 | 1.4.4 | 1.4.4 |
| krb5 | 1.20.1 | 1.19.4 | 1.20.1 | 1.19.4 | 1.19.4 | 1.19.4 | 1.19.4 |
| lazy-object-proxy | 1.6.0 | 1.6.0 | 1.6.0 | 1.6.0 | 1.6.0 | 1.6.0 | 1.6.0 |
| lazy\_loader | 0.2 | 0.2 | 0.2 | 0.1 | 0.2 | 0.2 | 0.2 |
| lcms2 | 2.12 | 2.12 | 2.12 | 2.12 | 2.12 | 2.12 | 2.12 |
| ld64 | 530 | 530 | |||||
| ld64\_osx-64 | 530 | ||||||
| ld64\_osx-arm64 | 530 | ||||||
| ld\_impl\_linux-64 | 2.38 | ||||||
| ld\_impl\_linux-aarch64 | 2.38 | ||||||
| ld\_impl\_linux-ppc64le | 2.38 | ||||||
| ld\_impl\_linux-s390x | 2.38 | ||||||
| ldid | 2.1.5 | 2.1.5 | |||||
| lerc | 3.0 | 3.0 | 3.0 | 3.0 | 3.0 | 3.0 | 3.0 |
| libaec | 1.0.4 | 1.0.4 | 1.0.4 | 1.0.4 | 1.0.4 | 1.0.4 | 1.0.4 |
| libarchive | 3.6.2 | 3.6.2 | 3.6.2 | 3.6.2 | 3.6.2 | 3.6.2 | 3.6.2 |
| libboost | 1.73.0 | 1.73.0 | 1.73.0 | 1.73.0 | 1.73.0 | 1.73.0 | |
| libbrotlicommon | 1.0.9 | 1.0.9 | 1.0.9 | 1.0.9 | 1.0.9 | 1.0.9 | 1.0.9 |
| libbrotlidec | 1.0.9 | 1.0.9 | 1.0.9 | 1.0.9 | 1.0.9 | 1.0.9 | 1.0.9 |
| libbrotlienc | 1.0.9 | 1.0.9 | 1.0.9 | 1.0.9 | 1.0.9 | 1.0.9 | 1.0.9 |
| libclang | 10.0.1 | 14.0.6 | 14.0.6 | 14.0.6 | 14.0.6 | ||
| libclang13 | 14.0.6 | 14.0.6 | 14.0.6 | 14.0.6 | |||
| libcurl | 8.1.1 | 8.1.1 | 8.1.1 | 8.1.1 | 8.1.1 | 8.1.1 | 8.1.1 |
| libcxx | 14.0.6 | 14.0.6 | |||||
| libdeflate | 1.17 | 1.17 | 1.17 | 1.17 | 1.17 | 1.17 | 1.17 |
| libedit | 3.1.20221030 | 3.1.20221030 | 3.1.20221030 | 3.1.20221030 | 3.1.20221030 | 3.1.20221030 | |
| libev | 4.33 | 4.33 | 4.33 | 4.33 | 4.33 | 4.33 | |
| libevent | 2.1.12 | 2.1.12 | 2.1.12 | 2.1.12 | 2.1.12 | 2.1.12 | |
| libffi | 3.4.4 | 3.4.4 | 3.4.4 | 3.4.2 | 3.4.4 | 3.4.4 | 3.4.4 |
| libgcc-ng | 11.2.0 | 11.2.0 | 11.2.0 | 11.2.0 | |||
| libgfortran | 5.0.0 | 5.0.0 | |||||
| libgfortran-ng | 11.2.0 | 11.2.0 | 11.2.0 | 11.2.0 | |||
| libgfortran5 | 11.2.0 | 11.2.0 | 11.2.0 | 11.2.0 | 11.3.0 | 11.3.0 | |
| libgomp | 11.2.0 | 11.2.0 | 11.2.0 | 11.2.0 | |||
| libiconv | 1.16 | 1.16 | 1.16 | ||||
| liblief | 0.12.3 | 0.12.3 | 0.12.3 | 0.12.3 | 0.12.3 | 0.12.3 | 0.12.3 |
| libllvm10 | 10.0.1 | ||||||
| libllvm14 | 14.0.6 | 14.0.6 | 14.0.6 | 14.0.6 | 14.0.6 | 14.0.6 | |
| libmamba | 1.4.1 | 1.4.1 | 1.4.1 | 1.4.1 | 1.4.1 | 1.4.1 | 1.4.1 |
| libmambapy | 1.4.1 | 1.4.1 | 1.4.1 | 1.4.1 | 1.4.1 | 1.4.1 | 1.4.1 |
| libnghttp2 | 1.52.0 | 1.52.0 | 1.52.0 | 1.52.0 | 1.52.0 | 1.52.0 | |
| libogg | 1.3.5 | ||||||
| libopenblas | 0.3.21 | 0.3.21 | 0.3.21 | 0.3.21 | 0.3.21 | ||
| libpng | 1.6.39 | 1.6.39 | 1.6.39 | 1.6.39 | 1.6.39 | 1.6.39 | 1.6.39 |
| libpq | 12.15 | 12.9 | 12.9 | 12.9 | |||
| libprotobuf | 3.20.3 | 3.20.3 | 3.20.3 | 3.20.3 | 3.20.3 | 3.20.3 | |
| libsodium | 1.0.18 | 1.0.18 | 1.0.18 | 1.0.18 | 1.0.18 | 1.0.18 | 1.0.18 |
| libsolv | 0.7.22 | 0.7.22 | 0.7.22 | 0.7.22 | 0.7.22 | 0.7.22 | 0.7.22 |
| libspatialindex | 1.9.3 | 1.9.3 | 1.9.3 | 1.9.3 | 1.9.3 | ||
| libssh2 | 1.10.0 | 1.10.0 | 1.10.0 | 1.10.0 | 1.10.0 | 1.10.0 | 1.10.0 |
| libstdcxx-ng | 11.2.0 | 11.2.0 | 11.2.0 | 11.2.0 | |||
| libthrift | 0.15.0 | 0.15.0 | 0.15.0 | 0.13.0 | 0.15.0 | 0.15.0 | |
| libtiff | 4.5.0 | 4.5.0 | 4.5.0 | 4.5.0 | 4.5.0 | 4.5.0 | 4.5.0 |
| libuuid | 1.41.5 | 1.41.5 | 1.41.5 | 1.41.5 | |||
| libuv | 1.44.2 | ||||||
| libvorbis | 1.3.7 | ||||||
| libwebp | 1.2.4 | 1.2.4 | 1.2.4 | 1.2.4 | 1.2.4 | 1.2.4 | 1.2.4 |
| libwebp-base | 1.2.4 | 1.2.4 | 1.2.4 | 1.2.4 | 1.2.4 | 1.2.4 | 1.2.4 |
| libxcb | 1.15 | 1.15 | |||||
| libxkbcommon | 1.0.1 | 1.0.1 | |||||
| libxml2 | 2.9.14 | 2.10.3 | 2.10.3 | 2.10.3 | 2.10.3 | 2.10.3 | 2.10.3 |
| libxslt | 1.1.35 | 1.1.37 | 1.1.37 | 1.1.37 | 1.1.37 | 1.1.37 | 1.1.37 |
| libzopfli | 1.0.3 | 1.0.3 | 1.0.3 | 1.0.3 | 1.0.3 | 1.0.3 | 1.0.3 |
| linkify-it-py | 2.0.0 | 2.0.0 | 2.0.0 | 2.0.0 | 2.0.0 | ||
| llvm-openmp | 14.0.6 | 14.0.6 | |||||
| llvmlite | 0.40.0 | 0.40.0 | 0.40.0 | 0.40.0 | 0.40.0 | 0.40.0 | |
| locket | 1.0.0 | 1.0.0 | 1.0.0 | 1.0.0 | 1.0.0 | 1.0.0 | 1.0.0 |
| lxml | 4.9.1 | 4.9.2 | 4.9.2 | 4.9.2 | 4.9.2 | 4.9.2 | 4.9.2 |
| lz4 | 4.3.2 | 4.3.2 | 4.3.2 | 4.3.2 | 4.3.2 | 4.3.2 | |
| lz4-c | 1.9.4 | 1.9.4 | 1.9.4 | 1.9.4 | 1.9.4 | 1.9.4 | 1.9.4 |
| lzo | 2.10 | 2.10 | 2.10 | 2.10 | 2.10 | 2.10 | 2.10 |
| m2-msys2-runtime | 2.5.0.17080.65c939c | ||||||
| m2-patch | 2.7.5 | ||||||
| m2w64-libwinpthread-git | 5.0.0.4634.697f757 | ||||||
| markdown | 3.4.1 | 3.4.1 | 3.4.1 | 3.4.1 | 3.4.1 | 3.4.1 | 3.4.1 |
| markdown-it-py | 2.2.0 | 2.2.0 | 2.2.0 | 2.2.0 | 2.2.0 | ||
| markupsafe | 2.1.1 | 2.1.1 | 2.1.1 | 2.1.1 | 2.1.1 | 2.1.1 | 2.1.1 |
| matplotlib | 3.7.1 | 3.7.1 | 3.7.1 | 3.7.1 | 3.7.1 | 3.7.1 | 3.7.1 |
| matplotlib-base | 3.7.1 | 3.7.1 | 3.7.1 | 3.7.1 | 3.7.1 | 3.7.1 | 3.7.1 |
| matplotlib-inline | 0.1.6 | 0.1.6 | 0.1.6 | 0.1.6 | 0.1.6 | 0.1.6 | 0.1.6 |
| mccabe | 0.7.0 | 0.7.0 | 0.7.0 | 0.7.0 | 0.7.0 | 0.7.0 | 0.7.0 |
| mdit-py-plugins | 0.3.0 | 0.3.0 | 0.3.0 | 0.3.0 | 0.3.0 | ||
| mdurl | 0.1.0 | 0.1.0 | 0.1.0 | 0.1.0 | 0.1.0 | ||
| menuinst | 1.4.19 | ||||||
| mistune | 0.8.4 | 0.8.4 | 0.8.4 | 0.8.4 | 0.8.4 | 0.8.4 | 0.8.4 |
| mkl | 2023.1.0 | 2023.1.0 | |||||
| mkl-service | 2.4.0 | 2.4.0 | |||||
| mkl\_fft | 1.3.6 | 1.3.6 | |||||
| mkl\_random | 1.2.2 | 1.2.2 | |||||
| mock | 4.0.3 | ||||||
| more-itertools | 8.12.0 | 8.12.0 | 8.12.0 | 8.12.0 | 8.12.0 | 8.12.0 | 8.12.0 |
| mpc | 1.1.0 | 1.1.0 | 1.1.0 | 1.1.0 | 1.1.0 | 1.1.0 | |
| mpfr | 4.0.2 | 4.0.2 | 4.0.2 | 4.0.2 | 4.0.2 | 4.0.2 | |
| mpi | 1.0 | ||||||
| mpich | 4.1.1 | ||||||
| mpmath | 1.2.1 | 1.2.1 | 1.2.1 | 1.2.1 | 1.2.1 | 1.2.1 | 1.2.1 |
| msgpack-python | 1.0.3 | 1.0.3 | 1.0.3 | 1.0.3 | 1.0.3 | 1.0.3 | 1.0.3 |
| msys2-conda-epoch | 20160418 | ||||||
| multidict | 6.0.2 | 6.0.2 | 6.0.2 | 6.0.2 | 6.0.2 | 6.0.2 | 6.0.2 |
| multipledispatch | 0.6.0 | 0.6.0 | 0.6.0 | 0.6.0 | 0.6.0 | 0.6.0 | |
| multiprocess | 0.70.14 | 0.70.14 | 0.70.14 | ||||
| munkres | 1.1.4 | 1.1.4 | 1.1.4 | 1.1.4 | 1.1.4 | 1.1.4 | 1.1.4 |
| mypy\_extensions | 0.4.3 | 0.4.3 | 0.4.3 | 0.4.3 | 0.4.3 | ||
| navigator-updater | 0.4.0 | 0.4.0 | 0.4.0 | 0.4.0 | 0.4.0 | ||
| nbclassic | 0.5.5 | 0.5.5 | 0.5.5 | 0.5.5 | 0.5.5 | 0.5.5 | 0.5.5 |
| nbclient | 0.5.13 | 0.5.13 | 0.5.13 | 0.5.13 | 0.5.13 | 0.5.13 | 0.5.13 |
| nbconvert | 6.5.4 | 6.5.4 | 6.5.4 | 6.5.4 | 6.5.4 | 6.5.4 | 6.5.4 |
| nbformat | 5.7.0 | 5.7.0 | 5.7.0 | 5.7.0 | 5.7.0 | 5.7.0 | 5.7.0 |
| ncurses | 6.4 | 6.4 | 6.4 | 6.4 | 6.4 | 6.4 | |
| nest-asyncio | 1.5.6 | 1.5.6 | 1.5.6 | 1.5.6 | 1.5.6 | 1.5.6 | 1.5.6 |
| networkx | 2.8.4 | 2.8.4 | 2.8.4 | 2.8.4 | 2.8.4 | 2.8.4 | 2.8.4 |
| ninja | 1.10.2 | 1.10.2 | 1.10.2 | ||||
| ninja-base | 1.10.2 | 1.10.2 | 1.10.2 | ||||
| nltk | 3.7 | 3.7 | 3.7 | 3.7 | 3.7 | 3.7 | 3.7 |
| notebook | 6.5.4 | 6.5.4 | 6.5.4 | 6.5.4 | 6.5.4 | 6.5.4 | 6.5.4 |
| notebook-shim | 0.2.2 | 0.2.2 | 0.2.2 | 0.2.2 | 0.2.2 | 0.2.2 | 0.2.2 |
| nspr | 4.35 | 4.35 | 4.35 | 4.35 | |||
| nss | 3.89.1 | 3.89.1 | 3.89.1 | 3.89.1 | |||
| numba | 0.57.0 | 0.57.0 | 0.57.0 | 0.57.0 | 0.57.0 | 0.57.0 | |
| numexpr | 2.8.4 | 2.8.4 | 2.8.4 | 2.8.4 | 2.8.4 | 2.8.4 | 2.8.4 |
| numpy | 1.24.3 | 1.24.3 | 1.24.3 | 1.25.0 | 1.24.3 | 1.24.3 | 1.24.3 |
| numpy-base | 1.24.3 | 1.24.3 | 1.24.3 | 1.25.0 | 1.24.3 | 1.24.3 | 1.24.3 |
| numpydoc | 1.5.0 | 1.5.0 | 1.5.0 | 1.5.0 | 1.5.0 | ||
| oniguruma | 6.9.7.1 | 6.9.7.1 | 6.9.7.1 | 6.9.7.1 | 6.9.7.1 | ||
| openjpeg | 2.4.0 | 2.4.0 | 2.4.0 | 2.4.0 | 2.3.0 | 2.4.0 | 2.4.0 |
| openpyxl | 3.0.10 | 3.0.10 | 3.0.10 | 3.0.10 | 3.0.10 | 3.0.10 | 3.0.10 |
| openssl | 1.1.1u | 1.1.1u | 1.1.1u | 1.1.1u | 1.1.1u | 1.1.1u | 1.1.1u |
| orc | 1.7.4 | 1.7.4 | 1.7.4 | 1.7.4 | 1.7.4 | 1.7.4 | |
| packaging | 23.0 | 23.0 | 23.0 | 23.0 | 23.0 | 23.0 | 23.0 |
| pandas | 1.5.3 | 1.5.3 | 1.5.3 | 1.5.3 | 1.5.3 | 1.5.3 | 1.5.3 |
| pandocfilters | 1.5.0 | 1.5.0 | 1.5.0 | 1.5.0 | 1.5.0 | 1.5.0 | 1.5.0 |
| panel | 1.1.0 | 0.14.3 | 1.1.0 | 0.12.6 | 1.1.0 | 1.1.0 | 1.1.0 |
| param | 1.13.0 | 1.13.0 | 1.13.0 | 1.13.0 | 1.13.0 | 1.13.0 | 1.13.0 |
| paramiko | 2.8.1 | ||||||
| parsel | 1.6.0 | 1.6.0 | 1.6.0 | 1.6.0 | 1.6.0 | 1.6.0 | |
| parso | 0.8.3 | 0.8.3 | 0.8.3 | 0.8.3 | 0.8.3 | 0.8.3 | 0.8.3 |
| partd | 1.2.0 | 1.2.0 | 1.2.0 | 1.2.0 | 1.2.0 | 1.2.0 | 1.2.0 |
| patch | 2.7.6 | 2.7.6 | 2.7.6 | 2.7.6 | 2.7.6 | 2.7.6 | |
| patchelf | 0.17.2 | 0.17.2 | 0.17.2 | 0.17.2 | |||
| pathlib | 1.0.1 | 1.0.1 | 1.0.1 | 1.0.1 | 1.0.1 | ||
| pathspec | 0.10.3 | 0.10.3 | 0.10.3 | 0.10.3 | 0.10.3 | ||
| patsy | 0.5.3 | 0.5.3 | 0.5.3 | 0.5.3 | 0.5.3 | 0.5.3 | 0.5.3 |
| pcre | 8.45 | 8.45 | 8.45 | 8.45 | 8.45 | ||
| pcre2 | 10.37 | 10.37 | 10.37 | 10.37 | 10.37 | 10.37 | 10.37 |
| pep8 | 1.7.1 | 1.7.1 | 1.7.1 | 1.7.1 | 1.7.1 | 1.7.1 | 1.7.1 |
| pexpect | 4.8.0 | 4.8.0 | 4.8.0 | 4.8.0 | 4.8.0 | 4.8.0 | 4.8.0 |
| pickleshare | 0.7.5 | 0.7.5 | 0.7.5 | 0.7.5 | 0.7.5 | 0.7.5 | 0.7.5 |
| pillow | 9.4.0 | 9.4.0 | 9.4.0 | 9.4.0 | 9.4.0 | 9.4.0 | 9.4.0 |
| pip | 23.1.2 | 23.1.2 | 23.1.2 | 23.1.2 | 23.1.2 | 23.1.2 | 23.1.2 |
| pkginfo | 1.9.6 | 1.9.6 | 1.9.6 | 1.9.6 | 1.9.6 | 1.9.6 | 1.9.6 |
| platformdirs | 2.5.2 | 2.5.2 | 2.5.2 | 2.5.2 | 2.5.2 | 2.5.2 | 2.5.2 |
| plotly | 5.9.0 | 5.9.0 | 5.9.0 | 5.9.0 | 5.9.0 | 5.9.0 | 5.9.0 |
| pluggy | 1.0.0 | 1.0.0 | 1.0.0 | 1.0.0 | 1.0.0 | 1.0.0 | 1.0.0 |
| ply | 3.11 | 3.11 | 3.11 | 3.11 | 3.11 | ||
| pooch | 1.4.0 | 1.4.0 | 1.4.0 | 1.4.0 | 1.4.0 | 1.4.0 | 1.4.0 |
| powershell\_shortcut | 0.0.1 | ||||||
| poyo | 0.5.0 | 0.5.0 | 0.5.0 | 0.5.0 | 0.5.0 | ||
| prometheus\_client | 0.14.1 | 0.14.1 | 0.14.1 | 0.14.1 | 0.14.1 | 0.14.1 | 0.14.1 |
| prompt-toolkit | 3.0.36 | 3.0.36 | 3.0.36 | 3.0.36 | 3.0.36 | 3.0.36 | 3.0.36 |
| prompt\_toolkit | 3.0.36 | 3.0.36 | 3.0.36 | 3.0.36 | 3.0.36 | 3.0.36 | 3.0.36 |
| protego | 0.1.16 | 0.1.16 | 0.1.16 | 0.1.16 | 0.1.16 | 0.1.16 | |
| psutil | 5.9.0 | 5.9.0 | 5.9.0 | 5.9.0 | 5.9.0 | 5.9.0 | 5.9.0 |
| ptyprocess | 0.7.0 | 0.7.0 | 0.7.0 | 0.7.0 | 0.7.0 | 0.7.0 | 0.7.0 |
| pure\_eval | 0.2.2 | 0.2.2 | 0.2.2 | 0.2.2 | 0.2.2 | 0.2.2 | 0.2.2 |
| py-cpuinfo | 8.0.0 | 8.0.0 | 8.0.0 | 8.0.0 | 8.0.0 | 8.0.0 | |
| py-lief | 0.12.3 | 0.12.3 | 0.12.3 | 0.12.3 | 0.12.3 | 0.12.3 | 0.12.3 |
| pyarrow | 11.0.0 | 11.0.0 | 11.0.0 | 11.0.0 | 11.0.0 | 11.0.0 | |
| pyasn1 | 0.4.8 | 0.4.8 | 0.4.8 | 0.4.8 | 0.4.8 | 0.4.8 | |
| pyasn1-modules | 0.2.8 | 0.2.8 | 0.2.8 | 0.2.8 | 0.2.8 | 0.2.8 | |
| pybind11-abi | 4 | 4 | 4 | 4 | 4 | 4 | 4 |
| pycodestyle | 2.10.0 | 2.10.0 | 2.10.0 | 2.10.0 | 2.10.0 | ||
| pycosat | 0.6.4 | 0.6.4 | 0.6.4 | 0.6.4 | 0.6.4 | 0.6.4 | 0.6.4 |
| pycparser | 2.21 | 2.21 | 2.21 | 2.21 | 2.21 | 2.21 | 2.21 |
| pyct | 0.5.0 | 0.5.0 | 0.5.0 | 0.5.0 | 0.5.0 | 0.5.0 | 0.5.0 |
| pycurl | 7.45.2 | 7.45.2 | 7.45.2 | 7.45.2 | 7.45.2 | 7.45.2 | 7.45.2 |
| pydispatcher | 2.0.5 | 2.0.5 | 2.0.5 | 2.0.5 | 2.0.5 | 2.0.5 | |
| pydocstyle | 6.3.0 | 6.3.0 | 6.3.0 | 6.3.0 | 6.3.0 | ||
| pyerfa | 2.0.0 | 2.0.0 | 2.0.0 | 2.0.0 | 2.0.0 | 2.0.0 | 2.0.0 |
| pyflakes | 3.0.1 | 3.0.1 | 3.0.1 | 3.0.1 | 3.0.1 | 3.0.1 | 3.0.1 |
| pygments | 2.15.1 | 2.15.1 | 2.15.1 | 2.15.1 | 2.15.1 | 2.15.1 | 2.15.1 |
| pyjwt | 2.4.0 | 2.4.0 | 2.4.0 | 2.4.0 | 2.4.0 | ||
| pylint | 2.16.2 | 2.16.2 | 2.16.2 | 2.16.2 | 2.16.2 | 2.16.2 | 2.16.2 |
| pylint-venv | 2.3.0 | 2.3.0 | 2.3.0 | 2.3.0 | 2.3.0 | ||
| pyls-spyder | 0.4.0 | 0.4.0 | 0.4.0 | 0.4.0 | 0.4.0 | ||
| pynacl | 1.5.0 | ||||||
| pyobjc-core | 9.0 | 9.0 | |||||
| pyobjc-framework-cocoa | 9.0 | 9.0 | |||||
| pyobjc-framework-coreservices | 9.0 | 9.0 | |||||
| pyobjc-framework-fsevents | 9.0 | 9.0 | |||||
| pyodbc | 4.0.34 | 4.0.34 | 4.0.34 | 4.0.34 | 4.0.34 | 4.0.34 | 4.0.34 |
| pyopenssl | 23.0.0 | 23.0.0 | 23.0.0 | 23.0.0 | 23.0.0 | 23.0.0 | 23.0.0 |
| pyparsing | 3.0.9 | 3.0.9 | 3.0.9 | 3.0.9 | 3.0.9 | 3.0.9 | 3.0.9 |
| pyqt | 5.15.7 | 5.15.7 | 5.15.7 | 5.15.7 | 5.15.7 | ||
| pyqt5-sip | 12.11.0 | 12.11.0 | 12.11.0 | 12.11.0 | 12.11.0 | ||
| pyqtwebengine | 5.15.7 | 5.15.7 | 5.15.7 | 5.15.7 | 5.15.7 | ||
| pyrsistent | 0.18.0 | 0.18.0 | 0.18.0 | 0.18.0 | 0.18.0 | 0.18.0 | 0.18.0 |
| pysocks | 1.7.1 | 1.7.1 | 1.7.1 | 1.7.1 | 1.7.1 | 1.7.1 | 1.7.1 |
| pytables | 3.8.0 | 3.8.0 | 3.8.0 | 3.7.0 | 3.8.0 | 3.8.0 | 3.8.0 |
| pytest | 7.3.1 | 7.3.1 | 7.3.1 | 7.3.1 | 7.3.1 | 7.3.1 | 7.3.1 |
| python | 3.11.3 | 3.11.3 | 3.11.3 | 3.11.3 | 3.11.3 | 3.11.3 | 3.11.3 |
| python-dateutil | 2.8.2 | 2.8.2 | 2.8.2 | 2.8.2 | 2.8.2 | 2.8.2 | 2.8.2 |
| python-fastjsonschema | 2.16.2 | 2.16.2 | 2.16.2 | 2.16.2 | 2.16.2 | 2.16.2 | 2.16.2 |
| python-json-logger | 2.0.7 | 2.0.7 | 2.0.7 | 2.0.7 | 2.0.7 | 2.0.7 | |
| python-libarchive-c | 2.9 | 2.9 | 2.9 | 2.9 | 2.9 | 2.9 | 2.9 |
| python-lmdb | 1.4.1 | 1.4.1 | 1.4.1 | 1.4.1 | 1.4.1 | 1.4.1 | 1.4.1 |
| python-lsp-black | 1.2.1 | 1.2.1 | 1.2.1 | 1.2.1 | 1.2.1 | ||
| python-lsp-jsonrpc | 1.0.0 | 1.0.0 | 1.0.0 | 1.0.0 | 1.0.0 | ||
| python-lsp-server | 1.7.2 | 1.7.2 | 1.7.2 | 1.7.2 | 1.7.2 | ||
| python-slugify | 5.0.2 | 5.0.2 | 5.0.2 | 5.0.2 | 5.0.2 | ||
| python-snappy | 0.6.1 | 0.6.1 | 0.6.1 | 0.6.1 | 0.6.1 | 0.6.1 | 0.6.1 |
| python-xxhash | 2.0.2 | 2.0.2 | 2.0.2 | ||||
| python.app | 3 | 3 | |||||
| pytoolconfig | 1.2.5 | 1.2.5 | 1.2.5 | 1.2.5 | 1.2.5 | ||
| pytorch | 2.0.1 | 2.0.1 | 2.0.1 | ||||
| pytz | 2022.7 | 2022.7 | 2022.7 | 2022.7 | 2022.7 | 2022.7 | 2022.7 |
| pyviz\_comms | 2.3.0 | 2.3.0 | 2.3.0 | 2.3.0 | 2.3.0 | 2.3.0 | 2.3.0 |
| pywavelets | 1.4.1 | 1.4.1 | 1.4.1 | 1.4.1 | 1.4.1 | 1.4.1 | 1.4.1 |
| pywin32 | 305 | ||||||
| pywin32-ctypes | 0.2.0 | ||||||
| pywinpty | 2.0.10 | ||||||
| pyxdg | 0.27 | 0.27 | |||||
| pyyaml | 6.0 | 6.0 | 6.0 | 6.0 | 6.0 | 6.0 | 6.0 |
| pyzmq | 25.1.0 | 25.1.0 | 25.1.0 | 25.1.0 | 25.1.0 | 25.1.0 | 25.1.0 |
| qdarkstyle | 3.0.2 | 3.0.2 | 3.0.2 | 3.0.2 | 3.0.2 | ||
| qstylizer | 0.2.2 | 0.2.2 | 0.2.2 | 0.2.2 | 0.2.2 | ||
| qt-main | 5.15.2 | 5.15.2 | 5.15.2 | 5.15.2 | 5.15.2 | ||
| qt-webengine | 5.15.9 | 5.15.9 | 5.15.9 | 5.15.9 | 5.15.9 | ||
| qtawesome | 1.2.2 | 1.2.2 | 1.2.2 | 1.2.2 | 1.2.2 | ||
| qtconsole | 5.4.2 | 5.4.2 | 5.4.2 | 5.4.2 | 5.4.2 | ||
| qtpy | 2.2.0 | 2.2.0 | 2.2.0 | 2.2.0 | 2.2.0 | ||
| qtwebkit | 5.212 | 5.212 | 5.212 | 5.212 | 5.212 | ||
| queuelib | 1.5.0 | 1.5.0 | 1.5.0 | 1.5.0 | 1.5.0 | 1.5.0 | |
| re2 | 2022.04.01 | 2022.04.01 | 2022.04.01 | 2022.04.01 | 2022.04.01 | 2022.04.01 | |
| readline | 8.2 | 8.2 | 8.2 | 8.2 | 8.2 | 8.2 | |
| regex | 2022.7.9 | 2022.7.9 | 2022.7.9 | 2022.7.9 | 2022.7.9 | 2022.7.9 | 2022.7.9 |
| reproc | 14.2.4 | 14.2.4 | 14.2.4 | 14.2.4 | 14.2.4 | 14.2.4 | 14.2.4 |
| reproc-cpp | 14.2.4 | 14.2.4 | 14.2.4 | 14.2.4 | 14.2.4 | 14.2.4 | 14.2.4 |
| requests | 2.29.0 | 2.29.0 | 2.29.0 | 2.29.0 | 2.29.0 | 2.29.0 | 2.29.0 |
| requests-file | 1.5.1 | 1.5.1 | 1.5.1 | 1.5.1 | 1.5.1 | 1.5.1 | |
| requests-toolbelt | 0.9.1 | 0.9.1 | 0.9.1 | 0.9.1 | 0.9.1 | 0.9.1 | 0.9.1 |
| responses | 0.13.3 | 0.13.3 | 0.13.3 | ||||
| rfc3339-validator | 0.1.4 | 0.1.4 | 0.1.4 | 0.1.4 | 0.1.4 | 0.1.4 | |
| rfc3986-validator | 0.1.1 | 0.1.1 | 0.1.1 | 0.1.1 | 0.1.1 | 0.1.1 | |
| rope | 1.7.0 | 1.7.0 | 1.7.0 | 1.7.0 | 1.7.0 | ||
| rtree | 1.0.1 | 1.0.1 | 1.0.1 | 1.0.1 | 1.0.1 | ||
| ruamel.yaml | 0.17.21 | 0.17.21 | 0.17.21 | 0.17.21 | 0.17.21 | 0.17.21 | 0.17.21 |
| ruamel\_yaml | 0.17.21 | 0.17.21 | 0.17.21 | 0.17.21 | 0.17.21 | 0.17.21 | 0.17.21 |
| s3fs | 2023.4.0 | 2023.4.0 | 2023.3.0 | 2023.3.0 | 2023.4.0 | 2023.3.0 | 2023.3.0 |
| s3transfer | 0.6.0 | 0.6.0 | 0.6.0 | 0.6.0 | |||
| sacremoses | 0.0.43 | 0.0.43 | 0.0.43 | 0.0.43 | 0.0.43 | 0.0.43 | 0.0.43 |
| scikit-image | 0.20.0 | 0.20.0 | 0.20.0 | 0.20.0 | 0.20.0 | 0.20.0 | 0.20.0 |
| scikit-learn | 1.2.2 | 1.2.2 | 1.2.2 | 1.2.2 | 1.2.2 | 1.2.2 | 1.2.2 |
| scikit-learn-intelex | 2023.1.1 | 2023.1.1 | |||||
| scipy | 1.10.1 | 1.10.1 | 1.10.1 | 1.10.1 | 1.10.1 | 1.10.1 | 1.10.1 |
| scrapy | 2.8.0 | 2.8.0 | 2.8.0 | 2.8.0 | 2.8.0 | 2.8.0 | |
| seaborn | 0.12.2 | 0.12.2 | 0.12.2 | 0.12.2 | 0.12.2 | 0.12.2 | 0.12.2 |
| secretstorage | 3.3.1 | 3.3.1 | |||||
| send2trash | 1.8.0 | 1.8.0 | 1.8.0 | 1.8.0 | 1.8.0 | 1.8.0 | 1.8.0 |
| service\_identity | 18.1.0 | 18.1.0 | 18.1.0 | 18.1.0 | 18.1.0 | 18.1.0 | |
| setuptools | 67.8.0 | 67.8.0 | 67.8.0 | 67.8.0 | 67.8.0 | 67.8.0 | 67.8.0 |
| sip | 6.6.2 | 6.6.2 | 6.6.2 | 6.6.2 | 6.6.2 | ||
| six | 1.16.0 | 1.16.0 | 1.16.0 | 1.16.0 | 1.16.0 | 1.16.0 | 1.16.0 |
| sleef | 3.5.1 | ||||||
| smart\_open | 5.2.1 | 5.2.1 | 5.2.1 | 5.2.1 | 5.2.1 | 5.2.1 | |
| snappy | 1.1.9 | 1.1.9 | 1.1.9 | 1.1.9 | 1.1.9 | 1.1.9 | 1.1.9 |
| sniffio | 1.2.0 | 1.2.0 | 1.2.0 | 1.2.0 | 1.2.0 | 1.2.0 | 1.2.0 |
| snowballstemmer | 2.2.0 | 2.2.0 | 2.2.0 | 2.2.0 | 2.2.0 | 2.2.0 | 2.2.0 |
| sortedcontainers | 2.4.0 | 2.4.0 | 2.4.0 | 2.4.0 | 2.4.0 | 2.4.0 | 2.4.0 |
| soupsieve | 2.4 | 2.4 | 2.4 | 2.4 | 2.4 | 2.4 | 2.4 |
| sphinx | 5.0.2 | 5.0.2 | 5.0.2 | 5.0.2 | 5.0.2 | ||
| sphinxcontrib-applehelp | 1.0.2 | 1.0.2 | 1.0.2 | 1.0.2 | 1.0.2 | ||
| sphinxcontrib-devhelp | 1.0.2 | 1.0.2 | 1.0.2 | 1.0.2 | 1.0.2 | ||
| sphinxcontrib-htmlhelp | 2.0.0 | 2.0.0 | 2.0.0 | 2.0.0 | 2.0.0 | ||
| sphinxcontrib-jsmath | 1.0.1 | 1.0.1 | 1.0.1 | 1.0.1 | 1.0.1 | ||
| sphinxcontrib-qthelp | 1.0.3 | 1.0.3 | 1.0.3 | 1.0.3 | 1.0.3 | ||
| sphinxcontrib-serializinghtml | 1.1.5 | 1.1.5 | 1.1.5 | 1.1.5 | 1.1.5 | ||
| spyder | 5.4.3 | 5.4.3 | 5.4.3 | 5.4.3 | 5.4.3 | ||
| spyder-kernels | 2.4.3 | 2.4.3 | 2.4.3 | 2.4.3 | 2.4.3 | ||
| sqlalchemy | 1.4.39 | 1.4.39 | 1.4.39 | 1.4.39 | 1.4.39 | 1.4.39 | 1.4.39 |
| sqlite | 3.41.2 | 3.41.2 | 3.41.2 | 3.41.2 | 3.41.2 | 3.41.2 | 3.41.2 |
| stack\_data | 0.2.0 | 0.2.0 | 0.2.0 | 0.2.0 | 0.2.0 | 0.2.0 | 0.2.0 |
| statsmodels | 0.13.5 | 0.13.5 | 0.13.5 | 0.13.5 | 0.13.5 | 0.13.5 | 0.13.5 |
| sympy | 1.11.1 | 1.11.1 | 1.11.1 | 1.11.1 | 1.11.1 | 1.11.1 | 1.11.1 |
| tabulate | 0.8.10 | 0.8.10 | 0.8.10 | 0.8.10 | 0.8.10 | 0.8.10 | 0.8.10 |
| tapi | 1100.0.11 | 1000.10.8 | |||||
| tbb | 2021.8.0 | 2021.8.0 | 2021.8.0 | 2021.8.0 | 2021.8.0 | 2021.8.0 | 2021.8.0 |
| tbb4py | 2021.8.0 | 2021.8.0 | 2021.8.0 | 2021.8.0 | 2021.8.0 | 2021.8.0 | 2021.8.0 |
| tblib | 1.7.0 | 1.7.0 | 1.7.0 | 1.7.0 | 1.7.0 | 1.7.0 | 1.7.0 |
| tenacity | 8.2.2 | 8.2.2 | 8.2.2 | 8.2.2 | 8.2.2 | 8.2.2 | 8.2.2 |
| terminado | 0.17.1 | 0.17.1 | 0.17.1 | 0.17.1 | 0.17.1 | 0.17.1 | 0.17.1 |
| text-unidecode | 1.3 | 1.3 | 1.3 | 1.3 | 1.3 | ||
| textdistance | 4.2.1 | 4.2.1 | 4.2.1 | 4.2.1 | 4.2.1 | ||
| threadpoolctl | 2.2.0 | 2.2.0 | 2.2.0 | 2.2.0 | 2.2.0 | 2.2.0 | 2.2.0 |
| three-merge | 0.1.1 | 0.1.1 | 0.1.1 | 0.1.1 | 0.1.1 | ||
| tifffile | 2021.7.2 | 2021.7.2 | 2021.7.2 | 2021.7.2 | 2021.7.2 | 2021.7.2 | 2021.7.2 |
| tinycss2 | 1.2.1 | 1.2.1 | 1.2.1 | 1.2.1 | 1.2.1 | 1.2.1 | 1.2.1 |
| tk | 8.6.12 | 8.6.12 | 8.6.12 | 8.6.12 | 8.6.12 | 8.6.12 | 8.6.12 |
| tldextract | 3.2.0 | 3.2.0 | 3.2.0 | 3.2.0 | 3.2.0 | 3.2.0 | |
| tokenizers | 0.13.2 | 0.13.2 | 0.13.2 | ||||
| toml | 0.10.2 | 0.10.2 | 0.10.2 | 0.10.2 | 0.10.2 | ||
| tomli | 2.0.1 | 2.0.1 | 2.0.1 | 2.0.1 | 2.0.1 | 2.0.1 | 2.0.1 |
| tomlkit | 0.11.1 | 0.11.1 | 0.11.1 | 0.11.1 | 0.11.1 | 0.11.1 | 0.11.1 |
| toolz | 0.12.0 | 0.12.0 | 0.12.0 | 0.12.0 | 0.12.0 | 0.12.0 | 0.12.0 |
| tornado | 6.2 | 6.2 | 6.2 | 6.2 | 6.2 | 6.2 | 6.2 |
| tqdm | 4.65.0 | 4.65.0 | 4.65.0 | 4.65.0 | 4.65.0 | 4.65.0 | 4.65.0 |
| traitlets | 5.7.1 | 5.7.1 | 5.7.1 | 5.7.1 | 5.7.1 | 5.7.1 | 5.7.1 |
| transformers | 4.29.2 | 4.29.2 | 2.1.1 | 2.1.1 | 4.29.2 | 2.1.1 | 2.1.1 |
| twisted | 22.10.0 | 22.10.0 | 22.10.0 | 22.10.0 | 22.10.0 | 22.10.0 | |
| twisted-iocpsupport | 1.0.2 | ||||||
| typing-extensions | 4.6.3 | 4.6.3 | 4.6.3 | 4.6.3 | 4.6.3 | 4.6.3 | 4.6.3 |
| typing\_extensions | 4.6.3 | 4.6.3 | 4.6.3 | 4.6.3 | 4.6.3 | 4.6.3 | 4.6.3 |
| tzdata | 2023c | 2023c | 2023c | 2023c | 2023c | 2023c | 2023c |
| uc-micro-py | 1.0.1 | 1.0.1 | 1.0.1 | 1.0.1 | 1.0.1 | ||
| ujson | 5.4.0 | 5.4.0 | 5.4.0 | 5.4.0 | 5.4.0 | ||
| unidecode | 1.2.0 | 1.2.0 | 1.2.0 | 1.2.0 | 1.2.0 | ||
| unixodbc | 2.3.11 | 2.3.11 | 2.3.11 | 2.3.11 | 2.3.11 | 2.3.11 | |
| urllib3 | 1.26.16 | 1.26.16 | 1.26.16 | 1.26.16 | 1.26.16 | 1.26.16 | 1.26.16 |
| utf8proc | 2.6.1 | 2.6.1 | 2.6.1 | 2.6.1 | 2.6.1 | 2.6.1 | |
| vc | 14.2 | ||||||
| vs2015\_runtime | 14.27.29016 | ||||||
| w3lib | 1.21.0 | 1.21.0 | 1.21.0 | 1.21.0 | 1.21.0 | 1.21.0 | |
| watchdog | 2.1.6 | 2.1.6 | 2.1.6 | 2.1.6 | 2.1.6 | ||
| wcwidth | 0.2.5 | 0.2.5 | 0.2.5 | 0.2.5 | 0.2.5 | 0.2.5 | 0.2.5 |
| webencodings | 0.5.1 | 0.5.1 | 0.5.1 | 0.5.1 | 0.5.1 | 0.5.1 | 0.5.1 |
| websocket-client | 0.58.0 | 0.58.0 | 0.58.0 | 0.58.0 | 0.58.0 | 0.58.0 | 0.58.0 |
| werkzeug | 2.2.3 | 2.2.3 | 2.2.3 | 2.2.3 | 2.2.3 | 2.2.3 | 2.2.3 |
| whatthepatch | 1.0.2 | 1.0.2 | 1.0.2 | 1.0.2 | 1.0.2 | ||
| wheel | 0.38.4 | 0.38.4 | 0.38.4 | 0.38.4 | 0.38.4 | 0.38.4 | 0.38.4 |
| widgetsnbextension | 4.0.5 | 4.0.5 | 4.0.5 | 4.0.5 | 4.0.5 | 4.0.5 | 4.0.5 |
| win\_inet\_pton | 1.1.0 | ||||||
| winpty | 0.4.3 | ||||||
| wrapt | 1.14.1 | 1.14.1 | 1.14.1 | 1.14.1 | 1.14.1 | 1.14.1 | 1.14.1 |
| wurlitzer | 3.0.2 | 3.0.2 | 3.0.2 | 3.0.2 | |||
| xarray | 2022.11.0 | 2022.11.0 | 2022.11.0 | 2022.11.0 | 2022.11.0 | 2022.11.0 | |
| xlwings | 0.29.1 | 0.29.1 | 0.29.1 | ||||
| xxhash | 0.8.0 | 0.8.0 | 0.8.0 | ||||
| xyzservices | 2022.9.0 | 2022.9.0 | 2022.9.0 | 2022.9.0 | 2022.9.0 | ||
| xz | 5.4.2 | 5.4.2 | 5.4.2 | 5.4.2 | 5.4.2 | 5.4.2 | 5.4.2 |
| y-py | 0.5.9 | 0.5.9 | 0.5.9 | 0.5.9 | 0.5.9 | 0.5.9 | |
| yaml | 0.2.5 | 0.2.5 | 0.2.5 | 0.2.5 | 0.2.5 | 0.2.5 | 0.2.5 |
| yaml-cpp | 0.7.0 | 0.7.0 | 0.7.0 | 0.7.0 | 0.7.0 | 0.7.0 | 0.7.0 |
| yapf | 0.31.0 | 0.31.0 | 0.31.0 | 0.31.0 | 0.31.0 | ||
| yarl | 1.8.1 | 1.8.1 | 1.8.1 | 1.8.1 | 1.8.1 | 1.8.1 | 1.8.1 |
| ypy-websocket | 0.8.2 | 0.8.2 | 0.8.2 | 0.8.2 | 0.8.2 | 0.8.2 | |
| zeromq | 4.3.4 | 4.3.4 | 4.3.4 | 4.3.4 | 4.3.4 | 4.3.4 | 4.3.4 |
| zfp | 0.5.5 | 0.5.5 | 0.5.5 | 0.5.5 | 0.5.5 | ||
| zict | 2.2.0 | 2.2.0 | 2.2.0 | 2.2.0 | 2.2.0 | 2.2.0 | 2.2.0 |
| zipp | 3.11.0 | 3.11.0 | 3.11.0 | 3.11.0 | 3.11.0 | 3.11.0 | 3.11.0 |
| zlib | 1.2.13 | 1.2.13 | 1.2.13 | 1.2.13 | 1.2.13 | 1.2.13 | 1.2.13 |
| zlib-ng | 2.0.7 | 2.0.7 | 2.0.7 | 2.0.7 | 2.0.7 | 2.0.7 | |
| zope | 1.0 | 1.0 | 1.0 | 1.0 | 1.0 | 1.0 | |
| zope.interface | 5.4.0 | 5.4.0 | 5.4.0 | 5.4.0 | 5.4.0 | 5.4.0 | |
| zstandard | 0.19.0 | 0.19.0 | 0.19.0 | 0.19.0 | 0.19.0 | 0.19.0 | 0.19.0 |
| zstd | 1.5.5 | 1.5.5 | 1.5.5 | 1.5.5 | 1.5.5 | 1.5.5 | 1.5.5 |
| Package Name | linux-64 | linux-aarch64 | linux-ppc64le | linux-s390x |
|---|---|---|---|---|
| \_anaconda\_depends | 2023.07 | 2023.07 | 2023.07 | 2023.07 |
| \_libgcc\_mutex | 0.1 | 0.1 | 0.1 | 0.1 |
| \_openmp\_mutex | 5.1 | 5.1 | 5.1 | 5.1 |
| abseil-cpp | 20211102.0 | 20211102.0 | 20211102.0 | |
| aiobotocore | 2.5.0 | 2.5.0 | 2.4.2 | 2.4.2 |
| aiofiles | 22.1.0 | 22.1.0 | 22.1.0 | |
| aiohttp | 3.8.3 | 3.8.3 | 3.8.3 | 3.8.3 |
| aioitertools | 0.7.1 | 0.7.1 | 0.7.1 | 0.7.1 |
| aiosignal | 1.2.0 | 1.2.0 | 1.2.0 | 1.2.0 |
| aiosqlite | 0.18.0 | 0.18.0 | 0.18.0 | |
| alabaster | 0.7.12 | 0.7.12 | ||
| anaconda-catalogs | 0.2.0 | 0.2.0 | 0.2.0 | 0.2.0 |
| anaconda-client | 1.11.3 | 1.11.3 | 1.11.3 | 1.11.3 |
| anaconda-navigator | 2.4.2 | 2.4.2 | ||
| anaconda-project | 0.11.1 | 0.11.1 | 0.11.1 | 0.11.1 |
| anyio | 3.5.0 | 3.5.0 | 3.5.0 | 3.5.0 |
| appdirs | 1.4.4 | 1.4.4 | 1.4.4 | 1.4.4 |
| argon2-cffi | 21.3.0 | 21.3.0 | 21.3.0 | 21.3.0 |
| argon2-cffi-bindings | 21.2.0 | 21.2.0 | 21.2.0 | 21.2.0 |
| arrow | 1.2.3 | 1.2.3 | ||
| arrow-cpp | 11.0.0 | 11.0.0 | 11.0.0 | |
| astroid | 2.14.2 | 2.14.2 | 2.14.2 | 2.14.2 |
| astropy | 5.1 | 5.1 | 5.1 | 5.1 |
| asttokens | 2.0.5 | 2.0.5 | 2.0.5 | 2.0.5 |
| async-timeout | 4.0.2 | 4.0.2 | 4.0.2 | 4.0.2 |
| atomicwrites | 1.4.0 | 1.4.0 | ||
| attrs | 22.1.0 | 22.1.0 | 22.1.0 | 22.1.0 |
| automat | 20.2.0 | 20.2.0 | 20.2.0 | |
| autopep8 | 1.6.0 | 1.6.0 | ||
| aws-c-common | 0.4.57 | 0.5.11 | 0.4.57 | |
| aws-c-event-stream | 0.1.6 | 0.1.6 | 0.1.6 | |
| aws-checksums | 0.1.9 | 0.1.11 | 0.1.9 | |
| aws-sdk-cpp | 1.8.185 | 1.8.185 | 1.8.185 | |
| babel | 2.11.0 | 2.11.0 | 2.11.0 | 2.11.0 |
| backcall | 0.2.0 | 0.2.0 | 0.2.0 | 0.2.0 |
| backports | 1.1 | 1.1 | 1.1 | 1.1 |
| backports.functools\_lru\_cache | 1.6.4 | 1.6.4 | 1.6.4 | 1.6.4 |
| backports.tempfile | 1.0 | 1.0 | 1.0 | 1.0 |
| backports.weakref | 1.0.post1 | 1.0.post1 | 1.0.post1 | 1.0.post1 |
| bcrypt | 3.2.0 | 3.2.0 | 3.2.0 | |
| beautifulsoup4 | 4.12.2 | 4.12.2 | 4.12.2 | 4.12.2 |
| binaryornot | 0.4.4 | 0.4.4 | ||
| black | 23.3.0 | 23.3.0 | ||
| blas | 1.0 | 1.0 | 1.0 | 1.0 |
| bleach | 4.1.0 | 4.1.0 | 4.1.0 | 4.1.0 |
| blosc | 1.21.3 | 1.21.3 | 1.21.3 | 1.21.3 |
| bokeh | 3.1.1 | 2.4.3 | 3.1.1 | 2.4.3 |
| boltons | 23.0.0 | 23.0.0 | 23.0.0 | 23.0.0 |
| boost-cpp | 1.73.0 | 1.73.0 | 1.73.0 | |
| boto3 | 1.24.28 | 1.24.28 | ||
| botocore | 1.29.76 | 1.29.76 | 1.27.59 | 1.27.59 |
| bottleneck | 1.3.5 | 1.3.5 | 1.3.5 | 1.3.5 |
| brotli | 1.0.9 | 1.0.9 | 1.0.9 | 1.0.9 |
| brotli-bin | 1.0.9 | 1.0.9 | 1.0.9 | 1.0.9 |
| brotlipy | 0.7.0 | 0.7.0 | 0.7.0 | 0.7.0 |
| brunsli | 0.1 | 0.1 | 0.1 | |
| bzip2 | 1.0.8 | 1.0.8 | 1.0.8 | 1.0.8 |
| c-ares | 1.19.0 | 1.19.0 | 1.19.0 | 1.19.0 |
| c-blosc2 | 2.8.0 | 2.8.0 | 2.8.0 | |
| ca-certificates | 2023.05.30 | 2023.05.30 | 2023.05.30 | 2023.05.30 |
| certifi | 2023.5.7 | 2023.5.7 | 2023.5.7 | 2023.5.7 |
| cffi | 1.15.1 | 1.15.1 | 1.15.1 | 1.15.1 |
| cfitsio | 3.470 | 3.470 | 3.470 | 3.470 |
| chardet | 4.0.0 | 4.0.0 | 4.0.0 | 4.0.0 |
| charls | 2.2.0 | 2.2.0 | 2.2.0 | |
| charset-normalizer | 2.0.4 | 2.0.4 | 2.0.4 | 2.0.4 |
| click | 8.0.4 | 8.0.4 | 8.0.4 | 8.0.4 |
| cloudpickle | 2.2.1 | 2.2.1 | 2.2.1 | 2.2.1 |
| clyent | 1.2.2 | 1.2.2 | 1.2.2 | 1.2.2 |
| colorama | 0.4.6 | 0.4.6 | 0.4.6 | 0.4.6 |
| colorcet | 3.0.1 | 3.0.1 | 3.0.1 | 3.0.1 |
| comm | 0.1.2 | 0.1.2 | 0.1.2 | 0.1.2 |
| conda | 23.5.2 | 23.5.2 | 23.5.2 | 23.5.2 |
| conda-build | 3.25.0 | 3.25.0 | 3.25.0 | 3.25.0 |
| conda-content-trust | 0.1.3 | 0.1.3 | 0.1.3 | 0.1.3 |
| conda-index | 0.2.3 | 0.2.3 | 0.2.3 | 0.2.3 |
| conda-libmamba-solver | 23.5.0 | 23.5.0 | 23.5.0 | 23.5.0 |
| conda-pack | 0.6.0 | 0.6.0 | 0.6.0 | 0.6.0 |
| conda-package-handling | 2.1.0 | 2.1.0 | 2.1.0 | 2.1.0 |
| conda-package-streaming | 0.8.0 | 0.8.0 | 0.8.0 | 0.8.0 |
| conda-repo-cli | 1.0.41 | 1.0.41 | ||
| conda-token | 0.4.0 | 0.4.0 | 0.4.0 | 0.4.0 |
| conda-verify | 3.4.2 | 3.4.2 | 3.4.2 | 3.4.2 |
| constantly | 15.1.0 | 15.1.0 | 15.1.0 | |
| contourpy | 1.0.5 | 1.0.5 | 1.0.5 | 1.0.5 |
| cookiecutter | 1.7.3 | 1.7.3 | ||
| cryptography | 39.0.1 | 39.0.1 | 39.0.1 | 39.0.1 |
| cssselect | 1.1.0 | 1.1.0 | 1.1.0 | |
| curl | 8.1.1 | 8.1.1 | 8.1.1 | 8.1.1 |
| cycler | 0.11.0 | 0.11.0 | 0.11.0 | 0.11.0 |
| cytoolz | 0.12.0 | 0.12.0 | 0.12.0 | 0.12.0 |
| daal4py | 2023.1.1 | |||
| dal | 2023.1.1 | |||
| dask | 2023.6.0 | 2023.4.1 | 2023.6.0 | 2023.6.0 |
| dask-core | 2023.6.0 | 2023.4.1 | 2023.6.0 | 2023.6.0 |
| datasets | 2.12.0 | 2.12.0 | ||
| datashader | 0.15.0 | 0.15.0 | 0.15.0 | |
| datashape | 0.5.4 | 0.5.4 | 0.5.4 | |
| dbus | 1.13.18 | 1.13.18 | ||
| debugpy | 1.5.1 | 1.5.1 | 1.5.1 | 1.5.1 |
| decorator | 5.1.1 | 5.1.1 | 5.1.1 | 5.1.1 |
| defusedxml | 0.7.1 | 0.7.1 | 0.7.1 | 0.7.1 |
| diff-match-patch | 20200713 | 20200713 | ||
| dill | 0.3.6 | 0.3.6 | 0.3.6 | 0.3.6 |
| distributed | 2023.6.0 | 2023.4.1 | 2023.6.0 | 2023.6.0 |
| docstring-to-markdown | 0.11 | 0.11 | ||
| docutils | 0.18.1 | 0.18.1 | ||
| entrypoints | 0.4 | 0.4 | 0.4 | 0.4 |
| et\_xmlfile | 1.1.0 | 1.1.0 | 1.1.0 | 1.1.0 |
| executing | 0.8.3 | 0.8.3 | 0.8.3 | 0.8.3 |
| expat | 2.4.9 | 2.4.9 | ||
| filelock | 3.9.0 | 3.9.0 | 3.9.0 | 3.9.0 |
| flake8 | 6.0.0 | 6.0.0 | ||
| flask | 2.2.2 | 2.2.2 | 2.2.2 | 2.2.2 |
| fmt | 9.1.0 | 9.1.0 | 9.1.0 | 9.1.0 |
| fontconfig | 2.14.1 | 2.14.1 | ||
| fonttools | 4.25.0 | 4.25.0 | 4.25.0 | 4.25.0 |
| freetype | 2.12.1 | 2.12.1 | 2.12.1 | 2.12.1 |
| frozenlist | 1.3.3 | 1.3.3 | 1.3.3 | 1.3.3 |
| fsspec | 2023.4.0 | 2023.4.0 | 2023.3.0 | 2023.3.0 |
| future | 0.18.3 | 0.18.3 | 0.18.3 | 0.18.3 |
| gensim | 4.3.0 | 4.3.0 | 4.3.0 | |
| gflags | 2.2.2 | 2.2.2 | 2.2.2 | |
| giflib | 5.2.1 | 5.2.1 | 5.2.1 | 5.2.1 |
| glib | 2.69.1 | 2.69.1 | ||
| glob2 | 0.7 | 0.7 | 0.7 | 0.7 |
| glog | 0.5.0 | 0.5.0 | 0.5.0 | |
| gmp | 6.2.1 | 6.2.1 | 6.2.1 | 6.2.1 |
| gmpy2 | 2.1.2 | 2.1.2 | 2.1.2 | 2.1.2 |
| greenlet | 2.0.1 | 2.0.1 | 2.0.1 | 2.0.1 |
| grpc-cpp | 1.46.1 | 1.46.1 | 1.46.1 | |
| gst-plugins-base | 1.14.1 | 1.14.1 | ||
| gstreamer | 1.14.1 | 1.14.1 | ||
| h5py | 3.7.0 | 3.7.0 | 3.7.0 | 3.7.0 |
| hdf5 | 1.10.6 | 1.10.6 | 1.10.6 | 1.10.6 |
| heapdict | 1.0.1 | 1.0.1 | 1.0.1 | 1.0.1 |
| holoviews | 1.16.2 | 1.16.2 | 1.16.2 | 1.14.8 |
| huggingface\_hub | 0.15.1 | 0.15.1 | ||
| hvplot | 0.8.4 | 0.8.4 | 0.8.4 | 0.7.3 |
| hyperlink | 21.0.0 | 21.0.0 | 21.0.0 | |
| icu | 58.2 | 68.1 | 58.2 | 68.1 |
| idna | 3.4 | 3.4 | 3.4 | 3.3 |
| imagecodecs | 2021.8.26 | 2021.8.26 | 2021.8.26 | 2021.8.26 |
| imageio | 2.31.1 | 2.31.1 | 2.31.1 | 2.26.0 |
| imagesize | 1.4.1 | 1.4.1 | ||
| imbalanced-learn | 0.10.1 | 0.10.1 | 0.10.1 | 0.10.1 |
| importlib-metadata | 6.0.0 | 6.0.0 | 6.0.0 | 6.0.0 |
| importlib\_metadata | 6.0.0 | 6.0.0 | ||
| incremental | 21.3.0 | 21.3.0 | 21.3.0 | |
| inflection | 0.5.1 | 0.5.1 | ||
| iniconfig | 1.1.1 | 1.1.1 | 1.1.1 | 1.1.1 |
| intake | 0.6.8 | 0.6.8 | 0.6.8 | 0.6.8 |
| intel-openmp | 2023.1.0 | |||
| intervaltree | 3.1.0 | 3.1.0 | ||
| ipykernel | 6.19.2 | 6.19.2 | 6.19.2 | 6.19.2 |
| ipython | 8.12.0 | 8.12.0 | 8.12.0 | 8.12.0 |
| ipython\_genutils | 0.2.0 | 0.2.0 | 0.2.0 | 0.2.0 |
| ipywidgets | 8.0.4 | 8.0.4 | 8.0.4 | 8.0.4 |
| isort | 5.9.3 | 5.9.3 | 5.9.3 | 5.9.3 |
| itemadapter | 0.3.0 | 0.3.0 | 0.3.0 | |
| itemloaders | 1.0.4 | 1.0.4 | 1.0.4 | |
| itsdangerous | 2.0.1 | 2.0.1 | 2.0.1 | 2.0.1 |
| jaraco.classes | 3.2.1 | 3.2.1 | ||
| jedi | 0.18.1 | 0.18.1 | 0.18.1 | 0.18.1 |
| jeepney | 0.7.1 | 0.7.1 | ||
| jellyfish | 0.9.0 | 0.9.0 | ||
| jinja2 | 3.1.2 | 3.1.2 | 3.1.2 | 3.1.2 |
| jinja2-time | 0.2.0 | 0.2.0 | ||
| jmespath | 0.10.0 | 0.10.0 | 0.10.0 | 0.10.0 |
| joblib | 1.2.0 | 1.2.0 | 1.2.0 | 1.2.0 |
| jpeg | 9e | 9e | 9e | 9e |
| jq | 1.6 | 1.6 | 1.6 | |
| json5 | 0.9.6 | 0.9.6 | 0.9.6 | 0.9.6 |
| jsonpatch | 1.32 | 1.32 | 1.32 | 1.32 |
| jsonpointer | 2.1 | 2.1 | 2.1 | 2.1 |
| jsonschema | 4.17.3 | 4.17.3 | 4.17.3 | 4.17.3 |
| jupyter | 1.0.0 | 1.0.0 | 1.0.0 | 1.0.0 |
| jupyter\_client | 8.1.0 | 8.1.0 | 8.1.0 | 8.1.0 |
| jupyter\_console | 6.6.3 | 6.6.3 | 6.6.3 | 6.6.3 |
| jupyter\_core | 5.3.0 | 5.3.0 | 5.3.0 | 5.3.0 |
| jupyter\_events | 0.6.3 | 0.6.3 | 0.6.3 | |
| jupyter\_server | 2.5.0 | 2.5.0 | 2.5.0 | 1.23.4 |
| jupyter\_server\_fileid | 0.9.0 | 0.9.0 | 0.9.0 | |
| jupyter\_server\_terminals | 0.4.4 | 0.4.4 | 0.4.4 | |
| jupyter\_server\_ydoc | 0.8.0 | 0.8.0 | 0.8.0 | |
| jupyter\_ydoc | 0.2.4 | 0.2.4 | 0.2.4 | |
| jupyterlab | 3.6.3 | 3.6.3 | 3.6.3 | 3.3.2 |
| jupyterlab\_pygments | 0.1.2 | 0.1.2 | 0.1.2 | 0.1.2 |
| jupyterlab\_server | 2.22.0 | 2.22.0 | 2.22.0 | 2.21.0 |
| jupyterlab\_widgets | 3.0.5 | 3.0.5 | 3.0.5 | 3.0.5 |
| jxrlib | 1.1 | 1.1 | 1.1 | 1.1 |
| keyring | 23.13.1 | 23.13.1 | ||
| kiwisolver | 1.4.4 | 1.4.4 | 1.4.4 | 1.4.4 |
| krb5 | 1.20.1 | 1.19.4 | 1.20.1 | 1.19.4 |
| lazy-object-proxy | 1.6.0 | 1.6.0 | 1.6.0 | 1.6.0 |
| lazy\_loader | 0.2 | 0.2 | 0.2 | 0.1 |
| lcms2 | 2.12 | 2.12 | 2.12 | 2.12 |
| ld\_impl\_linux-64 | 2.38 | |||
| ld\_impl\_linux-aarch64 | 2.38 | |||
| ld\_impl\_linux-ppc64le | 2.38 | |||
| ld\_impl\_linux-s390x | 2.38 | |||
| lerc | 3.0 | 3.0 | 3.0 | 3.0 |
| libaec | 1.0.4 | 1.0.4 | 1.0.4 | 1.0.4 |
| libarchive | 3.6.2 | 3.6.2 | 3.6.2 | 3.6.2 |
| libboost | 1.73.0 | 1.73.0 | 1.73.0 | |
| libbrotlicommon | 1.0.9 | 1.0.9 | 1.0.9 | 1.0.9 |
| libbrotlidec | 1.0.9 | 1.0.9 | 1.0.9 | 1.0.9 |
| libbrotlienc | 1.0.9 | 1.0.9 | 1.0.9 | 1.0.9 |
| libclang | 10.0.1 | 14.0.6 | ||
| libclang13 | 14.0.6 | |||
| libcurl | 8.1.1 | 8.1.1 | 8.1.1 | 8.1.1 |
| libdeflate | 1.17 | 1.17 | 1.17 | 1.17 |
| libedit | 3.1.20221030 | 3.1.20221030 | 3.1.20221030 | 3.1.20221030 |
| libev | 4.33 | 4.33 | 4.33 | 4.33 |
| libevent | 2.1.12 | 2.1.12 | 2.1.12 | |
| libffi | 3.4.4 | 3.4.4 | 3.4.4 | 3.4.2 |
| libgcc-ng | 11.2.0 | 11.2.0 | 11.2.0 | 11.2.0 |
| libgfortran-ng | 11.2.0 | 11.2.0 | 11.2.0 | 11.2.0 |
| libgfortran5 | 11.2.0 | 11.2.0 | 11.2.0 | 11.2.0 |
| libgomp | 11.2.0 | 11.2.0 | 11.2.0 | 11.2.0 |
| liblief | 0.12.3 | 0.12.3 | 0.12.3 | 0.12.3 |
| libllvm10 | 10.0.1 | |||
| libllvm14 | 14.0.6 | 14.0.6 | 14.0.6 | |
| libmamba | 1.4.1 | 1.4.1 | 1.4.1 | 1.4.1 |
| libmambapy | 1.4.1 | 1.4.1 | 1.4.1 | 1.4.1 |
| libnghttp2 | 1.52.0 | 1.52.0 | 1.52.0 | 1.52.0 |
| libopenblas | 0.3.21 | 0.3.21 | 0.3.21 | |
| libpng | 1.6.39 | 1.6.39 | 1.6.39 | 1.6.39 |
| libpq | 12.15 | 12.9 | ||
| libprotobuf | 3.20.3 | 3.20.3 | 3.20.3 | |
| libsodium | 1.0.18 | 1.0.18 | 1.0.18 | 1.0.18 |
| libsolv | 0.7.22 | 0.7.22 | 0.7.22 | 0.7.22 |
| libspatialindex | 1.9.3 | 1.9.3 | ||
| libssh2 | 1.10.0 | 1.10.0 | 1.10.0 | 1.10.0 |
| libstdcxx-ng | 11.2.0 | 11.2.0 | 11.2.0 | 11.2.0 |
| libthrift | 0.15.0 | 0.15.0 | 0.15.0 | |
| libtiff | 4.5.0 | 4.5.0 | 4.5.0 | 4.5.0 |
| libuuid | 1.41.5 | 1.41.5 | 1.41.5 | 1.41.5 |
| libwebp | 1.2.4 | 1.2.4 | 1.2.4 | 1.2.4 |
| libwebp-base | 1.2.4 | 1.2.4 | 1.2.4 | 1.2.4 |
| libxcb | 1.15 | 1.15 | ||
| libxkbcommon | 1.0.1 | 1.0.1 | ||
| libxml2 | 2.9.14 | 2.10.3 | 2.10.3 | 2.10.3 |
| libxslt | 1.1.35 | 1.1.37 | 1.1.37 | 1.1.37 |
| libzopfli | 1.0.3 | 1.0.3 | 1.0.3 | 1.0.3 |
| linkify-it-py | 2.0.0 | 2.0.0 | ||
| llvmlite | 0.40.0 | 0.40.0 | 0.40.0 | |
| locket | 1.0.0 | 1.0.0 | 1.0.0 | 1.0.0 |
| lxml | 4.9.1 | 4.9.2 | 4.9.2 | 4.9.2 |
| lz4 | 4.3.2 | 4.3.2 | 4.3.2 | |
| lz4-c | 1.9.4 | 1.9.4 | 1.9.4 | 1.9.4 |
| lzo | 2.10 | 2.10 | 2.10 | 2.10 |
| markdown | 3.4.1 | 3.4.1 | 3.4.1 | 3.4.1 |
| markdown-it-py | 2.2.0 | 2.2.0 | ||
| markupsafe | 2.1.1 | 2.1.1 | 2.1.1 | 2.1.1 |
| matplotlib | 3.7.1 | 3.7.1 | 3.7.1 | 3.7.1 |
| matplotlib-base | 3.7.1 | 3.7.1 | 3.7.1 | 3.7.1 |
| matplotlib-inline | 0.1.6 | 0.1.6 | 0.1.6 | 0.1.6 |
| mccabe | 0.7.0 | 0.7.0 | 0.7.0 | 0.7.0 |
| mdit-py-plugins | 0.3.0 | 0.3.0 | ||
| mdurl | 0.1.0 | 0.1.0 | ||
| mistune | 0.8.4 | 0.8.4 | 0.8.4 | 0.8.4 |
| mkl | 2023.1.0 | |||
| mkl-service | 2.4.0 | |||
| mkl\_fft | 1.3.6 | |||
| mkl\_random | 1.2.2 | |||
| mock | 4.0.3 | |||
| more-itertools | 8.12.0 | 8.12.0 | 8.12.0 | 8.12.0 |
| mpc | 1.1.0 | 1.1.0 | 1.1.0 | 1.1.0 |
| mpfr | 4.0.2 | 4.0.2 | 4.0.2 | 4.0.2 |
| mpi | 1.0 | |||
| mpich | 4.1.1 | |||
| mpmath | 1.2.1 | 1.2.1 | 1.2.1 | 1.2.1 |
| msgpack-python | 1.0.3 | 1.0.3 | 1.0.3 | 1.0.3 |
| multidict | 6.0.2 | 6.0.2 | 6.0.2 | 6.0.2 |
| multipledispatch | 0.6.0 | 0.6.0 | 0.6.0 | |
| multiprocess | 0.70.14 | 0.70.14 | ||
| munkres | 1.1.4 | 1.1.4 | 1.1.4 | 1.1.4 |
| mypy\_extensions | 0.4.3 | 0.4.3 | ||
| navigator-updater | 0.4.0 | 0.4.0 | ||
| nbclassic | 0.5.5 | 0.5.5 | 0.5.5 | 0.5.5 |
| nbclient | 0.5.13 | 0.5.13 | 0.5.13 | 0.5.13 |
| nbconvert | 6.5.4 | 6.5.4 | 6.5.4 | 6.5.4 |
| nbformat | 5.7.0 | 5.7.0 | 5.7.0 | 5.7.0 |
| ncurses | 6.4 | 6.4 | 6.4 | 6.4 |
| nest-asyncio | 1.5.6 | 1.5.6 | 1.5.6 | 1.5.6 |
| networkx | 2.8.4 | 2.8.4 | 2.8.4 | 2.8.4 |
| ninja | 1.10.2 | 1.10.2 | ||
| ninja-base | 1.10.2 | 1.10.2 | ||
| nltk | 3.7 | 3.7 | 3.7 | 3.7 |
| notebook | 6.5.4 | 6.5.4 | 6.5.4 | 6.5.4 |
| notebook-shim | 0.2.2 | 0.2.2 | 0.2.2 | 0.2.2 |
| nspr | 4.35 | 4.35 | ||
| nss | 3.89.1 | 3.89.1 | ||
| numba | 0.57.0 | 0.57.0 | 0.57.0 | |
| numexpr | 2.8.4 | 2.8.4 | 2.8.4 | 2.8.4 |
| numpy | 1.24.3 | 1.24.3 | 1.24.3 | 1.25.0 |
| numpy-base | 1.24.3 | 1.24.3 | 1.24.3 | 1.25.0 |
| numpydoc | 1.5.0 | 1.5.0 | ||
| oniguruma | 6.9.7.1 | 6.9.7.1 | 6.9.7.1 | |
| openjpeg | 2.4.0 | 2.4.0 | 2.4.0 | 2.4.0 |
| openpyxl | 3.0.10 | 3.0.10 | 3.0.10 | 3.0.10 |
| openssl | 1.1.1u | 1.1.1u | 1.1.1u | 1.1.1u |
| orc | 1.7.4 | 1.7.4 | 1.7.4 | |
| packaging | 23.0 | 23.0 | 23.0 | 23.0 |
| pandas | 1.5.3 | 1.5.3 | 1.5.3 | 1.5.3 |
| pandocfilters | 1.5.0 | 1.5.0 | 1.5.0 | 1.5.0 |
| panel | 1.1.0 | 0.14.3 | 1.1.0 | 0.12.6 |
| param | 1.13.0 | 1.13.0 | 1.13.0 | 1.13.0 |
| parsel | 1.6.0 | 1.6.0 | 1.6.0 | |
| parso | 0.8.3 | 0.8.3 | 0.8.3 | 0.8.3 |
| partd | 1.2.0 | 1.2.0 | 1.2.0 | 1.2.0 |
| patch | 2.7.6 | 2.7.6 | 2.7.6 | 2.7.6 |
| patchelf | 0.17.2 | 0.17.2 | 0.17.2 | 0.17.2 |
| pathlib | 1.0.1 | 1.0.1 | ||
| pathspec | 0.10.3 | 0.10.3 | ||
| patsy | 0.5.3 | 0.5.3 | 0.5.3 | 0.5.3 |
| pcre | 8.45 | 8.45 | ||
| pcre2 | 10.37 | 10.37 | 10.37 | 10.37 |
| pep8 | 1.7.1 | 1.7.1 | 1.7.1 | 1.7.1 |
| pexpect | 4.8.0 | 4.8.0 | 4.8.0 | 4.8.0 |
| pickleshare | 0.7.5 | 0.7.5 | 0.7.5 | 0.7.5 |
| pillow | 9.4.0 | 9.4.0 | 9.4.0 | 9.4.0 |
| pip | 23.1.2 | 23.1.2 | 23.1.2 | 23.1.2 |
| pkginfo | 1.9.6 | 1.9.6 | 1.9.6 | 1.9.6 |
| platformdirs | 2.5.2 | 2.5.2 | 2.5.2 | 2.5.2 |
| plotly | 5.9.0 | 5.9.0 | 5.9.0 | 5.9.0 |
| pluggy | 1.0.0 | 1.0.0 | 1.0.0 | 1.0.0 |
| ply | 3.11 | 3.11 | ||
| pooch | 1.4.0 | 1.4.0 | 1.4.0 | 1.4.0 |
| poyo | 0.5.0 | 0.5.0 | ||
| prometheus\_client | 0.14.1 | 0.14.1 | 0.14.1 | 0.14.1 |
| prompt-toolkit | 3.0.36 | 3.0.36 | 3.0.36 | 3.0.36 |
| prompt\_toolkit | 3.0.36 | 3.0.36 | 3.0.36 | 3.0.36 |
| protego | 0.1.16 | 0.1.16 | 0.1.16 | |
| psutil | 5.9.0 | 5.9.0 | 5.9.0 | 5.9.0 |
| ptyprocess | 0.7.0 | 0.7.0 | 0.7.0 | 0.7.0 |
| pure\_eval | 0.2.2 | 0.2.2 | 0.2.2 | 0.2.2 |
| py-cpuinfo | 8.0.0 | 8.0.0 | 8.0.0 | |
| py-lief | 0.12.3 | 0.12.3 | 0.12.3 | 0.12.3 |
| pyarrow | 11.0.0 | 11.0.0 | 11.0.0 | |
| pyasn1 | 0.4.8 | 0.4.8 | 0.4.8 | |
| pyasn1-modules | 0.2.8 | 0.2.8 | 0.2.8 | |
| pybind11-abi | 4 | 4 | 4 | 4 |
| pycodestyle | 2.10.0 | 2.10.0 | ||
| pycosat | 0.6.4 | 0.6.4 | 0.6.4 | 0.6.4 |
| pycparser | 2.21 | 2.21 | 2.21 | 2.21 |
| pyct | 0.5.0 | 0.5.0 | 0.5.0 | 0.5.0 |
| pycurl | 7.45.2 | 7.45.2 | 7.45.2 | 7.45.2 |
| pydispatcher | 2.0.5 | 2.0.5 | 2.0.5 | |
| pydocstyle | 6.3.0 | 6.3.0 | ||
| pyerfa | 2.0.0 | 2.0.0 | 2.0.0 | 2.0.0 |
| pyflakes | 3.0.1 | 3.0.1 | 3.0.1 | 3.0.1 |
| pygments | 2.15.1 | 2.15.1 | 2.15.1 | 2.15.1 |
| pyjwt | 2.4.0 | 2.4.0 | ||
| pylint | 2.16.2 | 2.16.2 | 2.16.2 | 2.16.2 |
| pylint-venv | 2.3.0 | 2.3.0 | ||
| pyls-spyder | 0.4.0 | 0.4.0 | ||
| pyodbc | 4.0.34 | 4.0.34 | 4.0.34 | 4.0.34 |
| pyopenssl | 23.0.0 | 23.0.0 | 23.0.0 | 23.0.0 |
| pyparsing | 3.0.9 | 3.0.9 | 3.0.9 | 3.0.9 |
| pyqt | 5.15.7 | 5.15.7 | ||
| pyqt5-sip | 12.11.0 | 12.11.0 | ||
| pyqtwebengine | 5.15.7 | 5.15.7 | ||
| pyrsistent | 0.18.0 | 0.18.0 | 0.18.0 | 0.18.0 |
| pysocks | 1.7.1 | 1.7.1 | 1.7.1 | 1.7.1 |
| pytables | 3.8.0 | 3.8.0 | 3.8.0 | 3.7.0 |
| pytest | 7.3.1 | 7.3.1 | 7.3.1 | 7.3.1 |
| python | 3.11.3 | 3.11.3 | 3.11.3 | 3.11.3 |
| python-dateutil | 2.8.2 | 2.8.2 | 2.8.2 | 2.8.2 |
| python-fastjsonschema | 2.16.2 | 2.16.2 | 2.16.2 | 2.16.2 |
| python-json-logger | 2.0.7 | 2.0.7 | 2.0.7 | |
| python-libarchive-c | 2.9 | 2.9 | 2.9 | 2.9 |
| python-lmdb | 1.4.1 | 1.4.1 | 1.4.1 | 1.4.1 |
| python-lsp-black | 1.2.1 | 1.2.1 | ||
| python-lsp-jsonrpc | 1.0.0 | 1.0.0 | ||
| python-lsp-server | 1.7.2 | 1.7.2 | ||
| python-slugify | 5.0.2 | 5.0.2 | ||
| python-snappy | 0.6.1 | 0.6.1 | 0.6.1 | 0.6.1 |
| python-xxhash | 2.0.2 | 2.0.2 | ||
| pytoolconfig | 1.2.5 | 1.2.5 | ||
| pytorch | 2.0.1 | 2.0.1 | ||
| pytz | 2022.7 | 2022.7 | 2022.7 | 2022.7 |
| pyviz\_comms | 2.3.0 | 2.3.0 | 2.3.0 | 2.3.0 |
| pywavelets | 1.4.1 | 1.4.1 | 1.4.1 | 1.4.1 |
| pyxdg | 0.27 | 0.27 | ||
| pyyaml | 6.0 | 6.0 | 6.0 | 6.0 |
| pyzmq | 25.1.0 | 25.1.0 | 25.1.0 | 25.1.0 |
| qdarkstyle | 3.0.2 | 3.0.2 | ||
| qstylizer | 0.2.2 | 0.2.2 | ||
| qt-main | 5.15.2 | 5.15.2 | ||
| qt-webengine | 5.15.9 | 5.15.9 | ||
| qtawesome | 1.2.2 | 1.2.2 | ||
| qtconsole | 5.4.2 | 5.4.2 | ||
| qtpy | 2.2.0 | 2.2.0 | ||
| qtwebkit | 5.212 | 5.212 | ||
| queuelib | 1.5.0 | 1.5.0 | 1.5.0 | |
| re2 | 2022.04.01 | 2022.04.01 | 2022.04.01 | |
| readline | 8.2 | 8.2 | 8.2 | 8.2 |
| regex | 2022.7.9 | 2022.7.9 | 2022.7.9 | 2022.7.9 |
| reproc | 14.2.4 | 14.2.4 | 14.2.4 | 14.2.4 |
| reproc-cpp | 14.2.4 | 14.2.4 | 14.2.4 | 14.2.4 |
| requests | 2.29.0 | 2.29.0 | 2.29.0 | 2.29.0 |
| requests-file | 1.5.1 | 1.5.1 | 1.5.1 | |
| requests-toolbelt | 0.9.1 | 0.9.1 | 0.9.1 | 0.9.1 |
| responses | 0.13.3 | 0.13.3 | ||
| rfc3339-validator | 0.1.4 | 0.1.4 | 0.1.4 | |
| rfc3986-validator | 0.1.1 | 0.1.1 | 0.1.1 | |
| rope | 1.7.0 | 1.7.0 | ||
| rtree | 1.0.1 | 1.0.1 | ||
| ruamel.yaml | 0.17.21 | 0.17.21 | 0.17.21 | 0.17.21 |
| ruamel\_yaml | 0.17.21 | 0.17.21 | 0.17.21 | 0.17.21 |
| s3fs | 2023.4.0 | 2023.4.0 | 2023.3.0 | 2023.3.0 |
| s3transfer | 0.6.0 | 0.6.0 | ||
| sacremoses | 0.0.43 | 0.0.43 | 0.0.43 | 0.0.43 |
| scikit-image | 0.20.0 | 0.20.0 | 0.20.0 | 0.20.0 |
| scikit-learn | 1.2.2 | 1.2.2 | 1.2.2 | 1.2.2 |
| scikit-learn-intelex | 2023.1.1 | |||
| scipy | 1.10.1 | 1.10.1 | 1.10.1 | 1.10.1 |
| scrapy | 2.8.0 | 2.8.0 | 2.8.0 | |
| seaborn | 0.12.2 | 0.12.2 | 0.12.2 | 0.12.2 |
| secretstorage | 3.3.1 | 3.3.1 | ||
| send2trash | 1.8.0 | 1.8.0 | 1.8.0 | 1.8.0 |
| service\_identity | 18.1.0 | 18.1.0 | 18.1.0 | |
| setuptools | 67.8.0 | 67.8.0 | 67.8.0 | 67.8.0 |
| sip | 6.6.2 | 6.6.2 | ||
| six | 1.16.0 | 1.16.0 | 1.16.0 | 1.16.0 |
| smart\_open | 5.2.1 | 5.2.1 | 5.2.1 | |
| snappy | 1.1.9 | 1.1.9 | 1.1.9 | 1.1.9 |
| sniffio | 1.2.0 | 1.2.0 | 1.2.0 | 1.2.0 |
| snowballstemmer | 2.2.0 | 2.2.0 | 2.2.0 | 2.2.0 |
| sortedcontainers | 2.4.0 | 2.4.0 | 2.4.0 | 2.4.0 |
| soupsieve | 2.4 | 2.4 | 2.4 | 2.4 |
| sphinx | 5.0.2 | 5.0.2 | ||
| sphinxcontrib-applehelp | 1.0.2 | 1.0.2 | ||
| sphinxcontrib-devhelp | 1.0.2 | 1.0.2 | ||
| sphinxcontrib-htmlhelp | 2.0.0 | 2.0.0 | ||
| sphinxcontrib-jsmath | 1.0.1 | 1.0.1 | ||
| sphinxcontrib-qthelp | 1.0.3 | 1.0.3 | ||
| sphinxcontrib-serializinghtml | 1.1.5 | 1.1.5 | ||
| spyder | 5.4.3 | 5.4.3 | ||
| spyder-kernels | 2.4.3 | 2.4.3 | ||
| sqlalchemy | 1.4.39 | 1.4.39 | 1.4.39 | 1.4.39 |
| sqlite | 3.41.2 | 3.41.2 | 3.41.2 | 3.41.2 |
| stack\_data | 0.2.0 | 0.2.0 | 0.2.0 | 0.2.0 |
| statsmodels | 0.13.5 | 0.13.5 | 0.13.5 | 0.13.5 |
| sympy | 1.11.1 | 1.11.1 | 1.11.1 | 1.11.1 |
| tabulate | 0.8.10 | 0.8.10 | 0.8.10 | 0.8.10 |
| tbb | 2021.8.0 | 2021.8.0 | 2021.8.0 | 2021.8.0 |
| tbb4py | 2021.8.0 | 2021.8.0 | 2021.8.0 | 2021.8.0 |
| tblib | 1.7.0 | 1.7.0 | 1.7.0 | 1.7.0 |
| tenacity | 8.2.2 | 8.2.2 | 8.2.2 | 8.2.2 |
| terminado | 0.17.1 | 0.17.1 | 0.17.1 | 0.17.1 |
| text-unidecode | 1.3 | 1.3 | ||
| textdistance | 4.2.1 | 4.2.1 | ||
| threadpoolctl | 2.2.0 | 2.2.0 | 2.2.0 | 2.2.0 |
| three-merge | 0.1.1 | 0.1.1 | ||
| tifffile | 2021.7.2 | 2021.7.2 | 2021.7.2 | 2021.7.2 |
| tinycss2 | 1.2.1 | 1.2.1 | 1.2.1 | 1.2.1 |
| tk | 8.6.12 | 8.6.12 | 8.6.12 | 8.6.12 |
| tldextract | 3.2.0 | 3.2.0 | 3.2.0 | |
| tokenizers | 0.13.2 | 0.13.2 | ||
| toml | 0.10.2 | 0.10.2 | ||
| tomli | 2.0.1 | 2.0.1 | 2.0.1 | 2.0.1 |
| tomlkit | 0.11.1 | 0.11.1 | 0.11.1 | 0.11.1 |
| toolz | 0.12.0 | 0.12.0 | 0.12.0 | 0.12.0 |
| tornado | 6.2 | 6.2 | 6.2 | 6.2 |
| tqdm | 4.65.0 | 4.65.0 | 4.65.0 | 4.65.0 |
| traitlets | 5.7.1 | 5.7.1 | 5.7.1 | 5.7.1 |
| transformers | 4.29.2 | 4.29.2 | 2.1.1 | 2.1.1 |
| twisted | 22.10.0 | 22.10.0 | 22.10.0 | |
| typing-extensions | 4.6.3 | 4.6.3 | 4.6.3 | 4.6.3 |
| typing\_extensions | 4.6.3 | 4.6.3 | 4.6.3 | 4.6.3 |
| tzdata | 2023c | 2023c | 2023c | 2023c |
| uc-micro-py | 1.0.1 | 1.0.1 | ||
| ujson | 5.4.0 | 5.4.0 | ||
| unidecode | 1.2.0 | 1.2.0 | ||
| unixodbc | 2.3.11 | 2.3.11 | 2.3.11 | 2.3.11 |
| urllib3 | 1.26.16 | 1.26.16 | 1.26.16 | 1.26.16 |
| utf8proc | 2.6.1 | 2.6.1 | 2.6.1 | |
| w3lib | 1.21.0 | 1.21.0 | 1.21.0 | |
| watchdog | 2.1.6 | 2.1.6 | ||
| wcwidth | 0.2.5 | 0.2.5 | 0.2.5 | 0.2.5 |
| webencodings | 0.5.1 | 0.5.1 | 0.5.1 | 0.5.1 |
| websocket-client | 0.58.0 | 0.58.0 | 0.58.0 | 0.58.0 |
| werkzeug | 2.2.3 | 2.2.3 | 2.2.3 | 2.2.3 |
| whatthepatch | 1.0.2 | 1.0.2 | ||
| wheel | 0.38.4 | 0.38.4 | 0.38.4 | 0.38.4 |
| widgetsnbextension | 4.0.5 | 4.0.5 | 4.0.5 | 4.0.5 |
| wrapt | 1.14.1 | 1.14.1 | 1.14.1 | 1.14.1 |
| wurlitzer | 3.0.2 | 3.0.2 | ||
| xarray | 2022.11.0 | 2022.11.0 | 2022.11.0 | |
| xxhash | 0.8.0 | 0.8.0 | ||
| xyzservices | 2022.9.0 | 2022.9.0 | ||
| xz | 5.4.2 | 5.4.2 | 5.4.2 | 5.4.2 |
| y-py | 0.5.9 | 0.5.9 | 0.5.9 | |
| yaml | 0.2.5 | 0.2.5 | 0.2.5 | 0.2.5 |
| yaml-cpp | 0.7.0 | 0.7.0 | 0.7.0 | 0.7.0 |
| yapf | 0.31.0 | 0.31.0 | ||
| yarl | 1.8.1 | 1.8.1 | 1.8.1 | 1.8.1 |
| ypy-websocket | 0.8.2 | 0.8.2 | 0.8.2 | |
| zeromq | 4.3.4 | 4.3.4 | 4.3.4 | 4.3.4 |
| zfp | 0.5.5 | 0.5.5 | ||
| zict | 2.2.0 | 2.2.0 | 2.2.0 | 2.2.0 |
| zipp | 3.11.0 | 3.11.0 | 3.11.0 | 3.11.0 |
| zlib | 1.2.13 | 1.2.13 | 1.2.13 | 1.2.13 |
| zlib-ng | 2.0.7 | 2.0.7 | 2.0.7 | |
| zope | 1.0 | 1.0 | 1.0 | |
| zope.interface | 5.4.0 | 5.4.0 | 5.4.0 | |
| zstandard | 0.19.0 | 0.19.0 | 0.19.0 | 0.19.0 |
| zstd | 1.5.5 | 1.5.5 | 1.5.5 | 1.5.5 |
| Package Name | osx-arm64 | osx-64 |
|---|---|---|
| \_anaconda\_depends | 2023.07 | 2023.07 |
| abseil-cpp | 20211102.0 | 20211102.0 |
| aiobotocore | 2.5.0 | 2.4.2 |
| aiofiles | 22.1.0 | 22.1.0 |
| aiohttp | 3.8.3 | 3.8.3 |
| aioitertools | 0.7.1 | 0.7.1 |
| aiosignal | 1.2.0 | 1.2.0 |
| aiosqlite | 0.18.0 | 0.18.0 |
| alabaster | 0.7.12 | 0.7.12 |
| anaconda-catalogs | 0.2.0 | 0.2.0 |
| anaconda-client | 1.11.3 | 1.11.3 |
| anaconda-navigator | 2.4.2 | 2.4.2 |
| anaconda-project | 0.11.1 | 0.11.1 |
| anyio | 3.5.0 | 3.5.0 |
| appdirs | 1.4.4 | 1.4.4 |
| applaunchservices | 0.3.0 | 0.3.0 |
| appnope | 0.1.2 | 0.1.2 |
| appscript | 1.1.2 | 1.1.2 |
| argon2-cffi | 21.3.0 | 21.3.0 |
| argon2-cffi-bindings | 21.2.0 | 21.2.0 |
| arrow | 1.2.3 | 1.2.3 |
| arrow-cpp | 11.0.0 | 11.0.0 |
| astroid | 2.14.2 | 2.14.2 |
| astropy | 5.1 | 5.1 |
| asttokens | 2.0.5 | 2.0.5 |
| async-timeout | 4.0.2 | 4.0.2 |
| atomicwrites | 1.4.0 | 1.4.0 |
| attrs | 22.1.0 | 22.1.0 |
| automat | 20.2.0 | 20.2.0 |
| autopep8 | 1.6.0 | 1.6.0 |
| aws-c-common | 0.6.8 | 0.4.57 |
| aws-c-event-stream | 0.1.6 | 0.1.6 |
| aws-checksums | 0.1.11 | 0.1.9 |
| aws-sdk-cpp | 1.8.185 | 1.8.185 |
| babel | 2.11.0 | 2.11.0 |
| backcall | 0.2.0 | 0.2.0 |
| backports | 1.1 | 1.1 |
| backports.functools\_lru\_cache | 1.6.4 | 1.6.4 |
| backports.tempfile | 1.0 | 1.0 |
| backports.weakref | 1.0.post1 | 1.0.post1 |
| bcrypt | 3.2.0 | 3.2.0 |
| beautifulsoup4 | 4.12.2 | 4.12.2 |
| binaryornot | 0.4.4 | 0.4.4 |
| black | 23.3.0 | 23.3.0 |
| blas | 1.0 | 1.0 |
| bleach | 4.1.0 | 4.1.0 |
| blosc | 1.21.3 | 1.21.3 |
| bokeh | 3.1.1 | 3.1.1 |
| boltons | 23.0.0 | 23.0.0 |
| boost-cpp | 1.73.0 | 1.73.0 |
| boto3 | 1.24.28 | |
| botocore | 1.29.76 | 1.27.59 |
| bottleneck | 1.3.5 | 1.3.5 |
| brotli | 1.0.9 | 1.0.9 |
| brotli-bin | 1.0.9 | 1.0.9 |
| brotlipy | 0.7.0 | 0.7.0 |
| brunsli | 0.1 | 0.1 |
| bzip2 | 1.0.8 | 1.0.8 |
| c-ares | 1.19.0 | 1.19.0 |
| c-blosc2 | 2.8.0 | 2.8.0 |
| ca-certificates | 2023.05.30 | 2023.05.30 |
| cctools | 949.0.1 | 949.0.1 |
| cctools\_osx-64 | 949.0.1 | |
| cctools\_osx-arm64 | 949.0.1 | |
| certifi | 2023.5.7 | 2023.5.7 |
| cffi | 1.15.1 | 1.15.1 |
| cfitsio | 3.470 | 3.470 |
| chardet | 4.0.0 | 4.0.0 |
| charls | 2.2.0 | 2.2.0 |
| charset-normalizer | 2.0.4 | 2.0.4 |
| click | 8.0.4 | 8.0.4 |
| cloudpickle | 2.2.1 | 2.2.1 |
| clyent | 1.2.2 | 1.2.2 |
| colorama | 0.4.6 | 0.4.6 |
| colorcet | 3.0.1 | 3.0.1 |
| comm | 0.1.2 | 0.1.2 |
| conda | 23.5.2 | 23.5.2 |
| conda-build | 3.25.0 | 3.25.0 |
| conda-content-trust | 0.1.3 | 0.1.3 |
| conda-index | 0.2.3 | 0.2.3 |
| conda-libmamba-solver | 23.5.0 | 23.5.0 |
| conda-pack | 0.6.0 | 0.6.0 |
| conda-package-handling | 2.1.0 | 2.1.0 |
| conda-package-streaming | 0.8.0 | 0.8.0 |
| conda-repo-cli | 1.0.41 | 1.0.41 |
| conda-token | 0.4.0 | 0.4.0 |
| conda-verify | 3.4.2 | 3.4.2 |
| constantly | 15.1.0 | 15.1.0 |
| contourpy | 1.0.5 | 1.0.5 |
| cookiecutter | 1.7.3 | 1.7.3 |
| cryptography | 39.0.1 | 39.0.1 |
| cssselect | 1.1.0 | 1.1.0 |
| curl | 8.1.1 | 8.1.1 |
| cycler | 0.11.0 | 0.11.0 |
| cytoolz | 0.12.0 | 0.12.0 |
| dask | 2023.6.0 | 2023.6.0 |
| dask-core | 2023.6.0 | 2023.6.0 |
| datasets | 2.12.0 | |
| datashader | 0.15.0 | 0.15.0 |
| datashape | 0.5.4 | 0.5.4 |
| debugpy | 1.5.1 | 1.5.1 |
| decorator | 5.1.1 | 5.1.1 |
| defusedxml | 0.7.1 | 0.7.1 |
| diff-match-patch | 20200713 | 20200713 |
| dill | 0.3.6 | 0.3.6 |
| distributed | 2023.6.0 | 2023.6.0 |
| docstring-to-markdown | 0.11 | 0.11 |
| docutils | 0.18.1 | 0.18.1 |
| entrypoints | 0.4 | 0.4 |
| et\_xmlfile | 1.1.0 | 1.1.0 |
| executing | 0.8.3 | 0.8.3 |
| filelock | 3.9.0 | 3.9.0 |
| flake8 | 6.0.0 | 6.0.0 |
| flask | 2.2.2 | 2.2.2 |
| fmt | 9.1.0 | 9.1.0 |
| fonttools | 4.25.0 | 4.25.0 |
| freetype | 2.12.1 | 2.12.1 |
| frozenlist | 1.3.3 | 1.3.3 |
| fsspec | 2023.4.0 | 2023.3.0 |
| future | 0.18.3 | 0.18.3 |
| gensim | 4.3.0 | 4.3.0 |
| gettext | 0.21.0 | 0.21.0 |
| gflags | 2.2.2 | 2.2.2 |
| giflib | 5.2.1 | 5.2.1 |
| glib | 2.69.1 | 2.69.1 |
| glob2 | 0.7 | 0.7 |
| glog | 0.5.0 | 0.5.0 |
| gmp | 6.2.1 | 6.2.1 |
| gmpy2 | 2.1.2 | 2.1.2 |
| greenlet | 2.0.1 | 2.0.1 |
| grpc-cpp | 1.46.1 | 1.46.1 |
| gst-plugins-base | 1.14.1 | 1.14.1 |
| gstreamer | 1.14.1 | 1.14.1 |
| h5py | 3.7.0 | 3.7.0 |
| hdf5 | 1.12.1 | 1.10.6 |
| heapdict | 1.0.1 | 1.0.1 |
| holoviews | 1.16.2 | 1.16.2 |
| huggingface\_hub | 0.15.1 | |
| hvplot | 0.8.4 | 0.8.4 |
| hyperlink | 21.0.0 | 21.0.0 |
| icu | 68.1 | 58.2 |
| idna | 3.4 | 3.4 |
| imagecodecs | 2021.8.26 | 2021.8.26 |
| imageio | 2.31.1 | 2.31.1 |
| imagesize | 1.4.1 | 1.4.1 |
| imbalanced-learn | 0.10.1 | 0.10.1 |
| importlib-metadata | 6.0.0 | 6.0.0 |
| importlib\_metadata | 6.0.0 | 6.0.0 |
| incremental | 21.3.0 | 21.3.0 |
| inflection | 0.5.1 | 0.5.1 |
| iniconfig | 1.1.1 | 1.1.1 |
| intake | 0.6.8 | 0.6.8 |
| intervaltree | 3.1.0 | 3.1.0 |
| ipykernel | 6.19.2 | 6.19.2 |
| ipython | 8.12.0 | 8.12.0 |
| ipython\_genutils | 0.2.0 | 0.2.0 |
| ipywidgets | 8.0.4 | 8.0.4 |
| isort | 5.9.3 | 5.9.3 |
| itemadapter | 0.3.0 | 0.3.0 |
| itemloaders | 1.0.4 | 1.0.4 |
| itsdangerous | 2.0.1 | 2.0.1 |
| jaraco.classes | 3.2.1 | 3.2.1 |
| jedi | 0.18.1 | 0.18.1 |
| jellyfish | 0.9.0 | 0.9.0 |
| jinja2 | 3.1.2 | 3.1.2 |
| jinja2-time | 0.2.0 | 0.2.0 |
| jmespath | 0.10.0 | 0.10.0 |
| joblib | 1.2.0 | 1.2.0 |
| jpeg | 9e | 9e |
| jq | 1.6 | 1.6 |
| json5 | 0.9.6 | 0.9.6 |
| jsonpatch | 1.32 | 1.32 |
| jsonpointer | 2.1 | 2.1 |
| jsonschema | 4.17.3 | 4.17.3 |
| jupyter | 1.0.0 | 1.0.0 |
| jupyter\_client | 8.1.0 | 8.1.0 |
| jupyter\_console | 6.6.3 | 6.6.3 |
| jupyter\_core | 5.3.0 | 5.3.0 |
| jupyter\_events | 0.6.3 | 0.6.3 |
| jupyter\_server | 2.5.0 | 2.5.0 |
| jupyter\_server\_fileid | 0.9.0 | 0.9.0 |
| jupyter\_server\_terminals | 0.4.4 | 0.4.4 |
| jupyter\_server\_ydoc | 0.8.0 | 0.8.0 |
| jupyter\_ydoc | 0.2.4 | 0.2.4 |
| jupyterlab | 3.6.3 | 3.6.3 |
| jupyterlab\_pygments | 0.1.2 | 0.1.2 |
| jupyterlab\_server | 2.22.0 | 2.22.0 |
| jupyterlab\_widgets | 3.0.5 | 3.0.5 |
| jxrlib | 1.1 | 1.1 |
| keyring | 23.13.1 | 23.13.1 |
| kiwisolver | 1.4.4 | 1.4.4 |
| krb5 | 1.19.4 | 1.19.4 |
| lazy-object-proxy | 1.6.0 | 1.6.0 |
| lazy\_loader | 0.2 | 0.2 |
| lcms2 | 2.12 | 2.12 |
| ld64 | 530 | 530 |
| ld64\_osx-64 | 530 | |
| ld64\_osx-arm64 | 530 | |
| ldid | 2.1.5 | 2.1.5 |
| lerc | 3.0 | 3.0 |
| libaec | 1.0.4 | 1.0.4 |
| libarchive | 3.6.2 | 3.6.2 |
| libboost | 1.73.0 | 1.73.0 |
| libbrotlicommon | 1.0.9 | 1.0.9 |
| libbrotlidec | 1.0.9 | 1.0.9 |
| libbrotlienc | 1.0.9 | 1.0.9 |
| libclang | 14.0.6 | 14.0.6 |
| libclang13 | 14.0.6 | 14.0.6 |
| libcurl | 8.1.1 | 8.1.1 |
| libcxx | 14.0.6 | 14.0.6 |
| libdeflate | 1.17 | 1.17 |
| libedit | 3.1.20221030 | 3.1.20221030 |
| libev | 4.33 | 4.33 |
| libevent | 2.1.12 | 2.1.12 |
| libffi | 3.4.4 | 3.4.4 |
| libgfortran | 5.0.0 | 5.0.0 |
| libgfortran5 | 11.3.0 | 11.3.0 |
| libiconv | 1.16 | 1.16 |
| liblief | 0.12.3 | 0.12.3 |
| libllvm14 | 14.0.6 | 14.0.6 |
| libmamba | 1.4.1 | 1.4.1 |
| libmambapy | 1.4.1 | 1.4.1 |
| libnghttp2 | 1.52.0 | 1.52.0 |
| libopenblas | 0.3.21 | 0.3.21 |
| libpng | 1.6.39 | 1.6.39 |
| libpq | 12.9 | 12.9 |
| libprotobuf | 3.20.3 | 3.20.3 |
| libsodium | 1.0.18 | 1.0.18 |
| libsolv | 0.7.22 | 0.7.22 |
| libspatialindex | 1.9.3 | 1.9.3 |
| libssh2 | 1.10.0 | 1.10.0 |
| libthrift | 0.13.0 | 0.15.0 |
| libtiff | 4.5.0 | 4.5.0 |
| libuv | 1.44.2 | |
| libwebp | 1.2.4 | 1.2.4 |
| libwebp-base | 1.2.4 | 1.2.4 |
| libxml2 | 2.10.3 | 2.10.3 |
| libxslt | 1.1.37 | 1.1.37 |
| libzopfli | 1.0.3 | 1.0.3 |
| linkify-it-py | 2.0.0 | 2.0.0 |
| llvm-openmp | 14.0.6 | 14.0.6 |
| llvmlite | 0.40.0 | 0.40.0 |
| locket | 1.0.0 | 1.0.0 |
| lxml | 4.9.2 | 4.9.2 |
| lz4 | 4.3.2 | 4.3.2 |
| lz4-c | 1.9.4 | 1.9.4 |
| lzo | 2.10 | 2.10 |
| markdown | 3.4.1 | 3.4.1 |
| markdown-it-py | 2.2.0 | 2.2.0 |
| markupsafe | 2.1.1 | 2.1.1 |
| matplotlib | 3.7.1 | 3.7.1 |
| matplotlib-base | 3.7.1 | 3.7.1 |
| matplotlib-inline | 0.1.6 | 0.1.6 |
| mccabe | 0.7.0 | 0.7.0 |
| mdit-py-plugins | 0.3.0 | 0.3.0 |
| mdurl | 0.1.0 | 0.1.0 |
| mistune | 0.8.4 | 0.8.4 |
| more-itertools | 8.12.0 | 8.12.0 |
| mpc | 1.1.0 | 1.1.0 |
| mpfr | 4.0.2 | 4.0.2 |
| mpmath | 1.2.1 | 1.2.1 |
| msgpack-python | 1.0.3 | 1.0.3 |
| multidict | 6.0.2 | 6.0.2 |
| multipledispatch | 0.6.0 | 0.6.0 |
| multiprocess | 0.70.14 | |
| munkres | 1.1.4 | 1.1.4 |
| mypy\_extensions | 0.4.3 | 0.4.3 |
| navigator-updater | 0.4.0 | 0.4.0 |
| nbclassic | 0.5.5 | 0.5.5 |
| nbclient | 0.5.13 | 0.5.13 |
| nbconvert | 6.5.4 | 6.5.4 |
| nbformat | 5.7.0 | 5.7.0 |
| ncurses | 6.4 | 6.4 |
| nest-asyncio | 1.5.6 | 1.5.6 |
| networkx | 2.8.4 | 2.8.4 |
| ninja | 1.10.2 | |
| ninja-base | 1.10.2 | |
| nltk | 3.7 | 3.7 |
| notebook | 6.5.4 | 6.5.4 |
| notebook-shim | 0.2.2 | 0.2.2 |
| nspr | 4.35 | 4.35 |
| nss | 3.89.1 | 3.89.1 |
| numba | 0.57.0 | 0.57.0 |
| numexpr | 2.8.4 | 2.8.4 |
| numpy | 1.24.3 | 1.24.3 |
| numpy-base | 1.24.3 | 1.24.3 |
| numpydoc | 1.5.0 | 1.5.0 |
| oniguruma | 6.9.7.1 | 6.9.7.1 |
| openjpeg | 2.3.0 | 2.4.0 |
| openpyxl | 3.0.10 | 3.0.10 |
| openssl | 1.1.1u | 1.1.1u |
| orc | 1.7.4 | 1.7.4 |
| packaging | 23.0 | 23.0 |
| pandas | 1.5.3 | 1.5.3 |
| pandocfilters | 1.5.0 | 1.5.0 |
| panel | 1.1.0 | 1.1.0 |
| param | 1.13.0 | 1.13.0 |
| parsel | 1.6.0 | 1.6.0 |
| parso | 0.8.3 | 0.8.3 |
| partd | 1.2.0 | 1.2.0 |
| patch | 2.7.6 | 2.7.6 |
| pathlib | 1.0.1 | 1.0.1 |
| pathspec | 0.10.3 | 0.10.3 |
| patsy | 0.5.3 | 0.5.3 |
| pcre | 8.45 | 8.45 |
| pcre2 | 10.37 | 10.37 |
| pep8 | 1.7.1 | 1.7.1 |
| pexpect | 4.8.0 | 4.8.0 |
| pickleshare | 0.7.5 | 0.7.5 |
| pillow | 9.4.0 | 9.4.0 |
| pip | 23.1.2 | 23.1.2 |
| pkginfo | 1.9.6 | 1.9.6 |
| platformdirs | 2.5.2 | 2.5.2 |
| plotly | 5.9.0 | 5.9.0 |
| pluggy | 1.0.0 | 1.0.0 |
| ply | 3.11 | 3.11 |
| pooch | 1.4.0 | 1.4.0 |
| poyo | 0.5.0 | 0.5.0 |
| prometheus\_client | 0.14.1 | 0.14.1 |
| prompt-toolkit | 3.0.36 | 3.0.36 |
| prompt\_toolkit | 3.0.36 | 3.0.36 |
| protego | 0.1.16 | 0.1.16 |
| psutil | 5.9.0 | 5.9.0 |
| ptyprocess | 0.7.0 | 0.7.0 |
| pure\_eval | 0.2.2 | 0.2.2 |
| py-cpuinfo | 8.0.0 | 8.0.0 |
| py-lief | 0.12.3 | 0.12.3 |
| pyarrow | 11.0.0 | 11.0.0 |
| pyasn1 | 0.4.8 | 0.4.8 |
| pyasn1-modules | 0.2.8 | 0.2.8 |
| pybind11-abi | 4 | 4 |
| pycodestyle | 2.10.0 | 2.10.0 |
| pycosat | 0.6.4 | 0.6.4 |
| pycparser | 2.21 | 2.21 |
| pyct | 0.5.0 | 0.5.0 |
| pycurl | 7.45.2 | 7.45.2 |
| pydispatcher | 2.0.5 | 2.0.5 |
| pydocstyle | 6.3.0 | 6.3.0 |
| pyerfa | 2.0.0 | 2.0.0 |
| pyflakes | 3.0.1 | 3.0.1 |
| pygments | 2.15.1 | 2.15.1 |
| pyjwt | 2.4.0 | 2.4.0 |
| pylint | 2.16.2 | 2.16.2 |
| pylint-venv | 2.3.0 | 2.3.0 |
| pyls-spyder | 0.4.0 | 0.4.0 |
| pyobjc-core | 9.0 | 9.0 |
| pyobjc-framework-cocoa | 9.0 | 9.0 |
| pyobjc-framework-coreservices | 9.0 | 9.0 |
| pyobjc-framework-fsevents | 9.0 | 9.0 |
| pyodbc | 4.0.34 | 4.0.34 |
| pyopenssl | 23.0.0 | 23.0.0 |
| pyparsing | 3.0.9 | 3.0.9 |
| pyqt | 5.15.7 | 5.15.7 |
| pyqt5-sip | 12.11.0 | 12.11.0 |
| pyqtwebengine | 5.15.7 | 5.15.7 |
| pyrsistent | 0.18.0 | 0.18.0 |
| pysocks | 1.7.1 | 1.7.1 |
| pytables | 3.8.0 | 3.8.0 |
| pytest | 7.3.1 | 7.3.1 |
| python | 3.11.3 | 3.11.3 |
| python-dateutil | 2.8.2 | 2.8.2 |
| python-fastjsonschema | 2.16.2 | 2.16.2 |
| python-json-logger | 2.0.7 | 2.0.7 |
| python-libarchive-c | 2.9 | 2.9 |
| python-lmdb | 1.4.1 | 1.4.1 |
| python-lsp-black | 1.2.1 | 1.2.1 |
| python-lsp-jsonrpc | 1.0.0 | 1.0.0 |
| python-lsp-server | 1.7.2 | 1.7.2 |
| python-slugify | 5.0.2 | 5.0.2 |
| python-snappy | 0.6.1 | 0.6.1 |
| python-xxhash | 2.0.2 | |
| python.app | 3 | 3 |
| pytoolconfig | 1.2.5 | 1.2.5 |
| pytorch | 2.0.1 | |
| pytz | 2022.7 | 2022.7 |
| pyviz\_comms | 2.3.0 | 2.3.0 |
| pywavelets | 1.4.1 | 1.4.1 |
| pyyaml | 6.0 | 6.0 |
| pyzmq | 25.1.0 | 25.1.0 |
| qdarkstyle | 3.0.2 | 3.0.2 |
| qstylizer | 0.2.2 | 0.2.2 |
| qt-main | 5.15.2 | 5.15.2 |
| qt-webengine | 5.15.9 | 5.15.9 |
| qtawesome | 1.2.2 | 1.2.2 |
| qtconsole | 5.4.2 | 5.4.2 |
| qtpy | 2.2.0 | 2.2.0 |
| qtwebkit | 5.212 | 5.212 |
| queuelib | 1.5.0 | 1.5.0 |
| re2 | 2022.04.01 | 2022.04.01 |
| readline | 8.2 | 8.2 |
| regex | 2022.7.9 | 2022.7.9 |
| reproc | 14.2.4 | 14.2.4 |
| reproc-cpp | 14.2.4 | 14.2.4 |
| requests | 2.29.0 | 2.29.0 |
| requests-file | 1.5.1 | 1.5.1 |
| requests-toolbelt | 0.9.1 | 0.9.1 |
| responses | 0.13.3 | |
| rfc3339-validator | 0.1.4 | 0.1.4 |
| rfc3986-validator | 0.1.1 | 0.1.1 |
| rope | 1.7.0 | 1.7.0 |
| rtree | 1.0.1 | 1.0.1 |
| ruamel.yaml | 0.17.21 | 0.17.21 |
| ruamel\_yaml | 0.17.21 | 0.17.21 |
| s3fs | 2023.4.0 | 2023.3.0 |
| s3transfer | 0.6.0 | |
| sacremoses | 0.0.43 | 0.0.43 |
| scikit-image | 0.20.0 | 0.20.0 |
| scikit-learn | 1.2.2 | 1.2.2 |
| scipy | 1.10.1 | 1.10.1 |
| scrapy | 2.8.0 | 2.8.0 |
| seaborn | 0.12.2 | 0.12.2 |
| send2trash | 1.8.0 | 1.8.0 |
| service\_identity | 18.1.0 | 18.1.0 |
| setuptools | 67.8.0 | 67.8.0 |
| sip | 6.6.2 | 6.6.2 |
| six | 1.16.0 | 1.16.0 |
| sleef | 3.5.1 | |
| smart\_open | 5.2.1 | 5.2.1 |
| snappy | 1.1.9 | 1.1.9 |
| sniffio | 1.2.0 | 1.2.0 |
| snowballstemmer | 2.2.0 | 2.2.0 |
| sortedcontainers | 2.4.0 | 2.4.0 |
| soupsieve | 2.4 | 2.4 |
| sphinx | 5.0.2 | 5.0.2 |
| sphinxcontrib-applehelp | 1.0.2 | 1.0.2 |
| sphinxcontrib-devhelp | 1.0.2 | 1.0.2 |
| sphinxcontrib-htmlhelp | 2.0.0 | 2.0.0 |
| sphinxcontrib-jsmath | 1.0.1 | 1.0.1 |
| sphinxcontrib-qthelp | 1.0.3 | 1.0.3 |
| sphinxcontrib-serializinghtml | 1.1.5 | 1.1.5 |
| spyder | 5.4.3 | 5.4.3 |
| spyder-kernels | 2.4.3 | 2.4.3 |
| sqlalchemy | 1.4.39 | 1.4.39 |
| sqlite | 3.41.2 | 3.41.2 |
| stack\_data | 0.2.0 | 0.2.0 |
| statsmodels | 0.13.5 | 0.13.5 |
| sympy | 1.11.1 | 1.11.1 |
| tabulate | 0.8.10 | 0.8.10 |
| tapi | 1100.0.11 | 1000.10.8 |
| tbb | 2021.8.0 | 2021.8.0 |
| tbb4py | 2021.8.0 | 2021.8.0 |
| tblib | 1.7.0 | 1.7.0 |
| tenacity | 8.2.2 | 8.2.2 |
| terminado | 0.17.1 | 0.17.1 |
| text-unidecode | 1.3 | 1.3 |
| textdistance | 4.2.1 | 4.2.1 |
| threadpoolctl | 2.2.0 | 2.2.0 |
| three-merge | 0.1.1 | 0.1.1 |
| tifffile | 2021.7.2 | 2021.7.2 |
| tinycss2 | 1.2.1 | 1.2.1 |
| tk | 8.6.12 | 8.6.12 |
| tldextract | 3.2.0 | 3.2.0 |
| tokenizers | 0.13.2 | |
| toml | 0.10.2 | 0.10.2 |
| tomli | 2.0.1 | 2.0.1 |
| tomlkit | 0.11.1 | 0.11.1 |
| toolz | 0.12.0 | 0.12.0 |
| tornado | 6.2 | 6.2 |
| tqdm | 4.65.0 | 4.65.0 |
| traitlets | 5.7.1 | 5.7.1 |
| transformers | 4.29.2 | 2.1.1 |
| twisted | 22.10.0 | 22.10.0 |
| typing-extensions | 4.6.3 | 4.6.3 |
| typing\_extensions | 4.6.3 | 4.6.3 |
| tzdata | 2023c | 2023c |
| uc-micro-py | 1.0.1 | 1.0.1 |
| ujson | 5.4.0 | 5.4.0 |
| unidecode | 1.2.0 | 1.2.0 |
| unixodbc | 2.3.11 | 2.3.11 |
| urllib3 | 1.26.16 | 1.26.16 |
| utf8proc | 2.6.1 | 2.6.1 |
| w3lib | 1.21.0 | 1.21.0 |
| watchdog | 2.1.6 | 2.1.6 |
| wcwidth | 0.2.5 | 0.2.5 |
| webencodings | 0.5.1 | 0.5.1 |
| websocket-client | 0.58.0 | 0.58.0 |
| werkzeug | 2.2.3 | 2.2.3 |
| whatthepatch | 1.0.2 | 1.0.2 |
| wheel | 0.38.4 | 0.38.4 |
| widgetsnbextension | 4.0.5 | 4.0.5 |
| wrapt | 1.14.1 | 1.14.1 |
| wurlitzer | 3.0.2 | 3.0.2 |
| xarray | 2022.11.0 | 2022.11.0 |
| xlwings | 0.29.1 | 0.29.1 |
| xxhash | 0.8.0 | |
| xyzservices | 2022.9.0 | 2022.9.0 |
| xz | 5.4.2 | 5.4.2 |
| y-py | 0.5.9 | 0.5.9 |
| yaml | 0.2.5 | 0.2.5 |
| yaml-cpp | 0.7.0 | 0.7.0 |
| yapf | 0.31.0 | 0.31.0 |
| yarl | 1.8.1 | 1.8.1 |
| ypy-websocket | 0.8.2 | 0.8.2 |
| zeromq | 4.3.4 | 4.3.4 |
| zfp | 0.5.5 | 0.5.5 |
| zict | 2.2.0 | 2.2.0 |
| zipp | 3.11.0 | 3.11.0 |
| zlib | 1.2.13 | 1.2.13 |
| zlib-ng | 2.0.7 | 2.0.7 |
| zope | 1.0 | 1.0 |
| zope.interface | 5.4.0 | 5.4.0 |
| zstandard | 0.19.0 | 0.19.0 |
| zstd | 1.5.5 | 1.5.5 |
| Package Name | win-64 |
|---|---|
| \_anaconda\_depends | 2023.07 |
| abseil-cpp | 20211102.0 |
| aiobotocore | 2.4.2 |
| aiofiles | 22.1.0 |
| aiohttp | 3.8.3 |
| aioitertools | 0.7.1 |
| aiosignal | 1.2.0 |
| aiosqlite | 0.18.0 |
| alabaster | 0.7.12 |
| anaconda-catalogs | 0.2.0 |
| anaconda-client | 1.11.3 |
| anaconda-navigator | 2.4.2 |
| anaconda-project | 0.11.1 |
| anyio | 3.5.0 |
| appdirs | 1.4.4 |
| argon2-cffi | 21.3.0 |
| argon2-cffi-bindings | 21.2.0 |
| arrow | 1.2.3 |
| arrow-cpp | 11.0.0 |
| astroid | 2.14.2 |
| astropy | 5.1 |
| asttokens | 2.0.5 |
| async-timeout | 4.0.2 |
| atomicwrites | 1.4.0 |
| attrs | 22.1.0 |
| automat | 20.2.0 |
| autopep8 | 1.6.0 |
| aws-c-common | 0.4.57 |
| aws-c-event-stream | 0.1.6 |
| aws-checksums | 0.1.9 |
| aws-sdk-cpp | 1.8.185 |
| babel | 2.11.0 |
| backcall | 0.2.0 |
| backports | 1.1 |
| backports.functools\_lru\_cache | 1.6.4 |
| backports.tempfile | 1.0 |
| backports.weakref | 1.0.post1 |
| bcrypt | 3.2.0 |
| beautifulsoup4 | 4.12.2 |
| binaryornot | 0.4.4 |
| black | 23.3.0 |
| blas | 1.0 |
| bleach | 4.1.0 |
| blosc | 1.21.3 |
| bokeh | 3.1.1 |
| boltons | 23.0.0 |
| boost-cpp | 1.73.0 |
| boto3 | 1.24.28 |
| botocore | 1.27.59 |
| bottleneck | 1.3.5 |
| brotli | 1.0.9 |
| brotli-bin | 1.0.9 |
| brotlipy | 0.7.0 |
| bzip2 | 1.0.8 |
| c-ares | 1.19.0 |
| c-blosc2 | 2.8.0 |
| ca-certificates | 2023.05.30 |
| certifi | 2023.5.7 |
| cffi | 1.15.1 |
| cfitsio | 3.470 |
| chardet | 4.0.0 |
| charls | 2.2.0 |
| charset-normalizer | 2.0.4 |
| click | 8.0.4 |
| cloudpickle | 2.2.1 |
| clyent | 1.2.2 |
| colorama | 0.4.6 |
| colorcet | 3.0.1 |
| comm | 0.1.2 |
| conda | 23.5.2 |
| conda-build | 3.25.0 |
| conda-content-trust | 0.1.3 |
| conda-index | 0.2.3 |
| conda-libmamba-solver | 23.5.0 |
| conda-pack | 0.6.0 |
| conda-package-handling | 2.1.0 |
| conda-package-streaming | 0.8.0 |
| conda-repo-cli | 1.0.41 |
| conda-token | 0.4.0 |
| conda-verify | 3.4.2 |
| console\_shortcut | 0.1.1 |
| constantly | 15.1.0 |
| contourpy | 1.0.5 |
| cookiecutter | 1.7.3 |
| cryptography | 39.0.1 |
| cssselect | 1.1.0 |
| curl | 8.1.1 |
| cycler | 0.11.0 |
| cytoolz | 0.12.0 |
| daal4py | 2023.1.1 |
| dal | 2023.1.1 |
| dask | 2023.6.0 |
| dask-core | 2023.6.0 |
| datashader | 0.15.0 |
| datashape | 0.5.4 |
| debugpy | 1.5.1 |
| decorator | 5.1.1 |
| defusedxml | 0.7.1 |
| diff-match-patch | 20200713 |
| dill | 0.3.6 |
| distributed | 2023.6.0 |
| docstring-to-markdown | 0.11 |
| docutils | 0.18.1 |
| entrypoints | 0.4 |
| et\_xmlfile | 1.1.0 |
| executing | 0.8.3 |
| filelock | 3.9.0 |
| flake8 | 6.0.0 |
| flask | 2.2.2 |
| fmt | 9.1.0 |
| fonttools | 4.25.0 |
| freetype | 2.12.1 |
| frozenlist | 1.3.3 |
| fsspec | 2023.3.0 |
| future | 0.18.3 |
| gensim | 4.3.0 |
| gflags | 2.2.2 |
| giflib | 5.2.1 |
| glib | 2.69.1 |
| glob2 | 0.7 |
| glog | 0.5.0 |
| greenlet | 2.0.1 |
| gst-plugins-base | 1.18.5 |
| gstreamer | 1.18.5 |
| h5py | 3.7.0 |
| hdf5 | 1.10.6 |
| heapdict | 1.0.1 |
| holoviews | 1.16.2 |
| hvplot | 0.8.4 |
| hyperlink | 21.0.0 |
| icc\_rt | 2022.1.0 |
| icu | 58.2 |
| idna | 3.4 |
| imagecodecs | 2021.8.26 |
| imageio | 2.26.0 |
| imagesize | 1.4.1 |
| imbalanced-learn | 0.10.1 |
| importlib-metadata | 6.0.0 |
| importlib\_metadata | 6.0.0 |
| incremental | 21.3.0 |
| inflection | 0.5.1 |
| iniconfig | 1.1.1 |
| intake | 0.6.8 |
| intel-openmp | 2023.1.0 |
| intervaltree | 3.1.0 |
| ipykernel | 6.19.2 |
| ipython | 8.12.0 |
| ipython\_genutils | 0.2.0 |
| ipywidgets | 8.0.4 |
| isort | 5.9.3 |
| itemadapter | 0.3.0 |
| itemloaders | 1.0.4 |
| itsdangerous | 2.0.1 |
| jaraco.classes | 3.2.1 |
| jedi | 0.18.1 |
| jellyfish | 0.9.0 |
| jinja2 | 3.1.2 |
| jinja2-time | 0.2.0 |
| jmespath | 0.10.0 |
| joblib | 1.2.0 |
| jpeg | 9e |
| jq | 1.6 |
| json5 | 0.9.6 |
| jsonpatch | 1.32 |
| jsonpointer | 2.1 |
| jsonschema | 4.17.3 |
| jupyter | 1.0.0 |
| jupyter\_client | 8.1.0 |
| jupyter\_console | 6.6.3 |
| jupyter\_core | 5.3.0 |
| jupyter\_events | 0.6.3 |
| jupyter\_server | 2.5.0 |
| jupyter\_server\_fileid | 0.9.0 |
| jupyter\_server\_terminals | 0.4.4 |
| jupyter\_server\_ydoc | 0.8.0 |
| jupyter\_ydoc | 0.2.4 |
| jupyterlab | 3.6.3 |
| jupyterlab\_pygments | 0.1.2 |
| jupyterlab\_server | 2.22.0 |
| jupyterlab\_widgets | 3.0.5 |
| jxrlib | 1.1 |
| keyring | 23.13.1 |
| kiwisolver | 1.4.4 |
| krb5 | 1.19.4 |
| lazy-object-proxy | 1.6.0 |
| lazy\_loader | 0.2 |
| lcms2 | 2.12 |
| lerc | 3.0 |
| libaec | 1.0.4 |
| libarchive | 3.6.2 |
| libboost | 1.73.0 |
| libbrotlicommon | 1.0.9 |
| libbrotlidec | 1.0.9 |
| libbrotlienc | 1.0.9 |
| libclang | 14.0.6 |
| libclang13 | 14.0.6 |
| libcurl | 8.1.1 |
| libdeflate | 1.17 |
| libevent | 2.1.12 |
| libffi | 3.4.4 |
| libiconv | 1.16 |
| liblief | 0.12.3 |
| libllvm14 | 14.0.6 |
| libmamba | 1.4.1 |
| libmambapy | 1.4.1 |
| libogg | 1.3.5 |
| libpng | 1.6.39 |
| libprotobuf | 3.20.3 |
| libsodium | 1.0.18 |
| libsolv | 0.7.22 |
| libspatialindex | 1.9.3 |
| libssh2 | 1.10.0 |
| libthrift | 0.15.0 |
| libtiff | 4.5.0 |
| libvorbis | 1.3.7 |
| libwebp | 1.2.4 |
| libwebp-base | 1.2.4 |
| libxml2 | 2.10.3 |
| libxslt | 1.1.37 |
| libzopfli | 1.0.3 |
| linkify-it-py | 2.0.0 |
| llvmlite | 0.40.0 |
| locket | 1.0.0 |
| lxml | 4.9.2 |
| lz4 | 4.3.2 |
| lz4-c | 1.9.4 |
| lzo | 2.10 |
| m2-msys2-runtime | 2.5.0.17080.65c939c |
| m2-patch | 2.7.5 |
| m2w64-libwinpthread-git | 5.0.0.4634.697f757 |
| markdown | 3.4.1 |
| markdown-it-py | 2.2.0 |
| markupsafe | 2.1.1 |
| matplotlib | 3.7.1 |
| matplotlib-base | 3.7.1 |
| matplotlib-inline | 0.1.6 |
| mccabe | 0.7.0 |
| mdit-py-plugins | 0.3.0 |
| mdurl | 0.1.0 |
| menuinst | 1.4.19 |
| mistune | 0.8.4 |
| mkl | 2023.1.0 |
| mkl-service | 2.4.0 |
| mkl\_fft | 1.3.6 |
| mkl\_random | 1.2.2 |
| more-itertools | 8.12.0 |
| mpmath | 1.2.1 |
| msgpack-python | 1.0.3 |
| msys2-conda-epoch | 20160418 |
| multidict | 6.0.2 |
| multipledispatch | 0.6.0 |
| munkres | 1.1.4 |
| mypy\_extensions | 0.4.3 |
| navigator-updater | 0.4.0 |
| nbclassic | 0.5.5 |
| nbclient | 0.5.13 |
| nbconvert | 6.5.4 |
| nbformat | 5.7.0 |
| nest-asyncio | 1.5.6 |
| networkx | 2.8.4 |
| nltk | 3.7 |
| notebook | 6.5.4 |
| notebook-shim | 0.2.2 |
| numba | 0.57.0 |
| numexpr | 2.8.4 |
| numpy | 1.24.3 |
| numpy-base | 1.24.3 |
| numpydoc | 1.5.0 |
| openjpeg | 2.4.0 |
| openpyxl | 3.0.10 |
| openssl | 1.1.1u |
| orc | 1.7.4 |
| packaging | 23.0 |
| pandas | 1.5.3 |
| pandocfilters | 1.5.0 |
| panel | 1.1.0 |
| param | 1.13.0 |
| paramiko | 2.8.1 |
| parsel | 1.6.0 |
| parso | 0.8.3 |
| partd | 1.2.0 |
| pathlib | 1.0.1 |
| pathspec | 0.10.3 |
| patsy | 0.5.3 |
| pcre | 8.45 |
| pcre2 | 10.37 |
| pep8 | 1.7.1 |
| pexpect | 4.8.0 |
| pickleshare | 0.7.5 |
| pillow | 9.4.0 |
| pip | 23.1.2 |
| pkginfo | 1.9.6 |
| platformdirs | 2.5.2 |
| plotly | 5.9.0 |
| pluggy | 1.0.0 |
| ply | 3.11 |
| pooch | 1.4.0 |
| powershell\_shortcut | 0.0.1 |
| poyo | 0.5.0 |
| prometheus\_client | 0.14.1 |
| prompt-toolkit | 3.0.36 |
| prompt\_toolkit | 3.0.36 |
| protego | 0.1.16 |
| psutil | 5.9.0 |
| ptyprocess | 0.7.0 |
| pure\_eval | 0.2.2 |
| py-cpuinfo | 8.0.0 |
| py-lief | 0.12.3 |
| pyarrow | 11.0.0 |
| pyasn1 | 0.4.8 |
| pyasn1-modules | 0.2.8 |
| pybind11-abi | 4 |
| pycodestyle | 2.10.0 |
| pycosat | 0.6.4 |
| pycparser | 2.21 |
| pyct | 0.5.0 |
| pycurl | 7.45.2 |
| pydispatcher | 2.0.5 |
| pydocstyle | 6.3.0 |
| pyerfa | 2.0.0 |
| pyflakes | 3.0.1 |
| pygments | 2.15.1 |
| pyjwt | 2.4.0 |
| pylint | 2.16.2 |
| pylint-venv | 2.3.0 |
| pyls-spyder | 0.4.0 |
| pynacl | 1.5.0 |
| pyodbc | 4.0.34 |
| pyopenssl | 23.0.0 |
| pyparsing | 3.0.9 |
| pyqt | 5.15.7 |
| pyqt5-sip | 12.11.0 |
| pyqtwebengine | 5.15.7 |
| pyrsistent | 0.18.0 |
| pysocks | 1.7.1 |
| pytables | 3.8.0 |
| pytest | 7.3.1 |
| python | 3.11.3 |
| python-dateutil | 2.8.2 |
| python-fastjsonschema | 2.16.2 |
| python-json-logger | 2.0.7 |
| python-libarchive-c | 2.9 |
| python-lmdb | 1.4.1 |
| python-lsp-black | 1.2.1 |
| python-lsp-jsonrpc | 1.0.0 |
| python-lsp-server | 1.7.2 |
| python-slugify | 5.0.2 |
| python-snappy | 0.6.1 |
| pytoolconfig | 1.2.5 |
| pytz | 2022.7 |
| pyviz\_comms | 2.3.0 |
| pywavelets | 1.4.1 |
| pywin32 | 305 |
| pywin32-ctypes | 0.2.0 |
| pywinpty | 2.0.10 |
| pyyaml | 6.0 |
| pyzmq | 25.1.0 |
| qdarkstyle | 3.0.2 |
| qstylizer | 0.2.2 |
| qt-main | 5.15.2 |
| qt-webengine | 5.15.9 |
| qtawesome | 1.2.2 |
| qtconsole | 5.4.2 |
| qtpy | 2.2.0 |
| qtwebkit | 5.212 |
| queuelib | 1.5.0 |
| re2 | 2022.04.01 |
| regex | 2022.7.9 |
| reproc | 14.2.4 |
| reproc-cpp | 14.2.4 |
| requests | 2.29.0 |
| requests-file | 1.5.1 |
| requests-toolbelt | 0.9.1 |
| rfc3339-validator | 0.1.4 |
| rfc3986-validator | 0.1.1 |
| rope | 1.7.0 |
| rtree | 1.0.1 |
| ruamel.yaml | 0.17.21 |
| ruamel\_yaml | 0.17.21 |
| s3fs | 2023.3.0 |
| s3transfer | 0.6.0 |
| sacremoses | 0.0.43 |
| scikit-image | 0.20.0 |
| scikit-learn | 1.2.2 |
| scikit-learn-intelex | 2023.1.1 |
| scipy | 1.10.1 |
| scrapy | 2.8.0 |
| seaborn | 0.12.2 |
| send2trash | 1.8.0 |
| service\_identity | 18.1.0 |
| setuptools | 67.8.0 |
| sip | 6.6.2 |
| six | 1.16.0 |
| smart\_open | 5.2.1 |
| snappy | 1.1.9 |
| sniffio | 1.2.0 |
| snowballstemmer | 2.2.0 |
| sortedcontainers | 2.4.0 |
| soupsieve | 2.4 |
| sphinx | 5.0.2 |
| sphinxcontrib-applehelp | 1.0.2 |
| sphinxcontrib-devhelp | 1.0.2 |
| sphinxcontrib-htmlhelp | 2.0.0 |
| sphinxcontrib-jsmath | 1.0.1 |
| sphinxcontrib-qthelp | 1.0.3 |
| sphinxcontrib-serializinghtml | 1.1.5 |
| spyder | 5.4.3 |
| spyder-kernels | 2.4.3 |
| sqlalchemy | 1.4.39 |
| sqlite | 3.41.2 |
| stack\_data | 0.2.0 |
| statsmodels | 0.13.5 |
| sympy | 1.11.1 |
| tabulate | 0.8.10 |
| tbb | 2021.8.0 |
| tbb4py | 2021.8.0 |
| tblib | 1.7.0 |
| tenacity | 8.2.2 |
| terminado | 0.17.1 |
| text-unidecode | 1.3 |
| textdistance | 4.2.1 |
| threadpoolctl | 2.2.0 |
| three-merge | 0.1.1 |
| tifffile | 2021.7.2 |
| tinycss2 | 1.2.1 |
| tk | 8.6.12 |
| tldextract | 3.2.0 |
| toml | 0.10.2 |
| tomli | 2.0.1 |
| tomlkit | 0.11.1 |
| toolz | 0.12.0 |
| tornado | 6.2 |
| tqdm | 4.65.0 |
| traitlets | 5.7.1 |
| transformers | 2.1.1 |
| twisted | 22.10.0 |
| twisted-iocpsupport | 1.0.2 |
| typing-extensions | 4.6.3 |
| typing\_extensions | 4.6.3 |
| tzdata | 2023c |
| uc-micro-py | 1.0.1 |
| ujson | 5.4.0 |
| unidecode | 1.2.0 |
| urllib3 | 1.26.16 |
| utf8proc | 2.6.1 |
| vc | 14.2 |
| vs2015\_runtime | 14.27.29016 |
| w3lib | 1.21.0 |
| watchdog | 2.1.6 |
| wcwidth | 0.2.5 |
| webencodings | 0.5.1 |
| websocket-client | 0.58.0 |
| werkzeug | 2.2.3 |
| whatthepatch | 1.0.2 |
| wheel | 0.38.4 |
| widgetsnbextension | 4.0.5 |
| win\_inet\_pton | 1.1.0 |
| winpty | 0.4.3 |
| wrapt | 1.14.1 |
| xarray | 2022.11.0 |
| xlwings | 0.29.1 |
| xyzservices | 2022.9.0 |
| xz | 5.4.2 |
| y-py | 0.5.9 |
| yaml | 0.2.5 |
| yaml-cpp | 0.7.0 |
| yapf | 0.31.0 |
| yarl | 1.8.1 |
| ypy-websocket | 0.8.2 |
| zeromq | 4.3.4 |
| zfp | 0.5.5 |
| zict | 2.2.0 |
| zipp | 3.11.0 |
| zlib | 1.2.13 |
| zlib-ng | 2.0.7 |
| zope | 1.0 |
| zope.interface | 5.4.0 |
| zstandard | 0.19.0 |
| zstd | 1.5.5 |
| \* apptools 4.2.1 \* argcomplete 0.6.7 \* astropy 0.3.0 \* atom 0.3.7 \* beautiful-soup 4.3.1 \* binstar 0.4.4 \* biopython 1.63 \* bitarray 0.8.1 \* blaze 0.4.2 \* blz 0.6.1 \* bokeh 0.4.1 \* boto 2.25.0 \* cairo 1.12.2 *L* \* casuarius 1.1 \* cdecimal 2.3 \* chaco 4.4.1 \* colorama 0.2.7 \* conda 3.4.1 \* conda-build 1.3.1 \* configobj 4.7.2 \* cubes 0.10.2 \* curl 7.30.0 *LM* \* cython 0.20.1 \* datashape 0.1.1 \* dateutil 2.1 \* disco 0.4.4 *L* \* docutils 0.11 \* dynd-python 0.6.1 \* enable 4.3.0 \* enaml 0.9.1 \* envisage 4.4.0 \* erlang R15B01 *L* \* flask 0.10.1 \* freetype 2.4.10 | \* future 0.11.2 \* gevent 1.0 \* gevent-websocket 0.9.2 \* gevent\_zeromq 0.2.5 \* greenlet 0.4.2 \* grin 1.2.1 \* h5py 2.2.1 \* hdf5 1.8.9 \* ipython 1.1.0 \* itsdangerous 0.23 \* jinja2 2.7.2 \* keyring 3.3 \* kiwisolver 0.1.2 \* launcher 0.1.2 \* libnetcdf 4.2.1.1 *LM* \* libpng 1.5.13 *LM* \* libsodium 0.4.5 *L* \* libtiff 4.0.2 *LM* \* libxml2 2.9.0 *LM* \* libxslt 1.1.28 *LM* \* llvm 3.3 \* llvmpy 0.12.3 \* lxml 3.3.1 \* markupsafe 0.18 \* matplotlib 1.3.1 \* mayavi 4.3.1 \* mdp 3.3 \* menuinst 1.0.3 *W* \* mingw 4.7 *W* \* mock 1.0.1 \* mpi4py 1.3 *L* \* mpich2 1.4.1p1 *L* \* netcdf4 1.0.8 *LM* \* networkx 1.8.1 | \* nltk 2.0.4 \* nose 1.3.0 \* numba 0.12.1 \* numexpr 2.3.1 \* numpy 1.8.0 \* opencv 2.4.6 *L* \* openpyxl 1.8.2 \* openssl 1.0.1g *LM* \* pandas 0.13.1 \* patsy 0.2.1 \* pep8 1.4.6 \* pil 1.1.7 \* pip 1.5.2 \* ply 3.4 \* psutil 1.2.1 \* py 1.4.20 \* py2cairo 1.10.0 *L* \* pyaudio 0.2.7 *M* \* pycosat 0.6.0 \* pycparser 2.10 \* pycrypto 2.6.1 \* pycurl 7.19.0 *LM* \* pyface 4.4.0 \* pyflakes 0.7.3 \* pygments 1.6 \* pykit 0.2.0 \* pyparsing 2.0.1 \* pyreadline 2.0 *W* \* pysal 1.6.0 \* pysam 0.6 *LM* \* pyside 1.2.1 \* pytables 3.1.0 \* pytest 2.5.2 \* python 2.7.6 | \* pytz 2013b \* pywin32 218.4 *W* \* pyyaml 3.10 \* pyzmq 2.2.0.1 \* qt 4.8.5 \* redis 2.6.9 *LM* \* redis-py 2.9.1 *LM* \* requests 2.2.1 \* rope 0.9.4 \* scikit-image 0.9.3 \* scikit-learn 0.14.1 \* scipy 0.13.3 \* setuptools 2.2 \* six 1.5.2 \* sphinx 1.2.1 \* spyder 2.2.5 \* sqlalchemy 0.9.2 \* ssl\_match\_hostname 3.4.0.2 \* statsmodels 0.5.0 \* sympy 0.7.4.1 \* theano 0.6.0 *L* \* tk 8.5.13 *LM* \* tornado 3.2.0 \* traits 4.4.0 \* traitsui 4.4.0 \* ujson 1.33 \* vtk 5.10.1 \* werkzeug 0.9.4 \* xlrd 0.9.2 \* xlsxwriter 0.5.2 \* xlwt 0.7.5 \* yaml 0.1.4 *LM* \* zeromq 2.2.0 *LM* \* zlib 1.2.7 |
|---|
| \* argcomplete 0.6.7 \* astropy 0.3.0 \* beautiful-soup 4.3.1 \* bitarray 0.8.1 \* blaze 0.4.2 \* blz 0.6.1 \* bokeh 0.4.1 \* cdecimal 2.3 \* colorama 0.2.7 \* curl 7.30.0 *LM* \* cython 0.20.1 \* datashape 0.1.1 \* dateutil 2.1 \* docutils 0.11 \* dynd-python 0.6.1 \* flask 0.10.1 \* freetype 2.4.10 \* future 0.11.2 \* greenlet 0.4.2 \* h5py 2.2.1 \* hdf5 1.8.9 \* ipython 1.1.0 \* itsdangerous 0.23 | \* jinja2 2.7.2 \* libnetcdf 4.2.1.1 *LM* \* libpng 1.5.13 *LM* \* libsodium 0.4.5 *L* \* libtiff 4.0.2 *LM* \* libxml2 2.9.0 *LM* \* libxslt 1.1.28 *LM* \* llvm 3.3 \* llvmpy 0.12.3 \* lxml 3.3.1 \* markupsafe 0.18 \* matplotlib 1.3.1 *LM* \* mdp 3.3 \* mingw 4.7 *W* \* mock 1.0.1 \* netcdf4 1.0.8 *LM* \* networkx 1.8.1 \* nose 1.3.0 \* numba 0.12.1 \* numexpr 2.3.1 \* numpy 1.8.0 \* openpyxl 1.8.2 \* openssl 1.0.1g *LM* | \* pandas 0.13.1 \* patsy 0.2.1 \* pillow 2.1.0 \* pip 1.5.2 \* ply 3.4 \* psutil 1.2.1 \* py 1.4.20 \* pycosat 0.6.0 \* pycparser 2.10 \* pycrypto 2.6.1 \* pyflakes 0.7.3 \* pygments 1.6 \* pykit 0.2.0 \* pyparsing 2.0.1 \* pyreadline 2.0 *W* \* pyside 1.2.1 *W* \* pytables 3.1.0 \* pytest 2.5.2 \* python 3.3.4 \* pytz 2013b \* pyyaml 3.10 \* pyzmq 2.2.0.1 \* redis 2.6.9 *LM* | \* redis-py 2.9.1 *LM* \* requests 2.2.1 \* scikit-image 0.9.3 \* scikit-learn 0.14.1 \* scipy 0.13.3 \* setuptools 2.2 \* six 1.5.2 \* sphinx 1.2.1 \* sqlalchemy 0.9.2 \* ssl\_match\_hostname 3.4.0.2 \* statsmodels 0.5.0 \* sympy 0.7.4.1 \* tk 8.5.13 *LM* \* tornado 3.2.0 \* ujson 1.33 \* werkzeug 0.9.4 \* xlrd 0.9.2 \* xlsxwriter 0.5.2 \* yaml 0.1.4 *LM* \* zeromq 2.2.0 *LM* \* zlib 1.2.7 |
|---|
| \* argcomplete 0.6.7 \* argparse 1.2.1 \* astropy 0.3.0 \* atom 0.3.7 \* beautiful-soup 4.3.1 \* biopython 1.63 \* bitarray 0.8.1 \* blaze 0.4.2 *LM* \* blz 0.6.1 \* boto 2.25.0 \* cairo 1.12.2 *L* \* casuarius 1.1 \* cdecimal 2.3 \* colorama 0.2.7 \* configobj 4.7.2 \* curl 7.30.0 *LM* \* cython 0.20.1 \* datashape 0.1.1 \* dateutil 2.1 \* disco 0.4.4 *L* \* docutils 0.11 \* dynd-python 0.6.1 \* erlang R15B01 *L* \* flask 0.10.1 \* freetype 2.4.10 \* future 0.11.2 \* gevent 1.0 \* gevent-websocket 0.9.2 \* gevent\_zeromq 0.2.5 | \* greenlet 0.4.2 \* grin 1.2.1 \* h5py 2.2.1 \* hdf5 1.8.9 \* ipython 1.1.0 \* itsdangerous 0.23 \* jinja2 2.7.2 \* kiwisolver 0.1.2 \* libnetcdf 4.2.1.1 *LM* \* libpng 1.5.13 *LM* \* libsodium 0.4.5 *L* \* libtiff 4.0.2 *LM* \* libxml2 2.9.0 *LM* \* libxslt 1.1.28 *LM* \* llvm 3.3 \* llvmpy 0.12.3 \* lxml 3.3.1 \* markupsafe 0.18 \* matplotlib 1.3.1 *LM* \* mdp 3.3 \* mingw 4.7 *W* \* mock 1.0.1 \* mpi4py 1.3 *L* \* mpich2 1.4.1p1 *L* \* netcdf4 1.0.8 *LM* \* networkx 1.8.1 \* nltk 2.0.4 \* nose 1.3.0 \* numba 0.12.1 | \* numexpr 2.3.1 \* numpy 1.8.0 \* opencv 2.4.6 *L* \* openssl 1.0.1g *LM* \* ordereddict 1.1 \* pandas 0.13.1 \* patsy 0.2.1 \* pep8 1.4.6 \* pil 1.1.7 \* pip 1.5.2 \* ply 3.4 \* psutil 1.2.1 \* py 1.4.20 \* py2cairo 1.10.0 *L* \* pycosat 0.6.0 \* pycparser 2.10 \* pycrypto 2.6.1 \* pycurl 7.19.0 *LM* \* pyflakes 0.7.3 \* pygments 1.6 \* pykit 0.2.0 \* pyparsing 2.0.1 \* pyreadline 2.0 *W* \* pysam 0.6 *LM* \* pytables 3.1.0 *LM* \* pytest 2.5.2 \* python 2.6.9 \* pytz 2013b \* pyyaml 3.10 | \* pyzmq 2.2.0.1 \* redis 2.6.9 *LM* \* redis-py 2.9.1 *LM* \* requests 2.2.1 \* scikit-image 0.9.3 \* scikit-learn 0.14.1 \* scipy 0.13.3 \* setuptools 2.2 \* six 1.5.2 \* sphinx 1.2.1 \* sqlalchemy 0.9.2 \* ssl\_match\_hostname 3.4.0.2 \* statsmodels 0.5.0 \* sympy 0.7.4.1 \* theano 0.6.0 *L* \* tk 8.5.13 *LM* \* tornado 3.2.0 \* traits 4.4.0 \* ujson 1.33 \* unittest2 0.5.1 \* werkzeug 0.9.4 \* xlrd 0.9.2 \* xlsxwriter 0.5.2 \* xlwt 0.7.5 \* yaml 0.1.4 *LM* \* zeromq 2.2.0 *LM* \* zlib 1.2.7 |
|---|
| \* apptools 4.2.1 \* argcomplete 0.6.7 \* astropy 0.3.0 \* atom 0.3.7 \* beautiful-soup 4.3.1 \* binstar 0.4.4 \* biopython 1.63 \* bitarray 0.8.1 \* blaze 0.4.2 \* blz 0.6.1 \* bokeh 0.4.1 \* boto 2.25.0 \* cairo 1.12.2 *L* \* casuarius 1.1 \* cdecimal 2.3 \* chaco 4.4.1 \* colorama 0.2.7 \* conda 3.0.6 \* conda-build 1.2.0 \* configobj 4.7.2 \* cubes 0.10.2 \* curl 7.30.0 *LM* \* cython 0.20.1 \* datashape 0.1.1 \* dateutil 2.1 \* disco 0.4.4 *L* \* docutils 0.11 \* dynd-python 0.6.1 \* enable 4.3.0 \* enaml 0.9.1 \* envisage 4.4.0 \* erlang R15B01 *L* \* flask 0.10.1 \* freetype 2.4.10 | \* future 0.11.2 \* gevent 1.0 \* gevent-websocket 0.9.2 \* gevent\_zeromq 0.2.5 \* greenlet 0.4.2 \* grin 1.2.1 \* h5py 2.2.1 \* hdf5 1.8.9 \* ipython 1.1.0 \* itsdangerous 0.23 \* jinja2 2.7.2 \* keyring 3.3 \* kiwisolver 0.1.2 \* launcher 0.1.2 \* libnetcdf 4.2.1.1 *LM* \* libpng 1.5.13 *LM* \* libsodium 0.4.5 *L* \* libtiff 4.0.2 *LM* \* libxml2 2.9.0 *LM* \* libxslt 1.1.28 *LM* \* llvm 3.3 \* llvmpy 0.12.3 \* lxml 3.3.1 \* markupsafe 0.18 \* matplotlib 1.3.1 \* mayavi 4.3.1 \* mdp 3.3 \* menuinst 1.0.3 *W* \* mingw 4.7 *W* \* mock 1.0.1 \* mpi4py 1.3 *L* \* mpich2 1.4.1p1 *L* \* netcdf4 1.0.8 *LM* \* networkx 1.8.1 | \* nltk 2.0.4 \* nose 1.3.0 \* numba 0.12.1 \* numexpr 2.3.1 \* numpy 1.8.0 \* opencv 2.4.6 *L* \* openpyxl 1.8.2 \* openssl 1.0.1c *LM* \* pandas 0.13.1 \* patsy 0.2.1 \* pep8 1.4.6 \* pil 1.1.7 \* pip 1.5.2 \* ply 3.4 \* psutil 1.2.1 \* py 1.4.20 \* py2cairo 1.10.0 *L* \* pyaudio 0.2.7 *M* \* pycosat 0.6.0 \* pycparser 2.10 \* pycrypto 2.6.1 \* pycurl 7.19.0 *LM* \* pyface 4.4.0 \* pyflakes 0.7.3 \* pygments 1.6 \* pykit 0.2.0 \* pyparsing 2.0.1 \* pyreadline 2.0 *W* \* pysal 1.6.0 \* pysam 0.6 *LM* \* pyside 1.2.1 \* pytables 3.1.0 \* pytest 2.5.2 \* python 2.7.6 | \* pytz 2013b \* pywin32 218.4 *W* \* pyyaml 3.10 \* pyzmq 2.2.0.1 \* qt 4.8.5 \* redis 2.6.9 *LM* \* redis-py 2.9.1 *LM* \* requests 2.2.1 \* rope 0.9.4 \* scikit-image 0.9.3 \* scikit-learn 0.14.1 \* scipy 0.13.3 \* setuptools 2.2 \* six 1.5.2 \* sphinx 1.2.1 \* spyder 2.2.5 \* sqlalchemy 0.9.2 \* ssl\_match\_hostname 3.4.0.2 \* statsmodels 0.5.0 \* sympy 0.7.4.1 \* theano 0.6.0 *L* \* tk 8.5.13 *LM* \* tornado 3.2.0 \* traits 4.4.0 \* traitsui 4.4.0 \* ujson 1.33 \* vtk 5.10.1 \* werkzeug 0.9.4 \* xlrd 0.9.2 \* xlsxwriter 0.5.2 \* xlwt 0.7.5 \* yaml 0.1.4 *LM* \* zeromq 2.2.0 *LM* \* zlib 1.2.7 |
|---|
| \* argcomplete 0.6.7 \* astropy 0.3.0 \* beautiful-soup 4.3.1 \* bitarray 0.8.1 \* blaze 0.4.2 \* blz 0.6.1 \* bokeh 0.4.1 \* cdecimal 2.3 \* colorama 0.2.7 \* curl 7.30.0 *LM* \* cython 0.20.1 \* datashape 0.1.1 \* dateutil 2.1 \* docutils 0.11 \* dynd-python 0.6.1 \* flask 0.10.1 \* freetype 2.4.10 \* future 0.11.2 \* greenlet 0.4.2 \* h5py 2.2.1 \* hdf5 1.8.9 \* ipython 1.1.0 \* itsdangerous 0.23 | \* jinja2 2.7.2 \* libnetcdf 4.2.1.1 *LM* \* libpng 1.5.13 *LM* \* libsodium 0.4.5 *L* \* libtiff 4.0.2 *LM* \* libxml2 2.9.0 *LM* \* libxslt 1.1.28 *LM* \* llvm 3.3 \* llvmpy 0.12.3 \* lxml 3.3.1 \* markupsafe 0.18 \* matplotlib 1.3.1 *LM* \* mdp 3.3 \* mingw 4.7 *W* \* mock 1.0.1 \* netcdf4 1.0.8 *LM* \* networkx 1.8.1 \* nose 1.3.0 \* numba 0.12.1 \* numexpr 2.3.1 \* numpy 1.8.0 \* openpyxl 1.8.2 \* openssl 1.0.1c *LM* | \* pandas 0.13.1 \* patsy 0.2.1 \* pillow 2.1.0 \* pip 1.5.2 \* ply 3.4 \* psutil 1.2.1 \* py 1.4.20 \* pycosat 0.6.0 \* pycparser 2.10 \* pycrypto 2.6.1 \* pyflakes 0.7.3 \* pygments 1.6 \* pykit 0.2.0 \* pyparsing 2.0.1 \* pyreadline 2.0 *W* \* pyside 1.2.1 *W* \* pytables 3.1.0 \* pytest 2.5.2 \* python 3.3.4 \* pytz 2013b \* pyyaml 3.10 \* pyzmq 2.2.0.1 \* redis 2.6.9 *LM* | \* redis-py 2.9.1 *LM* \* requests 2.2.1 \* scikit-image 0.9.3 \* scikit-learn 0.14.1 \* scipy 0.13.3 \* setuptools 2.2 \* six 1.5.2 \* sphinx 1.2.1 \* sqlalchemy 0.9.2 \* ssl\_match\_hostname 3.4.0.2 \* statsmodels 0.5.0 \* sympy 0.7.4.1 \* tk 8.5.13 *LM* \* tornado 3.2.0 \* ujson 1.33 \* werkzeug 0.9.4 \* xlrd 0.9.2 \* xlsxwriter 0.5.2 \* yaml 0.1.4 *LM* \* zeromq 2.2.0 *LM* \* zlib 1.2.7 |
|---|
| \* argcomplete 0.6.7 \* argparse 1.2.1 \* astropy 0.3.0 \* atom 0.3.7 \* beautiful-soup 4.3.1 \* biopython 1.63 \* bitarray 0.8.1 \* blaze 0.4.2 *LM* \* blz 0.6.1 \* boto 2.25.0 \* cairo 1.12.2 *L* \* casuarius 1.1 \* cdecimal 2.3 \* colorama 0.2.7 \* configobj 4.7.2 \* curl 7.30.0 *LM* \* cython 0.20.1 \* datashape 0.1.1 \* dateutil 2.1 \* disco 0.4.4 *L* \* docutils 0.11 \* dynd-python 0.6.1 \* erlang R15B01 *L* \* flask 0.10.1 \* freetype 2.4.10 \* future 0.11.2 \* gevent 1.0 \* gevent-websocket 0.9.2 \* gevent\_zeromq 0.2.5 | \* greenlet 0.4.2 \* grin 1.2.1 \* h5py 2.2.1 \* hdf5 1.8.9 \* ipython 1.1.0 \* itsdangerous 0.23 \* jinja2 2.7.2 \* kiwisolver 0.1.2 \* libnetcdf 4.2.1.1 *LM* \* libpng 1.5.13 *LM* \* libsodium 0.4.5 *L* \* libtiff 4.0.2 *LM* \* libxml2 2.9.0 *LM* \* libxslt 1.1.28 *LM* \* llvm 3.3 \* llvmpy 0.12.3 \* lxml 3.3.1 \* markupsafe 0.18 \* matplotlib 1.3.1 *LM* \* mdp 3.3 \* mingw 4.7 *W* \* mock 1.0.1 \* mpi4py 1.3 *L* \* mpich2 1.4.1p1 *L* \* netcdf4 1.0.8 *LM* \* networkx 1.8.1 \* nltk 2.0.4 \* nose 1.3.0 \* numba 0.12.1 | \* numexpr 2.3.1 \* numpy 1.8.0 \* opencv 2.4.6 *L* \* openssl 1.0.1c *LM* \* ordereddict 1.1 \* pandas 0.13.1 \* patsy 0.2.1 \* pep8 1.4.6 \* pil 1.1.7 \* pip 1.5.2 \* ply 3.4 \* psutil 1.2.1 \* py 1.4.20 \* py2cairo 1.10.0 *L* \* pycosat 0.6.0 \* pycparser 2.10 \* pycrypto 2.6.1 \* pycurl 7.19.0 *LM* \* pyflakes 0.7.3 \* pygments 1.6 \* pykit 0.2.0 \* pyparsing 2.0.1 \* pyreadline 2.0 *W* \* pysam 0.6 *LM* \* pytables 3.1.0 *LM* \* pytest 2.5.2 \* python 2.6.9 \* pytz 2013b \* pyyaml 3.10 | \* pyzmq 2.2.0.1 \* redis 2.6.9 *LM* \* redis-py 2.9.1 *LM* \* requests 2.2.1 \* scikit-image 0.9.3 \* scikit-learn 0.14.1 \* scipy 0.13.3 \* setuptools 2.2 \* six 1.5.2 \* sphinx 1.2.1 \* sqlalchemy 0.9.2 \* ssl\_match\_hostname 3.4.0.2 \* statsmodels 0.5.0 \* sympy 0.7.4.1 \* theano 0.6.0 *L* \* tk 8.5.13 *LM* \* tornado 3.2.0 \* traits 4.4.0 \* ujson 1.33 \* unittest2 0.5.1 \* werkzeug 0.9.4 \* xlrd 0.9.2 \* xlsxwriter 0.5.2 \* xlwt 0.7.5 \* yaml 0.1.4 *LM* \* zeromq 2.2.0 *LM* \* zlib 1.2.7 |
|---|
| \* apptools 4.2.1 \* argcomplete 0.6.7 \* astropy 0.3.0 \* atom 0.3.6 \* beautiful-soup 4.3.1 \* binstar 0.4.4 \* biopython 1.63 \* bitarray 0.8.1 \* blaze 0.4.1 \* blz 0.6.1 \* bokeh 0.4 \* boto 2.24.0 \* cairo 1.12.2 *L* \* casuarius 1.1 \* cdecimal 2.3 \* chaco 4.4.1 \* colorama 0.2.7 \* conda 3.0.3 \* conda-build 1.1.0 \* configobj 4.7.2 \* cubes 0.10.2 \* curl 7.30.0 *LM* \* cython 0.20 \* datashape 0.1.0 \* dateutil 2.1 \* disco 0.4.4 *L* \* docutils 0.11 \* dynd-python 0.6.0 \* enable 4.3.0 \* enaml 0.9.0 \* envisage 4.4.0 \* erlang R15B01 *L* \* flask 0.10.1 \* freetype 2.4.10 | \* future 0.11.2 \* gevent 1.0 \* gevent-websocket 0.9.2 \* gevent\_zeromq 0.2.5 \* greenlet 0.4.2 \* grin 1.2.1 \* h5py 2.2.1 \* hdf5 1.8.9 \* ipython 1.1.0 \* itsdangerous 0.23 \* jinja2 2.7.2 \* keyring 3.3 \* kiwisolver 0.1.2 \* launcher 0.1.2 \* libdynd 0.6.0 *LM* \* libnetcdf 4.2.1.1 *LM* \* libpng 1.5.13 *LM* \* libsodium 0.4.5 *L* \* libtiff 4.0.2 *LM* \* libxml2 2.9.0 *LM* \* libxslt 1.1.28 *LM* \* llvm 3.3 \* llvmpy 0.12.2 \* lxml 3.2.3 \* markupsafe 0.18 \* matplotlib 1.3.1 \* mayavi 4.3.1 \* mdp 3.3 \* menuinst 1.0.3 *W* \* mingw 4.7 *W* \* mock 1.0.1 \* mpi4py 1.3 *L* \* mpich2 1.4.1p1 *L* \* netcdf4 1.0.7 *LM* | \* networkx 1.8.1 \* nltk 2.0.4 \* nose 1.3.0 \* numba 0.12.0 \* numexpr 2.3.0 \* numpy 1.8.0 \* opencv 2.4.6 *L* \* openpyxl 1.8.2 \* openssl 1.0.1c *LM* \* pandas 0.13.0 \* patsy 0.2.1 \* pep8 1.4.6 \* pil 1.1.7 \* pip 1.5.2 \* ply 3.4 \* psutil 1.2.1 \* py 1.4.20 \* py2cairo 1.10.0 *L* \* pyaudio 0.2.7 *M* \* pycosat 0.6.0 \* pycparser 2.10 \* pycrypto 2.6.1 \* pycurl 7.19.0 *LM* \* pyface 4.4.0 \* pyflakes 0.7.3 \* pygments 1.6 \* pykit 0.1.0 \* pyparsing 2.0.1 \* pyreadline 2.0 *W* \* pysal 1.6.0 \* pysam 0.6 *LM* \* pyside 1.2.1 \* pytables 3.1.0 \* pytest 2.5.2 | \* python 2.7.6 \* pytz 2013b \* pywin32 218.4 *W* \* pyyaml 3.10 \* pyzmq 2.2.0.1 \* qt 4.8.5 \* redis 2.6.9 *LM* \* redis-py 2.9.1 *LM* \* requests 2.2.1 \* rope 0.9.4 \* scikit-image 0.9.3 \* scikit-learn 0.14.1 \* scipy 0.13.3 \* setuptools 2.1 \* six 1.5.2 \* sphinx 1.2.1 \* spyder 2.2.5 \* sqlalchemy 0.9.2 \* ssl\_match\_hostname 3.4.0.2 \* statsmodels 0.5.0 \* sympy 0.7.4.1 \* theano 0.6.0 *L* \* tk 8.5.13 *LM* \* tornado 3.2.0 \* traits 4.4.0 \* traitsui 4.4.0 \* ujson 1.33 \* vtk 5.10.1 \* werkzeug 0.9.4 \* xlrd 0.9.2 \* xlwt 0.7.5 \* yaml 0.1.4 *LM* \* zeromq 2.2.0 *LM* \* zlib 1.2.7 |
|---|
| \* argcomplete 0.6.7 \* astropy 0.3.0 \* beautiful-soup 4.3.1 \* bitarray 0.8.1 \* blaze 0.4.1 \* blz 0.6.1 \* bokeh 0.4 \* cdecimal 2.3 \* colorama 0.2.7 \* curl 7.30.0 *LM* \* cython 0.20 \* datashape 0.1.0 \* dateutil 2.1 \* docutils 0.11 \* dynd-python 0.6.0 \* flask 0.10.1 \* freetype 2.4.10 \* future 0.11.2 \* greenlet 0.4.2 \* hdf5 1.8.9 \* ipython 1.1.0 \* itsdangerous 0.23 | \* jinja2 2.7.2 \* libdynd 0.6.0 *LM* \* libnetcdf 4.2.1.1 *LM* \* libpng 1.5.13 *LM* \* libsodium 0.4.5 *L* \* libtiff 4.0.2 *LM* \* libxml2 2.9.0 *LM* \* libxslt 1.1.28 *LM* \* llvm 3.3 \* llvmpy 0.12.2 \* lxml 3.2.3 \* markupsafe 0.18 \* matplotlib 1.3.1 *LM* \* mdp 3.3 \* mingw 4.7 *W* \* mock 1.0.1 \* netcdf4 1.0.7 *LM* \* networkx 1.8.1 \* nose 1.3.0 \* numba 0.12.0 \* numexpr 2.3.0 \* numpy 1.8.0 | \* openpyxl 1.8.2 \* pandas 0.13.0 \* patsy 0.2.1 \* pillow 2.1.0 \* pip 1.5.2 \* ply 3.4 \* psutil 1.2.1 \* py 1.4.20 \* pycosat 0.6.0 \* pycparser 2.10 \* pycrypto 2.6.1 \* pyflakes 0.7.3 \* pygments 1.6 \* pykit 0.1.0 \* pyparsing 2.0.1 \* pyreadline 2.0 *W* \* pyside 1.1.2 *W* \* pytables 3.1.0 \* pytest 2.5.2 \* python 3.3.3 \* pytz 2013b \* pyyaml 3.10 | \* pyzmq 2.2.0.1 \* redis 2.6.9 *LM* \* redis-py 2.9.1 *LM* \* requests 2.2.1 \* scikit-image 0.9.3 \* scikit-learn 0.14.1 \* scipy 0.13.3 \* setuptools 2.1 \* six 1.5.2 \* sphinx 1.2.1 \* sqlalchemy 0.9.2 \* ssl\_match\_hostname 3.4.0.2 \* statsmodels 0.5.0 \* sympy 0.7.4.1 \* tornado 3.2.0 \* ujson 1.33 \* werkzeug 0.9.4 \* xlrd 0.9.2 \* yaml 0.1.4 *LM* \* zeromq 2.2.0 *LM* \* zlib 1.2.7 |
|---|
| \* argcomplete 0.6.7 \* argparse 1.2.1 \* astropy 0.3.0 \* atom 0.3.6 \* beautiful-soup 4.3.1 \* biopython 1.63 \* bitarray 0.8.1 \* blaze 0.4.1 \* blz 0.6.1 \* boto 2.24.0 \* cairo 1.12.2 *L* \* casuarius 1.1 \* cdecimal 2.3 \* colorama 0.2.7 \* configobj 4.7.2 \* curl 7.30.0 *LM* \* cython 0.20 \* datashape 0.1.0 \* dateutil 2.1 \* disco 0.4.4 *L* \* docutils 0.11 \* dynd-python 0.6.0 \* erlang R15B01 *L* \* flask 0.10.1 \* freetype 2.4.10 \* future 0.11.2 \* gevent 1.0 \* gevent-websocket 0.9.2 | \* gevent\_zeromq 0.2.5 \* greenlet 0.4.2 \* grin 1.2.1 \* h5py 2.2.1 \* hdf5 1.8.9 \* ipython 1.1.0 \* itsdangerous 0.23 \* jinja2 2.7.2 \* kiwisolver 0.1.2 \* libdynd 0.6.0 *LM* \* libnetcdf 4.2.1.1 *LM* \* libpng 1.5.13 *LM* \* libsodium 0.4.5 *L* \* libtiff 4.0.2 *LM* \* libxml2 2.9.0 *LM* \* libxslt 1.1.28 *LM* \* llvm 3.3 \* llvmpy 0.12.2 \* lxml 3.2.3 \* markupsafe 0.18 \* matplotlib 1.3.1 *LM* \* mdp 3.3 \* mingw 4.7 *W* \* mock 1.0.1 \* mpi4py 1.3 *L* \* mpich2 1.4.1p1 *L* \* netcdf4 1.0.7 *LM* \* networkx 1.8.1 | \* nltk 2.0.4 \* nose 1.3.0 \* numba 0.12.0 \* numexpr 2.3.0 \* numpy 1.8.0 \* opencv 2.4.6 *L* \* ordereddict 1.1 \* pandas 0.13.0 \* patsy 0.2.1 \* pep8 1.4.6 \* pil 1.1.7 \* pip 1.5.2 \* ply 3.4 \* psutil 1.2.1 \* py 1.4.20 \* py2cairo 1.10.0 *L* \* pycosat 0.6.0 \* pycparser 2.10 \* pycrypto 2.6.1 \* pycurl 7.19.0 *LM* \* pyflakes 0.7.3 \* pygments 1.6 \* pykit 0.1.0 \* pyparsing 2.0.1 \* pyreadline 2.0 *W* \* pysam 0.6 *LM* \* pytables 3.1.0 *LM* \* pytest 2.5.2 | \* python 2.6.9 \* pytz 2013b \* pyyaml 3.10 \* pyzmq 2.2.0.1 \* redis 2.6.9 *LM* \* redis-py 2.9.1 *LM* \* requests 2.2.1 \* scikit-image 0.9.3 \* scikit-learn 0.14.1 \* scipy 0.13.3 \* setuptools 2.1 \* six 1.5.2 \* sphinx 1.2.1 \* sqlalchemy 0.9.2 \* ssl\_match\_hostname 3.4.0.2 \* statsmodels 0.5.0 \* sympy 0.7.4.1 \* theano 0.6.0 *L* \* tornado 3.2.0 \* traits 4.4.0 \* ujson 1.33 \* unittest2 0.5.1 \* werkzeug 0.9.4 \* xlrd 0.9.2 \* xlwt 0.7.5 \* yaml 0.1.4 *LM* \* zeromq 2.2.0 *LM* \* zlib 1.2.7 |
|---|
| \* apptools 4.2.0 \* astropy 0.2.5 \* atom 0.3.4 \* beautiful-soup 4.3.1 \* binstar 0.3.1 \* biopython 1.62 \* bitarray 0.8.1 \* blaze 0.3 \* bokeh 0.2 \* boto 2.15.0 \* cairo 1.12.2 *L* \* casuarius 1.1 \* chaco 4.3.0 \* colorama 0.2.7 \* configobj 4.7.2 \* cubes 0.10.2 \* curl 7.30.0 *LM* \* cython 0.19.2 \* dateutil 2.1 \* disco 0.4.4 *L* \* distribute 0.6.45 \* docutils 0.11 \* dynd-python 0.5.0 \* enable 4.3.0 \* enaml 0.8.3 \* envisage 4.3.0 \* erlang R15B01 *L* \* flask 0.10.1 \* freetype 2.4.10 \* gevent 0.13.8 \* gevent-websocket 0.3.6 | \* gevent\_zeromq 0.2.5 \* greenlet 0.4.1 \* grin 1.2.1 \* h5py 2.2.0 \* hdf5 1.8.9 \* imaging 1.1.7 \* ipython 1.1.0 \* itsdangerous 0.23 \* jinja2 2.7.1 \* keyring 3.2 \* launcher 0.1.2 \* libevent 2.0.20 \* libnetcdf 4.2.1.1 *LM* \* libpng 1.5.13 *LM* \* libtiff 4.0.2 *LM* \* libxml2 2.9.0 *LM* \* libxslt 1.1.28 *LM* \* llvm 3.3 \* llvmmath 0.1.1 \* llvmpy 0.12.0 \* lxml 3.2.3 \* markupsafe 0.18 \* matplotlib 1.3.1 \* mayavi 4.3.0 \* mdp 3.3 \* menuinst 1.0.3 *W* \* meta 0.4.2.dev \* mingw 4.7 *W* \* mpi4py 1.3 *L* \* mpich2 1.4.1p1 *L* \* netcdf4 1.0.6 *LM* | \* networkx 1.8.1 \* nltk 2.0.4 \* nose 1.3.0 \* numba 0.11.0 \* numexpr 2.2.2 \* numpy 1.7.1 \* opencv 2.4.6 *L* \* openpyxl 1.6.2 \* pandas 0.12.0 \* patsy 0.2.1 \* pep8 1.4.6 \* pip 1.4.1 \* ply 3.4 \* psutil 1.1.2 \* py 1.4.17 \* py2cairo 1.10.0 *L* \* pyaudio 0.2.7 *M* \* pycosat 0.6.0 \* pycparser 2.9.1 \* pycrypto 2.6.1 \* pycurl 7.19.0 *LM* \* pyface 4.3.0 \* pyflakes 0.7.3 \* pygments 1.6 \* pykit 0.1.0 \* pyparsing 1.5.6 \* pyreadline 2.0.dev *W* \* pysal 1.6.0 \* pysam 0.6 *LM* \* pyside 1.2.1 \* pytables 3.0.0 | \* pytest 2.4.2 \* python 2.7.5 \* pytz 2013b \* pywin32 218.4 *W* \* pyyaml 3.10 \* pyzmq 2.2.0.1 \* qt 4.8.5 \* redis 2.6.9 *LM* \* redis-py 2.7.2 *LM* \* requests 1.2.3 \* rope 0.9.4 \* scikit-image 0.9.3 \* scikit-learn 0.14.1 \* scipy 0.13.0 \* six 1.4.1 \* sphinx 1.1.3 \* spyder 2.2.5 \* sqlalchemy 0.8.3 \* statsmodels 0.5.0 \* sympy 0.7.3 \* theano 0.5.0 *L* \* tornado 3.1.1 \* traits 4.3.0 \* traitsui 4.3.0 \* vtk 5.10.1 \* werkzeug 0.9.4 \* xlrd 0.9.2 \* xlwt 0.7.5 \* yaml 0.1.4 *LM* \* zeromq 2.2.0 *LM* \* zlib 1.2.7 |
|---|
| \* astropy 0.2.5 \* beautiful-soup 4.3.1 \* bitarray 0.8.1 \* colorama 0.2.7 \* curl 7.30.0 *LM* \* cython 0.19.2 \* dateutil 2.1 \* distribute 0.6.45 \* docutils 0.11 \* dynd-python 0.5.0 \* flask 0.10.1 \* freetype 2.4.10 \* greenlet 0.4.1 \* hdf5 1.8.9 \* ipython 1.1.0 \* itsdangerous 0.23 \* jinja2 2.7.1 \* libnetcdf 4.2.1.1 *LM* | \* libpng 1.5.13 *LM* \* libtiff 4.0.2 *LM* \* libxml2 2.9.0 *LM* \* libxslt 1.1.28 *LM* \* llvm 3.3 \* llvmmath 0.1.1 \* llvmpy 0.12.0 \* lxml 3.2.3 \* markupsafe 0.18 \* matplotlib 1.3.1 \* mdp 3.3 \* mingw 4.7 *W* \* netcdf4 1.0.6 *LM* \* networkx 1.8.1 \* nose 1.3.0 \* numba 0.11.0 \* numexpr 2.2.2 \* numpy 1.7.1 | \* openpyxl 1.6.2 \* pandas 0.12.0 \* patsy 0.2.1 \* pillow 2.1.0 \* pip 1.4.1 \* ply 3.4 \* psutil 1.1.2 \* pycosat 0.6.0 \* pycparser 2.9.1 \* pycrypto 2.6.1 \* pyflakes 0.7.3 \* pygments 1.6 \* pyparsing 1.5.6 \* pyreadline 2.0.dev *W* \* pyside 1.2.1 *W* \* pytables 3.0.0 \* python 3.3.2 \* pytz 2013b | \* pyyaml 3.10 \* pyzmq 2.2.0.1 \* requests 1.2.3 \* scikit-image 0.9.3 \* scipy 0.13.0 \* six 1.4.1 \* sphinx 1.1.3 \* sqlalchemy 0.8.3 \* statsmodels 0.5.0 \* sympy 0.7.3 \* tornado 3.1.1 \* werkzeug 0.9.4 \* xlrd 0.9.2 \* yaml 0.1.4 *LM* \* zeromq 2.2.0 *LM* \* zlib 1.2.7 |
|---|
| \* argparse 1.2.1 \* astropy 0.2.5 \* atom 0.3.4 \* beautiful-soup 4.3.1 \* biopython 1.62 \* bitarray 0.8.1 \* boto 2.15.0 \* cairo 1.12.2 *L* \* casuarius 1.1 \* colorama 0.2.7 \* configobj 4.7.2 \* curl 7.30.0 *LM* \* cython 0.19.2 \* dateutil 2.1 \* disco 0.4.4 *L* \* distribute 0.6.45 \* docutils 0.11 \* dynd-python 0.5.0 \* erlang R15B01 *L* \* flask 0.10.1 \* freetype 2.4.10 \* gevent 0.13.8 \* gevent-websocket 0.3.6 \* gevent\_zeromq 0.2.5 \* greenlet 0.4.1 | \* grin 1.2.1 \* h5py 2.2.0 \* hdf5 1.8.9 \* imaging 1.1.7 \* ipython 1.1.0 \* itsdangerous 0.23 \* jinja2 2.7.1 \* libevent 2.0.20 \* libnetcdf 4.2.1.1 *LM* \* libpng 1.5.13 *LM* \* libtiff 4.0.2 *LM* \* libxml2 2.9.0 *LM* \* libxslt 1.1.28 *LM* \* llvm 3.3 \* llvmmath 0.1.1 \* llvmpy 0.12.0 \* lxml 3.2.3 \* markupsafe 0.18 \* matplotlib 1.3.1 *LM* \* mdp 3.3 \* mingw 4.7 *W* \* mpi4py 1.3 *L* \* mpich2 1.4.1p1 *L* \* netcdf4 1.0.6 *LM* \* networkx 1.8.1 | \* nltk 2.0.4 \* nose 1.3.0 \* numba 0.11.0 \* numexpr 2.2.2 \* numpy 1.7.1 \* opencv 2.4.6 *L* \* ordereddict 1.1 \* pandas 0.12.0 \* patsy 0.2.1 \* pep8 1.4.6 \* pip 1.4.1 \* ply 3.4 \* psutil 1.1.2 \* py 1.4.17 \* py2cairo 1.10.0 *L* \* pycosat 0.6.0 \* pycparser 2.9.1 \* pycrypto 2.6.1 \* pycurl 7.19.0 *LM* \* pyflakes 0.7.3 \* pygments 1.6 \* pyparsing 1.5.6 \* pyreadline 2.0.dev *W* \* pysam 0.6 *LM* \* pytables 3.0.0 *LM* | \* pytest 2.4.2 \* python 2.6.9 \* pytz 2013b \* pyyaml 3.10 \* pyzmq 2.2.0.1 \* redis 2.6.9 *LM* \* redis-py 2.7.2 *LM* \* requests 1.2.3 \* scikit-image 0.9.3 \* scikit-learn 0.14.1 \* scipy 0.13.0 \* six 1.4.1 \* sphinx 1.1.3 \* sqlalchemy 0.8.3 \* statsmodels 0.5.0 \* sympy 0.7.3 *LM* \* theano 0.5.0 *L* \* tornado 3.1.1 \* werkzeug 0.9.4 \* xlrd 0.9.2 \* xlwt 0.7.5 \* yaml 0.1.4 *LM* \* zeromq 2.2.0 *LM* \* zlib 1.2.7 |
|---|
| \* apptools 4.2.0 \* astropy 0.2.4 \* atom 0.3.2 \* binstar 0.3.1 \* biopython 1.61 \* bitarray 0.8.1 \* bokeh 0.1.1 \* boto 2.12.0 \* cairo 1.12.2 *L* \* casuarius 1.1 \* chaco 4.3.0 \* configobj 4.7.2 \* cubes 0.10.2 \* curl 7.30.0 *LM* \* cython 0.19.1 \* dateutil 2.1 \* disco 0.4.4 *L* \* distribute 0.6.45 \* docutils 0.11 \* dynd-python 0.4.2 \* enable 4.3.0 \* enaml 0.7.19 \* envisage 4.3.0 \* erlang R15B01 *L* \* flask 0.10.1 \* freetype 2.4.10 \* gevent 0.13.8 \* gevent-websocket 0.3.6 \* gevent\_zeromq 0.2.5 | \* greenlet 0.4.1 \* grin 1.2.1 \* h5py 2.2.0 \* hdf5 1.8.9 \* imaging 1.1.7 \* ipython 1.0.0 \* itsdangerous 0.23 \* jinja2 2.7.1 \* keyring 3.0.1 \* launcher 0.1.2 \* libevent 2.0.20 \* libnetcdf 4.2.1.1 *LM* \* libpng 1.5.13 *LM* \* libtiff 4.0.2 *LM* \* libxml2 2.9.0 *LM* \* libxslt 1.1.28 *LM* \* llvm 3.3 \* llvmmath 0.1.1 \* llvmpy 0.12.0 \* lxml 3.2.3 \* markupsafe 0.18 \* matplotlib 1.3.0 \* mayavi 4.3.0 \* mdp 3.3 \* menuinst 1.0.1 *W* \* meta 0.4.2.dev \* mingw 4.7 *W* \* mpi4py 1.3 *L* \* mpich2 1.4.1p1 *L* | \* netcdf4 1.0.5 *LM* \* networkx 1.8.1 \* nltk 2.0.4 \* nose 1.3.0 \* numba 0.10.2 \* numexpr 2.0.1 \* numpy 1.7.1 \* opencv 2.4.6 *L* \* pandas 0.12.0 \* patsy 0.2.1 \* pep8 1.4.6 \* pip 1.4.1 \* ply 3.4 \* psutil 1.0.1 \* py 1.4.14 \* py2cairo 1.10.0 *L* \* pyaudio 0.2.7 *M* \* pycosat 0.6.0 \* pycparser 2.9.1 \* pycrypto 2.6 \* pycurl 7.19.0 *LM* \* pyface 4.3.0 \* pyflakes 0.7.3 \* pygments 1.6 \* pyparsing 1.5.6 \* pyreadline 2.0.dev *W* \* pysal 1.6.0 \* pysam 0.6 *LM* \* pyside 1.1.2 | \* pytables 2.4.0 \* pytest 2.3.5 \* python 2.7.5 \* pytz 2013b \* pywin32 218.4 *W* \* pyyaml 3.10 \* pyzmq 2.2.0.1 \* qt 4.7.4 \* redis-py 2.7.2 *LM* \* requests 1.2.3 \* rope 0.9.4 \* scikit-image 0.8.2 \* scikit-learn 0.14.1 \* scipy 0.12.0 \* six 1.4.1 \* sphinx 1.1.3 \* spyder 2.2.4 \* sqlalchemy 0.8.2 \* statsmodels 0.5.0 \* sympy 0.7.3 \* theano 0.5.0 *L* \* tornado 3.1.1 \* traits 4.3.0 \* traitsui 4.3.0 \* vtk 5.10.1 \* werkzeug 0.9.4 \* xlrd 0.9.2 \* xlwt 0.7.5 \* zlib 1.2.7 |
|---|
| \* astropy 0.2.4 \* bitarray 0.8.1 \* curl 7.30.0 *LM* \* cython 0.19.1 \* dateutil 2.1 \* distribute 0.6.45 \* docutils 0.11 \* dynd-python 0.4.2 \* flask 0.10.1 \* freetype 2.4.10 \* greenlet 0.4.1 \* hdf5 1.8.9 \* ipython 1.0.0 \* itsdangerous 0.23 \* jinja2 2.7.1 \* libnetcdf 4.2.1.1 *LM* | \* libpng 1.5.13 *LM* \* libtiff 4.0.2 *LM* \* libxml2 2.9.0 *LM* \* libxslt 1.1.28 *LM* \* llvm 3.3 \* llvmmath 0.1.1 \* llvmpy 0.12.0 \* lxml 3.2.3 \* markupsafe 0.18 \* matplotlib 1.3.0 \* mdp 3.3 \* mingw 4.7 *W* \* netcdf4 1.0.5 *LM* \* networkx 1.8.1 \* nose 1.3.0 \* numba 0.10.2 | \* numpy 1.7.1 \* pandas 0.12.0 \* patsy 0.2.1 \* pillow 2.1.0 \* pip 1.4.1 \* ply 3.4 \* psutil 1.0.1 \* pycosat 0.6.0 \* pycparser 2.9.1 \* pycrypto 2.6 \* pyflakes 0.7.3 \* pygments 1.6 \* pyparsing 1.5.6 \* pyreadline 2.0.dev *W* \* pyside 1.1.2 *W* \* python 3.3.2 | \* pytz 2013b \* pyyaml 3.10 \* pyzmq 2.2.0.1 \* requests 1.2.3 \* scikit-image 0.8.2 \* scipy 0.12.0 \* six 1.4.1 \* sphinx 1.1.3 \* sqlalchemy 0.8.2 \* statsmodels 0.5.0 \* sympy 0.7.3 \* tornado 3.1.1 \* werkzeug 0.9.4 \* xlrd 0.9.2 \* zlib 1.2.7 |
|---|
| \* argparse 1.2.1 \* astropy 0.2.4 \* atom 0.3.2 \* biopython 1.61 \* bitarray 0.8.1 \* boto 2.12.0 \* cairo 1.12.2 *L* \* casuarius 1.1 \* configobj 4.7.2 \* curl 7.30.0 *LM* \* cython 0.19.1 \* dateutil 2.1 \* disco 0.4.4 *L* \* distribute 0.6.45 \* docutils 0.11 \* dynd-python 0.4.2 \* erlang R15B01 *L* \* flask 0.10.1 \* freetype 2.4.10 \* gevent 0.13.8 \* gevent-websocket 0.3.6 \* gevent\_zeromq 0.2.5 \* greenlet 0.4.1 \* grin 1.2.1 | \* h5py 2.2.0 \* hdf5 1.8.9 \* imaging 1.1.7 \* ipython 1.0.0 \* itsdangerous 0.23 \* jinja2 2.7.1 \* libevent 2.0.20 \* libnetcdf 4.2.1.1 *LM* \* libpng 1.5.13 *LM* \* libtiff 4.0.2 *LM* \* libxml2 2.9.0 *LM* \* libxslt 1.1.28 *LM* \* llvm 3.3 \* llvmmath 0.1.1 \* llvmpy 0.12.0 \* lxml 3.2.3 \* markupsafe 0.18 \* matplotlib 1.3.0 *LM* \* mdp 3.3 \* mingw 4.7 *W* \* mpi4py 1.3 *L* \* mpich2 1.4.1p1 *L* \* netcdf4 1.0.5 *LM* \* networkx 1.8.1 | \* nltk 2.0.4 \* nose 1.3.0 \* numba 0.10.2 \* numexpr 2.0.1 \* numpy 1.7.1 \* opencv 2.4.6 *L* \* ordereddict 1.1 \* pandas 0.12.0 \* patsy 0.2.1 \* pep8 1.4.6 \* pip 1.4.1 \* ply 3.4 \* psutil 1.0.1 \* py 1.4.14 \* py2cairo 1.10.0 *L* \* pycosat 0.6.0 \* pycparser 2.9.1 \* pycrypto 2.6 \* pycurl 7.19.0 *LM* \* pyflakes 0.7.3 \* pygments 1.6 \* pyparsing 1.5.6 \* pyreadline 2.0.dev *W* \* pysam 0.6 *LM* | \* pytables 2.4.0 *LM* \* pytest 2.3.5 \* python 2.6.8 \* pytz 2013b \* pyyaml 3.10 \* pyzmq 2.2.0.1 \* redis-py 2.7.2 *LM* \* requests 1.2.3 \* scikit-image 0.8.2 \* scikit-learn 0.14.1 \* scipy 0.12.0 \* six 1.4.1 \* sphinx 1.1.3 \* sqlalchemy 0.8.2 \* statsmodels 0.5.0 \* sympy 0.7.3 *LM* \* theano 0.5.0 *L* \* tornado 3.1.1 \* werkzeug 0.9.4 \* xlrd 0.9.2 \* xlwt 0.7.5 \* zlib 1.2.7 |
|---|
| \* astropy 0.2.3 \* atom 0.2.3 \* binstar 0.1.2 \* biopython 1.61 \* bitarray 0.8.1 \* boto 2.9.6 \* cairo 1.12.2 *L* \* casuarius 1.1 \* conda 1.7.2 \* cubes 0.10.2 \* curl 7.30.0 *LM* \* cython 0.19.1 \* dateutil 2.1 \* disco 0.4.4 *L* \* distribute 0.6.45 \* docutils 0.10 \* dynd-python 0.4.0 \* enaml 0.7.6 \* erlang R15B01 *L* \* flask 0.10.1 \* freetype 2.4.10 \* gevent 0.13.8 \* gevent-websocket 0.3.6 \* gevent\_zeromq 0.2.5 \* greenlet 0.4.1 | \* grin 1.2.1 \* h5py 2.1.1 \* hdf5 1.8.9 \* imaging 1.1.7 \* ipython 0.13.2 \* itsdangerous 0.21 \* jinja2 2.6 \* keyring 1.4 \* launcher 0.1.2 \* libevent 2.0.20 \* libnetcdf 4.2.1.1 *LM* \* libpng 1.5.13 \* llvm 3.2 \* llvmmath 0.1.0 \* llvmpy 0.11.3 \* lxml 3.2.1 \* matplotlib 1.2.1 \* mdp 3.3 \* menuinst 1.0.1 *W* \* meta 0.4.2.dev \* mingw 4.7 *W* \* mpi4py 1.3 *L* \* mpich2 1.4.1p1 *L* \* netcdf4 1.0.4 *LM* \* networkx 1.7 | \* nltk 2.0.4 \* nose 1.3.0 \* numba 0.9.0 \* numexpr 2.0.1 \* numpy 1.7.1 \* opencv 2.4.2 *L* \* pandas 0.11.0 \* pep8 1.4.5 \* pip 1.3.1 \* ply 3.4 \* psutil 0.7.1 \* py 1.4.14 \* py2cairo 1.10.0 *L* \* pyaudio 0.2.7 *M* \* pycosat 0.6.0 \* pycparser 2.9.1 \* pycrypto 2.6 \* pycurl 7.19.0 *LM* \* pyflakes 0.7.2 \* pygments 1.6 \* pyparsing 1.5.6 \* pysal 1.5.0 \* pysam 0.6 *LM* \* pyside 1.1.2 \* pytables 2.4.0 | \* pytest 2.3.5 \* python 2.7.5 \* pytz 2013b \* pywin32 218.4 *W* \* pyyaml 3.10 \* pyzmq 2.2.0.1 \* qt 4.7.4 \* redis-py 2.7.2 *LM* \* requests 1.2.3 \* rope 0.9.4 \* scikit-image 0.8.2 \* scikit-learn 0.13.1 \* scipy 0.12.0 \* six 1.3.0 \* sphinx 1.1.3 \* spyder 2.2.0 \* sqlalchemy 0.8.1 \* statsmodels 0.4.3 \* sympy 0.7.2 \* theano 0.5.0 *L* \* tornado 3.1 \* werkzeug 0.9.1 \* xlrd 0.9.2 \* xlwt 0.7.5 \* zlib 1.2.7 |
|---|
| \* astropy 0.2.3 \* bitarray 0.8.1 \* curl 7.30.0 *LM* \* cython 0.19.1 \* dateutil 2.1 \* distribute 0.6.45 \* docutils 0.10 \* dynd-python 0.4.0 \* freetype 2.4.10 \* greenlet 0.4.1 \* hdf5 1.8.9 \* ipython 0.13.2 \* jinja2 2.6 | \* libnetcdf 4.2.1.1 *LM* \* libpng 1.5.13 \* llvm 3.2 \* llvmmath 0.1.0 \* llvmpy 0.11.3 \* lxml 3.2.1 \* matplotlib 1.2.1 \* mdp 3.3 \* mingw 4.7 *W* \* netcdf4 1.0.4 *LM* \* networkx 1.7 \* nose 1.3.0 \* numba 0.9.0 | \* numpy 1.7.1 \* pandas 0.11.0 \* pip 1.3.1 \* ply 3.4 \* psutil 0.7.1 \* pycosat 0.6.0 \* pycparser 2.9.1 \* pycrypto 2.6 \* pyflakes 0.7.2 \* pygments 1.6 \* pyside 1.1.2 *W* \* python 3.3.2 \* pytz 2013b | \* pyyaml 3.10 \* pyzmq 2.2.0.1 \* requests 1.2.3 \* scikit-image 0.8.2 \* scipy 0.12.0 \* six 1.3.0 \* sphinx 1.1.3 \* sqlalchemy 0.8.1 \* sympy 0.7.2 \* tornado 3.1 \* xlrd 0.9.2 \* zlib 1.2.7 |
|---|
| \* argparse 1.2.1 \* astropy 0.2.3 \* atom 0.2.3 \* biopython 1.61 \* bitarray 0.8.1 \* boto 2.9.6 \* cairo 1.12.2 *L* \* casuarius 1.1 \* curl 7.30.0 *LM* \* cython 0.19.1 \* dateutil 2.1 \* disco 0.4.4 *L* \* distribute 0.6.45 \* docutils 0.10 \* dynd-python 0.4.0 \* erlang R15B01 *L* \* flask 0.10.1 \* freetype 2.4.10 \* gevent 0.13.8 \* gevent-websocket 0.3.6 \* gevent\_zeromq 0.2.5 \* greenlet 0.4.1 | \* grin 1.2.1 \* h5py 2.1.1 \* hdf5 1.8.9 \* imaging 1.1.7 \* ipython 0.13.2 \* itsdangerous 0.21 \* jinja2 2.6 \* libevent 2.0.20 \* libnetcdf 4.2.1.1 *LM* \* libpng 1.5.13 \* llvm 3.2 \* llvmmath 0.1.0 \* llvmpy 0.11.3 \* lxml 3.2.1 \* matplotlib 1.2.1 *LM* \* mdp 3.3 \* mingw 4.7 *W* \* mpi4py 1.3 *L* \* mpich2 1.4.1p1 *L* \* netcdf4 1.0.4 *LM* \* networkx 1.7 \* nltk 2.0.4 | \* nose 1.3.0 \* numba 0.9.0 \* numexpr 2.0.1 \* numpy 1.7.1 \* opencv 2.4.2 *L* \* ordereddict 1.1 \* pandas 0.11.0 \* pep8 1.4.5 \* pip 1.3.1 \* ply 3.4 \* psutil 0.7.1 \* py 1.4.14 \* py2cairo 1.10.0 *L* \* pycosat 0.6.0 \* pycparser 2.9.1 \* pycrypto 2.6 \* pycurl 7.19.0 *LM* \* pyflakes 0.7.2 \* pygments 1.6 \* pyparsing 1.5.6 \* pysam 0.6 *LM* \* pytables 2.4.0 *LM* | \* pytest 2.3.5 \* python 2.6.8 \* pytz 2013b \* pyyaml 3.10 \* pyzmq 2.2.0.1 \* redis-py 2.7.2 *LM* \* requests 1.2.3 \* scikit-image 0.8.2 \* scikit-learn 0.13.1 \* scipy 0.12.0 \* six 1.3.0 \* sphinx 1.1.3 \* sqlalchemy 0.8.1 \* statsmodels 0.4.3 \* sympy 0.7.2 *LM* \* theano 0.5.0 *L* \* tornado 3.1 \* werkzeug 0.9.1 \* xlrd 0.9.2 \* xlwt 0.7.5 \* zlib 1.2.7 |
|---|
| \* astropy 0.2.1 \* atom 0.2.3 \* biopython 1.61 \* bitarray 0.8.1 \* boto 2.9.2 \* cairo 1.12.2 *L* \* casuarius 1.1 \* conda 1.5.2 \* cubes 0.10.2 \* curl 7.30.0 *LM* \* cython 0.19 \* dateutil 2.1 \* disco 0.4.4 *L* \* distribute 0.6.36 \* docutils 0.10 \* dynd-python 0.3.0 \* enaml 0.7.6 \* erlang R15B01 *L* \* flask 0.9 \* freetype 2.4.10 \* gevent 0.13.8 \* gevent-websocket 0.3.6 \* gevent\_zeromq 0.2.5 | \* greenlet 0.4.0 \* grin 1.2.1 \* h5py 2.1.1 \* hdf5 1.8.9 \* imaging 1.1.7 \* ipython 0.13.2 \* jinja2 2.6 \* libevent 2.0.20 \* libnetcdf 4.2.1.1 *LM* \* libpng 1.5.13 \* llvm 3.2 \* llvmpy 0.11.2 \* lxml 3.2.0 \* matplotlib 1.2.1 \* mdp 3.3 \* menuinst 1.0.0 *W* \* meta 0.4.2.dev \* mingw 4.7 *W* \* mpi4py 1.3 *L* \* mpich2 1.4.1p1 *L* \* netcdf4 1.0.4 *LM* \* networkx 1.7 \* nltk 2.0.4 | \* nose 1.3.0 \* numba 0.8.1 \* numexpr 2.0.1 \* numpy 1.7.1 \* opencv 2.4.2 *L* \* pandas 0.11.0 \* pip 1.3.1 \* ply 3.4 \* psutil 0.7.1 \* py 1.4.12 \* py2cairo 1.10.0 *L* \* pyaudio 0.2.7 *M* \* pycosat 0.6.0 \* pycparser 2.9.1 \* pycrypto 2.6 \* pycurl 7.19.0 *LM* \* pyflakes 0.7.2 \* pygments 1.6 \* pyparsing 1.5.6 \* pysal 1.5.0 \* pysam 0.6 *LM* \* pyside 1.1.2 \* pytables 2.4.0 | \* pytest 2.3.4 \* python 2.7.4 \* pytz 2013b \* pyyaml 3.10 \* pyzmq 2.2.0.1 \* qt 4.7.4 \* redis-py 2.7.2 *LM* \* requests 1.2.0 \* scikit-image 0.8.2 \* scikit-learn 0.13.1 \* scipy 0.12.0 \* six 1.3.0 \* sphinx 1.1.3 \* spyder 2.2.0 \* sqlalchemy 0.8.1 \* statsmodels 0.4.3 \* sympy 0.7.2 \* theano 0.5.0 *L* \* tornado 3.0.1 \* werkzeug 0.8.3 \* xlrd 0.9.2 \* xlwt 0.7.5 \* zlib 1.2.7 |
|---|
| \* astropy 0.2.1 \* bitarray 0.8.1 \* curl 7.30.0 *LM* \* cython 0.19 \* dateutil 2.1 \* distribute 0.6.36 \* docutils 0.10 \* dynd-python 0.3.0 \* freetype 2.4.10 \* greenlet 0.4.0 \* hdf5 1.8.9 \* ipython 0.13.2 \* jinja2 2.6 | \* libnetcdf 4.2.1.1 *LM* \* libpng 1.5.13 \* llvm 3.2 \* llvmpy 0.11.2 \* lxml 3.2.0 \* matplotlib 1.2.1 \* mdp 3.3 \* mingw 4.7 *W* \* netcdf4 1.0.4 *LM* \* networkx 1.7 \* nose 1.3.0 \* numba 0.8.1 \* numpy 1.7.1 | \* pandas 0.11.0 \* pip 1.3.1 \* ply 3.4 \* psutil 0.7.1 \* pycosat 0.6.0 \* pycparser 2.9.1 \* pycrypto 2.6 \* pyflakes 0.7.2 \* pygments 1.6 \* pyside 1.1.2 *W* \* python 3.3.1 \* pytz 2013b \* pyyaml 3.10 | \* pyzmq 2.2.0.1 \* requests 1.2.0 \* scikit-image 0.8.2 \* scipy 0.12.0 \* six 1.3.0 \* sphinx 1.1.3 \* sqlalchemy 0.8.1 \* sympy 0.7.2 \* tornado 3.0.1 \* xlrd 0.9.2 \* zlib 1.2.7 |
|---|
| \* argparse 1.2.1 \* astropy 0.2.1 \* atom 0.2.3 \* biopython 1.61 \* bitarray 0.8.1 \* boto 2.9.2 \* cairo 1.12.2 *L* \* casuarius 1.1 \* curl 7.30.0 *LM* \* cython 0.19 \* dateutil 2.1 \* disco 0.4.4 *L* \* distribute 0.6.36 \* docutils 0.10 \* dynd-python 0.3.0 \* erlang R15B01 *L* \* flask 0.9 \* freetype 2.4.10 \* gevent 0.13.8 \* gevent-websocket 0.3.6 \* gevent\_zeromq 0.2.5 | \* greenlet 0.4.0 \* grin 1.2.1 \* h5py 2.1.1 \* hdf5 1.8.9 \* imaging 1.1.7 \* ipython 0.13.2 \* jinja2 2.6 \* libevent 2.0.20 \* libnetcdf 4.2.1.1 *LM* \* libpng 1.5.13 \* llvm 3.2 \* llvmpy 0.11.2 \* lxml 3.2.0 \* matplotlib 1.2.1 *LM* \* mdp 3.3 \* mingw 4.7 *W* \* mpi4py 1.3 *L* \* mpich2 1.4.1p1 *L* \* netcdf4 1.0.4 *LM* \* networkx 1.7 \* nltk 2.0.4 | \* nose 1.3.0 \* numba 0.8.1 \* numexpr 2.0.1 \* numpy 1.7.1 \* opencv 2.4.2 *L* \* ordereddict 1.1 \* pandas 0.11.0 \* pip 1.3.1 \* ply 3.4 \* psutil 0.7.1 \* py 1.4.12 \* py2cairo 1.10.0 *L* \* pycosat 0.6.0 \* pycparser 2.9.1 \* pycrypto 2.6 \* pycurl 7.19.0 *LM* \* pyflakes 0.7.2 \* pygments 1.6 \* pyparsing 1.5.6 \* pysam 0.6 *LM* \* pytables 2.4.0 *LM* | \* pytest 2.3.4 \* python 2.6.8 \* pytz 2013b \* pyyaml 3.10 \* pyzmq 2.2.0.1 \* redis-py 2.7.2 *LM* \* requests 1.2.0 \* scikit-image 0.8.2 \* scikit-learn 0.13.1 \* scipy 0.12.0 \* six 1.3.0 \* sphinx 1.1.3 \* sqlalchemy 0.8.1 \* statsmodels 0.4.3 \* sympy 0.7.2 *LM* \* theano 0.5.0 *L* \* tornado 3.0.1 \* werkzeug 0.8.3 \* xlrd 0.9.2 \* xlwt 0.7.5 \* zlib 1.2.7 |
|---|
| \* astropy 0.2 \* biopython 1.60 \* bitarray 0.8.0 \* bitey 0.0 \* boto 2.8.0 \* cairo 1.12.2 *L* \* conda 1.4.4 \* cubes 0.10.2 \* cython 0.18 \* dateutil 2.1 \* disco 0.4.4 *L* \* distribute 0.6.34 \* docutils 0.10 \* erlang R15B01 *L* \* flask 0.9 \* freetype 2.4.10 \* gdata 2.0.17 \* gevent 0.13.8 \* gevent-websocket 0.3.6 \* gevent\_zeromq 0.2.5 \* googlecl 0.9.12 \* greenlet 0.4.0 | \* grin 1.2.1 \* h5py 2.1.1 \* hdf5 1.8.9 \* imaging 1.1.7 \* ipython 0.13.1 \* jinja2 2.6 \* libevent 2.0.20 \* libpng 1.5.13 \* llvm 3.2 \* llvmpy 0.11.1 \* lxml 3.0.2 \* matplotlib 1.2.0 \* mdp 3.3 \* menuinst 1.0.0 *W* \* meta 0.4.2.dev \* mingw 4.7 *W* \* mpi4py 1.3 *L* \* mpich2 1.4.1p1 *L* \* networkx 1.7 \* nltk 2.0.4 \* nose 1.2.1 \* numba 0.7.0 | \* numexpr 2.0.1 \* numpy 1.7.0 \* opencv 2.4.2 *L* \* pandas 0.10.1 \* pip 1.2.1 \* ply 3.4 \* psutil 0.6.1 \* py 1.4.12 \* py2cairo 1.10.0 *L* \* pyaudio 0.2.7 *M* \* pycparser 2.9.1 \* pycrypto 2.6 \* pycurl 7.19.0 *LM* \* pyflakes 0.6.1 \* pygments 1.6 \* pyparsing 1.5.6 \* pysal 1.5.0 \* pysam 0.6 *LM* \* pyside 1.1.2 \* pytables 2.4.0 \* pytest 2.3.4 \* python 2.7.3 | \* pytz 2012j \* pyyaml 3.10 \* pyzmq 2.2.0.1 \* qt 4.7.4 \* redis 2.6.9 *LM* \* redis-py 2.7.2 *LM* \* requests 0.13.9 \* scikit-image 0.8.2 \* scikit-learn 0.13 \* scipy 0.11.0 \* six 1.2.0 \* sphinx 1.1.3 \* spyder 2.1.13 \* sqlalchemy 0.7.8 \* statsmodels 0.4.3 \* sympy 0.7.1 \* theano 0.5.0 *L* \* tornado 2.4.1 \* werkzeug 0.8.3 \* xlrd 0.9.0 \* xlwt 0.7.4 \* zlib 1.2.7 |
|---|
| \* astropy 0.2 \* bitarray 0.8.0 \* cython 0.18 \* dateutil 2.1 \* distribute 0.6.34 \* docutils 0.10 \* freetype 2.4.10 \* greenlet 0.4.0 \* ipython 0.13.1 \* jinja2 2.6 \* libpng 1.5.13 | \* llvm 3.2 \* llvmpy 0.11.1 \* lxml 3.0.2 \* matplotlib 1.2.0 \* mdp 3.3 \* mingw 4.7 *W* \* networkx 1.7 \* nose 1.2.1 \* numpy 1.7.0 \* pandas 0.10.1 *LM* \* pip 1.2.1 | \* ply 3.4 \* psutil 0.6.1 \* pycparser 2.9.1 \* pycrypto 2.6 \* pyflakes 0.6.1 \* pygments 1.6 \* python 3.3.0 \* pytz 2012j \* pyyaml 3.10 \* pyzmq 2.2.0.1 \* requests 0.13.9 | \* scikit-image 0.8.2 *LM* \* scipy 0.11.0 *LM* \* six 1.2.0 \* sphinx 1.1.3 \* sqlalchemy 0.7.8 \* tornado 2.4.1 \* xlrd 0.9.0 \* zlib 1.2.7 |
|---|
| \* argparse 1.2.1 \* astropy 0.2 \* biopython 1.60 \* bitarray 0.8.0 \* boto 2.8.0 \* cairo 1.12.2 *L* \* cython 0.18 \* dateutil 2.1 \* disco 0.4.4 *L* \* distribute 0.6.34 \* docutils 0.10 \* erlang R15B01 *L* \* flask 0.9 \* freetype 2.4.10 \* gdata 2.0.17 \* gevent 0.13.8 \* gevent-websocket 0.3.6 \* gevent\_zeromq 0.2.5 \* googlecl 0.9.12 \* greenlet 0.4.0 | \* grin 1.2.1 \* h5py 2.1.1 \* hdf5 1.8.9 \* imaging 1.1.7 \* ipython 0.13.1 \* jinja2 2.6 \* libevent 2.0.20 \* libpng 1.5.13 \* llvm 3.2 \* llvmpy 0.11.1 \* lxml 3.0.2 \* matplotlib 1.2.0 *LM* \* mdp 3.3 \* mingw 4.7 *W* \* mpi4py 1.3 *L* \* mpich2 1.4.1p1 *L* \* networkx 1.7 \* nltk 2.0.4 \* nose 1.2.1 \* numba 0.7.0 | \* numexpr 2.0.1 \* numpy 1.7.0 \* opencv 2.4.2 *L* \* pandas 0.10.1 \* pip 1.2.1 \* ply 3.4 \* psutil 0.6.1 \* py 1.4.12 \* py2cairo 1.10.0 *L* \* pycparser 2.9.1 \* pycrypto 2.6 \* pycurl 7.19.0 *LM* \* pyflakes 0.6.1 \* pygments 1.6 \* pyparsing 1.5.6 \* pysam 0.6 *LM* \* pytables 2.4.0 *LM* \* pytest 2.3.4 \* python 2.6.8 \* pytz 2012j | \* pyyaml 3.10 \* pyzmq 2.2.0.1 \* redis 2.6.9 *LM* \* redis-py 2.7.2 *LM* \* requests 0.13.9 \* scikit-image 0.8.2 \* scikit-learn 0.13 \* scipy 0.11.0 \* six 1.2.0 \* sphinx 1.1.3 \* sqlalchemy 0.7.8 \* statsmodels 0.4.3 \* sympy 0.7.1 *LM* \* theano 0.5.0 *L* \* tornado 2.4.1 \* werkzeug 0.8.3 \* xlrd 0.9.0 \* xlwt 0.7.4 \* zlib 1.2.7 |
|---|
| \* biopython 1.60 \* bitarray 0.8.0 \* bitey 0.0 \* boto 2.7.0 \* cairo 1.12.2 *L* \* conda 1.3.5 \* cubes 0.10.1 \* cython 0.17.4 \* dateutil 1.5 \* disco 0.4.4 *L* \* distribute 0.6.34 \* docutils 0.10 \* erlang R15B01 *L* \* flask 0.9 \* freetype 2.4.10 \* gdata 2.0.17 \* gevent 0.13.8 \* gevent-websocket 0.3.6 \* gevent\_zeromq 0.2.5 \* googlecl 0.9.12 \* greenlet 0.4.0 \* grin 1.2.1 | \* h5py 2.1.1 \* hdf5 1.8.9 \* imaging 1.1.7 \* iopro 1.3.2 *P* \* ipython 0.13.1 \* jinja2 2.6 \* libevent 2.0.20 \* libnvvm 1.0 *P* \* libpng 1.5.13 \* llvm 3.2 \* llvmpy 0.10.2 \* matplotlib 1.2.0 \* mdp 3.3 \* meta 0.4.2.dev \* mingw 4.7 *W* \* mkl 10.3 *LP* \* mpi4py 1.3 *L* \* mpich2 1.4.1p1 *L* \* networkx 1.7 \* nltk 2.0.4 \* nose 1.2.1 \* numba 0.6.0 | \* numbapro 0.8.1 *P* \* numexpr 2.0.1 \* numpy 1.6.2 *W* \* numpy 1.7.0rc1 *U* \* opencv 2.4.2 *L* \* pandas 0.10.1 \* pip 1.2.1 \* ply 3.4 \* psutil 0.6.1 \* py 1.4.12 \* py2cairo 1.10.0 *L* \* pyaudio 0.2.7 *M* \* pycrypto 2.6 \* pycurl 7.19.0 \* pyflakes 0.5.0 \* pygments 1.5 \* pyparsing 1.5.6 \* pysal 1.4.0 \* pysam 0.6 *U* \* pyside 1.1.2 \* pytables 2.4.0 \* pytest 2.3.4 | \* python 2.7.3 \* pytz 2012d \* pyyaml 3.10 \* pyzmq 2.2.0.1 \* qt 4.7.4 \* redis 2.6.9 *U* \* redis-py 2.7.2 *U* \* requests 0.13.9 \* scikit-learn 0.13 \* scikits-image 0.7.1 \* scipy 0.11.0 \* sphinx 1.1.3 \* spyder 2.1.13 \* sqlalchemy 0.7.8 \* statsmodels 0.4.3 \* sympy 0.7.1 \* theano 0.5.0 *L* \* tornado 2.4.1 \* werkzeug 0.8.3 \* wiserf 1.1 *UP* \* zeromq 2.2.0 \* zlib 1.2.7 |
|---|
| \* bitarray 0.8.0 \* bitey 0.0 \* boto 2.6.0 \* cairo 1.12.2 *L* \* chaco 4.2.1.dev *M* \* conda 1.2.1 \* cython 0.17.1 \* dateutil 1.5 \* disco 0.4.2 *L* \* distribute 0.6.30 \* docutils 0.9.1 \* erlang R15B01 *L* \* flask 0.9 \* freetype 2.4.10 \* gevent 0.13.7 \* gevent-websocket 0.3.6 \* gevent\_zeromq 0.2.5 \* greenlet 0.4.0 \* grin 1.2.1 \* h5py 2.1.0 \* hdf5 1.8.9 | \* imaging 1.1.7 \* iopro 1.2.2 *P* \* ipython 0.13.1 \* jinja2 2.6 \* jpeg 8d \* libevent 2.0.20 \* libpng 1.5.13 \* llvm 3.1 \* llvmpy 0.9 \* matplotlib 1.2.0 \* mdp 3.3 \* meta 0.4.2.dev \* mingw 4.7 *W* \* mkl 10.3 *LP* \* mpi4py 1.3 *L* \* mpich2 1.4.1p1 *L* \* networkx 1.7 \* nltk 2.0.3 \* nose 1.1.2 \* numba 0.3.2 \* numbapro 0.7.3 *P* | \* numexpr 2.0.1 \* numpy 1.6.2 *W* \* numpy 1.7.0b2 *U* \* opencv 2.4.2 *L* \* pandas 0.9.0 \* pip 1.2.1 \* psutil 0.6.1 \* py 1.4.12 \* py2cairo 1.10.0 *L* \* pyaudio 0.2.6 *M* \* pycurl 7.19.0 \* pyflakes 0.5.0 \* pygments 1.5 \* pyreadline 1.7.1 *W* \* pysal 1.4.0 \* pysam 0.6 *U* \* pyside 1.1.2 \* pytables 2.4.0 \* pytest 2.3.3 \* python 2.7.3 \* pytz 2012d | \* pyyaml 3.10 \* pyzmq 2.2.0.1 \* qt 4.7.4 \* redis 2.4.15 *L* \* redis-py 2.4.13 *L* \* requests 0.13.9 \* scikit-learn 0.11 \* scikits-image 0.6.1 \* scipy 0.11.0 \* sphinx 1.1.3 \* spyder 2.1.11 \* sqlalchemy 0.7.8 \* statsmodels 0.4.3 \* sympy 0.7.1 \* theano 0.5.0 *L* \* tornado 2.3 \* werkzeug 0.8.3 \* wiserf 1.1 *UP* \* yaml 0.1.4 \* zeromq 2.2.0 \* zlib 1.2.7 |
|---|
| \* anaconda launcher \* bitarray 0.8.0 \* bitey \* cython 0.16 \* dateutil 1.5 \* disco 0.4.2 (Linux only) \* erlang (Linux only) \* flask 0.9 \* gevent 0.13.7 \* gevent-websocket 0.3.6 \* gevent\_zeromq 0.2.5 \* greenlet0.4.0 \* h5py 2.0.1 \* hdf5 1.8.9 \* PIL 1.1.7 | \* iopro 1.0 \* \* ipython 0.13 \* jinja2 2.6 \* llvm 3.1 \* llvmpy 0.8.2.dev \* matplotlib 1.1.1 \* mpi4py 1.3 \* mpich2 1.4.1p1 \* networkx 1.7 \* nose 1.1.2 \* numba 0.1.dev \* numbapro 1.0 \* \* numexpr 2.0.1 \* numpy 1.7.dev \* opencv 2.4.2 | \* openssl 1.0.1c \* pandas 0.8.1 \* pip 1.1 \* pixman 0.26.2 \* py2cairo 1.10.0 \* pycurl 7.19.0 \* pygments 1.5 \* pysal 1.4.0 \* pysam 0.6 \* pytables 2.4.0 \* python 2.7.3 \* pytz 2012c \* pyyaml 3.10 \* pyzmq 2.2.0 \* redis 2.4.15 (Linux only) | \* redis py-2.4.13 \* requests 0.13.5 \* scikit-learn 0.11 \* scikits-image 0.6.1 \* scipy 0.11.0rc2 \* spyder \* sqlalchemy 0.7.8 \* sqlite 3.7.13 \* statsmodels 0.4.3 \* sympy 0.7.1 \* theano 0.5.0 \* tornado 2.3 \* werkzeug 0.8.3 \* wiseRF \* |
|---|
| \* anaconda launcher \* bitarray 0.8.0 \* bitey \* cython 0.16 \* dateutil 1.5 \* disco 0.4.2 (Linux only) \* erlang (Linux only) \* flask 0.9 \* gevent 0.13.7 \* gevent-websocket 0.3.6 \* gevent\_zeromq 0.2.5 \* greenlet0.4.0 \* h5py 2.0.1 \* hdf5 1.8.9 \* PIL 1.1.7 | \* iopro 1.0 \* \* ipython 0.13 \* jinja2 2.6 \* llvm 3.1 \* llvmpy 0.8.2.dev \* matplotlib 1.1.1 \* mpi4py 1.3 \* mpich2 1.4.1p1 \* networkx 1.7 \* nose 1.1.2 \* numba 0.1.dev \* numbapro 1.0 \* \* numexpr 2.0.1 \* numpy 1.7.dev \* opencv 2.4.2 | \* openssl 1.0.1c \* pandas 0.8.1 \* pip 1.1 \* pixman 0.26.2 \* py2cairo 1.10.0 \* pycurl 7.19.0 \* pygments 1.5 \* pysal 1.4.0 \* pysam 0.6 \* pytables 2.4.0 \* python 2.7.3 \* pytz 2012c \* pyyaml 3.10 \* pyzmq 2.2.0 | \* redis 2.4.15 (Linux only) \* redis py-2.4.13 \* requests 0.13.5 \* scikit-learn 0.11 \* scikits-image 0.6.1 \* scipy 0.11.0rc2 \* sqlalchemy 0.7.8 \* sqlite 3.7.13 \* statsmodels 0.4.3 \* sympy 0.7.1 \* theano 0.5.0 \* tornado 2.3 \* werkzeug 0.8.3 \* wiseRF \* |
|---|
| Name | Version | Summary / License |
|---|---|---|
| [abstract-rendering](https://github.com/JosephCottam/AbstractRendering) Linux Mac | 0.5.1 | Rendering as a binning process / 3-clause BSD |
| [alabaster](https://github.com/bitprophet/alabaster) | 0.7.7 | configurable sidebar-enabled Sphinx theme / BSD |
| [anaconda-client](http://anaconda.org) | 1.2.2 | anaconda.org command line client library / BSD |
| [appnope](http://github.com/minrk/appnope) Mac | 0.1.0 | Disable App Nap on OS X 10.9 / BSD |
| [appscript](http://appscript.sourceforge.net/) Mac | 1.0.1 | Control AppleScriptable applications from Python / Public-Domain |
| [argcomplete](https://github.com/kislyuk/argcomplete) | 1.0.0 | Bash tab completion for argparse. Tab complete all the things! / Apache |
| [astropy](http://www.astropy.org/) | 1.1.1 | Community-developed python astronomy tools / BSD |
| [babel](http://babel.pocoo.org/) | 2.2.0 | Internationalization utilities / BSD |
| [beautifulsoup4](http://www.crummy.com/software/BeautifulSoup/) | 4.4.1 | screen-scraping library / MIT |
| [bitarray](https://github.com/ilanschnell/bitarray) | 0.8.1 | efficient arrays of booleans – C extension / PSF |
| [blaze-core](http://blaze.pydata.org) | 0.9.0 | Blaze is the next generation of NumPy / BSD |
| [bokeh](http://github.com/bokeh/bokeh) | 0.11.0 | statistical and novel interactive HTML plots for Python / BSD |
| [boto](https://github.com/boto/boto/) | 2.39.0 | Amazon Web Services Library / MIT |
| [bottleneck](http://berkeleyanalytics.com/bottleneck) | 1.0.0 | Fast NumPy array functions written in Cython. / Simplified BSD |
| [bzip2](http://www.bzip.org/) Windows | 1.0.6 | high-quality data compressor / BSD |
| [cffi](http://cffi.readthedocs.org) | 1.2.1 | Foreign Function Interface for Python calling C code / MIT |
| [clyent](https://github.com/binstar/clyent) | 1.2.0 | Command line client Library for windows and posix / BSD |
| [colorama](http://code.google.com/p/colorama/) | 0.3.6 | Cross-platform colored terminal text. / BSD |
| [comtypes](http://starship.python.net/crew/theller/comtypes/) Windows | 1.1.2 | pure Python COM package / MIT |
| [conda](http://conda.pydata.org/) | 3.19.1 | cross-platform, Python-agnostic binary package manager / BSD |
| [conda-build](https://github.com/conda/conda-build) | 1.19.0 | Commands and tools for building conda packages / BSD |
| [conda-env](https://github.com/conda/conda-env/) | 2.4.5 | provides a unified interface to dealing with Conda environments / BSD |
| [configobj](http://www.voidspace.org.uk/python/configobj.html) | 5.0.6 | Config file reading, writing and validation / BSD |
| [cryptography](https://github.com/pyca/cryptography) | 1.0.2 | provides cryptographic recipes and primitives to Python developers / Apache |
| [curl](http://curl.haxx.se/) | 7.45.0 | tool and library for transferring data with URL syntax / MIT/X derivate |
| [cycler](http://matplotlib.org/cycler/) | 0.9.0 | Composable style cycles / BSD |
| [cython](http://www.cython.org/) | 0.23.4 | The Cython compiler for writing C extensions for the Python language / Apache |
| [cytoolz](https://github.com/pytoolz/cytoolz) | 0.7.5 | Cython implementation of Toolz, high performance functional utilities / BSD |
| [datashape](https://github.com/ContinuumIO/datashape) | 0.5.0 | A data description language / BSD |
| [decorator](http://pypi.python.org/pypi/decorator) | 4.0.6 | Better living through Python with decorators / BSD |
| [docutils](http://docutils.sourceforge.net) | 0.12 | Utilities for general- and special-purpose documentation / Public-Domain, PSF, 2-clause BSD, GPLv3 |
| [dynd-python](https://github.com/libdynd/dynd-python) | 0.7.1 | Python exposure of DyND / BSD |
| [et\_xmlfile](https://bitbucket.org/openpyxl/et_xmlfile) | 1.0.1 | implementation of lxml.xmlfile for the standard library / MIT |
| [fastcache](https://github.com/pbrady/fastcache) | 1.0.2 | C implementation of Python 3 functools.lru\_cache / MIT |
| [flask](http://flask.pocoo.org/) | 0.10.1 | A microframework based on Werkzeug, Jinja2 and good intentions / BSD |
| [fontconfig](http://www.freedesktop.org/wiki/Software/fontconfig/) Linux | 2.11.1 | Fontconfig is a library for configuring and customizing font access / BSD |
| [freetype](http://freetype.sourceforge.net/index2.html) | 2.5.5 | A Free, High-Quality, and Portable Font Engine / FreeType License |
| [futures](http://code.google.com/p/pythonfutures) | 3.0.3 | Backport of the concurrent.futures package from Python 3.2 / BSD |
| [greenlet](http://pypi.python.org/pypi/greenlet/) | 0.4.9 | lightweight in-process concurrent programming / MIT |
| [h5py](http://code.google.com/p/h5py/) | 2.5.0 | Read and write HDF5 files from Python. / 3-clause BSD |
| [hdf5](http://www.hdfgroup.org/HDF5/) | 1.8.15.1 | HDF5 is a data model, library, and file format for storing and managing data / BSD-like |
| [idna](https://github.com/kjd/idna) | 2.0 | Internationalized Domain Names in Applications / BSD |
| [ipykernel](http://ipython.org) | 4.2.2 | IPython Kernel for Jupyter / BSD |
| [ipython](http://ipython.org/) | 4.0.3 | Productive Interactive Computing / BSD |
| [ipython\_genutils](http://jupyter.org) | 0.1.0 | vestigial utilities from IPython / BSD |
| [ipywidgets](http://github.com/jakevdp/ipywidgets) | 4.1.1 | IPython Static Widgets / BSD |
| [itsdangerous](http://github.com/mitsuhiko/itsdangerous) | 0.24 | Various helpers to pass trusted data to untrusted environments and back. / BSD |
| [jbig](https://www.cl.cam.ac.uk/~mgk25/jbigkit) Linux Mac | 2.1 | implementation of the JBIG1 data compression standard / GPL2 |
| [jdcal](http://github.com/phn/jdcal) | 1.2 | Julian dates from proleptic Gregorian and Julian calendars. / BSD |
| [jedi](https://github.com/davidhalter/jedi) | 0.9.0 | / MIT |
| [jinja2](http://jinja.pocoo.org/docs/) | 2.8 | An easy to use stand-alone template engine written in pure python. / BSD |
| [jpeg](http://www.ijg.org/) | 8d | read/write jpeg COM, EXIF, IPTC medata / Custom free software license |
| [jsonschema](http://github.com/Julian/jsonschema) | 2.4.0 | An implementation of JSON Schema validation for Python / MIT |
| [jupyter](http://jupyter.org) | 1.0.0 | Jupyter metapackage / BSD |
| [jupyter\_client](http://jupyter.org) | 4.1.1 | Jupyter protocol implementation and client libraries / BSD |
| [jupyter\_console](http://jupyter.org) | 4.1.0 | Jupyter terminal console / BSD |
| [jupyter\_core](http://jupyter.org) | 4.0.6 | base package on which Jupyter projects rely / BSD |
| launcher Mac Windows | 1.0.0 | Anaconda’s application launcher / proprietary - Continuum Analytics, Inc. |
| [libdynd](https://github.com/libdynd/libdynd) | 0.7.1 | C++ dynamic ndarray library / BSD |
| [libffi](https://github.com/atgreen/libffi) Linux | 3.0.13 | A portable foreign-function interface library / MIT |
| libgfortran Linux | 1.0 | GNU Fortran runtime library / GPL3 |
| [libpng](http://www.libpng.org/pub/png/libpng.html) | 1.6.17 | libpng is the official PNG reference library / libpng license |
| [libsodium](http://libsodium.org) Linux Windows | 1.0.3 | a modern software library for encryption, signatures, password hashing, etc. / MIT |
| [libtiff](http://www.libtiff.org/) | 4.0.6 | tiff image library / BSD-like |
| [libxml2](http://xmlsoft.org/) Linux Mac | 2.9.2 | The XML C parser and toolkit of Gnome / MIT |
| [libxslt](http://xmlsoft.org/) Linux Mac | 1.1.28 | Libxslt is the XSLT C library developed for the GNOME project / MIT |
| [llvmlite](https://github.com/numba/llvmlite) | 0.8.0 | lightweight wrapper around basic LLVM functionality / BSD |
| [lxml](http://lxml.de/) | 3.5.0 | XML processing library combining libxml2/libxslt with the ElementTree API / BSD |
| [markupsafe](http://github.com/mitsuhiko/markupsafe) | 0.23 | Implements a XML/HTML/XHTML Markup safe string for Python / BSD |
| [matplotlib](http://matplotlib.sourceforge.net/) | 1.5.1 | Python plotting package / PSF-based |
| [menuinst](https://github.com/ContinuumIO/menuinst) Windows | 1.3.2 | cross platform install of menu items / BSD |
| [mistune](https://github.com/lepture/mistune) | 0.7.1 | The fastest markdown parser in pure Python with renderer feature / BSD |
| [mkl](http://software.intel.com/en-us/articles/intel-mkl/) | 11.3.1 | math library for Intel and compatible processors / proprietary - Intel |
| [mkl-service](https://github.com/ContinuumIO/mkl-service) | 1.1.2 | Python bindings to MKL service functions / 3-clause BSD |
| [msvc\_runtime](http://www.microsoft.com) Windows | 1.0.1 | Bundles of the MSVC runtime for your Python / Proprietary |
| [multipledispatch](http://github.com/mrocklin/multipledispatch/) | 0.4.8 | Multiple dispatch / BSD |
| [nbconvert](http://jupyter.org) | 4.1.0 | converts notebooks to various other formats via Jinja templates / BSD |
| [nbformat](http://jupyter.org) | 4.0.1 | the base implementation of the Jupyter Notebook format / BSD |
| [networkx](http://networkx.lanl.gov/) | 1.11 | Python package for creating and manipulating graphs and networks / BSD |
| [nltk](http://nltk.org/) | 3.1 | Natural Language Toolkit / Apache |
| [node-webkit](https://github.com/rogerwang/node-webkit) Mac Windows | 0.10.1 | calls Node.js modules from DOM and enables a new way of writing applications / MIT |
| [nose](http://readthedocs.org/docs/nose/) | 1.3.7 | nose extends unittest to make testing easier / LGPL |
| [notebook](http://jupyter.org) | 4.1.0 | a web-based notebook environment for interactive computing / BSD |
| [numba](http://continuum.io/developer-resources.html) | 0.23.1 | compiling Python code using LLVM / BSD |
| [numexpr](https://github.com/pydata/numexpr) | 2.4.6 | fast numerical expression evaluator for NumPy / MIT |
| [numpy](http://numpy.scipy.org/) | 1.10.4 | array processing for numbers, strings, records, and objects. / BSD |
| [odo](http://odo.pydata.org/en/latest/) | 0.4.0 | Data Migration for Blaze Project / BSD |
| [openpyxl](http://openpyxl.readthedocs.org) | 2.3.2 | A Python library to read/write Excel 2007 xlsx/xlsm files / MIT |
| [openssl](http://www.openssl.org/) | 1.0.2f | OpenSSL is an open-source implementation of the SSL and TLS protocols / Apache-style |
| [pandas](http://pandas.pydata.org/) | 0.17.1 | Powerful data structures for data analysis, time series,and statistics / BSD |
| [patchelf](http://nixos.org/patchelf.html) Linux | 0.8 | a small utility to modify the dynamic linker and RPATH of ELF executables / GPL3 |
| [path.py](http://github.com/jaraco/path.py) | 8.1.2 | module wrapper for os.path / MIT |
| [patsy](https://github.com/pydata/patsy) | 0.4.0 | a library for describing statistical models and building design matrices. / BSD |
| [pep8](http://pep8.readthedocs.org/) | 1.7.0 | Python style guide checker / MIT |
| [pexpect](http://pexpect.readthedocs.org/) Linux Mac | 3.3 | Pexpect allows easy control of interactive console applications / ISC |
| [pickleshare](https://github.com/vivainio/pickleshare) | 0.5 | tiny shelve-like database with concurrency support / MIT |
| [pillow](http://python-pillow.github.io/) | 3.1.0 | Python Imaging Library (Fork) / PIL license |
| [pip](http://www.pip-installer.org/) | 8.0.2 | PyPA recommended tool for installing Python packages / MIT |
| [ply](http://www.dabeaz.com/ply/) | 3.8 | Python Lex & Yacc / BSD |
| [psutil](https://github.com/giampaolo/psutil) | 3.4.2 | cross-platform process and system utilities module for Python / BSD |
| [ptyprocess](https://github.com/pexpect/ptyprocess) Linux Mac | 0.5 | Run a subprocess in a pseudo terminal / ISC |
| [py](http://pylib.readthedocs.org/) | 1.4.31 | library with cross-python path, ini-parsing, io, code, log facilities / MIT |
| [pyasn1](http://sourceforge.net/projects/pyasn1/) | 0.1.9 | Offline IP address to Autonomous System Number lookup module / BSD |
| [pycosat](https://github.com/ilanschnell/pycosat) | 0.6.1 | bindings to picosat (a SAT solver) / MIT |
| [pycparser](https://github.com/eliben/pycparser) | 2.14 | C parser in Python / BSD |
| [pycrypto](http://www.pycrypto.org/) | 2.6.1 | Cryptographic modules for Python. / Public-Domain |
| [pycurl](http://pycurl.sourceforge.net/) Linux Mac | 7.19.5.3 | PycURL – cURL library module for Python / LGPL, MIT |
| [pyflakes](https://launchpad.net/pyflakes) | 1.0.0 | passive checker of Python programs / MIT |
| [pygments](http://pygments.org/) | 2.1 | Pygments is a syntax highlighting package written in Python / BSD |
| [pyopenssl](https://github.com/pyca/pyopenssl) | 0.15.1 | Python wrapper module around the OpenSSL library / Apache |
| [pyparsing](http://pyparsing.wikispaces.com/) | 2.0.3 | Python parsing module / MIT |
| [pyqt](http://www.riverbankcomputing.co.uk/software/pyqt) | 4.11.4 | PyQt is a Python binding of the cross-platform GUI toolkit Qt / Commercial, GPLv2, GPLv3 |
| [pyreadline](http://ipython.org/pyreadline.html) Windows | 2.1 | A python implmementation of GNU readline. / BSD |
| [pytables](http://www.pytables.org) | 3.2.2 | brings together Python, HDF5 and NumPy to easily handle large amounts of data / BSD |
| [pytest](http://pytest.org/) | 2.8.5 | simple powerful testing with Python / MIT |
| [python](http://www.python.org/) | 3.5.1 | general purpose programming language / PSF |
| [python-dateutil](https://dateutil.readthedocs.org/) | 2.4.2 | Extensions to the standard Python datetime module / BSD |
| [pytz](http://pytz.sourceforge.net/) | 2015.7 | World timezone definitions, modern and historical / MIT |
| [pywin32](http://sourceforge.net/projects/pywin32/) Windows | 219 | Python extensions for Windows / PSF |
| [pyyaml](http://pyyaml.org/wiki/PyYAML) | 3.11 | YAML parser and emitter for Python / MIT |
| [pyzmq](https://github.com/zeromq/pyzmq) | 15.2.0 | zeromq bindings for Python / LGPL and BSD |
| [qt](http://qt-project.org) | 4.8.7 | Qt is a cross-platform application and UI framework / LGPL |
| [qtconsole](http://jupyter.org) | 4.1.1 | Jupyter Qt Console / BSD |
| [readline](http://cnswww.cns.cwru.edu/php/chet/readline/rltop.html) Linux Mac | 6.2 | line-editing for programs with a command-line interface / GPL3 |
| [redis](http://redis.io/download/) Linux Mac | 2.6.9 | Redis is an open source, BSD licensed, advanced key-value cache and store / 3-clause BSD |
| [redis-py](https://github.com/andymccurdy/redis-py/) Linux Mac | 2.10.3 | Redis Python Client / MIT |
| [requests](http://docs.python-requests.org/en/latest/index.html) | 2.9.1 | Python HTTP for Humans / Apache |
| [rope](http://rope.sourceforge.net/) | 0.9.4 | a python refactoring library / GPL |
| [scikit-image](http://scikit-image.org/) | 0.11.3 | Image processing routines for SciPy / 3-clause BSD |
| [scikit-learn](http://scikit-learn.org/stable/) | 0.17 | A set of python modules for machine learning and data mining / 3-clause BSD |
| [scipy](http://www.scipy.org/) | 0.17.0 | Scientific Library for Python / BSD |
| [setuptools](https://pypi.python.org/pypi/setuptools) | 19.6.2 | Easily download, build, install, upgrade, and uninstall Python packages / PSF or ZPL |
| [simplegeneric](http://cheeseshop.python.org/pypi/simplegeneric) | 0.8.1 | lets you define simple single-dispatch generic functions / ZPL 2.1 |
| [sip](http://www.riverbankcomputing.com/software/sip/intro) | 4.16.9 | / GPL3 |
| [six](http://pypi.python.org/pypi/six/) | 1.10.0 | Python 2 and 3 compatibility utilities / MIT |
| [snowballstemmer](https://github.com/shibukawa/snowball_py) | 1.2.1 | provides 16 stemmer algorithms generated from Snowball algorithms / BSD |
| [sockjs-tornado](http://github.com/mrjoes/sockjs-tornado/) | 1.0.1 | SockJS python server implementation on top of Tornado framework / MIT |
| [sphinx](http://sphinx-doc.org) | 1.3.5 | Python documentation generator / BSD |
| [sphinx\_rtd\_theme](https://github.com/snide/sphinx_rtd_theme/) | 0.1.9 | ReadTheDocs.org theme for Sphinx / BSD |
| [spyder](https://github.com/spyder-ide/spyder) | 2.3.8 | Scientific PYthon Development EnviRonment / MIT |
| [sqlalchemy](http://www.sqlalchemy.org/) | 1.0.11 | Database Abstraction Library / MIT |
| [sqlite](http://www.sqlite.org/) Linux Mac | 3.9.2 | self-contained, zero-configuration, SQL database engine / Public-Domain |
| [statsmodels](http://statsmodels.sourceforge.net/) | 0.6.1 | Statistical computations and models for use with SciPy / 3-clause BSD |
| [sympy](http://sympy.org) | 0.7.6.1 | SymPy is a Python library for symbolic mathematics / 3-clause BSD |
| [terminado](https://github.com/takluyver/terminado) Linux Mac | 0.5 | Terminals served to term.js using Tornado websockets / BSD |
| [tk](http://www.tcl.tk/) | 8.5.18 | dynamic programming language with GUI elements / BSD-like |
| [toolz](http://toolz.readthedocs.org/en/latest/) | 0.7.4 | List processing tools and functional utilities / BSD |
| [tornado](http://www.tornadoweb.org/) | 4.3 | a Python web framework and asynchronous networking library / Apache |
| [traitlets](http://ipython.org/) | 4.1.0 | configuration system for Python applications / BSD |
| [unicodecsv](https://github.com/jdunck/python-unicodecsv) | 0.14.1 | The unicodecsv file reads and decodes byte strings for you / BSD |
| [util-linux](http://freecode.com/projects/util-linux) Linux | 2.21 | Util-linux is a suite of essential utilities for any Linux system / GPL2 |
| [werkzeug](http://werkzeug.pocoo.org/) | 0.11.3 | The Swiss Army knife of Python web development / BSD |
| [wheel](http://bitbucket.org/pypa/wheel/) | 0.26.0 | built-package format for Python / MIT |
| [xlrd](http://www.lexicon.net/sjmachin/xlrd.htm) | 0.9.4 | extract data from Microsoft Excel spreadsheet files / BSD |
| [xlsxwriter](https://github.com/jmcnamara/XlsxWriter) | 0.8.4 | A Python module for creating Excel XLSX files / BSD |
| [xlwings](http://xlwings.org/) Mac Windows | 0.6.4 | Make Excel fly. Interact with Excel from Python and vice versa / 3-clause BSD |
| [xlwt](http://www.python-excel.org/) | 1.0.0 | writing data and formatting information to Excel files / BSD |
| [xz](http://tukaani.org/xz/) Linux Mac | 5.0.5 | data compression software with high compression ratio / Public-Domain, GPL |
| [yaml](http://www.yaml.org/) Linux Mac | 0.1.6 | a human friendly data serialization standard for all programming languages / MIT |
| [zeromq](http://zeromq.org) Linux Mac | 4.1.3 | a messaging system, or “message-oriented middleware” / LGPL |
| [zlib](http://zlib.net/) | 1.2.8 | massively spiffy yet delicately unobtrusive compression library / zlib |
| Name | Version | Summary / License |
|---|---|---|
| [abstract-rendering](https://github.com/JosephCottam/AbstractRendering) Linux Mac | 0.5.1 | Rendering as a binning process / 3-clause BSD |
| [alabaster](https://github.com/bitprophet/alabaster) | 0.7.7 | configurable sidebar-enabled Sphinx theme / BSD |
| [anaconda-client](http://anaconda.org) | 1.2.2 | anaconda.org command line client library / BSD |
| [appnope](http://github.com/minrk/appnope) Mac | 0.1.0 | Disable App Nap on OS X 10.9 / BSD |
| [appscript](http://appscript.sourceforge.net/) Mac | 1.0.1 | Control AppleScriptable applications from Python / Public-Domain |
| [argcomplete](https://github.com/kislyuk/argcomplete) | 1.0.0 | Bash tab completion for argparse. Tab complete all the things! / Apache |
| [astropy](http://www.astropy.org/) | 1.1.1 | Community-developed python astronomy tools / BSD |
| [babel](http://babel.pocoo.org/) | 2.2.0 | Internationalization utilities / BSD |
| [backports\_abc](https://github.com/cython/backports_abc) | 0.4 | backport of recent additions to the ‘collections.abc’ module / PSF |
| [beautifulsoup4](http://www.crummy.com/software/BeautifulSoup/) | 4.4.1 | screen-scraping library / MIT |
| [bitarray](https://github.com/ilanschnell/bitarray) | 0.8.1 | efficient arrays of booleans – C extension / PSF |
| [blaze-core](http://blaze.pydata.org) | 0.9.0 | Blaze is the next generation of NumPy / BSD |
| [bokeh](http://github.com/bokeh/bokeh) | 0.11.0 | statistical and novel interactive HTML plots for Python / BSD |
| [boto](https://github.com/boto/boto/) | 2.39.0 | Amazon Web Services Library / MIT |
| [bottleneck](http://berkeleyanalytics.com/bottleneck) | 1.0.0 | Fast NumPy array functions written in Cython. / Simplified BSD |
| [bzip2](http://www.bzip.org/) Windows | 1.0.6 | high-quality data compressor / BSD |
| [cairo](http://cairographics.org/) Linux | 1.12.18 | Cairo is a 2D graphics library with support for multiple output devices. / LGPL 2.1, MPL 1.1 |
| [cdecimal](http://www.bytereef.org/mpdecimal/index.html) | 2.3 | Fast drop-in replacement for decimal.py / BSD |
| [cffi](http://cffi.readthedocs.org) | 1.2.1 | Foreign Function Interface for Python calling C code / MIT |
| [clyent](https://github.com/binstar/clyent) | 1.2.0 | Command line client Library for windows and posix / BSD |
| [colorama](http://code.google.com/p/colorama/) | 0.3.6 | Cross-platform colored terminal text. / BSD |
| [comtypes](http://starship.python.net/crew/theller/comtypes/) Windows | 1.1.2 | pure Python COM package / MIT |
| [conda](http://conda.pydata.org/) | 3.19.1 | cross-platform, Python-agnostic binary package manager / BSD |
| [conda-build](https://github.com/conda/conda-build) | 1.19.0 | Commands and tools for building conda packages / BSD |
| [conda-env](https://github.com/conda/conda-env/) | 2.4.5 | provides a unified interface to dealing with Conda environments / BSD |
| [configobj](http://www.voidspace.org.uk/python/configobj.html) | 5.0.6 | Config file reading, writing and validation / BSD |
| [cryptography](https://github.com/pyca/cryptography) | 1.0.2 | provides cryptographic recipes and primitives to Python developers / Apache |
| [curl](http://curl.haxx.se/) | 7.45.0 | tool and library for transferring data with URL syntax / MIT/X derivate |
| [cycler](http://matplotlib.org/cycler/) | 0.9.0 | Composable style cycles / BSD |
| [cython](http://www.cython.org/) | 0.23.4 | The Cython compiler for writing C extensions for the Python language / Apache |
| [cytoolz](https://github.com/pytoolz/cytoolz) | 0.7.5 | Cython implementation of Toolz, high performance functional utilities / BSD |
| [datashape](https://github.com/ContinuumIO/datashape) | 0.5.0 | A data description language / BSD |
| [decorator](http://pypi.python.org/pypi/decorator) | 4.0.6 | Better living through Python with decorators / BSD |
| [docutils](http://docutils.sourceforge.net) | 0.12 | Utilities for general- and special-purpose documentation / Public-Domain, PSF, 2-clause BSD, GPLv3 |
| [dynd-python](https://github.com/libdynd/dynd-python) Linux Mac | 0.7.1 | Python exposure of DyND / BSD |
| [enum34](https://pypi.python.org/pypi/enum34) | 1.1.2 | Robust enumerated type support in Python / BSD |
| [et\_xmlfile](https://bitbucket.org/openpyxl/et_xmlfile) | 1.0.1 | implementation of lxml.xmlfile for the standard library / MIT |
| [fastcache](https://github.com/pbrady/fastcache) | 1.0.2 | C implementation of Python 3 functools.lru\_cache / MIT |
| [flask](http://flask.pocoo.org/) | 0.10.1 | A microframework based on Werkzeug, Jinja2 and good intentions / BSD |
| [fontconfig](http://www.freedesktop.org/wiki/Software/fontconfig/) Linux | 2.11.1 | Fontconfig is a library for configuring and customizing font access / BSD |
| [freetype](http://freetype.sourceforge.net/index2.html) | 2.5.5 | A Free, High-Quality, and Portable Font Engine / FreeType License |
| [funcsigs](http://funcsigs.readthedocs.org/) | 0.4 | Python function signatures from PEP362 for Python 2.6, 2.7 and 3.2+ / Apache |
| [futures](http://code.google.com/p/pythonfutures) | 3.0.3 | Backport of the concurrent.futures package from Python 3.2 / BSD |
| [gevent](http://www.gevent.org/) | 1.0.2 | Coroutine-based network library / MIT |
| [gevent-websocket](https://bitbucket.org/Jeffrey/gevent-websocket) | 0.9.5 | Websocket handler for the gevent pywsgi server, a Python network library / Apache |
| [greenlet](http://pypi.python.org/pypi/greenlet/) | 0.4.9 | lightweight in-process concurrent programming / MIT |
| [grin](http://pypi.python.org/pypi/grin) | 1.2.1 | grep program configured the way Robert Kern likes it / BSD |
| [h5py](http://code.google.com/p/h5py/) | 2.5.0 | Read and write HDF5 files from Python. / 3-clause BSD |
| [hdf5](http://www.hdfgroup.org/HDF5/) | 1.8.15.1 | HDF5 is a data model, library, and file format for storing and managing data / BSD-like |
| [idna](https://github.com/kjd/idna) | 2.0 | Internationalized Domain Names in Applications / BSD |
| [ipaddress](https://github.com/phihag/ipaddress) | 1.0.14 | IPv4/IPv6 manipulation library / PSF |
| [ipykernel](http://ipython.org) | 4.2.2 | IPython Kernel for Jupyter / BSD |
| [ipython](http://ipython.org/) | 4.0.3 | Productive Interactive Computing / BSD |
| [ipython\_genutils](http://jupyter.org) | 0.1.0 | vestigial utilities from IPython / BSD |
| [ipywidgets](http://github.com/jakevdp/ipywidgets) | 4.1.1 | IPython Static Widgets / BSD |
| [itsdangerous](http://github.com/mitsuhiko/itsdangerous) | 0.24 | Various helpers to pass trusted data to untrusted environments and back. / BSD |
| [jbig](https://www.cl.cam.ac.uk/~mgk25/jbigkit) Linux Mac | 2.1 | implementation of the JBIG1 data compression standard / GPL2 |
| [jdcal](http://github.com/phn/jdcal) | 1.2 | Julian dates from proleptic Gregorian and Julian calendars. / BSD |
| [jedi](https://github.com/davidhalter/jedi) | 0.9.0 | / MIT |
| [jinja2](http://jinja.pocoo.org/docs/) | 2.8 | An easy to use stand-alone template engine written in pure python. / BSD |
| [jpeg](http://www.ijg.org/) | 8d | read/write jpeg COM, EXIF, IPTC medata / Custom free software license |
| [jsonschema](http://github.com/Julian/jsonschema) | 2.4.0 | An implementation of JSON Schema validation for Python / MIT |
| [jupyter](http://jupyter.org) | 1.0.0 | Jupyter metapackage / BSD |
| [jupyter\_client](http://jupyter.org) | 4.1.1 | Jupyter protocol implementation and client libraries / BSD |
| [jupyter\_console](http://jupyter.org) | 4.1.0 | Jupyter terminal console / BSD |
| [jupyter\_core](http://jupyter.org) | 4.0.6 | base package on which Jupyter projects rely / BSD |
| launcher Mac Windows | 1.0.0 | Anaconda’s application launcher / proprietary - Continuum Analytics, Inc. |
| [libdynd](https://github.com/libdynd/libdynd) Linux Mac | 0.7.1 | C++ dynamic ndarray library / BSD |
| [libffi](https://github.com/atgreen/libffi) Linux | 3.0.13 | A portable foreign-function interface library / MIT |
| libgfortran Linux | 1.0 | GNU Fortran runtime library / GPL3 |
| [libpng](http://www.libpng.org/pub/png/libpng.html) | 1.6.17 | libpng is the official PNG reference library / libpng license |
| [libsodium](http://libsodium.org) Linux Windows | 1.0.3 | a modern software library for encryption, signatures, password hashing, etc. / MIT |
| [libtiff](http://www.libtiff.org/) | 4.0.6 | tiff image library / BSD-like |
| [libxml2](http://xmlsoft.org/) Linux Mac | 2.9.2 | The XML C parser and toolkit of Gnome / MIT |
| [libxslt](http://xmlsoft.org/) Linux Mac | 1.1.28 | Libxslt is the XSLT C library developed for the GNOME project / MIT |
| [llvmlite](https://github.com/numba/llvmlite) | 0.8.0 | lightweight wrapper around basic LLVM functionality / BSD |
| [lxml](http://lxml.de/) | 3.5.0 | XML processing library combining libxml2/libxslt with the ElementTree API / BSD |
| [markupsafe](http://github.com/mitsuhiko/markupsafe) | 0.23 | Implements a XML/HTML/XHTML Markup safe string for Python / BSD |
| [matplotlib](http://matplotlib.sourceforge.net/) | 1.5.1 | Python plotting package / PSF-based |
| [menuinst](https://github.com/ContinuumIO/menuinst) Windows | 1.3.2 | cross platform install of menu items / BSD |
| [mistune](https://github.com/lepture/mistune) | 0.7.1 | The fastest markdown parser in pure Python with renderer feature / BSD |
| [mkl](http://software.intel.com/en-us/articles/intel-mkl/) | 11.3.1 | math library for Intel and compatible processors / proprietary - Intel |
| [mkl-service](https://github.com/ContinuumIO/mkl-service) | 1.1.2 | Python bindings to MKL service functions / 3-clause BSD |
| [msvc\_runtime](http://www.microsoft.com) Windows | 1.0.1 | Bundles of the MSVC runtime for your Python / Proprietary |
| [multipledispatch](http://github.com/mrocklin/multipledispatch/) | 0.4.8 | Multiple dispatch / BSD |
| [nbconvert](http://jupyter.org) | 4.1.0 | converts notebooks to various other formats via Jinja templates / BSD |
| [nbformat](http://jupyter.org) | 4.0.1 | the base implementation of the Jupyter Notebook format / BSD |
| [networkx](http://networkx.lanl.gov/) | 1.11 | Python package for creating and manipulating graphs and networks / BSD |
| [nltk](http://nltk.org/) | 3.1 | Natural Language Toolkit / Apache |
| [node-webkit](https://github.com/rogerwang/node-webkit) Mac Windows | 0.10.1 | calls Node.js modules from DOM and enables a new way of writing applications / MIT |
| [nose](http://readthedocs.org/docs/nose/) | 1.3.7 | nose extends unittest to make testing easier / LGPL |
| [notebook](http://jupyter.org) | 4.1.0 | a web-based notebook environment for interactive computing / BSD |
| [numba](http://continuum.io/developer-resources.html) | 0.23.1 | compiling Python code using LLVM / BSD |
| [numexpr](https://github.com/pydata/numexpr) | 2.4.6 | fast numerical expression evaluator for NumPy / MIT |
| [numpy](http://numpy.scipy.org/) | 1.10.4 | array processing for numbers, strings, records, and objects. / BSD |
| [odo](http://odo.pydata.org/en/latest/) | 0.4.0 | Data Migration for Blaze Project / BSD |
| [openpyxl](http://openpyxl.readthedocs.org) | 2.3.2 | A Python library to read/write Excel 2007 xlsx/xlsm files / MIT |
| [openssl](http://www.openssl.org/) | 1.0.2f | OpenSSL is an open-source implementation of the SSL and TLS protocols / Apache-style |
| [pandas](http://pandas.pydata.org/) | 0.17.1 | Powerful data structures for data analysis, time series,and statistics / BSD |
| [patchelf](http://nixos.org/patchelf.html) Linux | 0.8 | a small utility to modify the dynamic linker and RPATH of ELF executables / GPL3 |
| [path.py](http://github.com/jaraco/path.py) | 8.1.2 | module wrapper for os.path / MIT |
| [patsy](https://github.com/pydata/patsy) | 0.4.0 | a library for describing statistical models and building design matrices. / BSD |
| [pep8](http://pep8.readthedocs.org/) | 1.7.0 | Python style guide checker / MIT |
| [pexpect](http://pexpect.readthedocs.org/) Linux Mac | 3.3 | Pexpect allows easy control of interactive console applications / ISC |
| [pickleshare](https://github.com/vivainio/pickleshare) | 0.5 | tiny shelve-like database with concurrency support / MIT |
| [pillow](http://python-pillow.github.io/) | 3.1.0 | Python Imaging Library (Fork) / PIL license |
| [pip](http://www.pip-installer.org/) | 8.0.2 | PyPA recommended tool for installing Python packages / MIT |
| [pixman](http://cgit.freedesktop.org/pixman/) Linux | 0.32.6 | A low-level software library for pixel manipulation / MIT |
| [ply](http://www.dabeaz.com/ply/) | 3.8 | Python Lex & Yacc / BSD |
| [psutil](https://github.com/giampaolo/psutil) | 3.4.2 | cross-platform process and system utilities module for Python / BSD |
| [ptyprocess](https://github.com/pexpect/ptyprocess) Linux Mac | 0.5 | Run a subprocess in a pseudo terminal / ISC |
| [py](http://pylib.readthedocs.org/) | 1.4.31 | library with cross-python path, ini-parsing, io, code, log facilities / MIT |
| [pyasn1](http://sourceforge.net/projects/pyasn1/) | 0.1.9 | Offline IP address to Autonomous System Number lookup module / BSD |
| [pyaudio](http://people.csail.mit.edu/hubert/pyaudio/) Mac | 0.2.7 | Bindings for PortAudio v19, the cross-platform audio stream library / MIT |
| [pycairo](http://cairographics.org/pycairo/) Linux | 1.10.0 | Pycairo is a set of Python bindings for the cairo graphics library / LGPL 2.1, MPL 1.1 |
| [pycosat](https://github.com/ilanschnell/pycosat) | 0.6.1 | bindings to picosat (a SAT solver) / MIT |
| [pycparser](https://github.com/eliben/pycparser) | 2.14 | C parser in Python / BSD |
| [pycrypto](http://www.pycrypto.org/) | 2.6.1 | Cryptographic modules for Python. / Public-Domain |
| [pycurl](http://pycurl.sourceforge.net/) Linux Mac | 7.19.5.3 | PycURL – cURL library module for Python / LGPL, MIT |
| [pyflakes](https://launchpad.net/pyflakes) | 1.0.0 | passive checker of Python programs / MIT |
| [pygments](http://pygments.org/) | 2.1 | Pygments is a syntax highlighting package written in Python / BSD |
| [pyopenssl](https://github.com/pyca/pyopenssl) | 0.15.1 | Python wrapper module around the OpenSSL library / Apache |
| [pyparsing](http://pyparsing.wikispaces.com/) | 2.0.3 | Python parsing module / MIT |
| [pyqt](http://www.riverbankcomputing.co.uk/software/pyqt) | 4.11.4 | PyQt is a Python binding of the cross-platform GUI toolkit Qt / Commercial, GPLv2, GPLv3 |
| [pyreadline](http://ipython.org/pyreadline.html) Windows | 2.1 | A python implmementation of GNU readline. / BSD |
| [pytables](http://www.pytables.org) | 3.2.2 | brings together Python, HDF5 and NumPy to easily handle large amounts of data / BSD |
| [pytest](http://pytest.org/) | 2.8.5 | simple powerful testing with Python / MIT |
| [python](http://www.python.org/) | 2.7.11 | general purpose programming language / PSF |
| [python-dateutil](https://dateutil.readthedocs.org/) | 2.4.2 | Extensions to the standard Python datetime module / BSD |
| [pytz](http://pytz.sourceforge.net/) | 2015.7 | World timezone definitions, modern and historical / MIT |
| [pywin32](http://sourceforge.net/projects/pywin32/) Windows | 219 | Python extensions for Windows / PSF |
| [pyyaml](http://pyyaml.org/wiki/PyYAML) | 3.11 | YAML parser and emitter for Python / MIT |
| [pyzmq](https://github.com/zeromq/pyzmq) | 15.2.0 | zeromq bindings for Python / LGPL and BSD |
| [qt](http://qt-project.org) | 4.8.7 | Qt is a cross-platform application and UI framework / LGPL |
| [qtconsole](http://jupyter.org) | 4.1.1 | Jupyter Qt Console / BSD |
| [readline](http://cnswww.cns.cwru.edu/php/chet/readline/rltop.html) Linux Mac | 6.2 | line-editing for programs with a command-line interface / GPL3 |
| [redis](http://redis.io/download/) Linux Mac | 2.6.9 | Redis is an open source, BSD licensed, advanced key-value cache and store / 3-clause BSD |
| [redis-py](https://github.com/andymccurdy/redis-py/) Linux Mac | 2.10.3 | Redis Python Client / MIT |
| [requests](http://docs.python-requests.org/en/latest/index.html) | 2.9.1 | Python HTTP for Humans / Apache |
| [rope](http://rope.sourceforge.net/) | 0.9.4 | a python refactoring library / GPL |
| [scikit-image](http://scikit-image.org/) | 0.11.3 | Image processing routines for SciPy / 3-clause BSD |
| [scikit-learn](http://scikit-learn.org/stable/) | 0.17 | A set of python modules for machine learning and data mining / 3-clause BSD |
| [scipy](http://www.scipy.org/) | 0.17.0 | Scientific Library for Python / BSD |
| [setuptools](https://pypi.python.org/pypi/setuptools) | 19.6.2 | Easily download, build, install, upgrade, and uninstall Python packages / PSF or ZPL |
| [simplegeneric](http://cheeseshop.python.org/pypi/simplegeneric) | 0.8.1 | lets you define simple single-dispatch generic functions / ZPL 2.1 |
| [singledispatch](http://docs.python.org/3/library/functools.html#functools.singledispatch) | 3.4.0.3 | brings functools.singledispatch from Python 3.4 to Python 2.6-3.3 / MIT |
| [sip](http://www.riverbankcomputing.com/software/sip/intro) | 4.16.9 | / GPL3 |
| [six](http://pypi.python.org/pypi/six/) | 1.10.0 | Python 2 and 3 compatibility utilities / MIT |
| [snowballstemmer](https://github.com/shibukawa/snowball_py) | 1.2.1 | provides 16 stemmer algorithms generated from Snowball algorithms / BSD |
| [sockjs-tornado](http://github.com/mrjoes/sockjs-tornado/) | 1.0.1 | SockJS python server implementation on top of Tornado framework / MIT |
| [sphinx](http://sphinx-doc.org) | 1.3.5 | Python documentation generator / BSD |
| [sphinx\_rtd\_theme](https://github.com/snide/sphinx_rtd_theme/) | 0.1.9 | ReadTheDocs.org theme for Sphinx / BSD |
| [spyder](https://github.com/spyder-ide/spyder) | 2.3.8 | Scientific PYthon Development EnviRonment / MIT |
| [sqlalchemy](http://www.sqlalchemy.org/) | 1.0.11 | Database Abstraction Library / MIT |
| [sqlite](http://www.sqlite.org/) Linux Mac | 3.9.2 | self-contained, zero-configuration, SQL database engine / Public-Domain |
| [ssl\_match\_hostname](http://bitbucket.org/brandon/backports.ssl_match_hostname) | 3.4.0.2 | The ssl.match\_hostname() function from Python 3.4 / PSF |
| [statsmodels](http://statsmodels.sourceforge.net/) | 0.6.1 | Statistical computations and models for use with SciPy / 3-clause BSD |
| [sympy](http://sympy.org) | 0.7.6.1 | SymPy is a Python library for symbolic mathematics / 3-clause BSD |
| [terminado](https://github.com/takluyver/terminado) Linux Mac | 0.5 | Terminals served to term.js using Tornado websockets / BSD |
| [tk](http://www.tcl.tk/) | 8.5.18 | dynamic programming language with GUI elements / BSD-like |
| [toolz](http://toolz.readthedocs.org/en/latest/) | 0.7.4 | List processing tools and functional utilities / BSD |
| [tornado](http://www.tornadoweb.org/) | 4.3 | a Python web framework and asynchronous networking library / Apache |
| [traitlets](http://ipython.org/) | 4.1.0 | configuration system for Python applications / BSD |
| [unicodecsv](https://github.com/jdunck/python-unicodecsv) | 0.14.1 | The unicodecsv file reads and decodes byte strings for you / BSD |
| [util-linux](http://freecode.com/projects/util-linux) Linux | 2.21 | Util-linux is a suite of essential utilities for any Linux system / GPL2 |
| [werkzeug](http://werkzeug.pocoo.org/) | 0.11.3 | The Swiss Army knife of Python web development / BSD |
| [wheel](http://bitbucket.org/pypa/wheel/) | 0.26.0 | built-package format for Python / MIT |
| [xlrd](http://www.lexicon.net/sjmachin/xlrd.htm) | 0.9.4 | extract data from Microsoft Excel spreadsheet files / BSD |
| [xlsxwriter](https://github.com/jmcnamara/XlsxWriter) | 0.8.4 | A Python module for creating Excel XLSX files / BSD |
| [xlwings](http://xlwings.org/) Mac Windows | 0.6.4 | Make Excel fly. Interact with Excel from Python and vice versa / 3-clause BSD |
| [xlwt](http://www.python-excel.org/) | 1.0.0 | writing data and formatting information to Excel files / BSD |
| [xz](http://tukaani.org/xz/) Linux Mac | 5.0.5 | data compression software with high compression ratio / Public-Domain, GPL |
| [yaml](http://www.yaml.org/) Linux Mac | 0.1.6 | a human friendly data serialization standard for all programming languages / MIT |
| [zeromq](http://zeromq.org) Linux Mac | 4.1.3 | a messaging system, or “message-oriented middleware” / LGPL |
| [zlib](http://zlib.net/) | 1.2.8 | massively spiffy yet delicately unobtrusive compression library / zlib |
| Name | Version | Summary / License |
|---|---|---|
| [abstract-rendering](https://github.com/JosephCottam/AbstractRendering) Linux Mac | 0.5.1 | Rendering as a binning process / 3-clause BSD |
| [alabaster](https://github.com/bitprophet/alabaster) | 0.7.6 | configurable sidebar-enabled Sphinx theme / BSD |
| [anaconda-client](http://anaconda.org) | 1.2.1 | anaconda.org command line client library / BSD |
| [appnope](http://github.com/minrk/appnope) Mac | 0.1.0 | Disable App Nap on OS X 10.9 / BSD |
| [appscript](http://appscript.sourceforge.net/) Mac | 1.0.1 | Control AppleScriptable applications from Python / Public-Domain |
| [argcomplete](https://github.com/kislyuk/argcomplete) | 1.0.0 | Bash tab completion for argparse. Tab complete all the things! / Apache |
| [astropy](http://www.astropy.org/) | 1.0.6 | Community-developed python astronomy tools / BSD |
| [babel](http://babel.pocoo.org/) | 2.1.1 | Internationalization utilities / BSD |
| [beautifulsoup4](http://www.crummy.com/software/BeautifulSoup/) | 4.4.1 | screen-scraping library / MIT |
| [bitarray](https://github.com/ilanschnell/bitarray) | 0.8.1 | efficient arrays of booleans – C extension / PSF |
| [blaze-core](http://blaze.pydata.org) | 0.8.3 | Blaze is the next generation of NumPy / BSD |
| [bokeh](http://github.com/bokeh/bokeh) | 0.10.0 | statistical and novel interactive HTML plots for Python / BSD |
| [boto](https://github.com/boto/boto/) | 2.38.0 | Amazon Web Services Library / MIT |
| [bottleneck](http://berkeleyanalytics.com/bottleneck) | 1.0.0 | Fast NumPy array functions written in Cython. / Simplified BSD |
| [bzip2](http://www.bzip.org/) Windows | 1.0.6 | high-quality data compressor / BSD |
| [cffi](http://cffi.readthedocs.org) | 1.2.1 | Foreign Function Interface for Python calling C code / MIT |
| [clyent](https://github.com/binstar/clyent) | 1.2.0 | Command line client Library for windows and posix / BSD |
| [colorama](http://code.google.com/p/colorama/) | 0.3.3 | Cross-platform colored terminal text. / BSD |
| [comtypes](http://starship.python.net/crew/theller/comtypes/) Windows | 1.1.2 | pure Python COM package / MIT |
| [conda](http://conda.pydata.org/) | 3.18.8 | cross-platform, Python-agnostic binary package manager / BSD |
| [conda-build](https://github.com/conda/conda-build) | 1.18.2 | Commands and tools for building conda packages / BSD |
| [conda-env](https://github.com/conda/conda-env/) | 2.4.5 | provides a unified interface to dealing with Conda environments / BSD |
| [configobj](http://www.voidspace.org.uk/python/configobj.html) | 5.0.6 | Config file reading, writing and validation / BSD |
| [cryptography](https://github.com/pyca/cryptography) | 1.0.2 | provides cryptographic recipes and primitives to Python developers / Apache |
| [curl](http://curl.haxx.se/) | 7.45.0 | tool and library for transferring data with URL syntax / MIT/X derivate |
| [cycler](http://matplotlib.org/cycler/) | 0.9.0 | Composable style cycles / BSD |
| [cython](http://www.cython.org/) | 0.23.4 | The Cython compiler for writing C extensions for the Python language / Apache |
| [cytoolz](https://github.com/pytoolz/cytoolz) | 0.7.4 | Cython implementation of Toolz, high performance functional utilities / BSD |
| [datashape](https://github.com/ContinuumIO/datashape) | 0.4.7 | A data description language / BSD |
| [decorator](http://pypi.python.org/pypi/decorator) | 4.0.4 | Better living through Python with decorators / BSD |
| [docutils](http://docutils.sourceforge.net) | 0.12 | Utilities for general- and special-purpose documentation / Public-Domain, PSF, 2-clause BSD, GPLv3 |
| [dynd-python](https://github.com/libdynd/dynd-python) | 0.7.0 | Python exposure of DyND / BSD |
| [fastcache](https://github.com/pbrady/fastcache) | 1.0.2 | C implementation of Python 3 functools.lru\_cache / MIT |
| [flask](http://flask.pocoo.org/) | 0.10.1 | A microframework based on Werkzeug, Jinja2 and good intentions / BSD |
| [fontconfig](http://www.freedesktop.org/wiki/Software/fontconfig/) Linux | 2.11.1 | Fontconfig is a library for configuring and customizing font access / BSD |
| [freetype](http://freetype.sourceforge.net/index2.html) | 2.5.5 | A Free, High-Quality, and Portable Font Engine / FreeType License |
| [greenlet](http://pypi.python.org/pypi/greenlet/) | 0.4.9 | lightweight in-process concurrent programming / MIT |
| [h5py](http://code.google.com/p/h5py/) | 2.5.0 | Read and write HDF5 files from Python. / 3-clause BSD |
| [hdf5](http://www.hdfgroup.org/HDF5/) | 1.8.15.1 | HDF5 is a data model, library, and file format for storing and managing data / BSD-like |
| [idna](https://github.com/kjd/idna) | 2.0 | Internationalized Domain Names in Applications / BSD |
| [ipykernel](http://ipython.org) | 4.1.1 | IPython Kernel for Jupyter / BSD |
| [ipython](http://ipython.org/) | 4.0.1 | Productive Interactive Computing / BSD |
| [ipython\_genutils](http://jupyter.org) | 0.1.0 | vestigial utilities from IPython / BSD |
| [ipywidgets](http://github.com/jakevdp/ipywidgets) | 4.1.0 | IPython Static Widgets / BSD |
| [itsdangerous](http://github.com/mitsuhiko/itsdangerous) | 0.24 | Various helpers to pass trusted data to untrusted environments and back. / BSD |
| [jbig](https://www.cl.cam.ac.uk/~mgk25/jbigkit) Linux Mac | 2.1 | implementation of the JBIG1 data compression standard / GPL2 |
| [jdcal](http://github.com/phn/jdcal) | 1.0 | Julian dates from proleptic Gregorian and Julian calendars. / BSD |
| [jedi](https://github.com/davidhalter/jedi) | 0.9.0 | / MIT |
| [jinja2](http://jinja.pocoo.org/docs/) | 2.8 | An easy to use stand-alone template engine written in pure python. / BSD |
| [jpeg](http://www.ijg.org/) | 8d | read/write jpeg COM, EXIF, IPTC medata / Custom free software license |
| [jsonschema](http://github.com/Julian/jsonschema) | 2.4.0 | An implementation of JSON Schema validation for Python / MIT |
| [jupyter](http://jupyter.org) | 1.0.0 | Jupyter metapackage / BSD |
| [jupyter\_client](http://jupyter.org) | 4.1.1 | Jupyter protocol implementation and client libraries / BSD |
| [jupyter\_console](http://jupyter.org) | 4.0.3 | Jupyter terminal console / BSD |
| [jupyter\_core](http://jupyter.org) | 4.0.6 | base package on which Jupyter projects rely / BSD |
| launcher Mac Windows | 1.0.0 | Anaconda’s application launcher / proprietary - Continuum Analytics, Inc. |
| [libdynd](https://github.com/libdynd/libdynd) | 0.7.0 | C++ dynamic ndarray library / BSD |
| [libffi](https://github.com/atgreen/libffi) Linux | 3.0.13 | A portable foreign-function interface library / MIT |
| libgfortran Linux | 1.0 | GNU Fortran runtime library / GPL3 |
| [libpng](http://www.libpng.org/pub/png/libpng.html) | 1.6.17 | libpng is the official PNG reference library / libpng license |
| [libsodium](http://libsodium.org) Linux Windows | 1.0.3 | a modern software library for encryption, signatures, password hashing, etc. / MIT |
| [libtiff](http://www.libtiff.org/) | 4.0.6 | tiff image library / BSD-like |
| [libxml2](http://xmlsoft.org/) Linux Mac | 2.9.2 | The XML C parser and toolkit of Gnome / MIT |
| [libxslt](http://xmlsoft.org/) Linux Mac | 1.1.28 | Libxslt is the XSLT C library developed for the GNOME project / MIT |
| [llvmlite](https://github.com/numba/llvmlite) | 0.8.0 | lightweight wrapper around basic LLVM functionality / BSD |
| [lxml](http://lxml.de/) | 3.4.4 | XML processing library combining libxml2/libxslt with the ElementTree API / BSD |
| [markupsafe](http://github.com/mitsuhiko/markupsafe) | 0.23 | Implements a XML/HTML/XHTML Markup safe string for Python / BSD |
| [matplotlib](http://matplotlib.sourceforge.net/) | 1.5.0 | Python plotting package / PSF-based |
| [menuinst](https://github.com/ContinuumIO/menuinst) Windows | 1.3.1 | cross platform install of menu items / BSD |
| [mistune](https://github.com/lepture/mistune) | 0.7.1 | The fastest markdown parser in pure Python with renderer feature / BSD |
| [msvc\_runtime](http://www.microsoft.com) Windows | 1.0.1 | Bundles of the MSVC runtime for your Python / Proprietary |
| [multipledispatch](http://github.com/mrocklin/multipledispatch/) | 0.4.8 | Multiple dispatch / BSD |
| [nbconvert](http://jupyter.org) | 4.0.0 | converts notebooks to various other formats via Jinja templates / BSD |
| [nbformat](http://jupyter.org) | 4.0.1 | the base implementation of the Jupyter Notebook format / BSD |
| [networkx](http://networkx.lanl.gov/) | 1.10 | Python package for creating and manipulating graphs and networks / BSD |
| [nltk](http://nltk.org/) | 3.1 | Natural Language Toolkit / Apache |
| [node-webkit](https://github.com/rogerwang/node-webkit) Mac Windows | 0.10.1 | calls Node.js modules from DOM and enables a new way of writing applications / MIT |
| [nose](http://readthedocs.org/docs/nose/) | 1.3.7 | nose extends unittest to make testing easier / LGPL |
| [notebook](http://jupyter.org) | 4.0.6 | a web-based notebook environment for interactive computing / BSD |
| [numba](http://continuum.io/developer-resources.html) | 0.22.1 | compiling Python code using LLVM / BSD |
| [numexpr](https://github.com/pydata/numexpr) | 2.4.4 | Fast numerical expression evaluator for NumPy / MIT |
| [numpy](http://numpy.scipy.org/) | 1.9.3 | array processing for numbers, strings, records, and objects. / BSD |
| [odo](http://odo.pydata.org/en/latest/) | 0.3.4 | Data Migration for Blaze Project / BSD |
| [openblas](https://github.com/xianyi/OpenBLAS) Linux | 0.2.14 | optimized BLAS library based on GotoBLAS2 / BSD |
| [openpyxl](http://openpyxl.readthedocs.org) | 2.2.6 | A Python library to read/write Excel 2007 xlsx/xlsm files / MIT |
| [openssl](http://www.openssl.org/) | 1.0.2d | OpenSSL is an open-source implementation of the SSL and TLS protocols / Apache-style |
| [pandas](http://pandas.pydata.org/) | 0.17.1 | Powerful data structures for data analysis, time series,and statistics / BSD |
| [patchelf](http://nixos.org/patchelf.html) Linux | 0.6 | a small utility to modify the dynamic linker and RPATH of ELF executables / GPL3 |
| [path.py](http://github.com/jaraco/path.py) | 8.1.2 | module wrapper for os.path / MIT |
| [patsy](https://github.com/pydata/patsy) | 0.4.0 | a library for describing statistical models and building design matrices. / BSD |
| [pep8](http://pep8.readthedocs.org/) | 1.6.2 | Python style guide checker / MIT |
| [pexpect](http://pexpect.readthedocs.org/) Linux Mac | 3.3 | Pexpect allows easy control of interactive console applications / ISC |
| [pickleshare](https://github.com/vivainio/pickleshare) | 0.5 | tiny shelve-like database with concurrency support / MIT |
| [pillow](http://python-pillow.github.io/) | 3.0.0 | Python Imaging Library (Fork) / PIL license |
| [pip](http://www.pip-installer.org/) | 7.1.2 | PyPA recommended tool for installing Python packages / MIT |
| [ply](http://www.dabeaz.com/ply/) | 3.8 | Python Lex & Yacc / BSD |
| [psutil](https://github.com/giampaolo/psutil) | 3.3.0 | cross-platform process and system utilities module for Python / BSD |
| [ptyprocess](https://github.com/pexpect/ptyprocess) Linux Mac | 0.5 | Run a subprocess in a pseudo terminal / ISC |
| [py](http://pylib.readthedocs.org/en/latest/) | 1.4.30 | library with cross-python path, ini-parsing, io, code, log facilities / MIT |
| [pyasn1](http://sourceforge.net/projects/pyasn1/) | 0.1.9 | Offline IP address to Autonomous System Number lookup module / BSD |
| [pycosat](https://github.com/ilanschnell/pycosat) | 0.6.1 | bindings to picosat (a SAT solver) / MIT |
| [pycparser](https://github.com/eliben/pycparser) | 2.14 | C parser in Python / BSD |
| [pycrypto](http://www.pycrypto.org/) | 2.6.1 | Cryptographic modules for Python. / Public-Domain |
| [pycurl](http://pycurl.sourceforge.net/) | 7.19.5.1 | PycURL – cURL library module for Python / LGPL, MIT |
| [pyflakes](https://launchpad.net/pyflakes) | 1.0.0 | passive checker of Python programs / MIT |
| [pygments](http://pygments.org/) | 2.0.2 | Pygments is a syntax highlighting package written in Python / BSD |
| [pyopenssl](https://github.com/pyca/pyopenssl) | 0.15.1 | Python wrapper module around the OpenSSL library / Apache |
| [pyparsing](http://pyparsing.wikispaces.com/) | 2.0.3 | Python parsing module / MIT |
| [pyqt](http://www.riverbankcomputing.co.uk/software/pyqt) | 4.11.4 | PyQt is a Python binding of the cross-platform GUI toolkit Qt / Commercial, GPLv2, GPLv3 |
| [pyreadline](http://ipython.org/pyreadline.html) Windows | 2.1 | A python implmementation of GNU readline. / BSD |
| [pytables](http://www.pytables.org) | 3.2.2 | brings together Python, HDF5 and NumPy to easily handle large amounts of data / BSD |
| [pytest](http://pytest.org/) | 2.8.1 | simple powerful testing with Python / MIT |
| [python](http://www.python.org/) | 3.5.1 | general purpose programming language / PSF |
| [python-dateutil](https://dateutil.readthedocs.org/) | 2.4.2 | Extensions to the standard Python datetime module / BSD |
| [pytz](http://pytz.sourceforge.net/) | 2015.7 | World timezone definitions, modern and historical / MIT |
| [pywin32](http://sourceforge.net/projects/pywin32/) Windows | 219 | Python extensions for Windows / PSF |
| [pyyaml](http://pyyaml.org/wiki/PyYAML) | 3.11 | YAML parser and emitter for Python / MIT |
| [pyzmq](https://github.com/zeromq/pyzmq) | 14.7.0 | zeromq bindings for Python / LGPL and BSD |
| [qt](http://qt-project.org) | 4.8.7 | Qt is a cross-platform application and UI framework / LGPL |
| [qtconsole](http://jupyter.org) | 4.1.1 | Jupyter Qt Console / BSD |
| [readline](http://cnswww.cns.cwru.edu/php/chet/readline/rltop.html) Linux Mac | 6.2 | line-editing for programs with a command-line interface / GPL3 |
| [redis](http://redis.io/download/) Linux Mac | 2.6.9 | Redis is an open source, BSD licensed, advanced key-value cache and store / 3-clause BSD |
| [redis-py](https://github.com/andymccurdy/redis-py/) Linux Mac | 2.10.3 | Redis Python Client / MIT |
| [requests](http://docs.python-requests.org/en/latest/index.html) | 2.8.1 | Python HTTP for Humans / Apache |
| [rope](http://rope.sourceforge.net/) | 0.9.4 | a python refactoring library / GPL |
| [scikit-image](http://scikit-image.org/) | 0.11.3 | Image processing routines for SciPy / 3-clause BSD |
| [scikit-learn](http://scikit-learn.org/stable/) | 0.17 | A set of python modules for machine learning and data mining / 3-clause BSD |
| [scipy](http://www.scipy.org/) | 0.16.0 | Scientific Library for Python / BSD |
| [setuptools](https://pypi.python.org/pypi/setuptools) | 18.5 | Easily download, build, install, upgrade, and uninstall Python packages / PSF or ZPL |
| [simplegeneric](http://cheeseshop.python.org/pypi/simplegeneric) | 0.8.1 | lets you define simple single-dispatch generic functions / ZPL 2.1 |
| [sip](http://www.riverbankcomputing.com/software/sip/intro) | 4.16.9 | / GPL3 |
| [six](http://pypi.python.org/pypi/six/) | 1.10.0 | Python 2 and 3 compatibility utilities / MIT |
| [snowballstemmer](https://github.com/shibukawa/snowball_py) | 1.2.0 | provides 16 stemmer algorithms generated from Snowball algorithms / BSD |
| [sockjs-tornado](http://github.com/mrjoes/sockjs-tornado/) | 1.0.1 | SockJS python server implementation on top of Tornado framework / MIT |
| [sphinx](http://sphinx-doc.org) | 1.3.1 | Python documentation generator / BSD |
| [sphinx\_rtd\_theme](https://github.com/snide/sphinx_rtd_theme/) | 0.1.7 | ReadTheDocs.org theme for Sphinx / BSD |
| [spyder](https://github.com/spyder-ide/spyder) | 2.3.8 | Scientific PYthon Development EnviRonment / MIT |
| [sqlalchemy](http://www.sqlalchemy.org/) | 1.0.9 | Database Abstraction Library / MIT |
| [sqlite](http://www.sqlite.org/) Linux Mac | 3.8.4.1 | self-contained, zero-configuration, SQL database engine / Public-Domain |
| [statsmodels](http://statsmodels.sourceforge.net/) | 0.6.1 | Statistical computations and models for use with SciPy / 3-clause BSD |
| [sympy](http://sympy.org) | 0.7.6.1 | SymPy is a Python library for symbolic mathematics / 3-clause BSD |
| [terminado](https://github.com/takluyver/terminado) Linux Mac | 0.5 | Terminals served to term.js using Tornado websockets / BSD |
| [theano](http://deeplearning.net/software/theano/) Linux | 0.7.0 | Optimizing compiler for evaluating mathematical expressions on CPUs and GPUs / BSD |
| [tk](http://www.tcl.tk/) | 8.5.18 | dynamic programming language with GUI elements / BSD-like |
| [toolz](http://toolz.readthedocs.org/en/latest/) | 0.7.4 | List processing tools and functional utilities / BSD |
| [tornado](http://www.tornadoweb.org/) | 4.3 | a Python web framework and asynchronous networking library / Apache |
| [traitlets](http://ipython.org/) | 4.0.0 | configuration system for Python applications / BSD |
| [ujson](http://www.esn.me/) | 1.33 | Ultra fast JSON encoder and decoder for Python / BSD |
| [unicodecsv](https://github.com/jdunck/python-unicodecsv) | 0.14.1 | The unicodecsv file reads and decodes byte strings for you / BSD |
| [util-linux](http://freecode.com/projects/util-linux) Linux | 2.21 | Util-linux is a suite of essential utilities for any Linux system / GPL2 |
| [werkzeug](http://werkzeug.pocoo.org/) | 0.11.2 | The Swiss Army knife of Python web development / BSD |
| [wheel](http://bitbucket.org/pypa/wheel/) | 0.26.0 | built-package format for Python / MIT |
| [xlrd](http://www.lexicon.net/sjmachin/xlrd.htm) | 0.9.4 | Library for developers to extract data from Microsoft Excel spreadsheet files / BSD |
| [xlsxwriter](https://github.com/jmcnamara/XlsxWriter) | 0.7.7 | A Python module for creating Excel XLSX files / BSD |
| [xlwings](http://xlwings.org/) Mac Windows | 0.5.0 | Make Excel fly. Interact with Excel from Python and vice versa / 3-clause BSD |
| [xlwt](http://www.python-excel.org/) | 1.0.0 | writing data and formatting information to Excel files / BSD |
| [xz](http://tukaani.org/xz/) Linux Mac | 5.0.5 | data compression software with high compression ratio / Public-Domain, GPL |
| [yaml](http://www.yaml.org/) Linux Mac | 0.1.6 | a human friendly data serialization standard for all programming languages / MIT |
| [zeromq](http://zeromq.org) | 4.1.3 | a messaging system, or “message-oriented middleware” / LGPL |
| [zlib](http://zlib.net/) | 1.2.8 | massively spiffy yet delicately unobtrusive compression library / zlib |
| Name | Version | Summary / License |
|---|---|---|
| [abstract-rendering](https://github.com/JosephCottam/AbstractRendering) Linux Mac | 0.5.1 | Rendering as a binning process / 3-clause BSD |
| [alabaster](https://github.com/bitprophet/alabaster) | 0.7.6 | configurable sidebar-enabled Sphinx theme / BSD |
| [anaconda-client](http://anaconda.org) | 1.2.1 | anaconda.org command line client library / BSD |
| [appnope](http://github.com/minrk/appnope) Mac | 0.1.0 | Disable App Nap on OS X 10.9 / BSD |
| [appscript](http://appscript.sourceforge.net/) Mac | 1.0.1 | Control AppleScriptable applications from Python / Public-Domain |
| [argcomplete](https://github.com/kislyuk/argcomplete) | 1.0.0 | Bash tab completion for argparse. Tab complete all the things! / Apache |
| [astropy](http://www.astropy.org/) | 1.0.6 | Community-developed python astronomy tools / BSD |
| [babel](http://babel.pocoo.org/) | 2.1.1 | Internationalization utilities / BSD |
| [backports\_abc](https://github.com/cython/backports_abc) | 0.4 | backport of recent additions to the ‘collections.abc’ module / PSF |
| [beautifulsoup4](http://www.crummy.com/software/BeautifulSoup/) | 4.4.1 | screen-scraping library / MIT |
| [bitarray](https://github.com/ilanschnell/bitarray) | 0.8.1 | efficient arrays of booleans – C extension / PSF |
| [blaze-core](http://blaze.pydata.org) | 0.8.3 | Blaze is the next generation of NumPy / BSD |
| [bokeh](http://github.com/bokeh/bokeh) | 0.10.0 | statistical and novel interactive HTML plots for Python / BSD |
| [boto](https://github.com/boto/boto/) | 2.38.0 | Amazon Web Services Library / MIT |
| [bottleneck](http://berkeleyanalytics.com/bottleneck) | 1.0.0 | Fast NumPy array functions written in Cython. / Simplified BSD |
| [bzip2](http://www.bzip.org/) Windows | 1.0.6 | high-quality data compressor / BSD |
| [cairo](http://cairographics.org/) Linux | 1.12.18 | Cairo is a 2D graphics library with support for multiple output devices. / LGPL 2.1, MPL 1.1 |
| [cdecimal](http://www.bytereef.org/mpdecimal/index.html) | 2.3 | Fast drop-in replacement for decimal.py / BSD |
| [cffi](http://cffi.readthedocs.org) | 1.2.1 | Foreign Function Interface for Python calling C code / MIT |
| [clyent](https://github.com/binstar/clyent) | 1.2.0 | Command line client Library for windows and posix / BSD |
| [colorama](http://code.google.com/p/colorama/) | 0.3.3 | Cross-platform colored terminal text. / BSD |
| [comtypes](http://starship.python.net/crew/theller/comtypes/) Windows | 1.1.2 | pure Python COM package / MIT |
| [conda](http://conda.pydata.org/) | 3.18.8 | cross-platform, Python-agnostic binary package manager / BSD |
| [conda-build](https://github.com/conda/conda-build) | 1.18.2 | Commands and tools for building conda packages / BSD |
| [conda-env](https://github.com/conda/conda-env/) | 2.4.5 | provides a unified interface to dealing with Conda environments / BSD |
| [configobj](http://www.voidspace.org.uk/python/configobj.html) | 5.0.6 | Config file reading, writing and validation / BSD |
| [cryptography](https://github.com/pyca/cryptography) | 1.0.2 | provides cryptographic recipes and primitives to Python developers / Apache |
| [curl](http://curl.haxx.se/) | 7.45.0 | tool and library for transferring data with URL syntax / MIT/X derivate |
| [cycler](http://matplotlib.org/cycler/) | 0.9.0 | Composable style cycles / BSD |
| [cython](http://www.cython.org/) | 0.23.4 | The Cython compiler for writing C extensions for the Python language / Apache |
| [cytoolz](https://github.com/pytoolz/cytoolz) | 0.7.4 | Cython implementation of Toolz, high performance functional utilities / BSD |
| [datashape](https://github.com/ContinuumIO/datashape) | 0.4.7 | A data description language / BSD |
| [decorator](http://pypi.python.org/pypi/decorator) | 4.0.4 | Better living through Python with decorators / BSD |
| [docutils](http://docutils.sourceforge.net) | 0.12 | Utilities for general- and special-purpose documentation / Public-Domain, PSF, 2-clause BSD, GPLv3 |
| [dynd-python](https://github.com/libdynd/dynd-python) Linux Mac | 0.7.0 | Python exposure of DyND / BSD |
| [enum34](https://pypi.python.org/pypi/enum34) | 1.0.4 | Robust enumerated type support in Python / BSD |
| [fastcache](https://github.com/pbrady/fastcache) | 1.0.2 | C implementation of Python 3 functools.lru\_cache / MIT |
| [flask](http://flask.pocoo.org/) | 0.10.1 | A microframework based on Werkzeug, Jinja2 and good intentions / BSD |
| [fontconfig](http://www.freedesktop.org/wiki/Software/fontconfig/) Linux | 2.11.1 | Fontconfig is a library for configuring and customizing font access / BSD |
| [freetype](http://freetype.sourceforge.net/index2.html) | 2.5.5 | A Free, High-Quality, and Portable Font Engine / FreeType License |
| [funcsigs](http://funcsigs.readthedocs.org/) | 0.4 | Python function signatures from PEP362 for Python 2.6, 2.7 and 3.2+ / Apache |
| [gevent](http://www.gevent.org/) | 1.0.1 | Coroutine-based network library / MIT |
| [gevent-websocket](https://bitbucket.org/Jeffrey/gevent-websocket) | 0.9.3 | Websocket handler for the gevent pywsgi server, a Python network library / Apache |
| [greenlet](http://pypi.python.org/pypi/greenlet/) | 0.4.9 | lightweight in-process concurrent programming / MIT |
| [grin](http://pypi.python.org/pypi/grin) | 1.2.1 | grep program configured the way Robert Kern likes it / BSD |
| [h5py](http://code.google.com/p/h5py/) | 2.5.0 | Read and write HDF5 files from Python. / 3-clause BSD |
| [hdf5](http://www.hdfgroup.org/HDF5/) | 1.8.15.1 | HDF5 is a data model, library, and file format for storing and managing data / BSD-like |
| [idna](https://github.com/kjd/idna) | 2.0 | Internationalized Domain Names in Applications / BSD |
| [ipaddress](https://github.com/phihag/ipaddress) | 1.0.14 | IPv4/IPv6 manipulation library / PSF |
| [ipykernel](http://ipython.org) | 4.1.1 | IPython Kernel for Jupyter / BSD |
| [ipython](http://ipython.org/) | 4.0.1 | Productive Interactive Computing / BSD |
| [ipython\_genutils](http://jupyter.org) | 0.1.0 | vestigial utilities from IPython / BSD |
| [ipywidgets](http://github.com/jakevdp/ipywidgets) | 4.1.0 | IPython Static Widgets / BSD |
| [itsdangerous](http://github.com/mitsuhiko/itsdangerous) | 0.24 | Various helpers to pass trusted data to untrusted environments and back. / BSD |
| [jbig](https://www.cl.cam.ac.uk/~mgk25/jbigkit) Linux Mac | 2.1 | implementation of the JBIG1 data compression standard / GPL2 |
| [jdcal](http://github.com/phn/jdcal) | 1.0 | Julian dates from proleptic Gregorian and Julian calendars. / BSD |
| [jedi](https://github.com/davidhalter/jedi) | 0.9.0 | / MIT |
| [jinja2](http://jinja.pocoo.org/docs/) | 2.8 | An easy to use stand-alone template engine written in pure python. / BSD |
| [jpeg](http://www.ijg.org/) | 8d | read/write jpeg COM, EXIF, IPTC medata / Custom free software license |
| [jsonschema](http://github.com/Julian/jsonschema) | 2.4.0 | An implementation of JSON Schema validation for Python / MIT |
| [jupyter](http://jupyter.org) | 1.0.0 | Jupyter metapackage / BSD |
| [jupyter\_client](http://jupyter.org) | 4.1.1 | Jupyter protocol implementation and client libraries / BSD |
| [jupyter\_console](http://jupyter.org) | 4.0.3 | Jupyter terminal console / BSD |
| [jupyter\_core](http://jupyter.org) | 4.0.6 | base package on which Jupyter projects rely / BSD |
| launcher Mac Windows | 1.0.0 | Anaconda’s application launcher / proprietary - Continuum Analytics, Inc. |
| [libdynd](https://github.com/libdynd/libdynd) Linux Mac | 0.7.0 | C++ dynamic ndarray library / BSD |
| [libffi](https://github.com/atgreen/libffi) Linux | 3.0.13 | A portable foreign-function interface library / MIT |
| libgfortran Linux | 1.0 | GNU Fortran runtime library / GPL3 |
| [libpng](http://www.libpng.org/pub/png/libpng.html) | 1.6.17 | libpng is the official PNG reference library / libpng license |
| [libsodium](http://libsodium.org) Linux Windows | 1.0.3 | a modern software library for encryption, signatures, password hashing, etc. / MIT |
| [libtiff](http://www.libtiff.org/) | 4.0.6 | tiff image library / BSD-like |
| [libxml2](http://xmlsoft.org/) Linux Mac | 2.9.2 | The XML C parser and toolkit of Gnome / MIT |
| [libxslt](http://xmlsoft.org/) Linux Mac | 1.1.28 | Libxslt is the XSLT C library developed for the GNOME project / MIT |
| [llvmlite](https://github.com/numba/llvmlite) | 0.8.0 | lightweight wrapper around basic LLVM functionality / BSD |
| [lxml](http://lxml.de/) | 3.4.4 | XML processing library combining libxml2/libxslt with the ElementTree API / BSD |
| [markupsafe](http://github.com/mitsuhiko/markupsafe) | 0.23 | Implements a XML/HTML/XHTML Markup safe string for Python / BSD |
| [matplotlib](http://matplotlib.sourceforge.net/) | 1.5.0 | Python plotting package / PSF-based |
| [menuinst](https://github.com/ContinuumIO/menuinst) Windows | 1.3.1 | cross platform install of menu items / BSD |
| [mistune](https://github.com/lepture/mistune) | 0.7.1 | The fastest markdown parser in pure Python with renderer feature / BSD |
| [msvc\_runtime](http://www.microsoft.com) Windows | 1.0.1 | Bundles of the MSVC runtime for your Python / Proprietary |
| [multipledispatch](http://github.com/mrocklin/multipledispatch/) | 0.4.8 | Multiple dispatch / BSD |
| [nbconvert](http://jupyter.org) | 4.0.0 | converts notebooks to various other formats via Jinja templates / BSD |
| [nbformat](http://jupyter.org) | 4.0.1 | the base implementation of the Jupyter Notebook format / BSD |
| [networkx](http://networkx.lanl.gov/) | 1.10 | Python package for creating and manipulating graphs and networks / BSD |
| [nltk](http://nltk.org/) | 3.1 | Natural Language Toolkit / Apache |
| [node-webkit](https://github.com/rogerwang/node-webkit) Mac Windows | 0.10.1 | calls Node.js modules from DOM and enables a new way of writing applications / MIT |
| [nose](http://readthedocs.org/docs/nose/) | 1.3.7 | nose extends unittest to make testing easier / LGPL |
| [notebook](http://jupyter.org) | 4.0.6 | a web-based notebook environment for interactive computing / BSD |
| [numba](http://continuum.io/developer-resources.html) | 0.22.1 | compiling Python code using LLVM / BSD |
| [numexpr](https://github.com/pydata/numexpr) | 2.4.4 | Fast numerical expression evaluator for NumPy / MIT |
| [numpy](http://numpy.scipy.org/) | 1.9.3 | array processing for numbers, strings, records, and objects. / BSD |
| [odo](http://odo.pydata.org/en/latest/) | 0.3.4 | Data Migration for Blaze Project / BSD |
| [openblas](https://github.com/xianyi/OpenBLAS) Linux | 0.2.14 | optimized BLAS library based on GotoBLAS2 / BSD |
| [openpyxl](http://openpyxl.readthedocs.org) | 2.2.6 | A Python library to read/write Excel 2007 xlsx/xlsm files / MIT |
| [openssl](http://www.openssl.org/) | 1.0.2d | OpenSSL is an open-source implementation of the SSL and TLS protocols / Apache-style |
| [pandas](http://pandas.pydata.org/) | 0.17.1 | Powerful data structures for data analysis, time series,and statistics / BSD |
| [patchelf](http://nixos.org/patchelf.html) Linux | 0.6 | a small utility to modify the dynamic linker and RPATH of ELF executables / GPL3 |
| [path.py](http://github.com/jaraco/path.py) | 8.1.2 | module wrapper for os.path / MIT |
| [patsy](https://github.com/pydata/patsy) | 0.4.0 | a library for describing statistical models and building design matrices. / BSD |
| [pep8](http://pep8.readthedocs.org/) | 1.6.2 | Python style guide checker / MIT |
| [pexpect](http://pexpect.readthedocs.org/) Linux Mac | 3.3 | Pexpect allows easy control of interactive console applications / ISC |
| [pickleshare](https://github.com/vivainio/pickleshare) | 0.5 | tiny shelve-like database with concurrency support / MIT |
| [pillow](http://python-pillow.github.io/) | 3.0.0 | Python Imaging Library (Fork) / PIL license |
| [pip](http://www.pip-installer.org/) | 7.1.2 | PyPA recommended tool for installing Python packages / MIT |
| [pixman](http://cgit.freedesktop.org/pixman/) Linux | 0.32.6 | A low-level software library for pixel manipulation / MIT |
| [ply](http://www.dabeaz.com/ply/) | 3.8 | Python Lex & Yacc / BSD |
| [psutil](https://github.com/giampaolo/psutil) | 3.3.0 | cross-platform process and system utilities module for Python / BSD |
| [ptyprocess](https://github.com/pexpect/ptyprocess) Linux Mac | 0.5 | Run a subprocess in a pseudo terminal / ISC |
| [py](http://pylib.readthedocs.org/en/latest/) | 1.4.30 | library with cross-python path, ini-parsing, io, code, log facilities / MIT |
| [pyasn1](http://sourceforge.net/projects/pyasn1/) | 0.1.9 | Offline IP address to Autonomous System Number lookup module / BSD |
| [pyaudio](http://people.csail.mit.edu/hubert/pyaudio/) Mac | 0.2.7 | Bindings for PortAudio v19, the cross-platform audio stream library / MIT |
| [pycairo](http://cairographics.org/pycairo/) Linux | 1.10.0 | Pycairo is a set of Python bindings for the cairo graphics library / LGPL 2.1, MPL 1.1 |
| [pycosat](https://github.com/ilanschnell/pycosat) | 0.6.1 | bindings to picosat (a SAT solver) / MIT |
| [pycparser](https://github.com/eliben/pycparser) | 2.14 | C parser in Python / BSD |
| [pycrypto](http://www.pycrypto.org/) | 2.6.1 | Cryptographic modules for Python. / Public-Domain |
| [pycurl](http://pycurl.sourceforge.net/) | 7.19.5.1 | PycURL – cURL library module for Python / LGPL, MIT |
| [pyflakes](https://launchpad.net/pyflakes) | 1.0.0 | passive checker of Python programs / MIT |
| [pygments](http://pygments.org/) | 2.0.2 | Pygments is a syntax highlighting package written in Python / BSD |
| [pyopenssl](https://github.com/pyca/pyopenssl) | 0.15.1 | Python wrapper module around the OpenSSL library / Apache |
| [pyparsing](http://pyparsing.wikispaces.com/) | 2.0.3 | Python parsing module / MIT |
| [pyqt](http://www.riverbankcomputing.co.uk/software/pyqt) | 4.11.4 | PyQt is a Python binding of the cross-platform GUI toolkit Qt / Commercial, GPLv2, GPLv3 |
| [pyreadline](http://ipython.org/pyreadline.html) Windows | 2.1 | A python implmementation of GNU readline. / BSD |
| [pytables](http://www.pytables.org) | 3.2.2 | brings together Python, HDF5 and NumPy to easily handle large amounts of data / BSD |
| [pytest](http://pytest.org/) | 2.8.1 | simple powerful testing with Python / MIT |
| [python](http://www.python.org/) | 2.7.11 | general purpose programming language / PSF |
| [python-dateutil](https://dateutil.readthedocs.org/) | 2.4.2 | Extensions to the standard Python datetime module / BSD |
| [pytz](http://pytz.sourceforge.net/) | 2015.7 | World timezone definitions, modern and historical / MIT |
| [pywin32](http://sourceforge.net/projects/pywin32/) Windows | 219 | Python extensions for Windows / PSF |
| [pyyaml](http://pyyaml.org/wiki/PyYAML) | 3.11 | YAML parser and emitter for Python / MIT |
| [pyzmq](https://github.com/zeromq/pyzmq) | 14.7.0 | zeromq bindings for Python / LGPL and BSD |
| [qt](http://qt-project.org) | 4.8.7 | Qt is a cross-platform application and UI framework / LGPL |
| [qtconsole](http://jupyter.org) | 4.1.1 | Jupyter Qt Console / BSD |
| [readline](http://cnswww.cns.cwru.edu/php/chet/readline/rltop.html) Linux Mac | 6.2 | line-editing for programs with a command-line interface / GPL3 |
| [redis](http://redis.io/download/) Linux Mac | 2.6.9 | Redis is an open source, BSD licensed, advanced key-value cache and store / 3-clause BSD |
| [redis-py](https://github.com/andymccurdy/redis-py/) Linux Mac | 2.10.3 | Redis Python Client / MIT |
| [requests](http://docs.python-requests.org/en/latest/index.html) | 2.8.1 | Python HTTP for Humans / Apache |
| [rope](http://rope.sourceforge.net/) | 0.9.4 | a python refactoring library / GPL |
| [scikit-image](http://scikit-image.org/) | 0.11.3 | Image processing routines for SciPy / 3-clause BSD |
| [scikit-learn](http://scikit-learn.org/stable/) | 0.17 | A set of python modules for machine learning and data mining / 3-clause BSD |
| [scipy](http://www.scipy.org/) | 0.16.0 | Scientific Library for Python / BSD |
| [setuptools](https://pypi.python.org/pypi/setuptools) | 18.5 | Easily download, build, install, upgrade, and uninstall Python packages / PSF or ZPL |
| [simplegeneric](http://cheeseshop.python.org/pypi/simplegeneric) | 0.8.1 | lets you define simple single-dispatch generic functions / ZPL 2.1 |
| [singledispatch](http://docs.python.org/3/library/functools.html#functools.singledispatch) | 3.4.0.3 | brings functools.singledispatch from Python 3.4 to Python 2.6-3.3 / MIT |
| [sip](http://www.riverbankcomputing.com/software/sip/intro) | 4.16.9 | / GPL3 |
| [six](http://pypi.python.org/pypi/six/) | 1.10.0 | Python 2 and 3 compatibility utilities / MIT |
| [snowballstemmer](https://github.com/shibukawa/snowball_py) | 1.2.0 | provides 16 stemmer algorithms generated from Snowball algorithms / BSD |
| [sockjs-tornado](http://github.com/mrjoes/sockjs-tornado/) | 1.0.1 | SockJS python server implementation on top of Tornado framework / MIT |
| [sphinx](http://sphinx-doc.org) | 1.3.1 | Python documentation generator / BSD |
| [sphinx\_rtd\_theme](https://github.com/snide/sphinx_rtd_theme/) | 0.1.7 | ReadTheDocs.org theme for Sphinx / BSD |
| [spyder](https://github.com/spyder-ide/spyder) | 2.3.8 | Scientific PYthon Development EnviRonment / MIT |
| [sqlalchemy](http://www.sqlalchemy.org/) | 1.0.9 | Database Abstraction Library / MIT |
| [sqlite](http://www.sqlite.org/) Linux Mac | 3.8.4.1 | self-contained, zero-configuration, SQL database engine / Public-Domain |
| [ssl\_match\_hostname](http://bitbucket.org/brandon/backports.ssl_match_hostname) | 3.4.0.2 | The ssl.match\_hostname() function from Python 3.4 / PSF |
| [statsmodels](http://statsmodels.sourceforge.net/) | 0.6.1 | Statistical computations and models for use with SciPy / 3-clause BSD |
| [sympy](http://sympy.org) | 0.7.6.1 | SymPy is a Python library for symbolic mathematics / 3-clause BSD |
| [terminado](https://github.com/takluyver/terminado) Linux Mac | 0.5 | Terminals served to term.js using Tornado websockets / BSD |
| [theano](http://deeplearning.net/software/theano/) Linux | 0.7.0 | Optimizing compiler for evaluating mathematical expressions on CPUs and GPUs / BSD |
| [tk](http://www.tcl.tk/) | 8.5.18 | dynamic programming language with GUI elements / BSD-like |
| [toolz](http://toolz.readthedocs.org/en/latest/) | 0.7.4 | List processing tools and functional utilities / BSD |
| [tornado](http://www.tornadoweb.org/) | 4.3 | a Python web framework and asynchronous networking library / Apache |
| [traitlets](http://ipython.org/) | 4.0.0 | configuration system for Python applications / BSD |
| [ujson](http://www.esn.me/) | 1.33 | Ultra fast JSON encoder and decoder for Python / BSD |
| [unicodecsv](https://github.com/jdunck/python-unicodecsv) | 0.14.1 | The unicodecsv file reads and decodes byte strings for you / BSD |
| [util-linux](http://freecode.com/projects/util-linux) Linux | 2.21 | Util-linux is a suite of essential utilities for any Linux system / GPL2 |
| [werkzeug](http://werkzeug.pocoo.org/) | 0.11.2 | The Swiss Army knife of Python web development / BSD |
| [wheel](http://bitbucket.org/pypa/wheel/) | 0.26.0 | built-package format for Python / MIT |
| [xlrd](http://www.lexicon.net/sjmachin/xlrd.htm) | 0.9.4 | Library for developers to extract data from Microsoft Excel spreadsheet files / BSD |
| [xlsxwriter](https://github.com/jmcnamara/XlsxWriter) | 0.7.7 | A Python module for creating Excel XLSX files / BSD |
| [xlwings](http://xlwings.org/) Mac Windows | 0.5.0 | Make Excel fly. Interact with Excel from Python and vice versa / 3-clause BSD |
| [xlwt](http://www.python-excel.org/) | 1.0.0 | writing data and formatting information to Excel files / BSD |
| [xz](http://tukaani.org/xz/) Linux Mac | 5.0.5 | data compression software with high compression ratio / Public-Domain, GPL |
| [yaml](http://www.yaml.org/) Linux Mac | 0.1.6 | a human friendly data serialization standard for all programming languages / MIT |
| [zeromq](http://zeromq.org) | 4.1.3 | a messaging system, or “message-oriented middleware” / LGPL |
| [zlib](http://zlib.net/) | 1.2.8 | massively spiffy yet delicately unobtrusive compression library / zlib |
| Name | Version | Summary / License |
|---|---|---|
| [abstract-rendering](https://github.com/JosephCottam/AbstractRendering) Linux Mac | 0.5.1 | Rendering as a binning process / 3-clause BSD |
| [alabaster](https://github.com/bitprophet/alabaster) | 0.7.6 | configurable sidebar-enabled Sphinx theme / BSD |
| [anaconda-client](http://anaconda.org) | 1.1.0 | anaconda.org command line client library / BSD |
| [appnope](http://github.com/minrk/appnope) Mac | 0.1.0 | Disable App Nap on OS X 10.9 / BSD |
| [appscript](http://appscript.sourceforge.net/) Mac | 1.0.1 | Control AppleScriptable applications from Python / Public-Domain |
| [argcomplete](https://github.com/kislyuk/argcomplete) | 1.0.0 | Bash tab completion for argparse. Tab complete all the things! / Apache |
| [astropy](http://www.astropy.org/) | 1.0.5 | Community-developed python astronomy tools / BSD |
| [babel](http://babel.pocoo.org/) | 2.1.1 | Internationalization utilities / BSD |
| [beautifulsoup4](http://www.crummy.com/software/BeautifulSoup/) | 4.4.1 | screen-scraping library / MIT |
| [bitarray](https://github.com/ilanschnell/bitarray) | 0.8.1 | efficient arrays of booleans – C extension / PSF |
| [blaze-core](http://blaze.pydata.org) | 0.8.3 | Blaze is the next generation of NumPy / BSD |
| [bokeh](http://github.com/bokeh/bokeh) | 0.10.0 | statistical and novel interactive HTML plots for Python / BSD |
| [boto](https://github.com/boto/boto/) | 2.38.0 | Amazon Web Services Library / MIT |
| [bzip2](http://www.bzip.org/) Windows | 1.0.6 | high-quality data compressor / BSD |
| [cffi](http://cffi.readthedocs.org) | 1.2.1 | Foreign Function Interface for Python calling C code / MIT |
| [clyent](https://github.com/binstar/clyent) | 0.4.0 | Command line client Library for windows and posix / BSD |
| [colorama](http://code.google.com/p/colorama/) | 0.3.3 | Cross-platform colored terminal text. / BSD |
| [comtypes](http://starship.python.net/crew/theller/comtypes/) Windows | 1.1.2 | pure Python COM package / MIT |
| [conda](http://conda.pydata.org/) | 3.18.3 | cross-platform, Python-agnostic binary package manager / BSD |
| [conda-build](https://github.com/conda/conda-build) | 1.18.1 | Commands and tools for building conda packages / BSD |
| [conda-env](https://github.com/conda/conda-env/) | 2.4.4 | provides a unified interface to dealing with Conda environments / BSD |
| [configobj](http://www.voidspace.org.uk/python/configobj.html) | 5.0.6 | Config file reading, writing and validation / BSD |
| [cryptography](https://github.com/pyca/cryptography) | 1.0.2 | provides cryptographic recipes and primitives to Python developers / Apache |
| [curl](http://curl.haxx.se/) | 7.45.0 | tool and library for transferring data with URL syntax / MIT/X derivate |
| [cython](http://www.cython.org/) | 0.23.4 | The Cython compiler for writing C extensions for the Python language / Apache |
| [cytoolz](https://github.com/pytoolz/cytoolz) | 0.7.4 | Cython implementation of Toolz, high performance functional utilities / BSD |
| [datashape](https://github.com/ContinuumIO/datashape) | 0.4.7 | A data description language / BSD |
| [decorator](http://pypi.python.org/pypi/decorator) | 4.0.4 | Better living through Python with decorators / BSD |
| [docutils](http://docutils.sourceforge.net) | 0.12 | Utilities for general- and special-purpose documentation / Public-Domain, PSF, 2-clause BSD, GPLv3 |
| [fastcache](https://github.com/pbrady/fastcache) | 1.0.2 | C implementation of Python 3 functools.lru\_cache / MIT |
| [flask](http://flask.pocoo.org/) | 0.10.1 | A microframework based on Werkzeug, Jinja2 and good intentions / BSD |
| [fontconfig](http://www.freedesktop.org/wiki/Software/fontconfig/) Linux | 2.11.1 | Fontconfig is a library for configuring and customizing font access / BSD |
| [freetype](http://freetype.sourceforge.net/index2.html) | 2.5.5 | A Free, High-Quality, and Portable Font Engine / FreeType License |
| [greenlet](http://pypi.python.org/pypi/greenlet/) | 0.4.9 | lightweight in-process concurrent programming / MIT |
| [h5py](http://code.google.com/p/h5py/) | 2.5.0 | Read and write HDF5 files from Python. / 3-clause BSD |
| [hdf5](http://www.hdfgroup.org/HDF5/) | 1.8.15.1 | HDF5 is a data model, library, and file format for storing and managing data / BSD-like |
| [idna](https://github.com/kjd/idna) | 2.0 | Internationalized Domain Names in Applications / BSD |
| [ipykernel](http://ipython.org) | 4.1.1 | IPython Kernel for Jupyter / BSD |
| [ipython](http://ipython.org/) | 4.0.0 | Productive Interactive Computing / BSD |
| [ipython\_genutils](http://jupyter.org) | 0.1.0 | vestigial utilities from IPython / BSD |
| [ipywidgets](http://github.com/jakevdp/ipywidgets) | 4.1.0 | IPython Static Widgets / BSD |
| [itsdangerous](http://github.com/mitsuhiko/itsdangerous) | 0.24 | Various helpers to pass trusted data to untrusted environments and back. / BSD |
| [jdcal](http://github.com/phn/jdcal) | 1.0 | Julian dates from proleptic Gregorian and Julian calendars. / BSD |
| [jedi](https://github.com/davidhalter/jedi) | 0.9.0 | / MIT |
| [jinja2](http://jinja.pocoo.org/docs/) | 2.8 | An easy to use stand-alone template engine written in pure python. / BSD |
| [jpeg](http://www.ijg.org/) | 8d | read/write jpeg COM, EXIF, IPTC medata / Custom free software license |
| [jsonschema](http://github.com/Julian/jsonschema) | 2.4.0 | An implementation of JSON Schema validation for Python / MIT |
| [jupyter](http://jupyter.org) | 1.0.0 | Jupyter metapackage / BSD |
| [jupyter\_client](http://jupyter.org) | 4.1.1 | Jupyter protocol implementation and client libraries / BSD |
| [jupyter\_console](http://jupyter.org) | 4.0.3 | Jupyter terminal console / BSD |
| [jupyter\_core](http://jupyter.org) | 4.0.6 | base package on which Jupyter projects rely / BSD |
| launcher Mac Windows | 1.0.0 | Anaconda’s application launcher / proprietary - Continuum Analytics, Inc. |
| [libffi](https://github.com/atgreen/libffi) Linux | 3.0.13 | A portable foreign-function interface library / MIT |
| libgfortran Linux | 1.0 | GNU Fortran runtime library / GPL3 |
| [libpng](http://www.libpng.org/pub/png/libpng.html) | 1.6.17 | libpng is the official PNG reference library / libpng license |
| [libsodium](http://libsodium.org) Linux Windows | 1.0.3 | a modern software library for encryption, signatures, password hashing, etc. / MIT |
| [libtiff](http://www.libtiff.org/) | 4.0.6 | tiff image library / BSD-like |
| [libxml2](http://xmlsoft.org/) Linux Mac | 2.9.2 | The XML C parser and toolkit of Gnome / MIT |
| [libxslt](http://xmlsoft.org/) Linux Mac | 1.1.28 | Libxslt is the XSLT C library developed for the GNOME project / MIT |
| [lxml](http://lxml.de/) | 3.4.4 | XML processing library combining libxml2/libxslt with the ElementTree API / BSD |
| [markupsafe](http://github.com/mitsuhiko/markupsafe) | 0.23 | Implements a XML/HTML/XHTML Markup safe string for Python / BSD |
| [matplotlib](http://matplotlib.sourceforge.net/) | 1.4.3 | Python plotting package / PSF-based |
| [menuinst](https://github.com/ContinuumIO/menuinst) Windows | 1.2.1 | cross platform install of menu items / BSD |
| [mistune](https://github.com/lepture/mistune) | 0.7.1 | The fastest markdown parser in pure Python with renderer feature / BSD |
| [msvc\_runtime](http://www.microsoft.com) Windows | 1.0.0 | Bundles of the MSVC runtime for your Python / Proprietary |
| [multipledispatch](http://github.com/mrocklin/multipledispatch/) | 0.4.8 | Multiple dispatch / BSD |
| [nbconvert](http://jupyter.org) | 4.0.0 | converts notebooks to various other formats via Jinja templates / BSD |
| [nbformat](http://jupyter.org) | 4.0.1 | the base implementation of the Jupyter Notebook format / BSD |
| [networkx](http://networkx.lanl.gov/) | 1.10 | Python package for creating and manipulating graphs and networks / BSD |
| [nltk](http://nltk.org/) | 3.1 | Natural Language Toolkit / Apache |
| [node-webkit](https://github.com/rogerwang/node-webkit) Mac Windows | 0.10.1 | calls Node.js modules from DOM and enables a new way of writing applications / MIT |
| [nose](http://readthedocs.org/docs/nose/) | 1.3.7 | nose extends unittest to make testing easier / LGPL |
| [notebook](http://jupyter.org) | 4.0.6 | a web-based notebook environment for interactive computing / BSD |
| [numexpr](https://github.com/pydata/numexpr) | 2.4.4 | Fast numerical expression evaluator for NumPy / MIT |
| [numpy](http://numpy.scipy.org/) | 1.9.3 | array processing for numbers, strings, records, and objects. / BSD |
| [odo](http://odo.pydata.org/en/latest/) | 0.3.4 | Data Migration for Blaze Project / BSD |
| [openblas](https://github.com/xianyi/OpenBLAS) Linux | 0.2.14 | optimized BLAS library based on GotoBLAS2 / BSD |
| [openpyxl](http://openpyxl.readthedocs.org) | 2.2.6 | A Python library to read/write Excel 2007 xlsx/xlsm files / MIT |
| [openssl](http://www.openssl.org/) | 1.0.2d | OpenSSL is an open-source implementation of the SSL and TLS protocols / Apache-style |
| [pandas](http://pandas.pydata.org/) | 0.17.0 | Powerful data structures for data analysis, time series,and statistics / BSD |
| [patchelf](http://nixos.org/patchelf.html) Linux | 0.6 | a small utility to modify the dynamic linker and RPATH of ELF executables / GPL3 |
| [path.py](http://github.com/jaraco/path.py) | 8.1.2 | module wrapper for os.path / MIT |
| [patsy](https://github.com/pydata/patsy) | 0.4.0 | a library for describing statistical models and building design matrices. / BSD |
| [pep8](http://pep8.readthedocs.org/) | 1.6.2 | Python style guide checker / MIT |
| [pexpect](http://pexpect.readthedocs.org/) Linux Mac | 3.3 | Pexpect allows easy control of interactive console applications / ISC |
| [pickleshare](https://github.com/vivainio/pickleshare) | 0.5 | tiny shelve-like database with concurrency support / MIT |
| [pillow](http://python-pillow.github.io/) | 3.0.0 | Python Imaging Library (Fork) / PIL license |
| [pip](http://www.pip-installer.org/) | 7.1.2 | PyPA recommended tool for installing Python packages / MIT |
| [ply](http://www.dabeaz.com/ply/) | 3.8 | Python Lex & Yacc / BSD |
| [psutil](https://github.com/giampaolo/psutil) | 3.2.2 | cross-platform process and system utilities module for Python / BSD |
| [ptyprocess](https://github.com/pexpect/ptyprocess) Linux Mac | 0.5 | Run a subprocess in a pseudo terminal / ISC |
| [py](http://pylib.readthedocs.org/en/latest/) | 1.4.30 | library with cross-python path, ini-parsing, io, code, log facilities / MIT |
| [pyasn1](http://sourceforge.net/projects/pyasn1/) | 0.1.9 | Offline IP address to Autonomous System Number lookup module / BSD |
| [pycosat](https://github.com/ilanschnell/pycosat) | 0.6.1 | bindings to picosat (a SAT solver) / MIT |
| [pycparser](https://github.com/eliben/pycparser) | 2.14 | C parser in Python / BSD |
| [pycrypto](http://www.pycrypto.org/) | 2.6.1 | Cryptographic modules for Python. / Public-Domain |
| [pycurl](http://pycurl.sourceforge.net/) | 7.19.5.1 | PycURL – cURL library module for Python / LGPL, MIT |
| [pyflakes](https://launchpad.net/pyflakes) | 1.0.0 | passive checker of Python programs / MIT |
| [pygments](http://pygments.org/) | 2.0.2 | Pygments is a syntax highlighting package written in Python / BSD |
| [pyopenssl](https://github.com/pyca/pyopenssl) | 0.15.1 | Python wrapper module around the OpenSSL library / Apache |
| [pyparsing](http://pyparsing.wikispaces.com/) | 2.0.3 | Python parsing module / MIT |
| [pyqt](http://www.riverbankcomputing.co.uk/software/pyqt) | 4.11.4 | PyQt is a Python binding of the cross-platform GUI toolkit Qt / Commercial, GPLv2, GPLv3 |
| [pyreadline](http://ipython.org/pyreadline.html) Windows | 2.1 | A python implmementation of GNU readline. / BSD |
| [pytables](http://www.pytables.org) | 3.2.2 | brings together Python, HDF5 and NumPy to easily handle large amounts of data / BSD |
| [pytest](http://pytest.org/) | 2.8.1 | simple powerful testing with Python / MIT |
| [python](http://www.python.org/) | 3.5.0 | general purpose programming language / PSF |
| [python-dateutil](https://dateutil.readthedocs.org/) | 2.4.2 | Extensions to the standard Python datetime module / BSD |
| [pytz](http://pytz.sourceforge.net/) | 2015.6 | World timezone definitions, modern and historical / MIT |
| [pywin32](http://sourceforge.net/projects/pywin32/) Windows | 219 | Python extensions for Windows / PSF |
| [pyyaml](http://pyyaml.org/wiki/PyYAML) | 3.11 | YAML parser and emitter for Python / MIT |
| [pyzmq](https://github.com/zeromq/pyzmq) | 14.7.0 | zeromq bindings for Python / LGPL and BSD |
| [qt](http://qt-project.org) | 4.8.7 | Qt is a cross-platform application and UI framework / LGPL |
| [qtconsole](http://jupyter.org) | 4.1.0 | Jupyter Qt Console / BSD |
| [readline](http://cnswww.cns.cwru.edu/php/chet/readline/rltop.html) Linux Mac | 6.2 | line-editing for programs with a command-line interface / GPL3 |
| [redis](http://redis.io/download/) Linux Mac | 2.6.9 | Redis is an open source, BSD licensed, advanced key-value cache and store / 3-clause BSD |
| [redis-py](https://github.com/andymccurdy/redis-py/) Linux Mac | 2.10.3 | Redis Python Client / MIT |
| [requests](http://docs.python-requests.org/en/latest/index.html) | 2.8.1 | Python HTTP for Humans / Apache |
| [rope](http://rope.sourceforge.net/) | 0.9.4 | a python refactoring library / GPL |
| [scikit-image](http://scikit-image.org/) | 0.11.3 | Image processing routines for SciPy / 3-clause BSD |
| [scikit-learn](http://scikit-learn.org/stable/) | 0.16.1 | A set of python modules for machine learning and data mining / 3-clause BSD |
| [scipy](http://www.scipy.org/) | 0.16.0 | Scientific Library for Python / BSD |
| [setuptools](https://pypi.python.org/pypi/setuptools) | 18.4 | Easily download, build, install, upgrade, and uninstall Python packages / PSF or ZPL |
| [simplegeneric](http://cheeseshop.python.org/pypi/simplegeneric) | 0.8.1 | lets you define simple single-dispatch generic functions / ZPL 2.1 |
| [sip](http://www.riverbankcomputing.com/software/sip/intro) | 4.16.9 | / GPL3 |
| [six](http://pypi.python.org/pypi/six/) | 1.10.0 | Python 2 and 3 compatibility utilities / MIT |
| [snowballstemmer](https://github.com/shibukawa/snowball_py) | 1.2.0 | provides 16 stemmer algorithms generated from Snowball algorithms / BSD |
| [sockjs-tornado](http://github.com/mrjoes/sockjs-tornado/) | 1.0.1 | SockJS python server implementation on top of Tornado framework / MIT |
| [sphinx](http://sphinx-doc.org) | 1.3.1 | Python documentation generator / BSD |
| [sphinx\_rtd\_theme](https://github.com/snide/sphinx_rtd_theme/) | 0.1.7 | ReadTheDocs.org theme for Sphinx / BSD |
| [spyder](https://github.com/spyder-ide/spyder) | 2.3.7 | Scientific PYthon Development EnviRonment / MIT |
| [sqlalchemy](http://www.sqlalchemy.org/) | 1.0.9 | Database Abstraction Library / MIT |
| [sqlite](http://www.sqlite.org/) Linux Mac | 3.8.4.1 | self-contained, zero-configuration, SQL database engine / Public-Domain |
| [statsmodels](http://statsmodels.sourceforge.net/) | 0.6.1 | Statistical computations and models for use with SciPy / 3-clause BSD |
| [sympy](http://sympy.org) | 0.7.6.1 | SymPy is a Python library for symbolic mathematics / 3-clause BSD |
| [terminado](https://github.com/takluyver/terminado) Linux Mac | 0.5 | Terminals served to term.js using Tornado websockets / BSD |
| [theano](http://deeplearning.net/software/theano/) Linux | 0.7.0 | Optimizing compiler for evaluating mathematical expressions on CPUs and GPUs / BSD |
| [tk](http://www.tcl.tk/) | 8.5.18 | dynamic programming language with GUI elements / BSD-like |
| [toolz](http://toolz.readthedocs.org/en/latest/) | 0.7.4 | List processing tools and functional utilities / BSD |
| [tornado](http://www.tornadoweb.org/) | 4.2.1 | a Python web framework and asynchronous networking library / Apache |
| [traitlets](http://ipython.org/) | 4.0.0 | configuration system for Python applications / BSD |
| [ujson](http://www.esn.me/) | 1.33 | Ultra fast JSON encoder and decoder for Python / BSD |
| [unicodecsv](https://github.com/jdunck/python-unicodecsv) | 0.14.1 | The unicodecsv file reads and decodes byte strings for you / BSD |
| [util-linux](http://freecode.com/projects/util-linux) Linux | 2.21 | Util-linux is a suite of essential utilities for any Linux system / GPL2 |
| [werkzeug](http://werkzeug.pocoo.org/) | 0.10.4 | The Swiss Army knife of Python web development / BSD |
| [wheel](http://bitbucket.org/pypa/wheel/) | 0.26.0 | built-package format for Python / MIT |
| [xlrd](http://www.lexicon.net/sjmachin/xlrd.htm) | 0.9.4 | Library for developers to extract data from Microsoft Excel spreadsheet files / BSD |
| [xlsxwriter](https://github.com/jmcnamara/XlsxWriter) | 0.7.7 | A Python module for creating Excel XLSX files / BSD |
| [xlwings](http://xlwings.org/) Mac Windows | 0.4.1 | Make Excel fly. Interact with Excel from Python and vice versa / 3-clause BSD |
| [xlwt](http://www.python-excel.org/) | 1.0.0 | writing data and formatting information to Excel files / BSD |
| [xz](http://tukaani.org/xz/) Linux Mac | 5.0.5 | data compression software with high compression ratio / Public-Domain, GPL |
| [yaml](http://www.yaml.org/) Linux Mac | 0.1.6 | a human friendly data serialization standard for all programming languages / MIT |
| [zeromq](http://zeromq.org) | 4.1.3 | a messaging system, or “message-oriented middleware” / LGPL |
| [zlib](http://zlib.net/) | 1.2.8 | massively spiffy yet delicately unobtrusive compression library / zlib |
| Name | Version | Summary / License |
|---|---|---|
| [abstract-rendering](https://github.com/JosephCottam/AbstractRendering) Linux Mac | 0.5.1 | Rendering as a binning process / 3-clause BSD |
| [alabaster](https://github.com/bitprophet/alabaster) | 0.7.6 | configurable sidebar-enabled Sphinx theme / BSD |
| [anaconda-client](http://anaconda.org) | 1.1.0 | anaconda.org command line client library / BSD |
| [appnope](http://github.com/minrk/appnope) Mac | 0.1.0 | Disable App Nap on OS X 10.9 / BSD |
| [appscript](http://appscript.sourceforge.net/) Mac | 1.0.1 | Control AppleScriptable applications from Python / Public-Domain |
| [argcomplete](https://github.com/kislyuk/argcomplete) | 1.0.0 | Bash tab completion for argparse. Tab complete all the things! / Apache |
| [astropy](http://www.astropy.org/) | 1.0.5 | Community-developed python astronomy tools / BSD |
| [babel](http://babel.pocoo.org/) | 2.1.1 | Internationalization utilities / BSD |
| [beautifulsoup4](http://www.crummy.com/software/BeautifulSoup/) | 4.4.1 | screen-scraping library / MIT |
| [bitarray](https://github.com/ilanschnell/bitarray) | 0.8.1 | efficient arrays of booleans – C extension / PSF |
| [blaze-core](http://blaze.pydata.org) | 0.8.3 | Blaze is the next generation of NumPy / BSD |
| [bokeh](http://github.com/bokeh/bokeh) | 0.10.0 | statistical and novel interactive HTML plots for Python / BSD |
| [boto](https://github.com/boto/boto/) | 2.38.0 | Amazon Web Services Library / MIT |
| [bottleneck](http://berkeleyanalytics.com/bottleneck) | 1.0.0 | Fast NumPy array functions written in Cython. / Simplified BSD |
| [bzip2](http://www.bzip.org/) Windows | 1.0.6 | high-quality data compressor / BSD |
| [cairo](http://cairographics.org/) Linux | 1.12.18 | Cairo is a 2D graphics library with support for multiple output devices. / LGPL 2.1, MPL 1.1 |
| [cdecimal](http://www.bytereef.org/mpdecimal/index.html) | 2.3 | Fast drop-in replacement for decimal.py / BSD |
| [cffi](http://cffi.readthedocs.org) | 1.2.1 | Foreign Function Interface for Python calling C code / MIT |
| [clyent](https://github.com/binstar/clyent) | 0.4.0 | Command line client Library for windows and posix / BSD |
| [colorama](http://code.google.com/p/colorama/) | 0.3.3 | Cross-platform colored terminal text. / BSD |
| [comtypes](http://starship.python.net/crew/theller/comtypes/) Windows | 1.1.2 | pure Python COM package / MIT |
| [conda](http://conda.pydata.org/) | 3.18.3 | cross-platform, Python-agnostic binary package manager / BSD |
| [conda-build](https://github.com/conda/conda-build) | 1.18.1 | Commands and tools for building conda packages / BSD |
| [conda-env](https://github.com/conda/conda-env/) | 2.4.4 | provides a unified interface to dealing with Conda environments / BSD |
| [configobj](http://www.voidspace.org.uk/python/configobj.html) | 5.0.6 | Config file reading, writing and validation / BSD |
| [cryptography](https://github.com/pyca/cryptography) | 1.0.2 | provides cryptographic recipes and primitives to Python developers / Apache |
| [curl](http://curl.haxx.se/) | 7.45.0 | tool and library for transferring data with URL syntax / MIT/X derivate |
| [cython](http://www.cython.org/) | 0.23.4 | The Cython compiler for writing C extensions for the Python language / Apache |
| [cytoolz](https://github.com/pytoolz/cytoolz) | 0.7.4 | Cython implementation of Toolz, high performance functional utilities / BSD |
| [datashape](https://github.com/ContinuumIO/datashape) | 0.4.7 | A data description language / BSD |
| [decorator](http://pypi.python.org/pypi/decorator) | 4.0.4 | Better living through Python with decorators / BSD |
| [docutils](http://docutils.sourceforge.net) | 0.12 | Utilities for general- and special-purpose documentation / Public-Domain, PSF, 2-clause BSD, GPLv3 |
| [enum34](https://pypi.python.org/pypi/enum34) | 1.0.4 | Robust enumerated type support in Python / BSD |
| [fastcache](https://github.com/pbrady/fastcache) | 1.0.2 | C implementation of Python 3 functools.lru\_cache / MIT |
| [flask](http://flask.pocoo.org/) | 0.10.1 | A microframework based on Werkzeug, Jinja2 and good intentions / BSD |
| [fontconfig](http://www.freedesktop.org/wiki/Software/fontconfig/) Linux | 2.11.1 | Fontconfig is a library for configuring and customizing font access / BSD |
| [freetype](http://freetype.sourceforge.net/index2.html) | 2.5.5 | A Free, High-Quality, and Portable Font Engine / FreeType License |
| [funcsigs](http://funcsigs.readthedocs.org/) | 0.4 | Python function signatures from PEP362 for Python 2.6, 2.7 and 3.2+ / Apache |
| [gevent](http://www.gevent.org/) | 1.0.1 | Coroutine-based network library / MIT |
| [gevent-websocket](https://bitbucket.org/Jeffrey/gevent-websocket) | 0.9.3 | Websocket handler for the gevent pywsgi server, a Python network library / Apache |
| [greenlet](http://pypi.python.org/pypi/greenlet/) | 0.4.9 | lightweight in-process concurrent programming / MIT |
| [grin](http://pypi.python.org/pypi/grin) | 1.2.1 | grep program configured the way Robert Kern likes it / BSD |
| [h5py](http://code.google.com/p/h5py/) | 2.5.0 | Read and write HDF5 files from Python. / 3-clause BSD |
| [hdf5](http://www.hdfgroup.org/HDF5/) | 1.8.15.1 | HDF5 is a data model, library, and file format for storing and managing data / BSD-like |
| [idna](https://github.com/kjd/idna) | 2.0 | Internationalized Domain Names in Applications / BSD |
| [ipaddress](https://github.com/phihag/ipaddress) | 1.0.14 | IPv4/IPv6 manipulation library / PSF |
| [ipykernel](http://ipython.org) | 4.1.1 | IPython Kernel for Jupyter / BSD |
| [ipython](http://ipython.org/) | 4.0.0 | Productive Interactive Computing / BSD |
| [ipython\_genutils](http://jupyter.org) | 0.1.0 | vestigial utilities from IPython / BSD |
| [ipywidgets](http://github.com/jakevdp/ipywidgets) | 4.1.0 | IPython Static Widgets / BSD |
| [itsdangerous](http://github.com/mitsuhiko/itsdangerous) | 0.24 | Various helpers to pass trusted data to untrusted environments and back. / BSD |
| [jdcal](http://github.com/phn/jdcal) | 1.0 | Julian dates from proleptic Gregorian and Julian calendars. / BSD |
| [jedi](https://github.com/davidhalter/jedi) | 0.9.0 | / MIT |
| [jinja2](http://jinja.pocoo.org/docs/) | 2.8 | An easy to use stand-alone template engine written in pure python. / BSD |
| [jpeg](http://www.ijg.org/) | 8d | read/write jpeg COM, EXIF, IPTC medata / Custom free software license |
| [jsonschema](http://github.com/Julian/jsonschema) | 2.4.0 | An implementation of JSON Schema validation for Python / MIT |
| [jupyter](http://jupyter.org) | 1.0.0 | Jupyter metapackage / BSD |
| [jupyter\_client](http://jupyter.org) | 4.1.1 | Jupyter protocol implementation and client libraries / BSD |
| [jupyter\_console](http://jupyter.org) | 4.0.3 | Jupyter terminal console / BSD |
| [jupyter\_core](http://jupyter.org) | 4.0.6 | base package on which Jupyter projects rely / BSD |
| launcher Mac Windows | 1.0.0 | Anaconda’s application launcher / proprietary - Continuum Analytics, Inc. |
| [libffi](https://github.com/atgreen/libffi) Linux | 3.0.13 | A portable foreign-function interface library / MIT |
| libgfortran Linux | 1.0 | GNU Fortran runtime library / GPL3 |
| [libpng](http://www.libpng.org/pub/png/libpng.html) | 1.6.17 | libpng is the official PNG reference library / libpng license |
| [libsodium](http://libsodium.org) Linux Windows | 1.0.3 | a modern software library for encryption, signatures, password hashing, etc. / MIT |
| [libtiff](http://www.libtiff.org/) | 4.0.6 | tiff image library / BSD-like |
| [libxml2](http://xmlsoft.org/) Linux Mac | 2.9.2 | The XML C parser and toolkit of Gnome / MIT |
| [libxslt](http://xmlsoft.org/) Linux Mac | 1.1.28 | Libxslt is the XSLT C library developed for the GNOME project / MIT |
| [llvmlite](https://github.com/numba/llvmlite) | 0.7.0 | lightweight wrapper around basic LLVM functionality / BSD |
| [lxml](http://lxml.de/) | 3.4.4 | XML processing library combining libxml2/libxslt with the ElementTree API / BSD |
| [markupsafe](http://github.com/mitsuhiko/markupsafe) | 0.23 | Implements a XML/HTML/XHTML Markup safe string for Python / BSD |
| [matplotlib](http://matplotlib.sourceforge.net/) | 1.4.3 | Python plotting package / PSF-based |
| [menuinst](https://github.com/ContinuumIO/menuinst) Windows | 1.2.1 | cross platform install of menu items / BSD |
| [mistune](https://github.com/lepture/mistune) | 0.7.1 | The fastest markdown parser in pure Python with renderer feature / BSD |
| [msvc\_runtime](http://www.microsoft.com) Windows | 1.0.0 | Bundles of the MSVC runtime for your Python / Proprietary |
| [multipledispatch](http://github.com/mrocklin/multipledispatch/) | 0.4.8 | Multiple dispatch / BSD |
| [nbconvert](http://jupyter.org) | 4.0.0 | converts notebooks to various other formats via Jinja templates / BSD |
| [nbformat](http://jupyter.org) | 4.0.1 | the base implementation of the Jupyter Notebook format / BSD |
| [networkx](http://networkx.lanl.gov/) | 1.10 | Python package for creating and manipulating graphs and networks / BSD |
| [nltk](http://nltk.org/) | 3.1 | Natural Language Toolkit / Apache |
| [node-webkit](https://github.com/rogerwang/node-webkit) Mac Windows | 0.10.1 | calls Node.js modules from DOM and enables a new way of writing applications / MIT |
| [nose](http://readthedocs.org/docs/nose/) | 1.3.7 | nose extends unittest to make testing easier / LGPL |
| [notebook](http://jupyter.org) | 4.0.6 | a web-based notebook environment for interactive computing / BSD |
| [numba](http://continuum.io/developer-resources.html) | 0.21.0 | compiling Python code using LLVM / BSD |
| [numexpr](https://github.com/pydata/numexpr) | 2.4.4 | Fast numerical expression evaluator for NumPy / MIT |
| [numpy](http://numpy.scipy.org/) | 1.9.3 | array processing for numbers, strings, records, and objects. / BSD |
| [odo](http://odo.pydata.org/en/latest/) | 0.3.4 | Data Migration for Blaze Project / BSD |
| [openblas](https://github.com/xianyi/OpenBLAS) Linux | 0.2.14 | optimized BLAS library based on GotoBLAS2 / BSD |
| [openpyxl](http://openpyxl.readthedocs.org) | 2.2.6 | A Python library to read/write Excel 2007 xlsx/xlsm files / MIT |
| [openssl](http://www.openssl.org/) | 1.0.2d | OpenSSL is an open-source implementation of the SSL and TLS protocols / Apache-style |
| [pandas](http://pandas.pydata.org/) | 0.17.0 | Powerful data structures for data analysis, time series,and statistics / BSD |
| [patchelf](http://nixos.org/patchelf.html) Linux | 0.6 | a small utility to modify the dynamic linker and RPATH of ELF executables / GPL3 |
| [path.py](http://github.com/jaraco/path.py) | 8.1.2 | module wrapper for os.path / MIT |
| [patsy](https://github.com/pydata/patsy) | 0.4.0 | a library for describing statistical models and building design matrices. / BSD |
| [pep8](http://pep8.readthedocs.org/) | 1.6.2 | Python style guide checker / MIT |
| [pexpect](http://pexpect.readthedocs.org/) Linux Mac | 3.3 | Pexpect allows easy control of interactive console applications / ISC |
| [pickleshare](https://github.com/vivainio/pickleshare) | 0.5 | tiny shelve-like database with concurrency support / MIT |
| [pillow](http://python-pillow.github.io/) | 3.0.0 | Python Imaging Library (Fork) / PIL license |
| [pip](http://www.pip-installer.org/) | 7.1.2 | PyPA recommended tool for installing Python packages / MIT |
| [pixman](http://cgit.freedesktop.org/pixman/) Linux | 0.26.2 | a low-level software library for pixel manipulation / MIT |
| [ply](http://www.dabeaz.com/ply/) | 3.8 | Python Lex & Yacc / BSD |
| [psutil](https://github.com/giampaolo/psutil) | 3.2.2 | cross-platform process and system utilities module for Python / BSD |
| [ptyprocess](https://github.com/pexpect/ptyprocess) Linux Mac | 0.5 | Run a subprocess in a pseudo terminal / ISC |
| [py](http://pylib.readthedocs.org/en/latest/) | 1.4.30 | library with cross-python path, ini-parsing, io, code, log facilities / MIT |
| [py2cairo](http://cairographics.org/pycairo/) Linux | 1.10.0 | Pycairo is a set of Python bindings for the cairo graphics library / LGPL 2.1, MPL 1.1 |
| [pyasn1](http://sourceforge.net/projects/pyasn1/) | 0.1.9 | Offline IP address to Autonomous System Number lookup module / BSD |
| [pyaudio](http://people.csail.mit.edu/hubert/pyaudio/) Mac | 0.2.7 | Bindings for PortAudio v19, the cross-platform audio stream library / MIT |
| [pycosat](https://github.com/ilanschnell/pycosat) | 0.6.1 | bindings to picosat (a SAT solver) / MIT |
| [pycparser](https://github.com/eliben/pycparser) | 2.14 | C parser in Python / BSD |
| [pycrypto](http://www.pycrypto.org/) | 2.6.1 | Cryptographic modules for Python. / Public-Domain |
| [pycurl](http://pycurl.sourceforge.net/) | 7.19.5.1 | PycURL – cURL library module for Python / LGPL, MIT |
| [pyflakes](https://launchpad.net/pyflakes) | 1.0.0 | passive checker of Python programs / MIT |
| [pygments](http://pygments.org/) | 2.0.2 | Pygments is a syntax highlighting package written in Python / BSD |
| [pyopenssl](https://github.com/pyca/pyopenssl) | 0.15.1 | Python wrapper module around the OpenSSL library / Apache |
| [pyparsing](http://pyparsing.wikispaces.com/) | 2.0.3 | Python parsing module / MIT |
| [pyqt](http://www.riverbankcomputing.co.uk/software/pyqt) | 4.11.4 | PyQt is a Python binding of the cross-platform GUI toolkit Qt / Commercial, GPLv2, GPLv3 |
| [pyreadline](http://ipython.org/pyreadline.html) Windows | 2.1 | A python implmementation of GNU readline. / BSD |
| [pytables](http://www.pytables.org) | 3.2.2 | brings together Python, HDF5 and NumPy to easily handle large amounts of data / BSD |
| [pytest](http://pytest.org/) | 2.8.1 | simple powerful testing with Python / MIT |
| [python](http://www.python.org/) | 2.7.10 | general purpose programming language / PSF |
| [python-dateutil](https://dateutil.readthedocs.org/) | 2.4.2 | Extensions to the standard Python datetime module / BSD |
| [pytz](http://pytz.sourceforge.net/) | 2015.6 | World timezone definitions, modern and historical / MIT |
| [pywin32](http://sourceforge.net/projects/pywin32/) Windows | 219 | Python extensions for Windows / PSF |
| [pyyaml](http://pyyaml.org/wiki/PyYAML) | 3.11 | YAML parser and emitter for Python / MIT |
| [pyzmq](https://github.com/zeromq/pyzmq) | 14.7.0 | zeromq bindings for Python / LGPL and BSD |
| [qt](http://qt-project.org) | 4.8.7 | Qt is a cross-platform application and UI framework / LGPL |
| [qtconsole](http://jupyter.org) | 4.1.0 | Jupyter Qt Console / BSD |
| [readline](http://cnswww.cns.cwru.edu/php/chet/readline/rltop.html) Linux Mac | 6.2 | line-editing for programs with a command-line interface / GPL3 |
| [redis](http://redis.io/download/) Linux Mac | 2.6.9 | Redis is an open source, BSD licensed, advanced key-value cache and store / 3-clause BSD |
| [redis-py](https://github.com/andymccurdy/redis-py/) Linux Mac | 2.10.3 | Redis Python Client / MIT |
| [requests](http://docs.python-requests.org/en/latest/index.html) | 2.8.1 | Python HTTP for Humans / Apache |
| [rope](http://rope.sourceforge.net/) | 0.9.4 | a python refactoring library / GPL |
| [scikit-image](http://scikit-image.org/) | 0.11.3 | Image processing routines for SciPy / 3-clause BSD |
| [scikit-learn](http://scikit-learn.org/stable/) | 0.16.1 | A set of python modules for machine learning and data mining / 3-clause BSD |
| [scipy](http://www.scipy.org/) | 0.16.0 | Scientific Library for Python / BSD |
| [setuptools](https://pypi.python.org/pypi/setuptools) | 18.4 | Easily download, build, install, upgrade, and uninstall Python packages / PSF or ZPL |
| [simplegeneric](http://cheeseshop.python.org/pypi/simplegeneric) | 0.8.1 | lets you define simple single-dispatch generic functions / ZPL 2.1 |
| [singledispatch](http://docs.python.org/3/library/functools.html#functools.singledispatch) | 3.4.0.3 | brings functools.singledispatch from Python 3.4 to Python 2.6-3.3 / MIT |
| [sip](http://www.riverbankcomputing.com/software/sip/intro) | 4.16.9 | / GPL3 |
| [six](http://pypi.python.org/pypi/six/) | 1.10.0 | Python 2 and 3 compatibility utilities / MIT |
| [snowballstemmer](https://github.com/shibukawa/snowball_py) | 1.2.0 | provides 16 stemmer algorithms generated from Snowball algorithms / BSD |
| [sockjs-tornado](http://github.com/mrjoes/sockjs-tornado/) | 1.0.1 | SockJS python server implementation on top of Tornado framework / MIT |
| [sphinx](http://sphinx-doc.org) | 1.3.1 | Python documentation generator / BSD |
| [sphinx\_rtd\_theme](https://github.com/snide/sphinx_rtd_theme/) | 0.1.7 | ReadTheDocs.org theme for Sphinx / BSD |
| [spyder](https://github.com/spyder-ide/spyder) | 2.3.7 | Scientific PYthon Development EnviRonment / MIT |
| [sqlalchemy](http://www.sqlalchemy.org/) | 1.0.9 | Database Abstraction Library / MIT |
| [sqlite](http://www.sqlite.org/) Linux Mac | 3.8.4.1 | self-contained, zero-configuration, SQL database engine / Public-Domain |
| [ssl\_match\_hostname](http://bitbucket.org/brandon/backports.ssl_match_hostname) | 3.4.0.2 | The ssl.match\_hostname() function from Python 3.4 / PSF |
| [statsmodels](http://statsmodels.sourceforge.net/) | 0.6.1 | Statistical computations and models for use with SciPy / 3-clause BSD |
| [sympy](http://sympy.org) | 0.7.6.1 | SymPy is a Python library for symbolic mathematics / 3-clause BSD |
| [terminado](https://github.com/takluyver/terminado) Linux Mac | 0.5 | Terminals served to term.js using Tornado websockets / BSD |
| [theano](http://deeplearning.net/software/theano/) Linux | 0.7.0 | Optimizing compiler for evaluating mathematical expressions on CPUs and GPUs / BSD |
| [tk](http://www.tcl.tk/) | 8.5.18 | dynamic programming language with GUI elements / BSD-like |
| [toolz](http://toolz.readthedocs.org/en/latest/) | 0.7.4 | List processing tools and functional utilities / BSD |
| [tornado](http://www.tornadoweb.org/) | 4.2.1 | a Python web framework and asynchronous networking library / Apache |
| [traitlets](http://ipython.org/) | 4.0.0 | configuration system for Python applications / BSD |
| [ujson](http://www.esn.me/) | 1.33 | Ultra fast JSON encoder and decoder for Python / BSD |
| [unicodecsv](https://github.com/jdunck/python-unicodecsv) | 0.14.1 | The unicodecsv file reads and decodes byte strings for you / BSD |
| [util-linux](http://freecode.com/projects/util-linux) Linux | 2.21 | Util-linux is a suite of essential utilities for any Linux system / GPL2 |
| [werkzeug](http://werkzeug.pocoo.org/) | 0.10.4 | The Swiss Army knife of Python web development / BSD |
| [wheel](http://bitbucket.org/pypa/wheel/) | 0.26.0 | built-package format for Python / MIT |
| [xlrd](http://www.lexicon.net/sjmachin/xlrd.htm) | 0.9.4 | Library for developers to extract data from Microsoft Excel spreadsheet files / BSD |
| [xlsxwriter](https://github.com/jmcnamara/XlsxWriter) | 0.7.7 | A Python module for creating Excel XLSX files / BSD |
| [xlwings](http://xlwings.org/) Mac Windows | 0.4.1 | Make Excel fly. Interact with Excel from Python and vice versa / 3-clause BSD |
| [xlwt](http://www.python-excel.org/) | 1.0.0 | writing data and formatting information to Excel files / BSD |
| [yaml](http://www.yaml.org/) Linux Mac | 0.1.6 | a human friendly data serialization standard for all programming languages / MIT |
| [zeromq](http://zeromq.org) | 4.1.3 | a messaging system, or “message-oriented middleware” / LGPL |
| [zlib](http://zlib.net/) | 1.2.8 | massively spiffy yet delicately unobtrusive compression library / zlib |
| Name | Version | Summary / License |
|---|---|---|
| [abstract-rendering](https://github.com/JosephCottam/AbstractRendering) Linux Mac | 0.5.1 | Rendering as a binning process / 3-clause BSD |
| [alabaster](https://github.com/bitprophet/alabaster) | 0.7.3 | A configurable sidebar-enabled Sphinx theme / BSD |
| [appscript](http://appscript.sourceforge.net/) Mac | 1.0.1 | Control AppleScriptable applications from Python / Public-Domain |
| [argcomplete](https://github.com/kislyuk/argcomplete) | 0.8.9 | Bash tab completion for argparse. Tab complete all the things! / Apache |
| [astropy](http://www.astropy.org/) | 1.0.3 | Community-developed python astronomy tools / BSD |
| [babel](http://babel.pocoo.org/) | 1.3 | Internationalization utilities / BSD |
| [bcolz](https://github.com/Blosc/bcolz) | 0.9.0 | columnar and compressed data containers. / BSD |
| [beautiful-soup](http://www.crummy.com/software/BeautifulSoup/) | 4.3.2 | Screen-scraping library / PSF, MIT |
| [binstar](http://binstar.org) | 0.11.0 | Binstar command line client library / BSD |
| [bitarray](https://github.com/ilanschnell/bitarray) | 0.8.1 | efficient arrays of booleans – C extension / PSF |
| [blaze-core](http://blaze.pydata.org) | 0.8.0 | Blaze is the next generation of NumPy / BSD |
| [blz](https://github.com/ContinuumIO/blz) | 0.6.2 | a compressed data container / BSD |
| [bokeh](https://github.com/ContinuumIO/Bokeh) | 0.9.0 | Statistical and novel interactive HTML plots for Python / 3-clause BSD |
| [boto](https://github.com/boto/boto/) | 2.38.0 | Amazon Web Services Library / MIT |
| [bottleneck](http://berkeleyanalytics.com/bottleneck) | 1.0.0 | Fast NumPy array functions written in Cython. / Simplified BSD |
| [certifi](http://python-requests.org) | 14.05.14 | Python package for providing Mozilla’s CA Bundle. / ISC |
| [cffi](http://cffi.readthedocs.org) | 1.1.0 | Foreign Function Interface for Python calling C code / MIT |
| [clyent](https://github.com/binstar/clyent) | 0.3.4 | Command line client Library for windows and posix / BSD |
| [colorama](http://code.google.com/p/colorama/) | 0.3.3 | Cross-platform colored terminal text. / BSD |
| [conda](http://conda.pydata.org/) | 3.14.1 | cross-platform, Python-agnostic binary package manager / BSD |
| [conda-build](https://github.com/conda/conda-build) | 1.14.1 | Commands and tools for building conda packages / BSD |
| [conda-env](https://github.com/conda/conda-env/) | 2.2.3 | Provides a unified interface to dealing with Conda environments. / BSD |
| [configobj](http://www.voidspace.org.uk/python/configobj.html) | 5.0.6 | Config file reading, writing and validation / BSD |
| [cryptography](https://github.com/pyca/cryptography) | 0.9.1 | provides cryptographic recipes and primitives to Python developers / Apache |
| [curl](http://curl.haxx.se/) | 7.43.0 | tool and library for transferring data with URL syntax / MIT/X derivate |
| [cython](http://www.cython.org/) | 0.22.1 | The Cython compiler for writing C extensions for the Python language / Apache |
| [cytoolz](https://github.com/pytoolz/cytoolz) | 0.7.3 | Cython implementation of Toolz, high performance functional utilities / BSD |
| [datashape](https://github.com/ContinuumIO/datashape) | 0.4.5 | A data description language / BSD |
| [decorator](http://pypi.python.org/pypi/decorator) | 3.4.2 | Better living through Python with decorators / BSD |
| [docutils](http://docutils.sourceforge.net) | 0.12 | Utilities for general- and special-purpose documentation / Public-Domain, PSF, 2-clause BSD, GPLv3 |
| [dynd-python](https://github.com/ContinuumIO/dynd-python) | 0.6.5 | Python exposure of the DyND dynamic multi-dimensional array library / BSD |
| [fastcache](https://github.com/pbrady/fastcache) | 1.0.2 | C implementation of Python 3 functools.lru\_cache / MIT |
| [flask](http://flask.pocoo.org/) | 0.10.1 | A microframework based on Werkzeug, Jinja2 and good intentions / BSD |
| [fontconfig](http://www.freedesktop.org/wiki/Software/fontconfig/) Linux | 2.11.1 | Fontconfig is a library for configuring and customizing font access / BSD |
| [freetype](http://freetype.sourceforge.net/index2.html) Linux Mac | 2.5.2 | A Free, High-Quality, and Portable Font Engine / FreeType License |
| [greenlet](http://pypi.python.org/pypi/greenlet/) | 0.4.7 | Lightweight in-process concurrent programming / MIT |
| [h5py](http://code.google.com/p/h5py/) | 2.5.0 | Read and write HDF5 files from Python. / 3-clause BSD |
| [hdf5](http://www.hdfgroup.org/HDF5/) | 1.8.15.1 | HDF5 is a data model, library, and file format for storing and managing data / BSD-like |
| [idna](https://github.com/kjd/idna) | 2.0 | Internationalized Domain Names in Applications / BSD |
| [ipython](http://ipython.org/) | 3.2.0 | Productive Interactive Computing / BSD |
| [itsdangerous](http://github.com/mitsuhiko/itsdangerous) | 0.24 | Various helpers to pass trusted data to untrusted environments and back. / BSD |
| [jdcal](http://github.com/phn/jdcal) | 1.0 | Julian dates from proleptic Gregorian and Julian calendars. / BSD |
| [jedi](https://github.com/davidhalter/jedi) | 0.8.1 | / MIT |
| [jinja2](http://jinja.pocoo.org/docs/) | 2.7.3 | An easy to use stand-alone template engine written in pure python. / BSD |
| [jpeg](http://www.ijg.org/) Linux Mac | 8d | read/write jpeg COM, EXIF, IPTC medata / Custom free software license |
| [jsonschema](http://github.com/Julian/jsonschema) | 2.4.0 | An implementation of JSON Schema validation for Python / MIT |
| launcher Mac Windows | 1.0.0 | Anaconda’s application launcher / proprietary - Continuum Analytics, Inc. |
| [libdynd](https://github.com/libdynd/dynd-python) Linux Mac | 0.6.5 | Python exposure of DyND / BSD |
| [libffi](https://github.com/atgreen/libffi) Linux | 3.0.13 | A portable foreign-function interface library / MIT |
| [libpng](http://www.libpng.org/pub/png/libpng.html) Linux Mac | 1.6.17 | libpng is the official PNG reference library / libpng license |
| [libsodium](http://libsodium.org) Linux Mac | 0.4.5 | a modern software library for encryption, signatures, password hashing, etc. / MIT |
| [libtiff](http://www.libtiff.org/) Linux Mac | 4.0.2 | PyLibTiff: a Python tiff library / BSD-like |
| [libxml2](http://xmlsoft.org/) Linux Mac | 2.9.2 | The XML C parser and toolkit of Gnome / MIT |
| [libxslt](http://xmlsoft.org/) Linux Mac | 1.1.28 | Libxslt is the XSLT C library developed for the GNOME project / MIT |
| [llvmlite](https://github.com/numba/llvmlite) | 0.5.0 | lightweight wrapper around basic LLVM functionality / BSD |
| [lxml](http://lxml.de/) | 3.4.4 | XML processing library combining libxml2/libxslt with the ElementTree API / BSD |
| [markupsafe](http://github.com/mitsuhiko/markupsafe) | 0.23 | Implements a XML/HTML/XHTML Markup safe string for Python / BSD |
| [matplotlib](http://matplotlib.sourceforge.net/) | 1.4.3 | Python plotting package / PSF-based |
| [menuinst](https://github.com/ContinuumIO/menuinst) Windows | 1.0.4 | cross platform install of menu items / BSD |
| [mistune](https://github.com/lepture/mistune) | 0.5.1 | The fastest markdown parser in pure Python with renderer feature / BSD |
| [mock](http://www.voidspace.org.uk/python/mock/) | 1.0.1 | A Python Mocking and Patching Library for Testing / BSD |
| [multipledispatch](http://github.com/mrocklin/multipledispatch/) | 0.4.7 | Multiple dispatch / BSD |
| [networkx](http://networkx.lanl.gov/) | 1.9.1 | Python package for creating and manipulating graphs and networks / BSD |
| [nltk](http://nltk.org/) | 3.0.3 | Natural Language Toolkit / Apache |
| [node-webkit](https://github.com/rogerwang/node-webkit) Mac Windows | 0.10.1 | calls Node.js modules from DOM and enables a new way of writing applications / MIT |
| [nose](http://readthedocs.org/docs/nose/) | 1.3.7 | nose extends unittest to make testing easier / LGPL |
| [numba](http://continuum.io/developer-resources.html) | 0.19.1 | compiling Python code using LLVM / BSD |
| [numexpr](https://github.com/pydata/numexpr) | 2.4.3 | Fast numerical expression evaluator for NumPy / MIT |
| [numpy](http://numpy.scipy.org/) | 1.9.2 | array processing for numbers, strings, records, and objects. / BSD |
| [odo](http://odo.pydata.org/en/latest/) | 0.3.2 | Data Migration for Blaze Project / BSD |
| [openpyxl](http://openpyxl.readthedocs.org) | 1.8.5 | A Python library to read/write Excel 2007 xlsx/xlsm files / MIT |
| [openssl](http://www.openssl.org/) Linux Mac | 1.0.1k | OpenSSL is an open-source implementation of the SSL and TLS protocols / Apache-style |
| [pandas](http://pandas.pydata.org/) | 0.16.2 | Powerful data structures for data analysis, time series,and statistics / BSD |
| [patsy](https://github.com/pydata/patsy) | 0.3.0 | a library for describing statistical models and building design matrices. / BSD |
| [pep8](http://pep8.readthedocs.org/) | 1.6.2 | Python style guide checker / MIT |
| [pillow](http://python-pillow.github.io/) | 2.8.2 | Python Imaging Library (Fork) / PIL license |
| [pip](http://www.pip-installer.org/) | 7.0.3 | PyPA recommended tool for installing Python packages / MIT |
| [ply](http://www.dabeaz.com/ply/) | 3.6 | Python Lex & Yacc / BSD |
| [psutil](https://github.com/giampaolo/psutil) | 2.2.1 | A cross-platform process and system utilities module for Python / BSD |
| [ptyprocess](https://github.com/pexpect/ptyprocess) Linux Mac | 0.4 | Run a subprocess in a pseudo terminal / ISC |
| [py](http://pylib.readthedocs.org/en/latest/) | 1.4.27 | library with cross-python path, ini-parsing, io, code, log facilities / MIT |
| [pyasn1](http://sourceforge.net/projects/pyasn1/) | 0.1.7 | Offline IP address to Autonomous System Number lookup module / BSD |
| [pycosat](https://github.com/ilanschnell/pycosat) | 0.6.1 | bindings to picosat (a SAT solver) / MIT |
| [pycparser](https://github.com/eliben/pycparser) | 2.14 | C parser in Python / BSD |
| [pycrypto](http://www.pycrypto.org/) | 2.6.1 | Cryptographic modules for Python. / Public-Domain |
| [pycurl](http://pycurl.sourceforge.net/) Linux Mac | 7.19.5.1 | PycURL – cURL library module for Python / LGPL, MIT |
| [pyflakes](https://launchpad.net/pyflakes) | 0.9.2 | passive checker of Python programs / MIT |
| [pygments](http://pygments.org/) | 2.0.2 | Pygments is a syntax highlighting package written in Python / BSD |
| [pyopenssl](https://github.com/pyca/pyopenssl) | 0.15.1 | Python wrapper module around the OpenSSL library / Apache |
| [pyparsing](http://pyparsing.wikispaces.com/) | 2.0.3 | Python parsing module / MIT |
| [pyqt](http://www.riverbankcomputing.co.uk/software/pyqt) | 4.11.3 | PyQt is a Python binding of the cross-platform GUI toolkit Qt / Commercial, GPLv2, GPLv3 |
| [pyreadline](http://ipython.org/pyreadline.html) Windows | 2.0 | A python implmementation of GNU readline. / BSD |
| [pytables](http://www.pytables.org) | 3.2.0 | brings together Python, HDF5 and NumPy to easily handle large amounts of data / BSD |
| [pytest](http://pytest.org/) | 2.7.1 | simple powerful testing with Python / MIT |
| [python](http://www.python.org/) | 3.4.3 | general purpose programming language / PSF |
| [python-dateutil](https://dateutil.readthedocs.org/) | 2.4.2 | Extensions to the standard Python datetime module / BSD |
| [pytz](http://pytz.sourceforge.net/) | 2015.4 | World timezone definitions, modern and historical / MIT |
| [pywin32](https://pypi.python.org/pypi/pywin32) Windows | 219 | Python extensions for Windows / PSF |
| [pyyaml](http://pyyaml.org/wiki/PyYAML) | 3.11 | YAML parser and emitter for Python / MIT |
| [pyzmq](https://github.com/zeromq/pyzmq) | 14.7.0 | zeromq bindings for Python / LGPL and BSD |
| [qt](http://qt-project.org) Linux Mac | 4.8.6 | Qt is a cross-platform application and UI framework / LGPL |
| [readline](http://cnswww.cns.cwru.edu/php/chet/readline/rltop.html) Linux Mac | 6.2 | provides line-editing and for programs with a command-line interface / GPL3 |
| [redis](http://redis.io/download/) Linux Mac | 2.6.9 | Redis is an open source, BSD licensed, advanced key-value cache and store / 3-clause BSD |
| [redis-py](https://github.com/andymccurdy/redis-py/) Linux Mac | 2.10.3 | Redis Python Client / MIT |
| [requests](http://docs.python-requests.org/en/latest/index.html) | 2.7.0 | Python HTTP for Humans / Apache |
| [rope](http://rope.sourceforge.net/) | 0.9.4 | a python refactoring library / GPL |
| [runipy](https://github.com/paulgb/runipy) | 0.1.3 | Run IPython notebooks from the command line / BSD |
| [scikit-image](http://scikit-image.org/) | 0.11.3 | Image processing routines for SciPy / 3-clause BSD |
| [scikit-learn](http://scikit-learn.org/stable/) | 0.16.1 | A set of python modules for machine learning and data mining / 3-clause BSD |
| [scipy](http://www.scipy.org/) | 0.15.1 | Scientific Library for Python / BSD |
| [setuptools](https://pypi.python.org/pypi/setuptools) | 17.1.1 | Easily download, build, install, upgrade, and uninstall Python packages / PSF or ZPL |
| [sip](http://www.riverbankcomputing.com/software/sip/intro) Linux Mac | 4.16.5 | / GPL3 |
| [six](http://pypi.python.org/pypi/six/) | 1.9.0 | Python 2 and 3 compatibility utilities / MIT |
| [snowballstemmer](https://github.com/shibukawa/snowball_py) | 1.2.0 | provides 16 stemmer algorithms generated from Snowball algorithms / BSD |
| [sockjs-tornado](http://github.com/mrjoes/sockjs-tornado/) | 1.0.1 | SockJS python server implementation on top of Tornado framework / MIT |
| [sphinx](http://sphinx-doc.org) | 1.3.1 | Python documentation generator / BSD |
| [sphinx\_rtd\_theme](https://github.com/snide/sphinx_rtd_theme/) | 0.1.7 | ReadTheDocs.org theme for Sphinx / BSD |
| [spyder](https://github.com/spyder-ide/spyder) | 2.3.5.2 | Scientific PYthon Development EnviRonment / MIT |
| [sqlalchemy](http://www.sqlalchemy.org/) | 1.0.5 | Database Abstraction Library / MIT |
| [sqlite](http://www.sqlite.org/) Linux Mac | 3.8.4.1 | implements a self-contained, zero-configuration, SQL database engine / Public-Domain |
| [statsmodels](http://statsmodels.sourceforge.net/) | 0.6.1 | Statistical computations and models for use with SciPy / 3-clause BSD |
| [sympy](http://sympy.org) | 0.7.6 | SymPy is a Python library for symbolic mathematics / 3-clause BSD |
| [terminado](https://github.com/takluyver/terminado) Linux Mac | 0.5 | Terminals served to term.js using Tornado websockets / BSD |
| [theano](http://deeplearning.net/software/theano/) Linux | 0.7.0 | Optimizing compiler for evaluating mathematical expressions on CPUs and GPUs / BSD |
| [tk](http://www.tcl.tk/) Linux Mac | 8.5.18 | powerful but easy to learn dynamic programming language / BSD-like |
| [toolz](http://toolz.readthedocs.org/en/latest/) | 0.7.2 | List processing tools and functional utilities / BSD |
| [tornado](http://www.tornadoweb.org/) | 4.2 | Tornado is a Python web framework and asynchronous networking library / Apache |
| [ujson](http://www.esn.me/) | 1.33 | Ultra fast JSON encoder and decoder for Python / BSD |
| [util-linux](http://freecode.com/projects/util-linux) Linux | 2.21 | Util-linux is a suite of essential utilities for any Linux system / GPL2 |
| [werkzeug](http://werkzeug.pocoo.org/) | 0.10.4 | The Swiss Army knife of Python web development / BSD |
| [xlrd](http://www.lexicon.net/sjmachin/xlrd.htm) | 0.9.3 | Library for developers to extract data from Microsoft Excel spreadsheet files / BSD |
| [xlsxwriter](https://github.com/jmcnamara/XlsxWriter) | 0.7.3 | A Python module for creating Excel XLSX files / BSD |
| [xlwings](http://xlwings.org/) Mac Windows | 0.3.5 | Make Excel fly. Interact with Excel from Python and vice versa / 3-clause BSD |
| [xlwt](http://www.python-excel.org/) | 1.0.0 | writing data and formatting information to Excel files / BSD |
| [xz](http://tukaani.org/xz/) Linux Mac | 5.0.5 | a free general-purpose data compression software with high compression ratio / Public-Domain, GPL |
| [yaml](http://www.yaml.org/) Linux Mac | 0.1.6 | a human friendly data serialization standard for all programming languages / MIT |
| [zeromq](http://zeromq.org) Linux Mac | 4.0.5 | a messaging system, or “message-oriented middleware” / LGPL |
| [zlib](http://zlib.net/) | 1.2.8 | A Massively Spiffy Yet Delicately Unobtrusive Compression Library / zlib |
| Name | Version | Summary / License |
|---|---|---|
| [abstract-rendering](https://github.com/JosephCottam/AbstractRendering) Linux Mac | 0.5.1 | Rendering as a binning process / 3-clause BSD |
| [alabaster](https://github.com/bitprophet/alabaster) | 0.7.3 | A configurable sidebar-enabled Sphinx theme / BSD |
| [appscript](http://appscript.sourceforge.net/) Mac | 1.0.1 | Control AppleScriptable applications from Python / Public-Domain |
| [argcomplete](https://github.com/kislyuk/argcomplete) | 0.8.9 | Bash tab completion for argparse. Tab complete all the things! / Apache |
| [astropy](http://www.astropy.org/) | 1.0.3 | Community-developed python astronomy tools / BSD |
| [babel](http://babel.pocoo.org/) | 1.3 | Internationalization utilities / BSD |
| [bcolz](https://github.com/Blosc/bcolz) | 0.9.0 | columnar and compressed data containers. / BSD |
| [beautiful-soup](http://www.crummy.com/software/BeautifulSoup/) | 4.3.2 | Screen-scraping library / PSF, MIT |
| [binstar](http://binstar.org) | 0.11.0 | Binstar command line client library / BSD |
| [bitarray](https://github.com/ilanschnell/bitarray) | 0.8.1 | efficient arrays of booleans – C extension / PSF |
| [blaze-core](http://blaze.pydata.org) | 0.8.0 | Blaze is the next generation of NumPy / BSD |
| [blz](https://github.com/ContinuumIO/blz) | 0.6.2 | a compressed data container / BSD |
| [bokeh](https://github.com/ContinuumIO/Bokeh) | 0.9.0 | Statistical and novel interactive HTML plots for Python / 3-clause BSD |
| [boto](https://github.com/boto/boto/) | 2.38.0 | Amazon Web Services Library / MIT |
| [bottleneck](http://berkeleyanalytics.com/bottleneck) | 1.0.0 | Fast NumPy array functions written in Cython. / Simplified BSD |
| [cairo](http://cairographics.org/) Linux | 1.12.18 | Cairo is a 2D graphics library with support for multiple output devices. / LGPL 2.1, MPL 1.1 |
| [cdecimal](http://www.bytereef.org/mpdecimal/index.html) | 2.3 | Fast drop-in replacement for decimal.py / BSD |
| [certifi](http://python-requests.org) | 14.05.14 | Python package for providing Mozilla’s CA Bundle. / ISC |
| [cffi](http://cffi.readthedocs.org) | 1.1.0 | Foreign Function Interface for Python calling C code / MIT |
| [clyent](https://github.com/binstar/clyent) | 0.3.4 | Command line client Library for windows and posix / BSD |
| [colorama](http://code.google.com/p/colorama/) | 0.3.3 | Cross-platform colored terminal text. / BSD |
| [conda](http://conda.pydata.org/) | 3.14.1 | cross-platform, Python-agnostic binary package manager / BSD |
| [conda-build](https://github.com/conda/conda-build) | 1.14.1 | Commands and tools for building conda packages / BSD |
| [conda-env](https://github.com/conda/conda-env/) | 2.2.3 | Provides a unified interface to dealing with Conda environments. / BSD |
| [configobj](http://www.voidspace.org.uk/python/configobj.html) | 5.0.6 | Config file reading, writing and validation / BSD |
| [cryptography](https://github.com/pyca/cryptography) | 0.9.1 | provides cryptographic recipes and primitives to Python developers / Apache |
| [curl](http://curl.haxx.se/) | 7.43.0 | tool and library for transferring data with URL syntax / MIT/X derivate |
| [cython](http://www.cython.org/) | 0.22.1 | The Cython compiler for writing C extensions for the Python language / Apache |
| [cytoolz](https://github.com/pytoolz/cytoolz) | 0.7.3 | Cython implementation of Toolz, high performance functional utilities / BSD |
| [datashape](https://github.com/ContinuumIO/datashape) | 0.4.5 | A data description language / BSD |
| [decorator](http://pypi.python.org/pypi/decorator) | 3.4.2 | Better living through Python with decorators / BSD |
| [docutils](http://docutils.sourceforge.net) | 0.12 | Utilities for general- and special-purpose documentation / Public-Domain, PSF, 2-clause BSD, GPLv3 |
| [dynd-python](https://github.com/ContinuumIO/dynd-python) | 0.6.5 | Python exposure of the DyND dynamic multi-dimensional array library / BSD |
| [enum34](https://pypi.python.org/pypi/enum34) | 1.0.4 | Robust enumerated type support in Python / BSD |
| [fastcache](https://github.com/pbrady/fastcache) | 1.0.2 | C implementation of Python 3 functools.lru\_cache / MIT |
| [flask](http://flask.pocoo.org/) | 0.10.1 | A microframework based on Werkzeug, Jinja2 and good intentions / BSD |
| [fontconfig](http://www.freedesktop.org/wiki/Software/fontconfig/) Linux | 2.11.1 | Fontconfig is a library for configuring and customizing font access / BSD |
| [freetype](http://freetype.sourceforge.net/index2.html) Linux Mac | 2.5.2 | A Free, High-Quality, and Portable Font Engine / FreeType License |
| [funcsigs](http://funcsigs.readthedocs.org/) | 0.4 | Python function signatures from PEP362 for Python 2.6, 2.7 and 3.2+ / Apache |
| [gevent](http://www.gevent.org/) | 1.0.1 | Coroutine-based network library / MIT |
| [gevent-websocket](https://bitbucket.org/Jeffrey/gevent-websocket) | 0.9.3 | Websocket handler for the gevent pywsgi server, a Python network library / Apache |
| [greenlet](http://pypi.python.org/pypi/greenlet/) | 0.4.7 | Lightweight in-process concurrent programming / MIT |
| [grin](http://pypi.python.org/pypi/grin) | 1.2.1 | A grep program configured the way I like it / BSD |
| [h5py](http://code.google.com/p/h5py/) | 2.5.0 | Read and write HDF5 files from Python. / 3-clause BSD |
| [hdf5](http://www.hdfgroup.org/HDF5/) | 1.8.15.1 | HDF5 is a data model, library, and file format for storing and managing data / BSD-like |
| [idna](https://github.com/kjd/idna) | 2.0 | Internationalized Domain Names in Applications / BSD |
| [ipaddress](https://github.com/phihag/ipaddress) | 1.0.7 | IPv4/IPv6 manipulation library / PSF |
| [ipython](http://ipython.org/) | 3.2.0 | Productive Interactive Computing / BSD |
| [itsdangerous](http://github.com/mitsuhiko/itsdangerous) | 0.24 | Various helpers to pass trusted data to untrusted environments and back. / BSD |
| [jdcal](http://github.com/phn/jdcal) | 1.0 | Julian dates from proleptic Gregorian and Julian calendars. / BSD |
| [jedi](https://github.com/davidhalter/jedi) | 0.8.1 | / MIT |
| [jinja2](http://jinja.pocoo.org/docs/) | 2.7.3 | An easy to use stand-alone template engine written in pure python. / BSD |
| [jpeg](http://www.ijg.org/) Linux Mac | 8d | read/write jpeg COM, EXIF, IPTC medata / Custom free software license |
| [jsonschema](http://github.com/Julian/jsonschema) | 2.4.0 | An implementation of JSON Schema validation for Python / MIT |
| launcher Mac Windows | 1.0.0 | Anaconda’s application launcher / proprietary - Continuum Analytics, Inc. |
| [libdynd](https://github.com/libdynd/dynd-python) Linux Mac | 0.6.5 | Python exposure of DyND / BSD |
| [libffi](https://github.com/atgreen/libffi) Linux | 3.0.13 | A portable foreign-function interface library / MIT |
| [libpng](http://www.libpng.org/pub/png/libpng.html) Linux Mac | 1.6.17 | libpng is the official PNG reference library / libpng license |
| [libsodium](http://libsodium.org) Linux Mac | 0.4.5 | a modern software library for encryption, signatures, password hashing, etc. / MIT |
| [libtiff](http://www.libtiff.org/) Linux Mac | 4.0.2 | PyLibTiff: a Python tiff library / BSD-like |
| [libxml2](http://xmlsoft.org/) Linux Mac | 2.9.2 | The XML C parser and toolkit of Gnome / MIT |
| [libxslt](http://xmlsoft.org/) Linux Mac | 1.1.28 | Libxslt is the XSLT C library developed for the GNOME project / MIT |
| [llvmlite](https://github.com/numba/llvmlite) | 0.5.0 | lightweight wrapper around basic LLVM functionality / BSD |
| [lxml](http://lxml.de/) | 3.4.4 | XML processing library combining libxml2/libxslt with the ElementTree API / BSD |
| [markupsafe](http://github.com/mitsuhiko/markupsafe) | 0.23 | Implements a XML/HTML/XHTML Markup safe string for Python / BSD |
| [matplotlib](http://matplotlib.sourceforge.net/) | 1.4.3 | Python plotting package / PSF-based |
| [menuinst](https://github.com/ContinuumIO/menuinst) Windows | 1.0.4 | cross platform install of menu items / BSD |
| [mistune](https://github.com/lepture/mistune) | 0.5.1 | The fastest markdown parser in pure Python with renderer feature / BSD |
| [mock](http://www.voidspace.org.uk/python/mock/) | 1.0.1 | A Python Mocking and Patching Library for Testing / BSD |
| [multipledispatch](http://github.com/mrocklin/multipledispatch/) | 0.4.7 | Multiple dispatch / BSD |
| [networkx](http://networkx.lanl.gov/) | 1.9.1 | Python package for creating and manipulating graphs and networks / BSD |
| [nltk](http://nltk.org/) | 3.0.3 | Natural Language Toolkit / Apache |
| [node-webkit](https://github.com/rogerwang/node-webkit) Mac Windows | 0.10.1 | calls Node.js modules from DOM and enables a new way of writing applications / MIT |
| [nose](http://readthedocs.org/docs/nose/) | 1.3.7 | nose extends unittest to make testing easier / LGPL |
| [numba](http://continuum.io/developer-resources.html) | 0.19.1 | compiling Python code using LLVM / BSD |
| [numexpr](https://github.com/pydata/numexpr) | 2.4.3 | Fast numerical expression evaluator for NumPy / MIT |
| [numpy](http://numpy.scipy.org/) | 1.9.2 | array processing for numbers, strings, records, and objects. / BSD |
| [odo](http://odo.pydata.org/en/latest/) | 0.3.2 | Data Migration for Blaze Project / BSD |
| [openpyxl](http://openpyxl.readthedocs.org) | 1.8.5 | A Python library to read/write Excel 2007 xlsx/xlsm files / MIT |
| [openssl](http://www.openssl.org/) Linux Mac | 1.0.1k | OpenSSL is an open-source implementation of the SSL and TLS protocols / Apache-style |
| [pandas](http://pandas.pydata.org/) | 0.16.2 | Powerful data structures for data analysis, time series,and statistics / BSD |
| [patsy](https://github.com/pydata/patsy) | 0.3.0 | a library for describing statistical models and building design matrices. / BSD |
| [pep8](http://pep8.readthedocs.org/) | 1.6.2 | Python style guide checker / MIT |
| [pillow](http://python-pillow.github.io/) | 2.8.2 | Python Imaging Library (Fork) / PIL license |
| [pip](http://www.pip-installer.org/) | 7.0.3 | PyPA recommended tool for installing Python packages / MIT |
| [pixman](http://cgit.freedesktop.org/pixman/) Linux | 0.26.2 | a low-level software library for pixel manipulation / MIT |
| [ply](http://www.dabeaz.com/ply/) | 3.6 | Python Lex & Yacc / BSD |
| [psutil](https://github.com/giampaolo/psutil) | 2.2.1 | A cross-platform process and system utilities module for Python / BSD |
| [ptyprocess](https://github.com/pexpect/ptyprocess) Linux Mac | 0.4 | Run a subprocess in a pseudo terminal / ISC |
| [py](http://pylib.readthedocs.org/en/latest/) | 1.4.27 | library with cross-python path, ini-parsing, io, code, log facilities / MIT |
| [py2cairo](http://cairographics.org/pycairo/) Linux | 1.10.0 | Pycairo is a set of Python bindings for the cairo graphics library / LGPL 2.1, MPL 1.1 |
| [pyasn1](http://sourceforge.net/projects/pyasn1/) | 0.1.7 | Offline IP address to Autonomous System Number lookup module / BSD |
| [pyaudio](http://people.csail.mit.edu/hubert/pyaudio/) Mac | 0.2.7 | Bindings for PortAudio v19, the cross-platform audio stream library / MIT |
| [pycosat](https://github.com/ilanschnell/pycosat) | 0.6.1 | bindings to picosat (a SAT solver) / MIT |
| [pycparser](https://github.com/eliben/pycparser) | 2.14 | C parser in Python / BSD |
| [pycrypto](http://www.pycrypto.org/) | 2.6.1 | Cryptographic modules for Python. / Public-Domain |
| [pycurl](http://pycurl.sourceforge.net/) Linux Mac | 7.19.5.1 | PycURL – cURL library module for Python / LGPL, MIT |
| [pyflakes](https://launchpad.net/pyflakes) | 0.9.2 | passive checker of Python programs / MIT |
| [pygments](http://pygments.org/) | 2.0.2 | Pygments is a syntax highlighting package written in Python / BSD |
| [pyopenssl](https://github.com/pyca/pyopenssl) | 0.15.1 | Python wrapper module around the OpenSSL library / Apache |
| [pyparsing](http://pyparsing.wikispaces.com/) | 2.0.3 | Python parsing module / MIT |
| [pyqt](http://www.riverbankcomputing.co.uk/software/pyqt) | 4.11.3 | PyQt is a Python binding of the cross-platform GUI toolkit Qt / Commercial, GPLv2, GPLv3 |
| [pyreadline](http://ipython.org/pyreadline.html) Windows | 2.0 | A python implmementation of GNU readline. / BSD |
| [pytables](http://www.pytables.org) | 3.2.0 | brings together Python, HDF5 and NumPy to easily handle large amounts of data / BSD |
| [pytest](http://pytest.org/) | 2.7.1 | simple powerful testing with Python / MIT |
| [python](http://www.python.org/) | 2.7.10 | general purpose programming language / PSF |
| [python-dateutil](https://dateutil.readthedocs.org/) | 2.4.2 | Extensions to the standard Python datetime module / BSD |
| [pytz](http://pytz.sourceforge.net/) | 2015.4 | World timezone definitions, modern and historical / MIT |
| [pywin32](https://pypi.python.org/pypi/pywin32) Windows | 219 | Python extensions for Windows / PSF |
| [pyyaml](http://pyyaml.org/wiki/PyYAML) | 3.11 | YAML parser and emitter for Python / MIT |
| [pyzmq](https://github.com/zeromq/pyzmq) | 14.7.0 | zeromq bindings for Python / LGPL and BSD |
| [qt](http://qt-project.org) Linux Mac | 4.8.6 | Qt is a cross-platform application and UI framework / LGPL |
| [readline](http://cnswww.cns.cwru.edu/php/chet/readline/rltop.html) Linux Mac | 6.2 | provides line-editing and for programs with a command-line interface / GPL3 |
| [redis](http://redis.io/download/) Linux Mac | 2.6.9 | Redis is an open source, BSD licensed, advanced key-value cache and store / 3-clause BSD |
| [redis-py](https://github.com/andymccurdy/redis-py/) Linux Mac | 2.10.3 | Redis Python Client / MIT |
| [requests](http://docs.python-requests.org/en/latest/index.html) | 2.7.0 | Python HTTP for Humans / Apache |
| [rope](http://rope.sourceforge.net/) | 0.9.4 | a python refactoring library / GPL |
| [runipy](https://github.com/paulgb/runipy) | 0.1.3 | Run IPython notebooks from the command line / BSD |
| [scikit-image](http://scikit-image.org/) | 0.11.3 | Image processing routines for SciPy / 3-clause BSD |
| [scikit-learn](http://scikit-learn.org/stable/) | 0.16.1 | A set of python modules for machine learning and data mining / 3-clause BSD |
| [scipy](http://www.scipy.org/) | 0.15.1 | Scientific Library for Python / BSD |
| [setuptools](https://pypi.python.org/pypi/setuptools) | 17.1.1 | Easily download, build, install, upgrade, and uninstall Python packages / PSF or ZPL |
| [sip](http://www.riverbankcomputing.com/software/sip/intro) Linux Mac | 4.16.5 | / GPL3 |
| [six](http://pypi.python.org/pypi/six/) | 1.9.0 | Python 2 and 3 compatibility utilities / MIT |
| [snowballstemmer](https://github.com/shibukawa/snowball_py) | 1.2.0 | provides 16 stemmer algorithms generated from Snowball algorithms / BSD |
| [sockjs-tornado](http://github.com/mrjoes/sockjs-tornado/) | 1.0.1 | SockJS python server implementation on top of Tornado framework / MIT |
| [sphinx](http://sphinx-doc.org) | 1.3.1 | Python documentation generator / BSD |
| [sphinx\_rtd\_theme](https://github.com/snide/sphinx_rtd_theme/) | 0.1.7 | ReadTheDocs.org theme for Sphinx / BSD |
| [spyder](https://github.com/spyder-ide/spyder) | 2.3.5.2 | Scientific PYthon Development EnviRonment / MIT |
| [sqlalchemy](http://www.sqlalchemy.org/) | 1.0.5 | Database Abstraction Library / MIT |
| [sqlite](http://www.sqlite.org/) Linux Mac | 3.8.4.1 | implements a self-contained, zero-configuration, SQL database engine / Public-Domain |
| [ssl\_match\_hostname](http://bitbucket.org/brandon/backports.ssl_match_hostname) | 3.4.0.2 | The ssl.match\_hostname() function from Python 3.4 / PSF |
| [statsmodels](http://statsmodels.sourceforge.net/) | 0.6.1 | Statistical computations and models for use with SciPy / 3-clause BSD |
| [sympy](http://sympy.org) | 0.7.6 | SymPy is a Python library for symbolic mathematics / 3-clause BSD |
| [terminado](https://github.com/takluyver/terminado) Linux Mac | 0.5 | Terminals served to term.js using Tornado websockets / BSD |
| [theano](http://deeplearning.net/software/theano/) Linux | 0.7.0 | Optimizing compiler for evaluating mathematical expressions on CPUs and GPUs / BSD |
| [tk](http://www.tcl.tk/) Linux Mac | 8.5.18 | powerful but easy to learn dynamic programming language / BSD-like |
| [toolz](http://toolz.readthedocs.org/en/latest/) | 0.7.2 | List processing tools and functional utilities / BSD |
| [tornado](http://www.tornadoweb.org/) | 4.2 | Tornado is a Python web framework and asynchronous networking library / Apache |
| [ujson](http://www.esn.me/) | 1.33 | Ultra fast JSON encoder and decoder for Python / BSD |
| [unicodecsv](https://github.com/jdunck/python-unicodecsv) | 0.9.4 | The unicodecsv file reads and decodes byte strings for you / BSD |
| [util-linux](http://freecode.com/projects/util-linux) Linux | 2.21 | Util-linux is a suite of essential utilities for any Linux system / GPL2 |
| [werkzeug](http://werkzeug.pocoo.org/) | 0.10.4 | The Swiss Army knife of Python web development / BSD |
| [xlrd](http://www.lexicon.net/sjmachin/xlrd.htm) | 0.9.3 | Library for developers to extract data from Microsoft Excel spreadsheet files / BSD |
| [xlsxwriter](https://github.com/jmcnamara/XlsxWriter) | 0.7.3 | A Python module for creating Excel XLSX files / BSD |
| [xlwings](http://xlwings.org/) Mac Windows | 0.3.5 | Make Excel fly. Interact with Excel from Python and vice versa / 3-clause BSD |
| [xlwt](http://www.python-excel.org/) | 1.0.0 | writing data and formatting information to Excel files / BSD |
| [yaml](http://www.yaml.org/) Linux Mac | 0.1.6 | a human friendly data serialization standard for all programming languages / MIT |
| [zeromq](http://zeromq.org) Linux Mac | 4.0.5 | a messaging system, or “message-oriented middleware” / LGPL |
| [zlib](http://zlib.net/) | 1.2.8 | A Massively Spiffy Yet Delicately Unobtrusive Compression Library / zlib |
| Name | Version | Summary / License |
|---|---|---|
| [abstract-rendering](https://github.com/JosephCottam/AbstractRendering) Linux Mac | 0.5.1 | Rendering as a binning process / 3-clause BSD |
| [appscript](http://appscript.sourceforge.net/) Mac | 1.0.1 | Control AppleScriptable applications from Python / Public-Domain |
| [argcomplete](https://github.com/kislyuk/argcomplete) | 0.8.4 | Bash tab completion for argparse. Tab complete all the things! / Apache |
| [astropy](http://www.astropy.org/) | 1.0.1 | Community-developed python astronomy tools / BSD |
| [bcolz](https://github.com/Blosc/bcolz) | 0.8.1 | columnar and compressed data containers. / BSD |
| [beautiful-soup](http://www.crummy.com/software/BeautifulSoup/) | 4.3.2 | Screen-scraping library / PSF, MIT |
| [binstar](http://binstar.org) | 0.10.1 | Binstar command line client library / BSD |
| [bitarray](https://github.com/ilanschnell/bitarray) | 0.8.1 | efficient arrays of booleans – C extension / PSF |
| [blaze-core](http://blaze.pydata.org) | 0.7.3 | Blaze is the next generation of NumPy / BSD |
| [blz](https://github.com/ContinuumIO/blz) | 0.6.2 | a compressed data container / BSD |
| [bokeh](https://github.com/ContinuumIO/Bokeh) | 0.8.1 | Statistical and novel interactive HTML plots for Python / 3-clause BSD |
| [boto](https://github.com/boto/boto/) | 2.36.0 | Amazon Web Services Library / MIT |
| [certifi](http://python-requests.org) | 14.05.14 | Python package for providing Mozilla’s CA Bundle. / ISC |
| [cffi](http://cffi.readthedocs.org) | 0.9.2 | Foreign Function Interface for Python calling C code / MIT |
| [clyent](https://github.com/binstar/clyent) | 0.3.4 | Command line client Library for windows and posix / BSD |
| [colorama](http://code.google.com/p/colorama/) | 0.3.3 | Cross-platform colored terminal text. / BSD |
| [conda](http://conda.pydata.org/) | 3.10.0 | package management tool Installation / BSD |
| [conda-build](https://github.com/conda/conda-build) | 1.11.0 | Commands and tools for building conda packages / BSD |
| [configobj](http://www.voidspace.org.uk/python/configobj.html) | 5.0.6 | Config file reading, writing and validation / BSD |
| [cryptography](https://github.com/pyca/cryptography) | 0.8 | provides cryptographic recipes and primitives to Python developers / Apache |
| [curl](http://curl.haxx.se/) Linux Mac | 7.38.0 | curl is a command line tool and library for transferring data with URL syntax / MIT/X derivate |
| [cython](http://www.cython.org/) | 0.22 | The Cython compiler for writing C extensions for the Python language / Apache |
| [cytoolz](https://github.com/pytoolz/cytoolz) | 0.7.2 | Cython implementation of Toolz: High performance functional utilities / BSD |
| [datashape](https://github.com/ContinuumIO/datashape) | 0.4.4 | A data description language / BSD |
| [decorator](http://pypi.python.org/pypi/decorator) | 3.4.0 | Better living through Python with decorators / BSD |
| [docutils](http://docutils.sourceforge.net) | 0.12 | Utilities for general- and special-purpose documentation / Public-Domain, PSF, 2-clause BSD, GPLv3 |
| [dynd-python](https://github.com/ContinuumIO/dynd-python) | 0.6.5 | Python exposure of the DyND dynamic multi-dimensional array library / BSD |
| [fastcache](https://github.com/pbrady/fastcache) | 1.0.2 | C implementation of Python 3 functools.lru\_cache / MIT |
| [flask](http://flask.pocoo.org/) | 0.10.1 | A microframework based on Werkzeug, Jinja2 and good intentions / BSD |
| [fontconfig](http://www.freedesktop.org/wiki/Software/fontconfig/) Linux | 2.11.1 | Fontconfig is a library for configuring and customizing font access / BSD |
| [freetype](http://freetype.sourceforge.net/index2.html) Linux Mac | 2.5.2 | A Free, High-Quality, and Portable Font Engine / FreeType License |
| [greenlet](http://pypi.python.org/pypi/greenlet/) | 0.4.5 | Lightweight in-process concurrent programming / MIT |
| [h5py](http://code.google.com/p/h5py/) | 2.4.0 | Read and write HDF5 files from Python / 3-clause BSD |
| [hdf5](http://www.hdfgroup.org/HDF5/) Linux Mac | 1.8.14 | HDF5 is a data model, library, and file format for storing and managing data / BSD-like |
| [ipython](http://ipython.org/) | 3.0.0 | IPython: Productive Interactive Computing / BSD |
| [itsdangerous](http://github.com/mitsuhiko/itsdangerous) | 0.24 | Various helpers to pass trusted data to untrusted environments and back. / BSD |
| [jdcal](http://github.com/phn/jdcal) | 1.0 | Julian dates from proleptic Gregorian and Julian calendars. / BSD |
| [jedi](https://github.com/davidhalter/jedi) | 0.8.1 | / MIT |
| [jinja2](http://jinja.pocoo.org/docs/) | 2.7.3 | An easy to use stand-alone template engine written in pure python. / BSD |
| [jpeg](http://www.ijg.org/) Linux Mac | 8d | read/write jpeg COM, EXIF, IPTC medata / Custom free software license |
| [jsonschema](http://github.com/Julian/jsonschema) | 2.4.0 | An implementation of JSON Schema validation for Python / MIT |
| launcher Mac Windows | 1.0.0 | Anaconda’s application launcher / proprietary - Continuum Analytics, Inc. |
| [libdynd](https://github.com/libdynd/dynd-python) Linux Mac | 0.6.5 | Python exposure of DyND / BSD |
| [libffi](https://github.com/atgreen/libffi) Linux | 3.0.13 | A portable foreign-function interface library / MIT |
| [libpng](http://www.libpng.org/pub/png/libpng.html) Linux Mac | 1.5.13 | libpng is the official PNG reference library. / Open Source |
| [libsodium](http://libsodium.org) Linux Mac | 0.4.5 | a modern software library for encryption, signatures, password hashing, etc. / MIT |
| [libtiff](http://www.libtiff.org/) Linux Mac | 4.0.2 | PyLibTiff: a Python tiff library / BSD-like |
| [libxml2](http://xmlsoft.org/) Linux Mac | 2.9.0 | The XML C parser and toolkit of Gnome / MIT |
| [libxslt](http://xmlsoft.org/) Linux Mac | 1.1.28 | Libxslt is the XSLT C library developed for the GNOME project / MIT |
| [llvmlite](https://github.com/numba/llvmlite) | 0.2.2 | lightweight wrapper around basic LLVM functionality / BSD |
| [lxml](http://lxml.de/) | 3.4.2 | XML processing library combining libxml2/libxslt with the ElementTree API / BSD |
| [markupsafe](http://github.com/mitsuhiko/markupsafe) | 0.23 | Implements a XML/HTML/XHTML Markup safe string for Python / BSD |
| [matplotlib](http://matplotlib.sourceforge.net/) | 1.4.3 | Python plotting package / PSF-based |
| [menuinst](https://github.com/ContinuumIO/menuinst) Windows | 1.0.4 | cross platform install of menu items / BSD |
| [mistune](https://github.com/lepture/mistune) | 0.5.1 | The fastest markdown parser in pure Python with renderer feature / BSD |
| [mock](http://www.voidspace.org.uk/python/mock/) | 1.0.1 | A Python Mocking and Patching Library for Testing / BSD |
| [multipledispatch](http://github.com/mrocklin/multipledispatch/) | 0.4.7 | Multiple dispatch / BSD |
| [networkx](http://networkx.lanl.gov/) | 1.9.1 | Python package for creating and manipulating graphs and networks / BSD |
| [nltk](http://nltk.org/) | 3.0.2 | Natural Language Toolkit / Apache |
| [node-webkit](https://github.com/rogerwang/node-webkit) Mac Windows | 0.10.1 | calls Node.js modules from DOM and enables a new way of writing applications / MIT |
| [nose](http://readthedocs.org/docs/nose/) | 1.3.4 | nose extends unittest to make testing easier / LGPL |
| [numba](http://continuum.io/developer-resources.html) | 0.17.0 | compiling Python code using LLVM / BSD |
| [numexpr](http://code.google.com/p/numexpr/) | 2.3.1 | Fast numerical expression evaluator for NumPy / MIT |
| [numpy](http://numpy.scipy.org/) | 1.9.2 | array processing for numbers, strings, records, and objects. / BSD |
| [odo](http://odo.pydata.org/en/latest/) | 0.3.1 | Data Migration for Blaze Project / BSD |
| [openpyxl](http://openpyxl.readthedocs.org) | 1.8.5 | A Python library to read/write Excel 2007 xlsx/xlsm files / MIT |
| [openssl](http://www.openssl.org/) Linux Mac | 1.0.1k | OpenSSL is an open-source implementation of the SSL and TLS protocols / Apache-style |
| [pandas](http://pandas.pydata.org/) | 0.15.2 | Powerful data structures for data analysis, time series,and statistics / BSD |
| [patsy](https://github.com/pydata/patsy) | 0.3.0 | a library for describing statistical models and building design matrices. / BSD |
| [pep8](http://pep8.readthedocs.org/) | 1.6.2 | Python style guide checker / MIT |
| [pillow](http://python-imaging.github.io/) | 2.7.0 | Python Imaging Library (Fork) / PIL license |
| [pip](http://www.pip-installer.org/) | 6.0.8 | PyPA recommended tool for installing Python packages / MIT |
| [ply](http://www.dabeaz.com/ply/) | 3.4 | Python Lex & Yacc / BSD |
| [psutil](https://github.com/giampaolo/psutil) | 2.2.1 | A cross-platform process and system utilities module for Python / BSD |
| [ptyprocess](https://github.com/pexpect/ptyprocess) Linux Mac | 0.4 | Run a subprocess in a pseudo terminal / ISC |
| [py](http://pylib.org/) | 1.4.26 | library with cross-python path, ini-parsing, io, code, log facilities / MIT |
| [pyasn1](http://sourceforge.net/projects/pyasn1/) | 0.1.7 | Offline IP address to Autonomous System Number lookup module / BSD |
| [pycosat](https://github.com/ilanschnell/pycosat) | 0.6.1 | bindings to picosat (a SAT solver) / MIT |
| [pycparser](https://bitbucket.org/eliben/pycparser) | 2.10 | C parser in Python / BSD |
| [pycrypto](http://www.pycrypto.org/) | 2.6.1 | Cryptographic modules for Python. / Public-Domain |
| [pycurl](http://pycurl.sourceforge.net/) Linux Mac | 7.19.5.1 | PycURL – cURL library module for Python / LGPL, MIT |
| [pyflakes](https://launchpad.net/pyflakes) | 0.8.1 | passive checker of Python programs / MIT |
| [pygments](http://pygments.org/) | 2.0.2 | Pygments is a syntax highlighting package written in Python / BSD |
| [pyopenssl](https://github.com/pyca/pyopenssl) | 0.14 | Python wrapper module around the OpenSSL library / Apache |
| [pyparsing](http://pyparsing.wikispaces.com/) | 2.0.3 | Python parsing module / MIT |
| [pyqt](http://www.riverbankcomputing.co.uk/software/pyqt) | 4.11.3 | PyQt is a Python binding of the cross-platform GUI toolkit Qt / GPL |
| [pyreadline](http://ipython.org/pyreadline.html) Windows | 2.0 | A python implmementation of GNU readline. / BSD |
| [pytables](http://www.pytables.org) | 3.1.1 | brings together Python, HDF5 and NumPy to easily handle large amounts of data / BSD |
| [pytest](http://pytest.org/) | 2.6.4 | simple powerful testing with Python / MIT |
| [python](http://www.python.org/) | 3.4.3 | general purpose programming language / PSF |
| [python-dateutil](https://dateutil.readthedocs.org/) | 2.4.1 | Extensions to the standard Python datetime module / BSD |
| [pytz](http://pytz.sourceforge.net/) | 2015.2 | World timezone definitions, modern and historical / MIT |
| [pywin32](https://pypi.python.org/pypi/pywin32) Windows | 219 | Python extensions for Windows / PSF |
| [pyyaml](http://pyyaml.org/wiki/PyYAML) | 3.11 | YAML parser and emitter for Python / MIT |
| [pyzmq](https://github.com/zeromq/pyzmq) | 14.5.0 | zeromq bindings for Python / LGPL and BSD |
| [qt](http://qt-project.org) Linux Mac | 4.8.6 | Qt is a cross-platform application and UI framework / LGPL |
| [readline](http://cnswww.cns.cwru.edu/php/chet/readline/rltop.html) Linux Mac | 6.2 | provides line-editing and for programs with a command-line interface / GPLv3 |
| [redis](http://redis.io/download/) Linux Mac | 2.6.9 | Redis is an open source, BSD licensed, advanced key-value cache and store / 3-clause BSD |
| [redis-py](https://github.com/andymccurdy/redis-py/) Linux Mac | 2.10.3 | Redis Python Client / MIT |
| [requests](http://docs.python-requests.org/en/latest/index.html) | 2.6.0 | Python HTTP for Humans / ISC |
| [rope](http://rope.sourceforge.net/) | 0.9.4 | a python refactoring library / GPL |
| [runipy](https://github.com/paulgb/runipy) | 0.1.3 | Run IPython notebooks from the command line / BSD |
| [scikit-image](http://scikit-image.org/) | 0.11.2 | Image processing routines for SciPy / 3-clause BSD |
| [scikit-learn](http://scikit-learn.org/stable/) | 0.15.2 | A set of python modules for machine learning and data mining / 3-clause BSD |
| [scipy](http://www.scipy.org/) | 0.15.1 | Scientific Library for Python / BSD |
| [setuptools](https://pypi.python.org/pypi/setuptools) | 14.3 | Easily download, build, install, upgrade, and uninstall Python packages / PSF or ZPL |
| [sip](http://www.riverbankcomputing.com/software/sip/intro) Linux Mac | 4.16.5 | / GPL |
| [six](http://pypi.python.org/pypi/six/) | 1.9.0 | Python 2 and 3 compatibility utilities / MIT |
| [sockjs-tornado](http://github.com/mrjoes/sockjs-tornado/) | 1.0.1 | SockJS python server implementation on top of Tornado framework / MIT |
| [sphinx](http://sphinx-doc.org) | 1.2.3 | Python documentation generator / BSD |
| [spyder](https://github.com/spyder-ide/spyder) | 2.3.4 | Scientific PYthon Development EnviRonment / MIT |
| [sqlalchemy](http://www.sqlalchemy.org/) | 0.9.9 | Database Abstraction Library / MIT |
| [sqlite](http://www.sqlite.org/) Linux Mac | 3.8.4.1 | implements a self-contained, zero-configuration, SQL database engine / Public-Domain |
| [statsmodels](http://statsmodels.sourceforge.net/) | 0.6.1 | Statistical computations and models for use with SciPy / 3-clause BSD |
| [sympy](http://sympy.org) | 0.7.6 | SymPy is a Python library for symbolic mathematics / 3-clause BSD |
| [terminado](https://github.com/takluyver/terminado) Linux Mac | 0.5 | Terminals served to term.js using Tornado websockets / BSD |
| [tk](http://www.tcl.tk/) Linux Mac | 8.5.18 | powerful but easy to learn dynamic programming language / BSD-like |
| [toolz](http://toolz.readthedocs.org/en/latest/) | 0.7.1 | List processing tools and functional utilities / BSD |
| [tornado](http://www.tornadoweb.org/) | 4.1 | Tornado is a Python web framework and asynchronous networking library / Apache |
| [ujson](http://www.esn.me/) | 1.33 | Ultra fast JSON encoder and decoder for Python / BSD |
| [util-linux](http://freecode.com/projects/util-linux) Linux | 2.21 | Util-linux is a suite of essential utilities for any Linux system / GPL |
| [werkzeug](http://werkzeug.pocoo.org/) | 0.10.1 | The Swiss Army knife of Python web development / BSD |
| [xlrd](http://www.lexicon.net/sjmachin/xlrd.htm) | 0.9.3 | Library for developers to extract data from Microsoft Excel spreadsheet files / BSD |
| [xlsxwriter](https://github.com/jmcnamara/XlsxWriter) | 0.6.7 | A Python module for creating Excel XLSX files / BSD |
| [xlwings](http://xlwings.org/) Mac Windows | 0.3.4 | Make Excel fly. Interact with Excel from Python and vice versa / 3-clause BSD |
| [xz](http://tukaani.org/xz/) Linux Mac | 5.0.5 | a free general-purpose data compression software with high compression ratio / Public-Domain, GPL |
| [yaml](http://www.yaml.org/) Linux Mac | 0.1.4 | a human friendly data serialization standard for all programming languages / MIT |
| [zeromq](http://zeromq.org) Linux Mac | 4.0.4 | a messaging system, or “message-oriented middleware” / LGPL |
| [zlib](http://zlib.net/) Linux Mac | 1.2.8 | A Massively Spiffy Yet Delicately Unobtrusive Compression Library / zlib |
| Name | Version | Summary / License |
|---|---|---|
| [abstract-rendering](https://github.com/JosephCottam/AbstractRendering) Linux Mac | 0.5.1 | Rendering as a binning process / 3-clause BSD |
| [appscript](http://appscript.sourceforge.net/) Mac | 1.0.1 | Control AppleScriptable applications from Python / Public-Domain |
| [argcomplete](https://github.com/kislyuk/argcomplete) | 0.8.4 | Bash tab completion for argparse. Tab complete all the things! / Apache |
| [astropy](http://www.astropy.org/) | 1.0.1 | Community-developed python astronomy tools / BSD |
| [bcolz](https://github.com/Blosc/bcolz) | 0.8.1 | columnar and compressed data containers. / BSD |
| [beautiful-soup](http://www.crummy.com/software/BeautifulSoup/) | 4.3.2 | Screen-scraping library / PSF, MIT |
| [binstar](http://binstar.org) | 0.10.1 | Binstar command line client library / BSD |
| [bitarray](https://github.com/ilanschnell/bitarray) | 0.8.1 | efficient arrays of booleans – C extension / PSF |
| [blaze-core](http://blaze.pydata.org) | 0.7.3 | Blaze is the next generation of NumPy / BSD |
| [blz](https://github.com/ContinuumIO/blz) | 0.6.2 | a compressed data container / BSD |
| [bokeh](https://github.com/ContinuumIO/Bokeh) | 0.8.1 | Statistical and novel interactive HTML plots for Python / 3-clause BSD |
| [boto](https://github.com/boto/boto/) | 2.36.0 | Amazon Web Services Library / MIT |
| [cairo](http://cairographics.org/) Linux | 1.12.18 | Cairo is a 2D graphics library with support for multiple output devices. / LGPL 2.1, MPL 1.1 |
| [cdecimal](http://www.bytereef.org/mpdecimal/index.html) | 2.3 | Fast drop-in replacement for decimal.py / BSD |
| [certifi](http://python-requests.org) | 14.05.14 | Python package for providing Mozilla’s CA Bundle. / ISC |
| [cffi](http://cffi.readthedocs.org) | 0.9.2 | Foreign Function Interface for Python calling C code / MIT |
| [clyent](https://github.com/binstar/clyent) | 0.3.4 | Command line client Library for windows and posix / BSD |
| [colorama](http://code.google.com/p/colorama/) | 0.3.3 | Cross-platform colored terminal text. / BSD |
| [conda](http://conda.pydata.org/) | 3.10.0 | package management tool Installation / BSD |
| [conda-build](https://github.com/conda/conda-build) | 1.11.0 | Commands and tools for building conda packages / BSD |
| [configobj](http://www.voidspace.org.uk/python/configobj.html) | 5.0.6 | Config file reading, writing and validation / BSD |
| [cryptography](https://github.com/pyca/cryptography) | 0.8 | provides cryptographic recipes and primitives to Python developers / Apache |
| [curl](http://curl.haxx.se/) Linux Mac | 7.38.0 | curl is a command line tool and library for transferring data with URL syntax / MIT/X derivate |
| [cython](http://www.cython.org/) | 0.22 | The Cython compiler for writing C extensions for the Python language / Apache |
| [cytoolz](https://github.com/pytoolz/cytoolz) | 0.7.2 | Cython implementation of Toolz: High performance functional utilities / BSD |
| [datashape](https://github.com/ContinuumIO/datashape) | 0.4.4 | A data description language / BSD |
| [decorator](http://pypi.python.org/pypi/decorator) | 3.4.0 | Better living through Python with decorators / BSD |
| [docutils](http://docutils.sourceforge.net) | 0.12 | Utilities for general- and special-purpose documentation / Public-Domain, PSF, 2-clause BSD, GPLv3 |
| [dynd-python](https://github.com/ContinuumIO/dynd-python) | 0.6.5 | Python exposure of the DyND dynamic multi-dimensional array library / BSD |
| [enum34](https://pypi.python.org/pypi/enum34) | 1.0.4 | Robust enumerated type support in Python / BSD |
| [fastcache](https://github.com/pbrady/fastcache) | 1.0.2 | C implementation of Python 3 functools.lru\_cache / MIT |
| [flask](http://flask.pocoo.org/) | 0.10.1 | A microframework based on Werkzeug, Jinja2 and good intentions / BSD |
| [fontconfig](http://www.freedesktop.org/wiki/Software/fontconfig/) Linux | 2.11.1 | Fontconfig is a library for configuring and customizing font access / BSD |
| [freetype](http://freetype.sourceforge.net/index2.html) Linux Mac | 2.5.2 | A Free, High-Quality, and Portable Font Engine / FreeType License |
| [funcsigs](http://funcsigs.readthedocs.org/) | 0.4 | Python function signatures from PEP362 for Python 2.6, 2.7 and 3.2+ / Apache |
| [futures](http://code.google.com/p/pythonfutures) | 2.2.0 | Backport of the concurrent.futures package from Python 3.2 / BSD |
| [gevent](http://www.gevent.org/) | 1.0.1 | Coroutine-based network library / MIT |
| [gevent-websocket](https://bitbucket.org/Jeffrey/gevent-websocket) | 0.9.3 | Websocket handler for the gevent pywsgi server, a Python network library / Apache |
| [greenlet](http://pypi.python.org/pypi/greenlet/) | 0.4.5 | Lightweight in-process concurrent programming / MIT |
| [grin](http://pypi.python.org/pypi/grin) | 1.2.1 | A grep program configured the way I like it / BSD |
| [h5py](http://code.google.com/p/h5py/) | 2.4.0 | Read and write HDF5 files from Python / 3-clause BSD |
| [hdf5](http://www.hdfgroup.org/HDF5/) Linux Mac | 1.8.14 | HDF5 is a data model, library, and file format for storing and managing data / BSD-like |
| [ipython](http://ipython.org/) | 3.0.0 | IPython: Productive Interactive Computing / BSD |
| [itsdangerous](http://github.com/mitsuhiko/itsdangerous) | 0.24 | Various helpers to pass trusted data to untrusted environments and back. / BSD |
| [jdcal](http://github.com/phn/jdcal) | 1.0 | Julian dates from proleptic Gregorian and Julian calendars. / BSD |
| [jedi](https://github.com/davidhalter/jedi) | 0.8.1 | / MIT |
| [jinja2](http://jinja.pocoo.org/docs/) | 2.7.3 | An easy to use stand-alone template engine written in pure python. / BSD |
| [jpeg](http://www.ijg.org/) Linux Mac | 8d | read/write jpeg COM, EXIF, IPTC medata / Custom free software license |
| [jsonschema](http://github.com/Julian/jsonschema) | 2.4.0 | An implementation of JSON Schema validation for Python / MIT |
| launcher Mac Windows | 1.0.0 | Anaconda’s application launcher / proprietary - Continuum Analytics, Inc. |
| [libdynd](https://github.com/libdynd/dynd-python) Linux Mac | 0.6.5 | Python exposure of DyND / BSD |
| [libffi](https://github.com/atgreen/libffi) Linux | 3.0.13 | A portable foreign-function interface library / MIT |
| [libpng](http://www.libpng.org/pub/png/libpng.html) Linux Mac | 1.5.13 | libpng is the official PNG reference library. / Open Source |
| [libsodium](http://libsodium.org) Linux Mac | 0.4.5 | a modern software library for encryption, signatures, password hashing, etc. / MIT |
| [libtiff](http://www.libtiff.org/) Linux Mac | 4.0.2 | PyLibTiff: a Python tiff library / BSD-like |
| [libxml2](http://xmlsoft.org/) Linux Mac | 2.9.0 | The XML C parser and toolkit of Gnome / MIT |
| [libxslt](http://xmlsoft.org/) Linux Mac | 1.1.28 | Libxslt is the XSLT C library developed for the GNOME project / MIT |
| [llvmlite](https://github.com/numba/llvmlite) | 0.2.2 | lightweight wrapper around basic LLVM functionality / BSD |
| [lxml](http://lxml.de/) | 3.4.2 | XML processing library combining libxml2/libxslt with the ElementTree API / BSD |
| [markupsafe](http://github.com/mitsuhiko/markupsafe) | 0.23 | Implements a XML/HTML/XHTML Markup safe string for Python / BSD |
| [matplotlib](http://matplotlib.sourceforge.net/) | 1.4.3 | Python plotting package / PSF-based |
| [menuinst](https://github.com/ContinuumIO/menuinst) Windows | 1.0.4 | cross platform install of menu items / BSD |
| [mistune](https://github.com/lepture/mistune) | 0.5.1 | The fastest markdown parser in pure Python with renderer feature / BSD |
| [mock](http://www.voidspace.org.uk/python/mock/) | 1.0.1 | A Python Mocking and Patching Library for Testing / BSD |
| [multipledispatch](http://github.com/mrocklin/multipledispatch/) | 0.4.7 | Multiple dispatch / BSD |
| [networkx](http://networkx.lanl.gov/) | 1.9.1 | Python package for creating and manipulating graphs and networks / BSD |
| [nltk](http://nltk.org/) | 3.0.2 | Natural Language Toolkit / Apache |
| [node-webkit](https://github.com/rogerwang/node-webkit) Mac Windows | 0.10.1 | calls Node.js modules from DOM and enables a new way of writing applications / MIT |
| [nose](http://readthedocs.org/docs/nose/) | 1.3.4 | nose extends unittest to make testing easier / LGPL |
| [numba](http://continuum.io/developer-resources.html) | 0.17.0 | compiling Python code using LLVM / BSD |
| [numexpr](http://code.google.com/p/numexpr/) | 2.3.1 | Fast numerical expression evaluator for NumPy / MIT |
| [numpy](http://numpy.scipy.org/) | 1.9.2 | array processing for numbers, strings, records, and objects. / BSD |
| [odo](http://odo.pydata.org/en/latest/) | 0.3.1 | Data Migration for Blaze Project / BSD |
| [openpyxl](http://openpyxl.readthedocs.org) | 1.8.5 | A Python library to read/write Excel 2007 xlsx/xlsm files / MIT |
| [openssl](http://www.openssl.org/) Linux Mac | 1.0.1k | OpenSSL is an open-source implementation of the SSL and TLS protocols / Apache-style |
| [pandas](http://pandas.pydata.org/) | 0.15.2 | Powerful data structures for data analysis, time series,and statistics / BSD |
| [patsy](https://github.com/pydata/patsy) | 0.3.0 | a library for describing statistical models and building design matrices. / BSD |
| [pep8](http://pep8.readthedocs.org/) | 1.6.2 | Python style guide checker / MIT |
| [pillow](http://python-imaging.github.io/) | 2.7.0 | Python Imaging Library (Fork) / PIL license |
| [pip](http://www.pip-installer.org/) | 6.0.8 | PyPA recommended tool for installing Python packages / MIT |
| [pixman](http://cgit.freedesktop.org/pixman/) Linux | 0.26.2 | a low-level software library for pixel manipulation / MIT |
| [ply](http://www.dabeaz.com/ply/) | 3.4 | Python Lex & Yacc / BSD |
| [psutil](https://github.com/giampaolo/psutil) | 2.2.1 | A cross-platform process and system utilities module for Python / BSD |
| [ptyprocess](https://github.com/pexpect/ptyprocess) Linux Mac | 0.4 | Run a subprocess in a pseudo terminal / ISC |
| [py](http://pylib.org/) | 1.4.26 | library with cross-python path, ini-parsing, io, code, log facilities / MIT |
| [py2cairo](http://cairographics.org/pycairo/) Linux | 1.10.0 | Pycairo is a set of Python bindings for the cairo graphics library / LGPL 2.1, MPL 1.1 |
| [pyasn1](http://sourceforge.net/projects/pyasn1/) | 0.1.7 | Offline IP address to Autonomous System Number lookup module / BSD |
| [pyaudio](http://people.csail.mit.edu/hubert/pyaudio/) Mac | 0.2.7 | Bindings for PortAudio v19, the cross-platform audio stream library / MIT |
| [pycosat](https://github.com/ilanschnell/pycosat) | 0.6.1 | bindings to picosat (a SAT solver) / MIT |
| [pycparser](https://bitbucket.org/eliben/pycparser) | 2.10 | C parser in Python / BSD |
| [pycrypto](http://www.pycrypto.org/) | 2.6.1 | Cryptographic modules for Python. / Public-Domain |
| [pycurl](http://pycurl.sourceforge.net/) Linux Mac | 7.19.5.1 | PycURL – cURL library module for Python / LGPL, MIT |
| [pyflakes](https://launchpad.net/pyflakes) | 0.8.1 | passive checker of Python programs / MIT |
| [pygments](http://pygments.org/) | 2.0.2 | Pygments is a syntax highlighting package written in Python / BSD |
| [pyopenssl](https://github.com/pyca/pyopenssl) | 0.14 | Python wrapper module around the OpenSSL library / Apache |
| [pyparsing](http://pyparsing.wikispaces.com/) | 2.0.3 | Python parsing module / MIT |
| [pyqt](http://www.riverbankcomputing.co.uk/software/pyqt) | 4.11.3 | PyQt is a Python binding of the cross-platform GUI toolkit Qt / GPL |
| [pyreadline](http://ipython.org/pyreadline.html) Windows | 2.0 | A python implmementation of GNU readline. / BSD |
| [pytables](http://www.pytables.org) | 3.1.1 | brings together Python, HDF5 and NumPy to easily handle large amounts of data / BSD |
| [pytest](http://pytest.org/) | 2.6.4 | simple powerful testing with Python / MIT |
| [python](http://www.python.org/) | 2.7.9 | general purpose programming language / PSF |
| [python-dateutil](https://dateutil.readthedocs.org/) | 2.4.1 | Extensions to the standard Python datetime module / BSD |
| [pytz](http://pytz.sourceforge.net/) | 2015.2 | World timezone definitions, modern and historical / MIT |
| [pywin32](https://pypi.python.org/pypi/pywin32) Windows | 219 | Python extensions for Windows / PSF |
| [pyyaml](http://pyyaml.org/wiki/PyYAML) | 3.11 | YAML parser and emitter for Python / MIT |
| [pyzmq](https://github.com/zeromq/pyzmq) | 14.5.0 | zeromq bindings for Python / LGPL and BSD |
| [qt](http://qt-project.org) Linux Mac | 4.8.6 | Qt is a cross-platform application and UI framework / LGPL |
| [readline](http://cnswww.cns.cwru.edu/php/chet/readline/rltop.html) Linux Mac | 6.2 | provides line-editing and for programs with a command-line interface / GPLv3 |
| [redis](http://redis.io/download/) Linux Mac | 2.6.9 | Redis is an open source, BSD licensed, advanced key-value cache and store / 3-clause BSD |
| [redis-py](https://github.com/andymccurdy/redis-py/) Linux Mac | 2.10.3 | Redis Python Client / MIT |
| [requests](http://docs.python-requests.org/en/latest/index.html) | 2.6.0 | Python HTTP for Humans / ISC |
| [rope](http://rope.sourceforge.net/) | 0.9.4 | a python refactoring library / GPL |
| [runipy](https://github.com/paulgb/runipy) | 0.1.3 | Run IPython notebooks from the command line / BSD |
| [scikit-image](http://scikit-image.org/) | 0.11.2 | Image processing routines for SciPy / 3-clause BSD |
| [scikit-learn](http://scikit-learn.org/stable/) | 0.15.2 | A set of python modules for machine learning and data mining / 3-clause BSD |
| [scipy](http://www.scipy.org/) | 0.15.1 | Scientific Library for Python / BSD |
| [setuptools](https://pypi.python.org/pypi/setuptools) | 14.3 | Easily download, build, install, upgrade, and uninstall Python packages / PSF or ZPL |
| [sip](http://www.riverbankcomputing.com/software/sip/intro) Linux Mac | 4.16.5 | / GPL |
| [six](http://pypi.python.org/pypi/six/) | 1.9.0 | Python 2 and 3 compatibility utilities / MIT |
| [sockjs-tornado](http://github.com/mrjoes/sockjs-tornado/) | 1.0.1 | SockJS python server implementation on top of Tornado framework / MIT |
| [sphinx](http://sphinx-doc.org) | 1.2.3 | Python documentation generator / BSD |
| [spyder](https://github.com/spyder-ide/spyder) | 2.3.4 | Scientific PYthon Development EnviRonment / MIT |
| [sqlalchemy](http://www.sqlalchemy.org/) | 0.9.9 | Database Abstraction Library / MIT |
| [sqlite](http://www.sqlite.org/) Linux Mac | 3.8.4.1 | implements a self-contained, zero-configuration, SQL database engine / Public-Domain |
| [ssl\_match\_hostname](http://bitbucket.org/brandon/backports.ssl_match_hostname) | 3.4.0.2 | The ssl.match\_hostname() function from Python 3.4 / PSF |
| [statsmodels](http://statsmodels.sourceforge.net/) | 0.6.1 | Statistical computations and models for use with SciPy / 3-clause BSD |
| [sympy](http://sympy.org) | 0.7.6 | SymPy is a Python library for symbolic mathematics / 3-clause BSD |
| [terminado](https://github.com/takluyver/terminado) Linux Mac | 0.5 | Terminals served to term.js using Tornado websockets / BSD |
| [theano](http://deeplearning.net/software/theano/) Linux | 0.6.0 | Optimizing compiler for evaluating mathematical expressions on CPUs and GPUs / BSD |
| [tk](http://www.tcl.tk/) Linux Mac | 8.5.18 | powerful but easy to learn dynamic programming language / BSD-like |
| [toolz](http://toolz.readthedocs.org/en/latest/) | 0.7.1 | List processing tools and functional utilities / BSD |
| [tornado](http://www.tornadoweb.org/) | 4.1 | Tornado is a Python web framework and asynchronous networking library / Apache |
| [ujson](http://www.esn.me/) | 1.33 | Ultra fast JSON encoder and decoder for Python / BSD |
| [unicodecsv](https://github.com/jdunck/python-unicodecsv) | 0.9.4 | The unicodecsv file reads and decodes byte strings for you / BSD |
| [util-linux](http://freecode.com/projects/util-linux) Linux | 2.21 | Util-linux is a suite of essential utilities for any Linux system / GPL |
| [werkzeug](http://werkzeug.pocoo.org/) | 0.10.1 | The Swiss Army knife of Python web development / BSD |
| [xlrd](http://www.lexicon.net/sjmachin/xlrd.htm) | 0.9.3 | Library for developers to extract data from Microsoft Excel spreadsheet files / BSD |
| [xlsxwriter](https://github.com/jmcnamara/XlsxWriter) | 0.6.7 | A Python module for creating Excel XLSX files / BSD |
| [xlwings](http://xlwings.org/) Mac Windows | 0.3.4 | Make Excel fly. Interact with Excel from Python and vice versa / 3-clause BSD |
| [xlwt](http://www.python-excel.org/) | 0.7.5 | This package is for writing data and formatting information to Excel files / BSD |
| [yaml](http://www.yaml.org/) Linux Mac | 0.1.4 | a human friendly data serialization standard for all programming languages / MIT |
| [zeromq](http://zeromq.org) Linux Mac | 4.0.4 | a messaging system, or “message-oriented middleware” / LGPL |
| [zlib](http://zlib.net/) Linux Mac | 1.2.8 | A Massively Spiffy Yet Delicately Unobtrusive Compression Library / zlib |
| Name | Version | License |
|---|---|---|
| abstract-rendering Linux Mac | 0.5.1 | 3rd-clause BSD |
| argcomplete | 0.8.1 | Apache Software License |
| astropy | 0.4.2 | BSD |
| beautiful-soup | 4.3.2 | PSF/MIT |
| binstar | 0.7.1 | BSD |
| bitarray | 0.8.1 | PSF |
| blaze | 0.6.3 | BSD |
| blz | 0.6.2 | BSD |
| bokeh | 0.6.1 | New BSD |
| boto | 2.32.1 | MIT |
| cffi | 0.8.6 | MIT |
| colorama | 0.3.1 | BSD |
| conda | 3.7.0 | BSD |
| conda-build | 1.8.2 | BSD |
| configobj | 5.0.6 | BSD |
| cryptography | 0.5.4 | Apache 2.0 |
| curl Linux Mac | 7.38.0 | MIT/X derivate |
| cython | 0.21 | Apache 2.0 |
| cytoolz | 0.7.0 | BSD |
| datashape | 0.3.0 | BSD |
| dateutil | 2.1 | BSD |
| decorator | 3.4.0 | BSD |
| docutils | 0.12 | Public-Domain, PSF, 2-clause BSD, GPL3 |
| dynd-python | 0.6.5 | BSD |
| flask | 0.10.1 | BSD |
| freetype Linux Mac | 2.4.10 | FreeType License |
| future | 0.13.1 | MIT |
| greenlet | 0.4.4 | MIT |
| h5py | 2.3.1 | New BSD |
| hdf5 Linux Mac | 1.8.13 | BSD-style |
| ipython | 2.2.0 | BSD |
| itsdangerous | 0.24 | BSD License |
| jdcal | 1.0 | BSD |
| jinja2 | 2.7.3 | BSD |
| jpeg Linux Mac | 8d | Custom free software license |
| launcher Mac Windows | 1.0.0 | proprietary - Continuum Analytics, Inc. |
| libdynd Linux Mac | 0.6.5 | BSD |
| libffi Linux | 3.0.13 | MIT |
| libpng Linux Mac | 1.5.13 | Open Source |
| libsodium Linux Mac | 0.4.5 | MIT |
| libtiff Linux Mac | 4.0.2 | as-is |
| libxml2 Linux Mac | 2.9.0 | MIT |
| libxslt Linux Mac | 1.1.28 | MIT |
| llvm Linux Mac | 3.3 | Open Source |
| llvmpy | 0.12.7 | New BSD License |
| lxml | 3.4.0 | BSD |
| markupsafe | 0.23 | BSD |
| matplotlib | 1.4.0 | PSF-based |
| menuinst Windows | 1.0.4 | BDF |
| mingw Windows | 4.7 | GPL |
| mock | 1.0.1 | BSD |
| multipledispatch | 0.4.7 | BSD |
| networkx | 1.9.1 | BSD |
| nltk | 3.0.0 | Apache 2.0 |
| node-webkit Mac Windows | 0.10.1 | MIT |
| nose | 1.3.4 | LGPL |
| numba | 0.14.0 | numba license |
| numexpr | 2.3.1 | MIT |
| numpy | 1.9.0 | BSD |
| openpyxl | 1.8.5 | MIT/Expat |
| openssl Linux Mac | 1.0.1h | Apache-style |
| pandas | 0.14.1 | BSD |
| patsy | 0.3.0 | BSD License |
| pillow Linux Mac | 2.5.1 | Standard PIL license |
| pip | 1.5.6 | MIT |
| ply | 3.4 | BSD |
| psutil | 2.1.1 | BSD |
| py | 1.4.25 | MIT |
| pycosat | 0.6.1 | MIT |
| pycparser | 2.10 | BSD |
| pycrypto | 2.6.1 | Public Domain |
| pycurl Linux Mac | 7.19.5 | LGPL and MIT/X |
| pyflakes | 0.8.1 | MIT |
| pygments | 1.6 | BSD |
| pyopenssl | 0.14 | APL2 |
| pyparsing | 2.0.1 | MIT |
| pyqt | 4.10.4 | GPL |
| pyreadline Windows | 2.0 | BSD |
| pytables | 3.1.1 | BSD |
| pytest | 2.6.3 | MIT |
| python | 3.4.1 | PSF |
| pytz | 2014.7 | MIT |
| pywin32 Windows | 219 | PSF |
| pyyaml | 3.11 | MIT |
| pyzmq | 14.3.1 | LGPL and BSD |
| qt Linux Mac | 4.8.5 | LGPL |
| readline Linux Mac | 6.2 | GPL 3 |
| redis Linux Mac | 2.6.9 | 3-clause BSD |
| redis-py Linux Mac | 2.9.1 | MIT |
| requests | 2.4.1 | ISC |
| rope | 0.9.4 | GPL |
| runipy | 0.1.1 | BSD |
| scikit-image | 0.10.1 | Modified BSD |
| scikit-learn | 0.15.2 | 3-clause BSD |
| scipy | 0.14.0 | BSD |
| setuptools | 5.8 | PSF or ZPL |
| sip Linux Mac | 4.15.5 | GPL |
| six | 1.8.0 | MIT |
| sockjs-tornado | 1.0.1 | MIT |
| sphinx | 1.2.3 | BSD |
| spyder | 2.3.1 | MIT |
| sqlalchemy | 0.9.7 | MIT |
| sqlite Linux Mac | 3.8.4.1 | Public Domain |
| statsmodels | 0.5.0 | 3-clause Modified BSD |
| sympy | 0.7.5 | New BSD |
| tk Linux Mac | 8.5.15 | BSD-style |
| toolz | 0.7.0 | BSD |
| tornado | 4.0.2 | Apache |
| ujson | 1.33 | BSD |
| util-linux Linux | 2.21 | GPL |
| werkzeug | 0.9.6 | BSD |
| xlrd | 0.9.3 | BSD |
| xlsxwriter | 0.5.7 | BSD |
| xz Linux Mac | 5.0.5 | Public Domain and GPL |
| yaml Linux Mac | 0.1.4 | MIT |
| zeromq Linux Mac | 4.0.4 | LGPL |
| zlib Linux Mac | 1.2.7 | zlib |
| Name | Version | License |
|---|---|---|
| abstract-rendering Linux Mac | 0.5.1 | 3rd-clause BSD |
| argcomplete | 0.8.1 | Apache Software License |
| astropy | 0.4.2 | BSD |
| atom | 0.3.9 | BSD |
| beautiful-soup | 4.3.2 | PSF/MIT |
| binstar | 0.7.1 | BSD |
| bitarray | 0.8.1 | PSF |
| blaze | 0.6.3 | BSD |
| blz | 0.6.2 | BSD |
| bokeh | 0.6.1 | New BSD |
| boto | 2.32.1 | MIT |
| cairo Linux | 1.12.2 | LGPL 2.1 and MPL 1.1 |
| casuarius | 1.1 | LGPL |
| cdecimal | 2.3 | BSD |
| cffi | 0.8.6 | MIT |
| chaco | 4.4.1 | BSD |
| colorama | 0.3.1 | BSD |
| conda | 3.7.0 | BSD |
| conda-build | 1.8.2 | BSD |
| configobj | 5.0.6 | BSD |
| cryptography | 0.5.4 | Apache 2.0 |
| curl Linux Mac | 7.38.0 | MIT/X derivate |
| cython | 0.21 | Apache 2.0 |
| cytoolz | 0.7.0 | BSD |
| datashape | 0.3.0 | BSD |
| dateutil | 2.1 | BSD |
| decorator | 3.4.0 | BSD |
| docutils | 0.12 | Public-Domain, PSF, 2-clause BSD, GPL3 |
| dynd-python | 0.6.5 | BSD |
| enable | 4.3.0 | BSD |
| enaml | 0.9.8 | BSD |
| flask | 0.10.1 | BSD |
| freetype Linux Mac | 2.4.10 | FreeType License |
| future | 0.13.1 | MIT |
| futures | 2.1.6 | BSD |
| gevent | 1.0.1 | MIT |
| gevent-websocket | 0.9.3 | Apache |
| greenlet | 0.4.4 | MIT |
| grin | 1.2.1 | BSD |
| h5py | 2.3.1 | New BSD |
| hdf5 Linux Mac | 1.8.13 | BSD-style |
| ipython | 2.2.0 | BSD |
| itsdangerous | 0.24 | BSD License |
| jdcal | 1.0 | BSD |
| jinja2 | 2.7.3 | BSD |
| jpeg Linux Mac | 8d | Custom free software license |
| kiwisolver | 0.1.3 | BSD |
| launcher Mac Windows | 1.0.0 | proprietary - Continuum Analytics, Inc. |
| lcms Linux Mac | 1.19 | MIT |
| libdynd Linux Mac | 0.6.5 | BSD |
| libffi Linux | 3.0.13 | MIT |
| libpng Linux Mac | 1.5.13 | Open Source |
| libsodium Linux Mac | 0.4.5 | MIT |
| libtiff Linux Mac | 4.0.2 | as-is |
| libxml2 Linux Mac | 2.9.0 | MIT |
| libxslt Linux Mac | 1.1.28 | MIT |
| llvm Linux Mac | 3.3 | Open Source |
| llvmpy | 0.12.7 | New BSD License |
| lxml | 3.4.0 | BSD |
| markupsafe | 0.23 | BSD |
| matplotlib | 1.4.0 | PSF-based |
| menuinst Windows | 1.0.4 | BDF |
| mingw Windows | 4.7 | GPL |
| mock | 1.0.1 | BSD |
| mpi4py Linux | 1.3 | BSD |
| mpich2 Linux | 1.4.1p1 | mpich license |
| multipledispatch | 0.4.7 | BSD |
| networkx | 1.9.1 | BSD |
| nltk | 3.0.0 | Apache 2.0 |
| node-webkit Mac Windows | 0.10.1 | MIT |
| nose | 1.3.4 | LGPL |
| numba | 0.14.0 | numba license |
| numexpr | 2.3.1 | MIT |
| numpy | 1.9.0 | BSD |
| openpyxl | 1.8.5 | MIT/Expat |
| openssl Linux Mac | 1.0.1h | Apache-style |
| pandas | 0.14.1 | BSD |
| patsy | 0.3.0 | BSD License |
| pep8 | 1.5.7 | MIT License |
| pil | 1.1.7 | PIL license |
| pip | 1.5.6 | MIT |
| pixman Linux | 0.26.2 | MIT |
| ply | 3.4 | BSD |
| psutil | 2.1.1 | BSD |
| py | 1.4.25 | MIT |
| py2cairo Linux | 1.10.0 | LGPL 2.1 and MPL 1.1 |
| pyaudio Mac | 0.2.7 | MIT |
| pycosat | 0.6.1 | MIT |
| pycparser | 2.10 | BSD |
| pycrypto | 2.6.1 | Public Domain |
| pycurl Linux Mac | 7.19.5 | LGPL and MIT/X |
| pyface | 4.4.0 | BSD |
| pyflakes | 0.8.1 | MIT |
| pygments | 1.6 | BSD |
| pyopenssl | 0.14 | APL2 |
| pyparsing | 2.0.1 | MIT |
| pyqt | 4.10.4 | GPL |
| pyreadline Windows | 2.0 | BSD |
| pytables | 3.1.1 | BSD |
| pytest | 2.6.3 | MIT |
| python | 2.7.8 | PSF |
| pytz | 2014.7 | MIT |
| pywin32 Windows | 219 | PSF |
| pyyaml | 3.11 | MIT |
| pyzmq | 14.3.1 | LGPL and BSD |
| qt Linux Mac | 4.8.5 | LGPL |
| readline Linux Mac | 6.2 | GPL 3 |
| redis Linux Mac | 2.6.9 | 3-clause BSD |
| redis-py Linux Mac | 2.9.1 | MIT |
| requests | 2.4.1 | ISC |
| rope | 0.9.4 | GPL |
| runipy | 0.1.1 | BSD |
| scikit-image | 0.10.1 | Modified BSD |
| scikit-learn | 0.15.2 | 3-clause BSD |
| scipy | 0.14.0 | BSD |
| setuptools | 5.8 | PSF or ZPL |
| sip Linux Mac | 4.15.5 | GPL |
| six | 1.8.0 | MIT |
| sockjs-tornado | 1.0.1 | MIT |
| sphinx | 1.2.3 | BSD |
| spyder | 2.3.1 | MIT |
| sqlalchemy | 0.9.7 | MIT |
| sqlite Linux Mac | 3.8.4.1 | Public Domain |
| ssl\_match\_hostname | 3.4.0.2 | PSF |
| statsmodels | 0.5.0 | 3-clause Modified BSD |
| sympy | 0.7.5 | New BSD |
| theano Linux | 0.6.0 | BSD |
| tk Linux Mac | 8.5.15 | BSD-style |
| toolz | 0.7.0 | BSD |
| tornado | 4.0.2 | Apache |
| traits | 4.4.0 | BSD |
| traitsui | 4.4.0 | BSD |
| ujson | 1.33 | BSD |
| unicodecsv | 0.9.4 | BSD |
| util-linux Linux | 2.21 | GPL |
| werkzeug | 0.9.6 | BSD |
| xlrd | 0.9.3 | BSD |
| xlsxwriter | 0.5.7 | BSD |
| xlwings Windows | 0.2.2 | BSD 3-clause |
| xlwt | 0.7.5 | BSD |
| yaml Linux Mac | 0.1.4 | MIT |
| zeromq Linux Mac | 4.0.4 | LGPL |
| zlib Linux Mac | 1.2.7 | zlib |
| Name | Version | License |
|---|---|---|
| argcomplete | 0.6.7 | Apache Software License |
| astropy | 0.3.2 | BSD |
| beautiful-soup | 4.3.1 | PSF/MIT |
| binstar | 0.5.3 | BSD |
| bitarray | 0.8.1 | PSF |
| blaze | 0.5.0 | BSD |
| blz | 0.6.2 | BSD |
| bokeh | 0.4.4 | New BSD |
| cdecimal | 2.3 | BSD |
| colorama | 0.2.7 | BSD |
| conda | 3.5.5 | BSD |
| conda-build | 1.3.5 | BSD |
| configobj | 5.0.5 | BSD |
| curl Linux Mac | 7.30.0 | MIT/X derivate |
| cython | 0.20.1 | Apache 2.0 |
| datashape | 0.2.0 | BSD |
| dateutil | 2.1 | BSD |
| docutils | 0.11 | Public-Domain, PSF, 2-clause BSD, GPL3 |
| dynd-python | 0.6.2 | BSD |
| flask | 0.10.1 | BSD |
| freetype Linux Mac | 2.4.10 | FreeType License |
| future | 0.12.1 | MIT |
| greenlet | 0.4.2 | MIT |
| h5py | 2.3.0 | New BSD |
| hdf5 Linux Mac | 1.8.9 | BSD-style |
| ipython | 2.1.0 | BSD |
| itsdangerous | 0.24 | BSD License |
| jdcal | 1.0 | BSD |
| jinja2 | 2.7.2 | BSD |
| jpeg Linux Mac | 8d | Custom free software license |
| libdynd Linux Mac | 0.6.2 | BSD |
| libpng Linux Mac | 1.5.13 | Open Source |
| libsodium Linux Mac | 0.4.5 | MIT |
| libtiff Linux Mac | 4.0.2 | as-is |
| libxml2 Linux Mac | 2.9.0 | MIT |
| libxslt Linux Mac | 1.1.28 | MIT |
| llvm Linux Mac | 3.3 | Open Source |
| llvmpy | 0.12.6 | New BSD License |
| lxml | 3.3.5 | BSD |
| markupsafe | 0.18 | BSD |
| matplotlib | 1.3.1 | PSF-based |
| menuinst Windows | 1.0.3 | BDF |
| mingw Windows | 4.7 | GPL |
| mock | 1.0.1 | BSD |
| multipledispatch | 0.4.3 | BSD |
| networkx | 1.8.1 | BSD |
| nose | 1.3.3 | LGPL |
| numba | 0.13.2 | numba license |
| numexpr | 2.3.1 | MIT |
| numpy | 1.8.1 | BSD |
| openpyxl | 1.8.5 | MIT/Expat |
| openssl Linux Mac | 1.0.1h | Apache-style |
| pandas | 0.14.0 | BSD |
| patsy | 0.2.1 | BSD License |
| pillow Linux Mac | 2.4.0 | Standard PIL license |
| pip | 1.5.6 | MIT |
| ply | 3.4 | BSD |
| psutil | 2.1.1 | BSD |
| py | 1.4.20 | MIT |
| pycosat | 0.6.1 | MIT |
| pycparser | 2.10 | BSD |
| pycrypto | 2.6.1 | Public Domain |
| pyflakes | 0.8.1 | MIT |
| pygments | 1.6 | BSD |
| pyparsing | 2.0.1 | MIT |
| pyqt | 4.10.4 | GPL |
| pyreadline Windows | 2.0 | BSD |
| pytables | 3.1.1 | BSD |
| pytest | 2.5.2 | MIT |
| python | 3.4.1 | PSF |
| pytz | 2014.3 | MIT |
| pyyaml | 3.11 | MIT |
| pyzmq | 14.3.0 | LGPL and BSD |
| qt Linux Mac | 4.8.5 | LGPL |
| readline Linux Mac | 6.2 | GPL 3 |
| redis Linux Mac | 2.6.9 | 3-clause BSD |
| redis-py Linux Mac | 2.9.1 | MIT |
| requests | 2.3.0 | ISC |
| rope | 0.9.4 | GPL |
| runipy | 0.1.0 | BSD |
| scikit-image | 0.10.0 | Modified BSD |
| scipy | 0.14.0 | BSD |
| setuptools | 3.6 | PSF or ZPL |
| sip Linux Mac | 4.15.5 | GPL |
| six | 1.6.1 | MIT |
| sphinx | 1.2.2 | BSD |
| spyder | 2.3.0rc1 | MIT |
| sqlalchemy | 0.9.4 | MIT |
| sqlite Linux Mac | 3.8.4.1 | Public Domain |
| ssl\_match\_hostname | 3.4.0.2 | PSF |
| sympy | 0.7.5 | New BSD |
| tk Linux Mac | 8.5.15 | BSD-style |
| tornado | 3.2.1 | Apache |
| ujson | 1.33 | BSD |
| util-linux Linux | 2.21 | GPL |
| werkzeug | 0.9.6 | BSD |
| xlrd | 0.9.3 | BSD |
| xlsxwriter | 0.5.5 | BSD |
| yaml Linux Mac | 0.1.4 | MIT |
| zeromq Linux Mac | 4.0.4 | LGPL |
| zlib Linux Mac | 1.2.7 | zlib |
| Name | Version | License |
|---|---|---|
| argcomplete | 0.6.7 | Apache Software License |
| astropy | 0.3.2 | BSD |
| atom | 0.3.7 | BSD |
| beautiful-soup | 4.3.1 | PSF/MIT |
| binstar | 0.5.3 | BSD |
| bitarray | 0.8.1 | PSF |
| blaze | 0.5.0 | BSD |
| blz | 0.6.2 | BSD |
| bokeh | 0.4.4 | New BSD |
| boto | 2.28.0 | MIT |
| cairo Linux | 1.12.2 | LGPL 2.1 and MPL 1.1 |
| casuarius | 1.1 | LGPL |
| cdecimal | 2.3 | BSD |
| chaco | 4.4.1 | BSD |
| colorama | 0.2.7 | BSD |
| conda | 3.5.5 | BSD |
| conda-build | 1.3.5 | BSD |
| configobj | 5.0.5 | BSD |
| cubes | 0.10.2 | MIT |
| curl Linux Mac | 7.30.0 | MIT/X derivate |
| cython | 0.20.1 | Apache 2.0 |
| datashape | 0.2.0 | BSD |
| dateutil | 2.1 | BSD |
| docutils | 0.11 | Public-Domain, PSF, 2-clause BSD, GPL3 |
| dynd-python | 0.6.2 | BSD |
| enable | 4.3.0 | BSD |
| enaml | 0.9.1 | BSD |
| flask | 0.10.1 | BSD |
| freetype Linux Mac | 2.4.10 | FreeType License |
| future | 0.12.1 | MIT |
| gevent | 1.0.1 | MIT |
| gevent-websocket | 0.9.3 | Apache |
| greenlet | 0.4.2 | MIT |
| grin | 1.2.1 | BSD |
| h5py | 2.3.0 | New BSD |
| hdf5 Linux Mac | 1.8.9 | BSD-style |
| ipython | 2.1.0 | BSD |
| itsdangerous | 0.24 | BSD License |
| jdcal | 1.0 | BSD |
| jinja2 | 2.7.2 | BSD |
| jpeg Linux Mac | 8d | Custom free software license |
| kiwisolver | 0.1.2 | BSD |
| launcher | 0.1.5 | proprietary - Continuum Analytics, Inc. |
| lcms Linux Mac | 1.19 | MIT |
| libdynd Linux Mac | 0.6.2 | BSD |
| libpng Linux Mac | 1.5.13 | Open Source |
| libsodium Linux Mac | 0.4.5 | MIT |
| libtiff Linux Mac | 4.0.2 | as-is |
| libxml2 Linux Mac | 2.9.0 | MIT |
| libxslt Linux Mac | 1.1.28 | MIT |
| llvm Linux Mac | 3.3 | Open Source |
| llvmpy | 0.12.6 | New BSD License |
| lxml | 3.3.5 | BSD |
| markupsafe | 0.18 | BSD |
| matplotlib | 1.3.1 | PSF-based |
| menuinst Windows | 1.0.3 | BDF |
| mingw Windows | 4.7 | GPL |
| mock | 1.0.1 | BSD |
| mpi4py Linux | 1.3 | BSD |
| mpich2 Linux | 1.4.1p1 | mpich license |
| multipledispatch | 0.4.3 | BSD |
| networkx | 1.8.1 | BSD |
| nltk | 2.0.4 | Apache 2.0 |
| nose | 1.3.3 | LGPL |
| numba | 0.13.2 | numba license |
| numexpr | 2.3.1 | MIT |
| numpy | 1.8.1 | BSD |
| openpyxl | 1.8.5 | MIT/Expat |
| openssl Linux Mac | 1.0.1h | Apache-style |
| pandas | 0.14.0 | BSD |
| patsy | 0.2.1 | BSD License |
| pep8 | 1.5.6 | MIT License |
| pil | 1.1.7 | PIL license |
| pip | 1.5.6 | MIT |
| pixman Linux | 0.26.2 | MIT |
| ply | 3.4 | BSD |
| psutil | 2.1.1 | BSD |
| py | 1.4.20 | MIT |
| py2cairo Linux | 1.10.0 | LGPL 2.1 and MPL 1.1 |
| pyaudio Mac | 0.2.7 | MIT |
| pycosat | 0.6.1 | MIT |
| pycparser | 2.10 | BSD |
| pycrypto | 2.6.1 | Public Domain |
| pycurl Linux Mac | 7.19.3.1 | LGPL and MIT/X |
| pyface | 4.4.0 | BSD |
| pyflakes | 0.8.1 | MIT |
| pygments | 1.6 | BSD |
| pyparsing | 2.0.1 | MIT |
| pyqt | 4.10.4 | GPL |
| pyreadline Windows | 2.0 | BSD |
| pytables | 3.1.1 | BSD |
| pytest | 2.5.2 | MIT |
| python | 2.7.7 | PSF |
| pytz | 2014.3 | MIT |
| pywin32 Windows | 218.4 | PSF |
| pyyaml | 3.11 | MIT |
| pyzmq | 14.3.0 | LGPL and BSD |
| qt Linux Mac | 4.8.5 | LGPL |
| readline Linux Mac | 6.2 | GPL 3 |
| redis Linux Mac | 2.6.9 | 3-clause BSD |
| redis-py Linux Mac | 2.9.1 | MIT |
| requests | 2.3.0 | ISC |
| rope | 0.9.4 | GPL |
| runipy | 0.1.0 | BSD |
| scikit-image | 0.10.0 | Modified BSD |
| scikit-learn | 0.14.1 | 3-clause BSD |
| scipy | 0.14.0 | BSD |
| setuptools | 3.6 | PSF or ZPL |
| sip Linux Mac | 4.15.5 | GPL |
| six | 1.6.1 | MIT |
| sphinx | 1.2.2 | BSD |
| spyder | 2.3.0rc1 | MIT |
| sqlalchemy | 0.9.4 | MIT |
| sqlite Linux Mac | 3.8.4.1 | Public Domain |
| ssl\_match\_hostname | 3.4.0.2 | PSF |
| statsmodels | 0.5.0 | 3-clause Modified BSD |
| sympy | 0.7.5 | New BSD |
| theano Linux | 0.6.0 | BSD |
| tk Linux Mac | 8.5.15 | BSD-style |
| tornado | 3.2.1 | Apache |
| traits | 4.4.0 | BSD |
| traitsui | 4.4.0 | BSD |
| ujson | 1.33 | BSD |
| util-linux Linux | 2.21 | GPL |
| werkzeug | 0.9.6 | BSD |
| xlrd | 0.9.3 | BSD |
| xlsxwriter | 0.5.5 | BSD |
| xlwings Windows | 0.1.0 | BSD 3-clause |
| xlwt | 0.7.5 | BSD |
| yaml Linux Mac | 0.1.4 | MIT |
| zeromq Linux Mac | 4.0.4 | LGPL |
| zlib Linux Mac | 1.2.7 | zlib |
| Name | Version | Summary / License |
|---|---|---|
| [\_ipyw\_jlab\_nb\_ext\_conf](https://github.com/ContinuumIO/anaconda-nb-extensions-meta-config) | 0.1.0 | A configuration metapackage for enabling Anaconda-bundled jupyter extensions / BSD |
| [alabaster](http://www.sphinx-doc.org/en/stable/index.html) | 0.7.12 | Configurable, Python 2+3 compatible Sphinx theme. / BSD 3-Clause |
| [anaconda-client](http://anaconda.org) | 1.7.2 | anaconda.org command line client library / BSD 3-clause |
| [anaconda-navigator](https://github.com/ContinuumIO/navigator) | 1.9.6 | Anaconda Navigator / proprietary - Continuum Analytics, Inc. |
| [anaconda-project](https://github.com/Anaconda-Platform/anaconda-project) | 0.8.2 | Tool for encapsulating, running, and reproducing data science projects / BSD 3-Clause |
| [asn1crypto](https://github.com/wbond/asn1crypto) | 0.24.0 | Python ASN.1 library with a focus on performance and a pythonic API / MIT |
| [astroid](https://www.astroid.org/) | 2.1.0 | A abstract syntax tree for Python with inference support. / LGPL 2.1 |
| [astropy](http://www.astropy.org/) | 3.1 | Community-developed Python Library for Astronomy / BSD |
| [atomicwrites](https://github.com/untitaker/python-atomicwrites) | 1.2.1 | Atomic file writes. / MIT |
| [attrs](https://attrs.readthedocs.io/en/stable/) | 18.2.0 | attrs is the Python package that will bring back the joy of writing classes by relieving you from the drudgery of implementing object protocols (aka dunder methods). / MIT |
| [automat](https://github.com/glyph/Automat) | 0.7.0 | self-service finite-state machines for the programmer on the go / MIT |
| [babel](http://babel.pocoo.org/) | 2.6.0 | Utilities to internationalize and localize Python applications / BSD 3-clause |
| [backcall](https://github.com/takluyver/backcall/) | 0.1.0 | Specifications for callback functions passed in to an API / BSD-3-Clause |
| [backports](https://bitbucket.org/brandon/backports) | 1.0 | / BSD |
| [backports.os](https://github.com/pjdelport/backports.os) | 0.1.1 | Backport of new features in Python’s os module / Python Software Foundation |
| [backports.shutil\_get\_terminal\_size](https://github.com/chrippa/backports.shutil_get_terminal_size) | 1.0.0 | A backport of the get\_terminal\_size function from Python 3.3’s shutil. / MIT |
| [beautifulsoup4](http://www.crummy.com/software/BeautifulSoup/) | 4.6.3 | Python library designed for screen-scraping / MIT |
| [bitarray](https://github.com/ilanschnell/bitarray) | 0.8.3 | efficient arrays of booleans – C extension / PSF |
| [bkcharts](http://github.com/bokeh/bkcharts) | 0.2 | High level chart types built on top of Bokeh / BSD 3-Clause |
| blas | 1.0 | |
| [blaze](http://blaze.pydata.org) | 0.11.3 | NumPy and Pandas interface to big data / BSD 3-Clause |
| [bleach](https://github.com/mozilla/bleach) | 3.0.2 | Easy, whitelist-based HTML-sanitizing tool / Apache-2.0 |
| [blosc](https://github.com/Blosc/c-blosc) | 1.14.4 | A blocking, shuffling and loss-less compression library that can be faster than memcpy() / BSD 3-Clause |
| [bokeh](http://bokeh.pydata.org/) | 1.0.2 | Statistical and novel interactive HTML plots for Python / BSD 3-Clause |
| [boto](https://github.com/boto/boto/) | 2.49.0 | Amazon Web Services Library / MIT |
| [bottleneck](http://berkeleyanalytics.com/bottleneck) | 1.2.1 | Fast NumPy array functions written in Cython. / BSD 2-Clause |
| [bzip2](http://www.bzip.org/) | 1.0.6 | high-quality data compressor / bzip2 |
| [ca-certificates](https://github.com/conda-forge/ca-certificates-feedstock) | 2018.03.07 | Certificates for use with other packages. / ISC |
| [certifi](http://certifi.io/) | 2018.11.29 | Python package for providing Mozilla’s CA Bundle. / ISC |
| [cffi](https://bitbucket.org/cffi/cffi) | 1.11.5 | Foreign Function Interface for Python calling C code. / MIT |
| [chardet](https://github.com/chardet/chardet) | 3.0.4 | Universal character encoding detector / LGPL2 |
| [click](https://palletsprojects.com/p/click) | 7.0 | Python composable command line interface toolkit / BSD-3-Clause |
| [cloudpickle](https://github.com/cloudpipe/cloudpickle) | 0.6.1 | Extended pickling support for Python objects / BSD 3-Clause |
| [clyent](https://github.com/Anaconda-Platform/clyent) | 1.2.2 | Command line client library for windows and posix / BSD 3-Clause |
| [colorama](https://github.com/tartley/colorama) | 0.4.1 | Cross-platform colored terminal text / BSD-3-Clause |
| [comtypes](http://starship.python.net/crew/theller/comtypes/) | 1.1.7 | pure Python COM package / MIT |
| [conda](https://conda.io) | 4.5.12 | OS-agnostic, system-level binary package and environment manager. / BSD 3-Clause |
| [conda-build](https://github.com/conda/conda-build) | 3.17.6 | tools for building conda packages / BSD 3-Clause |
| [conda-env](https://github.com/conda/conda-env) | 2.6.0 | Tools for interacting with conda environments. / BSD 3-Clause |
| [conda-verify](https://github.com/conda/conda-verify) | 3.1.1 | tool for validating conda recipes and conda packages / BSD 3-Clause |
| console\_shortcut | 0.1.1 | Console shortcut creator for Windows (using menuinst) / BSD |
| [constantly](https://github.com/twisted/constantly) | 15.1.0 | Symbolic constants in Python / MIT |
| [contextlib2](http://contextlib2.readthedocs.org) | 0.5.5 | Backports and enhancements for the contextlib module / PSF |
| [cryptography](https://github.com/pyca/cryptography) | 2.4.2 | Provides cryptographic recipes and primitives to Python developers / Apache 2.0 or BSD 3-Clause, PSF 2 |
| [curl](http://curl.haxx.se/) | 7.63.0 | tool and library for transferring data with URL syntax / MIT/X derivate (`<http://curl.haxx.se/docs/copyright.html>`) |
| [cycler](http://matplotlib.org/cycler) | 0.10.0 | Composable style cycles. / BSD 3-Clause |
| [cython](http://www.cython.org/) | 0.29.2 | The Cython compiler for writing C extensions for the Python language / Apache-2.0 |
| [cytoolz](https://github.com/pytoolz/cytoolz) | 0.9.0.1 | Cython implementation of Toolz. High performance functional utilities. / BSD 3-Clause |
| [dask](http://github.com/dask/dask/) | 1.0.0 | Parallel Python with task scheduling / BSD 3-Clause |
| [dask-core](http://github.com/dask/dask/) | 1.0.0 | Parallel Python with task scheduling / BSD 3-Clause |
| [datashape](http://datashape.pydata.org) | 0.5.4 | A data description language. / BSD 2-Clause |
| [decorator](https://github.com/micheles/decorator) | 4.3.0 | Better living through Python with decorators. / BSD 3-Clause |
| [defusedxml](https://bitbucket.org/tiran/defusedxml) | 0.5.0 | XML bomb protection for Python stdlib modules / PSF 2.0 |
| [distributed](http://distributed.readthedocs.io/en/latest/) | 1.25.1 | Distributed computing with Dask / BSD 3-Clause |
| [docutils](http://docutils.sourceforge.net/) | 0.14 | Docutils – Python Documentation Utilities / Public Domain Dedictation and BSD 2-Clause and PSF 2.1.1 and GPL 3.0 |
| [entrypoints](https://github.com/takluyver/entrypoints) | 0.2.3 | Discover and load entry points from installed packages. / MIT License |
| [et\_xmlfile](https://bitbucket.org/openpyxl/et_xmlfile) | 1.0.1 | An implementation of lxml.xmlfile for the standard library / MIT |
| [fastcache](https://github.com/pbrady/fastcache) | 1.0.2 | C implementation of Python 3 lru\_cache / MIT |
| [filelock](https://github.com/benediktschmitt/py-filelock) | 3.0.10 | A platform independent file lock. / Public Domain |
| [flask](http://flask.pocoo.org) | 1.0.2 | A microframework based on Werkzeug, Jinja2 and good intentions. / BSD 3-Clause |
| [flask-cors](https://github.com/corydolphin/flask-cors) | 3.0.7 | A Flask extension adding a decorator for CORS support / MIT |
| [freetype](https://www.freetype.org/) | 2.9.1 | A Free, High-Quality, and Portable Font Engine / GPL-2.0 and FreeType |
| [future](http://python-future.org) | 0.17.1 | Clean single-source support for Python 3 and 2 / MIT |
| [get\_terminal\_size](https://github.com/chrippa/backports.shutil_get_terminal_size) | 1.0.0 | Get the size of the terminal window. / MIT |
| [gevent](http://www.gevent.org/) | 1.3.7 | Coroutine-based network library / MIT |
| [glob2](https://github.com/miracle2k/python-glob2) | 0.6 | Version of the glob module that supports recursion via \*\*, and can capture patterns. / BSD-2-Clause |
| [greenlet](https://github.com/python-greenlet/greenlet) | 0.4.15 | Lightweight in-process concurrent programming / MIT |
| [h5py](http://www.h5py.org/) | 2.8.0 | Read and write HDF5 files from Python. / BSD 3-Clause |
| [hdf5](http://www.hdfgroup.org/HDF5/) | 1.10.2 | HDF5 is a data model, library, and file format for storing and managing data / HDF5 |
| [heapdict](http://stutzbachenterprises.com/) | 1.0.0 | A heap with decrease-key and increase-key operations / BSD 3-Clause |
| [html5lib](https://github.com/html5lib/html5lib-python) | 1.0.1 | HTML parser based on the WHATWG HTML specification / MIT |
| [hyperlink](https://github.com/python-hyper/hyperlink) | 18.0.0 | Immutable, Pythonic, correct URLs. / MIT |
| [icc\_rt](https://software.intel.com/en-us/node/522690) | 2019.0.0 | Intel runtime libraries for C, C++ and Fortran compilers / Intel proprietary |
| [icu](http://site.icu-project.org/) | 58.2 | International Components for Unicode. / MIT |
| [idna](https://github.com/kjd/idna) | 2.8 | Internationalized Domain Names in Applications (IDNA). / BSD Like |
| [imageio](http://imageio.github.io) | 2.4.1 | a Python library for reading and writing image data / BSD 2-Clause |
| [imagesize](https://github.com/shibukawa/imagesize_py) | 1.1.0 | Getting image size from png/jpeg/jpeg2000/gif file / MIT |
| [importlib\_metadata](http://importlib-metadata.readthedocs.io) | 0.6 | A library to access the metadata for a Python package / APACHE-2.0 |
| [incremental](https://twistedmatrix.com) | 17.5.0 | A library that versions your Python projects / MIT License |
| [intel-openmp](https://software.intel.com/en-us/node/522690) | 2019.1 | Math library for Intel and compatible processors / proprietary - Intel |
| [ipykernel](https://ipython.org) | 5.1.0 | IPython Kernel for Jupyter / BSD-3-Clause |
| [ipython](https://ipython.org/) | 7.2.0 | IPython: Productive Interactive Computing / BSD-3-Clause |
| [ipython\_genutils](http://ipython.org) | 0.2.0 | vestigial utilities from IPython / BSD 3-Clause |
| [ipywidgets](https://github.com/ipython/ipywidgets) | 7.4.2 | Jupyter Interactive Widgets / BSD 3-clause |
| [isort](https://github.com/timothycrosley/isort) | 4.3.4 | A Python utility / library to sort Python imports. / MIT |
| [itsdangerous](https://github.com/pallets/itsdangerous) | 1.1.0 | Various helpers to pass trusted data to untrusted environments. / BSD 3-Clause |
| [jdcal](https://github.com/phn/jdcal) | 1.4 | Julian dates from proleptic Gregorian and Julian calendars. / BSD 2-Clause |
| [jedi](https://github.com/davidhalter/jedi/) | 0.13.2 | An autocompletion tool for Python that can be used for text editors. / MIT |
| [jinja2](http://jinja.pocoo.org) | 2.10 | An easy to use stand-alone template engine written in pure python. / 3-Clause BSD |
| [jpeg](http://www.ijg.org/) | 9b | read/write jpeg COM, EXIF, IPTC medata / Custom free software license |
| [jsonschema](https://github.com/Julian/jsonschema) | 2.6.0 | An implementation of JSON Schema validation for Python / MIT |
| [jupyter](http://jupyter.org) | 1.0.0 | Jupyter metapackage. Install all the Jupyter components in one go. / BSD 3-Clause |
| [jupyter\_client](http://jupyter.org) | 5.2.4 | Jupyter protocol implementation and client libraries / BSD 3-clause |
| [jupyter\_console](http://jupyter.org) | 6.0.0 | Jupyter terminal console / BSD-3-Clause |
| [jupyter\_core](http://jupyter.org) | 4.4.0 | Core common functionality of Jupyter projects. / BSD 3-clause |
| [jupyterlab](https://github.com/jupyterlab/jupyterlab) | 0.35.3 | JupyterLab PRE-ALPHA / BSD-3-Clause |
| [jupyterlab\_server](http://github.com/jupyterlab/jupyterlab_server) | 0.2.0 | A set of server components for JupyterLab and JupyterLab like applications. / BSD 3-Clause |
| [keyring](https://github.com/jaraco/keyring) | 17.0.0 | Store and access your passwords safely / Python Software Foundation or MIT |
| [kiwisolver](https://github.com/nucleic/kiwi) | 1.0.1 | A fast implementation of the Cassowary constraint solver / BSD 3-Clause |
| [krb5](http://web.mit.edu/kerberos/) | 1.16.1 | A network authentication protocol. / MIT |
| [lazy-object-proxy](https://github.com/ionelmc/python-lazy-object-proxy) | 1.3.1 | A fast and thorough lazy object proxy. / BSD 2-Clause |
| [libarchive](http://www.libarchive.org/) | 3.3.3 | Multi-format archive and compression library / BSD 2-Clause |
| [libcurl](http://curl.haxx.se/) | 7.63.0 | tool and library for transferring data with URL syntax / MIT/X derivate (`<http://curl.haxx.se/docs/copyright.html>`) |
| [libiconv](https://www.gnu.org/software/libiconv/) | 1.15 | Provides iconv for systems which don’t have one (or that cannot convert from/to Unicode.) / GPL and LGPL |
| [libpng](http://www.libpng.org/pub/png/libpng.html) | 1.6.35 | PNG reference library. / zlib/libpng |
| [libsodium](http://libsodium.org) | 1.0.16 | A modern and easy-to-use crypto library. / ISC |
| [libssh2](https://www.libssh2.org/) | 1.8.0 | the SSH library / BSD 3-Clause |
| [libtiff](http://www.libtiff.org/) | 4.0.9 | Support for the Tag Image File Format (TIFF). / HPND |
| [libxml2](http://xmlsoft.org/) | 2.9.8 | The XML C parser and toolkit of Gnome / MIT |
| [libxslt](http://xmlsoft.org/XSLT/) | 1.1.32 | The XSLT C library developed for the GNOME project / MIT |
| [llvmlite](https://github.com/numba/llvmlite) | 0.26.0 | A lightweight LLVM python binding for writing JIT compilers / New BSD License |
| [locket](https://github.com/mwilliamson/locket.py) | 0.2.0 | File-based locks for Python for Linux and Windows / BSD 2-Clause |
| [lxml](http://lxml.de/) | 4.2.5 | Pythonic binding for the C libraries libxml2 and libxslt. / BSD 3-Clause, GPL-2.0, ZPL-2.0, and ElementTree |
| [lz4-c](https://www.lz4.org) | 1.8.1.2 | Extremely Fast Compression algorithm / BSD 2-clause |
| [lzo](http://www.oberhumer.com/opensource/lzo/) | 2.10 | LZO is a portable lossless data compression library written in ANSI C. / GPL v2+ |
| m2w64-gcc-libgfortran | 5.3.0 | |
| m2w64-gcc-libs | 5.3.0 | |
| m2w64-gcc-libs-core | 5.3.0 | |
| m2w64-gmp | 6.1.0 | |
| m2w64-libwinpthread-git | 5.0.0.4634.697f757 | |
| [markupsafe](https://www.palletsprojects.com/p/markupsafe) | 1.1.0 | A Python module that implements the jinja2.Markup string / BSD-3-Clause |
| [matplotlib](http://matplotlib.org/) | 3.0.2 | Publication quality figures in Python / PSF-based |
| [mccabe](https://github.com/PyCQA/mccabe) | 0.6.1 | McCabe complexity checker for Python / MIT |
| [menuinst](https://github.com/ContinuumIO/menuinst) | 1.4.14 | cross platform menu item installation / BSD |
| [mistune](https://github.com/lepture/mistune) | 0.8.4 | The fastest markdown parser in pure Python. / BSD 3-Clause |
| [mkl](https://software.intel.com/en-us/mkl) | 2019.1 | Math library for Intel and compatible processors / proprietary - Intel |
| [mkl-service](https://github.com/ContinuumIO/mkl-service) | 1.1.2 | Python bindings to MKL service functions / 3-clause BSD |
| [mkl\_fft](http://github.com/IntelPython/mkl_fft) | 1.0.6 | NumPy-based implementation of Fast Fourier Transform using Intel (R) Math Kernel Library. / BSD 3-Clause |
| [mkl\_random](http://github.com/IntelPython/mkl_random) | 1.0.2 | Intel (R) MKL-powered package for sampling from common probability distributions into NumPy arrays. / BSD 3-Clause |
| [more-itertools](https://github.com/erikrose/more-itertools) | 4.3.0 | More routines for operating on iterables, beyond itertools / MIT |
| [mpmath](http://mpmath.org) | 1.1.0 | Python library for arbitrary-precision floating-point arithmetic / BSD 3-Clause |
| [msgpack-python](http://msgpack.org/) | 0.5.6 | MessagePack (de)serializer. / Apache 2.0 |
| msys2-conda-epoch | 20160418 | |
| [multipledispatch](https://github.com/mrocklin/multipledispatch/) | 0.6.0 | Multiple dispatch in Python / BSD 3-Clause |
| [navigator-updater](https://github.com/ContinuumIO/navigator-updater) | 0.2.1 | Anaconda Navigator Updater / proprietary - Continuum Analytics, Inc. |
| [nbconvert](http://jupyter.org) | 5.4.0 | Converting Jupyter Notebooks / BSD-3-Clause |
| [nbformat](http://jupyter.org) | 4.4.0 | The reference implementation of the Jupyter Notebook format / BSD 3-clause |
| [networkx](https://networkx.github.io/) | 2.2 | Python package for creating and manipulating complex networks / BSD 3-Clause |
| [nltk](http://nltk.org/) | 3.4 | Build Python programs to work with human language data / Apache 2.0 |
| [nose](http://readthedocs.org/docs/nose/) | 1.3.7 | Nose extends unittest to make testing easier / LGPL-2.1 |
| [notebook](http://jupyter.org) | 5.7.4 | Jupyter Notebook / BSD 3-clause |
| [numba](http://numba.github.com) | 0.41.0 | NumPy aware dynamic Python compiler using LLVM / BSD 2-clause |
| [numexpr](https://github.com/pydata/numexpr) | 2.6.8 | Fast numerical expression evaluator for NumPy. / MIT |
| [numpy](http://numpy.scipy.org/) | 1.15.4 | Array processing for numbers, strings, records, and objects. / BSD 3-Clause |
| numpy-base | 1.15.4 | |
| [numpydoc](https://github.com/numpy/numpydoc) | 0.8.0 | Sphinx extension to support docstrings in Numpy format / BSD 3-Clause |
| [odo](http://odo.pydata.org) | 0.5.1 | Data migration in Python / BSD-3-Clause |
| [olefile](http://www.decalage.info/python/olefileio) | 0.46 | parse, read and write Microsoft OLE2 files / BSD 2-Clause |
| [openpyxl](https://openpyxl.readthedocs.io) | 2.5.12 | A Python library to read/write Excel 2010 xlsx/xlsm files / MIT |
| [openssl](http://www.openssl.org/) | 1.1.1a | OpenSSL is an open-source implementation of the SSL and TLS protocols / OpenSSL |
| [packaging](https://github.com/pypa/packaging) | 18.0 | Core utilities for Python packages / Apache 2.0 or BSD 2-Clause |
| [pandas](http://pandas.pydata.org) | 0.23.4 | High-performance, easy-to-use data structures and data analysis tools. / BSD 3-clause |
| [pandoc](http://pandoc.org/) | 1.19.2.1 | Universal markup converter (repackaged binaries). / GPL-2.0 |
| [pandocfilters](https://github.com/jgm/pandocfilters) | 1.4.2 | A python module for writing pandoc filters / BSD-3-Clause |
| [parso](https://github.com/davidhalter/parso) | 0.3.1 | A Python Parser / MIT |
| [partd](https://github.com/dask/partd) | 0.3.9 | Data structure for on-disk shuffle operations / BSD 3-Clause |
| [path.py](https://github.com/jaraco/path.py) | 11.5.0 | A module wrapper for os.path / MIT |
| [pathlib2](https://github.com/mcmtroffaes/pathlib2) | 2.3.3 | Fork of pathlib aiming to support the full stdlib Python API. / MIT |
| [patsy](https://github.com/pydata/patsy) | 0.5.1 | Describing statistical models in Python using symbolic formulas / BSD-2-Clause, PSF2 |
| [pep8](http://pep8.readthedocs.org/) | 1.7.1 | Python style guide checker / MIT |
| [pickleshare](https://github.com/pickleshare/pickleshare/) | 0.7.5 | Tiny ‘shelve’-like database with concurrency support / MIT |
| [pillow](https://pillow.readthedocs.io) | 5.3.0 | Pillow is the friendly PIL fork by Alex Clark and Contributors / PIL |
| [pip](https://pip.pypa.io/en/stable/) | 18.1 | PyPA recommended tool for installing Python packages / MIT |
| [pkginfo](https://code.launchpad.net/~tseaver/pkginfo/trunk) | 1.4.2 | Query metadatdata from sdists / bdists / installed packages. / MIT |
| [pluggy](https://github.com/pytest-dev/pluggy) | 0.8.0 | Plugin registration and hook calling for Python / MIT |
| [ply](http://www.dabeaz.com/ply/index.html) | 3.11 | Python Lex-Yacc / BSD 3-clause |
| [progress](https://github.com/verigak/progress) | 1.3 | Easy progress reporting for Python / ISC |
| [prometheus\_client](https://github.com/prometheus/client_python) | 0.5.0 | Python client for the Prometheus monitoring system / Apache 2.0 |
| [prompt\_toolkit](https://github.com/jonathanslenders/python-prompt-toolkit) | 2.0.7 | Library for building powerful interactive command lines in Python / BSD 3-clause |
| [psutil](https://github.com/giampaolo/psutil) | 5.4.8 | A cross-platform process and system utilities module for Python / BSD 3-Clause |
| [py](https://github.com/pytest-dev/py) | 1.7.0 | library with cross-python path, ini-parsing, io, code, log facilities / MIT |
| [pyasn1-modules](http://pyasn1.sourceforge.net/) | 0.2.2 | A collection of ASN.1-based protocols modules. / BSD 2-Clause |
| [pycodestyle](https://pycodestyle.readthedocs.io/) | 2.4.0 | Python style guide checker / MIT |
| [pycosat](https://github.com/ContinuumIO/pycosat) | 0.6.3 | Bindings to picosat (a SAT solver) / MIT |
| [pycparser](https://github.com/eliben/pycparser) | 2.19 | Complete C99 parser in pure Python / BSD 3-clause |
| [pycrypto](http://www.pycrypto.org/) | 2.6.1 | Cryptographic modules for Python. / Public Domain |
| [pycurl](http://pycurl.sourceforge.net/) | 7.43.0.2 | A Python Interface To The cURL library / LGPL, MIT |
| [pyflakes](https://github.com/PyCQA/pyflakes) | 2.0.0 | Pyflakes analyzes programs and detects various errors. / MIT |
| [pygments](http://pygments.org/) | 2.3.1 | Generic syntax highlighting package / BSD 2-clause |
| [pylint](http://www.pylint.org/) | 2.2.2 | python code static checker / GPL |
| [pyodbc](https://github.com/mkleehammer/pyodbc) | 4.0.25 | DB API Module for ODBC / MIT |
| [pyopenssl](https://github.com/pyca/pyopenssl) | 18.0.0 | Python wrapper module around the OpenSSL library / Apache 2.0 |
| [pyparsing](http://pyparsing.wikispaces.com/) | 2.3.0 | Create and execute simple grammars / MIT |
| [pyqt](http://www.riverbankcomputing.co.uk/software/pyqt) | 5.9.2 | Python binding of the cross-platform GUI toolkit Qt. / Commercial, GPL-2.0, GPL-3.0 |
| [pysocks](https://github.com/Anorov/PySocks) | 1.6.8 | A Python SOCKS client module. See [Anorov/PySocks](https://github.com/Anorov/PySocks) for more information. / BSD 3-Clause |
| [pytables](http://www.pytables.org) | 3.4.4 | Brings together Python, HDF5 and NumPy to easily handle large amounts of data. / BSD 3-Clause |
| [pytest](https://docs.pytest.org/en/latest/) | 4.0.2 | Simple and powerful testing with Python. / MIT |
| [pytest-arraydiff](https://github.com/astrofrog/pytest-arraydiff) | 0.3 | pytest plugin to help with comparing array output from tests / BSD |
| [pytest-astropy](https://github.com/astropy/pytest-astropy) | 0.5.0 | Meta-package containing dependencies for testing Astropy / BSD |
| [pytest-doctestplus](https://github.com/astropy/pytest-doctestplus) | 0.2.0 | Pytest plugin with advanced doctest features / BSD |
| [pytest-openfiles](https://github.com/astropy/pytest-openfiles) | 0.3.1 | Pytest plugin for detecting inadvertent open file handles / BSD |
| [pytest-remotedata](https://github.com/astropy/pytest-remotedata) | 0.3.1 | Pytest plugin for controlling remote data access / BSD |
| [python](http://www.python.org/) | 3.7.1 | General purpose programming language / PSF |
| [python-dateutil](https://dateutil.readthedocs.org/) | 2.7.5 | Extensions to the standard Python datetime module. / BSD 3 Clause |
| python-libarchive-c | 2.8 | |
| [pytz](http://pythonhosted.org/pytz/) | 2018.7 | World timezone definitions, modern and historical. / MIT |
| [pywavelets](https://github.com/PyWavelets/pywt) | 1.0.1 | Discrete Wavelet Transforms in Python. / MIT |
| [pywin32](https://sourceforge.net/projects/pywin32) | 223 | Python extensions for Windows / PSF |
| [pywinpty](https://github.com/spyder-ide/pywinpty) | 0.5.5 | Python bindings for the winpty library / MIT |
| [pyyaml](http://pyyaml.org/wiki/PyYAML) | 3.13 | YAML parser and emitter for Python / MIT |
| [pyzmq](https://github.com/zeromq/pyzmq) | 17.1.2 | Python bindings for zeromq / BSD 3-clause |
| [qt](http://qt-project.org) | 5.9.7 | Qt is a cross-platform application and UI framework. / LGPL-3.0 |
| [qtawesome](https://github.com/spyder-ide/qtawesome) | 0.5.3 | Iconic fonts in PyQt and PySide applications / MIT |
| [qtconsole](http://jupyter.org) | 4.4.3 | Jupyter Qt console / BSD 3-Clause |
| [qtpy](https://github.com/spyder-ide/qtpy) | 1.5.2 | Abstraction layer for PyQt5/PyQt4/PySide / MIT |
| [requests](http://python-requests.org) | 2.21.0 | Python HTTP for Humans / Apache 2.0 |
| [rope](https://github.com/python-rope/rope) | 0.11.0 | A python refactoring library… / GPL 2.0 |
| [ruamel\_yaml](https://bitbucket.org/ruamel/yaml) | 0.15.46 | A patched copy of ruamel.yaml. / MIT |
| [scikit-image](http://scikit-image.org/) | 0.14.1 | Image processing routines for SciPy. / BSD 3-Clause |
| [scikit-learn](http://scikit-learn.org/) | 0.20.1 | A set of python modules for machine learning and data mining / BSD 3-Clause |
| [scipy](http://www.scipy.org/) | 1.1.0 | Scientific Library for Python / BSD 3-Clause |
| [seaborn](https://seaborn.pydata.org) | 0.9.0 | Statistical data visualization / BSD 3-Clause |
| [send2trash](https://github.com/hsoft/send2trash) | 1.5.0 | Python library to natively send files to Trash (or Recycle bin) on all platforms. / BSD-3-Clause |
| [setuptools](https://github.com/pypa/setuptools) | 40.6.3 | Download, build, install, upgrade, and uninstall Python packages / MIT |
| [simplegeneric](http://cheeseshop.python.org/pypi/simplegeneric) | 0.8.1 | Simple generic functions (similar to Python’s own len(), pickle.dump(), etc.) / Zope Public |
| [singledispatch](http://docs.python.org/3/library/functools.html#functools.singledispatch) | 3.4.0.3 | Transforms a function into a single-dispatch generic function / MIT |
| [sip](http://www.riverbankcomputing.com/software/sip/intro) | 4.19.8 | Create Python bindings for C and C++ libraries / GPL-3.0 |
| [six](http://pypi.python.org/pypi/six/) | 1.12.0 | Python 2 and 3 compatibility utilities / MIT |
| [snappy](https://github.com/google/snappy) | 1.1.7 | A fast compressor/decompressor / BSD 3-clause |
| [snowballstemmer](https://github.com/shibukawa/snowball_py) | 1.2.1 | Snowball stemming library collection for Python / BSD-2-Clause |
| [sortedcollections](http://www.grantjenks.com/docs/sortedcollections/) | 1.0.1 | Python Sorted Collections / Apache-2.0 |
| [sortedcontainers](http://www.grantjenks.com/docs/sortedcontainers/) | 2.1.0 | Python Sorted Container Types: SortedList, SortedDict, and SortedSet / Apache 2.0 |
| [sphinx](http://www.sphinx-doc.org) | 1.8.2 | Sphinx is a tool that makes it easy to create intelligent and beautiful documentation / BSD 2-clause |
| sphinxcontrib | 1.0 | Python namespace for sphinxcontrib / BSD |
| [sphinxcontrib-websupport](https://pypi.python.org/pypi/sphinxcontrib-websupport) | 1.1.0 | Sphinx API for Web Apps / BSD-2-Clause |
| [spyder](https://www.spyder-ide.org/) | 3.3.2 | The Scientific Python Development Environment / MIT |
| [spyder-kernels](https://github.com/spyder-ide/spyder-kernels) | 0.3.0 | Jupyter kernels for the Spyder console / MIT |
| [sqlalchemy](http://www.sqlalchemy.org/) | 1.2.15 | Database Abstraction Library. / MIT |
| [sqlite](http://www.sqlite.org/) | 3.26.0 | Implements a self-contained, zero-configuration, SQL database engine. / Public-Domain (`<http://www.sqlite.org/copyright.html>`) |
| [statsmodels](https://www.statsmodels.org) | 0.9.0 | Statistical computations and models for use with SciPy / BSD 3-Clause |
| [sympy](http://sympy.org) | 1.3 | Python library for symbolic mathematics / 3-clause BSD |
| [tblib](https://github.com/ionelmc/python-tblib) | 1.3.2 | Traceback serialization library. / BSD 2-Clause |
| [terminado](https://github.com/jupyter/terminado) | 0.8.1 | Terminals served by tornado websockets / BSD 2-clause |
| [testpath](https://testpath.readthedocs.io) | 0.4.2 | Testpath is a collection of utilities for Python code working with files and commands. / BSD-3-Clause |
| [tk](http://www.tcl.tk/) | 8.6.8 | A dynamic programming language with GUI support. Bundles Tcl and Tk. / Tcl/Tk |
| [toolz](http://toolz.readthedocs.org/) | 0.9.0 | A functional standard library for Python. / BSD 3-Clause |
| [tornado](http://www.tornadoweb.org/) | 5.1.1 | A Python web framework and asynchronous networking library, originally developed at FriendFeed. / Apache 2.0 |
| [tqdm](https://pypi.python.org/pypi/tqdm) | 4.28.1 | A Fast, Extensible Progress Meter / MPLv2.0, MIT |
| [traitlets](http://ipython.org/) | 4.3.2 | Configuration system for Python applications / BSD 3-clause |
| [unicodecsv](https://github.com/jdunck/python-unicodecsv) | 0.14.1 | Drop-in replacement for csv module which supports unicode strings / BSD |
| [urllib3](https://urllib3.readthedocs.io/) | 1.24.1 | HTTP library with thread-safe connection pooling, file post, and more. / MIT |
| [vc](https://github.com/conda/conda/wiki/VC-features) | 14.1 | A meta-package to impose mutual exclusivity among software built with different VS versions / Modified BSD License (3-clause) |
| [vs2015\_runtime](http://www.microsoft.com) | 14.15.26706 | Bundles of the MSVC 14 (VS 2015) runtime / Proprietary |
| [wcwidth](https://github.com/jquast/wcwidth) | 0.1.7 | Measures number of Terminal column cells of wide-character codes. / MIT |
| [webencodings](https://github.com/gsnedders/python-webencodings) | 0.5.1 | Character encoding aliases for legacy web content / BSD 3-Clause |
| [werkzeug](http://werkzeug.pocoo.org/) | 0.14.1 | The Python WSGI Utility Library. / BSD 3-Clause |
| [wheel](https://github.com/pypa/wheel) | 0.32.3 | A built-package format for Python. / MIT |
| [widgetsnbextension](http://ipython.org) | 3.4.2 | Interactive Widgets for Jupyter / BSD 3-clause |
| [win\_inet\_pton](https://github.com/hickeroar/win_inet_pton) | 1.0.1 | Native inet\_pton and inet\_ntop implementation for Python on Windows (with ctypes). / PUBLIC-DOMAIN |
| [win\_unicode\_console](https://github.com/Drekin/win-unicode-console) | 0.5 | A Python package to enable Unicode input and display when running Python from Windows console. / MIT |
| [wincertstore](https://bitbucket.org/tiran/wincertstore) | 0.2 | Python module to extract CA and CRL certs from Windows’ cert store (ctypes based). / PSF 2 |
| [winpty](https://github.com/rprichard/winpty) | 0.4.3 | Winpty provides an interface similar to a Unix pty-master for communicating with Windows console programs. / MIT |
| [wrapt](https://github.com/GrahamDumpleton/wrapt) | 1.10.11 | Module for decorators, wrappers and monkey patching. / BSD 2-Clause |
| [xlrd](http://www.python-excel.org/) | 1.2.0 | Library for developers to extract data from Microsoft Excel (tm) spreadsheet files / BSD 3-Clause and BSD with advertising |
| [xlsxwriter](https://xlsxwriter.readthedocs.io/) | 1.1.2 | A Python module for creating Excel XLSX files / BSD 2-Clause |
| [xlwings](http://xlwings.org/) | 0.15.1 | Interact with Excel from Python and vice versa / 3-clause BSD |
| [xlwt](http://www.python-excel.org/) | 1.3.0 | Writing data and formatting information to Excel files / BSD |
| [xz](http://tukaani.org/xz/) | 5.2.4 | Data compression software with high compression ratio / LGPL-2.1 and GPL-2.0 |
| [yaml](http://pyyaml.org/wiki/LibYAML) | 0.1.7 | A C library for parsing and emitting YAML. / MIT |
| [zeromq](http://zeromq.org) | 4.2.5 | A high-performance asynchronous messaging library. / LGPL 3 |
| [zict](http://github.com/mrocklin/zict) | 0.1.3 | Composable Dictionary Classes / BSD 3-Clause |
| [zlib](http://zlib.net/) | 1.2.11 | Massively spiffy yet delicately unobtrusive compression library / zlib |
| [zstd](http://www.zstd.net) | 1.3.7 | Zstandard - Fast real-time compression algorithm / BSD 3-Clause |
| Name | Version | Summary / License |
|---|---|---|
| [\_ipyw\_jlab\_nb\_ext\_conf](https://github.com/ContinuumIO/anaconda-nb-extensions-meta-config) | 0.1.0 | A configuration metapackage for enabling Anaconda-bundled jupyter extensions / BSD |
| [alabaster](http://www.sphinx-doc.org/en/stable/index.html) | 0.7.12 | Configurable, Python 2+3 compatible Sphinx theme. / BSD 3-Clause |
| [anaconda-client](http://anaconda.org) | 1.7.2 | anaconda.org command line client library / BSD 3-clause |
| [anaconda-navigator](https://github.com/ContinuumIO/navigator) | 1.9.6 | Anaconda Navigator / proprietary - Continuum Analytics, Inc. |
| [anaconda-project](https://github.com/Anaconda-Platform/anaconda-project) | 0.8.2 | Tool for encapsulating, running, and reproducing data science projects / BSD 3-Clause |
| [appnope](http://github.com/minrk/appnope) | 0.1.0 | Disable App Nap on OS X 10.9 / BSD 2-Clause |
| [appscript](http://appscript.sourceforge.net/) | 1.0.1 | Control AppleScriptable applications from Python / Public-Domain |
| [asn1crypto](https://github.com/wbond/asn1crypto) | 0.24.0 | Python ASN.1 library with a focus on performance and a pythonic API / MIT |
| [astroid](https://www.astroid.org/) | 2.1.0 | A abstract syntax tree for Python with inference support. / LGPL 2.1 |
| [astropy](http://www.astropy.org/) | 3.1 | Community-developed Python Library for Astronomy / BSD |
| [atomicwrites](https://github.com/untitaker/python-atomicwrites) | 1.2.1 | Atomic file writes. / MIT |
| [attrs](https://attrs.readthedocs.io/en/stable/) | 18.2.0 | attrs is the Python package that will bring back the joy of writing classes by relieving you from the drudgery of implementing object protocols (aka dunder methods). / MIT |
| [babel](http://babel.pocoo.org/) | 2.6.0 | Utilities to internationalize and localize Python applications / BSD 3-clause |
| [backcall](https://github.com/takluyver/backcall/) | 0.1.0 | Specifications for callback functions passed in to an API / BSD-3-Clause |
| [backports](https://bitbucket.org/brandon/backports) | 1.0 | / BSD |
| [backports.os](https://github.com/pjdelport/backports.os) | 0.1.1 | Backport of new features in Python’s os module / Python Software Foundation |
| [backports.shutil\_get\_terminal\_size](https://github.com/chrippa/backports.shutil_get_terminal_size) | 1.0.0 | A backport of the get\_terminal\_size function from Python 3.3’s shutil. / MIT |
| [beautifulsoup4](http://www.crummy.com/software/BeautifulSoup/) | 4.6.3 | Python library designed for screen-scraping / MIT |
| [bitarray](https://github.com/ilanschnell/bitarray) | 0.8.3 | efficient arrays of booleans – C extension / PSF |
| [bkcharts](http://github.com/bokeh/bkcharts) | 0.2 | High level chart types built on top of Bokeh / BSD 3-Clause |
| blas | 1.0 | |
| [blaze](http://blaze.pydata.org) | 0.11.3 | NumPy and Pandas interface to big data / BSD 3-Clause |
| [bleach](https://github.com/mozilla/bleach) | 3.0.2 | Easy, whitelist-based HTML-sanitizing tool / Apache-2.0 |
| [blosc](https://github.com/Blosc/c-blosc) | 1.14.4 | A blocking, shuffling and loss-less compression library that can be faster than memcpy() / BSD 3-Clause |
| [bokeh](http://bokeh.pydata.org/) | 1.0.2 | Statistical and novel interactive HTML plots for Python / BSD 3-Clause |
| [boto](https://github.com/boto/boto/) | 2.49.0 | Amazon Web Services Library / MIT |
| [bottleneck](http://berkeleyanalytics.com/bottleneck) | 1.2.1 | Fast NumPy array functions written in Cython. / BSD 2-Clause |
| [bzip2](http://www.bzip.org/) | 1.0.6 | high-quality data compressor / bzip2 |
| [ca-certificates](https://github.com/conda-forge/ca-certificates-feedstock) | 2018.03.07 | Certificates for use with other packages. / ISC |
| [certifi](http://certifi.io/) | 2018.11.29 | Python package for providing Mozilla’s CA Bundle. / ISC |
| [cffi](https://bitbucket.org/cffi/cffi) | 1.11.5 | Foreign Function Interface for Python calling C code. / MIT |
| [chardet](https://github.com/chardet/chardet) | 3.0.4 | Universal character encoding detector / LGPL2 |
| [click](https://palletsprojects.com/p/click) | 7.0 | Python composable command line interface toolkit / BSD-3-Clause |
| [cloudpickle](https://github.com/cloudpipe/cloudpickle) | 0.6.1 | Extended pickling support for Python objects / BSD 3-Clause |
| [clyent](https://github.com/Anaconda-Platform/clyent) | 1.2.2 | Command line client library for windows and posix / BSD 3-Clause |
| [colorama](https://github.com/tartley/colorama) | 0.4.1 | Cross-platform colored terminal text / BSD-3-Clause |
| [conda](https://conda.io) | 4.5.12 | OS-agnostic, system-level binary package and environment manager. / BSD 3-Clause |
| [conda-build](https://github.com/conda/conda-build) | 3.17.6 | tools for building conda packages / BSD 3-Clause |
| [conda-env](https://github.com/conda/conda-env) | 2.6.0 | Tools for interacting with conda environments. / BSD 3-Clause |
| [conda-verify](https://github.com/conda/conda-verify) | 3.1.1 | tool for validating conda recipes and conda packages / BSD 3-Clause |
| [contextlib2](http://contextlib2.readthedocs.org) | 0.5.5 | Backports and enhancements for the contextlib module / PSF |
| [cryptography](https://github.com/pyca/cryptography) | 2.4.2 | Provides cryptographic recipes and primitives to Python developers / Apache 2.0 or BSD 3-Clause, PSF 2 |
| [curl](http://curl.haxx.se/) | 7.63.0 | tool and library for transferring data with URL syntax / MIT/X derivate (`<http://curl.haxx.se/docs/copyright.html>`) |
| [cycler](http://matplotlib.org/cycler) | 0.10.0 | Composable style cycles. / BSD 3-Clause |
| [cython](http://www.cython.org/) | 0.29.2 | The Cython compiler for writing C extensions for the Python language / Apache-2.0 |
| [cytoolz](https://github.com/pytoolz/cytoolz) | 0.9.0.1 | Cython implementation of Toolz. High performance functional utilities. / BSD 3-Clause |
| [dask](http://github.com/dask/dask/) | 1.0.0 | Parallel Python with task scheduling / BSD 3-Clause |
| [dask-core](http://github.com/dask/dask/) | 1.0.0 | Parallel Python with task scheduling / BSD 3-Clause |
| [datashape](http://datashape.pydata.org) | 0.5.4 | A data description language. / BSD 2-Clause |
| [dbus](http://www.freedesktop.org/wiki/Software/dbus/) | 1.13.2 | Simple message bus system for applications to talk to one another / GPL2 |
| [decorator](https://github.com/micheles/decorator) | 4.3.0 | Better living through Python with decorators. / BSD 3-Clause |
| [defusedxml](https://bitbucket.org/tiran/defusedxml) | 0.5.0 | XML bomb protection for Python stdlib modules / PSF 2.0 |
| [distributed](http://distributed.readthedocs.io/en/latest/) | 1.25.1 | Distributed computing with Dask / BSD 3-Clause |
| [docutils](http://docutils.sourceforge.net/) | 0.14 | Docutils – Python Documentation Utilities / Public Domain Dedictation and BSD 2-Clause and PSF 2.1.1 and GPL 3.0 |
| [entrypoints](https://github.com/takluyver/entrypoints) | 0.2.3 | Discover and load entry points from installed packages. / MIT License |
| [et\_xmlfile](https://bitbucket.org/openpyxl/et_xmlfile) | 1.0.1 | An implementation of lxml.xmlfile for the standard library / MIT |
| [expat](http://expat.sourceforge.net/) | 2.2.6 | Expat XML parser library in C. / MIT |
| [fastcache](https://github.com/pbrady/fastcache) | 1.0.2 | C implementation of Python 3 lru\_cache / MIT |
| [filelock](https://github.com/benediktschmitt/py-filelock) | 3.0.10 | A platform independent file lock. / Public Domain |
| [flask](http://flask.pocoo.org) | 1.0.2 | A microframework based on Werkzeug, Jinja2 and good intentions. / BSD 3-Clause |
| [flask-cors](https://github.com/corydolphin/flask-cors) | 3.0.7 | A Flask extension adding a decorator for CORS support / MIT |
| [freetype](https://www.freetype.org/) | 2.9.1 | A Free, High-Quality, and Portable Font Engine / GPL-2.0 and FreeType |
| [future](http://python-future.org) | 0.17.1 | Clean single-source support for Python 3 and 2 / MIT |
| [get\_terminal\_size](https://github.com/chrippa/backports.shutil_get_terminal_size) | 1.0.0 | Get the size of the terminal window. / MIT |
| [gettext](https://www.gnu.org/software/gettext/) | 0.19.8.1 | Internationalization package. / GPLv2 |
| [gevent](http://www.gevent.org/) | 1.3.7 | Coroutine-based network library / MIT |
| [glib](https://developer.gnome.org/glib/) | 2.56.2 | Provides core application building blocks for libraries and applications written in C. / LGPL-2.1 |
| [glob2](https://github.com/miracle2k/python-glob2) | 0.6 | Version of the glob module that supports recursion via \*\*, and can capture patterns. / BSD-2-Clause |
| [gmp](http://gmplib.org/) | 6.1.2 | The GNU multiprecision library. / GPL 2 and LGPL 3 |
| [gmpy2](https://pypi.python.org/pypi/gmpy2) | 2.0.8 | GMP/MPIR, MPFR, and MPC interface to Python 2.6+ and 3.x / LGPL 3 |
| [greenlet](https://github.com/python-greenlet/greenlet) | 0.4.15 | Lightweight in-process concurrent programming / MIT |
| [h5py](http://www.h5py.org/) | 2.8.0 | Read and write HDF5 files from Python. / BSD 3-Clause |
| [hdf5](http://www.hdfgroup.org/HDF5/) | 1.10.2 | HDF5 is a data model, library, and file format for storing and managing data / HDF5 |
| [heapdict](http://stutzbachenterprises.com/) | 1.0.0 | A heap with decrease-key and increase-key operations / BSD 3-Clause |
| [html5lib](https://github.com/html5lib/html5lib-python) | 1.0.1 | HTML parser based on the WHATWG HTML specification / MIT |
| [icu](http://site.icu-project.org/) | 58.2 | International Components for Unicode. / MIT |
| [idna](https://github.com/kjd/idna) | 2.8 | Internationalized Domain Names in Applications (IDNA). / BSD Like |
| [imageio](http://imageio.github.io) | 2.4.1 | a Python library for reading and writing image data / BSD 2-Clause |
| [imagesize](https://github.com/shibukawa/imagesize_py) | 1.1.0 | Getting image size from png/jpeg/jpeg2000/gif file / MIT |
| [importlib\_metadata](http://importlib-metadata.readthedocs.io) | 0.6 | A library to access the metadata for a Python package / APACHE-2.0 |
| [intel-openmp](https://software.intel.com/en-us/node/522690) | 2019.1 | Math library for Intel and compatible processors / proprietary - Intel |
| [ipykernel](https://ipython.org) | 5.1.0 | IPython Kernel for Jupyter / BSD-3-Clause |
| [ipython](https://ipython.org/) | 7.2.0 | IPython: Productive Interactive Computing / BSD-3-Clause |
| [ipython\_genutils](http://ipython.org) | 0.2.0 | vestigial utilities from IPython / BSD 3-Clause |
| [ipywidgets](https://github.com/ipython/ipywidgets) | 7.4.2 | Jupyter Interactive Widgets / BSD 3-clause |
| [isort](https://github.com/timothycrosley/isort) | 4.3.4 | A Python utility / library to sort Python imports. / MIT |
| [itsdangerous](https://github.com/pallets/itsdangerous) | 1.1.0 | Various helpers to pass trusted data to untrusted environments. / BSD 3-Clause |
| [jbig](https://www.cl.cam.ac.uk/~mgk25/jbigkit) | 2.1 | Implementation of the JBIG1 data compression standard / GPL-2.0 |
| [jdcal](https://github.com/phn/jdcal) | 1.4 | Julian dates from proleptic Gregorian and Julian calendars. / BSD 2-Clause |
| [jedi](https://github.com/davidhalter/jedi/) | 0.13.2 | An autocompletion tool for Python that can be used for text editors. / MIT |
| [jinja2](http://jinja.pocoo.org) | 2.10 | An easy to use stand-alone template engine written in pure python. / 3-Clause BSD |
| [jpeg](http://www.ijg.org/) | 9b | read/write jpeg COM, EXIF, IPTC medata / Custom free software license |
| [jsonschema](https://github.com/Julian/jsonschema) | 2.6.0 | An implementation of JSON Schema validation for Python / MIT |
| [jupyter](http://jupyter.org) | 1.0.0 | Jupyter metapackage. Install all the Jupyter components in one go. / BSD 3-Clause |
| [jupyter\_client](http://jupyter.org) | 5.2.4 | Jupyter protocol implementation and client libraries / BSD 3-clause |
| [jupyter\_console](http://jupyter.org) | 6.0.0 | Jupyter terminal console / BSD-3-Clause |
| [jupyter\_core](http://jupyter.org) | 4.4.0 | Core common functionality of Jupyter projects. / BSD 3-clause |
| [jupyterlab](https://github.com/jupyterlab/jupyterlab) | 0.35.3 | JupyterLab PRE-ALPHA / BSD-3-Clause |
| [jupyterlab\_server](http://github.com/jupyterlab/jupyterlab_server) | 0.2.0 | A set of server components for JupyterLab and JupyterLab like applications. / BSD 3-Clause |
| [keyring](https://github.com/jaraco/keyring) | 17.0.0 | Store and access your passwords safely / Python Software Foundation or MIT |
| [kiwisolver](https://github.com/nucleic/kiwi) | 1.0.1 | A fast implementation of the Cassowary constraint solver / BSD 3-Clause |
| [krb5](http://web.mit.edu/kerberos/) | 1.16.1 | A network authentication protocol. / MIT |
| [lazy-object-proxy](https://github.com/ionelmc/python-lazy-object-proxy) | 1.3.1 | A fast and thorough lazy object proxy. / BSD 2-Clause |
| [libarchive](http://www.libarchive.org/) | 3.3.3 | Multi-format archive and compression library / BSD 2-Clause |
| [libcurl](http://curl.haxx.se/) | 7.63.0 | tool and library for transferring data with URL syntax / MIT/X derivate (`<http://curl.haxx.se/docs/copyright.html>`) |
| [libcxx](http://libcxx.llvm.org/) | 4.0.1 | C++ Standard Library / MIT license or UIUC License |
| [libcxxabi](http://libcxxabi.llvm.org/) | 4.0.1 | C++ Standard Library Support / MIT license or UIUC License |
| [libedit](http://thrysoee.dk/editline/) | 3.1.20170329 | Editline Library (libedit) / NetBSD |
| [libffi](https://sourceware.org/libffi/) | 3.2.1 | A Portable Foreign Function Interface Library. / Custom |
| [libgfortran](http://gcc.gnu.org/) | 3.0.1 | Fortran libraries from the GNU Compiler Collection / GPL 3 (with GCC Runtime Library Exception 3.1) |
| [libiconv](https://www.gnu.org/software/libiconv/) | 1.15 | Provides iconv for systems which don’t have one (or that cannot convert from/to Unicode.) / GPL and LGPL |
| [liblief](https://lief.quarkslab.com/) | 0.9.0 | A cross platform library to parse, modify and abstract ELF, PE and MachO formats. / Apache 2.0 |
| [libpng](http://www.libpng.org/pub/png/libpng.html) | 1.6.35 | PNG reference library. / zlib/libpng |
| [libsodium](http://libsodium.org) | 1.0.16 | A modern and easy-to-use crypto library. / ISC |
| [libssh2](https://www.libssh2.org/) | 1.8.0 | the SSH library / BSD 3-Clause |
| [libtiff](http://www.libtiff.org/) | 4.0.9 | Support for the Tag Image File Format (TIFF). / HPND |
| [libxml2](http://xmlsoft.org/) | 2.9.8 | The XML C parser and toolkit of Gnome / MIT |
| [libxslt](http://xmlsoft.org/XSLT/) | 1.1.32 | The XSLT C library developed for the GNOME project / MIT |
| [llvmlite](https://github.com/numba/llvmlite) | 0.26.0 | A lightweight LLVM python binding for writing JIT compilers / New BSD License |
| [locket](https://github.com/mwilliamson/locket.py) | 0.2.0 | File-based locks for Python for Linux and Windows / BSD 2-Clause |
| [lxml](http://lxml.de/) | 4.2.5 | Pythonic binding for the C libraries libxml2 and libxslt. / BSD 3-Clause, GPL-2.0, ZPL-2.0, and ElementTree |
| [lz4-c](https://www.lz4.org) | 1.8.1.2 | Extremely Fast Compression algorithm / BSD 2-clause |
| [lzo](http://www.oberhumer.com/opensource/lzo/) | 2.10 | LZO is a portable lossless data compression library written in ANSI C. / GPL v2+ |
| [markupsafe](https://www.palletsprojects.com/p/markupsafe) | 1.1.0 | A Python module that implements the jinja2.Markup string / BSD-3-Clause |
| [matplotlib](http://matplotlib.org/) | 3.0.2 | Publication quality figures in Python / PSF-based |
| [mccabe](https://github.com/PyCQA/mccabe) | 0.6.1 | McCabe complexity checker for Python / MIT |
| [mistune](https://github.com/lepture/mistune) | 0.8.4 | The fastest markdown parser in pure Python. / BSD 3-Clause |
| [mkl](https://software.intel.com/en-us/mkl) | 2019.1 | Math library for Intel and compatible processors / proprietary - Intel |
| [mkl-service](https://github.com/ContinuumIO/mkl-service) | 1.1.2 | Python bindings to MKL service functions / 3-clause BSD |
| [mkl\_fft](http://github.com/IntelPython/mkl_fft) | 1.0.6 | NumPy-based implementation of Fast Fourier Transform using Intel (R) Math Kernel Library. / BSD 3-Clause |
| [mkl\_random](http://github.com/IntelPython/mkl_random) | 1.0.2 | Intel (R) MKL-powered package for sampling from common probability distributions into NumPy arrays. / BSD 3-Clause |
| [more-itertools](https://github.com/erikrose/more-itertools) | 4.3.0 | More routines for operating on iterables, beyond itertools / MIT |
| [mpc](http://www.multiprecision.org/) | 1.1.0 | A C library for the arithmetic of complex numbers with arbitrarily high precision. / LGPL 3 |
| [mpfr](http://www.mpfr.org/) | 4.0.1 | The MPFR library is a C library for multiple-precision floating-point computations with correct rounding. / LGPL 3 |
| [mpmath](http://mpmath.org) | 1.1.0 | Python library for arbitrary-precision floating-point arithmetic / BSD 3-Clause |
| [msgpack-python](http://msgpack.org/) | 0.5.6 | MessagePack (de)serializer. / Apache 2.0 |
| [multipledispatch](https://github.com/mrocklin/multipledispatch/) | 0.6.0 | Multiple dispatch in Python / BSD 3-Clause |
| [navigator-updater](https://github.com/ContinuumIO/navigator-updater) | 0.2.1 | Anaconda Navigator Updater / proprietary - Continuum Analytics, Inc. |
| [nbconvert](http://jupyter.org) | 5.4.0 | Converting Jupyter Notebooks / BSD-3-Clause |
| [nbformat](http://jupyter.org) | 4.4.0 | The reference implementation of the Jupyter Notebook format / BSD 3-clause |
| [ncurses](http://www.gnu.org/software/ncurses/) | 6.1 | Library for text-based user interfaces / Free software (MIT-like) |
| [networkx](https://networkx.github.io/) | 2.2 | Python package for creating and manipulating complex networks / BSD 3-Clause |
| [nltk](http://nltk.org/) | 3.4 | Build Python programs to work with human language data / Apache 2.0 |
| [nose](http://readthedocs.org/docs/nose/) | 1.3.7 | Nose extends unittest to make testing easier / LGPL-2.1 |
| [notebook](http://jupyter.org) | 5.7.4 | Jupyter Notebook / BSD 3-clause |
| [numba](http://numba.github.com) | 0.41.0 | NumPy aware dynamic Python compiler using LLVM / BSD 2-clause |
| [numexpr](https://github.com/pydata/numexpr) | 2.6.8 | Fast numerical expression evaluator for NumPy. / MIT |
| [numpy](http://numpy.scipy.org/) | 1.15.4 | Array processing for numbers, strings, records, and objects. / BSD 3-Clause |
| numpy-base | 1.15.4 | |
| [numpydoc](https://github.com/numpy/numpydoc) | 0.8.0 | Sphinx extension to support docstrings in Numpy format / BSD 3-Clause |
| [odo](http://odo.pydata.org) | 0.5.1 | Data migration in Python / BSD-3-Clause |
| [olefile](http://www.decalage.info/python/olefileio) | 0.46 | parse, read and write Microsoft OLE2 files / BSD 2-Clause |
| [openpyxl](https://openpyxl.readthedocs.io) | 2.5.12 | A Python library to read/write Excel 2010 xlsx/xlsm files / MIT |
| [openssl](http://www.openssl.org/) | 1.1.1a | OpenSSL is an open-source implementation of the SSL and TLS protocols / OpenSSL |
| [packaging](https://github.com/pypa/packaging) | 18.0 | Core utilities for Python packages / Apache 2.0 or BSD 2-Clause |
| [pandas](http://pandas.pydata.org) | 0.23.4 | High-performance, easy-to-use data structures and data analysis tools. / BSD 3-clause |
| [pandoc](http://pandoc.org/) | 1.19.2.1 | Universal markup converter (repackaged binaries). / GPL-2.0 |
| [pandocfilters](https://github.com/jgm/pandocfilters) | 1.4.2 | A python module for writing pandoc filters / BSD-3-Clause |
| [parso](https://github.com/davidhalter/parso) | 0.3.1 | A Python Parser / MIT |
| [partd](https://github.com/dask/partd) | 0.3.9 | Data structure for on-disk shuffle operations / BSD 3-Clause |
| [path.py](https://github.com/jaraco/path.py) | 11.5.0 | A module wrapper for os.path / MIT |
| [pathlib2](https://github.com/mcmtroffaes/pathlib2) | 2.3.3 | Fork of pathlib aiming to support the full stdlib Python API. / MIT |
| [patsy](https://github.com/pydata/patsy) | 0.5.1 | Describing statistical models in Python using symbolic formulas / BSD-2-Clause, PSF2 |
| [pcre](http://www.pcre.org/) | 8.42 | Regular expression pattern matching using the same syntax and semantics as Perl 5. / BSD 3-Clause |
| [pep8](http://pep8.readthedocs.org/) | 1.7.1 | Python style guide checker / MIT |
| [pexpect](http://pexpect.sourceforge.net/) | 4.6.0 | Pexpect makes Python a better tool for controlling other applications. / ISC |
| [pickleshare](https://github.com/pickleshare/pickleshare/) | 0.7.5 | Tiny ‘shelve’-like database with concurrency support / MIT |
| [pillow](https://pillow.readthedocs.io) | 5.3.0 | Pillow is the friendly PIL fork by Alex Clark and Contributors / PIL |
| [pip](https://pip.pypa.io/en/stable/) | 18.1 | PyPA recommended tool for installing Python packages / MIT |
| [pkginfo](https://code.launchpad.net/~tseaver/pkginfo/trunk) | 1.4.2 | Query metadatdata from sdists / bdists / installed packages. / MIT |
| [pluggy](https://github.com/pytest-dev/pluggy) | 0.8.0 | Plugin registration and hook calling for Python / MIT |
| [ply](http://www.dabeaz.com/ply/index.html) | 3.11 | Python Lex-Yacc / BSD 3-clause |
| [prometheus\_client](https://github.com/prometheus/client_python) | 0.5.0 | Python client for the Prometheus monitoring system / Apache 2.0 |
| [prompt\_toolkit](https://github.com/jonathanslenders/python-prompt-toolkit) | 2.0.7 | Library for building powerful interactive command lines in Python / BSD 3-clause |
| [psutil](https://github.com/giampaolo/psutil) | 5.4.8 | A cross-platform process and system utilities module for Python / BSD 3-Clause |
| [ptyprocess](https://github.com/pexpect/ptyprocess) | 0.6.0 | Run a subprocess in a pseudo terminal / ISC |
| [py](https://github.com/pytest-dev/py) | 1.7.0 | library with cross-python path, ini-parsing, io, code, log facilities / MIT |
| [py-lief](https://lief.quarkslab.com/) | 0.9.0 | A cross platform library to parse, modify and abstract ELF, PE and MachO formats. / Apache 2.0 |
| [pycodestyle](https://pycodestyle.readthedocs.io/) | 2.4.0 | Python style guide checker / MIT |
| [pycosat](https://github.com/ContinuumIO/pycosat) | 0.6.3 | Bindings to picosat (a SAT solver) / MIT |
| [pycparser](https://github.com/eliben/pycparser) | 2.19 | Complete C99 parser in pure Python / BSD 3-clause |
| [pycrypto](http://www.pycrypto.org/) | 2.6.1 | Cryptographic modules for Python. / Public Domain |
| [pycurl](http://pycurl.sourceforge.net/) | 7.43.0.2 | A Python Interface To The cURL library / LGPL, MIT |
| [pyflakes](https://github.com/PyCQA/pyflakes) | 2.0.0 | Pyflakes analyzes programs and detects various errors. / MIT |
| [pygments](http://pygments.org/) | 2.3.1 | Generic syntax highlighting package / BSD 2-clause |
| [pylint](http://www.pylint.org/) | 2.2.2 | python code static checker / GPL |
| [pyodbc](https://github.com/mkleehammer/pyodbc) | 4.0.25 | DB API Module for ODBC / MIT |
| [pyopenssl](https://github.com/pyca/pyopenssl) | 18.0.0 | Python wrapper module around the OpenSSL library / Apache 2.0 |
| [pyparsing](http://pyparsing.wikispaces.com/) | 2.3.0 | Create and execute simple grammars / MIT |
| [pyqt](http://www.riverbankcomputing.co.uk/software/pyqt) | 5.9.2 | Python binding of the cross-platform GUI toolkit Qt. / Commercial, GPL-2.0, GPL-3.0 |
| [pysocks](https://github.com/Anorov/PySocks) | 1.6.8 | A Python SOCKS client module. See [Anorov/PySocks](https://github.com/Anorov/PySocks) for more information. / BSD 3-Clause |
| [pytables](http://www.pytables.org) | 3.4.4 | Brings together Python, HDF5 and NumPy to easily handle large amounts of data. / BSD 3-Clause |
| [pytest](https://docs.pytest.org/en/latest/) | 4.0.2 | Simple and powerful testing with Python. / MIT |
| [pytest-arraydiff](https://github.com/astrofrog/pytest-arraydiff) | 0.3 | pytest plugin to help with comparing array output from tests / BSD |
| [pytest-astropy](https://github.com/astropy/pytest-astropy) | 0.5.0 | Meta-package containing dependencies for testing Astropy / BSD |
| [pytest-doctestplus](https://github.com/astropy/pytest-doctestplus) | 0.2.0 | Pytest plugin with advanced doctest features / BSD |
| [pytest-openfiles](https://github.com/astropy/pytest-openfiles) | 0.3.1 | Pytest plugin for detecting inadvertent open file handles / BSD |
| [pytest-remotedata](https://github.com/astropy/pytest-remotedata) | 0.3.1 | Pytest plugin for controlling remote data access / BSD |
| [python](http://www.python.org/) | 3.7.1 | General purpose programming language / PSF |
| [python-dateutil](https://dateutil.readthedocs.org/) | 2.7.5 | Extensions to the standard Python datetime module. / BSD 3 Clause |
| python-libarchive-c | 2.8 | |
| python.app | 2 | Proxy on OS X letting Python libraries hook into the gui event loop / BSD |
| [pytz](http://pythonhosted.org/pytz/) | 2018.7 | World timezone definitions, modern and historical. / MIT |
| [pywavelets](https://github.com/PyWavelets/pywt) | 1.0.1 | Discrete Wavelet Transforms in Python. / MIT |
| [pyyaml](http://pyyaml.org/wiki/PyYAML) | 3.13 | YAML parser and emitter for Python / MIT |
| [pyzmq](https://github.com/zeromq/pyzmq) | 17.1.2 | Python bindings for zeromq / BSD 3-clause |
| [qt](http://qt-project.org) | 5.9.7 | Qt is a cross-platform application and UI framework. / LGPL-3.0 |
| [qtawesome](https://github.com/spyder-ide/qtawesome) | 0.5.3 | Iconic fonts in PyQt and PySide applications / MIT |
| [qtconsole](http://jupyter.org) | 4.4.3 | Jupyter Qt console / BSD 3-Clause |
| [qtpy](https://github.com/spyder-ide/qtpy) | 1.5.2 | Abstraction layer for PyQt5/PyQt4/PySide / MIT |
| [readline](https://cnswww.cns.cwru.edu/php/chet/readline/rltop.html) | 7.0 | library for editing command lines as they are typed in / GPL-3.0 |
| [requests](http://python-requests.org) | 2.21.0 | Python HTTP for Humans / Apache 2.0 |
| [rope](https://github.com/python-rope/rope) | 0.11.0 | A python refactoring library… / GPL 2.0 |
| [ruamel\_yaml](https://bitbucket.org/ruamel/yaml) | 0.15.46 | A patched copy of ruamel.yaml. / MIT |
| [scikit-image](http://scikit-image.org/) | 0.14.1 | Image processing routines for SciPy. / BSD 3-Clause |
| [scikit-learn](http://scikit-learn.org/) | 0.20.1 | A set of python modules for machine learning and data mining / BSD 3-Clause |
| [scipy](http://www.scipy.org/) | 1.1.0 | Scientific Library for Python / BSD 3-Clause |
| [seaborn](https://seaborn.pydata.org) | 0.9.0 | Statistical data visualization / BSD 3-Clause |
| [send2trash](https://github.com/hsoft/send2trash) | 1.5.0 | Python library to natively send files to Trash (or Recycle bin) on all platforms. / BSD-3-Clause |
| [setuptools](https://github.com/pypa/setuptools) | 40.6.3 | Download, build, install, upgrade, and uninstall Python packages / MIT |
| [simplegeneric](http://cheeseshop.python.org/pypi/simplegeneric) | 0.8.1 | Simple generic functions (similar to Python’s own len(), pickle.dump(), etc.) / Zope Public |
| [singledispatch](http://docs.python.org/3/library/functools.html#functools.singledispatch) | 3.4.0.3 | Transforms a function into a single-dispatch generic function / MIT |
| [sip](http://www.riverbankcomputing.com/software/sip/intro) | 4.19.8 | Create Python bindings for C and C++ libraries / GPL-3.0 |
| [six](http://pypi.python.org/pypi/six/) | 1.12.0 | Python 2 and 3 compatibility utilities / MIT |
| [snappy](https://github.com/google/snappy) | 1.1.7 | A fast compressor/decompressor / BSD 3-clause |
| [snowballstemmer](https://github.com/shibukawa/snowball_py) | 1.2.1 | Snowball stemming library collection for Python / BSD-2-Clause |
| [sortedcollections](http://www.grantjenks.com/docs/sortedcollections/) | 1.0.1 | Python Sorted Collections / Apache-2.0 |
| [sortedcontainers](http://www.grantjenks.com/docs/sortedcontainers/) | 2.1.0 | Python Sorted Container Types: SortedList, SortedDict, and SortedSet / Apache 2.0 |
| [sphinx](http://www.sphinx-doc.org) | 1.8.2 | Sphinx is a tool that makes it easy to create intelligent and beautiful documentation / BSD 2-clause |
| sphinxcontrib | 1.0 | Python namespace for sphinxcontrib / BSD |
| [sphinxcontrib-websupport](https://pypi.python.org/pypi/sphinxcontrib-websupport) | 1.1.0 | Sphinx API for Web Apps / BSD-2-Clause |
| [spyder](https://www.spyder-ide.org/) | 3.3.2 | The Scientific Python Development Environment / MIT |
| [spyder-kernels](https://github.com/spyder-ide/spyder-kernels) | 0.3.0 | Jupyter kernels for the Spyder console / MIT |
| [sqlalchemy](http://www.sqlalchemy.org/) | 1.2.15 | Database Abstraction Library. / MIT |
| [sqlite](http://www.sqlite.org/) | 3.26.0 | Implements a self-contained, zero-configuration, SQL database engine. / Public-Domain (`<http://www.sqlite.org/copyright.html>`) |
| [statsmodels](https://www.statsmodels.org) | 0.9.0 | Statistical computations and models for use with SciPy / BSD 3-Clause |
| [sympy](http://sympy.org) | 1.3 | Python library for symbolic mathematics / 3-clause BSD |
| [tblib](https://github.com/ionelmc/python-tblib) | 1.3.2 | Traceback serialization library. / BSD 2-Clause |
| [terminado](https://github.com/jupyter/terminado) | 0.8.1 | Terminals served by tornado websockets / BSD 2-clause |
| [testpath](https://testpath.readthedocs.io) | 0.4.2 | Testpath is a collection of utilities for Python code working with files and commands. / BSD-3-Clause |
| [tk](http://www.tcl.tk/) | 8.6.8 | A dynamic programming language with GUI support. Bundles Tcl and Tk. / Tcl/Tk |
| [toolz](http://toolz.readthedocs.org/) | 0.9.0 | A functional standard library for Python. / BSD 3-Clause |
| [tornado](http://www.tornadoweb.org/) | 5.1.1 | A Python web framework and asynchronous networking library, originally developed at FriendFeed. / Apache 2.0 |
| [tqdm](https://pypi.python.org/pypi/tqdm) | 4.28.1 | A Fast, Extensible Progress Meter / MPLv2.0, MIT |
| [traitlets](http://ipython.org/) | 4.3.2 | Configuration system for Python applications / BSD 3-clause |
| [unicodecsv](https://github.com/jdunck/python-unicodecsv) | 0.14.1 | Drop-in replacement for csv module which supports unicode strings / BSD |
| [unixodbc](http://www.unixodbc.org/) | 2.3.7 | ODBC on non MS Windows platforms / LGPL-2.1 |
| [urllib3](https://urllib3.readthedocs.io/) | 1.24.1 | HTTP library with thread-safe connection pooling, file post, and more. / MIT |
| [wcwidth](https://github.com/jquast/wcwidth) | 0.1.7 | Measures number of Terminal column cells of wide-character codes. / MIT |
| [webencodings](https://github.com/gsnedders/python-webencodings) | 0.5.1 | Character encoding aliases for legacy web content / BSD 3-Clause |
| [werkzeug](http://werkzeug.pocoo.org/) | 0.14.1 | The Python WSGI Utility Library. / BSD 3-Clause |
| [wheel](https://github.com/pypa/wheel) | 0.32.3 | A built-package format for Python. / MIT |
| [widgetsnbextension](http://ipython.org) | 3.4.2 | Interactive Widgets for Jupyter / BSD 3-clause |
| [wrapt](https://github.com/GrahamDumpleton/wrapt) | 1.10.11 | Module for decorators, wrappers and monkey patching. / BSD 2-Clause |
| [wurlitzer](https://github.com/minrk/wurlitzer) | 1.0.2 | Capture C-level stdout/stderr in Python / MIT |
| [xlrd](http://www.python-excel.org/) | 1.2.0 | Library for developers to extract data from Microsoft Excel (tm) spreadsheet files / BSD 3-Clause and BSD with advertising |
| [xlsxwriter](https://xlsxwriter.readthedocs.io/) | 1.1.2 | A Python module for creating Excel XLSX files / BSD 2-Clause |
| [xlwings](http://xlwings.org/) | 0.15.1 | Interact with Excel from Python and vice versa / 3-clause BSD |
| [xlwt](http://www.python-excel.org/) | 1.3.0 | Writing data and formatting information to Excel files / BSD |
| [xz](http://tukaani.org/xz/) | 5.2.4 | Data compression software with high compression ratio / LGPL-2.1 and GPL-2.0 |
| [yaml](http://pyyaml.org/wiki/LibYAML) | 0.1.7 | A C library for parsing and emitting YAML. / MIT |
| [zeromq](http://zeromq.org) | 4.2.5 | A high-performance asynchronous messaging library. / LGPL 3 |
| [zict](http://github.com/mrocklin/zict) | 0.1.3 | Composable Dictionary Classes / BSD 3-Clause |
| [zlib](http://zlib.net/) | 1.2.11 | Massively spiffy yet delicately unobtrusive compression library / zlib |
| [zstd](http://www.zstd.net) | 1.3.7 | Zstandard - Fast real-time compression algorithm / BSD 3-Clause |
| Name | Version | Summary / License |
|---|---|---|
| [\_ipyw\_jlab\_nb\_ext\_conf](https://github.com/ContinuumIO/anaconda-nb-extensions-meta-config) | 0.1.0 | A configuration metapackage for enabling Anaconda-bundled jupyter extensions / BSD |
| [alabaster](http://www.sphinx-doc.org/en/stable/index.html) | 0.7.12 | Configurable, Python 2+3 compatible Sphinx theme. / BSD 3-Clause |
| [anaconda-client](http://anaconda.org) | 1.7.2 | anaconda.org command line client library / BSD 3-clause |
| [anaconda-project](https://github.com/Anaconda-Platform/anaconda-project) | 0.8.2 | Tool for encapsulating, running, and reproducing data science projects / BSD 3-Clause |
| [asn1crypto](https://github.com/wbond/asn1crypto) | 0.24.0 | Python ASN.1 library with a focus on performance and a pythonic API / MIT |
| [astroid](https://www.astroid.org/) | 2.1.0 | A abstract syntax tree for Python with inference support. / LGPL 2.1 |
| [astropy](http://www.astropy.org/) | 3.0.5 | Community-developed Python Library for Astronomy / BSD |
| [atomicwrites](https://github.com/untitaker/python-atomicwrites) | 1.2.1 | Atomic file writes. / MIT |
| [attrs](https://attrs.readthedocs.io/en/stable/) | 18.2.0 | attrs is the Python package that will bring back the joy of writing classes by relieving you from the drudgery of implementing object protocols (aka dunder methods). / MIT |
| [automat](https://github.com/glyph/Automat) | 0.7.0 | self-service finite-state machines for the programmer on the go / MIT |
| [babel](http://babel.pocoo.org/) | 2.6.0 | Utilities to internationalize and localize Python applications / BSD 3-clause |
| [backcall](https://github.com/takluyver/backcall/) | 0.1.0 | Specifications for callback functions passed in to an API / BSD-3-Clause |
| [backports](https://bitbucket.org/brandon/backports) | 1.0 | / BSD |
| [backports.os](https://github.com/pjdelport/backports.os) | 0.1.1 | Backport of new features in Python’s os module / Python Software Foundation |
| [backports.shutil\_get\_terminal\_size](https://github.com/chrippa/backports.shutil_get_terminal_size) | 1.0.0 | A backport of the get\_terminal\_size function from Python 3.3’s shutil. / MIT |
| [beautifulsoup4](http://www.crummy.com/software/BeautifulSoup/) | 4.6.3 | Python library designed for screen-scraping / MIT |
| [bitarray](https://github.com/ilanschnell/bitarray) | 0.8.3 | efficient arrays of booleans – C extension / PSF |
| [bkcharts](http://github.com/bokeh/bkcharts) | 0.2 | High level chart types built on top of Bokeh / BSD 3-Clause |
| blas | 1.0 | |
| [bleach](https://github.com/mozilla/bleach) | 3.0.2 | Easy, whitelist-based HTML-sanitizing tool / Apache-2.0 |
| [blosc](https://github.com/Blosc/c-blosc) | 1.14.4 | A blocking, shuffling and loss-less compression library that can be faster than memcpy() / BSD 3-Clause |
| [bokeh](http://bokeh.pydata.org/) | 1.0.2 | Statistical and novel interactive HTML plots for Python / BSD 3-Clause |
| [boto](https://github.com/boto/boto/) | 2.49.0 | Amazon Web Services Library / MIT |
| [bottleneck](http://berkeleyanalytics.com/bottleneck) | 1.2.1 | Fast NumPy array functions written in Cython. / BSD 2-Clause |
| [bzip2](http://www.bzip.org/) | 1.0.6 | high-quality data compressor / bzip2 |
| [ca-certificates](https://github.com/conda-forge/ca-certificates-feedstock) | 2018.03.07 | Certificates for use with other packages. / ISC |
| [cairo](http://cairographics.org/) | 1.14.12 | Cairo is a 2D graphics library with support for multiple output devices. / LGPL 2.1 or MPL 1.1 |
| [certifi](http://certifi.io/) | 2018.11.29 | Python package for providing Mozilla’s CA Bundle. / ISC |
| [cffi](https://bitbucket.org/cffi/cffi) | 1.11.5 | Foreign Function Interface for Python calling C code. / MIT |
| [chardet](https://github.com/chardet/chardet) | 3.0.4 | Universal character encoding detector / LGPL2 |
| [click](https://palletsprojects.com/p/click) | 7.0 | Python composable command line interface toolkit / BSD-3-Clause |
| [cloudpickle](https://github.com/cloudpipe/cloudpickle) | 0.6.1 | Extended pickling support for Python objects / BSD 3-Clause |
| [clyent](https://github.com/Anaconda-Platform/clyent) | 1.2.2 | Command line client library for windows and posix / BSD 3-Clause |
| [colorama](https://github.com/tartley/colorama) | 0.4.1 | Cross-platform colored terminal text / BSD-3-Clause |
| [conda](https://conda.io) | 4.5.12 | OS-agnostic, system-level binary package and environment manager. / BSD 3-Clause |
| [conda-build](https://github.com/conda/conda-build) | 3.16.3 | tools for building conda packages / BSD 3-Clause |
| [conda-env](https://github.com/conda/conda-env) | 2.6.0 | Tools for interacting with conda environments. / BSD 3-Clause |
| [conda-verify](https://github.com/conda/conda-verify) | 3.1.1 | tool for validating conda recipes and conda packages / BSD 3-Clause |
| [constantly](https://github.com/twisted/constantly) | 15.1.0 | Symbolic constants in Python / MIT |
| [contextlib2](http://contextlib2.readthedocs.org) | 0.5.5 | Backports and enhancements for the contextlib module / PSF |
| [cryptography](https://github.com/pyca/cryptography) | 2.4.2 | Provides cryptographic recipes and primitives to Python developers / Apache 2.0 or BSD 3-Clause, PSF 2 |
| [curl](http://curl.haxx.se/) | 7.63.0 | tool and library for transferring data with URL syntax / MIT/X derivate (`<http://curl.haxx.se/docs/copyright.html>`) |
| [cycler](http://matplotlib.org/cycler) | 0.10.0 | Composable style cycles. / BSD 3-Clause |
| [cython](http://www.cython.org/) | 0.29.2 | The Cython compiler for writing C extensions for the Python language / Apache-2.0 |
| [cytoolz](https://github.com/pytoolz/cytoolz) | 0.9.0.1 | Cython implementation of Toolz. High performance functional utilities. / BSD 3-Clause |
| [dask](http://github.com/dask/dask/) | 1.0.0 | Parallel Python with task scheduling / BSD 3-Clause |
| [dask-core](http://github.com/dask/dask/) | 1.0.0 | Parallel Python with task scheduling / BSD 3-Clause |
| [datashape](http://datashape.pydata.org) | 0.5.4 | A data description language. / BSD 2-Clause |
| [decorator](https://github.com/micheles/decorator) | 4.3.0 | Better living through Python with decorators. / BSD 3-Clause |
| [distributed](http://distributed.readthedocs.io/en/latest/) | 1.25.1 | Distributed computing with Dask / BSD 3-Clause |
| [docutils](http://docutils.sourceforge.net/) | 0.14 | Docutils – Python Documentation Utilities / Public Domain Dedictation and BSD 2-Clause and PSF 2.1.1 and GPL 3.0 |
| [entrypoints](https://github.com/takluyver/entrypoints) | 0.2.3 | Discover and load entry points from installed packages. / MIT License |
| [et\_xmlfile](https://bitbucket.org/openpyxl/et_xmlfile) | 1.0.1 | An implementation of lxml.xmlfile for the standard library / MIT |
| [expat](http://expat.sourceforge.net/) | 2.2.6 | Expat XML parser library in C. / MIT |
| [fastcache](https://github.com/pbrady/fastcache) | 1.0.2 | C implementation of Python 3 lru\_cache / MIT |
| [filelock](https://github.com/benediktschmitt/py-filelock) | 3.0.10 | A platform independent file lock. / Public Domain |
| [flask](http://flask.pocoo.org) | 1.0.2 | A microframework based on Werkzeug, Jinja2 and good intentions. / BSD 3-Clause |
| [flask-cors](https://github.com/corydolphin/flask-cors) | 3.0.7 | A Flask extension adding a decorator for CORS support / MIT |
| [fontconfig](http://www.freedesktop.org/wiki/Software/fontconfig/) | 2.13.0 | A library for configuring and customizing font access. / MIT |
| [freetype](https://www.freetype.org/) | 2.9.1 | A Free, High-Quality, and Portable Font Engine / GPL-2.0 and FreeType |
| [future](http://python-future.org) | 0.17.1 | Clean single-source support for Python 3 and 2 / MIT |
| [get\_terminal\_size](https://github.com/chrippa/backports.shutil_get_terminal_size) | 1.0.0 | Get the size of the terminal window. / MIT |
| [gevent](http://www.gevent.org/) | 1.3.7 | Coroutine-based network library / MIT |
| [glib](https://developer.gnome.org/glib/) | 2.56.2 | Provides core application building blocks for libraries and applications written in C. / LGPL-2.1 |
| [glob2](https://github.com/miracle2k/python-glob2) | 0.6 | Version of the glob module that supports recursion via \*\*, and can capture patterns. / BSD-2-Clause |
| [gmp](http://gmplib.org/) | 6.1.2 | The GNU multiprecision library. / GPL 2 and LGPL 3 |
| [gmpy2](https://pypi.python.org/pypi/gmpy2) | 2.0.8 | GMP/MPIR, MPFR, and MPC interface to Python 2.6+ and 3.x / LGPL 3 |
| [greenlet](https://github.com/python-greenlet/greenlet) | 0.4.15 | Lightweight in-process concurrent programming / MIT |
| [h5py](http://www.h5py.org/) | 2.8.0 | Read and write HDF5 files from Python. / BSD 3-Clause |
| [hdf5](http://www.hdfgroup.org/HDF5/) | 1.10.2 | HDF5 is a data model, library, and file format for storing and managing data / HDF5 |
| [heapdict](http://stutzbachenterprises.com/) | 1.0.0 | A heap with decrease-key and increase-key operations / BSD 3-Clause |
| [html5lib](https://github.com/html5lib/html5lib-python) | 1.0.1 | HTML parser based on the WHATWG HTML specification / MIT |
| [hyperlink](https://github.com/python-hyper/hyperlink) | 18.0.0 | Immutable, Pythonic, correct URLs. / MIT |
| [icu](http://site.icu-project.org/) | 58.2 | International Components for Unicode. / MIT |
| [idna](https://github.com/kjd/idna) | 2.8 | Internationalized Domain Names in Applications (IDNA). / BSD Like |
| [imageio](http://imageio.github.io) | 2.4.1 | a Python library for reading and writing image data / BSD 2-Clause |
| [imagesize](https://github.com/shibukawa/imagesize_py) | 1.1.0 | Getting image size from png/jpeg/jpeg2000/gif file / MIT |
| [importlib\_metadata](http://importlib-metadata.readthedocs.io) | 0.6 | A library to access the metadata for a Python package / APACHE-2.0 |
| [incremental](https://twistedmatrix.com) | 17.5.0 | A library that versions your Python projects / MIT License |
| [ipykernel](https://ipython.org) | 5.1.0 | IPython Kernel for Jupyter / BSD-3-Clause |
| [ipython](https://ipython.org/) | 7.2.0 | IPython: Productive Interactive Computing / BSD-3-Clause |
| [ipython\_genutils](http://ipython.org) | 0.2.0 | vestigial utilities from IPython / BSD 3-Clause |
| [ipywidgets](https://github.com/ipython/ipywidgets) | 7.4.2 | Jupyter Interactive Widgets / BSD 3-clause |
| [isort](https://github.com/timothycrosley/isort) | 4.3.4 | A Python utility / library to sort Python imports. / MIT |
| [itsdangerous](https://github.com/pallets/itsdangerous) | 1.1.0 | Various helpers to pass trusted data to untrusted environments. / BSD 3-Clause |
| [jbig](https://www.cl.cam.ac.uk/~mgk25/jbigkit) | 2.1 | Implementation of the JBIG1 data compression standard / GPL-2.0 |
| [jdcal](https://github.com/phn/jdcal) | 1.4 | Julian dates from proleptic Gregorian and Julian calendars. / BSD 2-Clause |
| [jedi](https://github.com/davidhalter/jedi/) | 0.13.2 | An autocompletion tool for Python that can be used for text editors. / MIT |
| [jinja2](http://jinja.pocoo.org) | 2.10 | An easy to use stand-alone template engine written in pure python. / 3-Clause BSD |
| [jpeg](http://www.ijg.org/) | 9b | read/write jpeg COM, EXIF, IPTC medata / Custom free software license |
| [jsonschema](https://github.com/Julian/jsonschema) | 2.6.0 | An implementation of JSON Schema validation for Python / MIT |
| [jupyter](http://jupyter.org) | 1.0.0 | Jupyter metapackage. Install all the Jupyter components in one go. / BSD 3-Clause |
| [jupyter\_client](http://jupyter.org) | 5.2.4 | Jupyter protocol implementation and client libraries / BSD 3-clause |
| [jupyter\_console](http://jupyter.org) | 6.0.0 | Jupyter terminal console / BSD-3-Clause |
| [jupyter\_core](http://jupyter.org) | 4.4.0 | Core common functionality of Jupyter projects. / BSD 3-clause |
| [jupyterlab](https://github.com/jupyterlab/jupyterlab) | 0.35.3 | JupyterLab PRE-ALPHA / BSD-3-Clause |
| [jupyterlab\_server](http://github.com/jupyterlab/jupyterlab_server) | 0.2.0 | A set of server components for JupyterLab and JupyterLab like applications. / BSD 3-Clause |
| [kiwisolver](https://github.com/nucleic/kiwi) | 1.0.1 | A fast implementation of the Cassowary constraint solver / BSD 3-Clause |
| [krb5](http://web.mit.edu/kerberos/) | 1.16.1 | A network authentication protocol. / MIT |
| [lazy-object-proxy](https://github.com/ionelmc/python-lazy-object-proxy) | 1.3.1 | A fast and thorough lazy object proxy. / BSD 2-Clause |
| [libarchive](http://www.libarchive.org/) | 3.3.3 | Multi-format archive and compression library / BSD 2-Clause |
| [libcurl](http://curl.haxx.se/) | 7.63.0 | tool and library for transferring data with URL syntax / MIT/X derivate (`<http://curl.haxx.se/docs/copyright.html>`) |
| [libedit](http://thrysoee.dk/editline/) | 3.1.20170329 | Editline Library (libedit) / NetBSD |
| [libffi](https://sourceware.org/libffi/) | 3.2.1 | A Portable Foreign Function Interface Library. / Custom |
| [libgcc-ng](https://gcc.gnu.org/onlinedocs/gccint/Libgcc.html) | 8.2.0 | The GCC low-level runtime library / GPL |
| [libgfortran](http://gcc.gnu.org/) | 3.0.0 | Fortran libraries from the GNU Compiler Collection / GPL 3 (with GCC Runtime Library Exception 3.1) |
| [libgfortran-ng](https://gcc.gnu.org/) | 7.3.0 | The GNU Fortran Runtime Library / GPL |
| [libiconv](https://www.gnu.org/software/libiconv/) | 1.14 | Provides iconv for systems which don’t have one (or that cannot convert from/to Unicode.) / GPL and LGPL |
| [libopenblas](http://www.openblas.net/) | 0.2.20 | An Optimized BLAS library / BSD |
| [libpng](http://www.libpng.org/pub/png/libpng.html) | 1.6.35 | PNG reference library. / zlib/libpng |
| [libsodium](http://libsodium.org) | 1.0.16 | A modern and easy-to-use crypto library. / ISC |
| [libssh2](https://www.libssh2.org/) | 1.8.0 | the SSH library / BSD 3-Clause |
| [libstdcxx-ng](https://gcc.gnu.org/) | 8.2.0 | The GNU C++ Runtime Library / GPL3 with runtime exception |
| [libtiff](http://www.libtiff.org/) | 4.0.9 | Support for the Tag Image File Format (TIFF). / HPND |
| [libuuid](http://sourceforge.net/projects/libuuid/) | 1.0.3 | Portable uuid C library. / BSD 3-Clause |
| [libxcb](http://xcb.freedesktop.org/) | 1.13 | This is the C-language Binding (XCB) package to the X Window System protocol / MIT |
| [libxml2](http://xmlsoft.org/) | 2.9.8 | The XML C parser and toolkit of Gnome / MIT |
| [libxslt](http://xmlsoft.org/XSLT/) | 1.1.32 | The XSLT C library developed for the GNOME project / MIT |
| [locket](https://github.com/mwilliamson/locket.py) | 0.2.0 | File-based locks for Python for Linux and Windows / BSD 2-Clause |
| [lxml](http://lxml.de/) | 4.2.5 | Pythonic binding for the C libraries libxml2 and libxslt. / BSD 3-Clause, GPL-2.0, ZPL-2.0, and ElementTree |
| [lz4-c](https://www.lz4.org) | 1.8.1.2 | Extremely Fast Compression algorithm / BSD 2-clause |
| [lzo](http://www.oberhumer.com/opensource/lzo/) | 2.10 | LZO is a portable lossless data compression library written in ANSI C. / GPL v2+ |
| [markupsafe](https://www.palletsprojects.com/p/markupsafe) | 1.1.0 | A Python module that implements the jinja2.Markup string / BSD-3-Clause |
| [matplotlib](http://matplotlib.org/) | 3.0.2 | Publication quality figures in Python / PSF-based |
| [mccabe](https://github.com/PyCQA/mccabe) | 0.6.1 | McCabe complexity checker for Python / MIT |
| [mistune](https://github.com/lepture/mistune) | 0.8.4 | The fastest markdown parser in pure Python. / BSD 3-Clause |
| [more-itertools](https://github.com/erikrose/more-itertools) | 4.3.0 | More routines for operating on iterables, beyond itertools / MIT |
| [mpc](http://www.multiprecision.org/) | 1.1.0 | A C library for the arithmetic of complex numbers with arbitrarily high precision. / LGPL 3 |
| [mpfr](http://www.mpfr.org/) | 4.0.1 | The MPFR library is a C library for multiple-precision floating-point computations with correct rounding. / LGPL 3 |
| [mpmath](http://mpmath.org) | 1.1.0 | Python library for arbitrary-precision floating-point arithmetic / BSD 3-Clause |
| [msgpack-python](http://msgpack.org/) | 0.5.6 | MessagePack (de)serializer. / Apache 2.0 |
| [multipledispatch](https://github.com/mrocklin/multipledispatch/) | 0.6.0 | Multiple dispatch in Python / BSD 3-Clause |
| [nbconvert](http://jupyter.org) | 5.3.1 | Converting Jupyter Notebooks / BSD-3-Clause |
| [nbformat](http://jupyter.org) | 4.4.0 | The reference implementation of the Jupyter Notebook format / BSD 3-clause |
| [ncurses](http://www.gnu.org/software/ncurses/) | 6.1 | Library for text-based user interfaces / Free software (MIT-like) |
| [networkx](https://networkx.github.io/) | 2.2 | Python package for creating and manipulating complex networks / BSD 3-Clause |
| [nltk](http://nltk.org/) | 3.4 | Build Python programs to work with human language data / Apache 2.0 |
| [nose](http://readthedocs.org/docs/nose/) | 1.3.7 | Nose extends unittest to make testing easier / LGPL-2.1 |
| [notebook](http://jupyter.org) | 5.7.4 | Jupyter Notebook / BSD 3-clause |
| [numexpr](https://github.com/pydata/numexpr) | 2.6.7 | Fast numerical expression evaluator for NumPy. / MIT |
| [numpy](http://numpy.scipy.org/) | 1.14.5 | Array processing for numbers, strings, records, and objects. / BSD 3-Clause |
| numpy-base | 1.14.5 | |
| [numpydoc](https://github.com/numpy/numpydoc) | 0.8.0 | Sphinx extension to support docstrings in Numpy format / BSD 3-Clause |
| [odo](http://odo.pydata.org) | 0.5.1 | Data migration in Python / BSD-3-Clause |
| [olefile](http://www.decalage.info/python/olefileio) | 0.46 | parse, read and write Microsoft OLE2 files / BSD 2-Clause |
| [openblas](http://www.openblas.net/) | 0.2.20 | An Optimized BLAS library / BSD |
| openblas-devel | 0.2.20 | |
| [openpyxl](https://openpyxl.readthedocs.io) | 2.5.12 | A Python library to read/write Excel 2010 xlsx/xlsm files / MIT |
| [openssl](http://www.openssl.org/) | 1.1.1a | OpenSSL is an open-source implementation of the SSL and TLS protocols / OpenSSL |
| [packaging](https://github.com/pypa/packaging) | 18.0 | Core utilities for Python packages / Apache 2.0 or BSD 2-Clause |
| [pandas](http://pandas.pydata.org) | 0.23.4 | High-performance, easy-to-use data structures and data analysis tools. / BSD 3-clause |
| [pandoc](http://pandoc.org/) | 2.0.0.1 | Universal markup converter (repackaged binaries). / GPL-2.0 |
| [pandocfilters](https://github.com/jgm/pandocfilters) | 1.4.2 | A python module for writing pandoc filters / BSD-3-Clause |
| [parso](https://github.com/davidhalter/parso) | 0.3.1 | A Python Parser / MIT |
| [partd](https://github.com/dask/partd) | 0.3.9 | Data structure for on-disk shuffle operations / BSD 3-Clause |
| [patchelf](http://nixos.org/patchelf.html) | 0.9 | A small utility to modify the dynamic linker and RPATH of ELF executables. / GPL 3 |
| [path.py](https://github.com/jaraco/path.py) | 11.5.0 | A module wrapper for os.path / MIT |
| [pathlib2](https://github.com/mcmtroffaes/pathlib2) | 2.3.3 | Fork of pathlib aiming to support the full stdlib Python API. / MIT |
| [patsy](https://github.com/pydata/patsy) | 0.5.1 | Describing statistical models in Python using symbolic formulas / BSD-2-Clause, PSF2 |
| [pcre](http://www.pcre.org/) | 8.42 | Regular expression pattern matching using the same syntax and semantics as Perl 5. / BSD 3-Clause |
| [pep8](http://pep8.readthedocs.org/) | 1.7.1 | Python style guide checker / MIT |
| [pexpect](http://pexpect.sourceforge.net/) | 4.6.0 | Pexpect makes Python a better tool for controlling other applications. / ISC |
| [pickleshare](https://github.com/pickleshare/pickleshare/) | 0.7.5 | Tiny ‘shelve’-like database with concurrency support / MIT |
| [pillow](https://pillow.readthedocs.io) | 5.3.0 | Pillow is the friendly PIL fork by Alex Clark and Contributors / PIL |
| [pip](https://pip.pypa.io/en/stable/) | 18.1 | PyPA recommended tool for installing Python packages / MIT |
| [pixman](http://www.pixman.org/) | 0.34.0 | A low-level software library for pixel manipulation. / MIT |
| [pkginfo](https://code.launchpad.net/~tseaver/pkginfo/trunk) | 1.4.2 | Query metadatdata from sdists / bdists / installed packages. / MIT |
| [pluggy](https://github.com/pytest-dev/pluggy) | 0.8.0 | Plugin registration and hook calling for Python / MIT |
| [ply](http://www.dabeaz.com/ply/index.html) | 3.11 | Python Lex-Yacc / BSD 3-clause |
| [prometheus\_client](https://github.com/prometheus/client_python) | 0.5.0 | Python client for the Prometheus monitoring system / Apache 2.0 |
| [prompt\_toolkit](https://github.com/jonathanslenders/python-prompt-toolkit) | 2.0.7 | Library for building powerful interactive command lines in Python / BSD 3-clause |
| [psutil](https://github.com/giampaolo/psutil) | 5.4.8 | A cross-platform process and system utilities module for Python / BSD 3-Clause |
| [ptyprocess](https://github.com/pexpect/ptyprocess) | 0.6.0 | Run a subprocess in a pseudo terminal / ISC |
| [py](https://github.com/pytest-dev/py) | 1.7.0 | library with cross-python path, ini-parsing, io, code, log facilities / MIT |
| [pyasn1-modules](http://pyasn1.sourceforge.net/) | 0.2.2 | A collection of ASN.1-based protocols modules. / BSD 2-Clause |
| [pycodestyle](https://pycodestyle.readthedocs.io/) | 2.4.0 | Python style guide checker / MIT |
| [pycosat](https://github.com/ContinuumIO/pycosat) | 0.6.3 | Bindings to picosat (a SAT solver) / MIT |
| [pycparser](https://github.com/eliben/pycparser) | 2.19 | Complete C99 parser in pure Python / BSD 3-clause |
| [pycrypto](http://www.pycrypto.org/) | 2.6.1 | Cryptographic modules for Python. / Public Domain |
| [pycurl](http://pycurl.sourceforge.net/) | 7.43.0.2 | A Python Interface To The cURL library / LGPL, MIT |
| [pyflakes](https://github.com/PyCQA/pyflakes) | 2.0.0 | Pyflakes analyzes programs and detects various errors. / MIT |
| [pygments](http://pygments.org/) | 2.3.1 | Generic syntax highlighting package / BSD 2-clause |
| [pylint](http://www.pylint.org/) | 2.2.2 | python code static checker / GPL |
| [pyodbc](https://github.com/mkleehammer/pyodbc) | 4.0.25 | DB API Module for ODBC / MIT |
| [pyopenssl](https://github.com/pyca/pyopenssl) | 18.0.0 | Python wrapper module around the OpenSSL library / Apache 2.0 |
| [pyparsing](http://pyparsing.wikispaces.com/) | 2.3.0 | Create and execute simple grammars / MIT |
| [pysocks](https://github.com/Anorov/PySocks) | 1.6.8 | A Python SOCKS client module. See [Anorov/PySocks](https://github.com/Anorov/PySocks) for more information. / BSD 3-Clause |
| [pytables](http://www.pytables.org) | 3.4.4 | Brings together Python, HDF5 and NumPy to easily handle large amounts of data. / BSD 3-Clause |
| [pytest](https://docs.pytest.org/en/latest/) | 4.0.2 | Simple and powerful testing with Python. / MIT |
| [pytest-arraydiff](https://github.com/astrofrog/pytest-arraydiff) | 0.3 | pytest plugin to help with comparing array output from tests / BSD |
| [pytest-astropy](https://github.com/astropy/pytest-astropy) | 0.5.0 | Meta-package containing dependencies for testing Astropy / BSD |
| [pytest-doctestplus](https://github.com/astropy/pytest-doctestplus) | 0.2.0 | Pytest plugin with advanced doctest features / BSD |
| [pytest-openfiles](https://github.com/astropy/pytest-openfiles) | 0.3.1 | Pytest plugin for detecting inadvertent open file handles / BSD |
| [pytest-remotedata](https://github.com/astropy/pytest-remotedata) | 0.3.1 | Pytest plugin for controlling remote data access / BSD |
| [python](http://www.python.org/) | 3.7.1 | General purpose programming language / PSF |
| [python-dateutil](https://dateutil.readthedocs.org/) | 2.7.5 | Extensions to the standard Python datetime module. / BSD 3 Clause |
| python-libarchive-c | 2.8 | |
| [pytz](http://pythonhosted.org/pytz/) | 2018.7 | World timezone definitions, modern and historical. / MIT |
| [pywavelets](https://github.com/PyWavelets/pywt) | 1.0.1 | Discrete Wavelet Transforms in Python. / MIT |
| [pyyaml](http://pyyaml.org/wiki/PyYAML) | 3.13 | YAML parser and emitter for Python / MIT |
| [pyzmq](https://github.com/zeromq/pyzmq) | 17.1.2 | Python bindings for zeromq / BSD 3-clause |
| [readline](https://cnswww.cns.cwru.edu/php/chet/readline/rltop.html) | 7.0 | library for editing command lines as they are typed in / GPL-3.0 |
| [requests](http://python-requests.org) | 2.21.0 | Python HTTP for Humans / Apache 2.0 |
| [ruamel\_yaml](https://bitbucket.org/ruamel/yaml) | 0.15.46 | A patched copy of ruamel.yaml. / MIT |
| [scikit-image](http://scikit-image.org/) | 0.14.1 | Image processing routines for SciPy. / BSD 3-Clause |
| [scikit-learn](http://scikit-learn.org/) | 0.19.1 | A set of python modules for machine learning and data mining / BSD 3-Clause |
| [scipy](http://www.scipy.org/) | 1.1.0 | Scientific Library for Python / BSD 3-Clause |
| [seaborn](https://seaborn.pydata.org) | 0.9.0 | Statistical data visualization / BSD 3-Clause |
| [send2trash](https://github.com/hsoft/send2trash) | 1.5.0 | Python library to natively send files to Trash (or Recycle bin) on all platforms. / BSD-3-Clause |
| [setuptools](https://github.com/pypa/setuptools) | 40.6.3 | Download, build, install, upgrade, and uninstall Python packages / MIT |
| [simplegeneric](http://cheeseshop.python.org/pypi/simplegeneric) | 0.8.1 | Simple generic functions (similar to Python’s own len(), pickle.dump(), etc.) / Zope Public |
| [singledispatch](http://docs.python.org/3/library/functools.html#functools.singledispatch) | 3.4.0.3 | Transforms a function into a single-dispatch generic function / MIT |
| [six](http://pypi.python.org/pypi/six/) | 1.12.0 | Python 2 and 3 compatibility utilities / MIT |
| [snappy](https://github.com/google/snappy) | 1.1.7 | A fast compressor/decompressor / BSD 3-clause |
| [snowballstemmer](https://github.com/shibukawa/snowball_py) | 1.2.1 | Snowball stemming library collection for Python / BSD-2-Clause |
| [sortedcollections](http://www.grantjenks.com/docs/sortedcollections/) | 1.0.1 | Python Sorted Collections / Apache-2.0 |
| [sortedcontainers](http://www.grantjenks.com/docs/sortedcontainers/) | 2.1.0 | Python Sorted Container Types: SortedList, SortedDict, and SortedSet / Apache 2.0 |
| [sphinx](http://www.sphinx-doc.org) | 1.8.2 | Sphinx is a tool that makes it easy to create intelligent and beautiful documentation / BSD 2-clause |
| sphinxcontrib | 1.0 | Python namespace for sphinxcontrib / BSD |
| [sphinxcontrib-websupport](https://pypi.python.org/pypi/sphinxcontrib-websupport) | 1.1.0 | Sphinx API for Web Apps / BSD-2-Clause |
| [sqlalchemy](http://www.sqlalchemy.org/) | 1.2.15 | Database Abstraction Library. / MIT |
| [sqlite](http://www.sqlite.org/) | 3.26.0 | Implements a self-contained, zero-configuration, SQL database engine. / Public-Domain (`<http://www.sqlite.org/copyright.html>`) |
| [statsmodels](https://www.statsmodels.org) | 0.9.0 | Statistical computations and models for use with SciPy / BSD 3-Clause |
| [sympy](http://sympy.org) | 1.3 | Python library for symbolic mathematics / 3-clause BSD |
| [tblib](https://github.com/ionelmc/python-tblib) | 1.3.2 | Traceback serialization library. / BSD 2-Clause |
| [terminado](https://github.com/jupyter/terminado) | 0.8.1 | Terminals served by tornado websockets / BSD 2-clause |
| [testpath](https://testpath.readthedocs.io) | 0.4.2 | Testpath is a collection of utilities for Python code working with files and commands. / BSD-3-Clause |
| [tk](http://www.tcl.tk/) | 8.6.8 | A dynamic programming language with GUI support. Bundles Tcl and Tk. / Tcl/Tk |
| [toolz](http://toolz.readthedocs.org/) | 0.9.0 | A functional standard library for Python. / BSD 3-Clause |
| [tornado](http://www.tornadoweb.org/) | 5.1.1 | A Python web framework and asynchronous networking library, originally developed at FriendFeed. / Apache 2.0 |
| [tqdm](https://pypi.python.org/pypi/tqdm) | 4.28.1 | A Fast, Extensible Progress Meter / MPLv2.0, MIT |
| [traitlets](http://ipython.org/) | 4.3.2 | Configuration system for Python applications / BSD 3-clause |
| [unicodecsv](https://github.com/jdunck/python-unicodecsv) | 0.14.1 | Drop-in replacement for csv module which supports unicode strings / BSD |
| [unixodbc](http://www.unixodbc.org/) | 2.3.7 | ODBC on non MS Windows platforms / LGPL-2.1 |
| [urllib3](https://urllib3.readthedocs.io/) | 1.24.1 | HTTP library with thread-safe connection pooling, file post, and more. / MIT |
| [wcwidth](https://github.com/jquast/wcwidth) | 0.1.7 | Measures number of Terminal column cells of wide-character codes. / MIT |
| [webencodings](https://github.com/gsnedders/python-webencodings) | 0.5.1 | Character encoding aliases for legacy web content / BSD 3-Clause |
| [werkzeug](http://werkzeug.pocoo.org/) | 0.14.1 | The Python WSGI Utility Library. / BSD 3-Clause |
| [wheel](https://github.com/pypa/wheel) | 0.32.3 | A built-package format for Python. / MIT |
| [widgetsnbextension](http://ipython.org) | 3.4.2 | Interactive Widgets for Jupyter / BSD 3-clause |
| [wrapt](https://github.com/GrahamDumpleton/wrapt) | 1.10.11 | Module for decorators, wrappers and monkey patching. / BSD 2-Clause |
| [xlrd](http://www.python-excel.org/) | 1.2.0 | Library for developers to extract data from Microsoft Excel (tm) spreadsheet files / BSD 3-Clause and BSD with advertising |
| [xlsxwriter](https://xlsxwriter.readthedocs.io/) | 1.1.2 | A Python module for creating Excel XLSX files / BSD 2-Clause |
| [xlwt](http://www.python-excel.org/) | 1.3.0 | Writing data and formatting information to Excel files / BSD |
| [xz](http://tukaani.org/xz/) | 5.2.4 | Data compression software with high compression ratio / LGPL-2.1 and GPL-2.0 |
| [yaml](http://pyyaml.org/wiki/LibYAML) | 0.1.7 | A C library for parsing and emitting YAML. / MIT |
| [zeromq](http://zeromq.org) | 4.2.5 | A high-performance asynchronous messaging library. / LGPL 3 |
| [zict](http://github.com/mrocklin/zict) | 0.1.3 | Composable Dictionary Classes / BSD 3-Clause |
| [zlib](http://zlib.net/) | 1.2.11 | Massively spiffy yet delicately unobtrusive compression library / zlib |
| [zstd](http://www.zstd.net) | 1.3.7 | Zstandard - Fast real-time compression algorithm / BSD 3-Clause |
| Name | Version | Summary / License |
|---|---|---|
| [\_ipyw\_jlab\_nb\_ext\_conf](https://github.com/ContinuumIO/anaconda-nb-extensions-meta-config) | 0.1.0 | A configuration metapackage for enabling Anaconda-bundled jupyter extensions / BSD |
| [alabaster](http://www.sphinx-doc.org/en/stable/index.html) | 0.7.12 | Configurable, Python 2+3 compatible Sphinx theme. / BSD 3-Clause |
| [anaconda-client](http://anaconda.org) | 1.7.2 | anaconda.org command line client library / BSD 3-clause |
| [anaconda-navigator](https://github.com/ContinuumIO/navigator) | 1.9.6 | Anaconda Navigator / proprietary - Continuum Analytics, Inc. |
| [anaconda-project](https://github.com/Anaconda-Platform/anaconda-project) | 0.8.2 | Tool for encapsulating, running, and reproducing data science projects / BSD 3-Clause |
| [asn1crypto](https://github.com/wbond/asn1crypto) | 0.24.0 | Python ASN.1 library with a focus on performance and a pythonic API / MIT |
| [astroid](https://www.astroid.org/) | 2.1.0 | A abstract syntax tree for Python with inference support. / LGPL 2.1 |
| [astropy](http://www.astropy.org/) | 3.1 | Community-developed Python Library for Astronomy / BSD |
| [atomicwrites](https://github.com/untitaker/python-atomicwrites) | 1.2.1 | Atomic file writes. / MIT |
| [attrs](https://attrs.readthedocs.io/en/stable/) | 18.2.0 | attrs is the Python package that will bring back the joy of writing classes by relieving you from the drudgery of implementing object protocols (aka dunder methods). / MIT |
| [automat](https://github.com/glyph/Automat) | 0.7.0 | self-service finite-state machines for the programmer on the go / MIT |
| [babel](http://babel.pocoo.org/) | 2.6.0 | Utilities to internationalize and localize Python applications / BSD 3-clause |
| [backcall](https://github.com/takluyver/backcall/) | 0.1.0 | Specifications for callback functions passed in to an API / BSD-3-Clause |
| [backports](https://bitbucket.org/brandon/backports) | 1.0 | / BSD |
| [backports.os](https://github.com/pjdelport/backports.os) | 0.1.1 | Backport of new features in Python’s os module / Python Software Foundation |
| [backports.shutil\_get\_terminal\_size](https://github.com/chrippa/backports.shutil_get_terminal_size) | 1.0.0 | A backport of the get\_terminal\_size function from Python 3.3’s shutil. / MIT |
| [beautifulsoup4](http://www.crummy.com/software/BeautifulSoup/) | 4.6.3 | Python library designed for screen-scraping / MIT |
| [bitarray](https://github.com/ilanschnell/bitarray) | 0.8.3 | efficient arrays of booleans – C extension / PSF |
| [bkcharts](http://github.com/bokeh/bkcharts) | 0.2 | High level chart types built on top of Bokeh / BSD 3-Clause |
| blas | 1.0 | |
| [blaze](http://blaze.pydata.org) | 0.11.3 | NumPy and Pandas interface to big data / BSD 3-Clause |
| [bleach](https://github.com/mozilla/bleach) | 3.0.2 | Easy, whitelist-based HTML-sanitizing tool / Apache-2.0 |
| [blosc](https://github.com/Blosc/c-blosc) | 1.14.4 | A blocking, shuffling and loss-less compression library that can be faster than memcpy() / BSD 3-Clause |
| [bokeh](http://bokeh.pydata.org/) | 1.0.2 | Statistical and novel interactive HTML plots for Python / BSD 3-Clause |
| [boto](https://github.com/boto/boto/) | 2.49.0 | Amazon Web Services Library / MIT |
| [bottleneck](http://berkeleyanalytics.com/bottleneck) | 1.2.1 | Fast NumPy array functions written in Cython. / BSD 2-Clause |
| [bzip2](http://www.bzip.org/) | 1.0.6 | high-quality data compressor / bzip2 |
| [ca-certificates](https://github.com/conda-forge/ca-certificates-feedstock) | 2018.03.07 | Certificates for use with other packages. / ISC |
| [cairo](http://cairographics.org/) | 1.14.12 | Cairo is a 2D graphics library with support for multiple output devices. / LGPL 2.1 or MPL 1.1 |
| [certifi](http://certifi.io/) | 2018.11.29 | Python package for providing Mozilla’s CA Bundle. / ISC |
| [cffi](https://bitbucket.org/cffi/cffi) | 1.11.5 | Foreign Function Interface for Python calling C code. / MIT |
| [chardet](https://github.com/chardet/chardet) | 3.0.4 | Universal character encoding detector / LGPL2 |
| [click](https://palletsprojects.com/p/click) | 7.0 | Python composable command line interface toolkit / BSD-3-Clause |
| [cloudpickle](https://github.com/cloudpipe/cloudpickle) | 0.6.1 | Extended pickling support for Python objects / BSD 3-Clause |
| [clyent](https://github.com/Anaconda-Platform/clyent) | 1.2.2 | Command line client library for windows and posix / BSD 3-Clause |
| [colorama](https://github.com/tartley/colorama) | 0.4.1 | Cross-platform colored terminal text / BSD-3-Clause |
| [conda](https://conda.io) | 4.5.12 | OS-agnostic, system-level binary package and environment manager. / BSD 3-Clause |
| [conda-build](https://github.com/conda/conda-build) | 3.17.6 | tools for building conda packages / BSD 3-Clause |
| [conda-env](https://github.com/conda/conda-env) | 2.6.0 | Tools for interacting with conda environments. / BSD 3-Clause |
| [conda-verify](https://github.com/conda/conda-verify) | 3.1.1 | tool for validating conda recipes and conda packages / BSD 3-Clause |
| [constantly](https://github.com/twisted/constantly) | 15.1.0 | Symbolic constants in Python / MIT |
| [contextlib2](http://contextlib2.readthedocs.org) | 0.5.5 | Backports and enhancements for the contextlib module / PSF |
| [cryptography](https://github.com/pyca/cryptography) | 2.4.2 | Provides cryptographic recipes and primitives to Python developers / Apache 2.0 or BSD 3-Clause, PSF 2 |
| [curl](http://curl.haxx.se/) | 7.63.0 | tool and library for transferring data with URL syntax / MIT/X derivate (`<http://curl.haxx.se/docs/copyright.html>`) |
| [cycler](http://matplotlib.org/cycler) | 0.10.0 | Composable style cycles. / BSD 3-Clause |
| [cython](http://www.cython.org/) | 0.29.2 | The Cython compiler for writing C extensions for the Python language / Apache-2.0 |
| [cytoolz](https://github.com/pytoolz/cytoolz) | 0.9.0.1 | Cython implementation of Toolz. High performance functional utilities. / BSD 3-Clause |
| [dask](http://github.com/dask/dask/) | 1.0.0 | Parallel Python with task scheduling / BSD 3-Clause |
| [dask-core](http://github.com/dask/dask/) | 1.0.0 | Parallel Python with task scheduling / BSD 3-Clause |
| [datashape](http://datashape.pydata.org) | 0.5.4 | A data description language. / BSD 2-Clause |
| [dbus](http://www.freedesktop.org/wiki/Software/dbus/) | 1.13.2 | Simple message bus system for applications to talk to one another / GPL2 |
| [decorator](https://github.com/micheles/decorator) | 4.3.0 | Better living through Python with decorators. / BSD 3-Clause |
| [defusedxml](https://bitbucket.org/tiran/defusedxml) | 0.5.0 | XML bomb protection for Python stdlib modules / PSF 2.0 |
| [distributed](http://distributed.readthedocs.io/en/latest/) | 1.25.1 | Distributed computing with Dask / BSD 3-Clause |
| [docutils](http://docutils.sourceforge.net/) | 0.14 | Docutils – Python Documentation Utilities / Public Domain Dedictation and BSD 2-Clause and PSF 2.1.1 and GPL 3.0 |
| [entrypoints](https://github.com/takluyver/entrypoints) | 0.2.3 | Discover and load entry points from installed packages. / MIT License |
| [et\_xmlfile](https://bitbucket.org/openpyxl/et_xmlfile) | 1.0.1 | An implementation of lxml.xmlfile for the standard library / MIT |
| [expat](http://expat.sourceforge.net/) | 2.2.6 | Expat XML parser library in C. / MIT |
| [fastcache](https://github.com/pbrady/fastcache) | 1.0.2 | C implementation of Python 3 lru\_cache / MIT |
| [filelock](https://github.com/benediktschmitt/py-filelock) | 3.0.10 | A platform independent file lock. / Public Domain |
| [flask](http://flask.pocoo.org) | 1.0.2 | A microframework based on Werkzeug, Jinja2 and good intentions. / BSD 3-Clause |
| [flask-cors](https://github.com/corydolphin/flask-cors) | 3.0.7 | A Flask extension adding a decorator for CORS support / MIT |
| [fontconfig](http://www.freedesktop.org/wiki/Software/fontconfig/) | 2.13.0 | A library for configuring and customizing font access. / MIT |
| [freetype](https://www.freetype.org/) | 2.9.1 | A Free, High-Quality, and Portable Font Engine / GPL-2.0 and FreeType |
| [fribidi](https://github.com/fribidi/fribidi) | 1.0.5 | The Free Implementation of the Unicode Bidirectional Algorithm. / LGPL-2.1 |
| [future](http://python-future.org) | 0.17.1 | Clean single-source support for Python 3 and 2 / MIT |
| [get\_terminal\_size](https://github.com/chrippa/backports.shutil_get_terminal_size) | 1.0.0 | Get the size of the terminal window. / MIT |
| [gevent](http://www.gevent.org/) | 1.3.7 | Coroutine-based network library / MIT |
| [glib](https://developer.gnome.org/glib/) | 2.56.2 | Provides core application building blocks for libraries and applications written in C. / LGPL-2.1 |
| [glob2](https://github.com/miracle2k/python-glob2) | 0.6 | Version of the glob module that supports recursion via \*\*, and can capture patterns. / BSD-2-Clause |
| [gmp](http://gmplib.org/) | 6.1.2 | The GNU multiprecision library. / GPL 2 and LGPL 3 |
| [gmpy2](https://pypi.python.org/pypi/gmpy2) | 2.0.8 | GMP/MPIR, MPFR, and MPC interface to Python 2.6+ and 3.x / LGPL 3 |
| [graphite2](http://graphite.sil.org/) | 1.3.12 | A “smart font” system that handles the complexities of lesser-known languages of the world. / LGPLv2 |
| [greenlet](https://github.com/python-greenlet/greenlet) | 0.4.15 | Lightweight in-process concurrent programming / MIT |
| [gst-plugins-base](http://gstreamer.freedesktop.org/) | 1.14.0 | GStreamer Base Plug-ins / GPL2 |
| [gstreamer](http://gstreamer.freedesktop.org/) | 1.14.0 | Library for constructing graphs of media-handling components / LGPL 2 |
| [h5py](http://www.h5py.org/) | 2.8.0 | Read and write HDF5 files from Python. / BSD 3-Clause |
| [harfbuzz](http://www.freedesktop.org/wiki/Software/HarfBuzz/) | 1.8.8 | An OpenType text shaping engine. / MIT |
| [hdf5](http://www.hdfgroup.org/HDF5/) | 1.10.2 | HDF5 is a data model, library, and file format for storing and managing data / HDF5 |
| [heapdict](http://stutzbachenterprises.com/) | 1.0.0 | A heap with decrease-key and increase-key operations / BSD 3-Clause |
| [html5lib](https://github.com/html5lib/html5lib-python) | 1.0.1 | HTML parser based on the WHATWG HTML specification / MIT |
| [hyperlink](https://github.com/python-hyper/hyperlink) | 18.0.0 | Immutable, Pythonic, correct URLs. / MIT |
| [icu](http://site.icu-project.org/) | 58.2 | International Components for Unicode. / MIT |
| [idna](https://github.com/kjd/idna) | 2.8 | Internationalized Domain Names in Applications (IDNA). / BSD Like |
| [imageio](http://imageio.github.io) | 2.4.1 | a Python library for reading and writing image data / BSD 2-Clause |
| [imagesize](https://github.com/shibukawa/imagesize_py) | 1.1.0 | Getting image size from png/jpeg/jpeg2000/gif file / MIT |
| [importlib\_metadata](http://importlib-metadata.readthedocs.io) | 0.6 | A library to access the metadata for a Python package / APACHE-2.0 |
| [incremental](https://twistedmatrix.com) | 17.5.0 | A library that versions your Python projects / MIT License |
| [intel-openmp](https://software.intel.com/en-us/node/522690) | 2019.1 | Math library for Intel and compatible processors / proprietary - Intel |
| [ipykernel](https://ipython.org) | 5.1.0 | IPython Kernel for Jupyter / BSD-3-Clause |
| [ipython](https://ipython.org/) | 7.2.0 | IPython: Productive Interactive Computing / BSD-3-Clause |
| [ipython\_genutils](http://ipython.org) | 0.2.0 | vestigial utilities from IPython / BSD 3-Clause |
| [ipywidgets](https://github.com/ipython/ipywidgets) | 7.4.2 | Jupyter Interactive Widgets / BSD 3-clause |
| [isort](https://github.com/timothycrosley/isort) | 4.3.4 | A Python utility / library to sort Python imports. / MIT |
| [itsdangerous](https://github.com/pallets/itsdangerous) | 1.1.0 | Various helpers to pass trusted data to untrusted environments. / BSD 3-Clause |
| [jbig](https://www.cl.cam.ac.uk/~mgk25/jbigkit) | 2.1 | Implementation of the JBIG1 data compression standard / GPL-2.0 |
| [jdcal](https://github.com/phn/jdcal) | 1.4 | Julian dates from proleptic Gregorian and Julian calendars. / BSD 2-Clause |
| [jedi](https://github.com/davidhalter/jedi/) | 0.13.2 | An autocompletion tool for Python that can be used for text editors. / MIT |
| [jeepney](https://gitlab.com/takluyver/jeepney) | 0.4 | Pure Python DBus interface / MIT |
| [jinja2](http://jinja.pocoo.org) | 2.10 | An easy to use stand-alone template engine written in pure python. / 3-Clause BSD |
| [jpeg](http://www.ijg.org/) | 9b | read/write jpeg COM, EXIF, IPTC medata / Custom free software license |
| [jsonschema](https://github.com/Julian/jsonschema) | 2.6.0 | An implementation of JSON Schema validation for Python / MIT |
| [jupyter](http://jupyter.org) | 1.0.0 | Jupyter metapackage. Install all the Jupyter components in one go. / BSD 3-Clause |
| [jupyter\_client](http://jupyter.org) | 5.2.4 | Jupyter protocol implementation and client libraries / BSD 3-clause |
| [jupyter\_console](http://jupyter.org) | 6.0.0 | Jupyter terminal console / BSD-3-Clause |
| [jupyter\_core](http://jupyter.org) | 4.4.0 | Core common functionality of Jupyter projects. / BSD 3-clause |
| [jupyterlab](https://github.com/jupyterlab/jupyterlab) | 0.35.3 | JupyterLab PRE-ALPHA / BSD-3-Clause |
| [jupyterlab\_server](http://github.com/jupyterlab/jupyterlab_server) | 0.2.0 | A set of server components for JupyterLab and JupyterLab like applications. / BSD 3-Clause |
| [keyring](https://github.com/jaraco/keyring) | 17.0.0 | Store and access your passwords safely / Python Software Foundation or MIT |
| [kiwisolver](https://github.com/nucleic/kiwi) | 1.0.1 | A fast implementation of the Cassowary constraint solver / BSD 3-Clause |
| [krb5](http://web.mit.edu/kerberos/) | 1.16.1 | A network authentication protocol. / MIT |
| [lazy-object-proxy](https://github.com/ionelmc/python-lazy-object-proxy) | 1.3.1 | A fast and thorough lazy object proxy. / BSD 2-Clause |
| [libarchive](http://www.libarchive.org/) | 3.3.3 | Multi-format archive and compression library / BSD 2-Clause |
| [libcurl](http://curl.haxx.se/) | 7.63.0 | tool and library for transferring data with URL syntax / MIT/X derivate (`<http://curl.haxx.se/docs/copyright.html>`) |
| [libedit](http://thrysoee.dk/editline/) | 3.1.20170329 | Editline Library (libedit) / NetBSD |
| [libffi](https://sourceware.org/libffi/) | 3.2.1 | A Portable Foreign Function Interface Library. / Custom |
| [libgcc-ng](https://gcc.gnu.org/onlinedocs/gccint/Libgcc.html) | 8.2.0 | The GCC low-level runtime library / GPL |
| [libgfortran-ng](https://gcc.gnu.org/) | 7.3.0 | The GNU Fortran Runtime Library / GPL |
| [liblief](https://lief.quarkslab.com/) | 0.9.0 | A cross platform library to parse, modify and abstract ELF, PE and MachO formats. / Apache 2.0 |
| [libpng](http://www.libpng.org/pub/png/libpng.html) | 1.6.35 | PNG reference library. / zlib/libpng |
| [libsodium](http://libsodium.org) | 1.0.16 | A modern and easy-to-use crypto library. / ISC |
| [libssh2](https://www.libssh2.org/) | 1.8.0 | the SSH library / BSD 3-Clause |
| [libstdcxx-ng](https://gcc.gnu.org/) | 8.2.0 | The GNU C++ Runtime Library / GPL3 with runtime exception |
| [libtiff](http://www.libtiff.org/) | 4.0.9 | Support for the Tag Image File Format (TIFF). / HPND |
| [libtool](http://www.gnu.org/software/libtool/) | 2.4.6 | The GNU Portable Library Tool / GPL 3 |
| [libuuid](http://sourceforge.net/projects/libuuid/) | 1.0.3 | Portable uuid C library. / BSD 3-Clause |
| [libxcb](http://xcb.freedesktop.org/) | 1.13 | This is the C-language Binding (XCB) package to the X Window System protocol / MIT |
| [libxml2](http://xmlsoft.org/) | 2.9.8 | The XML C parser and toolkit of Gnome / MIT |
| [libxslt](http://xmlsoft.org/XSLT/) | 1.1.32 | The XSLT C library developed for the GNOME project / MIT |
| [llvmlite](https://github.com/numba/llvmlite) | 0.26.0 | A lightweight LLVM python binding for writing JIT compilers / New BSD License |
| [locket](https://github.com/mwilliamson/locket.py) | 0.2.0 | File-based locks for Python for Linux and Windows / BSD 2-Clause |
| [lxml](http://lxml.de/) | 4.2.5 | Pythonic binding for the C libraries libxml2 and libxslt. / BSD 3-Clause, GPL-2.0, ZPL-2.0, and ElementTree |
| [lz4-c](https://www.lz4.org) | 1.8.1.2 | Extremely Fast Compression algorithm / BSD 2-clause |
| [lzo](http://www.oberhumer.com/opensource/lzo/) | 2.10 | LZO is a portable lossless data compression library written in ANSI C. / GPL v2+ |
| [markupsafe](https://www.palletsprojects.com/p/markupsafe) | 1.1.0 | A Python module that implements the jinja2.Markup string / BSD-3-Clause |
| [matplotlib](http://matplotlib.org/) | 3.0.2 | Publication quality figures in Python / PSF-based |
| [mccabe](https://github.com/PyCQA/mccabe) | 0.6.1 | McCabe complexity checker for Python / MIT |
| [mistune](https://github.com/lepture/mistune) | 0.8.4 | The fastest markdown parser in pure Python. / BSD 3-Clause |
| [mkl](https://software.intel.com/en-us/mkl) | 2019.1 | Math library for Intel and compatible processors / proprietary - Intel |
| [mkl-service](https://github.com/ContinuumIO/mkl-service) | 1.1.2 | Python bindings to MKL service functions / 3-clause BSD |
| [mkl\_fft](http://github.com/IntelPython/mkl_fft) | 1.0.6 | NumPy-based implementation of Fast Fourier Transform using Intel (R) Math Kernel Library. / BSD 3-Clause |
| [mkl\_random](http://github.com/IntelPython/mkl_random) | 1.0.2 | Intel (R) MKL-powered package for sampling from common probability distributions into NumPy arrays. / BSD 3-Clause |
| [more-itertools](https://github.com/erikrose/more-itertools) | 4.3.0 | More routines for operating on iterables, beyond itertools / MIT |
| [mpc](http://www.multiprecision.org/) | 1.1.0 | A C library for the arithmetic of complex numbers with arbitrarily high precision. / LGPL 3 |
| [mpfr](http://www.mpfr.org/) | 4.0.1 | The MPFR library is a C library for multiple-precision floating-point computations with correct rounding. / LGPL 3 |
| [mpmath](http://mpmath.org) | 1.1.0 | Python library for arbitrary-precision floating-point arithmetic / BSD 3-Clause |
| [msgpack-python](http://msgpack.org/) | 0.5.6 | MessagePack (de)serializer. / Apache 2.0 |
| [multipledispatch](https://github.com/mrocklin/multipledispatch/) | 0.6.0 | Multiple dispatch in Python / BSD 3-Clause |
| [navigator-updater](https://github.com/ContinuumIO/navigator-updater) | 0.2.1 | Anaconda Navigator Updater / proprietary - Continuum Analytics, Inc. |
| [nbconvert](http://jupyter.org) | 5.4.0 | Converting Jupyter Notebooks / BSD-3-Clause |
| [nbformat](http://jupyter.org) | 4.4.0 | The reference implementation of the Jupyter Notebook format / BSD 3-clause |
| [ncurses](http://www.gnu.org/software/ncurses/) | 6.1 | Library for text-based user interfaces / Free software (MIT-like) |
| [networkx](https://networkx.github.io/) | 2.2 | Python package for creating and manipulating complex networks / BSD 3-Clause |
| [nltk](http://nltk.org/) | 3.4 | Build Python programs to work with human language data / Apache 2.0 |
| [nose](http://readthedocs.org/docs/nose/) | 1.3.7 | Nose extends unittest to make testing easier / LGPL-2.1 |
| [notebook](http://jupyter.org) | 5.7.4 | Jupyter Notebook / BSD 3-clause |
| [numba](http://numba.github.com) | 0.41.0 | NumPy aware dynamic Python compiler using LLVM / BSD 2-clause |
| [numexpr](https://github.com/pydata/numexpr) | 2.6.8 | Fast numerical expression evaluator for NumPy. / MIT |
| [numpy](http://numpy.scipy.org/) | 1.15.4 | Array processing for numbers, strings, records, and objects. / BSD 3-Clause |
| numpy-base | 1.15.4 | |
| [numpydoc](https://github.com/numpy/numpydoc) | 0.8.0 | Sphinx extension to support docstrings in Numpy format / BSD 3-Clause |
| [odo](http://odo.pydata.org) | 0.5.1 | Data migration in Python / BSD-3-Clause |
| [olefile](http://www.decalage.info/python/olefileio) | 0.46 | parse, read and write Microsoft OLE2 files / BSD 2-Clause |
| [openpyxl](https://openpyxl.readthedocs.io) | 2.5.12 | A Python library to read/write Excel 2010 xlsx/xlsm files / MIT |
| [openssl](http://www.openssl.org/) | 1.1.1a | OpenSSL is an open-source implementation of the SSL and TLS protocols / OpenSSL |
| [packaging](https://github.com/pypa/packaging) | 18.0 | Core utilities for Python packages / Apache 2.0 or BSD 2-Clause |
| [pandas](http://pandas.pydata.org) | 0.23.4 | High-performance, easy-to-use data structures and data analysis tools. / BSD 3-clause |
| [pandoc](http://pandoc.org/) | 1.19.2.1 | Universal markup converter (repackaged binaries). / GPL-2.0 |
| [pandocfilters](https://github.com/jgm/pandocfilters) | 1.4.2 | A python module for writing pandoc filters / BSD-3-Clause |
| [pango](http://www.pango.org/) | 1.42.4 | Text layout and rendering engine. / LGPL-2.1 |
| [parso](https://github.com/davidhalter/parso) | 0.3.1 | A Python Parser / MIT |
| [partd](https://github.com/dask/partd) | 0.3.9 | Data structure for on-disk shuffle operations / BSD 3-Clause |
| [patchelf](http://nixos.org/patchelf.html) | 0.9 | A small utility to modify the dynamic linker and RPATH of ELF executables. / GPL 3 |
| [path.py](https://github.com/jaraco/path.py) | 11.5.0 | A module wrapper for os.path / MIT |
| [pathlib2](https://github.com/mcmtroffaes/pathlib2) | 2.3.3 | Fork of pathlib aiming to support the full stdlib Python API. / MIT |
| [patsy](https://github.com/pydata/patsy) | 0.5.1 | Describing statistical models in Python using symbolic formulas / BSD-2-Clause, PSF2 |
| [pcre](http://www.pcre.org/) | 8.42 | Regular expression pattern matching using the same syntax and semantics as Perl 5. / BSD 3-Clause |
| [pep8](http://pep8.readthedocs.org/) | 1.7.1 | Python style guide checker / MIT |
| [pexpect](http://pexpect.sourceforge.net/) | 4.6.0 | Pexpect makes Python a better tool for controlling other applications. / ISC |
| [pickleshare](https://github.com/pickleshare/pickleshare/) | 0.7.5 | Tiny ‘shelve’-like database with concurrency support / MIT |
| [pillow](https://pillow.readthedocs.io) | 5.3.0 | Pillow is the friendly PIL fork by Alex Clark and Contributors / PIL |
| [pip](https://pip.pypa.io/en/stable/) | 18.1 | PyPA recommended tool for installing Python packages / MIT |
| [pixman](http://www.pixman.org/) | 0.34.0 | A low-level software library for pixel manipulation. / MIT |
| [pkginfo](https://code.launchpad.net/~tseaver/pkginfo/trunk) | 1.4.2 | Query metadatdata from sdists / bdists / installed packages. / MIT |
| [pluggy](https://github.com/pytest-dev/pluggy) | 0.8.0 | Plugin registration and hook calling for Python / MIT |
| [ply](http://www.dabeaz.com/ply/index.html) | 3.11 | Python Lex-Yacc / BSD 3-clause |
| [prometheus\_client](https://github.com/prometheus/client_python) | 0.5.0 | Python client for the Prometheus monitoring system / Apache 2.0 |
| [prompt\_toolkit](https://github.com/jonathanslenders/python-prompt-toolkit) | 2.0.7 | Library for building powerful interactive command lines in Python / BSD 3-clause |
| [psutil](https://github.com/giampaolo/psutil) | 5.4.8 | A cross-platform process and system utilities module for Python / BSD 3-Clause |
| [ptyprocess](https://github.com/pexpect/ptyprocess) | 0.6.0 | Run a subprocess in a pseudo terminal / ISC |
| [py](https://github.com/pytest-dev/py) | 1.7.0 | library with cross-python path, ini-parsing, io, code, log facilities / MIT |
| [py-lief](https://lief.quarkslab.com/) | 0.9.0 | A cross platform library to parse, modify and abstract ELF, PE and MachO formats. / Apache 2.0 |
| [pyasn1-modules](http://pyasn1.sourceforge.net/) | 0.2.2 | A collection of ASN.1-based protocols modules. / BSD 2-Clause |
| [pycodestyle](https://pycodestyle.readthedocs.io/) | 2.4.0 | Python style guide checker / MIT |
| [pycosat](https://github.com/ContinuumIO/pycosat) | 0.6.3 | Bindings to picosat (a SAT solver) / MIT |
| [pycparser](https://github.com/eliben/pycparser) | 2.19 | Complete C99 parser in pure Python / BSD 3-clause |
| [pycrypto](http://www.pycrypto.org/) | 2.6.1 | Cryptographic modules for Python. / Public Domain |
| [pycurl](http://pycurl.sourceforge.net/) | 7.43.0.2 | A Python Interface To The cURL library / LGPL, MIT |
| [pyflakes](https://github.com/PyCQA/pyflakes) | 2.0.0 | Pyflakes analyzes programs and detects various errors. / MIT |
| [pygments](http://pygments.org/) | 2.3.1 | Generic syntax highlighting package / BSD 2-clause |
| [pylint](http://www.pylint.org/) | 2.2.2 | python code static checker / GPL |
| [pyodbc](https://github.com/mkleehammer/pyodbc) | 4.0.25 | DB API Module for ODBC / MIT |
| [pyopenssl](https://github.com/pyca/pyopenssl) | 18.0.0 | Python wrapper module around the OpenSSL library / Apache 2.0 |
| [pyparsing](http://pyparsing.wikispaces.com/) | 2.3.0 | Create and execute simple grammars / MIT |
| [pyqt](http://www.riverbankcomputing.co.uk/software/pyqt) | 5.9.2 | Python binding of the cross-platform GUI toolkit Qt. / Commercial, GPL-2.0, GPL-3.0 |
| [pysocks](https://github.com/Anorov/PySocks) | 1.6.8 | A Python SOCKS client module. See [Anorov/PySocks](https://github.com/Anorov/PySocks) for more information. / BSD 3-Clause |
| [pytables](http://www.pytables.org) | 3.4.4 | Brings together Python, HDF5 and NumPy to easily handle large amounts of data. / BSD 3-Clause |
| [pytest](https://docs.pytest.org/en/latest/) | 4.0.2 | Simple and powerful testing with Python. / MIT |
| [pytest-arraydiff](https://github.com/astrofrog/pytest-arraydiff) | 0.3 | pytest plugin to help with comparing array output from tests / BSD |
| [pytest-astropy](https://github.com/astropy/pytest-astropy) | 0.5.0 | Meta-package containing dependencies for testing Astropy / BSD |
| [pytest-doctestplus](https://github.com/astropy/pytest-doctestplus) | 0.2.0 | Pytest plugin with advanced doctest features / BSD |
| [pytest-openfiles](https://github.com/astropy/pytest-openfiles) | 0.3.1 | Pytest plugin for detecting inadvertent open file handles / BSD |
| [pytest-remotedata](https://github.com/astropy/pytest-remotedata) | 0.3.1 | Pytest plugin for controlling remote data access / BSD |
| [python](http://www.python.org/) | 3.7.1 | General purpose programming language / PSF |
| [python-dateutil](https://dateutil.readthedocs.org/) | 2.7.5 | Extensions to the standard Python datetime module. / BSD 3 Clause |
| python-libarchive-c | 2.8 | |
| [pytz](http://pythonhosted.org/pytz/) | 2018.7 | World timezone definitions, modern and historical. / MIT |
| [pywavelets](https://github.com/PyWavelets/pywt) | 1.0.1 | Discrete Wavelet Transforms in Python. / MIT |
| [pyyaml](http://pyyaml.org/wiki/PyYAML) | 3.13 | YAML parser and emitter for Python / MIT |
| [pyzmq](https://github.com/zeromq/pyzmq) | 17.1.2 | Python bindings for zeromq / BSD 3-clause |
| [qt](http://qt-project.org) | 5.9.7 | Qt is a cross-platform application and UI framework. / LGPL-3.0 |
| [qtawesome](https://github.com/spyder-ide/qtawesome) | 0.5.3 | Iconic fonts in PyQt and PySide applications / MIT |
| [qtconsole](http://jupyter.org) | 4.4.3 | Jupyter Qt console / BSD 3-Clause |
| [qtpy](https://github.com/spyder-ide/qtpy) | 1.5.2 | Abstraction layer for PyQt5/PyQt4/PySide / MIT |
| [readline](https://cnswww.cns.cwru.edu/php/chet/readline/rltop.html) | 7.0 | library for editing command lines as they are typed in / GPL-3.0 |
| [requests](http://python-requests.org) | 2.21.0 | Python HTTP for Humans / Apache 2.0 |
| [rope](https://github.com/python-rope/rope) | 0.11.0 | A python refactoring library… / GPL 2.0 |
| [ruamel\_yaml](https://bitbucket.org/ruamel/yaml) | 0.15.46 | A patched copy of ruamel.yaml. / MIT |
| [scikit-image](http://scikit-image.org/) | 0.14.1 | Image processing routines for SciPy. / BSD 3-Clause |
| [scikit-learn](http://scikit-learn.org/) | 0.20.1 | A set of python modules for machine learning and data mining / BSD 3-Clause |
| [scipy](http://www.scipy.org/) | 1.1.0 | Scientific Library for Python / BSD 3-Clause |
| [seaborn](https://seaborn.pydata.org) | 0.9.0 | Statistical data visualization / BSD 3-Clause |
| [secretstorage](https://github.com/mitya57/secretstorage) | 3.1.0 | Provides a way for securely storing passwords and other secrets. / BSD-3-Clause |
| [send2trash](https://github.com/hsoft/send2trash) | 1.5.0 | Python library to natively send files to Trash (or Recycle bin) on all platforms. / BSD-3-Clause |
| [setuptools](https://github.com/pypa/setuptools) | 40.6.3 | Download, build, install, upgrade, and uninstall Python packages / MIT |
| [simplegeneric](http://cheeseshop.python.org/pypi/simplegeneric) | 0.8.1 | Simple generic functions (similar to Python’s own len(), pickle.dump(), etc.) / Zope Public |
| [singledispatch](http://docs.python.org/3/library/functools.html#functools.singledispatch) | 3.4.0.3 | Transforms a function into a single-dispatch generic function / MIT |
| [sip](http://www.riverbankcomputing.com/software/sip/intro) | 4.19.8 | Create Python bindings for C and C++ libraries / GPL-3.0 |
| [six](http://pypi.python.org/pypi/six/) | 1.12.0 | Python 2 and 3 compatibility utilities / MIT |
| [snappy](https://github.com/google/snappy) | 1.1.7 | A fast compressor/decompressor / BSD 3-clause |
| [snowballstemmer](https://github.com/shibukawa/snowball_py) | 1.2.1 | Snowball stemming library collection for Python / BSD-2-Clause |
| [sortedcollections](http://www.grantjenks.com/docs/sortedcollections/) | 1.0.1 | Python Sorted Collections / Apache-2.0 |
| [sortedcontainers](http://www.grantjenks.com/docs/sortedcontainers/) | 2.1.0 | Python Sorted Container Types: SortedList, SortedDict, and SortedSet / Apache 2.0 |
| [sphinx](http://www.sphinx-doc.org) | 1.8.2 | Sphinx is a tool that makes it easy to create intelligent and beautiful documentation / BSD 2-clause |
| sphinxcontrib | 1.0 | Python namespace for sphinxcontrib / BSD |
| [sphinxcontrib-websupport](https://pypi.python.org/pypi/sphinxcontrib-websupport) | 1.1.0 | Sphinx API for Web Apps / BSD-2-Clause |
| [spyder](https://www.spyder-ide.org/) | 3.3.2 | The Scientific Python Development Environment / MIT |
| [spyder-kernels](https://github.com/spyder-ide/spyder-kernels) | 0.3.0 | Jupyter kernels for the Spyder console / MIT |
| [sqlalchemy](http://www.sqlalchemy.org/) | 1.2.15 | Database Abstraction Library. / MIT |
| [sqlite](http://www.sqlite.org/) | 3.26.0 | Implements a self-contained, zero-configuration, SQL database engine. / Public-Domain (`<http://www.sqlite.org/copyright.html>`) |
| [statsmodels](https://www.statsmodels.org) | 0.9.0 | Statistical computations and models for use with SciPy / BSD 3-Clause |
| [sympy](http://sympy.org) | 1.3 | Python library for symbolic mathematics / 3-clause BSD |
| [tblib](https://github.com/ionelmc/python-tblib) | 1.3.2 | Traceback serialization library. / BSD 2-Clause |
| [terminado](https://github.com/jupyter/terminado) | 0.8.1 | Terminals served by tornado websockets / BSD 2-clause |
| [testpath](https://testpath.readthedocs.io) | 0.4.2 | Testpath is a collection of utilities for Python code working with files and commands. / BSD-3-Clause |
| [tk](http://www.tcl.tk/) | 8.6.8 | A dynamic programming language with GUI support. Bundles Tcl and Tk. / Tcl/Tk |
| [toolz](http://toolz.readthedocs.org/) | 0.9.0 | A functional standard library for Python. / BSD 3-Clause |
| [tornado](http://www.tornadoweb.org/) | 5.1.1 | A Python web framework and asynchronous networking library, originally developed at FriendFeed. / Apache 2.0 |
| [tqdm](https://pypi.python.org/pypi/tqdm) | 4.28.1 | A Fast, Extensible Progress Meter / MPLv2.0, MIT |
| [traitlets](http://ipython.org/) | 4.3.2 | Configuration system for Python applications / BSD 3-clause |
| [unicodecsv](https://github.com/jdunck/python-unicodecsv) | 0.14.1 | Drop-in replacement for csv module which supports unicode strings / BSD |
| [unixodbc](http://www.unixodbc.org/) | 2.3.7 | ODBC on non MS Windows platforms / LGPL-2.1 |
| [urllib3](https://urllib3.readthedocs.io/) | 1.24.1 | HTTP library with thread-safe connection pooling, file post, and more. / MIT |
| [wcwidth](https://github.com/jquast/wcwidth) | 0.1.7 | Measures number of Terminal column cells of wide-character codes. / MIT |
| [webencodings](https://github.com/gsnedders/python-webencodings) | 0.5.1 | Character encoding aliases for legacy web content / BSD 3-Clause |
| [werkzeug](http://werkzeug.pocoo.org/) | 0.14.1 | The Python WSGI Utility Library. / BSD 3-Clause |
| [wheel](https://github.com/pypa/wheel) | 0.32.3 | A built-package format for Python. / MIT |
| [widgetsnbextension](http://ipython.org) | 3.4.2 | Interactive Widgets for Jupyter / BSD 3-clause |
| [wrapt](https://github.com/GrahamDumpleton/wrapt) | 1.10.11 | Module for decorators, wrappers and monkey patching. / BSD 2-Clause |
| [wurlitzer](https://github.com/minrk/wurlitzer) | 1.0.2 | Capture C-level stdout/stderr in Python / MIT |
| [xlrd](http://www.python-excel.org/) | 1.2.0 | Library for developers to extract data from Microsoft Excel (tm) spreadsheet files / BSD 3-Clause and BSD with advertising |
| [xlsxwriter](https://xlsxwriter.readthedocs.io/) | 1.1.2 | A Python module for creating Excel XLSX files / BSD 2-Clause |
| [xlwt](http://www.python-excel.org/) | 1.3.0 | Writing data and formatting information to Excel files / BSD |
| [xz](http://tukaani.org/xz/) | 5.2.4 | Data compression software with high compression ratio / LGPL-2.1 and GPL-2.0 |
| [yaml](http://pyyaml.org/wiki/LibYAML) | 0.1.7 | A C library for parsing and emitting YAML. / MIT |
| [zeromq](http://zeromq.org) | 4.2.5 | A high-performance asynchronous messaging library. / LGPL 3 |
| [zict](http://github.com/mrocklin/zict) | 0.1.3 | Composable Dictionary Classes / BSD 3-Clause |
| [zlib](http://zlib.net/) | 1.2.11 | Massively spiffy yet delicately unobtrusive compression library / zlib |
| [zstd](http://www.zstd.net) | 1.3.7 | Zstandard - Fast real-time compression algorithm / BSD 3-Clause |
| Name | Version | Summary / License |
|---|---|---|
| [\_ipyw\_jlab\_nb\_ext\_conf](https://github.com/ContinuumIO/anaconda-nb-extensions-meta-config) | 0.1.0 | A configuration metapackage for enabling Anaconda-bundled jupyter extensions / BSD |
| [alabaster](http://www.sphinx-doc.org/en/stable/index.html) | 0.7.12 | Configurable, Python 2+3 compatible Sphinx theme. / BSD 3-Clause |
| [anaconda-client](http://anaconda.org) | 1.7.2 | anaconda.org command line client library / BSD 3-clause |
| [anaconda-navigator](https://github.com/ContinuumIO/navigator) | 1.9.6 | Anaconda Navigator / proprietary - Continuum Analytics, Inc. |
| [anaconda-project](https://github.com/Anaconda-Platform/anaconda-project) | 0.8.2 | Tool for encapsulating, running, and reproducing data science projects / BSD 3-Clause |
| [asn1crypto](https://github.com/wbond/asn1crypto) | 0.24.0 | Python ASN.1 library with a focus on performance and a pythonic API / MIT |
| [astroid](https://www.astroid.org/) | 2.1.0 | A abstract syntax tree for Python with inference support. / LGPL 2.1 |
| [astropy](http://www.astropy.org/) | 3.1 | Community-developed Python Library for Astronomy / BSD |
| [atomicwrites](https://github.com/untitaker/python-atomicwrites) | 1.2.1 | Atomic file writes. / MIT |
| [attrs](https://attrs.readthedocs.io/en/stable/) | 18.2.0 | attrs is the Python package that will bring back the joy of writing classes by relieving you from the drudgery of implementing object protocols (aka dunder methods). / MIT |
| [automat](https://github.com/glyph/Automat) | 0.7.0 | self-service finite-state machines for the programmer on the go / MIT |
| [babel](http://babel.pocoo.org/) | 2.6.0 | Utilities to internationalize and localize Python applications / BSD 3-clause |
| [backcall](https://github.com/takluyver/backcall/) | 0.1.0 | Specifications for callback functions passed in to an API / BSD-3-Clause |
| [backports](https://bitbucket.org/brandon/backports) | 1.0 | / BSD |
| [backports.os](https://github.com/pjdelport/backports.os) | 0.1.1 | Backport of new features in Python’s os module / Python Software Foundation |
| [backports.shutil\_get\_terminal\_size](https://github.com/chrippa/backports.shutil_get_terminal_size) | 1.0.0 | A backport of the get\_terminal\_size function from Python 3.3’s shutil. / MIT |
| [beautifulsoup4](http://www.crummy.com/software/BeautifulSoup/) | 4.6.3 | Python library designed for screen-scraping / MIT |
| [bitarray](https://github.com/ilanschnell/bitarray) | 0.8.3 | efficient arrays of booleans – C extension / PSF |
| [bkcharts](http://github.com/bokeh/bkcharts) | 0.2 | High level chart types built on top of Bokeh / BSD 3-Clause |
| blas | 1.0 | |
| [blaze](http://blaze.pydata.org) | 0.11.3 | NumPy and Pandas interface to big data / BSD 3-Clause |
| [bleach](https://github.com/mozilla/bleach) | 3.0.2 | Easy, whitelist-based HTML-sanitizing tool / Apache-2.0 |
| [blosc](https://github.com/Blosc/c-blosc) | 1.14.4 | A blocking, shuffling and loss-less compression library that can be faster than memcpy() / BSD 3-Clause |
| [bokeh](http://bokeh.pydata.org/) | 1.0.2 | Statistical and novel interactive HTML plots for Python / BSD 3-Clause |
| [boto](https://github.com/boto/boto/) | 2.49.0 | Amazon Web Services Library / MIT |
| [bottleneck](http://berkeleyanalytics.com/bottleneck) | 1.2.1 | Fast NumPy array functions written in Cython. / BSD 2-Clause |
| [bzip2](http://www.bzip.org/) | 1.0.6 | high-quality data compressor / bzip2 |
| [ca-certificates](https://github.com/conda-forge/ca-certificates-feedstock) | 2018.03.07 | Certificates for use with other packages. / ISC |
| [cairo](http://cairographics.org/) | 1.14.12 | Cairo is a 2D graphics library with support for multiple output devices. / LGPL 2.1 or MPL 1.1 |
| [certifi](http://certifi.io/) | 2018.11.29 | Python package for providing Mozilla’s CA Bundle. / ISC |
| [cffi](https://bitbucket.org/cffi/cffi) | 1.11.5 | Foreign Function Interface for Python calling C code. / MIT |
| [chardet](https://github.com/chardet/chardet) | 3.0.4 | Universal character encoding detector / LGPL2 |
| [click](https://palletsprojects.com/p/click) | 7.0 | Python composable command line interface toolkit / BSD-3-Clause |
| [cloudpickle](https://github.com/cloudpipe/cloudpickle) | 0.6.1 | Extended pickling support for Python objects / BSD 3-Clause |
| [clyent](https://github.com/Anaconda-Platform/clyent) | 1.2.2 | Command line client library for windows and posix / BSD 3-Clause |
| [colorama](https://github.com/tartley/colorama) | 0.4.1 | Cross-platform colored terminal text / BSD-3-Clause |
| [conda](https://conda.io) | 4.5.12 | OS-agnostic, system-level binary package and environment manager. / BSD 3-Clause |
| [conda-build](https://github.com/conda/conda-build) | 3.17.6 | tools for building conda packages / BSD 3-Clause |
| [conda-env](https://github.com/conda/conda-env) | 2.6.0 | Tools for interacting with conda environments. / BSD 3-Clause |
| [conda-verify](https://github.com/conda/conda-verify) | 3.1.1 | tool for validating conda recipes and conda packages / BSD 3-Clause |
| [constantly](https://github.com/twisted/constantly) | 15.1.0 | Symbolic constants in Python / MIT |
| [contextlib2](http://contextlib2.readthedocs.org) | 0.5.5 | Backports and enhancements for the contextlib module / PSF |
| [cryptography](https://github.com/pyca/cryptography) | 2.4.2 | Provides cryptographic recipes and primitives to Python developers / Apache 2.0 or BSD 3-Clause, PSF 2 |
| [curl](http://curl.haxx.se/) | 7.63.0 | tool and library for transferring data with URL syntax / MIT/X derivate (`<http://curl.haxx.se/docs/copyright.html>`) |
| [cycler](http://matplotlib.org/cycler) | 0.10.0 | Composable style cycles. / BSD 3-Clause |
| [cython](http://www.cython.org/) | 0.29.2 | The Cython compiler for writing C extensions for the Python language / Apache-2.0 |
| [cytoolz](https://github.com/pytoolz/cytoolz) | 0.9.0.1 | Cython implementation of Toolz. High performance functional utilities. / BSD 3-Clause |
| [dask](http://github.com/dask/dask/) | 1.0.0 | Parallel Python with task scheduling / BSD 3-Clause |
| [dask-core](http://github.com/dask/dask/) | 1.0.0 | Parallel Python with task scheduling / BSD 3-Clause |
| [datashape](http://datashape.pydata.org) | 0.5.4 | A data description language. / BSD 2-Clause |
| [dbus](http://www.freedesktop.org/wiki/Software/dbus/) | 1.13.2 | Simple message bus system for applications to talk to one another / GPL2 |
| [decorator](https://github.com/micheles/decorator) | 4.3.0 | Better living through Python with decorators. / BSD 3-Clause |
| [defusedxml](https://bitbucket.org/tiran/defusedxml) | 0.5.0 | XML bomb protection for Python stdlib modules / PSF 2.0 |
| [distributed](http://distributed.readthedocs.io/en/latest/) | 1.25.1 | Distributed computing with Dask / BSD 3-Clause |
| [docutils](http://docutils.sourceforge.net/) | 0.14 | Docutils – Python Documentation Utilities / Public Domain Dedictation and BSD 2-Clause and PSF 2.1.1 and GPL 3.0 |
| [entrypoints](https://github.com/takluyver/entrypoints) | 0.2.3 | Discover and load entry points from installed packages. / MIT License |
| [et\_xmlfile](https://bitbucket.org/openpyxl/et_xmlfile) | 1.0.1 | An implementation of lxml.xmlfile for the standard library / MIT |
| [expat](http://expat.sourceforge.net/) | 2.2.6 | Expat XML parser library in C. / MIT |
| [fastcache](https://github.com/pbrady/fastcache) | 1.0.2 | C implementation of Python 3 lru\_cache / MIT |
| [filelock](https://github.com/benediktschmitt/py-filelock) | 3.0.10 | A platform independent file lock. / Public Domain |
| [flask](http://flask.pocoo.org) | 1.0.2 | A microframework based on Werkzeug, Jinja2 and good intentions. / BSD 3-Clause |
| [flask-cors](https://github.com/corydolphin/flask-cors) | 3.0.7 | A Flask extension adding a decorator for CORS support / MIT |
| [fontconfig](http://www.freedesktop.org/wiki/Software/fontconfig/) | 2.13.0 | A library for configuring and customizing font access. / MIT |
| [freetype](https://www.freetype.org/) | 2.9.1 | A Free, High-Quality, and Portable Font Engine / GPL-2.0 and FreeType |
| [fribidi](https://github.com/fribidi/fribidi) | 1.0.5 | The Free Implementation of the Unicode Bidirectional Algorithm. / LGPL-2.1 |
| [future](http://python-future.org) | 0.17.1 | Clean single-source support for Python 3 and 2 / MIT |
| [get\_terminal\_size](https://github.com/chrippa/backports.shutil_get_terminal_size) | 1.0.0 | Get the size of the terminal window. / MIT |
| [gevent](http://www.gevent.org/) | 1.3.7 | Coroutine-based network library / MIT |
| [glib](https://developer.gnome.org/glib/) | 2.56.2 | Provides core application building blocks for libraries and applications written in C. / LGPL-2.1 |
| [glob2](https://github.com/miracle2k/python-glob2) | 0.6 | Version of the glob module that supports recursion via \*\*, and can capture patterns. / BSD-2-Clause |
| [gmp](http://gmplib.org/) | 6.1.2 | The GNU multiprecision library. / GPL 2 and LGPL 3 |
| [gmpy2](https://pypi.python.org/pypi/gmpy2) | 2.0.8 | GMP/MPIR, MPFR, and MPC interface to Python 2.6+ and 3.x / LGPL 3 |
| [graphite2](http://graphite.sil.org/) | 1.3.12 | A “smart font” system that handles the complexities of lesser-known languages of the world. / LGPLv2 |
| [greenlet](https://github.com/python-greenlet/greenlet) | 0.4.15 | Lightweight in-process concurrent programming / MIT |
| [gst-plugins-base](http://gstreamer.freedesktop.org/) | 1.14.0 | GStreamer Base Plug-ins / GPL2 |
| [gstreamer](http://gstreamer.freedesktop.org/) | 1.14.0 | Library for constructing graphs of media-handling components / LGPL 2 |
| [h5py](http://www.h5py.org/) | 2.8.0 | Read and write HDF5 files from Python. / BSD 3-Clause |
| [harfbuzz](http://www.freedesktop.org/wiki/Software/HarfBuzz/) | 1.8.8 | An OpenType text shaping engine. / MIT |
| [hdf5](http://www.hdfgroup.org/HDF5/) | 1.10.2 | HDF5 is a data model, library, and file format for storing and managing data / HDF5 |
| [heapdict](http://stutzbachenterprises.com/) | 1.0.0 | A heap with decrease-key and increase-key operations / BSD 3-Clause |
| [html5lib](https://github.com/html5lib/html5lib-python) | 1.0.1 | HTML parser based on the WHATWG HTML specification / MIT |
| [hyperlink](https://github.com/python-hyper/hyperlink) | 18.0.0 | Immutable, Pythonic, correct URLs. / MIT |
| [icu](http://site.icu-project.org/) | 58.2 | International Components for Unicode. / MIT |
| [idna](https://github.com/kjd/idna) | 2.8 | Internationalized Domain Names in Applications (IDNA). / BSD Like |
| [imageio](http://imageio.github.io) | 2.4.1 | a Python library for reading and writing image data / BSD 2-Clause |
| [imagesize](https://github.com/shibukawa/imagesize_py) | 1.1.0 | Getting image size from png/jpeg/jpeg2000/gif file / MIT |
| [importlib\_metadata](http://importlib-metadata.readthedocs.io) | 0.6 | A library to access the metadata for a Python package / APACHE-2.0 |
| [incremental](https://twistedmatrix.com) | 17.5.0 | A library that versions your Python projects / MIT License |
| [intel-openmp](https://software.intel.com/en-us/node/522690) | 2019.1 | Math library for Intel and compatible processors / proprietary - Intel |
| [ipykernel](https://ipython.org) | 5.1.0 | IPython Kernel for Jupyter / BSD-3-Clause |
| [ipython](https://ipython.org/) | 7.2.0 | IPython: Productive Interactive Computing / BSD-3-Clause |
| [ipython\_genutils](http://ipython.org) | 0.2.0 | vestigial utilities from IPython / BSD 3-Clause |
| [ipywidgets](https://github.com/ipython/ipywidgets) | 7.4.2 | Jupyter Interactive Widgets / BSD 3-clause |
| [isort](https://github.com/timothycrosley/isort) | 4.3.4 | A Python utility / library to sort Python imports. / MIT |
| [itsdangerous](https://github.com/pallets/itsdangerous) | 1.1.0 | Various helpers to pass trusted data to untrusted environments. / BSD 3-Clause |
| [jbig](https://www.cl.cam.ac.uk/~mgk25/jbigkit) | 2.1 | Implementation of the JBIG1 data compression standard / GPL-2.0 |
| [jdcal](https://github.com/phn/jdcal) | 1.4 | Julian dates from proleptic Gregorian and Julian calendars. / BSD 2-Clause |
| [jedi](https://github.com/davidhalter/jedi/) | 0.13.2 | An autocompletion tool for Python that can be used for text editors. / MIT |
| [jeepney](https://gitlab.com/takluyver/jeepney) | 0.4 | Pure Python DBus interface / MIT |
| [jinja2](http://jinja.pocoo.org) | 2.10 | An easy to use stand-alone template engine written in pure python. / 3-Clause BSD |
| [jpeg](http://www.ijg.org/) | 9b | read/write jpeg COM, EXIF, IPTC medata / Custom free software license |
| [jsonschema](https://github.com/Julian/jsonschema) | 2.6.0 | An implementation of JSON Schema validation for Python / MIT |
| [jupyter](http://jupyter.org) | 1.0.0 | Jupyter metapackage. Install all the Jupyter components in one go. / BSD 3-Clause |
| [jupyter\_client](http://jupyter.org) | 5.2.4 | Jupyter protocol implementation and client libraries / BSD 3-clause |
| [jupyter\_console](http://jupyter.org) | 6.0.0 | Jupyter terminal console / BSD-3-Clause |
| [jupyter\_core](http://jupyter.org) | 4.4.0 | Core common functionality of Jupyter projects. / BSD 3-clause |
| [jupyterlab](https://github.com/jupyterlab/jupyterlab) | 0.35.3 | JupyterLab PRE-ALPHA / BSD-3-Clause |
| [jupyterlab\_server](http://github.com/jupyterlab/jupyterlab_server) | 0.2.0 | A set of server components for JupyterLab and JupyterLab like applications. / BSD 3-Clause |
| [keyring](https://github.com/jaraco/keyring) | 17.0.0 | Store and access your passwords safely / Python Software Foundation or MIT |
| [kiwisolver](https://github.com/nucleic/kiwi) | 1.0.1 | A fast implementation of the Cassowary constraint solver / BSD 3-Clause |
| [krb5](http://web.mit.edu/kerberos/) | 1.16.1 | A network authentication protocol. / MIT |
| [lazy-object-proxy](https://github.com/ionelmc/python-lazy-object-proxy) | 1.3.1 | A fast and thorough lazy object proxy. / BSD 2-Clause |
| [libarchive](http://www.libarchive.org/) | 3.3.3 | Multi-format archive and compression library / BSD 2-Clause |
| [libcurl](http://curl.haxx.se/) | 7.63.0 | tool and library for transferring data with URL syntax / MIT/X derivate (`<http://curl.haxx.se/docs/copyright.html>`) |
| [libedit](http://thrysoee.dk/editline/) | 3.1.20170329 | Editline Library (libedit) / NetBSD |
| [libffi](https://sourceware.org/libffi/) | 3.2.1 | A Portable Foreign Function Interface Library. / Custom |
| [libgcc-ng](https://gcc.gnu.org/onlinedocs/gccint/Libgcc.html) | 8.2.0 | The GCC low-level runtime library / GPL |
| [libgfortran-ng](https://gcc.gnu.org/) | 7.3.0 | The GNU Fortran Runtime Library / GPL |
| [liblief](https://lief.quarkslab.com/) | 0.9.0 | A cross platform library to parse, modify and abstract ELF, PE and MachO formats. / Apache 2.0 |
| [libpng](http://www.libpng.org/pub/png/libpng.html) | 1.6.35 | PNG reference library. / zlib/libpng |
| [libsodium](http://libsodium.org) | 1.0.16 | A modern and easy-to-use crypto library. / ISC |
| [libssh2](https://www.libssh2.org/) | 1.8.0 | the SSH library / BSD 3-Clause |
| [libstdcxx-ng](https://gcc.gnu.org/) | 8.2.0 | The GNU C++ Runtime Library / GPL3 with runtime exception |
| [libtiff](http://www.libtiff.org/) | 4.0.9 | Support for the Tag Image File Format (TIFF). / HPND |
| [libtool](http://www.gnu.org/software/libtool/) | 2.4.6 | The GNU Portable Library Tool / GPL 3 |
| [libuuid](http://sourceforge.net/projects/libuuid/) | 1.0.3 | Portable uuid C library. / BSD 3-Clause |
| [libxcb](http://xcb.freedesktop.org/) | 1.13 | This is the C-language Binding (XCB) package to the X Window System protocol / MIT |
| [libxml2](http://xmlsoft.org/) | 2.9.8 | The XML C parser and toolkit of Gnome / MIT |
| [libxslt](http://xmlsoft.org/XSLT/) | 1.1.32 | The XSLT C library developed for the GNOME project / MIT |
| [llvmlite](https://github.com/numba/llvmlite) | 0.26.0 | A lightweight LLVM python binding for writing JIT compilers / New BSD License |
| [locket](https://github.com/mwilliamson/locket.py) | 0.2.0 | File-based locks for Python for Linux and Windows / BSD 2-Clause |
| [lxml](http://lxml.de/) | 4.2.5 | Pythonic binding for the C libraries libxml2 and libxslt. / BSD 3-Clause, GPL-2.0, ZPL-2.0, and ElementTree |
| [lz4-c](https://www.lz4.org) | 1.8.1.2 | Extremely Fast Compression algorithm / BSD 2-clause |
| [lzo](http://www.oberhumer.com/opensource/lzo/) | 2.10 | LZO is a portable lossless data compression library written in ANSI C. / GPL v2+ |
| [markupsafe](https://www.palletsprojects.com/p/markupsafe) | 1.1.0 | A Python module that implements the jinja2.Markup string / BSD-3-Clause |
| [matplotlib](http://matplotlib.org/) | 3.0.2 | Publication quality figures in Python / PSF-based |
| [mccabe](https://github.com/PyCQA/mccabe) | 0.6.1 | McCabe complexity checker for Python / MIT |
| [mistune](https://github.com/lepture/mistune) | 0.8.4 | The fastest markdown parser in pure Python. / BSD 3-Clause |
| [mkl](https://software.intel.com/en-us/mkl) | 2019.1 | Math library for Intel and compatible processors / proprietary - Intel |
| [mkl-service](https://github.com/ContinuumIO/mkl-service) | 1.1.2 | Python bindings to MKL service functions / 3-clause BSD |
| [mkl\_fft](http://github.com/IntelPython/mkl_fft) | 1.0.6 | NumPy-based implementation of Fast Fourier Transform using Intel (R) Math Kernel Library. / BSD 3-Clause |
| [mkl\_random](http://github.com/IntelPython/mkl_random) | 1.0.2 | Intel (R) MKL-powered package for sampling from common probability distributions into NumPy arrays. / BSD 3-Clause |
| [more-itertools](https://github.com/erikrose/more-itertools) | 4.3.0 | More routines for operating on iterables, beyond itertools / MIT |
| [mpc](http://www.multiprecision.org/) | 1.1.0 | A C library for the arithmetic of complex numbers with arbitrarily high precision. / LGPL 3 |
| [mpfr](http://www.mpfr.org/) | 4.0.1 | The MPFR library is a C library for multiple-precision floating-point computations with correct rounding. / LGPL 3 |
| [mpmath](http://mpmath.org) | 1.1.0 | Python library for arbitrary-precision floating-point arithmetic / BSD 3-Clause |
| [msgpack-python](http://msgpack.org/) | 0.5.6 | MessagePack (de)serializer. / Apache 2.0 |
| [multipledispatch](https://github.com/mrocklin/multipledispatch/) | 0.6.0 | Multiple dispatch in Python / BSD 3-Clause |
| [navigator-updater](https://github.com/ContinuumIO/navigator-updater) | 0.2.1 | Anaconda Navigator Updater / proprietary - Continuum Analytics, Inc. |
| [nbconvert](http://jupyter.org) | 5.4.0 | Converting Jupyter Notebooks / BSD-3-Clause |
| [nbformat](http://jupyter.org) | 4.4.0 | The reference implementation of the Jupyter Notebook format / BSD 3-clause |
| [ncurses](http://www.gnu.org/software/ncurses/) | 6.1 | Library for text-based user interfaces / Free software (MIT-like) |
| [networkx](https://networkx.github.io/) | 2.2 | Python package for creating and manipulating complex networks / BSD 3-Clause |
| [nltk](http://nltk.org/) | 3.4 | Build Python programs to work with human language data / Apache 2.0 |
| [nose](http://readthedocs.org/docs/nose/) | 1.3.7 | Nose extends unittest to make testing easier / LGPL-2.1 |
| [notebook](http://jupyter.org) | 5.7.4 | Jupyter Notebook / BSD 3-clause |
| [numba](http://numba.github.com) | 0.41.0 | NumPy aware dynamic Python compiler using LLVM / BSD 2-clause |
| [numexpr](https://github.com/pydata/numexpr) | 2.6.8 | Fast numerical expression evaluator for NumPy. / MIT |
| [numpy](http://numpy.scipy.org/) | 1.15.4 | Array processing for numbers, strings, records, and objects. / BSD 3-Clause |
| numpy-base | 1.15.4 | |
| [numpydoc](https://github.com/numpy/numpydoc) | 0.8.0 | Sphinx extension to support docstrings in Numpy format / BSD 3-Clause |
| [odo](http://odo.pydata.org) | 0.5.1 | Data migration in Python / BSD-3-Clause |
| [olefile](http://www.decalage.info/python/olefileio) | 0.46 | parse, read and write Microsoft OLE2 files / BSD 2-Clause |
| [openpyxl](https://openpyxl.readthedocs.io) | 2.5.12 | A Python library to read/write Excel 2010 xlsx/xlsm files / MIT |
| [openssl](http://www.openssl.org/) | 1.1.1a | OpenSSL is an open-source implementation of the SSL and TLS protocols / OpenSSL |
| [packaging](https://github.com/pypa/packaging) | 18.0 | Core utilities for Python packages / Apache 2.0 or BSD 2-Clause |
| [pandas](http://pandas.pydata.org) | 0.23.4 | High-performance, easy-to-use data structures and data analysis tools. / BSD 3-clause |
| [pandoc](http://pandoc.org/) | 1.15.0.6 | Universal markup converter (repackaged binaries). / GPL-2.0 |
| [pandocfilters](https://github.com/jgm/pandocfilters) | 1.4.2 | A python module for writing pandoc filters / BSD-3-Clause |
| [pango](http://www.pango.org/) | 1.42.4 | Text layout and rendering engine. / LGPL-2.1 |
| [parso](https://github.com/davidhalter/parso) | 0.3.1 | A Python Parser / MIT |
| [partd](https://github.com/dask/partd) | 0.3.9 | Data structure for on-disk shuffle operations / BSD 3-Clause |
| [patchelf](http://nixos.org/patchelf.html) | 0.9 | A small utility to modify the dynamic linker and RPATH of ELF executables. / GPL 3 |
| [path.py](https://github.com/jaraco/path.py) | 11.5.0 | A module wrapper for os.path / MIT |
| [pathlib2](https://github.com/mcmtroffaes/pathlib2) | 2.3.3 | Fork of pathlib aiming to support the full stdlib Python API. / MIT |
| [patsy](https://github.com/pydata/patsy) | 0.5.1 | Describing statistical models in Python using symbolic formulas / BSD-2-Clause, PSF2 |
| [pcre](http://www.pcre.org/) | 8.42 | Regular expression pattern matching using the same syntax and semantics as Perl 5. / BSD 3-Clause |
| [pep8](http://pep8.readthedocs.org/) | 1.7.1 | Python style guide checker / MIT |
| [pexpect](http://pexpect.sourceforge.net/) | 4.6.0 | Pexpect makes Python a better tool for controlling other applications. / ISC |
| [pickleshare](https://github.com/pickleshare/pickleshare/) | 0.7.5 | Tiny ‘shelve’-like database with concurrency support / MIT |
| [pillow](https://pillow.readthedocs.io) | 5.3.0 | Pillow is the friendly PIL fork by Alex Clark and Contributors / PIL |
| [pip](https://pip.pypa.io/en/stable/) | 18.1 | PyPA recommended tool for installing Python packages / MIT |
| [pixman](http://www.pixman.org/) | 0.34.0 | A low-level software library for pixel manipulation. / MIT |
| [pkginfo](https://code.launchpad.net/~tseaver/pkginfo/trunk) | 1.4.2 | Query metadatdata from sdists / bdists / installed packages. / MIT |
| [pluggy](https://github.com/pytest-dev/pluggy) | 0.8.0 | Plugin registration and hook calling for Python / MIT |
| [ply](http://www.dabeaz.com/ply/index.html) | 3.11 | Python Lex-Yacc / BSD 3-clause |
| [prometheus\_client](https://github.com/prometheus/client_python) | 0.5.0 | Python client for the Prometheus monitoring system / Apache 2.0 |
| [prompt\_toolkit](https://github.com/jonathanslenders/python-prompt-toolkit) | 2.0.7 | Library for building powerful interactive command lines in Python / BSD 3-clause |
| [psutil](https://github.com/giampaolo/psutil) | 5.4.8 | A cross-platform process and system utilities module for Python / BSD 3-Clause |
| [ptyprocess](https://github.com/pexpect/ptyprocess) | 0.6.0 | Run a subprocess in a pseudo terminal / ISC |
| [py](https://github.com/pytest-dev/py) | 1.7.0 | library with cross-python path, ini-parsing, io, code, log facilities / MIT |
| [py-lief](https://lief.quarkslab.com/) | 0.9.0 | A cross platform library to parse, modify and abstract ELF, PE and MachO formats. / Apache 2.0 |
| [pyasn1-modules](http://pyasn1.sourceforge.net/) | 0.2.2 | A collection of ASN.1-based protocols modules. / BSD 2-Clause |
| [pycodestyle](https://pycodestyle.readthedocs.io/) | 2.4.0 | Python style guide checker / MIT |
| [pycosat](https://github.com/ContinuumIO/pycosat) | 0.6.3 | Bindings to picosat (a SAT solver) / MIT |
| [pycparser](https://github.com/eliben/pycparser) | 2.19 | Complete C99 parser in pure Python / BSD 3-clause |
| [pycrypto](http://www.pycrypto.org/) | 2.6.1 | Cryptographic modules for Python. / Public Domain |
| [pycurl](http://pycurl.sourceforge.net/) | 7.43.0.2 | A Python Interface To The cURL library / LGPL, MIT |
| [pyflakes](https://github.com/PyCQA/pyflakes) | 2.0.0 | Pyflakes analyzes programs and detects various errors. / MIT |
| [pygments](http://pygments.org/) | 2.3.1 | Generic syntax highlighting package / BSD 2-clause |
| [pylint](http://www.pylint.org/) | 2.2.2 | python code static checker / GPL |
| [pyodbc](https://github.com/mkleehammer/pyodbc) | 4.0.25 | DB API Module for ODBC / MIT |
| [pyopenssl](https://github.com/pyca/pyopenssl) | 18.0.0 | Python wrapper module around the OpenSSL library / Apache 2.0 |
| [pyparsing](http://pyparsing.wikispaces.com/) | 2.3.0 | Create and execute simple grammars / MIT |
| [pyqt](http://www.riverbankcomputing.co.uk/software/pyqt) | 5.9.2 | Python binding of the cross-platform GUI toolkit Qt. / Commercial, GPL-2.0, GPL-3.0 |
| [pysocks](https://github.com/Anorov/PySocks) | 1.6.8 | A Python SOCKS client module. See [Anorov/PySocks](https://github.com/Anorov/PySocks) for more information. / BSD 3-Clause |
| [pytables](http://www.pytables.org) | 3.4.4 | Brings together Python, HDF5 and NumPy to easily handle large amounts of data. / BSD 3-Clause |
| [pytest](https://docs.pytest.org/en/latest/) | 4.0.2 | Simple and powerful testing with Python. / MIT |
| [pytest-arraydiff](https://github.com/astrofrog/pytest-arraydiff) | 0.3 | pytest plugin to help with comparing array output from tests / BSD |
| [pytest-astropy](https://github.com/astropy/pytest-astropy) | 0.5.0 | Meta-package containing dependencies for testing Astropy / BSD |
| [pytest-doctestplus](https://github.com/astropy/pytest-doctestplus) | 0.2.0 | Pytest plugin with advanced doctest features / BSD |
| [pytest-openfiles](https://github.com/astropy/pytest-openfiles) | 0.3.1 | Pytest plugin for detecting inadvertent open file handles / BSD |
| [pytest-remotedata](https://github.com/astropy/pytest-remotedata) | 0.3.1 | Pytest plugin for controlling remote data access / BSD |
| [python](http://www.python.org/) | 3.7.1 | General purpose programming language / PSF |
| [python-dateutil](https://dateutil.readthedocs.org/) | 2.7.5 | Extensions to the standard Python datetime module. / BSD 3 Clause |
| python-libarchive-c | 2.8 | |
| [pytz](http://pythonhosted.org/pytz/) | 2018.7 | World timezone definitions, modern and historical. / MIT |
| [pywavelets](https://github.com/PyWavelets/pywt) | 1.0.1 | Discrete Wavelet Transforms in Python. / MIT |
| [pyyaml](http://pyyaml.org/wiki/PyYAML) | 3.13 | YAML parser and emitter for Python / MIT |
| [pyzmq](https://github.com/zeromq/pyzmq) | 17.1.2 | Python bindings for zeromq / BSD 3-clause |
| [qt](http://qt-project.org) | 5.9.7 | Qt is a cross-platform application and UI framework. / LGPL-3.0 |
| [qtawesome](https://github.com/spyder-ide/qtawesome) | 0.5.3 | Iconic fonts in PyQt and PySide applications / MIT |
| [qtconsole](http://jupyter.org) | 4.4.3 | Jupyter Qt console / BSD 3-Clause |
| [qtpy](https://github.com/spyder-ide/qtpy) | 1.5.2 | Abstraction layer for PyQt5/PyQt4/PySide / MIT |
| [readline](https://cnswww.cns.cwru.edu/php/chet/readline/rltop.html) | 7.0 | library for editing command lines as they are typed in / GPL-3.0 |
| [requests](http://python-requests.org) | 2.21.0 | Python HTTP for Humans / Apache 2.0 |
| [rope](https://github.com/python-rope/rope) | 0.11.0 | A python refactoring library… / GPL 2.0 |
| [ruamel\_yaml](https://bitbucket.org/ruamel/yaml) | 0.15.46 | A patched copy of ruamel.yaml. / MIT |
| [scikit-image](http://scikit-image.org/) | 0.14.1 | Image processing routines for SciPy. / BSD 3-Clause |
| [scikit-learn](http://scikit-learn.org/) | 0.20.1 | A set of python modules for machine learning and data mining / BSD 3-Clause |
| [scipy](http://www.scipy.org/) | 1.1.0 | Scientific Library for Python / BSD 3-Clause |
| [seaborn](https://seaborn.pydata.org) | 0.9.0 | Statistical data visualization / BSD 3-Clause |
| [secretstorage](https://github.com/mitya57/secretstorage) | 3.1.0 | Provides a way for securely storing passwords and other secrets. / BSD-3-Clause |
| [send2trash](https://github.com/hsoft/send2trash) | 1.5.0 | Python library to natively send files to Trash (or Recycle bin) on all platforms. / BSD-3-Clause |
| [setuptools](https://github.com/pypa/setuptools) | 40.6.3 | Download, build, install, upgrade, and uninstall Python packages / MIT |
| [simplegeneric](http://cheeseshop.python.org/pypi/simplegeneric) | 0.8.1 | Simple generic functions (similar to Python’s own len(), pickle.dump(), etc.) / Zope Public |
| [singledispatch](http://docs.python.org/3/library/functools.html#functools.singledispatch) | 3.4.0.3 | Transforms a function into a single-dispatch generic function / MIT |
| [sip](http://www.riverbankcomputing.com/software/sip/intro) | 4.19.8 | Create Python bindings for C and C++ libraries / GPL-3.0 |
| [six](http://pypi.python.org/pypi/six/) | 1.12.0 | Python 2 and 3 compatibility utilities / MIT |
| [snappy](https://github.com/google/snappy) | 1.1.7 | A fast compressor/decompressor / BSD 3-clause |
| [snowballstemmer](https://github.com/shibukawa/snowball_py) | 1.2.1 | Snowball stemming library collection for Python / BSD-2-Clause |
| [sortedcollections](http://www.grantjenks.com/docs/sortedcollections/) | 1.0.1 | Python Sorted Collections / Apache-2.0 |
| [sortedcontainers](http://www.grantjenks.com/docs/sortedcontainers/) | 2.1.0 | Python Sorted Container Types: SortedList, SortedDict, and SortedSet / Apache 2.0 |
| [sphinx](http://www.sphinx-doc.org) | 1.8.2 | Sphinx is a tool that makes it easy to create intelligent and beautiful documentation / BSD 2-clause |
| sphinxcontrib | 1.0 | Python namespace for sphinxcontrib / BSD |
| [sphinxcontrib-websupport](https://pypi.python.org/pypi/sphinxcontrib-websupport) | 1.1.0 | Sphinx API for Web Apps / BSD-2-Clause |
| [spyder](https://www.spyder-ide.org/) | 3.3.2 | The Scientific Python Development Environment / MIT |
| [spyder-kernels](https://github.com/spyder-ide/spyder-kernels) | 0.3.0 | Jupyter kernels for the Spyder console / MIT |
| [sqlalchemy](http://www.sqlalchemy.org/) | 1.2.15 | Database Abstraction Library. / MIT |
| [sqlite](http://www.sqlite.org/) | 3.26.0 | Implements a self-contained, zero-configuration, SQL database engine. / Public-Domain (`<http://www.sqlite.org/copyright.html>`) |
| [statsmodels](https://www.statsmodels.org) | 0.9.0 | Statistical computations and models for use with SciPy / BSD 3-Clause |
| [sympy](http://sympy.org) | 1.3 | Python library for symbolic mathematics / 3-clause BSD |
| [tblib](https://github.com/ionelmc/python-tblib) | 1.3.2 | Traceback serialization library. / BSD 2-Clause |
| [terminado](https://github.com/jupyter/terminado) | 0.8.1 | Terminals served by tornado websockets / BSD 2-clause |
| [testpath](https://testpath.readthedocs.io) | 0.4.2 | Testpath is a collection of utilities for Python code working with files and commands. / BSD-3-Clause |
| [tk](http://www.tcl.tk/) | 8.6.8 | A dynamic programming language with GUI support. Bundles Tcl and Tk. / Tcl/Tk |
| [toolz](http://toolz.readthedocs.org/) | 0.9.0 | A functional standard library for Python. / BSD 3-Clause |
| [tornado](http://www.tornadoweb.org/) | 5.1.1 | A Python web framework and asynchronous networking library, originally developed at FriendFeed. / Apache 2.0 |
| [tqdm](https://pypi.python.org/pypi/tqdm) | 4.28.1 | A Fast, Extensible Progress Meter / MPLv2.0, MIT |
| [traitlets](http://ipython.org/) | 4.3.2 | Configuration system for Python applications / BSD 3-clause |
| [unicodecsv](https://github.com/jdunck/python-unicodecsv) | 0.14.1 | Drop-in replacement for csv module which supports unicode strings / BSD |
| [unixodbc](http://www.unixodbc.org/) | 2.3.7 | ODBC on non MS Windows platforms / LGPL-2.1 |
| [urllib3](https://urllib3.readthedocs.io/) | 1.24.1 | HTTP library with thread-safe connection pooling, file post, and more. / MIT |
| [wcwidth](https://github.com/jquast/wcwidth) | 0.1.7 | Measures number of Terminal column cells of wide-character codes. / MIT |
| [webencodings](https://github.com/gsnedders/python-webencodings) | 0.5.1 | Character encoding aliases for legacy web content / BSD 3-Clause |
| [werkzeug](http://werkzeug.pocoo.org/) | 0.14.1 | The Python WSGI Utility Library. / BSD 3-Clause |
| [wheel](https://github.com/pypa/wheel) | 0.32.3 | A built-package format for Python. / MIT |
| [widgetsnbextension](http://ipython.org) | 3.4.2 | Interactive Widgets for Jupyter / BSD 3-clause |
| [wrapt](https://github.com/GrahamDumpleton/wrapt) | 1.10.11 | Module for decorators, wrappers and monkey patching. / BSD 2-Clause |
| [wurlitzer](https://github.com/minrk/wurlitzer) | 1.0.2 | Capture C-level stdout/stderr in Python / MIT |
| [xlrd](http://www.python-excel.org/) | 1.2.0 | Library for developers to extract data from Microsoft Excel (tm) spreadsheet files / BSD 3-Clause and BSD with advertising |
| [xlsxwriter](https://xlsxwriter.readthedocs.io/) | 1.1.2 | A Python module for creating Excel XLSX files / BSD 2-Clause |
| [xlwt](http://www.python-excel.org/) | 1.3.0 | Writing data and formatting information to Excel files / BSD |
| [xz](http://tukaani.org/xz/) | 5.2.4 | Data compression software with high compression ratio / LGPL-2.1 and GPL-2.0 |
| [yaml](http://pyyaml.org/wiki/LibYAML) | 0.1.7 | A C library for parsing and emitting YAML. / MIT |
| [zeromq](http://zeromq.org) | 4.2.5 | A high-performance asynchronous messaging library. / LGPL 3 |
| [zict](http://github.com/mrocklin/zict) | 0.1.3 | Composable Dictionary Classes / BSD 3-Clause |
| [zlib](http://zlib.net/) | 1.2.11 | Massively spiffy yet delicately unobtrusive compression library / zlib |
| [zstd](http://www.zstd.net) | 1.3.7 | Zstandard - Fast real-time compression algorithm / BSD 3-Clause |
| Name | Version | Summary / License |
|---|---|---|
| [\_ipyw\_jlab\_nb\_ext\_conf](https://github.com/ContinuumIO/anaconda-nb-extensions-meta-config) | 0.1.0 | A configuration metapackage for enabling Anaconda-bundled jupyter extensions / BSD |
| [alabaster](http://www.sphinx-doc.org/en/stable/index.html) | 0.7.12 | Configurable, Python 2+3 compatible Sphinx theme. / BSD 3-Clause |
| [anaconda-client](http://anaconda.org) | 1.7.2 | anaconda.org command line client library / BSD 3-clause |
| [anaconda-navigator](https://github.com/ContinuumIO/navigator) | 1.9.6 | Anaconda Navigator / proprietary - Continuum Analytics, Inc. |
| [anaconda-project](https://github.com/Anaconda-Platform/anaconda-project) | 0.8.2 | Tool for encapsulating, running, and reproducing data science projects / BSD 3-Clause |
| [asn1crypto](https://github.com/wbond/asn1crypto) | 0.24.0 | Python ASN.1 library with a focus on performance and a pythonic API / MIT |
| [astroid](https://www.astroid.org/) | 1.6.5 | A abstract syntax tree for Python with inference support. / LGPL 2.1 |
| [astropy](http://www.astropy.org/) | 2.0.9 | Community-developed Python Library for Astronomy / BSD |
| [atomicwrites](https://github.com/untitaker/python-atomicwrites) | 1.2.1 | Atomic file writes. / MIT |
| [attrs](https://attrs.readthedocs.io/en/stable/) | 18.2.0 | attrs is the Python package that will bring back the joy of writing classes by relieving you from the drudgery of implementing object protocols (aka dunder methods). / MIT |
| [automat](https://github.com/glyph/Automat) | 0.7.0 | self-service finite-state machines for the programmer on the go / MIT |
| [babel](http://babel.pocoo.org/) | 2.6.0 | Utilities to internationalize and localize Python applications / BSD 3-clause |
| [backports](https://bitbucket.org/brandon/backports) | 1.0 | / BSD |
| [backports.functools\_lru\_cache](https://github.com/jaraco/backports.functools_lru_cache) | 1.5 | Backport of functools.lru\_cache from Python 3.3 as published at ActiveState. / MIT |
| [backports.os](https://github.com/pjdelport/backports.os) | 0.1.1 | Backport of new features in Python’s os module / Python Software Foundation |
| [backports.shutil\_get\_terminal\_size](https://github.com/chrippa/backports.shutil_get_terminal_size) | 1.0.0 | A backport of the get\_terminal\_size function from Python 3.3’s shutil. / MIT |
| [backports.shutil\_which](https://github.com/minrk/backports.shutil_which) | 3.5.2 | Backport of shutil.which from Python 3.3 / PSF2 & MIT |
| [backports\_abc](https://github.com/cython/backports_abc) | 0.5 | A backport of recent additions to the collections.abc module. / PSF 2 |
| [beautifulsoup4](http://www.crummy.com/software/BeautifulSoup/) | 4.6.3 | Python library designed for screen-scraping / MIT |
| [bitarray](https://github.com/ilanschnell/bitarray) | 0.8.3 | efficient arrays of booleans – C extension / PSF |
| [bkcharts](http://github.com/bokeh/bkcharts) | 0.2 | High level chart types built on top of Bokeh / BSD 3-Clause |
| blas | 1.0 | |
| [blaze](http://blaze.pydata.org) | 0.11.3 | NumPy and Pandas interface to big data / BSD 3-Clause |
| [bleach](https://github.com/mozilla/bleach) | 3.0.2 | Easy, whitelist-based HTML-sanitizing tool / Apache-2.0 |
| [blosc](https://github.com/Blosc/c-blosc) | 1.14.4 | A blocking, shuffling and loss-less compression library that can be faster than memcpy() / BSD 3-Clause |
| [bokeh](http://bokeh.pydata.org/) | 1.0.2 | Statistical and novel interactive HTML plots for Python / BSD 3-Clause |
| [boto](https://github.com/boto/boto/) | 2.49.0 | Amazon Web Services Library / MIT |
| [bottleneck](http://berkeleyanalytics.com/bottleneck) | 1.2.1 | Fast NumPy array functions written in Cython. / BSD 2-Clause |
| [bzip2](http://www.bzip.org/) | 1.0.6 | high-quality data compressor / bzip2 |
| [ca-certificates](https://github.com/conda-forge/ca-certificates-feedstock) | 2018.03.07 | Certificates for use with other packages. / ISC |
| [cdecimal](http://www.bytereef.org/mpdecimal/index.html) | 2.3 | Fast drop-in replacement for decimal.py / BSD 2-Clause |
| [certifi](http://certifi.io/) | 2018.11.29 | Python package for providing Mozilla’s CA Bundle. / ISC |
| [cffi](https://bitbucket.org/cffi/cffi) | 1.11.5 | Foreign Function Interface for Python calling C code. / MIT |
| [chardet](https://github.com/chardet/chardet) | 3.0.4 | Universal character encoding detector / LGPL2 |
| [click](https://palletsprojects.com/p/click) | 7.0 | Python composable command line interface toolkit / BSD-3-Clause |
| [cloudpickle](https://github.com/cloudpipe/cloudpickle) | 0.6.1 | Extended pickling support for Python objects / BSD 3-Clause |
| [clyent](https://github.com/Anaconda-Platform/clyent) | 1.2.2 | Command line client library for windows and posix / BSD 3-Clause |
| [colorama](https://github.com/tartley/colorama) | 0.4.1 | Cross-platform colored terminal text / BSD-3-Clause |
| [comtypes](http://starship.python.net/crew/theller/comtypes/) | 1.1.7 | pure Python COM package / MIT |
| [conda](https://conda.io) | 4.5.12 | OS-agnostic, system-level binary package and environment manager. / BSD 3-Clause |
| [conda-build](https://github.com/conda/conda-build) | 3.17.6 | tools for building conda packages / BSD 3-Clause |
| [conda-env](https://github.com/conda/conda-env) | 2.6.0 | Tools for interacting with conda environments. / BSD 3-Clause |
| [conda-verify](https://github.com/conda/conda-verify) | 3.1.1 | tool for validating conda recipes and conda packages / BSD 3-Clause |
| [configparser](http://docs.python.org/3/library/configparser.html) | 3.5.0 | This library brings the updated configparser from Python 3.5 to Python 2.6-3.5 / MIT |
| console\_shortcut | 0.1.1 | Console shortcut creator for Windows (using menuinst) / BSD |
| [constantly](https://github.com/twisted/constantly) | 15.1.0 | Symbolic constants in Python / MIT |
| [contextlib2](http://contextlib2.readthedocs.org) | 0.5.5 | Backports and enhancements for the contextlib module / PSF |
| [cryptography](https://github.com/pyca/cryptography) | 2.4.2 | Provides cryptographic recipes and primitives to Python developers / Apache 2.0 or BSD 3-Clause, PSF 2 |
| [curl](http://curl.haxx.se/) | 7.63.0 | tool and library for transferring data with URL syntax / MIT/X derivate (`<http://curl.haxx.se/docs/copyright.html>`) |
| [cycler](http://matplotlib.org/cycler) | 0.10.0 | Composable style cycles. / BSD 3-Clause |
| [cython](http://www.cython.org/) | 0.29.2 | The Cython compiler for writing C extensions for the Python language / Apache-2.0 |
| [cytoolz](https://github.com/pytoolz/cytoolz) | 0.9.0.1 | Cython implementation of Toolz. High performance functional utilities. / BSD 3-Clause |
| [dask](http://github.com/dask/dask/) | 1.0.0 | Parallel Python with task scheduling / BSD 3-Clause |
| [dask-core](http://github.com/dask/dask/) | 1.0.0 | Parallel Python with task scheduling / BSD 3-Clause |
| [datashape](http://datashape.pydata.org) | 0.5.4 | A data description language. / BSD 2-Clause |
| [decorator](https://github.com/micheles/decorator) | 4.3.0 | Better living through Python with decorators. / BSD 3-Clause |
| [defusedxml](https://bitbucket.org/tiran/defusedxml) | 0.5.0 | XML bomb protection for Python stdlib modules / PSF 2.0 |
| [distributed](http://distributed.readthedocs.io/en/latest/) | 1.25.1 | Distributed computing with Dask / BSD 3-Clause |
| [docutils](http://docutils.sourceforge.net/) | 0.14 | Docutils – Python Documentation Utilities / Public Domain Dedictation and BSD 2-Clause and PSF 2.1.1 and GPL 3.0 |
| [entrypoints](https://github.com/takluyver/entrypoints) | 0.2.3 | Discover and load entry points from installed packages. / MIT License |
| [enum34](https://bitbucket.org/stoneleaf/enum34) | 1.1.6 | Python 3.4 Enum backported to 3.3, 3.2, 3.1, 2.7, 2.6, 2.5, and 2.4 / BSD 3-Clause |
| [et\_xmlfile](https://bitbucket.org/openpyxl/et_xmlfile) | 1.0.1 | An implementation of lxml.xmlfile for the standard library / MIT |
| [fastcache](https://github.com/pbrady/fastcache) | 1.0.2 | C implementation of Python 3 lru\_cache / MIT |
| [filelock](https://github.com/benediktschmitt/py-filelock) | 3.0.10 | A platform independent file lock. / Public Domain |
| [flask](http://flask.pocoo.org) | 1.0.2 | A microframework based on Werkzeug, Jinja2 and good intentions. / BSD 3-Clause |
| [flask-cors](https://github.com/corydolphin/flask-cors) | 3.0.7 | A Flask extension adding a decorator for CORS support / MIT |
| [freetype](https://www.freetype.org/) | 2.9.1 | A Free, High-Quality, and Portable Font Engine / GPL-2.0 and FreeType |
| [funcsigs](http://funcsigs.readthedocs.org) | 1.0.2 | Python function signatures from PEP362 for Python 2.6, 2.7 and 3.2+. / Apache 2.0 |
| [functools32](https://github.com/MiCHiLU/python-functools32) | 3.2.3.2 | Backport of the functools module from Python 3.2.3 for use on 2.7 and PyPy. / PSF license |
| [future](http://python-future.org) | 0.17.1 | Clean single-source support for Python 3 and 2 / MIT |
| [futures](https://github.com/agronholm/pythonfutures) | 3.2.0 | Backport of the concurrent.futures package from Python 3.2 / PSF |
| [get\_terminal\_size](https://github.com/chrippa/backports.shutil_get_terminal_size) | 1.0.0 | Get the size of the terminal window. / MIT |
| [gevent](http://www.gevent.org/) | 1.3.7 | Coroutine-based network library / MIT |
| [glob2](https://github.com/miracle2k/python-glob2) | 0.6 | Version of the glob module that supports recursion via \*\*, and can capture patterns. / BSD-2-Clause |
| [greenlet](https://github.com/python-greenlet/greenlet) | 0.4.15 | Lightweight in-process concurrent programming / MIT |
| [grin](http://pypi.python.org/pypi/grin) | 1.2.1 | Enhanced grep-like tool / BSD 3-Clause |
| [h5py](http://www.h5py.org/) | 2.8.0 | Read and write HDF5 files from Python. / BSD 3-Clause |
| [hdf5](http://www.hdfgroup.org/HDF5/) | 1.10.2 | HDF5 is a data model, library, and file format for storing and managing data / HDF5 |
| [heapdict](http://stutzbachenterprises.com/) | 1.0.0 | A heap with decrease-key and increase-key operations / BSD 3-Clause |
| [html5lib](https://github.com/html5lib/html5lib-python) | 1.0.1 | HTML parser based on the WHATWG HTML specification / MIT |
| [hyperlink](https://github.com/python-hyper/hyperlink) | 18.0.0 | Immutable, Pythonic, correct URLs. / MIT |
| [icc\_rt](https://software.intel.com/en-us/node/522690) | 2019.0.0 | Intel runtime libraries for C, C++ and Fortran compilers / Intel proprietary |
| [icu](http://site.icu-project.org/) | 58.2 | International Components for Unicode. / MIT |
| [idna](https://github.com/kjd/idna) | 2.8 | Internationalized Domain Names in Applications (IDNA). / BSD Like |
| [imageio](http://imageio.github.io) | 2.4.1 | a Python library for reading and writing image data / BSD 2-Clause |
| [imagesize](https://github.com/shibukawa/imagesize_py) | 1.1.0 | Getting image size from png/jpeg/jpeg2000/gif file / MIT |
| [importlib\_metadata](http://importlib-metadata.readthedocs.io) | 0.6 | A library to access the metadata for a Python package / APACHE-2.0 |
| [incremental](https://twistedmatrix.com) | 17.5.0 | A library that versions your Python projects / MIT License |
| [intel-openmp](https://software.intel.com/en-us/node/522690) | 2019.1 | Math library for Intel and compatible processors / proprietary - Intel |
| [ipaddress](https://github.com/phihag/ipaddress) | 1.0.22 | IPv4/IPv6 manipulation library / PSF 2 |
| [ipykernel](https://ipython.org) | 4.10.0 | IPython Kernel for Jupyter / BSD-3-Clause |
| [ipython](https://ipython.org/) | 5.8.0 | IPython: Productive Interactive Computing / BSD-3-Clause |
| [ipython\_genutils](http://ipython.org) | 0.2.0 | vestigial utilities from IPython / BSD 3-Clause |
| [ipywidgets](https://github.com/ipython/ipywidgets) | 7.4.2 | Jupyter Interactive Widgets / BSD 3-clause |
| [isort](https://github.com/timothycrosley/isort) | 4.3.4 | A Python utility / library to sort Python imports. / MIT |
| [itsdangerous](https://github.com/pallets/itsdangerous) | 1.1.0 | Various helpers to pass trusted data to untrusted environments. / BSD 3-Clause |
| [jdcal](https://github.com/phn/jdcal) | 1.4 | Julian dates from proleptic Gregorian and Julian calendars. / BSD 2-Clause |
| [jedi](https://github.com/davidhalter/jedi/) | 0.13.2 | An autocompletion tool for Python that can be used for text editors. / MIT |
| [jinja2](http://jinja.pocoo.org) | 2.10 | An easy to use stand-alone template engine written in pure python. / 3-Clause BSD |
| [jpeg](http://www.ijg.org/) | 9b | read/write jpeg COM, EXIF, IPTC medata / Custom free software license |
| [jsonschema](https://github.com/Julian/jsonschema) | 2.6.0 | An implementation of JSON Schema validation for Python / MIT |
| [jupyter](http://jupyter.org) | 1.0.0 | Jupyter metapackage. Install all the Jupyter components in one go. / BSD 3-Clause |
| [jupyter\_client](http://jupyter.org) | 5.2.4 | Jupyter protocol implementation and client libraries / BSD 3-clause |
| [jupyter\_console](http://jupyter.org) | 5.2.0 | Jupyter terminal console / BSD-3-Clause |
| [jupyter\_core](http://jupyter.org) | 4.4.0 | Core common functionality of Jupyter projects. / BSD 3-clause |
| [jupyterlab](https://github.com/jupyterlab/jupyterlab) | 0.33.11 | JupyterLab PRE-ALPHA / BSD-3-Clause |
| [jupyterlab\_launcher](http://github.com/jupyterlab/jupyterlab_launcher) | 0.11.2 | A Launcher for JupyterLab based applications. / BSD 3-Clause |
| [keyring](https://github.com/jaraco/keyring) | 17.0.0 | Store and access your passwords safely / Python Software Foundation or MIT |
| [kiwisolver](https://github.com/nucleic/kiwi) | 1.0.1 | A fast implementation of the Cassowary constraint solver / BSD 3-Clause |
| [krb5](http://web.mit.edu/kerberos/) | 1.16.1 | A network authentication protocol. / MIT |
| [lazy-object-proxy](https://github.com/ionelmc/python-lazy-object-proxy) | 1.3.1 | A fast and thorough lazy object proxy. / BSD 2-Clause |
| [libarchive](http://www.libarchive.org/) | 3.3.3 | Multi-format archive and compression library / BSD 2-Clause |
| [libcurl](http://curl.haxx.se/) | 7.63.0 | tool and library for transferring data with URL syntax / MIT/X derivate (`<http://curl.haxx.se/docs/copyright.html>`) |
| [libiconv](https://www.gnu.org/software/libiconv/) | 1.15 | Provides iconv for systems which don’t have one (or that cannot convert from/to Unicode.) / GPL and LGPL |
| [libpng](http://www.libpng.org/pub/png/libpng.html) | 1.6.35 | PNG reference library. / zlib/libpng |
| [libsodium](http://libsodium.org) | 1.0.16 | A modern and easy-to-use crypto library. / ISC |
| [libssh2](https://www.libssh2.org/) | 1.8.0 | the SSH library / BSD 3-Clause |
| [libtiff](http://www.libtiff.org/) | 4.0.9 | Support for the Tag Image File Format (TIFF). / HPND |
| [libxml2](http://xmlsoft.org/) | 2.9.8 | The XML C parser and toolkit of Gnome / MIT |
| [libxslt](http://xmlsoft.org/XSLT/) | 1.1.32 | The XSLT C library developed for the GNOME project / MIT |
| [linecache2](https://github.com/testing-cabal/linecache2) | 1.0.0 | Backport of the linecache module / PSF 1.0 |
| [llvmlite](https://github.com/numba/llvmlite) | 0.26.0 | A lightweight LLVM python binding for writing JIT compilers / New BSD License |
| [locket](https://github.com/mwilliamson/locket.py) | 0.2.0 | File-based locks for Python for Linux and Windows / BSD 2-Clause |
| [lxml](http://lxml.de/) | 4.2.5 | Pythonic binding for the C libraries libxml2 and libxslt. / BSD 3-Clause, GPL-2.0, ZPL-2.0, and ElementTree |
| [lz4-c](https://www.lz4.org) | 1.8.1.2 | Extremely Fast Compression algorithm / BSD 2-clause |
| [lzo](http://www.oberhumer.com/opensource/lzo/) | 2.10 | LZO is a portable lossless data compression library written in ANSI C. / GPL v2+ |
| m2w64-gcc-libgfortran | 5.3.0 | |
| m2w64-gcc-libs | 5.3.0 | |
| m2w64-gcc-libs-core | 5.3.0 | |
| m2w64-gmp | 6.1.0 | |
| m2w64-libwinpthread-git | 5.0.0.4634.697f757 | |
| [markupsafe](https://www.palletsprojects.com/p/markupsafe) | 1.1.0 | A Python module that implements the jinja2.Markup string / BSD-3-Clause |
| [matplotlib](http://matplotlib.org/) | 2.2.3 | Publication quality figures in Python / PSF-based |
| [mccabe](https://github.com/PyCQA/mccabe) | 0.6.1 | McCabe complexity checker for Python / MIT |
| [menuinst](https://github.com/ContinuumIO/menuinst) | 1.4.14 | cross platform menu item installation / BSD |
| [mistune](https://github.com/lepture/mistune) | 0.8.4 | The fastest markdown parser in pure Python. / BSD 3-Clause |
| [mkl](https://software.intel.com/en-us/mkl) | 2019.1 | Math library for Intel and compatible processors / proprietary - Intel |
| [mkl-service](https://github.com/ContinuumIO/mkl-service) | 1.1.2 | Python bindings to MKL service functions / 3-clause BSD |
| [mkl\_fft](http://github.com/IntelPython/mkl_fft) | 1.0.6 | NumPy-based implementation of Fast Fourier Transform using Intel (R) Math Kernel Library. / BSD 3-Clause |
| [more-itertools](https://github.com/erikrose/more-itertools) | 4.3.0 | More routines for operating on iterables, beyond itertools / MIT |
| [mpmath](http://mpmath.org) | 1.1.0 | Python library for arbitrary-precision floating-point arithmetic / BSD 3-Clause |
| [msgpack-python](http://msgpack.org/) | 0.5.6 | MessagePack (de)serializer. / Apache 2.0 |
| msys2-conda-epoch | 20160418 | |
| [multipledispatch](https://github.com/mrocklin/multipledispatch/) | 0.6.0 | Multiple dispatch in Python / BSD 3-Clause |
| [navigator-updater](https://github.com/ContinuumIO/navigator-updater) | 0.2.1 | Anaconda Navigator Updater / proprietary - Continuum Analytics, Inc. |
| [nbconvert](http://jupyter.org) | 5.4.0 | Converting Jupyter Notebooks / BSD-3-Clause |
| [nbformat](http://jupyter.org) | 4.4.0 | The reference implementation of the Jupyter Notebook format / BSD 3-clause |
| [networkx](https://networkx.github.io/) | 2.2 | Python package for creating and manipulating complex networks / BSD 3-Clause |
| [nltk](http://nltk.org/) | 3.4 | Build Python programs to work with human language data / Apache 2.0 |
| [nose](http://readthedocs.org/docs/nose/) | 1.3.7 | Nose extends unittest to make testing easier / LGPL-2.1 |
| [notebook](http://jupyter.org) | 5.7.4 | Jupyter Notebook / BSD 3-clause |
| [numba](http://numba.github.com) | 0.41.0 | NumPy aware dynamic Python compiler using LLVM / BSD 2-clause |
| [numexpr](https://github.com/pydata/numexpr) | 2.6.8 | Fast numerical expression evaluator for NumPy. / MIT |
| [numpy](http://numpy.scipy.org/) | 1.15.4 | Array processing for numbers, strings, records, and objects. / BSD 3-Clause |
| numpy-base | 1.15.4 | |
| [numpydoc](https://github.com/numpy/numpydoc) | 0.8.0 | Sphinx extension to support docstrings in Numpy format / BSD 3-Clause |
| [odo](http://odo.pydata.org) | 0.5.1 | Data migration in Python / BSD-3-Clause |
| [olefile](http://www.decalage.info/python/olefileio) | 0.46 | parse, read and write Microsoft OLE2 files / BSD 2-Clause |
| [openpyxl](https://openpyxl.readthedocs.io) | 2.5.12 | A Python library to read/write Excel 2010 xlsx/xlsm files / MIT |
| [openssl](http://www.openssl.org/) | 1.0.2p | OpenSSL is an open-source implementation of the SSL and TLS protocols / OpenSSL |
| [packaging](https://github.com/pypa/packaging) | 18.0 | Core utilities for Python packages / Apache 2.0 or BSD 2-Clause |
| [pandas](http://pandas.pydata.org) | 0.23.4 | High-performance, easy-to-use data structures and data analysis tools. / BSD 3-clause |
| [pandoc](http://pandoc.org/) | 1.19.2.1 | Universal markup converter (repackaged binaries). / GPL-2.0 |
| [pandocfilters](https://github.com/jgm/pandocfilters) | 1.4.2 | A python module for writing pandoc filters / BSD-3-Clause |
| [parso](https://github.com/davidhalter/parso) | 0.3.1 | A Python Parser / MIT |
| [partd](https://github.com/dask/partd) | 0.3.9 | Data structure for on-disk shuffle operations / BSD 3-Clause |
| [path.py](https://github.com/jaraco/path.py) | 11.5.0 | A module wrapper for os.path / MIT |
| [pathlib2](https://github.com/mcmtroffaes/pathlib2) | 2.3.3 | Fork of pathlib aiming to support the full stdlib Python API. / MIT |
| [patsy](https://github.com/pydata/patsy) | 0.5.1 | Describing statistical models in Python using symbolic formulas / BSD-2-Clause, PSF2 |
| [pep8](http://pep8.readthedocs.org/) | 1.7.1 | Python style guide checker / MIT |
| [pickleshare](https://github.com/pickleshare/pickleshare/) | 0.7.5 | Tiny ‘shelve’-like database with concurrency support / MIT |
| [pillow](https://pillow.readthedocs.io) | 5.3.0 | Pillow is the friendly PIL fork by Alex Clark and Contributors / PIL |
| [pip](https://pip.pypa.io/en/stable/) | 18.1 | PyPA recommended tool for installing Python packages / MIT |
| [pkginfo](https://code.launchpad.net/~tseaver/pkginfo/trunk) | 1.4.2 | Query metadatdata from sdists / bdists / installed packages. / MIT |
| [pluggy](https://github.com/pytest-dev/pluggy) | 0.8.0 | Plugin registration and hook calling for Python / MIT |
| [ply](http://www.dabeaz.com/ply/index.html) | 3.11 | Python Lex-Yacc / BSD 3-clause |
| [progress](https://github.com/verigak/progress) | 1.3 | Easy progress reporting for Python / ISC |
| [prometheus\_client](https://github.com/prometheus/client_python) | 0.5.0 | Python client for the Prometheus monitoring system / Apache 2.0 |
| [prompt\_toolkit](https://github.com/jonathanslenders/python-prompt-toolkit) | 1.0.15 | Library for building powerful interactive command lines in Python / BSD 3-clause |
| [psutil](https://github.com/giampaolo/psutil) | 5.4.8 | A cross-platform process and system utilities module for Python / BSD 3-Clause |
| [py](https://github.com/pytest-dev/py) | 1.7.0 | library with cross-python path, ini-parsing, io, code, log facilities / MIT |
| [pyasn1-modules](http://pyasn1.sourceforge.net/) | 0.2.2 | A collection of ASN.1-based protocols modules. / BSD 2-Clause |
| [pycodestyle](https://pycodestyle.readthedocs.io/) | 2.4.0 | Python style guide checker / MIT |
| [pycosat](https://github.com/ContinuumIO/pycosat) | 0.6.3 | Bindings to picosat (a SAT solver) / MIT |
| [pycparser](https://github.com/eliben/pycparser) | 2.19 | Complete C99 parser in pure Python / BSD 3-clause |
| [pycrypto](http://www.pycrypto.org/) | 2.6.1 | Cryptographic modules for Python. / Public Domain |
| [pycurl](http://pycurl.sourceforge.net/) | 7.43.0.2 | A Python Interface To The cURL library / LGPL, MIT |
| [pyflakes](https://github.com/PyCQA/pyflakes) | 2.0.0 | Pyflakes analyzes programs and detects various errors. / MIT |
| [pygments](http://pygments.org/) | 2.3.1 | Generic syntax highlighting package / BSD 2-clause |
| [pylint](http://www.pylint.org/) | 1.9.2 | python code static checker / GPL |
| [pyodbc](https://github.com/mkleehammer/pyodbc) | 4.0.25 | DB API Module for ODBC / MIT |
| [pyopenssl](https://github.com/pyca/pyopenssl) | 18.0.0 | Python wrapper module around the OpenSSL library / Apache 2.0 |
| [pyparsing](http://pyparsing.wikispaces.com/) | 2.3.0 | Create and execute simple grammars / MIT |
| [pyqt](http://www.riverbankcomputing.co.uk/software/pyqt) | 5.6.0 | Python binding of the cross-platform GUI toolkit Qt. / Commercial, GPL-2.0, GPL-3.0 |
| [pysocks](https://github.com/Anorov/PySocks) | 1.6.8 | A Python SOCKS client module. See [Anorov/PySocks](https://github.com/Anorov/PySocks) for more information. / BSD 3-Clause |
| [pytables](http://www.pytables.org) | 3.4.4 | Brings together Python, HDF5 and NumPy to easily handle large amounts of data. / BSD 3-Clause |
| [pytest](https://docs.pytest.org/en/latest/) | 4.0.2 | Simple and powerful testing with Python. / MIT |
| [python](http://www.python.org/) | 2.7.15 | General purpose programming language / PSF |
| [python-dateutil](https://dateutil.readthedocs.org/) | 2.7.5 | Extensions to the standard Python datetime module. / BSD 3 Clause |
| python-libarchive-c | 2.8 | |
| [pytz](http://pythonhosted.org/pytz/) | 2018.7 | World timezone definitions, modern and historical. / MIT |
| [pywavelets](https://github.com/PyWavelets/pywt) | 1.0.1 | Discrete Wavelet Transforms in Python. / MIT |
| [pywin32](https://sourceforge.net/projects/pywin32) | 223 | Python extensions for Windows / PSF |
| [pywinpty](https://github.com/spyder-ide/pywinpty) | 0.5.5 | Python bindings for the winpty library / MIT |
| [pyyaml](http://pyyaml.org/wiki/PyYAML) | 3.13 | YAML parser and emitter for Python / MIT |
| [pyzmq](https://github.com/zeromq/pyzmq) | 17.1.2 | Python bindings for zeromq / BSD 3-clause |
| [qt](http://qt-project.org) | 5.6.2 | Qt is a cross-platform application and UI framework. / LGPL-3.0 |
| [qtawesome](https://github.com/spyder-ide/qtawesome) | 0.5.3 | Iconic fonts in PyQt and PySide applications / MIT |
| [qtconsole](http://jupyter.org) | 4.4.3 | Jupyter Qt console / BSD 3-Clause |
| [qtpy](https://github.com/spyder-ide/qtpy) | 1.5.2 | Abstraction layer for PyQt5/PyQt4/PySide / MIT |
| [requests](http://python-requests.org) | 2.21.0 | Python HTTP for Humans / Apache 2.0 |
| [rope](https://github.com/python-rope/rope) | 0.11.0 | A python refactoring library… / GPL 2.0 |
| [ruamel\_yaml](https://bitbucket.org/ruamel/yaml) | 0.15.46 | A patched copy of ruamel.yaml. / MIT |
| [scandir](https://github.com/benhoyt/scandir) | 1.9.0 | scandir, a better directory iterator and faster os.walk() / BSD 3-Clause |
| [scikit-image](http://scikit-image.org/) | 0.14.1 | Image processing routines for SciPy. / BSD 3-Clause |
| [scikit-learn](http://scikit-learn.org/) | 0.20.1 | A set of python modules for machine learning and data mining / BSD 3-Clause |
| [scipy](http://www.scipy.org/) | 1.1.0 | Scientific Library for Python / BSD 3-Clause |
| [seaborn](https://seaborn.pydata.org) | 0.9.0 | Statistical data visualization / BSD 3-Clause |
| [send2trash](https://github.com/hsoft/send2trash) | 1.5.0 | Python library to natively send files to Trash (or Recycle bin) on all platforms. / BSD-3-Clause |
| [setuptools](https://github.com/pypa/setuptools) | 40.6.3 | Download, build, install, upgrade, and uninstall Python packages / MIT |
| [simplegeneric](http://cheeseshop.python.org/pypi/simplegeneric) | 0.8.1 | Simple generic functions (similar to Python’s own len(), pickle.dump(), etc.) / Zope Public |
| [singledispatch](http://docs.python.org/3/library/functools.html#functools.singledispatch) | 3.4.0.3 | Transforms a function into a single-dispatch generic function / MIT |
| [sip](http://www.riverbankcomputing.com/software/sip/intro) | 4.18.1 | Create Python bindings for C and C++ libraries / GPL-3.0 |
| [six](http://pypi.python.org/pypi/six/) | 1.12.0 | Python 2 and 3 compatibility utilities / MIT |
| [snappy](https://github.com/google/snappy) | 1.1.7 | A fast compressor/decompressor / BSD 3-clause |
| [snowballstemmer](https://github.com/shibukawa/snowball_py) | 1.2.1 | Snowball stemming library collection for Python / BSD-2-Clause |
| [sortedcollections](http://www.grantjenks.com/docs/sortedcollections/) | 1.0.1 | Python Sorted Collections / Apache-2.0 |
| [sortedcontainers](http://www.grantjenks.com/docs/sortedcontainers/) | 2.1.0 | Python Sorted Container Types: SortedList, SortedDict, and SortedSet / Apache 2.0 |
| [sphinx](http://www.sphinx-doc.org) | 1.8.2 | Sphinx is a tool that makes it easy to create intelligent and beautiful documentation / BSD 2-clause |
| sphinxcontrib | 1.0 | Python namespace for sphinxcontrib / BSD |
| [sphinxcontrib-websupport](https://pypi.python.org/pypi/sphinxcontrib-websupport) | 1.1.0 | Sphinx API for Web Apps / BSD-2-Clause |
| [spyder](https://www.spyder-ide.org/) | 3.3.2 | The Scientific Python Development Environment / MIT |
| [spyder-kernels](https://github.com/spyder-ide/spyder-kernels) | 0.3.0 | Jupyter kernels for the Spyder console / MIT |
| [sqlalchemy](http://www.sqlalchemy.org/) | 1.2.15 | Database Abstraction Library. / MIT |
| [sqlite](http://www.sqlite.org/) | 3.26.0 | Implements a self-contained, zero-configuration, SQL database engine. / Public-Domain (`<http://www.sqlite.org/copyright.html>`) |
| [ssl\_match\_hostname](http://bitbucket.org/brandon/backports.ssl_match_hostname) | 3.5.0.1 | The ssl.match\_hostname() function from Python 3.5 / PSF 2 |
| [statsmodels](https://www.statsmodels.org) | 0.9.0 | Statistical computations and models for use with SciPy / BSD 3-Clause |
| [subprocess32](https://github.com/google/python-subprocess32) | 3.5.3 | A backport of the subprocess module from Python 3.2/3.3 for use on 2.x. / PSF 2 |
| [sympy](http://sympy.org) | 1.3 | Python library for symbolic mathematics / 3-clause BSD |
| [tblib](https://github.com/ionelmc/python-tblib) | 1.3.2 | Traceback serialization library. / BSD 2-Clause |
| [terminado](https://github.com/jupyter/terminado) | 0.8.1 | Terminals served by tornado websockets / BSD 2-clause |
| [testpath](https://testpath.readthedocs.io) | 0.4.2 | Testpath is a collection of utilities for Python code working with files and commands. / BSD-3-Clause |
| [tk](http://www.tcl.tk/) | 8.6.8 | A dynamic programming language with GUI support. Bundles Tcl and Tk. / Tcl/Tk |
| [toolz](http://toolz.readthedocs.org/) | 0.9.0 | A functional standard library for Python. / BSD 3-Clause |
| [tornado](http://www.tornadoweb.org/) | 5.1.1 | A Python web framework and asynchronous networking library, originally developed at FriendFeed. / Apache 2.0 |
| [tqdm](https://pypi.python.org/pypi/tqdm) | 4.28.1 | A Fast, Extensible Progress Meter / MPLv2.0, MIT |
| [traceback2](https://github.com/testing-cabal/traceback2) | 1.4.0 | Backports of the traceback module / PSF 2.0 |
| [traitlets](http://ipython.org/) | 4.3.2 | Configuration system for Python applications / BSD 3-clause |
| [typing](https://docs.python.org/3.5/library/typing.html) | 3.6.6 | Type Hints for Python - backport for `Python<3.5` / PSF |
| [unicodecsv](https://github.com/jdunck/python-unicodecsv) | 0.14.1 | Drop-in replacement for csv module which supports unicode strings / BSD |
| [unittest2](http://pypi.python.org/pypi/unittest2) | 1.1.0 | The new features in unittest backported to Python 2.4+ / BSD |
| [urllib3](https://urllib3.readthedocs.io/) | 1.24.1 | HTTP library with thread-safe connection pooling, file post, and more. / MIT |
| [vc](https://github.com/conda/conda/wiki/VC-features) | 9 | A meta-package to impose mutual exclusivity among software built with different VS versions / Modified BSD License (3-clause) |
| [vs2008\_runtime](http://www.microsoft.com) | 9.00.30729.1 | Bundles of the MSVC 9 (VS 2008) runtime / Proprietary |
| [vs2015\_runtime](http://www.microsoft.com) | 14.15.26706 | Bundles of the MSVC 14 (VS 2015) runtime / Proprietary |
| [wcwidth](https://github.com/jquast/wcwidth) | 0.1.7 | Measures number of Terminal column cells of wide-character codes. / MIT |
| [webencodings](https://github.com/gsnedders/python-webencodings) | 0.5.1 | Character encoding aliases for legacy web content / BSD 3-Clause |
| [werkzeug](http://werkzeug.pocoo.org/) | 0.14.1 | The Python WSGI Utility Library. / BSD 3-Clause |
| [wheel](https://github.com/pypa/wheel) | 0.32.3 | A built-package format for Python. / MIT |
| [widgetsnbextension](http://ipython.org) | 3.4.2 | Interactive Widgets for Jupyter / BSD 3-clause |
| [win\_inet\_pton](https://github.com/hickeroar/win_inet_pton) | 1.0.1 | Native inet\_pton and inet\_ntop implementation for Python on Windows (with ctypes). / PUBLIC-DOMAIN |
| [win\_unicode\_console](https://github.com/Drekin/win-unicode-console) | 0.5 | A Python package to enable Unicode input and display when running Python from Windows console. / MIT |
| [wincertstore](https://bitbucket.org/tiran/wincertstore) | 0.2 | Python module to extract CA and CRL certs from Windows’ cert store (ctypes based). / PSF 2 |
| [winpty](https://github.com/rprichard/winpty) | 0.4.3 | Winpty provides an interface similar to a Unix pty-master for communicating with Windows console programs. / MIT |
| [wrapt](https://github.com/GrahamDumpleton/wrapt) | 1.10.11 | Module for decorators, wrappers and monkey patching. / BSD 2-Clause |
| [xlrd](http://www.python-excel.org/) | 1.2.0 | Library for developers to extract data from Microsoft Excel (tm) spreadsheet files / BSD 3-Clause and BSD with advertising |
| [xlsxwriter](https://xlsxwriter.readthedocs.io/) | 1.1.2 | A Python module for creating Excel XLSX files / BSD 2-Clause |
| [xlwings](http://xlwings.org/) | 0.15.1 | Interact with Excel from Python and vice versa / 3-clause BSD |
| [xlwt](http://www.python-excel.org/) | 1.3.0 | Writing data and formatting information to Excel files / BSD |
| [xz](http://tukaani.org/xz/) | 5.2.4 | Data compression software with high compression ratio / LGPL-2.1 and GPL-2.0 |
| [yaml](http://pyyaml.org/wiki/LibYAML) | 0.1.7 | A C library for parsing and emitting YAML. / MIT |
| [zeromq](http://zeromq.org) | 4.2.5 | A high-performance asynchronous messaging library. / LGPL 3 |
| [zict](http://github.com/mrocklin/zict) | 0.1.3 | Composable Dictionary Classes / BSD 3-Clause |
| [zlib](http://zlib.net/) | 1.2.11 | Massively spiffy yet delicately unobtrusive compression library / zlib |
| Name | Version | Summary / License |
|---|---|---|
| [\_ipyw\_jlab\_nb\_ext\_conf](https://github.com/ContinuumIO/anaconda-nb-extensions-meta-config) | 0.1.0 | A configuration metapackage for enabling Anaconda-bundled jupyter extensions / BSD |
| [alabaster](http://www.sphinx-doc.org/en/stable/index.html) | 0.7.12 | Configurable, Python 2+3 compatible Sphinx theme. / BSD 3-Clause |
| [anaconda-client](http://anaconda.org) | 1.7.2 | anaconda.org command line client library / BSD 3-clause |
| [anaconda-navigator](https://github.com/ContinuumIO/navigator) | 1.9.6 | Anaconda Navigator / proprietary - Continuum Analytics, Inc. |
| [anaconda-project](https://github.com/Anaconda-Platform/anaconda-project) | 0.8.2 | Tool for encapsulating, running, and reproducing data science projects / BSD 3-Clause |
| [appnope](http://github.com/minrk/appnope) | 0.1.0 | Disable App Nap on OS X 10.9 / BSD 2-Clause |
| [appscript](http://appscript.sourceforge.net/) | 1.0.1 | Control AppleScriptable applications from Python / Public-Domain |
| [asn1crypto](https://github.com/wbond/asn1crypto) | 0.24.0 | Python ASN.1 library with a focus on performance and a pythonic API / MIT |
| [astroid](https://www.astroid.org/) | 1.6.5 | A abstract syntax tree for Python with inference support. / LGPL 2.1 |
| [astropy](http://www.astropy.org/) | 2.0.9 | Community-developed Python Library for Astronomy / BSD |
| [atomicwrites](https://github.com/untitaker/python-atomicwrites) | 1.2.1 | Atomic file writes. / MIT |
| [attrs](https://attrs.readthedocs.io/en/stable/) | 18.2.0 | attrs is the Python package that will bring back the joy of writing classes by relieving you from the drudgery of implementing object protocols (aka dunder methods). / MIT |
| [babel](http://babel.pocoo.org/) | 2.6.0 | Utilities to internationalize and localize Python applications / BSD 3-clause |
| [backports](https://bitbucket.org/brandon/backports) | 1.0 | / BSD |
| [backports.functools\_lru\_cache](https://github.com/jaraco/backports.functools_lru_cache) | 1.5 | Backport of functools.lru\_cache from Python 3.3 as published at ActiveState. / MIT |
| [backports.os](https://github.com/pjdelport/backports.os) | 0.1.1 | Backport of new features in Python’s os module / Python Software Foundation |
| [backports.shutil\_get\_terminal\_size](https://github.com/chrippa/backports.shutil_get_terminal_size) | 1.0.0 | A backport of the get\_terminal\_size function from Python 3.3’s shutil. / MIT |
| [backports\_abc](https://github.com/cython/backports_abc) | 0.5 | A backport of recent additions to the collections.abc module. / PSF 2 |
| [beautifulsoup4](http://www.crummy.com/software/BeautifulSoup/) | 4.6.3 | Python library designed for screen-scraping / MIT |
| [bitarray](https://github.com/ilanschnell/bitarray) | 0.8.3 | efficient arrays of booleans – C extension / PSF |
| [bkcharts](http://github.com/bokeh/bkcharts) | 0.2 | High level chart types built on top of Bokeh / BSD 3-Clause |
| blas | 1.0 | |
| [blaze](http://blaze.pydata.org) | 0.11.3 | NumPy and Pandas interface to big data / BSD 3-Clause |
| [bleach](https://github.com/mozilla/bleach) | 3.0.2 | Easy, whitelist-based HTML-sanitizing tool / Apache-2.0 |
| [blosc](https://github.com/Blosc/c-blosc) | 1.14.4 | A blocking, shuffling and loss-less compression library that can be faster than memcpy() / BSD 3-Clause |
| [bokeh](http://bokeh.pydata.org/) | 1.0.2 | Statistical and novel interactive HTML plots for Python / BSD 3-Clause |
| [boto](https://github.com/boto/boto/) | 2.49.0 | Amazon Web Services Library / MIT |
| [bottleneck](http://berkeleyanalytics.com/bottleneck) | 1.2.1 | Fast NumPy array functions written in Cython. / BSD 2-Clause |
| [bzip2](http://www.bzip.org/) | 1.0.6 | high-quality data compressor / bzip2 |
| [ca-certificates](https://github.com/conda-forge/ca-certificates-feedstock) | 2018.03.07 | Certificates for use with other packages. / ISC |
| [cdecimal](http://www.bytereef.org/mpdecimal/index.html) | 2.3 | Fast drop-in replacement for decimal.py / BSD 2-Clause |
| [certifi](http://certifi.io/) | 2018.11.29 | Python package for providing Mozilla’s CA Bundle. / ISC |
| [cffi](https://bitbucket.org/cffi/cffi) | 1.11.5 | Foreign Function Interface for Python calling C code. / MIT |
| [chardet](https://github.com/chardet/chardet) | 3.0.4 | Universal character encoding detector / LGPL2 |
| [click](https://palletsprojects.com/p/click) | 7.0 | Python composable command line interface toolkit / BSD-3-Clause |
| [cloudpickle](https://github.com/cloudpipe/cloudpickle) | 0.6.1 | Extended pickling support for Python objects / BSD 3-Clause |
| [clyent](https://github.com/Anaconda-Platform/clyent) | 1.2.2 | Command line client library for windows and posix / BSD 3-Clause |
| [colorama](https://github.com/tartley/colorama) | 0.4.1 | Cross-platform colored terminal text / BSD-3-Clause |
| [conda](https://conda.io) | 4.5.12 | OS-agnostic, system-level binary package and environment manager. / BSD 3-Clause |
| [conda-build](https://github.com/conda/conda-build) | 3.17.6 | tools for building conda packages / BSD 3-Clause |
| [conda-env](https://github.com/conda/conda-env) | 2.6.0 | Tools for interacting with conda environments. / BSD 3-Clause |
| [conda-verify](https://github.com/conda/conda-verify) | 3.1.1 | tool for validating conda recipes and conda packages / BSD 3-Clause |
| [configparser](http://docs.python.org/3/library/configparser.html) | 3.5.0 | This library brings the updated configparser from Python 3.5 to Python 2.6-3.5 / MIT |
| [contextlib2](http://contextlib2.readthedocs.org) | 0.5.5 | Backports and enhancements for the contextlib module / PSF |
| [cryptography](https://github.com/pyca/cryptography) | 2.4.2 | Provides cryptographic recipes and primitives to Python developers / Apache 2.0 or BSD 3-Clause, PSF 2 |
| [curl](http://curl.haxx.se/) | 7.63.0 | tool and library for transferring data with URL syntax / MIT/X derivate (`<http://curl.haxx.se/docs/copyright.html>`) |
| [cycler](http://matplotlib.org/cycler) | 0.10.0 | Composable style cycles. / BSD 3-Clause |
| [cython](http://www.cython.org/) | 0.29.2 | The Cython compiler for writing C extensions for the Python language / Apache-2.0 |
| [cytoolz](https://github.com/pytoolz/cytoolz) | 0.9.0.1 | Cython implementation of Toolz. High performance functional utilities. / BSD 3-Clause |
| [dask](http://github.com/dask/dask/) | 1.0.0 | Parallel Python with task scheduling / BSD 3-Clause |
| [dask-core](http://github.com/dask/dask/) | 1.0.0 | Parallel Python with task scheduling / BSD 3-Clause |
| [datashape](http://datashape.pydata.org) | 0.5.4 | A data description language. / BSD 2-Clause |
| [dbus](http://www.freedesktop.org/wiki/Software/dbus/) | 1.13.2 | Simple message bus system for applications to talk to one another / GPL2 |
| [decorator](https://github.com/micheles/decorator) | 4.3.0 | Better living through Python with decorators. / BSD 3-Clause |
| [defusedxml](https://bitbucket.org/tiran/defusedxml) | 0.5.0 | XML bomb protection for Python stdlib modules / PSF 2.0 |
| [distributed](http://distributed.readthedocs.io/en/latest/) | 1.25.1 | Distributed computing with Dask / BSD 3-Clause |
| [docutils](http://docutils.sourceforge.net/) | 0.14 | Docutils – Python Documentation Utilities / Public Domain Dedictation and BSD 2-Clause and PSF 2.1.1 and GPL 3.0 |
| [entrypoints](https://github.com/takluyver/entrypoints) | 0.2.3 | Discover and load entry points from installed packages. / MIT License |
| [enum34](https://bitbucket.org/stoneleaf/enum34) | 1.1.6 | Python 3.4 Enum backported to 3.3, 3.2, 3.1, 2.7, 2.6, 2.5, and 2.4 / BSD 3-Clause |
| [et\_xmlfile](https://bitbucket.org/openpyxl/et_xmlfile) | 1.0.1 | An implementation of lxml.xmlfile for the standard library / MIT |
| [expat](http://expat.sourceforge.net/) | 2.2.6 | Expat XML parser library in C. / MIT |
| [fastcache](https://github.com/pbrady/fastcache) | 1.0.2 | C implementation of Python 3 lru\_cache / MIT |
| [filelock](https://github.com/benediktschmitt/py-filelock) | 3.0.10 | A platform independent file lock. / Public Domain |
| [flask](http://flask.pocoo.org) | 1.0.2 | A microframework based on Werkzeug, Jinja2 and good intentions. / BSD 3-Clause |
| [flask-cors](https://github.com/corydolphin/flask-cors) | 3.0.7 | A Flask extension adding a decorator for CORS support / MIT |
| [freetype](https://www.freetype.org/) | 2.9.1 | A Free, High-Quality, and Portable Font Engine / GPL-2.0 and FreeType |
| [funcsigs](http://funcsigs.readthedocs.org) | 1.0.2 | Python function signatures from PEP362 for Python 2.6, 2.7 and 3.2+. / Apache 2.0 |
| [functools32](https://github.com/MiCHiLU/python-functools32) | 3.2.3.2 | Backport of the functools module from Python 3.2.3 for use on 2.7 and PyPy. / PSF license |
| [future](http://python-future.org) | 0.17.1 | Clean single-source support for Python 3 and 2 / MIT |
| [futures](https://github.com/agronholm/pythonfutures) | 3.2.0 | Backport of the concurrent.futures package from Python 3.2 / PSF |
| [get\_terminal\_size](https://github.com/chrippa/backports.shutil_get_terminal_size) | 1.0.0 | Get the size of the terminal window. / MIT |
| [gettext](https://www.gnu.org/software/gettext/) | 0.19.8.1 | Internationalization package. / GPLv2 |
| [gevent](http://www.gevent.org/) | 1.3.7 | Coroutine-based network library / MIT |
| [glib](https://developer.gnome.org/glib/) | 2.56.2 | Provides core application building blocks for libraries and applications written in C. / LGPL-2.1 |
| [glob2](https://github.com/miracle2k/python-glob2) | 0.6 | Version of the glob module that supports recursion via \*\*, and can capture patterns. / BSD-2-Clause |
| [gmp](http://gmplib.org/) | 6.1.2 | The GNU multiprecision library. / GPL 2 and LGPL 3 |
| [gmpy2](https://pypi.python.org/pypi/gmpy2) | 2.0.8 | GMP/MPIR, MPFR, and MPC interface to Python 2.6+ and 3.x / LGPL 3 |
| [greenlet](https://github.com/python-greenlet/greenlet) | 0.4.15 | Lightweight in-process concurrent programming / MIT |
| [grin](http://pypi.python.org/pypi/grin) | 1.2.1 | Enhanced grep-like tool / BSD 3-Clause |
| [h5py](http://www.h5py.org/) | 2.8.0 | Read and write HDF5 files from Python. / BSD 3-Clause |
| [hdf5](http://www.hdfgroup.org/HDF5/) | 1.10.2 | HDF5 is a data model, library, and file format for storing and managing data / HDF5 |
| [heapdict](http://stutzbachenterprises.com/) | 1.0.0 | A heap with decrease-key and increase-key operations / BSD 3-Clause |
| [html5lib](https://github.com/html5lib/html5lib-python) | 1.0.1 | HTML parser based on the WHATWG HTML specification / MIT |
| [icu](http://site.icu-project.org/) | 58.2 | International Components for Unicode. / MIT |
| [idna](https://github.com/kjd/idna) | 2.8 | Internationalized Domain Names in Applications (IDNA). / BSD Like |
| [imageio](http://imageio.github.io) | 2.4.1 | a Python library for reading and writing image data / BSD 2-Clause |
| [imagesize](https://github.com/shibukawa/imagesize_py) | 1.1.0 | Getting image size from png/jpeg/jpeg2000/gif file / MIT |
| [importlib\_metadata](http://importlib-metadata.readthedocs.io) | 0.6 | A library to access the metadata for a Python package / APACHE-2.0 |
| [intel-openmp](https://software.intel.com/en-us/node/522690) | 2019.1 | Math library for Intel and compatible processors / proprietary - Intel |
| [ipaddress](https://github.com/phihag/ipaddress) | 1.0.22 | IPv4/IPv6 manipulation library / PSF 2 |
| [ipykernel](https://ipython.org) | 4.10.0 | IPython Kernel for Jupyter / BSD-3-Clause |
| [ipython](https://ipython.org/) | 5.8.0 | IPython: Productive Interactive Computing / BSD-3-Clause |
| [ipython\_genutils](http://ipython.org) | 0.2.0 | vestigial utilities from IPython / BSD 3-Clause |
| [ipywidgets](https://github.com/ipython/ipywidgets) | 7.4.2 | Jupyter Interactive Widgets / BSD 3-clause |
| [isort](https://github.com/timothycrosley/isort) | 4.3.4 | A Python utility / library to sort Python imports. / MIT |
| [itsdangerous](https://github.com/pallets/itsdangerous) | 1.1.0 | Various helpers to pass trusted data to untrusted environments. / BSD 3-Clause |
| [jbig](https://www.cl.cam.ac.uk/~mgk25/jbigkit) | 2.1 | Implementation of the JBIG1 data compression standard / GPL-2.0 |
| [jdcal](https://github.com/phn/jdcal) | 1.4 | Julian dates from proleptic Gregorian and Julian calendars. / BSD 2-Clause |
| [jedi](https://github.com/davidhalter/jedi/) | 0.13.2 | An autocompletion tool for Python that can be used for text editors. / MIT |
| [jinja2](http://jinja.pocoo.org) | 2.10 | An easy to use stand-alone template engine written in pure python. / 3-Clause BSD |
| [jpeg](http://www.ijg.org/) | 9b | read/write jpeg COM, EXIF, IPTC medata / Custom free software license |
| [jsonschema](https://github.com/Julian/jsonschema) | 2.6.0 | An implementation of JSON Schema validation for Python / MIT |
| [jupyter](http://jupyter.org) | 1.0.0 | Jupyter metapackage. Install all the Jupyter components in one go. / BSD 3-Clause |
| [jupyter\_client](http://jupyter.org) | 5.2.4 | Jupyter protocol implementation and client libraries / BSD 3-clause |
| [jupyter\_console](http://jupyter.org) | 5.2.0 | Jupyter terminal console / BSD-3-Clause |
| [jupyter\_core](http://jupyter.org) | 4.4.0 | Core common functionality of Jupyter projects. / BSD 3-clause |
| [jupyterlab](https://github.com/jupyterlab/jupyterlab) | 0.33.11 | JupyterLab PRE-ALPHA / BSD-3-Clause |
| [jupyterlab\_launcher](http://github.com/jupyterlab/jupyterlab_launcher) | 0.11.2 | A Launcher for JupyterLab based applications. / BSD 3-Clause |
| [keyring](https://github.com/jaraco/keyring) | 17.0.0 | Store and access your passwords safely / Python Software Foundation or MIT |
| [kiwisolver](https://github.com/nucleic/kiwi) | 1.0.1 | A fast implementation of the Cassowary constraint solver / BSD 3-Clause |
| [krb5](http://web.mit.edu/kerberos/) | 1.16.1 | A network authentication protocol. / MIT |
| [lazy-object-proxy](https://github.com/ionelmc/python-lazy-object-proxy) | 1.3.1 | A fast and thorough lazy object proxy. / BSD 2-Clause |
| [libarchive](http://www.libarchive.org/) | 3.3.3 | Multi-format archive and compression library / BSD 2-Clause |
| [libcurl](http://curl.haxx.se/) | 7.63.0 | tool and library for transferring data with URL syntax / MIT/X derivate (`<http://curl.haxx.se/docs/copyright.html>`) |
| [libcxx](http://libcxx.llvm.org/) | 4.0.1 | C++ Standard Library / MIT license or UIUC License |
| [libcxxabi](http://libcxxabi.llvm.org/) | 4.0.1 | C++ Standard Library Support / MIT license or UIUC License |
| [libedit](http://thrysoee.dk/editline/) | 3.1.20170329 | Editline Library (libedit) / NetBSD |
| [libffi](https://sourceware.org/libffi/) | 3.2.1 | A Portable Foreign Function Interface Library. / Custom |
| [libgfortran](http://gcc.gnu.org/) | 3.0.1 | Fortran libraries from the GNU Compiler Collection / GPL 3 (with GCC Runtime Library Exception 3.1) |
| [libiconv](https://www.gnu.org/software/libiconv/) | 1.15 | Provides iconv for systems which don’t have one (or that cannot convert from/to Unicode.) / GPL and LGPL |
| [liblief](https://lief.quarkslab.com/) | 0.9.0 | A cross platform library to parse, modify and abstract ELF, PE and MachO formats. / Apache 2.0 |
| [libpng](http://www.libpng.org/pub/png/libpng.html) | 1.6.35 | PNG reference library. / zlib/libpng |
| [libsodium](http://libsodium.org) | 1.0.16 | A modern and easy-to-use crypto library. / ISC |
| [libssh2](https://www.libssh2.org/) | 1.8.0 | the SSH library / BSD 3-Clause |
| [libtiff](http://www.libtiff.org/) | 4.0.9 | Support for the Tag Image File Format (TIFF). / HPND |
| [libxml2](http://xmlsoft.org/) | 2.9.8 | The XML C parser and toolkit of Gnome / MIT |
| [libxslt](http://xmlsoft.org/XSLT/) | 1.1.32 | The XSLT C library developed for the GNOME project / MIT |
| [linecache2](https://github.com/testing-cabal/linecache2) | 1.0.0 | Backport of the linecache module / PSF 1.0 |
| [llvmlite](https://github.com/numba/llvmlite) | 0.26.0 | A lightweight LLVM python binding for writing JIT compilers / New BSD License |
| [locket](https://github.com/mwilliamson/locket.py) | 0.2.0 | File-based locks for Python for Linux and Windows / BSD 2-Clause |
| [lxml](http://lxml.de/) | 4.2.5 | Pythonic binding for the C libraries libxml2 and libxslt. / BSD 3-Clause, GPL-2.0, ZPL-2.0, and ElementTree |
| [lz4-c](https://www.lz4.org) | 1.8.1.2 | Extremely Fast Compression algorithm / BSD 2-clause |
| [lzo](http://www.oberhumer.com/opensource/lzo/) | 2.10 | LZO is a portable lossless data compression library written in ANSI C. / GPL v2+ |
| [markupsafe](https://www.palletsprojects.com/p/markupsafe) | 1.1.0 | A Python module that implements the jinja2.Markup string / BSD-3-Clause |
| [matplotlib](http://matplotlib.org/) | 2.2.3 | Publication quality figures in Python / PSF-based |
| [mccabe](https://github.com/PyCQA/mccabe) | 0.6.1 | McCabe complexity checker for Python / MIT |
| [mistune](https://github.com/lepture/mistune) | 0.8.4 | The fastest markdown parser in pure Python. / BSD 3-Clause |
| [mkl](https://software.intel.com/en-us/mkl) | 2019.1 | Math library for Intel and compatible processors / proprietary - Intel |
| [mkl-service](https://github.com/ContinuumIO/mkl-service) | 1.1.2 | Python bindings to MKL service functions / 3-clause BSD |
| [mkl\_fft](http://github.com/IntelPython/mkl_fft) | 1.0.6 | NumPy-based implementation of Fast Fourier Transform using Intel (R) Math Kernel Library. / BSD 3-Clause |
| [mkl\_random](http://github.com/IntelPython/mkl_random) | 1.0.2 | Intel (R) MKL-powered package for sampling from common probability distributions into NumPy arrays. / BSD 3-Clause |
| [more-itertools](https://github.com/erikrose/more-itertools) | 4.3.0 | More routines for operating on iterables, beyond itertools / MIT |
| [mpc](http://www.multiprecision.org/) | 1.1.0 | A C library for the arithmetic of complex numbers with arbitrarily high precision. / LGPL 3 |
| [mpfr](http://www.mpfr.org/) | 4.0.1 | The MPFR library is a C library for multiple-precision floating-point computations with correct rounding. / LGPL 3 |
| [mpmath](http://mpmath.org) | 1.1.0 | Python library for arbitrary-precision floating-point arithmetic / BSD 3-Clause |
| [msgpack-python](http://msgpack.org/) | 0.5.6 | MessagePack (de)serializer. / Apache 2.0 |
| [multipledispatch](https://github.com/mrocklin/multipledispatch/) | 0.6.0 | Multiple dispatch in Python / BSD 3-Clause |
| [navigator-updater](https://github.com/ContinuumIO/navigator-updater) | 0.2.1 | Anaconda Navigator Updater / proprietary - Continuum Analytics, Inc. |
| [nbconvert](http://jupyter.org) | 5.4.0 | Converting Jupyter Notebooks / BSD-3-Clause |
| [nbformat](http://jupyter.org) | 4.4.0 | The reference implementation of the Jupyter Notebook format / BSD 3-clause |
| [ncurses](http://www.gnu.org/software/ncurses/) | 6.1 | Library for text-based user interfaces / Free software (MIT-like) |
| [networkx](https://networkx.github.io/) | 2.2 | Python package for creating and manipulating complex networks / BSD 3-Clause |
| [nltk](http://nltk.org/) | 3.4 | Build Python programs to work with human language data / Apache 2.0 |
| [nose](http://readthedocs.org/docs/nose/) | 1.3.7 | Nose extends unittest to make testing easier / LGPL-2.1 |
| [notebook](http://jupyter.org) | 5.7.4 | Jupyter Notebook / BSD 3-clause |
| [numba](http://numba.github.com) | 0.41.0 | NumPy aware dynamic Python compiler using LLVM / BSD 2-clause |
| [numexpr](https://github.com/pydata/numexpr) | 2.6.8 | Fast numerical expression evaluator for NumPy. / MIT |
| [numpy](http://numpy.scipy.org/) | 1.15.4 | Array processing for numbers, strings, records, and objects. / BSD 3-Clause |
| numpy-base | 1.15.4 | |
| [numpydoc](https://github.com/numpy/numpydoc) | 0.8.0 | Sphinx extension to support docstrings in Numpy format / BSD 3-Clause |
| [odo](http://odo.pydata.org) | 0.5.1 | Data migration in Python / BSD-3-Clause |
| [olefile](http://www.decalage.info/python/olefileio) | 0.46 | parse, read and write Microsoft OLE2 files / BSD 2-Clause |
| [openpyxl](https://openpyxl.readthedocs.io) | 2.5.12 | A Python library to read/write Excel 2010 xlsx/xlsm files / MIT |
| [openssl](http://www.openssl.org/) | 1.1.1a | OpenSSL is an open-source implementation of the SSL and TLS protocols / OpenSSL |
| [packaging](https://github.com/pypa/packaging) | 18.0 | Core utilities for Python packages / Apache 2.0 or BSD 2-Clause |
| [pandas](http://pandas.pydata.org) | 0.23.4 | High-performance, easy-to-use data structures and data analysis tools. / BSD 3-clause |
| [pandoc](http://pandoc.org/) | 1.19.2.1 | Universal markup converter (repackaged binaries). / GPL-2.0 |
| [pandocfilters](https://github.com/jgm/pandocfilters) | 1.4.2 | A python module for writing pandoc filters / BSD-3-Clause |
| [parso](https://github.com/davidhalter/parso) | 0.3.1 | A Python Parser / MIT |
| [partd](https://github.com/dask/partd) | 0.3.9 | Data structure for on-disk shuffle operations / BSD 3-Clause |
| [path.py](https://github.com/jaraco/path.py) | 11.5.0 | A module wrapper for os.path / MIT |
| [pathlib2](https://github.com/mcmtroffaes/pathlib2) | 2.3.3 | Fork of pathlib aiming to support the full stdlib Python API. / MIT |
| [patsy](https://github.com/pydata/patsy) | 0.5.1 | Describing statistical models in Python using symbolic formulas / BSD-2-Clause, PSF2 |
| [pcre](http://www.pcre.org/) | 8.42 | Regular expression pattern matching using the same syntax and semantics as Perl 5. / BSD 3-Clause |
| [pep8](http://pep8.readthedocs.org/) | 1.7.1 | Python style guide checker / MIT |
| [pexpect](http://pexpect.sourceforge.net/) | 4.6.0 | Pexpect makes Python a better tool for controlling other applications. / ISC |
| [pickleshare](https://github.com/pickleshare/pickleshare/) | 0.7.5 | Tiny ‘shelve’-like database with concurrency support / MIT |
| [pillow](https://pillow.readthedocs.io) | 5.3.0 | Pillow is the friendly PIL fork by Alex Clark and Contributors / PIL |
| [pip](https://pip.pypa.io/en/stable/) | 18.1 | PyPA recommended tool for installing Python packages / MIT |
| [pkginfo](https://code.launchpad.net/~tseaver/pkginfo/trunk) | 1.4.2 | Query metadatdata from sdists / bdists / installed packages. / MIT |
| [pluggy](https://github.com/pytest-dev/pluggy) | 0.8.0 | Plugin registration and hook calling for Python / MIT |
| [ply](http://www.dabeaz.com/ply/index.html) | 3.11 | Python Lex-Yacc / BSD 3-clause |
| [portaudio](http://www.portaudio.com/) | 19.6.0 | A cross platform, open-source, audio I/O library / MIT |
| [prometheus\_client](https://github.com/prometheus/client_python) | 0.5.0 | Python client for the Prometheus monitoring system / Apache 2.0 |
| [prompt\_toolkit](https://github.com/jonathanslenders/python-prompt-toolkit) | 1.0.15 | Library for building powerful interactive command lines in Python / BSD 3-clause |
| [psutil](https://github.com/giampaolo/psutil) | 5.4.8 | A cross-platform process and system utilities module for Python / BSD 3-Clause |
| [ptyprocess](https://github.com/pexpect/ptyprocess) | 0.6.0 | Run a subprocess in a pseudo terminal / ISC |
| [py](https://github.com/pytest-dev/py) | 1.7.0 | library with cross-python path, ini-parsing, io, code, log facilities / MIT |
| [py-lief](https://lief.quarkslab.com/) | 0.9.0 | A cross platform library to parse, modify and abstract ELF, PE and MachO formats. / Apache 2.0 |
| [pyaudio](http://people.csail.mit.edu/hubert/pyaudio/) | 0.2.11 | Bindings for PortAudio v19, the cross-platform audio stream library / MIT |
| [pycodestyle](https://pycodestyle.readthedocs.io/) | 2.4.0 | Python style guide checker / MIT |
| [pycosat](https://github.com/ContinuumIO/pycosat) | 0.6.3 | Bindings to picosat (a SAT solver) / MIT |
| [pycparser](https://github.com/eliben/pycparser) | 2.19 | Complete C99 parser in pure Python / BSD 3-clause |
| [pycrypto](http://www.pycrypto.org/) | 2.6.1 | Cryptographic modules for Python. / Public Domain |
| [pycurl](http://pycurl.sourceforge.net/) | 7.43.0.2 | A Python Interface To The cURL library / LGPL, MIT |
| [pyflakes](https://github.com/PyCQA/pyflakes) | 2.0.0 | Pyflakes analyzes programs and detects various errors. / MIT |
| [pygments](http://pygments.org/) | 2.3.1 | Generic syntax highlighting package / BSD 2-clause |
| [pylint](http://www.pylint.org/) | 1.9.2 | python code static checker / GPL |
| [pyodbc](https://github.com/mkleehammer/pyodbc) | 4.0.25 | DB API Module for ODBC / MIT |
| [pyopenssl](https://github.com/pyca/pyopenssl) | 18.0.0 | Python wrapper module around the OpenSSL library / Apache 2.0 |
| [pyparsing](http://pyparsing.wikispaces.com/) | 2.3.0 | Create and execute simple grammars / MIT |
| [pyqt](http://www.riverbankcomputing.co.uk/software/pyqt) | 5.9.2 | Python binding of the cross-platform GUI toolkit Qt. / Commercial, GPL-2.0, GPL-3.0 |
| [pysocks](https://github.com/Anorov/PySocks) | 1.6.8 | A Python SOCKS client module. See [Anorov/PySocks](https://github.com/Anorov/PySocks) for more information. / BSD 3-Clause |
| [pytables](http://www.pytables.org) | 3.4.4 | Brings together Python, HDF5 and NumPy to easily handle large amounts of data. / BSD 3-Clause |
| [pytest](https://docs.pytest.org/en/latest/) | 4.0.2 | Simple and powerful testing with Python. / MIT |
| [python](http://www.python.org/) | 2.7.15 | General purpose programming language / PSF |
| [python-dateutil](https://dateutil.readthedocs.org/) | 2.7.5 | Extensions to the standard Python datetime module. / BSD 3 Clause |
| python-libarchive-c | 2.8 | |
| python.app | 2 | Proxy on OS X letting Python libraries hook into the gui event loop / BSD |
| [pytz](http://pythonhosted.org/pytz/) | 2018.7 | World timezone definitions, modern and historical. / MIT |
| [pywavelets](https://github.com/PyWavelets/pywt) | 1.0.1 | Discrete Wavelet Transforms in Python. / MIT |
| [pyyaml](http://pyyaml.org/wiki/PyYAML) | 3.13 | YAML parser and emitter for Python / MIT |
| [pyzmq](https://github.com/zeromq/pyzmq) | 17.1.2 | Python bindings for zeromq / BSD 3-clause |
| [qt](http://qt-project.org) | 5.9.7 | Qt is a cross-platform application and UI framework. / LGPL-3.0 |
| [qtawesome](https://github.com/spyder-ide/qtawesome) | 0.5.3 | Iconic fonts in PyQt and PySide applications / MIT |
| [qtconsole](http://jupyter.org) | 4.4.3 | Jupyter Qt console / BSD 3-Clause |
| [qtpy](https://github.com/spyder-ide/qtpy) | 1.5.2 | Abstraction layer for PyQt5/PyQt4/PySide / MIT |
| [readline](https://cnswww.cns.cwru.edu/php/chet/readline/rltop.html) | 7.0 | library for editing command lines as they are typed in / GPL-3.0 |
| [requests](http://python-requests.org) | 2.21.0 | Python HTTP for Humans / Apache 2.0 |
| [rope](https://github.com/python-rope/rope) | 0.11.0 | A python refactoring library… / GPL 2.0 |
| [ruamel\_yaml](https://bitbucket.org/ruamel/yaml) | 0.15.46 | A patched copy of ruamel.yaml. / MIT |
| [scandir](https://github.com/benhoyt/scandir) | 1.9.0 | scandir, a better directory iterator and faster os.walk() / BSD 3-Clause |
| [scikit-image](http://scikit-image.org/) | 0.14.1 | Image processing routines for SciPy. / BSD 3-Clause |
| [scikit-learn](http://scikit-learn.org/) | 0.20.1 | A set of python modules for machine learning and data mining / BSD 3-Clause |
| [scipy](http://www.scipy.org/) | 1.1.0 | Scientific Library for Python / BSD 3-Clause |
| [seaborn](https://seaborn.pydata.org) | 0.9.0 | Statistical data visualization / BSD 3-Clause |
| [send2trash](https://github.com/hsoft/send2trash) | 1.5.0 | Python library to natively send files to Trash (or Recycle bin) on all platforms. / BSD-3-Clause |
| [setuptools](https://github.com/pypa/setuptools) | 40.6.3 | Download, build, install, upgrade, and uninstall Python packages / MIT |
| [simplegeneric](http://cheeseshop.python.org/pypi/simplegeneric) | 0.8.1 | Simple generic functions (similar to Python’s own len(), pickle.dump(), etc.) / Zope Public |
| [singledispatch](http://docs.python.org/3/library/functools.html#functools.singledispatch) | 3.4.0.3 | Transforms a function into a single-dispatch generic function / MIT |
| [sip](http://www.riverbankcomputing.com/software/sip/intro) | 4.19.8 | Create Python bindings for C and C++ libraries / GPL-3.0 |
| [six](http://pypi.python.org/pypi/six/) | 1.12.0 | Python 2 and 3 compatibility utilities / MIT |
| [snappy](https://github.com/google/snappy) | 1.1.7 | A fast compressor/decompressor / BSD 3-clause |
| [snowballstemmer](https://github.com/shibukawa/snowball_py) | 1.2.1 | Snowball stemming library collection for Python / BSD-2-Clause |
| [sortedcollections](http://www.grantjenks.com/docs/sortedcollections/) | 1.0.1 | Python Sorted Collections / Apache-2.0 |
| [sortedcontainers](http://www.grantjenks.com/docs/sortedcontainers/) | 2.1.0 | Python Sorted Container Types: SortedList, SortedDict, and SortedSet / Apache 2.0 |
| [sphinx](http://www.sphinx-doc.org) | 1.8.2 | Sphinx is a tool that makes it easy to create intelligent and beautiful documentation / BSD 2-clause |
| sphinxcontrib | 1.0 | Python namespace for sphinxcontrib / BSD |
| [sphinxcontrib-websupport](https://pypi.python.org/pypi/sphinxcontrib-websupport) | 1.1.0 | Sphinx API for Web Apps / BSD-2-Clause |
| [spyder](https://www.spyder-ide.org/) | 3.3.2 | The Scientific Python Development Environment / MIT |
| [spyder-kernels](https://github.com/spyder-ide/spyder-kernels) | 0.3.0 | Jupyter kernels for the Spyder console / MIT |
| [sqlalchemy](http://www.sqlalchemy.org/) | 1.2.15 | Database Abstraction Library. / MIT |
| [sqlite](http://www.sqlite.org/) | 3.26.0 | Implements a self-contained, zero-configuration, SQL database engine. / Public-Domain (`<http://www.sqlite.org/copyright.html>`) |
| [ssl\_match\_hostname](http://bitbucket.org/brandon/backports.ssl_match_hostname) | 3.5.0.1 | The ssl.match\_hostname() function from Python 3.5 / PSF 2 |
| [statsmodels](https://www.statsmodels.org) | 0.9.0 | Statistical computations and models for use with SciPy / BSD 3-Clause |
| [subprocess32](https://github.com/google/python-subprocess32) | 3.5.3 | A backport of the subprocess module from Python 3.2/3.3 for use on 2.x. / PSF 2 |
| [sympy](http://sympy.org) | 1.3 | Python library for symbolic mathematics / 3-clause BSD |
| [tblib](https://github.com/ionelmc/python-tblib) | 1.3.2 | Traceback serialization library. / BSD 2-Clause |
| [terminado](https://github.com/jupyter/terminado) | 0.8.1 | Terminals served by tornado websockets / BSD 2-clause |
| [testpath](https://testpath.readthedocs.io) | 0.4.2 | Testpath is a collection of utilities for Python code working with files and commands. / BSD-3-Clause |
| [tk](http://www.tcl.tk/) | 8.6.8 | A dynamic programming language with GUI support. Bundles Tcl and Tk. / Tcl/Tk |
| [toolz](http://toolz.readthedocs.org/) | 0.9.0 | A functional standard library for Python. / BSD 3-Clause |
| [tornado](http://www.tornadoweb.org/) | 5.1.1 | A Python web framework and asynchronous networking library, originally developed at FriendFeed. / Apache 2.0 |
| [tqdm](https://pypi.python.org/pypi/tqdm) | 4.28.1 | A Fast, Extensible Progress Meter / MPLv2.0, MIT |
| [traceback2](https://github.com/testing-cabal/traceback2) | 1.4.0 | Backports of the traceback module / PSF 2.0 |
| [traitlets](http://ipython.org/) | 4.3.2 | Configuration system for Python applications / BSD 3-clause |
| [typing](https://docs.python.org/3.5/library/typing.html) | 3.6.6 | Type Hints for Python - backport for `Python<3.5` / PSF |
| [unicodecsv](https://github.com/jdunck/python-unicodecsv) | 0.14.1 | Drop-in replacement for csv module which supports unicode strings / BSD |
| [unittest2](http://pypi.python.org/pypi/unittest2) | 1.1.0 | The new features in unittest backported to Python 2.4+ / BSD |
| [unixodbc](http://www.unixodbc.org/) | 2.3.7 | ODBC on non MS Windows platforms / LGPL-2.1 |
| [urllib3](https://urllib3.readthedocs.io/) | 1.24.1 | HTTP library with thread-safe connection pooling, file post, and more. / MIT |
| [wcwidth](https://github.com/jquast/wcwidth) | 0.1.7 | Measures number of Terminal column cells of wide-character codes. / MIT |
| [webencodings](https://github.com/gsnedders/python-webencodings) | 0.5.1 | Character encoding aliases for legacy web content / BSD 3-Clause |
| [werkzeug](http://werkzeug.pocoo.org/) | 0.14.1 | The Python WSGI Utility Library. / BSD 3-Clause |
| [wheel](https://github.com/pypa/wheel) | 0.32.3 | A built-package format for Python. / MIT |
| [widgetsnbextension](http://ipython.org) | 3.4.2 | Interactive Widgets for Jupyter / BSD 3-clause |
| [wrapt](https://github.com/GrahamDumpleton/wrapt) | 1.10.11 | Module for decorators, wrappers and monkey patching. / BSD 2-Clause |
| [wurlitzer](https://github.com/minrk/wurlitzer) | 1.0.2 | Capture C-level stdout/stderr in Python / MIT |
| [xlrd](http://www.python-excel.org/) | 1.2.0 | Library for developers to extract data from Microsoft Excel (tm) spreadsheet files / BSD 3-Clause and BSD with advertising |
| [xlsxwriter](https://xlsxwriter.readthedocs.io/) | 1.1.2 | A Python module for creating Excel XLSX files / BSD 2-Clause |
| [xlwings](http://xlwings.org/) | 0.15.1 | Interact with Excel from Python and vice versa / 3-clause BSD |
| [xlwt](http://www.python-excel.org/) | 1.2.0 | Writing data and formatting information to Excel files / BSD |
| [xz](http://tukaani.org/xz/) | 5.2.4 | Data compression software with high compression ratio / LGPL-2.1 and GPL-2.0 |
| [yaml](http://pyyaml.org/wiki/LibYAML) | 0.1.7 | A C library for parsing and emitting YAML. / MIT |
| [zeromq](http://zeromq.org) | 4.2.5 | A high-performance asynchronous messaging library. / LGPL 3 |
| [zict](http://github.com/mrocklin/zict) | 0.1.3 | Composable Dictionary Classes / BSD 3-Clause |
| [zlib](http://zlib.net/) | 1.2.11 | Massively spiffy yet delicately unobtrusive compression library / zlib |
| [zstd](http://www.zstd.net) | 1.3.7 | Zstandard - Fast real-time compression algorithm / BSD 3-Clause |
| Name | Version | Summary / License |
|---|---|---|
| [\_ipyw\_jlab\_nb\_ext\_conf](https://github.com/ContinuumIO/anaconda-nb-extensions-meta-config) | 0.1.0 | A configuration metapackage for enabling Anaconda-bundled jupyter extensions / BSD |
| [alabaster](http://www.sphinx-doc.org/en/stable/index.html) | 0.7.12 | Configurable, Python 2+3 compatible Sphinx theme. / BSD 3-Clause |
| [anaconda-client](http://anaconda.org) | 1.7.2 | anaconda.org command line client library / BSD 3-clause |
| [anaconda-project](https://github.com/Anaconda-Platform/anaconda-project) | 0.8.2 | Tool for encapsulating, running, and reproducing data science projects / BSD 3-Clause |
| [asn1crypto](https://github.com/wbond/asn1crypto) | 0.24.0 | Python ASN.1 library with a focus on performance and a pythonic API / MIT |
| [astroid](https://www.astroid.org/) | 1.6.5 | A abstract syntax tree for Python with inference support. / LGPL 2.1 |
| [astropy](http://www.astropy.org/) | 2.0.9 | Community-developed Python Library for Astronomy / BSD |
| [atomicwrites](https://github.com/untitaker/python-atomicwrites) | 1.2.1 | Atomic file writes. / MIT |
| [attrs](https://attrs.readthedocs.io/en/stable/) | 18.2.0 | attrs is the Python package that will bring back the joy of writing classes by relieving you from the drudgery of implementing object protocols (aka dunder methods). / MIT |
| [automat](https://github.com/glyph/Automat) | 0.7.0 | self-service finite-state machines for the programmer on the go / MIT |
| [babel](http://babel.pocoo.org/) | 2.6.0 | Utilities to internationalize and localize Python applications / BSD 3-clause |
| [backports](https://bitbucket.org/brandon/backports) | 1.0 | / BSD |
| [backports.functools\_lru\_cache](https://github.com/jaraco/backports.functools_lru_cache) | 1.5 | Backport of functools.lru\_cache from Python 3.3 as published at ActiveState. / MIT |
| [backports.os](https://github.com/pjdelport/backports.os) | 0.1.1 | Backport of new features in Python’s os module / Python Software Foundation |
| [backports.shutil\_get\_terminal\_size](https://github.com/chrippa/backports.shutil_get_terminal_size) | 1.0.0 | A backport of the get\_terminal\_size function from Python 3.3’s shutil. / MIT |
| [backports\_abc](https://github.com/cython/backports_abc) | 0.5 | A backport of recent additions to the collections.abc module. / PSF 2 |
| [beautifulsoup4](http://www.crummy.com/software/BeautifulSoup/) | 4.6.3 | Python library designed for screen-scraping / MIT |
| [bitarray](https://github.com/ilanschnell/bitarray) | 0.8.3 | efficient arrays of booleans – C extension / PSF |
| [bkcharts](http://github.com/bokeh/bkcharts) | 0.2 | High level chart types built on top of Bokeh / BSD 3-Clause |
| blas | 1.0 | |
| [bleach](https://github.com/mozilla/bleach) | 3.0.2 | Easy, whitelist-based HTML-sanitizing tool / Apache-2.0 |
| [blosc](https://github.com/Blosc/c-blosc) | 1.14.4 | A blocking, shuffling and loss-less compression library that can be faster than memcpy() / BSD 3-Clause |
| [bokeh](http://bokeh.pydata.org/) | 1.0.2 | Statistical and novel interactive HTML plots for Python / BSD 3-Clause |
| [boto](https://github.com/boto/boto/) | 2.49.0 | Amazon Web Services Library / MIT |
| [bottleneck](http://berkeleyanalytics.com/bottleneck) | 1.2.1 | Fast NumPy array functions written in Cython. / BSD 2-Clause |
| [bzip2](http://www.bzip.org/) | 1.0.6 | high-quality data compressor / bzip2 |
| [ca-certificates](https://github.com/conda-forge/ca-certificates-feedstock) | 2018.03.07 | Certificates for use with other packages. / ISC |
| [cairo](http://cairographics.org/) | 1.14.12 | Cairo is a 2D graphics library with support for multiple output devices. / LGPL 2.1 or MPL 1.1 |
| [cdecimal](http://www.bytereef.org/mpdecimal/index.html) | 2.3 | Fast drop-in replacement for decimal.py / BSD 2-Clause |
| [certifi](http://certifi.io/) | 2018.11.29 | Python package for providing Mozilla’s CA Bundle. / ISC |
| [cffi](https://bitbucket.org/cffi/cffi) | 1.11.5 | Foreign Function Interface for Python calling C code. / MIT |
| [chardet](https://github.com/chardet/chardet) | 3.0.4 | Universal character encoding detector / LGPL2 |
| [click](https://palletsprojects.com/p/click) | 7.0 | Python composable command line interface toolkit / BSD-3-Clause |
| [cloudpickle](https://github.com/cloudpipe/cloudpickle) | 0.6.1 | Extended pickling support for Python objects / BSD 3-Clause |
| [clyent](https://github.com/Anaconda-Platform/clyent) | 1.2.2 | Command line client library for windows and posix / BSD 3-Clause |
| [colorama](https://github.com/tartley/colorama) | 0.4.1 | Cross-platform colored terminal text / BSD-3-Clause |
| [conda](https://conda.io) | 4.5.12 | OS-agnostic, system-level binary package and environment manager. / BSD 3-Clause |
| [conda-build](https://github.com/conda/conda-build) | 3.16.3 | tools for building conda packages / BSD 3-Clause |
| [conda-env](https://github.com/conda/conda-env) | 2.6.0 | Tools for interacting with conda environments. / BSD 3-Clause |
| [conda-verify](https://github.com/conda/conda-verify) | 3.1.1 | tool for validating conda recipes and conda packages / BSD 3-Clause |
| [configparser](http://docs.python.org/3/library/configparser.html) | 3.5.0 | This library brings the updated configparser from Python 3.5 to Python 2.6-3.5 / MIT |
| [constantly](https://github.com/twisted/constantly) | 15.1.0 | Symbolic constants in Python / MIT |
| [contextlib2](http://contextlib2.readthedocs.org) | 0.5.5 | Backports and enhancements for the contextlib module / PSF |
| [cryptography](https://github.com/pyca/cryptography) | 2.4.2 | Provides cryptographic recipes and primitives to Python developers / Apache 2.0 or BSD 3-Clause, PSF 2 |
| [curl](http://curl.haxx.se/) | 7.63.0 | tool and library for transferring data with URL syntax / MIT/X derivate (`<http://curl.haxx.se/docs/copyright.html>`) |
| [cycler](http://matplotlib.org/cycler) | 0.10.0 | Composable style cycles. / BSD 3-Clause |
| [cython](http://www.cython.org/) | 0.29.2 | The Cython compiler for writing C extensions for the Python language / Apache-2.0 |
| [cytoolz](https://github.com/pytoolz/cytoolz) | 0.9.0.1 | Cython implementation of Toolz. High performance functional utilities. / BSD 3-Clause |
| [dask](http://github.com/dask/dask/) | 1.0.0 | Parallel Python with task scheduling / BSD 3-Clause |
| [dask-core](http://github.com/dask/dask/) | 1.0.0 | Parallel Python with task scheduling / BSD 3-Clause |
| [datashape](http://datashape.pydata.org) | 0.5.4 | A data description language. / BSD 2-Clause |
| [decorator](https://github.com/micheles/decorator) | 4.3.0 | Better living through Python with decorators. / BSD 3-Clause |
| [distributed](http://distributed.readthedocs.io/en/latest/) | 1.25.1 | Distributed computing with Dask / BSD 3-Clause |
| [docutils](http://docutils.sourceforge.net/) | 0.14 | Docutils – Python Documentation Utilities / Public Domain Dedictation and BSD 2-Clause and PSF 2.1.1 and GPL 3.0 |
| [entrypoints](https://github.com/takluyver/entrypoints) | 0.2.3 | Discover and load entry points from installed packages. / MIT License |
| [enum34](https://bitbucket.org/stoneleaf/enum34) | 1.1.6 | Python 3.4 Enum backported to 3.3, 3.2, 3.1, 2.7, 2.6, 2.5, and 2.4 / BSD 3-Clause |
| [et\_xmlfile](https://bitbucket.org/openpyxl/et_xmlfile) | 1.0.1 | An implementation of lxml.xmlfile for the standard library / MIT |
| [expat](http://expat.sourceforge.net/) | 2.2.6 | Expat XML parser library in C. / MIT |
| [fastcache](https://github.com/pbrady/fastcache) | 1.0.2 | C implementation of Python 3 lru\_cache / MIT |
| [filelock](https://github.com/benediktschmitt/py-filelock) | 3.0.10 | A platform independent file lock. / Public Domain |
| [flask](http://flask.pocoo.org) | 1.0.2 | A microframework based on Werkzeug, Jinja2 and good intentions. / BSD 3-Clause |
| [flask-cors](https://github.com/corydolphin/flask-cors) | 3.0.7 | A Flask extension adding a decorator for CORS support / MIT |
| [fontconfig](http://www.freedesktop.org/wiki/Software/fontconfig/) | 2.13.0 | A library for configuring and customizing font access. / MIT |
| [freetype](https://www.freetype.org/) | 2.9.1 | A Free, High-Quality, and Portable Font Engine / GPL-2.0 and FreeType |
| [funcsigs](http://funcsigs.readthedocs.org) | 1.0.2 | Python function signatures from PEP362 for Python 2.6, 2.7 and 3.2+. / Apache 2.0 |
| [functools32](https://github.com/MiCHiLU/python-functools32) | 3.2.3.2 | Backport of the functools module from Python 3.2.3 for use on 2.7 and PyPy. / PSF license |
| [functools\_lru\_cache](https://github.com/jaraco/backports.functools_lru_cache) | 1.4 | Backport of functools.lru\_cache from Python 3.3 as published at ActiveState. / MIT |
| [future](http://python-future.org) | 0.17.1 | Clean single-source support for Python 3 and 2 / MIT |
| [futures](https://github.com/agronholm/pythonfutures) | 3.2.0 | Backport of the concurrent.futures package from Python 3.2 / PSF |
| [get\_terminal\_size](https://github.com/chrippa/backports.shutil_get_terminal_size) | 1.0.0 | Get the size of the terminal window. / MIT |
| [gevent](http://www.gevent.org/) | 1.3.7 | Coroutine-based network library / MIT |
| [glib](https://developer.gnome.org/glib/) | 2.56.2 | Provides core application building blocks for libraries and applications written in C. / LGPL-2.1 |
| [glob2](https://github.com/miracle2k/python-glob2) | 0.6 | Version of the glob module that supports recursion via \*\*, and can capture patterns. / BSD-2-Clause |
| [gmp](http://gmplib.org/) | 6.1.2 | The GNU multiprecision library. / GPL 2 and LGPL 3 |
| [gmpy2](https://pypi.python.org/pypi/gmpy2) | 2.0.8 | GMP/MPIR, MPFR, and MPC interface to Python 2.6+ and 3.x / LGPL 3 |
| [greenlet](https://github.com/python-greenlet/greenlet) | 0.4.15 | Lightweight in-process concurrent programming / MIT |
| [grin](http://pypi.python.org/pypi/grin) | 1.2.1 | Enhanced grep-like tool / BSD 3-Clause |
| [h5py](http://www.h5py.org/) | 2.8.0 | Read and write HDF5 files from Python. / BSD 3-Clause |
| [hdf5](http://www.hdfgroup.org/HDF5/) | 1.10.2 | HDF5 is a data model, library, and file format for storing and managing data / HDF5 |
| [heapdict](http://stutzbachenterprises.com/) | 1.0.0 | A heap with decrease-key and increase-key operations / BSD 3-Clause |
| [html5lib](https://github.com/html5lib/html5lib-python) | 1.0.1 | HTML parser based on the WHATWG HTML specification / MIT |
| [hyperlink](https://github.com/python-hyper/hyperlink) | 18.0.0 | Immutable, Pythonic, correct URLs. / MIT |
| [icu](http://site.icu-project.org/) | 58.2 | International Components for Unicode. / MIT |
| [idna](https://github.com/kjd/idna) | 2.8 | Internationalized Domain Names in Applications (IDNA). / BSD Like |
| [imageio](http://imageio.github.io) | 2.4.1 | a Python library for reading and writing image data / BSD 2-Clause |
| [imagesize](https://github.com/shibukawa/imagesize_py) | 1.1.0 | Getting image size from png/jpeg/jpeg2000/gif file / MIT |
| [importlib\_metadata](http://importlib-metadata.readthedocs.io) | 0.6 | A library to access the metadata for a Python package / APACHE-2.0 |
| [incremental](https://twistedmatrix.com) | 17.5.0 | A library that versions your Python projects / MIT License |
| [ipaddress](https://github.com/phihag/ipaddress) | 1.0.22 | IPv4/IPv6 manipulation library / PSF 2 |
| [ipykernel](https://ipython.org) | 4.10.0 | IPython Kernel for Jupyter / BSD-3-Clause |
| [ipython](https://ipython.org/) | 5.8.0 | IPython: Productive Interactive Computing / BSD-3-Clause |
| [ipython\_genutils](http://ipython.org) | 0.2.0 | vestigial utilities from IPython / BSD 3-Clause |
| [ipywidgets](https://github.com/ipython/ipywidgets) | 7.4.2 | Jupyter Interactive Widgets / BSD 3-clause |
| [isort](https://github.com/timothycrosley/isort) | 4.3.4 | A Python utility / library to sort Python imports. / MIT |
| [itsdangerous](https://github.com/pallets/itsdangerous) | 1.1.0 | Various helpers to pass trusted data to untrusted environments. / BSD 3-Clause |
| [jbig](https://www.cl.cam.ac.uk/~mgk25/jbigkit) | 2.1 | Implementation of the JBIG1 data compression standard / GPL-2.0 |
| [jdcal](https://github.com/phn/jdcal) | 1.4 | Julian dates from proleptic Gregorian and Julian calendars. / BSD 2-Clause |
| [jedi](https://github.com/davidhalter/jedi/) | 0.13.2 | An autocompletion tool for Python that can be used for text editors. / MIT |
| [jinja2](http://jinja.pocoo.org) | 2.10 | An easy to use stand-alone template engine written in pure python. / 3-Clause BSD |
| [jpeg](http://www.ijg.org/) | 9b | read/write jpeg COM, EXIF, IPTC medata / Custom free software license |
| [jsonschema](https://github.com/Julian/jsonschema) | 2.6.0 | An implementation of JSON Schema validation for Python / MIT |
| [jupyter](http://jupyter.org) | 1.0.0 | Jupyter metapackage. Install all the Jupyter components in one go. / BSD 3-Clause |
| [jupyter\_client](http://jupyter.org) | 5.2.4 | Jupyter protocol implementation and client libraries / BSD 3-clause |
| [jupyter\_console](http://jupyter.org) | 5.2.0 | Jupyter terminal console / BSD-3-Clause |
| [jupyter\_core](http://jupyter.org) | 4.4.0 | Core common functionality of Jupyter projects. / BSD 3-clause |
| [jupyterlab](https://github.com/jupyterlab/jupyterlab) | 0.33.11 | JupyterLab PRE-ALPHA / BSD-3-Clause |
| [jupyterlab\_launcher](http://github.com/jupyterlab/jupyterlab_launcher) | 0.11.2 | A Launcher for JupyterLab based applications. / BSD 3-Clause |
| [kiwisolver](https://github.com/nucleic/kiwi) | 1.0.1 | A fast implementation of the Cassowary constraint solver / BSD 3-Clause |
| [krb5](http://web.mit.edu/kerberos/) | 1.16.1 | A network authentication protocol. / MIT |
| [lazy-object-proxy](https://github.com/ionelmc/python-lazy-object-proxy) | 1.3.1 | A fast and thorough lazy object proxy. / BSD 2-Clause |
| [libarchive](http://www.libarchive.org/) | 3.3.3 | Multi-format archive and compression library / BSD 2-Clause |
| [libcurl](http://curl.haxx.se/) | 7.63.0 | tool and library for transferring data with URL syntax / MIT/X derivate (`<http://curl.haxx.se/docs/copyright.html>`) |
| [libedit](http://thrysoee.dk/editline/) | 3.1.20170329 | Editline Library (libedit) / NetBSD |
| [libffi](https://sourceware.org/libffi/) | 3.2.1 | A Portable Foreign Function Interface Library. / Custom |
| [libgcc-ng](https://gcc.gnu.org/onlinedocs/gccint/Libgcc.html) | 8.2.0 | The GCC low-level runtime library / GPL |
| [libgfortran](http://gcc.gnu.org/) | 3.0.0 | Fortran libraries from the GNU Compiler Collection / GPL 3 (with GCC Runtime Library Exception 3.1) |
| [libgfortran-ng](https://gcc.gnu.org/) | 7.3.0 | The GNU Fortran Runtime Library / GPL |
| [libiconv](https://www.gnu.org/software/libiconv/) | 1.14 | Provides iconv for systems which don’t have one (or that cannot convert from/to Unicode.) / GPL and LGPL |
| [libopenblas](http://www.openblas.net/) | 0.2.20 | An Optimized BLAS library / BSD |
| [libpng](http://www.libpng.org/pub/png/libpng.html) | 1.6.35 | PNG reference library. / zlib/libpng |
| [libsodium](http://libsodium.org) | 1.0.16 | A modern and easy-to-use crypto library. / ISC |
| [libssh2](https://www.libssh2.org/) | 1.8.0 | the SSH library / BSD 3-Clause |
| [libstdcxx-ng](https://gcc.gnu.org/) | 8.2.0 | The GNU C++ Runtime Library / GPL3 with runtime exception |
| [libtiff](http://www.libtiff.org/) | 4.0.9 | Support for the Tag Image File Format (TIFF). / HPND |
| [libuuid](http://sourceforge.net/projects/libuuid/) | 1.0.3 | Portable uuid C library. / BSD 3-Clause |
| [libxcb](http://xcb.freedesktop.org/) | 1.13 | This is the C-language Binding (XCB) package to the X Window System protocol / MIT |
| [libxml2](http://xmlsoft.org/) | 2.9.8 | The XML C parser and toolkit of Gnome / MIT |
| [libxslt](http://xmlsoft.org/XSLT/) | 1.1.32 | The XSLT C library developed for the GNOME project / MIT |
| [linecache2](https://github.com/testing-cabal/linecache2) | 1.0.0 | Backport of the linecache module / PSF 1.0 |
| [locket](https://github.com/mwilliamson/locket.py) | 0.2.0 | File-based locks for Python for Linux and Windows / BSD 2-Clause |
| [lxml](http://lxml.de/) | 4.2.5 | Pythonic binding for the C libraries libxml2 and libxslt. / BSD 3-Clause, GPL-2.0, ZPL-2.0, and ElementTree |
| [lz4-c](https://www.lz4.org) | 1.8.1.2 | Extremely Fast Compression algorithm / BSD 2-clause |
| [lzo](http://www.oberhumer.com/opensource/lzo/) | 2.10 | LZO is a portable lossless data compression library written in ANSI C. / GPL v2+ |
| [markupsafe](https://www.palletsprojects.com/p/markupsafe) | 1.1.0 | A Python module that implements the jinja2.Markup string / BSD-3-Clause |
| [matplotlib](http://matplotlib.org/) | 2.2.3 | Publication quality figures in Python / PSF-based |
| [mccabe](https://github.com/PyCQA/mccabe) | 0.6.1 | McCabe complexity checker for Python / MIT |
| [mistune](https://github.com/lepture/mistune) | 0.8.4 | The fastest markdown parser in pure Python. / BSD 3-Clause |
| [more-itertools](https://github.com/erikrose/more-itertools) | 4.3.0 | More routines for operating on iterables, beyond itertools / MIT |
| [mpc](http://www.multiprecision.org/) | 1.1.0 | A C library for the arithmetic of complex numbers with arbitrarily high precision. / LGPL 3 |
| [mpfr](http://www.mpfr.org/) | 4.0.1 | The MPFR library is a C library for multiple-precision floating-point computations with correct rounding. / LGPL 3 |
| [mpmath](http://mpmath.org) | 1.1.0 | Python library for arbitrary-precision floating-point arithmetic / BSD 3-Clause |
| [msgpack-python](http://msgpack.org/) | 0.5.6 | MessagePack (de)serializer. / Apache 2.0 |
| [multipledispatch](https://github.com/mrocklin/multipledispatch/) | 0.6.0 | Multiple dispatch in Python / BSD 3-Clause |
| [nbconvert](http://jupyter.org) | 5.3.1 | Converting Jupyter Notebooks / BSD-3-Clause |
| [nbformat](http://jupyter.org) | 4.4.0 | The reference implementation of the Jupyter Notebook format / BSD 3-clause |
| [ncurses](http://www.gnu.org/software/ncurses/) | 6.1 | Library for text-based user interfaces / Free software (MIT-like) |
| [networkx](https://networkx.github.io/) | 2.2 | Python package for creating and manipulating complex networks / BSD 3-Clause |
| [nltk](http://nltk.org/) | 3.4 | Build Python programs to work with human language data / Apache 2.0 |
| [nose](http://readthedocs.org/docs/nose/) | 1.3.7 | Nose extends unittest to make testing easier / LGPL-2.1 |
| [notebook](http://jupyter.org) | 5.7.4 | Jupyter Notebook / BSD 3-clause |
| [numexpr](https://github.com/pydata/numexpr) | 2.6.7 | Fast numerical expression evaluator for NumPy. / MIT |
| [numpy](http://numpy.scipy.org/) | 1.14.5 | Array processing for numbers, strings, records, and objects. / BSD 3-Clause |
| numpy-base | 1.14.5 | |
| [numpydoc](https://github.com/numpy/numpydoc) | 0.8.0 | Sphinx extension to support docstrings in Numpy format / BSD 3-Clause |
| [odo](http://odo.pydata.org) | 0.5.1 | Data migration in Python / BSD-3-Clause |
| [olefile](http://www.decalage.info/python/olefileio) | 0.46 | parse, read and write Microsoft OLE2 files / BSD 2-Clause |
| [openblas](http://www.openblas.net/) | 0.2.20 | An Optimized BLAS library / BSD |
| openblas-devel | 0.2.20 | |
| [openpyxl](https://openpyxl.readthedocs.io) | 2.5.12 | A Python library to read/write Excel 2010 xlsx/xlsm files / MIT |
| [openssl](http://www.openssl.org/) | 1.1.1a | OpenSSL is an open-source implementation of the SSL and TLS protocols / OpenSSL |
| [packaging](https://github.com/pypa/packaging) | 18.0 | Core utilities for Python packages / Apache 2.0 or BSD 2-Clause |
| [pandas](http://pandas.pydata.org) | 0.23.4 | High-performance, easy-to-use data structures and data analysis tools. / BSD 3-clause |
| [pandoc](http://pandoc.org/) | 2.0.0.1 | Universal markup converter (repackaged binaries). / GPL-2.0 |
| [pandocfilters](https://github.com/jgm/pandocfilters) | 1.4.2 | A python module for writing pandoc filters / BSD-3-Clause |
| [parso](https://github.com/davidhalter/parso) | 0.3.1 | A Python Parser / MIT |
| [partd](https://github.com/dask/partd) | 0.3.9 | Data structure for on-disk shuffle operations / BSD 3-Clause |
| [patchelf](http://nixos.org/patchelf.html) | 0.9 | A small utility to modify the dynamic linker and RPATH of ELF executables. / GPL 3 |
| [path.py](https://github.com/jaraco/path.py) | 11.5.0 | A module wrapper for os.path / MIT |
| [pathlib2](https://github.com/mcmtroffaes/pathlib2) | 2.3.3 | Fork of pathlib aiming to support the full stdlib Python API. / MIT |
| [patsy](https://github.com/pydata/patsy) | 0.5.1 | Describing statistical models in Python using symbolic formulas / BSD-2-Clause, PSF2 |
| [pcre](http://www.pcre.org/) | 8.42 | Regular expression pattern matching using the same syntax and semantics as Perl 5. / BSD 3-Clause |
| [pep8](http://pep8.readthedocs.org/) | 1.7.1 | Python style guide checker / MIT |
| [pexpect](http://pexpect.sourceforge.net/) | 4.6.0 | Pexpect makes Python a better tool for controlling other applications. / ISC |
| [pickleshare](https://github.com/pickleshare/pickleshare/) | 0.7.5 | Tiny ‘shelve’-like database with concurrency support / MIT |
| [pillow](https://pillow.readthedocs.io) | 5.3.0 | Pillow is the friendly PIL fork by Alex Clark and Contributors / PIL |
| [pip](https://pip.pypa.io/en/stable/) | 18.1 | PyPA recommended tool for installing Python packages / MIT |
| [pixman](http://www.pixman.org/) | 0.34.0 | A low-level software library for pixel manipulation. / MIT |
| [pkginfo](https://code.launchpad.net/~tseaver/pkginfo/trunk) | 1.4.2 | Query metadatdata from sdists / bdists / installed packages. / MIT |
| [pluggy](https://github.com/pytest-dev/pluggy) | 0.8.0 | Plugin registration and hook calling for Python / MIT |
| [ply](http://www.dabeaz.com/ply/index.html) | 3.11 | Python Lex-Yacc / BSD 3-clause |
| [prometheus\_client](https://github.com/prometheus/client_python) | 0.5.0 | Python client for the Prometheus monitoring system / Apache 2.0 |
| [prompt\_toolkit](https://github.com/jonathanslenders/python-prompt-toolkit) | 1.0.15 | Library for building powerful interactive command lines in Python / BSD 3-clause |
| [psutil](https://github.com/giampaolo/psutil) | 5.4.8 | A cross-platform process and system utilities module for Python / BSD 3-Clause |
| [ptyprocess](https://github.com/pexpect/ptyprocess) | 0.6.0 | Run a subprocess in a pseudo terminal / ISC |
| [py](https://github.com/pytest-dev/py) | 1.7.0 | library with cross-python path, ini-parsing, io, code, log facilities / MIT |
| [pyasn1-modules](http://pyasn1.sourceforge.net/) | 0.2.2 | A collection of ASN.1-based protocols modules. / BSD 2-Clause |
| [pycairo](http://cairographics.org/pycairo/) | 1.18.0 | Python bindings for the Cairo graphics library. / LGPL 2.1, MPL 1.1 |
| [pycodestyle](https://pycodestyle.readthedocs.io/) | 2.4.0 | Python style guide checker / MIT |
| [pycosat](https://github.com/ContinuumIO/pycosat) | 0.6.3 | Bindings to picosat (a SAT solver) / MIT |
| [pycparser](https://github.com/eliben/pycparser) | 2.19 | Complete C99 parser in pure Python / BSD 3-clause |
| [pycrypto](http://www.pycrypto.org/) | 2.6.1 | Cryptographic modules for Python. / Public Domain |
| [pycurl](http://pycurl.sourceforge.net/) | 7.43.0.2 | A Python Interface To The cURL library / LGPL, MIT |
| [pyflakes](https://github.com/PyCQA/pyflakes) | 2.0.0 | Pyflakes analyzes programs and detects various errors. / MIT |
| [pygments](http://pygments.org/) | 2.3.1 | Generic syntax highlighting package / BSD 2-clause |
| [pylint](http://www.pylint.org/) | 1.9.2 | python code static checker / GPL |
| [pyodbc](https://github.com/mkleehammer/pyodbc) | 4.0.25 | DB API Module for ODBC / MIT |
| [pyopenssl](https://github.com/pyca/pyopenssl) | 18.0.0 | Python wrapper module around the OpenSSL library / Apache 2.0 |
| [pyparsing](http://pyparsing.wikispaces.com/) | 2.3.0 | Create and execute simple grammars / MIT |
| [pysocks](https://github.com/Anorov/PySocks) | 1.6.8 | A Python SOCKS client module. See [Anorov/PySocks](https://github.com/Anorov/PySocks) for more information. / BSD 3-Clause |
| [pytables](http://www.pytables.org) | 3.4.4 | Brings together Python, HDF5 and NumPy to easily handle large amounts of data. / BSD 3-Clause |
| [pytest](https://docs.pytest.org/en/latest/) | 4.0.2 | Simple and powerful testing with Python. / MIT |
| [python](http://www.python.org/) | 2.7.15 | General purpose programming language / PSF |
| [python-dateutil](https://dateutil.readthedocs.org/) | 2.7.5 | Extensions to the standard Python datetime module. / BSD 3 Clause |
| python-libarchive-c | 2.8 | |
| [pytz](http://pythonhosted.org/pytz/) | 2018.7 | World timezone definitions, modern and historical. / MIT |
| [pywavelets](https://github.com/PyWavelets/pywt) | 1.0.1 | Discrete Wavelet Transforms in Python. / MIT |
| [pyyaml](http://pyyaml.org/wiki/PyYAML) | 3.13 | YAML parser and emitter for Python / MIT |
| [pyzmq](https://github.com/zeromq/pyzmq) | 17.1.2 | Python bindings for zeromq / BSD 3-clause |
| [readline](https://cnswww.cns.cwru.edu/php/chet/readline/rltop.html) | 7.0 | library for editing command lines as they are typed in / GPL-3.0 |
| [requests](http://python-requests.org) | 2.21.0 | Python HTTP for Humans / Apache 2.0 |
| [ruamel\_yaml](https://bitbucket.org/ruamel/yaml) | 0.15.46 | A patched copy of ruamel.yaml. / MIT |
| [scandir](https://github.com/benhoyt/scandir) | 1.9.0 | scandir, a better directory iterator and faster os.walk() / BSD 3-Clause |
| [scikit-image](http://scikit-image.org/) | 0.14.1 | Image processing routines for SciPy. / BSD 3-Clause |
| [scikit-learn](http://scikit-learn.org/) | 0.19.1 | A set of python modules for machine learning and data mining / BSD 3-Clause |
| [scipy](http://www.scipy.org/) | 1.1.0 | Scientific Library for Python / BSD 3-Clause |
| [seaborn](https://seaborn.pydata.org) | 0.9.0 | Statistical data visualization / BSD 3-Clause |
| [send2trash](https://github.com/hsoft/send2trash) | 1.5.0 | Python library to natively send files to Trash (or Recycle bin) on all platforms. / BSD-3-Clause |
| [setuptools](https://github.com/pypa/setuptools) | 40.6.3 | Download, build, install, upgrade, and uninstall Python packages / MIT |
| [simplegeneric](http://cheeseshop.python.org/pypi/simplegeneric) | 0.8.1 | Simple generic functions (similar to Python’s own len(), pickle.dump(), etc.) / Zope Public |
| [singledispatch](http://docs.python.org/3/library/functools.html#functools.singledispatch) | 3.4.0.3 | Transforms a function into a single-dispatch generic function / MIT |
| [six](http://pypi.python.org/pypi/six/) | 1.12.0 | Python 2 and 3 compatibility utilities / MIT |
| [snappy](https://github.com/google/snappy) | 1.1.7 | A fast compressor/decompressor / BSD 3-clause |
| [snowballstemmer](https://github.com/shibukawa/snowball_py) | 1.2.1 | Snowball stemming library collection for Python / BSD-2-Clause |
| [sortedcollections](http://www.grantjenks.com/docs/sortedcollections/) | 1.0.1 | Python Sorted Collections / Apache-2.0 |
| [sortedcontainers](http://www.grantjenks.com/docs/sortedcontainers/) | 2.1.0 | Python Sorted Container Types: SortedList, SortedDict, and SortedSet / Apache 2.0 |
| [sphinx](http://www.sphinx-doc.org) | 1.8.2 | Sphinx is a tool that makes it easy to create intelligent and beautiful documentation / BSD 2-clause |
| sphinxcontrib | 1.0 | Python namespace for sphinxcontrib / BSD |
| [sphinxcontrib-websupport](https://pypi.python.org/pypi/sphinxcontrib-websupport) | 1.1.0 | Sphinx API for Web Apps / BSD-2-Clause |
| [sqlalchemy](http://www.sqlalchemy.org/) | 1.2.15 | Database Abstraction Library. / MIT |
| [sqlite](http://www.sqlite.org/) | 3.26.0 | Implements a self-contained, zero-configuration, SQL database engine. / Public-Domain (`<http://www.sqlite.org/copyright.html>`) |
| [ssl\_match\_hostname](http://bitbucket.org/brandon/backports.ssl_match_hostname) | 3.5.0.1 | The ssl.match\_hostname() function from Python 3.5 / PSF 2 |
| [statsmodels](https://www.statsmodels.org) | 0.9.0 | Statistical computations and models for use with SciPy / BSD 3-Clause |
| [subprocess32](https://github.com/google/python-subprocess32) | 3.5.3 | A backport of the subprocess module from Python 3.2/3.3 for use on 2.x. / PSF 2 |
| [sympy](http://sympy.org) | 1.3 | Python library for symbolic mathematics / 3-clause BSD |
| [tblib](https://github.com/ionelmc/python-tblib) | 1.3.2 | Traceback serialization library. / BSD 2-Clause |
| [terminado](https://github.com/jupyter/terminado) | 0.8.1 | Terminals served by tornado websockets / BSD 2-clause |
| [testpath](https://testpath.readthedocs.io) | 0.4.2 | Testpath is a collection of utilities for Python code working with files and commands. / BSD-3-Clause |
| [tk](http://www.tcl.tk/) | 8.6.8 | A dynamic programming language with GUI support. Bundles Tcl and Tk. / Tcl/Tk |
| [toolz](http://toolz.readthedocs.org/) | 0.9.0 | A functional standard library for Python. / BSD 3-Clause |
| [tornado](http://www.tornadoweb.org/) | 5.1.1 | A Python web framework and asynchronous networking library, originally developed at FriendFeed. / Apache 2.0 |
| [tqdm](https://pypi.python.org/pypi/tqdm) | 4.28.1 | A Fast, Extensible Progress Meter / MPLv2.0, MIT |
| [traceback2](https://github.com/testing-cabal/traceback2) | 1.4.0 | Backports of the traceback module / PSF 2.0 |
| [traitlets](http://ipython.org/) | 4.3.2 | Configuration system for Python applications / BSD 3-clause |
| [typing](https://docs.python.org/3.5/library/typing.html) | 3.6.6 | Type Hints for Python - backport for `Python<3.5` / PSF |
| [unicodecsv](https://github.com/jdunck/python-unicodecsv) | 0.14.1 | Drop-in replacement for csv module which supports unicode strings / BSD |
| [unittest2](http://pypi.python.org/pypi/unittest2) | 1.1.0 | The new features in unittest backported to Python 2.4+ / BSD |
| [unixodbc](http://www.unixodbc.org/) | 2.3.7 | ODBC on non MS Windows platforms / LGPL-2.1 |
| [urllib3](https://urllib3.readthedocs.io/) | 1.24.1 | HTTP library with thread-safe connection pooling, file post, and more. / MIT |
| [wcwidth](https://github.com/jquast/wcwidth) | 0.1.7 | Measures number of Terminal column cells of wide-character codes. / MIT |
| [webencodings](https://github.com/gsnedders/python-webencodings) | 0.5.1 | Character encoding aliases for legacy web content / BSD 3-Clause |
| [werkzeug](http://werkzeug.pocoo.org/) | 0.14.1 | The Python WSGI Utility Library. / BSD 3-Clause |
| [wheel](https://github.com/pypa/wheel) | 0.32.3 | A built-package format for Python. / MIT |
| [widgetsnbextension](http://ipython.org) | 3.4.2 | Interactive Widgets for Jupyter / BSD 3-clause |
| [wrapt](https://github.com/GrahamDumpleton/wrapt) | 1.10.11 | Module for decorators, wrappers and monkey patching. / BSD 2-Clause |
| [xlrd](http://www.python-excel.org/) | 1.2.0 | Library for developers to extract data from Microsoft Excel (tm) spreadsheet files / BSD 3-Clause and BSD with advertising |
| [xlsxwriter](https://xlsxwriter.readthedocs.io/) | 1.1.2 | A Python module for creating Excel XLSX files / BSD 2-Clause |
| [xlwt](http://www.python-excel.org/) | 1.3.0 | Writing data and formatting information to Excel files / BSD |
| [xz](http://tukaani.org/xz/) | 5.2.4 | Data compression software with high compression ratio / LGPL-2.1 and GPL-2.0 |
| [yaml](http://pyyaml.org/wiki/LibYAML) | 0.1.7 | A C library for parsing and emitting YAML. / MIT |
| [zeromq](http://zeromq.org) | 4.2.5 | A high-performance asynchronous messaging library. / LGPL 3 |
| [zict](http://github.com/mrocklin/zict) | 0.1.3 | Composable Dictionary Classes / BSD 3-Clause |
| [zlib](http://zlib.net/) | 1.2.11 | Massively spiffy yet delicately unobtrusive compression library / zlib |
| [zstd](http://www.zstd.net) | 1.3.7 | Zstandard - Fast real-time compression algorithm / BSD 3-Clause |
| Name | Version | Summary / License |
|---|---|---|
| [\_ipyw\_jlab\_nb\_ext\_conf](https://github.com/ContinuumIO/anaconda-nb-extensions-meta-config) | 0.1.0 | A configuration metapackage for enabling Anaconda-bundled jupyter extensions / BSD |
| [alabaster](http://www.sphinx-doc.org/en/stable/index.html) | 0.7.12 | Configurable, Python 2+3 compatible Sphinx theme. / BSD 3-Clause |
| [anaconda-client](http://anaconda.org) | 1.7.2 | anaconda.org command line client library / BSD 3-clause |
| [anaconda-navigator](https://github.com/ContinuumIO/navigator) | 1.9.6 | Anaconda Navigator / proprietary - Continuum Analytics, Inc. |
| [anaconda-project](https://github.com/Anaconda-Platform/anaconda-project) | 0.8.2 | Tool for encapsulating, running, and reproducing data science projects / BSD 3-Clause |
| [asn1crypto](https://github.com/wbond/asn1crypto) | 0.24.0 | Python ASN.1 library with a focus on performance and a pythonic API / MIT |
| [astroid](https://www.astroid.org/) | 1.6.5 | A abstract syntax tree for Python with inference support. / LGPL 2.1 |
| [astropy](http://www.astropy.org/) | 2.0.9 | Community-developed Python Library for Astronomy / BSD |
| [atomicwrites](https://github.com/untitaker/python-atomicwrites) | 1.2.1 | Atomic file writes. / MIT |
| [attrs](https://attrs.readthedocs.io/en/stable/) | 18.2.0 | attrs is the Python package that will bring back the joy of writing classes by relieving you from the drudgery of implementing object protocols (aka dunder methods). / MIT |
| [automat](https://github.com/glyph/Automat) | 0.7.0 | self-service finite-state machines for the programmer on the go / MIT |
| [babel](http://babel.pocoo.org/) | 2.6.0 | Utilities to internationalize and localize Python applications / BSD 3-clause |
| [backports](https://bitbucket.org/brandon/backports) | 1.0 | / BSD |
| [backports.functools\_lru\_cache](https://github.com/jaraco/backports.functools_lru_cache) | 1.5 | Backport of functools.lru\_cache from Python 3.3 as published at ActiveState. / MIT |
| [backports.os](https://github.com/pjdelport/backports.os) | 0.1.1 | Backport of new features in Python’s os module / Python Software Foundation |
| [backports.shutil\_get\_terminal\_size](https://github.com/chrippa/backports.shutil_get_terminal_size) | 1.0.0 | A backport of the get\_terminal\_size function from Python 3.3’s shutil. / MIT |
| [backports\_abc](https://github.com/cython/backports_abc) | 0.5 | A backport of recent additions to the collections.abc module. / PSF 2 |
| [beautifulsoup4](http://www.crummy.com/software/BeautifulSoup/) | 4.6.3 | Python library designed for screen-scraping / MIT |
| [bitarray](https://github.com/ilanschnell/bitarray) | 0.8.3 | efficient arrays of booleans – C extension / PSF |
| [bkcharts](http://github.com/bokeh/bkcharts) | 0.2 | High level chart types built on top of Bokeh / BSD 3-Clause |
| blas | 1.0 | |
| [blaze](http://blaze.pydata.org) | 0.11.3 | NumPy and Pandas interface to big data / BSD 3-Clause |
| [bleach](https://github.com/mozilla/bleach) | 3.0.2 | Easy, whitelist-based HTML-sanitizing tool / Apache-2.0 |
| [blosc](https://github.com/Blosc/c-blosc) | 1.14.4 | A blocking, shuffling and loss-less compression library that can be faster than memcpy() / BSD 3-Clause |
| [bokeh](http://bokeh.pydata.org/) | 1.0.2 | Statistical and novel interactive HTML plots for Python / BSD 3-Clause |
| [boto](https://github.com/boto/boto/) | 2.49.0 | Amazon Web Services Library / MIT |
| [bottleneck](http://berkeleyanalytics.com/bottleneck) | 1.2.1 | Fast NumPy array functions written in Cython. / BSD 2-Clause |
| [bzip2](http://www.bzip.org/) | 1.0.6 | high-quality data compressor / bzip2 |
| [ca-certificates](https://github.com/conda-forge/ca-certificates-feedstock) | 2018.03.07 | Certificates for use with other packages. / ISC |
| [cairo](http://cairographics.org/) | 1.14.12 | Cairo is a 2D graphics library with support for multiple output devices. / LGPL 2.1 or MPL 1.1 |
| [cdecimal](http://www.bytereef.org/mpdecimal/index.html) | 2.3 | Fast drop-in replacement for decimal.py / BSD 2-Clause |
| [certifi](http://certifi.io/) | 2018.11.29 | Python package for providing Mozilla’s CA Bundle. / ISC |
| [cffi](https://bitbucket.org/cffi/cffi) | 1.11.5 | Foreign Function Interface for Python calling C code. / MIT |
| [chardet](https://github.com/chardet/chardet) | 3.0.4 | Universal character encoding detector / LGPL2 |
| [click](https://palletsprojects.com/p/click) | 7.0 | Python composable command line interface toolkit / BSD-3-Clause |
| [cloudpickle](https://github.com/cloudpipe/cloudpickle) | 0.6.1 | Extended pickling support for Python objects / BSD 3-Clause |
| [clyent](https://github.com/Anaconda-Platform/clyent) | 1.2.2 | Command line client library for windows and posix / BSD 3-Clause |
| [colorama](https://github.com/tartley/colorama) | 0.4.1 | Cross-platform colored terminal text / BSD-3-Clause |
| [conda](https://conda.io) | 4.5.12 | OS-agnostic, system-level binary package and environment manager. / BSD 3-Clause |
| [conda-build](https://github.com/conda/conda-build) | 3.17.6 | tools for building conda packages / BSD 3-Clause |
| [conda-env](https://github.com/conda/conda-env) | 2.6.0 | Tools for interacting with conda environments. / BSD 3-Clause |
| [conda-verify](https://github.com/conda/conda-verify) | 3.1.1 | tool for validating conda recipes and conda packages / BSD 3-Clause |
| [configparser](http://docs.python.org/3/library/configparser.html) | 3.5.0 | This library brings the updated configparser from Python 3.5 to Python 2.6-3.5 / MIT |
| [constantly](https://github.com/twisted/constantly) | 15.1.0 | Symbolic constants in Python / MIT |
| [contextlib2](http://contextlib2.readthedocs.org) | 0.5.5 | Backports and enhancements for the contextlib module / PSF |
| [cryptography](https://github.com/pyca/cryptography) | 2.4.2 | Provides cryptographic recipes and primitives to Python developers / Apache 2.0 or BSD 3-Clause, PSF 2 |
| [curl](http://curl.haxx.se/) | 7.63.0 | tool and library for transferring data with URL syntax / MIT/X derivate (`<http://curl.haxx.se/docs/copyright.html>`) |
| [cycler](http://matplotlib.org/cycler) | 0.10.0 | Composable style cycles. / BSD 3-Clause |
| [cython](http://www.cython.org/) | 0.29.2 | The Cython compiler for writing C extensions for the Python language / Apache-2.0 |
| [cytoolz](https://github.com/pytoolz/cytoolz) | 0.9.0.1 | Cython implementation of Toolz. High performance functional utilities. / BSD 3-Clause |
| [dask](http://github.com/dask/dask/) | 1.0.0 | Parallel Python with task scheduling / BSD 3-Clause |
| [dask-core](http://github.com/dask/dask/) | 1.0.0 | Parallel Python with task scheduling / BSD 3-Clause |
| [datashape](http://datashape.pydata.org) | 0.5.4 | A data description language. / BSD 2-Clause |
| [dbus](http://www.freedesktop.org/wiki/Software/dbus/) | 1.13.2 | Simple message bus system for applications to talk to one another / GPL2 |
| [decorator](https://github.com/micheles/decorator) | 4.3.0 | Better living through Python with decorators. / BSD 3-Clause |
| [defusedxml](https://bitbucket.org/tiran/defusedxml) | 0.5.0 | XML bomb protection for Python stdlib modules / PSF 2.0 |
| [distributed](http://distributed.readthedocs.io/en/latest/) | 1.25.1 | Distributed computing with Dask / BSD 3-Clause |
| [docutils](http://docutils.sourceforge.net/) | 0.14 | Docutils – Python Documentation Utilities / Public Domain Dedictation and BSD 2-Clause and PSF 2.1.1 and GPL 3.0 |
| [entrypoints](https://github.com/takluyver/entrypoints) | 0.2.3 | Discover and load entry points from installed packages. / MIT License |
| [enum34](https://bitbucket.org/stoneleaf/enum34) | 1.1.6 | Python 3.4 Enum backported to 3.3, 3.2, 3.1, 2.7, 2.6, 2.5, and 2.4 / BSD 3-Clause |
| [et\_xmlfile](https://bitbucket.org/openpyxl/et_xmlfile) | 1.0.1 | An implementation of lxml.xmlfile for the standard library / MIT |
| [expat](http://expat.sourceforge.net/) | 2.2.6 | Expat XML parser library in C. / MIT |
| [fastcache](https://github.com/pbrady/fastcache) | 1.0.2 | C implementation of Python 3 lru\_cache / MIT |
| [filelock](https://github.com/benediktschmitt/py-filelock) | 3.0.10 | A platform independent file lock. / Public Domain |
| [flask](http://flask.pocoo.org) | 1.0.2 | A microframework based on Werkzeug, Jinja2 and good intentions. / BSD 3-Clause |
| [flask-cors](https://github.com/corydolphin/flask-cors) | 3.0.7 | A Flask extension adding a decorator for CORS support / MIT |
| [fontconfig](http://www.freedesktop.org/wiki/Software/fontconfig/) | 2.13.0 | A library for configuring and customizing font access. / MIT |
| [freetype](https://www.freetype.org/) | 2.9.1 | A Free, High-Quality, and Portable Font Engine / GPL-2.0 and FreeType |
| [fribidi](https://github.com/fribidi/fribidi) | 1.0.5 | The Free Implementation of the Unicode Bidirectional Algorithm. / LGPL-2.1 |
| [funcsigs](http://funcsigs.readthedocs.org) | 1.0.2 | Python function signatures from PEP362 for Python 2.6, 2.7 and 3.2+. / Apache 2.0 |
| [functools32](https://github.com/MiCHiLU/python-functools32) | 3.2.3.2 | Backport of the functools module from Python 3.2.3 for use on 2.7 and PyPy. / PSF license |
| [future](http://python-future.org) | 0.17.1 | Clean single-source support for Python 3 and 2 / MIT |
| [futures](https://github.com/agronholm/pythonfutures) | 3.2.0 | Backport of the concurrent.futures package from Python 3.2 / PSF |
| [get\_terminal\_size](https://github.com/chrippa/backports.shutil_get_terminal_size) | 1.0.0 | Get the size of the terminal window. / MIT |
| [gevent](http://www.gevent.org/) | 1.3.7 | Coroutine-based network library / MIT |
| [glib](https://developer.gnome.org/glib/) | 2.56.2 | Provides core application building blocks for libraries and applications written in C. / LGPL-2.1 |
| [glob2](https://github.com/miracle2k/python-glob2) | 0.6 | Version of the glob module that supports recursion via \*\*, and can capture patterns. / BSD-2-Clause |
| [gmp](http://gmplib.org/) | 6.1.2 | The GNU multiprecision library. / GPL 2 and LGPL 3 |
| [gmpy2](https://pypi.python.org/pypi/gmpy2) | 2.0.8 | GMP/MPIR, MPFR, and MPC interface to Python 2.6+ and 3.x / LGPL 3 |
| [graphite2](http://graphite.sil.org/) | 1.3.12 | A “smart font” system that handles the complexities of lesser-known languages of the world. / LGPLv2 |
| [greenlet](https://github.com/python-greenlet/greenlet) | 0.4.15 | Lightweight in-process concurrent programming / MIT |
| [grin](http://pypi.python.org/pypi/grin) | 1.2.1 | Enhanced grep-like tool / BSD 3-Clause |
| [gst-plugins-base](http://gstreamer.freedesktop.org/) | 1.14.0 | GStreamer Base Plug-ins / GPL2 |
| [gstreamer](http://gstreamer.freedesktop.org/) | 1.14.0 | Library for constructing graphs of media-handling components / LGPL 2 |
| [h5py](http://www.h5py.org/) | 2.8.0 | Read and write HDF5 files from Python. / BSD 3-Clause |
| [harfbuzz](http://www.freedesktop.org/wiki/Software/HarfBuzz/) | 1.8.8 | An OpenType text shaping engine. / MIT |
| [hdf5](http://www.hdfgroup.org/HDF5/) | 1.10.2 | HDF5 is a data model, library, and file format for storing and managing data / HDF5 |
| [heapdict](http://stutzbachenterprises.com/) | 1.0.0 | A heap with decrease-key and increase-key operations / BSD 3-Clause |
| [html5lib](https://github.com/html5lib/html5lib-python) | 1.0.1 | HTML parser based on the WHATWG HTML specification / MIT |
| [hyperlink](https://github.com/python-hyper/hyperlink) | 18.0.0 | Immutable, Pythonic, correct URLs. / MIT |
| [icu](http://site.icu-project.org/) | 58.2 | International Components for Unicode. / MIT |
| [idna](https://github.com/kjd/idna) | 2.8 | Internationalized Domain Names in Applications (IDNA). / BSD Like |
| [imageio](http://imageio.github.io) | 2.4.1 | a Python library for reading and writing image data / BSD 2-Clause |
| [imagesize](https://github.com/shibukawa/imagesize_py) | 1.1.0 | Getting image size from png/jpeg/jpeg2000/gif file / MIT |
| [importlib\_metadata](http://importlib-metadata.readthedocs.io) | 0.6 | A library to access the metadata for a Python package / APACHE-2.0 |
| [incremental](https://twistedmatrix.com) | 17.5.0 | A library that versions your Python projects / MIT License |
| [intel-openmp](https://software.intel.com/en-us/node/522690) | 2019.1 | Math library for Intel and compatible processors / proprietary - Intel |
| [ipaddress](https://github.com/phihag/ipaddress) | 1.0.22 | IPv4/IPv6 manipulation library / PSF 2 |
| [ipykernel](https://ipython.org) | 4.10.0 | IPython Kernel for Jupyter / BSD-3-Clause |
| [ipython](https://ipython.org/) | 5.8.0 | IPython: Productive Interactive Computing / BSD-3-Clause |
| [ipython\_genutils](http://ipython.org) | 0.2.0 | vestigial utilities from IPython / BSD 3-Clause |
| [ipywidgets](https://github.com/ipython/ipywidgets) | 7.4.2 | Jupyter Interactive Widgets / BSD 3-clause |
| [isort](https://github.com/timothycrosley/isort) | 4.3.4 | A Python utility / library to sort Python imports. / MIT |
| [itsdangerous](https://github.com/pallets/itsdangerous) | 1.1.0 | Various helpers to pass trusted data to untrusted environments. / BSD 3-Clause |
| [jbig](https://www.cl.cam.ac.uk/~mgk25/jbigkit) | 2.1 | Implementation of the JBIG1 data compression standard / GPL-2.0 |
| [jdcal](https://github.com/phn/jdcal) | 1.4 | Julian dates from proleptic Gregorian and Julian calendars. / BSD 2-Clause |
| [jedi](https://github.com/davidhalter/jedi/) | 0.13.2 | An autocompletion tool for Python that can be used for text editors. / MIT |
| [jinja2](http://jinja.pocoo.org) | 2.10 | An easy to use stand-alone template engine written in pure python. / 3-Clause BSD |
| [jpeg](http://www.ijg.org/) | 9b | read/write jpeg COM, EXIF, IPTC medata / Custom free software license |
| [jsonschema](https://github.com/Julian/jsonschema) | 2.6.0 | An implementation of JSON Schema validation for Python / MIT |
| [jupyter](http://jupyter.org) | 1.0.0 | Jupyter metapackage. Install all the Jupyter components in one go. / BSD 3-Clause |
| [jupyter\_client](http://jupyter.org) | 5.2.4 | Jupyter protocol implementation and client libraries / BSD 3-clause |
| [jupyter\_console](http://jupyter.org) | 5.2.0 | Jupyter terminal console / BSD-3-Clause |
| [jupyter\_core](http://jupyter.org) | 4.4.0 | Core common functionality of Jupyter projects. / BSD 3-clause |
| [jupyterlab](https://github.com/jupyterlab/jupyterlab) | 0.33.11 | JupyterLab PRE-ALPHA / BSD-3-Clause |
| [jupyterlab\_launcher](http://github.com/jupyterlab/jupyterlab_launcher) | 0.11.2 | A Launcher for JupyterLab based applications. / BSD 3-Clause |
| [kiwisolver](https://github.com/nucleic/kiwi) | 1.0.1 | A fast implementation of the Cassowary constraint solver / BSD 3-Clause |
| [krb5](http://web.mit.edu/kerberos/) | 1.16.1 | A network authentication protocol. / MIT |
| [lazy-object-proxy](https://github.com/ionelmc/python-lazy-object-proxy) | 1.3.1 | A fast and thorough lazy object proxy. / BSD 2-Clause |
| [libarchive](http://www.libarchive.org/) | 3.3.3 | Multi-format archive and compression library / BSD 2-Clause |
| [libcurl](http://curl.haxx.se/) | 7.63.0 | tool and library for transferring data with URL syntax / MIT/X derivate (`<http://curl.haxx.se/docs/copyright.html>`) |
| [libedit](http://thrysoee.dk/editline/) | 3.1.20170329 | Editline Library (libedit) / NetBSD |
| [libffi](https://sourceware.org/libffi/) | 3.2.1 | A Portable Foreign Function Interface Library. / Custom |
| [libgcc-ng](https://gcc.gnu.org/onlinedocs/gccint/Libgcc.html) | 8.2.0 | The GCC low-level runtime library / GPL |
| [libgfortran-ng](https://gcc.gnu.org/) | 7.3.0 | The GNU Fortran Runtime Library / GPL |
| [liblief](https://lief.quarkslab.com/) | 0.9.0 | A cross platform library to parse, modify and abstract ELF, PE and MachO formats. / Apache 2.0 |
| [libpng](http://www.libpng.org/pub/png/libpng.html) | 1.6.35 | PNG reference library. / zlib/libpng |
| [libsodium](http://libsodium.org) | 1.0.16 | A modern and easy-to-use crypto library. / ISC |
| [libssh2](https://www.libssh2.org/) | 1.8.0 | the SSH library / BSD 3-Clause |
| [libstdcxx-ng](https://gcc.gnu.org/) | 8.2.0 | The GNU C++ Runtime Library / GPL3 with runtime exception |
| [libtiff](http://www.libtiff.org/) | 4.0.9 | Support for the Tag Image File Format (TIFF). / HPND |
| [libtool](http://www.gnu.org/software/libtool/) | 2.4.6 | The GNU Portable Library Tool / GPL 3 |
| [libuuid](http://sourceforge.net/projects/libuuid/) | 1.0.3 | Portable uuid C library. / BSD 3-Clause |
| [libxcb](http://xcb.freedesktop.org/) | 1.13 | This is the C-language Binding (XCB) package to the X Window System protocol / MIT |
| [libxml2](http://xmlsoft.org/) | 2.9.8 | The XML C parser and toolkit of Gnome / MIT |
| [libxslt](http://xmlsoft.org/XSLT/) | 1.1.32 | The XSLT C library developed for the GNOME project / MIT |
| [linecache2](https://github.com/testing-cabal/linecache2) | 1.0.0 | Backport of the linecache module / PSF 1.0 |
| [llvmlite](https://github.com/numba/llvmlite) | 0.26.0 | A lightweight LLVM python binding for writing JIT compilers / New BSD License |
| [locket](https://github.com/mwilliamson/locket.py) | 0.2.0 | File-based locks for Python for Linux and Windows / BSD 2-Clause |
| [lxml](http://lxml.de/) | 4.2.5 | Pythonic binding for the C libraries libxml2 and libxslt. / BSD 3-Clause, GPL-2.0, ZPL-2.0, and ElementTree |
| [lz4-c](https://www.lz4.org) | 1.8.1.2 | Extremely Fast Compression algorithm / BSD 2-clause |
| [lzo](http://www.oberhumer.com/opensource/lzo/) | 2.10 | LZO is a portable lossless data compression library written in ANSI C. / GPL v2+ |
| [markupsafe](https://www.palletsprojects.com/p/markupsafe) | 1.1.0 | A Python module that implements the jinja2.Markup string / BSD-3-Clause |
| [matplotlib](http://matplotlib.org/) | 2.2.3 | Publication quality figures in Python / PSF-based |
| [mccabe](https://github.com/PyCQA/mccabe) | 0.6.1 | McCabe complexity checker for Python / MIT |
| [mistune](https://github.com/lepture/mistune) | 0.8.4 | The fastest markdown parser in pure Python. / BSD 3-Clause |
| [mkl](https://software.intel.com/en-us/mkl) | 2019.1 | Math library for Intel and compatible processors / proprietary - Intel |
| [mkl-service](https://github.com/ContinuumIO/mkl-service) | 1.1.2 | Python bindings to MKL service functions / 3-clause BSD |
| [mkl\_fft](http://github.com/IntelPython/mkl_fft) | 1.0.6 | NumPy-based implementation of Fast Fourier Transform using Intel (R) Math Kernel Library. / BSD 3-Clause |
| [mkl\_random](http://github.com/IntelPython/mkl_random) | 1.0.2 | Intel (R) MKL-powered package for sampling from common probability distributions into NumPy arrays. / BSD 3-Clause |
| [more-itertools](https://github.com/erikrose/more-itertools) | 4.3.0 | More routines for operating on iterables, beyond itertools / MIT |
| [mpc](http://www.multiprecision.org/) | 1.1.0 | A C library for the arithmetic of complex numbers with arbitrarily high precision. / LGPL 3 |
| [mpfr](http://www.mpfr.org/) | 4.0.1 | The MPFR library is a C library for multiple-precision floating-point computations with correct rounding. / LGPL 3 |
| [mpmath](http://mpmath.org) | 1.1.0 | Python library for arbitrary-precision floating-point arithmetic / BSD 3-Clause |
| [msgpack-python](http://msgpack.org/) | 0.5.6 | MessagePack (de)serializer. / Apache 2.0 |
| [multipledispatch](https://github.com/mrocklin/multipledispatch/) | 0.6.0 | Multiple dispatch in Python / BSD 3-Clause |
| [navigator-updater](https://github.com/ContinuumIO/navigator-updater) | 0.2.1 | Anaconda Navigator Updater / proprietary - Continuum Analytics, Inc. |
| [nbconvert](http://jupyter.org) | 5.4.0 | Converting Jupyter Notebooks / BSD-3-Clause |
| [nbformat](http://jupyter.org) | 4.4.0 | The reference implementation of the Jupyter Notebook format / BSD 3-clause |
| [ncurses](http://www.gnu.org/software/ncurses/) | 6.1 | Library for text-based user interfaces / Free software (MIT-like) |
| [networkx](https://networkx.github.io/) | 2.2 | Python package for creating and manipulating complex networks / BSD 3-Clause |
| [nltk](http://nltk.org/) | 3.4 | Build Python programs to work with human language data / Apache 2.0 |
| [nose](http://readthedocs.org/docs/nose/) | 1.3.7 | Nose extends unittest to make testing easier / LGPL-2.1 |
| [notebook](http://jupyter.org) | 5.7.4 | Jupyter Notebook / BSD 3-clause |
| [numba](http://numba.github.com) | 0.41.0 | NumPy aware dynamic Python compiler using LLVM / BSD 2-clause |
| [numexpr](https://github.com/pydata/numexpr) | 2.6.8 | Fast numerical expression evaluator for NumPy. / MIT |
| [numpy](http://numpy.scipy.org/) | 1.15.4 | Array processing for numbers, strings, records, and objects. / BSD 3-Clause |
| numpy-base | 1.15.4 | |
| [numpydoc](https://github.com/numpy/numpydoc) | 0.8.0 | Sphinx extension to support docstrings in Numpy format / BSD 3-Clause |
| [odo](http://odo.pydata.org) | 0.5.1 | Data migration in Python / BSD-3-Clause |
| [olefile](http://www.decalage.info/python/olefileio) | 0.46 | parse, read and write Microsoft OLE2 files / BSD 2-Clause |
| [openpyxl](https://openpyxl.readthedocs.io) | 2.5.12 | A Python library to read/write Excel 2010 xlsx/xlsm files / MIT |
| [openssl](http://www.openssl.org/) | 1.1.1a | OpenSSL is an open-source implementation of the SSL and TLS protocols / OpenSSL |
| [packaging](https://github.com/pypa/packaging) | 18.0 | Core utilities for Python packages / Apache 2.0 or BSD 2-Clause |
| [pandas](http://pandas.pydata.org) | 0.23.4 | High-performance, easy-to-use data structures and data analysis tools. / BSD 3-clause |
| [pandoc](http://pandoc.org/) | 1.19.2.1 | Universal markup converter (repackaged binaries). / GPL-2.0 |
| [pandocfilters](https://github.com/jgm/pandocfilters) | 1.4.2 | A python module for writing pandoc filters / BSD-3-Clause |
| [pango](http://www.pango.org/) | 1.42.4 | Text layout and rendering engine. / LGPL-2.1 |
| [parso](https://github.com/davidhalter/parso) | 0.3.1 | A Python Parser / MIT |
| [partd](https://github.com/dask/partd) | 0.3.9 | Data structure for on-disk shuffle operations / BSD 3-Clause |
| [patchelf](http://nixos.org/patchelf.html) | 0.9 | A small utility to modify the dynamic linker and RPATH of ELF executables. / GPL 3 |
| [path.py](https://github.com/jaraco/path.py) | 11.5.0 | A module wrapper for os.path / MIT |
| [pathlib2](https://github.com/mcmtroffaes/pathlib2) | 2.3.3 | Fork of pathlib aiming to support the full stdlib Python API. / MIT |
| [patsy](https://github.com/pydata/patsy) | 0.5.1 | Describing statistical models in Python using symbolic formulas / BSD-2-Clause, PSF2 |
| [pcre](http://www.pcre.org/) | 8.42 | Regular expression pattern matching using the same syntax and semantics as Perl 5. / BSD 3-Clause |
| [pep8](http://pep8.readthedocs.org/) | 1.7.1 | Python style guide checker / MIT |
| [pexpect](http://pexpect.sourceforge.net/) | 4.6.0 | Pexpect makes Python a better tool for controlling other applications. / ISC |
| [pickleshare](https://github.com/pickleshare/pickleshare/) | 0.7.5 | Tiny ‘shelve’-like database with concurrency support / MIT |
| [pillow](https://pillow.readthedocs.io) | 5.3.0 | Pillow is the friendly PIL fork by Alex Clark and Contributors / PIL |
| [pip](https://pip.pypa.io/en/stable/) | 18.1 | PyPA recommended tool for installing Python packages / MIT |
| [pixman](http://www.pixman.org/) | 0.34.0 | A low-level software library for pixel manipulation. / MIT |
| [pkginfo](https://code.launchpad.net/~tseaver/pkginfo/trunk) | 1.4.2 | Query metadatdata from sdists / bdists / installed packages. / MIT |
| [pluggy](https://github.com/pytest-dev/pluggy) | 0.8.0 | Plugin registration and hook calling for Python / MIT |
| [ply](http://www.dabeaz.com/ply/index.html) | 3.11 | Python Lex-Yacc / BSD 3-clause |
| [prometheus\_client](https://github.com/prometheus/client_python) | 0.5.0 | Python client for the Prometheus monitoring system / Apache 2.0 |
| [prompt\_toolkit](https://github.com/jonathanslenders/python-prompt-toolkit) | 1.0.15 | Library for building powerful interactive command lines in Python / BSD 3-clause |
| [psutil](https://github.com/giampaolo/psutil) | 5.4.8 | A cross-platform process and system utilities module for Python / BSD 3-Clause |
| [ptyprocess](https://github.com/pexpect/ptyprocess) | 0.6.0 | Run a subprocess in a pseudo terminal / ISC |
| [py](https://github.com/pytest-dev/py) | 1.7.0 | library with cross-python path, ini-parsing, io, code, log facilities / MIT |
| [py-lief](https://lief.quarkslab.com/) | 0.9.0 | A cross platform library to parse, modify and abstract ELF, PE and MachO formats. / Apache 2.0 |
| [pyasn1-modules](http://pyasn1.sourceforge.net/) | 0.2.2 | A collection of ASN.1-based protocols modules. / BSD 2-Clause |
| [pycairo](http://cairographics.org/pycairo/) | 1.18.0 | Python bindings for the Cairo graphics library. / LGPL 2.1, MPL 1.1 |
| [pycodestyle](https://pycodestyle.readthedocs.io/) | 2.4.0 | Python style guide checker / MIT |
| [pycosat](https://github.com/ContinuumIO/pycosat) | 0.6.3 | Bindings to picosat (a SAT solver) / MIT |
| [pycparser](https://github.com/eliben/pycparser) | 2.19 | Complete C99 parser in pure Python / BSD 3-clause |
| [pycrypto](http://www.pycrypto.org/) | 2.6.1 | Cryptographic modules for Python. / Public Domain |
| [pycurl](http://pycurl.sourceforge.net/) | 7.43.0.2 | A Python Interface To The cURL library / LGPL, MIT |
| [pyflakes](https://github.com/PyCQA/pyflakes) | 2.0.0 | Pyflakes analyzes programs and detects various errors. / MIT |
| [pygments](http://pygments.org/) | 2.3.1 | Generic syntax highlighting package / BSD 2-clause |
| [pylint](http://www.pylint.org/) | 1.9.2 | python code static checker / GPL |
| [pyodbc](https://github.com/mkleehammer/pyodbc) | 4.0.25 | DB API Module for ODBC / MIT |
| [pyopenssl](https://github.com/pyca/pyopenssl) | 18.0.0 | Python wrapper module around the OpenSSL library / Apache 2.0 |
| [pyparsing](http://pyparsing.wikispaces.com/) | 2.3.0 | Create and execute simple grammars / MIT |
| [pyqt](http://www.riverbankcomputing.co.uk/software/pyqt) | 5.9.2 | Python binding of the cross-platform GUI toolkit Qt. / Commercial, GPL-2.0, GPL-3.0 |
| [pysocks](https://github.com/Anorov/PySocks) | 1.6.8 | A Python SOCKS client module. See [Anorov/PySocks](https://github.com/Anorov/PySocks) for more information. / BSD 3-Clause |
| [pytables](http://www.pytables.org) | 3.4.4 | Brings together Python, HDF5 and NumPy to easily handle large amounts of data. / BSD 3-Clause |
| [pytest](https://docs.pytest.org/en/latest/) | 4.0.2 | Simple and powerful testing with Python. / MIT |
| [python](http://www.python.org/) | 2.7.15 | General purpose programming language / PSF |
| [python-dateutil](https://dateutil.readthedocs.org/) | 2.7.5 | Extensions to the standard Python datetime module. / BSD 3 Clause |
| python-libarchive-c | 2.8 | |
| [pytz](http://pythonhosted.org/pytz/) | 2018.7 | World timezone definitions, modern and historical. / MIT |
| [pywavelets](https://github.com/PyWavelets/pywt) | 1.0.1 | Discrete Wavelet Transforms in Python. / MIT |
| [pyyaml](http://pyyaml.org/wiki/PyYAML) | 3.13 | YAML parser and emitter for Python / MIT |
| [pyzmq](https://github.com/zeromq/pyzmq) | 17.1.2 | Python bindings for zeromq / BSD 3-clause |
| [qt](http://qt-project.org) | 5.9.7 | Qt is a cross-platform application and UI framework. / LGPL-3.0 |
| [qtawesome](https://github.com/spyder-ide/qtawesome) | 0.5.3 | Iconic fonts in PyQt and PySide applications / MIT |
| [qtconsole](http://jupyter.org) | 4.4.3 | Jupyter Qt console / BSD 3-Clause |
| [qtpy](https://github.com/spyder-ide/qtpy) | 1.5.2 | Abstraction layer for PyQt5/PyQt4/PySide / MIT |
| [readline](https://cnswww.cns.cwru.edu/php/chet/readline/rltop.html) | 7.0 | library for editing command lines as they are typed in / GPL-3.0 |
| [requests](http://python-requests.org) | 2.21.0 | Python HTTP for Humans / Apache 2.0 |
| [rope](https://github.com/python-rope/rope) | 0.11.0 | A python refactoring library… / GPL 2.0 |
| [ruamel\_yaml](https://bitbucket.org/ruamel/yaml) | 0.15.46 | A patched copy of ruamel.yaml. / MIT |
| [scandir](https://github.com/benhoyt/scandir) | 1.9.0 | scandir, a better directory iterator and faster os.walk() / BSD 3-Clause |
| [scikit-image](http://scikit-image.org/) | 0.14.1 | Image processing routines for SciPy. / BSD 3-Clause |
| [scikit-learn](http://scikit-learn.org/) | 0.20.1 | A set of python modules for machine learning and data mining / BSD 3-Clause |
| [scipy](http://www.scipy.org/) | 1.1.0 | Scientific Library for Python / BSD 3-Clause |
| [seaborn](https://seaborn.pydata.org) | 0.9.0 | Statistical data visualization / BSD 3-Clause |
| [send2trash](https://github.com/hsoft/send2trash) | 1.5.0 | Python library to natively send files to Trash (or Recycle bin) on all platforms. / BSD-3-Clause |
| [setuptools](https://github.com/pypa/setuptools) | 40.6.3 | Download, build, install, upgrade, and uninstall Python packages / MIT |
| [simplegeneric](http://cheeseshop.python.org/pypi/simplegeneric) | 0.8.1 | Simple generic functions (similar to Python’s own len(), pickle.dump(), etc.) / Zope Public |
| [singledispatch](http://docs.python.org/3/library/functools.html#functools.singledispatch) | 3.4.0.3 | Transforms a function into a single-dispatch generic function / MIT |
| [sip](http://www.riverbankcomputing.com/software/sip/intro) | 4.19.8 | Create Python bindings for C and C++ libraries / GPL-3.0 |
| [six](http://pypi.python.org/pypi/six/) | 1.12.0 | Python 2 and 3 compatibility utilities / MIT |
| [snappy](https://github.com/google/snappy) | 1.1.7 | A fast compressor/decompressor / BSD 3-clause |
| [snowballstemmer](https://github.com/shibukawa/snowball_py) | 1.2.1 | Snowball stemming library collection for Python / BSD-2-Clause |
| [sortedcollections](http://www.grantjenks.com/docs/sortedcollections/) | 1.0.1 | Python Sorted Collections / Apache-2.0 |
| [sortedcontainers](http://www.grantjenks.com/docs/sortedcontainers/) | 2.1.0 | Python Sorted Container Types: SortedList, SortedDict, and SortedSet / Apache 2.0 |
| [sphinx](http://www.sphinx-doc.org) | 1.8.2 | Sphinx is a tool that makes it easy to create intelligent and beautiful documentation / BSD 2-clause |
| sphinxcontrib | 1.0 | Python namespace for sphinxcontrib / BSD |
| [sphinxcontrib-websupport](https://pypi.python.org/pypi/sphinxcontrib-websupport) | 1.1.0 | Sphinx API for Web Apps / BSD-2-Clause |
| [spyder](https://www.spyder-ide.org/) | 3.3.2 | The Scientific Python Development Environment / MIT |
| [spyder-kernels](https://github.com/spyder-ide/spyder-kernels) | 0.3.0 | Jupyter kernels for the Spyder console / MIT |
| [sqlalchemy](http://www.sqlalchemy.org/) | 1.2.15 | Database Abstraction Library. / MIT |
| [sqlite](http://www.sqlite.org/) | 3.26.0 | Implements a self-contained, zero-configuration, SQL database engine. / Public-Domain (`<http://www.sqlite.org/copyright.html>`) |
| [ssl\_match\_hostname](http://bitbucket.org/brandon/backports.ssl_match_hostname) | 3.5.0.1 | The ssl.match\_hostname() function from Python 3.5 / PSF 2 |
| [statsmodels](https://www.statsmodels.org) | 0.9.0 | Statistical computations and models for use with SciPy / BSD 3-Clause |
| [subprocess32](https://github.com/google/python-subprocess32) | 3.5.3 | A backport of the subprocess module from Python 3.2/3.3 for use on 2.x. / PSF 2 |
| [sympy](http://sympy.org) | 1.3 | Python library for symbolic mathematics / 3-clause BSD |
| [tblib](https://github.com/ionelmc/python-tblib) | 1.3.2 | Traceback serialization library. / BSD 2-Clause |
| [terminado](https://github.com/jupyter/terminado) | 0.8.1 | Terminals served by tornado websockets / BSD 2-clause |
| [testpath](https://testpath.readthedocs.io) | 0.4.2 | Testpath is a collection of utilities for Python code working with files and commands. / BSD-3-Clause |
| [tk](http://www.tcl.tk/) | 8.6.8 | A dynamic programming language with GUI support. Bundles Tcl and Tk. / Tcl/Tk |
| [toolz](http://toolz.readthedocs.org/) | 0.9.0 | A functional standard library for Python. / BSD 3-Clause |
| [tornado](http://www.tornadoweb.org/) | 5.1.1 | A Python web framework and asynchronous networking library, originally developed at FriendFeed. / Apache 2.0 |
| [tqdm](https://pypi.python.org/pypi/tqdm) | 4.28.1 | A Fast, Extensible Progress Meter / MPLv2.0, MIT |
| [traceback2](https://github.com/testing-cabal/traceback2) | 1.4.0 | Backports of the traceback module / PSF 2.0 |
| [traitlets](http://ipython.org/) | 4.3.2 | Configuration system for Python applications / BSD 3-clause |
| [typing](https://docs.python.org/3.5/library/typing.html) | 3.6.6 | Type Hints for Python - backport for `Python<3.5` / PSF |
| [unicodecsv](https://github.com/jdunck/python-unicodecsv) | 0.14.1 | Drop-in replacement for csv module which supports unicode strings / BSD |
| [unittest2](http://pypi.python.org/pypi/unittest2) | 1.1.0 | The new features in unittest backported to Python 2.4+ / BSD |
| [unixodbc](http://www.unixodbc.org/) | 2.3.7 | ODBC on non MS Windows platforms / LGPL-2.1 |
| [urllib3](https://urllib3.readthedocs.io/) | 1.24.1 | HTTP library with thread-safe connection pooling, file post, and more. / MIT |
| [wcwidth](https://github.com/jquast/wcwidth) | 0.1.7 | Measures number of Terminal column cells of wide-character codes. / MIT |
| [webencodings](https://github.com/gsnedders/python-webencodings) | 0.5.1 | Character encoding aliases for legacy web content / BSD 3-Clause |
| [werkzeug](http://werkzeug.pocoo.org/) | 0.14.1 | The Python WSGI Utility Library. / BSD 3-Clause |
| [wheel](https://github.com/pypa/wheel) | 0.32.3 | A built-package format for Python. / MIT |
| [widgetsnbextension](http://ipython.org) | 3.4.2 | Interactive Widgets for Jupyter / BSD 3-clause |
| [wrapt](https://github.com/GrahamDumpleton/wrapt) | 1.10.11 | Module for decorators, wrappers and monkey patching. / BSD 2-Clause |
| [wurlitzer](https://github.com/minrk/wurlitzer) | 1.0.2 | Capture C-level stdout/stderr in Python / MIT |
| [xlrd](http://www.python-excel.org/) | 1.2.0 | Library for developers to extract data from Microsoft Excel (tm) spreadsheet files / BSD 3-Clause and BSD with advertising |
| [xlsxwriter](https://xlsxwriter.readthedocs.io/) | 1.1.2 | A Python module for creating Excel XLSX files / BSD 2-Clause |
| [xlwt](http://www.python-excel.org/) | 1.3.0 | Writing data and formatting information to Excel files / BSD |
| [xz](http://tukaani.org/xz/) | 5.2.4 | Data compression software with high compression ratio / LGPL-2.1 and GPL-2.0 |
| [yaml](http://pyyaml.org/wiki/LibYAML) | 0.1.7 | A C library for parsing and emitting YAML. / MIT |
| [zeromq](http://zeromq.org) | 4.2.5 | A high-performance asynchronous messaging library. / LGPL 3 |
| [zict](http://github.com/mrocklin/zict) | 0.1.3 | Composable Dictionary Classes / BSD 3-Clause |
| [zlib](http://zlib.net/) | 1.2.11 | Massively spiffy yet delicately unobtrusive compression library / zlib |
| [zstd](http://www.zstd.net) | 1.3.7 | Zstandard - Fast real-time compression algorithm / BSD 3-Clause |
| Name | Version | Summary / License |
|---|---|---|
| [\_ipyw\_jlab\_nb\_ext\_conf](https://github.com/ContinuumIO/anaconda-nb-extensions-meta-config) | 0.1.0 | A configuration metapackage for enabling Anaconda-bundled jupyter extensions / BSD |
| [alabaster](http://www.sphinx-doc.org/en/stable/index.html) | 0.7.12 | Configurable, Python 2+3 compatible Sphinx theme. / BSD 3-Clause |
| [anaconda-client](http://anaconda.org) | 1.7.2 | anaconda.org command line client library / BSD 3-clause |
| [anaconda-navigator](https://github.com/ContinuumIO/navigator) | 1.9.6 | Anaconda Navigator / proprietary - Continuum Analytics, Inc. |
| [anaconda-project](https://github.com/Anaconda-Platform/anaconda-project) | 0.8.2 | Tool for encapsulating, running, and reproducing data science projects / BSD 3-Clause |
| [asn1crypto](https://github.com/wbond/asn1crypto) | 0.24.0 | Python ASN.1 library with a focus on performance and a pythonic API / MIT |
| [astroid](https://www.astroid.org/) | 1.6.5 | A abstract syntax tree for Python with inference support. / LGPL 2.1 |
| [astropy](http://www.astropy.org/) | 2.0.9 | Community-developed Python Library for Astronomy / BSD |
| [atomicwrites](https://github.com/untitaker/python-atomicwrites) | 1.2.1 | Atomic file writes. / MIT |
| [attrs](https://attrs.readthedocs.io/en/stable/) | 18.2.0 | attrs is the Python package that will bring back the joy of writing classes by relieving you from the drudgery of implementing object protocols (aka dunder methods). / MIT |
| [automat](https://github.com/glyph/Automat) | 0.7.0 | self-service finite-state machines for the programmer on the go / MIT |
| [babel](http://babel.pocoo.org/) | 2.6.0 | Utilities to internationalize and localize Python applications / BSD 3-clause |
| [backports](https://bitbucket.org/brandon/backports) | 1.0 | / BSD |
| [backports.functools\_lru\_cache](https://github.com/jaraco/backports.functools_lru_cache) | 1.5 | Backport of functools.lru\_cache from Python 3.3 as published at ActiveState. / MIT |
| [backports.os](https://github.com/pjdelport/backports.os) | 0.1.1 | Backport of new features in Python’s os module / Python Software Foundation |
| [backports.shutil\_get\_terminal\_size](https://github.com/chrippa/backports.shutil_get_terminal_size) | 1.0.0 | A backport of the get\_terminal\_size function from Python 3.3’s shutil. / MIT |
| [backports\_abc](https://github.com/cython/backports_abc) | 0.5 | A backport of recent additions to the collections.abc module. / PSF 2 |
| [beautifulsoup4](http://www.crummy.com/software/BeautifulSoup/) | 4.6.3 | Python library designed for screen-scraping / MIT |
| [bitarray](https://github.com/ilanschnell/bitarray) | 0.8.3 | efficient arrays of booleans – C extension / PSF |
| [bkcharts](http://github.com/bokeh/bkcharts) | 0.2 | High level chart types built on top of Bokeh / BSD 3-Clause |
| blas | 1.0 | |
| [blaze](http://blaze.pydata.org) | 0.11.3 | NumPy and Pandas interface to big data / BSD 3-Clause |
| [bleach](https://github.com/mozilla/bleach) | 3.0.2 | Easy, whitelist-based HTML-sanitizing tool / Apache-2.0 |
| [blosc](https://github.com/Blosc/c-blosc) | 1.14.4 | A blocking, shuffling and loss-less compression library that can be faster than memcpy() / BSD 3-Clause |
| [bokeh](http://bokeh.pydata.org/) | 1.0.2 | Statistical and novel interactive HTML plots for Python / BSD 3-Clause |
| [boto](https://github.com/boto/boto/) | 2.49.0 | Amazon Web Services Library / MIT |
| [bottleneck](http://berkeleyanalytics.com/bottleneck) | 1.2.1 | Fast NumPy array functions written in Cython. / BSD 2-Clause |
| [bzip2](http://www.bzip.org/) | 1.0.6 | high-quality data compressor / bzip2 |
| [ca-certificates](https://github.com/conda-forge/ca-certificates-feedstock) | 2018.03.07 | Certificates for use with other packages. / ISC |
| [cairo](http://cairographics.org/) | 1.14.12 | Cairo is a 2D graphics library with support for multiple output devices. / LGPL 2.1 or MPL 1.1 |
| [cdecimal](http://www.bytereef.org/mpdecimal/index.html) | 2.3 | Fast drop-in replacement for decimal.py / BSD 2-Clause |
| [certifi](http://certifi.io/) | 2018.11.29 | Python package for providing Mozilla’s CA Bundle. / ISC |
| [cffi](https://bitbucket.org/cffi/cffi) | 1.11.5 | Foreign Function Interface for Python calling C code. / MIT |
| [chardet](https://github.com/chardet/chardet) | 3.0.4 | Universal character encoding detector / LGPL2 |
| [click](https://palletsprojects.com/p/click) | 7.0 | Python composable command line interface toolkit / BSD-3-Clause |
| [cloudpickle](https://github.com/cloudpipe/cloudpickle) | 0.6.1 | Extended pickling support for Python objects / BSD 3-Clause |
| [clyent](https://github.com/Anaconda-Platform/clyent) | 1.2.2 | Command line client library for windows and posix / BSD 3-Clause |
| [colorama](https://github.com/tartley/colorama) | 0.4.1 | Cross-platform colored terminal text / BSD-3-Clause |
| [conda](https://conda.io) | 4.5.12 | OS-agnostic, system-level binary package and environment manager. / BSD 3-Clause |
| [conda-build](https://github.com/conda/conda-build) | 3.17.6 | tools for building conda packages / BSD 3-Clause |
| [conda-env](https://github.com/conda/conda-env) | 2.6.0 | Tools for interacting with conda environments. / BSD 3-Clause |
| [conda-verify](https://github.com/conda/conda-verify) | 3.1.1 | tool for validating conda recipes and conda packages / BSD 3-Clause |
| [configparser](http://docs.python.org/3/library/configparser.html) | 3.5.0 | This library brings the updated configparser from Python 3.5 to Python 2.6-3.5 / MIT |
| [constantly](https://github.com/twisted/constantly) | 15.1.0 | Symbolic constants in Python / MIT |
| [contextlib2](http://contextlib2.readthedocs.org) | 0.5.5 | Backports and enhancements for the contextlib module / PSF |
| [cryptography](https://github.com/pyca/cryptography) | 2.4.2 | Provides cryptographic recipes and primitives to Python developers / Apache 2.0 or BSD 3-Clause, PSF 2 |
| [curl](http://curl.haxx.se/) | 7.63.0 | tool and library for transferring data with URL syntax / MIT/X derivate (`<http://curl.haxx.se/docs/copyright.html>`) |
| [cycler](http://matplotlib.org/cycler) | 0.10.0 | Composable style cycles. / BSD 3-Clause |
| [cython](http://www.cython.org/) | 0.29.2 | The Cython compiler for writing C extensions for the Python language / Apache-2.0 |
| [cytoolz](https://github.com/pytoolz/cytoolz) | 0.9.0.1 | Cython implementation of Toolz. High performance functional utilities. / BSD 3-Clause |
| [dask](http://github.com/dask/dask/) | 1.0.0 | Parallel Python with task scheduling / BSD 3-Clause |
| [dask-core](http://github.com/dask/dask/) | 1.0.0 | Parallel Python with task scheduling / BSD 3-Clause |
| [datashape](http://datashape.pydata.org) | 0.5.4 | A data description language. / BSD 2-Clause |
| [dbus](http://www.freedesktop.org/wiki/Software/dbus/) | 1.13.2 | Simple message bus system for applications to talk to one another / GPL2 |
| [decorator](https://github.com/micheles/decorator) | 4.3.0 | Better living through Python with decorators. / BSD 3-Clause |
| [defusedxml](https://bitbucket.org/tiran/defusedxml) | 0.5.0 | XML bomb protection for Python stdlib modules / PSF 2.0 |
| [distributed](http://distributed.readthedocs.io/en/latest/) | 1.25.1 | Distributed computing with Dask / BSD 3-Clause |
| [docutils](http://docutils.sourceforge.net/) | 0.14 | Docutils – Python Documentation Utilities / Public Domain Dedictation and BSD 2-Clause and PSF 2.1.1 and GPL 3.0 |
| [entrypoints](https://github.com/takluyver/entrypoints) | 0.2.3 | Discover and load entry points from installed packages. / MIT License |
| [enum34](https://bitbucket.org/stoneleaf/enum34) | 1.1.6 | Python 3.4 Enum backported to 3.3, 3.2, 3.1, 2.7, 2.6, 2.5, and 2.4 / BSD 3-Clause |
| [et\_xmlfile](https://bitbucket.org/openpyxl/et_xmlfile) | 1.0.1 | An implementation of lxml.xmlfile for the standard library / MIT |
| [expat](http://expat.sourceforge.net/) | 2.2.6 | Expat XML parser library in C. / MIT |
| [fastcache](https://github.com/pbrady/fastcache) | 1.0.2 | C implementation of Python 3 lru\_cache / MIT |
| [filelock](https://github.com/benediktschmitt/py-filelock) | 3.0.10 | A platform independent file lock. / Public Domain |
| [flask](http://flask.pocoo.org) | 1.0.2 | A microframework based on Werkzeug, Jinja2 and good intentions. / BSD 3-Clause |
| [flask-cors](https://github.com/corydolphin/flask-cors) | 3.0.7 | A Flask extension adding a decorator for CORS support / MIT |
| [fontconfig](http://www.freedesktop.org/wiki/Software/fontconfig/) | 2.13.0 | A library for configuring and customizing font access. / MIT |
| [freetype](https://www.freetype.org/) | 2.9.1 | A Free, High-Quality, and Portable Font Engine / GPL-2.0 and FreeType |
| [fribidi](https://github.com/fribidi/fribidi) | 1.0.5 | The Free Implementation of the Unicode Bidirectional Algorithm. / LGPL-2.1 |
| [funcsigs](http://funcsigs.readthedocs.org) | 1.0.2 | Python function signatures from PEP362 for Python 2.6, 2.7 and 3.2+. / Apache 2.0 |
| [functools32](https://github.com/MiCHiLU/python-functools32) | 3.2.3.2 | Backport of the functools module from Python 3.2.3 for use on 2.7 and PyPy. / PSF license |
| [future](http://python-future.org) | 0.17.1 | Clean single-source support for Python 3 and 2 / MIT |
| [futures](https://github.com/agronholm/pythonfutures) | 3.2.0 | Backport of the concurrent.futures package from Python 3.2 / PSF |
| [get\_terminal\_size](https://github.com/chrippa/backports.shutil_get_terminal_size) | 1.0.0 | Get the size of the terminal window. / MIT |
| [gevent](http://www.gevent.org/) | 1.3.7 | Coroutine-based network library / MIT |
| [glib](https://developer.gnome.org/glib/) | 2.56.2 | Provides core application building blocks for libraries and applications written in C. / LGPL-2.1 |
| [glob2](https://github.com/miracle2k/python-glob2) | 0.6 | Version of the glob module that supports recursion via \*\*, and can capture patterns. / BSD-2-Clause |
| [gmp](http://gmplib.org/) | 6.1.2 | The GNU multiprecision library. / GPL 2 and LGPL 3 |
| [gmpy2](https://pypi.python.org/pypi/gmpy2) | 2.0.8 | GMP/MPIR, MPFR, and MPC interface to Python 2.6+ and 3.x / LGPL 3 |
| [graphite2](http://graphite.sil.org/) | 1.3.12 | A “smart font” system that handles the complexities of lesser-known languages of the world. / LGPLv2 |
| [greenlet](https://github.com/python-greenlet/greenlet) | 0.4.15 | Lightweight in-process concurrent programming / MIT |
| [grin](http://pypi.python.org/pypi/grin) | 1.2.1 | Enhanced grep-like tool / BSD 3-Clause |
| [gst-plugins-base](http://gstreamer.freedesktop.org/) | 1.14.0 | GStreamer Base Plug-ins / GPL2 |
| [gstreamer](http://gstreamer.freedesktop.org/) | 1.14.0 | Library for constructing graphs of media-handling components / LGPL 2 |
| [h5py](http://www.h5py.org/) | 2.8.0 | Read and write HDF5 files from Python. / BSD 3-Clause |
| [harfbuzz](http://www.freedesktop.org/wiki/Software/HarfBuzz/) | 1.8.8 | An OpenType text shaping engine. / MIT |
| [hdf5](http://www.hdfgroup.org/HDF5/) | 1.10.2 | HDF5 is a data model, library, and file format for storing and managing data / HDF5 |
| [heapdict](http://stutzbachenterprises.com/) | 1.0.0 | A heap with decrease-key and increase-key operations / BSD 3-Clause |
| [html5lib](https://github.com/html5lib/html5lib-python) | 1.0.1 | HTML parser based on the WHATWG HTML specification / MIT |
| [hyperlink](https://github.com/python-hyper/hyperlink) | 18.0.0 | Immutable, Pythonic, correct URLs. / MIT |
| [icu](http://site.icu-project.org/) | 58.2 | International Components for Unicode. / MIT |
| [idna](https://github.com/kjd/idna) | 2.8 | Internationalized Domain Names in Applications (IDNA). / BSD Like |
| [imageio](http://imageio.github.io) | 2.4.1 | a Python library for reading and writing image data / BSD 2-Clause |
| [imagesize](https://github.com/shibukawa/imagesize_py) | 1.1.0 | Getting image size from png/jpeg/jpeg2000/gif file / MIT |
| [importlib\_metadata](http://importlib-metadata.readthedocs.io) | 0.6 | A library to access the metadata for a Python package / APACHE-2.0 |
| [incremental](https://twistedmatrix.com) | 17.5.0 | A library that versions your Python projects / MIT License |
| [intel-openmp](https://software.intel.com/en-us/node/522690) | 2019.1 | Math library for Intel and compatible processors / proprietary - Intel |
| [ipaddress](https://github.com/phihag/ipaddress) | 1.0.22 | IPv4/IPv6 manipulation library / PSF 2 |
| [ipykernel](https://ipython.org) | 4.10.0 | IPython Kernel for Jupyter / BSD-3-Clause |
| [ipython](https://ipython.org/) | 5.8.0 | IPython: Productive Interactive Computing / BSD-3-Clause |
| [ipython\_genutils](http://ipython.org) | 0.2.0 | vestigial utilities from IPython / BSD 3-Clause |
| [ipywidgets](https://github.com/ipython/ipywidgets) | 7.4.2 | Jupyter Interactive Widgets / BSD 3-clause |
| [isort](https://github.com/timothycrosley/isort) | 4.3.4 | A Python utility / library to sort Python imports. / MIT |
| [itsdangerous](https://github.com/pallets/itsdangerous) | 1.1.0 | Various helpers to pass trusted data to untrusted environments. / BSD 3-Clause |
| [jbig](https://www.cl.cam.ac.uk/~mgk25/jbigkit) | 2.1 | Implementation of the JBIG1 data compression standard / GPL-2.0 |
| [jdcal](https://github.com/phn/jdcal) | 1.4 | Julian dates from proleptic Gregorian and Julian calendars. / BSD 2-Clause |
| [jedi](https://github.com/davidhalter/jedi/) | 0.13.2 | An autocompletion tool for Python that can be used for text editors. / MIT |
| [jinja2](http://jinja.pocoo.org) | 2.10 | An easy to use stand-alone template engine written in pure python. / 3-Clause BSD |
| [jpeg](http://www.ijg.org/) | 9b | read/write jpeg COM, EXIF, IPTC medata / Custom free software license |
| [jsonschema](https://github.com/Julian/jsonschema) | 2.6.0 | An implementation of JSON Schema validation for Python / MIT |
| [jupyter](http://jupyter.org) | 1.0.0 | Jupyter metapackage. Install all the Jupyter components in one go. / BSD 3-Clause |
| [jupyter\_client](http://jupyter.org) | 5.2.4 | Jupyter protocol implementation and client libraries / BSD 3-clause |
| [jupyter\_console](http://jupyter.org) | 5.2.0 | Jupyter terminal console / BSD-3-Clause |
| [jupyter\_core](http://jupyter.org) | 4.4.0 | Core common functionality of Jupyter projects. / BSD 3-clause |
| [jupyterlab](https://github.com/jupyterlab/jupyterlab) | 0.33.11 | JupyterLab PRE-ALPHA / BSD-3-Clause |
| [jupyterlab\_launcher](http://github.com/jupyterlab/jupyterlab_launcher) | 0.11.2 | A Launcher for JupyterLab based applications. / BSD 3-Clause |
| [kiwisolver](https://github.com/nucleic/kiwi) | 1.0.1 | A fast implementation of the Cassowary constraint solver / BSD 3-Clause |
| [krb5](http://web.mit.edu/kerberos/) | 1.16.1 | A network authentication protocol. / MIT |
| [lazy-object-proxy](https://github.com/ionelmc/python-lazy-object-proxy) | 1.3.1 | A fast and thorough lazy object proxy. / BSD 2-Clause |
| [libarchive](http://www.libarchive.org/) | 3.3.3 | Multi-format archive and compression library / BSD 2-Clause |
| [libcurl](http://curl.haxx.se/) | 7.63.0 | tool and library for transferring data with URL syntax / MIT/X derivate (`<http://curl.haxx.se/docs/copyright.html>`) |
| [libedit](http://thrysoee.dk/editline/) | 3.1.20170329 | Editline Library (libedit) / NetBSD |
| [libffi](https://sourceware.org/libffi/) | 3.2.1 | A Portable Foreign Function Interface Library. / Custom |
| [libgcc-ng](https://gcc.gnu.org/onlinedocs/gccint/Libgcc.html) | 8.2.0 | The GCC low-level runtime library / GPL |
| [libgfortran-ng](https://gcc.gnu.org/) | 7.3.0 | The GNU Fortran Runtime Library / GPL |
| [liblief](https://lief.quarkslab.com/) | 0.9.0 | A cross platform library to parse, modify and abstract ELF, PE and MachO formats. / Apache 2.0 |
| [libpng](http://www.libpng.org/pub/png/libpng.html) | 1.6.35 | PNG reference library. / zlib/libpng |
| [libsodium](http://libsodium.org) | 1.0.16 | A modern and easy-to-use crypto library. / ISC |
| [libssh2](https://www.libssh2.org/) | 1.8.0 | the SSH library / BSD 3-Clause |
| [libstdcxx-ng](https://gcc.gnu.org/) | 8.2.0 | The GNU C++ Runtime Library / GPL3 with runtime exception |
| [libtiff](http://www.libtiff.org/) | 4.0.9 | Support for the Tag Image File Format (TIFF). / HPND |
| [libtool](http://www.gnu.org/software/libtool/) | 2.4.6 | The GNU Portable Library Tool / GPL 3 |
| [libuuid](http://sourceforge.net/projects/libuuid/) | 1.0.3 | Portable uuid C library. / BSD 3-Clause |
| [libxcb](http://xcb.freedesktop.org/) | 1.13 | This is the C-language Binding (XCB) package to the X Window System protocol / MIT |
| [libxml2](http://xmlsoft.org/) | 2.9.8 | The XML C parser and toolkit of Gnome / MIT |
| [libxslt](http://xmlsoft.org/XSLT/) | 1.1.32 | The XSLT C library developed for the GNOME project / MIT |
| [linecache2](https://github.com/testing-cabal/linecache2) | 1.0.0 | Backport of the linecache module / PSF 1.0 |
| [llvmlite](https://github.com/numba/llvmlite) | 0.26.0 | A lightweight LLVM python binding for writing JIT compilers / New BSD License |
| [locket](https://github.com/mwilliamson/locket.py) | 0.2.0 | File-based locks for Python for Linux and Windows / BSD 2-Clause |
| [lxml](http://lxml.de/) | 4.2.5 | Pythonic binding for the C libraries libxml2 and libxslt. / BSD 3-Clause, GPL-2.0, ZPL-2.0, and ElementTree |
| [lz4-c](https://www.lz4.org) | 1.8.1.2 | Extremely Fast Compression algorithm / BSD 2-clause |
| [lzo](http://www.oberhumer.com/opensource/lzo/) | 2.10 | LZO is a portable lossless data compression library written in ANSI C. / GPL v2+ |
| [markupsafe](https://www.palletsprojects.com/p/markupsafe) | 1.1.0 | A Python module that implements the jinja2.Markup string / BSD-3-Clause |
| [matplotlib](http://matplotlib.org/) | 2.2.3 | Publication quality figures in Python / PSF-based |
| [mccabe](https://github.com/PyCQA/mccabe) | 0.6.1 | McCabe complexity checker for Python / MIT |
| [mistune](https://github.com/lepture/mistune) | 0.8.4 | The fastest markdown parser in pure Python. / BSD 3-Clause |
| [mkl](https://software.intel.com/en-us/mkl) | 2019.1 | Math library for Intel and compatible processors / proprietary - Intel |
| [mkl-service](https://github.com/ContinuumIO/mkl-service) | 1.1.2 | Python bindings to MKL service functions / 3-clause BSD |
| [mkl\_fft](http://github.com/IntelPython/mkl_fft) | 1.0.6 | NumPy-based implementation of Fast Fourier Transform using Intel (R) Math Kernel Library. / BSD 3-Clause |
| [mkl\_random](http://github.com/IntelPython/mkl_random) | 1.0.2 | Intel (R) MKL-powered package for sampling from common probability distributions into NumPy arrays. / BSD 3-Clause |
| [more-itertools](https://github.com/erikrose/more-itertools) | 4.3.0 | More routines for operating on iterables, beyond itertools / MIT |
| [mpc](http://www.multiprecision.org/) | 1.1.0 | A C library for the arithmetic of complex numbers with arbitrarily high precision. / LGPL 3 |
| [mpfr](http://www.mpfr.org/) | 4.0.1 | The MPFR library is a C library for multiple-precision floating-point computations with correct rounding. / LGPL 3 |
| [mpmath](http://mpmath.org) | 1.1.0 | Python library for arbitrary-precision floating-point arithmetic / BSD 3-Clause |
| [msgpack-python](http://msgpack.org/) | 0.5.6 | MessagePack (de)serializer. / Apache 2.0 |
| [multipledispatch](https://github.com/mrocklin/multipledispatch/) | 0.6.0 | Multiple dispatch in Python / BSD 3-Clause |
| [navigator-updater](https://github.com/ContinuumIO/navigator-updater) | 0.2.1 | Anaconda Navigator Updater / proprietary - Continuum Analytics, Inc. |
| [nbconvert](http://jupyter.org) | 5.4.0 | Converting Jupyter Notebooks / BSD-3-Clause |
| [nbformat](http://jupyter.org) | 4.4.0 | The reference implementation of the Jupyter Notebook format / BSD 3-clause |
| [ncurses](http://www.gnu.org/software/ncurses/) | 6.1 | Library for text-based user interfaces / Free software (MIT-like) |
| [networkx](https://networkx.github.io/) | 2.2 | Python package for creating and manipulating complex networks / BSD 3-Clause |
| [nltk](http://nltk.org/) | 3.4 | Build Python programs to work with human language data / Apache 2.0 |
| [nose](http://readthedocs.org/docs/nose/) | 1.3.7 | Nose extends unittest to make testing easier / LGPL-2.1 |
| [notebook](http://jupyter.org) | 5.7.4 | Jupyter Notebook / BSD 3-clause |
| [numba](http://numba.github.com) | 0.41.0 | NumPy aware dynamic Python compiler using LLVM / BSD 2-clause |
| [numexpr](https://github.com/pydata/numexpr) | 2.6.8 | Fast numerical expression evaluator for NumPy. / MIT |
| [numpy](http://numpy.scipy.org/) | 1.15.4 | Array processing for numbers, strings, records, and objects. / BSD 3-Clause |
| numpy-base | 1.15.4 | |
| [numpydoc](https://github.com/numpy/numpydoc) | 0.8.0 | Sphinx extension to support docstrings in Numpy format / BSD 3-Clause |
| [odo](http://odo.pydata.org) | 0.5.1 | Data migration in Python / BSD-3-Clause |
| [olefile](http://www.decalage.info/python/olefileio) | 0.46 | parse, read and write Microsoft OLE2 files / BSD 2-Clause |
| [openpyxl](https://openpyxl.readthedocs.io) | 2.5.12 | A Python library to read/write Excel 2010 xlsx/xlsm files / MIT |
| [openssl](http://www.openssl.org/) | 1.1.1a | OpenSSL is an open-source implementation of the SSL and TLS protocols / OpenSSL |
| [packaging](https://github.com/pypa/packaging) | 18.0 | Core utilities for Python packages / Apache 2.0 or BSD 2-Clause |
| [pandas](http://pandas.pydata.org) | 0.23.4 | High-performance, easy-to-use data structures and data analysis tools. / BSD 3-clause |
| [pandoc](http://pandoc.org/) | 1.15.0.6 | Universal markup converter (repackaged binaries). / GPL-2.0 |
| [pandocfilters](https://github.com/jgm/pandocfilters) | 1.4.2 | A python module for writing pandoc filters / BSD-3-Clause |
| [pango](http://www.pango.org/) | 1.42.4 | Text layout and rendering engine. / LGPL-2.1 |
| [parso](https://github.com/davidhalter/parso) | 0.3.1 | A Python Parser / MIT |
| [partd](https://github.com/dask/partd) | 0.3.9 | Data structure for on-disk shuffle operations / BSD 3-Clause |
| [patchelf](http://nixos.org/patchelf.html) | 0.9 | A small utility to modify the dynamic linker and RPATH of ELF executables. / GPL 3 |
| [path.py](https://github.com/jaraco/path.py) | 11.5.0 | A module wrapper for os.path / MIT |
| [pathlib2](https://github.com/mcmtroffaes/pathlib2) | 2.3.3 | Fork of pathlib aiming to support the full stdlib Python API. / MIT |
| [patsy](https://github.com/pydata/patsy) | 0.5.1 | Describing statistical models in Python using symbolic formulas / BSD-2-Clause, PSF2 |
| [pcre](http://www.pcre.org/) | 8.42 | Regular expression pattern matching using the same syntax and semantics as Perl 5. / BSD 3-Clause |
| [pep8](http://pep8.readthedocs.org/) | 1.7.1 | Python style guide checker / MIT |
| [pexpect](http://pexpect.sourceforge.net/) | 4.6.0 | Pexpect makes Python a better tool for controlling other applications. / ISC |
| [pickleshare](https://github.com/pickleshare/pickleshare/) | 0.7.5 | Tiny ‘shelve’-like database with concurrency support / MIT |
| [pillow](https://pillow.readthedocs.io) | 5.3.0 | Pillow is the friendly PIL fork by Alex Clark and Contributors / PIL |
| [pip](https://pip.pypa.io/en/stable/) | 18.1 | PyPA recommended tool for installing Python packages / MIT |
| [pixman](http://www.pixman.org/) | 0.34.0 | A low-level software library for pixel manipulation. / MIT |
| [pkginfo](https://code.launchpad.net/~tseaver/pkginfo/trunk) | 1.4.2 | Query metadatdata from sdists / bdists / installed packages. / MIT |
| [pluggy](https://github.com/pytest-dev/pluggy) | 0.8.0 | Plugin registration and hook calling for Python / MIT |
| [ply](http://www.dabeaz.com/ply/index.html) | 3.11 | Python Lex-Yacc / BSD 3-clause |
| [prometheus\_client](https://github.com/prometheus/client_python) | 0.5.0 | Python client for the Prometheus monitoring system / Apache 2.0 |
| [prompt\_toolkit](https://github.com/jonathanslenders/python-prompt-toolkit) | 1.0.15 | Library for building powerful interactive command lines in Python / BSD 3-clause |
| [psutil](https://github.com/giampaolo/psutil) | 5.4.8 | A cross-platform process and system utilities module for Python / BSD 3-Clause |
| [ptyprocess](https://github.com/pexpect/ptyprocess) | 0.6.0 | Run a subprocess in a pseudo terminal / ISC |
| [py](https://github.com/pytest-dev/py) | 1.7.0 | library with cross-python path, ini-parsing, io, code, log facilities / MIT |
| [py-lief](https://lief.quarkslab.com/) | 0.9.0 | A cross platform library to parse, modify and abstract ELF, PE and MachO formats. / Apache 2.0 |
| [pyasn1-modules](http://pyasn1.sourceforge.net/) | 0.2.2 | A collection of ASN.1-based protocols modules. / BSD 2-Clause |
| [pycairo](http://cairographics.org/pycairo/) | 1.18.0 | Python bindings for the Cairo graphics library. / LGPL 2.1, MPL 1.1 |
| [pycodestyle](https://pycodestyle.readthedocs.io/) | 2.4.0 | Python style guide checker / MIT |
| [pycosat](https://github.com/ContinuumIO/pycosat) | 0.6.3 | Bindings to picosat (a SAT solver) / MIT |
| [pycparser](https://github.com/eliben/pycparser) | 2.19 | Complete C99 parser in pure Python / BSD 3-clause |
| [pycrypto](http://www.pycrypto.org/) | 2.6.1 | Cryptographic modules for Python. / Public Domain |
| [pycurl](http://pycurl.sourceforge.net/) | 7.43.0.2 | A Python Interface To The cURL library / LGPL, MIT |
| [pyflakes](https://github.com/PyCQA/pyflakes) | 2.0.0 | Pyflakes analyzes programs and detects various errors. / MIT |
| [pygments](http://pygments.org/) | 2.3.1 | Generic syntax highlighting package / BSD 2-clause |
| [pylint](http://www.pylint.org/) | 1.9.2 | python code static checker / GPL |
| [pyodbc](https://github.com/mkleehammer/pyodbc) | 4.0.25 | DB API Module for ODBC / MIT |
| [pyopenssl](https://github.com/pyca/pyopenssl) | 18.0.0 | Python wrapper module around the OpenSSL library / Apache 2.0 |
| [pyparsing](http://pyparsing.wikispaces.com/) | 2.3.0 | Create and execute simple grammars / MIT |
| [pyqt](http://www.riverbankcomputing.co.uk/software/pyqt) | 5.9.2 | Python binding of the cross-platform GUI toolkit Qt. / Commercial, GPL-2.0, GPL-3.0 |
| [pysocks](https://github.com/Anorov/PySocks) | 1.6.8 | A Python SOCKS client module. See [Anorov/PySocks](https://github.com/Anorov/PySocks) for more information. / BSD 3-Clause |
| [pytables](http://www.pytables.org) | 3.4.4 | Brings together Python, HDF5 and NumPy to easily handle large amounts of data. / BSD 3-Clause |
| [pytest](https://docs.pytest.org/en/latest/) | 4.0.2 | Simple and powerful testing with Python. / MIT |
| [python](http://www.python.org/) | 2.7.15 | General purpose programming language / PSF |
| [python-dateutil](https://dateutil.readthedocs.org/) | 2.7.5 | Extensions to the standard Python datetime module. / BSD 3 Clause |
| python-libarchive-c | 2.8 | |
| [pytz](http://pythonhosted.org/pytz/) | 2018.7 | World timezone definitions, modern and historical. / MIT |
| [pywavelets](https://github.com/PyWavelets/pywt) | 1.0.1 | Discrete Wavelet Transforms in Python. / MIT |
| [pyyaml](http://pyyaml.org/wiki/PyYAML) | 3.13 | YAML parser and emitter for Python / MIT |
| [pyzmq](https://github.com/zeromq/pyzmq) | 17.1.2 | Python bindings for zeromq / BSD 3-clause |
| [qt](http://qt-project.org) | 5.9.7 | Qt is a cross-platform application and UI framework. / LGPL-3.0 |
| [qtawesome](https://github.com/spyder-ide/qtawesome) | 0.5.3 | Iconic fonts in PyQt and PySide applications / MIT |
| [qtconsole](http://jupyter.org) | 4.4.3 | Jupyter Qt console / BSD 3-Clause |
| [qtpy](https://github.com/spyder-ide/qtpy) | 1.5.2 | Abstraction layer for PyQt5/PyQt4/PySide / MIT |
| [readline](https://cnswww.cns.cwru.edu/php/chet/readline/rltop.html) | 7.0 | library for editing command lines as they are typed in / GPL-3.0 |
| [requests](http://python-requests.org) | 2.21.0 | Python HTTP for Humans / Apache 2.0 |
| [rope](https://github.com/python-rope/rope) | 0.11.0 | A python refactoring library… / GPL 2.0 |
| [ruamel\_yaml](https://bitbucket.org/ruamel/yaml) | 0.15.46 | A patched copy of ruamel.yaml. / MIT |
| [scandir](https://github.com/benhoyt/scandir) | 1.9.0 | scandir, a better directory iterator and faster os.walk() / BSD 3-Clause |
| [scikit-image](http://scikit-image.org/) | 0.14.1 | Image processing routines for SciPy. / BSD 3-Clause |
| [scikit-learn](http://scikit-learn.org/) | 0.20.1 | A set of python modules for machine learning and data mining / BSD 3-Clause |
| [scipy](http://www.scipy.org/) | 1.1.0 | Scientific Library for Python / BSD 3-Clause |
| [seaborn](https://seaborn.pydata.org) | 0.9.0 | Statistical data visualization / BSD 3-Clause |
| [send2trash](https://github.com/hsoft/send2trash) | 1.5.0 | Python library to natively send files to Trash (or Recycle bin) on all platforms. / BSD-3-Clause |
| [setuptools](https://github.com/pypa/setuptools) | 40.6.3 | Download, build, install, upgrade, and uninstall Python packages / MIT |
| [simplegeneric](http://cheeseshop.python.org/pypi/simplegeneric) | 0.8.1 | Simple generic functions (similar to Python’s own len(), pickle.dump(), etc.) / Zope Public |
| [singledispatch](http://docs.python.org/3/library/functools.html#functools.singledispatch) | 3.4.0.3 | Transforms a function into a single-dispatch generic function / MIT |
| [sip](http://www.riverbankcomputing.com/software/sip/intro) | 4.19.8 | Create Python bindings for C and C++ libraries / GPL-3.0 |
| [six](http://pypi.python.org/pypi/six/) | 1.12.0 | Python 2 and 3 compatibility utilities / MIT |
| [snappy](https://github.com/google/snappy) | 1.1.7 | A fast compressor/decompressor / BSD 3-clause |
| [snowballstemmer](https://github.com/shibukawa/snowball_py) | 1.2.1 | Snowball stemming library collection for Python / BSD-2-Clause |
| [sortedcollections](http://www.grantjenks.com/docs/sortedcollections/) | 1.0.1 | Python Sorted Collections / Apache-2.0 |
| [sortedcontainers](http://www.grantjenks.com/docs/sortedcontainers/) | 2.1.0 | Python Sorted Container Types: SortedList, SortedDict, and SortedSet / Apache 2.0 |
| [sphinx](http://www.sphinx-doc.org) | 1.8.2 | Sphinx is a tool that makes it easy to create intelligent and beautiful documentation / BSD 2-clause |
| sphinxcontrib | 1.0 | Python namespace for sphinxcontrib / BSD |
| [sphinxcontrib-websupport](https://pypi.python.org/pypi/sphinxcontrib-websupport) | 1.1.0 | Sphinx API for Web Apps / BSD-2-Clause |
| [spyder](https://www.spyder-ide.org/) | 3.3.2 | The Scientific Python Development Environment / MIT |
| [spyder-kernels](https://github.com/spyder-ide/spyder-kernels) | 0.3.0 | Jupyter kernels for the Spyder console / MIT |
| [sqlalchemy](http://www.sqlalchemy.org/) | 1.2.15 | Database Abstraction Library. / MIT |
| [sqlite](http://www.sqlite.org/) | 3.26.0 | Implements a self-contained, zero-configuration, SQL database engine. / Public-Domain (`<http://www.sqlite.org/copyright.html>`) |
| [ssl\_match\_hostname](http://bitbucket.org/brandon/backports.ssl_match_hostname) | 3.5.0.1 | The ssl.match\_hostname() function from Python 3.5 / PSF 2 |
| [statsmodels](https://www.statsmodels.org) | 0.9.0 | Statistical computations and models for use with SciPy / BSD 3-Clause |
| [subprocess32](https://github.com/google/python-subprocess32) | 3.5.3 | A backport of the subprocess module from Python 3.2/3.3 for use on 2.x. / PSF 2 |
| [sympy](http://sympy.org) | 1.3 | Python library for symbolic mathematics / 3-clause BSD |
| [tblib](https://github.com/ionelmc/python-tblib) | 1.3.2 | Traceback serialization library. / BSD 2-Clause |
| [terminado](https://github.com/jupyter/terminado) | 0.8.1 | Terminals served by tornado websockets / BSD 2-clause |
| [testpath](https://testpath.readthedocs.io) | 0.4.2 | Testpath is a collection of utilities for Python code working with files and commands. / BSD-3-Clause |
| [tk](http://www.tcl.tk/) | 8.6.8 | A dynamic programming language with GUI support. Bundles Tcl and Tk. / Tcl/Tk |
| [toolz](http://toolz.readthedocs.org/) | 0.9.0 | A functional standard library for Python. / BSD 3-Clause |
| [tornado](http://www.tornadoweb.org/) | 5.1.1 | A Python web framework and asynchronous networking library, originally developed at FriendFeed. / Apache 2.0 |
| [tqdm](https://pypi.python.org/pypi/tqdm) | 4.28.1 | A Fast, Extensible Progress Meter / MPLv2.0, MIT |
| [traceback2](https://github.com/testing-cabal/traceback2) | 1.4.0 | Backports of the traceback module / PSF 2.0 |
| [traitlets](http://ipython.org/) | 4.3.2 | Configuration system for Python applications / BSD 3-clause |
| [typing](https://docs.python.org/3.5/library/typing.html) | 3.6.6 | Type Hints for Python - backport for `Python<3.5` / PSF |
| [unicodecsv](https://github.com/jdunck/python-unicodecsv) | 0.14.1 | Drop-in replacement for csv module which supports unicode strings / BSD |
| [unittest2](http://pypi.python.org/pypi/unittest2) | 1.1.0 | The new features in unittest backported to Python 2.4+ / BSD |
| [unixodbc](http://www.unixodbc.org/) | 2.3.7 | ODBC on non MS Windows platforms / LGPL-2.1 |
| [urllib3](https://urllib3.readthedocs.io/) | 1.24.1 | HTTP library with thread-safe connection pooling, file post, and more. / MIT |
| [wcwidth](https://github.com/jquast/wcwidth) | 0.1.7 | Measures number of Terminal column cells of wide-character codes. / MIT |
| [webencodings](https://github.com/gsnedders/python-webencodings) | 0.5.1 | Character encoding aliases for legacy web content / BSD 3-Clause |
| [werkzeug](http://werkzeug.pocoo.org/) | 0.14.1 | The Python WSGI Utility Library. / BSD 3-Clause |
| [wheel](https://github.com/pypa/wheel) | 0.32.3 | A built-package format for Python. / MIT |
| [widgetsnbextension](http://ipython.org) | 3.4.2 | Interactive Widgets for Jupyter / BSD 3-clause |
| [wrapt](https://github.com/GrahamDumpleton/wrapt) | 1.10.11 | Module for decorators, wrappers and monkey patching. / BSD 2-Clause |
| [wurlitzer](https://github.com/minrk/wurlitzer) | 1.0.2 | Capture C-level stdout/stderr in Python / MIT |
| [xlrd](http://www.python-excel.org/) | 1.2.0 | Library for developers to extract data from Microsoft Excel (tm) spreadsheet files / BSD 3-Clause and BSD with advertising |
| [xlsxwriter](https://xlsxwriter.readthedocs.io/) | 1.1.2 | A Python module for creating Excel XLSX files / BSD 2-Clause |
| [xlwt](http://www.python-excel.org/) | 1.3.0 | Writing data and formatting information to Excel files / BSD |
| [xz](http://tukaani.org/xz/) | 5.2.4 | Data compression software with high compression ratio / LGPL-2.1 and GPL-2.0 |
| [yaml](http://pyyaml.org/wiki/LibYAML) | 0.1.7 | A C library for parsing and emitting YAML. / MIT |
| [zeromq](http://zeromq.org) | 4.2.5 | A high-performance asynchronous messaging library. / LGPL 3 |
| [zict](http://github.com/mrocklin/zict) | 0.1.3 | Composable Dictionary Classes / BSD 3-Clause |
| [zlib](http://zlib.net/) | 1.2.11 | Massively spiffy yet delicately unobtrusive compression library / zlib |
| [zstd](http://www.zstd.net) | 1.3.7 | Zstandard - Fast real-time compression algorithm / BSD 3-Clause |
| Name | Version | Summary / License |
|---|---|---|
| [\_ipyw\_jlab\_nb\_ext\_conf](https://github.com/ContinuumIO/anaconda-nb-extensions-meta-config) | 0.1.0 | A configuration metapackage for enabling Anaconda-bundled jupyter extensions / BSD |
| [alabaster](http://www.sphinx-doc.org/en/stable/index.html) | 0.7.12 | Configurable, Python 2+3 compatible Sphinx theme. / BSD 3-Clause |
| [anaconda-client](http://anaconda.org) | 1.7.2 | anaconda.org command line client library / BSD 3-clause |
| [anaconda-project](https://github.com/Anaconda-Platform/anaconda-project) | 0.8.3 | Tool for encapsulating, running, and reproducing data science projects / BSD 3-Clause |
| [asn1crypto](https://github.com/wbond/asn1crypto) | 1.0.1 | Python ASN.1 library with a focus on performance and a pythonic API / MIT |
| [astroid](https://www.astroid.org/) | 2.3.1 | A abstract syntax tree for Python with inference support. / LGPL 2.1 |
| [astropy](http://www.astropy.org/) | 3.2.1 | Community-developed Python Library for Astronomy / BSD 3-clause |
| [atomicwrites](https://github.com/untitaker/python-atomicwrites) | 1.3.0 | Atomic file writes / MIT |
| [attrs](https://attrs.readthedocs.io/en/stable/) | 19.2.0 | attrs is the Python package that will bring back the joy of writing classes by relieving you from the drudgery of implementing object protocols (aka dunder methods). / MIT |
| [babel](http://babel.pocoo.org/) | 2.7.0 | Utilities to internationalize and localize Python applications / BSD 3-clause |
| [backcall](https://github.com/takluyver/backcall/) | 0.1.0 | Specifications for callback functions passed in to an API / BSD-3-Clause |
| [backports](https://bitbucket.org/brandon/backports) | 1.0 | None / BSD |
| [backports.os](https://github.com/pjdelport/backports.os) | 0.1.1 | Backport of new features in Python’s os module / Python Software Foundation |
| [backports.shutil\_get\_terminal\_size](https://github.com/chrippa/backports.shutil_get_terminal_size) | 1.0.0 | A backport of the get\_terminal\_size function from Python 3.3’s shutil. / MIT |
| [beautifulsoup4](http://www.crummy.com/software/BeautifulSoup/) | 4.8.0 | Python library designed for screen-scraping / MIT |
| [bitarray](https://github.com/ilanschnell/bitarray) | 1.0.1 | efficient arrays of booleans – C extension / PSF |
| [bkcharts](http://github.com/bokeh/bkcharts) | 0.2 | High level chart types built on top of Bokeh / BSD 3-Clause |
| blas | 1.0 | |
| [bleach](https://github.com/mozilla/bleach) | 3.1.0 | Easy, whitelist-based HTML-sanitizing tool / Apache-2.0 |
| [blosc](https://github.com/Blosc/c-blosc) | 1.16.3 | A blocking, shuffling and loss-less compression library that can be faster than memcpy() / BSD 3-Clause |
| [bokeh](http://bokeh.pydata.org/) | 1.3.4 | Statistical and novel interactive HTML plots for Python / BSD 3-Clause |
| [boto](https://github.com/boto/boto/) | 2.49.0 | Amazon Web Services Library / MIT |
| [bottleneck](http://berkeleyanalytics.com/bottleneck) | 1.2.1 | Fast NumPy array functions written in Cython. / BSD 2-Clause |
| [bzip2](http://www.bzip.org/) | 1.0.8 | high-quality data compressor / bzip2 |
| [ca-certificates](https://github.com/conda-forge/ca-certificates-feedstock) | 2019.8.28 | Certificates for use with other packages. / MPL 2.0 |
| [certifi](http://certifi.io/) | 2019.9.11 | Python package for providing Mozilla’s CA Bundle. / ISC |
| [cffi](https://bitbucket.org/cffi/cffi) | 1.12.3 | Foreign Function Interface for Python calling C code. / MIT |
| [chardet](https://github.com/chardet/chardet) | 3.0.4 | Universal character encoding detector / LGPL2 |
| [click](https://palletsprojects.com/p/click) | 7.0 | Python composable command line interface toolkit / BSD-3-Clause |
| [cloudpickle](https://github.com/cloudpipe/cloudpickle) | 1.2.2 | Extended pickling support for Python objects / BSD 3-Clause |
| [clyent](https://github.com/Anaconda-Platform/clyent) | 1.2.2 | Command line client library for windows and posix / BSD 3-Clause |
| [colorama](https://github.com/tartley/colorama) | 0.4.1 | Cross-platform colored terminal text / BSD-3-Clause |
| [comtypes](http://starship.python.net/crew/theller/comtypes/) | 1.1.7 | pure Python COM package / MIT |
| [conda](https://conda.io) | 4.7.12 | OS-agnostic, system-level binary package and environment manager. / BSD 3-Clause |
| [conda-build](https://github.com/conda/conda-build) | 3.18.9 | tools for building conda packages / BSD 3-Clause |
| [conda-env](https://github.com/conda/conda-env) | 2.6.0 | Tools for interacting with conda environments. / BSD 3-Clause |
| [conda-verify](https://github.com/conda/conda-verify) | 3.4.2 | tool for validating conda recipes and conda packages / BSD 3-Clause |
| console\_shortcut | 0.1.1 | Console shortcut creator for Windows (using menuinst) / BSD |
| [contextlib2](http://contextlib2.readthedocs.org) | 0.6.0 | Backports and enhancements for the contextlib module / PSF 2 |
| [cryptography](https://github.com/pyca/cryptography) | 2.7 | Provides cryptographic recipes and primitives to Python developers / Apache 2.0 or BSD 3-Clause, PSF 2 |
| [curl](http://curl.haxx.se/) | 7.65.3 | tool and library for transferring data with URL syntax / MIT/X derivate (`<http://curl.haxx.se/docs/copyright.html>`) |
| [cycler](http://matplotlib.org/cycler) | 0.10.0 | Composable style cycles. / BSD 3-Clause |
| [cython](http://www.cython.org/) | 0.29.13 | The Cython compiler for writing C extensions for the Python language / Apache-2.0 |
| [cytoolz](https://github.com/pytoolz/cytoolz) | 0.10.0 | Cython implementation of Toolz. High performance functional utilities / BSD-3-Clause |
| [dask](https://dask.org/) | 2.5.2 | Parallel PyData with Task Scheduling / BSD 3-Clause |
| [dask-core](http://github.com/dask/dask/) | 2.5.2 | Parallel Python with task scheduling / BSD 3-Clause |
| [decorator](https://github.com/micheles/decorator) | 4.4.0 | Better living through Python with decorators. / BSD 3-Clause |
| [defusedxml](https://bitbucket.org/tiran/defusedxml) | 0.6.0 | XML bomb protection for Python stdlib modules / PSF 2.0 |
| [distributed](http://distributed.readthedocs.io/en/latest/) | 2.5.2 | Distributed computing with Dask / BSD 3-Clause |
| [docutils](http://docutils.sourceforge.net/) | 0.15.2 | Docutils – Python Documentation Utilities / Public Domain Dedictation and BSD 2-Clause and PSF 2.1.1 and GPL 3.0 |
| [entrypoints](https://github.com/takluyver/entrypoints) | 0.3 | Discover and load entry points from installed packages. / MIT License |
| [et\_xmlfile](https://bitbucket.org/openpyxl/et_xmlfile) | 1.0.1 | An implementation of lxml.xmlfile for the standard library / MIT |
| [fastcache](https://github.com/pbrady/fastcache) | 1.1.0 | C implementation of Python 3 lru\_cache / MIT |
| [filelock](https://github.com/benediktschmitt/py-filelock) | 3.0.12 | A platform independent file lock. / Public Domain |
| [flask](http://flask.pocoo.org) | 1.1.1 | A microframework based on Werkzeug, Jinja2 and good intentions. / BSD 3-Clause |
| [freetype](https://www.freetype.org/) | 2.9.1 | A Free, High-Quality, and Portable Font Engine / GPL-2.0 and FreeType |
| [fsspec](https://github.com/martindurant/filesystem_spec) | 0.5.2 | A specification for pythonic filesystems / BSD-3-Clause |
| [get\_terminal\_size](https://github.com/chrippa/backports.shutil_get_terminal_size) | 1.0.0 | Get the size of the terminal window. / MIT |
| [gevent](http://www.gevent.org/) | 1.4.0 | Coroutine-based network library / MIT |
| [glob2](https://github.com/miracle2k/python-glob2) | 0.7 | Version of the glob module that supports recursion via \*\*, and can capture patterns. / BSD-2-Clause |
| [greenlet](https://github.com/python-greenlet/greenlet) | 0.4.15 | Lightweight in-process concurrent programming / MIT |
| [h5py](http://www.h5py.org/) | 2.9.0 | Read and write HDF5 files from Python. / BSD-3-Clause |
| [hdf5](http://www.hdfgroup.org/HDF5/) | 1.10.4 | HDF5 is a data model, library, and file format for storing and managing data / HDF5 |
| [heapdict](http://stutzbachenterprises.com/) | 1.0.1 | A heap with decrease-key and increase-key operations / BSD 3-Clause |
| [html5lib](https://github.com/html5lib/html5lib-python) | 1.0.1 | HTML parser based on the WHATWG HTML specification / MIT |
| icc\_rt | 2019.0.0 | Intel runtime libraries for C, C++ and Fortran compilers / Intel proprietary |
| [icu](http://site.icu-project.org/) | 58.2 | International Components for Unicode. / MIT |
| [idna](https://github.com/kjd/idna) | 2.8 | Internationalized Domain Names in Applications (IDNA). / BSD Like |
| [imageio](http://imageio.github.io) | 2.6.0 | A Python library for reading and writing image data / BSD-2-Clause |
| [imagesize](https://github.com/shibukawa/imagesize_py) | 1.1.0 | Getting image size from png/jpeg/jpeg2000/gif file / MIT |
| [importlib\_metadata](http://importlib-metadata.readthedocs.io) | 0.23 | A library to access the metadata for a Python package / APACHE-2.0 |
| [intel-openmp](https://software.intel.com/en-us/node/522690) | 2019.4 | Math library for Intel and compatible processors / proprietary - Intel |
| [ipykernel](https://ipython.org) | 5.1.2 | IPython Kernel for Jupyter / BSD-3-Clause |
| [ipython](https://ipython.org/) | 7.8.0 | IPython: Productive Interactive Computing / BSD-3-Clause |
| [ipython\_genutils](http://ipython.org) | 0.2.0 | vestigial utilities from IPython / BSD 3-Clause |
| [ipywidgets](https://github.com/ipython/ipywidgets) | 7.5.1 | Jupyter Interactive Widgets / BSD 3-clause |
| [isort](https://github.com/timothycrosley/isort) | 4.3.21 | A Python utility / library to sort Python imports. / MIT |
| [itsdangerous](https://github.com/pallets/itsdangerous) | 1.1.0 | Various helpers to pass trusted data to untrusted environments. / BSD 3-Clause |
| [jdcal](https://github.com/phn/jdcal) | 1.4.1 | Julian dates from proleptic Gregorian and Julian calendars. / BSD 2-Clause |
| [jedi](https://github.com/davidhalter/jedi/) | 0.15.1 | An autocompletion tool for Python that can be used for text editors. / MIT |
| [jinja2](http://jinja.pocoo.org) | 2.10.3 | An easy to use stand-alone template engine written in pure python. / 3-Clause BSD |
| [joblib](http://packages.python.org/joblib/) | 0.13.2 | Python function as pipeline jobs. / BSD 3-Clause |
| [jpeg](http://www.ijg.org/) | 9b | read/write jpeg COM, EXIF, IPTC medata / Custom free software license |
| [json5](https://github.com/dpranke/pyjson5) | 0.8.5 | A Python implementation of the JSON5 data format / Apache-2.0 |
| [jsonschema](https://github.com/Julian/jsonschema) | 3.0.2 | An implementation of JSON Schema validation for Python / MIT |
| [jupyter](http://jupyter.org) | 1.0.0 | Jupyter metapackage. Install all the Jupyter components in one go. / BSD 3-Clause |
| [jupyter\_client](http://jupyter.org) | 5.3.3 | Jupyter protocol implementation and client libraries / BSD 3-clause |
| [jupyter\_console](http://jupyter.org) | 6.0.0 | Jupyter terminal console / BSD-3-Clause |
| [jupyter\_core](http://jupyter.org) | 4.5.0 | Core common functionality of Jupyter projects. / BSD 3-clause |
| [jupyterlab](https://github.com/jupyterlab/jupyterlab) | 1.1.4 | JupyterLab / BSD-3-Clause |
| [jupyterlab\_server](http://github.com/jupyterlab/jupyterlab_server) | 1.0.6 | A set of server components for JupyterLab and JupyterLab like applications. / BSD 3-Clause |
| [keyring](https://github.com/jaraco/keyring) | 18.0.0 | Store and access your passwords safely / Python Software Foundation or MIT |
| [kiwisolver](https://github.com/nucleic/kiwi) | 1.1.0 | A fast implementation of the Cassowary constraint solver / BSD 3-Clause |
| [krb5](http://web.mit.edu/kerberos/) | 1.16.1 | A network authentication protocol. / MIT |
| [lazy-object-proxy](https://github.com/ionelmc/python-lazy-object-proxy) | 1.4.2 | A fast and thorough lazy object proxy / BSD-2-Clause |
| [libarchive](http://www.libarchive.org/) | 3.3.3 | Multi-format archive and compression library / BSD 2-Clause |
| [libcurl](http://curl.haxx.se/) | 7.65.3 | tool and library for transferring data with URL syntax / MIT/X derivate (`<http://curl.haxx.se/docs/copyright.html>`) |
| [libiconv](https://www.gnu.org/software/libiconv/) | 1.15 | Provides iconv for systems which don’t have one (or that cannot convert from/to Unicode.) / GPL and LGPL |
| [liblief](https://lief.quarkslab.com/) | 0.9.0 | A cross platform library to parse, modify and abstract ELF, PE and MachO formats. / Apache 2.0 |
| [libpng](http://www.libpng.org/pub/png/libpng.html) | 1.6.37 | PNG reference library / zlib/libpng |
| [libsodium](http://libsodium.org) | 1.0.16 | A modern and easy-to-use crypto library. / ISC |
| [libssh2](https://www.libssh2.org/) | 1.8.2 | the SSH library / BSD-3-Clause |
| [libtiff](http://www.libtiff.org/) | 4.0.10 | Support for the Tag Image File Format (TIFF). / HPND |
| [libxml2](http://xmlsoft.org/) | 2.9.9 | The XML C parser and toolkit of Gnome / MIT |
| [libxslt](http://xmlsoft.org/XSLT/) | 1.1.33 | The XSLT C library developed for the GNOME project / MIT |
| [llvmlite](https://github.com/numba/llvmlite) | 0.29.0 | A lightweight LLVM python binding for writing JIT compilers / New BSD License |
| [locket](https://github.com/mwilliamson/locket.py) | 0.2.0 | File-based locks for Python for Linux and Windows / BSD 2-Clause |
| [lxml](http://lxml.de/) | 4.4.1 | Pythonic binding for the C libraries libxml2 and libxslt. / BSD 3-Clause, GPL-2.0, ZPL-2.0, and ElementTree |
| [lz4-c](https://www.lz4.org) | 1.8.1.2 | Extremely Fast Compression algorithm / BSD 2-clause |
| [lzo](http://www.oberhumer.com/opensource/lzo/) | 2.10 | LZO is a portable lossless data compression library written in ANSI C. / GPL v2+ |
| m2w64-gcc-libgfortran | 5.3.0 | / |
| m2w64-gcc-libs | 5.3.0 | / |
| m2w64-gcc-libs-core | 5.3.0 | / |
| m2w64-gmp | 6.1.0 | / |
| m2w64-libwinpthread-git | 5.0.0.4634.697f757 | / |
| [markupsafe](https://www.palletsprojects.com/p/markupsafe) | 1.1.1 | A Python module that implements the jinja2.Markup string / BSD-3-Clause |
| [matplotlib](http://matplotlib.org/) | 3.1.1 | Publication quality figures in Python / PSF-based |
| [mccabe](https://github.com/PyCQA/mccabe) | 0.6.1 | McCabe complexity checker for Python / MIT |
| [menuinst](https://github.com/ContinuumIO/menuinst) | 1.4.16 | cross platform menu item installation / BSD |
| [mistune](https://github.com/lepture/mistune) | 0.8.4 | The fastest markdown parser in pure Python. / BSD 3-Clause |
| [mkl](https://software.intel.com/en-us/mkl) | 2019.4 | Math library for Intel and compatible processors / proprietary - Intel |
| [mkl-service](https://github.com/ContinuumIO/mkl-service) | 2.3.0 | Python bindings to MKL service functions / 3-clause BSD |
| [mkl\_fft](http://github.com/IntelPython/mkl_fft) | 1.0.14 | NumPy-based implementation of Fast Fourier Transform using Intel (R) Math Kernel Library. / BSD 3-Clause |
| [mkl\_random](http://github.com/IntelPython/mkl_random) | 1.1.0 | Intel (R) MKL-powered package for sampling from common probability distributions into NumPy arrays. / BSD 3-Clause |
| [mock](https://github.com/testing-cabal/mock) | 3.0.5 | A library for testing in Python / BSD-2-Clause |
| [more-itertools](https://github.com/erikrose/more-itertools) | 7.2.0 | More routines for operating on iterables, beyond itertools / MIT |
| [mpmath](http://mpmath.org) | 1.1.0 | Python library for arbitrary-precision floating-point arithmetic / BSD 3-Clause |
| [msgpack-python](http://msgpack.org/) | 0.6.1 | MessagePack (de)serializer. / Apache 2.0 |
| msys2-conda-epoch | 20160418 | / |
| [multipledispatch](https://github.com/mrocklin/multipledispatch/) | 0.6.0 | Multiple dispatch in Python / BSD 3-Clause |
| [nbconvert](http://jupyter.org) | 5.6.0 | Converting Jupyter Notebooks / BSD-3-Clause |
| [nbformat](http://jupyter.org) | 4.4.0 | The reference implementation of the Jupyter Notebook format / BSD 3-clause |
| [networkx](https://networkx.github.io/) | 2.3 | Python package for creating and manipulating complex networks / BSD-3-Clause |
| [nltk](http://nltk.org/) | 3.4.5 | Build Python programs to work with human language data / Apache 2.0 |
| [nose](http://readthedocs.org/docs/nose/) | 1.3.7 | Nose extends unittest to make testing easier / LGPL-2.1 |
| [notebook](http://jupyter.org) | 6.0.1 | Jupyter Notebook / BSD 3-clause |
| [numba](http://numba.github.com) | 0.45.1 | NumPy aware dynamic Python compiler using LLVM / BSD 2-clause |
| [numexpr](https://github.com/pydata/numexpr) | 2.7.0 | Fast numerical expression evaluator for NumPy. / MIT |
| [numpy](http://numpy.scipy.org/) | 1.16.5 | Array processing for numbers, strings, records, and objects. / BSD 3-Clause |
| [numpy-base](http://numpy.scipy.org/) | 1.16.5 | Array processing for numbers, strings, records, and objects. / BSD 3-Clause |
| [numpydoc](https://github.com/numpy/numpydoc) | 0.9.1 | Numpy’s Sphinx extensions / BSD 3-Clause |
| [olefile](http://www.decalage.info/python/olefileio) | 0.46 | parse, read and write Microsoft OLE2 files / BSD 2-Clause |
| [openpyxl](https://openpyxl.readthedocs.io) | 3.0.0 | A Python library to read/write Excel 2010 xlsx/xlsm files / MIT |
| [openssl](http://www.openssl.org/) | 1.1.1d | OpenSSL is an open-source implementation of the SSL and TLS protocols / OpenSSL |
| [packaging](https://github.com/pypa/packaging) | 19.2 | Core utilities for Python packages / Apache 2.0 or BSD 2-Clause |
| [pandas](http://pandas.pydata.org) | 0.25.1 | High-performance, easy-to-use data structures and data analysis tools. / BSD 3-clause |
| [pandoc](http://pandoc.org/) | 2.2.3.2 | Universal markup converter (repackaged binaries). / GPL-2.0 |
| [pandocfilters](https://github.com/jgm/pandocfilters) | 1.4.2 | A python module for writing pandoc filters / BSD-3-Clause |
| [parso](https://github.com/davidhalter/parso) | 0.5.1 | A Python Parser / MIT |
| [partd](https://github.com/dask/partd) | 1.0.0 | Data structure for on-disk shuffle operations / BSD 3-Clause |
| [path.py](https://github.com/jaraco/path.py) | 12.0.1 | A module wrapper for os.path / MIT |
| [pathlib2](https://github.com/mcmtroffaes/pathlib2) | 2.3.5 | Fork of pathlib aiming to support the full stdlib Python API / MIT |
| [patsy](https://github.com/pydata/patsy) | 0.5.1 | Describing statistical models in Python using symbolic formulas / BSD-2-Clause, PSF2 |
| [pep8](http://pep8.readthedocs.org/) | 1.7.1 | Python style guide checker / MIT |
| [pickleshare](https://github.com/pickleshare/pickleshare/) | 0.7.5 | Tiny ‘shelve’-like database with concurrency support / MIT |
| [pillow](https://pillow.readthedocs.io) | 6.2.0 | Pillow is the friendly PIL fork by Alex Clark and Contributors / PIL |
| [pip](https://pip.pypa.io/en/stable/) | 19.2.3 | PyPA recommended tool for installing Python packages / MIT |
| [pkginfo](https://code.launchpad.net/~tseaver/pkginfo/trunk) | 1.5.0.1 | Query metadatdata from sdists / bdists / installed packages. / MIT |
| [pluggy](https://github.com/pytest-dev/pluggy) | 0.13.0 | Plugin registration and hook calling for Python / MIT |
| [ply](http://www.dabeaz.com/ply/index.html) | 3.11 | Python Lex-Yacc / BSD 3-clause |
| powershell\_shortcut | 0.0.1 | Powershell shortcut creator for Windows (using menuinst) / BSD |
| [prometheus\_client](https://github.com/prometheus/client_python) | 0.7.1 | Python client for the Prometheus monitoring system / Apache 2.0 |
| [prompt\_toolkit](https://github.com/jonathanslenders/python-prompt-toolkit) | 2.0.10 | Library for building powerful interactive command lines in Python / BSD 3-clause |
| [psutil](https://github.com/giampaolo/psutil) | 5.6.3 | A cross-platform process and system utilities module for Python / BSD 3-Clause |
| [py](https://github.com/pytest-dev/py) | 1.8.0 | library with cross-python path, ini-parsing, io, code, log facilities / MIT |
| [py-lief](https://lief.quarkslab.com/) | 0.9.0 | A cross platform library to parse, modify and abstract ELF, PE and MachO formats. / Apache 2.0 |
| [pycodestyle](https://pycodestyle.readthedocs.io/) | 2.5.0 | Python style guide checker / MIT |
| [pycosat](https://github.com/ContinuumIO/pycosat) | 0.6.3 | Bindings to picosat (a SAT solver) / MIT |
| [pycparser](https://github.com/eliben/pycparser) | 2.19 | Complete C99 parser in pure Python / BSD 3-clause |
| [pycrypto](http://www.pycrypto.org/) | 2.6.1 | Cryptographic modules for Python. / Public Domain |
| [pycurl](http://pycurl.sourceforge.net/) | 7.43.0.3 | A Python Interface To The cURL library / LGPL, MIT |
| [pyflakes](https://github.com/PyCQA/pyflakes) | 2.1.1 | Pyflakes analyzes programs and detects various errors. / MIT |
| [pygments](http://pygments.org/) | 2.4.2 | Generic syntax highlighting package / BSD 2-clause |
| [pylint](http://www.pylint.org/) | 2.4.2 | python code static checker / GPL 2 |
| [pyodbc](https://github.com/mkleehammer/pyodbc) | 4.0.27 | DB API Module for ODBC / MIT |
| [pyopenssl](https://github.com/pyca/pyopenssl) | 19.0.0 | Python wrapper module around the OpenSSL library / Apache 2.0 |
| [pyparsing](http://pyparsing.wikispaces.com/) | 2.4.2 | Create and execute simple grammars / MIT |
| [pyqt](http://www.riverbankcomputing.co.uk/software/pyqt) | 5.9.2 | Python binding of the cross-platform GUI toolkit Qt. / Commercial, GPL-2.0, GPL-3.0 |
| [pyreadline](http://ipython.org/pyreadline) | 2.1 | A python implmementation of GNU readline. / BSD 3-Clause |
| [pyrsistent](http://github.com/tobgu/pyrsistent/) | 0.15.4 | Persistent/Functional/Immutable data structures / MIT |
| [pysocks](https://github.com/Anorov/PySocks) | 1.7.1 | A Python SOCKS client module. See [Anorov/PySocks](https://github.com/Anorov/PySocks) for more information. / BSD 3-Clause |
| [pytables](http://www.pytables.org) | 3.5.2 | Brings together Python, HDF5 and NumPy to easily handle large amounts of data. / BSD 3-Clause |
| [pytest](https://docs.pytest.org/en/latest/) | 5.2.1 | Simple and powerful testing with Python. / MIT |
| [pytest-arraydiff](https://github.com/astrofrog/pytest-arraydiff) | 0.3 | pytest plugin to help with comparing array output from tests / BSD |
| [pytest-astropy](https://github.com/astropy/pytest-astropy) | 0.5.0 | Meta-package containing dependencies for testing Astropy / BSD |
| [pytest-doctestplus](https://github.com/astropy/pytest-doctestplus) | 0.4.0 | Pytest plugin with advanced doctest features / BSD 3-Clause |
| [pytest-openfiles](https://github.com/astropy/pytest-openfiles) | 0.4.0 | Pytest plugin for detecting inadvertent open file handles / BSD-3-Clause |
| [pytest-remotedata](https://github.com/astropy/pytest-remotedata) | 0.3.2 | Pytest plugin for controlling remote data access / BSD |
| [python](http://www.python.org/) | 3.7.4 | General purpose programming language / PSF |
| [python-dateutil](https://dateutil.readthedocs.org/) | 2.8.0 | Extensions to the standard Python datetime module. / BSD 3 Clause |
| [python-libarchive-c](https://github.com/Changaco/python-libarchive-c) | 2.8 | Python interface to libarchive / CC0-1.0 |
| [pytz](http://pythonhosted.org/pytz/) | 2019.3 | World timezone definitions, modern and historical. / MIT |
| [pywavelets](https://github.com/PyWavelets/pywt) | 1.0.3 | Discrete Wavelet Transforms in Python / MIT |
| [pywin32](https://sourceforge.net/projects/pywin32) | 223 | Python extensions for Windows / PSF |
| [pywinpty](https://github.com/spyder-ide/pywinpty) | 0.5.5 | Python bindings for the winpty library / MIT |
| [pyyaml](http://pyyaml.org/wiki/PyYAML) | 5.1.2 | YAML parser and emitter for Python / MIT |
| [pyzmq](https://github.com/zeromq/pyzmq) | 18.1.0 | Python bindings for zeromq / BSD 3-clause |
| [qt](http://qt-project.org) | 5.9.7 | Qt is a cross-platform application and UI framework. / LGPL-3.0 |
| [qtawesome](https://github.com/spyder-ide/qtawesome) | 0.6.0 | Iconic fonts in PyQt and PySide applications / MIT |
| [qtconsole](http://jupyter.org) | 4.5.5 | Jupyter Qt console / BSD 3-Clause |
| [qtpy](https://github.com/spyder-ide/qtpy) | 1.9.0 | Abstraction layer for PyQt5/PyQt4/PySide / MIT |
| [requests](http://python-requests.org) | 2.22.0 | Python HTTP for Humans / Apache 2.0 |
| [rope](https://github.com/python-rope/rope) | 0.14.0 | A python refactoring library / GPL 2.0 |
| [ruamel\_yaml](https://bitbucket.org/ruamel/yaml) | 0.15.46 | A patched copy of ruamel.yaml. / MIT |
| [scikit-image](http://scikit-image.org/) | 0.15.0 | Image processing routines for SciPy. / BSD 3-Clause |
| [scikit-learn](http://scikit-learn.org/) | 0.21.3 | A set of python modules for machine learning and data mining / BSD 3-Clause |
| [scipy](http://www.scipy.org/) | 1.3.1 | Scientific Library for Python / BSD 3-Clause |
| [seaborn](https://seaborn.pydata.org) | 0.9.0 | Statistical data visualization / BSD 3-Clause |
| [send2trash](https://github.com/hsoft/send2trash) | 1.5.0 | Python library to natively send files to Trash (or Recycle bin) on all platforms. / BSD-3-Clause |
| [setuptools](https://github.com/pypa/setuptools) | 41.4.0 | Download, build, install, upgrade, and uninstall Python packages / MIT |
| [simplegeneric](http://cheeseshop.python.org/pypi/simplegeneric) | 0.8.1 | Simple generic functions (similar to Python’s own len(), pickle.dump(), etc.) / Zope Public |
| [singledispatch](http://docs.python.org/3/library/functools.html#functools.singledispatch) | 3.4.0.3 | Transforms a function into a single-dispatch generic function / MIT |
| [sip](http://www.riverbankcomputing.com/software/sip/intro) | 4.19.8 | Create Python bindings for C and C++ libraries / GPL-3.0 |
| [six](http://pypi.python.org/pypi/six/) | 1.12.0 | Python 2 and 3 compatibility utilities / MIT |
| [snappy](https://github.com/google/snappy) | 1.1.7 | A fast compressor/decompressor / BSD 3-clause |
| [snowballstemmer](https://github.com/shibukawa/snowball_py) | 2.0.0 | Snowball stemming library collection for Python / BSD-2-Clause |
| [sortedcollections](http://www.grantjenks.com/docs/sortedcollections/) | 1.1.2 | Python Sorted Collections / Apache-2.0 |
| [sortedcontainers](http://www.grantjenks.com/docs/sortedcontainers/) | 2.1.0 | Python Sorted Container Types: SortedList, SortedDict, and SortedSet / Apache 2.0 |
| [soupsieve](http://facelessuser.github.io/soupsieve) | 1.9.3 | A modern CSS selector implementation for BeautifulSoup / MIT |
| [sphinx](http://www.sphinx-doc.org) | 2.2.0 | Sphinx is a tool that makes it easy to create intelligent and beautiful documentation / BSD-2-Clause |
| sphinxcontrib | 1.0 | Python namespace for sphinxcontrib / BSD |
| [sphinxcontrib-applehelp](https://www.sphinx-doc.org/en/master/) | 1.0.1 | sphinxcontrib-applehelp is a sphinx extension which outputs Apple help books / BSD-2-Clause |
| [sphinxcontrib-devhelp](https://www.sphinx-doc.org/en/master/) | 1.0.1 | sphinxcontrib-devhelp is a sphinx extension which outputs Devhelp document / BSD-2-Clause |
| [sphinxcontrib-htmlhelp](https://www.sphinx-doc.org/en/master/) | 1.0.2 | sphinxcontrib-htmlhelp is a sphinx extension which … / BSD-2-Clause |
| [sphinxcontrib-jsmath](https://www.sphinx-doc.org/en/master/) | 1.0.1 | A sphinx extension which renders display math in HTML via JavaScript / BSD-2-Clause |
| [sphinxcontrib-qthelp](https://www.sphinx-doc.org/en/master/) | 1.0.2 | sphinxcontrib-qthelp is a sphinx extension which outputs QtHelp document / BSD-2-Clause |
| [sphinxcontrib-serializinghtml](https://www.sphinx-doc.org/en/master/) | 1.1.3 | sphinxcontrib-serializinghtml is a sphinx extension which outputs “serialized” HTML files (json and pickle). / BSD-2-Clause |
| [sphinxcontrib-websupport](https://pypi.python.org/pypi/sphinxcontrib-websupport) | 1.1.2 | Sphinx API for Web Apps / BSD-2-Clause |
| [spyder](https://www.spyder-ide.org/) | 3.3.6 | The Scientific Python Development Environment / MIT |
| [spyder-kernels](https://github.com/spyder-ide/spyder-kernels) | 0.5.2 | Jupyter kernels for the Spyder console / MIT |
| [sqlalchemy](http://www.sqlalchemy.org/) | 1.3.9 | Database Abstraction Library. / MIT |
| [sqlite](http://www.sqlite.org/) | 3.30.0 | Implements a self-contained, zero-configuration, SQL database engine. / Public-Domain (`<http://www.sqlite.org/copyright.html>`) |
| [statsmodels](https://www.statsmodels.org) | 0.10.1 | Statistical computations and models for use with SciPy / BSD 3-Clause |
| [sympy](http://sympy.org) | 1.4 | Python library for symbolic mathematics / BSD-3-Clause |
| [tbb](http://www.threadingbuildingblocks.org) | 2019.4 | High level abstract threading library / Apache 2.0 |
| [tblib](https://github.com/ionelmc/python-tblib) | 1.4.0 | Traceback serialization library. / BSD 2-Clause |
| [terminado](https://github.com/jupyter/terminado) | 0.8.2 | Terminals served by tornado websockets / BSD 2-Clause |
| [testpath](https://testpath.readthedocs.io) | 0.4.2 | Testpath is a collection of utilities for Python code working with files and commands. / BSD-3-Clause |
| [tk](http://www.tcl.tk/) | 8.6.8 | A dynamic programming language with GUI support. Bundles Tcl and Tk. / Tcl/Tk |
| [toolz](http://toolz.readthedocs.org/) | 0.10.0 | A functional standard library for Python / BSD 3-Clause |
| [tornado](http://www.tornadoweb.org/) | 6.0.3 | A Python web framework and asynchronous networking library, originally developed at FriendFeed. / Apache 2.0 |
| [tqdm](https://pypi.python.org/pypi/tqdm) | 4.36.1 | A Fast, Extensible Progress Meter / MPLv2.0, MIT |
| [traitlets](http://ipython.org/) | 4.3.3 | Configuration system for Python applications / BSD-3-Clause |
| [unicodecsv](https://github.com/jdunck/python-unicodecsv) | 0.14.1 | Drop-in replacement for csv module which supports unicode strings / BSD |
| [urllib3](https://urllib3.readthedocs.io/) | 1.24.2 | HTTP library with thread-safe connection pooling, file post, and more. / MIT |
| [vc](https://github.com/conda/conda/wiki/VC-features) | 14.1 | A meta-package to impose mutual exclusivity among software built with different VS versions / Modified BSD License (3-clause) |
| vs2015\_runtime | 14.16.27012 | MSVC runtimes associated with cl.exe version 19.16.27032.1 (VS 2017 update 9) / None |
| [wcwidth](https://github.com/jquast/wcwidth) | 0.1.7 | Measures number of Terminal column cells of wide-character codes. / MIT |
| [webencodings](https://github.com/gsnedders/python-webencodings) | 0.5.1 | Character encoding aliases for legacy web content / BSD 3-Clause |
| [werkzeug](https://palletsprojects.com/p/werkzeug/) | 0.16.0 | The comprehensive WSGI web application library. / BSD 3-Clause |
| [wheel](https://github.com/pypa/wheel) | 0.33.6 | A built-package format for Python. / MIT |
| [widgetsnbextension](http://ipython.org) | 3.5.1 | Interactive Widgets for Jupyter / BSD 3-clause |
| [win\_inet\_pton](https://github.com/hickeroar/win_inet_pton) | 1.1.0 | Native inet\_pton and inet\_ntop implementation for Python on Windows (with ctypes). / PUBLIC-DOMAIN |
| [win\_unicode\_console](https://github.com/Drekin/win-unicode-console) | 0.5 | A Python package to enable Unicode input and display when running Python from Windows console. / MIT |
| [wincertstore](https://bitbucket.org/tiran/wincertstore) | 0.2 | Python module to extract CA and CRL certs from Windows’ cert store (ctypes based). / PSF 2 |
| [winpty](https://github.com/rprichard/winpty) | 0.4.3 | Winpty provides an interface similar to a Unix pty-master for communicating with Windows console programs. / MIT |
| [wrapt](https://github.com/GrahamDumpleton/wrapt) | 1.11.2 | Module for decorators, wrappers and monkey patching / BSD 2-Clause |
| [xlrd](http://www.python-excel.org/) | 1.2.0 | Library for developers to extract data from Microsoft Excel (tm) spreadsheet files / BSD 3-Clause and BSD with advertising |
| [xlsxwriter](https://xlsxwriter.readthedocs.io/) | 1.2.1 | A Python module for creating Excel XLSX files / BSD 2-Clause |
| [xlwings](http://xlwings.org/) | 0.15.10 | Interact with Excel from Python and vice versa / 3-clause BSD |
| [xlwt](http://www.python-excel.org/) | 1.3.0 | Writing data and formatting information to Excel files / BSD |
| [xz](http://tukaani.org/xz/) | 5.2.4 | Data compression software with high compression ratio / LGPL-2.1 and GPL-2.0 |
| [yaml](http://pyyaml.org/wiki/LibYAML) | 0.1.7 | A C library for parsing and emitting YAML. / MIT |
| [zeromq](http://zeromq.org) | 4.3.1 | A high-performance asynchronous messaging library. / LGPL 3 |
| [zict](http://github.com/mrocklin/zict) | 1.0.0 | Composable Dictionary Classes / BSD 3-Clause |
| [zipp](https://github.com/jaraco/zipp) | 0.6.0 | A pathlib-compatible Zipfile object wrapper / MIT |
| [zlib](http://zlib.net/) | 1.2.11 | Massively spiffy yet delicately unobtrusive compression library / zlib |
| [zstd](http://www.zstd.net) | 1.3.7 | Zstandard - Fast real-time compression algorithm / BSD 3-Clause |
| Name | Version | Summary / License |
|---|---|---|
| [\_ipyw\_jlab\_nb\_ext\_conf](https://github.com/ContinuumIO/anaconda-nb-extensions-meta-config) | 0.1.0 | A configuration metapackage for enabling Anaconda-bundled jupyter extensions / BSD |
| [alabaster](http://www.sphinx-doc.org/en/stable/index.html) | 0.7.12 | Configurable, Python 2+3 compatible Sphinx theme. / BSD 3-Clause |
| [anaconda-client](http://anaconda.org) | 1.7.2 | anaconda.org command line client library / BSD 3-clause |
| [anaconda-project](https://github.com/Anaconda-Platform/anaconda-project) | 0.8.3 | Tool for encapsulating, running, and reproducing data science projects / BSD 3-Clause |
| [asn1crypto](https://github.com/wbond/asn1crypto) | 1.0.1 | Python ASN.1 library with a focus on performance and a pythonic API / MIT |
| [astroid](https://www.astroid.org/) | 2.3.1 | A abstract syntax tree for Python with inference support. / LGPL 2.1 |
| [astropy](http://www.astropy.org/) | 3.2.1 | Community-developed Python Library for Astronomy / BSD 3-clause |
| [atomicwrites](https://github.com/untitaker/python-atomicwrites) | 1.3.0 | Atomic file writes / MIT |
| [attrs](https://attrs.readthedocs.io/en/stable/) | 19.2.0 | attrs is the Python package that will bring back the joy of writing classes by relieving you from the drudgery of implementing object protocols (aka dunder methods). / MIT |
| [babel](http://babel.pocoo.org/) | 2.7.0 | Utilities to internationalize and localize Python applications / BSD 3-clause |
| [backcall](https://github.com/takluyver/backcall/) | 0.1.0 | Specifications for callback functions passed in to an API / BSD-3-Clause |
| [backports](https://bitbucket.org/brandon/backports) | 1.0 | None / BSD |
| [backports.os](https://github.com/pjdelport/backports.os) | 0.1.1 | Backport of new features in Python’s os module / Python Software Foundation |
| [backports.shutil\_get\_terminal\_size](https://github.com/chrippa/backports.shutil_get_terminal_size) | 1.0.0 | A backport of the get\_terminal\_size function from Python 3.3’s shutil. / MIT |
| [beautifulsoup4](http://www.crummy.com/software/BeautifulSoup/) | 4.8.0 | Python library designed for screen-scraping / MIT |
| [bitarray](https://github.com/ilanschnell/bitarray) | 1.0.1 | efficient arrays of booleans – C extension / PSF |
| [bkcharts](http://github.com/bokeh/bkcharts) | 0.2 | High level chart types built on top of Bokeh / BSD 3-Clause |
| blas | 1.0 | |
| [bleach](https://github.com/mozilla/bleach) | 3.1.0 | Easy, whitelist-based HTML-sanitizing tool / Apache-2.0 |
| [blosc](https://github.com/Blosc/c-blosc) | 1.16.3 | A blocking, shuffling and loss-less compression library that can be faster than memcpy() / BSD 3-Clause |
| [bokeh](http://bokeh.pydata.org/) | 1.3.4 | Statistical and novel interactive HTML plots for Python / BSD 3-Clause |
| [boto](https://github.com/boto/boto/) | 2.49.0 | Amazon Web Services Library / MIT |
| [bottleneck](http://berkeleyanalytics.com/bottleneck) | 1.2.1 | Fast NumPy array functions written in Cython. / BSD 2-Clause |
| [bzip2](http://www.bzip.org/) | 1.0.8 | high-quality data compressor / bzip2 |
| [ca-certificates](https://github.com/conda-forge/ca-certificates-feedstock) | 2019.8.28 | Certificates for use with other packages. / MPL 2.0 |
| [certifi](http://certifi.io/) | 2019.9.11 | Python package for providing Mozilla’s CA Bundle. / ISC |
| [cffi](https://bitbucket.org/cffi/cffi) | 1.12.3 | Foreign Function Interface for Python calling C code. / MIT |
| [chardet](https://github.com/chardet/chardet) | 3.0.4 | Universal character encoding detector / LGPL2 |
| [click](https://palletsprojects.com/p/click) | 7.0 | Python composable command line interface toolkit / BSD-3-Clause |
| [cloudpickle](https://github.com/cloudpipe/cloudpickle) | 1.2.2 | Extended pickling support for Python objects / BSD 3-Clause |
| [clyent](https://github.com/Anaconda-Platform/clyent) | 1.2.2 | Command line client library for windows and posix / BSD 3-Clause |
| [colorama](https://github.com/tartley/colorama) | 0.4.1 | Cross-platform colored terminal text / BSD-3-Clause |
| [comtypes](http://starship.python.net/crew/theller/comtypes/) | 1.1.7 | pure Python COM package / MIT |
| [conda](https://conda.io) | 4.7.12 | OS-agnostic, system-level binary package and environment manager. / BSD 3-Clause |
| [conda-build](https://github.com/conda/conda-build) | 3.18.9 | tools for building conda packages / BSD 3-Clause |
| [conda-env](https://github.com/conda/conda-env) | 2.6.0 | Tools for interacting with conda environments. / BSD 3-Clause |
| [conda-verify](https://github.com/conda/conda-verify) | 3.4.2 | tool for validating conda recipes and conda packages / BSD 3-Clause |
| console\_shortcut | 0.1.1 | Console shortcut creator for Windows (using menuinst) / BSD |
| [contextlib2](http://contextlib2.readthedocs.org) | 0.6.0 | Backports and enhancements for the contextlib module / PSF 2 |
| [cryptography](https://github.com/pyca/cryptography) | 2.7 | Provides cryptographic recipes and primitives to Python developers / Apache 2.0 or BSD 3-Clause, PSF 2 |
| [curl](http://curl.haxx.se/) | 7.65.3 | tool and library for transferring data with URL syntax / MIT/X derivate (`<http://curl.haxx.se/docs/copyright.html>`) |
| [cycler](http://matplotlib.org/cycler) | 0.10.0 | Composable style cycles. / BSD 3-Clause |
| [cython](http://www.cython.org/) | 0.29.13 | The Cython compiler for writing C extensions for the Python language / Apache-2.0 |
| [cytoolz](https://github.com/pytoolz/cytoolz) | 0.10.0 | Cython implementation of Toolz. High performance functional utilities / BSD-3-Clause |
| [dask](https://dask.org/) | 2.5.2 | Parallel PyData with Task Scheduling / BSD 3-Clause |
| [dask-core](http://github.com/dask/dask/) | 2.5.2 | Parallel Python with task scheduling / BSD 3-Clause |
| [decorator](https://github.com/micheles/decorator) | 4.4.0 | Better living through Python with decorators. / BSD 3-Clause |
| [defusedxml](https://bitbucket.org/tiran/defusedxml) | 0.6.0 | XML bomb protection for Python stdlib modules / PSF 2.0 |
| [distributed](http://distributed.readthedocs.io/en/latest/) | 2.5.2 | Distributed computing with Dask / BSD 3-Clause |
| [docutils](http://docutils.sourceforge.net/) | 0.15.2 | Docutils – Python Documentation Utilities / Public Domain Dedictation and BSD 2-Clause and PSF 2.1.1 and GPL 3.0 |
| [entrypoints](https://github.com/takluyver/entrypoints) | 0.3 | Discover and load entry points from installed packages. / MIT License |
| [et\_xmlfile](https://bitbucket.org/openpyxl/et_xmlfile) | 1.0.1 | An implementation of lxml.xmlfile for the standard library / MIT |
| [fastcache](https://github.com/pbrady/fastcache) | 1.1.0 | C implementation of Python 3 lru\_cache / MIT |
| [filelock](https://github.com/benediktschmitt/py-filelock) | 3.0.12 | A platform independent file lock. / Public Domain |
| [flask](http://flask.pocoo.org) | 1.1.1 | A microframework based on Werkzeug, Jinja2 and good intentions. / BSD 3-Clause |
| [freetype](https://www.freetype.org/) | 2.9.1 | A Free, High-Quality, and Portable Font Engine / GPL-2.0 and FreeType |
| [fsspec](https://github.com/martindurant/filesystem_spec) | 0.5.2 | A specification for pythonic filesystems / BSD-3-Clause |
| [get\_terminal\_size](https://github.com/chrippa/backports.shutil_get_terminal_size) | 1.0.0 | Get the size of the terminal window. / MIT |
| [gevent](http://www.gevent.org/) | 1.4.0 | Coroutine-based network library / MIT |
| [glob2](https://github.com/miracle2k/python-glob2) | 0.7 | Version of the glob module that supports recursion via \*\*, and can capture patterns. / BSD-2-Clause |
| [greenlet](https://github.com/python-greenlet/greenlet) | 0.4.15 | Lightweight in-process concurrent programming / MIT |
| [h5py](http://www.h5py.org/) | 2.9.0 | Read and write HDF5 files from Python. / BSD-3-Clause |
| [hdf5](http://www.hdfgroup.org/HDF5/) | 1.10.4 | HDF5 is a data model, library, and file format for storing and managing data / HDF5 |
| [heapdict](http://stutzbachenterprises.com/) | 1.0.1 | A heap with decrease-key and increase-key operations / BSD 3-Clause |
| [html5lib](https://github.com/html5lib/html5lib-python) | 1.0.1 | HTML parser based on the WHATWG HTML specification / MIT |
| icc\_rt | 2019.0.0 | Intel runtime libraries for C, C++ and Fortran compilers / Intel proprietary |
| [icu](http://site.icu-project.org/) | 58.2 | International Components for Unicode. / MIT |
| [idna](https://github.com/kjd/idna) | 2.8 | Internationalized Domain Names in Applications (IDNA). / BSD Like |
| [imageio](http://imageio.github.io) | 2.6.0 | A Python library for reading and writing image data / BSD-2-Clause |
| [imagesize](https://github.com/shibukawa/imagesize_py) | 1.1.0 | Getting image size from png/jpeg/jpeg2000/gif file / MIT |
| [importlib\_metadata](http://importlib-metadata.readthedocs.io) | 0.23 | A library to access the metadata for a Python package / APACHE-2.0 |
| [intel-openmp](https://software.intel.com/en-us/node/522690) | 2019.4 | Math library for Intel and compatible processors / proprietary - Intel |
| [ipykernel](https://ipython.org) | 5.1.2 | IPython Kernel for Jupyter / BSD-3-Clause |
| [ipython](https://ipython.org/) | 7.8.0 | IPython: Productive Interactive Computing / BSD-3-Clause |
| [ipython\_genutils](http://ipython.org) | 0.2.0 | vestigial utilities from IPython / BSD 3-Clause |
| [ipywidgets](https://github.com/ipython/ipywidgets) | 7.5.1 | Jupyter Interactive Widgets / BSD 3-clause |
| [isort](https://github.com/timothycrosley/isort) | 4.3.21 | A Python utility / library to sort Python imports. / MIT |
| [itsdangerous](https://github.com/pallets/itsdangerous) | 1.1.0 | Various helpers to pass trusted data to untrusted environments. / BSD 3-Clause |
| [jdcal](https://github.com/phn/jdcal) | 1.4.1 | Julian dates from proleptic Gregorian and Julian calendars. / BSD 2-Clause |
| [jedi](https://github.com/davidhalter/jedi/) | 0.15.1 | An autocompletion tool for Python that can be used for text editors. / MIT |
| [jinja2](http://jinja.pocoo.org) | 2.10.3 | An easy to use stand-alone template engine written in pure python. / 3-Clause BSD |
| [joblib](http://packages.python.org/joblib/) | 0.13.2 | Python function as pipeline jobs. / BSD 3-Clause |
| [jpeg](http://www.ijg.org/) | 9b | read/write jpeg COM, EXIF, IPTC medata / Custom free software license |
| [json5](https://github.com/dpranke/pyjson5) | 0.8.5 | A Python implementation of the JSON5 data format / Apache-2.0 |
| [jsonschema](https://github.com/Julian/jsonschema) | 3.0.2 | An implementation of JSON Schema validation for Python / MIT |
| [jupyter](http://jupyter.org) | 1.0.0 | Jupyter metapackage. Install all the Jupyter components in one go. / BSD 3-Clause |
| [jupyter\_client](http://jupyter.org) | 5.3.3 | Jupyter protocol implementation and client libraries / BSD 3-clause |
| [jupyter\_console](http://jupyter.org) | 6.0.0 | Jupyter terminal console / BSD-3-Clause |
| [jupyter\_core](http://jupyter.org) | 4.5.0 | Core common functionality of Jupyter projects. / BSD 3-clause |
| [jupyterlab](https://github.com/jupyterlab/jupyterlab) | 1.1.4 | JupyterLab / BSD-3-Clause |
| [jupyterlab\_server](http://github.com/jupyterlab/jupyterlab_server) | 1.0.6 | A set of server components for JupyterLab and JupyterLab like applications. / BSD 3-Clause |
| [keyring](https://github.com/jaraco/keyring) | 18.0.0 | Store and access your passwords safely / Python Software Foundation or MIT |
| [kiwisolver](https://github.com/nucleic/kiwi) | 1.1.0 | A fast implementation of the Cassowary constraint solver / BSD 3-Clause |
| [krb5](http://web.mit.edu/kerberos/) | 1.16.1 | A network authentication protocol. / MIT |
| [lazy-object-proxy](https://github.com/ionelmc/python-lazy-object-proxy) | 1.4.2 | A fast and thorough lazy object proxy / BSD-2-Clause |
| [libarchive](http://www.libarchive.org/) | 3.3.3 | Multi-format archive and compression library / BSD 2-Clause |
| [libcurl](http://curl.haxx.se/) | 7.65.3 | tool and library for transferring data with URL syntax / MIT/X derivate (`<http://curl.haxx.se/docs/copyright.html>`) |
| [libiconv](https://www.gnu.org/software/libiconv/) | 1.15 | Provides iconv for systems which don’t have one (or that cannot convert from/to Unicode.) / GPL and LGPL |
| [liblief](https://lief.quarkslab.com/) | 0.9.0 | A cross platform library to parse, modify and abstract ELF, PE and MachO formats. / Apache 2.0 |
| [libpng](http://www.libpng.org/pub/png/libpng.html) | 1.6.37 | PNG reference library / zlib/libpng |
| [libsodium](http://libsodium.org) | 1.0.16 | A modern and easy-to-use crypto library. / ISC |
| [libssh2](https://www.libssh2.org/) | 1.8.2 | the SSH library / BSD-3-Clause |
| [libtiff](http://www.libtiff.org/) | 4.0.10 | Support for the Tag Image File Format (TIFF). / HPND |
| [libxml2](http://xmlsoft.org/) | 2.9.9 | The XML C parser and toolkit of Gnome / MIT |
| [libxslt](http://xmlsoft.org/XSLT/) | 1.1.33 | The XSLT C library developed for the GNOME project / MIT |
| [llvmlite](https://github.com/numba/llvmlite) | 0.29.0 | A lightweight LLVM python binding for writing JIT compilers / New BSD License |
| [locket](https://github.com/mwilliamson/locket.py) | 0.2.0 | File-based locks for Python for Linux and Windows / BSD 2-Clause |
| [lxml](http://lxml.de/) | 4.4.1 | Pythonic binding for the C libraries libxml2 and libxslt. / BSD 3-Clause, GPL-2.0, ZPL-2.0, and ElementTree |
| [lz4-c](https://www.lz4.org) | 1.8.1.2 | Extremely Fast Compression algorithm / BSD 2-clause |
| [lzo](http://www.oberhumer.com/opensource/lzo/) | 2.10 | LZO is a portable lossless data compression library written in ANSI C. / GPL v2+ |
| m2w64-gcc-libgfortran | 5.3.0 | / |
| m2w64-gcc-libs | 5.3.0 | / |
| m2w64-gcc-libs-core | 5.3.0 | / |
| m2w64-gmp | 6.1.0 | / |
| m2w64-libwinpthread-git | 5.0.0.4634.697f757 | / |
| [markupsafe](https://www.palletsprojects.com/p/markupsafe) | 1.1.1 | A Python module that implements the jinja2.Markup string / BSD-3-Clause |
| [matplotlib](http://matplotlib.org/) | 3.1.1 | Publication quality figures in Python / PSF-based |
| [mccabe](https://github.com/PyCQA/mccabe) | 0.6.1 | McCabe complexity checker for Python / MIT |
| [menuinst](https://github.com/ContinuumIO/menuinst) | 1.4.16 | cross platform menu item installation / BSD |
| [mistune](https://github.com/lepture/mistune) | 0.8.4 | The fastest markdown parser in pure Python. / BSD 3-Clause |
| [mkl](https://software.intel.com/en-us/mkl) | 2019.4 | Math library for Intel and compatible processors / proprietary - Intel |
| [mkl-service](https://github.com/ContinuumIO/mkl-service) | 2.3.0 | Python bindings to MKL service functions / 3-clause BSD |
| [mkl\_fft](http://github.com/IntelPython/mkl_fft) | 1.0.14 | NumPy-based implementation of Fast Fourier Transform using Intel (R) Math Kernel Library. / BSD 3-Clause |
| [mkl\_random](http://github.com/IntelPython/mkl_random) | 1.1.0 | Intel (R) MKL-powered package for sampling from common probability distributions into NumPy arrays. / BSD 3-Clause |
| [mock](https://github.com/testing-cabal/mock) | 3.0.5 | A library for testing in Python / BSD-2-Clause |
| [more-itertools](https://github.com/erikrose/more-itertools) | 7.2.0 | More routines for operating on iterables, beyond itertools / MIT |
| [mpmath](http://mpmath.org) | 1.1.0 | Python library for arbitrary-precision floating-point arithmetic / BSD 3-Clause |
| [msgpack-python](http://msgpack.org/) | 0.6.1 | MessagePack (de)serializer. / Apache 2.0 |
| msys2-conda-epoch | 20160418 | / |
| [multipledispatch](https://github.com/mrocklin/multipledispatch/) | 0.6.0 | Multiple dispatch in Python / BSD 3-Clause |
| [nbconvert](http://jupyter.org) | 5.6.0 | Converting Jupyter Notebooks / BSD-3-Clause |
| [nbformat](http://jupyter.org) | 4.4.0 | The reference implementation of the Jupyter Notebook format / BSD 3-clause |
| [networkx](https://networkx.github.io/) | 2.3 | Python package for creating and manipulating complex networks / BSD-3-Clause |
| [nltk](http://nltk.org/) | 3.4.5 | Build Python programs to work with human language data / Apache 2.0 |
| [nose](http://readthedocs.org/docs/nose/) | 1.3.7 | Nose extends unittest to make testing easier / LGPL-2.1 |
| [notebook](http://jupyter.org) | 6.0.1 | Jupyter Notebook / BSD 3-clause |
| [numba](http://numba.github.com) | 0.45.0 | NumPy aware dynamic Python compiler using LLVM / BSD 2-clause |
| [numexpr](https://github.com/pydata/numexpr) | 2.7.0 | Fast numerical expression evaluator for NumPy. / MIT |
| [numpy](http://numpy.scipy.org/) | 1.16.5 | Array processing for numbers, strings, records, and objects. / BSD 3-Clause |
| [numpy-base](http://numpy.scipy.org/) | 1.16.5 | Array processing for numbers, strings, records, and objects. / BSD 3-Clause |
| [numpydoc](https://github.com/numpy/numpydoc) | 0.9.1 | Numpy’s Sphinx extensions / BSD 3-Clause |
| [olefile](http://www.decalage.info/python/olefileio) | 0.46 | parse, read and write Microsoft OLE2 files / BSD 2-Clause |
| [openpyxl](https://openpyxl.readthedocs.io) | 3.0.0 | A Python library to read/write Excel 2010 xlsx/xlsm files / MIT |
| [openssl](http://www.openssl.org/) | 1.1.1d | OpenSSL is an open-source implementation of the SSL and TLS protocols / OpenSSL |
| [packaging](https://github.com/pypa/packaging) | 19.2 | Core utilities for Python packages / Apache 2.0 or BSD 2-Clause |
| [pandas](http://pandas.pydata.org) | 0.25.1 | High-performance, easy-to-use data structures and data analysis tools. / BSD 3-clause |
| [pandoc](http://pandoc.org/) | 2.2.3.2 | Universal markup converter (repackaged binaries). / GPL-2.0 |
| [pandocfilters](https://github.com/jgm/pandocfilters) | 1.4.2 | A python module for writing pandoc filters / BSD-3-Clause |
| [parso](https://github.com/davidhalter/parso) | 0.5.1 | A Python Parser / MIT |
| [partd](https://github.com/dask/partd) | 1.0.0 | Data structure for on-disk shuffle operations / BSD 3-Clause |
| [path.py](https://github.com/jaraco/path.py) | 12.0.1 | A module wrapper for os.path / MIT |
| [pathlib2](https://github.com/mcmtroffaes/pathlib2) | 2.3.5 | Fork of pathlib aiming to support the full stdlib Python API / MIT |
| [patsy](https://github.com/pydata/patsy) | 0.5.1 | Describing statistical models in Python using symbolic formulas / BSD-2-Clause, PSF2 |
| [pep8](http://pep8.readthedocs.org/) | 1.7.1 | Python style guide checker / MIT |
| [pickleshare](https://github.com/pickleshare/pickleshare/) | 0.7.5 | Tiny ‘shelve’-like database with concurrency support / MIT |
| [pillow](https://pillow.readthedocs.io) | 6.2.0 | Pillow is the friendly PIL fork by Alex Clark and Contributors / PIL |
| [pip](https://pip.pypa.io/en/stable/) | 19.2.3 | PyPA recommended tool for installing Python packages / MIT |
| [pkginfo](https://code.launchpad.net/~tseaver/pkginfo/trunk) | 1.5.0.1 | Query metadatdata from sdists / bdists / installed packages. / MIT |
| [pluggy](https://github.com/pytest-dev/pluggy) | 0.13.0 | Plugin registration and hook calling for Python / MIT |
| [ply](http://www.dabeaz.com/ply/index.html) | 3.11 | Python Lex-Yacc / BSD 3-clause |
| powershell\_shortcut | 0.0.1 | Powershell shortcut creator for Windows (using menuinst) / BSD |
| [prometheus\_client](https://github.com/prometheus/client_python) | 0.7.1 | Python client for the Prometheus monitoring system / Apache 2.0 |
| [prompt\_toolkit](https://github.com/jonathanslenders/python-prompt-toolkit) | 2.0.10 | Library for building powerful interactive command lines in Python / BSD 3-clause |
| [psutil](https://github.com/giampaolo/psutil) | 5.6.3 | A cross-platform process and system utilities module for Python / BSD 3-Clause |
| [py](https://github.com/pytest-dev/py) | 1.8.0 | library with cross-python path, ini-parsing, io, code, log facilities / MIT |
| [py-lief](https://lief.quarkslab.com/) | 0.9.0 | A cross platform library to parse, modify and abstract ELF, PE and MachO formats. / Apache 2.0 |
| [pycodestyle](https://pycodestyle.readthedocs.io/) | 2.5.0 | Python style guide checker / MIT |
| [pycosat](https://github.com/ContinuumIO/pycosat) | 0.6.3 | Bindings to picosat (a SAT solver) / MIT |
| [pycparser](https://github.com/eliben/pycparser) | 2.19 | Complete C99 parser in pure Python / BSD 3-clause |
| [pycrypto](http://www.pycrypto.org/) | 2.6.1 | Cryptographic modules for Python. / Public Domain |
| [pycurl](http://pycurl.sourceforge.net/) | 7.43.0.3 | A Python Interface To The cURL library / LGPL, MIT |
| [pyflakes](https://github.com/PyCQA/pyflakes) | 2.1.1 | Pyflakes analyzes programs and detects various errors. / MIT |
| [pygments](http://pygments.org/) | 2.4.2 | Generic syntax highlighting package / BSD 2-clause |
| [pylint](http://www.pylint.org/) | 2.4.2 | python code static checker / GPL 2 |
| [pyodbc](https://github.com/mkleehammer/pyodbc) | 4.0.27 | DB API Module for ODBC / MIT |
| [pyopenssl](https://github.com/pyca/pyopenssl) | 19.0.0 | Python wrapper module around the OpenSSL library / Apache 2.0 |
| [pyparsing](http://pyparsing.wikispaces.com/) | 2.4.2 | Create and execute simple grammars / MIT |
| [pyqt](http://www.riverbankcomputing.co.uk/software/pyqt) | 5.9.2 | Python binding of the cross-platform GUI toolkit Qt. / Commercial, GPL-2.0, GPL-3.0 |
| [pyreadline](http://ipython.org/pyreadline) | 2.1 | A python implmementation of GNU readline. / BSD 3-Clause |
| [pyrsistent](http://github.com/tobgu/pyrsistent/) | 0.15.4 | Persistent/Functional/Immutable data structures / MIT |
| [pysocks](https://github.com/Anorov/PySocks) | 1.7.1 | A Python SOCKS client module. See [Anorov/PySocks](https://github.com/Anorov/PySocks) for more information. / BSD 3-Clause |
| [pytables](http://www.pytables.org) | 3.5.2 | Brings together Python, HDF5 and NumPy to easily handle large amounts of data. / BSD 3-Clause |
| [pytest](https://docs.pytest.org/en/latest/) | 5.2.1 | Simple and powerful testing with Python. / MIT |
| [pytest-arraydiff](https://github.com/astrofrog/pytest-arraydiff) | 0.3 | pytest plugin to help with comparing array output from tests / BSD |
| [pytest-astropy](https://github.com/astropy/pytest-astropy) | 0.5.0 | Meta-package containing dependencies for testing Astropy / BSD |
| [pytest-doctestplus](https://github.com/astropy/pytest-doctestplus) | 0.4.0 | Pytest plugin with advanced doctest features / BSD 3-Clause |
| [pytest-openfiles](https://github.com/astropy/pytest-openfiles) | 0.4.0 | Pytest plugin for detecting inadvertent open file handles / BSD-3-Clause |
| [pytest-remotedata](https://github.com/astropy/pytest-remotedata) | 0.3.2 | Pytest plugin for controlling remote data access / BSD |
| [python](http://www.python.org/) | 3.7.4 | General purpose programming language / PSF |
| [python-dateutil](https://dateutil.readthedocs.org/) | 2.8.0 | Extensions to the standard Python datetime module. / BSD 3 Clause |
| [python-libarchive-c](https://github.com/Changaco/python-libarchive-c) | 2.8 | Python interface to libarchive / CC0-1.0 |
| [pytz](http://pythonhosted.org/pytz/) | 2019.3 | World timezone definitions, modern and historical. / MIT |
| [pywavelets](https://github.com/PyWavelets/pywt) | 1.0.3 | Discrete Wavelet Transforms in Python / MIT |
| [pywin32](https://sourceforge.net/projects/pywin32) | 223 | Python extensions for Windows / PSF |
| [pywinpty](https://github.com/spyder-ide/pywinpty) | 0.5.5 | Python bindings for the winpty library / MIT |
| [pyyaml](http://pyyaml.org/wiki/PyYAML) | 5.1.2 | YAML parser and emitter for Python / MIT |
| [pyzmq](https://github.com/zeromq/pyzmq) | 18.1.0 | Python bindings for zeromq / BSD 3-clause |
| [qt](http://qt-project.org) | 5.9.7 | Qt is a cross-platform application and UI framework. / LGPL-3.0 |
| [qtawesome](https://github.com/spyder-ide/qtawesome) | 0.6.0 | Iconic fonts in PyQt and PySide applications / MIT |
| [qtconsole](http://jupyter.org) | 4.5.5 | Jupyter Qt console / BSD 3-Clause |
| [qtpy](https://github.com/spyder-ide/qtpy) | 1.9.0 | Abstraction layer for PyQt5/PyQt4/PySide / MIT |
| [requests](http://python-requests.org) | 2.22.0 | Python HTTP for Humans / Apache 2.0 |
| [rope](https://github.com/python-rope/rope) | 0.14.0 | A python refactoring library / GPL 2.0 |
| [ruamel\_yaml](https://bitbucket.org/ruamel/yaml) | 0.15.46 | A patched copy of ruamel.yaml. / MIT |
| [scikit-image](http://scikit-image.org/) | 0.15.0 | Image processing routines for SciPy. / BSD 3-Clause |
| [scikit-learn](http://scikit-learn.org/) | 0.21.1 | A set of python modules for machine learning and data mining / BSD 3-Clause |
| [scipy](http://www.scipy.org/) | 1.3.1 | Scientific Library for Python / BSD 3-Clause |
| [seaborn](https://seaborn.pydata.org) | 0.9.0 | Statistical data visualization / BSD 3-Clause |
| [send2trash](https://github.com/hsoft/send2trash) | 1.5.0 | Python library to natively send files to Trash (or Recycle bin) on all platforms. / BSD-3-Clause |
| [setuptools](https://github.com/pypa/setuptools) | 41.4.0 | Download, build, install, upgrade, and uninstall Python packages / MIT |
| [simplegeneric](http://cheeseshop.python.org/pypi/simplegeneric) | 0.8.1 | Simple generic functions (similar to Python’s own len(), pickle.dump(), etc.) / Zope Public |
| [singledispatch](http://docs.python.org/3/library/functools.html#functools.singledispatch) | 3.4.0.3 | Transforms a function into a single-dispatch generic function / MIT |
| [sip](http://www.riverbankcomputing.com/software/sip/intro) | 4.19.8 | Create Python bindings for C and C++ libraries / GPL-3.0 |
| [six](http://pypi.python.org/pypi/six/) | 1.12.0 | Python 2 and 3 compatibility utilities / MIT |
| [snappy](https://github.com/google/snappy) | 1.1.7 | A fast compressor/decompressor / BSD 3-clause |
| [snowballstemmer](https://github.com/shibukawa/snowball_py) | 2.0.0 | Snowball stemming library collection for Python / BSD-2-Clause |
| [sortedcollections](http://www.grantjenks.com/docs/sortedcollections/) | 1.1.2 | Python Sorted Collections / Apache-2.0 |
| [sortedcontainers](http://www.grantjenks.com/docs/sortedcontainers/) | 2.1.0 | Python Sorted Container Types: SortedList, SortedDict, and SortedSet / Apache 2.0 |
| [soupsieve](http://facelessuser.github.io/soupsieve) | 1.9.3 | A modern CSS selector implementation for BeautifulSoup / MIT |
| [sphinx](http://www.sphinx-doc.org) | 2.2.0 | Sphinx is a tool that makes it easy to create intelligent and beautiful documentation / BSD-2-Clause |
| sphinxcontrib | 1.0 | Python namespace for sphinxcontrib / BSD |
| [sphinxcontrib-applehelp](https://www.sphinx-doc.org/en/master/) | 1.0.1 | sphinxcontrib-applehelp is a sphinx extension which outputs Apple help books / BSD-2-Clause |
| [sphinxcontrib-devhelp](https://www.sphinx-doc.org/en/master/) | 1.0.1 | sphinxcontrib-devhelp is a sphinx extension which outputs Devhelp document / BSD-2-Clause |
| [sphinxcontrib-htmlhelp](https://www.sphinx-doc.org/en/master/) | 1.0.2 | sphinxcontrib-htmlhelp is a sphinx extension which … / BSD-2-Clause |
| [sphinxcontrib-jsmath](https://www.sphinx-doc.org/en/master/) | 1.0.1 | A sphinx extension which renders display math in HTML via JavaScript / BSD-2-Clause |
| [sphinxcontrib-qthelp](https://www.sphinx-doc.org/en/master/) | 1.0.2 | sphinxcontrib-qthelp is a sphinx extension which outputs QtHelp document / BSD-2-Clause |
| [sphinxcontrib-serializinghtml](https://www.sphinx-doc.org/en/master/) | 1.1.3 | sphinxcontrib-serializinghtml is a sphinx extension which outputs “serialized” HTML files (json and pickle). / BSD-2-Clause |
| [sphinxcontrib-websupport](https://pypi.python.org/pypi/sphinxcontrib-websupport) | 1.1.2 | Sphinx API for Web Apps / BSD-2-Clause |
| [spyder](https://www.spyder-ide.org/) | 3.3.6 | The Scientific Python Development Environment / MIT |
| [spyder-kernels](https://github.com/spyder-ide/spyder-kernels) | 0.5.2 | Jupyter kernels for the Spyder console / MIT |
| [sqlalchemy](http://www.sqlalchemy.org/) | 1.3.9 | Database Abstraction Library. / MIT |
| [sqlite](http://www.sqlite.org/) | 3.30.0 | Implements a self-contained, zero-configuration, SQL database engine. / Public-Domain (`<http://www.sqlite.org/copyright.html>`) |
| [statsmodels](https://www.statsmodels.org) | 0.10.1 | Statistical computations and models for use with SciPy / BSD 3-Clause |
| [sympy](http://sympy.org) | 1.4 | Python library for symbolic mathematics / BSD-3-Clause |
| [tbb](http://www.threadingbuildingblocks.org) | 2019.4 | High level abstract threading library / Apache 2.0 |
| [tblib](https://github.com/ionelmc/python-tblib) | 1.4.0 | Traceback serialization library. / BSD 2-Clause |
| [terminado](https://github.com/jupyter/terminado) | 0.8.2 | Terminals served by tornado websockets / BSD 2-Clause |
| [testpath](https://testpath.readthedocs.io) | 0.4.2 | Testpath is a collection of utilities for Python code working with files and commands. / BSD-3-Clause |
| [tk](http://www.tcl.tk/) | 8.6.8 | A dynamic programming language with GUI support. Bundles Tcl and Tk. / Tcl/Tk |
| [toolz](http://toolz.readthedocs.org/) | 0.10.0 | A functional standard library for Python / BSD 3-Clause |
| [tornado](http://www.tornadoweb.org/) | 6.0.3 | A Python web framework and asynchronous networking library, originally developed at FriendFeed. / Apache 2.0 |
| [tqdm](https://pypi.python.org/pypi/tqdm) | 4.36.1 | A Fast, Extensible Progress Meter / MPLv2.0, MIT |
| [traitlets](http://ipython.org/) | 4.3.3 | Configuration system for Python applications / BSD-3-Clause |
| [unicodecsv](https://github.com/jdunck/python-unicodecsv) | 0.14.1 | Drop-in replacement for csv module which supports unicode strings / BSD |
| [urllib3](https://urllib3.readthedocs.io/) | 1.24.2 | HTTP library with thread-safe connection pooling, file post, and more. / MIT |
| [vc](https://github.com/conda/conda/wiki/VC-features) | 14.1 | A meta-package to impose mutual exclusivity among software built with different VS versions / Modified BSD License (3-clause) |
| vs2015\_runtime | 14.16.27012 | MSVC runtimes associated with cl.exe version 19.16.27032.1 (VS 2017 update 9) / None |
| [wcwidth](https://github.com/jquast/wcwidth) | 0.1.7 | Measures number of Terminal column cells of wide-character codes. / MIT |
| [webencodings](https://github.com/gsnedders/python-webencodings) | 0.5.1 | Character encoding aliases for legacy web content / BSD 3-Clause |
| [werkzeug](https://palletsprojects.com/p/werkzeug/) | 0.16.0 | The comprehensive WSGI web application library. / BSD 3-Clause |
| [wheel](https://github.com/pypa/wheel) | 0.33.6 | A built-package format for Python. / MIT |
| [widgetsnbextension](http://ipython.org) | 3.5.1 | Interactive Widgets for Jupyter / BSD 3-clause |
| [win\_inet\_pton](https://github.com/hickeroar/win_inet_pton) | 1.1.0 | Native inet\_pton and inet\_ntop implementation for Python on Windows (with ctypes). / PUBLIC-DOMAIN |
| [win\_unicode\_console](https://github.com/Drekin/win-unicode-console) | 0.5 | A Python package to enable Unicode input and display when running Python from Windows console. / MIT |
| [wincertstore](https://bitbucket.org/tiran/wincertstore) | 0.2 | Python module to extract CA and CRL certs from Windows’ cert store (ctypes based). / PSF 2 |
| [winpty](https://github.com/rprichard/winpty) | 0.4.3 | Winpty provides an interface similar to a Unix pty-master for communicating with Windows console programs. / MIT |
| [wrapt](https://github.com/GrahamDumpleton/wrapt) | 1.11.2 | Module for decorators, wrappers and monkey patching / BSD 2-Clause |
| [xlrd](http://www.python-excel.org/) | 1.2.0 | Library for developers to extract data from Microsoft Excel (tm) spreadsheet files / BSD 3-Clause and BSD with advertising |
| [xlsxwriter](https://xlsxwriter.readthedocs.io/) | 1.2.1 | A Python module for creating Excel XLSX files / BSD 2-Clause |
| [xlwings](http://xlwings.org/) | 0.15.10 | Interact with Excel from Python and vice versa / 3-clause BSD |
| [xlwt](http://www.python-excel.org/) | 1.3.0 | Writing data and formatting information to Excel files / BSD |
| [xz](http://tukaani.org/xz/) | 5.2.4 | Data compression software with high compression ratio / LGPL-2.1 and GPL-2.0 |
| [yaml](http://pyyaml.org/wiki/LibYAML) | 0.1.7 | A C library for parsing and emitting YAML. / MIT |
| [zeromq](http://zeromq.org) | 4.3.1 | A high-performance asynchronous messaging library. / LGPL 3 |
| [zict](http://github.com/mrocklin/zict) | 1.0.0 | Composable Dictionary Classes / BSD 3-Clause |
| [zipp](https://github.com/jaraco/zipp) | 0.6.0 | A pathlib-compatible Zipfile object wrapper / MIT |
| [zlib](http://zlib.net/) | 1.2.11 | Massively spiffy yet delicately unobtrusive compression library / zlib |
| [zstd](http://www.zstd.net) | 1.3.7 | Zstandard - Fast real-time compression algorithm / BSD 3-Clause |
| Name | Version | Summary / License |
|---|---|---|
| [\_ipyw\_jlab\_nb\_ext\_conf](https://github.com/ContinuumIO/anaconda-nb-extensions-meta-config) | 0.1.0 | A configuration metapackage for enabling Anaconda-bundled jupyter extensions / BSD |
| [alabaster](http://www.sphinx-doc.org/en/stable/index.html) | 0.7.12 | Configurable, Python 2+3 compatible Sphinx theme. / BSD 3-Clause |
| [anaconda-client](http://anaconda.org) | 1.7.2 | anaconda.org command line client library / BSD 3-clause |
| [anaconda-project](https://github.com/Anaconda-Platform/anaconda-project) | 0.8.3 | Tool for encapsulating, running, and reproducing data science projects / BSD 3-Clause |
| [appnope](http://github.com/minrk/appnope) | 0.1.0 | Disable App Nap on OS X 10.9 / BSD 2-Clause |
| [appscript](http://appscript.sourceforge.net/) | 1.1.0 | Control AppleScriptable applications from Python / Public-Domain |
| [asn1crypto](https://github.com/wbond/asn1crypto) | 1.0.1 | Python ASN.1 library with a focus on performance and a pythonic API / MIT |
| [astroid](https://www.astroid.org/) | 2.3.1 | A abstract syntax tree for Python with inference support. / LGPL 2.1 |
| [astropy](http://www.astropy.org/) | 3.2.2 | Community-developed Python Library for Astronomy / BSD 3-clause |
| [atomicwrites](https://github.com/untitaker/python-atomicwrites) | 1.3.0 | Atomic file writes / MIT |
| [attrs](https://attrs.readthedocs.io/en/stable/) | 19.2.0 | attrs is the Python package that will bring back the joy of writing classes by relieving you from the drudgery of implementing object protocols (aka dunder methods). / MIT |
| [babel](http://babel.pocoo.org/) | 2.7.0 | Utilities to internationalize and localize Python applications / BSD 3-clause |
| [backcall](https://github.com/takluyver/backcall/) | 0.1.0 | Specifications for callback functions passed in to an API / BSD-3-Clause |
| [backports](https://bitbucket.org/brandon/backports) | 1.0 | None / BSD |
| [backports.os](https://github.com/pjdelport/backports.os) | 0.1.1 | Backport of new features in Python’s os module / Python Software Foundation |
| [backports.shutil\_get\_terminal\_size](https://github.com/chrippa/backports.shutil_get_terminal_size) | 1.0.0 | A backport of the get\_terminal\_size function from Python 3.3’s shutil. / MIT |
| [beautifulsoup4](http://www.crummy.com/software/BeautifulSoup/) | 4.8.0 | Python library designed for screen-scraping / MIT |
| [bitarray](https://github.com/ilanschnell/bitarray) | 1.0.1 | efficient arrays of booleans – C extension / PSF |
| [bkcharts](http://github.com/bokeh/bkcharts) | 0.2 | High level chart types built on top of Bokeh / BSD 3-Clause |
| blas | 1.0 | |
| [bleach](https://github.com/mozilla/bleach) | 3.1.0 | Easy, whitelist-based HTML-sanitizing tool / Apache-2.0 |
| [blosc](https://github.com/Blosc/c-blosc) | 1.16.3 | A blocking, shuffling and loss-less compression library that can be faster than memcpy() / BSD 3-Clause |
| [bokeh](http://bokeh.pydata.org/) | 1.3.4 | Statistical and novel interactive HTML plots for Python / BSD 3-Clause |
| [boto](https://github.com/boto/boto/) | 2.49.0 | Amazon Web Services Library / MIT |
| [bottleneck](http://berkeleyanalytics.com/bottleneck) | 1.2.1 | Fast NumPy array functions written in Cython. / BSD 2-Clause |
| [bzip2](http://www.bzip.org/) | 1.0.8 | high-quality data compressor / bzip2 |
| [ca-certificates](https://github.com/conda-forge/ca-certificates-feedstock) | 2019.8.28 | Certificates for use with other packages. / MPL 2.0 |
| [certifi](http://certifi.io/) | 2019.9.11 | Python package for providing Mozilla’s CA Bundle. / ISC |
| [cffi](https://bitbucket.org/cffi/cffi) | 1.12.3 | Foreign Function Interface for Python calling C code. / MIT |
| [chardet](https://github.com/chardet/chardet) | 3.0.4 | Universal character encoding detector / LGPL2 |
| [click](https://palletsprojects.com/p/click) | 7.0 | Python composable command line interface toolkit / BSD-3-Clause |
| [cloudpickle](https://github.com/cloudpipe/cloudpickle) | 1.2.2 | Extended pickling support for Python objects / BSD 3-Clause |
| [clyent](https://github.com/Anaconda-Platform/clyent) | 1.2.2 | Command line client library for windows and posix / BSD 3-Clause |
| [colorama](https://github.com/tartley/colorama) | 0.4.1 | Cross-platform colored terminal text / BSD-3-Clause |
| [conda](https://conda.io) | 4.7.12 | OS-agnostic, system-level binary package and environment manager. / BSD 3-Clause |
| [conda-build](https://github.com/conda/conda-build) | 3.18.9 | tools for building conda packages / BSD 3-Clause |
| [conda-env](https://github.com/conda/conda-env) | 2.6.0 | Tools for interacting with conda environments. / BSD 3-Clause |
| [conda-verify](https://github.com/conda/conda-verify) | 3.4.2 | tool for validating conda recipes and conda packages / BSD 3-Clause |
| [contextlib2](http://contextlib2.readthedocs.org) | 0.6.0 | Backports and enhancements for the contextlib module / PSF 2 |
| [cryptography](https://github.com/pyca/cryptography) | 2.7 | Provides cryptographic recipes and primitives to Python developers / Apache 2.0 or BSD 3-Clause, PSF 2 |
| [curl](http://curl.haxx.se/) | 7.65.3 | tool and library for transferring data with URL syntax / MIT/X derivate (`<http://curl.haxx.se/docs/copyright.html>`) |
| [cycler](http://matplotlib.org/cycler) | 0.10.0 | Composable style cycles. / BSD 3-Clause |
| [cython](http://www.cython.org/) | 0.29.13 | The Cython compiler for writing C extensions for the Python language / Apache-2.0 |
| [cytoolz](https://github.com/pytoolz/cytoolz) | 0.10.0 | Cython implementation of Toolz. High performance functional utilities / BSD-3-Clause |
| [dask](https://dask.org/) | 2.5.2 | Parallel PyData with Task Scheduling / BSD 3-Clause |
| [dask-core](http://github.com/dask/dask/) | 2.5.2 | Parallel Python with task scheduling / BSD 3-Clause |
| [dbus](http://www.freedesktop.org/wiki/Software/dbus/) | 1.13.6 | Simple message bus system for applications to talk to one another / GPL2 |
| [decorator](https://github.com/micheles/decorator) | 4.4.0 | Better living through Python with decorators. / BSD 3-Clause |
| [defusedxml](https://bitbucket.org/tiran/defusedxml) | 0.6.0 | XML bomb protection for Python stdlib modules / PSF 2.0 |
| [distributed](http://distributed.readthedocs.io/en/latest/) | 2.5.2 | Distributed computing with Dask / BSD 3-Clause |
| [docutils](http://docutils.sourceforge.net/) | 0.15.2 | Docutils – Python Documentation Utilities / Public Domain Dedictation and BSD 2-Clause and PSF 2.1.1 and GPL 3.0 |
| [entrypoints](https://github.com/takluyver/entrypoints) | 0.3 | Discover and load entry points from installed packages. / MIT License |
| [et\_xmlfile](https://bitbucket.org/openpyxl/et_xmlfile) | 1.0.1 | An implementation of lxml.xmlfile for the standard library / MIT |
| [expat](http://expat.sourceforge.net/) | 2.2.6 | Expat XML parser library in C. / MIT |
| [fastcache](https://github.com/pbrady/fastcache) | 1.1.0 | C implementation of Python 3 lru\_cache / MIT |
| [filelock](https://github.com/benediktschmitt/py-filelock) | 3.0.12 | A platform independent file lock. / Public Domain |
| [flask](http://flask.pocoo.org) | 1.1.1 | A microframework based on Werkzeug, Jinja2 and good intentions. / BSD 3-Clause |
| [freetype](https://www.freetype.org/) | 2.9.1 | A Free, High-Quality, and Portable Font Engine / GPL-2.0 and FreeType |
| [fsspec](https://github.com/martindurant/filesystem_spec) | 0.5.2 | A specification for pythonic filesystems / BSD-3-Clause |
| [get\_terminal\_size](https://github.com/chrippa/backports.shutil_get_terminal_size) | 1.0.0 | Get the size of the terminal window. / MIT |
| [gettext](https://www.gnu.org/software/gettext/) | 0.19.8.1 | Internationalization package. / GPLv2 |
| [gevent](http://www.gevent.org/) | 1.4.0 | Coroutine-based network library / MIT |
| [glib](https://developer.gnome.org/glib/) | 2.56.2 | Provides core application building blocks for libraries and applications written in C. / LGPL-2.1 |
| [glob2](https://github.com/miracle2k/python-glob2) | 0.7 | Version of the glob module that supports recursion via \*\*, and can capture patterns. / BSD-2-Clause |
| [gmp](http://gmplib.org/) | 6.1.2 | The GNU multiprecision library. / GPL 2 and LGPL 3 |
| [gmpy2](https://pypi.python.org/pypi/gmpy2) | 2.0.8 | GMP/MPIR, MPFR, and MPC interface to Python 2.6+ and 3.x / LGPL 3 |
| [greenlet](https://github.com/python-greenlet/greenlet) | 0.4.15 | Lightweight in-process concurrent programming / MIT |
| [h5py](http://www.h5py.org/) | 2.9.0 | Read and write HDF5 files from Python. / BSD-3-Clause |
| [hdf5](http://www.hdfgroup.org/HDF5/) | 1.10.4 | HDF5 is a data model, library, and file format for storing and managing data / HDF5 |
| [heapdict](http://stutzbachenterprises.com/) | 1.0.1 | A heap with decrease-key and increase-key operations / BSD 3-Clause |
| [html5lib](https://github.com/html5lib/html5lib-python) | 1.0.1 | HTML parser based on the WHATWG HTML specification / MIT |
| [icu](http://site.icu-project.org/) | 58.2 | International Components for Unicode. / MIT |
| [idna](https://github.com/kjd/idna) | 2.8 | Internationalized Domain Names in Applications (IDNA). / BSD Like |
| [imageio](http://imageio.github.io) | 2.6.0 | A Python library for reading and writing image data / BSD-2-Clause |
| [imagesize](https://github.com/shibukawa/imagesize_py) | 1.1.0 | Getting image size from png/jpeg/jpeg2000/gif file / MIT |
| [importlib\_metadata](http://importlib-metadata.readthedocs.io) | 0.23 | A library to access the metadata for a Python package / APACHE-2.0 |
| [intel-openmp](https://software.intel.com/en-us/node/522690) | 2019.4 | Math library for Intel and compatible processors / proprietary - Intel |
| [ipykernel](https://ipython.org) | 5.1.2 | IPython Kernel for Jupyter / BSD-3-Clause |
| [ipython](https://ipython.org/) | 7.8.0 | IPython: Productive Interactive Computing / BSD-3-Clause |
| [ipython\_genutils](http://ipython.org) | 0.2.0 | vestigial utilities from IPython / BSD 3-Clause |
| [ipywidgets](https://github.com/ipython/ipywidgets) | 7.5.1 | Jupyter Interactive Widgets / BSD 3-clause |
| [isort](https://github.com/timothycrosley/isort) | 4.3.21 | A Python utility / library to sort Python imports. / MIT |
| [itsdangerous](https://github.com/pallets/itsdangerous) | 1.1.0 | Various helpers to pass trusted data to untrusted environments. / BSD 3-Clause |
| [jbig](https://www.cl.cam.ac.uk/~mgk25/jbigkit) | 2.1 | Implementation of the JBIG1 data compression standard / GPL-2.0 |
| [jdcal](https://github.com/phn/jdcal) | 1.4.1 | Julian dates from proleptic Gregorian and Julian calendars. / BSD 2-Clause |
| [jedi](https://github.com/davidhalter/jedi/) | 0.15.1 | An autocompletion tool for Python that can be used for text editors. / MIT |
| [jinja2](http://jinja.pocoo.org) | 2.10.3 | An easy to use stand-alone template engine written in pure python. / 3-Clause BSD |
| [joblib](http://packages.python.org/joblib/) | 0.13.2 | Python function as pipeline jobs. / BSD 3-Clause |
| [jpeg](http://www.ijg.org/) | 9b | read/write jpeg COM, EXIF, IPTC medata / Custom free software license |
| [json5](https://github.com/dpranke/pyjson5) | 0.8.5 | A Python implementation of the JSON5 data format / Apache-2.0 |
| [jsonschema](https://github.com/Julian/jsonschema) | 3.0.2 | An implementation of JSON Schema validation for Python / MIT |
| [jupyter](http://jupyter.org) | 1.0.0 | Jupyter metapackage. Install all the Jupyter components in one go. / BSD 3-Clause |
| [jupyter\_client](http://jupyter.org) | 5.3.3 | Jupyter protocol implementation and client libraries / BSD 3-clause |
| [jupyter\_console](http://jupyter.org) | 6.0.0 | Jupyter terminal console / BSD-3-Clause |
| [jupyter\_core](http://jupyter.org) | 4.5.0 | Core common functionality of Jupyter projects. / BSD 3-clause |
| [jupyterlab](https://github.com/jupyterlab/jupyterlab) | 1.1.4 | JupyterLab / BSD-3-Clause |
| [jupyterlab\_server](http://github.com/jupyterlab/jupyterlab_server) | 1.0.6 | A set of server components for JupyterLab and JupyterLab like applications. / BSD 3-Clause |
| [keyring](https://github.com/jaraco/keyring) | 18.0.0 | Store and access your passwords safely / Python Software Foundation or MIT |
| [kiwisolver](https://github.com/nucleic/kiwi) | 1.1.0 | A fast implementation of the Cassowary constraint solver / BSD 3-Clause |
| [krb5](http://web.mit.edu/kerberos/) | 1.16.1 | A network authentication protocol. / MIT |
| [lazy-object-proxy](https://github.com/ionelmc/python-lazy-object-proxy) | 1.4.2 | A fast and thorough lazy object proxy / BSD-2-Clause |
| [libarchive](http://www.libarchive.org/) | 3.3.3 | Multi-format archive and compression library / BSD 2-Clause |
| [libcurl](http://curl.haxx.se/) | 7.65.3 | tool and library for transferring data with URL syntax / MIT/X derivate (`<http://curl.haxx.se/docs/copyright.html>`) |
| [libcxx](http://libcxx.llvm.org/) | 4.0.1 | C++ Standard Library / MIT license or UIUC License |
| [libcxxabi](http://libcxxabi.llvm.org/) | 4.0.1 | C++ Standard Library Support / MIT license or UIUC License |
| [libedit](http://thrysoee.dk/editline/) | 3.1.20181209 | Editline Library (libedit) / NetBSD |
| [libffi](https://sourceware.org/libffi/) | 3.2.1 | A Portable Foreign Function Interface Library. / Custom |
| [libgfortran](http://gcc.gnu.org/) | 3.0.1 | Fortran libraries from the GNU Compiler Collection / GPL 3 (with GCC Runtime Library Exception 3.1) |
| [libiconv](https://www.gnu.org/software/libiconv/) | 1.15 | Provides iconv for systems which don’t have one (or that cannot convert from/to Unicode.) / GPL and LGPL |
| [liblief](https://lief.quarkslab.com/) | 0.9.0 | A cross platform library to parse, modify and abstract ELF, PE and MachO formats. / Apache 2.0 |
| [libpng](http://www.libpng.org/pub/png/libpng.html) | 1.6.37 | PNG reference library / zlib/libpng |
| [libsodium](http://libsodium.org) | 1.0.16 | A modern and easy-to-use crypto library. / ISC |
| [libssh2](https://www.libssh2.org/) | 1.8.2 | the SSH library / BSD-3-Clause |
| [libtiff](http://www.libtiff.org/) | 4.0.10 | Support for the Tag Image File Format (TIFF). / HPND |
| [libxml2](http://xmlsoft.org/) | 2.9.9 | The XML C parser and toolkit of Gnome / MIT |
| [libxslt](http://xmlsoft.org/XSLT/) | 1.1.33 | The XSLT C library developed for the GNOME project / MIT |
| [llvm-openmp](http://openmp.llvm.org/) | 4.0.1 | Support for the OpenMP language / MIT license or UIUC License |
| [llvmlite](https://github.com/numba/llvmlite) | 0.29.0 | A lightweight LLVM python binding for writing JIT compilers / New BSD License |
| [locket](https://github.com/mwilliamson/locket.py) | 0.2.0 | File-based locks for Python for Linux and Windows / BSD 2-Clause |
| [lxml](http://lxml.de/) | 4.4.1 | Pythonic binding for the C libraries libxml2 and libxslt. / BSD 3-Clause, GPL-2.0, ZPL-2.0, and ElementTree |
| [lz4-c](https://www.lz4.org) | 1.8.1.2 | Extremely Fast Compression algorithm / BSD 2-clause |
| [lzo](http://www.oberhumer.com/opensource/lzo/) | 2.10 | LZO is a portable lossless data compression library written in ANSI C. / GPL v2+ |
| [markupsafe](https://www.palletsprojects.com/p/markupsafe) | 1.1.1 | A Python module that implements the jinja2.Markup string / BSD-3-Clause |
| [matplotlib](http://matplotlib.org/) | 3.1.1 | Publication quality figures in Python / PSF-based |
| [mccabe](https://github.com/PyCQA/mccabe) | 0.6.1 | McCabe complexity checker for Python / MIT |
| [mistune](https://github.com/lepture/mistune) | 0.8.4 | The fastest markdown parser in pure Python. / BSD 3-Clause |
| [mkl](https://software.intel.com/en-us/mkl) | 2019.4 | Math library for Intel and compatible processors / proprietary - Intel |
| [mkl-service](https://github.com/ContinuumIO/mkl-service) | 2.3.0 | Python bindings to MKL service functions / 3-clause BSD |
| [mkl\_fft](http://github.com/IntelPython/mkl_fft) | 1.0.14 | NumPy-based implementation of Fast Fourier Transform using Intel (R) Math Kernel Library. / BSD 3-Clause |
| [mkl\_random](http://github.com/IntelPython/mkl_random) | 1.1.0 | Intel (R) MKL-powered package for sampling from common probability distributions into NumPy arrays. / BSD 3-Clause |
| [mock](https://github.com/testing-cabal/mock) | 3.0.5 | A library for testing in Python / BSD-2-Clause |
| [more-itertools](https://github.com/erikrose/more-itertools) | 7.2.0 | More routines for operating on iterables, beyond itertools / MIT |
| [mpc](http://www.multiprecision.org/) | 1.1.0 | A C library for the arithmetic of complex numbers with arbitrarily high precision. / LGPL 3 |
| [mpfr](http://www.mpfr.org/) | 4.0.1 | The MPFR library is a C library for multiple-precision floating-point computations with correct rounding. / LGPL 3 |
| [mpmath](http://mpmath.org) | 1.1.0 | Python library for arbitrary-precision floating-point arithmetic / BSD 3-Clause |
| [msgpack-python](http://msgpack.org/) | 0.6.1 | MessagePack (de)serializer. / Apache 2.0 |
| [multipledispatch](https://github.com/mrocklin/multipledispatch/) | 0.6.0 | Multiple dispatch in Python / BSD 3-Clause |
| [nbconvert](http://jupyter.org) | 5.6.0 | Converting Jupyter Notebooks / BSD-3-Clause |
| [nbformat](http://jupyter.org) | 4.4.0 | The reference implementation of the Jupyter Notebook format / BSD 3-clause |
| [ncurses](http://www.gnu.org/software/ncurses/) | 6.1 | Library for text-based user interfaces / Free software (MIT-like) |
| [networkx](https://networkx.github.io/) | 2.3 | Python package for creating and manipulating complex networks / BSD-3-Clause |
| [nltk](http://nltk.org/) | 3.4.5 | Build Python programs to work with human language data / Apache 2.0 |
| [nose](http://readthedocs.org/docs/nose/) | 1.3.7 | Nose extends unittest to make testing easier / LGPL-2.1 |
| [notebook](http://jupyter.org) | 6.0.1 | Jupyter Notebook / BSD 3-clause |
| [numba](http://numba.github.com) | 0.45.1 | NumPy aware dynamic Python compiler using LLVM / BSD 2-clause |
| [numexpr](https://github.com/pydata/numexpr) | 2.7.0 | Fast numerical expression evaluator for NumPy. / MIT |
| [numpy](http://numpy.scipy.org/) | 1.17.2 | Array processing for numbers, strings, records, and objects. / BSD 3-Clause |
| [numpy-base](http://numpy.scipy.org/) | 1.17.2 | Array processing for numbers, strings, records, and objects. / BSD 3-Clause |
| [numpydoc](https://github.com/numpy/numpydoc) | 0.9.1 | Numpy’s Sphinx extensions / BSD 3-Clause |
| [olefile](http://www.decalage.info/python/olefileio) | 0.46 | parse, read and write Microsoft OLE2 files / BSD 2-Clause |
| [openpyxl](https://openpyxl.readthedocs.io) | 3.0.0 | A Python library to read/write Excel 2010 xlsx/xlsm files / MIT |
| [openssl](http://www.openssl.org/) | 1.1.1d | OpenSSL is an open-source implementation of the SSL and TLS protocols / OpenSSL |
| [packaging](https://github.com/pypa/packaging) | 19.2 | Core utilities for Python packages / Apache 2.0 or BSD 2-Clause |
| [pandas](http://pandas.pydata.org) | 0.25.1 | High-performance, easy-to-use data structures and data analysis tools. / BSD 3-clause |
| [pandoc](http://pandoc.org/) | 2.2.3.2 | Universal markup converter (repackaged binaries). / GPL-2.0 |
| [pandocfilters](https://github.com/jgm/pandocfilters) | 1.4.2 | A python module for writing pandoc filters / BSD-3-Clause |
| [parso](https://github.com/davidhalter/parso) | 0.5.1 | A Python Parser / MIT |
| [partd](https://github.com/dask/partd) | 1.0.0 | Data structure for on-disk shuffle operations / BSD 3-Clause |
| [path.py](https://github.com/jaraco/path.py) | 12.0.1 | A module wrapper for os.path / MIT |
| [pathlib2](https://github.com/mcmtroffaes/pathlib2) | 2.3.5 | Fork of pathlib aiming to support the full stdlib Python API / MIT |
| [patsy](https://github.com/pydata/patsy) | 0.5.1 | Describing statistical models in Python using symbolic formulas / BSD-2-Clause, PSF2 |
| [pcre](http://www.pcre.org/) | 8.43 | Regular expression pattern matching using the same syntax and semantics as Perl 5. / BSD 3-Clause |
| [pep8](http://pep8.readthedocs.org/) | 1.7.1 | Python style guide checker / MIT |
| [pexpect](http://pexpect.sourceforge.net/) | 4.7.0 | Pexpect makes Python a better tool for controlling other applications. / ISC |
| [pickleshare](https://github.com/pickleshare/pickleshare/) | 0.7.5 | Tiny ‘shelve’-like database with concurrency support / MIT |
| [pillow](https://pillow.readthedocs.io) | 6.2.0 | Pillow is the friendly PIL fork by Alex Clark and Contributors / PIL |
| [pip](https://pip.pypa.io/en/stable/) | 19.2.3 | PyPA recommended tool for installing Python packages / MIT |
| [pkginfo](https://code.launchpad.net/~tseaver/pkginfo/trunk) | 1.5.0.1 | Query metadatdata from sdists / bdists / installed packages. / MIT |
| [pluggy](https://github.com/pytest-dev/pluggy) | 0.13.0 | Plugin registration and hook calling for Python / MIT |
| [ply](http://www.dabeaz.com/ply/index.html) | 3.11 | Python Lex-Yacc / BSD 3-clause |
| [prometheus\_client](https://github.com/prometheus/client_python) | 0.7.1 | Python client for the Prometheus monitoring system / Apache 2.0 |
| [prompt\_toolkit](https://github.com/jonathanslenders/python-prompt-toolkit) | 2.0.10 | Library for building powerful interactive command lines in Python / BSD 3-clause |
| [psutil](https://github.com/giampaolo/psutil) | 5.6.3 | A cross-platform process and system utilities module for Python / BSD 3-Clause |
| [ptyprocess](https://github.com/pexpect/ptyprocess) | 0.6.0 | Run a subprocess in a pseudo terminal / ISC |
| [py](https://github.com/pytest-dev/py) | 1.8.0 | library with cross-python path, ini-parsing, io, code, log facilities / MIT |
| [py-lief](https://lief.quarkslab.com/) | 0.9.0 | A cross platform library to parse, modify and abstract ELF, PE and MachO formats. / Apache 2.0 |
| [pycodestyle](https://pycodestyle.readthedocs.io/) | 2.5.0 | Python style guide checker / MIT |
| [pycosat](https://github.com/ContinuumIO/pycosat) | 0.6.3 | Bindings to picosat (a SAT solver) / MIT |
| [pycparser](https://github.com/eliben/pycparser) | 2.19 | Complete C99 parser in pure Python / BSD 3-clause |
| [pycrypto](http://www.pycrypto.org/) | 2.6.1 | Cryptographic modules for Python. / Public Domain |
| [pycurl](http://pycurl.sourceforge.net/) | 7.43.0.3 | A Python Interface To The cURL library / LGPL, MIT |
| [pyflakes](https://github.com/PyCQA/pyflakes) | 2.1.1 | Pyflakes analyzes programs and detects various errors. / MIT |
| [pygments](http://pygments.org/) | 2.4.2 | Generic syntax highlighting package / BSD 2-clause |
| [pylint](http://www.pylint.org/) | 2.4.2 | python code static checker / GPL 2 |
| [pyodbc](https://github.com/mkleehammer/pyodbc) | 4.0.27 | DB API Module for ODBC / MIT |
| [pyopenssl](https://github.com/pyca/pyopenssl) | 19.0.0 | Python wrapper module around the OpenSSL library / Apache 2.0 |
| [pyparsing](http://pyparsing.wikispaces.com/) | 2.4.2 | Create and execute simple grammars / MIT |
| [pyqt](http://www.riverbankcomputing.co.uk/software/pyqt) | 5.9.2 | Python binding of the cross-platform GUI toolkit Qt. / Commercial, GPL-2.0, GPL-3.0 |
| [pyrsistent](http://github.com/tobgu/pyrsistent/) | 0.15.4 | Persistent/Functional/Immutable data structures / MIT |
| [pysocks](https://github.com/Anorov/PySocks) | 1.7.1 | A Python SOCKS client module. See [Anorov/PySocks](https://github.com/Anorov/PySocks) for more information. / BSD 3-Clause |
| [pytables](http://www.pytables.org) | 3.5.2 | Brings together Python, HDF5 and NumPy to easily handle large amounts of data. / BSD 3-Clause |
| [pytest](https://docs.pytest.org/en/latest/) | 5.2.1 | Simple and powerful testing with Python. / MIT |
| [pytest-arraydiff](https://github.com/astrofrog/pytest-arraydiff) | 0.3 | pytest plugin to help with comparing array output from tests / BSD |
| [pytest-astropy](https://github.com/astropy/pytest-astropy) | 0.5.0 | Meta-package containing dependencies for testing Astropy / BSD |
| [pytest-doctestplus](https://github.com/astropy/pytest-doctestplus) | 0.4.0 | Pytest plugin with advanced doctest features / BSD 3-Clause |
| [pytest-openfiles](https://github.com/astropy/pytest-openfiles) | 0.4.0 | Pytest plugin for detecting inadvertent open file handles / BSD-3-Clause |
| [pytest-remotedata](https://github.com/astropy/pytest-remotedata) | 0.3.2 | Pytest plugin for controlling remote data access / BSD |
| [python](http://www.python.org/) | 3.7.4 | General purpose programming language / PSF |
| [python-dateutil](https://dateutil.readthedocs.org/) | 2.8.0 | Extensions to the standard Python datetime module. / BSD 3 Clause |
| [python-libarchive-c](https://github.com/Changaco/python-libarchive-c) | 2.8 | Python interface to libarchive / CC0-1.0 |
| python.app | 2 | Proxy on OS X letting Python libraries hook into the gui event loop / BSD |
| [pytz](http://pythonhosted.org/pytz/) | 2019.3 | World timezone definitions, modern and historical. / MIT |
| [pywavelets](https://github.com/PyWavelets/pywt) | 1.0.3 | Discrete Wavelet Transforms in Python / MIT |
| [pyyaml](http://pyyaml.org/wiki/PyYAML) | 5.1.2 | YAML parser and emitter for Python / MIT |
| [pyzmq](https://github.com/zeromq/pyzmq) | 18.1.0 | Python bindings for zeromq / BSD 3-clause |
| [qt](http://qt-project.org) | 5.9.7 | Qt is a cross-platform application and UI framework. / LGPL-3.0 |
| [qtawesome](https://github.com/spyder-ide/qtawesome) | 0.6.0 | Iconic fonts in PyQt and PySide applications / MIT |
| [qtconsole](http://jupyter.org) | 4.5.5 | Jupyter Qt console / BSD 3-Clause |
| [qtpy](https://github.com/spyder-ide/qtpy) | 1.9.0 | Abstraction layer for PyQt5/PyQt4/PySide / MIT |
| [readline](https://cnswww.cns.cwru.edu/php/chet/readline/rltop.html) | 7.0 | library for editing command lines as they are typed in / GPL3 |
| [requests](http://python-requests.org) | 2.22.0 | Python HTTP for Humans / Apache 2.0 |
| ripgrep | 0.10.0 | |
| [rope](https://github.com/python-rope/rope) | 0.14.0 | A python refactoring library / GPL 2.0 |
| [ruamel\_yaml](https://bitbucket.org/ruamel/yaml) | 0.15.46 | A patched copy of ruamel.yaml. / MIT |
| [scikit-image](http://scikit-image.org/) | 0.15.0 | Image processing routines for SciPy. / BSD 3-Clause |
| [scikit-learn](http://scikit-learn.org/) | 0.21.3 | A set of python modules for machine learning and data mining / BSD 3-Clause |
| [scipy](http://www.scipy.org/) | 1.3.1 | Scientific Library for Python / BSD 3-Clause |
| [seaborn](https://seaborn.pydata.org) | 0.9.0 | Statistical data visualization / BSD 3-Clause |
| [send2trash](https://github.com/hsoft/send2trash) | 1.5.0 | Python library to natively send files to Trash (or Recycle bin) on all platforms. / BSD-3-Clause |
| [setuptools](https://github.com/pypa/setuptools) | 41.4.0 | Download, build, install, upgrade, and uninstall Python packages / MIT |
| [simplegeneric](http://cheeseshop.python.org/pypi/simplegeneric) | 0.8.1 | Simple generic functions (similar to Python’s own len(), pickle.dump(), etc.) / Zope Public |
| [singledispatch](http://docs.python.org/3/library/functools.html#functools.singledispatch) | 3.4.0.3 | Transforms a function into a single-dispatch generic function / MIT |
| [sip](http://www.riverbankcomputing.com/software/sip/intro) | 4.19.8 | Create Python bindings for C and C++ libraries / GPL-3.0 |
| [six](http://pypi.python.org/pypi/six/) | 1.12.0 | Python 2 and 3 compatibility utilities / MIT |
| [snappy](https://github.com/google/snappy) | 1.1.7 | A fast compressor/decompressor / BSD 3-clause |
| [snowballstemmer](https://github.com/shibukawa/snowball_py) | 2.0.0 | Snowball stemming library collection for Python / BSD-2-Clause |
| [sortedcollections](http://www.grantjenks.com/docs/sortedcollections/) | 1.1.2 | Python Sorted Collections / Apache-2.0 |
| [sortedcontainers](http://www.grantjenks.com/docs/sortedcontainers/) | 2.1.0 | Python Sorted Container Types: SortedList, SortedDict, and SortedSet / Apache 2.0 |
| [soupsieve](http://facelessuser.github.io/soupsieve) | 1.9.3 | A modern CSS selector implementation for BeautifulSoup / MIT |
| [sphinx](http://www.sphinx-doc.org) | 2.2.0 | Sphinx is a tool that makes it easy to create intelligent and beautiful documentation / BSD-2-Clause |
| sphinxcontrib | 1.0 | Python namespace for sphinxcontrib / BSD |
| [sphinxcontrib-applehelp](https://www.sphinx-doc.org/en/master/) | 1.0.1 | sphinxcontrib-applehelp is a sphinx extension which outputs Apple help books / BSD-2-Clause |
| [sphinxcontrib-devhelp](https://www.sphinx-doc.org/en/master/) | 1.0.1 | sphinxcontrib-devhelp is a sphinx extension which outputs Devhelp document / BSD-2-Clause |
| [sphinxcontrib-htmlhelp](https://www.sphinx-doc.org/en/master/) | 1.0.2 | sphinxcontrib-htmlhelp is a sphinx extension which … / BSD-2-Clause |
| [sphinxcontrib-jsmath](https://www.sphinx-doc.org/en/master/) | 1.0.1 | A sphinx extension which renders display math in HTML via JavaScript / BSD-2-Clause |
| [sphinxcontrib-qthelp](https://www.sphinx-doc.org/en/master/) | 1.0.2 | sphinxcontrib-qthelp is a sphinx extension which outputs QtHelp document / BSD-2-Clause |
| [sphinxcontrib-serializinghtml](https://www.sphinx-doc.org/en/master/) | 1.1.3 | sphinxcontrib-serializinghtml is a sphinx extension which outputs “serialized” HTML files (json and pickle). / BSD-2-Clause |
| [sphinxcontrib-websupport](https://pypi.python.org/pypi/sphinxcontrib-websupport) | 1.1.2 | Sphinx API for Web Apps / BSD-2-Clause |
| [spyder](https://www.spyder-ide.org/) | 3.3.6 | The Scientific Python Development Environment / MIT |
| [spyder-kernels](https://github.com/spyder-ide/spyder-kernels) | 0.5.2 | Jupyter kernels for the Spyder console / MIT |
| [sqlalchemy](http://www.sqlalchemy.org/) | 1.3.9 | Database Abstraction Library. / MIT |
| [sqlite](http://www.sqlite.org/) | 3.30.0 | Implements a self-contained, zero-configuration, SQL database engine. / Public-Domain (`<http://www.sqlite.org/copyright.html>`) |
| [statsmodels](https://www.statsmodels.org) | 0.10.1 | Statistical computations and models for use with SciPy / BSD 3-Clause |
| [sympy](http://sympy.org) | 1.4 | Python library for symbolic mathematics / BSD-3-Clause |
| [tbb](http://www.threadingbuildingblocks.org) | 2019.8 | High level abstract threading library / Apache 2.0 |
| [tblib](https://github.com/ionelmc/python-tblib) | 1.4.0 | Traceback serialization library. / BSD 2-Clause |
| [terminado](https://github.com/jupyter/terminado) | 0.8.2 | Terminals served by tornado websockets / BSD 2-Clause |
| [testpath](https://testpath.readthedocs.io) | 0.4.2 | Testpath is a collection of utilities for Python code working with files and commands. / BSD-3-Clause |
| [tk](http://www.tcl.tk/) | 8.6.8 | A dynamic programming language with GUI support. Bundles Tcl and Tk. / Tcl/Tk |
| [toolz](http://toolz.readthedocs.org/) | 0.10.0 | A functional standard library for Python / BSD 3-Clause |
| [tornado](http://www.tornadoweb.org/) | 6.0.3 | A Python web framework and asynchronous networking library, originally developed at FriendFeed. / Apache 2.0 |
| [tqdm](https://pypi.python.org/pypi/tqdm) | 4.36.1 | A Fast, Extensible Progress Meter / MPLv2.0, MIT |
| [traitlets](http://ipython.org/) | 4.3.3 | Configuration system for Python applications / BSD-3-Clause |
| [unicodecsv](https://github.com/jdunck/python-unicodecsv) | 0.14.1 | Drop-in replacement for csv module which supports unicode strings / BSD |
| [unixodbc](http://www.unixodbc.org/) | 2.3.7 | ODBC on non MS Windows platforms / LGPL-2.1 |
| [urllib3](https://urllib3.readthedocs.io/) | 1.24.2 | HTTP library with thread-safe connection pooling, file post, and more. / MIT |
| [wcwidth](https://github.com/jquast/wcwidth) | 0.1.7 | Measures number of Terminal column cells of wide-character codes. / MIT |
| [webencodings](https://github.com/gsnedders/python-webencodings) | 0.5.1 | Character encoding aliases for legacy web content / BSD 3-Clause |
| [werkzeug](https://palletsprojects.com/p/werkzeug/) | 0.16.0 | The comprehensive WSGI web application library. / BSD 3-Clause |
| [wheel](https://github.com/pypa/wheel) | 0.33.6 | A built-package format for Python. / MIT |
| [widgetsnbextension](http://ipython.org) | 3.5.1 | Interactive Widgets for Jupyter / BSD 3-clause |
| [wrapt](https://github.com/GrahamDumpleton/wrapt) | 1.11.2 | Module for decorators, wrappers and monkey patching / BSD 2-Clause |
| [wurlitzer](https://github.com/minrk/wurlitzer) | 1.0.3 | Capture C-level stdout/stderr in Python / MIT |
| [xlrd](http://www.python-excel.org/) | 1.2.0 | Library for developers to extract data from Microsoft Excel (tm) spreadsheet files / BSD 3-Clause and BSD with advertising |
| [xlsxwriter](https://xlsxwriter.readthedocs.io/) | 1.2.1 | A Python module for creating Excel XLSX files / BSD 2-Clause |
| [xlwings](http://xlwings.org/) | 0.15.10 | Interact with Excel from Python and vice versa / 3-clause BSD |
| [xlwt](http://www.python-excel.org/) | 1.3.0 | Writing data and formatting information to Excel files / BSD |
| [xz](http://tukaani.org/xz/) | 5.2.4 | Data compression software with high compression ratio / LGPL-2.1 and GPL-2.0 |
| [yaml](http://pyyaml.org/wiki/LibYAML) | 0.1.7 | A C library for parsing and emitting YAML. / MIT |
| [zeromq](http://zeromq.org) | 4.3.1 | A high-performance asynchronous messaging library. / LGPL 3 |
| [zict](http://github.com/mrocklin/zict) | 1.0.0 | Composable Dictionary Classes / BSD 3-Clause |
| [zipp](https://github.com/jaraco/zipp) | 0.6.0 | A pathlib-compatible Zipfile object wrapper / MIT |
| [zlib](http://zlib.net/) | 1.2.11 | Massively spiffy yet delicately unobtrusive compression library / zlib |
| [zstd](http://www.zstd.net) | 1.3.7 | Zstandard - Fast real-time compression algorithm / BSD 3-Clause |
| Name | Version | Summary / License |
|---|---|---|
| [\_ipyw\_jlab\_nb\_ext\_conf](https://github.com/ContinuumIO/anaconda-nb-extensions-meta-config) | 0.1.0 | A configuration metapackage for enabling Anaconda-bundled jupyter extensions / BSD |
| \_libgcc\_mutex | 0.1 | Mutex for libgcc and libgcc-ng / None |
| [alabaster](http://www.sphinx-doc.org/en/stable/index.html) | 0.7.12 | Configurable, Python 2+3 compatible Sphinx theme. / BSD 3-Clause |
| [anaconda-client](http://anaconda.org) | 1.7.2 | anaconda.org command line client library / BSD 3-clause |
| [anaconda-project](https://github.com/Anaconda-Platform/anaconda-project) | 0.8.3 | Tool for encapsulating, running, and reproducing data science projects / BSD 3-Clause |
| [asn1crypto](https://github.com/wbond/asn1crypto) | 1.0.1 | Python ASN.1 library with a focus on performance and a pythonic API / MIT |
| [astroid](https://www.astroid.org/) | 2.3.1 | A abstract syntax tree for Python with inference support. / LGPL 2.1 |
| [astropy](http://www.astropy.org/) | 3.2.2 | Community-developed Python Library for Astronomy / BSD 3-clause |
| [atomicwrites](https://github.com/untitaker/python-atomicwrites) | 1.3.0 | Atomic file writes / MIT |
| [attrs](https://attrs.readthedocs.io/en/stable/) | 19.2.0 | attrs is the Python package that will bring back the joy of writing classes by relieving you from the drudgery of implementing object protocols (aka dunder methods). / MIT |
| [babel](http://babel.pocoo.org/) | 2.7.0 | Utilities to internationalize and localize Python applications / BSD 3-clause |
| [backcall](https://github.com/takluyver/backcall/) | 0.1.0 | Specifications for callback functions passed in to an API / BSD-3-Clause |
| [backports](https://bitbucket.org/brandon/backports) | 1.0 | None / BSD |
| [backports.os](https://github.com/pjdelport/backports.os) | 0.1.1 | Backport of new features in Python’s os module / Python Software Foundation |
| [backports.shutil\_get\_terminal\_size](https://github.com/chrippa/backports.shutil_get_terminal_size) | 1.0.0 | A backport of the get\_terminal\_size function from Python 3.3’s shutil. / MIT |
| [beautifulsoup4](http://www.crummy.com/software/BeautifulSoup/) | 4.8.0 | Python library designed for screen-scraping / MIT |
| [bitarray](https://github.com/ilanschnell/bitarray) | 1.0.1 | efficient arrays of booleans – C extension / PSF |
| [bkcharts](http://github.com/bokeh/bkcharts) | 0.2 | High level chart types built on top of Bokeh / BSD 3-Clause |
| blas | 1.0 | |
| [bleach](https://github.com/mozilla/bleach) | 3.1.0 | Easy, whitelist-based HTML-sanitizing tool / Apache-2.0 |
| [blosc](https://github.com/Blosc/c-blosc) | 1.16.3 | A blocking, shuffling and loss-less compression library that can be faster than memcpy() / BSD 3-Clause |
| [bokeh](http://bokeh.pydata.org/) | 1.3.4 | Statistical and novel interactive HTML plots for Python / BSD 3-Clause |
| [boto](https://github.com/boto/boto/) | 2.49.0 | Amazon Web Services Library / MIT |
| [bottleneck](http://berkeleyanalytics.com/bottleneck) | 1.2.1 | Fast NumPy array functions written in Cython. / BSD 2-Clause |
| [bzip2](http://www.bzip.org/) | 1.0.8 | high-quality data compressor / bzip2 |
| [ca-certificates](https://github.com/conda-forge/ca-certificates-feedstock) | 2019.8.28 | Certificates for use with other packages. / MPL 2.0 |
| [cairo](http://cairographics.org/) | 1.14.12 | Cairo is a 2D graphics library with support for multiple output devices. / LGPL 2.1 or MPL 1.1 |
| [certifi](http://certifi.io/) | 2019.9.11 | Python package for providing Mozilla’s CA Bundle. / ISC |
| [cffi](https://bitbucket.org/cffi/cffi) | 1.12.3 | Foreign Function Interface for Python calling C code. / MIT |
| [chardet](https://github.com/chardet/chardet) | 3.0.4 | Universal character encoding detector / LGPL2 |
| [click](https://palletsprojects.com/p/click) | 7.0 | Python composable command line interface toolkit / BSD-3-Clause |
| [cloudpickle](https://github.com/cloudpipe/cloudpickle) | 1.2.2 | Extended pickling support for Python objects / BSD 3-Clause |
| [clyent](https://github.com/Anaconda-Platform/clyent) | 1.2.2 | Command line client library for windows and posix / BSD 3-Clause |
| [colorama](https://github.com/tartley/colorama) | 0.4.1 | Cross-platform colored terminal text / BSD-3-Clause |
| [conda](https://conda.io) | 4.7.12 | OS-agnostic, system-level binary package and environment manager. / BSD 3-Clause |
| [conda-build](https://github.com/conda/conda-build) | 3.18.9 | tools for building conda packages / BSD 3-Clause |
| [conda-env](https://github.com/conda/conda-env) | 2.6.0 | Tools for interacting with conda environments. / BSD 3-Clause |
| [conda-verify](https://github.com/conda/conda-verify) | 3.4.2 | tool for validating conda recipes and conda packages / BSD 3-Clause |
| [contextlib2](http://contextlib2.readthedocs.org) | 0.6.0 | Backports and enhancements for the contextlib module / PSF 2 |
| [cryptography](https://github.com/pyca/cryptography) | 2.7 | Provides cryptographic recipes and primitives to Python developers / Apache 2.0 or BSD 3-Clause, PSF 2 |
| [curl](http://curl.haxx.se/) | 7.65.3 | tool and library for transferring data with URL syntax / MIT/X derivate (`<http://curl.haxx.se/docs/copyright.html>`) |
| [cycler](http://matplotlib.org/cycler) | 0.10.0 | Composable style cycles. / BSD 3-Clause |
| [cython](http://www.cython.org/) | 0.29.13 | The Cython compiler for writing C extensions for the Python language / Apache-2.0 |
| [cytoolz](https://github.com/pytoolz/cytoolz) | 0.10.0 | Cython implementation of Toolz. High performance functional utilities / BSD-3-Clause |
| [dask](https://dask.org/) | 2.5.2 | Parallel PyData with Task Scheduling / BSD 3-Clause |
| [dask-core](http://github.com/dask/dask/) | 2.5.2 | Parallel Python with task scheduling / BSD 3-Clause |
| [decorator](https://github.com/micheles/decorator) | 4.4.0 | Better living through Python with decorators. / BSD 3-Clause |
| [defusedxml](https://bitbucket.org/tiran/defusedxml) | 0.6.0 | XML bomb protection for Python stdlib modules / PSF 2.0 |
| [distributed](http://distributed.readthedocs.io/en/latest/) | 2.5.2 | Distributed computing with Dask / BSD 3-Clause |
| [docutils](http://docutils.sourceforge.net/) | 0.15.2 | Docutils – Python Documentation Utilities / Public Domain Dedictation and BSD 2-Clause and PSF 2.1.1 and GPL 3.0 |
| [entrypoints](https://github.com/takluyver/entrypoints) | 0.3 | Discover and load entry points from installed packages. / MIT License |
| [et\_xmlfile](https://bitbucket.org/openpyxl/et_xmlfile) | 1.0.1 | An implementation of lxml.xmlfile for the standard library / MIT |
| [expat](http://expat.sourceforge.net/) | 2.2.6 | Expat XML parser library in C. / MIT |
| [fastcache](https://github.com/pbrady/fastcache) | 1.1.0 | C implementation of Python 3 lru\_cache / MIT |
| [filelock](https://github.com/benediktschmitt/py-filelock) | 3.0.12 | A platform independent file lock. / Public Domain |
| [flask](http://flask.pocoo.org) | 1.1.1 | A microframework based on Werkzeug, Jinja2 and good intentions. / BSD 3-Clause |
| [fontconfig](http://www.freedesktop.org/wiki/Software/fontconfig/) | 2.13.0 | A library for configuring and customizing font access. / MIT |
| [freetype](https://www.freetype.org/) | 2.9.1 | A Free, High-Quality, and Portable Font Engine / GPL-2.0 and FreeType |
| [fsspec](https://github.com/martindurant/filesystem_spec) | 0.5.2 | A specification for pythonic filesystems / BSD-3-Clause |
| [get\_terminal\_size](https://github.com/chrippa/backports.shutil_get_terminal_size) | 1.0.0 | Get the size of the terminal window. / MIT |
| [gevent](http://www.gevent.org/) | 1.4.0 | Coroutine-based network library / MIT |
| [glib](https://developer.gnome.org/glib/) | 2.56.2 | Provides core application building blocks for libraries and applications written in C. / LGPL-2.1 |
| [glob2](https://github.com/miracle2k/python-glob2) | 0.7 | Version of the glob module that supports recursion via \*\*, and can capture patterns. / BSD-2-Clause |
| [gmp](http://gmplib.org/) | 6.1.2 | The GNU multiprecision library. / GPL 2 and LGPL 3 |
| [gmpy2](https://pypi.python.org/pypi/gmpy2) | 2.0.8 | GMP/MPIR, MPFR, and MPC interface to Python 2.6+ and 3.x / LGPL 3 |
| [greenlet](https://github.com/python-greenlet/greenlet) | 0.4.15 | Lightweight in-process concurrent programming / MIT |
| [h5py](http://www.h5py.org/) | 2.8.0 | Read and write HDF5 files from Python. / BSD-3-Clause |
| [hdf5](http://www.hdfgroup.org/HDF5/) | 1.10.2 | HDF5 is a data model, library, and file format for storing and managing data / HDF5 |
| [heapdict](http://stutzbachenterprises.com/) | 1.0.1 | A heap with decrease-key and increase-key operations / BSD 3-Clause |
| [html5lib](https://github.com/html5lib/html5lib-python) | 1.0.1 | HTML parser based on the WHATWG HTML specification / MIT |
| [icu](http://site.icu-project.org/) | 58.2 | International Components for Unicode. / MIT |
| [idna](https://github.com/kjd/idna) | 2.8 | Internationalized Domain Names in Applications (IDNA). / BSD Like |
| [imageio](http://imageio.github.io) | 2.6.0 | A Python library for reading and writing image data / BSD-2-Clause |
| [imagesize](https://github.com/shibukawa/imagesize_py) | 1.1.0 | Getting image size from png/jpeg/jpeg2000/gif file / MIT |
| [importlib\_metadata](http://importlib-metadata.readthedocs.io) | 0.23 | A library to access the metadata for a Python package / APACHE-2.0 |
| [ipykernel](https://ipython.org) | 5.1.2 | IPython Kernel for Jupyter / BSD-3-Clause |
| [ipython](https://ipython.org/) | 7.8.0 | IPython: Productive Interactive Computing / BSD-3-Clause |
| [ipython\_genutils](http://ipython.org) | 0.2.0 | vestigial utilities from IPython / BSD 3-Clause |
| [ipywidgets](https://github.com/ipython/ipywidgets) | 7.5.1 | Jupyter Interactive Widgets / BSD 3-clause |
| [isort](https://github.com/timothycrosley/isort) | 4.3.21 | A Python utility / library to sort Python imports. / MIT |
| [itsdangerous](https://github.com/pallets/itsdangerous) | 1.1.0 | Various helpers to pass trusted data to untrusted environments. / BSD 3-Clause |
| [jbig](https://www.cl.cam.ac.uk/~mgk25/jbigkit) | 2.1 | Implementation of the JBIG1 data compression standard / GPL-2.0 |
| [jdcal](https://github.com/phn/jdcal) | 1.4.1 | Julian dates from proleptic Gregorian and Julian calendars. / BSD 2-Clause |
| [jedi](https://github.com/davidhalter/jedi/) | 0.15.1 | An autocompletion tool for Python that can be used for text editors. / MIT |
| [jinja2](http://jinja.pocoo.org) | 2.10.3 | An easy to use stand-alone template engine written in pure python. / 3-Clause BSD |
| [joblib](http://packages.python.org/joblib/) | 0.13.2 | Python function as pipeline jobs. / BSD 3-Clause |
| [jpeg](http://www.ijg.org/) | 9b | read/write jpeg COM, EXIF, IPTC medata / Custom free software license |
| [jsonschema](https://github.com/Julian/jsonschema) | 3.0.2 | An implementation of JSON Schema validation for Python / MIT |
| [jupyter](http://jupyter.org) | 1.0.0 | Jupyter metapackage. Install all the Jupyter components in one go. / BSD 3-Clause |
| [jupyter\_client](http://jupyter.org) | 5.3.3 | Jupyter protocol implementation and client libraries / BSD 3-clause |
| [jupyter\_console](http://jupyter.org) | 6.0.0 | Jupyter terminal console / BSD-3-Clause |
| [jupyter\_core](http://jupyter.org) | 4.5.0 | Core common functionality of Jupyter projects. / BSD 3-clause |
| [kiwisolver](https://github.com/nucleic/kiwi) | 1.1.0 | A fast implementation of the Cassowary constraint solver / BSD 3-Clause |
| [krb5](http://web.mit.edu/kerberos/) | 1.16.1 | A network authentication protocol. / MIT |
| [lazy-object-proxy](https://github.com/ionelmc/python-lazy-object-proxy) | 1.4.2 | A fast and thorough lazy object proxy / BSD-2-Clause |
| [libarchive](http://www.libarchive.org/) | 3.3.3 | Multi-format archive and compression library / BSD 2-Clause |
| [libcurl](http://curl.haxx.se/) | 7.65.3 | tool and library for transferring data with URL syntax / MIT/X derivate (`<http://curl.haxx.se/docs/copyright.html>`) |
| [libedit](http://thrysoee.dk/editline/) | 3.1.20181209 | Editline Library (libedit) / NetBSD |
| [libffi](https://sourceware.org/libffi/) | 3.2.1 | A Portable Foreign Function Interface Library. / Custom |
| [libgcc-ng](https://gcc.gnu.org/onlinedocs/gccint/Libgcc.html) | 8.2.0 | The GCC low-level runtime library / GPL |
| [libgfortran-ng](https://gcc.gnu.org/) | 7.3.0 | The GNU Fortran Runtime Library / GPL |
| [libopenblas](http://www.openblas.net/) | 0.3.6 | An Optimized BLAS library / BSD |
| [libpng](http://www.libpng.org/pub/png/libpng.html) | 1.6.37 | PNG reference library / zlib/libpng |
| [libsodium](http://libsodium.org) | 1.0.16 | A modern and easy-to-use crypto library. / ISC |
| [libssh2](https://www.libssh2.org/) | 1.8.2 | the SSH library / BSD-3-Clause |
| [libstdcxx-ng](https://gcc.gnu.org/) | 8.2.0 | The GNU C++ Runtime Library / GPL3 with runtime exception |
| [libtiff](http://www.libtiff.org/) | 4.0.10 | Support for the Tag Image File Format (TIFF). / HPND |
| [libuuid](http://sourceforge.net/projects/libuuid/) | 1.0.3 | Portable uuid C library. / BSD 3-Clause |
| [libxcb](http://xcb.freedesktop.org/) | 1.13 | This is the C-language Binding (XCB) package to the X Window System protocol / MIT |
| [libxml2](http://xmlsoft.org/) | 2.9.9 | The XML C parser and toolkit of Gnome / MIT |
| [libxslt](http://xmlsoft.org/XSLT/) | 1.1.33 | The XSLT C library developed for the GNOME project / MIT |
| [locket](https://github.com/mwilliamson/locket.py) | 0.2.0 | File-based locks for Python for Linux and Windows / BSD 2-Clause |
| [lxml](http://lxml.de/) | 4.4.1 | Pythonic binding for the C libraries libxml2 and libxslt. / BSD 3-Clause, GPL-2.0, ZPL-2.0, and ElementTree |
| [lz4-c](https://www.lz4.org) | 1.8.1.2 | Extremely Fast Compression algorithm / BSD 2-clause |
| [lzo](http://www.oberhumer.com/opensource/lzo/) | 2.10 | LZO is a portable lossless data compression library written in ANSI C. / GPL v2+ |
| [markupsafe](https://www.palletsprojects.com/p/markupsafe) | 1.1.1 | A Python module that implements the jinja2.Markup string / BSD-3-Clause |
| [matplotlib](http://matplotlib.org/) | 3.1.1 | Publication quality figures in Python / PSF-based |
| [mccabe](https://github.com/PyCQA/mccabe) | 0.6.1 | McCabe complexity checker for Python / MIT |
| [mistune](https://github.com/lepture/mistune) | 0.8.4 | The fastest markdown parser in pure Python. / BSD 3-Clause |
| [more-itertools](https://github.com/erikrose/more-itertools) | 7.2.0 | More routines for operating on iterables, beyond itertools / MIT |
| [mpc](http://www.multiprecision.org/) | 1.1.0 | A C library for the arithmetic of complex numbers with arbitrarily high precision. / LGPL 3 |
| [mpfr](http://www.mpfr.org/) | 4.0.1 | The MPFR library is a C library for multiple-precision floating-point computations with correct rounding. / LGPL 3 |
| [mpmath](http://mpmath.org) | 1.1.0 | Python library for arbitrary-precision floating-point arithmetic / BSD 3-Clause |
| [msgpack-python](http://msgpack.org/) | 0.6.1 | MessagePack (de)serializer. / Apache 2.0 |
| [multipledispatch](https://github.com/mrocklin/multipledispatch/) | 0.6.0 | Multiple dispatch in Python / BSD 3-Clause |
| [nbconvert](http://jupyter.org) | 5.6.0 | Converting Jupyter Notebooks / BSD-3-Clause |
| [nbformat](http://jupyter.org) | 4.4.0 | The reference implementation of the Jupyter Notebook format / BSD 3-clause |
| [ncurses](http://www.gnu.org/software/ncurses/) | 6.1 | Library for text-based user interfaces / Free software (MIT-like) |
| [networkx](https://networkx.github.io/) | 2.3 | Python package for creating and manipulating complex networks / BSD-3-Clause |
| [nltk](http://nltk.org/) | 3.4.5 | Build Python programs to work with human language data / Apache 2.0 |
| nomkl | 3.0 | None / BSD |
| [nose](http://readthedocs.org/docs/nose/) | 1.3.7 | Nose extends unittest to make testing easier / LGPL-2.1 |
| [notebook](http://jupyter.org) | 6.0.1 | Jupyter Notebook / BSD 3-clause |
| [numexpr](https://github.com/pydata/numexpr) | 2.7.0 | Fast numerical expression evaluator for NumPy. / MIT |
| [numpy](http://numpy.scipy.org/) | 1.17.2 | Array processing for numbers, strings, records, and objects. / BSD 3-Clause |
| [numpy-base](http://numpy.scipy.org/) | 1.17.2 | Array processing for numbers, strings, records, and objects. / BSD 3-Clause |
| [numpydoc](https://github.com/numpy/numpydoc) | 0.9.1 | Numpy’s Sphinx extensions / BSD 3-Clause |
| [olefile](http://www.decalage.info/python/olefileio) | 0.46 | parse, read and write Microsoft OLE2 files / BSD 2-Clause |
| [openblas](http://www.openblas.net/) | 0.3.6 | An Optimized BLAS library / BSD |
| openblas-devel | 0.3.6 | OpenBLAS headers and libraries for developing software that used OpenBLAS. / None |
| [openpyxl](https://openpyxl.readthedocs.io) | 3.0.0 | A Python library to read/write Excel 2010 xlsx/xlsm files / MIT |
| [openssl](http://www.openssl.org/) | 1.1.1d | OpenSSL is an open-source implementation of the SSL and TLS protocols / OpenSSL |
| [packaging](https://github.com/pypa/packaging) | 19.2 | Core utilities for Python packages / Apache 2.0 or BSD 2-Clause |
| [pandas](http://pandas.pydata.org) | 0.25.1 | High-performance, easy-to-use data structures and data analysis tools. / BSD 3-clause |
| [pandoc](http://pandoc.org/) | 2.0.0.1 | Universal markup converter (repackaged binaries). / GPL-2.0 |
| [pandocfilters](https://github.com/jgm/pandocfilters) | 1.4.2 | A python module for writing pandoc filters / BSD-3-Clause |
| [parso](https://github.com/davidhalter/parso) | 0.5.1 | A Python Parser / MIT |
| [partd](https://github.com/dask/partd) | 1.0.0 | Data structure for on-disk shuffle operations / BSD 3-Clause |
| [patchelf](http://nixos.org/patchelf.html) | 0.9 | A small utility to modify the dynamic linker and RPATH of ELF executables. / GPL 3 |
| [path.py](https://github.com/jaraco/path.py) | 12.0.1 | A module wrapper for os.path / MIT |
| [pathlib2](https://github.com/mcmtroffaes/pathlib2) | 2.3.5 | Fork of pathlib aiming to support the full stdlib Python API / MIT |
| [patsy](https://github.com/pydata/patsy) | 0.5.1 | Describing statistical models in Python using symbolic formulas / BSD-2-Clause, PSF2 |
| [pcre](http://www.pcre.org/) | 8.43 | Regular expression pattern matching using the same syntax and semantics as Perl 5. / BSD 3-Clause |
| [pep8](http://pep8.readthedocs.org/) | 1.7.1 | Python style guide checker / MIT |
| [pexpect](http://pexpect.sourceforge.net/) | 4.7.0 | Pexpect makes Python a better tool for controlling other applications. / ISC |
| [pickleshare](https://github.com/pickleshare/pickleshare/) | 0.7.5 | Tiny ‘shelve’-like database with concurrency support / MIT |
| [pillow](https://pillow.readthedocs.io) | 6.2.0 | Pillow is the friendly PIL fork by Alex Clark and Contributors / PIL |
| [pip](https://pip.pypa.io/en/stable/) | 19.2.3 | PyPA recommended tool for installing Python packages / MIT |
| [pixman](http://www.pixman.org/) | 0.34.0 | A low-level software library for pixel manipulation. / MIT |
| [pkginfo](https://code.launchpad.net/~tseaver/pkginfo/trunk) | 1.5.0.1 | Query metadatdata from sdists / bdists / installed packages. / MIT |
| [pluggy](https://github.com/pytest-dev/pluggy) | 0.13.0 | Plugin registration and hook calling for Python / MIT |
| [ply](http://www.dabeaz.com/ply/index.html) | 3.11 | Python Lex-Yacc / BSD 3-clause |
| [prometheus\_client](https://github.com/prometheus/client_python) | 0.7.1 | Python client for the Prometheus monitoring system / Apache 2.0 |
| [prompt\_toolkit](https://github.com/jonathanslenders/python-prompt-toolkit) | 2.0.10 | Library for building powerful interactive command lines in Python / BSD 3-clause |
| [psutil](https://github.com/giampaolo/psutil) | 5.6.3 | A cross-platform process and system utilities module for Python / BSD 3-Clause |
| [ptyprocess](https://github.com/pexpect/ptyprocess) | 0.6.0 | Run a subprocess in a pseudo terminal / ISC |
| [py](https://github.com/pytest-dev/py) | 1.8.0 | library with cross-python path, ini-parsing, io, code, log facilities / MIT |
| [pycodestyle](https://pycodestyle.readthedocs.io/) | 2.5.0 | Python style guide checker / MIT |
| [pycosat](https://github.com/ContinuumIO/pycosat) | 0.6.3 | Bindings to picosat (a SAT solver) / MIT |
| [pycparser](https://github.com/eliben/pycparser) | 2.19 | Complete C99 parser in pure Python / BSD 3-clause |
| [pycrypto](http://www.pycrypto.org/) | 2.6.1 | Cryptographic modules for Python. / Public Domain |
| [pycurl](http://pycurl.sourceforge.net/) | 7.43.0.3 | A Python Interface To The cURL library / LGPL, MIT |
| [pyflakes](https://github.com/PyCQA/pyflakes) | 2.1.1 | Pyflakes analyzes programs and detects various errors. / MIT |
| [pygments](http://pygments.org/) | 2.4.2 | Generic syntax highlighting package / BSD 2-clause |
| [pylint](http://www.pylint.org/) | 2.4.2 | python code static checker / GPL 2 |
| [pyodbc](https://github.com/mkleehammer/pyodbc) | 4.0.27 | DB API Module for ODBC / MIT |
| [pyopenssl](https://github.com/pyca/pyopenssl) | 19.0.0 | Python wrapper module around the OpenSSL library / Apache 2.0 |
| [pyparsing](http://pyparsing.wikispaces.com/) | 2.4.2 | Create and execute simple grammars / MIT |
| [pyrsistent](http://github.com/tobgu/pyrsistent/) | 0.15.4 | Persistent/Functional/Immutable data structures / MIT |
| [pysocks](https://github.com/Anorov/PySocks) | 1.7.1 | A Python SOCKS client module. See [Anorov/PySocks](https://github.com/Anorov/PySocks) for more information. / BSD 3-Clause |
| [pytables](http://www.pytables.org) | 3.4.4 | Brings together Python, HDF5 and NumPy to easily handle large amounts of data. / BSD 3-Clause |
| [pytest](https://docs.pytest.org/en/latest/) | 5.2.1 | Simple and powerful testing with Python. / MIT |
| [pytest-arraydiff](https://github.com/astrofrog/pytest-arraydiff) | 0.3 | pytest plugin to help with comparing array output from tests / BSD |
| [pytest-astropy](https://github.com/astropy/pytest-astropy) | 0.5.0 | Meta-package containing dependencies for testing Astropy / BSD |
| [pytest-doctestplus](https://github.com/astropy/pytest-doctestplus) | 0.4.0 | Pytest plugin with advanced doctest features / BSD 3-Clause |
| [pytest-openfiles](https://github.com/astropy/pytest-openfiles) | 0.4.0 | Pytest plugin for detecting inadvertent open file handles / BSD-3-Clause |
| [pytest-remotedata](https://github.com/astropy/pytest-remotedata) | 0.3.2 | Pytest plugin for controlling remote data access / BSD |
| [python](http://www.python.org/) | 3.7.4 | General purpose programming language / PSF |
| [python-dateutil](https://dateutil.readthedocs.org/) | 2.8.0 | Extensions to the standard Python datetime module. / BSD 3 Clause |
| [python-libarchive-c](https://github.com/Changaco/python-libarchive-c) | 2.8 | Python interface to libarchive / CC0-1.0 |
| [pytz](http://pythonhosted.org/pytz/) | 2019.3 | World timezone definitions, modern and historical. / MIT |
| [pywavelets](https://github.com/PyWavelets/pywt) | 1.0.3 | Discrete Wavelet Transforms in Python / MIT |
| [pyyaml](http://pyyaml.org/wiki/PyYAML) | 5.1.2 | YAML parser and emitter for Python / MIT |
| [pyzmq](https://github.com/zeromq/pyzmq) | 18.1.0 | Python bindings for zeromq / BSD 3-clause |
| [readline](https://cnswww.cns.cwru.edu/php/chet/readline/rltop.html) | 7.0 | library for editing command lines as they are typed in / GPL3 |
| [requests](http://python-requests.org) | 2.22.0 | Python HTTP for Humans / Apache 2.0 |
| [ruamel\_yaml](https://bitbucket.org/ruamel/yaml) | 0.15.46 | A patched copy of ruamel.yaml. / MIT |
| [scikit-image](http://scikit-image.org/) | 0.15.0 | Image processing routines for SciPy. / BSD 3-Clause |
| [scikit-learn](http://scikit-learn.org/) | 0.21.3 | A set of python modules for machine learning and data mining / BSD 3-Clause |
| [scipy](http://www.scipy.org/) | 1.3.0 | Scientific Library for Python / BSD 3-Clause |
| [seaborn](https://seaborn.pydata.org) | 0.9.0 | Statistical data visualization / BSD 3-Clause |
| [send2trash](https://github.com/hsoft/send2trash) | 1.5.0 | Python library to natively send files to Trash (or Recycle bin) on all platforms. / BSD-3-Clause |
| [setuptools](https://github.com/pypa/setuptools) | 41.4.0 | Download, build, install, upgrade, and uninstall Python packages / MIT |
| [simplegeneric](http://cheeseshop.python.org/pypi/simplegeneric) | 0.8.1 | Simple generic functions (similar to Python’s own len(), pickle.dump(), etc.) / Zope Public |
| [singledispatch](http://docs.python.org/3/library/functools.html#functools.singledispatch) | 3.4.0.3 | Transforms a function into a single-dispatch generic function / MIT |
| [six](http://pypi.python.org/pypi/six/) | 1.12.0 | Python 2 and 3 compatibility utilities / MIT |
| [snappy](https://github.com/google/snappy) | 1.1.7 | A fast compressor/decompressor / BSD 3-clause |
| [snowballstemmer](https://github.com/shibukawa/snowball_py) | 2.0.0 | Snowball stemming library collection for Python / BSD-2-Clause |
| [sortedcollections](http://www.grantjenks.com/docs/sortedcollections/) | 1.1.2 | Python Sorted Collections / Apache-2.0 |
| [sortedcontainers](http://www.grantjenks.com/docs/sortedcontainers/) | 2.1.0 | Python Sorted Container Types: SortedList, SortedDict, and SortedSet / Apache 2.0 |
| [soupsieve](http://facelessuser.github.io/soupsieve) | 1.9.3 | A modern CSS selector implementation for BeautifulSoup / MIT |
| [sphinx](http://www.sphinx-doc.org) | 2.2.0 | Sphinx is a tool that makes it easy to create intelligent and beautiful documentation / BSD-2-Clause |
| sphinxcontrib | 1.0 | Python namespace for sphinxcontrib / BSD |
| [sphinxcontrib-applehelp](https://www.sphinx-doc.org/en/master/) | 1.0.1 | sphinxcontrib-applehelp is a sphinx extension which outputs Apple help books / BSD-2-Clause |
| [sphinxcontrib-devhelp](https://www.sphinx-doc.org/en/master/) | 1.0.1 | sphinxcontrib-devhelp is a sphinx extension which outputs Devhelp document / BSD-2-Clause |
| [sphinxcontrib-htmlhelp](https://www.sphinx-doc.org/en/master/) | 1.0.2 | sphinxcontrib-htmlhelp is a sphinx extension which … / BSD-2-Clause |
| [sphinxcontrib-jsmath](https://www.sphinx-doc.org/en/master/) | 1.0.1 | A sphinx extension which renders display math in HTML via JavaScript / BSD-2-Clause |
| [sphinxcontrib-qthelp](https://www.sphinx-doc.org/en/master/) | 1.0.2 | sphinxcontrib-qthelp is a sphinx extension which outputs QtHelp document / BSD-2-Clause |
| [sphinxcontrib-serializinghtml](https://www.sphinx-doc.org/en/master/) | 1.1.3 | sphinxcontrib-serializinghtml is a sphinx extension which outputs “serialized” HTML files (json and pickle). / BSD-2-Clause |
| [sphinxcontrib-websupport](https://pypi.python.org/pypi/sphinxcontrib-websupport) | 1.1.2 | Sphinx API for Web Apps / BSD-2-Clause |
| [sqlalchemy](http://www.sqlalchemy.org/) | 1.3.9 | Database Abstraction Library. / MIT |
| [sqlite](http://www.sqlite.org/) | 3.30.0 | Implements a self-contained, zero-configuration, SQL database engine. / Public-Domain (`<http://www.sqlite.org/copyright.html>`) |
| [statsmodels](https://www.statsmodels.org) | 0.10.1 | Statistical computations and models for use with SciPy / BSD 3-Clause |
| [sympy](http://sympy.org) | 1.4 | Python library for symbolic mathematics / BSD-3-Clause |
| [tblib](https://github.com/ionelmc/python-tblib) | 1.4.0 | Traceback serialization library. / BSD 2-Clause |
| [terminado](https://github.com/jupyter/terminado) | 0.8.2 | Terminals served by tornado websockets / BSD 2-Clause |
| [testpath](https://testpath.readthedocs.io) | 0.4.2 | Testpath is a collection of utilities for Python code working with files and commands. / BSD-3-Clause |
| [tk](http://www.tcl.tk/) | 8.6.8 | A dynamic programming language with GUI support. Bundles Tcl and Tk. / Tcl/Tk |
| [toolz](http://toolz.readthedocs.org/) | 0.10.0 | A functional standard library for Python / BSD 3-Clause |
| [tornado](http://www.tornadoweb.org/) | 6.0.3 | A Python web framework and asynchronous networking library, originally developed at FriendFeed. / Apache 2.0 |
| [tqdm](https://pypi.python.org/pypi/tqdm) | 4.36.1 | A Fast, Extensible Progress Meter / MPLv2.0, MIT |
| [traitlets](http://ipython.org/) | 4.3.3 | Configuration system for Python applications / BSD-3-Clause |
| [unicodecsv](https://github.com/jdunck/python-unicodecsv) | 0.14.1 | Drop-in replacement for csv module which supports unicode strings / BSD |
| [unixodbc](http://www.unixodbc.org/) | 2.3.7 | ODBC on non MS Windows platforms / LGPL-2.1 |
| [urllib3](https://urllib3.readthedocs.io/) | 1.24.2 | HTTP library with thread-safe connection pooling, file post, and more. / MIT |
| [wcwidth](https://github.com/jquast/wcwidth) | 0.1.7 | Measures number of Terminal column cells of wide-character codes. / MIT |
| [webencodings](https://github.com/gsnedders/python-webencodings) | 0.5.1 | Character encoding aliases for legacy web content / BSD 3-Clause |
| [werkzeug](https://palletsprojects.com/p/werkzeug/) | 0.16.0 | The comprehensive WSGI web application library. / BSD 3-Clause |
| [wheel](https://github.com/pypa/wheel) | 0.33.6 | A built-package format for Python. / MIT |
| [widgetsnbextension](http://ipython.org) | 3.5.1 | Interactive Widgets for Jupyter / BSD 3-clause |
| [wrapt](https://github.com/GrahamDumpleton/wrapt) | 1.11.2 | Module for decorators, wrappers and monkey patching / BSD 2-Clause |
| [xlrd](http://www.python-excel.org/) | 1.2.0 | Library for developers to extract data from Microsoft Excel (tm) spreadsheet files / BSD 3-Clause and BSD with advertising |
| [xlsxwriter](https://xlsxwriter.readthedocs.io/) | 1.2.1 | A Python module for creating Excel XLSX files / BSD 2-Clause |
| [xlwt](http://www.python-excel.org/) | 1.3.0 | Writing data and formatting information to Excel files / BSD |
| [xz](http://tukaani.org/xz/) | 5.2.4 | Data compression software with high compression ratio / LGPL-2.1 and GPL-2.0 |
| [yaml](http://pyyaml.org/wiki/LibYAML) | 0.1.7 | A C library for parsing and emitting YAML. / MIT |
| [zeromq](http://zeromq.org) | 4.2.5 | A high-performance asynchronous messaging library. / LGPL 3 |
| [zict](http://github.com/mrocklin/zict) | 1.0.0 | Composable Dictionary Classes / BSD 3-Clause |
| [zipp](https://github.com/jaraco/zipp) | 0.6.0 | A pathlib-compatible Zipfile object wrapper / MIT |
| [zlib](http://zlib.net/) | 1.2.11 | Massively spiffy yet delicately unobtrusive compression library / zlib |
| [zstd](http://www.zstd.net) | 1.3.7 | Zstandard - Fast real-time compression algorithm / BSD 3-Clause |
| Name | Version | Summary / License |
|---|---|---|
| [\_ipyw\_jlab\_nb\_ext\_conf](https://github.com/ContinuumIO/anaconda-nb-extensions-meta-config) | 0.1.0 | A configuration metapackage for enabling Anaconda-bundled jupyter extensions / BSD |
| \_libgcc\_mutex | 0.1 | Mutex for libgcc and libgcc-ng / None |
| [alabaster](http://www.sphinx-doc.org/en/stable/index.html) | 0.7.12 | Configurable, Python 2+3 compatible Sphinx theme. / BSD 3-Clause |
| [anaconda-client](http://anaconda.org) | 1.7.2 | anaconda.org command line client library / BSD 3-clause |
| [anaconda-project](https://github.com/Anaconda-Platform/anaconda-project) | 0.8.3 | Tool for encapsulating, running, and reproducing data science projects / BSD 3-Clause |
| [asn1crypto](https://github.com/wbond/asn1crypto) | 1.0.1 | Python ASN.1 library with a focus on performance and a pythonic API / MIT |
| [astroid](https://www.astroid.org/) | 2.3.1 | A abstract syntax tree for Python with inference support. / LGPL 2.1 |
| [astropy](http://www.astropy.org/) | 3.2.2 | Community-developed Python Library for Astronomy / BSD 3-clause |
| [atomicwrites](https://github.com/untitaker/python-atomicwrites) | 1.3.0 | Atomic file writes / MIT |
| [attrs](https://attrs.readthedocs.io/en/stable/) | 19.2.0 | attrs is the Python package that will bring back the joy of writing classes by relieving you from the drudgery of implementing object protocols (aka dunder methods). / MIT |
| [babel](http://babel.pocoo.org/) | 2.7.0 | Utilities to internationalize and localize Python applications / BSD 3-clause |
| [backcall](https://github.com/takluyver/backcall/) | 0.1.0 | Specifications for callback functions passed in to an API / BSD-3-Clause |
| [backports](https://bitbucket.org/brandon/backports) | 1.0 | None / BSD |
| [backports.os](https://github.com/pjdelport/backports.os) | 0.1.1 | Backport of new features in Python’s os module / Python Software Foundation |
| [backports.shutil\_get\_terminal\_size](https://github.com/chrippa/backports.shutil_get_terminal_size) | 1.0.0 | A backport of the get\_terminal\_size function from Python 3.3’s shutil. / MIT |
| [beautifulsoup4](http://www.crummy.com/software/BeautifulSoup/) | 4.8.0 | Python library designed for screen-scraping / MIT |
| [bitarray](https://github.com/ilanschnell/bitarray) | 1.0.1 | efficient arrays of booleans – C extension / PSF |
| [bkcharts](http://github.com/bokeh/bkcharts) | 0.2 | High level chart types built on top of Bokeh / BSD 3-Clause |
| blas | 1.0 | |
| [bleach](https://github.com/mozilla/bleach) | 3.1.0 | Easy, whitelist-based HTML-sanitizing tool / Apache-2.0 |
| [blosc](https://github.com/Blosc/c-blosc) | 1.16.3 | A blocking, shuffling and loss-less compression library that can be faster than memcpy() / BSD 3-Clause |
| [bokeh](http://bokeh.pydata.org/) | 1.3.4 | Statistical and novel interactive HTML plots for Python / BSD 3-Clause |
| [boto](https://github.com/boto/boto/) | 2.49.0 | Amazon Web Services Library / MIT |
| [bottleneck](http://berkeleyanalytics.com/bottleneck) | 1.2.1 | Fast NumPy array functions written in Cython. / BSD 2-Clause |
| [bzip2](http://www.bzip.org/) | 1.0.8 | high-quality data compressor / bzip2 |
| [ca-certificates](https://github.com/conda-forge/ca-certificates-feedstock) | 2019.8.28 | Certificates for use with other packages. / MPL 2.0 |
| [cairo](http://cairographics.org/) | 1.14.12 | Cairo is a 2D graphics library with support for multiple output devices. / LGPL 2.1 or MPL 1.1 |
| [certifi](http://certifi.io/) | 2019.9.11 | Python package for providing Mozilla’s CA Bundle. / ISC |
| [cffi](https://bitbucket.org/cffi/cffi) | 1.12.3 | Foreign Function Interface for Python calling C code. / MIT |
| [chardet](https://github.com/chardet/chardet) | 3.0.4 | Universal character encoding detector / LGPL2 |
| [click](https://palletsprojects.com/p/click) | 7.0 | Python composable command line interface toolkit / BSD-3-Clause |
| [cloudpickle](https://github.com/cloudpipe/cloudpickle) | 1.2.2 | Extended pickling support for Python objects / BSD 3-Clause |
| [clyent](https://github.com/Anaconda-Platform/clyent) | 1.2.2 | Command line client library for windows and posix / BSD 3-Clause |
| [colorama](https://github.com/tartley/colorama) | 0.4.1 | Cross-platform colored terminal text / BSD-3-Clause |
| [conda](https://conda.io) | 4.7.12 | OS-agnostic, system-level binary package and environment manager. / BSD 3-Clause |
| [conda-build](https://github.com/conda/conda-build) | 3.18.9 | tools for building conda packages / BSD 3-Clause |
| [conda-env](https://github.com/conda/conda-env) | 2.6.0 | Tools for interacting with conda environments. / BSD 3-Clause |
| [conda-verify](https://github.com/conda/conda-verify) | 3.4.2 | tool for validating conda recipes and conda packages / BSD 3-Clause |
| [contextlib2](http://contextlib2.readthedocs.org) | 0.6.0 | Backports and enhancements for the contextlib module / PSF 2 |
| [cryptography](https://github.com/pyca/cryptography) | 2.7 | Provides cryptographic recipes and primitives to Python developers / Apache 2.0 or BSD 3-Clause, PSF 2 |
| [curl](http://curl.haxx.se/) | 7.65.3 | tool and library for transferring data with URL syntax / MIT/X derivate (`<http://curl.haxx.se/docs/copyright.html>`) |
| [cycler](http://matplotlib.org/cycler) | 0.10.0 | Composable style cycles. / BSD 3-Clause |
| [cython](http://www.cython.org/) | 0.29.13 | The Cython compiler for writing C extensions for the Python language / Apache-2.0 |
| [cytoolz](https://github.com/pytoolz/cytoolz) | 0.10.0 | Cython implementation of Toolz. High performance functional utilities / BSD-3-Clause |
| [dask](https://dask.org/) | 2.5.2 | Parallel PyData with Task Scheduling / BSD 3-Clause |
| [dask-core](http://github.com/dask/dask/) | 2.5.2 | Parallel Python with task scheduling / BSD 3-Clause |
| [dbus](http://www.freedesktop.org/wiki/Software/dbus/) | 1.13.6 | Simple message bus system for applications to talk to one another / GPL2 |
| [decorator](https://github.com/micheles/decorator) | 4.4.0 | Better living through Python with decorators. / BSD 3-Clause |
| [defusedxml](https://bitbucket.org/tiran/defusedxml) | 0.6.0 | XML bomb protection for Python stdlib modules / PSF 2.0 |
| [distributed](http://distributed.readthedocs.io/en/latest/) | 2.5.2 | Distributed computing with Dask / BSD 3-Clause |
| [docutils](http://docutils.sourceforge.net/) | 0.15.2 | Docutils – Python Documentation Utilities / Public Domain Dedictation and BSD 2-Clause and PSF 2.1.1 and GPL 3.0 |
| [entrypoints](https://github.com/takluyver/entrypoints) | 0.3 | Discover and load entry points from installed packages. / MIT License |
| [et\_xmlfile](https://bitbucket.org/openpyxl/et_xmlfile) | 1.0.1 | An implementation of lxml.xmlfile for the standard library / MIT |
| [expat](http://expat.sourceforge.net/) | 2.2.6 | Expat XML parser library in C. / MIT |
| [fastcache](https://github.com/pbrady/fastcache) | 1.1.0 | C implementation of Python 3 lru\_cache / MIT |
| [filelock](https://github.com/benediktschmitt/py-filelock) | 3.0.12 | A platform independent file lock. / Public Domain |
| [flask](http://flask.pocoo.org) | 1.1.1 | A microframework based on Werkzeug, Jinja2 and good intentions. / BSD 3-Clause |
| [fontconfig](http://www.freedesktop.org/wiki/Software/fontconfig/) | 2.13.0 | A library for configuring and customizing font access. / MIT |
| [freetype](https://www.freetype.org/) | 2.9.1 | A Free, High-Quality, and Portable Font Engine / GPL-2.0 and FreeType |
| [fribidi](https://github.com/fribidi/fribidi) | 1.0.5 | The Free Implementation of the Unicode Bidirectional Algorithm. / LGPL-2.1 |
| [fsspec](https://github.com/martindurant/filesystem_spec) | 0.5.2 | A specification for pythonic filesystems / BSD-3-Clause |
| [get\_terminal\_size](https://github.com/chrippa/backports.shutil_get_terminal_size) | 1.0.0 | Get the size of the terminal window. / MIT |
| [gevent](http://www.gevent.org/) | 1.4.0 | Coroutine-based network library / MIT |
| [glib](https://developer.gnome.org/glib/) | 2.56.2 | Provides core application building blocks for libraries and applications written in C. / LGPL-2.1 |
| [glob2](https://github.com/miracle2k/python-glob2) | 0.7 | Version of the glob module that supports recursion via \*\*, and can capture patterns. / BSD-2-Clause |
| [gmp](http://gmplib.org/) | 6.1.2 | The GNU multiprecision library. / GPL 2 and LGPL 3 |
| [gmpy2](https://pypi.python.org/pypi/gmpy2) | 2.0.8 | GMP/MPIR, MPFR, and MPC interface to Python 2.6+ and 3.x / LGPL 3 |
| [graphite2](http://graphite.sil.org/) | 1.3.13 | A “smart font” system that handles the complexities of lesser-known languages of the world. / LGPLv2 |
| [greenlet](https://github.com/python-greenlet/greenlet) | 0.4.15 | Lightweight in-process concurrent programming / MIT |
| [gst-plugins-base](http://gstreamer.freedesktop.org/) | 1.14.0 | GStreamer Base Plug-ins / GPL2 |
| [gstreamer](http://gstreamer.freedesktop.org/) | 1.14.0 | Library for constructing graphs of media-handling components / LGPL 2 |
| [h5py](http://www.h5py.org/) | 2.9.0 | Read and write HDF5 files from Python. / BSD-3-Clause |
| [harfbuzz](http://www.freedesktop.org/wiki/Software/HarfBuzz/) | 1.8.8 | An OpenType text shaping engine. / MIT |
| [hdf5](http://www.hdfgroup.org/HDF5/) | 1.10.4 | HDF5 is a data model, library, and file format for storing and managing data / HDF5 |
| [heapdict](http://stutzbachenterprises.com/) | 1.0.1 | A heap with decrease-key and increase-key operations / BSD 3-Clause |
| [html5lib](https://github.com/html5lib/html5lib-python) | 1.0.1 | HTML parser based on the WHATWG HTML specification / MIT |
| [icu](http://site.icu-project.org/) | 58.2 | International Components for Unicode. / MIT |
| [idna](https://github.com/kjd/idna) | 2.8 | Internationalized Domain Names in Applications (IDNA). / BSD Like |
| [imageio](http://imageio.github.io) | 2.6.0 | A Python library for reading and writing image data / BSD-2-Clause |
| [imagesize](https://github.com/shibukawa/imagesize_py) | 1.1.0 | Getting image size from png/jpeg/jpeg2000/gif file / MIT |
| [importlib\_metadata](http://importlib-metadata.readthedocs.io) | 0.23 | A library to access the metadata for a Python package / APACHE-2.0 |
| [intel-openmp](https://software.intel.com/en-us/node/522690) | 2019.4 | Math library for Intel and compatible processors / proprietary - Intel |
| [ipykernel](https://ipython.org) | 5.1.2 | IPython Kernel for Jupyter / BSD-3-Clause |
| [ipython](https://ipython.org/) | 7.8.0 | IPython: Productive Interactive Computing / BSD-3-Clause |
| [ipython\_genutils](http://ipython.org) | 0.2.0 | vestigial utilities from IPython / BSD 3-Clause |
| [ipywidgets](https://github.com/ipython/ipywidgets) | 7.5.1 | Jupyter Interactive Widgets / BSD 3-clause |
| [isort](https://github.com/timothycrosley/isort) | 4.3.21 | A Python utility / library to sort Python imports. / MIT |
| [itsdangerous](https://github.com/pallets/itsdangerous) | 1.1.0 | Various helpers to pass trusted data to untrusted environments. / BSD 3-Clause |
| [jbig](https://www.cl.cam.ac.uk/~mgk25/jbigkit) | 2.1 | Implementation of the JBIG1 data compression standard / GPL-2.0 |
| [jdcal](https://github.com/phn/jdcal) | 1.4.1 | Julian dates from proleptic Gregorian and Julian calendars. / BSD 2-Clause |
| [jedi](https://github.com/davidhalter/jedi/) | 0.15.1 | An autocompletion tool for Python that can be used for text editors. / MIT |
| [jeepney](https://gitlab.com/takluyver/jeepney) | 0.4.1 | Pure Python DBus interface / MIT |
| [jinja2](http://jinja.pocoo.org) | 2.10.3 | An easy to use stand-alone template engine written in pure python. / 3-Clause BSD |
| [joblib](http://packages.python.org/joblib/) | 0.13.2 | Python function as pipeline jobs. / BSD 3-Clause |
| [jpeg](http://www.ijg.org/) | 9b | read/write jpeg COM, EXIF, IPTC medata / Custom free software license |
| [json5](https://github.com/dpranke/pyjson5) | 0.8.5 | A Python implementation of the JSON5 data format / Apache-2.0 |
| [jsonschema](https://github.com/Julian/jsonschema) | 3.0.2 | An implementation of JSON Schema validation for Python / MIT |
| [jupyter](http://jupyter.org) | 1.0.0 | Jupyter metapackage. Install all the Jupyter components in one go. / BSD 3-Clause |
| [jupyter\_client](http://jupyter.org) | 5.3.3 | Jupyter protocol implementation and client libraries / BSD 3-clause |
| [jupyter\_console](http://jupyter.org) | 6.0.0 | Jupyter terminal console / BSD-3-Clause |
| [jupyter\_core](http://jupyter.org) | 4.5.0 | Core common functionality of Jupyter projects. / BSD 3-clause |
| [jupyterlab](https://github.com/jupyterlab/jupyterlab) | 1.1.4 | JupyterLab / BSD-3-Clause |
| [jupyterlab\_server](http://github.com/jupyterlab/jupyterlab_server) | 1.0.6 | A set of server components for JupyterLab and JupyterLab like applications. / BSD 3-Clause |
| [keyring](https://github.com/jaraco/keyring) | 18.0.0 | Store and access your passwords safely / Python Software Foundation or MIT |
| [kiwisolver](https://github.com/nucleic/kiwi) | 1.1.0 | A fast implementation of the Cassowary constraint solver / BSD 3-Clause |
| [krb5](http://web.mit.edu/kerberos/) | 1.16.1 | A network authentication protocol. / MIT |
| [lazy-object-proxy](https://github.com/ionelmc/python-lazy-object-proxy) | 1.4.2 | A fast and thorough lazy object proxy / BSD-2-Clause |
| [libarchive](http://www.libarchive.org/) | 3.3.3 | Multi-format archive and compression library / BSD 2-Clause |
| [libcurl](http://curl.haxx.se/) | 7.65.3 | tool and library for transferring data with URL syntax / MIT/X derivate (`<http://curl.haxx.se/docs/copyright.html>`) |
| [libedit](http://thrysoee.dk/editline/) | 3.1.20181209 | Editline Library (libedit) / NetBSD |
| [libffi](https://sourceware.org/libffi/) | 3.2.1 | A Portable Foreign Function Interface Library. / Custom |
| [libgcc-ng](https://gcc.gnu.org/onlinedocs/gccint/Libgcc.html) | 9.1.0 | The GCC low-level runtime library / GPL |
| [libgfortran-ng](https://gcc.gnu.org/) | 7.3.0 | The GNU Fortran Runtime Library / GPL |
| [liblief](https://lief.quarkslab.com/) | 0.9.0 | A cross platform library to parse, modify and abstract ELF, PE and MachO formats. / Apache 2.0 |
| [libpng](http://www.libpng.org/pub/png/libpng.html) | 1.6.37 | PNG reference library / zlib/libpng |
| [libsodium](http://libsodium.org) | 1.0.16 | A modern and easy-to-use crypto library. / ISC |
| [libssh2](https://www.libssh2.org/) | 1.8.2 | the SSH library / BSD-3-Clause |
| [libstdcxx-ng](https://gcc.gnu.org/) | 9.1.0 | The GNU C++ Runtime Library / GPL3 with runtime exception |
| [libtiff](http://www.libtiff.org/) | 4.0.10 | Support for the Tag Image File Format (TIFF). / HPND |
| [libtool](http://www.gnu.org/software/libtool/) | 2.4.6 | The GNU Portable Library Tool / GPL 3 |
| [libuuid](http://sourceforge.net/projects/libuuid/) | 1.0.3 | Portable uuid C library. / BSD 3-Clause |
| [libxcb](http://xcb.freedesktop.org/) | 1.13 | This is the C-language Binding (XCB) package to the X Window System protocol / MIT |
| [libxml2](http://xmlsoft.org/) | 2.9.9 | The XML C parser and toolkit of Gnome / MIT |
| [libxslt](http://xmlsoft.org/XSLT/) | 1.1.33 | The XSLT C library developed for the GNOME project / MIT |
| [llvmlite](https://github.com/numba/llvmlite) | 0.29.0 | A lightweight LLVM python binding for writing JIT compilers / New BSD License |
| [locket](https://github.com/mwilliamson/locket.py) | 0.2.0 | File-based locks for Python for Linux and Windows / BSD 2-Clause |
| [lxml](http://lxml.de/) | 4.4.1 | Pythonic binding for the C libraries libxml2 and libxslt. / BSD 3-Clause, GPL-2.0, ZPL-2.0, and ElementTree |
| [lz4-c](https://www.lz4.org) | 1.8.1.2 | Extremely Fast Compression algorithm / BSD 2-clause |
| [lzo](http://www.oberhumer.com/opensource/lzo/) | 2.10 | LZO is a portable lossless data compression library written in ANSI C. / GPL v2+ |
| [markupsafe](https://www.palletsprojects.com/p/markupsafe) | 1.1.1 | A Python module that implements the jinja2.Markup string / BSD-3-Clause |
| [matplotlib](http://matplotlib.org/) | 3.1.1 | Publication quality figures in Python / PSF-based |
| [mccabe](https://github.com/PyCQA/mccabe) | 0.6.1 | McCabe complexity checker for Python / MIT |
| [mistune](https://github.com/lepture/mistune) | 0.8.4 | The fastest markdown parser in pure Python. / BSD 3-Clause |
| [mkl](https://software.intel.com/en-us/mkl) | 2019.4 | Math library for Intel and compatible processors / proprietary - Intel |
| [mkl-service](https://github.com/ContinuumIO/mkl-service) | 2.3.0 | Python bindings to MKL service functions / 3-clause BSD |
| [mkl\_fft](http://github.com/IntelPython/mkl_fft) | 1.0.14 | NumPy-based implementation of Fast Fourier Transform using Intel (R) Math Kernel Library. / BSD 3-Clause |
| [mkl\_random](http://github.com/IntelPython/mkl_random) | 1.1.0 | Intel (R) MKL-powered package for sampling from common probability distributions into NumPy arrays. / BSD 3-Clause |
| [mock](https://github.com/testing-cabal/mock) | 3.0.5 | A library for testing in Python / BSD-2-Clause |
| [more-itertools](https://github.com/erikrose/more-itertools) | 7.2.0 | More routines for operating on iterables, beyond itertools / MIT |
| [mpc](http://www.multiprecision.org/) | 1.1.0 | A C library for the arithmetic of complex numbers with arbitrarily high precision. / LGPL 3 |
| [mpfr](http://www.mpfr.org/) | 4.0.1 | The MPFR library is a C library for multiple-precision floating-point computations with correct rounding. / LGPL 3 |
| [mpmath](http://mpmath.org) | 1.1.0 | Python library for arbitrary-precision floating-point arithmetic / BSD 3-Clause |
| [msgpack-python](http://msgpack.org/) | 0.6.1 | MessagePack (de)serializer. / Apache 2.0 |
| [multipledispatch](https://github.com/mrocklin/multipledispatch/) | 0.6.0 | Multiple dispatch in Python / BSD 3-Clause |
| [nbconvert](http://jupyter.org) | 5.6.0 | Converting Jupyter Notebooks / BSD-3-Clause |
| [nbformat](http://jupyter.org) | 4.4.0 | The reference implementation of the Jupyter Notebook format / BSD 3-clause |
| [ncurses](http://www.gnu.org/software/ncurses/) | 6.1 | Library for text-based user interfaces / Free software (MIT-like) |
| [networkx](https://networkx.github.io/) | 2.3 | Python package for creating and manipulating complex networks / BSD-3-Clause |
| [nltk](http://nltk.org/) | 3.4.5 | Build Python programs to work with human language data / Apache 2.0 |
| [nose](http://readthedocs.org/docs/nose/) | 1.3.7 | Nose extends unittest to make testing easier / LGPL-2.1 |
| [notebook](http://jupyter.org) | 6.0.1 | Jupyter Notebook / BSD 3-clause |
| [numba](http://numba.github.com) | 0.45.1 | NumPy aware dynamic Python compiler using LLVM / BSD 2-clause |
| [numexpr](https://github.com/pydata/numexpr) | 2.7.0 | Fast numerical expression evaluator for NumPy. / MIT |
| [numpy](http://numpy.scipy.org/) | 1.17.2 | Array processing for numbers, strings, records, and objects. / BSD 3-Clause |
| [numpy-base](http://numpy.scipy.org/) | 1.17.2 | Array processing for numbers, strings, records, and objects. / BSD 3-Clause |
| [numpydoc](https://github.com/numpy/numpydoc) | 0.9.1 | Numpy’s Sphinx extensions / BSD 3-Clause |
| [olefile](http://www.decalage.info/python/olefileio) | 0.46 | parse, read and write Microsoft OLE2 files / BSD 2-Clause |
| [openpyxl](https://openpyxl.readthedocs.io) | 3.0.0 | A Python library to read/write Excel 2010 xlsx/xlsm files / MIT |
| [openssl](http://www.openssl.org/) | 1.1.1d | OpenSSL is an open-source implementation of the SSL and TLS protocols / OpenSSL |
| [packaging](https://github.com/pypa/packaging) | 19.2 | Core utilities for Python packages / Apache 2.0 or BSD 2-Clause |
| [pandas](http://pandas.pydata.org) | 0.25.1 | High-performance, easy-to-use data structures and data analysis tools. / BSD 3-clause |
| [pandoc](http://pandoc.org/) | 2.2.3.2 | Universal markup converter (repackaged binaries). / GPL-2.0 |
| [pandocfilters](https://github.com/jgm/pandocfilters) | 1.4.2 | A python module for writing pandoc filters / BSD-3-Clause |
| [pango](http://www.pango.org/) | 1.42.4 | Text layout and rendering engine. / LGPL-2.1 |
| [parso](https://github.com/davidhalter/parso) | 0.5.1 | A Python Parser / MIT |
| [partd](https://github.com/dask/partd) | 1.0.0 | Data structure for on-disk shuffle operations / BSD 3-Clause |
| [patchelf](http://nixos.org/patchelf.html) | 0.9 | A small utility to modify the dynamic linker and RPATH of ELF executables. / GPL 3 |
| [path.py](https://github.com/jaraco/path.py) | 12.0.1 | A module wrapper for os.path / MIT |
| [pathlib2](https://github.com/mcmtroffaes/pathlib2) | 2.3.5 | Fork of pathlib aiming to support the full stdlib Python API / MIT |
| [patsy](https://github.com/pydata/patsy) | 0.5.1 | Describing statistical models in Python using symbolic formulas / BSD-2-Clause, PSF2 |
| [pcre](http://www.pcre.org/) | 8.43 | Regular expression pattern matching using the same syntax and semantics as Perl 5. / BSD 3-Clause |
| [pep8](http://pep8.readthedocs.org/) | 1.7.1 | Python style guide checker / MIT |
| [pexpect](http://pexpect.sourceforge.net/) | 4.7.0 | Pexpect makes Python a better tool for controlling other applications. / ISC |
| [pickleshare](https://github.com/pickleshare/pickleshare/) | 0.7.5 | Tiny ‘shelve’-like database with concurrency support / MIT |
| [pillow](https://pillow.readthedocs.io) | 6.2.0 | Pillow is the friendly PIL fork by Alex Clark and Contributors / PIL |
| [pip](https://pip.pypa.io/en/stable/) | 19.2.3 | PyPA recommended tool for installing Python packages / MIT |
| [pixman](http://www.pixman.org/) | 0.38.0 | A low-level software library for pixel manipulation. / MIT |
| [pkginfo](https://code.launchpad.net/~tseaver/pkginfo/trunk) | 1.5.0.1 | Query metadatdata from sdists / bdists / installed packages. / MIT |
| [pluggy](https://github.com/pytest-dev/pluggy) | 0.13.0 | Plugin registration and hook calling for Python / MIT |
| [ply](http://www.dabeaz.com/ply/index.html) | 3.11 | Python Lex-Yacc / BSD 3-clause |
| [prometheus\_client](https://github.com/prometheus/client_python) | 0.7.1 | Python client for the Prometheus monitoring system / Apache 2.0 |
| [prompt\_toolkit](https://github.com/jonathanslenders/python-prompt-toolkit) | 2.0.10 | Library for building powerful interactive command lines in Python / BSD 3-clause |
| [psutil](https://github.com/giampaolo/psutil) | 5.6.3 | A cross-platform process and system utilities module for Python / BSD 3-Clause |
| [ptyprocess](https://github.com/pexpect/ptyprocess) | 0.6.0 | Run a subprocess in a pseudo terminal / ISC |
| [py](https://github.com/pytest-dev/py) | 1.8.0 | library with cross-python path, ini-parsing, io, code, log facilities / MIT |
| [py-lief](https://lief.quarkslab.com/) | 0.9.0 | A cross platform library to parse, modify and abstract ELF, PE and MachO formats. / Apache 2.0 |
| [pycodestyle](https://pycodestyle.readthedocs.io/) | 2.5.0 | Python style guide checker / MIT |
| [pycosat](https://github.com/ContinuumIO/pycosat) | 0.6.3 | Bindings to picosat (a SAT solver) / MIT |
| [pycparser](https://github.com/eliben/pycparser) | 2.19 | Complete C99 parser in pure Python / BSD 3-clause |
| [pycrypto](http://www.pycrypto.org/) | 2.6.1 | Cryptographic modules for Python. / Public Domain |
| [pycurl](http://pycurl.sourceforge.net/) | 7.43.0.3 | A Python Interface To The cURL library / LGPL, MIT |
| [pyflakes](https://github.com/PyCQA/pyflakes) | 2.1.1 | Pyflakes analyzes programs and detects various errors. / MIT |
| [pygments](http://pygments.org/) | 2.4.2 | Generic syntax highlighting package / BSD 2-clause |
| [pylint](http://www.pylint.org/) | 2.4.2 | python code static checker / GPL 2 |
| [pyodbc](https://github.com/mkleehammer/pyodbc) | 4.0.27 | DB API Module for ODBC / MIT |
| [pyopenssl](https://github.com/pyca/pyopenssl) | 19.0.0 | Python wrapper module around the OpenSSL library / Apache 2.0 |
| [pyparsing](http://pyparsing.wikispaces.com/) | 2.4.2 | Create and execute simple grammars / MIT |
| [pyqt](http://www.riverbankcomputing.co.uk/software/pyqt) | 5.9.2 | Python binding of the cross-platform GUI toolkit Qt. / Commercial, GPL-2.0, GPL-3.0 |
| [pyrsistent](http://github.com/tobgu/pyrsistent/) | 0.15.4 | Persistent/Functional/Immutable data structures / MIT |
| [pysocks](https://github.com/Anorov/PySocks) | 1.7.1 | A Python SOCKS client module. See [Anorov/PySocks](https://github.com/Anorov/PySocks) for more information. / BSD 3-Clause |
| [pytables](http://www.pytables.org) | 3.5.2 | Brings together Python, HDF5 and NumPy to easily handle large amounts of data. / BSD 3-Clause |
| [pytest](https://docs.pytest.org/en/latest/) | 5.2.1 | Simple and powerful testing with Python. / MIT |
| [pytest-arraydiff](https://github.com/astrofrog/pytest-arraydiff) | 0.3 | pytest plugin to help with comparing array output from tests / BSD |
| [pytest-astropy](https://github.com/astropy/pytest-astropy) | 0.5.0 | Meta-package containing dependencies for testing Astropy / BSD |
| [pytest-doctestplus](https://github.com/astropy/pytest-doctestplus) | 0.4.0 | Pytest plugin with advanced doctest features / BSD 3-Clause |
| [pytest-openfiles](https://github.com/astropy/pytest-openfiles) | 0.4.0 | Pytest plugin for detecting inadvertent open file handles / BSD-3-Clause |
| [pytest-remotedata](https://github.com/astropy/pytest-remotedata) | 0.3.2 | Pytest plugin for controlling remote data access / BSD |
| [python](http://www.python.org/) | 3.7.4 | General purpose programming language / PSF |
| [python-dateutil](https://dateutil.readthedocs.org/) | 2.8.0 | Extensions to the standard Python datetime module. / BSD 3 Clause |
| [python-libarchive-c](https://github.com/Changaco/python-libarchive-c) | 2.8 | Python interface to libarchive / CC0-1.0 |
| [pytz](http://pythonhosted.org/pytz/) | 2019.3 | World timezone definitions, modern and historical. / MIT |
| [pywavelets](https://github.com/PyWavelets/pywt) | 1.0.3 | Discrete Wavelet Transforms in Python / MIT |
| [pyyaml](http://pyyaml.org/wiki/PyYAML) | 5.1.2 | YAML parser and emitter for Python / MIT |
| [pyzmq](https://github.com/zeromq/pyzmq) | 18.1.0 | Python bindings for zeromq / BSD 3-clause |
| [qt](http://qt-project.org) | 5.9.7 | Qt is a cross-platform application and UI framework. / LGPL-3.0 |
| [qtawesome](https://github.com/spyder-ide/qtawesome) | 0.6.0 | Iconic fonts in PyQt and PySide applications / MIT |
| [qtconsole](http://jupyter.org) | 4.5.5 | Jupyter Qt console / BSD 3-Clause |
| [qtpy](https://github.com/spyder-ide/qtpy) | 1.9.0 | Abstraction layer for PyQt5/PyQt4/PySide / MIT |
| [readline](https://cnswww.cns.cwru.edu/php/chet/readline/rltop.html) | 7.0 | library for editing command lines as they are typed in / GPL3 |
| [requests](http://python-requests.org) | 2.22.0 | Python HTTP for Humans / Apache 2.0 |
| ripgrep | 0.10.0 | |
| [rope](https://github.com/python-rope/rope) | 0.14.0 | A python refactoring library / GPL 2.0 |
| [ruamel\_yaml](https://bitbucket.org/ruamel/yaml) | 0.15.46 | A patched copy of ruamel.yaml. / MIT |
| [scikit-image](http://scikit-image.org/) | 0.15.0 | Image processing routines for SciPy. / BSD 3-Clause |
| [scikit-learn](http://scikit-learn.org/) | 0.21.3 | A set of python modules for machine learning and data mining / BSD 3-Clause |
| [scipy](http://www.scipy.org/) | 1.3.1 | Scientific Library for Python / BSD 3-Clause |
| [seaborn](https://seaborn.pydata.org) | 0.9.0 | Statistical data visualization / BSD 3-Clause |
| [secretstorage](https://github.com/mitya57/secretstorage) | 3.1.1 | Provides a way for securely storing passwords and other secrets. / BSD-3-Clause |
| [send2trash](https://github.com/hsoft/send2trash) | 1.5.0 | Python library to natively send files to Trash (or Recycle bin) on all platforms. / BSD-3-Clause |
| [setuptools](https://github.com/pypa/setuptools) | 41.4.0 | Download, build, install, upgrade, and uninstall Python packages / MIT |
| [simplegeneric](http://cheeseshop.python.org/pypi/simplegeneric) | 0.8.1 | Simple generic functions (similar to Python’s own len(), pickle.dump(), etc.) / Zope Public |
| [singledispatch](http://docs.python.org/3/library/functools.html#functools.singledispatch) | 3.4.0.3 | Transforms a function into a single-dispatch generic function / MIT |
| [sip](http://www.riverbankcomputing.com/software/sip/intro) | 4.19.8 | Create Python bindings for C and C++ libraries / GPL-3.0 |
| [six](http://pypi.python.org/pypi/six/) | 1.12.0 | Python 2 and 3 compatibility utilities / MIT |
| [snappy](https://github.com/google/snappy) | 1.1.7 | A fast compressor/decompressor / BSD 3-clause |
| [snowballstemmer](https://github.com/shibukawa/snowball_py) | 2.0.0 | Snowball stemming library collection for Python / BSD-2-Clause |
| [sortedcollections](http://www.grantjenks.com/docs/sortedcollections/) | 1.1.2 | Python Sorted Collections / Apache-2.0 |
| [sortedcontainers](http://www.grantjenks.com/docs/sortedcontainers/) | 2.1.0 | Python Sorted Container Types: SortedList, SortedDict, and SortedSet / Apache 2.0 |
| [soupsieve](http://facelessuser.github.io/soupsieve) | 1.9.3 | A modern CSS selector implementation for BeautifulSoup / MIT |
| [sphinx](http://www.sphinx-doc.org) | 2.2.0 | Sphinx is a tool that makes it easy to create intelligent and beautiful documentation / BSD-2-Clause |
| sphinxcontrib | 1.0 | Python namespace for sphinxcontrib / BSD |
| [sphinxcontrib-applehelp](https://www.sphinx-doc.org/en/master/) | 1.0.1 | sphinxcontrib-applehelp is a sphinx extension which outputs Apple help books / BSD-2-Clause |
| [sphinxcontrib-devhelp](https://www.sphinx-doc.org/en/master/) | 1.0.1 | sphinxcontrib-devhelp is a sphinx extension which outputs Devhelp document / BSD-2-Clause |
| [sphinxcontrib-htmlhelp](https://www.sphinx-doc.org/en/master/) | 1.0.2 | sphinxcontrib-htmlhelp is a sphinx extension which … / BSD-2-Clause |
| [sphinxcontrib-jsmath](https://www.sphinx-doc.org/en/master/) | 1.0.1 | A sphinx extension which renders display math in HTML via JavaScript / BSD-2-Clause |
| [sphinxcontrib-qthelp](https://www.sphinx-doc.org/en/master/) | 1.0.2 | sphinxcontrib-qthelp is a sphinx extension which outputs QtHelp document / BSD-2-Clause |
| [sphinxcontrib-serializinghtml](https://www.sphinx-doc.org/en/master/) | 1.1.3 | sphinxcontrib-serializinghtml is a sphinx extension which outputs “serialized” HTML files (json and pickle). / BSD-2-Clause |
| [sphinxcontrib-websupport](https://pypi.python.org/pypi/sphinxcontrib-websupport) | 1.1.2 | Sphinx API for Web Apps / BSD-2-Clause |
| [spyder](https://www.spyder-ide.org/) | 3.3.6 | The Scientific Python Development Environment / MIT |
| [spyder-kernels](https://github.com/spyder-ide/spyder-kernels) | 0.5.2 | Jupyter kernels for the Spyder console / MIT |
| [sqlalchemy](http://www.sqlalchemy.org/) | 1.3.9 | Database Abstraction Library. / MIT |
| [sqlite](http://www.sqlite.org/) | 3.30.0 | Implements a self-contained, zero-configuration, SQL database engine. / Public-Domain (`<http://www.sqlite.org/copyright.html>`) |
| [statsmodels](https://www.statsmodels.org) | 0.10.1 | Statistical computations and models for use with SciPy / BSD 3-Clause |
| [sympy](http://sympy.org) | 1.4 | Python library for symbolic mathematics / BSD-3-Clause |
| [tbb](http://www.threadingbuildingblocks.org) | 2019.4 | High level abstract threading library / Apache 2.0 |
| [tblib](https://github.com/ionelmc/python-tblib) | 1.4.0 | Traceback serialization library. / BSD 2-Clause |
| [terminado](https://github.com/jupyter/terminado) | 0.8.2 | Terminals served by tornado websockets / BSD 2-Clause |
| [testpath](https://testpath.readthedocs.io) | 0.4.2 | Testpath is a collection of utilities for Python code working with files and commands. / BSD-3-Clause |
| [tk](http://www.tcl.tk/) | 8.6.8 | A dynamic programming language with GUI support. Bundles Tcl and Tk. / Tcl/Tk |
| [toolz](http://toolz.readthedocs.org/) | 0.10.0 | A functional standard library for Python / BSD 3-Clause |
| [tornado](http://www.tornadoweb.org/) | 6.0.3 | A Python web framework and asynchronous networking library, originally developed at FriendFeed. / Apache 2.0 |
| [tqdm](https://pypi.python.org/pypi/tqdm) | 4.36.1 | A Fast, Extensible Progress Meter / MPLv2.0, MIT |
| [traitlets](http://ipython.org/) | 4.3.3 | Configuration system for Python applications / BSD-3-Clause |
| [unicodecsv](https://github.com/jdunck/python-unicodecsv) | 0.14.1 | Drop-in replacement for csv module which supports unicode strings / BSD |
| [unixodbc](http://www.unixodbc.org/) | 2.3.7 | ODBC on non MS Windows platforms / LGPL-2.1 |
| [urllib3](https://urllib3.readthedocs.io/) | 1.24.2 | HTTP library with thread-safe connection pooling, file post, and more. / MIT |
| [wcwidth](https://github.com/jquast/wcwidth) | 0.1.7 | Measures number of Terminal column cells of wide-character codes. / MIT |
| [webencodings](https://github.com/gsnedders/python-webencodings) | 0.5.1 | Character encoding aliases for legacy web content / BSD 3-Clause |
| [werkzeug](https://palletsprojects.com/p/werkzeug/) | 0.16.0 | The comprehensive WSGI web application library. / BSD 3-Clause |
| [wheel](https://github.com/pypa/wheel) | 0.33.6 | A built-package format for Python. / MIT |
| [widgetsnbextension](http://ipython.org) | 3.5.1 | Interactive Widgets for Jupyter / BSD 3-clause |
| [wrapt](https://github.com/GrahamDumpleton/wrapt) | 1.11.2 | Module for decorators, wrappers and monkey patching / BSD 2-Clause |
| [wurlitzer](https://github.com/minrk/wurlitzer) | 1.0.3 | Capture C-level stdout/stderr in Python / MIT |
| [xlrd](http://www.python-excel.org/) | 1.2.0 | Library for developers to extract data from Microsoft Excel (tm) spreadsheet files / BSD 3-Clause and BSD with advertising |
| [xlsxwriter](https://xlsxwriter.readthedocs.io/) | 1.2.1 | A Python module for creating Excel XLSX files / BSD 2-Clause |
| [xlwt](http://www.python-excel.org/) | 1.3.0 | Writing data and formatting information to Excel files / BSD |
| [xz](http://tukaani.org/xz/) | 5.2.4 | Data compression software with high compression ratio / LGPL-2.1 and GPL-2.0 |
| [yaml](http://pyyaml.org/wiki/LibYAML) | 0.1.7 | A C library for parsing and emitting YAML. / MIT |
| [zeromq](http://zeromq.org) | 4.3.1 | A high-performance asynchronous messaging library. / LGPL 3 |
| [zict](http://github.com/mrocklin/zict) | 1.0.0 | Composable Dictionary Classes / BSD 3-Clause |
| [zipp](https://github.com/jaraco/zipp) | 0.6.0 | A pathlib-compatible Zipfile object wrapper / MIT |
| [zlib](http://zlib.net/) | 1.2.11 | Massively spiffy yet delicately unobtrusive compression library / zlib |
| [zstd](http://www.zstd.net) | 1.3.7 | Zstandard - Fast real-time compression algorithm / BSD 3-Clause |
| Name | Version | Summary / License |
|---|---|---|
| [\_ipyw\_jlab\_nb\_ext\_conf](https://github.com/ContinuumIO/anaconda-nb-extensions-meta-config) | 0.1.0 | A configuration metapackage for enabling Anaconda-bundled jupyter extensions / BSD |
| [alabaster](http://www.sphinx-doc.org/en/stable/index.html) | 0.7.12 | Configurable, Python 2+3 compatible Sphinx theme. / BSD 3-Clause |
| [anaconda-client](http://anaconda.org) | 1.7.2 | anaconda.org command line client library / BSD 3-clause |
| [anaconda-project](https://github.com/Anaconda-Platform/anaconda-project) | 0.8.3 | Tool for encapsulating, running, and reproducing data science projects / BSD 3-Clause |
| [asn1crypto](https://github.com/wbond/asn1crypto) | 1.0.1 | Python ASN.1 library with a focus on performance and a pythonic API / MIT |
| [astroid](https://www.astroid.org/) | 1.6.5 | A abstract syntax tree for Python with inference support. / LGPL 2.1 |
| [astropy](http://www.astropy.org/) | 2.0.9 | Community-developed Python Library for Astronomy / BSD 3-clause |
| [atomicwrites](https://github.com/untitaker/python-atomicwrites) | 1.3.0 | Atomic file writes / MIT |
| [attrs](https://attrs.readthedocs.io/en/stable/) | 19.2.0 | attrs is the Python package that will bring back the joy of writing classes by relieving you from the drudgery of implementing object protocols (aka dunder methods). / MIT |
| [babel](http://babel.pocoo.org/) | 2.7.0 | Utilities to internationalize and localize Python applications / BSD 3-clause |
| [backports](https://bitbucket.org/brandon/backports) | 1.0 | None / BSD |
| [backports.functools\_lru\_cache](https://github.com/jaraco/backports.functools_lru_cache) | 1.5 | Backport of functools.lru\_cache from Python 3.3 as published at ActiveState. / MIT |
| [backports.os](https://github.com/pjdelport/backports.os) | 0.1.1 | Backport of new features in Python’s os module / Python Software Foundation |
| [backports.shutil\_get\_terminal\_size](https://github.com/chrippa/backports.shutil_get_terminal_size) | 1.0.0 | A backport of the get\_terminal\_size function from Python 3.3’s shutil. / MIT |
| [backports.shutil\_which](https://github.com/minrk/backports.shutil_which) | 3.5.2 | Backport of shutil.which from Python 3.3 / PSF2 & MIT |
| [backports\_abc](https://github.com/cython/backports_abc) | 0.5 | A backport of recent additions to the collections.abc module. / PSF 2 |
| [beautifulsoup4](http://www.crummy.com/software/BeautifulSoup/) | 4.8.0 | Python library designed for screen-scraping / MIT |
| [bitarray](https://github.com/ilanschnell/bitarray) | 1.0.1 | efficient arrays of booleans – C extension / PSF |
| [bkcharts](http://github.com/bokeh/bkcharts) | 0.2 | High level chart types built on top of Bokeh / BSD 3-Clause |
| blas | 1.0 | |
| [bleach](https://github.com/mozilla/bleach) | 3.1.0 | Easy, whitelist-based HTML-sanitizing tool / Apache-2.0 |
| [blosc](https://github.com/Blosc/c-blosc) | 1.16.3 | A blocking, shuffling and loss-less compression library that can be faster than memcpy() / BSD 3-Clause |
| [bokeh](http://bokeh.pydata.org/) | 1.3.4 | Statistical and novel interactive HTML plots for Python / BSD 3-Clause |
| [boto](https://github.com/boto/boto/) | 2.49.0 | Amazon Web Services Library / MIT |
| [bottleneck](http://berkeleyanalytics.com/bottleneck) | 1.2.1 | Fast NumPy array functions written in Cython. / BSD 2-Clause |
| [bzip2](http://www.bzip.org/) | 1.0.8 | high-quality data compressor / bzip2 |
| [ca-certificates](https://github.com/conda-forge/ca-certificates-feedstock) | 2019.8.28 | Certificates for use with other packages. / MPL 2.0 |
| [cdecimal](http://www.bytereef.org/mpdecimal/index.html) | 2.3 | Fast drop-in replacement for decimal.py / BSD 2-Clause |
| [certifi](http://certifi.io/) | 2019.9.11 | Python package for providing Mozilla’s CA Bundle. / ISC |
| [cffi](https://bitbucket.org/cffi/cffi) | 1.12.3 | Foreign Function Interface for Python calling C code. / MIT |
| [chardet](https://github.com/chardet/chardet) | 3.0.4 | Universal character encoding detector / LGPL2 |
| [click](https://palletsprojects.com/p/click) | 7.0 | Python composable command line interface toolkit / BSD-3-Clause |
| [cloudpickle](https://github.com/cloudpipe/cloudpickle) | 1.2.2 | Extended pickling support for Python objects / BSD 3-Clause |
| [clyent](https://github.com/Anaconda-Platform/clyent) | 1.2.2 | Command line client library for windows and posix / BSD 3-Clause |
| [colorama](https://github.com/tartley/colorama) | 0.4.1 | Cross-platform colored terminal text / BSD-3-Clause |
| [comtypes](http://starship.python.net/crew/theller/comtypes/) | 1.1.7 | pure Python COM package / MIT |
| [conda](https://conda.io) | 4.7.12 | OS-agnostic, system-level binary package and environment manager. / BSD 3-Clause |
| [conda-build](https://github.com/conda/conda-build) | 3.18.9 | tools for building conda packages / BSD 3-Clause |
| [conda-env](https://github.com/conda/conda-env) | 2.6.0 | Tools for interacting with conda environments. / BSD 3-Clause |
| [conda-verify](https://github.com/conda/conda-verify) | 3.4.2 | tool for validating conda recipes and conda packages / BSD 3-Clause |
| [configparser](http://docs.python.org/3/library/configparser.html) | 4.0.2 | This library brings the updated configparser from Python 3.5 to Python 2.6-3.5 / MIT |
| console\_shortcut | 0.1.1 | Console shortcut creator for Windows (using menuinst) / BSD |
| [contextlib2](http://contextlib2.readthedocs.org) | 0.6.0 | Backports and enhancements for the contextlib module / PSF 2 |
| [cryptography](https://github.com/pyca/cryptography) | 2.4.2 | Provides cryptographic recipes and primitives to Python developers / Apache 2.0 or BSD 3-Clause, PSF 2 |
| [curl](http://curl.haxx.se/) | 7.64.0 | tool and library for transferring data with URL syntax / MIT/X derivate (`<http://curl.haxx.se/docs/copyright.html>`) |
| [cycler](http://matplotlib.org/cycler) | 0.10.0 | Composable style cycles. / BSD 3-Clause |
| [cython](http://www.cython.org/) | 0.29.13 | The Cython compiler for writing C extensions for the Python language / Apache-2.0 |
| [cytoolz](https://github.com/pytoolz/cytoolz) | 0.10.0 | Cython implementation of Toolz. High performance functional utilities / BSD-3-Clause |
| [dask](https://dask.org/) | 1.2.2 | Parallel PyData with Task Scheduling / BSD 3-Clause |
| [dask-core](http://github.com/dask/dask/) | 1.2.2 | Parallel Python with task scheduling / BSD 3-Clause |
| [decorator](https://github.com/micheles/decorator) | 4.4.0 | Better living through Python with decorators. / BSD 3-Clause |
| [defusedxml](https://bitbucket.org/tiran/defusedxml) | 0.6.0 | XML bomb protection for Python stdlib modules / PSF 2.0 |
| [distributed](http://distributed.readthedocs.io/en/latest/) | 1.28.1 | Distributed computing with Dask / BSD 3-Clause |
| [docutils](http://docutils.sourceforge.net/) | 0.15.2 | Docutils – Python Documentation Utilities / Public Domain Dedictation and BSD 2-Clause and PSF 2.1.1 and GPL 3.0 |
| [entrypoints](https://github.com/takluyver/entrypoints) | 0.3 | Discover and load entry points from installed packages. / MIT License |
| [enum34](https://bitbucket.org/stoneleaf/enum34) | 1.1.6 | Python 3.4 Enum backported to 3.3, 3.2, 3.1, 2.7, 2.6, 2.5, and 2.4 / BSD 3-Clause |
| [et\_xmlfile](https://bitbucket.org/openpyxl/et_xmlfile) | 1.0.1 | An implementation of lxml.xmlfile for the standard library / MIT |
| [fastcache](https://github.com/pbrady/fastcache) | 1.1.0 | C implementation of Python 3 lru\_cache / MIT |
| [filelock](https://github.com/benediktschmitt/py-filelock) | 3.0.12 | A platform independent file lock. / Public Domain |
| [flask](http://flask.pocoo.org) | 1.1.1 | A microframework based on Werkzeug, Jinja2 and good intentions. / BSD 3-Clause |
| [freetype](https://www.freetype.org/) | 2.9.1 | A Free, High-Quality, and Portable Font Engine / GPL-2.0 and FreeType |
| [funcsigs](http://funcsigs.readthedocs.org) | 1.0.2 | Python function signatures from PEP362 for Python 2.6, 2.7 and 3.2+. / Apache 2.0 |
| [functools32](https://github.com/MiCHiLU/python-functools32) | 3.2.3.2 | Backport of the functools module from Python 3.2.3 for use on 2.7 and PyPy. / PSF license |
| [future](http://python-future.org) | 0.17.1 | Clean single-source support for Python 3 and 2 / MIT |
| [futures](https://github.com/agronholm/pythonfutures) | 3.3.0 | Backport of the concurrent.futures package from Python 3.2 / PSF |
| [get\_terminal\_size](https://github.com/chrippa/backports.shutil_get_terminal_size) | 1.0.0 | Get the size of the terminal window. / MIT |
| [gevent](http://www.gevent.org/) | 1.4.0 | Coroutine-based network library / MIT |
| [glob2](https://github.com/miracle2k/python-glob2) | 0.7 | Version of the glob module that supports recursion via \*\*, and can capture patterns. / BSD-2-Clause |
| [greenlet](https://github.com/python-greenlet/greenlet) | 0.4.15 | Lightweight in-process concurrent programming / MIT |
| [grin](http://pypi.python.org/pypi/grin) | 1.2.1 | Enhanced grep-like tool / BSD 3-Clause |
| [h5py](http://www.h5py.org/) | 2.9.0 | Read and write HDF5 files from Python. / BSD-3-Clause |
| [hdf5](http://www.hdfgroup.org/HDF5/) | 1.10.4 | HDF5 is a data model, library, and file format for storing and managing data / HDF5 |
| [heapdict](http://stutzbachenterprises.com/) | 1.0.1 | A heap with decrease-key and increase-key operations / BSD 3-Clause |
| [html5lib](https://github.com/html5lib/html5lib-python) | 1.0.1 | HTML parser based on the WHATWG HTML specification / MIT |
| icc\_rt | 2019.0.0 | Intel runtime libraries for C, C++ and Fortran compilers / Intel proprietary |
| [icu](http://site.icu-project.org/) | 58.2 | International Components for Unicode. / MIT |
| [idna](https://github.com/kjd/idna) | 2.8 | Internationalized Domain Names in Applications (IDNA). / BSD Like |
| [imageio](http://imageio.github.io) | 2.6.0 | A Python library for reading and writing image data / BSD-2-Clause |
| [imagesize](https://github.com/shibukawa/imagesize_py) | 1.1.0 | Getting image size from png/jpeg/jpeg2000/gif file / MIT |
| [importlib\_metadata](http://importlib-metadata.readthedocs.io) | 0.23 | A library to access the metadata for a Python package / APACHE-2.0 |
| [intel-openmp](https://software.intel.com/en-us/node/522690) | 2019.4 | Math library for Intel and compatible processors / proprietary - Intel |
| [ipaddress](https://github.com/phihag/ipaddress) | 1.0.22 | IPv4/IPv6 manipulation library / PSF 2 |
| [ipykernel](https://ipython.org) | 4.10.0 | IPython Kernel for Jupyter / BSD-3-Clause |
| [ipython](https://ipython.org/) | 5.8.0 | IPython: Productive Interactive Computing / BSD-3-Clause |
| [ipython\_genutils](http://ipython.org) | 0.2.0 | vestigial utilities from IPython / BSD 3-Clause |
| [ipywidgets](https://github.com/ipython/ipywidgets) | 7.5.1 | Jupyter Interactive Widgets / BSD 3-clause |
| [isort](https://github.com/timothycrosley/isort) | 4.3.21 | A Python utility / library to sort Python imports. / MIT |
| [itsdangerous](https://github.com/pallets/itsdangerous) | 1.1.0 | Various helpers to pass trusted data to untrusted environments. / BSD 3-Clause |
| [jdcal](https://github.com/phn/jdcal) | 1.4.1 | Julian dates from proleptic Gregorian and Julian calendars. / BSD 2-Clause |
| [jedi](https://github.com/davidhalter/jedi/) | 0.15.1 | An autocompletion tool for Python that can be used for text editors. / MIT |
| [jinja2](http://jinja.pocoo.org) | 2.10.3 | An easy to use stand-alone template engine written in pure python. / 3-Clause BSD |
| [jpeg](http://www.ijg.org/) | 9b | read/write jpeg COM, EXIF, IPTC medata / Custom free software license |
| [jsonschema](https://github.com/Julian/jsonschema) | 3.0.2 | An implementation of JSON Schema validation for Python / MIT |
| [jupyter](http://jupyter.org) | 1.0.0 | Jupyter metapackage. Install all the Jupyter components in one go. / BSD 3-Clause |
| [jupyter\_client](http://jupyter.org) | 5.3.3 | Jupyter protocol implementation and client libraries / BSD 3-clause |
| [jupyter\_console](http://jupyter.org) | 5.2.0 | Jupyter terminal console / BSD-3-Clause |
| [jupyter\_core](http://jupyter.org) | 4.5.0 | Core common functionality of Jupyter projects. / BSD 3-clause |
| [jupyterlab](https://github.com/jupyterlab/jupyterlab) | 0.33.11 | JupyterLab / BSD-3-Clause |
| [jupyterlab\_launcher](http://github.com/jupyterlab/jupyterlab_launcher) | 0.11.2 | A Launcher for JupyterLab based applications. / BSD 3-Clause |
| [keyring](https://github.com/jaraco/keyring) | 18.0.0 | Store and access your passwords safely / Python Software Foundation or MIT |
| [kiwisolver](https://github.com/nucleic/kiwi) | 1.1.0 | A fast implementation of the Cassowary constraint solver / BSD 3-Clause |
| [krb5](http://web.mit.edu/kerberos/) | 1.16.1 | A network authentication protocol. / MIT |
| [lazy-object-proxy](https://github.com/ionelmc/python-lazy-object-proxy) | 1.4.1 | A fast and thorough lazy object proxy / BSD-2-Clause |
| [libarchive](http://www.libarchive.org/) | 3.3.3 | Multi-format archive and compression library / BSD 2-Clause |
| [libcurl](http://curl.haxx.se/) | 7.64.0 | tool and library for transferring data with URL syntax / MIT/X derivate (`<http://curl.haxx.se/docs/copyright.html>`) |
| [libiconv](https://www.gnu.org/software/libiconv/) | 1.15 | Provides iconv for systems which don’t have one (or that cannot convert from/to Unicode.) / GPL and LGPL |
| [libpng](http://www.libpng.org/pub/png/libpng.html) | 1.6.37 | PNG reference library / zlib/libpng |
| [libsodium](http://libsodium.org) | 1.0.16 | A modern and easy-to-use crypto library. / ISC |
| [libssh2](https://www.libssh2.org/) | 1.8.0 | the SSH library / BSD-3-Clause |
| [libtiff](http://www.libtiff.org/) | 4.0.10 | Support for the Tag Image File Format (TIFF). / HPND |
| [libxml2](http://xmlsoft.org/) | 2.9.9 | The XML C parser and toolkit of Gnome / MIT |
| [libxslt](http://xmlsoft.org/XSLT/) | 1.1.33 | The XSLT C library developed for the GNOME project / MIT |
| [linecache2](https://github.com/testing-cabal/linecache2) | 1.0.0 | Backport of the linecache module / PSF 1.0 |
| [llvmlite](https://github.com/numba/llvmlite) | 0.29.0 | A lightweight LLVM python binding for writing JIT compilers / New BSD License |
| [locket](https://github.com/mwilliamson/locket.py) | 0.2.0 | File-based locks for Python for Linux and Windows / BSD 2-Clause |
| [lxml](http://lxml.de/) | 4.4.1 | Pythonic binding for the C libraries libxml2 and libxslt. / BSD 3-Clause, GPL-2.0, ZPL-2.0, and ElementTree |
| [lz4-c](https://www.lz4.org) | 1.8.1.2 | Extremely Fast Compression algorithm / BSD 2-clause |
| [lzo](http://www.oberhumer.com/opensource/lzo/) | 2.10 | LZO is a portable lossless data compression library written in ANSI C. / GPL v2+ |
| m2w64-gcc-libgfortran | 5.3.0 | / |
| m2w64-gcc-libs | 5.3.0 | / |
| m2w64-gcc-libs-core | 5.3.0 | / |
| m2w64-gmp | 6.1.0 | / |
| m2w64-libwinpthread-git | 5.0.0.4634.697f757 | / |
| [markupsafe](https://www.palletsprojects.com/p/markupsafe) | 1.1.1 | A Python module that implements the jinja2.Markup string / BSD-3-Clause |
| [matplotlib](http://matplotlib.org/) | 2.2.3 | Publication quality figures in Python / PSF-based |
| [mccabe](https://github.com/PyCQA/mccabe) | 0.6.1 | McCabe complexity checker for Python / MIT |
| [menuinst](https://github.com/ContinuumIO/menuinst) | 1.4.16 | cross platform menu item installation / BSD |
| [mistune](https://github.com/lepture/mistune) | 0.8.4 | The fastest markdown parser in pure Python. / BSD 3-Clause |
| [mkl](https://software.intel.com/en-us/mkl) | 2019.4 | Math library for Intel and compatible processors / proprietary - Intel |
| [mkl-service](https://github.com/ContinuumIO/mkl-service) | 2.3.0 | Python bindings to MKL service functions / 3-clause BSD |
| [mkl\_fft](http://github.com/IntelPython/mkl_fft) | 1.0.14 | NumPy-based implementation of Fast Fourier Transform using Intel (R) Math Kernel Library. / BSD 3-Clause |
| [mock](https://github.com/testing-cabal/mock) | 3.0.5 | A library for testing in Python / BSD-2-Clause |
| [more-itertools](https://github.com/erikrose/more-itertools) | 5.0.0 | More routines for operating on iterables, beyond itertools / MIT |
| [mpmath](http://mpmath.org) | 1.1.0 | Python library for arbitrary-precision floating-point arithmetic / BSD 3-Clause |
| [msgpack-python](http://msgpack.org/) | 0.6.1 | MessagePack (de)serializer. / Apache 2.0 |
| msys2-conda-epoch | 20160418 | / |
| [multipledispatch](https://github.com/mrocklin/multipledispatch/) | 0.6.0 | Multiple dispatch in Python / BSD 3-Clause |
| [nbconvert](http://jupyter.org) | 5.6.0 | Converting Jupyter Notebooks / BSD-3-Clause |
| [nbformat](http://jupyter.org) | 4.4.0 | The reference implementation of the Jupyter Notebook format / BSD 3-clause |
| [networkx](https://networkx.github.io/) | 2.2 | Python package for creating and manipulating complex networks / BSD-3-Clause |
| [nltk](http://nltk.org/) | 3.4.5 | Build Python programs to work with human language data / Apache 2.0 |
| [nose](http://readthedocs.org/docs/nose/) | 1.3.7 | Nose extends unittest to make testing easier / LGPL-2.1 |
| [notebook](http://jupyter.org) | 5.7.8 | Jupyter Notebook / BSD 3-clause |
| [numba](http://numba.github.com) | 0.45.1 | NumPy aware dynamic Python compiler using LLVM / BSD 2-clause |
| [numexpr](https://github.com/pydata/numexpr) | 2.7.0 | Fast numerical expression evaluator for NumPy. / MIT |
| [numpy](http://numpy.scipy.org/) | 1.16.5 | Array processing for numbers, strings, records, and objects. / BSD 3-Clause |
| [numpy-base](http://numpy.scipy.org/) | 1.16.5 | Array processing for numbers, strings, records, and objects. / BSD 3-Clause |
| [numpydoc](https://github.com/numpy/numpydoc) | 0.9.1 | Numpy’s Sphinx extensions / BSD 3-Clause |
| [olefile](http://www.decalage.info/python/olefileio) | 0.46 | parse, read and write Microsoft OLE2 files / BSD 2-Clause |
| [openpyxl](https://openpyxl.readthedocs.io) | 2.6.3 | A Python library to read/write Excel 2010 xlsx/xlsm files / MIT |
| [openssl](http://www.openssl.org/) | 1.0.2t | OpenSSL is an open-source implementation of the SSL and TLS protocols / OpenSSL |
| [packaging](https://github.com/pypa/packaging) | 19.2 | Core utilities for Python packages / Apache 2.0 or BSD 2-Clause |
| [pandas](http://pandas.pydata.org) | 0.24.2 | High-performance, easy-to-use data structures and data analysis tools. / BSD 3-clause |
| [pandoc](http://pandoc.org/) | 2.2.3.2 | Universal markup converter (repackaged binaries). / GPL-2.0 |
| [pandocfilters](https://github.com/jgm/pandocfilters) | 1.4.2 | A python module for writing pandoc filters / BSD-3-Clause |
| [parso](https://github.com/davidhalter/parso) | 0.5.1 | A Python Parser / MIT |
| [partd](https://github.com/dask/partd) | 1.0.0 | Data structure for on-disk shuffle operations / BSD 3-Clause |
| [path.py](https://github.com/jaraco/path.py) | 11.5.0 | A module wrapper for os.path / MIT |
| [pathlib2](https://github.com/mcmtroffaes/pathlib2) | 2.3.5 | Fork of pathlib aiming to support the full stdlib Python API / MIT |
| [patsy](https://github.com/pydata/patsy) | 0.5.1 | Describing statistical models in Python using symbolic formulas / BSD-2-Clause, PSF2 |
| [pep8](http://pep8.readthedocs.org/) | 1.7.1 | Python style guide checker / MIT |
| [pickleshare](https://github.com/pickleshare/pickleshare/) | 0.7.5 | Tiny ‘shelve’-like database with concurrency support / MIT |
| [pillow](https://pillow.readthedocs.io) | 6.2.0 | Pillow is the friendly PIL fork by Alex Clark and Contributors / PIL |
| [pip](https://pip.pypa.io/en/stable/) | 19.2.3 | PyPA recommended tool for installing Python packages / MIT |
| [pkginfo](https://code.launchpad.net/~tseaver/pkginfo/trunk) | 1.5.0.1 | Query metadatdata from sdists / bdists / installed packages. / MIT |
| [pluggy](https://github.com/pytest-dev/pluggy) | 0.13.0 | Plugin registration and hook calling for Python / MIT |
| [ply](http://www.dabeaz.com/ply/index.html) | 3.11 | Python Lex-Yacc / BSD 3-clause |
| powershell\_shortcut | 0.0.1 | Powershell shortcut creator for Windows (using menuinst) / BSD |
| [prometheus\_client](https://github.com/prometheus/client_python) | 0.7.1 | Python client for the Prometheus monitoring system / Apache 2.0 |
| [prompt\_toolkit](https://github.com/jonathanslenders/python-prompt-toolkit) | 1.0.15 | Library for building powerful interactive command lines in Python / BSD 3-clause |
| [psutil](https://github.com/giampaolo/psutil) | 5.6.3 | A cross-platform process and system utilities module for Python / BSD 3-Clause |
| [py](https://github.com/pytest-dev/py) | 1.8.0 | library with cross-python path, ini-parsing, io, code, log facilities / MIT |
| [pycodestyle](https://pycodestyle.readthedocs.io/) | 2.5.0 | Python style guide checker / MIT |
| [pycosat](https://github.com/ContinuumIO/pycosat) | 0.6.3 | Bindings to picosat (a SAT solver) / MIT |
| [pycparser](https://github.com/eliben/pycparser) | 2.19 | Complete C99 parser in pure Python / BSD 3-clause |
| [pycrypto](http://www.pycrypto.org/) | 2.6.1 | Cryptographic modules for Python. / Public Domain |
| [pycurl](http://pycurl.sourceforge.net/) | 7.43.0.2 | A Python Interface To The cURL library / LGPL, MIT |
| [pyflakes](https://github.com/PyCQA/pyflakes) | 2.1.1 | Pyflakes analyzes programs and detects various errors. / MIT |
| [pygments](http://pygments.org/) | 2.4.2 | Generic syntax highlighting package / BSD 2-clause |
| [pylint](http://www.pylint.org/) | 1.9.2 | python code static checker / GPL 2 |
| [pyodbc](https://github.com/mkleehammer/pyodbc) | 4.0.27 | DB API Module for ODBC / MIT |
| [pyopenssl](https://github.com/pyca/pyopenssl) | 19.0.0 | Python wrapper module around the OpenSSL library / Apache 2.0 |
| [pyparsing](http://pyparsing.wikispaces.com/) | 2.4.2 | Create and execute simple grammars / MIT |
| [pyqt](http://www.riverbankcomputing.co.uk/software/pyqt) | 5.6.0 | Python binding of the cross-platform GUI toolkit Qt. / Commercial, GPL-2.0, GPL-3.0 |
| [pyreadline](http://ipython.org/pyreadline) | 2.1 | A python implmementation of GNU readline. / BSD 3-Clause |
| [pyrsistent](http://github.com/tobgu/pyrsistent/) | 0.15.4 | Persistent/Functional/Immutable data structures / MIT |
| [pysocks](https://github.com/Anorov/PySocks) | 1.7.1 | A Python SOCKS client module. See [Anorov/PySocks](https://github.com/Anorov/PySocks) for more information. / BSD 3-Clause |
| [pytables](http://www.pytables.org) | 3.5.2 | Brings together Python, HDF5 and NumPy to easily handle large amounts of data. / BSD 3-Clause |
| [pytest](https://docs.pytest.org/en/latest/) | 4.6.2 | Simple and powerful testing with Python. / MIT |
| [python](http://www.python.org/) | 2.7.16 | General purpose programming language / PSF |
| [python-dateutil](https://dateutil.readthedocs.org/) | 2.8.0 | Extensions to the standard Python datetime module. / BSD 3 Clause |
| [python-libarchive-c](https://github.com/Changaco/python-libarchive-c) | 2.8 | Python interface to libarchive / CC0-1.0 |
| [pytz](http://pythonhosted.org/pytz/) | 2019.3 | World timezone definitions, modern and historical. / MIT |
| [pywavelets](https://github.com/PyWavelets/pywt) | 1.0.3 | Discrete Wavelet Transforms in Python / MIT |
| [pywin32](https://sourceforge.net/projects/pywin32) | 223 | Python extensions for Windows / PSF |
| [pywinpty](https://github.com/spyder-ide/pywinpty) | 0.5.5 | Python bindings for the winpty library / MIT |
| [pyyaml](http://pyyaml.org/wiki/PyYAML) | 5.1.2 | YAML parser and emitter for Python / MIT |
| [pyzmq](https://github.com/zeromq/pyzmq) | 18.1.0 | Python bindings for zeromq / BSD 3-clause |
| [qt](http://qt-project.org) | 5.6.2 | Qt is a cross-platform application and UI framework. / LGPL-3.0 |
| [qtawesome](https://github.com/spyder-ide/qtawesome) | 0.6.0 | Iconic fonts in PyQt and PySide applications / MIT |
| [qtconsole](http://jupyter.org) | 4.5.5 | Jupyter Qt console / BSD 3-Clause |
| [qtpy](https://github.com/spyder-ide/qtpy) | 1.9.0 | Abstraction layer for PyQt5/PyQt4/PySide / MIT |
| [requests](http://python-requests.org) | 2.22.0 | Python HTTP for Humans / Apache 2.0 |
| [rope](https://github.com/python-rope/rope) | 0.14.0 | A python refactoring library / GPL 2.0 |
| [ruamel\_yaml](https://bitbucket.org/ruamel/yaml) | 0.15.46 | A patched copy of ruamel.yaml. / MIT |
| [scandir](https://github.com/benhoyt/scandir) | 1.10.0 | scandir, a better directory iterator and faster os.walk() / BSD 3-Clause |
| [scikit-image](http://scikit-image.org/) | 0.14.2 | Image processing routines for SciPy. / BSD 3-Clause |
| [scikit-learn](http://scikit-learn.org/) | 0.20.3 | A set of python modules for machine learning and data mining / BSD 3-Clause |
| [scipy](http://www.scipy.org/) | 1.2.1 | Scientific Library for Python / BSD 3-Clause |
| [seaborn](https://seaborn.pydata.org) | 0.9.0 | Statistical data visualization / BSD 3-Clause |
| [send2trash](https://github.com/hsoft/send2trash) | 1.5.0 | Python library to natively send files to Trash (or Recycle bin) on all platforms. / BSD-3-Clause |
| [setuptools](https://github.com/pypa/setuptools) | 41.4.0 | Download, build, install, upgrade, and uninstall Python packages / MIT |
| [simplegeneric](http://cheeseshop.python.org/pypi/simplegeneric) | 0.8.1 | Simple generic functions (similar to Python’s own len(), pickle.dump(), etc.) / Zope Public |
| [singledispatch](http://docs.python.org/3/library/functools.html#functools.singledispatch) | 3.4.0.3 | Transforms a function into a single-dispatch generic function / MIT |
| [sip](http://www.riverbankcomputing.com/software/sip/intro) | 4.18.1 | Create Python bindings for C and C++ libraries / GPL-3.0 |
| [six](http://pypi.python.org/pypi/six/) | 1.12.0 | Python 2 and 3 compatibility utilities / MIT |
| [snappy](https://github.com/google/snappy) | 1.1.7 | A fast compressor/decompressor / BSD 3-clause |
| [snowballstemmer](https://github.com/shibukawa/snowball_py) | 2.0.0 | Snowball stemming library collection for Python / BSD-2-Clause |
| [sortedcollections](http://www.grantjenks.com/docs/sortedcollections/) | 1.1.2 | Python Sorted Collections / Apache-2.0 |
| [sortedcontainers](http://www.grantjenks.com/docs/sortedcontainers/) | 2.1.0 | Python Sorted Container Types: SortedList, SortedDict, and SortedSet / Apache 2.0 |
| [soupsieve](http://facelessuser.github.io/soupsieve) | 1.9.3 | A modern CSS selector implementation for BeautifulSoup / MIT |
| [sphinx](http://www.sphinx-doc.org) | 1.8.5 | Sphinx is a tool that makes it easy to create intelligent and beautiful documentation / BSD-2-Clause |
| sphinxcontrib | 1.0 | Python namespace for sphinxcontrib / BSD |
| [sphinxcontrib-websupport](https://pypi.python.org/pypi/sphinxcontrib-websupport) | 1.1.2 | Sphinx API for Web Apps / BSD-2-Clause |
| [spyder](https://www.spyder-ide.org/) | 3.3.6 | The Scientific Python Development Environment / MIT |
| [spyder-kernels](https://github.com/spyder-ide/spyder-kernels) | 0.5.2 | Jupyter kernels for the Spyder console / MIT |
| [sqlalchemy](http://www.sqlalchemy.org/) | 1.3.9 | Database Abstraction Library. / MIT |
| [sqlite](http://www.sqlite.org/) | 3.30.0 | Implements a self-contained, zero-configuration, SQL database engine. / Public-Domain (`<http://www.sqlite.org/copyright.html>`) |
| [ssl\_match\_hostname](http://bitbucket.org/brandon/backports.ssl_match_hostname) | 3.7.0.1 | The ssl.match\_hostname() function from Python 3.5 / PSF 2 |
| [statsmodels](https://www.statsmodels.org) | 0.10.1 | Statistical computations and models for use with SciPy / BSD 3-Clause |
| [subprocess32](https://github.com/google/python-subprocess32) | 3.5.4 | A backport of the subprocess module from Python 3.2/3.3 for use on 2.x / Python-2.0 |
| [sympy](http://sympy.org) | 1.4 | Python library for symbolic mathematics / BSD-3-Clause |
| [tblib](https://github.com/ionelmc/python-tblib) | 1.4.0 | Traceback serialization library. / BSD 2-Clause |
| [terminado](https://github.com/jupyter/terminado) | 0.8.2 | Terminals served by tornado websockets / BSD 2-Clause |
| [testpath](https://testpath.readthedocs.io) | 0.4.2 | Testpath is a collection of utilities for Python code working with files and commands. / BSD-3-Clause |
| [tk](http://www.tcl.tk/) | 8.6.8 | A dynamic programming language with GUI support. Bundles Tcl and Tk. / Tcl/Tk |
| [toolz](http://toolz.readthedocs.org/) | 0.10.0 | A functional standard library for Python / BSD 3-Clause |
| [tornado](http://www.tornadoweb.org/) | 5.1.1 | A Python web framework and asynchronous networking library, originally developed at FriendFeed. / Apache 2.0 |
| [tqdm](https://pypi.python.org/pypi/tqdm) | 4.36.1 | A Fast, Extensible Progress Meter / MPLv2.0, MIT |
| [traceback2](https://github.com/testing-cabal/traceback2) | 1.4.0 | Backports of the traceback module / PSF 2.0 |
| [traitlets](http://ipython.org/) | 4.3.3 | Configuration system for Python applications / BSD-3-Clause |
| [typing](https://docs.python.org/3.5/library/typing.html) | 3.7.4.1 | Type Hints for Python - backport for `Python<3.5` / PSF |
| [unicodecsv](https://github.com/jdunck/python-unicodecsv) | 0.14.1 | Drop-in replacement for csv module which supports unicode strings / BSD |
| [unittest2](http://pypi.python.org/pypi/unittest2) | 1.1.0 | The new features in unittest backported to Python 2.4+ / BSD |
| [urllib3](https://urllib3.readthedocs.io/) | 1.24.2 | HTTP library with thread-safe connection pooling, file post, and more. / MIT |
| [vc](https://github.com/conda/conda/wiki/VC-features) | 9 | A meta-package to impose mutual exclusivity among software built with different VS versions / Modified BSD License (3-clause) |
| vs2008\_runtime | 9.00.30729.1 | |
| vs2015\_runtime | 14.16.27012 | MSVC runtimes associated with cl.exe version 19.16.27032.1 (VS 2017 update 9) / None |
| [wcwidth](https://github.com/jquast/wcwidth) | 0.1.7 | Measures number of Terminal column cells of wide-character codes. / MIT |
| [webencodings](https://github.com/gsnedders/python-webencodings) | 0.5.1 | Character encoding aliases for legacy web content / BSD 3-Clause |
| [werkzeug](https://palletsprojects.com/p/werkzeug/) | 0.16.0 | The comprehensive WSGI web application library. / BSD 3-Clause |
| [wheel](https://github.com/pypa/wheel) | 0.33.6 | A built-package format for Python. / MIT |
| [widgetsnbextension](http://ipython.org) | 3.5.1 | Interactive Widgets for Jupyter / BSD 3-clause |
| [win\_inet\_pton](https://github.com/hickeroar/win_inet_pton) | 1.1.0 | Native inet\_pton and inet\_ntop implementation for Python on Windows (with ctypes). / PUBLIC-DOMAIN |
| [win\_unicode\_console](https://github.com/Drekin/win-unicode-console) | 0.5 | A Python package to enable Unicode input and display when running Python from Windows console. / MIT |
| [wincertstore](https://bitbucket.org/tiran/wincertstore) | 0.2 | Python module to extract CA and CRL certs from Windows’ cert store (ctypes based). / PSF 2 |
| [winpty](https://github.com/rprichard/winpty) | 0.4.3 | Winpty provides an interface similar to a Unix pty-master for communicating with Windows console programs. / MIT |
| [wrapt](https://github.com/GrahamDumpleton/wrapt) | 1.11.2 | Module for decorators, wrappers and monkey patching / BSD 2-Clause |
| [xlrd](http://www.python-excel.org/) | 1.2.0 | Library for developers to extract data from Microsoft Excel (tm) spreadsheet files / BSD 3-Clause and BSD with advertising |
| [xlsxwriter](https://xlsxwriter.readthedocs.io/) | 1.2.1 | A Python module for creating Excel XLSX files / BSD 2-Clause |
| [xlwings](http://xlwings.org/) | 0.15.10 | Interact with Excel from Python and vice versa / 3-clause BSD |
| [xlwt](http://www.python-excel.org/) | 1.3.0 | Writing data and formatting information to Excel files / BSD |
| [xz](http://tukaani.org/xz/) | 5.2.4 | Data compression software with high compression ratio / LGPL-2.1 and GPL-2.0 |
| [yaml](http://pyyaml.org/wiki/LibYAML) | 0.1.7 | A C library for parsing and emitting YAML. / MIT |
| [zeromq](http://zeromq.org) | 4.3.1 | A high-performance asynchronous messaging library. / LGPL 3 |
| [zict](http://github.com/mrocklin/zict) | 1.0.0 | Composable Dictionary Classes / BSD 3-Clause |
| [zipp](https://github.com/jaraco/zipp) | 0.6.0 | A pathlib-compatible Zipfile object wrapper / MIT |
| [zlib](http://zlib.net/) | 1.2.11 | Massively spiffy yet delicately unobtrusive compression library / zlib |
| [zstd](http://www.zstd.net) | 1.3.7 | Zstandard - Fast real-time compression algorithm / BSD 3-Clause |
| Name | Version | Summary / License |
|---|---|---|
| [\_ipyw\_jlab\_nb\_ext\_conf](https://github.com/ContinuumIO/anaconda-nb-extensions-meta-config) | 0.1.0 | A configuration metapackage for enabling Anaconda-bundled jupyter extensions / BSD |
| [alabaster](http://www.sphinx-doc.org/en/stable/index.html) | 0.7.12 | Configurable, Python 2+3 compatible Sphinx theme. / BSD 3-Clause |
| [anaconda-client](http://anaconda.org) | 1.7.2 | anaconda.org command line client library / BSD 3-clause |
| [anaconda-project](https://github.com/Anaconda-Platform/anaconda-project) | 0.8.3 | Tool for encapsulating, running, and reproducing data science projects / BSD 3-Clause |
| [asn1crypto](https://github.com/wbond/asn1crypto) | 1.0.1 | Python ASN.1 library with a focus on performance and a pythonic API / MIT |
| [astroid](https://www.astroid.org/) | 1.6.5 | A abstract syntax tree for Python with inference support. / LGPL 2.1 |
| [astropy](http://www.astropy.org/) | 2.0.9 | Community-developed Python Library for Astronomy / BSD 3-clause |
| [atomicwrites](https://github.com/untitaker/python-atomicwrites) | 1.3.0 | Atomic file writes / MIT |
| [attrs](https://attrs.readthedocs.io/en/stable/) | 19.2.0 | attrs is the Python package that will bring back the joy of writing classes by relieving you from the drudgery of implementing object protocols (aka dunder methods). / MIT |
| [babel](http://babel.pocoo.org/) | 2.7.0 | Utilities to internationalize and localize Python applications / BSD 3-clause |
| [backports](https://bitbucket.org/brandon/backports) | 1.0 | None / BSD |
| [backports.functools\_lru\_cache](https://github.com/jaraco/backports.functools_lru_cache) | 1.5 | Backport of functools.lru\_cache from Python 3.3 as published at ActiveState. / MIT |
| [backports.os](https://github.com/pjdelport/backports.os) | 0.1.1 | Backport of new features in Python’s os module / Python Software Foundation |
| [backports.shutil\_get\_terminal\_size](https://github.com/chrippa/backports.shutil_get_terminal_size) | 1.0.0 | A backport of the get\_terminal\_size function from Python 3.3’s shutil. / MIT |
| [backports.shutil\_which](https://github.com/minrk/backports.shutil_which) | 3.5.2 | Backport of shutil.which from Python 3.3 / PSF2 & MIT |
| [backports\_abc](https://github.com/cython/backports_abc) | 0.5 | A backport of recent additions to the collections.abc module. / PSF 2 |
| [beautifulsoup4](http://www.crummy.com/software/BeautifulSoup/) | 4.8.0 | Python library designed for screen-scraping / MIT |
| [bitarray](https://github.com/ilanschnell/bitarray) | 1.0.1 | efficient arrays of booleans – C extension / PSF |
| [bkcharts](http://github.com/bokeh/bkcharts) | 0.2 | High level chart types built on top of Bokeh / BSD 3-Clause |
| blas | 1.0 | |
| [bleach](https://github.com/mozilla/bleach) | 3.1.0 | Easy, whitelist-based HTML-sanitizing tool / Apache-2.0 |
| [blosc](https://github.com/Blosc/c-blosc) | 1.15.0 | A blocking, shuffling and loss-less compression library that can be faster than memcpy() / BSD 3-Clause |
| [bokeh](http://bokeh.pydata.org/) | 1.3.4 | Statistical and novel interactive HTML plots for Python / BSD 3-Clause |
| [boto](https://github.com/boto/boto/) | 2.49.0 | Amazon Web Services Library / MIT |
| [bottleneck](http://berkeleyanalytics.com/bottleneck) | 1.2.1 | Fast NumPy array functions written in Cython. / BSD 2-Clause |
| [bzip2](http://www.bzip.org/) | 1.0.8 | high-quality data compressor / bzip2 |
| [ca-certificates](https://github.com/conda-forge/ca-certificates-feedstock) | 2019.8.28 | Certificates for use with other packages. / MPL 2.0 |
| [cdecimal](http://www.bytereef.org/mpdecimal/index.html) | 2.3 | Fast drop-in replacement for decimal.py / BSD 2-Clause |
| [certifi](http://certifi.io/) | 2019.9.11 | Python package for providing Mozilla’s CA Bundle. / ISC |
| [cffi](https://bitbucket.org/cffi/cffi) | 1.12.3 | Foreign Function Interface for Python calling C code. / MIT |
| [chardet](https://github.com/chardet/chardet) | 3.0.4 | Universal character encoding detector / LGPL2 |
| [click](https://palletsprojects.com/p/click) | 7.0 | Python composable command line interface toolkit / BSD-3-Clause |
| [cloudpickle](https://github.com/cloudpipe/cloudpickle) | 1.2.2 | Extended pickling support for Python objects / BSD 3-Clause |
| [clyent](https://github.com/Anaconda-Platform/clyent) | 1.2.2 | Command line client library for windows and posix / BSD 3-Clause |
| [colorama](https://github.com/tartley/colorama) | 0.4.1 | Cross-platform colored terminal text / BSD-3-Clause |
| [comtypes](http://starship.python.net/crew/theller/comtypes/) | 1.1.7 | pure Python COM package / MIT |
| [conda](https://conda.io) | 4.7.12 | OS-agnostic, system-level binary package and environment manager. / BSD 3-Clause |
| [conda-build](https://github.com/conda/conda-build) | 3.18.9 | tools for building conda packages / BSD 3-Clause |
| [conda-env](https://github.com/conda/conda-env) | 2.6.0 | Tools for interacting with conda environments. / BSD 3-Clause |
| [conda-verify](https://github.com/conda/conda-verify) | 3.4.2 | tool for validating conda recipes and conda packages / BSD 3-Clause |
| [configparser](http://docs.python.org/3/library/configparser.html) | 4.0.2 | This library brings the updated configparser from Python 3.5 to Python 2.6-3.5 / MIT |
| console\_shortcut | 0.1.1 | Console shortcut creator for Windows (using menuinst) / BSD |
| [contextlib2](http://contextlib2.readthedocs.org) | 0.6.0 | Backports and enhancements for the contextlib module / PSF 2 |
| [cryptography](https://github.com/pyca/cryptography) | 2.4.2 | Provides cryptographic recipes and primitives to Python developers / Apache 2.0 or BSD 3-Clause, PSF 2 |
| [curl](http://curl.haxx.se/) | 7.64.0 | tool and library for transferring data with URL syntax / MIT/X derivate (`<http://curl.haxx.se/docs/copyright.html>`) |
| [cycler](http://matplotlib.org/cycler) | 0.10.0 | Composable style cycles. / BSD 3-Clause |
| [cython](http://www.cython.org/) | 0.29.13 | The Cython compiler for writing C extensions for the Python language / Apache-2.0 |
| [cytoolz](https://github.com/pytoolz/cytoolz) | 0.10.0 | Cython implementation of Toolz. High performance functional utilities / BSD-3-Clause |
| [dask](https://dask.org/) | 1.2.2 | Parallel PyData with Task Scheduling / BSD 3-Clause |
| [dask-core](http://github.com/dask/dask/) | 1.2.2 | Parallel Python with task scheduling / BSD 3-Clause |
| [decorator](https://github.com/micheles/decorator) | 4.4.0 | Better living through Python with decorators. / BSD 3-Clause |
| [defusedxml](https://bitbucket.org/tiran/defusedxml) | 0.6.0 | XML bomb protection for Python stdlib modules / PSF 2.0 |
| [distributed](http://distributed.readthedocs.io/en/latest/) | 1.28.1 | Distributed computing with Dask / BSD 3-Clause |
| [docutils](http://docutils.sourceforge.net/) | 0.15.2 | Docutils – Python Documentation Utilities / Public Domain Dedictation and BSD 2-Clause and PSF 2.1.1 and GPL 3.0 |
| [entrypoints](https://github.com/takluyver/entrypoints) | 0.3 | Discover and load entry points from installed packages. / MIT License |
| [enum34](https://bitbucket.org/stoneleaf/enum34) | 1.1.6 | Python 3.4 Enum backported to 3.3, 3.2, 3.1, 2.7, 2.6, 2.5, and 2.4 / BSD 3-Clause |
| [et\_xmlfile](https://bitbucket.org/openpyxl/et_xmlfile) | 1.0.1 | An implementation of lxml.xmlfile for the standard library / MIT |
| [fastcache](https://github.com/pbrady/fastcache) | 1.1.0 | C implementation of Python 3 lru\_cache / MIT |
| [filelock](https://github.com/benediktschmitt/py-filelock) | 3.0.12 | A platform independent file lock. / Public Domain |
| [flask](http://flask.pocoo.org) | 1.1.1 | A microframework based on Werkzeug, Jinja2 and good intentions. / BSD 3-Clause |
| [freetype](https://www.freetype.org/) | 2.9.1 | A Free, High-Quality, and Portable Font Engine / GPL-2.0 and FreeType |
| [funcsigs](http://funcsigs.readthedocs.org) | 1.0.2 | Python function signatures from PEP362 for Python 2.6, 2.7 and 3.2+. / Apache 2.0 |
| [functools32](https://github.com/MiCHiLU/python-functools32) | 3.2.3.2 | Backport of the functools module from Python 3.2.3 for use on 2.7 and PyPy. / PSF license |
| [future](http://python-future.org) | 0.17.1 | Clean single-source support for Python 3 and 2 / MIT |
| [futures](https://github.com/agronholm/pythonfutures) | 3.3.0 | Backport of the concurrent.futures package from Python 3.2 / PSF |
| [get\_terminal\_size](https://github.com/chrippa/backports.shutil_get_terminal_size) | 1.0.0 | Get the size of the terminal window. / MIT |
| [gevent](http://www.gevent.org/) | 1.4.0 | Coroutine-based network library / MIT |
| [glob2](https://github.com/miracle2k/python-glob2) | 0.7 | Version of the glob module that supports recursion via \*\*, and can capture patterns. / BSD-2-Clause |
| [greenlet](https://github.com/python-greenlet/greenlet) | 0.4.15 | Lightweight in-process concurrent programming / MIT |
| [grin](http://pypi.python.org/pypi/grin) | 1.2.1 | Enhanced grep-like tool / BSD 3-Clause |
| [h5py](http://www.h5py.org/) | 2.9.0 | Read and write HDF5 files from Python. / BSD-3-Clause |
| [hdf5](http://www.hdfgroup.org/HDF5/) | 1.10.4 | HDF5 is a data model, library, and file format for storing and managing data / HDF5 |
| [heapdict](http://stutzbachenterprises.com/) | 1.0.1 | A heap with decrease-key and increase-key operations / BSD 3-Clause |
| [html5lib](https://github.com/html5lib/html5lib-python) | 1.0.1 | HTML parser based on the WHATWG HTML specification / MIT |
| icc\_rt | 2019.0.0 | Intel runtime libraries for C, C++ and Fortran compilers / Intel proprietary |
| [icu](http://site.icu-project.org/) | 58.2 | International Components for Unicode. / MIT |
| [idna](https://github.com/kjd/idna) | 2.8 | Internationalized Domain Names in Applications (IDNA). / BSD Like |
| [imageio](http://imageio.github.io) | 2.6.0 | A Python library for reading and writing image data / BSD-2-Clause |
| [imagesize](https://github.com/shibukawa/imagesize_py) | 1.1.0 | Getting image size from png/jpeg/jpeg2000/gif file / MIT |
| [importlib\_metadata](http://importlib-metadata.readthedocs.io) | 0.23 | A library to access the metadata for a Python package / APACHE-2.0 |
| [intel-openmp](https://software.intel.com/en-us/node/522690) | 2019.4 | Math library for Intel and compatible processors / proprietary - Intel |
| [ipaddress](https://github.com/phihag/ipaddress) | 1.0.22 | IPv4/IPv6 manipulation library / PSF 2 |
| [ipykernel](https://ipython.org) | 4.10.0 | IPython Kernel for Jupyter / BSD-3-Clause |
| [ipython](https://ipython.org/) | 5.8.0 | IPython: Productive Interactive Computing / BSD-3-Clause |
| [ipython\_genutils](http://ipython.org) | 0.2.0 | vestigial utilities from IPython / BSD 3-Clause |
| [ipywidgets](https://github.com/ipython/ipywidgets) | 7.5.1 | Jupyter Interactive Widgets / BSD 3-clause |
| [isort](https://github.com/timothycrosley/isort) | 4.3.21 | A Python utility / library to sort Python imports. / MIT |
| [itsdangerous](https://github.com/pallets/itsdangerous) | 1.1.0 | Various helpers to pass trusted data to untrusted environments. / BSD 3-Clause |
| [jdcal](https://github.com/phn/jdcal) | 1.4.1 | Julian dates from proleptic Gregorian and Julian calendars. / BSD 2-Clause |
| [jedi](https://github.com/davidhalter/jedi/) | 0.15.1 | An autocompletion tool for Python that can be used for text editors. / MIT |
| [jinja2](http://jinja.pocoo.org) | 2.10.3 | An easy to use stand-alone template engine written in pure python. / 3-Clause BSD |
| [jpeg](http://www.ijg.org/) | 9b | read/write jpeg COM, EXIF, IPTC medata / Custom free software license |
| [jsonschema](https://github.com/Julian/jsonschema) | 3.0.2 | An implementation of JSON Schema validation for Python / MIT |
| [jupyter](http://jupyter.org) | 1.0.0 | Jupyter metapackage. Install all the Jupyter components in one go. / BSD 3-Clause |
| [jupyter\_client](http://jupyter.org) | 5.3.3 | Jupyter protocol implementation and client libraries / BSD 3-clause |
| [jupyter\_console](http://jupyter.org) | 5.2.0 | Jupyter terminal console / BSD-3-Clause |
| [jupyter\_core](http://jupyter.org) | 4.5.0 | Core common functionality of Jupyter projects. / BSD 3-clause |
| [jupyterlab](https://github.com/jupyterlab/jupyterlab) | 0.33.11 | JupyterLab / BSD-3-Clause |
| [jupyterlab\_launcher](http://github.com/jupyterlab/jupyterlab_launcher) | 0.11.2 | A Launcher for JupyterLab based applications. / BSD 3-Clause |
| [keyring](https://github.com/jaraco/keyring) | 18.0.0 | Store and access your passwords safely / Python Software Foundation or MIT |
| [kiwisolver](https://github.com/nucleic/kiwi) | 1.1.0 | A fast implementation of the Cassowary constraint solver / BSD 3-Clause |
| [krb5](http://web.mit.edu/kerberos/) | 1.16.1 | A network authentication protocol. / MIT |
| [lazy-object-proxy](https://github.com/ionelmc/python-lazy-object-proxy) | 1.4.2 | A fast and thorough lazy object proxy / BSD-2-Clause |
| [libarchive](http://www.libarchive.org/) | 3.3.3 | Multi-format archive and compression library / BSD 2-Clause |
| [libcurl](http://curl.haxx.se/) | 7.64.0 | tool and library for transferring data with URL syntax / MIT/X derivate (`<http://curl.haxx.se/docs/copyright.html>`) |
| [libiconv](https://www.gnu.org/software/libiconv/) | 1.15 | Provides iconv for systems which don’t have one (or that cannot convert from/to Unicode.) / GPL and LGPL |
| [libpng](http://www.libpng.org/pub/png/libpng.html) | 1.6.37 | PNG reference library / zlib/libpng |
| [libsodium](http://libsodium.org) | 1.0.16 | A modern and easy-to-use crypto library. / ISC |
| [libssh2](https://www.libssh2.org/) | 1.8.0 | the SSH library / BSD-3-Clause |
| [libtiff](http://www.libtiff.org/) | 4.0.10 | Support for the Tag Image File Format (TIFF). / HPND |
| [libxml2](http://xmlsoft.org/) | 2.9.9 | The XML C parser and toolkit of Gnome / MIT |
| [libxslt](http://xmlsoft.org/XSLT/) | 1.1.33 | The XSLT C library developed for the GNOME project / MIT |
| [linecache2](https://github.com/testing-cabal/linecache2) | 1.0.0 | Backport of the linecache module / PSF 1.0 |
| [llvmlite](https://github.com/numba/llvmlite) | 0.29.0 | A lightweight LLVM python binding for writing JIT compilers / New BSD License |
| [locket](https://github.com/mwilliamson/locket.py) | 0.2.0 | File-based locks for Python for Linux and Windows / BSD 2-Clause |
| [lxml](http://lxml.de/) | 4.4.1 | Pythonic binding for the C libraries libxml2 and libxslt. / BSD 3-Clause, GPL-2.0, ZPL-2.0, and ElementTree |
| [lz4-c](https://www.lz4.org) | 1.8.1.2 | Extremely Fast Compression algorithm / BSD 2-clause |
| [lzo](http://www.oberhumer.com/opensource/lzo/) | 2.10 | LZO is a portable lossless data compression library written in ANSI C. / GPL v2+ |
| m2w64-gcc-libgfortran | 5.3.0 | / |
| m2w64-gcc-libs | 5.3.0 | / |
| m2w64-gcc-libs-core | 5.3.0 | / |
| m2w64-gmp | 6.1.0 | / |
| m2w64-libwinpthread-git | 5.0.0.4634.697f757 | / |
| [markupsafe](https://www.palletsprojects.com/p/markupsafe) | 1.1.1 | A Python module that implements the jinja2.Markup string / BSD-3-Clause |
| [matplotlib](http://matplotlib.org/) | 2.2.3 | Publication quality figures in Python / PSF-based |
| [mccabe](https://github.com/PyCQA/mccabe) | 0.6.1 | McCabe complexity checker for Python / MIT |
| [menuinst](https://github.com/ContinuumIO/menuinst) | 1.4.16 | cross platform menu item installation / BSD |
| [mistune](https://github.com/lepture/mistune) | 0.8.4 | The fastest markdown parser in pure Python. / BSD 3-Clause |
| [mkl](https://software.intel.com/en-us/mkl) | 2019.4 | Math library for Intel and compatible processors / proprietary - Intel |
| [mkl-service](https://github.com/ContinuumIO/mkl-service) | 2.3.0 | Python bindings to MKL service functions / 3-clause BSD |
| [mkl\_fft](http://github.com/IntelPython/mkl_fft) | 1.0.14 | NumPy-based implementation of Fast Fourier Transform using Intel (R) Math Kernel Library. / BSD 3-Clause |
| [mock](https://github.com/testing-cabal/mock) | 3.0.5 | A library for testing in Python / BSD-2-Clause |
| [more-itertools](https://github.com/erikrose/more-itertools) | 5.0.0 | More routines for operating on iterables, beyond itertools / MIT |
| [mpmath](http://mpmath.org) | 1.1.0 | Python library for arbitrary-precision floating-point arithmetic / BSD 3-Clause |
| [msgpack-python](http://msgpack.org/) | 0.6.1 | MessagePack (de)serializer. / Apache 2.0 |
| msys2-conda-epoch | 20160418 | / |
| [multipledispatch](https://github.com/mrocklin/multipledispatch/) | 0.6.0 | Multiple dispatch in Python / BSD 3-Clause |
| [nbconvert](http://jupyter.org) | 5.6.0 | Converting Jupyter Notebooks / BSD-3-Clause |
| [nbformat](http://jupyter.org) | 4.4.0 | The reference implementation of the Jupyter Notebook format / BSD 3-clause |
| [networkx](https://networkx.github.io/) | 2.2 | Python package for creating and manipulating complex networks / BSD-3-Clause |
| [nltk](http://nltk.org/) | 3.4.5 | Build Python programs to work with human language data / Apache 2.0 |
| [nose](http://readthedocs.org/docs/nose/) | 1.3.7 | Nose extends unittest to make testing easier / LGPL-2.1 |
| [notebook](http://jupyter.org) | 5.7.8 | Jupyter Notebook / BSD 3-clause |
| [numba](http://numba.github.com) | 0.45.0 | NumPy aware dynamic Python compiler using LLVM / BSD 2-clause |
| [numexpr](https://github.com/pydata/numexpr) | 2.7.0 | Fast numerical expression evaluator for NumPy. / MIT |
| [numpy](http://numpy.scipy.org/) | 1.16.5 | Array processing for numbers, strings, records, and objects. / BSD 3-Clause |
| [numpy-base](http://numpy.scipy.org/) | 1.16.5 | Array processing for numbers, strings, records, and objects. / BSD 3-Clause |
| [numpydoc](https://github.com/numpy/numpydoc) | 0.9.1 | Numpy’s Sphinx extensions / BSD 3-Clause |
| [olefile](http://www.decalage.info/python/olefileio) | 0.46 | parse, read and write Microsoft OLE2 files / BSD 2-Clause |
| [openpyxl](https://openpyxl.readthedocs.io) | 2.6.4 | A Python library to read/write Excel 2010 xlsx/xlsm files / MIT |
| [openssl](http://www.openssl.org/) | 1.0.2t | OpenSSL is an open-source implementation of the SSL and TLS protocols / OpenSSL |
| [packaging](https://github.com/pypa/packaging) | 19.2 | Core utilities for Python packages / Apache 2.0 or BSD 2-Clause |
| [pandas](http://pandas.pydata.org) | 0.24.2 | High-performance, easy-to-use data structures and data analysis tools. / BSD 3-clause |
| [pandoc](http://pandoc.org/) | 2.2.3.2 | Universal markup converter (repackaged binaries). / GPL-2.0 |
| [pandocfilters](https://github.com/jgm/pandocfilters) | 1.4.2 | A python module for writing pandoc filters / BSD-3-Clause |
| [parso](https://github.com/davidhalter/parso) | 0.5.1 | A Python Parser / MIT |
| [partd](https://github.com/dask/partd) | 1.0.0 | Data structure for on-disk shuffle operations / BSD 3-Clause |
| [path.py](https://github.com/jaraco/path.py) | 11.5.2 | A module wrapper for os.path / MIT |
| [pathlib2](https://github.com/mcmtroffaes/pathlib2) | 2.3.5 | Fork of pathlib aiming to support the full stdlib Python API / MIT |
| [patsy](https://github.com/pydata/patsy) | 0.5.1 | Describing statistical models in Python using symbolic formulas / BSD-2-Clause, PSF2 |
| [pep8](http://pep8.readthedocs.org/) | 1.7.1 | Python style guide checker / MIT |
| [pickleshare](https://github.com/pickleshare/pickleshare/) | 0.7.5 | Tiny ‘shelve’-like database with concurrency support / MIT |
| [pillow](https://pillow.readthedocs.io) | 6.2.0 | Pillow is the friendly PIL fork by Alex Clark and Contributors / PIL |
| [pip](https://pip.pypa.io/en/stable/) | 19.2.3 | PyPA recommended tool for installing Python packages / MIT |
| [pkginfo](https://code.launchpad.net/~tseaver/pkginfo/trunk) | 1.5.0.1 | Query metadatdata from sdists / bdists / installed packages. / MIT |
| [pluggy](https://github.com/pytest-dev/pluggy) | 0.13.0 | Plugin registration and hook calling for Python / MIT |
| [ply](http://www.dabeaz.com/ply/index.html) | 3.11 | Python Lex-Yacc / BSD 3-clause |
| powershell\_shortcut | 0.0.1 | Powershell shortcut creator for Windows (using menuinst) / BSD |
| [prometheus\_client](https://github.com/prometheus/client_python) | 0.7.1 | Python client for the Prometheus monitoring system / Apache 2.0 |
| [prompt\_toolkit](https://github.com/jonathanslenders/python-prompt-toolkit) | 1.0.15 | Library for building powerful interactive command lines in Python / BSD 3-clause |
| [psutil](https://github.com/giampaolo/psutil) | 5.6.3 | A cross-platform process and system utilities module for Python / BSD 3-Clause |
| [py](https://github.com/pytest-dev/py) | 1.8.0 | library with cross-python path, ini-parsing, io, code, log facilities / MIT |
| [pycodestyle](https://pycodestyle.readthedocs.io/) | 2.5.0 | Python style guide checker / MIT |
| [pycosat](https://github.com/ContinuumIO/pycosat) | 0.6.3 | Bindings to picosat (a SAT solver) / MIT |
| [pycparser](https://github.com/eliben/pycparser) | 2.19 | Complete C99 parser in pure Python / BSD 3-clause |
| [pycrypto](http://www.pycrypto.org/) | 2.6.1 | Cryptographic modules for Python. / Public Domain |
| [pycurl](http://pycurl.sourceforge.net/) | 7.43.0.2 | A Python Interface To The cURL library / LGPL, MIT |
| [pyflakes](https://github.com/PyCQA/pyflakes) | 2.1.1 | Pyflakes analyzes programs and detects various errors. / MIT |
| [pygments](http://pygments.org/) | 2.4.2 | Generic syntax highlighting package / BSD 2-clause |
| [pylint](http://www.pylint.org/) | 1.9.2 | python code static checker / GPL 2 |
| [pyodbc](https://github.com/mkleehammer/pyodbc) | 4.0.27 | DB API Module for ODBC / MIT |
| [pyopenssl](https://github.com/pyca/pyopenssl) | 19.0.0 | Python wrapper module around the OpenSSL library / Apache 2.0 |
| [pyparsing](http://pyparsing.wikispaces.com/) | 2.4.2 | Create and execute simple grammars / MIT |
| [pyqt](http://www.riverbankcomputing.co.uk/software/pyqt) | 5.6.0 | Python binding of the cross-platform GUI toolkit Qt. / Commercial, GPL-2.0, GPL-3.0 |
| [pyreadline](http://ipython.org/pyreadline) | 2.1 | A python implmementation of GNU readline. / BSD 3-Clause |
| [pyrsistent](http://github.com/tobgu/pyrsistent/) | 0.15.4 | Persistent/Functional/Immutable data structures / MIT |
| [pysocks](https://github.com/Anorov/PySocks) | 1.7.1 | A Python SOCKS client module. See [Anorov/PySocks](https://github.com/Anorov/PySocks) for more information. / BSD 3-Clause |
| [pytables](http://www.pytables.org) | 3.5.2 | Brings together Python, HDF5 and NumPy to easily handle large amounts of data. / BSD 3-Clause |
| [pytest](https://docs.pytest.org/en/latest/) | 4.6.2 | Simple and powerful testing with Python. / MIT |
| [python](http://www.python.org/) | 2.7.16 | General purpose programming language / PSF |
| [python-dateutil](https://dateutil.readthedocs.org/) | 2.8.0 | Extensions to the standard Python datetime module. / BSD 3 Clause |
| [python-libarchive-c](https://github.com/Changaco/python-libarchive-c) | 2.8 | Python interface to libarchive / CC0-1.0 |
| [pytz](http://pythonhosted.org/pytz/) | 2019.3 | World timezone definitions, modern and historical. / MIT |
| [pywavelets](https://github.com/PyWavelets/pywt) | 1.0.3 | Discrete Wavelet Transforms in Python / MIT |
| [pywin32](https://sourceforge.net/projects/pywin32) | 223 | Python extensions for Windows / PSF |
| [pywinpty](https://github.com/spyder-ide/pywinpty) | 0.5.5 | Python bindings for the winpty library / MIT |
| [pyyaml](http://pyyaml.org/wiki/PyYAML) | 5.1.2 | YAML parser and emitter for Python / MIT |
| [pyzmq](https://github.com/zeromq/pyzmq) | 18.1.0 | Python bindings for zeromq / BSD 3-clause |
| [qt](http://qt-project.org) | 5.6.2 | Qt is a cross-platform application and UI framework. / LGPL-3.0 |
| [qtawesome](https://github.com/spyder-ide/qtawesome) | 0.6.0 | Iconic fonts in PyQt and PySide applications / MIT |
| [qtconsole](http://jupyter.org) | 4.5.5 | Jupyter Qt console / BSD 3-Clause |
| [qtpy](https://github.com/spyder-ide/qtpy) | 1.9.0 | Abstraction layer for PyQt5/PyQt4/PySide / MIT |
| [requests](http://python-requests.org) | 2.22.0 | Python HTTP for Humans / Apache 2.0 |
| [rope](https://github.com/python-rope/rope) | 0.14.0 | A python refactoring library / GPL 2.0 |
| [ruamel\_yaml](https://bitbucket.org/ruamel/yaml) | 0.15.46 | A patched copy of ruamel.yaml. / MIT |
| [scandir](https://github.com/benhoyt/scandir) | 1.10.0 | scandir, a better directory iterator and faster os.walk() / BSD 3-Clause |
| [scikit-image](http://scikit-image.org/) | 0.14.2 | Image processing routines for SciPy. / BSD 3-Clause |
| [scikit-learn](http://scikit-learn.org/) | 0.20.3 | A set of python modules for machine learning and data mining / BSD 3-Clause |
| [scipy](http://www.scipy.org/) | 1.2.1 | Scientific Library for Python / BSD 3-Clause |
| [seaborn](https://seaborn.pydata.org) | 0.9.0 | Statistical data visualization / BSD 3-Clause |
| [send2trash](https://github.com/hsoft/send2trash) | 1.5.0 | Python library to natively send files to Trash (or Recycle bin) on all platforms. / BSD-3-Clause |
| [setuptools](https://github.com/pypa/setuptools) | 41.4.0 | Download, build, install, upgrade, and uninstall Python packages / MIT |
| [simplegeneric](http://cheeseshop.python.org/pypi/simplegeneric) | 0.8.1 | Simple generic functions (similar to Python’s own len(), pickle.dump(), etc.) / Zope Public |
| [singledispatch](http://docs.python.org/3/library/functools.html#functools.singledispatch) | 3.4.0.3 | Transforms a function into a single-dispatch generic function / MIT |
| [sip](http://www.riverbankcomputing.com/software/sip/intro) | 4.18.1 | Create Python bindings for C and C++ libraries / GPL-3.0 |
| [six](http://pypi.python.org/pypi/six/) | 1.12.0 | Python 2 and 3 compatibility utilities / MIT |
| [snappy](https://github.com/google/snappy) | 1.1.7 | A fast compressor/decompressor / BSD 3-clause |
| [snowballstemmer](https://github.com/shibukawa/snowball_py) | 2.0.0 | Snowball stemming library collection for Python / BSD-2-Clause |
| [sortedcollections](http://www.grantjenks.com/docs/sortedcollections/) | 1.1.2 | Python Sorted Collections / Apache-2.0 |
| [sortedcontainers](http://www.grantjenks.com/docs/sortedcontainers/) | 2.1.0 | Python Sorted Container Types: SortedList, SortedDict, and SortedSet / Apache 2.0 |
| [soupsieve](http://facelessuser.github.io/soupsieve) | 1.9.3 | A modern CSS selector implementation for BeautifulSoup / MIT |
| [sphinx](http://www.sphinx-doc.org) | 1.8.5 | Sphinx is a tool that makes it easy to create intelligent and beautiful documentation / BSD-2-Clause |
| sphinxcontrib | 1.0 | Python namespace for sphinxcontrib / BSD |
| [sphinxcontrib-websupport](https://pypi.python.org/pypi/sphinxcontrib-websupport) | 1.1.2 | Sphinx API for Web Apps / BSD-2-Clause |
| [spyder](https://www.spyder-ide.org/) | 3.3.6 | The Scientific Python Development Environment / MIT |
| [spyder-kernels](https://github.com/spyder-ide/spyder-kernels) | 0.5.2 | Jupyter kernels for the Spyder console / MIT |
| [sqlalchemy](http://www.sqlalchemy.org/) | 1.3.9 | Database Abstraction Library. / MIT |
| [sqlite](http://www.sqlite.org/) | 3.30.0 | Implements a self-contained, zero-configuration, SQL database engine. / Public-Domain (`<http://www.sqlite.org/copyright.html>`) |
| [ssl\_match\_hostname](http://bitbucket.org/brandon/backports.ssl_match_hostname) | 3.7.0.1 | The ssl.match\_hostname() function from Python 3.5 / PSF 2 |
| [statsmodels](https://www.statsmodels.org) | 0.10.1 | Statistical computations and models for use with SciPy / BSD 3-Clause |
| [subprocess32](https://github.com/google/python-subprocess32) | 3.5.4 | A backport of the subprocess module from Python 3.2/3.3 for use on 2.x / Python-2.0 |
| [sympy](http://sympy.org) | 1.4 | Python library for symbolic mathematics / BSD-3-Clause |
| [tblib](https://github.com/ionelmc/python-tblib) | 1.4.0 | Traceback serialization library. / BSD 2-Clause |
| [terminado](https://github.com/jupyter/terminado) | 0.8.2 | Terminals served by tornado websockets / BSD 2-Clause |
| [testpath](https://testpath.readthedocs.io) | 0.4.2 | Testpath is a collection of utilities for Python code working with files and commands. / BSD-3-Clause |
| [tk](http://www.tcl.tk/) | 8.6.8 | A dynamic programming language with GUI support. Bundles Tcl and Tk. / Tcl/Tk |
| [toolz](http://toolz.readthedocs.org/) | 0.10.0 | A functional standard library for Python / BSD 3-Clause |
| [tornado](http://www.tornadoweb.org/) | 5.1.1 | A Python web framework and asynchronous networking library, originally developed at FriendFeed. / Apache 2.0 |
| [tqdm](https://pypi.python.org/pypi/tqdm) | 4.36.1 | A Fast, Extensible Progress Meter / MPLv2.0, MIT |
| [traceback2](https://github.com/testing-cabal/traceback2) | 1.4.0 | Backports of the traceback module / PSF 2.0 |
| [traitlets](http://ipython.org/) | 4.3.3 | Configuration system for Python applications / BSD-3-Clause |
| [typing](https://docs.python.org/3.5/library/typing.html) | 3.7.4.1 | Type Hints for Python - backport for `Python<3.5` / PSF |
| [unicodecsv](https://github.com/jdunck/python-unicodecsv) | 0.14.1 | Drop-in replacement for csv module which supports unicode strings / BSD |
| [unittest2](http://pypi.python.org/pypi/unittest2) | 1.1.0 | The new features in unittest backported to Python 2.4+ / BSD |
| [urllib3](https://urllib3.readthedocs.io/) | 1.24.2 | HTTP library with thread-safe connection pooling, file post, and more. / MIT |
| [vc](https://github.com/conda/conda/wiki/VC-features) | 9 | A meta-package to impose mutual exclusivity among software built with different VS versions / Modified BSD License (3-clause) |
| vs2008\_runtime | 9.00.30729.1 | |
| vs2015\_runtime | 14.16.27012 | MSVC runtimes associated with cl.exe version 19.16.27032.1 (VS 2017 update 9) / None |
| [wcwidth](https://github.com/jquast/wcwidth) | 0.1.7 | Measures number of Terminal column cells of wide-character codes. / MIT |
| [webencodings](https://github.com/gsnedders/python-webencodings) | 0.5.1 | Character encoding aliases for legacy web content / BSD 3-Clause |
| [werkzeug](https://palletsprojects.com/p/werkzeug/) | 0.16.0 | The comprehensive WSGI web application library. / BSD 3-Clause |
| [wheel](https://github.com/pypa/wheel) | 0.33.6 | A built-package format for Python. / MIT |
| [widgetsnbextension](http://ipython.org) | 3.5.1 | Interactive Widgets for Jupyter / BSD 3-clause |
| [win\_inet\_pton](https://github.com/hickeroar/win_inet_pton) | 1.1.0 | Native inet\_pton and inet\_ntop implementation for Python on Windows (with ctypes). / PUBLIC-DOMAIN |
| [win\_unicode\_console](https://github.com/Drekin/win-unicode-console) | 0.5 | A Python package to enable Unicode input and display when running Python from Windows console. / MIT |
| [wincertstore](https://bitbucket.org/tiran/wincertstore) | 0.2 | Python module to extract CA and CRL certs from Windows’ cert store (ctypes based). / PSF 2 |
| [winpty](https://github.com/rprichard/winpty) | 0.4.3 | Winpty provides an interface similar to a Unix pty-master for communicating with Windows console programs. / MIT |
| [wrapt](https://github.com/GrahamDumpleton/wrapt) | 1.11.2 | Module for decorators, wrappers and monkey patching / BSD 2-Clause |
| [xlrd](http://www.python-excel.org/) | 1.2.0 | Library for developers to extract data from Microsoft Excel (tm) spreadsheet files / BSD 3-Clause and BSD with advertising |
| [xlsxwriter](https://xlsxwriter.readthedocs.io/) | 1.2.1 | A Python module for creating Excel XLSX files / BSD 2-Clause |
| [xlwings](http://xlwings.org/) | 0.15.10 | Interact with Excel from Python and vice versa / 3-clause BSD |
| [xlwt](http://www.python-excel.org/) | 1.3.0 | Writing data and formatting information to Excel files / BSD |
| [xz](http://tukaani.org/xz/) | 5.2.4 | Data compression software with high compression ratio / LGPL-2.1 and GPL-2.0 |
| [yaml](http://pyyaml.org/wiki/LibYAML) | 0.1.7 | A C library for parsing and emitting YAML. / MIT |
| [zeromq](http://zeromq.org) | 4.3.1 | A high-performance asynchronous messaging library. / LGPL 3 |
| [zict](http://github.com/mrocklin/zict) | 1.0.0 | Composable Dictionary Classes / BSD 3-Clause |
| [zipp](https://github.com/jaraco/zipp) | 0.6.0 | A pathlib-compatible Zipfile object wrapper / MIT |
| [zlib](http://zlib.net/) | 1.2.11 | Massively spiffy yet delicately unobtrusive compression library / zlib |
| [zstd](http://www.zstd.net) | 1.3.7 | Zstandard - Fast real-time compression algorithm / BSD 3-Clause |
| Name | Version | Summary / License |
|---|---|---|
| [\_ipyw\_jlab\_nb\_ext\_conf](https://github.com/ContinuumIO/anaconda-nb-extensions-meta-config) | 0.1.0 | A configuration metapackage for enabling Anaconda-bundled jupyter extensions / BSD |
| [alabaster](http://www.sphinx-doc.org/en/stable/index.html) | 0.7.12 | Configurable, Python 2+3 compatible Sphinx theme. / BSD 3-Clause |
| [anaconda-client](http://anaconda.org) | 1.7.2 | anaconda.org command line client library / BSD 3-clause |
| [anaconda-project](https://github.com/Anaconda-Platform/anaconda-project) | 0.8.3 | Tool for encapsulating, running, and reproducing data science projects / BSD 3-Clause |
| [appnope](http://github.com/minrk/appnope) | 0.1.0 | Disable App Nap on OS X 10.9 / BSD 2-Clause |
| [appscript](http://appscript.sourceforge.net/) | 1.1.0 | Control AppleScriptable applications from Python / Public-Domain |
| [asn1crypto](https://github.com/wbond/asn1crypto) | 1.0.1 | Python ASN.1 library with a focus on performance and a pythonic API / MIT |
| [astroid](https://www.astroid.org/) | 1.6.5 | A abstract syntax tree for Python with inference support. / LGPL 2.1 |
| [astropy](http://www.astropy.org/) | 2.0.9 | Community-developed Python Library for Astronomy / BSD 3-clause |
| [atomicwrites](https://github.com/untitaker/python-atomicwrites) | 1.3.0 | Atomic file writes / MIT |
| [attrs](https://attrs.readthedocs.io/en/stable/) | 19.2.0 | attrs is the Python package that will bring back the joy of writing classes by relieving you from the drudgery of implementing object protocols (aka dunder methods). / MIT |
| [babel](http://babel.pocoo.org/) | 2.7.0 | Utilities to internationalize and localize Python applications / BSD 3-clause |
| [backports](https://bitbucket.org/brandon/backports) | 1.0 | None / BSD |
| [backports.functools\_lru\_cache](https://github.com/jaraco/backports.functools_lru_cache) | 1.5 | Backport of functools.lru\_cache from Python 3.3 as published at ActiveState. / MIT |
| [backports.os](https://github.com/pjdelport/backports.os) | 0.1.1 | Backport of new features in Python’s os module / Python Software Foundation |
| [backports.shutil\_get\_terminal\_size](https://github.com/chrippa/backports.shutil_get_terminal_size) | 1.0.0 | A backport of the get\_terminal\_size function from Python 3.3’s shutil. / MIT |
| [backports\_abc](https://github.com/cython/backports_abc) | 0.5 | A backport of recent additions to the collections.abc module. / PSF 2 |
| [beautifulsoup4](http://www.crummy.com/software/BeautifulSoup/) | 4.8.0 | Python library designed for screen-scraping / MIT |
| [bitarray](https://github.com/ilanschnell/bitarray) | 1.0.1 | efficient arrays of booleans – C extension / PSF |
| [bkcharts](http://github.com/bokeh/bkcharts) | 0.2 | High level chart types built on top of Bokeh / BSD 3-Clause |
| blas | 1.0 | |
| [bleach](https://github.com/mozilla/bleach) | 3.1.0 | Easy, whitelist-based HTML-sanitizing tool / Apache-2.0 |
| [blosc](https://github.com/Blosc/c-blosc) | 1.16.3 | A blocking, shuffling and loss-less compression library that can be faster than memcpy() / BSD 3-Clause |
| [bokeh](http://bokeh.pydata.org/) | 1.3.4 | Statistical and novel interactive HTML plots for Python / BSD 3-Clause |
| [boto](https://github.com/boto/boto/) | 2.49.0 | Amazon Web Services Library / MIT |
| [bottleneck](http://berkeleyanalytics.com/bottleneck) | 1.2.1 | Fast NumPy array functions written in Cython. / BSD 2-Clause |
| [bzip2](http://www.bzip.org/) | 1.0.8 | high-quality data compressor / bzip2 |
| [ca-certificates](https://github.com/conda-forge/ca-certificates-feedstock) | 2019.8.28 | Certificates for use with other packages. / MPL 2.0 |
| [cdecimal](http://www.bytereef.org/mpdecimal/index.html) | 2.3 | Fast drop-in replacement for decimal.py / BSD 2-Clause |
| [certifi](http://certifi.io/) | 2019.9.11 | Python package for providing Mozilla’s CA Bundle. / ISC |
| [cffi](https://bitbucket.org/cffi/cffi) | 1.12.3 | Foreign Function Interface for Python calling C code. / MIT |
| [chardet](https://github.com/chardet/chardet) | 3.0.4 | Universal character encoding detector / LGPL2 |
| [click](https://palletsprojects.com/p/click) | 7.0 | Python composable command line interface toolkit / BSD-3-Clause |
| [cloudpickle](https://github.com/cloudpipe/cloudpickle) | 1.2.2 | Extended pickling support for Python objects / BSD 3-Clause |
| [clyent](https://github.com/Anaconda-Platform/clyent) | 1.2.2 | Command line client library for windows and posix / BSD 3-Clause |
| [colorama](https://github.com/tartley/colorama) | 0.4.1 | Cross-platform colored terminal text / BSD-3-Clause |
| [conda](https://conda.io) | 4.7.12 | OS-agnostic, system-level binary package and environment manager. / BSD 3-Clause |
| [conda-build](https://github.com/conda/conda-build) | 3.18.9 | tools for building conda packages / BSD 3-Clause |
| [conda-env](https://github.com/conda/conda-env) | 2.6.0 | Tools for interacting with conda environments. / BSD 3-Clause |
| [conda-verify](https://github.com/conda/conda-verify) | 3.4.2 | tool for validating conda recipes and conda packages / BSD 3-Clause |
| [configparser](http://docs.python.org/3/library/configparser.html) | 4.0.2 | This library brings the updated configparser from Python 3.5 to Python 2.6-3.5 / MIT |
| [contextlib2](http://contextlib2.readthedocs.org) | 0.6.0 | Backports and enhancements for the contextlib module / PSF 2 |
| [cryptography](https://github.com/pyca/cryptography) | 2.7 | Provides cryptographic recipes and primitives to Python developers / Apache 2.0 or BSD 3-Clause, PSF 2 |
| [curl](http://curl.haxx.se/) | 7.65.3 | tool and library for transferring data with URL syntax / MIT/X derivate (`<http://curl.haxx.se/docs/copyright.html>`) |
| [cycler](http://matplotlib.org/cycler) | 0.10.0 | Composable style cycles. / BSD 3-Clause |
| [cython](http://www.cython.org/) | 0.29.13 | The Cython compiler for writing C extensions for the Python language / Apache-2.0 |
| [cytoolz](https://github.com/pytoolz/cytoolz) | 0.10.0 | Cython implementation of Toolz. High performance functional utilities / BSD-3-Clause |
| [dask](https://dask.org/) | 1.2.2 | Parallel PyData with Task Scheduling / BSD 3-Clause |
| [dask-core](http://github.com/dask/dask/) | 1.2.2 | Parallel Python with task scheduling / BSD 3-Clause |
| [dbus](http://www.freedesktop.org/wiki/Software/dbus/) | 1.13.6 | Simple message bus system for applications to talk to one another / GPL2 |
| [decorator](https://github.com/micheles/decorator) | 4.4.0 | Better living through Python with decorators. / BSD 3-Clause |
| [defusedxml](https://bitbucket.org/tiran/defusedxml) | 0.6.0 | XML bomb protection for Python stdlib modules / PSF 2.0 |
| [distributed](http://distributed.readthedocs.io/en/latest/) | 1.28.1 | Distributed computing with Dask / BSD 3-Clause |
| [docutils](http://docutils.sourceforge.net/) | 0.15.2 | Docutils – Python Documentation Utilities / Public Domain Dedictation and BSD 2-Clause and PSF 2.1.1 and GPL 3.0 |
| [entrypoints](https://github.com/takluyver/entrypoints) | 0.3 | Discover and load entry points from installed packages. / MIT License |
| [enum34](https://bitbucket.org/stoneleaf/enum34) | 1.1.6 | Python 3.4 Enum backported to 3.3, 3.2, 3.1, 2.7, 2.6, 2.5, and 2.4 / BSD 3-Clause |
| [et\_xmlfile](https://bitbucket.org/openpyxl/et_xmlfile) | 1.0.1 | An implementation of lxml.xmlfile for the standard library / MIT |
| [expat](http://expat.sourceforge.net/) | 2.2.6 | Expat XML parser library in C. / MIT |
| [fastcache](https://github.com/pbrady/fastcache) | 1.1.0 | C implementation of Python 3 lru\_cache / MIT |
| [filelock](https://github.com/benediktschmitt/py-filelock) | 3.0.12 | A platform independent file lock. / Public Domain |
| [flask](http://flask.pocoo.org) | 1.1.1 | A microframework based on Werkzeug, Jinja2 and good intentions. / BSD 3-Clause |
| [freetype](https://www.freetype.org/) | 2.9.1 | A Free, High-Quality, and Portable Font Engine / GPL-2.0 and FreeType |
| [funcsigs](http://funcsigs.readthedocs.org) | 1.0.2 | Python function signatures from PEP362 for Python 2.6, 2.7 and 3.2+. / Apache 2.0 |
| [functools32](https://github.com/MiCHiLU/python-functools32) | 3.2.3.2 | Backport of the functools module from Python 3.2.3 for use on 2.7 and PyPy. / PSF license |
| [future](http://python-future.org) | 0.17.1 | Clean single-source support for Python 3 and 2 / MIT |
| [futures](https://github.com/agronholm/pythonfutures) | 3.3.0 | Backport of the concurrent.futures package from Python 3.2 / PSF |
| [get\_terminal\_size](https://github.com/chrippa/backports.shutil_get_terminal_size) | 1.0.0 | Get the size of the terminal window. / MIT |
| [gettext](https://www.gnu.org/software/gettext/) | 0.19.8.1 | Internationalization package. / GPLv2 |
| [gevent](http://www.gevent.org/) | 1.4.0 | Coroutine-based network library / MIT |
| [glib](https://developer.gnome.org/glib/) | 2.56.2 | Provides core application building blocks for libraries and applications written in C. / LGPL-2.1 |
| [glob2](https://github.com/miracle2k/python-glob2) | 0.7 | Version of the glob module that supports recursion via \*\*, and can capture patterns. / BSD-2-Clause |
| [gmp](http://gmplib.org/) | 6.1.2 | The GNU multiprecision library. / GPL 2 and LGPL 3 |
| [gmpy2](https://pypi.python.org/pypi/gmpy2) | 2.0.8 | GMP/MPIR, MPFR, and MPC interface to Python 2.6+ and 3.x / LGPL 3 |
| [greenlet](https://github.com/python-greenlet/greenlet) | 0.4.15 | Lightweight in-process concurrent programming / MIT |
| [grin](http://pypi.python.org/pypi/grin) | 1.2.1 | Enhanced grep-like tool / BSD 3-Clause |
| [h5py](http://www.h5py.org/) | 2.9.0 | Read and write HDF5 files from Python. / BSD-3-Clause |
| [hdf5](http://www.hdfgroup.org/HDF5/) | 1.10.4 | HDF5 is a data model, library, and file format for storing and managing data / HDF5 |
| [heapdict](http://stutzbachenterprises.com/) | 1.0.1 | A heap with decrease-key and increase-key operations / BSD 3-Clause |
| [html5lib](https://github.com/html5lib/html5lib-python) | 1.0.1 | HTML parser based on the WHATWG HTML specification / MIT |
| [icu](http://site.icu-project.org/) | 58.2 | International Components for Unicode. / MIT |
| [idna](https://github.com/kjd/idna) | 2.8 | Internationalized Domain Names in Applications (IDNA). / BSD Like |
| [imageio](http://imageio.github.io) | 2.6.0 | A Python library for reading and writing image data / BSD-2-Clause |
| [imagesize](https://github.com/shibukawa/imagesize_py) | 1.1.0 | Getting image size from png/jpeg/jpeg2000/gif file / MIT |
| [importlib\_metadata](http://importlib-metadata.readthedocs.io) | 0.23 | A library to access the metadata for a Python package / APACHE-2.0 |
| [intel-openmp](https://software.intel.com/en-us/node/522690) | 2019.4 | Math library for Intel and compatible processors / proprietary - Intel |
| [ipaddress](https://github.com/phihag/ipaddress) | 1.0.22 | IPv4/IPv6 manipulation library / PSF 2 |
| [ipykernel](https://ipython.org) | 4.10.0 | IPython Kernel for Jupyter / BSD-3-Clause |
| [ipython](https://ipython.org/) | 5.8.0 | IPython: Productive Interactive Computing / BSD-3-Clause |
| [ipython\_genutils](http://ipython.org) | 0.2.0 | vestigial utilities from IPython / BSD 3-Clause |
| [ipywidgets](https://github.com/ipython/ipywidgets) | 7.5.1 | Jupyter Interactive Widgets / BSD 3-clause |
| [isort](https://github.com/timothycrosley/isort) | 4.3.21 | A Python utility / library to sort Python imports. / MIT |
| [itsdangerous](https://github.com/pallets/itsdangerous) | 1.1.0 | Various helpers to pass trusted data to untrusted environments. / BSD 3-Clause |
| [jbig](https://www.cl.cam.ac.uk/~mgk25/jbigkit) | 2.1 | Implementation of the JBIG1 data compression standard / GPL-2.0 |
| [jdcal](https://github.com/phn/jdcal) | 1.4.1 | Julian dates from proleptic Gregorian and Julian calendars. / BSD 2-Clause |
| [jedi](https://github.com/davidhalter/jedi/) | 0.15.1 | An autocompletion tool for Python that can be used for text editors. / MIT |
| [jinja2](http://jinja.pocoo.org) | 2.10.3 | An easy to use stand-alone template engine written in pure python. / 3-Clause BSD |
| [jpeg](http://www.ijg.org/) | 9b | read/write jpeg COM, EXIF, IPTC medata / Custom free software license |
| [jsonschema](https://github.com/Julian/jsonschema) | 3.0.2 | An implementation of JSON Schema validation for Python / MIT |
| [jupyter](http://jupyter.org) | 1.0.0 | Jupyter metapackage. Install all the Jupyter components in one go. / BSD 3-Clause |
| [jupyter\_client](http://jupyter.org) | 5.3.3 | Jupyter protocol implementation and client libraries / BSD 3-clause |
| [jupyter\_console](http://jupyter.org) | 5.2.0 | Jupyter terminal console / BSD-3-Clause |
| [jupyter\_core](http://jupyter.org) | 4.5.0 | Core common functionality of Jupyter projects. / BSD 3-clause |
| [jupyterlab](https://github.com/jupyterlab/jupyterlab) | 0.33.11 | JupyterLab / BSD-3-Clause |
| [jupyterlab\_launcher](http://github.com/jupyterlab/jupyterlab_launcher) | 0.11.2 | A Launcher for JupyterLab based applications. / BSD 3-Clause |
| [keyring](https://github.com/jaraco/keyring) | 18.0.0 | Store and access your passwords safely / Python Software Foundation or MIT |
| [kiwisolver](https://github.com/nucleic/kiwi) | 1.1.0 | A fast implementation of the Cassowary constraint solver / BSD 3-Clause |
| [krb5](http://web.mit.edu/kerberos/) | 1.16.1 | A network authentication protocol. / MIT |
| [lazy-object-proxy](https://github.com/ionelmc/python-lazy-object-proxy) | 1.4.2 | A fast and thorough lazy object proxy / BSD-2-Clause |
| [libarchive](http://www.libarchive.org/) | 3.3.3 | Multi-format archive and compression library / BSD 2-Clause |
| [libcurl](http://curl.haxx.se/) | 7.65.3 | tool and library for transferring data with URL syntax / MIT/X derivate (`<http://curl.haxx.se/docs/copyright.html>`) |
| [libcxx](http://libcxx.llvm.org/) | 4.0.1 | C++ Standard Library / MIT license or UIUC License |
| [libcxxabi](http://libcxxabi.llvm.org/) | 4.0.1 | C++ Standard Library Support / MIT license or UIUC License |
| [libedit](http://thrysoee.dk/editline/) | 3.1.20181209 | Editline Library (libedit) / NetBSD |
| [libffi](https://sourceware.org/libffi/) | 3.2.1 | A Portable Foreign Function Interface Library. / Custom |
| [libgfortran](http://gcc.gnu.org/) | 3.0.1 | Fortran libraries from the GNU Compiler Collection / GPL 3 (with GCC Runtime Library Exception 3.1) |
| [libiconv](https://www.gnu.org/software/libiconv/) | 1.15 | Provides iconv for systems which don’t have one (or that cannot convert from/to Unicode.) / GPL and LGPL |
| [liblief](https://lief.quarkslab.com/) | 0.9.0 | A cross platform library to parse, modify and abstract ELF, PE and MachO formats. / Apache 2.0 |
| [libpng](http://www.libpng.org/pub/png/libpng.html) | 1.6.37 | PNG reference library / zlib/libpng |
| [libsodium](http://libsodium.org) | 1.0.16 | A modern and easy-to-use crypto library. / ISC |
| [libssh2](https://www.libssh2.org/) | 1.8.2 | the SSH library / BSD-3-Clause |
| [libtiff](http://www.libtiff.org/) | 4.0.10 | Support for the Tag Image File Format (TIFF). / HPND |
| [libxml2](http://xmlsoft.org/) | 2.9.9 | The XML C parser and toolkit of Gnome / MIT |
| [libxslt](http://xmlsoft.org/XSLT/) | 1.1.33 | The XSLT C library developed for the GNOME project / MIT |
| [linecache2](https://github.com/testing-cabal/linecache2) | 1.0.0 | Backport of the linecache module / PSF 1.0 |
| [llvmlite](https://github.com/numba/llvmlite) | 0.29.0 | A lightweight LLVM python binding for writing JIT compilers / New BSD License |
| [locket](https://github.com/mwilliamson/locket.py) | 0.2.0 | File-based locks for Python for Linux and Windows / BSD 2-Clause |
| [lxml](http://lxml.de/) | 4.4.1 | Pythonic binding for the C libraries libxml2 and libxslt. / BSD 3-Clause, GPL-2.0, ZPL-2.0, and ElementTree |
| [lz4-c](https://www.lz4.org) | 1.8.1.2 | Extremely Fast Compression algorithm / BSD 2-clause |
| [lzo](http://www.oberhumer.com/opensource/lzo/) | 2.10 | LZO is a portable lossless data compression library written in ANSI C. / GPL v2+ |
| [markupsafe](https://www.palletsprojects.com/p/markupsafe) | 1.1.1 | A Python module that implements the jinja2.Markup string / BSD-3-Clause |
| [matplotlib](http://matplotlib.org/) | 2.2.3 | Publication quality figures in Python / PSF-based |
| [mccabe](https://github.com/PyCQA/mccabe) | 0.6.1 | McCabe complexity checker for Python / MIT |
| [mistune](https://github.com/lepture/mistune) | 0.8.4 | The fastest markdown parser in pure Python. / BSD 3-Clause |
| [mkl](https://software.intel.com/en-us/mkl) | 2019.4 | Math library for Intel and compatible processors / proprietary - Intel |
| [mkl-service](https://github.com/ContinuumIO/mkl-service) | 2.3.0 | Python bindings to MKL service functions / 3-clause BSD |
| [mkl\_fft](http://github.com/IntelPython/mkl_fft) | 1.0.14 | NumPy-based implementation of Fast Fourier Transform using Intel (R) Math Kernel Library. / BSD 3-Clause |
| [mkl\_random](http://github.com/IntelPython/mkl_random) | 1.1.0 | Intel (R) MKL-powered package for sampling from common probability distributions into NumPy arrays. / BSD 3-Clause |
| [mock](https://github.com/testing-cabal/mock) | 3.0.5 | A library for testing in Python / BSD-2-Clause |
| [more-itertools](https://github.com/erikrose/more-itertools) | 5.0.0 | More routines for operating on iterables, beyond itertools / MIT |
| [mpc](http://www.multiprecision.org/) | 1.1.0 | A C library for the arithmetic of complex numbers with arbitrarily high precision. / LGPL 3 |
| [mpfr](http://www.mpfr.org/) | 4.0.1 | The MPFR library is a C library for multiple-precision floating-point computations with correct rounding. / LGPL 3 |
| [mpmath](http://mpmath.org) | 1.1.0 | Python library for arbitrary-precision floating-point arithmetic / BSD 3-Clause |
| [msgpack-python](http://msgpack.org/) | 0.6.1 | MessagePack (de)serializer. / Apache 2.0 |
| [multipledispatch](https://github.com/mrocklin/multipledispatch/) | 0.6.0 | Multiple dispatch in Python / BSD 3-Clause |
| [nbconvert](http://jupyter.org) | 5.6.0 | Converting Jupyter Notebooks / BSD-3-Clause |
| [nbformat](http://jupyter.org) | 4.4.0 | The reference implementation of the Jupyter Notebook format / BSD 3-clause |
| [ncurses](http://www.gnu.org/software/ncurses/) | 6.1 | Library for text-based user interfaces / Free software (MIT-like) |
| [networkx](https://networkx.github.io/) | 2.2 | Python package for creating and manipulating complex networks / BSD-3-Clause |
| [nltk](http://nltk.org/) | 3.4.5 | Build Python programs to work with human language data / Apache 2.0 |
| [nose](http://readthedocs.org/docs/nose/) | 1.3.7 | Nose extends unittest to make testing easier / LGPL-2.1 |
| [notebook](http://jupyter.org) | 5.7.8 | Jupyter Notebook / BSD 3-clause |
| [numba](http://numba.github.com) | 0.45.1 | NumPy aware dynamic Python compiler using LLVM / BSD 2-clause |
| [numexpr](https://github.com/pydata/numexpr) | 2.7.0 | Fast numerical expression evaluator for NumPy. / MIT |
| [numpy](http://numpy.scipy.org/) | 1.16.5 | Array processing for numbers, strings, records, and objects. / BSD 3-Clause |
| [numpy-base](http://numpy.scipy.org/) | 1.16.5 | Array processing for numbers, strings, records, and objects. / BSD 3-Clause |
| [numpydoc](https://github.com/numpy/numpydoc) | 0.9.1 | Numpy’s Sphinx extensions / BSD 3-Clause |
| [olefile](http://www.decalage.info/python/olefileio) | 0.46 | parse, read and write Microsoft OLE2 files / BSD 2-Clause |
| [openpyxl](https://openpyxl.readthedocs.io) | 2.6.3 | A Python library to read/write Excel 2010 xlsx/xlsm files / MIT |
| [openssl](http://www.openssl.org/) | 1.1.1d | OpenSSL is an open-source implementation of the SSL and TLS protocols / OpenSSL |
| [packaging](https://github.com/pypa/packaging) | 19.2 | Core utilities for Python packages / Apache 2.0 or BSD 2-Clause |
| [pandas](http://pandas.pydata.org) | 0.24.2 | High-performance, easy-to-use data structures and data analysis tools. / BSD 3-clause |
| [pandoc](http://pandoc.org/) | 2.2.3.2 | Universal markup converter (repackaged binaries). / GPL-2.0 |
| [pandocfilters](https://github.com/jgm/pandocfilters) | 1.4.2 | A python module for writing pandoc filters / BSD-3-Clause |
| [parso](https://github.com/davidhalter/parso) | 0.5.1 | A Python Parser / MIT |
| [partd](https://github.com/dask/partd) | 1.0.0 | Data structure for on-disk shuffle operations / BSD 3-Clause |
| [path.py](https://github.com/jaraco/path.py) | 11.5.0 | A module wrapper for os.path / MIT |
| [pathlib2](https://github.com/mcmtroffaes/pathlib2) | 2.3.5 | Fork of pathlib aiming to support the full stdlib Python API / MIT |
| [patsy](https://github.com/pydata/patsy) | 0.5.1 | Describing statistical models in Python using symbolic formulas / BSD-2-Clause, PSF2 |
| [pcre](http://www.pcre.org/) | 8.43 | Regular expression pattern matching using the same syntax and semantics as Perl 5. / BSD 3-Clause |
| [pep8](http://pep8.readthedocs.org/) | 1.7.1 | Python style guide checker / MIT |
| [pexpect](http://pexpect.sourceforge.net/) | 4.7.0 | Pexpect makes Python a better tool for controlling other applications. / ISC |
| [pickleshare](https://github.com/pickleshare/pickleshare/) | 0.7.5 | Tiny ‘shelve’-like database with concurrency support / MIT |
| [pillow](https://pillow.readthedocs.io) | 6.2.0 | Pillow is the friendly PIL fork by Alex Clark and Contributors / PIL |
| [pip](https://pip.pypa.io/en/stable/) | 19.2.3 | PyPA recommended tool for installing Python packages / MIT |
| [pkginfo](https://code.launchpad.net/~tseaver/pkginfo/trunk) | 1.5.0.1 | Query metadatdata from sdists / bdists / installed packages. / MIT |
| [pluggy](https://github.com/pytest-dev/pluggy) | 0.13.0 | Plugin registration and hook calling for Python / MIT |
| [ply](http://www.dabeaz.com/ply/index.html) | 3.11 | Python Lex-Yacc / BSD 3-clause |
| [portaudio](http://www.portaudio.com/) | 19.6.0 | A cross platform, open-source, audio I/O library / MIT |
| [prometheus\_client](https://github.com/prometheus/client_python) | 0.7.1 | Python client for the Prometheus monitoring system / Apache 2.0 |
| [prompt\_toolkit](https://github.com/jonathanslenders/python-prompt-toolkit) | 1.0.15 | Library for building powerful interactive command lines in Python / BSD 3-clause |
| [psutil](https://github.com/giampaolo/psutil) | 5.6.3 | A cross-platform process and system utilities module for Python / BSD 3-Clause |
| [ptyprocess](https://github.com/pexpect/ptyprocess) | 0.6.0 | Run a subprocess in a pseudo terminal / ISC |
| [py](https://github.com/pytest-dev/py) | 1.8.0 | library with cross-python path, ini-parsing, io, code, log facilities / MIT |
| [py-lief](https://lief.quarkslab.com/) | 0.9.0 | A cross platform library to parse, modify and abstract ELF, PE and MachO formats. / Apache 2.0 |
| [pyaudio](http://people.csail.mit.edu/hubert/pyaudio/) | 0.2.11 | Bindings for PortAudio v19, the cross-platform audio stream library / MIT |
| [pycodestyle](https://pycodestyle.readthedocs.io/) | 2.5.0 | Python style guide checker / MIT |
| [pycosat](https://github.com/ContinuumIO/pycosat) | 0.6.3 | Bindings to picosat (a SAT solver) / MIT |
| [pycparser](https://github.com/eliben/pycparser) | 2.19 | Complete C99 parser in pure Python / BSD 3-clause |
| [pycrypto](http://www.pycrypto.org/) | 2.6.1 | Cryptographic modules for Python. / Public Domain |
| [pycurl](http://pycurl.sourceforge.net/) | 7.43.0.3 | A Python Interface To The cURL library / LGPL, MIT |
| [pyflakes](https://github.com/PyCQA/pyflakes) | 2.1.1 | Pyflakes analyzes programs and detects various errors. / MIT |
| [pygments](http://pygments.org/) | 2.4.2 | Generic syntax highlighting package / BSD 2-clause |
| [pylint](http://www.pylint.org/) | 1.9.2 | python code static checker / GPL 2 |
| [pyodbc](https://github.com/mkleehammer/pyodbc) | 4.0.27 | DB API Module for ODBC / MIT |
| [pyopenssl](https://github.com/pyca/pyopenssl) | 19.0.0 | Python wrapper module around the OpenSSL library / Apache 2.0 |
| [pyparsing](http://pyparsing.wikispaces.com/) | 2.4.2 | Create and execute simple grammars / MIT |
| [pyqt](http://www.riverbankcomputing.co.uk/software/pyqt) | 5.9.2 | Python binding of the cross-platform GUI toolkit Qt. / Commercial, GPL-2.0, GPL-3.0 |
| [pyrsistent](http://github.com/tobgu/pyrsistent/) | 0.15.4 | Persistent/Functional/Immutable data structures / MIT |
| [pysocks](https://github.com/Anorov/PySocks) | 1.7.1 | A Python SOCKS client module. See [Anorov/PySocks](https://github.com/Anorov/PySocks) for more information. / BSD 3-Clause |
| [pytables](http://www.pytables.org) | 3.5.2 | Brings together Python, HDF5 and NumPy to easily handle large amounts of data. / BSD 3-Clause |
| [pytest](https://docs.pytest.org/en/latest/) | 4.6.2 | Simple and powerful testing with Python. / MIT |
| [python](http://www.python.org/) | 2.7.16 | General purpose programming language / PSF |
| [python-dateutil](https://dateutil.readthedocs.org/) | 2.8.0 | Extensions to the standard Python datetime module. / BSD 3 Clause |
| [python-libarchive-c](https://github.com/Changaco/python-libarchive-c) | 2.8 | Python interface to libarchive / CC0-1.0 |
| python.app | 2 | Proxy on OS X letting Python libraries hook into the gui event loop / BSD |
| [pytz](http://pythonhosted.org/pytz/) | 2019.3 | World timezone definitions, modern and historical. / MIT |
| [pywavelets](https://github.com/PyWavelets/pywt) | 1.0.3 | Discrete Wavelet Transforms in Python / MIT |
| [pyyaml](http://pyyaml.org/wiki/PyYAML) | 5.1.1 | YAML parser and emitter for Python / MIT |
| [pyzmq](https://github.com/zeromq/pyzmq) | 18.1.0 | Python bindings for zeromq / BSD 3-clause |
| [qt](http://qt-project.org) | 5.9.7 | Qt is a cross-platform application and UI framework. / LGPL-3.0 |
| [qtawesome](https://github.com/spyder-ide/qtawesome) | 0.6.0 | Iconic fonts in PyQt and PySide applications / MIT |
| [qtconsole](http://jupyter.org) | 4.5.5 | Jupyter Qt console / BSD 3-Clause |
| [qtpy](https://github.com/spyder-ide/qtpy) | 1.9.0 | Abstraction layer for PyQt5/PyQt4/PySide / MIT |
| [readline](https://cnswww.cns.cwru.edu/php/chet/readline/rltop.html) | 7.0 | library for editing command lines as they are typed in / GPL3 |
| [requests](http://python-requests.org) | 2.22.0 | Python HTTP for Humans / Apache 2.0 |
| ripgrep | 0.10.0 | |
| [rope](https://github.com/python-rope/rope) | 0.14.0 | A python refactoring library / GPL 2.0 |
| [ruamel\_yaml](https://bitbucket.org/ruamel/yaml) | 0.15.46 | A patched copy of ruamel.yaml. / MIT |
| [scandir](https://github.com/benhoyt/scandir) | 1.10.0 | scandir, a better directory iterator and faster os.walk() / BSD 3-Clause |
| [scikit-image](http://scikit-image.org/) | 0.14.2 | Image processing routines for SciPy. / BSD 3-Clause |
| [scikit-learn](http://scikit-learn.org/) | 0.20.3 | A set of python modules for machine learning and data mining / BSD 3-Clause |
| [scipy](http://www.scipy.org/) | 1.2.1 | Scientific Library for Python / BSD 3-Clause |
| [seaborn](https://seaborn.pydata.org) | 0.9.0 | Statistical data visualization / BSD 3-Clause |
| [send2trash](https://github.com/hsoft/send2trash) | 1.5.0 | Python library to natively send files to Trash (or Recycle bin) on all platforms. / BSD-3-Clause |
| [setuptools](https://github.com/pypa/setuptools) | 41.4.0 | Download, build, install, upgrade, and uninstall Python packages / MIT |
| [simplegeneric](http://cheeseshop.python.org/pypi/simplegeneric) | 0.8.1 | Simple generic functions (similar to Python’s own len(), pickle.dump(), etc.) / Zope Public |
| [singledispatch](http://docs.python.org/3/library/functools.html#functools.singledispatch) | 3.4.0.3 | Transforms a function into a single-dispatch generic function / MIT |
| [sip](http://www.riverbankcomputing.com/software/sip/intro) | 4.19.8 | Create Python bindings for C and C++ libraries / GPL-3.0 |
| [six](http://pypi.python.org/pypi/six/) | 1.12.0 | Python 2 and 3 compatibility utilities / MIT |
| [snappy](https://github.com/google/snappy) | 1.1.7 | A fast compressor/decompressor / BSD 3-clause |
| [snowballstemmer](https://github.com/shibukawa/snowball_py) | 2.0.0 | Snowball stemming library collection for Python / BSD-2-Clause |
| [sortedcollections](http://www.grantjenks.com/docs/sortedcollections/) | 1.1.2 | Python Sorted Collections / Apache-2.0 |
| [sortedcontainers](http://www.grantjenks.com/docs/sortedcontainers/) | 2.1.0 | Python Sorted Container Types: SortedList, SortedDict, and SortedSet / Apache 2.0 |
| [soupsieve](http://facelessuser.github.io/soupsieve) | 1.9.3 | A modern CSS selector implementation for BeautifulSoup / MIT |
| [sphinx](http://www.sphinx-doc.org) | 1.8.5 | Sphinx is a tool that makes it easy to create intelligent and beautiful documentation / BSD-2-Clause |
| sphinxcontrib | 1.0 | Python namespace for sphinxcontrib / BSD |
| [sphinxcontrib-websupport](https://pypi.python.org/pypi/sphinxcontrib-websupport) | 1.1.2 | Sphinx API for Web Apps / BSD-2-Clause |
| [spyder](https://www.spyder-ide.org/) | 3.3.6 | The Scientific Python Development Environment / MIT |
| [spyder-kernels](https://github.com/spyder-ide/spyder-kernels) | 0.5.2 | Jupyter kernels for the Spyder console / MIT |
| [sqlalchemy](http://www.sqlalchemy.org/) | 1.3.9 | Database Abstraction Library. / MIT |
| [sqlite](http://www.sqlite.org/) | 3.30.0 | Implements a self-contained, zero-configuration, SQL database engine. / Public-Domain (`<http://www.sqlite.org/copyright.html>`) |
| [ssl\_match\_hostname](http://bitbucket.org/brandon/backports.ssl_match_hostname) | 3.7.0.1 | The ssl.match\_hostname() function from Python 3.5 / PSF 2 |
| [statsmodels](https://www.statsmodels.org) | 0.10.1 | Statistical computations and models for use with SciPy / BSD 3-Clause |
| [subprocess32](https://github.com/google/python-subprocess32) | 3.5.4 | A backport of the subprocess module from Python 3.2/3.3 for use on 2.x / Python-2.0 |
| [sympy](http://sympy.org) | 1.4 | Python library for symbolic mathematics / BSD-3-Clause |
| [tbb](http://www.threadingbuildingblocks.org) | 2019.8 | High level abstract threading library / Apache 2.0 |
| [tblib](https://github.com/ionelmc/python-tblib) | 1.4.0 | Traceback serialization library. / BSD 2-Clause |
| [terminado](https://github.com/jupyter/terminado) | 0.8.2 | Terminals served by tornado websockets / BSD 2-Clause |
| [testpath](https://testpath.readthedocs.io) | 0.4.2 | Testpath is a collection of utilities for Python code working with files and commands. / BSD-3-Clause |
| [tk](http://www.tcl.tk/) | 8.6.8 | A dynamic programming language with GUI support. Bundles Tcl and Tk. / Tcl/Tk |
| [toolz](http://toolz.readthedocs.org/) | 0.10.0 | A functional standard library for Python / BSD 3-Clause |
| [tornado](http://www.tornadoweb.org/) | 5.1.1 | A Python web framework and asynchronous networking library, originally developed at FriendFeed. / Apache 2.0 |
| [tqdm](https://pypi.python.org/pypi/tqdm) | 4.36.1 | A Fast, Extensible Progress Meter / MPLv2.0, MIT |
| [traceback2](https://github.com/testing-cabal/traceback2) | 1.4.0 | Backports of the traceback module / PSF 2.0 |
| [traitlets](http://ipython.org/) | 4.3.3 | Configuration system for Python applications / BSD-3-Clause |
| [typing](https://docs.python.org/3.5/library/typing.html) | 3.7.4.1 | Type Hints for Python - backport for `Python<3.5` / PSF |
| [unicodecsv](https://github.com/jdunck/python-unicodecsv) | 0.14.1 | Drop-in replacement for csv module which supports unicode strings / BSD |
| [unittest2](http://pypi.python.org/pypi/unittest2) | 1.1.0 | The new features in unittest backported to Python 2.4+ / BSD |
| [unixodbc](http://www.unixodbc.org/) | 2.3.7 | ODBC on non MS Windows platforms / LGPL-2.1 |
| [urllib3](https://urllib3.readthedocs.io/) | 1.24.2 | HTTP library with thread-safe connection pooling, file post, and more. / MIT |
| [wcwidth](https://github.com/jquast/wcwidth) | 0.1.7 | Measures number of Terminal column cells of wide-character codes. / MIT |
| [webencodings](https://github.com/gsnedders/python-webencodings) | 0.5.1 | Character encoding aliases for legacy web content / BSD 3-Clause |
| [werkzeug](https://palletsprojects.com/p/werkzeug/) | 0.16.0 | The comprehensive WSGI web application library. / BSD 3-Clause |
| [wheel](https://github.com/pypa/wheel) | 0.33.6 | A built-package format for Python. / MIT |
| [widgetsnbextension](http://ipython.org) | 3.5.1 | Interactive Widgets for Jupyter / BSD 3-clause |
| [wrapt](https://github.com/GrahamDumpleton/wrapt) | 1.11.2 | Module for decorators, wrappers and monkey patching / BSD 2-Clause |
| [wurlitzer](https://github.com/minrk/wurlitzer) | 1.0.3 | Capture C-level stdout/stderr in Python / MIT |
| [xlrd](http://www.python-excel.org/) | 1.2.0 | Library for developers to extract data from Microsoft Excel (tm) spreadsheet files / BSD 3-Clause and BSD with advertising |
| [xlsxwriter](https://xlsxwriter.readthedocs.io/) | 1.2.1 | A Python module for creating Excel XLSX files / BSD 2-Clause |
| [xlwings](http://xlwings.org/) | 0.15.10 | Interact with Excel from Python and vice versa / 3-clause BSD |
| [xlwt](http://www.python-excel.org/) | 1.2.0 | Writing data and formatting information to Excel files / BSD |
| [xz](http://tukaani.org/xz/) | 5.2.4 | Data compression software with high compression ratio / LGPL-2.1 and GPL-2.0 |
| [yaml](http://pyyaml.org/wiki/LibYAML) | 0.1.7 | A C library for parsing and emitting YAML. / MIT |
| [zeromq](http://zeromq.org) | 4.3.1 | A high-performance asynchronous messaging library. / LGPL 3 |
| [zict](http://github.com/mrocklin/zict) | 1.0.0 | Composable Dictionary Classes / BSD 3-Clause |
| [zipp](https://github.com/jaraco/zipp) | 0.6.0 | A pathlib-compatible Zipfile object wrapper / MIT |
| [zlib](http://zlib.net/) | 1.2.11 | Massively spiffy yet delicately unobtrusive compression library / zlib |
| [zstd](http://www.zstd.net) | 1.3.7 | Zstandard - Fast real-time compression algorithm / BSD 3-Clause |
| Name | Version | Summary / License |
|---|---|---|
| [\_ipyw\_jlab\_nb\_ext\_conf](https://github.com/ContinuumIO/anaconda-nb-extensions-meta-config) | 0.1.0 | A configuration metapackage for enabling Anaconda-bundled jupyter extensions / BSD |
| \_libgcc\_mutex | 0.1 | Mutex for libgcc and libgcc-ng / None |
| [alabaster](http://www.sphinx-doc.org/en/stable/index.html) | 0.7.12 | Configurable, Python 2+3 compatible Sphinx theme. / BSD 3-Clause |
| [anaconda-client](http://anaconda.org) | 1.7.2 | anaconda.org command line client library / BSD 3-clause |
| [anaconda-project](https://github.com/Anaconda-Platform/anaconda-project) | 0.8.3 | Tool for encapsulating, running, and reproducing data science projects / BSD 3-Clause |
| [asn1crypto](https://github.com/wbond/asn1crypto) | 1.0.1 | Python ASN.1 library with a focus on performance and a pythonic API / MIT |
| [astroid](https://www.astroid.org/) | 1.6.5 | A abstract syntax tree for Python with inference support. / LGPL 2.1 |
| [astropy](http://www.astropy.org/) | 2.0.9 | Community-developed Python Library for Astronomy / BSD 3-clause |
| [atomicwrites](https://github.com/untitaker/python-atomicwrites) | 1.3.0 | Atomic file writes / MIT |
| [attrs](https://attrs.readthedocs.io/en/stable/) | 19.2.0 | attrs is the Python package that will bring back the joy of writing classes by relieving you from the drudgery of implementing object protocols (aka dunder methods). / MIT |
| [babel](http://babel.pocoo.org/) | 2.7.0 | Utilities to internationalize and localize Python applications / BSD 3-clause |
| [backports](https://bitbucket.org/brandon/backports) | 1.0 | None / BSD |
| [backports.functools\_lru\_cache](https://github.com/jaraco/backports.functools_lru_cache) | 1.5 | Backport of functools.lru\_cache from Python 3.3 as published at ActiveState. / MIT |
| [backports.os](https://github.com/pjdelport/backports.os) | 0.1.1 | Backport of new features in Python’s os module / Python Software Foundation |
| [backports.shutil\_get\_terminal\_size](https://github.com/chrippa/backports.shutil_get_terminal_size) | 1.0.0 | A backport of the get\_terminal\_size function from Python 3.3’s shutil. / MIT |
| [backports\_abc](https://github.com/cython/backports_abc) | 0.5 | A backport of recent additions to the collections.abc module. / PSF 2 |
| [beautifulsoup4](http://www.crummy.com/software/BeautifulSoup/) | 4.8.0 | Python library designed for screen-scraping / MIT |
| [bitarray](https://github.com/ilanschnell/bitarray) | 1.0.1 | efficient arrays of booleans – C extension / PSF |
| [bkcharts](http://github.com/bokeh/bkcharts) | 0.2 | High level chart types built on top of Bokeh / BSD 3-Clause |
| blas | 1.0 | |
| [bleach](https://github.com/mozilla/bleach) | 3.1.0 | Easy, whitelist-based HTML-sanitizing tool / Apache-2.0 |
| [blosc](https://github.com/Blosc/c-blosc) | 1.16.3 | A blocking, shuffling and loss-less compression library that can be faster than memcpy() / BSD 3-Clause |
| [bokeh](http://bokeh.pydata.org/) | 1.3.4 | Statistical and novel interactive HTML plots for Python / BSD 3-Clause |
| [boto](https://github.com/boto/boto/) | 2.49.0 | Amazon Web Services Library / MIT |
| [bottleneck](http://berkeleyanalytics.com/bottleneck) | 1.2.1 | Fast NumPy array functions written in Cython. / BSD 2-Clause |
| [bzip2](http://www.bzip.org/) | 1.0.8 | high-quality data compressor / bzip2 |
| [ca-certificates](https://github.com/conda-forge/ca-certificates-feedstock) | 2019.8.28 | Certificates for use with other packages. / MPL 2.0 |
| [cairo](http://cairographics.org/) | 1.14.12 | Cairo is a 2D graphics library with support for multiple output devices. / LGPL 2.1 or MPL 1.1 |
| [cdecimal](http://www.bytereef.org/mpdecimal/index.html) | 2.3 | Fast drop-in replacement for decimal.py / BSD 2-Clause |
| [certifi](http://certifi.io/) | 2019.9.11 | Python package for providing Mozilla’s CA Bundle. / ISC |
| [cffi](https://bitbucket.org/cffi/cffi) | 1.12.3 | Foreign Function Interface for Python calling C code. / MIT |
| [chardet](https://github.com/chardet/chardet) | 3.0.4 | Universal character encoding detector / LGPL2 |
| [click](https://palletsprojects.com/p/click) | 7.0 | Python composable command line interface toolkit / BSD-3-Clause |
| [cloudpickle](https://github.com/cloudpipe/cloudpickle) | 1.2.2 | Extended pickling support for Python objects / BSD 3-Clause |
| [clyent](https://github.com/Anaconda-Platform/clyent) | 1.2.2 | Command line client library for windows and posix / BSD 3-Clause |
| [colorama](https://github.com/tartley/colorama) | 0.4.1 | Cross-platform colored terminal text / BSD-3-Clause |
| [conda](https://conda.io) | 4.7.12 | OS-agnostic, system-level binary package and environment manager. / BSD 3-Clause |
| [conda-build](https://github.com/conda/conda-build) | 3.18.9 | tools for building conda packages / BSD 3-Clause |
| [conda-env](https://github.com/conda/conda-env) | 2.6.0 | Tools for interacting with conda environments. / BSD 3-Clause |
| [conda-verify](https://github.com/conda/conda-verify) | 3.4.2 | tool for validating conda recipes and conda packages / BSD 3-Clause |
| [configparser](http://docs.python.org/3/library/configparser.html) | 4.0.2 | This library brings the updated configparser from Python 3.5 to Python 2.6-3.5 / MIT |
| [contextlib2](http://contextlib2.readthedocs.org) | 0.6.0 | Backports and enhancements for the contextlib module / PSF 2 |
| [cryptography](https://github.com/pyca/cryptography) | 2.7 | Provides cryptographic recipes and primitives to Python developers / Apache 2.0 or BSD 3-Clause, PSF 2 |
| [curl](http://curl.haxx.se/) | 7.65.3 | tool and library for transferring data with URL syntax / MIT/X derivate (`<http://curl.haxx.se/docs/copyright.html>`) |
| [cycler](http://matplotlib.org/cycler) | 0.10.0 | Composable style cycles. / BSD 3-Clause |
| [cython](http://www.cython.org/) | 0.29.13 | The Cython compiler for writing C extensions for the Python language / Apache-2.0 |
| [cytoolz](https://github.com/pytoolz/cytoolz) | 0.10.0 | Cython implementation of Toolz. High performance functional utilities / BSD-3-Clause |
| [dask](https://dask.org/) | 1.2.2 | Parallel PyData with Task Scheduling / BSD 3-Clause |
| [dask-core](http://github.com/dask/dask/) | 1.2.2 | Parallel Python with task scheduling / BSD 3-Clause |
| [decorator](https://github.com/micheles/decorator) | 4.4.0 | Better living through Python with decorators. / BSD 3-Clause |
| [defusedxml](https://bitbucket.org/tiran/defusedxml) | 0.6.0 | XML bomb protection for Python stdlib modules / PSF 2.0 |
| [distributed](http://distributed.readthedocs.io/en/latest/) | 1.28.1 | Distributed computing with Dask / BSD 3-Clause |
| [docutils](http://docutils.sourceforge.net/) | 0.15.2 | Docutils – Python Documentation Utilities / Public Domain Dedictation and BSD 2-Clause and PSF 2.1.1 and GPL 3.0 |
| [entrypoints](https://github.com/takluyver/entrypoints) | 0.3 | Discover and load entry points from installed packages. / MIT License |
| [enum34](https://bitbucket.org/stoneleaf/enum34) | 1.1.6 | Python 3.4 Enum backported to 3.3, 3.2, 3.1, 2.7, 2.6, 2.5, and 2.4 / BSD 3-Clause |
| [et\_xmlfile](https://bitbucket.org/openpyxl/et_xmlfile) | 1.0.1 | An implementation of lxml.xmlfile for the standard library / MIT |
| [expat](http://expat.sourceforge.net/) | 2.2.6 | Expat XML parser library in C. / MIT |
| [fastcache](https://github.com/pbrady/fastcache) | 1.1.0 | C implementation of Python 3 lru\_cache / MIT |
| [filelock](https://github.com/benediktschmitt/py-filelock) | 3.0.12 | A platform independent file lock. / Public Domain |
| [flask](http://flask.pocoo.org) | 1.1.1 | A microframework based on Werkzeug, Jinja2 and good intentions. / BSD 3-Clause |
| [fontconfig](http://www.freedesktop.org/wiki/Software/fontconfig/) | 2.13.0 | A library for configuring and customizing font access. / MIT |
| [freetype](https://www.freetype.org/) | 2.9.1 | A Free, High-Quality, and Portable Font Engine / GPL-2.0 and FreeType |
| [funcsigs](http://funcsigs.readthedocs.org) | 1.0.2 | Python function signatures from PEP362 for Python 2.6, 2.7 and 3.2+. / Apache 2.0 |
| [functools32](https://github.com/MiCHiLU/python-functools32) | 3.2.3.2 | Backport of the functools module from Python 3.2.3 for use on 2.7 and PyPy. / PSF license |
| [future](http://python-future.org) | 0.17.1 | Clean single-source support for Python 3 and 2 / MIT |
| [futures](https://github.com/agronholm/pythonfutures) | 3.3.0 | Backport of the concurrent.futures package from Python 3.2 / PSF |
| [get\_terminal\_size](https://github.com/chrippa/backports.shutil_get_terminal_size) | 1.0.0 | Get the size of the terminal window. / MIT |
| [gevent](http://www.gevent.org/) | 1.4.0 | Coroutine-based network library / MIT |
| [glib](https://developer.gnome.org/glib/) | 2.56.2 | Provides core application building blocks for libraries and applications written in C. / LGPL-2.1 |
| [glob2](https://github.com/miracle2k/python-glob2) | 0.7 | Version of the glob module that supports recursion via \*\*, and can capture patterns. / BSD-2-Clause |
| [gmp](http://gmplib.org/) | 6.1.2 | The GNU multiprecision library. / GPL 2 and LGPL 3 |
| [gmpy2](https://pypi.python.org/pypi/gmpy2) | 2.0.8 | GMP/MPIR, MPFR, and MPC interface to Python 2.6+ and 3.x / LGPL 3 |
| [greenlet](https://github.com/python-greenlet/greenlet) | 0.4.15 | Lightweight in-process concurrent programming / MIT |
| [grin](http://pypi.python.org/pypi/grin) | 1.2.1 | Enhanced grep-like tool / BSD 3-Clause |
| [h5py](http://www.h5py.org/) | 2.8.0 | Read and write HDF5 files from Python. / BSD-3-Clause |
| [hdf5](http://www.hdfgroup.org/HDF5/) | 1.10.2 | HDF5 is a data model, library, and file format for storing and managing data / HDF5 |
| [heapdict](http://stutzbachenterprises.com/) | 1.0.1 | A heap with decrease-key and increase-key operations / BSD 3-Clause |
| [html5lib](https://github.com/html5lib/html5lib-python) | 1.0.1 | HTML parser based on the WHATWG HTML specification / MIT |
| [icu](http://site.icu-project.org/) | 58.2 | International Components for Unicode. / MIT |
| [idna](https://github.com/kjd/idna) | 2.8 | Internationalized Domain Names in Applications (IDNA). / BSD Like |
| [imageio](http://imageio.github.io) | 2.6.0 | A Python library for reading and writing image data / BSD-2-Clause |
| [imagesize](https://github.com/shibukawa/imagesize_py) | 1.1.0 | Getting image size from png/jpeg/jpeg2000/gif file / MIT |
| [importlib\_metadata](http://importlib-metadata.readthedocs.io) | 0.23 | A library to access the metadata for a Python package / APACHE-2.0 |
| [ipaddress](https://github.com/phihag/ipaddress) | 1.0.22 | IPv4/IPv6 manipulation library / PSF 2 |
| [ipykernel](https://ipython.org) | 4.10.0 | IPython Kernel for Jupyter / BSD-3-Clause |
| [ipython](https://ipython.org/) | 5.8.0 | IPython: Productive Interactive Computing / BSD-3-Clause |
| [ipython\_genutils](http://ipython.org) | 0.2.0 | vestigial utilities from IPython / BSD 3-Clause |
| [ipywidgets](https://github.com/ipython/ipywidgets) | 7.5.1 | Jupyter Interactive Widgets / BSD 3-clause |
| [isort](https://github.com/timothycrosley/isort) | 4.3.21 | A Python utility / library to sort Python imports. / MIT |
| [itsdangerous](https://github.com/pallets/itsdangerous) | 1.1.0 | Various helpers to pass trusted data to untrusted environments. / BSD 3-Clause |
| [jbig](https://www.cl.cam.ac.uk/~mgk25/jbigkit) | 2.1 | Implementation of the JBIG1 data compression standard / GPL-2.0 |
| [jdcal](https://github.com/phn/jdcal) | 1.4.1 | Julian dates from proleptic Gregorian and Julian calendars. / BSD 2-Clause |
| [jedi](https://github.com/davidhalter/jedi/) | 0.15.1 | An autocompletion tool for Python that can be used for text editors. / MIT |
| [jinja2](http://jinja.pocoo.org) | 2.10.3 | An easy to use stand-alone template engine written in pure python. / 3-Clause BSD |
| [jpeg](http://www.ijg.org/) | 9b | read/write jpeg COM, EXIF, IPTC medata / Custom free software license |
| [jsonschema](https://github.com/Julian/jsonschema) | 3.0.2 | An implementation of JSON Schema validation for Python / MIT |
| [jupyter](http://jupyter.org) | 1.0.0 | Jupyter metapackage. Install all the Jupyter components in one go. / BSD 3-Clause |
| [jupyter\_client](http://jupyter.org) | 5.3.3 | Jupyter protocol implementation and client libraries / BSD 3-clause |
| [jupyter\_console](http://jupyter.org) | 5.2.0 | Jupyter terminal console / BSD-3-Clause |
| [jupyter\_core](http://jupyter.org) | 4.5.0 | Core common functionality of Jupyter projects. / BSD 3-clause |
| [kiwisolver](https://github.com/nucleic/kiwi) | 1.1.0 | A fast implementation of the Cassowary constraint solver / BSD 3-Clause |
| [krb5](http://web.mit.edu/kerberos/) | 1.16.1 | A network authentication protocol. / MIT |
| [lazy-object-proxy](https://github.com/ionelmc/python-lazy-object-proxy) | 1.4.2 | A fast and thorough lazy object proxy / BSD-2-Clause |
| [libarchive](http://www.libarchive.org/) | 3.3.3 | Multi-format archive and compression library / BSD 2-Clause |
| [libcurl](http://curl.haxx.se/) | 7.65.3 | tool and library for transferring data with URL syntax / MIT/X derivate (`<http://curl.haxx.se/docs/copyright.html>`) |
| [libedit](http://thrysoee.dk/editline/) | 3.1.20181209 | Editline Library (libedit) / NetBSD |
| [libffi](https://sourceware.org/libffi/) | 3.2.1 | A Portable Foreign Function Interface Library. / Custom |
| [libgcc-ng](https://gcc.gnu.org/onlinedocs/gccint/Libgcc.html) | 8.2.0 | The GCC low-level runtime library / GPL |
| [libgfortran-ng](https://gcc.gnu.org/) | 7.3.0 | The GNU Fortran Runtime Library / GPL |
| [libopenblas](http://www.openblas.net/) | 0.2.20 | An Optimized BLAS library / BSD |
| [libpng](http://www.libpng.org/pub/png/libpng.html) | 1.6.37 | PNG reference library / zlib/libpng |
| [libsodium](http://libsodium.org) | 1.0.16 | A modern and easy-to-use crypto library. / ISC |
| [libssh2](https://www.libssh2.org/) | 1.8.2 | the SSH library / BSD-3-Clause |
| [libstdcxx-ng](https://gcc.gnu.org/) | 8.2.0 | The GNU C++ Runtime Library / GPL3 with runtime exception |
| [libtiff](http://www.libtiff.org/) | 4.0.10 | Support for the Tag Image File Format (TIFF). / HPND |
| [libuuid](http://sourceforge.net/projects/libuuid/) | 1.0.3 | Portable uuid C library. / BSD 3-Clause |
| [libxcb](http://xcb.freedesktop.org/) | 1.13 | This is the C-language Binding (XCB) package to the X Window System protocol / MIT |
| [libxml2](http://xmlsoft.org/) | 2.9.9 | The XML C parser and toolkit of Gnome / MIT |
| [libxslt](http://xmlsoft.org/XSLT/) | 1.1.33 | The XSLT C library developed for the GNOME project / MIT |
| [linecache2](https://github.com/testing-cabal/linecache2) | 1.0.0 | Backport of the linecache module / PSF 1.0 |
| [locket](https://github.com/mwilliamson/locket.py) | 0.2.0 | File-based locks for Python for Linux and Windows / BSD 2-Clause |
| [lxml](http://lxml.de/) | 4.4.1 | Pythonic binding for the C libraries libxml2 and libxslt. / BSD 3-Clause, GPL-2.0, ZPL-2.0, and ElementTree |
| [lz4-c](https://www.lz4.org) | 1.8.1.2 | Extremely Fast Compression algorithm / BSD 2-clause |
| [lzo](http://www.oberhumer.com/opensource/lzo/) | 2.10 | LZO is a portable lossless data compression library written in ANSI C. / GPL v2+ |
| [markupsafe](https://www.palletsprojects.com/p/markupsafe) | 1.1.1 | A Python module that implements the jinja2.Markup string / BSD-3-Clause |
| [matplotlib](http://matplotlib.org/) | 2.2.3 | Publication quality figures in Python / PSF-based |
| [mccabe](https://github.com/PyCQA/mccabe) | 0.6.1 | McCabe complexity checker for Python / MIT |
| [mistune](https://github.com/lepture/mistune) | 0.8.4 | The fastest markdown parser in pure Python. / BSD 3-Clause |
| [more-itertools](https://github.com/erikrose/more-itertools) | 5.0.0 | More routines for operating on iterables, beyond itertools / MIT |
| [mpc](http://www.multiprecision.org/) | 1.1.0 | A C library for the arithmetic of complex numbers with arbitrarily high precision. / LGPL 3 |
| [mpfr](http://www.mpfr.org/) | 4.0.1 | The MPFR library is a C library for multiple-precision floating-point computations with correct rounding. / LGPL 3 |
| [mpmath](http://mpmath.org) | 1.1.0 | Python library for arbitrary-precision floating-point arithmetic / BSD 3-Clause |
| [msgpack-python](http://msgpack.org/) | 0.6.1 | MessagePack (de)serializer. / Apache 2.0 |
| [multipledispatch](https://github.com/mrocklin/multipledispatch/) | 0.6.0 | Multiple dispatch in Python / BSD 3-Clause |
| [nbconvert](http://jupyter.org) | 5.6.0 | Converting Jupyter Notebooks / BSD-3-Clause |
| [nbformat](http://jupyter.org) | 4.4.0 | The reference implementation of the Jupyter Notebook format / BSD 3-clause |
| [ncurses](http://www.gnu.org/software/ncurses/) | 6.1 | Library for text-based user interfaces / Free software (MIT-like) |
| [networkx](https://networkx.github.io/) | 2.2 | Python package for creating and manipulating complex networks / BSD-3-Clause |
| [nltk](http://nltk.org/) | 3.4.5 | Build Python programs to work with human language data / Apache 2.0 |
| [nose](http://readthedocs.org/docs/nose/) | 1.3.7 | Nose extends unittest to make testing easier / LGPL-2.1 |
| [notebook](http://jupyter.org) | 5.7.8 | Jupyter Notebook / BSD 3-clause |
| [numexpr](https://github.com/pydata/numexpr) | 2.6.7 | Fast numerical expression evaluator for NumPy. / MIT |
| [numpy](http://numpy.scipy.org/) | 1.14.5 | Array processing for numbers, strings, records, and objects. / BSD 3-Clause |
| [numpy-base](http://numpy.scipy.org/) | 1.14.5 | Array processing for numbers, strings, records, and objects. / BSD 3-Clause |
| [numpydoc](https://github.com/numpy/numpydoc) | 0.9.1 | Numpy’s Sphinx extensions / BSD 3-Clause |
| [olefile](http://www.decalage.info/python/olefileio) | 0.46 | parse, read and write Microsoft OLE2 files / BSD 2-Clause |
| [openblas](http://www.openblas.net/) | 0.2.20 | An Optimized BLAS library / BSD |
| openblas-devel | 0.2.20 | OpenBLAS headers and libraries for developing software that used OpenBLAS. / None |
| [openpyxl](https://openpyxl.readthedocs.io) | 2.6.3 | A Python library to read/write Excel 2010 xlsx/xlsm files / MIT |
| [openssl](http://www.openssl.org/) | 1.1.1d | OpenSSL is an open-source implementation of the SSL and TLS protocols / OpenSSL |
| [packaging](https://github.com/pypa/packaging) | 19.2 | Core utilities for Python packages / Apache 2.0 or BSD 2-Clause |
| [pandas](http://pandas.pydata.org) | 0.24.2 | High-performance, easy-to-use data structures and data analysis tools. / BSD 3-clause |
| [pandoc](http://pandoc.org/) | 2.0.0.1 | Universal markup converter (repackaged binaries). / GPL-2.0 |
| [pandocfilters](https://github.com/jgm/pandocfilters) | 1.4.2 | A python module for writing pandoc filters / BSD-3-Clause |
| [parso](https://github.com/davidhalter/parso) | 0.5.1 | A Python Parser / MIT |
| [partd](https://github.com/dask/partd) | 1.0.0 | Data structure for on-disk shuffle operations / BSD 3-Clause |
| [patchelf](http://nixos.org/patchelf.html) | 0.9 | A small utility to modify the dynamic linker and RPATH of ELF executables. / GPL 3 |
| [path.py](https://github.com/jaraco/path.py) | 11.5.0 | A module wrapper for os.path / MIT |
| [pathlib2](https://github.com/mcmtroffaes/pathlib2) | 2.3.5 | Fork of pathlib aiming to support the full stdlib Python API / MIT |
| [patsy](https://github.com/pydata/patsy) | 0.5.1 | Describing statistical models in Python using symbolic formulas / BSD-2-Clause, PSF2 |
| [pcre](http://www.pcre.org/) | 8.43 | Regular expression pattern matching using the same syntax and semantics as Perl 5. / BSD 3-Clause |
| [pep8](http://pep8.readthedocs.org/) | 1.7.1 | Python style guide checker / MIT |
| [pexpect](http://pexpect.sourceforge.net/) | 4.7.0 | Pexpect makes Python a better tool for controlling other applications. / ISC |
| [pickleshare](https://github.com/pickleshare/pickleshare/) | 0.7.5 | Tiny ‘shelve’-like database with concurrency support / MIT |
| [pillow](https://pillow.readthedocs.io) | 6.2.0 | Pillow is the friendly PIL fork by Alex Clark and Contributors / PIL |
| [pip](https://pip.pypa.io/en/stable/) | 19.2.3 | PyPA recommended tool for installing Python packages / MIT |
| [pixman](http://www.pixman.org/) | 0.34.0 | A low-level software library for pixel manipulation. / MIT |
| [pkginfo](https://code.launchpad.net/~tseaver/pkginfo/trunk) | 1.5.0.1 | Query metadatdata from sdists / bdists / installed packages. / MIT |
| [pluggy](https://github.com/pytest-dev/pluggy) | 0.13.0 | Plugin registration and hook calling for Python / MIT |
| [ply](http://www.dabeaz.com/ply/index.html) | 3.11 | Python Lex-Yacc / BSD 3-clause |
| [prometheus\_client](https://github.com/prometheus/client_python) | 0.7.1 | Python client for the Prometheus monitoring system / Apache 2.0 |
| [prompt\_toolkit](https://github.com/jonathanslenders/python-prompt-toolkit) | 1.0.15 | Library for building powerful interactive command lines in Python / BSD 3-clause |
| [psutil](https://github.com/giampaolo/psutil) | 5.6.3 | A cross-platform process and system utilities module for Python / BSD 3-Clause |
| [ptyprocess](https://github.com/pexpect/ptyprocess) | 0.6.0 | Run a subprocess in a pseudo terminal / ISC |
| [py](https://github.com/pytest-dev/py) | 1.8.0 | library with cross-python path, ini-parsing, io, code, log facilities / MIT |
| [pycairo](http://cairographics.org/pycairo/) | 1.18.1 | Python bindings for the Cairo graphics library. / LGPL 2.1, MPL 1.1 |
| [pycodestyle](https://pycodestyle.readthedocs.io/) | 2.5.0 | Python style guide checker / MIT |
| [pycosat](https://github.com/ContinuumIO/pycosat) | 0.6.3 | Bindings to picosat (a SAT solver) / MIT |
| [pycparser](https://github.com/eliben/pycparser) | 2.19 | Complete C99 parser in pure Python / BSD 3-clause |
| [pycrypto](http://www.pycrypto.org/) | 2.6.1 | Cryptographic modules for Python. / Public Domain |
| [pycurl](http://pycurl.sourceforge.net/) | 7.43.0.3 | A Python Interface To The cURL library / LGPL, MIT |
| [pyflakes](https://github.com/PyCQA/pyflakes) | 2.1.1 | Pyflakes analyzes programs and detects various errors. / MIT |
| [pygments](http://pygments.org/) | 2.4.2 | Generic syntax highlighting package / BSD 2-clause |
| [pylint](http://www.pylint.org/) | 1.9.2 | python code static checker / GPL 2 |
| [pyodbc](https://github.com/mkleehammer/pyodbc) | 4.0.27 | DB API Module for ODBC / MIT |
| [pyopenssl](https://github.com/pyca/pyopenssl) | 19.0.0 | Python wrapper module around the OpenSSL library / Apache 2.0 |
| [pyparsing](http://pyparsing.wikispaces.com/) | 2.4.2 | Create and execute simple grammars / MIT |
| [pyrsistent](http://github.com/tobgu/pyrsistent/) | 0.15.4 | Persistent/Functional/Immutable data structures / MIT |
| [pysocks](https://github.com/Anorov/PySocks) | 1.7.1 | A Python SOCKS client module. See [Anorov/PySocks](https://github.com/Anorov/PySocks) for more information. / BSD 3-Clause |
| [pytables](http://www.pytables.org) | 3.4.4 | Brings together Python, HDF5 and NumPy to easily handle large amounts of data. / BSD 3-Clause |
| [pytest](https://docs.pytest.org/en/latest/) | 4.6.2 | Simple and powerful testing with Python. / MIT |
| [python](http://www.python.org/) | 2.7.16 | General purpose programming language / PSF |
| [python-dateutil](https://dateutil.readthedocs.org/) | 2.8.0 | Extensions to the standard Python datetime module. / BSD 3 Clause |
| [python-libarchive-c](https://github.com/Changaco/python-libarchive-c) | 2.8 | Python interface to libarchive / CC0-1.0 |
| [pytz](http://pythonhosted.org/pytz/) | 2019.3 | World timezone definitions, modern and historical. / MIT |
| [pywavelets](https://github.com/PyWavelets/pywt) | 1.0.3 | Discrete Wavelet Transforms in Python / MIT |
| [pyyaml](http://pyyaml.org/wiki/PyYAML) | 5.1.2 | YAML parser and emitter for Python / MIT |
| [pyzmq](https://github.com/zeromq/pyzmq) | 18.1.0 | Python bindings for zeromq / BSD 3-clause |
| [readline](https://cnswww.cns.cwru.edu/php/chet/readline/rltop.html) | 7.0 | library for editing command lines as they are typed in / GPL3 |
| [requests](http://python-requests.org) | 2.22.0 | Python HTTP for Humans / Apache 2.0 |
| [ruamel\_yaml](https://bitbucket.org/ruamel/yaml) | 0.15.46 | A patched copy of ruamel.yaml. / MIT |
| [scandir](https://github.com/benhoyt/scandir) | 1.10.0 | scandir, a better directory iterator and faster os.walk() / BSD 3-Clause |
| [scikit-image](http://scikit-image.org/) | 0.14.1 | Image processing routines for SciPy. / BSD 3-Clause |
| [scikit-learn](http://scikit-learn.org/) | 0.19.1 | A set of python modules for machine learning and data mining / BSD 3-Clause |
| [scipy](http://www.scipy.org/) | 1.1.0 | Scientific Library for Python / BSD 3-Clause |
| [seaborn](https://seaborn.pydata.org) | 0.9.0 | Statistical data visualization / BSD 3-Clause |
| [send2trash](https://github.com/hsoft/send2trash) | 1.5.0 | Python library to natively send files to Trash (or Recycle bin) on all platforms. / BSD-3-Clause |
| [setuptools](https://github.com/pypa/setuptools) | 41.4.0 | Download, build, install, upgrade, and uninstall Python packages / MIT |
| [simplegeneric](http://cheeseshop.python.org/pypi/simplegeneric) | 0.8.1 | Simple generic functions (similar to Python’s own len(), pickle.dump(), etc.) / Zope Public |
| [singledispatch](http://docs.python.org/3/library/functools.html#functools.singledispatch) | 3.4.0.3 | Transforms a function into a single-dispatch generic function / MIT |
| [six](http://pypi.python.org/pypi/six/) | 1.12.0 | Python 2 and 3 compatibility utilities / MIT |
| [snappy](https://github.com/google/snappy) | 1.1.7 | A fast compressor/decompressor / BSD 3-clause |
| [snowballstemmer](https://github.com/shibukawa/snowball_py) | 2.0.0 | Snowball stemming library collection for Python / BSD-2-Clause |
| [sortedcollections](http://www.grantjenks.com/docs/sortedcollections/) | 1.1.2 | Python Sorted Collections / Apache-2.0 |
| [sortedcontainers](http://www.grantjenks.com/docs/sortedcontainers/) | 2.1.0 | Python Sorted Container Types: SortedList, SortedDict, and SortedSet / Apache 2.0 |
| [soupsieve](http://facelessuser.github.io/soupsieve) | 1.9.3 | A modern CSS selector implementation for BeautifulSoup / MIT |
| [sphinx](http://www.sphinx-doc.org) | 1.8.5 | Sphinx is a tool that makes it easy to create intelligent and beautiful documentation / BSD-2-Clause |
| sphinxcontrib | 1.0 | Python namespace for sphinxcontrib / BSD |
| [sphinxcontrib-websupport](https://pypi.python.org/pypi/sphinxcontrib-websupport) | 1.1.2 | Sphinx API for Web Apps / BSD-2-Clause |
| [sqlalchemy](http://www.sqlalchemy.org/) | 1.3.9 | Database Abstraction Library. / MIT |
| [sqlite](http://www.sqlite.org/) | 3.30.0 | Implements a self-contained, zero-configuration, SQL database engine. / Public-Domain (`<http://www.sqlite.org/copyright.html>`) |
| [ssl\_match\_hostname](http://bitbucket.org/brandon/backports.ssl_match_hostname) | 3.7.0.1 | The ssl.match\_hostname() function from Python 3.5 / PSF 2 |
| [statsmodels](https://www.statsmodels.org) | 0.10.1 | Statistical computations and models for use with SciPy / BSD 3-Clause |
| [subprocess32](https://github.com/google/python-subprocess32) | 3.5.4 | A backport of the subprocess module from Python 3.2/3.3 for use on 2.x / Python-2.0 |
| [sympy](http://sympy.org) | 1.4 | Python library for symbolic mathematics / BSD-3-Clause |
| [tblib](https://github.com/ionelmc/python-tblib) | 1.4.0 | Traceback serialization library. / BSD 2-Clause |
| [terminado](https://github.com/jupyter/terminado) | 0.8.2 | Terminals served by tornado websockets / BSD 2-Clause |
| [testpath](https://testpath.readthedocs.io) | 0.4.2 | Testpath is a collection of utilities for Python code working with files and commands. / BSD-3-Clause |
| [tk](http://www.tcl.tk/) | 8.6.8 | A dynamic programming language with GUI support. Bundles Tcl and Tk. / Tcl/Tk |
| [toolz](http://toolz.readthedocs.org/) | 0.10.0 | A functional standard library for Python / BSD 3-Clause |
| [tornado](http://www.tornadoweb.org/) | 5.1.1 | A Python web framework and asynchronous networking library, originally developed at FriendFeed. / Apache 2.0 |
| [tqdm](https://pypi.python.org/pypi/tqdm) | 4.36.1 | A Fast, Extensible Progress Meter / MPLv2.0, MIT |
| [traceback2](https://github.com/testing-cabal/traceback2) | 1.4.0 | Backports of the traceback module / PSF 2.0 |
| [traitlets](http://ipython.org/) | 4.3.3 | Configuration system for Python applications / BSD-3-Clause |
| [typing](https://docs.python.org/3.5/library/typing.html) | 3.7.4.1 | Type Hints for Python - backport for `Python<3.5` / PSF |
| [unicodecsv](https://github.com/jdunck/python-unicodecsv) | 0.14.1 | Drop-in replacement for csv module which supports unicode strings / BSD |
| [unittest2](http://pypi.python.org/pypi/unittest2) | 1.1.0 | The new features in unittest backported to Python 2.4+ / BSD |
| [unixodbc](http://www.unixodbc.org/) | 2.3.7 | ODBC on non MS Windows platforms / LGPL-2.1 |
| [urllib3](https://urllib3.readthedocs.io/) | 1.24.2 | HTTP library with thread-safe connection pooling, file post, and more. / MIT |
| [wcwidth](https://github.com/jquast/wcwidth) | 0.1.7 | Measures number of Terminal column cells of wide-character codes. / MIT |
| [webencodings](https://github.com/gsnedders/python-webencodings) | 0.5.1 | Character encoding aliases for legacy web content / BSD 3-Clause |
| [werkzeug](https://palletsprojects.com/p/werkzeug/) | 0.16.0 | The comprehensive WSGI web application library. / BSD 3-Clause |
| [wheel](https://github.com/pypa/wheel) | 0.33.6 | A built-package format for Python. / MIT |
| [widgetsnbextension](http://ipython.org) | 3.5.1 | Interactive Widgets for Jupyter / BSD 3-clause |
| [wrapt](https://github.com/GrahamDumpleton/wrapt) | 1.11.2 | Module for decorators, wrappers and monkey patching / BSD 2-Clause |
| [xlrd](http://www.python-excel.org/) | 1.2.0 | Library for developers to extract data from Microsoft Excel (tm) spreadsheet files / BSD 3-Clause and BSD with advertising |
| [xlsxwriter](https://xlsxwriter.readthedocs.io/) | 1.2.1 | A Python module for creating Excel XLSX files / BSD 2-Clause |
| [xlwt](http://www.python-excel.org/) | 1.3.0 | Writing data and formatting information to Excel files / BSD |
| [xz](http://tukaani.org/xz/) | 5.2.4 | Data compression software with high compression ratio / LGPL-2.1 and GPL-2.0 |
| [yaml](http://pyyaml.org/wiki/LibYAML) | 0.1.7 | A C library for parsing and emitting YAML. / MIT |
| [zeromq](http://zeromq.org) | 4.2.5 | A high-performance asynchronous messaging library. / LGPL 3 |
| [zict](http://github.com/mrocklin/zict) | 1.0.0 | Composable Dictionary Classes / BSD 3-Clause |
| [zipp](https://github.com/jaraco/zipp) | 0.6.0 | A pathlib-compatible Zipfile object wrapper / MIT |
| [zlib](http://zlib.net/) | 1.2.11 | Massively spiffy yet delicately unobtrusive compression library / zlib |
| [zstd](http://www.zstd.net) | 1.3.7 | Zstandard - Fast real-time compression algorithm / BSD 3-Clause |
| Name | Version | Summary / License |
|---|---|---|
| [\_ipyw\_jlab\_nb\_ext\_conf](https://github.com/ContinuumIO/anaconda-nb-extensions-meta-config) | 0.1.0 | A configuration metapackage for enabling Anaconda-bundled jupyter extensions / BSD |
| \_libgcc\_mutex | 0.1 | Mutex for libgcc and libgcc-ng / None |
| [alabaster](http://www.sphinx-doc.org/en/stable/index.html) | 0.7.12 | Configurable, Python 2+3 compatible Sphinx theme. / BSD 3-Clause |
| [anaconda-client](http://anaconda.org) | 1.7.2 | anaconda.org command line client library / BSD 3-clause |
| [anaconda-project](https://github.com/Anaconda-Platform/anaconda-project) | 0.8.3 | Tool for encapsulating, running, and reproducing data science projects / BSD 3-Clause |
| [asn1crypto](https://github.com/wbond/asn1crypto) | 1.0.1 | Python ASN.1 library with a focus on performance and a pythonic API / MIT |
| [astroid](https://www.astroid.org/) | 1.6.5 | A abstract syntax tree for Python with inference support. / LGPL 2.1 |
| [astropy](http://www.astropy.org/) | 2.0.9 | Community-developed Python Library for Astronomy / BSD 3-clause |
| [atomicwrites](https://github.com/untitaker/python-atomicwrites) | 1.3.0 | Atomic file writes / MIT |
| [attrs](https://attrs.readthedocs.io/en/stable/) | 19.2.0 | attrs is the Python package that will bring back the joy of writing classes by relieving you from the drudgery of implementing object protocols (aka dunder methods). / MIT |
| [babel](http://babel.pocoo.org/) | 2.7.0 | Utilities to internationalize and localize Python applications / BSD 3-clause |
| [backports](https://bitbucket.org/brandon/backports) | 1.0 | None / BSD |
| [backports.functools\_lru\_cache](https://github.com/jaraco/backports.functools_lru_cache) | 1.5 | Backport of functools.lru\_cache from Python 3.3 as published at ActiveState. / MIT |
| [backports.os](https://github.com/pjdelport/backports.os) | 0.1.1 | Backport of new features in Python’s os module / Python Software Foundation |
| [backports.shutil\_get\_terminal\_size](https://github.com/chrippa/backports.shutil_get_terminal_size) | 1.0.0 | A backport of the get\_terminal\_size function from Python 3.3’s shutil. / MIT |
| [backports\_abc](https://github.com/cython/backports_abc) | 0.5 | A backport of recent additions to the collections.abc module. / PSF 2 |
| [beautifulsoup4](http://www.crummy.com/software/BeautifulSoup/) | 4.8.0 | Python library designed for screen-scraping / MIT |
| [bitarray](https://github.com/ilanschnell/bitarray) | 1.0.1 | efficient arrays of booleans – C extension / PSF |
| [bkcharts](http://github.com/bokeh/bkcharts) | 0.2 | High level chart types built on top of Bokeh / BSD 3-Clause |
| blas | 1.0 | |
| [bleach](https://github.com/mozilla/bleach) | 3.1.0 | Easy, whitelist-based HTML-sanitizing tool / Apache-2.0 |
| [blosc](https://github.com/Blosc/c-blosc) | 1.16.3 | A blocking, shuffling and loss-less compression library that can be faster than memcpy() / BSD 3-Clause |
| [bokeh](http://bokeh.pydata.org/) | 1.3.4 | Statistical and novel interactive HTML plots for Python / BSD 3-Clause |
| [boto](https://github.com/boto/boto/) | 2.49.0 | Amazon Web Services Library / MIT |
| [bottleneck](http://berkeleyanalytics.com/bottleneck) | 1.2.1 | Fast NumPy array functions written in Cython. / BSD 2-Clause |
| [bzip2](http://www.bzip.org/) | 1.0.8 | high-quality data compressor / bzip2 |
| [ca-certificates](https://github.com/conda-forge/ca-certificates-feedstock) | 2019.8.28 | Certificates for use with other packages. / MPL 2.0 |
| [cairo](http://cairographics.org/) | 1.14.12 | Cairo is a 2D graphics library with support for multiple output devices. / LGPL 2.1 or MPL 1.1 |
| [cdecimal](http://www.bytereef.org/mpdecimal/index.html) | 2.3 | Fast drop-in replacement for decimal.py / BSD 2-Clause |
| [certifi](http://certifi.io/) | 2019.9.11 | Python package for providing Mozilla’s CA Bundle. / ISC |
| [cffi](https://bitbucket.org/cffi/cffi) | 1.12.3 | Foreign Function Interface for Python calling C code. / MIT |
| [chardet](https://github.com/chardet/chardet) | 3.0.4 | Universal character encoding detector / LGPL2 |
| [click](https://palletsprojects.com/p/click) | 7.0 | Python composable command line interface toolkit / BSD-3-Clause |
| [cloudpickle](https://github.com/cloudpipe/cloudpickle) | 1.2.2 | Extended pickling support for Python objects / BSD 3-Clause |
| [clyent](https://github.com/Anaconda-Platform/clyent) | 1.2.2 | Command line client library for windows and posix / BSD 3-Clause |
| [colorama](https://github.com/tartley/colorama) | 0.4.1 | Cross-platform colored terminal text / BSD-3-Clause |
| [conda](https://conda.io) | 4.7.12 | OS-agnostic, system-level binary package and environment manager. / BSD 3-Clause |
| [conda-build](https://github.com/conda/conda-build) | 3.18.9 | tools for building conda packages / BSD 3-Clause |
| [conda-env](https://github.com/conda/conda-env) | 2.6.0 | Tools for interacting with conda environments. / BSD 3-Clause |
| [conda-verify](https://github.com/conda/conda-verify) | 3.4.2 | tool for validating conda recipes and conda packages / BSD 3-Clause |
| [configparser](http://docs.python.org/3/library/configparser.html) | 4.0.2 | This library brings the updated configparser from Python 3.5 to Python 2.6-3.5 / MIT |
| [contextlib2](http://contextlib2.readthedocs.org) | 0.6.0 | Backports and enhancements for the contextlib module / PSF 2 |
| [cryptography](https://github.com/pyca/cryptography) | 2.7 | Provides cryptographic recipes and primitives to Python developers / Apache 2.0 or BSD 3-Clause, PSF 2 |
| [curl](http://curl.haxx.se/) | 7.65.3 | tool and library for transferring data with URL syntax / MIT/X derivate (`<http://curl.haxx.se/docs/copyright.html>`) |
| [cycler](http://matplotlib.org/cycler) | 0.10.0 | Composable style cycles. / BSD 3-Clause |
| [cython](http://www.cython.org/) | 0.29.13 | The Cython compiler for writing C extensions for the Python language / Apache-2.0 |
| [cytoolz](https://github.com/pytoolz/cytoolz) | 0.10.0 | Cython implementation of Toolz. High performance functional utilities / BSD-3-Clause |
| [dask](https://dask.org/) | 1.2.2 | Parallel PyData with Task Scheduling / BSD 3-Clause |
| [dask-core](http://github.com/dask/dask/) | 1.2.2 | Parallel Python with task scheduling / BSD 3-Clause |
| [dbus](http://www.freedesktop.org/wiki/Software/dbus/) | 1.13.6 | Simple message bus system for applications to talk to one another / GPL2 |
| [decorator](https://github.com/micheles/decorator) | 4.4.0 | Better living through Python with decorators. / BSD 3-Clause |
| [defusedxml](https://bitbucket.org/tiran/defusedxml) | 0.6.0 | XML bomb protection for Python stdlib modules / PSF 2.0 |
| [distributed](http://distributed.readthedocs.io/en/latest/) | 1.28.1 | Distributed computing with Dask / BSD 3-Clause |
| [docutils](http://docutils.sourceforge.net/) | 0.15.2 | Docutils – Python Documentation Utilities / Public Domain Dedictation and BSD 2-Clause and PSF 2.1.1 and GPL 3.0 |
| [entrypoints](https://github.com/takluyver/entrypoints) | 0.3 | Discover and load entry points from installed packages. / MIT License |
| [enum34](https://bitbucket.org/stoneleaf/enum34) | 1.1.6 | Python 3.4 Enum backported to 3.3, 3.2, 3.1, 2.7, 2.6, 2.5, and 2.4 / BSD 3-Clause |
| [et\_xmlfile](https://bitbucket.org/openpyxl/et_xmlfile) | 1.0.1 | An implementation of lxml.xmlfile for the standard library / MIT |
| [expat](http://expat.sourceforge.net/) | 2.2.6 | Expat XML parser library in C. / MIT |
| [fastcache](https://github.com/pbrady/fastcache) | 1.1.0 | C implementation of Python 3 lru\_cache / MIT |
| [filelock](https://github.com/benediktschmitt/py-filelock) | 3.0.12 | A platform independent file lock. / Public Domain |
| [flask](http://flask.pocoo.org) | 1.1.1 | A microframework based on Werkzeug, Jinja2 and good intentions. / BSD 3-Clause |
| [fontconfig](http://www.freedesktop.org/wiki/Software/fontconfig/) | 2.13.0 | A library for configuring and customizing font access. / MIT |
| [freetype](https://www.freetype.org/) | 2.9.1 | A Free, High-Quality, and Portable Font Engine / GPL-2.0 and FreeType |
| [fribidi](https://github.com/fribidi/fribidi) | 1.0.5 | The Free Implementation of the Unicode Bidirectional Algorithm. / LGPL-2.1 |
| [funcsigs](http://funcsigs.readthedocs.org) | 1.0.2 | Python function signatures from PEP362 for Python 2.6, 2.7 and 3.2+. / Apache 2.0 |
| [functools32](https://github.com/MiCHiLU/python-functools32) | 3.2.3.2 | Backport of the functools module from Python 3.2.3 for use on 2.7 and PyPy. / PSF license |
| [future](http://python-future.org) | 0.17.1 | Clean single-source support for Python 3 and 2 / MIT |
| [futures](https://github.com/agronholm/pythonfutures) | 3.3.0 | Backport of the concurrent.futures package from Python 3.2 / PSF |
| [get\_terminal\_size](https://github.com/chrippa/backports.shutil_get_terminal_size) | 1.0.0 | Get the size of the terminal window. / MIT |
| [gevent](http://www.gevent.org/) | 1.4.0 | Coroutine-based network library / MIT |
| [glib](https://developer.gnome.org/glib/) | 2.56.2 | Provides core application building blocks for libraries and applications written in C. / LGPL-2.1 |
| [glob2](https://github.com/miracle2k/python-glob2) | 0.7 | Version of the glob module that supports recursion via \*\*, and can capture patterns. / BSD-2-Clause |
| [gmp](http://gmplib.org/) | 6.1.2 | The GNU multiprecision library. / GPL 2 and LGPL 3 |
| [gmpy2](https://pypi.python.org/pypi/gmpy2) | 2.0.8 | GMP/MPIR, MPFR, and MPC interface to Python 2.6+ and 3.x / LGPL 3 |
| [graphite2](http://graphite.sil.org/) | 1.3.13 | A “smart font” system that handles the complexities of lesser-known languages of the world. / LGPLv2 |
| [greenlet](https://github.com/python-greenlet/greenlet) | 0.4.15 | Lightweight in-process concurrent programming / MIT |
| [grin](http://pypi.python.org/pypi/grin) | 1.2.1 | Enhanced grep-like tool / BSD 3-Clause |
| [gst-plugins-base](http://gstreamer.freedesktop.org/) | 1.14.0 | GStreamer Base Plug-ins / GPL2 |
| [gstreamer](http://gstreamer.freedesktop.org/) | 1.14.0 | Library for constructing graphs of media-handling components / LGPL 2 |
| [h5py](http://www.h5py.org/) | 2.9.0 | Read and write HDF5 files from Python. / BSD-3-Clause |
| [harfbuzz](http://www.freedesktop.org/wiki/Software/HarfBuzz/) | 1.8.8 | An OpenType text shaping engine. / MIT |
| [hdf5](http://www.hdfgroup.org/HDF5/) | 1.10.4 | HDF5 is a data model, library, and file format for storing and managing data / HDF5 |
| [heapdict](http://stutzbachenterprises.com/) | 1.0.1 | A heap with decrease-key and increase-key operations / BSD 3-Clause |
| [html5lib](https://github.com/html5lib/html5lib-python) | 1.0.1 | HTML parser based on the WHATWG HTML specification / MIT |
| [icu](http://site.icu-project.org/) | 58.2 | International Components for Unicode. / MIT |
| [idna](https://github.com/kjd/idna) | 2.8 | Internationalized Domain Names in Applications (IDNA). / BSD Like |
| [imageio](http://imageio.github.io) | 2.6.0 | A Python library for reading and writing image data / BSD-2-Clause |
| [imagesize](https://github.com/shibukawa/imagesize_py) | 1.1.0 | Getting image size from png/jpeg/jpeg2000/gif file / MIT |
| [importlib\_metadata](http://importlib-metadata.readthedocs.io) | 0.23 | A library to access the metadata for a Python package / APACHE-2.0 |
| [intel-openmp](https://software.intel.com/en-us/node/522690) | 2019.4 | Math library for Intel and compatible processors / proprietary - Intel |
| [ipaddress](https://github.com/phihag/ipaddress) | 1.0.22 | IPv4/IPv6 manipulation library / PSF 2 |
| [ipykernel](https://ipython.org) | 4.10.0 | IPython Kernel for Jupyter / BSD-3-Clause |
| [ipython](https://ipython.org/) | 5.8.0 | IPython: Productive Interactive Computing / BSD-3-Clause |
| [ipython\_genutils](http://ipython.org) | 0.2.0 | vestigial utilities from IPython / BSD 3-Clause |
| [ipywidgets](https://github.com/ipython/ipywidgets) | 7.5.1 | Jupyter Interactive Widgets / BSD 3-clause |
| [isort](https://github.com/timothycrosley/isort) | 4.3.21 | A Python utility / library to sort Python imports. / MIT |
| [itsdangerous](https://github.com/pallets/itsdangerous) | 1.1.0 | Various helpers to pass trusted data to untrusted environments. / BSD 3-Clause |
| [jbig](https://www.cl.cam.ac.uk/~mgk25/jbigkit) | 2.1 | Implementation of the JBIG1 data compression standard / GPL-2.0 |
| [jdcal](https://github.com/phn/jdcal) | 1.4.1 | Julian dates from proleptic Gregorian and Julian calendars. / BSD 2-Clause |
| [jedi](https://github.com/davidhalter/jedi/) | 0.15.1 | An autocompletion tool for Python that can be used for text editors. / MIT |
| [jinja2](http://jinja.pocoo.org) | 2.10.3 | An easy to use stand-alone template engine written in pure python. / 3-Clause BSD |
| [jpeg](http://www.ijg.org/) | 9b | read/write jpeg COM, EXIF, IPTC medata / Custom free software license |
| [jsonschema](https://github.com/Julian/jsonschema) | 3.0.2 | An implementation of JSON Schema validation for Python / MIT |
| [jupyter](http://jupyter.org) | 1.0.0 | Jupyter metapackage. Install all the Jupyter components in one go. / BSD 3-Clause |
| [jupyter\_client](http://jupyter.org) | 5.3.3 | Jupyter protocol implementation and client libraries / BSD 3-clause |
| [jupyter\_console](http://jupyter.org) | 5.2.0 | Jupyter terminal console / BSD-3-Clause |
| [jupyter\_core](http://jupyter.org) | 4.5.0 | Core common functionality of Jupyter projects. / BSD 3-clause |
| [jupyterlab](https://github.com/jupyterlab/jupyterlab) | 0.33.11 | JupyterLab / BSD-3-Clause |
| [jupyterlab\_launcher](http://github.com/jupyterlab/jupyterlab_launcher) | 0.11.2 | A Launcher for JupyterLab based applications. / BSD 3-Clause |
| [kiwisolver](https://github.com/nucleic/kiwi) | 1.1.0 | A fast implementation of the Cassowary constraint solver / BSD 3-Clause |
| [krb5](http://web.mit.edu/kerberos/) | 1.16.1 | A network authentication protocol. / MIT |
| [lazy-object-proxy](https://github.com/ionelmc/python-lazy-object-proxy) | 1.4.2 | A fast and thorough lazy object proxy / BSD-2-Clause |
| [libarchive](http://www.libarchive.org/) | 3.3.3 | Multi-format archive and compression library / BSD 2-Clause |
| [libcurl](http://curl.haxx.se/) | 7.65.3 | tool and library for transferring data with URL syntax / MIT/X derivate (`<http://curl.haxx.se/docs/copyright.html>`) |
| [libedit](http://thrysoee.dk/editline/) | 3.1.20181209 | Editline Library (libedit) / NetBSD |
| [libffi](https://sourceware.org/libffi/) | 3.2.1 | A Portable Foreign Function Interface Library. / Custom |
| [libgcc-ng](https://gcc.gnu.org/onlinedocs/gccint/Libgcc.html) | 9.1.0 | The GCC low-level runtime library / GPL |
| [libgfortran-ng](https://gcc.gnu.org/) | 7.3.0 | The GNU Fortran Runtime Library / GPL |
| [liblief](https://lief.quarkslab.com/) | 0.9.0 | A cross platform library to parse, modify and abstract ELF, PE and MachO formats. / Apache 2.0 |
| [libpng](http://www.libpng.org/pub/png/libpng.html) | 1.6.37 | PNG reference library / zlib/libpng |
| [libsodium](http://libsodium.org) | 1.0.16 | A modern and easy-to-use crypto library. / ISC |
| [libssh2](https://www.libssh2.org/) | 1.8.2 | the SSH library / BSD-3-Clause |
| [libstdcxx-ng](https://gcc.gnu.org/) | 9.1.0 | The GNU C++ Runtime Library / GPL3 with runtime exception |
| [libtiff](http://www.libtiff.org/) | 4.0.10 | Support for the Tag Image File Format (TIFF). / HPND |
| [libtool](http://www.gnu.org/software/libtool/) | 2.4.6 | The GNU Portable Library Tool / GPL 3 |
| [libuuid](http://sourceforge.net/projects/libuuid/) | 1.0.3 | Portable uuid C library. / BSD 3-Clause |
| [libxcb](http://xcb.freedesktop.org/) | 1.13 | This is the C-language Binding (XCB) package to the X Window System protocol / MIT |
| [libxml2](http://xmlsoft.org/) | 2.9.9 | The XML C parser and toolkit of Gnome / MIT |
| [libxslt](http://xmlsoft.org/XSLT/) | 1.1.33 | The XSLT C library developed for the GNOME project / MIT |
| [linecache2](https://github.com/testing-cabal/linecache2) | 1.0.0 | Backport of the linecache module / PSF 1.0 |
| [llvmlite](https://github.com/numba/llvmlite) | 0.29.0 | A lightweight LLVM python binding for writing JIT compilers / New BSD License |
| [locket](https://github.com/mwilliamson/locket.py) | 0.2.0 | File-based locks for Python for Linux and Windows / BSD 2-Clause |
| [lxml](http://lxml.de/) | 4.4.1 | Pythonic binding for the C libraries libxml2 and libxslt. / BSD 3-Clause, GPL-2.0, ZPL-2.0, and ElementTree |
| [lz4-c](https://www.lz4.org) | 1.8.1.2 | Extremely Fast Compression algorithm / BSD 2-clause |
| [lzo](http://www.oberhumer.com/opensource/lzo/) | 2.10 | LZO is a portable lossless data compression library written in ANSI C. / GPL v2+ |
| [markupsafe](https://www.palletsprojects.com/p/markupsafe) | 1.1.1 | A Python module that implements the jinja2.Markup string / BSD-3-Clause |
| [matplotlib](http://matplotlib.org/) | 2.2.3 | Publication quality figures in Python / PSF-based |
| [mccabe](https://github.com/PyCQA/mccabe) | 0.6.1 | McCabe complexity checker for Python / MIT |
| [mistune](https://github.com/lepture/mistune) | 0.8.4 | The fastest markdown parser in pure Python. / BSD 3-Clause |
| [mkl](https://software.intel.com/en-us/mkl) | 2019.4 | Math library for Intel and compatible processors / proprietary - Intel |
| [mkl-service](https://github.com/ContinuumIO/mkl-service) | 2.3.0 | Python bindings to MKL service functions / 3-clause BSD |
| [mkl\_fft](http://github.com/IntelPython/mkl_fft) | 1.0.14 | NumPy-based implementation of Fast Fourier Transform using Intel (R) Math Kernel Library. / BSD 3-Clause |
| [mkl\_random](http://github.com/IntelPython/mkl_random) | 1.1.0 | Intel (R) MKL-powered package for sampling from common probability distributions into NumPy arrays. / BSD 3-Clause |
| [mock](https://github.com/testing-cabal/mock) | 3.0.5 | A library for testing in Python / BSD-2-Clause |
| [more-itertools](https://github.com/erikrose/more-itertools) | 5.0.0 | More routines for operating on iterables, beyond itertools / MIT |
| [mpc](http://www.multiprecision.org/) | 1.1.0 | A C library for the arithmetic of complex numbers with arbitrarily high precision. / LGPL 3 |
| [mpfr](http://www.mpfr.org/) | 4.0.1 | The MPFR library is a C library for multiple-precision floating-point computations with correct rounding. / LGPL 3 |
| [mpmath](http://mpmath.org) | 1.1.0 | Python library for arbitrary-precision floating-point arithmetic / BSD 3-Clause |
| [msgpack-python](http://msgpack.org/) | 0.6.1 | MessagePack (de)serializer. / Apache 2.0 |
| [multipledispatch](https://github.com/mrocklin/multipledispatch/) | 0.6.0 | Multiple dispatch in Python / BSD 3-Clause |
| [nbconvert](http://jupyter.org) | 5.6.0 | Converting Jupyter Notebooks / BSD-3-Clause |
| [nbformat](http://jupyter.org) | 4.4.0 | The reference implementation of the Jupyter Notebook format / BSD 3-clause |
| [ncurses](http://www.gnu.org/software/ncurses/) | 6.1 | Library for text-based user interfaces / Free software (MIT-like) |
| [networkx](https://networkx.github.io/) | 2.2 | Python package for creating and manipulating complex networks / BSD-3-Clause |
| [nltk](http://nltk.org/) | 3.4.5 | Build Python programs to work with human language data / Apache 2.0 |
| [nose](http://readthedocs.org/docs/nose/) | 1.3.7 | Nose extends unittest to make testing easier / LGPL-2.1 |
| [notebook](http://jupyter.org) | 5.7.8 | Jupyter Notebook / BSD 3-clause |
| [numba](http://numba.github.com) | 0.45.1 | NumPy aware dynamic Python compiler using LLVM / BSD 2-clause |
| [numexpr](https://github.com/pydata/numexpr) | 2.7.0 | Fast numerical expression evaluator for NumPy. / MIT |
| [numpy](http://numpy.scipy.org/) | 1.16.5 | Array processing for numbers, strings, records, and objects. / BSD 3-Clause |
| [numpy-base](http://numpy.scipy.org/) | 1.16.5 | Array processing for numbers, strings, records, and objects. / BSD 3-Clause |
| [numpydoc](https://github.com/numpy/numpydoc) | 0.9.1 | Numpy’s Sphinx extensions / BSD 3-Clause |
| [olefile](http://www.decalage.info/python/olefileio) | 0.46 | parse, read and write Microsoft OLE2 files / BSD 2-Clause |
| [openpyxl](https://openpyxl.readthedocs.io) | 2.6.3 | A Python library to read/write Excel 2010 xlsx/xlsm files / MIT |
| [openssl](http://www.openssl.org/) | 1.1.1d | OpenSSL is an open-source implementation of the SSL and TLS protocols / OpenSSL |
| [packaging](https://github.com/pypa/packaging) | 19.2 | Core utilities for Python packages / Apache 2.0 or BSD 2-Clause |
| [pandas](http://pandas.pydata.org) | 0.24.2 | High-performance, easy-to-use data structures and data analysis tools. / BSD 3-clause |
| [pandoc](http://pandoc.org/) | 2.2.3.2 | Universal markup converter (repackaged binaries). / GPL-2.0 |
| [pandocfilters](https://github.com/jgm/pandocfilters) | 1.4.2 | A python module for writing pandoc filters / BSD-3-Clause |
| [pango](http://www.pango.org/) | 1.42.4 | Text layout and rendering engine. / LGPL-2.1 |
| [parso](https://github.com/davidhalter/parso) | 0.5.1 | A Python Parser / MIT |
| [partd](https://github.com/dask/partd) | 1.0.0 | Data structure for on-disk shuffle operations / BSD 3-Clause |
| [patchelf](http://nixos.org/patchelf.html) | 0.9 | A small utility to modify the dynamic linker and RPATH of ELF executables. / GPL 3 |
| [path.py](https://github.com/jaraco/path.py) | 11.5.0 | A module wrapper for os.path / MIT |
| [pathlib2](https://github.com/mcmtroffaes/pathlib2) | 2.3.5 | Fork of pathlib aiming to support the full stdlib Python API / MIT |
| [patsy](https://github.com/pydata/patsy) | 0.5.1 | Describing statistical models in Python using symbolic formulas / BSD-2-Clause, PSF2 |
| [pcre](http://www.pcre.org/) | 8.43 | Regular expression pattern matching using the same syntax and semantics as Perl 5. / BSD 3-Clause |
| [pep8](http://pep8.readthedocs.org/) | 1.7.1 | Python style guide checker / MIT |
| [pexpect](http://pexpect.sourceforge.net/) | 4.7.0 | Pexpect makes Python a better tool for controlling other applications. / ISC |
| [pickleshare](https://github.com/pickleshare/pickleshare/) | 0.7.5 | Tiny ‘shelve’-like database with concurrency support / MIT |
| [pillow](https://pillow.readthedocs.io) | 6.2.0 | Pillow is the friendly PIL fork by Alex Clark and Contributors / PIL |
| [pip](https://pip.pypa.io/en/stable/) | 19.2.3 | PyPA recommended tool for installing Python packages / MIT |
| [pixman](http://www.pixman.org/) | 0.38.0 | A low-level software library for pixel manipulation. / MIT |
| [pkginfo](https://code.launchpad.net/~tseaver/pkginfo/trunk) | 1.5.0.1 | Query metadatdata from sdists / bdists / installed packages. / MIT |
| [pluggy](https://github.com/pytest-dev/pluggy) | 0.13.0 | Plugin registration and hook calling for Python / MIT |
| [ply](http://www.dabeaz.com/ply/index.html) | 3.11 | Python Lex-Yacc / BSD 3-clause |
| [prometheus\_client](https://github.com/prometheus/client_python) | 0.7.1 | Python client for the Prometheus monitoring system / Apache 2.0 |
| [prompt\_toolkit](https://github.com/jonathanslenders/python-prompt-toolkit) | 1.0.15 | Library for building powerful interactive command lines in Python / BSD 3-clause |
| [psutil](https://github.com/giampaolo/psutil) | 5.6.3 | A cross-platform process and system utilities module for Python / BSD 3-Clause |
| [ptyprocess](https://github.com/pexpect/ptyprocess) | 0.6.0 | Run a subprocess in a pseudo terminal / ISC |
| [py](https://github.com/pytest-dev/py) | 1.8.0 | library with cross-python path, ini-parsing, io, code, log facilities / MIT |
| [py-lief](https://lief.quarkslab.com/) | 0.9.0 | A cross platform library to parse, modify and abstract ELF, PE and MachO formats. / Apache 2.0 |
| [pycairo](http://cairographics.org/pycairo/) | 1.18.1 | Python bindings for the Cairo graphics library. / LGPL 2.1, MPL 1.1 |
| [pycodestyle](https://pycodestyle.readthedocs.io/) | 2.5.0 | Python style guide checker / MIT |
| [pycosat](https://github.com/ContinuumIO/pycosat) | 0.6.3 | Bindings to picosat (a SAT solver) / MIT |
| [pycparser](https://github.com/eliben/pycparser) | 2.19 | Complete C99 parser in pure Python / BSD 3-clause |
| [pycrypto](http://www.pycrypto.org/) | 2.6.1 | Cryptographic modules for Python. / Public Domain |
| [pycurl](http://pycurl.sourceforge.net/) | 7.43.0.3 | A Python Interface To The cURL library / LGPL, MIT |
| [pyflakes](https://github.com/PyCQA/pyflakes) | 2.1.1 | Pyflakes analyzes programs and detects various errors. / MIT |
| [pygments](http://pygments.org/) | 2.4.2 | Generic syntax highlighting package / BSD 2-clause |
| [pylint](http://www.pylint.org/) | 1.9.2 | python code static checker / GPL 2 |
| [pyodbc](https://github.com/mkleehammer/pyodbc) | 4.0.27 | DB API Module for ODBC / MIT |
| [pyopenssl](https://github.com/pyca/pyopenssl) | 19.0.0 | Python wrapper module around the OpenSSL library / Apache 2.0 |
| [pyparsing](http://pyparsing.wikispaces.com/) | 2.4.2 | Create and execute simple grammars / MIT |
| [pyqt](http://www.riverbankcomputing.co.uk/software/pyqt) | 5.9.2 | Python binding of the cross-platform GUI toolkit Qt. / Commercial, GPL-2.0, GPL-3.0 |
| [pyrsistent](http://github.com/tobgu/pyrsistent/) | 0.15.4 | Persistent/Functional/Immutable data structures / MIT |
| [pysocks](https://github.com/Anorov/PySocks) | 1.7.1 | A Python SOCKS client module. See [Anorov/PySocks](https://github.com/Anorov/PySocks) for more information. / BSD 3-Clause |
| [pytables](http://www.pytables.org) | 3.5.2 | Brings together Python, HDF5 and NumPy to easily handle large amounts of data. / BSD 3-Clause |
| [pytest](https://docs.pytest.org/en/latest/) | 4.6.2 | Simple and powerful testing with Python. / MIT |
| [python](http://www.python.org/) | 2.7.16 | General purpose programming language / PSF |
| [python-dateutil](https://dateutil.readthedocs.org/) | 2.8.0 | Extensions to the standard Python datetime module. / BSD 3 Clause |
| [python-libarchive-c](https://github.com/Changaco/python-libarchive-c) | 2.8 | Python interface to libarchive / CC0-1.0 |
| [pytz](http://pythonhosted.org/pytz/) | 2019.3 | World timezone definitions, modern and historical. / MIT |
| [pywavelets](https://github.com/PyWavelets/pywt) | 1.0.3 | Discrete Wavelet Transforms in Python / MIT |
| [pyyaml](http://pyyaml.org/wiki/PyYAML) | 5.1.2 | YAML parser and emitter for Python / MIT |
| [pyzmq](https://github.com/zeromq/pyzmq) | 18.1.0 | Python bindings for zeromq / BSD 3-clause |
| [qt](http://qt-project.org) | 5.9.7 | Qt is a cross-platform application and UI framework. / LGPL-3.0 |
| [qtawesome](https://github.com/spyder-ide/qtawesome) | 0.6.0 | Iconic fonts in PyQt and PySide applications / MIT |
| [qtconsole](http://jupyter.org) | 4.5.5 | Jupyter Qt console / BSD 3-Clause |
| [qtpy](https://github.com/spyder-ide/qtpy) | 1.9.0 | Abstraction layer for PyQt5/PyQt4/PySide / MIT |
| [readline](https://cnswww.cns.cwru.edu/php/chet/readline/rltop.html) | 7.0 | library for editing command lines as they are typed in / GPL3 |
| [requests](http://python-requests.org) | 2.22.0 | Python HTTP for Humans / Apache 2.0 |
| ripgrep | 0.10.0 | |
| [rope](https://github.com/python-rope/rope) | 0.14.0 | A python refactoring library / GPL 2.0 |
| [ruamel\_yaml](https://bitbucket.org/ruamel/yaml) | 0.15.46 | A patched copy of ruamel.yaml. / MIT |
| [scandir](https://github.com/benhoyt/scandir) | 1.10.0 | scandir, a better directory iterator and faster os.walk() / BSD 3-Clause |
| [scikit-image](http://scikit-image.org/) | 0.14.2 | Image processing routines for SciPy. / BSD 3-Clause |
| [scikit-learn](http://scikit-learn.org/) | 0.20.3 | A set of python modules for machine learning and data mining / BSD 3-Clause |
| [scipy](http://www.scipy.org/) | 1.2.1 | Scientific Library for Python / BSD 3-Clause |
| [seaborn](https://seaborn.pydata.org) | 0.9.0 | Statistical data visualization / BSD 3-Clause |
| [send2trash](https://github.com/hsoft/send2trash) | 1.5.0 | Python library to natively send files to Trash (or Recycle bin) on all platforms. / BSD-3-Clause |
| [setuptools](https://github.com/pypa/setuptools) | 41.4.0 | Download, build, install, upgrade, and uninstall Python packages / MIT |
| [simplegeneric](http://cheeseshop.python.org/pypi/simplegeneric) | 0.8.1 | Simple generic functions (similar to Python’s own len(), pickle.dump(), etc.) / Zope Public |
| [singledispatch](http://docs.python.org/3/library/functools.html#functools.singledispatch) | 3.4.0.3 | Transforms a function into a single-dispatch generic function / MIT |
| [sip](http://www.riverbankcomputing.com/software/sip/intro) | 4.19.8 | Create Python bindings for C and C++ libraries / GPL-3.0 |
| [six](http://pypi.python.org/pypi/six/) | 1.12.0 | Python 2 and 3 compatibility utilities / MIT |
| [snappy](https://github.com/google/snappy) | 1.1.7 | A fast compressor/decompressor / BSD 3-clause |
| [snowballstemmer](https://github.com/shibukawa/snowball_py) | 2.0.0 | Snowball stemming library collection for Python / BSD-2-Clause |
| [sortedcollections](http://www.grantjenks.com/docs/sortedcollections/) | 1.1.2 | Python Sorted Collections / Apache-2.0 |
| [sortedcontainers](http://www.grantjenks.com/docs/sortedcontainers/) | 2.1.0 | Python Sorted Container Types: SortedList, SortedDict, and SortedSet / Apache 2.0 |
| [soupsieve](http://facelessuser.github.io/soupsieve) | 1.9.3 | A modern CSS selector implementation for BeautifulSoup / MIT |
| [sphinx](http://www.sphinx-doc.org) | 1.8.5 | Sphinx is a tool that makes it easy to create intelligent and beautiful documentation / BSD-2-Clause |
| sphinxcontrib | 1.0 | Python namespace for sphinxcontrib / BSD |
| [sphinxcontrib-websupport](https://pypi.python.org/pypi/sphinxcontrib-websupport) | 1.1.2 | Sphinx API for Web Apps / BSD-2-Clause |
| [spyder](https://www.spyder-ide.org/) | 3.3.6 | The Scientific Python Development Environment / MIT |
| [spyder-kernels](https://github.com/spyder-ide/spyder-kernels) | 0.5.2 | Jupyter kernels for the Spyder console / MIT |
| [sqlalchemy](http://www.sqlalchemy.org/) | 1.3.9 | Database Abstraction Library. / MIT |
| [sqlite](http://www.sqlite.org/) | 3.30.0 | Implements a self-contained, zero-configuration, SQL database engine. / Public-Domain (`<http://www.sqlite.org/copyright.html>`) |
| [ssl\_match\_hostname](http://bitbucket.org/brandon/backports.ssl_match_hostname) | 3.7.0.1 | The ssl.match\_hostname() function from Python 3.5 / PSF 2 |
| [statsmodels](https://www.statsmodels.org) | 0.10.1 | Statistical computations and models for use with SciPy / BSD 3-Clause |
| [subprocess32](https://github.com/google/python-subprocess32) | 3.5.4 | A backport of the subprocess module from Python 3.2/3.3 for use on 2.x / Python-2.0 |
| [sympy](http://sympy.org) | 1.4 | Python library for symbolic mathematics / BSD-3-Clause |
| [tbb](http://www.threadingbuildingblocks.org) | 2019.4 | High level abstract threading library / Apache 2.0 |
| [tblib](https://github.com/ionelmc/python-tblib) | 1.4.0 | Traceback serialization library. / BSD 2-Clause |
| [terminado](https://github.com/jupyter/terminado) | 0.8.2 | Terminals served by tornado websockets / BSD 2-Clause |
| [testpath](https://testpath.readthedocs.io) | 0.4.2 | Testpath is a collection of utilities for Python code working with files and commands. / BSD-3-Clause |
| [tk](http://www.tcl.tk/) | 8.6.8 | A dynamic programming language with GUI support. Bundles Tcl and Tk. / Tcl/Tk |
| [toolz](http://toolz.readthedocs.org/) | 0.10.0 | A functional standard library for Python / BSD 3-Clause |
| [tornado](http://www.tornadoweb.org/) | 5.1.1 | A Python web framework and asynchronous networking library, originally developed at FriendFeed. / Apache 2.0 |
| [tqdm](https://pypi.python.org/pypi/tqdm) | 4.36.1 | A Fast, Extensible Progress Meter / MPLv2.0, MIT |
| [traceback2](https://github.com/testing-cabal/traceback2) | 1.4.0 | Backports of the traceback module / PSF 2.0 |
| [traitlets](http://ipython.org/) | 4.3.3 | Configuration system for Python applications / BSD-3-Clause |
| [typing](https://docs.python.org/3.5/library/typing.html) | 3.7.4.1 | Type Hints for Python - backport for `Python<3.5` / PSF |
| [unicodecsv](https://github.com/jdunck/python-unicodecsv) | 0.14.1 | Drop-in replacement for csv module which supports unicode strings / BSD |
| [unittest2](http://pypi.python.org/pypi/unittest2) | 1.1.0 | The new features in unittest backported to Python 2.4+ / BSD |
| [unixodbc](http://www.unixodbc.org/) | 2.3.7 | ODBC on non MS Windows platforms / LGPL-2.1 |
| [urllib3](https://urllib3.readthedocs.io/) | 1.24.2 | HTTP library with thread-safe connection pooling, file post, and more. / MIT |
| [wcwidth](https://github.com/jquast/wcwidth) | 0.1.7 | Measures number of Terminal column cells of wide-character codes. / MIT |
| [webencodings](https://github.com/gsnedders/python-webencodings) | 0.5.1 | Character encoding aliases for legacy web content / BSD 3-Clause |
| [werkzeug](https://palletsprojects.com/p/werkzeug/) | 0.16.0 | The comprehensive WSGI web application library. / BSD 3-Clause |
| [wheel](https://github.com/pypa/wheel) | 0.33.6 | A built-package format for Python. / MIT |
| [widgetsnbextension](http://ipython.org) | 3.5.1 | Interactive Widgets for Jupyter / BSD 3-clause |
| [wrapt](https://github.com/GrahamDumpleton/wrapt) | 1.11.2 | Module for decorators, wrappers and monkey patching / BSD 2-Clause |
| [wurlitzer](https://github.com/minrk/wurlitzer) | 1.0.3 | Capture C-level stdout/stderr in Python / MIT |
| [xlrd](http://www.python-excel.org/) | 1.2.0 | Library for developers to extract data from Microsoft Excel (tm) spreadsheet files / BSD 3-Clause and BSD with advertising |
| [xlsxwriter](https://xlsxwriter.readthedocs.io/) | 1.2.1 | A Python module for creating Excel XLSX files / BSD 2-Clause |
| [xlwt](http://www.python-excel.org/) | 1.3.0 | Writing data and formatting information to Excel files / BSD |
| [xz](http://tukaani.org/xz/) | 5.2.4 | Data compression software with high compression ratio / LGPL-2.1 and GPL-2.0 |
| [yaml](http://pyyaml.org/wiki/LibYAML) | 0.1.7 | A C library for parsing and emitting YAML. / MIT |
| [zeromq](http://zeromq.org) | 4.3.1 | A high-performance asynchronous messaging library. / LGPL 3 |
| [zict](http://github.com/mrocklin/zict) | 1.0.0 | Composable Dictionary Classes / BSD 3-Clause |
| [zipp](https://github.com/jaraco/zipp) | 0.6.0 | A pathlib-compatible Zipfile object wrapper / MIT |
| [zlib](http://zlib.net/) | 1.2.11 | Massively spiffy yet delicately unobtrusive compression library / zlib |
| [zstd](http://www.zstd.net) | 1.3.7 | Zstandard - Fast real-time compression algorithm / BSD 3-Clause |
| Name | Version | Summary / License |
|---|---|---|
| [\_ipyw\_jlab\_nb\_ext\_conf](https://github.com/ContinuumIO/anaconda-nb-extensions-meta-config) | 0.1.0 | A configuration metapackage for enabling Anaconda-bundled jupyter extensions / BSD |
| [alabaster](http://www.sphinx-doc.org/en/stable/index.html) | 0.7.12 | Configurable, Python 2+3 compatible Sphinx theme. / BSD 3-Clause |
| [anaconda-client](http://anaconda.org) | 1.7.2 | anaconda.org command line client library / BSD 3-clause |
| [anaconda-project](https://github.com/Anaconda-Platform/anaconda-project) | 0.8.3 | Tool for encapsulating, running, and reproducing data science projects / BSD 3-Clause |
| [asn1crypto](https://github.com/wbond/asn1crypto) | 0.24.0 | Python ASN.1 library with a focus on performance and a pythonic API / MIT |
| [astroid](https://www.astroid.org/) | 2.2.5 | A abstract syntax tree for Python with inference support. / LGPL 2.1 |
| [astropy](http://www.astropy.org/) | 3.2.1 | Community-developed Python Library for Astronomy / BSD |
| [atomicwrites](https://github.com/untitaker/python-atomicwrites) | 1.3.0 | Atomic file writes / MIT |
| [attrs](https://attrs.readthedocs.io/en/stable/) | 19.1.0 | attrs is the Python package that will bring back the joy of writing classes by relieving you from the drudgery of implementing object protocols (aka dunder methods). / MIT |
| [babel](http://babel.pocoo.org/) | 2.7.0 | Utilities to internationalize and localize Python applications / BSD 3-clause |
| [backcall](https://github.com/takluyver/backcall/) | 0.1.0 | Specifications for callback functions passed in to an API / BSD-3-Clause |
| [backports](https://bitbucket.org/brandon/backports) | 1.0 | None / BSD |
| [backports.os](https://github.com/pjdelport/backports.os) | 0.1.1 | Backport of new features in Python’s os module / Python Software Foundation |
| [backports.shutil\_get\_terminal\_size](https://github.com/chrippa/backports.shutil_get_terminal_size) | 1.0.0 | A backport of the get\_terminal\_size function from Python 3.3’s shutil. / MIT |
| [beautifulsoup4](http://www.crummy.com/software/BeautifulSoup/) | 4.7.1 | Python library designed for screen-scraping / MIT |
| [bitarray](https://github.com/ilanschnell/bitarray) | 0.9.3 | efficient arrays of booleans – C extension / PSF |
| [bkcharts](http://github.com/bokeh/bkcharts) | 0.2 | High level chart types built on top of Bokeh / BSD 3-Clause |
| blas | 1.0 | None / None |
| [bleach](https://github.com/mozilla/bleach) | 3.1.0 | Easy, whitelist-based HTML-sanitizing tool / Apache-2.0 |
| [blosc](https://github.com/Blosc/c-blosc) | 1.16.3 | A blocking, shuffling and loss-less compression library that can be faster than memcpy() / BSD 3-Clause |
| [bokeh](http://bokeh.pydata.org/) | 1.2.0 | Statistical and novel interactive HTML plots for Python / BSD 3-Clause |
| [boto](https://github.com/boto/boto/) | 2.49.0 | Amazon Web Services Library / MIT |
| [bottleneck](http://berkeleyanalytics.com/bottleneck) | 1.2.1 | Fast NumPy array functions written in Cython. / BSD 2-Clause |
| [bzip2](http://www.bzip.org/) | 1.0.8 | high-quality data compressor / bzip2 |
| [ca-certificates](https://github.com/conda-forge/ca-certificates-feedstock) | 2019.5.15 | Certificates for use with other packages. / ISC |
| [certifi](http://certifi.io/) | 2019.6.16 | Python package for providing Mozilla’s CA Bundle. / ISC |
| [cffi](https://bitbucket.org/cffi/cffi) | 1.12.3 | Foreign Function Interface for Python calling C code. / MIT |
| [chardet](https://github.com/chardet/chardet) | 3.0.4 | Universal character encoding detector / LGPL2 |
| [click](https://palletsprojects.com/p/click) | 7.0 | Python composable command line interface toolkit / BSD-3-Clause |
| [cloudpickle](https://github.com/cloudpipe/cloudpickle) | 1.2.1 | Extended pickling support for Python objects / BSD 3-Clause |
| [clyent](https://github.com/Anaconda-Platform/clyent) | 1.2.2 | Command line client library for windows and posix / BSD 3-Clause |
| [colorama](https://github.com/tartley/colorama) | 0.4.1 | Cross-platform colored terminal text / BSD-3-Clause |
| [comtypes](http://starship.python.net/crew/theller/comtypes/) | 1.1.7 | pure Python COM package / MIT |
| [conda](https://conda.io) | 4.7.10 | OS-agnostic, system-level binary package and environment manager. / BSD 3-Clause |
| [conda-build](https://github.com/conda/conda-build) | 3.18.9 | tools for building conda packages / BSD 3-Clause |
| [conda-env](https://github.com/conda/conda-env) | 2.6.0 | Tools for interacting with conda environments. / BSD 3-Clause |
| [conda-verify](https://github.com/conda/conda-verify) | 3.4.2 | tool for validating conda recipes and conda packages / BSD 3-Clause |
| console\_shortcut | 0.1.1 | Console shortcut creator for Windows (using menuinst) / BSD |
| [contextlib2](http://contextlib2.readthedocs.org) | 0.5.5 | Backports and enhancements for the contextlib module / PSF |
| [cryptography](https://github.com/pyca/cryptography) | 2.7 | Provides cryptographic recipes and primitives to Python developers / Apache 2.0 or BSD 3-Clause, PSF 2 |
| [curl](http://curl.haxx.se/) | 7.65.2 | tool and library for transferring data with URL syntax / MIT/X derivate (`<http://curl.haxx.se/docs/copyright.html>`) |
| [cycler](http://matplotlib.org/cycler) | 0.10.0 | Composable style cycles. / BSD 3-Clause |
| [cython](http://www.cython.org/) | 0.29.12 | The Cython compiler for writing C extensions for the Python language / Apache-2.0 |
| [cytoolz](https://github.com/pytoolz/cytoolz) | 0.10.0 | Cython implementation of Toolz. High performance functional utilities / BSD-3-Clause |
| [dask](https://dask.org/) | 2.1.0 | Parallel PyData with Task Scheduling / BSD 3-Clause |
| [dask-core](http://github.com/dask/dask/) | 2.1.0 | Parallel Python with task scheduling / BSD 3-Clause |
| [decorator](https://github.com/micheles/decorator) | 4.4.0 | Better living through Python with decorators. / BSD 3-Clause |
| [defusedxml](https://bitbucket.org/tiran/defusedxml) | 0.6.0 | XML bomb protection for Python stdlib modules / PSF 2.0 |
| [distributed](http://distributed.readthedocs.io/en/latest/) | 2.1.0 | Distributed computing with Dask / BSD 3-Clause |
| [docutils](http://docutils.sourceforge.net/) | 0.14 | Docutils – Python Documentation Utilities / Public Domain Dedictation and BSD 2-Clause and PSF 2.1.1 and GPL 3.0 |
| [entrypoints](https://github.com/takluyver/entrypoints) | 0.3 | Discover and load entry points from installed packages. / MIT License |
| [et\_xmlfile](https://bitbucket.org/openpyxl/et_xmlfile) | 1.0.1 | An implementation of lxml.xmlfile for the standard library / MIT |
| [fastcache](https://github.com/pbrady/fastcache) | 1.1.0 | C implementation of Python 3 lru\_cache / MIT |
| [filelock](https://github.com/benediktschmitt/py-filelock) | 3.0.12 | A platform independent file lock. / Public Domain |
| [flask](http://flask.pocoo.org) | 1.1.1 | A microframework based on Werkzeug, Jinja2 and good intentions. / BSD 3-Clause |
| [freetype](https://www.freetype.org/) | 2.9.1 | A Free, High-Quality, and Portable Font Engine / GPL-2.0 and FreeType |
| [get\_terminal\_size](https://github.com/chrippa/backports.shutil_get_terminal_size) | 1.0.0 | Get the size of the terminal window. / MIT |
| [gevent](http://www.gevent.org/) | 1.4.0 | Coroutine-based network library / MIT |
| [glob2](https://github.com/miracle2k/python-glob2) | 0.7 | Version of the glob module that supports recursion via \*\*, and can capture patterns. / BSD-2-Clause |
| [greenlet](https://github.com/python-greenlet/greenlet) | 0.4.15 | Lightweight in-process concurrent programming / MIT |
| [h5py](http://www.h5py.org/) | 2.9.0 | Read and write HDF5 files from Python. / BSD-3-Clause |
| [hdf5](http://www.hdfgroup.org/HDF5/) | 1.10.4 | HDF5 is a data model, library, and file format for storing and managing data / HDF5 |
| [heapdict](http://stutzbachenterprises.com/) | 1.0.0 | A heap with decrease-key and increase-key operations / BSD 3-Clause |
| [html5lib](https://github.com/html5lib/html5lib-python) | 1.0.1 | HTML parser based on the WHATWG HTML specification / MIT |
| icc\_rt | 2019.0.0 | Intel runtime libraries for C, C++ and Fortran compilers / Intel proprietary |
| [icu](http://site.icu-project.org/) | 58.2 | International Components for Unicode. / MIT |
| [idna](https://github.com/kjd/idna) | 2.8 | Internationalized Domain Names in Applications (IDNA). / BSD Like |
| [imageio](http://imageio.github.io) | 2.5.0 | a Python library for reading and writing image data / BSD 2-Clause |
| [imagesize](https://github.com/shibukawa/imagesize_py) | 1.1.0 | Getting image size from png/jpeg/jpeg2000/gif file / MIT |
| [importlib\_metadata](http://importlib-metadata.readthedocs.io) | 0.17 | A library to access the metadata for a Python package / APACHE-2.0 |
| [intel-openmp](https://software.intel.com/en-us/node/522690) | 2019.4 | Math library for Intel and compatible processors / proprietary - Intel |
| [ipykernel](https://ipython.org) | 5.1.1 | IPython Kernel for Jupyter / BSD-3-Clause |
| [ipython](https://ipython.org/) | 7.6.1 | IPython: Productive Interactive Computing / BSD-3-Clause |
| [ipython\_genutils](http://ipython.org) | 0.2.0 | vestigial utilities from IPython / BSD 3-Clause |
| [ipywidgets](https://github.com/ipython/ipywidgets) | 7.5.0 | Jupyter Interactive Widgets / BSD 3-clause |
| [isort](https://github.com/timothycrosley/isort) | 4.3.21 | A Python utility / library to sort Python imports. / MIT |
| [itsdangerous](https://github.com/pallets/itsdangerous) | 1.1.0 | Various helpers to pass trusted data to untrusted environments. / BSD 3-Clause |
| [jdcal](https://github.com/phn/jdcal) | 1.4.1 | Julian dates from proleptic Gregorian and Julian calendars. / BSD 2-Clause |
| [jedi](https://github.com/davidhalter/jedi/) | 0.13.3 | An autocompletion tool for Python that can be used for text editors. / MIT |
| [jinja2](http://jinja.pocoo.org) | 2.10.1 | An easy to use stand-alone template engine written in pure python. / 3-Clause BSD |
| [joblib](http://packages.python.org/joblib/) | 0.13.2 | Python function as pipeline jobs. / BSD 3-Clause |
| [jpeg](http://www.ijg.org/) | 9b | read/write jpeg COM, EXIF, IPTC medata / Custom free software license |
| [json5](https://github.com/dpranke/pyjson5) | 0.8.4 | A Python implementation of the JSON5 data format / Apache-2.0 |
| [jsonschema](https://github.com/Julian/jsonschema) | 3.0.1 | An implementation of JSON Schema validation for Python / MIT |
| [jupyter](http://jupyter.org) | 1.0.0 | Jupyter metapackage. Install all the Jupyter components in one go. / BSD 3-Clause |
| [jupyter\_client](http://jupyter.org) | 5.3.1 | Jupyter protocol implementation and client libraries / BSD 3-clause |
| [jupyter\_console](http://jupyter.org) | 6.0.0 | Jupyter terminal console / BSD-3-Clause |
| [jupyter\_core](http://jupyter.org) | 4.5.0 | Core common functionality of Jupyter projects. / BSD 3-clause |
| [jupyterlab](https://github.com/jupyterlab/jupyterlab) | 1.0.2 | JupyterLab / BSD-3-Clause |
| [jupyterlab\_server](http://github.com/jupyterlab/jupyterlab_server) | 1.0.0 | A set of server components for JupyterLab and JupyterLab like applications. / BSD 3-Clause |
| [keyring](https://github.com/jaraco/keyring) | 18.0.0 | Store and access your passwords safely / Python Software Foundation or MIT |
| [kiwisolver](https://github.com/nucleic/kiwi) | 1.1.0 | A fast implementation of the Cassowary constraint solver / BSD 3-Clause |
| [krb5](http://web.mit.edu/kerberos/) | 1.16.1 | A network authentication protocol. / MIT |
| [lazy-object-proxy](https://github.com/ionelmc/python-lazy-object-proxy) | 1.4.1 | A fast and thorough lazy object proxy / BSD-2-Clause |
| [libarchive](http://www.libarchive.org/) | 3.3.3 | Multi-format archive and compression library / BSD 2-Clause |
| [libcurl](http://curl.haxx.se/) | 7.65.2 | tool and library for transferring data with URL syntax / MIT/X derivate (`<http://curl.haxx.se/docs/copyright.html>`) |
| [libiconv](https://www.gnu.org/software/libiconv/) | 1.15 | Provides iconv for systems which don’t have one (or that cannot convert from/to Unicode.) / GPL and LGPL |
| [liblief](https://lief.quarkslab.com/) | 0.9.0 | A cross platform library to parse, modify and abstract ELF, PE and MachO formats. / Apache 2.0 |
| [libpng](http://www.libpng.org/pub/png/libpng.html) | 1.6.37 | PNG reference library / zlib/libpng |
| [libsodium](http://libsodium.org) | 1.0.16 | A modern and easy-to-use crypto library. / ISC |
| [libssh2](https://www.libssh2.org/) | 1.8.2 | the SSH library / BSD-3-Clause |
| [libtiff](http://www.libtiff.org/) | 4.0.10 | Support for the Tag Image File Format (TIFF). / HPND |
| [libxml2](http://xmlsoft.org/) | 2.9.9 | The XML C parser and toolkit of Gnome / MIT |
| [libxslt](http://xmlsoft.org/XSLT/) | 1.1.33 | The XSLT C library developed for the GNOME project / MIT |
| [llvmlite](https://github.com/numba/llvmlite) | 0.29.0 | A lightweight LLVM python binding for writing JIT compilers / New BSD License |
| [locket](https://github.com/mwilliamson/locket.py) | 0.2.0 | File-based locks for Python for Linux and Windows / BSD 2-Clause |
| [lxml](http://lxml.de/) | 4.3.4 | Pythonic binding for the C libraries libxml2 and libxslt. / BSD 3-Clause, GPL-2.0, ZPL-2.0, and ElementTree |
| [lz4-c](https://www.lz4.org) | 1.8.1.2 | Extremely Fast Compression algorithm / BSD 2-clause |
| [lzo](http://www.oberhumer.com/opensource/lzo/) | 2.10 | LZO is a portable lossless data compression library written in ANSI C. / GPL v2+ |
| m2w64-gcc-libgfortran | 5.3.0 | |
| m2w64-gcc-libs | 5.3.0 | |
| m2w64-gcc-libs-core | 5.3.0 | |
| m2w64-gmp | 6.1.0 | |
| m2w64-libwinpthread-git | 5.0.0.4634.697f757 | |
| [markupsafe](https://www.palletsprojects.com/p/markupsafe) | 1.1.1 | A Python module that implements the jinja2.Markup string / BSD-3-Clause |
| [matplotlib](http://matplotlib.org/) | 3.1.0 | Publication quality figures in Python / PSF-based |
| [mccabe](https://github.com/PyCQA/mccabe) | 0.6.1 | McCabe complexity checker for Python / MIT |
| [menuinst](https://github.com/ContinuumIO/menuinst) | 1.4.16 | cross platform menu item installation / BSD |
| [mistune](https://github.com/lepture/mistune) | 0.8.4 | The fastest markdown parser in pure Python. / BSD 3-Clause |
| [mkl](https://software.intel.com/en-us/mkl) | 2019.4 | Math library for Intel and compatible processors / proprietary - Intel |
| [mkl-service](http://github.com/IntelPython/mkl-service) | 2.0.2 | Python hooks for Intel(R) Math Kernel Library runtime control settings. / BSD-3-Clause |
| [mkl\_fft](http://github.com/IntelPython/mkl_fft) | 1.0.12 | NumPy-based implementation of Fast Fourier Transform using Intel (R) Math Kernel Library. / BSD 3-Clause |
| [mkl\_random](http://github.com/IntelPython/mkl_random) | 1.0.2 | Intel (R) MKL-powered package for sampling from common probability distributions into NumPy arrays. / BSD 3-Clause |
| [mock](https://github.com/testing-cabal/mock) | 3.0.5 | A library for testing in Python / BSD-2-Clause |
| [more-itertools](https://github.com/erikrose/more-itertools) | 7.0.0 | More routines for operating on iterables, beyond itertools / MIT |
| [mpmath](http://mpmath.org) | 1.1.0 | Python library for arbitrary-precision floating-point arithmetic / BSD 3-Clause |
| [msgpack-python](http://msgpack.org/) | 0.6.1 | MessagePack (de)serializer. / Apache 2.0 |
| msys2-conda-epoch | 20160418 | |
| [multipledispatch](https://github.com/mrocklin/multipledispatch/) | 0.6.0 | Multiple dispatch in Python / BSD 3-Clause |
| [nbconvert](http://jupyter.org) | 5.5.0 | Converting Jupyter Notebooks / BSD-3-Clause |
| [nbformat](http://jupyter.org) | 4.4.0 | The reference implementation of the Jupyter Notebook format / BSD 3-clause |
| [networkx](https://networkx.github.io/) | 2.3 | Python package for creating and manipulating complex networks / BSD-3-Clause |
| [nltk](http://nltk.org/) | 3.4.4 | Build Python programs to work with human language data / Apache 2.0 |
| [nose](http://readthedocs.org/docs/nose/) | 1.3.7 | Nose extends unittest to make testing easier / LGPL-2.1 |
| [notebook](http://jupyter.org) | 6.0.0 | Jupyter Notebook / BSD 3-clause |
| [numba](http://numba.github.com) | 0.44.1 | NumPy aware dynamic Python compiler using LLVM / BSD 2-clause |
| [numexpr](https://github.com/pydata/numexpr) | 2.6.9 | Fast numerical expression evaluator for NumPy. / MIT |
| [numpy](http://numpy.scipy.org/) | 1.16.4 | Array processing for numbers, strings, records, and objects. / BSD 3-Clause |
| numpy-base | 1.16.4 | None / None |
| [numpydoc](https://github.com/numpy/numpydoc) | 0.9.1 | Numpy’s Sphinx extensions / BSD 3-Clause |
| [olefile](http://www.decalage.info/python/olefileio) | 0.46 | parse, read and write Microsoft OLE2 files / BSD 2-Clause |
| [openpyxl](https://openpyxl.readthedocs.io) | 2.6.2 | A Python library to read/write Excel 2010 xlsx/xlsm files / MIT |
| [openssl](http://www.openssl.org/) | 1.1.1c | OpenSSL is an open-source implementation of the SSL and TLS protocols / OpenSSL |
| [packaging](https://github.com/pypa/packaging) | 19.0 | Core utilities for Python packages / Apache 2.0 or BSD 2-Clause |
| [pandas](http://pandas.pydata.org) | 0.24.2 | High-performance, easy-to-use data structures and data analysis tools. / BSD 3-clause |
| [pandoc](http://pandoc.org/) | 2.2.3.2 | Universal markup converter (repackaged binaries). / GPL-2.0 |
| [pandocfilters](https://github.com/jgm/pandocfilters) | 1.4.2 | A python module for writing pandoc filters / BSD-3-Clause |
| [parso](https://github.com/davidhalter/parso) | 0.5.0 | A Python Parser / MIT |
| [partd](https://github.com/dask/partd) | 1.0.0 | Data structure for on-disk shuffle operations / BSD 3-Clause |
| [path.py](https://github.com/jaraco/path.py) | 12.0.1 | A module wrapper for os.path / MIT |
| [pathlib2](https://github.com/mcmtroffaes/pathlib2) | 2.3.4 | Fork of pathlib aiming to support the full stdlib Python API / MIT |
| [patsy](https://github.com/pydata/patsy) | 0.5.1 | Describing statistical models in Python using symbolic formulas / BSD-2-Clause, PSF2 |
| [pep8](http://pep8.readthedocs.org/) | 1.7.1 | Python style guide checker / MIT |
| [pickleshare](https://github.com/pickleshare/pickleshare/) | 0.7.5 | Tiny ‘shelve’-like database with concurrency support / MIT |
| [pillow](https://pillow.readthedocs.io) | 6.1.0 | Pillow is the friendly PIL fork by Alex Clark and Contributors / PIL |
| [pip](https://pip.pypa.io/en/stable/) | 19.1.1 | PyPA recommended tool for installing Python packages / MIT |
| [pkginfo](https://code.launchpad.net/~tseaver/pkginfo/trunk) | 1.5.0.1 | Query metadatdata from sdists / bdists / installed packages. / MIT |
| [pluggy](https://github.com/pytest-dev/pluggy) | 0.12.0 | Plugin registration and hook calling for Python / MIT |
| [ply](http://www.dabeaz.com/ply/index.html) | 3.11 | Python Lex-Yacc / BSD 3-clause |
| powershell\_shortcut | 0.0.1 | Powershell shortcut creator for Windows (using menuinst) / BSD |
| [prometheus\_client](https://github.com/prometheus/client_python) | 0.7.1 | Python client for the Prometheus monitoring system / Apache 2.0 |
| [prompt\_toolkit](https://github.com/jonathanslenders/python-prompt-toolkit) | 2.0.9 | Library for building powerful interactive command lines in Python / BSD 3-clause |
| [psutil](https://github.com/giampaolo/psutil) | 5.6.3 | A cross-platform process and system utilities module for Python / BSD 3-Clause |
| [py](https://github.com/pytest-dev/py) | 1.8.0 | library with cross-python path, ini-parsing, io, code, log facilities / MIT |
| [py-lief](https://lief.quarkslab.com/) | 0.9.0 | A cross platform library to parse, modify and abstract ELF, PE and MachO formats. / Apache 2.0 |
| [pycodestyle](https://pycodestyle.readthedocs.io/) | 2.5.0 | Python style guide checker / MIT |
| [pycosat](https://github.com/ContinuumIO/pycosat) | 0.6.3 | Bindings to picosat (a SAT solver) / MIT |
| [pycparser](https://github.com/eliben/pycparser) | 2.19 | Complete C99 parser in pure Python / BSD 3-clause |
| [pycrypto](http://www.pycrypto.org/) | 2.6.1 | Cryptographic modules for Python. / Public Domain |
| [pycurl](http://pycurl.sourceforge.net/) | 7.43.0.3 | A Python Interface To The cURL library / LGPL, MIT |
| [pyflakes](https://github.com/PyCQA/pyflakes) | 2.1.1 | Pyflakes analyzes programs and detects various errors. / MIT |
| [pygments](http://pygments.org/) | 2.4.2 | Generic syntax highlighting package / BSD 2-clause |
| [pylint](http://www.pylint.org/) | 2.3.1 | python code static checker / GPL |
| [pyodbc](https://github.com/mkleehammer/pyodbc) | 4.0.26 | DB API Module for ODBC / MIT |
| [pyopenssl](https://github.com/pyca/pyopenssl) | 19.0.0 | Python wrapper module around the OpenSSL library / Apache 2.0 |
| [pyparsing](http://pyparsing.wikispaces.com/) | 2.4.0 | Create and execute simple grammars / MIT |
| [pyqt](http://www.riverbankcomputing.co.uk/software/pyqt) | 5.9.2 | Python binding of the cross-platform GUI toolkit Qt. / Commercial, GPL-2.0, GPL-3.0 |
| [pyreadline](http://ipython.org/pyreadline) | 2.1 | A python implmementation of GNU readline. / BSD 3-Clause |
| [pyrsistent](http://github.com/tobgu/pyrsistent/) | 0.14.11 | Persistent/Functional/Immutable data structures / MIT |
| [pysocks](https://github.com/Anorov/PySocks) | 1.7.0 | A Python SOCKS client module. See [Anorov/PySocks](https://github.com/Anorov/PySocks) for more information. / BSD 3-Clause |
| [pytables](http://www.pytables.org) | 3.5.2 | Brings together Python, HDF5 and NumPy to easily handle large amounts of data. / BSD 3-Clause |
| [pytest](https://docs.pytest.org/en/latest/) | 5.0.1 | Simple and powerful testing with Python. / MIT |
| [pytest-arraydiff](https://github.com/astrofrog/pytest-arraydiff) | 0.3 | pytest plugin to help with comparing array output from tests / BSD |
| [pytest-astropy](https://github.com/astropy/pytest-astropy) | 0.5.0 | Meta-package containing dependencies for testing Astropy / BSD |
| [pytest-doctestplus](https://github.com/astropy/pytest-doctestplus) | 0.3.0 | Pytest plugin with advanced doctest features / BSD |
| [pytest-openfiles](https://github.com/astropy/pytest-openfiles) | 0.3.2 | Pytest plugin for detecting inadvertent open file handles / BSD |
| [pytest-remotedata](https://github.com/astropy/pytest-remotedata) | 0.3.1 | Pytest plugin for controlling remote data access / BSD |
| [python](http://www.python.org/) | 3.7.3 | General purpose programming language / PSF |
| [python-dateutil](https://dateutil.readthedocs.org/) | 2.8.0 | Extensions to the standard Python datetime module. / BSD 3 Clause |
| [python-libarchive-c](https://github.com/Changaco/python-libarchive-c) | 2.8 | Python interface to libarchive / CC0-1.0 |
| [pytz](http://pythonhosted.org/pytz/) | 2019.1 | World timezone definitions, modern and historical. / MIT |
| [pywavelets](https://github.com/PyWavelets/pywt) | 1.0.3 | Discrete Wavelet Transforms in Python / MIT |
| [pywin32](https://sourceforge.net/projects/pywin32) | 223 | Python extensions for Windows / PSF |
| [pywinpty](https://github.com/spyder-ide/pywinpty) | 0.5.5 | Python bindings for the winpty library / MIT |
| [pyyaml](http://pyyaml.org/wiki/PyYAML) | 5.1.1 | YAML parser and emitter for Python / MIT |
| [pyzmq](https://github.com/zeromq/pyzmq) | 18.0.0 | Python bindings for zeromq / BSD 3-clause |
| [qt](http://qt-project.org) | 5.9.7 | Qt is a cross-platform application and UI framework. / LGPL-3.0 |
| [qtawesome](https://github.com/spyder-ide/qtawesome) | 0.5.7 | Iconic fonts in PyQt and PySide applications / MIT |
| [qtconsole](http://jupyter.org) | 4.5.1 | Jupyter Qt console / BSD 3-Clause |
| [qtpy](https://github.com/spyder-ide/qtpy) | 1.8.0 | Abstraction layer for PyQt5/PyQt4/PySide / MIT |
| [requests](http://python-requests.org) | 2.22.0 | Python HTTP for Humans / Apache 2.0 |
| [rope](https://github.com/python-rope/rope) | 0.14.0 | A python refactoring library / GPL 2.0 |
| [ruamel\_yaml](https://bitbucket.org/ruamel/yaml) | 0.15.46 | A patched copy of ruamel.yaml. / MIT |
| [scikit-image](http://scikit-image.org/) | 0.15.0 | Image processing routines for SciPy. / BSD 3-Clause |
| [scikit-learn](http://scikit-learn.org/) | 0.21.2 | A set of python modules for machine learning and data mining / BSD 3-Clause |
| [scipy](http://www.scipy.org/) | 1.2.1 | Scientific Library for Python / BSD 3-Clause |
| [seaborn](https://seaborn.pydata.org) | 0.9.0 | Statistical data visualization / BSD 3-Clause |
| [send2trash](https://github.com/hsoft/send2trash) | 1.5.0 | Python library to natively send files to Trash (or Recycle bin) on all platforms. / BSD-3-Clause |
| [setuptools](https://github.com/pypa/setuptools) | 41.0.1 | Download, build, install, upgrade, and uninstall Python packages / MIT |
| [simplegeneric](http://cheeseshop.python.org/pypi/simplegeneric) | 0.8.1 | Simple generic functions (similar to Python’s own len(), pickle.dump(), etc.) / Zope Public |
| [singledispatch](http://docs.python.org/3/library/functools.html#functools.singledispatch) | 3.4.0.3 | Transforms a function into a single-dispatch generic function / MIT |
| [sip](http://www.riverbankcomputing.com/software/sip/intro) | 4.19.8 | Create Python bindings for C and C++ libraries / GPL-3.0 |
| [six](http://pypi.python.org/pypi/six/) | 1.12.0 | Python 2 and 3 compatibility utilities / MIT |
| [snappy](https://github.com/google/snappy) | 1.1.7 | A fast compressor/decompressor / BSD 3-clause |
| [snowballstemmer](https://github.com/shibukawa/snowball_py) | 1.9.0 | Snowball stemming library collection for Python / BSD-2-Clause |
| [sortedcollections](http://www.grantjenks.com/docs/sortedcollections/) | 1.1.2 | Python Sorted Collections / Apache-2.0 |
| [sortedcontainers](http://www.grantjenks.com/docs/sortedcontainers/) | 2.1.0 | Python Sorted Container Types: SortedList, SortedDict, and SortedSet / Apache 2.0 |
| [soupsieve](http://facelessuser.github.io/soupsieve) | 1.8 | A modern CSS selector implementation for BeautifulSoup / MIT |
| [sphinx](http://www.sphinx-doc.org) | 2.1.2 | Sphinx is a tool that makes it easy to create intelligent and beautiful documentation / BSD-2-Clause |
| sphinxcontrib | 1.0 | Python namespace for sphinxcontrib / BSD |
| [sphinxcontrib-applehelp](https://www.sphinx-doc.org/en/master/) | 1.0.1 | sphinxcontrib-applehelp is a sphinx extension which outputs Apple help books / BSD-2-Clause |
| [sphinxcontrib-devhelp](https://www.sphinx-doc.org/en/master/) | 1.0.1 | sphinxcontrib-devhelp is a sphinx extension which outputs Devhelp document / BSD-2-Clause |
| [sphinxcontrib-htmlhelp](https://www.sphinx-doc.org/en/master/) | 1.0.2 | sphinxcontrib-htmlhelp is a sphinx extension which … / BSD-2-Clause |
| [sphinxcontrib-jsmath](https://www.sphinx-doc.org/en/master/) | 1.0.1 | A sphinx extension which renders display math in HTML via JavaScript / BSD-2-Clause |
| [sphinxcontrib-qthelp](https://www.sphinx-doc.org/en/master/) | 1.0.2 | sphinxcontrib-qthelp is a sphinx extension which outputs QtHelp document / BSD-2-Clause |
| [sphinxcontrib-serializinghtml](https://www.sphinx-doc.org/en/master/) | 1.1.3 | sphinxcontrib-serializinghtml is a sphinx extension which outputs “serialized” HTML files (json and pickle). / BSD-2-Clause |
| [sphinxcontrib-websupport](https://pypi.python.org/pypi/sphinxcontrib-websupport) | 1.1.2 | Sphinx API for Web Apps / BSD-2-Clause |
| [spyder](https://www.spyder-ide.org/) | 3.3.6 | The Scientific Python Development Environment / MIT |
| [spyder-kernels](https://github.com/spyder-ide/spyder-kernels) | 0.5.1 | Jupyter kernels for the Spyder console / MIT |
| [sqlalchemy](http://www.sqlalchemy.org/) | 1.3.5 | Database Abstraction Library. / MIT |
| [sqlite](http://www.sqlite.org/) | 3.29.0 | Implements a self-contained, zero-configuration, SQL database engine. / Public-Domain (`<http://www.sqlite.org/copyright.html>`) |
| [statsmodels](https://www.statsmodels.org) | 0.10.0 | Statistical computations and models for use with SciPy / BSD 3-Clause |
| [sympy](http://sympy.org) | 1.4 | Python library for symbolic mathematics / BSD-3-Clause |
| [tblib](https://github.com/ionelmc/python-tblib) | 1.4.0 | Traceback serialization library. / BSD 2-Clause |
| [terminado](https://github.com/jupyter/terminado) | 0.8.2 | Terminals served by tornado websockets / BSD 2-Clause |
| [testpath](https://testpath.readthedocs.io) | 0.4.2 | Testpath is a collection of utilities for Python code working with files and commands. / BSD-3-Clause |
| [tk](http://www.tcl.tk/) | 8.6.8 | A dynamic programming language with GUI support. Bundles Tcl and Tk. / Tcl/Tk |
| [toolz](http://toolz.readthedocs.org/) | 0.10.0 | A functional standard library for Python / BSD 3-Clause |
| [tornado](http://www.tornadoweb.org/) | 6.0.3 | A Python web framework and asynchronous networking library, originally developed at FriendFeed. / Apache 2.0 |
| [tqdm](https://pypi.python.org/pypi/tqdm) | 4.32.1 | A Fast, Extensible Progress Meter / MPLv2.0, MIT |
| [traitlets](http://ipython.org/) | 4.3.2 | Configuration system for Python applications / BSD 3-clause |
| [unicodecsv](https://github.com/jdunck/python-unicodecsv) | 0.14.1 | Drop-in replacement for csv module which supports unicode strings / BSD |
| [urllib3](https://urllib3.readthedocs.io/) | 1.24.2 | HTTP library with thread-safe connection pooling, file post, and more. / MIT |
| [vc](https://github.com/conda/conda/wiki/VC-features) | 14.1 | A meta-package to impose mutual exclusivity among software built with different VS versions / Modified BSD License (3-clause) |
| vs2015\_runtime | 14.15.26706 | MSVC runtimes associated with cl.exe version 19.15.26726 (VS 2017 update 8) / None |
| [wcwidth](https://github.com/jquast/wcwidth) | 0.1.7 | Measures number of Terminal column cells of wide-character codes. / MIT |
| [webencodings](https://github.com/gsnedders/python-webencodings) | 0.5.1 | Character encoding aliases for legacy web content / BSD 3-Clause |
| [werkzeug](https://palletsprojects.com/p/werkzeug/) | 0.15.4 | The comprehensive WSGI web application library. / BSD 3-Clause |
| [wheel](https://github.com/pypa/wheel) | 0.33.4 | A built-package format for Python. / MIT |
| [widgetsnbextension](http://ipython.org) | 3.5.0 | Interactive Widgets for Jupyter / BSD 3-clause |
| [win\_inet\_pton](https://github.com/hickeroar/win_inet_pton) | 1.1.0 | Native inet\_pton and inet\_ntop implementation for Python on Windows (with ctypes). / PUBLIC-DOMAIN |
| [win\_unicode\_console](https://github.com/Drekin/win-unicode-console) | 0.5 | A Python package to enable Unicode input and display when running Python from Windows console. / MIT |
| [wincertstore](https://bitbucket.org/tiran/wincertstore) | 0.2 | Python module to extract CA and CRL certs from Windows’ cert store (ctypes based). / PSF 2 |
| [winpty](https://github.com/rprichard/winpty) | 0.4.3 | Winpty provides an interface similar to a Unix pty-master for communicating with Windows console programs. / MIT |
| [wrapt](https://github.com/GrahamDumpleton/wrapt) | 1.11.2 | Module for decorators, wrappers and monkey patching / BSD 2-Clause |
| [xlrd](http://www.python-excel.org/) | 1.2.0 | Library for developers to extract data from Microsoft Excel (tm) spreadsheet files / BSD 3-Clause and BSD with advertising |
| [xlsxwriter](https://xlsxwriter.readthedocs.io/) | 1.1.8 | A Python module for creating Excel XLSX files / BSD 2-Clause |
| [xlwings](http://xlwings.org/) | 0.15.8 | Interact with Excel from Python and vice versa / 3-clause BSD |
| [xlwt](http://www.python-excel.org/) | 1.3.0 | Writing data and formatting information to Excel files / BSD |
| [xz](http://tukaani.org/xz/) | 5.2.4 | Data compression software with high compression ratio / LGPL-2.1 and GPL-2.0 |
| [yaml](http://pyyaml.org/wiki/LibYAML) | 0.1.7 | A C library for parsing and emitting YAML. / MIT |
| [zeromq](http://zeromq.org) | 4.3.1 | A high-performance asynchronous messaging library. / LGPL 3 |
| [zict](http://github.com/mrocklin/zict) | 1.0.0 | Composable Dictionary Classes / BSD 3-Clause |
| [zipp](https://github.com/jaraco/zipp) | 0.5.1 | A pathlib-compatible Zipfile object wrapper / MIT |
| [zlib](http://zlib.net/) | 1.2.11 | Massively spiffy yet delicately unobtrusive compression library / zlib |
| [zstd](http://www.zstd.net) | 1.3.7 | Zstandard - Fast real-time compression algorithm / BSD 3-Clause |
| Name | Version | Summary / License |
|---|---|---|
| [\_ipyw\_jlab\_nb\_ext\_conf](https://github.com/ContinuumIO/anaconda-nb-extensions-meta-config) | 0.1.0 | A configuration metapackage for enabling Anaconda-bundled jupyter extensions / BSD |
| [alabaster](http://www.sphinx-doc.org/en/stable/index.html) | 0.7.12 | Configurable, Python 2+3 compatible Sphinx theme. / BSD 3-Clause |
| [anaconda-client](http://anaconda.org) | 1.7.2 | anaconda.org command line client library / BSD 3-clause |
| [anaconda-project](https://github.com/Anaconda-Platform/anaconda-project) | 0.8.3 | Tool for encapsulating, running, and reproducing data science projects / BSD 3-Clause |
| [asn1crypto](https://github.com/wbond/asn1crypto) | 0.24.0 | Python ASN.1 library with a focus on performance and a pythonic API / MIT |
| [astroid](https://www.astroid.org/) | 2.2.5 | A abstract syntax tree for Python with inference support. / LGPL 2.1 |
| [astropy](http://www.astropy.org/) | 3.2.1 | Community-developed Python Library for Astronomy / BSD |
| [atomicwrites](https://github.com/untitaker/python-atomicwrites) | 1.3.0 | Atomic file writes / MIT |
| [attrs](https://attrs.readthedocs.io/en/stable/) | 19.1.0 | attrs is the Python package that will bring back the joy of writing classes by relieving you from the drudgery of implementing object protocols (aka dunder methods). / MIT |
| [babel](http://babel.pocoo.org/) | 2.7.0 | Utilities to internationalize and localize Python applications / BSD 3-clause |
| [backcall](https://github.com/takluyver/backcall/) | 0.1.0 | Specifications for callback functions passed in to an API / BSD-3-Clause |
| [backports](https://bitbucket.org/brandon/backports) | 1.0 | None / BSD |
| [backports.os](https://github.com/pjdelport/backports.os) | 0.1.1 | Backport of new features in Python’s os module / Python Software Foundation |
| [backports.shutil\_get\_terminal\_size](https://github.com/chrippa/backports.shutil_get_terminal_size) | 1.0.0 | A backport of the get\_terminal\_size function from Python 3.3’s shutil. / MIT |
| [beautifulsoup4](http://www.crummy.com/software/BeautifulSoup/) | 4.7.1 | Python library designed for screen-scraping / MIT |
| [bitarray](https://github.com/ilanschnell/bitarray) | 0.9.3 | efficient arrays of booleans – C extension / PSF |
| [bkcharts](http://github.com/bokeh/bkcharts) | 0.2 | High level chart types built on top of Bokeh / BSD 3-Clause |
| blas | 1.0 | None / None |
| [bleach](https://github.com/mozilla/bleach) | 3.1.0 | Easy, whitelist-based HTML-sanitizing tool / Apache-2.0 |
| [blosc](https://github.com/Blosc/c-blosc) | 1.16.3 | A blocking, shuffling and loss-less compression library that can be faster than memcpy() / BSD 3-Clause |
| [bokeh](http://bokeh.pydata.org/) | 1.2.0 | Statistical and novel interactive HTML plots for Python / BSD 3-Clause |
| [boto](https://github.com/boto/boto/) | 2.49.0 | Amazon Web Services Library / MIT |
| [bottleneck](http://berkeleyanalytics.com/bottleneck) | 1.2.1 | Fast NumPy array functions written in Cython. / BSD 2-Clause |
| [bzip2](http://www.bzip.org/) | 1.0.8 | high-quality data compressor / bzip2 |
| [ca-certificates](https://github.com/conda-forge/ca-certificates-feedstock) | 2019.5.15 | Certificates for use with other packages. / ISC |
| [certifi](http://certifi.io/) | 2019.6.16 | Python package for providing Mozilla’s CA Bundle. / ISC |
| [cffi](https://bitbucket.org/cffi/cffi) | 1.12.3 | Foreign Function Interface for Python calling C code. / MIT |
| [chardet](https://github.com/chardet/chardet) | 3.0.4 | Universal character encoding detector / LGPL2 |
| [click](https://palletsprojects.com/p/click) | 7.0 | Python composable command line interface toolkit / BSD-3-Clause |
| [cloudpickle](https://github.com/cloudpipe/cloudpickle) | 1.2.1 | Extended pickling support for Python objects / BSD 3-Clause |
| [clyent](https://github.com/Anaconda-Platform/clyent) | 1.2.2 | Command line client library for windows and posix / BSD 3-Clause |
| [colorama](https://github.com/tartley/colorama) | 0.4.1 | Cross-platform colored terminal text / BSD-3-Clause |
| [comtypes](http://starship.python.net/crew/theller/comtypes/) | 1.1.7 | pure Python COM package / MIT |
| [conda](https://conda.io) | 4.7.10 | OS-agnostic, system-level binary package and environment manager. / BSD 3-Clause |
| [conda-build](https://github.com/conda/conda-build) | 3.18.9 | tools for building conda packages / BSD 3-Clause |
| [conda-env](https://github.com/conda/conda-env) | 2.6.0 | Tools for interacting with conda environments. / BSD 3-Clause |
| [conda-verify](https://github.com/conda/conda-verify) | 3.4.2 | tool for validating conda recipes and conda packages / BSD 3-Clause |
| console\_shortcut | 0.1.1 | Console shortcut creator for Windows (using menuinst) / BSD |
| [contextlib2](http://contextlib2.readthedocs.org) | 0.5.5 | Backports and enhancements for the contextlib module / PSF |
| [cryptography](https://github.com/pyca/cryptography) | 2.7 | Provides cryptographic recipes and primitives to Python developers / Apache 2.0 or BSD 3-Clause, PSF 2 |
| [curl](http://curl.haxx.se/) | 7.65.2 | tool and library for transferring data with URL syntax / MIT/X derivate (`<http://curl.haxx.se/docs/copyright.html>`) |
| [cycler](http://matplotlib.org/cycler) | 0.10.0 | Composable style cycles. / BSD 3-Clause |
| [cython](http://www.cython.org/) | 0.29.12 | The Cython compiler for writing C extensions for the Python language / Apache-2.0 |
| [cytoolz](https://github.com/pytoolz/cytoolz) | 0.10.0 | Cython implementation of Toolz. High performance functional utilities / BSD-3-Clause |
| [dask](https://dask.org/) | 2.1.0 | Parallel PyData with Task Scheduling / BSD 3-Clause |
| [dask-core](http://github.com/dask/dask/) | 2.1.0 | Parallel Python with task scheduling / BSD 3-Clause |
| [decorator](https://github.com/micheles/decorator) | 4.4.0 | Better living through Python with decorators. / BSD 3-Clause |
| [defusedxml](https://bitbucket.org/tiran/defusedxml) | 0.6.0 | XML bomb protection for Python stdlib modules / PSF 2.0 |
| [distributed](http://distributed.readthedocs.io/en/latest/) | 2.1.0 | Distributed computing with Dask / BSD 3-Clause |
| [docutils](http://docutils.sourceforge.net/) | 0.14 | Docutils – Python Documentation Utilities / Public Domain Dedictation and BSD 2-Clause and PSF 2.1.1 and GPL 3.0 |
| [entrypoints](https://github.com/takluyver/entrypoints) | 0.3 | Discover and load entry points from installed packages. / MIT License |
| [et\_xmlfile](https://bitbucket.org/openpyxl/et_xmlfile) | 1.0.1 | An implementation of lxml.xmlfile for the standard library / MIT |
| [fastcache](https://github.com/pbrady/fastcache) | 1.1.0 | C implementation of Python 3 lru\_cache / MIT |
| [filelock](https://github.com/benediktschmitt/py-filelock) | 3.0.12 | A platform independent file lock. / Public Domain |
| [flask](http://flask.pocoo.org) | 1.1.1 | A microframework based on Werkzeug, Jinja2 and good intentions. / BSD 3-Clause |
| [freetype](https://www.freetype.org/) | 2.9.1 | A Free, High-Quality, and Portable Font Engine / GPL-2.0 and FreeType |
| [get\_terminal\_size](https://github.com/chrippa/backports.shutil_get_terminal_size) | 1.0.0 | Get the size of the terminal window. / MIT |
| [gevent](http://www.gevent.org/) | 1.4.0 | Coroutine-based network library / MIT |
| [glob2](https://github.com/miracle2k/python-glob2) | 0.7 | Version of the glob module that supports recursion via \*\*, and can capture patterns. / BSD-2-Clause |
| [greenlet](https://github.com/python-greenlet/greenlet) | 0.4.15 | Lightweight in-process concurrent programming / MIT |
| [h5py](http://www.h5py.org/) | 2.9.0 | Read and write HDF5 files from Python. / BSD-3-Clause |
| [hdf5](http://www.hdfgroup.org/HDF5/) | 1.10.4 | HDF5 is a data model, library, and file format for storing and managing data / HDF5 |
| [heapdict](http://stutzbachenterprises.com/) | 1.0.0 | A heap with decrease-key and increase-key operations / BSD 3-Clause |
| [html5lib](https://github.com/html5lib/html5lib-python) | 1.0.1 | HTML parser based on the WHATWG HTML specification / MIT |
| icc\_rt | 2019.0.0 | Intel runtime libraries for C, C++ and Fortran compilers / Intel proprietary |
| [icu](http://site.icu-project.org/) | 58.2 | International Components for Unicode. / MIT |
| [idna](https://github.com/kjd/idna) | 2.8 | Internationalized Domain Names in Applications (IDNA). / BSD Like |
| [imageio](http://imageio.github.io) | 2.5.0 | a Python library for reading and writing image data / BSD 2-Clause |
| [imagesize](https://github.com/shibukawa/imagesize_py) | 1.1.0 | Getting image size from png/jpeg/jpeg2000/gif file / MIT |
| [importlib\_metadata](http://importlib-metadata.readthedocs.io) | 0.17 | A library to access the metadata for a Python package / APACHE-2.0 |
| [intel-openmp](https://software.intel.com/en-us/node/522690) | 2019.4 | Math library for Intel and compatible processors / proprietary - Intel |
| [ipykernel](https://ipython.org) | 5.1.1 | IPython Kernel for Jupyter / BSD-3-Clause |
| [ipython](https://ipython.org/) | 7.6.1 | IPython: Productive Interactive Computing / BSD-3-Clause |
| [ipython\_genutils](http://ipython.org) | 0.2.0 | vestigial utilities from IPython / BSD 3-Clause |
| [ipywidgets](https://github.com/ipython/ipywidgets) | 7.5.0 | Jupyter Interactive Widgets / BSD 3-clause |
| [isort](https://github.com/timothycrosley/isort) | 4.3.21 | A Python utility / library to sort Python imports. / MIT |
| [itsdangerous](https://github.com/pallets/itsdangerous) | 1.1.0 | Various helpers to pass trusted data to untrusted environments. / BSD 3-Clause |
| [jdcal](https://github.com/phn/jdcal) | 1.4.1 | Julian dates from proleptic Gregorian and Julian calendars. / BSD 2-Clause |
| [jedi](https://github.com/davidhalter/jedi/) | 0.13.3 | An autocompletion tool for Python that can be used for text editors. / MIT |
| [jinja2](http://jinja.pocoo.org) | 2.10.1 | An easy to use stand-alone template engine written in pure python. / 3-Clause BSD |
| [joblib](http://packages.python.org/joblib/) | 0.13.2 | Python function as pipeline jobs. / BSD 3-Clause |
| [jpeg](http://www.ijg.org/) | 9b | read/write jpeg COM, EXIF, IPTC medata / Custom free software license |
| [json5](https://github.com/dpranke/pyjson5) | 0.8.4 | A Python implementation of the JSON5 data format / Apache-2.0 |
| [jsonschema](https://github.com/Julian/jsonschema) | 3.0.1 | An implementation of JSON Schema validation for Python / MIT |
| [jupyter](http://jupyter.org) | 1.0.0 | Jupyter metapackage. Install all the Jupyter components in one go. / BSD 3-Clause |
| [jupyter\_client](http://jupyter.org) | 5.3.1 | Jupyter protocol implementation and client libraries / BSD 3-clause |
| [jupyter\_console](http://jupyter.org) | 6.0.0 | Jupyter terminal console / BSD-3-Clause |
| [jupyter\_core](http://jupyter.org) | 4.5.0 | Core common functionality of Jupyter projects. / BSD 3-clause |
| [jupyterlab](https://github.com/jupyterlab/jupyterlab) | 1.0.2 | JupyterLab / BSD-3-Clause |
| [jupyterlab\_server](http://github.com/jupyterlab/jupyterlab_server) | 1.0.0 | A set of server components for JupyterLab and JupyterLab like applications. / BSD 3-Clause |
| [keyring](https://github.com/jaraco/keyring) | 18.0.0 | Store and access your passwords safely / Python Software Foundation or MIT |
| [kiwisolver](https://github.com/nucleic/kiwi) | 1.1.0 | A fast implementation of the Cassowary constraint solver / BSD 3-Clause |
| [krb5](http://web.mit.edu/kerberos/) | 1.16.1 | A network authentication protocol. / MIT |
| [lazy-object-proxy](https://github.com/ionelmc/python-lazy-object-proxy) | 1.4.1 | A fast and thorough lazy object proxy / BSD-2-Clause |
| [libarchive](http://www.libarchive.org/) | 3.3.3 | Multi-format archive and compression library / BSD 2-Clause |
| [libcurl](http://curl.haxx.se/) | 7.65.2 | tool and library for transferring data with URL syntax / MIT/X derivate (`<http://curl.haxx.se/docs/copyright.html>`) |
| [libiconv](https://www.gnu.org/software/libiconv/) | 1.15 | Provides iconv for systems which don’t have one (or that cannot convert from/to Unicode.) / GPL and LGPL |
| [liblief](https://lief.quarkslab.com/) | 0.9.0 | A cross platform library to parse, modify and abstract ELF, PE and MachO formats. / Apache 2.0 |
| [libpng](http://www.libpng.org/pub/png/libpng.html) | 1.6.37 | PNG reference library / zlib/libpng |
| [libsodium](http://libsodium.org) | 1.0.16 | A modern and easy-to-use crypto library. / ISC |
| [libssh2](https://www.libssh2.org/) | 1.8.2 | the SSH library / BSD-3-Clause |
| [libtiff](http://www.libtiff.org/) | 4.0.10 | Support for the Tag Image File Format (TIFF). / HPND |
| [libxml2](http://xmlsoft.org/) | 2.9.9 | The XML C parser and toolkit of Gnome / MIT |
| [libxslt](http://xmlsoft.org/XSLT/) | 1.1.33 | The XSLT C library developed for the GNOME project / MIT |
| [llvmlite](https://github.com/numba/llvmlite) | 0.29.0 | A lightweight LLVM python binding for writing JIT compilers / New BSD License |
| [locket](https://github.com/mwilliamson/locket.py) | 0.2.0 | File-based locks for Python for Linux and Windows / BSD 2-Clause |
| [lxml](http://lxml.de/) | 4.3.4 | Pythonic binding for the C libraries libxml2 and libxslt. / BSD 3-Clause, GPL-2.0, ZPL-2.0, and ElementTree |
| [lz4-c](https://www.lz4.org) | 1.8.1.2 | Extremely Fast Compression algorithm / BSD 2-clause |
| [lzo](http://www.oberhumer.com/opensource/lzo/) | 2.10 | LZO is a portable lossless data compression library written in ANSI C. / GPL v2+ |
| m2w64-gcc-libgfortran | 5.3.0 | |
| m2w64-gcc-libs | 5.3.0 | |
| m2w64-gcc-libs-core | 5.3.0 | |
| m2w64-gmp | 6.1.0 | |
| m2w64-libwinpthread-git | 5.0.0.4634.697f757 | |
| [markupsafe](https://www.palletsprojects.com/p/markupsafe) | 1.1.1 | A Python module that implements the jinja2.Markup string / BSD-3-Clause |
| [matplotlib](http://matplotlib.org/) | 3.1.0 | Publication quality figures in Python / PSF-based |
| [mccabe](https://github.com/PyCQA/mccabe) | 0.6.1 | McCabe complexity checker for Python / MIT |
| [menuinst](https://github.com/ContinuumIO/menuinst) | 1.4.16 | cross platform menu item installation / BSD |
| [mistune](https://github.com/lepture/mistune) | 0.8.4 | The fastest markdown parser in pure Python. / BSD 3-Clause |
| [mkl](https://software.intel.com/en-us/mkl) | 2019.4 | Math library for Intel and compatible processors / proprietary - Intel |
| [mkl-service](http://github.com/IntelPython/mkl-service) | 2.0.2 | Python hooks for Intel(R) Math Kernel Library runtime control settings. / BSD-3-Clause |
| [mkl\_fft](http://github.com/IntelPython/mkl_fft) | 1.0.12 | NumPy-based implementation of Fast Fourier Transform using Intel (R) Math Kernel Library. / BSD 3-Clause |
| [mkl\_random](http://github.com/IntelPython/mkl_random) | 1.0.2 | Intel (R) MKL-powered package for sampling from common probability distributions into NumPy arrays. / BSD 3-Clause |
| [mock](https://github.com/testing-cabal/mock) | 3.0.5 | A library for testing in Python / BSD-2-Clause |
| [more-itertools](https://github.com/erikrose/more-itertools) | 7.0.0 | More routines for operating on iterables, beyond itertools / MIT |
| [mpmath](http://mpmath.org) | 1.1.0 | Python library for arbitrary-precision floating-point arithmetic / BSD 3-Clause |
| [msgpack-python](http://msgpack.org/) | 0.6.1 | MessagePack (de)serializer. / Apache 2.0 |
| msys2-conda-epoch | 20160418 | |
| [multipledispatch](https://github.com/mrocklin/multipledispatch/) | 0.6.0 | Multiple dispatch in Python / BSD 3-Clause |
| [nbconvert](http://jupyter.org) | 5.5.0 | Converting Jupyter Notebooks / BSD-3-Clause |
| [nbformat](http://jupyter.org) | 4.4.0 | The reference implementation of the Jupyter Notebook format / BSD 3-clause |
| [networkx](https://networkx.github.io/) | 2.3 | Python package for creating and manipulating complex networks / BSD-3-Clause |
| [nltk](http://nltk.org/) | 3.4.4 | Build Python programs to work with human language data / Apache 2.0 |
| [nose](http://readthedocs.org/docs/nose/) | 1.3.7 | Nose extends unittest to make testing easier / LGPL-2.1 |
| [notebook](http://jupyter.org) | 6.0.0 | Jupyter Notebook / BSD 3-clause |
| [numba](http://numba.github.com) | 0.44.1 | NumPy aware dynamic Python compiler using LLVM / BSD 2-clause |
| [numexpr](https://github.com/pydata/numexpr) | 2.6.9 | Fast numerical expression evaluator for NumPy. / MIT |
| [numpy](http://numpy.scipy.org/) | 1.16.4 | Array processing for numbers, strings, records, and objects. / BSD 3-Clause |
| numpy-base | 1.16.4 | None / None |
| [numpydoc](https://github.com/numpy/numpydoc) | 0.9.1 | Numpy’s Sphinx extensions / BSD 3-Clause |
| [olefile](http://www.decalage.info/python/olefileio) | 0.46 | parse, read and write Microsoft OLE2 files / BSD 2-Clause |
| [openpyxl](https://openpyxl.readthedocs.io) | 2.6.2 | A Python library to read/write Excel 2010 xlsx/xlsm files / MIT |
| [openssl](http://www.openssl.org/) | 1.1.1c | OpenSSL is an open-source implementation of the SSL and TLS protocols / OpenSSL |
| [packaging](https://github.com/pypa/packaging) | 19.0 | Core utilities for Python packages / Apache 2.0 or BSD 2-Clause |
| [pandas](http://pandas.pydata.org) | 0.24.2 | High-performance, easy-to-use data structures and data analysis tools. / BSD 3-clause |
| [pandoc](http://pandoc.org/) | 2.2.3.2 | Universal markup converter (repackaged binaries). / GPL-2.0 |
| [pandocfilters](https://github.com/jgm/pandocfilters) | 1.4.2 | A python module for writing pandoc filters / BSD-3-Clause |
| [parso](https://github.com/davidhalter/parso) | 0.5.0 | A Python Parser / MIT |
| [partd](https://github.com/dask/partd) | 1.0.0 | Data structure for on-disk shuffle operations / BSD 3-Clause |
| [path.py](https://github.com/jaraco/path.py) | 12.0.1 | A module wrapper for os.path / MIT |
| [pathlib2](https://github.com/mcmtroffaes/pathlib2) | 2.3.4 | Fork of pathlib aiming to support the full stdlib Python API / MIT |
| [patsy](https://github.com/pydata/patsy) | 0.5.1 | Describing statistical models in Python using symbolic formulas / BSD-2-Clause, PSF2 |
| [pep8](http://pep8.readthedocs.org/) | 1.7.1 | Python style guide checker / MIT |
| [pickleshare](https://github.com/pickleshare/pickleshare/) | 0.7.5 | Tiny ‘shelve’-like database with concurrency support / MIT |
| [pillow](https://pillow.readthedocs.io) | 6.1.0 | Pillow is the friendly PIL fork by Alex Clark and Contributors / PIL |
| [pip](https://pip.pypa.io/en/stable/) | 19.1.1 | PyPA recommended tool for installing Python packages / MIT |
| [pkginfo](https://code.launchpad.net/~tseaver/pkginfo/trunk) | 1.5.0.1 | Query metadatdata from sdists / bdists / installed packages. / MIT |
| [pluggy](https://github.com/pytest-dev/pluggy) | 0.12.0 | Plugin registration and hook calling for Python / MIT |
| [ply](http://www.dabeaz.com/ply/index.html) | 3.11 | Python Lex-Yacc / BSD 3-clause |
| powershell\_shortcut | 0.0.1 | Powershell shortcut creator for Windows (using menuinst) / BSD |
| [prometheus\_client](https://github.com/prometheus/client_python) | 0.7.1 | Python client for the Prometheus monitoring system / Apache 2.0 |
| [prompt\_toolkit](https://github.com/jonathanslenders/python-prompt-toolkit) | 2.0.9 | Library for building powerful interactive command lines in Python / BSD 3-clause |
| [psutil](https://github.com/giampaolo/psutil) | 5.6.3 | A cross-platform process and system utilities module for Python / BSD 3-Clause |
| [py](https://github.com/pytest-dev/py) | 1.8.0 | library with cross-python path, ini-parsing, io, code, log facilities / MIT |
| [py-lief](https://lief.quarkslab.com/) | 0.9.0 | A cross platform library to parse, modify and abstract ELF, PE and MachO formats. / Apache 2.0 |
| [pycodestyle](https://pycodestyle.readthedocs.io/) | 2.5.0 | Python style guide checker / MIT |
| [pycosat](https://github.com/ContinuumIO/pycosat) | 0.6.3 | Bindings to picosat (a SAT solver) / MIT |
| [pycparser](https://github.com/eliben/pycparser) | 2.19 | Complete C99 parser in pure Python / BSD 3-clause |
| [pycrypto](http://www.pycrypto.org/) | 2.6.1 | Cryptographic modules for Python. / Public Domain |
| [pycurl](http://pycurl.sourceforge.net/) | 7.43.0.3 | A Python Interface To The cURL library / LGPL, MIT |
| [pyflakes](https://github.com/PyCQA/pyflakes) | 2.1.1 | Pyflakes analyzes programs and detects various errors. / MIT |
| [pygments](http://pygments.org/) | 2.4.2 | Generic syntax highlighting package / BSD 2-clause |
| [pylint](http://www.pylint.org/) | 2.3.1 | python code static checker / GPL |
| [pyodbc](https://github.com/mkleehammer/pyodbc) | 4.0.26 | DB API Module for ODBC / MIT |
| [pyopenssl](https://github.com/pyca/pyopenssl) | 19.0.0 | Python wrapper module around the OpenSSL library / Apache 2.0 |
| [pyparsing](http://pyparsing.wikispaces.com/) | 2.4.0 | Create and execute simple grammars / MIT |
| [pyqt](http://www.riverbankcomputing.co.uk/software/pyqt) | 5.9.2 | Python binding of the cross-platform GUI toolkit Qt. / Commercial, GPL-2.0, GPL-3.0 |
| [pyreadline](http://ipython.org/pyreadline) | 2.1 | A python implmementation of GNU readline. / BSD 3-Clause |
| [pyrsistent](http://github.com/tobgu/pyrsistent/) | 0.14.11 | Persistent/Functional/Immutable data structures / MIT |
| [pysocks](https://github.com/Anorov/PySocks) | 1.7.0 | A Python SOCKS client module. See [Anorov/PySocks](https://github.com/Anorov/PySocks) for more information. / BSD 3-Clause |
| [pytables](http://www.pytables.org) | 3.5.2 | Brings together Python, HDF5 and NumPy to easily handle large amounts of data. / BSD 3-Clause |
| [pytest](https://docs.pytest.org/en/latest/) | 5.0.1 | Simple and powerful testing with Python. / MIT |
| [pytest-arraydiff](https://github.com/astrofrog/pytest-arraydiff) | 0.3 | pytest plugin to help with comparing array output from tests / BSD |
| [pytest-astropy](https://github.com/astropy/pytest-astropy) | 0.5.0 | Meta-package containing dependencies for testing Astropy / BSD |
| [pytest-doctestplus](https://github.com/astropy/pytest-doctestplus) | 0.3.0 | Pytest plugin with advanced doctest features / BSD |
| [pytest-openfiles](https://github.com/astropy/pytest-openfiles) | 0.3.2 | Pytest plugin for detecting inadvertent open file handles / BSD |
| [pytest-remotedata](https://github.com/astropy/pytest-remotedata) | 0.3.1 | Pytest plugin for controlling remote data access / BSD |
| [python](http://www.python.org/) | 3.7.3 | General purpose programming language / PSF |
| [python-dateutil](https://dateutil.readthedocs.org/) | 2.8.0 | Extensions to the standard Python datetime module. / BSD 3 Clause |
| [python-libarchive-c](https://github.com/Changaco/python-libarchive-c) | 2.8 | Python interface to libarchive / CC0-1.0 |
| [pytz](http://pythonhosted.org/pytz/) | 2019.1 | World timezone definitions, modern and historical. / MIT |
| [pywavelets](https://github.com/PyWavelets/pywt) | 1.0.3 | Discrete Wavelet Transforms in Python / MIT |
| [pywin32](https://sourceforge.net/projects/pywin32) | 223 | Python extensions for Windows / PSF |
| [pywinpty](https://github.com/spyder-ide/pywinpty) | 0.5.5 | Python bindings for the winpty library / MIT |
| [pyyaml](http://pyyaml.org/wiki/PyYAML) | 5.1.1 | YAML parser and emitter for Python / MIT |
| [pyzmq](https://github.com/zeromq/pyzmq) | 18.0.0 | Python bindings for zeromq / BSD 3-clause |
| [qt](http://qt-project.org) | 5.9.7 | Qt is a cross-platform application and UI framework. / LGPL-3.0 |
| [qtawesome](https://github.com/spyder-ide/qtawesome) | 0.5.7 | Iconic fonts in PyQt and PySide applications / MIT |
| [qtconsole](http://jupyter.org) | 4.5.1 | Jupyter Qt console / BSD 3-Clause |
| [qtpy](https://github.com/spyder-ide/qtpy) | 1.8.0 | Abstraction layer for PyQt5/PyQt4/PySide / MIT |
| [requests](http://python-requests.org) | 2.22.0 | Python HTTP for Humans / Apache 2.0 |
| [rope](https://github.com/python-rope/rope) | 0.14.0 | A python refactoring library / GPL 2.0 |
| [ruamel\_yaml](https://bitbucket.org/ruamel/yaml) | 0.15.46 | A patched copy of ruamel.yaml. / MIT |
| [scikit-image](http://scikit-image.org/) | 0.15.0 | Image processing routines for SciPy. / BSD 3-Clause |
| [scikit-learn](http://scikit-learn.org/) | 0.21.1 | A set of python modules for machine learning and data mining / BSD 3-Clause |
| [scipy](http://www.scipy.org/) | 1.3.0 | Scientific Library for Python / BSD 3-Clause |
| [seaborn](https://seaborn.pydata.org) | 0.9.0 | Statistical data visualization / BSD 3-Clause |
| [send2trash](https://github.com/hsoft/send2trash) | 1.5.0 | Python library to natively send files to Trash (or Recycle bin) on all platforms. / BSD-3-Clause |
| [setuptools](https://github.com/pypa/setuptools) | 41.0.1 | Download, build, install, upgrade, and uninstall Python packages / MIT |
| [simplegeneric](http://cheeseshop.python.org/pypi/simplegeneric) | 0.8.1 | Simple generic functions (similar to Python’s own len(), pickle.dump(), etc.) / Zope Public |
| [singledispatch](http://docs.python.org/3/library/functools.html#functools.singledispatch) | 3.4.0.3 | Transforms a function into a single-dispatch generic function / MIT |
| [sip](http://www.riverbankcomputing.com/software/sip/intro) | 4.19.8 | Create Python bindings for C and C++ libraries / GPL-3.0 |
| [six](http://pypi.python.org/pypi/six/) | 1.12.0 | Python 2 and 3 compatibility utilities / MIT |
| [snappy](https://github.com/google/snappy) | 1.1.7 | A fast compressor/decompressor / BSD 3-clause |
| [snowballstemmer](https://github.com/shibukawa/snowball_py) | 1.9.0 | Snowball stemming library collection for Python / BSD-2-Clause |
| [sortedcollections](http://www.grantjenks.com/docs/sortedcollections/) | 1.1.2 | Python Sorted Collections / Apache-2.0 |
| [sortedcontainers](http://www.grantjenks.com/docs/sortedcontainers/) | 2.1.0 | Python Sorted Container Types: SortedList, SortedDict, and SortedSet / Apache 2.0 |
| [soupsieve](http://facelessuser.github.io/soupsieve) | 1.8 | A modern CSS selector implementation for BeautifulSoup / MIT |
| [sphinx](http://www.sphinx-doc.org) | 2.1.2 | Sphinx is a tool that makes it easy to create intelligent and beautiful documentation / BSD-2-Clause |
| sphinxcontrib | 1.0 | Python namespace for sphinxcontrib / BSD |
| [sphinxcontrib-applehelp](https://www.sphinx-doc.org/en/master/) | 1.0.1 | sphinxcontrib-applehelp is a sphinx extension which outputs Apple help books / BSD-2-Clause |
| [sphinxcontrib-devhelp](https://www.sphinx-doc.org/en/master/) | 1.0.1 | sphinxcontrib-devhelp is a sphinx extension which outputs Devhelp document / BSD-2-Clause |
| [sphinxcontrib-htmlhelp](https://www.sphinx-doc.org/en/master/) | 1.0.2 | sphinxcontrib-htmlhelp is a sphinx extension which … / BSD-2-Clause |
| [sphinxcontrib-jsmath](https://www.sphinx-doc.org/en/master/) | 1.0.1 | A sphinx extension which renders display math in HTML via JavaScript / BSD-2-Clause |
| [sphinxcontrib-qthelp](https://www.sphinx-doc.org/en/master/) | 1.0.2 | sphinxcontrib-qthelp is a sphinx extension which outputs QtHelp document / BSD-2-Clause |
| [sphinxcontrib-serializinghtml](https://www.sphinx-doc.org/en/master/) | 1.1.3 | sphinxcontrib-serializinghtml is a sphinx extension which outputs “serialized” HTML files (json and pickle). / BSD-2-Clause |
| [sphinxcontrib-websupport](https://pypi.python.org/pypi/sphinxcontrib-websupport) | 1.1.2 | Sphinx API for Web Apps / BSD-2-Clause |
| [spyder](https://www.spyder-ide.org/) | 3.3.6 | The Scientific Python Development Environment / MIT |
| [spyder-kernels](https://github.com/spyder-ide/spyder-kernels) | 0.5.1 | Jupyter kernels for the Spyder console / MIT |
| [sqlalchemy](http://www.sqlalchemy.org/) | 1.3.5 | Database Abstraction Library. / MIT |
| [sqlite](http://www.sqlite.org/) | 3.29.0 | Implements a self-contained, zero-configuration, SQL database engine. / Public-Domain (`<http://www.sqlite.org/copyright.html>`) |
| [statsmodels](https://www.statsmodels.org) | 0.10.0 | Statistical computations and models for use with SciPy / BSD 3-Clause |
| [sympy](http://sympy.org) | 1.4 | Python library for symbolic mathematics / BSD-3-Clause |
| [tblib](https://github.com/ionelmc/python-tblib) | 1.4.0 | Traceback serialization library. / BSD 2-Clause |
| [terminado](https://github.com/jupyter/terminado) | 0.8.2 | Terminals served by tornado websockets / BSD 2-Clause |
| [testpath](https://testpath.readthedocs.io) | 0.4.2 | Testpath is a collection of utilities for Python code working with files and commands. / BSD-3-Clause |
| [tk](http://www.tcl.tk/) | 8.6.8 | A dynamic programming language with GUI support. Bundles Tcl and Tk. / Tcl/Tk |
| [toolz](http://toolz.readthedocs.org/) | 0.10.0 | A functional standard library for Python / BSD 3-Clause |
| [tornado](http://www.tornadoweb.org/) | 6.0.3 | A Python web framework and asynchronous networking library, originally developed at FriendFeed. / Apache 2.0 |
| [tqdm](https://pypi.python.org/pypi/tqdm) | 4.32.1 | A Fast, Extensible Progress Meter / MPLv2.0, MIT |
| [traitlets](http://ipython.org/) | 4.3.2 | Configuration system for Python applications / BSD 3-clause |
| [unicodecsv](https://github.com/jdunck/python-unicodecsv) | 0.14.1 | Drop-in replacement for csv module which supports unicode strings / BSD |
| [urllib3](https://urllib3.readthedocs.io/) | 1.24.2 | HTTP library with thread-safe connection pooling, file post, and more. / MIT |
| [vc](https://github.com/conda/conda/wiki/VC-features) | 14.1 | A meta-package to impose mutual exclusivity among software built with different VS versions / Modified BSD License (3-clause) |
| vs2015\_runtime | 14.15.26706 | MSVC runtimes associated with cl.exe version 19.15.26726 (VS 2017 update 8) / None |
| [wcwidth](https://github.com/jquast/wcwidth) | 0.1.7 | Measures number of Terminal column cells of wide-character codes. / MIT |
| [webencodings](https://github.com/gsnedders/python-webencodings) | 0.5.1 | Character encoding aliases for legacy web content / BSD 3-Clause |
| [werkzeug](https://palletsprojects.com/p/werkzeug/) | 0.15.4 | The comprehensive WSGI web application library. / BSD 3-Clause |
| [wheel](https://github.com/pypa/wheel) | 0.33.4 | A built-package format for Python. / MIT |
| [widgetsnbextension](http://ipython.org) | 3.5.0 | Interactive Widgets for Jupyter / BSD 3-clause |
| [win\_inet\_pton](https://github.com/hickeroar/win_inet_pton) | 1.1.0 | Native inet\_pton and inet\_ntop implementation for Python on Windows (with ctypes). / PUBLIC-DOMAIN |
| [win\_unicode\_console](https://github.com/Drekin/win-unicode-console) | 0.5 | A Python package to enable Unicode input and display when running Python from Windows console. / MIT |
| [wincertstore](https://bitbucket.org/tiran/wincertstore) | 0.2 | Python module to extract CA and CRL certs from Windows’ cert store (ctypes based). / PSF 2 |
| [winpty](https://github.com/rprichard/winpty) | 0.4.3 | Winpty provides an interface similar to a Unix pty-master for communicating with Windows console programs. / MIT |
| [wrapt](https://github.com/GrahamDumpleton/wrapt) | 1.11.2 | Module for decorators, wrappers and monkey patching / BSD 2-Clause |
| [xlrd](http://www.python-excel.org/) | 1.2.0 | Library for developers to extract data from Microsoft Excel (tm) spreadsheet files / BSD 3-Clause and BSD with advertising |
| [xlsxwriter](https://xlsxwriter.readthedocs.io/) | 1.1.8 | A Python module for creating Excel XLSX files / BSD 2-Clause |
| [xlwings](http://xlwings.org/) | 0.15.8 | Interact with Excel from Python and vice versa / 3-clause BSD |
| [xlwt](http://www.python-excel.org/) | 1.3.0 | Writing data and formatting information to Excel files / BSD |
| [xz](http://tukaani.org/xz/) | 5.2.4 | Data compression software with high compression ratio / LGPL-2.1 and GPL-2.0 |
| [yaml](http://pyyaml.org/wiki/LibYAML) | 0.1.7 | A C library for parsing and emitting YAML. / MIT |
| [zeromq](http://zeromq.org) | 4.3.1 | A high-performance asynchronous messaging library. / LGPL 3 |
| [zict](http://github.com/mrocklin/zict) | 1.0.0 | Composable Dictionary Classes / BSD 3-Clause |
| [zipp](https://github.com/jaraco/zipp) | 0.5.1 | A pathlib-compatible Zipfile object wrapper / MIT |
| [zlib](http://zlib.net/) | 1.2.11 | Massively spiffy yet delicately unobtrusive compression library / zlib |
| [zstd](http://www.zstd.net) | 1.3.7 | Zstandard - Fast real-time compression algorithm / BSD 3-Clause |
| Name | Version | Summary / License |
|---|---|---|
| [\_ipyw\_jlab\_nb\_ext\_conf](https://github.com/ContinuumIO/anaconda-nb-extensions-meta-config) | 0.1.0 | A configuration metapackage for enabling Anaconda-bundled jupyter extensions / BSD |
| [alabaster](http://www.sphinx-doc.org/en/stable/index.html) | 0.7.12 | Configurable, Python 2+3 compatible Sphinx theme. / BSD 3-Clause |
| [anaconda-client](http://anaconda.org) | 1.7.2 | anaconda.org command line client library / BSD 3-clause |
| [anaconda-project](https://github.com/Anaconda-Platform/anaconda-project) | 0.8.3 | Tool for encapsulating, running, and reproducing data science projects / BSD 3-Clause |
| [appnope](http://github.com/minrk/appnope) | 0.1.0 | Disable App Nap on OS X 10.9 / BSD 2-Clause |
| [appscript](http://appscript.sourceforge.net/) | 1.1.0 | Control AppleScriptable applications from Python / Public-Domain |
| [asn1crypto](https://github.com/wbond/asn1crypto) | 0.24.0 | Python ASN.1 library with a focus on performance and a pythonic API / MIT |
| [astroid](https://www.astroid.org/) | 2.2.5 | A abstract syntax tree for Python with inference support. / LGPL 2.1 |
| [astropy](http://www.astropy.org/) | 3.2.1 | Community-developed Python Library for Astronomy / BSD |
| [atomicwrites](https://github.com/untitaker/python-atomicwrites) | 1.3.0 | Atomic file writes / MIT |
| [attrs](https://attrs.readthedocs.io/en/stable/) | 19.1.0 | attrs is the Python package that will bring back the joy of writing classes by relieving you from the drudgery of implementing object protocols (aka dunder methods). / MIT |
| [babel](http://babel.pocoo.org/) | 2.7.0 | Utilities to internationalize and localize Python applications / BSD 3-clause |
| [backcall](https://github.com/takluyver/backcall/) | 0.1.0 | Specifications for callback functions passed in to an API / BSD-3-Clause |
| [backports](https://bitbucket.org/brandon/backports) | 1.0 | None / BSD |
| [backports.os](https://github.com/pjdelport/backports.os) | 0.1.1 | Backport of new features in Python’s os module / Python Software Foundation |
| [backports.shutil\_get\_terminal\_size](https://github.com/chrippa/backports.shutil_get_terminal_size) | 1.0.0 | A backport of the get\_terminal\_size function from Python 3.3’s shutil. / MIT |
| [beautifulsoup4](http://www.crummy.com/software/BeautifulSoup/) | 4.7.1 | Python library designed for screen-scraping / MIT |
| [bitarray](https://github.com/ilanschnell/bitarray) | 0.9.3 | efficient arrays of booleans – C extension / PSF |
| [bkcharts](http://github.com/bokeh/bkcharts) | 0.2 | High level chart types built on top of Bokeh / BSD 3-Clause |
| blas | 1.0 | None / None |
| [bleach](https://github.com/mozilla/bleach) | 3.1.0 | Easy, whitelist-based HTML-sanitizing tool / Apache-2.0 |
| [blosc](https://github.com/Blosc/c-blosc) | 1.16.3 | A blocking, shuffling and loss-less compression library that can be faster than memcpy() / BSD 3-Clause |
| [bokeh](http://bokeh.pydata.org/) | 1.2.0 | Statistical and novel interactive HTML plots for Python / BSD 3-Clause |
| [boto](https://github.com/boto/boto/) | 2.49.0 | Amazon Web Services Library / MIT |
| [bottleneck](http://berkeleyanalytics.com/bottleneck) | 1.2.1 | Fast NumPy array functions written in Cython. / BSD 2-Clause |
| [bzip2](http://www.bzip.org/) | 1.0.8 | high-quality data compressor / bzip2 |
| [ca-certificates](https://github.com/conda-forge/ca-certificates-feedstock) | 2019.5.15 | Certificates for use with other packages. / ISC |
| [certifi](http://certifi.io/) | 2019.6.16 | Python package for providing Mozilla’s CA Bundle. / ISC |
| [cffi](https://bitbucket.org/cffi/cffi) | 1.12.3 | Foreign Function Interface for Python calling C code. / MIT |
| [chardet](https://github.com/chardet/chardet) | 3.0.4 | Universal character encoding detector / LGPL2 |
| [click](https://palletsprojects.com/p/click) | 7.0 | Python composable command line interface toolkit / BSD-3-Clause |
| [cloudpickle](https://github.com/cloudpipe/cloudpickle) | 1.2.1 | Extended pickling support for Python objects / BSD 3-Clause |
| [clyent](https://github.com/Anaconda-Platform/clyent) | 1.2.2 | Command line client library for windows and posix / BSD 3-Clause |
| [colorama](https://github.com/tartley/colorama) | 0.4.1 | Cross-platform colored terminal text / BSD-3-Clause |
| [conda](https://conda.io) | 4.7.10 | OS-agnostic, system-level binary package and environment manager. / BSD 3-Clause |
| [conda-build](https://github.com/conda/conda-build) | 3.18.9 | tools for building conda packages / BSD 3-Clause |
| [conda-env](https://github.com/conda/conda-env) | 2.6.0 | Tools for interacting with conda environments. / BSD 3-Clause |
| [conda-verify](https://github.com/conda/conda-verify) | 3.4.2 | tool for validating conda recipes and conda packages / BSD 3-Clause |
| [contextlib2](http://contextlib2.readthedocs.org) | 0.5.5 | Backports and enhancements for the contextlib module / PSF |
| [cryptography](https://github.com/pyca/cryptography) | 2.7 | Provides cryptographic recipes and primitives to Python developers / Apache 2.0 or BSD 3-Clause, PSF 2 |
| [curl](http://curl.haxx.se/) | 7.65.2 | tool and library for transferring data with URL syntax / MIT/X derivate (`<http://curl.haxx.se/docs/copyright.html>`) |
| [cycler](http://matplotlib.org/cycler) | 0.10.0 | Composable style cycles. / BSD 3-Clause |
| [cython](http://www.cython.org/) | 0.29.12 | The Cython compiler for writing C extensions for the Python language / Apache-2.0 |
| [cytoolz](https://github.com/pytoolz/cytoolz) | 0.10.0 | Cython implementation of Toolz. High performance functional utilities / BSD-3-Clause |
| [dask](https://dask.org/) | 2.1.0 | Parallel PyData with Task Scheduling / BSD 3-Clause |
| [dask-core](http://github.com/dask/dask/) | 2.1.0 | Parallel Python with task scheduling / BSD 3-Clause |
| [dbus](http://www.freedesktop.org/wiki/Software/dbus/) | 1.13.6 | Simple message bus system for applications to talk to one another / GPL2 |
| [decorator](https://github.com/micheles/decorator) | 4.4.0 | Better living through Python with decorators. / BSD 3-Clause |
| [defusedxml](https://bitbucket.org/tiran/defusedxml) | 0.6.0 | XML bomb protection for Python stdlib modules / PSF 2.0 |
| [distributed](http://distributed.readthedocs.io/en/latest/) | 2.1.0 | Distributed computing with Dask / BSD 3-Clause |
| [docutils](http://docutils.sourceforge.net/) | 0.14 | Docutils – Python Documentation Utilities / Public Domain Dedictation and BSD 2-Clause and PSF 2.1.1 and GPL 3.0 |
| [entrypoints](https://github.com/takluyver/entrypoints) | 0.3 | Discover and load entry points from installed packages. / MIT License |
| [et\_xmlfile](https://bitbucket.org/openpyxl/et_xmlfile) | 1.0.1 | An implementation of lxml.xmlfile for the standard library / MIT |
| [expat](http://expat.sourceforge.net/) | 2.2.6 | Expat XML parser library in C. / MIT |
| [fastcache](https://github.com/pbrady/fastcache) | 1.1.0 | C implementation of Python 3 lru\_cache / MIT |
| [filelock](https://github.com/benediktschmitt/py-filelock) | 3.0.12 | A platform independent file lock. / Public Domain |
| [flask](http://flask.pocoo.org) | 1.1.1 | A microframework based on Werkzeug, Jinja2 and good intentions. / BSD 3-Clause |
| [freetype](https://www.freetype.org/) | 2.9.1 | A Free, High-Quality, and Portable Font Engine / GPL-2.0 and FreeType |
| [get\_terminal\_size](https://github.com/chrippa/backports.shutil_get_terminal_size) | 1.0.0 | Get the size of the terminal window. / MIT |
| [gettext](https://www.gnu.org/software/gettext/) | 0.19.8.1 | Internationalization package. / GPLv2 |
| [gevent](http://www.gevent.org/) | 1.4.0 | Coroutine-based network library / MIT |
| [glib](https://developer.gnome.org/glib/) | 2.56.2 | Provides core application building blocks for libraries and applications written in C. / LGPL-2.1 |
| [glob2](https://github.com/miracle2k/python-glob2) | 0.7 | Version of the glob module that supports recursion via \*\*, and can capture patterns. / BSD-2-Clause |
| [gmp](http://gmplib.org/) | 6.1.2 | The GNU multiprecision library. / GPL 2 and LGPL 3 |
| [gmpy2](https://pypi.python.org/pypi/gmpy2) | 2.0.8 | GMP/MPIR, MPFR, and MPC interface to Python 2.6+ and 3.x / LGPL 3 |
| [greenlet](https://github.com/python-greenlet/greenlet) | 0.4.15 | Lightweight in-process concurrent programming / MIT |
| [h5py](http://www.h5py.org/) | 2.9.0 | Read and write HDF5 files from Python. / BSD-3-Clause |
| [hdf5](http://www.hdfgroup.org/HDF5/) | 1.10.4 | HDF5 is a data model, library, and file format for storing and managing data / HDF5 |
| [heapdict](http://stutzbachenterprises.com/) | 1.0.0 | A heap with decrease-key and increase-key operations / BSD 3-Clause |
| [html5lib](https://github.com/html5lib/html5lib-python) | 1.0.1 | HTML parser based on the WHATWG HTML specification / MIT |
| [icu](http://site.icu-project.org/) | 58.2 | International Components for Unicode. / MIT |
| [idna](https://github.com/kjd/idna) | 2.8 | Internationalized Domain Names in Applications (IDNA). / BSD Like |
| [imageio](http://imageio.github.io) | 2.5.0 | a Python library for reading and writing image data / BSD 2-Clause |
| [imagesize](https://github.com/shibukawa/imagesize_py) | 1.1.0 | Getting image size from png/jpeg/jpeg2000/gif file / MIT |
| [importlib\_metadata](http://importlib-metadata.readthedocs.io) | 0.17 | A library to access the metadata for a Python package / APACHE-2.0 |
| [intel-openmp](https://software.intel.com/en-us/node/522690) | 2019.4 | Math library for Intel and compatible processors / proprietary - Intel |
| [ipykernel](https://ipython.org) | 5.1.1 | IPython Kernel for Jupyter / BSD-3-Clause |
| [ipython](https://ipython.org/) | 7.6.1 | IPython: Productive Interactive Computing / BSD-3-Clause |
| [ipython\_genutils](http://ipython.org) | 0.2.0 | vestigial utilities from IPython / BSD 3-Clause |
| [ipywidgets](https://github.com/ipython/ipywidgets) | 7.5.0 | Jupyter Interactive Widgets / BSD 3-clause |
| [isort](https://github.com/timothycrosley/isort) | 4.3.21 | A Python utility / library to sort Python imports. / MIT |
| [itsdangerous](https://github.com/pallets/itsdangerous) | 1.1.0 | Various helpers to pass trusted data to untrusted environments. / BSD 3-Clause |
| [jbig](https://www.cl.cam.ac.uk/~mgk25/jbigkit) | 2.1 | Implementation of the JBIG1 data compression standard / GPL-2.0 |
| [jdcal](https://github.com/phn/jdcal) | 1.4.1 | Julian dates from proleptic Gregorian and Julian calendars. / BSD 2-Clause |
| [jedi](https://github.com/davidhalter/jedi/) | 0.13.3 | An autocompletion tool for Python that can be used for text editors. / MIT |
| [jinja2](http://jinja.pocoo.org) | 2.10.1 | An easy to use stand-alone template engine written in pure python. / 3-Clause BSD |
| [joblib](http://packages.python.org/joblib/) | 0.13.2 | Python function as pipeline jobs. / BSD 3-Clause |
| [jpeg](http://www.ijg.org/) | 9b | read/write jpeg COM, EXIF, IPTC medata / Custom free software license |
| [json5](https://github.com/dpranke/pyjson5) | 0.8.4 | A Python implementation of the JSON5 data format / Apache-2.0 |
| [jsonschema](https://github.com/Julian/jsonschema) | 3.0.1 | An implementation of JSON Schema validation for Python / MIT |
| [jupyter](http://jupyter.org) | 1.0.0 | Jupyter metapackage. Install all the Jupyter components in one go. / BSD 3-Clause |
| [jupyter\_client](http://jupyter.org) | 5.3.1 | Jupyter protocol implementation and client libraries / BSD 3-clause |
| [jupyter\_console](http://jupyter.org) | 6.0.0 | Jupyter terminal console / BSD-3-Clause |
| [jupyter\_core](http://jupyter.org) | 4.5.0 | Core common functionality of Jupyter projects. / BSD 3-clause |
| [jupyterlab](https://github.com/jupyterlab/jupyterlab) | 1.0.2 | JupyterLab / BSD-3-Clause |
| [jupyterlab\_server](http://github.com/jupyterlab/jupyterlab_server) | 1.0.0 | A set of server components for JupyterLab and JupyterLab like applications. / BSD 3-Clause |
| [keyring](https://github.com/jaraco/keyring) | 18.0.0 | Store and access your passwords safely / Python Software Foundation or MIT |
| [kiwisolver](https://github.com/nucleic/kiwi) | 1.1.0 | A fast implementation of the Cassowary constraint solver / BSD 3-Clause |
| [krb5](http://web.mit.edu/kerberos/) | 1.16.1 | A network authentication protocol. / MIT |
| [lazy-object-proxy](https://github.com/ionelmc/python-lazy-object-proxy) | 1.4.1 | A fast and thorough lazy object proxy / BSD-2-Clause |
| [libarchive](http://www.libarchive.org/) | 3.3.3 | Multi-format archive and compression library / BSD 2-Clause |
| [libcurl](http://curl.haxx.se/) | 7.65.2 | tool and library for transferring data with URL syntax / MIT/X derivate (`<http://curl.haxx.se/docs/copyright.html>`) |
| [libcxx](http://libcxx.llvm.org/) | 4.0.1 | C++ Standard Library / MIT license or UIUC License |
| [libcxxabi](http://libcxxabi.llvm.org/) | 4.0.1 | C++ Standard Library Support / MIT license or UIUC License |
| [libedit](http://thrysoee.dk/editline/) | 3.1.20181209 | Editline Library (libedit) / NetBSD |
| [libffi](https://sourceware.org/libffi/) | 3.2.1 | A Portable Foreign Function Interface Library. / Custom |
| [libgfortran](http://gcc.gnu.org/) | 3.0.1 | Fortran libraries from the GNU Compiler Collection / GPL 3 (with GCC Runtime Library Exception 3.1) |
| [libiconv](https://www.gnu.org/software/libiconv/) | 1.15 | Provides iconv for systems which don’t have one (or that cannot convert from/to Unicode.) / GPL and LGPL |
| [liblief](https://lief.quarkslab.com/) | 0.9.0 | A cross platform library to parse, modify and abstract ELF, PE and MachO formats. / Apache 2.0 |
| [libpng](http://www.libpng.org/pub/png/libpng.html) | 1.6.37 | PNG reference library / zlib/libpng |
| [libsodium](http://libsodium.org) | 1.0.16 | A modern and easy-to-use crypto library. / ISC |
| [libssh2](https://www.libssh2.org/) | 1.8.2 | the SSH library / BSD-3-Clause |
| [libtiff](http://www.libtiff.org/) | 4.0.10 | Support for the Tag Image File Format (TIFF). / HPND |
| [libxml2](http://xmlsoft.org/) | 2.9.9 | The XML C parser and toolkit of Gnome / MIT |
| [libxslt](http://xmlsoft.org/XSLT/) | 1.1.33 | The XSLT C library developed for the GNOME project / MIT |
| [llvm-openmp](http://openmp.llvm.org/) | 4.0.1 | Support for the OpenMP language / MIT license or UIUC License |
| [llvmlite](https://github.com/numba/llvmlite) | 0.29.0 | A lightweight LLVM python binding for writing JIT compilers / New BSD License |
| [locket](https://github.com/mwilliamson/locket.py) | 0.2.0 | File-based locks for Python for Linux and Windows / BSD 2-Clause |
| [lxml](http://lxml.de/) | 4.3.4 | Pythonic binding for the C libraries libxml2 and libxslt. / BSD 3-Clause, GPL-2.0, ZPL-2.0, and ElementTree |
| [lz4-c](https://www.lz4.org) | 1.8.1.2 | Extremely Fast Compression algorithm / BSD 2-clause |
| [lzo](http://www.oberhumer.com/opensource/lzo/) | 2.10 | LZO is a portable lossless data compression library written in ANSI C. / GPL v2+ |
| [markupsafe](https://www.palletsprojects.com/p/markupsafe) | 1.1.1 | A Python module that implements the jinja2.Markup string / BSD-3-Clause |
| [matplotlib](http://matplotlib.org/) | 3.1.0 | Publication quality figures in Python / PSF-based |
| [mccabe](https://github.com/PyCQA/mccabe) | 0.6.1 | McCabe complexity checker for Python / MIT |
| [mistune](https://github.com/lepture/mistune) | 0.8.4 | The fastest markdown parser in pure Python. / BSD 3-Clause |
| [mkl](https://software.intel.com/en-us/mkl) | 2019.4 | Math library for Intel and compatible processors / proprietary - Intel |
| [mkl-service](http://github.com/IntelPython/mkl-service) | 2.0.2 | Python hooks for Intel(R) Math Kernel Library runtime control settings. / BSD-3-Clause |
| [mkl\_fft](http://github.com/IntelPython/mkl_fft) | 1.0.12 | NumPy-based implementation of Fast Fourier Transform using Intel (R) Math Kernel Library. / BSD 3-Clause |
| [mkl\_random](http://github.com/IntelPython/mkl_random) | 1.0.2 | Intel (R) MKL-powered package for sampling from common probability distributions into NumPy arrays. / BSD 3-Clause |
| [mock](https://github.com/testing-cabal/mock) | 3.0.5 | A library for testing in Python / BSD-2-Clause |
| [more-itertools](https://github.com/erikrose/more-itertools) | 7.0.0 | More routines for operating on iterables, beyond itertools / MIT |
| [mpc](http://www.multiprecision.org/) | 1.1.0 | A C library for the arithmetic of complex numbers with arbitrarily high precision. / LGPL 3 |
| [mpfr](http://www.mpfr.org/) | 4.0.1 | The MPFR library is a C library for multiple-precision floating-point computations with correct rounding. / LGPL 3 |
| [mpmath](http://mpmath.org) | 1.1.0 | Python library for arbitrary-precision floating-point arithmetic / BSD 3-Clause |
| [msgpack-python](http://msgpack.org/) | 0.6.1 | MessagePack (de)serializer. / Apache 2.0 |
| [multipledispatch](https://github.com/mrocklin/multipledispatch/) | 0.6.0 | Multiple dispatch in Python / BSD 3-Clause |
| [nbconvert](http://jupyter.org) | 5.5.0 | Converting Jupyter Notebooks / BSD-3-Clause |
| [nbformat](http://jupyter.org) | 4.4.0 | The reference implementation of the Jupyter Notebook format / BSD 3-clause |
| [ncurses](http://www.gnu.org/software/ncurses/) | 6.1 | Library for text-based user interfaces / Free software (MIT-like) |
| [networkx](https://networkx.github.io/) | 2.3 | Python package for creating and manipulating complex networks / BSD-3-Clause |
| [nltk](http://nltk.org/) | 3.4.4 | Build Python programs to work with human language data / Apache 2.0 |
| [nose](http://readthedocs.org/docs/nose/) | 1.3.7 | Nose extends unittest to make testing easier / LGPL-2.1 |
| [notebook](http://jupyter.org) | 6.0.0 | Jupyter Notebook / BSD 3-clause |
| [numba](http://numba.github.com) | 0.44.1 | NumPy aware dynamic Python compiler using LLVM / BSD 2-clause |
| [numexpr](https://github.com/pydata/numexpr) | 2.6.9 | Fast numerical expression evaluator for NumPy. / MIT |
| [numpy](http://numpy.scipy.org/) | 1.16.4 | Array processing for numbers, strings, records, and objects. / BSD 3-Clause |
| numpy-base | 1.16.4 | None / None |
| [numpydoc](https://github.com/numpy/numpydoc) | 0.9.1 | Numpy’s Sphinx extensions / BSD 3-Clause |
| [olefile](http://www.decalage.info/python/olefileio) | 0.46 | parse, read and write Microsoft OLE2 files / BSD 2-Clause |
| [openpyxl](https://openpyxl.readthedocs.io) | 2.6.2 | A Python library to read/write Excel 2010 xlsx/xlsm files / MIT |
| [openssl](http://www.openssl.org/) | 1.1.1c | OpenSSL is an open-source implementation of the SSL and TLS protocols / OpenSSL |
| [packaging](https://github.com/pypa/packaging) | 19.0 | Core utilities for Python packages / Apache 2.0 or BSD 2-Clause |
| [pandas](http://pandas.pydata.org) | 0.24.2 | High-performance, easy-to-use data structures and data analysis tools. / BSD 3-clause |
| [pandoc](http://pandoc.org/) | 2.2.3.2 | Universal markup converter (repackaged binaries). / GPL-2.0 |
| [pandocfilters](https://github.com/jgm/pandocfilters) | 1.4.2 | A python module for writing pandoc filters / BSD-3-Clause |
| [parso](https://github.com/davidhalter/parso) | 0.5.0 | A Python Parser / MIT |
| [partd](https://github.com/dask/partd) | 1.0.0 | Data structure for on-disk shuffle operations / BSD 3-Clause |
| [path.py](https://github.com/jaraco/path.py) | 12.0.1 | A module wrapper for os.path / MIT |
| [pathlib2](https://github.com/mcmtroffaes/pathlib2) | 2.3.4 | Fork of pathlib aiming to support the full stdlib Python API / MIT |
| [patsy](https://github.com/pydata/patsy) | 0.5.1 | Describing statistical models in Python using symbolic formulas / BSD-2-Clause, PSF2 |
| [pcre](http://www.pcre.org/) | 8.43 | Regular expression pattern matching using the same syntax and semantics as Perl 5. / BSD 3-Clause |
| [pep8](http://pep8.readthedocs.org/) | 1.7.1 | Python style guide checker / MIT |
| [pexpect](http://pexpect.sourceforge.net/) | 4.7.0 | Pexpect makes Python a better tool for controlling other applications. / ISC |
| [pickleshare](https://github.com/pickleshare/pickleshare/) | 0.7.5 | Tiny ‘shelve’-like database with concurrency support / MIT |
| [pillow](https://pillow.readthedocs.io) | 6.1.0 | Pillow is the friendly PIL fork by Alex Clark and Contributors / PIL |
| [pip](https://pip.pypa.io/en/stable/) | 19.1.1 | PyPA recommended tool for installing Python packages / MIT |
| [pkginfo](https://code.launchpad.net/~tseaver/pkginfo/trunk) | 1.5.0.1 | Query metadatdata from sdists / bdists / installed packages. / MIT |
| [pluggy](https://github.com/pytest-dev/pluggy) | 0.12.0 | Plugin registration and hook calling for Python / MIT |
| [ply](http://www.dabeaz.com/ply/index.html) | 3.11 | Python Lex-Yacc / BSD 3-clause |
| [prometheus\_client](https://github.com/prometheus/client_python) | 0.7.1 | Python client for the Prometheus monitoring system / Apache 2.0 |
| [prompt\_toolkit](https://github.com/jonathanslenders/python-prompt-toolkit) | 2.0.9 | Library for building powerful interactive command lines in Python / BSD 3-clause |
| [psutil](https://github.com/giampaolo/psutil) | 5.6.3 | A cross-platform process and system utilities module for Python / BSD 3-Clause |
| [ptyprocess](https://github.com/pexpect/ptyprocess) | 0.6.0 | Run a subprocess in a pseudo terminal / ISC |
| [py](https://github.com/pytest-dev/py) | 1.8.0 | library with cross-python path, ini-parsing, io, code, log facilities / MIT |
| [py-lief](https://lief.quarkslab.com/) | 0.9.0 | A cross platform library to parse, modify and abstract ELF, PE and MachO formats. / Apache 2.0 |
| [pycodestyle](https://pycodestyle.readthedocs.io/) | 2.5.0 | Python style guide checker / MIT |
| [pycosat](https://github.com/ContinuumIO/pycosat) | 0.6.3 | Bindings to picosat (a SAT solver) / MIT |
| [pycparser](https://github.com/eliben/pycparser) | 2.19 | Complete C99 parser in pure Python / BSD 3-clause |
| [pycrypto](http://www.pycrypto.org/) | 2.6.1 | Cryptographic modules for Python. / Public Domain |
| [pycurl](http://pycurl.sourceforge.net/) | 7.43.0.3 | A Python Interface To The cURL library / LGPL, MIT |
| [pyflakes](https://github.com/PyCQA/pyflakes) | 2.1.1 | Pyflakes analyzes programs and detects various errors. / MIT |
| [pygments](http://pygments.org/) | 2.4.2 | Generic syntax highlighting package / BSD 2-clause |
| [pylint](http://www.pylint.org/) | 2.3.1 | python code static checker / GPL |
| [pyodbc](https://github.com/mkleehammer/pyodbc) | 4.0.26 | DB API Module for ODBC / MIT |
| [pyopenssl](https://github.com/pyca/pyopenssl) | 19.0.0 | Python wrapper module around the OpenSSL library / Apache 2.0 |
| [pyparsing](http://pyparsing.wikispaces.com/) | 2.4.0 | Create and execute simple grammars / MIT |
| [pyqt](http://www.riverbankcomputing.co.uk/software/pyqt) | 5.9.2 | Python binding of the cross-platform GUI toolkit Qt. / Commercial, GPL-2.0, GPL-3.0 |
| [pyrsistent](http://github.com/tobgu/pyrsistent/) | 0.14.11 | Persistent/Functional/Immutable data structures / MIT |
| [pysocks](https://github.com/Anorov/PySocks) | 1.7.0 | A Python SOCKS client module. See [Anorov/PySocks](https://github.com/Anorov/PySocks) for more information. / BSD 3-Clause |
| [pytables](http://www.pytables.org) | 3.5.2 | Brings together Python, HDF5 and NumPy to easily handle large amounts of data. / BSD 3-Clause |
| [pytest](https://docs.pytest.org/en/latest/) | 5.0.1 | Simple and powerful testing with Python. / MIT |
| [pytest-arraydiff](https://github.com/astrofrog/pytest-arraydiff) | 0.3 | pytest plugin to help with comparing array output from tests / BSD |
| [pytest-astropy](https://github.com/astropy/pytest-astropy) | 0.5.0 | Meta-package containing dependencies for testing Astropy / BSD |
| [pytest-doctestplus](https://github.com/astropy/pytest-doctestplus) | 0.3.0 | Pytest plugin with advanced doctest features / BSD |
| [pytest-openfiles](https://github.com/astropy/pytest-openfiles) | 0.3.2 | Pytest plugin for detecting inadvertent open file handles / BSD |
| [pytest-remotedata](https://github.com/astropy/pytest-remotedata) | 0.3.1 | Pytest plugin for controlling remote data access / BSD |
| [python](http://www.python.org/) | 3.7.3 | General purpose programming language / PSF |
| [python-dateutil](https://dateutil.readthedocs.org/) | 2.8.0 | Extensions to the standard Python datetime module. / BSD 3 Clause |
| [python-libarchive-c](https://github.com/Changaco/python-libarchive-c) | 2.8 | Python interface to libarchive / CC0-1.0 |
| python.app | 2 | Proxy on OS X letting Python libraries hook into the gui event loop / BSD |
| [pytz](http://pythonhosted.org/pytz/) | 2019.1 | World timezone definitions, modern and historical. / MIT |
| [pywavelets](https://github.com/PyWavelets/pywt) | 1.0.3 | Discrete Wavelet Transforms in Python / MIT |
| [pyyaml](http://pyyaml.org/wiki/PyYAML) | 5.1.1 | YAML parser and emitter for Python / MIT |
| [pyzmq](https://github.com/zeromq/pyzmq) | 18.0.0 | Python bindings for zeromq / BSD 3-clause |
| [qt](http://qt-project.org) | 5.9.7 | Qt is a cross-platform application and UI framework. / LGPL-3.0 |
| [qtawesome](https://github.com/spyder-ide/qtawesome) | 0.5.7 | Iconic fonts in PyQt and PySide applications / MIT |
| [qtconsole](http://jupyter.org) | 4.5.1 | Jupyter Qt console / BSD 3-Clause |
| [qtpy](https://github.com/spyder-ide/qtpy) | 1.8.0 | Abstraction layer for PyQt5/PyQt4/PySide / MIT |
| [readline](https://cnswww.cns.cwru.edu/php/chet/readline/rltop.html) | 7.0 | library for editing command lines as they are typed in / GPL3 |
| [requests](http://python-requests.org) | 2.22.0 | Python HTTP for Humans / Apache 2.0 |
| [rope](https://github.com/python-rope/rope) | 0.14.0 | A python refactoring library / GPL 2.0 |
| [ruamel\_yaml](https://bitbucket.org/ruamel/yaml) | 0.15.46 | A patched copy of ruamel.yaml. / MIT |
| [scikit-image](http://scikit-image.org/) | 0.15.0 | Image processing routines for SciPy. / BSD 3-Clause |
| [scikit-learn](http://scikit-learn.org/) | 0.21.2 | A set of python modules for machine learning and data mining / BSD 3-Clause |
| [scipy](http://www.scipy.org/) | 1.3.0 | Scientific Library for Python / BSD 3-Clause |
| [seaborn](https://seaborn.pydata.org) | 0.9.0 | Statistical data visualization / BSD 3-Clause |
| [send2trash](https://github.com/hsoft/send2trash) | 1.5.0 | Python library to natively send files to Trash (or Recycle bin) on all platforms. / BSD-3-Clause |
| [setuptools](https://github.com/pypa/setuptools) | 41.0.1 | Download, build, install, upgrade, and uninstall Python packages / MIT |
| [simplegeneric](http://cheeseshop.python.org/pypi/simplegeneric) | 0.8.1 | Simple generic functions (similar to Python’s own len(), pickle.dump(), etc.) / Zope Public |
| [singledispatch](http://docs.python.org/3/library/functools.html#functools.singledispatch) | 3.4.0.3 | Transforms a function into a single-dispatch generic function / MIT |
| [sip](http://www.riverbankcomputing.com/software/sip/intro) | 4.19.8 | Create Python bindings for C and C++ libraries / GPL-3.0 |
| [six](http://pypi.python.org/pypi/six/) | 1.12.0 | Python 2 and 3 compatibility utilities / MIT |
| [snappy](https://github.com/google/snappy) | 1.1.7 | A fast compressor/decompressor / BSD 3-clause |
| [snowballstemmer](https://github.com/shibukawa/snowball_py) | 1.9.0 | Snowball stemming library collection for Python / BSD-2-Clause |
| [sortedcollections](http://www.grantjenks.com/docs/sortedcollections/) | 1.1.2 | Python Sorted Collections / Apache-2.0 |
| [sortedcontainers](http://www.grantjenks.com/docs/sortedcontainers/) | 2.1.0 | Python Sorted Container Types: SortedList, SortedDict, and SortedSet / Apache 2.0 |
| [soupsieve](http://facelessuser.github.io/soupsieve) | 1.8 | A modern CSS selector implementation for BeautifulSoup / MIT |
| [sphinx](http://www.sphinx-doc.org) | 2.1.2 | Sphinx is a tool that makes it easy to create intelligent and beautiful documentation / BSD-2-Clause |
| sphinxcontrib | 1.0 | Python namespace for sphinxcontrib / BSD |
| [sphinxcontrib-applehelp](https://www.sphinx-doc.org/en/master/) | 1.0.1 | sphinxcontrib-applehelp is a sphinx extension which outputs Apple help books / BSD-2-Clause |
| [sphinxcontrib-devhelp](https://www.sphinx-doc.org/en/master/) | 1.0.1 | sphinxcontrib-devhelp is a sphinx extension which outputs Devhelp document / BSD-2-Clause |
| [sphinxcontrib-htmlhelp](https://www.sphinx-doc.org/en/master/) | 1.0.2 | sphinxcontrib-htmlhelp is a sphinx extension which … / BSD-2-Clause |
| [sphinxcontrib-jsmath](https://www.sphinx-doc.org/en/master/) | 1.0.1 | A sphinx extension which renders display math in HTML via JavaScript / BSD-2-Clause |
| [sphinxcontrib-qthelp](https://www.sphinx-doc.org/en/master/) | 1.0.2 | sphinxcontrib-qthelp is a sphinx extension which outputs QtHelp document / BSD-2-Clause |
| [sphinxcontrib-serializinghtml](https://www.sphinx-doc.org/en/master/) | 1.1.3 | sphinxcontrib-serializinghtml is a sphinx extension which outputs “serialized” HTML files (json and pickle). / BSD-2-Clause |
| [sphinxcontrib-websupport](https://pypi.python.org/pypi/sphinxcontrib-websupport) | 1.1.2 | Sphinx API for Web Apps / BSD-2-Clause |
| [spyder](https://www.spyder-ide.org/) | 3.3.6 | The Scientific Python Development Environment / MIT |
| [spyder-kernels](https://github.com/spyder-ide/spyder-kernels) | 0.5.1 | Jupyter kernels for the Spyder console / MIT |
| [sqlalchemy](http://www.sqlalchemy.org/) | 1.3.5 | Database Abstraction Library. / MIT |
| [sqlite](http://www.sqlite.org/) | 3.29.0 | Implements a self-contained, zero-configuration, SQL database engine. / Public-Domain (`<http://www.sqlite.org/copyright.html>`) |
| [statsmodels](https://www.statsmodels.org) | 0.10.0 | Statistical computations and models for use with SciPy / BSD 3-Clause |
| [sympy](http://sympy.org) | 1.4 | Python library for symbolic mathematics / BSD-3-Clause |
| [tblib](https://github.com/ionelmc/python-tblib) | 1.4.0 | Traceback serialization library. / BSD 2-Clause |
| [terminado](https://github.com/jupyter/terminado) | 0.8.2 | Terminals served by tornado websockets / BSD 2-Clause |
| [testpath](https://testpath.readthedocs.io) | 0.4.2 | Testpath is a collection of utilities for Python code working with files and commands. / BSD-3-Clause |
| [tk](http://www.tcl.tk/) | 8.6.8 | A dynamic programming language with GUI support. Bundles Tcl and Tk. / Tcl/Tk |
| [toolz](http://toolz.readthedocs.org/) | 0.10.0 | A functional standard library for Python / BSD 3-Clause |
| [tornado](http://www.tornadoweb.org/) | 6.0.3 | A Python web framework and asynchronous networking library, originally developed at FriendFeed. / Apache 2.0 |
| [tqdm](https://pypi.python.org/pypi/tqdm) | 4.32.1 | A Fast, Extensible Progress Meter / MPLv2.0, MIT |
| [traitlets](http://ipython.org/) | 4.3.2 | Configuration system for Python applications / BSD 3-clause |
| [unicodecsv](https://github.com/jdunck/python-unicodecsv) | 0.14.1 | Drop-in replacement for csv module which supports unicode strings / BSD |
| [unixodbc](http://www.unixodbc.org/) | 2.3.7 | ODBC on non MS Windows platforms / LGPL-2.1 |
| [urllib3](https://urllib3.readthedocs.io/) | 1.24.2 | HTTP library with thread-safe connection pooling, file post, and more. / MIT |
| [wcwidth](https://github.com/jquast/wcwidth) | 0.1.7 | Measures number of Terminal column cells of wide-character codes. / MIT |
| [webencodings](https://github.com/gsnedders/python-webencodings) | 0.5.1 | Character encoding aliases for legacy web content / BSD 3-Clause |
| [werkzeug](https://palletsprojects.com/p/werkzeug/) | 0.15.4 | The comprehensive WSGI web application library. / BSD 3-Clause |
| [wheel](https://github.com/pypa/wheel) | 0.33.4 | A built-package format for Python. / MIT |
| [widgetsnbextension](http://ipython.org) | 3.5.0 | Interactive Widgets for Jupyter / BSD 3-clause |
| [wrapt](https://github.com/GrahamDumpleton/wrapt) | 1.11.2 | Module for decorators, wrappers and monkey patching / BSD 2-Clause |
| [wurlitzer](https://github.com/minrk/wurlitzer) | 1.0.2 | Capture C-level stdout/stderr in Python / MIT |
| [xlrd](http://www.python-excel.org/) | 1.2.0 | Library for developers to extract data from Microsoft Excel (tm) spreadsheet files / BSD 3-Clause and BSD with advertising |
| [xlsxwriter](https://xlsxwriter.readthedocs.io/) | 1.1.8 | A Python module for creating Excel XLSX files / BSD 2-Clause |
| [xlwings](http://xlwings.org/) | 0.15.8 | Interact with Excel from Python and vice versa / 3-clause BSD |
| [xlwt](http://www.python-excel.org/) | 1.3.0 | Writing data and formatting information to Excel files / BSD |
| [xz](http://tukaani.org/xz/) | 5.2.4 | Data compression software with high compression ratio / LGPL-2.1 and GPL-2.0 |
| [yaml](http://pyyaml.org/wiki/LibYAML) | 0.1.7 | A C library for parsing and emitting YAML. / MIT |
| [zeromq](http://zeromq.org) | 4.3.1 | A high-performance asynchronous messaging library. / LGPL 3 |
| [zict](http://github.com/mrocklin/zict) | 1.0.0 | Composable Dictionary Classes / BSD 3-Clause |
| [zipp](https://github.com/jaraco/zipp) | 0.5.1 | A pathlib-compatible Zipfile object wrapper / MIT |
| [zlib](http://zlib.net/) | 1.2.11 | Massively spiffy yet delicately unobtrusive compression library / zlib |
| [zstd](http://www.zstd.net) | 1.3.7 | Zstandard - Fast real-time compression algorithm / BSD 3-Clause |
| Name | Version | Summary / License |
|---|---|---|
| [\_ipyw\_jlab\_nb\_ext\_conf](https://github.com/ContinuumIO/anaconda-nb-extensions-meta-config) | 0.1.0 | A configuration metapackage for enabling Anaconda-bundled jupyter extensions / BSD |
| \_libgcc\_mutex | 0.1 | Mutex for libgcc and libgcc-ng / None |
| [alabaster](http://www.sphinx-doc.org/en/stable/index.html) | 0.7.12 | Configurable, Python 2+3 compatible Sphinx theme. / BSD 3-Clause |
| [anaconda-client](http://anaconda.org) | 1.7.2 | anaconda.org command line client library / BSD 3-clause |
| [anaconda-project](https://github.com/Anaconda-Platform/anaconda-project) | 0.8.3 | Tool for encapsulating, running, and reproducing data science projects / BSD 3-Clause |
| [asn1crypto](https://github.com/wbond/asn1crypto) | 0.24.0 | Python ASN.1 library with a focus on performance and a pythonic API / MIT |
| [astroid](https://www.astroid.org/) | 2.2.5 | A abstract syntax tree for Python with inference support. / LGPL 2.1 |
| [astropy](http://www.astropy.org/) | 3.0.5 | Community-developed Python Library for Astronomy / BSD |
| [atomicwrites](https://github.com/untitaker/python-atomicwrites) | 1.3.0 | Atomic file writes / MIT |
| [attrs](https://attrs.readthedocs.io/en/stable/) | 19.1.0 | attrs is the Python package that will bring back the joy of writing classes by relieving you from the drudgery of implementing object protocols (aka dunder methods). / MIT |
| [babel](http://babel.pocoo.org/) | 2.7.0 | Utilities to internationalize and localize Python applications / BSD 3-clause |
| [backcall](https://github.com/takluyver/backcall/) | 0.1.0 | Specifications for callback functions passed in to an API / BSD-3-Clause |
| [backports](https://bitbucket.org/brandon/backports) | 1.0 | None / BSD |
| [backports.os](https://github.com/pjdelport/backports.os) | 0.1.1 | Backport of new features in Python’s os module / Python Software Foundation |
| [backports.shutil\_get\_terminal\_size](https://github.com/chrippa/backports.shutil_get_terminal_size) | 1.0.0 | A backport of the get\_terminal\_size function from Python 3.3’s shutil. / MIT |
| [beautifulsoup4](http://www.crummy.com/software/BeautifulSoup/) | 4.7.1 | Python library designed for screen-scraping / MIT |
| [bitarray](https://github.com/ilanschnell/bitarray) | 0.9.3 | efficient arrays of booleans – C extension / PSF |
| [bkcharts](http://github.com/bokeh/bkcharts) | 0.2 | High level chart types built on top of Bokeh / BSD 3-Clause |
| blas | 1.0 | None / None |
| [bleach](https://github.com/mozilla/bleach) | 3.1.0 | Easy, whitelist-based HTML-sanitizing tool / Apache-2.0 |
| [blosc](https://github.com/Blosc/c-blosc) | 1.16.3 | A blocking, shuffling and loss-less compression library that can be faster than memcpy() / BSD 3-Clause |
| [bokeh](http://bokeh.pydata.org/) | 1.2.0 | Statistical and novel interactive HTML plots for Python / BSD 3-Clause |
| [boto](https://github.com/boto/boto/) | 2.49.0 | Amazon Web Services Library / MIT |
| [bottleneck](http://berkeleyanalytics.com/bottleneck) | 1.2.1 | Fast NumPy array functions written in Cython. / BSD 2-Clause |
| [bzip2](http://www.bzip.org/) | 1.0.8 | high-quality data compressor / bzip2 |
| [ca-certificates](https://github.com/conda-forge/ca-certificates-feedstock) | 2019.5.15 | Certificates for use with other packages. / ISC |
| [cairo](http://cairographics.org/) | 1.14.12 | Cairo is a 2D graphics library with support for multiple output devices. / LGPL 2.1 or MPL 1.1 |
| [certifi](http://certifi.io/) | 2019.6.16 | Python package for providing Mozilla’s CA Bundle. / ISC |
| [cffi](https://bitbucket.org/cffi/cffi) | 1.12.3 | Foreign Function Interface for Python calling C code. / MIT |
| [chardet](https://github.com/chardet/chardet) | 3.0.4 | Universal character encoding detector / LGPL2 |
| [click](https://palletsprojects.com/p/click) | 7.0 | Python composable command line interface toolkit / BSD-3-Clause |
| [cloudpickle](https://github.com/cloudpipe/cloudpickle) | 1.2.1 | Extended pickling support for Python objects / BSD 3-Clause |
| [clyent](https://github.com/Anaconda-Platform/clyent) | 1.2.2 | Command line client library for windows and posix / BSD 3-Clause |
| [colorama](https://github.com/tartley/colorama) | 0.4.1 | Cross-platform colored terminal text / BSD-3-Clause |
| [conda](https://conda.io) | 4.7.10 | OS-agnostic, system-level binary package and environment manager. / BSD 3-Clause |
| [conda-build](https://github.com/conda/conda-build) | 3.18.9 | tools for building conda packages / BSD 3-Clause |
| [conda-env](https://github.com/conda/conda-env) | 2.6.0 | Tools for interacting with conda environments. / BSD 3-Clause |
| [conda-verify](https://github.com/conda/conda-verify) | 3.4.2 | tool for validating conda recipes and conda packages / BSD 3-Clause |
| [contextlib2](http://contextlib2.readthedocs.org) | 0.5.5 | Backports and enhancements for the contextlib module / PSF |
| [cryptography](https://github.com/pyca/cryptography) | 2.7 | Provides cryptographic recipes and primitives to Python developers / Apache 2.0 or BSD 3-Clause, PSF 2 |
| [curl](http://curl.haxx.se/) | 7.65.2 | tool and library for transferring data with URL syntax / MIT/X derivate (`<http://curl.haxx.se/docs/copyright.html>`) |
| [cycler](http://matplotlib.org/cycler) | 0.10.0 | Composable style cycles. / BSD 3-Clause |
| [cython](http://www.cython.org/) | 0.29.12 | The Cython compiler for writing C extensions for the Python language / Apache-2.0 |
| [cytoolz](https://github.com/pytoolz/cytoolz) | 0.10.0 | Cython implementation of Toolz. High performance functional utilities / BSD-3-Clause |
| [dask](https://dask.org/) | 2.1.0 | Parallel PyData with Task Scheduling / BSD 3-Clause |
| [dask-core](http://github.com/dask/dask/) | 2.1.0 | Parallel Python with task scheduling / BSD 3-Clause |
| [decorator](https://github.com/micheles/decorator) | 4.4.0 | Better living through Python with decorators. / BSD 3-Clause |
| [defusedxml](https://bitbucket.org/tiran/defusedxml) | 0.6.0 | XML bomb protection for Python stdlib modules / PSF 2.0 |
| [distributed](http://distributed.readthedocs.io/en/latest/) | 2.1.0 | Distributed computing with Dask / BSD 3-Clause |
| [docutils](http://docutils.sourceforge.net/) | 0.14 | Docutils – Python Documentation Utilities / Public Domain Dedictation and BSD 2-Clause and PSF 2.1.1 and GPL 3.0 |
| [entrypoints](https://github.com/takluyver/entrypoints) | 0.3 | Discover and load entry points from installed packages. / MIT License |
| [et\_xmlfile](https://bitbucket.org/openpyxl/et_xmlfile) | 1.0.1 | An implementation of lxml.xmlfile for the standard library / MIT |
| [expat](http://expat.sourceforge.net/) | 2.2.6 | Expat XML parser library in C. / MIT |
| [fastcache](https://github.com/pbrady/fastcache) | 1.1.0 | C implementation of Python 3 lru\_cache / MIT |
| [filelock](https://github.com/benediktschmitt/py-filelock) | 3.0.12 | A platform independent file lock. / Public Domain |
| [flask](http://flask.pocoo.org) | 1.1.1 | A microframework based on Werkzeug, Jinja2 and good intentions. / BSD 3-Clause |
| [fontconfig](http://www.freedesktop.org/wiki/Software/fontconfig/) | 2.13.0 | A library for configuring and customizing font access. / MIT |
| [freetype](https://www.freetype.org/) | 2.9.1 | A Free, High-Quality, and Portable Font Engine / GPL-2.0 and FreeType |
| [get\_terminal\_size](https://github.com/chrippa/backports.shutil_get_terminal_size) | 1.0.0 | Get the size of the terminal window. / MIT |
| [gevent](http://www.gevent.org/) | 1.4.0 | Coroutine-based network library / MIT |
| [glib](https://developer.gnome.org/glib/) | 2.56.2 | Provides core application building blocks for libraries and applications written in C. / LGPL-2.1 |
| [glob2](https://github.com/miracle2k/python-glob2) | 0.7 | Version of the glob module that supports recursion via \*\*, and can capture patterns. / BSD-2-Clause |
| [gmp](http://gmplib.org/) | 6.1.2 | The GNU multiprecision library. / GPL 2 and LGPL 3 |
| [gmpy2](https://pypi.python.org/pypi/gmpy2) | 2.0.8 | GMP/MPIR, MPFR, and MPC interface to Python 2.6+ and 3.x / LGPL 3 |
| [greenlet](https://github.com/python-greenlet/greenlet) | 0.4.15 | Lightweight in-process concurrent programming / MIT |
| [h5py](http://www.h5py.org/) | 2.8.0 | Read and write HDF5 files from Python. / BSD-3-Clause |
| [hdf5](http://www.hdfgroup.org/HDF5/) | 1.10.2 | HDF5 is a data model, library, and file format for storing and managing data / HDF5 |
| [heapdict](http://stutzbachenterprises.com/) | 1.0.0 | A heap with decrease-key and increase-key operations / BSD 3-Clause |
| [html5lib](https://github.com/html5lib/html5lib-python) | 1.0.1 | HTML parser based on the WHATWG HTML specification / MIT |
| [icu](http://site.icu-project.org/) | 58.2 | International Components for Unicode. / MIT |
| [idna](https://github.com/kjd/idna) | 2.8 | Internationalized Domain Names in Applications (IDNA). / BSD Like |
| [imageio](http://imageio.github.io) | 2.5.0 | a Python library for reading and writing image data / BSD 2-Clause |
| [imagesize](https://github.com/shibukawa/imagesize_py) | 1.1.0 | Getting image size from png/jpeg/jpeg2000/gif file / MIT |
| [importlib\_metadata](http://importlib-metadata.readthedocs.io) | 0.17 | A library to access the metadata for a Python package / APACHE-2.0 |
| [ipykernel](https://ipython.org) | 5.1.1 | IPython Kernel for Jupyter / BSD-3-Clause |
| [ipython](https://ipython.org/) | 7.6.1 | IPython: Productive Interactive Computing / BSD-3-Clause |
| [ipython\_genutils](http://ipython.org) | 0.2.0 | vestigial utilities from IPython / BSD 3-Clause |
| [ipywidgets](https://github.com/ipython/ipywidgets) | 7.5.0 | Jupyter Interactive Widgets / BSD 3-clause |
| [isort](https://github.com/timothycrosley/isort) | 4.3.21 | A Python utility / library to sort Python imports. / MIT |
| [itsdangerous](https://github.com/pallets/itsdangerous) | 1.1.0 | Various helpers to pass trusted data to untrusted environments. / BSD 3-Clause |
| [jbig](https://www.cl.cam.ac.uk/~mgk25/jbigkit) | 2.1 | Implementation of the JBIG1 data compression standard / GPL-2.0 |
| [jdcal](https://github.com/phn/jdcal) | 1.4.1 | Julian dates from proleptic Gregorian and Julian calendars. / BSD 2-Clause |
| [jedi](https://github.com/davidhalter/jedi/) | 0.13.3 | An autocompletion tool for Python that can be used for text editors. / MIT |
| [jinja2](http://jinja.pocoo.org) | 2.10.1 | An easy to use stand-alone template engine written in pure python. / 3-Clause BSD |
| [jpeg](http://www.ijg.org/) | 9b | read/write jpeg COM, EXIF, IPTC medata / Custom free software license |
| [jsonschema](https://github.com/Julian/jsonschema) | 3.0.1 | An implementation of JSON Schema validation for Python / MIT |
| [jupyter](http://jupyter.org) | 1.0.0 | Jupyter metapackage. Install all the Jupyter components in one go. / BSD 3-Clause |
| [jupyter\_client](http://jupyter.org) | 5.3.1 | Jupyter protocol implementation and client libraries / BSD 3-clause |
| [jupyter\_console](http://jupyter.org) | 6.0.0 | Jupyter terminal console / BSD-3-Clause |
| [jupyter\_core](http://jupyter.org) | 4.5.0 | Core common functionality of Jupyter projects. / BSD 3-clause |
| [kiwisolver](https://github.com/nucleic/kiwi) | 1.1.0 | A fast implementation of the Cassowary constraint solver / BSD 3-Clause |
| [krb5](http://web.mit.edu/kerberos/) | 1.16.1 | A network authentication protocol. / MIT |
| [lazy-object-proxy](https://github.com/ionelmc/python-lazy-object-proxy) | 1.4.1 | A fast and thorough lazy object proxy / BSD-2-Clause |
| [libarchive](http://www.libarchive.org/) | 3.3.3 | Multi-format archive and compression library / BSD 2-Clause |
| [libcurl](http://curl.haxx.se/) | 7.65.2 | tool and library for transferring data with URL syntax / MIT/X derivate (`<http://curl.haxx.se/docs/copyright.html>`) |
| [libedit](http://thrysoee.dk/editline/) | 3.1.20181209 | Editline Library (libedit) / NetBSD |
| [libffi](https://sourceware.org/libffi/) | 3.2.1 | A Portable Foreign Function Interface Library. / Custom |
| [libgcc-ng](https://gcc.gnu.org/onlinedocs/gccint/Libgcc.html) | 8.2.0 | The GCC low-level runtime library / GPL |
| [libgfortran-ng](https://gcc.gnu.org/) | 7.3.0 | The GNU Fortran Runtime Library / GPL |
| [libopenblas](http://www.openblas.net/) | 0.2.20 | An Optimized BLAS library / BSD |
| [libpng](http://www.libpng.org/pub/png/libpng.html) | 1.6.37 | PNG reference library / zlib/libpng |
| [libsodium](http://libsodium.org) | 1.0.16 | A modern and easy-to-use crypto library. / ISC |
| [libssh2](https://www.libssh2.org/) | 1.8.2 | the SSH library / BSD-3-Clause |
| [libstdcxx-ng](https://gcc.gnu.org/) | 8.2.0 | The GNU C++ Runtime Library / GPL3 with runtime exception |
| [libtiff](http://www.libtiff.org/) | 4.0.10 | Support for the Tag Image File Format (TIFF). / HPND |
| [libuuid](http://sourceforge.net/projects/libuuid/) | 1.0.3 | Portable uuid C library. / BSD 3-Clause |
| [libxcb](http://xcb.freedesktop.org/) | 1.13 | This is the C-language Binding (XCB) package to the X Window System protocol / MIT |
| [libxml2](http://xmlsoft.org/) | 2.9.9 | The XML C parser and toolkit of Gnome / MIT |
| [libxslt](http://xmlsoft.org/XSLT/) | 1.1.33 | The XSLT C library developed for the GNOME project / MIT |
| [locket](https://github.com/mwilliamson/locket.py) | 0.2.0 | File-based locks for Python for Linux and Windows / BSD 2-Clause |
| [lxml](http://lxml.de/) | 4.3.4 | Pythonic binding for the C libraries libxml2 and libxslt. / BSD 3-Clause, GPL-2.0, ZPL-2.0, and ElementTree |
| [lz4-c](https://www.lz4.org) | 1.8.1.2 | Extremely Fast Compression algorithm / BSD 2-clause |
| [lzo](http://www.oberhumer.com/opensource/lzo/) | 2.10 | LZO is a portable lossless data compression library written in ANSI C. / GPL v2+ |
| [markupsafe](https://www.palletsprojects.com/p/markupsafe) | 1.1.1 | A Python module that implements the jinja2.Markup string / BSD-3-Clause |
| [matplotlib](http://matplotlib.org/) | 3.1.0 | Publication quality figures in Python / PSF-based |
| [mccabe](https://github.com/PyCQA/mccabe) | 0.6.1 | McCabe complexity checker for Python / MIT |
| [mistune](https://github.com/lepture/mistune) | 0.8.4 | The fastest markdown parser in pure Python. / BSD 3-Clause |
| [more-itertools](https://github.com/erikrose/more-itertools) | 7.0.0 | More routines for operating on iterables, beyond itertools / MIT |
| [mpc](http://www.multiprecision.org/) | 1.1.0 | A C library for the arithmetic of complex numbers with arbitrarily high precision. / LGPL 3 |
| [mpfr](http://www.mpfr.org/) | 4.0.1 | The MPFR library is a C library for multiple-precision floating-point computations with correct rounding. / LGPL 3 |
| [mpmath](http://mpmath.org) | 1.1.0 | Python library for arbitrary-precision floating-point arithmetic / BSD 3-Clause |
| [msgpack-python](http://msgpack.org/) | 0.6.1 | MessagePack (de)serializer. / Apache 2.0 |
| [multipledispatch](https://github.com/mrocklin/multipledispatch/) | 0.6.0 | Multiple dispatch in Python / BSD 3-Clause |
| [nbconvert](http://jupyter.org) | 5.5.0 | Converting Jupyter Notebooks / BSD-3-Clause |
| [nbformat](http://jupyter.org) | 4.4.0 | The reference implementation of the Jupyter Notebook format / BSD 3-clause |
| [ncurses](http://www.gnu.org/software/ncurses/) | 6.1 | Library for text-based user interfaces / Free software (MIT-like) |
| [networkx](https://networkx.github.io/) | 2.3 | Python package for creating and manipulating complex networks / BSD-3-Clause |
| [nltk](http://nltk.org/) | 3.4.4 | Build Python programs to work with human language data / Apache 2.0 |
| [nose](http://readthedocs.org/docs/nose/) | 1.3.7 | Nose extends unittest to make testing easier / LGPL-2.1 |
| [notebook](http://jupyter.org) | 6.0.0 | Jupyter Notebook / BSD 3-clause |
| [numexpr](https://github.com/pydata/numexpr) | 2.6.7 | Fast numerical expression evaluator for NumPy. / MIT |
| [numpy](http://numpy.scipy.org/) | 1.14.5 | Array processing for numbers, strings, records, and objects. / BSD 3-Clause |
| numpy-base | 1.14.5 | None / None |
| [numpydoc](https://github.com/numpy/numpydoc) | 0.9.1 | Numpy’s Sphinx extensions / BSD 3-Clause |
| [olefile](http://www.decalage.info/python/olefileio) | 0.46 | parse, read and write Microsoft OLE2 files / BSD 2-Clause |
| [openblas](http://www.openblas.net/) | 0.2.20 | An Optimized BLAS library / BSD |
| openblas-devel | 0.2.20 | OpenBLAS headers and libraries for developing software that used OpenBLAS. / None |
| [openpyxl](https://openpyxl.readthedocs.io) | 2.6.2 | A Python library to read/write Excel 2010 xlsx/xlsm files / MIT |
| [openssl](http://www.openssl.org/) | 1.1.1c | OpenSSL is an open-source implementation of the SSL and TLS protocols / OpenSSL |
| [packaging](https://github.com/pypa/packaging) | 19.0 | Core utilities for Python packages / Apache 2.0 or BSD 2-Clause |
| [pandas](http://pandas.pydata.org) | 0.23.4 | High-performance, easy-to-use data structures and data analysis tools. / BSD 3-clause |
| [pandoc](http://pandoc.org/) | 2.0.0.1 | Universal markup converter (repackaged binaries). / GPL-2.0 |
| [pandocfilters](https://github.com/jgm/pandocfilters) | 1.4.2 | A python module for writing pandoc filters / BSD-3-Clause |
| [parso](https://github.com/davidhalter/parso) | 0.5.0 | A Python Parser / MIT |
| [partd](https://github.com/dask/partd) | 1.0.0 | Data structure for on-disk shuffle operations / BSD 3-Clause |
| [patchelf](http://nixos.org/patchelf.html) | 0.9 | A small utility to modify the dynamic linker and RPATH of ELF executables. / GPL 3 |
| [path.py](https://github.com/jaraco/path.py) | 12.0.1 | A module wrapper for os.path / MIT |
| [pathlib2](https://github.com/mcmtroffaes/pathlib2) | 2.3.4 | Fork of pathlib aiming to support the full stdlib Python API / MIT |
| [patsy](https://github.com/pydata/patsy) | 0.5.1 | Describing statistical models in Python using symbolic formulas / BSD-2-Clause, PSF2 |
| [pcre](http://www.pcre.org/) | 8.43 | Regular expression pattern matching using the same syntax and semantics as Perl 5. / BSD 3-Clause |
| [pep8](http://pep8.readthedocs.org/) | 1.7.1 | Python style guide checker / MIT |
| [pexpect](http://pexpect.sourceforge.net/) | 4.7.0 | Pexpect makes Python a better tool for controlling other applications. / ISC |
| [pickleshare](https://github.com/pickleshare/pickleshare/) | 0.7.5 | Tiny ‘shelve’-like database with concurrency support / MIT |
| [pillow](https://pillow.readthedocs.io) | 6.1.0 | Pillow is the friendly PIL fork by Alex Clark and Contributors / PIL |
| [pip](https://pip.pypa.io/en/stable/) | 19.1.1 | PyPA recommended tool for installing Python packages / MIT |
| [pixman](http://www.pixman.org/) | 0.34.0 | A low-level software library for pixel manipulation. / MIT |
| [pkginfo](https://code.launchpad.net/~tseaver/pkginfo/trunk) | 1.5.0.1 | Query metadatdata from sdists / bdists / installed packages. / MIT |
| [pluggy](https://github.com/pytest-dev/pluggy) | 0.12.0 | Plugin registration and hook calling for Python / MIT |
| [ply](http://www.dabeaz.com/ply/index.html) | 3.11 | Python Lex-Yacc / BSD 3-clause |
| [prometheus\_client](https://github.com/prometheus/client_python) | 0.7.1 | Python client for the Prometheus monitoring system / Apache 2.0 |
| [prompt\_toolkit](https://github.com/jonathanslenders/python-prompt-toolkit) | 2.0.9 | Library for building powerful interactive command lines in Python / BSD 3-clause |
| [psutil](https://github.com/giampaolo/psutil) | 5.6.3 | A cross-platform process and system utilities module for Python / BSD 3-Clause |
| [ptyprocess](https://github.com/pexpect/ptyprocess) | 0.6.0 | Run a subprocess in a pseudo terminal / ISC |
| [py](https://github.com/pytest-dev/py) | 1.8.0 | library with cross-python path, ini-parsing, io, code, log facilities / MIT |
| [pycodestyle](https://pycodestyle.readthedocs.io/) | 2.5.0 | Python style guide checker / MIT |
| [pycosat](https://github.com/ContinuumIO/pycosat) | 0.6.3 | Bindings to picosat (a SAT solver) / MIT |
| [pycparser](https://github.com/eliben/pycparser) | 2.19 | Complete C99 parser in pure Python / BSD 3-clause |
| [pycrypto](http://www.pycrypto.org/) | 2.6.1 | Cryptographic modules for Python. / Public Domain |
| [pycurl](http://pycurl.sourceforge.net/) | 7.43.0.3 | A Python Interface To The cURL library / LGPL, MIT |
| [pyflakes](https://github.com/PyCQA/pyflakes) | 2.1.1 | Pyflakes analyzes programs and detects various errors. / MIT |
| [pygments](http://pygments.org/) | 2.4.2 | Generic syntax highlighting package / BSD 2-clause |
| [pylint](http://www.pylint.org/) | 2.3.1 | python code static checker / GPL |
| [pyodbc](https://github.com/mkleehammer/pyodbc) | 4.0.26 | DB API Module for ODBC / MIT |
| [pyopenssl](https://github.com/pyca/pyopenssl) | 19.0.0 | Python wrapper module around the OpenSSL library / Apache 2.0 |
| [pyparsing](http://pyparsing.wikispaces.com/) | 2.4.0 | Create and execute simple grammars / MIT |
| [pyrsistent](http://github.com/tobgu/pyrsistent/) | 0.14.11 | Persistent/Functional/Immutable data structures / MIT |
| [pysocks](https://github.com/Anorov/PySocks) | 1.7.0 | A Python SOCKS client module. See [Anorov/PySocks](https://github.com/Anorov/PySocks) for more information. / BSD 3-Clause |
| [pytables](http://www.pytables.org) | 3.4.4 | Brings together Python, HDF5 and NumPy to easily handle large amounts of data. / BSD 3-Clause |
| [pytest](https://docs.pytest.org/en/latest/) | 5.0.1 | Simple and powerful testing with Python. / MIT |
| [pytest-arraydiff](https://github.com/astrofrog/pytest-arraydiff) | 0.3 | pytest plugin to help with comparing array output from tests / BSD |
| [pytest-astropy](https://github.com/astropy/pytest-astropy) | 0.5.0 | Meta-package containing dependencies for testing Astropy / BSD |
| [pytest-doctestplus](https://github.com/astropy/pytest-doctestplus) | 0.3.0 | Pytest plugin with advanced doctest features / BSD |
| [pytest-openfiles](https://github.com/astropy/pytest-openfiles) | 0.3.1 | Pytest plugin for detecting inadvertent open file handles / BSD |
| [pytest-remotedata](https://github.com/astropy/pytest-remotedata) | 0.3.1 | Pytest plugin for controlling remote data access / BSD |
| [python](http://www.python.org/) | 3.7.3 | General purpose programming language / PSF |
| [python-dateutil](https://dateutil.readthedocs.org/) | 2.8.0 | Extensions to the standard Python datetime module. / BSD 3 Clause |
| [python-libarchive-c](https://github.com/Changaco/python-libarchive-c) | 2.8 | Python interface to libarchive / CC0-1.0 |
| [pytz](http://pythonhosted.org/pytz/) | 2019.1 | World timezone definitions, modern and historical. / MIT |
| [pywavelets](https://github.com/PyWavelets/pywt) | 1.0.3 | Discrete Wavelet Transforms in Python / MIT |
| [pyyaml](http://pyyaml.org/wiki/PyYAML) | 5.1.1 | YAML parser and emitter for Python / MIT |
| [pyzmq](https://github.com/zeromq/pyzmq) | 18.0.0 | Python bindings for zeromq / BSD 3-clause |
| [readline](https://cnswww.cns.cwru.edu/php/chet/readline/rltop.html) | 7.0 | library for editing command lines as they are typed in / GPL3 |
| [requests](http://python-requests.org) | 2.22.0 | Python HTTP for Humans / Apache 2.0 |
| [ruamel\_yaml](https://bitbucket.org/ruamel/yaml) | 0.15.46 | A patched copy of ruamel.yaml. / MIT |
| [scikit-image](http://scikit-image.org/) | 0.15.0 | Image processing routines for SciPy. / BSD 3-Clause |
| [scikit-learn](http://scikit-learn.org/) | 0.19.1 | A set of python modules for machine learning and data mining / BSD 3-Clause |
| [scipy](http://www.scipy.org/) | 1.1.0 | Scientific Library for Python / BSD 3-Clause |
| [seaborn](https://seaborn.pydata.org) | 0.9.0 | Statistical data visualization / BSD 3-Clause |
| [send2trash](https://github.com/hsoft/send2trash) | 1.5.0 | Python library to natively send files to Trash (or Recycle bin) on all platforms. / BSD-3-Clause |
| [setuptools](https://github.com/pypa/setuptools) | 41.0.1 | Download, build, install, upgrade, and uninstall Python packages / MIT |
| [simplegeneric](http://cheeseshop.python.org/pypi/simplegeneric) | 0.8.1 | Simple generic functions (similar to Python’s own len(), pickle.dump(), etc.) / Zope Public |
| [singledispatch](http://docs.python.org/3/library/functools.html#functools.singledispatch) | 3.4.0.3 | Transforms a function into a single-dispatch generic function / MIT |
| [six](http://pypi.python.org/pypi/six/) | 1.12.0 | Python 2 and 3 compatibility utilities / MIT |
| [snappy](https://github.com/google/snappy) | 1.1.7 | A fast compressor/decompressor / BSD 3-clause |
| [snowballstemmer](https://github.com/shibukawa/snowball_py) | 1.9.0 | Snowball stemming library collection for Python / BSD-2-Clause |
| [sortedcollections](http://www.grantjenks.com/docs/sortedcollections/) | 1.1.2 | Python Sorted Collections / Apache-2.0 |
| [sortedcontainers](http://www.grantjenks.com/docs/sortedcontainers/) | 2.1.0 | Python Sorted Container Types: SortedList, SortedDict, and SortedSet / Apache 2.0 |
| [soupsieve](http://facelessuser.github.io/soupsieve) | 1.8 | A modern CSS selector implementation for BeautifulSoup / MIT |
| [sphinx](http://www.sphinx-doc.org) | 2.1.2 | Sphinx is a tool that makes it easy to create intelligent and beautiful documentation / BSD-2-Clause |
| sphinxcontrib | 1.0 | Python namespace for sphinxcontrib / BSD |
| [sphinxcontrib-applehelp](https://www.sphinx-doc.org/en/master/) | 1.0.1 | sphinxcontrib-applehelp is a sphinx extension which outputs Apple help books / BSD-2-Clause |
| [sphinxcontrib-devhelp](https://www.sphinx-doc.org/en/master/) | 1.0.1 | sphinxcontrib-devhelp is a sphinx extension which outputs Devhelp document / BSD-2-Clause |
| [sphinxcontrib-htmlhelp](https://www.sphinx-doc.org/en/master/) | 1.0.2 | sphinxcontrib-htmlhelp is a sphinx extension which … / BSD-2-Clause |
| [sphinxcontrib-jsmath](https://www.sphinx-doc.org/en/master/) | 1.0.1 | A sphinx extension which renders display math in HTML via JavaScript / BSD-2-Clause |
| [sphinxcontrib-qthelp](https://www.sphinx-doc.org/en/master/) | 1.0.2 | sphinxcontrib-qthelp is a sphinx extension which outputs QtHelp document / BSD-2-Clause |
| [sphinxcontrib-serializinghtml](https://www.sphinx-doc.org/en/master/) | 1.1.3 | sphinxcontrib-serializinghtml is a sphinx extension which outputs “serialized” HTML files (json and pickle). / BSD-2-Clause |
| [sphinxcontrib-websupport](https://pypi.python.org/pypi/sphinxcontrib-websupport) | 1.1.2 | Sphinx API for Web Apps / BSD-2-Clause |
| [sqlalchemy](http://www.sqlalchemy.org/) | 1.3.5 | Database Abstraction Library. / MIT |
| [sqlite](http://www.sqlite.org/) | 3.29.0 | Implements a self-contained, zero-configuration, SQL database engine. / Public-Domain (`<http://www.sqlite.org/copyright.html>`) |
| [statsmodels](https://www.statsmodels.org) | 0.10.0 | Statistical computations and models for use with SciPy / BSD 3-Clause |
| [sympy](http://sympy.org) | 1.4 | Python library for symbolic mathematics / BSD-3-Clause |
| [tblib](https://github.com/ionelmc/python-tblib) | 1.4.0 | Traceback serialization library. / BSD 2-Clause |
| [terminado](https://github.com/jupyter/terminado) | 0.8.2 | Terminals served by tornado websockets / BSD 2-Clause |
| [testpath](https://testpath.readthedocs.io) | 0.4.2 | Testpath is a collection of utilities for Python code working with files and commands. / BSD-3-Clause |
| [tk](http://www.tcl.tk/) | 8.6.8 | A dynamic programming language with GUI support. Bundles Tcl and Tk. / Tcl/Tk |
| [toolz](http://toolz.readthedocs.org/) | 0.10.0 | A functional standard library for Python / BSD 3-Clause |
| [tornado](http://www.tornadoweb.org/) | 6.0.3 | A Python web framework and asynchronous networking library, originally developed at FriendFeed. / Apache 2.0 |
| [tqdm](https://pypi.python.org/pypi/tqdm) | 4.32.1 | A Fast, Extensible Progress Meter / MPLv2.0, MIT |
| [traitlets](http://ipython.org/) | 4.3.2 | Configuration system for Python applications / BSD 3-clause |
| [unicodecsv](https://github.com/jdunck/python-unicodecsv) | 0.14.1 | Drop-in replacement for csv module which supports unicode strings / BSD |
| [unixodbc](http://www.unixodbc.org/) | 2.3.7 | ODBC on non MS Windows platforms / LGPL-2.1 |
| [urllib3](https://urllib3.readthedocs.io/) | 1.24.2 | HTTP library with thread-safe connection pooling, file post, and more. / MIT |
| [wcwidth](https://github.com/jquast/wcwidth) | 0.1.7 | Measures number of Terminal column cells of wide-character codes. / MIT |
| [webencodings](https://github.com/gsnedders/python-webencodings) | 0.5.1 | Character encoding aliases for legacy web content / BSD 3-Clause |
| [werkzeug](https://palletsprojects.com/p/werkzeug/) | 0.15.4 | The comprehensive WSGI web application library. / BSD 3-Clause |
| [wheel](https://github.com/pypa/wheel) | 0.33.4 | A built-package format for Python. / MIT |
| [widgetsnbextension](http://ipython.org) | 3.5.0 | Interactive Widgets for Jupyter / BSD 3-clause |
| [wrapt](https://github.com/GrahamDumpleton/wrapt) | 1.11.2 | Module for decorators, wrappers and monkey patching / BSD 2-Clause |
| [xlrd](http://www.python-excel.org/) | 1.2.0 | Library for developers to extract data from Microsoft Excel (tm) spreadsheet files / BSD 3-Clause and BSD with advertising |
| [xlsxwriter](https://xlsxwriter.readthedocs.io/) | 1.1.8 | A Python module for creating Excel XLSX files / BSD 2-Clause |
| [xlwt](http://www.python-excel.org/) | 1.3.0 | Writing data and formatting information to Excel files / BSD |
| [xz](http://tukaani.org/xz/) | 5.2.4 | Data compression software with high compression ratio / LGPL-2.1 and GPL-2.0 |
| [yaml](http://pyyaml.org/wiki/LibYAML) | 0.1.7 | A C library for parsing and emitting YAML. / MIT |
| [zeromq](http://zeromq.org) | 4.2.5 | A high-performance asynchronous messaging library. / LGPL 3 |
| [zict](http://github.com/mrocklin/zict) | 1.0.0 | Composable Dictionary Classes / BSD 3-Clause |
| [zipp](https://github.com/jaraco/zipp) | 0.5.1 | A pathlib-compatible Zipfile object wrapper / MIT |
| [zlib](http://zlib.net/) | 1.2.11 | Massively spiffy yet delicately unobtrusive compression library / zlib |
| [zstd](http://www.zstd.net) | 1.3.7 | Zstandard - Fast real-time compression algorithm / BSD 3-Clause |
| Name | Version | Summary / License |
|---|---|---|
| [\_ipyw\_jlab\_nb\_ext\_conf](https://github.com/ContinuumIO/anaconda-nb-extensions-meta-config) | 0.1.0 | A configuration metapackage for enabling Anaconda-bundled jupyter extensions / BSD |
| \_libgcc\_mutex | 0.1 | Mutex for libgcc and libgcc-ng / None |
| [alabaster](http://www.sphinx-doc.org/en/stable/index.html) | 0.7.12 | Configurable, Python 2+3 compatible Sphinx theme. / BSD 3-Clause |
| [anaconda-client](http://anaconda.org) | 1.7.2 | anaconda.org command line client library / BSD 3-clause |
| [anaconda-project](https://github.com/Anaconda-Platform/anaconda-project) | 0.8.3 | Tool for encapsulating, running, and reproducing data science projects / BSD 3-Clause |
| [asn1crypto](https://github.com/wbond/asn1crypto) | 0.24.0 | Python ASN.1 library with a focus on performance and a pythonic API / MIT |
| [astroid](https://www.astroid.org/) | 2.2.5 | A abstract syntax tree for Python with inference support. / LGPL 2.1 |
| [astropy](http://www.astropy.org/) | 3.2.1 | Community-developed Python Library for Astronomy / BSD |
| [atomicwrites](https://github.com/untitaker/python-atomicwrites) | 1.3.0 | Atomic file writes / MIT |
| [attrs](https://attrs.readthedocs.io/en/stable/) | 19.1.0 | attrs is the Python package that will bring back the joy of writing classes by relieving you from the drudgery of implementing object protocols (aka dunder methods). / MIT |
| [babel](http://babel.pocoo.org/) | 2.7.0 | Utilities to internationalize and localize Python applications / BSD 3-clause |
| [backcall](https://github.com/takluyver/backcall/) | 0.1.0 | Specifications for callback functions passed in to an API / BSD-3-Clause |
| [backports](https://bitbucket.org/brandon/backports) | 1.0 | None / BSD |
| [backports.os](https://github.com/pjdelport/backports.os) | 0.1.1 | Backport of new features in Python’s os module / Python Software Foundation |
| [backports.shutil\_get\_terminal\_size](https://github.com/chrippa/backports.shutil_get_terminal_size) | 1.0.0 | A backport of the get\_terminal\_size function from Python 3.3’s shutil. / MIT |
| [beautifulsoup4](http://www.crummy.com/software/BeautifulSoup/) | 4.7.1 | Python library designed for screen-scraping / MIT |
| [bitarray](https://github.com/ilanschnell/bitarray) | 0.9.3 | efficient arrays of booleans – C extension / PSF |
| [bkcharts](http://github.com/bokeh/bkcharts) | 0.2 | High level chart types built on top of Bokeh / BSD 3-Clause |
| blas | 1.0 | None / None |
| [bleach](https://github.com/mozilla/bleach) | 3.1.0 | Easy, whitelist-based HTML-sanitizing tool / Apache-2.0 |
| [blosc](https://github.com/Blosc/c-blosc) | 1.16.3 | A blocking, shuffling and loss-less compression library that can be faster than memcpy() / BSD 3-Clause |
| [bokeh](http://bokeh.pydata.org/) | 1.2.0 | Statistical and novel interactive HTML plots for Python / BSD 3-Clause |
| [boto](https://github.com/boto/boto/) | 2.49.0 | Amazon Web Services Library / MIT |
| [bottleneck](http://berkeleyanalytics.com/bottleneck) | 1.2.1 | Fast NumPy array functions written in Cython. / BSD 2-Clause |
| [bzip2](http://www.bzip.org/) | 1.0.8 | high-quality data compressor / bzip2 |
| [ca-certificates](https://github.com/conda-forge/ca-certificates-feedstock) | 2019.5.15 | Certificates for use with other packages. / ISC |
| [cairo](http://cairographics.org/) | 1.14.12 | Cairo is a 2D graphics library with support for multiple output devices. / LGPL 2.1 or MPL 1.1 |
| [certifi](http://certifi.io/) | 2019.6.16 | Python package for providing Mozilla’s CA Bundle. / ISC |
| [cffi](https://bitbucket.org/cffi/cffi) | 1.12.3 | Foreign Function Interface for Python calling C code. / MIT |
| [chardet](https://github.com/chardet/chardet) | 3.0.4 | Universal character encoding detector / LGPL2 |
| [click](https://palletsprojects.com/p/click) | 7.0 | Python composable command line interface toolkit / BSD-3-Clause |
| [cloudpickle](https://github.com/cloudpipe/cloudpickle) | 1.2.1 | Extended pickling support for Python objects / BSD 3-Clause |
| [clyent](https://github.com/Anaconda-Platform/clyent) | 1.2.2 | Command line client library for windows and posix / BSD 3-Clause |
| [colorama](https://github.com/tartley/colorama) | 0.4.1 | Cross-platform colored terminal text / BSD-3-Clause |
| [conda](https://conda.io) | 4.7.10 | OS-agnostic, system-level binary package and environment manager. / BSD 3-Clause |
| [conda-build](https://github.com/conda/conda-build) | 3.18.9 | tools for building conda packages / BSD 3-Clause |
| [conda-env](https://github.com/conda/conda-env) | 2.6.0 | Tools for interacting with conda environments. / BSD 3-Clause |
| [conda-verify](https://github.com/conda/conda-verify) | 3.4.2 | tool for validating conda recipes and conda packages / BSD 3-Clause |
| [contextlib2](http://contextlib2.readthedocs.org) | 0.5.5 | Backports and enhancements for the contextlib module / PSF |
| [cryptography](https://github.com/pyca/cryptography) | 2.7 | Provides cryptographic recipes and primitives to Python developers / Apache 2.0 or BSD 3-Clause, PSF 2 |
| [curl](http://curl.haxx.se/) | 7.65.2 | tool and library for transferring data with URL syntax / MIT/X derivate (`<http://curl.haxx.se/docs/copyright.html>`) |
| [cycler](http://matplotlib.org/cycler) | 0.10.0 | Composable style cycles. / BSD 3-Clause |
| [cython](http://www.cython.org/) | 0.29.12 | The Cython compiler for writing C extensions for the Python language / Apache-2.0 |
| [cytoolz](https://github.com/pytoolz/cytoolz) | 0.10.0 | Cython implementation of Toolz. High performance functional utilities / BSD-3-Clause |
| [dask](https://dask.org/) | 2.1.0 | Parallel PyData with Task Scheduling / BSD 3-Clause |
| [dask-core](http://github.com/dask/dask/) | 2.1.0 | Parallel Python with task scheduling / BSD 3-Clause |
| [dbus](http://www.freedesktop.org/wiki/Software/dbus/) | 1.13.6 | Simple message bus system for applications to talk to one another / GPL2 |
| [decorator](https://github.com/micheles/decorator) | 4.4.0 | Better living through Python with decorators. / BSD 3-Clause |
| [defusedxml](https://bitbucket.org/tiran/defusedxml) | 0.6.0 | XML bomb protection for Python stdlib modules / PSF 2.0 |
| [distributed](http://distributed.readthedocs.io/en/latest/) | 2.1.0 | Distributed computing with Dask / BSD 3-Clause |
| [docutils](http://docutils.sourceforge.net/) | 0.14 | Docutils – Python Documentation Utilities / Public Domain Dedictation and BSD 2-Clause and PSF 2.1.1 and GPL 3.0 |
| [entrypoints](https://github.com/takluyver/entrypoints) | 0.3 | Discover and load entry points from installed packages. / MIT License |
| [et\_xmlfile](https://bitbucket.org/openpyxl/et_xmlfile) | 1.0.1 | An implementation of lxml.xmlfile for the standard library / MIT |
| [expat](http://expat.sourceforge.net/) | 2.2.6 | Expat XML parser library in C. / MIT |
| [fastcache](https://github.com/pbrady/fastcache) | 1.1.0 | C implementation of Python 3 lru\_cache / MIT |
| [filelock](https://github.com/benediktschmitt/py-filelock) | 3.0.12 | A platform independent file lock. / Public Domain |
| [flask](http://flask.pocoo.org) | 1.1.1 | A microframework based on Werkzeug, Jinja2 and good intentions. / BSD 3-Clause |
| [fontconfig](http://www.freedesktop.org/wiki/Software/fontconfig/) | 2.13.0 | A library for configuring and customizing font access. / MIT |
| [freetype](https://www.freetype.org/) | 2.9.1 | A Free, High-Quality, and Portable Font Engine / GPL-2.0 and FreeType |
| [fribidi](https://github.com/fribidi/fribidi) | 1.0.5 | The Free Implementation of the Unicode Bidirectional Algorithm. / LGPL-2.1 |
| [get\_terminal\_size](https://github.com/chrippa/backports.shutil_get_terminal_size) | 1.0.0 | Get the size of the terminal window. / MIT |
| [gevent](http://www.gevent.org/) | 1.4.0 | Coroutine-based network library / MIT |
| [glib](https://developer.gnome.org/glib/) | 2.56.2 | Provides core application building blocks for libraries and applications written in C. / LGPL-2.1 |
| [glob2](https://github.com/miracle2k/python-glob2) | 0.7 | Version of the glob module that supports recursion via \*\*, and can capture patterns. / BSD-2-Clause |
| [gmp](http://gmplib.org/) | 6.1.2 | The GNU multiprecision library. / GPL 2 and LGPL 3 |
| [gmpy2](https://pypi.python.org/pypi/gmpy2) | 2.0.8 | GMP/MPIR, MPFR, and MPC interface to Python 2.6+ and 3.x / LGPL 3 |
| [graphite2](http://graphite.sil.org/) | 1.3.13 | A “smart font” system that handles the complexities of lesser-known languages of the world. / LGPLv2 |
| [greenlet](https://github.com/python-greenlet/greenlet) | 0.4.15 | Lightweight in-process concurrent programming / MIT |
| [gst-plugins-base](http://gstreamer.freedesktop.org/) | 1.14.0 | GStreamer Base Plug-ins / GPL2 |
| [gstreamer](http://gstreamer.freedesktop.org/) | 1.14.0 | Library for constructing graphs of media-handling components / LGPL 2 |
| [h5py](http://www.h5py.org/) | 2.9.0 | Read and write HDF5 files from Python. / BSD-3-Clause |
| [harfbuzz](http://www.freedesktop.org/wiki/Software/HarfBuzz/) | 1.8.8 | An OpenType text shaping engine. / MIT |
| [hdf5](http://www.hdfgroup.org/HDF5/) | 1.10.4 | HDF5 is a data model, library, and file format for storing and managing data / HDF5 |
| [heapdict](http://stutzbachenterprises.com/) | 1.0.0 | A heap with decrease-key and increase-key operations / BSD 3-Clause |
| [html5lib](https://github.com/html5lib/html5lib-python) | 1.0.1 | HTML parser based on the WHATWG HTML specification / MIT |
| [icu](http://site.icu-project.org/) | 58.2 | International Components for Unicode. / MIT |
| [idna](https://github.com/kjd/idna) | 2.8 | Internationalized Domain Names in Applications (IDNA). / BSD Like |
| [imageio](http://imageio.github.io) | 2.5.0 | a Python library for reading and writing image data / BSD 2-Clause |
| [imagesize](https://github.com/shibukawa/imagesize_py) | 1.1.0 | Getting image size from png/jpeg/jpeg2000/gif file / MIT |
| [importlib\_metadata](http://importlib-metadata.readthedocs.io) | 0.17 | A library to access the metadata for a Python package / APACHE-2.0 |
| [intel-openmp](https://software.intel.com/en-us/node/522690) | 2019.4 | Math library for Intel and compatible processors / proprietary - Intel |
| [ipykernel](https://ipython.org) | 5.1.1 | IPython Kernel for Jupyter / BSD-3-Clause |
| [ipython](https://ipython.org/) | 7.6.1 | IPython: Productive Interactive Computing / BSD-3-Clause |
| [ipython\_genutils](http://ipython.org) | 0.2.0 | vestigial utilities from IPython / BSD 3-Clause |
| [ipywidgets](https://github.com/ipython/ipywidgets) | 7.5.0 | Jupyter Interactive Widgets / BSD 3-clause |
| [isort](https://github.com/timothycrosley/isort) | 4.3.21 | A Python utility / library to sort Python imports. / MIT |
| [itsdangerous](https://github.com/pallets/itsdangerous) | 1.1.0 | Various helpers to pass trusted data to untrusted environments. / BSD 3-Clause |
| [jbig](https://www.cl.cam.ac.uk/~mgk25/jbigkit) | 2.1 | Implementation of the JBIG1 data compression standard / GPL-2.0 |
| [jdcal](https://github.com/phn/jdcal) | 1.4.1 | Julian dates from proleptic Gregorian and Julian calendars. / BSD 2-Clause |
| [jedi](https://github.com/davidhalter/jedi/) | 0.13.3 | An autocompletion tool for Python that can be used for text editors. / MIT |
| [jeepney](https://gitlab.com/takluyver/jeepney) | 0.4 | Pure Python DBus interface / MIT |
| [jinja2](http://jinja.pocoo.org) | 2.10.1 | An easy to use stand-alone template engine written in pure python. / 3-Clause BSD |
| [joblib](http://packages.python.org/joblib/) | 0.13.2 | Python function as pipeline jobs. / BSD 3-Clause |
| [jpeg](http://www.ijg.org/) | 9b | read/write jpeg COM, EXIF, IPTC medata / Custom free software license |
| [json5](https://github.com/dpranke/pyjson5) | 0.8.4 | A Python implementation of the JSON5 data format / Apache-2.0 |
| [jsonschema](https://github.com/Julian/jsonschema) | 3.0.1 | An implementation of JSON Schema validation for Python / MIT |
| [jupyter](http://jupyter.org) | 1.0.0 | Jupyter metapackage. Install all the Jupyter components in one go. / BSD 3-Clause |
| [jupyter\_client](http://jupyter.org) | 5.3.1 | Jupyter protocol implementation and client libraries / BSD 3-clause |
| [jupyter\_console](http://jupyter.org) | 6.0.0 | Jupyter terminal console / BSD-3-Clause |
| [jupyter\_core](http://jupyter.org) | 4.5.0 | Core common functionality of Jupyter projects. / BSD 3-clause |
| [jupyterlab](https://github.com/jupyterlab/jupyterlab) | 1.0.2 | JupyterLab / BSD-3-Clause |
| [jupyterlab\_server](http://github.com/jupyterlab/jupyterlab_server) | 1.0.0 | A set of server components for JupyterLab and JupyterLab like applications. / BSD 3-Clause |
| [keyring](https://github.com/jaraco/keyring) | 18.0.0 | Store and access your passwords safely / Python Software Foundation or MIT |
| [kiwisolver](https://github.com/nucleic/kiwi) | 1.1.0 | A fast implementation of the Cassowary constraint solver / BSD 3-Clause |
| [krb5](http://web.mit.edu/kerberos/) | 1.16.1 | A network authentication protocol. / MIT |
| [lazy-object-proxy](https://github.com/ionelmc/python-lazy-object-proxy) | 1.4.1 | A fast and thorough lazy object proxy / BSD-2-Clause |
| [libarchive](http://www.libarchive.org/) | 3.3.3 | Multi-format archive and compression library / BSD 2-Clause |
| [libcurl](http://curl.haxx.se/) | 7.65.2 | tool and library for transferring data with URL syntax / MIT/X derivate (`<http://curl.haxx.se/docs/copyright.html>`) |
| [libedit](http://thrysoee.dk/editline/) | 3.1.20181209 | Editline Library (libedit) / NetBSD |
| [libffi](https://sourceware.org/libffi/) | 3.2.1 | A Portable Foreign Function Interface Library. / Custom |
| [libgcc-ng](https://gcc.gnu.org/onlinedocs/gccint/Libgcc.html) | 9.1.0 | The GCC low-level runtime library / GPL |
| [libgfortran-ng](https://gcc.gnu.org/) | 7.3.0 | The GNU Fortran Runtime Library / GPL |
| [liblief](https://lief.quarkslab.com/) | 0.9.0 | A cross platform library to parse, modify and abstract ELF, PE and MachO formats. / Apache 2.0 |
| [libpng](http://www.libpng.org/pub/png/libpng.html) | 1.6.37 | PNG reference library / zlib/libpng |
| [libsodium](http://libsodium.org) | 1.0.16 | A modern and easy-to-use crypto library. / ISC |
| [libssh2](https://www.libssh2.org/) | 1.8.2 | the SSH library / BSD-3-Clause |
| [libstdcxx-ng](https://gcc.gnu.org/) | 9.1.0 | The GNU C++ Runtime Library / GPL3 with runtime exception |
| [libtiff](http://www.libtiff.org/) | 4.0.10 | Support for the Tag Image File Format (TIFF). / HPND |
| [libtool](http://www.gnu.org/software/libtool/) | 2.4.6 | The GNU Portable Library Tool / GPL 3 |
| [libuuid](http://sourceforge.net/projects/libuuid/) | 1.0.3 | Portable uuid C library. / BSD 3-Clause |
| [libxcb](http://xcb.freedesktop.org/) | 1.13 | This is the C-language Binding (XCB) package to the X Window System protocol / MIT |
| [libxml2](http://xmlsoft.org/) | 2.9.9 | The XML C parser and toolkit of Gnome / MIT |
| [libxslt](http://xmlsoft.org/XSLT/) | 1.1.33 | The XSLT C library developed for the GNOME project / MIT |
| [llvmlite](https://github.com/numba/llvmlite) | 0.29.0 | A lightweight LLVM python binding for writing JIT compilers / New BSD License |
| [locket](https://github.com/mwilliamson/locket.py) | 0.2.0 | File-based locks for Python for Linux and Windows / BSD 2-Clause |
| [lxml](http://lxml.de/) | 4.3.4 | Pythonic binding for the C libraries libxml2 and libxslt. / BSD 3-Clause, GPL-2.0, ZPL-2.0, and ElementTree |
| [lz4-c](https://www.lz4.org) | 1.8.1.2 | Extremely Fast Compression algorithm / BSD 2-clause |
| [lzo](http://www.oberhumer.com/opensource/lzo/) | 2.10 | LZO is a portable lossless data compression library written in ANSI C. / GPL v2+ |
| [markupsafe](https://www.palletsprojects.com/p/markupsafe) | 1.1.1 | A Python module that implements the jinja2.Markup string / BSD-3-Clause |
| [matplotlib](http://matplotlib.org/) | 3.1.0 | Publication quality figures in Python / PSF-based |
| [mccabe](https://github.com/PyCQA/mccabe) | 0.6.1 | McCabe complexity checker for Python / MIT |
| [mistune](https://github.com/lepture/mistune) | 0.8.4 | The fastest markdown parser in pure Python. / BSD 3-Clause |
| [mkl](https://software.intel.com/en-us/mkl) | 2019.4 | Math library for Intel and compatible processors / proprietary - Intel |
| [mkl-service](http://github.com/IntelPython/mkl-service) | 2.0.2 | Python hooks for Intel(R) Math Kernel Library runtime control settings. / BSD-3-Clause |
| [mkl\_fft](http://github.com/IntelPython/mkl_fft) | 1.0.12 | NumPy-based implementation of Fast Fourier Transform using Intel (R) Math Kernel Library. / BSD 3-Clause |
| [mkl\_random](http://github.com/IntelPython/mkl_random) | 1.0.2 | Intel (R) MKL-powered package for sampling from common probability distributions into NumPy arrays. / BSD 3-Clause |
| [mock](https://github.com/testing-cabal/mock) | 3.0.5 | A library for testing in Python / BSD-2-Clause |
| [more-itertools](https://github.com/erikrose/more-itertools) | 7.0.0 | More routines for operating on iterables, beyond itertools / MIT |
| [mpc](http://www.multiprecision.org/) | 1.1.0 | A C library for the arithmetic of complex numbers with arbitrarily high precision. / LGPL 3 |
| [mpfr](http://www.mpfr.org/) | 4.0.1 | The MPFR library is a C library for multiple-precision floating-point computations with correct rounding. / LGPL 3 |
| [mpmath](http://mpmath.org) | 1.1.0 | Python library for arbitrary-precision floating-point arithmetic / BSD 3-Clause |
| [msgpack-python](http://msgpack.org/) | 0.6.1 | MessagePack (de)serializer. / Apache 2.0 |
| [multipledispatch](https://github.com/mrocklin/multipledispatch/) | 0.6.0 | Multiple dispatch in Python / BSD 3-Clause |
| [nbconvert](http://jupyter.org) | 5.5.0 | Converting Jupyter Notebooks / BSD-3-Clause |
| [nbformat](http://jupyter.org) | 4.4.0 | The reference implementation of the Jupyter Notebook format / BSD 3-clause |
| [ncurses](http://www.gnu.org/software/ncurses/) | 6.1 | Library for text-based user interfaces / Free software (MIT-like) |
| [networkx](https://networkx.github.io/) | 2.3 | Python package for creating and manipulating complex networks / BSD-3-Clause |
| [nltk](http://nltk.org/) | 3.4.4 | Build Python programs to work with human language data / Apache 2.0 |
| [nose](http://readthedocs.org/docs/nose/) | 1.3.7 | Nose extends unittest to make testing easier / LGPL-2.1 |
| [notebook](http://jupyter.org) | 6.0.0 | Jupyter Notebook / BSD 3-clause |
| [numba](http://numba.github.com) | 0.44.1 | NumPy aware dynamic Python compiler using LLVM / BSD 2-clause |
| [numexpr](https://github.com/pydata/numexpr) | 2.6.9 | Fast numerical expression evaluator for NumPy. / MIT |
| [numpy](http://numpy.scipy.org/) | 1.16.4 | Array processing for numbers, strings, records, and objects. / BSD 3-Clause |
| numpy-base | 1.16.4 | None / None |
| [numpydoc](https://github.com/numpy/numpydoc) | 0.9.1 | Numpy’s Sphinx extensions / BSD 3-Clause |
| [olefile](http://www.decalage.info/python/olefileio) | 0.46 | parse, read and write Microsoft OLE2 files / BSD 2-Clause |
| [openpyxl](https://openpyxl.readthedocs.io) | 2.6.2 | A Python library to read/write Excel 2010 xlsx/xlsm files / MIT |
| [openssl](http://www.openssl.org/) | 1.1.1c | OpenSSL is an open-source implementation of the SSL and TLS protocols / OpenSSL |
| [packaging](https://github.com/pypa/packaging) | 19.0 | Core utilities for Python packages / Apache 2.0 or BSD 2-Clause |
| [pandas](http://pandas.pydata.org) | 0.24.2 | High-performance, easy-to-use data structures and data analysis tools. / BSD 3-clause |
| [pandoc](http://pandoc.org/) | 2.2.3.2 | Universal markup converter (repackaged binaries). / GPL-2.0 |
| [pandocfilters](https://github.com/jgm/pandocfilters) | 1.4.2 | A python module for writing pandoc filters / BSD-3-Clause |
| [pango](http://www.pango.org/) | 1.42.4 | Text layout and rendering engine. / LGPL-2.1 |
| [parso](https://github.com/davidhalter/parso) | 0.5.0 | A Python Parser / MIT |
| [partd](https://github.com/dask/partd) | 1.0.0 | Data structure for on-disk shuffle operations / BSD 3-Clause |
| [patchelf](http://nixos.org/patchelf.html) | 0.9 | A small utility to modify the dynamic linker and RPATH of ELF executables. / GPL 3 |
| [path.py](https://github.com/jaraco/path.py) | 12.0.1 | A module wrapper for os.path / MIT |
| [pathlib2](https://github.com/mcmtroffaes/pathlib2) | 2.3.4 | Fork of pathlib aiming to support the full stdlib Python API / MIT |
| [patsy](https://github.com/pydata/patsy) | 0.5.1 | Describing statistical models in Python using symbolic formulas / BSD-2-Clause, PSF2 |
| [pcre](http://www.pcre.org/) | 8.43 | Regular expression pattern matching using the same syntax and semantics as Perl 5. / BSD 3-Clause |
| [pep8](http://pep8.readthedocs.org/) | 1.7.1 | Python style guide checker / MIT |
| [pexpect](http://pexpect.sourceforge.net/) | 4.7.0 | Pexpect makes Python a better tool for controlling other applications. / ISC |
| [pickleshare](https://github.com/pickleshare/pickleshare/) | 0.7.5 | Tiny ‘shelve’-like database with concurrency support / MIT |
| [pillow](https://pillow.readthedocs.io) | 6.1.0 | Pillow is the friendly PIL fork by Alex Clark and Contributors / PIL |
| [pip](https://pip.pypa.io/en/stable/) | 19.1.1 | PyPA recommended tool for installing Python packages / MIT |
| [pixman](http://www.pixman.org/) | 0.38.0 | A low-level software library for pixel manipulation. / MIT |
| [pkginfo](https://code.launchpad.net/~tseaver/pkginfo/trunk) | 1.5.0.1 | Query metadatdata from sdists / bdists / installed packages. / MIT |
| [pluggy](https://github.com/pytest-dev/pluggy) | 0.12.0 | Plugin registration and hook calling for Python / MIT |
| [ply](http://www.dabeaz.com/ply/index.html) | 3.11 | Python Lex-Yacc / BSD 3-clause |
| [prometheus\_client](https://github.com/prometheus/client_python) | 0.7.1 | Python client for the Prometheus monitoring system / Apache 2.0 |
| [prompt\_toolkit](https://github.com/jonathanslenders/python-prompt-toolkit) | 2.0.9 | Library for building powerful interactive command lines in Python / BSD 3-clause |
| [psutil](https://github.com/giampaolo/psutil) | 5.6.3 | A cross-platform process and system utilities module for Python / BSD 3-Clause |
| [ptyprocess](https://github.com/pexpect/ptyprocess) | 0.6.0 | Run a subprocess in a pseudo terminal / ISC |
| [py](https://github.com/pytest-dev/py) | 1.8.0 | library with cross-python path, ini-parsing, io, code, log facilities / MIT |
| [py-lief](https://lief.quarkslab.com/) | 0.9.0 | A cross platform library to parse, modify and abstract ELF, PE and MachO formats. / Apache 2.0 |
| [pycodestyle](https://pycodestyle.readthedocs.io/) | 2.5.0 | Python style guide checker / MIT |
| [pycosat](https://github.com/ContinuumIO/pycosat) | 0.6.3 | Bindings to picosat (a SAT solver) / MIT |
| [pycparser](https://github.com/eliben/pycparser) | 2.19 | Complete C99 parser in pure Python / BSD 3-clause |
| [pycrypto](http://www.pycrypto.org/) | 2.6.1 | Cryptographic modules for Python. / Public Domain |
| [pycurl](http://pycurl.sourceforge.net/) | 7.43.0.3 | A Python Interface To The cURL library / LGPL, MIT |
| [pyflakes](https://github.com/PyCQA/pyflakes) | 2.1.1 | Pyflakes analyzes programs and detects various errors. / MIT |
| [pygments](http://pygments.org/) | 2.4.2 | Generic syntax highlighting package / BSD 2-clause |
| [pylint](http://www.pylint.org/) | 2.3.1 | python code static checker / GPL |
| [pyodbc](https://github.com/mkleehammer/pyodbc) | 4.0.26 | DB API Module for ODBC / MIT |
| [pyopenssl](https://github.com/pyca/pyopenssl) | 19.0.0 | Python wrapper module around the OpenSSL library / Apache 2.0 |
| [pyparsing](http://pyparsing.wikispaces.com/) | 2.4.0 | Create and execute simple grammars / MIT |
| [pyqt](http://www.riverbankcomputing.co.uk/software/pyqt) | 5.9.2 | Python binding of the cross-platform GUI toolkit Qt. / Commercial, GPL-2.0, GPL-3.0 |
| [pyrsistent](http://github.com/tobgu/pyrsistent/) | 0.14.11 | Persistent/Functional/Immutable data structures / MIT |
| [pysocks](https://github.com/Anorov/PySocks) | 1.7.0 | A Python SOCKS client module. See [Anorov/PySocks](https://github.com/Anorov/PySocks) for more information. / BSD 3-Clause |
| [pytables](http://www.pytables.org) | 3.5.2 | Brings together Python, HDF5 and NumPy to easily handle large amounts of data. / BSD 3-Clause |
| [pytest](https://docs.pytest.org/en/latest/) | 5.0.1 | Simple and powerful testing with Python. / MIT |
| [pytest-arraydiff](https://github.com/astrofrog/pytest-arraydiff) | 0.3 | pytest plugin to help with comparing array output from tests / BSD |
| [pytest-astropy](https://github.com/astropy/pytest-astropy) | 0.5.0 | Meta-package containing dependencies for testing Astropy / BSD |
| [pytest-doctestplus](https://github.com/astropy/pytest-doctestplus) | 0.3.0 | Pytest plugin with advanced doctest features / BSD |
| [pytest-openfiles](https://github.com/astropy/pytest-openfiles) | 0.3.2 | Pytest plugin for detecting inadvertent open file handles / BSD |
| [pytest-remotedata](https://github.com/astropy/pytest-remotedata) | 0.3.1 | Pytest plugin for controlling remote data access / BSD |
| [python](http://www.python.org/) | 3.7.3 | General purpose programming language / PSF |
| [python-dateutil](https://dateutil.readthedocs.org/) | 2.8.0 | Extensions to the standard Python datetime module. / BSD 3 Clause |
| [python-libarchive-c](https://github.com/Changaco/python-libarchive-c) | 2.8 | Python interface to libarchive / CC0-1.0 |
| [pytz](http://pythonhosted.org/pytz/) | 2019.1 | World timezone definitions, modern and historical. / MIT |
| [pywavelets](https://github.com/PyWavelets/pywt) | 1.0.3 | Discrete Wavelet Transforms in Python / MIT |
| [pyyaml](http://pyyaml.org/wiki/PyYAML) | 5.1.1 | YAML parser and emitter for Python / MIT |
| [pyzmq](https://github.com/zeromq/pyzmq) | 18.0.0 | Python bindings for zeromq / BSD 3-clause |
| [qt](http://qt-project.org) | 5.9.7 | Qt is a cross-platform application and UI framework. / LGPL-3.0 |
| [qtawesome](https://github.com/spyder-ide/qtawesome) | 0.5.7 | Iconic fonts in PyQt and PySide applications / MIT |
| [qtconsole](http://jupyter.org) | 4.5.1 | Jupyter Qt console / BSD 3-Clause |
| [qtpy](https://github.com/spyder-ide/qtpy) | 1.8.0 | Abstraction layer for PyQt5/PyQt4/PySide / MIT |
| [readline](https://cnswww.cns.cwru.edu/php/chet/readline/rltop.html) | 7.0 | library for editing command lines as they are typed in / GPL3 |
| [requests](http://python-requests.org) | 2.22.0 | Python HTTP for Humans / Apache 2.0 |
| [rope](https://github.com/python-rope/rope) | 0.14.0 | A python refactoring library / GPL 2.0 |
| [ruamel\_yaml](https://bitbucket.org/ruamel/yaml) | 0.15.46 | A patched copy of ruamel.yaml. / MIT |
| [scikit-image](http://scikit-image.org/) | 0.15.0 | Image processing routines for SciPy. / BSD 3-Clause |
| [scikit-learn](http://scikit-learn.org/) | 0.21.2 | A set of python modules for machine learning and data mining / BSD 3-Clause |
| [scipy](http://www.scipy.org/) | 1.3.0 | Scientific Library for Python / BSD 3-Clause |
| [seaborn](https://seaborn.pydata.org) | 0.9.0 | Statistical data visualization / BSD 3-Clause |
| [secretstorage](https://github.com/mitya57/secretstorage) | 3.1.1 | Provides a way for securely storing passwords and other secrets. / BSD-3-Clause |
| [send2trash](https://github.com/hsoft/send2trash) | 1.5.0 | Python library to natively send files to Trash (or Recycle bin) on all platforms. / BSD-3-Clause |
| [setuptools](https://github.com/pypa/setuptools) | 41.0.1 | Download, build, install, upgrade, and uninstall Python packages / MIT |
| [simplegeneric](http://cheeseshop.python.org/pypi/simplegeneric) | 0.8.1 | Simple generic functions (similar to Python’s own len(), pickle.dump(), etc.) / Zope Public |
| [singledispatch](http://docs.python.org/3/library/functools.html#functools.singledispatch) | 3.4.0.3 | Transforms a function into a single-dispatch generic function / MIT |
| [sip](http://www.riverbankcomputing.com/software/sip/intro) | 4.19.8 | Create Python bindings for C and C++ libraries / GPL-3.0 |
| [six](http://pypi.python.org/pypi/six/) | 1.12.0 | Python 2 and 3 compatibility utilities / MIT |
| [snappy](https://github.com/google/snappy) | 1.1.7 | A fast compressor/decompressor / BSD 3-clause |
| [snowballstemmer](https://github.com/shibukawa/snowball_py) | 1.9.0 | Snowball stemming library collection for Python / BSD-2-Clause |
| [sortedcollections](http://www.grantjenks.com/docs/sortedcollections/) | 1.1.2 | Python Sorted Collections / Apache-2.0 |
| [sortedcontainers](http://www.grantjenks.com/docs/sortedcontainers/) | 2.1.0 | Python Sorted Container Types: SortedList, SortedDict, and SortedSet / Apache 2.0 |
| [soupsieve](http://facelessuser.github.io/soupsieve) | 1.8 | A modern CSS selector implementation for BeautifulSoup / MIT |
| [sphinx](http://www.sphinx-doc.org) | 2.1.2 | Sphinx is a tool that makes it easy to create intelligent and beautiful documentation / BSD-2-Clause |
| sphinxcontrib | 1.0 | Python namespace for sphinxcontrib / BSD |
| [sphinxcontrib-applehelp](https://www.sphinx-doc.org/en/master/) | 1.0.1 | sphinxcontrib-applehelp is a sphinx extension which outputs Apple help books / BSD-2-Clause |
| [sphinxcontrib-devhelp](https://www.sphinx-doc.org/en/master/) | 1.0.1 | sphinxcontrib-devhelp is a sphinx extension which outputs Devhelp document / BSD-2-Clause |
| [sphinxcontrib-htmlhelp](https://www.sphinx-doc.org/en/master/) | 1.0.2 | sphinxcontrib-htmlhelp is a sphinx extension which … / BSD-2-Clause |
| [sphinxcontrib-jsmath](https://www.sphinx-doc.org/en/master/) | 1.0.1 | A sphinx extension which renders display math in HTML via JavaScript / BSD-2-Clause |
| [sphinxcontrib-qthelp](https://www.sphinx-doc.org/en/master/) | 1.0.2 | sphinxcontrib-qthelp is a sphinx extension which outputs QtHelp document / BSD-2-Clause |
| [sphinxcontrib-serializinghtml](https://www.sphinx-doc.org/en/master/) | 1.1.3 | sphinxcontrib-serializinghtml is a sphinx extension which outputs “serialized” HTML files (json and pickle). / BSD-2-Clause |
| [sphinxcontrib-websupport](https://pypi.python.org/pypi/sphinxcontrib-websupport) | 1.1.2 | Sphinx API for Web Apps / BSD-2-Clause |
| [spyder](https://www.spyder-ide.org/) | 3.3.6 | The Scientific Python Development Environment / MIT |
| [spyder-kernels](https://github.com/spyder-ide/spyder-kernels) | 0.5.1 | Jupyter kernels for the Spyder console / MIT |
| [sqlalchemy](http://www.sqlalchemy.org/) | 1.3.5 | Database Abstraction Library. / MIT |
| [sqlite](http://www.sqlite.org/) | 3.29.0 | Implements a self-contained, zero-configuration, SQL database engine. / Public-Domain (`<http://www.sqlite.org/copyright.html>`) |
| [statsmodels](https://www.statsmodels.org) | 0.10.0 | Statistical computations and models for use with SciPy / BSD 3-Clause |
| [sympy](http://sympy.org) | 1.4 | Python library for symbolic mathematics / BSD-3-Clause |
| [tblib](https://github.com/ionelmc/python-tblib) | 1.4.0 | Traceback serialization library. / BSD 2-Clause |
| [terminado](https://github.com/jupyter/terminado) | 0.8.2 | Terminals served by tornado websockets / BSD 2-Clause |
| [testpath](https://testpath.readthedocs.io) | 0.4.2 | Testpath is a collection of utilities for Python code working with files and commands. / BSD-3-Clause |
| [tk](http://www.tcl.tk/) | 8.6.8 | A dynamic programming language with GUI support. Bundles Tcl and Tk. / Tcl/Tk |
| [toolz](http://toolz.readthedocs.org/) | 0.10.0 | A functional standard library for Python / BSD 3-Clause |
| [tornado](http://www.tornadoweb.org/) | 6.0.3 | A Python web framework and asynchronous networking library, originally developed at FriendFeed. / Apache 2.0 |
| [tqdm](https://pypi.python.org/pypi/tqdm) | 4.32.1 | A Fast, Extensible Progress Meter / MPLv2.0, MIT |
| [traitlets](http://ipython.org/) | 4.3.2 | Configuration system for Python applications / BSD 3-clause |
| [unicodecsv](https://github.com/jdunck/python-unicodecsv) | 0.14.1 | Drop-in replacement for csv module which supports unicode strings / BSD |
| [unixodbc](http://www.unixodbc.org/) | 2.3.7 | ODBC on non MS Windows platforms / LGPL-2.1 |
| [urllib3](https://urllib3.readthedocs.io/) | 1.24.2 | HTTP library with thread-safe connection pooling, file post, and more. / MIT |
| [wcwidth](https://github.com/jquast/wcwidth) | 0.1.7 | Measures number of Terminal column cells of wide-character codes. / MIT |
| [webencodings](https://github.com/gsnedders/python-webencodings) | 0.5.1 | Character encoding aliases for legacy web content / BSD 3-Clause |
| [werkzeug](https://palletsprojects.com/p/werkzeug/) | 0.15.4 | The comprehensive WSGI web application library. / BSD 3-Clause |
| [wheel](https://github.com/pypa/wheel) | 0.33.4 | A built-package format for Python. / MIT |
| [widgetsnbextension](http://ipython.org) | 3.5.0 | Interactive Widgets for Jupyter / BSD 3-clause |
| [wrapt](https://github.com/GrahamDumpleton/wrapt) | 1.11.2 | Module for decorators, wrappers and monkey patching / BSD 2-Clause |
| [wurlitzer](https://github.com/minrk/wurlitzer) | 1.0.2 | Capture C-level stdout/stderr in Python / MIT |
| [xlrd](http://www.python-excel.org/) | 1.2.0 | Library for developers to extract data from Microsoft Excel (tm) spreadsheet files / BSD 3-Clause and BSD with advertising |
| [xlsxwriter](https://xlsxwriter.readthedocs.io/) | 1.1.8 | A Python module for creating Excel XLSX files / BSD 2-Clause |
| [xlwt](http://www.python-excel.org/) | 1.3.0 | Writing data and formatting information to Excel files / BSD |
| [xz](http://tukaani.org/xz/) | 5.2.4 | Data compression software with high compression ratio / LGPL-2.1 and GPL-2.0 |
| [yaml](http://pyyaml.org/wiki/LibYAML) | 0.1.7 | A C library for parsing and emitting YAML. / MIT |
| [zeromq](http://zeromq.org) | 4.3.1 | A high-performance asynchronous messaging library. / LGPL 3 |
| [zict](http://github.com/mrocklin/zict) | 1.0.0 | Composable Dictionary Classes / BSD 3-Clause |
| [zipp](https://github.com/jaraco/zipp) | 0.5.1 | A pathlib-compatible Zipfile object wrapper / MIT |
| [zlib](http://zlib.net/) | 1.2.11 | Massively spiffy yet delicately unobtrusive compression library / zlib |
| [zstd](http://www.zstd.net) | 1.3.7 | Zstandard - Fast real-time compression algorithm / BSD 3-Clause |
| Name | Version | Summary / License |
|---|---|---|
| [\_ipyw\_jlab\_nb\_ext\_conf](https://github.com/ContinuumIO/anaconda-nb-extensions-meta-config) | 0.1.0 | A configuration metapackage for enabling Anaconda-bundled jupyter extensions / BSD |
| [alabaster](http://www.sphinx-doc.org/en/stable/index.html) | 0.7.12 | Configurable, Python 2+3 compatible Sphinx theme. / BSD 3-Clause |
| [anaconda-client](http://anaconda.org) | 1.7.2 | anaconda.org command line client library / BSD 3-clause |
| [anaconda-project](https://github.com/Anaconda-Platform/anaconda-project) | 0.8.3 | Tool for encapsulating, running, and reproducing data science projects / BSD 3-Clause |
| [asn1crypto](https://github.com/wbond/asn1crypto) | 0.24.0 | Python ASN.1 library with a focus on performance and a pythonic API / MIT |
| [astroid](https://www.astroid.org/) | 1.6.5 | A abstract syntax tree for Python with inference support. / LGPL 2.1 |
| [astropy](http://www.astropy.org/) | 2.0.9 | Community-developed Python Library for Astronomy / BSD |
| [atomicwrites](https://github.com/untitaker/python-atomicwrites) | 1.3.0 | Atomic file writes / MIT |
| [attrs](https://attrs.readthedocs.io/en/stable/) | 19.1.0 | attrs is the Python package that will bring back the joy of writing classes by relieving you from the drudgery of implementing object protocols (aka dunder methods). / MIT |
| [babel](http://babel.pocoo.org/) | 2.7.0 | Utilities to internationalize and localize Python applications / BSD 3-clause |
| [backports](https://bitbucket.org/brandon/backports) | 1.0 | None / BSD |
| [backports.functools\_lru\_cache](https://github.com/jaraco/backports.functools_lru_cache) | 1.5 | Backport of functools.lru\_cache from Python 3.3 as published at ActiveState. / MIT |
| [backports.os](https://github.com/pjdelport/backports.os) | 0.1.1 | Backport of new features in Python’s os module / Python Software Foundation |
| [backports.shutil\_get\_terminal\_size](https://github.com/chrippa/backports.shutil_get_terminal_size) | 1.0.0 | A backport of the get\_terminal\_size function from Python 3.3’s shutil. / MIT |
| [backports.shutil\_which](https://github.com/minrk/backports.shutil_which) | 3.5.2 | Backport of shutil.which from Python 3.3 / PSF2 & MIT |
| [backports\_abc](https://github.com/cython/backports_abc) | 0.5 | A backport of recent additions to the collections.abc module. / PSF 2 |
| [beautifulsoup4](http://www.crummy.com/software/BeautifulSoup/) | 4.7.1 | Python library designed for screen-scraping / MIT |
| [bitarray](https://github.com/ilanschnell/bitarray) | 0.9.2 | efficient arrays of booleans – C extension / PSF |
| [bkcharts](http://github.com/bokeh/bkcharts) | 0.2 | High level chart types built on top of Bokeh / BSD 3-Clause |
| blas | 1.0 | None / None |
| [bleach](https://github.com/mozilla/bleach) | 3.1.0 | Easy, whitelist-based HTML-sanitizing tool / Apache-2.0 |
| [blosc](https://github.com/Blosc/c-blosc) | 1.16.3 | A blocking, shuffling and loss-less compression library that can be faster than memcpy() / BSD 3-Clause |
| [bokeh](http://bokeh.pydata.org/) | 1.2.0 | Statistical and novel interactive HTML plots for Python / BSD 3-Clause |
| [boto](https://github.com/boto/boto/) | 2.49.0 | Amazon Web Services Library / MIT |
| [bottleneck](http://berkeleyanalytics.com/bottleneck) | 1.2.1 | Fast NumPy array functions written in Cython. / BSD 2-Clause |
| [bzip2](http://www.bzip.org/) | 1.0.8 | high-quality data compressor / bzip2 |
| [ca-certificates](https://github.com/conda-forge/ca-certificates-feedstock) | 2019.5.15 | Certificates for use with other packages. / ISC |
| [cdecimal](http://www.bytereef.org/mpdecimal/index.html) | 2.3 | Fast drop-in replacement for decimal.py / BSD 2-Clause |
| [certifi](http://certifi.io/) | 2019.6.16 | Python package for providing Mozilla’s CA Bundle. / ISC |
| [cffi](https://bitbucket.org/cffi/cffi) | 1.12.3 | Foreign Function Interface for Python calling C code. / MIT |
| [chardet](https://github.com/chardet/chardet) | 3.0.4 | Universal character encoding detector / LGPL2 |
| [click](https://palletsprojects.com/p/click) | 7.0 | Python composable command line interface toolkit / BSD-3-Clause |
| [cloudpickle](https://github.com/cloudpipe/cloudpickle) | 1.2.1 | Extended pickling support for Python objects / BSD 3-Clause |
| [clyent](https://github.com/Anaconda-Platform/clyent) | 1.2.2 | Command line client library for windows and posix / BSD 3-Clause |
| [colorama](https://github.com/tartley/colorama) | 0.4.1 | Cross-platform colored terminal text / BSD-3-Clause |
| [comtypes](http://starship.python.net/crew/theller/comtypes/) | 1.1.7 | pure Python COM package / MIT |
| [conda](https://conda.io) | 4.7.10 | OS-agnostic, system-level binary package and environment manager. / BSD 3-Clause |
| [conda-build](https://github.com/conda/conda-build) | 3.18.9 | tools for building conda packages / BSD 3-Clause |
| [conda-env](https://github.com/conda/conda-env) | 2.6.0 | Tools for interacting with conda environments. / BSD 3-Clause |
| [conda-verify](https://github.com/conda/conda-verify) | 3.4.2 | tool for validating conda recipes and conda packages / BSD 3-Clause |
| [configparser](http://docs.python.org/3/library/configparser.html) | 3.7.4 | This library brings the updated configparser from Python 3.5 to Python 2.6-3.5 / MIT |
| console\_shortcut | 0.1.1 | Console shortcut creator for Windows (using menuinst) / BSD |
| [contextlib2](http://contextlib2.readthedocs.org) | 0.5.5 | Backports and enhancements for the contextlib module / PSF |
| [cryptography](https://github.com/pyca/cryptography) | 2.4.2 | Provides cryptographic recipes and primitives to Python developers / Apache 2.0 or BSD 3-Clause, PSF 2 |
| [curl](http://curl.haxx.se/) | 7.64.0 | tool and library for transferring data with URL syntax / MIT/X derivate (`<http://curl.haxx.se/docs/copyright.html>`) |
| [cycler](http://matplotlib.org/cycler) | 0.10.0 | Composable style cycles. / BSD 3-Clause |
| [cython](http://www.cython.org/) | 0.29.12 | The Cython compiler for writing C extensions for the Python language / Apache-2.0 |
| [cytoolz](https://github.com/pytoolz/cytoolz) | 0.10.0 | Cython implementation of Toolz. High performance functional utilities / BSD-3-Clause |
| [dask](https://dask.org/) | 1.2.2 | Parallel PyData with Task Scheduling / BSD 3-Clause |
| [dask-core](http://github.com/dask/dask/) | 1.2.2 | Parallel Python with task scheduling / BSD 3-Clause |
| [decorator](https://github.com/micheles/decorator) | 4.4.0 | Better living through Python with decorators. / BSD 3-Clause |
| [defusedxml](https://bitbucket.org/tiran/defusedxml) | 0.6.0 | XML bomb protection for Python stdlib modules / PSF 2.0 |
| [distributed](http://distributed.readthedocs.io/en/latest/) | 1.28.1 | Distributed computing with Dask / BSD 3-Clause |
| [docutils](http://docutils.sourceforge.net/) | 0.14 | Docutils – Python Documentation Utilities / Public Domain Dedictation and BSD 2-Clause and PSF 2.1.1 and GPL 3.0 |
| [entrypoints](https://github.com/takluyver/entrypoints) | 0.3 | Discover and load entry points from installed packages. / MIT License |
| [enum34](https://bitbucket.org/stoneleaf/enum34) | 1.1.6 | Python 3.4 Enum backported to 3.3, 3.2, 3.1, 2.7, 2.6, 2.5, and 2.4 / BSD 3-Clause |
| [et\_xmlfile](https://bitbucket.org/openpyxl/et_xmlfile) | 1.0.1 | An implementation of lxml.xmlfile for the standard library / MIT |
| [fastcache](https://github.com/pbrady/fastcache) | 1.1.0 | C implementation of Python 3 lru\_cache / MIT |
| [filelock](https://github.com/benediktschmitt/py-filelock) | 3.0.12 | A platform independent file lock. / Public Domain |
| [flask](http://flask.pocoo.org) | 1.1.1 | A microframework based on Werkzeug, Jinja2 and good intentions. / BSD 3-Clause |
| [freetype](https://www.freetype.org/) | 2.9.1 | A Free, High-Quality, and Portable Font Engine / GPL-2.0 and FreeType |
| [funcsigs](http://funcsigs.readthedocs.org) | 1.0.2 | Python function signatures from PEP362 for Python 2.6, 2.7 and 3.2+. / Apache 2.0 |
| [functools32](https://github.com/MiCHiLU/python-functools32) | 3.2.3.2 | Backport of the functools module from Python 3.2.3 for use on 2.7 and PyPy. / PSF license |
| [future](http://python-future.org) | 0.17.1 | Clean single-source support for Python 3 and 2 / MIT |
| [futures](https://github.com/agronholm/pythonfutures) | 3.3.0 | Backport of the concurrent.futures package from Python 3.2 / PSF |
| [get\_terminal\_size](https://github.com/chrippa/backports.shutil_get_terminal_size) | 1.0.0 | Get the size of the terminal window. / MIT |
| [gevent](http://www.gevent.org/) | 1.4.0 | Coroutine-based network library / MIT |
| [glob2](https://github.com/miracle2k/python-glob2) | 0.7 | Version of the glob module that supports recursion via \*\*, and can capture patterns. / BSD-2-Clause |
| [greenlet](https://github.com/python-greenlet/greenlet) | 0.4.15 | Lightweight in-process concurrent programming / MIT |
| [grin](http://pypi.python.org/pypi/grin) | 1.2.1 | Enhanced grep-like tool / BSD 3-Clause |
| [h5py](http://www.h5py.org/) | 2.9.0 | Read and write HDF5 files from Python. / BSD-3-Clause |
| [hdf5](http://www.hdfgroup.org/HDF5/) | 1.10.4 | HDF5 is a data model, library, and file format for storing and managing data / HDF5 |
| [heapdict](http://stutzbachenterprises.com/) | 1.0.0 | A heap with decrease-key and increase-key operations / BSD 3-Clause |
| [html5lib](https://github.com/html5lib/html5lib-python) | 1.0.1 | HTML parser based on the WHATWG HTML specification / MIT |
| icc\_rt | 2019.0.0 | Intel runtime libraries for C, C++ and Fortran compilers / Intel proprietary |
| [icu](http://site.icu-project.org/) | 58.2 | International Components for Unicode. / MIT |
| [idna](https://github.com/kjd/idna) | 2.8 | Internationalized Domain Names in Applications (IDNA). / BSD Like |
| [imageio](http://imageio.github.io) | 2.5.0 | a Python library for reading and writing image data / BSD 2-Clause |
| [imagesize](https://github.com/shibukawa/imagesize_py) | 1.1.0 | Getting image size from png/jpeg/jpeg2000/gif file / MIT |
| [importlib\_metadata](http://importlib-metadata.readthedocs.io) | 0.17 | A library to access the metadata for a Python package / APACHE-2.0 |
| [intel-openmp](https://software.intel.com/en-us/node/522690) | 2019.4 | Math library for Intel and compatible processors / proprietary - Intel |
| [ipaddress](https://github.com/phihag/ipaddress) | 1.0.22 | IPv4/IPv6 manipulation library / PSF 2 |
| [ipykernel](https://ipython.org) | 4.10.0 | IPython Kernel for Jupyter / BSD-3-Clause |
| [ipython](https://ipython.org/) | 5.8.0 | IPython: Productive Interactive Computing / BSD-3-Clause |
| [ipython\_genutils](http://ipython.org) | 0.2.0 | vestigial utilities from IPython / BSD 3-Clause |
| [ipywidgets](https://github.com/ipython/ipywidgets) | 7.5.0 | Jupyter Interactive Widgets / BSD 3-clause |
| [isort](https://github.com/timothycrosley/isort) | 4.3.21 | A Python utility / library to sort Python imports. / MIT |
| [itsdangerous](https://github.com/pallets/itsdangerous) | 1.1.0 | Various helpers to pass trusted data to untrusted environments. / BSD 3-Clause |
| [jdcal](https://github.com/phn/jdcal) | 1.4.1 | Julian dates from proleptic Gregorian and Julian calendars. / BSD 2-Clause |
| [jedi](https://github.com/davidhalter/jedi/) | 0.13.3 | An autocompletion tool for Python that can be used for text editors. / MIT |
| [jinja2](http://jinja.pocoo.org) | 2.10.1 | An easy to use stand-alone template engine written in pure python. / 3-Clause BSD |
| [jpeg](http://www.ijg.org/) | 9b | read/write jpeg COM, EXIF, IPTC medata / Custom free software license |
| [jsonschema](https://github.com/Julian/jsonschema) | 3.0.1 | An implementation of JSON Schema validation for Python / MIT |
| [jupyter](http://jupyter.org) | 1.0.0 | Jupyter metapackage. Install all the Jupyter components in one go. / BSD 3-Clause |
| [jupyter\_client](http://jupyter.org) | 5.3.1 | Jupyter protocol implementation and client libraries / BSD 3-clause |
| [jupyter\_console](http://jupyter.org) | 5.2.0 | Jupyter terminal console / BSD-3-Clause |
| [jupyter\_core](http://jupyter.org) | 4.5.0 | Core common functionality of Jupyter projects. / BSD 3-clause |
| [jupyterlab](https://github.com/jupyterlab/jupyterlab) | 0.33.11 | JupyterLab / BSD-3-Clause |
| [jupyterlab\_launcher](http://github.com/jupyterlab/jupyterlab_launcher) | 0.11.2 | A Launcher for JupyterLab based applications. / BSD 3-Clause |
| [keyring](https://github.com/jaraco/keyring) | 18.0.0 | Store and access your passwords safely / Python Software Foundation or MIT |
| [kiwisolver](https://github.com/nucleic/kiwi) | 1.1.0 | A fast implementation of the Cassowary constraint solver / BSD 3-Clause |
| [krb5](http://web.mit.edu/kerberos/) | 1.16.1 | A network authentication protocol. / MIT |
| [lazy-object-proxy](https://github.com/ionelmc/python-lazy-object-proxy) | 1.4.1 | A fast and thorough lazy object proxy / BSD-2-Clause |
| [libarchive](http://www.libarchive.org/) | 3.3.3 | Multi-format archive and compression library / BSD 2-Clause |
| [libcurl](http://curl.haxx.se/) | 7.64.0 | tool and library for transferring data with URL syntax / MIT/X derivate (`<http://curl.haxx.se/docs/copyright.html>`) |
| [libiconv](https://www.gnu.org/software/libiconv/) | 1.15 | Provides iconv for systems which don’t have one (or that cannot convert from/to Unicode.) / GPL and LGPL |
| [libpng](http://www.libpng.org/pub/png/libpng.html) | 1.6.37 | PNG reference library / zlib/libpng |
| [libsodium](http://libsodium.org) | 1.0.16 | A modern and easy-to-use crypto library. / ISC |
| [libssh2](https://www.libssh2.org/) | 1.8.0 | the SSH library / BSD-3-Clause |
| [libtiff](http://www.libtiff.org/) | 4.0.10 | Support for the Tag Image File Format (TIFF). / HPND |
| [libxml2](http://xmlsoft.org/) | 2.9.9 | The XML C parser and toolkit of Gnome / MIT |
| [libxslt](http://xmlsoft.org/XSLT/) | 1.1.33 | The XSLT C library developed for the GNOME project / MIT |
| [linecache2](https://github.com/testing-cabal/linecache2) | 1.0.0 | Backport of the linecache module / PSF 1.0 |
| [llvmlite](https://github.com/numba/llvmlite) | 0.29.0 | A lightweight LLVM python binding for writing JIT compilers / New BSD License |
| [locket](https://github.com/mwilliamson/locket.py) | 0.2.0 | File-based locks for Python for Linux and Windows / BSD 2-Clause |
| [lxml](http://lxml.de/) | 4.3.4 | Pythonic binding for the C libraries libxml2 and libxslt. / BSD 3-Clause, GPL-2.0, ZPL-2.0, and ElementTree |
| [lz4-c](https://www.lz4.org) | 1.8.1.2 | Extremely Fast Compression algorithm / BSD 2-clause |
| [lzo](http://www.oberhumer.com/opensource/lzo/) | 2.10 | LZO is a portable lossless data compression library written in ANSI C. / GPL v2+ |
| m2w64-gcc-libgfortran | 5.3.0 | |
| m2w64-gcc-libs | 5.3.0 | |
| m2w64-gcc-libs-core | 5.3.0 | |
| m2w64-gmp | 6.1.0 | |
| m2w64-libwinpthread-git | 5.0.0.4634.697f757 | |
| [markupsafe](https://www.palletsprojects.com/p/markupsafe) | 1.1.1 | A Python module that implements the jinja2.Markup string / BSD-3-Clause |
| [matplotlib](http://matplotlib.org/) | 2.2.3 | Publication quality figures in Python / PSF-based |
| [mccabe](https://github.com/PyCQA/mccabe) | 0.6.1 | McCabe complexity checker for Python / MIT |
| [menuinst](https://github.com/ContinuumIO/menuinst) | 1.4.16 | cross platform menu item installation / BSD |
| [mistune](https://github.com/lepture/mistune) | 0.8.4 | The fastest markdown parser in pure Python. / BSD 3-Clause |
| [mkl](https://software.intel.com/en-us/mkl) | 2019.4 | Math library for Intel and compatible processors / proprietary - Intel |
| [mkl-service](http://github.com/IntelPython/mkl-service) | 2.0.2 | Python hooks for Intel(R) Math Kernel Library runtime control settings. / BSD-3-Clause |
| [mkl\_fft](http://github.com/IntelPython/mkl_fft) | 1.0.12 | NumPy-based implementation of Fast Fourier Transform using Intel (R) Math Kernel Library. / BSD 3-Clause |
| [mock](https://github.com/testing-cabal/mock) | 3.0.5 | A library for testing in Python / BSD-2-Clause |
| [more-itertools](https://github.com/erikrose/more-itertools) | 5.0.0 | More routines for operating on iterables, beyond itertools / MIT |
| [mpmath](http://mpmath.org) | 1.1.0 | Python library for arbitrary-precision floating-point arithmetic / BSD 3-Clause |
| [msgpack-python](http://msgpack.org/) | 0.6.1 | MessagePack (de)serializer. / Apache 2.0 |
| msys2-conda-epoch | 20160418 | |
| [multipledispatch](https://github.com/mrocklin/multipledispatch/) | 0.6.0 | Multiple dispatch in Python / BSD 3-Clause |
| [nbconvert](http://jupyter.org) | 5.5.0 | Converting Jupyter Notebooks / BSD-3-Clause |
| [nbformat](http://jupyter.org) | 4.4.0 | The reference implementation of the Jupyter Notebook format / BSD 3-clause |
| [networkx](https://networkx.github.io/) | 2.2 | Python package for creating and manipulating complex networks / BSD-3-Clause |
| [nltk](http://nltk.org/) | 3.4.4 | Build Python programs to work with human language data / Apache 2.0 |
| [nose](http://readthedocs.org/docs/nose/) | 1.3.7 | Nose extends unittest to make testing easier / LGPL-2.1 |
| [notebook](http://jupyter.org) | 5.7.8 | Jupyter Notebook / BSD 3-clause |
| [numba](http://numba.github.com) | 0.44.1 | NumPy aware dynamic Python compiler using LLVM / BSD 2-clause |
| [numexpr](https://github.com/pydata/numexpr) | 2.6.9 | Fast numerical expression evaluator for NumPy. / MIT |
| [numpy](http://numpy.scipy.org/) | 1.16.3 | Array processing for numbers, strings, records, and objects. / BSD 3-Clause |
| numpy-base | 1.16.3 | None / None |
| [numpydoc](https://github.com/numpy/numpydoc) | 0.9.1 | Numpy’s Sphinx extensions / BSD 3-Clause |
| [olefile](http://www.decalage.info/python/olefileio) | 0.46 | parse, read and write Microsoft OLE2 files / BSD 2-Clause |
| [openpyxl](https://openpyxl.readthedocs.io) | 2.6.2 | A Python library to read/write Excel 2010 xlsx/xlsm files / MIT |
| [openssl](http://www.openssl.org/) | 1.0.2s | OpenSSL is an open-source implementation of the SSL and TLS protocols / OpenSSL |
| [packaging](https://github.com/pypa/packaging) | 19.0 | Core utilities for Python packages / Apache 2.0 or BSD 2-Clause |
| [pandas](http://pandas.pydata.org) | 0.24.2 | High-performance, easy-to-use data structures and data analysis tools. / BSD 3-clause |
| [pandoc](http://pandoc.org/) | 2.2.3.2 | Universal markup converter (repackaged binaries). / GPL-2.0 |
| [pandocfilters](https://github.com/jgm/pandocfilters) | 1.4.2 | A python module for writing pandoc filters / BSD-3-Clause |
| [parso](https://github.com/davidhalter/parso) | 0.5.0 | A Python Parser / MIT |
| [partd](https://github.com/dask/partd) | 1.0.0 | Data structure for on-disk shuffle operations / BSD 3-Clause |
| [path.py](https://github.com/jaraco/path.py) | 11.5.0 | A module wrapper for os.path / MIT |
| [pathlib2](https://github.com/mcmtroffaes/pathlib2) | 2.3.4 | Fork of pathlib aiming to support the full stdlib Python API / MIT |
| [patsy](https://github.com/pydata/patsy) | 0.5.1 | Describing statistical models in Python using symbolic formulas / BSD-2-Clause, PSF2 |
| [pep8](http://pep8.readthedocs.org/) | 1.7.1 | Python style guide checker / MIT |
| [pickleshare](https://github.com/pickleshare/pickleshare/) | 0.7.5 | Tiny ‘shelve’-like database with concurrency support / MIT |
| [pillow](https://pillow.readthedocs.io) | 6.1.0 | Pillow is the friendly PIL fork by Alex Clark and Contributors / PIL |
| [pip](https://pip.pypa.io/en/stable/) | 19.1.1 | PyPA recommended tool for installing Python packages / MIT |
| [pkginfo](https://code.launchpad.net/~tseaver/pkginfo/trunk) | 1.5.0.1 | Query metadatdata from sdists / bdists / installed packages. / MIT |
| [pluggy](https://github.com/pytest-dev/pluggy) | 0.12.0 | Plugin registration and hook calling for Python / MIT |
| [ply](http://www.dabeaz.com/ply/index.html) | 3.11 | Python Lex-Yacc / BSD 3-clause |
| powershell\_shortcut | 0.0.1 | Powershell shortcut creator for Windows (using menuinst) / BSD |
| [prometheus\_client](https://github.com/prometheus/client_python) | 0.7.1 | Python client for the Prometheus monitoring system / Apache 2.0 |
| [prompt\_toolkit](https://github.com/jonathanslenders/python-prompt-toolkit) | 1.0.15 | Library for building powerful interactive command lines in Python / BSD 3-clause |
| [psutil](https://github.com/giampaolo/psutil) | 5.6.3 | A cross-platform process and system utilities module for Python / BSD 3-Clause |
| [py](https://github.com/pytest-dev/py) | 1.8.0 | library with cross-python path, ini-parsing, io, code, log facilities / MIT |
| [pycodestyle](https://pycodestyle.readthedocs.io/) | 2.5.0 | Python style guide checker / MIT |
| [pycosat](https://github.com/ContinuumIO/pycosat) | 0.6.3 | Bindings to picosat (a SAT solver) / MIT |
| [pycparser](https://github.com/eliben/pycparser) | 2.19 | Complete C99 parser in pure Python / BSD 3-clause |
| [pycrypto](http://www.pycrypto.org/) | 2.6.1 | Cryptographic modules for Python. / Public Domain |
| [pycurl](http://pycurl.sourceforge.net/) | 7.43.0.2 | A Python Interface To The cURL library / LGPL, MIT |
| [pyflakes](https://github.com/PyCQA/pyflakes) | 2.1.1 | Pyflakes analyzes programs and detects various errors. / MIT |
| [pygments](http://pygments.org/) | 2.4.2 | Generic syntax highlighting package / BSD 2-clause |
| [pylint](http://www.pylint.org/) | 1.9.2 | python code static checker / GPL |
| [pyodbc](https://github.com/mkleehammer/pyodbc) | 4.0.26 | DB API Module for ODBC / MIT |
| [pyopenssl](https://github.com/pyca/pyopenssl) | 19.0.0 | Python wrapper module around the OpenSSL library / Apache 2.0 |
| [pyparsing](http://pyparsing.wikispaces.com/) | 2.4.0 | Create and execute simple grammars / MIT |
| [pyqt](http://www.riverbankcomputing.co.uk/software/pyqt) | 5.6.0 | Python binding of the cross-platform GUI toolkit Qt. / Commercial, GPL-2.0, GPL-3.0 |
| [pyreadline](http://ipython.org/pyreadline) | 2.1 | A python implmementation of GNU readline. / BSD 3-Clause |
| [pyrsistent](http://github.com/tobgu/pyrsistent/) | 0.14.11 | Persistent/Functional/Immutable data structures / MIT |
| [pysocks](https://github.com/Anorov/PySocks) | 1.7.0 | A Python SOCKS client module. See [Anorov/PySocks](https://github.com/Anorov/PySocks) for more information. / BSD 3-Clause |
| [pytables](http://www.pytables.org) | 3.5.2 | Brings together Python, HDF5 and NumPy to easily handle large amounts of data. / BSD 3-Clause |
| [pytest](https://docs.pytest.org/en/latest/) | 4.6.2 | Simple and powerful testing with Python. / MIT |
| [python](http://www.python.org/) | 2.7.16 | General purpose programming language / PSF |
| [python-dateutil](https://dateutil.readthedocs.org/) | 2.8.0 | Extensions to the standard Python datetime module. / BSD 3 Clause |
| [python-libarchive-c](https://github.com/Changaco/python-libarchive-c) | 2.8 | Python interface to libarchive / CC0-1.0 |
| [pytz](http://pythonhosted.org/pytz/) | 2019.1 | World timezone definitions, modern and historical. / MIT |
| [pywavelets](https://github.com/PyWavelets/pywt) | 1.0.3 | Discrete Wavelet Transforms in Python / MIT |
| [pywin32](https://sourceforge.net/projects/pywin32) | 223 | Python extensions for Windows / PSF |
| [pywinpty](https://github.com/spyder-ide/pywinpty) | 0.5.5 | Python bindings for the winpty library / MIT |
| [pyyaml](http://pyyaml.org/wiki/PyYAML) | 5.1.1 | YAML parser and emitter for Python / MIT |
| [pyzmq](https://github.com/zeromq/pyzmq) | 18.0.0 | Python bindings for zeromq / BSD 3-clause |
| [qt](http://qt-project.org) | 5.6.2 | Qt is a cross-platform application and UI framework. / LGPL-3.0 |
| [qtawesome](https://github.com/spyder-ide/qtawesome) | 0.5.7 | Iconic fonts in PyQt and PySide applications / MIT |
| [qtconsole](http://jupyter.org) | 4.5.1 | Jupyter Qt console / BSD 3-Clause |
| [qtpy](https://github.com/spyder-ide/qtpy) | 1.8.0 | Abstraction layer for PyQt5/PyQt4/PySide / MIT |
| [requests](http://python-requests.org) | 2.22.0 | Python HTTP for Humans / Apache 2.0 |
| [rope](https://github.com/python-rope/rope) | 0.14.0 | A python refactoring library / GPL 2.0 |
| [ruamel\_yaml](https://bitbucket.org/ruamel/yaml) | 0.15.46 | A patched copy of ruamel.yaml. / MIT |
| [scandir](https://github.com/benhoyt/scandir) | 1.10.0 | scandir, a better directory iterator and faster os.walk() / BSD 3-Clause |
| [scikit-image](http://scikit-image.org/) | 0.14.2 | Image processing routines for SciPy. / BSD 3-Clause |
| [scikit-learn](http://scikit-learn.org/) | 0.20.3 | A set of python modules for machine learning and data mining / BSD 3-Clause |
| [scipy](http://www.scipy.org/) | 1.2.1 | Scientific Library for Python / BSD 3-Clause |
| [seaborn](https://seaborn.pydata.org) | 0.9.0 | Statistical data visualization / BSD 3-Clause |
| [send2trash](https://github.com/hsoft/send2trash) | 1.5.0 | Python library to natively send files to Trash (or Recycle bin) on all platforms. / BSD-3-Clause |
| [setuptools](https://github.com/pypa/setuptools) | 41.0.1 | Download, build, install, upgrade, and uninstall Python packages / MIT |
| [simplegeneric](http://cheeseshop.python.org/pypi/simplegeneric) | 0.8.1 | Simple generic functions (similar to Python’s own len(), pickle.dump(), etc.) / Zope Public |
| [singledispatch](http://docs.python.org/3/library/functools.html#functools.singledispatch) | 3.4.0.3 | Transforms a function into a single-dispatch generic function / MIT |
| [sip](http://www.riverbankcomputing.com/software/sip/intro) | 4.18.1 | Create Python bindings for C and C++ libraries / GPL-3.0 |
| [six](http://pypi.python.org/pypi/six/) | 1.12.0 | Python 2 and 3 compatibility utilities / MIT |
| [snappy](https://github.com/google/snappy) | 1.1.7 | A fast compressor/decompressor / BSD 3-clause |
| [snowballstemmer](https://github.com/shibukawa/snowball_py) | 1.9.0 | Snowball stemming library collection for Python / BSD-2-Clause |
| [sortedcollections](http://www.grantjenks.com/docs/sortedcollections/) | 1.1.2 | Python Sorted Collections / Apache-2.0 |
| [sortedcontainers](http://www.grantjenks.com/docs/sortedcontainers/) | 2.1.0 | Python Sorted Container Types: SortedList, SortedDict, and SortedSet / Apache 2.0 |
| [soupsieve](http://facelessuser.github.io/soupsieve) | 1.8 | A modern CSS selector implementation for BeautifulSoup / MIT |
| [sphinx](http://www.sphinx-doc.org) | 1.8.5 | Sphinx is a tool that makes it easy to create intelligent and beautiful documentation / BSD-2-Clause |
| sphinxcontrib | 1.0 | Python namespace for sphinxcontrib / BSD |
| [sphinxcontrib-websupport](https://pypi.python.org/pypi/sphinxcontrib-websupport) | 1.1.2 | Sphinx API for Web Apps / BSD-2-Clause |
| [spyder](https://www.spyder-ide.org/) | 3.3.6 | The Scientific Python Development Environment / MIT |
| [spyder-kernels](https://github.com/spyder-ide/spyder-kernels) | 0.5.1 | Jupyter kernels for the Spyder console / MIT |
| [sqlalchemy](http://www.sqlalchemy.org/) | 1.3.5 | Database Abstraction Library. / MIT |
| [sqlite](http://www.sqlite.org/) | 3.29.0 | Implements a self-contained, zero-configuration, SQL database engine. / Public-Domain (`<http://www.sqlite.org/copyright.html>`) |
| [ssl\_match\_hostname](http://bitbucket.org/brandon/backports.ssl_match_hostname) | 3.7.0.1 | The ssl.match\_hostname() function from Python 3.5 / PSF 2 |
| [statsmodels](https://www.statsmodels.org) | 0.10.0 | Statistical computations and models for use with SciPy / BSD 3-Clause |
| [subprocess32](https://github.com/google/python-subprocess32) | 3.5.4 | A backport of the subprocess module from Python 3.2/3.3 for use on 2.x / Python-2.0 |
| [sympy](http://sympy.org) | 1.4 | Python library for symbolic mathematics / BSD-3-Clause |
| [tblib](https://github.com/ionelmc/python-tblib) | 1.4.0 | Traceback serialization library. / BSD 2-Clause |
| [terminado](https://github.com/jupyter/terminado) | 0.8.2 | Terminals served by tornado websockets / BSD 2-Clause |
| [testpath](https://testpath.readthedocs.io) | 0.4.2 | Testpath is a collection of utilities for Python code working with files and commands. / BSD-3-Clause |
| [tk](http://www.tcl.tk/) | 8.6.8 | A dynamic programming language with GUI support. Bundles Tcl and Tk. / Tcl/Tk |
| [toolz](http://toolz.readthedocs.org/) | 0.10.0 | A functional standard library for Python / BSD 3-Clause |
| [tornado](http://www.tornadoweb.org/) | 5.1.1 | A Python web framework and asynchronous networking library, originally developed at FriendFeed. / Apache 2.0 |
| [tqdm](https://pypi.python.org/pypi/tqdm) | 4.32.1 | A Fast, Extensible Progress Meter / MPLv2.0, MIT |
| [traceback2](https://github.com/testing-cabal/traceback2) | 1.4.0 | Backports of the traceback module / PSF 2.0 |
| [traitlets](http://ipython.org/) | 4.3.2 | Configuration system for Python applications / BSD 3-clause |
| [typing](https://docs.python.org/3.5/library/typing.html) | 3.7.4 | Type Hints for Python - backport for `Python<3.5` / PSF |
| [unicodecsv](https://github.com/jdunck/python-unicodecsv) | 0.14.1 | Drop-in replacement for csv module which supports unicode strings / BSD |
| [unittest2](http://pypi.python.org/pypi/unittest2) | 1.1.0 | The new features in unittest backported to Python 2.4+ / BSD |
| [urllib3](https://urllib3.readthedocs.io/) | 1.24.2 | HTTP library with thread-safe connection pooling, file post, and more. / MIT |
| [vc](https://github.com/conda/conda/wiki/VC-features) | 9 | A meta-package to impose mutual exclusivity among software built with different VS versions / Modified BSD License (3-clause) |
| vs2008\_runtime | 9.00.30729.1 | None / None |
| vs2015\_runtime | 14.15.26706 | MSVC runtimes associated with cl.exe version 19.15.26726 (VS 2017 update 8) / None |
| [wcwidth](https://github.com/jquast/wcwidth) | 0.1.7 | Measures number of Terminal column cells of wide-character codes. / MIT |
| [webencodings](https://github.com/gsnedders/python-webencodings) | 0.5.1 | Character encoding aliases for legacy web content / BSD 3-Clause |
| [werkzeug](https://palletsprojects.com/p/werkzeug/) | 0.15.4 | The comprehensive WSGI web application library. / BSD 3-Clause |
| [wheel](https://github.com/pypa/wheel) | 0.33.4 | A built-package format for Python. / MIT |
| [widgetsnbextension](http://ipython.org) | 3.5.0 | Interactive Widgets for Jupyter / BSD 3-clause |
| [win\_inet\_pton](https://github.com/hickeroar/win_inet_pton) | 1.1.0 | Native inet\_pton and inet\_ntop implementation for Python on Windows (with ctypes). / PUBLIC-DOMAIN |
| [win\_unicode\_console](https://github.com/Drekin/win-unicode-console) | 0.5 | A Python package to enable Unicode input and display when running Python from Windows console. / MIT |
| [wincertstore](https://bitbucket.org/tiran/wincertstore) | 0.2 | Python module to extract CA and CRL certs from Windows’ cert store (ctypes based). / PSF 2 |
| [winpty](https://github.com/rprichard/winpty) | 0.4.3 | Winpty provides an interface similar to a Unix pty-master for communicating with Windows console programs. / MIT |
| [wrapt](https://github.com/GrahamDumpleton/wrapt) | 1.11.2 | Module for decorators, wrappers and monkey patching / BSD 2-Clause |
| [xlrd](http://www.python-excel.org/) | 1.2.0 | Library for developers to extract data from Microsoft Excel (tm) spreadsheet files / BSD 3-Clause and BSD with advertising |
| [xlsxwriter](https://xlsxwriter.readthedocs.io/) | 1.1.8 | A Python module for creating Excel XLSX files / BSD 2-Clause |
| [xlwings](http://xlwings.org/) | 0.15.8 | Interact with Excel from Python and vice versa / 3-clause BSD |
| [xlwt](http://www.python-excel.org/) | 1.3.0 | Writing data and formatting information to Excel files / BSD |
| [xz](http://tukaani.org/xz/) | 5.2.4 | Data compression software with high compression ratio / LGPL-2.1 and GPL-2.0 |
| [yaml](http://pyyaml.org/wiki/LibYAML) | 0.1.7 | A C library for parsing and emitting YAML. / MIT |
| [zeromq](http://zeromq.org) | 4.3.1 | A high-performance asynchronous messaging library. / LGPL 3 |
| [zict](http://github.com/mrocklin/zict) | 1.0.0 | Composable Dictionary Classes / BSD 3-Clause |
| [zipp](https://github.com/jaraco/zipp) | 0.5.1 | A pathlib-compatible Zipfile object wrapper / MIT |
| [zlib](http://zlib.net/) | 1.2.11 | Massively spiffy yet delicately unobtrusive compression library / zlib |
| [zstd](http://www.zstd.net) | 1.3.7 | Zstandard - Fast real-time compression algorithm / BSD 3-Clause |
| Name | Version | Summary / License |
|---|---|---|
| [\_ipyw\_jlab\_nb\_ext\_conf](https://github.com/ContinuumIO/anaconda-nb-extensions-meta-config) | 0.1.0 | A configuration metapackage for enabling Anaconda-bundled jupyter extensions / BSD |
| [alabaster](http://www.sphinx-doc.org/en/stable/index.html) | 0.7.12 | Configurable, Python 2+3 compatible Sphinx theme. / BSD 3-Clause |
| [anaconda-client](http://anaconda.org) | 1.7.2 | anaconda.org command line client library / BSD 3-clause |
| [anaconda-project](https://github.com/Anaconda-Platform/anaconda-project) | 0.8.3 | Tool for encapsulating, running, and reproducing data science projects / BSD 3-Clause |
| [asn1crypto](https://github.com/wbond/asn1crypto) | 0.24.0 | Python ASN.1 library with a focus on performance and a pythonic API / MIT |
| [astroid](https://www.astroid.org/) | 1.6.5 | A abstract syntax tree for Python with inference support. / LGPL 2.1 |
| [astropy](http://www.astropy.org/) | 2.0.9 | Community-developed Python Library for Astronomy / BSD |
| [atomicwrites](https://github.com/untitaker/python-atomicwrites) | 1.3.0 | Atomic file writes / MIT |
| [attrs](https://attrs.readthedocs.io/en/stable/) | 19.1.0 | attrs is the Python package that will bring back the joy of writing classes by relieving you from the drudgery of implementing object protocols (aka dunder methods). / MIT |
| [babel](http://babel.pocoo.org/) | 2.7.0 | Utilities to internationalize and localize Python applications / BSD 3-clause |
| [backports](https://bitbucket.org/brandon/backports) | 1.0 | None / BSD |
| [backports.functools\_lru\_cache](https://github.com/jaraco/backports.functools_lru_cache) | 1.5 | Backport of functools.lru\_cache from Python 3.3 as published at ActiveState. / MIT |
| [backports.os](https://github.com/pjdelport/backports.os) | 0.1.1 | Backport of new features in Python’s os module / Python Software Foundation |
| [backports.shutil\_get\_terminal\_size](https://github.com/chrippa/backports.shutil_get_terminal_size) | 1.0.0 | A backport of the get\_terminal\_size function from Python 3.3’s shutil. / MIT |
| [backports.shutil\_which](https://github.com/minrk/backports.shutil_which) | 3.5.2 | Backport of shutil.which from Python 3.3 / PSF2 & MIT |
| [backports\_abc](https://github.com/cython/backports_abc) | 0.5 | A backport of recent additions to the collections.abc module. / PSF 2 |
| [beautifulsoup4](http://www.crummy.com/software/BeautifulSoup/) | 4.7.1 | Python library designed for screen-scraping / MIT |
| [bitarray](https://github.com/ilanschnell/bitarray) | 0.9.3 | efficient arrays of booleans – C extension / PSF |
| [bkcharts](http://github.com/bokeh/bkcharts) | 0.2 | High level chart types built on top of Bokeh / BSD 3-Clause |
| blas | 1.0 | None / None |
| [bleach](https://github.com/mozilla/bleach) | 3.1.0 | Easy, whitelist-based HTML-sanitizing tool / Apache-2.0 |
| [blosc](https://github.com/Blosc/c-blosc) | 1.15.0 | A blocking, shuffling and loss-less compression library that can be faster than memcpy() / BSD 3-Clause |
| [bokeh](http://bokeh.pydata.org/) | 1.2.0 | Statistical and novel interactive HTML plots for Python / BSD 3-Clause |
| [boto](https://github.com/boto/boto/) | 2.49.0 | Amazon Web Services Library / MIT |
| [bottleneck](http://berkeleyanalytics.com/bottleneck) | 1.2.1 | Fast NumPy array functions written in Cython. / BSD 2-Clause |
| [bzip2](http://www.bzip.org/) | 1.0.8 | high-quality data compressor / bzip2 |
| [ca-certificates](https://github.com/conda-forge/ca-certificates-feedstock) | 2019.5.15 | Certificates for use with other packages. / ISC |
| [cdecimal](http://www.bytereef.org/mpdecimal/index.html) | 2.3 | Fast drop-in replacement for decimal.py / BSD 2-Clause |
| [certifi](http://certifi.io/) | 2019.6.16 | Python package for providing Mozilla’s CA Bundle. / ISC |
| [cffi](https://bitbucket.org/cffi/cffi) | 1.12.3 | Foreign Function Interface for Python calling C code. / MIT |
| [chardet](https://github.com/chardet/chardet) | 3.0.4 | Universal character encoding detector / LGPL2 |
| [click](https://palletsprojects.com/p/click) | 7.0 | Python composable command line interface toolkit / BSD-3-Clause |
| [cloudpickle](https://github.com/cloudpipe/cloudpickle) | 1.2.1 | Extended pickling support for Python objects / BSD 3-Clause |
| [clyent](https://github.com/Anaconda-Platform/clyent) | 1.2.2 | Command line client library for windows and posix / BSD 3-Clause |
| [colorama](https://github.com/tartley/colorama) | 0.4.1 | Cross-platform colored terminal text / BSD-3-Clause |
| [comtypes](http://starship.python.net/crew/theller/comtypes/) | 1.1.7 | pure Python COM package / MIT |
| [conda](https://conda.io) | 4.7.10 | OS-agnostic, system-level binary package and environment manager. / BSD 3-Clause |
| [conda-build](https://github.com/conda/conda-build) | 3.18.9 | tools for building conda packages / BSD 3-Clause |
| [conda-env](https://github.com/conda/conda-env) | 2.6.0 | Tools for interacting with conda environments. / BSD 3-Clause |
| [conda-verify](https://github.com/conda/conda-verify) | 3.4.2 | tool for validating conda recipes and conda packages / BSD 3-Clause |
| [configparser](http://docs.python.org/3/library/configparser.html) | 3.7.4 | This library brings the updated configparser from Python 3.5 to Python 2.6-3.5 / MIT |
| console\_shortcut | 0.1.1 | Console shortcut creator for Windows (using menuinst) / BSD |
| [contextlib2](http://contextlib2.readthedocs.org) | 0.5.5 | Backports and enhancements for the contextlib module / PSF |
| [cryptography](https://github.com/pyca/cryptography) | 2.4.2 | Provides cryptographic recipes and primitives to Python developers / Apache 2.0 or BSD 3-Clause, PSF 2 |
| [curl](http://curl.haxx.se/) | 7.64.0 | tool and library for transferring data with URL syntax / MIT/X derivate (`<http://curl.haxx.se/docs/copyright.html>`) |
| [cycler](http://matplotlib.org/cycler) | 0.10.0 | Composable style cycles. / BSD 3-Clause |
| [cython](http://www.cython.org/) | 0.29.12 | The Cython compiler for writing C extensions for the Python language / Apache-2.0 |
| [cytoolz](https://github.com/pytoolz/cytoolz) | 0.10.0 | Cython implementation of Toolz. High performance functional utilities / BSD-3-Clause |
| [dask](https://dask.org/) | 1.2.2 | Parallel PyData with Task Scheduling / BSD 3-Clause |
| [dask-core](http://github.com/dask/dask/) | 1.2.2 | Parallel Python with task scheduling / BSD 3-Clause |
| [decorator](https://github.com/micheles/decorator) | 4.4.0 | Better living through Python with decorators. / BSD 3-Clause |
| [defusedxml](https://bitbucket.org/tiran/defusedxml) | 0.6.0 | XML bomb protection for Python stdlib modules / PSF 2.0 |
| [distributed](http://distributed.readthedocs.io/en/latest/) | 1.28.1 | Distributed computing with Dask / BSD 3-Clause |
| [docutils](http://docutils.sourceforge.net/) | 0.14 | Docutils – Python Documentation Utilities / Public Domain Dedictation and BSD 2-Clause and PSF 2.1.1 and GPL 3.0 |
| [entrypoints](https://github.com/takluyver/entrypoints) | 0.3 | Discover and load entry points from installed packages. / MIT License |
| [enum34](https://bitbucket.org/stoneleaf/enum34) | 1.1.6 | Python 3.4 Enum backported to 3.3, 3.2, 3.1, 2.7, 2.6, 2.5, and 2.4 / BSD 3-Clause |
| [et\_xmlfile](https://bitbucket.org/openpyxl/et_xmlfile) | 1.0.1 | An implementation of lxml.xmlfile for the standard library / MIT |
| [fastcache](https://github.com/pbrady/fastcache) | 1.1.0 | C implementation of Python 3 lru\_cache / MIT |
| [filelock](https://github.com/benediktschmitt/py-filelock) | 3.0.12 | A platform independent file lock. / Public Domain |
| [flask](http://flask.pocoo.org) | 1.1.1 | A microframework based on Werkzeug, Jinja2 and good intentions. / BSD 3-Clause |
| [freetype](https://www.freetype.org/) | 2.9.1 | A Free, High-Quality, and Portable Font Engine / GPL-2.0 and FreeType |
| [funcsigs](http://funcsigs.readthedocs.org) | 1.0.2 | Python function signatures from PEP362 for Python 2.6, 2.7 and 3.2+. / Apache 2.0 |
| [functools32](https://github.com/MiCHiLU/python-functools32) | 3.2.3.2 | Backport of the functools module from Python 3.2.3 for use on 2.7 and PyPy. / PSF license |
| [future](http://python-future.org) | 0.17.1 | Clean single-source support for Python 3 and 2 / MIT |
| [futures](https://github.com/agronholm/pythonfutures) | 3.3.0 | Backport of the concurrent.futures package from Python 3.2 / PSF |
| [get\_terminal\_size](https://github.com/chrippa/backports.shutil_get_terminal_size) | 1.0.0 | Get the size of the terminal window. / MIT |
| [gevent](http://www.gevent.org/) | 1.4.0 | Coroutine-based network library / MIT |
| [glob2](https://github.com/miracle2k/python-glob2) | 0.7 | Version of the glob module that supports recursion via \*\*, and can capture patterns. / BSD-2-Clause |
| [greenlet](https://github.com/python-greenlet/greenlet) | 0.4.15 | Lightweight in-process concurrent programming / MIT |
| [grin](http://pypi.python.org/pypi/grin) | 1.2.1 | Enhanced grep-like tool / BSD 3-Clause |
| [h5py](http://www.h5py.org/) | 2.9.0 | Read and write HDF5 files from Python. / BSD-3-Clause |
| [hdf5](http://www.hdfgroup.org/HDF5/) | 1.10.4 | HDF5 is a data model, library, and file format for storing and managing data / HDF5 |
| [heapdict](http://stutzbachenterprises.com/) | 1.0.0 | A heap with decrease-key and increase-key operations / BSD 3-Clause |
| [html5lib](https://github.com/html5lib/html5lib-python) | 1.0.1 | HTML parser based on the WHATWG HTML specification / MIT |
| icc\_rt | 2019.0.0 | Intel runtime libraries for C, C++ and Fortran compilers / Intel proprietary |
| [icu](http://site.icu-project.org/) | 58.2 | International Components for Unicode. / MIT |
| [idna](https://github.com/kjd/idna) | 2.8 | Internationalized Domain Names in Applications (IDNA). / BSD Like |
| [imageio](http://imageio.github.io) | 2.5.0 | a Python library for reading and writing image data / BSD 2-Clause |
| [imagesize](https://github.com/shibukawa/imagesize_py) | 1.1.0 | Getting image size from png/jpeg/jpeg2000/gif file / MIT |
| [importlib\_metadata](http://importlib-metadata.readthedocs.io) | 0.17 | A library to access the metadata for a Python package / APACHE-2.0 |
| [intel-openmp](https://software.intel.com/en-us/node/522690) | 2019.4 | Math library for Intel and compatible processors / proprietary - Intel |
| [ipaddress](https://github.com/phihag/ipaddress) | 1.0.22 | IPv4/IPv6 manipulation library / PSF 2 |
| [ipykernel](https://ipython.org) | 4.10.0 | IPython Kernel for Jupyter / BSD-3-Clause |
| [ipython](https://ipython.org/) | 5.8.0 | IPython: Productive Interactive Computing / BSD-3-Clause |
| [ipython\_genutils](http://ipython.org) | 0.2.0 | vestigial utilities from IPython / BSD 3-Clause |
| [ipywidgets](https://github.com/ipython/ipywidgets) | 7.5.0 | Jupyter Interactive Widgets / BSD 3-clause |
| [isort](https://github.com/timothycrosley/isort) | 4.3.21 | A Python utility / library to sort Python imports. / MIT |
| [itsdangerous](https://github.com/pallets/itsdangerous) | 1.1.0 | Various helpers to pass trusted data to untrusted environments. / BSD 3-Clause |
| [jdcal](https://github.com/phn/jdcal) | 1.4.1 | Julian dates from proleptic Gregorian and Julian calendars. / BSD 2-Clause |
| [jedi](https://github.com/davidhalter/jedi/) | 0.13.3 | An autocompletion tool for Python that can be used for text editors. / MIT |
| [jinja2](http://jinja.pocoo.org) | 2.10.1 | An easy to use stand-alone template engine written in pure python. / 3-Clause BSD |
| [jpeg](http://www.ijg.org/) | 9b | read/write jpeg COM, EXIF, IPTC medata / Custom free software license |
| [jsonschema](https://github.com/Julian/jsonschema) | 3.0.1 | An implementation of JSON Schema validation for Python / MIT |
| [jupyter](http://jupyter.org) | 1.0.0 | Jupyter metapackage. Install all the Jupyter components in one go. / BSD 3-Clause |
| [jupyter\_client](http://jupyter.org) | 5.3.1 | Jupyter protocol implementation and client libraries / BSD 3-clause |
| [jupyter\_console](http://jupyter.org) | 5.2.0 | Jupyter terminal console / BSD-3-Clause |
| [jupyter\_core](http://jupyter.org) | 4.5.0 | Core common functionality of Jupyter projects. / BSD 3-clause |
| [jupyterlab](https://github.com/jupyterlab/jupyterlab) | 0.33.11 | JupyterLab / BSD-3-Clause |
| [jupyterlab\_launcher](http://github.com/jupyterlab/jupyterlab_launcher) | 0.11.2 | A Launcher for JupyterLab based applications. / BSD 3-Clause |
| [keyring](https://github.com/jaraco/keyring) | 18.0.0 | Store and access your passwords safely / Python Software Foundation or MIT |
| [kiwisolver](https://github.com/nucleic/kiwi) | 1.1.0 | A fast implementation of the Cassowary constraint solver / BSD 3-Clause |
| [krb5](http://web.mit.edu/kerberos/) | 1.16.1 | A network authentication protocol. / MIT |
| [lazy-object-proxy](https://github.com/ionelmc/python-lazy-object-proxy) | 1.4.1 | A fast and thorough lazy object proxy / BSD-2-Clause |
| [libarchive](http://www.libarchive.org/) | 3.3.3 | Multi-format archive and compression library / BSD 2-Clause |
| [libcurl](http://curl.haxx.se/) | 7.64.0 | tool and library for transferring data with URL syntax / MIT/X derivate (`<http://curl.haxx.se/docs/copyright.html>`) |
| [libiconv](https://www.gnu.org/software/libiconv/) | 1.15 | Provides iconv for systems which don’t have one (or that cannot convert from/to Unicode.) / GPL and LGPL |
| [libpng](http://www.libpng.org/pub/png/libpng.html) | 1.6.37 | PNG reference library / zlib/libpng |
| [libsodium](http://libsodium.org) | 1.0.16 | A modern and easy-to-use crypto library. / ISC |
| [libssh2](https://www.libssh2.org/) | 1.8.0 | the SSH library / BSD-3-Clause |
| [libtiff](http://www.libtiff.org/) | 4.0.10 | Support for the Tag Image File Format (TIFF). / HPND |
| [libxml2](http://xmlsoft.org/) | 2.9.9 | The XML C parser and toolkit of Gnome / MIT |
| [libxslt](http://xmlsoft.org/XSLT/) | 1.1.33 | The XSLT C library developed for the GNOME project / MIT |
| [linecache2](https://github.com/testing-cabal/linecache2) | 1.0.0 | Backport of the linecache module / PSF 1.0 |
| [llvmlite](https://github.com/numba/llvmlite) | 0.29.0 | A lightweight LLVM python binding for writing JIT compilers / New BSD License |
| [locket](https://github.com/mwilliamson/locket.py) | 0.2.0 | File-based locks for Python for Linux and Windows / BSD 2-Clause |
| [lxml](http://lxml.de/) | 4.3.4 | Pythonic binding for the C libraries libxml2 and libxslt. / BSD 3-Clause, GPL-2.0, ZPL-2.0, and ElementTree |
| [lz4-c](https://www.lz4.org) | 1.8.1.2 | Extremely Fast Compression algorithm / BSD 2-clause |
| [lzo](http://www.oberhumer.com/opensource/lzo/) | 2.10 | LZO is a portable lossless data compression library written in ANSI C. / GPL v2+ |
| m2w64-gcc-libgfortran | 5.3.0 | |
| m2w64-gcc-libs | 5.3.0 | |
| m2w64-gcc-libs-core | 5.3.0 | |
| m2w64-gmp | 6.1.0 | |
| m2w64-libwinpthread-git | 5.0.0.4634.697f757 | |
| [markupsafe](https://www.palletsprojects.com/p/markupsafe) | 1.1.1 | A Python module that implements the jinja2.Markup string / BSD-3-Clause |
| [matplotlib](http://matplotlib.org/) | 2.2.3 | Publication quality figures in Python / PSF-based |
| [mccabe](https://github.com/PyCQA/mccabe) | 0.6.1 | McCabe complexity checker for Python / MIT |
| [menuinst](https://github.com/ContinuumIO/menuinst) | 1.4.16 | cross platform menu item installation / BSD |
| [mistune](https://github.com/lepture/mistune) | 0.8.4 | The fastest markdown parser in pure Python. / BSD 3-Clause |
| [mkl](https://software.intel.com/en-us/mkl) | 2019.4 | Math library for Intel and compatible processors / proprietary - Intel |
| [mkl-service](http://github.com/IntelPython/mkl-service) | 2.0.2 | Python hooks for Intel(R) Math Kernel Library runtime control settings. / BSD-3-Clause |
| [mkl\_fft](http://github.com/IntelPython/mkl_fft) | 1.0.12 | NumPy-based implementation of Fast Fourier Transform using Intel (R) Math Kernel Library. / BSD 3-Clause |
| [mock](https://github.com/testing-cabal/mock) | 3.0.5 | A library for testing in Python / BSD-2-Clause |
| [more-itertools](https://github.com/erikrose/more-itertools) | 5.0.0 | More routines for operating on iterables, beyond itertools / MIT |
| [mpmath](http://mpmath.org) | 1.1.0 | Python library for arbitrary-precision floating-point arithmetic / BSD 3-Clause |
| [msgpack-python](http://msgpack.org/) | 0.6.1 | MessagePack (de)serializer. / Apache 2.0 |
| msys2-conda-epoch | 20160418 | |
| [multipledispatch](https://github.com/mrocklin/multipledispatch/) | 0.6.0 | Multiple dispatch in Python / BSD 3-Clause |
| [nbconvert](http://jupyter.org) | 5.5.0 | Converting Jupyter Notebooks / BSD-3-Clause |
| [nbformat](http://jupyter.org) | 4.4.0 | The reference implementation of the Jupyter Notebook format / BSD 3-clause |
| [networkx](https://networkx.github.io/) | 2.2 | Python package for creating and manipulating complex networks / BSD-3-Clause |
| [nltk](http://nltk.org/) | 3.4.4 | Build Python programs to work with human language data / Apache 2.0 |
| [nose](http://readthedocs.org/docs/nose/) | 1.3.7 | Nose extends unittest to make testing easier / LGPL-2.1 |
| [notebook](http://jupyter.org) | 5.7.8 | Jupyter Notebook / BSD 3-clause |
| [numba](http://numba.github.com) | 0.44.1 | NumPy aware dynamic Python compiler using LLVM / BSD 2-clause |
| [numexpr](https://github.com/pydata/numexpr) | 2.6.9 | Fast numerical expression evaluator for NumPy. / MIT |
| [numpy](http://numpy.scipy.org/) | 1.16.4 | Array processing for numbers, strings, records, and objects. / BSD 3-Clause |
| numpy-base | 1.16.4 | None / None |
| [numpydoc](https://github.com/numpy/numpydoc) | 0.9.1 | Numpy’s Sphinx extensions / BSD 3-Clause |
| [olefile](http://www.decalage.info/python/olefileio) | 0.46 | parse, read and write Microsoft OLE2 files / BSD 2-Clause |
| [openpyxl](https://openpyxl.readthedocs.io) | 2.6.2 | A Python library to read/write Excel 2010 xlsx/xlsm files / MIT |
| [openssl](http://www.openssl.org/) | 1.0.2s | OpenSSL is an open-source implementation of the SSL and TLS protocols / OpenSSL |
| [packaging](https://github.com/pypa/packaging) | 19.0 | Core utilities for Python packages / Apache 2.0 or BSD 2-Clause |
| [pandas](http://pandas.pydata.org) | 0.24.2 | High-performance, easy-to-use data structures and data analysis tools. / BSD 3-clause |
| [pandoc](http://pandoc.org/) | 2.2.3.2 | Universal markup converter (repackaged binaries). / GPL-2.0 |
| [pandocfilters](https://github.com/jgm/pandocfilters) | 1.4.2 | A python module for writing pandoc filters / BSD-3-Clause |
| [parso](https://github.com/davidhalter/parso) | 0.5.0 | A Python Parser / MIT |
| [partd](https://github.com/dask/partd) | 1.0.0 | Data structure for on-disk shuffle operations / BSD 3-Clause |
| [path.py](https://github.com/jaraco/path.py) | 11.5.0 | A module wrapper for os.path / MIT |
| [pathlib2](https://github.com/mcmtroffaes/pathlib2) | 2.3.4 | Fork of pathlib aiming to support the full stdlib Python API / MIT |
| [patsy](https://github.com/pydata/patsy) | 0.5.1 | Describing statistical models in Python using symbolic formulas / BSD-2-Clause, PSF2 |
| [pep8](http://pep8.readthedocs.org/) | 1.7.1 | Python style guide checker / MIT |
| [pickleshare](https://github.com/pickleshare/pickleshare/) | 0.7.5 | Tiny ‘shelve’-like database with concurrency support / MIT |
| [pillow](https://pillow.readthedocs.io) | 6.1.0 | Pillow is the friendly PIL fork by Alex Clark and Contributors / PIL |
| [pip](https://pip.pypa.io/en/stable/) | 19.1.1 | PyPA recommended tool for installing Python packages / MIT |
| [pkginfo](https://code.launchpad.net/~tseaver/pkginfo/trunk) | 1.5.0.1 | Query metadatdata from sdists / bdists / installed packages. / MIT |
| [pluggy](https://github.com/pytest-dev/pluggy) | 0.12.0 | Plugin registration and hook calling for Python / MIT |
| [ply](http://www.dabeaz.com/ply/index.html) | 3.11 | Python Lex-Yacc / BSD 3-clause |
| powershell\_shortcut | 0.0.1 | Powershell shortcut creator for Windows (using menuinst) / BSD |
| [prometheus\_client](https://github.com/prometheus/client_python) | 0.7.1 | Python client for the Prometheus monitoring system / Apache 2.0 |
| [prompt\_toolkit](https://github.com/jonathanslenders/python-prompt-toolkit) | 1.0.15 | Library for building powerful interactive command lines in Python / BSD 3-clause |
| [psutil](https://github.com/giampaolo/psutil) | 5.6.3 | A cross-platform process and system utilities module for Python / BSD 3-Clause |
| [py](https://github.com/pytest-dev/py) | 1.8.0 | library with cross-python path, ini-parsing, io, code, log facilities / MIT |
| [pycodestyle](https://pycodestyle.readthedocs.io/) | 2.5.0 | Python style guide checker / MIT |
| [pycosat](https://github.com/ContinuumIO/pycosat) | 0.6.3 | Bindings to picosat (a SAT solver) / MIT |
| [pycparser](https://github.com/eliben/pycparser) | 2.19 | Complete C99 parser in pure Python / BSD 3-clause |
| [pycrypto](http://www.pycrypto.org/) | 2.6.1 | Cryptographic modules for Python. / Public Domain |
| [pycurl](http://pycurl.sourceforge.net/) | 7.43.0.2 | A Python Interface To The cURL library / LGPL, MIT |
| [pyflakes](https://github.com/PyCQA/pyflakes) | 2.1.1 | Pyflakes analyzes programs and detects various errors. / MIT |
| [pygments](http://pygments.org/) | 2.4.2 | Generic syntax highlighting package / BSD 2-clause |
| [pylint](http://www.pylint.org/) | 1.9.2 | python code static checker / GPL |
| [pyodbc](https://github.com/mkleehammer/pyodbc) | 4.0.26 | DB API Module for ODBC / MIT |
| [pyopenssl](https://github.com/pyca/pyopenssl) | 19.0.0 | Python wrapper module around the OpenSSL library / Apache 2.0 |
| [pyparsing](http://pyparsing.wikispaces.com/) | 2.4.0 | Create and execute simple grammars / MIT |
| [pyqt](http://www.riverbankcomputing.co.uk/software/pyqt) | 5.6.0 | Python binding of the cross-platform GUI toolkit Qt. / Commercial, GPL-2.0, GPL-3.0 |
| [pyreadline](http://ipython.org/pyreadline) | 2.1 | A python implmementation of GNU readline. / BSD 3-Clause |
| [pyrsistent](http://github.com/tobgu/pyrsistent/) | 0.14.11 | Persistent/Functional/Immutable data structures / MIT |
| [pysocks](https://github.com/Anorov/PySocks) | 1.7.0 | A Python SOCKS client module. See [Anorov/PySocks](https://github.com/Anorov/PySocks) for more information. / BSD 3-Clause |
| [pytables](http://www.pytables.org) | 3.5.2 | Brings together Python, HDF5 and NumPy to easily handle large amounts of data. / BSD 3-Clause |
| [pytest](https://docs.pytest.org/en/latest/) | 4.6.2 | Simple and powerful testing with Python. / MIT |
| [python](http://www.python.org/) | 2.7.16 | General purpose programming language / PSF |
| [python-dateutil](https://dateutil.readthedocs.org/) | 2.8.0 | Extensions to the standard Python datetime module. / BSD 3 Clause |
| [python-libarchive-c](https://github.com/Changaco/python-libarchive-c) | 2.8 | Python interface to libarchive / CC0-1.0 |
| [pytz](http://pythonhosted.org/pytz/) | 2019.1 | World timezone definitions, modern and historical. / MIT |
| [pywavelets](https://github.com/PyWavelets/pywt) | 1.0.3 | Discrete Wavelet Transforms in Python / MIT |
| [pywin32](https://sourceforge.net/projects/pywin32) | 223 | Python extensions for Windows / PSF |
| [pywinpty](https://github.com/spyder-ide/pywinpty) | 0.5.5 | Python bindings for the winpty library / MIT |
| [pyyaml](http://pyyaml.org/wiki/PyYAML) | 5.1.1 | YAML parser and emitter for Python / MIT |
| [pyzmq](https://github.com/zeromq/pyzmq) | 18.0.0 | Python bindings for zeromq / BSD 3-clause |
| [qt](http://qt-project.org) | 5.6.2 | Qt is a cross-platform application and UI framework. / LGPL-3.0 |
| [qtawesome](https://github.com/spyder-ide/qtawesome) | 0.5.7 | Iconic fonts in PyQt and PySide applications / MIT |
| [qtconsole](http://jupyter.org) | 4.5.1 | Jupyter Qt console / BSD 3-Clause |
| [qtpy](https://github.com/spyder-ide/qtpy) | 1.8.0 | Abstraction layer for PyQt5/PyQt4/PySide / MIT |
| [requests](http://python-requests.org) | 2.22.0 | Python HTTP for Humans / Apache 2.0 |
| [rope](https://github.com/python-rope/rope) | 0.14.0 | A python refactoring library / GPL 2.0 |
| [ruamel\_yaml](https://bitbucket.org/ruamel/yaml) | 0.15.46 | A patched copy of ruamel.yaml. / MIT |
| [scandir](https://github.com/benhoyt/scandir) | 1.10.0 | scandir, a better directory iterator and faster os.walk() / BSD 3-Clause |
| [scikit-image](http://scikit-image.org/) | 0.14.2 | Image processing routines for SciPy. / BSD 3-Clause |
| [scikit-learn](http://scikit-learn.org/) | 0.20.3 | A set of python modules for machine learning and data mining / BSD 3-Clause |
| [scipy](http://www.scipy.org/) | 1.2.1 | Scientific Library for Python / BSD 3-Clause |
| [seaborn](https://seaborn.pydata.org) | 0.9.0 | Statistical data visualization / BSD 3-Clause |
| [send2trash](https://github.com/hsoft/send2trash) | 1.5.0 | Python library to natively send files to Trash (or Recycle bin) on all platforms. / BSD-3-Clause |
| [setuptools](https://github.com/pypa/setuptools) | 41.0.1 | Download, build, install, upgrade, and uninstall Python packages / MIT |
| [simplegeneric](http://cheeseshop.python.org/pypi/simplegeneric) | 0.8.1 | Simple generic functions (similar to Python’s own len(), pickle.dump(), etc.) / Zope Public |
| [singledispatch](http://docs.python.org/3/library/functools.html#functools.singledispatch) | 3.4.0.3 | Transforms a function into a single-dispatch generic function / MIT |
| [sip](http://www.riverbankcomputing.com/software/sip/intro) | 4.18.1 | Create Python bindings for C and C++ libraries / GPL-3.0 |
| [six](http://pypi.python.org/pypi/six/) | 1.12.0 | Python 2 and 3 compatibility utilities / MIT |
| [snappy](https://github.com/google/snappy) | 1.1.7 | A fast compressor/decompressor / BSD 3-clause |
| [snowballstemmer](https://github.com/shibukawa/snowball_py) | 1.9.0 | Snowball stemming library collection for Python / BSD-2-Clause |
| [sortedcollections](http://www.grantjenks.com/docs/sortedcollections/) | 1.1.2 | Python Sorted Collections / Apache-2.0 |
| [sortedcontainers](http://www.grantjenks.com/docs/sortedcontainers/) | 2.1.0 | Python Sorted Container Types: SortedList, SortedDict, and SortedSet / Apache 2.0 |
| [soupsieve](http://facelessuser.github.io/soupsieve) | 1.8 | A modern CSS selector implementation for BeautifulSoup / MIT |
| [sphinx](http://www.sphinx-doc.org) | 1.8.5 | Sphinx is a tool that makes it easy to create intelligent and beautiful documentation / BSD-2-Clause |
| sphinxcontrib | 1.0 | Python namespace for sphinxcontrib / BSD |
| [sphinxcontrib-websupport](https://pypi.python.org/pypi/sphinxcontrib-websupport) | 1.1.2 | Sphinx API for Web Apps / BSD-2-Clause |
| [spyder](https://www.spyder-ide.org/) | 3.3.6 | The Scientific Python Development Environment / MIT |
| [spyder-kernels](https://github.com/spyder-ide/spyder-kernels) | 0.5.1 | Jupyter kernels for the Spyder console / MIT |
| [sqlalchemy](http://www.sqlalchemy.org/) | 1.3.5 | Database Abstraction Library. / MIT |
| [sqlite](http://www.sqlite.org/) | 3.29.0 | Implements a self-contained, zero-configuration, SQL database engine. / Public-Domain (`<http://www.sqlite.org/copyright.html>`) |
| [ssl\_match\_hostname](http://bitbucket.org/brandon/backports.ssl_match_hostname) | 3.7.0.1 | The ssl.match\_hostname() function from Python 3.5 / PSF 2 |
| [statsmodels](https://www.statsmodels.org) | 0.10.0 | Statistical computations and models for use with SciPy / BSD 3-Clause |
| [subprocess32](https://github.com/google/python-subprocess32) | 3.5.4 | A backport of the subprocess module from Python 3.2/3.3 for use on 2.x / Python-2.0 |
| [sympy](http://sympy.org) | 1.4 | Python library for symbolic mathematics / BSD-3-Clause |
| [tblib](https://github.com/ionelmc/python-tblib) | 1.4.0 | Traceback serialization library. / BSD 2-Clause |
| [terminado](https://github.com/jupyter/terminado) | 0.8.2 | Terminals served by tornado websockets / BSD 2-Clause |
| [testpath](https://testpath.readthedocs.io) | 0.4.2 | Testpath is a collection of utilities for Python code working with files and commands. / BSD-3-Clause |
| [tk](http://www.tcl.tk/) | 8.6.8 | A dynamic programming language with GUI support. Bundles Tcl and Tk. / Tcl/Tk |
| [toolz](http://toolz.readthedocs.org/) | 0.10.0 | A functional standard library for Python / BSD 3-Clause |
| [tornado](http://www.tornadoweb.org/) | 5.1.1 | A Python web framework and asynchronous networking library, originally developed at FriendFeed. / Apache 2.0 |
| [tqdm](https://pypi.python.org/pypi/tqdm) | 4.32.1 | A Fast, Extensible Progress Meter / MPLv2.0, MIT |
| [traceback2](https://github.com/testing-cabal/traceback2) | 1.4.0 | Backports of the traceback module / PSF 2.0 |
| [traitlets](http://ipython.org/) | 4.3.2 | Configuration system for Python applications / BSD 3-clause |
| [typing](https://docs.python.org/3.5/library/typing.html) | 3.7.4 | Type Hints for Python - backport for `Python<3.5` / PSF |
| [unicodecsv](https://github.com/jdunck/python-unicodecsv) | 0.14.1 | Drop-in replacement for csv module which supports unicode strings / BSD |
| [unittest2](http://pypi.python.org/pypi/unittest2) | 1.1.0 | The new features in unittest backported to Python 2.4+ / BSD |
| [urllib3](https://urllib3.readthedocs.io/) | 1.24.2 | HTTP library with thread-safe connection pooling, file post, and more. / MIT |
| [vc](https://github.com/conda/conda/wiki/VC-features) | 9 | A meta-package to impose mutual exclusivity among software built with different VS versions / Modified BSD License (3-clause) |
| vs2008\_runtime | 9.00.30729.1 | None / None |
| vs2015\_runtime | 14.15.26706 | MSVC runtimes associated with cl.exe version 19.15.26726 (VS 2017 update 8) / None |
| [wcwidth](https://github.com/jquast/wcwidth) | 0.1.7 | Measures number of Terminal column cells of wide-character codes. / MIT |
| [webencodings](https://github.com/gsnedders/python-webencodings) | 0.5.1 | Character encoding aliases for legacy web content / BSD 3-Clause |
| [werkzeug](https://palletsprojects.com/p/werkzeug/) | 0.15.4 | The comprehensive WSGI web application library. / BSD 3-Clause |
| [wheel](https://github.com/pypa/wheel) | 0.33.4 | A built-package format for Python. / MIT |
| [widgetsnbextension](http://ipython.org) | 3.5.0 | Interactive Widgets for Jupyter / BSD 3-clause |
| [win\_inet\_pton](https://github.com/hickeroar/win_inet_pton) | 1.1.0 | Native inet\_pton and inet\_ntop implementation for Python on Windows (with ctypes). / PUBLIC-DOMAIN |
| [win\_unicode\_console](https://github.com/Drekin/win-unicode-console) | 0.5 | A Python package to enable Unicode input and display when running Python from Windows console. / MIT |
| [wincertstore](https://bitbucket.org/tiran/wincertstore) | 0.2 | Python module to extract CA and CRL certs from Windows’ cert store (ctypes based). / PSF 2 |
| [winpty](https://github.com/rprichard/winpty) | 0.4.3 | Winpty provides an interface similar to a Unix pty-master for communicating with Windows console programs. / MIT |
| [wrapt](https://github.com/GrahamDumpleton/wrapt) | 1.11.2 | Module for decorators, wrappers and monkey patching / BSD 2-Clause |
| [xlrd](http://www.python-excel.org/) | 1.2.0 | Library for developers to extract data from Microsoft Excel (tm) spreadsheet files / BSD 3-Clause and BSD with advertising |
| [xlsxwriter](https://xlsxwriter.readthedocs.io/) | 1.1.8 | A Python module for creating Excel XLSX files / BSD 2-Clause |
| [xlwings](http://xlwings.org/) | 0.15.8 | Interact with Excel from Python and vice versa / 3-clause BSD |
| [xlwt](http://www.python-excel.org/) | 1.3.0 | Writing data and formatting information to Excel files / BSD |
| [xz](http://tukaani.org/xz/) | 5.2.4 | Data compression software with high compression ratio / LGPL-2.1 and GPL-2.0 |
| [yaml](http://pyyaml.org/wiki/LibYAML) | 0.1.7 | A C library for parsing and emitting YAML. / MIT |
| [zeromq](http://zeromq.org) | 4.3.1 | A high-performance asynchronous messaging library. / LGPL 3 |
| [zict](http://github.com/mrocklin/zict) | 1.0.0 | Composable Dictionary Classes / BSD 3-Clause |
| [zipp](https://github.com/jaraco/zipp) | 0.5.1 | A pathlib-compatible Zipfile object wrapper / MIT |
| [zlib](http://zlib.net/) | 1.2.11 | Massively spiffy yet delicately unobtrusive compression library / zlib |
| [zstd](http://www.zstd.net) | 1.3.7 | Zstandard - Fast real-time compression algorithm / BSD 3-Clause |
| Name | Version | Summary / License |
|---|---|---|
| [\_ipyw\_jlab\_nb\_ext\_conf](https://github.com/ContinuumIO/anaconda-nb-extensions-meta-config) | 0.1.0 | A configuration metapackage for enabling Anaconda-bundled jupyter extensions / BSD |
| [alabaster](http://www.sphinx-doc.org/en/stable/index.html) | 0.7.12 | Configurable, Python 2+3 compatible Sphinx theme. / BSD 3-Clause |
| [anaconda-client](http://anaconda.org) | 1.7.2 | anaconda.org command line client library / BSD 3-clause |
| [anaconda-project](https://github.com/Anaconda-Platform/anaconda-project) | 0.8.3 | Tool for encapsulating, running, and reproducing data science projects / BSD 3-Clause |
| [appnope](http://github.com/minrk/appnope) | 0.1.0 | Disable App Nap on OS X 10.9 / BSD 2-Clause |
| [appscript](http://appscript.sourceforge.net/) | 1.1.0 | Control AppleScriptable applications from Python / Public-Domain |
| [asn1crypto](https://github.com/wbond/asn1crypto) | 0.24.0 | Python ASN.1 library with a focus on performance and a pythonic API / MIT |
| [astroid](https://www.astroid.org/) | 1.6.5 | A abstract syntax tree for Python with inference support. / LGPL 2.1 |
| [astropy](http://www.astropy.org/) | 2.0.9 | Community-developed Python Library for Astronomy / BSD |
| [atomicwrites](https://github.com/untitaker/python-atomicwrites) | 1.3.0 | Atomic file writes / MIT |
| [attrs](https://attrs.readthedocs.io/en/stable/) | 19.1.0 | attrs is the Python package that will bring back the joy of writing classes by relieving you from the drudgery of implementing object protocols (aka dunder methods). / MIT |
| [babel](http://babel.pocoo.org/) | 2.7.0 | Utilities to internationalize and localize Python applications / BSD 3-clause |
| [backports](https://bitbucket.org/brandon/backports) | 1.0 | None / BSD |
| [backports.functools\_lru\_cache](https://github.com/jaraco/backports.functools_lru_cache) | 1.5 | Backport of functools.lru\_cache from Python 3.3 as published at ActiveState. / MIT |
| [backports.os](https://github.com/pjdelport/backports.os) | 0.1.1 | Backport of new features in Python’s os module / Python Software Foundation |
| [backports.shutil\_get\_terminal\_size](https://github.com/chrippa/backports.shutil_get_terminal_size) | 1.0.0 | A backport of the get\_terminal\_size function from Python 3.3’s shutil. / MIT |
| [backports\_abc](https://github.com/cython/backports_abc) | 0.5 | A backport of recent additions to the collections.abc module. / PSF 2 |
| [beautifulsoup4](http://www.crummy.com/software/BeautifulSoup/) | 4.7.1 | Python library designed for screen-scraping / MIT |
| [bitarray](https://github.com/ilanschnell/bitarray) | 0.9.3 | efficient arrays of booleans – C extension / PSF |
| [bkcharts](http://github.com/bokeh/bkcharts) | 0.2 | High level chart types built on top of Bokeh / BSD 3-Clause |
| blas | 1.0 | None / None |
| [bleach](https://github.com/mozilla/bleach) | 3.1.0 | Easy, whitelist-based HTML-sanitizing tool / Apache-2.0 |
| [blosc](https://github.com/Blosc/c-blosc) | 1.16.3 | A blocking, shuffling and loss-less compression library that can be faster than memcpy() / BSD 3-Clause |
| [bokeh](http://bokeh.pydata.org/) | 1.2.0 | Statistical and novel interactive HTML plots for Python / BSD 3-Clause |
| [boto](https://github.com/boto/boto/) | 2.49.0 | Amazon Web Services Library / MIT |
| [bottleneck](http://berkeleyanalytics.com/bottleneck) | 1.2.1 | Fast NumPy array functions written in Cython. / BSD 2-Clause |
| [bzip2](http://www.bzip.org/) | 1.0.8 | high-quality data compressor / bzip2 |
| [ca-certificates](https://github.com/conda-forge/ca-certificates-feedstock) | 2019.5.15 | Certificates for use with other packages. / ISC |
| [cdecimal](http://www.bytereef.org/mpdecimal/index.html) | 2.3 | Fast drop-in replacement for decimal.py / BSD 2-Clause |
| [certifi](http://certifi.io/) | 2019.6.16 | Python package for providing Mozilla’s CA Bundle. / ISC |
| [cffi](https://bitbucket.org/cffi/cffi) | 1.12.3 | Foreign Function Interface for Python calling C code. / MIT |
| [chardet](https://github.com/chardet/chardet) | 3.0.4 | Universal character encoding detector / LGPL2 |
| [click](https://palletsprojects.com/p/click) | 7.0 | Python composable command line interface toolkit / BSD-3-Clause |
| [cloudpickle](https://github.com/cloudpipe/cloudpickle) | 1.2.1 | Extended pickling support for Python objects / BSD 3-Clause |
| [clyent](https://github.com/Anaconda-Platform/clyent) | 1.2.2 | Command line client library for windows and posix / BSD 3-Clause |
| [colorama](https://github.com/tartley/colorama) | 0.4.1 | Cross-platform colored terminal text / BSD-3-Clause |
| [conda](https://conda.io) | 4.7.10 | OS-agnostic, system-level binary package and environment manager. / BSD 3-Clause |
| [conda-build](https://github.com/conda/conda-build) | 3.18.9 | tools for building conda packages / BSD 3-Clause |
| [conda-env](https://github.com/conda/conda-env) | 2.6.0 | Tools for interacting with conda environments. / BSD 3-Clause |
| [conda-verify](https://github.com/conda/conda-verify) | 3.4.2 | tool for validating conda recipes and conda packages / BSD 3-Clause |
| [configparser](http://docs.python.org/3/library/configparser.html) | 3.7.4 | This library brings the updated configparser from Python 3.5 to Python 2.6-3.5 / MIT |
| [contextlib2](http://contextlib2.readthedocs.org) | 0.5.5 | Backports and enhancements for the contextlib module / PSF |
| [cryptography](https://github.com/pyca/cryptography) | 2.7 | Provides cryptographic recipes and primitives to Python developers / Apache 2.0 or BSD 3-Clause, PSF 2 |
| [curl](http://curl.haxx.se/) | 7.65.2 | tool and library for transferring data with URL syntax / MIT/X derivate (`<http://curl.haxx.se/docs/copyright.html>`) |
| [cycler](http://matplotlib.org/cycler) | 0.10.0 | Composable style cycles. / BSD 3-Clause |
| [cython](http://www.cython.org/) | 0.29.12 | The Cython compiler for writing C extensions for the Python language / Apache-2.0 |
| [cytoolz](https://github.com/pytoolz/cytoolz) | 0.10.0 | Cython implementation of Toolz. High performance functional utilities / BSD-3-Clause |
| [dask](https://dask.org/) | 1.2.2 | Parallel PyData with Task Scheduling / BSD 3-Clause |
| [dask-core](http://github.com/dask/dask/) | 1.2.2 | Parallel Python with task scheduling / BSD 3-Clause |
| [dbus](http://www.freedesktop.org/wiki/Software/dbus/) | 1.13.6 | Simple message bus system for applications to talk to one another / GPL2 |
| [decorator](https://github.com/micheles/decorator) | 4.4.0 | Better living through Python with decorators. / BSD 3-Clause |
| [defusedxml](https://bitbucket.org/tiran/defusedxml) | 0.6.0 | XML bomb protection for Python stdlib modules / PSF 2.0 |
| [distributed](http://distributed.readthedocs.io/en/latest/) | 1.28.1 | Distributed computing with Dask / BSD 3-Clause |
| [docutils](http://docutils.sourceforge.net/) | 0.14 | Docutils – Python Documentation Utilities / Public Domain Dedictation and BSD 2-Clause and PSF 2.1.1 and GPL 3.0 |
| [entrypoints](https://github.com/takluyver/entrypoints) | 0.3 | Discover and load entry points from installed packages. / MIT License |
| [enum34](https://bitbucket.org/stoneleaf/enum34) | 1.1.6 | Python 3.4 Enum backported to 3.3, 3.2, 3.1, 2.7, 2.6, 2.5, and 2.4 / BSD 3-Clause |
| [et\_xmlfile](https://bitbucket.org/openpyxl/et_xmlfile) | 1.0.1 | An implementation of lxml.xmlfile for the standard library / MIT |
| [expat](http://expat.sourceforge.net/) | 2.2.6 | Expat XML parser library in C. / MIT |
| [fastcache](https://github.com/pbrady/fastcache) | 1.1.0 | C implementation of Python 3 lru\_cache / MIT |
| [filelock](https://github.com/benediktschmitt/py-filelock) | 3.0.12 | A platform independent file lock. / Public Domain |
| [flask](http://flask.pocoo.org) | 1.1.1 | A microframework based on Werkzeug, Jinja2 and good intentions. / BSD 3-Clause |
| [freetype](https://www.freetype.org/) | 2.9.1 | A Free, High-Quality, and Portable Font Engine / GPL-2.0 and FreeType |
| [funcsigs](http://funcsigs.readthedocs.org) | 1.0.2 | Python function signatures from PEP362 for Python 2.6, 2.7 and 3.2+. / Apache 2.0 |
| [functools32](https://github.com/MiCHiLU/python-functools32) | 3.2.3.2 | Backport of the functools module from Python 3.2.3 for use on 2.7 and PyPy. / PSF license |
| [future](http://python-future.org) | 0.17.1 | Clean single-source support for Python 3 and 2 / MIT |
| [futures](https://github.com/agronholm/pythonfutures) | 3.3.0 | Backport of the concurrent.futures package from Python 3.2 / PSF |
| [get\_terminal\_size](https://github.com/chrippa/backports.shutil_get_terminal_size) | 1.0.0 | Get the size of the terminal window. / MIT |
| [gettext](https://www.gnu.org/software/gettext/) | 0.19.8.1 | Internationalization package. / GPLv2 |
| [gevent](http://www.gevent.org/) | 1.4.0 | Coroutine-based network library / MIT |
| [glib](https://developer.gnome.org/glib/) | 2.56.2 | Provides core application building blocks for libraries and applications written in C. / LGPL-2.1 |
| [glob2](https://github.com/miracle2k/python-glob2) | 0.7 | Version of the glob module that supports recursion via \*\*, and can capture patterns. / BSD-2-Clause |
| [gmp](http://gmplib.org/) | 6.1.2 | The GNU multiprecision library. / GPL 2 and LGPL 3 |
| [gmpy2](https://pypi.python.org/pypi/gmpy2) | 2.0.8 | GMP/MPIR, MPFR, and MPC interface to Python 2.6+ and 3.x / LGPL 3 |
| [greenlet](https://github.com/python-greenlet/greenlet) | 0.4.15 | Lightweight in-process concurrent programming / MIT |
| [grin](http://pypi.python.org/pypi/grin) | 1.2.1 | Enhanced grep-like tool / BSD 3-Clause |
| [h5py](http://www.h5py.org/) | 2.9.0 | Read and write HDF5 files from Python. / BSD-3-Clause |
| [hdf5](http://www.hdfgroup.org/HDF5/) | 1.10.4 | HDF5 is a data model, library, and file format for storing and managing data / HDF5 |
| [heapdict](http://stutzbachenterprises.com/) | 1.0.0 | A heap with decrease-key and increase-key operations / BSD 3-Clause |
| [html5lib](https://github.com/html5lib/html5lib-python) | 1.0.1 | HTML parser based on the WHATWG HTML specification / MIT |
| [icu](http://site.icu-project.org/) | 58.2 | International Components for Unicode. / MIT |
| [idna](https://github.com/kjd/idna) | 2.8 | Internationalized Domain Names in Applications (IDNA). / BSD Like |
| [imageio](http://imageio.github.io) | 2.5.0 | a Python library for reading and writing image data / BSD 2-Clause |
| [imagesize](https://github.com/shibukawa/imagesize_py) | 1.1.0 | Getting image size from png/jpeg/jpeg2000/gif file / MIT |
| [importlib\_metadata](http://importlib-metadata.readthedocs.io) | 0.17 | A library to access the metadata for a Python package / APACHE-2.0 |
| [intel-openmp](https://software.intel.com/en-us/node/522690) | 2019.4 | Math library for Intel and compatible processors / proprietary - Intel |
| [ipaddress](https://github.com/phihag/ipaddress) | 1.0.22 | IPv4/IPv6 manipulation library / PSF 2 |
| [ipykernel](https://ipython.org) | 4.10.0 | IPython Kernel for Jupyter / BSD-3-Clause |
| [ipython](https://ipython.org/) | 5.8.0 | IPython: Productive Interactive Computing / BSD-3-Clause |
| [ipython\_genutils](http://ipython.org) | 0.2.0 | vestigial utilities from IPython / BSD 3-Clause |
| [ipywidgets](https://github.com/ipython/ipywidgets) | 7.5.0 | Jupyter Interactive Widgets / BSD 3-clause |
| [isort](https://github.com/timothycrosley/isort) | 4.3.21 | A Python utility / library to sort Python imports. / MIT |
| [itsdangerous](https://github.com/pallets/itsdangerous) | 1.1.0 | Various helpers to pass trusted data to untrusted environments. / BSD 3-Clause |
| [jbig](https://www.cl.cam.ac.uk/~mgk25/jbigkit) | 2.1 | Implementation of the JBIG1 data compression standard / GPL-2.0 |
| [jdcal](https://github.com/phn/jdcal) | 1.4.1 | Julian dates from proleptic Gregorian and Julian calendars. / BSD 2-Clause |
| [jedi](https://github.com/davidhalter/jedi/) | 0.13.3 | An autocompletion tool for Python that can be used for text editors. / MIT |
| [jinja2](http://jinja.pocoo.org) | 2.10.1 | An easy to use stand-alone template engine written in pure python. / 3-Clause BSD |
| [jpeg](http://www.ijg.org/) | 9b | read/write jpeg COM, EXIF, IPTC medata / Custom free software license |
| [jsonschema](https://github.com/Julian/jsonschema) | 3.0.1 | An implementation of JSON Schema validation for Python / MIT |
| [jupyter](http://jupyter.org) | 1.0.0 | Jupyter metapackage. Install all the Jupyter components in one go. / BSD 3-Clause |
| [jupyter\_client](http://jupyter.org) | 5.3.1 | Jupyter protocol implementation and client libraries / BSD 3-clause |
| [jupyter\_console](http://jupyter.org) | 5.2.0 | Jupyter terminal console / BSD-3-Clause |
| [jupyter\_core](http://jupyter.org) | 4.5.0 | Core common functionality of Jupyter projects. / BSD 3-clause |
| [jupyterlab](https://github.com/jupyterlab/jupyterlab) | 0.33.11 | JupyterLab / BSD-3-Clause |
| [jupyterlab\_launcher](http://github.com/jupyterlab/jupyterlab_launcher) | 0.11.2 | A Launcher for JupyterLab based applications. / BSD 3-Clause |
| [keyring](https://github.com/jaraco/keyring) | 18.0.0 | Store and access your passwords safely / Python Software Foundation or MIT |
| [kiwisolver](https://github.com/nucleic/kiwi) | 1.1.0 | A fast implementation of the Cassowary constraint solver / BSD 3-Clause |
| [krb5](http://web.mit.edu/kerberos/) | 1.16.1 | A network authentication protocol. / MIT |
| [lazy-object-proxy](https://github.com/ionelmc/python-lazy-object-proxy) | 1.4.1 | A fast and thorough lazy object proxy / BSD-2-Clause |
| [libarchive](http://www.libarchive.org/) | 3.3.3 | Multi-format archive and compression library / BSD 2-Clause |
| [libcurl](http://curl.haxx.se/) | 7.65.2 | tool and library for transferring data with URL syntax / MIT/X derivate (`<http://curl.haxx.se/docs/copyright.html>`) |
| [libcxx](http://libcxx.llvm.org/) | 4.0.1 | C++ Standard Library / MIT license or UIUC License |
| [libcxxabi](http://libcxxabi.llvm.org/) | 4.0.1 | C++ Standard Library Support / MIT license or UIUC License |
| [libedit](http://thrysoee.dk/editline/) | 3.1.20181209 | Editline Library (libedit) / NetBSD |
| [libffi](https://sourceware.org/libffi/) | 3.2.1 | A Portable Foreign Function Interface Library. / Custom |
| [libgfortran](http://gcc.gnu.org/) | 3.0.1 | Fortran libraries from the GNU Compiler Collection / GPL 3 (with GCC Runtime Library Exception 3.1) |
| [libiconv](https://www.gnu.org/software/libiconv/) | 1.15 | Provides iconv for systems which don’t have one (or that cannot convert from/to Unicode.) / GPL and LGPL |
| [liblief](https://lief.quarkslab.com/) | 0.9.0 | A cross platform library to parse, modify and abstract ELF, PE and MachO formats. / Apache 2.0 |
| [libpng](http://www.libpng.org/pub/png/libpng.html) | 1.6.37 | PNG reference library / zlib/libpng |
| [libsodium](http://libsodium.org) | 1.0.16 | A modern and easy-to-use crypto library. / ISC |
| [libssh2](https://www.libssh2.org/) | 1.8.2 | the SSH library / BSD-3-Clause |
| [libtiff](http://www.libtiff.org/) | 4.0.10 | Support for the Tag Image File Format (TIFF). / HPND |
| [libxml2](http://xmlsoft.org/) | 2.9.9 | The XML C parser and toolkit of Gnome / MIT |
| [libxslt](http://xmlsoft.org/XSLT/) | 1.1.33 | The XSLT C library developed for the GNOME project / MIT |
| [linecache2](https://github.com/testing-cabal/linecache2) | 1.0.0 | Backport of the linecache module / PSF 1.0 |
| [llvmlite](https://github.com/numba/llvmlite) | 0.29.0 | A lightweight LLVM python binding for writing JIT compilers / New BSD License |
| [locket](https://github.com/mwilliamson/locket.py) | 0.2.0 | File-based locks for Python for Linux and Windows / BSD 2-Clause |
| [lxml](http://lxml.de/) | 4.3.4 | Pythonic binding for the C libraries libxml2 and libxslt. / BSD 3-Clause, GPL-2.0, ZPL-2.0, and ElementTree |
| [lz4-c](https://www.lz4.org) | 1.8.1.2 | Extremely Fast Compression algorithm / BSD 2-clause |
| [lzo](http://www.oberhumer.com/opensource/lzo/) | 2.10 | LZO is a portable lossless data compression library written in ANSI C. / GPL v2+ |
| [markupsafe](https://www.palletsprojects.com/p/markupsafe) | 1.1.1 | A Python module that implements the jinja2.Markup string / BSD-3-Clause |
| [matplotlib](http://matplotlib.org/) | 2.2.3 | Publication quality figures in Python / PSF-based |
| [mccabe](https://github.com/PyCQA/mccabe) | 0.6.1 | McCabe complexity checker for Python / MIT |
| [mistune](https://github.com/lepture/mistune) | 0.8.4 | The fastest markdown parser in pure Python. / BSD 3-Clause |
| [mkl](https://software.intel.com/en-us/mkl) | 2019.4 | Math library for Intel and compatible processors / proprietary - Intel |
| [mkl-service](http://github.com/IntelPython/mkl-service) | 2.0.2 | Python hooks for Intel(R) Math Kernel Library runtime control settings. / BSD-3-Clause |
| [mkl\_fft](http://github.com/IntelPython/mkl_fft) | 1.0.12 | NumPy-based implementation of Fast Fourier Transform using Intel (R) Math Kernel Library. / BSD 3-Clause |
| [mkl\_random](http://github.com/IntelPython/mkl_random) | 1.0.2 | Intel (R) MKL-powered package for sampling from common probability distributions into NumPy arrays. / BSD 3-Clause |
| [mock](https://github.com/testing-cabal/mock) | 3.0.5 | A library for testing in Python / BSD-2-Clause |
| [more-itertools](https://github.com/erikrose/more-itertools) | 5.0.0 | More routines for operating on iterables, beyond itertools / MIT |
| [mpc](http://www.multiprecision.org/) | 1.1.0 | A C library for the arithmetic of complex numbers with arbitrarily high precision. / LGPL 3 |
| [mpfr](http://www.mpfr.org/) | 4.0.1 | The MPFR library is a C library for multiple-precision floating-point computations with correct rounding. / LGPL 3 |
| [mpmath](http://mpmath.org) | 1.1.0 | Python library for arbitrary-precision floating-point arithmetic / BSD 3-Clause |
| [msgpack-python](http://msgpack.org/) | 0.6.1 | MessagePack (de)serializer. / Apache 2.0 |
| [multipledispatch](https://github.com/mrocklin/multipledispatch/) | 0.6.0 | Multiple dispatch in Python / BSD 3-Clause |
| [nbconvert](http://jupyter.org) | 5.5.0 | Converting Jupyter Notebooks / BSD-3-Clause |
| [nbformat](http://jupyter.org) | 4.4.0 | The reference implementation of the Jupyter Notebook format / BSD 3-clause |
| [ncurses](http://www.gnu.org/software/ncurses/) | 6.1 | Library for text-based user interfaces / Free software (MIT-like) |
| [networkx](https://networkx.github.io/) | 2.2 | Python package for creating and manipulating complex networks / BSD-3-Clause |
| [nltk](http://nltk.org/) | 3.4.4 | Build Python programs to work with human language data / Apache 2.0 |
| [nose](http://readthedocs.org/docs/nose/) | 1.3.7 | Nose extends unittest to make testing easier / LGPL-2.1 |
| [notebook](http://jupyter.org) | 5.7.8 | Jupyter Notebook / BSD 3-clause |
| [numba](http://numba.github.com) | 0.44.1 | NumPy aware dynamic Python compiler using LLVM / BSD 2-clause |
| [numexpr](https://github.com/pydata/numexpr) | 2.6.9 | Fast numerical expression evaluator for NumPy. / MIT |
| [numpy](http://numpy.scipy.org/) | 1.16.4 | Array processing for numbers, strings, records, and objects. / BSD 3-Clause |
| numpy-base | 1.16.4 | None / None |
| [numpydoc](https://github.com/numpy/numpydoc) | 0.9.1 | Numpy’s Sphinx extensions / BSD 3-Clause |
| [olefile](http://www.decalage.info/python/olefileio) | 0.46 | parse, read and write Microsoft OLE2 files / BSD 2-Clause |
| [openpyxl](https://openpyxl.readthedocs.io) | 2.6.2 | A Python library to read/write Excel 2010 xlsx/xlsm files / MIT |
| [openssl](http://www.openssl.org/) | 1.1.1c | OpenSSL is an open-source implementation of the SSL and TLS protocols / OpenSSL |
| [packaging](https://github.com/pypa/packaging) | 19.0 | Core utilities for Python packages / Apache 2.0 or BSD 2-Clause |
| [pandas](http://pandas.pydata.org) | 0.24.2 | High-performance, easy-to-use data structures and data analysis tools. / BSD 3-clause |
| [pandoc](http://pandoc.org/) | 2.2.3.2 | Universal markup converter (repackaged binaries). / GPL-2.0 |
| [pandocfilters](https://github.com/jgm/pandocfilters) | 1.4.2 | A python module for writing pandoc filters / BSD-3-Clause |
| [parso](https://github.com/davidhalter/parso) | 0.5.0 | A Python Parser / MIT |
| [partd](https://github.com/dask/partd) | 1.0.0 | Data structure for on-disk shuffle operations / BSD 3-Clause |
| [path.py](https://github.com/jaraco/path.py) | 11.5.0 | A module wrapper for os.path / MIT |
| [pathlib2](https://github.com/mcmtroffaes/pathlib2) | 2.3.4 | Fork of pathlib aiming to support the full stdlib Python API / MIT |
| [patsy](https://github.com/pydata/patsy) | 0.5.1 | Describing statistical models in Python using symbolic formulas / BSD-2-Clause, PSF2 |
| [pcre](http://www.pcre.org/) | 8.43 | Regular expression pattern matching using the same syntax and semantics as Perl 5. / BSD 3-Clause |
| [pep8](http://pep8.readthedocs.org/) | 1.7.1 | Python style guide checker / MIT |
| [pexpect](http://pexpect.sourceforge.net/) | 4.7.0 | Pexpect makes Python a better tool for controlling other applications. / ISC |
| [pickleshare](https://github.com/pickleshare/pickleshare/) | 0.7.5 | Tiny ‘shelve’-like database with concurrency support / MIT |
| [pillow](https://pillow.readthedocs.io) | 6.1.0 | Pillow is the friendly PIL fork by Alex Clark and Contributors / PIL |
| [pip](https://pip.pypa.io/en/stable/) | 19.1.1 | PyPA recommended tool for installing Python packages / MIT |
| [pkginfo](https://code.launchpad.net/~tseaver/pkginfo/trunk) | 1.5.0.1 | Query metadatdata from sdists / bdists / installed packages. / MIT |
| [pluggy](https://github.com/pytest-dev/pluggy) | 0.12.0 | Plugin registration and hook calling for Python / MIT |
| [ply](http://www.dabeaz.com/ply/index.html) | 3.11 | Python Lex-Yacc / BSD 3-clause |
| [portaudio](http://www.portaudio.com/) | 19.6.0 | A cross platform, open-source, audio I/O library / MIT |
| [prometheus\_client](https://github.com/prometheus/client_python) | 0.7.1 | Python client for the Prometheus monitoring system / Apache 2.0 |
| [prompt\_toolkit](https://github.com/jonathanslenders/python-prompt-toolkit) | 1.0.15 | Library for building powerful interactive command lines in Python / BSD 3-clause |
| [psutil](https://github.com/giampaolo/psutil) | 5.6.3 | A cross-platform process and system utilities module for Python / BSD 3-Clause |
| [ptyprocess](https://github.com/pexpect/ptyprocess) | 0.6.0 | Run a subprocess in a pseudo terminal / ISC |
| [py](https://github.com/pytest-dev/py) | 1.8.0 | library with cross-python path, ini-parsing, io, code, log facilities / MIT |
| [py-lief](https://lief.quarkslab.com/) | 0.9.0 | A cross platform library to parse, modify and abstract ELF, PE and MachO formats. / Apache 2.0 |
| [pyaudio](http://people.csail.mit.edu/hubert/pyaudio/) | 0.2.11 | Bindings for PortAudio v19, the cross-platform audio stream library / MIT |
| [pycodestyle](https://pycodestyle.readthedocs.io/) | 2.5.0 | Python style guide checker / MIT |
| [pycosat](https://github.com/ContinuumIO/pycosat) | 0.6.3 | Bindings to picosat (a SAT solver) / MIT |
| [pycparser](https://github.com/eliben/pycparser) | 2.19 | Complete C99 parser in pure Python / BSD 3-clause |
| [pycrypto](http://www.pycrypto.org/) | 2.6.1 | Cryptographic modules for Python. / Public Domain |
| [pycurl](http://pycurl.sourceforge.net/) | 7.43.0.3 | A Python Interface To The cURL library / LGPL, MIT |
| [pyflakes](https://github.com/PyCQA/pyflakes) | 2.1.1 | Pyflakes analyzes programs and detects various errors. / MIT |
| [pygments](http://pygments.org/) | 2.4.2 | Generic syntax highlighting package / BSD 2-clause |
| [pylint](http://www.pylint.org/) | 1.9.2 | python code static checker / GPL |
| [pyodbc](https://github.com/mkleehammer/pyodbc) | 4.0.26 | DB API Module for ODBC / MIT |
| [pyopenssl](https://github.com/pyca/pyopenssl) | 19.0.0 | Python wrapper module around the OpenSSL library / Apache 2.0 |
| [pyparsing](http://pyparsing.wikispaces.com/) | 2.4.0 | Create and execute simple grammars / MIT |
| [pyqt](http://www.riverbankcomputing.co.uk/software/pyqt) | 5.9.2 | Python binding of the cross-platform GUI toolkit Qt. / Commercial, GPL-2.0, GPL-3.0 |
| [pyrsistent](http://github.com/tobgu/pyrsistent/) | 0.14.11 | Persistent/Functional/Immutable data structures / MIT |
| [pysocks](https://github.com/Anorov/PySocks) | 1.7.0 | A Python SOCKS client module. See [Anorov/PySocks](https://github.com/Anorov/PySocks) for more information. / BSD 3-Clause |
| [pytables](http://www.pytables.org) | 3.5.2 | Brings together Python, HDF5 and NumPy to easily handle large amounts of data. / BSD 3-Clause |
| [pytest](https://docs.pytest.org/en/latest/) | 4.6.2 | Simple and powerful testing with Python. / MIT |
| [python](http://www.python.org/) | 2.7.16 | General purpose programming language / PSF |
| [python-dateutil](https://dateutil.readthedocs.org/) | 2.8.0 | Extensions to the standard Python datetime module. / BSD 3 Clause |
| [python-libarchive-c](https://github.com/Changaco/python-libarchive-c) | 2.8 | Python interface to libarchive / CC0-1.0 |
| python.app | 2 | Proxy on OS X letting Python libraries hook into the gui event loop / BSD |
| [pytz](http://pythonhosted.org/pytz/) | 2019.1 | World timezone definitions, modern and historical. / MIT |
| [pywavelets](https://github.com/PyWavelets/pywt) | 1.0.3 | Discrete Wavelet Transforms in Python / MIT |
| [pyyaml](http://pyyaml.org/wiki/PyYAML) | 5.1.1 | YAML parser and emitter for Python / MIT |
| [pyzmq](https://github.com/zeromq/pyzmq) | 18.0.0 | Python bindings for zeromq / BSD 3-clause |
| [qt](http://qt-project.org) | 5.9.7 | Qt is a cross-platform application and UI framework. / LGPL-3.0 |
| [qtawesome](https://github.com/spyder-ide/qtawesome) | 0.5.7 | Iconic fonts in PyQt and PySide applications / MIT |
| [qtconsole](http://jupyter.org) | 4.5.1 | Jupyter Qt console / BSD 3-Clause |
| [qtpy](https://github.com/spyder-ide/qtpy) | 1.8.0 | Abstraction layer for PyQt5/PyQt4/PySide / MIT |
| [readline](https://cnswww.cns.cwru.edu/php/chet/readline/rltop.html) | 7.0 | library for editing command lines as they are typed in / GPL3 |
| [requests](http://python-requests.org) | 2.22.0 | Python HTTP for Humans / Apache 2.0 |
| [rope](https://github.com/python-rope/rope) | 0.14.0 | A python refactoring library / GPL 2.0 |
| [ruamel\_yaml](https://bitbucket.org/ruamel/yaml) | 0.15.46 | A patched copy of ruamel.yaml. / MIT |
| [scandir](https://github.com/benhoyt/scandir) | 1.10.0 | scandir, a better directory iterator and faster os.walk() / BSD 3-Clause |
| [scikit-image](http://scikit-image.org/) | 0.14.2 | Image processing routines for SciPy. / BSD 3-Clause |
| [scikit-learn](http://scikit-learn.org/) | 0.20.3 | A set of python modules for machine learning and data mining / BSD 3-Clause |
| [scipy](http://www.scipy.org/) | 1.2.1 | Scientific Library for Python / BSD 3-Clause |
| [seaborn](https://seaborn.pydata.org) | 0.9.0 | Statistical data visualization / BSD 3-Clause |
| [send2trash](https://github.com/hsoft/send2trash) | 1.5.0 | Python library to natively send files to Trash (or Recycle bin) on all platforms. / BSD-3-Clause |
| [setuptools](https://github.com/pypa/setuptools) | 41.0.1 | Download, build, install, upgrade, and uninstall Python packages / MIT |
| [simplegeneric](http://cheeseshop.python.org/pypi/simplegeneric) | 0.8.1 | Simple generic functions (similar to Python’s own len(), pickle.dump(), etc.) / Zope Public |
| [singledispatch](http://docs.python.org/3/library/functools.html#functools.singledispatch) | 3.4.0.3 | Transforms a function into a single-dispatch generic function / MIT |
| [sip](http://www.riverbankcomputing.com/software/sip/intro) | 4.19.8 | Create Python bindings for C and C++ libraries / GPL-3.0 |
| [six](http://pypi.python.org/pypi/six/) | 1.12.0 | Python 2 and 3 compatibility utilities / MIT |
| [snappy](https://github.com/google/snappy) | 1.1.7 | A fast compressor/decompressor / BSD 3-clause |
| [snowballstemmer](https://github.com/shibukawa/snowball_py) | 1.9.0 | Snowball stemming library collection for Python / BSD-2-Clause |
| [sortedcollections](http://www.grantjenks.com/docs/sortedcollections/) | 1.1.2 | Python Sorted Collections / Apache-2.0 |
| [sortedcontainers](http://www.grantjenks.com/docs/sortedcontainers/) | 2.1.0 | Python Sorted Container Types: SortedList, SortedDict, and SortedSet / Apache 2.0 |
| [soupsieve](http://facelessuser.github.io/soupsieve) | 1.8 | A modern CSS selector implementation for BeautifulSoup / MIT |
| [sphinx](http://www.sphinx-doc.org) | 1.8.5 | Sphinx is a tool that makes it easy to create intelligent and beautiful documentation / BSD-2-Clause |
| sphinxcontrib | 1.0 | Python namespace for sphinxcontrib / BSD |
| [sphinxcontrib-websupport](https://pypi.python.org/pypi/sphinxcontrib-websupport) | 1.1.2 | Sphinx API for Web Apps / BSD-2-Clause |
| [spyder](https://www.spyder-ide.org/) | 3.3.6 | The Scientific Python Development Environment / MIT |
| [spyder-kernels](https://github.com/spyder-ide/spyder-kernels) | 0.5.1 | Jupyter kernels for the Spyder console / MIT |
| [sqlalchemy](http://www.sqlalchemy.org/) | 1.3.5 | Database Abstraction Library. / MIT |
| [sqlite](http://www.sqlite.org/) | 3.29.0 | Implements a self-contained, zero-configuration, SQL database engine. / Public-Domain (`<http://www.sqlite.org/copyright.html>`) |
| [ssl\_match\_hostname](http://bitbucket.org/brandon/backports.ssl_match_hostname) | 3.7.0.1 | The ssl.match\_hostname() function from Python 3.5 / PSF 2 |
| [statsmodels](https://www.statsmodels.org) | 0.10.0 | Statistical computations and models for use with SciPy / BSD 3-Clause |
| [subprocess32](https://github.com/google/python-subprocess32) | 3.5.4 | A backport of the subprocess module from Python 3.2/3.3 for use on 2.x / Python-2.0 |
| [sympy](http://sympy.org) | 1.4 | Python library for symbolic mathematics / BSD-3-Clause |
| [tblib](https://github.com/ionelmc/python-tblib) | 1.4.0 | Traceback serialization library. / BSD 2-Clause |
| [terminado](https://github.com/jupyter/terminado) | 0.8.2 | Terminals served by tornado websockets / BSD 2-Clause |
| [testpath](https://testpath.readthedocs.io) | 0.4.2 | Testpath is a collection of utilities for Python code working with files and commands. / BSD-3-Clause |
| [tk](http://www.tcl.tk/) | 8.6.8 | A dynamic programming language with GUI support. Bundles Tcl and Tk. / Tcl/Tk |
| [toolz](http://toolz.readthedocs.org/) | 0.10.0 | A functional standard library for Python / BSD 3-Clause |
| [tornado](http://www.tornadoweb.org/) | 5.1.1 | A Python web framework and asynchronous networking library, originally developed at FriendFeed. / Apache 2.0 |
| [tqdm](https://pypi.python.org/pypi/tqdm) | 4.32.1 | A Fast, Extensible Progress Meter / MPLv2.0, MIT |
| [traceback2](https://github.com/testing-cabal/traceback2) | 1.4.0 | Backports of the traceback module / PSF 2.0 |
| [traitlets](http://ipython.org/) | 4.3.2 | Configuration system for Python applications / BSD 3-clause |
| [typing](https://docs.python.org/3.5/library/typing.html) | 3.7.4 | Type Hints for Python - backport for `Python<3.5` / PSF |
| [unicodecsv](https://github.com/jdunck/python-unicodecsv) | 0.14.1 | Drop-in replacement for csv module which supports unicode strings / BSD |
| [unittest2](http://pypi.python.org/pypi/unittest2) | 1.1.0 | The new features in unittest backported to Python 2.4+ / BSD |
| [unixodbc](http://www.unixodbc.org/) | 2.3.7 | ODBC on non MS Windows platforms / LGPL-2.1 |
| [urllib3](https://urllib3.readthedocs.io/) | 1.24.2 | HTTP library with thread-safe connection pooling, file post, and more. / MIT |
| [wcwidth](https://github.com/jquast/wcwidth) | 0.1.7 | Measures number of Terminal column cells of wide-character codes. / MIT |
| [webencodings](https://github.com/gsnedders/python-webencodings) | 0.5.1 | Character encoding aliases for legacy web content / BSD 3-Clause |
| [werkzeug](https://palletsprojects.com/p/werkzeug/) | 0.15.4 | The comprehensive WSGI web application library. / BSD 3-Clause |
| [wheel](https://github.com/pypa/wheel) | 0.33.4 | A built-package format for Python. / MIT |
| [widgetsnbextension](http://ipython.org) | 3.5.0 | Interactive Widgets for Jupyter / BSD 3-clause |
| [wrapt](https://github.com/GrahamDumpleton/wrapt) | 1.11.2 | Module for decorators, wrappers and monkey patching / BSD 2-Clause |
| [wurlitzer](https://github.com/minrk/wurlitzer) | 1.0.2 | Capture C-level stdout/stderr in Python / MIT |
| [xlrd](http://www.python-excel.org/) | 1.2.0 | Library for developers to extract data from Microsoft Excel (tm) spreadsheet files / BSD 3-Clause and BSD with advertising |
| [xlsxwriter](https://xlsxwriter.readthedocs.io/) | 1.1.8 | A Python module for creating Excel XLSX files / BSD 2-Clause |
| [xlwings](http://xlwings.org/) | 0.15.8 | Interact with Excel from Python and vice versa / 3-clause BSD |
| [xlwt](http://www.python-excel.org/) | 1.2.0 | Writing data and formatting information to Excel files / BSD |
| [xz](http://tukaani.org/xz/) | 5.2.4 | Data compression software with high compression ratio / LGPL-2.1 and GPL-2.0 |
| [yaml](http://pyyaml.org/wiki/LibYAML) | 0.1.7 | A C library for parsing and emitting YAML. / MIT |
| [zeromq](http://zeromq.org) | 4.3.1 | A high-performance asynchronous messaging library. / LGPL 3 |
| [zict](http://github.com/mrocklin/zict) | 1.0.0 | Composable Dictionary Classes / BSD 3-Clause |
| [zipp](https://github.com/jaraco/zipp) | 0.5.1 | A pathlib-compatible Zipfile object wrapper / MIT |
| [zlib](http://zlib.net/) | 1.2.11 | Massively spiffy yet delicately unobtrusive compression library / zlib |
| [zstd](http://www.zstd.net) | 1.3.7 | Zstandard - Fast real-time compression algorithm / BSD 3-Clause |
| Name | Version | Summary / License |
|---|---|---|
| [\_ipyw\_jlab\_nb\_ext\_conf](https://github.com/ContinuumIO/anaconda-nb-extensions-meta-config) | 0.1.0 | A configuration metapackage for enabling Anaconda-bundled jupyter extensions / BSD |
| \_libgcc\_mutex | 0.1 | Mutex for libgcc and libgcc-ng / None |
| [alabaster](http://www.sphinx-doc.org/en/stable/index.html) | 0.7.12 | Configurable, Python 2+3 compatible Sphinx theme. / BSD 3-Clause |
| [anaconda-client](http://anaconda.org) | 1.7.2 | anaconda.org command line client library / BSD 3-clause |
| [anaconda-project](https://github.com/Anaconda-Platform/anaconda-project) | 0.8.3 | Tool for encapsulating, running, and reproducing data science projects / BSD 3-Clause |
| [asn1crypto](https://github.com/wbond/asn1crypto) | 0.24.0 | Python ASN.1 library with a focus on performance and a pythonic API / MIT |
| [astroid](https://www.astroid.org/) | 1.6.5 | A abstract syntax tree for Python with inference support. / LGPL 2.1 |
| [astropy](http://www.astropy.org/) | 2.0.9 | Community-developed Python Library for Astronomy / BSD |
| [atomicwrites](https://github.com/untitaker/python-atomicwrites) | 1.3.0 | Atomic file writes / MIT |
| [attrs](https://attrs.readthedocs.io/en/stable/) | 19.1.0 | attrs is the Python package that will bring back the joy of writing classes by relieving you from the drudgery of implementing object protocols (aka dunder methods). / MIT |
| [babel](http://babel.pocoo.org/) | 2.7.0 | Utilities to internationalize and localize Python applications / BSD 3-clause |
| [backports](https://bitbucket.org/brandon/backports) | 1.0 | None / BSD |
| [backports.functools\_lru\_cache](https://github.com/jaraco/backports.functools_lru_cache) | 1.5 | Backport of functools.lru\_cache from Python 3.3 as published at ActiveState. / MIT |
| [backports.os](https://github.com/pjdelport/backports.os) | 0.1.1 | Backport of new features in Python’s os module / Python Software Foundation |
| [backports.shutil\_get\_terminal\_size](https://github.com/chrippa/backports.shutil_get_terminal_size) | 1.0.0 | A backport of the get\_terminal\_size function from Python 3.3’s shutil. / MIT |
| [backports\_abc](https://github.com/cython/backports_abc) | 0.5 | A backport of recent additions to the collections.abc module. / PSF 2 |
| [beautifulsoup4](http://www.crummy.com/software/BeautifulSoup/) | 4.7.1 | Python library designed for screen-scraping / MIT |
| [bitarray](https://github.com/ilanschnell/bitarray) | 0.9.3 | efficient arrays of booleans – C extension / PSF |
| [bkcharts](http://github.com/bokeh/bkcharts) | 0.2 | High level chart types built on top of Bokeh / BSD 3-Clause |
| blas | 1.0 | None / None |
| [bleach](https://github.com/mozilla/bleach) | 3.1.0 | Easy, whitelist-based HTML-sanitizing tool / Apache-2.0 |
| [blosc](https://github.com/Blosc/c-blosc) | 1.16.3 | A blocking, shuffling and loss-less compression library that can be faster than memcpy() / BSD 3-Clause |
| [bokeh](http://bokeh.pydata.org/) | 1.2.0 | Statistical and novel interactive HTML plots for Python / BSD 3-Clause |
| [boto](https://github.com/boto/boto/) | 2.49.0 | Amazon Web Services Library / MIT |
| [bottleneck](http://berkeleyanalytics.com/bottleneck) | 1.2.1 | Fast NumPy array functions written in Cython. / BSD 2-Clause |
| [bzip2](http://www.bzip.org/) | 1.0.8 | high-quality data compressor / bzip2 |
| [ca-certificates](https://github.com/conda-forge/ca-certificates-feedstock) | 2019.5.15 | Certificates for use with other packages. / ISC |
| [cairo](http://cairographics.org/) | 1.14.12 | Cairo is a 2D graphics library with support for multiple output devices. / LGPL 2.1 or MPL 1.1 |
| [cdecimal](http://www.bytereef.org/mpdecimal/index.html) | 2.3 | Fast drop-in replacement for decimal.py / BSD 2-Clause |
| [certifi](http://certifi.io/) | 2019.6.16 | Python package for providing Mozilla’s CA Bundle. / ISC |
| [cffi](https://bitbucket.org/cffi/cffi) | 1.12.3 | Foreign Function Interface for Python calling C code. / MIT |
| [chardet](https://github.com/chardet/chardet) | 3.0.4 | Universal character encoding detector / LGPL2 |
| [click](https://palletsprojects.com/p/click) | 7.0 | Python composable command line interface toolkit / BSD-3-Clause |
| [cloudpickle](https://github.com/cloudpipe/cloudpickle) | 1.2.1 | Extended pickling support for Python objects / BSD 3-Clause |
| [clyent](https://github.com/Anaconda-Platform/clyent) | 1.2.2 | Command line client library for windows and posix / BSD 3-Clause |
| [colorama](https://github.com/tartley/colorama) | 0.4.1 | Cross-platform colored terminal text / BSD-3-Clause |
| [conda](https://conda.io) | 4.7.10 | OS-agnostic, system-level binary package and environment manager. / BSD 3-Clause |
| [conda-build](https://github.com/conda/conda-build) | 3.18.9 | tools for building conda packages / BSD 3-Clause |
| [conda-env](https://github.com/conda/conda-env) | 2.6.0 | Tools for interacting with conda environments. / BSD 3-Clause |
| [conda-verify](https://github.com/conda/conda-verify) | 3.4.2 | tool for validating conda recipes and conda packages / BSD 3-Clause |
| [configparser](http://docs.python.org/3/library/configparser.html) | 3.7.4 | This library brings the updated configparser from Python 3.5 to Python 2.6-3.5 / MIT |
| [contextlib2](http://contextlib2.readthedocs.org) | 0.5.5 | Backports and enhancements for the contextlib module / PSF |
| [cryptography](https://github.com/pyca/cryptography) | 2.7 | Provides cryptographic recipes and primitives to Python developers / Apache 2.0 or BSD 3-Clause, PSF 2 |
| [curl](http://curl.haxx.se/) | 7.65.2 | tool and library for transferring data with URL syntax / MIT/X derivate (`<http://curl.haxx.se/docs/copyright.html>`) |
| [cycler](http://matplotlib.org/cycler) | 0.10.0 | Composable style cycles. / BSD 3-Clause |
| [cython](http://www.cython.org/) | 0.29.12 | The Cython compiler for writing C extensions for the Python language / Apache-2.0 |
| [cytoolz](https://github.com/pytoolz/cytoolz) | 0.10.0 | Cython implementation of Toolz. High performance functional utilities / BSD-3-Clause |
| [dask](https://dask.org/) | 1.2.2 | Parallel PyData with Task Scheduling / BSD 3-Clause |
| [dask-core](http://github.com/dask/dask/) | 1.2.2 | Parallel Python with task scheduling / BSD 3-Clause |
| [decorator](https://github.com/micheles/decorator) | 4.4.0 | Better living through Python with decorators. / BSD 3-Clause |
| [defusedxml](https://bitbucket.org/tiran/defusedxml) | 0.6.0 | XML bomb protection for Python stdlib modules / PSF 2.0 |
| [distributed](http://distributed.readthedocs.io/en/latest/) | 1.28.1 | Distributed computing with Dask / BSD 3-Clause |
| [docutils](http://docutils.sourceforge.net/) | 0.14 | Docutils – Python Documentation Utilities / Public Domain Dedictation and BSD 2-Clause and PSF 2.1.1 and GPL 3.0 |
| [entrypoints](https://github.com/takluyver/entrypoints) | 0.3 | Discover and load entry points from installed packages. / MIT License |
| [enum34](https://bitbucket.org/stoneleaf/enum34) | 1.1.6 | Python 3.4 Enum backported to 3.3, 3.2, 3.1, 2.7, 2.6, 2.5, and 2.4 / BSD 3-Clause |
| [et\_xmlfile](https://bitbucket.org/openpyxl/et_xmlfile) | 1.0.1 | An implementation of lxml.xmlfile for the standard library / MIT |
| [expat](http://expat.sourceforge.net/) | 2.2.6 | Expat XML parser library in C. / MIT |
| [fastcache](https://github.com/pbrady/fastcache) | 1.1.0 | C implementation of Python 3 lru\_cache / MIT |
| [filelock](https://github.com/benediktschmitt/py-filelock) | 3.0.12 | A platform independent file lock. / Public Domain |
| [flask](http://flask.pocoo.org) | 1.1.1 | A microframework based on Werkzeug, Jinja2 and good intentions. / BSD 3-Clause |
| [fontconfig](http://www.freedesktop.org/wiki/Software/fontconfig/) | 2.13.0 | A library for configuring and customizing font access. / MIT |
| [freetype](https://www.freetype.org/) | 2.9.1 | A Free, High-Quality, and Portable Font Engine / GPL-2.0 and FreeType |
| [funcsigs](http://funcsigs.readthedocs.org) | 1.0.2 | Python function signatures from PEP362 for Python 2.6, 2.7 and 3.2+. / Apache 2.0 |
| [functools32](https://github.com/MiCHiLU/python-functools32) | 3.2.3.2 | Backport of the functools module from Python 3.2.3 for use on 2.7 and PyPy. / PSF license |
| [future](http://python-future.org) | 0.17.1 | Clean single-source support for Python 3 and 2 / MIT |
| [futures](https://github.com/agronholm/pythonfutures) | 3.3.0 | Backport of the concurrent.futures package from Python 3.2 / PSF |
| [get\_terminal\_size](https://github.com/chrippa/backports.shutil_get_terminal_size) | 1.0.0 | Get the size of the terminal window. / MIT |
| [gevent](http://www.gevent.org/) | 1.4.0 | Coroutine-based network library / MIT |
| [glib](https://developer.gnome.org/glib/) | 2.56.2 | Provides core application building blocks for libraries and applications written in C. / LGPL-2.1 |
| [glob2](https://github.com/miracle2k/python-glob2) | 0.7 | Version of the glob module that supports recursion via \*\*, and can capture patterns. / BSD-2-Clause |
| [gmp](http://gmplib.org/) | 6.1.2 | The GNU multiprecision library. / GPL 2 and LGPL 3 |
| [gmpy2](https://pypi.python.org/pypi/gmpy2) | 2.0.8 | GMP/MPIR, MPFR, and MPC interface to Python 2.6+ and 3.x / LGPL 3 |
| [greenlet](https://github.com/python-greenlet/greenlet) | 0.4.15 | Lightweight in-process concurrent programming / MIT |
| [grin](http://pypi.python.org/pypi/grin) | 1.2.1 | Enhanced grep-like tool / BSD 3-Clause |
| [h5py](http://www.h5py.org/) | 2.8.0 | Read and write HDF5 files from Python. / BSD-3-Clause |
| [hdf5](http://www.hdfgroup.org/HDF5/) | 1.10.2 | HDF5 is a data model, library, and file format for storing and managing data / HDF5 |
| [heapdict](http://stutzbachenterprises.com/) | 1.0.0 | A heap with decrease-key and increase-key operations / BSD 3-Clause |
| [html5lib](https://github.com/html5lib/html5lib-python) | 1.0.1 | HTML parser based on the WHATWG HTML specification / MIT |
| [icu](http://site.icu-project.org/) | 58.2 | International Components for Unicode. / MIT |
| [idna](https://github.com/kjd/idna) | 2.8 | Internationalized Domain Names in Applications (IDNA). / BSD Like |
| [imageio](http://imageio.github.io) | 2.5.0 | a Python library for reading and writing image data / BSD 2-Clause |
| [imagesize](https://github.com/shibukawa/imagesize_py) | 1.1.0 | Getting image size from png/jpeg/jpeg2000/gif file / MIT |
| [importlib\_metadata](http://importlib-metadata.readthedocs.io) | 0.17 | A library to access the metadata for a Python package / APACHE-2.0 |
| [ipaddress](https://github.com/phihag/ipaddress) | 1.0.22 | IPv4/IPv6 manipulation library / PSF 2 |
| [ipykernel](https://ipython.org) | 4.10.0 | IPython Kernel for Jupyter / BSD-3-Clause |
| [ipython](https://ipython.org/) | 5.8.0 | IPython: Productive Interactive Computing / BSD-3-Clause |
| [ipython\_genutils](http://ipython.org) | 0.2.0 | vestigial utilities from IPython / BSD 3-Clause |
| [ipywidgets](https://github.com/ipython/ipywidgets) | 7.5.0 | Jupyter Interactive Widgets / BSD 3-clause |
| [isort](https://github.com/timothycrosley/isort) | 4.3.21 | A Python utility / library to sort Python imports. / MIT |
| [itsdangerous](https://github.com/pallets/itsdangerous) | 1.1.0 | Various helpers to pass trusted data to untrusted environments. / BSD 3-Clause |
| [jbig](https://www.cl.cam.ac.uk/~mgk25/jbigkit) | 2.1 | Implementation of the JBIG1 data compression standard / GPL-2.0 |
| [jdcal](https://github.com/phn/jdcal) | 1.4.1 | Julian dates from proleptic Gregorian and Julian calendars. / BSD 2-Clause |
| [jedi](https://github.com/davidhalter/jedi/) | 0.13.3 | An autocompletion tool for Python that can be used for text editors. / MIT |
| [jinja2](http://jinja.pocoo.org) | 2.10.1 | An easy to use stand-alone template engine written in pure python. / 3-Clause BSD |
| [jpeg](http://www.ijg.org/) | 9b | read/write jpeg COM, EXIF, IPTC medata / Custom free software license |
| [jsonschema](https://github.com/Julian/jsonschema) | 3.0.1 | An implementation of JSON Schema validation for Python / MIT |
| [jupyter](http://jupyter.org) | 1.0.0 | Jupyter metapackage. Install all the Jupyter components in one go. / BSD 3-Clause |
| [jupyter\_client](http://jupyter.org) | 5.3.1 | Jupyter protocol implementation and client libraries / BSD 3-clause |
| [jupyter\_console](http://jupyter.org) | 5.2.0 | Jupyter terminal console / BSD-3-Clause |
| [jupyter\_core](http://jupyter.org) | 4.5.0 | Core common functionality of Jupyter projects. / BSD 3-clause |
| [kiwisolver](https://github.com/nucleic/kiwi) | 1.1.0 | A fast implementation of the Cassowary constraint solver / BSD 3-Clause |
| [krb5](http://web.mit.edu/kerberos/) | 1.16.1 | A network authentication protocol. / MIT |
| [lazy-object-proxy](https://github.com/ionelmc/python-lazy-object-proxy) | 1.4.1 | A fast and thorough lazy object proxy / BSD-2-Clause |
| [libarchive](http://www.libarchive.org/) | 3.3.3 | Multi-format archive and compression library / BSD 2-Clause |
| [libcurl](http://curl.haxx.se/) | 7.65.2 | tool and library for transferring data with URL syntax / MIT/X derivate (`<http://curl.haxx.se/docs/copyright.html>`) |
| [libedit](http://thrysoee.dk/editline/) | 3.1.20181209 | Editline Library (libedit) / NetBSD |
| [libffi](https://sourceware.org/libffi/) | 3.2.1 | A Portable Foreign Function Interface Library. / Custom |
| [libgcc-ng](https://gcc.gnu.org/onlinedocs/gccint/Libgcc.html) | 8.2.0 | The GCC low-level runtime library / GPL |
| [libgfortran-ng](https://gcc.gnu.org/) | 7.3.0 | The GNU Fortran Runtime Library / GPL |
| [libopenblas](http://www.openblas.net/) | 0.2.20 | An Optimized BLAS library / BSD |
| [libpng](http://www.libpng.org/pub/png/libpng.html) | 1.6.37 | PNG reference library / zlib/libpng |
| [libsodium](http://libsodium.org) | 1.0.16 | A modern and easy-to-use crypto library. / ISC |
| [libssh2](https://www.libssh2.org/) | 1.8.2 | the SSH library / BSD-3-Clause |
| [libstdcxx-ng](https://gcc.gnu.org/) | 8.2.0 | The GNU C++ Runtime Library / GPL3 with runtime exception |
| [libtiff](http://www.libtiff.org/) | 4.0.10 | Support for the Tag Image File Format (TIFF). / HPND |
| [libuuid](http://sourceforge.net/projects/libuuid/) | 1.0.3 | Portable uuid C library. / BSD 3-Clause |
| [libxcb](http://xcb.freedesktop.org/) | 1.13 | This is the C-language Binding (XCB) package to the X Window System protocol / MIT |
| [libxml2](http://xmlsoft.org/) | 2.9.9 | The XML C parser and toolkit of Gnome / MIT |
| [libxslt](http://xmlsoft.org/XSLT/) | 1.1.33 | The XSLT C library developed for the GNOME project / MIT |
| [linecache2](https://github.com/testing-cabal/linecache2) | 1.0.0 | Backport of the linecache module / PSF 1.0 |
| [locket](https://github.com/mwilliamson/locket.py) | 0.2.0 | File-based locks for Python for Linux and Windows / BSD 2-Clause |
| [lxml](http://lxml.de/) | 4.3.4 | Pythonic binding for the C libraries libxml2 and libxslt. / BSD 3-Clause, GPL-2.0, ZPL-2.0, and ElementTree |
| [lz4-c](https://www.lz4.org) | 1.8.1.2 | Extremely Fast Compression algorithm / BSD 2-clause |
| [lzo](http://www.oberhumer.com/opensource/lzo/) | 2.10 | LZO is a portable lossless data compression library written in ANSI C. / GPL v2+ |
| [markupsafe](https://www.palletsprojects.com/p/markupsafe) | 1.1.1 | A Python module that implements the jinja2.Markup string / BSD-3-Clause |
| [matplotlib](http://matplotlib.org/) | 2.2.3 | Publication quality figures in Python / PSF-based |
| [mccabe](https://github.com/PyCQA/mccabe) | 0.6.1 | McCabe complexity checker for Python / MIT |
| [mistune](https://github.com/lepture/mistune) | 0.8.4 | The fastest markdown parser in pure Python. / BSD 3-Clause |
| [more-itertools](https://github.com/erikrose/more-itertools) | 5.0.0 | More routines for operating on iterables, beyond itertools / MIT |
| [mpc](http://www.multiprecision.org/) | 1.1.0 | A C library for the arithmetic of complex numbers with arbitrarily high precision. / LGPL 3 |
| [mpfr](http://www.mpfr.org/) | 4.0.1 | The MPFR library is a C library for multiple-precision floating-point computations with correct rounding. / LGPL 3 |
| [mpmath](http://mpmath.org) | 1.1.0 | Python library for arbitrary-precision floating-point arithmetic / BSD 3-Clause |
| [msgpack-python](http://msgpack.org/) | 0.6.1 | MessagePack (de)serializer. / Apache 2.0 |
| [multipledispatch](https://github.com/mrocklin/multipledispatch/) | 0.6.0 | Multiple dispatch in Python / BSD 3-Clause |
| [nbconvert](http://jupyter.org) | 5.5.0 | Converting Jupyter Notebooks / BSD-3-Clause |
| [nbformat](http://jupyter.org) | 4.4.0 | The reference implementation of the Jupyter Notebook format / BSD 3-clause |
| [ncurses](http://www.gnu.org/software/ncurses/) | 6.1 | Library for text-based user interfaces / Free software (MIT-like) |
| [networkx](https://networkx.github.io/) | 2.2 | Python package for creating and manipulating complex networks / BSD-3-Clause |
| [nltk](http://nltk.org/) | 3.4.4 | Build Python programs to work with human language data / Apache 2.0 |
| [nose](http://readthedocs.org/docs/nose/) | 1.3.7 | Nose extends unittest to make testing easier / LGPL-2.1 |
| [notebook](http://jupyter.org) | 5.7.8 | Jupyter Notebook / BSD 3-clause |
| [numexpr](https://github.com/pydata/numexpr) | 2.6.7 | Fast numerical expression evaluator for NumPy. / MIT |
| [numpy](http://numpy.scipy.org/) | 1.14.5 | Array processing for numbers, strings, records, and objects. / BSD 3-Clause |
| numpy-base | 1.14.5 | None / None |
| [numpydoc](https://github.com/numpy/numpydoc) | 0.9.1 | Numpy’s Sphinx extensions / BSD 3-Clause |
| [olefile](http://www.decalage.info/python/olefileio) | 0.46 | parse, read and write Microsoft OLE2 files / BSD 2-Clause |
| [openblas](http://www.openblas.net/) | 0.2.20 | An Optimized BLAS library / BSD |
| openblas-devel | 0.2.20 | OpenBLAS headers and libraries for developing software that used OpenBLAS. / None |
| [openpyxl](https://openpyxl.readthedocs.io) | 2.6.2 | A Python library to read/write Excel 2010 xlsx/xlsm files / MIT |
| [openssl](http://www.openssl.org/) | 1.1.1c | OpenSSL is an open-source implementation of the SSL and TLS protocols / OpenSSL |
| [packaging](https://github.com/pypa/packaging) | 19.0 | Core utilities for Python packages / Apache 2.0 or BSD 2-Clause |
| [pandas](http://pandas.pydata.org) | 0.24.2 | High-performance, easy-to-use data structures and data analysis tools. / BSD 3-clause |
| [pandoc](http://pandoc.org/) | 2.0.0.1 | Universal markup converter (repackaged binaries). / GPL-2.0 |
| [pandocfilters](https://github.com/jgm/pandocfilters) | 1.4.2 | A python module for writing pandoc filters / BSD-3-Clause |
| [parso](https://github.com/davidhalter/parso) | 0.5.0 | A Python Parser / MIT |
| [partd](https://github.com/dask/partd) | 1.0.0 | Data structure for on-disk shuffle operations / BSD 3-Clause |
| [patchelf](http://nixos.org/patchelf.html) | 0.9 | A small utility to modify the dynamic linker and RPATH of ELF executables. / GPL 3 |
| [path.py](https://github.com/jaraco/path.py) | 11.5.0 | A module wrapper for os.path / MIT |
| [pathlib2](https://github.com/mcmtroffaes/pathlib2) | 2.3.4 | Fork of pathlib aiming to support the full stdlib Python API / MIT |
| [patsy](https://github.com/pydata/patsy) | 0.5.1 | Describing statistical models in Python using symbolic formulas / BSD-2-Clause, PSF2 |
| [pcre](http://www.pcre.org/) | 8.43 | Regular expression pattern matching using the same syntax and semantics as Perl 5. / BSD 3-Clause |
| [pep8](http://pep8.readthedocs.org/) | 1.7.1 | Python style guide checker / MIT |
| [pexpect](http://pexpect.sourceforge.net/) | 4.7.0 | Pexpect makes Python a better tool for controlling other applications. / ISC |
| [pickleshare](https://github.com/pickleshare/pickleshare/) | 0.7.5 | Tiny ‘shelve’-like database with concurrency support / MIT |
| [pillow](https://pillow.readthedocs.io) | 6.1.0 | Pillow is the friendly PIL fork by Alex Clark and Contributors / PIL |
| [pip](https://pip.pypa.io/en/stable/) | 19.1.1 | PyPA recommended tool for installing Python packages / MIT |
| [pixman](http://www.pixman.org/) | 0.34.0 | A low-level software library for pixel manipulation. / MIT |
| [pkginfo](https://code.launchpad.net/~tseaver/pkginfo/trunk) | 1.5.0.1 | Query metadatdata from sdists / bdists / installed packages. / MIT |
| [pluggy](https://github.com/pytest-dev/pluggy) | 0.12.0 | Plugin registration and hook calling for Python / MIT |
| [ply](http://www.dabeaz.com/ply/index.html) | 3.11 | Python Lex-Yacc / BSD 3-clause |
| [prometheus\_client](https://github.com/prometheus/client_python) | 0.7.1 | Python client for the Prometheus monitoring system / Apache 2.0 |
| [prompt\_toolkit](https://github.com/jonathanslenders/python-prompt-toolkit) | 1.0.15 | Library for building powerful interactive command lines in Python / BSD 3-clause |
| [psutil](https://github.com/giampaolo/psutil) | 5.6.3 | A cross-platform process and system utilities module for Python / BSD 3-Clause |
| [ptyprocess](https://github.com/pexpect/ptyprocess) | 0.6.0 | Run a subprocess in a pseudo terminal / ISC |
| [py](https://github.com/pytest-dev/py) | 1.8.0 | library with cross-python path, ini-parsing, io, code, log facilities / MIT |
| [pycairo](http://cairographics.org/pycairo/) | 1.18.1 | Python bindings for the Cairo graphics library. / LGPL 2.1, MPL 1.1 |
| [pycodestyle](https://pycodestyle.readthedocs.io/) | 2.5.0 | Python style guide checker / MIT |
| [pycosat](https://github.com/ContinuumIO/pycosat) | 0.6.3 | Bindings to picosat (a SAT solver) / MIT |
| [pycparser](https://github.com/eliben/pycparser) | 2.19 | Complete C99 parser in pure Python / BSD 3-clause |
| [pycrypto](http://www.pycrypto.org/) | 2.6.1 | Cryptographic modules for Python. / Public Domain |
| [pycurl](http://pycurl.sourceforge.net/) | 7.43.0.3 | A Python Interface To The cURL library / LGPL, MIT |
| [pyflakes](https://github.com/PyCQA/pyflakes) | 2.1.1 | Pyflakes analyzes programs and detects various errors. / MIT |
| [pygments](http://pygments.org/) | 2.4.2 | Generic syntax highlighting package / BSD 2-clause |
| [pylint](http://www.pylint.org/) | 1.9.2 | python code static checker / GPL |
| [pyodbc](https://github.com/mkleehammer/pyodbc) | 4.0.26 | DB API Module for ODBC / MIT |
| [pyopenssl](https://github.com/pyca/pyopenssl) | 19.0.0 | Python wrapper module around the OpenSSL library / Apache 2.0 |
| [pyparsing](http://pyparsing.wikispaces.com/) | 2.4.0 | Create and execute simple grammars / MIT |
| [pyrsistent](http://github.com/tobgu/pyrsistent/) | 0.14.11 | Persistent/Functional/Immutable data structures / MIT |
| [pysocks](https://github.com/Anorov/PySocks) | 1.7.0 | A Python SOCKS client module. See [Anorov/PySocks](https://github.com/Anorov/PySocks) for more information. / BSD 3-Clause |
| [pytables](http://www.pytables.org) | 3.4.4 | Brings together Python, HDF5 and NumPy to easily handle large amounts of data. / BSD 3-Clause |
| [pytest](https://docs.pytest.org/en/latest/) | 4.6.2 | Simple and powerful testing with Python. / MIT |
| [python](http://www.python.org/) | 2.7.16 | General purpose programming language / PSF |
| [python-dateutil](https://dateutil.readthedocs.org/) | 2.8.0 | Extensions to the standard Python datetime module. / BSD 3 Clause |
| [python-libarchive-c](https://github.com/Changaco/python-libarchive-c) | 2.8 | Python interface to libarchive / CC0-1.0 |
| [pytz](http://pythonhosted.org/pytz/) | 2019.1 | World timezone definitions, modern and historical. / MIT |
| [pywavelets](https://github.com/PyWavelets/pywt) | 1.0.3 | Discrete Wavelet Transforms in Python / MIT |
| [pyyaml](http://pyyaml.org/wiki/PyYAML) | 5.1.1 | YAML parser and emitter for Python / MIT |
| [pyzmq](https://github.com/zeromq/pyzmq) | 18.0.0 | Python bindings for zeromq / BSD 3-clause |
| [readline](https://cnswww.cns.cwru.edu/php/chet/readline/rltop.html) | 7.0 | library for editing command lines as they are typed in / GPL3 |
| [requests](http://python-requests.org) | 2.22.0 | Python HTTP for Humans / Apache 2.0 |
| [ruamel\_yaml](https://bitbucket.org/ruamel/yaml) | 0.15.46 | A patched copy of ruamel.yaml. / MIT |
| [scandir](https://github.com/benhoyt/scandir) | 1.10.0 | scandir, a better directory iterator and faster os.walk() / BSD 3-Clause |
| [scikit-image](http://scikit-image.org/) | 0.14.1 | Image processing routines for SciPy. / BSD 3-Clause |
| [scikit-learn](http://scikit-learn.org/) | 0.19.1 | A set of python modules for machine learning and data mining / BSD 3-Clause |
| [scipy](http://www.scipy.org/) | 1.1.0 | Scientific Library for Python / BSD 3-Clause |
| [seaborn](https://seaborn.pydata.org) | 0.9.0 | Statistical data visualization / BSD 3-Clause |
| [send2trash](https://github.com/hsoft/send2trash) | 1.5.0 | Python library to natively send files to Trash (or Recycle bin) on all platforms. / BSD-3-Clause |
| [setuptools](https://github.com/pypa/setuptools) | 41.0.1 | Download, build, install, upgrade, and uninstall Python packages / MIT |
| [simplegeneric](http://cheeseshop.python.org/pypi/simplegeneric) | 0.8.1 | Simple generic functions (similar to Python’s own len(), pickle.dump(), etc.) / Zope Public |
| [singledispatch](http://docs.python.org/3/library/functools.html#functools.singledispatch) | 3.4.0.3 | Transforms a function into a single-dispatch generic function / MIT |
| [six](http://pypi.python.org/pypi/six/) | 1.12.0 | Python 2 and 3 compatibility utilities / MIT |
| [snappy](https://github.com/google/snappy) | 1.1.7 | A fast compressor/decompressor / BSD 3-clause |
| [snowballstemmer](https://github.com/shibukawa/snowball_py) | 1.9.0 | Snowball stemming library collection for Python / BSD-2-Clause |
| [sortedcollections](http://www.grantjenks.com/docs/sortedcollections/) | 1.1.2 | Python Sorted Collections / Apache-2.0 |
| [sortedcontainers](http://www.grantjenks.com/docs/sortedcontainers/) | 2.1.0 | Python Sorted Container Types: SortedList, SortedDict, and SortedSet / Apache 2.0 |
| [soupsieve](http://facelessuser.github.io/soupsieve) | 1.8 | A modern CSS selector implementation for BeautifulSoup / MIT |
| [sphinx](http://www.sphinx-doc.org) | 1.8.5 | Sphinx is a tool that makes it easy to create intelligent and beautiful documentation / BSD-2-Clause |
| sphinxcontrib | 1.0 | Python namespace for sphinxcontrib / BSD |
| [sphinxcontrib-websupport](https://pypi.python.org/pypi/sphinxcontrib-websupport) | 1.1.2 | Sphinx API for Web Apps / BSD-2-Clause |
| [sqlalchemy](http://www.sqlalchemy.org/) | 1.3.5 | Database Abstraction Library. / MIT |
| [sqlite](http://www.sqlite.org/) | 3.29.0 | Implements a self-contained, zero-configuration, SQL database engine. / Public-Domain (`<http://www.sqlite.org/copyright.html>`) |
| [ssl\_match\_hostname](http://bitbucket.org/brandon/backports.ssl_match_hostname) | 3.7.0.1 | The ssl.match\_hostname() function from Python 3.5 / PSF 2 |
| [statsmodels](https://www.statsmodels.org) | 0.10.0 | Statistical computations and models for use with SciPy / BSD 3-Clause |
| [subprocess32](https://github.com/google/python-subprocess32) | 3.5.4 | A backport of the subprocess module from Python 3.2/3.3 for use on 2.x / Python-2.0 |
| [sympy](http://sympy.org) | 1.4 | Python library for symbolic mathematics / BSD-3-Clause |
| [tblib](https://github.com/ionelmc/python-tblib) | 1.4.0 | Traceback serialization library. / BSD 2-Clause |
| [terminado](https://github.com/jupyter/terminado) | 0.8.2 | Terminals served by tornado websockets / BSD 2-Clause |
| [testpath](https://testpath.readthedocs.io) | 0.4.2 | Testpath is a collection of utilities for Python code working with files and commands. / BSD-3-Clause |
| [tk](http://www.tcl.tk/) | 8.6.8 | A dynamic programming language with GUI support. Bundles Tcl and Tk. / Tcl/Tk |
| [toolz](http://toolz.readthedocs.org/) | 0.10.0 | A functional standard library for Python / BSD 3-Clause |
| [tornado](http://www.tornadoweb.org/) | 5.1.1 | A Python web framework and asynchronous networking library, originally developed at FriendFeed. / Apache 2.0 |
| [tqdm](https://pypi.python.org/pypi/tqdm) | 4.32.1 | A Fast, Extensible Progress Meter / MPLv2.0, MIT |
| [traceback2](https://github.com/testing-cabal/traceback2) | 1.4.0 | Backports of the traceback module / PSF 2.0 |
| [traitlets](http://ipython.org/) | 4.3.2 | Configuration system for Python applications / BSD 3-clause |
| [typing](https://docs.python.org/3.5/library/typing.html) | 3.7.4 | Type Hints for Python - backport for `Python<3.5` / PSF |
| [unicodecsv](https://github.com/jdunck/python-unicodecsv) | 0.14.1 | Drop-in replacement for csv module which supports unicode strings / BSD |
| [unittest2](http://pypi.python.org/pypi/unittest2) | 1.1.0 | The new features in unittest backported to Python 2.4+ / BSD |
| [unixodbc](http://www.unixodbc.org/) | 2.3.7 | ODBC on non MS Windows platforms / LGPL-2.1 |
| [urllib3](https://urllib3.readthedocs.io/) | 1.24.2 | HTTP library with thread-safe connection pooling, file post, and more. / MIT |
| [wcwidth](https://github.com/jquast/wcwidth) | 0.1.7 | Measures number of Terminal column cells of wide-character codes. / MIT |
| [webencodings](https://github.com/gsnedders/python-webencodings) | 0.5.1 | Character encoding aliases for legacy web content / BSD 3-Clause |
| [werkzeug](https://palletsprojects.com/p/werkzeug/) | 0.15.4 | The comprehensive WSGI web application library. / BSD 3-Clause |
| [wheel](https://github.com/pypa/wheel) | 0.33.4 | A built-package format for Python. / MIT |
| [widgetsnbextension](http://ipython.org) | 3.5.0 | Interactive Widgets for Jupyter / BSD 3-clause |
| [wrapt](https://github.com/GrahamDumpleton/wrapt) | 1.11.2 | Module for decorators, wrappers and monkey patching / BSD 2-Clause |
| [xlrd](http://www.python-excel.org/) | 1.2.0 | Library for developers to extract data from Microsoft Excel (tm) spreadsheet files / BSD 3-Clause and BSD with advertising |
| [xlsxwriter](https://xlsxwriter.readthedocs.io/) | 1.1.8 | A Python module for creating Excel XLSX files / BSD 2-Clause |
| [xlwt](http://www.python-excel.org/) | 1.3.0 | Writing data and formatting information to Excel files / BSD |
| [xz](http://tukaani.org/xz/) | 5.2.4 | Data compression software with high compression ratio / LGPL-2.1 and GPL-2.0 |
| [yaml](http://pyyaml.org/wiki/LibYAML) | 0.1.7 | A C library for parsing and emitting YAML. / MIT |
| [zeromq](http://zeromq.org) | 4.2.5 | A high-performance asynchronous messaging library. / LGPL 3 |
| [zict](http://github.com/mrocklin/zict) | 1.0.0 | Composable Dictionary Classes / BSD 3-Clause |
| [zipp](https://github.com/jaraco/zipp) | 0.5.1 | A pathlib-compatible Zipfile object wrapper / MIT |
| [zlib](http://zlib.net/) | 1.2.11 | Massively spiffy yet delicately unobtrusive compression library / zlib |
| [zstd](http://www.zstd.net) | 1.3.7 | Zstandard - Fast real-time compression algorithm / BSD 3-Clause |
| Name | Version | Summary / License |
|---|---|---|
| [\_ipyw\_jlab\_nb\_ext\_conf](https://github.com/ContinuumIO/anaconda-nb-extensions-meta-config) | 0.1.0 | A configuration metapackage for enabling Anaconda-bundled jupyter extensions / BSD |
| \_libgcc\_mutex | 0.1 | Mutex for libgcc and libgcc-ng / None |
| [alabaster](http://www.sphinx-doc.org/en/stable/index.html) | 0.7.12 | Configurable, Python 2+3 compatible Sphinx theme. / BSD 3-Clause |
| [anaconda-client](http://anaconda.org) | 1.7.2 | anaconda.org command line client library / BSD 3-clause |
| [anaconda-project](https://github.com/Anaconda-Platform/anaconda-project) | 0.8.3 | Tool for encapsulating, running, and reproducing data science projects / BSD 3-Clause |
| [asn1crypto](https://github.com/wbond/asn1crypto) | 0.24.0 | Python ASN.1 library with a focus on performance and a pythonic API / MIT |
| [astroid](https://www.astroid.org/) | 1.6.5 | A abstract syntax tree for Python with inference support. / LGPL 2.1 |
| [astropy](http://www.astropy.org/) | 2.0.9 | Community-developed Python Library for Astronomy / BSD |
| [atomicwrites](https://github.com/untitaker/python-atomicwrites) | 1.3.0 | Atomic file writes / MIT |
| [attrs](https://attrs.readthedocs.io/en/stable/) | 19.1.0 | attrs is the Python package that will bring back the joy of writing classes by relieving you from the drudgery of implementing object protocols (aka dunder methods). / MIT |
| [babel](http://babel.pocoo.org/) | 2.7.0 | Utilities to internationalize and localize Python applications / BSD 3-clause |
| [backports](https://bitbucket.org/brandon/backports) | 1.0 | None / BSD |
| [backports.functools\_lru\_cache](https://github.com/jaraco/backports.functools_lru_cache) | 1.5 | Backport of functools.lru\_cache from Python 3.3 as published at ActiveState. / MIT |
| [backports.os](https://github.com/pjdelport/backports.os) | 0.1.1 | Backport of new features in Python’s os module / Python Software Foundation |
| [backports.shutil\_get\_terminal\_size](https://github.com/chrippa/backports.shutil_get_terminal_size) | 1.0.0 | A backport of the get\_terminal\_size function from Python 3.3’s shutil. / MIT |
| [backports\_abc](https://github.com/cython/backports_abc) | 0.5 | A backport of recent additions to the collections.abc module. / PSF 2 |
| [beautifulsoup4](http://www.crummy.com/software/BeautifulSoup/) | 4.7.1 | Python library designed for screen-scraping / MIT |
| [bitarray](https://github.com/ilanschnell/bitarray) | 0.9.3 | efficient arrays of booleans – C extension / PSF |
| [bkcharts](http://github.com/bokeh/bkcharts) | 0.2 | High level chart types built on top of Bokeh / BSD 3-Clause |
| blas | 1.0 | None / None |
| [bleach](https://github.com/mozilla/bleach) | 3.1.0 | Easy, whitelist-based HTML-sanitizing tool / Apache-2.0 |
| [blosc](https://github.com/Blosc/c-blosc) | 1.16.3 | A blocking, shuffling and loss-less compression library that can be faster than memcpy() / BSD 3-Clause |
| [bokeh](http://bokeh.pydata.org/) | 1.2.0 | Statistical and novel interactive HTML plots for Python / BSD 3-Clause |
| [boto](https://github.com/boto/boto/) | 2.49.0 | Amazon Web Services Library / MIT |
| [bottleneck](http://berkeleyanalytics.com/bottleneck) | 1.2.1 | Fast NumPy array functions written in Cython. / BSD 2-Clause |
| [bzip2](http://www.bzip.org/) | 1.0.8 | high-quality data compressor / bzip2 |
| [ca-certificates](https://github.com/conda-forge/ca-certificates-feedstock) | 2019.5.15 | Certificates for use with other packages. / ISC |
| [cairo](http://cairographics.org/) | 1.14.12 | Cairo is a 2D graphics library with support for multiple output devices. / LGPL 2.1 or MPL 1.1 |
| [cdecimal](http://www.bytereef.org/mpdecimal/index.html) | 2.3 | Fast drop-in replacement for decimal.py / BSD 2-Clause |
| [certifi](http://certifi.io/) | 2019.6.16 | Python package for providing Mozilla’s CA Bundle. / ISC |
| [cffi](https://bitbucket.org/cffi/cffi) | 1.12.3 | Foreign Function Interface for Python calling C code. / MIT |
| [chardet](https://github.com/chardet/chardet) | 3.0.4 | Universal character encoding detector / LGPL2 |
| [click](https://palletsprojects.com/p/click) | 7.0 | Python composable command line interface toolkit / BSD-3-Clause |
| [cloudpickle](https://github.com/cloudpipe/cloudpickle) | 1.2.1 | Extended pickling support for Python objects / BSD 3-Clause |
| [clyent](https://github.com/Anaconda-Platform/clyent) | 1.2.2 | Command line client library for windows and posix / BSD 3-Clause |
| [colorama](https://github.com/tartley/colorama) | 0.4.1 | Cross-platform colored terminal text / BSD-3-Clause |
| [conda](https://conda.io) | 4.7.10 | OS-agnostic, system-level binary package and environment manager. / BSD 3-Clause |
| [conda-build](https://github.com/conda/conda-build) | 3.18.9 | tools for building conda packages / BSD 3-Clause |
| [conda-env](https://github.com/conda/conda-env) | 2.6.0 | Tools for interacting with conda environments. / BSD 3-Clause |
| [conda-verify](https://github.com/conda/conda-verify) | 3.4.2 | tool for validating conda recipes and conda packages / BSD 3-Clause |
| [configparser](http://docs.python.org/3/library/configparser.html) | 3.7.4 | This library brings the updated configparser from Python 3.5 to Python 2.6-3.5 / MIT |
| [contextlib2](http://contextlib2.readthedocs.org) | 0.5.5 | Backports and enhancements for the contextlib module / PSF |
| [cryptography](https://github.com/pyca/cryptography) | 2.7 | Provides cryptographic recipes and primitives to Python developers / Apache 2.0 or BSD 3-Clause, PSF 2 |
| [curl](http://curl.haxx.se/) | 7.65.2 | tool and library for transferring data with URL syntax / MIT/X derivate (`<http://curl.haxx.se/docs/copyright.html>`) |
| [cycler](http://matplotlib.org/cycler) | 0.10.0 | Composable style cycles. / BSD 3-Clause |
| [cython](http://www.cython.org/) | 0.29.12 | The Cython compiler for writing C extensions for the Python language / Apache-2.0 |
| [cytoolz](https://github.com/pytoolz/cytoolz) | 0.10.0 | Cython implementation of Toolz. High performance functional utilities / BSD-3-Clause |
| [dask](https://dask.org/) | 1.2.2 | Parallel PyData with Task Scheduling / BSD 3-Clause |
| [dask-core](http://github.com/dask/dask/) | 1.2.2 | Parallel Python with task scheduling / BSD 3-Clause |
| [dbus](http://www.freedesktop.org/wiki/Software/dbus/) | 1.13.6 | Simple message bus system for applications to talk to one another / GPL2 |
| [decorator](https://github.com/micheles/decorator) | 4.4.0 | Better living through Python with decorators. / BSD 3-Clause |
| [defusedxml](https://bitbucket.org/tiran/defusedxml) | 0.6.0 | XML bomb protection for Python stdlib modules / PSF 2.0 |
| [distributed](http://distributed.readthedocs.io/en/latest/) | 1.28.1 | Distributed computing with Dask / BSD 3-Clause |
| [docutils](http://docutils.sourceforge.net/) | 0.14 | Docutils – Python Documentation Utilities / Public Domain Dedictation and BSD 2-Clause and PSF 2.1.1 and GPL 3.0 |
| [entrypoints](https://github.com/takluyver/entrypoints) | 0.3 | Discover and load entry points from installed packages. / MIT License |
| [enum34](https://bitbucket.org/stoneleaf/enum34) | 1.1.6 | Python 3.4 Enum backported to 3.3, 3.2, 3.1, 2.7, 2.6, 2.5, and 2.4 / BSD 3-Clause |
| [et\_xmlfile](https://bitbucket.org/openpyxl/et_xmlfile) | 1.0.1 | An implementation of lxml.xmlfile for the standard library / MIT |
| [expat](http://expat.sourceforge.net/) | 2.2.6 | Expat XML parser library in C. / MIT |
| [fastcache](https://github.com/pbrady/fastcache) | 1.1.0 | C implementation of Python 3 lru\_cache / MIT |
| [filelock](https://github.com/benediktschmitt/py-filelock) | 3.0.12 | A platform independent file lock. / Public Domain |
| [flask](http://flask.pocoo.org) | 1.1.1 | A microframework based on Werkzeug, Jinja2 and good intentions. / BSD 3-Clause |
| [fontconfig](http://www.freedesktop.org/wiki/Software/fontconfig/) | 2.13.0 | A library for configuring and customizing font access. / MIT |
| [freetype](https://www.freetype.org/) | 2.9.1 | A Free, High-Quality, and Portable Font Engine / GPL-2.0 and FreeType |
| [fribidi](https://github.com/fribidi/fribidi) | 1.0.5 | The Free Implementation of the Unicode Bidirectional Algorithm. / LGPL-2.1 |
| [funcsigs](http://funcsigs.readthedocs.org) | 1.0.2 | Python function signatures from PEP362 for Python 2.6, 2.7 and 3.2+. / Apache 2.0 |
| [functools32](https://github.com/MiCHiLU/python-functools32) | 3.2.3.2 | Backport of the functools module from Python 3.2.3 for use on 2.7 and PyPy. / PSF license |
| [future](http://python-future.org) | 0.17.1 | Clean single-source support for Python 3 and 2 / MIT |
| [futures](https://github.com/agronholm/pythonfutures) | 3.3.0 | Backport of the concurrent.futures package from Python 3.2 / PSF |
| [get\_terminal\_size](https://github.com/chrippa/backports.shutil_get_terminal_size) | 1.0.0 | Get the size of the terminal window. / MIT |
| [gevent](http://www.gevent.org/) | 1.4.0 | Coroutine-based network library / MIT |
| [glib](https://developer.gnome.org/glib/) | 2.56.2 | Provides core application building blocks for libraries and applications written in C. / LGPL-2.1 |
| [glob2](https://github.com/miracle2k/python-glob2) | 0.7 | Version of the glob module that supports recursion via \*\*, and can capture patterns. / BSD-2-Clause |
| [gmp](http://gmplib.org/) | 6.1.2 | The GNU multiprecision library. / GPL 2 and LGPL 3 |
| [gmpy2](https://pypi.python.org/pypi/gmpy2) | 2.0.8 | GMP/MPIR, MPFR, and MPC interface to Python 2.6+ and 3.x / LGPL 3 |
| [graphite2](http://graphite.sil.org/) | 1.3.13 | A “smart font” system that handles the complexities of lesser-known languages of the world. / LGPLv2 |
| [greenlet](https://github.com/python-greenlet/greenlet) | 0.4.15 | Lightweight in-process concurrent programming / MIT |
| [grin](http://pypi.python.org/pypi/grin) | 1.2.1 | Enhanced grep-like tool / BSD 3-Clause |
| [gst-plugins-base](http://gstreamer.freedesktop.org/) | 1.14.0 | GStreamer Base Plug-ins / GPL2 |
| [gstreamer](http://gstreamer.freedesktop.org/) | 1.14.0 | Library for constructing graphs of media-handling components / LGPL 2 |
| [h5py](http://www.h5py.org/) | 2.9.0 | Read and write HDF5 files from Python. / BSD-3-Clause |
| [harfbuzz](http://www.freedesktop.org/wiki/Software/HarfBuzz/) | 1.8.8 | An OpenType text shaping engine. / MIT |
| [hdf5](http://www.hdfgroup.org/HDF5/) | 1.10.4 | HDF5 is a data model, library, and file format for storing and managing data / HDF5 |
| [heapdict](http://stutzbachenterprises.com/) | 1.0.0 | A heap with decrease-key and increase-key operations / BSD 3-Clause |
| [html5lib](https://github.com/html5lib/html5lib-python) | 1.0.1 | HTML parser based on the WHATWG HTML specification / MIT |
| [icu](http://site.icu-project.org/) | 58.2 | International Components for Unicode. / MIT |
| [idna](https://github.com/kjd/idna) | 2.8 | Internationalized Domain Names in Applications (IDNA). / BSD Like |
| [imageio](http://imageio.github.io) | 2.5.0 | a Python library for reading and writing image data / BSD 2-Clause |
| [imagesize](https://github.com/shibukawa/imagesize_py) | 1.1.0 | Getting image size from png/jpeg/jpeg2000/gif file / MIT |
| [importlib\_metadata](http://importlib-metadata.readthedocs.io) | 0.17 | A library to access the metadata for a Python package / APACHE-2.0 |
| [intel-openmp](https://software.intel.com/en-us/node/522690) | 2019.4 | Math library for Intel and compatible processors / proprietary - Intel |
| [ipaddress](https://github.com/phihag/ipaddress) | 1.0.22 | IPv4/IPv6 manipulation library / PSF 2 |
| [ipykernel](https://ipython.org) | 4.10.0 | IPython Kernel for Jupyter / BSD-3-Clause |
| [ipython](https://ipython.org/) | 5.8.0 | IPython: Productive Interactive Computing / BSD-3-Clause |
| [ipython\_genutils](http://ipython.org) | 0.2.0 | vestigial utilities from IPython / BSD 3-Clause |
| [ipywidgets](https://github.com/ipython/ipywidgets) | 7.5.0 | Jupyter Interactive Widgets / BSD 3-clause |
| [isort](https://github.com/timothycrosley/isort) | 4.3.21 | A Python utility / library to sort Python imports. / MIT |
| [itsdangerous](https://github.com/pallets/itsdangerous) | 1.1.0 | Various helpers to pass trusted data to untrusted environments. / BSD 3-Clause |
| [jbig](https://www.cl.cam.ac.uk/~mgk25/jbigkit) | 2.1 | Implementation of the JBIG1 data compression standard / GPL-2.0 |
| [jdcal](https://github.com/phn/jdcal) | 1.4.1 | Julian dates from proleptic Gregorian and Julian calendars. / BSD 2-Clause |
| [jedi](https://github.com/davidhalter/jedi/) | 0.13.3 | An autocompletion tool for Python that can be used for text editors. / MIT |
| [jinja2](http://jinja.pocoo.org) | 2.10.1 | An easy to use stand-alone template engine written in pure python. / 3-Clause BSD |
| [jpeg](http://www.ijg.org/) | 9b | read/write jpeg COM, EXIF, IPTC medata / Custom free software license |
| [jsonschema](https://github.com/Julian/jsonschema) | 3.0.1 | An implementation of JSON Schema validation for Python / MIT |
| [jupyter](http://jupyter.org) | 1.0.0 | Jupyter metapackage. Install all the Jupyter components in one go. / BSD 3-Clause |
| [jupyter\_client](http://jupyter.org) | 5.3.1 | Jupyter protocol implementation and client libraries / BSD 3-clause |
| [jupyter\_console](http://jupyter.org) | 5.2.0 | Jupyter terminal console / BSD-3-Clause |
| [jupyter\_core](http://jupyter.org) | 4.5.0 | Core common functionality of Jupyter projects. / BSD 3-clause |
| [jupyterlab](https://github.com/jupyterlab/jupyterlab) | 0.33.11 | JupyterLab / BSD-3-Clause |
| [jupyterlab\_launcher](http://github.com/jupyterlab/jupyterlab_launcher) | 0.11.2 | A Launcher for JupyterLab based applications. / BSD 3-Clause |
| [kiwisolver](https://github.com/nucleic/kiwi) | 1.1.0 | A fast implementation of the Cassowary constraint solver / BSD 3-Clause |
| [krb5](http://web.mit.edu/kerberos/) | 1.16.1 | A network authentication protocol. / MIT |
| [lazy-object-proxy](https://github.com/ionelmc/python-lazy-object-proxy) | 1.4.1 | A fast and thorough lazy object proxy / BSD-2-Clause |
| [libarchive](http://www.libarchive.org/) | 3.3.3 | Multi-format archive and compression library / BSD 2-Clause |
| [libcurl](http://curl.haxx.se/) | 7.65.2 | tool and library for transferring data with URL syntax / MIT/X derivate (`<http://curl.haxx.se/docs/copyright.html>`) |
| [libedit](http://thrysoee.dk/editline/) | 3.1.20181209 | Editline Library (libedit) / NetBSD |
| [libffi](https://sourceware.org/libffi/) | 3.2.1 | A Portable Foreign Function Interface Library. / Custom |
| [libgcc-ng](https://gcc.gnu.org/onlinedocs/gccint/Libgcc.html) | 9.1.0 | The GCC low-level runtime library / GPL |
| [libgfortran-ng](https://gcc.gnu.org/) | 7.3.0 | The GNU Fortran Runtime Library / GPL |
| [liblief](https://lief.quarkslab.com/) | 0.9.0 | A cross platform library to parse, modify and abstract ELF, PE and MachO formats. / Apache 2.0 |
| [libpng](http://www.libpng.org/pub/png/libpng.html) | 1.6.37 | PNG reference library / zlib/libpng |
| [libsodium](http://libsodium.org) | 1.0.16 | A modern and easy-to-use crypto library. / ISC |
| [libssh2](https://www.libssh2.org/) | 1.8.2 | the SSH library / BSD-3-Clause |
| [libstdcxx-ng](https://gcc.gnu.org/) | 9.1.0 | The GNU C++ Runtime Library / GPL3 with runtime exception |
| [libtiff](http://www.libtiff.org/) | 4.0.10 | Support for the Tag Image File Format (TIFF). / HPND |
| [libtool](http://www.gnu.org/software/libtool/) | 2.4.6 | The GNU Portable Library Tool / GPL 3 |
| [libuuid](http://sourceforge.net/projects/libuuid/) | 1.0.3 | Portable uuid C library. / BSD 3-Clause |
| [libxcb](http://xcb.freedesktop.org/) | 1.13 | This is the C-language Binding (XCB) package to the X Window System protocol / MIT |
| [libxml2](http://xmlsoft.org/) | 2.9.9 | The XML C parser and toolkit of Gnome / MIT |
| [libxslt](http://xmlsoft.org/XSLT/) | 1.1.33 | The XSLT C library developed for the GNOME project / MIT |
| [linecache2](https://github.com/testing-cabal/linecache2) | 1.0.0 | Backport of the linecache module / PSF 1.0 |
| [llvmlite](https://github.com/numba/llvmlite) | 0.29.0 | A lightweight LLVM python binding for writing JIT compilers / New BSD License |
| [locket](https://github.com/mwilliamson/locket.py) | 0.2.0 | File-based locks for Python for Linux and Windows / BSD 2-Clause |
| [lxml](http://lxml.de/) | 4.3.4 | Pythonic binding for the C libraries libxml2 and libxslt. / BSD 3-Clause, GPL-2.0, ZPL-2.0, and ElementTree |
| [lz4-c](https://www.lz4.org) | 1.8.1.2 | Extremely Fast Compression algorithm / BSD 2-clause |
| [lzo](http://www.oberhumer.com/opensource/lzo/) | 2.10 | LZO is a portable lossless data compression library written in ANSI C. / GPL v2+ |
| [markupsafe](https://www.palletsprojects.com/p/markupsafe) | 1.1.1 | A Python module that implements the jinja2.Markup string / BSD-3-Clause |
| [matplotlib](http://matplotlib.org/) | 2.2.3 | Publication quality figures in Python / PSF-based |
| [mccabe](https://github.com/PyCQA/mccabe) | 0.6.1 | McCabe complexity checker for Python / MIT |
| [mistune](https://github.com/lepture/mistune) | 0.8.4 | The fastest markdown parser in pure Python. / BSD 3-Clause |
| [mkl](https://software.intel.com/en-us/mkl) | 2019.4 | Math library for Intel and compatible processors / proprietary - Intel |
| [mkl-service](http://github.com/IntelPython/mkl-service) | 2.0.2 | Python hooks for Intel(R) Math Kernel Library runtime control settings. / BSD-3-Clause |
| [mkl\_fft](http://github.com/IntelPython/mkl_fft) | 1.0.12 | NumPy-based implementation of Fast Fourier Transform using Intel (R) Math Kernel Library. / BSD 3-Clause |
| [mkl\_random](http://github.com/IntelPython/mkl_random) | 1.0.2 | Intel (R) MKL-powered package for sampling from common probability distributions into NumPy arrays. / BSD 3-Clause |
| [mock](https://github.com/testing-cabal/mock) | 3.0.5 | A library for testing in Python / BSD-2-Clause |
| [more-itertools](https://github.com/erikrose/more-itertools) | 5.0.0 | More routines for operating on iterables, beyond itertools / MIT |
| [mpc](http://www.multiprecision.org/) | 1.1.0 | A C library for the arithmetic of complex numbers with arbitrarily high precision. / LGPL 3 |
| [mpfr](http://www.mpfr.org/) | 4.0.1 | The MPFR library is a C library for multiple-precision floating-point computations with correct rounding. / LGPL 3 |
| [mpmath](http://mpmath.org) | 1.1.0 | Python library for arbitrary-precision floating-point arithmetic / BSD 3-Clause |
| [msgpack-python](http://msgpack.org/) | 0.6.1 | MessagePack (de)serializer. / Apache 2.0 |
| [multipledispatch](https://github.com/mrocklin/multipledispatch/) | 0.6.0 | Multiple dispatch in Python / BSD 3-Clause |
| [nbconvert](http://jupyter.org) | 5.5.0 | Converting Jupyter Notebooks / BSD-3-Clause |
| [nbformat](http://jupyter.org) | 4.4.0 | The reference implementation of the Jupyter Notebook format / BSD 3-clause |
| [ncurses](http://www.gnu.org/software/ncurses/) | 6.1 | Library for text-based user interfaces / Free software (MIT-like) |
| [networkx](https://networkx.github.io/) | 2.2 | Python package for creating and manipulating complex networks / BSD-3-Clause |
| [nltk](http://nltk.org/) | 3.4.4 | Build Python programs to work with human language data / Apache 2.0 |
| [nose](http://readthedocs.org/docs/nose/) | 1.3.7 | Nose extends unittest to make testing easier / LGPL-2.1 |
| [notebook](http://jupyter.org) | 5.7.8 | Jupyter Notebook / BSD 3-clause |
| [numba](http://numba.github.com) | 0.44.1 | NumPy aware dynamic Python compiler using LLVM / BSD 2-clause |
| [numexpr](https://github.com/pydata/numexpr) | 2.6.9 | Fast numerical expression evaluator for NumPy. / MIT |
| [numpy](http://numpy.scipy.org/) | 1.16.4 | Array processing for numbers, strings, records, and objects. / BSD 3-Clause |
| numpy-base | 1.16.4 | None / None |
| [numpydoc](https://github.com/numpy/numpydoc) | 0.9.1 | Numpy’s Sphinx extensions / BSD 3-Clause |
| [olefile](http://www.decalage.info/python/olefileio) | 0.46 | parse, read and write Microsoft OLE2 files / BSD 2-Clause |
| [openpyxl](https://openpyxl.readthedocs.io) | 2.6.2 | A Python library to read/write Excel 2010 xlsx/xlsm files / MIT |
| [openssl](http://www.openssl.org/) | 1.1.1c | OpenSSL is an open-source implementation of the SSL and TLS protocols / OpenSSL |
| [packaging](https://github.com/pypa/packaging) | 19.0 | Core utilities for Python packages / Apache 2.0 or BSD 2-Clause |
| [pandas](http://pandas.pydata.org) | 0.24.2 | High-performance, easy-to-use data structures and data analysis tools. / BSD 3-clause |
| [pandoc](http://pandoc.org/) | 2.2.3.2 | Universal markup converter (repackaged binaries). / GPL-2.0 |
| [pandocfilters](https://github.com/jgm/pandocfilters) | 1.4.2 | A python module for writing pandoc filters / BSD-3-Clause |
| [pango](http://www.pango.org/) | 1.42.4 | Text layout and rendering engine. / LGPL-2.1 |
| [parso](https://github.com/davidhalter/parso) | 0.5.0 | A Python Parser / MIT |
| [partd](https://github.com/dask/partd) | 1.0.0 | Data structure for on-disk shuffle operations / BSD 3-Clause |
| [patchelf](http://nixos.org/patchelf.html) | 0.9 | A small utility to modify the dynamic linker and RPATH of ELF executables. / GPL 3 |
| [path.py](https://github.com/jaraco/path.py) | 11.5.0 | A module wrapper for os.path / MIT |
| [pathlib2](https://github.com/mcmtroffaes/pathlib2) | 2.3.4 | Fork of pathlib aiming to support the full stdlib Python API / MIT |
| [patsy](https://github.com/pydata/patsy) | 0.5.1 | Describing statistical models in Python using symbolic formulas / BSD-2-Clause, PSF2 |
| [pcre](http://www.pcre.org/) | 8.43 | Regular expression pattern matching using the same syntax and semantics as Perl 5. / BSD 3-Clause |
| [pep8](http://pep8.readthedocs.org/) | 1.7.1 | Python style guide checker / MIT |
| [pexpect](http://pexpect.sourceforge.net/) | 4.7.0 | Pexpect makes Python a better tool for controlling other applications. / ISC |
| [pickleshare](https://github.com/pickleshare/pickleshare/) | 0.7.5 | Tiny ‘shelve’-like database with concurrency support / MIT |
| [pillow](https://pillow.readthedocs.io) | 6.1.0 | Pillow is the friendly PIL fork by Alex Clark and Contributors / PIL |
| [pip](https://pip.pypa.io/en/stable/) | 19.1.1 | PyPA recommended tool for installing Python packages / MIT |
| [pixman](http://www.pixman.org/) | 0.38.0 | A low-level software library for pixel manipulation. / MIT |
| [pkginfo](https://code.launchpad.net/~tseaver/pkginfo/trunk) | 1.5.0.1 | Query metadatdata from sdists / bdists / installed packages. / MIT |
| [pluggy](https://github.com/pytest-dev/pluggy) | 0.12.0 | Plugin registration and hook calling for Python / MIT |
| [ply](http://www.dabeaz.com/ply/index.html) | 3.11 | Python Lex-Yacc / BSD 3-clause |
| [prometheus\_client](https://github.com/prometheus/client_python) | 0.7.1 | Python client for the Prometheus monitoring system / Apache 2.0 |
| [prompt\_toolkit](https://github.com/jonathanslenders/python-prompt-toolkit) | 1.0.15 | Library for building powerful interactive command lines in Python / BSD 3-clause |
| [psutil](https://github.com/giampaolo/psutil) | 5.6.3 | A cross-platform process and system utilities module for Python / BSD 3-Clause |
| [ptyprocess](https://github.com/pexpect/ptyprocess) | 0.6.0 | Run a subprocess in a pseudo terminal / ISC |
| [py](https://github.com/pytest-dev/py) | 1.8.0 | library with cross-python path, ini-parsing, io, code, log facilities / MIT |
| [py-lief](https://lief.quarkslab.com/) | 0.9.0 | A cross platform library to parse, modify and abstract ELF, PE and MachO formats. / Apache 2.0 |
| [pycairo](http://cairographics.org/pycairo/) | 1.18.1 | Python bindings for the Cairo graphics library. / LGPL 2.1, MPL 1.1 |
| [pycodestyle](https://pycodestyle.readthedocs.io/) | 2.5.0 | Python style guide checker / MIT |
| [pycosat](https://github.com/ContinuumIO/pycosat) | 0.6.3 | Bindings to picosat (a SAT solver) / MIT |
| [pycparser](https://github.com/eliben/pycparser) | 2.19 | Complete C99 parser in pure Python / BSD 3-clause |
| [pycrypto](http://www.pycrypto.org/) | 2.6.1 | Cryptographic modules for Python. / Public Domain |
| [pycurl](http://pycurl.sourceforge.net/) | 7.43.0.3 | A Python Interface To The cURL library / LGPL, MIT |
| [pyflakes](https://github.com/PyCQA/pyflakes) | 2.1.1 | Pyflakes analyzes programs and detects various errors. / MIT |
| [pygments](http://pygments.org/) | 2.4.2 | Generic syntax highlighting package / BSD 2-clause |
| [pylint](http://www.pylint.org/) | 1.9.2 | python code static checker / GPL |
| [pyodbc](https://github.com/mkleehammer/pyodbc) | 4.0.26 | DB API Module for ODBC / MIT |
| [pyopenssl](https://github.com/pyca/pyopenssl) | 19.0.0 | Python wrapper module around the OpenSSL library / Apache 2.0 |
| [pyparsing](http://pyparsing.wikispaces.com/) | 2.4.0 | Create and execute simple grammars / MIT |
| [pyqt](http://www.riverbankcomputing.co.uk/software/pyqt) | 5.9.2 | Python binding of the cross-platform GUI toolkit Qt. / Commercial, GPL-2.0, GPL-3.0 |
| [pyrsistent](http://github.com/tobgu/pyrsistent/) | 0.14.11 | Persistent/Functional/Immutable data structures / MIT |
| [pysocks](https://github.com/Anorov/PySocks) | 1.7.0 | A Python SOCKS client module. See [Anorov/PySocks](https://github.com/Anorov/PySocks) for more information. / BSD 3-Clause |
| [pytables](http://www.pytables.org) | 3.5.2 | Brings together Python, HDF5 and NumPy to easily handle large amounts of data. / BSD 3-Clause |
| [pytest](https://docs.pytest.org/en/latest/) | 4.6.2 | Simple and powerful testing with Python. / MIT |
| [python](http://www.python.org/) | 2.7.16 | General purpose programming language / PSF |
| [python-dateutil](https://dateutil.readthedocs.org/) | 2.8.0 | Extensions to the standard Python datetime module. / BSD 3 Clause |
| [python-libarchive-c](https://github.com/Changaco/python-libarchive-c) | 2.8 | Python interface to libarchive / CC0-1.0 |
| [pytz](http://pythonhosted.org/pytz/) | 2019.1 | World timezone definitions, modern and historical. / MIT |
| [pywavelets](https://github.com/PyWavelets/pywt) | 1.0.3 | Discrete Wavelet Transforms in Python / MIT |
| [pyyaml](http://pyyaml.org/wiki/PyYAML) | 5.1.1 | YAML parser and emitter for Python / MIT |
| [pyzmq](https://github.com/zeromq/pyzmq) | 18.0.0 | Python bindings for zeromq / BSD 3-clause |
| [qt](http://qt-project.org) | 5.9.7 | Qt is a cross-platform application and UI framework. / LGPL-3.0 |
| [qtawesome](https://github.com/spyder-ide/qtawesome) | 0.5.7 | Iconic fonts in PyQt and PySide applications / MIT |
| [qtconsole](http://jupyter.org) | 4.5.1 | Jupyter Qt console / BSD 3-Clause |
| [qtpy](https://github.com/spyder-ide/qtpy) | 1.8.0 | Abstraction layer for PyQt5/PyQt4/PySide / MIT |
| [readline](https://cnswww.cns.cwru.edu/php/chet/readline/rltop.html) | 7.0 | library for editing command lines as they are typed in / GPL3 |
| [requests](http://python-requests.org) | 2.22.0 | Python HTTP for Humans / Apache 2.0 |
| [rope](https://github.com/python-rope/rope) | 0.14.0 | A python refactoring library / GPL 2.0 |
| [ruamel\_yaml](https://bitbucket.org/ruamel/yaml) | 0.15.46 | A patched copy of ruamel.yaml. / MIT |
| [scandir](https://github.com/benhoyt/scandir) | 1.10.0 | scandir, a better directory iterator and faster os.walk() / BSD 3-Clause |
| [scikit-image](http://scikit-image.org/) | 0.14.2 | Image processing routines for SciPy. / BSD 3-Clause |
| [scikit-learn](http://scikit-learn.org/) | 0.20.3 | A set of python modules for machine learning and data mining / BSD 3-Clause |
| [scipy](http://www.scipy.org/) | 1.2.1 | Scientific Library for Python / BSD 3-Clause |
| [seaborn](https://seaborn.pydata.org) | 0.9.0 | Statistical data visualization / BSD 3-Clause |
| [send2trash](https://github.com/hsoft/send2trash) | 1.5.0 | Python library to natively send files to Trash (or Recycle bin) on all platforms. / BSD-3-Clause |
| [setuptools](https://github.com/pypa/setuptools) | 41.0.1 | Download, build, install, upgrade, and uninstall Python packages / MIT |
| [simplegeneric](http://cheeseshop.python.org/pypi/simplegeneric) | 0.8.1 | Simple generic functions (similar to Python’s own len(), pickle.dump(), etc.) / Zope Public |
| [singledispatch](http://docs.python.org/3/library/functools.html#functools.singledispatch) | 3.4.0.3 | Transforms a function into a single-dispatch generic function / MIT |
| [sip](http://www.riverbankcomputing.com/software/sip/intro) | 4.19.8 | Create Python bindings for C and C++ libraries / GPL-3.0 |
| [six](http://pypi.python.org/pypi/six/) | 1.12.0 | Python 2 and 3 compatibility utilities / MIT |
| [snappy](https://github.com/google/snappy) | 1.1.7 | A fast compressor/decompressor / BSD 3-clause |
| [snowballstemmer](https://github.com/shibukawa/snowball_py) | 1.9.0 | Snowball stemming library collection for Python / BSD-2-Clause |
| [sortedcollections](http://www.grantjenks.com/docs/sortedcollections/) | 1.1.2 | Python Sorted Collections / Apache-2.0 |
| [sortedcontainers](http://www.grantjenks.com/docs/sortedcontainers/) | 2.1.0 | Python Sorted Container Types: SortedList, SortedDict, and SortedSet / Apache 2.0 |
| [soupsieve](http://facelessuser.github.io/soupsieve) | 1.8 | A modern CSS selector implementation for BeautifulSoup / MIT |
| [sphinx](http://www.sphinx-doc.org) | 1.8.5 | Sphinx is a tool that makes it easy to create intelligent and beautiful documentation / BSD-2-Clause |
| sphinxcontrib | 1.0 | Python namespace for sphinxcontrib / BSD |
| [sphinxcontrib-websupport](https://pypi.python.org/pypi/sphinxcontrib-websupport) | 1.1.2 | Sphinx API for Web Apps / BSD-2-Clause |
| [spyder](https://www.spyder-ide.org/) | 3.3.6 | The Scientific Python Development Environment / MIT |
| [spyder-kernels](https://github.com/spyder-ide/spyder-kernels) | 0.5.1 | Jupyter kernels for the Spyder console / MIT |
| [sqlalchemy](http://www.sqlalchemy.org/) | 1.3.5 | Database Abstraction Library. / MIT |
| [sqlite](http://www.sqlite.org/) | 3.29.0 | Implements a self-contained, zero-configuration, SQL database engine. / Public-Domain (`<http://www.sqlite.org/copyright.html>`) |
| [ssl\_match\_hostname](http://bitbucket.org/brandon/backports.ssl_match_hostname) | 3.7.0.1 | The ssl.match\_hostname() function from Python 3.5 / PSF 2 |
| [statsmodels](https://www.statsmodels.org) | 0.10.0 | Statistical computations and models for use with SciPy / BSD 3-Clause |
| [subprocess32](https://github.com/google/python-subprocess32) | 3.5.4 | A backport of the subprocess module from Python 3.2/3.3 for use on 2.x / Python-2.0 |
| [sympy](http://sympy.org) | 1.4 | Python library for symbolic mathematics / BSD-3-Clause |
| [tblib](https://github.com/ionelmc/python-tblib) | 1.4.0 | Traceback serialization library. / BSD 2-Clause |
| [terminado](https://github.com/jupyter/terminado) | 0.8.2 | Terminals served by tornado websockets / BSD 2-Clause |
| [testpath](https://testpath.readthedocs.io) | 0.4.2 | Testpath is a collection of utilities for Python code working with files and commands. / BSD-3-Clause |
| [tk](http://www.tcl.tk/) | 8.6.8 | A dynamic programming language with GUI support. Bundles Tcl and Tk. / Tcl/Tk |
| [toolz](http://toolz.readthedocs.org/) | 0.10.0 | A functional standard library for Python / BSD 3-Clause |
| [tornado](http://www.tornadoweb.org/) | 5.1.1 | A Python web framework and asynchronous networking library, originally developed at FriendFeed. / Apache 2.0 |
| [tqdm](https://pypi.python.org/pypi/tqdm) | 4.32.1 | A Fast, Extensible Progress Meter / MPLv2.0, MIT |
| [traceback2](https://github.com/testing-cabal/traceback2) | 1.4.0 | Backports of the traceback module / PSF 2.0 |
| [traitlets](http://ipython.org/) | 4.3.2 | Configuration system for Python applications / BSD 3-clause |
| [typing](https://docs.python.org/3.5/library/typing.html) | 3.7.4 | Type Hints for Python - backport for `Python<3.5` / PSF |
| [unicodecsv](https://github.com/jdunck/python-unicodecsv) | 0.14.1 | Drop-in replacement for csv module which supports unicode strings / BSD |
| [unittest2](http://pypi.python.org/pypi/unittest2) | 1.1.0 | The new features in unittest backported to Python 2.4+ / BSD |
| [unixodbc](http://www.unixodbc.org/) | 2.3.7 | ODBC on non MS Windows platforms / LGPL-2.1 |
| [urllib3](https://urllib3.readthedocs.io/) | 1.24.2 | HTTP library with thread-safe connection pooling, file post, and more. / MIT |
| [wcwidth](https://github.com/jquast/wcwidth) | 0.1.7 | Measures number of Terminal column cells of wide-character codes. / MIT |
| [webencodings](https://github.com/gsnedders/python-webencodings) | 0.5.1 | Character encoding aliases for legacy web content / BSD 3-Clause |
| [werkzeug](https://palletsprojects.com/p/werkzeug/) | 0.15.4 | The comprehensive WSGI web application library. / BSD 3-Clause |
| [wheel](https://github.com/pypa/wheel) | 0.33.4 | A built-package format for Python. / MIT |
| [widgetsnbextension](http://ipython.org) | 3.5.0 | Interactive Widgets for Jupyter / BSD 3-clause |
| [wrapt](https://github.com/GrahamDumpleton/wrapt) | 1.11.2 | Module for decorators, wrappers and monkey patching / BSD 2-Clause |
| [wurlitzer](https://github.com/minrk/wurlitzer) | 1.0.2 | Capture C-level stdout/stderr in Python / MIT |
| [xlrd](http://www.python-excel.org/) | 1.2.0 | Library for developers to extract data from Microsoft Excel (tm) spreadsheet files / BSD 3-Clause and BSD with advertising |
| [xlsxwriter](https://xlsxwriter.readthedocs.io/) | 1.1.8 | A Python module for creating Excel XLSX files / BSD 2-Clause |
| [xlwt](http://www.python-excel.org/) | 1.3.0 | Writing data and formatting information to Excel files / BSD |
| [xz](http://tukaani.org/xz/) | 5.2.4 | Data compression software with high compression ratio / LGPL-2.1 and GPL-2.0 |
| [yaml](http://pyyaml.org/wiki/LibYAML) | 0.1.7 | A C library for parsing and emitting YAML. / MIT |
| [zeromq](http://zeromq.org) | 4.3.1 | A high-performance asynchronous messaging library. / LGPL 3 |
| [zict](http://github.com/mrocklin/zict) | 1.0.0 | Composable Dictionary Classes / BSD 3-Clause |
| [zipp](https://github.com/jaraco/zipp) | 0.5.1 | A pathlib-compatible Zipfile object wrapper / MIT |
| [zlib](http://zlib.net/) | 1.2.11 | Massively spiffy yet delicately unobtrusive compression library / zlib |
| [zstd](http://www.zstd.net) | 1.3.7 | Zstandard - Fast real-time compression algorithm / BSD 3-Clause |
| Name | Version | Summary / License |
|---|---|---|
| [alabaster](http://www.sphinx-doc.org/en/stable/index.html) | 0.7.12 | Configurable, Python 2+3 compatible Sphinx theme. / BSD 3-Clause |
| [anaconda-client](http://anaconda.org) | 1.7.2 | anaconda.org command line client library / BSD 3-clause |
| [anaconda-project](https://github.com/Anaconda-Platform/anaconda-project) | 0.8.2 | Tool for encapsulating, running, and reproducing data science projects / BSD 3-Clause |
| [asn1crypto](https://github.com/wbond/asn1crypto) | 0.24.0 | Python ASN.1 library with a focus on performance and a pythonic API / MIT |
| [astroid](https://www.astroid.org/) | 2.2.5 | A abstract syntax tree for Python with inference support. / LGPL 2.1 |
| [astropy](http://www.astropy.org/) | 3.1.2 | Community-developed Python Library for Astronomy / BSD |
| [atomicwrites](https://github.com/untitaker/python-atomicwrites) | 1.3.0 | Atomic file writes / MIT |
| [attrs](https://attrs.readthedocs.io/en/stable/) | 19.1.0 | attrs is the Python package that will bring back the joy of writing classes by relieving you from the drudgery of implementing object protocols (aka dunder methods). / MIT |
| [babel](http://babel.pocoo.org/) | 2.6.0 | Utilities to internationalize and localize Python applications / BSD 3-clause |
| [backcall](https://github.com/takluyver/backcall/) | 0.1.0 | Specifications for callback functions passed in to an API / BSD-3-Clause |
| [backports](https://bitbucket.org/brandon/backports) | 1.0 | / BSD |
| [backports.os](https://github.com/pjdelport/backports.os) | 0.1.1 | Backport of new features in Python’s os module / Python Software Foundation |
| [backports.shutil\_get\_terminal\_size](https://github.com/chrippa/backports.shutil_get_terminal_size) | 1.0.0 | A backport of the get\_terminal\_size function from Python 3.3’s shutil. / MIT |
| [beautifulsoup4](http://www.crummy.com/software/BeautifulSoup/) | 4.7.1 | Python library designed for screen-scraping / MIT |
| [bitarray](https://github.com/ilanschnell/bitarray) | 0.8.3 | efficient arrays of booleans – C extension / PSF |
| [bkcharts](http://github.com/bokeh/bkcharts) | 0.2 | High level chart types built on top of Bokeh / BSD 3-Clause |
| blas | 1.0 | |
| [bleach](https://github.com/mozilla/bleach) | 3.1.0 | Easy, whitelist-based HTML-sanitizing tool / Apache-2.0 |
| [blosc](https://github.com/Blosc/c-blosc) | 1.15.0 | A blocking, shuffling and loss-less compression library that can be faster than memcpy() / BSD 3-Clause |
| [bokeh](http://bokeh.pydata.org/) | 1.0.4 | Statistical and novel interactive HTML plots for Python / BSD 3-Clause |
| [boto](https://github.com/boto/boto/) | 2.49.0 | Amazon Web Services Library / MIT |
| [bottleneck](http://berkeleyanalytics.com/bottleneck) | 1.2.1 | Fast NumPy array functions written in Cython. / BSD 2-Clause |
| [bzip2](http://www.bzip.org/) | 1.0.6 | high-quality data compressor / bzip2 |
| [ca-certificates](https://github.com/conda-forge/ca-certificates-feedstock) | 2019.1.23 | Certificates for use with other packages. / ISC |
| [certifi](http://certifi.io/) | 2019.3.9 | Python package for providing Mozilla’s CA Bundle. / ISC |
| [cffi](https://bitbucket.org/cffi/cffi) | 1.12.2 | Foreign Function Interface for Python calling C code. / MIT |
| [chardet](https://github.com/chardet/chardet) | 3.0.4 | Universal character encoding detector / LGPL2 |
| [click](https://palletsprojects.com/p/click) | 7.0 | Python composable command line interface toolkit / BSD-3-Clause |
| [cloudpickle](https://github.com/cloudpipe/cloudpickle) | 0.8.0 | Extended pickling support for Python objects / BSD 3-Clause |
| [clyent](https://github.com/Anaconda-Platform/clyent) | 1.2.2 | Command line client library for windows and posix / BSD 3-Clause |
| [colorama](https://github.com/tartley/colorama) | 0.4.1 | Cross-platform colored terminal text / BSD-3-Clause |
| [comtypes](http://starship.python.net/crew/theller/comtypes/) | 1.1.7 | pure Python COM package / MIT |
| [conda](https://conda.io) | 4.6.11 | OS-agnostic, system-level binary package and environment manager. / BSD 3-Clause |
| [conda-build](https://github.com/conda/conda-build) | 3.17.8 | tools for building conda packages / BSD 3-Clause |
| [conda-env](https://github.com/conda/conda-env) | 2.6.0 | Tools for interacting with conda environments. / BSD 3-Clause |
| console\_shortcut | 0.1.1 | Console shortcut creator for Windows (using menuinst) / BSD |
| [contextlib2](http://contextlib2.readthedocs.org) | 0.5.5 | Backports and enhancements for the contextlib module / PSF |
| [cryptography](https://github.com/pyca/cryptography) | 2.6.1 | Provides cryptographic recipes and primitives to Python developers / Apache 2.0 or BSD 3-Clause, PSF 2 |
| [curl](http://curl.haxx.se/) | 7.64.0 | tool and library for transferring data with URL syntax / MIT/X derivate (`<http://curl.haxx.se/docs/copyright.html>`) |
| [cycler](http://matplotlib.org/cycler) | 0.10.0 | Composable style cycles. / BSD 3-Clause |
| [cython](http://www.cython.org/) | 0.29.6 | The Cython compiler for writing C extensions for the Python language / Apache-2.0 |
| [cytoolz](https://github.com/pytoolz/cytoolz) | 0.9.0.1 | Cython implementation of Toolz. High performance functional utilities. / BSD 3-Clause |
| [dask](http://github.com/dask/dask/) | 1.1.4 | Parallel Python with task scheduling / BSD 3-Clause |
| [dask-core](http://github.com/dask/dask/) | 1.1.4 | Parallel Python with task scheduling / BSD 3-Clause |
| [decorator](https://github.com/micheles/decorator) | 4.4.0 | Better living through Python with decorators. / BSD 3-Clause |
| [defusedxml](https://bitbucket.org/tiran/defusedxml) | 0.5.0 | XML bomb protection for Python stdlib modules / PSF 2.0 |
| [distributed](http://distributed.readthedocs.io/en/latest/) | 1.26.0 | Distributed computing with Dask / BSD 3-Clause |
| [docutils](http://docutils.sourceforge.net/) | 0.14 | Docutils – Python Documentation Utilities / Public Domain Dedictation and BSD 2-Clause and PSF 2.1.1 and GPL 3.0 |
| [entrypoints](https://github.com/takluyver/entrypoints) | 0.3 | Discover and load entry points from installed packages. / MIT License |
| [et\_xmlfile](https://bitbucket.org/openpyxl/et_xmlfile) | 1.0.1 | An implementation of lxml.xmlfile for the standard library / MIT |
| [fastcache](https://github.com/pbrady/fastcache) | 1.0.2 | C implementation of Python 3 lru\_cache / MIT |
| [filelock](https://github.com/benediktschmitt/py-filelock) | 3.0.10 | A platform independent file lock. / Public Domain |
| [flask](http://flask.pocoo.org) | 1.0.2 | A microframework based on Werkzeug, Jinja2 and good intentions. / BSD 3-Clause |
| [freetype](https://www.freetype.org/) | 2.9.1 | A Free, High-Quality, and Portable Font Engine / GPL-2.0 and FreeType |
| [get\_terminal\_size](https://github.com/chrippa/backports.shutil_get_terminal_size) | 1.0.0 | Get the size of the terminal window. / MIT |
| [gevent](http://www.gevent.org/) | 1.4.0 | Coroutine-based network library / MIT |
| [glob2](https://github.com/miracle2k/python-glob2) | 0.6 | Version of the glob module that supports recursion via \*\*, and can capture patterns. / BSD-2-Clause |
| [greenlet](https://github.com/python-greenlet/greenlet) | 0.4.15 | Lightweight in-process concurrent programming / MIT |
| [h5py](http://www.h5py.org/) | 2.9.0 | Read and write HDF5 files from Python. / BSD-3-Clause |
| [hdf5](http://www.hdfgroup.org/HDF5/) | 1.10.4 | HDF5 is a data model, library, and file format for storing and managing data / HDF5 |
| [heapdict](http://stutzbachenterprises.com/) | 1.0.0 | A heap with decrease-key and increase-key operations / BSD 3-Clause |
| [html5lib](https://github.com/html5lib/html5lib-python) | 1.0.1 | HTML parser based on the WHATWG HTML specification / MIT |
| [icc\_rt](https://software.intel.com/en-us/node/522690) | 2019.0.0 | Intel runtime libraries for C, C++ and Fortran compilers / Intel proprietary |
| [icu](http://site.icu-project.org/) | 58.2 | International Components for Unicode. / MIT |
| [idna](https://github.com/kjd/idna) | 2.8 | Internationalized Domain Names in Applications (IDNA). / BSD Like |
| [imageio](http://imageio.github.io) | 2.5.0 | a Python library for reading and writing image data / BSD 2-Clause |
| [imagesize](https://github.com/shibukawa/imagesize_py) | 1.1.0 | Getting image size from png/jpeg/jpeg2000/gif file / MIT |
| [importlib\_metadata](http://importlib-metadata.readthedocs.io) | 0.8 | A library to access the metadata for a Python package / APACHE-2.0 |
| [intel-openmp](https://software.intel.com/en-us/node/522690) | 2019.3 | Math library for Intel and compatible processors / proprietary - Intel |
| [ipykernel](https://ipython.org) | 5.1.0 | IPython Kernel for Jupyter / BSD-3-Clause |
| [ipython](https://ipython.org/) | 7.4.0 | IPython: Productive Interactive Computing / BSD-3-Clause |
| [ipython\_genutils](http://ipython.org) | 0.2.0 | vestigial utilities from IPython / BSD 3-Clause |
| [ipywidgets](https://github.com/ipython/ipywidgets) | 7.4.2 | Jupyter Interactive Widgets / BSD 3-clause |
| [isort](https://github.com/timothycrosley/isort) | 4.3.16 | A Python utility / library to sort Python imports. / MIT |
| [itsdangerous](https://github.com/pallets/itsdangerous) | 1.1.0 | Various helpers to pass trusted data to untrusted environments. / BSD 3-Clause |
| [jdcal](https://github.com/phn/jdcal) | 1.4 | Julian dates from proleptic Gregorian and Julian calendars. / BSD 2-Clause |
| [jedi](https://github.com/davidhalter/jedi/) | 0.13.3 | An autocompletion tool for Python that can be used for text editors. / MIT |
| [jinja2](http://jinja.pocoo.org) | 2.10 | An easy to use stand-alone template engine written in pure python. / 3-Clause BSD |
| [jpeg](http://www.ijg.org/) | 9b | read/write jpeg COM, EXIF, IPTC medata / Custom free software license |
| [jsonschema](https://github.com/Julian/jsonschema) | 3.0.1 | An implementation of JSON Schema validation for Python / MIT |
| [jupyter](http://jupyter.org) | 1.0.0 | Jupyter metapackage. Install all the Jupyter components in one go. / BSD 3-Clause |
| [jupyter\_client](http://jupyter.org) | 5.2.4 | Jupyter protocol implementation and client libraries / BSD 3-clause |
| [jupyter\_console](http://jupyter.org) | 6.0.0 | Jupyter terminal console / BSD-3-Clause |
| [jupyter\_core](http://jupyter.org) | 4.4.0 | Core common functionality of Jupyter projects. / BSD 3-clause |
| [jupyterlab](https://github.com/jupyterlab/jupyterlab) | 0.35.4 | JupyterLab PRE-ALPHA / BSD-3-Clause |
| [jupyterlab\_server](http://github.com/jupyterlab/jupyterlab_server) | 0.2.0 | A set of server components for JupyterLab and JupyterLab like applications. / BSD 3-Clause |
| [keyring](https://github.com/jaraco/keyring) | 18.0.0 | Store and access your passwords safely / Python Software Foundation or MIT |
| [kiwisolver](https://github.com/nucleic/kiwi) | 1.0.1 | A fast implementation of the Cassowary constraint solver / BSD 3-Clause |
| [krb5](http://web.mit.edu/kerberos/) | 1.16.1 | A network authentication protocol. / MIT |
| [lazy-object-proxy](https://github.com/ionelmc/python-lazy-object-proxy) | 1.3.1 | A fast and thorough lazy object proxy. / BSD 2-Clause |
| [libarchive](http://www.libarchive.org/) | 3.3.3 | Multi-format archive and compression library / BSD 2-Clause |
| [libcurl](http://curl.haxx.se/) | 7.64.0 | tool and library for transferring data with URL syntax / MIT/X derivate (`<http://curl.haxx.se/docs/copyright.html>`) |
| [libiconv](https://www.gnu.org/software/libiconv/) | 1.15 | Provides iconv for systems which don’t have one (or that cannot convert from/to Unicode.) / GPL and LGPL |
| [liblief](https://lief.quarkslab.com/) | 0.9.0 | A cross platform library to parse, modify and abstract ELF, PE and MachO formats. / Apache 2.0 |
| [libpng](http://www.libpng.org/pub/png/libpng.html) | 1.6.36 | PNG reference library. / zlib/libpng |
| [libsodium](http://libsodium.org) | 1.0.16 | A modern and easy-to-use crypto library. / ISC |
| [libssh2](https://www.libssh2.org/) | 1.8.0 | the SSH library / BSD 3-Clause |
| [libtiff](http://www.libtiff.org/) | 4.0.10 | Support for the Tag Image File Format (TIFF). / HPND |
| [libxml2](http://xmlsoft.org/) | 2.9.9 | The XML C parser and toolkit of Gnome / MIT |
| [libxslt](http://xmlsoft.org/XSLT/) | 1.1.33 | The XSLT C library developed for the GNOME project / MIT |
| [llvmlite](https://github.com/numba/llvmlite) | 0.28.0 | A lightweight LLVM python binding for writing JIT compilers / New BSD License |
| [locket](https://github.com/mwilliamson/locket.py) | 0.2.0 | File-based locks for Python for Linux and Windows / BSD 2-Clause |
| [lxml](http://lxml.de/) | 4.3.2 | Pythonic binding for the C libraries libxml2 and libxslt. / BSD 3-Clause, GPL-2.0, ZPL-2.0, and ElementTree |
| [lz4-c](https://www.lz4.org) | 1.8.1.2 | Extremely Fast Compression algorithm / BSD 2-clause |
| [lzo](http://www.oberhumer.com/opensource/lzo/) | 2.10 | LZO is a portable lossless data compression library written in ANSI C. / GPL v2+ |
| m2w64-gcc-libgfortran | 5.3.0 | |
| m2w64-gcc-libs | 5.3.0 | |
| m2w64-gcc-libs-core | 5.3.0 | |
| m2w64-gmp | 6.1.0 | |
| m2w64-libwinpthread-git | 5.0.0.4634.697f757 | |
| [markupsafe](https://www.palletsprojects.com/p/markupsafe) | 1.1.1 | A Python module that implements the jinja2.Markup string / BSD-3-Clause |
| [matplotlib](http://matplotlib.org/) | 3.0.3 | Publication quality figures in Python / PSF-based |
| [mccabe](https://github.com/PyCQA/mccabe) | 0.6.1 | McCabe complexity checker for Python / MIT |
| [menuinst](https://github.com/ContinuumIO/menuinst) | 1.4.16 | cross platform menu item installation / BSD |
| [mistune](https://github.com/lepture/mistune) | 0.8.4 | The fastest markdown parser in pure Python. / BSD 3-Clause |
| [mkl](https://software.intel.com/en-us/mkl) | 2019.3 | Math library for Intel and compatible processors / proprietary - Intel |
| [mkl-service](https://github.com/ContinuumIO/mkl-service) | 1.1.2 | Python bindings to MKL service functions / 3-clause BSD |
| [mkl\_fft](http://github.com/IntelPython/mkl_fft) | 1.0.10 | NumPy-based implementation of Fast Fourier Transform using Intel (R) Math Kernel Library. / BSD 3-Clause |
| [mkl\_random](http://github.com/IntelPython/mkl_random) | 1.0.2 | Intel (R) MKL-powered package for sampling from common probability distributions into NumPy arrays. / BSD 3-Clause |
| [more-itertools](https://github.com/erikrose/more-itertools) | 6.0.0 | More routines for operating on iterables, beyond itertools / MIT |
| [mpmath](http://mpmath.org) | 1.1.0 | Python library for arbitrary-precision floating-point arithmetic / BSD 3-Clause |
| [msgpack-python](http://msgpack.org/) | 0.6.1 | MessagePack (de)serializer. / Apache 2.0 |
| msys2-conda-epoch | 20160418 | |
| [multipledispatch](https://github.com/mrocklin/multipledispatch/) | 0.6.0 | Multiple dispatch in Python / BSD 3-Clause |
| [nbconvert](http://jupyter.org) | 5.4.1 | Converting Jupyter Notebooks / BSD-3-Clause |
| [nbformat](http://jupyter.org) | 4.4.0 | The reference implementation of the Jupyter Notebook format / BSD 3-clause |
| [networkx](https://networkx.github.io/) | 2.2 | Python package for creating and manipulating complex networks / BSD 3-Clause |
| [nltk](http://nltk.org/) | 3.4 | Build Python programs to work with human language data / Apache 2.0 |
| [nose](http://readthedocs.org/docs/nose/) | 1.3.7 | Nose extends unittest to make testing easier / LGPL-2.1 |
| [notebook](http://jupyter.org) | 5.7.8 | Jupyter Notebook / BSD 3-clause |
| [numba](http://numba.github.com) | 0.43.1 | NumPy aware dynamic Python compiler using LLVM / BSD 2-clause |
| [numexpr](https://github.com/pydata/numexpr) | 2.6.9 | Fast numerical expression evaluator for NumPy. / MIT |
| [numpy](http://numpy.scipy.org/) | 1.16.2 | Array processing for numbers, strings, records, and objects. / BSD 3-Clause |
| numpy-base | 1.16.2 | |
| [numpydoc](https://github.com/numpy/numpydoc) | 0.8.0 | Sphinx extension to support docstrings in Numpy format / BSD 3-Clause |
| [olefile](http://www.decalage.info/python/olefileio) | 0.46 | parse, read and write Microsoft OLE2 files / BSD 2-Clause |
| [openpyxl](https://openpyxl.readthedocs.io) | 2.6.1 | A Python library to read/write Excel 2010 xlsx/xlsm files / MIT |
| [openssl](http://www.openssl.org/) | 1.1.1b | OpenSSL is an open-source implementation of the SSL and TLS protocols / OpenSSL |
| [packaging](https://github.com/pypa/packaging) | 19.0 | Core utilities for Python packages / Apache 2.0 or BSD 2-Clause |
| [pandas](http://pandas.pydata.org) | 0.24.2 | High-performance, easy-to-use data structures and data analysis tools. / BSD 3-clause |
| [pandoc](http://pandoc.org/) | 2.2.3.2 | Universal markup converter (repackaged binaries). / GPL-2.0 |
| [pandocfilters](https://github.com/jgm/pandocfilters) | 1.4.2 | A python module for writing pandoc filters / BSD-3-Clause |
| [parso](https://github.com/davidhalter/parso) | 0.3.4 | A Python Parser / MIT |
| [partd](https://github.com/dask/partd) | 0.3.10 | Data structure for on-disk shuffle operations / BSD 3-Clause |
| [path.py](https://github.com/jaraco/path.py) | 11.5.0 | A module wrapper for os.path / MIT |
| [pathlib2](https://github.com/mcmtroffaes/pathlib2) | 2.3.3 | Fork of pathlib aiming to support the full stdlib Python API. / MIT |
| [patsy](https://github.com/pydata/patsy) | 0.5.1 | Describing statistical models in Python using symbolic formulas / BSD-2-Clause, PSF2 |
| [pep8](http://pep8.readthedocs.org/) | 1.7.1 | Python style guide checker / MIT |
| [pickleshare](https://github.com/pickleshare/pickleshare/) | 0.7.5 | Tiny ‘shelve’-like database with concurrency support / MIT |
| [pillow](https://pillow.readthedocs.io) | 5.4.1 | Pillow is the friendly PIL fork by Alex Clark and Contributors / PIL |
| [pip](https://pip.pypa.io/en/stable/) | 19.0.3 | PyPA recommended tool for installing Python packages / MIT |
| [pkginfo](https://code.launchpad.net/~tseaver/pkginfo/trunk) | 1.5.0.1 | Query metadatdata from sdists / bdists / installed packages. / MIT |
| [pluggy](https://github.com/pytest-dev/pluggy) | 0.9.0 | Plugin registration and hook calling for Python / MIT |
| [ply](http://www.dabeaz.com/ply/index.html) | 3.11 | Python Lex-Yacc / BSD 3-clause |
| powershell\_shortcut | 0.0.1 | Powershell shortcut creator for Windows (using menuinst) / BSD |
| [prometheus\_client](https://github.com/prometheus/client_python) | 0.6.0 | Python client for the Prometheus monitoring system / Apache 2.0 |
| [prompt\_toolkit](https://github.com/jonathanslenders/python-prompt-toolkit) | 2.0.9 | Library for building powerful interactive command lines in Python / BSD 3-clause |
| [psutil](https://github.com/giampaolo/psutil) | 5.6.1 | A cross-platform process and system utilities module for Python / BSD 3-Clause |
| [py](https://github.com/pytest-dev/py) | 1.8.0 | library with cross-python path, ini-parsing, io, code, log facilities / MIT |
| [py-lief](https://lief.quarkslab.com/) | 0.9.0 | A cross platform library to parse, modify and abstract ELF, PE and MachO formats. / Apache 2.0 |
| [pycodestyle](https://pycodestyle.readthedocs.io/) | 2.5.0 | Python style guide checker / MIT |
| [pycosat](https://github.com/ContinuumIO/pycosat) | 0.6.3 | Bindings to picosat (a SAT solver) / MIT |
| [pycparser](https://github.com/eliben/pycparser) | 2.19 | Complete C99 parser in pure Python / BSD 3-clause |
| [pycrypto](http://www.pycrypto.org/) | 2.6.1 | Cryptographic modules for Python. / Public Domain |
| [pycurl](http://pycurl.sourceforge.net/) | 7.43.0.2 | A Python Interface To The cURL library / LGPL, MIT |
| [pyflakes](https://github.com/PyCQA/pyflakes) | 2.1.1 | Pyflakes analyzes programs and detects various errors. / MIT |
| [pygments](http://pygments.org/) | 2.3.1 | Generic syntax highlighting package / BSD 2-clause |
| [pylint](http://www.pylint.org/) | 2.3.1 | python code static checker / GPL |
| [pyodbc](https://github.com/mkleehammer/pyodbc) | 4.0.26 | DB API Module for ODBC / MIT |
| [pyopenssl](https://github.com/pyca/pyopenssl) | 19.0.0 | Python wrapper module around the OpenSSL library / Apache 2.0 |
| [pyparsing](http://pyparsing.wikispaces.com/) | 2.3.1 | Create and execute simple grammars / MIT |
| [pyqt](http://www.riverbankcomputing.co.uk/software/pyqt) | 5.9.2 | Python binding of the cross-platform GUI toolkit Qt. / Commercial, GPL-2.0, GPL-3.0 |
| [pyreadline](http://ipython.org/pyreadline) | 2.1 | A python implmementation of GNU readline. / BSD 3-Clause |
| [pyrsistent](http://github.com/tobgu/pyrsistent/) | 0.14.11 | Persistent/Functional/Immutable data structures / MIT |
| [pysocks](https://github.com/Anorov/PySocks) | 1.6.8 | A Python SOCKS client module. See [Anorov/PySocks](https://github.com/Anorov/PySocks) for more information. / BSD 3-Clause |
| [pytables](http://www.pytables.org) | 3.5.1 | Brings together Python, HDF5 and NumPy to easily handle large amounts of data. / BSD 3-Clause |
| [pytest](https://docs.pytest.org/en/latest/) | 4.3.1 | Simple and powerful testing with Python. / MIT |
| [pytest-arraydiff](https://github.com/astrofrog/pytest-arraydiff) | 0.3 | pytest plugin to help with comparing array output from tests / BSD |
| [pytest-astropy](https://github.com/astropy/pytest-astropy) | 0.5.0 | Meta-package containing dependencies for testing Astropy / BSD |
| [pytest-doctestplus](https://github.com/astropy/pytest-doctestplus) | 0.3.0 | Pytest plugin with advanced doctest features / BSD |
| [pytest-openfiles](https://github.com/astropy/pytest-openfiles) | 0.3.2 | Pytest plugin for detecting inadvertent open file handles / BSD |
| [pytest-remotedata](https://github.com/astropy/pytest-remotedata) | 0.3.1 | Pytest plugin for controlling remote data access / BSD |
| [python](http://www.python.org/) | 3.7.3 | General purpose programming language / PSF |
| [python-dateutil](https://dateutil.readthedocs.org/) | 2.8.0 | Extensions to the standard Python datetime module. / BSD 3 Clause |
| python-libarchive-c | 2.8 | |
| [pytz](http://pythonhosted.org/pytz/) | 2018.9 | World timezone definitions, modern and historical. / MIT |
| [pywavelets](https://github.com/PyWavelets/pywt) | 1.0.2 | Discrete Wavelet Transforms in Python. / MIT |
| [pywin32](https://sourceforge.net/projects/pywin32) | 223 | Python extensions for Windows / PSF |
| [pywinpty](https://github.com/spyder-ide/pywinpty) | 0.5.5 | Python bindings for the winpty library / MIT |
| [pyyaml](http://pyyaml.org/wiki/PyYAML) | 5.1 | YAML parser and emitter for Python / MIT |
| [pyzmq](https://github.com/zeromq/pyzmq) | 18.0.0 | Python bindings for zeromq / BSD 3-clause |
| [qt](http://qt-project.org) | 5.9.7 | Qt is a cross-platform application and UI framework. / LGPL-3.0 |
| [qtawesome](https://github.com/spyder-ide/qtawesome) | 0.5.7 | Iconic fonts in PyQt and PySide applications / MIT |
| [qtconsole](http://jupyter.org) | 4.4.3 | Jupyter Qt console / BSD 3-Clause |
| [qtpy](https://github.com/spyder-ide/qtpy) | 1.7.0 | Abstraction layer for PyQt5/PyQt4/PySide / MIT |
| [requests](http://python-requests.org) | 2.21.0 | Python HTTP for Humans / Apache 2.0 |
| [rope](https://github.com/python-rope/rope) | 0.12.0 | A python refactoring library… / GPL 2.0 |
| [ruamel\_yaml](https://bitbucket.org/ruamel/yaml) | 0.15.46 | A patched copy of ruamel.yaml. / MIT |
| [scikit-image](http://scikit-image.org/) | 0.14.2 | Image processing routines for SciPy. / BSD 3-Clause |
| [scikit-learn](http://scikit-learn.org/) | 0.20.3 | A set of python modules for machine learning and data mining / BSD 3-Clause |
| [scipy](http://www.scipy.org/) | 1.2.1 | Scientific Library for Python / BSD 3-Clause |
| [seaborn](https://seaborn.pydata.org) | 0.9.0 | Statistical data visualization / BSD 3-Clause |
| [send2trash](https://github.com/hsoft/send2trash) | 1.5.0 | Python library to natively send files to Trash (or Recycle bin) on all platforms. / BSD-3-Clause |
| [setuptools](https://github.com/pypa/setuptools) | 40.8.0 | Download, build, install, upgrade, and uninstall Python packages / MIT |
| [simplegeneric](http://cheeseshop.python.org/pypi/simplegeneric) | 0.8.1 | Simple generic functions (similar to Python’s own len(), pickle.dump(), etc.) / Zope Public |
| [singledispatch](http://docs.python.org/3/library/functools.html#functools.singledispatch) | 3.4.0.3 | Transforms a function into a single-dispatch generic function / MIT |
| [sip](http://www.riverbankcomputing.com/software/sip/intro) | 4.19.8 | Create Python bindings for C and C++ libraries / GPL-3.0 |
| [six](http://pypi.python.org/pypi/six/) | 1.12.0 | Python 2 and 3 compatibility utilities / MIT |
| [snappy](https://github.com/google/snappy) | 1.1.7 | A fast compressor/decompressor / BSD 3-clause |
| [snowballstemmer](https://github.com/shibukawa/snowball_py) | 1.2.1 | Snowball stemming library collection for Python / BSD-2-Clause |
| [sortedcollections](http://www.grantjenks.com/docs/sortedcollections/) | 1.1.2 | Python Sorted Collections / Apache-2.0 |
| [sortedcontainers](http://www.grantjenks.com/docs/sortedcontainers/) | 2.1.0 | Python Sorted Container Types: SortedList, SortedDict, and SortedSet / Apache 2.0 |
| [soupsieve](http://facelessuser.github.io/soupsieve) | 1.8 | A modern CSS selector implementation for BeautifulSoup / MIT |
| [sphinx](http://www.sphinx-doc.org) | 1.8.5 | Sphinx is a tool that makes it easy to create intelligent and beautiful documentation / BSD 2-clause |
| sphinxcontrib | 1.0 | Python namespace for sphinxcontrib / BSD |
| [sphinxcontrib-websupport](https://pypi.python.org/pypi/sphinxcontrib-websupport) | 1.1.0 | Sphinx API for Web Apps / BSD-2-Clause |
| [spyder](https://www.spyder-ide.org/) | 3.3.3 | The Scientific Python Development Environment / MIT |
| [spyder-kernels](https://github.com/spyder-ide/spyder-kernels) | 0.4.2 | Jupyter kernels for the Spyder console / MIT |
| [sqlalchemy](http://www.sqlalchemy.org/) | 1.3.1 | Database Abstraction Library. / MIT |
| [sqlite](http://www.sqlite.org/) | 3.27.2 | Implements a self-contained, zero-configuration, SQL database engine. / Public-Domain (`<http://www.sqlite.org/copyright.html>`) |
| [statsmodels](https://www.statsmodels.org) | 0.9.0 | Statistical computations and models for use with SciPy / BSD 3-Clause |
| [sympy](http://sympy.org) | 1.3 | Python library for symbolic mathematics / 3-clause BSD |
| [tblib](https://github.com/ionelmc/python-tblib) | 1.3.2 | Traceback serialization library. / BSD 2-Clause |
| [terminado](https://github.com/jupyter/terminado) | 0.8.1 | Terminals served by tornado websockets / BSD 2-clause |
| [testpath](https://testpath.readthedocs.io) | 0.4.2 | Testpath is a collection of utilities for Python code working with files and commands. / BSD-3-Clause |
| [tk](http://www.tcl.tk/) | 8.6.8 | A dynamic programming language with GUI support. Bundles Tcl and Tk. / Tcl/Tk |
| [toolz](http://toolz.readthedocs.org/) | 0.9.0 | A functional standard library for Python. / BSD 3-Clause |
| [tornado](http://www.tornadoweb.org/) | 6.0.2 | A Python web framework and asynchronous networking library, originally developed at FriendFeed. / Apache 2.0 |
| [tqdm](https://pypi.python.org/pypi/tqdm) | 4.31.1 | A Fast, Extensible Progress Meter / MPLv2.0, MIT |
| [traitlets](http://ipython.org/) | 4.3.2 | Configuration system for Python applications / BSD 3-clause |
| [unicodecsv](https://github.com/jdunck/python-unicodecsv) | 0.14.1 | Drop-in replacement for csv module which supports unicode strings / BSD |
| [urllib3](https://urllib3.readthedocs.io/) | 1.24.1 | HTTP library with thread-safe connection pooling, file post, and more. / MIT |
| [vc](https://github.com/conda/conda/wiki/VC-features) | 14.1 | A meta-package to impose mutual exclusivity among software built with different VS versions / Modified BSD License (3-clause) |
| [vs2015\_runtime](http://www.microsoft.com) | 14.15.26706 | Bundles of the MSVC 14 (VS 2015) runtime / Proprietary |
| [wcwidth](https://github.com/jquast/wcwidth) | 0.1.7 | Measures number of Terminal column cells of wide-character codes. / MIT |
| [webencodings](https://github.com/gsnedders/python-webencodings) | 0.5.1 | Character encoding aliases for legacy web content / BSD 3-Clause |
| [werkzeug](http://werkzeug.pocoo.org/) | 0.14.1 | The Python WSGI Utility Library. / BSD 3-Clause |
| [wheel](https://github.com/pypa/wheel) | 0.33.1 | A built-package format for Python. / MIT |
| [widgetsnbextension](http://ipython.org) | 3.4.2 | Interactive Widgets for Jupyter / BSD 3-clause |
| [win\_inet\_pton](https://github.com/hickeroar/win_inet_pton) | 1.1.0 | Native inet\_pton and inet\_ntop implementation for Python on Windows (with ctypes). / PUBLIC-DOMAIN |
| [win\_unicode\_console](https://github.com/Drekin/win-unicode-console) | 0.5 | A Python package to enable Unicode input and display when running Python from Windows console. / MIT |
| [wincertstore](https://bitbucket.org/tiran/wincertstore) | 0.2 | Python module to extract CA and CRL certs from Windows’ cert store (ctypes based). / PSF 2 |
| [winpty](https://github.com/rprichard/winpty) | 0.4.3 | Winpty provides an interface similar to a Unix pty-master for communicating with Windows console programs. / MIT |
| [wrapt](https://github.com/GrahamDumpleton/wrapt) | 1.11.1 | Module for decorators, wrappers and monkey patching / BSD 2-Clause |
| [xlrd](http://www.python-excel.org/) | 1.2.0 | Library for developers to extract data from Microsoft Excel (tm) spreadsheet files / BSD 3-Clause and BSD with advertising |
| [xlsxwriter](https://xlsxwriter.readthedocs.io/) | 1.1.5 | A Python module for creating Excel XLSX files / BSD 2-Clause |
| [xlwings](http://xlwings.org/) | 0.15.4 | Interact with Excel from Python and vice versa / 3-clause BSD |
| [xlwt](http://www.python-excel.org/) | 1.3.0 | Writing data and formatting information to Excel files / BSD |
| [xz](http://tukaani.org/xz/) | 5.2.4 | Data compression software with high compression ratio / LGPL-2.1 and GPL-2.0 |
| [yaml](http://pyyaml.org/wiki/LibYAML) | 0.1.7 | A C library for parsing and emitting YAML. / MIT |
| [zeromq](http://zeromq.org) | 4.3.1 | A high-performance asynchronous messaging library. / LGPL 3 |
| [zict](http://github.com/mrocklin/zict) | 0.1.4 | Composable Dictionary Classes / BSD 3-Clause |
| [zipp](https://github.com/jaraco/zipp) | 0.3.3 | A pathlib-compatible Zipfile object wrapper / MIT |
| [zlib](http://zlib.net/) | 1.2.11 | Massively spiffy yet delicately unobtrusive compression library / zlib |
| [zstd](http://www.zstd.net) | 1.3.7 | Zstandard - Fast real-time compression algorithm / BSD 3-Clause |
| Name | Version | Summary / License |
|---|---|---|
| [alabaster](http://www.sphinx-doc.org/en/stable/index.html) | 0.7.12 | Configurable, Python 2+3 compatible Sphinx theme. / BSD 3-Clause |
| [anaconda-client](http://anaconda.org) | 1.7.2 | anaconda.org command line client library / BSD 3-clause |
| [anaconda-project](https://github.com/Anaconda-Platform/anaconda-project) | 0.8.2 | Tool for encapsulating, running, and reproducing data science projects / BSD 3-Clause |
| [asn1crypto](https://github.com/wbond/asn1crypto) | 0.24.0 | Python ASN.1 library with a focus on performance and a pythonic API / MIT |
| [astroid](https://www.astroid.org/) | 2.2.5 | A abstract syntax tree for Python with inference support. / LGPL 2.1 |
| [astropy](http://www.astropy.org/) | 3.1.2 | Community-developed Python Library for Astronomy / BSD |
| [atomicwrites](https://github.com/untitaker/python-atomicwrites) | 1.3.0 | Atomic file writes / MIT |
| [attrs](https://attrs.readthedocs.io/en/stable/) | 19.1.0 | attrs is the Python package that will bring back the joy of writing classes by relieving you from the drudgery of implementing object protocols (aka dunder methods). / MIT |
| [babel](http://babel.pocoo.org/) | 2.6.0 | Utilities to internationalize and localize Python applications / BSD 3-clause |
| [backcall](https://github.com/takluyver/backcall/) | 0.1.0 | Specifications for callback functions passed in to an API / BSD-3-Clause |
| [backports](https://bitbucket.org/brandon/backports) | 1.0 | / BSD |
| [backports.os](https://github.com/pjdelport/backports.os) | 0.1.1 | Backport of new features in Python’s os module / Python Software Foundation |
| [backports.shutil\_get\_terminal\_size](https://github.com/chrippa/backports.shutil_get_terminal_size) | 1.0.0 | A backport of the get\_terminal\_size function from Python 3.3’s shutil. / MIT |
| [beautifulsoup4](http://www.crummy.com/software/BeautifulSoup/) | 4.7.1 | Python library designed for screen-scraping / MIT |
| [bitarray](https://github.com/ilanschnell/bitarray) | 0.8.3 | efficient arrays of booleans – C extension / PSF |
| [bkcharts](http://github.com/bokeh/bkcharts) | 0.2 | High level chart types built on top of Bokeh / BSD 3-Clause |
| blas | 1.0 | |
| [bleach](https://github.com/mozilla/bleach) | 3.1.0 | Easy, whitelist-based HTML-sanitizing tool / Apache-2.0 |
| [blosc](https://github.com/Blosc/c-blosc) | 1.15.0 | A blocking, shuffling and loss-less compression library that can be faster than memcpy() / BSD 3-Clause |
| [bokeh](http://bokeh.pydata.org/) | 1.0.4 | Statistical and novel interactive HTML plots for Python / BSD 3-Clause |
| [boto](https://github.com/boto/boto/) | 2.49.0 | Amazon Web Services Library / MIT |
| [bottleneck](http://berkeleyanalytics.com/bottleneck) | 1.2.1 | Fast NumPy array functions written in Cython. / BSD 2-Clause |
| [bzip2](http://www.bzip.org/) | 1.0.6 | high-quality data compressor / bzip2 |
| [ca-certificates](https://github.com/conda-forge/ca-certificates-feedstock) | 2019.1.23 | Certificates for use with other packages. / ISC |
| [certifi](http://certifi.io/) | 2019.3.9 | Python package for providing Mozilla’s CA Bundle. / ISC |
| [cffi](https://bitbucket.org/cffi/cffi) | 1.12.2 | Foreign Function Interface for Python calling C code. / MIT |
| [chardet](https://github.com/chardet/chardet) | 3.0.4 | Universal character encoding detector / LGPL2 |
| [click](https://palletsprojects.com/p/click) | 7.0 | Python composable command line interface toolkit / BSD-3-Clause |
| [cloudpickle](https://github.com/cloudpipe/cloudpickle) | 0.8.0 | Extended pickling support for Python objects / BSD 3-Clause |
| [clyent](https://github.com/Anaconda-Platform/clyent) | 1.2.2 | Command line client library for windows and posix / BSD 3-Clause |
| [colorama](https://github.com/tartley/colorama) | 0.4.1 | Cross-platform colored terminal text / BSD-3-Clause |
| [comtypes](http://starship.python.net/crew/theller/comtypes/) | 1.1.7 | pure Python COM package / MIT |
| [conda](https://conda.io) | 4.6.11 | OS-agnostic, system-level binary package and environment manager. / BSD 3-Clause |
| [conda-build](https://github.com/conda/conda-build) | 3.17.8 | tools for building conda packages / BSD 3-Clause |
| [conda-env](https://github.com/conda/conda-env) | 2.6.0 | Tools for interacting with conda environments. / BSD 3-Clause |
| console\_shortcut | 0.1.1 | Console shortcut creator for Windows (using menuinst) / BSD |
| [contextlib2](http://contextlib2.readthedocs.org) | 0.5.5 | Backports and enhancements for the contextlib module / PSF |
| [cryptography](https://github.com/pyca/cryptography) | 2.6.1 | Provides cryptographic recipes and primitives to Python developers / Apache 2.0 or BSD 3-Clause, PSF 2 |
| [curl](http://curl.haxx.se/) | 7.64.0 | tool and library for transferring data with URL syntax / MIT/X derivate (`<http://curl.haxx.se/docs/copyright.html>`) |
| [cycler](http://matplotlib.org/cycler) | 0.10.0 | Composable style cycles. / BSD 3-Clause |
| [cython](http://www.cython.org/) | 0.29.6 | The Cython compiler for writing C extensions for the Python language / Apache-2.0 |
| [cytoolz](https://github.com/pytoolz/cytoolz) | 0.9.0.1 | Cython implementation of Toolz. High performance functional utilities. / BSD 3-Clause |
| [dask](http://github.com/dask/dask/) | 1.1.4 | Parallel Python with task scheduling / BSD 3-Clause |
| [dask-core](http://github.com/dask/dask/) | 1.1.4 | Parallel Python with task scheduling / BSD 3-Clause |
| [decorator](https://github.com/micheles/decorator) | 4.4.0 | Better living through Python with decorators. / BSD 3-Clause |
| [defusedxml](https://bitbucket.org/tiran/defusedxml) | 0.5.0 | XML bomb protection for Python stdlib modules / PSF 2.0 |
| [distributed](http://distributed.readthedocs.io/en/latest/) | 1.26.0 | Distributed computing with Dask / BSD 3-Clause |
| [docutils](http://docutils.sourceforge.net/) | 0.14 | Docutils – Python Documentation Utilities / Public Domain Dedictation and BSD 2-Clause and PSF 2.1.1 and GPL 3.0 |
| [entrypoints](https://github.com/takluyver/entrypoints) | 0.3 | Discover and load entry points from installed packages. / MIT License |
| [et\_xmlfile](https://bitbucket.org/openpyxl/et_xmlfile) | 1.0.1 | An implementation of lxml.xmlfile for the standard library / MIT |
| [fastcache](https://github.com/pbrady/fastcache) | 1.0.2 | C implementation of Python 3 lru\_cache / MIT |
| [filelock](https://github.com/benediktschmitt/py-filelock) | 3.0.10 | A platform independent file lock. / Public Domain |
| [flask](http://flask.pocoo.org) | 1.0.2 | A microframework based on Werkzeug, Jinja2 and good intentions. / BSD 3-Clause |
| [freetype](https://www.freetype.org/) | 2.9.1 | A Free, High-Quality, and Portable Font Engine / GPL-2.0 and FreeType |
| [get\_terminal\_size](https://github.com/chrippa/backports.shutil_get_terminal_size) | 1.0.0 | Get the size of the terminal window. / MIT |
| [gevent](http://www.gevent.org/) | 1.4.0 | Coroutine-based network library / MIT |
| [glob2](https://github.com/miracle2k/python-glob2) | 0.6 | Version of the glob module that supports recursion via \*\*, and can capture patterns. / BSD-2-Clause |
| [greenlet](https://github.com/python-greenlet/greenlet) | 0.4.15 | Lightweight in-process concurrent programming / MIT |
| [h5py](http://www.h5py.org/) | 2.9.0 | Read and write HDF5 files from Python. / BSD-3-Clause |
| [hdf5](http://www.hdfgroup.org/HDF5/) | 1.10.4 | HDF5 is a data model, library, and file format for storing and managing data / HDF5 |
| [heapdict](http://stutzbachenterprises.com/) | 1.0.0 | A heap with decrease-key and increase-key operations / BSD 3-Clause |
| [html5lib](https://github.com/html5lib/html5lib-python) | 1.0.1 | HTML parser based on the WHATWG HTML specification / MIT |
| [icc\_rt](https://software.intel.com/en-us/node/522690) | 2019.0.0 | Intel runtime libraries for C, C++ and Fortran compilers / Intel proprietary |
| [icu](http://site.icu-project.org/) | 58.2 | International Components for Unicode. / MIT |
| [idna](https://github.com/kjd/idna) | 2.8 | Internationalized Domain Names in Applications (IDNA). / BSD Like |
| [imageio](http://imageio.github.io) | 2.5.0 | a Python library for reading and writing image data / BSD 2-Clause |
| [imagesize](https://github.com/shibukawa/imagesize_py) | 1.1.0 | Getting image size from png/jpeg/jpeg2000/gif file / MIT |
| [importlib\_metadata](http://importlib-metadata.readthedocs.io) | 0.8 | A library to access the metadata for a Python package / APACHE-2.0 |
| [intel-openmp](https://software.intel.com/en-us/node/522690) | 2019.3 | Math library for Intel and compatible processors / proprietary - Intel |
| [ipykernel](https://ipython.org) | 5.1.0 | IPython Kernel for Jupyter / BSD-3-Clause |
| [ipython](https://ipython.org/) | 7.4.0 | IPython: Productive Interactive Computing / BSD-3-Clause |
| [ipython\_genutils](http://ipython.org) | 0.2.0 | vestigial utilities from IPython / BSD 3-Clause |
| [ipywidgets](https://github.com/ipython/ipywidgets) | 7.4.2 | Jupyter Interactive Widgets / BSD 3-clause |
| [isort](https://github.com/timothycrosley/isort) | 4.3.16 | A Python utility / library to sort Python imports. / MIT |
| [itsdangerous](https://github.com/pallets/itsdangerous) | 1.1.0 | Various helpers to pass trusted data to untrusted environments. / BSD 3-Clause |
| [jdcal](https://github.com/phn/jdcal) | 1.4 | Julian dates from proleptic Gregorian and Julian calendars. / BSD 2-Clause |
| [jedi](https://github.com/davidhalter/jedi/) | 0.13.3 | An autocompletion tool for Python that can be used for text editors. / MIT |
| [jinja2](http://jinja.pocoo.org) | 2.10 | An easy to use stand-alone template engine written in pure python. / 3-Clause BSD |
| [jpeg](http://www.ijg.org/) | 9b | read/write jpeg COM, EXIF, IPTC medata / Custom free software license |
| [jsonschema](https://github.com/Julian/jsonschema) | 3.0.1 | An implementation of JSON Schema validation for Python / MIT |
| [jupyter](http://jupyter.org) | 1.0.0 | Jupyter metapackage. Install all the Jupyter components in one go. / BSD 3-Clause |
| [jupyter\_client](http://jupyter.org) | 5.2.4 | Jupyter protocol implementation and client libraries / BSD 3-clause |
| [jupyter\_console](http://jupyter.org) | 6.0.0 | Jupyter terminal console / BSD-3-Clause |
| [jupyter\_core](http://jupyter.org) | 4.4.0 | Core common functionality of Jupyter projects. / BSD 3-clause |
| [jupyterlab](https://github.com/jupyterlab/jupyterlab) | 0.35.4 | JupyterLab PRE-ALPHA / BSD-3-Clause |
| [jupyterlab\_server](http://github.com/jupyterlab/jupyterlab_server) | 0.2.0 | A set of server components for JupyterLab and JupyterLab like applications. / BSD 3-Clause |
| [keyring](https://github.com/jaraco/keyring) | 18.0.0 | Store and access your passwords safely / Python Software Foundation or MIT |
| [kiwisolver](https://github.com/nucleic/kiwi) | 1.0.1 | A fast implementation of the Cassowary constraint solver / BSD 3-Clause |
| [krb5](http://web.mit.edu/kerberos/) | 1.16.1 | A network authentication protocol. / MIT |
| [lazy-object-proxy](https://github.com/ionelmc/python-lazy-object-proxy) | 1.3.1 | A fast and thorough lazy object proxy. / BSD 2-Clause |
| [libarchive](http://www.libarchive.org/) | 3.3.3 | Multi-format archive and compression library / BSD 2-Clause |
| [libcurl](http://curl.haxx.se/) | 7.64.0 | tool and library for transferring data with URL syntax / MIT/X derivate (`<http://curl.haxx.se/docs/copyright.html>`) |
| [libiconv](https://www.gnu.org/software/libiconv/) | 1.15 | Provides iconv for systems which don’t have one (or that cannot convert from/to Unicode.) / GPL and LGPL |
| [libpng](http://www.libpng.org/pub/png/libpng.html) | 1.6.36 | PNG reference library. / zlib/libpng |
| [libsodium](http://libsodium.org) | 1.0.16 | A modern and easy-to-use crypto library. / ISC |
| [libssh2](https://www.libssh2.org/) | 1.8.0 | the SSH library / BSD 3-Clause |
| [libtiff](http://www.libtiff.org/) | 4.0.10 | Support for the Tag Image File Format (TIFF). / HPND |
| [libxml2](http://xmlsoft.org/) | 2.9.9 | The XML C parser and toolkit of Gnome / MIT |
| [libxslt](http://xmlsoft.org/XSLT/) | 1.1.33 | The XSLT C library developed for the GNOME project / MIT |
| [llvmlite](https://github.com/numba/llvmlite) | 0.28.0 | A lightweight LLVM python binding for writing JIT compilers / New BSD License |
| [locket](https://github.com/mwilliamson/locket.py) | 0.2.0 | File-based locks for Python for Linux and Windows / BSD 2-Clause |
| [lxml](http://lxml.de/) | 4.3.2 | Pythonic binding for the C libraries libxml2 and libxslt. / BSD 3-Clause, GPL-2.0, ZPL-2.0, and ElementTree |
| [lz4-c](https://www.lz4.org) | 1.8.1.2 | Extremely Fast Compression algorithm / BSD 2-clause |
| [lzo](http://www.oberhumer.com/opensource/lzo/) | 2.10 | LZO is a portable lossless data compression library written in ANSI C. / GPL v2+ |
| m2w64-gcc-libgfortran | 5.3.0 | |
| m2w64-gcc-libs | 5.3.0 | |
| m2w64-gcc-libs-core | 5.3.0 | |
| m2w64-gmp | 6.1.0 | |
| m2w64-libwinpthread-git | 5.0.0.4634.697f757 | |
| [markupsafe](https://www.palletsprojects.com/p/markupsafe) | 1.1.1 | A Python module that implements the jinja2.Markup string / BSD-3-Clause |
| [matplotlib](http://matplotlib.org/) | 3.0.3 | Publication quality figures in Python / PSF-based |
| [mccabe](https://github.com/PyCQA/mccabe) | 0.6.1 | McCabe complexity checker for Python / MIT |
| [menuinst](https://github.com/ContinuumIO/menuinst) | 1.4.16 | cross platform menu item installation / BSD |
| [mistune](https://github.com/lepture/mistune) | 0.8.4 | The fastest markdown parser in pure Python. / BSD 3-Clause |
| [mkl](https://software.intel.com/en-us/mkl) | 2019.3 | Math library for Intel and compatible processors / proprietary - Intel |
| [mkl-service](https://github.com/ContinuumIO/mkl-service) | 1.1.2 | Python bindings to MKL service functions / 3-clause BSD |
| [mkl\_fft](http://github.com/IntelPython/mkl_fft) | 1.0.10 | NumPy-based implementation of Fast Fourier Transform using Intel (R) Math Kernel Library. / BSD 3-Clause |
| [mkl\_random](http://github.com/IntelPython/mkl_random) | 1.0.2 | Intel (R) MKL-powered package for sampling from common probability distributions into NumPy arrays. / BSD 3-Clause |
| [more-itertools](https://github.com/erikrose/more-itertools) | 6.0.0 | More routines for operating on iterables, beyond itertools / MIT |
| [mpmath](http://mpmath.org) | 1.1.0 | Python library for arbitrary-precision floating-point arithmetic / BSD 3-Clause |
| [msgpack-python](http://msgpack.org/) | 0.6.1 | MessagePack (de)serializer. / Apache 2.0 |
| msys2-conda-epoch | 20160418 | |
| [multipledispatch](https://github.com/mrocklin/multipledispatch/) | 0.6.0 | Multiple dispatch in Python / BSD 3-Clause |
| [nbconvert](http://jupyter.org) | 5.4.1 | Converting Jupyter Notebooks / BSD-3-Clause |
| [nbformat](http://jupyter.org) | 4.4.0 | The reference implementation of the Jupyter Notebook format / BSD 3-clause |
| [networkx](https://networkx.github.io/) | 2.2 | Python package for creating and manipulating complex networks / BSD 3-Clause |
| [nltk](http://nltk.org/) | 3.4 | Build Python programs to work with human language data / Apache 2.0 |
| [nose](http://readthedocs.org/docs/nose/) | 1.3.7 | Nose extends unittest to make testing easier / LGPL-2.1 |
| [notebook](http://jupyter.org) | 5.7.8 | Jupyter Notebook / BSD 3-clause |
| [numba](http://numba.github.com) | 0.43.1 | NumPy aware dynamic Python compiler using LLVM / BSD 2-clause |
| [numexpr](https://github.com/pydata/numexpr) | 2.6.9 | Fast numerical expression evaluator for NumPy. / MIT |
| [numpy](http://numpy.scipy.org/) | 1.16.2 | Array processing for numbers, strings, records, and objects. / BSD 3-Clause |
| numpy-base | 1.16.2 | |
| [numpydoc](https://github.com/numpy/numpydoc) | 0.8.0 | Sphinx extension to support docstrings in Numpy format / BSD 3-Clause |
| [olefile](http://www.decalage.info/python/olefileio) | 0.46 | parse, read and write Microsoft OLE2 files / BSD 2-Clause |
| [openpyxl](https://openpyxl.readthedocs.io) | 2.6.1 | A Python library to read/write Excel 2010 xlsx/xlsm files / MIT |
| [openssl](http://www.openssl.org/) | 1.1.1b | OpenSSL is an open-source implementation of the SSL and TLS protocols / OpenSSL |
| [packaging](https://github.com/pypa/packaging) | 19.0 | Core utilities for Python packages / Apache 2.0 or BSD 2-Clause |
| [pandas](http://pandas.pydata.org) | 0.24.2 | High-performance, easy-to-use data structures and data analysis tools. / BSD 3-clause |
| [pandoc](http://pandoc.org/) | 2.2.3.2 | Universal markup converter (repackaged binaries). / GPL-2.0 |
| [pandocfilters](https://github.com/jgm/pandocfilters) | 1.4.2 | A python module for writing pandoc filters / BSD-3-Clause |
| [parso](https://github.com/davidhalter/parso) | 0.3.4 | A Python Parser / MIT |
| [partd](https://github.com/dask/partd) | 0.3.10 | Data structure for on-disk shuffle operations / BSD 3-Clause |
| [path.py](https://github.com/jaraco/path.py) | 11.5.0 | A module wrapper for os.path / MIT |
| [pathlib2](https://github.com/mcmtroffaes/pathlib2) | 2.3.3 | Fork of pathlib aiming to support the full stdlib Python API. / MIT |
| [patsy](https://github.com/pydata/patsy) | 0.5.1 | Describing statistical models in Python using symbolic formulas / BSD-2-Clause, PSF2 |
| [pep8](http://pep8.readthedocs.org/) | 1.7.1 | Python style guide checker / MIT |
| [pickleshare](https://github.com/pickleshare/pickleshare/) | 0.7.5 | Tiny ‘shelve’-like database with concurrency support / MIT |
| [pillow](https://pillow.readthedocs.io) | 5.4.1 | Pillow is the friendly PIL fork by Alex Clark and Contributors / PIL |
| [pip](https://pip.pypa.io/en/stable/) | 19.0.3 | PyPA recommended tool for installing Python packages / MIT |
| [pkginfo](https://code.launchpad.net/~tseaver/pkginfo/trunk) | 1.5.0.1 | Query metadatdata from sdists / bdists / installed packages. / MIT |
| [pluggy](https://github.com/pytest-dev/pluggy) | 0.9.0 | Plugin registration and hook calling for Python / MIT |
| [ply](http://www.dabeaz.com/ply/index.html) | 3.11 | Python Lex-Yacc / BSD 3-clause |
| powershell\_shortcut | 0.0.1 | Powershell shortcut creator for Windows (using menuinst) / BSD |
| [prometheus\_client](https://github.com/prometheus/client_python) | 0.6.0 | Python client for the Prometheus monitoring system / Apache 2.0 |
| [prompt\_toolkit](https://github.com/jonathanslenders/python-prompt-toolkit) | 2.0.9 | Library for building powerful interactive command lines in Python / BSD 3-clause |
| [psutil](https://github.com/giampaolo/psutil) | 5.6.1 | A cross-platform process and system utilities module for Python / BSD 3-Clause |
| [py](https://github.com/pytest-dev/py) | 1.8.0 | library with cross-python path, ini-parsing, io, code, log facilities / MIT |
| [pycodestyle](https://pycodestyle.readthedocs.io/) | 2.5.0 | Python style guide checker / MIT |
| [pycosat](https://github.com/ContinuumIO/pycosat) | 0.6.3 | Bindings to picosat (a SAT solver) / MIT |
| [pycparser](https://github.com/eliben/pycparser) | 2.19 | Complete C99 parser in pure Python / BSD 3-clause |
| [pycrypto](http://www.pycrypto.org/) | 2.6.1 | Cryptographic modules for Python. / Public Domain |
| [pycurl](http://pycurl.sourceforge.net/) | 7.43.0.2 | A Python Interface To The cURL library / LGPL, MIT |
| [pyflakes](https://github.com/PyCQA/pyflakes) | 2.1.1 | Pyflakes analyzes programs and detects various errors. / MIT |
| [pygments](http://pygments.org/) | 2.3.1 | Generic syntax highlighting package / BSD 2-clause |
| [pylint](http://www.pylint.org/) | 2.3.1 | python code static checker / GPL |
| [pyodbc](https://github.com/mkleehammer/pyodbc) | 4.0.26 | DB API Module for ODBC / MIT |
| [pyopenssl](https://github.com/pyca/pyopenssl) | 19.0.0 | Python wrapper module around the OpenSSL library / Apache 2.0 |
| [pyparsing](http://pyparsing.wikispaces.com/) | 2.3.1 | Create and execute simple grammars / MIT |
| [pyqt](http://www.riverbankcomputing.co.uk/software/pyqt) | 5.9.2 | Python binding of the cross-platform GUI toolkit Qt. / Commercial, GPL-2.0, GPL-3.0 |
| [pyreadline](http://ipython.org/pyreadline) | 2.1 | A python implmementation of GNU readline. / BSD 3-Clause |
| [pyrsistent](http://github.com/tobgu/pyrsistent/) | 0.14.11 | Persistent/Functional/Immutable data structures / MIT |
| [pysocks](https://github.com/Anorov/PySocks) | 1.6.8 | A Python SOCKS client module. See [Anorov/PySocks](https://github.com/Anorov/PySocks) for more information. / BSD 3-Clause |
| [pytables](http://www.pytables.org) | 3.5.1 | Brings together Python, HDF5 and NumPy to easily handle large amounts of data. / BSD 3-Clause |
| [pytest](https://docs.pytest.org/en/latest/) | 4.3.1 | Simple and powerful testing with Python. / MIT |
| [pytest-arraydiff](https://github.com/astrofrog/pytest-arraydiff) | 0.3 | pytest plugin to help with comparing array output from tests / BSD |
| [pytest-astropy](https://github.com/astropy/pytest-astropy) | 0.5.0 | Meta-package containing dependencies for testing Astropy / BSD |
| [pytest-doctestplus](https://github.com/astropy/pytest-doctestplus) | 0.3.0 | Pytest plugin with advanced doctest features / BSD |
| [pytest-openfiles](https://github.com/astropy/pytest-openfiles) | 0.3.2 | Pytest plugin for detecting inadvertent open file handles / BSD |
| [pytest-remotedata](https://github.com/astropy/pytest-remotedata) | 0.3.1 | Pytest plugin for controlling remote data access / BSD |
| [python](http://www.python.org/) | 3.7.3 | General purpose programming language / PSF |
| [python-dateutil](https://dateutil.readthedocs.org/) | 2.8.0 | Extensions to the standard Python datetime module. / BSD 3 Clause |
| python-libarchive-c | 2.8 | |
| [pytz](http://pythonhosted.org/pytz/) | 2018.9 | World timezone definitions, modern and historical. / MIT |
| [pywavelets](https://github.com/PyWavelets/pywt) | 1.0.2 | Discrete Wavelet Transforms in Python. / MIT |
| [pywin32](https://sourceforge.net/projects/pywin32) | 223 | Python extensions for Windows / PSF |
| [pywinpty](https://github.com/spyder-ide/pywinpty) | 0.5.5 | Python bindings for the winpty library / MIT |
| [pyyaml](http://pyyaml.org/wiki/PyYAML) | 5.1 | YAML parser and emitter for Python / MIT |
| [pyzmq](https://github.com/zeromq/pyzmq) | 18.0.0 | Python bindings for zeromq / BSD 3-clause |
| [qt](http://qt-project.org) | 5.9.7 | Qt is a cross-platform application and UI framework. / LGPL-3.0 |
| [qtawesome](https://github.com/spyder-ide/qtawesome) | 0.5.7 | Iconic fonts in PyQt and PySide applications / MIT |
| [qtconsole](http://jupyter.org) | 4.4.3 | Jupyter Qt console / BSD 3-Clause |
| [qtpy](https://github.com/spyder-ide/qtpy) | 1.7.0 | Abstraction layer for PyQt5/PyQt4/PySide / MIT |
| [requests](http://python-requests.org) | 2.21.0 | Python HTTP for Humans / Apache 2.0 |
| [rope](https://github.com/python-rope/rope) | 0.12.0 | A python refactoring library… / GPL 2.0 |
| [ruamel\_yaml](https://bitbucket.org/ruamel/yaml) | 0.15.46 | A patched copy of ruamel.yaml. / MIT |
| [scikit-image](http://scikit-image.org/) | 0.14.2 | Image processing routines for SciPy. / BSD 3-Clause |
| [scikit-learn](http://scikit-learn.org/) | 0.20.3 | A set of python modules for machine learning and data mining / BSD 3-Clause |
| [scipy](http://www.scipy.org/) | 1.2.1 | Scientific Library for Python / BSD 3-Clause |
| [seaborn](https://seaborn.pydata.org) | 0.9.0 | Statistical data visualization / BSD 3-Clause |
| [send2trash](https://github.com/hsoft/send2trash) | 1.5.0 | Python library to natively send files to Trash (or Recycle bin) on all platforms. / BSD-3-Clause |
| [setuptools](https://github.com/pypa/setuptools) | 40.8.0 | Download, build, install, upgrade, and uninstall Python packages / MIT |
| [simplegeneric](http://cheeseshop.python.org/pypi/simplegeneric) | 0.8.1 | Simple generic functions (similar to Python’s own len(), pickle.dump(), etc.) / Zope Public |
| [singledispatch](http://docs.python.org/3/library/functools.html#functools.singledispatch) | 3.4.0.3 | Transforms a function into a single-dispatch generic function / MIT |
| [sip](http://www.riverbankcomputing.com/software/sip/intro) | 4.19.8 | Create Python bindings for C and C++ libraries / GPL-3.0 |
| [six](http://pypi.python.org/pypi/six/) | 1.12.0 | Python 2 and 3 compatibility utilities / MIT |
| [snappy](https://github.com/google/snappy) | 1.1.7 | A fast compressor/decompressor / BSD 3-clause |
| [snowballstemmer](https://github.com/shibukawa/snowball_py) | 1.2.1 | Snowball stemming library collection for Python / BSD-2-Clause |
| [sortedcollections](http://www.grantjenks.com/docs/sortedcollections/) | 1.1.2 | Python Sorted Collections / Apache-2.0 |
| [sortedcontainers](http://www.grantjenks.com/docs/sortedcontainers/) | 2.1.0 | Python Sorted Container Types: SortedList, SortedDict, and SortedSet / Apache 2.0 |
| [soupsieve](http://facelessuser.github.io/soupsieve) | 1.8 | A modern CSS selector implementation for BeautifulSoup / MIT |
| [sphinx](http://www.sphinx-doc.org) | 1.8.5 | Sphinx is a tool that makes it easy to create intelligent and beautiful documentation / BSD 2-clause |
| sphinxcontrib | 1.0 | Python namespace for sphinxcontrib / BSD |
| [sphinxcontrib-websupport](https://pypi.python.org/pypi/sphinxcontrib-websupport) | 1.1.0 | Sphinx API for Web Apps / BSD-2-Clause |
| [spyder](https://www.spyder-ide.org/) | 3.3.3 | The Scientific Python Development Environment / MIT |
| [spyder-kernels](https://github.com/spyder-ide/spyder-kernels) | 0.4.2 | Jupyter kernels for the Spyder console / MIT |
| [sqlalchemy](http://www.sqlalchemy.org/) | 1.3.1 | Database Abstraction Library. / MIT |
| [sqlite](http://www.sqlite.org/) | 3.27.2 | Implements a self-contained, zero-configuration, SQL database engine. / Public-Domain (`<http://www.sqlite.org/copyright.html>`) |
| [statsmodels](https://www.statsmodels.org) | 0.9.0 | Statistical computations and models for use with SciPy / BSD 3-Clause |
| [sympy](http://sympy.org) | 1.3 | Python library for symbolic mathematics / 3-clause BSD |
| [tblib](https://github.com/ionelmc/python-tblib) | 1.3.2 | Traceback serialization library. / BSD 2-Clause |
| [terminado](https://github.com/jupyter/terminado) | 0.8.1 | Terminals served by tornado websockets / BSD 2-clause |
| [testpath](https://testpath.readthedocs.io) | 0.4.2 | Testpath is a collection of utilities for Python code working with files and commands. / BSD-3-Clause |
| [tk](http://www.tcl.tk/) | 8.6.8 | A dynamic programming language with GUI support. Bundles Tcl and Tk. / Tcl/Tk |
| [toolz](http://toolz.readthedocs.org/) | 0.9.0 | A functional standard library for Python. / BSD 3-Clause |
| [tornado](http://www.tornadoweb.org/) | 6.0.2 | A Python web framework and asynchronous networking library, originally developed at FriendFeed. / Apache 2.0 |
| [tqdm](https://pypi.python.org/pypi/tqdm) | 4.31.1 | A Fast, Extensible Progress Meter / MPLv2.0, MIT |
| [traitlets](http://ipython.org/) | 4.3.2 | Configuration system for Python applications / BSD 3-clause |
| [unicodecsv](https://github.com/jdunck/python-unicodecsv) | 0.14.1 | Drop-in replacement for csv module which supports unicode strings / BSD |
| [urllib3](https://urllib3.readthedocs.io/) | 1.24.1 | HTTP library with thread-safe connection pooling, file post, and more. / MIT |
| [vc](https://github.com/conda/conda/wiki/VC-features) | 14.1 | A meta-package to impose mutual exclusivity among software built with different VS versions / Modified BSD License (3-clause) |
| [vs2015\_runtime](http://www.microsoft.com) | 14.15.26706 | Bundles of the MSVC 14 (VS 2015) runtime / Proprietary |
| [wcwidth](https://github.com/jquast/wcwidth) | 0.1.7 | Measures number of Terminal column cells of wide-character codes. / MIT |
| [webencodings](https://github.com/gsnedders/python-webencodings) | 0.5.1 | Character encoding aliases for legacy web content / BSD 3-Clause |
| [werkzeug](http://werkzeug.pocoo.org/) | 0.14.1 | The Python WSGI Utility Library. / BSD 3-Clause |
| [wheel](https://github.com/pypa/wheel) | 0.33.1 | A built-package format for Python. / MIT |
| [widgetsnbextension](http://ipython.org) | 3.4.2 | Interactive Widgets for Jupyter / BSD 3-clause |
| [win\_inet\_pton](https://github.com/hickeroar/win_inet_pton) | 1.1.0 | Native inet\_pton and inet\_ntop implementation for Python on Windows (with ctypes). / PUBLIC-DOMAIN |
| [win\_unicode\_console](https://github.com/Drekin/win-unicode-console) | 0.5 | A Python package to enable Unicode input and display when running Python from Windows console. / MIT |
| [wincertstore](https://bitbucket.org/tiran/wincertstore) | 0.2 | Python module to extract CA and CRL certs from Windows’ cert store (ctypes based). / PSF 2 |
| [winpty](https://github.com/rprichard/winpty) | 0.4.3 | Winpty provides an interface similar to a Unix pty-master for communicating with Windows console programs. / MIT |
| [wrapt](https://github.com/GrahamDumpleton/wrapt) | 1.11.1 | Module for decorators, wrappers and monkey patching / BSD 2-Clause |
| [xlrd](http://www.python-excel.org/) | 1.2.0 | Library for developers to extract data from Microsoft Excel (tm) spreadsheet files / BSD 3-Clause and BSD with advertising |
| [xlsxwriter](https://xlsxwriter.readthedocs.io/) | 1.1.5 | A Python module for creating Excel XLSX files / BSD 2-Clause |
| [xlwings](http://xlwings.org/) | 0.15.4 | Interact with Excel from Python and vice versa / 3-clause BSD |
| [xlwt](http://www.python-excel.org/) | 1.3.0 | Writing data and formatting information to Excel files / BSD |
| [xz](http://tukaani.org/xz/) | 5.2.4 | Data compression software with high compression ratio / LGPL-2.1 and GPL-2.0 |
| [yaml](http://pyyaml.org/wiki/LibYAML) | 0.1.7 | A C library for parsing and emitting YAML. / MIT |
| [zeromq](http://zeromq.org) | 4.3.1 | A high-performance asynchronous messaging library. / LGPL 3 |
| [zict](http://github.com/mrocklin/zict) | 0.1.4 | Composable Dictionary Classes / BSD 3-Clause |
| [zipp](https://github.com/jaraco/zipp) | 0.3.3 | A pathlib-compatible Zipfile object wrapper / MIT |
| [zlib](http://zlib.net/) | 1.2.11 | Massively spiffy yet delicately unobtrusive compression library / zlib |
| [zstd](http://www.zstd.net) | 1.3.7 | Zstandard - Fast real-time compression algorithm / BSD 3-Clause |
| Name | Version | Summary / License |
|---|---|---|
| [alabaster](http://www.sphinx-doc.org/en/stable/index.html) | 0.7.12 | Configurable, Python 2+3 compatible Sphinx theme. / BSD 3-Clause |
| [anaconda-client](http://anaconda.org) | 1.7.2 | anaconda.org command line client library / BSD 3-clause |
| [anaconda-project](https://github.com/Anaconda-Platform/anaconda-project) | 0.8.2 | Tool for encapsulating, running, and reproducing data science projects / BSD 3-Clause |
| [appnope](http://github.com/minrk/appnope) | 0.1.0 | Disable App Nap on OS X 10.9 / BSD 2-Clause |
| [appscript](http://appscript.sourceforge.net/) | 1.1.0 | Control AppleScriptable applications from Python / Public-Domain |
| [asn1crypto](https://github.com/wbond/asn1crypto) | 0.24.0 | Python ASN.1 library with a focus on performance and a pythonic API / MIT |
| [astroid](https://www.astroid.org/) | 2.2.5 | A abstract syntax tree for Python with inference support. / LGPL 2.1 |
| [astropy](http://www.astropy.org/) | 3.1.2 | Community-developed Python Library for Astronomy / BSD |
| [atomicwrites](https://github.com/untitaker/python-atomicwrites) | 1.3.0 | Atomic file writes / MIT |
| [attrs](https://attrs.readthedocs.io/en/stable/) | 19.1.0 | attrs is the Python package that will bring back the joy of writing classes by relieving you from the drudgery of implementing object protocols (aka dunder methods). / MIT |
| [babel](http://babel.pocoo.org/) | 2.6.0 | Utilities to internationalize and localize Python applications / BSD 3-clause |
| [backcall](https://github.com/takluyver/backcall/) | 0.1.0 | Specifications for callback functions passed in to an API / BSD-3-Clause |
| [backports](https://bitbucket.org/brandon/backports) | 1.0 | / BSD |
| [backports.os](https://github.com/pjdelport/backports.os) | 0.1.1 | Backport of new features in Python’s os module / Python Software Foundation |
| [backports.shutil\_get\_terminal\_size](https://github.com/chrippa/backports.shutil_get_terminal_size) | 1.0.0 | A backport of the get\_terminal\_size function from Python 3.3’s shutil. / MIT |
| [beautifulsoup4](http://www.crummy.com/software/BeautifulSoup/) | 4.7.1 | Python library designed for screen-scraping / MIT |
| [bitarray](https://github.com/ilanschnell/bitarray) | 0.8.3 | efficient arrays of booleans – C extension / PSF |
| [bkcharts](http://github.com/bokeh/bkcharts) | 0.2 | High level chart types built on top of Bokeh / BSD 3-Clause |
| blas | 1.0 | |
| [bleach](https://github.com/mozilla/bleach) | 3.1.0 | Easy, whitelist-based HTML-sanitizing tool / Apache-2.0 |
| [blosc](https://github.com/Blosc/c-blosc) | 1.15.0 | A blocking, shuffling and loss-less compression library that can be faster than memcpy() / BSD 3-Clause |
| [bokeh](http://bokeh.pydata.org/) | 1.0.4 | Statistical and novel interactive HTML plots for Python / BSD 3-Clause |
| [boto](https://github.com/boto/boto/) | 2.49.0 | Amazon Web Services Library / MIT |
| [bottleneck](http://berkeleyanalytics.com/bottleneck) | 1.2.1 | Fast NumPy array functions written in Cython. / BSD 2-Clause |
| [bzip2](http://www.bzip.org/) | 1.0.6 | high-quality data compressor / bzip2 |
| [ca-certificates](https://github.com/conda-forge/ca-certificates-feedstock) | 2019.1.23 | Certificates for use with other packages. / ISC |
| [certifi](http://certifi.io/) | 2019.3.9 | Python package for providing Mozilla’s CA Bundle. / ISC |
| [cffi](https://bitbucket.org/cffi/cffi) | 1.12.2 | Foreign Function Interface for Python calling C code. / MIT |
| [chardet](https://github.com/chardet/chardet) | 3.0.4 | Universal character encoding detector / LGPL2 |
| [click](https://palletsprojects.com/p/click) | 7.0 | Python composable command line interface toolkit / BSD-3-Clause |
| [cloudpickle](https://github.com/cloudpipe/cloudpickle) | 0.8.0 | Extended pickling support for Python objects / BSD 3-Clause |
| [clyent](https://github.com/Anaconda-Platform/clyent) | 1.2.2 | Command line client library for windows and posix / BSD 3-Clause |
| [colorama](https://github.com/tartley/colorama) | 0.4.1 | Cross-platform colored terminal text / BSD-3-Clause |
| [conda](https://conda.io) | 4.6.11 | OS-agnostic, system-level binary package and environment manager. / BSD 3-Clause |
| [conda-build](https://github.com/conda/conda-build) | 3.17.8 | tools for building conda packages / BSD 3-Clause |
| [conda-env](https://github.com/conda/conda-env) | 2.6.0 | Tools for interacting with conda environments. / BSD 3-Clause |
| [contextlib2](http://contextlib2.readthedocs.org) | 0.5.5 | Backports and enhancements for the contextlib module / PSF |
| [cryptography](https://github.com/pyca/cryptography) | 2.6.1 | Provides cryptographic recipes and primitives to Python developers / Apache 2.0 or BSD 3-Clause, PSF 2 |
| [curl](http://curl.haxx.se/) | 7.64.0 | tool and library for transferring data with URL syntax / MIT/X derivate (`<http://curl.haxx.se/docs/copyright.html>`) |
| [cycler](http://matplotlib.org/cycler) | 0.10.0 | Composable style cycles. / BSD 3-Clause |
| [cython](http://www.cython.org/) | 0.29.6 | The Cython compiler for writing C extensions for the Python language / Apache-2.0 |
| [cytoolz](https://github.com/pytoolz/cytoolz) | 0.9.0.1 | Cython implementation of Toolz. High performance functional utilities. / BSD 3-Clause |
| [dask](http://github.com/dask/dask/) | 1.1.4 | Parallel Python with task scheduling / BSD 3-Clause |
| [dask-core](http://github.com/dask/dask/) | 1.1.4 | Parallel Python with task scheduling / BSD 3-Clause |
| [dbus](http://www.freedesktop.org/wiki/Software/dbus/) | 1.13.6 | Simple message bus system for applications to talk to one another / GPL2 |
| [decorator](https://github.com/micheles/decorator) | 4.4.0 | Better living through Python with decorators. / BSD 3-Clause |
| [defusedxml](https://bitbucket.org/tiran/defusedxml) | 0.5.0 | XML bomb protection for Python stdlib modules / PSF 2.0 |
| [distributed](http://distributed.readthedocs.io/en/latest/) | 1.26.0 | Distributed computing with Dask / BSD 3-Clause |
| [docutils](http://docutils.sourceforge.net/) | 0.14 | Docutils – Python Documentation Utilities / Public Domain Dedictation and BSD 2-Clause and PSF 2.1.1 and GPL 3.0 |
| [entrypoints](https://github.com/takluyver/entrypoints) | 0.3 | Discover and load entry points from installed packages. / MIT License |
| [et\_xmlfile](https://bitbucket.org/openpyxl/et_xmlfile) | 1.0.1 | An implementation of lxml.xmlfile for the standard library / MIT |
| [expat](http://expat.sourceforge.net/) | 2.2.6 | Expat XML parser library in C. / MIT |
| [fastcache](https://github.com/pbrady/fastcache) | 1.0.2 | C implementation of Python 3 lru\_cache / MIT |
| [filelock](https://github.com/benediktschmitt/py-filelock) | 3.0.10 | A platform independent file lock. / Public Domain |
| [flask](http://flask.pocoo.org) | 1.0.2 | A microframework based on Werkzeug, Jinja2 and good intentions. / BSD 3-Clause |
| [freetype](https://www.freetype.org/) | 2.9.1 | A Free, High-Quality, and Portable Font Engine / GPL-2.0 and FreeType |
| [get\_terminal\_size](https://github.com/chrippa/backports.shutil_get_terminal_size) | 1.0.0 | Get the size of the terminal window. / MIT |
| [gettext](https://www.gnu.org/software/gettext/) | 0.19.8.1 | Internationalization package. / GPLv2 |
| [gevent](http://www.gevent.org/) | 1.4.0 | Coroutine-based network library / MIT |
| [glib](https://developer.gnome.org/glib/) | 2.56.2 | Provides core application building blocks for libraries and applications written in C. / LGPL-2.1 |
| [glob2](https://github.com/miracle2k/python-glob2) | 0.6 | Version of the glob module that supports recursion via \*\*, and can capture patterns. / BSD-2-Clause |
| [gmp](http://gmplib.org/) | 6.1.2 | The GNU multiprecision library. / GPL 2 and LGPL 3 |
| [gmpy2](https://pypi.python.org/pypi/gmpy2) | 2.0.8 | GMP/MPIR, MPFR, and MPC interface to Python 2.6+ and 3.x / LGPL 3 |
| [greenlet](https://github.com/python-greenlet/greenlet) | 0.4.15 | Lightweight in-process concurrent programming / MIT |
| [h5py](http://www.h5py.org/) | 2.9.0 | Read and write HDF5 files from Python. / BSD-3-Clause |
| [hdf5](http://www.hdfgroup.org/HDF5/) | 1.10.4 | HDF5 is a data model, library, and file format for storing and managing data / HDF5 |
| [heapdict](http://stutzbachenterprises.com/) | 1.0.0 | A heap with decrease-key and increase-key operations / BSD 3-Clause |
| [html5lib](https://github.com/html5lib/html5lib-python) | 1.0.1 | HTML parser based on the WHATWG HTML specification / MIT |
| [icu](http://site.icu-project.org/) | 58.2 | International Components for Unicode. / MIT |
| [idna](https://github.com/kjd/idna) | 2.8 | Internationalized Domain Names in Applications (IDNA). / BSD Like |
| [imageio](http://imageio.github.io) | 2.5.0 | a Python library for reading and writing image data / BSD 2-Clause |
| [imagesize](https://github.com/shibukawa/imagesize_py) | 1.1.0 | Getting image size from png/jpeg/jpeg2000/gif file / MIT |
| [importlib\_metadata](http://importlib-metadata.readthedocs.io) | 0.8 | A library to access the metadata for a Python package / APACHE-2.0 |
| [intel-openmp](https://software.intel.com/en-us/node/522690) | 2019.3 | Math library for Intel and compatible processors / proprietary - Intel |
| [ipykernel](https://ipython.org) | 5.1.0 | IPython Kernel for Jupyter / BSD-3-Clause |
| [ipython](https://ipython.org/) | 7.4.0 | IPython: Productive Interactive Computing / BSD-3-Clause |
| [ipython\_genutils](http://ipython.org) | 0.2.0 | vestigial utilities from IPython / BSD 3-Clause |
| [ipywidgets](https://github.com/ipython/ipywidgets) | 7.4.2 | Jupyter Interactive Widgets / BSD 3-clause |
| [isort](https://github.com/timothycrosley/isort) | 4.3.16 | A Python utility / library to sort Python imports. / MIT |
| [itsdangerous](https://github.com/pallets/itsdangerous) | 1.1.0 | Various helpers to pass trusted data to untrusted environments. / BSD 3-Clause |
| [jbig](https://www.cl.cam.ac.uk/~mgk25/jbigkit) | 2.1 | Implementation of the JBIG1 data compression standard / GPL-2.0 |
| [jdcal](https://github.com/phn/jdcal) | 1.4 | Julian dates from proleptic Gregorian and Julian calendars. / BSD 2-Clause |
| [jedi](https://github.com/davidhalter/jedi/) | 0.13.3 | An autocompletion tool for Python that can be used for text editors. / MIT |
| [jinja2](http://jinja.pocoo.org) | 2.10 | An easy to use stand-alone template engine written in pure python. / 3-Clause BSD |
| [jpeg](http://www.ijg.org/) | 9b | read/write jpeg COM, EXIF, IPTC medata / Custom free software license |
| [jsonschema](https://github.com/Julian/jsonschema) | 3.0.1 | An implementation of JSON Schema validation for Python / MIT |
| [jupyter](http://jupyter.org) | 1.0.0 | Jupyter metapackage. Install all the Jupyter components in one go. / BSD 3-Clause |
| [jupyter\_client](http://jupyter.org) | 5.2.4 | Jupyter protocol implementation and client libraries / BSD 3-clause |
| [jupyter\_console](http://jupyter.org) | 6.0.0 | Jupyter terminal console / BSD-3-Clause |
| [jupyter\_core](http://jupyter.org) | 4.4.0 | Core common functionality of Jupyter projects. / BSD 3-clause |
| [jupyterlab](https://github.com/jupyterlab/jupyterlab) | 0.35.4 | JupyterLab PRE-ALPHA / BSD-3-Clause |
| [jupyterlab\_server](http://github.com/jupyterlab/jupyterlab_server) | 0.2.0 | A set of server components for JupyterLab and JupyterLab like applications. / BSD 3-Clause |
| [keyring](https://github.com/jaraco/keyring) | 18.0.0 | Store and access your passwords safely / Python Software Foundation or MIT |
| [kiwisolver](https://github.com/nucleic/kiwi) | 1.0.1 | A fast implementation of the Cassowary constraint solver / BSD 3-Clause |
| [krb5](http://web.mit.edu/kerberos/) | 1.16.1 | A network authentication protocol. / MIT |
| [lazy-object-proxy](https://github.com/ionelmc/python-lazy-object-proxy) | 1.3.1 | A fast and thorough lazy object proxy. / BSD 2-Clause |
| [libarchive](http://www.libarchive.org/) | 3.3.3 | Multi-format archive and compression library / BSD 2-Clause |
| [libcurl](http://curl.haxx.se/) | 7.64.0 | tool and library for transferring data with URL syntax / MIT/X derivate (`<http://curl.haxx.se/docs/copyright.html>`) |
| [libcxx](http://libcxx.llvm.org/) | 4.0.1 | C++ Standard Library / MIT license or UIUC License |
| [libcxxabi](http://libcxxabi.llvm.org/) | 4.0.1 | C++ Standard Library Support / MIT license or UIUC License |
| [libedit](http://thrysoee.dk/editline/) | 3.1.20181209 | Editline Library (libedit) / NetBSD |
| [libffi](https://sourceware.org/libffi/) | 3.2.1 | A Portable Foreign Function Interface Library. / Custom |
| [libgfortran](http://gcc.gnu.org/) | 3.0.1 | Fortran libraries from the GNU Compiler Collection / GPL 3 (with GCC Runtime Library Exception 3.1) |
| [libiconv](https://www.gnu.org/software/libiconv/) | 1.15 | Provides iconv for systems which don’t have one (or that cannot convert from/to Unicode.) / GPL and LGPL |
| [liblief](https://lief.quarkslab.com/) | 0.9.0 | A cross platform library to parse, modify and abstract ELF, PE and MachO formats. / Apache 2.0 |
| [libpng](http://www.libpng.org/pub/png/libpng.html) | 1.6.36 | PNG reference library. / zlib/libpng |
| [libsodium](http://libsodium.org) | 1.0.16 | A modern and easy-to-use crypto library. / ISC |
| [libssh2](https://www.libssh2.org/) | 1.8.0 | the SSH library / BSD 3-Clause |
| [libtiff](http://www.libtiff.org/) | 4.0.10 | Support for the Tag Image File Format (TIFF). / HPND |
| [libxml2](http://xmlsoft.org/) | 2.9.9 | The XML C parser and toolkit of Gnome / MIT |
| [libxslt](http://xmlsoft.org/XSLT/) | 1.1.33 | The XSLT C library developed for the GNOME project / MIT |
| [llvmlite](https://github.com/numba/llvmlite) | 0.28.0 | A lightweight LLVM python binding for writing JIT compilers / New BSD License |
| [locket](https://github.com/mwilliamson/locket.py) | 0.2.0 | File-based locks for Python for Linux and Windows / BSD 2-Clause |
| [lxml](http://lxml.de/) | 4.3.2 | Pythonic binding for the C libraries libxml2 and libxslt. / BSD 3-Clause, GPL-2.0, ZPL-2.0, and ElementTree |
| [lz4-c](https://www.lz4.org) | 1.8.1.2 | Extremely Fast Compression algorithm / BSD 2-clause |
| [lzo](http://www.oberhumer.com/opensource/lzo/) | 2.10 | LZO is a portable lossless data compression library written in ANSI C. / GPL v2+ |
| [markupsafe](https://www.palletsprojects.com/p/markupsafe) | 1.1.1 | A Python module that implements the jinja2.Markup string / BSD-3-Clause |
| [matplotlib](http://matplotlib.org/) | 3.0.3 | Publication quality figures in Python / PSF-based |
| [mccabe](https://github.com/PyCQA/mccabe) | 0.6.1 | McCabe complexity checker for Python / MIT |
| [mistune](https://github.com/lepture/mistune) | 0.8.4 | The fastest markdown parser in pure Python. / BSD 3-Clause |
| [mkl](https://software.intel.com/en-us/mkl) | 2019.3 | Math library for Intel and compatible processors / proprietary - Intel |
| [mkl-service](https://github.com/ContinuumIO/mkl-service) | 1.1.2 | Python bindings to MKL service functions / 3-clause BSD |
| [mkl\_fft](http://github.com/IntelPython/mkl_fft) | 1.0.10 | NumPy-based implementation of Fast Fourier Transform using Intel (R) Math Kernel Library. / BSD 3-Clause |
| [mkl\_random](http://github.com/IntelPython/mkl_random) | 1.0.2 | Intel (R) MKL-powered package for sampling from common probability distributions into NumPy arrays. / BSD 3-Clause |
| [more-itertools](https://github.com/erikrose/more-itertools) | 6.0.0 | More routines for operating on iterables, beyond itertools / MIT |
| [mpc](http://www.multiprecision.org/) | 1.1.0 | A C library for the arithmetic of complex numbers with arbitrarily high precision. / LGPL 3 |
| [mpfr](http://www.mpfr.org/) | 4.0.1 | The MPFR library is a C library for multiple-precision floating-point computations with correct rounding. / LGPL 3 |
| [mpmath](http://mpmath.org) | 1.1.0 | Python library for arbitrary-precision floating-point arithmetic / BSD 3-Clause |
| [msgpack-python](http://msgpack.org/) | 0.6.1 | MessagePack (de)serializer. / Apache 2.0 |
| [multipledispatch](https://github.com/mrocklin/multipledispatch/) | 0.6.0 | Multiple dispatch in Python / BSD 3-Clause |
| [nbconvert](http://jupyter.org) | 5.4.1 | Converting Jupyter Notebooks / BSD-3-Clause |
| [nbformat](http://jupyter.org) | 4.4.0 | The reference implementation of the Jupyter Notebook format / BSD 3-clause |
| [ncurses](http://www.gnu.org/software/ncurses/) | 6.1 | Library for text-based user interfaces / Free software (MIT-like) |
| [networkx](https://networkx.github.io/) | 2.2 | Python package for creating and manipulating complex networks / BSD 3-Clause |
| [nltk](http://nltk.org/) | 3.4 | Build Python programs to work with human language data / Apache 2.0 |
| [nose](http://readthedocs.org/docs/nose/) | 1.3.7 | Nose extends unittest to make testing easier / LGPL-2.1 |
| [notebook](http://jupyter.org) | 5.7.8 | Jupyter Notebook / BSD 3-clause |
| [numba](http://numba.github.com) | 0.43.1 | NumPy aware dynamic Python compiler using LLVM / BSD 2-clause |
| [numexpr](https://github.com/pydata/numexpr) | 2.6.9 | Fast numerical expression evaluator for NumPy. / MIT |
| [numpy](http://numpy.scipy.org/) | 1.16.2 | Array processing for numbers, strings, records, and objects. / BSD 3-Clause |
| numpy-base | 1.16.2 | |
| [numpydoc](https://github.com/numpy/numpydoc) | 0.8.0 | Sphinx extension to support docstrings in Numpy format / BSD 3-Clause |
| [olefile](http://www.decalage.info/python/olefileio) | 0.46 | parse, read and write Microsoft OLE2 files / BSD 2-Clause |
| [openpyxl](https://openpyxl.readthedocs.io) | 2.6.1 | A Python library to read/write Excel 2010 xlsx/xlsm files / MIT |
| [openssl](http://www.openssl.org/) | 1.1.1b | OpenSSL is an open-source implementation of the SSL and TLS protocols / OpenSSL |
| [packaging](https://github.com/pypa/packaging) | 19.0 | Core utilities for Python packages / Apache 2.0 or BSD 2-Clause |
| [pandas](http://pandas.pydata.org) | 0.24.2 | High-performance, easy-to-use data structures and data analysis tools. / BSD 3-clause |
| [pandoc](http://pandoc.org/) | 2.2.3.2 | Universal markup converter (repackaged binaries). / GPL-2.0 |
| [pandocfilters](https://github.com/jgm/pandocfilters) | 1.4.2 | A python module for writing pandoc filters / BSD-3-Clause |
| [parso](https://github.com/davidhalter/parso) | 0.3.4 | A Python Parser / MIT |
| [partd](https://github.com/dask/partd) | 0.3.10 | Data structure for on-disk shuffle operations / BSD 3-Clause |
| [path.py](https://github.com/jaraco/path.py) | 11.5.0 | A module wrapper for os.path / MIT |
| [pathlib2](https://github.com/mcmtroffaes/pathlib2) | 2.3.3 | Fork of pathlib aiming to support the full stdlib Python API. / MIT |
| [patsy](https://github.com/pydata/patsy) | 0.5.1 | Describing statistical models in Python using symbolic formulas / BSD-2-Clause, PSF2 |
| [pcre](http://www.pcre.org/) | 8.43 | Regular expression pattern matching using the same syntax and semantics as Perl 5. / BSD 3-Clause |
| [pep8](http://pep8.readthedocs.org/) | 1.7.1 | Python style guide checker / MIT |
| [pexpect](http://pexpect.sourceforge.net/) | 4.6.0 | Pexpect makes Python a better tool for controlling other applications. / ISC |
| [pickleshare](https://github.com/pickleshare/pickleshare/) | 0.7.5 | Tiny ‘shelve’-like database with concurrency support / MIT |
| [pillow](https://pillow.readthedocs.io) | 5.4.1 | Pillow is the friendly PIL fork by Alex Clark and Contributors / PIL |
| [pip](https://pip.pypa.io/en/stable/) | 19.0.3 | PyPA recommended tool for installing Python packages / MIT |
| [pkginfo](https://code.launchpad.net/~tseaver/pkginfo/trunk) | 1.5.0.1 | Query metadatdata from sdists / bdists / installed packages. / MIT |
| [pluggy](https://github.com/pytest-dev/pluggy) | 0.9.0 | Plugin registration and hook calling for Python / MIT |
| [ply](http://www.dabeaz.com/ply/index.html) | 3.11 | Python Lex-Yacc / BSD 3-clause |
| [prometheus\_client](https://github.com/prometheus/client_python) | 0.6.0 | Python client for the Prometheus monitoring system / Apache 2.0 |
| [prompt\_toolkit](https://github.com/jonathanslenders/python-prompt-toolkit) | 2.0.9 | Library for building powerful interactive command lines in Python / BSD 3-clause |
| [psutil](https://github.com/giampaolo/psutil) | 5.6.1 | A cross-platform process and system utilities module for Python / BSD 3-Clause |
| [ptyprocess](https://github.com/pexpect/ptyprocess) | 0.6.0 | Run a subprocess in a pseudo terminal / ISC |
| [py](https://github.com/pytest-dev/py) | 1.8.0 | library with cross-python path, ini-parsing, io, code, log facilities / MIT |
| [py-lief](https://lief.quarkslab.com/) | 0.9.0 | A cross platform library to parse, modify and abstract ELF, PE and MachO formats. / Apache 2.0 |
| [pycodestyle](https://pycodestyle.readthedocs.io/) | 2.5.0 | Python style guide checker / MIT |
| [pycosat](https://github.com/ContinuumIO/pycosat) | 0.6.3 | Bindings to picosat (a SAT solver) / MIT |
| [pycparser](https://github.com/eliben/pycparser) | 2.19 | Complete C99 parser in pure Python / BSD 3-clause |
| [pycrypto](http://www.pycrypto.org/) | 2.6.1 | Cryptographic modules for Python. / Public Domain |
| [pycurl](http://pycurl.sourceforge.net/) | 7.43.0.2 | A Python Interface To The cURL library / LGPL, MIT |
| [pyflakes](https://github.com/PyCQA/pyflakes) | 2.1.1 | Pyflakes analyzes programs and detects various errors. / MIT |
| [pygments](http://pygments.org/) | 2.3.1 | Generic syntax highlighting package / BSD 2-clause |
| [pylint](http://www.pylint.org/) | 2.3.1 | python code static checker / GPL |
| [pyodbc](https://github.com/mkleehammer/pyodbc) | 4.0.26 | DB API Module for ODBC / MIT |
| [pyopenssl](https://github.com/pyca/pyopenssl) | 19.0.0 | Python wrapper module around the OpenSSL library / Apache 2.0 |
| [pyparsing](http://pyparsing.wikispaces.com/) | 2.3.1 | Create and execute simple grammars / MIT |
| [pyqt](http://www.riverbankcomputing.co.uk/software/pyqt) | 5.9.2 | Python binding of the cross-platform GUI toolkit Qt. / Commercial, GPL-2.0, GPL-3.0 |
| [pyrsistent](http://github.com/tobgu/pyrsistent/) | 0.14.11 | Persistent/Functional/Immutable data structures / MIT |
| [pysocks](https://github.com/Anorov/PySocks) | 1.6.8 | A Python SOCKS client module. See [Anorov/PySocks](https://github.com/Anorov/PySocks) for more information. / BSD 3-Clause |
| [pytables](http://www.pytables.org) | 3.5.1 | Brings together Python, HDF5 and NumPy to easily handle large amounts of data. / BSD 3-Clause |
| [pytest](https://docs.pytest.org/en/latest/) | 4.3.1 | Simple and powerful testing with Python. / MIT |
| [pytest-arraydiff](https://github.com/astrofrog/pytest-arraydiff) | 0.3 | pytest plugin to help with comparing array output from tests / BSD |
| [pytest-astropy](https://github.com/astropy/pytest-astropy) | 0.5.0 | Meta-package containing dependencies for testing Astropy / BSD |
| [pytest-doctestplus](https://github.com/astropy/pytest-doctestplus) | 0.3.0 | Pytest plugin with advanced doctest features / BSD |
| [pytest-openfiles](https://github.com/astropy/pytest-openfiles) | 0.3.2 | Pytest plugin for detecting inadvertent open file handles / BSD |
| [pytest-remotedata](https://github.com/astropy/pytest-remotedata) | 0.3.1 | Pytest plugin for controlling remote data access / BSD |
| [python](http://www.python.org/) | 3.7.3 | General purpose programming language / PSF |
| [python-dateutil](https://dateutil.readthedocs.org/) | 2.8.0 | Extensions to the standard Python datetime module. / BSD 3 Clause |
| python-libarchive-c | 2.8 | |
| python.app | 2 | Proxy on OS X letting Python libraries hook into the gui event loop / BSD |
| [pytz](http://pythonhosted.org/pytz/) | 2018.9 | World timezone definitions, modern and historical. / MIT |
| [pywavelets](https://github.com/PyWavelets/pywt) | 1.0.2 | Discrete Wavelet Transforms in Python. / MIT |
| [pyyaml](http://pyyaml.org/wiki/PyYAML) | 5.1 | YAML parser and emitter for Python / MIT |
| [pyzmq](https://github.com/zeromq/pyzmq) | 18.0.0 | Python bindings for zeromq / BSD 3-clause |
| [qt](http://qt-project.org) | 5.9.7 | Qt is a cross-platform application and UI framework. / LGPL-3.0 |
| [qtawesome](https://github.com/spyder-ide/qtawesome) | 0.5.7 | Iconic fonts in PyQt and PySide applications / MIT |
| [qtconsole](http://jupyter.org) | 4.4.3 | Jupyter Qt console / BSD 3-Clause |
| [qtpy](https://github.com/spyder-ide/qtpy) | 1.7.0 | Abstraction layer for PyQt5/PyQt4/PySide / MIT |
| [readline](https://cnswww.cns.cwru.edu/php/chet/readline/rltop.html) | 7.0 | library for editing command lines as they are typed in / GPL-3.0 |
| [requests](http://python-requests.org) | 2.21.0 | Python HTTP for Humans / Apache 2.0 |
| [rope](https://github.com/python-rope/rope) | 0.12.0 | A python refactoring library… / GPL 2.0 |
| [ruamel\_yaml](https://bitbucket.org/ruamel/yaml) | 0.15.46 | A patched copy of ruamel.yaml. / MIT |
| [scikit-image](http://scikit-image.org/) | 0.14.2 | Image processing routines for SciPy. / BSD 3-Clause |
| [scikit-learn](http://scikit-learn.org/) | 0.20.3 | A set of python modules for machine learning and data mining / BSD 3-Clause |
| [scipy](http://www.scipy.org/) | 1.2.1 | Scientific Library for Python / BSD 3-Clause |
| [seaborn](https://seaborn.pydata.org) | 0.9.0 | Statistical data visualization / BSD 3-Clause |
| [send2trash](https://github.com/hsoft/send2trash) | 1.5.0 | Python library to natively send files to Trash (or Recycle bin) on all platforms. / BSD-3-Clause |
| [setuptools](https://github.com/pypa/setuptools) | 40.8.0 | Download, build, install, upgrade, and uninstall Python packages / MIT |
| [simplegeneric](http://cheeseshop.python.org/pypi/simplegeneric) | 0.8.1 | Simple generic functions (similar to Python’s own len(), pickle.dump(), etc.) / Zope Public |
| [singledispatch](http://docs.python.org/3/library/functools.html#functools.singledispatch) | 3.4.0.3 | Transforms a function into a single-dispatch generic function / MIT |
| [sip](http://www.riverbankcomputing.com/software/sip/intro) | 4.19.8 | Create Python bindings for C and C++ libraries / GPL-3.0 |
| [six](http://pypi.python.org/pypi/six/) | 1.12.0 | Python 2 and 3 compatibility utilities / MIT |
| [snappy](https://github.com/google/snappy) | 1.1.7 | A fast compressor/decompressor / BSD 3-clause |
| [snowballstemmer](https://github.com/shibukawa/snowball_py) | 1.2.1 | Snowball stemming library collection for Python / BSD-2-Clause |
| [sortedcollections](http://www.grantjenks.com/docs/sortedcollections/) | 1.1.2 | Python Sorted Collections / Apache-2.0 |
| [sortedcontainers](http://www.grantjenks.com/docs/sortedcontainers/) | 2.1.0 | Python Sorted Container Types: SortedList, SortedDict, and SortedSet / Apache 2.0 |
| [soupsieve](http://facelessuser.github.io/soupsieve) | 1.8 | A modern CSS selector implementation for BeautifulSoup / MIT |
| [sphinx](http://www.sphinx-doc.org) | 1.8.5 | Sphinx is a tool that makes it easy to create intelligent and beautiful documentation / BSD 2-clause |
| sphinxcontrib | 1.0 | Python namespace for sphinxcontrib / BSD |
| [sphinxcontrib-websupport](https://pypi.python.org/pypi/sphinxcontrib-websupport) | 1.1.0 | Sphinx API for Web Apps / BSD-2-Clause |
| [spyder](https://www.spyder-ide.org/) | 3.3.3 | The Scientific Python Development Environment / MIT |
| [spyder-kernels](https://github.com/spyder-ide/spyder-kernels) | 0.4.2 | Jupyter kernels for the Spyder console / MIT |
| [sqlalchemy](http://www.sqlalchemy.org/) | 1.3.1 | Database Abstraction Library. / MIT |
| [sqlite](http://www.sqlite.org/) | 3.27.2 | Implements a self-contained, zero-configuration, SQL database engine. / Public-Domain (`<http://www.sqlite.org/copyright.html>`) |
| [statsmodels](https://www.statsmodels.org) | 0.9.0 | Statistical computations and models for use with SciPy / BSD 3-Clause |
| [sympy](http://sympy.org) | 1.3 | Python library for symbolic mathematics / 3-clause BSD |
| [tblib](https://github.com/ionelmc/python-tblib) | 1.3.2 | Traceback serialization library. / BSD 2-Clause |
| [terminado](https://github.com/jupyter/terminado) | 0.8.1 | Terminals served by tornado websockets / BSD 2-clause |
| [testpath](https://testpath.readthedocs.io) | 0.4.2 | Testpath is a collection of utilities for Python code working with files and commands. / BSD-3-Clause |
| [tk](http://www.tcl.tk/) | 8.6.8 | A dynamic programming language with GUI support. Bundles Tcl and Tk. / Tcl/Tk |
| [toolz](http://toolz.readthedocs.org/) | 0.9.0 | A functional standard library for Python. / BSD 3-Clause |
| [tornado](http://www.tornadoweb.org/) | 6.0.2 | A Python web framework and asynchronous networking library, originally developed at FriendFeed. / Apache 2.0 |
| [tqdm](https://pypi.python.org/pypi/tqdm) | 4.31.1 | A Fast, Extensible Progress Meter / MPLv2.0, MIT |
| [traitlets](http://ipython.org/) | 4.3.2 | Configuration system for Python applications / BSD 3-clause |
| [unicodecsv](https://github.com/jdunck/python-unicodecsv) | 0.14.1 | Drop-in replacement for csv module which supports unicode strings / BSD |
| [unixodbc](http://www.unixodbc.org/) | 2.3.7 | ODBC on non MS Windows platforms / LGPL-2.1 |
| [urllib3](https://urllib3.readthedocs.io/) | 1.24.1 | HTTP library with thread-safe connection pooling, file post, and more. / MIT |
| [wcwidth](https://github.com/jquast/wcwidth) | 0.1.7 | Measures number of Terminal column cells of wide-character codes. / MIT |
| [webencodings](https://github.com/gsnedders/python-webencodings) | 0.5.1 | Character encoding aliases for legacy web content / BSD 3-Clause |
| [werkzeug](http://werkzeug.pocoo.org/) | 0.14.1 | The Python WSGI Utility Library. / BSD 3-Clause |
| [wheel](https://github.com/pypa/wheel) | 0.33.1 | A built-package format for Python. / MIT |
| [widgetsnbextension](http://ipython.org) | 3.4.2 | Interactive Widgets for Jupyter / BSD 3-clause |
| [wrapt](https://github.com/GrahamDumpleton/wrapt) | 1.11.1 | Module for decorators, wrappers and monkey patching / BSD 2-Clause |
| [wurlitzer](https://github.com/minrk/wurlitzer) | 1.0.2 | Capture C-level stdout/stderr in Python / MIT |
| [xlrd](http://www.python-excel.org/) | 1.2.0 | Library for developers to extract data from Microsoft Excel (tm) spreadsheet files / BSD 3-Clause and BSD with advertising |
| [xlsxwriter](https://xlsxwriter.readthedocs.io/) | 1.1.5 | A Python module for creating Excel XLSX files / BSD 2-Clause |
| [xlwings](http://xlwings.org/) | 0.15.4 | Interact with Excel from Python and vice versa / 3-clause BSD |
| [xlwt](http://www.python-excel.org/) | 1.3.0 | Writing data and formatting information to Excel files / BSD |
| [xz](http://tukaani.org/xz/) | 5.2.4 | Data compression software with high compression ratio / LGPL-2.1 and GPL-2.0 |
| [yaml](http://pyyaml.org/wiki/LibYAML) | 0.1.7 | A C library for parsing and emitting YAML. / MIT |
| [zeromq](http://zeromq.org) | 4.3.1 | A high-performance asynchronous messaging library. / LGPL 3 |
| [zict](http://github.com/mrocklin/zict) | 0.1.4 | Composable Dictionary Classes / BSD 3-Clause |
| [zipp](https://github.com/jaraco/zipp) | 0.3.3 | A pathlib-compatible Zipfile object wrapper / MIT |
| [zlib](http://zlib.net/) | 1.2.11 | Massively spiffy yet delicately unobtrusive compression library / zlib |
| [zstd](http://www.zstd.net) | 1.3.7 | Zstandard - Fast real-time compression algorithm / BSD 3-Clause |
| Name | Version | Summary / License |
|---|---|---|
| [alabaster](http://www.sphinx-doc.org/en/stable/index.html) | 0.7.12 | Configurable, Python 2+3 compatible Sphinx theme. / BSD 3-Clause |
| [anaconda-client](http://anaconda.org) | 1.7.2 | anaconda.org command line client library / BSD 3-clause |
| [anaconda-project](https://github.com/Anaconda-Platform/anaconda-project) | 0.8.2 | Tool for encapsulating, running, and reproducing data science projects / BSD 3-Clause |
| [asn1crypto](https://github.com/wbond/asn1crypto) | 0.24.0 | Python ASN.1 library with a focus on performance and a pythonic API / MIT |
| [astroid](https://www.astroid.org/) | 2.2.5 | A abstract syntax tree for Python with inference support. / LGPL 2.1 |
| [astropy](http://www.astropy.org/) | 3.0.5 | Community-developed Python Library for Astronomy / BSD |
| [atomicwrites](https://github.com/untitaker/python-atomicwrites) | 1.3.0 | Atomic file writes / MIT |
| [attrs](https://attrs.readthedocs.io/en/stable/) | 19.1.0 | attrs is the Python package that will bring back the joy of writing classes by relieving you from the drudgery of implementing object protocols (aka dunder methods). / MIT |
| [babel](http://babel.pocoo.org/) | 2.6.0 | Utilities to internationalize and localize Python applications / BSD 3-clause |
| [backcall](https://github.com/takluyver/backcall/) | 0.1.0 | Specifications for callback functions passed in to an API / BSD-3-Clause |
| [backports](https://bitbucket.org/brandon/backports) | 1.0 | / BSD |
| [backports.os](https://github.com/pjdelport/backports.os) | 0.1.1 | Backport of new features in Python’s os module / Python Software Foundation |
| [backports.shutil\_get\_terminal\_size](https://github.com/chrippa/backports.shutil_get_terminal_size) | 1.0.0 | A backport of the get\_terminal\_size function from Python 3.3’s shutil. / MIT |
| [beautifulsoup4](http://www.crummy.com/software/BeautifulSoup/) | 4.7.1 | Python library designed for screen-scraping / MIT |
| [bitarray](https://github.com/ilanschnell/bitarray) | 0.8.3 | efficient arrays of booleans – C extension / PSF |
| [bkcharts](http://github.com/bokeh/bkcharts) | 0.2 | High level chart types built on top of Bokeh / BSD 3-Clause |
| blas | 1.0 | |
| [bleach](https://github.com/mozilla/bleach) | 3.1.0 | Easy, whitelist-based HTML-sanitizing tool / Apache-2.0 |
| [blosc](https://github.com/Blosc/c-blosc) | 1.15.0 | A blocking, shuffling and loss-less compression library that can be faster than memcpy() / BSD 3-Clause |
| [bokeh](http://bokeh.pydata.org/) | 1.0.4 | Statistical and novel interactive HTML plots for Python / BSD 3-Clause |
| [boto](https://github.com/boto/boto/) | 2.49.0 | Amazon Web Services Library / MIT |
| [bottleneck](http://berkeleyanalytics.com/bottleneck) | 1.2.1 | Fast NumPy array functions written in Cython. / BSD 2-Clause |
| [bzip2](http://www.bzip.org/) | 1.0.6 | high-quality data compressor / bzip2 |
| [ca-certificates](https://github.com/conda-forge/ca-certificates-feedstock) | 2019.1.23 | Certificates for use with other packages. / ISC |
| [cairo](http://cairographics.org/) | 1.14.12 | Cairo is a 2D graphics library with support for multiple output devices. / LGPL 2.1 or MPL 1.1 |
| [certifi](http://certifi.io/) | 2019.3.9 | Python package for providing Mozilla’s CA Bundle. / ISC |
| [cffi](https://bitbucket.org/cffi/cffi) | 1.12.2 | Foreign Function Interface for Python calling C code. / MIT |
| [chardet](https://github.com/chardet/chardet) | 3.0.4 | Universal character encoding detector / LGPL2 |
| [click](https://palletsprojects.com/p/click) | 7.0 | Python composable command line interface toolkit / BSD-3-Clause |
| [cloudpickle](https://github.com/cloudpipe/cloudpickle) | 0.8.0 | Extended pickling support for Python objects / BSD 3-Clause |
| [clyent](https://github.com/Anaconda-Platform/clyent) | 1.2.2 | Command line client library for windows and posix / BSD 3-Clause |
| [colorama](https://github.com/tartley/colorama) | 0.4.1 | Cross-platform colored terminal text / BSD-3-Clause |
| [conda](https://conda.io) | 4.6.11 | OS-agnostic, system-level binary package and environment manager. / BSD 3-Clause |
| [conda-build](https://github.com/conda/conda-build) | 3.17.8 | tools for building conda packages / BSD 3-Clause |
| [conda-env](https://github.com/conda/conda-env) | 2.6.0 | Tools for interacting with conda environments. / BSD 3-Clause |
| [contextlib2](http://contextlib2.readthedocs.org) | 0.5.5 | Backports and enhancements for the contextlib module / PSF |
| [cryptography](https://github.com/pyca/cryptography) | 2.6.1 | Provides cryptographic recipes and primitives to Python developers / Apache 2.0 or BSD 3-Clause, PSF 2 |
| [curl](http://curl.haxx.se/) | 7.64.0 | tool and library for transferring data with URL syntax / MIT/X derivate (`<http://curl.haxx.se/docs/copyright.html>`) |
| [cycler](http://matplotlib.org/cycler) | 0.10.0 | Composable style cycles. / BSD 3-Clause |
| [cython](http://www.cython.org/) | 0.29.6 | The Cython compiler for writing C extensions for the Python language / Apache-2.0 |
| [cytoolz](https://github.com/pytoolz/cytoolz) | 0.9.0.1 | Cython implementation of Toolz. High performance functional utilities. / BSD 3-Clause |
| [dask](http://github.com/dask/dask/) | 1.1.4 | Parallel Python with task scheduling / BSD 3-Clause |
| [dask-core](http://github.com/dask/dask/) | 1.1.4 | Parallel Python with task scheduling / BSD 3-Clause |
| [decorator](https://github.com/micheles/decorator) | 4.4.0 | Better living through Python with decorators. / BSD 3-Clause |
| [defusedxml](https://bitbucket.org/tiran/defusedxml) | 0.5.0 | XML bomb protection for Python stdlib modules / PSF 2.0 |
| [distributed](http://distributed.readthedocs.io/en/latest/) | 1.26.0 | Distributed computing with Dask / BSD 3-Clause |
| [docutils](http://docutils.sourceforge.net/) | 0.14 | Docutils – Python Documentation Utilities / Public Domain Dedictation and BSD 2-Clause and PSF 2.1.1 and GPL 3.0 |
| [entrypoints](https://github.com/takluyver/entrypoints) | 0.3 | Discover and load entry points from installed packages. / MIT License |
| [et\_xmlfile](https://bitbucket.org/openpyxl/et_xmlfile) | 1.0.1 | An implementation of lxml.xmlfile for the standard library / MIT |
| [expat](http://expat.sourceforge.net/) | 2.2.6 | Expat XML parser library in C. / MIT |
| [fastcache](https://github.com/pbrady/fastcache) | 1.0.2 | C implementation of Python 3 lru\_cache / MIT |
| [filelock](https://github.com/benediktschmitt/py-filelock) | 3.0.10 | A platform independent file lock. / Public Domain |
| [flask](http://flask.pocoo.org) | 1.0.2 | A microframework based on Werkzeug, Jinja2 and good intentions. / BSD 3-Clause |
| [fontconfig](http://www.freedesktop.org/wiki/Software/fontconfig/) | 2.13.0 | A library for configuring and customizing font access. / MIT |
| [freetype](https://www.freetype.org/) | 2.9.1 | A Free, High-Quality, and Portable Font Engine / GPL-2.0 and FreeType |
| [get\_terminal\_size](https://github.com/chrippa/backports.shutil_get_terminal_size) | 1.0.0 | Get the size of the terminal window. / MIT |
| [gevent](http://www.gevent.org/) | 1.4.0 | Coroutine-based network library / MIT |
| [glib](https://developer.gnome.org/glib/) | 2.56.2 | Provides core application building blocks for libraries and applications written in C. / LGPL-2.1 |
| [glob2](https://github.com/miracle2k/python-glob2) | 0.6 | Version of the glob module that supports recursion via \*\*, and can capture patterns. / BSD-2-Clause |
| [gmp](http://gmplib.org/) | 6.1.2 | The GNU multiprecision library. / GPL 2 and LGPL 3 |
| [gmpy2](https://pypi.python.org/pypi/gmpy2) | 2.0.8 | GMP/MPIR, MPFR, and MPC interface to Python 2.6+ and 3.x / LGPL 3 |
| [greenlet](https://github.com/python-greenlet/greenlet) | 0.4.15 | Lightweight in-process concurrent programming / MIT |
| [h5py](http://www.h5py.org/) | 2.8.0 | Read and write HDF5 files from Python. / BSD-3-Clause |
| [hdf5](http://www.hdfgroup.org/HDF5/) | 1.10.2 | HDF5 is a data model, library, and file format for storing and managing data / HDF5 |
| [heapdict](http://stutzbachenterprises.com/) | 1.0.0 | A heap with decrease-key and increase-key operations / BSD 3-Clause |
| [html5lib](https://github.com/html5lib/html5lib-python) | 1.0.1 | HTML parser based on the WHATWG HTML specification / MIT |
| [icu](http://site.icu-project.org/) | 58.2 | International Components for Unicode. / MIT |
| [idna](https://github.com/kjd/idna) | 2.8 | Internationalized Domain Names in Applications (IDNA). / BSD Like |
| [imageio](http://imageio.github.io) | 2.5.0 | a Python library for reading and writing image data / BSD 2-Clause |
| [imagesize](https://github.com/shibukawa/imagesize_py) | 1.1.0 | Getting image size from png/jpeg/jpeg2000/gif file / MIT |
| [importlib\_metadata](http://importlib-metadata.readthedocs.io) | 0.8 | A library to access the metadata for a Python package / APACHE-2.0 |
| [ipykernel](https://ipython.org) | 5.1.0 | IPython Kernel for Jupyter / BSD-3-Clause |
| [ipython](https://ipython.org/) | 7.4.0 | IPython: Productive Interactive Computing / BSD-3-Clause |
| [ipython\_genutils](http://ipython.org) | 0.2.0 | vestigial utilities from IPython / BSD 3-Clause |
| [ipywidgets](https://github.com/ipython/ipywidgets) | 7.4.2 | Jupyter Interactive Widgets / BSD 3-clause |
| [isort](https://github.com/timothycrosley/isort) | 4.3.16 | A Python utility / library to sort Python imports. / MIT |
| [itsdangerous](https://github.com/pallets/itsdangerous) | 1.1.0 | Various helpers to pass trusted data to untrusted environments. / BSD 3-Clause |
| [jbig](https://www.cl.cam.ac.uk/~mgk25/jbigkit) | 2.1 | Implementation of the JBIG1 data compression standard / GPL-2.0 |
| [jdcal](https://github.com/phn/jdcal) | 1.4 | Julian dates from proleptic Gregorian and Julian calendars. / BSD 2-Clause |
| [jedi](https://github.com/davidhalter/jedi/) | 0.13.3 | An autocompletion tool for Python that can be used for text editors. / MIT |
| [jinja2](http://jinja.pocoo.org) | 2.10 | An easy to use stand-alone template engine written in pure python. / 3-Clause BSD |
| [jpeg](http://www.ijg.org/) | 9b | read/write jpeg COM, EXIF, IPTC medata / Custom free software license |
| [jsonschema](https://github.com/Julian/jsonschema) | 3.0.1 | An implementation of JSON Schema validation for Python / MIT |
| [jupyter](http://jupyter.org) | 1.0.0 | Jupyter metapackage. Install all the Jupyter components in one go. / BSD 3-Clause |
| [jupyter\_client](http://jupyter.org) | 5.2.4 | Jupyter protocol implementation and client libraries / BSD 3-clause |
| [jupyter\_console](http://jupyter.org) | 6.0.0 | Jupyter terminal console / BSD-3-Clause |
| [jupyter\_core](http://jupyter.org) | 4.4.0 | Core common functionality of Jupyter projects. / BSD 3-clause |
| [kiwisolver](https://github.com/nucleic/kiwi) | 1.0.1 | A fast implementation of the Cassowary constraint solver / BSD 3-Clause |
| [krb5](http://web.mit.edu/kerberos/) | 1.16.1 | A network authentication protocol. / MIT |
| [lazy-object-proxy](https://github.com/ionelmc/python-lazy-object-proxy) | 1.3.1 | A fast and thorough lazy object proxy. / BSD 2-Clause |
| [libarchive](http://www.libarchive.org/) | 3.3.3 | Multi-format archive and compression library / BSD 2-Clause |
| [libcurl](http://curl.haxx.se/) | 7.64.0 | tool and library for transferring data with URL syntax / MIT/X derivate (`<http://curl.haxx.se/docs/copyright.html>`) |
| [libedit](http://thrysoee.dk/editline/) | 3.1.20181209 | Editline Library (libedit) / NetBSD |
| [libffi](https://sourceware.org/libffi/) | 3.2.1 | A Portable Foreign Function Interface Library. / Custom |
| [libgcc-ng](https://gcc.gnu.org/onlinedocs/gccint/Libgcc.html) | 8.2.0 | The GCC low-level runtime library / GPL |
| [libgfortran-ng](https://gcc.gnu.org/) | 7.3.0 | The GNU Fortran Runtime Library / GPL |
| [libopenblas](http://www.openblas.net/) | 0.2.20 | An Optimized BLAS library / BSD |
| [libpng](http://www.libpng.org/pub/png/libpng.html) | 1.6.36 | PNG reference library. / zlib/libpng |
| [libsodium](http://libsodium.org) | 1.0.16 | A modern and easy-to-use crypto library. / ISC |
| [libssh2](https://www.libssh2.org/) | 1.8.0 | the SSH library / BSD 3-Clause |
| [libstdcxx-ng](https://gcc.gnu.org/) | 8.2.0 | The GNU C++ Runtime Library / GPL3 with runtime exception |
| [libtiff](http://www.libtiff.org/) | 4.0.10 | Support for the Tag Image File Format (TIFF). / HPND |
| [libuuid](http://sourceforge.net/projects/libuuid/) | 1.0.3 | Portable uuid C library. / BSD 3-Clause |
| [libxcb](http://xcb.freedesktop.org/) | 1.13 | This is the C-language Binding (XCB) package to the X Window System protocol / MIT |
| [libxml2](http://xmlsoft.org/) | 2.9.9 | The XML C parser and toolkit of Gnome / MIT |
| [libxslt](http://xmlsoft.org/XSLT/) | 1.1.33 | The XSLT C library developed for the GNOME project / MIT |
| [locket](https://github.com/mwilliamson/locket.py) | 0.2.0 | File-based locks for Python for Linux and Windows / BSD 2-Clause |
| [lxml](http://lxml.de/) | 4.3.2 | Pythonic binding for the C libraries libxml2 and libxslt. / BSD 3-Clause, GPL-2.0, ZPL-2.0, and ElementTree |
| [lz4-c](https://www.lz4.org) | 1.8.1.2 | Extremely Fast Compression algorithm / BSD 2-clause |
| [lzo](http://www.oberhumer.com/opensource/lzo/) | 2.10 | LZO is a portable lossless data compression library written in ANSI C. / GPL v2+ |
| [markupsafe](https://www.palletsprojects.com/p/markupsafe) | 1.1.1 | A Python module that implements the jinja2.Markup string / BSD-3-Clause |
| [matplotlib](http://matplotlib.org/) | 3.0.3 | Publication quality figures in Python / PSF-based |
| [mccabe](https://github.com/PyCQA/mccabe) | 0.6.1 | McCabe complexity checker for Python / MIT |
| [mistune](https://github.com/lepture/mistune) | 0.8.4 | The fastest markdown parser in pure Python. / BSD 3-Clause |
| [more-itertools](https://github.com/erikrose/more-itertools) | 6.0.0 | More routines for operating on iterables, beyond itertools / MIT |
| [mpc](http://www.multiprecision.org/) | 1.1.0 | A C library for the arithmetic of complex numbers with arbitrarily high precision. / LGPL 3 |
| [mpfr](http://www.mpfr.org/) | 4.0.1 | The MPFR library is a C library for multiple-precision floating-point computations with correct rounding. / LGPL 3 |
| [mpmath](http://mpmath.org) | 1.1.0 | Python library for arbitrary-precision floating-point arithmetic / BSD 3-Clause |
| [msgpack-python](http://msgpack.org/) | 0.6.1 | MessagePack (de)serializer. / Apache 2.0 |
| [multipledispatch](https://github.com/mrocklin/multipledispatch/) | 0.6.0 | Multiple dispatch in Python / BSD 3-Clause |
| [nbconvert](http://jupyter.org) | 5.4.1 | Converting Jupyter Notebooks / BSD-3-Clause |
| [nbformat](http://jupyter.org) | 4.4.0 | The reference implementation of the Jupyter Notebook format / BSD 3-clause |
| [ncurses](http://www.gnu.org/software/ncurses/) | 6.1 | Library for text-based user interfaces / Free software (MIT-like) |
| [networkx](https://networkx.github.io/) | 2.2 | Python package for creating and manipulating complex networks / BSD 3-Clause |
| [nltk](http://nltk.org/) | 3.4 | Build Python programs to work with human language data / Apache 2.0 |
| [nose](http://readthedocs.org/docs/nose/) | 1.3.7 | Nose extends unittest to make testing easier / LGPL-2.1 |
| [notebook](http://jupyter.org) | 5.7.8 | Jupyter Notebook / BSD 3-clause |
| [numexpr](https://github.com/pydata/numexpr) | 2.6.7 | Fast numerical expression evaluator for NumPy. / MIT |
| [numpy](http://numpy.scipy.org/) | 1.14.5 | Array processing for numbers, strings, records, and objects. / BSD 3-Clause |
| numpy-base | 1.14.5 | |
| [numpydoc](https://github.com/numpy/numpydoc) | 0.8.0 | Sphinx extension to support docstrings in Numpy format / BSD 3-Clause |
| [olefile](http://www.decalage.info/python/olefileio) | 0.46 | parse, read and write Microsoft OLE2 files / BSD 2-Clause |
| [openblas](http://www.openblas.net/) | 0.2.20 | An Optimized BLAS library / BSD |
| openblas-devel | 0.2.20 | |
| [openpyxl](https://openpyxl.readthedocs.io) | 2.6.1 | A Python library to read/write Excel 2010 xlsx/xlsm files / MIT |
| [openssl](http://www.openssl.org/) | 1.1.1b | OpenSSL is an open-source implementation of the SSL and TLS protocols / OpenSSL |
| [packaging](https://github.com/pypa/packaging) | 19.0 | Core utilities for Python packages / Apache 2.0 or BSD 2-Clause |
| [pandas](http://pandas.pydata.org) | 0.23.4 | High-performance, easy-to-use data structures and data analysis tools. / BSD 3-clause |
| [pandoc](http://pandoc.org/) | 2.0.0.1 | Universal markup converter (repackaged binaries). / GPL-2.0 |
| [pandocfilters](https://github.com/jgm/pandocfilters) | 1.4.2 | A python module for writing pandoc filters / BSD-3-Clause |
| [parso](https://github.com/davidhalter/parso) | 0.3.4 | A Python Parser / MIT |
| [partd](https://github.com/dask/partd) | 0.3.10 | Data structure for on-disk shuffle operations / BSD 3-Clause |
| [patchelf](http://nixos.org/patchelf.html) | 0.9 | A small utility to modify the dynamic linker and RPATH of ELF executables. / GPL 3 |
| [path.py](https://github.com/jaraco/path.py) | 11.5.0 | A module wrapper for os.path / MIT |
| [pathlib2](https://github.com/mcmtroffaes/pathlib2) | 2.3.3 | Fork of pathlib aiming to support the full stdlib Python API. / MIT |
| [patsy](https://github.com/pydata/patsy) | 0.5.1 | Describing statistical models in Python using symbolic formulas / BSD-2-Clause, PSF2 |
| [pcre](http://www.pcre.org/) | 8.43 | Regular expression pattern matching using the same syntax and semantics as Perl 5. / BSD 3-Clause |
| [pep8](http://pep8.readthedocs.org/) | 1.7.1 | Python style guide checker / MIT |
| [pexpect](http://pexpect.sourceforge.net/) | 4.6.0 | Pexpect makes Python a better tool for controlling other applications. / ISC |
| [pickleshare](https://github.com/pickleshare/pickleshare/) | 0.7.5 | Tiny ‘shelve’-like database with concurrency support / MIT |
| [pillow](https://pillow.readthedocs.io) | 5.3.0 | Pillow is the friendly PIL fork by Alex Clark and Contributors / PIL |
| [pip](https://pip.pypa.io/en/stable/) | 19.0.3 | PyPA recommended tool for installing Python packages / MIT |
| [pixman](http://www.pixman.org/) | 0.34.0 | A low-level software library for pixel manipulation. / MIT |
| [pkginfo](https://code.launchpad.net/~tseaver/pkginfo/trunk) | 1.5.0.1 | Query metadatdata from sdists / bdists / installed packages. / MIT |
| [pluggy](https://github.com/pytest-dev/pluggy) | 0.9.0 | Plugin registration and hook calling for Python / MIT |
| [ply](http://www.dabeaz.com/ply/index.html) | 3.11 | Python Lex-Yacc / BSD 3-clause |
| [prometheus\_client](https://github.com/prometheus/client_python) | 0.6.0 | Python client for the Prometheus monitoring system / Apache 2.0 |
| [prompt\_toolkit](https://github.com/jonathanslenders/python-prompt-toolkit) | 2.0.9 | Library for building powerful interactive command lines in Python / BSD 3-clause |
| [psutil](https://github.com/giampaolo/psutil) | 5.6.1 | A cross-platform process and system utilities module for Python / BSD 3-Clause |
| [ptyprocess](https://github.com/pexpect/ptyprocess) | 0.6.0 | Run a subprocess in a pseudo terminal / ISC |
| [py](https://github.com/pytest-dev/py) | 1.8.0 | library with cross-python path, ini-parsing, io, code, log facilities / MIT |
| [pycodestyle](https://pycodestyle.readthedocs.io/) | 2.5.0 | Python style guide checker / MIT |
| [pycosat](https://github.com/ContinuumIO/pycosat) | 0.6.3 | Bindings to picosat (a SAT solver) / MIT |
| [pycparser](https://github.com/eliben/pycparser) | 2.19 | Complete C99 parser in pure Python / BSD 3-clause |
| [pycrypto](http://www.pycrypto.org/) | 2.6.1 | Cryptographic modules for Python. / Public Domain |
| [pycurl](http://pycurl.sourceforge.net/) | 7.43.0.2 | A Python Interface To The cURL library / LGPL, MIT |
| [pyflakes](https://github.com/PyCQA/pyflakes) | 2.1.1 | Pyflakes analyzes programs and detects various errors. / MIT |
| [pygments](http://pygments.org/) | 2.3.1 | Generic syntax highlighting package / BSD 2-clause |
| [pylint](http://www.pylint.org/) | 2.3.1 | python code static checker / GPL |
| [pyodbc](https://github.com/mkleehammer/pyodbc) | 4.0.26 | DB API Module for ODBC / MIT |
| [pyopenssl](https://github.com/pyca/pyopenssl) | 19.0.0 | Python wrapper module around the OpenSSL library / Apache 2.0 |
| [pyparsing](http://pyparsing.wikispaces.com/) | 2.3.1 | Create and execute simple grammars / MIT |
| [pyrsistent](http://github.com/tobgu/pyrsistent/) | 0.14.11 | Persistent/Functional/Immutable data structures / MIT |
| [pysocks](https://github.com/Anorov/PySocks) | 1.6.8 | A Python SOCKS client module. See [Anorov/PySocks](https://github.com/Anorov/PySocks) for more information. / BSD 3-Clause |
| [pytables](http://www.pytables.org) | 3.4.4 | Brings together Python, HDF5 and NumPy to easily handle large amounts of data. / BSD 3-Clause |
| [pytest](https://docs.pytest.org/en/latest/) | 4.3.1 | Simple and powerful testing with Python. / MIT |
| [pytest-arraydiff](https://github.com/astrofrog/pytest-arraydiff) | 0.3 | pytest plugin to help with comparing array output from tests / BSD |
| [pytest-astropy](https://github.com/astropy/pytest-astropy) | 0.5.0 | Meta-package containing dependencies for testing Astropy / BSD |
| [pytest-doctestplus](https://github.com/astropy/pytest-doctestplus) | 0.3.0 | Pytest plugin with advanced doctest features / BSD |
| [pytest-openfiles](https://github.com/astropy/pytest-openfiles) | 0.3.1 | Pytest plugin for detecting inadvertent open file handles / BSD |
| [pytest-remotedata](https://github.com/astropy/pytest-remotedata) | 0.3.1 | Pytest plugin for controlling remote data access / BSD |
| [python](http://www.python.org/) | 3.7.3 | General purpose programming language / PSF |
| [python-dateutil](https://dateutil.readthedocs.org/) | 2.8.0 | Extensions to the standard Python datetime module. / BSD 3 Clause |
| python-libarchive-c | 2.8 | |
| [pytz](http://pythonhosted.org/pytz/) | 2018.9 | World timezone definitions, modern and historical. / MIT |
| [pywavelets](https://github.com/PyWavelets/pywt) | 1.0.2 | Discrete Wavelet Transforms in Python. / MIT |
| [pyyaml](http://pyyaml.org/wiki/PyYAML) | 5.1 | YAML parser and emitter for Python / MIT |
| [pyzmq](https://github.com/zeromq/pyzmq) | 18.0.0 | Python bindings for zeromq / BSD 3-clause |
| [readline](https://cnswww.cns.cwru.edu/php/chet/readline/rltop.html) | 7.0 | library for editing command lines as they are typed in / GPL-3.0 |
| [requests](http://python-requests.org) | 2.21.0 | Python HTTP for Humans / Apache 2.0 |
| [ruamel\_yaml](https://bitbucket.org/ruamel/yaml) | 0.15.46 | A patched copy of ruamel.yaml. / MIT |
| [scikit-image](http://scikit-image.org/) | 0.14.1 | Image processing routines for SciPy. / BSD 3-Clause |
| [scikit-learn](http://scikit-learn.org/) | 0.19.1 | A set of python modules for machine learning and data mining / BSD 3-Clause |
| [scipy](http://www.scipy.org/) | 1.1.0 | Scientific Library for Python / BSD 3-Clause |
| [seaborn](https://seaborn.pydata.org) | 0.9.0 | Statistical data visualization / BSD 3-Clause |
| [send2trash](https://github.com/hsoft/send2trash) | 1.5.0 | Python library to natively send files to Trash (or Recycle bin) on all platforms. / BSD-3-Clause |
| [setuptools](https://github.com/pypa/setuptools) | 40.8.0 | Download, build, install, upgrade, and uninstall Python packages / MIT |
| [simplegeneric](http://cheeseshop.python.org/pypi/simplegeneric) | 0.8.1 | Simple generic functions (similar to Python’s own len(), pickle.dump(), etc.) / Zope Public |
| [singledispatch](http://docs.python.org/3/library/functools.html#functools.singledispatch) | 3.4.0.3 | Transforms a function into a single-dispatch generic function / MIT |
| [six](http://pypi.python.org/pypi/six/) | 1.12.0 | Python 2 and 3 compatibility utilities / MIT |
| [snappy](https://github.com/google/snappy) | 1.1.7 | A fast compressor/decompressor / BSD 3-clause |
| [snowballstemmer](https://github.com/shibukawa/snowball_py) | 1.2.1 | Snowball stemming library collection for Python / BSD-2-Clause |
| [sortedcollections](http://www.grantjenks.com/docs/sortedcollections/) | 1.1.2 | Python Sorted Collections / Apache-2.0 |
| [sortedcontainers](http://www.grantjenks.com/docs/sortedcontainers/) | 2.1.0 | Python Sorted Container Types: SortedList, SortedDict, and SortedSet / Apache 2.0 |
| [soupsieve](http://facelessuser.github.io/soupsieve) | 1.8 | A modern CSS selector implementation for BeautifulSoup / MIT |
| [sphinx](http://www.sphinx-doc.org) | 1.8.5 | Sphinx is a tool that makes it easy to create intelligent and beautiful documentation / BSD 2-clause |
| sphinxcontrib | 1.0 | Python namespace for sphinxcontrib / BSD |
| [sphinxcontrib-websupport](https://pypi.python.org/pypi/sphinxcontrib-websupport) | 1.1.0 | Sphinx API for Web Apps / BSD-2-Clause |
| [sqlalchemy](http://www.sqlalchemy.org/) | 1.3.1 | Database Abstraction Library. / MIT |
| [sqlite](http://www.sqlite.org/) | 3.27.2 | Implements a self-contained, zero-configuration, SQL database engine. / Public-Domain (`<http://www.sqlite.org/copyright.html>`) |
| [statsmodels](https://www.statsmodels.org) | 0.9.0 | Statistical computations and models for use with SciPy / BSD 3-Clause |
| [sympy](http://sympy.org) | 1.3 | Python library for symbolic mathematics / 3-clause BSD |
| [tblib](https://github.com/ionelmc/python-tblib) | 1.3.2 | Traceback serialization library. / BSD 2-Clause |
| [terminado](https://github.com/jupyter/terminado) | 0.8.1 | Terminals served by tornado websockets / BSD 2-clause |
| [testpath](https://testpath.readthedocs.io) | 0.4.2 | Testpath is a collection of utilities for Python code working with files and commands. / BSD-3-Clause |
| [tk](http://www.tcl.tk/) | 8.6.8 | A dynamic programming language with GUI support. Bundles Tcl and Tk. / Tcl/Tk |
| [toolz](http://toolz.readthedocs.org/) | 0.9.0 | A functional standard library for Python. / BSD 3-Clause |
| [tornado](http://www.tornadoweb.org/) | 6.0.2 | A Python web framework and asynchronous networking library, originally developed at FriendFeed. / Apache 2.0 |
| [tqdm](https://pypi.python.org/pypi/tqdm) | 4.31.1 | A Fast, Extensible Progress Meter / MPLv2.0, MIT |
| [traitlets](http://ipython.org/) | 4.3.2 | Configuration system for Python applications / BSD 3-clause |
| [unicodecsv](https://github.com/jdunck/python-unicodecsv) | 0.14.1 | Drop-in replacement for csv module which supports unicode strings / BSD |
| [unixodbc](http://www.unixodbc.org/) | 2.3.7 | ODBC on non MS Windows platforms / LGPL-2.1 |
| [urllib3](https://urllib3.readthedocs.io/) | 1.24.1 | HTTP library with thread-safe connection pooling, file post, and more. / MIT |
| [wcwidth](https://github.com/jquast/wcwidth) | 0.1.7 | Measures number of Terminal column cells of wide-character codes. / MIT |
| [webencodings](https://github.com/gsnedders/python-webencodings) | 0.5.1 | Character encoding aliases for legacy web content / BSD 3-Clause |
| [werkzeug](http://werkzeug.pocoo.org/) | 0.14.1 | The Python WSGI Utility Library. / BSD 3-Clause |
| [wheel](https://github.com/pypa/wheel) | 0.33.1 | A built-package format for Python. / MIT |
| [widgetsnbextension](http://ipython.org) | 3.4.2 | Interactive Widgets for Jupyter / BSD 3-clause |
| [wrapt](https://github.com/GrahamDumpleton/wrapt) | 1.11.1 | Module for decorators, wrappers and monkey patching / BSD 2-Clause |
| [xlrd](http://www.python-excel.org/) | 1.2.0 | Library for developers to extract data from Microsoft Excel (tm) spreadsheet files / BSD 3-Clause and BSD with advertising |
| [xlsxwriter](https://xlsxwriter.readthedocs.io/) | 1.1.5 | A Python module for creating Excel XLSX files / BSD 2-Clause |
| [xlwt](http://www.python-excel.org/) | 1.3.0 | Writing data and formatting information to Excel files / BSD |
| [xz](http://tukaani.org/xz/) | 5.2.4 | Data compression software with high compression ratio / LGPL-2.1 and GPL-2.0 |
| [yaml](http://pyyaml.org/wiki/LibYAML) | 0.1.7 | A C library for parsing and emitting YAML. / MIT |
| [zeromq](http://zeromq.org) | 4.2.5 | A high-performance asynchronous messaging library. / LGPL 3 |
| [zict](http://github.com/mrocklin/zict) | 0.1.4 | Composable Dictionary Classes / BSD 3-Clause |
| [zipp](https://github.com/jaraco/zipp) | 0.3.3 | A pathlib-compatible Zipfile object wrapper / MIT |
| [zlib](http://zlib.net/) | 1.2.11 | Massively spiffy yet delicately unobtrusive compression library / zlib |
| [zstd](http://www.zstd.net) | 1.3.7 | Zstandard - Fast real-time compression algorithm / BSD 3-Clause |
| Name | Version | Summary / License |
|---|---|---|
| [alabaster](http://www.sphinx-doc.org/en/stable/index.html) | 0.7.12 | Configurable, Python 2+3 compatible Sphinx theme. / BSD 3-Clause |
| [anaconda-client](http://anaconda.org) | 1.7.2 | anaconda.org command line client library / BSD 3-clause |
| [anaconda-project](https://github.com/Anaconda-Platform/anaconda-project) | 0.8.2 | Tool for encapsulating, running, and reproducing data science projects / BSD 3-Clause |
| [asn1crypto](https://github.com/wbond/asn1crypto) | 0.24.0 | Python ASN.1 library with a focus on performance and a pythonic API / MIT |
| [astroid](https://www.astroid.org/) | 2.2.5 | A abstract syntax tree for Python with inference support. / LGPL 2.1 |
| [astropy](http://www.astropy.org/) | 3.1.2 | Community-developed Python Library for Astronomy / BSD |
| [atomicwrites](https://github.com/untitaker/python-atomicwrites) | 1.3.0 | Atomic file writes / MIT |
| [attrs](https://attrs.readthedocs.io/en/stable/) | 19.1.0 | attrs is the Python package that will bring back the joy of writing classes by relieving you from the drudgery of implementing object protocols (aka dunder methods). / MIT |
| [babel](http://babel.pocoo.org/) | 2.6.0 | Utilities to internationalize and localize Python applications / BSD 3-clause |
| [backcall](https://github.com/takluyver/backcall/) | 0.1.0 | Specifications for callback functions passed in to an API / BSD-3-Clause |
| [backports](https://bitbucket.org/brandon/backports) | 1.0 | / BSD |
| [backports.os](https://github.com/pjdelport/backports.os) | 0.1.1 | Backport of new features in Python’s os module / Python Software Foundation |
| [backports.shutil\_get\_terminal\_size](https://github.com/chrippa/backports.shutil_get_terminal_size) | 1.0.0 | A backport of the get\_terminal\_size function from Python 3.3’s shutil. / MIT |
| [beautifulsoup4](http://www.crummy.com/software/BeautifulSoup/) | 4.7.1 | Python library designed for screen-scraping / MIT |
| [bitarray](https://github.com/ilanschnell/bitarray) | 0.8.3 | efficient arrays of booleans – C extension / PSF |
| [bkcharts](http://github.com/bokeh/bkcharts) | 0.2 | High level chart types built on top of Bokeh / BSD 3-Clause |
| blas | 1.0 | |
| [bleach](https://github.com/mozilla/bleach) | 3.1.0 | Easy, whitelist-based HTML-sanitizing tool / Apache-2.0 |
| [blosc](https://github.com/Blosc/c-blosc) | 1.15.0 | A blocking, shuffling and loss-less compression library that can be faster than memcpy() / BSD 3-Clause |
| [bokeh](http://bokeh.pydata.org/) | 1.0.4 | Statistical and novel interactive HTML plots for Python / BSD 3-Clause |
| [boto](https://github.com/boto/boto/) | 2.49.0 | Amazon Web Services Library / MIT |
| [bottleneck](http://berkeleyanalytics.com/bottleneck) | 1.2.1 | Fast NumPy array functions written in Cython. / BSD 2-Clause |
| [bzip2](http://www.bzip.org/) | 1.0.6 | high-quality data compressor / bzip2 |
| [ca-certificates](https://github.com/conda-forge/ca-certificates-feedstock) | 2019.1.23 | Certificates for use with other packages. / ISC |
| [cairo](http://cairographics.org/) | 1.14.12 | Cairo is a 2D graphics library with support for multiple output devices. / LGPL 2.1 or MPL 1.1 |
| [certifi](http://certifi.io/) | 2019.3.9 | Python package for providing Mozilla’s CA Bundle. / ISC |
| [cffi](https://bitbucket.org/cffi/cffi) | 1.12.2 | Foreign Function Interface for Python calling C code. / MIT |
| [chardet](https://github.com/chardet/chardet) | 3.0.4 | Universal character encoding detector / LGPL2 |
| [click](https://palletsprojects.com/p/click) | 7.0 | Python composable command line interface toolkit / BSD-3-Clause |
| [cloudpickle](https://github.com/cloudpipe/cloudpickle) | 0.8.0 | Extended pickling support for Python objects / BSD 3-Clause |
| [clyent](https://github.com/Anaconda-Platform/clyent) | 1.2.2 | Command line client library for windows and posix / BSD 3-Clause |
| [colorama](https://github.com/tartley/colorama) | 0.4.1 | Cross-platform colored terminal text / BSD-3-Clause |
| [conda](https://conda.io) | 4.6.11 | OS-agnostic, system-level binary package and environment manager. / BSD 3-Clause |
| [conda-build](https://github.com/conda/conda-build) | 3.17.8 | tools for building conda packages / BSD 3-Clause |
| [conda-env](https://github.com/conda/conda-env) | 2.6.0 | Tools for interacting with conda environments. / BSD 3-Clause |
| [contextlib2](http://contextlib2.readthedocs.org) | 0.5.5 | Backports and enhancements for the contextlib module / PSF |
| [cryptography](https://github.com/pyca/cryptography) | 2.6.1 | Provides cryptographic recipes and primitives to Python developers / Apache 2.0 or BSD 3-Clause, PSF 2 |
| [curl](http://curl.haxx.se/) | 7.64.0 | tool and library for transferring data with URL syntax / MIT/X derivate (`<http://curl.haxx.se/docs/copyright.html>`) |
| [cycler](http://matplotlib.org/cycler) | 0.10.0 | Composable style cycles. / BSD 3-Clause |
| [cython](http://www.cython.org/) | 0.29.6 | The Cython compiler for writing C extensions for the Python language / Apache-2.0 |
| [cytoolz](https://github.com/pytoolz/cytoolz) | 0.9.0.1 | Cython implementation of Toolz. High performance functional utilities. / BSD 3-Clause |
| [dask](http://github.com/dask/dask/) | 1.1.4 | Parallel Python with task scheduling / BSD 3-Clause |
| [dask-core](http://github.com/dask/dask/) | 1.1.4 | Parallel Python with task scheduling / BSD 3-Clause |
| [dbus](http://www.freedesktop.org/wiki/Software/dbus/) | 1.13.6 | Simple message bus system for applications to talk to one another / GPL2 |
| [decorator](https://github.com/micheles/decorator) | 4.4.0 | Better living through Python with decorators. / BSD 3-Clause |
| [defusedxml](https://bitbucket.org/tiran/defusedxml) | 0.5.0 | XML bomb protection for Python stdlib modules / PSF 2.0 |
| [distributed](http://distributed.readthedocs.io/en/latest/) | 1.26.0 | Distributed computing with Dask / BSD 3-Clause |
| [docutils](http://docutils.sourceforge.net/) | 0.14 | Docutils – Python Documentation Utilities / Public Domain Dedictation and BSD 2-Clause and PSF 2.1.1 and GPL 3.0 |
| [entrypoints](https://github.com/takluyver/entrypoints) | 0.3 | Discover and load entry points from installed packages. / MIT License |
| [et\_xmlfile](https://bitbucket.org/openpyxl/et_xmlfile) | 1.0.1 | An implementation of lxml.xmlfile for the standard library / MIT |
| [expat](http://expat.sourceforge.net/) | 2.2.6 | Expat XML parser library in C. / MIT |
| [fastcache](https://github.com/pbrady/fastcache) | 1.0.2 | C implementation of Python 3 lru\_cache / MIT |
| [filelock](https://github.com/benediktschmitt/py-filelock) | 3.0.10 | A platform independent file lock. / Public Domain |
| [flask](http://flask.pocoo.org) | 1.0.2 | A microframework based on Werkzeug, Jinja2 and good intentions. / BSD 3-Clause |
| [fontconfig](http://www.freedesktop.org/wiki/Software/fontconfig/) | 2.13.0 | A library for configuring and customizing font access. / MIT |
| [freetype](https://www.freetype.org/) | 2.9.1 | A Free, High-Quality, and Portable Font Engine / GPL-2.0 and FreeType |
| [fribidi](https://github.com/fribidi/fribidi) | 1.0.5 | The Free Implementation of the Unicode Bidirectional Algorithm. / LGPL-2.1 |
| [get\_terminal\_size](https://github.com/chrippa/backports.shutil_get_terminal_size) | 1.0.0 | Get the size of the terminal window. / MIT |
| [gevent](http://www.gevent.org/) | 1.4.0 | Coroutine-based network library / MIT |
| [glib](https://developer.gnome.org/glib/) | 2.56.2 | Provides core application building blocks for libraries and applications written in C. / LGPL-2.1 |
| [glob2](https://github.com/miracle2k/python-glob2) | 0.6 | Version of the glob module that supports recursion via \*\*, and can capture patterns. / BSD-2-Clause |
| [gmp](http://gmplib.org/) | 6.1.2 | The GNU multiprecision library. / GPL 2 and LGPL 3 |
| [gmpy2](https://pypi.python.org/pypi/gmpy2) | 2.0.8 | GMP/MPIR, MPFR, and MPC interface to Python 2.6+ and 3.x / LGPL 3 |
| [graphite2](http://graphite.sil.org/) | 1.3.13 | A “smart font” system that handles the complexities of lesser-known languages of the world. / LGPLv2 |
| [greenlet](https://github.com/python-greenlet/greenlet) | 0.4.15 | Lightweight in-process concurrent programming / MIT |
| [gst-plugins-base](http://gstreamer.freedesktop.org/) | 1.14.0 | GStreamer Base Plug-ins / GPL2 |
| [gstreamer](http://gstreamer.freedesktop.org/) | 1.14.0 | Library for constructing graphs of media-handling components / LGPL 2 |
| [h5py](http://www.h5py.org/) | 2.9.0 | Read and write HDF5 files from Python. / BSD-3-Clause |
| [harfbuzz](http://www.freedesktop.org/wiki/Software/HarfBuzz/) | 1.8.8 | An OpenType text shaping engine. / MIT |
| [hdf5](http://www.hdfgroup.org/HDF5/) | 1.10.4 | HDF5 is a data model, library, and file format for storing and managing data / HDF5 |
| [heapdict](http://stutzbachenterprises.com/) | 1.0.0 | A heap with decrease-key and increase-key operations / BSD 3-Clause |
| [html5lib](https://github.com/html5lib/html5lib-python) | 1.0.1 | HTML parser based on the WHATWG HTML specification / MIT |
| [icu](http://site.icu-project.org/) | 58.2 | International Components for Unicode. / MIT |
| [idna](https://github.com/kjd/idna) | 2.8 | Internationalized Domain Names in Applications (IDNA). / BSD Like |
| [imageio](http://imageio.github.io) | 2.5.0 | a Python library for reading and writing image data / BSD 2-Clause |
| [imagesize](https://github.com/shibukawa/imagesize_py) | 1.1.0 | Getting image size from png/jpeg/jpeg2000/gif file / MIT |
| [importlib\_metadata](http://importlib-metadata.readthedocs.io) | 0.8 | A library to access the metadata for a Python package / APACHE-2.0 |
| [intel-openmp](https://software.intel.com/en-us/node/522690) | 2019.3 | Math library for Intel and compatible processors / proprietary - Intel |
| [ipykernel](https://ipython.org) | 5.1.0 | IPython Kernel for Jupyter / BSD-3-Clause |
| [ipython](https://ipython.org/) | 7.4.0 | IPython: Productive Interactive Computing / BSD-3-Clause |
| [ipython\_genutils](http://ipython.org) | 0.2.0 | vestigial utilities from IPython / BSD 3-Clause |
| [ipywidgets](https://github.com/ipython/ipywidgets) | 7.4.2 | Jupyter Interactive Widgets / BSD 3-clause |
| [isort](https://github.com/timothycrosley/isort) | 4.3.16 | A Python utility / library to sort Python imports. / MIT |
| [itsdangerous](https://github.com/pallets/itsdangerous) | 1.1.0 | Various helpers to pass trusted data to untrusted environments. / BSD 3-Clause |
| [jbig](https://www.cl.cam.ac.uk/~mgk25/jbigkit) | 2.1 | Implementation of the JBIG1 data compression standard / GPL-2.0 |
| [jdcal](https://github.com/phn/jdcal) | 1.4 | Julian dates from proleptic Gregorian and Julian calendars. / BSD 2-Clause |
| [jedi](https://github.com/davidhalter/jedi/) | 0.13.3 | An autocompletion tool for Python that can be used for text editors. / MIT |
| [jeepney](https://gitlab.com/takluyver/jeepney) | 0.4 | Pure Python DBus interface / MIT |
| [jinja2](http://jinja.pocoo.org) | 2.10 | An easy to use stand-alone template engine written in pure python. / 3-Clause BSD |
| [jpeg](http://www.ijg.org/) | 9b | read/write jpeg COM, EXIF, IPTC medata / Custom free software license |
| [jsonschema](https://github.com/Julian/jsonschema) | 3.0.1 | An implementation of JSON Schema validation for Python / MIT |
| [jupyter](http://jupyter.org) | 1.0.0 | Jupyter metapackage. Install all the Jupyter components in one go. / BSD 3-Clause |
| [jupyter\_client](http://jupyter.org) | 5.2.4 | Jupyter protocol implementation and client libraries / BSD 3-clause |
| [jupyter\_console](http://jupyter.org) | 6.0.0 | Jupyter terminal console / BSD-3-Clause |
| [jupyter\_core](http://jupyter.org) | 4.4.0 | Core common functionality of Jupyter projects. / BSD 3-clause |
| [jupyterlab](https://github.com/jupyterlab/jupyterlab) | 0.35.4 | JupyterLab PRE-ALPHA / BSD-3-Clause |
| [jupyterlab\_server](http://github.com/jupyterlab/jupyterlab_server) | 0.2.0 | A set of server components for JupyterLab and JupyterLab like applications. / BSD 3-Clause |
| [keyring](https://github.com/jaraco/keyring) | 18.0.0 | Store and access your passwords safely / Python Software Foundation or MIT |
| [kiwisolver](https://github.com/nucleic/kiwi) | 1.0.1 | A fast implementation of the Cassowary constraint solver / BSD 3-Clause |
| [krb5](http://web.mit.edu/kerberos/) | 1.16.1 | A network authentication protocol. / MIT |
| [lazy-object-proxy](https://github.com/ionelmc/python-lazy-object-proxy) | 1.3.1 | A fast and thorough lazy object proxy. / BSD 2-Clause |
| [libarchive](http://www.libarchive.org/) | 3.3.3 | Multi-format archive and compression library / BSD 2-Clause |
| [libcurl](http://curl.haxx.se/) | 7.64.0 | tool and library for transferring data with URL syntax / MIT/X derivate (`<http://curl.haxx.se/docs/copyright.html>`) |
| [libedit](http://thrysoee.dk/editline/) | 3.1.20181209 | Editline Library (libedit) / NetBSD |
| [libffi](https://sourceware.org/libffi/) | 3.2.1 | A Portable Foreign Function Interface Library. / Custom |
| [libgcc-ng](https://gcc.gnu.org/onlinedocs/gccint/Libgcc.html) | 8.2.0 | The GCC low-level runtime library / GPL |
| [libgfortran-ng](https://gcc.gnu.org/) | 7.3.0 | The GNU Fortran Runtime Library / GPL |
| [liblief](https://lief.quarkslab.com/) | 0.9.0 | A cross platform library to parse, modify and abstract ELF, PE and MachO formats. / Apache 2.0 |
| [libpng](http://www.libpng.org/pub/png/libpng.html) | 1.6.36 | PNG reference library. / zlib/libpng |
| [libsodium](http://libsodium.org) | 1.0.16 | A modern and easy-to-use crypto library. / ISC |
| [libssh2](https://www.libssh2.org/) | 1.8.0 | the SSH library / BSD 3-Clause |
| [libstdcxx-ng](https://gcc.gnu.org/) | 8.2.0 | The GNU C++ Runtime Library / GPL3 with runtime exception |
| [libtiff](http://www.libtiff.org/) | 4.0.10 | Support for the Tag Image File Format (TIFF). / HPND |
| [libtool](http://www.gnu.org/software/libtool/) | 2.4.6 | The GNU Portable Library Tool / GPL 3 |
| [libuuid](http://sourceforge.net/projects/libuuid/) | 1.0.3 | Portable uuid C library. / BSD 3-Clause |
| [libxcb](http://xcb.freedesktop.org/) | 1.13 | This is the C-language Binding (XCB) package to the X Window System protocol / MIT |
| [libxml2](http://xmlsoft.org/) | 2.9.9 | The XML C parser and toolkit of Gnome / MIT |
| [libxslt](http://xmlsoft.org/XSLT/) | 1.1.33 | The XSLT C library developed for the GNOME project / MIT |
| [llvmlite](https://github.com/numba/llvmlite) | 0.28.0 | A lightweight LLVM python binding for writing JIT compilers / New BSD License |
| [locket](https://github.com/mwilliamson/locket.py) | 0.2.0 | File-based locks for Python for Linux and Windows / BSD 2-Clause |
| [lxml](http://lxml.de/) | 4.3.2 | Pythonic binding for the C libraries libxml2 and libxslt. / BSD 3-Clause, GPL-2.0, ZPL-2.0, and ElementTree |
| [lz4-c](https://www.lz4.org) | 1.8.1.2 | Extremely Fast Compression algorithm / BSD 2-clause |
| [lzo](http://www.oberhumer.com/opensource/lzo/) | 2.10 | LZO is a portable lossless data compression library written in ANSI C. / GPL v2+ |
| [markupsafe](https://www.palletsprojects.com/p/markupsafe) | 1.1.1 | A Python module that implements the jinja2.Markup string / BSD-3-Clause |
| [matplotlib](http://matplotlib.org/) | 3.0.3 | Publication quality figures in Python / PSF-based |
| [mccabe](https://github.com/PyCQA/mccabe) | 0.6.1 | McCabe complexity checker for Python / MIT |
| [mistune](https://github.com/lepture/mistune) | 0.8.4 | The fastest markdown parser in pure Python. / BSD 3-Clause |
| [mkl](https://software.intel.com/en-us/mkl) | 2019.3 | Math library for Intel and compatible processors / proprietary - Intel |
| [mkl-service](https://github.com/ContinuumIO/mkl-service) | 1.1.2 | Python bindings to MKL service functions / 3-clause BSD |
| [mkl\_fft](http://github.com/IntelPython/mkl_fft) | 1.0.10 | NumPy-based implementation of Fast Fourier Transform using Intel (R) Math Kernel Library. / BSD 3-Clause |
| [mkl\_random](http://github.com/IntelPython/mkl_random) | 1.0.2 | Intel (R) MKL-powered package for sampling from common probability distributions into NumPy arrays. / BSD 3-Clause |
| [more-itertools](https://github.com/erikrose/more-itertools) | 6.0.0 | More routines for operating on iterables, beyond itertools / MIT |
| [mpc](http://www.multiprecision.org/) | 1.1.0 | A C library for the arithmetic of complex numbers with arbitrarily high precision. / LGPL 3 |
| [mpfr](http://www.mpfr.org/) | 4.0.1 | The MPFR library is a C library for multiple-precision floating-point computations with correct rounding. / LGPL 3 |
| [mpmath](http://mpmath.org) | 1.1.0 | Python library for arbitrary-precision floating-point arithmetic / BSD 3-Clause |
| [msgpack-python](http://msgpack.org/) | 0.6.1 | MessagePack (de)serializer. / Apache 2.0 |
| [multipledispatch](https://github.com/mrocklin/multipledispatch/) | 0.6.0 | Multiple dispatch in Python / BSD 3-Clause |
| [nbconvert](http://jupyter.org) | 5.4.1 | Converting Jupyter Notebooks / BSD-3-Clause |
| [nbformat](http://jupyter.org) | 4.4.0 | The reference implementation of the Jupyter Notebook format / BSD 3-clause |
| [ncurses](http://www.gnu.org/software/ncurses/) | 6.1 | Library for text-based user interfaces / Free software (MIT-like) |
| [networkx](https://networkx.github.io/) | 2.2 | Python package for creating and manipulating complex networks / BSD 3-Clause |
| [nltk](http://nltk.org/) | 3.4 | Build Python programs to work with human language data / Apache 2.0 |
| [nose](http://readthedocs.org/docs/nose/) | 1.3.7 | Nose extends unittest to make testing easier / LGPL-2.1 |
| [notebook](http://jupyter.org) | 5.7.8 | Jupyter Notebook / BSD 3-clause |
| [numba](http://numba.github.com) | 0.43.1 | NumPy aware dynamic Python compiler using LLVM / BSD 2-clause |
| [numexpr](https://github.com/pydata/numexpr) | 2.6.9 | Fast numerical expression evaluator for NumPy. / MIT |
| [numpy](http://numpy.scipy.org/) | 1.16.2 | Array processing for numbers, strings, records, and objects. / BSD 3-Clause |
| numpy-base | 1.16.2 | |
| [numpydoc](https://github.com/numpy/numpydoc) | 0.8.0 | Sphinx extension to support docstrings in Numpy format / BSD 3-Clause |
| [olefile](http://www.decalage.info/python/olefileio) | 0.46 | parse, read and write Microsoft OLE2 files / BSD 2-Clause |
| [openpyxl](https://openpyxl.readthedocs.io) | 2.6.1 | A Python library to read/write Excel 2010 xlsx/xlsm files / MIT |
| [openssl](http://www.openssl.org/) | 1.1.1b | OpenSSL is an open-source implementation of the SSL and TLS protocols / OpenSSL |
| [packaging](https://github.com/pypa/packaging) | 19.0 | Core utilities for Python packages / Apache 2.0 or BSD 2-Clause |
| [pandas](http://pandas.pydata.org) | 0.24.2 | High-performance, easy-to-use data structures and data analysis tools. / BSD 3-clause |
| [pandoc](http://pandoc.org/) | 2.2.3.2 | Universal markup converter (repackaged binaries). / GPL-2.0 |
| [pandocfilters](https://github.com/jgm/pandocfilters) | 1.4.2 | A python module for writing pandoc filters / BSD-3-Clause |
| [pango](http://www.pango.org/) | 1.42.4 | Text layout and rendering engine. / LGPL-2.1 |
| [parso](https://github.com/davidhalter/parso) | 0.3.4 | A Python Parser / MIT |
| [partd](https://github.com/dask/partd) | 0.3.10 | Data structure for on-disk shuffle operations / BSD 3-Clause |
| [patchelf](http://nixos.org/patchelf.html) | 0.9 | A small utility to modify the dynamic linker and RPATH of ELF executables. / GPL 3 |
| [path.py](https://github.com/jaraco/path.py) | 11.5.0 | A module wrapper for os.path / MIT |
| [pathlib2](https://github.com/mcmtroffaes/pathlib2) | 2.3.3 | Fork of pathlib aiming to support the full stdlib Python API. / MIT |
| [patsy](https://github.com/pydata/patsy) | 0.5.1 | Describing statistical models in Python using symbolic formulas / BSD-2-Clause, PSF2 |
| [pcre](http://www.pcre.org/) | 8.43 | Regular expression pattern matching using the same syntax and semantics as Perl 5. / BSD 3-Clause |
| [pep8](http://pep8.readthedocs.org/) | 1.7.1 | Python style guide checker / MIT |
| [pexpect](http://pexpect.sourceforge.net/) | 4.6.0 | Pexpect makes Python a better tool for controlling other applications. / ISC |
| [pickleshare](https://github.com/pickleshare/pickleshare/) | 0.7.5 | Tiny ‘shelve’-like database with concurrency support / MIT |
| [pillow](https://pillow.readthedocs.io) | 5.4.1 | Pillow is the friendly PIL fork by Alex Clark and Contributors / PIL |
| [pip](https://pip.pypa.io/en/stable/) | 19.0.3 | PyPA recommended tool for installing Python packages / MIT |
| [pixman](http://www.pixman.org/) | 0.38.0 | A low-level software library for pixel manipulation. / MIT |
| [pkginfo](https://code.launchpad.net/~tseaver/pkginfo/trunk) | 1.5.0.1 | Query metadatdata from sdists / bdists / installed packages. / MIT |
| [pluggy](https://github.com/pytest-dev/pluggy) | 0.9.0 | Plugin registration and hook calling for Python / MIT |
| [ply](http://www.dabeaz.com/ply/index.html) | 3.11 | Python Lex-Yacc / BSD 3-clause |
| [prometheus\_client](https://github.com/prometheus/client_python) | 0.6.0 | Python client for the Prometheus monitoring system / Apache 2.0 |
| [prompt\_toolkit](https://github.com/jonathanslenders/python-prompt-toolkit) | 2.0.9 | Library for building powerful interactive command lines in Python / BSD 3-clause |
| [psutil](https://github.com/giampaolo/psutil) | 5.6.1 | A cross-platform process and system utilities module for Python / BSD 3-Clause |
| [ptyprocess](https://github.com/pexpect/ptyprocess) | 0.6.0 | Run a subprocess in a pseudo terminal / ISC |
| [py](https://github.com/pytest-dev/py) | 1.8.0 | library with cross-python path, ini-parsing, io, code, log facilities / MIT |
| [py-lief](https://lief.quarkslab.com/) | 0.9.0 | A cross platform library to parse, modify and abstract ELF, PE and MachO formats. / Apache 2.0 |
| [pycodestyle](https://pycodestyle.readthedocs.io/) | 2.5.0 | Python style guide checker / MIT |
| [pycosat](https://github.com/ContinuumIO/pycosat) | 0.6.3 | Bindings to picosat (a SAT solver) / MIT |
| [pycparser](https://github.com/eliben/pycparser) | 2.19 | Complete C99 parser in pure Python / BSD 3-clause |
| [pycrypto](http://www.pycrypto.org/) | 2.6.1 | Cryptographic modules for Python. / Public Domain |
| [pycurl](http://pycurl.sourceforge.net/) | 7.43.0.2 | A Python Interface To The cURL library / LGPL, MIT |
| [pyflakes](https://github.com/PyCQA/pyflakes) | 2.1.1 | Pyflakes analyzes programs and detects various errors. / MIT |
| [pygments](http://pygments.org/) | 2.3.1 | Generic syntax highlighting package / BSD 2-clause |
| [pylint](http://www.pylint.org/) | 2.3.1 | python code static checker / GPL |
| [pyodbc](https://github.com/mkleehammer/pyodbc) | 4.0.26 | DB API Module for ODBC / MIT |
| [pyopenssl](https://github.com/pyca/pyopenssl) | 19.0.0 | Python wrapper module around the OpenSSL library / Apache 2.0 |
| [pyparsing](http://pyparsing.wikispaces.com/) | 2.3.1 | Create and execute simple grammars / MIT |
| [pyqt](http://www.riverbankcomputing.co.uk/software/pyqt) | 5.9.2 | Python binding of the cross-platform GUI toolkit Qt. / Commercial, GPL-2.0, GPL-3.0 |
| [pyrsistent](http://github.com/tobgu/pyrsistent/) | 0.14.11 | Persistent/Functional/Immutable data structures / MIT |
| [pysocks](https://github.com/Anorov/PySocks) | 1.6.8 | A Python SOCKS client module. See [Anorov/PySocks](https://github.com/Anorov/PySocks) for more information. / BSD 3-Clause |
| [pytables](http://www.pytables.org) | 3.5.1 | Brings together Python, HDF5 and NumPy to easily handle large amounts of data. / BSD 3-Clause |
| [pytest](https://docs.pytest.org/en/latest/) | 4.3.1 | Simple and powerful testing with Python. / MIT |
| [pytest-arraydiff](https://github.com/astrofrog/pytest-arraydiff) | 0.3 | pytest plugin to help with comparing array output from tests / BSD |
| [pytest-astropy](https://github.com/astropy/pytest-astropy) | 0.5.0 | Meta-package containing dependencies for testing Astropy / BSD |
| [pytest-doctestplus](https://github.com/astropy/pytest-doctestplus) | 0.3.0 | Pytest plugin with advanced doctest features / BSD |
| [pytest-openfiles](https://github.com/astropy/pytest-openfiles) | 0.3.2 | Pytest plugin for detecting inadvertent open file handles / BSD |
| [pytest-remotedata](https://github.com/astropy/pytest-remotedata) | 0.3.1 | Pytest plugin for controlling remote data access / BSD |
| [python](http://www.python.org/) | 3.7.3 | General purpose programming language / PSF |
| [python-dateutil](https://dateutil.readthedocs.org/) | 2.8.0 | Extensions to the standard Python datetime module. / BSD 3 Clause |
| python-libarchive-c | 2.8 | |
| [pytz](http://pythonhosted.org/pytz/) | 2018.9 | World timezone definitions, modern and historical. / MIT |
| [pywavelets](https://github.com/PyWavelets/pywt) | 1.0.2 | Discrete Wavelet Transforms in Python. / MIT |
| [pyyaml](http://pyyaml.org/wiki/PyYAML) | 5.1 | YAML parser and emitter for Python / MIT |
| [pyzmq](https://github.com/zeromq/pyzmq) | 18.0.0 | Python bindings for zeromq / BSD 3-clause |
| [qt](http://qt-project.org) | 5.9.7 | Qt is a cross-platform application and UI framework. / LGPL-3.0 |
| [qtawesome](https://github.com/spyder-ide/qtawesome) | 0.5.7 | Iconic fonts in PyQt and PySide applications / MIT |
| [qtconsole](http://jupyter.org) | 4.4.3 | Jupyter Qt console / BSD 3-Clause |
| [qtpy](https://github.com/spyder-ide/qtpy) | 1.7.0 | Abstraction layer for PyQt5/PyQt4/PySide / MIT |
| [readline](https://cnswww.cns.cwru.edu/php/chet/readline/rltop.html) | 7.0 | library for editing command lines as they are typed in / GPL-3.0 |
| [requests](http://python-requests.org) | 2.21.0 | Python HTTP for Humans / Apache 2.0 |
| [rope](https://github.com/python-rope/rope) | 0.12.0 | A python refactoring library… / GPL 2.0 |
| [ruamel\_yaml](https://bitbucket.org/ruamel/yaml) | 0.15.46 | A patched copy of ruamel.yaml. / MIT |
| [scikit-image](http://scikit-image.org/) | 0.14.2 | Image processing routines for SciPy. / BSD 3-Clause |
| [scikit-learn](http://scikit-learn.org/) | 0.20.3 | A set of python modules for machine learning and data mining / BSD 3-Clause |
| [scipy](http://www.scipy.org/) | 1.2.1 | Scientific Library for Python / BSD 3-Clause |
| [seaborn](https://seaborn.pydata.org) | 0.9.0 | Statistical data visualization / BSD 3-Clause |
| [secretstorage](https://github.com/mitya57/secretstorage) | 3.1.1 | Provides a way for securely storing passwords and other secrets. / BSD-3-Clause |
| [send2trash](https://github.com/hsoft/send2trash) | 1.5.0 | Python library to natively send files to Trash (or Recycle bin) on all platforms. / BSD-3-Clause |
| [setuptools](https://github.com/pypa/setuptools) | 40.8.0 | Download, build, install, upgrade, and uninstall Python packages / MIT |
| [simplegeneric](http://cheeseshop.python.org/pypi/simplegeneric) | 0.8.1 | Simple generic functions (similar to Python’s own len(), pickle.dump(), etc.) / Zope Public |
| [singledispatch](http://docs.python.org/3/library/functools.html#functools.singledispatch) | 3.4.0.3 | Transforms a function into a single-dispatch generic function / MIT |
| [sip](http://www.riverbankcomputing.com/software/sip/intro) | 4.19.8 | Create Python bindings for C and C++ libraries / GPL-3.0 |
| [six](http://pypi.python.org/pypi/six/) | 1.12.0 | Python 2 and 3 compatibility utilities / MIT |
| [snappy](https://github.com/google/snappy) | 1.1.7 | A fast compressor/decompressor / BSD 3-clause |
| [snowballstemmer](https://github.com/shibukawa/snowball_py) | 1.2.1 | Snowball stemming library collection for Python / BSD-2-Clause |
| [sortedcollections](http://www.grantjenks.com/docs/sortedcollections/) | 1.1.2 | Python Sorted Collections / Apache-2.0 |
| [sortedcontainers](http://www.grantjenks.com/docs/sortedcontainers/) | 2.1.0 | Python Sorted Container Types: SortedList, SortedDict, and SortedSet / Apache 2.0 |
| [soupsieve](http://facelessuser.github.io/soupsieve) | 1.8 | A modern CSS selector implementation for BeautifulSoup / MIT |
| [sphinx](http://www.sphinx-doc.org) | 1.8.5 | Sphinx is a tool that makes it easy to create intelligent and beautiful documentation / BSD 2-clause |
| sphinxcontrib | 1.0 | Python namespace for sphinxcontrib / BSD |
| [sphinxcontrib-websupport](https://pypi.python.org/pypi/sphinxcontrib-websupport) | 1.1.0 | Sphinx API for Web Apps / BSD-2-Clause |
| [spyder](https://www.spyder-ide.org/) | 3.3.3 | The Scientific Python Development Environment / MIT |
| [spyder-kernels](https://github.com/spyder-ide/spyder-kernels) | 0.4.2 | Jupyter kernels for the Spyder console / MIT |
| [sqlalchemy](http://www.sqlalchemy.org/) | 1.3.1 | Database Abstraction Library. / MIT |
| [sqlite](http://www.sqlite.org/) | 3.27.2 | Implements a self-contained, zero-configuration, SQL database engine. / Public-Domain (`<http://www.sqlite.org/copyright.html>`) |
| [statsmodels](https://www.statsmodels.org) | 0.9.0 | Statistical computations and models for use with SciPy / BSD 3-Clause |
| [sympy](http://sympy.org) | 1.3 | Python library for symbolic mathematics / 3-clause BSD |
| [tblib](https://github.com/ionelmc/python-tblib) | 1.3.2 | Traceback serialization library. / BSD 2-Clause |
| [terminado](https://github.com/jupyter/terminado) | 0.8.1 | Terminals served by tornado websockets / BSD 2-clause |
| [testpath](https://testpath.readthedocs.io) | 0.4.2 | Testpath is a collection of utilities for Python code working with files and commands. / BSD-3-Clause |
| [tk](http://www.tcl.tk/) | 8.6.8 | A dynamic programming language with GUI support. Bundles Tcl and Tk. / Tcl/Tk |
| [toolz](http://toolz.readthedocs.org/) | 0.9.0 | A functional standard library for Python. / BSD 3-Clause |
| [tornado](http://www.tornadoweb.org/) | 6.0.2 | A Python web framework and asynchronous networking library, originally developed at FriendFeed. / Apache 2.0 |
| [tqdm](https://pypi.python.org/pypi/tqdm) | 4.31.1 | A Fast, Extensible Progress Meter / MPLv2.0, MIT |
| [traitlets](http://ipython.org/) | 4.3.2 | Configuration system for Python applications / BSD 3-clause |
| [unicodecsv](https://github.com/jdunck/python-unicodecsv) | 0.14.1 | Drop-in replacement for csv module which supports unicode strings / BSD |
| [unixodbc](http://www.unixodbc.org/) | 2.3.7 | ODBC on non MS Windows platforms / LGPL-2.1 |
| [urllib3](https://urllib3.readthedocs.io/) | 1.24.1 | HTTP library with thread-safe connection pooling, file post, and more. / MIT |
| [wcwidth](https://github.com/jquast/wcwidth) | 0.1.7 | Measures number of Terminal column cells of wide-character codes. / MIT |
| [webencodings](https://github.com/gsnedders/python-webencodings) | 0.5.1 | Character encoding aliases for legacy web content / BSD 3-Clause |
| [werkzeug](http://werkzeug.pocoo.org/) | 0.14.1 | The Python WSGI Utility Library. / BSD 3-Clause |
| [wheel](https://github.com/pypa/wheel) | 0.33.1 | A built-package format for Python. / MIT |
| [widgetsnbextension](http://ipython.org) | 3.4.2 | Interactive Widgets for Jupyter / BSD 3-clause |
| [wrapt](https://github.com/GrahamDumpleton/wrapt) | 1.11.1 | Module for decorators, wrappers and monkey patching / BSD 2-Clause |
| [wurlitzer](https://github.com/minrk/wurlitzer) | 1.0.2 | Capture C-level stdout/stderr in Python / MIT |
| [xlrd](http://www.python-excel.org/) | 1.2.0 | Library for developers to extract data from Microsoft Excel (tm) spreadsheet files / BSD 3-Clause and BSD with advertising |
| [xlsxwriter](https://xlsxwriter.readthedocs.io/) | 1.1.5 | A Python module for creating Excel XLSX files / BSD 2-Clause |
| [xlwt](http://www.python-excel.org/) | 1.3.0 | Writing data and formatting information to Excel files / BSD |
| [xz](http://tukaani.org/xz/) | 5.2.4 | Data compression software with high compression ratio / LGPL-2.1 and GPL-2.0 |
| [yaml](http://pyyaml.org/wiki/LibYAML) | 0.1.7 | A C library for parsing and emitting YAML. / MIT |
| [zeromq](http://zeromq.org) | 4.3.1 | A high-performance asynchronous messaging library. / LGPL 3 |
| [zict](http://github.com/mrocklin/zict) | 0.1.4 | Composable Dictionary Classes / BSD 3-Clause |
| [zipp](https://github.com/jaraco/zipp) | 0.3.3 | A pathlib-compatible Zipfile object wrapper / MIT |
| [zlib](http://zlib.net/) | 1.2.11 | Massively spiffy yet delicately unobtrusive compression library / zlib |
| [zstd](http://www.zstd.net) | 1.3.7 | Zstandard - Fast real-time compression algorithm / BSD 3-Clause |
| Name | Version | Summary / License |
|---|---|---|
| [alabaster](http://www.sphinx-doc.org/en/stable/index.html) | 0.7.12 | Configurable, Python 2+3 compatible Sphinx theme. / BSD 3-Clause |
| [anaconda-client](http://anaconda.org) | 1.7.2 | anaconda.org command line client library / BSD 3-clause |
| [anaconda-project](https://github.com/Anaconda-Platform/anaconda-project) | 0.8.2 | Tool for encapsulating, running, and reproducing data science projects / BSD 3-Clause |
| [asn1crypto](https://github.com/wbond/asn1crypto) | 0.24.0 | Python ASN.1 library with a focus on performance and a pythonic API / MIT |
| [astroid](https://www.astroid.org/) | 1.6.5 | A abstract syntax tree for Python with inference support. / LGPL 2.1 |
| [astropy](http://www.astropy.org/) | 2.0.9 | Community-developed Python Library for Astronomy / BSD |
| [atomicwrites](https://github.com/untitaker/python-atomicwrites) | 1.3.0 | Atomic file writes / MIT |
| [attrs](https://attrs.readthedocs.io/en/stable/) | 19.1.0 | attrs is the Python package that will bring back the joy of writing classes by relieving you from the drudgery of implementing object protocols (aka dunder methods). / MIT |
| [babel](http://babel.pocoo.org/) | 2.6.0 | Utilities to internationalize and localize Python applications / BSD 3-clause |
| [backports](https://bitbucket.org/brandon/backports) | 1.0 | / BSD |
| [backports.functools\_lru\_cache](https://github.com/jaraco/backports.functools_lru_cache) | 1.5 | Backport of functools.lru\_cache from Python 3.3 as published at ActiveState. / MIT |
| [backports.os](https://github.com/pjdelport/backports.os) | 0.1.1 | Backport of new features in Python’s os module / Python Software Foundation |
| [backports.shutil\_get\_terminal\_size](https://github.com/chrippa/backports.shutil_get_terminal_size) | 1.0.0 | A backport of the get\_terminal\_size function from Python 3.3’s shutil. / MIT |
| [backports.shutil\_which](https://github.com/minrk/backports.shutil_which) | 3.5.2 | Backport of shutil.which from Python 3.3 / PSF2 & MIT |
| [backports\_abc](https://github.com/cython/backports_abc) | 0.5 | A backport of recent additions to the collections.abc module. / PSF 2 |
| [beautifulsoup4](http://www.crummy.com/software/BeautifulSoup/) | 4.7.1 | Python library designed for screen-scraping / MIT |
| [bitarray](https://github.com/ilanschnell/bitarray) | 0.8.3 | efficient arrays of booleans – C extension / PSF |
| [bkcharts](http://github.com/bokeh/bkcharts) | 0.2 | High level chart types built on top of Bokeh / BSD 3-Clause |
| blas | 1.0 | |
| [bleach](https://github.com/mozilla/bleach) | 3.1.0 | Easy, whitelist-based HTML-sanitizing tool / Apache-2.0 |
| [blosc](https://github.com/Blosc/c-blosc) | 1.15.0 | A blocking, shuffling and loss-less compression library that can be faster than memcpy() / BSD 3-Clause |
| [bokeh](http://bokeh.pydata.org/) | 1.0.4 | Statistical and novel interactive HTML plots for Python / BSD 3-Clause |
| [boto](https://github.com/boto/boto/) | 2.49.0 | Amazon Web Services Library / MIT |
| [bottleneck](http://berkeleyanalytics.com/bottleneck) | 1.2.1 | Fast NumPy array functions written in Cython. / BSD 2-Clause |
| [bzip2](http://www.bzip.org/) | 1.0.6 | high-quality data compressor / bzip2 |
| [ca-certificates](https://github.com/conda-forge/ca-certificates-feedstock) | 2019.1.23 | Certificates for use with other packages. / ISC |
| [cdecimal](http://www.bytereef.org/mpdecimal/index.html) | 2.3 | Fast drop-in replacement for decimal.py / BSD 2-Clause |
| [certifi](http://certifi.io/) | 2019.3.9 | Python package for providing Mozilla’s CA Bundle. / ISC |
| [cffi](https://bitbucket.org/cffi/cffi) | 1.12.2 | Foreign Function Interface for Python calling C code. / MIT |
| [chardet](https://github.com/chardet/chardet) | 3.0.4 | Universal character encoding detector / LGPL2 |
| [click](https://palletsprojects.com/p/click) | 7.0 | Python composable command line interface toolkit / BSD-3-Clause |
| [cloudpickle](https://github.com/cloudpipe/cloudpickle) | 0.8.0 | Extended pickling support for Python objects / BSD 3-Clause |
| [clyent](https://github.com/Anaconda-Platform/clyent) | 1.2.2 | Command line client library for windows and posix / BSD 3-Clause |
| [colorama](https://github.com/tartley/colorama) | 0.4.1 | Cross-platform colored terminal text / BSD-3-Clause |
| [comtypes](http://starship.python.net/crew/theller/comtypes/) | 1.1.7 | pure Python COM package / MIT |
| [conda](https://conda.io) | 4.6.11 | OS-agnostic, system-level binary package and environment manager. / BSD 3-Clause |
| [conda-build](https://github.com/conda/conda-build) | 3.17.8 | tools for building conda packages / BSD 3-Clause |
| [conda-env](https://github.com/conda/conda-env) | 2.6.0 | Tools for interacting with conda environments. / BSD 3-Clause |
| [configparser](http://docs.python.org/3/library/configparser.html) | 3.7.3 | This library brings the updated configparser from Python 3.5 to Python 2.6-3.5 / MIT |
| console\_shortcut | 0.1.1 | Console shortcut creator for Windows (using menuinst) / BSD |
| [contextlib2](http://contextlib2.readthedocs.org) | 0.5.5 | Backports and enhancements for the contextlib module / PSF |
| [cryptography](https://github.com/pyca/cryptography) | 2.4.2 | Provides cryptographic recipes and primitives to Python developers / Apache 2.0 or BSD 3-Clause, PSF 2 |
| [curl](http://curl.haxx.se/) | 7.64.0 | tool and library for transferring data with URL syntax / MIT/X derivate (`<http://curl.haxx.se/docs/copyright.html>`) |
| [cycler](http://matplotlib.org/cycler) | 0.10.0 | Composable style cycles. / BSD 3-Clause |
| [cython](http://www.cython.org/) | 0.29.6 | The Cython compiler for writing C extensions for the Python language / Apache-2.0 |
| [cytoolz](https://github.com/pytoolz/cytoolz) | 0.9.0.1 | Cython implementation of Toolz. High performance functional utilities. / BSD 3-Clause |
| [dask](http://github.com/dask/dask/) | 1.1.4 | Parallel Python with task scheduling / BSD 3-Clause |
| [dask-core](http://github.com/dask/dask/) | 1.1.4 | Parallel Python with task scheduling / BSD 3-Clause |
| [decorator](https://github.com/micheles/decorator) | 4.4.0 | Better living through Python with decorators. / BSD 3-Clause |
| [defusedxml](https://bitbucket.org/tiran/defusedxml) | 0.5.0 | XML bomb protection for Python stdlib modules / PSF 2.0 |
| [distributed](http://distributed.readthedocs.io/en/latest/) | 1.26.0 | Distributed computing with Dask / BSD 3-Clause |
| [docutils](http://docutils.sourceforge.net/) | 0.14 | Docutils – Python Documentation Utilities / Public Domain Dedictation and BSD 2-Clause and PSF 2.1.1 and GPL 3.0 |
| [entrypoints](https://github.com/takluyver/entrypoints) | 0.3 | Discover and load entry points from installed packages. / MIT License |
| [enum34](https://bitbucket.org/stoneleaf/enum34) | 1.1.6 | Python 3.4 Enum backported to 3.3, 3.2, 3.1, 2.7, 2.6, 2.5, and 2.4 / BSD 3-Clause |
| [et\_xmlfile](https://bitbucket.org/openpyxl/et_xmlfile) | 1.0.1 | An implementation of lxml.xmlfile for the standard library / MIT |
| [fastcache](https://github.com/pbrady/fastcache) | 1.0.2 | C implementation of Python 3 lru\_cache / MIT |
| [filelock](https://github.com/benediktschmitt/py-filelock) | 3.0.10 | A platform independent file lock. / Public Domain |
| [flask](http://flask.pocoo.org) | 1.0.2 | A microframework based on Werkzeug, Jinja2 and good intentions. / BSD 3-Clause |
| [freetype](https://www.freetype.org/) | 2.9.1 | A Free, High-Quality, and Portable Font Engine / GPL-2.0 and FreeType |
| [funcsigs](http://funcsigs.readthedocs.org) | 1.0.2 | Python function signatures from PEP362 for Python 2.6, 2.7 and 3.2+. / Apache 2.0 |
| [functools32](https://github.com/MiCHiLU/python-functools32) | 3.2.3.2 | Backport of the functools module from Python 3.2.3 for use on 2.7 and PyPy. / PSF license |
| [future](http://python-future.org) | 0.17.1 | Clean single-source support for Python 3 and 2 / MIT |
| [futures](https://github.com/agronholm/pythonfutures) | 3.2.0 | Backport of the concurrent.futures package from Python 3.2 / PSF |
| [get\_terminal\_size](https://github.com/chrippa/backports.shutil_get_terminal_size) | 1.0.0 | Get the size of the terminal window. / MIT |
| [gevent](http://www.gevent.org/) | 1.4.0 | Coroutine-based network library / MIT |
| [glob2](https://github.com/miracle2k/python-glob2) | 0.6 | Version of the glob module that supports recursion via \*\*, and can capture patterns. / BSD-2-Clause |
| [greenlet](https://github.com/python-greenlet/greenlet) | 0.4.15 | Lightweight in-process concurrent programming / MIT |
| [grin](http://pypi.python.org/pypi/grin) | 1.2.1 | Enhanced grep-like tool / BSD 3-Clause |
| [h5py](http://www.h5py.org/) | 2.9.0 | Read and write HDF5 files from Python. / BSD-3-Clause |
| [hdf5](http://www.hdfgroup.org/HDF5/) | 1.10.4 | HDF5 is a data model, library, and file format for storing and managing data / HDF5 |
| [heapdict](http://stutzbachenterprises.com/) | 1.0.0 | A heap with decrease-key and increase-key operations / BSD 3-Clause |
| [html5lib](https://github.com/html5lib/html5lib-python) | 1.0.1 | HTML parser based on the WHATWG HTML specification / MIT |
| [icc\_rt](https://software.intel.com/en-us/node/522690) | 2019.0.0 | Intel runtime libraries for C, C++ and Fortran compilers / Intel proprietary |
| [icu](http://site.icu-project.org/) | 58.2 | International Components for Unicode. / MIT |
| [idna](https://github.com/kjd/idna) | 2.8 | Internationalized Domain Names in Applications (IDNA). / BSD Like |
| [imageio](http://imageio.github.io) | 2.5.0 | a Python library for reading and writing image data / BSD 2-Clause |
| [imagesize](https://github.com/shibukawa/imagesize_py) | 1.1.0 | Getting image size from png/jpeg/jpeg2000/gif file / MIT |
| [importlib\_metadata](http://importlib-metadata.readthedocs.io) | 0.8 | A library to access the metadata for a Python package / APACHE-2.0 |
| [intel-openmp](https://software.intel.com/en-us/node/522690) | 2019.3 | Math library for Intel and compatible processors / proprietary - Intel |
| [ipaddress](https://github.com/phihag/ipaddress) | 1.0.22 | IPv4/IPv6 manipulation library / PSF 2 |
| [ipykernel](https://ipython.org) | 4.10.0 | IPython Kernel for Jupyter / BSD-3-Clause |
| [ipython](https://ipython.org/) | 5.8.0 | IPython: Productive Interactive Computing / BSD-3-Clause |
| [ipython\_genutils](http://ipython.org) | 0.2.0 | vestigial utilities from IPython / BSD 3-Clause |
| [ipywidgets](https://github.com/ipython/ipywidgets) | 7.4.2 | Jupyter Interactive Widgets / BSD 3-clause |
| [isort](https://github.com/timothycrosley/isort) | 4.3.16 | A Python utility / library to sort Python imports. / MIT |
| [itsdangerous](https://github.com/pallets/itsdangerous) | 1.1.0 | Various helpers to pass trusted data to untrusted environments. / BSD 3-Clause |
| [jdcal](https://github.com/phn/jdcal) | 1.4 | Julian dates from proleptic Gregorian and Julian calendars. / BSD 2-Clause |
| [jedi](https://github.com/davidhalter/jedi/) | 0.13.3 | An autocompletion tool for Python that can be used for text editors. / MIT |
| [jinja2](http://jinja.pocoo.org) | 2.10 | An easy to use stand-alone template engine written in pure python. / 3-Clause BSD |
| [jpeg](http://www.ijg.org/) | 9b | read/write jpeg COM, EXIF, IPTC medata / Custom free software license |
| [jsonschema](https://github.com/Julian/jsonschema) | 3.0.1 | An implementation of JSON Schema validation for Python / MIT |
| [jupyter](http://jupyter.org) | 1.0.0 | Jupyter metapackage. Install all the Jupyter components in one go. / BSD 3-Clause |
| [jupyter\_client](http://jupyter.org) | 5.2.4 | Jupyter protocol implementation and client libraries / BSD 3-clause |
| [jupyter\_console](http://jupyter.org) | 5.2.0 | Jupyter terminal console / BSD-3-Clause |
| [jupyter\_core](http://jupyter.org) | 4.4.0 | Core common functionality of Jupyter projects. / BSD 3-clause |
| [jupyterlab](https://github.com/jupyterlab/jupyterlab) | 0.33.11 | JupyterLab PRE-ALPHA / BSD-3-Clause |
| [jupyterlab\_launcher](http://github.com/jupyterlab/jupyterlab_launcher) | 0.11.2 | A Launcher for JupyterLab based applications. / BSD 3-Clause |
| [keyring](https://github.com/jaraco/keyring) | 18.0.0 | Store and access your passwords safely / Python Software Foundation or MIT |
| [kiwisolver](https://github.com/nucleic/kiwi) | 1.0.1 | A fast implementation of the Cassowary constraint solver / BSD 3-Clause |
| [krb5](http://web.mit.edu/kerberos/) | 1.16.1 | A network authentication protocol. / MIT |
| [lazy-object-proxy](https://github.com/ionelmc/python-lazy-object-proxy) | 1.3.1 | A fast and thorough lazy object proxy. / BSD 2-Clause |
| [libarchive](http://www.libarchive.org/) | 3.3.3 | Multi-format archive and compression library / BSD 2-Clause |
| [libcurl](http://curl.haxx.se/) | 7.64.0 | tool and library for transferring data with URL syntax / MIT/X derivate (`<http://curl.haxx.se/docs/copyright.html>`) |
| [libiconv](https://www.gnu.org/software/libiconv/) | 1.15 | Provides iconv for systems which don’t have one (or that cannot convert from/to Unicode.) / GPL and LGPL |
| [libpng](http://www.libpng.org/pub/png/libpng.html) | 1.6.36 | PNG reference library. / zlib/libpng |
| [libsodium](http://libsodium.org) | 1.0.16 | A modern and easy-to-use crypto library. / ISC |
| [libssh2](https://www.libssh2.org/) | 1.8.0 | the SSH library / BSD 3-Clause |
| [libtiff](http://www.libtiff.org/) | 4.0.10 | Support for the Tag Image File Format (TIFF). / HPND |
| [libxml2](http://xmlsoft.org/) | 2.9.9 | The XML C parser and toolkit of Gnome / MIT |
| [libxslt](http://xmlsoft.org/XSLT/) | 1.1.33 | The XSLT C library developed for the GNOME project / MIT |
| [linecache2](https://github.com/testing-cabal/linecache2) | 1.0.0 | Backport of the linecache module / PSF 1.0 |
| [llvmlite](https://github.com/numba/llvmlite) | 0.28.0 | A lightweight LLVM python binding for writing JIT compilers / New BSD License |
| [locket](https://github.com/mwilliamson/locket.py) | 0.2.0 | File-based locks for Python for Linux and Windows / BSD 2-Clause |
| [lxml](http://lxml.de/) | 4.3.2 | Pythonic binding for the C libraries libxml2 and libxslt. / BSD 3-Clause, GPL-2.0, ZPL-2.0, and ElementTree |
| [lz4-c](https://www.lz4.org) | 1.8.1.2 | Extremely Fast Compression algorithm / BSD 2-clause |
| [lzo](http://www.oberhumer.com/opensource/lzo/) | 2.10 | LZO is a portable lossless data compression library written in ANSI C. / GPL v2+ |
| m2w64-gcc-libgfortran | 5.3.0 | |
| m2w64-gcc-libs | 5.3.0 | |
| m2w64-gcc-libs-core | 5.3.0 | |
| m2w64-gmp | 6.1.0 | |
| m2w64-libwinpthread-git | 5.0.0.4634.697f757 | |
| [markupsafe](https://www.palletsprojects.com/p/markupsafe) | 1.1.1 | A Python module that implements the jinja2.Markup string / BSD-3-Clause |
| [matplotlib](http://matplotlib.org/) | 2.2.3 | Publication quality figures in Python / PSF-based |
| [mccabe](https://github.com/PyCQA/mccabe) | 0.6.1 | McCabe complexity checker for Python / MIT |
| [menuinst](https://github.com/ContinuumIO/menuinst) | 1.4.16 | cross platform menu item installation / BSD |
| [mistune](https://github.com/lepture/mistune) | 0.8.4 | The fastest markdown parser in pure Python. / BSD 3-Clause |
| [mkl](https://software.intel.com/en-us/mkl) | 2019.3 | Math library for Intel and compatible processors / proprietary - Intel |
| [mkl-service](https://github.com/ContinuumIO/mkl-service) | 1.1.2 | Python bindings to MKL service functions / 3-clause BSD |
| [mkl\_fft](http://github.com/IntelPython/mkl_fft) | 1.0.10 | NumPy-based implementation of Fast Fourier Transform using Intel (R) Math Kernel Library. / BSD 3-Clause |
| [more-itertools](https://github.com/erikrose/more-itertools) | 5.0.0 | More routines for operating on iterables, beyond itertools / MIT |
| [mpmath](http://mpmath.org) | 1.1.0 | Python library for arbitrary-precision floating-point arithmetic / BSD 3-Clause |
| [msgpack-python](http://msgpack.org/) | 0.6.1 | MessagePack (de)serializer. / Apache 2.0 |
| msys2-conda-epoch | 20160418 | |
| [multipledispatch](https://github.com/mrocklin/multipledispatch/) | 0.6.0 | Multiple dispatch in Python / BSD 3-Clause |
| [nbconvert](http://jupyter.org) | 5.4.1 | Converting Jupyter Notebooks / BSD-3-Clause |
| [nbformat](http://jupyter.org) | 4.4.0 | The reference implementation of the Jupyter Notebook format / BSD 3-clause |
| [networkx](https://networkx.github.io/) | 2.2 | Python package for creating and manipulating complex networks / BSD 3-Clause |
| [nltk](http://nltk.org/) | 3.4 | Build Python programs to work with human language data / Apache 2.0 |
| [nose](http://readthedocs.org/docs/nose/) | 1.3.7 | Nose extends unittest to make testing easier / LGPL-2.1 |
| [notebook](http://jupyter.org) | 5.7.8 | Jupyter Notebook / BSD 3-clause |
| [numba](http://numba.github.com) | 0.43.1 | NumPy aware dynamic Python compiler using LLVM / BSD 2-clause |
| [numexpr](https://github.com/pydata/numexpr) | 2.6.9 | Fast numerical expression evaluator for NumPy. / MIT |
| [numpy](http://numpy.scipy.org/) | 1.16.2 | Array processing for numbers, strings, records, and objects. / BSD 3-Clause |
| numpy-base | 1.16.2 | |
| [numpydoc](https://github.com/numpy/numpydoc) | 0.8.0 | Sphinx extension to support docstrings in Numpy format / BSD 3-Clause |
| [olefile](http://www.decalage.info/python/olefileio) | 0.46 | parse, read and write Microsoft OLE2 files / BSD 2-Clause |
| [openpyxl](https://openpyxl.readthedocs.io) | 2.6.1 | A Python library to read/write Excel 2010 xlsx/xlsm files / MIT |
| [openssl](http://www.openssl.org/) | 1.0.2r | OpenSSL is an open-source implementation of the SSL and TLS protocols / OpenSSL |
| [packaging](https://github.com/pypa/packaging) | 19.0 | Core utilities for Python packages / Apache 2.0 or BSD 2-Clause |
| [pandas](http://pandas.pydata.org) | 0.24.2 | High-performance, easy-to-use data structures and data analysis tools. / BSD 3-clause |
| [pandoc](http://pandoc.org/) | 2.2.3.2 | Universal markup converter (repackaged binaries). / GPL-2.0 |
| [pandocfilters](https://github.com/jgm/pandocfilters) | 1.4.2 | A python module for writing pandoc filters / BSD-3-Clause |
| [parso](https://github.com/davidhalter/parso) | 0.3.4 | A Python Parser / MIT |
| [partd](https://github.com/dask/partd) | 0.3.10 | Data structure for on-disk shuffle operations / BSD 3-Clause |
| [path.py](https://github.com/jaraco/path.py) | 11.5.0 | A module wrapper for os.path / MIT |
| [pathlib2](https://github.com/mcmtroffaes/pathlib2) | 2.3.3 | Fork of pathlib aiming to support the full stdlib Python API. / MIT |
| [patsy](https://github.com/pydata/patsy) | 0.5.1 | Describing statistical models in Python using symbolic formulas / BSD-2-Clause, PSF2 |
| [pep8](http://pep8.readthedocs.org/) | 1.7.1 | Python style guide checker / MIT |
| [pickleshare](https://github.com/pickleshare/pickleshare/) | 0.7.5 | Tiny ‘shelve’-like database with concurrency support / MIT |
| [pillow](https://pillow.readthedocs.io) | 5.4.1 | Pillow is the friendly PIL fork by Alex Clark and Contributors / PIL |
| [pip](https://pip.pypa.io/en/stable/) | 19.0.3 | PyPA recommended tool for installing Python packages / MIT |
| [pkginfo](https://code.launchpad.net/~tseaver/pkginfo/trunk) | 1.5.0.1 | Query metadatdata from sdists / bdists / installed packages. / MIT |
| [pluggy](https://github.com/pytest-dev/pluggy) | 0.9.0 | Plugin registration and hook calling for Python / MIT |
| [ply](http://www.dabeaz.com/ply/index.html) | 3.11 | Python Lex-Yacc / BSD 3-clause |
| powershell\_shortcut | 0.0.1 | Powershell shortcut creator for Windows (using menuinst) / BSD |
| [prometheus\_client](https://github.com/prometheus/client_python) | 0.6.0 | Python client for the Prometheus monitoring system / Apache 2.0 |
| [prompt\_toolkit](https://github.com/jonathanslenders/python-prompt-toolkit) | 1.0.15 | Library for building powerful interactive command lines in Python / BSD 3-clause |
| [psutil](https://github.com/giampaolo/psutil) | 5.5.0 | A cross-platform process and system utilities module for Python / BSD 3-Clause |
| [py](https://github.com/pytest-dev/py) | 1.8.0 | library with cross-python path, ini-parsing, io, code, log facilities / MIT |
| [pycodestyle](https://pycodestyle.readthedocs.io/) | 2.5.0 | Python style guide checker / MIT |
| [pycosat](https://github.com/ContinuumIO/pycosat) | 0.6.3 | Bindings to picosat (a SAT solver) / MIT |
| [pycparser](https://github.com/eliben/pycparser) | 2.19 | Complete C99 parser in pure Python / BSD 3-clause |
| [pycrypto](http://www.pycrypto.org/) | 2.6.1 | Cryptographic modules for Python. / Public Domain |
| [pycurl](http://pycurl.sourceforge.net/) | 7.43.0.2 | A Python Interface To The cURL library / LGPL, MIT |
| [pyflakes](https://github.com/PyCQA/pyflakes) | 2.1.1 | Pyflakes analyzes programs and detects various errors. / MIT |
| [pygments](http://pygments.org/) | 2.3.1 | Generic syntax highlighting package / BSD 2-clause |
| [pylint](http://www.pylint.org/) | 1.9.2 | python code static checker / GPL |
| [pyodbc](https://github.com/mkleehammer/pyodbc) | 4.0.26 | DB API Module for ODBC / MIT |
| [pyopenssl](https://github.com/pyca/pyopenssl) | 19.0.0 | Python wrapper module around the OpenSSL library / Apache 2.0 |
| [pyparsing](http://pyparsing.wikispaces.com/) | 2.3.1 | Create and execute simple grammars / MIT |
| [pyqt](http://www.riverbankcomputing.co.uk/software/pyqt) | 5.6.0 | Python binding of the cross-platform GUI toolkit Qt. / Commercial, GPL-2.0, GPL-3.0 |
| [pyreadline](http://ipython.org/pyreadline) | 2.1 | A python implmementation of GNU readline. / BSD 3-Clause |
| [pyrsistent](http://github.com/tobgu/pyrsistent/) | 0.14.11 | Persistent/Functional/Immutable data structures / MIT |
| [pysocks](https://github.com/Anorov/PySocks) | 1.6.8 | A Python SOCKS client module. See [Anorov/PySocks](https://github.com/Anorov/PySocks) for more information. / BSD 3-Clause |
| [pytables](http://www.pytables.org) | 3.5.1 | Brings together Python, HDF5 and NumPy to easily handle large amounts of data. / BSD 3-Clause |
| [pytest](https://docs.pytest.org/en/latest/) | 4.3.1 | Simple and powerful testing with Python. / MIT |
| [python](http://www.python.org/) | 2.7.16 | General purpose programming language / PSF |
| [python-dateutil](https://dateutil.readthedocs.org/) | 2.8.0 | Extensions to the standard Python datetime module. / BSD 3 Clause |
| python-libarchive-c | 2.8 | |
| [pytz](http://pythonhosted.org/pytz/) | 2018.9 | World timezone definitions, modern and historical. / MIT |
| [pywavelets](https://github.com/PyWavelets/pywt) | 1.0.2 | Discrete Wavelet Transforms in Python. / MIT |
| [pywin32](https://sourceforge.net/projects/pywin32) | 223 | Python extensions for Windows / PSF |
| [pywinpty](https://github.com/spyder-ide/pywinpty) | 0.5.5 | Python bindings for the winpty library / MIT |
| [pyyaml](http://pyyaml.org/wiki/PyYAML) | 5.1 | YAML parser and emitter for Python / MIT |
| [pyzmq](https://github.com/zeromq/pyzmq) | 18.0.0 | Python bindings for zeromq / BSD 3-clause |
| [qt](http://qt-project.org) | 5.6.2 | Qt is a cross-platform application and UI framework. / LGPL-3.0 |
| [qtawesome](https://github.com/spyder-ide/qtawesome) | 0.5.7 | Iconic fonts in PyQt and PySide applications / MIT |
| [qtconsole](http://jupyter.org) | 4.4.3 | Jupyter Qt console / BSD 3-Clause |
| [qtpy](https://github.com/spyder-ide/qtpy) | 1.7.0 | Abstraction layer for PyQt5/PyQt4/PySide / MIT |
| [requests](http://python-requests.org) | 2.21.0 | Python HTTP for Humans / Apache 2.0 |
| [rope](https://github.com/python-rope/rope) | 0.12.0 | A python refactoring library… / GPL 2.0 |
| [ruamel\_yaml](https://bitbucket.org/ruamel/yaml) | 0.15.46 | A patched copy of ruamel.yaml. / MIT |
| [scandir](https://github.com/benhoyt/scandir) | 1.10.0 | scandir, a better directory iterator and faster os.walk() / BSD 3-Clause |
| [scikit-image](http://scikit-image.org/) | 0.14.2 | Image processing routines for SciPy. / BSD 3-Clause |
| [scikit-learn](http://scikit-learn.org/) | 0.20.3 | A set of python modules for machine learning and data mining / BSD 3-Clause |
| [scipy](http://www.scipy.org/) | 1.2.1 | Scientific Library for Python / BSD 3-Clause |
| [seaborn](https://seaborn.pydata.org) | 0.9.0 | Statistical data visualization / BSD 3-Clause |
| [send2trash](https://github.com/hsoft/send2trash) | 1.5.0 | Python library to natively send files to Trash (or Recycle bin) on all platforms. / BSD-3-Clause |
| [setuptools](https://github.com/pypa/setuptools) | 40.8.0 | Download, build, install, upgrade, and uninstall Python packages / MIT |
| [simplegeneric](http://cheeseshop.python.org/pypi/simplegeneric) | 0.8.1 | Simple generic functions (similar to Python’s own len(), pickle.dump(), etc.) / Zope Public |
| [singledispatch](http://docs.python.org/3/library/functools.html#functools.singledispatch) | 3.4.0.3 | Transforms a function into a single-dispatch generic function / MIT |
| [sip](http://www.riverbankcomputing.com/software/sip/intro) | 4.18.1 | Create Python bindings for C and C++ libraries / GPL-3.0 |
| [six](http://pypi.python.org/pypi/six/) | 1.12.0 | Python 2 and 3 compatibility utilities / MIT |
| [snappy](https://github.com/google/snappy) | 1.1.7 | A fast compressor/decompressor / BSD 3-clause |
| [snowballstemmer](https://github.com/shibukawa/snowball_py) | 1.2.1 | Snowball stemming library collection for Python / BSD-2-Clause |
| [sortedcollections](http://www.grantjenks.com/docs/sortedcollections/) | 1.1.2 | Python Sorted Collections / Apache-2.0 |
| [sortedcontainers](http://www.grantjenks.com/docs/sortedcontainers/) | 2.1.0 | Python Sorted Container Types: SortedList, SortedDict, and SortedSet / Apache 2.0 |
| [soupsieve](http://facelessuser.github.io/soupsieve) | 1.8 | A modern CSS selector implementation for BeautifulSoup / MIT |
| [sphinx](http://www.sphinx-doc.org) | 1.8.5 | Sphinx is a tool that makes it easy to create intelligent and beautiful documentation / BSD 2-clause |
| sphinxcontrib | 1.0 | Python namespace for sphinxcontrib / BSD |
| [sphinxcontrib-websupport](https://pypi.python.org/pypi/sphinxcontrib-websupport) | 1.1.0 | Sphinx API for Web Apps / BSD-2-Clause |
| [spyder](https://www.spyder-ide.org/) | 3.3.3 | The Scientific Python Development Environment / MIT |
| [spyder-kernels](https://github.com/spyder-ide/spyder-kernels) | 0.4.2 | Jupyter kernels for the Spyder console / MIT |
| [sqlalchemy](http://www.sqlalchemy.org/) | 1.3.1 | Database Abstraction Library. / MIT |
| [sqlite](http://www.sqlite.org/) | 3.27.2 | Implements a self-contained, zero-configuration, SQL database engine. / Public-Domain (`<http://www.sqlite.org/copyright.html>`) |
| [ssl\_match\_hostname](http://bitbucket.org/brandon/backports.ssl_match_hostname) | 3.7.0.1 | The ssl.match\_hostname() function from Python 3.5 / PSF 2 |
| [statsmodels](https://www.statsmodels.org) | 0.9.0 | Statistical computations and models for use with SciPy / BSD 3-Clause |
| [subprocess32](https://github.com/google/python-subprocess32) | 3.5.3 | A backport of the subprocess module from Python 3.2/3.3 for use on 2.x. / PSF 2 |
| [sympy](http://sympy.org) | 1.3 | Python library for symbolic mathematics / 3-clause BSD |
| [tblib](https://github.com/ionelmc/python-tblib) | 1.3.2 | Traceback serialization library. / BSD 2-Clause |
| [terminado](https://github.com/jupyter/terminado) | 0.8.1 | Terminals served by tornado websockets / BSD 2-clause |
| [testpath](https://testpath.readthedocs.io) | 0.4.2 | Testpath is a collection of utilities for Python code working with files and commands. / BSD-3-Clause |
| [tk](http://www.tcl.tk/) | 8.6.8 | A dynamic programming language with GUI support. Bundles Tcl and Tk. / Tcl/Tk |
| [toolz](http://toolz.readthedocs.org/) | 0.9.0 | A functional standard library for Python. / BSD 3-Clause |
| [tornado](http://www.tornadoweb.org/) | 5.1.1 | A Python web framework and asynchronous networking library, originally developed at FriendFeed. / Apache 2.0 |
| [tqdm](https://pypi.python.org/pypi/tqdm) | 4.31.1 | A Fast, Extensible Progress Meter / MPLv2.0, MIT |
| [traceback2](https://github.com/testing-cabal/traceback2) | 1.4.0 | Backports of the traceback module / PSF 2.0 |
| [traitlets](http://ipython.org/) | 4.3.2 | Configuration system for Python applications / BSD 3-clause |
| [typing](https://docs.python.org/3.5/library/typing.html) | 3.6.6 | Type Hints for Python - backport for `Python<3.5` / PSF |
| [unicodecsv](https://github.com/jdunck/python-unicodecsv) | 0.14.1 | Drop-in replacement for csv module which supports unicode strings / BSD |
| [unittest2](http://pypi.python.org/pypi/unittest2) | 1.1.0 | The new features in unittest backported to Python 2.4+ / BSD |
| [urllib3](https://urllib3.readthedocs.io/) | 1.24.1 | HTTP library with thread-safe connection pooling, file post, and more. / MIT |
| [vc](https://github.com/conda/conda/wiki/VC-features) | 9 | A meta-package to impose mutual exclusivity among software built with different VS versions / Modified BSD License (3-clause) |
| [vs2008\_runtime](http://www.microsoft.com) | 9.00.30729.1 | Bundles of the MSVC 9 (VS 2008) runtime / Proprietary |
| [vs2015\_runtime](http://www.microsoft.com) | 14.15.26706 | Bundles of the MSVC 14 (VS 2015) runtime / Proprietary |
| [wcwidth](https://github.com/jquast/wcwidth) | 0.1.7 | Measures number of Terminal column cells of wide-character codes. / MIT |
| [webencodings](https://github.com/gsnedders/python-webencodings) | 0.5.1 | Character encoding aliases for legacy web content / BSD 3-Clause |
| [werkzeug](http://werkzeug.pocoo.org/) | 0.14.1 | The Python WSGI Utility Library. / BSD 3-Clause |
| [wheel](https://github.com/pypa/wheel) | 0.33.1 | A built-package format for Python. / MIT |
| [widgetsnbextension](http://ipython.org) | 3.4.2 | Interactive Widgets for Jupyter / BSD 3-clause |
| [win\_inet\_pton](https://github.com/hickeroar/win_inet_pton) | 1.1.0 | Native inet\_pton and inet\_ntop implementation for Python on Windows (with ctypes). / PUBLIC-DOMAIN |
| [win\_unicode\_console](https://github.com/Drekin/win-unicode-console) | 0.5 | A Python package to enable Unicode input and display when running Python from Windows console. / MIT |
| [wincertstore](https://bitbucket.org/tiran/wincertstore) | 0.2 | Python module to extract CA and CRL certs from Windows’ cert store (ctypes based). / PSF 2 |
| [winpty](https://github.com/rprichard/winpty) | 0.4.3 | Winpty provides an interface similar to a Unix pty-master for communicating with Windows console programs. / MIT |
| [wrapt](https://github.com/GrahamDumpleton/wrapt) | 1.11.1 | Module for decorators, wrappers and monkey patching / BSD 2-Clause |
| [xlrd](http://www.python-excel.org/) | 1.2.0 | Library for developers to extract data from Microsoft Excel (tm) spreadsheet files / BSD 3-Clause and BSD with advertising |
| [xlsxwriter](https://xlsxwriter.readthedocs.io/) | 1.1.5 | A Python module for creating Excel XLSX files / BSD 2-Clause |
| [xlwings](http://xlwings.org/) | 0.15.4 | Interact with Excel from Python and vice versa / 3-clause BSD |
| [xlwt](http://www.python-excel.org/) | 1.3.0 | Writing data and formatting information to Excel files / BSD |
| [xz](http://tukaani.org/xz/) | 5.2.4 | Data compression software with high compression ratio / LGPL-2.1 and GPL-2.0 |
| [yaml](http://pyyaml.org/wiki/LibYAML) | 0.1.7 | A C library for parsing and emitting YAML. / MIT |
| [zeromq](http://zeromq.org) | 4.3.1 | A high-performance asynchronous messaging library. / LGPL 3 |
| [zict](http://github.com/mrocklin/zict) | 0.1.4 | Composable Dictionary Classes / BSD 3-Clause |
| [zipp](https://github.com/jaraco/zipp) | 0.3.3 | A pathlib-compatible Zipfile object wrapper / MIT |
| [zlib](http://zlib.net/) | 1.2.11 | Massively spiffy yet delicately unobtrusive compression library / zlib |
| [zstd](http://www.zstd.net) | 1.3.7 | Zstandard - Fast real-time compression algorithm / BSD 3-Clause |
| Name | Version | Summary / License |
|---|---|---|
| [alabaster](http://www.sphinx-doc.org/en/stable/index.html) | 0.7.12 | Configurable, Python 2+3 compatible Sphinx theme. / BSD 3-Clause |
| [anaconda-client](http://anaconda.org) | 1.7.2 | anaconda.org command line client library / BSD 3-clause |
| [anaconda-project](https://github.com/Anaconda-Platform/anaconda-project) | 0.8.2 | Tool for encapsulating, running, and reproducing data science projects / BSD 3-Clause |
| [appnope](http://github.com/minrk/appnope) | 0.1.0 | Disable App Nap on OS X 10.9 / BSD 2-Clause |
| [appscript](http://appscript.sourceforge.net/) | 1.1.0 | Control AppleScriptable applications from Python / Public-Domain |
| [asn1crypto](https://github.com/wbond/asn1crypto) | 0.24.0 | Python ASN.1 library with a focus on performance and a pythonic API / MIT |
| [astroid](https://www.astroid.org/) | 1.6.5 | A abstract syntax tree for Python with inference support. / LGPL 2.1 |
| [astropy](http://www.astropy.org/) | 2.0.9 | Community-developed Python Library for Astronomy / BSD |
| [atomicwrites](https://github.com/untitaker/python-atomicwrites) | 1.3.0 | Atomic file writes / MIT |
| [attrs](https://attrs.readthedocs.io/en/stable/) | 19.1.0 | attrs is the Python package that will bring back the joy of writing classes by relieving you from the drudgery of implementing object protocols (aka dunder methods). / MIT |
| [babel](http://babel.pocoo.org/) | 2.6.0 | Utilities to internationalize and localize Python applications / BSD 3-clause |
| [backports](https://bitbucket.org/brandon/backports) | 1.0 | / BSD |
| [backports.functools\_lru\_cache](https://github.com/jaraco/backports.functools_lru_cache) | 1.5 | Backport of functools.lru\_cache from Python 3.3 as published at ActiveState. / MIT |
| [backports.os](https://github.com/pjdelport/backports.os) | 0.1.1 | Backport of new features in Python’s os module / Python Software Foundation |
| [backports.shutil\_get\_terminal\_size](https://github.com/chrippa/backports.shutil_get_terminal_size) | 1.0.0 | A backport of the get\_terminal\_size function from Python 3.3’s shutil. / MIT |
| [backports\_abc](https://github.com/cython/backports_abc) | 0.5 | A backport of recent additions to the collections.abc module. / PSF 2 |
| [beautifulsoup4](http://www.crummy.com/software/BeautifulSoup/) | 4.7.1 | Python library designed for screen-scraping / MIT |
| [bitarray](https://github.com/ilanschnell/bitarray) | 0.8.3 | efficient arrays of booleans – C extension / PSF |
| [bkcharts](http://github.com/bokeh/bkcharts) | 0.2 | High level chart types built on top of Bokeh / BSD 3-Clause |
| blas | 1.0 | |
| [bleach](https://github.com/mozilla/bleach) | 3.1.0 | Easy, whitelist-based HTML-sanitizing tool / Apache-2.0 |
| [blosc](https://github.com/Blosc/c-blosc) | 1.15.0 | A blocking, shuffling and loss-less compression library that can be faster than memcpy() / BSD 3-Clause |
| [bokeh](http://bokeh.pydata.org/) | 1.0.4 | Statistical and novel interactive HTML plots for Python / BSD 3-Clause |
| [boto](https://github.com/boto/boto/) | 2.49.0 | Amazon Web Services Library / MIT |
| [bottleneck](http://berkeleyanalytics.com/bottleneck) | 1.2.1 | Fast NumPy array functions written in Cython. / BSD 2-Clause |
| [bzip2](http://www.bzip.org/) | 1.0.6 | high-quality data compressor / bzip2 |
| [ca-certificates](https://github.com/conda-forge/ca-certificates-feedstock) | 2019.1.23 | Certificates for use with other packages. / ISC |
| [cdecimal](http://www.bytereef.org/mpdecimal/index.html) | 2.3 | Fast drop-in replacement for decimal.py / BSD 2-Clause |
| [certifi](http://certifi.io/) | 2019.3.9 | Python package for providing Mozilla’s CA Bundle. / ISC |
| [cffi](https://bitbucket.org/cffi/cffi) | 1.12.2 | Foreign Function Interface for Python calling C code. / MIT |
| [chardet](https://github.com/chardet/chardet) | 3.0.4 | Universal character encoding detector / LGPL2 |
| [click](https://palletsprojects.com/p/click) | 7.0 | Python composable command line interface toolkit / BSD-3-Clause |
| [cloudpickle](https://github.com/cloudpipe/cloudpickle) | 0.8.0 | Extended pickling support for Python objects / BSD 3-Clause |
| [clyent](https://github.com/Anaconda-Platform/clyent) | 1.2.2 | Command line client library for windows and posix / BSD 3-Clause |
| [colorama](https://github.com/tartley/colorama) | 0.4.1 | Cross-platform colored terminal text / BSD-3-Clause |
| [conda](https://conda.io) | 4.6.11 | OS-agnostic, system-level binary package and environment manager. / BSD 3-Clause |
| [conda-build](https://github.com/conda/conda-build) | 3.17.8 | tools for building conda packages / BSD 3-Clause |
| [conda-env](https://github.com/conda/conda-env) | 2.6.0 | Tools for interacting with conda environments. / BSD 3-Clause |
| [configparser](http://docs.python.org/3/library/configparser.html) | 3.7.3 | This library brings the updated configparser from Python 3.5 to Python 2.6-3.5 / MIT |
| [contextlib2](http://contextlib2.readthedocs.org) | 0.5.5 | Backports and enhancements for the contextlib module / PSF |
| [cryptography](https://github.com/pyca/cryptography) | 2.6.1 | Provides cryptographic recipes and primitives to Python developers / Apache 2.0 or BSD 3-Clause, PSF 2 |
| [curl](http://curl.haxx.se/) | 7.64.0 | tool and library for transferring data with URL syntax / MIT/X derivate (`<http://curl.haxx.se/docs/copyright.html>`) |
| [cycler](http://matplotlib.org/cycler) | 0.10.0 | Composable style cycles. / BSD 3-Clause |
| [cython](http://www.cython.org/) | 0.29.6 | The Cython compiler for writing C extensions for the Python language / Apache-2.0 |
| [cytoolz](https://github.com/pytoolz/cytoolz) | 0.9.0.1 | Cython implementation of Toolz. High performance functional utilities. / BSD 3-Clause |
| [dask](http://github.com/dask/dask/) | 1.1.4 | Parallel Python with task scheduling / BSD 3-Clause |
| [dask-core](http://github.com/dask/dask/) | 1.1.4 | Parallel Python with task scheduling / BSD 3-Clause |
| [dbus](http://www.freedesktop.org/wiki/Software/dbus/) | 1.13.6 | Simple message bus system for applications to talk to one another / GPL2 |
| [decorator](https://github.com/micheles/decorator) | 4.4.0 | Better living through Python with decorators. / BSD 3-Clause |
| [defusedxml](https://bitbucket.org/tiran/defusedxml) | 0.5.0 | XML bomb protection for Python stdlib modules / PSF 2.0 |
| [distributed](http://distributed.readthedocs.io/en/latest/) | 1.26.0 | Distributed computing with Dask / BSD 3-Clause |
| [docutils](http://docutils.sourceforge.net/) | 0.14 | Docutils – Python Documentation Utilities / Public Domain Dedictation and BSD 2-Clause and PSF 2.1.1 and GPL 3.0 |
| [entrypoints](https://github.com/takluyver/entrypoints) | 0.3 | Discover and load entry points from installed packages. / MIT License |
| [enum34](https://bitbucket.org/stoneleaf/enum34) | 1.1.6 | Python 3.4 Enum backported to 3.3, 3.2, 3.1, 2.7, 2.6, 2.5, and 2.4 / BSD 3-Clause |
| [et\_xmlfile](https://bitbucket.org/openpyxl/et_xmlfile) | 1.0.1 | An implementation of lxml.xmlfile for the standard library / MIT |
| [expat](http://expat.sourceforge.net/) | 2.2.6 | Expat XML parser library in C. / MIT |
| [fastcache](https://github.com/pbrady/fastcache) | 1.0.2 | C implementation of Python 3 lru\_cache / MIT |
| [filelock](https://github.com/benediktschmitt/py-filelock) | 3.0.10 | A platform independent file lock. / Public Domain |
| [flask](http://flask.pocoo.org) | 1.0.2 | A microframework based on Werkzeug, Jinja2 and good intentions. / BSD 3-Clause |
| [freetype](https://www.freetype.org/) | 2.9.1 | A Free, High-Quality, and Portable Font Engine / GPL-2.0 and FreeType |
| [funcsigs](http://funcsigs.readthedocs.org) | 1.0.2 | Python function signatures from PEP362 for Python 2.6, 2.7 and 3.2+. / Apache 2.0 |
| [functools32](https://github.com/MiCHiLU/python-functools32) | 3.2.3.2 | Backport of the functools module from Python 3.2.3 for use on 2.7 and PyPy. / PSF license |
| [future](http://python-future.org) | 0.17.1 | Clean single-source support for Python 3 and 2 / MIT |
| [futures](https://github.com/agronholm/pythonfutures) | 3.2.0 | Backport of the concurrent.futures package from Python 3.2 / PSF |
| [get\_terminal\_size](https://github.com/chrippa/backports.shutil_get_terminal_size) | 1.0.0 | Get the size of the terminal window. / MIT |
| [gettext](https://www.gnu.org/software/gettext/) | 0.19.8.1 | Internationalization package. / GPLv2 |
| [gevent](http://www.gevent.org/) | 1.4.0 | Coroutine-based network library / MIT |
| [glib](https://developer.gnome.org/glib/) | 2.56.2 | Provides core application building blocks for libraries and applications written in C. / LGPL-2.1 |
| [glob2](https://github.com/miracle2k/python-glob2) | 0.6 | Version of the glob module that supports recursion via \*\*, and can capture patterns. / BSD-2-Clause |
| [gmp](http://gmplib.org/) | 6.1.2 | The GNU multiprecision library. / GPL 2 and LGPL 3 |
| [gmpy2](https://pypi.python.org/pypi/gmpy2) | 2.0.8 | GMP/MPIR, MPFR, and MPC interface to Python 2.6+ and 3.x / LGPL 3 |
| [greenlet](https://github.com/python-greenlet/greenlet) | 0.4.15 | Lightweight in-process concurrent programming / MIT |
| [grin](http://pypi.python.org/pypi/grin) | 1.2.1 | Enhanced grep-like tool / BSD 3-Clause |
| [h5py](http://www.h5py.org/) | 2.9.0 | Read and write HDF5 files from Python. / BSD-3-Clause |
| [hdf5](http://www.hdfgroup.org/HDF5/) | 1.10.4 | HDF5 is a data model, library, and file format for storing and managing data / HDF5 |
| [heapdict](http://stutzbachenterprises.com/) | 1.0.0 | A heap with decrease-key and increase-key operations / BSD 3-Clause |
| [html5lib](https://github.com/html5lib/html5lib-python) | 1.0.1 | HTML parser based on the WHATWG HTML specification / MIT |
| [icu](http://site.icu-project.org/) | 58.2 | International Components for Unicode. / MIT |
| [idna](https://github.com/kjd/idna) | 2.8 | Internationalized Domain Names in Applications (IDNA). / BSD Like |
| [imageio](http://imageio.github.io) | 2.5.0 | a Python library for reading and writing image data / BSD 2-Clause |
| [imagesize](https://github.com/shibukawa/imagesize_py) | 1.1.0 | Getting image size from png/jpeg/jpeg2000/gif file / MIT |
| [importlib\_metadata](http://importlib-metadata.readthedocs.io) | 0.8 | A library to access the metadata for a Python package / APACHE-2.0 |
| [intel-openmp](https://software.intel.com/en-us/node/522690) | 2019.3 | Math library for Intel and compatible processors / proprietary - Intel |
| [ipaddress](https://github.com/phihag/ipaddress) | 1.0.22 | IPv4/IPv6 manipulation library / PSF 2 |
| [ipykernel](https://ipython.org) | 4.10.0 | IPython Kernel for Jupyter / BSD-3-Clause |
| [ipython](https://ipython.org/) | 5.8.0 | IPython: Productive Interactive Computing / BSD-3-Clause |
| [ipython\_genutils](http://ipython.org) | 0.2.0 | vestigial utilities from IPython / BSD 3-Clause |
| [ipywidgets](https://github.com/ipython/ipywidgets) | 7.4.2 | Jupyter Interactive Widgets / BSD 3-clause |
| [isort](https://github.com/timothycrosley/isort) | 4.3.16 | A Python utility / library to sort Python imports. / MIT |
| [itsdangerous](https://github.com/pallets/itsdangerous) | 1.1.0 | Various helpers to pass trusted data to untrusted environments. / BSD 3-Clause |
| [jbig](https://www.cl.cam.ac.uk/~mgk25/jbigkit) | 2.1 | Implementation of the JBIG1 data compression standard / GPL-2.0 |
| [jdcal](https://github.com/phn/jdcal) | 1.4 | Julian dates from proleptic Gregorian and Julian calendars. / BSD 2-Clause |
| [jedi](https://github.com/davidhalter/jedi/) | 0.13.3 | An autocompletion tool for Python that can be used for text editors. / MIT |
| [jinja2](http://jinja.pocoo.org) | 2.10 | An easy to use stand-alone template engine written in pure python. / 3-Clause BSD |
| [jpeg](http://www.ijg.org/) | 9b | read/write jpeg COM, EXIF, IPTC medata / Custom free software license |
| [jsonschema](https://github.com/Julian/jsonschema) | 3.0.1 | An implementation of JSON Schema validation for Python / MIT |
| [jupyter](http://jupyter.org) | 1.0.0 | Jupyter metapackage. Install all the Jupyter components in one go. / BSD 3-Clause |
| [jupyter\_client](http://jupyter.org) | 5.2.4 | Jupyter protocol implementation and client libraries / BSD 3-clause |
| [jupyter\_console](http://jupyter.org) | 5.2.0 | Jupyter terminal console / BSD-3-Clause |
| [jupyter\_core](http://jupyter.org) | 4.4.0 | Core common functionality of Jupyter projects. / BSD 3-clause |
| [jupyterlab](https://github.com/jupyterlab/jupyterlab) | 0.33.11 | JupyterLab PRE-ALPHA / BSD-3-Clause |
| [jupyterlab\_launcher](http://github.com/jupyterlab/jupyterlab_launcher) | 0.11.2 | A Launcher for JupyterLab based applications. / BSD 3-Clause |
| [keyring](https://github.com/jaraco/keyring) | 18.0.0 | Store and access your passwords safely / Python Software Foundation or MIT |
| [kiwisolver](https://github.com/nucleic/kiwi) | 1.0.1 | A fast implementation of the Cassowary constraint solver / BSD 3-Clause |
| [krb5](http://web.mit.edu/kerberos/) | 1.16.1 | A network authentication protocol. / MIT |
| [lazy-object-proxy](https://github.com/ionelmc/python-lazy-object-proxy) | 1.3.1 | A fast and thorough lazy object proxy. / BSD 2-Clause |
| [libarchive](http://www.libarchive.org/) | 3.3.3 | Multi-format archive and compression library / BSD 2-Clause |
| [libcurl](http://curl.haxx.se/) | 7.64.0 | tool and library for transferring data with URL syntax / MIT/X derivate (`<http://curl.haxx.se/docs/copyright.html>`) |
| [libcxx](http://libcxx.llvm.org/) | 4.0.1 | C++ Standard Library / MIT license or UIUC License |
| [libcxxabi](http://libcxxabi.llvm.org/) | 4.0.1 | C++ Standard Library Support / MIT license or UIUC License |
| [libedit](http://thrysoee.dk/editline/) | 3.1.20181209 | Editline Library (libedit) / NetBSD |
| [libffi](https://sourceware.org/libffi/) | 3.2.1 | A Portable Foreign Function Interface Library. / Custom |
| [libgfortran](http://gcc.gnu.org/) | 3.0.1 | Fortran libraries from the GNU Compiler Collection / GPL 3 (with GCC Runtime Library Exception 3.1) |
| [libiconv](https://www.gnu.org/software/libiconv/) | 1.15 | Provides iconv for systems which don’t have one (or that cannot convert from/to Unicode.) / GPL and LGPL |
| [liblief](https://lief.quarkslab.com/) | 0.9.0 | A cross platform library to parse, modify and abstract ELF, PE and MachO formats. / Apache 2.0 |
| [libpng](http://www.libpng.org/pub/png/libpng.html) | 1.6.36 | PNG reference library. / zlib/libpng |
| [libsodium](http://libsodium.org) | 1.0.16 | A modern and easy-to-use crypto library. / ISC |
| [libssh2](https://www.libssh2.org/) | 1.8.0 | the SSH library / BSD 3-Clause |
| [libtiff](http://www.libtiff.org/) | 4.0.10 | Support for the Tag Image File Format (TIFF). / HPND |
| [libxml2](http://xmlsoft.org/) | 2.9.9 | The XML C parser and toolkit of Gnome / MIT |
| [libxslt](http://xmlsoft.org/XSLT/) | 1.1.33 | The XSLT C library developed for the GNOME project / MIT |
| [linecache2](https://github.com/testing-cabal/linecache2) | 1.0.0 | Backport of the linecache module / PSF 1.0 |
| [llvmlite](https://github.com/numba/llvmlite) | 0.28.0 | A lightweight LLVM python binding for writing JIT compilers / New BSD License |
| [locket](https://github.com/mwilliamson/locket.py) | 0.2.0 | File-based locks for Python for Linux and Windows / BSD 2-Clause |
| [lxml](http://lxml.de/) | 4.3.2 | Pythonic binding for the C libraries libxml2 and libxslt. / BSD 3-Clause, GPL-2.0, ZPL-2.0, and ElementTree |
| [lz4-c](https://www.lz4.org) | 1.8.1.2 | Extremely Fast Compression algorithm / BSD 2-clause |
| [lzo](http://www.oberhumer.com/opensource/lzo/) | 2.10 | LZO is a portable lossless data compression library written in ANSI C. / GPL v2+ |
| [markupsafe](https://www.palletsprojects.com/p/markupsafe) | 1.1.1 | A Python module that implements the jinja2.Markup string / BSD-3-Clause |
| [matplotlib](http://matplotlib.org/) | 2.2.3 | Publication quality figures in Python / PSF-based |
| [mccabe](https://github.com/PyCQA/mccabe) | 0.6.1 | McCabe complexity checker for Python / MIT |
| [mistune](https://github.com/lepture/mistune) | 0.8.4 | The fastest markdown parser in pure Python. / BSD 3-Clause |
| [mkl](https://software.intel.com/en-us/mkl) | 2019.3 | Math library for Intel and compatible processors / proprietary - Intel |
| [mkl-service](https://github.com/ContinuumIO/mkl-service) | 1.1.2 | Python bindings to MKL service functions / 3-clause BSD |
| [mkl\_fft](http://github.com/IntelPython/mkl_fft) | 1.0.10 | NumPy-based implementation of Fast Fourier Transform using Intel (R) Math Kernel Library. / BSD 3-Clause |
| [mkl\_random](http://github.com/IntelPython/mkl_random) | 1.0.2 | Intel (R) MKL-powered package for sampling from common probability distributions into NumPy arrays. / BSD 3-Clause |
| [more-itertools](https://github.com/erikrose/more-itertools) | 5.0.0 | More routines for operating on iterables, beyond itertools / MIT |
| [mpc](http://www.multiprecision.org/) | 1.1.0 | A C library for the arithmetic of complex numbers with arbitrarily high precision. / LGPL 3 |
| [mpfr](http://www.mpfr.org/) | 4.0.1 | The MPFR library is a C library for multiple-precision floating-point computations with correct rounding. / LGPL 3 |
| [mpmath](http://mpmath.org) | 1.1.0 | Python library for arbitrary-precision floating-point arithmetic / BSD 3-Clause |
| [msgpack-python](http://msgpack.org/) | 0.6.1 | MessagePack (de)serializer. / Apache 2.0 |
| [multipledispatch](https://github.com/mrocklin/multipledispatch/) | 0.6.0 | Multiple dispatch in Python / BSD 3-Clause |
| [nbconvert](http://jupyter.org) | 5.4.1 | Converting Jupyter Notebooks / BSD-3-Clause |
| [nbformat](http://jupyter.org) | 4.4.0 | The reference implementation of the Jupyter Notebook format / BSD 3-clause |
| [ncurses](http://www.gnu.org/software/ncurses/) | 6.1 | Library for text-based user interfaces / Free software (MIT-like) |
| [networkx](https://networkx.github.io/) | 2.2 | Python package for creating and manipulating complex networks / BSD 3-Clause |
| [nltk](http://nltk.org/) | 3.4 | Build Python programs to work with human language data / Apache 2.0 |
| [nose](http://readthedocs.org/docs/nose/) | 1.3.7 | Nose extends unittest to make testing easier / LGPL-2.1 |
| [notebook](http://jupyter.org) | 5.7.8 | Jupyter Notebook / BSD 3-clause |
| [numba](http://numba.github.com) | 0.43.1 | NumPy aware dynamic Python compiler using LLVM / BSD 2-clause |
| [numexpr](https://github.com/pydata/numexpr) | 2.6.9 | Fast numerical expression evaluator for NumPy. / MIT |
| [numpy](http://numpy.scipy.org/) | 1.16.2 | Array processing for numbers, strings, records, and objects. / BSD 3-Clause |
| numpy-base | 1.16.2 | |
| [numpydoc](https://github.com/numpy/numpydoc) | 0.8.0 | Sphinx extension to support docstrings in Numpy format / BSD 3-Clause |
| [olefile](http://www.decalage.info/python/olefileio) | 0.46 | parse, read and write Microsoft OLE2 files / BSD 2-Clause |
| [openpyxl](https://openpyxl.readthedocs.io) | 2.6.1 | A Python library to read/write Excel 2010 xlsx/xlsm files / MIT |
| [openssl](http://www.openssl.org/) | 1.1.1b | OpenSSL is an open-source implementation of the SSL and TLS protocols / OpenSSL |
| [packaging](https://github.com/pypa/packaging) | 19.0 | Core utilities for Python packages / Apache 2.0 or BSD 2-Clause |
| [pandas](http://pandas.pydata.org) | 0.24.2 | High-performance, easy-to-use data structures and data analysis tools. / BSD 3-clause |
| [pandoc](http://pandoc.org/) | 2.2.3.2 | Universal markup converter (repackaged binaries). / GPL-2.0 |
| [pandocfilters](https://github.com/jgm/pandocfilters) | 1.4.2 | A python module for writing pandoc filters / BSD-3-Clause |
| [parso](https://github.com/davidhalter/parso) | 0.3.4 | A Python Parser / MIT |
| [partd](https://github.com/dask/partd) | 0.3.10 | Data structure for on-disk shuffle operations / BSD 3-Clause |
| [path.py](https://github.com/jaraco/path.py) | 11.5.0 | A module wrapper for os.path / MIT |
| [pathlib2](https://github.com/mcmtroffaes/pathlib2) | 2.3.3 | Fork of pathlib aiming to support the full stdlib Python API. / MIT |
| [patsy](https://github.com/pydata/patsy) | 0.5.1 | Describing statistical models in Python using symbolic formulas / BSD-2-Clause, PSF2 |
| [pcre](http://www.pcre.org/) | 8.43 | Regular expression pattern matching using the same syntax and semantics as Perl 5. / BSD 3-Clause |
| [pep8](http://pep8.readthedocs.org/) | 1.7.1 | Python style guide checker / MIT |
| [pexpect](http://pexpect.sourceforge.net/) | 4.6.0 | Pexpect makes Python a better tool for controlling other applications. / ISC |
| [pickleshare](https://github.com/pickleshare/pickleshare/) | 0.7.5 | Tiny ‘shelve’-like database with concurrency support / MIT |
| [pillow](https://pillow.readthedocs.io) | 5.4.1 | Pillow is the friendly PIL fork by Alex Clark and Contributors / PIL |
| [pip](https://pip.pypa.io/en/stable/) | 19.0.3 | PyPA recommended tool for installing Python packages / MIT |
| [pkginfo](https://code.launchpad.net/~tseaver/pkginfo/trunk) | 1.5.0.1 | Query metadatdata from sdists / bdists / installed packages. / MIT |
| [pluggy](https://github.com/pytest-dev/pluggy) | 0.9.0 | Plugin registration and hook calling for Python / MIT |
| [ply](http://www.dabeaz.com/ply/index.html) | 3.11 | Python Lex-Yacc / BSD 3-clause |
| [portaudio](http://www.portaudio.com/) | 19.6.0 | A cross platform, open-source, audio I/O library / MIT |
| [prometheus\_client](https://github.com/prometheus/client_python) | 0.6.0 | Python client for the Prometheus monitoring system / Apache 2.0 |
| [prompt\_toolkit](https://github.com/jonathanslenders/python-prompt-toolkit) | 1.0.15 | Library for building powerful interactive command lines in Python / BSD 3-clause |
| [psutil](https://github.com/giampaolo/psutil) | 5.6.1 | A cross-platform process and system utilities module for Python / BSD 3-Clause |
| [ptyprocess](https://github.com/pexpect/ptyprocess) | 0.6.0 | Run a subprocess in a pseudo terminal / ISC |
| [py](https://github.com/pytest-dev/py) | 1.8.0 | library with cross-python path, ini-parsing, io, code, log facilities / MIT |
| [py-lief](https://lief.quarkslab.com/) | 0.9.0 | A cross platform library to parse, modify and abstract ELF, PE and MachO formats. / Apache 2.0 |
| [pyaudio](http://people.csail.mit.edu/hubert/pyaudio/) | 0.2.11 | Bindings for PortAudio v19, the cross-platform audio stream library / MIT |
| [pycodestyle](https://pycodestyle.readthedocs.io/) | 2.5.0 | Python style guide checker / MIT |
| [pycosat](https://github.com/ContinuumIO/pycosat) | 0.6.3 | Bindings to picosat (a SAT solver) / MIT |
| [pycparser](https://github.com/eliben/pycparser) | 2.19 | Complete C99 parser in pure Python / BSD 3-clause |
| [pycrypto](http://www.pycrypto.org/) | 2.6.1 | Cryptographic modules for Python. / Public Domain |
| [pycurl](http://pycurl.sourceforge.net/) | 7.43.0.2 | A Python Interface To The cURL library / LGPL, MIT |
| [pyflakes](https://github.com/PyCQA/pyflakes) | 2.1.1 | Pyflakes analyzes programs and detects various errors. / MIT |
| [pygments](http://pygments.org/) | 2.3.1 | Generic syntax highlighting package / BSD 2-clause |
| [pylint](http://www.pylint.org/) | 1.9.2 | python code static checker / GPL |
| [pyodbc](https://github.com/mkleehammer/pyodbc) | 4.0.26 | DB API Module for ODBC / MIT |
| [pyopenssl](https://github.com/pyca/pyopenssl) | 19.0.0 | Python wrapper module around the OpenSSL library / Apache 2.0 |
| [pyparsing](http://pyparsing.wikispaces.com/) | 2.3.1 | Create and execute simple grammars / MIT |
| [pyqt](http://www.riverbankcomputing.co.uk/software/pyqt) | 5.9.2 | Python binding of the cross-platform GUI toolkit Qt. / Commercial, GPL-2.0, GPL-3.0 |
| [pyrsistent](http://github.com/tobgu/pyrsistent/) | 0.14.11 | Persistent/Functional/Immutable data structures / MIT |
| [pysocks](https://github.com/Anorov/PySocks) | 1.6.8 | A Python SOCKS client module. See [Anorov/PySocks](https://github.com/Anorov/PySocks) for more information. / BSD 3-Clause |
| [pytables](http://www.pytables.org) | 3.5.1 | Brings together Python, HDF5 and NumPy to easily handle large amounts of data. / BSD 3-Clause |
| [pytest](https://docs.pytest.org/en/latest/) | 4.3.1 | Simple and powerful testing with Python. / MIT |
| [python](http://www.python.org/) | 2.7.16 | General purpose programming language / PSF |
| [python-dateutil](https://dateutil.readthedocs.org/) | 2.8.0 | Extensions to the standard Python datetime module. / BSD 3 Clause |
| python-libarchive-c | 2.8 | |
| python.app | 2 | Proxy on OS X letting Python libraries hook into the gui event loop / BSD |
| [pytz](http://pythonhosted.org/pytz/) | 2018.9 | World timezone definitions, modern and historical. / MIT |
| [pywavelets](https://github.com/PyWavelets/pywt) | 1.0.2 | Discrete Wavelet Transforms in Python. / MIT |
| [pyyaml](http://pyyaml.org/wiki/PyYAML) | 5.1 | YAML parser and emitter for Python / MIT |
| [pyzmq](https://github.com/zeromq/pyzmq) | 18.0.0 | Python bindings for zeromq / BSD 3-clause |
| [qt](http://qt-project.org) | 5.9.7 | Qt is a cross-platform application and UI framework. / LGPL-3.0 |
| [qtawesome](https://github.com/spyder-ide/qtawesome) | 0.5.7 | Iconic fonts in PyQt and PySide applications / MIT |
| [qtconsole](http://jupyter.org) | 4.4.3 | Jupyter Qt console / BSD 3-Clause |
| [qtpy](https://github.com/spyder-ide/qtpy) | 1.7.0 | Abstraction layer for PyQt5/PyQt4/PySide / MIT |
| [readline](https://cnswww.cns.cwru.edu/php/chet/readline/rltop.html) | 7.0 | library for editing command lines as they are typed in / GPL-3.0 |
| [requests](http://python-requests.org) | 2.21.0 | Python HTTP for Humans / Apache 2.0 |
| [rope](https://github.com/python-rope/rope) | 0.12.0 | A python refactoring library… / GPL 2.0 |
| [ruamel\_yaml](https://bitbucket.org/ruamel/yaml) | 0.15.46 | A patched copy of ruamel.yaml. / MIT |
| [scandir](https://github.com/benhoyt/scandir) | 1.10.0 | scandir, a better directory iterator and faster os.walk() / BSD 3-Clause |
| [scikit-image](http://scikit-image.org/) | 0.14.2 | Image processing routines for SciPy. / BSD 3-Clause |
| [scikit-learn](http://scikit-learn.org/) | 0.20.3 | A set of python modules for machine learning and data mining / BSD 3-Clause |
| [scipy](http://www.scipy.org/) | 1.2.1 | Scientific Library for Python / BSD 3-Clause |
| [seaborn](https://seaborn.pydata.org) | 0.9.0 | Statistical data visualization / BSD 3-Clause |
| [send2trash](https://github.com/hsoft/send2trash) | 1.5.0 | Python library to natively send files to Trash (or Recycle bin) on all platforms. / BSD-3-Clause |
| [setuptools](https://github.com/pypa/setuptools) | 40.8.0 | Download, build, install, upgrade, and uninstall Python packages / MIT |
| [simplegeneric](http://cheeseshop.python.org/pypi/simplegeneric) | 0.8.1 | Simple generic functions (similar to Python’s own len(), pickle.dump(), etc.) / Zope Public |
| [singledispatch](http://docs.python.org/3/library/functools.html#functools.singledispatch) | 3.4.0.3 | Transforms a function into a single-dispatch generic function / MIT |
| [sip](http://www.riverbankcomputing.com/software/sip/intro) | 4.19.8 | Create Python bindings for C and C++ libraries / GPL-3.0 |
| [six](http://pypi.python.org/pypi/six/) | 1.12.0 | Python 2 and 3 compatibility utilities / MIT |
| [snappy](https://github.com/google/snappy) | 1.1.7 | A fast compressor/decompressor / BSD 3-clause |
| [snowballstemmer](https://github.com/shibukawa/snowball_py) | 1.2.1 | Snowball stemming library collection for Python / BSD-2-Clause |
| [sortedcollections](http://www.grantjenks.com/docs/sortedcollections/) | 1.1.2 | Python Sorted Collections / Apache-2.0 |
| [sortedcontainers](http://www.grantjenks.com/docs/sortedcontainers/) | 2.1.0 | Python Sorted Container Types: SortedList, SortedDict, and SortedSet / Apache 2.0 |
| [soupsieve](http://facelessuser.github.io/soupsieve) | 1.8 | A modern CSS selector implementation for BeautifulSoup / MIT |
| [sphinx](http://www.sphinx-doc.org) | 1.8.5 | Sphinx is a tool that makes it easy to create intelligent and beautiful documentation / BSD 2-clause |
| sphinxcontrib | 1.0 | Python namespace for sphinxcontrib / BSD |
| [sphinxcontrib-websupport](https://pypi.python.org/pypi/sphinxcontrib-websupport) | 1.1.0 | Sphinx API for Web Apps / BSD-2-Clause |
| [spyder](https://www.spyder-ide.org/) | 3.3.3 | The Scientific Python Development Environment / MIT |
| [spyder-kernels](https://github.com/spyder-ide/spyder-kernels) | 0.4.2 | Jupyter kernels for the Spyder console / MIT |
| [sqlalchemy](http://www.sqlalchemy.org/) | 1.3.1 | Database Abstraction Library. / MIT |
| [sqlite](http://www.sqlite.org/) | 3.27.2 | Implements a self-contained, zero-configuration, SQL database engine. / Public-Domain (`<http://www.sqlite.org/copyright.html>`) |
| [ssl\_match\_hostname](http://bitbucket.org/brandon/backports.ssl_match_hostname) | 3.7.0.1 | The ssl.match\_hostname() function from Python 3.5 / PSF 2 |
| [statsmodels](https://www.statsmodels.org) | 0.9.0 | Statistical computations and models for use with SciPy / BSD 3-Clause |
| [subprocess32](https://github.com/google/python-subprocess32) | 3.5.3 | A backport of the subprocess module from Python 3.2/3.3 for use on 2.x. / PSF 2 |
| [sympy](http://sympy.org) | 1.3 | Python library for symbolic mathematics / 3-clause BSD |
| [tblib](https://github.com/ionelmc/python-tblib) | 1.3.2 | Traceback serialization library. / BSD 2-Clause |
| [terminado](https://github.com/jupyter/terminado) | 0.8.1 | Terminals served by tornado websockets / BSD 2-clause |
| [testpath](https://testpath.readthedocs.io) | 0.4.2 | Testpath is a collection of utilities for Python code working with files and commands. / BSD-3-Clause |
| [tk](http://www.tcl.tk/) | 8.6.8 | A dynamic programming language with GUI support. Bundles Tcl and Tk. / Tcl/Tk |
| [toolz](http://toolz.readthedocs.org/) | 0.9.0 | A functional standard library for Python. / BSD 3-Clause |
| [tornado](http://www.tornadoweb.org/) | 5.1.1 | A Python web framework and asynchronous networking library, originally developed at FriendFeed. / Apache 2.0 |
| [tqdm](https://pypi.python.org/pypi/tqdm) | 4.31.1 | A Fast, Extensible Progress Meter / MPLv2.0, MIT |
| [traceback2](https://github.com/testing-cabal/traceback2) | 1.4.0 | Backports of the traceback module / PSF 2.0 |
| [traitlets](http://ipython.org/) | 4.3.2 | Configuration system for Python applications / BSD 3-clause |
| [typing](https://docs.python.org/3.5/library/typing.html) | 3.6.6 | Type Hints for Python - backport for `Python<3.5` / PSF |
| [unicodecsv](https://github.com/jdunck/python-unicodecsv) | 0.14.1 | Drop-in replacement for csv module which supports unicode strings / BSD |
| [unittest2](http://pypi.python.org/pypi/unittest2) | 1.1.0 | The new features in unittest backported to Python 2.4+ / BSD |
| [unixodbc](http://www.unixodbc.org/) | 2.3.7 | ODBC on non MS Windows platforms / LGPL-2.1 |
| [urllib3](https://urllib3.readthedocs.io/) | 1.24.1 | HTTP library with thread-safe connection pooling, file post, and more. / MIT |
| [wcwidth](https://github.com/jquast/wcwidth) | 0.1.7 | Measures number of Terminal column cells of wide-character codes. / MIT |
| [webencodings](https://github.com/gsnedders/python-webencodings) | 0.5.1 | Character encoding aliases for legacy web content / BSD 3-Clause |
| [werkzeug](http://werkzeug.pocoo.org/) | 0.14.1 | The Python WSGI Utility Library. / BSD 3-Clause |
| [wheel](https://github.com/pypa/wheel) | 0.33.1 | A built-package format for Python. / MIT |
| [widgetsnbextension](http://ipython.org) | 3.4.2 | Interactive Widgets for Jupyter / BSD 3-clause |
| [wrapt](https://github.com/GrahamDumpleton/wrapt) | 1.11.1 | Module for decorators, wrappers and monkey patching / BSD 2-Clause |
| [wurlitzer](https://github.com/minrk/wurlitzer) | 1.0.2 | Capture C-level stdout/stderr in Python / MIT |
| [xlrd](http://www.python-excel.org/) | 1.2.0 | Library for developers to extract data from Microsoft Excel (tm) spreadsheet files / BSD 3-Clause and BSD with advertising |
| [xlsxwriter](https://xlsxwriter.readthedocs.io/) | 1.1.5 | A Python module for creating Excel XLSX files / BSD 2-Clause |
| [xlwings](http://xlwings.org/) | 0.15.4 | Interact with Excel from Python and vice versa / 3-clause BSD |
| [xlwt](http://www.python-excel.org/) | 1.2.0 | Writing data and formatting information to Excel files / BSD |
| [xz](http://tukaani.org/xz/) | 5.2.4 | Data compression software with high compression ratio / LGPL-2.1 and GPL-2.0 |
| [yaml](http://pyyaml.org/wiki/LibYAML) | 0.1.7 | A C library for parsing and emitting YAML. / MIT |
| [zeromq](http://zeromq.org) | 4.3.1 | A high-performance asynchronous messaging library. / LGPL 3 |
| [zict](http://github.com/mrocklin/zict) | 0.1.4 | Composable Dictionary Classes / BSD 3-Clause |
| [zipp](https://github.com/jaraco/zipp) | 0.3.3 | A pathlib-compatible Zipfile object wrapper / MIT |
| [zlib](http://zlib.net/) | 1.2.11 | Massively spiffy yet delicately unobtrusive compression library / zlib |
| [zstd](http://www.zstd.net) | 1.3.7 | Zstandard - Fast real-time compression algorithm / BSD 3-Clause |
| Name | Version | Summary / License |
|---|---|---|
| [alabaster](http://www.sphinx-doc.org/en/stable/index.html) | 0.7.12 | Configurable, Python 2+3 compatible Sphinx theme. / BSD 3-Clause |
| [anaconda-client](http://anaconda.org) | 1.7.2 | anaconda.org command line client library / BSD 3-clause |
| [anaconda-project](https://github.com/Anaconda-Platform/anaconda-project) | 0.8.2 | Tool for encapsulating, running, and reproducing data science projects / BSD 3-Clause |
| [asn1crypto](https://github.com/wbond/asn1crypto) | 0.24.0 | Python ASN.1 library with a focus on performance and a pythonic API / MIT |
| [astroid](https://www.astroid.org/) | 1.6.5 | A abstract syntax tree for Python with inference support. / LGPL 2.1 |
| [astropy](http://www.astropy.org/) | 2.0.9 | Community-developed Python Library for Astronomy / BSD |
| [atomicwrites](https://github.com/untitaker/python-atomicwrites) | 1.3.0 | Atomic file writes / MIT |
| [attrs](https://attrs.readthedocs.io/en/stable/) | 19.1.0 | attrs is the Python package that will bring back the joy of writing classes by relieving you from the drudgery of implementing object protocols (aka dunder methods). / MIT |
| [babel](http://babel.pocoo.org/) | 2.6.0 | Utilities to internationalize and localize Python applications / BSD 3-clause |
| [backports](https://bitbucket.org/brandon/backports) | 1.0 | / BSD |
| [backports.functools\_lru\_cache](https://github.com/jaraco/backports.functools_lru_cache) | 1.5 | Backport of functools.lru\_cache from Python 3.3 as published at ActiveState. / MIT |
| [backports.os](https://github.com/pjdelport/backports.os) | 0.1.1 | Backport of new features in Python’s os module / Python Software Foundation |
| [backports.shutil\_get\_terminal\_size](https://github.com/chrippa/backports.shutil_get_terminal_size) | 1.0.0 | A backport of the get\_terminal\_size function from Python 3.3’s shutil. / MIT |
| [backports\_abc](https://github.com/cython/backports_abc) | 0.5 | A backport of recent additions to the collections.abc module. / PSF 2 |
| [beautifulsoup4](http://www.crummy.com/software/BeautifulSoup/) | 4.7.1 | Python library designed for screen-scraping / MIT |
| [bitarray](https://github.com/ilanschnell/bitarray) | 0.8.3 | efficient arrays of booleans – C extension / PSF |
| [bkcharts](http://github.com/bokeh/bkcharts) | 0.2 | High level chart types built on top of Bokeh / BSD 3-Clause |
| blas | 1.0 | |
| [bleach](https://github.com/mozilla/bleach) | 3.1.0 | Easy, whitelist-based HTML-sanitizing tool / Apache-2.0 |
| [blosc](https://github.com/Blosc/c-blosc) | 1.15.0 | A blocking, shuffling and loss-less compression library that can be faster than memcpy() / BSD 3-Clause |
| [bokeh](http://bokeh.pydata.org/) | 1.0.4 | Statistical and novel interactive HTML plots for Python / BSD 3-Clause |
| [boto](https://github.com/boto/boto/) | 2.49.0 | Amazon Web Services Library / MIT |
| [bottleneck](http://berkeleyanalytics.com/bottleneck) | 1.2.1 | Fast NumPy array functions written in Cython. / BSD 2-Clause |
| [bzip2](http://www.bzip.org/) | 1.0.6 | high-quality data compressor / bzip2 |
| [ca-certificates](https://github.com/conda-forge/ca-certificates-feedstock) | 2019.1.23 | Certificates for use with other packages. / ISC |
| [cairo](http://cairographics.org/) | 1.14.12 | Cairo is a 2D graphics library with support for multiple output devices. / LGPL 2.1 or MPL 1.1 |
| [cdecimal](http://www.bytereef.org/mpdecimal/index.html) | 2.3 | Fast drop-in replacement for decimal.py / BSD 2-Clause |
| [certifi](http://certifi.io/) | 2019.3.9 | Python package for providing Mozilla’s CA Bundle. / ISC |
| [cffi](https://bitbucket.org/cffi/cffi) | 1.12.2 | Foreign Function Interface for Python calling C code. / MIT |
| [chardet](https://github.com/chardet/chardet) | 3.0.4 | Universal character encoding detector / LGPL2 |
| [click](https://palletsprojects.com/p/click) | 7.0 | Python composable command line interface toolkit / BSD-3-Clause |
| [cloudpickle](https://github.com/cloudpipe/cloudpickle) | 0.8.0 | Extended pickling support for Python objects / BSD 3-Clause |
| [clyent](https://github.com/Anaconda-Platform/clyent) | 1.2.2 | Command line client library for windows and posix / BSD 3-Clause |
| [colorama](https://github.com/tartley/colorama) | 0.4.1 | Cross-platform colored terminal text / BSD-3-Clause |
| [conda](https://conda.io) | 4.6.11 | OS-agnostic, system-level binary package and environment manager. / BSD 3-Clause |
| [conda-build](https://github.com/conda/conda-build) | 3.17.8 | tools for building conda packages / BSD 3-Clause |
| [conda-env](https://github.com/conda/conda-env) | 2.6.0 | Tools for interacting with conda environments. / BSD 3-Clause |
| [configparser](http://docs.python.org/3/library/configparser.html) | 3.7.3 | This library brings the updated configparser from Python 3.5 to Python 2.6-3.5 / MIT |
| [contextlib2](http://contextlib2.readthedocs.org) | 0.5.5 | Backports and enhancements for the contextlib module / PSF |
| [cryptography](https://github.com/pyca/cryptography) | 2.6.1 | Provides cryptographic recipes and primitives to Python developers / Apache 2.0 or BSD 3-Clause, PSF 2 |
| [curl](http://curl.haxx.se/) | 7.64.0 | tool and library for transferring data with URL syntax / MIT/X derivate (`<http://curl.haxx.se/docs/copyright.html>`) |
| [cycler](http://matplotlib.org/cycler) | 0.10.0 | Composable style cycles. / BSD 3-Clause |
| [cython](http://www.cython.org/) | 0.29.6 | The Cython compiler for writing C extensions for the Python language / Apache-2.0 |
| [cytoolz](https://github.com/pytoolz/cytoolz) | 0.9.0.1 | Cython implementation of Toolz. High performance functional utilities. / BSD 3-Clause |
| [dask](http://github.com/dask/dask/) | 1.1.4 | Parallel Python with task scheduling / BSD 3-Clause |
| [dask-core](http://github.com/dask/dask/) | 1.1.4 | Parallel Python with task scheduling / BSD 3-Clause |
| [decorator](https://github.com/micheles/decorator) | 4.4.0 | Better living through Python with decorators. / BSD 3-Clause |
| [defusedxml](https://bitbucket.org/tiran/defusedxml) | 0.5.0 | XML bomb protection for Python stdlib modules / PSF 2.0 |
| [distributed](http://distributed.readthedocs.io/en/latest/) | 1.26.0 | Distributed computing with Dask / BSD 3-Clause |
| [docutils](http://docutils.sourceforge.net/) | 0.14 | Docutils – Python Documentation Utilities / Public Domain Dedictation and BSD 2-Clause and PSF 2.1.1 and GPL 3.0 |
| [entrypoints](https://github.com/takluyver/entrypoints) | 0.3 | Discover and load entry points from installed packages. / MIT License |
| [enum34](https://bitbucket.org/stoneleaf/enum34) | 1.1.6 | Python 3.4 Enum backported to 3.3, 3.2, 3.1, 2.7, 2.6, 2.5, and 2.4 / BSD 3-Clause |
| [et\_xmlfile](https://bitbucket.org/openpyxl/et_xmlfile) | 1.0.1 | An implementation of lxml.xmlfile for the standard library / MIT |
| [expat](http://expat.sourceforge.net/) | 2.2.6 | Expat XML parser library in C. / MIT |
| [fastcache](https://github.com/pbrady/fastcache) | 1.0.2 | C implementation of Python 3 lru\_cache / MIT |
| [filelock](https://github.com/benediktschmitt/py-filelock) | 3.0.10 | A platform independent file lock. / Public Domain |
| [flask](http://flask.pocoo.org) | 1.0.2 | A microframework based on Werkzeug, Jinja2 and good intentions. / BSD 3-Clause |
| [fontconfig](http://www.freedesktop.org/wiki/Software/fontconfig/) | 2.13.0 | A library for configuring and customizing font access. / MIT |
| [freetype](https://www.freetype.org/) | 2.9.1 | A Free, High-Quality, and Portable Font Engine / GPL-2.0 and FreeType |
| [funcsigs](http://funcsigs.readthedocs.org) | 1.0.2 | Python function signatures from PEP362 for Python 2.6, 2.7 and 3.2+. / Apache 2.0 |
| [functools32](https://github.com/MiCHiLU/python-functools32) | 3.2.3.2 | Backport of the functools module from Python 3.2.3 for use on 2.7 and PyPy. / PSF license |
| [future](http://python-future.org) | 0.17.1 | Clean single-source support for Python 3 and 2 / MIT |
| [futures](https://github.com/agronholm/pythonfutures) | 3.2.0 | Backport of the concurrent.futures package from Python 3.2 / PSF |
| [get\_terminal\_size](https://github.com/chrippa/backports.shutil_get_terminal_size) | 1.0.0 | Get the size of the terminal window. / MIT |
| [gevent](http://www.gevent.org/) | 1.4.0 | Coroutine-based network library / MIT |
| [glib](https://developer.gnome.org/glib/) | 2.56.2 | Provides core application building blocks for libraries and applications written in C. / LGPL-2.1 |
| [glob2](https://github.com/miracle2k/python-glob2) | 0.6 | Version of the glob module that supports recursion via \*\*, and can capture patterns. / BSD-2-Clause |
| [gmp](http://gmplib.org/) | 6.1.2 | The GNU multiprecision library. / GPL 2 and LGPL 3 |
| [gmpy2](https://pypi.python.org/pypi/gmpy2) | 2.0.8 | GMP/MPIR, MPFR, and MPC interface to Python 2.6+ and 3.x / LGPL 3 |
| [greenlet](https://github.com/python-greenlet/greenlet) | 0.4.15 | Lightweight in-process concurrent programming / MIT |
| [grin](http://pypi.python.org/pypi/grin) | 1.2.1 | Enhanced grep-like tool / BSD 3-Clause |
| [h5py](http://www.h5py.org/) | 2.8.0 | Read and write HDF5 files from Python. / BSD-3-Clause |
| [hdf5](http://www.hdfgroup.org/HDF5/) | 1.10.2 | HDF5 is a data model, library, and file format for storing and managing data / HDF5 |
| [heapdict](http://stutzbachenterprises.com/) | 1.0.0 | A heap with decrease-key and increase-key operations / BSD 3-Clause |
| [html5lib](https://github.com/html5lib/html5lib-python) | 1.0.1 | HTML parser based on the WHATWG HTML specification / MIT |
| [icu](http://site.icu-project.org/) | 58.2 | International Components for Unicode. / MIT |
| [idna](https://github.com/kjd/idna) | 2.8 | Internationalized Domain Names in Applications (IDNA). / BSD Like |
| [imageio](http://imageio.github.io) | 2.5.0 | a Python library for reading and writing image data / BSD 2-Clause |
| [imagesize](https://github.com/shibukawa/imagesize_py) | 1.1.0 | Getting image size from png/jpeg/jpeg2000/gif file / MIT |
| [importlib\_metadata](http://importlib-metadata.readthedocs.io) | 0.8 | A library to access the metadata for a Python package / APACHE-2.0 |
| [ipaddress](https://github.com/phihag/ipaddress) | 1.0.22 | IPv4/IPv6 manipulation library / PSF 2 |
| [ipykernel](https://ipython.org) | 4.10.0 | IPython Kernel for Jupyter / BSD-3-Clause |
| [ipython](https://ipython.org/) | 5.8.0 | IPython: Productive Interactive Computing / BSD-3-Clause |
| [ipython\_genutils](http://ipython.org) | 0.2.0 | vestigial utilities from IPython / BSD 3-Clause |
| [ipywidgets](https://github.com/ipython/ipywidgets) | 7.4.2 | Jupyter Interactive Widgets / BSD 3-clause |
| [isort](https://github.com/timothycrosley/isort) | 4.3.16 | A Python utility / library to sort Python imports. / MIT |
| [itsdangerous](https://github.com/pallets/itsdangerous) | 1.1.0 | Various helpers to pass trusted data to untrusted environments. / BSD 3-Clause |
| [jbig](https://www.cl.cam.ac.uk/~mgk25/jbigkit) | 2.1 | Implementation of the JBIG1 data compression standard / GPL-2.0 |
| [jdcal](https://github.com/phn/jdcal) | 1.4 | Julian dates from proleptic Gregorian and Julian calendars. / BSD 2-Clause |
| [jedi](https://github.com/davidhalter/jedi/) | 0.13.3 | An autocompletion tool for Python that can be used for text editors. / MIT |
| [jinja2](http://jinja.pocoo.org) | 2.10 | An easy to use stand-alone template engine written in pure python. / 3-Clause BSD |
| [jpeg](http://www.ijg.org/) | 9b | read/write jpeg COM, EXIF, IPTC medata / Custom free software license |
| [jsonschema](https://github.com/Julian/jsonschema) | 3.0.1 | An implementation of JSON Schema validation for Python / MIT |
| [jupyter](http://jupyter.org) | 1.0.0 | Jupyter metapackage. Install all the Jupyter components in one go. / BSD 3-Clause |
| [jupyter\_client](http://jupyter.org) | 5.2.4 | Jupyter protocol implementation and client libraries / BSD 3-clause |
| [jupyter\_console](http://jupyter.org) | 5.2.0 | Jupyter terminal console / BSD-3-Clause |
| [jupyter\_core](http://jupyter.org) | 4.4.0 | Core common functionality of Jupyter projects. / BSD 3-clause |
| [kiwisolver](https://github.com/nucleic/kiwi) | 1.0.1 | A fast implementation of the Cassowary constraint solver / BSD 3-Clause |
| [krb5](http://web.mit.edu/kerberos/) | 1.16.1 | A network authentication protocol. / MIT |
| [lazy-object-proxy](https://github.com/ionelmc/python-lazy-object-proxy) | 1.3.1 | A fast and thorough lazy object proxy. / BSD 2-Clause |
| [libarchive](http://www.libarchive.org/) | 3.3.3 | Multi-format archive and compression library / BSD 2-Clause |
| [libcurl](http://curl.haxx.se/) | 7.64.0 | tool and library for transferring data with URL syntax / MIT/X derivate (`<http://curl.haxx.se/docs/copyright.html>`) |
| [libedit](http://thrysoee.dk/editline/) | 3.1.20181209 | Editline Library (libedit) / NetBSD |
| [libffi](https://sourceware.org/libffi/) | 3.2.1 | A Portable Foreign Function Interface Library. / Custom |
| [libgcc-ng](https://gcc.gnu.org/onlinedocs/gccint/Libgcc.html) | 8.2.0 | The GCC low-level runtime library / GPL |
| [libgfortran-ng](https://gcc.gnu.org/) | 7.3.0 | The GNU Fortran Runtime Library / GPL |
| [libopenblas](http://www.openblas.net/) | 0.2.20 | An Optimized BLAS library / BSD |
| [libpng](http://www.libpng.org/pub/png/libpng.html) | 1.6.36 | PNG reference library. / zlib/libpng |
| [libsodium](http://libsodium.org) | 1.0.16 | A modern and easy-to-use crypto library. / ISC |
| [libssh2](https://www.libssh2.org/) | 1.8.0 | the SSH library / BSD 3-Clause |
| [libstdcxx-ng](https://gcc.gnu.org/) | 8.2.0 | The GNU C++ Runtime Library / GPL3 with runtime exception |
| [libtiff](http://www.libtiff.org/) | 4.0.10 | Support for the Tag Image File Format (TIFF). / HPND |
| [libuuid](http://sourceforge.net/projects/libuuid/) | 1.0.3 | Portable uuid C library. / BSD 3-Clause |
| [libxcb](http://xcb.freedesktop.org/) | 1.13 | This is the C-language Binding (XCB) package to the X Window System protocol / MIT |
| [libxml2](http://xmlsoft.org/) | 2.9.9 | The XML C parser and toolkit of Gnome / MIT |
| [libxslt](http://xmlsoft.org/XSLT/) | 1.1.33 | The XSLT C library developed for the GNOME project / MIT |
| [linecache2](https://github.com/testing-cabal/linecache2) | 1.0.0 | Backport of the linecache module / PSF 1.0 |
| [locket](https://github.com/mwilliamson/locket.py) | 0.2.0 | File-based locks for Python for Linux and Windows / BSD 2-Clause |
| [lxml](http://lxml.de/) | 4.3.2 | Pythonic binding for the C libraries libxml2 and libxslt. / BSD 3-Clause, GPL-2.0, ZPL-2.0, and ElementTree |
| [lz4-c](https://www.lz4.org) | 1.8.1.2 | Extremely Fast Compression algorithm / BSD 2-clause |
| [lzo](http://www.oberhumer.com/opensource/lzo/) | 2.10 | LZO is a portable lossless data compression library written in ANSI C. / GPL v2+ |
| [markupsafe](https://www.palletsprojects.com/p/markupsafe) | 1.1.1 | A Python module that implements the jinja2.Markup string / BSD-3-Clause |
| [matplotlib](http://matplotlib.org/) | 2.2.3 | Publication quality figures in Python / PSF-based |
| [mccabe](https://github.com/PyCQA/mccabe) | 0.6.1 | McCabe complexity checker for Python / MIT |
| [mistune](https://github.com/lepture/mistune) | 0.8.4 | The fastest markdown parser in pure Python. / BSD 3-Clause |
| [more-itertools](https://github.com/erikrose/more-itertools) | 5.0.0 | More routines for operating on iterables, beyond itertools / MIT |
| [mpc](http://www.multiprecision.org/) | 1.1.0 | A C library for the arithmetic of complex numbers with arbitrarily high precision. / LGPL 3 |
| [mpfr](http://www.mpfr.org/) | 4.0.1 | The MPFR library is a C library for multiple-precision floating-point computations with correct rounding. / LGPL 3 |
| [mpmath](http://mpmath.org) | 1.1.0 | Python library for arbitrary-precision floating-point arithmetic / BSD 3-Clause |
| [msgpack-python](http://msgpack.org/) | 0.6.1 | MessagePack (de)serializer. / Apache 2.0 |
| [multipledispatch](https://github.com/mrocklin/multipledispatch/) | 0.6.0 | Multiple dispatch in Python / BSD 3-Clause |
| [nbconvert](http://jupyter.org) | 5.4.1 | Converting Jupyter Notebooks / BSD-3-Clause |
| [nbformat](http://jupyter.org) | 4.4.0 | The reference implementation of the Jupyter Notebook format / BSD 3-clause |
| [ncurses](http://www.gnu.org/software/ncurses/) | 6.1 | Library for text-based user interfaces / Free software (MIT-like) |
| [networkx](https://networkx.github.io/) | 2.2 | Python package for creating and manipulating complex networks / BSD 3-Clause |
| [nltk](http://nltk.org/) | 3.4 | Build Python programs to work with human language data / Apache 2.0 |
| [nose](http://readthedocs.org/docs/nose/) | 1.3.7 | Nose extends unittest to make testing easier / LGPL-2.1 |
| [notebook](http://jupyter.org) | 5.7.8 | Jupyter Notebook / BSD 3-clause |
| [numexpr](https://github.com/pydata/numexpr) | 2.6.7 | Fast numerical expression evaluator for NumPy. / MIT |
| [numpy](http://numpy.scipy.org/) | 1.14.5 | Array processing for numbers, strings, records, and objects. / BSD 3-Clause |
| numpy-base | 1.14.5 | |
| [numpydoc](https://github.com/numpy/numpydoc) | 0.8.0 | Sphinx extension to support docstrings in Numpy format / BSD 3-Clause |
| [olefile](http://www.decalage.info/python/olefileio) | 0.46 | parse, read and write Microsoft OLE2 files / BSD 2-Clause |
| [openblas](http://www.openblas.net/) | 0.2.20 | An Optimized BLAS library / BSD |
| openblas-devel | 0.2.20 | |
| [openpyxl](https://openpyxl.readthedocs.io) | 2.6.1 | A Python library to read/write Excel 2010 xlsx/xlsm files / MIT |
| [openssl](http://www.openssl.org/) | 1.1.1b | OpenSSL is an open-source implementation of the SSL and TLS protocols / OpenSSL |
| [packaging](https://github.com/pypa/packaging) | 19.0 | Core utilities for Python packages / Apache 2.0 or BSD 2-Clause |
| [pandas](http://pandas.pydata.org) | 0.24.2 | High-performance, easy-to-use data structures and data analysis tools. / BSD 3-clause |
| [pandoc](http://pandoc.org/) | 2.0.0.1 | Universal markup converter (repackaged binaries). / GPL-2.0 |
| [pandocfilters](https://github.com/jgm/pandocfilters) | 1.4.2 | A python module for writing pandoc filters / BSD-3-Clause |
| [parso](https://github.com/davidhalter/parso) | 0.3.4 | A Python Parser / MIT |
| [partd](https://github.com/dask/partd) | 0.3.10 | Data structure for on-disk shuffle operations / BSD 3-Clause |
| [patchelf](http://nixos.org/patchelf.html) | 0.9 | A small utility to modify the dynamic linker and RPATH of ELF executables. / GPL 3 |
| [path.py](https://github.com/jaraco/path.py) | 11.5.0 | A module wrapper for os.path / MIT |
| [pathlib2](https://github.com/mcmtroffaes/pathlib2) | 2.3.3 | Fork of pathlib aiming to support the full stdlib Python API. / MIT |
| [patsy](https://github.com/pydata/patsy) | 0.5.1 | Describing statistical models in Python using symbolic formulas / BSD-2-Clause, PSF2 |
| [pcre](http://www.pcre.org/) | 8.43 | Regular expression pattern matching using the same syntax and semantics as Perl 5. / BSD 3-Clause |
| [pep8](http://pep8.readthedocs.org/) | 1.7.1 | Python style guide checker / MIT |
| [pexpect](http://pexpect.sourceforge.net/) | 4.6.0 | Pexpect makes Python a better tool for controlling other applications. / ISC |
| [pickleshare](https://github.com/pickleshare/pickleshare/) | 0.7.5 | Tiny ‘shelve’-like database with concurrency support / MIT |
| [pillow](https://pillow.readthedocs.io) | 5.3.0 | Pillow is the friendly PIL fork by Alex Clark and Contributors / PIL |
| [pip](https://pip.pypa.io/en/stable/) | 19.0.3 | PyPA recommended tool for installing Python packages / MIT |
| [pixman](http://www.pixman.org/) | 0.34.0 | A low-level software library for pixel manipulation. / MIT |
| [pkginfo](https://code.launchpad.net/~tseaver/pkginfo/trunk) | 1.5.0.1 | Query metadatdata from sdists / bdists / installed packages. / MIT |
| [pluggy](https://github.com/pytest-dev/pluggy) | 0.9.0 | Plugin registration and hook calling for Python / MIT |
| [ply](http://www.dabeaz.com/ply/index.html) | 3.11 | Python Lex-Yacc / BSD 3-clause |
| [prometheus\_client](https://github.com/prometheus/client_python) | 0.6.0 | Python client for the Prometheus monitoring system / Apache 2.0 |
| [prompt\_toolkit](https://github.com/jonathanslenders/python-prompt-toolkit) | 1.0.15 | Library for building powerful interactive command lines in Python / BSD 3-clause |
| [psutil](https://github.com/giampaolo/psutil) | 5.6.1 | A cross-platform process and system utilities module for Python / BSD 3-Clause |
| [ptyprocess](https://github.com/pexpect/ptyprocess) | 0.6.0 | Run a subprocess in a pseudo terminal / ISC |
| [py](https://github.com/pytest-dev/py) | 1.8.0 | library with cross-python path, ini-parsing, io, code, log facilities / MIT |
| [pycairo](http://cairographics.org/pycairo/) | 1.18.0 | Python bindings for the Cairo graphics library. / LGPL 2.1, MPL 1.1 |
| [pycodestyle](https://pycodestyle.readthedocs.io/) | 2.5.0 | Python style guide checker / MIT |
| [pycosat](https://github.com/ContinuumIO/pycosat) | 0.6.3 | Bindings to picosat (a SAT solver) / MIT |
| [pycparser](https://github.com/eliben/pycparser) | 2.19 | Complete C99 parser in pure Python / BSD 3-clause |
| [pycrypto](http://www.pycrypto.org/) | 2.6.1 | Cryptographic modules for Python. / Public Domain |
| [pycurl](http://pycurl.sourceforge.net/) | 7.43.0.2 | A Python Interface To The cURL library / LGPL, MIT |
| [pyflakes](https://github.com/PyCQA/pyflakes) | 2.1.1 | Pyflakes analyzes programs and detects various errors. / MIT |
| [pygments](http://pygments.org/) | 2.3.1 | Generic syntax highlighting package / BSD 2-clause |
| [pylint](http://www.pylint.org/) | 1.9.2 | python code static checker / GPL |
| [pyodbc](https://github.com/mkleehammer/pyodbc) | 4.0.26 | DB API Module for ODBC / MIT |
| [pyopenssl](https://github.com/pyca/pyopenssl) | 19.0.0 | Python wrapper module around the OpenSSL library / Apache 2.0 |
| [pyparsing](http://pyparsing.wikispaces.com/) | 2.3.1 | Create and execute simple grammars / MIT |
| [pyrsistent](http://github.com/tobgu/pyrsistent/) | 0.14.11 | Persistent/Functional/Immutable data structures / MIT |
| [pysocks](https://github.com/Anorov/PySocks) | 1.6.8 | A Python SOCKS client module. See [Anorov/PySocks](https://github.com/Anorov/PySocks) for more information. / BSD 3-Clause |
| [pytables](http://www.pytables.org) | 3.4.4 | Brings together Python, HDF5 and NumPy to easily handle large amounts of data. / BSD 3-Clause |
| [pytest](https://docs.pytest.org/en/latest/) | 4.3.1 | Simple and powerful testing with Python. / MIT |
| [python](http://www.python.org/) | 2.7.16 | General purpose programming language / PSF |
| [python-dateutil](https://dateutil.readthedocs.org/) | 2.8.0 | Extensions to the standard Python datetime module. / BSD 3 Clause |
| python-libarchive-c | 2.8 | |
| [pytz](http://pythonhosted.org/pytz/) | 2018.9 | World timezone definitions, modern and historical. / MIT |
| [pywavelets](https://github.com/PyWavelets/pywt) | 1.0.2 | Discrete Wavelet Transforms in Python. / MIT |
| [pyyaml](http://pyyaml.org/wiki/PyYAML) | 5.1 | YAML parser and emitter for Python / MIT |
| [pyzmq](https://github.com/zeromq/pyzmq) | 18.0.0 | Python bindings for zeromq / BSD 3-clause |
| [readline](https://cnswww.cns.cwru.edu/php/chet/readline/rltop.html) | 7.0 | library for editing command lines as they are typed in / GPL-3.0 |
| [requests](http://python-requests.org) | 2.21.0 | Python HTTP for Humans / Apache 2.0 |
| [ruamel\_yaml](https://bitbucket.org/ruamel/yaml) | 0.15.46 | A patched copy of ruamel.yaml. / MIT |
| [scandir](https://github.com/benhoyt/scandir) | 1.10.0 | scandir, a better directory iterator and faster os.walk() / BSD 3-Clause |
| [scikit-image](http://scikit-image.org/) | 0.14.1 | Image processing routines for SciPy. / BSD 3-Clause |
| [scikit-learn](http://scikit-learn.org/) | 0.19.1 | A set of python modules for machine learning and data mining / BSD 3-Clause |
| [scipy](http://www.scipy.org/) | 1.1.0 | Scientific Library for Python / BSD 3-Clause |
| [seaborn](https://seaborn.pydata.org) | 0.9.0 | Statistical data visualization / BSD 3-Clause |
| [send2trash](https://github.com/hsoft/send2trash) | 1.5.0 | Python library to natively send files to Trash (or Recycle bin) on all platforms. / BSD-3-Clause |
| [setuptools](https://github.com/pypa/setuptools) | 40.8.0 | Download, build, install, upgrade, and uninstall Python packages / MIT |
| [simplegeneric](http://cheeseshop.python.org/pypi/simplegeneric) | 0.8.1 | Simple generic functions (similar to Python’s own len(), pickle.dump(), etc.) / Zope Public |
| [singledispatch](http://docs.python.org/3/library/functools.html#functools.singledispatch) | 3.4.0.3 | Transforms a function into a single-dispatch generic function / MIT |
| [six](http://pypi.python.org/pypi/six/) | 1.12.0 | Python 2 and 3 compatibility utilities / MIT |
| [snappy](https://github.com/google/snappy) | 1.1.7 | A fast compressor/decompressor / BSD 3-clause |
| [snowballstemmer](https://github.com/shibukawa/snowball_py) | 1.2.1 | Snowball stemming library collection for Python / BSD-2-Clause |
| [sortedcollections](http://www.grantjenks.com/docs/sortedcollections/) | 1.1.2 | Python Sorted Collections / Apache-2.0 |
| [sortedcontainers](http://www.grantjenks.com/docs/sortedcontainers/) | 2.1.0 | Python Sorted Container Types: SortedList, SortedDict, and SortedSet / Apache 2.0 |
| [soupsieve](http://facelessuser.github.io/soupsieve) | 1.8 | A modern CSS selector implementation for BeautifulSoup / MIT |
| [sphinx](http://www.sphinx-doc.org) | 1.8.5 | Sphinx is a tool that makes it easy to create intelligent and beautiful documentation / BSD 2-clause |
| sphinxcontrib | 1.0 | Python namespace for sphinxcontrib / BSD |
| [sphinxcontrib-websupport](https://pypi.python.org/pypi/sphinxcontrib-websupport) | 1.1.0 | Sphinx API for Web Apps / BSD-2-Clause |
| [sqlalchemy](http://www.sqlalchemy.org/) | 1.3.1 | Database Abstraction Library. / MIT |
| [sqlite](http://www.sqlite.org/) | 3.27.2 | Implements a self-contained, zero-configuration, SQL database engine. / Public-Domain (`<http://www.sqlite.org/copyright.html>`) |
| [ssl\_match\_hostname](http://bitbucket.org/brandon/backports.ssl_match_hostname) | 3.7.0.1 | The ssl.match\_hostname() function from Python 3.5 / PSF 2 |
| [statsmodels](https://www.statsmodels.org) | 0.9.0 | Statistical computations and models for use with SciPy / BSD 3-Clause |
| [subprocess32](https://github.com/google/python-subprocess32) | 3.5.3 | A backport of the subprocess module from Python 3.2/3.3 for use on 2.x. / PSF 2 |
| [sympy](http://sympy.org) | 1.3 | Python library for symbolic mathematics / 3-clause BSD |
| [tblib](https://github.com/ionelmc/python-tblib) | 1.3.2 | Traceback serialization library. / BSD 2-Clause |
| [terminado](https://github.com/jupyter/terminado) | 0.8.1 | Terminals served by tornado websockets / BSD 2-clause |
| [testpath](https://testpath.readthedocs.io) | 0.4.2 | Testpath is a collection of utilities for Python code working with files and commands. / BSD-3-Clause |
| [tk](http://www.tcl.tk/) | 8.6.8 | A dynamic programming language with GUI support. Bundles Tcl and Tk. / Tcl/Tk |
| [toolz](http://toolz.readthedocs.org/) | 0.9.0 | A functional standard library for Python. / BSD 3-Clause |
| [tornado](http://www.tornadoweb.org/) | 5.1.1 | A Python web framework and asynchronous networking library, originally developed at FriendFeed. / Apache 2.0 |
| [tqdm](https://pypi.python.org/pypi/tqdm) | 4.31.1 | A Fast, Extensible Progress Meter / MPLv2.0, MIT |
| [traceback2](https://github.com/testing-cabal/traceback2) | 1.4.0 | Backports of the traceback module / PSF 2.0 |
| [traitlets](http://ipython.org/) | 4.3.2 | Configuration system for Python applications / BSD 3-clause |
| [typing](https://docs.python.org/3.5/library/typing.html) | 3.6.6 | Type Hints for Python - backport for `Python<3.5` / PSF |
| [unicodecsv](https://github.com/jdunck/python-unicodecsv) | 0.14.1 | Drop-in replacement for csv module which supports unicode strings / BSD |
| [unittest2](http://pypi.python.org/pypi/unittest2) | 1.1.0 | The new features in unittest backported to Python 2.4+ / BSD |
| [unixodbc](http://www.unixodbc.org/) | 2.3.7 | ODBC on non MS Windows platforms / LGPL-2.1 |
| [urllib3](https://urllib3.readthedocs.io/) | 1.24.1 | HTTP library with thread-safe connection pooling, file post, and more. / MIT |
| [wcwidth](https://github.com/jquast/wcwidth) | 0.1.7 | Measures number of Terminal column cells of wide-character codes. / MIT |
| [webencodings](https://github.com/gsnedders/python-webencodings) | 0.5.1 | Character encoding aliases for legacy web content / BSD 3-Clause |
| [werkzeug](http://werkzeug.pocoo.org/) | 0.14.1 | The Python WSGI Utility Library. / BSD 3-Clause |
| [wheel](https://github.com/pypa/wheel) | 0.33.1 | A built-package format for Python. / MIT |
| [widgetsnbextension](http://ipython.org) | 3.4.2 | Interactive Widgets for Jupyter / BSD 3-clause |
| [wrapt](https://github.com/GrahamDumpleton/wrapt) | 1.11.1 | Module for decorators, wrappers and monkey patching / BSD 2-Clause |
| [xlrd](http://www.python-excel.org/) | 1.2.0 | Library for developers to extract data from Microsoft Excel (tm) spreadsheet files / BSD 3-Clause and BSD with advertising |
| [xlsxwriter](https://xlsxwriter.readthedocs.io/) | 1.1.5 | A Python module for creating Excel XLSX files / BSD 2-Clause |
| [xlwt](http://www.python-excel.org/) | 1.3.0 | Writing data and formatting information to Excel files / BSD |
| [xz](http://tukaani.org/xz/) | 5.2.4 | Data compression software with high compression ratio / LGPL-2.1 and GPL-2.0 |
| [yaml](http://pyyaml.org/wiki/LibYAML) | 0.1.7 | A C library for parsing and emitting YAML. / MIT |
| [zeromq](http://zeromq.org) | 4.2.5 | A high-performance asynchronous messaging library. / LGPL 3 |
| [zict](http://github.com/mrocklin/zict) | 0.1.4 | Composable Dictionary Classes / BSD 3-Clause |
| [zipp](https://github.com/jaraco/zipp) | 0.3.3 | A pathlib-compatible Zipfile object wrapper / MIT |
| [zlib](http://zlib.net/) | 1.2.11 | Massively spiffy yet delicately unobtrusive compression library / zlib |
| [zstd](http://www.zstd.net) | 1.3.7 | Zstandard - Fast real-time compression algorithm / BSD 3-Clause |
| Name | Version | Summary / License |
|---|---|---|
| [alabaster](http://www.sphinx-doc.org/en/stable/index.html) | 0.7.12 | Configurable, Python 2+3 compatible Sphinx theme. / BSD 3-Clause |
| [anaconda-client](http://anaconda.org) | 1.7.2 | anaconda.org command line client library / BSD 3-clause |
| [anaconda-project](https://github.com/Anaconda-Platform/anaconda-project) | 0.8.2 | Tool for encapsulating, running, and reproducing data science projects / BSD 3-Clause |
| [asn1crypto](https://github.com/wbond/asn1crypto) | 0.24.0 | Python ASN.1 library with a focus on performance and a pythonic API / MIT |
| [astroid](https://www.astroid.org/) | 1.6.5 | A abstract syntax tree for Python with inference support. / LGPL 2.1 |
| [astropy](http://www.astropy.org/) | 2.0.9 | Community-developed Python Library for Astronomy / BSD |
| [atomicwrites](https://github.com/untitaker/python-atomicwrites) | 1.3.0 | Atomic file writes / MIT |
| [attrs](https://attrs.readthedocs.io/en/stable/) | 19.1.0 | attrs is the Python package that will bring back the joy of writing classes by relieving you from the drudgery of implementing object protocols (aka dunder methods). / MIT |
| [babel](http://babel.pocoo.org/) | 2.6.0 | Utilities to internationalize and localize Python applications / BSD 3-clause |
| [backports](https://bitbucket.org/brandon/backports) | 1.0 | / BSD |
| [backports.functools\_lru\_cache](https://github.com/jaraco/backports.functools_lru_cache) | 1.5 | Backport of functools.lru\_cache from Python 3.3 as published at ActiveState. / MIT |
| [backports.os](https://github.com/pjdelport/backports.os) | 0.1.1 | Backport of new features in Python’s os module / Python Software Foundation |
| [backports.shutil\_get\_terminal\_size](https://github.com/chrippa/backports.shutil_get_terminal_size) | 1.0.0 | A backport of the get\_terminal\_size function from Python 3.3’s shutil. / MIT |
| [backports\_abc](https://github.com/cython/backports_abc) | 0.5 | A backport of recent additions to the collections.abc module. / PSF 2 |
| [beautifulsoup4](http://www.crummy.com/software/BeautifulSoup/) | 4.7.1 | Python library designed for screen-scraping / MIT |
| [bitarray](https://github.com/ilanschnell/bitarray) | 0.8.3 | efficient arrays of booleans – C extension / PSF |
| [bkcharts](http://github.com/bokeh/bkcharts) | 0.2 | High level chart types built on top of Bokeh / BSD 3-Clause |
| blas | 1.0 | |
| [bleach](https://github.com/mozilla/bleach) | 3.1.0 | Easy, whitelist-based HTML-sanitizing tool / Apache-2.0 |
| [blosc](https://github.com/Blosc/c-blosc) | 1.15.0 | A blocking, shuffling and loss-less compression library that can be faster than memcpy() / BSD 3-Clause |
| [bokeh](http://bokeh.pydata.org/) | 1.0.4 | Statistical and novel interactive HTML plots for Python / BSD 3-Clause |
| [boto](https://github.com/boto/boto/) | 2.49.0 | Amazon Web Services Library / MIT |
| [bottleneck](http://berkeleyanalytics.com/bottleneck) | 1.2.1 | Fast NumPy array functions written in Cython. / BSD 2-Clause |
| [bzip2](http://www.bzip.org/) | 1.0.6 | high-quality data compressor / bzip2 |
| [ca-certificates](https://github.com/conda-forge/ca-certificates-feedstock) | 2019.1.23 | Certificates for use with other packages. / ISC |
| [cairo](http://cairographics.org/) | 1.14.12 | Cairo is a 2D graphics library with support for multiple output devices. / LGPL 2.1 or MPL 1.1 |
| [cdecimal](http://www.bytereef.org/mpdecimal/index.html) | 2.3 | Fast drop-in replacement for decimal.py / BSD 2-Clause |
| [certifi](http://certifi.io/) | 2019.3.9 | Python package for providing Mozilla’s CA Bundle. / ISC |
| [cffi](https://bitbucket.org/cffi/cffi) | 1.12.2 | Foreign Function Interface for Python calling C code. / MIT |
| [chardet](https://github.com/chardet/chardet) | 3.0.4 | Universal character encoding detector / LGPL2 |
| [click](https://palletsprojects.com/p/click) | 7.0 | Python composable command line interface toolkit / BSD-3-Clause |
| [cloudpickle](https://github.com/cloudpipe/cloudpickle) | 0.8.0 | Extended pickling support for Python objects / BSD 3-Clause |
| [clyent](https://github.com/Anaconda-Platform/clyent) | 1.2.2 | Command line client library for windows and posix / BSD 3-Clause |
| [colorama](https://github.com/tartley/colorama) | 0.4.1 | Cross-platform colored terminal text / BSD-3-Clause |
| [conda](https://conda.io) | 4.6.11 | OS-agnostic, system-level binary package and environment manager. / BSD 3-Clause |
| [conda-build](https://github.com/conda/conda-build) | 3.17.8 | tools for building conda packages / BSD 3-Clause |
| [conda-env](https://github.com/conda/conda-env) | 2.6.0 | Tools for interacting with conda environments. / BSD 3-Clause |
| [configparser](http://docs.python.org/3/library/configparser.html) | 3.7.3 | This library brings the updated configparser from Python 3.5 to Python 2.6-3.5 / MIT |
| [contextlib2](http://contextlib2.readthedocs.org) | 0.5.5 | Backports and enhancements for the contextlib module / PSF |
| [cryptography](https://github.com/pyca/cryptography) | 2.6.1 | Provides cryptographic recipes and primitives to Python developers / Apache 2.0 or BSD 3-Clause, PSF 2 |
| [curl](http://curl.haxx.se/) | 7.64.0 | tool and library for transferring data with URL syntax / MIT/X derivate (`<http://curl.haxx.se/docs/copyright.html>`) |
| [cycler](http://matplotlib.org/cycler) | 0.10.0 | Composable style cycles. / BSD 3-Clause |
| [cython](http://www.cython.org/) | 0.29.6 | The Cython compiler for writing C extensions for the Python language / Apache-2.0 |
| [cytoolz](https://github.com/pytoolz/cytoolz) | 0.9.0.1 | Cython implementation of Toolz. High performance functional utilities. / BSD 3-Clause |
| [dask](http://github.com/dask/dask/) | 1.1.4 | Parallel Python with task scheduling / BSD 3-Clause |
| [dask-core](http://github.com/dask/dask/) | 1.1.4 | Parallel Python with task scheduling / BSD 3-Clause |
| [dbus](http://www.freedesktop.org/wiki/Software/dbus/) | 1.13.6 | Simple message bus system for applications to talk to one another / GPL2 |
| [decorator](https://github.com/micheles/decorator) | 4.4.0 | Better living through Python with decorators. / BSD 3-Clause |
| [defusedxml](https://bitbucket.org/tiran/defusedxml) | 0.5.0 | XML bomb protection for Python stdlib modules / PSF 2.0 |
| [distributed](http://distributed.readthedocs.io/en/latest/) | 1.26.0 | Distributed computing with Dask / BSD 3-Clause |
| [docutils](http://docutils.sourceforge.net/) | 0.14 | Docutils – Python Documentation Utilities / Public Domain Dedictation and BSD 2-Clause and PSF 2.1.1 and GPL 3.0 |
| [entrypoints](https://github.com/takluyver/entrypoints) | 0.3 | Discover and load entry points from installed packages. / MIT License |
| [enum34](https://bitbucket.org/stoneleaf/enum34) | 1.1.6 | Python 3.4 Enum backported to 3.3, 3.2, 3.1, 2.7, 2.6, 2.5, and 2.4 / BSD 3-Clause |
| [et\_xmlfile](https://bitbucket.org/openpyxl/et_xmlfile) | 1.0.1 | An implementation of lxml.xmlfile for the standard library / MIT |
| [expat](http://expat.sourceforge.net/) | 2.2.6 | Expat XML parser library in C. / MIT |
| [fastcache](https://github.com/pbrady/fastcache) | 1.0.2 | C implementation of Python 3 lru\_cache / MIT |
| [filelock](https://github.com/benediktschmitt/py-filelock) | 3.0.10 | A platform independent file lock. / Public Domain |
| [flask](http://flask.pocoo.org) | 1.0.2 | A microframework based on Werkzeug, Jinja2 and good intentions. / BSD 3-Clause |
| [fontconfig](http://www.freedesktop.org/wiki/Software/fontconfig/) | 2.13.0 | A library for configuring and customizing font access. / MIT |
| [freetype](https://www.freetype.org/) | 2.9.1 | A Free, High-Quality, and Portable Font Engine / GPL-2.0 and FreeType |
| [fribidi](https://github.com/fribidi/fribidi) | 1.0.5 | The Free Implementation of the Unicode Bidirectional Algorithm. / LGPL-2.1 |
| [funcsigs](http://funcsigs.readthedocs.org) | 1.0.2 | Python function signatures from PEP362 for Python 2.6, 2.7 and 3.2+. / Apache 2.0 |
| [functools32](https://github.com/MiCHiLU/python-functools32) | 3.2.3.2 | Backport of the functools module from Python 3.2.3 for use on 2.7 and PyPy. / PSF license |
| [future](http://python-future.org) | 0.17.1 | Clean single-source support for Python 3 and 2 / MIT |
| [futures](https://github.com/agronholm/pythonfutures) | 3.2.0 | Backport of the concurrent.futures package from Python 3.2 / PSF |
| [get\_terminal\_size](https://github.com/chrippa/backports.shutil_get_terminal_size) | 1.0.0 | Get the size of the terminal window. / MIT |
| [gevent](http://www.gevent.org/) | 1.4.0 | Coroutine-based network library / MIT |
| [glib](https://developer.gnome.org/glib/) | 2.56.2 | Provides core application building blocks for libraries and applications written in C. / LGPL-2.1 |
| [glob2](https://github.com/miracle2k/python-glob2) | 0.6 | Version of the glob module that supports recursion via \*\*, and can capture patterns. / BSD-2-Clause |
| [gmp](http://gmplib.org/) | 6.1.2 | The GNU multiprecision library. / GPL 2 and LGPL 3 |
| [gmpy2](https://pypi.python.org/pypi/gmpy2) | 2.0.8 | GMP/MPIR, MPFR, and MPC interface to Python 2.6+ and 3.x / LGPL 3 |
| [graphite2](http://graphite.sil.org/) | 1.3.13 | A “smart font” system that handles the complexities of lesser-known languages of the world. / LGPLv2 |
| [greenlet](https://github.com/python-greenlet/greenlet) | 0.4.15 | Lightweight in-process concurrent programming / MIT |
| [grin](http://pypi.python.org/pypi/grin) | 1.2.1 | Enhanced grep-like tool / BSD 3-Clause |
| [gst-plugins-base](http://gstreamer.freedesktop.org/) | 1.14.0 | GStreamer Base Plug-ins / GPL2 |
| [gstreamer](http://gstreamer.freedesktop.org/) | 1.14.0 | Library for constructing graphs of media-handling components / LGPL 2 |
| [h5py](http://www.h5py.org/) | 2.9.0 | Read and write HDF5 files from Python. / BSD-3-Clause |
| [harfbuzz](http://www.freedesktop.org/wiki/Software/HarfBuzz/) | 1.8.8 | An OpenType text shaping engine. / MIT |
| [hdf5](http://www.hdfgroup.org/HDF5/) | 1.10.4 | HDF5 is a data model, library, and file format for storing and managing data / HDF5 |
| [heapdict](http://stutzbachenterprises.com/) | 1.0.0 | A heap with decrease-key and increase-key operations / BSD 3-Clause |
| [html5lib](https://github.com/html5lib/html5lib-python) | 1.0.1 | HTML parser based on the WHATWG HTML specification / MIT |
| [icu](http://site.icu-project.org/) | 58.2 | International Components for Unicode. / MIT |
| [idna](https://github.com/kjd/idna) | 2.8 | Internationalized Domain Names in Applications (IDNA). / BSD Like |
| [imageio](http://imageio.github.io) | 2.5.0 | a Python library for reading and writing image data / BSD 2-Clause |
| [imagesize](https://github.com/shibukawa/imagesize_py) | 1.1.0 | Getting image size from png/jpeg/jpeg2000/gif file / MIT |
| [importlib\_metadata](http://importlib-metadata.readthedocs.io) | 0.8 | A library to access the metadata for a Python package / APACHE-2.0 |
| [intel-openmp](https://software.intel.com/en-us/node/522690) | 2019.3 | Math library for Intel and compatible processors / proprietary - Intel |
| [ipaddress](https://github.com/phihag/ipaddress) | 1.0.22 | IPv4/IPv6 manipulation library / PSF 2 |
| [ipykernel](https://ipython.org) | 4.10.0 | IPython Kernel for Jupyter / BSD-3-Clause |
| [ipython](https://ipython.org/) | 5.8.0 | IPython: Productive Interactive Computing / BSD-3-Clause |
| [ipython\_genutils](http://ipython.org) | 0.2.0 | vestigial utilities from IPython / BSD 3-Clause |
| [ipywidgets](https://github.com/ipython/ipywidgets) | 7.4.2 | Jupyter Interactive Widgets / BSD 3-clause |
| [isort](https://github.com/timothycrosley/isort) | 4.3.16 | A Python utility / library to sort Python imports. / MIT |
| [itsdangerous](https://github.com/pallets/itsdangerous) | 1.1.0 | Various helpers to pass trusted data to untrusted environments. / BSD 3-Clause |
| [jbig](https://www.cl.cam.ac.uk/~mgk25/jbigkit) | 2.1 | Implementation of the JBIG1 data compression standard / GPL-2.0 |
| [jdcal](https://github.com/phn/jdcal) | 1.4 | Julian dates from proleptic Gregorian and Julian calendars. / BSD 2-Clause |
| [jedi](https://github.com/davidhalter/jedi/) | 0.13.3 | An autocompletion tool for Python that can be used for text editors. / MIT |
| [jinja2](http://jinja.pocoo.org) | 2.10 | An easy to use stand-alone template engine written in pure python. / 3-Clause BSD |
| [jpeg](http://www.ijg.org/) | 9b | read/write jpeg COM, EXIF, IPTC medata / Custom free software license |
| [jsonschema](https://github.com/Julian/jsonschema) | 3.0.1 | An implementation of JSON Schema validation for Python / MIT |
| [jupyter](http://jupyter.org) | 1.0.0 | Jupyter metapackage. Install all the Jupyter components in one go. / BSD 3-Clause |
| [jupyter\_client](http://jupyter.org) | 5.2.4 | Jupyter protocol implementation and client libraries / BSD 3-clause |
| [jupyter\_console](http://jupyter.org) | 5.2.0 | Jupyter terminal console / BSD-3-Clause |
| [jupyter\_core](http://jupyter.org) | 4.4.0 | Core common functionality of Jupyter projects. / BSD 3-clause |
| [jupyterlab](https://github.com/jupyterlab/jupyterlab) | 0.33.11 | JupyterLab PRE-ALPHA / BSD-3-Clause |
| [jupyterlab\_launcher](http://github.com/jupyterlab/jupyterlab_launcher) | 0.11.2 | A Launcher for JupyterLab based applications. / BSD 3-Clause |
| [kiwisolver](https://github.com/nucleic/kiwi) | 1.0.1 | A fast implementation of the Cassowary constraint solver / BSD 3-Clause |
| [krb5](http://web.mit.edu/kerberos/) | 1.16.1 | A network authentication protocol. / MIT |
| [lazy-object-proxy](https://github.com/ionelmc/python-lazy-object-proxy) | 1.3.1 | A fast and thorough lazy object proxy. / BSD 2-Clause |
| [libarchive](http://www.libarchive.org/) | 3.3.3 | Multi-format archive and compression library / BSD 2-Clause |
| [libcurl](http://curl.haxx.se/) | 7.64.0 | tool and library for transferring data with URL syntax / MIT/X derivate (`<http://curl.haxx.se/docs/copyright.html>`) |
| [libedit](http://thrysoee.dk/editline/) | 3.1.20181209 | Editline Library (libedit) / NetBSD |
| [libffi](https://sourceware.org/libffi/) | 3.2.1 | A Portable Foreign Function Interface Library. / Custom |
| [libgcc-ng](https://gcc.gnu.org/onlinedocs/gccint/Libgcc.html) | 8.2.0 | The GCC low-level runtime library / GPL |
| [libgfortran-ng](https://gcc.gnu.org/) | 7.3.0 | The GNU Fortran Runtime Library / GPL |
| [liblief](https://lief.quarkslab.com/) | 0.9.0 | A cross platform library to parse, modify and abstract ELF, PE and MachO formats. / Apache 2.0 |
| [libpng](http://www.libpng.org/pub/png/libpng.html) | 1.6.36 | PNG reference library. / zlib/libpng |
| [libsodium](http://libsodium.org) | 1.0.16 | A modern and easy-to-use crypto library. / ISC |
| [libssh2](https://www.libssh2.org/) | 1.8.0 | the SSH library / BSD 3-Clause |
| [libstdcxx-ng](https://gcc.gnu.org/) | 8.2.0 | The GNU C++ Runtime Library / GPL3 with runtime exception |
| [libtiff](http://www.libtiff.org/) | 4.0.10 | Support for the Tag Image File Format (TIFF). / HPND |
| [libtool](http://www.gnu.org/software/libtool/) | 2.4.6 | The GNU Portable Library Tool / GPL 3 |
| [libuuid](http://sourceforge.net/projects/libuuid/) | 1.0.3 | Portable uuid C library. / BSD 3-Clause |
| [libxcb](http://xcb.freedesktop.org/) | 1.13 | This is the C-language Binding (XCB) package to the X Window System protocol / MIT |
| [libxml2](http://xmlsoft.org/) | 2.9.9 | The XML C parser and toolkit of Gnome / MIT |
| [libxslt](http://xmlsoft.org/XSLT/) | 1.1.33 | The XSLT C library developed for the GNOME project / MIT |
| [linecache2](https://github.com/testing-cabal/linecache2) | 1.0.0 | Backport of the linecache module / PSF 1.0 |
| [llvmlite](https://github.com/numba/llvmlite) | 0.28.0 | A lightweight LLVM python binding for writing JIT compilers / New BSD License |
| [locket](https://github.com/mwilliamson/locket.py) | 0.2.0 | File-based locks for Python for Linux and Windows / BSD 2-Clause |
| [lxml](http://lxml.de/) | 4.3.2 | Pythonic binding for the C libraries libxml2 and libxslt. / BSD 3-Clause, GPL-2.0, ZPL-2.0, and ElementTree |
| [lz4-c](https://www.lz4.org) | 1.8.1.2 | Extremely Fast Compression algorithm / BSD 2-clause |
| [lzo](http://www.oberhumer.com/opensource/lzo/) | 2.10 | LZO is a portable lossless data compression library written in ANSI C. / GPL v2+ |
| [markupsafe](https://www.palletsprojects.com/p/markupsafe) | 1.1.1 | A Python module that implements the jinja2.Markup string / BSD-3-Clause |
| [matplotlib](http://matplotlib.org/) | 2.2.3 | Publication quality figures in Python / PSF-based |
| [mccabe](https://github.com/PyCQA/mccabe) | 0.6.1 | McCabe complexity checker for Python / MIT |
| [mistune](https://github.com/lepture/mistune) | 0.8.4 | The fastest markdown parser in pure Python. / BSD 3-Clause |
| [mkl](https://software.intel.com/en-us/mkl) | 2019.3 | Math library for Intel and compatible processors / proprietary - Intel |
| [mkl-service](https://github.com/ContinuumIO/mkl-service) | 1.1.2 | Python bindings to MKL service functions / 3-clause BSD |
| [mkl\_fft](http://github.com/IntelPython/mkl_fft) | 1.0.10 | NumPy-based implementation of Fast Fourier Transform using Intel (R) Math Kernel Library. / BSD 3-Clause |
| [mkl\_random](http://github.com/IntelPython/mkl_random) | 1.0.2 | Intel (R) MKL-powered package for sampling from common probability distributions into NumPy arrays. / BSD 3-Clause |
| [more-itertools](https://github.com/erikrose/more-itertools) | 5.0.0 | More routines for operating on iterables, beyond itertools / MIT |
| [mpc](http://www.multiprecision.org/) | 1.1.0 | A C library for the arithmetic of complex numbers with arbitrarily high precision. / LGPL 3 |
| [mpfr](http://www.mpfr.org/) | 4.0.1 | The MPFR library is a C library for multiple-precision floating-point computations with correct rounding. / LGPL 3 |
| [mpmath](http://mpmath.org) | 1.1.0 | Python library for arbitrary-precision floating-point arithmetic / BSD 3-Clause |
| [msgpack-python](http://msgpack.org/) | 0.6.1 | MessagePack (de)serializer. / Apache 2.0 |
| [multipledispatch](https://github.com/mrocklin/multipledispatch/) | 0.6.0 | Multiple dispatch in Python / BSD 3-Clause |
| [nbconvert](http://jupyter.org) | 5.4.1 | Converting Jupyter Notebooks / BSD-3-Clause |
| [nbformat](http://jupyter.org) | 4.4.0 | The reference implementation of the Jupyter Notebook format / BSD 3-clause |
| [ncurses](http://www.gnu.org/software/ncurses/) | 6.1 | Library for text-based user interfaces / Free software (MIT-like) |
| [networkx](https://networkx.github.io/) | 2.2 | Python package for creating and manipulating complex networks / BSD 3-Clause |
| [nltk](http://nltk.org/) | 3.4 | Build Python programs to work with human language data / Apache 2.0 |
| [nose](http://readthedocs.org/docs/nose/) | 1.3.7 | Nose extends unittest to make testing easier / LGPL-2.1 |
| [notebook](http://jupyter.org) | 5.7.8 | Jupyter Notebook / BSD 3-clause |
| [numba](http://numba.github.com) | 0.43.1 | NumPy aware dynamic Python compiler using LLVM / BSD 2-clause |
| [numexpr](https://github.com/pydata/numexpr) | 2.6.9 | Fast numerical expression evaluator for NumPy. / MIT |
| [numpy](http://numpy.scipy.org/) | 1.16.2 | Array processing for numbers, strings, records, and objects. / BSD 3-Clause |
| numpy-base | 1.16.2 | |
| [numpydoc](https://github.com/numpy/numpydoc) | 0.8.0 | Sphinx extension to support docstrings in Numpy format / BSD 3-Clause |
| [olefile](http://www.decalage.info/python/olefileio) | 0.46 | parse, read and write Microsoft OLE2 files / BSD 2-Clause |
| [openpyxl](https://openpyxl.readthedocs.io) | 2.6.1 | A Python library to read/write Excel 2010 xlsx/xlsm files / MIT |
| [openssl](http://www.openssl.org/) | 1.1.1b | OpenSSL is an open-source implementation of the SSL and TLS protocols / OpenSSL |
| [packaging](https://github.com/pypa/packaging) | 19.0 | Core utilities for Python packages / Apache 2.0 or BSD 2-Clause |
| [pandas](http://pandas.pydata.org) | 0.24.2 | High-performance, easy-to-use data structures and data analysis tools. / BSD 3-clause |
| [pandoc](http://pandoc.org/) | 2.2.3.2 | Universal markup converter (repackaged binaries). / GPL-2.0 |
| [pandocfilters](https://github.com/jgm/pandocfilters) | 1.4.2 | A python module for writing pandoc filters / BSD-3-Clause |
| [pango](http://www.pango.org/) | 1.42.4 | Text layout and rendering engine. / LGPL-2.1 |
| [parso](https://github.com/davidhalter/parso) | 0.3.4 | A Python Parser / MIT |
| [partd](https://github.com/dask/partd) | 0.3.10 | Data structure for on-disk shuffle operations / BSD 3-Clause |
| [patchelf](http://nixos.org/patchelf.html) | 0.9 | A small utility to modify the dynamic linker and RPATH of ELF executables. / GPL 3 |
| [path.py](https://github.com/jaraco/path.py) | 11.5.0 | A module wrapper for os.path / MIT |
| [pathlib2](https://github.com/mcmtroffaes/pathlib2) | 2.3.3 | Fork of pathlib aiming to support the full stdlib Python API. / MIT |
| [patsy](https://github.com/pydata/patsy) | 0.5.1 | Describing statistical models in Python using symbolic formulas / BSD-2-Clause, PSF2 |
| [pcre](http://www.pcre.org/) | 8.43 | Regular expression pattern matching using the same syntax and semantics as Perl 5. / BSD 3-Clause |
| [pep8](http://pep8.readthedocs.org/) | 1.7.1 | Python style guide checker / MIT |
| [pexpect](http://pexpect.sourceforge.net/) | 4.6.0 | Pexpect makes Python a better tool for controlling other applications. / ISC |
| [pickleshare](https://github.com/pickleshare/pickleshare/) | 0.7.5 | Tiny ‘shelve’-like database with concurrency support / MIT |
| [pillow](https://pillow.readthedocs.io) | 5.4.1 | Pillow is the friendly PIL fork by Alex Clark and Contributors / PIL |
| [pip](https://pip.pypa.io/en/stable/) | 19.0.3 | PyPA recommended tool for installing Python packages / MIT |
| [pixman](http://www.pixman.org/) | 0.38.0 | A low-level software library for pixel manipulation. / MIT |
| [pkginfo](https://code.launchpad.net/~tseaver/pkginfo/trunk) | 1.5.0.1 | Query metadatdata from sdists / bdists / installed packages. / MIT |
| [pluggy](https://github.com/pytest-dev/pluggy) | 0.9.0 | Plugin registration and hook calling for Python / MIT |
| [ply](http://www.dabeaz.com/ply/index.html) | 3.11 | Python Lex-Yacc / BSD 3-clause |
| [prometheus\_client](https://github.com/prometheus/client_python) | 0.6.0 | Python client for the Prometheus monitoring system / Apache 2.0 |
| [prompt\_toolkit](https://github.com/jonathanslenders/python-prompt-toolkit) | 1.0.15 | Library for building powerful interactive command lines in Python / BSD 3-clause |
| [psutil](https://github.com/giampaolo/psutil) | 5.6.1 | A cross-platform process and system utilities module for Python / BSD 3-Clause |
| [ptyprocess](https://github.com/pexpect/ptyprocess) | 0.6.0 | Run a subprocess in a pseudo terminal / ISC |
| [py](https://github.com/pytest-dev/py) | 1.8.0 | library with cross-python path, ini-parsing, io, code, log facilities / MIT |
| [py-lief](https://lief.quarkslab.com/) | 0.9.0 | A cross platform library to parse, modify and abstract ELF, PE and MachO formats. / Apache 2.0 |
| [pycairo](http://cairographics.org/pycairo/) | 1.18.0 | Python bindings for the Cairo graphics library. / LGPL 2.1, MPL 1.1 |
| [pycodestyle](https://pycodestyle.readthedocs.io/) | 2.5.0 | Python style guide checker / MIT |
| [pycosat](https://github.com/ContinuumIO/pycosat) | 0.6.3 | Bindings to picosat (a SAT solver) / MIT |
| [pycparser](https://github.com/eliben/pycparser) | 2.19 | Complete C99 parser in pure Python / BSD 3-clause |
| [pycrypto](http://www.pycrypto.org/) | 2.6.1 | Cryptographic modules for Python. / Public Domain |
| [pycurl](http://pycurl.sourceforge.net/) | 7.43.0.2 | A Python Interface To The cURL library / LGPL, MIT |
| [pyflakes](https://github.com/PyCQA/pyflakes) | 2.1.1 | Pyflakes analyzes programs and detects various errors. / MIT |
| [pygments](http://pygments.org/) | 2.3.1 | Generic syntax highlighting package / BSD 2-clause |
| [pylint](http://www.pylint.org/) | 1.9.2 | python code static checker / GPL |
| [pyodbc](https://github.com/mkleehammer/pyodbc) | 4.0.26 | DB API Module for ODBC / MIT |
| [pyopenssl](https://github.com/pyca/pyopenssl) | 19.0.0 | Python wrapper module around the OpenSSL library / Apache 2.0 |
| [pyparsing](http://pyparsing.wikispaces.com/) | 2.3.1 | Create and execute simple grammars / MIT |
| [pyqt](http://www.riverbankcomputing.co.uk/software/pyqt) | 5.9.2 | Python binding of the cross-platform GUI toolkit Qt. / Commercial, GPL-2.0, GPL-3.0 |
| [pyrsistent](http://github.com/tobgu/pyrsistent/) | 0.14.11 | Persistent/Functional/Immutable data structures / MIT |
| [pysocks](https://github.com/Anorov/PySocks) | 1.6.8 | A Python SOCKS client module. See [Anorov/PySocks](https://github.com/Anorov/PySocks) for more information. / BSD 3-Clause |
| [pytables](http://www.pytables.org) | 3.5.1 | Brings together Python, HDF5 and NumPy to easily handle large amounts of data. / BSD 3-Clause |
| [pytest](https://docs.pytest.org/en/latest/) | 4.3.1 | Simple and powerful testing with Python. / MIT |
| [python](http://www.python.org/) | 2.7.16 | General purpose programming language / PSF |
| [python-dateutil](https://dateutil.readthedocs.org/) | 2.8.0 | Extensions to the standard Python datetime module. / BSD 3 Clause |
| python-libarchive-c | 2.8 | |
| [pytz](http://pythonhosted.org/pytz/) | 2018.9 | World timezone definitions, modern and historical. / MIT |
| [pywavelets](https://github.com/PyWavelets/pywt) | 1.0.2 | Discrete Wavelet Transforms in Python. / MIT |
| [pyyaml](http://pyyaml.org/wiki/PyYAML) | 5.1 | YAML parser and emitter for Python / MIT |
| [pyzmq](https://github.com/zeromq/pyzmq) | 18.0.0 | Python bindings for zeromq / BSD 3-clause |
| [qt](http://qt-project.org) | 5.9.7 | Qt is a cross-platform application and UI framework. / LGPL-3.0 |
| [qtawesome](https://github.com/spyder-ide/qtawesome) | 0.5.7 | Iconic fonts in PyQt and PySide applications / MIT |
| [qtconsole](http://jupyter.org) | 4.4.3 | Jupyter Qt console / BSD 3-Clause |
| [qtpy](https://github.com/spyder-ide/qtpy) | 1.7.0 | Abstraction layer for PyQt5/PyQt4/PySide / MIT |
| [readline](https://cnswww.cns.cwru.edu/php/chet/readline/rltop.html) | 7.0 | library for editing command lines as they are typed in / GPL-3.0 |
| [requests](http://python-requests.org) | 2.21.0 | Python HTTP for Humans / Apache 2.0 |
| [rope](https://github.com/python-rope/rope) | 0.12.0 | A python refactoring library… / GPL 2.0 |
| [ruamel\_yaml](https://bitbucket.org/ruamel/yaml) | 0.15.46 | A patched copy of ruamel.yaml. / MIT |
| [scandir](https://github.com/benhoyt/scandir) | 1.10.0 | scandir, a better directory iterator and faster os.walk() / BSD 3-Clause |
| [scikit-image](http://scikit-image.org/) | 0.14.2 | Image processing routines for SciPy. / BSD 3-Clause |
| [scikit-learn](http://scikit-learn.org/) | 0.20.3 | A set of python modules for machine learning and data mining / BSD 3-Clause |
| [scipy](http://www.scipy.org/) | 1.2.1 | Scientific Library for Python / BSD 3-Clause |
| [seaborn](https://seaborn.pydata.org) | 0.9.0 | Statistical data visualization / BSD 3-Clause |
| [send2trash](https://github.com/hsoft/send2trash) | 1.5.0 | Python library to natively send files to Trash (or Recycle bin) on all platforms. / BSD-3-Clause |
| [setuptools](https://github.com/pypa/setuptools) | 40.8.0 | Download, build, install, upgrade, and uninstall Python packages / MIT |
| [simplegeneric](http://cheeseshop.python.org/pypi/simplegeneric) | 0.8.1 | Simple generic functions (similar to Python’s own len(), pickle.dump(), etc.) / Zope Public |
| [singledispatch](http://docs.python.org/3/library/functools.html#functools.singledispatch) | 3.4.0.3 | Transforms a function into a single-dispatch generic function / MIT |
| [sip](http://www.riverbankcomputing.com/software/sip/intro) | 4.19.8 | Create Python bindings for C and C++ libraries / GPL-3.0 |
| [six](http://pypi.python.org/pypi/six/) | 1.12.0 | Python 2 and 3 compatibility utilities / MIT |
| [snappy](https://github.com/google/snappy) | 1.1.7 | A fast compressor/decompressor / BSD 3-clause |
| [snowballstemmer](https://github.com/shibukawa/snowball_py) | 1.2.1 | Snowball stemming library collection for Python / BSD-2-Clause |
| [sortedcollections](http://www.grantjenks.com/docs/sortedcollections/) | 1.1.2 | Python Sorted Collections / Apache-2.0 |
| [sortedcontainers](http://www.grantjenks.com/docs/sortedcontainers/) | 2.1.0 | Python Sorted Container Types: SortedList, SortedDict, and SortedSet / Apache 2.0 |
| [soupsieve](http://facelessuser.github.io/soupsieve) | 1.8 | A modern CSS selector implementation for BeautifulSoup / MIT |
| [sphinx](http://www.sphinx-doc.org) | 1.8.5 | Sphinx is a tool that makes it easy to create intelligent and beautiful documentation / BSD 2-clause |
| sphinxcontrib | 1.0 | Python namespace for sphinxcontrib / BSD |
| [sphinxcontrib-websupport](https://pypi.python.org/pypi/sphinxcontrib-websupport) | 1.1.0 | Sphinx API for Web Apps / BSD-2-Clause |
| [spyder](https://www.spyder-ide.org/) | 3.3.3 | The Scientific Python Development Environment / MIT |
| [spyder-kernels](https://github.com/spyder-ide/spyder-kernels) | 0.4.2 | Jupyter kernels for the Spyder console / MIT |
| [sqlalchemy](http://www.sqlalchemy.org/) | 1.3.1 | Database Abstraction Library. / MIT |
| [sqlite](http://www.sqlite.org/) | 3.27.2 | Implements a self-contained, zero-configuration, SQL database engine. / Public-Domain (`<http://www.sqlite.org/copyright.html>`) |
| [ssl\_match\_hostname](http://bitbucket.org/brandon/backports.ssl_match_hostname) | 3.7.0.1 | The ssl.match\_hostname() function from Python 3.5 / PSF 2 |
| [statsmodels](https://www.statsmodels.org) | 0.9.0 | Statistical computations and models for use with SciPy / BSD 3-Clause |
| [subprocess32](https://github.com/google/python-subprocess32) | 3.5.3 | A backport of the subprocess module from Python 3.2/3.3 for use on 2.x. / PSF 2 |
| [sympy](http://sympy.org) | 1.3 | Python library for symbolic mathematics / 3-clause BSD |
| [tblib](https://github.com/ionelmc/python-tblib) | 1.3.2 | Traceback serialization library. / BSD 2-Clause |
| [terminado](https://github.com/jupyter/terminado) | 0.8.1 | Terminals served by tornado websockets / BSD 2-clause |
| [testpath](https://testpath.readthedocs.io) | 0.4.2 | Testpath is a collection of utilities for Python code working with files and commands. / BSD-3-Clause |
| [tk](http://www.tcl.tk/) | 8.6.8 | A dynamic programming language with GUI support. Bundles Tcl and Tk. / Tcl/Tk |
| [toolz](http://toolz.readthedocs.org/) | 0.9.0 | A functional standard library for Python. / BSD 3-Clause |
| [tornado](http://www.tornadoweb.org/) | 5.1.1 | A Python web framework and asynchronous networking library, originally developed at FriendFeed. / Apache 2.0 |
| [tqdm](https://pypi.python.org/pypi/tqdm) | 4.31.1 | A Fast, Extensible Progress Meter / MPLv2.0, MIT |
| [traceback2](https://github.com/testing-cabal/traceback2) | 1.4.0 | Backports of the traceback module / PSF 2.0 |
| [traitlets](http://ipython.org/) | 4.3.2 | Configuration system for Python applications / BSD 3-clause |
| [typing](https://docs.python.org/3.5/library/typing.html) | 3.6.6 | Type Hints for Python - backport for `Python<3.5` / PSF |
| [unicodecsv](https://github.com/jdunck/python-unicodecsv) | 0.14.1 | Drop-in replacement for csv module which supports unicode strings / BSD |
| [unittest2](http://pypi.python.org/pypi/unittest2) | 1.1.0 | The new features in unittest backported to Python 2.4+ / BSD |
| [unixodbc](http://www.unixodbc.org/) | 2.3.7 | ODBC on non MS Windows platforms / LGPL-2.1 |
| [urllib3](https://urllib3.readthedocs.io/) | 1.24.1 | HTTP library with thread-safe connection pooling, file post, and more. / MIT |
| [wcwidth](https://github.com/jquast/wcwidth) | 0.1.7 | Measures number of Terminal column cells of wide-character codes. / MIT |
| [webencodings](https://github.com/gsnedders/python-webencodings) | 0.5.1 | Character encoding aliases for legacy web content / BSD 3-Clause |
| [werkzeug](http://werkzeug.pocoo.org/) | 0.14.1 | The Python WSGI Utility Library. / BSD 3-Clause |
| [wheel](https://github.com/pypa/wheel) | 0.33.1 | A built-package format for Python. / MIT |
| [widgetsnbextension](http://ipython.org) | 3.4.2 | Interactive Widgets for Jupyter / BSD 3-clause |
| [wrapt](https://github.com/GrahamDumpleton/wrapt) | 1.11.1 | Module for decorators, wrappers and monkey patching / BSD 2-Clause |
| [wurlitzer](https://github.com/minrk/wurlitzer) | 1.0.2 | Capture C-level stdout/stderr in Python / MIT |
| [xlrd](http://www.python-excel.org/) | 1.2.0 | Library for developers to extract data from Microsoft Excel (tm) spreadsheet files / BSD 3-Clause and BSD with advertising |
| [xlsxwriter](https://xlsxwriter.readthedocs.io/) | 1.1.5 | A Python module for creating Excel XLSX files / BSD 2-Clause |
| [xlwt](http://www.python-excel.org/) | 1.3.0 | Writing data and formatting information to Excel files / BSD |
| [xz](http://tukaani.org/xz/) | 5.2.4 | Data compression software with high compression ratio / LGPL-2.1 and GPL-2.0 |
| [yaml](http://pyyaml.org/wiki/LibYAML) | 0.1.7 | A C library for parsing and emitting YAML. / MIT |
| [zeromq](http://zeromq.org) | 4.3.1 | A high-performance asynchronous messaging library. / LGPL 3 |
| [zict](http://github.com/mrocklin/zict) | 0.1.4 | Composable Dictionary Classes / BSD 3-Clause |
| [zipp](https://github.com/jaraco/zipp) | 0.3.3 | A pathlib-compatible Zipfile object wrapper / MIT |
| [zlib](http://zlib.net/) | 1.2.11 | Massively spiffy yet delicately unobtrusive compression library / zlib |
| [zstd](http://www.zstd.net) | 1.3.7 | Zstandard - Fast real-time compression algorithm / BSD 3-Clause |
| Name | Version | Summary / License |
|---|---|---|
| [\_ipyw\_jlab\_nb\_ext\_conf](https://github.com/ContinuumIO/anaconda-nb-extensions-meta-config) | 0.1.0 | A configuration metapackage for enabling Anaconda-bundled jupyter extensions / BSD |
| [alabaster](http://www.sphinx-doc.org/en/stable/index.html) | 0.7.12 | Configurable, Python 2+3 compatible Sphinx theme. / BSD 3-Clause |
| [anaconda-client](http://anaconda.org) | 1.7.2 | anaconda.org command line client library / BSD 3-clause |
| [anaconda-project](https://github.com/Anaconda-Platform/anaconda-project) | 0.8.4 | Tool for encapsulating, running, and reproducing data science projects / BSD 3-Clause |
| [argh](https://github.com/neithere/argh) | 0.26.2 | The Natural CLI. / LGPL 3 |
| [argon2-cffi](https://argon2-cffi.readthedocs.org/) | 20.1.0 | The secure Argon2 password hashing algorithm. / MIT |
| [asn1crypto](https://github.com/wbond/asn1crypto) | 1.4.0 | Python ASN.1 library with a focus on performance and a pythonic API / MIT |
| [astroid](https://www.astroid.org/) | 2.4.2 | A abstract syntax tree for Python with inference support. / LGPL-2.1-only |
| [astropy](http://www.astropy.org/) | 4.0.2 | Community-developed Python Library for Astronomy / BSD-3-Clause |
| [async\_generator](https://github.com/python-trio/async_generator) | 1.10 | Async generators and context managers for Python 3.5+ / MIT |
| [atomicwrites](https://github.com/untitaker/python-atomicwrites) | 1.4.0 | Atomic file writes / MIT |
| [attrs](https://attrs.readthedocs.io/en/stable/) | 20.3.0 | attrs is the Python package that will bring back the joy of writing classes by relieving you from the drudgery of implementing object protocols (aka dunder methods). / MIT |
| [autopep8](https://github.com/hhatto/autopep8) | 1.5.4 | A tool that automatically formats Python code to conform to the PEP 8 style guide / MIT |
| [babel](http://babel.pocoo.org/) | 2.8.1 | Utilities to internationalize and localize Python applications / BSD 3-clause |
| [backcall](https://github.com/takluyver/backcall/) | 0.2.0 | Specifications for callback functions passed in to an API / BSD-3-Clause |
| [backports](https://bitbucket.org/brandon/backports) | 1.0 | None / BSD |
| [backports.shutil\_get\_terminal\_size](https://github.com/chrippa/backports.shutil_get_terminal_size) | 1.0.0 | A backport of the get\_terminal\_size function from Python 3.3’s shutil. / MIT |
| [bcrypt](https://github.com/pyca/bcrypt/) | 3.2.0 | Modern password hashing for your software and your servers / Apache-2.0 |
| [beautifulsoup4](http://www.crummy.com/software/BeautifulSoup/) | 4.9.3 | Python library designed for screen-scraping / MIT |
| [bitarray](https://github.com/ilanschnell/bitarray) | 1.6.1 | efficient arrays of booleans – C extension / PSF |
| [bkcharts](http://github.com/bokeh/bkcharts) | 0.2 | High level chart types built on top of Bokeh / BSD 3-Clause |
| blas | 1.0 | |
| [bleach](https://github.com/mozilla/bleach) | 3.2.1 | Easy, whitelist-based HTML-sanitizing tool / Apache-2.0 |
| [blosc](https://github.com/Blosc/c-blosc) | 1.20.1 | A blocking, shuffling and loss-less compression library that can be faster than memcpy() / BSD-3-Clause |
| [bokeh](http://bokeh.pydata.org/) | 2.2.3 | Statistical and novel interactive HTML plots for Python / BSD-3-Clause |
| [boto](https://github.com/boto/boto/) | 2.49.0 | Amazon Web Services Library / MIT |
| [bottleneck](https://github.com/pydata/bottleneck) | 1.3.2 | Fast NumPy array functions written in Cython. / BSD 2-Clause |
| [brotlipy](https://github.com/python-hyper/brotlipy) | 0.7.0 | Python bindings to the Brotli compression library / MIT |
| [bzip2](http://www.bzip.org/) | 1.0.8 | high-quality data compressor / bzip2 |
| [ca-certificates](https://github.com/conda-forge/ca-certificates-feedstock) | 2020.10.14 | Certificates for use with other packages. / MPL 2.0 |
| [certifi](http://certifi.io/) | 2020.6.20 | Python package for providing Mozilla’s CA Bundle. / ISC |
| [cffi](https://bitbucket.org/cffi/cffi) | 1.14.3 | Foreign Function Interface for Python calling C code. / MIT |
| [chardet](https://github.com/chardet/chardet) | 3.0.4 | Universal character encoding detector / LGPL2 |
| [click](https://palletsprojects.com/p/click) | 7.1.2 | Python composable command line interface toolkit / BSD-3-Clause |
| [cloudpickle](https://github.com/cloudpipe/cloudpickle) | 1.6.0 | Extended pickling support for Python objects / BSD-3-Clause |
| [clyent](https://github.com/Anaconda-Platform/clyent) | 1.2.2 | Command line client library for windows and posix / BSD 3-Clause |
| [colorama](https://github.com/tartley/colorama) | 0.4.4 | Cross-platform colored terminal text / BSD-3-Clause |
| [comtypes](http://starship.python.net/crew/theller/comtypes/) | 1.1.7 | pure Python COM package / MIT |
| [conda](https://conda.io) | 4.9.2 | OS-agnostic, system-level binary package and environment manager. / BSD 3-Clause |
| [conda-build](https://github.com/conda/conda-build) | 3.20.5 | tools for building conda packages / BSD 3-Clause |
| [conda-env](https://github.com/conda/conda-env) | 2.6.0 | Tools for interacting with conda environments. / BSD 3-Clause |
| [conda-verify](https://github.com/conda/conda-verify) | 3.4.2 | tool for validating conda recipes and conda packages / BSD 3-Clause |
| console\_shortcut | 0.1.1 | Console shortcut creator for Windows (using menuinst) / BSD |
| [contextlib2](http://contextlib2.readthedocs.org) | 0.6.0.post1 | Backports and enhancements for the contextlib module / PSF 2 |
| [cryptography](https://github.com/pyca/cryptography) | 3.1.1 | Provides cryptographic recipes and primitives to Python developers / Apache-2.0 AND BSD-3-Clause AND PSF-2.0 |
| [curl](http://curl.haxx.se/) | 7.71.1 | tool and library for transferring data with URL syntax / MIT/X derivate (`<http://curl.haxx.se/docs/copyright.html>`) |
| [cycler](http://matplotlib.org/cycler) | 0.10.0 | Composable style cycles. / BSD 3-Clause |
| [cython](http://www.cython.org/) | 0.29.21 | The Cython compiler for writing C extensions for the Python language / Apache-2.0 |
| [cytoolz](https://github.com/pytoolz/cytoolz) | 0.11.0 | Cython implementation of Toolz. High performance functional utilities / BSD-3-Clause |
| [dask](https://dask.org/) | 2.30.0 | Parallel PyData with Task Scheduling / BSD-3-Clause |
| [dask-core](http://github.com/dask/dask/) | 2.30.0 | Parallel Python with task scheduling / BSD-3-Clause |
| [decorator](https://github.com/micheles/decorator) | 4.4.2 | Better living through Python with decorators. / BSD-3-Clause |
| [defusedxml](https://bitbucket.org/tiran/defusedxml) | 0.6.0 | XML bomb protection for Python stdlib modules / PSF 2.0 |
| [diff-match-patch](http://code.google.com/p/google-diff-match-patch/) | 20200713 | Diff Match Patch is a high-performance library in multiple languages that manipulates plain text / Apache-2.0 |
| [distributed](http://distributed.readthedocs.io/en/latest/) | 2.30.1 | Distributed computing with Dask / BSD-3-Clause |
| [docutils](http://docutils.sourceforge.net/) | 0.16 | Docutils – Python Documentation Utilities / Public Domain Dedictation and BSD 2-Clause and PSF 2.1.1 and GPL 3.0 |
| [entrypoints](https://github.com/takluyver/entrypoints) | 0.3 | Discover and load entry points from installed packages. / MIT License |
| [et\_xmlfile](https://bitbucket.org/openpyxl/et_xmlfile) | 1.0.1 | An implementation of lxml.xmlfile for the standard library / MIT |
| [fastcache](https://github.com/pbrady/fastcache) | 1.1.0 | C implementation of Python 3 lru\_cache / MIT |
| [filelock](https://github.com/benediktschmitt/py-filelock) | 3.0.12 | A platform independent file lock. / Public Domain |
| [flake8](http://flake8.pycqa.org/) | 3.8.4 | Your Tool For Style Guide Enforcement / MIT |
| [flask](http://flask.pocoo.org) | 1.1.2 | A microframework based on Werkzeug, Jinja2 and good intentions. / BSD 3-Clause |
| [freetype](https://www.freetype.org/) | 2.10.4 | A Free, High-Quality, and Portable Font Engine / GPL-2.0-only and LicenseRef-FreeType |
| [fsspec](https://github.com/martindurant/filesystem_spec) | 0.8.3 | A specification for pythonic filesystems / BSD-3-Clause |
| [future](http://python-future.org) | 0.18.2 | Clean single-source support for Python 3 and 2 / MIT |
| [get\_terminal\_size](https://github.com/chrippa/backports.shutil_get_terminal_size) | 1.0.0 | Get the size of the terminal window. / MIT |
| [gevent](https://www.gevent.org) | 20.9.0 | Coroutine-based network library / MIT |
| [glob2](https://github.com/miracle2k/python-glob2) | 0.7 | Version of the glob module that supports recursion via \*\*, and can capture patterns. / BSD-2-Clause |
| [greenlet](https://github.com/python-greenlet/greenlet) | 0.4.17 | Lightweight in-process concurrent programming / MIT |
| [h5py](http://www.h5py.org/) | 2.10.0 | Read and write HDF5 files from Python. / BSD-3-Clause |
| [hdf5](http://www.hdfgroup.org/HDF5/) | 1.10.4 | HDF5 is a data model, library, and file format for storing and managing data / HDF5 |
| [heapdict](http://stutzbachenterprises.com/) | 1.0.1 | A heap with decrease-key and increase-key operations / BSD 3-Clause |
| [html5lib](https://github.com/html5lib/html5lib-python) | 1.1 | HTML parser based on the WHATWG HTML specification / MIT |
| icc\_rt | 2019.0.0 | Intel runtime libraries for C, C++ and Fortran compilers / Intel proprietary |
| [icu](http://site.icu-project.org/) | 58.2 | International Components for Unicode. / MIT |
| [idna](https://github.com/kjd/idna) | 2.10 | Internationalized Domain Names in Applications (IDNA). / BSD Like |
| [imageio](https://imageio.github.io) | 2.9.0 | A Python library for reading and writing image data / BSD-2-Clause |
| [imagesize](https://github.com/shibukawa/imagesize_py) | 1.2.0 | Getting image size from png/jpeg/jpeg2000/gif file / MIT |
| [importlib-metadata](https://gitlab.com/python-devs/importlib_metadata) | 2.0.0 | A library to access the metadata for a Python package / Apache-2.0 |
| [importlib\_metadata](https://gitlab.com/python-devs/importlib_metadata) | 2.0.0 | A library to access the metadata for a Python package / Apache-2.0 |
| [iniconfig](http://github.com/RonnyPfannschmidt/iniconfig) | 1.1.1 | iniconfig: brain-dead simple config-ini parsing / MIT |
| [intel-openmp](https://software.intel.com/en-us/node/522690) | 2020.2 | Math library for Intel and compatible processors / LicenseRef-ProprietaryIntel |
| [intervaltree](https://github.com/chaimleib/intervaltree) | 3.1.0 | Editable interval tree data structure for Python 2 and 3 / Apache-2.0 |
| [ipykernel](https://ipython.org) | 5.3.4 | IPython Kernel for Jupyter / BSD-3-Clause |
| [ipython](https://ipython.org) | 7.19.0 | IPython: Productive Interactive Computing / BSD-3-Clause |
| [ipython\_genutils](http://ipython.org) | 0.2.0 | vestigial utilities from IPython / BSD 3-Clause |
| [ipywidgets](https://github.com/ipython/ipywidgets) | 7.5.1 | Jupyter Interactive Widgets / BSD 3-clause |
| [isort](https://github.com/timothycrosley/isort) | 5.6.4 | A Python utility / library to sort Python imports. / MIT |
| [itsdangerous](https://github.com/pallets/itsdangerous) | 1.1.0 | Various helpers to pass trusted data to untrusted environments. / BSD 3-Clause |
| [jdcal](https://github.com/phn/jdcal) | 1.4.1 | Julian dates from proleptic Gregorian and Julian calendars. / BSD 2-Clause |
| [jedi](https://github.com/davidhalter/jedi/) | 0.17.1 | An autocompletion tool for Python that can be used for text editors. / MIT |
| [jinja2](http://jinja.pocoo.org) | 2.11.2 | An easy to use stand-alone template engine written in pure python. / 3-Clause BSD |
| [joblib](https://pypi.org/project/joblib/) | 0.17.0 | Lightweight pipelining: using Python functions as pipeline jobs. / BSD-3-Clause |
| [jpeg](http://www.ijg.org/) | 9b | read/write jpeg COM, EXIF, IPTC medata / Custom free software license |
| [json5](https://github.com/dpranke/pyjson5) | 0.9.5 | A Python implementation of the JSON5 data format / Apache-2.0 |
| [jsonschema](https://github.com/Julian/jsonschema) | 3.2.0 | An implementation of JSON Schema validation for Python / MIT |
| [jupyter](http://jupyter.org) | 1.0.0 | Jupyter metapackage. Install all the Jupyter components in one go. / BSD 3-Clause |
| [jupyter\_client](https://jupyter.org) | 6.1.7 | jupyter\_client contains the reference implementation of the Jupyter protocol. / BSD-3-Clause |
| [jupyter\_console](http://jupyter.org) | 6.2.0 | Jupyter terminal console / BSD-3-Clause |
| [jupyter\_core](https://jupyter.org) | 4.6.3 | Core common functionality of Jupyter projects. / BSD-3-Clause |
| [jupyterlab](https://github.com/jupyterlab/jupyterlab) | 2.2.6 | JupyterLab PRE-ALPHA / BSD-3-Clause |
| [jupyterlab\_pygments](http://github.com/JupyterLab/jupyterlab_pygments) | 0.1.2 | Pygments syntax coloring scheme making use of the JupyterLab CSS variables / BSD-3-Clause |
| [jupyterlab\_server](https://github.com/jupyterlab/jupyterlab_server) | 1.2.0 | A set of server components for JupyterLab and JupyterLab like applications. / BSD-3-Clause |
| [keyring](https://github.com/jaraco/keyring) | 21.4.0 | Store and access your passwords safely / Python Software Foundation or MIT |
| [kiwisolver](https://github.com/nucleic/kiwi) | 1.3.0 | An efficient C++ implementation of the Cassowary constraint solver / BSD-3-Clause |
| [krb5](http://web.mit.edu/kerberos/) | 1.18.2 | A network authentication protocol. / MIT |
| [lazy-object-proxy](https://github.com/ionelmc/python-lazy-object-proxy) | 1.4.3 | A fast and thorough lazy object proxy / BSD-2-Clause |
| [libarchive](http://www.libarchive.org/) | 3.4.2 | Multi-format archive and compression library / BSD-2-Clause |
| [libcurl](http://curl.haxx.se/) | 7.71.1 | tool and library for transferring data with URL syntax / MIT/X derivate (`<http://curl.haxx.se/docs/copyright.html>`) |
| [libiconv](https://www.gnu.org/software/libiconv/) | 1.15 | Provides iconv for systems which don’t have one (or that cannot convert from/to Unicode.) / GPL and LGPL |
| [liblief](https://lief.quarkslab.com/) | 0.10.1 | A cross platform library to parse, modify and abstract ELF, PE and MachO formats. / Apache-2.0 |
| [libpng](http://www.libpng.org/pub/png/libpng.html) | 1.6.37 | PNG reference library / zlib/libpng |
| [libsodium](http://libsodium.org) | 1.0.18 | A modern and easy-to-use crypto library. / ISC |
| [libspatialindex](http://libspatialindex.github.io) | 1.9.3 | Extensible framework for robust spatial indexing / MIT |
| [libssh2](https://www.libssh2.org/) | 1.9.0 | the SSH library / BSD-3-Clause |
| [libtiff](http://www.libtiff.org/) | 4.1.0 | Support for the Tag Image File Format (TIFF). / HPND |
| [libxml2](http://xmlsoft.org/) | 2.9.10 | The XML C parser and toolkit of Gnome / MIT |
| [libxslt](http://xmlsoft.org/XSLT/) | 1.1.34 | The XSLT C library developed for the GNOME project / MIT |
| [llvmlite](http://llvmlite.pydata.org) | 0.34.0 | A lightweight LLVM python binding for writing JIT compilers. / BSD-2-Clause |
| [locket](https://github.com/mwilliamson/locket.py) | 0.2.0 | File-based locks for Python for Linux and Windows / BSD 2-Clause |
| [lxml](http://lxml.de/) | 4.6.1 | Pythonic binding for the C libraries libxml2 and libxslt. / BSD-3-Clause and GPL-2.0-only and ZPL-2.0 and LicenseRef-ElementTree |
| [lz4-c](https://www.lz4.org) | 1.9.2 | Extremely Fast Compression algorithm / BSD-2-Clause |
| [lzo](http://www.oberhumer.com/opensource/lzo/) | 2.10 | LZO is a portable lossless data compression library written in ANSI C. / GPL v2+ |
| m2w64-gcc-libgfortran | 5.3.0 | / |
| m2w64-gcc-libs | 5.3.0 | / |
| m2w64-gcc-libs-core | 5.3.0 | / |
| m2w64-gmp | 6.1.0 | / |
| m2w64-libwinpthread-git | 5.0.0.4634.697f757 | / |
| [markupsafe](https://www.palletsprojects.com/p/markupsafe) | 1.1.1 | A Python module that implements the jinja2.Markup string / BSD-3-Clause |
| [matplotlib](http://matplotlib.org/) | 3.3.2 | Publication quality figures in Python / LicenseRef-PSF-based |
| [matplotlib-base](http://matplotlib.org/) | 3.3.2 | Publication quality figures in Python / LicenseRef-PSF-based |
| [mccabe](https://github.com/PyCQA/mccabe) | 0.6.1 | McCabe complexity checker for Python / MIT |
| [menuinst](https://github.com/ContinuumIO/menuinst) | 1.4.16 | cross platform menu item installation / BSD |
| [mistune](https://github.com/lepture/mistune) | 0.8.4 | The fastest markdown parser in pure Python. / BSD 3-Clause |
| [mkl](https://software.intel.com/en-us/mkl) | 2020.2 | Math library for Intel and compatible processors / LicenseRef-ProprietaryIntel |
| [mkl-service](https://github.com/ContinuumIO/mkl-service) | 2.3.0 | Python bindings to MKL service functions / 3-clause BSD |
| [mkl\_fft](http://github.com/IntelPython/mkl_fft) | 1.2.0 | NumPy-based implementation of Fast Fourier Transform using Intel (R) Math Kernel Library. / BSD 3-Clause |
| [mkl\_random](http://github.com/IntelPython/mkl_random) | 1.1.1 | Intel (R) MKL-powered package for sampling from common probability distributions into NumPy arrays. / BSD 3-Clause |
| [mock](https://github.com/testing-cabal/mock) | 4.0.2 | A library for testing in Python / BSD-2-Clause |
| [more-itertools](https://github.com/more-itertools/more-itertools) | 8.6.0 | More routines for operating on iterables, beyond itertools / MIT |
| [mpmath](http://mpmath.org) | 1.1.0 | Python library for arbitrary-precision floating-point arithmetic / BSD 3-Clause |
| [msgpack-python](http://msgpack.org/) | 1.0.0 | MessagePack (de)serializer / Apache-2.0 |
| msys2-conda-epoch | 20160418 | / |
| [multipledispatch](https://github.com/mrocklin/multipledispatch/) | 0.6.0 | Multiple dispatch in Python / BSD 3-Clause |
| [nbclient](https://jupyter.org) | 0.5.1 | A client library for executing notebooks. Formally nbconvert’s ExecutePreprocessor. / BSD-3-Clause |
| [nbconvert](http://jupyter.org) | 6.0.7 | Converting Jupyter Notebooks / BSD-3-Clause |
| [nbformat](http://jupyter.org) | 5.0.8 | The reference implementation of the Jupyter Notebook format / BSD-3-Clause |
| [nest-asyncio](https://github.com/erdewit/nest_asyncio) | 1.4.2 | Patch asyncio to allow nested event loops / BSD-2-Clause |
| [networkx](https://networkx.github.io/) | 2.5 | Python package for creating and manipulating complex networks / BSD-3-Clause |
| [nltk](http://nltk.org/) | 3.5 | Natural Language Toolkit / Apache 2.0 |
| [nose](http://readthedocs.org/docs/nose/) | 1.3.7 | Nose extends unittest to make testing easier / LGPL-2.1 |
| [notebook](https://jupyter.org) | 6.1.4 | Jupyter Notebook / BSD-3-Clause |
| [numba](http://numba.github.com) | 0.51.2 | NumPy aware dynamic Python compiler using LLVM / BSD-2-Clause |
| [numexpr](https://github.com/pydata/numexpr) | 2.7.1 | Fast numerical expression evaluator for NumPy. / MIT |
| [numpy](http://numpy.scipy.org/) | 1.19.2 | Array processing for numbers, strings, records, and objects. / BSD 3-Clause |
| [numpy-base](http://numpy.scipy.org/) | 1.19.2 | Array processing for numbers, strings, records, and objects. / BSD 3-Clause |
| [numpydoc](https://github.com/numpy/numpydoc) | 1.1.0 | Numpy’s Sphinx extensions / BSD 3-Clause |
| [olefile](http://www.decalage.info/python/olefileio) | 0.46 | parse, read and write Microsoft OLE2 files / BSD 2-Clause |
| [openpyxl](https://openpyxl.readthedocs.io) | 3.0.5 | A Python library to read/write Excel 2010 xlsx/xlsm files / MIT |
| [openssl](http://www.openssl.org/) | 1.1.1h | OpenSSL is an open-source implementation of the SSL and TLS protocols / OpenSSL |
| [packaging](https://github.com/pypa/packaging) | 20.4 | Core utilities for Python packages / Apache 2.0 or BSD 2-Clause |
| [pandas](http://pandas.pydata.org) | 1.1.3 | High-performance, easy-to-use data structures and data analysis tools. / BSD-3-Clause |
| [pandoc](http://pandoc.org/) | 2.11 | Universal markup converter (repackaged binaries) / GPL-2.0 |
| [pandocfilters](https://github.com/jgm/pandocfilters) | 1.4.3 | A python module for writing pandoc filters / BSD-3-Clause |
| [paramiko](http://www.paramiko.org/) | 2.7.2 | SSH2 protocol library / LGPL-2.1-or-later |
| [parso](https://github.com/davidhalter/parso) | 0.7.0 | A Python Parser / MIT |
| [partd](https://github.com/dask/partd) | 1.1.0 | Data structure for on-disk shuffle operations / BSD 3-Clause |
| [path](https://github.com/jaraco/path) | 15.0.0 | A module wrapper for os.path / MIT |
| [path.py](https://github.com/jaraco/path.py) | 12.5.0 | A module wrapper for os.path / MIT |
| [pathlib2](https://github.com/mcmtroffaes/pathlib2) | 2.3.5 | Fork of pathlib aiming to support the full stdlib Python API / MIT |
| [pathtools](https://github.com/gorakhargosh/pathtools) | 0.1.2 | Path utilities for Python. / MIT |
| [patsy](https://github.com/pydata/patsy) | 0.5.1 | Describing statistical models in Python using symbolic formulas / BSD-2-Clause, PSF2 |
| [pep8](http://pep8.readthedocs.org/) | 1.7.1 | Python style guide checker / MIT |
| [pexpect](http://pexpect.sourceforge.net/) | 4.8.0 | Pexpect makes Python a better tool for controlling other applications. / ISC |
| [pickleshare](https://github.com/pickleshare/pickleshare/) | 0.7.5 | Tiny ‘shelve’-like database with concurrency support / MIT |
| [pillow](https://pillow.readthedocs.io) | 8.0.1 | Pillow is the friendly PIL fork by Alex Clark and Contributors / LicenseRef-PIL |
| [pip](https://pip.pypa.io/en/stable/) | 20.2.4 | PyPA recommended tool for installing Python packages / MIT |
| [pkginfo](https://code.launchpad.net/~tseaver/pkginfo/trunk) | 1.6.1 | Query metadatdata from sdists / bdists / installed packages. / MIT |
| [pluggy](https://github.com/pytest-dev/pluggy) | 0.13.1 | Plugin registration and hook calling for Python / MIT |
| [ply](http://www.dabeaz.com/ply/index.html) | 3.11 | Python Lex-Yacc / BSD 3-clause |
| powershell\_shortcut | 0.0.1 | Powershell shortcut creator for Windows (using menuinst) / BSD |
| [prometheus\_client](https://github.com/prometheus/client_python) | 0.8.0 | Python client for the Prometheus monitoring system / Apache-2.0 |
| [prompt-toolkit](https://github.com/jonathanslenders/python-prompt-toolkit) | 3.0.8 | Library for building powerful interactive command lines in Python / BSD-3-Clause |
| [prompt\_toolkit](https://github.com/jonathanslenders/python-prompt-toolkit) | 3.0.8 | Library for building powerful interactive command lines in Python / BSD-3-Clause |
| [psutil](https://github.com/giampaolo/psutil) | 5.7.2 | A cross-platform process and system utilities module for Python / BSD-3-Clause |
| [py](https://github.com/pytest-dev/py) | 1.9.0 | library with cross-python path, ini-parsing, io, code, log facilities / MIT |
| [py-lief](https://lief.quarkslab.com/) | 0.10.1 | A cross platform library to parse, modify and abstract ELF, PE and MachO formats. / Apache-2.0 |
| [pycodestyle](https://pycodestyle.readthedocs.io/) | 2.6.0 | Python style guide checker / MIT |
| [pycosat](https://github.com/ContinuumIO/pycosat) | 0.6.3 | Bindings to picosat (a SAT solver) / MIT |
| [pycparser](https://github.com/eliben/pycparser) | 2.20 | Complete C99 parser in pure Python / BSD 3-clause |
| [pycurl](http://pycurl.sourceforge.net/) | 7.43.0.6 | A Python Interface To The cURL library / LGPL, MIT |
| [pydocstyle](https://github.com/PyCQA/pydocstyle) | 5.1.1 | Python docstring style checker (formerly pep257) / MIT |
| [pyflakes](https://github.com/PyCQA/pyflakes) | 2.2.0 | Pyflakes analyzes programs and detects various errors. / MIT |
| [pygments](http://pygments.org/) | 2.7.2 | Pygments is a generic syntax highlighter suitable for use in code hosting, forums, wikis or other applications that need to prettify source code. / BSD-2-clause |
| [pylint](http://www.pylint.org/) | 2.6.0 | python code static checker / GPL-2.0-only |
| [pynacl](https://github.com/pyca/pynacl) | 1.4.0 | PyNaCl is a Python binding to the Networking and Cryptography library, a crypto library with the stated goal of improving usability, security and speed. / Apache-2.0 |
| [pyodbc](https://github.com/mkleehammer/pyodbc) | 4.0.30 | DB API Module for ODBC / MIT |
| [pyopenssl](https://github.com/pyca/pyopenssl) | 19.1.0 | Python wrapper module around the OpenSSL library / Apache 2.0 |
| [pyparsing](http://pyparsing.wikispaces.com/) | 2.4.7 | Create and execute simple grammars / MIT |
| [pyqt](http://www.riverbankcomputing.co.uk/software/pyqt) | 5.9.2 | Python binding of the cross-platform GUI toolkit Qt. / Commercial, GPL-2.0, GPL-3.0 |
| [pyreadline](http://ipython.org/pyreadline) | 2.1 | A python implmementation of GNU readline. / BSD 3-Clause |
| [pyrsistent](http://github.com/tobgu/pyrsistent/) | 0.17.3 | Persistent/Functional/Immutable data structures / MIT |
| [pysocks](https://github.com/Anorov/PySocks) | 1.7.1 | A Python SOCKS client module. See [Anorov/PySocks](https://github.com/Anorov/PySocks) for more information. / BSD 3-Clause |
| [pytables](http://www.pytables.org) | 3.6.1 | Brings together Python, HDF5 and NumPy to easily handle large amounts of data. / BSD 3-Clause |
| [pytest](https://docs.pytest.org/en/latest/) | 6.1.1 | Simple and powerful testing with Python. / MIT |
| [python](https://www.python.org/) | 3.8.5 | General purpose programming language / Python-2.0 |
| [python-dateutil](https://dateutil.readthedocs.org/) | 2.8.1 | Extensions to the standard Python datetime module. / BSD 3 Clause |
| [python-jsonrpc-server](https://github.com/palantir/python-jsonrpc-server) | 0.4.0 | A Python 2.7 and 3.4+ server implementation of the JSON RPC 2.0 protocol. / MIT |
| [python-language-server](https://github.com/palantir/python-language-server) | 0.35.1 | An implementation of the Language Server Protocol for Python / MIT |
| [python-libarchive-c](https://github.com/Changaco/python-libarchive-c) | 2.9 | Python interface to libarchive / CC0-1.0 |
| [pytz](http://pythonhosted.org/pytz/) | 2020.1 | World timezone definitions, modern and historical. / MIT |
| [pywavelets](https://github.com/PyWavelets/pywt) | 1.1.1 | Discrete Wavelet Transforms in Python / MIT |
| [pywin32](https://sourceforge.net/projects/pywin32) | 227 | Python extensions for Windows / PSF |
| [pywin32-ctypes](https://github.com/enthought/pywin32-ctypes) | 0.2.0 | A limited subset of pywin32 re-implemented using ctypes (or cffi) / BSD 3 Clause |
| [pywinpty](https://github.com/spyder-ide/pywinpty) | 0.5.7 | Python bindings for the winpty library / MIT |
| [pyyaml](http://pyyaml.org/wiki/PyYAML) | 5.3.1 | YAML parser and emitter for Python / MIT |
| [pyzmq](https://github.com/zeromq/pyzmq) | 19.0.2 | Python bindings for zeromq / BSD 3-clause |
| [qdarkstyle](https://github.com/ColinDuquesnoy/QDarkStyleSheet) | 2.8.1 | A dark stylesheet for Qt applications (Qt4, Qt5, PySide, PyQt4, PyQt5, QtPy, PyQtGraph). / MIT |
| [qt](http://qt-project.org) | 5.9.7 | Qt is a cross-platform application and UI framework. / LGPL-3.0 |
| [qtawesome](https://github.com/spyder-ide/qtawesome) | 1.0.1 | Iconic fonts in PyQt and PySide applications / MIT |
| [qtconsole](http://jupyter.org) | 4.7.7 | Jupyter Qt Console / BSD-3-Clause |
| [qtpy](https://github.com/spyder-ide/qtpy) | 1.9.0 | Abstraction layer for PyQt5/PyQt4/PySide / MIT |
| [regex](https://bitbucket.org/mrabarnett/mrab-regex) | 2020.10.15 | Alternative regular expression module, to replace re / Python-2.0 |
| [requests](http://python-requests.org) | 2.24.0 | Requests is an elegant and simple HTTP library for Python, built with ♥. / Apache-2.0 |
| [rope](https://github.com/python-rope/rope) | 0.18.0 | A python refactoring library / GPL 2.0 |
| [rtree](http://toblerity.github.com/rtree/) | 0.9.4 | R-Tree spatial index for Python GIS / MIT |
| [ruamel\_yaml](https://bitbucket.org/ruamel/yaml) | 0.15.87 | A patched copy of ruamel.yaml. / MIT |
| [scikit-image](http://scikit-image.org/) | 0.17.2 | Image processing in Python. / BSD-3-Clause |
| [scikit-learn](http://scikit-learn.org/) | 0.23.2 | A set of python modules for machine learning and data mining / BSD-3-Clause |
| [scipy](http://www.scipy.org/) | 1.5.2 | Scientific Library for Python / BSD 3-Clause |
| [seaborn](https://seaborn.pydata.org) | 0.11.0 | Statistical data visualization / BSD 3-Clause |
| [send2trash](https://github.com/hsoft/send2trash) | 1.5.0 | Python library to natively send files to Trash (or Recycle bin) on all platforms. / BSD-3-Clause |
| [setuptools](https://github.com/pypa/setuptools) | 50.3.1 | Download, build, install, upgrade, and uninstall Python packages / MIT |
| [simplegeneric](http://cheeseshop.python.org/pypi/simplegeneric) | 0.8.1 | Simple generic functions (similar to Python’s own len(), pickle.dump(), etc.) / Zope Public |
| [singledispatch](http://docs.python.org/3/library/functools.html#functools.singledispatch) | 3.4.0.3 | Transforms a function into a single-dispatch generic function / MIT |
| [sip](http://www.riverbankcomputing.com/software/sip/intro) | 4.19.13 | Create Python bindings for C and C++ libraries / GPL-3.0 |
| [six](https://six.readthedocs.io/) | 1.15.0 | Python 2 and 3 compatibility utilities / MIT |
| [snowballstemmer](https://github.com/shibukawa/snowball_py) | 2.0.0 | Snowball stemming library collection for Python / BSD-2-Clause |
| [sortedcollections](http://www.grantjenks.com/docs/sortedcollections/) | 1.2.1 | Python Sorted Collections / Apache-2.0 |
| [sortedcontainers](http://www.grantjenks.com/docs/sortedcontainers/) | 2.2.2 | Python Sorted Container Types: SortedList, SortedDict, and SortedSet / Apache-2.0 |
| [soupsieve](http://facelessuser.github.io/soupsieve) | 2.0.1 | A modern CSS selector implementation for BeautifulSoup / MIT |
| [sphinx](http://www.sphinx-doc.org) | 3.2.1 | Sphinx is a tool that makes it easy to create intelligent and beautiful documentation / BSD-2-Clause |
| sphinxcontrib | 1.0 | Python namespace for sphinxcontrib / BSD |
| [sphinxcontrib-applehelp](https://www.sphinx-doc.org/en/master/) | 1.0.2 | sphinxcontrib-applehelp is a sphinx extension which outputs Apple help books / BSD-2-Clause |
| [sphinxcontrib-devhelp](https://www.sphinx-doc.org/en/master/) | 1.0.2 | sphinxcontrib-devhelp is a sphinx extension which outputs Devhelp document / BSD-2-Clause |
| [sphinxcontrib-htmlhelp](https://www.sphinx-doc.org/en/master/) | 1.0.3 | sphinxcontrib-htmlhelp is a sphinx extension which … / BSD-2-Clause |
| [sphinxcontrib-jsmath](https://www.sphinx-doc.org/en/master/) | 1.0.1 | A sphinx extension which renders display math in HTML via JavaScript / BSD-2-Clause |
| [sphinxcontrib-qthelp](https://www.sphinx-doc.org/en/master/) | 1.0.3 | sphinxcontrib-qthelp is a sphinx extension which outputs QtHelp document / BSD-2-Clause |
| [sphinxcontrib-serializinghtml](https://www.sphinx-doc.org/en/master/) | 1.1.4 | sphinxcontrib-serializinghtml is a sphinx extension which outputs “serialized” HTML files (json and pickle). / BSD-2-Clause |
| [sphinxcontrib-websupport](https://pypi.python.org/pypi/sphinxcontrib-websupport) | 1.2.4 | Sphinx API for Web Apps / BSD-2-Clause |
| [spyder](https://www.spyder-ide.org/) | 4.1.5 | The Scientific Python Development Environment / MIT |
| [spyder-kernels](https://www.spyder-ide.org/) | 1.9.4 | Jupyter kernels for Spyder’s console / MIT |
| [sqlalchemy](http://www.sqlalchemy.org/) | 1.3.20 | Database Abstraction Library. / MIT |
| [sqlite](http://www.sqlite.org/) | 3.33.0 | Implements a self-contained, zero-configuration, SQL database engine / Public-Domain (`<http://www.sqlite.org/copyright.html>`) |
| [statsmodels](https://www.statsmodels.org) | 0.12.0 | Statistical computations and models for use with SciPy / BSD-3-Clause |
| [sympy](https://sympy.org) | 1.6.2 | Python library for symbolic mathematics / BSD-3-Clause |
| [tblib](https://github.com/ionelmc/python-tblib) | 1.7.0 | Traceback serialization library. / BSD 2-Clause |
| [terminado](https://github.com/jupyter/terminado) | 0.9.1 | Terminals served by tornado websockets / BSD-2-Clause |
| [testpath](https://testpath.readthedocs.io) | 0.4.4 | Testpath is a collection of utilities for Python code working with files and commands. / BSD-3-Clause |
| [threadpoolctl](https://github.com/joblib/threadpoolctl) | 2.1.0 | Python helpers to control the threadpools of native libraries / BSD 3-Clause |
| [tifffile](https://github.com/blink1073/tifffile) | 2020.10.1 | Read and write image data from and to TIFF files. / BSD 3-Clause |
| [tk](http://www.tcl.tk/) | 8.6.10 | A dynamic programming language with GUI support. Bundles Tcl and Tk. / Tcl/Tk |
| [toml](https://github.com/uiri/toml) | 0.10.1 | Python lib for TOML. / MIT |
| [toolz](http://toolz.readthedocs.org/) | 0.11.1 | A functional standard library for Python / BSD-3-Clause |
| [tornado](http://www.tornadoweb.org/) | 6.0.4 | A Python web framework and asynchronous networking library, originally developed at FriendFeed. / Apache-2.0 |
| [tqdm](https://pypi.python.org/pypi/tqdm) | 4.50.2 | A Fast, Extensible Progress Meter / MPLv2.0, MIT |
| [traitlets](http://traitlets.readthedocs.org/) | 5.0.5 | Configuration system for Python applications / BSD-3-Clause |
| [typing\_extensions](https://github.com/python/typing/tree/master/typing_extensions) | 3.7.4.3 | Backported and Experimental Type Hints for Python / PSF-2.0 |
| [ujson](https://github.com/ultrajson/ultrajson) | 4.0.1 | Ultra fast JSON decoder and encoder written in C with Python bindings / BSD-3-Clause |
| [unicodecsv](https://github.com/jdunck/python-unicodecsv) | 0.14.1 | Drop-in replacement for csv module which supports unicode strings / BSD |
| [urllib3](https://urllib3.readthedocs.io/) | 1.25.11 | HTTP library with thread-safe connection pooling, file post, and more. / MIT |
| [vc](https://github.com/conda/conda/wiki/VC-features) | 14.1 | A meta-package to impose mutual exclusivity among software built with different VS versions / Modified BSD License (3-clause) |
| vs2015\_runtime | 14.16.27012 | MSVC runtimes associated with cl.exe version 19.16.27032.1 (VS 2017 update 9) / None |
| [watchdog](http://github.com/gorakhargosh/watchdog) | 0.10.3 | Filesystem events monitoring / Apache 2.0 |
| [wcwidth](https://github.com/jquast/wcwidth) | 0.2.5 | Measures number of Terminal column cells of wide-character codes. / MIT |
| [webencodings](https://github.com/gsnedders/python-webencodings) | 0.5.1 | Character encoding aliases for legacy web content / BSD 3-Clause |
| [werkzeug](https://palletsprojects.com/p/werkzeug/) | 1.0.1 | The comprehensive WSGI web application library. / BSD 3-Clause |
| [wheel](https://github.com/pypa/wheel) | 0.35.1 | A built-package format for Python. / MIT |
| [widgetsnbextension](http://ipython.org) | 3.5.1 | Interactive Widgets for Jupyter / BSD 3-clause |
| [win\_inet\_pton](https://github.com/hickeroar/win_inet_pton) | 1.1.0 | Native inet\_pton and inet\_ntop implementation for Python on Windows (with ctypes). / PUBLIC-DOMAIN |
| [win\_unicode\_console](https://github.com/Drekin/win-unicode-console) | 0.5 | A Python package to enable Unicode input and display when running Python from Windows console. / MIT |
| [wincertstore](https://bitbucket.org/tiran/wincertstore) | 0.2 | Python module to extract CA and CRL certs from Windows’ cert store (ctypes based). / PSF 2 |
| [winpty](https://github.com/rprichard/winpty) | 0.4.3 | Winpty provides an interface similar to a Unix pty-master for communicating with Windows console programs. / MIT |
| [wrapt](https://github.com/GrahamDumpleton/wrapt) | 1.11.2 | Module for decorators, wrappers and monkey patching / BSD 2-Clause |
| [xlrd](http://www.python-excel.org/) | 1.2.0 | Library for developers to extract data from Microsoft Excel (tm) spreadsheet files / BSD 3-Clause and BSD with advertising |
| [xlsxwriter](https://xlsxwriter.readthedocs.io/) | 1.3.7 | A Python module for creating Excel XLSX files / BSD-2-Clause |
| [xlwings](http://xlwings.org/) | 0.20.8 | Interact with Excel from Python and vice versa / 3-clause BSD |
| [xlwt](http://www.python-excel.org/) | 1.3.0 | Writing data and formatting information to Excel files / BSD |
| [xz](http://tukaani.org/xz/) | 5.2.5 | Data compression software with high compression ratio / LGPL-2.1 and GPL-2.0 |
| [yaml](http://pyyaml.org/wiki/LibYAML) | 0.2.5 | A C library for parsing and emitting YAML / MIT |
| [yapf](https://github.com/google/yapf) | 0.30.0 | A formatter for Python files / Apache 2.0 |
| [zeromq](http://zeromq.org) | 4.3.2 | A high-performance asynchronous messaging library. / LGPL 3 |
| [zict](http://github.com/mrocklin/zict) | 2.0.0 | Composable Dictionary Classes / BSD 3-Clause |
| [zipp](https://github.com/jaraco/zipp) | 3.4.0 | A pathlib-compatible Zipfile object wrapper / MIT |
| [zlib](http://zlib.net/) | 1.2.11 | Massively spiffy yet delicately unobtrusive compression library / zlib |
| zope | 1.0 | web application server / BSD |
| [zope.event](http://www.zope.org/en/latest/) | 4.5.0 | Very basic event publishing system / Zope Public License |
| [zope.interface](http://docs.zope.org/zope.interface/) | 5.1.2 | Interfaces for Python / ZPL-2.1 |
| [zstd](http://www.zstd.net) | 1.4.5 | Zstandard - Fast real-time compression algorithm / BSD 3-Clause |
| Name | Version | Summary / License |
|---|---|---|
| [\_ipyw\_jlab\_nb\_ext\_conf](https://github.com/ContinuumIO/anaconda-nb-extensions-meta-config) | 0.1.0 | A configuration metapackage for enabling Anaconda-bundled jupyter extensions / BSD |
| [alabaster](http://www.sphinx-doc.org/en/stable/index.html) | 0.7.12 | Configurable, Python 2+3 compatible Sphinx theme. / BSD 3-Clause |
| [anaconda-client](http://anaconda.org) | 1.7.2 | anaconda.org command line client library / BSD 3-clause |
| [anaconda-project](https://github.com/Anaconda-Platform/anaconda-project) | 0.8.4 | Tool for encapsulating, running, and reproducing data science projects / BSD 3-Clause |
| [argh](https://github.com/neithere/argh) | 0.26.2 | The Natural CLI. / LGPL 3 |
| [argon2-cffi](https://argon2-cffi.readthedocs.org/) | 20.1.0 | The secure Argon2 password hashing algorithm. / MIT |
| [asn1crypto](https://github.com/wbond/asn1crypto) | 1.4.0 | Python ASN.1 library with a focus on performance and a pythonic API / MIT |
| [astroid](https://www.astroid.org/) | 2.4.2 | A abstract syntax tree for Python with inference support. / LGPL-2.1-only |
| [astropy](http://www.astropy.org/) | 4.0.2 | Community-developed Python Library for Astronomy / BSD-3-Clause |
| [async\_generator](https://github.com/python-trio/async_generator) | 1.10 | Async generators and context managers for Python 3.5+ / MIT |
| [atomicwrites](https://github.com/untitaker/python-atomicwrites) | 1.4.0 | Atomic file writes / MIT |
| [attrs](https://attrs.readthedocs.io/en/stable/) | 20.3.0 | attrs is the Python package that will bring back the joy of writing classes by relieving you from the drudgery of implementing object protocols (aka dunder methods). / MIT |
| [autopep8](https://github.com/hhatto/autopep8) | 1.5.4 | A tool that automatically formats Python code to conform to the PEP 8 style guide / MIT |
| [babel](http://babel.pocoo.org/) | 2.8.1 | Utilities to internationalize and localize Python applications / BSD 3-clause |
| [backcall](https://github.com/takluyver/backcall/) | 0.2.0 | Specifications for callback functions passed in to an API / BSD-3-Clause |
| [backports](https://bitbucket.org/brandon/backports) | 1.0 | None / BSD |
| [backports.shutil\_get\_terminal\_size](https://github.com/chrippa/backports.shutil_get_terminal_size) | 1.0.0 | A backport of the get\_terminal\_size function from Python 3.3’s shutil. / MIT |
| [bcrypt](https://github.com/pyca/bcrypt/) | 3.2.0 | Modern password hashing for your software and your servers / Apache-2.0 |
| [beautifulsoup4](http://www.crummy.com/software/BeautifulSoup/) | 4.9.3 | Python library designed for screen-scraping / MIT |
| [bitarray](https://github.com/ilanschnell/bitarray) | 1.6.1 | efficient arrays of booleans – C extension / PSF |
| [bkcharts](http://github.com/bokeh/bkcharts) | 0.2 | High level chart types built on top of Bokeh / BSD 3-Clause |
| blas | 1.0 | |
| [bleach](https://github.com/mozilla/bleach) | 3.2.1 | Easy, whitelist-based HTML-sanitizing tool / Apache-2.0 |
| [blosc](https://github.com/Blosc/c-blosc) | 1.20.1 | A blocking, shuffling and loss-less compression library that can be faster than memcpy() / BSD-3-Clause |
| [bokeh](http://bokeh.pydata.org/) | 2.2.3 | Statistical and novel interactive HTML plots for Python / BSD-3-Clause |
| [boto](https://github.com/boto/boto/) | 2.49.0 | Amazon Web Services Library / MIT |
| [bottleneck](https://github.com/pydata/bottleneck) | 1.3.2 | Fast NumPy array functions written in Cython. / BSD 2-Clause |
| [brotlipy](https://github.com/python-hyper/brotlipy) | 0.7.0 | Python bindings to the Brotli compression library / MIT |
| [bzip2](http://www.bzip.org/) | 1.0.8 | high-quality data compressor / bzip2 |
| [ca-certificates](https://github.com/conda-forge/ca-certificates-feedstock) | 2020.10.14 | Certificates for use with other packages. / MPL 2.0 |
| [certifi](http://certifi.io/) | 2020.6.20 | Python package for providing Mozilla’s CA Bundle. / ISC |
| [cffi](https://bitbucket.org/cffi/cffi) | 1.14.3 | Foreign Function Interface for Python calling C code. / MIT |
| [chardet](https://github.com/chardet/chardet) | 3.0.4 | Universal character encoding detector / LGPL2 |
| [click](https://palletsprojects.com/p/click) | 7.1.2 | Python composable command line interface toolkit / BSD-3-Clause |
| [cloudpickle](https://github.com/cloudpipe/cloudpickle) | 1.6.0 | Extended pickling support for Python objects / BSD-3-Clause |
| [clyent](https://github.com/Anaconda-Platform/clyent) | 1.2.2 | Command line client library for windows and posix / BSD 3-Clause |
| [colorama](https://github.com/tartley/colorama) | 0.4.4 | Cross-platform colored terminal text / BSD-3-Clause |
| [comtypes](http://starship.python.net/crew/theller/comtypes/) | 1.1.7 | pure Python COM package / MIT |
| [conda](https://conda.io) | 4.9.2 | OS-agnostic, system-level binary package and environment manager. / BSD 3-Clause |
| [conda-build](https://github.com/conda/conda-build) | 3.20.5 | tools for building conda packages / BSD 3-Clause |
| [conda-env](https://github.com/conda/conda-env) | 2.6.0 | Tools for interacting with conda environments. / BSD 3-Clause |
| [conda-verify](https://github.com/conda/conda-verify) | 3.4.2 | tool for validating conda recipes and conda packages / BSD 3-Clause |
| console\_shortcut | 0.1.1 | Console shortcut creator for Windows (using menuinst) / BSD |
| [contextlib2](http://contextlib2.readthedocs.org) | 0.6.0.post1 | Backports and enhancements for the contextlib module / PSF 2 |
| [cryptography](https://github.com/pyca/cryptography) | 3.1 | Provides cryptographic recipes and primitives to Python developers / Apache-2.0 AND BSD-3-Clause AND PSF-2.0 |
| [curl](http://curl.haxx.se/) | 7.71.1 | tool and library for transferring data with URL syntax / MIT/X derivate (`<http://curl.haxx.se/docs/copyright.html>`) |
| [cycler](http://matplotlib.org/cycler) | 0.10.0 | Composable style cycles. / BSD 3-Clause |
| [cython](http://www.cython.org/) | 0.29.21 | The Cython compiler for writing C extensions for the Python language / Apache-2.0 |
| [cytoolz](https://github.com/pytoolz/cytoolz) | 0.11.0 | Cython implementation of Toolz. High performance functional utilities / BSD-3-Clause |
| [dask](https://dask.org/) | 2.30.0 | Parallel PyData with Task Scheduling / BSD-3-Clause |
| [dask-core](http://github.com/dask/dask/) | 2.30.0 | Parallel Python with task scheduling / BSD-3-Clause |
| [decorator](https://github.com/micheles/decorator) | 4.4.2 | Better living through Python with decorators. / BSD-3-Clause |
| [defusedxml](https://bitbucket.org/tiran/defusedxml) | 0.6.0 | XML bomb protection for Python stdlib modules / PSF 2.0 |
| [diff-match-patch](http://code.google.com/p/google-diff-match-patch/) | 20200713 | Diff Match Patch is a high-performance library in multiple languages that manipulates plain text / Apache-2.0 |
| [distributed](http://distributed.readthedocs.io/en/latest/) | 2.30.1 | Distributed computing with Dask / BSD-3-Clause |
| [docutils](http://docutils.sourceforge.net/) | 0.16 | Docutils – Python Documentation Utilities / Public Domain Dedictation and BSD 2-Clause and PSF 2.1.1 and GPL 3.0 |
| [entrypoints](https://github.com/takluyver/entrypoints) | 0.3 | Discover and load entry points from installed packages. / MIT License |
| [et\_xmlfile](https://bitbucket.org/openpyxl/et_xmlfile) | 1.0.1 | An implementation of lxml.xmlfile for the standard library / MIT |
| [fastcache](https://github.com/pbrady/fastcache) | 1.1.0 | C implementation of Python 3 lru\_cache / MIT |
| [filelock](https://github.com/benediktschmitt/py-filelock) | 3.0.12 | A platform independent file lock. / Public Domain |
| [flake8](http://flake8.pycqa.org/) | 3.8.4 | Your Tool For Style Guide Enforcement / MIT |
| [flask](http://flask.pocoo.org) | 1.1.2 | A microframework based on Werkzeug, Jinja2 and good intentions. / BSD 3-Clause |
| [freetype](https://www.freetype.org/) | 2.10.4 | A Free, High-Quality, and Portable Font Engine / GPL-2.0-only and LicenseRef-FreeType |
| [fsspec](https://github.com/martindurant/filesystem_spec) | 0.8.3 | A specification for pythonic filesystems / BSD-3-Clause |
| [future](http://python-future.org) | 0.18.2 | Clean single-source support for Python 3 and 2 / MIT |
| [get\_terminal\_size](https://github.com/chrippa/backports.shutil_get_terminal_size) | 1.0.0 | Get the size of the terminal window. / MIT |
| [gevent](https://www.gevent.org) | 20.9.0 | Coroutine-based network library / MIT |
| [glob2](https://github.com/miracle2k/python-glob2) | 0.7 | Version of the glob module that supports recursion via \*\*, and can capture patterns. / BSD-2-Clause |
| [greenlet](https://github.com/python-greenlet/greenlet) | 0.4.17 | Lightweight in-process concurrent programming / MIT |
| [h5py](http://www.h5py.org/) | 2.10.0 | Read and write HDF5 files from Python. / BSD-3-Clause |
| [hdf5](http://www.hdfgroup.org/HDF5/) | 1.10.4 | HDF5 is a data model, library, and file format for storing and managing data / HDF5 |
| [heapdict](http://stutzbachenterprises.com/) | 1.0.1 | A heap with decrease-key and increase-key operations / BSD 3-Clause |
| [html5lib](https://github.com/html5lib/html5lib-python) | 1.1 | HTML parser based on the WHATWG HTML specification / MIT |
| icc\_rt | 2019.0.0 | Intel runtime libraries for C, C++ and Fortran compilers / Intel proprietary |
| [icu](http://site.icu-project.org/) | 58.2 | International Components for Unicode. / MIT |
| [idna](https://github.com/kjd/idna) | 2.10 | Internationalized Domain Names in Applications (IDNA). / BSD Like |
| [imageio](https://imageio.github.io) | 2.9.0 | A Python library for reading and writing image data / BSD-2-Clause |
| [imagesize](https://github.com/shibukawa/imagesize_py) | 1.2.0 | Getting image size from png/jpeg/jpeg2000/gif file / MIT |
| [importlib-metadata](https://gitlab.com/python-devs/importlib_metadata) | 2.0.0 | A library to access the metadata for a Python package / Apache-2.0 |
| [importlib\_metadata](https://gitlab.com/python-devs/importlib_metadata) | 2.0.0 | A library to access the metadata for a Python package / Apache-2.0 |
| [iniconfig](http://github.com/RonnyPfannschmidt/iniconfig) | 1.1.1 | iniconfig: brain-dead simple config-ini parsing / MIT |
| [intel-openmp](https://software.intel.com/en-us/node/522690) | 2020.2 | Math library for Intel and compatible processors / LicenseRef-ProprietaryIntel |
| [intervaltree](https://github.com/chaimleib/intervaltree) | 3.1.0 | Editable interval tree data structure for Python 2 and 3 / Apache-2.0 |
| [ipykernel](https://ipython.org) | 5.3.4 | IPython Kernel for Jupyter / BSD-3-Clause |
| [ipython](https://ipython.org) | 7.19.0 | IPython: Productive Interactive Computing / BSD-3-Clause |
| [ipython\_genutils](http://ipython.org) | 0.2.0 | vestigial utilities from IPython / BSD 3-Clause |
| [ipywidgets](https://github.com/ipython/ipywidgets) | 7.5.1 | Jupyter Interactive Widgets / BSD 3-clause |
| [isort](https://github.com/timothycrosley/isort) | 5.6.4 | A Python utility / library to sort Python imports. / MIT |
| [itsdangerous](https://github.com/pallets/itsdangerous) | 1.1.0 | Various helpers to pass trusted data to untrusted environments. / BSD 3-Clause |
| [jdcal](https://github.com/phn/jdcal) | 1.4.1 | Julian dates from proleptic Gregorian and Julian calendars. / BSD 2-Clause |
| [jedi](https://github.com/davidhalter/jedi/) | 0.17.1 | An autocompletion tool for Python that can be used for text editors. / MIT |
| [jinja2](http://jinja.pocoo.org) | 2.11.2 | An easy to use stand-alone template engine written in pure python. / 3-Clause BSD |
| [joblib](https://pypi.org/project/joblib/) | 0.17.0 | Lightweight pipelining: using Python functions as pipeline jobs. / BSD-3-Clause |
| [jpeg](http://www.ijg.org/) | 9b | read/write jpeg COM, EXIF, IPTC medata / Custom free software license |
| [json5](https://github.com/dpranke/pyjson5) | 0.9.5 | A Python implementation of the JSON5 data format / Apache-2.0 |
| [jsonschema](https://github.com/Julian/jsonschema) | 3.2.0 | An implementation of JSON Schema validation for Python / MIT |
| [jupyter](http://jupyter.org) | 1.0.0 | Jupyter metapackage. Install all the Jupyter components in one go. / BSD 3-Clause |
| [jupyter\_client](https://jupyter.org) | 6.1.7 | jupyter\_client contains the reference implementation of the Jupyter protocol. / BSD-3-Clause |
| [jupyter\_console](http://jupyter.org) | 6.2.0 | Jupyter terminal console / BSD-3-Clause |
| [jupyter\_core](https://jupyter.org) | 4.6.3 | Core common functionality of Jupyter projects. / BSD-3-Clause |
| [jupyterlab](https://github.com/jupyterlab/jupyterlab) | 2.2.6 | JupyterLab PRE-ALPHA / BSD-3-Clause |
| [jupyterlab\_pygments](http://github.com/JupyterLab/jupyterlab_pygments) | 0.1.2 | Pygments syntax coloring scheme making use of the JupyterLab CSS variables / BSD-3-Clause |
| [jupyterlab\_server](https://github.com/jupyterlab/jupyterlab_server) | 1.2.0 | A set of server components for JupyterLab and JupyterLab like applications. / BSD-3-Clause |
| [keyring](https://github.com/jaraco/keyring) | 21.4.0 | Store and access your passwords safely / Python Software Foundation or MIT |
| [kiwisolver](https://github.com/nucleic/kiwi) | 1.3.0 | An efficient C++ implementation of the Cassowary constraint solver / BSD-3-Clause |
| [krb5](http://web.mit.edu/kerberos/) | 1.18.2 | A network authentication protocol. / MIT |
| [lazy-object-proxy](https://github.com/ionelmc/python-lazy-object-proxy) | 1.4.3 | A fast and thorough lazy object proxy / BSD-2-Clause |
| [libarchive](http://www.libarchive.org/) | 3.4.2 | Multi-format archive and compression library / BSD-2-Clause |
| [libcurl](http://curl.haxx.se/) | 7.71.1 | tool and library for transferring data with URL syntax / MIT/X derivate (`<http://curl.haxx.se/docs/copyright.html>`) |
| [libiconv](https://www.gnu.org/software/libiconv/) | 1.15 | Provides iconv for systems which don’t have one (or that cannot convert from/to Unicode.) / GPL and LGPL |
| [liblief](https://lief.quarkslab.com/) | 0.10.1 | A cross platform library to parse, modify and abstract ELF, PE and MachO formats. / Apache-2.0 |
| [libpng](http://www.libpng.org/pub/png/libpng.html) | 1.6.37 | PNG reference library / zlib/libpng |
| [libsodium](http://libsodium.org) | 1.0.18 | A modern and easy-to-use crypto library. / ISC |
| [libspatialindex](http://libspatialindex.github.io) | 1.8.5 | Extensible framework for robust spatial indexing / MIT |
| [libssh2](https://www.libssh2.org/) | 1.9.0 | the SSH library / BSD-3-Clause |
| [libtiff](http://www.libtiff.org/) | 4.1.0 | Support for the Tag Image File Format (TIFF). / HPND |
| [libxml2](http://xmlsoft.org/) | 2.9.10 | The XML C parser and toolkit of Gnome / MIT |
| [libxslt](http://xmlsoft.org/XSLT/) | 1.1.34 | The XSLT C library developed for the GNOME project / MIT |
| [llvmlite](http://llvmlite.pydata.org) | 0.34.0 | A lightweight LLVM python binding for writing JIT compilers. / BSD-2-Clause |
| [locket](https://github.com/mwilliamson/locket.py) | 0.2.0 | File-based locks for Python for Linux and Windows / BSD 2-Clause |
| [lxml](http://lxml.de/) | 4.6.1 | Pythonic binding for the C libraries libxml2 and libxslt. / BSD-3-Clause and GPL-2.0-only and ZPL-2.0 and LicenseRef-ElementTree |
| [lz4-c](https://www.lz4.org) | 1.9.2 | Extremely Fast Compression algorithm / BSD-2-Clause |
| [lzo](http://www.oberhumer.com/opensource/lzo/) | 2.10 | LZO is a portable lossless data compression library written in ANSI C. / GPL v2+ |
| m2w64-gcc-libgfortran | 5.3.0 | / |
| m2w64-gcc-libs | 5.3.0 | / |
| m2w64-gcc-libs-core | 5.3.0 | / |
| m2w64-gmp | 6.1.0 | / |
| m2w64-libwinpthread-git | 5.0.0.4634.697f757 | / |
| [markupsafe](https://www.palletsprojects.com/p/markupsafe) | 1.1.1 | A Python module that implements the jinja2.Markup string / BSD-3-Clause |
| [matplotlib](http://matplotlib.org/) | 3.3.1 | Publication quality figures in Python / LicenseRef-PSF-based |
| [matplotlib-base](http://matplotlib.org/) | 3.3.1 | Publication quality figures in Python / LicenseRef-PSF-based |
| [mccabe](https://github.com/PyCQA/mccabe) | 0.6.1 | McCabe complexity checker for Python / MIT |
| [menuinst](https://github.com/ContinuumIO/menuinst) | 1.4.16 | cross platform menu item installation / BSD |
| [mistune](https://github.com/lepture/mistune) | 0.8.4 | The fastest markdown parser in pure Python. / BSD 3-Clause |
| [mkl](https://software.intel.com/en-us/mkl) | 2020.2 | Math library for Intel and compatible processors / LicenseRef-ProprietaryIntel |
| [mkl-service](https://github.com/ContinuumIO/mkl-service) | 2.3.0 | Python bindings to MKL service functions / 3-clause BSD |
| [mkl\_fft](http://github.com/IntelPython/mkl_fft) | 1.2.0 | NumPy-based implementation of Fast Fourier Transform using Intel (R) Math Kernel Library. / BSD 3-Clause |
| [mkl\_random](http://github.com/IntelPython/mkl_random) | 1.1.1 | Intel (R) MKL-powered package for sampling from common probability distributions into NumPy arrays. / BSD 3-Clause |
| [mock](https://github.com/testing-cabal/mock) | 4.0.2 | A library for testing in Python / BSD-2-Clause |
| [more-itertools](https://github.com/more-itertools/more-itertools) | 8.6.0 | More routines for operating on iterables, beyond itertools / MIT |
| [mpmath](http://mpmath.org) | 1.1.0 | Python library for arbitrary-precision floating-point arithmetic / BSD 3-Clause |
| [msgpack-python](http://msgpack.org/) | 1.0.0 | MessagePack (de)serializer / Apache-2.0 |
| msys2-conda-epoch | 20160418 | / |
| [multipledispatch](https://github.com/mrocklin/multipledispatch/) | 0.6.0 | Multiple dispatch in Python / BSD 3-Clause |
| [nbclient](https://jupyter.org) | 0.5.1 | A client library for executing notebooks. Formally nbconvert’s ExecutePreprocessor. / BSD-3-Clause |
| [nbconvert](http://jupyter.org) | 6.0.7 | Converting Jupyter Notebooks / BSD-3-Clause |
| [nbformat](http://jupyter.org) | 5.0.8 | The reference implementation of the Jupyter Notebook format / BSD-3-Clause |
| [nest-asyncio](https://github.com/erdewit/nest_asyncio) | 1.4.2 | Patch asyncio to allow nested event loops / BSD-2-Clause |
| [networkx](https://networkx.github.io/) | 2.5 | Python package for creating and manipulating complex networks / BSD-3-Clause |
| [nltk](http://nltk.org/) | 3.5 | Natural Language Toolkit / Apache 2.0 |
| [nose](http://readthedocs.org/docs/nose/) | 1.3.7 | Nose extends unittest to make testing easier / LGPL-2.1 |
| [notebook](https://jupyter.org) | 6.1.4 | Jupyter Notebook / BSD-3-Clause |
| [numba](http://numba.github.com) | 0.51.2 | NumPy aware dynamic Python compiler using LLVM / BSD-2-Clause |
| [numexpr](https://github.com/pydata/numexpr) | 2.7.1 | Fast numerical expression evaluator for NumPy. / MIT |
| [numpy](http://numpy.scipy.org/) | 1.19.2 | Array processing for numbers, strings, records, and objects. / BSD 3-Clause |
| [numpy-base](http://numpy.scipy.org/) | 1.19.2 | Array processing for numbers, strings, records, and objects. / BSD 3-Clause |
| [numpydoc](https://github.com/numpy/numpydoc) | 1.1.0 | Numpy’s Sphinx extensions / BSD 3-Clause |
| [olefile](http://www.decalage.info/python/olefileio) | 0.46 | parse, read and write Microsoft OLE2 files / BSD 2-Clause |
| [openpyxl](https://openpyxl.readthedocs.io) | 3.0.5 | A Python library to read/write Excel 2010 xlsx/xlsm files / MIT |
| [openssl](http://www.openssl.org/) | 1.1.1h | OpenSSL is an open-source implementation of the SSL and TLS protocols / OpenSSL |
| [packaging](https://github.com/pypa/packaging) | 20.4 | Core utilities for Python packages / Apache 2.0 or BSD 2-Clause |
| [pandas](http://pandas.pydata.org) | 1.1.3 | High-performance, easy-to-use data structures and data analysis tools. / BSD-3-Clause |
| [pandoc](http://pandoc.org/) | 2.11 | Universal markup converter (repackaged binaries) / GPL-2.0 |
| [pandocfilters](https://github.com/jgm/pandocfilters) | 1.4.3 | A python module for writing pandoc filters / BSD-3-Clause |
| [paramiko](http://www.paramiko.org/) | 2.7.2 | SSH2 protocol library / LGPL-2.1-or-later |
| [parso](https://github.com/davidhalter/parso) | 0.7.0 | A Python Parser / MIT |
| [partd](https://github.com/dask/partd) | 1.1.0 | Data structure for on-disk shuffle operations / BSD 3-Clause |
| [path](https://github.com/jaraco/path) | 15.0.0 | A module wrapper for os.path / MIT |
| [path.py](https://github.com/jaraco/path.py) | 12.5.0 | A module wrapper for os.path / MIT |
| [pathlib2](https://github.com/mcmtroffaes/pathlib2) | 2.3.5 | Fork of pathlib aiming to support the full stdlib Python API / MIT |
| [pathtools](https://github.com/gorakhargosh/pathtools) | 0.1.2 | Path utilities for Python. / MIT |
| [patsy](https://github.com/pydata/patsy) | 0.5.1 | Describing statistical models in Python using symbolic formulas / BSD-2-Clause, PSF2 |
| [pep8](http://pep8.readthedocs.org/) | 1.7.1 | Python style guide checker / MIT |
| [pexpect](http://pexpect.sourceforge.net/) | 4.8.0 | Pexpect makes Python a better tool for controlling other applications. / ISC |
| [pickleshare](https://github.com/pickleshare/pickleshare/) | 0.7.5 | Tiny ‘shelve’-like database with concurrency support / MIT |
| [pillow](https://pillow.readthedocs.io) | 8.0.1 | Pillow is the friendly PIL fork by Alex Clark and Contributors / LicenseRef-PIL |
| [pip](https://pip.pypa.io/en/stable/) | 20.2.4 | PyPA recommended tool for installing Python packages / MIT |
| [pkginfo](https://code.launchpad.net/~tseaver/pkginfo/trunk) | 1.6.1 | Query metadatdata from sdists / bdists / installed packages. / MIT |
| [pluggy](https://github.com/pytest-dev/pluggy) | 0.13.1 | Plugin registration and hook calling for Python / MIT |
| [ply](http://www.dabeaz.com/ply/index.html) | 3.11 | Python Lex-Yacc / BSD 3-clause |
| powershell\_shortcut | 0.0.1 | Powershell shortcut creator for Windows (using menuinst) / BSD |
| [prometheus\_client](https://github.com/prometheus/client_python) | 0.8.0 | Python client for the Prometheus monitoring system / Apache-2.0 |
| [prompt-toolkit](https://github.com/jonathanslenders/python-prompt-toolkit) | 3.0.8 | Library for building powerful interactive command lines in Python / BSD-3-Clause |
| [prompt\_toolkit](https://github.com/jonathanslenders/python-prompt-toolkit) | 3.0.8 | Library for building powerful interactive command lines in Python / BSD-3-Clause |
| [psutil](https://github.com/giampaolo/psutil) | 5.7.2 | A cross-platform process and system utilities module for Python / BSD-3-Clause |
| [py](https://github.com/pytest-dev/py) | 1.9.0 | library with cross-python path, ini-parsing, io, code, log facilities / MIT |
| [py-lief](https://lief.quarkslab.com/) | 0.10.1 | A cross platform library to parse, modify and abstract ELF, PE and MachO formats. / Apache-2.0 |
| [pycodestyle](https://pycodestyle.readthedocs.io/) | 2.6.0 | Python style guide checker / MIT |
| [pycosat](https://github.com/ContinuumIO/pycosat) | 0.6.3 | Bindings to picosat (a SAT solver) / MIT |
| [pycparser](https://github.com/eliben/pycparser) | 2.20 | Complete C99 parser in pure Python / BSD 3-clause |
| [pycurl](http://pycurl.sourceforge.net/) | 7.43.0.6 | A Python Interface To The cURL library / LGPL, MIT |
| [pydocstyle](https://github.com/PyCQA/pydocstyle) | 5.1.1 | Python docstring style checker (formerly pep257) / MIT |
| [pyflakes](https://github.com/PyCQA/pyflakes) | 2.2.0 | Pyflakes analyzes programs and detects various errors. / MIT |
| [pygments](http://pygments.org/) | 2.7.2 | Pygments is a generic syntax highlighter suitable for use in code hosting, forums, wikis or other applications that need to prettify source code. / BSD-2-clause |
| [pylint](http://www.pylint.org/) | 2.6.0 | python code static checker / GPL-2.0-only |
| [pynacl](https://github.com/pyca/pynacl) | 1.4.0 | PyNaCl is a Python binding to the Networking and Cryptography library, a crypto library with the stated goal of improving usability, security and speed. / Apache-2.0 |
| [pyodbc](https://github.com/mkleehammer/pyodbc) | 4.0.30 | DB API Module for ODBC / MIT |
| [pyopenssl](https://github.com/pyca/pyopenssl) | 19.1.0 | Python wrapper module around the OpenSSL library / Apache 2.0 |
| [pyparsing](http://pyparsing.wikispaces.com/) | 2.4.7 | Create and execute simple grammars / MIT |
| [pyqt](http://www.riverbankcomputing.co.uk/software/pyqt) | 5.9.2 | Python binding of the cross-platform GUI toolkit Qt. / Commercial, GPL-2.0, GPL-3.0 |
| [pyreadline](http://ipython.org/pyreadline) | 2.1 | A python implmementation of GNU readline. / BSD 3-Clause |
| [pyrsistent](http://github.com/tobgu/pyrsistent/) | 0.17.3 | Persistent/Functional/Immutable data structures / MIT |
| [pysocks](https://github.com/Anorov/PySocks) | 1.7.1 | A Python SOCKS client module. See [Anorov/PySocks](https://github.com/Anorov/PySocks) for more information. / BSD 3-Clause |
| [pytables](http://www.pytables.org) | 3.6.1 | Brings together Python, HDF5 and NumPy to easily handle large amounts of data. / BSD 3-Clause |
| [pytest](https://docs.pytest.org/en/latest/) | 6.1.1 | Simple and powerful testing with Python. / MIT |
| [python](https://www.python.org/) | 3.8.5 | General purpose programming language / Python-2.0 |
| [python-dateutil](https://dateutil.readthedocs.org/) | 2.8.1 | Extensions to the standard Python datetime module. / BSD 3 Clause |
| [python-jsonrpc-server](https://github.com/palantir/python-jsonrpc-server) | 0.4.0 | A Python 2.7 and 3.4+ server implementation of the JSON RPC 2.0 protocol. / MIT |
| [python-language-server](https://github.com/palantir/python-language-server) | 0.35.1 | An implementation of the Language Server Protocol for Python / MIT |
| [python-libarchive-c](https://github.com/Changaco/python-libarchive-c) | 2.9 | Python interface to libarchive / CC0-1.0 |
| [pytz](http://pythonhosted.org/pytz/) | 2020.1 | World timezone definitions, modern and historical. / MIT |
| [pywavelets](https://github.com/PyWavelets/pywt) | 1.1.1 | Discrete Wavelet Transforms in Python / MIT |
| [pywin32](https://sourceforge.net/projects/pywin32) | 227 | Python extensions for Windows / PSF |
| [pywin32-ctypes](https://github.com/enthought/pywin32-ctypes) | 0.2.0 | A limited subset of pywin32 re-implemented using ctypes (or cffi) / BSD 3 Clause |
| [pywinpty](https://github.com/spyder-ide/pywinpty) | 0.5.7 | Python bindings for the winpty library / MIT |
| [pyyaml](http://pyyaml.org/wiki/PyYAML) | 5.3.1 | YAML parser and emitter for Python / MIT |
| [pyzmq](https://github.com/zeromq/pyzmq) | 19.0.2 | Python bindings for zeromq / BSD 3-clause |
| [qdarkstyle](https://github.com/ColinDuquesnoy/QDarkStyleSheet) | 2.8.1 | A dark stylesheet for Qt applications (Qt4, Qt5, PySide, PyQt4, PyQt5, QtPy, PyQtGraph). / MIT |
| [qt](http://qt-project.org) | 5.9.7 | Qt is a cross-platform application and UI framework. / LGPL-3.0 |
| [qtawesome](https://github.com/spyder-ide/qtawesome) | 1.0.1 | Iconic fonts in PyQt and PySide applications / MIT |
| [qtconsole](http://jupyter.org) | 4.7.7 | Jupyter Qt Console / BSD-3-Clause |
| [qtpy](https://github.com/spyder-ide/qtpy) | 1.9.0 | Abstraction layer for PyQt5/PyQt4/PySide / MIT |
| [regex](https://bitbucket.org/mrabarnett/mrab-regex) | 2020.10.15 | Alternative regular expression module, to replace re / Python-2.0 |
| [requests](http://python-requests.org) | 2.24.0 | Requests is an elegant and simple HTTP library for Python, built with ♥. / Apache-2.0 |
| [rope](https://github.com/python-rope/rope) | 0.18.0 | A python refactoring library / GPL 2.0 |
| [rtree](http://toblerity.github.com/rtree/) | 0.9.4 | R-Tree spatial index for Python GIS / MIT |
| [ruamel\_yaml](https://bitbucket.org/ruamel/yaml) | 0.15.87 | A patched copy of ruamel.yaml. / MIT |
| [scikit-image](http://scikit-image.org/) | 0.16.2 | Image processing in Python. / BSD-3-Clause |
| [scikit-learn](http://scikit-learn.org/) | 0.23.1 | A set of python modules for machine learning and data mining / BSD-3-Clause |
| [scipy](http://www.scipy.org/) | 1.5.2 | Scientific Library for Python / BSD 3-Clause |
| [seaborn](https://seaborn.pydata.org) | 0.11.0 | Statistical data visualization / BSD 3-Clause |
| [send2trash](https://github.com/hsoft/send2trash) | 1.5.0 | Python library to natively send files to Trash (or Recycle bin) on all platforms. / BSD-3-Clause |
| [setuptools](https://github.com/pypa/setuptools) | 50.3.1 | Download, build, install, upgrade, and uninstall Python packages / MIT |
| [simplegeneric](http://cheeseshop.python.org/pypi/simplegeneric) | 0.8.1 | Simple generic functions (similar to Python’s own len(), pickle.dump(), etc.) / Zope Public |
| [singledispatch](http://docs.python.org/3/library/functools.html#functools.singledispatch) | 3.4.0.3 | Transforms a function into a single-dispatch generic function / MIT |
| [sip](http://www.riverbankcomputing.com/software/sip/intro) | 4.19.13 | Create Python bindings for C and C++ libraries / GPL-3.0 |
| [six](https://six.readthedocs.io/) | 1.15.0 | Python 2 and 3 compatibility utilities / MIT |
| [snowballstemmer](https://github.com/shibukawa/snowball_py) | 2.0.0 | Snowball stemming library collection for Python / BSD-2-Clause |
| [sortedcollections](http://www.grantjenks.com/docs/sortedcollections/) | 1.2.1 | Python Sorted Collections / Apache-2.0 |
| [sortedcontainers](http://www.grantjenks.com/docs/sortedcontainers/) | 2.2.2 | Python Sorted Container Types: SortedList, SortedDict, and SortedSet / Apache-2.0 |
| [soupsieve](http://facelessuser.github.io/soupsieve) | 2.0.1 | A modern CSS selector implementation for BeautifulSoup / MIT |
| [sphinx](http://www.sphinx-doc.org) | 3.2.1 | Sphinx is a tool that makes it easy to create intelligent and beautiful documentation / BSD-2-Clause |
| sphinxcontrib | 1.0 | Python namespace for sphinxcontrib / BSD |
| [sphinxcontrib-applehelp](https://www.sphinx-doc.org/en/master/) | 1.0.2 | sphinxcontrib-applehelp is a sphinx extension which outputs Apple help books / BSD-2-Clause |
| [sphinxcontrib-devhelp](https://www.sphinx-doc.org/en/master/) | 1.0.2 | sphinxcontrib-devhelp is a sphinx extension which outputs Devhelp document / BSD-2-Clause |
| [sphinxcontrib-htmlhelp](https://www.sphinx-doc.org/en/master/) | 1.0.3 | sphinxcontrib-htmlhelp is a sphinx extension which … / BSD-2-Clause |
| [sphinxcontrib-jsmath](https://www.sphinx-doc.org/en/master/) | 1.0.1 | A sphinx extension which renders display math in HTML via JavaScript / BSD-2-Clause |
| [sphinxcontrib-qthelp](https://www.sphinx-doc.org/en/master/) | 1.0.3 | sphinxcontrib-qthelp is a sphinx extension which outputs QtHelp document / BSD-2-Clause |
| [sphinxcontrib-serializinghtml](https://www.sphinx-doc.org/en/master/) | 1.1.4 | sphinxcontrib-serializinghtml is a sphinx extension which outputs “serialized” HTML files (json and pickle). / BSD-2-Clause |
| [sphinxcontrib-websupport](https://pypi.python.org/pypi/sphinxcontrib-websupport) | 1.2.4 | Sphinx API for Web Apps / BSD-2-Clause |
| [spyder](https://www.spyder-ide.org/) | 4.1.5 | The Scientific Python Development Environment / MIT |
| [spyder-kernels](https://www.spyder-ide.org/) | 1.9.4 | Jupyter kernels for Spyder’s console / MIT |
| [sqlalchemy](http://www.sqlalchemy.org/) | 1.3.20 | Database Abstraction Library. / MIT |
| [sqlite](http://www.sqlite.org/) | 3.33.0 | Implements a self-contained, zero-configuration, SQL database engine / Public-Domain (`<http://www.sqlite.org/copyright.html>`) |
| [statsmodels](https://www.statsmodels.org) | 0.12.0 | Statistical computations and models for use with SciPy / BSD-3-Clause |
| [sympy](https://sympy.org) | 1.6.2 | Python library for symbolic mathematics / BSD-3-Clause |
| [tblib](https://github.com/ionelmc/python-tblib) | 1.7.0 | Traceback serialization library. / BSD 2-Clause |
| [terminado](https://github.com/jupyter/terminado) | 0.9.1 | Terminals served by tornado websockets / BSD-2-Clause |
| [testpath](https://testpath.readthedocs.io) | 0.4.4 | Testpath is a collection of utilities for Python code working with files and commands. / BSD-3-Clause |
| [threadpoolctl](https://github.com/joblib/threadpoolctl) | 2.1.0 | Python helpers to control the threadpools of native libraries / BSD 3-Clause |
| [tk](http://www.tcl.tk/) | 8.6.10 | A dynamic programming language with GUI support. Bundles Tcl and Tk. / Tcl/Tk |
| [toml](https://github.com/uiri/toml) | 0.10.1 | Python lib for TOML. / MIT |
| [toolz](http://toolz.readthedocs.org/) | 0.11.1 | A functional standard library for Python / BSD-3-Clause |
| [tornado](http://www.tornadoweb.org/) | 6.0.4 | A Python web framework and asynchronous networking library, originally developed at FriendFeed. / Apache-2.0 |
| [tqdm](https://pypi.python.org/pypi/tqdm) | 4.50.2 | A Fast, Extensible Progress Meter / MPLv2.0, MIT |
| [traitlets](http://traitlets.readthedocs.org/) | 5.0.5 | Configuration system for Python applications / BSD-3-Clause |
| [typing\_extensions](https://github.com/python/typing/tree/master/typing_extensions) | 3.7.4.3 | Backported and Experimental Type Hints for Python / PSF-2.0 |
| [ujson](https://github.com/ultrajson/ultrajson) | 4.0.1 | Ultra fast JSON decoder and encoder written in C with Python bindings / BSD-3-Clause |
| [unicodecsv](https://github.com/jdunck/python-unicodecsv) | 0.14.1 | Drop-in replacement for csv module which supports unicode strings / BSD |
| [urllib3](https://urllib3.readthedocs.io/) | 1.25.11 | HTTP library with thread-safe connection pooling, file post, and more. / MIT |
| [vc](https://github.com/conda/conda/wiki/VC-features) | 14.1 | A meta-package to impose mutual exclusivity among software built with different VS versions / Modified BSD License (3-clause) |
| vs2015\_runtime | 14.16.27012 | MSVC runtimes associated with cl.exe version 19.16.27032.1 (VS 2017 update 9) / None |
| [watchdog](http://github.com/gorakhargosh/watchdog) | 0.10.3 | Filesystem events monitoring / Apache 2.0 |
| [wcwidth](https://github.com/jquast/wcwidth) | 0.2.5 | Measures number of Terminal column cells of wide-character codes. / MIT |
| [webencodings](https://github.com/gsnedders/python-webencodings) | 0.5.1 | Character encoding aliases for legacy web content / BSD 3-Clause |
| [werkzeug](https://palletsprojects.com/p/werkzeug/) | 1.0.1 | The comprehensive WSGI web application library. / BSD 3-Clause |
| [wheel](https://github.com/pypa/wheel) | 0.35.1 | A built-package format for Python. / MIT |
| [widgetsnbextension](http://ipython.org) | 3.5.1 | Interactive Widgets for Jupyter / BSD 3-clause |
| [win\_inet\_pton](https://github.com/hickeroar/win_inet_pton) | 1.1.0 | Native inet\_pton and inet\_ntop implementation for Python on Windows (with ctypes). / PUBLIC-DOMAIN |
| [win\_unicode\_console](https://github.com/Drekin/win-unicode-console) | 0.5 | A Python package to enable Unicode input and display when running Python from Windows console. / MIT |
| [wincertstore](https://bitbucket.org/tiran/wincertstore) | 0.2 | Python module to extract CA and CRL certs from Windows’ cert store (ctypes based). / PSF 2 |
| [winpty](https://github.com/rprichard/winpty) | 0.4.3 | Winpty provides an interface similar to a Unix pty-master for communicating with Windows console programs. / MIT |
| [wrapt](https://github.com/GrahamDumpleton/wrapt) | 1.11.2 | Module for decorators, wrappers and monkey patching / BSD 2-Clause |
| [xlrd](http://www.python-excel.org/) | 1.2.0 | Library for developers to extract data from Microsoft Excel (tm) spreadsheet files / BSD 3-Clause and BSD with advertising |
| [xlsxwriter](https://xlsxwriter.readthedocs.io/) | 1.3.7 | A Python module for creating Excel XLSX files / BSD-2-Clause |
| [xlwings](http://xlwings.org/) | 0.20.8 | Interact with Excel from Python and vice versa / 3-clause BSD |
| [xlwt](http://www.python-excel.org/) | 1.3.0 | Writing data and formatting information to Excel files / BSD |
| [xz](http://tukaani.org/xz/) | 5.2.5 | Data compression software with high compression ratio / LGPL-2.1 and GPL-2.0 |
| [yaml](http://pyyaml.org/wiki/LibYAML) | 0.2.5 | A C library for parsing and emitting YAML / MIT |
| [yapf](https://github.com/google/yapf) | 0.30.0 | A formatter for Python files / Apache 2.0 |
| [zeromq](http://zeromq.org) | 4.3.2 | A high-performance asynchronous messaging library. / LGPL 3 |
| [zict](http://github.com/mrocklin/zict) | 2.0.0 | Composable Dictionary Classes / BSD 3-Clause |
| [zipp](https://github.com/jaraco/zipp) | 3.4.0 | A pathlib-compatible Zipfile object wrapper / MIT |
| [zlib](http://zlib.net/) | 1.2.11 | Massively spiffy yet delicately unobtrusive compression library / zlib |
| zope | 1.0 | web application server / BSD |
| [zope.event](http://www.zope.org/en/latest/) | 4.5.0 | Very basic event publishing system / Zope Public License |
| [zope.interface](http://docs.zope.org/zope.interface/) | 5.1.0 | Interfaces for Python / ZPL-2.1 |
| [zstd](http://www.zstd.net) | 1.4.5 | Zstandard - Fast real-time compression algorithm / BSD 3-Clause |
| Name | Version | Summary / License |
|---|---|---|
| [\_ipyw\_jlab\_nb\_ext\_conf](https://github.com/ContinuumIO/anaconda-nb-extensions-meta-config) | 0.1.0 | A configuration metapackage for enabling Anaconda-bundled jupyter extensions / BSD |
| [alabaster](http://www.sphinx-doc.org/en/stable/index.html) | 0.7.12 | Configurable, Python 2+3 compatible Sphinx theme. / BSD 3-Clause |
| [anaconda-client](http://anaconda.org) | 1.7.2 | anaconda.org command line client library / BSD 3-clause |
| [anaconda-project](https://github.com/Anaconda-Platform/anaconda-project) | 0.8.4 | Tool for encapsulating, running, and reproducing data science projects / BSD 3-Clause |
| [applaunchservices](https://github.com/impact27/applaunchservices) | 0.2.1 | Simple package for registering an app with apple Launch Services to handle UTI and URL / MIT |
| [appnope](http://github.com/minrk/appnope) | 0.1.0 | Disable App Nap on OS X 10.9 / BSD 2-Clause |
| [appscript](http://appscript.sourceforge.net) | 1.1.1 | Control AppleScriptable applications from Python. / Public Domain |
| [argh](https://github.com/neithere/argh) | 0.26.2 | The Natural CLI. / LGPL 3 |
| [argon2-cffi](https://argon2-cffi.readthedocs.org/) | 20.1.0 | The secure Argon2 password hashing algorithm. / MIT |
| [asn1crypto](https://github.com/wbond/asn1crypto) | 1.4.0 | Python ASN.1 library with a focus on performance and a pythonic API / MIT |
| [astroid](https://www.astroid.org/) | 2.4.2 | A abstract syntax tree for Python with inference support. / LGPL-2.1-only |
| [astropy](http://www.astropy.org/) | 4.0.2 | Community-developed Python Library for Astronomy / BSD-3-Clause |
| [async\_generator](https://github.com/python-trio/async_generator) | 1.10 | Async generators and context managers for Python 3.5+ / MIT |
| [atomicwrites](https://github.com/untitaker/python-atomicwrites) | 1.4.0 | Atomic file writes / MIT |
| [attrs](https://attrs.readthedocs.io/en/stable/) | 20.3.0 | attrs is the Python package that will bring back the joy of writing classes by relieving you from the drudgery of implementing object protocols (aka dunder methods). / MIT |
| [autopep8](https://github.com/hhatto/autopep8) | 1.5.4 | A tool that automatically formats Python code to conform to the PEP 8 style guide / MIT |
| [babel](http://babel.pocoo.org/) | 2.8.1 | Utilities to internationalize and localize Python applications / BSD 3-clause |
| [backcall](https://github.com/takluyver/backcall/) | 0.2.0 | Specifications for callback functions passed in to an API / BSD-3-Clause |
| [backports](https://bitbucket.org/brandon/backports) | 1.0 | None / BSD |
| [backports.shutil\_get\_terminal\_size](https://github.com/chrippa/backports.shutil_get_terminal_size) | 1.0.0 | A backport of the get\_terminal\_size function from Python 3.3’s shutil. / MIT |
| [beautifulsoup4](http://www.crummy.com/software/BeautifulSoup/) | 4.9.3 | Python library designed for screen-scraping / MIT |
| [bitarray](https://github.com/ilanschnell/bitarray) | 1.6.1 | efficient arrays of booleans – C extension / PSF |
| [bkcharts](http://github.com/bokeh/bkcharts) | 0.2 | High level chart types built on top of Bokeh / BSD 3-Clause |
| blas | 1.0 | |
| [bleach](https://github.com/mozilla/bleach) | 3.2.1 | Easy, whitelist-based HTML-sanitizing tool / Apache-2.0 |
| [blosc](https://github.com/Blosc/c-blosc) | 1.20.1 | A blocking, shuffling and loss-less compression library that can be faster than memcpy() / BSD-3-Clause |
| [bokeh](http://bokeh.pydata.org/) | 2.2.3 | Statistical and novel interactive HTML plots for Python / BSD-3-Clause |
| [boto](https://github.com/boto/boto/) | 2.49.0 | Amazon Web Services Library / MIT |
| [bottleneck](https://github.com/pydata/bottleneck) | 1.3.2 | Fast NumPy array functions written in Cython. / BSD 2-Clause |
| [brotlipy](https://github.com/python-hyper/brotlipy) | 0.7.0 | Python bindings to the Brotli compression library / MIT |
| [bzip2](http://www.bzip.org/) | 1.0.8 | high-quality data compressor / bzip2 |
| [ca-certificates](https://github.com/conda-forge/ca-certificates-feedstock) | 2020.10.14 | Certificates for use with other packages. / MPL 2.0 |
| [certifi](http://certifi.io/) | 2020.6.20 | Python package for providing Mozilla’s CA Bundle. / ISC |
| [cffi](https://bitbucket.org/cffi/cffi) | 1.14.3 | Foreign Function Interface for Python calling C code. / MIT |
| [chardet](https://github.com/chardet/chardet) | 3.0.4 | Universal character encoding detector / LGPL2 |
| [click](https://palletsprojects.com/p/click) | 7.1.2 | Python composable command line interface toolkit / BSD-3-Clause |
| [cloudpickle](https://github.com/cloudpipe/cloudpickle) | 1.6.0 | Extended pickling support for Python objects / BSD-3-Clause |
| [clyent](https://github.com/Anaconda-Platform/clyent) | 1.2.2 | Command line client library for windows and posix / BSD 3-Clause |
| [colorama](https://github.com/tartley/colorama) | 0.4.4 | Cross-platform colored terminal text / BSD-3-Clause |
| [conda](https://conda.io) | 4.9.2 | OS-agnostic, system-level binary package and environment manager. / BSD 3-Clause |
| [conda-build](https://github.com/conda/conda-build) | 3.20.5 | tools for building conda packages / BSD 3-Clause |
| [conda-env](https://github.com/conda/conda-env) | 2.6.0 | Tools for interacting with conda environments. / BSD 3-Clause |
| [conda-verify](https://github.com/conda/conda-verify) | 3.4.2 | tool for validating conda recipes and conda packages / BSD 3-Clause |
| [contextlib2](http://contextlib2.readthedocs.org) | 0.6.0.post1 | Backports and enhancements for the contextlib module / PSF 2 |
| [cryptography](https://github.com/pyca/cryptography) | 3.1.1 | Provides cryptographic recipes and primitives to Python developers / Apache-2.0 AND BSD-3-Clause AND PSF-2.0 |
| [curl](http://curl.haxx.se/) | 7.71.1 | tool and library for transferring data with URL syntax / MIT/X derivate (`<http://curl.haxx.se/docs/copyright.html>`) |
| [cycler](http://matplotlib.org/cycler) | 0.10.0 | Composable style cycles. / BSD 3-Clause |
| [cython](http://www.cython.org/) | 0.29.21 | The Cython compiler for writing C extensions for the Python language / Apache-2.0 |
| [cytoolz](https://github.com/pytoolz/cytoolz) | 0.11.0 | Cython implementation of Toolz. High performance functional utilities / BSD-3-Clause |
| [dask](https://dask.org/) | 2.30.0 | Parallel PyData with Task Scheduling / BSD-3-Clause |
| [dask-core](http://github.com/dask/dask/) | 2.30.0 | Parallel Python with task scheduling / BSD-3-Clause |
| [dbus](http://www.freedesktop.org/wiki/Software/dbus/) | 1.13.18 | Simple message bus system for applications to talk to one another / GPL2 |
| [decorator](https://github.com/micheles/decorator) | 4.4.2 | Better living through Python with decorators. / BSD-3-Clause |
| [defusedxml](https://bitbucket.org/tiran/defusedxml) | 0.6.0 | XML bomb protection for Python stdlib modules / PSF 2.0 |
| [diff-match-patch](http://code.google.com/p/google-diff-match-patch/) | 20200713 | Diff Match Patch is a high-performance library in multiple languages that manipulates plain text / Apache-2.0 |
| [distributed](http://distributed.readthedocs.io/en/latest/) | 2.30.1 | Distributed computing with Dask / BSD-3-Clause |
| [docutils](http://docutils.sourceforge.net/) | 0.16 | Docutils – Python Documentation Utilities / Public Domain Dedictation and BSD 2-Clause and PSF 2.1.1 and GPL 3.0 |
| [entrypoints](https://github.com/takluyver/entrypoints) | 0.3 | Discover and load entry points from installed packages. / MIT License |
| [et\_xmlfile](https://bitbucket.org/openpyxl/et_xmlfile) | 1.0.1 | An implementation of lxml.xmlfile for the standard library / MIT |
| [expat](http://expat.sourceforge.net/) | 2.2.10 | Expat XML parser library in C / MIT |
| [fastcache](https://github.com/pbrady/fastcache) | 1.1.0 | C implementation of Python 3 lru\_cache / MIT |
| [filelock](https://github.com/benediktschmitt/py-filelock) | 3.0.12 | A platform independent file lock. / Public Domain |
| [flake8](http://flake8.pycqa.org/) | 3.8.4 | Your Tool For Style Guide Enforcement / MIT |
| [flask](http://flask.pocoo.org) | 1.1.2 | A microframework based on Werkzeug, Jinja2 and good intentions. / BSD 3-Clause |
| [freetype](https://www.freetype.org/) | 2.10.4 | A Free, High-Quality, and Portable Font Engine / GPL-2.0-only and LicenseRef-FreeType |
| [fsspec](https://github.com/martindurant/filesystem_spec) | 0.8.3 | A specification for pythonic filesystems / BSD-3-Clause |
| [future](http://python-future.org) | 0.18.2 | Clean single-source support for Python 3 and 2 / MIT |
| [get\_terminal\_size](https://github.com/chrippa/backports.shutil_get_terminal_size) | 1.0.0 | Get the size of the terminal window. / MIT |
| [gettext](https://www.gnu.org/software/gettext/) | 0.19.8.1 | Internationalization package. / GPLv2 |
| [gevent](https://www.gevent.org) | 20.9.0 | Coroutine-based network library / MIT |
| [glib](https://developer.gnome.org/glib/) | 2.66.1 | Provides core application building blocks for libraries and applications written in C. / LGPL-2.1 |
| [glob2](https://github.com/miracle2k/python-glob2) | 0.7 | Version of the glob module that supports recursion via \*\*, and can capture patterns. / BSD-2-Clause |
| [gmp](http://gmplib.org/) | 6.1.2 | The GNU multiprecision library. / GPL 2 and LGPL 3 |
| [gmpy2](https://pypi.python.org/pypi/gmpy2) | 2.0.8 | GMP/MPIR, MPFR, and MPC interface to Python 2.6+ and 3.x / LGPL 3 |
| [greenlet](https://github.com/python-greenlet/greenlet) | 0.4.17 | Lightweight in-process concurrent programming / MIT |
| [h5py](http://www.h5py.org/) | 2.10.0 | Read and write HDF5 files from Python. / BSD-3-Clause |
| [hdf5](http://www.hdfgroup.org/HDF5/) | 1.10.4 | HDF5 is a data model, library, and file format for storing and managing data / HDF5 |
| [heapdict](http://stutzbachenterprises.com/) | 1.0.1 | A heap with decrease-key and increase-key operations / BSD 3-Clause |
| [html5lib](https://github.com/html5lib/html5lib-python) | 1.1 | HTML parser based on the WHATWG HTML specification / MIT |
| [icu](http://site.icu-project.org/) | 58.2 | International Components for Unicode. / MIT |
| [idna](https://github.com/kjd/idna) | 2.10 | Internationalized Domain Names in Applications (IDNA). / BSD Like |
| [imageio](https://imageio.github.io) | 2.9.0 | A Python library for reading and writing image data / BSD-2-Clause |
| [imagesize](https://github.com/shibukawa/imagesize_py) | 1.2.0 | Getting image size from png/jpeg/jpeg2000/gif file / MIT |
| [importlib-metadata](https://gitlab.com/python-devs/importlib_metadata) | 2.0.0 | A library to access the metadata for a Python package / Apache-2.0 |
| [importlib\_metadata](https://gitlab.com/python-devs/importlib_metadata) | 2.0.0 | A library to access the metadata for a Python package / Apache-2.0 |
| [iniconfig](http://github.com/RonnyPfannschmidt/iniconfig) | 1.1.1 | iniconfig: brain-dead simple config-ini parsing / MIT |
| [intel-openmp](https://software.intel.com/en-us/node/522690) | 2019.4 | Math library for Intel and compatible processors / LicenseRef-ProprietaryIntel |
| [intervaltree](https://github.com/chaimleib/intervaltree) | 3.1.0 | Editable interval tree data structure for Python 2 and 3 / Apache-2.0 |
| [ipykernel](https://ipython.org) | 5.3.4 | IPython Kernel for Jupyter / BSD-3-Clause |
| [ipython](https://ipython.org) | 7.19.0 | IPython: Productive Interactive Computing / BSD-3-Clause |
| [ipython\_genutils](http://ipython.org) | 0.2.0 | vestigial utilities from IPython / BSD 3-Clause |
| [ipywidgets](https://github.com/ipython/ipywidgets) | 7.5.1 | Jupyter Interactive Widgets / BSD 3-clause |
| [isort](https://github.com/timothycrosley/isort) | 5.6.4 | A Python utility / library to sort Python imports. / MIT |
| [itsdangerous](https://github.com/pallets/itsdangerous) | 1.1.0 | Various helpers to pass trusted data to untrusted environments. / BSD 3-Clause |
| [jbig](https://www.cl.cam.ac.uk/~mgk25/jbigkit) | 2.1 | Implementation of the JBIG1 data compression standard / GPL-2.0 |
| [jdcal](https://github.com/phn/jdcal) | 1.4.1 | Julian dates from proleptic Gregorian and Julian calendars. / BSD 2-Clause |
| [jedi](https://github.com/davidhalter/jedi/) | 0.17.1 | An autocompletion tool for Python that can be used for text editors. / MIT |
| [jinja2](http://jinja.pocoo.org) | 2.11.2 | An easy to use stand-alone template engine written in pure python. / 3-Clause BSD |
| [joblib](https://pypi.org/project/joblib/) | 0.17.0 | Lightweight pipelining: using Python functions as pipeline jobs. / BSD-3-Clause |
| [jpeg](http://www.ijg.org/) | 9b | read/write jpeg COM, EXIF, IPTC medata / Custom free software license |
| [json5](https://github.com/dpranke/pyjson5) | 0.9.5 | A Python implementation of the JSON5 data format / Apache-2.0 |
| [jsonschema](https://github.com/Julian/jsonschema) | 3.2.0 | An implementation of JSON Schema validation for Python / MIT |
| [jupyter](http://jupyter.org) | 1.0.0 | Jupyter metapackage. Install all the Jupyter components in one go. / BSD 3-Clause |
| [jupyter\_client](https://jupyter.org) | 6.1.7 | jupyter\_client contains the reference implementation of the Jupyter protocol. / BSD-3-Clause |
| [jupyter\_console](http://jupyter.org) | 6.2.0 | Jupyter terminal console / BSD-3-Clause |
| [jupyter\_core](https://jupyter.org) | 4.6.3 | Core common functionality of Jupyter projects. / BSD-3-Clause |
| [jupyterlab](https://github.com/jupyterlab/jupyterlab) | 2.2.6 | JupyterLab PRE-ALPHA / BSD-3-Clause |
| [jupyterlab\_pygments](http://github.com/JupyterLab/jupyterlab_pygments) | 0.1.2 | Pygments syntax coloring scheme making use of the JupyterLab CSS variables / BSD-3-Clause |
| [jupyterlab\_server](https://github.com/jupyterlab/jupyterlab_server) | 1.2.0 | A set of server components for JupyterLab and JupyterLab like applications. / BSD-3-Clause |
| [keyring](https://github.com/jaraco/keyring) | 21.4.0 | Store and access your passwords safely / Python Software Foundation or MIT |
| [kiwisolver](https://github.com/nucleic/kiwi) | 1.3.0 | An efficient C++ implementation of the Cassowary constraint solver / BSD-3-Clause |
| [krb5](http://web.mit.edu/kerberos/) | 1.18.2 | A network authentication protocol. / MIT |
| [lazy-object-proxy](https://github.com/ionelmc/python-lazy-object-proxy) | 1.4.3 | A fast and thorough lazy object proxy / BSD-2-Clause |
| [lcms2](http://www.littlecms.com/) | 2.11 | Open Source Color Management Engine / MIT |
| [libarchive](http://www.libarchive.org/) | 3.4.2 | Multi-format archive and compression library / BSD-2-Clause |
| [libcurl](http://curl.haxx.se/) | 7.71.1 | tool and library for transferring data with URL syntax / MIT/X derivate (`<http://curl.haxx.se/docs/copyright.html>`) |
| [libcxx](http://llvm.org/) | 10.0.0 | LLVM C++ standard library / Apache-2.0 WITH LLVM-exception |
| [libedit](http://thrysoee.dk/editline/) | 3.1.20191231 | Editline Library (libedit) / BSD-2-Clause |
| [libffi](https://sourceware.org/libffi/) | 3.3 | A Portable Foreign Function Interface Library. / Custom |
| [libgfortran](http://gcc.gnu.org/) | 3.0.1 | Fortran libraries from the GNU Compiler Collection / GPL 3 (with GCC Runtime Library Exception 3.1) |
| [libiconv](https://www.gnu.org/software/libiconv/) | 1.16 | Provides iconv for systems which don’t have one (or that cannot convert from/to Unicode.) / GPL and LGPL |
| [liblief](https://lief.quarkslab.com/) | 0.10.1 | A cross platform library to parse, modify and abstract ELF, PE and MachO formats. / Apache-2.0 |
| [libllvm10](http://llvm.org/) | 10.0.1 | Development headers and libraries for LLVM / Apache-2.0 WITH LLVM-exception |
| [libpng](http://www.libpng.org/pub/png/libpng.html) | 1.6.37 | PNG reference library / zlib/libpng |
| [libsodium](http://libsodium.org) | 1.0.18 | A modern and easy-to-use crypto library. / ISC |
| [libspatialindex](http://libspatialindex.github.io) | 1.9.3 | Extensible framework for robust spatial indexing / MIT |
| [libssh2](https://www.libssh2.org/) | 1.9.0 | the SSH library / BSD-3-Clause |
| [libtiff](http://www.libtiff.org/) | 4.1.0 | Support for the Tag Image File Format (TIFF). / HPND |
| [libxml2](http://xmlsoft.org/) | 2.9.10 | The XML C parser and toolkit of Gnome / MIT |
| [libxslt](http://xmlsoft.org/XSLT/) | 1.1.34 | The XSLT C library developed for the GNOME project / MIT |
| [llvm-openmp](http://openmp.llvm.org/) | 10.0.0 | The OpenMP API supports multi-platform shared-memory parallel programming in C/C++ and Fortran. / NCSA |
| [llvmlite](http://llvmlite.pydata.org) | 0.34.0 | A lightweight LLVM python binding for writing JIT compilers. / BSD-2-Clause |
| [locket](https://github.com/mwilliamson/locket.py) | 0.2.0 | File-based locks for Python for Linux and Windows / BSD 2-Clause |
| [lxml](http://lxml.de/) | 4.6.1 | Pythonic binding for the C libraries libxml2 and libxslt. / BSD-3-Clause and GPL-2.0-only and ZPL-2.0 and LicenseRef-ElementTree |
| [lz4-c](https://www.lz4.org) | 1.9.2 | Extremely Fast Compression algorithm / BSD-2-Clause |
| [lzo](http://www.oberhumer.com/opensource/lzo/) | 2.10 | LZO is a portable lossless data compression library written in ANSI C. / GPL v2+ |
| [markupsafe](https://www.palletsprojects.com/p/markupsafe) | 1.1.1 | A Python module that implements the jinja2.Markup string / BSD-3-Clause |
| [matplotlib](http://matplotlib.org/) | 3.3.2 | Publication quality figures in Python / LicenseRef-PSF-based |
| [matplotlib-base](http://matplotlib.org/) | 3.3.2 | Publication quality figures in Python / LicenseRef-PSF-based |
| [mccabe](https://github.com/PyCQA/mccabe) | 0.6.1 | McCabe complexity checker for Python / MIT |
| [mistune](https://github.com/lepture/mistune) | 0.8.4 | The fastest markdown parser in pure Python. / BSD 3-Clause |
| [mkl](https://software.intel.com/en-us/mkl) | 2019.4 | Math library for Intel and compatible processors / LicenseRef-ProprietaryIntel |
| [mkl-service](https://github.com/ContinuumIO/mkl-service) | 2.3.0 | Python bindings to MKL service functions / 3-clause BSD |
| [mkl\_fft](http://github.com/IntelPython/mkl_fft) | 1.2.0 | NumPy-based implementation of Fast Fourier Transform using Intel (R) Math Kernel Library. / BSD 3-Clause |
| [mkl\_random](http://github.com/IntelPython/mkl_random) | 1.1.1 | Intel (R) MKL-powered package for sampling from common probability distributions into NumPy arrays. / BSD 3-Clause |
| [mock](https://github.com/testing-cabal/mock) | 4.0.2 | A library for testing in Python / BSD-2-Clause |
| [more-itertools](https://github.com/more-itertools/more-itertools) | 8.6.0 | More routines for operating on iterables, beyond itertools / MIT |
| [mpc](http://www.multiprecision.org/) | 1.1.0 | A C library for the arithmetic of complex numbers with arbitrarily high precision. / LGPL 3 |
| [mpfr](http://www.mpfr.org/) | 4.0.2 | The MPFR library is a C library for multiple-precision floating-point computations with correct rounding. / LGPL-3.0-only |
| [mpmath](http://mpmath.org) | 1.1.0 | Python library for arbitrary-precision floating-point arithmetic / BSD 3-Clause |
| [msgpack-python](http://msgpack.org/) | 1.0.0 | MessagePack (de)serializer / Apache-2.0 |
| [multipledispatch](https://github.com/mrocklin/multipledispatch/) | 0.6.0 | Multiple dispatch in Python / BSD 3-Clause |
| [nbclient](https://jupyter.org) | 0.5.1 | A client library for executing notebooks. Formally nbconvert’s ExecutePreprocessor. / BSD-3-Clause |
| [nbconvert](http://jupyter.org) | 6.0.7 | Converting Jupyter Notebooks / BSD-3-Clause |
| [nbformat](http://jupyter.org) | 5.0.8 | The reference implementation of the Jupyter Notebook format / BSD-3-Clause |
| [ncurses](http://www.gnu.org/software/ncurses/) | 6.2 | Library for text-based user interfaces / Free software (MIT-like) |
| [nest-asyncio](https://github.com/erdewit/nest_asyncio) | 1.4.2 | Patch asyncio to allow nested event loops / BSD-2-Clause |
| [networkx](https://networkx.github.io/) | 2.5 | Python package for creating and manipulating complex networks / BSD-3-Clause |
| [nltk](http://nltk.org/) | 3.5 | Natural Language Toolkit / Apache 2.0 |
| [nose](http://readthedocs.org/docs/nose/) | 1.3.7 | Nose extends unittest to make testing easier / LGPL-2.1 |
| [notebook](https://jupyter.org) | 6.1.4 | Jupyter Notebook / BSD-3-Clause |
| [numba](http://numba.github.com) | 0.51.2 | NumPy aware dynamic Python compiler using LLVM / BSD-2-Clause |
| [numexpr](https://github.com/pydata/numexpr) | 2.7.1 | Fast numerical expression evaluator for NumPy. / MIT |
| [numpy](http://numpy.scipy.org/) | 1.19.2 | Array processing for numbers, strings, records, and objects. / BSD 3-Clause |
| [numpy-base](http://numpy.scipy.org/) | 1.19.2 | Array processing for numbers, strings, records, and objects. / BSD 3-Clause |
| [numpydoc](https://github.com/numpy/numpydoc) | 1.1.0 | Numpy’s Sphinx extensions / BSD 3-Clause |
| [olefile](http://www.decalage.info/python/olefileio) | 0.46 | parse, read and write Microsoft OLE2 files / BSD 2-Clause |
| [openpyxl](https://openpyxl.readthedocs.io) | 3.0.5 | A Python library to read/write Excel 2010 xlsx/xlsm files / MIT |
| [openssl](http://www.openssl.org/) | 1.1.1h | OpenSSL is an open-source implementation of the SSL and TLS protocols / OpenSSL |
| [packaging](https://github.com/pypa/packaging) | 20.4 | Core utilities for Python packages / Apache 2.0 or BSD 2-Clause |
| [pandas](http://pandas.pydata.org) | 1.1.3 | High-performance, easy-to-use data structures and data analysis tools. / BSD-3-Clause |
| [pandoc](http://pandoc.org/) | 2.11 | Universal markup converter (repackaged binaries) / GPL-2.0 |
| [pandocfilters](https://github.com/jgm/pandocfilters) | 1.4.3 | A python module for writing pandoc filters / BSD-3-Clause |
| [parso](https://github.com/davidhalter/parso) | 0.7.0 | A Python Parser / MIT |
| [partd](https://github.com/dask/partd) | 1.1.0 | Data structure for on-disk shuffle operations / BSD 3-Clause |
| [path](https://github.com/jaraco/path) | 15.0.0 | A module wrapper for os.path / MIT |
| [path.py](https://github.com/jaraco/path.py) | 12.5.0 | A module wrapper for os.path / MIT |
| [pathlib2](https://github.com/mcmtroffaes/pathlib2) | 2.3.5 | Fork of pathlib aiming to support the full stdlib Python API / MIT |
| [pathtools](https://github.com/gorakhargosh/pathtools) | 0.1.2 | Path utilities for Python. / MIT |
| [patsy](https://github.com/pydata/patsy) | 0.5.1 | Describing statistical models in Python using symbolic formulas / BSD-2-Clause, PSF2 |
| [pcre](http://www.pcre.org/) | 8.44 | Regular expression pattern matching using the same syntax and semantics as Perl 5. / BSD 3-Clause |
| [pep8](http://pep8.readthedocs.org/) | 1.7.1 | Python style guide checker / MIT |
| [pexpect](http://pexpect.sourceforge.net/) | 4.8.0 | Pexpect makes Python a better tool for controlling other applications. / ISC |
| [pickleshare](https://github.com/pickleshare/pickleshare/) | 0.7.5 | Tiny ‘shelve’-like database with concurrency support / MIT |
| [pillow](https://pillow.readthedocs.io) | 8.0.1 | Pillow is the friendly PIL fork by Alex Clark and Contributors / LicenseRef-PIL |
| [pip](https://pip.pypa.io/en/stable/) | 20.2.4 | PyPA recommended tool for installing Python packages / MIT |
| [pkginfo](https://code.launchpad.net/~tseaver/pkginfo/trunk) | 1.6.1 | Query metadatdata from sdists / bdists / installed packages. / MIT |
| [pluggy](https://github.com/pytest-dev/pluggy) | 0.13.1 | Plugin registration and hook calling for Python / MIT |
| [ply](http://www.dabeaz.com/ply/index.html) | 3.11 | Python Lex-Yacc / BSD 3-clause |
| [prometheus\_client](https://github.com/prometheus/client_python) | 0.8.0 | Python client for the Prometheus monitoring system / Apache-2.0 |
| [prompt-toolkit](https://github.com/jonathanslenders/python-prompt-toolkit) | 3.0.8 | Library for building powerful interactive command lines in Python / BSD-3-Clause |
| [prompt\_toolkit](https://github.com/jonathanslenders/python-prompt-toolkit) | 3.0.8 | Library for building powerful interactive command lines in Python / BSD-3-Clause |
| [psutil](https://github.com/giampaolo/psutil) | 5.7.2 | A cross-platform process and system utilities module for Python / BSD-3-Clause |
| [ptyprocess](https://github.com/pexpect/ptyprocess) | 0.6.0 | Run a subprocess in a pseudo terminal / ISC |
| [py](https://github.com/pytest-dev/py) | 1.9.0 | library with cross-python path, ini-parsing, io, code, log facilities / MIT |
| [py-lief](https://lief.quarkslab.com/) | 0.10.1 | A cross platform library to parse, modify and abstract ELF, PE and MachO formats. / Apache-2.0 |
| [pycodestyle](https://pycodestyle.readthedocs.io/) | 2.6.0 | Python style guide checker / MIT |
| [pycosat](https://github.com/ContinuumIO/pycosat) | 0.6.3 | Bindings to picosat (a SAT solver) / MIT |
| [pycparser](https://github.com/eliben/pycparser) | 2.20 | Complete C99 parser in pure Python / BSD 3-clause |
| [pycurl](http://pycurl.sourceforge.net/) | 7.43.0.6 | A Python Interface To The cURL library / LGPL, MIT |
| [pydocstyle](https://github.com/PyCQA/pydocstyle) | 5.1.1 | Python docstring style checker (formerly pep257) / MIT |
| [pyflakes](https://github.com/PyCQA/pyflakes) | 2.2.0 | Pyflakes analyzes programs and detects various errors. / MIT |
| [pygments](http://pygments.org/) | 2.7.2 | Pygments is a generic syntax highlighter suitable for use in code hosting, forums, wikis or other applications that need to prettify source code. / BSD-2-clause |
| [pylint](http://www.pylint.org/) | 2.6.0 | python code static checker / GPL-2.0-only |
| [pyodbc](https://github.com/mkleehammer/pyodbc) | 4.0.30 | DB API Module for ODBC / MIT |
| [pyopenssl](https://github.com/pyca/pyopenssl) | 19.1.0 | Python wrapper module around the OpenSSL library / Apache 2.0 |
| [pyparsing](http://pyparsing.wikispaces.com/) | 2.4.7 | Create and execute simple grammars / MIT |
| [pyqt](http://www.riverbankcomputing.co.uk/software/pyqt) | 5.9.2 | Python binding of the cross-platform GUI toolkit Qt. / Commercial, GPL-2.0, GPL-3.0 |
| [pyrsistent](http://github.com/tobgu/pyrsistent/) | 0.17.3 | Persistent/Functional/Immutable data structures / MIT |
| [pysocks](https://github.com/Anorov/PySocks) | 1.7.1 | A Python SOCKS client module. See [Anorov/PySocks](https://github.com/Anorov/PySocks) for more information. / BSD 3-Clause |
| [pytables](http://www.pytables.org) | 3.6.1 | Brings together Python, HDF5 and NumPy to easily handle large amounts of data. / BSD 3-Clause |
| [pytest](https://docs.pytest.org/en/latest/) | 6.1.1 | Simple and powerful testing with Python. / MIT |
| [python](https://www.python.org/) | 3.8.5 | General purpose programming language / Python-2.0 |
| [python-dateutil](https://dateutil.readthedocs.org/) | 2.8.1 | Extensions to the standard Python datetime module. / BSD 3 Clause |
| [python-jsonrpc-server](https://github.com/palantir/python-jsonrpc-server) | 0.4.0 | A Python 2.7 and 3.4+ server implementation of the JSON RPC 2.0 protocol. / MIT |
| [python-language-server](https://github.com/palantir/python-language-server) | 0.35.1 | An implementation of the Language Server Protocol for Python / MIT |
| [python-libarchive-c](https://github.com/Changaco/python-libarchive-c) | 2.9 | Python interface to libarchive / CC0-1.0 |
| python.app | 2 | Proxy on OS X letting Python libraries hook into the gui event loop / BSD |
| [pytz](http://pythonhosted.org/pytz/) | 2020.1 | World timezone definitions, modern and historical. / MIT |
| [pywavelets](https://github.com/PyWavelets/pywt) | 1.1.1 | Discrete Wavelet Transforms in Python / MIT |
| [pyyaml](http://pyyaml.org/wiki/PyYAML) | 5.3.1 | YAML parser and emitter for Python / MIT |
| [pyzmq](https://github.com/zeromq/pyzmq) | 19.0.2 | Python bindings for zeromq / BSD 3-clause |
| [qdarkstyle](https://github.com/ColinDuquesnoy/QDarkStyleSheet) | 2.8.1 | A dark stylesheet for Qt applications (Qt4, Qt5, PySide, PyQt4, PyQt5, QtPy, PyQtGraph). / MIT |
| [qt](http://qt-project.org) | 5.9.7 | Qt is a cross-platform application and UI framework. / LGPL-3.0 |
| [qtawesome](https://github.com/spyder-ide/qtawesome) | 1.0.1 | Iconic fonts in PyQt and PySide applications / MIT |
| [qtconsole](http://jupyter.org) | 4.7.7 | Jupyter Qt Console / BSD-3-Clause |
| [qtpy](https://github.com/spyder-ide/qtpy) | 1.9.0 | Abstraction layer for PyQt5/PyQt4/PySide / MIT |
| [readline](https://cnswww.cns.cwru.edu/php/chet/readline/rltop.html) | 8.0 | library for editing command lines as they are typed in / GPL-3.0 |
| [regex](https://bitbucket.org/mrabarnett/mrab-regex) | 2020.10.15 | Alternative regular expression module, to replace re / Python-2.0 |
| [requests](http://python-requests.org) | 2.24.0 | Requests is an elegant and simple HTTP library for Python, built with ♥. / Apache-2.0 |
| ripgrep | 12.1.1 | |
| [rope](https://github.com/python-rope/rope) | 0.18.0 | A python refactoring library / GPL 2.0 |
| [rtree](http://toblerity.github.com/rtree/) | 0.9.4 | R-Tree spatial index for Python GIS / MIT |
| [ruamel\_yaml](https://bitbucket.org/ruamel/yaml) | 0.15.87 | A patched copy of ruamel.yaml. / MIT |
| [scikit-image](http://scikit-image.org/) | 0.17.2 | Image processing in Python. / BSD-3-Clause |
| [scikit-learn](http://scikit-learn.org/) | 0.23.2 | A set of python modules for machine learning and data mining / BSD-3-Clause |
| [scipy](http://www.scipy.org/) | 1.5.2 | Scientific Library for Python / BSD 3-Clause |
| [seaborn](https://seaborn.pydata.org) | 0.11.0 | Statistical data visualization / BSD 3-Clause |
| [send2trash](https://github.com/hsoft/send2trash) | 1.5.0 | Python library to natively send files to Trash (or Recycle bin) on all platforms. / BSD-3-Clause |
| [setuptools](https://github.com/pypa/setuptools) | 50.3.1 | Download, build, install, upgrade, and uninstall Python packages / MIT |
| [simplegeneric](http://cheeseshop.python.org/pypi/simplegeneric) | 0.8.1 | Simple generic functions (similar to Python’s own len(), pickle.dump(), etc.) / Zope Public |
| [singledispatch](http://docs.python.org/3/library/functools.html#functools.singledispatch) | 3.4.0.3 | Transforms a function into a single-dispatch generic function / MIT |
| [sip](http://www.riverbankcomputing.com/software/sip/intro) | 4.19.8 | Create Python bindings for C and C++ libraries / GPL-3.0 |
| [six](https://six.readthedocs.io/) | 1.15.0 | Python 2 and 3 compatibility utilities / MIT |
| [snowballstemmer](https://github.com/shibukawa/snowball_py) | 2.0.0 | Snowball stemming library collection for Python / BSD-2-Clause |
| [sortedcollections](http://www.grantjenks.com/docs/sortedcollections/) | 1.2.1 | Python Sorted Collections / Apache-2.0 |
| [sortedcontainers](http://www.grantjenks.com/docs/sortedcontainers/) | 2.2.2 | Python Sorted Container Types: SortedList, SortedDict, and SortedSet / Apache-2.0 |
| [soupsieve](http://facelessuser.github.io/soupsieve) | 2.0.1 | A modern CSS selector implementation for BeautifulSoup / MIT |
| [sphinx](http://www.sphinx-doc.org) | 3.2.1 | Sphinx is a tool that makes it easy to create intelligent and beautiful documentation / BSD-2-Clause |
| sphinxcontrib | 1.0 | Python namespace for sphinxcontrib / BSD |
| [sphinxcontrib-applehelp](https://www.sphinx-doc.org/en/master/) | 1.0.2 | sphinxcontrib-applehelp is a sphinx extension which outputs Apple help books / BSD-2-Clause |
| [sphinxcontrib-devhelp](https://www.sphinx-doc.org/en/master/) | 1.0.2 | sphinxcontrib-devhelp is a sphinx extension which outputs Devhelp document / BSD-2-Clause |
| [sphinxcontrib-htmlhelp](https://www.sphinx-doc.org/en/master/) | 1.0.3 | sphinxcontrib-htmlhelp is a sphinx extension which … / BSD-2-Clause |
| [sphinxcontrib-jsmath](https://www.sphinx-doc.org/en/master/) | 1.0.1 | A sphinx extension which renders display math in HTML via JavaScript / BSD-2-Clause |
| [sphinxcontrib-qthelp](https://www.sphinx-doc.org/en/master/) | 1.0.3 | sphinxcontrib-qthelp is a sphinx extension which outputs QtHelp document / BSD-2-Clause |
| [sphinxcontrib-serializinghtml](https://www.sphinx-doc.org/en/master/) | 1.1.4 | sphinxcontrib-serializinghtml is a sphinx extension which outputs “serialized” HTML files (json and pickle). / BSD-2-Clause |
| [sphinxcontrib-websupport](https://pypi.python.org/pypi/sphinxcontrib-websupport) | 1.2.4 | Sphinx API for Web Apps / BSD-2-Clause |
| [spyder](https://www.spyder-ide.org/) | 4.1.5 | The Scientific Python Development Environment / MIT |
| [spyder-kernels](https://www.spyder-ide.org/) | 1.9.4 | Jupyter kernels for Spyder’s console / MIT |
| [sqlalchemy](http://www.sqlalchemy.org/) | 1.3.20 | Database Abstraction Library. / MIT |
| [sqlite](http://www.sqlite.org/) | 3.33.0 | Implements a self-contained, zero-configuration, SQL database engine / Public-Domain (`<http://www.sqlite.org/copyright.html>`) |
| [statsmodels](https://www.statsmodels.org) | 0.12.0 | Statistical computations and models for use with SciPy / BSD-3-Clause |
| [sympy](https://sympy.org) | 1.6.2 | Python library for symbolic mathematics / BSD-3-Clause |
| [tblib](https://github.com/ionelmc/python-tblib) | 1.7.0 | Traceback serialization library. / BSD 2-Clause |
| [terminado](https://github.com/jupyter/terminado) | 0.9.1 | Terminals served by tornado websockets / BSD-2-Clause |
| [testpath](https://testpath.readthedocs.io) | 0.4.4 | Testpath is a collection of utilities for Python code working with files and commands. / BSD-3-Clause |
| [threadpoolctl](https://github.com/joblib/threadpoolctl) | 2.1.0 | Python helpers to control the threadpools of native libraries / BSD 3-Clause |
| [tifffile](https://github.com/blink1073/tifffile) | 2020.10.1 | Read and write image data from and to TIFF files. / BSD 3-Clause |
| [tk](http://www.tcl.tk/) | 8.6.10 | A dynamic programming language with GUI support. Bundles Tcl and Tk. / Tcl/Tk |
| [toml](https://github.com/uiri/toml) | 0.10.1 | Python lib for TOML. / MIT |
| [toolz](http://toolz.readthedocs.org/) | 0.11.1 | A functional standard library for Python / BSD-3-Clause |
| [tornado](http://www.tornadoweb.org/) | 6.0.4 | A Python web framework and asynchronous networking library, originally developed at FriendFeed. / Apache-2.0 |
| [tqdm](https://pypi.python.org/pypi/tqdm) | 4.50.2 | A Fast, Extensible Progress Meter / MPLv2.0, MIT |
| [traitlets](http://traitlets.readthedocs.org/) | 5.0.5 | Configuration system for Python applications / BSD-3-Clause |
| [typing\_extensions](https://github.com/python/typing/tree/master/typing_extensions) | 3.7.4.3 | Backported and Experimental Type Hints for Python / PSF-2.0 |
| [ujson](https://github.com/ultrajson/ultrajson) | 4.0.1 | Ultra fast JSON decoder and encoder written in C with Python bindings / BSD-3-Clause |
| [unicodecsv](https://github.com/jdunck/python-unicodecsv) | 0.14.1 | Drop-in replacement for csv module which supports unicode strings / BSD |
| [unixodbc](http://www.unixodbc.org/) | 2.3.9 | ODBC on non MS Windows platforms / LGPL-2.1 |
| [urllib3](https://urllib3.readthedocs.io/) | 1.25.11 | HTTP library with thread-safe connection pooling, file post, and more. / MIT |
| [watchdog](http://github.com/gorakhargosh/watchdog) | 0.10.3 | Filesystem events monitoring / Apache 2.0 |
| [wcwidth](https://github.com/jquast/wcwidth) | 0.2.5 | Measures number of Terminal column cells of wide-character codes. / MIT |
| [webencodings](https://github.com/gsnedders/python-webencodings) | 0.5.1 | Character encoding aliases for legacy web content / BSD 3-Clause |
| [werkzeug](https://palletsprojects.com/p/werkzeug/) | 1.0.1 | The comprehensive WSGI web application library. / BSD 3-Clause |
| [wheel](https://github.com/pypa/wheel) | 0.35.1 | A built-package format for Python. / MIT |
| [widgetsnbextension](http://ipython.org) | 3.5.1 | Interactive Widgets for Jupyter / BSD 3-clause |
| [wrapt](https://github.com/GrahamDumpleton/wrapt) | 1.11.2 | Module for decorators, wrappers and monkey patching / BSD 2-Clause |
| [wurlitzer](https://github.com/minrk/wurlitzer) | 2.0.1 | Capture C-level stdout/stderr in Python / MIT |
| [xlrd](http://www.python-excel.org/) | 1.2.0 | Library for developers to extract data from Microsoft Excel (tm) spreadsheet files / BSD 3-Clause and BSD with advertising |
| [xlsxwriter](https://xlsxwriter.readthedocs.io/) | 1.3.7 | A Python module for creating Excel XLSX files / BSD-2-Clause |
| [xlwings](http://xlwings.org/) | 0.20.8 | Interact with Excel from Python and vice versa / 3-clause BSD |
| [xlwt](http://www.python-excel.org/) | 1.3.0 | Writing data and formatting information to Excel files / BSD |
| [xz](http://tukaani.org/xz/) | 5.2.5 | Data compression software with high compression ratio / LGPL-2.1 and GPL-2.0 |
| [yaml](http://pyyaml.org/wiki/LibYAML) | 0.2.5 | A C library for parsing and emitting YAML / MIT |
| [yapf](https://github.com/google/yapf) | 0.30.0 | A formatter for Python files / Apache 2.0 |
| [zeromq](http://zeromq.org) | 4.3.3 | A high-performance asynchronous messaging library. / LGPL 3 |
| [zict](http://github.com/mrocklin/zict) | 2.0.0 | Composable Dictionary Classes / BSD 3-Clause |
| [zipp](https://github.com/jaraco/zipp) | 3.4.0 | A pathlib-compatible Zipfile object wrapper / MIT |
| [zlib](http://zlib.net/) | 1.2.11 | Massively spiffy yet delicately unobtrusive compression library / zlib |
| zope | 1.0 | web application server / BSD |
| [zope.event](http://www.zope.org/en/latest/) | 4.5.0 | Very basic event publishing system / Zope Public License |
| [zope.interface](http://docs.zope.org/zope.interface/) | 5.1.2 | Interfaces for Python / ZPL-2.1 |
| [zstd](http://www.zstd.net) | 1.4.5 | Zstandard - Fast real-time compression algorithm / BSD 3-Clause |
| Name | Version | Summary / License |
|---|---|---|
| [\_ipyw\_jlab\_nb\_ext\_conf](https://github.com/ContinuumIO/anaconda-nb-extensions-meta-config) | 0.1.0 | A configuration metapackage for enabling Anaconda-bundled jupyter extensions / BSD |
| \_libgcc\_mutex | 0.1 | Mutex for libgcc and libgcc-ng / None |
| [alabaster](http://www.sphinx-doc.org/en/stable/index.html) | 0.7.12 | Configurable, Python 2+3 compatible Sphinx theme. / BSD 3-Clause |
| [anaconda-client](http://anaconda.org) | 1.7.2 | anaconda.org command line client library / BSD 3-clause |
| [anaconda-project](https://github.com/Anaconda-Platform/anaconda-project) | 0.8.4 | Tool for encapsulating, running, and reproducing data science projects / BSD 3-Clause |
| [argon2-cffi](https://argon2-cffi.readthedocs.org/) | 20.1.0 | The secure Argon2 password hashing algorithm. / MIT |
| [asn1crypto](https://github.com/wbond/asn1crypto) | 1.4.0 | Python ASN.1 library with a focus on performance and a pythonic API / MIT |
| [astroid](https://www.astroid.org/) | 2.4.2 | A abstract syntax tree for Python with inference support. / LGPL-2.1-only |
| [astropy](http://www.astropy.org/) | 4.0.2 | Community-developed Python Library for Astronomy / BSD-3-Clause |
| [async\_generator](https://github.com/python-trio/async_generator) | 1.10 | Async generators and context managers for Python 3.5+ / MIT |
| [attrs](https://attrs.readthedocs.io/en/stable/) | 20.3.0 | attrs is the Python package that will bring back the joy of writing classes by relieving you from the drudgery of implementing object protocols (aka dunder methods). / MIT |
| [babel](http://babel.pocoo.org/) | 2.8.1 | Utilities to internationalize and localize Python applications / BSD 3-clause |
| [backcall](https://github.com/takluyver/backcall/) | 0.2.0 | Specifications for callback functions passed in to an API / BSD-3-Clause |
| [backports](https://bitbucket.org/brandon/backports) | 1.0 | None / BSD |
| [backports.shutil\_get\_terminal\_size](https://github.com/chrippa/backports.shutil_get_terminal_size) | 1.0.0 | A backport of the get\_terminal\_size function from Python 3.3’s shutil. / MIT |
| [beautifulsoup4](http://www.crummy.com/software/BeautifulSoup/) | 4.9.3 | Python library designed for screen-scraping / MIT |
| [bitarray](https://github.com/ilanschnell/bitarray) | 1.6.1 | efficient arrays of booleans – C extension / PSF |
| [bkcharts](http://github.com/bokeh/bkcharts) | 0.2 | High level chart types built on top of Bokeh / BSD 3-Clause |
| blas | 1.0 | |
| [bleach](https://github.com/mozilla/bleach) | 3.2.1 | Easy, whitelist-based HTML-sanitizing tool / Apache-2.0 |
| [blosc](https://github.com/Blosc/c-blosc) | 1.20.1 | A blocking, shuffling and loss-less compression library that can be faster than memcpy() / BSD-3-Clause |
| [bokeh](http://bokeh.pydata.org/) | 2.2.3 | Statistical and novel interactive HTML plots for Python / BSD-3-Clause |
| [boto](https://github.com/boto/boto/) | 2.49.0 | Amazon Web Services Library / MIT |
| [bottleneck](https://github.com/pydata/bottleneck) | 1.3.2 | Fast NumPy array functions written in Cython. / BSD 2-Clause |
| [brotlipy](https://github.com/python-hyper/brotlipy) | 0.7.0 | Python bindings to the Brotli compression library / MIT |
| [bzip2](http://www.bzip.org/) | 1.0.8 | high-quality data compressor / bzip2 |
| [ca-certificates](https://github.com/conda-forge/ca-certificates-feedstock) | 2020.10.14 | Certificates for use with other packages. / MPL 2.0 |
| [cairo](http://cairographics.org/) | 1.14.12 | Cairo is a 2D graphics library with support for multiple output devices. / LGPL 2.1 or MPL 1.1 |
| [certifi](http://certifi.io/) | 2020.6.20 | Python package for providing Mozilla’s CA Bundle. / ISC |
| [cffi](https://bitbucket.org/cffi/cffi) | 1.14.3 | Foreign Function Interface for Python calling C code. / MIT |
| [chardet](https://github.com/chardet/chardet) | 3.0.4 | Universal character encoding detector / LGPL2 |
| [click](https://palletsprojects.com/p/click) | 7.1.2 | Python composable command line interface toolkit / BSD-3-Clause |
| [cloudpickle](https://github.com/cloudpipe/cloudpickle) | 1.6.0 | Extended pickling support for Python objects / BSD-3-Clause |
| [clyent](https://github.com/Anaconda-Platform/clyent) | 1.2.2 | Command line client library for windows and posix / BSD 3-Clause |
| [colorama](https://github.com/tartley/colorama) | 0.4.4 | Cross-platform colored terminal text / BSD-3-Clause |
| [conda](https://conda.io) | 4.9.2 | OS-agnostic, system-level binary package and environment manager. / BSD 3-Clause |
| [conda-build](https://github.com/conda/conda-build) | 3.20.5 | tools for building conda packages / BSD 3-Clause |
| [conda-env](https://github.com/conda/conda-env) | 2.6.0 | Tools for interacting with conda environments. / BSD 3-Clause |
| [conda-verify](https://github.com/conda/conda-verify) | 3.4.2 | tool for validating conda recipes and conda packages / BSD 3-Clause |
| [contextlib2](http://contextlib2.readthedocs.org) | 0.6.0.post1 | Backports and enhancements for the contextlib module / PSF 2 |
| [cryptography](https://github.com/pyca/cryptography) | 3.1.1 | Provides cryptographic recipes and primitives to Python developers / Apache-2.0 AND BSD-3-Clause AND PSF-2.0 |
| [curl](http://curl.haxx.se/) | 7.71.1 | tool and library for transferring data with URL syntax / MIT/X derivate (`<http://curl.haxx.se/docs/copyright.html>`) |
| [cycler](http://matplotlib.org/cycler) | 0.10.0 | Composable style cycles. / BSD 3-Clause |
| [cython](http://www.cython.org/) | 0.29.21 | The Cython compiler for writing C extensions for the Python language / Apache-2.0 |
| [cytoolz](https://github.com/pytoolz/cytoolz) | 0.11.0 | Cython implementation of Toolz. High performance functional utilities / BSD-3-Clause |
| [dask](https://dask.org/) | 2.30.0 | Parallel PyData with Task Scheduling / BSD-3-Clause |
| [dask-core](http://github.com/dask/dask/) | 2.30.0 | Parallel Python with task scheduling / BSD-3-Clause |
| [decorator](https://github.com/micheles/decorator) | 4.4.2 | Better living through Python with decorators. / BSD-3-Clause |
| [defusedxml](https://bitbucket.org/tiran/defusedxml) | 0.6.0 | XML bomb protection for Python stdlib modules / PSF 2.0 |
| [distributed](http://distributed.readthedocs.io/en/latest/) | 2.30.1 | Distributed computing with Dask / BSD-3-Clause |
| [docutils](http://docutils.sourceforge.net/) | 0.16 | Docutils – Python Documentation Utilities / Public Domain Dedictation and BSD 2-Clause and PSF 2.1.1 and GPL 3.0 |
| [entrypoints](https://github.com/takluyver/entrypoints) | 0.3 | Discover and load entry points from installed packages. / MIT License |
| [et\_xmlfile](https://bitbucket.org/openpyxl/et_xmlfile) | 1.0.1 | An implementation of lxml.xmlfile for the standard library / MIT |
| [expat](http://expat.sourceforge.net/) | 2.2.10 | Expat XML parser library in C / MIT |
| [fastcache](https://github.com/pbrady/fastcache) | 1.1.0 | C implementation of Python 3 lru\_cache / MIT |
| [filelock](https://github.com/benediktschmitt/py-filelock) | 3.0.12 | A platform independent file lock. / Public Domain |
| [flask](http://flask.pocoo.org) | 1.1.2 | A microframework based on Werkzeug, Jinja2 and good intentions. / BSD 3-Clause |
| [fontconfig](http://www.freedesktop.org/wiki/Software/fontconfig/) | 2.13.0 | A library for configuring and customizing font access. / MIT |
| [freetype](https://www.freetype.org/) | 2.10.4 | A Free, High-Quality, and Portable Font Engine / GPL-2.0-only and LicenseRef-FreeType |
| [fsspec](https://github.com/martindurant/filesystem_spec) | 0.8.3 | A specification for pythonic filesystems / BSD-3-Clause |
| [get\_terminal\_size](https://github.com/chrippa/backports.shutil_get_terminal_size) | 1.0.0 | Get the size of the terminal window. / MIT |
| [gevent](https://www.gevent.org) | 20.9.0 | Coroutine-based network library / MIT |
| [glib](https://developer.gnome.org/glib/) | 2.66.1 | Provides core application building blocks for libraries and applications written in C. / LGPL-2.1 |
| [glob2](https://github.com/miracle2k/python-glob2) | 0.7 | Version of the glob module that supports recursion via \*\*, and can capture patterns. / BSD-2-Clause |
| [gmp](http://gmplib.org/) | 6.1.2 | The GNU multiprecision library. / GPL 2 and LGPL 3 |
| [gmpy2](https://pypi.python.org/pypi/gmpy2) | 2.0.8 | GMP/MPIR, MPFR, and MPC interface to Python 2.6+ and 3.x / LGPL 3 |
| [greenlet](https://github.com/python-greenlet/greenlet) | 0.4.17 | Lightweight in-process concurrent programming / MIT |
| [h5py](http://www.h5py.org/) | 2.10.0 | Read and write HDF5 files from Python. / BSD-3-Clause |
| [hdf5](http://www.hdfgroup.org/HDF5/) | 1.10.4 | HDF5 is a data model, library, and file format for storing and managing data / HDF5 |
| [heapdict](http://stutzbachenterprises.com/) | 1.0.1 | A heap with decrease-key and increase-key operations / BSD 3-Clause |
| [html5lib](https://github.com/html5lib/html5lib-python) | 1.1 | HTML parser based on the WHATWG HTML specification / MIT |
| [icu](http://site.icu-project.org/) | 58.2 | International Components for Unicode. / MIT |
| [idna](https://github.com/kjd/idna) | 2.10 | Internationalized Domain Names in Applications (IDNA). / BSD Like |
| [imageio](https://imageio.github.io) | 2.9.0 | A Python library for reading and writing image data / BSD-2-Clause |
| [imagesize](https://github.com/shibukawa/imagesize_py) | 1.2.0 | Getting image size from png/jpeg/jpeg2000/gif file / MIT |
| [importlib-metadata](https://gitlab.com/python-devs/importlib_metadata) | 2.0.0 | A library to access the metadata for a Python package / Apache-2.0 |
| [importlib\_metadata](https://gitlab.com/python-devs/importlib_metadata) | 2.0.0 | A library to access the metadata for a Python package / Apache-2.0 |
| [iniconfig](http://github.com/RonnyPfannschmidt/iniconfig) | 1.1.1 | iniconfig: brain-dead simple config-ini parsing / MIT |
| [ipykernel](https://ipython.org) | 5.3.4 | IPython Kernel for Jupyter / BSD-3-Clause |
| [ipython](https://ipython.org) | 7.19.0 | IPython: Productive Interactive Computing / BSD-3-Clause |
| [ipython\_genutils](http://ipython.org) | 0.2.0 | vestigial utilities from IPython / BSD 3-Clause |
| [ipywidgets](https://github.com/ipython/ipywidgets) | 7.5.1 | Jupyter Interactive Widgets / BSD 3-clause |
| [isort](https://github.com/timothycrosley/isort) | 5.6.4 | A Python utility / library to sort Python imports. / MIT |
| [itsdangerous](https://github.com/pallets/itsdangerous) | 1.1.0 | Various helpers to pass trusted data to untrusted environments. / BSD 3-Clause |
| [jbig](https://www.cl.cam.ac.uk/~mgk25/jbigkit) | 2.1 | Implementation of the JBIG1 data compression standard / GPL-2.0 |
| [jdcal](https://github.com/phn/jdcal) | 1.4.1 | Julian dates from proleptic Gregorian and Julian calendars. / BSD 2-Clause |
| [jedi](https://github.com/davidhalter/jedi/) | 0.17.2 | An autocompletion tool for Python that can be used for text editors. / MIT |
| [jinja2](http://jinja.pocoo.org) | 2.11.2 | An easy to use stand-alone template engine written in pure python. / 3-Clause BSD |
| [joblib](https://pypi.org/project/joblib/) | 0.17.0 | Lightweight pipelining: using Python functions as pipeline jobs. / BSD-3-Clause |
| [jpeg](http://www.ijg.org/) | 9b | read/write jpeg COM, EXIF, IPTC medata / Custom free software license |
| [jsonschema](https://github.com/Julian/jsonschema) | 3.2.0 | An implementation of JSON Schema validation for Python / MIT |
| [jupyter](http://jupyter.org) | 1.0.0 | Jupyter metapackage. Install all the Jupyter components in one go. / BSD 3-Clause |
| [jupyter\_client](https://jupyter.org) | 6.1.7 | jupyter\_client contains the reference implementation of the Jupyter protocol. / BSD-3-Clause |
| [jupyter\_console](http://jupyter.org) | 6.2.0 | Jupyter terminal console / BSD-3-Clause |
| [jupyter\_core](https://jupyter.org) | 4.6.1 | Core common functionality of Jupyter projects. / BSD-3-Clause |
| [jupyterlab\_pygments](http://github.com/JupyterLab/jupyterlab_pygments) | 0.1.2 | Pygments syntax coloring scheme making use of the JupyterLab CSS variables / BSD-3-Clause |
| [kiwisolver](https://github.com/nucleic/kiwi) | 1.3.0 | An efficient C++ implementation of the Cassowary constraint solver / BSD-3-Clause |
| [krb5](http://web.mit.edu/kerberos/) | 1.18.2 | A network authentication protocol. / MIT |
| [lazy-object-proxy](https://github.com/ionelmc/python-lazy-object-proxy) | 1.4.3 | A fast and thorough lazy object proxy / BSD-2-Clause |
| [lcms2](http://www.littlecms.com/) | 2.11 | Open Source Color Management Engine / MIT |
| [ld\_impl\_linux-ppc64le](https://www.gnu.org/software/binutils/) | 2.33.1 | A set of programming tools for creating and managing binary programs, object files, libraries, profile data, and assembly source code. / GPL 3 |
| [libarchive](http://www.libarchive.org/) | 3.4.2 | Multi-format archive and compression library / BSD-2-Clause |
| [libcurl](http://curl.haxx.se/) | 7.71.1 | tool and library for transferring data with URL syntax / MIT/X derivate (`<http://curl.haxx.se/docs/copyright.html>`) |
| [libedit](http://thrysoee.dk/editline/) | 3.1.20191231 | Editline Library (libedit) / BSD-2-Clause |
| [libffi](https://sourceware.org/libffi/) | 3.3 | A Portable Foreign Function Interface Library. / Custom |
| [libgcc-ng](https://gcc.gnu.org/onlinedocs/gccint/Libgcc.html) | 8.2.0 | The GCC low-level runtime library / GPL |
| [libgfortran-ng](https://gcc.gnu.org/) | 7.3.0 | The GNU Fortran Runtime Library / GPL |
| [liblief](https://lief.quarkslab.com/) | 0.10.1 | A cross platform library to parse, modify and abstract ELF, PE and MachO formats. / Apache-2.0 |
| [libopenblas](http://www.openblas.net/) | 0.3.10 | An Optimized BLAS library / BSD |
| [libpng](http://www.libpng.org/pub/png/libpng.html) | 1.6.37 | PNG reference library / zlib/libpng |
| [libsodium](http://libsodium.org) | 1.0.18 | A modern and easy-to-use crypto library. / ISC |
| [libssh2](https://www.libssh2.org/) | 1.9.0 | the SSH library / BSD-3-Clause |
| [libstdcxx-ng](https://gcc.gnu.org/) | 8.2.0 | The GNU C++ Runtime Library / GPL3 with runtime exception |
| [libtiff](http://www.libtiff.org/) | 4.1.0 | Support for the Tag Image File Format (TIFF). / HPND |
| [libuuid](http://sourceforge.net/projects/libuuid/) | 1.0.3 | Portable uuid C library. / BSD 3-Clause |
| [libxcb](http://xcb.freedesktop.org/) | 1.14 | This is the C-language Binding (XCB) package to the X Window System protocol / MIT |
| [libxml2](http://xmlsoft.org/) | 2.9.10 | The XML C parser and toolkit of Gnome / MIT |
| [libxslt](http://xmlsoft.org/XSLT/) | 1.1.34 | The XSLT C library developed for the GNOME project / MIT |
| [locket](https://github.com/mwilliamson/locket.py) | 0.2.0 | File-based locks for Python for Linux and Windows / BSD 2-Clause |
| [lxml](http://lxml.de/) | 4.6.1 | Pythonic binding for the C libraries libxml2 and libxslt. / BSD-3-Clause and GPL-2.0-only and ZPL-2.0 and LicenseRef-ElementTree |
| [lz4-c](https://www.lz4.org) | 1.9.2 | Extremely Fast Compression algorithm / BSD-2-Clause |
| [lzo](http://www.oberhumer.com/opensource/lzo/) | 2.10 | LZO is a portable lossless data compression library written in ANSI C. / GPL v2+ |
| [markupsafe](https://www.palletsprojects.com/p/markupsafe) | 1.1.1 | A Python module that implements the jinja2.Markup string / BSD-3-Clause |
| [matplotlib](http://matplotlib.org/) | 3.3.2 | Publication quality figures in Python / LicenseRef-PSF-based |
| [matplotlib-base](http://matplotlib.org/) | 3.3.2 | Publication quality figures in Python / LicenseRef-PSF-based |
| [mccabe](https://github.com/PyCQA/mccabe) | 0.6.1 | McCabe complexity checker for Python / MIT |
| [mistune](https://github.com/lepture/mistune) | 0.8.4 | The fastest markdown parser in pure Python. / BSD 3-Clause |
| [mock](https://github.com/testing-cabal/mock) | 4.0.2 | A library for testing in Python / BSD-2-Clause |
| [more-itertools](https://github.com/more-itertools/more-itertools) | 8.6.0 | More routines for operating on iterables, beyond itertools / MIT |
| [mpc](http://www.multiprecision.org/) | 1.1.0 | A C library for the arithmetic of complex numbers with arbitrarily high precision. / LGPL 3 |
| [mpfr](http://www.mpfr.org/) | 4.0.2 | The MPFR library is a C library for multiple-precision floating-point computations with correct rounding. / LGPL-3.0-only |
| [mpmath](http://mpmath.org) | 1.1.0 | Python library for arbitrary-precision floating-point arithmetic / BSD 3-Clause |
| [msgpack-python](http://msgpack.org/) | 1.0.0 | MessagePack (de)serializer / Apache-2.0 |
| [multipledispatch](https://github.com/mrocklin/multipledispatch/) | 0.6.0 | Multiple dispatch in Python / BSD 3-Clause |
| [nbclient](https://jupyter.org) | 0.5.1 | A client library for executing notebooks. Formally nbconvert’s ExecutePreprocessor. / BSD-3-Clause |
| [nbconvert](http://jupyter.org) | 6.0.7 | Converting Jupyter Notebooks / BSD-3-Clause |
| [nbformat](http://jupyter.org) | 5.0.8 | The reference implementation of the Jupyter Notebook format / BSD-3-Clause |
| [ncurses](http://www.gnu.org/software/ncurses/) | 6.2 | Library for text-based user interfaces / Free software (MIT-like) |
| [nest-asyncio](https://github.com/erdewit/nest_asyncio) | 1.4.2 | Patch asyncio to allow nested event loops / BSD-2-Clause |
| [networkx](https://networkx.github.io/) | 2.5 | Python package for creating and manipulating complex networks / BSD-3-Clause |
| [nltk](http://nltk.org/) | 3.5 | Natural Language Toolkit / Apache 2.0 |
| nomkl | 3.0 | None / BSD |
| [nose](http://readthedocs.org/docs/nose/) | 1.3.7 | Nose extends unittest to make testing easier / LGPL-2.1 |
| [notebook](https://jupyter.org) | 6.1.4 | Jupyter Notebook / BSD-3-Clause |
| [numexpr](https://github.com/pydata/numexpr) | 2.7.1 | Fast numerical expression evaluator for NumPy. / MIT |
| [numpy](http://numpy.scipy.org/) | 1.19.2 | Array processing for numbers, strings, records, and objects. / BSD 3-Clause |
| [numpy-base](http://numpy.scipy.org/) | 1.19.2 | Array processing for numbers, strings, records, and objects. / BSD 3-Clause |
| [numpydoc](https://github.com/numpy/numpydoc) | 1.1.0 | Numpy’s Sphinx extensions / BSD 3-Clause |
| [olefile](http://www.decalage.info/python/olefileio) | 0.46 | parse, read and write Microsoft OLE2 files / BSD 2-Clause |
| [openblas](http://www.openblas.net/) | 0.3.10 | An optimized BLAS library / BSD |
| openblas-devel | 0.3.10 | OpenBLAS headers and libraries for developing software that used OpenBLAS. / None |
| [openpyxl](https://openpyxl.readthedocs.io) | 3.0.5 | A Python library to read/write Excel 2010 xlsx/xlsm files / MIT |
| [openssl](http://www.openssl.org/) | 1.1.1h | OpenSSL is an open-source implementation of the SSL and TLS protocols / OpenSSL |
| [packaging](https://github.com/pypa/packaging) | 20.4 | Core utilities for Python packages / Apache 2.0 or BSD 2-Clause |
| [pandas](http://pandas.pydata.org) | 1.1.3 | High-performance, easy-to-use data structures and data analysis tools. / BSD-3-Clause |
| [pandoc](http://pandoc.org/) | 2.11 | Universal markup converter (repackaged binaries) / GPL-2.0 |
| [pandocfilters](https://github.com/jgm/pandocfilters) | 1.4.3 | A python module for writing pandoc filters / BSD-3-Clause |
| [parso](https://github.com/davidhalter/parso) | 0.7.0 | A Python Parser / MIT |
| [partd](https://github.com/dask/partd) | 1.1.0 | Data structure for on-disk shuffle operations / BSD 3-Clause |
| [patchelf](http://nixos.org/patchelf.html) | 0.12 | A small utility to modify the dynamic linker and RPATH of ELF executables. / GPL-3.0-or-later |
| [path](https://github.com/jaraco/path) | 15.0.0 | A module wrapper for os.path / MIT |
| [path.py](https://github.com/jaraco/path.py) | 12.5.0 | A module wrapper for os.path / MIT |
| [pathlib2](https://github.com/mcmtroffaes/pathlib2) | 2.3.5 | Fork of pathlib aiming to support the full stdlib Python API / MIT |
| [patsy](https://github.com/pydata/patsy) | 0.5.1 | Describing statistical models in Python using symbolic formulas / BSD-2-Clause, PSF2 |
| [pcre](http://www.pcre.org/) | 8.44 | Regular expression pattern matching using the same syntax and semantics as Perl 5. / BSD 3-Clause |
| [pep8](http://pep8.readthedocs.org/) | 1.7.1 | Python style guide checker / MIT |
| [pexpect](http://pexpect.sourceforge.net/) | 4.8.0 | Pexpect makes Python a better tool for controlling other applications. / ISC |
| [pickleshare](https://github.com/pickleshare/pickleshare/) | 0.7.5 | Tiny ‘shelve’-like database with concurrency support / MIT |
| [pillow](https://pillow.readthedocs.io) | 8.0.1 | Pillow is the friendly PIL fork by Alex Clark and Contributors / LicenseRef-PIL |
| [pip](https://pip.pypa.io/en/stable/) | 20.2.4 | PyPA recommended tool for installing Python packages / MIT |
| [pixman](http://www.pixman.org/) | 0.40.0 | A low-level software library for pixel manipulation. / MIT |
| [pkginfo](https://code.launchpad.net/~tseaver/pkginfo/trunk) | 1.6.1 | Query metadatdata from sdists / bdists / installed packages. / MIT |
| [pluggy](https://github.com/pytest-dev/pluggy) | 0.13.1 | Plugin registration and hook calling for Python / MIT |
| [ply](http://www.dabeaz.com/ply/index.html) | 3.11 | Python Lex-Yacc / BSD 3-clause |
| [prometheus\_client](https://github.com/prometheus/client_python) | 0.8.0 | Python client for the Prometheus monitoring system / Apache-2.0 |
| [prompt-toolkit](https://github.com/jonathanslenders/python-prompt-toolkit) | 3.0.8 | Library for building powerful interactive command lines in Python / BSD-3-Clause |
| [prompt\_toolkit](https://github.com/jonathanslenders/python-prompt-toolkit) | 3.0.8 | Library for building powerful interactive command lines in Python / BSD-3-Clause |
| [psutil](https://github.com/giampaolo/psutil) | 5.7.2 | A cross-platform process and system utilities module for Python / BSD-3-Clause |
| [ptyprocess](https://github.com/pexpect/ptyprocess) | 0.6.0 | Run a subprocess in a pseudo terminal / ISC |
| [py](https://github.com/pytest-dev/py) | 1.9.0 | library with cross-python path, ini-parsing, io, code, log facilities / MIT |
| [py-lief](https://lief.quarkslab.com/) | 0.10.1 | A cross platform library to parse, modify and abstract ELF, PE and MachO formats. / Apache-2.0 |
| [pycodestyle](https://pycodestyle.readthedocs.io/) | 2.6.0 | Python style guide checker / MIT |
| [pycosat](https://github.com/ContinuumIO/pycosat) | 0.6.3 | Bindings to picosat (a SAT solver) / MIT |
| [pycparser](https://github.com/eliben/pycparser) | 2.20 | Complete C99 parser in pure Python / BSD 3-clause |
| [pycurl](http://pycurl.sourceforge.net/) | 7.43.0.6 | A Python Interface To The cURL library / LGPL, MIT |
| [pyflakes](https://github.com/PyCQA/pyflakes) | 2.2.0 | Pyflakes analyzes programs and detects various errors. / MIT |
| [pygments](http://pygments.org/) | 2.7.2 | Pygments is a generic syntax highlighter suitable for use in code hosting, forums, wikis or other applications that need to prettify source code. / BSD-2-clause |
| [pylint](http://www.pylint.org/) | 2.6.0 | python code static checker / GPL-2.0-only |
| [pyodbc](https://github.com/mkleehammer/pyodbc) | 4.0.30 | DB API Module for ODBC / MIT |
| [pyopenssl](https://github.com/pyca/pyopenssl) | 19.1.0 | Python wrapper module around the OpenSSL library / Apache 2.0 |
| [pyparsing](http://pyparsing.wikispaces.com/) | 2.4.7 | Create and execute simple grammars / MIT |
| [pyrsistent](http://github.com/tobgu/pyrsistent/) | 0.17.3 | Persistent/Functional/Immutable data structures / MIT |
| [pysocks](https://github.com/Anorov/PySocks) | 1.7.1 | A Python SOCKS client module. See [Anorov/PySocks](https://github.com/Anorov/PySocks) for more information. / BSD 3-Clause |
| [pytables](http://www.pytables.org) | 3.6.1 | Brings together Python, HDF5 and NumPy to easily handle large amounts of data. / BSD 3-Clause |
| [pytest](https://docs.pytest.org/en/latest/) | 6.1.1 | Simple and powerful testing with Python. / MIT |
| [python](https://www.python.org/) | 3.8.5 | General purpose programming language / Python-2.0 |
| [python-dateutil](https://dateutil.readthedocs.org/) | 2.8.1 | Extensions to the standard Python datetime module. / BSD 3 Clause |
| [python-libarchive-c](https://github.com/Changaco/python-libarchive-c) | 2.9 | Python interface to libarchive / CC0-1.0 |
| [pytz](http://pythonhosted.org/pytz/) | 2020.1 | World timezone definitions, modern and historical. / MIT |
| [pywavelets](https://github.com/PyWavelets/pywt) | 1.1.1 | Discrete Wavelet Transforms in Python / MIT |
| [pyyaml](http://pyyaml.org/wiki/PyYAML) | 5.3.1 | YAML parser and emitter for Python / MIT |
| [pyzmq](https://github.com/zeromq/pyzmq) | 19.0.2 | Python bindings for zeromq / BSD 3-clause |
| [readline](https://cnswww.cns.cwru.edu/php/chet/readline/rltop.html) | 8.0 | library for editing command lines as they are typed in / GPL-3.0 |
| [regex](https://bitbucket.org/mrabarnett/mrab-regex) | 2020.10.15 | Alternative regular expression module, to replace re / Python-2.0 |
| [requests](http://python-requests.org) | 2.24.0 | Requests is an elegant and simple HTTP library for Python, built with ♥. / Apache-2.0 |
| [ruamel\_yaml](https://bitbucket.org/ruamel/yaml) | 0.15.87 | A patched copy of ruamel.yaml. / MIT |
| [scikit-image](http://scikit-image.org/) | 0.17.2 | Image processing in Python. / BSD-3-Clause |
| [scikit-learn](http://scikit-learn.org/) | 0.23.2 | A set of python modules for machine learning and data mining / BSD-3-Clause |
| [scipy](http://www.scipy.org/) | 1.5.2 | Scientific Library for Python / BSD 3-Clause |
| [seaborn](https://seaborn.pydata.org) | 0.11.0 | Statistical data visualization / BSD 3-Clause |
| [send2trash](https://github.com/hsoft/send2trash) | 1.5.0 | Python library to natively send files to Trash (or Recycle bin) on all platforms. / BSD-3-Clause |
| [setuptools](https://github.com/pypa/setuptools) | 50.3.1 | Download, build, install, upgrade, and uninstall Python packages / MIT |
| [simplegeneric](http://cheeseshop.python.org/pypi/simplegeneric) | 0.8.1 | Simple generic functions (similar to Python’s own len(), pickle.dump(), etc.) / Zope Public |
| [singledispatch](http://docs.python.org/3/library/functools.html#functools.singledispatch) | 3.4.0.3 | Transforms a function into a single-dispatch generic function / MIT |
| [six](https://six.readthedocs.io/) | 1.15.0 | Python 2 and 3 compatibility utilities / MIT |
| [snowballstemmer](https://github.com/shibukawa/snowball_py) | 2.0.0 | Snowball stemming library collection for Python / BSD-2-Clause |
| [sortedcollections](http://www.grantjenks.com/docs/sortedcollections/) | 1.2.1 | Python Sorted Collections / Apache-2.0 |
| [sortedcontainers](http://www.grantjenks.com/docs/sortedcontainers/) | 2.2.2 | Python Sorted Container Types: SortedList, SortedDict, and SortedSet / Apache-2.0 |
| [soupsieve](http://facelessuser.github.io/soupsieve) | 2.0.1 | A modern CSS selector implementation for BeautifulSoup / MIT |
| [sphinx](http://www.sphinx-doc.org) | 3.2.1 | Sphinx is a tool that makes it easy to create intelligent and beautiful documentation / BSD-2-Clause |
| sphinxcontrib | 1.0 | Python namespace for sphinxcontrib / BSD |
| [sphinxcontrib-applehelp](https://www.sphinx-doc.org/en/master/) | 1.0.2 | sphinxcontrib-applehelp is a sphinx extension which outputs Apple help books / BSD-2-Clause |
| [sphinxcontrib-devhelp](https://www.sphinx-doc.org/en/master/) | 1.0.2 | sphinxcontrib-devhelp is a sphinx extension which outputs Devhelp document / BSD-2-Clause |
| [sphinxcontrib-htmlhelp](https://www.sphinx-doc.org/en/master/) | 1.0.3 | sphinxcontrib-htmlhelp is a sphinx extension which … / BSD-2-Clause |
| [sphinxcontrib-jsmath](https://www.sphinx-doc.org/en/master/) | 1.0.1 | A sphinx extension which renders display math in HTML via JavaScript / BSD-2-Clause |
| [sphinxcontrib-qthelp](https://www.sphinx-doc.org/en/master/) | 1.0.3 | sphinxcontrib-qthelp is a sphinx extension which outputs QtHelp document / BSD-2-Clause |
| [sphinxcontrib-serializinghtml](https://www.sphinx-doc.org/en/master/) | 1.1.4 | sphinxcontrib-serializinghtml is a sphinx extension which outputs “serialized” HTML files (json and pickle). / BSD-2-Clause |
| [sphinxcontrib-websupport](https://pypi.python.org/pypi/sphinxcontrib-websupport) | 1.2.4 | Sphinx API for Web Apps / BSD-2-Clause |
| [sqlalchemy](http://www.sqlalchemy.org/) | 1.3.20 | Database Abstraction Library. / MIT |
| [sqlite](http://www.sqlite.org/) | 3.33.0 | Implements a self-contained, zero-configuration, SQL database engine / Public-Domain (`<http://www.sqlite.org/copyright.html>`) |
| [statsmodels](https://www.statsmodels.org) | 0.12.0 | Statistical computations and models for use with SciPy / BSD-3-Clause |
| [sympy](https://sympy.org) | 1.6.2 | Python library for symbolic mathematics / BSD-3-Clause |
| [tblib](https://github.com/ionelmc/python-tblib) | 1.7.0 | Traceback serialization library. / BSD 2-Clause |
| [terminado](https://github.com/jupyter/terminado) | 0.9.1 | Terminals served by tornado websockets / BSD-2-Clause |
| [testpath](https://testpath.readthedocs.io) | 0.4.4 | Testpath is a collection of utilities for Python code working with files and commands. / BSD-3-Clause |
| [threadpoolctl](https://github.com/joblib/threadpoolctl) | 2.1.0 | Python helpers to control the threadpools of native libraries / BSD 3-Clause |
| [tifffile](https://github.com/blink1073/tifffile) | 2020.10.1 | Read and write image data from and to TIFF files. / BSD 3-Clause |
| [tk](http://www.tcl.tk/) | 8.6.10 | A dynamic programming language with GUI support. Bundles Tcl and Tk. / Tcl/Tk |
| [toml](https://github.com/uiri/toml) | 0.10.1 | Python lib for TOML. / MIT |
| [toolz](http://toolz.readthedocs.org/) | 0.11.1 | A functional standard library for Python / BSD-3-Clause |
| [tornado](http://www.tornadoweb.org/) | 6.0.4 | A Python web framework and asynchronous networking library, originally developed at FriendFeed. / Apache-2.0 |
| [tqdm](https://pypi.python.org/pypi/tqdm) | 4.50.2 | A Fast, Extensible Progress Meter / MPLv2.0, MIT |
| [traitlets](http://traitlets.readthedocs.org/) | 5.0.5 | Configuration system for Python applications / BSD-3-Clause |
| [typing\_extensions](https://github.com/python/typing/tree/master/typing_extensions) | 3.7.4.3 | Backported and Experimental Type Hints for Python / PSF-2.0 |
| [unicodecsv](https://github.com/jdunck/python-unicodecsv) | 0.14.1 | Drop-in replacement for csv module which supports unicode strings / BSD |
| [unixodbc](http://www.unixodbc.org/) | 2.3.9 | ODBC on non MS Windows platforms / LGPL-2.1 |
| [urllib3](https://urllib3.readthedocs.io/) | 1.25.11 | HTTP library with thread-safe connection pooling, file post, and more. / MIT |
| [wcwidth](https://github.com/jquast/wcwidth) | 0.2.5 | Measures number of Terminal column cells of wide-character codes. / MIT |
| [webencodings](https://github.com/gsnedders/python-webencodings) | 0.5.1 | Character encoding aliases for legacy web content / BSD 3-Clause |
| [werkzeug](https://palletsprojects.com/p/werkzeug/) | 1.0.1 | The comprehensive WSGI web application library. / BSD 3-Clause |
| [wheel](https://github.com/pypa/wheel) | 0.35.1 | A built-package format for Python. / MIT |
| [widgetsnbextension](http://ipython.org) | 3.5.1 | Interactive Widgets for Jupyter / BSD 3-clause |
| [wrapt](https://github.com/GrahamDumpleton/wrapt) | 1.11.2 | Module for decorators, wrappers and monkey patching / BSD 2-Clause |
| [xlrd](http://www.python-excel.org/) | 1.2.0 | Library for developers to extract data from Microsoft Excel (tm) spreadsheet files / BSD 3-Clause and BSD with advertising |
| [xlsxwriter](https://xlsxwriter.readthedocs.io/) | 1.3.7 | A Python module for creating Excel XLSX files / BSD-2-Clause |
| [xlwt](http://www.python-excel.org/) | 1.3.0 | Writing data and formatting information to Excel files / BSD |
| [xz](http://tukaani.org/xz/) | 5.2.5 | Data compression software with high compression ratio / LGPL-2.1 and GPL-2.0 |
| [yaml](http://pyyaml.org/wiki/LibYAML) | 0.2.5 | A C library for parsing and emitting YAML / MIT |
| [zeromq](http://zeromq.org) | 4.3.3 | A high-performance asynchronous messaging library. / LGPL 3 |
| [zict](http://github.com/mrocklin/zict) | 2.0.0 | Composable Dictionary Classes / BSD 3-Clause |
| [zipp](https://github.com/jaraco/zipp) | 3.4.0 | A pathlib-compatible Zipfile object wrapper / MIT |
| [zlib](http://zlib.net/) | 1.2.11 | Massively spiffy yet delicately unobtrusive compression library / zlib |
| zope | 1.0 | web application server / BSD |
| [zope.event](http://www.zope.org/en/latest/) | 4.5.0 | Very basic event publishing system / Zope Public License |
| [zope.interface](http://docs.zope.org/zope.interface/) | 5.1.2 | Interfaces for Python / ZPL-2.1 |
| [zstd](http://www.zstd.net) | 1.4.5 | Zstandard - Fast real-time compression algorithm / BSD 3-Clause |
| Name | Version | Summary / License |
|---|---|---|
| [\_ipyw\_jlab\_nb\_ext\_conf](https://github.com/ContinuumIO/anaconda-nb-extensions-meta-config) | 0.1.0 | A configuration metapackage for enabling Anaconda-bundled jupyter extensions / BSD |
| \_libgcc\_mutex | 0.1 | Mutex for libgcc and libgcc-ng / None |
| [alabaster](http://www.sphinx-doc.org/en/stable/index.html) | 0.7.12 | Configurable, Python 2+3 compatible Sphinx theme. / BSD 3-Clause |
| [anaconda-client](http://anaconda.org) | 1.7.2 | anaconda.org command line client library / BSD 3-clause |
| [anaconda-project](https://github.com/Anaconda-Platform/anaconda-project) | 0.8.4 | Tool for encapsulating, running, and reproducing data science projects / BSD 3-Clause |
| [argh](https://github.com/neithere/argh) | 0.26.2 | The Natural CLI. / LGPL 3 |
| [argon2-cffi](https://argon2-cffi.readthedocs.org/) | 20.1.0 | The secure Argon2 password hashing algorithm. / MIT |
| [asn1crypto](https://github.com/wbond/asn1crypto) | 1.4.0 | Python ASN.1 library with a focus on performance and a pythonic API / MIT |
| [astroid](https://www.astroid.org/) | 2.4.2 | A abstract syntax tree for Python with inference support. / LGPL-2.1-only |
| [astropy](http://www.astropy.org/) | 4.0.2 | Community-developed Python Library for Astronomy / BSD-3-Clause |
| [async\_generator](https://github.com/python-trio/async_generator) | 1.10 | Async generators and context managers for Python 3.5+ / MIT |
| [atomicwrites](https://github.com/untitaker/python-atomicwrites) | 1.4.0 | Atomic file writes / MIT |
| [attrs](https://attrs.readthedocs.io/en/stable/) | 20.3.0 | attrs is the Python package that will bring back the joy of writing classes by relieving you from the drudgery of implementing object protocols (aka dunder methods). / MIT |
| [autopep8](https://github.com/hhatto/autopep8) | 1.5.4 | A tool that automatically formats Python code to conform to the PEP 8 style guide / MIT |
| [babel](http://babel.pocoo.org/) | 2.8.1 | Utilities to internationalize and localize Python applications / BSD 3-clause |
| [backcall](https://github.com/takluyver/backcall/) | 0.2.0 | Specifications for callback functions passed in to an API / BSD-3-Clause |
| [backports](https://bitbucket.org/brandon/backports) | 1.0 | None / BSD |
| [backports.shutil\_get\_terminal\_size](https://github.com/chrippa/backports.shutil_get_terminal_size) | 1.0.0 | A backport of the get\_terminal\_size function from Python 3.3’s shutil. / MIT |
| [beautifulsoup4](http://www.crummy.com/software/BeautifulSoup/) | 4.9.3 | Python library designed for screen-scraping / MIT |
| [bitarray](https://github.com/ilanschnell/bitarray) | 1.6.1 | efficient arrays of booleans – C extension / PSF |
| [bkcharts](http://github.com/bokeh/bkcharts) | 0.2 | High level chart types built on top of Bokeh / BSD 3-Clause |
| blas | 1.0 | |
| [bleach](https://github.com/mozilla/bleach) | 3.2.1 | Easy, whitelist-based HTML-sanitizing tool / Apache-2.0 |
| [blosc](https://github.com/Blosc/c-blosc) | 1.20.1 | A blocking, shuffling and loss-less compression library that can be faster than memcpy() / BSD-3-Clause |
| [bokeh](http://bokeh.pydata.org/) | 2.2.3 | Statistical and novel interactive HTML plots for Python / BSD-3-Clause |
| [boto](https://github.com/boto/boto/) | 2.49.0 | Amazon Web Services Library / MIT |
| [bottleneck](https://github.com/pydata/bottleneck) | 1.3.2 | Fast NumPy array functions written in Cython. / BSD 2-Clause |
| [brotlipy](https://github.com/python-hyper/brotlipy) | 0.7.0 | Python bindings to the Brotli compression library / MIT |
| [bzip2](http://www.bzip.org/) | 1.0.8 | high-quality data compressor / bzip2 |
| [ca-certificates](https://github.com/conda-forge/ca-certificates-feedstock) | 2020.10.14 | Certificates for use with other packages. / MPL 2.0 |
| [cairo](http://cairographics.org/) | 1.14.12 | Cairo is a 2D graphics library with support for multiple output devices. / LGPL 2.1 or MPL 1.1 |
| [certifi](http://certifi.io/) | 2020.6.20 | Python package for providing Mozilla’s CA Bundle. / ISC |
| [cffi](https://bitbucket.org/cffi/cffi) | 1.14.3 | Foreign Function Interface for Python calling C code. / MIT |
| [chardet](https://github.com/chardet/chardet) | 3.0.4 | Universal character encoding detector / LGPL2 |
| [click](https://palletsprojects.com/p/click) | 7.1.2 | Python composable command line interface toolkit / BSD-3-Clause |
| [cloudpickle](https://github.com/cloudpipe/cloudpickle) | 1.6.0 | Extended pickling support for Python objects / BSD-3-Clause |
| [clyent](https://github.com/Anaconda-Platform/clyent) | 1.2.2 | Command line client library for windows and posix / BSD 3-Clause |
| [colorama](https://github.com/tartley/colorama) | 0.4.4 | Cross-platform colored terminal text / BSD-3-Clause |
| [conda](https://conda.io) | 4.9.2 | OS-agnostic, system-level binary package and environment manager. / BSD 3-Clause |
| [conda-build](https://github.com/conda/conda-build) | 3.20.5 | tools for building conda packages / BSD 3-Clause |
| [conda-env](https://github.com/conda/conda-env) | 2.6.0 | Tools for interacting with conda environments. / BSD 3-Clause |
| [conda-verify](https://github.com/conda/conda-verify) | 3.4.2 | tool for validating conda recipes and conda packages / BSD 3-Clause |
| [contextlib2](http://contextlib2.readthedocs.org) | 0.6.0.post1 | Backports and enhancements for the contextlib module / PSF 2 |
| [cryptography](https://github.com/pyca/cryptography) | 3.1.1 | Provides cryptographic recipes and primitives to Python developers / Apache-2.0 AND BSD-3-Clause AND PSF-2.0 |
| [curl](http://curl.haxx.se/) | 7.71.1 | tool and library for transferring data with URL syntax / MIT/X derivate (`<http://curl.haxx.se/docs/copyright.html>`) |
| [cycler](http://matplotlib.org/cycler) | 0.10.0 | Composable style cycles. / BSD 3-Clause |
| [cython](http://www.cython.org/) | 0.29.21 | The Cython compiler for writing C extensions for the Python language / Apache-2.0 |
| [cytoolz](https://github.com/pytoolz/cytoolz) | 0.11.0 | Cython implementation of Toolz. High performance functional utilities / BSD-3-Clause |
| [dask](https://dask.org/) | 2.30.0 | Parallel PyData with Task Scheduling / BSD-3-Clause |
| [dask-core](http://github.com/dask/dask/) | 2.30.0 | Parallel Python with task scheduling / BSD-3-Clause |
| [dbus](http://www.freedesktop.org/wiki/Software/dbus/) | 1.13.18 | Simple message bus system for applications to talk to one another / GPL2 |
| [decorator](https://github.com/micheles/decorator) | 4.4.2 | Better living through Python with decorators. / BSD-3-Clause |
| [defusedxml](https://bitbucket.org/tiran/defusedxml) | 0.6.0 | XML bomb protection for Python stdlib modules / PSF 2.0 |
| [diff-match-patch](http://code.google.com/p/google-diff-match-patch/) | 20200713 | Diff Match Patch is a high-performance library in multiple languages that manipulates plain text / Apache-2.0 |
| [distributed](http://distributed.readthedocs.io/en/latest/) | 2.30.1 | Distributed computing with Dask / BSD-3-Clause |
| [docutils](http://docutils.sourceforge.net/) | 0.16 | Docutils – Python Documentation Utilities / Public Domain Dedictation and BSD 2-Clause and PSF 2.1.1 and GPL 3.0 |
| [entrypoints](https://github.com/takluyver/entrypoints) | 0.3 | Discover and load entry points from installed packages. / MIT License |
| [et\_xmlfile](https://bitbucket.org/openpyxl/et_xmlfile) | 1.0.1 | An implementation of lxml.xmlfile for the standard library / MIT |
| [expat](http://expat.sourceforge.net/) | 2.2.10 | Expat XML parser library in C / MIT |
| [fastcache](https://github.com/pbrady/fastcache) | 1.1.0 | C implementation of Python 3 lru\_cache / MIT |
| [filelock](https://github.com/benediktschmitt/py-filelock) | 3.0.12 | A platform independent file lock. / Public Domain |
| [flake8](http://flake8.pycqa.org/) | 3.8.4 | Your Tool For Style Guide Enforcement / MIT |
| [flask](http://flask.pocoo.org) | 1.1.2 | A microframework based on Werkzeug, Jinja2 and good intentions. / BSD 3-Clause |
| [fontconfig](http://www.freedesktop.org/wiki/Software/fontconfig/) | 2.13.0 | A library for configuring and customizing font access. / MIT |
| [freetype](https://www.freetype.org/) | 2.10.4 | A Free, High-Quality, and Portable Font Engine / GPL-2.0-only and LicenseRef-FreeType |
| [fribidi](https://github.com/fribidi/fribidi) | 1.0.10 | The Free Implementation of the Unicode Bidirectional Algorithm. / LGPL-2.1 |
| [fsspec](https://github.com/martindurant/filesystem_spec) | 0.8.3 | A specification for pythonic filesystems / BSD-3-Clause |
| [future](http://python-future.org) | 0.18.2 | Clean single-source support for Python 3 and 2 / MIT |
| [get\_terminal\_size](https://github.com/chrippa/backports.shutil_get_terminal_size) | 1.0.0 | Get the size of the terminal window. / MIT |
| [gevent](https://www.gevent.org) | 20.9.0 | Coroutine-based network library / MIT |
| [glib](https://developer.gnome.org/glib/) | 2.66.1 | Provides core application building blocks for libraries and applications written in C. / LGPL-2.1 |
| [glob2](https://github.com/miracle2k/python-glob2) | 0.7 | Version of the glob module that supports recursion via \*\*, and can capture patterns. / BSD-2-Clause |
| [gmp](http://gmplib.org/) | 6.1.2 | The GNU multiprecision library. / GPL 2 and LGPL 3 |
| [gmpy2](https://pypi.python.org/pypi/gmpy2) | 2.0.8 | GMP/MPIR, MPFR, and MPC interface to Python 2.6+ and 3.x / LGPL 3 |
| [graphite2](http://graphite.sil.org/) | 1.3.14 | A “smart font” system that handles the complexities of lesser-known languages of the world. / LGPLv2 |
| [greenlet](https://github.com/python-greenlet/greenlet) | 0.4.17 | Lightweight in-process concurrent programming / MIT |
| [gst-plugins-base](http://gstreamer.freedesktop.org/) | 1.14.0 | GStreamer Base Plug-ins / GPL2 |
| [gstreamer](http://gstreamer.freedesktop.org/) | 1.14.0 | Library for constructing graphs of media-handling components / LGPL 2 |
| [h5py](http://www.h5py.org/) | 2.10.0 | Read and write HDF5 files from Python. / BSD-3-Clause |
| [harfbuzz](http://www.freedesktop.org/wiki/Software/HarfBuzz/) | 2.4.0 | An OpenType text shaping engine. / MIT |
| [hdf5](http://www.hdfgroup.org/HDF5/) | 1.10.4 | HDF5 is a data model, library, and file format for storing and managing data / HDF5 |
| [heapdict](http://stutzbachenterprises.com/) | 1.0.1 | A heap with decrease-key and increase-key operations / BSD 3-Clause |
| [html5lib](https://github.com/html5lib/html5lib-python) | 1.1 | HTML parser based on the WHATWG HTML specification / MIT |
| [icu](http://site.icu-project.org/) | 58.2 | International Components for Unicode. / MIT |
| [idna](https://github.com/kjd/idna) | 2.10 | Internationalized Domain Names in Applications (IDNA). / BSD Like |
| [imageio](https://imageio.github.io) | 2.9.0 | A Python library for reading and writing image data / BSD-2-Clause |
| [imagesize](https://github.com/shibukawa/imagesize_py) | 1.2.0 | Getting image size from png/jpeg/jpeg2000/gif file / MIT |
| [importlib-metadata](https://gitlab.com/python-devs/importlib_metadata) | 2.0.0 | A library to access the metadata for a Python package / Apache-2.0 |
| [importlib\_metadata](https://gitlab.com/python-devs/importlib_metadata) | 2.0.0 | A library to access the metadata for a Python package / Apache-2.0 |
| [iniconfig](http://github.com/RonnyPfannschmidt/iniconfig) | 1.1.1 | iniconfig: brain-dead simple config-ini parsing / MIT |
| [intel-openmp](https://software.intel.com/en-us/node/522690) | 2020.2 | Math library for Intel and compatible processors / LicenseRef-ProprietaryIntel |
| [intervaltree](https://github.com/chaimleib/intervaltree) | 3.1.0 | Editable interval tree data structure for Python 2 and 3 / Apache-2.0 |
| [ipykernel](https://ipython.org) | 5.3.4 | IPython Kernel for Jupyter / BSD-3-Clause |
| [ipython](https://ipython.org) | 7.19.0 | IPython: Productive Interactive Computing / BSD-3-Clause |
| [ipython\_genutils](http://ipython.org) | 0.2.0 | vestigial utilities from IPython / BSD 3-Clause |
| [ipywidgets](https://github.com/ipython/ipywidgets) | 7.5.1 | Jupyter Interactive Widgets / BSD 3-clause |
| [isort](https://github.com/timothycrosley/isort) | 5.6.4 | A Python utility / library to sort Python imports. / MIT |
| [itsdangerous](https://github.com/pallets/itsdangerous) | 1.1.0 | Various helpers to pass trusted data to untrusted environments. / BSD 3-Clause |
| [jbig](https://www.cl.cam.ac.uk/~mgk25/jbigkit) | 2.1 | Implementation of the JBIG1 data compression standard / GPL-2.0 |
| [jdcal](https://github.com/phn/jdcal) | 1.4.1 | Julian dates from proleptic Gregorian and Julian calendars. / BSD 2-Clause |
| [jedi](https://github.com/davidhalter/jedi/) | 0.17.1 | An autocompletion tool for Python that can be used for text editors. / MIT |
| [jeepney](https://gitlab.com/takluyver/jeepney) | 0.5.0 | Pure Python DBus interface / MIT |
| [jinja2](http://jinja.pocoo.org) | 2.11.2 | An easy to use stand-alone template engine written in pure python. / 3-Clause BSD |
| [joblib](https://pypi.org/project/joblib/) | 0.17.0 | Lightweight pipelining: using Python functions as pipeline jobs. / BSD-3-Clause |
| [jpeg](http://www.ijg.org/) | 9b | read/write jpeg COM, EXIF, IPTC medata / Custom free software license |
| [json5](https://github.com/dpranke/pyjson5) | 0.9.5 | A Python implementation of the JSON5 data format / Apache-2.0 |
| [jsonschema](https://github.com/Julian/jsonschema) | 3.2.0 | An implementation of JSON Schema validation for Python / MIT |
| [jupyter](http://jupyter.org) | 1.0.0 | Jupyter metapackage. Install all the Jupyter components in one go. / BSD 3-Clause |
| [jupyter\_client](https://jupyter.org) | 6.1.7 | jupyter\_client contains the reference implementation of the Jupyter protocol. / BSD-3-Clause |
| [jupyter\_console](http://jupyter.org) | 6.2.0 | Jupyter terminal console / BSD-3-Clause |
| [jupyter\_core](https://jupyter.org) | 4.6.3 | Core common functionality of Jupyter projects. / BSD-3-Clause |
| [jupyterlab](https://github.com/jupyterlab/jupyterlab) | 2.2.6 | JupyterLab PRE-ALPHA / BSD-3-Clause |
| [jupyterlab\_pygments](http://github.com/JupyterLab/jupyterlab_pygments) | 0.1.2 | Pygments syntax coloring scheme making use of the JupyterLab CSS variables / BSD-3-Clause |
| [jupyterlab\_server](https://github.com/jupyterlab/jupyterlab_server) | 1.2.0 | A set of server components for JupyterLab and JupyterLab like applications. / BSD-3-Clause |
| [keyring](https://github.com/jaraco/keyring) | 21.4.0 | Store and access your passwords safely / Python Software Foundation or MIT |
| [kiwisolver](https://github.com/nucleic/kiwi) | 1.3.0 | An efficient C++ implementation of the Cassowary constraint solver / BSD-3-Clause |
| [krb5](http://web.mit.edu/kerberos/) | 1.18.2 | A network authentication protocol. / MIT |
| [lazy-object-proxy](https://github.com/ionelmc/python-lazy-object-proxy) | 1.4.3 | A fast and thorough lazy object proxy / BSD-2-Clause |
| [lcms2](http://www.littlecms.com/) | 2.11 | Open Source Color Management Engine / MIT |
| [ld\_impl\_linux-64](https://www.gnu.org/software/binutils/) | 2.33.1 | A set of programming tools for creating and managing binary programs, object files, libraries, profile data, and assembly source code. / GPL 3 |
| [libarchive](http://www.libarchive.org/) | 3.4.2 | Multi-format archive and compression library / BSD-2-Clause |
| [libcurl](http://curl.haxx.se/) | 7.71.1 | tool and library for transferring data with URL syntax / MIT/X derivate (`<http://curl.haxx.se/docs/copyright.html>`) |
| [libedit](http://thrysoee.dk/editline/) | 3.1.20191231 | Editline Library (libedit) / BSD-2-Clause |
| [libffi](https://sourceware.org/libffi/) | 3.3 | A Portable Foreign Function Interface Library. / Custom |
| [libgcc-ng](https://gcc.gnu.org/onlinedocs/gccint/Libgcc.html) | 9.1.0 | The GCC low-level runtime library / GPL |
| [libgfortran-ng](https://gcc.gnu.org/) | 7.3.0 | The GNU Fortran Runtime Library / GPL |
| [liblief](https://lief.quarkslab.com/) | 0.10.1 | A cross platform library to parse, modify and abstract ELF, PE and MachO formats. / Apache-2.0 |
| [libllvm10](http://llvm.org/) | 10.0.1 | Development headers and libraries for LLVM / Apache-2.0 WITH LLVM-exception |
| [libpng](http://www.libpng.org/pub/png/libpng.html) | 1.6.37 | PNG reference library / zlib/libpng |
| [libsodium](http://libsodium.org) | 1.0.18 | A modern and easy-to-use crypto library. / ISC |
| [libspatialindex](http://libspatialindex.github.io) | 1.9.3 | Extensible framework for robust spatial indexing / MIT |
| [libssh2](https://www.libssh2.org/) | 1.9.0 | the SSH library / BSD-3-Clause |
| [libstdcxx-ng](https://gcc.gnu.org/) | 9.1.0 | The GNU C++ Runtime Library / GPL3 with runtime exception |
| [libtiff](http://www.libtiff.org/) | 4.1.0 | Support for the Tag Image File Format (TIFF). / HPND |
| [libtool](http://www.gnu.org/software/libtool/) | 2.4.6 | The GNU Portable Library Tool / GPL 3 |
| [libuuid](http://sourceforge.net/projects/libuuid/) | 1.0.3 | Portable uuid C library. / BSD 3-Clause |
| [libxcb](http://xcb.freedesktop.org/) | 1.14 | This is the C-language Binding (XCB) package to the X Window System protocol / MIT |
| [libxml2](http://xmlsoft.org/) | 2.9.10 | The XML C parser and toolkit of Gnome / MIT |
| [libxslt](http://xmlsoft.org/XSLT/) | 1.1.34 | The XSLT C library developed for the GNOME project / MIT |
| [llvmlite](http://llvmlite.pydata.org) | 0.34.0 | A lightweight LLVM python binding for writing JIT compilers. / BSD-2-Clause |
| [locket](https://github.com/mwilliamson/locket.py) | 0.2.0 | File-based locks for Python for Linux and Windows / BSD 2-Clause |
| [lxml](http://lxml.de/) | 4.6.1 | Pythonic binding for the C libraries libxml2 and libxslt. / BSD-3-Clause and GPL-2.0-only and ZPL-2.0 and LicenseRef-ElementTree |
| [lz4-c](https://www.lz4.org) | 1.9.2 | Extremely Fast Compression algorithm / BSD-2-Clause |
| [lzo](http://www.oberhumer.com/opensource/lzo/) | 2.10 | LZO is a portable lossless data compression library written in ANSI C. / GPL v2+ |
| [markupsafe](https://www.palletsprojects.com/p/markupsafe) | 1.1.1 | A Python module that implements the jinja2.Markup string / BSD-3-Clause |
| [matplotlib](http://matplotlib.org/) | 3.3.2 | Publication quality figures in Python / LicenseRef-PSF-based |
| [matplotlib-base](http://matplotlib.org/) | 3.3.2 | Publication quality figures in Python / LicenseRef-PSF-based |
| [mccabe](https://github.com/PyCQA/mccabe) | 0.6.1 | McCabe complexity checker for Python / MIT |
| [mistune](https://github.com/lepture/mistune) | 0.8.4 | The fastest markdown parser in pure Python. / BSD 3-Clause |
| [mkl](https://software.intel.com/en-us/mkl) | 2020.2 | Math library for Intel and compatible processors / LicenseRef-ProprietaryIntel |
| [mkl-service](https://github.com/ContinuumIO/mkl-service) | 2.3.0 | Python bindings to MKL service functions / 3-clause BSD |
| [mkl\_fft](http://github.com/IntelPython/mkl_fft) | 1.2.0 | NumPy-based implementation of Fast Fourier Transform using Intel (R) Math Kernel Library. / BSD 3-Clause |
| [mkl\_random](http://github.com/IntelPython/mkl_random) | 1.1.1 | Intel (R) MKL-powered package for sampling from common probability distributions into NumPy arrays. / BSD 3-Clause |
| [mock](https://github.com/testing-cabal/mock) | 4.0.2 | A library for testing in Python / BSD-2-Clause |
| [more-itertools](https://github.com/more-itertools/more-itertools) | 8.6.0 | More routines for operating on iterables, beyond itertools / MIT |
| [mpc](http://www.multiprecision.org/) | 1.1.0 | A C library for the arithmetic of complex numbers with arbitrarily high precision. / LGPL 3 |
| [mpfr](http://www.mpfr.org/) | 4.0.2 | The MPFR library is a C library for multiple-precision floating-point computations with correct rounding. / LGPL-3.0-only |
| [mpmath](http://mpmath.org) | 1.1.0 | Python library for arbitrary-precision floating-point arithmetic / BSD 3-Clause |
| [msgpack-python](http://msgpack.org/) | 1.0.0 | MessagePack (de)serializer / Apache-2.0 |
| [multipledispatch](https://github.com/mrocklin/multipledispatch/) | 0.6.0 | Multiple dispatch in Python / BSD 3-Clause |
| [nbclient](https://jupyter.org) | 0.5.1 | A client library for executing notebooks. Formally nbconvert’s ExecutePreprocessor. / BSD-3-Clause |
| [nbconvert](http://jupyter.org) | 6.0.7 | Converting Jupyter Notebooks / BSD-3-Clause |
| [nbformat](http://jupyter.org) | 5.0.8 | The reference implementation of the Jupyter Notebook format / BSD-3-Clause |
| [ncurses](http://www.gnu.org/software/ncurses/) | 6.2 | Library for text-based user interfaces / Free software (MIT-like) |
| [nest-asyncio](https://github.com/erdewit/nest_asyncio) | 1.4.2 | Patch asyncio to allow nested event loops / BSD-2-Clause |
| [networkx](https://networkx.github.io/) | 2.5 | Python package for creating and manipulating complex networks / BSD-3-Clause |
| [nltk](http://nltk.org/) | 3.5 | Natural Language Toolkit / Apache 2.0 |
| [nose](http://readthedocs.org/docs/nose/) | 1.3.7 | Nose extends unittest to make testing easier / LGPL-2.1 |
| [notebook](https://jupyter.org) | 6.1.4 | Jupyter Notebook / BSD-3-Clause |
| [numba](http://numba.github.com) | 0.51.2 | NumPy aware dynamic Python compiler using LLVM / BSD-2-Clause |
| [numexpr](https://github.com/pydata/numexpr) | 2.7.1 | Fast numerical expression evaluator for NumPy. / MIT |
| [numpy](http://numpy.scipy.org/) | 1.19.2 | Array processing for numbers, strings, records, and objects. / BSD 3-Clause |
| [numpy-base](http://numpy.scipy.org/) | 1.19.2 | Array processing for numbers, strings, records, and objects. / BSD 3-Clause |
| [numpydoc](https://github.com/numpy/numpydoc) | 1.1.0 | Numpy’s Sphinx extensions / BSD 3-Clause |
| [olefile](http://www.decalage.info/python/olefileio) | 0.46 | parse, read and write Microsoft OLE2 files / BSD 2-Clause |
| [openpyxl](https://openpyxl.readthedocs.io) | 3.0.5 | A Python library to read/write Excel 2010 xlsx/xlsm files / MIT |
| [openssl](http://www.openssl.org/) | 1.1.1h | OpenSSL is an open-source implementation of the SSL and TLS protocols / OpenSSL |
| [packaging](https://github.com/pypa/packaging) | 20.4 | Core utilities for Python packages / Apache 2.0 or BSD 2-Clause |
| [pandas](http://pandas.pydata.org) | 1.1.3 | High-performance, easy-to-use data structures and data analysis tools. / BSD-3-Clause |
| [pandoc](http://pandoc.org/) | 2.11 | Universal markup converter (repackaged binaries) / GPL-2.0 |
| [pandocfilters](https://github.com/jgm/pandocfilters) | 1.4.3 | A python module for writing pandoc filters / BSD-3-Clause |
| [pango](http://www.pango.org/) | 1.45.3 | Text layout and rendering engine. / LGPL-2.1 |
| [parso](https://github.com/davidhalter/parso) | 0.7.0 | A Python Parser / MIT |
| [partd](https://github.com/dask/partd) | 1.1.0 | Data structure for on-disk shuffle operations / BSD 3-Clause |
| [patchelf](http://nixos.org/patchelf.html) | 0.12 | A small utility to modify the dynamic linker and RPATH of ELF executables. / GPL-3.0-or-later |
| [path](https://github.com/jaraco/path) | 15.0.0 | A module wrapper for os.path / MIT |
| [path.py](https://github.com/jaraco/path.py) | 12.5.0 | A module wrapper for os.path / MIT |
| [pathlib2](https://github.com/mcmtroffaes/pathlib2) | 2.3.5 | Fork of pathlib aiming to support the full stdlib Python API / MIT |
| [pathtools](https://github.com/gorakhargosh/pathtools) | 0.1.2 | Path utilities for Python. / MIT |
| [patsy](https://github.com/pydata/patsy) | 0.5.1 | Describing statistical models in Python using symbolic formulas / BSD-2-Clause, PSF2 |
| [pcre](http://www.pcre.org/) | 8.44 | Regular expression pattern matching using the same syntax and semantics as Perl 5. / BSD 3-Clause |
| [pep8](http://pep8.readthedocs.org/) | 1.7.1 | Python style guide checker / MIT |
| [pexpect](http://pexpect.sourceforge.net/) | 4.8.0 | Pexpect makes Python a better tool for controlling other applications. / ISC |
| [pickleshare](https://github.com/pickleshare/pickleshare/) | 0.7.5 | Tiny ‘shelve’-like database with concurrency support / MIT |
| [pillow](https://pillow.readthedocs.io) | 8.0.1 | Pillow is the friendly PIL fork by Alex Clark and Contributors / LicenseRef-PIL |
| [pip](https://pip.pypa.io/en/stable/) | 20.2.4 | PyPA recommended tool for installing Python packages / MIT |
| [pixman](http://www.pixman.org/) | 0.40.0 | A low-level software library for pixel manipulation. / MIT |
| [pkginfo](https://code.launchpad.net/~tseaver/pkginfo/trunk) | 1.6.1 | Query metadatdata from sdists / bdists / installed packages. / MIT |
| [pluggy](https://github.com/pytest-dev/pluggy) | 0.13.1 | Plugin registration and hook calling for Python / MIT |
| [ply](http://www.dabeaz.com/ply/index.html) | 3.11 | Python Lex-Yacc / BSD 3-clause |
| [prometheus\_client](https://github.com/prometheus/client_python) | 0.8.0 | Python client for the Prometheus monitoring system / Apache-2.0 |
| [prompt-toolkit](https://github.com/jonathanslenders/python-prompt-toolkit) | 3.0.8 | Library for building powerful interactive command lines in Python / BSD-3-Clause |
| [prompt\_toolkit](https://github.com/jonathanslenders/python-prompt-toolkit) | 3.0.8 | Library for building powerful interactive command lines in Python / BSD-3-Clause |
| [psutil](https://github.com/giampaolo/psutil) | 5.7.2 | A cross-platform process and system utilities module for Python / BSD-3-Clause |
| [ptyprocess](https://github.com/pexpect/ptyprocess) | 0.6.0 | Run a subprocess in a pseudo terminal / ISC |
| [py](https://github.com/pytest-dev/py) | 1.9.0 | library with cross-python path, ini-parsing, io, code, log facilities / MIT |
| [py-lief](https://lief.quarkslab.com/) | 0.10.1 | A cross platform library to parse, modify and abstract ELF, PE and MachO formats. / Apache-2.0 |
| [pycodestyle](https://pycodestyle.readthedocs.io/) | 2.6.0 | Python style guide checker / MIT |
| [pycosat](https://github.com/ContinuumIO/pycosat) | 0.6.3 | Bindings to picosat (a SAT solver) / MIT |
| [pycparser](https://github.com/eliben/pycparser) | 2.20 | Complete C99 parser in pure Python / BSD 3-clause |
| [pycurl](http://pycurl.sourceforge.net/) | 7.43.0.6 | A Python Interface To The cURL library / LGPL, MIT |
| [pydocstyle](https://github.com/PyCQA/pydocstyle) | 5.1.1 | Python docstring style checker (formerly pep257) / MIT |
| [pyflakes](https://github.com/PyCQA/pyflakes) | 2.2.0 | Pyflakes analyzes programs and detects various errors. / MIT |
| [pygments](http://pygments.org/) | 2.7.2 | Pygments is a generic syntax highlighter suitable for use in code hosting, forums, wikis or other applications that need to prettify source code. / BSD-2-clause |
| [pylint](http://www.pylint.org/) | 2.6.0 | python code static checker / GPL-2.0-only |
| [pyodbc](https://github.com/mkleehammer/pyodbc) | 4.0.30 | DB API Module for ODBC / MIT |
| [pyopenssl](https://github.com/pyca/pyopenssl) | 19.1.0 | Python wrapper module around the OpenSSL library / Apache 2.0 |
| [pyparsing](http://pyparsing.wikispaces.com/) | 2.4.7 | Create and execute simple grammars / MIT |
| [pyqt](http://www.riverbankcomputing.co.uk/software/pyqt) | 5.9.2 | Python binding of the cross-platform GUI toolkit Qt. / Commercial, GPL-2.0, GPL-3.0 |
| [pyrsistent](http://github.com/tobgu/pyrsistent/) | 0.17.3 | Persistent/Functional/Immutable data structures / MIT |
| [pysocks](https://github.com/Anorov/PySocks) | 1.7.1 | A Python SOCKS client module. See [Anorov/PySocks](https://github.com/Anorov/PySocks) for more information. / BSD 3-Clause |
| [pytables](http://www.pytables.org) | 3.6.1 | Brings together Python, HDF5 and NumPy to easily handle large amounts of data. / BSD 3-Clause |
| [pytest](https://docs.pytest.org/en/latest/) | 6.1.1 | Simple and powerful testing with Python. / MIT |
| [python](https://www.python.org/) | 3.8.5 | General purpose programming language / Python-2.0 |
| [python-dateutil](https://dateutil.readthedocs.org/) | 2.8.1 | Extensions to the standard Python datetime module. / BSD 3 Clause |
| [python-jsonrpc-server](https://github.com/palantir/python-jsonrpc-server) | 0.4.0 | A Python 2.7 and 3.4+ server implementation of the JSON RPC 2.0 protocol. / MIT |
| [python-language-server](https://github.com/palantir/python-language-server) | 0.35.1 | An implementation of the Language Server Protocol for Python / MIT |
| [python-libarchive-c](https://github.com/Changaco/python-libarchive-c) | 2.9 | Python interface to libarchive / CC0-1.0 |
| [pytz](http://pythonhosted.org/pytz/) | 2020.1 | World timezone definitions, modern and historical. / MIT |
| [pywavelets](https://github.com/PyWavelets/pywt) | 1.1.1 | Discrete Wavelet Transforms in Python / MIT |
| [pyxdg](http://freedesktop.org/wiki/Software/pyxdg) | 0.27 | PyXDG contains implementations of freedesktop.org standards in python. / GNU Lesser General Public v2 (LGPLv2) |
| [pyyaml](http://pyyaml.org/wiki/PyYAML) | 5.3.1 | YAML parser and emitter for Python / MIT |
| [pyzmq](https://github.com/zeromq/pyzmq) | 19.0.2 | Python bindings for zeromq / BSD 3-clause |
| [qdarkstyle](https://github.com/ColinDuquesnoy/QDarkStyleSheet) | 2.8.1 | A dark stylesheet for Qt applications (Qt4, Qt5, PySide, PyQt4, PyQt5, QtPy, PyQtGraph). / MIT |
| [qt](http://qt-project.org) | 5.9.7 | Qt is a cross-platform application and UI framework. / LGPL-3.0 |
| [qtawesome](https://github.com/spyder-ide/qtawesome) | 1.0.1 | Iconic fonts in PyQt and PySide applications / MIT |
| [qtconsole](http://jupyter.org) | 4.7.7 | Jupyter Qt Console / BSD-3-Clause |
| [qtpy](https://github.com/spyder-ide/qtpy) | 1.9.0 | Abstraction layer for PyQt5/PyQt4/PySide / MIT |
| [readline](https://cnswww.cns.cwru.edu/php/chet/readline/rltop.html) | 8.0 | library for editing command lines as they are typed in / GPL-3.0 |
| [regex](https://bitbucket.org/mrabarnett/mrab-regex) | 2020.10.15 | Alternative regular expression module, to replace re / Python-2.0 |
| [requests](http://python-requests.org) | 2.24.0 | Requests is an elegant and simple HTTP library for Python, built with ♥. / Apache-2.0 |
| ripgrep | 12.1.1 | |
| [rope](https://github.com/python-rope/rope) | 0.18.0 | A python refactoring library / GPL 2.0 |
| [rtree](http://toblerity.github.com/rtree/) | 0.9.4 | R-Tree spatial index for Python GIS / MIT |
| [ruamel\_yaml](https://bitbucket.org/ruamel/yaml) | 0.15.87 | A patched copy of ruamel.yaml. / MIT |
| [scikit-image](http://scikit-image.org/) | 0.17.2 | Image processing in Python. / BSD-3-Clause |
| [scikit-learn](http://scikit-learn.org/) | 0.23.2 | A set of python modules for machine learning and data mining / BSD-3-Clause |
| [scipy](http://www.scipy.org/) | 1.5.2 | Scientific Library for Python / BSD 3-Clause |
| [seaborn](https://seaborn.pydata.org) | 0.11.0 | Statistical data visualization / BSD 3-Clause |
| [secretstorage](https://github.com/mitya57/secretstorage) | 3.1.2 | Provides a way for securely storing passwords and other secrets. / BSD-3-Clause |
| [send2trash](https://github.com/hsoft/send2trash) | 1.5.0 | Python library to natively send files to Trash (or Recycle bin) on all platforms. / BSD-3-Clause |
| [setuptools](https://github.com/pypa/setuptools) | 50.3.1 | Download, build, install, upgrade, and uninstall Python packages / MIT |
| [simplegeneric](http://cheeseshop.python.org/pypi/simplegeneric) | 0.8.1 | Simple generic functions (similar to Python’s own len(), pickle.dump(), etc.) / Zope Public |
| [singledispatch](http://docs.python.org/3/library/functools.html#functools.singledispatch) | 3.4.0.3 | Transforms a function into a single-dispatch generic function / MIT |
| [sip](http://www.riverbankcomputing.com/software/sip/intro) | 4.19.13 | Create Python bindings for C and C++ libraries / GPL-3.0 |
| [six](https://six.readthedocs.io/) | 1.15.0 | Python 2 and 3 compatibility utilities / MIT |
| [snowballstemmer](https://github.com/shibukawa/snowball_py) | 2.0.0 | Snowball stemming library collection for Python / BSD-2-Clause |
| [sortedcollections](http://www.grantjenks.com/docs/sortedcollections/) | 1.2.1 | Python Sorted Collections / Apache-2.0 |
| [sortedcontainers](http://www.grantjenks.com/docs/sortedcontainers/) | 2.2.2 | Python Sorted Container Types: SortedList, SortedDict, and SortedSet / Apache-2.0 |
| [soupsieve](http://facelessuser.github.io/soupsieve) | 2.0.1 | A modern CSS selector implementation for BeautifulSoup / MIT |
| [sphinx](http://www.sphinx-doc.org) | 3.2.1 | Sphinx is a tool that makes it easy to create intelligent and beautiful documentation / BSD-2-Clause |
| sphinxcontrib | 1.0 | Python namespace for sphinxcontrib / BSD |
| [sphinxcontrib-applehelp](https://www.sphinx-doc.org/en/master/) | 1.0.2 | sphinxcontrib-applehelp is a sphinx extension which outputs Apple help books / BSD-2-Clause |
| [sphinxcontrib-devhelp](https://www.sphinx-doc.org/en/master/) | 1.0.2 | sphinxcontrib-devhelp is a sphinx extension which outputs Devhelp document / BSD-2-Clause |
| [sphinxcontrib-htmlhelp](https://www.sphinx-doc.org/en/master/) | 1.0.3 | sphinxcontrib-htmlhelp is a sphinx extension which … / BSD-2-Clause |
| [sphinxcontrib-jsmath](https://www.sphinx-doc.org/en/master/) | 1.0.1 | A sphinx extension which renders display math in HTML via JavaScript / BSD-2-Clause |
| [sphinxcontrib-qthelp](https://www.sphinx-doc.org/en/master/) | 1.0.3 | sphinxcontrib-qthelp is a sphinx extension which outputs QtHelp document / BSD-2-Clause |
| [sphinxcontrib-serializinghtml](https://www.sphinx-doc.org/en/master/) | 1.1.4 | sphinxcontrib-serializinghtml is a sphinx extension which outputs “serialized” HTML files (json and pickle). / BSD-2-Clause |
| [sphinxcontrib-websupport](https://pypi.python.org/pypi/sphinxcontrib-websupport) | 1.2.4 | Sphinx API for Web Apps / BSD-2-Clause |
| [spyder](https://www.spyder-ide.org/) | 4.1.5 | The Scientific Python Development Environment / MIT |
| [spyder-kernels](https://www.spyder-ide.org/) | 1.9.4 | Jupyter kernels for Spyder’s console / MIT |
| [sqlalchemy](http://www.sqlalchemy.org/) | 1.3.20 | Database Abstraction Library. / MIT |
| [sqlite](http://www.sqlite.org/) | 3.33.0 | Implements a self-contained, zero-configuration, SQL database engine / Public-Domain (`<http://www.sqlite.org/copyright.html>`) |
| [statsmodels](https://www.statsmodels.org) | 0.12.0 | Statistical computations and models for use with SciPy / BSD-3-Clause |
| [sympy](https://sympy.org) | 1.6.2 | Python library for symbolic mathematics / BSD-3-Clause |
| [tbb](http://www.threadingbuildingblocks.org) | 2020.3 | High level abstract threading library / Apache-2.0 |
| [tblib](https://github.com/ionelmc/python-tblib) | 1.7.0 | Traceback serialization library. / BSD 2-Clause |
| [terminado](https://github.com/jupyter/terminado) | 0.9.1 | Terminals served by tornado websockets / BSD-2-Clause |
| [testpath](https://testpath.readthedocs.io) | 0.4.4 | Testpath is a collection of utilities for Python code working with files and commands. / BSD-3-Clause |
| [threadpoolctl](https://github.com/joblib/threadpoolctl) | 2.1.0 | Python helpers to control the threadpools of native libraries / BSD 3-Clause |
| [tifffile](https://github.com/blink1073/tifffile) | 2020.10.1 | Read and write image data from and to TIFF files. / BSD 3-Clause |
| [tk](http://www.tcl.tk/) | 8.6.10 | A dynamic programming language with GUI support. Bundles Tcl and Tk. / Tcl/Tk |
| [toml](https://github.com/uiri/toml) | 0.10.1 | Python lib for TOML. / MIT |
| [toolz](http://toolz.readthedocs.org/) | 0.11.1 | A functional standard library for Python / BSD-3-Clause |
| [tornado](http://www.tornadoweb.org/) | 6.0.4 | A Python web framework and asynchronous networking library, originally developed at FriendFeed. / Apache-2.0 |
| [tqdm](https://pypi.python.org/pypi/tqdm) | 4.50.2 | A Fast, Extensible Progress Meter / MPLv2.0, MIT |
| [traitlets](http://traitlets.readthedocs.org/) | 5.0.5 | Configuration system for Python applications / BSD-3-Clause |
| [typing\_extensions](https://github.com/python/typing/tree/master/typing_extensions) | 3.7.4.3 | Backported and Experimental Type Hints for Python / PSF-2.0 |
| [ujson](https://github.com/ultrajson/ultrajson) | 4.0.1 | Ultra fast JSON decoder and encoder written in C with Python bindings / BSD-3-Clause |
| [unicodecsv](https://github.com/jdunck/python-unicodecsv) | 0.14.1 | Drop-in replacement for csv module which supports unicode strings / BSD |
| [unixodbc](http://www.unixodbc.org/) | 2.3.9 | ODBC on non MS Windows platforms / LGPL-2.1 |
| [urllib3](https://urllib3.readthedocs.io/) | 1.25.11 | HTTP library with thread-safe connection pooling, file post, and more. / MIT |
| [watchdog](http://github.com/gorakhargosh/watchdog) | 0.10.3 | Filesystem events monitoring / Apache 2.0 |
| [wcwidth](https://github.com/jquast/wcwidth) | 0.2.5 | Measures number of Terminal column cells of wide-character codes. / MIT |
| [webencodings](https://github.com/gsnedders/python-webencodings) | 0.5.1 | Character encoding aliases for legacy web content / BSD 3-Clause |
| [werkzeug](https://palletsprojects.com/p/werkzeug/) | 1.0.1 | The comprehensive WSGI web application library. / BSD 3-Clause |
| [wheel](https://github.com/pypa/wheel) | 0.35.1 | A built-package format for Python. / MIT |
| [widgetsnbextension](http://ipython.org) | 3.5.1 | Interactive Widgets for Jupyter / BSD 3-clause |
| [wrapt](https://github.com/GrahamDumpleton/wrapt) | 1.11.2 | Module for decorators, wrappers and monkey patching / BSD 2-Clause |
| [wurlitzer](https://github.com/minrk/wurlitzer) | 2.0.1 | Capture C-level stdout/stderr in Python / MIT |
| [xlrd](http://www.python-excel.org/) | 1.2.0 | Library for developers to extract data from Microsoft Excel (tm) spreadsheet files / BSD 3-Clause and BSD with advertising |
| [xlsxwriter](https://xlsxwriter.readthedocs.io/) | 1.3.7 | A Python module for creating Excel XLSX files / BSD-2-Clause |
| [xlwt](http://www.python-excel.org/) | 1.3.0 | Writing data and formatting information to Excel files / BSD |
| [xz](http://tukaani.org/xz/) | 5.2.5 | Data compression software with high compression ratio / LGPL-2.1 and GPL-2.0 |
| [yaml](http://pyyaml.org/wiki/LibYAML) | 0.2.5 | A C library for parsing and emitting YAML / MIT |
| [yapf](https://github.com/google/yapf) | 0.30.0 | A formatter for Python files / Apache 2.0 |
| [zeromq](http://zeromq.org) | 4.3.3 | A high-performance asynchronous messaging library. / LGPL 3 |
| [zict](http://github.com/mrocklin/zict) | 2.0.0 | Composable Dictionary Classes / BSD 3-Clause |
| [zipp](https://github.com/jaraco/zipp) | 3.4.0 | A pathlib-compatible Zipfile object wrapper / MIT |
| [zlib](http://zlib.net/) | 1.2.11 | Massively spiffy yet delicately unobtrusive compression library / zlib |
| zope | 1.0 | web application server / BSD |
| [zope.event](http://www.zope.org/en/latest/) | 4.5.0 | Very basic event publishing system / Zope Public License |
| [zope.interface](http://docs.zope.org/zope.interface/) | 5.1.2 | Interfaces for Python / ZPL-2.1 |
| [zstd](http://www.zstd.net) | 1.4.5 | Zstandard - Fast real-time compression algorithm / BSD 3-Clause |
| Name | Version | Summary / License |
|---|---|---|
| [\_ipyw\_jlab\_nb\_ext\_conf](https://github.com/ContinuumIO/anaconda-nb-extensions-meta-config) | 0.1.0 | A configuration metapackage for enabling Anaconda-bundled jupyter extensions / BSD |
| [alabaster](http://www.sphinx-doc.org/en/stable/index.html) | 0.7.12 | Configurable, Python 2+3 compatible Sphinx theme. / BSD 3-Clause |
| [anaconda-client](http://anaconda.org) | 1.7.2 | anaconda.org command line client library / BSD 3-clause |
| [anaconda-project](https://github.com/Anaconda-Platform/anaconda-project) | 0.8.4 | Tool for encapsulating, running, and reproducing data science projects / BSD 3-Clause |
| [argh](https://github.com/neithere/argh) | 0.26.2 | The Natural CLI. / LGPL 3 |
| [argon2-cffi](https://argon2-cffi.readthedocs.org/) | 20.1.0 | The secure Argon2 password hashing algorithm. / MIT |
| [asn1crypto](https://github.com/wbond/asn1crypto) | 1.4.0 | Python ASN.1 library with a focus on performance and a pythonic API / MIT |
| [astroid](https://www.astroid.org/) | 2.4.2 | A abstract syntax tree for Python with inference support. / LGPL-2.1-only |
| [astropy](http://www.astropy.org/) | 4.0.2 | Community-developed Python Library for Astronomy / BSD-3-Clause |
| [async\_generator](https://github.com/python-trio/async_generator) | 1.10 | Async generators and context managers for Python 3.5+ / MIT |
| [atomicwrites](https://github.com/untitaker/python-atomicwrites) | 1.4.0 | Atomic file writes / MIT |
| [attrs](https://attrs.readthedocs.io/en/stable/) | 20.3.0 | attrs is the Python package that will bring back the joy of writing classes by relieving you from the drudgery of implementing object protocols (aka dunder methods). / MIT |
| [autopep8](https://github.com/hhatto/autopep8) | 1.5.4 | A tool that automatically formats Python code to conform to the PEP 8 style guide / MIT |
| [babel](http://babel.pocoo.org/) | 2.8.1 | Utilities to internationalize and localize Python applications / BSD 3-clause |
| [backcall](https://github.com/takluyver/backcall/) | 0.2.0 | Specifications for callback functions passed in to an API / BSD-3-Clause |
| [backports](https://bitbucket.org/brandon/backports) | 1.0 | None / BSD |
| [backports.shutil\_get\_terminal\_size](https://github.com/chrippa/backports.shutil_get_terminal_size) | 1.0.0 | A backport of the get\_terminal\_size function from Python 3.3’s shutil. / MIT |
| [bcrypt](https://github.com/pyca/bcrypt/) | 3.2.0 | Modern password hashing for your software and your servers / Apache-2.0 |
| [beautifulsoup4](http://www.crummy.com/software/BeautifulSoup/) | 4.9.3 | Python library designed for screen-scraping / MIT |
| [bitarray](https://github.com/ilanschnell/bitarray) | 1.6.1 | efficient arrays of booleans – C extension / PSF |
| [bkcharts](http://github.com/bokeh/bkcharts) | 0.2 | High level chart types built on top of Bokeh / BSD 3-Clause |
| blas | 1.0 | |
| [bleach](https://github.com/mozilla/bleach) | 3.2.1 | Easy, whitelist-based HTML-sanitizing tool / Apache-2.0 |
| [blosc](https://github.com/Blosc/c-blosc) | 1.20.1 | A blocking, shuffling and loss-less compression library that can be faster than memcpy() / BSD-3-Clause |
| [bokeh](http://bokeh.pydata.org/) | 2.2.3 | Statistical and novel interactive HTML plots for Python / BSD-3-Clause |
| [boto](https://github.com/boto/boto/) | 2.49.0 | Amazon Web Services Library / MIT |
| [bottleneck](https://github.com/pydata/bottleneck) | 1.3.2 | Fast NumPy array functions written in Cython. / BSD 2-Clause |
| [brotlipy](https://github.com/python-hyper/brotlipy) | 0.7.0 | Python bindings to the Brotli compression library / MIT |
| [bzip2](http://www.bzip.org/) | 1.0.8 | high-quality data compressor / bzip2 |
| [ca-certificates](https://github.com/conda-forge/ca-certificates-feedstock) | 2020.10.14 | Certificates for use with other packages. / MPL 2.0 |
| [certifi](http://certifi.io/) | 2020.6.20 | Python package for providing Mozilla’s CA Bundle. / ISC |
| [cffi](https://bitbucket.org/cffi/cffi) | 1.14.3 | Foreign Function Interface for Python calling C code. / MIT |
| [chardet](https://github.com/chardet/chardet) | 3.0.4 | Universal character encoding detector / LGPL2 |
| [click](https://palletsprojects.com/p/click) | 7.1.2 | Python composable command line interface toolkit / BSD-3-Clause |
| [cloudpickle](https://github.com/cloudpipe/cloudpickle) | 1.6.0 | Extended pickling support for Python objects / BSD-3-Clause |
| [clyent](https://github.com/Anaconda-Platform/clyent) | 1.2.2 | Command line client library for windows and posix / BSD 3-Clause |
| [colorama](https://github.com/tartley/colorama) | 0.4.4 | Cross-platform colored terminal text / BSD-3-Clause |
| [comtypes](http://starship.python.net/crew/theller/comtypes/) | 1.1.7 | pure Python COM package / MIT |
| [conda](https://conda.io) | 4.9.2 | OS-agnostic, system-level binary package and environment manager. / BSD 3-Clause |
| [conda-build](https://github.com/conda/conda-build) | 3.20.5 | tools for building conda packages / BSD 3-Clause |
| [conda-env](https://github.com/conda/conda-env) | 2.6.0 | Tools for interacting with conda environments. / BSD 3-Clause |
| [conda-verify](https://github.com/conda/conda-verify) | 3.4.2 | tool for validating conda recipes and conda packages / BSD 3-Clause |
| console\_shortcut | 0.1.1 | Console shortcut creator for Windows (using menuinst) / BSD |
| [contextlib2](http://contextlib2.readthedocs.org) | 0.6.0.post1 | Backports and enhancements for the contextlib module / PSF 2 |
| [cryptography](https://github.com/pyca/cryptography) | 3.1.1 | Provides cryptographic recipes and primitives to Python developers / Apache-2.0 AND BSD-3-Clause AND PSF-2.0 |
| [curl](http://curl.haxx.se/) | 7.71.1 | tool and library for transferring data with URL syntax / MIT/X derivate (`<http://curl.haxx.se/docs/copyright.html>`) |
| [cycler](http://matplotlib.org/cycler) | 0.10.0 | Composable style cycles. / BSD 3-Clause |
| [cython](http://www.cython.org/) | 0.29.21 | The Cython compiler for writing C extensions for the Python language / Apache-2.0 |
| [cytoolz](https://github.com/pytoolz/cytoolz) | 0.11.0 | Cython implementation of Toolz. High performance functional utilities / BSD-3-Clause |
| [dask](https://dask.org/) | 2.30.0 | Parallel PyData with Task Scheduling / BSD-3-Clause |
| [dask-core](http://github.com/dask/dask/) | 2.30.0 | Parallel Python with task scheduling / BSD-3-Clause |
| [decorator](https://github.com/micheles/decorator) | 4.4.2 | Better living through Python with decorators. / BSD-3-Clause |
| [defusedxml](https://bitbucket.org/tiran/defusedxml) | 0.6.0 | XML bomb protection for Python stdlib modules / PSF 2.0 |
| [diff-match-patch](http://code.google.com/p/google-diff-match-patch/) | 20200713 | Diff Match Patch is a high-performance library in multiple languages that manipulates plain text / Apache-2.0 |
| [distributed](http://distributed.readthedocs.io/en/latest/) | 2.30.1 | Distributed computing with Dask / BSD-3-Clause |
| [docutils](http://docutils.sourceforge.net/) | 0.16 | Docutils – Python Documentation Utilities / Public Domain Dedictation and BSD 2-Clause and PSF 2.1.1 and GPL 3.0 |
| [entrypoints](https://github.com/takluyver/entrypoints) | 0.3 | Discover and load entry points from installed packages. / MIT License |
| [et\_xmlfile](https://bitbucket.org/openpyxl/et_xmlfile) | 1.0.1 | An implementation of lxml.xmlfile for the standard library / MIT |
| [fastcache](https://github.com/pbrady/fastcache) | 1.1.0 | C implementation of Python 3 lru\_cache / MIT |
| [filelock](https://github.com/benediktschmitt/py-filelock) | 3.0.12 | A platform independent file lock. / Public Domain |
| [flake8](http://flake8.pycqa.org/) | 3.8.4 | Your Tool For Style Guide Enforcement / MIT |
| [flask](http://flask.pocoo.org) | 1.1.2 | A microframework based on Werkzeug, Jinja2 and good intentions. / BSD 3-Clause |
| [freetype](https://www.freetype.org/) | 2.10.4 | A Free, High-Quality, and Portable Font Engine / GPL-2.0-only and LicenseRef-FreeType |
| [fsspec](https://github.com/martindurant/filesystem_spec) | 0.8.3 | A specification for pythonic filesystems / BSD-3-Clause |
| [future](http://python-future.org) | 0.18.2 | Clean single-source support for Python 3 and 2 / MIT |
| [get\_terminal\_size](https://github.com/chrippa/backports.shutil_get_terminal_size) | 1.0.0 | Get the size of the terminal window. / MIT |
| [gevent](https://www.gevent.org) | 20.9.0 | Coroutine-based network library / MIT |
| [glob2](https://github.com/miracle2k/python-glob2) | 0.7 | Version of the glob module that supports recursion via \*\*, and can capture patterns. / BSD-2-Clause |
| [greenlet](https://github.com/python-greenlet/greenlet) | 0.4.17 | Lightweight in-process concurrent programming / MIT |
| [h5py](http://www.h5py.org/) | 2.10.0 | Read and write HDF5 files from Python. / BSD-3-Clause |
| [hdf5](http://www.hdfgroup.org/HDF5/) | 1.10.4 | HDF5 is a data model, library, and file format for storing and managing data / HDF5 |
| [heapdict](http://stutzbachenterprises.com/) | 1.0.1 | A heap with decrease-key and increase-key operations / BSD 3-Clause |
| [html5lib](https://github.com/html5lib/html5lib-python) | 1.1 | HTML parser based on the WHATWG HTML specification / MIT |
| icc\_rt | 2019.0.0 | Intel runtime libraries for C, C++ and Fortran compilers / Intel proprietary |
| [icu](http://site.icu-project.org/) | 58.2 | International Components for Unicode. / MIT |
| [idna](https://github.com/kjd/idna) | 2.10 | Internationalized Domain Names in Applications (IDNA). / BSD Like |
| [imageio](https://imageio.github.io) | 2.9.0 | A Python library for reading and writing image data / BSD-2-Clause |
| [imagesize](https://github.com/shibukawa/imagesize_py) | 1.2.0 | Getting image size from png/jpeg/jpeg2000/gif file / MIT |
| [importlib-metadata](https://gitlab.com/python-devs/importlib_metadata) | 2.0.0 | A library to access the metadata for a Python package / Apache-2.0 |
| [importlib\_metadata](https://gitlab.com/python-devs/importlib_metadata) | 2.0.0 | A library to access the metadata for a Python package / Apache-2.0 |
| [iniconfig](http://github.com/RonnyPfannschmidt/iniconfig) | 1.1.1 | iniconfig: brain-dead simple config-ini parsing / MIT |
| [intel-openmp](https://software.intel.com/en-us/node/522690) | 2020.2 | Math library for Intel and compatible processors / LicenseRef-ProprietaryIntel |
| [intervaltree](https://github.com/chaimleib/intervaltree) | 3.1.0 | Editable interval tree data structure for Python 2 and 3 / Apache-2.0 |
| [ipykernel](https://ipython.org) | 5.3.4 | IPython Kernel for Jupyter / BSD-3-Clause |
| [ipython](https://ipython.org) | 7.19.0 | IPython: Productive Interactive Computing / BSD-3-Clause |
| [ipython\_genutils](http://ipython.org) | 0.2.0 | vestigial utilities from IPython / BSD 3-Clause |
| [ipywidgets](https://github.com/ipython/ipywidgets) | 7.5.1 | Jupyter Interactive Widgets / BSD 3-clause |
| [isort](https://github.com/timothycrosley/isort) | 5.6.4 | A Python utility / library to sort Python imports. / MIT |
| [itsdangerous](https://github.com/pallets/itsdangerous) | 1.1.0 | Various helpers to pass trusted data to untrusted environments. / BSD 3-Clause |
| [jdcal](https://github.com/phn/jdcal) | 1.4.1 | Julian dates from proleptic Gregorian and Julian calendars. / BSD 2-Clause |
| [jedi](https://github.com/davidhalter/jedi/) | 0.17.1 | An autocompletion tool for Python that can be used for text editors. / MIT |
| [jinja2](http://jinja.pocoo.org) | 2.11.2 | An easy to use stand-alone template engine written in pure python. / 3-Clause BSD |
| [joblib](https://pypi.org/project/joblib/) | 0.17.0 | Lightweight pipelining: using Python functions as pipeline jobs. / BSD-3-Clause |
| [jpeg](http://www.ijg.org/) | 9b | read/write jpeg COM, EXIF, IPTC medata / Custom free software license |
| [json5](https://github.com/dpranke/pyjson5) | 0.9.5 | A Python implementation of the JSON5 data format / Apache-2.0 |
| [jsonschema](https://github.com/Julian/jsonschema) | 3.2.0 | An implementation of JSON Schema validation for Python / MIT |
| [jupyter](http://jupyter.org) | 1.0.0 | Jupyter metapackage. Install all the Jupyter components in one go. / BSD 3-Clause |
| [jupyter\_client](https://jupyter.org) | 6.1.7 | jupyter\_client contains the reference implementation of the Jupyter protocol. / BSD-3-Clause |
| [jupyter\_console](http://jupyter.org) | 6.2.0 | Jupyter terminal console / BSD-3-Clause |
| [jupyter\_core](https://jupyter.org) | 4.6.3 | Core common functionality of Jupyter projects. / BSD-3-Clause |
| [jupyterlab](https://github.com/jupyterlab/jupyterlab) | 2.2.6 | JupyterLab PRE-ALPHA / BSD-3-Clause |
| [jupyterlab\_pygments](http://github.com/JupyterLab/jupyterlab_pygments) | 0.1.2 | Pygments syntax coloring scheme making use of the JupyterLab CSS variables / BSD-3-Clause |
| [jupyterlab\_server](https://github.com/jupyterlab/jupyterlab_server) | 1.2.0 | A set of server components for JupyterLab and JupyterLab like applications. / BSD-3-Clause |
| [keyring](https://github.com/jaraco/keyring) | 21.4.0 | Store and access your passwords safely / Python Software Foundation or MIT |
| [kiwisolver](https://github.com/nucleic/kiwi) | 1.3.0 | An efficient C++ implementation of the Cassowary constraint solver / BSD-3-Clause |
| [krb5](http://web.mit.edu/kerberos/) | 1.18.2 | A network authentication protocol. / MIT |
| [lazy-object-proxy](https://github.com/ionelmc/python-lazy-object-proxy) | 1.4.3 | A fast and thorough lazy object proxy / BSD-2-Clause |
| [libarchive](http://www.libarchive.org/) | 3.4.2 | Multi-format archive and compression library / BSD-2-Clause |
| [libcurl](http://curl.haxx.se/) | 7.71.1 | tool and library for transferring data with URL syntax / MIT/X derivate (`<http://curl.haxx.se/docs/copyright.html>`) |
| [libiconv](https://www.gnu.org/software/libiconv/) | 1.15 | Provides iconv for systems which don’t have one (or that cannot convert from/to Unicode.) / GPL and LGPL |
| [liblief](https://lief.quarkslab.com/) | 0.10.1 | A cross platform library to parse, modify and abstract ELF, PE and MachO formats. / Apache-2.0 |
| [libpng](http://www.libpng.org/pub/png/libpng.html) | 1.6.37 | PNG reference library / zlib/libpng |
| [libsodium](http://libsodium.org) | 1.0.18 | A modern and easy-to-use crypto library. / ISC |
| [libspatialindex](http://libspatialindex.github.io) | 1.9.3 | Extensible framework for robust spatial indexing / MIT |
| [libssh2](https://www.libssh2.org/) | 1.9.0 | the SSH library / BSD-3-Clause |
| [libtiff](http://www.libtiff.org/) | 4.1.0 | Support for the Tag Image File Format (TIFF). / HPND |
| [libxml2](http://xmlsoft.org/) | 2.9.10 | The XML C parser and toolkit of Gnome / MIT |
| [libxslt](http://xmlsoft.org/XSLT/) | 1.1.34 | The XSLT C library developed for the GNOME project / MIT |
| [llvmlite](http://llvmlite.pydata.org) | 0.34.0 | A lightweight LLVM python binding for writing JIT compilers. / BSD-2-Clause |
| [locket](https://github.com/mwilliamson/locket.py) | 0.2.0 | File-based locks for Python for Linux and Windows / BSD 2-Clause |
| [lxml](http://lxml.de/) | 4.6.1 | Pythonic binding for the C libraries libxml2 and libxslt. / BSD-3-Clause and GPL-2.0-only and ZPL-2.0 and LicenseRef-ElementTree |
| [lz4-c](https://www.lz4.org) | 1.9.2 | Extremely Fast Compression algorithm / BSD-2-Clause |
| [lzo](http://www.oberhumer.com/opensource/lzo/) | 2.10 | LZO is a portable lossless data compression library written in ANSI C. / GPL v2+ |
| m2w64-gcc-libgfortran | 5.3.0 | / |
| m2w64-gcc-libs | 5.3.0 | / |
| m2w64-gcc-libs-core | 5.3.0 | / |
| m2w64-gmp | 6.1.0 | / |
| m2w64-libwinpthread-git | 5.0.0.4634.697f757 | / |
| [markupsafe](https://www.palletsprojects.com/p/markupsafe) | 1.1.1 | A Python module that implements the jinja2.Markup string / BSD-3-Clause |
| [matplotlib](http://matplotlib.org/) | 3.3.2 | Publication quality figures in Python / LicenseRef-PSF-based |
| [matplotlib-base](http://matplotlib.org/) | 3.3.2 | Publication quality figures in Python / LicenseRef-PSF-based |
| [mccabe](https://github.com/PyCQA/mccabe) | 0.6.1 | McCabe complexity checker for Python / MIT |
| [menuinst](https://github.com/ContinuumIO/menuinst) | 1.4.16 | cross platform menu item installation / BSD |
| [mistune](https://github.com/lepture/mistune) | 0.8.4 | The fastest markdown parser in pure Python. / BSD 3-Clause |
| [mkl](https://software.intel.com/en-us/mkl) | 2020.2 | Math library for Intel and compatible processors / LicenseRef-ProprietaryIntel |
| [mkl-service](https://github.com/ContinuumIO/mkl-service) | 2.3.0 | Python bindings to MKL service functions / 3-clause BSD |
| [mkl\_fft](http://github.com/IntelPython/mkl_fft) | 1.2.0 | NumPy-based implementation of Fast Fourier Transform using Intel (R) Math Kernel Library. / BSD 3-Clause |
| [mkl\_random](http://github.com/IntelPython/mkl_random) | 1.1.1 | Intel (R) MKL-powered package for sampling from common probability distributions into NumPy arrays. / BSD 3-Clause |
| [mock](https://github.com/testing-cabal/mock) | 4.0.2 | A library for testing in Python / BSD-2-Clause |
| [more-itertools](https://github.com/more-itertools/more-itertools) | 8.6.0 | More routines for operating on iterables, beyond itertools / MIT |
| [mpmath](http://mpmath.org) | 1.1.0 | Python library for arbitrary-precision floating-point arithmetic / BSD 3-Clause |
| [msgpack-python](http://msgpack.org/) | 1.0.0 | MessagePack (de)serializer / Apache-2.0 |
| msys2-conda-epoch | 20160418 | / |
| [multipledispatch](https://github.com/mrocklin/multipledispatch/) | 0.6.0 | Multiple dispatch in Python / BSD 3-Clause |
| [nbclient](https://jupyter.org) | 0.5.1 | A client library for executing notebooks. Formally nbconvert’s ExecutePreprocessor. / BSD-3-Clause |
| [nbconvert](http://jupyter.org) | 6.0.7 | Converting Jupyter Notebooks / BSD-3-Clause |
| [nbformat](http://jupyter.org) | 5.0.8 | The reference implementation of the Jupyter Notebook format / BSD-3-Clause |
| [nest-asyncio](https://github.com/erdewit/nest_asyncio) | 1.4.2 | Patch asyncio to allow nested event loops / BSD-2-Clause |
| [networkx](https://networkx.github.io/) | 2.5 | Python package for creating and manipulating complex networks / BSD-3-Clause |
| [nltk](http://nltk.org/) | 3.5 | Natural Language Toolkit / Apache 2.0 |
| [nose](http://readthedocs.org/docs/nose/) | 1.3.7 | Nose extends unittest to make testing easier / LGPL-2.1 |
| [notebook](https://jupyter.org) | 6.1.4 | Jupyter Notebook / BSD-3-Clause |
| [numba](http://numba.github.com) | 0.51.2 | NumPy aware dynamic Python compiler using LLVM / BSD-2-Clause |
| [numexpr](https://github.com/pydata/numexpr) | 2.7.1 | Fast numerical expression evaluator for NumPy. / MIT |
| [numpy](http://numpy.scipy.org/) | 1.19.2 | Array processing for numbers, strings, records, and objects. / BSD 3-Clause |
| [numpy-base](http://numpy.scipy.org/) | 1.19.2 | Array processing for numbers, strings, records, and objects. / BSD 3-Clause |
| [numpydoc](https://github.com/numpy/numpydoc) | 1.1.0 | Numpy’s Sphinx extensions / BSD 3-Clause |
| [olefile](http://www.decalage.info/python/olefileio) | 0.46 | parse, read and write Microsoft OLE2 files / BSD 2-Clause |
| [openpyxl](https://openpyxl.readthedocs.io) | 3.0.5 | A Python library to read/write Excel 2010 xlsx/xlsm files / MIT |
| [openssl](http://www.openssl.org/) | 1.1.1h | OpenSSL is an open-source implementation of the SSL and TLS protocols / OpenSSL |
| [packaging](https://github.com/pypa/packaging) | 20.4 | Core utilities for Python packages / Apache 2.0 or BSD 2-Clause |
| [pandas](http://pandas.pydata.org) | 1.1.3 | High-performance, easy-to-use data structures and data analysis tools. / BSD-3-Clause |
| [pandoc](http://pandoc.org/) | 2.11 | Universal markup converter (repackaged binaries) / GPL-2.0 |
| [pandocfilters](https://github.com/jgm/pandocfilters) | 1.4.3 | A python module for writing pandoc filters / BSD-3-Clause |
| [paramiko](http://www.paramiko.org/) | 2.7.2 | SSH2 protocol library / LGPL-2.1-or-later |
| [parso](https://github.com/davidhalter/parso) | 0.7.0 | A Python Parser / MIT |
| [partd](https://github.com/dask/partd) | 1.1.0 | Data structure for on-disk shuffle operations / BSD 3-Clause |
| [path](https://github.com/jaraco/path) | 15.0.0 | A module wrapper for os.path / MIT |
| [path.py](https://github.com/jaraco/path.py) | 12.5.0 | A module wrapper for os.path / MIT |
| [pathlib2](https://github.com/mcmtroffaes/pathlib2) | 2.3.5 | Fork of pathlib aiming to support the full stdlib Python API / MIT |
| [pathtools](https://github.com/gorakhargosh/pathtools) | 0.1.2 | Path utilities for Python. / MIT |
| [patsy](https://github.com/pydata/patsy) | 0.5.1 | Describing statistical models in Python using symbolic formulas / BSD-2-Clause, PSF2 |
| [pep8](http://pep8.readthedocs.org/) | 1.7.1 | Python style guide checker / MIT |
| [pexpect](http://pexpect.sourceforge.net/) | 4.8.0 | Pexpect makes Python a better tool for controlling other applications. / ISC |
| [pickleshare](https://github.com/pickleshare/pickleshare/) | 0.7.5 | Tiny ‘shelve’-like database with concurrency support / MIT |
| [pillow](https://pillow.readthedocs.io) | 8.0.1 | Pillow is the friendly PIL fork by Alex Clark and Contributors / LicenseRef-PIL |
| [pip](https://pip.pypa.io/en/stable/) | 20.2.4 | PyPA recommended tool for installing Python packages / MIT |
| [pkginfo](https://code.launchpad.net/~tseaver/pkginfo/trunk) | 1.6.1 | Query metadatdata from sdists / bdists / installed packages. / MIT |
| [pluggy](https://github.com/pytest-dev/pluggy) | 0.13.1 | Plugin registration and hook calling for Python / MIT |
| [ply](http://www.dabeaz.com/ply/index.html) | 3.11 | Python Lex-Yacc / BSD 3-clause |
| powershell\_shortcut | 0.0.1 | Powershell shortcut creator for Windows (using menuinst) / BSD |
| [prometheus\_client](https://github.com/prometheus/client_python) | 0.8.0 | Python client for the Prometheus monitoring system / Apache-2.0 |
| [prompt-toolkit](https://github.com/jonathanslenders/python-prompt-toolkit) | 3.0.8 | Library for building powerful interactive command lines in Python / BSD-3-Clause |
| [prompt\_toolkit](https://github.com/jonathanslenders/python-prompt-toolkit) | 3.0.8 | Library for building powerful interactive command lines in Python / BSD-3-Clause |
| [psutil](https://github.com/giampaolo/psutil) | 5.7.2 | A cross-platform process and system utilities module for Python / BSD-3-Clause |
| [py](https://github.com/pytest-dev/py) | 1.9.0 | library with cross-python path, ini-parsing, io, code, log facilities / MIT |
| [py-lief](https://lief.quarkslab.com/) | 0.10.1 | A cross platform library to parse, modify and abstract ELF, PE and MachO formats. / Apache-2.0 |
| [pycodestyle](https://pycodestyle.readthedocs.io/) | 2.6.0 | Python style guide checker / MIT |
| [pycosat](https://github.com/ContinuumIO/pycosat) | 0.6.3 | Bindings to picosat (a SAT solver) / MIT |
| [pycparser](https://github.com/eliben/pycparser) | 2.20 | Complete C99 parser in pure Python / BSD 3-clause |
| [pycurl](http://pycurl.sourceforge.net/) | 7.43.0.6 | A Python Interface To The cURL library / LGPL, MIT |
| [pydocstyle](https://github.com/PyCQA/pydocstyle) | 5.1.1 | Python docstring style checker (formerly pep257) / MIT |
| [pyflakes](https://github.com/PyCQA/pyflakes) | 2.2.0 | Pyflakes analyzes programs and detects various errors. / MIT |
| [pygments](http://pygments.org/) | 2.7.2 | Pygments is a generic syntax highlighter suitable for use in code hosting, forums, wikis or other applications that need to prettify source code. / BSD-2-clause |
| [pylint](http://www.pylint.org/) | 2.6.0 | python code static checker / GPL-2.0-only |
| [pynacl](https://github.com/pyca/pynacl) | 1.4.0 | PyNaCl is a Python binding to the Networking and Cryptography library, a crypto library with the stated goal of improving usability, security and speed. / Apache-2.0 |
| [pyodbc](https://github.com/mkleehammer/pyodbc) | 4.0.30 | DB API Module for ODBC / MIT |
| [pyopenssl](https://github.com/pyca/pyopenssl) | 19.1.0 | Python wrapper module around the OpenSSL library / Apache 2.0 |
| [pyparsing](http://pyparsing.wikispaces.com/) | 2.4.7 | Create and execute simple grammars / MIT |
| [pyqt](http://www.riverbankcomputing.co.uk/software/pyqt) | 5.9.2 | Python binding of the cross-platform GUI toolkit Qt. / Commercial, GPL-2.0, GPL-3.0 |
| [pyreadline](http://ipython.org/pyreadline) | 2.1 | A python implmementation of GNU readline. / BSD 3-Clause |
| [pyrsistent](http://github.com/tobgu/pyrsistent/) | 0.17.3 | Persistent/Functional/Immutable data structures / MIT |
| [pysocks](https://github.com/Anorov/PySocks) | 1.7.1 | A Python SOCKS client module. See [Anorov/PySocks](https://github.com/Anorov/PySocks) for more information. / BSD 3-Clause |
| [pytables](http://www.pytables.org) | 3.6.1 | Brings together Python, HDF5 and NumPy to easily handle large amounts of data. / BSD 3-Clause |
| [pytest](https://docs.pytest.org/en/latest/) | 6.1.1 | Simple and powerful testing with Python. / MIT |
| [python](https://www.python.org/) | 3.8.5 | General purpose programming language / Python-2.0 |
| [python-dateutil](https://dateutil.readthedocs.org/) | 2.8.1 | Extensions to the standard Python datetime module. / BSD 3 Clause |
| [python-jsonrpc-server](https://github.com/palantir/python-jsonrpc-server) | 0.4.0 | A Python 2.7 and 3.4+ server implementation of the JSON RPC 2.0 protocol. / MIT |
| [python-language-server](https://github.com/palantir/python-language-server) | 0.35.1 | An implementation of the Language Server Protocol for Python / MIT |
| [python-libarchive-c](https://github.com/Changaco/python-libarchive-c) | 2.9 | Python interface to libarchive / CC0-1.0 |
| [pytz](http://pythonhosted.org/pytz/) | 2020.1 | World timezone definitions, modern and historical. / MIT |
| [pywavelets](https://github.com/PyWavelets/pywt) | 1.1.1 | Discrete Wavelet Transforms in Python / MIT |
| [pywin32](https://sourceforge.net/projects/pywin32) | 227 | Python extensions for Windows / PSF |
| [pywin32-ctypes](https://github.com/enthought/pywin32-ctypes) | 0.2.0 | A limited subset of pywin32 re-implemented using ctypes (or cffi) / BSD 3 Clause |
| [pywinpty](https://github.com/spyder-ide/pywinpty) | 0.5.7 | Python bindings for the winpty library / MIT |
| [pyyaml](http://pyyaml.org/wiki/PyYAML) | 5.3.1 | YAML parser and emitter for Python / MIT |
| [pyzmq](https://github.com/zeromq/pyzmq) | 19.0.2 | Python bindings for zeromq / BSD 3-clause |
| [qdarkstyle](https://github.com/ColinDuquesnoy/QDarkStyleSheet) | 2.8.1 | A dark stylesheet for Qt applications (Qt4, Qt5, PySide, PyQt4, PyQt5, QtPy, PyQtGraph). / MIT |
| [qt](http://qt-project.org) | 5.9.7 | Qt is a cross-platform application and UI framework. / LGPL-3.0 |
| [qtawesome](https://github.com/spyder-ide/qtawesome) | 1.0.1 | Iconic fonts in PyQt and PySide applications / MIT |
| [qtconsole](http://jupyter.org) | 4.7.7 | Jupyter Qt Console / BSD-3-Clause |
| [qtpy](https://github.com/spyder-ide/qtpy) | 1.9.0 | Abstraction layer for PyQt5/PyQt4/PySide / MIT |
| [regex](https://bitbucket.org/mrabarnett/mrab-regex) | 2020.10.15 | Alternative regular expression module, to replace re / Python-2.0 |
| [requests](http://python-requests.org) | 2.24.0 | Requests is an elegant and simple HTTP library for Python, built with ♥. / Apache-2.0 |
| [rope](https://github.com/python-rope/rope) | 0.18.0 | A python refactoring library / GPL 2.0 |
| [rtree](http://toblerity.github.com/rtree/) | 0.9.4 | R-Tree spatial index for Python GIS / MIT |
| [ruamel\_yaml](https://bitbucket.org/ruamel/yaml) | 0.15.87 | A patched copy of ruamel.yaml. / MIT |
| [scikit-image](http://scikit-image.org/) | 0.17.2 | Image processing in Python. / BSD-3-Clause |
| [scikit-learn](http://scikit-learn.org/) | 0.23.2 | A set of python modules for machine learning and data mining / BSD-3-Clause |
| [scipy](http://www.scipy.org/) | 1.5.2 | Scientific Library for Python / BSD 3-Clause |
| [seaborn](https://seaborn.pydata.org) | 0.11.0 | Statistical data visualization / BSD 3-Clause |
| [send2trash](https://github.com/hsoft/send2trash) | 1.5.0 | Python library to natively send files to Trash (or Recycle bin) on all platforms. / BSD-3-Clause |
| [setuptools](https://github.com/pypa/setuptools) | 50.3.1 | Download, build, install, upgrade, and uninstall Python packages / MIT |
| [simplegeneric](http://cheeseshop.python.org/pypi/simplegeneric) | 0.8.1 | Simple generic functions (similar to Python’s own len(), pickle.dump(), etc.) / Zope Public |
| [singledispatch](http://docs.python.org/3/library/functools.html#functools.singledispatch) | 3.4.0.3 | Transforms a function into a single-dispatch generic function / MIT |
| [sip](http://www.riverbankcomputing.com/software/sip/intro) | 4.19.13 | Create Python bindings for C and C++ libraries / GPL-3.0 |
| [six](https://six.readthedocs.io/) | 1.15.0 | Python 2 and 3 compatibility utilities / MIT |
| [snowballstemmer](https://github.com/shibukawa/snowball_py) | 2.0.0 | Snowball stemming library collection for Python / BSD-2-Clause |
| [sortedcollections](http://www.grantjenks.com/docs/sortedcollections/) | 1.2.1 | Python Sorted Collections / Apache-2.0 |
| [sortedcontainers](http://www.grantjenks.com/docs/sortedcontainers/) | 2.2.2 | Python Sorted Container Types: SortedList, SortedDict, and SortedSet / Apache-2.0 |
| [soupsieve](http://facelessuser.github.io/soupsieve) | 2.0.1 | A modern CSS selector implementation for BeautifulSoup / MIT |
| [sphinx](http://www.sphinx-doc.org) | 3.2.1 | Sphinx is a tool that makes it easy to create intelligent and beautiful documentation / BSD-2-Clause |
| sphinxcontrib | 1.0 | Python namespace for sphinxcontrib / BSD |
| [sphinxcontrib-applehelp](https://www.sphinx-doc.org/en/master/) | 1.0.2 | sphinxcontrib-applehelp is a sphinx extension which outputs Apple help books / BSD-2-Clause |
| [sphinxcontrib-devhelp](https://www.sphinx-doc.org/en/master/) | 1.0.2 | sphinxcontrib-devhelp is a sphinx extension which outputs Devhelp document / BSD-2-Clause |
| [sphinxcontrib-htmlhelp](https://www.sphinx-doc.org/en/master/) | 1.0.3 | sphinxcontrib-htmlhelp is a sphinx extension which … / BSD-2-Clause |
| [sphinxcontrib-jsmath](https://www.sphinx-doc.org/en/master/) | 1.0.1 | A sphinx extension which renders display math in HTML via JavaScript / BSD-2-Clause |
| [sphinxcontrib-qthelp](https://www.sphinx-doc.org/en/master/) | 1.0.3 | sphinxcontrib-qthelp is a sphinx extension which outputs QtHelp document / BSD-2-Clause |
| [sphinxcontrib-serializinghtml](https://www.sphinx-doc.org/en/master/) | 1.1.4 | sphinxcontrib-serializinghtml is a sphinx extension which outputs “serialized” HTML files (json and pickle). / BSD-2-Clause |
| [sphinxcontrib-websupport](https://pypi.python.org/pypi/sphinxcontrib-websupport) | 1.2.4 | Sphinx API for Web Apps / BSD-2-Clause |
| [spyder](https://www.spyder-ide.org/) | 4.1.5 | The Scientific Python Development Environment / MIT |
| [spyder-kernels](https://www.spyder-ide.org/) | 1.9.4 | Jupyter kernels for Spyder’s console / MIT |
| [sqlalchemy](http://www.sqlalchemy.org/) | 1.3.20 | Database Abstraction Library. / MIT |
| [sqlite](http://www.sqlite.org/) | 3.33.0 | Implements a self-contained, zero-configuration, SQL database engine / Public-Domain (`<http://www.sqlite.org/copyright.html>`) |
| [statsmodels](https://www.statsmodels.org) | 0.12.0 | Statistical computations and models for use with SciPy / BSD-3-Clause |
| [sympy](https://sympy.org) | 1.6.2 | Python library for symbolic mathematics / BSD-3-Clause |
| [tblib](https://github.com/ionelmc/python-tblib) | 1.7.0 | Traceback serialization library. / BSD 2-Clause |
| [terminado](https://github.com/jupyter/terminado) | 0.9.1 | Terminals served by tornado websockets / BSD-2-Clause |
| [testpath](https://testpath.readthedocs.io) | 0.4.4 | Testpath is a collection of utilities for Python code working with files and commands. / BSD-3-Clause |
| [threadpoolctl](https://github.com/joblib/threadpoolctl) | 2.1.0 | Python helpers to control the threadpools of native libraries / BSD 3-Clause |
| [tifffile](https://github.com/blink1073/tifffile) | 2020.10.1 | Read and write image data from and to TIFF files. / BSD 3-Clause |
| [tk](http://www.tcl.tk/) | 8.6.10 | A dynamic programming language with GUI support. Bundles Tcl and Tk. / Tcl/Tk |
| [toml](https://github.com/uiri/toml) | 0.10.1 | Python lib for TOML. / MIT |
| [toolz](http://toolz.readthedocs.org/) | 0.11.1 | A functional standard library for Python / BSD-3-Clause |
| [tornado](http://www.tornadoweb.org/) | 6.0.4 | A Python web framework and asynchronous networking library, originally developed at FriendFeed. / Apache-2.0 |
| [tqdm](https://pypi.python.org/pypi/tqdm) | 4.50.2 | A Fast, Extensible Progress Meter / MPLv2.0, MIT |
| [traitlets](http://traitlets.readthedocs.org/) | 5.0.5 | Configuration system for Python applications / BSD-3-Clause |
| [typing\_extensions](https://github.com/python/typing/tree/master/typing_extensions) | 3.7.4.3 | Backported and Experimental Type Hints for Python / PSF-2.0 |
| [ujson](https://github.com/ultrajson/ultrajson) | 4.0.1 | Ultra fast JSON decoder and encoder written in C with Python bindings / BSD-3-Clause |
| [unicodecsv](https://github.com/jdunck/python-unicodecsv) | 0.14.1 | Drop-in replacement for csv module which supports unicode strings / BSD |
| [urllib3](https://urllib3.readthedocs.io/) | 1.25.11 | HTTP library with thread-safe connection pooling, file post, and more. / MIT |
| [vc](https://github.com/conda/conda/wiki/VC-features) | 14.1 | A meta-package to impose mutual exclusivity among software built with different VS versions / Modified BSD License (3-clause) |
| vs2015\_runtime | 14.16.27012 | MSVC runtimes associated with cl.exe version 19.16.27032.1 (VS 2017 update 9) / None |
| [watchdog](http://github.com/gorakhargosh/watchdog) | 0.10.3 | Filesystem events monitoring / Apache 2.0 |
| [wcwidth](https://github.com/jquast/wcwidth) | 0.2.5 | Measures number of Terminal column cells of wide-character codes. / MIT |
| [webencodings](https://github.com/gsnedders/python-webencodings) | 0.5.1 | Character encoding aliases for legacy web content / BSD 3-Clause |
| [werkzeug](https://palletsprojects.com/p/werkzeug/) | 1.0.1 | The comprehensive WSGI web application library. / BSD 3-Clause |
| [wheel](https://github.com/pypa/wheel) | 0.35.1 | A built-package format for Python. / MIT |
| [widgetsnbextension](http://ipython.org) | 3.5.1 | Interactive Widgets for Jupyter / BSD 3-clause |
| [win\_inet\_pton](https://github.com/hickeroar/win_inet_pton) | 1.1.0 | Native inet\_pton and inet\_ntop implementation for Python on Windows (with ctypes). / PUBLIC-DOMAIN |
| [win\_unicode\_console](https://github.com/Drekin/win-unicode-console) | 0.5 | A Python package to enable Unicode input and display when running Python from Windows console. / MIT |
| [wincertstore](https://bitbucket.org/tiran/wincertstore) | 0.2 | Python module to extract CA and CRL certs from Windows’ cert store (ctypes based). / PSF 2 |
| [winpty](https://github.com/rprichard/winpty) | 0.4.3 | Winpty provides an interface similar to a Unix pty-master for communicating with Windows console programs. / MIT |
| [wrapt](https://github.com/GrahamDumpleton/wrapt) | 1.11.2 | Module for decorators, wrappers and monkey patching / BSD 2-Clause |
| [xlrd](http://www.python-excel.org/) | 1.2.0 | Library for developers to extract data from Microsoft Excel (tm) spreadsheet files / BSD 3-Clause and BSD with advertising |
| [xlsxwriter](https://xlsxwriter.readthedocs.io/) | 1.3.7 | A Python module for creating Excel XLSX files / BSD-2-Clause |
| [xlwings](http://xlwings.org/) | 0.20.8 | Interact with Excel from Python and vice versa / 3-clause BSD |
| [xlwt](http://www.python-excel.org/) | 1.3.0 | Writing data and formatting information to Excel files / BSD |
| [xz](http://tukaani.org/xz/) | 5.2.5 | Data compression software with high compression ratio / LGPL-2.1 and GPL-2.0 |
| [yaml](http://pyyaml.org/wiki/LibYAML) | 0.2.5 | A C library for parsing and emitting YAML / MIT |
| [yapf](https://github.com/google/yapf) | 0.30.0 | A formatter for Python files / Apache 2.0 |
| [zeromq](http://zeromq.org) | 4.3.2 | A high-performance asynchronous messaging library. / LGPL 3 |
| [zict](http://github.com/mrocklin/zict) | 2.0.0 | Composable Dictionary Classes / BSD 3-Clause |
| [zipp](https://github.com/jaraco/zipp) | 3.4.0 | A pathlib-compatible Zipfile object wrapper / MIT |
| [zlib](http://zlib.net/) | 1.2.11 | Massively spiffy yet delicately unobtrusive compression library / zlib |
| zope | 1.0 | web application server / BSD |
| [zope.event](http://www.zope.org/en/latest/) | 4.5.0 | Very basic event publishing system / Zope Public License |
| [zope.interface](http://docs.zope.org/zope.interface/) | 5.1.2 | Interfaces for Python / ZPL-2.1 |
| [zstd](http://www.zstd.net) | 1.4.5 | Zstandard - Fast real-time compression algorithm / BSD 3-Clause |
| Name | Version | Summary / License |
|---|---|---|
| [\_ipyw\_jlab\_nb\_ext\_conf](https://github.com/ContinuumIO/anaconda-nb-extensions-meta-config) | 0.1.0 | A configuration metapackage for enabling Anaconda-bundled jupyter extensions / BSD |
| [alabaster](http://www.sphinx-doc.org/en/stable/index.html) | 0.7.12 | Configurable, Python 2+3 compatible Sphinx theme. / BSD 3-Clause |
| [anaconda-client](http://anaconda.org) | 1.7.2 | anaconda.org command line client library / BSD 3-clause |
| [anaconda-project](https://github.com/Anaconda-Platform/anaconda-project) | 0.8.4 | Tool for encapsulating, running, and reproducing data science projects / BSD 3-Clause |
| [argh](https://github.com/neithere/argh) | 0.26.2 | The Natural CLI. / LGPL 3 |
| [argon2-cffi](https://argon2-cffi.readthedocs.org/) | 20.1.0 | The secure Argon2 password hashing algorithm. / MIT |
| [asn1crypto](https://github.com/wbond/asn1crypto) | 1.4.0 | Python ASN.1 library with a focus on performance and a pythonic API / MIT |
| [astroid](https://www.astroid.org/) | 2.4.2 | A abstract syntax tree for Python with inference support. / LGPL-2.1-only |
| [astropy](http://www.astropy.org/) | 4.0.2 | Community-developed Python Library for Astronomy / BSD-3-Clause |
| [async\_generator](https://github.com/python-trio/async_generator) | 1.10 | Async generators and context managers for Python 3.5+ / MIT |
| [atomicwrites](https://github.com/untitaker/python-atomicwrites) | 1.4.0 | Atomic file writes / MIT |
| [attrs](https://attrs.readthedocs.io/en/stable/) | 20.3.0 | attrs is the Python package that will bring back the joy of writing classes by relieving you from the drudgery of implementing object protocols (aka dunder methods). / MIT |
| [autopep8](https://github.com/hhatto/autopep8) | 1.5.4 | A tool that automatically formats Python code to conform to the PEP 8 style guide / MIT |
| [babel](http://babel.pocoo.org/) | 2.8.1 | Utilities to internationalize and localize Python applications / BSD 3-clause |
| [backcall](https://github.com/takluyver/backcall/) | 0.2.0 | Specifications for callback functions passed in to an API / BSD-3-Clause |
| [backports](https://bitbucket.org/brandon/backports) | 1.0 | None / BSD |
| [backports.shutil\_get\_terminal\_size](https://github.com/chrippa/backports.shutil_get_terminal_size) | 1.0.0 | A backport of the get\_terminal\_size function from Python 3.3’s shutil. / MIT |
| [bcrypt](https://github.com/pyca/bcrypt/) | 3.2.0 | Modern password hashing for your software and your servers / Apache-2.0 |
| [beautifulsoup4](http://www.crummy.com/software/BeautifulSoup/) | 4.9.3 | Python library designed for screen-scraping / MIT |
| [bitarray](https://github.com/ilanschnell/bitarray) | 1.6.1 | efficient arrays of booleans – C extension / PSF |
| [bkcharts](http://github.com/bokeh/bkcharts) | 0.2 | High level chart types built on top of Bokeh / BSD 3-Clause |
| blas | 1.0 | |
| [bleach](https://github.com/mozilla/bleach) | 3.2.1 | Easy, whitelist-based HTML-sanitizing tool / Apache-2.0 |
| [blosc](https://github.com/Blosc/c-blosc) | 1.20.1 | A blocking, shuffling and loss-less compression library that can be faster than memcpy() / BSD-3-Clause |
| [bokeh](http://bokeh.pydata.org/) | 2.2.3 | Statistical and novel interactive HTML plots for Python / BSD-3-Clause |
| [boto](https://github.com/boto/boto/) | 2.49.0 | Amazon Web Services Library / MIT |
| [bottleneck](https://github.com/pydata/bottleneck) | 1.3.2 | Fast NumPy array functions written in Cython. / BSD 2-Clause |
| [brotlipy](https://github.com/python-hyper/brotlipy) | 0.7.0 | Python bindings to the Brotli compression library / MIT |
| [bzip2](http://www.bzip.org/) | 1.0.8 | high-quality data compressor / bzip2 |
| [ca-certificates](https://github.com/conda-forge/ca-certificates-feedstock) | 2020.10.14 | Certificates for use with other packages. / MPL 2.0 |
| [certifi](http://certifi.io/) | 2020.6.20 | Python package for providing Mozilla’s CA Bundle. / ISC |
| [cffi](https://bitbucket.org/cffi/cffi) | 1.14.3 | Foreign Function Interface for Python calling C code. / MIT |
| [chardet](https://github.com/chardet/chardet) | 3.0.4 | Universal character encoding detector / LGPL2 |
| [click](https://palletsprojects.com/p/click) | 7.1.2 | Python composable command line interface toolkit / BSD-3-Clause |
| [cloudpickle](https://github.com/cloudpipe/cloudpickle) | 1.6.0 | Extended pickling support for Python objects / BSD-3-Clause |
| [clyent](https://github.com/Anaconda-Platform/clyent) | 1.2.2 | Command line client library for windows and posix / BSD 3-Clause |
| [colorama](https://github.com/tartley/colorama) | 0.4.4 | Cross-platform colored terminal text / BSD-3-Clause |
| [comtypes](http://starship.python.net/crew/theller/comtypes/) | 1.1.7 | pure Python COM package / MIT |
| [conda](https://conda.io) | 4.9.2 | OS-agnostic, system-level binary package and environment manager. / BSD 3-Clause |
| [conda-build](https://github.com/conda/conda-build) | 3.20.5 | tools for building conda packages / BSD 3-Clause |
| [conda-env](https://github.com/conda/conda-env) | 2.6.0 | Tools for interacting with conda environments. / BSD 3-Clause |
| [conda-verify](https://github.com/conda/conda-verify) | 3.4.2 | tool for validating conda recipes and conda packages / BSD 3-Clause |
| console\_shortcut | 0.1.1 | Console shortcut creator for Windows (using menuinst) / BSD |
| [contextlib2](http://contextlib2.readthedocs.org) | 0.6.0.post1 | Backports and enhancements for the contextlib module / PSF 2 |
| [cryptography](https://github.com/pyca/cryptography) | 3.1 | Provides cryptographic recipes and primitives to Python developers / Apache-2.0 AND BSD-3-Clause AND PSF-2.0 |
| [curl](http://curl.haxx.se/) | 7.71.1 | tool and library for transferring data with URL syntax / MIT/X derivate (`<http://curl.haxx.se/docs/copyright.html>`) |
| [cycler](http://matplotlib.org/cycler) | 0.10.0 | Composable style cycles. / BSD 3-Clause |
| [cython](http://www.cython.org/) | 0.29.21 | The Cython compiler for writing C extensions for the Python language / Apache-2.0 |
| [cytoolz](https://github.com/pytoolz/cytoolz) | 0.11.0 | Cython implementation of Toolz. High performance functional utilities / BSD-3-Clause |
| [dask](https://dask.org/) | 2.30.0 | Parallel PyData with Task Scheduling / BSD-3-Clause |
| [dask-core](http://github.com/dask/dask/) | 2.30.0 | Parallel Python with task scheduling / BSD-3-Clause |
| [decorator](https://github.com/micheles/decorator) | 4.4.2 | Better living through Python with decorators. / BSD-3-Clause |
| [defusedxml](https://bitbucket.org/tiran/defusedxml) | 0.6.0 | XML bomb protection for Python stdlib modules / PSF 2.0 |
| [diff-match-patch](http://code.google.com/p/google-diff-match-patch/) | 20200713 | Diff Match Patch is a high-performance library in multiple languages that manipulates plain text / Apache-2.0 |
| [distributed](http://distributed.readthedocs.io/en/latest/) | 2.30.1 | Distributed computing with Dask / BSD-3-Clause |
| [docutils](http://docutils.sourceforge.net/) | 0.16 | Docutils – Python Documentation Utilities / Public Domain Dedictation and BSD 2-Clause and PSF 2.1.1 and GPL 3.0 |
| [entrypoints](https://github.com/takluyver/entrypoints) | 0.3 | Discover and load entry points from installed packages. / MIT License |
| [et\_xmlfile](https://bitbucket.org/openpyxl/et_xmlfile) | 1.0.1 | An implementation of lxml.xmlfile for the standard library / MIT |
| [fastcache](https://github.com/pbrady/fastcache) | 1.1.0 | C implementation of Python 3 lru\_cache / MIT |
| [filelock](https://github.com/benediktschmitt/py-filelock) | 3.0.12 | A platform independent file lock. / Public Domain |
| [flake8](http://flake8.pycqa.org/) | 3.8.4 | Your Tool For Style Guide Enforcement / MIT |
| [flask](http://flask.pocoo.org) | 1.1.2 | A microframework based on Werkzeug, Jinja2 and good intentions. / BSD 3-Clause |
| [freetype](https://www.freetype.org/) | 2.10.4 | A Free, High-Quality, and Portable Font Engine / GPL-2.0-only and LicenseRef-FreeType |
| [fsspec](https://github.com/martindurant/filesystem_spec) | 0.8.3 | A specification for pythonic filesystems / BSD-3-Clause |
| [future](http://python-future.org) | 0.18.2 | Clean single-source support for Python 3 and 2 / MIT |
| [get\_terminal\_size](https://github.com/chrippa/backports.shutil_get_terminal_size) | 1.0.0 | Get the size of the terminal window. / MIT |
| [gevent](https://www.gevent.org) | 20.9.0 | Coroutine-based network library / MIT |
| [glob2](https://github.com/miracle2k/python-glob2) | 0.7 | Version of the glob module that supports recursion via \*\*, and can capture patterns. / BSD-2-Clause |
| [greenlet](https://github.com/python-greenlet/greenlet) | 0.4.17 | Lightweight in-process concurrent programming / MIT |
| [h5py](http://www.h5py.org/) | 2.10.0 | Read and write HDF5 files from Python. / BSD-3-Clause |
| [hdf5](http://www.hdfgroup.org/HDF5/) | 1.10.4 | HDF5 is a data model, library, and file format for storing and managing data / HDF5 |
| [heapdict](http://stutzbachenterprises.com/) | 1.0.1 | A heap with decrease-key and increase-key operations / BSD 3-Clause |
| [html5lib](https://github.com/html5lib/html5lib-python) | 1.1 | HTML parser based on the WHATWG HTML specification / MIT |
| icc\_rt | 2019.0.0 | Intel runtime libraries for C, C++ and Fortran compilers / Intel proprietary |
| [icu](http://site.icu-project.org/) | 58.2 | International Components for Unicode. / MIT |
| [idna](https://github.com/kjd/idna) | 2.10 | Internationalized Domain Names in Applications (IDNA). / BSD Like |
| [imageio](https://imageio.github.io) | 2.9.0 | A Python library for reading and writing image data / BSD-2-Clause |
| [imagesize](https://github.com/shibukawa/imagesize_py) | 1.2.0 | Getting image size from png/jpeg/jpeg2000/gif file / MIT |
| [importlib-metadata](https://gitlab.com/python-devs/importlib_metadata) | 2.0.0 | A library to access the metadata for a Python package / Apache-2.0 |
| [importlib\_metadata](https://gitlab.com/python-devs/importlib_metadata) | 2.0.0 | A library to access the metadata for a Python package / Apache-2.0 |
| [iniconfig](http://github.com/RonnyPfannschmidt/iniconfig) | 1.1.1 | iniconfig: brain-dead simple config-ini parsing / MIT |
| [intel-openmp](https://software.intel.com/en-us/node/522690) | 2020.2 | Math library for Intel and compatible processors / LicenseRef-ProprietaryIntel |
| [intervaltree](https://github.com/chaimleib/intervaltree) | 3.1.0 | Editable interval tree data structure for Python 2 and 3 / Apache-2.0 |
| [ipykernel](https://ipython.org) | 5.3.4 | IPython Kernel for Jupyter / BSD-3-Clause |
| [ipython](https://ipython.org) | 7.19.0 | IPython: Productive Interactive Computing / BSD-3-Clause |
| [ipython\_genutils](http://ipython.org) | 0.2.0 | vestigial utilities from IPython / BSD 3-Clause |
| [ipywidgets](https://github.com/ipython/ipywidgets) | 7.5.1 | Jupyter Interactive Widgets / BSD 3-clause |
| [isort](https://github.com/timothycrosley/isort) | 5.6.4 | A Python utility / library to sort Python imports. / MIT |
| [itsdangerous](https://github.com/pallets/itsdangerous) | 1.1.0 | Various helpers to pass trusted data to untrusted environments. / BSD 3-Clause |
| [jdcal](https://github.com/phn/jdcal) | 1.4.1 | Julian dates from proleptic Gregorian and Julian calendars. / BSD 2-Clause |
| [jedi](https://github.com/davidhalter/jedi/) | 0.17.1 | An autocompletion tool for Python that can be used for text editors. / MIT |
| [jinja2](http://jinja.pocoo.org) | 2.11.2 | An easy to use stand-alone template engine written in pure python. / 3-Clause BSD |
| [joblib](https://pypi.org/project/joblib/) | 0.17.0 | Lightweight pipelining: using Python functions as pipeline jobs. / BSD-3-Clause |
| [jpeg](http://www.ijg.org/) | 9b | read/write jpeg COM, EXIF, IPTC medata / Custom free software license |
| [json5](https://github.com/dpranke/pyjson5) | 0.9.5 | A Python implementation of the JSON5 data format / Apache-2.0 |
| [jsonschema](https://github.com/Julian/jsonschema) | 3.2.0 | An implementation of JSON Schema validation for Python / MIT |
| [jupyter](http://jupyter.org) | 1.0.0 | Jupyter metapackage. Install all the Jupyter components in one go. / BSD 3-Clause |
| [jupyter\_client](https://jupyter.org) | 6.1.7 | jupyter\_client contains the reference implementation of the Jupyter protocol. / BSD-3-Clause |
| [jupyter\_console](http://jupyter.org) | 6.2.0 | Jupyter terminal console / BSD-3-Clause |
| [jupyter\_core](https://jupyter.org) | 4.6.3 | Core common functionality of Jupyter projects. / BSD-3-Clause |
| [jupyterlab](https://github.com/jupyterlab/jupyterlab) | 2.2.6 | JupyterLab PRE-ALPHA / BSD-3-Clause |
| [jupyterlab\_pygments](http://github.com/JupyterLab/jupyterlab_pygments) | 0.1.2 | Pygments syntax coloring scheme making use of the JupyterLab CSS variables / BSD-3-Clause |
| [jupyterlab\_server](https://github.com/jupyterlab/jupyterlab_server) | 1.2.0 | A set of server components for JupyterLab and JupyterLab like applications. / BSD-3-Clause |
| [keyring](https://github.com/jaraco/keyring) | 21.4.0 | Store and access your passwords safely / Python Software Foundation or MIT |
| [kiwisolver](https://github.com/nucleic/kiwi) | 1.3.0 | An efficient C++ implementation of the Cassowary constraint solver / BSD-3-Clause |
| [krb5](http://web.mit.edu/kerberos/) | 1.18.2 | A network authentication protocol. / MIT |
| [lazy-object-proxy](https://github.com/ionelmc/python-lazy-object-proxy) | 1.4.3 | A fast and thorough lazy object proxy / BSD-2-Clause |
| [libarchive](http://www.libarchive.org/) | 3.4.2 | Multi-format archive and compression library / BSD-2-Clause |
| [libcurl](http://curl.haxx.se/) | 7.71.1 | tool and library for transferring data with URL syntax / MIT/X derivate (`<http://curl.haxx.se/docs/copyright.html>`) |
| [libiconv](https://www.gnu.org/software/libiconv/) | 1.15 | Provides iconv for systems which don’t have one (or that cannot convert from/to Unicode.) / GPL and LGPL |
| [liblief](https://lief.quarkslab.com/) | 0.10.1 | A cross platform library to parse, modify and abstract ELF, PE and MachO formats. / Apache-2.0 |
| [libpng](http://www.libpng.org/pub/png/libpng.html) | 1.6.37 | PNG reference library / zlib/libpng |
| [libsodium](http://libsodium.org) | 1.0.18 | A modern and easy-to-use crypto library. / ISC |
| [libspatialindex](http://libspatialindex.github.io) | 1.8.5 | Extensible framework for robust spatial indexing / MIT |
| [libssh2](https://www.libssh2.org/) | 1.9.0 | the SSH library / BSD-3-Clause |
| [libtiff](http://www.libtiff.org/) | 4.1.0 | Support for the Tag Image File Format (TIFF). / HPND |
| [libxml2](http://xmlsoft.org/) | 2.9.10 | The XML C parser and toolkit of Gnome / MIT |
| [libxslt](http://xmlsoft.org/XSLT/) | 1.1.34 | The XSLT C library developed for the GNOME project / MIT |
| [llvmlite](http://llvmlite.pydata.org) | 0.34.0 | A lightweight LLVM python binding for writing JIT compilers. / BSD-2-Clause |
| [locket](https://github.com/mwilliamson/locket.py) | 0.2.0 | File-based locks for Python for Linux and Windows / BSD 2-Clause |
| [lxml](http://lxml.de/) | 4.6.1 | Pythonic binding for the C libraries libxml2 and libxslt. / BSD-3-Clause and GPL-2.0-only and ZPL-2.0 and LicenseRef-ElementTree |
| [lz4-c](https://www.lz4.org) | 1.9.2 | Extremely Fast Compression algorithm / BSD-2-Clause |
| [lzo](http://www.oberhumer.com/opensource/lzo/) | 2.10 | LZO is a portable lossless data compression library written in ANSI C. / GPL v2+ |
| m2w64-gcc-libgfortran | 5.3.0 | / |
| m2w64-gcc-libs | 5.3.0 | / |
| m2w64-gcc-libs-core | 5.3.0 | / |
| m2w64-gmp | 6.1.0 | / |
| m2w64-libwinpthread-git | 5.0.0.4634.697f757 | / |
| [markupsafe](https://www.palletsprojects.com/p/markupsafe) | 1.1.1 | A Python module that implements the jinja2.Markup string / BSD-3-Clause |
| [matplotlib](http://matplotlib.org/) | 3.3.1 | Publication quality figures in Python / LicenseRef-PSF-based |
| [matplotlib-base](http://matplotlib.org/) | 3.3.1 | Publication quality figures in Python / LicenseRef-PSF-based |
| [mccabe](https://github.com/PyCQA/mccabe) | 0.6.1 | McCabe complexity checker for Python / MIT |
| [menuinst](https://github.com/ContinuumIO/menuinst) | 1.4.16 | cross platform menu item installation / BSD |
| [mistune](https://github.com/lepture/mistune) | 0.8.4 | The fastest markdown parser in pure Python. / BSD 3-Clause |
| [mkl](https://software.intel.com/en-us/mkl) | 2020.2 | Math library for Intel and compatible processors / LicenseRef-ProprietaryIntel |
| [mkl-service](https://github.com/ContinuumIO/mkl-service) | 2.3.0 | Python bindings to MKL service functions / 3-clause BSD |
| [mkl\_fft](http://github.com/IntelPython/mkl_fft) | 1.2.0 | NumPy-based implementation of Fast Fourier Transform using Intel (R) Math Kernel Library. / BSD 3-Clause |
| [mkl\_random](http://github.com/IntelPython/mkl_random) | 1.1.1 | Intel (R) MKL-powered package for sampling from common probability distributions into NumPy arrays. / BSD 3-Clause |
| [mock](https://github.com/testing-cabal/mock) | 4.0.2 | A library for testing in Python / BSD-2-Clause |
| [more-itertools](https://github.com/more-itertools/more-itertools) | 8.6.0 | More routines for operating on iterables, beyond itertools / MIT |
| [mpmath](http://mpmath.org) | 1.1.0 | Python library for arbitrary-precision floating-point arithmetic / BSD 3-Clause |
| [msgpack-python](http://msgpack.org/) | 1.0.0 | MessagePack (de)serializer / Apache-2.0 |
| msys2-conda-epoch | 20160418 | / |
| [multipledispatch](https://github.com/mrocklin/multipledispatch/) | 0.6.0 | Multiple dispatch in Python / BSD 3-Clause |
| [nbclient](https://jupyter.org) | 0.5.1 | A client library for executing notebooks. Formally nbconvert’s ExecutePreprocessor. / BSD-3-Clause |
| [nbconvert](http://jupyter.org) | 6.0.7 | Converting Jupyter Notebooks / BSD-3-Clause |
| [nbformat](http://jupyter.org) | 5.0.8 | The reference implementation of the Jupyter Notebook format / BSD-3-Clause |
| [nest-asyncio](https://github.com/erdewit/nest_asyncio) | 1.4.2 | Patch asyncio to allow nested event loops / BSD-2-Clause |
| [networkx](https://networkx.github.io/) | 2.5 | Python package for creating and manipulating complex networks / BSD-3-Clause |
| [nltk](http://nltk.org/) | 3.5 | Natural Language Toolkit / Apache 2.0 |
| [nose](http://readthedocs.org/docs/nose/) | 1.3.7 | Nose extends unittest to make testing easier / LGPL-2.1 |
| [notebook](https://jupyter.org) | 6.1.4 | Jupyter Notebook / BSD-3-Clause |
| [numba](http://numba.github.com) | 0.51.2 | NumPy aware dynamic Python compiler using LLVM / BSD-2-Clause |
| [numexpr](https://github.com/pydata/numexpr) | 2.7.1 | Fast numerical expression evaluator for NumPy. / MIT |
| [numpy](http://numpy.scipy.org/) | 1.19.2 | Array processing for numbers, strings, records, and objects. / BSD 3-Clause |
| [numpy-base](http://numpy.scipy.org/) | 1.19.2 | Array processing for numbers, strings, records, and objects. / BSD 3-Clause |
| [numpydoc](https://github.com/numpy/numpydoc) | 1.1.0 | Numpy’s Sphinx extensions / BSD 3-Clause |
| [olefile](http://www.decalage.info/python/olefileio) | 0.46 | parse, read and write Microsoft OLE2 files / BSD 2-Clause |
| [openpyxl](https://openpyxl.readthedocs.io) | 3.0.5 | A Python library to read/write Excel 2010 xlsx/xlsm files / MIT |
| [openssl](http://www.openssl.org/) | 1.1.1h | OpenSSL is an open-source implementation of the SSL and TLS protocols / OpenSSL |
| [packaging](https://github.com/pypa/packaging) | 20.4 | Core utilities for Python packages / Apache 2.0 or BSD 2-Clause |
| [pandas](http://pandas.pydata.org) | 1.1.3 | High-performance, easy-to-use data structures and data analysis tools. / BSD-3-Clause |
| [pandoc](http://pandoc.org/) | 2.11 | Universal markup converter (repackaged binaries) / GPL-2.0 |
| [pandocfilters](https://github.com/jgm/pandocfilters) | 1.4.3 | A python module for writing pandoc filters / BSD-3-Clause |
| [paramiko](http://www.paramiko.org/) | 2.7.2 | SSH2 protocol library / LGPL-2.1-or-later |
| [parso](https://github.com/davidhalter/parso) | 0.7.0 | A Python Parser / MIT |
| [partd](https://github.com/dask/partd) | 1.1.0 | Data structure for on-disk shuffle operations / BSD 3-Clause |
| [path](https://github.com/jaraco/path) | 15.0.0 | A module wrapper for os.path / MIT |
| [path.py](https://github.com/jaraco/path.py) | 12.5.0 | A module wrapper for os.path / MIT |
| [pathlib2](https://github.com/mcmtroffaes/pathlib2) | 2.3.5 | Fork of pathlib aiming to support the full stdlib Python API / MIT |
| [pathtools](https://github.com/gorakhargosh/pathtools) | 0.1.2 | Path utilities for Python. / MIT |
| [patsy](https://github.com/pydata/patsy) | 0.5.1 | Describing statistical models in Python using symbolic formulas / BSD-2-Clause, PSF2 |
| [pep8](http://pep8.readthedocs.org/) | 1.7.1 | Python style guide checker / MIT |
| [pexpect](http://pexpect.sourceforge.net/) | 4.8.0 | Pexpect makes Python a better tool for controlling other applications. / ISC |
| [pickleshare](https://github.com/pickleshare/pickleshare/) | 0.7.5 | Tiny ‘shelve’-like database with concurrency support / MIT |
| [pillow](https://pillow.readthedocs.io) | 8.0.1 | Pillow is the friendly PIL fork by Alex Clark and Contributors / LicenseRef-PIL |
| [pip](https://pip.pypa.io/en/stable/) | 20.2.4 | PyPA recommended tool for installing Python packages / MIT |
| [pkginfo](https://code.launchpad.net/~tseaver/pkginfo/trunk) | 1.6.1 | Query metadatdata from sdists / bdists / installed packages. / MIT |
| [pluggy](https://github.com/pytest-dev/pluggy) | 0.13.1 | Plugin registration and hook calling for Python / MIT |
| [ply](http://www.dabeaz.com/ply/index.html) | 3.11 | Python Lex-Yacc / BSD 3-clause |
| powershell\_shortcut | 0.0.1 | Powershell shortcut creator for Windows (using menuinst) / BSD |
| [prometheus\_client](https://github.com/prometheus/client_python) | 0.8.0 | Python client for the Prometheus monitoring system / Apache-2.0 |
| [prompt-toolkit](https://github.com/jonathanslenders/python-prompt-toolkit) | 3.0.8 | Library for building powerful interactive command lines in Python / BSD-3-Clause |
| [prompt\_toolkit](https://github.com/jonathanslenders/python-prompt-toolkit) | 3.0.8 | Library for building powerful interactive command lines in Python / BSD-3-Clause |
| [psutil](https://github.com/giampaolo/psutil) | 5.7.2 | A cross-platform process and system utilities module for Python / BSD-3-Clause |
| [py](https://github.com/pytest-dev/py) | 1.9.0 | library with cross-python path, ini-parsing, io, code, log facilities / MIT |
| [py-lief](https://lief.quarkslab.com/) | 0.10.1 | A cross platform library to parse, modify and abstract ELF, PE and MachO formats. / Apache-2.0 |
| [pycodestyle](https://pycodestyle.readthedocs.io/) | 2.6.0 | Python style guide checker / MIT |
| [pycosat](https://github.com/ContinuumIO/pycosat) | 0.6.3 | Bindings to picosat (a SAT solver) / MIT |
| [pycparser](https://github.com/eliben/pycparser) | 2.20 | Complete C99 parser in pure Python / BSD 3-clause |
| [pycurl](http://pycurl.sourceforge.net/) | 7.43.0.6 | A Python Interface To The cURL library / LGPL, MIT |
| [pydocstyle](https://github.com/PyCQA/pydocstyle) | 5.1.1 | Python docstring style checker (formerly pep257) / MIT |
| [pyflakes](https://github.com/PyCQA/pyflakes) | 2.2.0 | Pyflakes analyzes programs and detects various errors. / MIT |
| [pygments](http://pygments.org/) | 2.7.2 | Pygments is a generic syntax highlighter suitable for use in code hosting, forums, wikis or other applications that need to prettify source code. / BSD-2-clause |
| [pylint](http://www.pylint.org/) | 2.6.0 | python code static checker / GPL-2.0-only |
| [pynacl](https://github.com/pyca/pynacl) | 1.4.0 | PyNaCl is a Python binding to the Networking and Cryptography library, a crypto library with the stated goal of improving usability, security and speed. / Apache-2.0 |
| [pyodbc](https://github.com/mkleehammer/pyodbc) | 4.0.30 | DB API Module for ODBC / MIT |
| [pyopenssl](https://github.com/pyca/pyopenssl) | 19.1.0 | Python wrapper module around the OpenSSL library / Apache 2.0 |
| [pyparsing](http://pyparsing.wikispaces.com/) | 2.4.7 | Create and execute simple grammars / MIT |
| [pyqt](http://www.riverbankcomputing.co.uk/software/pyqt) | 5.9.2 | Python binding of the cross-platform GUI toolkit Qt. / Commercial, GPL-2.0, GPL-3.0 |
| [pyreadline](http://ipython.org/pyreadline) | 2.1 | A python implmementation of GNU readline. / BSD 3-Clause |
| [pyrsistent](http://github.com/tobgu/pyrsistent/) | 0.17.3 | Persistent/Functional/Immutable data structures / MIT |
| [pysocks](https://github.com/Anorov/PySocks) | 1.7.1 | A Python SOCKS client module. See [Anorov/PySocks](https://github.com/Anorov/PySocks) for more information. / BSD 3-Clause |
| [pytables](http://www.pytables.org) | 3.6.1 | Brings together Python, HDF5 and NumPy to easily handle large amounts of data. / BSD 3-Clause |
| [pytest](https://docs.pytest.org/en/latest/) | 6.1.1 | Simple and powerful testing with Python. / MIT |
| [python](https://www.python.org/) | 3.8.5 | General purpose programming language / Python-2.0 |
| [python-dateutil](https://dateutil.readthedocs.org/) | 2.8.1 | Extensions to the standard Python datetime module. / BSD 3 Clause |
| [python-jsonrpc-server](https://github.com/palantir/python-jsonrpc-server) | 0.4.0 | A Python 2.7 and 3.4+ server implementation of the JSON RPC 2.0 protocol. / MIT |
| [python-language-server](https://github.com/palantir/python-language-server) | 0.35.1 | An implementation of the Language Server Protocol for Python / MIT |
| [python-libarchive-c](https://github.com/Changaco/python-libarchive-c) | 2.9 | Python interface to libarchive / CC0-1.0 |
| [pytz](http://pythonhosted.org/pytz/) | 2020.1 | World timezone definitions, modern and historical. / MIT |
| [pywavelets](https://github.com/PyWavelets/pywt) | 1.1.1 | Discrete Wavelet Transforms in Python / MIT |
| [pywin32](https://sourceforge.net/projects/pywin32) | 227 | Python extensions for Windows / PSF |
| [pywin32-ctypes](https://github.com/enthought/pywin32-ctypes) | 0.2.0 | A limited subset of pywin32 re-implemented using ctypes (or cffi) / BSD 3 Clause |
| [pywinpty](https://github.com/spyder-ide/pywinpty) | 0.5.7 | Python bindings for the winpty library / MIT |
| [pyyaml](http://pyyaml.org/wiki/PyYAML) | 5.3.1 | YAML parser and emitter for Python / MIT |
| [pyzmq](https://github.com/zeromq/pyzmq) | 19.0.2 | Python bindings for zeromq / BSD 3-clause |
| [qdarkstyle](https://github.com/ColinDuquesnoy/QDarkStyleSheet) | 2.8.1 | A dark stylesheet for Qt applications (Qt4, Qt5, PySide, PyQt4, PyQt5, QtPy, PyQtGraph). / MIT |
| [qt](http://qt-project.org) | 5.9.7 | Qt is a cross-platform application and UI framework. / LGPL-3.0 |
| [qtawesome](https://github.com/spyder-ide/qtawesome) | 1.0.1 | Iconic fonts in PyQt and PySide applications / MIT |
| [qtconsole](http://jupyter.org) | 4.7.7 | Jupyter Qt Console / BSD-3-Clause |
| [qtpy](https://github.com/spyder-ide/qtpy) | 1.9.0 | Abstraction layer for PyQt5/PyQt4/PySide / MIT |
| [regex](https://bitbucket.org/mrabarnett/mrab-regex) | 2020.10.15 | Alternative regular expression module, to replace re / Python-2.0 |
| [requests](http://python-requests.org) | 2.24.0 | Requests is an elegant and simple HTTP library for Python, built with ♥. / Apache-2.0 |
| [rope](https://github.com/python-rope/rope) | 0.18.0 | A python refactoring library / GPL 2.0 |
| [rtree](http://toblerity.github.com/rtree/) | 0.9.4 | R-Tree spatial index for Python GIS / MIT |
| [ruamel\_yaml](https://bitbucket.org/ruamel/yaml) | 0.15.87 | A patched copy of ruamel.yaml. / MIT |
| [scikit-image](http://scikit-image.org/) | 0.16.2 | Image processing in Python. / BSD-3-Clause |
| [scikit-learn](http://scikit-learn.org/) | 0.23.1 | A set of python modules for machine learning and data mining / BSD-3-Clause |
| [scipy](http://www.scipy.org/) | 1.5.2 | Scientific Library for Python / BSD 3-Clause |
| [seaborn](https://seaborn.pydata.org) | 0.11.0 | Statistical data visualization / BSD 3-Clause |
| [send2trash](https://github.com/hsoft/send2trash) | 1.5.0 | Python library to natively send files to Trash (or Recycle bin) on all platforms. / BSD-3-Clause |
| [setuptools](https://github.com/pypa/setuptools) | 50.3.1 | Download, build, install, upgrade, and uninstall Python packages / MIT |
| [simplegeneric](http://cheeseshop.python.org/pypi/simplegeneric) | 0.8.1 | Simple generic functions (similar to Python’s own len(), pickle.dump(), etc.) / Zope Public |
| [singledispatch](http://docs.python.org/3/library/functools.html#functools.singledispatch) | 3.4.0.3 | Transforms a function into a single-dispatch generic function / MIT |
| [sip](http://www.riverbankcomputing.com/software/sip/intro) | 4.19.13 | Create Python bindings for C and C++ libraries / GPL-3.0 |
| [six](https://six.readthedocs.io/) | 1.15.0 | Python 2 and 3 compatibility utilities / MIT |
| [snowballstemmer](https://github.com/shibukawa/snowball_py) | 2.0.0 | Snowball stemming library collection for Python / BSD-2-Clause |
| [sortedcollections](http://www.grantjenks.com/docs/sortedcollections/) | 1.2.1 | Python Sorted Collections / Apache-2.0 |
| [sortedcontainers](http://www.grantjenks.com/docs/sortedcontainers/) | 2.2.2 | Python Sorted Container Types: SortedList, SortedDict, and SortedSet / Apache-2.0 |
| [soupsieve](http://facelessuser.github.io/soupsieve) | 2.0.1 | A modern CSS selector implementation for BeautifulSoup / MIT |
| [sphinx](http://www.sphinx-doc.org) | 3.2.1 | Sphinx is a tool that makes it easy to create intelligent and beautiful documentation / BSD-2-Clause |
| sphinxcontrib | 1.0 | Python namespace for sphinxcontrib / BSD |
| [sphinxcontrib-applehelp](https://www.sphinx-doc.org/en/master/) | 1.0.2 | sphinxcontrib-applehelp is a sphinx extension which outputs Apple help books / BSD-2-Clause |
| [sphinxcontrib-devhelp](https://www.sphinx-doc.org/en/master/) | 1.0.2 | sphinxcontrib-devhelp is a sphinx extension which outputs Devhelp document / BSD-2-Clause |
| [sphinxcontrib-htmlhelp](https://www.sphinx-doc.org/en/master/) | 1.0.3 | sphinxcontrib-htmlhelp is a sphinx extension which … / BSD-2-Clause |
| [sphinxcontrib-jsmath](https://www.sphinx-doc.org/en/master/) | 1.0.1 | A sphinx extension which renders display math in HTML via JavaScript / BSD-2-Clause |
| [sphinxcontrib-qthelp](https://www.sphinx-doc.org/en/master/) | 1.0.3 | sphinxcontrib-qthelp is a sphinx extension which outputs QtHelp document / BSD-2-Clause |
| [sphinxcontrib-serializinghtml](https://www.sphinx-doc.org/en/master/) | 1.1.4 | sphinxcontrib-serializinghtml is a sphinx extension which outputs “serialized” HTML files (json and pickle). / BSD-2-Clause |
| [sphinxcontrib-websupport](https://pypi.python.org/pypi/sphinxcontrib-websupport) | 1.2.4 | Sphinx API for Web Apps / BSD-2-Clause |
| [spyder](https://www.spyder-ide.org/) | 4.1.5 | The Scientific Python Development Environment / MIT |
| [spyder-kernels](https://www.spyder-ide.org/) | 1.9.4 | Jupyter kernels for Spyder’s console / MIT |
| [sqlalchemy](http://www.sqlalchemy.org/) | 1.3.20 | Database Abstraction Library. / MIT |
| [sqlite](http://www.sqlite.org/) | 3.33.0 | Implements a self-contained, zero-configuration, SQL database engine / Public-Domain (`<http://www.sqlite.org/copyright.html>`) |
| [statsmodels](https://www.statsmodels.org) | 0.12.0 | Statistical computations and models for use with SciPy / BSD-3-Clause |
| [sympy](https://sympy.org) | 1.6.2 | Python library for symbolic mathematics / BSD-3-Clause |
| [tblib](https://github.com/ionelmc/python-tblib) | 1.7.0 | Traceback serialization library. / BSD 2-Clause |
| [terminado](https://github.com/jupyter/terminado) | 0.9.1 | Terminals served by tornado websockets / BSD-2-Clause |
| [testpath](https://testpath.readthedocs.io) | 0.4.4 | Testpath is a collection of utilities for Python code working with files and commands. / BSD-3-Clause |
| [threadpoolctl](https://github.com/joblib/threadpoolctl) | 2.1.0 | Python helpers to control the threadpools of native libraries / BSD 3-Clause |
| [tk](http://www.tcl.tk/) | 8.6.10 | A dynamic programming language with GUI support. Bundles Tcl and Tk. / Tcl/Tk |
| [toml](https://github.com/uiri/toml) | 0.10.1 | Python lib for TOML. / MIT |
| [toolz](http://toolz.readthedocs.org/) | 0.11.1 | A functional standard library for Python / BSD-3-Clause |
| [tornado](http://www.tornadoweb.org/) | 6.0.4 | A Python web framework and asynchronous networking library, originally developed at FriendFeed. / Apache-2.0 |
| [tqdm](https://pypi.python.org/pypi/tqdm) | 4.50.2 | A Fast, Extensible Progress Meter / MPLv2.0, MIT |
| [traitlets](http://traitlets.readthedocs.org/) | 5.0.5 | Configuration system for Python applications / BSD-3-Clause |
| [typing\_extensions](https://github.com/python/typing/tree/master/typing_extensions) | 3.7.4.3 | Backported and Experimental Type Hints for Python / PSF-2.0 |
| [ujson](https://github.com/ultrajson/ultrajson) | 4.0.1 | Ultra fast JSON decoder and encoder written in C with Python bindings / BSD-3-Clause |
| [unicodecsv](https://github.com/jdunck/python-unicodecsv) | 0.14.1 | Drop-in replacement for csv module which supports unicode strings / BSD |
| [urllib3](https://urllib3.readthedocs.io/) | 1.25.11 | HTTP library with thread-safe connection pooling, file post, and more. / MIT |
| [vc](https://github.com/conda/conda/wiki/VC-features) | 14.1 | A meta-package to impose mutual exclusivity among software built with different VS versions / Modified BSD License (3-clause) |
| vs2015\_runtime | 14.16.27012 | MSVC runtimes associated with cl.exe version 19.16.27032.1 (VS 2017 update 9) / None |
| [watchdog](http://github.com/gorakhargosh/watchdog) | 0.10.3 | Filesystem events monitoring / Apache 2.0 |
| [wcwidth](https://github.com/jquast/wcwidth) | 0.2.5 | Measures number of Terminal column cells of wide-character codes. / MIT |
| [webencodings](https://github.com/gsnedders/python-webencodings) | 0.5.1 | Character encoding aliases for legacy web content / BSD 3-Clause |
| [werkzeug](https://palletsprojects.com/p/werkzeug/) | 1.0.1 | The comprehensive WSGI web application library. / BSD 3-Clause |
| [wheel](https://github.com/pypa/wheel) | 0.35.1 | A built-package format for Python. / MIT |
| [widgetsnbextension](http://ipython.org) | 3.5.1 | Interactive Widgets for Jupyter / BSD 3-clause |
| [win\_inet\_pton](https://github.com/hickeroar/win_inet_pton) | 1.1.0 | Native inet\_pton and inet\_ntop implementation for Python on Windows (with ctypes). / PUBLIC-DOMAIN |
| [win\_unicode\_console](https://github.com/Drekin/win-unicode-console) | 0.5 | A Python package to enable Unicode input and display when running Python from Windows console. / MIT |
| [wincertstore](https://bitbucket.org/tiran/wincertstore) | 0.2 | Python module to extract CA and CRL certs from Windows’ cert store (ctypes based). / PSF 2 |
| [winpty](https://github.com/rprichard/winpty) | 0.4.3 | Winpty provides an interface similar to a Unix pty-master for communicating with Windows console programs. / MIT |
| [wrapt](https://github.com/GrahamDumpleton/wrapt) | 1.11.2 | Module for decorators, wrappers and monkey patching / BSD 2-Clause |
| [xlrd](http://www.python-excel.org/) | 1.2.0 | Library for developers to extract data from Microsoft Excel (tm) spreadsheet files / BSD 3-Clause and BSD with advertising |
| [xlsxwriter](https://xlsxwriter.readthedocs.io/) | 1.3.7 | A Python module for creating Excel XLSX files / BSD-2-Clause |
| [xlwings](http://xlwings.org/) | 0.20.8 | Interact with Excel from Python and vice versa / 3-clause BSD |
| [xlwt](http://www.python-excel.org/) | 1.3.0 | Writing data and formatting information to Excel files / BSD |
| [xz](http://tukaani.org/xz/) | 5.2.5 | Data compression software with high compression ratio / LGPL-2.1 and GPL-2.0 |
| [yaml](http://pyyaml.org/wiki/LibYAML) | 0.2.5 | A C library for parsing and emitting YAML / MIT |
| [yapf](https://github.com/google/yapf) | 0.30.0 | A formatter for Python files / Apache 2.0 |
| [zeromq](http://zeromq.org) | 4.3.2 | A high-performance asynchronous messaging library. / LGPL 3 |
| [zict](http://github.com/mrocklin/zict) | 2.0.0 | Composable Dictionary Classes / BSD 3-Clause |
| [zipp](https://github.com/jaraco/zipp) | 3.4.0 | A pathlib-compatible Zipfile object wrapper / MIT |
| [zlib](http://zlib.net/) | 1.2.11 | Massively spiffy yet delicately unobtrusive compression library / zlib |
| zope | 1.0 | web application server / BSD |
| [zope.event](http://www.zope.org/en/latest/) | 4.5.0 | Very basic event publishing system / Zope Public License |
| [zope.interface](http://docs.zope.org/zope.interface/) | 5.1.0 | Interfaces for Python / ZPL-2.1 |
| [zstd](http://www.zstd.net) | 1.4.5 | Zstandard - Fast real-time compression algorithm / BSD 3-Clause |
| Name | Version | Summary / License |
|---|---|---|
| [\_ipyw\_jlab\_nb\_ext\_conf](https://github.com/ContinuumIO/anaconda-nb-extensions-meta-config) | 0.1.0 | A configuration metapackage for enabling Anaconda-bundled jupyter extensions / BSD |
| [alabaster](http://www.sphinx-doc.org/en/stable/index.html) | 0.7.12 | Configurable, Python 2+3 compatible Sphinx theme. / BSD 3-Clause |
| [anaconda-client](http://anaconda.org) | 1.7.2 | anaconda.org command line client library / BSD 3-clause |
| [anaconda-project](https://github.com/Anaconda-Platform/anaconda-project) | 0.8.4 | Tool for encapsulating, running, and reproducing data science projects / BSD 3-Clause |
| [applaunchservices](https://github.com/impact27/applaunchservices) | 0.2.1 | Simple package for registering an app with apple Launch Services to handle UTI and URL / MIT |
| [appnope](http://github.com/minrk/appnope) | 0.1.0 | Disable App Nap on OS X 10.9 / BSD 2-Clause |
| [appscript](http://appscript.sourceforge.net) | 1.1.1 | Control AppleScriptable applications from Python. / Public Domain |
| [argh](https://github.com/neithere/argh) | 0.26.2 | The Natural CLI. / LGPL 3 |
| [argon2-cffi](https://argon2-cffi.readthedocs.org/) | 20.1.0 | The secure Argon2 password hashing algorithm. / MIT |
| [asn1crypto](https://github.com/wbond/asn1crypto) | 1.4.0 | Python ASN.1 library with a focus on performance and a pythonic API / MIT |
| [astroid](https://www.astroid.org/) | 2.4.2 | A abstract syntax tree for Python with inference support. / LGPL-2.1-only |
| [astropy](http://www.astropy.org/) | 4.0.2 | Community-developed Python Library for Astronomy / BSD-3-Clause |
| [async\_generator](https://github.com/python-trio/async_generator) | 1.10 | Async generators and context managers for Python 3.5+ / MIT |
| [atomicwrites](https://github.com/untitaker/python-atomicwrites) | 1.4.0 | Atomic file writes / MIT |
| [attrs](https://attrs.readthedocs.io/en/stable/) | 20.3.0 | attrs is the Python package that will bring back the joy of writing classes by relieving you from the drudgery of implementing object protocols (aka dunder methods). / MIT |
| [autopep8](https://github.com/hhatto/autopep8) | 1.5.4 | A tool that automatically formats Python code to conform to the PEP 8 style guide / MIT |
| [babel](http://babel.pocoo.org/) | 2.8.1 | Utilities to internationalize and localize Python applications / BSD 3-clause |
| [backcall](https://github.com/takluyver/backcall/) | 0.2.0 | Specifications for callback functions passed in to an API / BSD-3-Clause |
| [backports](https://bitbucket.org/brandon/backports) | 1.0 | None / BSD |
| [backports.shutil\_get\_terminal\_size](https://github.com/chrippa/backports.shutil_get_terminal_size) | 1.0.0 | A backport of the get\_terminal\_size function from Python 3.3’s shutil. / MIT |
| [beautifulsoup4](http://www.crummy.com/software/BeautifulSoup/) | 4.9.3 | Python library designed for screen-scraping / MIT |
| [bitarray](https://github.com/ilanschnell/bitarray) | 1.6.1 | efficient arrays of booleans – C extension / PSF |
| [bkcharts](http://github.com/bokeh/bkcharts) | 0.2 | High level chart types built on top of Bokeh / BSD 3-Clause |
| blas | 1.0 | |
| [bleach](https://github.com/mozilla/bleach) | 3.2.1 | Easy, whitelist-based HTML-sanitizing tool / Apache-2.0 |
| [blosc](https://github.com/Blosc/c-blosc) | 1.20.1 | A blocking, shuffling and loss-less compression library that can be faster than memcpy() / BSD-3-Clause |
| [bokeh](http://bokeh.pydata.org/) | 2.2.3 | Statistical and novel interactive HTML plots for Python / BSD-3-Clause |
| [boto](https://github.com/boto/boto/) | 2.49.0 | Amazon Web Services Library / MIT |
| [bottleneck](https://github.com/pydata/bottleneck) | 1.3.2 | Fast NumPy array functions written in Cython. / BSD 2-Clause |
| [brotlipy](https://github.com/python-hyper/brotlipy) | 0.7.0 | Python bindings to the Brotli compression library / MIT |
| [bzip2](http://www.bzip.org/) | 1.0.8 | high-quality data compressor / bzip2 |
| [ca-certificates](https://github.com/conda-forge/ca-certificates-feedstock) | 2020.10.14 | Certificates for use with other packages. / MPL 2.0 |
| [certifi](http://certifi.io/) | 2020.6.20 | Python package for providing Mozilla’s CA Bundle. / ISC |
| [cffi](https://bitbucket.org/cffi/cffi) | 1.14.3 | Foreign Function Interface for Python calling C code. / MIT |
| [chardet](https://github.com/chardet/chardet) | 3.0.4 | Universal character encoding detector / LGPL2 |
| [click](https://palletsprojects.com/p/click) | 7.1.2 | Python composable command line interface toolkit / BSD-3-Clause |
| [cloudpickle](https://github.com/cloudpipe/cloudpickle) | 1.6.0 | Extended pickling support for Python objects / BSD-3-Clause |
| [clyent](https://github.com/Anaconda-Platform/clyent) | 1.2.2 | Command line client library for windows and posix / BSD 3-Clause |
| [colorama](https://github.com/tartley/colorama) | 0.4.4 | Cross-platform colored terminal text / BSD-3-Clause |
| [conda](https://conda.io) | 4.9.2 | OS-agnostic, system-level binary package and environment manager. / BSD 3-Clause |
| [conda-build](https://github.com/conda/conda-build) | 3.20.5 | tools for building conda packages / BSD 3-Clause |
| [conda-env](https://github.com/conda/conda-env) | 2.6.0 | Tools for interacting with conda environments. / BSD 3-Clause |
| [conda-verify](https://github.com/conda/conda-verify) | 3.4.2 | tool for validating conda recipes and conda packages / BSD 3-Clause |
| [contextlib2](http://contextlib2.readthedocs.org) | 0.6.0.post1 | Backports and enhancements for the contextlib module / PSF 2 |
| [cryptography](https://github.com/pyca/cryptography) | 3.1.1 | Provides cryptographic recipes and primitives to Python developers / Apache-2.0 AND BSD-3-Clause AND PSF-2.0 |
| [curl](http://curl.haxx.se/) | 7.71.1 | tool and library for transferring data with URL syntax / MIT/X derivate (`<http://curl.haxx.se/docs/copyright.html>`) |
| [cycler](http://matplotlib.org/cycler) | 0.10.0 | Composable style cycles. / BSD 3-Clause |
| [cython](http://www.cython.org/) | 0.29.21 | The Cython compiler for writing C extensions for the Python language / Apache-2.0 |
| [cytoolz](https://github.com/pytoolz/cytoolz) | 0.11.0 | Cython implementation of Toolz. High performance functional utilities / BSD-3-Clause |
| [dask](https://dask.org/) | 2.30.0 | Parallel PyData with Task Scheduling / BSD-3-Clause |
| [dask-core](http://github.com/dask/dask/) | 2.30.0 | Parallel Python with task scheduling / BSD-3-Clause |
| [dbus](http://www.freedesktop.org/wiki/Software/dbus/) | 1.13.18 | Simple message bus system for applications to talk to one another / GPL2 |
| [decorator](https://github.com/micheles/decorator) | 4.4.2 | Better living through Python with decorators. / BSD-3-Clause |
| [defusedxml](https://bitbucket.org/tiran/defusedxml) | 0.6.0 | XML bomb protection for Python stdlib modules / PSF 2.0 |
| [diff-match-patch](http://code.google.com/p/google-diff-match-patch/) | 20200713 | Diff Match Patch is a high-performance library in multiple languages that manipulates plain text / Apache-2.0 |
| [distributed](http://distributed.readthedocs.io/en/latest/) | 2.30.1 | Distributed computing with Dask / BSD-3-Clause |
| [docutils](http://docutils.sourceforge.net/) | 0.16 | Docutils – Python Documentation Utilities / Public Domain Dedictation and BSD 2-Clause and PSF 2.1.1 and GPL 3.0 |
| [entrypoints](https://github.com/takluyver/entrypoints) | 0.3 | Discover and load entry points from installed packages. / MIT License |
| [et\_xmlfile](https://bitbucket.org/openpyxl/et_xmlfile) | 1.0.1 | An implementation of lxml.xmlfile for the standard library / MIT |
| [expat](http://expat.sourceforge.net/) | 2.2.10 | Expat XML parser library in C / MIT |
| [fastcache](https://github.com/pbrady/fastcache) | 1.1.0 | C implementation of Python 3 lru\_cache / MIT |
| [filelock](https://github.com/benediktschmitt/py-filelock) | 3.0.12 | A platform independent file lock. / Public Domain |
| [flake8](http://flake8.pycqa.org/) | 3.8.4 | Your Tool For Style Guide Enforcement / MIT |
| [flask](http://flask.pocoo.org) | 1.1.2 | A microframework based on Werkzeug, Jinja2 and good intentions. / BSD 3-Clause |
| [freetype](https://www.freetype.org/) | 2.10.4 | A Free, High-Quality, and Portable Font Engine / GPL-2.0-only and LicenseRef-FreeType |
| [fsspec](https://github.com/martindurant/filesystem_spec) | 0.8.3 | A specification for pythonic filesystems / BSD-3-Clause |
| [future](http://python-future.org) | 0.18.2 | Clean single-source support for Python 3 and 2 / MIT |
| [get\_terminal\_size](https://github.com/chrippa/backports.shutil_get_terminal_size) | 1.0.0 | Get the size of the terminal window. / MIT |
| [gettext](https://www.gnu.org/software/gettext/) | 0.19.8.1 | Internationalization package. / GPLv2 |
| [gevent](https://www.gevent.org) | 20.9.0 | Coroutine-based network library / MIT |
| [glib](https://developer.gnome.org/glib/) | 2.66.1 | Provides core application building blocks for libraries and applications written in C. / LGPL-2.1 |
| [glob2](https://github.com/miracle2k/python-glob2) | 0.7 | Version of the glob module that supports recursion via \*\*, and can capture patterns. / BSD-2-Clause |
| [gmp](http://gmplib.org/) | 6.1.2 | The GNU multiprecision library. / GPL 2 and LGPL 3 |
| [gmpy2](https://pypi.python.org/pypi/gmpy2) | 2.0.8 | GMP/MPIR, MPFR, and MPC interface to Python 2.6+ and 3.x / LGPL 3 |
| [greenlet](https://github.com/python-greenlet/greenlet) | 0.4.17 | Lightweight in-process concurrent programming / MIT |
| [h5py](http://www.h5py.org/) | 2.10.0 | Read and write HDF5 files from Python. / BSD-3-Clause |
| [hdf5](http://www.hdfgroup.org/HDF5/) | 1.10.4 | HDF5 is a data model, library, and file format for storing and managing data / HDF5 |
| [heapdict](http://stutzbachenterprises.com/) | 1.0.1 | A heap with decrease-key and increase-key operations / BSD 3-Clause |
| [html5lib](https://github.com/html5lib/html5lib-python) | 1.1 | HTML parser based on the WHATWG HTML specification / MIT |
| [icu](http://site.icu-project.org/) | 58.2 | International Components for Unicode. / MIT |
| [idna](https://github.com/kjd/idna) | 2.10 | Internationalized Domain Names in Applications (IDNA). / BSD Like |
| [imageio](https://imageio.github.io) | 2.9.0 | A Python library for reading and writing image data / BSD-2-Clause |
| [imagesize](https://github.com/shibukawa/imagesize_py) | 1.2.0 | Getting image size from png/jpeg/jpeg2000/gif file / MIT |
| [importlib-metadata](https://gitlab.com/python-devs/importlib_metadata) | 2.0.0 | A library to access the metadata for a Python package / Apache-2.0 |
| [importlib\_metadata](https://gitlab.com/python-devs/importlib_metadata) | 2.0.0 | A library to access the metadata for a Python package / Apache-2.0 |
| [iniconfig](http://github.com/RonnyPfannschmidt/iniconfig) | 1.1.1 | iniconfig: brain-dead simple config-ini parsing / MIT |
| [intel-openmp](https://software.intel.com/en-us/node/522690) | 2019.4 | Math library for Intel and compatible processors / LicenseRef-ProprietaryIntel |
| [intervaltree](https://github.com/chaimleib/intervaltree) | 3.1.0 | Editable interval tree data structure for Python 2 and 3 / Apache-2.0 |
| [ipykernel](https://ipython.org) | 5.3.4 | IPython Kernel for Jupyter / BSD-3-Clause |
| [ipython](https://ipython.org) | 7.19.0 | IPython: Productive Interactive Computing / BSD-3-Clause |
| [ipython\_genutils](http://ipython.org) | 0.2.0 | vestigial utilities from IPython / BSD 3-Clause |
| [ipywidgets](https://github.com/ipython/ipywidgets) | 7.5.1 | Jupyter Interactive Widgets / BSD 3-clause |
| [isort](https://github.com/timothycrosley/isort) | 5.6.4 | A Python utility / library to sort Python imports. / MIT |
| [itsdangerous](https://github.com/pallets/itsdangerous) | 1.1.0 | Various helpers to pass trusted data to untrusted environments. / BSD 3-Clause |
| [jbig](https://www.cl.cam.ac.uk/~mgk25/jbigkit) | 2.1 | Implementation of the JBIG1 data compression standard / GPL-2.0 |
| [jdcal](https://github.com/phn/jdcal) | 1.4.1 | Julian dates from proleptic Gregorian and Julian calendars. / BSD 2-Clause |
| [jedi](https://github.com/davidhalter/jedi/) | 0.17.1 | An autocompletion tool for Python that can be used for text editors. / MIT |
| [jinja2](http://jinja.pocoo.org) | 2.11.2 | An easy to use stand-alone template engine written in pure python. / 3-Clause BSD |
| [joblib](https://pypi.org/project/joblib/) | 0.17.0 | Lightweight pipelining: using Python functions as pipeline jobs. / BSD-3-Clause |
| [jpeg](http://www.ijg.org/) | 9b | read/write jpeg COM, EXIF, IPTC medata / Custom free software license |
| [json5](https://github.com/dpranke/pyjson5) | 0.9.5 | A Python implementation of the JSON5 data format / Apache-2.0 |
| [jsonschema](https://github.com/Julian/jsonschema) | 3.2.0 | An implementation of JSON Schema validation for Python / MIT |
| [jupyter](http://jupyter.org) | 1.0.0 | Jupyter metapackage. Install all the Jupyter components in one go. / BSD 3-Clause |
| [jupyter\_client](https://jupyter.org) | 6.1.7 | jupyter\_client contains the reference implementation of the Jupyter protocol. / BSD-3-Clause |
| [jupyter\_console](http://jupyter.org) | 6.2.0 | Jupyter terminal console / BSD-3-Clause |
| [jupyter\_core](https://jupyter.org) | 4.6.3 | Core common functionality of Jupyter projects. / BSD-3-Clause |
| [jupyterlab](https://github.com/jupyterlab/jupyterlab) | 2.2.6 | JupyterLab PRE-ALPHA / BSD-3-Clause |
| [jupyterlab\_pygments](http://github.com/JupyterLab/jupyterlab_pygments) | 0.1.2 | Pygments syntax coloring scheme making use of the JupyterLab CSS variables / BSD-3-Clause |
| [jupyterlab\_server](https://github.com/jupyterlab/jupyterlab_server) | 1.2.0 | A set of server components for JupyterLab and JupyterLab like applications. / BSD-3-Clause |
| [keyring](https://github.com/jaraco/keyring) | 21.4.0 | Store and access your passwords safely / Python Software Foundation or MIT |
| [kiwisolver](https://github.com/nucleic/kiwi) | 1.3.0 | An efficient C++ implementation of the Cassowary constraint solver / BSD-3-Clause |
| [krb5](http://web.mit.edu/kerberos/) | 1.18.2 | A network authentication protocol. / MIT |
| [lazy-object-proxy](https://github.com/ionelmc/python-lazy-object-proxy) | 1.4.3 | A fast and thorough lazy object proxy / BSD-2-Clause |
| [lcms2](http://www.littlecms.com/) | 2.11 | Open Source Color Management Engine / MIT |
| [libarchive](http://www.libarchive.org/) | 3.4.2 | Multi-format archive and compression library / BSD-2-Clause |
| [libcurl](http://curl.haxx.se/) | 7.71.1 | tool and library for transferring data with URL syntax / MIT/X derivate (`<http://curl.haxx.se/docs/copyright.html>`) |
| [libcxx](http://llvm.org/) | 10.0.0 | LLVM C++ standard library / Apache-2.0 WITH LLVM-exception |
| [libedit](http://thrysoee.dk/editline/) | 3.1.20191231 | Editline Library (libedit) / BSD-2-Clause |
| [libffi](https://sourceware.org/libffi/) | 3.3 | A Portable Foreign Function Interface Library. / Custom |
| [libgfortran](http://gcc.gnu.org/) | 3.0.1 | Fortran libraries from the GNU Compiler Collection / GPL 3 (with GCC Runtime Library Exception 3.1) |
| [libiconv](https://www.gnu.org/software/libiconv/) | 1.16 | Provides iconv for systems which don’t have one (or that cannot convert from/to Unicode.) / GPL and LGPL |
| [liblief](https://lief.quarkslab.com/) | 0.10.1 | A cross platform library to parse, modify and abstract ELF, PE and MachO formats. / Apache-2.0 |
| [libllvm10](http://llvm.org/) | 10.0.1 | Development headers and libraries for LLVM / Apache-2.0 WITH LLVM-exception |
| [libpng](http://www.libpng.org/pub/png/libpng.html) | 1.6.37 | PNG reference library / zlib/libpng |
| [libsodium](http://libsodium.org) | 1.0.18 | A modern and easy-to-use crypto library. / ISC |
| [libspatialindex](http://libspatialindex.github.io) | 1.9.3 | Extensible framework for robust spatial indexing / MIT |
| [libssh2](https://www.libssh2.org/) | 1.9.0 | the SSH library / BSD-3-Clause |
| [libtiff](http://www.libtiff.org/) | 4.1.0 | Support for the Tag Image File Format (TIFF). / HPND |
| [libxml2](http://xmlsoft.org/) | 2.9.10 | The XML C parser and toolkit of Gnome / MIT |
| [libxslt](http://xmlsoft.org/XSLT/) | 1.1.34 | The XSLT C library developed for the GNOME project / MIT |
| [llvm-openmp](http://openmp.llvm.org/) | 10.0.0 | The OpenMP API supports multi-platform shared-memory parallel programming in C/C++ and Fortran. / NCSA |
| [llvmlite](http://llvmlite.pydata.org) | 0.34.0 | A lightweight LLVM python binding for writing JIT compilers. / BSD-2-Clause |
| [locket](https://github.com/mwilliamson/locket.py) | 0.2.0 | File-based locks for Python for Linux and Windows / BSD 2-Clause |
| [lxml](http://lxml.de/) | 4.6.1 | Pythonic binding for the C libraries libxml2 and libxslt. / BSD-3-Clause and GPL-2.0-only and ZPL-2.0 and LicenseRef-ElementTree |
| [lz4-c](https://www.lz4.org) | 1.9.2 | Extremely Fast Compression algorithm / BSD-2-Clause |
| [lzo](http://www.oberhumer.com/opensource/lzo/) | 2.10 | LZO is a portable lossless data compression library written in ANSI C. / GPL v2+ |
| [markupsafe](https://www.palletsprojects.com/p/markupsafe) | 1.1.1 | A Python module that implements the jinja2.Markup string / BSD-3-Clause |
| [matplotlib](http://matplotlib.org/) | 3.3.2 | Publication quality figures in Python / LicenseRef-PSF-based |
| [matplotlib-base](http://matplotlib.org/) | 3.3.2 | Publication quality figures in Python / LicenseRef-PSF-based |
| [mccabe](https://github.com/PyCQA/mccabe) | 0.6.1 | McCabe complexity checker for Python / MIT |
| [mistune](https://github.com/lepture/mistune) | 0.8.4 | The fastest markdown parser in pure Python. / BSD 3-Clause |
| [mkl](https://software.intel.com/en-us/mkl) | 2019.4 | Math library for Intel and compatible processors / LicenseRef-ProprietaryIntel |
| [mkl-service](https://github.com/ContinuumIO/mkl-service) | 2.3.0 | Python bindings to MKL service functions / 3-clause BSD |
| [mkl\_fft](http://github.com/IntelPython/mkl_fft) | 1.2.0 | NumPy-based implementation of Fast Fourier Transform using Intel (R) Math Kernel Library. / BSD 3-Clause |
| [mkl\_random](http://github.com/IntelPython/mkl_random) | 1.1.1 | Intel (R) MKL-powered package for sampling from common probability distributions into NumPy arrays. / BSD 3-Clause |
| [mock](https://github.com/testing-cabal/mock) | 4.0.2 | A library for testing in Python / BSD-2-Clause |
| [more-itertools](https://github.com/more-itertools/more-itertools) | 8.6.0 | More routines for operating on iterables, beyond itertools / MIT |
| [mpc](http://www.multiprecision.org/) | 1.1.0 | A C library for the arithmetic of complex numbers with arbitrarily high precision. / LGPL 3 |
| [mpfr](http://www.mpfr.org/) | 4.0.2 | The MPFR library is a C library for multiple-precision floating-point computations with correct rounding. / LGPL-3.0-only |
| [mpmath](http://mpmath.org) | 1.1.0 | Python library for arbitrary-precision floating-point arithmetic / BSD 3-Clause |
| [msgpack-python](http://msgpack.org/) | 1.0.0 | MessagePack (de)serializer / Apache-2.0 |
| [multipledispatch](https://github.com/mrocklin/multipledispatch/) | 0.6.0 | Multiple dispatch in Python / BSD 3-Clause |
| [nbclient](https://jupyter.org) | 0.5.1 | A client library for executing notebooks. Formally nbconvert’s ExecutePreprocessor. / BSD-3-Clause |
| [nbconvert](http://jupyter.org) | 6.0.7 | Converting Jupyter Notebooks / BSD-3-Clause |
| [nbformat](http://jupyter.org) | 5.0.8 | The reference implementation of the Jupyter Notebook format / BSD-3-Clause |
| [ncurses](http://www.gnu.org/software/ncurses/) | 6.2 | Library for text-based user interfaces / Free software (MIT-like) |
| [nest-asyncio](https://github.com/erdewit/nest_asyncio) | 1.4.2 | Patch asyncio to allow nested event loops / BSD-2-Clause |
| [networkx](https://networkx.github.io/) | 2.5 | Python package for creating and manipulating complex networks / BSD-3-Clause |
| [nltk](http://nltk.org/) | 3.5 | Natural Language Toolkit / Apache 2.0 |
| [nose](http://readthedocs.org/docs/nose/) | 1.3.7 | Nose extends unittest to make testing easier / LGPL-2.1 |
| [notebook](https://jupyter.org) | 6.1.4 | Jupyter Notebook / BSD-3-Clause |
| [numba](http://numba.github.com) | 0.51.2 | NumPy aware dynamic Python compiler using LLVM / BSD-2-Clause |
| [numexpr](https://github.com/pydata/numexpr) | 2.7.1 | Fast numerical expression evaluator for NumPy. / MIT |
| [numpy](http://numpy.scipy.org/) | 1.19.2 | Array processing for numbers, strings, records, and objects. / BSD 3-Clause |
| [numpy-base](http://numpy.scipy.org/) | 1.19.2 | Array processing for numbers, strings, records, and objects. / BSD 3-Clause |
| [numpydoc](https://github.com/numpy/numpydoc) | 1.1.0 | Numpy’s Sphinx extensions / BSD 3-Clause |
| [olefile](http://www.decalage.info/python/olefileio) | 0.46 | parse, read and write Microsoft OLE2 files / BSD 2-Clause |
| [openpyxl](https://openpyxl.readthedocs.io) | 3.0.5 | A Python library to read/write Excel 2010 xlsx/xlsm files / MIT |
| [openssl](http://www.openssl.org/) | 1.1.1h | OpenSSL is an open-source implementation of the SSL and TLS protocols / OpenSSL |
| [packaging](https://github.com/pypa/packaging) | 20.4 | Core utilities for Python packages / Apache 2.0 or BSD 2-Clause |
| [pandas](http://pandas.pydata.org) | 1.1.3 | High-performance, easy-to-use data structures and data analysis tools. / BSD-3-Clause |
| [pandoc](http://pandoc.org/) | 2.11 | Universal markup converter (repackaged binaries) / GPL-2.0 |
| [pandocfilters](https://github.com/jgm/pandocfilters) | 1.4.3 | A python module for writing pandoc filters / BSD-3-Clause |
| [parso](https://github.com/davidhalter/parso) | 0.7.0 | A Python Parser / MIT |
| [partd](https://github.com/dask/partd) | 1.1.0 | Data structure for on-disk shuffle operations / BSD 3-Clause |
| [path](https://github.com/jaraco/path) | 15.0.0 | A module wrapper for os.path / MIT |
| [path.py](https://github.com/jaraco/path.py) | 12.5.0 | A module wrapper for os.path / MIT |
| [pathlib2](https://github.com/mcmtroffaes/pathlib2) | 2.3.5 | Fork of pathlib aiming to support the full stdlib Python API / MIT |
| [pathtools](https://github.com/gorakhargosh/pathtools) | 0.1.2 | Path utilities for Python. / MIT |
| [patsy](https://github.com/pydata/patsy) | 0.5.1 | Describing statistical models in Python using symbolic formulas / BSD-2-Clause, PSF2 |
| [pcre](http://www.pcre.org/) | 8.44 | Regular expression pattern matching using the same syntax and semantics as Perl 5. / BSD 3-Clause |
| [pep8](http://pep8.readthedocs.org/) | 1.7.1 | Python style guide checker / MIT |
| [pexpect](http://pexpect.sourceforge.net/) | 4.8.0 | Pexpect makes Python a better tool for controlling other applications. / ISC |
| [pickleshare](https://github.com/pickleshare/pickleshare/) | 0.7.5 | Tiny ‘shelve’-like database with concurrency support / MIT |
| [pillow](https://pillow.readthedocs.io) | 8.0.1 | Pillow is the friendly PIL fork by Alex Clark and Contributors / LicenseRef-PIL |
| [pip](https://pip.pypa.io/en/stable/) | 20.2.4 | PyPA recommended tool for installing Python packages / MIT |
| [pkginfo](https://code.launchpad.net/~tseaver/pkginfo/trunk) | 1.6.1 | Query metadatdata from sdists / bdists / installed packages. / MIT |
| [pluggy](https://github.com/pytest-dev/pluggy) | 0.13.1 | Plugin registration and hook calling for Python / MIT |
| [ply](http://www.dabeaz.com/ply/index.html) | 3.11 | Python Lex-Yacc / BSD 3-clause |
| [prometheus\_client](https://github.com/prometheus/client_python) | 0.8.0 | Python client for the Prometheus monitoring system / Apache-2.0 |
| [prompt-toolkit](https://github.com/jonathanslenders/python-prompt-toolkit) | 3.0.8 | Library for building powerful interactive command lines in Python / BSD-3-Clause |
| [prompt\_toolkit](https://github.com/jonathanslenders/python-prompt-toolkit) | 3.0.8 | Library for building powerful interactive command lines in Python / BSD-3-Clause |
| [psutil](https://github.com/giampaolo/psutil) | 5.7.2 | A cross-platform process and system utilities module for Python / BSD-3-Clause |
| [ptyprocess](https://github.com/pexpect/ptyprocess) | 0.6.0 | Run a subprocess in a pseudo terminal / ISC |
| [py](https://github.com/pytest-dev/py) | 1.9.0 | library with cross-python path, ini-parsing, io, code, log facilities / MIT |
| [py-lief](https://lief.quarkslab.com/) | 0.10.1 | A cross platform library to parse, modify and abstract ELF, PE and MachO formats. / Apache-2.0 |
| [pycodestyle](https://pycodestyle.readthedocs.io/) | 2.6.0 | Python style guide checker / MIT |
| [pycosat](https://github.com/ContinuumIO/pycosat) | 0.6.3 | Bindings to picosat (a SAT solver) / MIT |
| [pycparser](https://github.com/eliben/pycparser) | 2.20 | Complete C99 parser in pure Python / BSD 3-clause |
| [pycurl](http://pycurl.sourceforge.net/) | 7.43.0.6 | A Python Interface To The cURL library / LGPL, MIT |
| [pydocstyle](https://github.com/PyCQA/pydocstyle) | 5.1.1 | Python docstring style checker (formerly pep257) / MIT |
| [pyflakes](https://github.com/PyCQA/pyflakes) | 2.2.0 | Pyflakes analyzes programs and detects various errors. / MIT |
| [pygments](http://pygments.org/) | 2.7.2 | Pygments is a generic syntax highlighter suitable for use in code hosting, forums, wikis or other applications that need to prettify source code. / BSD-2-clause |
| [pylint](http://www.pylint.org/) | 2.6.0 | python code static checker / GPL-2.0-only |
| [pyodbc](https://github.com/mkleehammer/pyodbc) | 4.0.30 | DB API Module for ODBC / MIT |
| [pyopenssl](https://github.com/pyca/pyopenssl) | 19.1.0 | Python wrapper module around the OpenSSL library / Apache 2.0 |
| [pyparsing](http://pyparsing.wikispaces.com/) | 2.4.7 | Create and execute simple grammars / MIT |
| [pyqt](http://www.riverbankcomputing.co.uk/software/pyqt) | 5.9.2 | Python binding of the cross-platform GUI toolkit Qt. / Commercial, GPL-2.0, GPL-3.0 |
| [pyrsistent](http://github.com/tobgu/pyrsistent/) | 0.17.3 | Persistent/Functional/Immutable data structures / MIT |
| [pysocks](https://github.com/Anorov/PySocks) | 1.7.1 | A Python SOCKS client module. See [Anorov/PySocks](https://github.com/Anorov/PySocks) for more information. / BSD 3-Clause |
| [pytables](http://www.pytables.org) | 3.6.1 | Brings together Python, HDF5 and NumPy to easily handle large amounts of data. / BSD 3-Clause |
| [pytest](https://docs.pytest.org/en/latest/) | 6.1.1 | Simple and powerful testing with Python. / MIT |
| [python](https://www.python.org/) | 3.8.5 | General purpose programming language / Python-2.0 |
| [python-dateutil](https://dateutil.readthedocs.org/) | 2.8.1 | Extensions to the standard Python datetime module. / BSD 3 Clause |
| [python-jsonrpc-server](https://github.com/palantir/python-jsonrpc-server) | 0.4.0 | A Python 2.7 and 3.4+ server implementation of the JSON RPC 2.0 protocol. / MIT |
| [python-language-server](https://github.com/palantir/python-language-server) | 0.35.1 | An implementation of the Language Server Protocol for Python / MIT |
| [python-libarchive-c](https://github.com/Changaco/python-libarchive-c) | 2.9 | Python interface to libarchive / CC0-1.0 |
| python.app | 2 | Proxy on OS X letting Python libraries hook into the gui event loop / BSD |
| [pytz](http://pythonhosted.org/pytz/) | 2020.1 | World timezone definitions, modern and historical. / MIT |
| [pywavelets](https://github.com/PyWavelets/pywt) | 1.1.1 | Discrete Wavelet Transforms in Python / MIT |
| [pyyaml](http://pyyaml.org/wiki/PyYAML) | 5.3.1 | YAML parser and emitter for Python / MIT |
| [pyzmq](https://github.com/zeromq/pyzmq) | 19.0.2 | Python bindings for zeromq / BSD 3-clause |
| [qdarkstyle](https://github.com/ColinDuquesnoy/QDarkStyleSheet) | 2.8.1 | A dark stylesheet for Qt applications (Qt4, Qt5, PySide, PyQt4, PyQt5, QtPy, PyQtGraph). / MIT |
| [qt](http://qt-project.org) | 5.9.7 | Qt is a cross-platform application and UI framework. / LGPL-3.0 |
| [qtawesome](https://github.com/spyder-ide/qtawesome) | 1.0.1 | Iconic fonts in PyQt and PySide applications / MIT |
| [qtconsole](http://jupyter.org) | 4.7.7 | Jupyter Qt Console / BSD-3-Clause |
| [qtpy](https://github.com/spyder-ide/qtpy) | 1.9.0 | Abstraction layer for PyQt5/PyQt4/PySide / MIT |
| [readline](https://cnswww.cns.cwru.edu/php/chet/readline/rltop.html) | 8.0 | library for editing command lines as they are typed in / GPL-3.0 |
| [regex](https://bitbucket.org/mrabarnett/mrab-regex) | 2020.10.15 | Alternative regular expression module, to replace re / Python-2.0 |
| [requests](http://python-requests.org) | 2.24.0 | Requests is an elegant and simple HTTP library for Python, built with ♥. / Apache-2.0 |
| ripgrep | 12.1.1 | |
| [rope](https://github.com/python-rope/rope) | 0.18.0 | A python refactoring library / GPL 2.0 |
| [rtree](http://toblerity.github.com/rtree/) | 0.9.4 | R-Tree spatial index for Python GIS / MIT |
| [ruamel\_yaml](https://bitbucket.org/ruamel/yaml) | 0.15.87 | A patched copy of ruamel.yaml. / MIT |
| [scikit-image](http://scikit-image.org/) | 0.17.2 | Image processing in Python. / BSD-3-Clause |
| [scikit-learn](http://scikit-learn.org/) | 0.23.2 | A set of python modules for machine learning and data mining / BSD-3-Clause |
| [scipy](http://www.scipy.org/) | 1.5.2 | Scientific Library for Python / BSD 3-Clause |
| [seaborn](https://seaborn.pydata.org) | 0.11.0 | Statistical data visualization / BSD 3-Clause |
| [send2trash](https://github.com/hsoft/send2trash) | 1.5.0 | Python library to natively send files to Trash (or Recycle bin) on all platforms. / BSD-3-Clause |
| [setuptools](https://github.com/pypa/setuptools) | 50.3.1 | Download, build, install, upgrade, and uninstall Python packages / MIT |
| [simplegeneric](http://cheeseshop.python.org/pypi/simplegeneric) | 0.8.1 | Simple generic functions (similar to Python’s own len(), pickle.dump(), etc.) / Zope Public |
| [singledispatch](http://docs.python.org/3/library/functools.html#functools.singledispatch) | 3.4.0.3 | Transforms a function into a single-dispatch generic function / MIT |
| [sip](http://www.riverbankcomputing.com/software/sip/intro) | 4.19.8 | Create Python bindings for C and C++ libraries / GPL-3.0 |
| [six](https://six.readthedocs.io/) | 1.15.0 | Python 2 and 3 compatibility utilities / MIT |
| [snowballstemmer](https://github.com/shibukawa/snowball_py) | 2.0.0 | Snowball stemming library collection for Python / BSD-2-Clause |
| [sortedcollections](http://www.grantjenks.com/docs/sortedcollections/) | 1.2.1 | Python Sorted Collections / Apache-2.0 |
| [sortedcontainers](http://www.grantjenks.com/docs/sortedcontainers/) | 2.2.2 | Python Sorted Container Types: SortedList, SortedDict, and SortedSet / Apache-2.0 |
| [soupsieve](http://facelessuser.github.io/soupsieve) | 2.0.1 | A modern CSS selector implementation for BeautifulSoup / MIT |
| [sphinx](http://www.sphinx-doc.org) | 3.2.1 | Sphinx is a tool that makes it easy to create intelligent and beautiful documentation / BSD-2-Clause |
| sphinxcontrib | 1.0 | Python namespace for sphinxcontrib / BSD |
| [sphinxcontrib-applehelp](https://www.sphinx-doc.org/en/master/) | 1.0.2 | sphinxcontrib-applehelp is a sphinx extension which outputs Apple help books / BSD-2-Clause |
| [sphinxcontrib-devhelp](https://www.sphinx-doc.org/en/master/) | 1.0.2 | sphinxcontrib-devhelp is a sphinx extension which outputs Devhelp document / BSD-2-Clause |
| [sphinxcontrib-htmlhelp](https://www.sphinx-doc.org/en/master/) | 1.0.3 | sphinxcontrib-htmlhelp is a sphinx extension which … / BSD-2-Clause |
| [sphinxcontrib-jsmath](https://www.sphinx-doc.org/en/master/) | 1.0.1 | A sphinx extension which renders display math in HTML via JavaScript / BSD-2-Clause |
| [sphinxcontrib-qthelp](https://www.sphinx-doc.org/en/master/) | 1.0.3 | sphinxcontrib-qthelp is a sphinx extension which outputs QtHelp document / BSD-2-Clause |
| [sphinxcontrib-serializinghtml](https://www.sphinx-doc.org/en/master/) | 1.1.4 | sphinxcontrib-serializinghtml is a sphinx extension which outputs “serialized” HTML files (json and pickle). / BSD-2-Clause |
| [sphinxcontrib-websupport](https://pypi.python.org/pypi/sphinxcontrib-websupport) | 1.2.4 | Sphinx API for Web Apps / BSD-2-Clause |
| [spyder](https://www.spyder-ide.org/) | 4.1.5 | The Scientific Python Development Environment / MIT |
| [spyder-kernels](https://www.spyder-ide.org/) | 1.9.4 | Jupyter kernels for Spyder’s console / MIT |
| [sqlalchemy](http://www.sqlalchemy.org/) | 1.3.20 | Database Abstraction Library. / MIT |
| [sqlite](http://www.sqlite.org/) | 3.33.0 | Implements a self-contained, zero-configuration, SQL database engine / Public-Domain (`<http://www.sqlite.org/copyright.html>`) |
| [statsmodels](https://www.statsmodels.org) | 0.12.0 | Statistical computations and models for use with SciPy / BSD-3-Clause |
| [sympy](https://sympy.org) | 1.6.2 | Python library for symbolic mathematics / BSD-3-Clause |
| [tblib](https://github.com/ionelmc/python-tblib) | 1.7.0 | Traceback serialization library. / BSD 2-Clause |
| [terminado](https://github.com/jupyter/terminado) | 0.9.1 | Terminals served by tornado websockets / BSD-2-Clause |
| [testpath](https://testpath.readthedocs.io) | 0.4.4 | Testpath is a collection of utilities for Python code working with files and commands. / BSD-3-Clause |
| [threadpoolctl](https://github.com/joblib/threadpoolctl) | 2.1.0 | Python helpers to control the threadpools of native libraries / BSD 3-Clause |
| [tifffile](https://github.com/blink1073/tifffile) | 2020.10.1 | Read and write image data from and to TIFF files. / BSD 3-Clause |
| [tk](http://www.tcl.tk/) | 8.6.10 | A dynamic programming language with GUI support. Bundles Tcl and Tk. / Tcl/Tk |
| [toml](https://github.com/uiri/toml) | 0.10.1 | Python lib for TOML. / MIT |
| [toolz](http://toolz.readthedocs.org/) | 0.11.1 | A functional standard library for Python / BSD-3-Clause |
| [tornado](http://www.tornadoweb.org/) | 6.0.4 | A Python web framework and asynchronous networking library, originally developed at FriendFeed. / Apache-2.0 |
| [tqdm](https://pypi.python.org/pypi/tqdm) | 4.50.2 | A Fast, Extensible Progress Meter / MPLv2.0, MIT |
| [traitlets](http://traitlets.readthedocs.org/) | 5.0.5 | Configuration system for Python applications / BSD-3-Clause |
| [typing\_extensions](https://github.com/python/typing/tree/master/typing_extensions) | 3.7.4.3 | Backported and Experimental Type Hints for Python / PSF-2.0 |
| [ujson](https://github.com/ultrajson/ultrajson) | 4.0.1 | Ultra fast JSON decoder and encoder written in C with Python bindings / BSD-3-Clause |
| [unicodecsv](https://github.com/jdunck/python-unicodecsv) | 0.14.1 | Drop-in replacement for csv module which supports unicode strings / BSD |
| [unixodbc](http://www.unixodbc.org/) | 2.3.9 | ODBC on non MS Windows platforms / LGPL-2.1 |
| [urllib3](https://urllib3.readthedocs.io/) | 1.25.11 | HTTP library with thread-safe connection pooling, file post, and more. / MIT |
| [watchdog](http://github.com/gorakhargosh/watchdog) | 0.10.3 | Filesystem events monitoring / Apache 2.0 |
| [wcwidth](https://github.com/jquast/wcwidth) | 0.2.5 | Measures number of Terminal column cells of wide-character codes. / MIT |
| [webencodings](https://github.com/gsnedders/python-webencodings) | 0.5.1 | Character encoding aliases for legacy web content / BSD 3-Clause |
| [werkzeug](https://palletsprojects.com/p/werkzeug/) | 1.0.1 | The comprehensive WSGI web application library. / BSD 3-Clause |
| [wheel](https://github.com/pypa/wheel) | 0.35.1 | A built-package format for Python. / MIT |
| [widgetsnbextension](http://ipython.org) | 3.5.1 | Interactive Widgets for Jupyter / BSD 3-clause |
| [wrapt](https://github.com/GrahamDumpleton/wrapt) | 1.11.2 | Module for decorators, wrappers and monkey patching / BSD 2-Clause |
| [wurlitzer](https://github.com/minrk/wurlitzer) | 2.0.1 | Capture C-level stdout/stderr in Python / MIT |
| [xlrd](http://www.python-excel.org/) | 1.2.0 | Library for developers to extract data from Microsoft Excel (tm) spreadsheet files / BSD 3-Clause and BSD with advertising |
| [xlsxwriter](https://xlsxwriter.readthedocs.io/) | 1.3.7 | A Python module for creating Excel XLSX files / BSD-2-Clause |
| [xlwings](http://xlwings.org/) | 0.20.8 | Interact with Excel from Python and vice versa / 3-clause BSD |
| [xlwt](http://www.python-excel.org/) | 1.3.0 | Writing data and formatting information to Excel files / BSD |
| [xz](http://tukaani.org/xz/) | 5.2.5 | Data compression software with high compression ratio / LGPL-2.1 and GPL-2.0 |
| [yaml](http://pyyaml.org/wiki/LibYAML) | 0.2.5 | A C library for parsing and emitting YAML / MIT |
| [yapf](https://github.com/google/yapf) | 0.30.0 | A formatter for Python files / Apache 2.0 |
| [zeromq](http://zeromq.org) | 4.3.3 | A high-performance asynchronous messaging library. / LGPL 3 |
| [zict](http://github.com/mrocklin/zict) | 2.0.0 | Composable Dictionary Classes / BSD 3-Clause |
| [zipp](https://github.com/jaraco/zipp) | 3.4.0 | A pathlib-compatible Zipfile object wrapper / MIT |
| [zlib](http://zlib.net/) | 1.2.11 | Massively spiffy yet delicately unobtrusive compression library / zlib |
| zope | 1.0 | web application server / BSD |
| [zope.event](http://www.zope.org/en/latest/) | 4.5.0 | Very basic event publishing system / Zope Public License |
| [zope.interface](http://docs.zope.org/zope.interface/) | 5.1.2 | Interfaces for Python / ZPL-2.1 |
| [zstd](http://www.zstd.net) | 1.4.5 | Zstandard - Fast real-time compression algorithm / BSD 3-Clause |
| Name | Version | Summary / License |
|---|---|---|
| [\_ipyw\_jlab\_nb\_ext\_conf](https://github.com/ContinuumIO/anaconda-nb-extensions-meta-config) | 0.1.0 | A configuration metapackage for enabling Anaconda-bundled jupyter extensions / BSD |
| \_libgcc\_mutex | 0.1 | Mutex for libgcc and libgcc-ng / None |
| [alabaster](http://www.sphinx-doc.org/en/stable/index.html) | 0.7.12 | Configurable, Python 2+3 compatible Sphinx theme. / BSD 3-Clause |
| [anaconda-client](http://anaconda.org) | 1.7.2 | anaconda.org command line client library / BSD 3-clause |
| [anaconda-project](https://github.com/Anaconda-Platform/anaconda-project) | 0.8.4 | Tool for encapsulating, running, and reproducing data science projects / BSD 3-Clause |
| [argon2-cffi](https://argon2-cffi.readthedocs.org/) | 20.1.0 | The secure Argon2 password hashing algorithm. / MIT |
| [asn1crypto](https://github.com/wbond/asn1crypto) | 1.4.0 | Python ASN.1 library with a focus on performance and a pythonic API / MIT |
| [astroid](https://www.astroid.org/) | 2.4.2 | A abstract syntax tree for Python with inference support. / LGPL-2.1-only |
| [astropy](http://www.astropy.org/) | 4.0.2 | Community-developed Python Library for Astronomy / BSD-3-Clause |
| [async\_generator](https://github.com/python-trio/async_generator) | 1.10 | Async generators and context managers for Python 3.5+ / MIT |
| [attrs](https://attrs.readthedocs.io/en/stable/) | 20.3.0 | attrs is the Python package that will bring back the joy of writing classes by relieving you from the drudgery of implementing object protocols (aka dunder methods). / MIT |
| [babel](http://babel.pocoo.org/) | 2.8.1 | Utilities to internationalize and localize Python applications / BSD 3-clause |
| [backcall](https://github.com/takluyver/backcall/) | 0.2.0 | Specifications for callback functions passed in to an API / BSD-3-Clause |
| [backports](https://bitbucket.org/brandon/backports) | 1.0 | None / BSD |
| [backports.shutil\_get\_terminal\_size](https://github.com/chrippa/backports.shutil_get_terminal_size) | 1.0.0 | A backport of the get\_terminal\_size function from Python 3.3’s shutil. / MIT |
| [beautifulsoup4](http://www.crummy.com/software/BeautifulSoup/) | 4.9.3 | Python library designed for screen-scraping / MIT |
| [bitarray](https://github.com/ilanschnell/bitarray) | 1.6.1 | efficient arrays of booleans – C extension / PSF |
| [bkcharts](http://github.com/bokeh/bkcharts) | 0.2 | High level chart types built on top of Bokeh / BSD 3-Clause |
| blas | 1.0 | |
| [bleach](https://github.com/mozilla/bleach) | 3.2.1 | Easy, whitelist-based HTML-sanitizing tool / Apache-2.0 |
| [blosc](https://github.com/Blosc/c-blosc) | 1.20.1 | A blocking, shuffling and loss-less compression library that can be faster than memcpy() / BSD-3-Clause |
| [bokeh](http://bokeh.pydata.org/) | 2.2.3 | Statistical and novel interactive HTML plots for Python / BSD-3-Clause |
| [boto](https://github.com/boto/boto/) | 2.49.0 | Amazon Web Services Library / MIT |
| [bottleneck](https://github.com/pydata/bottleneck) | 1.3.2 | Fast NumPy array functions written in Cython. / BSD 2-Clause |
| [brotlipy](https://github.com/python-hyper/brotlipy) | 0.7.0 | Python bindings to the Brotli compression library / MIT |
| [bzip2](http://www.bzip.org/) | 1.0.8 | high-quality data compressor / bzip2 |
| [ca-certificates](https://github.com/conda-forge/ca-certificates-feedstock) | 2020.10.14 | Certificates for use with other packages. / MPL 2.0 |
| [cairo](http://cairographics.org/) | 1.14.12 | Cairo is a 2D graphics library with support for multiple output devices. / LGPL 2.1 or MPL 1.1 |
| [certifi](http://certifi.io/) | 2020.6.20 | Python package for providing Mozilla’s CA Bundle. / ISC |
| [cffi](https://bitbucket.org/cffi/cffi) | 1.14.3 | Foreign Function Interface for Python calling C code. / MIT |
| [chardet](https://github.com/chardet/chardet) | 3.0.4 | Universal character encoding detector / LGPL2 |
| [click](https://palletsprojects.com/p/click) | 7.1.2 | Python composable command line interface toolkit / BSD-3-Clause |
| [cloudpickle](https://github.com/cloudpipe/cloudpickle) | 1.6.0 | Extended pickling support for Python objects / BSD-3-Clause |
| [clyent](https://github.com/Anaconda-Platform/clyent) | 1.2.2 | Command line client library for windows and posix / BSD 3-Clause |
| [colorama](https://github.com/tartley/colorama) | 0.4.4 | Cross-platform colored terminal text / BSD-3-Clause |
| [conda](https://conda.io) | 4.9.2 | OS-agnostic, system-level binary package and environment manager. / BSD 3-Clause |
| [conda-build](https://github.com/conda/conda-build) | 3.20.5 | tools for building conda packages / BSD 3-Clause |
| [conda-env](https://github.com/conda/conda-env) | 2.6.0 | Tools for interacting with conda environments. / BSD 3-Clause |
| [conda-verify](https://github.com/conda/conda-verify) | 3.4.2 | tool for validating conda recipes and conda packages / BSD 3-Clause |
| [contextlib2](http://contextlib2.readthedocs.org) | 0.6.0.post1 | Backports and enhancements for the contextlib module / PSF 2 |
| [cryptography](https://github.com/pyca/cryptography) | 3.1.1 | Provides cryptographic recipes and primitives to Python developers / Apache-2.0 AND BSD-3-Clause AND PSF-2.0 |
| [curl](http://curl.haxx.se/) | 7.71.1 | tool and library for transferring data with URL syntax / MIT/X derivate (`<http://curl.haxx.se/docs/copyright.html>`) |
| [cycler](http://matplotlib.org/cycler) | 0.10.0 | Composable style cycles. / BSD 3-Clause |
| [cython](http://www.cython.org/) | 0.29.21 | The Cython compiler for writing C extensions for the Python language / Apache-2.0 |
| [cytoolz](https://github.com/pytoolz/cytoolz) | 0.11.0 | Cython implementation of Toolz. High performance functional utilities / BSD-3-Clause |
| [dask](https://dask.org/) | 2.30.0 | Parallel PyData with Task Scheduling / BSD-3-Clause |
| [dask-core](http://github.com/dask/dask/) | 2.30.0 | Parallel Python with task scheduling / BSD-3-Clause |
| [decorator](https://github.com/micheles/decorator) | 4.4.2 | Better living through Python with decorators. / BSD-3-Clause |
| [defusedxml](https://bitbucket.org/tiran/defusedxml) | 0.6.0 | XML bomb protection for Python stdlib modules / PSF 2.0 |
| [distributed](http://distributed.readthedocs.io/en/latest/) | 2.30.1 | Distributed computing with Dask / BSD-3-Clause |
| [docutils](http://docutils.sourceforge.net/) | 0.16 | Docutils – Python Documentation Utilities / Public Domain Dedictation and BSD 2-Clause and PSF 2.1.1 and GPL 3.0 |
| [entrypoints](https://github.com/takluyver/entrypoints) | 0.3 | Discover and load entry points from installed packages. / MIT License |
| [et\_xmlfile](https://bitbucket.org/openpyxl/et_xmlfile) | 1.0.1 | An implementation of lxml.xmlfile for the standard library / MIT |
| [expat](http://expat.sourceforge.net/) | 2.2.10 | Expat XML parser library in C / MIT |
| [fastcache](https://github.com/pbrady/fastcache) | 1.1.0 | C implementation of Python 3 lru\_cache / MIT |
| [filelock](https://github.com/benediktschmitt/py-filelock) | 3.0.12 | A platform independent file lock. / Public Domain |
| [flask](http://flask.pocoo.org) | 1.1.2 | A microframework based on Werkzeug, Jinja2 and good intentions. / BSD 3-Clause |
| [fontconfig](http://www.freedesktop.org/wiki/Software/fontconfig/) | 2.13.0 | A library for configuring and customizing font access. / MIT |
| [freetype](https://www.freetype.org/) | 2.10.4 | A Free, High-Quality, and Portable Font Engine / GPL-2.0-only and LicenseRef-FreeType |
| [fsspec](https://github.com/martindurant/filesystem_spec) | 0.8.3 | A specification for pythonic filesystems / BSD-3-Clause |
| [get\_terminal\_size](https://github.com/chrippa/backports.shutil_get_terminal_size) | 1.0.0 | Get the size of the terminal window. / MIT |
| [gevent](https://www.gevent.org) | 20.9.0 | Coroutine-based network library / MIT |
| [glib](https://developer.gnome.org/glib/) | 2.66.1 | Provides core application building blocks for libraries and applications written in C. / LGPL-2.1 |
| [glob2](https://github.com/miracle2k/python-glob2) | 0.7 | Version of the glob module that supports recursion via \*\*, and can capture patterns. / BSD-2-Clause |
| [gmp](http://gmplib.org/) | 6.1.2 | The GNU multiprecision library. / GPL 2 and LGPL 3 |
| [gmpy2](https://pypi.python.org/pypi/gmpy2) | 2.0.8 | GMP/MPIR, MPFR, and MPC interface to Python 2.6+ and 3.x / LGPL 3 |
| [greenlet](https://github.com/python-greenlet/greenlet) | 0.4.17 | Lightweight in-process concurrent programming / MIT |
| [h5py](http://www.h5py.org/) | 2.10.0 | Read and write HDF5 files from Python. / BSD-3-Clause |
| [hdf5](http://www.hdfgroup.org/HDF5/) | 1.10.4 | HDF5 is a data model, library, and file format for storing and managing data / HDF5 |
| [heapdict](http://stutzbachenterprises.com/) | 1.0.1 | A heap with decrease-key and increase-key operations / BSD 3-Clause |
| [html5lib](https://github.com/html5lib/html5lib-python) | 1.1 | HTML parser based on the WHATWG HTML specification / MIT |
| [icu](http://site.icu-project.org/) | 58.2 | International Components for Unicode. / MIT |
| [idna](https://github.com/kjd/idna) | 2.10 | Internationalized Domain Names in Applications (IDNA). / BSD Like |
| [imageio](https://imageio.github.io) | 2.9.0 | A Python library for reading and writing image data / BSD-2-Clause |
| [imagesize](https://github.com/shibukawa/imagesize_py) | 1.2.0 | Getting image size from png/jpeg/jpeg2000/gif file / MIT |
| [importlib-metadata](https://gitlab.com/python-devs/importlib_metadata) | 2.0.0 | A library to access the metadata for a Python package / Apache-2.0 |
| [importlib\_metadata](https://gitlab.com/python-devs/importlib_metadata) | 2.0.0 | A library to access the metadata for a Python package / Apache-2.0 |
| [iniconfig](http://github.com/RonnyPfannschmidt/iniconfig) | 1.1.1 | iniconfig: brain-dead simple config-ini parsing / MIT |
| [ipykernel](https://ipython.org) | 5.3.4 | IPython Kernel for Jupyter / BSD-3-Clause |
| [ipython](https://ipython.org) | 7.19.0 | IPython: Productive Interactive Computing / BSD-3-Clause |
| [ipython\_genutils](http://ipython.org) | 0.2.0 | vestigial utilities from IPython / BSD 3-Clause |
| [ipywidgets](https://github.com/ipython/ipywidgets) | 7.5.1 | Jupyter Interactive Widgets / BSD 3-clause |
| [isort](https://github.com/timothycrosley/isort) | 5.6.4 | A Python utility / library to sort Python imports. / MIT |
| [itsdangerous](https://github.com/pallets/itsdangerous) | 1.1.0 | Various helpers to pass trusted data to untrusted environments. / BSD 3-Clause |
| [jbig](https://www.cl.cam.ac.uk/~mgk25/jbigkit) | 2.1 | Implementation of the JBIG1 data compression standard / GPL-2.0 |
| [jdcal](https://github.com/phn/jdcal) | 1.4.1 | Julian dates from proleptic Gregorian and Julian calendars. / BSD 2-Clause |
| [jedi](https://github.com/davidhalter/jedi/) | 0.17.2 | An autocompletion tool for Python that can be used for text editors. / MIT |
| [jinja2](http://jinja.pocoo.org) | 2.11.2 | An easy to use stand-alone template engine written in pure python. / 3-Clause BSD |
| [joblib](https://pypi.org/project/joblib/) | 0.17.0 | Lightweight pipelining: using Python functions as pipeline jobs. / BSD-3-Clause |
| [jpeg](http://www.ijg.org/) | 9b | read/write jpeg COM, EXIF, IPTC medata / Custom free software license |
| [jsonschema](https://github.com/Julian/jsonschema) | 3.2.0 | An implementation of JSON Schema validation for Python / MIT |
| [jupyter](http://jupyter.org) | 1.0.0 | Jupyter metapackage. Install all the Jupyter components in one go. / BSD 3-Clause |
| [jupyter\_client](https://jupyter.org) | 6.1.7 | jupyter\_client contains the reference implementation of the Jupyter protocol. / BSD-3-Clause |
| [jupyter\_console](http://jupyter.org) | 6.2.0 | Jupyter terminal console / BSD-3-Clause |
| [jupyter\_core](https://jupyter.org) | 4.6.1 | Core common functionality of Jupyter projects. / BSD-3-Clause |
| [jupyterlab\_pygments](http://github.com/JupyterLab/jupyterlab_pygments) | 0.1.2 | Pygments syntax coloring scheme making use of the JupyterLab CSS variables / BSD-3-Clause |
| [kiwisolver](https://github.com/nucleic/kiwi) | 1.3.0 | An efficient C++ implementation of the Cassowary constraint solver / BSD-3-Clause |
| [krb5](http://web.mit.edu/kerberos/) | 1.18.2 | A network authentication protocol. / MIT |
| [lazy-object-proxy](https://github.com/ionelmc/python-lazy-object-proxy) | 1.4.3 | A fast and thorough lazy object proxy / BSD-2-Clause |
| [lcms2](http://www.littlecms.com/) | 2.11 | Open Source Color Management Engine / MIT |
| [ld\_impl\_linux-ppc64le](https://www.gnu.org/software/binutils/) | 2.33.1 | A set of programming tools for creating and managing binary programs, object files, libraries, profile data, and assembly source code. / GPL 3 |
| [libarchive](http://www.libarchive.org/) | 3.4.2 | Multi-format archive and compression library / BSD-2-Clause |
| [libcurl](http://curl.haxx.se/) | 7.71.1 | tool and library for transferring data with URL syntax / MIT/X derivate (`<http://curl.haxx.se/docs/copyright.html>`) |
| [libedit](http://thrysoee.dk/editline/) | 3.1.20191231 | Editline Library (libedit) / BSD-2-Clause |
| [libffi](https://sourceware.org/libffi/) | 3.3 | A Portable Foreign Function Interface Library. / Custom |
| [libgcc-ng](https://gcc.gnu.org/onlinedocs/gccint/Libgcc.html) | 8.2.0 | The GCC low-level runtime library / GPL |
| [libgfortran-ng](https://gcc.gnu.org/) | 7.3.0 | The GNU Fortran Runtime Library / GPL |
| [liblief](https://lief.quarkslab.com/) | 0.10.1 | A cross platform library to parse, modify and abstract ELF, PE and MachO formats. / Apache-2.0 |
| [libopenblas](http://www.openblas.net/) | 0.3.10 | An Optimized BLAS library / BSD |
| [libpng](http://www.libpng.org/pub/png/libpng.html) | 1.6.37 | PNG reference library / zlib/libpng |
| [libsodium](http://libsodium.org) | 1.0.18 | A modern and easy-to-use crypto library. / ISC |
| [libssh2](https://www.libssh2.org/) | 1.9.0 | the SSH library / BSD-3-Clause |
| [libstdcxx-ng](https://gcc.gnu.org/) | 8.2.0 | The GNU C++ Runtime Library / GPL3 with runtime exception |
| [libtiff](http://www.libtiff.org/) | 4.1.0 | Support for the Tag Image File Format (TIFF). / HPND |
| [libuuid](http://sourceforge.net/projects/libuuid/) | 1.0.3 | Portable uuid C library. / BSD 3-Clause |
| [libxcb](http://xcb.freedesktop.org/) | 1.14 | This is the C-language Binding (XCB) package to the X Window System protocol / MIT |
| [libxml2](http://xmlsoft.org/) | 2.9.10 | The XML C parser and toolkit of Gnome / MIT |
| [libxslt](http://xmlsoft.org/XSLT/) | 1.1.34 | The XSLT C library developed for the GNOME project / MIT |
| [locket](https://github.com/mwilliamson/locket.py) | 0.2.0 | File-based locks for Python for Linux and Windows / BSD 2-Clause |
| [lxml](http://lxml.de/) | 4.6.1 | Pythonic binding for the C libraries libxml2 and libxslt. / BSD-3-Clause and GPL-2.0-only and ZPL-2.0 and LicenseRef-ElementTree |
| [lz4-c](https://www.lz4.org) | 1.9.2 | Extremely Fast Compression algorithm / BSD-2-Clause |
| [lzo](http://www.oberhumer.com/opensource/lzo/) | 2.10 | LZO is a portable lossless data compression library written in ANSI C. / GPL v2+ |
| [markupsafe](https://www.palletsprojects.com/p/markupsafe) | 1.1.1 | A Python module that implements the jinja2.Markup string / BSD-3-Clause |
| [matplotlib](http://matplotlib.org/) | 3.3.2 | Publication quality figures in Python / LicenseRef-PSF-based |
| [matplotlib-base](http://matplotlib.org/) | 3.3.2 | Publication quality figures in Python / LicenseRef-PSF-based |
| [mccabe](https://github.com/PyCQA/mccabe) | 0.6.1 | McCabe complexity checker for Python / MIT |
| [mistune](https://github.com/lepture/mistune) | 0.8.4 | The fastest markdown parser in pure Python. / BSD 3-Clause |
| [mock](https://github.com/testing-cabal/mock) | 4.0.2 | A library for testing in Python / BSD-2-Clause |
| [more-itertools](https://github.com/more-itertools/more-itertools) | 8.6.0 | More routines for operating on iterables, beyond itertools / MIT |
| [mpc](http://www.multiprecision.org/) | 1.1.0 | A C library for the arithmetic of complex numbers with arbitrarily high precision. / LGPL 3 |
| [mpfr](http://www.mpfr.org/) | 4.0.2 | The MPFR library is a C library for multiple-precision floating-point computations with correct rounding. / LGPL-3.0-only |
| [mpmath](http://mpmath.org) | 1.1.0 | Python library for arbitrary-precision floating-point arithmetic / BSD 3-Clause |
| [msgpack-python](http://msgpack.org/) | 1.0.0 | MessagePack (de)serializer / Apache-2.0 |
| [multipledispatch](https://github.com/mrocklin/multipledispatch/) | 0.6.0 | Multiple dispatch in Python / BSD 3-Clause |
| [nbclient](https://jupyter.org) | 0.5.1 | A client library for executing notebooks. Formally nbconvert’s ExecutePreprocessor. / BSD-3-Clause |
| [nbconvert](http://jupyter.org) | 6.0.7 | Converting Jupyter Notebooks / BSD-3-Clause |
| [nbformat](http://jupyter.org) | 5.0.8 | The reference implementation of the Jupyter Notebook format / BSD-3-Clause |
| [ncurses](http://www.gnu.org/software/ncurses/) | 6.2 | Library for text-based user interfaces / Free software (MIT-like) |
| [nest-asyncio](https://github.com/erdewit/nest_asyncio) | 1.4.2 | Patch asyncio to allow nested event loops / BSD-2-Clause |
| [networkx](https://networkx.github.io/) | 2.5 | Python package for creating and manipulating complex networks / BSD-3-Clause |
| [nltk](http://nltk.org/) | 3.5 | Natural Language Toolkit / Apache 2.0 |
| nomkl | 3.0 | None / BSD |
| [nose](http://readthedocs.org/docs/nose/) | 1.3.7 | Nose extends unittest to make testing easier / LGPL-2.1 |
| [notebook](https://jupyter.org) | 6.1.4 | Jupyter Notebook / BSD-3-Clause |
| [numexpr](https://github.com/pydata/numexpr) | 2.7.1 | Fast numerical expression evaluator for NumPy. / MIT |
| [numpy](http://numpy.scipy.org/) | 1.19.2 | Array processing for numbers, strings, records, and objects. / BSD 3-Clause |
| [numpy-base](http://numpy.scipy.org/) | 1.19.2 | Array processing for numbers, strings, records, and objects. / BSD 3-Clause |
| [numpydoc](https://github.com/numpy/numpydoc) | 1.1.0 | Numpy’s Sphinx extensions / BSD 3-Clause |
| [olefile](http://www.decalage.info/python/olefileio) | 0.46 | parse, read and write Microsoft OLE2 files / BSD 2-Clause |
| [openblas](http://www.openblas.net/) | 0.3.10 | An optimized BLAS library / BSD |
| openblas-devel | 0.3.10 | OpenBLAS headers and libraries for developing software that used OpenBLAS. / None |
| [openpyxl](https://openpyxl.readthedocs.io) | 3.0.5 | A Python library to read/write Excel 2010 xlsx/xlsm files / MIT |
| [openssl](http://www.openssl.org/) | 1.1.1h | OpenSSL is an open-source implementation of the SSL and TLS protocols / OpenSSL |
| [packaging](https://github.com/pypa/packaging) | 20.4 | Core utilities for Python packages / Apache 2.0 or BSD 2-Clause |
| [pandas](http://pandas.pydata.org) | 1.1.3 | High-performance, easy-to-use data structures and data analysis tools. / BSD-3-Clause |
| [pandoc](http://pandoc.org/) | 2.11 | Universal markup converter (repackaged binaries) / GPL-2.0 |
| [pandocfilters](https://github.com/jgm/pandocfilters) | 1.4.3 | A python module for writing pandoc filters / BSD-3-Clause |
| [parso](https://github.com/davidhalter/parso) | 0.7.0 | A Python Parser / MIT |
| [partd](https://github.com/dask/partd) | 1.1.0 | Data structure for on-disk shuffle operations / BSD 3-Clause |
| [patchelf](http://nixos.org/patchelf.html) | 0.12 | A small utility to modify the dynamic linker and RPATH of ELF executables. / GPL-3.0-or-later |
| [path](https://github.com/jaraco/path) | 15.0.0 | A module wrapper for os.path / MIT |
| [path.py](https://github.com/jaraco/path.py) | 12.5.0 | A module wrapper for os.path / MIT |
| [pathlib2](https://github.com/mcmtroffaes/pathlib2) | 2.3.5 | Fork of pathlib aiming to support the full stdlib Python API / MIT |
| [patsy](https://github.com/pydata/patsy) | 0.5.1 | Describing statistical models in Python using symbolic formulas / BSD-2-Clause, PSF2 |
| [pcre](http://www.pcre.org/) | 8.44 | Regular expression pattern matching using the same syntax and semantics as Perl 5. / BSD 3-Clause |
| [pep8](http://pep8.readthedocs.org/) | 1.7.1 | Python style guide checker / MIT |
| [pexpect](http://pexpect.sourceforge.net/) | 4.8.0 | Pexpect makes Python a better tool for controlling other applications. / ISC |
| [pickleshare](https://github.com/pickleshare/pickleshare/) | 0.7.5 | Tiny ‘shelve’-like database with concurrency support / MIT |
| [pillow](https://pillow.readthedocs.io) | 8.0.1 | Pillow is the friendly PIL fork by Alex Clark and Contributors / LicenseRef-PIL |
| [pip](https://pip.pypa.io/en/stable/) | 20.2.4 | PyPA recommended tool for installing Python packages / MIT |
| [pixman](http://www.pixman.org/) | 0.40.0 | A low-level software library for pixel manipulation. / MIT |
| [pkginfo](https://code.launchpad.net/~tseaver/pkginfo/trunk) | 1.6.1 | Query metadatdata from sdists / bdists / installed packages. / MIT |
| [pluggy](https://github.com/pytest-dev/pluggy) | 0.13.1 | Plugin registration and hook calling for Python / MIT |
| [ply](http://www.dabeaz.com/ply/index.html) | 3.11 | Python Lex-Yacc / BSD 3-clause |
| [prometheus\_client](https://github.com/prometheus/client_python) | 0.8.0 | Python client for the Prometheus monitoring system / Apache-2.0 |
| [prompt-toolkit](https://github.com/jonathanslenders/python-prompt-toolkit) | 3.0.8 | Library for building powerful interactive command lines in Python / BSD-3-Clause |
| [prompt\_toolkit](https://github.com/jonathanslenders/python-prompt-toolkit) | 3.0.8 | Library for building powerful interactive command lines in Python / BSD-3-Clause |
| [psutil](https://github.com/giampaolo/psutil) | 5.7.2 | A cross-platform process and system utilities module for Python / BSD-3-Clause |
| [ptyprocess](https://github.com/pexpect/ptyprocess) | 0.6.0 | Run a subprocess in a pseudo terminal / ISC |
| [py](https://github.com/pytest-dev/py) | 1.9.0 | library with cross-python path, ini-parsing, io, code, log facilities / MIT |
| [py-lief](https://lief.quarkslab.com/) | 0.10.1 | A cross platform library to parse, modify and abstract ELF, PE and MachO formats. / Apache-2.0 |
| [pycodestyle](https://pycodestyle.readthedocs.io/) | 2.6.0 | Python style guide checker / MIT |
| [pycosat](https://github.com/ContinuumIO/pycosat) | 0.6.3 | Bindings to picosat (a SAT solver) / MIT |
| [pycparser](https://github.com/eliben/pycparser) | 2.20 | Complete C99 parser in pure Python / BSD 3-clause |
| [pycurl](http://pycurl.sourceforge.net/) | 7.43.0.6 | A Python Interface To The cURL library / LGPL, MIT |
| [pyflakes](https://github.com/PyCQA/pyflakes) | 2.2.0 | Pyflakes analyzes programs and detects various errors. / MIT |
| [pygments](http://pygments.org/) | 2.7.2 | Pygments is a generic syntax highlighter suitable for use in code hosting, forums, wikis or other applications that need to prettify source code. / BSD-2-clause |
| [pylint](http://www.pylint.org/) | 2.6.0 | python code static checker / GPL-2.0-only |
| [pyodbc](https://github.com/mkleehammer/pyodbc) | 4.0.30 | DB API Module for ODBC / MIT |
| [pyopenssl](https://github.com/pyca/pyopenssl) | 19.1.0 | Python wrapper module around the OpenSSL library / Apache 2.0 |
| [pyparsing](http://pyparsing.wikispaces.com/) | 2.4.7 | Create and execute simple grammars / MIT |
| [pyrsistent](http://github.com/tobgu/pyrsistent/) | 0.17.3 | Persistent/Functional/Immutable data structures / MIT |
| [pysocks](https://github.com/Anorov/PySocks) | 1.7.1 | A Python SOCKS client module. See [Anorov/PySocks](https://github.com/Anorov/PySocks) for more information. / BSD 3-Clause |
| [pytables](http://www.pytables.org) | 3.6.1 | Brings together Python, HDF5 and NumPy to easily handle large amounts of data. / BSD 3-Clause |
| [pytest](https://docs.pytest.org/en/latest/) | 6.1.1 | Simple and powerful testing with Python. / MIT |
| [python](https://www.python.org/) | 3.8.5 | General purpose programming language / Python-2.0 |
| [python-dateutil](https://dateutil.readthedocs.org/) | 2.8.1 | Extensions to the standard Python datetime module. / BSD 3 Clause |
| [python-libarchive-c](https://github.com/Changaco/python-libarchive-c) | 2.9 | Python interface to libarchive / CC0-1.0 |
| [pytz](http://pythonhosted.org/pytz/) | 2020.1 | World timezone definitions, modern and historical. / MIT |
| [pywavelets](https://github.com/PyWavelets/pywt) | 1.1.1 | Discrete Wavelet Transforms in Python / MIT |
| [pyyaml](http://pyyaml.org/wiki/PyYAML) | 5.3.1 | YAML parser and emitter for Python / MIT |
| [pyzmq](https://github.com/zeromq/pyzmq) | 19.0.2 | Python bindings for zeromq / BSD 3-clause |
| [readline](https://cnswww.cns.cwru.edu/php/chet/readline/rltop.html) | 8.0 | library for editing command lines as they are typed in / GPL-3.0 |
| [regex](https://bitbucket.org/mrabarnett/mrab-regex) | 2020.10.15 | Alternative regular expression module, to replace re / Python-2.0 |
| [requests](http://python-requests.org) | 2.24.0 | Requests is an elegant and simple HTTP library for Python, built with ♥. / Apache-2.0 |
| [ruamel\_yaml](https://bitbucket.org/ruamel/yaml) | 0.15.87 | A patched copy of ruamel.yaml. / MIT |
| [scikit-image](http://scikit-image.org/) | 0.17.2 | Image processing in Python. / BSD-3-Clause |
| [scikit-learn](http://scikit-learn.org/) | 0.23.2 | A set of python modules for machine learning and data mining / BSD-3-Clause |
| [scipy](http://www.scipy.org/) | 1.5.2 | Scientific Library for Python / BSD 3-Clause |
| [seaborn](https://seaborn.pydata.org) | 0.11.0 | Statistical data visualization / BSD 3-Clause |
| [send2trash](https://github.com/hsoft/send2trash) | 1.5.0 | Python library to natively send files to Trash (or Recycle bin) on all platforms. / BSD-3-Clause |
| [setuptools](https://github.com/pypa/setuptools) | 50.3.1 | Download, build, install, upgrade, and uninstall Python packages / MIT |
| [simplegeneric](http://cheeseshop.python.org/pypi/simplegeneric) | 0.8.1 | Simple generic functions (similar to Python’s own len(), pickle.dump(), etc.) / Zope Public |
| [singledispatch](http://docs.python.org/3/library/functools.html#functools.singledispatch) | 3.4.0.3 | Transforms a function into a single-dispatch generic function / MIT |
| [six](https://six.readthedocs.io/) | 1.15.0 | Python 2 and 3 compatibility utilities / MIT |
| [snowballstemmer](https://github.com/shibukawa/snowball_py) | 2.0.0 | Snowball stemming library collection for Python / BSD-2-Clause |
| [sortedcollections](http://www.grantjenks.com/docs/sortedcollections/) | 1.2.1 | Python Sorted Collections / Apache-2.0 |
| [sortedcontainers](http://www.grantjenks.com/docs/sortedcontainers/) | 2.2.2 | Python Sorted Container Types: SortedList, SortedDict, and SortedSet / Apache-2.0 |
| [soupsieve](http://facelessuser.github.io/soupsieve) | 2.0.1 | A modern CSS selector implementation for BeautifulSoup / MIT |
| [sphinx](http://www.sphinx-doc.org) | 3.2.1 | Sphinx is a tool that makes it easy to create intelligent and beautiful documentation / BSD-2-Clause |
| sphinxcontrib | 1.0 | Python namespace for sphinxcontrib / BSD |
| [sphinxcontrib-applehelp](https://www.sphinx-doc.org/en/master/) | 1.0.2 | sphinxcontrib-applehelp is a sphinx extension which outputs Apple help books / BSD-2-Clause |
| [sphinxcontrib-devhelp](https://www.sphinx-doc.org/en/master/) | 1.0.2 | sphinxcontrib-devhelp is a sphinx extension which outputs Devhelp document / BSD-2-Clause |
| [sphinxcontrib-htmlhelp](https://www.sphinx-doc.org/en/master/) | 1.0.3 | sphinxcontrib-htmlhelp is a sphinx extension which … / BSD-2-Clause |
| [sphinxcontrib-jsmath](https://www.sphinx-doc.org/en/master/) | 1.0.1 | A sphinx extension which renders display math in HTML via JavaScript / BSD-2-Clause |
| [sphinxcontrib-qthelp](https://www.sphinx-doc.org/en/master/) | 1.0.3 | sphinxcontrib-qthelp is a sphinx extension which outputs QtHelp document / BSD-2-Clause |
| [sphinxcontrib-serializinghtml](https://www.sphinx-doc.org/en/master/) | 1.1.4 | sphinxcontrib-serializinghtml is a sphinx extension which outputs “serialized” HTML files (json and pickle). / BSD-2-Clause |
| [sphinxcontrib-websupport](https://pypi.python.org/pypi/sphinxcontrib-websupport) | 1.2.4 | Sphinx API for Web Apps / BSD-2-Clause |
| [sqlalchemy](http://www.sqlalchemy.org/) | 1.3.20 | Database Abstraction Library. / MIT |
| [sqlite](http://www.sqlite.org/) | 3.33.0 | Implements a self-contained, zero-configuration, SQL database engine / Public-Domain (`<http://www.sqlite.org/copyright.html>`) |
| [statsmodels](https://www.statsmodels.org) | 0.12.0 | Statistical computations and models for use with SciPy / BSD-3-Clause |
| [sympy](https://sympy.org) | 1.6.2 | Python library for symbolic mathematics / BSD-3-Clause |
| [tblib](https://github.com/ionelmc/python-tblib) | 1.7.0 | Traceback serialization library. / BSD 2-Clause |
| [terminado](https://github.com/jupyter/terminado) | 0.9.1 | Terminals served by tornado websockets / BSD-2-Clause |
| [testpath](https://testpath.readthedocs.io) | 0.4.4 | Testpath is a collection of utilities for Python code working with files and commands. / BSD-3-Clause |
| [threadpoolctl](https://github.com/joblib/threadpoolctl) | 2.1.0 | Python helpers to control the threadpools of native libraries / BSD 3-Clause |
| [tifffile](https://github.com/blink1073/tifffile) | 2020.10.1 | Read and write image data from and to TIFF files. / BSD 3-Clause |
| [tk](http://www.tcl.tk/) | 8.6.10 | A dynamic programming language with GUI support. Bundles Tcl and Tk. / Tcl/Tk |
| [toml](https://github.com/uiri/toml) | 0.10.1 | Python lib for TOML. / MIT |
| [toolz](http://toolz.readthedocs.org/) | 0.11.1 | A functional standard library for Python / BSD-3-Clause |
| [tornado](http://www.tornadoweb.org/) | 6.0.4 | A Python web framework and asynchronous networking library, originally developed at FriendFeed. / Apache-2.0 |
| [tqdm](https://pypi.python.org/pypi/tqdm) | 4.50.2 | A Fast, Extensible Progress Meter / MPLv2.0, MIT |
| [traitlets](http://traitlets.readthedocs.org/) | 5.0.5 | Configuration system for Python applications / BSD-3-Clause |
| [typing\_extensions](https://github.com/python/typing/tree/master/typing_extensions) | 3.7.4.3 | Backported and Experimental Type Hints for Python / PSF-2.0 |
| [unicodecsv](https://github.com/jdunck/python-unicodecsv) | 0.14.1 | Drop-in replacement for csv module which supports unicode strings / BSD |
| [unixodbc](http://www.unixodbc.org/) | 2.3.9 | ODBC on non MS Windows platforms / LGPL-2.1 |
| [urllib3](https://urllib3.readthedocs.io/) | 1.25.11 | HTTP library with thread-safe connection pooling, file post, and more. / MIT |
| [wcwidth](https://github.com/jquast/wcwidth) | 0.2.5 | Measures number of Terminal column cells of wide-character codes. / MIT |
| [webencodings](https://github.com/gsnedders/python-webencodings) | 0.5.1 | Character encoding aliases for legacy web content / BSD 3-Clause |
| [werkzeug](https://palletsprojects.com/p/werkzeug/) | 1.0.1 | The comprehensive WSGI web application library. / BSD 3-Clause |
| [wheel](https://github.com/pypa/wheel) | 0.35.1 | A built-package format for Python. / MIT |
| [widgetsnbextension](http://ipython.org) | 3.5.1 | Interactive Widgets for Jupyter / BSD 3-clause |
| [wrapt](https://github.com/GrahamDumpleton/wrapt) | 1.11.2 | Module for decorators, wrappers and monkey patching / BSD 2-Clause |
| [xlrd](http://www.python-excel.org/) | 1.2.0 | Library for developers to extract data from Microsoft Excel (tm) spreadsheet files / BSD 3-Clause and BSD with advertising |
| [xlsxwriter](https://xlsxwriter.readthedocs.io/) | 1.3.7 | A Python module for creating Excel XLSX files / BSD-2-Clause |
| [xlwt](http://www.python-excel.org/) | 1.3.0 | Writing data and formatting information to Excel files / BSD |
| [xz](http://tukaani.org/xz/) | 5.2.5 | Data compression software with high compression ratio / LGPL-2.1 and GPL-2.0 |
| [yaml](http://pyyaml.org/wiki/LibYAML) | 0.2.5 | A C library for parsing and emitting YAML / MIT |
| [zeromq](http://zeromq.org) | 4.3.3 | A high-performance asynchronous messaging library. / LGPL 3 |
| [zict](http://github.com/mrocklin/zict) | 2.0.0 | Composable Dictionary Classes / BSD 3-Clause |
| [zipp](https://github.com/jaraco/zipp) | 3.4.0 | A pathlib-compatible Zipfile object wrapper / MIT |
| [zlib](http://zlib.net/) | 1.2.11 | Massively spiffy yet delicately unobtrusive compression library / zlib |
| zope | 1.0 | web application server / BSD |
| [zope.event](http://www.zope.org/en/latest/) | 4.5.0 | Very basic event publishing system / Zope Public License |
| [zope.interface](http://docs.zope.org/zope.interface/) | 5.1.2 | Interfaces for Python / ZPL-2.1 |
| [zstd](http://www.zstd.net) | 1.4.5 | Zstandard - Fast real-time compression algorithm / BSD 3-Clause |
| Name | Version | Summary / License |
|---|---|---|
| [\_ipyw\_jlab\_nb\_ext\_conf](https://github.com/ContinuumIO/anaconda-nb-extensions-meta-config) | 0.1.0 | A configuration metapackage for enabling Anaconda-bundled jupyter extensions / BSD |
| \_libgcc\_mutex | 0.1 | Mutex for libgcc and libgcc-ng / None |
| [alabaster](http://www.sphinx-doc.org/en/stable/index.html) | 0.7.12 | Configurable, Python 2+3 compatible Sphinx theme. / BSD 3-Clause |
| [anaconda-client](http://anaconda.org) | 1.7.2 | anaconda.org command line client library / BSD 3-clause |
| [anaconda-project](https://github.com/Anaconda-Platform/anaconda-project) | 0.8.4 | Tool for encapsulating, running, and reproducing data science projects / BSD 3-Clause |
| [argh](https://github.com/neithere/argh) | 0.26.2 | The Natural CLI. / LGPL 3 |
| [argon2-cffi](https://argon2-cffi.readthedocs.org/) | 20.1.0 | The secure Argon2 password hashing algorithm. / MIT |
| [asn1crypto](https://github.com/wbond/asn1crypto) | 1.4.0 | Python ASN.1 library with a focus on performance and a pythonic API / MIT |
| [astroid](https://www.astroid.org/) | 2.4.2 | A abstract syntax tree for Python with inference support. / LGPL-2.1-only |
| [astropy](http://www.astropy.org/) | 4.0.2 | Community-developed Python Library for Astronomy / BSD-3-Clause |
| [async\_generator](https://github.com/python-trio/async_generator) | 1.10 | Async generators and context managers for Python 3.5+ / MIT |
| [atomicwrites](https://github.com/untitaker/python-atomicwrites) | 1.4.0 | Atomic file writes / MIT |
| [attrs](https://attrs.readthedocs.io/en/stable/) | 20.3.0 | attrs is the Python package that will bring back the joy of writing classes by relieving you from the drudgery of implementing object protocols (aka dunder methods). / MIT |
| [autopep8](https://github.com/hhatto/autopep8) | 1.5.4 | A tool that automatically formats Python code to conform to the PEP 8 style guide / MIT |
| [babel](http://babel.pocoo.org/) | 2.8.1 | Utilities to internationalize and localize Python applications / BSD 3-clause |
| [backcall](https://github.com/takluyver/backcall/) | 0.2.0 | Specifications for callback functions passed in to an API / BSD-3-Clause |
| [backports](https://bitbucket.org/brandon/backports) | 1.0 | None / BSD |
| [backports.shutil\_get\_terminal\_size](https://github.com/chrippa/backports.shutil_get_terminal_size) | 1.0.0 | A backport of the get\_terminal\_size function from Python 3.3’s shutil. / MIT |
| [beautifulsoup4](http://www.crummy.com/software/BeautifulSoup/) | 4.9.3 | Python library designed for screen-scraping / MIT |
| [bitarray](https://github.com/ilanschnell/bitarray) | 1.6.1 | efficient arrays of booleans – C extension / PSF |
| [bkcharts](http://github.com/bokeh/bkcharts) | 0.2 | High level chart types built on top of Bokeh / BSD 3-Clause |
| blas | 1.0 | |
| [bleach](https://github.com/mozilla/bleach) | 3.2.1 | Easy, whitelist-based HTML-sanitizing tool / Apache-2.0 |
| [blosc](https://github.com/Blosc/c-blosc) | 1.20.1 | A blocking, shuffling and loss-less compression library that can be faster than memcpy() / BSD-3-Clause |
| [bokeh](http://bokeh.pydata.org/) | 2.2.3 | Statistical and novel interactive HTML plots for Python / BSD-3-Clause |
| [boto](https://github.com/boto/boto/) | 2.49.0 | Amazon Web Services Library / MIT |
| [bottleneck](https://github.com/pydata/bottleneck) | 1.3.2 | Fast NumPy array functions written in Cython. / BSD 2-Clause |
| [brotlipy](https://github.com/python-hyper/brotlipy) | 0.7.0 | Python bindings to the Brotli compression library / MIT |
| [bzip2](http://www.bzip.org/) | 1.0.8 | high-quality data compressor / bzip2 |
| [ca-certificates](https://github.com/conda-forge/ca-certificates-feedstock) | 2020.10.14 | Certificates for use with other packages. / MPL 2.0 |
| [cairo](http://cairographics.org/) | 1.14.12 | Cairo is a 2D graphics library with support for multiple output devices. / LGPL 2.1 or MPL 1.1 |
| [certifi](http://certifi.io/) | 2020.6.20 | Python package for providing Mozilla’s CA Bundle. / ISC |
| [cffi](https://bitbucket.org/cffi/cffi) | 1.14.3 | Foreign Function Interface for Python calling C code. / MIT |
| [chardet](https://github.com/chardet/chardet) | 3.0.4 | Universal character encoding detector / LGPL2 |
| [click](https://palletsprojects.com/p/click) | 7.1.2 | Python composable command line interface toolkit / BSD-3-Clause |
| [cloudpickle](https://github.com/cloudpipe/cloudpickle) | 1.6.0 | Extended pickling support for Python objects / BSD-3-Clause |
| [clyent](https://github.com/Anaconda-Platform/clyent) | 1.2.2 | Command line client library for windows and posix / BSD 3-Clause |
| [colorama](https://github.com/tartley/colorama) | 0.4.4 | Cross-platform colored terminal text / BSD-3-Clause |
| [conda](https://conda.io) | 4.9.2 | OS-agnostic, system-level binary package and environment manager. / BSD 3-Clause |
| [conda-build](https://github.com/conda/conda-build) | 3.20.5 | tools for building conda packages / BSD 3-Clause |
| [conda-env](https://github.com/conda/conda-env) | 2.6.0 | Tools for interacting with conda environments. / BSD 3-Clause |
| [conda-verify](https://github.com/conda/conda-verify) | 3.4.2 | tool for validating conda recipes and conda packages / BSD 3-Clause |
| [contextlib2](http://contextlib2.readthedocs.org) | 0.6.0.post1 | Backports and enhancements for the contextlib module / PSF 2 |
| [cryptography](https://github.com/pyca/cryptography) | 3.1.1 | Provides cryptographic recipes and primitives to Python developers / Apache-2.0 AND BSD-3-Clause AND PSF-2.0 |
| [curl](http://curl.haxx.se/) | 7.71.1 | tool and library for transferring data with URL syntax / MIT/X derivate (`<http://curl.haxx.se/docs/copyright.html>`) |
| [cycler](http://matplotlib.org/cycler) | 0.10.0 | Composable style cycles. / BSD 3-Clause |
| [cython](http://www.cython.org/) | 0.29.21 | The Cython compiler for writing C extensions for the Python language / Apache-2.0 |
| [cytoolz](https://github.com/pytoolz/cytoolz) | 0.11.0 | Cython implementation of Toolz. High performance functional utilities / BSD-3-Clause |
| [dask](https://dask.org/) | 2.30.0 | Parallel PyData with Task Scheduling / BSD-3-Clause |
| [dask-core](http://github.com/dask/dask/) | 2.30.0 | Parallel Python with task scheduling / BSD-3-Clause |
| [dbus](http://www.freedesktop.org/wiki/Software/dbus/) | 1.13.18 | Simple message bus system for applications to talk to one another / GPL2 |
| [decorator](https://github.com/micheles/decorator) | 4.4.2 | Better living through Python with decorators. / BSD-3-Clause |
| [defusedxml](https://bitbucket.org/tiran/defusedxml) | 0.6.0 | XML bomb protection for Python stdlib modules / PSF 2.0 |
| [diff-match-patch](http://code.google.com/p/google-diff-match-patch/) | 20200713 | Diff Match Patch is a high-performance library in multiple languages that manipulates plain text / Apache-2.0 |
| [distributed](http://distributed.readthedocs.io/en/latest/) | 2.30.1 | Distributed computing with Dask / BSD-3-Clause |
| [docutils](http://docutils.sourceforge.net/) | 0.16 | Docutils – Python Documentation Utilities / Public Domain Dedictation and BSD 2-Clause and PSF 2.1.1 and GPL 3.0 |
| [entrypoints](https://github.com/takluyver/entrypoints) | 0.3 | Discover and load entry points from installed packages. / MIT License |
| [et\_xmlfile](https://bitbucket.org/openpyxl/et_xmlfile) | 1.0.1 | An implementation of lxml.xmlfile for the standard library / MIT |
| [expat](http://expat.sourceforge.net/) | 2.2.10 | Expat XML parser library in C / MIT |
| [fastcache](https://github.com/pbrady/fastcache) | 1.1.0 | C implementation of Python 3 lru\_cache / MIT |
| [filelock](https://github.com/benediktschmitt/py-filelock) | 3.0.12 | A platform independent file lock. / Public Domain |
| [flake8](http://flake8.pycqa.org/) | 3.8.4 | Your Tool For Style Guide Enforcement / MIT |
| [flask](http://flask.pocoo.org) | 1.1.2 | A microframework based on Werkzeug, Jinja2 and good intentions. / BSD 3-Clause |
| [fontconfig](http://www.freedesktop.org/wiki/Software/fontconfig/) | 2.13.0 | A library for configuring and customizing font access. / MIT |
| [freetype](https://www.freetype.org/) | 2.10.4 | A Free, High-Quality, and Portable Font Engine / GPL-2.0-only and LicenseRef-FreeType |
| [fribidi](https://github.com/fribidi/fribidi) | 1.0.10 | The Free Implementation of the Unicode Bidirectional Algorithm. / LGPL-2.1 |
| [fsspec](https://github.com/martindurant/filesystem_spec) | 0.8.3 | A specification for pythonic filesystems / BSD-3-Clause |
| [future](http://python-future.org) | 0.18.2 | Clean single-source support for Python 3 and 2 / MIT |
| [get\_terminal\_size](https://github.com/chrippa/backports.shutil_get_terminal_size) | 1.0.0 | Get the size of the terminal window. / MIT |
| [gevent](https://www.gevent.org) | 20.9.0 | Coroutine-based network library / MIT |
| [glib](https://developer.gnome.org/glib/) | 2.66.1 | Provides core application building blocks for libraries and applications written in C. / LGPL-2.1 |
| [glob2](https://github.com/miracle2k/python-glob2) | 0.7 | Version of the glob module that supports recursion via \*\*, and can capture patterns. / BSD-2-Clause |
| [gmp](http://gmplib.org/) | 6.1.2 | The GNU multiprecision library. / GPL 2 and LGPL 3 |
| [gmpy2](https://pypi.python.org/pypi/gmpy2) | 2.0.8 | GMP/MPIR, MPFR, and MPC interface to Python 2.6+ and 3.x / LGPL 3 |
| [graphite2](http://graphite.sil.org/) | 1.3.14 | A “smart font” system that handles the complexities of lesser-known languages of the world. / LGPLv2 |
| [greenlet](https://github.com/python-greenlet/greenlet) | 0.4.17 | Lightweight in-process concurrent programming / MIT |
| [gst-plugins-base](http://gstreamer.freedesktop.org/) | 1.14.0 | GStreamer Base Plug-ins / GPL2 |
| [gstreamer](http://gstreamer.freedesktop.org/) | 1.14.0 | Library for constructing graphs of media-handling components / LGPL 2 |
| [h5py](http://www.h5py.org/) | 2.10.0 | Read and write HDF5 files from Python. / BSD-3-Clause |
| [harfbuzz](http://www.freedesktop.org/wiki/Software/HarfBuzz/) | 2.4.0 | An OpenType text shaping engine. / MIT |
| [hdf5](http://www.hdfgroup.org/HDF5/) | 1.10.4 | HDF5 is a data model, library, and file format for storing and managing data / HDF5 |
| [heapdict](http://stutzbachenterprises.com/) | 1.0.1 | A heap with decrease-key and increase-key operations / BSD 3-Clause |
| [html5lib](https://github.com/html5lib/html5lib-python) | 1.1 | HTML parser based on the WHATWG HTML specification / MIT |
| [icu](http://site.icu-project.org/) | 58.2 | International Components for Unicode. / MIT |
| [idna](https://github.com/kjd/idna) | 2.10 | Internationalized Domain Names in Applications (IDNA). / BSD Like |
| [imageio](https://imageio.github.io) | 2.9.0 | A Python library for reading and writing image data / BSD-2-Clause |
| [imagesize](https://github.com/shibukawa/imagesize_py) | 1.2.0 | Getting image size from png/jpeg/jpeg2000/gif file / MIT |
| [importlib-metadata](https://gitlab.com/python-devs/importlib_metadata) | 2.0.0 | A library to access the metadata for a Python package / Apache-2.0 |
| [importlib\_metadata](https://gitlab.com/python-devs/importlib_metadata) | 2.0.0 | A library to access the metadata for a Python package / Apache-2.0 |
| [iniconfig](http://github.com/RonnyPfannschmidt/iniconfig) | 1.1.1 | iniconfig: brain-dead simple config-ini parsing / MIT |
| [intel-openmp](https://software.intel.com/en-us/node/522690) | 2020.2 | Math library for Intel and compatible processors / LicenseRef-ProprietaryIntel |
| [intervaltree](https://github.com/chaimleib/intervaltree) | 3.1.0 | Editable interval tree data structure for Python 2 and 3 / Apache-2.0 |
| [ipykernel](https://ipython.org) | 5.3.4 | IPython Kernel for Jupyter / BSD-3-Clause |
| [ipython](https://ipython.org) | 7.19.0 | IPython: Productive Interactive Computing / BSD-3-Clause |
| [ipython\_genutils](http://ipython.org) | 0.2.0 | vestigial utilities from IPython / BSD 3-Clause |
| [ipywidgets](https://github.com/ipython/ipywidgets) | 7.5.1 | Jupyter Interactive Widgets / BSD 3-clause |
| [isort](https://github.com/timothycrosley/isort) | 5.6.4 | A Python utility / library to sort Python imports. / MIT |
| [itsdangerous](https://github.com/pallets/itsdangerous) | 1.1.0 | Various helpers to pass trusted data to untrusted environments. / BSD 3-Clause |
| [jbig](https://www.cl.cam.ac.uk/~mgk25/jbigkit) | 2.1 | Implementation of the JBIG1 data compression standard / GPL-2.0 |
| [jdcal](https://github.com/phn/jdcal) | 1.4.1 | Julian dates from proleptic Gregorian and Julian calendars. / BSD 2-Clause |
| [jedi](https://github.com/davidhalter/jedi/) | 0.17.1 | An autocompletion tool for Python that can be used for text editors. / MIT |
| [jeepney](https://gitlab.com/takluyver/jeepney) | 0.5.0 | Pure Python DBus interface / MIT |
| [jinja2](http://jinja.pocoo.org) | 2.11.2 | An easy to use stand-alone template engine written in pure python. / 3-Clause BSD |
| [joblib](https://pypi.org/project/joblib/) | 0.17.0 | Lightweight pipelining: using Python functions as pipeline jobs. / BSD-3-Clause |
| [jpeg](http://www.ijg.org/) | 9b | read/write jpeg COM, EXIF, IPTC medata / Custom free software license |
| [json5](https://github.com/dpranke/pyjson5) | 0.9.5 | A Python implementation of the JSON5 data format / Apache-2.0 |
| [jsonschema](https://github.com/Julian/jsonschema) | 3.2.0 | An implementation of JSON Schema validation for Python / MIT |
| [jupyter](http://jupyter.org) | 1.0.0 | Jupyter metapackage. Install all the Jupyter components in one go. / BSD 3-Clause |
| [jupyter\_client](https://jupyter.org) | 6.1.7 | jupyter\_client contains the reference implementation of the Jupyter protocol. / BSD-3-Clause |
| [jupyter\_console](http://jupyter.org) | 6.2.0 | Jupyter terminal console / BSD-3-Clause |
| [jupyter\_core](https://jupyter.org) | 4.6.3 | Core common functionality of Jupyter projects. / BSD-3-Clause |
| [jupyterlab](https://github.com/jupyterlab/jupyterlab) | 2.2.6 | JupyterLab PRE-ALPHA / BSD-3-Clause |
| [jupyterlab\_pygments](http://github.com/JupyterLab/jupyterlab_pygments) | 0.1.2 | Pygments syntax coloring scheme making use of the JupyterLab CSS variables / BSD-3-Clause |
| [jupyterlab\_server](https://github.com/jupyterlab/jupyterlab_server) | 1.2.0 | A set of server components for JupyterLab and JupyterLab like applications. / BSD-3-Clause |
| [keyring](https://github.com/jaraco/keyring) | 21.4.0 | Store and access your passwords safely / Python Software Foundation or MIT |
| [kiwisolver](https://github.com/nucleic/kiwi) | 1.3.0 | An efficient C++ implementation of the Cassowary constraint solver / BSD-3-Clause |
| [krb5](http://web.mit.edu/kerberos/) | 1.18.2 | A network authentication protocol. / MIT |
| [lazy-object-proxy](https://github.com/ionelmc/python-lazy-object-proxy) | 1.4.3 | A fast and thorough lazy object proxy / BSD-2-Clause |
| [lcms2](http://www.littlecms.com/) | 2.11 | Open Source Color Management Engine / MIT |
| [ld\_impl\_linux-64](https://www.gnu.org/software/binutils/) | 2.33.1 | A set of programming tools for creating and managing binary programs, object files, libraries, profile data, and assembly source code. / GPL 3 |
| [libarchive](http://www.libarchive.org/) | 3.4.2 | Multi-format archive and compression library / BSD-2-Clause |
| [libcurl](http://curl.haxx.se/) | 7.71.1 | tool and library for transferring data with URL syntax / MIT/X derivate (`<http://curl.haxx.se/docs/copyright.html>`) |
| [libedit](http://thrysoee.dk/editline/) | 3.1.20191231 | Editline Library (libedit) / BSD-2-Clause |
| [libffi](https://sourceware.org/libffi/) | 3.3 | A Portable Foreign Function Interface Library. / Custom |
| [libgcc-ng](https://gcc.gnu.org/onlinedocs/gccint/Libgcc.html) | 9.1.0 | The GCC low-level runtime library / GPL |
| [libgfortran-ng](https://gcc.gnu.org/) | 7.3.0 | The GNU Fortran Runtime Library / GPL |
| [liblief](https://lief.quarkslab.com/) | 0.10.1 | A cross platform library to parse, modify and abstract ELF, PE and MachO formats. / Apache-2.0 |
| [libllvm10](http://llvm.org/) | 10.0.1 | Development headers and libraries for LLVM / Apache-2.0 WITH LLVM-exception |
| [libpng](http://www.libpng.org/pub/png/libpng.html) | 1.6.37 | PNG reference library / zlib/libpng |
| [libsodium](http://libsodium.org) | 1.0.18 | A modern and easy-to-use crypto library. / ISC |
| [libspatialindex](http://libspatialindex.github.io) | 1.9.3 | Extensible framework for robust spatial indexing / MIT |
| [libssh2](https://www.libssh2.org/) | 1.9.0 | the SSH library / BSD-3-Clause |
| [libstdcxx-ng](https://gcc.gnu.org/) | 9.1.0 | The GNU C++ Runtime Library / GPL3 with runtime exception |
| [libtiff](http://www.libtiff.org/) | 4.1.0 | Support for the Tag Image File Format (TIFF). / HPND |
| [libtool](http://www.gnu.org/software/libtool/) | 2.4.6 | The GNU Portable Library Tool / GPL 3 |
| [libuuid](http://sourceforge.net/projects/libuuid/) | 1.0.3 | Portable uuid C library. / BSD 3-Clause |
| [libxcb](http://xcb.freedesktop.org/) | 1.14 | This is the C-language Binding (XCB) package to the X Window System protocol / MIT |
| [libxml2](http://xmlsoft.org/) | 2.9.10 | The XML C parser and toolkit of Gnome / MIT |
| [libxslt](http://xmlsoft.org/XSLT/) | 1.1.34 | The XSLT C library developed for the GNOME project / MIT |
| [llvmlite](http://llvmlite.pydata.org) | 0.34.0 | A lightweight LLVM python binding for writing JIT compilers. / BSD-2-Clause |
| [locket](https://github.com/mwilliamson/locket.py) | 0.2.0 | File-based locks for Python for Linux and Windows / BSD 2-Clause |
| [lxml](http://lxml.de/) | 4.6.1 | Pythonic binding for the C libraries libxml2 and libxslt. / BSD-3-Clause and GPL-2.0-only and ZPL-2.0 and LicenseRef-ElementTree |
| [lz4-c](https://www.lz4.org) | 1.9.2 | Extremely Fast Compression algorithm / BSD-2-Clause |
| [lzo](http://www.oberhumer.com/opensource/lzo/) | 2.10 | LZO is a portable lossless data compression library written in ANSI C. / GPL v2+ |
| [markupsafe](https://www.palletsprojects.com/p/markupsafe) | 1.1.1 | A Python module that implements the jinja2.Markup string / BSD-3-Clause |
| [matplotlib](http://matplotlib.org/) | 3.3.2 | Publication quality figures in Python / LicenseRef-PSF-based |
| [matplotlib-base](http://matplotlib.org/) | 3.3.2 | Publication quality figures in Python / LicenseRef-PSF-based |
| [mccabe](https://github.com/PyCQA/mccabe) | 0.6.1 | McCabe complexity checker for Python / MIT |
| [mistune](https://github.com/lepture/mistune) | 0.8.4 | The fastest markdown parser in pure Python. / BSD 3-Clause |
| [mkl](https://software.intel.com/en-us/mkl) | 2020.2 | Math library for Intel and compatible processors / LicenseRef-ProprietaryIntel |
| [mkl-service](https://github.com/ContinuumIO/mkl-service) | 2.3.0 | Python bindings to MKL service functions / 3-clause BSD |
| [mkl\_fft](http://github.com/IntelPython/mkl_fft) | 1.2.0 | NumPy-based implementation of Fast Fourier Transform using Intel (R) Math Kernel Library. / BSD 3-Clause |
| [mkl\_random](http://github.com/IntelPython/mkl_random) | 1.1.1 | Intel (R) MKL-powered package for sampling from common probability distributions into NumPy arrays. / BSD 3-Clause |
| [mock](https://github.com/testing-cabal/mock) | 4.0.2 | A library for testing in Python / BSD-2-Clause |
| [more-itertools](https://github.com/more-itertools/more-itertools) | 8.6.0 | More routines for operating on iterables, beyond itertools / MIT |
| [mpc](http://www.multiprecision.org/) | 1.1.0 | A C library for the arithmetic of complex numbers with arbitrarily high precision. / LGPL 3 |
| [mpfr](http://www.mpfr.org/) | 4.0.2 | The MPFR library is a C library for multiple-precision floating-point computations with correct rounding. / LGPL-3.0-only |
| [mpmath](http://mpmath.org) | 1.1.0 | Python library for arbitrary-precision floating-point arithmetic / BSD 3-Clause |
| [msgpack-python](http://msgpack.org/) | 1.0.0 | MessagePack (de)serializer / Apache-2.0 |
| [multipledispatch](https://github.com/mrocklin/multipledispatch/) | 0.6.0 | Multiple dispatch in Python / BSD 3-Clause |
| [nbclient](https://jupyter.org) | 0.5.1 | A client library for executing notebooks. Formally nbconvert’s ExecutePreprocessor. / BSD-3-Clause |
| [nbconvert](http://jupyter.org) | 6.0.7 | Converting Jupyter Notebooks / BSD-3-Clause |
| [nbformat](http://jupyter.org) | 5.0.8 | The reference implementation of the Jupyter Notebook format / BSD-3-Clause |
| [ncurses](http://www.gnu.org/software/ncurses/) | 6.2 | Library for text-based user interfaces / Free software (MIT-like) |
| [nest-asyncio](https://github.com/erdewit/nest_asyncio) | 1.4.2 | Patch asyncio to allow nested event loops / BSD-2-Clause |
| [networkx](https://networkx.github.io/) | 2.5 | Python package for creating and manipulating complex networks / BSD-3-Clause |
| [nltk](http://nltk.org/) | 3.5 | Natural Language Toolkit / Apache 2.0 |
| [nose](http://readthedocs.org/docs/nose/) | 1.3.7 | Nose extends unittest to make testing easier / LGPL-2.1 |
| [notebook](https://jupyter.org) | 6.1.4 | Jupyter Notebook / BSD-3-Clause |
| [numba](http://numba.github.com) | 0.51.2 | NumPy aware dynamic Python compiler using LLVM / BSD-2-Clause |
| [numexpr](https://github.com/pydata/numexpr) | 2.7.1 | Fast numerical expression evaluator for NumPy. / MIT |
| [numpy](http://numpy.scipy.org/) | 1.19.2 | Array processing for numbers, strings, records, and objects. / BSD 3-Clause |
| [numpy-base](http://numpy.scipy.org/) | 1.19.2 | Array processing for numbers, strings, records, and objects. / BSD 3-Clause |
| [numpydoc](https://github.com/numpy/numpydoc) | 1.1.0 | Numpy’s Sphinx extensions / BSD 3-Clause |
| [olefile](http://www.decalage.info/python/olefileio) | 0.46 | parse, read and write Microsoft OLE2 files / BSD 2-Clause |
| [openpyxl](https://openpyxl.readthedocs.io) | 3.0.5 | A Python library to read/write Excel 2010 xlsx/xlsm files / MIT |
| [openssl](http://www.openssl.org/) | 1.1.1h | OpenSSL is an open-source implementation of the SSL and TLS protocols / OpenSSL |
| [packaging](https://github.com/pypa/packaging) | 20.4 | Core utilities for Python packages / Apache 2.0 or BSD 2-Clause |
| [pandas](http://pandas.pydata.org) | 1.1.3 | High-performance, easy-to-use data structures and data analysis tools. / BSD-3-Clause |
| [pandoc](http://pandoc.org/) | 2.11 | Universal markup converter (repackaged binaries) / GPL-2.0 |
| [pandocfilters](https://github.com/jgm/pandocfilters) | 1.4.3 | A python module for writing pandoc filters / BSD-3-Clause |
| [pango](http://www.pango.org/) | 1.45.3 | Text layout and rendering engine. / LGPL-2.1 |
| [parso](https://github.com/davidhalter/parso) | 0.7.0 | A Python Parser / MIT |
| [partd](https://github.com/dask/partd) | 1.1.0 | Data structure for on-disk shuffle operations / BSD 3-Clause |
| [patchelf](http://nixos.org/patchelf.html) | 0.12 | A small utility to modify the dynamic linker and RPATH of ELF executables. / GPL-3.0-or-later |
| [path](https://github.com/jaraco/path) | 15.0.0 | A module wrapper for os.path / MIT |
| [path.py](https://github.com/jaraco/path.py) | 12.5.0 | A module wrapper for os.path / MIT |
| [pathlib2](https://github.com/mcmtroffaes/pathlib2) | 2.3.5 | Fork of pathlib aiming to support the full stdlib Python API / MIT |
| [pathtools](https://github.com/gorakhargosh/pathtools) | 0.1.2 | Path utilities for Python. / MIT |
| [patsy](https://github.com/pydata/patsy) | 0.5.1 | Describing statistical models in Python using symbolic formulas / BSD-2-Clause, PSF2 |
| [pcre](http://www.pcre.org/) | 8.44 | Regular expression pattern matching using the same syntax and semantics as Perl 5. / BSD 3-Clause |
| [pep8](http://pep8.readthedocs.org/) | 1.7.1 | Python style guide checker / MIT |
| [pexpect](http://pexpect.sourceforge.net/) | 4.8.0 | Pexpect makes Python a better tool for controlling other applications. / ISC |
| [pickleshare](https://github.com/pickleshare/pickleshare/) | 0.7.5 | Tiny ‘shelve’-like database with concurrency support / MIT |
| [pillow](https://pillow.readthedocs.io) | 8.0.1 | Pillow is the friendly PIL fork by Alex Clark and Contributors / LicenseRef-PIL |
| [pip](https://pip.pypa.io/en/stable/) | 20.2.4 | PyPA recommended tool for installing Python packages / MIT |
| [pixman](http://www.pixman.org/) | 0.40.0 | A low-level software library for pixel manipulation. / MIT |
| [pkginfo](https://code.launchpad.net/~tseaver/pkginfo/trunk) | 1.6.1 | Query metadatdata from sdists / bdists / installed packages. / MIT |
| [pluggy](https://github.com/pytest-dev/pluggy) | 0.13.1 | Plugin registration and hook calling for Python / MIT |
| [ply](http://www.dabeaz.com/ply/index.html) | 3.11 | Python Lex-Yacc / BSD 3-clause |
| [prometheus\_client](https://github.com/prometheus/client_python) | 0.8.0 | Python client for the Prometheus monitoring system / Apache-2.0 |
| [prompt-toolkit](https://github.com/jonathanslenders/python-prompt-toolkit) | 3.0.8 | Library for building powerful interactive command lines in Python / BSD-3-Clause |
| [prompt\_toolkit](https://github.com/jonathanslenders/python-prompt-toolkit) | 3.0.8 | Library for building powerful interactive command lines in Python / BSD-3-Clause |
| [psutil](https://github.com/giampaolo/psutil) | 5.7.2 | A cross-platform process and system utilities module for Python / BSD-3-Clause |
| [ptyprocess](https://github.com/pexpect/ptyprocess) | 0.6.0 | Run a subprocess in a pseudo terminal / ISC |
| [py](https://github.com/pytest-dev/py) | 1.9.0 | library with cross-python path, ini-parsing, io, code, log facilities / MIT |
| [py-lief](https://lief.quarkslab.com/) | 0.10.1 | A cross platform library to parse, modify and abstract ELF, PE and MachO formats. / Apache-2.0 |
| [pycodestyle](https://pycodestyle.readthedocs.io/) | 2.6.0 | Python style guide checker / MIT |
| [pycosat](https://github.com/ContinuumIO/pycosat) | 0.6.3 | Bindings to picosat (a SAT solver) / MIT |
| [pycparser](https://github.com/eliben/pycparser) | 2.20 | Complete C99 parser in pure Python / BSD 3-clause |
| [pycurl](http://pycurl.sourceforge.net/) | 7.43.0.6 | A Python Interface To The cURL library / LGPL, MIT |
| [pydocstyle](https://github.com/PyCQA/pydocstyle) | 5.1.1 | Python docstring style checker (formerly pep257) / MIT |
| [pyflakes](https://github.com/PyCQA/pyflakes) | 2.2.0 | Pyflakes analyzes programs and detects various errors. / MIT |
| [pygments](http://pygments.org/) | 2.7.2 | Pygments is a generic syntax highlighter suitable for use in code hosting, forums, wikis or other applications that need to prettify source code. / BSD-2-clause |
| [pylint](http://www.pylint.org/) | 2.6.0 | python code static checker / GPL-2.0-only |
| [pyodbc](https://github.com/mkleehammer/pyodbc) | 4.0.30 | DB API Module for ODBC / MIT |
| [pyopenssl](https://github.com/pyca/pyopenssl) | 19.1.0 | Python wrapper module around the OpenSSL library / Apache 2.0 |
| [pyparsing](http://pyparsing.wikispaces.com/) | 2.4.7 | Create and execute simple grammars / MIT |
| [pyqt](http://www.riverbankcomputing.co.uk/software/pyqt) | 5.9.2 | Python binding of the cross-platform GUI toolkit Qt. / Commercial, GPL-2.0, GPL-3.0 |
| [pyrsistent](http://github.com/tobgu/pyrsistent/) | 0.17.3 | Persistent/Functional/Immutable data structures / MIT |
| [pysocks](https://github.com/Anorov/PySocks) | 1.7.1 | A Python SOCKS client module. See [Anorov/PySocks](https://github.com/Anorov/PySocks) for more information. / BSD 3-Clause |
| [pytables](http://www.pytables.org) | 3.6.1 | Brings together Python, HDF5 and NumPy to easily handle large amounts of data. / BSD 3-Clause |
| [pytest](https://docs.pytest.org/en/latest/) | 6.1.1 | Simple and powerful testing with Python. / MIT |
| [python](https://www.python.org/) | 3.8.5 | General purpose programming language / Python-2.0 |
| [python-dateutil](https://dateutil.readthedocs.org/) | 2.8.1 | Extensions to the standard Python datetime module. / BSD 3 Clause |
| [python-jsonrpc-server](https://github.com/palantir/python-jsonrpc-server) | 0.4.0 | A Python 2.7 and 3.4+ server implementation of the JSON RPC 2.0 protocol. / MIT |
| [python-language-server](https://github.com/palantir/python-language-server) | 0.35.1 | An implementation of the Language Server Protocol for Python / MIT |
| [python-libarchive-c](https://github.com/Changaco/python-libarchive-c) | 2.9 | Python interface to libarchive / CC0-1.0 |
| [pytz](http://pythonhosted.org/pytz/) | 2020.1 | World timezone definitions, modern and historical. / MIT |
| [pywavelets](https://github.com/PyWavelets/pywt) | 1.1.1 | Discrete Wavelet Transforms in Python / MIT |
| [pyxdg](http://freedesktop.org/wiki/Software/pyxdg) | 0.27 | PyXDG contains implementations of freedesktop.org standards in python. / GNU Lesser General Public v2 (LGPLv2) |
| [pyyaml](http://pyyaml.org/wiki/PyYAML) | 5.3.1 | YAML parser and emitter for Python / MIT |
| [pyzmq](https://github.com/zeromq/pyzmq) | 19.0.2 | Python bindings for zeromq / BSD 3-clause |
| [qdarkstyle](https://github.com/ColinDuquesnoy/QDarkStyleSheet) | 2.8.1 | A dark stylesheet for Qt applications (Qt4, Qt5, PySide, PyQt4, PyQt5, QtPy, PyQtGraph). / MIT |
| [qt](http://qt-project.org) | 5.9.7 | Qt is a cross-platform application and UI framework. / LGPL-3.0 |
| [qtawesome](https://github.com/spyder-ide/qtawesome) | 1.0.1 | Iconic fonts in PyQt and PySide applications / MIT |
| [qtconsole](http://jupyter.org) | 4.7.7 | Jupyter Qt Console / BSD-3-Clause |
| [qtpy](https://github.com/spyder-ide/qtpy) | 1.9.0 | Abstraction layer for PyQt5/PyQt4/PySide / MIT |
| [readline](https://cnswww.cns.cwru.edu/php/chet/readline/rltop.html) | 8.0 | library for editing command lines as they are typed in / GPL-3.0 |
| [regex](https://bitbucket.org/mrabarnett/mrab-regex) | 2020.10.15 | Alternative regular expression module, to replace re / Python-2.0 |
| [requests](http://python-requests.org) | 2.24.0 | Requests is an elegant and simple HTTP library for Python, built with ♥. / Apache-2.0 |
| ripgrep | 12.1.1 | |
| [rope](https://github.com/python-rope/rope) | 0.18.0 | A python refactoring library / GPL 2.0 |
| [rtree](http://toblerity.github.com/rtree/) | 0.9.4 | R-Tree spatial index for Python GIS / MIT |
| [ruamel\_yaml](https://bitbucket.org/ruamel/yaml) | 0.15.87 | A patched copy of ruamel.yaml. / MIT |
| [scikit-image](http://scikit-image.org/) | 0.17.2 | Image processing in Python. / BSD-3-Clause |
| [scikit-learn](http://scikit-learn.org/) | 0.23.2 | A set of python modules for machine learning and data mining / BSD-3-Clause |
| [scipy](http://www.scipy.org/) | 1.5.2 | Scientific Library for Python / BSD 3-Clause |
| [seaborn](https://seaborn.pydata.org) | 0.11.0 | Statistical data visualization / BSD 3-Clause |
| [secretstorage](https://github.com/mitya57/secretstorage) | 3.1.2 | Provides a way for securely storing passwords and other secrets. / BSD-3-Clause |
| [send2trash](https://github.com/hsoft/send2trash) | 1.5.0 | Python library to natively send files to Trash (or Recycle bin) on all platforms. / BSD-3-Clause |
| [setuptools](https://github.com/pypa/setuptools) | 50.3.1 | Download, build, install, upgrade, and uninstall Python packages / MIT |
| [simplegeneric](http://cheeseshop.python.org/pypi/simplegeneric) | 0.8.1 | Simple generic functions (similar to Python’s own len(), pickle.dump(), etc.) / Zope Public |
| [singledispatch](http://docs.python.org/3/library/functools.html#functools.singledispatch) | 3.4.0.3 | Transforms a function into a single-dispatch generic function / MIT |
| [sip](http://www.riverbankcomputing.com/software/sip/intro) | 4.19.13 | Create Python bindings for C and C++ libraries / GPL-3.0 |
| [six](https://six.readthedocs.io/) | 1.15.0 | Python 2 and 3 compatibility utilities / MIT |
| [snowballstemmer](https://github.com/shibukawa/snowball_py) | 2.0.0 | Snowball stemming library collection for Python / BSD-2-Clause |
| [sortedcollections](http://www.grantjenks.com/docs/sortedcollections/) | 1.2.1 | Python Sorted Collections / Apache-2.0 |
| [sortedcontainers](http://www.grantjenks.com/docs/sortedcontainers/) | 2.2.2 | Python Sorted Container Types: SortedList, SortedDict, and SortedSet / Apache-2.0 |
| [soupsieve](http://facelessuser.github.io/soupsieve) | 2.0.1 | A modern CSS selector implementation for BeautifulSoup / MIT |
| [sphinx](http://www.sphinx-doc.org) | 3.2.1 | Sphinx is a tool that makes it easy to create intelligent and beautiful documentation / BSD-2-Clause |
| sphinxcontrib | 1.0 | Python namespace for sphinxcontrib / BSD |
| [sphinxcontrib-applehelp](https://www.sphinx-doc.org/en/master/) | 1.0.2 | sphinxcontrib-applehelp is a sphinx extension which outputs Apple help books / BSD-2-Clause |
| [sphinxcontrib-devhelp](https://www.sphinx-doc.org/en/master/) | 1.0.2 | sphinxcontrib-devhelp is a sphinx extension which outputs Devhelp document / BSD-2-Clause |
| [sphinxcontrib-htmlhelp](https://www.sphinx-doc.org/en/master/) | 1.0.3 | sphinxcontrib-htmlhelp is a sphinx extension which … / BSD-2-Clause |
| [sphinxcontrib-jsmath](https://www.sphinx-doc.org/en/master/) | 1.0.1 | A sphinx extension which renders display math in HTML via JavaScript / BSD-2-Clause |
| [sphinxcontrib-qthelp](https://www.sphinx-doc.org/en/master/) | 1.0.3 | sphinxcontrib-qthelp is a sphinx extension which outputs QtHelp document / BSD-2-Clause |
| [sphinxcontrib-serializinghtml](https://www.sphinx-doc.org/en/master/) | 1.1.4 | sphinxcontrib-serializinghtml is a sphinx extension which outputs “serialized” HTML files (json and pickle). / BSD-2-Clause |
| [sphinxcontrib-websupport](https://pypi.python.org/pypi/sphinxcontrib-websupport) | 1.2.4 | Sphinx API for Web Apps / BSD-2-Clause |
| [spyder](https://www.spyder-ide.org/) | 4.1.5 | The Scientific Python Development Environment / MIT |
| [spyder-kernels](https://www.spyder-ide.org/) | 1.9.4 | Jupyter kernels for Spyder’s console / MIT |
| [sqlalchemy](http://www.sqlalchemy.org/) | 1.3.20 | Database Abstraction Library. / MIT |
| [sqlite](http://www.sqlite.org/) | 3.33.0 | Implements a self-contained, zero-configuration, SQL database engine / Public-Domain (`<http://www.sqlite.org/copyright.html>`) |
| [statsmodels](https://www.statsmodels.org) | 0.12.0 | Statistical computations and models for use with SciPy / BSD-3-Clause |
| [sympy](https://sympy.org) | 1.6.2 | Python library for symbolic mathematics / BSD-3-Clause |
| [tbb](http://www.threadingbuildingblocks.org) | 2020.3 | High level abstract threading library / Apache-2.0 |
| [tblib](https://github.com/ionelmc/python-tblib) | 1.7.0 | Traceback serialization library. / BSD 2-Clause |
| [terminado](https://github.com/jupyter/terminado) | 0.9.1 | Terminals served by tornado websockets / BSD-2-Clause |
| [testpath](https://testpath.readthedocs.io) | 0.4.4 | Testpath is a collection of utilities for Python code working with files and commands. / BSD-3-Clause |
| [threadpoolctl](https://github.com/joblib/threadpoolctl) | 2.1.0 | Python helpers to control the threadpools of native libraries / BSD 3-Clause |
| [tifffile](https://github.com/blink1073/tifffile) | 2020.10.1 | Read and write image data from and to TIFF files. / BSD 3-Clause |
| [tk](http://www.tcl.tk/) | 8.6.10 | A dynamic programming language with GUI support. Bundles Tcl and Tk. / Tcl/Tk |
| [toml](https://github.com/uiri/toml) | 0.10.1 | Python lib for TOML. / MIT |
| [toolz](http://toolz.readthedocs.org/) | 0.11.1 | A functional standard library for Python / BSD-3-Clause |
| [tornado](http://www.tornadoweb.org/) | 6.0.4 | A Python web framework and asynchronous networking library, originally developed at FriendFeed. / Apache-2.0 |
| [tqdm](https://pypi.python.org/pypi/tqdm) | 4.50.2 | A Fast, Extensible Progress Meter / MPLv2.0, MIT |
| [traitlets](http://traitlets.readthedocs.org/) | 5.0.5 | Configuration system for Python applications / BSD-3-Clause |
| [typing\_extensions](https://github.com/python/typing/tree/master/typing_extensions) | 3.7.4.3 | Backported and Experimental Type Hints for Python / PSF-2.0 |
| [ujson](https://github.com/ultrajson/ultrajson) | 4.0.1 | Ultra fast JSON decoder and encoder written in C with Python bindings / BSD-3-Clause |
| [unicodecsv](https://github.com/jdunck/python-unicodecsv) | 0.14.1 | Drop-in replacement for csv module which supports unicode strings / BSD |
| [unixodbc](http://www.unixodbc.org/) | 2.3.9 | ODBC on non MS Windows platforms / LGPL-2.1 |
| [urllib3](https://urllib3.readthedocs.io/) | 1.25.11 | HTTP library with thread-safe connection pooling, file post, and more. / MIT |
| [watchdog](http://github.com/gorakhargosh/watchdog) | 0.10.3 | Filesystem events monitoring / Apache 2.0 |
| [wcwidth](https://github.com/jquast/wcwidth) | 0.2.5 | Measures number of Terminal column cells of wide-character codes. / MIT |
| [webencodings](https://github.com/gsnedders/python-webencodings) | 0.5.1 | Character encoding aliases for legacy web content / BSD 3-Clause |
| [werkzeug](https://palletsprojects.com/p/werkzeug/) | 1.0.1 | The comprehensive WSGI web application library. / BSD 3-Clause |
| [wheel](https://github.com/pypa/wheel) | 0.35.1 | A built-package format for Python. / MIT |
| [widgetsnbextension](http://ipython.org) | 3.5.1 | Interactive Widgets for Jupyter / BSD 3-clause |
| [wrapt](https://github.com/GrahamDumpleton/wrapt) | 1.11.2 | Module for decorators, wrappers and monkey patching / BSD 2-Clause |
| [wurlitzer](https://github.com/minrk/wurlitzer) | 2.0.1 | Capture C-level stdout/stderr in Python / MIT |
| [xlrd](http://www.python-excel.org/) | 1.2.0 | Library for developers to extract data from Microsoft Excel (tm) spreadsheet files / BSD 3-Clause and BSD with advertising |
| [xlsxwriter](https://xlsxwriter.readthedocs.io/) | 1.3.7 | A Python module for creating Excel XLSX files / BSD-2-Clause |
| [xlwt](http://www.python-excel.org/) | 1.3.0 | Writing data and formatting information to Excel files / BSD |
| [xz](http://tukaani.org/xz/) | 5.2.5 | Data compression software with high compression ratio / LGPL-2.1 and GPL-2.0 |
| [yaml](http://pyyaml.org/wiki/LibYAML) | 0.2.5 | A C library for parsing and emitting YAML / MIT |
| [yapf](https://github.com/google/yapf) | 0.30.0 | A formatter for Python files / Apache 2.0 |
| [zeromq](http://zeromq.org) | 4.3.3 | A high-performance asynchronous messaging library. / LGPL 3 |
| [zict](http://github.com/mrocklin/zict) | 2.0.0 | Composable Dictionary Classes / BSD 3-Clause |
| [zipp](https://github.com/jaraco/zipp) | 3.4.0 | A pathlib-compatible Zipfile object wrapper / MIT |
| [zlib](http://zlib.net/) | 1.2.11 | Massively spiffy yet delicately unobtrusive compression library / zlib |
| zope | 1.0 | web application server / BSD |
| [zope.event](http://www.zope.org/en/latest/) | 4.5.0 | Very basic event publishing system / Zope Public License |
| [zope.interface](http://docs.zope.org/zope.interface/) | 5.1.2 | Interfaces for Python / ZPL-2.1 |
| [zstd](http://www.zstd.net) | 1.4.5 | Zstandard - Fast real-time compression algorithm / BSD 3-Clause |
| Name | Version | Summary / License |
|---|---|---|
| [\_ipyw\_jlab\_nb\_ext\_conf](https://github.com/ContinuumIO/anaconda-nb-extensions-meta-config) | 0.1.0 | A configuration metapackage for enabling Anaconda-bundled jupyter extensions / BSD |
| [alabaster](http://www.sphinx-doc.org/en/stable/index.html) | 0.7.12 | Configurable, Python 2+3 compatible Sphinx theme. / BSD 3-Clause |
| [anaconda-client](http://anaconda.org) | 1.7.2 | anaconda.org command line client library / BSD 3-clause |
| [anaconda-project](https://github.com/Anaconda-Platform/anaconda-project) | 0.8.4 | Tool for encapsulating, running, and reproducing data science projects / BSD 3-Clause |
| [argh](https://github.com/neithere/argh) | 0.26.2 | The Natural CLI. / LGPL 3 |
| [asn1crypto](https://github.com/wbond/asn1crypto) | 1.3.0 | Python ASN.1 library with a focus on performance and a pythonic API / MIT |
| [astroid](https://www.astroid.org/) | 2.3.3 | A abstract syntax tree for Python with inference support. / LGPL-2.1-only |
| [astropy](http://www.astropy.org/) | 4.0 | Community-developed Python Library for Astronomy / BSD-3-Clause |
| [atomicwrites](https://github.com/untitaker/python-atomicwrites) | 1.3.0 | Atomic file writes / MIT |
| [attrs](https://attrs.readthedocs.io/en/stable/) | 19.3.0 | attrs is the Python package that will bring back the joy of writing classes by relieving you from the drudgery of implementing object protocols (aka dunder methods). / MIT |
| [autopep8](https://github.com/hhatto/autopep8) | 1.4.4 | A tool that automatically formats Python code to conform to the PEP 8 style guide / MIT |
| [babel](http://babel.pocoo.org/) | 2.8.0 | Utilities to internationalize and localize Python applications / BSD 3-clause |
| [backcall](https://github.com/takluyver/backcall/) | 0.1.0 | Specifications for callback functions passed in to an API / BSD-3-Clause |
| [backports](https://bitbucket.org/brandon/backports) | 1.0 | None / BSD |
| [backports.shutil\_get\_terminal\_size](https://github.com/chrippa/backports.shutil_get_terminal_size) | 1.0.0 | A backport of the get\_terminal\_size function from Python 3.3’s shutil. / MIT |
| [bcrypt](https://github.com/pyca/bcrypt/) | 3.1.7 | Modern password hashing for your software and your servers / Apache-2.0 |
| [beautifulsoup4](http://www.crummy.com/software/BeautifulSoup/) | 4.8.2 | Python library designed for screen-scraping / MIT |
| [bitarray](https://github.com/ilanschnell/bitarray) | 1.2.1 | efficient arrays of booleans – C extension / PSF |
| [bkcharts](http://github.com/bokeh/bkcharts) | 0.2 | High level chart types built on top of Bokeh / BSD 3-Clause |
| blas | 1.0 | |
| [bleach](https://github.com/mozilla/bleach) | 3.1.0 | Easy, whitelist-based HTML-sanitizing tool / Apache-2.0 |
| [blosc](https://github.com/Blosc/c-blosc) | 1.16.3 | A blocking, shuffling and loss-less compression library that can be faster than memcpy() / BSD-3-Clause |
| [bokeh](http://bokeh.pydata.org/) | 1.4.0 | Statistical and novel interactive HTML plots for Python / BSD-3-Clause |
| [boto](https://github.com/boto/boto/) | 2.49.0 | Amazon Web Services Library / MIT |
| [bottleneck](https://github.com/pydata/bottleneck) | 1.3.2 | Fast NumPy array functions written in Cython. / BSD 2-Clause |
| [brotlipy](https://github.com/python-hyper/brotlipy) | 0.7.0 | Python bindings to the Brotli compression library / MIT |
| [bzip2](http://www.bzip.org/) | 1.0.8 | high-quality data compressor / bzip2 |
| [ca-certificates](https://github.com/conda-forge/ca-certificates-feedstock) | 2020.1.1 | Certificates for use with other packages. / MPL 2.0 |
| [certifi](http://certifi.io/) | 2019.11.28 | Python package for providing Mozilla’s CA Bundle. / ISC |
| [cffi](https://bitbucket.org/cffi/cffi) | 1.14.0 | Foreign Function Interface for Python calling C code. / MIT |
| [chardet](https://github.com/chardet/chardet) | 3.0.4 | Universal character encoding detector / LGPL2 |
| [click](https://palletsprojects.com/p/click) | 7.0 | Python composable command line interface toolkit / BSD-3-Clause |
| [cloudpickle](https://github.com/cloudpipe/cloudpickle) | 1.3.0 | Extended pickling support for Python objects / BSD 3-Clause |
| [clyent](https://github.com/Anaconda-Platform/clyent) | 1.2.2 | Command line client library for windows and posix / BSD 3-Clause |
| [colorama](https://github.com/tartley/colorama) | 0.4.3 | Cross-platform colored terminal text / BSD-3-Clause |
| [comtypes](http://starship.python.net/crew/theller/comtypes/) | 1.1.7 | pure Python COM package / MIT |
| [conda](https://conda.io) | 4.8.3 | OS-agnostic, system-level binary package and environment manager. / BSD 3-Clause |
| [conda-build](https://github.com/conda/conda-build) | 3.18.11 | tools for building conda packages / BSD 3-Clause |
| [conda-env](https://github.com/conda/conda-env) | 2.6.0 | Tools for interacting with conda environments. / BSD 3-Clause |
| [conda-verify](https://github.com/conda/conda-verify) | 3.4.2 | tool for validating conda recipes and conda packages / BSD 3-Clause |
| console\_shortcut | 0.1.1 | Console shortcut creator for Windows (using menuinst) / BSD |
| [contextlib2](http://contextlib2.readthedocs.org) | 0.6.0.post1 | Backports and enhancements for the contextlib module / PSF 2 |
| [cryptography](https://github.com/pyca/cryptography) | 2.8 | Provides cryptographic recipes and primitives to Python developers / Apache-2.0 AND BSD-3-Clause AND PSF-2.0 |
| [curl](http://curl.haxx.se/) | 7.68.0 | tool and library for transferring data with URL syntax / MIT/X derivate (`<http://curl.haxx.se/docs/copyright.html>`) |
| [cycler](http://matplotlib.org/cycler) | 0.10.0 | Composable style cycles. / BSD 3-Clause |
| [cython](http://www.cython.org/) | 0.29.15 | The Cython compiler for writing C extensions for the Python language / Apache-2.0 |
| [cytoolz](https://github.com/pytoolz/cytoolz) | 0.10.1 | Cython implementation of Toolz. High performance functional utilities / BSD-3-Clause |
| [dask](https://dask.org/) | 2.11.0 | Parallel PyData with Task Scheduling / BSD-3-Clause |
| [dask-core](http://github.com/dask/dask/) | 2.11.0 | Parallel Python with task scheduling / BSD-3-Clause |
| [decorator](https://github.com/micheles/decorator) | 4.4.1 | Better living through Python with decorators. / BSD-3-Clause |
| [defusedxml](https://bitbucket.org/tiran/defusedxml) | 0.6.0 | XML bomb protection for Python stdlib modules / PSF 2.0 |
| [diff-match-patch](http://code.google.com/p/google-diff-match-patch/) | 20181111 | Diff Match Patch is a high-performance library in multiple languages that manipulates plain text / Apache-2.0 |
| [distributed](http://distributed.readthedocs.io/en/latest/) | 2.11.0 | Distributed computing with Dask / BSD-3-Clause |
| [docutils](http://docutils.sourceforge.net/) | 0.16 | Docutils – Python Documentation Utilities / Public Domain Dedictation and BSD 2-Clause and PSF 2.1.1 and GPL 3.0 |
| [entrypoints](https://github.com/takluyver/entrypoints) | 0.3 | Discover and load entry points from installed packages. / MIT License |
| [et\_xmlfile](https://bitbucket.org/openpyxl/et_xmlfile) | 1.0.1 | An implementation of lxml.xmlfile for the standard library / MIT |
| [fastcache](https://github.com/pbrady/fastcache) | 1.1.0 | C implementation of Python 3 lru\_cache / MIT |
| [filelock](https://github.com/benediktschmitt/py-filelock) | 3.0.12 | A platform independent file lock. / Public Domain |
| [flake8](http://flake8.pycqa.org/) | 3.7.9 | Your Tool For Style Guide Enforcement / MIT |
| [flask](http://flask.pocoo.org) | 1.1.1 | A microframework based on Werkzeug, Jinja2 and good intentions. / BSD 3-Clause |
| [freetype](https://www.freetype.org/) | 2.9.1 | A Free, High-Quality, and Portable Font Engine / GPL-2.0-only and LicenseRef-FreeType |
| [fsspec](https://github.com/martindurant/filesystem_spec) | 0.6.2 | A specification for pythonic filesystems / BSD-3-Clause |
| [future](http://python-future.org) | 0.18.2 | Clean single-source support for Python 3 and 2 / MIT |
| [get\_terminal\_size](https://github.com/chrippa/backports.shutil_get_terminal_size) | 1.0.0 | Get the size of the terminal window. / MIT |
| [gevent](https://www.gevent.org) | 1.4.0 | Coroutine-based network library / MIT |
| [glob2](https://github.com/miracle2k/python-glob2) | 0.7 | Version of the glob module that supports recursion via \*\*, and can capture patterns. / BSD-2-Clause |
| [gmpy2](https://pypi.python.org/pypi/gmpy2) | 2.0.8 | GMP/MPIR, MPFR, and MPC interface to Python 2.6+ and 3.x / LGPL 3 |
| [greenlet](https://github.com/python-greenlet/greenlet) | 0.4.15 | Lightweight in-process concurrent programming / MIT |
| [h5py](http://www.h5py.org/) | 2.10.0 | Read and write HDF5 files from Python. / BSD-3-Clause |
| [hdf5](http://www.hdfgroup.org/HDF5/) | 1.10.4 | HDF5 is a data model, library, and file format for storing and managing data / HDF5 |
| [heapdict](http://stutzbachenterprises.com/) | 1.0.1 | A heap with decrease-key and increase-key operations / BSD 3-Clause |
| [html5lib](https://github.com/html5lib/html5lib-python) | 1.0.1 | HTML parser based on the WHATWG HTML specification / MIT |
| icc\_rt | 2019.0.0 | Intel runtime libraries for C, C++ and Fortran compilers / Intel proprietary |
| [icu](http://site.icu-project.org/) | 58.2 | International Components for Unicode. / MIT |
| [idna](https://github.com/kjd/idna) | 2.8 | Internationalized Domain Names in Applications (IDNA). / BSD Like |
| [imageio](https://imageio.github.io) | 2.6.1 | A Python library for reading and writing image data / BSD-2-Clause |
| [imagesize](https://github.com/shibukawa/imagesize_py) | 1.2.0 | Getting image size from png/jpeg/jpeg2000/gif file / MIT |
| [importlib-metadata](https://gitlab.com/python-devs/importlib_metadata) | 1.7.0 | A library to access the metadata for a Python package / Apache-2.0 |
| [importlib\_metadata](https://gitlab.com/python-devs/importlib_metadata) | 1.5.0 | A library to access the metadata for a Python package / Apache-2.0 |
| [intel-openmp](https://software.intel.com/en-us/node/522690) | 2020.0 | Math library for Intel and compatible processors / proprietary - Intel |
| [intervaltree](https://github.com/chaimleib/intervaltree) | 3.0.2 | Editable interval tree data structure for Python 2 and 3 / Apache-2.0 |
| [ipykernel](https://ipython.org) | 5.1.4 | IPython Kernel for Jupyter / BSD-3-Clause |
| [ipython](https://ipython.org) | 7.12.0 | IPython: Productive Interactive Computing / BSD-3-Clause |
| [ipython\_genutils](http://ipython.org) | 0.2.0 | vestigial utilities from IPython / BSD 3-Clause |
| [ipywidgets](https://github.com/ipython/ipywidgets) | 7.5.1 | Jupyter Interactive Widgets / BSD 3-clause |
| [isort](https://github.com/timothycrosley/isort) | 4.3.21 | A Python utility / library to sort Python imports. / MIT |
| [itsdangerous](https://github.com/pallets/itsdangerous) | 1.1.0 | Various helpers to pass trusted data to untrusted environments. / BSD 3-Clause |
| [jdcal](https://github.com/phn/jdcal) | 1.4.1 | Julian dates from proleptic Gregorian and Julian calendars. / BSD 2-Clause |
| [jedi](https://github.com/davidhalter/jedi/) | 0.14.1 | An autocompletion tool for Python that can be used for text editors. / MIT |
| [jinja2](http://jinja.pocoo.org) | 2.11.1 | An easy to use stand-alone template engine written in pure python. / 3-Clause BSD |
| [joblib](https://pypi.org/project/joblib/) | 0.14.1 | Lightweight pipelining: using Python functions as pipeline jobs. / BSD-3-Clause |
| [jpeg](http://www.ijg.org/) | 9b | read/write jpeg COM, EXIF, IPTC medata / Custom free software license |
| [json5](https://github.com/dpranke/pyjson5) | 0.9.1 | A Python implementation of the JSON5 data format / Apache-2.0 |
| [jsonschema](https://github.com/Julian/jsonschema) | 3.2.0 | An implementation of JSON Schema validation for Python / MIT |
| [jupyter](http://jupyter.org) | 1.0.0 | Jupyter metapackage. Install all the Jupyter components in one go. / BSD 3-Clause |
| [jupyter\_client](https://jupyter.org) | 5.3.4 | jupyter\_client contains the reference implementation of the Jupyter protocol. / BSD-3-Clause |
| [jupyter\_console](http://jupyter.org) | 6.1.0 | Jupyter terminal console / BSD-3-Clause |
| [jupyter\_core](https://jupyter.org) | 4.6.1 | Core common functionality of Jupyter projects. / BSD-3-Clause |
| [jupyterlab](https://github.com/jupyterlab/jupyterlab) | 1.2.6 | JupyterLab PRE-ALPHA / BSD-3-Clause |
| [jupyterlab\_server](https://github.com/jupyterlab/jupyterlab_server) | 1.0.6 | A set of server components for JupyterLab and JupyterLab like applications. / BSD-3-Clause |
| [keyring](https://github.com/jaraco/keyring) | 21.1.0 | Store and access your passwords safely / Python Software Foundation or MIT |
| [kiwisolver](https://github.com/nucleic/kiwi) | 1.1.0 | An efficient C++ implementation of the Cassowary constraint solver / BSD-3-Clause |
| [krb5](http://web.mit.edu/kerberos/) | 1.17.1 | A network authentication protocol. / MIT |
| [lazy-object-proxy](https://github.com/ionelmc/python-lazy-object-proxy) | 1.4.3 | A fast and thorough lazy object proxy / BSD-2-Clause |
| [libarchive](http://www.libarchive.org/) | 3.3.3 | Multi-format archive and compression library / BSD-2-Clause |
| [libcurl](http://curl.haxx.se/) | 7.68.0 | tool and library for transferring data with URL syntax / MIT/X derivate (`<http://curl.haxx.se/docs/copyright.html>`) |
| [libiconv](https://www.gnu.org/software/libiconv/) | 1.15 | Provides iconv for systems which don’t have one (or that cannot convert from/to Unicode.) / GPL and LGPL |
| [liblief](https://lief.quarkslab.com/) | 0.9.0 | A cross platform library to parse, modify and abstract ELF, PE and MachO formats. / Apache-2.0 |
| [libllvm9](http://llvm.org/) | 9.0.1 | Development headers and libraries for LLVM / LLVM-Exception |
| [libpng](http://www.libpng.org/pub/png/libpng.html) | 1.6.37 | PNG reference library / zlib/libpng |
| [libsodium](http://libsodium.org) | 1.0.16 | A modern and easy-to-use crypto library. / ISC |
| [libspatialindex](http://libspatialindex.github.io) | 1.9.3 | Extensible framework for robust spatial indexing / MIT |
| [libssh2](https://www.libssh2.org/) | 1.8.2 | the SSH library / BSD-3-Clause |
| [libtiff](http://www.libtiff.org/) | 4.1.0 | Support for the Tag Image File Format (TIFF). / HPND |
| [libxml2](http://xmlsoft.org/) | 2.9.9 | The XML C parser and toolkit of Gnome / MIT |
| [libxslt](http://xmlsoft.org/XSLT/) | 1.1.33 | The XSLT C library developed for the GNOME project / MIT |
| [llvmlite](https://github.com/numba/llvmlite) | 0.31.0 | A lightweight LLVM python binding for writing JIT compilers / New BSD License |
| [locket](https://github.com/mwilliamson/locket.py) | 0.2.0 | File-based locks for Python for Linux and Windows / BSD 2-Clause |
| [lxml](http://lxml.de/) | 4.5.0 | Pythonic binding for the C libraries libxml2 and libxslt. / BSD-3-Clause and GPL-2.0-only and ZPL-2.0 and LicenseRef-ElementTree |
| [lz4-c](https://www.lz4.org) | 1.8.1.2 | Extremely Fast Compression algorithm / BSD-2-Clause |
| [lzo](http://www.oberhumer.com/opensource/lzo/) | 2.10 | LZO is a portable lossless data compression library written in ANSI C. / GPL v2+ |
| m2w64-gcc-libgfortran | 5.3.0 | / |
| m2w64-gcc-libs | 5.3.0 | / |
| m2w64-gcc-libs-core | 5.3.0 | / |
| m2w64-gmp | 6.1.0 | / |
| m2w64-libwinpthread-git | 5.0.0.4634.697f757 | / |
| [markupsafe](https://www.palletsprojects.com/p/markupsafe) | 1.1.1 | A Python module that implements the jinja2.Markup string / BSD-3-Clause |
| [matplotlib](http://matplotlib.org/) | 3.1.3 | Publication quality figures in Python / PSF-based |
| [matplotlib-base](http://matplotlib.org/) | 3.1.3 | Publication quality figures in Python / PSF-based |
| [mccabe](https://github.com/PyCQA/mccabe) | 0.6.1 | McCabe complexity checker for Python / MIT |
| [menuinst](https://github.com/ContinuumIO/menuinst) | 1.4.16 | cross platform menu item installation / BSD |
| [mistune](https://github.com/lepture/mistune) | 0.8.4 | The fastest markdown parser in pure Python. / BSD 3-Clause |
| [mkl](https://software.intel.com/en-us/mkl) | 2020.0 | Math library for Intel and compatible processors / proprietary - Intel |
| [mkl-service](https://github.com/ContinuumIO/mkl-service) | 2.3.0 | Python bindings to MKL service functions / 3-clause BSD |
| [mkl\_fft](http://github.com/IntelPython/mkl_fft) | 1.0.15 | NumPy-based implementation of Fast Fourier Transform using Intel (R) Math Kernel Library. / BSD 3-Clause |
| [mkl\_random](http://github.com/IntelPython/mkl_random) | 1.1.0 | Intel (R) MKL-powered package for sampling from common probability distributions into NumPy arrays. / BSD 3-Clause |
| [mock](https://github.com/testing-cabal/mock) | 4.0.1 | A library for testing in Python / BSD-2-Clause |
| [more-itertools](https://github.com/more-itertools/more-itertools) | 8.2.0 | More routines for operating on iterables, beyond itertools / MIT |
| [mpc](http://www.multiprecision.org/) | 1.1.0 | A C library for the arithmetic of complex numbers with arbitrarily high precision. / LGPL 3 |
| [mpfr](http://www.mpfr.org/) | 4.0.2 | The MPFR library is a C library for multiple-precision floating-point computations with correct rounding. / LGPL-3.0-only |
| [mpir](http://mpir.org/) | 3.0.0 | Multiple Precision Integers and Rationals. / LGPL 3 |
| [mpmath](http://mpmath.org) | 1.1.0 | Python library for arbitrary-precision floating-point arithmetic / BSD 3-Clause |
| [msgpack-python](http://msgpack.org/) | 0.6.1 | MessagePack (de)serializer / Apache-2.0 |
| msys2-conda-epoch | 20160418 | / |
| [multipledispatch](https://github.com/mrocklin/multipledispatch/) | 0.6.0 | Multiple dispatch in Python / BSD 3-Clause |
| [nbconvert](http://jupyter.org) | 5.6.1 | Converting Jupyter Notebooks / BSD-3-Clause |
| [nbformat](http://jupyter.org) | 5.0.4 | The reference implementation of the Jupyter Notebook format / BSD-3-Clause |
| [networkx](https://networkx.github.io/) | 2.4 | Python package for creating and manipulating complex networks / BSD-3-Clause |
| [nltk](http://nltk.org/) | 3.4.5 | Natural Language Toolkit / Apache 2.0 |
| [nose](http://readthedocs.org/docs/nose/) | 1.3.7 | Nose extends unittest to make testing easier / LGPL-2.1 |
| [notebook](https://jupyter.org) | 6.0.3 | Jupyter Notebook / BSD-3-Clause |
| [numba](http://numba.github.com) | 0.48.0 | NumPy aware dynamic Python compiler using LLVM / BSD 2-clause |
| [numexpr](https://github.com/pydata/numexpr) | 2.7.1 | Fast numerical expression evaluator for NumPy. / MIT |
| [numpy](http://numpy.scipy.org/) | 1.18.1 | Array processing for numbers, strings, records, and objects. / BSD 3-Clause |
| [numpy-base](http://numpy.scipy.org/) | 1.18.1 | Array processing for numbers, strings, records, and objects. / BSD 3-Clause |
| [numpydoc](https://github.com/numpy/numpydoc) | 0.9.2 | Numpy’s Sphinx extensions / BSD 3-Clause |
| [olefile](http://www.decalage.info/python/olefileio) | 0.46 | parse, read and write Microsoft OLE2 files / BSD 2-Clause |
| [openpyxl](https://openpyxl.readthedocs.io) | 3.0.3 | A Python library to read/write Excel 2010 xlsx/xlsm files / MIT |
| [openssl](http://www.openssl.org/) | 1.1.1d | OpenSSL is an open-source implementation of the SSL and TLS protocols / OpenSSL |
| [packaging](https://github.com/pypa/packaging) | 20.1 | Core utilities for Python packages / Apache 2.0 or BSD 2-Clause |
| [pandas](http://pandas.pydata.org) | 1.0.1 | High-performance, easy-to-use data structures and data analysis tools. / BSD-3-Clause |
| [pandoc](http://pandoc.org/) | 2.2.3.2 | Universal markup converter (repackaged binaries) / GPL-2.0 |
| [pandocfilters](https://github.com/jgm/pandocfilters) | 1.4.2 | A python module for writing pandoc filters / BSD-3-Clause |
| [paramiko](http://www.paramiko.org/) | 2.7.1 | SSH2 protocol library / LGPL 2.1 |
| [parso](https://github.com/davidhalter/parso) | 0.5.2 | A Python Parser / MIT |
| [partd](https://github.com/dask/partd) | 1.1.0 | Data structure for on-disk shuffle operations / BSD 3-Clause |
| [path](https://github.com/jaraco/path) | 13.1.0 | A module wrapper for os.path / MIT |
| [path.py](https://github.com/jaraco/path.py) | 12.4.0 | A module wrapper for os.path / MIT |
| [pathlib2](https://github.com/mcmtroffaes/pathlib2) | 2.3.5 | Fork of pathlib aiming to support the full stdlib Python API / MIT |
| [pathtools](https://github.com/gorakhargosh/pathtools) | 0.1.2 | Path utilities for Python. / MIT |
| [patsy](https://github.com/pydata/patsy) | 0.5.1 | Describing statistical models in Python using symbolic formulas / BSD-2-Clause, PSF2 |
| [pep8](http://pep8.readthedocs.org/) | 1.7.1 | Python style guide checker / MIT |
| [pexpect](http://pexpect.sourceforge.net/) | 4.8.0 | Pexpect makes Python a better tool for controlling other applications. / ISC |
| [pickleshare](https://github.com/pickleshare/pickleshare/) | 0.7.5 | Tiny ‘shelve’-like database with concurrency support / MIT |
| [pillow](https://pillow.readthedocs.io) | 7.0.0 | Pillow is the friendly PIL fork by Alex Clark and Contributors / LicenseRef-PIL |
| [pip](https://pip.pypa.io/en/stable/) | 20.0.2 | PyPA recommended tool for installing Python packages / MIT |
| [pkginfo](https://code.launchpad.net/~tseaver/pkginfo/trunk) | 1.5.0.1 | Query metadatdata from sdists / bdists / installed packages. / MIT |
| [pluggy](https://github.com/pytest-dev/pluggy) | 0.13.1 | Plugin registration and hook calling for Python / MIT |
| [ply](http://www.dabeaz.com/ply/index.html) | 3.11 | Python Lex-Yacc / BSD 3-clause |
| powershell\_shortcut | 0.0.1 | Powershell shortcut creator for Windows (using menuinst) / BSD |
| [prometheus\_client](https://github.com/prometheus/client_python) | 0.7.1 | Python client for the Prometheus monitoring system / Apache-2.0 |
| [prompt-toolkit](https://github.com/jonathanslenders/python-prompt-toolkit) | 3.0.5 | Library for building powerful interactive command lines in Python / BSD-3-Clause |
| [prompt\_toolkit](https://github.com/jonathanslenders/python-prompt-toolkit) | 3.0.3 | Library for building powerful interactive command lines in Python / BSD-3-Clause |
| [psutil](https://github.com/giampaolo/psutil) | 5.6.7 | A cross-platform process and system utilities module for Python / BSD 3-Clause |
| [py](https://github.com/pytest-dev/py) | 1.8.1 | library with cross-python path, ini-parsing, io, code, log facilities / MIT |
| [py-lief](https://lief.quarkslab.com/) | 0.9.0 | A cross platform library to parse, modify and abstract ELF, PE and MachO formats. / Apache-2.0 |
| [pycodestyle](https://pycodestyle.readthedocs.io/) | 2.5.0 | Python style guide checker / MIT |
| [pycosat](https://github.com/ContinuumIO/pycosat) | 0.6.3 | Bindings to picosat (a SAT solver) / MIT |
| [pycparser](https://github.com/eliben/pycparser) | 2.19 | Complete C99 parser in pure Python / BSD 3-clause |
| [pycrypto](http://www.pycrypto.org/) | 2.6.1 | Cryptographic modules for Python. / Public Domain |
| [pycurl](http://pycurl.sourceforge.net/) | 7.43.0.5 | A Python Interface To The cURL library / LGPL, MIT |
| [pydocstyle](https://github.com/PyCQA/pydocstyle) | 4.0.1 | Python docstring style checker (formerly pep257) / MIT |
| [pyflakes](https://github.com/PyCQA/pyflakes) | 2.1.1 | Pyflakes analyzes programs and detects various errors. / MIT |
| [pygments](http://pygments.org/) | 2.5.2 | Pygments is a generic syntax highlighter suitable for use in code hosting, forums, wikis or other applications that need to prettify source code. / BSD-2-clause |
| [pylint](http://www.pylint.org/) | 2.4.4 | python code static checker / GPL-2.0-only |
| [pynacl](https://github.com/pyca/pynacl) | 1.3.0 | PyNaCl is a Python binding to the Networking and Cryptography library, a crypto library with the stated goal of improving usability, security and speed. / Apache-2.0 |
| [pyodbc](https://github.com/mkleehammer/pyodbc) | 4.0.30 | DB API Module for ODBC / MIT |
| [pyopenssl](https://github.com/pyca/pyopenssl) | 19.1.0 | Python wrapper module around the OpenSSL library / Apache 2.0 |
| [pyparsing](http://pyparsing.wikispaces.com/) | 2.4.6 | Create and execute simple grammars / MIT |
| [pyqt](http://www.riverbankcomputing.co.uk/software/pyqt) | 5.9.2 | Python binding of the cross-platform GUI toolkit Qt. / Commercial, GPL-2.0, GPL-3.0 |
| [pyreadline](http://ipython.org/pyreadline) | 2.1 | A python implmementation of GNU readline. / BSD 3-Clause |
| [pyrsistent](http://github.com/tobgu/pyrsistent/) | 0.15.7 | Persistent/Functional/Immutable data structures / MIT |
| [pysocks](https://github.com/Anorov/PySocks) | 1.7.1 | A Python SOCKS client module. See [Anorov/PySocks](https://github.com/Anorov/PySocks) for more information. / BSD 3-Clause |
| [pytables](http://www.pytables.org) | 3.6.1 | Brings together Python, HDF5 and NumPy to easily handle large amounts of data. / BSD 3-Clause |
| [pytest](https://docs.pytest.org/en/latest/) | 5.3.5 | Simple and powerful testing with Python. / MIT |
| [python](http://www.python.org/) | 3.7.6 | General purpose programming language / PSF |
| [python-dateutil](https://dateutil.readthedocs.org/) | 2.8.1 | Extensions to the standard Python datetime module. / BSD 3 Clause |
| [python-jsonrpc-server](https://github.com/palantir/python-jsonrpc-server) | 0.3.4 | A Python 2.7 and 3.4+ server implementation of the JSON RPC 2.0 protocol. / MIT |
| [python-language-server](https://github.com/palantir/python-language-server) | 0.31.7 | An implementation of the Language Server Protocol for Python / MIT |
| [python-libarchive-c](https://github.com/Changaco/python-libarchive-c) | 2.8 | Python interface to libarchive / CC0-1.0 |
| [pytz](http://pythonhosted.org/pytz/) | 2019.3 | World timezone definitions, modern and historical. / MIT |
| [pywavelets](https://github.com/PyWavelets/pywt) | 1.1.1 | Discrete Wavelet Transforms in Python / MIT |
| [pywin32](https://sourceforge.net/projects/pywin32) | 227 | Python extensions for Windows / PSF |
| [pywin32-ctypes](https://github.com/enthought/pywin32-ctypes) | 0.2.0 | A limited subset of pywin32 re-implemented using ctypes (or cffi) / BSD 3 Clause |
| [pywinpty](https://github.com/spyder-ide/pywinpty) | 0.5.7 | Python bindings for the winpty library / MIT |
| [pyyaml](http://pyyaml.org/wiki/PyYAML) | 5.3 | YAML parser and emitter for Python / MIT |
| [pyzmq](https://github.com/zeromq/pyzmq) | 18.1.1 | Python bindings for zeromq / BSD 3-clause |
| [qdarkstyle](https://github.com/ColinDuquesnoy/QDarkStyleSheet) | 2.8 | A dark stylesheet for Qt applications (Qt4, Qt5, PySide, PyQt4, PyQt5, QtPy, PyQtGraph). / MIT |
| [qt](http://qt-project.org) | 5.9.7 | Qt is a cross-platform application and UI framework. / LGPL-3.0 |
| [qtawesome](https://github.com/spyder-ide/qtawesome) | 0.6.1 | Iconic fonts in PyQt and PySide applications / MIT |
| [qtconsole](http://jupyter.org) | 4.6.0 | Jupyter Qt Console / BSD 3-Clause |
| [qtpy](https://github.com/spyder-ide/qtpy) | 1.9.0 | Abstraction layer for PyQt5/PyQt4/PySide / MIT |
| [regex](https://bitbucket.org/mrabarnett/mrab-regex) | 2020.6.8 | Alternative regular expression module, to replace re / Python-2.0 |
| [requests](http://python-requests.org) | 2.22.0 | Requests is an elegant and simple HTTP library for Python, built with ♥. / Apache-2.0 |
| [rope](https://github.com/python-rope/rope) | 0.16.0 | A python refactoring library / GPL 2.0 |
| [rtree](http://toblerity.github.com/rtree/) | 0.9.3 | R-Tree spatial index for Python GIS / MIT |
| [ruamel\_yaml](https://bitbucket.org/ruamel/yaml) | 0.15.87 | A patched copy of ruamel.yaml. / MIT |
| [scikit-image](http://scikit-image.org/) | 0.16.2 | Image processing routines for SciPy. / BSD 3-Clause |
| [scikit-learn](http://scikit-learn.org/) | 0.22.1 | A set of python modules for machine learning and data mining / BSD-3-Clause |
| [scipy](http://www.scipy.org/) | 1.4.1 | Scientific Library for Python / BSD 3-Clause |
| [seaborn](https://seaborn.pydata.org) | 0.10.0 | Statistical data visualization / BSD 3-Clause |
| [send2trash](https://github.com/hsoft/send2trash) | 1.5.0 | Python library to natively send files to Trash (or Recycle bin) on all platforms. / BSD-3-Clause |
| [setuptools](https://github.com/pypa/setuptools) | 45.2.0 | Download, build, install, upgrade, and uninstall Python packages / MIT |
| [simplegeneric](http://cheeseshop.python.org/pypi/simplegeneric) | 0.8.1 | Simple generic functions (similar to Python’s own len(), pickle.dump(), etc.) / Zope Public |
| [singledispatch](http://docs.python.org/3/library/functools.html#functools.singledispatch) | 3.4.0.3 | Transforms a function into a single-dispatch generic function / MIT |
| [sip](http://www.riverbankcomputing.com/software/sip/intro) | 4.19.8 | Create Python bindings for C and C++ libraries / GPL-3.0 |
| [six](https://six.readthedocs.io/) | 1.14.0 | Python 2 and 3 compatibility utilities / MIT |
| [snappy](https://github.com/google/snappy) | 1.1.7 | A fast compressor/decompressor / BSD 3-clause |
| [snowballstemmer](https://github.com/shibukawa/snowball_py) | 2.0.0 | Snowball stemming library collection for Python / BSD-2-Clause |
| [sortedcollections](http://www.grantjenks.com/docs/sortedcollections/) | 1.1.2 | Python Sorted Collections / Apache-2.0 |
| [sortedcontainers](http://www.grantjenks.com/docs/sortedcontainers/) | 2.1.0 | Python Sorted Container Types: SortedList, SortedDict, and SortedSet / Apache-2.0 |
| [soupsieve](http://facelessuser.github.io/soupsieve) | 1.9.5 | A modern CSS selector implementation for BeautifulSoup / MIT |
| [sphinx](http://www.sphinx-doc.org) | 2.4.0 | Sphinx is a tool that makes it easy to create intelligent and beautiful documentation / BSD-2-Clause |
| sphinxcontrib | 1.0 | Python namespace for sphinxcontrib / BSD |
| [sphinxcontrib-applehelp](https://www.sphinx-doc.org/en/master/) | 1.0.1 | sphinxcontrib-applehelp is a sphinx extension which outputs Apple help books / BSD-2-Clause |
| [sphinxcontrib-devhelp](https://www.sphinx-doc.org/en/master/) | 1.0.1 | sphinxcontrib-devhelp is a sphinx extension which outputs Devhelp document / BSD-2-Clause |
| [sphinxcontrib-htmlhelp](https://www.sphinx-doc.org/en/master/) | 1.0.2 | sphinxcontrib-htmlhelp is a sphinx extension which … / BSD-2-Clause |
| [sphinxcontrib-jsmath](https://www.sphinx-doc.org/en/master/) | 1.0.1 | A sphinx extension which renders display math in HTML via JavaScript / BSD-2-Clause |
| [sphinxcontrib-qthelp](https://www.sphinx-doc.org/en/master/) | 1.0.2 | sphinxcontrib-qthelp is a sphinx extension which outputs QtHelp document / BSD-2-Clause |
| [sphinxcontrib-serializinghtml](https://www.sphinx-doc.org/en/master/) | 1.1.3 | sphinxcontrib-serializinghtml is a sphinx extension which outputs “serialized” HTML files (json and pickle). / BSD-2-Clause |
| [sphinxcontrib-websupport](https://pypi.python.org/pypi/sphinxcontrib-websupport) | 1.2.0 | Sphinx API for Web Apps / BSD-2-Clause |
| [spyder](https://www.spyder-ide.org/) | 4.0.1 | The Scientific Python Development Environment / MIT |
| [spyder-kernels](https://www.spyder-ide.org/) | 1.8.1 | Jupyter kernels for Spyder’s console / MIT |
| [sqlalchemy](http://www.sqlalchemy.org/) | 1.3.13 | Database Abstraction Library. / MIT |
| [sqlite](http://www.sqlite.org/) | 3.31.1 | Implements a self-contained, zero-configuration, SQL database engine / Public-Domain (`<http://www.sqlite.org/copyright.html>`) |
| [statsmodels](https://www.statsmodels.org) | 0.11.0 | Statistical computations and models for use with SciPy / BSD-3-Clause |
| [sympy](https://sympy.org) | 1.5.1 | Python library for symbolic mathematics / BSD-3-Clause |
| [tbb](http://www.threadingbuildingblocks.org) | 2020.0 | High level abstract threading library / Apache 2.0 |
| [tblib](https://github.com/ionelmc/python-tblib) | 1.6.0 | Traceback serialization library. / BSD 2-Clause |
| [terminado](https://github.com/jupyter/terminado) | 0.8.3 | Terminals served by tornado websockets / BSD-2-Clause |
| [testpath](https://testpath.readthedocs.io) | 0.4.4 | Testpath is a collection of utilities for Python code working with files and commands. / BSD-3-Clause |
| [threadpoolctl](https://github.com/joblib/threadpoolctl) | 2.1.0 | Python helpers to control the threadpools of native libraries / BSD 3-Clause |
| [tk](http://www.tcl.tk/) | 8.6.8 | A dynamic programming language with GUI support. Bundles Tcl and Tk. / Tcl/Tk |
| [toml](https://github.com/uiri/toml) | 0.10.1 | Python lib for TOML. / MIT |
| [toolz](http://toolz.readthedocs.org/) | 0.10.0 | A functional standard library for Python / BSD 3-Clause |
| [tornado](http://www.tornadoweb.org/) | 6.0.3 | A Python web framework and asynchronous networking library, originally developed at FriendFeed. / Apache-2.0 |
| [tqdm](https://pypi.python.org/pypi/tqdm) | 4.42.1 | A Fast, Extensible Progress Meter / MPLv2.0, MIT |
| [traitlets](http://ipython.org/) | 4.3.3 | Configuration system for Python applications / BSD-3-Clause |
| [typed-ast](https://github.com/python/typed_ast) | 1.4.1 | a fork of Python 2 and 3 ast modules with type comment support / Apache 2.0 |
| [typing\_extensions](https://github.com/python/typing/tree/master/typing_extensions) | 3.7.4.2 | Backported and Experimental Type Hints for Python / PSF-2.0 |
| [ujson](https://github.com/ultrajson/ultrajson) | 1.35 | Ultra fast JSON decoder and encoder written in C with Python bindings / BSD-3-Clause |
| [unicodecsv](https://github.com/jdunck/python-unicodecsv) | 0.14.1 | Drop-in replacement for csv module which supports unicode strings / BSD |
| [urllib3](https://urllib3.readthedocs.io/) | 1.25.8 | HTTP library with thread-safe connection pooling, file post, and more. / MIT |
| [vc](https://github.com/conda/conda/wiki/VC-features) | 14.1 | A meta-package to impose mutual exclusivity among software built with different VS versions / Modified BSD License (3-clause) |
| vs2015\_runtime | 14.16.27012 | MSVC runtimes associated with cl.exe version 19.16.27032.1 (VS 2017 update 9) / None |
| [watchdog](http://github.com/gorakhargosh/watchdog) | 0.10.2 | Filesystem events monitoring / Apache 2.0 |
| [wcwidth](https://github.com/jquast/wcwidth) | 0.1.8 | Measures number of Terminal column cells of wide-character codes. / MIT |
| [webencodings](https://github.com/gsnedders/python-webencodings) | 0.5.1 | Character encoding aliases for legacy web content / BSD 3-Clause |
| [werkzeug](https://palletsprojects.com/p/werkzeug/) | 1.0.0 | The comprehensive WSGI web application library. / BSD 3-Clause |
| [wheel](https://github.com/pypa/wheel) | 0.34.2 | A built-package format for Python. / MIT |
| [widgetsnbextension](http://ipython.org) | 3.5.1 | Interactive Widgets for Jupyter / BSD 3-clause |
| [win\_inet\_pton](https://github.com/hickeroar/win_inet_pton) | 1.1.0 | Native inet\_pton and inet\_ntop implementation for Python on Windows (with ctypes). / PUBLIC-DOMAIN |
| [win\_unicode\_console](https://github.com/Drekin/win-unicode-console) | 0.5 | A Python package to enable Unicode input and display when running Python from Windows console. / MIT |
| [wincertstore](https://bitbucket.org/tiran/wincertstore) | 0.2 | Python module to extract CA and CRL certs from Windows’ cert store (ctypes based). / PSF 2 |
| [winpty](https://github.com/rprichard/winpty) | 0.4.3 | Winpty provides an interface similar to a Unix pty-master for communicating with Windows console programs. / MIT |
| [wrapt](https://github.com/GrahamDumpleton/wrapt) | 1.11.2 | Module for decorators, wrappers and monkey patching / BSD 2-Clause |
| [xlrd](http://www.python-excel.org/) | 1.2.0 | Library for developers to extract data from Microsoft Excel (tm) spreadsheet files / BSD 3-Clause and BSD with advertising |
| [xlsxwriter](https://xlsxwriter.readthedocs.io/) | 1.2.7 | A Python module for creating Excel XLSX files / BSD-2-Clause |
| [xlwings](http://xlwings.org/) | 0.17.1 | Interact with Excel from Python and vice versa / 3-clause BSD |
| [xlwt](http://www.python-excel.org/) | 1.3.0 | Writing data and formatting information to Excel files / BSD |
| [xz](http://tukaani.org/xz/) | 5.2.4 | Data compression software with high compression ratio / LGPL-2.1 and GPL-2.0 |
| [yaml](http://pyyaml.org/wiki/LibYAML) | 0.1.7 | A C library for parsing and emitting YAML / MIT |
| [yapf](https://github.com/google/yapf) | 0.28.0 | A formatter for Python files / Apache 2.0 |
| [zeromq](http://zeromq.org) | 4.3.1 | A high-performance asynchronous messaging library. / LGPL 3 |
| [zict](http://github.com/mrocklin/zict) | 1.0.0 | Composable Dictionary Classes / BSD 3-Clause |
| [zipp](https://github.com/jaraco/zipp) | 2.2.0 | A pathlib-compatible Zipfile object wrapper / MIT |
| [zlib](http://zlib.net/) | 1.2.11 | Massively spiffy yet delicately unobtrusive compression library / zlib |
| zope | 1.0 | web application server / BSD |
| [zope.event](http://www.zope.org/en/latest/) | 4.4 | Very basic event publishing system / Zope Public License |
| [zope.interface](http://docs.zope.org/zope.interface/) | 4.7.1 | Interfaces for Python / ZPL 2.1 |
| [zstd](http://www.zstd.net) | 1.3.7 | Zstandard - Fast real-time compression algorithm / BSD 3-Clause |
| Name | Version | Summary / License |
|---|---|---|
| [\_ipyw\_jlab\_nb\_ext\_conf](https://github.com/ContinuumIO/anaconda-nb-extensions-meta-config) | 0.1.0 | A configuration metapackage for enabling Anaconda-bundled jupyter extensions / BSD |
| [alabaster](http://www.sphinx-doc.org/en/stable/index.html) | 0.7.12 | Configurable, Python 2+3 compatible Sphinx theme. / BSD 3-Clause |
| [anaconda-client](http://anaconda.org) | 1.7.2 | anaconda.org command line client library / BSD 3-clause |
| [anaconda-project](https://github.com/Anaconda-Platform/anaconda-project) | 0.8.4 | Tool for encapsulating, running, and reproducing data science projects / BSD 3-Clause |
| [argh](https://github.com/neithere/argh) | 0.26.2 | The Natural CLI. / LGPL 3 |
| [asn1crypto](https://github.com/wbond/asn1crypto) | 1.3.0 | Python ASN.1 library with a focus on performance and a pythonic API / MIT |
| [astroid](https://www.astroid.org/) | 2.3.3 | A abstract syntax tree for Python with inference support. / LGPL-2.1-only |
| [astropy](http://www.astropy.org/) | 4.0 | Community-developed Python Library for Astronomy / BSD-3-Clause |
| [atomicwrites](https://github.com/untitaker/python-atomicwrites) | 1.3.0 | Atomic file writes / MIT |
| [attrs](https://attrs.readthedocs.io/en/stable/) | 19.3.0 | attrs is the Python package that will bring back the joy of writing classes by relieving you from the drudgery of implementing object protocols (aka dunder methods). / MIT |
| [autopep8](https://github.com/hhatto/autopep8) | 1.4.4 | A tool that automatically formats Python code to conform to the PEP 8 style guide / MIT |
| [babel](http://babel.pocoo.org/) | 2.8.0 | Utilities to internationalize and localize Python applications / BSD 3-clause |
| [backcall](https://github.com/takluyver/backcall/) | 0.1.0 | Specifications for callback functions passed in to an API / BSD-3-Clause |
| [backports](https://bitbucket.org/brandon/backports) | 1.0 | None / BSD |
| [backports.shutil\_get\_terminal\_size](https://github.com/chrippa/backports.shutil_get_terminal_size) | 1.0.0 | A backport of the get\_terminal\_size function from Python 3.3’s shutil. / MIT |
| [bcrypt](https://github.com/pyca/bcrypt/) | 3.1.7 | Modern password hashing for your software and your servers / Apache-2.0 |
| [beautifulsoup4](http://www.crummy.com/software/BeautifulSoup/) | 4.8.2 | Python library designed for screen-scraping / MIT |
| [bitarray](https://github.com/ilanschnell/bitarray) | 1.2.1 | efficient arrays of booleans – C extension / PSF |
| [bkcharts](http://github.com/bokeh/bkcharts) | 0.2 | High level chart types built on top of Bokeh / BSD 3-Clause |
| blas | 1.0 | |
| [bleach](https://github.com/mozilla/bleach) | 3.1.0 | Easy, whitelist-based HTML-sanitizing tool / Apache-2.0 |
| [blosc](https://github.com/Blosc/c-blosc) | 1.16.3 | A blocking, shuffling and loss-less compression library that can be faster than memcpy() / BSD-3-Clause |
| [bokeh](http://bokeh.pydata.org/) | 1.4.0 | Statistical and novel interactive HTML plots for Python / BSD-3-Clause |
| [boto](https://github.com/boto/boto/) | 2.49.0 | Amazon Web Services Library / MIT |
| [bottleneck](https://github.com/pydata/bottleneck) | 1.3.2 | Fast NumPy array functions written in Cython. / BSD 2-Clause |
| [brotlipy](https://github.com/python-hyper/brotlipy) | 0.7.0 | Python bindings to the Brotli compression library / MIT |
| [bzip2](http://www.bzip.org/) | 1.0.8 | high-quality data compressor / bzip2 |
| [ca-certificates](https://github.com/conda-forge/ca-certificates-feedstock) | 2020.1.1 | Certificates for use with other packages. / MPL 2.0 |
| [certifi](http://certifi.io/) | 2019.11.28 | Python package for providing Mozilla’s CA Bundle. / ISC |
| [cffi](https://bitbucket.org/cffi/cffi) | 1.14.0 | Foreign Function Interface for Python calling C code. / MIT |
| [chardet](https://github.com/chardet/chardet) | 3.0.4 | Universal character encoding detector / LGPL2 |
| [click](https://palletsprojects.com/p/click) | 7.0 | Python composable command line interface toolkit / BSD-3-Clause |
| [cloudpickle](https://github.com/cloudpipe/cloudpickle) | 1.3.0 | Extended pickling support for Python objects / BSD 3-Clause |
| [clyent](https://github.com/Anaconda-Platform/clyent) | 1.2.2 | Command line client library for windows and posix / BSD 3-Clause |
| [colorama](https://github.com/tartley/colorama) | 0.4.3 | Cross-platform colored terminal text / BSD-3-Clause |
| [comtypes](http://starship.python.net/crew/theller/comtypes/) | 1.1.7 | pure Python COM package / MIT |
| [conda](https://conda.io) | 4.8.3 | OS-agnostic, system-level binary package and environment manager. / BSD 3-Clause |
| [conda-build](https://github.com/conda/conda-build) | 3.18.11 | tools for building conda packages / BSD 3-Clause |
| [conda-env](https://github.com/conda/conda-env) | 2.6.0 | Tools for interacting with conda environments. / BSD 3-Clause |
| [conda-verify](https://github.com/conda/conda-verify) | 3.4.2 | tool for validating conda recipes and conda packages / BSD 3-Clause |
| console\_shortcut | 0.1.1 | Console shortcut creator for Windows (using menuinst) / BSD |
| [contextlib2](http://contextlib2.readthedocs.org) | 0.6.0.post1 | Backports and enhancements for the contextlib module / PSF 2 |
| [cryptography](https://github.com/pyca/cryptography) | 2.8 | Provides cryptographic recipes and primitives to Python developers / Apache-2.0 AND BSD-3-Clause AND PSF-2.0 |
| [curl](http://curl.haxx.se/) | 7.68.0 | tool and library for transferring data with URL syntax / MIT/X derivate (`<http://curl.haxx.se/docs/copyright.html>`) |
| [cycler](http://matplotlib.org/cycler) | 0.10.0 | Composable style cycles. / BSD 3-Clause |
| [cython](http://www.cython.org/) | 0.29.15 | The Cython compiler for writing C extensions for the Python language / Apache-2.0 |
| [cytoolz](https://github.com/pytoolz/cytoolz) | 0.10.1 | Cython implementation of Toolz. High performance functional utilities / BSD-3-Clause |
| [dask](https://dask.org/) | 2.11.0 | Parallel PyData with Task Scheduling / BSD-3-Clause |
| [dask-core](http://github.com/dask/dask/) | 2.11.0 | Parallel Python with task scheduling / BSD-3-Clause |
| [decorator](https://github.com/micheles/decorator) | 4.4.1 | Better living through Python with decorators. / BSD-3-Clause |
| [defusedxml](https://bitbucket.org/tiran/defusedxml) | 0.6.0 | XML bomb protection for Python stdlib modules / PSF 2.0 |
| [diff-match-patch](http://code.google.com/p/google-diff-match-patch/) | 20181111 | Diff Match Patch is a high-performance library in multiple languages that manipulates plain text / Apache-2.0 |
| [distributed](http://distributed.readthedocs.io/en/latest/) | 2.11.0 | Distributed computing with Dask / BSD-3-Clause |
| [docutils](http://docutils.sourceforge.net/) | 0.16 | Docutils – Python Documentation Utilities / Public Domain Dedictation and BSD 2-Clause and PSF 2.1.1 and GPL 3.0 |
| [entrypoints](https://github.com/takluyver/entrypoints) | 0.3 | Discover and load entry points from installed packages. / MIT License |
| [et\_xmlfile](https://bitbucket.org/openpyxl/et_xmlfile) | 1.0.1 | An implementation of lxml.xmlfile for the standard library / MIT |
| [fastcache](https://github.com/pbrady/fastcache) | 1.1.0 | C implementation of Python 3 lru\_cache / MIT |
| [filelock](https://github.com/benediktschmitt/py-filelock) | 3.0.12 | A platform independent file lock. / Public Domain |
| [flake8](http://flake8.pycqa.org/) | 3.7.9 | Your Tool For Style Guide Enforcement / MIT |
| [flask](http://flask.pocoo.org) | 1.1.1 | A microframework based on Werkzeug, Jinja2 and good intentions. / BSD 3-Clause |
| [freetype](https://www.freetype.org/) | 2.9.1 | A Free, High-Quality, and Portable Font Engine / GPL-2.0-only and LicenseRef-FreeType |
| [fsspec](https://github.com/martindurant/filesystem_spec) | 0.6.2 | A specification for pythonic filesystems / BSD-3-Clause |
| [future](http://python-future.org) | 0.18.2 | Clean single-source support for Python 3 and 2 / MIT |
| [get\_terminal\_size](https://github.com/chrippa/backports.shutil_get_terminal_size) | 1.0.0 | Get the size of the terminal window. / MIT |
| [gevent](https://www.gevent.org) | 1.4.0 | Coroutine-based network library / MIT |
| [glob2](https://github.com/miracle2k/python-glob2) | 0.7 | Version of the glob module that supports recursion via \*\*, and can capture patterns. / BSD-2-Clause |
| [gmpy2](https://pypi.python.org/pypi/gmpy2) | 2.0.8 | GMP/MPIR, MPFR, and MPC interface to Python 2.6+ and 3.x / LGPL 3 |
| [greenlet](https://github.com/python-greenlet/greenlet) | 0.4.15 | Lightweight in-process concurrent programming / MIT |
| [h5py](http://www.h5py.org/) | 2.10.0 | Read and write HDF5 files from Python. / BSD-3-Clause |
| [hdf5](http://www.hdfgroup.org/HDF5/) | 1.10.4 | HDF5 is a data model, library, and file format for storing and managing data / HDF5 |
| [heapdict](http://stutzbachenterprises.com/) | 1.0.1 | A heap with decrease-key and increase-key operations / BSD 3-Clause |
| [html5lib](https://github.com/html5lib/html5lib-python) | 1.0.1 | HTML parser based on the WHATWG HTML specification / MIT |
| icc\_rt | 2019.0.0 | Intel runtime libraries for C, C++ and Fortran compilers / Intel proprietary |
| [icu](http://site.icu-project.org/) | 58.2 | International Components for Unicode. / MIT |
| [idna](https://github.com/kjd/idna) | 2.8 | Internationalized Domain Names in Applications (IDNA). / BSD Like |
| [imageio](https://imageio.github.io) | 2.6.1 | A Python library for reading and writing image data / BSD-2-Clause |
| [imagesize](https://github.com/shibukawa/imagesize_py) | 1.2.0 | Getting image size from png/jpeg/jpeg2000/gif file / MIT |
| [importlib-metadata](https://gitlab.com/python-devs/importlib_metadata) | 1.6.1 | A library to access the metadata for a Python package / Apache-2.0 |
| [importlib\_metadata](https://gitlab.com/python-devs/importlib_metadata) | 1.5.0 | A library to access the metadata for a Python package / Apache-2.0 |
| [intel-openmp](https://software.intel.com/en-us/node/522690) | 2020.0 | Math library for Intel and compatible processors / proprietary - Intel |
| [intervaltree](https://github.com/chaimleib/intervaltree) | 3.0.2 | Editable interval tree data structure for Python 2 and 3 / Apache-2.0 |
| [ipykernel](https://ipython.org) | 5.1.4 | IPython Kernel for Jupyter / BSD-3-Clause |
| [ipython](https://ipython.org) | 7.12.0 | IPython: Productive Interactive Computing / BSD-3-Clause |
| [ipython\_genutils](http://ipython.org) | 0.2.0 | vestigial utilities from IPython / BSD 3-Clause |
| [ipywidgets](https://github.com/ipython/ipywidgets) | 7.5.1 | Jupyter Interactive Widgets / BSD 3-clause |
| [isort](https://github.com/timothycrosley/isort) | 4.3.21 | A Python utility / library to sort Python imports. / MIT |
| [itsdangerous](https://github.com/pallets/itsdangerous) | 1.1.0 | Various helpers to pass trusted data to untrusted environments. / BSD 3-Clause |
| [jdcal](https://github.com/phn/jdcal) | 1.4.1 | Julian dates from proleptic Gregorian and Julian calendars. / BSD 2-Clause |
| [jedi](https://github.com/davidhalter/jedi/) | 0.14.1 | An autocompletion tool for Python that can be used for text editors. / MIT |
| [jinja2](http://jinja.pocoo.org) | 2.11.1 | An easy to use stand-alone template engine written in pure python. / 3-Clause BSD |
| [joblib](https://pypi.org/project/joblib/) | 0.14.1 | Lightweight pipelining: using Python functions as pipeline jobs. / BSD-3-Clause |
| [jpeg](http://www.ijg.org/) | 9b | read/write jpeg COM, EXIF, IPTC medata / Custom free software license |
| [json5](https://github.com/dpranke/pyjson5) | 0.9.1 | A Python implementation of the JSON5 data format / Apache-2.0 |
| [jsonschema](https://github.com/Julian/jsonschema) | 3.2.0 | An implementation of JSON Schema validation for Python / MIT |
| [jupyter](http://jupyter.org) | 1.0.0 | Jupyter metapackage. Install all the Jupyter components in one go. / BSD 3-Clause |
| [jupyter\_client](https://jupyter.org) | 5.3.4 | jupyter\_client contains the reference implementation of the Jupyter protocol. / BSD-3-Clause |
| [jupyter\_console](http://jupyter.org) | 6.1.0 | Jupyter terminal console / BSD-3-Clause |
| [jupyter\_core](https://jupyter.org) | 4.6.1 | Core common functionality of Jupyter projects. / BSD-3-Clause |
| [jupyterlab](https://github.com/jupyterlab/jupyterlab) | 1.2.6 | JupyterLab PRE-ALPHA / BSD-3-Clause |
| [jupyterlab\_server](https://github.com/jupyterlab/jupyterlab_server) | 1.0.6 | A set of server components for JupyterLab and JupyterLab like applications. / BSD-3-Clause |
| [keyring](https://github.com/jaraco/keyring) | 21.1.0 | Store and access your passwords safely / Python Software Foundation or MIT |
| [kiwisolver](https://github.com/nucleic/kiwi) | 1.1.0 | An efficient C++ implementation of the Cassowary constraint solver / BSD-3-Clause |
| [krb5](http://web.mit.edu/kerberos/) | 1.17.1 | A network authentication protocol. / MIT |
| [lazy-object-proxy](https://github.com/ionelmc/python-lazy-object-proxy) | 1.4.3 | A fast and thorough lazy object proxy / BSD-2-Clause |
| [libarchive](http://www.libarchive.org/) | 3.3.3 | Multi-format archive and compression library / BSD-2-Clause |
| [libcurl](http://curl.haxx.se/) | 7.68.0 | tool and library for transferring data with URL syntax / MIT/X derivate (`<http://curl.haxx.se/docs/copyright.html>`) |
| [libiconv](https://www.gnu.org/software/libiconv/) | 1.15 | Provides iconv for systems which don’t have one (or that cannot convert from/to Unicode.) / GPL and LGPL |
| [liblief](https://lief.quarkslab.com/) | 0.9.0 | A cross platform library to parse, modify and abstract ELF, PE and MachO formats. / Apache-2.0 |
| [libllvm9](http://llvm.org/) | 9.0.1 | Development headers and libraries for LLVM / LLVM-Exception |
| [libpng](http://www.libpng.org/pub/png/libpng.html) | 1.6.37 | PNG reference library / zlib/libpng |
| [libsodium](http://libsodium.org) | 1.0.16 | A modern and easy-to-use crypto library. / ISC |
| [libspatialindex](http://libspatialindex.github.io) | 1.8.5 | Extensible framework for robust spatial indexing / MIT |
| [libssh2](https://www.libssh2.org/) | 1.8.2 | the SSH library / BSD-3-Clause |
| [libtiff](http://www.libtiff.org/) | 4.1.0 | Support for the Tag Image File Format (TIFF). / HPND |
| [libxml2](http://xmlsoft.org/) | 2.9.9 | The XML C parser and toolkit of Gnome / MIT |
| [libxslt](http://xmlsoft.org/XSLT/) | 1.1.33 | The XSLT C library developed for the GNOME project / MIT |
| [llvmlite](https://github.com/numba/llvmlite) | 0.31.0 | A lightweight LLVM python binding for writing JIT compilers / New BSD License |
| [locket](https://github.com/mwilliamson/locket.py) | 0.2.0 | File-based locks for Python for Linux and Windows / BSD 2-Clause |
| [lxml](http://lxml.de/) | 4.5.0 | Pythonic binding for the C libraries libxml2 and libxslt. / BSD-3-Clause and GPL-2.0-only and ZPL-2.0 and LicenseRef-ElementTree |
| [lz4-c](https://www.lz4.org) | 1.8.1.2 | Extremely Fast Compression algorithm / BSD-2-Clause |
| [lzo](http://www.oberhumer.com/opensource/lzo/) | 2.10 | LZO is a portable lossless data compression library written in ANSI C. / GPL v2+ |
| m2w64-gcc-libgfortran | 5.3.0 | / |
| m2w64-gcc-libs | 5.3.0 | / |
| m2w64-gcc-libs-core | 5.3.0 | / |
| m2w64-gmp | 6.1.0 | / |
| m2w64-libwinpthread-git | 5.0.0.4634.697f757 | / |
| [markupsafe](https://www.palletsprojects.com/p/markupsafe) | 1.1.1 | A Python module that implements the jinja2.Markup string / BSD-3-Clause |
| [matplotlib](http://matplotlib.org/) | 3.1.3 | Publication quality figures in Python / PSF-based |
| [matplotlib-base](http://matplotlib.org/) | 3.1.3 | Publication quality figures in Python / PSF-based |
| [mccabe](https://github.com/PyCQA/mccabe) | 0.6.1 | McCabe complexity checker for Python / MIT |
| [menuinst](https://github.com/ContinuumIO/menuinst) | 1.4.16 | cross platform menu item installation / BSD |
| [mistune](https://github.com/lepture/mistune) | 0.8.4 | The fastest markdown parser in pure Python. / BSD 3-Clause |
| [mkl](https://software.intel.com/en-us/mkl) | 2020.0 | Math library for Intel and compatible processors / proprietary - Intel |
| [mkl-service](https://github.com/ContinuumIO/mkl-service) | 2.3.0 | Python bindings to MKL service functions / 3-clause BSD |
| [mkl\_fft](http://github.com/IntelPython/mkl_fft) | 1.0.15 | NumPy-based implementation of Fast Fourier Transform using Intel (R) Math Kernel Library. / BSD 3-Clause |
| [mkl\_random](http://github.com/IntelPython/mkl_random) | 1.1.0 | Intel (R) MKL-powered package for sampling from common probability distributions into NumPy arrays. / BSD 3-Clause |
| [mock](https://github.com/testing-cabal/mock) | 4.0.1 | A library for testing in Python / BSD-2-Clause |
| [more-itertools](https://github.com/more-itertools/more-itertools) | 8.2.0 | More routines for operating on iterables, beyond itertools / MIT |
| [mpc](http://www.multiprecision.org/) | 1.1.0 | A C library for the arithmetic of complex numbers with arbitrarily high precision. / LGPL 3 |
| [mpfr](http://www.mpfr.org/) | 4.0.2 | The MPFR library is a C library for multiple-precision floating-point computations with correct rounding. / LGPL-3.0-only |
| [mpir](http://mpir.org/) | 3.0.0 | Multiple Precision Integers and Rationals. / LGPL 3 |
| [mpmath](http://mpmath.org) | 1.1.0 | Python library for arbitrary-precision floating-point arithmetic / BSD 3-Clause |
| [msgpack-python](http://msgpack.org/) | 0.6.1 | MessagePack (de)serializer / Apache-2.0 |
| msys2-conda-epoch | 20160418 | / |
| [multipledispatch](https://github.com/mrocklin/multipledispatch/) | 0.6.0 | Multiple dispatch in Python / BSD 3-Clause |
| [nbconvert](http://jupyter.org) | 5.6.1 | Converting Jupyter Notebooks / BSD-3-Clause |
| [nbformat](http://jupyter.org) | 5.0.4 | The reference implementation of the Jupyter Notebook format / BSD-3-Clause |
| [networkx](https://networkx.github.io/) | 2.4 | Python package for creating and manipulating complex networks / BSD-3-Clause |
| [nltk](http://nltk.org/) | 3.4.5 | Natural Language Toolkit / Apache 2.0 |
| [nose](http://readthedocs.org/docs/nose/) | 1.3.7 | Nose extends unittest to make testing easier / LGPL-2.1 |
| [notebook](https://jupyter.org) | 6.0.3 | Jupyter Notebook / BSD-3-Clause |
| [numba](http://numba.github.com) | 0.48.0 | NumPy aware dynamic Python compiler using LLVM / BSD 2-clause |
| [numexpr](https://github.com/pydata/numexpr) | 2.7.1 | Fast numerical expression evaluator for NumPy. / MIT |
| [numpy](http://numpy.scipy.org/) | 1.18.1 | Array processing for numbers, strings, records, and objects. / BSD 3-Clause |
| [numpy-base](http://numpy.scipy.org/) | 1.18.1 | Array processing for numbers, strings, records, and objects. / BSD 3-Clause |
| [numpydoc](https://github.com/numpy/numpydoc) | 0.9.2 | Numpy’s Sphinx extensions / BSD 3-Clause |
| [olefile](http://www.decalage.info/python/olefileio) | 0.46 | parse, read and write Microsoft OLE2 files / BSD 2-Clause |
| [openpyxl](https://openpyxl.readthedocs.io) | 3.0.3 | A Python library to read/write Excel 2010 xlsx/xlsm files / MIT |
| [openssl](http://www.openssl.org/) | 1.1.1d | OpenSSL is an open-source implementation of the SSL and TLS protocols / OpenSSL |
| [packaging](https://github.com/pypa/packaging) | 20.1 | Core utilities for Python packages / Apache 2.0 or BSD 2-Clause |
| [pandas](http://pandas.pydata.org) | 1.0.1 | High-performance, easy-to-use data structures and data analysis tools. / BSD-3-Clause |
| [pandoc](http://pandoc.org/) | 2.2.3.2 | Universal markup converter (repackaged binaries) / GPL-2.0 |
| [pandocfilters](https://github.com/jgm/pandocfilters) | 1.4.2 | A python module for writing pandoc filters / BSD-3-Clause |
| [paramiko](http://www.paramiko.org/) | 2.7.1 | SSH2 protocol library / LGPL 2.1 |
| [parso](https://github.com/davidhalter/parso) | 0.5.2 | A Python Parser / MIT |
| [partd](https://github.com/dask/partd) | 1.1.0 | Data structure for on-disk shuffle operations / BSD 3-Clause |
| [path](https://github.com/jaraco/path) | 13.1.0 | A module wrapper for os.path / MIT |
| [path.py](https://github.com/jaraco/path.py) | 12.4.0 | A module wrapper for os.path / MIT |
| [pathlib2](https://github.com/mcmtroffaes/pathlib2) | 2.3.5 | Fork of pathlib aiming to support the full stdlib Python API / MIT |
| [pathtools](https://github.com/gorakhargosh/pathtools) | 0.1.2 | Path utilities for Python. / MIT |
| [patsy](https://github.com/pydata/patsy) | 0.5.1 | Describing statistical models in Python using symbolic formulas / BSD-2-Clause, PSF2 |
| [pep8](http://pep8.readthedocs.org/) | 1.7.1 | Python style guide checker / MIT |
| [pexpect](http://pexpect.sourceforge.net/) | 4.8.0 | Pexpect makes Python a better tool for controlling other applications. / ISC |
| [pickleshare](https://github.com/pickleshare/pickleshare/) | 0.7.5 | Tiny ‘shelve’-like database with concurrency support / MIT |
| [pillow](https://pillow.readthedocs.io) | 7.0.0 | Pillow is the friendly PIL fork by Alex Clark and Contributors / LicenseRef-PIL |
| [pip](https://pip.pypa.io/en/stable/) | 20.0.2 | PyPA recommended tool for installing Python packages / MIT |
| [pkginfo](https://code.launchpad.net/~tseaver/pkginfo/trunk) | 1.5.0.1 | Query metadatdata from sdists / bdists / installed packages. / MIT |
| [pluggy](https://github.com/pytest-dev/pluggy) | 0.13.1 | Plugin registration and hook calling for Python / MIT |
| [ply](http://www.dabeaz.com/ply/index.html) | 3.11 | Python Lex-Yacc / BSD 3-clause |
| powershell\_shortcut | 0.0.1 | Powershell shortcut creator for Windows (using menuinst) / BSD |
| [prometheus\_client](https://github.com/prometheus/client_python) | 0.7.1 | Python client for the Prometheus monitoring system / Apache-2.0 |
| [prompt-toolkit](https://github.com/jonathanslenders/python-prompt-toolkit) | 3.0.5 | Library for building powerful interactive command lines in Python / BSD-3-Clause |
| [prompt\_toolkit](https://github.com/jonathanslenders/python-prompt-toolkit) | 3.0.3 | Library for building powerful interactive command lines in Python / BSD-3-Clause |
| [psutil](https://github.com/giampaolo/psutil) | 5.6.7 | A cross-platform process and system utilities module for Python / BSD 3-Clause |
| [py](https://github.com/pytest-dev/py) | 1.8.1 | library with cross-python path, ini-parsing, io, code, log facilities / MIT |
| [py-lief](https://lief.quarkslab.com/) | 0.9.0 | A cross platform library to parse, modify and abstract ELF, PE and MachO formats. / Apache-2.0 |
| [pycodestyle](https://pycodestyle.readthedocs.io/) | 2.5.0 | Python style guide checker / MIT |
| [pycosat](https://github.com/ContinuumIO/pycosat) | 0.6.3 | Bindings to picosat (a SAT solver) / MIT |
| [pycparser](https://github.com/eliben/pycparser) | 2.19 | Complete C99 parser in pure Python / BSD 3-clause |
| [pycrypto](http://www.pycrypto.org/) | 2.6.1 | Cryptographic modules for Python. / Public Domain |
| [pycurl](http://pycurl.sourceforge.net/) | 7.43.0.5 | A Python Interface To The cURL library / LGPL, MIT |
| [pydocstyle](https://github.com/PyCQA/pydocstyle) | 4.0.1 | Python docstring style checker (formerly pep257) / MIT |
| [pyflakes](https://github.com/PyCQA/pyflakes) | 2.1.1 | Pyflakes analyzes programs and detects various errors. / MIT |
| [pygments](http://pygments.org/) | 2.5.2 | Pygments is a generic syntax highlighter suitable for use in code hosting, forums, wikis or other applications that need to prettify source code. / BSD-2-clause |
| [pylint](http://www.pylint.org/) | 2.4.4 | python code static checker / GPL-2.0-only |
| [pynacl](https://github.com/pyca/pynacl) | 1.3.0 | PyNaCl is a Python binding to the Networking and Cryptography library, a crypto library with the stated goal of improving usability, security and speed. / Apache-2.0 |
| [pyodbc](https://github.com/mkleehammer/pyodbc) | 4.0.30 | DB API Module for ODBC / MIT |
| [pyopenssl](https://github.com/pyca/pyopenssl) | 19.1.0 | Python wrapper module around the OpenSSL library / Apache 2.0 |
| [pyparsing](http://pyparsing.wikispaces.com/) | 2.4.6 | Create and execute simple grammars / MIT |
| [pyqt](http://www.riverbankcomputing.co.uk/software/pyqt) | 5.9.2 | Python binding of the cross-platform GUI toolkit Qt. / Commercial, GPL-2.0, GPL-3.0 |
| [pyreadline](http://ipython.org/pyreadline) | 2.1 | A python implmementation of GNU readline. / BSD 3-Clause |
| [pyrsistent](http://github.com/tobgu/pyrsistent/) | 0.15.7 | Persistent/Functional/Immutable data structures / MIT |
| [pysocks](https://github.com/Anorov/PySocks) | 1.7.1 | A Python SOCKS client module. See [Anorov/PySocks](https://github.com/Anorov/PySocks) for more information. / BSD 3-Clause |
| [pytables](http://www.pytables.org) | 3.6.1 | Brings together Python, HDF5 and NumPy to easily handle large amounts of data. / BSD 3-Clause |
| [pytest](https://docs.pytest.org/en/latest/) | 5.3.5 | Simple and powerful testing with Python. / MIT |
| [python](http://www.python.org/) | 3.7.6 | General purpose programming language / PSF |
| [python-dateutil](https://dateutil.readthedocs.org/) | 2.8.1 | Extensions to the standard Python datetime module. / BSD 3 Clause |
| [python-jsonrpc-server](https://github.com/palantir/python-jsonrpc-server) | 0.3.4 | A Python 2.7 and 3.4+ server implementation of the JSON RPC 2.0 protocol. / MIT |
| [python-language-server](https://github.com/palantir/python-language-server) | 0.31.7 | An implementation of the Language Server Protocol for Python / MIT |
| [python-libarchive-c](https://github.com/Changaco/python-libarchive-c) | 2.8 | Python interface to libarchive / CC0-1.0 |
| [pytz](http://pythonhosted.org/pytz/) | 2019.3 | World timezone definitions, modern and historical. / MIT |
| [pywavelets](https://github.com/PyWavelets/pywt) | 1.1.1 | Discrete Wavelet Transforms in Python / MIT |
| [pywin32](https://sourceforge.net/projects/pywin32) | 227 | Python extensions for Windows / PSF |
| [pywin32-ctypes](https://github.com/enthought/pywin32-ctypes) | 0.2.0 | A limited subset of pywin32 re-implemented using ctypes (or cffi) / BSD 3 Clause |
| [pywinpty](https://github.com/spyder-ide/pywinpty) | 0.5.7 | Python bindings for the winpty library / MIT |
| [pyyaml](http://pyyaml.org/wiki/PyYAML) | 5.3 | YAML parser and emitter for Python / MIT |
| [pyzmq](https://github.com/zeromq/pyzmq) | 18.1.1 | Python bindings for zeromq / BSD 3-clause |
| [qdarkstyle](https://github.com/ColinDuquesnoy/QDarkStyleSheet) | 2.8 | A dark stylesheet for Qt applications (Qt4, Qt5, PySide, PyQt4, PyQt5, QtPy, PyQtGraph). / MIT |
| [qt](http://qt-project.org) | 5.9.7 | Qt is a cross-platform application and UI framework. / LGPL-3.0 |
| [qtawesome](https://github.com/spyder-ide/qtawesome) | 0.6.1 | Iconic fonts in PyQt and PySide applications / MIT |
| [qtconsole](http://jupyter.org) | 4.6.0 | Jupyter Qt Console / BSD 3-Clause |
| [qtpy](https://github.com/spyder-ide/qtpy) | 1.9.0 | Abstraction layer for PyQt5/PyQt4/PySide / MIT |
| [regex](https://bitbucket.org/mrabarnett/mrab-regex) | 2020.6.8 | Alternative regular expression module, to replace re / Python-2.0 |
| [requests](http://python-requests.org) | 2.22.0 | Requests is an elegant and simple HTTP library for Python, built with ♥. / Apache-2.0 |
| [rope](https://github.com/python-rope/rope) | 0.16.0 | A python refactoring library / GPL 2.0 |
| [rtree](http://toblerity.github.com/rtree/) | 0.9.3 | R-Tree spatial index for Python GIS / MIT |
| [ruamel\_yaml](https://bitbucket.org/ruamel/yaml) | 0.15.87 | A patched copy of ruamel.yaml. / MIT |
| [scikit-image](http://scikit-image.org/) | 0.16.2 | Image processing routines for SciPy. / BSD 3-Clause |
| [scikit-learn](http://scikit-learn.org/) | 0.21.1 | A set of python modules for machine learning and data mining / BSD-3-Clause |
| [scipy](http://www.scipy.org/) | 1.4.1 | Scientific Library for Python / BSD 3-Clause |
| [seaborn](https://seaborn.pydata.org) | 0.10.0 | Statistical data visualization / BSD 3-Clause |
| [send2trash](https://github.com/hsoft/send2trash) | 1.5.0 | Python library to natively send files to Trash (or Recycle bin) on all platforms. / BSD-3-Clause |
| [setuptools](https://github.com/pypa/setuptools) | 45.2.0 | Download, build, install, upgrade, and uninstall Python packages / MIT |
| [simplegeneric](http://cheeseshop.python.org/pypi/simplegeneric) | 0.8.1 | Simple generic functions (similar to Python’s own len(), pickle.dump(), etc.) / Zope Public |
| [singledispatch](http://docs.python.org/3/library/functools.html#functools.singledispatch) | 3.4.0.3 | Transforms a function into a single-dispatch generic function / MIT |
| [sip](http://www.riverbankcomputing.com/software/sip/intro) | 4.19.8 | Create Python bindings for C and C++ libraries / GPL-3.0 |
| [six](https://six.readthedocs.io/) | 1.14.0 | Python 2 and 3 compatibility utilities / MIT |
| [snappy](https://github.com/google/snappy) | 1.1.7 | A fast compressor/decompressor / BSD 3-clause |
| [snowballstemmer](https://github.com/shibukawa/snowball_py) | 2.0.0 | Snowball stemming library collection for Python / BSD-2-Clause |
| [sortedcollections](http://www.grantjenks.com/docs/sortedcollections/) | 1.1.2 | Python Sorted Collections / Apache-2.0 |
| [sortedcontainers](http://www.grantjenks.com/docs/sortedcontainers/) | 2.1.0 | Python Sorted Container Types: SortedList, SortedDict, and SortedSet / Apache-2.0 |
| [soupsieve](http://facelessuser.github.io/soupsieve) | 1.9.5 | A modern CSS selector implementation for BeautifulSoup / MIT |
| [sphinx](http://www.sphinx-doc.org) | 2.4.0 | Sphinx is a tool that makes it easy to create intelligent and beautiful documentation / BSD-2-Clause |
| sphinxcontrib | 1.0 | Python namespace for sphinxcontrib / BSD |
| [sphinxcontrib-applehelp](https://www.sphinx-doc.org/en/master/) | 1.0.1 | sphinxcontrib-applehelp is a sphinx extension which outputs Apple help books / BSD-2-Clause |
| [sphinxcontrib-devhelp](https://www.sphinx-doc.org/en/master/) | 1.0.1 | sphinxcontrib-devhelp is a sphinx extension which outputs Devhelp document / BSD-2-Clause |
| [sphinxcontrib-htmlhelp](https://www.sphinx-doc.org/en/master/) | 1.0.2 | sphinxcontrib-htmlhelp is a sphinx extension which … / BSD-2-Clause |
| [sphinxcontrib-jsmath](https://www.sphinx-doc.org/en/master/) | 1.0.1 | A sphinx extension which renders display math in HTML via JavaScript / BSD-2-Clause |
| [sphinxcontrib-qthelp](https://www.sphinx-doc.org/en/master/) | 1.0.2 | sphinxcontrib-qthelp is a sphinx extension which outputs QtHelp document / BSD-2-Clause |
| [sphinxcontrib-serializinghtml](https://www.sphinx-doc.org/en/master/) | 1.1.3 | sphinxcontrib-serializinghtml is a sphinx extension which outputs “serialized” HTML files (json and pickle). / BSD-2-Clause |
| [sphinxcontrib-websupport](https://pypi.python.org/pypi/sphinxcontrib-websupport) | 1.2.0 | Sphinx API for Web Apps / BSD-2-Clause |
| [spyder](https://www.spyder-ide.org/) | 4.0.1 | The Scientific Python Development Environment / MIT |
| [spyder-kernels](https://www.spyder-ide.org/) | 1.8.1 | Jupyter kernels for Spyder’s console / MIT |
| [sqlalchemy](http://www.sqlalchemy.org/) | 1.3.13 | Database Abstraction Library. / MIT |
| [sqlite](http://www.sqlite.org/) | 3.31.1 | Implements a self-contained, zero-configuration, SQL database engine / Public-Domain (`<http://www.sqlite.org/copyright.html>`) |
| [statsmodels](https://www.statsmodels.org) | 0.11.0 | Statistical computations and models for use with SciPy / BSD-3-Clause |
| [sympy](https://sympy.org) | 1.5.1 | Python library for symbolic mathematics / BSD-3-Clause |
| [tbb](http://www.threadingbuildingblocks.org) | 2020.0 | High level abstract threading library / Apache 2.0 |
| [tblib](https://github.com/ionelmc/python-tblib) | 1.6.0 | Traceback serialization library. / BSD 2-Clause |
| [terminado](https://github.com/jupyter/terminado) | 0.8.3 | Terminals served by tornado websockets / BSD-2-Clause |
| [testpath](https://testpath.readthedocs.io) | 0.4.4 | Testpath is a collection of utilities for Python code working with files and commands. / BSD-3-Clause |
| [threadpoolctl](https://github.com/joblib/threadpoolctl) | 2.1.0 | Python helpers to control the threadpools of native libraries / BSD 3-Clause |
| [tk](http://www.tcl.tk/) | 8.6.8 | A dynamic programming language with GUI support. Bundles Tcl and Tk. / Tcl/Tk |
| [toml](https://github.com/uiri/toml) | 0.10.1 | Python lib for TOML. / MIT |
| [toolz](http://toolz.readthedocs.org/) | 0.10.0 | A functional standard library for Python / BSD 3-Clause |
| [tornado](http://www.tornadoweb.org/) | 6.0.3 | A Python web framework and asynchronous networking library, originally developed at FriendFeed. / Apache-2.0 |
| [tqdm](https://pypi.python.org/pypi/tqdm) | 4.42.1 | A Fast, Extensible Progress Meter / MPLv2.0, MIT |
| [traitlets](http://ipython.org/) | 4.3.3 | Configuration system for Python applications / BSD-3-Clause |
| [typed-ast](https://github.com/python/typed_ast) | 1.4.1 | a fork of Python 2 and 3 ast modules with type comment support / Apache 2.0 |
| [typing\_extensions](https://github.com/python/typing/tree/master/typing_extensions) | 3.7.4.2 | Backported and Experimental Type Hints for Python / PSF-2.0 |
| [ujson](https://github.com/ultrajson/ultrajson) | 1.35 | Ultra fast JSON decoder and encoder written in C with Python bindings / BSD-3-Clause |
| [unicodecsv](https://github.com/jdunck/python-unicodecsv) | 0.14.1 | Drop-in replacement for csv module which supports unicode strings / BSD |
| [urllib3](https://urllib3.readthedocs.io/) | 1.25.8 | HTTP library with thread-safe connection pooling, file post, and more. / MIT |
| [vc](https://github.com/conda/conda/wiki/VC-features) | 14.1 | A meta-package to impose mutual exclusivity among software built with different VS versions / Modified BSD License (3-clause) |
| vs2015\_runtime | 14.16.27012 | MSVC runtimes associated with cl.exe version 19.16.27032.1 (VS 2017 update 9) / None |
| [watchdog](http://github.com/gorakhargosh/watchdog) | 0.10.2 | Filesystem events monitoring / Apache 2.0 |
| [wcwidth](https://github.com/jquast/wcwidth) | 0.1.8 | Measures number of Terminal column cells of wide-character codes. / MIT |
| [webencodings](https://github.com/gsnedders/python-webencodings) | 0.5.1 | Character encoding aliases for legacy web content / BSD 3-Clause |
| [werkzeug](https://palletsprojects.com/p/werkzeug/) | 1.0.0 | The comprehensive WSGI web application library. / BSD 3-Clause |
| [wheel](https://github.com/pypa/wheel) | 0.34.2 | A built-package format for Python. / MIT |
| [widgetsnbextension](http://ipython.org) | 3.5.1 | Interactive Widgets for Jupyter / BSD 3-clause |
| [win\_inet\_pton](https://github.com/hickeroar/win_inet_pton) | 1.1.0 | Native inet\_pton and inet\_ntop implementation for Python on Windows (with ctypes). / PUBLIC-DOMAIN |
| [win\_unicode\_console](https://github.com/Drekin/win-unicode-console) | 0.5 | A Python package to enable Unicode input and display when running Python from Windows console. / MIT |
| [wincertstore](https://bitbucket.org/tiran/wincertstore) | 0.2 | Python module to extract CA and CRL certs from Windows’ cert store (ctypes based). / PSF 2 |
| [winpty](https://github.com/rprichard/winpty) | 0.4.3 | Winpty provides an interface similar to a Unix pty-master for communicating with Windows console programs. / MIT |
| [wrapt](https://github.com/GrahamDumpleton/wrapt) | 1.11.2 | Module for decorators, wrappers and monkey patching / BSD 2-Clause |
| [xlrd](http://www.python-excel.org/) | 1.2.0 | Library for developers to extract data from Microsoft Excel (tm) spreadsheet files / BSD 3-Clause and BSD with advertising |
| [xlsxwriter](https://xlsxwriter.readthedocs.io/) | 1.2.7 | A Python module for creating Excel XLSX files / BSD-2-Clause |
| [xlwings](http://xlwings.org/) | 0.17.1 | Interact with Excel from Python and vice versa / 3-clause BSD |
| [xlwt](http://www.python-excel.org/) | 1.3.0 | Writing data and formatting information to Excel files / BSD |
| [xz](http://tukaani.org/xz/) | 5.2.4 | Data compression software with high compression ratio / LGPL-2.1 and GPL-2.0 |
| [yaml](http://pyyaml.org/wiki/LibYAML) | 0.1.7 | A C library for parsing and emitting YAML / MIT |
| [yapf](https://github.com/google/yapf) | 0.28.0 | A formatter for Python files / Apache 2.0 |
| [zeromq](http://zeromq.org) | 4.3.1 | A high-performance asynchronous messaging library. / LGPL 3 |
| [zict](http://github.com/mrocklin/zict) | 1.0.0 | Composable Dictionary Classes / BSD 3-Clause |
| [zipp](https://github.com/jaraco/zipp) | 2.2.0 | A pathlib-compatible Zipfile object wrapper / MIT |
| [zlib](http://zlib.net/) | 1.2.11 | Massively spiffy yet delicately unobtrusive compression library / zlib |
| zope | 1.0 | web application server / BSD |
| [zope.event](http://www.zope.org/en/latest/) | 4.4 | Very basic event publishing system / Zope Public License |
| [zope.interface](http://docs.zope.org/zope.interface/) | 4.7.1 | Interfaces for Python / ZPL 2.1 |
| [zstd](http://www.zstd.net) | 1.3.7 | Zstandard - Fast real-time compression algorithm / BSD 3-Clause |
| Name | Version | Summary / License |
|---|---|---|
| [\_ipyw\_jlab\_nb\_ext\_conf](https://github.com/ContinuumIO/anaconda-nb-extensions-meta-config) | 0.1.0 | A configuration metapackage for enabling Anaconda-bundled jupyter extensions / BSD |
| [alabaster](http://www.sphinx-doc.org/en/stable/index.html) | 0.7.12 | Configurable, Python 2+3 compatible Sphinx theme. / BSD 3-Clause |
| [anaconda-client](http://anaconda.org) | 1.7.2 | anaconda.org command line client library / BSD 3-clause |
| [anaconda-project](https://github.com/Anaconda-Platform/anaconda-project) | 0.8.4 | Tool for encapsulating, running, and reproducing data science projects / BSD 3-Clause |
| [applaunchservices](https://github.com/impact27/applaunchservices) | 0.2.1 | Simple package for registering an app with apple Launch Services to handle UTI and URL / MIT |
| [appnope](http://github.com/minrk/appnope) | 0.1.0 | Disable App Nap on OS X 10.9 / BSD 2-Clause |
| [appscript](http://appscript.sourceforge.net) | 1.1.0 | Control AppleScriptable applications from Python. / Public Domain |
| [argh](https://github.com/neithere/argh) | 0.26.2 | The Natural CLI. / LGPL 3 |
| [asn1crypto](https://github.com/wbond/asn1crypto) | 1.3.0 | Python ASN.1 library with a focus on performance and a pythonic API / MIT |
| [astroid](https://www.astroid.org/) | 2.3.3 | A abstract syntax tree for Python with inference support. / LGPL-2.1-only |
| [astropy](http://www.astropy.org/) | 4.0 | Community-developed Python Library for Astronomy / BSD-3-Clause |
| [atomicwrites](https://github.com/untitaker/python-atomicwrites) | 1.3.0 | Atomic file writes / MIT |
| [attrs](https://attrs.readthedocs.io/en/stable/) | 19.3.0 | attrs is the Python package that will bring back the joy of writing classes by relieving you from the drudgery of implementing object protocols (aka dunder methods). / MIT |
| [autopep8](https://github.com/hhatto/autopep8) | 1.4.4 | A tool that automatically formats Python code to conform to the PEP 8 style guide / MIT |
| [babel](http://babel.pocoo.org/) | 2.8.0 | Utilities to internationalize and localize Python applications / BSD 3-clause |
| [backcall](https://github.com/takluyver/backcall/) | 0.1.0 | Specifications for callback functions passed in to an API / BSD-3-Clause |
| [backports](https://bitbucket.org/brandon/backports) | 1.0 | None / BSD |
| [backports.shutil\_get\_terminal\_size](https://github.com/chrippa/backports.shutil_get_terminal_size) | 1.0.0 | A backport of the get\_terminal\_size function from Python 3.3’s shutil. / MIT |
| [beautifulsoup4](http://www.crummy.com/software/BeautifulSoup/) | 4.8.2 | Python library designed for screen-scraping / MIT |
| [bitarray](https://github.com/ilanschnell/bitarray) | 1.2.1 | efficient arrays of booleans – C extension / PSF |
| [bkcharts](http://github.com/bokeh/bkcharts) | 0.2 | High level chart types built on top of Bokeh / BSD 3-Clause |
| blas | 1.0 | |
| [bleach](https://github.com/mozilla/bleach) | 3.1.0 | Easy, whitelist-based HTML-sanitizing tool / Apache-2.0 |
| [blosc](https://github.com/Blosc/c-blosc) | 1.16.3 | A blocking, shuffling and loss-less compression library that can be faster than memcpy() / BSD-3-Clause |
| [bokeh](http://bokeh.pydata.org/) | 1.4.0 | Statistical and novel interactive HTML plots for Python / BSD-3-Clause |
| [boto](https://github.com/boto/boto/) | 2.49.0 | Amazon Web Services Library / MIT |
| [bottleneck](https://github.com/pydata/bottleneck) | 1.3.2 | Fast NumPy array functions written in Cython. / BSD 2-Clause |
| [brotlipy](https://github.com/python-hyper/brotlipy) | 0.7.0 | Python bindings to the Brotli compression library / MIT |
| [bzip2](http://www.bzip.org/) | 1.0.8 | high-quality data compressor / bzip2 |
| [ca-certificates](https://github.com/conda-forge/ca-certificates-feedstock) | 2020.1.1 | Certificates for use with other packages. / MPL 2.0 |
| [certifi](http://certifi.io/) | 2019.11.28 | Python package for providing Mozilla’s CA Bundle. / ISC |
| [cffi](https://bitbucket.org/cffi/cffi) | 1.14.0 | Foreign Function Interface for Python calling C code. / MIT |
| [chardet](https://github.com/chardet/chardet) | 3.0.4 | Universal character encoding detector / LGPL2 |
| [click](https://palletsprojects.com/p/click) | 7.0 | Python composable command line interface toolkit / BSD-3-Clause |
| [cloudpickle](https://github.com/cloudpipe/cloudpickle) | 1.3.0 | Extended pickling support for Python objects / BSD 3-Clause |
| [clyent](https://github.com/Anaconda-Platform/clyent) | 1.2.2 | Command line client library for windows and posix / BSD 3-Clause |
| [colorama](https://github.com/tartley/colorama) | 0.4.3 | Cross-platform colored terminal text / BSD-3-Clause |
| [conda](https://conda.io) | 4.8.3 | OS-agnostic, system-level binary package and environment manager. / BSD 3-Clause |
| [conda-build](https://github.com/conda/conda-build) | 3.18.11 | tools for building conda packages / BSD 3-Clause |
| [conda-env](https://github.com/conda/conda-env) | 2.6.0 | Tools for interacting with conda environments. / BSD 3-Clause |
| [conda-verify](https://github.com/conda/conda-verify) | 3.4.2 | tool for validating conda recipes and conda packages / BSD 3-Clause |
| [contextlib2](http://contextlib2.readthedocs.org) | 0.6.0.post1 | Backports and enhancements for the contextlib module / PSF 2 |
| [cryptography](https://github.com/pyca/cryptography) | 2.8 | Provides cryptographic recipes and primitives to Python developers / Apache-2.0 AND BSD-3-Clause AND PSF-2.0 |
| [curl](http://curl.haxx.se/) | 7.68.0 | tool and library for transferring data with URL syntax / MIT/X derivate (`<http://curl.haxx.se/docs/copyright.html>`) |
| [cycler](http://matplotlib.org/cycler) | 0.10.0 | Composable style cycles. / BSD 3-Clause |
| [cython](http://www.cython.org/) | 0.29.15 | The Cython compiler for writing C extensions for the Python language / Apache-2.0 |
| [cytoolz](https://github.com/pytoolz/cytoolz) | 0.10.1 | Cython implementation of Toolz. High performance functional utilities / BSD-3-Clause |
| [dask](https://dask.org/) | 2.11.0 | Parallel PyData with Task Scheduling / BSD-3-Clause |
| [dask-core](http://github.com/dask/dask/) | 2.11.0 | Parallel Python with task scheduling / BSD-3-Clause |
| [dbus](http://www.freedesktop.org/wiki/Software/dbus/) | 1.13.12 | Simple message bus system for applications to talk to one another / GPL2 |
| [decorator](https://github.com/micheles/decorator) | 4.4.1 | Better living through Python with decorators. / BSD-3-Clause |
| [defusedxml](https://bitbucket.org/tiran/defusedxml) | 0.6.0 | XML bomb protection for Python stdlib modules / PSF 2.0 |
| [diff-match-patch](http://code.google.com/p/google-diff-match-patch/) | 20181111 | Diff Match Patch is a high-performance library in multiple languages that manipulates plain text / Apache-2.0 |
| [distributed](http://distributed.readthedocs.io/en/latest/) | 2.11.0 | Distributed computing with Dask / BSD-3-Clause |
| [docutils](http://docutils.sourceforge.net/) | 0.16 | Docutils – Python Documentation Utilities / Public Domain Dedictation and BSD 2-Clause and PSF 2.1.1 and GPL 3.0 |
| [entrypoints](https://github.com/takluyver/entrypoints) | 0.3 | Discover and load entry points from installed packages. / MIT License |
| [et\_xmlfile](https://bitbucket.org/openpyxl/et_xmlfile) | 1.0.1 | An implementation of lxml.xmlfile for the standard library / MIT |
| [expat](http://expat.sourceforge.net/) | 2.2.6 | Expat XML parser library in C / MIT |
| [fastcache](https://github.com/pbrady/fastcache) | 1.1.0 | C implementation of Python 3 lru\_cache / MIT |
| [filelock](https://github.com/benediktschmitt/py-filelock) | 3.0.12 | A platform independent file lock. / Public Domain |
| [flake8](http://flake8.pycqa.org/) | 3.7.9 | Your Tool For Style Guide Enforcement / MIT |
| [flask](http://flask.pocoo.org) | 1.1.1 | A microframework based on Werkzeug, Jinja2 and good intentions. / BSD 3-Clause |
| [freetype](https://www.freetype.org/) | 2.9.1 | A Free, High-Quality, and Portable Font Engine / GPL-2.0-only and LicenseRef-FreeType |
| [fsspec](https://github.com/martindurant/filesystem_spec) | 0.6.2 | A specification for pythonic filesystems / BSD-3-Clause |
| [future](http://python-future.org) | 0.18.2 | Clean single-source support for Python 3 and 2 / MIT |
| [get\_terminal\_size](https://github.com/chrippa/backports.shutil_get_terminal_size) | 1.0.0 | Get the size of the terminal window. / MIT |
| [gettext](https://www.gnu.org/software/gettext/) | 0.19.8.1 | Internationalization package. / GPLv2 |
| [gevent](https://www.gevent.org) | 1.4.0 | Coroutine-based network library / MIT |
| [glib](https://developer.gnome.org/glib/) | 2.63.1 | Provides core application building blocks for libraries and applications written in C. / LGPL-2.1 |
| [glob2](https://github.com/miracle2k/python-glob2) | 0.7 | Version of the glob module that supports recursion via \*\*, and can capture patterns. / BSD-2-Clause |
| [gmp](http://gmplib.org/) | 6.1.2 | The GNU multiprecision library. / GPL 2 and LGPL 3 |
| [gmpy2](https://pypi.python.org/pypi/gmpy2) | 2.0.8 | GMP/MPIR, MPFR, and MPC interface to Python 2.6+ and 3.x / LGPL 3 |
| [greenlet](https://github.com/python-greenlet/greenlet) | 0.4.15 | Lightweight in-process concurrent programming / MIT |
| [h5py](http://www.h5py.org/) | 2.10.0 | Read and write HDF5 files from Python. / BSD-3-Clause |
| [hdf5](http://www.hdfgroup.org/HDF5/) | 1.10.4 | HDF5 is a data model, library, and file format for storing and managing data / HDF5 |
| [heapdict](http://stutzbachenterprises.com/) | 1.0.1 | A heap with decrease-key and increase-key operations / BSD 3-Clause |
| [html5lib](https://github.com/html5lib/html5lib-python) | 1.0.1 | HTML parser based on the WHATWG HTML specification / MIT |
| [icu](http://site.icu-project.org/) | 58.2 | International Components for Unicode. / MIT |
| [idna](https://github.com/kjd/idna) | 2.8 | Internationalized Domain Names in Applications (IDNA). / BSD Like |
| [imageio](https://imageio.github.io) | 2.6.1 | A Python library for reading and writing image data / BSD-2-Clause |
| [imagesize](https://github.com/shibukawa/imagesize_py) | 1.2.0 | Getting image size from png/jpeg/jpeg2000/gif file / MIT |
| [importlib-metadata](https://gitlab.com/python-devs/importlib_metadata) | 1.7.0 | A library to access the metadata for a Python package / Apache-2.0 |
| [importlib\_metadata](https://gitlab.com/python-devs/importlib_metadata) | 1.5.0 | A library to access the metadata for a Python package / Apache-2.0 |
| [intel-openmp](https://software.intel.com/en-us/node/522690) | 2019.4 | Math library for Intel and compatible processors / proprietary - Intel |
| [intervaltree](https://github.com/chaimleib/intervaltree) | 3.0.2 | Editable interval tree data structure for Python 2 and 3 / Apache-2.0 |
| [ipykernel](https://ipython.org) | 5.1.4 | IPython Kernel for Jupyter / BSD-3-Clause |
| [ipython](https://ipython.org) | 7.12.0 | IPython: Productive Interactive Computing / BSD-3-Clause |
| [ipython\_genutils](http://ipython.org) | 0.2.0 | vestigial utilities from IPython / BSD 3-Clause |
| [ipywidgets](https://github.com/ipython/ipywidgets) | 7.5.1 | Jupyter Interactive Widgets / BSD 3-clause |
| [isort](https://github.com/timothycrosley/isort) | 4.3.21 | A Python utility / library to sort Python imports. / MIT |
| [itsdangerous](https://github.com/pallets/itsdangerous) | 1.1.0 | Various helpers to pass trusted data to untrusted environments. / BSD 3-Clause |
| [jbig](https://www.cl.cam.ac.uk/~mgk25/jbigkit) | 2.1 | Implementation of the JBIG1 data compression standard / GPL-2.0 |
| [jdcal](https://github.com/phn/jdcal) | 1.4.1 | Julian dates from proleptic Gregorian and Julian calendars. / BSD 2-Clause |
| [jedi](https://github.com/davidhalter/jedi/) | 0.14.1 | An autocompletion tool for Python that can be used for text editors. / MIT |
| [jinja2](http://jinja.pocoo.org) | 2.11.1 | An easy to use stand-alone template engine written in pure python. / 3-Clause BSD |
| [joblib](https://pypi.org/project/joblib/) | 0.14.1 | Lightweight pipelining: using Python functions as pipeline jobs. / BSD-3-Clause |
| [jpeg](http://www.ijg.org/) | 9b | read/write jpeg COM, EXIF, IPTC medata / Custom free software license |
| [json5](https://github.com/dpranke/pyjson5) | 0.9.1 | A Python implementation of the JSON5 data format / Apache-2.0 |
| [jsonschema](https://github.com/Julian/jsonschema) | 3.2.0 | An implementation of JSON Schema validation for Python / MIT |
| [jupyter](http://jupyter.org) | 1.0.0 | Jupyter metapackage. Install all the Jupyter components in one go. / BSD 3-Clause |
| [jupyter\_client](https://jupyter.org) | 5.3.4 | jupyter\_client contains the reference implementation of the Jupyter protocol. / BSD-3-Clause |
| [jupyter\_console](http://jupyter.org) | 6.1.0 | Jupyter terminal console / BSD-3-Clause |
| [jupyter\_core](https://jupyter.org) | 4.6.1 | Core common functionality of Jupyter projects. / BSD-3-Clause |
| [jupyterlab](https://github.com/jupyterlab/jupyterlab) | 1.2.6 | JupyterLab PRE-ALPHA / BSD-3-Clause |
| [jupyterlab\_server](https://github.com/jupyterlab/jupyterlab_server) | 1.0.6 | A set of server components for JupyterLab and JupyterLab like applications. / BSD-3-Clause |
| [keyring](https://github.com/jaraco/keyring) | 21.1.0 | Store and access your passwords safely / Python Software Foundation or MIT |
| [kiwisolver](https://github.com/nucleic/kiwi) | 1.1.0 | An efficient C++ implementation of the Cassowary constraint solver / BSD-3-Clause |
| [krb5](http://web.mit.edu/kerberos/) | 1.17.1 | A network authentication protocol. / MIT |
| [lazy-object-proxy](https://github.com/ionelmc/python-lazy-object-proxy) | 1.4.3 | A fast and thorough lazy object proxy / BSD-2-Clause |
| [lcms2](http://www.littlecms.com/) | 2.11 | Open Source Color Management Engine / MIT |
| [libarchive](http://www.libarchive.org/) | 3.3.3 | Multi-format archive and compression library / BSD-2-Clause |
| [libcurl](http://curl.haxx.se/) | 7.68.0 | tool and library for transferring data with URL syntax / MIT/X derivate (`<http://curl.haxx.se/docs/copyright.html>`) |
| [libcxx](http://llvm.org/) | 4.0.1 | LLVM C++ standard library / Apache-2.0 WITH LLVM-exception |
| [libedit](http://thrysoee.dk/editline/) | 3.1.20181209 | Editline Library (libedit) / BSD-2-Clause |
| [libffi](https://sourceware.org/libffi/) | 3.2.1 | A Portable Foreign Function Interface Library. / Custom |
| [libgfortran](http://gcc.gnu.org/) | 3.0.1 | Fortran libraries from the GNU Compiler Collection / GPL 3 (with GCC Runtime Library Exception 3.1) |
| [libiconv](https://www.gnu.org/software/libiconv/) | 1.15 | Provides iconv for systems which don’t have one (or that cannot convert from/to Unicode.) / GPL and LGPL |
| [liblief](https://lief.quarkslab.com/) | 0.9.0 | A cross platform library to parse, modify and abstract ELF, PE and MachO formats. / Apache-2.0 |
| [libllvm9](http://llvm.org/) | 9.0.1 | Development headers and libraries for LLVM / LLVM-Exception |
| [libpng](http://www.libpng.org/pub/png/libpng.html) | 1.6.37 | PNG reference library / zlib/libpng |
| [libsodium](http://libsodium.org) | 1.0.16 | A modern and easy-to-use crypto library. / ISC |
| [libspatialindex](http://libspatialindex.github.io) | 1.9.3 | Extensible framework for robust spatial indexing / MIT |
| [libssh2](https://www.libssh2.org/) | 1.9.0 | the SSH library / BSD-3-Clause |
| [libtiff](http://www.libtiff.org/) | 4.1.0 | Support for the Tag Image File Format (TIFF). / HPND |
| [libxml2](http://xmlsoft.org/) | 2.9.9 | The XML C parser and toolkit of Gnome / MIT |
| [libxslt](http://xmlsoft.org/XSLT/) | 1.1.33 | The XSLT C library developed for the GNOME project / MIT |
| [llvm-openmp](http://openmp.llvm.org/) | 4.0.1 | The OpenMP API supports multi-platform shared-memory parallel programming in C/C++ and Fortran. / NCSA |
| [llvmlite](https://github.com/numba/llvmlite) | 0.31.0 | A lightweight LLVM python binding for writing JIT compilers / New BSD License |
| [locket](https://github.com/mwilliamson/locket.py) | 0.2.0 | File-based locks for Python for Linux and Windows / BSD 2-Clause |
| [lxml](http://lxml.de/) | 4.5.0 | Pythonic binding for the C libraries libxml2 and libxslt. / BSD-3-Clause and GPL-2.0-only and ZPL-2.0 and LicenseRef-ElementTree |
| [lz4-c](https://www.lz4.org) | 1.8.1.2 | Extremely Fast Compression algorithm / BSD-2-Clause |
| [lzo](http://www.oberhumer.com/opensource/lzo/) | 2.10 | LZO is a portable lossless data compression library written in ANSI C. / GPL v2+ |
| [markupsafe](https://www.palletsprojects.com/p/markupsafe) | 1.1.1 | A Python module that implements the jinja2.Markup string / BSD-3-Clause |
| [matplotlib](http://matplotlib.org/) | 3.1.3 | Publication quality figures in Python / PSF-based |
| [matplotlib-base](http://matplotlib.org/) | 3.1.3 | Publication quality figures in Python / PSF-based |
| [mccabe](https://github.com/PyCQA/mccabe) | 0.6.1 | McCabe complexity checker for Python / MIT |
| [mistune](https://github.com/lepture/mistune) | 0.8.4 | The fastest markdown parser in pure Python. / BSD 3-Clause |
| [mkl](https://software.intel.com/en-us/mkl) | 2019.4 | Math library for Intel and compatible processors / proprietary - Intel |
| [mkl-service](https://github.com/ContinuumIO/mkl-service) | 2.3.0 | Python bindings to MKL service functions / 3-clause BSD |
| [mkl\_fft](http://github.com/IntelPython/mkl_fft) | 1.0.15 | NumPy-based implementation of Fast Fourier Transform using Intel (R) Math Kernel Library. / BSD 3-Clause |
| [mkl\_random](http://github.com/IntelPython/mkl_random) | 1.1.0 | Intel (R) MKL-powered package for sampling from common probability distributions into NumPy arrays. / BSD 3-Clause |
| [mock](https://github.com/testing-cabal/mock) | 4.0.1 | A library for testing in Python / BSD-2-Clause |
| [more-itertools](https://github.com/more-itertools/more-itertools) | 8.2.0 | More routines for operating on iterables, beyond itertools / MIT |
| [mpc](http://www.multiprecision.org/) | 1.1.0 | A C library for the arithmetic of complex numbers with arbitrarily high precision. / LGPL 3 |
| [mpfr](http://www.mpfr.org/) | 4.0.1 | The MPFR library is a C library for multiple-precision floating-point computations with correct rounding. / LGPL-3.0-only |
| [mpmath](http://mpmath.org) | 1.1.0 | Python library for arbitrary-precision floating-point arithmetic / BSD 3-Clause |
| [msgpack-python](http://msgpack.org/) | 0.6.1 | MessagePack (de)serializer / Apache-2.0 |
| [multipledispatch](https://github.com/mrocklin/multipledispatch/) | 0.6.0 | Multiple dispatch in Python / BSD 3-Clause |
| [nbconvert](http://jupyter.org) | 5.6.1 | Converting Jupyter Notebooks / BSD-3-Clause |
| [nbformat](http://jupyter.org) | 5.0.4 | The reference implementation of the Jupyter Notebook format / BSD-3-Clause |
| [ncurses](http://www.gnu.org/software/ncurses/) | 6.2 | Library for text-based user interfaces / Free software (MIT-like) |
| [networkx](https://networkx.github.io/) | 2.4 | Python package for creating and manipulating complex networks / BSD-3-Clause |
| [nltk](http://nltk.org/) | 3.4.5 | Natural Language Toolkit / Apache 2.0 |
| [nose](http://readthedocs.org/docs/nose/) | 1.3.7 | Nose extends unittest to make testing easier / LGPL-2.1 |
| [notebook](https://jupyter.org) | 6.0.3 | Jupyter Notebook / BSD-3-Clause |
| [numba](http://numba.github.com) | 0.48.0 | NumPy aware dynamic Python compiler using LLVM / BSD 2-clause |
| [numexpr](https://github.com/pydata/numexpr) | 2.7.1 | Fast numerical expression evaluator for NumPy. / MIT |
| [numpy](http://numpy.scipy.org/) | 1.18.1 | Array processing for numbers, strings, records, and objects. / BSD 3-Clause |
| [numpy-base](http://numpy.scipy.org/) | 1.18.1 | Array processing for numbers, strings, records, and objects. / BSD 3-Clause |
| [numpydoc](https://github.com/numpy/numpydoc) | 0.9.2 | Numpy’s Sphinx extensions / BSD 3-Clause |
| [olefile](http://www.decalage.info/python/olefileio) | 0.46 | parse, read and write Microsoft OLE2 files / BSD 2-Clause |
| [openpyxl](https://openpyxl.readthedocs.io) | 3.0.3 | A Python library to read/write Excel 2010 xlsx/xlsm files / MIT |
| [openssl](http://www.openssl.org/) | 1.1.1d | OpenSSL is an open-source implementation of the SSL and TLS protocols / OpenSSL |
| [packaging](https://github.com/pypa/packaging) | 20.1 | Core utilities for Python packages / Apache 2.0 or BSD 2-Clause |
| [pandas](http://pandas.pydata.org) | 1.0.1 | High-performance, easy-to-use data structures and data analysis tools. / BSD-3-Clause |
| [pandoc](http://pandoc.org/) | 2.2.3.2 | Universal markup converter (repackaged binaries) / GPL-2.0 |
| [pandocfilters](https://github.com/jgm/pandocfilters) | 1.4.2 | A python module for writing pandoc filters / BSD-3-Clause |
| [parso](https://github.com/davidhalter/parso) | 0.5.2 | A Python Parser / MIT |
| [partd](https://github.com/dask/partd) | 1.1.0 | Data structure for on-disk shuffle operations / BSD 3-Clause |
| [path](https://github.com/jaraco/path) | 13.1.0 | A module wrapper for os.path / MIT |
| [path.py](https://github.com/jaraco/path.py) | 12.4.0 | A module wrapper for os.path / MIT |
| [pathlib2](https://github.com/mcmtroffaes/pathlib2) | 2.3.5 | Fork of pathlib aiming to support the full stdlib Python API / MIT |
| [pathtools](https://github.com/gorakhargosh/pathtools) | 0.1.2 | Path utilities for Python. / MIT |
| [patsy](https://github.com/pydata/patsy) | 0.5.1 | Describing statistical models in Python using symbolic formulas / BSD-2-Clause, PSF2 |
| [pcre](http://www.pcre.org/) | 8.43 | Regular expression pattern matching using the same syntax and semantics as Perl 5. / BSD 3-Clause |
| [pep8](http://pep8.readthedocs.org/) | 1.7.1 | Python style guide checker / MIT |
| [pexpect](http://pexpect.sourceforge.net/) | 4.8.0 | Pexpect makes Python a better tool for controlling other applications. / ISC |
| [pickleshare](https://github.com/pickleshare/pickleshare/) | 0.7.5 | Tiny ‘shelve’-like database with concurrency support / MIT |
| [pillow](https://pillow.readthedocs.io) | 7.0.0 | Pillow is the friendly PIL fork by Alex Clark and Contributors / LicenseRef-PIL |
| [pip](https://pip.pypa.io/en/stable/) | 20.0.2 | PyPA recommended tool for installing Python packages / MIT |
| [pkginfo](https://code.launchpad.net/~tseaver/pkginfo/trunk) | 1.5.0.1 | Query metadatdata from sdists / bdists / installed packages. / MIT |
| [pluggy](https://github.com/pytest-dev/pluggy) | 0.13.1 | Plugin registration and hook calling for Python / MIT |
| [ply](http://www.dabeaz.com/ply/index.html) | 3.11 | Python Lex-Yacc / BSD 3-clause |
| [prometheus\_client](https://github.com/prometheus/client_python) | 0.7.1 | Python client for the Prometheus monitoring system / Apache-2.0 |
| [prompt-toolkit](https://github.com/jonathanslenders/python-prompt-toolkit) | 3.0.5 | Library for building powerful interactive command lines in Python / BSD-3-Clause |
| [prompt\_toolkit](https://github.com/jonathanslenders/python-prompt-toolkit) | 3.0.3 | Library for building powerful interactive command lines in Python / BSD-3-Clause |
| [psutil](https://github.com/giampaolo/psutil) | 5.6.7 | A cross-platform process and system utilities module for Python / BSD 3-Clause |
| [ptyprocess](https://github.com/pexpect/ptyprocess) | 0.6.0 | Run a subprocess in a pseudo terminal / ISC |
| [py](https://github.com/pytest-dev/py) | 1.8.1 | library with cross-python path, ini-parsing, io, code, log facilities / MIT |
| [py-lief](https://lief.quarkslab.com/) | 0.9.0 | A cross platform library to parse, modify and abstract ELF, PE and MachO formats. / Apache-2.0 |
| [pycodestyle](https://pycodestyle.readthedocs.io/) | 2.5.0 | Python style guide checker / MIT |
| [pycosat](https://github.com/ContinuumIO/pycosat) | 0.6.3 | Bindings to picosat (a SAT solver) / MIT |
| [pycparser](https://github.com/eliben/pycparser) | 2.19 | Complete C99 parser in pure Python / BSD 3-clause |
| [pycrypto](http://www.pycrypto.org/) | 2.6.1 | Cryptographic modules for Python. / Public Domain |
| [pycurl](http://pycurl.sourceforge.net/) | 7.43.0.5 | A Python Interface To The cURL library / LGPL, MIT |
| [pydocstyle](https://github.com/PyCQA/pydocstyle) | 4.0.1 | Python docstring style checker (formerly pep257) / MIT |
| [pyflakes](https://github.com/PyCQA/pyflakes) | 2.1.1 | Pyflakes analyzes programs and detects various errors. / MIT |
| [pygments](http://pygments.org/) | 2.5.2 | Pygments is a generic syntax highlighter suitable for use in code hosting, forums, wikis or other applications that need to prettify source code. / BSD-2-clause |
| [pylint](http://www.pylint.org/) | 2.4.4 | python code static checker / GPL-2.0-only |
| [pyodbc](https://github.com/mkleehammer/pyodbc) | 4.0.30 | DB API Module for ODBC / MIT |
| [pyopenssl](https://github.com/pyca/pyopenssl) | 19.1.0 | Python wrapper module around the OpenSSL library / Apache 2.0 |
| [pyparsing](http://pyparsing.wikispaces.com/) | 2.4.6 | Create and execute simple grammars / MIT |
| [pyqt](http://www.riverbankcomputing.co.uk/software/pyqt) | 5.9.2 | Python binding of the cross-platform GUI toolkit Qt. / Commercial, GPL-2.0, GPL-3.0 |
| [pyrsistent](http://github.com/tobgu/pyrsistent/) | 0.15.7 | Persistent/Functional/Immutable data structures / MIT |
| [pysocks](https://github.com/Anorov/PySocks) | 1.7.1 | A Python SOCKS client module. See [Anorov/PySocks](https://github.com/Anorov/PySocks) for more information. / BSD 3-Clause |
| [pytables](http://www.pytables.org) | 3.6.1 | Brings together Python, HDF5 and NumPy to easily handle large amounts of data. / BSD 3-Clause |
| [pytest](https://docs.pytest.org/en/latest/) | 5.3.5 | Simple and powerful testing with Python. / MIT |
| [python](http://www.python.org/) | 3.7.6 | General purpose programming language / PSF |
| [python-dateutil](https://dateutil.readthedocs.org/) | 2.8.1 | Extensions to the standard Python datetime module. / BSD 3 Clause |
| [python-jsonrpc-server](https://github.com/palantir/python-jsonrpc-server) | 0.3.4 | A Python 2.7 and 3.4+ server implementation of the JSON RPC 2.0 protocol. / MIT |
| [python-language-server](https://github.com/palantir/python-language-server) | 0.31.7 | An implementation of the Language Server Protocol for Python / MIT |
| [python-libarchive-c](https://github.com/Changaco/python-libarchive-c) | 2.8 | Python interface to libarchive / CC0-1.0 |
| python.app | 2 | Proxy on OS X letting Python libraries hook into the gui event loop / BSD |
| [pytz](http://pythonhosted.org/pytz/) | 2019.3 | World timezone definitions, modern and historical. / MIT |
| [pywavelets](https://github.com/PyWavelets/pywt) | 1.1.1 | Discrete Wavelet Transforms in Python / MIT |
| [pyyaml](http://pyyaml.org/wiki/PyYAML) | 5.3 | YAML parser and emitter for Python / MIT |
| [pyzmq](https://github.com/zeromq/pyzmq) | 18.1.1 | Python bindings for zeromq / BSD 3-clause |
| [qdarkstyle](https://github.com/ColinDuquesnoy/QDarkStyleSheet) | 2.8 | A dark stylesheet for Qt applications (Qt4, Qt5, PySide, PyQt4, PyQt5, QtPy, PyQtGraph). / MIT |
| [qt](http://qt-project.org) | 5.9.7 | Qt is a cross-platform application and UI framework. / LGPL-3.0 |
| [qtawesome](https://github.com/spyder-ide/qtawesome) | 0.6.1 | Iconic fonts in PyQt and PySide applications / MIT |
| [qtconsole](http://jupyter.org) | 4.6.0 | Jupyter Qt Console / BSD 3-Clause |
| [qtpy](https://github.com/spyder-ide/qtpy) | 1.9.0 | Abstraction layer for PyQt5/PyQt4/PySide / MIT |
| [readline](https://cnswww.cns.cwru.edu/php/chet/readline/rltop.html) | 7.0 | library for editing command lines as they are typed in / GPL-3.0 |
| [regex](https://bitbucket.org/mrabarnett/mrab-regex) | 2020.6.8 | Alternative regular expression module, to replace re / Python-2.0 |
| [requests](http://python-requests.org) | 2.22.0 | Requests is an elegant and simple HTTP library for Python, built with ♥. / Apache-2.0 |
| ripgrep | 11.0.2 | |
| [rope](https://github.com/python-rope/rope) | 0.16.0 | A python refactoring library / GPL 2.0 |
| [rtree](http://toblerity.github.com/rtree/) | 0.9.3 | R-Tree spatial index for Python GIS / MIT |
| [ruamel\_yaml](https://bitbucket.org/ruamel/yaml) | 0.15.87 | A patched copy of ruamel.yaml. / MIT |
| [scikit-image](http://scikit-image.org/) | 0.16.2 | Image processing routines for SciPy. / BSD 3-Clause |
| [scikit-learn](http://scikit-learn.org/) | 0.22.1 | A set of python modules for machine learning and data mining / BSD-3-Clause |
| [scipy](http://www.scipy.org/) | 1.4.1 | Scientific Library for Python / BSD 3-Clause |
| [seaborn](https://seaborn.pydata.org) | 0.10.0 | Statistical data visualization / BSD 3-Clause |
| [send2trash](https://github.com/hsoft/send2trash) | 1.5.0 | Python library to natively send files to Trash (or Recycle bin) on all platforms. / BSD-3-Clause |
| [setuptools](https://github.com/pypa/setuptools) | 46.0.0 | Download, build, install, upgrade, and uninstall Python packages / MIT |
| [simplegeneric](http://cheeseshop.python.org/pypi/simplegeneric) | 0.8.1 | Simple generic functions (similar to Python’s own len(), pickle.dump(), etc.) / Zope Public |
| [singledispatch](http://docs.python.org/3/library/functools.html#functools.singledispatch) | 3.4.0.3 | Transforms a function into a single-dispatch generic function / MIT |
| [sip](http://www.riverbankcomputing.com/software/sip/intro) | 4.19.8 | Create Python bindings for C and C++ libraries / GPL-3.0 |
| [six](https://six.readthedocs.io/) | 1.14.0 | Python 2 and 3 compatibility utilities / MIT |
| [snappy](https://github.com/google/snappy) | 1.1.7 | A fast compressor/decompressor / BSD 3-clause |
| [snowballstemmer](https://github.com/shibukawa/snowball_py) | 2.0.0 | Snowball stemming library collection for Python / BSD-2-Clause |
| [sortedcollections](http://www.grantjenks.com/docs/sortedcollections/) | 1.1.2 | Python Sorted Collections / Apache-2.0 |
| [sortedcontainers](http://www.grantjenks.com/docs/sortedcontainers/) | 2.1.0 | Python Sorted Container Types: SortedList, SortedDict, and SortedSet / Apache-2.0 |
| [soupsieve](http://facelessuser.github.io/soupsieve) | 1.9.5 | A modern CSS selector implementation for BeautifulSoup / MIT |
| [sphinx](http://www.sphinx-doc.org) | 2.4.0 | Sphinx is a tool that makes it easy to create intelligent and beautiful documentation / BSD-2-Clause |
| sphinxcontrib | 1.0 | Python namespace for sphinxcontrib / BSD |
| [sphinxcontrib-applehelp](https://www.sphinx-doc.org/en/master/) | 1.0.1 | sphinxcontrib-applehelp is a sphinx extension which outputs Apple help books / BSD-2-Clause |
| [sphinxcontrib-devhelp](https://www.sphinx-doc.org/en/master/) | 1.0.1 | sphinxcontrib-devhelp is a sphinx extension which outputs Devhelp document / BSD-2-Clause |
| [sphinxcontrib-htmlhelp](https://www.sphinx-doc.org/en/master/) | 1.0.2 | sphinxcontrib-htmlhelp is a sphinx extension which … / BSD-2-Clause |
| [sphinxcontrib-jsmath](https://www.sphinx-doc.org/en/master/) | 1.0.1 | A sphinx extension which renders display math in HTML via JavaScript / BSD-2-Clause |
| [sphinxcontrib-qthelp](https://www.sphinx-doc.org/en/master/) | 1.0.2 | sphinxcontrib-qthelp is a sphinx extension which outputs QtHelp document / BSD-2-Clause |
| [sphinxcontrib-serializinghtml](https://www.sphinx-doc.org/en/master/) | 1.1.3 | sphinxcontrib-serializinghtml is a sphinx extension which outputs “serialized” HTML files (json and pickle). / BSD-2-Clause |
| [sphinxcontrib-websupport](https://pypi.python.org/pypi/sphinxcontrib-websupport) | 1.2.0 | Sphinx API for Web Apps / BSD-2-Clause |
| [spyder](https://www.spyder-ide.org/) | 4.0.1 | The Scientific Python Development Environment / MIT |
| [spyder-kernels](https://www.spyder-ide.org/) | 1.8.1 | Jupyter kernels for Spyder’s console / MIT |
| [sqlalchemy](http://www.sqlalchemy.org/) | 1.3.13 | Database Abstraction Library. / MIT |
| [sqlite](http://www.sqlite.org/) | 3.31.1 | Implements a self-contained, zero-configuration, SQL database engine / Public-Domain (`<http://www.sqlite.org/copyright.html>`) |
| [statsmodels](https://www.statsmodels.org) | 0.11.0 | Statistical computations and models for use with SciPy / BSD-3-Clause |
| [sympy](https://sympy.org) | 1.5.1 | Python library for symbolic mathematics / BSD-3-Clause |
| [tbb](http://www.threadingbuildingblocks.org) | 2020.0 | High level abstract threading library / Apache 2.0 |
| [tblib](https://github.com/ionelmc/python-tblib) | 1.6.0 | Traceback serialization library. / BSD 2-Clause |
| [terminado](https://github.com/jupyter/terminado) | 0.8.3 | Terminals served by tornado websockets / BSD-2-Clause |
| [testpath](https://testpath.readthedocs.io) | 0.4.4 | Testpath is a collection of utilities for Python code working with files and commands. / BSD-3-Clause |
| [threadpoolctl](https://github.com/joblib/threadpoolctl) | 2.1.0 | Python helpers to control the threadpools of native libraries / BSD 3-Clause |
| [tk](http://www.tcl.tk/) | 8.6.8 | A dynamic programming language with GUI support. Bundles Tcl and Tk. / Tcl/Tk |
| [toml](https://github.com/uiri/toml) | 0.10.1 | Python lib for TOML. / MIT |
| [toolz](http://toolz.readthedocs.org/) | 0.10.0 | A functional standard library for Python / BSD 3-Clause |
| [tornado](http://www.tornadoweb.org/) | 6.0.3 | A Python web framework and asynchronous networking library, originally developed at FriendFeed. / Apache-2.0 |
| [tqdm](https://pypi.python.org/pypi/tqdm) | 4.42.1 | A Fast, Extensible Progress Meter / MPLv2.0, MIT |
| [traitlets](http://ipython.org/) | 4.3.3 | Configuration system for Python applications / BSD-3-Clause |
| [typed-ast](https://github.com/python/typed_ast) | 1.4.1 | a fork of Python 2 and 3 ast modules with type comment support / Apache 2.0 |
| [typing\_extensions](https://github.com/python/typing/tree/master/typing_extensions) | 3.7.4.2 | Backported and Experimental Type Hints for Python / PSF-2.0 |
| [ujson](https://github.com/ultrajson/ultrajson) | 1.35 | Ultra fast JSON decoder and encoder written in C with Python bindings / BSD-3-Clause |
| [unicodecsv](https://github.com/jdunck/python-unicodecsv) | 0.14.1 | Drop-in replacement for csv module which supports unicode strings / BSD |
| [unixodbc](http://www.unixodbc.org/) | 2.3.7 | ODBC on non MS Windows platforms / LGPL-2.1 |
| [urllib3](https://urllib3.readthedocs.io/) | 1.25.8 | HTTP library with thread-safe connection pooling, file post, and more. / MIT |
| [watchdog](http://github.com/gorakhargosh/watchdog) | 0.10.2 | Filesystem events monitoring / Apache 2.0 |
| [wcwidth](https://github.com/jquast/wcwidth) | 0.1.8 | Measures number of Terminal column cells of wide-character codes. / MIT |
| [webencodings](https://github.com/gsnedders/python-webencodings) | 0.5.1 | Character encoding aliases for legacy web content / BSD 3-Clause |
| [werkzeug](https://palletsprojects.com/p/werkzeug/) | 1.0.0 | The comprehensive WSGI web application library. / BSD 3-Clause |
| [wheel](https://github.com/pypa/wheel) | 0.34.2 | A built-package format for Python. / MIT |
| [widgetsnbextension](http://ipython.org) | 3.5.1 | Interactive Widgets for Jupyter / BSD 3-clause |
| [wrapt](https://github.com/GrahamDumpleton/wrapt) | 1.11.2 | Module for decorators, wrappers and monkey patching / BSD 2-Clause |
| [wurlitzer](https://github.com/minrk/wurlitzer) | 2.0.0 | Capture C-level stdout/stderr in Python / MIT |
| [xlrd](http://www.python-excel.org/) | 1.2.0 | Library for developers to extract data from Microsoft Excel (tm) spreadsheet files / BSD 3-Clause and BSD with advertising |
| [xlsxwriter](https://xlsxwriter.readthedocs.io/) | 1.2.7 | A Python module for creating Excel XLSX files / BSD-2-Clause |
| [xlwings](http://xlwings.org/) | 0.17.1 | Interact with Excel from Python and vice versa / 3-clause BSD |
| [xlwt](http://www.python-excel.org/) | 1.3.0 | Writing data and formatting information to Excel files / BSD |
| [xz](http://tukaani.org/xz/) | 5.2.4 | Data compression software with high compression ratio / LGPL-2.1 and GPL-2.0 |
| [yaml](http://pyyaml.org/wiki/LibYAML) | 0.1.7 | A C library for parsing and emitting YAML / MIT |
| [yapf](https://github.com/google/yapf) | 0.28.0 | A formatter for Python files / Apache 2.0 |
| [zeromq](http://zeromq.org) | 4.3.1 | A high-performance asynchronous messaging library. / LGPL 3 |
| [zict](http://github.com/mrocklin/zict) | 1.0.0 | Composable Dictionary Classes / BSD 3-Clause |
| [zipp](https://github.com/jaraco/zipp) | 2.2.0 | A pathlib-compatible Zipfile object wrapper / MIT |
| [zlib](http://zlib.net/) | 1.2.11 | Massively spiffy yet delicately unobtrusive compression library / zlib |
| zope | 1.0 | web application server / BSD |
| [zope.event](http://www.zope.org/en/latest/) | 4.4 | Very basic event publishing system / Zope Public License |
| [zope.interface](http://docs.zope.org/zope.interface/) | 4.7.1 | Interfaces for Python / ZPL 2.1 |
| [zstd](http://www.zstd.net) | 1.3.7 | Zstandard - Fast real-time compression algorithm / BSD 3-Clause |
| Name | Version | Summary / License |
|---|---|---|
| [\_ipyw\_jlab\_nb\_ext\_conf](https://github.com/ContinuumIO/anaconda-nb-extensions-meta-config) | 0.1.0 | A configuration metapackage for enabling Anaconda-bundled jupyter extensions / BSD |
| \_libgcc\_mutex | 0.1 | Mutex for libgcc and libgcc-ng / None |
| [alabaster](http://www.sphinx-doc.org/en/stable/index.html) | 0.7.12 | Configurable, Python 2+3 compatible Sphinx theme. / BSD 3-Clause |
| [anaconda-client](http://anaconda.org) | 1.7.2 | anaconda.org command line client library / BSD 3-clause |
| [anaconda-project](https://github.com/Anaconda-Platform/anaconda-project) | 0.8.4 | Tool for encapsulating, running, and reproducing data science projects / BSD 3-Clause |
| [asn1crypto](https://github.com/wbond/asn1crypto) | 1.3.0 | Python ASN.1 library with a focus on performance and a pythonic API / MIT |
| [astroid](https://www.astroid.org/) | 2.3.3 | A abstract syntax tree for Python with inference support. / LGPL-2.1-only |
| [astropy](http://www.astropy.org/) | 4.0 | Community-developed Python Library for Astronomy / BSD-3-Clause |
| [attrs](https://attrs.readthedocs.io/en/stable/) | 19.3.0 | attrs is the Python package that will bring back the joy of writing classes by relieving you from the drudgery of implementing object protocols (aka dunder methods). / MIT |
| [babel](http://babel.pocoo.org/) | 2.8.0 | Utilities to internationalize and localize Python applications / BSD 3-clause |
| [backcall](https://github.com/takluyver/backcall/) | 0.1.0 | Specifications for callback functions passed in to an API / BSD-3-Clause |
| [backports](https://bitbucket.org/brandon/backports) | 1.0 | None / BSD |
| [backports.shutil\_get\_terminal\_size](https://github.com/chrippa/backports.shutil_get_terminal_size) | 1.0.0 | A backport of the get\_terminal\_size function from Python 3.3’s shutil. / MIT |
| [beautifulsoup4](http://www.crummy.com/software/BeautifulSoup/) | 4.8.2 | Python library designed for screen-scraping / MIT |
| [bitarray](https://github.com/ilanschnell/bitarray) | 1.2.1 | efficient arrays of booleans – C extension / PSF |
| [bkcharts](http://github.com/bokeh/bkcharts) | 0.2 | High level chart types built on top of Bokeh / BSD 3-Clause |
| blas | 1.0 | |
| [bleach](https://github.com/mozilla/bleach) | 3.1.0 | Easy, whitelist-based HTML-sanitizing tool / Apache-2.0 |
| [blosc](https://github.com/Blosc/c-blosc) | 1.16.3 | A blocking, shuffling and loss-less compression library that can be faster than memcpy() / BSD-3-Clause |
| [bokeh](http://bokeh.pydata.org/) | 1.4.0 | Statistical and novel interactive HTML plots for Python / BSD-3-Clause |
| [boto](https://github.com/boto/boto/) | 2.49.0 | Amazon Web Services Library / MIT |
| [bottleneck](https://github.com/pydata/bottleneck) | 1.3.2 | Fast NumPy array functions written in Cython. / BSD 2-Clause |
| [brotlipy](https://github.com/python-hyper/brotlipy) | 0.7.0 | Python bindings to the Brotli compression library / MIT |
| [bzip2](http://www.bzip.org/) | 1.0.8 | high-quality data compressor / bzip2 |
| [ca-certificates](https://github.com/conda-forge/ca-certificates-feedstock) | 2020.1.1 | Certificates for use with other packages. / MPL 2.0 |
| [cairo](http://cairographics.org/) | 1.14.12 | Cairo is a 2D graphics library with support for multiple output devices. / LGPL 2.1 or MPL 1.1 |
| [certifi](http://certifi.io/) | 2019.11.28 | Python package for providing Mozilla’s CA Bundle. / ISC |
| [cffi](https://bitbucket.org/cffi/cffi) | 1.14.0 | Foreign Function Interface for Python calling C code. / MIT |
| [chardet](https://github.com/chardet/chardet) | 3.0.4 | Universal character encoding detector / LGPL2 |
| [click](https://palletsprojects.com/p/click) | 7.0 | Python composable command line interface toolkit / BSD-3-Clause |
| [cloudpickle](https://github.com/cloudpipe/cloudpickle) | 1.3.0 | Extended pickling support for Python objects / BSD 3-Clause |
| [clyent](https://github.com/Anaconda-Platform/clyent) | 1.2.2 | Command line client library for windows and posix / BSD 3-Clause |
| [colorama](https://github.com/tartley/colorama) | 0.4.3 | Cross-platform colored terminal text / BSD-3-Clause |
| [conda](https://conda.io) | 4.8.3 | OS-agnostic, system-level binary package and environment manager. / BSD 3-Clause |
| [conda-build](https://github.com/conda/conda-build) | 3.18.11 | tools for building conda packages / BSD 3-Clause |
| [conda-env](https://github.com/conda/conda-env) | 2.6.0 | Tools for interacting with conda environments. / BSD 3-Clause |
| [conda-verify](https://github.com/conda/conda-verify) | 3.4.2 | tool for validating conda recipes and conda packages / BSD 3-Clause |
| [contextlib2](http://contextlib2.readthedocs.org) | 0.6.0.post1 | Backports and enhancements for the contextlib module / PSF 2 |
| [cryptography](https://github.com/pyca/cryptography) | 2.8 | Provides cryptographic recipes and primitives to Python developers / Apache-2.0 AND BSD-3-Clause AND PSF-2.0 |
| [curl](http://curl.haxx.se/) | 7.68.0 | tool and library for transferring data with URL syntax / MIT/X derivate (`<http://curl.haxx.se/docs/copyright.html>`) |
| [cycler](http://matplotlib.org/cycler) | 0.10.0 | Composable style cycles. / BSD 3-Clause |
| [cython](http://www.cython.org/) | 0.29.15 | The Cython compiler for writing C extensions for the Python language / Apache-2.0 |
| [cytoolz](https://github.com/pytoolz/cytoolz) | 0.10.1 | Cython implementation of Toolz. High performance functional utilities / BSD-3-Clause |
| [dask](https://dask.org/) | 2.11.0 | Parallel PyData with Task Scheduling / BSD-3-Clause |
| [dask-core](http://github.com/dask/dask/) | 2.11.0 | Parallel Python with task scheduling / BSD-3-Clause |
| [decorator](https://github.com/micheles/decorator) | 4.4.1 | Better living through Python with decorators. / BSD-3-Clause |
| [defusedxml](https://bitbucket.org/tiran/defusedxml) | 0.6.0 | XML bomb protection for Python stdlib modules / PSF 2.0 |
| [distributed](http://distributed.readthedocs.io/en/latest/) | 2.11.0 | Distributed computing with Dask / BSD-3-Clause |
| [docutils](http://docutils.sourceforge.net/) | 0.16 | Docutils – Python Documentation Utilities / Public Domain Dedictation and BSD 2-Clause and PSF 2.1.1 and GPL 3.0 |
| [entrypoints](https://github.com/takluyver/entrypoints) | 0.3 | Discover and load entry points from installed packages. / MIT License |
| [et\_xmlfile](https://bitbucket.org/openpyxl/et_xmlfile) | 1.0.1 | An implementation of lxml.xmlfile for the standard library / MIT |
| [expat](http://expat.sourceforge.net/) | 2.2.6 | Expat XML parser library in C / MIT |
| [fastcache](https://github.com/pbrady/fastcache) | 1.1.0 | C implementation of Python 3 lru\_cache / MIT |
| [filelock](https://github.com/benediktschmitt/py-filelock) | 3.0.12 | A platform independent file lock. / Public Domain |
| [flask](http://flask.pocoo.org) | 1.1.1 | A microframework based on Werkzeug, Jinja2 and good intentions. / BSD 3-Clause |
| [fontconfig](http://www.freedesktop.org/wiki/Software/fontconfig/) | 2.13.0 | A library for configuring and customizing font access. / MIT |
| [freetype](https://www.freetype.org/) | 2.9.1 | A Free, High-Quality, and Portable Font Engine / GPL-2.0-only and LicenseRef-FreeType |
| [fsspec](https://github.com/martindurant/filesystem_spec) | 0.6.2 | A specification for pythonic filesystems / BSD-3-Clause |
| [get\_terminal\_size](https://github.com/chrippa/backports.shutil_get_terminal_size) | 1.0.0 | Get the size of the terminal window. / MIT |
| [gevent](https://www.gevent.org) | 1.4.0 | Coroutine-based network library / MIT |
| [glib](https://developer.gnome.org/glib/) | 2.63.1 | Provides core application building blocks for libraries and applications written in C. / LGPL-2.1 |
| [glob2](https://github.com/miracle2k/python-glob2) | 0.7 | Version of the glob module that supports recursion via \*\*, and can capture patterns. / BSD-2-Clause |
| [gmp](http://gmplib.org/) | 6.1.2 | The GNU multiprecision library. / GPL 2 and LGPL 3 |
| [gmpy2](https://pypi.python.org/pypi/gmpy2) | 2.0.8 | GMP/MPIR, MPFR, and MPC interface to Python 2.6+ and 3.x / LGPL 3 |
| [greenlet](https://github.com/python-greenlet/greenlet) | 0.4.15 | Lightweight in-process concurrent programming / MIT |
| [h5py](http://www.h5py.org/) | 2.10.0 | Read and write HDF5 files from Python. / BSD-3-Clause |
| [hdf5](http://www.hdfgroup.org/HDF5/) | 1.10.4 | HDF5 is a data model, library, and file format for storing and managing data / HDF5 |
| [heapdict](http://stutzbachenterprises.com/) | 1.0.1 | A heap with decrease-key and increase-key operations / BSD 3-Clause |
| [html5lib](https://github.com/html5lib/html5lib-python) | 1.0.1 | HTML parser based on the WHATWG HTML specification / MIT |
| [icu](http://site.icu-project.org/) | 58.2 | International Components for Unicode. / MIT |
| [idna](https://github.com/kjd/idna) | 2.8 | Internationalized Domain Names in Applications (IDNA). / BSD Like |
| [imageio](https://imageio.github.io) | 2.6.1 | A Python library for reading and writing image data / BSD-2-Clause |
| [imagesize](https://github.com/shibukawa/imagesize_py) | 1.2.0 | Getting image size from png/jpeg/jpeg2000/gif file / MIT |
| [importlib-metadata](https://gitlab.com/python-devs/importlib_metadata) | 1.7.0 | A library to access the metadata for a Python package / Apache-2.0 |
| [importlib\_metadata](https://gitlab.com/python-devs/importlib_metadata) | 1.5.0 | A library to access the metadata for a Python package / Apache-2.0 |
| [ipykernel](https://ipython.org) | 5.1.4 | IPython Kernel for Jupyter / BSD-3-Clause |
| [ipython](https://ipython.org) | 7.12.0 | IPython: Productive Interactive Computing / BSD-3-Clause |
| [ipython\_genutils](http://ipython.org) | 0.2.0 | vestigial utilities from IPython / BSD 3-Clause |
| [ipywidgets](https://github.com/ipython/ipywidgets) | 7.5.1 | Jupyter Interactive Widgets / BSD 3-clause |
| [isort](https://github.com/timothycrosley/isort) | 4.3.21 | A Python utility / library to sort Python imports. / MIT |
| [itsdangerous](https://github.com/pallets/itsdangerous) | 1.1.0 | Various helpers to pass trusted data to untrusted environments. / BSD 3-Clause |
| [jbig](https://www.cl.cam.ac.uk/~mgk25/jbigkit) | 2.1 | Implementation of the JBIG1 data compression standard / GPL-2.0 |
| [jdcal](https://github.com/phn/jdcal) | 1.4.1 | Julian dates from proleptic Gregorian and Julian calendars. / BSD 2-Clause |
| [jedi](https://github.com/davidhalter/jedi/) | 0.16.0 | An autocompletion tool for Python that can be used for text editors. / MIT |
| [jinja2](http://jinja.pocoo.org) | 2.11.1 | An easy to use stand-alone template engine written in pure python. / 3-Clause BSD |
| [joblib](https://pypi.org/project/joblib/) | 0.14.1 | Lightweight pipelining: using Python functions as pipeline jobs. / BSD-3-Clause |
| [jpeg](http://www.ijg.org/) | 9b | read/write jpeg COM, EXIF, IPTC medata / Custom free software license |
| [jsonschema](https://github.com/Julian/jsonschema) | 3.2.0 | An implementation of JSON Schema validation for Python / MIT |
| [jupyter](http://jupyter.org) | 1.0.0 | Jupyter metapackage. Install all the Jupyter components in one go. / BSD 3-Clause |
| [jupyter\_client](https://jupyter.org) | 5.3.4 | jupyter\_client contains the reference implementation of the Jupyter protocol. / BSD-3-Clause |
| [jupyter\_console](http://jupyter.org) | 6.1.0 | Jupyter terminal console / BSD-3-Clause |
| [jupyter\_core](https://jupyter.org) | 4.6.1 | Core common functionality of Jupyter projects. / BSD-3-Clause |
| [kiwisolver](https://github.com/nucleic/kiwi) | 1.1.0 | An efficient C++ implementation of the Cassowary constraint solver / BSD-3-Clause |
| [krb5](http://web.mit.edu/kerberos/) | 1.17.1 | A network authentication protocol. / MIT |
| [lazy-object-proxy](https://github.com/ionelmc/python-lazy-object-proxy) | 1.4.3 | A fast and thorough lazy object proxy / BSD-2-Clause |
| [lcms2](http://www.littlecms.com/) | 2.11 | Open Source Color Management Engine / MIT |
| [ld\_impl\_linux-ppc64le](https://www.gnu.org/software/binutils/) | 2.33.1 | A set of programming tools for creating and managing binary programs, object files, libraries, profile data, and assembly source code. / GPL 3 |
| [libarchive](http://www.libarchive.org/) | 3.3.3 | Multi-format archive and compression library / BSD-2-Clause |
| [libcurl](http://curl.haxx.se/) | 7.68.0 | tool and library for transferring data with URL syntax / MIT/X derivate (`<http://curl.haxx.se/docs/copyright.html>`) |
| [libedit](http://thrysoee.dk/editline/) | 3.1.20181209 | Editline Library (libedit) / BSD-2-Clause |
| [libffi](https://sourceware.org/libffi/) | 3.2.1 | A Portable Foreign Function Interface Library. / Custom |
| [libgcc-ng](https://gcc.gnu.org/onlinedocs/gccint/Libgcc.html) | 8.2.0 | The GCC low-level runtime library / GPL |
| [libgfortran-ng](https://gcc.gnu.org/) | 7.3.0 | The GNU Fortran Runtime Library / GPL |
| [liblief](https://lief.quarkslab.com/) | 0.10.1 | A cross platform library to parse, modify and abstract ELF, PE and MachO formats. / Apache-2.0 |
| [libopenblas](http://www.openblas.net/) | 0.3.6 | An Optimized BLAS library / BSD |
| [libpng](http://www.libpng.org/pub/png/libpng.html) | 1.6.37 | PNG reference library / zlib/libpng |
| [libsodium](http://libsodium.org) | 1.0.16 | A modern and easy-to-use crypto library. / ISC |
| [libssh2](https://www.libssh2.org/) | 1.8.2 | the SSH library / BSD-3-Clause |
| [libstdcxx-ng](https://gcc.gnu.org/) | 8.2.0 | The GNU C++ Runtime Library / GPL3 with runtime exception |
| [libtiff](http://www.libtiff.org/) | 4.1.0 | Support for the Tag Image File Format (TIFF). / HPND |
| [libuuid](http://sourceforge.net/projects/libuuid/) | 1.0.3 | Portable uuid C library. / BSD 3-Clause |
| [libxcb](http://xcb.freedesktop.org/) | 1.13 | This is the C-language Binding (XCB) package to the X Window System protocol / MIT |
| [libxml2](http://xmlsoft.org/) | 2.9.9 | The XML C parser and toolkit of Gnome / MIT |
| [libxslt](http://xmlsoft.org/XSLT/) | 1.1.33 | The XSLT C library developed for the GNOME project / MIT |
| [locket](https://github.com/mwilliamson/locket.py) | 0.2.0 | File-based locks for Python for Linux and Windows / BSD 2-Clause |
| [lxml](http://lxml.de/) | 4.5.0 | Pythonic binding for the C libraries libxml2 and libxslt. / BSD-3-Clause and GPL-2.0-only and ZPL-2.0 and LicenseRef-ElementTree |
| [lz4-c](https://www.lz4.org) | 1.8.1.2 | Extremely Fast Compression algorithm / BSD-2-Clause |
| [lzo](http://www.oberhumer.com/opensource/lzo/) | 2.10 | LZO is a portable lossless data compression library written in ANSI C. / GPL v2+ |
| [markupsafe](https://www.palletsprojects.com/p/markupsafe) | 1.1.1 | A Python module that implements the jinja2.Markup string / BSD-3-Clause |
| [matplotlib](http://matplotlib.org/) | 3.1.3 | Publication quality figures in Python / PSF-based |
| [matplotlib-base](http://matplotlib.org/) | 3.1.3 | Publication quality figures in Python / PSF-based |
| [mccabe](https://github.com/PyCQA/mccabe) | 0.6.1 | McCabe complexity checker for Python / MIT |
| [mistune](https://github.com/lepture/mistune) | 0.8.4 | The fastest markdown parser in pure Python. / BSD 3-Clause |
| [mock](https://github.com/testing-cabal/mock) | 4.0.1 | A library for testing in Python / BSD-2-Clause |
| [more-itertools](https://github.com/more-itertools/more-itertools) | 8.2.0 | More routines for operating on iterables, beyond itertools / MIT |
| [mpc](http://www.multiprecision.org/) | 1.1.0 | A C library for the arithmetic of complex numbers with arbitrarily high precision. / LGPL 3 |
| [mpfr](http://www.mpfr.org/) | 4.0.1 | The MPFR library is a C library for multiple-precision floating-point computations with correct rounding. / LGPL-3.0-only |
| [mpmath](http://mpmath.org) | 1.1.0 | Python library for arbitrary-precision floating-point arithmetic / BSD 3-Clause |
| [msgpack-python](http://msgpack.org/) | 0.6.1 | MessagePack (de)serializer / Apache-2.0 |
| [multipledispatch](https://github.com/mrocklin/multipledispatch/) | 0.6.0 | Multiple dispatch in Python / BSD 3-Clause |
| [nbconvert](http://jupyter.org) | 5.6.1 | Converting Jupyter Notebooks / BSD-3-Clause |
| [nbformat](http://jupyter.org) | 5.0.4 | The reference implementation of the Jupyter Notebook format / BSD-3-Clause |
| [ncurses](http://www.gnu.org/software/ncurses/) | 6.2 | Library for text-based user interfaces / Free software (MIT-like) |
| [networkx](https://networkx.github.io/) | 2.4 | Python package for creating and manipulating complex networks / BSD-3-Clause |
| [nltk](http://nltk.org/) | 3.4.5 | Natural Language Toolkit / Apache 2.0 |
| nomkl | 3.0 | None / BSD |
| [nose](http://readthedocs.org/docs/nose/) | 1.3.7 | Nose extends unittest to make testing easier / LGPL-2.1 |
| [notebook](https://jupyter.org) | 6.0.3 | Jupyter Notebook / BSD-3-Clause |
| [numexpr](https://github.com/pydata/numexpr) | 2.7.1 | Fast numerical expression evaluator for NumPy. / MIT |
| [numpy](http://numpy.scipy.org/) | 1.18.1 | Array processing for numbers, strings, records, and objects. / BSD 3-Clause |
| [numpy-base](http://numpy.scipy.org/) | 1.18.1 | Array processing for numbers, strings, records, and objects. / BSD 3-Clause |
| [numpydoc](https://github.com/numpy/numpydoc) | 0.9.2 | Numpy’s Sphinx extensions / BSD 3-Clause |
| [olefile](http://www.decalage.info/python/olefileio) | 0.46 | parse, read and write Microsoft OLE2 files / BSD 2-Clause |
| [openblas](http://www.openblas.net/) | 0.3.6 | An optimized BLAS library / BSD |
| openblas-devel | 0.3.6 | OpenBLAS headers and libraries for developing software that used OpenBLAS. / None |
| [openpyxl](https://openpyxl.readthedocs.io) | 3.0.3 | A Python library to read/write Excel 2010 xlsx/xlsm files / MIT |
| [openssl](http://www.openssl.org/) | 1.1.1d | OpenSSL is an open-source implementation of the SSL and TLS protocols / OpenSSL |
| [packaging](https://github.com/pypa/packaging) | 20.1 | Core utilities for Python packages / Apache 2.0 or BSD 2-Clause |
| [pandas](http://pandas.pydata.org) | 1.0.1 | High-performance, easy-to-use data structures and data analysis tools. / BSD-3-Clause |
| [pandoc](http://pandoc.org/) | 2.0.0.1 | Universal markup converter (repackaged binaries) / GPL-2.0 |
| [pandocfilters](https://github.com/jgm/pandocfilters) | 1.4.2 | A python module for writing pandoc filters / BSD-3-Clause |
| [parso](https://github.com/davidhalter/parso) | 0.6.1 | A Python Parser / MIT |
| [partd](https://github.com/dask/partd) | 1.1.0 | Data structure for on-disk shuffle operations / BSD 3-Clause |
| [patchelf](http://nixos.org/patchelf.html) | 0.10 | A small utility to modify the dynamic linker and RPATH of ELF executables. / GPL-3.0-or-later |
| [path](https://github.com/jaraco/path) | 13.1.0 | A module wrapper for os.path / MIT |
| [path.py](https://github.com/jaraco/path.py) | 12.4.0 | A module wrapper for os.path / MIT |
| [pathlib2](https://github.com/mcmtroffaes/pathlib2) | 2.3.5 | Fork of pathlib aiming to support the full stdlib Python API / MIT |
| [patsy](https://github.com/pydata/patsy) | 0.5.1 | Describing statistical models in Python using symbolic formulas / BSD-2-Clause, PSF2 |
| [pcre](http://www.pcre.org/) | 8.43 | Regular expression pattern matching using the same syntax and semantics as Perl 5. / BSD 3-Clause |
| [pep8](http://pep8.readthedocs.org/) | 1.7.1 | Python style guide checker / MIT |
| [pexpect](http://pexpect.sourceforge.net/) | 4.8.0 | Pexpect makes Python a better tool for controlling other applications. / ISC |
| [pickleshare](https://github.com/pickleshare/pickleshare/) | 0.7.5 | Tiny ‘shelve’-like database with concurrency support / MIT |
| [pillow](https://pillow.readthedocs.io) | 7.0.0 | Pillow is the friendly PIL fork by Alex Clark and Contributors / LicenseRef-PIL |
| [pip](https://pip.pypa.io/en/stable/) | 20.0.2 | PyPA recommended tool for installing Python packages / MIT |
| [pixman](http://www.pixman.org/) | 0.34.0 | A low-level software library for pixel manipulation. / MIT |
| [pkginfo](https://code.launchpad.net/~tseaver/pkginfo/trunk) | 1.5.0.1 | Query metadatdata from sdists / bdists / installed packages. / MIT |
| [pluggy](https://github.com/pytest-dev/pluggy) | 0.13.1 | Plugin registration and hook calling for Python / MIT |
| [ply](http://www.dabeaz.com/ply/index.html) | 3.11 | Python Lex-Yacc / BSD 3-clause |
| [prometheus\_client](https://github.com/prometheus/client_python) | 0.7.1 | Python client for the Prometheus monitoring system / Apache-2.0 |
| [prompt-toolkit](https://github.com/jonathanslenders/python-prompt-toolkit) | 3.0.5 | Library for building powerful interactive command lines in Python / BSD-3-Clause |
| [prompt\_toolkit](https://github.com/jonathanslenders/python-prompt-toolkit) | 3.0.3 | Library for building powerful interactive command lines in Python / BSD-3-Clause |
| [psutil](https://github.com/giampaolo/psutil) | 5.6.7 | A cross-platform process and system utilities module for Python / BSD 3-Clause |
| [ptyprocess](https://github.com/pexpect/ptyprocess) | 0.6.0 | Run a subprocess in a pseudo terminal / ISC |
| [py](https://github.com/pytest-dev/py) | 1.8.1 | library with cross-python path, ini-parsing, io, code, log facilities / MIT |
| [py-lief](https://lief.quarkslab.com/) | 0.10.1 | A cross platform library to parse, modify and abstract ELF, PE and MachO formats. / Apache-2.0 |
| [pycodestyle](https://pycodestyle.readthedocs.io/) | 2.5.0 | Python style guide checker / MIT |
| [pycosat](https://github.com/ContinuumIO/pycosat) | 0.6.3 | Bindings to picosat (a SAT solver) / MIT |
| [pycparser](https://github.com/eliben/pycparser) | 2.19 | Complete C99 parser in pure Python / BSD 3-clause |
| [pycrypto](http://www.pycrypto.org/) | 2.6.1 | Cryptographic modules for Python. / Public Domain |
| [pycurl](http://pycurl.sourceforge.net/) | 7.43.0.5 | A Python Interface To The cURL library / LGPL, MIT |
| [pyflakes](https://github.com/PyCQA/pyflakes) | 2.1.1 | Pyflakes analyzes programs and detects various errors. / MIT |
| [pygments](http://pygments.org/) | 2.5.2 | Pygments is a generic syntax highlighter suitable for use in code hosting, forums, wikis or other applications that need to prettify source code. / BSD-2-clause |
| [pylint](http://www.pylint.org/) | 2.4.4 | python code static checker / GPL-2.0-only |
| [pyodbc](https://github.com/mkleehammer/pyodbc) | 4.0.30 | DB API Module for ODBC / MIT |
| [pyopenssl](https://github.com/pyca/pyopenssl) | 19.1.0 | Python wrapper module around the OpenSSL library / Apache 2.0 |
| [pyparsing](http://pyparsing.wikispaces.com/) | 2.4.6 | Create and execute simple grammars / MIT |
| [pyrsistent](http://github.com/tobgu/pyrsistent/) | 0.15.7 | Persistent/Functional/Immutable data structures / MIT |
| [pysocks](https://github.com/Anorov/PySocks) | 1.7.1 | A Python SOCKS client module. See [Anorov/PySocks](https://github.com/Anorov/PySocks) for more information. / BSD 3-Clause |
| [pytables](http://www.pytables.org) | 3.6.1 | Brings together Python, HDF5 and NumPy to easily handle large amounts of data. / BSD 3-Clause |
| [pytest](https://docs.pytest.org/en/latest/) | 5.3.5 | Simple and powerful testing with Python. / MIT |
| [python](http://www.python.org/) | 3.7.6 | General purpose programming language / PSF |
| [python-dateutil](https://dateutil.readthedocs.org/) | 2.8.1 | Extensions to the standard Python datetime module. / BSD 3 Clause |
| [python-libarchive-c](https://github.com/Changaco/python-libarchive-c) | 2.8 | Python interface to libarchive / CC0-1.0 |
| [pytz](http://pythonhosted.org/pytz/) | 2019.3 | World timezone definitions, modern and historical. / MIT |
| [pywavelets](https://github.com/PyWavelets/pywt) | 1.1.1 | Discrete Wavelet Transforms in Python / MIT |
| [pyyaml](http://pyyaml.org/wiki/PyYAML) | 5.3 | YAML parser and emitter for Python / MIT |
| [pyzmq](https://github.com/zeromq/pyzmq) | 18.1.1 | Python bindings for zeromq / BSD 3-clause |
| [readline](https://cnswww.cns.cwru.edu/php/chet/readline/rltop.html) | 7.0 | library for editing command lines as they are typed in / GPL-3.0 |
| [regex](https://bitbucket.org/mrabarnett/mrab-regex) | 2020.6.8 | Alternative regular expression module, to replace re / Python-2.0 |
| [requests](http://python-requests.org) | 2.22.0 | Requests is an elegant and simple HTTP library for Python, built with ♥. / Apache-2.0 |
| [ruamel\_yaml](https://bitbucket.org/ruamel/yaml) | 0.15.87 | A patched copy of ruamel.yaml. / MIT |
| [scikit-image](http://scikit-image.org/) | 0.16.2 | Image processing routines for SciPy. / BSD 3-Clause |
| [scikit-learn](http://scikit-learn.org/) | 0.22.1 | A set of python modules for machine learning and data mining / BSD-3-Clause |
| [scipy](http://www.scipy.org/) | 1.4.1 | Scientific Library for Python / BSD 3-Clause |
| [seaborn](https://seaborn.pydata.org) | 0.10.0 | Statistical data visualization / BSD 3-Clause |
| [send2trash](https://github.com/hsoft/send2trash) | 1.5.0 | Python library to natively send files to Trash (or Recycle bin) on all platforms. / BSD-3-Clause |
| [setuptools](https://github.com/pypa/setuptools) | 45.2.0 | Download, build, install, upgrade, and uninstall Python packages / MIT |
| [simplegeneric](http://cheeseshop.python.org/pypi/simplegeneric) | 0.8.1 | Simple generic functions (similar to Python’s own len(), pickle.dump(), etc.) / Zope Public |
| [singledispatch](http://docs.python.org/3/library/functools.html#functools.singledispatch) | 3.4.0.3 | Transforms a function into a single-dispatch generic function / MIT |
| [six](https://six.readthedocs.io/) | 1.14.0 | Python 2 and 3 compatibility utilities / MIT |
| [snappy](https://github.com/google/snappy) | 1.1.7 | A fast compressor/decompressor / BSD 3-clause |
| [snowballstemmer](https://github.com/shibukawa/snowball_py) | 2.0.0 | Snowball stemming library collection for Python / BSD-2-Clause |
| [sortedcollections](http://www.grantjenks.com/docs/sortedcollections/) | 1.1.2 | Python Sorted Collections / Apache-2.0 |
| [sortedcontainers](http://www.grantjenks.com/docs/sortedcontainers/) | 2.1.0 | Python Sorted Container Types: SortedList, SortedDict, and SortedSet / Apache-2.0 |
| [soupsieve](http://facelessuser.github.io/soupsieve) | 1.9.5 | A modern CSS selector implementation for BeautifulSoup / MIT |
| [sphinx](http://www.sphinx-doc.org) | 2.4.0 | Sphinx is a tool that makes it easy to create intelligent and beautiful documentation / BSD-2-Clause |
| sphinxcontrib | 1.0 | Python namespace for sphinxcontrib / BSD |
| [sphinxcontrib-applehelp](https://www.sphinx-doc.org/en/master/) | 1.0.1 | sphinxcontrib-applehelp is a sphinx extension which outputs Apple help books / BSD-2-Clause |
| [sphinxcontrib-devhelp](https://www.sphinx-doc.org/en/master/) | 1.0.1 | sphinxcontrib-devhelp is a sphinx extension which outputs Devhelp document / BSD-2-Clause |
| [sphinxcontrib-htmlhelp](https://www.sphinx-doc.org/en/master/) | 1.0.2 | sphinxcontrib-htmlhelp is a sphinx extension which … / BSD-2-Clause |
| [sphinxcontrib-jsmath](https://www.sphinx-doc.org/en/master/) | 1.0.1 | A sphinx extension which renders display math in HTML via JavaScript / BSD-2-Clause |
| [sphinxcontrib-qthelp](https://www.sphinx-doc.org/en/master/) | 1.0.2 | sphinxcontrib-qthelp is a sphinx extension which outputs QtHelp document / BSD-2-Clause |
| [sphinxcontrib-serializinghtml](https://www.sphinx-doc.org/en/master/) | 1.1.3 | sphinxcontrib-serializinghtml is a sphinx extension which outputs “serialized” HTML files (json and pickle). / BSD-2-Clause |
| [sphinxcontrib-websupport](https://pypi.python.org/pypi/sphinxcontrib-websupport) | 1.2.0 | Sphinx API for Web Apps / BSD-2-Clause |
| [sqlalchemy](http://www.sqlalchemy.org/) | 1.3.13 | Database Abstraction Library. / MIT |
| [sqlite](http://www.sqlite.org/) | 3.31.1 | Implements a self-contained, zero-configuration, SQL database engine / Public-Domain (`<http://www.sqlite.org/copyright.html>`) |
| [statsmodels](https://www.statsmodels.org) | 0.11.0 | Statistical computations and models for use with SciPy / BSD-3-Clause |
| [sympy](https://sympy.org) | 1.5.1 | Python library for symbolic mathematics / BSD-3-Clause |
| [tblib](https://github.com/ionelmc/python-tblib) | 1.6.0 | Traceback serialization library. / BSD 2-Clause |
| [terminado](https://github.com/jupyter/terminado) | 0.8.3 | Terminals served by tornado websockets / BSD-2-Clause |
| [testpath](https://testpath.readthedocs.io) | 0.4.4 | Testpath is a collection of utilities for Python code working with files and commands. / BSD-3-Clause |
| [threadpoolctl](https://github.com/joblib/threadpoolctl) | 2.1.0 | Python helpers to control the threadpools of native libraries / BSD 3-Clause |
| [tk](http://www.tcl.tk/) | 8.6.8 | A dynamic programming language with GUI support. Bundles Tcl and Tk. / Tcl/Tk |
| [toml](https://github.com/uiri/toml) | 0.10.1 | Python lib for TOML. / MIT |
| [toolz](http://toolz.readthedocs.org/) | 0.10.0 | A functional standard library for Python / BSD 3-Clause |
| [tornado](http://www.tornadoweb.org/) | 6.0.3 | A Python web framework and asynchronous networking library, originally developed at FriendFeed. / Apache-2.0 |
| [tqdm](https://pypi.python.org/pypi/tqdm) | 4.42.1 | A Fast, Extensible Progress Meter / MPLv2.0, MIT |
| [traitlets](http://ipython.org/) | 4.3.3 | Configuration system for Python applications / BSD-3-Clause |
| [typed-ast](https://github.com/python/typed_ast) | 1.4.1 | a fork of Python 2 and 3 ast modules with type comment support / Apache 2.0 |
| [typing\_extensions](https://github.com/python/typing/tree/master/typing_extensions) | 3.7.4.2 | Backported and Experimental Type Hints for Python / PSF-2.0 |
| [unicodecsv](https://github.com/jdunck/python-unicodecsv) | 0.14.1 | Drop-in replacement for csv module which supports unicode strings / BSD |
| [unixodbc](http://www.unixodbc.org/) | 2.3.7 | ODBC on non MS Windows platforms / LGPL-2.1 |
| [urllib3](https://urllib3.readthedocs.io/) | 1.25.8 | HTTP library with thread-safe connection pooling, file post, and more. / MIT |
| [wcwidth](https://github.com/jquast/wcwidth) | 0.1.8 | Measures number of Terminal column cells of wide-character codes. / MIT |
| [webencodings](https://github.com/gsnedders/python-webencodings) | 0.5.1 | Character encoding aliases for legacy web content / BSD 3-Clause |
| [werkzeug](https://palletsprojects.com/p/werkzeug/) | 1.0.0 | The comprehensive WSGI web application library. / BSD 3-Clause |
| [wheel](https://github.com/pypa/wheel) | 0.34.2 | A built-package format for Python. / MIT |
| [widgetsnbextension](http://ipython.org) | 3.5.1 | Interactive Widgets for Jupyter / BSD 3-clause |
| [wrapt](https://github.com/GrahamDumpleton/wrapt) | 1.11.2 | Module for decorators, wrappers and monkey patching / BSD 2-Clause |
| [xlrd](http://www.python-excel.org/) | 1.2.0 | Library for developers to extract data from Microsoft Excel (tm) spreadsheet files / BSD 3-Clause and BSD with advertising |
| [xlsxwriter](https://xlsxwriter.readthedocs.io/) | 1.2.7 | A Python module for creating Excel XLSX files / BSD-2-Clause |
| [xlwt](http://www.python-excel.org/) | 1.3.0 | Writing data and formatting information to Excel files / BSD |
| [xz](http://tukaani.org/xz/) | 5.2.4 | Data compression software with high compression ratio / LGPL-2.1 and GPL-2.0 |
| [yaml](http://pyyaml.org/wiki/LibYAML) | 0.1.7 | A C library for parsing and emitting YAML / MIT |
| [zeromq](http://zeromq.org) | 4.2.5 | A high-performance asynchronous messaging library. / LGPL 3 |
| [zict](http://github.com/mrocklin/zict) | 1.0.0 | Composable Dictionary Classes / BSD 3-Clause |
| [zipp](https://github.com/jaraco/zipp) | 2.2.0 | A pathlib-compatible Zipfile object wrapper / MIT |
| [zlib](http://zlib.net/) | 1.2.11 | Massively spiffy yet delicately unobtrusive compression library / zlib |
| zope | 1.0 | web application server / BSD |
| [zope.event](http://www.zope.org/en/latest/) | 4.4 | Very basic event publishing system / Zope Public License |
| [zope.interface](http://docs.zope.org/zope.interface/) | 4.7.1 | Interfaces for Python / ZPL 2.1 |
| [zstd](http://www.zstd.net) | 1.3.7 | Zstandard - Fast real-time compression algorithm / BSD 3-Clause |
| Name | Version | Summary / License |
|---|---|---|
| [\_ipyw\_jlab\_nb\_ext\_conf](https://github.com/ContinuumIO/anaconda-nb-extensions-meta-config) | 0.1.0 | A configuration metapackage for enabling Anaconda-bundled jupyter extensions / BSD |
| \_libgcc\_mutex | 0.1 | Mutex for libgcc and libgcc-ng / None |
| [alabaster](http://www.sphinx-doc.org/en/stable/index.html) | 0.7.12 | Configurable, Python 2+3 compatible Sphinx theme. / BSD 3-Clause |
| [anaconda-client](http://anaconda.org) | 1.7.2 | anaconda.org command line client library / BSD 3-clause |
| [anaconda-project](https://github.com/Anaconda-Platform/anaconda-project) | 0.8.4 | Tool for encapsulating, running, and reproducing data science projects / BSD 3-Clause |
| [argh](https://github.com/neithere/argh) | 0.26.2 | The Natural CLI. / LGPL 3 |
| [asn1crypto](https://github.com/wbond/asn1crypto) | 1.3.0 | Python ASN.1 library with a focus on performance and a pythonic API / MIT |
| [astroid](https://www.astroid.org/) | 2.3.3 | A abstract syntax tree for Python with inference support. / LGPL-2.1-only |
| [astropy](http://www.astropy.org/) | 4.0 | Community-developed Python Library for Astronomy / BSD-3-Clause |
| [atomicwrites](https://github.com/untitaker/python-atomicwrites) | 1.3.0 | Atomic file writes / MIT |
| [attrs](https://attrs.readthedocs.io/en/stable/) | 19.3.0 | attrs is the Python package that will bring back the joy of writing classes by relieving you from the drudgery of implementing object protocols (aka dunder methods). / MIT |
| [autopep8](https://github.com/hhatto/autopep8) | 1.4.4 | A tool that automatically formats Python code to conform to the PEP 8 style guide / MIT |
| [babel](http://babel.pocoo.org/) | 2.8.0 | Utilities to internationalize and localize Python applications / BSD 3-clause |
| [backcall](https://github.com/takluyver/backcall/) | 0.1.0 | Specifications for callback functions passed in to an API / BSD-3-Clause |
| [backports](https://bitbucket.org/brandon/backports) | 1.0 | None / BSD |
| [backports.shutil\_get\_terminal\_size](https://github.com/chrippa/backports.shutil_get_terminal_size) | 1.0.0 | A backport of the get\_terminal\_size function from Python 3.3’s shutil. / MIT |
| [beautifulsoup4](http://www.crummy.com/software/BeautifulSoup/) | 4.8.2 | Python library designed for screen-scraping / MIT |
| [bitarray](https://github.com/ilanschnell/bitarray) | 1.2.1 | efficient arrays of booleans – C extension / PSF |
| [bkcharts](http://github.com/bokeh/bkcharts) | 0.2 | High level chart types built on top of Bokeh / BSD 3-Clause |
| blas | 1.0 | |
| [bleach](https://github.com/mozilla/bleach) | 3.1.0 | Easy, whitelist-based HTML-sanitizing tool / Apache-2.0 |
| [blosc](https://github.com/Blosc/c-blosc) | 1.16.3 | A blocking, shuffling and loss-less compression library that can be faster than memcpy() / BSD-3-Clause |
| [bokeh](http://bokeh.pydata.org/) | 1.4.0 | Statistical and novel interactive HTML plots for Python / BSD-3-Clause |
| [boto](https://github.com/boto/boto/) | 2.49.0 | Amazon Web Services Library / MIT |
| [bottleneck](https://github.com/pydata/bottleneck) | 1.3.2 | Fast NumPy array functions written in Cython. / BSD 2-Clause |
| [brotlipy](https://github.com/python-hyper/brotlipy) | 0.7.0 | Python bindings to the Brotli compression library / MIT |
| [bzip2](http://www.bzip.org/) | 1.0.8 | high-quality data compressor / bzip2 |
| [ca-certificates](https://github.com/conda-forge/ca-certificates-feedstock) | 2020.1.1 | Certificates for use with other packages. / MPL 2.0 |
| [cairo](http://cairographics.org/) | 1.14.12 | Cairo is a 2D graphics library with support for multiple output devices. / LGPL 2.1 or MPL 1.1 |
| [certifi](http://certifi.io/) | 2019.11.28 | Python package for providing Mozilla’s CA Bundle. / ISC |
| [cffi](https://bitbucket.org/cffi/cffi) | 1.14.0 | Foreign Function Interface for Python calling C code. / MIT |
| [chardet](https://github.com/chardet/chardet) | 3.0.4 | Universal character encoding detector / LGPL2 |
| [click](https://palletsprojects.com/p/click) | 7.0 | Python composable command line interface toolkit / BSD-3-Clause |
| [cloudpickle](https://github.com/cloudpipe/cloudpickle) | 1.3.0 | Extended pickling support for Python objects / BSD 3-Clause |
| [clyent](https://github.com/Anaconda-Platform/clyent) | 1.2.2 | Command line client library for windows and posix / BSD 3-Clause |
| [colorama](https://github.com/tartley/colorama) | 0.4.3 | Cross-platform colored terminal text / BSD-3-Clause |
| [conda](https://conda.io) | 4.8.3 | OS-agnostic, system-level binary package and environment manager. / BSD 3-Clause |
| [conda-build](https://github.com/conda/conda-build) | 3.18.11 | tools for building conda packages / BSD 3-Clause |
| [conda-env](https://github.com/conda/conda-env) | 2.6.0 | Tools for interacting with conda environments. / BSD 3-Clause |
| [conda-verify](https://github.com/conda/conda-verify) | 3.4.2 | tool for validating conda recipes and conda packages / BSD 3-Clause |
| [contextlib2](http://contextlib2.readthedocs.org) | 0.6.0.post1 | Backports and enhancements for the contextlib module / PSF 2 |
| [cryptography](https://github.com/pyca/cryptography) | 2.8 | Provides cryptographic recipes and primitives to Python developers / Apache-2.0 AND BSD-3-Clause AND PSF-2.0 |
| [curl](http://curl.haxx.se/) | 7.68.0 | tool and library for transferring data with URL syntax / MIT/X derivate (`<http://curl.haxx.se/docs/copyright.html>`) |
| [cycler](http://matplotlib.org/cycler) | 0.10.0 | Composable style cycles. / BSD 3-Clause |
| [cython](http://www.cython.org/) | 0.29.15 | The Cython compiler for writing C extensions for the Python language / Apache-2.0 |
| [cytoolz](https://github.com/pytoolz/cytoolz) | 0.10.1 | Cython implementation of Toolz. High performance functional utilities / BSD-3-Clause |
| [dask](https://dask.org/) | 2.11.0 | Parallel PyData with Task Scheduling / BSD-3-Clause |
| [dask-core](http://github.com/dask/dask/) | 2.11.0 | Parallel Python with task scheduling / BSD-3-Clause |
| [dbus](http://www.freedesktop.org/wiki/Software/dbus/) | 1.13.12 | Simple message bus system for applications to talk to one another / GPL2 |
| [decorator](https://github.com/micheles/decorator) | 4.4.1 | Better living through Python with decorators. / BSD-3-Clause |
| [defusedxml](https://bitbucket.org/tiran/defusedxml) | 0.6.0 | XML bomb protection for Python stdlib modules / PSF 2.0 |
| [diff-match-patch](http://code.google.com/p/google-diff-match-patch/) | 20181111 | Diff Match Patch is a high-performance library in multiple languages that manipulates plain text / Apache-2.0 |
| [distributed](http://distributed.readthedocs.io/en/latest/) | 2.11.0 | Distributed computing with Dask / BSD-3-Clause |
| [docutils](http://docutils.sourceforge.net/) | 0.16 | Docutils – Python Documentation Utilities / Public Domain Dedictation and BSD 2-Clause and PSF 2.1.1 and GPL 3.0 |
| [entrypoints](https://github.com/takluyver/entrypoints) | 0.3 | Discover and load entry points from installed packages. / MIT License |
| [et\_xmlfile](https://bitbucket.org/openpyxl/et_xmlfile) | 1.0.1 | An implementation of lxml.xmlfile for the standard library / MIT |
| [expat](http://expat.sourceforge.net/) | 2.2.6 | Expat XML parser library in C / MIT |
| [fastcache](https://github.com/pbrady/fastcache) | 1.1.0 | C implementation of Python 3 lru\_cache / MIT |
| [filelock](https://github.com/benediktschmitt/py-filelock) | 3.0.12 | A platform independent file lock. / Public Domain |
| [flake8](http://flake8.pycqa.org/) | 3.7.9 | Your Tool For Style Guide Enforcement / MIT |
| [flask](http://flask.pocoo.org) | 1.1.1 | A microframework based on Werkzeug, Jinja2 and good intentions. / BSD 3-Clause |
| [fontconfig](http://www.freedesktop.org/wiki/Software/fontconfig/) | 2.13.0 | A library for configuring and customizing font access. / MIT |
| [freetype](https://www.freetype.org/) | 2.9.1 | A Free, High-Quality, and Portable Font Engine / GPL-2.0-only and LicenseRef-FreeType |
| [fribidi](https://github.com/fribidi/fribidi) | 1.0.5 | The Free Implementation of the Unicode Bidirectional Algorithm. / LGPL-2.1 |
| [fsspec](https://github.com/martindurant/filesystem_spec) | 0.6.2 | A specification for pythonic filesystems / BSD-3-Clause |
| [future](http://python-future.org) | 0.18.2 | Clean single-source support for Python 3 and 2 / MIT |
| [get\_terminal\_size](https://github.com/chrippa/backports.shutil_get_terminal_size) | 1.0.0 | Get the size of the terminal window. / MIT |
| [gevent](https://www.gevent.org) | 1.4.0 | Coroutine-based network library / MIT |
| [glib](https://developer.gnome.org/glib/) | 2.63.1 | Provides core application building blocks for libraries and applications written in C. / LGPL-2.1 |
| [glob2](https://github.com/miracle2k/python-glob2) | 0.7 | Version of the glob module that supports recursion via \*\*, and can capture patterns. / BSD-2-Clause |
| [gmp](http://gmplib.org/) | 6.1.2 | The GNU multiprecision library. / GPL 2 and LGPL 3 |
| [gmpy2](https://pypi.python.org/pypi/gmpy2) | 2.0.8 | GMP/MPIR, MPFR, and MPC interface to Python 2.6+ and 3.x / LGPL 3 |
| [graphite2](http://graphite.sil.org/) | 1.3.13 | A “smart font” system that handles the complexities of lesser-known languages of the world. / LGPLv2 |
| [greenlet](https://github.com/python-greenlet/greenlet) | 0.4.15 | Lightweight in-process concurrent programming / MIT |
| [gst-plugins-base](http://gstreamer.freedesktop.org/) | 1.14.0 | GStreamer Base Plug-ins / GPL2 |
| [gstreamer](http://gstreamer.freedesktop.org/) | 1.14.0 | Library for constructing graphs of media-handling components / LGPL 2 |
| [h5py](http://www.h5py.org/) | 2.10.0 | Read and write HDF5 files from Python. / BSD-3-Clause |
| [harfbuzz](http://www.freedesktop.org/wiki/Software/HarfBuzz/) | 1.8.8 | An OpenType text shaping engine. / MIT |
| [hdf5](http://www.hdfgroup.org/HDF5/) | 1.10.4 | HDF5 is a data model, library, and file format for storing and managing data / HDF5 |
| [heapdict](http://stutzbachenterprises.com/) | 1.0.1 | A heap with decrease-key and increase-key operations / BSD 3-Clause |
| [html5lib](https://github.com/html5lib/html5lib-python) | 1.0.1 | HTML parser based on the WHATWG HTML specification / MIT |
| [icu](http://site.icu-project.org/) | 58.2 | International Components for Unicode. / MIT |
| [idna](https://github.com/kjd/idna) | 2.8 | Internationalized Domain Names in Applications (IDNA). / BSD Like |
| [imageio](https://imageio.github.io) | 2.6.1 | A Python library for reading and writing image data / BSD-2-Clause |
| [imagesize](https://github.com/shibukawa/imagesize_py) | 1.2.0 | Getting image size from png/jpeg/jpeg2000/gif file / MIT |
| [importlib-metadata](https://gitlab.com/python-devs/importlib_metadata) | 1.7.0 | A library to access the metadata for a Python package / Apache-2.0 |
| [importlib\_metadata](https://gitlab.com/python-devs/importlib_metadata) | 1.5.0 | A library to access the metadata for a Python package / Apache-2.0 |
| [intel-openmp](https://software.intel.com/en-us/node/522690) | 2020.0 | Math library for Intel and compatible processors / proprietary - Intel |
| [intervaltree](https://github.com/chaimleib/intervaltree) | 3.0.2 | Editable interval tree data structure for Python 2 and 3 / Apache-2.0 |
| [ipykernel](https://ipython.org) | 5.1.4 | IPython Kernel for Jupyter / BSD-3-Clause |
| [ipython](https://ipython.org) | 7.12.0 | IPython: Productive Interactive Computing / BSD-3-Clause |
| [ipython\_genutils](http://ipython.org) | 0.2.0 | vestigial utilities from IPython / BSD 3-Clause |
| [ipywidgets](https://github.com/ipython/ipywidgets) | 7.5.1 | Jupyter Interactive Widgets / BSD 3-clause |
| [isort](https://github.com/timothycrosley/isort) | 4.3.21 | A Python utility / library to sort Python imports. / MIT |
| [itsdangerous](https://github.com/pallets/itsdangerous) | 1.1.0 | Various helpers to pass trusted data to untrusted environments. / BSD 3-Clause |
| [jbig](https://www.cl.cam.ac.uk/~mgk25/jbigkit) | 2.1 | Implementation of the JBIG1 data compression standard / GPL-2.0 |
| [jdcal](https://github.com/phn/jdcal) | 1.4.1 | Julian dates from proleptic Gregorian and Julian calendars. / BSD 2-Clause |
| [jedi](https://github.com/davidhalter/jedi/) | 0.14.1 | An autocompletion tool for Python that can be used for text editors. / MIT |
| [jeepney](https://gitlab.com/takluyver/jeepney) | 0.4.2 | Pure Python DBus interface / MIT |
| [jinja2](http://jinja.pocoo.org) | 2.11.1 | An easy to use stand-alone template engine written in pure python. / 3-Clause BSD |
| [joblib](https://pypi.org/project/joblib/) | 0.14.1 | Lightweight pipelining: using Python functions as pipeline jobs. / BSD-3-Clause |
| [jpeg](http://www.ijg.org/) | 9b | read/write jpeg COM, EXIF, IPTC medata / Custom free software license |
| [json5](https://github.com/dpranke/pyjson5) | 0.9.1 | A Python implementation of the JSON5 data format / Apache-2.0 |
| [jsonschema](https://github.com/Julian/jsonschema) | 3.2.0 | An implementation of JSON Schema validation for Python / MIT |
| [jupyter](http://jupyter.org) | 1.0.0 | Jupyter metapackage. Install all the Jupyter components in one go. / BSD 3-Clause |
| [jupyter\_client](https://jupyter.org) | 5.3.4 | jupyter\_client contains the reference implementation of the Jupyter protocol. / BSD-3-Clause |
| [jupyter\_console](http://jupyter.org) | 6.1.0 | Jupyter terminal console / BSD-3-Clause |
| [jupyter\_core](https://jupyter.org) | 4.6.1 | Core common functionality of Jupyter projects. / BSD-3-Clause |
| [jupyterlab](https://github.com/jupyterlab/jupyterlab) | 1.2.6 | JupyterLab PRE-ALPHA / BSD-3-Clause |
| [jupyterlab\_server](https://github.com/jupyterlab/jupyterlab_server) | 1.0.6 | A set of server components for JupyterLab and JupyterLab like applications. / BSD-3-Clause |
| [keyring](https://github.com/jaraco/keyring) | 21.1.0 | Store and access your passwords safely / Python Software Foundation or MIT |
| [kiwisolver](https://github.com/nucleic/kiwi) | 1.1.0 | An efficient C++ implementation of the Cassowary constraint solver / BSD-3-Clause |
| [krb5](http://web.mit.edu/kerberos/) | 1.17.1 | A network authentication protocol. / MIT |
| [lazy-object-proxy](https://github.com/ionelmc/python-lazy-object-proxy) | 1.4.3 | A fast and thorough lazy object proxy / BSD-2-Clause |
| [lcms2](http://www.littlecms.com/) | 2.11 | Open Source Color Management Engine / MIT |
| [ld\_impl\_linux-64](https://www.gnu.org/software/binutils/) | 2.33.1 | A set of programming tools for creating and managing binary programs, object files, libraries, profile data, and assembly source code. / GPL 3 |
| [libarchive](http://www.libarchive.org/) | 3.3.3 | Multi-format archive and compression library / BSD-2-Clause |
| [libcurl](http://curl.haxx.se/) | 7.68.0 | tool and library for transferring data with URL syntax / MIT/X derivate (`<http://curl.haxx.se/docs/copyright.html>`) |
| [libedit](http://thrysoee.dk/editline/) | 3.1.20181209 | Editline Library (libedit) / BSD-2-Clause |
| [libffi](https://sourceware.org/libffi/) | 3.2.1 | A Portable Foreign Function Interface Library. / Custom |
| [libgcc-ng](https://gcc.gnu.org/onlinedocs/gccint/Libgcc.html) | 9.1.0 | The GCC low-level runtime library / GPL |
| [libgfortran-ng](https://gcc.gnu.org/) | 7.3.0 | The GNU Fortran Runtime Library / GPL |
| [liblief](https://lief.quarkslab.com/) | 0.9.0 | A cross platform library to parse, modify and abstract ELF, PE and MachO formats. / Apache-2.0 |
| [libllvm9](http://llvm.org/) | 9.0.1 | Development headers and libraries for LLVM / LLVM-Exception |
| [libpng](http://www.libpng.org/pub/png/libpng.html) | 1.6.37 | PNG reference library / zlib/libpng |
| [libsodium](http://libsodium.org) | 1.0.16 | A modern and easy-to-use crypto library. / ISC |
| [libspatialindex](http://libspatialindex.github.io) | 1.9.3 | Extensible framework for robust spatial indexing / MIT |
| [libssh2](https://www.libssh2.org/) | 1.8.2 | the SSH library / BSD-3-Clause |
| [libstdcxx-ng](https://gcc.gnu.org/) | 9.1.0 | The GNU C++ Runtime Library / GPL3 with runtime exception |
| [libtiff](http://www.libtiff.org/) | 4.1.0 | Support for the Tag Image File Format (TIFF). / HPND |
| [libtool](http://www.gnu.org/software/libtool/) | 2.4.6 | The GNU Portable Library Tool / GPL 3 |
| [libuuid](http://sourceforge.net/projects/libuuid/) | 1.0.3 | Portable uuid C library. / BSD 3-Clause |
| [libxcb](http://xcb.freedesktop.org/) | 1.13 | This is the C-language Binding (XCB) package to the X Window System protocol / MIT |
| [libxml2](http://xmlsoft.org/) | 2.9.9 | The XML C parser and toolkit of Gnome / MIT |
| [libxslt](http://xmlsoft.org/XSLT/) | 1.1.33 | The XSLT C library developed for the GNOME project / MIT |
| [llvmlite](https://github.com/numba/llvmlite) | 0.31.0 | A lightweight LLVM python binding for writing JIT compilers / New BSD License |
| [locket](https://github.com/mwilliamson/locket.py) | 0.2.0 | File-based locks for Python for Linux and Windows / BSD 2-Clause |
| [lxml](http://lxml.de/) | 4.5.0 | Pythonic binding for the C libraries libxml2 and libxslt. / BSD-3-Clause and GPL-2.0-only and ZPL-2.0 and LicenseRef-ElementTree |
| [lz4-c](https://www.lz4.org) | 1.8.1.2 | Extremely Fast Compression algorithm / BSD-2-Clause |
| [lzo](http://www.oberhumer.com/opensource/lzo/) | 2.10 | LZO is a portable lossless data compression library written in ANSI C. / GPL v2+ |
| [markupsafe](https://www.palletsprojects.com/p/markupsafe) | 1.1.1 | A Python module that implements the jinja2.Markup string / BSD-3-Clause |
| [matplotlib](http://matplotlib.org/) | 3.1.3 | Publication quality figures in Python / PSF-based |
| [matplotlib-base](http://matplotlib.org/) | 3.1.3 | Publication quality figures in Python / PSF-based |
| [mccabe](https://github.com/PyCQA/mccabe) | 0.6.1 | McCabe complexity checker for Python / MIT |
| [mistune](https://github.com/lepture/mistune) | 0.8.4 | The fastest markdown parser in pure Python. / BSD 3-Clause |
| [mkl](https://software.intel.com/en-us/mkl) | 2020.0 | Math library for Intel and compatible processors / proprietary - Intel |
| [mkl-service](https://github.com/ContinuumIO/mkl-service) | 2.3.0 | Python bindings to MKL service functions / 3-clause BSD |
| [mkl\_fft](http://github.com/IntelPython/mkl_fft) | 1.0.15 | NumPy-based implementation of Fast Fourier Transform using Intel (R) Math Kernel Library. / BSD 3-Clause |
| [mkl\_random](http://github.com/IntelPython/mkl_random) | 1.1.0 | Intel (R) MKL-powered package for sampling from common probability distributions into NumPy arrays. / BSD 3-Clause |
| [mock](https://github.com/testing-cabal/mock) | 4.0.1 | A library for testing in Python / BSD-2-Clause |
| [more-itertools](https://github.com/more-itertools/more-itertools) | 8.2.0 | More routines for operating on iterables, beyond itertools / MIT |
| [mpc](http://www.multiprecision.org/) | 1.1.0 | A C library for the arithmetic of complex numbers with arbitrarily high precision. / LGPL 3 |
| [mpfr](http://www.mpfr.org/) | 4.0.1 | The MPFR library is a C library for multiple-precision floating-point computations with correct rounding. / LGPL-3.0-only |
| [mpmath](http://mpmath.org) | 1.1.0 | Python library for arbitrary-precision floating-point arithmetic / BSD 3-Clause |
| [msgpack-python](http://msgpack.org/) | 0.6.1 | MessagePack (de)serializer / Apache-2.0 |
| [multipledispatch](https://github.com/mrocklin/multipledispatch/) | 0.6.0 | Multiple dispatch in Python / BSD 3-Clause |
| [nbconvert](http://jupyter.org) | 5.6.1 | Converting Jupyter Notebooks / BSD-3-Clause |
| [nbformat](http://jupyter.org) | 5.0.4 | The reference implementation of the Jupyter Notebook format / BSD-3-Clause |
| [ncurses](http://www.gnu.org/software/ncurses/) | 6.2 | Library for text-based user interfaces / Free software (MIT-like) |
| [networkx](https://networkx.github.io/) | 2.4 | Python package for creating and manipulating complex networks / BSD-3-Clause |
| [nltk](http://nltk.org/) | 3.4.5 | Natural Language Toolkit / Apache 2.0 |
| [nose](http://readthedocs.org/docs/nose/) | 1.3.7 | Nose extends unittest to make testing easier / LGPL-2.1 |
| [notebook](https://jupyter.org) | 6.0.3 | Jupyter Notebook / BSD-3-Clause |
| [numba](http://numba.github.com) | 0.48.0 | NumPy aware dynamic Python compiler using LLVM / BSD 2-clause |
| [numexpr](https://github.com/pydata/numexpr) | 2.7.1 | Fast numerical expression evaluator for NumPy. / MIT |
| [numpy](http://numpy.scipy.org/) | 1.18.1 | Array processing for numbers, strings, records, and objects. / BSD 3-Clause |
| [numpy-base](http://numpy.scipy.org/) | 1.18.1 | Array processing for numbers, strings, records, and objects. / BSD 3-Clause |
| [numpydoc](https://github.com/numpy/numpydoc) | 0.9.2 | Numpy’s Sphinx extensions / BSD 3-Clause |
| [olefile](http://www.decalage.info/python/olefileio) | 0.46 | parse, read and write Microsoft OLE2 files / BSD 2-Clause |
| [openpyxl](https://openpyxl.readthedocs.io) | 3.0.3 | A Python library to read/write Excel 2010 xlsx/xlsm files / MIT |
| [openssl](http://www.openssl.org/) | 1.1.1d | OpenSSL is an open-source implementation of the SSL and TLS protocols / OpenSSL |
| [packaging](https://github.com/pypa/packaging) | 20.1 | Core utilities for Python packages / Apache 2.0 or BSD 2-Clause |
| [pandas](http://pandas.pydata.org) | 1.0.1 | High-performance, easy-to-use data structures and data analysis tools. / BSD-3-Clause |
| [pandoc](http://pandoc.org/) | 2.2.3.2 | Universal markup converter (repackaged binaries) / GPL-2.0 |
| [pandocfilters](https://github.com/jgm/pandocfilters) | 1.4.2 | A python module for writing pandoc filters / BSD-3-Clause |
| [pango](http://www.pango.org/) | 1.42.4 | Text layout and rendering engine. / LGPL-2.1 |
| [parso](https://github.com/davidhalter/parso) | 0.5.2 | A Python Parser / MIT |
| [partd](https://github.com/dask/partd) | 1.1.0 | Data structure for on-disk shuffle operations / BSD 3-Clause |
| [patchelf](http://nixos.org/patchelf.html) | 0.10 | A small utility to modify the dynamic linker and RPATH of ELF executables. / GPL-3.0-or-later |
| [path](https://github.com/jaraco/path) | 13.1.0 | A module wrapper for os.path / MIT |
| [path.py](https://github.com/jaraco/path.py) | 12.4.0 | A module wrapper for os.path / MIT |
| [pathlib2](https://github.com/mcmtroffaes/pathlib2) | 2.3.5 | Fork of pathlib aiming to support the full stdlib Python API / MIT |
| [pathtools](https://github.com/gorakhargosh/pathtools) | 0.1.2 | Path utilities for Python. / MIT |
| [patsy](https://github.com/pydata/patsy) | 0.5.1 | Describing statistical models in Python using symbolic formulas / BSD-2-Clause, PSF2 |
| [pcre](http://www.pcre.org/) | 8.43 | Regular expression pattern matching using the same syntax and semantics as Perl 5. / BSD 3-Clause |
| [pep8](http://pep8.readthedocs.org/) | 1.7.1 | Python style guide checker / MIT |
| [pexpect](http://pexpect.sourceforge.net/) | 4.8.0 | Pexpect makes Python a better tool for controlling other applications. / ISC |
| [pickleshare](https://github.com/pickleshare/pickleshare/) | 0.7.5 | Tiny ‘shelve’-like database with concurrency support / MIT |
| [pillow](https://pillow.readthedocs.io) | 7.0.0 | Pillow is the friendly PIL fork by Alex Clark and Contributors / LicenseRef-PIL |
| [pip](https://pip.pypa.io/en/stable/) | 20.0.2 | PyPA recommended tool for installing Python packages / MIT |
| [pixman](http://www.pixman.org/) | 0.38.0 | A low-level software library for pixel manipulation. / MIT |
| [pkginfo](https://code.launchpad.net/~tseaver/pkginfo/trunk) | 1.5.0.1 | Query metadatdata from sdists / bdists / installed packages. / MIT |
| [pluggy](https://github.com/pytest-dev/pluggy) | 0.13.1 | Plugin registration and hook calling for Python / MIT |
| [ply](http://www.dabeaz.com/ply/index.html) | 3.11 | Python Lex-Yacc / BSD 3-clause |
| [prometheus\_client](https://github.com/prometheus/client_python) | 0.7.1 | Python client for the Prometheus monitoring system / Apache-2.0 |
| [prompt-toolkit](https://github.com/jonathanslenders/python-prompt-toolkit) | 3.0.5 | Library for building powerful interactive command lines in Python / BSD-3-Clause |
| [prompt\_toolkit](https://github.com/jonathanslenders/python-prompt-toolkit) | 3.0.3 | Library for building powerful interactive command lines in Python / BSD-3-Clause |
| [psutil](https://github.com/giampaolo/psutil) | 5.6.7 | A cross-platform process and system utilities module for Python / BSD 3-Clause |
| [ptyprocess](https://github.com/pexpect/ptyprocess) | 0.6.0 | Run a subprocess in a pseudo terminal / ISC |
| [py](https://github.com/pytest-dev/py) | 1.8.1 | library with cross-python path, ini-parsing, io, code, log facilities / MIT |
| [py-lief](https://lief.quarkslab.com/) | 0.9.0 | A cross platform library to parse, modify and abstract ELF, PE and MachO formats. / Apache-2.0 |
| [pycodestyle](https://pycodestyle.readthedocs.io/) | 2.5.0 | Python style guide checker / MIT |
| [pycosat](https://github.com/ContinuumIO/pycosat) | 0.6.3 | Bindings to picosat (a SAT solver) / MIT |
| [pycparser](https://github.com/eliben/pycparser) | 2.19 | Complete C99 parser in pure Python / BSD 3-clause |
| [pycrypto](http://www.pycrypto.org/) | 2.6.1 | Cryptographic modules for Python. / Public Domain |
| [pycurl](http://pycurl.sourceforge.net/) | 7.43.0.5 | A Python Interface To The cURL library / LGPL, MIT |
| [pydocstyle](https://github.com/PyCQA/pydocstyle) | 4.0.1 | Python docstring style checker (formerly pep257) / MIT |
| [pyflakes](https://github.com/PyCQA/pyflakes) | 2.1.1 | Pyflakes analyzes programs and detects various errors. / MIT |
| [pygments](http://pygments.org/) | 2.5.2 | Pygments is a generic syntax highlighter suitable for use in code hosting, forums, wikis or other applications that need to prettify source code. / BSD-2-clause |
| [pylint](http://www.pylint.org/) | 2.4.4 | python code static checker / GPL-2.0-only |
| [pyodbc](https://github.com/mkleehammer/pyodbc) | 4.0.30 | DB API Module for ODBC / MIT |
| [pyopenssl](https://github.com/pyca/pyopenssl) | 19.1.0 | Python wrapper module around the OpenSSL library / Apache 2.0 |
| [pyparsing](http://pyparsing.wikispaces.com/) | 2.4.6 | Create and execute simple grammars / MIT |
| [pyqt](http://www.riverbankcomputing.co.uk/software/pyqt) | 5.9.2 | Python binding of the cross-platform GUI toolkit Qt. / Commercial, GPL-2.0, GPL-3.0 |
| [pyrsistent](http://github.com/tobgu/pyrsistent/) | 0.15.7 | Persistent/Functional/Immutable data structures / MIT |
| [pysocks](https://github.com/Anorov/PySocks) | 1.7.1 | A Python SOCKS client module. See [Anorov/PySocks](https://github.com/Anorov/PySocks) for more information. / BSD 3-Clause |
| [pytables](http://www.pytables.org) | 3.6.1 | Brings together Python, HDF5 and NumPy to easily handle large amounts of data. / BSD 3-Clause |
| [pytest](https://docs.pytest.org/en/latest/) | 5.3.5 | Simple and powerful testing with Python. / MIT |
| [python](http://www.python.org/) | 3.7.6 | General purpose programming language / PSF |
| [python-dateutil](https://dateutil.readthedocs.org/) | 2.8.1 | Extensions to the standard Python datetime module. / BSD 3 Clause |
| [python-jsonrpc-server](https://github.com/palantir/python-jsonrpc-server) | 0.3.4 | A Python 2.7 and 3.4+ server implementation of the JSON RPC 2.0 protocol. / MIT |
| [python-language-server](https://github.com/palantir/python-language-server) | 0.31.7 | An implementation of the Language Server Protocol for Python / MIT |
| [python-libarchive-c](https://github.com/Changaco/python-libarchive-c) | 2.8 | Python interface to libarchive / CC0-1.0 |
| [pytz](http://pythonhosted.org/pytz/) | 2019.3 | World timezone definitions, modern and historical. / MIT |
| [pywavelets](https://github.com/PyWavelets/pywt) | 1.1.1 | Discrete Wavelet Transforms in Python / MIT |
| [pyxdg](http://freedesktop.org/wiki/Software/pyxdg) | 0.26 | PyXDG contains implementations of freedesktop.org standards in python. / GNU Lesser General Public v2 (LGPLv2) |
| [pyyaml](http://pyyaml.org/wiki/PyYAML) | 5.3 | YAML parser and emitter for Python / MIT |
| [pyzmq](https://github.com/zeromq/pyzmq) | 18.1.1 | Python bindings for zeromq / BSD 3-clause |
| [qdarkstyle](https://github.com/ColinDuquesnoy/QDarkStyleSheet) | 2.8 | A dark stylesheet for Qt applications (Qt4, Qt5, PySide, PyQt4, PyQt5, QtPy, PyQtGraph). / MIT |
| [qt](http://qt-project.org) | 5.9.7 | Qt is a cross-platform application and UI framework. / LGPL-3.0 |
| [qtawesome](https://github.com/spyder-ide/qtawesome) | 0.6.1 | Iconic fonts in PyQt and PySide applications / MIT |
| [qtconsole](http://jupyter.org) | 4.6.0 | Jupyter Qt Console / BSD 3-Clause |
| [qtpy](https://github.com/spyder-ide/qtpy) | 1.9.0 | Abstraction layer for PyQt5/PyQt4/PySide / MIT |
| [readline](https://cnswww.cns.cwru.edu/php/chet/readline/rltop.html) | 7.0 | library for editing command lines as they are typed in / GPL-3.0 |
| [regex](https://bitbucket.org/mrabarnett/mrab-regex) | 2020.6.8 | Alternative regular expression module, to replace re / Python-2.0 |
| [requests](http://python-requests.org) | 2.22.0 | Requests is an elegant and simple HTTP library for Python, built with ♥. / Apache-2.0 |
| ripgrep | 11.0.2 | |
| [rope](https://github.com/python-rope/rope) | 0.16.0 | A python refactoring library / GPL 2.0 |
| [rtree](http://toblerity.github.com/rtree/) | 0.9.3 | R-Tree spatial index for Python GIS / MIT |
| [ruamel\_yaml](https://bitbucket.org/ruamel/yaml) | 0.15.87 | A patched copy of ruamel.yaml. / MIT |
| [scikit-image](http://scikit-image.org/) | 0.16.2 | Image processing routines for SciPy. / BSD 3-Clause |
| [scikit-learn](http://scikit-learn.org/) | 0.22.1 | A set of python modules for machine learning and data mining / BSD-3-Clause |
| [scipy](http://www.scipy.org/) | 1.4.1 | Scientific Library for Python / BSD 3-Clause |
| [seaborn](https://seaborn.pydata.org) | 0.10.0 | Statistical data visualization / BSD 3-Clause |
| [secretstorage](https://github.com/mitya57/secretstorage) | 3.1.2 | Provides a way for securely storing passwords and other secrets. / BSD-3-Clause |
| [send2trash](https://github.com/hsoft/send2trash) | 1.5.0 | Python library to natively send files to Trash (or Recycle bin) on all platforms. / BSD-3-Clause |
| [setuptools](https://github.com/pypa/setuptools) | 45.2.0 | Download, build, install, upgrade, and uninstall Python packages / MIT |
| [simplegeneric](http://cheeseshop.python.org/pypi/simplegeneric) | 0.8.1 | Simple generic functions (similar to Python’s own len(), pickle.dump(), etc.) / Zope Public |
| [singledispatch](http://docs.python.org/3/library/functools.html#functools.singledispatch) | 3.4.0.3 | Transforms a function into a single-dispatch generic function / MIT |
| [sip](http://www.riverbankcomputing.com/software/sip/intro) | 4.19.8 | Create Python bindings for C and C++ libraries / GPL-3.0 |
| [six](https://six.readthedocs.io/) | 1.14.0 | Python 2 and 3 compatibility utilities / MIT |
| [snappy](https://github.com/google/snappy) | 1.1.7 | A fast compressor/decompressor / BSD 3-clause |
| [snowballstemmer](https://github.com/shibukawa/snowball_py) | 2.0.0 | Snowball stemming library collection for Python / BSD-2-Clause |
| [sortedcollections](http://www.grantjenks.com/docs/sortedcollections/) | 1.1.2 | Python Sorted Collections / Apache-2.0 |
| [sortedcontainers](http://www.grantjenks.com/docs/sortedcontainers/) | 2.1.0 | Python Sorted Container Types: SortedList, SortedDict, and SortedSet / Apache-2.0 |
| [soupsieve](http://facelessuser.github.io/soupsieve) | 1.9.5 | A modern CSS selector implementation for BeautifulSoup / MIT |
| [sphinx](http://www.sphinx-doc.org) | 2.4.0 | Sphinx is a tool that makes it easy to create intelligent and beautiful documentation / BSD-2-Clause |
| sphinxcontrib | 1.0 | Python namespace for sphinxcontrib / BSD |
| [sphinxcontrib-applehelp](https://www.sphinx-doc.org/en/master/) | 1.0.1 | sphinxcontrib-applehelp is a sphinx extension which outputs Apple help books / BSD-2-Clause |
| [sphinxcontrib-devhelp](https://www.sphinx-doc.org/en/master/) | 1.0.1 | sphinxcontrib-devhelp is a sphinx extension which outputs Devhelp document / BSD-2-Clause |
| [sphinxcontrib-htmlhelp](https://www.sphinx-doc.org/en/master/) | 1.0.2 | sphinxcontrib-htmlhelp is a sphinx extension which … / BSD-2-Clause |
| [sphinxcontrib-jsmath](https://www.sphinx-doc.org/en/master/) | 1.0.1 | A sphinx extension which renders display math in HTML via JavaScript / BSD-2-Clause |
| [sphinxcontrib-qthelp](https://www.sphinx-doc.org/en/master/) | 1.0.2 | sphinxcontrib-qthelp is a sphinx extension which outputs QtHelp document / BSD-2-Clause |
| [sphinxcontrib-serializinghtml](https://www.sphinx-doc.org/en/master/) | 1.1.3 | sphinxcontrib-serializinghtml is a sphinx extension which outputs “serialized” HTML files (json and pickle). / BSD-2-Clause |
| [sphinxcontrib-websupport](https://pypi.python.org/pypi/sphinxcontrib-websupport) | 1.2.0 | Sphinx API for Web Apps / BSD-2-Clause |
| [spyder](https://www.spyder-ide.org/) | 4.0.1 | The Scientific Python Development Environment / MIT |
| [spyder-kernels](https://www.spyder-ide.org/) | 1.8.1 | Jupyter kernels for Spyder’s console / MIT |
| [sqlalchemy](http://www.sqlalchemy.org/) | 1.3.13 | Database Abstraction Library. / MIT |
| [sqlite](http://www.sqlite.org/) | 3.31.1 | Implements a self-contained, zero-configuration, SQL database engine / Public-Domain (`<http://www.sqlite.org/copyright.html>`) |
| [statsmodels](https://www.statsmodels.org) | 0.11.0 | Statistical computations and models for use with SciPy / BSD-3-Clause |
| [sympy](https://sympy.org) | 1.5.1 | Python library for symbolic mathematics / BSD-3-Clause |
| [tbb](http://www.threadingbuildingblocks.org) | 2020.0 | High level abstract threading library / Apache 2.0 |
| [tblib](https://github.com/ionelmc/python-tblib) | 1.6.0 | Traceback serialization library. / BSD 2-Clause |
| [terminado](https://github.com/jupyter/terminado) | 0.8.3 | Terminals served by tornado websockets / BSD-2-Clause |
| [testpath](https://testpath.readthedocs.io) | 0.4.4 | Testpath is a collection of utilities for Python code working with files and commands. / BSD-3-Clause |
| [threadpoolctl](https://github.com/joblib/threadpoolctl) | 2.1.0 | Python helpers to control the threadpools of native libraries / BSD 3-Clause |
| [tk](http://www.tcl.tk/) | 8.6.8 | A dynamic programming language with GUI support. Bundles Tcl and Tk. / Tcl/Tk |
| [toml](https://github.com/uiri/toml) | 0.10.1 | Python lib for TOML. / MIT |
| [toolz](http://toolz.readthedocs.org/) | 0.10.0 | A functional standard library for Python / BSD 3-Clause |
| [tornado](http://www.tornadoweb.org/) | 6.0.3 | A Python web framework and asynchronous networking library, originally developed at FriendFeed. / Apache-2.0 |
| [tqdm](https://pypi.python.org/pypi/tqdm) | 4.42.1 | A Fast, Extensible Progress Meter / MPLv2.0, MIT |
| [traitlets](http://ipython.org/) | 4.3.3 | Configuration system for Python applications / BSD-3-Clause |
| [typed-ast](https://github.com/python/typed_ast) | 1.4.1 | a fork of Python 2 and 3 ast modules with type comment support / Apache 2.0 |
| [typing\_extensions](https://github.com/python/typing/tree/master/typing_extensions) | 3.7.4.2 | Backported and Experimental Type Hints for Python / PSF-2.0 |
| [ujson](https://github.com/ultrajson/ultrajson) | 1.35 | Ultra fast JSON decoder and encoder written in C with Python bindings / BSD-3-Clause |
| [unicodecsv](https://github.com/jdunck/python-unicodecsv) | 0.14.1 | Drop-in replacement for csv module which supports unicode strings / BSD |
| [unixodbc](http://www.unixodbc.org/) | 2.3.7 | ODBC on non MS Windows platforms / LGPL-2.1 |
| [urllib3](https://urllib3.readthedocs.io/) | 1.25.8 | HTTP library with thread-safe connection pooling, file post, and more. / MIT |
| [watchdog](http://github.com/gorakhargosh/watchdog) | 0.10.2 | Filesystem events monitoring / Apache 2.0 |
| [wcwidth](https://github.com/jquast/wcwidth) | 0.1.8 | Measures number of Terminal column cells of wide-character codes. / MIT |
| [webencodings](https://github.com/gsnedders/python-webencodings) | 0.5.1 | Character encoding aliases for legacy web content / BSD 3-Clause |
| [werkzeug](https://palletsprojects.com/p/werkzeug/) | 1.0.0 | The comprehensive WSGI web application library. / BSD 3-Clause |
| [wheel](https://github.com/pypa/wheel) | 0.34.2 | A built-package format for Python. / MIT |
| [widgetsnbextension](http://ipython.org) | 3.5.1 | Interactive Widgets for Jupyter / BSD 3-clause |
| [wrapt](https://github.com/GrahamDumpleton/wrapt) | 1.11.2 | Module for decorators, wrappers and monkey patching / BSD 2-Clause |
| [wurlitzer](https://github.com/minrk/wurlitzer) | 2.0.0 | Capture C-level stdout/stderr in Python / MIT |
| [xlrd](http://www.python-excel.org/) | 1.2.0 | Library for developers to extract data from Microsoft Excel (tm) spreadsheet files / BSD 3-Clause and BSD with advertising |
| [xlsxwriter](https://xlsxwriter.readthedocs.io/) | 1.2.7 | A Python module for creating Excel XLSX files / BSD-2-Clause |
| [xlwt](http://www.python-excel.org/) | 1.3.0 | Writing data and formatting information to Excel files / BSD |
| [xz](http://tukaani.org/xz/) | 5.2.4 | Data compression software with high compression ratio / LGPL-2.1 and GPL-2.0 |
| [yaml](http://pyyaml.org/wiki/LibYAML) | 0.1.7 | A C library for parsing and emitting YAML / MIT |
| [yapf](https://github.com/google/yapf) | 0.28.0 | A formatter for Python files / Apache 2.0 |
| [zeromq](http://zeromq.org) | 4.3.1 | A high-performance asynchronous messaging library. / LGPL 3 |
| [zict](http://github.com/mrocklin/zict) | 1.0.0 | Composable Dictionary Classes / BSD 3-Clause |
| [zipp](https://github.com/jaraco/zipp) | 2.2.0 | A pathlib-compatible Zipfile object wrapper / MIT |
| [zlib](http://zlib.net/) | 1.2.11 | Massively spiffy yet delicately unobtrusive compression library / zlib |
| zope | 1.0 | web application server / BSD |
| [zope.event](http://www.zope.org/en/latest/) | 4.4 | Very basic event publishing system / Zope Public License |
| [zope.interface](http://docs.zope.org/zope.interface/) | 4.7.1 | Interfaces for Python / ZPL 2.1 |
| [zstd](http://www.zstd.net) | 1.3.7 | Zstandard - Fast real-time compression algorithm / BSD 3-Clause |
| Name | Version | Summary / License |
|---|---|---|
| [alabaster](http://www.sphinx-doc.org/en/stable/index.html) | 0.7.12 | Configurable, Python 2+3 compatible Sphinx theme. / BSD 3-Clause |
| [anaconda-client](https://github.com/Anaconda-Platform/anaconda-client) | 1.9.0 | Anaconda Cloud command line client library / BSD 3-Clause |
| [anaconda-navigator](https://github.com/ContinuumIO/navigator) | 2.1.1 | Anaconda Navigator / proprietary - Continuum Analytics, Inc. |
| [anaconda-project](https://github.com/Anaconda-Platform/anaconda-project) | 0.10.1 | Tool for encapsulating, running, and reproducing data science projects / BSD-3-Clause |
| [anyio](https://github.com/agronholm/anyio) | 2.2.0 | High level compatibility layer for multiple asynchronous event loop implementations on Python / MIT |
| [appdirs](http://github.com/ActiveState/appdirs) | 1.4.4 | A small Python module for determining appropriate platform-specific dirs. / MIT |
| [argh](https://github.com/neithere/argh) | 0.26.2 | The Natural CLI. / LGPL 3 |
| [argon2-cffi](https://argon2-cffi.readthedocs.org/) | 20.1.0 | The secure Argon2 password hashing algorithm. / MIT |
| [arrow](https://github.com/crsmithdev/arrow) | 0.13.1 | Better dates & times for Python / Apache-2.0 |
| [asn1crypto](https://github.com/wbond/asn1crypto) | 1.4.0 | Python ASN.1 library with a focus on performance and a pythonic API / MIT |
| [astroid](https://www.astroid.org/) | 2.6.6 | A abstract syntax tree for Python with inference support. / LGPL-2.1-or-later |
| [astropy](http://www.astropy.org/) | 4.3.1 | Community-developed Python Library for Astronomy / BSD-3-Clause |
| [async\_generator](https://github.com/python-trio/async_generator) | 1.10 | Async generators and context managers for Python 3.5+ / MIT |
| [atomicwrites](https://github.com/untitaker/python-atomicwrites) | 1.4.0 | Atomic file writes / MIT |
| [attrs](https://attrs.readthedocs.io/en/stable/) | 21.2.0 | attrs is the Python package that will bring back the joy of writing classes by relieving you from the drudgery of implementing object protocols (aka dunder methods). / MIT |
| [autopep8](https://github.com/hhatto/autopep8) | 1.5.7 | A tool that automatically formats Python code to conform to the PEP 8 style guide / MIT |
| [babel](http://babel.pocoo.org/) | 2.9.1 | Utilities to internationalize and localize Python applications / BSD 3-clause |
| [backcall](https://github.com/takluyver/backcall/) | 0.2.0 | Specifications for callback functions passed in to an API / BSD-3-Clause |
| [backports](https://bitbucket.org/brandon/backports) | 1.0 | None / BSD |
| [backports.shutil\_get\_terminal\_size](https://github.com/chrippa/backports.shutil_get_terminal_size) | 1.0.0 | A backport of the get\_terminal\_size function from Python 3.3’s shutil. / MIT |
| [bcrypt](https://github.com/pyca/bcrypt/) | 3.2.0 | Modern password hashing for your software and your servers / Apache-2.0 |
| [beautifulsoup4](http://www.crummy.com/software/BeautifulSoup/) | 4.10.0 | Python library designed for screen-scraping / MIT |
| [binaryornot](https://github.com/audreyr/binaryornot) | 0.4.4 | Ultra-lightweight pure Python package to check if a file is binary or text. / BSD-3-Clause |
| [bitarray](https://github.com/ilanschnell/bitarray) | 2.3.0 | efficient arrays of booleans – C extension / PSF |
| [bkcharts](http://github.com/bokeh/bkcharts) | 0.2 | High level chart types built on top of Bokeh / BSD 3-Clause |
| [black](https://github.com/python/black) | 19.10b0 | The Uncompromising Code Formatter / MIT |
| [blas](http://www.netlib.org/lapack) | 1.0 | Linear Algebra PACKage / BSD-3-Clause |
| [bleach](https://github.com/mozilla/bleach) | 4.0.0 | Easy, whitelist-based HTML-sanitizing tool / Apache-2.0 |
| [blosc](https://github.com/Blosc/c-blosc) | 1.21.0 | A blocking, shuffling and loss-less compression library that can be faster than memcpy() / BSD-3-Clause |
| [bokeh](http://bokeh.pydata.org/) | 2.4.1 | Statistical and novel interactive HTML plots for Python / BSD-3-Clause |
| [boto](https://github.com/boto/boto/) | 2.49.0 | Amazon Web Services Library / MIT |
| [bottleneck](https://github.com/pydata/bottleneck) | 1.3.2 | Fast NumPy array functions written in Cython. / BSD 2-Clause |
| [brotli](http://github.com/google/brotli) | 1.0.9 | Brotli compression format / MIT |
| [brotlipy](https://github.com/python-hyper/brotlipy) | 0.7.0 | Python bindings to the Brotli compression library / MIT |
| [bzip2](http://www.bzip.org/) | 1.0.8 | high-quality data compressor / bzip2 |
| [ca-certificates](https://github.com/conda-forge/ca-certificates-feedstock) | 2021.10.26 | Certificates for use with other packages. / MPL 2.0 |
| [cached-property](https://github.com/pydanny/cached-property) | 1.5.2 | A decorator for caching properties in classes. / BSD-3-Clause |
| [certifi](http://certifi.io/) | 2021.10.8 | Python package for providing Mozilla’s CA Bundle. / ISC |
| [cffi](http://cffi.readthedocs.org/) | 1.14.6 | Foreign Function Interface for Python calling C code. / MIT |
| [cfitsio](http://heasarc.gsfc.nasa.gov/fitsio/fitsio.html) | 3.470 | A library for reading and writing FITS files / fitsio |
| [chardet](https://github.com/chardet/chardet) | 4.0.0 | Universal character encoding detector / LGPL2 |
| [charls](https://github.com/team-charls/charls) | 2.2.0 | CharLS is a C++ implementation of the JPEG-LS standard for lossless and near-lossless image compression and decompression. JPEG-LS is a low-complexity image compression standard that matches JPEG 2000 compression ratios. / BSD-3-Clause |
| [charset-normalizer](https://github.com/ousret/charset_normalizer) | 2.0.4 | The Real First Universal Charset Detector. Open, modern and actively maintained alternative to Chardet. / MIT |
| [click](https://palletsprojects.com/p/click) | 8.0.3 | Python composable command line interface toolkit / BSD-3-Clause |
| [cloudpickle](https://github.com/cloudpipe/cloudpickle) | 2.0.0 | Extended pickling support for Python objects / BSD-3-Clause |
| [clyent](https://github.com/Anaconda-Platform/clyent) | 1.2.2 | Command line client library for windows and posix / BSD 3-Clause |
| [colorama](https://github.com/tartley/colorama) | 0.4.4 | Cross-platform colored terminal text / BSD-3-Clause |
| [comtypes](http://starship.python.net/crew/theller/comtypes/) | 1.1.10 | pure Python COM package / MIT |
| [conda](https://conda.io) | 4.10.3 | OS-agnostic, system-level binary package and environment manager. / BSD 3-Clause |
| [conda-build](https://github.com/conda/conda-build) | 3.21.6 | tools for building conda packages / BSD 3-Clause |
| [conda-content-trust](https://github.com/conda/conda-content-trust) | 0.1.1 | Signing and verification tools for conda / BSD-3-Clause |
| [conda-env](https://github.com/conda/conda-env) | 2.6.0 | Tools for interacting with conda environments. / BSD 3-Clause |
| [conda-token](https://github.com/Anaconda/conda-token) | 0.3.0 | Set repository access token / BSD-3-Clause |
| [conda-verify](https://github.com/conda/conda-verify) | 3.4.2 | tool for validating conda recipes and conda packages / BSD 3-Clause |
| console\_shortcut | 0.1.1 | Console shortcut creator for Windows (using menuinst) / BSD |
| [contextlib2](http://contextlib2.readthedocs.org) | 0.6.0.post1 | Backports and enhancements for the contextlib module / PSF 2 |
| [cookiecutter](https://github.com/cookiecutter/cookiecutter) | 1.7.2 | A command-line utility that creates projects from cookiecutters (project templates), e.g. creating a Python package project from a Python package project template. / BSD-3-Clause |
| [cryptography](https://github.com/pyca/cryptography) | 3.4.8 | Provides cryptographic recipes and primitives to Python developers / Apache-2.0 AND BSD-3-Clause AND PSF-2.0 AND MIT |
| [curl](http://curl.haxx.se/) | 7.78.0 | tool and library for transferring data with URL syntax / curl |
| [cycler](http://matplotlib.org/cycler) | 0.10.0 | Composable style cycles. / BSD 3-Clause |
| [cython](http://www.cython.org/) | 0.29.24 | The Cython compiler for writing C extensions for the Python language / Apache-2.0 |
| [cytoolz](https://github.com/pytoolz/cytoolz) | 0.11.0 | Cython implementation of Toolz. High performance functional utilities / BSD-3-Clause |
| [daal4py](https://intelpython.github.io/daal4py/) | 2021.3.0 | A convenient Python API to Intel (R) oneAPI Data Analytics Library / Apache-2.0 |
| [dal](https://software.intel.com/content/www/us/en/develop/tools.html) | 2021.3.0 | Intel® oneDAL runtime libraries / Intel Simplified Software License |
| [dask](https://dask.org/) | 2021.10.0 | Parallel PyData with Task Scheduling / BSD-3-Clause |
| [dask-core](http://github.com/dask/dask/) | 2021.10.0 | Parallel Python with task scheduling / BSD-3-Clause |
| [dataclasses](https://github.com/ericvsmith/dataclasses) | 0.8 | An implementation of PEP 557: Data Classes / Apache-2.0 |
| [debugpy](https://github.com/Microsoft/debugpy) | 1.4.1 | An implementation of the Debug Adapter Protocol for Python / MIT |
| [decorator](https://github.com/micheles/decorator) | 5.1.0 | Better living through Python with decorators. / BSD-2-Clause |
| [defusedxml](https://bitbucket.org/tiran/defusedxml) | 0.7.1 | XML bomb protection for Python stdlib modules / PSF 2.0 |
| [diff-match-patch](http://code.google.com/p/google-diff-match-patch/) | 20200713 | Diff Match Patch is a high-performance library in multiple languages that manipulates plain text / Apache-2.0 |
| [distributed](http://distributed.readthedocs.io/en/latest/) | 2021.10.0 | Distributed computing with Dask / BSD-3-Clause |
| [docutils](http://docutils.sourceforge.net/) | 0.17.1 | Docutils – Python Documentation Utilities / Public Domain Dedictation and BSD 2-Clause and PSF 2.1.1 and GPL 3.0 |
| [entrypoints](https://github.com/takluyver/entrypoints) | 0.3 | Discover and load entry points from installed packages. / MIT License |
| [et\_xmlfile](https://foss.heptapod.net/openpyxl/et_xmlfile) | 1.1.0 | An implementation of lxml.xmlfile for the standard library / MIT AND PSF-2.0 |
| [fastcache](https://github.com/pbrady/fastcache) | 1.1.0 | C implementation of Python 3 lru\_cache / MIT |
| [filelock](https://github.com/benediktschmitt/py-filelock) | 3.3.1 | A platform independent file lock. / Public Domain |
| [flake8](http://flake8.pycqa.org/) | 3.9.2 | Your Tool For Style Guide Enforcement / MIT |
| [flask](http://flask.pocoo.org) | 1.1.2 | A microframework based on Werkzeug, Jinja2 and good intentions. / BSD 3-Clause |
| [fonttools](https://github.com/fonttools/fonttools) | 4.25.0 | fontTools is a library for manipulating fonts, written in Python. / MIT |
| [freetype](https://www.freetype.org/) | 2.10.4 | A Free, High-Quality, and Portable Font Engine / GPL-2.0-only and LicenseRef-FreeType |
| [fsspec](https://github.com/martindurant/filesystem_spec) | 2021.10.1 | A specification for pythonic filesystems / BSD-3-Clause |
| [get\_terminal\_size](https://github.com/chrippa/backports.shutil_get_terminal_size) | 1.0.0 | Get the size of the terminal window. / MIT |
| [gevent](https://www.gevent.org) | 21.8.0 | Coroutine-based network library / MIT |
| [giflib](http://giflib.sourceforge.net) | 5.2.1 | Library for reading and writing gif images / MIT |
| [glob2](https://github.com/miracle2k/python-glob2) | 0.7 | Version of the glob module that supports recursion via \*\*, and can capture patterns. / BSD-2-Clause |
| [greenlet](https://github.com/python-greenlet/greenlet) | 1.1.1 | Lightweight in-process concurrent programming / MIT |
| [h5py](http://www.h5py.org/) | 3.2.1 | Read and write HDF5 files from Python / BSD-3-Clause |
| [hdf5](http://www.hdfgroup.org/HDF5/) | 1.10.6 | HDF5 is a data model, library, and file format for storing and managing data / HDF5 |
| [heapdict](http://stutzbachenterprises.com/) | 1.0.1 | A heap with decrease-key and increase-key operations / BSD 3-Clause |
| [html5lib](https://github.com/html5lib/html5lib-python) | 1.1 | HTML parser based on the WHATWG HTML specification / MIT |
| icc\_rt | 2019.0.0 | Intel runtime libraries for C, C++ and Fortran compilers / Intel proprietary |
| [icu](http://site.icu-project.org/) | 58.2 | International Components for Unicode. / MIT |
| [idna](https://github.com/kjd/idna) | 3.2 | Internationalized Domain Names in Applications (IDNA). / BSD-3-Clause |
| [imagecodecs](https://www.lfd.uci.edu/~gohlke/) | 2021.8.26 | Image transformation, compression, and decompression codecs / BSD-3-Clause |
| [imageio](https://imageio.github.io) | 2.9.0 | A Python library for reading and writing image data / BSD-2-Clause |
| [imagesize](https://github.com/shibukawa/imagesize_py) | 1.2.0 | Getting image size from png/jpeg/jpeg2000/gif file / MIT |
| [importlib-metadata](https://github.com/python/importlib_metadata) | 4.8.1 | A library to access the metadata for a Python package / Apache-2.0 |
| [importlib\_metadata](https://github.com/python/importlib_metadata) | 4.8.1 | A library to access the metadata for a Python package / Apache-2.0 |
| [inflection](http://github.com/jpvanhal/inflection) | 0.5.1 | A port of Ruby on Rails inflector to Python / MIT |
| [iniconfig](http://github.com/RonnyPfannschmidt/iniconfig) | 1.1.1 | iniconfig: brain-dead simple config-ini parsing / MIT |
| [intel-openmp](https://software.intel.com/en-us/node/522690) | 2021.4.0 | Math library for Intel and compatible processors / LicenseRef-ProprietaryIntel |
| [intervaltree](https://github.com/chaimleib/intervaltree) | 3.1.0 | Editable interval tree data structure for Python 2 and 3 / Apache-2.0 |
| [ipykernel](https://ipython.org) | 6.4.1 | IPython Kernel for Jupyter / BSD-3-Clause |
| [ipython](https://ipython.org) | 7.29.0 | IPython: Productive Interactive Computing / BSD-3-Clause |
| [ipython\_genutils](http://ipython.org) | 0.2.0 | vestigial utilities from IPython / BSD 3-Clause |
| [ipywidgets](https://github.com/ipython/ipywidgets) | 7.6.5 | Jupyter Interactive Widgets / BSD-3-Clause |
| [isort](https://github.com/timothycrosley/isort) | 5.9.3 | A Python utility / library to sort Python imports. / MIT |
| [itsdangerous](https://github.com/pallets/itsdangerous) | 2.0.1 | Various helpers to pass trusted data to untrusted environments. / BSD-3-Clause |
| [jdcal](https://github.com/phn/jdcal) | 1.4.1 | Julian dates from proleptic Gregorian and Julian calendars. / BSD 2-Clause |
| [jedi](https://github.com/davidhalter/jedi/) | 0.18.0 | An autocompletion tool for Python that can be used for text editors. / MIT |
| [jinja2](http://jinja.pocoo.org) | 2.11.3 | An easy to use stand-alone template engine written in pure python. / BSD-3-Clause |
| [jinja2-time](https://github.com/hackebrot/jinja2-time) | 0.2.0 | Jinja2 Extension for Dates and Times / MIT |
| [joblib](https://joblib.readthedocs.io/en/latest/) | 1.1.0 | Lightweight pipelining: using Python functions as pipeline jobs. / BSD-3-Clause |
| [jpeg](http://www.ijg.org/) | 9d | read/write jpeg COM, EXIF, IPTC medata / Custom free software license |
| [json5](https://github.com/dpranke/pyjson5) | 0.9.6 | A Python implementation of the JSON5 data format / Apache-2.0 |
| [jsonschema](https://github.com/Julian/jsonschema) | 3.2.0 | An implementation of JSON Schema validation for Python / MIT |
| [jupyter](http://jupyter.org) | 1.0.0 | Jupyter metapackage. Install all the Jupyter components in one go. / BSD 3-Clause |
| [jupyter\_client](https://jupyter.org) | 6.1.12 | jupyter\_client contains the reference implementation of the Jupyter protocol. / BSD-3-Clause |
| [jupyter\_console](http://jupyter.org) | 6.4.0 | Jupyter terminal console / BSD-3-Clause |
| [jupyter\_core](https://jupyter.org) | 4.8.1 | Core common functionality of Jupyter projects. / BSD-3-Clause |
| [jupyter\_server](https://jupyter.org) | 1.4.1 | Jupyter Server / BSD-3-Clause |
| [jupyterlab](https://github.com/jupyterlab/jupyterlab) | 3.2.1 | An extensible environment for interactive and reproducible computing, based on the Jupyter Notebook and Architecture. / BSD-3-Clause |
| [jupyterlab\_pygments](http://github.com/JupyterLab/jupyterlab_pygments) | 0.1.2 | Pygments syntax coloring scheme making use of the JupyterLab CSS variables / BSD-3-Clause |
| [jupyterlab\_server](https://github.com/jupyterlab/jupyterlab_server) | 2.8.2 | A set of server components for JupyterLab and JupyterLab like applications. / BSD-3-Clause |
| [jupyterlab\_widgets](https://github.com/jupyter-widgets/ipywidgets) | 1.0.0 | JupyterLab extension providing HTML widgets / BSD-3-Clause |
| [keyring](https://github.com/jaraco/keyring) | 23.1.0 | Store and access your passwords safely / MIT |
| [kiwisolver](https://github.com/nucleic/kiwi) | 1.3.1 | An efficient C++ implementation of the Cassowary constraint solver / BSD-3-Clause |
| [krb5](http://web.mit.edu/kerberos/) | 1.19.2 | A network authentication protocol. / MIT |
| [lazy-object-proxy](https://github.com/ionelmc/python-lazy-object-proxy) | 1.6.0 | A fast and thorough lazy object proxy / BSD-2-Clause |
| [lcms2](http://www.littlecms.com/) | 2.12 | Open Source Color Management Engine / MIT |
| [lerc](https://github.com/Esri/lerc) | 3.0 | LERC - Limited Error Raster Compression / Apache-2.0 |
| [libaec](https://gitlab.dkrz.de/k202009/libaec) | 1.0.4 | Adaptive Entropy Coding library / BSD-2-Clause |
| [libarchive](http://www.libarchive.org/) | 3.4.2 | Multi-format archive and compression library / BSD-2-Clause |
| [libcurl](http://curl.haxx.se/) | 7.78.0 | tool and library for transferring data with URL syntax / curl |
| [libdeflate](https://github.com/ebiggers/libdeflate) | 1.8 | libdeflate is a library for fast, whole-buffer DEFLATE-based compression and decompression. / MIT |
| [libiconv](https://www.gnu.org/software/libiconv/) | 1.15 | Provides iconv for systems which don’t have one (or that cannot convert from/to Unicode.) / GPL and LGPL |
| [liblief](https://lief.quarkslab.com/) | 0.10.1 | A cross platform library to parse, modify and abstract ELF, PE and MachO formats. / Apache-2.0 |
| [libpng](http://www.libpng.org/pub/png/libpng.html) | 1.6.37 | PNG reference library / zlib/libpng |
| [libspatialindex](http://libspatialindex.github.io) | 1.9.3 | Extensible framework for robust spatial indexing / MIT |
| [libssh2](https://www.libssh2.org/) | 1.9.0 | the SSH library / BSD-3-Clause |
| [libtiff](http://www.libtiff.org/) | 4.2.0 | Support for the Tag Image File Format (TIFF). / HPND |
| [libwebp](https://developers.google.com/speed/webp/) | 1.2.0 | WebP image library / Google |
| [libxml2](http://xmlsoft.org/) | 2.9.12 | The XML C parser and toolkit of Gnome / MIT |
| [libxslt](http://xmlsoft.org/XSLT/) | 1.1.34 | The XSLT C library developed for the GNOME project / MIT |
| [libzopfli](https://github.com/google/zopfli) | 1.0.3 | A compression library programmed in C to perform very good, but slow, deflate or zlib compression. / Apache-2.0 |
| [llvmlite](http://llvmlite.pydata.org) | 0.37.0 | A lightweight LLVM python binding for writing JIT compilers. / BSD-2-Clause |
| [locket](https://github.com/mwilliamson/locket.py) | 0.2.1 | File-based locks for Python for Linux and Windows / BSD 2-Clause |
| [lxml](http://lxml.de/) | 4.6.3 | Pythonic binding for the C libraries libxml2 and libxslt. / BSD-3-Clause and GPL-2.0-only and ZPL-2.0 and LicenseRef-ElementTree |
| [lz4-c](https://www.lz4.org) | 1.9.3 | Extremely Fast Compression algorithm / BSD-2-Clause |
| [lzo](http://www.oberhumer.com/opensource/lzo/) | 2.10 | LZO is a portable lossless data compression library written in ANSI C. / GPL v2+ |
| [m2w64-gcc-libgfortran](https://gcc.gnu.org) | 5.3.0 | GNU Compiler Collection (libgfortran) for MinGW-w64 / GPL, LGPL, FDL, custom |
| m2w64-gcc-libs | 5.3.0 | None / GPL3+, partial:GCCRLE, partial:LGPL2+ |
| [m2w64-gcc-libs-core](https://gcc.gnu.org) | 5.3.0 | GNU Compiler Collection (core libraries) for MinGW-w64 / GPL3+, partial:GCCRLE, partial:LGPL2+ |
| m2w64-gmp | 6.1.0 | None / LGPL3 |
| m2w64-libwinpthread-git | 5.0.0.4634.697f757 | None / MIT, BSD |
| [markupsafe](https://www.palletsprojects.com/p/markupsafe) | 1.1.1 | A Python module that implements the jinja2.Markup string / BSD-3-Clause |
| [matplotlib](http://matplotlib.org/) | 3.4.3 | Publication quality figures in Python / LicenseRef-PSF-based |
| [matplotlib-base](http://matplotlib.org/) | 3.4.3 | Publication quality figures in Python / LicenseRef-PSF-based |
| [matplotlib-inline](https://github.com/ipython/matplotlib-inline) | 0.1.2 | Inline Matplotlib backend for Jupyter / BSD-3-Clause |
| [mccabe](https://github.com/PyCQA/mccabe) | 0.6.1 | McCabe complexity checker for Python / MIT |
| [menuinst](https://github.com/conda/menuinst) | 1.4.18 | cross platform install of menu items / BSD-3-Clause |
| [mistune](https://github.com/lepture/mistune) | 0.8.4 | The fastest markdown parser in pure Python. / BSD 3-Clause |
| [mkl](https://software.intel.com/en-us/mkl) | 2021.4.0 | Math library for Intel and compatible processors / LicenseRef-ProprietaryIntel |
| [mkl-service](http://github.com/IntelPython/mkl-service) | 2.4.0 | Python hooks for Intel(R) Math Kernel Library runtime control settings. / BSD-3-Clause |
| [mkl\_fft](http://github.com/IntelPython/mkl_fft) | 1.3.1 | NumPy-based implementation of Fast Fourier Transform using Intel (R) Math Kernel Library. / BSD 3-Clause |
| [mkl\_random](http://github.com/IntelPython/mkl_random) | 1.2.2 | Intel (R) MKL-powered package for sampling from common probability distributions into NumPy arrays. / BSD-3-Clause |
| [mock](https://github.com/testing-cabal/mock) | 4.0.3 | A library for testing in Python / BSD-2-Clause |
| [more-itertools](https://github.com/more-itertools/more-itertools) | 8.10.0 | More routines for operating on iterables, beyond itertools / MIT |
| [mpmath](http://mpmath.org) | 1.2.1 | Python library for arbitrary-precision floating-point arithmetic / BSD 3-Clause |
| [msgpack-python](http://msgpack.org/) | 1.0.2 | MessagePack (de)serializer / Apache-2.0 |
| msys2-conda-epoch | 20160418 | |
| [multipledispatch](https://github.com/mrocklin/multipledispatch/) | 0.6.0 | Multiple dispatch in Python / BSD 3-Clause |
| [munkres](https://github.com/bmc/munkres) | 1.1.4 | The Munkres module provides an O(n^3) implementation of the Munkres algorithm (also called the Hungarian algorithm or the Kuhn-Munkres algorithm). / Apache-2.0 |
| [mypy\_extensions](http://www.mypy-lang.org/) | 0.4.3 | Experimental type system extensions for programs checked with the mypy typechecker. / MIT |
| [nbclassic](http://github.com/jupyterlab/nbclassic) | 0.2.6 | Jupyter Notebook as a Jupyter Server Extension. / BSD-3-Clause |
| [nbclient](https://jupyter.org) | 0.5.3 | A client library for executing notebooks. Formally nbconvert’s ExecutePreprocessor. / BSD-3-Clause |
| [nbconvert](http://jupyter.org) | 6.1.0 | Converting Jupyter Notebooks / BSD-3-Clause |
| [nbformat](http://jupyter.org) | 5.1.3 | The Jupyter Notebook format / BSD-3-Clause |
| [nest-asyncio](https://github.com/erdewit/nest_asyncio) | 1.5.1 | Patch asyncio to allow nested event loops / BSD-2-Clause |
| [networkx](https://networkx.github.io/) | 2.6.3 | Python package for creating and manipulating complex networks / BSD-3-Clause |
| [nltk](http://nltk.org/) | 3.6.5 | Natural Language Toolkit / Apache 2.0 |
| [nose](http://readthedocs.org/docs/nose/) | 1.3.7 | Nose extends unittest to make testing easier / LGPL-2.1 |
| [notebook](https://jupyter.org) | 6.4.5 | Jupyter Notebook / BSD-3-Clause |
| [numba](http://numba.pydata.org) | 0.54.1 | NumPy aware dynamic Python compiler using LLVM / BSD-2-Clause |
| [numexpr](https://github.com/pydata/numexpr) | 2.7.3 | Fast numerical expression evaluator for NumPy. / MIT |
| [numpy](http://numpy.scipy.org/) | 1.20.3 | Array processing for numbers, strings, records, and objects. / BSD 3-Clause |
| [numpy-base](http://numpy.scipy.org/) | 1.20.3 | Array processing for numbers, strings, records, and objects. / BSD 3-Clause |
| [numpydoc](https://github.com/numpy/numpydoc) | 1.1.0 | Numpy’s Sphinx extensions / BSD 3-Clause |
| [olefile](http://www.decalage.info/python/olefileio) | 0.46 | parse, read and write Microsoft OLE2 files / BSD 2-Clause |
| [openjpeg](http://www.openjpeg.org/) | 2.4.0 | An open-source JPEG 2000 codec written in C / BSD 2-Clause |
| [openpyxl](https://openpyxl.readthedocs.io) | 3.0.9 | A Python library to read/write Excel 2010 xlsx/xlsm files / MIT |
| [openssl](http://www.openssl.org/) | 1.1.1l | OpenSSL is an open-source implementation of the SSL and TLS protocols / OpenSSL |
| [packaging](https://github.com/pypa/packaging) | 21.0 | Core utilities for Python packages / Apache 2.0 or BSD 2-Clause |
| [pandas](http://pandas.pydata.org) | 1.3.4 | High-performance, easy-to-use data structures and data analysis tools. / BSD-3-Clause |
| [pandocfilters](https://github.com/jgm/pandocfilters) | 1.4.3 | A python module for writing pandoc filters / BSD-3-Clause |
| [paramiko](http://www.paramiko.org/) | 2.7.2 | SSH2 protocol library / LGPL-2.1-or-later |
| [parso](https://github.com/davidhalter/parso) | 0.8.2 | A Python Parser / MIT |
| [partd](https://github.com/dask/partd) | 1.2.0 | Data structure for on-disk shuffle operations / BSD 3-Clause |
| [path](https://github.com/jaraco/path) | 16.0.0 | A module wrapper for os.path / MIT |
| [path.py](https://github.com/jaraco/path.py) | 12.5.0 | A module wrapper for os.path / MIT |
| [pathlib2](https://github.com/mcmtroffaes/pathlib2) | 2.3.6 | Fork of pathlib aiming to support the full stdlib Python API / MIT |
| [pathspec](https://github.com/cpburnz/python-path-specification) | 0.7.0 | Utility library for gitignore style pattern matching of file paths. / MPL-2.0 |
| [patsy](https://github.com/pydata/patsy) | 0.5.2 | Describing statistical models in Python using symbolic formulas / BSD-2-Clause AND PSF-2.0 |
| [pep8](http://pep8.readthedocs.org/) | 1.7.1 | Python style guide checker / MIT |
| [pexpect](http://pexpect.sourceforge.net/) | 4.8.0 | Pexpect makes Python a better tool for controlling other applications. / ISC |
| [pickleshare](https://github.com/pickleshare/pickleshare/) | 0.7.5 | Tiny ‘shelve’-like database with concurrency support / MIT |
| [pillow](https://pillow.readthedocs.io) | 8.4.0 | Pillow is the friendly PIL fork by Alex Clark and Contributors / LicenseRef-PIL |
| [pip](https://pip.pypa.io/en/stable/) | 21.2.4 | PyPA recommended tool for installing Python packages / MIT |
| [pkginfo](https://code.launchpad.net/~tseaver/pkginfo/trunk) | 1.7.1 | Query metadatdata from sdists / bdists / installed packages. / MIT |
| [pluggy](https://github.com/pytest-dev/pluggy) | 0.13.1 | Plugin registration and hook calling for Python / MIT |
| [ply](http://www.dabeaz.com/ply/index.html) | 3.11 | Python Lex-Yacc / BSD 3-clause |
| powershell\_shortcut | 0.0.1 | Powershell shortcut creator for Windows (using menuinst) / BSD |
| [poyo](https://github.com/hackebrot/poyo) | 0.5.0 | A lightweight YAML Parser for Python / MIT |
| [prometheus\_client](https://github.com/prometheus/client_python) | 0.11.0 | Python client for the Prometheus monitoring system / Apache-2.0 |
| [prompt-toolkit](https://github.com/jonathanslenders/python-prompt-toolkit) | 3.0.20 | Library for building powerful interactive command lines in Python / BSD-3-Clause |
| [prompt\_toolkit](https://github.com/jonathanslenders/python-prompt-toolkit) | 3.0.20 | Library for building powerful interactive command lines in Python / BSD-3-Clause |
| [psutil](https://github.com/giampaolo/psutil) | 5.8.0 | A cross-platform process and system utilities module for Python / BSD-3-Clause |
| [ptyprocess](https://github.com/pexpect/ptyprocess) | 0.7.0 | Run a subprocess in a pseudo terminal / ISC |
| [py](https://github.com/pytest-dev/py) | 1.10.0 | library with cross-python path, ini-parsing, io, code, log facilities / MIT |
| [py-lief](https://lief.quarkslab.com/) | 0.10.1 | A cross platform library to parse, modify and abstract ELF, PE and MachO formats. / Apache-2.0 |
| [pycodestyle](https://pycodestyle.readthedocs.io/) | 2.7.0 | Python style guide checker / MIT |
| [pycosat](https://github.com/ContinuumIO/pycosat) | 0.6.3 | Bindings to picosat (a SAT solver) / MIT |
| [pycparser](https://github.com/eliben/pycparser) | 2.20 | Complete C99 parser in pure Python / BSD 3-clause |
| [pycurl](http://pycurl.sourceforge.net/) | 7.44.1 | A Python Interface To The cURL library / LGPL, MIT |
| [pydocstyle](https://github.com/PyCQA/pydocstyle) | 6.1.1 | Python docstring style checker (formerly pep257) / MIT |
| [pyerfa](https://pyerfa.readthedocs.io/) | 2.0.0 | Python bindings for ERFA routines / BSD-3-Clause |
| [pyflakes](https://github.com/PyCQA/pyflakes) | 2.3.1 | Pyflakes analyzes programs and detects various errors. / MIT |
| [pygments](http://pygments.org/) | 2.10.0 | Pygments is a generic syntax highlighter suitable for use in code hosting, forums, wikis or other applications that need to prettify source code. / BSD-2-clause |
| [pylint](https://www.pylint.org) | 2.9.6 | python code static checker / GPL-2.0-or-later |
| [pyls-spyder](https://github.com/spyder-ide/pyls-spyder) | 0.4.0 | Spyder extensions for the python-lsp-server / MIT |
| [pynacl](https://github.com/pyca/pynacl) | 1.4.0 | PyNaCl is a Python binding to the Networking and Cryptography library, a crypto library with the stated goal of improving usability, security and speed. / Apache-2.0 |
| [pyodbc](https://github.com/mkleehammer/pyodbc) | 4.0.31 | DB API Module for ODBC / MIT |
| [pyopenssl](https://github.com/pyca/pyopenssl) | 21.0.0 | Python wrapper module around the OpenSSL library / Apache 2.0 |
| [pyparsing](https://github.com/pyparsing/pyparsing/) | 3.0.4 | Create and execute simple grammars / MIT |
| [pyqt](http://www.riverbankcomputing.co.uk/software/pyqt) | 5.9.2 | Python binding of the cross-platform GUI toolkit Qt. / Commercial, GPL-2.0, GPL-3.0 |
| [pyreadline](http://ipython.org/pyreadline) | 2.1 | A python implmementation of GNU readline. / BSD 3-Clause |
| [pyrsistent](http://github.com/tobgu/pyrsistent/) | 0.18.0 | Persistent/Functional/Immutable data structures / MIT |
| [pysocks](https://github.com/Anorov/PySocks) | 1.7.1 | A Python SOCKS client module. See [Anorov/PySocks](https://github.com/Anorov/PySocks) for more information. / BSD 3-Clause |
| [pytables](http://www.pytables.org) | 3.6.1 | Brings together Python, HDF5 and NumPy to easily handle large amounts of data. / BSD 3-Clause |
| [pytest](https://docs.pytest.org/en/latest/) | 6.2.4 | Simple and powerful testing with Python. / MIT |
| [python](https://www.python.org/) | 3.9.7 | General purpose programming language / Python-2.0 |
| [python-dateutil](https://dateutil.readthedocs.org/) | 2.8.2 | Extensions to the standard Python datetime module. / BSD-3-Clause and Apache |
| [python-libarchive-c](https://github.com/Changaco/python-libarchive-c) | 2.9 | Python interface to libarchive / CC0-1.0 |
| [python-lsp-black](https://github.com/python-lsp/python-lsp-black) | 1.0.0 | Black plugin for the Python LSP Server / MIT |
| [python-lsp-jsonrpc](https://github.com/python-lsp/python-lsp-jsonrpc) | 1.0.0 | A Python 3.6+ server implementation of the JSON RPC 2.0 protocol. / MIT |
| [python-lsp-server](https://github.com/python-lsp/python-lsp-server) | 1.2.4 | An implementation of the Language Server Protocol for Python / MIT |
| [python-slugify](https://github.com/un33k/python-slugify) | 5.0.2 | A Python Slugify application that handles Unicode / MIT |
| [pytz](http://pythonhosted.org/pytz/) | 2021.3 | World timezone definitions, modern and historical. / MIT |
| [pywavelets](https://github.com/PyWavelets/pywt) | 1.1.1 | Discrete Wavelet Transforms in Python / MIT |
| [pywin32](https://github.com/mhammond/pywin32) | 228 | Python extensions for Windows / PSF-2.0 |
| [pywin32-ctypes](https://github.com/enthought/pywin32-ctypes) | 0.2.0 | A limited subset of pywin32 re-implemented using ctypes (or cffi) / BSD 3 Clause |
| [pywinpty](https://github.com/spyder-ide/pywinpty) | 0.5.7 | Python bindings for the winpty library / MIT |
| [pyyaml](http://pyyaml.org/wiki/PyYAML) | 6.0 | YAML parser and emitter for Python / MIT |
| [pyzmq](https://github.com/zeromq/pyzmq) | 22.2.1 | Python bindings for zeromq / BSD 3-clause |
| [qdarkstyle](https://github.com/ColinDuquesnoy/QDarkStyleSheet) | 3.0.2 | A dark stylesheet for Qt applications (Qt4, Qt5, PySide, PyQt4, PyQt5, QtPy, PyQtGraph). / MIT |
| [qstylizer](https://github.com/blambright/qstylizer) | 0.1.10 | Qt stylesheet generation utility for PyQt/PySide / MIT |
| [qt](http://qt.io) | 5.9.7 | Qt is a cross-platform application and UI framework. / LGPL-3.0-only |
| [qtawesome](https://github.com/spyder-ide/qtawesome) | 1.0.2 | Iconic fonts in PyQt and PySide applications / MIT |
| [qtconsole](http://jupyter.org) | 5.1.1 | Jupyter Qt Console / BSD-3-Clause |
| [qtpy](https://github.com/spyder-ide/qtpy) | 1.10.0 | Abstraction layer for PyQt5/PyQt4/PySide / MIT |
| [regex](https://bitbucket.org/mrabarnett/mrab-regex) | 2021.8.3 | Alternative regular expression module, to replace re / Apache 2.0 |
| [requests](http://python-requests.org) | 2.26.0 | Requests is an elegant and simple HTTP library for Python, built with ♥. / Apache-2.0 |
| [rope](https://github.com/python-rope/rope) | 0.19.0 | A python refactoring library / LGPL 3.0 |
| [rtree](http://toblerity.github.com/rtree/) | 0.9.7 | R-Tree spatial index for Python GIS / MIT |
| [ruamel\_yaml](https://sourceforge.net/p/ruamel-yaml/code/ci/default/tree) | 0.15.100 | A patched copy of ruamel.yaml. / MIT |
| [scikit-image](http://scikit-image.org/) | 0.18.3 | Image processing in Python. / BSD-3-Clause |
| [scikit-learn](http://scikit-learn.org/) | 0.24.2 | A set of python modules for machine learning and data mining / BSD-3-Clause |
| [scikit-learn-intelex](https://intel.github.io/scikit-learn-intelex) | 2021.3.0 | Intel(R) Extension for Scikit-learn is a seamless way to speed up your Scikit-learn application. / Apache-2.0 |
| [scipy](http://www.scipy.org/) | 1.7.1 | Scientific Library for Python / BSD-3-Clause |
| [seaborn](https://seaborn.pydata.org) | 0.11.2 | Statistical data visualization / BSD 3-Clause |
| [send2trash](https://github.com/arsenetar/send2trash) | 1.8.0 | Python library to natively send files to Trash (or Recycle bin) on all platforms. / BSD-3-Clause |
| [setuptools](https://github.com/pypa/setuptools) | 58.0.4 | Download, build, install, upgrade, and uninstall Python packages / MIT |
| [simplegeneric](http://cheeseshop.python.org/pypi/simplegeneric) | 0.8.1 | Simple generic functions (similar to Python’s own len(), pickle.dump(), etc.) / Zope Public |
| [singledispatch](http://docs.python.org/3/library/functools.html#functools.singledispatch) | 3.7.0 | Transforms a function into a single-dispatch generic function / MIT |
| [sip](https://www.riverbankcomputing.com/software/pyqt-builder/intro) | 4.19.13 | Python binding of the cross-platform builder toolkit for Qt. / Commercial, GPL-2.0, GPL-3.0 |
| [six](https://six.readthedocs.io/) | 1.16.0 | Python 2 and 3 compatibility utilities / MIT |
| [snappy](https://github.com/google/snappy) | 1.1.8 | A fast compressor/decompressor / BSD 3-clause |
| [sniffio](https://github.com/python-trio/sniffio) | 1.2.0 | Sniff out which async library your code is running under / Apache-2.0 |
| [snowballstemmer](https://github.com/shibukawa/snowball_py) | 2.1.0 | Snowball stemming library collection for Python / BSD-2-Clause |
| [sortedcollections](http://www.grantjenks.com/docs/sortedcollections/) | 2.1.0 | Python Sorted Collections / Apache-2.0 |
| [sortedcontainers](http://www.grantjenks.com/docs/sortedcontainers/) | 2.4.0 | Python Sorted Container Types: SortedList, SortedDict, and SortedSet / Apache-2.0 |
| [soupsieve](http://facelessuser.github.io/soupsieve) | 2.2.1 | A modern CSS selector implementation for BeautifulSoup / MIT |
| [sphinx](http://www.sphinx-doc.org) | 4.2.0 | Sphinx is a tool that makes it easy to create intelligent and beautiful documentation / BSD-2-Clause |
| sphinxcontrib | 1.0 | Python namespace for sphinxcontrib / BSD |
| [sphinxcontrib-applehelp](https://www.sphinx-doc.org/en/master/) | 1.0.2 | sphinxcontrib-applehelp is a sphinx extension which outputs Apple help books / BSD-2-Clause |
| [sphinxcontrib-devhelp](https://www.sphinx-doc.org/en/master/) | 1.0.2 | sphinxcontrib-devhelp is a sphinx extension which outputs Devhelp document / BSD-2-Clause |
| [sphinxcontrib-htmlhelp](https://www.sphinx-doc.org/en/master/) | 2.0.0 | sphinxcontrib-htmlhelp is a sphinx extension which renders HTML help files. / BSD-2-Clause |
| [sphinxcontrib-jsmath](https://www.sphinx-doc.org/en/master/) | 1.0.1 | A sphinx extension which renders display math in HTML via JavaScript / BSD-2-Clause |
| [sphinxcontrib-qthelp](https://www.sphinx-doc.org/en/master/) | 1.0.3 | sphinxcontrib-qthelp is a sphinx extension which outputs QtHelp document / BSD-2-Clause |
| [sphinxcontrib-serializinghtml](https://www.sphinx-doc.org/en/master/) | 1.1.5 | sphinxcontrib-serializinghtml is a sphinx extension which outputs “serialized” HTML files (json and pickle). / BSD-2-Clause |
| [sphinxcontrib-websupport](https://pypi.python.org/pypi/sphinxcontrib-websupport) | 1.2.4 | Sphinx API for Web Apps / BSD-2-Clause |
| [spyder](https://www.spyder-ide.org/) | 5.1.5 | The Scientific Python Development Environment / MIT |
| [spyder-kernels](https://www.spyder-ide.org/) | 2.1.3 | Jupyter kernels for Spyder’s console / MIT |
| [sqlalchemy](http://www.sqlalchemy.org/) | 1.4.22 | Database Abstraction Library. / MIT |
| [sqlite](http://www.sqlite.org/) | 3.36.0 | Implements a self-contained, zero-configuration, SQL database engine / Public-Domain (`<http://www.sqlite.org/copyright.html>`) |
| [statsmodels](https://www.statsmodels.org) | 0.12.2 | Statistical computations and models for use with SciPy / BSD-3-Clause |
| [sympy](https://sympy.org) | 1.9 | Python library for symbolic mathematics / BSD-3-Clause |
| [tbb](https://github.com/oneapi-src/oneTBB) | 2021.4.0 | High level abstract threading library / Apache-2.0 |
| tbb4py | 2021.4.0 | TBB module for Python / Apache 2.0 |
| [tblib](https://github.com/ionelmc/python-tblib) | 1.7.0 | Traceback serialization library. / BSD 2-Clause |
| [terminado](https://github.com/jupyter/terminado) | 0.9.4 | Terminals served by tornado websockets / BSD-2-Clause |
| [testpath](https://testpath.readthedocs.io) | 0.5.0 | Testpath is a collection of utilities for Python code working with files and commands. / BSD-3-Clause |
| [text-unidecode](https://github.com/kmike/text-unidecode/) | 1.3 | The most basic Text::Unidecode port / Artistic |
| [textdistance](https://github.com/orsinium/textdistance) | 4.2.1 | TextDistance – python library for comparing distance between two or more sequences by many algorithms. / MIT |
| [threadpoolctl](https://github.com/joblib/threadpoolctl) | 2.2.0 | Python helpers to control the threadpools of native libraries / BSD 3-Clause |
| [three-merge](https://github.com/spyder-ide/three-merge) | 0.1.1 | Simple Python library to perform a 3-way merge between strings / MIT |
| [tifffile](https://github.com/cgohlke/tifffile) | 2021.7.2 | Read and write image data from and to TIFF files. / BSD-3-Clause |
| [tinycss](http://tinycss.readthedocs.io/) | 0.4 | Tinycss is a complete yet simple CSS parser for Python. / BSD-3-Clause |
| [tk](http://www.tcl.tk/) | 8.6.11 | A dynamic programming language with GUI support. Bundles Tcl and Tk. / Tcl/Tk |
| [toml](https://github.com/uiri/toml) | 0.10.2 | Python lib for TOML. / MIT |
| [toolz](http://toolz.readthedocs.org/) | 0.11.1 | A functional standard library for Python / BSD-3-Clause |
| [tornado](http://www.tornadoweb.org/) | 6.1 | A Python web framework and asynchronous networking library, originally developed at FriendFeed. / Apache-2.0 |
| [tqdm](https://pypi.python.org/pypi/tqdm) | 4.62.3 | A Fast, Extensible Progress Meter / MPL-2.0 AND MIT |
| [traitlets](http://traitlets.readthedocs.org/) | 5.1.0 | Configuration system for Python applications / BSD-3-Clause |
| [typed-ast](https://github.com/python/typed_ast) | 1.4.3 | a fork of Python 2 and 3 ast modules with type comment support / Apache-2.0 AND PSF-2.0 AND MIT |
| [typing\_extensions](https://github.com/python/typing/tree/master/typing_extensions) | 3.10.0.2 | Backported and Experimental Type Hints for Python / PSF-2.0 |
| [tzdata](https://www.iana.org/time-zones) | 2021e | The Time Zone Database (called tz, tzdb or zoneinfo) / Public-Domain AND BSD-3-clause |
| [ujson](https://github.com/ultrajson/ultrajson) | 4.0.2 | Ultra fast JSON decoder and encoder written in C with Python bindings / BSD-3-Clause |
| [unicodecsv](https://github.com/jdunck/python-unicodecsv) | 0.14.1 | Drop-in replacement for csv module which supports unicode strings / BSD |
| [unidecode](https://pypi.python.org/pypi/Unidecode) | 1.2.0 | ASCII transliterations of Unicode text / GPL-2.0-or-later |
| [urllib3](https://urllib3.readthedocs.io/) | 1.26.7 | HTTP library with thread-safe connection pooling, file post, and more. / MIT |
| [vc](https://github.com/conda/conda/wiki/VC-features) | 14.2 | A meta-package to impose mutual exclusivity among software built with different VS versions / Modified BSD License (3-clause) |
| vs2015\_runtime | 14.27.29016 | MSVC runtimes associated with cl.exe version 19.27.29111 (VS 2019 update 5) / None |
| [watchdog](http://github.com/gorakhargosh/watchdog) | 2.1.3 | Filesystem events monitoring / Apache-2.0 |
| [wcwidth](https://github.com/jquast/wcwidth) | 0.2.5 | Measures number of Terminal column cells of wide-character codes. / MIT |
| [webencodings](https://github.com/gsnedders/python-webencodings) | 0.5.1 | Character encoding aliases for legacy web content / BSD 3-Clause |
| [werkzeug](https://palletsprojects.com/p/werkzeug/) | 2.0.2 | The comprehensive WSGI web application library. / BSD-3-Clause |
| [wheel](https://github.com/pypa/wheel) | 0.37.0 | A built-package format for Python. / MIT |
| [whichcraft](https://github.com/pydanny/whichcraft) | 0.6.1 | This package provides cross-platform cross-python shutil.which functionality. / BSD-3-Clause |
| [widgetsnbextension](http://ipython.org) | 3.5.1 | Interactive Widgets for Jupyter / BSD 3-clause |
| [win\_inet\_pton](https://github.com/hickeroar/win_inet_pton) | 1.1.0 | Native inet\_pton and inet\_ntop implementation for Python on Windows (with ctypes). / PUBLIC-DOMAIN |
| [win\_unicode\_console](https://github.com/Drekin/win-unicode-console) | 0.5 | A Python package to enable Unicode input and display when running Python from Windows console. / MIT |
| [wincertstore](https://bitbucket.org/tiran/wincertstore) | 0.2 | Python module to extract CA and CRL certs from Windows’ cert store (ctypes based). / PSF 2 |
| [winpty](https://github.com/rprichard/winpty) | 0.4.3 | Winpty provides an interface similar to a Unix pty-master for communicating with Windows console programs. / MIT |
| [wrapt](https://github.com/GrahamDumpleton/wrapt) | 1.12.1 | Module for decorators, wrappers and monkey patching / BSD 2-Clause |
| [xlrd](http://www.python-excel.org/) | 2.0.1 | Library for developers to extract data from Microsoft Excel (tm) spreadsheet files / BSD 3-Clause and BSD with advertising |
| [xlsxwriter](https://xlsxwriter.readthedocs.io/) | 3.0.1 | A Python module for creating Excel XLSX files / BSD-2-Clause |
| [xlwings](http://xlwings.org/) | 0.24.9 | Interact with Excel from Python and vice versa / BSD-3-clause |
| [xlwt](http://www.python-excel.org/) | 1.3.0 | Writing data and formatting information to Excel files / BSD |
| [xz](http://tukaani.org/xz/) | 5.2.5 | Data compression software with high compression ratio / LGPL-2.1 and GPL-2.0 |
| [yaml](http://pyyaml.org/wiki/LibYAML) | 0.2.5 | A C library for parsing and emitting YAML / MIT |
| [yapf](https://github.com/google/yapf) | 0.31.0 | A formatter for Python files / Apache 2.0 |
| [zfp](https://computation.llnl.gov/projects/floating-point-compression) | 0.5.5 | Library for compressed numerical arrays that support high throughput read and write random access / BSD-3-Clause |
| [zict](http://github.com/mrocklin/zict) | 2.0.0 | Composable Dictionary Classes / BSD 3-Clause |
| [zipp](https://github.com/jaraco/zipp) | 3.6.0 | A pathlib-compatible Zipfile object wrapper / MIT |
| [zlib](http://zlib.net/) | 1.2.11 | Massively spiffy yet delicately unobtrusive compression library / zlib |
| zope | 1.0 | web application server / BSD |
| [zope.event](http://www.zope.org/en/latest/) | 4.5.0 | Very basic event publishing system / Zope Public License |
| [zope.interface](https://github.com/zopefoundation/zope.interface) | 5.4.0 | Interfaces for Python / ZPL-2.1 |
| [zstd](http://www.zstd.net) | 1.4.9 | Zstandard - Fast real-time compression algorithm / BSD 3-Clause |
| Name | Version | Summary / License |
|---|---|---|
| [alabaster](http://www.sphinx-doc.org/en/stable/index.html) | 0.7.12 | Configurable, Python 2+3 compatible Sphinx theme. / BSD 3-Clause |
| [anaconda-client](https://github.com/Anaconda-Platform/anaconda-client) | 1.9.0 | Anaconda Cloud command line client library / BSD 3-Clause |
| [anaconda-navigator](https://github.com/ContinuumIO/navigator) | 2.1.1 | Anaconda Navigator / proprietary - Continuum Analytics, Inc. |
| [anaconda-project](https://github.com/Anaconda-Platform/anaconda-project) | 0.10.1 | Tool for encapsulating, running, and reproducing data science projects / BSD-3-Clause |
| [anyio](https://github.com/agronholm/anyio) | 2.2.0 | High level compatibility layer for multiple asynchronous event loop implementations on Python / MIT |
| [appdirs](http://github.com/ActiveState/appdirs) | 1.4.4 | A small Python module for determining appropriate platform-specific dirs. / MIT |
| [argh](https://github.com/neithere/argh) | 0.26.2 | The Natural CLI. / LGPL 3 |
| [argon2-cffi](https://argon2-cffi.readthedocs.org/) | 20.1.0 | The secure Argon2 password hashing algorithm. / MIT |
| [arrow](https://github.com/crsmithdev/arrow) | 0.13.1 | Better dates & times for Python / Apache-2.0 |
| [asn1crypto](https://github.com/wbond/asn1crypto) | 1.4.0 | Python ASN.1 library with a focus on performance and a pythonic API / MIT |
| [astroid](https://www.astroid.org/) | 2.6.6 | A abstract syntax tree for Python with inference support. / LGPL-2.1-or-later |
| [astropy](http://www.astropy.org/) | 4.3.1 | Community-developed Python Library for Astronomy / BSD-3-Clause |
| [async\_generator](https://github.com/python-trio/async_generator) | 1.10 | Async generators and context managers for Python 3.5+ / MIT |
| [atomicwrites](https://github.com/untitaker/python-atomicwrites) | 1.4.0 | Atomic file writes / MIT |
| [attrs](https://attrs.readthedocs.io/en/stable/) | 21.2.0 | attrs is the Python package that will bring back the joy of writing classes by relieving you from the drudgery of implementing object protocols (aka dunder methods). / MIT |
| [autopep8](https://github.com/hhatto/autopep8) | 1.5.7 | A tool that automatically formats Python code to conform to the PEP 8 style guide / MIT |
| [babel](http://babel.pocoo.org/) | 2.9.1 | Utilities to internationalize and localize Python applications / BSD 3-clause |
| [backcall](https://github.com/takluyver/backcall/) | 0.2.0 | Specifications for callback functions passed in to an API / BSD-3-Clause |
| [backports](https://bitbucket.org/brandon/backports) | 1.0 | None / BSD |
| [backports.shutil\_get\_terminal\_size](https://github.com/chrippa/backports.shutil_get_terminal_size) | 1.0.0 | A backport of the get\_terminal\_size function from Python 3.3’s shutil. / MIT |
| [bcrypt](https://github.com/pyca/bcrypt/) | 3.2.0 | Modern password hashing for your software and your servers / Apache-2.0 |
| [beautifulsoup4](http://www.crummy.com/software/BeautifulSoup/) | 4.10.0 | Python library designed for screen-scraping / MIT |
| [binaryornot](https://github.com/audreyr/binaryornot) | 0.4.4 | Ultra-lightweight pure Python package to check if a file is binary or text. / BSD-3-Clause |
| [bitarray](https://github.com/ilanschnell/bitarray) | 2.3.0 | efficient arrays of booleans – C extension / PSF |
| [bkcharts](http://github.com/bokeh/bkcharts) | 0.2 | High level chart types built on top of Bokeh / BSD 3-Clause |
| [black](https://github.com/python/black) | 19.10b0 | The Uncompromising Code Formatter / MIT |
| [blas](http://www.netlib.org/lapack) | 1.0 | Linear Algebra PACKage / BSD-3-Clause |
| [bleach](https://github.com/mozilla/bleach) | 4.0.0 | Easy, whitelist-based HTML-sanitizing tool / Apache-2.0 |
| [blosc](https://github.com/Blosc/c-blosc) | 1.21.0 | A blocking, shuffling and loss-less compression library that can be faster than memcpy() / BSD-3-Clause |
| [bokeh](http://bokeh.pydata.org/) | 2.4.1 | Statistical and novel interactive HTML plots for Python / BSD-3-Clause |
| [boto](https://github.com/boto/boto/) | 2.49.0 | Amazon Web Services Library / MIT |
| [bottleneck](https://github.com/pydata/bottleneck) | 1.3.2 | Fast NumPy array functions written in Cython. / BSD 2-Clause |
| [brotli](http://github.com/google/brotli) | 1.0.9 | Brotli compression format / MIT |
| [brotlipy](https://github.com/python-hyper/brotlipy) | 0.7.0 | Python bindings to the Brotli compression library / MIT |
| [bzip2](http://www.bzip.org/) | 1.0.8 | high-quality data compressor / bzip2 |
| [ca-certificates](https://github.com/conda-forge/ca-certificates-feedstock) | 2021.10.26 | Certificates for use with other packages. / MPL 2.0 |
| [cached-property](https://github.com/pydanny/cached-property) | 1.5.2 | A decorator for caching properties in classes. / BSD-3-Clause |
| [certifi](http://certifi.io/) | 2021.10.8 | Python package for providing Mozilla’s CA Bundle. / ISC |
| [cffi](http://cffi.readthedocs.org/) | 1.14.6 | Foreign Function Interface for Python calling C code. / MIT |
| [chardet](https://github.com/chardet/chardet) | 4.0.0 | Universal character encoding detector / LGPL2 |
| [charset-normalizer](https://github.com/ousret/charset_normalizer) | 2.0.4 | The Real First Universal Charset Detector. Open, modern and actively maintained alternative to Chardet. / MIT |
| [click](https://palletsprojects.com/p/click) | 8.0.3 | Python composable command line interface toolkit / BSD-3-Clause |
| [cloudpickle](https://github.com/cloudpipe/cloudpickle) | 2.0.0 | Extended pickling support for Python objects / BSD-3-Clause |
| [clyent](https://github.com/Anaconda-Platform/clyent) | 1.2.2 | Command line client library for windows and posix / BSD 3-Clause |
| [colorama](https://github.com/tartley/colorama) | 0.4.4 | Cross-platform colored terminal text / BSD-3-Clause |
| [comtypes](http://starship.python.net/crew/theller/comtypes/) | 1.1.10 | pure Python COM package / MIT |
| [conda](https://conda.io) | 4.10.3 | OS-agnostic, system-level binary package and environment manager. / BSD 3-Clause |
| [conda-build](https://github.com/conda/conda-build) | 3.21.6 | tools for building conda packages / BSD 3-Clause |
| [conda-content-trust](https://github.com/conda/conda-content-trust) | 0.1.1 | Signing and verification tools for conda / BSD-3-Clause |
| [conda-env](https://github.com/conda/conda-env) | 2.6.0 | Tools for interacting with conda environments. / BSD 3-Clause |
| [conda-token](https://github.com/Anaconda/conda-token) | 0.3.0 | Set repository access token / BSD-3-Clause |
| [conda-verify](https://github.com/conda/conda-verify) | 3.4.2 | tool for validating conda recipes and conda packages / BSD 3-Clause |
| console\_shortcut | 0.1.1 | Console shortcut creator for Windows (using menuinst) / BSD |
| [contextlib2](http://contextlib2.readthedocs.org) | 0.6.0.post1 | Backports and enhancements for the contextlib module / PSF 2 |
| [cookiecutter](https://github.com/cookiecutter/cookiecutter) | 1.7.2 | A command-line utility that creates projects from cookiecutters (project templates), e.g. creating a Python package project from a Python package project template. / BSD-3-Clause |
| [cryptography](https://github.com/pyca/cryptography) | 3.4.7 | Provides cryptographic recipes and primitives to Python developers / Apache-2.0 AND BSD-3-Clause AND PSF-2.0 AND MIT |
| [curl](http://curl.haxx.se/) | 7.78.0 | tool and library for transferring data with URL syntax / curl |
| [cycler](http://matplotlib.org/cycler) | 0.10.0 | Composable style cycles. / BSD 3-Clause |
| [cython](http://www.cython.org/) | 0.29.24 | The Cython compiler for writing C extensions for the Python language / Apache-2.0 |
| [cytoolz](https://github.com/pytoolz/cytoolz) | 0.11.0 | Cython implementation of Toolz. High performance functional utilities / BSD-3-Clause |
| [dask](https://dask.org/) | 2021.10.0 | Parallel PyData with Task Scheduling / BSD-3-Clause |
| [dask-core](http://github.com/dask/dask/) | 2021.10.0 | Parallel Python with task scheduling / BSD-3-Clause |
| [dataclasses](https://github.com/ericvsmith/dataclasses) | 0.8 | An implementation of PEP 557: Data Classes / Apache-2.0 |
| [debugpy](https://github.com/Microsoft/debugpy) | 1.4.1 | An implementation of the Debug Adapter Protocol for Python / MIT |
| [decorator](https://github.com/micheles/decorator) | 5.1.0 | Better living through Python with decorators. / BSD-2-Clause |
| [defusedxml](https://bitbucket.org/tiran/defusedxml) | 0.7.1 | XML bomb protection for Python stdlib modules / PSF 2.0 |
| [diff-match-patch](http://code.google.com/p/google-diff-match-patch/) | 20200713 | Diff Match Patch is a high-performance library in multiple languages that manipulates plain text / Apache-2.0 |
| [distributed](http://distributed.readthedocs.io/en/latest/) | 2021.10.0 | Distributed computing with Dask / BSD-3-Clause |
| [docutils](http://docutils.sourceforge.net/) | 0.17.1 | Docutils – Python Documentation Utilities / Public Domain Dedictation and BSD 2-Clause and PSF 2.1.1 and GPL 3.0 |
| [entrypoints](https://github.com/takluyver/entrypoints) | 0.3 | Discover and load entry points from installed packages. / MIT License |
| [et\_xmlfile](https://foss.heptapod.net/openpyxl/et_xmlfile) | 1.1.0 | An implementation of lxml.xmlfile for the standard library / MIT AND PSF-2.0 |
| [fastcache](https://github.com/pbrady/fastcache) | 1.1.0 | C implementation of Python 3 lru\_cache / MIT |
| [filelock](https://github.com/benediktschmitt/py-filelock) | 3.3.1 | A platform independent file lock. / Public Domain |
| [flake8](http://flake8.pycqa.org/) | 3.9.2 | Your Tool For Style Guide Enforcement / MIT |
| [flask](http://flask.pocoo.org) | 1.1.2 | A microframework based on Werkzeug, Jinja2 and good intentions. / BSD 3-Clause |
| [fonttools](https://github.com/fonttools/fonttools) | 4.25.0 | fontTools is a library for manipulating fonts, written in Python. / MIT |
| [freetype](https://www.freetype.org/) | 2.10.4 | A Free, High-Quality, and Portable Font Engine / GPL-2.0-only and LicenseRef-FreeType |
| [fsspec](https://github.com/martindurant/filesystem_spec) | 2021.10.1 | A specification for pythonic filesystems / BSD-3-Clause |
| [get\_terminal\_size](https://github.com/chrippa/backports.shutil_get_terminal_size) | 1.0.0 | Get the size of the terminal window. / MIT |
| [gevent](https://www.gevent.org) | 21.8.0 | Coroutine-based network library / MIT |
| [glob2](https://github.com/miracle2k/python-glob2) | 0.7 | Version of the glob module that supports recursion via \*\*, and can capture patterns. / BSD-2-Clause |
| [greenlet](https://github.com/python-greenlet/greenlet) | 1.1.1 | Lightweight in-process concurrent programming / MIT |
| [h5py](http://www.h5py.org/) | 3.2.1 | Read and write HDF5 files from Python / BSD-3-Clause |
| [hdf5](http://www.hdfgroup.org/HDF5/) | 1.10.6 | HDF5 is a data model, library, and file format for storing and managing data / HDF5 |
| [heapdict](http://stutzbachenterprises.com/) | 1.0.1 | A heap with decrease-key and increase-key operations / BSD 3-Clause |
| [html5lib](https://github.com/html5lib/html5lib-python) | 1.1 | HTML parser based on the WHATWG HTML specification / MIT |
| icc\_rt | 2019.0.0 | Intel runtime libraries for C, C++ and Fortran compilers / Intel proprietary |
| [icu](http://site.icu-project.org/) | 58.2 | International Components for Unicode. / MIT |
| [idna](https://github.com/kjd/idna) | 3.2 | Internationalized Domain Names in Applications (IDNA). / BSD-3-Clause |
| [imageio](https://imageio.github.io) | 2.9.0 | A Python library for reading and writing image data / BSD-2-Clause |
| [imagesize](https://github.com/shibukawa/imagesize_py) | 1.2.0 | Getting image size from png/jpeg/jpeg2000/gif file / MIT |
| [importlib-metadata](https://github.com/python/importlib_metadata) | 4.8.1 | A library to access the metadata for a Python package / Apache-2.0 |
| [importlib\_metadata](https://github.com/python/importlib_metadata) | 4.8.1 | A library to access the metadata for a Python package / Apache-2.0 |
| [inflection](http://github.com/jpvanhal/inflection) | 0.5.1 | A port of Ruby on Rails inflector to Python / MIT |
| [iniconfig](http://github.com/RonnyPfannschmidt/iniconfig) | 1.1.1 | iniconfig: brain-dead simple config-ini parsing / MIT |
| [intel-openmp](https://software.intel.com/en-us/node/522690) | 2021.4.0 | Math library for Intel and compatible processors / LicenseRef-ProprietaryIntel |
| [intervaltree](https://github.com/chaimleib/intervaltree) | 3.1.0 | Editable interval tree data structure for Python 2 and 3 / Apache-2.0 |
| [ipykernel](https://ipython.org) | 6.4.1 | IPython Kernel for Jupyter / BSD-3-Clause |
| [ipython](https://ipython.org) | 7.29.0 | IPython: Productive Interactive Computing / BSD-3-Clause |
| [ipython\_genutils](http://ipython.org) | 0.2.0 | vestigial utilities from IPython / BSD 3-Clause |
| [ipywidgets](https://github.com/ipython/ipywidgets) | 7.6.5 | Jupyter Interactive Widgets / BSD-3-Clause |
| [isort](https://github.com/timothycrosley/isort) | 5.9.3 | A Python utility / library to sort Python imports. / MIT |
| [itsdangerous](https://github.com/pallets/itsdangerous) | 2.0.1 | Various helpers to pass trusted data to untrusted environments. / BSD-3-Clause |
| [jdcal](https://github.com/phn/jdcal) | 1.4.1 | Julian dates from proleptic Gregorian and Julian calendars. / BSD 2-Clause |
| [jedi](https://github.com/davidhalter/jedi/) | 0.18.0 | An autocompletion tool for Python that can be used for text editors. / MIT |
| [jinja2](http://jinja.pocoo.org) | 2.11.3 | An easy to use stand-alone template engine written in pure python. / BSD-3-Clause |
| [jinja2-time](https://github.com/hackebrot/jinja2-time) | 0.2.0 | Jinja2 Extension for Dates and Times / MIT |
| [joblib](https://joblib.readthedocs.io/en/latest/) | 1.1.0 | Lightweight pipelining: using Python functions as pipeline jobs. / BSD-3-Clause |
| [jpeg](http://www.ijg.org/) | 9d | read/write jpeg COM, EXIF, IPTC medata / Custom free software license |
| [json5](https://github.com/dpranke/pyjson5) | 0.9.6 | A Python implementation of the JSON5 data format / Apache-2.0 |
| [jsonschema](https://github.com/Julian/jsonschema) | 3.2.0 | An implementation of JSON Schema validation for Python / MIT |
| [jupyter](http://jupyter.org) | 1.0.0 | Jupyter metapackage. Install all the Jupyter components in one go. / BSD 3-Clause |
| [jupyter\_client](https://jupyter.org) | 6.1.12 | jupyter\_client contains the reference implementation of the Jupyter protocol. / BSD-3-Clause |
| [jupyter\_console](http://jupyter.org) | 6.4.0 | Jupyter terminal console / BSD-3-Clause |
| [jupyter\_core](https://jupyter.org) | 4.8.1 | Core common functionality of Jupyter projects. / BSD-3-Clause |
| [jupyter\_server](https://jupyter.org) | 1.4.1 | Jupyter Server / BSD-3-Clause |
| [jupyterlab](https://github.com/jupyterlab/jupyterlab) | 3.2.1 | An extensible environment for interactive and reproducible computing, based on the Jupyter Notebook and Architecture. / BSD-3-Clause |
| [jupyterlab\_pygments](http://github.com/JupyterLab/jupyterlab_pygments) | 0.1.2 | Pygments syntax coloring scheme making use of the JupyterLab CSS variables / BSD-3-Clause |
| [jupyterlab\_server](https://github.com/jupyterlab/jupyterlab_server) | 2.8.2 | A set of server components for JupyterLab and JupyterLab like applications. / BSD-3-Clause |
| [jupyterlab\_widgets](https://github.com/jupyter-widgets/ipywidgets) | 1.0.0 | JupyterLab extension providing HTML widgets / BSD-3-Clause |
| [keyring](https://github.com/jaraco/keyring) | 23.1.0 | Store and access your passwords safely / MIT |
| [kiwisolver](https://github.com/nucleic/kiwi) | 1.3.1 | An efficient C++ implementation of the Cassowary constraint solver / BSD-3-Clause |
| [krb5](http://web.mit.edu/kerberos/) | 1.19.2 | A network authentication protocol. / MIT |
| [lazy-object-proxy](https://github.com/ionelmc/python-lazy-object-proxy) | 1.6.0 | A fast and thorough lazy object proxy / BSD-2-Clause |
| [libarchive](http://www.libarchive.org/) | 3.4.2 | Multi-format archive and compression library / BSD-2-Clause |
| [libcurl](http://curl.haxx.se/) | 7.78.0 | tool and library for transferring data with URL syntax / curl |
| [libiconv](https://www.gnu.org/software/libiconv/) | 1.15 | Provides iconv for systems which don’t have one (or that cannot convert from/to Unicode.) / GPL and LGPL |
| [liblief](https://lief.quarkslab.com/) | 0.10.1 | A cross platform library to parse, modify and abstract ELF, PE and MachO formats. / Apache-2.0 |
| [libpng](http://www.libpng.org/pub/png/libpng.html) | 1.6.37 | PNG reference library / zlib/libpng |
| [libspatialindex](http://libspatialindex.github.io) | 1.9.3 | Extensible framework for robust spatial indexing / MIT |
| [libssh2](https://www.libssh2.org/) | 1.9.0 | the SSH library / BSD-3-Clause |
| [libtiff](http://www.libtiff.org/) | 4.2.0 | Support for the Tag Image File Format (TIFF). / HPND |
| [libwebp](https://developers.google.com/speed/webp/) | 1.2.0 | WebP image library / Google |
| [libxml2](http://xmlsoft.org/) | 2.9.12 | The XML C parser and toolkit of Gnome / MIT |
| [libxslt](http://xmlsoft.org/XSLT/) | 1.1.34 | The XSLT C library developed for the GNOME project / MIT |
| [llvmlite](http://llvmlite.pydata.org) | 0.37.0 | A lightweight LLVM python binding for writing JIT compilers. / BSD-2-Clause |
| [locket](https://github.com/mwilliamson/locket.py) | 0.2.1 | File-based locks for Python for Linux and Windows / BSD 2-Clause |
| [lxml](http://lxml.de/) | 4.6.3 | Pythonic binding for the C libraries libxml2 and libxslt. / BSD-3-Clause and GPL-2.0-only and ZPL-2.0 and LicenseRef-ElementTree |
| [lz4-c](https://www.lz4.org) | 1.9.3 | Extremely Fast Compression algorithm / BSD-2-Clause |
| [lzo](http://www.oberhumer.com/opensource/lzo/) | 2.10 | LZO is a portable lossless data compression library written in ANSI C. / GPL v2+ |
| [m2w64-gcc-libgfortran](https://gcc.gnu.org) | 5.3.0 | GNU Compiler Collection (libgfortran) for MinGW-w64 / GPL, LGPL, FDL, custom |
| m2w64-gcc-libs | 5.3.0 | None / GPL3+, partial:GCCRLE, partial:LGPL2+ |
| [m2w64-gcc-libs-core](https://gcc.gnu.org) | 5.3.0 | GNU Compiler Collection (core libraries) for MinGW-w64 / GPL3+, partial:GCCRLE, partial:LGPL2+ |
| m2w64-gmp | 6.1.0 | None / LGPL3 |
| m2w64-libwinpthread-git | 5.0.0.4634.697f757 | None / MIT, BSD |
| [markupsafe](https://www.palletsprojects.com/p/markupsafe) | 1.1.1 | A Python module that implements the jinja2.Markup string / BSD-3-Clause |
| [matplotlib](http://matplotlib.org/) | 3.4.3 | Publication quality figures in Python / LicenseRef-PSF-based |
| [matplotlib-base](http://matplotlib.org/) | 3.4.3 | Publication quality figures in Python / LicenseRef-PSF-based |
| [matplotlib-inline](https://github.com/ipython/matplotlib-inline) | 0.1.2 | Inline Matplotlib backend for Jupyter / BSD-3-Clause |
| [mccabe](https://github.com/PyCQA/mccabe) | 0.6.1 | McCabe complexity checker for Python / MIT |
| [menuinst](https://github.com/conda/menuinst) | 1.4.18 | cross platform install of menu items / BSD-3-Clause |
| [mistune](https://github.com/lepture/mistune) | 0.8.4 | The fastest markdown parser in pure Python. / BSD 3-Clause |
| [mkl](https://software.intel.com/en-us/mkl) | 2021.4.0 | Math library for Intel and compatible processors / LicenseRef-ProprietaryIntel |
| [mkl-service](http://github.com/IntelPython/mkl-service) | 2.4.0 | Python hooks for Intel(R) Math Kernel Library runtime control settings. / BSD-3-Clause |
| [mkl\_fft](http://github.com/IntelPython/mkl_fft) | 1.3.1 | NumPy-based implementation of Fast Fourier Transform using Intel (R) Math Kernel Library. / BSD 3-Clause |
| [mkl\_random](http://github.com/IntelPython/mkl_random) | 1.2.2 | Intel (R) MKL-powered package for sampling from common probability distributions into NumPy arrays. / BSD-3-Clause |
| [mock](https://github.com/testing-cabal/mock) | 4.0.3 | A library for testing in Python / BSD-2-Clause |
| [more-itertools](https://github.com/more-itertools/more-itertools) | 8.10.0 | More routines for operating on iterables, beyond itertools / MIT |
| [mpmath](http://mpmath.org) | 1.2.1 | Python library for arbitrary-precision floating-point arithmetic / BSD 3-Clause |
| [msgpack-python](http://msgpack.org/) | 1.0.2 | MessagePack (de)serializer / Apache-2.0 |
| msys2-conda-epoch | 20160418 | |
| [multipledispatch](https://github.com/mrocklin/multipledispatch/) | 0.6.0 | Multiple dispatch in Python / BSD 3-Clause |
| [munkres](https://github.com/bmc/munkres) | 1.1.4 | The Munkres module provides an O(n^3) implementation of the Munkres algorithm (also called the Hungarian algorithm or the Kuhn-Munkres algorithm). / Apache-2.0 |
| [mypy\_extensions](http://www.mypy-lang.org/) | 0.4.3 | Experimental type system extensions for programs checked with the mypy typechecker. / MIT |
| [nbclassic](http://github.com/jupyterlab/nbclassic) | 0.2.6 | Jupyter Notebook as a Jupyter Server Extension. / BSD-3-Clause |
| [nbclient](https://jupyter.org) | 0.5.3 | A client library for executing notebooks. Formally nbconvert’s ExecutePreprocessor. / BSD-3-Clause |
| [nbconvert](http://jupyter.org) | 6.1.0 | Converting Jupyter Notebooks / BSD-3-Clause |
| [nbformat](http://jupyter.org) | 5.1.3 | The Jupyter Notebook format / BSD-3-Clause |
| [nest-asyncio](https://github.com/erdewit/nest_asyncio) | 1.5.1 | Patch asyncio to allow nested event loops / BSD-2-Clause |
| [networkx](https://networkx.github.io/) | 2.6.3 | Python package for creating and manipulating complex networks / BSD-3-Clause |
| [nltk](http://nltk.org/) | 3.6.5 | Natural Language Toolkit / Apache 2.0 |
| [nose](http://readthedocs.org/docs/nose/) | 1.3.7 | Nose extends unittest to make testing easier / LGPL-2.1 |
| [notebook](https://jupyter.org) | 6.4.5 | Jupyter Notebook / BSD-3-Clause |
| [numba](http://numba.pydata.org) | 0.54.1 | NumPy aware dynamic Python compiler using LLVM / BSD-2-Clause |
| [numexpr](https://github.com/pydata/numexpr) | 2.7.3 | Fast numerical expression evaluator for NumPy. / MIT |
| [numpy](http://numpy.scipy.org/) | 1.20.3 | Array processing for numbers, strings, records, and objects. / BSD 3-Clause |
| [numpy-base](http://numpy.scipy.org/) | 1.20.3 | Array processing for numbers, strings, records, and objects. / BSD 3-Clause |
| [numpydoc](https://github.com/numpy/numpydoc) | 1.1.0 | Numpy’s Sphinx extensions / BSD 3-Clause |
| [olefile](http://www.decalage.info/python/olefileio) | 0.46 | parse, read and write Microsoft OLE2 files / BSD 2-Clause |
| [openpyxl](https://openpyxl.readthedocs.io) | 3.0.9 | A Python library to read/write Excel 2010 xlsx/xlsm files / MIT |
| [openssl](http://www.openssl.org/) | 1.1.1l | OpenSSL is an open-source implementation of the SSL and TLS protocols / OpenSSL |
| [packaging](https://github.com/pypa/packaging) | 21.0 | Core utilities for Python packages / Apache 2.0 or BSD 2-Clause |
| [pandas](http://pandas.pydata.org) | 1.3.4 | High-performance, easy-to-use data structures and data analysis tools. / BSD-3-Clause |
| [pandocfilters](https://github.com/jgm/pandocfilters) | 1.4.3 | A python module for writing pandoc filters / BSD-3-Clause |
| [paramiko](http://www.paramiko.org/) | 2.7.2 | SSH2 protocol library / LGPL-2.1-or-later |
| [parso](https://github.com/davidhalter/parso) | 0.8.2 | A Python Parser / MIT |
| [partd](https://github.com/dask/partd) | 1.2.0 | Data structure for on-disk shuffle operations / BSD 3-Clause |
| [path](https://github.com/jaraco/path) | 16.0.0 | A module wrapper for os.path / MIT |
| [path.py](https://github.com/jaraco/path.py) | 12.5.0 | A module wrapper for os.path / MIT |
| [pathlib2](https://github.com/mcmtroffaes/pathlib2) | 2.3.6 | Fork of pathlib aiming to support the full stdlib Python API / MIT |
| [pathspec](https://github.com/cpburnz/python-path-specification) | 0.7.0 | Utility library for gitignore style pattern matching of file paths. / MPL-2.0 |
| [patsy](https://github.com/pydata/patsy) | 0.5.2 | Describing statistical models in Python using symbolic formulas / BSD-2-Clause AND PSF-2.0 |
| [pep8](http://pep8.readthedocs.org/) | 1.7.1 | Python style guide checker / MIT |
| [pexpect](http://pexpect.sourceforge.net/) | 4.8.0 | Pexpect makes Python a better tool for controlling other applications. / ISC |
| [pickleshare](https://github.com/pickleshare/pickleshare/) | 0.7.5 | Tiny ‘shelve’-like database with concurrency support / MIT |
| [pillow](https://pillow.readthedocs.io) | 8.4.0 | Pillow is the friendly PIL fork by Alex Clark and Contributors / LicenseRef-PIL |
| [pip](https://pip.pypa.io/en/stable/) | 21.2.4 | PyPA recommended tool for installing Python packages / MIT |
| [pkginfo](https://code.launchpad.net/~tseaver/pkginfo/trunk) | 1.7.1 | Query metadatdata from sdists / bdists / installed packages. / MIT |
| [pluggy](https://github.com/pytest-dev/pluggy) | 0.13.1 | Plugin registration and hook calling for Python / MIT |
| [ply](http://www.dabeaz.com/ply/index.html) | 3.11 | Python Lex-Yacc / BSD 3-clause |
| powershell\_shortcut | 0.0.1 | Powershell shortcut creator for Windows (using menuinst) / BSD |
| [poyo](https://github.com/hackebrot/poyo) | 0.5.0 | A lightweight YAML Parser for Python / MIT |
| [prometheus\_client](https://github.com/prometheus/client_python) | 0.11.0 | Python client for the Prometheus monitoring system / Apache-2.0 |
| [prompt-toolkit](https://github.com/jonathanslenders/python-prompt-toolkit) | 3.0.20 | Library for building powerful interactive command lines in Python / BSD-3-Clause |
| [prompt\_toolkit](https://github.com/jonathanslenders/python-prompt-toolkit) | 3.0.20 | Library for building powerful interactive command lines in Python / BSD-3-Clause |
| [psutil](https://github.com/giampaolo/psutil) | 5.8.0 | A cross-platform process and system utilities module for Python / BSD-3-Clause |
| [ptyprocess](https://github.com/pexpect/ptyprocess) | 0.7.0 | Run a subprocess in a pseudo terminal / ISC |
| [py](https://github.com/pytest-dev/py) | 1.10.0 | library with cross-python path, ini-parsing, io, code, log facilities / MIT |
| [py-lief](https://lief.quarkslab.com/) | 0.10.1 | A cross platform library to parse, modify and abstract ELF, PE and MachO formats. / Apache-2.0 |
| [pycodestyle](https://pycodestyle.readthedocs.io/) | 2.7.0 | Python style guide checker / MIT |
| [pycosat](https://github.com/ContinuumIO/pycosat) | 0.6.3 | Bindings to picosat (a SAT solver) / MIT |
| [pycparser](https://github.com/eliben/pycparser) | 2.20 | Complete C99 parser in pure Python / BSD 3-clause |
| [pycurl](http://pycurl.sourceforge.net/) | 7.44.1 | A Python Interface To The cURL library / LGPL, MIT |
| [pydocstyle](https://github.com/PyCQA/pydocstyle) | 6.1.1 | Python docstring style checker (formerly pep257) / MIT |
| [pyerfa](https://pyerfa.readthedocs.io/) | 2.0.0 | Python bindings for ERFA routines / BSD-3-Clause |
| [pyflakes](https://github.com/PyCQA/pyflakes) | 2.3.1 | Pyflakes analyzes programs and detects various errors. / MIT |
| [pygments](http://pygments.org/) | 2.10.0 | Pygments is a generic syntax highlighter suitable for use in code hosting, forums, wikis or other applications that need to prettify source code. / BSD-2-clause |
| [pylint](https://www.pylint.org) | 2.9.6 | python code static checker / GPL-2.0-or-later |
| [pyls-spyder](https://github.com/spyder-ide/pyls-spyder) | 0.4.0 | Spyder extensions for the python-lsp-server / MIT |
| [pynacl](https://github.com/pyca/pynacl) | 1.4.0 | PyNaCl is a Python binding to the Networking and Cryptography library, a crypto library with the stated goal of improving usability, security and speed. / Apache-2.0 |
| [pyodbc](https://github.com/mkleehammer/pyodbc) | 4.0.31 | DB API Module for ODBC / MIT |
| [pyopenssl](https://github.com/pyca/pyopenssl) | 21.0.0 | Python wrapper module around the OpenSSL library / Apache 2.0 |
| [pyparsing](https://github.com/pyparsing/pyparsing/) | 3.0.4 | Create and execute simple grammars / MIT |
| [pyqt](http://www.riverbankcomputing.co.uk/software/pyqt) | 5.9.2 | Python binding of the cross-platform GUI toolkit Qt. / Commercial, GPL-2.0, GPL-3.0 |
| [pyreadline](http://ipython.org/pyreadline) | 2.1 | A python implmementation of GNU readline. / BSD 3-Clause |
| [pyrsistent](http://github.com/tobgu/pyrsistent/) | 0.18.0 | Persistent/Functional/Immutable data structures / MIT |
| [pysocks](https://github.com/Anorov/PySocks) | 1.7.1 | A Python SOCKS client module. See [Anorov/PySocks](https://github.com/Anorov/PySocks) for more information. / BSD 3-Clause |
| [pytables](http://www.pytables.org) | 3.6.1 | Brings together Python, HDF5 and NumPy to easily handle large amounts of data. / BSD 3-Clause |
| [pytest](https://docs.pytest.org/en/latest/) | 6.2.4 | Simple and powerful testing with Python. / MIT |
| [python](https://www.python.org/) | 3.9.7 | General purpose programming language / Python-2.0 |
| [python-dateutil](https://dateutil.readthedocs.org/) | 2.8.2 | Extensions to the standard Python datetime module. / BSD-3-Clause and Apache |
| [python-libarchive-c](https://github.com/Changaco/python-libarchive-c) | 2.9 | Python interface to libarchive / CC0-1.0 |
| [python-lsp-black](https://github.com/python-lsp/python-lsp-black) | 1.0.0 | Black plugin for the Python LSP Server / MIT |
| [python-lsp-jsonrpc](https://github.com/python-lsp/python-lsp-jsonrpc) | 1.0.0 | A Python 3.6+ server implementation of the JSON RPC 2.0 protocol. / MIT |
| [python-lsp-server](https://github.com/python-lsp/python-lsp-server) | 1.2.4 | An implementation of the Language Server Protocol for Python / MIT |
| [python-slugify](https://github.com/un33k/python-slugify) | 5.0.2 | A Python Slugify application that handles Unicode / MIT |
| [pytz](http://pythonhosted.org/pytz/) | 2021.3 | World timezone definitions, modern and historical. / MIT |
| [pywavelets](https://github.com/PyWavelets/pywt) | 1.1.1 | Discrete Wavelet Transforms in Python / MIT |
| [pywin32](https://github.com/mhammond/pywin32) | 228 | Python extensions for Windows / PSF-2.0 |
| [pywin32-ctypes](https://github.com/enthought/pywin32-ctypes) | 0.2.0 | A limited subset of pywin32 re-implemented using ctypes (or cffi) / BSD 3 Clause |
| [pywinpty](https://github.com/spyder-ide/pywinpty) | 0.5.7 | Python bindings for the winpty library / MIT |
| [pyyaml](http://pyyaml.org/wiki/PyYAML) | 6.0 | YAML parser and emitter for Python / MIT |
| [pyzmq](https://github.com/zeromq/pyzmq) | 22.2.1 | Python bindings for zeromq / BSD 3-clause |
| [qdarkstyle](https://github.com/ColinDuquesnoy/QDarkStyleSheet) | 3.0.2 | A dark stylesheet for Qt applications (Qt4, Qt5, PySide, PyQt4, PyQt5, QtPy, PyQtGraph). / MIT |
| [qstylizer](https://github.com/blambright/qstylizer) | 0.1.10 | Qt stylesheet generation utility for PyQt/PySide / MIT |
| [qt](http://qt.io) | 5.9.7 | Qt is a cross-platform application and UI framework. / LGPL-3.0-only |
| [qtawesome](https://github.com/spyder-ide/qtawesome) | 1.0.2 | Iconic fonts in PyQt and PySide applications / MIT |
| [qtconsole](http://jupyter.org) | 5.1.1 | Jupyter Qt Console / BSD-3-Clause |
| [qtpy](https://github.com/spyder-ide/qtpy) | 1.10.0 | Abstraction layer for PyQt5/PyQt4/PySide / MIT |
| [regex](https://bitbucket.org/mrabarnett/mrab-regex) | 2021.8.3 | Alternative regular expression module, to replace re / Apache 2.0 |
| [requests](http://python-requests.org) | 2.26.0 | Requests is an elegant and simple HTTP library for Python, built with ♥. / Apache-2.0 |
| [rope](https://github.com/python-rope/rope) | 0.19.0 | A python refactoring library / LGPL 3.0 |
| [rtree](http://toblerity.github.com/rtree/) | 0.9.7 | R-Tree spatial index for Python GIS / MIT |
| [ruamel\_yaml](https://sourceforge.net/p/ruamel-yaml/code/ci/default/tree) | 0.15.100 | A patched copy of ruamel.yaml. / MIT |
| [scikit-image](http://scikit-image.org/) | 0.16.2 | Image processing in Python. / BSD-3-Clause |
| [scikit-learn](http://scikit-learn.org/) | 0.24.2 | A set of python modules for machine learning and data mining / BSD-3-Clause |
| [scipy](http://www.scipy.org/) | 1.6.2 | Scientific Library for Python / BSD-3-Clause |
| [seaborn](https://seaborn.pydata.org) | 0.11.2 | Statistical data visualization / BSD 3-Clause |
| [send2trash](https://github.com/arsenetar/send2trash) | 1.8.0 | Python library to natively send files to Trash (or Recycle bin) on all platforms. / BSD-3-Clause |
| [setuptools](https://github.com/pypa/setuptools) | 58.0.4 | Download, build, install, upgrade, and uninstall Python packages / MIT |
| [simplegeneric](http://cheeseshop.python.org/pypi/simplegeneric) | 0.8.1 | Simple generic functions (similar to Python’s own len(), pickle.dump(), etc.) / Zope Public |
| [singledispatch](http://docs.python.org/3/library/functools.html#functools.singledispatch) | 3.7.0 | Transforms a function into a single-dispatch generic function / MIT |
| [sip](https://www.riverbankcomputing.com/software/pyqt-builder/intro) | 4.19.13 | Python binding of the cross-platform builder toolkit for Qt. / Commercial, GPL-2.0, GPL-3.0 |
| [six](https://six.readthedocs.io/) | 1.16.0 | Python 2 and 3 compatibility utilities / MIT |
| [sniffio](https://github.com/python-trio/sniffio) | 1.2.0 | Sniff out which async library your code is running under / Apache-2.0 |
| [snowballstemmer](https://github.com/shibukawa/snowball_py) | 2.1.0 | Snowball stemming library collection for Python / BSD-2-Clause |
| [sortedcollections](http://www.grantjenks.com/docs/sortedcollections/) | 2.1.0 | Python Sorted Collections / Apache-2.0 |
| [sortedcontainers](http://www.grantjenks.com/docs/sortedcontainers/) | 2.4.0 | Python Sorted Container Types: SortedList, SortedDict, and SortedSet / Apache-2.0 |
| [soupsieve](http://facelessuser.github.io/soupsieve) | 2.2.1 | A modern CSS selector implementation for BeautifulSoup / MIT |
| [sphinx](http://www.sphinx-doc.org) | 4.2.0 | Sphinx is a tool that makes it easy to create intelligent and beautiful documentation / BSD-2-Clause |
| sphinxcontrib | 1.0 | Python namespace for sphinxcontrib / BSD |
| [sphinxcontrib-applehelp](https://www.sphinx-doc.org/en/master/) | 1.0.2 | sphinxcontrib-applehelp is a sphinx extension which outputs Apple help books / BSD-2-Clause |
| [sphinxcontrib-devhelp](https://www.sphinx-doc.org/en/master/) | 1.0.2 | sphinxcontrib-devhelp is a sphinx extension which outputs Devhelp document / BSD-2-Clause |
| [sphinxcontrib-htmlhelp](https://www.sphinx-doc.org/en/master/) | 2.0.0 | sphinxcontrib-htmlhelp is a sphinx extension which renders HTML help files. / BSD-2-Clause |
| [sphinxcontrib-jsmath](https://www.sphinx-doc.org/en/master/) | 1.0.1 | A sphinx extension which renders display math in HTML via JavaScript / BSD-2-Clause |
| [sphinxcontrib-qthelp](https://www.sphinx-doc.org/en/master/) | 1.0.3 | sphinxcontrib-qthelp is a sphinx extension which outputs QtHelp document / BSD-2-Clause |
| [sphinxcontrib-serializinghtml](https://www.sphinx-doc.org/en/master/) | 1.1.5 | sphinxcontrib-serializinghtml is a sphinx extension which outputs “serialized” HTML files (json and pickle). / BSD-2-Clause |
| [sphinxcontrib-websupport](https://pypi.python.org/pypi/sphinxcontrib-websupport) | 1.2.4 | Sphinx API for Web Apps / BSD-2-Clause |
| [spyder](https://www.spyder-ide.org/) | 5.1.5 | The Scientific Python Development Environment / MIT |
| [spyder-kernels](https://www.spyder-ide.org/) | 2.1.3 | Jupyter kernels for Spyder’s console / MIT |
| [sqlalchemy](http://www.sqlalchemy.org/) | 1.4.22 | Database Abstraction Library. / MIT |
| [sqlite](http://www.sqlite.org/) | 3.36.0 | Implements a self-contained, zero-configuration, SQL database engine / Public-Domain (`<http://www.sqlite.org/copyright.html>`) |
| [statsmodels](https://www.statsmodels.org) | 0.12.2 | Statistical computations and models for use with SciPy / BSD-3-Clause |
| [sympy](https://sympy.org) | 1.9 | Python library for symbolic mathematics / BSD-3-Clause |
| [tbb](https://github.com/oneapi-src/oneTBB) | 2021.4.0 | High level abstract threading library / Apache-2.0 |
| tbb4py | 2021.4.0 | TBB module for Python / Apache 2.0 |
| [tblib](https://github.com/ionelmc/python-tblib) | 1.7.0 | Traceback serialization library. / BSD 2-Clause |
| [terminado](https://github.com/jupyter/terminado) | 0.9.4 | Terminals served by tornado websockets / BSD-2-Clause |
| [testpath](https://testpath.readthedocs.io) | 0.5.0 | Testpath is a collection of utilities for Python code working with files and commands. / BSD-3-Clause |
| [text-unidecode](https://github.com/kmike/text-unidecode/) | 1.3 | The most basic Text::Unidecode port / Artistic |
| [textdistance](https://github.com/orsinium/textdistance) | 4.2.1 | TextDistance – python library for comparing distance between two or more sequences by many algorithms. / MIT |
| [threadpoolctl](https://github.com/joblib/threadpoolctl) | 2.2.0 | Python helpers to control the threadpools of native libraries / BSD 3-Clause |
| [three-merge](https://github.com/spyder-ide/three-merge) | 0.1.1 | Simple Python library to perform a 3-way merge between strings / MIT |
| [tinycss](http://tinycss.readthedocs.io/) | 0.4 | Tinycss is a complete yet simple CSS parser for Python. / BSD-3-Clause |
| [tk](http://www.tcl.tk/) | 8.6.11 | A dynamic programming language with GUI support. Bundles Tcl and Tk. / Tcl/Tk |
| [toml](https://github.com/uiri/toml) | 0.10.2 | Python lib for TOML. / MIT |
| [toolz](http://toolz.readthedocs.org/) | 0.11.1 | A functional standard library for Python / BSD-3-Clause |
| [tornado](http://www.tornadoweb.org/) | 6.1 | A Python web framework and asynchronous networking library, originally developed at FriendFeed. / Apache-2.0 |
| [tqdm](https://pypi.python.org/pypi/tqdm) | 4.62.3 | A Fast, Extensible Progress Meter / MPL-2.0 AND MIT |
| [traitlets](http://traitlets.readthedocs.org/) | 5.1.0 | Configuration system for Python applications / BSD-3-Clause |
| [typed-ast](https://github.com/python/typed_ast) | 1.4.3 | a fork of Python 2 and 3 ast modules with type comment support / Apache-2.0 AND PSF-2.0 AND MIT |
| [typing\_extensions](https://github.com/python/typing/tree/master/typing_extensions) | 3.10.0.2 | Backported and Experimental Type Hints for Python / PSF-2.0 |
| [tzdata](https://www.iana.org/time-zones) | 2021e | The Time Zone Database (called tz, tzdb or zoneinfo) / Public-Domain AND BSD-3-clause |
| [ujson](https://github.com/ultrajson/ultrajson) | 4.0.2 | Ultra fast JSON decoder and encoder written in C with Python bindings / BSD-3-Clause |
| [unicodecsv](https://github.com/jdunck/python-unicodecsv) | 0.14.1 | Drop-in replacement for csv module which supports unicode strings / BSD |
| [unidecode](https://pypi.python.org/pypi/Unidecode) | 1.2.0 | ASCII transliterations of Unicode text / GPL-2.0-or-later |
| [urllib3](https://urllib3.readthedocs.io/) | 1.26.7 | HTTP library with thread-safe connection pooling, file post, and more. / MIT |
| [vc](https://github.com/conda/conda/wiki/VC-features) | 14.2 | A meta-package to impose mutual exclusivity among software built with different VS versions / Modified BSD License (3-clause) |
| vs2015\_runtime | 14.27.29016 | MSVC runtimes associated with cl.exe version 19.27.29111 (VS 2019 update 5) / None |
| [watchdog](http://github.com/gorakhargosh/watchdog) | 2.1.3 | Filesystem events monitoring / Apache-2.0 |
| [wcwidth](https://github.com/jquast/wcwidth) | 0.2.5 | Measures number of Terminal column cells of wide-character codes. / MIT |
| [webencodings](https://github.com/gsnedders/python-webencodings) | 0.5.1 | Character encoding aliases for legacy web content / BSD 3-Clause |
| [werkzeug](https://palletsprojects.com/p/werkzeug/) | 2.0.2 | The comprehensive WSGI web application library. / BSD-3-Clause |
| [wheel](https://github.com/pypa/wheel) | 0.37.0 | A built-package format for Python. / MIT |
| [whichcraft](https://github.com/pydanny/whichcraft) | 0.6.1 | This package provides cross-platform cross-python shutil.which functionality. / BSD-3-Clause |
| [widgetsnbextension](http://ipython.org) | 3.5.1 | Interactive Widgets for Jupyter / BSD 3-clause |
| [win\_inet\_pton](https://github.com/hickeroar/win_inet_pton) | 1.1.0 | Native inet\_pton and inet\_ntop implementation for Python on Windows (with ctypes). / PUBLIC-DOMAIN |
| [win\_unicode\_console](https://github.com/Drekin/win-unicode-console) | 0.5 | A Python package to enable Unicode input and display when running Python from Windows console. / MIT |
| [wincertstore](https://bitbucket.org/tiran/wincertstore) | 0.2 | Python module to extract CA and CRL certs from Windows’ cert store (ctypes based). / PSF 2 |
| [winpty](https://github.com/rprichard/winpty) | 0.4.3 | Winpty provides an interface similar to a Unix pty-master for communicating with Windows console programs. / MIT |
| [wrapt](https://github.com/GrahamDumpleton/wrapt) | 1.12.1 | Module for decorators, wrappers and monkey patching / BSD 2-Clause |
| [xlrd](http://www.python-excel.org/) | 2.0.1 | Library for developers to extract data from Microsoft Excel (tm) spreadsheet files / BSD 3-Clause and BSD with advertising |
| [xlsxwriter](https://xlsxwriter.readthedocs.io/) | 3.0.1 | A Python module for creating Excel XLSX files / BSD-2-Clause |
| [xlwings](http://xlwings.org/) | 0.24.9 | Interact with Excel from Python and vice versa / BSD-3-clause |
| [xlwt](http://www.python-excel.org/) | 1.3.0 | Writing data and formatting information to Excel files / BSD |
| [xz](http://tukaani.org/xz/) | 5.2.5 | Data compression software with high compression ratio / LGPL-2.1 and GPL-2.0 |
| [yaml](http://pyyaml.org/wiki/LibYAML) | 0.2.5 | A C library for parsing and emitting YAML / MIT |
| [yapf](https://github.com/google/yapf) | 0.31.0 | A formatter for Python files / Apache 2.0 |
| [zict](http://github.com/mrocklin/zict) | 2.0.0 | Composable Dictionary Classes / BSD 3-Clause |
| [zipp](https://github.com/jaraco/zipp) | 3.6.0 | A pathlib-compatible Zipfile object wrapper / MIT |
| [zlib](http://zlib.net/) | 1.2.11 | Massively spiffy yet delicately unobtrusive compression library / zlib |
| zope | 1.0 | web application server / BSD |
| [zope.event](http://www.zope.org/en/latest/) | 4.5.0 | Very basic event publishing system / Zope Public License |
| [zope.interface](https://github.com/zopefoundation/zope.interface) | 5.4.0 | Interfaces for Python / ZPL-2.1 |
| [zstd](http://www.zstd.net) | 1.4.9 | Zstandard - Fast real-time compression algorithm / BSD 3-Clause |
| Name | Version | Summary / License |
|---|---|---|
| [alabaster](http://www.sphinx-doc.org/en/stable/index.html) | 0.7.12 | Configurable, Python 2+3 compatible Sphinx theme. / BSD 3-Clause |
| [anaconda-client](https://github.com/Anaconda-Platform/anaconda-client) | 1.9.0 | Anaconda Cloud command line client library / BSD 3-Clause |
| [anaconda-navigator](https://github.com/ContinuumIO/navigator) | 2.1.1 | Anaconda Navigator / proprietary - Continuum Analytics, Inc. |
| [anaconda-project](https://github.com/Anaconda-Platform/anaconda-project) | 0.10.1 | Tool for encapsulating, running, and reproducing data science projects / BSD-3-Clause |
| [anyio](https://github.com/agronholm/anyio) | 2.2.0 | High level compatibility layer for multiple asynchronous event loop implementations on Python / MIT |
| [appdirs](http://github.com/ActiveState/appdirs) | 1.4.4 | A small Python module for determining appropriate platform-specific dirs. / MIT |
| [applaunchservices](https://github.com/impact27/applaunchservices) | 0.2.1 | Simple package for registering an app with apple Launch Services to handle UTI and URL / MIT |
| [appnope](http://github.com/minrk/appnope) | 0.1.2 | Disable App Nap on OS X 10.9 / BSD 2-Clause |
| [appscript](http://appscript.sourceforge.net) | 1.1.2 | Control AppleScriptable applications from Python. / Public Domain |
| [argh](https://github.com/neithere/argh) | 0.26.2 | The Natural CLI. / LGPL 3 |
| [argon2-cffi](https://argon2-cffi.readthedocs.org/) | 20.1.0 | The secure Argon2 password hashing algorithm. / MIT |
| [arrow](https://github.com/crsmithdev/arrow) | 0.13.1 | Better dates & times for Python / Apache-2.0 |
| [asn1crypto](https://github.com/wbond/asn1crypto) | 1.4.0 | Python ASN.1 library with a focus on performance and a pythonic API / MIT |
| [astroid](https://www.astroid.org/) | 2.6.6 | A abstract syntax tree for Python with inference support. / LGPL-2.1-or-later |
| [astropy](http://www.astropy.org/) | 4.3.1 | Community-developed Python Library for Astronomy / BSD-3-Clause |
| [async\_generator](https://github.com/python-trio/async_generator) | 1.10 | Async generators and context managers for Python 3.5+ / MIT |
| [atomicwrites](https://github.com/untitaker/python-atomicwrites) | 1.4.0 | Atomic file writes / MIT |
| [attrs](https://attrs.readthedocs.io/en/stable/) | 21.2.0 | attrs is the Python package that will bring back the joy of writing classes by relieving you from the drudgery of implementing object protocols (aka dunder methods). / MIT |
| [autopep8](https://github.com/hhatto/autopep8) | 1.5.7 | A tool that automatically formats Python code to conform to the PEP 8 style guide / MIT |
| [babel](http://babel.pocoo.org/) | 2.9.1 | Utilities to internationalize and localize Python applications / BSD 3-clause |
| [backcall](https://github.com/takluyver/backcall/) | 0.2.0 | Specifications for callback functions passed in to an API / BSD-3-Clause |
| [backports](https://bitbucket.org/brandon/backports) | 1.0 | None / BSD |
| [backports.shutil\_get\_terminal\_size](https://github.com/chrippa/backports.shutil_get_terminal_size) | 1.0.0 | A backport of the get\_terminal\_size function from Python 3.3’s shutil. / MIT |
| [beautifulsoup4](http://www.crummy.com/software/BeautifulSoup/) | 4.10.0 | Python library designed for screen-scraping / MIT |
| [binaryornot](https://github.com/audreyr/binaryornot) | 0.4.4 | Ultra-lightweight pure Python package to check if a file is binary or text. / BSD-3-Clause |
| [bitarray](https://github.com/ilanschnell/bitarray) | 2.3.0 | efficient arrays of booleans – C extension / PSF |
| [bkcharts](http://github.com/bokeh/bkcharts) | 0.2 | High level chart types built on top of Bokeh / BSD 3-Clause |
| [black](https://github.com/python/black) | 19.10b0 | The Uncompromising Code Formatter / MIT |
| [blas](http://www.netlib.org/lapack) | 1.0 | Linear Algebra PACKage / BSD-3-Clause |
| [bleach](https://github.com/mozilla/bleach) | 4.0.0 | Easy, whitelist-based HTML-sanitizing tool / Apache-2.0 |
| [blosc](https://github.com/Blosc/c-blosc) | 1.21.0 | A blocking, shuffling and loss-less compression library that can be faster than memcpy() / BSD-3-Clause |
| [bokeh](http://bokeh.pydata.org/) | 2.4.1 | Statistical and novel interactive HTML plots for Python / BSD-3-Clause |
| [boto](https://github.com/boto/boto/) | 2.49.0 | Amazon Web Services Library / MIT |
| [bottleneck](https://github.com/pydata/bottleneck) | 1.3.2 | Fast NumPy array functions written in Cython. / BSD 2-Clause |
| [brotli](http://github.com/google/brotli) | 1.0.9 | Brotli compression format / MIT |
| [brotlipy](https://github.com/python-hyper/brotlipy) | 0.7.0 | Python bindings to the Brotli compression library / MIT |
| [brunsli](https://github.com/google/brunsli) | 0.1 | Practical JPEG Repacker / MIT |
| [bzip2](http://www.bzip.org/) | 1.0.8 | high-quality data compressor / bzip2 |
| [c-ares](https://c-ares.haxx.se/) | 1.17.1 | This is c-ares, an asynchronous resolver library / MIT |
| [ca-certificates](https://github.com/conda-forge/ca-certificates-feedstock) | 2021.10.26 | Certificates for use with other packages. / MPL 2.0 |
| [cached-property](https://github.com/pydanny/cached-property) | 1.5.2 | A decorator for caching properties in classes. / BSD-3-Clause |
| [certifi](http://certifi.io/) | 2021.10.8 | Python package for providing Mozilla’s CA Bundle. / ISC |
| [cffi](http://cffi.readthedocs.org/) | 1.14.6 | Foreign Function Interface for Python calling C code. / MIT |
| [cfitsio](http://heasarc.gsfc.nasa.gov/fitsio/fitsio.html) | 3.470 | A library for reading and writing FITS files / fitsio |
| [chardet](https://github.com/chardet/chardet) | 4.0.0 | Universal character encoding detector / LGPL2 |
| [charls](https://github.com/team-charls/charls) | 2.2.0 | CharLS is a C++ implementation of the JPEG-LS standard for lossless and near-lossless image compression and decompression. JPEG-LS is a low-complexity image compression standard that matches JPEG 2000 compression ratios. / BSD-3-Clause |
| [charset-normalizer](https://github.com/ousret/charset_normalizer) | 2.0.4 | The Real First Universal Charset Detector. Open, modern and actively maintained alternative to Chardet. / MIT |
| [click](https://palletsprojects.com/p/click) | 8.0.3 | Python composable command line interface toolkit / BSD-3-Clause |
| [cloudpickle](https://github.com/cloudpipe/cloudpickle) | 2.0.0 | Extended pickling support for Python objects / BSD-3-Clause |
| [clyent](https://github.com/Anaconda-Platform/clyent) | 1.2.2 | Command line client library for windows and posix / BSD 3-Clause |
| [colorama](https://github.com/tartley/colorama) | 0.4.4 | Cross-platform colored terminal text / BSD-3-Clause |
| [conda](https://conda.io) | 4.10.3 | OS-agnostic, system-level binary package and environment manager. / BSD 3-Clause |
| [conda-build](https://github.com/conda/conda-build) | 3.21.6 | tools for building conda packages / BSD 3-Clause |
| [conda-content-trust](https://github.com/conda/conda-content-trust) | 0.1.1 | Signing and verification tools for conda / BSD-3-Clause |
| [conda-env](https://github.com/conda/conda-env) | 2.6.0 | Tools for interacting with conda environments. / BSD 3-Clause |
| [conda-token](https://github.com/Anaconda/conda-token) | 0.3.0 | Set repository access token / BSD-3-Clause |
| [conda-verify](https://github.com/conda/conda-verify) | 3.4.2 | tool for validating conda recipes and conda packages / BSD 3-Clause |
| [contextlib2](http://contextlib2.readthedocs.org) | 0.6.0.post1 | Backports and enhancements for the contextlib module / PSF 2 |
| [cookiecutter](https://github.com/cookiecutter/cookiecutter) | 1.7.2 | A command-line utility that creates projects from cookiecutters (project templates), e.g. creating a Python package project from a Python package project template. / BSD-3-Clause |
| [cryptography](https://github.com/pyca/cryptography) | 3.4.8 | Provides cryptographic recipes and primitives to Python developers / Apache-2.0 AND BSD-3-Clause AND PSF-2.0 AND MIT |
| [curl](http://curl.haxx.se/) | 7.78.0 | tool and library for transferring data with URL syntax / curl |
| [cycler](http://matplotlib.org/cycler) | 0.10.0 | Composable style cycles. / BSD 3-Clause |
| [cython](http://www.cython.org/) | 0.29.24 | The Cython compiler for writing C extensions for the Python language / Apache-2.0 |
| [cytoolz](https://github.com/pytoolz/cytoolz) | 0.11.0 | Cython implementation of Toolz. High performance functional utilities / BSD-3-Clause |
| [daal4py](https://intelpython.github.io/daal4py/) | 2021.3.0 | A convenient Python API to Intel (R) oneAPI Data Analytics Library / Apache-2.0 |
| [dal](https://software.intel.com/content/www/us/en/develop/tools.html) | 2021.3.0 | Intel® oneDAL runtime libraries / Intel Simplified Software License |
| [dask](https://dask.org/) | 2021.10.0 | Parallel PyData with Task Scheduling / BSD-3-Clause |
| [dask-core](http://github.com/dask/dask/) | 2021.10.0 | Parallel Python with task scheduling / BSD-3-Clause |
| [dataclasses](https://github.com/ericvsmith/dataclasses) | 0.8 | An implementation of PEP 557: Data Classes / Apache-2.0 |
| [debugpy](https://github.com/Microsoft/debugpy) | 1.4.1 | An implementation of the Debug Adapter Protocol for Python / MIT |
| [decorator](https://github.com/micheles/decorator) | 5.1.0 | Better living through Python with decorators. / BSD-2-Clause |
| [defusedxml](https://bitbucket.org/tiran/defusedxml) | 0.7.1 | XML bomb protection for Python stdlib modules / PSF 2.0 |
| [diff-match-patch](http://code.google.com/p/google-diff-match-patch/) | 20200713 | Diff Match Patch is a high-performance library in multiple languages that manipulates plain text / Apache-2.0 |
| [distributed](http://distributed.readthedocs.io/en/latest/) | 2021.10.0 | Distributed computing with Dask / BSD-3-Clause |
| [docutils](http://docutils.sourceforge.net/) | 0.17.1 | Docutils – Python Documentation Utilities / Public Domain Dedictation and BSD 2-Clause and PSF 2.1.1 and GPL 3.0 |
| [entrypoints](https://github.com/takluyver/entrypoints) | 0.3 | Discover and load entry points from installed packages. / MIT License |
| [et\_xmlfile](https://foss.heptapod.net/openpyxl/et_xmlfile) | 1.1.0 | An implementation of lxml.xmlfile for the standard library / MIT AND PSF-2.0 |
| [fastcache](https://github.com/pbrady/fastcache) | 1.1.0 | C implementation of Python 3 lru\_cache / MIT |
| [filelock](https://github.com/benediktschmitt/py-filelock) | 3.3.1 | A platform independent file lock. / Public Domain |
| [flake8](http://flake8.pycqa.org/) | 3.9.2 | Your Tool For Style Guide Enforcement / MIT |
| [flask](http://flask.pocoo.org) | 1.1.2 | A microframework based on Werkzeug, Jinja2 and good intentions. / BSD 3-Clause |
| [fonttools](https://github.com/fonttools/fonttools) | 4.25.0 | fontTools is a library for manipulating fonts, written in Python. / MIT |
| [freetype](https://www.freetype.org/) | 2.10.4 | A Free, High-Quality, and Portable Font Engine / GPL-2.0-only and LicenseRef-FreeType |
| [fsspec](https://github.com/martindurant/filesystem_spec) | 2021.8.1 | A specification for pythonic filesystems / BSD-3-Clause |
| [get\_terminal\_size](https://github.com/chrippa/backports.shutil_get_terminal_size) | 1.0.0 | Get the size of the terminal window. / MIT |
| [gevent](https://www.gevent.org) | 21.8.0 | Coroutine-based network library / MIT |
| [giflib](http://giflib.sourceforge.net) | 5.2.1 | Library for reading and writing gif images / MIT |
| [glob2](https://github.com/miracle2k/python-glob2) | 0.7 | Version of the glob module that supports recursion via \*\*, and can capture patterns. / BSD-2-Clause |
| [gmp](http://gmplib.org/) | 6.2.1 | The GNU multiprecision library. / GPL-2.0-or-later AND LGPL-3.0-or-later |
| [gmpy2](https://pypi.python.org/pypi/gmpy2) | 2.0.8 | GMP/MPIR, MPFR, and MPC interface to Python 2.6+ and 3.x / LGPL 3 |
| [greenlet](https://github.com/python-greenlet/greenlet) | 1.1.1 | Lightweight in-process concurrent programming / MIT |
| [h5py](http://www.h5py.org/) | 3.2.1 | Read and write HDF5 files from Python / BSD-3-Clause |
| [hdf5](http://www.hdfgroup.org/HDF5/) | 1.10.6 | HDF5 is a data model, library, and file format for storing and managing data / HDF5 |
| [heapdict](http://stutzbachenterprises.com/) | 1.0.1 | A heap with decrease-key and increase-key operations / BSD 3-Clause |
| [html5lib](https://github.com/html5lib/html5lib-python) | 1.1 | HTML parser based on the WHATWG HTML specification / MIT |
| [icu](http://site.icu-project.org/) | 58.2 | International Components for Unicode. / MIT |
| [idna](https://github.com/kjd/idna) | 3.2 | Internationalized Domain Names in Applications (IDNA). / BSD-3-Clause |
| [imagecodecs](https://www.lfd.uci.edu/~gohlke/) | 2021.8.26 | Image transformation, compression, and decompression codecs / BSD-3-Clause |
| [imageio](https://imageio.github.io) | 2.9.0 | A Python library for reading and writing image data / BSD-2-Clause |
| [imagesize](https://github.com/shibukawa/imagesize_py) | 1.2.0 | Getting image size from png/jpeg/jpeg2000/gif file / MIT |
| [importlib-metadata](https://github.com/python/importlib_metadata) | 4.8.1 | A library to access the metadata for a Python package / Apache-2.0 |
| [importlib\_metadata](https://github.com/python/importlib_metadata) | 4.8.1 | A library to access the metadata for a Python package / Apache-2.0 |
| [inflection](http://github.com/jpvanhal/inflection) | 0.5.1 | A port of Ruby on Rails inflector to Python / MIT |
| [iniconfig](http://github.com/RonnyPfannschmidt/iniconfig) | 1.1.1 | iniconfig: brain-dead simple config-ini parsing / MIT |
| [intel-openmp](https://software.intel.com/en-us/node/522690) | 2021.4.0 | Math library for Intel and compatible processors / LicenseRef-ProprietaryIntel |
| [intervaltree](https://github.com/chaimleib/intervaltree) | 3.1.0 | Editable interval tree data structure for Python 2 and 3 / Apache-2.0 |
| [ipykernel](https://ipython.org) | 6.4.1 | IPython Kernel for Jupyter / BSD-3-Clause |
| [ipython](https://ipython.org) | 7.29.0 | IPython: Productive Interactive Computing / BSD-3-Clause |
| [ipython\_genutils](http://ipython.org) | 0.2.0 | vestigial utilities from IPython / BSD 3-Clause |
| [ipywidgets](https://github.com/ipython/ipywidgets) | 7.6.5 | Jupyter Interactive Widgets / BSD-3-Clause |
| [isort](https://github.com/timothycrosley/isort) | 5.9.3 | A Python utility / library to sort Python imports. / MIT |
| [itsdangerous](https://github.com/pallets/itsdangerous) | 2.0.1 | Various helpers to pass trusted data to untrusted environments. / BSD-3-Clause |
| [jbig](https://www.cl.cam.ac.uk/~mgk25/jbigkit) | 2.1 | Implementation of the JBIG1 data compression standard / GPL-2.0 |
| [jdcal](https://github.com/phn/jdcal) | 1.4.1 | Julian dates from proleptic Gregorian and Julian calendars. / BSD 2-Clause |
| [jedi](https://github.com/davidhalter/jedi/) | 0.18.0 | An autocompletion tool for Python that can be used for text editors. / MIT |
| [jinja2](http://jinja.pocoo.org) | 2.11.3 | An easy to use stand-alone template engine written in pure python. / BSD-3-Clause |
| [jinja2-time](https://github.com/hackebrot/jinja2-time) | 0.2.0 | Jinja2 Extension for Dates and Times / MIT |
| [joblib](https://joblib.readthedocs.io/en/latest/) | 1.1.0 | Lightweight pipelining: using Python functions as pipeline jobs. / BSD-3-Clause |
| [jpeg](http://www.ijg.org/) | 9d | read/write jpeg COM, EXIF, IPTC medata / Custom free software license |
| [json5](https://github.com/dpranke/pyjson5) | 0.9.6 | A Python implementation of the JSON5 data format / Apache-2.0 |
| [jsonschema](https://github.com/Julian/jsonschema) | 3.2.0 | An implementation of JSON Schema validation for Python / MIT |
| [jupyter](http://jupyter.org) | 1.0.0 | Jupyter metapackage. Install all the Jupyter components in one go. / BSD 3-Clause |
| [jupyter\_client](https://jupyter.org) | 6.1.12 | jupyter\_client contains the reference implementation of the Jupyter protocol. / BSD-3-Clause |
| [jupyter\_console](http://jupyter.org) | 6.4.0 | Jupyter terminal console / BSD-3-Clause |
| [jupyter\_core](https://jupyter.org) | 4.8.1 | Core common functionality of Jupyter projects. / BSD-3-Clause |
| [jupyter\_server](https://jupyter.org) | 1.4.1 | Jupyter Server / BSD-3-Clause |
| [jupyterlab](https://github.com/jupyterlab/jupyterlab) | 3.2.1 | An extensible environment for interactive and reproducible computing, based on the Jupyter Notebook and Architecture. / BSD-3-Clause |
| [jupyterlab\_pygments](http://github.com/JupyterLab/jupyterlab_pygments) | 0.1.2 | Pygments syntax coloring scheme making use of the JupyterLab CSS variables / BSD-3-Clause |
| [jupyterlab\_server](https://github.com/jupyterlab/jupyterlab_server) | 2.8.2 | A set of server components for JupyterLab and JupyterLab like applications. / BSD-3-Clause |
| [jupyterlab\_widgets](https://github.com/jupyter-widgets/ipywidgets) | 1.0.0 | JupyterLab extension providing HTML widgets / BSD-3-Clause |
| [jxrlib](https://packages.debian.org/source/sid/jxrlib) | 1.1 | jxrlib - JPEG XR Library by Microsoft, built from Debian hosted sources. / BSD-2-Clause |
| [keyring](https://github.com/jaraco/keyring) | 23.1.0 | Store and access your passwords safely / MIT |
| [kiwisolver](https://github.com/nucleic/kiwi) | 1.3.1 | An efficient C++ implementation of the Cassowary constraint solver / BSD-3-Clause |
| [krb5](http://web.mit.edu/kerberos/) | 1.19.2 | A network authentication protocol. / MIT |
| [lazy-object-proxy](https://github.com/ionelmc/python-lazy-object-proxy) | 1.6.0 | A fast and thorough lazy object proxy / BSD-2-Clause |
| [lcms2](http://www.littlecms.com/) | 2.12 | Open Source Color Management Engine / MIT |
| [lerc](https://github.com/Esri/lerc) | 3.0 | LERC - Limited Error Raster Compression / Apache-2.0 |
| [libaec](https://gitlab.dkrz.de/k202009/libaec) | 1.0.4 | Adaptive Entropy Coding library / BSD-2-Clause |
| [libarchive](http://www.libarchive.org/) | 3.4.2 | Multi-format archive and compression library / BSD-2-Clause |
| [libcurl](http://curl.haxx.se/) | 7.78.0 | tool and library for transferring data with URL syntax / curl |
| [libcxx](http://llvm.org/) | 12.0.0 | LLVM C++ standard library / Apache-2.0 WITH LLVM-exception |
| [libdeflate](https://github.com/ebiggers/libdeflate) | 1.8 | libdeflate is a library for fast, whole-buffer DEFLATE-based compression and decompression. / MIT |
| [libedit](http://thrysoee.dk/editline/) | 3.1.20210910 | Editline Library (libedit) / BSD-2-Clause |
| [libev](http://software.schmorp.de/pkg/libev.html) | 4.33 | A full-featured and high-performance event loop that is loosely modeled after libevent, but without its limitations and bugs. / BSD-2-Clause |
| [libffi](https://sourceware.org/libffi/) | 3.3 | A Portable Foreign Function Interface Library. / MIT |
| [libgfortran](http://gcc.gnu.org/) | 3.0.1 | Fortran compiler and libraries from the GNU Compiler Collection / GPL-3.0-only WITH GCC-exception-3.1 |
| [libiconv](https://www.gnu.org/software/libiconv/) | 1.16 | Provides iconv for systems which don’t have one (or that cannot convert from/to Unicode.) / GPL and LGPL |
| [liblief](https://lief.quarkslab.com/) | 0.10.1 | A cross platform library to parse, modify and abstract ELF, PE and MachO formats. / Apache-2.0 |
| [libllvm11](http://llvm.org/) | 11.1.0 | Development headers and libraries for LLVM / Apache-2.0 WITH LLVM-exception |
| [libnghttp2](http://github.com/nghttp2/nghttp2) | 1.41.0 | This is an implementation of Hypertext Transfer Protocol version 2. / MIT |
| [libpng](http://www.libpng.org/pub/png/libpng.html) | 1.6.37 | PNG reference library / zlib/libpng |
| [libsodium](http://libsodium.org) | 1.0.18 | A modern and easy-to-use crypto library. / ISC |
| [libspatialindex](http://libspatialindex.github.io) | 1.9.3 | Extensible framework for robust spatial indexing / MIT |
| [libssh2](https://www.libssh2.org/) | 1.9.0 | the SSH library / BSD-3-Clause |
| [libtiff](http://www.libtiff.org/) | 4.2.0 | Support for the Tag Image File Format (TIFF). / HPND |
| [libuv](http://libuv.org/) | 1.40.0 | Cross-platform asynchronous I/O / MIT |
| [libwebp](https://developers.google.com/speed/webp/) | 1.2.0 | WebP image library / Google |
| [libwebp-base](https://developers.google.com/speed/webp) | 1.2.0 | WebP image library / BSD-3-Clause |
| [libxml2](http://xmlsoft.org/) | 2.9.12 | The XML C parser and toolkit of Gnome / MIT |
| [libxslt](http://xmlsoft.org/XSLT/) | 1.1.34 | The XSLT C library developed for the GNOME project / MIT |
| [libzopfli](https://github.com/google/zopfli) | 1.0.3 | A compression library programmed in C to perform very good, but slow, deflate or zlib compression. / Apache-2.0 |
| [llvm-openmp](http://openmp.llvm.org/) | 12.0.0 | The OpenMP API supports multi-platform shared-memory parallel programming in C/C++ and Fortran. / NCSA |
| [llvmlite](http://llvmlite.pydata.org) | 0.37.0 | A lightweight LLVM python binding for writing JIT compilers. / BSD-2-Clause |
| [locket](https://github.com/mwilliamson/locket.py) | 0.2.1 | File-based locks for Python for Linux and Windows / BSD 2-Clause |
| [lxml](http://lxml.de/) | 4.6.3 | Pythonic binding for the C libraries libxml2 and libxslt. / BSD-3-Clause and GPL-2.0-only and ZPL-2.0 and LicenseRef-ElementTree |
| [lz4-c](https://www.lz4.org) | 1.9.3 | Extremely Fast Compression algorithm / BSD-2-Clause |
| [lzo](http://www.oberhumer.com/opensource/lzo/) | 2.10 | LZO is a portable lossless data compression library written in ANSI C. / GPL v2+ |
| [markupsafe](https://www.palletsprojects.com/p/markupsafe) | 1.1.1 | A Python module that implements the jinja2.Markup string / BSD-3-Clause |
| [matplotlib](http://matplotlib.org/) | 3.4.3 | Publication quality figures in Python / LicenseRef-PSF-based |
| [matplotlib-base](http://matplotlib.org/) | 3.4.3 | Publication quality figures in Python / LicenseRef-PSF-based |
| [matplotlib-inline](https://github.com/ipython/matplotlib-inline) | 0.1.2 | Inline Matplotlib backend for Jupyter / BSD-3-Clause |
| [mccabe](https://github.com/PyCQA/mccabe) | 0.6.1 | McCabe complexity checker for Python / MIT |
| [mistune](https://github.com/lepture/mistune) | 0.8.4 | The fastest markdown parser in pure Python. / BSD 3-Clause |
| [mkl](https://software.intel.com/en-us/mkl) | 2021.4.0 | Math library for Intel and compatible processors / LicenseRef-ProprietaryIntel |
| [mkl-service](http://github.com/IntelPython/mkl-service) | 2.4.0 | Python hooks for Intel(R) Math Kernel Library runtime control settings. / BSD-3-Clause |
| [mkl\_fft](http://github.com/IntelPython/mkl_fft) | 1.3.1 | NumPy-based implementation of Fast Fourier Transform using Intel (R) Math Kernel Library. / BSD 3-Clause |
| [mkl\_random](http://github.com/IntelPython/mkl_random) | 1.2.2 | Intel (R) MKL-powered package for sampling from common probability distributions into NumPy arrays. / BSD-3-Clause |
| [mock](https://github.com/testing-cabal/mock) | 4.0.3 | A library for testing in Python / BSD-2-Clause |
| [more-itertools](https://github.com/more-itertools/more-itertools) | 8.10.0 | More routines for operating on iterables, beyond itertools / MIT |
| [mpc](http://www.multiprecision.org/) | 1.1.0 | A C library for the arithmetic of complex numbers with arbitrarily high precision. / LGPL 3 |
| [mpfr](http://www.mpfr.org/) | 4.0.2 | The MPFR library is a C library for multiple-precision floating-point computations with correct rounding. / LGPL-3.0-only |
| [mpi](http://www.mpich.org/) | 1.0 | A high performance widely portable implementation of the MPI standard. / MPICH |
| [mpich](http://www.mpich.org/) | 3.3.2 | A high performance widely portable implementation of the MPI standard. / MPICH |
| [mpmath](http://mpmath.org) | 1.2.1 | Python library for arbitrary-precision floating-point arithmetic / BSD 3-Clause |
| [msgpack-python](http://msgpack.org/) | 1.0.2 | MessagePack (de)serializer / Apache-2.0 |
| [multipledispatch](https://github.com/mrocklin/multipledispatch/) | 0.6.0 | Multiple dispatch in Python / BSD 3-Clause |
| [munkres](https://github.com/bmc/munkres) | 1.1.4 | The Munkres module provides an O(n^3) implementation of the Munkres algorithm (also called the Hungarian algorithm or the Kuhn-Munkres algorithm). / Apache-2.0 |
| [mypy\_extensions](http://www.mypy-lang.org/) | 0.4.3 | Experimental type system extensions for programs checked with the mypy typechecker. / MIT |
| [nbclassic](http://github.com/jupyterlab/nbclassic) | 0.2.6 | Jupyter Notebook as a Jupyter Server Extension. / BSD-3-Clause |
| [nbclient](https://jupyter.org) | 0.5.3 | A client library for executing notebooks. Formally nbconvert’s ExecutePreprocessor. / BSD-3-Clause |
| [nbconvert](http://jupyter.org) | 6.1.0 | Converting Jupyter Notebooks / BSD-3-Clause |
| [nbformat](http://jupyter.org) | 5.1.3 | The Jupyter Notebook format / BSD-3-Clause |
| [ncurses](http://www.gnu.org/software/ncurses/) | 6.3 | Library for text-based user interfaces / Free software (MIT-like) |
| [nest-asyncio](https://github.com/erdewit/nest_asyncio) | 1.5.1 | Patch asyncio to allow nested event loops / BSD-2-Clause |
| [networkx](https://networkx.github.io/) | 2.6.3 | Python package for creating and manipulating complex networks / BSD-3-Clause |
| [nltk](http://nltk.org/) | 3.6.5 | Natural Language Toolkit / Apache 2.0 |
| [nose](http://readthedocs.org/docs/nose/) | 1.3.7 | Nose extends unittest to make testing easier / LGPL-2.1 |
| [notebook](https://jupyter.org) | 6.4.5 | Jupyter Notebook / BSD-3-Clause |
| [numba](http://numba.pydata.org) | 0.54.1 | NumPy aware dynamic Python compiler using LLVM / BSD-2-Clause |
| [numexpr](https://github.com/pydata/numexpr) | 2.7.3 | Fast numerical expression evaluator for NumPy. / MIT |
| [numpy](http://numpy.scipy.org/) | 1.20.3 | Array processing for numbers, strings, records, and objects. / BSD 3-Clause |
| [numpy-base](http://numpy.scipy.org/) | 1.20.3 | Array processing for numbers, strings, records, and objects. / BSD 3-Clause |
| [numpydoc](https://github.com/numpy/numpydoc) | 1.1.0 | Numpy’s Sphinx extensions / BSD 3-Clause |
| [olefile](http://www.decalage.info/python/olefileio) | 0.46 | parse, read and write Microsoft OLE2 files / BSD 2-Clause |
| [openjpeg](http://www.openjpeg.org/) | 2.4.0 | An open-source JPEG 2000 codec written in C / BSD 2-Clause |
| [openpyxl](https://openpyxl.readthedocs.io) | 3.0.9 | A Python library to read/write Excel 2010 xlsx/xlsm files / MIT |
| [openssl](http://www.openssl.org/) | 1.1.1l | OpenSSL is an open-source implementation of the SSL and TLS protocols / OpenSSL |
| [packaging](https://github.com/pypa/packaging) | 21.0 | Core utilities for Python packages / Apache 2.0 or BSD 2-Clause |
| [pandas](http://pandas.pydata.org) | 1.3.4 | High-performance, easy-to-use data structures and data analysis tools. / BSD-3-Clause |
| [pandocfilters](https://github.com/jgm/pandocfilters) | 1.4.3 | A python module for writing pandoc filters / BSD-3-Clause |
| [parso](https://github.com/davidhalter/parso) | 0.8.2 | A Python Parser / MIT |
| [partd](https://github.com/dask/partd) | 1.2.0 | Data structure for on-disk shuffle operations / BSD 3-Clause |
| [path](https://github.com/jaraco/path) | 16.0.0 | A module wrapper for os.path / MIT |
| [path.py](https://github.com/jaraco/path.py) | 12.5.0 | A module wrapper for os.path / MIT |
| [pathlib2](https://github.com/mcmtroffaes/pathlib2) | 2.3.6 | Fork of pathlib aiming to support the full stdlib Python API / MIT |
| [pathspec](https://github.com/cpburnz/python-path-specification) | 0.7.0 | Utility library for gitignore style pattern matching of file paths. / MPL-2.0 |
| [patsy](https://github.com/pydata/patsy) | 0.5.2 | Describing statistical models in Python using symbolic formulas / BSD-2-Clause AND PSF-2.0 |
| [pep8](http://pep8.readthedocs.org/) | 1.7.1 | Python style guide checker / MIT |
| [pexpect](http://pexpect.sourceforge.net/) | 4.8.0 | Pexpect makes Python a better tool for controlling other applications. / ISC |
| [pickleshare](https://github.com/pickleshare/pickleshare/) | 0.7.5 | Tiny ‘shelve’-like database with concurrency support / MIT |
| [pillow](https://pillow.readthedocs.io) | 8.4.0 | Pillow is the friendly PIL fork by Alex Clark and Contributors / LicenseRef-PIL |
| [pip](https://pip.pypa.io/en/stable/) | 21.2.4 | PyPA recommended tool for installing Python packages / MIT |
| [pkginfo](https://code.launchpad.net/~tseaver/pkginfo/trunk) | 1.7.1 | Query metadatdata from sdists / bdists / installed packages. / MIT |
| [pluggy](https://github.com/pytest-dev/pluggy) | 0.13.1 | Plugin registration and hook calling for Python / MIT |
| [ply](http://www.dabeaz.com/ply/index.html) | 3.11 | Python Lex-Yacc / BSD 3-clause |
| [poyo](https://github.com/hackebrot/poyo) | 0.5.0 | A lightweight YAML Parser for Python / MIT |
| [prometheus\_client](https://github.com/prometheus/client_python) | 0.11.0 | Python client for the Prometheus monitoring system / Apache-2.0 |
| [prompt-toolkit](https://github.com/jonathanslenders/python-prompt-toolkit) | 3.0.20 | Library for building powerful interactive command lines in Python / BSD-3-Clause |
| [prompt\_toolkit](https://github.com/jonathanslenders/python-prompt-toolkit) | 3.0.20 | Library for building powerful interactive command lines in Python / BSD-3-Clause |
| [psutil](https://github.com/giampaolo/psutil) | 5.8.0 | A cross-platform process and system utilities module for Python / BSD-3-Clause |
| [ptyprocess](https://github.com/pexpect/ptyprocess) | 0.7.0 | Run a subprocess in a pseudo terminal / ISC |
| [py](https://github.com/pytest-dev/py) | 1.10.0 | library with cross-python path, ini-parsing, io, code, log facilities / MIT |
| [py-lief](https://lief.quarkslab.com/) | 0.10.1 | A cross platform library to parse, modify and abstract ELF, PE and MachO formats. / Apache-2.0 |
| [pycodestyle](https://pycodestyle.readthedocs.io/) | 2.7.0 | Python style guide checker / MIT |
| [pycosat](https://github.com/ContinuumIO/pycosat) | 0.6.3 | Bindings to picosat (a SAT solver) / MIT |
| [pycparser](https://github.com/eliben/pycparser) | 2.20 | Complete C99 parser in pure Python / BSD 3-clause |
| [pycurl](http://pycurl.sourceforge.net/) | 7.44.1 | A Python Interface To The cURL library / LGPL, MIT |
| [pydocstyle](https://github.com/PyCQA/pydocstyle) | 6.1.1 | Python docstring style checker (formerly pep257) / MIT |
| [pyerfa](https://pyerfa.readthedocs.io/) | 2.0.0 | Python bindings for ERFA routines / BSD-3-Clause |
| [pyflakes](https://github.com/PyCQA/pyflakes) | 2.3.1 | Pyflakes analyzes programs and detects various errors. / MIT |
| [pygments](http://pygments.org/) | 2.10.0 | Pygments is a generic syntax highlighter suitable for use in code hosting, forums, wikis or other applications that need to prettify source code. / BSD-2-clause |
| [pylint](https://www.pylint.org) | 2.9.6 | python code static checker / GPL-2.0-or-later |
| [pyls-spyder](https://github.com/spyder-ide/pyls-spyder) | 0.4.0 | Spyder extensions for the python-lsp-server / MIT |
| [pyodbc](https://github.com/mkleehammer/pyodbc) | 4.0.31 | DB API Module for ODBC / MIT |
| [pyopenssl](https://github.com/pyca/pyopenssl) | 21.0.0 | Python wrapper module around the OpenSSL library / Apache 2.0 |
| [pyparsing](https://github.com/pyparsing/pyparsing/) | 3.0.4 | Create and execute simple grammars / MIT |
| [pyqt](http://www.riverbankcomputing.co.uk/software/pyqt) | 5.9.2 | Python binding of the cross-platform GUI toolkit Qt. / Commercial, GPL-2.0, GPL-3.0 |
| [pyrsistent](http://github.com/tobgu/pyrsistent/) | 0.18.0 | Persistent/Functional/Immutable data structures / MIT |
| [pysocks](https://github.com/Anorov/PySocks) | 1.7.1 | A Python SOCKS client module. See [Anorov/PySocks](https://github.com/Anorov/PySocks) for more information. / BSD 3-Clause |
| [pytables](http://www.pytables.org) | 3.6.1 | Brings together Python, HDF5 and NumPy to easily handle large amounts of data. / BSD 3-Clause |
| [pytest](https://docs.pytest.org/en/latest/) | 6.2.4 | Simple and powerful testing with Python. / MIT |
| [python](https://www.python.org/) | 3.9.7 | General purpose programming language / Python-2.0 |
| [python-dateutil](https://dateutil.readthedocs.org/) | 2.8.2 | Extensions to the standard Python datetime module. / BSD-3-Clause and Apache |
| [python-libarchive-c](https://github.com/Changaco/python-libarchive-c) | 2.9 | Python interface to libarchive / CC0-1.0 |
| [python-lsp-black](https://github.com/python-lsp/python-lsp-black) | 1.0.0 | Black plugin for the Python LSP Server / MIT |
| [python-lsp-jsonrpc](https://github.com/python-lsp/python-lsp-jsonrpc) | 1.0.0 | A Python 3.6+ server implementation of the JSON RPC 2.0 protocol. / MIT |
| [python-lsp-server](https://github.com/python-lsp/python-lsp-server) | 1.2.4 | An implementation of the Language Server Protocol for Python / MIT |
| [python-slugify](https://github.com/un33k/python-slugify) | 5.0.2 | A Python Slugify application that handles Unicode / MIT |
| [python.app](https://www.python.org/) | 3 | Proxy on macOS letting Python libraries hook into the GUI event loop / BSD-3-Clause |
| [pytz](http://pythonhosted.org/pytz/) | 2021.3 | World timezone definitions, modern and historical. / MIT |
| [pywavelets](https://github.com/PyWavelets/pywt) | 1.1.1 | Discrete Wavelet Transforms in Python / MIT |
| [pyyaml](http://pyyaml.org/wiki/PyYAML) | 6.0 | YAML parser and emitter for Python / MIT |
| [pyzmq](https://github.com/zeromq/pyzmq) | 22.2.1 | Python bindings for zeromq / BSD 3-clause |
| [qdarkstyle](https://github.com/ColinDuquesnoy/QDarkStyleSheet) | 3.0.2 | A dark stylesheet for Qt applications (Qt4, Qt5, PySide, PyQt4, PyQt5, QtPy, PyQtGraph). / MIT |
| [qstylizer](https://github.com/blambright/qstylizer) | 0.1.10 | Qt stylesheet generation utility for PyQt/PySide / MIT |
| [qt](http://qt.io) | 5.9.7 | Qt is a cross-platform application and UI framework. / LGPL-3.0-only |
| [qtawesome](https://github.com/spyder-ide/qtawesome) | 1.0.2 | Iconic fonts in PyQt and PySide applications / MIT |
| [qtconsole](http://jupyter.org) | 5.1.1 | Jupyter Qt Console / BSD-3-Clause |
| [qtpy](https://github.com/spyder-ide/qtpy) | 1.10.0 | Abstraction layer for PyQt5/PyQt4/PySide / MIT |
| [readline](https://cnswww.cns.cwru.edu/php/chet/readline/rltop.html) | 8.1 | library for editing command lines as they are typed in / GPL-3.0 |
| [regex](https://bitbucket.org/mrabarnett/mrab-regex) | 2021.8.3 | Alternative regular expression module, to replace re / Apache 2.0 |
| [requests](http://python-requests.org) | 2.26.0 | Requests is an elegant and simple HTTP library for Python, built with ♥. / Apache-2.0 |
| ripgrep | 12.1.1 | |
| [rope](https://github.com/python-rope/rope) | 0.19.0 | A python refactoring library / LGPL 3.0 |
| [rtree](http://toblerity.github.com/rtree/) | 0.9.7 | R-Tree spatial index for Python GIS / MIT |
| [ruamel\_yaml](https://sourceforge.net/p/ruamel-yaml/code/ci/default/tree) | 0.15.100 | A patched copy of ruamel.yaml. / MIT |
| [scikit-image](http://scikit-image.org/) | 0.18.3 | Image processing in Python. / BSD-3-Clause |
| [scikit-learn](http://scikit-learn.org/) | 0.24.2 | A set of python modules for machine learning and data mining / BSD-3-Clause |
| [scikit-learn-intelex](https://intel.github.io/scikit-learn-intelex) | 2021.3.0 | Intel(R) Extension for Scikit-learn is a seamless way to speed up your Scikit-learn application. / Apache-2.0 |
| [scipy](http://www.scipy.org/) | 1.7.1 | Scientific Library for Python / BSD-3-Clause |
| [seaborn](https://seaborn.pydata.org) | 0.11.2 | Statistical data visualization / BSD 3-Clause |
| [send2trash](https://github.com/arsenetar/send2trash) | 1.8.0 | Python library to natively send files to Trash (or Recycle bin) on all platforms. / BSD-3-Clause |
| [setuptools](https://github.com/pypa/setuptools) | 58.0.4 | Download, build, install, upgrade, and uninstall Python packages / MIT |
| [simplegeneric](http://cheeseshop.python.org/pypi/simplegeneric) | 0.8.1 | Simple generic functions (similar to Python’s own len(), pickle.dump(), etc.) / Zope Public |
| [singledispatch](http://docs.python.org/3/library/functools.html#functools.singledispatch) | 3.7.0 | Transforms a function into a single-dispatch generic function / MIT |
| [sip](https://www.riverbankcomputing.com/software/pyqt-builder/intro) | 4.19.13 | Python binding of the cross-platform builder toolkit for Qt. / Commercial, GPL-2.0, GPL-3.0 |
| [six](https://six.readthedocs.io/) | 1.16.0 | Python 2 and 3 compatibility utilities / MIT |
| [snappy](https://github.com/google/snappy) | 1.1.8 | A fast compressor/decompressor / BSD 3-clause |
| [sniffio](https://github.com/python-trio/sniffio) | 1.2.0 | Sniff out which async library your code is running under / Apache-2.0 |
| [snowballstemmer](https://github.com/shibukawa/snowball_py) | 2.1.0 | Snowball stemming library collection for Python / BSD-2-Clause |
| [sortedcollections](http://www.grantjenks.com/docs/sortedcollections/) | 2.1.0 | Python Sorted Collections / Apache-2.0 |
| [sortedcontainers](http://www.grantjenks.com/docs/sortedcontainers/) | 2.4.0 | Python Sorted Container Types: SortedList, SortedDict, and SortedSet / Apache-2.0 |
| [soupsieve](http://facelessuser.github.io/soupsieve) | 2.2.1 | A modern CSS selector implementation for BeautifulSoup / MIT |
| [sphinx](http://www.sphinx-doc.org) | 4.2.0 | Sphinx is a tool that makes it easy to create intelligent and beautiful documentation / BSD-2-Clause |
| sphinxcontrib | 1.0 | Python namespace for sphinxcontrib / BSD |
| [sphinxcontrib-applehelp](https://www.sphinx-doc.org/en/master/) | 1.0.2 | sphinxcontrib-applehelp is a sphinx extension which outputs Apple help books / BSD-2-Clause |
| [sphinxcontrib-devhelp](https://www.sphinx-doc.org/en/master/) | 1.0.2 | sphinxcontrib-devhelp is a sphinx extension which outputs Devhelp document / BSD-2-Clause |
| [sphinxcontrib-htmlhelp](https://www.sphinx-doc.org/en/master/) | 2.0.0 | sphinxcontrib-htmlhelp is a sphinx extension which renders HTML help files. / BSD-2-Clause |
| [sphinxcontrib-jsmath](https://www.sphinx-doc.org/en/master/) | 1.0.1 | A sphinx extension which renders display math in HTML via JavaScript / BSD-2-Clause |
| [sphinxcontrib-qthelp](https://www.sphinx-doc.org/en/master/) | 1.0.3 | sphinxcontrib-qthelp is a sphinx extension which outputs QtHelp document / BSD-2-Clause |
| [sphinxcontrib-serializinghtml](https://www.sphinx-doc.org/en/master/) | 1.1.5 | sphinxcontrib-serializinghtml is a sphinx extension which outputs “serialized” HTML files (json and pickle). / BSD-2-Clause |
| [sphinxcontrib-websupport](https://pypi.python.org/pypi/sphinxcontrib-websupport) | 1.2.4 | Sphinx API for Web Apps / BSD-2-Clause |
| [spyder](https://www.spyder-ide.org/) | 5.1.5 | The Scientific Python Development Environment / MIT |
| [spyder-kernels](https://www.spyder-ide.org/) | 2.1.3 | Jupyter kernels for Spyder’s console / MIT |
| [sqlalchemy](http://www.sqlalchemy.org/) | 1.4.22 | Database Abstraction Library. / MIT |
| [sqlite](http://www.sqlite.org/) | 3.36.0 | Implements a self-contained, zero-configuration, SQL database engine / Public-Domain (`<http://www.sqlite.org/copyright.html>`) |
| [statsmodels](https://www.statsmodels.org) | 0.12.2 | Statistical computations and models for use with SciPy / BSD-3-Clause |
| [sympy](https://sympy.org) | 1.9 | Python library for symbolic mathematics / BSD-3-Clause |
| [tbb](https://github.com/oneapi-src/oneTBB) | 2021.4.0 | High level abstract threading library / Apache-2.0 |
| tbb4py | 2021.4.0 | TBB module for Python / Apache 2.0 |
| [tblib](https://github.com/ionelmc/python-tblib) | 1.7.0 | Traceback serialization library. / BSD 2-Clause |
| [terminado](https://github.com/jupyter/terminado) | 0.9.4 | Terminals served by tornado websockets / BSD-2-Clause |
| [testpath](https://testpath.readthedocs.io) | 0.5.0 | Testpath is a collection of utilities for Python code working with files and commands. / BSD-3-Clause |
| [text-unidecode](https://github.com/kmike/text-unidecode/) | 1.3 | The most basic Text::Unidecode port / Artistic |
| [textdistance](https://github.com/orsinium/textdistance) | 4.2.1 | TextDistance – python library for comparing distance between two or more sequences by many algorithms. / MIT |
| [threadpoolctl](https://github.com/joblib/threadpoolctl) | 2.2.0 | Python helpers to control the threadpools of native libraries / BSD 3-Clause |
| [three-merge](https://github.com/spyder-ide/three-merge) | 0.1.1 | Simple Python library to perform a 3-way merge between strings / MIT |
| [tifffile](https://github.com/cgohlke/tifffile) | 2021.7.2 | Read and write image data from and to TIFF files. / BSD-3-Clause |
| [tinycss](http://tinycss.readthedocs.io/) | 0.4 | Tinycss is a complete yet simple CSS parser for Python. / BSD-3-Clause |
| [tk](http://www.tcl.tk/) | 8.6.11 | A dynamic programming language with GUI support. Bundles Tcl and Tk. / Tcl/Tk |
| [toml](https://github.com/uiri/toml) | 0.10.2 | Python lib for TOML. / MIT |
| [toolz](http://toolz.readthedocs.org/) | 0.11.1 | A functional standard library for Python / BSD-3-Clause |
| [tornado](http://www.tornadoweb.org/) | 6.1 | A Python web framework and asynchronous networking library, originally developed at FriendFeed. / Apache-2.0 |
| [tqdm](https://pypi.python.org/pypi/tqdm) | 4.62.3 | A Fast, Extensible Progress Meter / MPL-2.0 AND MIT |
| [traitlets](http://traitlets.readthedocs.org/) | 5.1.0 | Configuration system for Python applications / BSD-3-Clause |
| [typed-ast](https://github.com/python/typed_ast) | 1.4.3 | a fork of Python 2 and 3 ast modules with type comment support / Apache-2.0 AND PSF-2.0 AND MIT |
| [typing\_extensions](https://github.com/python/typing/tree/master/typing_extensions) | 3.10.0.2 | Backported and Experimental Type Hints for Python / PSF-2.0 |
| [tzdata](https://www.iana.org/time-zones) | 2021e | The Time Zone Database (called tz, tzdb or zoneinfo) / Public-Domain AND BSD-3-clause |
| [ujson](https://github.com/ultrajson/ultrajson) | 4.0.2 | Ultra fast JSON decoder and encoder written in C with Python bindings / BSD-3-Clause |
| [unicodecsv](https://github.com/jdunck/python-unicodecsv) | 0.14.1 | Drop-in replacement for csv module which supports unicode strings / BSD |
| [unidecode](https://pypi.python.org/pypi/Unidecode) | 1.2.0 | ASCII transliterations of Unicode text / GPL-2.0-or-later |
| [unixodbc](http://www.unixodbc.org/) | 2.3.9 | ODBC on non MS Windows platforms / LGPL-2.1 |
| [urllib3](https://urllib3.readthedocs.io/) | 1.26.7 | HTTP library with thread-safe connection pooling, file post, and more. / MIT |
| [watchdog](http://github.com/gorakhargosh/watchdog) | 2.1.3 | Filesystem events monitoring / Apache-2.0 |
| [wcwidth](https://github.com/jquast/wcwidth) | 0.2.5 | Measures number of Terminal column cells of wide-character codes. / MIT |
| [webencodings](https://github.com/gsnedders/python-webencodings) | 0.5.1 | Character encoding aliases for legacy web content / BSD 3-Clause |
| [werkzeug](https://palletsprojects.com/p/werkzeug/) | 2.0.2 | The comprehensive WSGI web application library. / BSD-3-Clause |
| [wheel](https://github.com/pypa/wheel) | 0.37.0 | A built-package format for Python. / MIT |
| [whichcraft](https://github.com/pydanny/whichcraft) | 0.6.1 | This package provides cross-platform cross-python shutil.which functionality. / BSD-3-Clause |
| [widgetsnbextension](http://ipython.org) | 3.5.1 | Interactive Widgets for Jupyter / BSD 3-clause |
| [wrapt](https://github.com/GrahamDumpleton/wrapt) | 1.12.1 | Module for decorators, wrappers and monkey patching / BSD 2-Clause |
| [wurlitzer](https://github.com/minrk/wurlitzer) | 2.1.1 | Capture C-level stdout/stderr in Python / MIT |
| [xlrd](http://www.python-excel.org/) | 2.0.1 | Library for developers to extract data from Microsoft Excel (tm) spreadsheet files / BSD 3-Clause and BSD with advertising |
| [xlsxwriter](https://xlsxwriter.readthedocs.io/) | 3.0.1 | A Python module for creating Excel XLSX files / BSD-2-Clause |
| [xlwings](http://xlwings.org/) | 0.24.9 | Interact with Excel from Python and vice versa / BSD-3-clause |
| [xlwt](http://www.python-excel.org/) | 1.3.0 | Writing data and formatting information to Excel files / BSD |
| [xz](http://tukaani.org/xz/) | 5.2.5 | Data compression software with high compression ratio / LGPL-2.1 and GPL-2.0 |
| [yaml](http://pyyaml.org/wiki/LibYAML) | 0.2.5 | A C library for parsing and emitting YAML / MIT |
| [yapf](https://github.com/google/yapf) | 0.31.0 | A formatter for Python files / Apache 2.0 |
| [zeromq](http://zeromq.org) | 4.3.4 | A high-performance asynchronous messaging library. / LGPL-3.0-or-later |
| [zfp](https://computation.llnl.gov/projects/floating-point-compression) | 0.5.5 | Library for compressed numerical arrays that support high throughput read and write random access / BSD-3-Clause |
| [zict](http://github.com/mrocklin/zict) | 2.0.0 | Composable Dictionary Classes / BSD 3-Clause |
| [zipp](https://github.com/jaraco/zipp) | 3.6.0 | A pathlib-compatible Zipfile object wrapper / MIT |
| [zlib](http://zlib.net/) | 1.2.11 | Massively spiffy yet delicately unobtrusive compression library / zlib |
| zope | 1.0 | web application server / BSD |
| [zope.event](http://www.zope.org/en/latest/) | 4.5.0 | Very basic event publishing system / Zope Public License |
| [zope.interface](https://github.com/zopefoundation/zope.interface) | 5.4.0 | Interfaces for Python / ZPL-2.1 |
| [zstd](http://www.zstd.net) | 1.4.9 | Zstandard - Fast real-time compression algorithm / BSD 3-Clause |
| Name | Version | Summary / License |
|---|---|---|
| [\_libgcc\_mutex](https://github.com/AnacondaRecipes/_libgcc_mutex-feedstock) | 0.1 | Mutex for libgcc and libgcc-ng / None |
| [\_openmp\_mutex](https://github.com/conda-forge/ctng-compilers-feedstock) | 4.5 | OpenMP Implementation Mutex / BSD-3-Clause |
| [alabaster](http://www.sphinx-doc.org/en/stable/index.html) | 0.7.12 | Configurable, Python 2+3 compatible Sphinx theme. / BSD 3-Clause |
| [anaconda-client](https://github.com/Anaconda-Platform/anaconda-client) | 1.9.0 | Anaconda Cloud command line client library / BSD 3-Clause |
| [anaconda-project](https://github.com/Anaconda-Platform/anaconda-project) | 0.10.1 | Tool for encapsulating, running, and reproducing data science projects / BSD-3-Clause |
| [anyio](https://github.com/agronholm/anyio) | 2.0.2 | High level compatibility layer for multiple asynchronous event loop implementations on Python / MIT |
| [argon2-cffi](https://argon2-cffi.readthedocs.org/) | 20.1.0 | The secure Argon2 password hashing algorithm. / MIT |
| [asn1crypto](https://github.com/wbond/asn1crypto) | 1.4.0 | Python ASN.1 library with a focus on performance and a pythonic API / MIT |
| [astroid](https://www.astroid.org/) | 2.4.2 | A abstract syntax tree for Python with inference support. / LGPL-2.1-or-later |
| [astropy](http://www.astropy.org/) | 4.3.1 | Community-developed Python Library for Astronomy / BSD-3-Clause |
| [async\_generator](https://github.com/python-trio/async_generator) | 1.10 | Async generators and context managers for Python 3.5+ / MIT |
| [attrs](https://attrs.readthedocs.io/en/stable/) | 21.2.0 | attrs is the Python package that will bring back the joy of writing classes by relieving you from the drudgery of implementing object protocols (aka dunder methods). / MIT |
| [babel](http://babel.pocoo.org/) | 2.9.1 | Utilities to internationalize and localize Python applications / BSD 3-clause |
| [backcall](https://github.com/takluyver/backcall/) | 0.2.0 | Specifications for callback functions passed in to an API / BSD-3-Clause |
| [backports](https://bitbucket.org/brandon/backports) | 1.0 | None / BSD |
| [backports.shutil\_get\_terminal\_size](https://github.com/chrippa/backports.shutil_get_terminal_size) | 1.0.0 | A backport of the get\_terminal\_size function from Python 3.3’s shutil. / MIT |
| [beautifulsoup4](http://www.crummy.com/software/BeautifulSoup/) | 4.10.0 | Python library designed for screen-scraping / MIT |
| [bitarray](https://github.com/ilanschnell/bitarray) | 1.6.1 | efficient arrays of booleans – C extension / PSF |
| [bkcharts](http://github.com/bokeh/bkcharts) | 0.2 | High level chart types built on top of Bokeh / BSD 3-Clause |
| [blas](http://www.netlib.org/lapack) | 1.0 | Linear Algebra PACKage / BSD-3-Clause |
| [bleach](https://github.com/mozilla/bleach) | 4.0.0 | Easy, whitelist-based HTML-sanitizing tool / Apache-2.0 |
| [blosc](https://github.com/Blosc/c-blosc) | 1.21.0 | A blocking, shuffling and loss-less compression library that can be faster than memcpy() / BSD-3-Clause |
| [bokeh](http://bokeh.pydata.org/) | 2.4.1 | Statistical and novel interactive HTML plots for Python / BSD-3-Clause |
| [bottleneck](https://github.com/pydata/bottleneck) | 1.3.2 | Fast NumPy array functions written in Cython. / BSD 2-Clause |
| [brotli](http://github.com/google/brotli) | 1.0.9 | Brotli compression format / MIT |
| [brotlipy](https://github.com/python-hyper/brotlipy) | 0.7.0 | Python bindings to the Brotli compression library / MIT |
| [bzip2](http://www.bzip.org/) | 1.0.8 | high-quality data compressor / bzip2 |
| [c-ares](https://c-ares.haxx.se/) | 1.17.1 | This is c-ares, an asynchronous resolver library / MIT |
| [ca-certificates](https://github.com/conda-forge/ca-certificates-feedstock) | 2021.10.26 | Certificates for use with other packages. / MPL 2.0 |
| [cairo](http://cairographics.org/) | 1.16.0 | Cairo is a 2D graphics library with support for multiple output devices. / LGPL 2.1 or MPL 1.1 |
| [certifi](http://certifi.io/) | 2021.10.8 | Python package for providing Mozilla’s CA Bundle. / ISC |
| [cffi](http://cffi.readthedocs.org/) | 1.14.6 | Foreign Function Interface for Python calling C code. / MIT |
| [chardet](https://github.com/chardet/chardet) | 4.0.0 | Universal character encoding detector / LGPL2 |
| [charset-normalizer](https://github.com/ousret/charset_normalizer) | 2.0.4 | The Real First Universal Charset Detector. Open, modern and actively maintained alternative to Chardet. / MIT |
| [click](https://palletsprojects.com/p/click) | 8.0.3 | Python composable command line interface toolkit / BSD-3-Clause |
| [cloudpickle](https://github.com/cloudpipe/cloudpickle) | 2.0.0 | Extended pickling support for Python objects / BSD-3-Clause |
| [clyent](https://github.com/Anaconda-Platform/clyent) | 1.2.2 | Command line client library for windows and posix / BSD 3-Clause |
| [colorama](https://github.com/tartley/colorama) | 0.4.4 | Cross-platform colored terminal text / BSD-3-Clause |
| [conda](https://conda.io) | 4.10.3 | OS-agnostic, system-level binary package and environment manager. / BSD 3-Clause |
| [conda-build](https://github.com/conda/conda-build) | 3.21.6 | tools for building conda packages / BSD 3-Clause |
| [conda-content-trust](https://github.com/conda/conda-content-trust) | 0.1.1 | Signing and verification tools for conda / BSD-3-Clause |
| [conda-env](https://github.com/conda/conda-env) | 2.6.0 | Tools for interacting with conda environments. / BSD 3-Clause |
| [conda-token](https://github.com/Anaconda/conda-token) | 0.3.0 | Set repository access token / BSD-3-Clause |
| [conda-verify](https://github.com/conda/conda-verify) | 3.4.2 | tool for validating conda recipes and conda packages / BSD 3-Clause |
| [contextlib2](http://contextlib2.readthedocs.org) | 0.6.0.post1 | Backports and enhancements for the contextlib module / PSF 2 |
| [cryptography](https://github.com/pyca/cryptography) | 3.4.7 | Provides cryptographic recipes and primitives to Python developers / Apache-2.0 AND BSD-3-Clause AND PSF-2.0 AND MIT |
| [curl](http://curl.haxx.se/) | 7.71.1 | tool and library for transferring data with URL syntax / curl |
| [cycler](http://matplotlib.org/cycler) | 0.10.0 | Composable style cycles. / BSD 3-Clause |
| [cython](http://www.cython.org/) | 0.29.24 | The Cython compiler for writing C extensions for the Python language / Apache-2.0 |
| [cytoolz](https://github.com/pytoolz/cytoolz) | 0.11.0 | Cython implementation of Toolz. High performance functional utilities / BSD-3-Clause |
| [dask](https://dask.org/) | 2021.10.0 | Parallel PyData with Task Scheduling / BSD-3-Clause |
| [dask-core](http://github.com/dask/dask/) | 2021.10.0 | Parallel Python with task scheduling / BSD-3-Clause |
| [dataclasses](https://github.com/ericvsmith/dataclasses) | 0.8 | An implementation of PEP 557: Data Classes / Apache-2.0 |
| [dbus](http://www.freedesktop.org/wiki/Software/dbus/) | 1.13.18 | Simple message bus system for applications to talk to one another / GPL2 |
| [debugpy](https://github.com/Microsoft/debugpy) | 1.4.1 | An implementation of the Debug Adapter Protocol for Python / MIT |
| [decorator](https://github.com/micheles/decorator) | 5.1.0 | Better living through Python with decorators. / BSD-2-Clause |
| [defusedxml](https://bitbucket.org/tiran/defusedxml) | 0.7.1 | XML bomb protection for Python stdlib modules / PSF 2.0 |
| [distributed](http://distributed.readthedocs.io/en/latest/) | 2021.10.0 | Distributed computing with Dask / BSD-3-Clause |
| [docutils](http://docutils.sourceforge.net/) | 0.17 | Docutils – Python Documentation Utilities / Public Domain Dedictation and BSD 2-Clause and PSF 2.1.1 and GPL 3.0 |
| [entrypoints](https://github.com/takluyver/entrypoints) | 0.3 | Discover and load entry points from installed packages. / MIT License |
| [et\_xmlfile](https://foss.heptapod.net/openpyxl/et_xmlfile) | 1.1.0 | An implementation of lxml.xmlfile for the standard library / MIT AND PSF-2.0 |
| [expat](http://expat.sourceforge.net/) | 2.4.1 | Expat XML parser library in C / MIT |
| [fastcache](https://github.com/pbrady/fastcache) | 1.1.0 | C implementation of Python 3 lru\_cache / MIT |
| [filelock](https://github.com/benediktschmitt/py-filelock) | 3.3.1 | A platform independent file lock. / Public Domain |
| [flask](http://flask.pocoo.org) | 1.1.2 | A microframework based on Werkzeug, Jinja2 and good intentions. / BSD 3-Clause |
| [fontconfig](http://www.freedesktop.org/wiki/Software/fontconfig/) | 2.13.1 | A library for configuring and customizing font access. / MIT |
| [fonttools](https://github.com/fonttools/fonttools) | 4.25.0 | fontTools is a library for manipulating fonts, written in Python. / MIT |
| [freetype](https://www.freetype.org/) | 2.10.4 | A Free, High-Quality, and Portable Font Engine / GPL-2.0-only and LicenseRef-FreeType |
| [fribidi](https://github.com/fribidi/fribidi) | 1.0.10 | The Free Implementation of the Unicode Bidirectional Algorithm. / LGPL-2.1 |
| [fsspec](https://github.com/martindurant/filesystem_spec) | 2021.8.1 | A specification for pythonic filesystems / BSD-3-Clause |
| [get\_terminal\_size](https://github.com/chrippa/backports.shutil_get_terminal_size) | 1.0.0 | Get the size of the terminal window. / MIT |
| [gevent](https://www.gevent.org) | 21.8.0 | Coroutine-based network library / MIT |
| [giflib](http://giflib.sourceforge.net) | 5.2.1 | Library for reading and writing gif images / MIT |
| [glib](https://developer.gnome.org/glib/) | 2.69.1 | Provides core application building blocks for libraries and applications written in C. / LGPL-2.1-or-later |
| [glob2](https://github.com/miracle2k/python-glob2) | 0.7 | Version of the glob module that supports recursion via \*\*, and can capture patterns. / BSD-2-Clause |
| [gmp](http://gmplib.org/) | 6.2.1 | The GNU multiprecision library. / GPL-2.0-or-later AND LGPL-3.0-or-later |
| [gmpy2](https://pypi.python.org/pypi/gmpy2) | 2.0.8 | GMP/MPIR, MPFR, and MPC interface to Python 2.6+ and 3.x / LGPL 3 |
| [graphite2](http://graphite.sil.org/) | 1.3.14 | A “smart font” system that handles the complexities of lesser-known languages of the world. / LGPLv2 |
| [greenlet](https://github.com/python-greenlet/greenlet) | 1.1.1 | Lightweight in-process concurrent programming / MIT |
| [h5py](http://www.h5py.org/) | 2.10.0 | Read and write HDF5 files from Python / BSD-3-Clause |
| [harfbuzz](http://www.freedesktop.org/wiki/Software/HarfBuzz/) | 2.8.0 | An OpenType text shaping engine. / MIT |
| [hdf5](http://www.hdfgroup.org/HDF5/) | 1.10.6 | HDF5 is a data model, library, and file format for storing and managing data / HDF5 |
| [heapdict](http://stutzbachenterprises.com/) | 1.0.1 | A heap with decrease-key and increase-key operations / BSD 3-Clause |
| [html5lib](https://github.com/html5lib/html5lib-python) | 1.1 | HTML parser based on the WHATWG HTML specification / MIT |
| [icu](http://site.icu-project.org/) | 68.1 | International Components for Unicode. / MIT |
| [idna](https://github.com/kjd/idna) | 3.2 | Internationalized Domain Names in Applications (IDNA). / BSD-3-Clause |
| [imagecodecs](https://www.lfd.uci.edu/~gohlke/) | 2021.1.11 | Image transformation, compression, and decompression codecs / BSD-3-Clause |
| [imageio](https://imageio.github.io) | 2.9.0 | A Python library for reading and writing image data / BSD-2-Clause |
| [imagesize](https://github.com/shibukawa/imagesize_py) | 1.2.0 | Getting image size from png/jpeg/jpeg2000/gif file / MIT |
| [importlib-metadata](https://github.com/python/importlib_metadata) | 4.8.1 | A library to access the metadata for a Python package / Apache-2.0 |
| [importlib\_metadata](https://github.com/python/importlib_metadata) | 4.8.1 | A library to access the metadata for a Python package / Apache-2.0 |
| [iniconfig](http://github.com/RonnyPfannschmidt/iniconfig) | 1.1.1 | iniconfig: brain-dead simple config-ini parsing / MIT |
| [ipykernel](https://ipython.org) | 6.4.1 | IPython Kernel for Jupyter / BSD-3-Clause |
| [ipython](https://ipython.org) | 7.29.0 | IPython: Productive Interactive Computing / BSD-3-Clause |
| [ipython\_genutils](http://ipython.org) | 0.2.0 | vestigial utilities from IPython / BSD 3-Clause |
| [ipywidgets](https://github.com/ipython/ipywidgets) | 7.6.5 | Jupyter Interactive Widgets / BSD-3-Clause |
| [isort](https://github.com/timothycrosley/isort) | 5.9.3 | A Python utility / library to sort Python imports. / MIT |
| [itsdangerous](https://github.com/pallets/itsdangerous) | 2.0.1 | Various helpers to pass trusted data to untrusted environments. / BSD-3-Clause |
| [jbig](https://www.cl.cam.ac.uk/~mgk25/jbigkit) | 2.1 | Implementation of the JBIG1 data compression standard / GPL-2.0 |
| [jdcal](https://github.com/phn/jdcal) | 1.4.1 | Julian dates from proleptic Gregorian and Julian calendars. / BSD 2-Clause |
| [jedi](https://github.com/davidhalter/jedi/) | 0.18.0 | An autocompletion tool for Python that can be used for text editors. / MIT |
| [jinja2](http://jinja.pocoo.org) | 2.11.3 | An easy to use stand-alone template engine written in pure python. / BSD-3-Clause |
| [joblib](https://joblib.readthedocs.io/en/latest/) | 1.1.0 | Lightweight pipelining: using Python functions as pipeline jobs. / BSD-3-Clause |
| [jpeg](http://www.ijg.org/) | 9d | read/write jpeg COM, EXIF, IPTC medata / Custom free software license |
| [json5](https://github.com/dpranke/pyjson5) | 0.9.6 | A Python implementation of the JSON5 data format / Apache-2.0 |
| [jsonschema](https://github.com/Julian/jsonschema) | 3.2.0 | An implementation of JSON Schema validation for Python / MIT |
| [jupyter](http://jupyter.org) | 1.0.0 | Jupyter metapackage. Install all the Jupyter components in one go. / BSD 3-Clause |
| [jupyter\_client](https://jupyter.org) | 7.0.1 | jupyter\_client contains the reference implementation of the Jupyter protocol. / BSD-3-Clause |
| [jupyter\_console](http://jupyter.org) | 6.4.0 | Jupyter terminal console / BSD-3-Clause |
| [jupyter\_core](https://jupyter.org) | 4.8.1 | Core common functionality of Jupyter projects. / BSD-3-Clause |
| [jupyter\_server](https://jupyter.org) | 1.4.1 | Jupyter Server / BSD-3-Clause |
| [jupyterlab](https://github.com/jupyterlab/jupyterlab) | 3.2.1 | An extensible environment for interactive and reproducible computing, based on the Jupyter Notebook and Architecture. / BSD-3-Clause |
| [jupyterlab\_pygments](http://github.com/JupyterLab/jupyterlab_pygments) | 0.1.2 | Pygments syntax coloring scheme making use of the JupyterLab CSS variables / BSD-3-Clause |
| [jupyterlab\_server](https://github.com/jupyterlab/jupyterlab_server) | 2.8.2 | A set of server components for JupyterLab and JupyterLab like applications. / BSD-3-Clause |
| [jupyterlab\_widgets](https://github.com/jupyter-widgets/ipywidgets) | 1.0.0 | JupyterLab extension providing HTML widgets / BSD-3-Clause |
| [jxrlib](https://packages.debian.org/source/sid/jxrlib) | 1.1 | jxrlib - JPEG XR Library by Microsoft, built from Debian hosted sources. / BSD-2-Clause |
| [kiwisolver](https://github.com/nucleic/kiwi) | 1.3.1 | An efficient C++ implementation of the Cassowary constraint solver / BSD-3-Clause |
| [krb5](http://web.mit.edu/kerberos/) | 1.18.2 | A network authentication protocol. / MIT |
| [lazy-object-proxy](https://github.com/ionelmc/python-lazy-object-proxy) | 1.4.3 | A fast and thorough lazy object proxy / BSD-2-Clause |
| [lcms2](http://www.littlecms.com/) | 2.12 | Open Source Color Management Engine / MIT |
| [ld\_impl\_linux-s390x](https://www.gnu.org/software/binutils/) | 2.33.1 | A set of programming tools for creating and managing binary programs, object files, libraries, profile data, and assembly source code. / GPL-3.0-only |
| [libaec](https://gitlab.dkrz.de/k202009/libaec) | 1.0.4 | Adaptive Entropy Coding library / BSD-2-Clause |
| [libarchive](http://www.libarchive.org/) | 3.4.2 | Multi-format archive and compression library / BSD-2-Clause |
| [libcurl](http://curl.haxx.se/) | 7.71.1 | tool and library for transferring data with URL syntax / curl |
| [libdeflate](https://github.com/ebiggers/libdeflate) | 1.7 | libdeflate is a library for fast, whole-buffer DEFLATE-based compression and decompression. / MIT |
| [libedit](http://thrysoee.dk/editline/) | 3.1.20210910 | Editline Library (libedit) / BSD-2-Clause |
| [libev](http://software.schmorp.de/pkg/libev.html) | 4.33 | A full-featured and high-performance event loop that is loosely modeled after libevent, but without its limitations and bugs. / BSD-2-Clause |
| [libffi](https://sourceware.org/libffi/) | 3.3 | A Portable Foreign Function Interface Library. / MIT |
| [libgcc-ng](https://gcc.gnu.org/onlinedocs/gccint/Libgcc.html) | 9.3.0 | The GCC low-level runtime library / GPL-3.0-only WITH GCC-exception-3.1 |
| [libgfortran-ng](https://gcc.gnu.org/) | 7.5.0 | The GNU Fortran Runtime Library / GPL-3.0-only WITH GCC-exception-3.1 |
| [libgfortran4](https://gcc.gnu.org/) | 7.5.0 | The GNU Fortran Runtime Library / GPL-3.0-only WITH GCC-exception-3.1 |
| [libgomp](https://gcc.gnu.org/onlinedocs/gccint/Libgcc.html) | 9.3.0 | The GCC OpenMP implementation. / GPL-3.0-only WITH GCC-exception-3.1 |
| [liblief](https://lief.quarkslab.com/) | 0.10.1 | A cross platform library to parse, modify and abstract ELF, PE and MachO formats. / Apache-2.0 |
| [libopenblas](http://www.openblas.net/) | 0.3.13 | An Optimized BLAS library / BSD |
| [libpng](http://www.libpng.org/pub/png/libpng.html) | 1.6.37 | PNG reference library / zlib/libpng |
| [libsodium](http://libsodium.org) | 1.0.18 | A modern and easy-to-use crypto library. / ISC |
| [libssh2](https://www.libssh2.org/) | 1.9.0 | the SSH library / BSD-3-Clause |
| [libstdcxx-ng](https://gcc.gnu.org/) | 9.3.0 | The GNU C++ Runtime Library / GPL-3.0-only WITH GCC-exception-3.1 |
| [libtiff](http://www.libtiff.org/) | 4.2.0 | Support for the Tag Image File Format (TIFF). / HPND |
| [libtool](http://www.gnu.org/software/libtool/) | 2.4.6 | The GNU Portable Library Tool / GPL 3 |
| [libuuid](http://sourceforge.net/projects/libuuid/) | 1.0.3 | Portable uuid C library. / BSD 3-Clause |
| [libuv](http://libuv.org/) | 1.40.0 | Cross-platform asynchronous I/O / MIT |
| [libwebp](https://developers.google.com/speed/webp/) | 1.2.0 | WebP image library / Google |
| [libxcb](http://xcb.freedesktop.org/) | 1.14 | This is the C-language Binding (XCB) package to the X Window System protocol / MIT |
| [libxml2](http://xmlsoft.org/) | 2.9.12 | The XML C parser and toolkit of Gnome / MIT |
| [libxslt](http://xmlsoft.org/XSLT/) | 1.1.34 | The XSLT C library developed for the GNOME project / MIT |
| [libzopfli](https://github.com/google/zopfli) | 1.0.3 | A compression library programmed in C to perform very good, but slow, deflate or zlib compression. / Apache-2.0 |
| [locket](https://github.com/mwilliamson/locket.py) | 0.2.1 | File-based locks for Python for Linux and Windows / BSD 2-Clause |
| [lxml](http://lxml.de/) | 4.6.3 | Pythonic binding for the C libraries libxml2 and libxslt. / BSD-3-Clause and GPL-2.0-only and ZPL-2.0 and LicenseRef-ElementTree |
| [lz4-c](https://www.lz4.org) | 1.9.3 | Extremely Fast Compression algorithm / BSD-2-Clause |
| [lzo](http://www.oberhumer.com/opensource/lzo/) | 2.10 | LZO is a portable lossless data compression library written in ANSI C. / GPL v2+ |
| [markupsafe](https://www.palletsprojects.com/p/markupsafe) | 2.0.1 | A Python module that implements the jinja2.Markup string / BSD-3-Clause |
| [matplotlib](http://matplotlib.org/) | 3.4.3 | Publication quality figures in Python / LicenseRef-PSF-based |
| [matplotlib-base](http://matplotlib.org/) | 3.4.3 | Publication quality figures in Python / LicenseRef-PSF-based |
| [matplotlib-inline](https://github.com/ipython/matplotlib-inline) | 0.1.2 | Inline Matplotlib backend for Jupyter / BSD-3-Clause |
| [mccabe](https://github.com/PyCQA/mccabe) | 0.6.1 | McCabe complexity checker for Python / MIT |
| [mistune](https://github.com/lepture/mistune) | 0.8.4 | The fastest markdown parser in pure Python. / BSD 3-Clause |
| [mock](https://github.com/testing-cabal/mock) | 4.0.3 | A library for testing in Python / BSD-2-Clause |
| [more-itertools](https://github.com/more-itertools/more-itertools) | 8.10.0 | More routines for operating on iterables, beyond itertools / MIT |
| [mpc](http://www.multiprecision.org/) | 1.1.0 | A C library for the arithmetic of complex numbers with arbitrarily high precision. / LGPL 3 |
| [mpfr](http://www.mpfr.org/) | 4.0.2 | The MPFR library is a C library for multiple-precision floating-point computations with correct rounding. / LGPL-3.0-only |
| [mpmath](http://mpmath.org) | 1.2.1 | Python library for arbitrary-precision floating-point arithmetic / BSD 3-Clause |
| [msgpack-python](http://msgpack.org/) | 1.0.2 | MessagePack (de)serializer / Apache-2.0 |
| [multipledispatch](https://github.com/mrocklin/multipledispatch/) | 0.6.0 | Multiple dispatch in Python / BSD 3-Clause |
| [munkres](https://github.com/bmc/munkres) | 1.1.4 | The Munkres module provides an O(n^3) implementation of the Munkres algorithm (also called the Hungarian algorithm or the Kuhn-Munkres algorithm). / Apache-2.0 |
| [nbclassic](http://github.com/jupyterlab/nbclassic) | 0.2.6 | Jupyter Notebook as a Jupyter Server Extension. / BSD-3-Clause |
| [nbclient](https://jupyter.org) | 0.5.3 | A client library for executing notebooks. Formally nbconvert’s ExecutePreprocessor. / BSD-3-Clause |
| [nbconvert](http://jupyter.org) | 6.1.0 | Converting Jupyter Notebooks / BSD-3-Clause |
| [nbformat](http://jupyter.org) | 5.1.3 | The Jupyter Notebook format / BSD-3-Clause |
| [ncurses](http://www.gnu.org/software/ncurses/) | 6.3 | Library for text-based user interfaces / Free software (MIT-like) |
| [nest-asyncio](https://github.com/erdewit/nest_asyncio) | 1.5.1 | Patch asyncio to allow nested event loops / BSD-2-Clause |
| [networkx](https://networkx.github.io/) | 2.6.3 | Python package for creating and manipulating complex networks / BSD-3-Clause |
| [nltk](http://nltk.org/) | 3.6.3 | Natural Language Toolkit / Apache 2.0 |
| nomkl | 3.0 | None / BSD |
| [nose](http://readthedocs.org/docs/nose/) | 1.3.7 | Nose extends unittest to make testing easier / LGPL-2.1 |
| [notebook](https://jupyter.org) | 6.4.5 | Jupyter Notebook / BSD-3-Clause |
| [numexpr](https://github.com/pydata/numexpr) | 2.7.3 | Fast numerical expression evaluator for NumPy. / MIT |
| [numpy](http://numpy.scipy.org/) | 1.20.3 | Array processing for numbers, strings, records, and objects. / BSD 3-Clause |
| [numpy-base](http://numpy.scipy.org/) | 1.20.3 | Array processing for numbers, strings, records, and objects. / BSD 3-Clause |
| [numpydoc](https://github.com/numpy/numpydoc) | 1.1.0 | Numpy’s Sphinx extensions / BSD 3-Clause |
| [olefile](http://www.decalage.info/python/olefileio) | 0.46 | parse, read and write Microsoft OLE2 files / BSD 2-Clause |
| [openblas](http://www.openblas.net/) | 0.3.13 | An optimized BLAS library / BSD |
| openblas-devel | 0.3.13 | OpenBLAS headers and libraries for developing software that used OpenBLAS. / None |
| [openjpeg](http://www.openjpeg.org/) | 2.4.0 | An open-source JPEG 2000 codec written in C / BSD 2-Clause |
| [openpyxl](https://openpyxl.readthedocs.io) | 3.0.9 | A Python library to read/write Excel 2010 xlsx/xlsm files / MIT |
| [openssl](http://www.openssl.org/) | 1.1.1l | OpenSSL is an open-source implementation of the SSL and TLS protocols / OpenSSL |
| [packaging](https://github.com/pypa/packaging) | 21.0 | Core utilities for Python packages / Apache 2.0 or BSD 2-Clause |
| [pandas](http://pandas.pydata.org) | 1.3.4 | High-performance, easy-to-use data structures and data analysis tools. / BSD-3-Clause |
| [pandocfilters](https://github.com/jgm/pandocfilters) | 1.4.3 | A python module for writing pandoc filters / BSD-3-Clause |
| [pango](http://www.pango.org/) | 1.45.3 | Text layout and rendering engine. / LGPL-2.1 |
| [parso](https://github.com/davidhalter/parso) | 0.8.2 | A Python Parser / MIT |
| [partd](https://github.com/dask/partd) | 1.2.0 | Data structure for on-disk shuffle operations / BSD 3-Clause |
| [patchelf](http://nixos.org/patchelf.html) | 0.13 | A small utility to modify the dynamic linker and RPATH of ELF executables. / GPL-3.0-or-later |
| [path](https://github.com/jaraco/path) | 16.0.0 | A module wrapper for os.path / MIT |
| [path.py](https://github.com/jaraco/path.py) | 12.5.0 | A module wrapper for os.path / MIT |
| [pathlib2](https://github.com/mcmtroffaes/pathlib2) | 2.3.6 | Fork of pathlib aiming to support the full stdlib Python API / MIT |
| [patsy](https://github.com/pydata/patsy) | 0.5.2 | Describing statistical models in Python using symbolic formulas / BSD-2-Clause AND PSF-2.0 |
| [pcre](http://www.pcre.org/) | 8.45 | Regular expression pattern matching using the same syntax and semantics as Perl 5. / BSD 3-Clause |
| [pep8](http://pep8.readthedocs.org/) | 1.7.1 | Python style guide checker / MIT |
| [pexpect](http://pexpect.sourceforge.net/) | 4.8.0 | Pexpect makes Python a better tool for controlling other applications. / ISC |
| [pickleshare](https://github.com/pickleshare/pickleshare/) | 0.7.5 | Tiny ‘shelve’-like database with concurrency support / MIT |
| [pillow](https://pillow.readthedocs.io) | 8.4.0 | Pillow is the friendly PIL fork by Alex Clark and Contributors / LicenseRef-PIL |
| [pip](https://pip.pypa.io/en/stable/) | 21.2.4 | PyPA recommended tool for installing Python packages / MIT |
| [pixman](http://www.pixman.org/) | 0.40.0 | A low-level software library for pixel manipulation. / MIT |
| [pkginfo](https://code.launchpad.net/~tseaver/pkginfo/trunk) | 1.7.1 | Query metadatdata from sdists / bdists / installed packages. / MIT |
| [pluggy](https://github.com/pytest-dev/pluggy) | 0.13.1 | Plugin registration and hook calling for Python / MIT |
| [ply](http://www.dabeaz.com/ply/index.html) | 3.11 | Python Lex-Yacc / BSD 3-clause |
| [prometheus\_client](https://github.com/prometheus/client_python) | 0.11.0 | Python client for the Prometheus monitoring system / Apache-2.0 |
| [prompt-toolkit](https://github.com/jonathanslenders/python-prompt-toolkit) | 3.0.20 | Library for building powerful interactive command lines in Python / BSD-3-Clause |
| [prompt\_toolkit](https://github.com/jonathanslenders/python-prompt-toolkit) | 3.0.20 | Library for building powerful interactive command lines in Python / BSD-3-Clause |
| [psutil](https://github.com/giampaolo/psutil) | 5.8.0 | A cross-platform process and system utilities module for Python / BSD-3-Clause |
| [ptyprocess](https://github.com/pexpect/ptyprocess) | 0.7.0 | Run a subprocess in a pseudo terminal / ISC |
| [py](https://github.com/pytest-dev/py) | 1.10.0 | library with cross-python path, ini-parsing, io, code, log facilities / MIT |
| [py-lief](https://lief.quarkslab.com/) | 0.10.1 | A cross platform library to parse, modify and abstract ELF, PE and MachO formats. / Apache-2.0 |
| [pycodestyle](https://pycodestyle.readthedocs.io/) | 2.7.0 | Python style guide checker / MIT |
| [pycosat](https://github.com/ContinuumIO/pycosat) | 0.6.3 | Bindings to picosat (a SAT solver) / MIT |
| [pycparser](https://github.com/eliben/pycparser) | 2.20 | Complete C99 parser in pure Python / BSD 3-clause |
| [pycurl](http://pycurl.sourceforge.net/) | 7.44.1 | A Python Interface To The cURL library / LGPL, MIT |
| [pyerfa](https://pyerfa.readthedocs.io/) | 2.0.0 | Python bindings for ERFA routines / BSD-3-Clause |
| [pyflakes](https://github.com/PyCQA/pyflakes) | 2.3.1 | Pyflakes analyzes programs and detects various errors. / MIT |
| [pygments](http://pygments.org/) | 2.10.0 | Pygments is a generic syntax highlighter suitable for use in code hosting, forums, wikis or other applications that need to prettify source code. / BSD-2-clause |
| [pylint](https://www.pylint.org) | 2.7.4 | python code static checker / GPL-2.0-or-later |
| [pyodbc](https://github.com/mkleehammer/pyodbc) | 4.0.30 | DB API Module for ODBC / MIT |
| [pyopenssl](https://github.com/pyca/pyopenssl) | 21.0.0 | Python wrapper module around the OpenSSL library / Apache 2.0 |
| [pyparsing](https://github.com/pyparsing/pyparsing/) | 3.0.4 | Create and execute simple grammars / MIT |
| [pyrsistent](http://github.com/tobgu/pyrsistent/) | 0.18.0 | Persistent/Functional/Immutable data structures / MIT |
| [pysocks](https://github.com/Anorov/PySocks) | 1.7.1 | A Python SOCKS client module. See [Anorov/PySocks](https://github.com/Anorov/PySocks) for more information. / BSD 3-Clause |
| [pytables](http://www.pytables.org) | 3.6.1 | Brings together Python, HDF5 and NumPy to easily handle large amounts of data. / BSD 3-Clause |
| [pytest](https://docs.pytest.org/en/latest/) | 6.2.3 | Simple and powerful testing with Python. / MIT |
| [python](https://www.python.org/) | 3.9.7 | General purpose programming language / Python-2.0 |
| [python-dateutil](https://dateutil.readthedocs.org/) | 2.8.2 | Extensions to the standard Python datetime module. / BSD-3-Clause and Apache |
| [python-libarchive-c](https://github.com/Changaco/python-libarchive-c) | 2.9 | Python interface to libarchive / CC0-1.0 |
| [pytz](http://pythonhosted.org/pytz/) | 2021.3 | World timezone definitions, modern and historical. / MIT |
| [pywavelets](https://github.com/PyWavelets/pywt) | 1.1.1 | Discrete Wavelet Transforms in Python / MIT |
| [pyyaml](http://pyyaml.org/wiki/PyYAML) | 5.4.1 | YAML parser and emitter for Python / MIT |
| [pyzmq](https://github.com/zeromq/pyzmq) | 20.0.0 | Python bindings for zeromq / BSD 3-clause |
| [readline](https://cnswww.cns.cwru.edu/php/chet/readline/rltop.html) | 8.1 | library for editing command lines as they are typed in / GPL-3.0 |
| [regex](https://bitbucket.org/mrabarnett/mrab-regex) | 2021.4.4 | Alternative regular expression module, to replace re / Apache 2.0 |
| [requests](http://python-requests.org) | 2.26.0 | Requests is an elegant and simple HTTP library for Python, built with ♥. / Apache-2.0 |
| [rope](https://github.com/python-rope/rope) | 0.19.0 | A python refactoring library / LGPL 3.0 |
| [ruamel\_yaml](https://sourceforge.net/p/ruamel-yaml/code/ci/default/tree) | 0.15.80 | A patched copy of ruamel.yaml. / MIT |
| [scikit-image](http://scikit-image.org/) | 0.18.3 | Image processing in Python. / BSD-3-Clause |
| [scikit-learn](http://scikit-learn.org/) | 0.24.2 | A set of python modules for machine learning and data mining / BSD-3-Clause |
| [scipy](http://www.scipy.org/) | 1.7.1 | Scientific Library for Python / BSD-3-Clause |
| [seaborn](https://seaborn.pydata.org) | 0.11.2 | Statistical data visualization / BSD 3-Clause |
| [send2trash](https://github.com/arsenetar/send2trash) | 1.8.0 | Python library to natively send files to Trash (or Recycle bin) on all platforms. / BSD-3-Clause |
| [setuptools](https://github.com/pypa/setuptools) | 58.0.4 | Download, build, install, upgrade, and uninstall Python packages / MIT |
| [simplegeneric](http://cheeseshop.python.org/pypi/simplegeneric) | 0.8.1 | Simple generic functions (similar to Python’s own len(), pickle.dump(), etc.) / Zope Public |
| [singledispatch](http://docs.python.org/3/library/functools.html#functools.singledispatch) | 3.7.0 | Transforms a function into a single-dispatch generic function / MIT |
| [sip](https://www.riverbankcomputing.com/software/pyqt-builder/intro) | 4.19.25 | Python binding of the cross-platform builder toolkit for Qt. / Commercial, GPL-2.0, GPL-3.0 |
| [six](https://six.readthedocs.io/) | 1.16.0 | Python 2 and 3 compatibility utilities / MIT |
| [snappy](https://github.com/google/snappy) | 1.1.8 | A fast compressor/decompressor / BSD 3-clause |
| [sniffio](https://github.com/python-trio/sniffio) | 1.1.0 | Sniff out which async library your code is running under / Apache-2.0 |
| [snowballstemmer](https://github.com/shibukawa/snowball_py) | 2.1.0 | Snowball stemming library collection for Python / BSD-2-Clause |
| [sortedcollections](http://www.grantjenks.com/docs/sortedcollections/) | 2.1.0 | Python Sorted Collections / Apache-2.0 |
| [sortedcontainers](http://www.grantjenks.com/docs/sortedcontainers/) | 2.4.0 | Python Sorted Container Types: SortedList, SortedDict, and SortedSet / Apache-2.0 |
| [soupsieve](http://facelessuser.github.io/soupsieve) | 2.2.1 | A modern CSS selector implementation for BeautifulSoup / MIT |
| [sphinx](http://www.sphinx-doc.org) | 4.2.0 | Sphinx is a tool that makes it easy to create intelligent and beautiful documentation / BSD-2-Clause |
| sphinxcontrib | 1.0 | Python namespace for sphinxcontrib / BSD |
| [sphinxcontrib-applehelp](https://www.sphinx-doc.org/en/master/) | 1.0.2 | sphinxcontrib-applehelp is a sphinx extension which outputs Apple help books / BSD-2-Clause |
| [sphinxcontrib-devhelp](https://www.sphinx-doc.org/en/master/) | 1.0.2 | sphinxcontrib-devhelp is a sphinx extension which outputs Devhelp document / BSD-2-Clause |
| [sphinxcontrib-htmlhelp](https://www.sphinx-doc.org/en/master/) | 2.0.0 | sphinxcontrib-htmlhelp is a sphinx extension which renders HTML help files. / BSD-2-Clause |
| [sphinxcontrib-jsmath](https://www.sphinx-doc.org/en/master/) | 1.0.1 | A sphinx extension which renders display math in HTML via JavaScript / BSD-2-Clause |
| [sphinxcontrib-qthelp](https://www.sphinx-doc.org/en/master/) | 1.0.3 | sphinxcontrib-qthelp is a sphinx extension which outputs QtHelp document / BSD-2-Clause |
| [sphinxcontrib-serializinghtml](https://www.sphinx-doc.org/en/master/) | 1.1.5 | sphinxcontrib-serializinghtml is a sphinx extension which outputs “serialized” HTML files (json and pickle). / BSD-2-Clause |
| [sphinxcontrib-websupport](https://pypi.python.org/pypi/sphinxcontrib-websupport) | 1.2.4 | Sphinx API for Web Apps / BSD-2-Clause |
| [sqlalchemy](http://www.sqlalchemy.org/) | 1.4.22 | Database Abstraction Library. / MIT |
| [sqlite](http://www.sqlite.org/) | 3.36.0 | Implements a self-contained, zero-configuration, SQL database engine / Public-Domain (`<http://www.sqlite.org/copyright.html>`) |
| [statsmodels](https://www.statsmodels.org) | 0.12.2 | Statistical computations and models for use with SciPy / BSD-3-Clause |
| [sympy](https://sympy.org) | 1.9 | Python library for symbolic mathematics / BSD-3-Clause |
| [tblib](https://github.com/ionelmc/python-tblib) | 1.7.0 | Traceback serialization library. / BSD 2-Clause |
| [terminado](https://github.com/jupyter/terminado) | 0.9.4 | Terminals served by tornado websockets / BSD-2-Clause |
| [testpath](https://testpath.readthedocs.io) | 0.5.0 | Testpath is a collection of utilities for Python code working with files and commands. / BSD-3-Clause |
| [threadpoolctl](https://github.com/joblib/threadpoolctl) | 2.2.0 | Python helpers to control the threadpools of native libraries / BSD 3-Clause |
| [tifffile](https://github.com/cgohlke/tifffile) | 2021.3.17 | Read and write image data from and to TIFF files. / BSD-3-Clause |
| [tk](http://www.tcl.tk/) | 8.6.11 | A dynamic programming language with GUI support. Bundles Tcl and Tk. / Tcl/Tk |
| [toml](https://github.com/uiri/toml) | 0.10.2 | Python lib for TOML. / MIT |
| [toolz](http://toolz.readthedocs.org/) | 0.11.1 | A functional standard library for Python / BSD-3-Clause |
| [tornado](http://www.tornadoweb.org/) | 6.1 | A Python web framework and asynchronous networking library, originally developed at FriendFeed. / Apache-2.0 |
| [tqdm](https://pypi.python.org/pypi/tqdm) | 4.62.3 | A Fast, Extensible Progress Meter / MPL-2.0 AND MIT |
| [traitlets](http://traitlets.readthedocs.org/) | 5.1.0 | Configuration system for Python applications / BSD-3-Clause |
| [typing\_extensions](https://github.com/python/typing/tree/master/typing_extensions) | 3.10.0.2 | Backported and Experimental Type Hints for Python / PSF-2.0 |
| [tzdata](https://www.iana.org/time-zones) | 2021e | The Time Zone Database (called tz, tzdb or zoneinfo) / Public-Domain AND BSD-3-clause |
| [unicodecsv](https://github.com/jdunck/python-unicodecsv) | 0.14.1 | Drop-in replacement for csv module which supports unicode strings / BSD |
| [unixodbc](http://www.unixodbc.org/) | 2.3.9 | ODBC on non MS Windows platforms / LGPL-2.1 |
| [urllib3](https://urllib3.readthedocs.io/) | 1.26.7 | HTTP library with thread-safe connection pooling, file post, and more. / MIT |
| [wcwidth](https://github.com/jquast/wcwidth) | 0.2.5 | Measures number of Terminal column cells of wide-character codes. / MIT |
| [webencodings](https://github.com/gsnedders/python-webencodings) | 0.5.1 | Character encoding aliases for legacy web content / BSD 3-Clause |
| [werkzeug](https://palletsprojects.com/p/werkzeug/) | 2.0.2 | The comprehensive WSGI web application library. / BSD-3-Clause |
| [wheel](https://github.com/pypa/wheel) | 0.37.0 | A built-package format for Python. / MIT |
| [widgetsnbextension](http://ipython.org) | 3.5.1 | Interactive Widgets for Jupyter / BSD 3-clause |
| [wrapt](https://github.com/GrahamDumpleton/wrapt) | 1.11.2 | Module for decorators, wrappers and monkey patching / BSD 2-Clause |
| [xlrd](http://www.python-excel.org/) | 2.0.1 | Library for developers to extract data from Microsoft Excel (tm) spreadsheet files / BSD 3-Clause and BSD with advertising |
| [xlsxwriter](https://xlsxwriter.readthedocs.io/) | 3.0.1 | A Python module for creating Excel XLSX files / BSD-2-Clause |
| [xlwt](http://www.python-excel.org/) | 1.3.0 | Writing data and formatting information to Excel files / BSD |
| [xz](http://tukaani.org/xz/) | 5.2.5 | Data compression software with high compression ratio / LGPL-2.1 and GPL-2.0 |
| [yaml](http://pyyaml.org/wiki/LibYAML) | 0.1.7 | A C library for parsing and emitting YAML / MIT |
| [zeromq](http://zeromq.org) | 4.3.4 | A high-performance asynchronous messaging library. / LGPL-3.0-or-later |
| [zict](http://github.com/mrocklin/zict) | 2.0.0 | Composable Dictionary Classes / BSD 3-Clause |
| [zipp](https://github.com/jaraco/zipp) | 3.6.0 | A pathlib-compatible Zipfile object wrapper / MIT |
| [zlib](http://zlib.net/) | 1.2.11 | Massively spiffy yet delicately unobtrusive compression library / zlib |
| zope | 1.0 | web application server / BSD |
| [zope.event](http://www.zope.org/en/latest/) | 4.5.0 | Very basic event publishing system / Zope Public License |
| [zope.interface](https://github.com/zopefoundation/zope.interface) | 5.4.0 | Interfaces for Python / ZPL-2.1 |
| [zstd](http://www.zstd.net) | 1.4.9 | Zstandard - Fast real-time compression algorithm / BSD 3-Clause |
| Name | Version | Summary / License |
|---|---|---|
| [\_libgcc\_mutex](https://github.com/AnacondaRecipes/_libgcc_mutex-feedstock) | 0.1 | Mutex for libgcc and libgcc-ng / None |
| [alabaster](http://www.sphinx-doc.org/en/stable/index.html) | 0.7.12 | Configurable, Python 2+3 compatible Sphinx theme. / BSD 3-Clause |
| [anaconda-client](https://github.com/Anaconda-Platform/anaconda-client) | 1.9.0 | Anaconda Cloud command line client library / BSD 3-Clause |
| [anaconda-project](https://github.com/Anaconda-Platform/anaconda-project) | 0.10.1 | Tool for encapsulating, running, and reproducing data science projects / BSD-3-Clause |
| [argon2-cffi](https://argon2-cffi.readthedocs.org/) | 20.1.0 | The secure Argon2 password hashing algorithm. / MIT |
| [asn1crypto](https://github.com/wbond/asn1crypto) | 1.4.0 | Python ASN.1 library with a focus on performance and a pythonic API / MIT |
| [astroid](https://www.astroid.org/) | 2.6.6 | A abstract syntax tree for Python with inference support. / LGPL-2.1-or-later |
| [astropy](http://www.astropy.org/) | 4.3.1 | Community-developed Python Library for Astronomy / BSD-3-Clause |
| [async\_generator](https://github.com/python-trio/async_generator) | 1.10 | Async generators and context managers for Python 3.5+ / MIT |
| [attrs](https://attrs.readthedocs.io/en/stable/) | 21.2.0 | attrs is the Python package that will bring back the joy of writing classes by relieving you from the drudgery of implementing object protocols (aka dunder methods). / MIT |
| [babel](http://babel.pocoo.org/) | 2.9.1 | Utilities to internationalize and localize Python applications / BSD 3-clause |
| [backcall](https://github.com/takluyver/backcall/) | 0.2.0 | Specifications for callback functions passed in to an API / BSD-3-Clause |
| [backports](https://bitbucket.org/brandon/backports) | 1.0 | None / BSD |
| [backports.shutil\_get\_terminal\_size](https://github.com/chrippa/backports.shutil_get_terminal_size) | 1.0.0 | A backport of the get\_terminal\_size function from Python 3.3’s shutil. / MIT |
| [beautifulsoup4](http://www.crummy.com/software/BeautifulSoup/) | 4.10.0 | Python library designed for screen-scraping / MIT |
| [bitarray](https://github.com/ilanschnell/bitarray) | 2.3.0 | efficient arrays of booleans – C extension / PSF |
| [bkcharts](http://github.com/bokeh/bkcharts) | 0.2 | High level chart types built on top of Bokeh / BSD 3-Clause |
| [blas](http://www.netlib.org/lapack) | 1.0 | Linear Algebra PACKage / BSD-3-Clause |
| [bleach](https://github.com/mozilla/bleach) | 4.0.0 | Easy, whitelist-based HTML-sanitizing tool / Apache-2.0 |
| [blosc](https://github.com/Blosc/c-blosc) | 1.21.0 | A blocking, shuffling and loss-less compression library that can be faster than memcpy() / BSD-3-Clause |
| [bokeh](http://bokeh.pydata.org/) | 2.4.1 | Statistical and novel interactive HTML plots for Python / BSD-3-Clause |
| [boto](https://github.com/boto/boto/) | 2.49.0 | Amazon Web Services Library / MIT |
| [bottleneck](https://github.com/pydata/bottleneck) | 1.3.2 | Fast NumPy array functions written in Cython. / BSD 2-Clause |
| [brotli](http://github.com/google/brotli) | 1.0.9 | Brotli compression format / MIT |
| [brotlipy](https://github.com/python-hyper/brotlipy) | 0.7.0 | Python bindings to the Brotli compression library / MIT |
| [brunsli](https://github.com/google/brunsli) | 0.1 | Practical JPEG Repacker / MIT |
| [bzip2](http://www.bzip.org/) | 1.0.8 | high-quality data compressor / bzip2 |
| [c-ares](https://c-ares.haxx.se/) | 1.17.1 | This is c-ares, an asynchronous resolver library / MIT |
| [ca-certificates](https://github.com/conda-forge/ca-certificates-feedstock) | 2021.10.26 | Certificates for use with other packages. / MPL 2.0 |
| [cached-property](https://github.com/pydanny/cached-property) | 1.5.2 | A decorator for caching properties in classes. / BSD-3-Clause |
| [cairo](http://cairographics.org/) | 1.16.0 | Cairo is a 2D graphics library with support for multiple output devices. / LGPL 2.1 or MPL 1.1 |
| [certifi](http://certifi.io/) | 2021.10.8 | Python package for providing Mozilla’s CA Bundle. / ISC |
| [cffi](http://cffi.readthedocs.org/) | 1.14.6 | Foreign Function Interface for Python calling C code. / MIT |
| [cfitsio](http://heasarc.gsfc.nasa.gov/fitsio/fitsio.html) | 3.470 | A library for reading and writing FITS files / fitsio |
| [chardet](https://github.com/chardet/chardet) | 4.0.0 | Universal character encoding detector / LGPL2 |
| [charls](https://github.com/team-charls/charls) | 2.2.0 | CharLS is a C++ implementation of the JPEG-LS standard for lossless and near-lossless image compression and decompression. JPEG-LS is a low-complexity image compression standard that matches JPEG 2000 compression ratios. / BSD-3-Clause |
| [charset-normalizer](https://github.com/ousret/charset_normalizer) | 2.0.4 | The Real First Universal Charset Detector. Open, modern and actively maintained alternative to Chardet. / MIT |
| [click](https://palletsprojects.com/p/click) | 8.0.3 | Python composable command line interface toolkit / BSD-3-Clause |
| [cloudpickle](https://github.com/cloudpipe/cloudpickle) | 2.0.0 | Extended pickling support for Python objects / BSD-3-Clause |
| [clyent](https://github.com/Anaconda-Platform/clyent) | 1.2.2 | Command line client library for windows and posix / BSD 3-Clause |
| [colorama](https://github.com/tartley/colorama) | 0.4.4 | Cross-platform colored terminal text / BSD-3-Clause |
| [conda](https://conda.io) | 4.10.3 | OS-agnostic, system-level binary package and environment manager. / BSD 3-Clause |
| [conda-build](https://github.com/conda/conda-build) | 3.21.6 | tools for building conda packages / BSD 3-Clause |
| [conda-content-trust](https://github.com/conda/conda-content-trust) | 0.1.1 | Signing and verification tools for conda / BSD-3-Clause |
| [conda-env](https://github.com/conda/conda-env) | 2.6.0 | Tools for interacting with conda environments. / BSD 3-Clause |
| [conda-token](https://github.com/Anaconda/conda-token) | 0.3.0 | Set repository access token / BSD-3-Clause |
| [conda-verify](https://github.com/conda/conda-verify) | 3.4.2 | tool for validating conda recipes and conda packages / BSD 3-Clause |
| [contextlib2](http://contextlib2.readthedocs.org) | 0.6.0.post1 | Backports and enhancements for the contextlib module / PSF 2 |
| [cryptography](https://github.com/pyca/cryptography) | 3.4.8 | Provides cryptographic recipes and primitives to Python developers / Apache-2.0 AND BSD-3-Clause AND PSF-2.0 AND MIT |
| [curl](http://curl.haxx.se/) | 7.78.0 | tool and library for transferring data with URL syntax / curl |
| [cycler](http://matplotlib.org/cycler) | 0.10.0 | Composable style cycles. / BSD 3-Clause |
| [cython](http://www.cython.org/) | 0.29.24 | The Cython compiler for writing C extensions for the Python language / Apache-2.0 |
| [cytoolz](https://github.com/pytoolz/cytoolz) | 0.11.0 | Cython implementation of Toolz. High performance functional utilities / BSD-3-Clause |
| [dask](https://dask.org/) | 2021.10.0 | Parallel PyData with Task Scheduling / BSD-3-Clause |
| [dask-core](http://github.com/dask/dask/) | 2021.10.0 | Parallel Python with task scheduling / BSD-3-Clause |
| [dataclasses](https://github.com/ericvsmith/dataclasses) | 0.8 | An implementation of PEP 557: Data Classes / Apache-2.0 |
| [debugpy](https://github.com/Microsoft/debugpy) | 1.4.1 | An implementation of the Debug Adapter Protocol for Python / MIT |
| [decorator](https://github.com/micheles/decorator) | 5.1.0 | Better living through Python with decorators. / BSD-2-Clause |
| [defusedxml](https://bitbucket.org/tiran/defusedxml) | 0.7.1 | XML bomb protection for Python stdlib modules / PSF 2.0 |
| [distributed](http://distributed.readthedocs.io/en/latest/) | 2021.10.0 | Distributed computing with Dask / BSD-3-Clause |
| [docutils](http://docutils.sourceforge.net/) | 0.17.1 | Docutils – Python Documentation Utilities / Public Domain Dedictation and BSD 2-Clause and PSF 2.1.1 and GPL 3.0 |
| [entrypoints](https://github.com/takluyver/entrypoints) | 0.3 | Discover and load entry points from installed packages. / MIT License |
| [et\_xmlfile](https://foss.heptapod.net/openpyxl/et_xmlfile) | 1.1.0 | An implementation of lxml.xmlfile for the standard library / MIT AND PSF-2.0 |
| [expat](http://expat.sourceforge.net/) | 2.4.1 | Expat XML parser library in C / MIT |
| [fastcache](https://github.com/pbrady/fastcache) | 1.1.0 | C implementation of Python 3 lru\_cache / MIT |
| [filelock](https://github.com/benediktschmitt/py-filelock) | 3.3.1 | A platform independent file lock. / Public Domain |
| [flask](http://flask.pocoo.org) | 1.1.2 | A microframework based on Werkzeug, Jinja2 and good intentions. / BSD 3-Clause |
| [fontconfig](http://www.freedesktop.org/wiki/Software/fontconfig/) | 2.13.1 | A library for configuring and customizing font access. / MIT |
| [fonttools](https://github.com/fonttools/fonttools) | 4.25.0 | fontTools is a library for manipulating fonts, written in Python. / MIT |
| [freetype](https://www.freetype.org/) | 2.10.4 | A Free, High-Quality, and Portable Font Engine / GPL-2.0-only and LicenseRef-FreeType |
| [fsspec](https://github.com/martindurant/filesystem_spec) | 2021.8.1 | A specification for pythonic filesystems / BSD-3-Clause |
| [get\_terminal\_size](https://github.com/chrippa/backports.shutil_get_terminal_size) | 1.0.0 | Get the size of the terminal window. / MIT |
| [gevent](https://www.gevent.org) | 21.8.0 | Coroutine-based network library / MIT |
| [giflib](http://giflib.sourceforge.net) | 5.2.1 | Library for reading and writing gif images / MIT |
| [glib](https://developer.gnome.org/glib/) | 2.69.1 | Provides core application building blocks for libraries and applications written in C. / LGPL-2.1-or-later |
| [glob2](https://github.com/miracle2k/python-glob2) | 0.7 | Version of the glob module that supports recursion via \*\*, and can capture patterns. / BSD-2-Clause |
| [gmp](http://gmplib.org/) | 6.2.1 | The GNU multiprecision library. / GPL-2.0-or-later AND LGPL-3.0-or-later |
| [gmpy2](https://pypi.python.org/pypi/gmpy2) | 2.0.8 | GMP/MPIR, MPFR, and MPC interface to Python 2.6+ and 3.x / LGPL 3 |
| [greenlet](https://github.com/python-greenlet/greenlet) | 1.1.1 | Lightweight in-process concurrent programming / MIT |
| [h5py](http://www.h5py.org/) | 3.2.1 | Read and write HDF5 files from Python / BSD-3-Clause |
| [hdf5](http://www.hdfgroup.org/HDF5/) | 1.10.6 | HDF5 is a data model, library, and file format for storing and managing data / HDF5 |
| [heapdict](http://stutzbachenterprises.com/) | 1.0.1 | A heap with decrease-key and increase-key operations / BSD 3-Clause |
| [html5lib](https://github.com/html5lib/html5lib-python) | 1.1 | HTML parser based on the WHATWG HTML specification / MIT |
| [icu](http://site.icu-project.org/) | 58.2 | International Components for Unicode. / MIT |
| [idna](https://github.com/kjd/idna) | 3.2 | Internationalized Domain Names in Applications (IDNA). / BSD-3-Clause |
| [imagecodecs](https://www.lfd.uci.edu/~gohlke/) | 2021.8.26 | Image transformation, compression, and decompression codecs / BSD-3-Clause |
| [imageio](https://imageio.github.io) | 2.9.0 | A Python library for reading and writing image data / BSD-2-Clause |
| [imagesize](https://github.com/shibukawa/imagesize_py) | 1.2.0 | Getting image size from png/jpeg/jpeg2000/gif file / MIT |
| [importlib-metadata](https://github.com/python/importlib_metadata) | 4.8.1 | A library to access the metadata for a Python package / Apache-2.0 |
| [importlib\_metadata](https://github.com/python/importlib_metadata) | 4.8.1 | A library to access the metadata for a Python package / Apache-2.0 |
| [iniconfig](http://github.com/RonnyPfannschmidt/iniconfig) | 1.1.1 | iniconfig: brain-dead simple config-ini parsing / MIT |
| [ipykernel](https://ipython.org) | 6.4.1 | IPython Kernel for Jupyter / BSD-3-Clause |
| [ipython](https://ipython.org) | 7.29.0 | IPython: Productive Interactive Computing / BSD-3-Clause |
| [ipython\_genutils](http://ipython.org) | 0.2.0 | vestigial utilities from IPython / BSD 3-Clause |
| [ipywidgets](https://github.com/ipython/ipywidgets) | 7.6.5 | Jupyter Interactive Widgets / BSD-3-Clause |
| [isort](https://github.com/timothycrosley/isort) | 5.9.3 | A Python utility / library to sort Python imports. / MIT |
| [itsdangerous](https://github.com/pallets/itsdangerous) | 2.0.1 | Various helpers to pass trusted data to untrusted environments. / BSD-3-Clause |
| [jbig](https://www.cl.cam.ac.uk/~mgk25/jbigkit) | 2.1 | Implementation of the JBIG1 data compression standard / GPL-2.0 |
| [jdcal](https://github.com/phn/jdcal) | 1.4.1 | Julian dates from proleptic Gregorian and Julian calendars. / BSD 2-Clause |
| [jedi](https://github.com/davidhalter/jedi/) | 0.18.0 | An autocompletion tool for Python that can be used for text editors. / MIT |
| [jinja2](http://jinja.pocoo.org) | 2.11.3 | An easy to use stand-alone template engine written in pure python. / BSD-3-Clause |
| [joblib](https://joblib.readthedocs.io/en/latest/) | 1.1.0 | Lightweight pipelining: using Python functions as pipeline jobs. / BSD-3-Clause |
| [jpeg](http://www.ijg.org/) | 9d | read/write jpeg COM, EXIF, IPTC medata / Custom free software license |
| [jsonschema](https://github.com/Julian/jsonschema) | 3.2.0 | An implementation of JSON Schema validation for Python / MIT |
| [jupyter](http://jupyter.org) | 1.0.0 | Jupyter metapackage. Install all the Jupyter components in one go. / BSD 3-Clause |
| [jupyter\_client](https://jupyter.org) | 7.0.1 | jupyter\_client contains the reference implementation of the Jupyter protocol. / BSD-3-Clause |
| [jupyter\_console](http://jupyter.org) | 6.4.0 | Jupyter terminal console / BSD-3-Clause |
| [jupyter\_core](https://jupyter.org) | 4.8.1 | Core common functionality of Jupyter projects. / BSD-3-Clause |
| [jupyterlab\_pygments](http://github.com/JupyterLab/jupyterlab_pygments) | 0.1.2 | Pygments syntax coloring scheme making use of the JupyterLab CSS variables / BSD-3-Clause |
| [jupyterlab\_widgets](https://github.com/jupyter-widgets/ipywidgets) | 1.0.0 | JupyterLab extension providing HTML widgets / BSD-3-Clause |
| [jxrlib](https://packages.debian.org/source/sid/jxrlib) | 1.1 | jxrlib - JPEG XR Library by Microsoft, built from Debian hosted sources. / BSD-2-Clause |
| [kiwisolver](https://github.com/nucleic/kiwi) | 1.3.1 | An efficient C++ implementation of the Cassowary constraint solver / BSD-3-Clause |
| [krb5](http://web.mit.edu/kerberos/) | 1.19.2 | A network authentication protocol. / MIT |
| [lazy-object-proxy](https://github.com/ionelmc/python-lazy-object-proxy) | 1.6.0 | A fast and thorough lazy object proxy / BSD-2-Clause |
| [lcms2](http://www.littlecms.com/) | 2.12 | Open Source Color Management Engine / MIT |
| [ld\_impl\_linux-ppc64le](https://www.gnu.org/software/binutils/) | 2.33.1 | A set of programming tools for creating and managing binary programs, object files, libraries, profile data, and assembly source code. / GPL-3.0-only |
| [lerc](https://github.com/Esri/lerc) | 3.0 | LERC - Limited Error Raster Compression / Apache-2.0 |
| [libaec](https://gitlab.dkrz.de/k202009/libaec) | 1.0.4 | Adaptive Entropy Coding library / BSD-2-Clause |
| [libarchive](http://www.libarchive.org/) | 3.4.2 | Multi-format archive and compression library / BSD-2-Clause |
| [libcurl](http://curl.haxx.se/) | 7.78.0 | tool and library for transferring data with URL syntax / curl |
| [libdeflate](https://github.com/ebiggers/libdeflate) | 1.8 | libdeflate is a library for fast, whole-buffer DEFLATE-based compression and decompression. / MIT |
| [libedit](http://thrysoee.dk/editline/) | 3.1.20210910 | Editline Library (libedit) / BSD-2-Clause |
| [libev](http://software.schmorp.de/pkg/libev.html) | 4.33 | A full-featured and high-performance event loop that is loosely modeled after libevent, but without its limitations and bugs. / BSD-2-Clause |
| [libffi](https://sourceware.org/libffi/) | 3.3 | A Portable Foreign Function Interface Library. / MIT |
| [libgcc-ng](https://gcc.gnu.org/onlinedocs/gccint/Libgcc.html) | 8.2.0 | The GCC low-level runtime library / GPL-3.0-only WITH GCC-exception-3.1 |
| [libgfortran-ng](https://gcc.gnu.org/) | 7.3.0 | The GNU Fortran Runtime Library / GPL-3.0-only WITH GCC-exception-3.1 |
| [liblief](https://lief.quarkslab.com/) | 0.10.1 | A cross platform library to parse, modify and abstract ELF, PE and MachO formats. / Apache-2.0 |
| [libnghttp2](http://github.com/nghttp2/nghttp2) | 1.41.0 | This is an implementation of Hypertext Transfer Protocol version 2. / MIT |
| [libopenblas](http://www.openblas.net/) | 0.3.13 | An Optimized BLAS library / BSD |
| [libpng](http://www.libpng.org/pub/png/libpng.html) | 1.6.37 | PNG reference library / zlib/libpng |
| [libsodium](http://libsodium.org) | 1.0.18 | A modern and easy-to-use crypto library. / ISC |
| [libssh2](https://www.libssh2.org/) | 1.9.0 | the SSH library / BSD-3-Clause |
| [libstdcxx-ng](https://gcc.gnu.org/) | 8.2.0 | The GNU C++ Runtime Library / GPL-3.0-only WITH GCC-exception-3.1 |
| [libtiff](http://www.libtiff.org/) | 4.2.0 | Support for the Tag Image File Format (TIFF). / HPND |
| [libuuid](http://sourceforge.net/projects/libuuid/) | 1.0.3 | Portable uuid C library. / BSD 3-Clause |
| [libuv](http://libuv.org/) | 1.40.0 | Cross-platform asynchronous I/O / MIT |
| [libwebp](https://developers.google.com/speed/webp/) | 1.2.0 | WebP image library / Google |
| [libwebp-base](https://developers.google.com/speed/webp) | 1.2.0 | WebP image library / BSD-3-Clause |
| [libxcb](http://xcb.freedesktop.org/) | 1.14 | This is the C-language Binding (XCB) package to the X Window System protocol / MIT |
| [libxml2](http://xmlsoft.org/) | 2.9.12 | The XML C parser and toolkit of Gnome / MIT |
| [libxslt](http://xmlsoft.org/XSLT/) | 1.1.34 | The XSLT C library developed for the GNOME project / MIT |
| [libzopfli](https://github.com/google/zopfli) | 1.0.3 | A compression library programmed in C to perform very good, but slow, deflate or zlib compression. / Apache-2.0 |
| [locket](https://github.com/mwilliamson/locket.py) | 0.2.1 | File-based locks for Python for Linux and Windows / BSD 2-Clause |
| [lxml](http://lxml.de/) | 4.6.3 | Pythonic binding for the C libraries libxml2 and libxslt. / BSD-3-Clause and GPL-2.0-only and ZPL-2.0 and LicenseRef-ElementTree |
| [lz4-c](https://www.lz4.org) | 1.9.3 | Extremely Fast Compression algorithm / BSD-2-Clause |
| [lzo](http://www.oberhumer.com/opensource/lzo/) | 2.10 | LZO is a portable lossless data compression library written in ANSI C. / GPL v2+ |
| [markupsafe](https://www.palletsprojects.com/p/markupsafe) | 2.0.1 | A Python module that implements the jinja2.Markup string / BSD-3-Clause |
| [matplotlib](http://matplotlib.org/) | 3.4.3 | Publication quality figures in Python / LicenseRef-PSF-based |
| [matplotlib-base](http://matplotlib.org/) | 3.4.3 | Publication quality figures in Python / LicenseRef-PSF-based |
| [matplotlib-inline](https://github.com/ipython/matplotlib-inline) | 0.1.2 | Inline Matplotlib backend for Jupyter / BSD-3-Clause |
| [mccabe](https://github.com/PyCQA/mccabe) | 0.6.1 | McCabe complexity checker for Python / MIT |
| [mistune](https://github.com/lepture/mistune) | 0.8.4 | The fastest markdown parser in pure Python. / BSD 3-Clause |
| [mock](https://github.com/testing-cabal/mock) | 4.0.3 | A library for testing in Python / BSD-2-Clause |
| [more-itertools](https://github.com/more-itertools/more-itertools) | 8.10.0 | More routines for operating on iterables, beyond itertools / MIT |
| [mpc](http://www.multiprecision.org/) | 1.1.0 | A C library for the arithmetic of complex numbers with arbitrarily high precision. / LGPL 3 |
| [mpfr](http://www.mpfr.org/) | 4.0.2 | The MPFR library is a C library for multiple-precision floating-point computations with correct rounding. / LGPL-3.0-only |
| [mpmath](http://mpmath.org) | 1.2.1 | Python library for arbitrary-precision floating-point arithmetic / BSD 3-Clause |
| [msgpack-python](http://msgpack.org/) | 1.0.2 | MessagePack (de)serializer / Apache-2.0 |
| [multipledispatch](https://github.com/mrocklin/multipledispatch/) | 0.6.0 | Multiple dispatch in Python / BSD 3-Clause |
| [munkres](https://github.com/bmc/munkres) | 1.1.4 | The Munkres module provides an O(n^3) implementation of the Munkres algorithm (also called the Hungarian algorithm or the Kuhn-Munkres algorithm). / Apache-2.0 |
| [nbclient](https://jupyter.org) | 0.5.3 | A client library for executing notebooks. Formally nbconvert’s ExecutePreprocessor. / BSD-3-Clause |
| [nbconvert](http://jupyter.org) | 6.1.0 | Converting Jupyter Notebooks / BSD-3-Clause |
| [nbformat](http://jupyter.org) | 5.1.3 | The Jupyter Notebook format / BSD-3-Clause |
| [ncurses](http://www.gnu.org/software/ncurses/) | 6.3 | Library for text-based user interfaces / Free software (MIT-like) |
| [nest-asyncio](https://github.com/erdewit/nest_asyncio) | 1.5.1 | Patch asyncio to allow nested event loops / BSD-2-Clause |
| [networkx](https://networkx.github.io/) | 2.6.3 | Python package for creating and manipulating complex networks / BSD-3-Clause |
| [nltk](http://nltk.org/) | 3.6.5 | Natural Language Toolkit / Apache 2.0 |
| nomkl | 3.0 | None / BSD |
| [nose](http://readthedocs.org/docs/nose/) | 1.3.7 | Nose extends unittest to make testing easier / LGPL-2.1 |
| [notebook](https://jupyter.org) | 6.4.5 | Jupyter Notebook / BSD-3-Clause |
| [numexpr](https://github.com/pydata/numexpr) | 2.7.3 | Fast numerical expression evaluator for NumPy. / MIT |
| [numpy](http://numpy.scipy.org/) | 1.20.3 | Array processing for numbers, strings, records, and objects. / BSD 3-Clause |
| [numpy-base](http://numpy.scipy.org/) | 1.20.3 | Array processing for numbers, strings, records, and objects. / BSD 3-Clause |
| [numpydoc](https://github.com/numpy/numpydoc) | 1.1.0 | Numpy’s Sphinx extensions / BSD 3-Clause |
| [olefile](http://www.decalage.info/python/olefileio) | 0.46 | parse, read and write Microsoft OLE2 files / BSD 2-Clause |
| [openblas](http://www.openblas.net/) | 0.3.13 | An optimized BLAS library / BSD |
| openblas-devel | 0.3.13 | OpenBLAS headers and libraries for developing software that used OpenBLAS. / None |
| [openjpeg](http://www.openjpeg.org/) | 2.4.0 | An open-source JPEG 2000 codec written in C / BSD 2-Clause |
| [openpyxl](https://openpyxl.readthedocs.io) | 3.0.9 | A Python library to read/write Excel 2010 xlsx/xlsm files / MIT |
| [openssl](http://www.openssl.org/) | 1.1.1l | OpenSSL is an open-source implementation of the SSL and TLS protocols / OpenSSL |
| [packaging](https://github.com/pypa/packaging) | 21.0 | Core utilities for Python packages / Apache 2.0 or BSD 2-Clause |
| [pandas](http://pandas.pydata.org) | 1.3.4 | High-performance, easy-to-use data structures and data analysis tools. / BSD-3-Clause |
| [pandocfilters](https://github.com/jgm/pandocfilters) | 1.4.3 | A python module for writing pandoc filters / BSD-3-Clause |
| [parso](https://github.com/davidhalter/parso) | 0.8.2 | A Python Parser / MIT |
| [partd](https://github.com/dask/partd) | 1.2.0 | Data structure for on-disk shuffle operations / BSD 3-Clause |
| [patchelf](http://nixos.org/patchelf.html) | 0.13 | A small utility to modify the dynamic linker and RPATH of ELF executables. / GPL-3.0-or-later |
| [path](https://github.com/jaraco/path) | 16.0.0 | A module wrapper for os.path / MIT |
| [path.py](https://github.com/jaraco/path.py) | 12.5.0 | A module wrapper for os.path / MIT |
| [pathlib2](https://github.com/mcmtroffaes/pathlib2) | 2.3.6 | Fork of pathlib aiming to support the full stdlib Python API / MIT |
| [patsy](https://github.com/pydata/patsy) | 0.5.2 | Describing statistical models in Python using symbolic formulas / BSD-2-Clause AND PSF-2.0 |
| [pcre](http://www.pcre.org/) | 8.45 | Regular expression pattern matching using the same syntax and semantics as Perl 5. / BSD 3-Clause |
| [pep8](http://pep8.readthedocs.org/) | 1.7.1 | Python style guide checker / MIT |
| [pexpect](http://pexpect.sourceforge.net/) | 4.8.0 | Pexpect makes Python a better tool for controlling other applications. / ISC |
| [pickleshare](https://github.com/pickleshare/pickleshare/) | 0.7.5 | Tiny ‘shelve’-like database with concurrency support / MIT |
| [pillow](https://pillow.readthedocs.io) | 8.4.0 | Pillow is the friendly PIL fork by Alex Clark and Contributors / LicenseRef-PIL |
| [pip](https://pip.pypa.io/en/stable/) | 21.2.4 | PyPA recommended tool for installing Python packages / MIT |
| [pixman](http://www.pixman.org/) | 0.40.0 | A low-level software library for pixel manipulation. / MIT |
| [pkginfo](https://code.launchpad.net/~tseaver/pkginfo/trunk) | 1.7.1 | Query metadatdata from sdists / bdists / installed packages. / MIT |
| [pluggy](https://github.com/pytest-dev/pluggy) | 0.13.1 | Plugin registration and hook calling for Python / MIT |
| [ply](http://www.dabeaz.com/ply/index.html) | 3.11 | Python Lex-Yacc / BSD 3-clause |
| [prometheus\_client](https://github.com/prometheus/client_python) | 0.11.0 | Python client for the Prometheus monitoring system / Apache-2.0 |
| [prompt-toolkit](https://github.com/jonathanslenders/python-prompt-toolkit) | 3.0.20 | Library for building powerful interactive command lines in Python / BSD-3-Clause |
| [prompt\_toolkit](https://github.com/jonathanslenders/python-prompt-toolkit) | 3.0.20 | Library for building powerful interactive command lines in Python / BSD-3-Clause |
| [psutil](https://github.com/giampaolo/psutil) | 5.8.0 | A cross-platform process and system utilities module for Python / BSD-3-Clause |
| [ptyprocess](https://github.com/pexpect/ptyprocess) | 0.7.0 | Run a subprocess in a pseudo terminal / ISC |
| [py](https://github.com/pytest-dev/py) | 1.10.0 | library with cross-python path, ini-parsing, io, code, log facilities / MIT |
| [py-lief](https://lief.quarkslab.com/) | 0.10.1 | A cross platform library to parse, modify and abstract ELF, PE and MachO formats. / Apache-2.0 |
| [pycodestyle](https://pycodestyle.readthedocs.io/) | 2.7.0 | Python style guide checker / MIT |
| [pycosat](https://github.com/ContinuumIO/pycosat) | 0.6.3 | Bindings to picosat (a SAT solver) / MIT |
| [pycparser](https://github.com/eliben/pycparser) | 2.20 | Complete C99 parser in pure Python / BSD 3-clause |
| [pycurl](http://pycurl.sourceforge.net/) | 7.44.1 | A Python Interface To The cURL library / LGPL, MIT |
| [pyerfa](https://pyerfa.readthedocs.io/) | 2.0.0 | Python bindings for ERFA routines / BSD-3-Clause |
| [pyflakes](https://github.com/PyCQA/pyflakes) | 2.3.1 | Pyflakes analyzes programs and detects various errors. / MIT |
| [pygments](http://pygments.org/) | 2.10.0 | Pygments is a generic syntax highlighter suitable for use in code hosting, forums, wikis or other applications that need to prettify source code. / BSD-2-clause |
| [pylint](https://www.pylint.org) | 2.9.6 | python code static checker / GPL-2.0-or-later |
| [pyodbc](https://github.com/mkleehammer/pyodbc) | 4.0.31 | DB API Module for ODBC / MIT |
| [pyopenssl](https://github.com/pyca/pyopenssl) | 21.0.0 | Python wrapper module around the OpenSSL library / Apache 2.0 |
| [pyparsing](https://github.com/pyparsing/pyparsing/) | 3.0.4 | Create and execute simple grammars / MIT |
| [pyrsistent](http://github.com/tobgu/pyrsistent/) | 0.18.0 | Persistent/Functional/Immutable data structures / MIT |
| [pysocks](https://github.com/Anorov/PySocks) | 1.7.1 | A Python SOCKS client module. See [Anorov/PySocks](https://github.com/Anorov/PySocks) for more information. / BSD 3-Clause |
| [pytables](http://www.pytables.org) | 3.6.1 | Brings together Python, HDF5 and NumPy to easily handle large amounts of data. / BSD 3-Clause |
| [pytest](https://docs.pytest.org/en/latest/) | 6.2.4 | Simple and powerful testing with Python. / MIT |
| [python](https://www.python.org/) | 3.9.7 | General purpose programming language / Python-2.0 |
| [python-dateutil](https://dateutil.readthedocs.org/) | 2.8.2 | Extensions to the standard Python datetime module. / BSD-3-Clause and Apache |
| [python-libarchive-c](https://github.com/Changaco/python-libarchive-c) | 2.9 | Python interface to libarchive / CC0-1.0 |
| [pytz](http://pythonhosted.org/pytz/) | 2021.3 | World timezone definitions, modern and historical. / MIT |
| [pywavelets](https://github.com/PyWavelets/pywt) | 1.1.1 | Discrete Wavelet Transforms in Python / MIT |
| [pyyaml](http://pyyaml.org/wiki/PyYAML) | 6.0 | YAML parser and emitter for Python / MIT |
| [pyzmq](https://github.com/zeromq/pyzmq) | 22.2.1 | Python bindings for zeromq / BSD 3-clause |
| [readline](https://cnswww.cns.cwru.edu/php/chet/readline/rltop.html) | 8.1 | library for editing command lines as they are typed in / GPL-3.0 |
| [regex](https://bitbucket.org/mrabarnett/mrab-regex) | 2021.8.3 | Alternative regular expression module, to replace re / Apache 2.0 |
| [requests](http://python-requests.org) | 2.26.0 | Requests is an elegant and simple HTTP library for Python, built with ♥. / Apache-2.0 |
| [ruamel\_yaml](https://sourceforge.net/p/ruamel-yaml/code/ci/default/tree) | 0.15.100 | A patched copy of ruamel.yaml. / MIT |
| [scikit-image](http://scikit-image.org/) | 0.18.3 | Image processing in Python. / BSD-3-Clause |
| [scikit-learn](http://scikit-learn.org/) | 0.24.2 | A set of python modules for machine learning and data mining / BSD-3-Clause |
| [scipy](http://www.scipy.org/) | 1.7.1 | Scientific Library for Python / BSD-3-Clause |
| [seaborn](https://seaborn.pydata.org) | 0.11.2 | Statistical data visualization / BSD 3-Clause |
| [send2trash](https://github.com/arsenetar/send2trash) | 1.8.0 | Python library to natively send files to Trash (or Recycle bin) on all platforms. / BSD-3-Clause |
| [setuptools](https://github.com/pypa/setuptools) | 58.0.4 | Download, build, install, upgrade, and uninstall Python packages / MIT |
| [simplegeneric](http://cheeseshop.python.org/pypi/simplegeneric) | 0.8.1 | Simple generic functions (similar to Python’s own len(), pickle.dump(), etc.) / Zope Public |
| [singledispatch](http://docs.python.org/3/library/functools.html#functools.singledispatch) | 3.7.0 | Transforms a function into a single-dispatch generic function / MIT |
| [six](https://six.readthedocs.io/) | 1.16.0 | Python 2 and 3 compatibility utilities / MIT |
| [snappy](https://github.com/google/snappy) | 1.1.8 | A fast compressor/decompressor / BSD 3-clause |
| [snowballstemmer](https://github.com/shibukawa/snowball_py) | 2.1.0 | Snowball stemming library collection for Python / BSD-2-Clause |
| [sortedcollections](http://www.grantjenks.com/docs/sortedcollections/) | 2.1.0 | Python Sorted Collections / Apache-2.0 |
| [sortedcontainers](http://www.grantjenks.com/docs/sortedcontainers/) | 2.4.0 | Python Sorted Container Types: SortedList, SortedDict, and SortedSet / Apache-2.0 |
| [soupsieve](http://facelessuser.github.io/soupsieve) | 2.2.1 | A modern CSS selector implementation for BeautifulSoup / MIT |
| [sphinx](http://www.sphinx-doc.org) | 4.2.0 | Sphinx is a tool that makes it easy to create intelligent and beautiful documentation / BSD-2-Clause |
| sphinxcontrib | 1.0 | Python namespace for sphinxcontrib / BSD |
| [sphinxcontrib-applehelp](https://www.sphinx-doc.org/en/master/) | 1.0.2 | sphinxcontrib-applehelp is a sphinx extension which outputs Apple help books / BSD-2-Clause |
| [sphinxcontrib-devhelp](https://www.sphinx-doc.org/en/master/) | 1.0.2 | sphinxcontrib-devhelp is a sphinx extension which outputs Devhelp document / BSD-2-Clause |
| [sphinxcontrib-htmlhelp](https://www.sphinx-doc.org/en/master/) | 2.0.0 | sphinxcontrib-htmlhelp is a sphinx extension which renders HTML help files. / BSD-2-Clause |
| [sphinxcontrib-jsmath](https://www.sphinx-doc.org/en/master/) | 1.0.1 | A sphinx extension which renders display math in HTML via JavaScript / BSD-2-Clause |
| [sphinxcontrib-qthelp](https://www.sphinx-doc.org/en/master/) | 1.0.3 | sphinxcontrib-qthelp is a sphinx extension which outputs QtHelp document / BSD-2-Clause |
| [sphinxcontrib-serializinghtml](https://www.sphinx-doc.org/en/master/) | 1.1.5 | sphinxcontrib-serializinghtml is a sphinx extension which outputs “serialized” HTML files (json and pickle). / BSD-2-Clause |
| [sphinxcontrib-websupport](https://pypi.python.org/pypi/sphinxcontrib-websupport) | 1.2.4 | Sphinx API for Web Apps / BSD-2-Clause |
| [sqlalchemy](http://www.sqlalchemy.org/) | 1.4.22 | Database Abstraction Library. / MIT |
| [sqlite](http://www.sqlite.org/) | 3.36.0 | Implements a self-contained, zero-configuration, SQL database engine / Public-Domain (`<http://www.sqlite.org/copyright.html>`) |
| [statsmodels](https://www.statsmodels.org) | 0.13.0 | Statistical computations and models for use with SciPy / BSD-3-Clause |
| [sympy](https://sympy.org) | 1.9 | Python library for symbolic mathematics / BSD-3-Clause |
| [tbb](https://github.com/oneapi-src/oneTBB) | 2021.4.0 | High level abstract threading library / Apache-2.0 |
| tbb4py | 2021.4.0 | TBB module for Python / Apache 2.0 |
| [tblib](https://github.com/ionelmc/python-tblib) | 1.7.0 | Traceback serialization library. / BSD 2-Clause |
| [terminado](https://github.com/jupyter/terminado) | 0.9.4 | Terminals served by tornado websockets / BSD-2-Clause |
| [testpath](https://testpath.readthedocs.io) | 0.5.0 | Testpath is a collection of utilities for Python code working with files and commands. / BSD-3-Clause |
| [threadpoolctl](https://github.com/joblib/threadpoolctl) | 2.2.0 | Python helpers to control the threadpools of native libraries / BSD 3-Clause |
| [tifffile](https://github.com/cgohlke/tifffile) | 2021.7.2 | Read and write image data from and to TIFF files. / BSD-3-Clause |
| [tk](http://www.tcl.tk/) | 8.6.11 | A dynamic programming language with GUI support. Bundles Tcl and Tk. / Tcl/Tk |
| [toml](https://github.com/uiri/toml) | 0.10.2 | Python lib for TOML. / MIT |
| [toolz](http://toolz.readthedocs.org/) | 0.11.1 | A functional standard library for Python / BSD-3-Clause |
| [tornado](http://www.tornadoweb.org/) | 6.1 | A Python web framework and asynchronous networking library, originally developed at FriendFeed. / Apache-2.0 |
| [tqdm](https://pypi.python.org/pypi/tqdm) | 4.62.3 | A Fast, Extensible Progress Meter / MPL-2.0 AND MIT |
| [traitlets](http://traitlets.readthedocs.org/) | 5.1.0 | Configuration system for Python applications / BSD-3-Clause |
| [typing\_extensions](https://github.com/python/typing/tree/master/typing_extensions) | 3.10.0.2 | Backported and Experimental Type Hints for Python / PSF-2.0 |
| [tzdata](https://www.iana.org/time-zones) | 2021e | The Time Zone Database (called tz, tzdb or zoneinfo) / Public-Domain AND BSD-3-clause |
| [unicodecsv](https://github.com/jdunck/python-unicodecsv) | 0.14.1 | Drop-in replacement for csv module which supports unicode strings / BSD |
| [unixodbc](http://www.unixodbc.org/) | 2.3.9 | ODBC on non MS Windows platforms / LGPL-2.1 |
| [urllib3](https://urllib3.readthedocs.io/) | 1.26.7 | HTTP library with thread-safe connection pooling, file post, and more. / MIT |
| [wcwidth](https://github.com/jquast/wcwidth) | 0.2.5 | Measures number of Terminal column cells of wide-character codes. / MIT |
| [webencodings](https://github.com/gsnedders/python-webencodings) | 0.5.1 | Character encoding aliases for legacy web content / BSD 3-Clause |
| [werkzeug](https://palletsprojects.com/p/werkzeug/) | 2.0.2 | The comprehensive WSGI web application library. / BSD-3-Clause |
| [wheel](https://github.com/pypa/wheel) | 0.37.0 | A built-package format for Python. / MIT |
| [widgetsnbextension](http://ipython.org) | 3.5.1 | Interactive Widgets for Jupyter / BSD 3-clause |
| [wrapt](https://github.com/GrahamDumpleton/wrapt) | 1.12.1 | Module for decorators, wrappers and monkey patching / BSD 2-Clause |
| [xlrd](http://www.python-excel.org/) | 2.0.1 | Library for developers to extract data from Microsoft Excel (tm) spreadsheet files / BSD 3-Clause and BSD with advertising |
| [xlsxwriter](https://xlsxwriter.readthedocs.io/) | 3.0.1 | A Python module for creating Excel XLSX files / BSD-2-Clause |
| [xlwt](http://www.python-excel.org/) | 1.3.0 | Writing data and formatting information to Excel files / BSD |
| [xz](http://tukaani.org/xz/) | 5.2.5 | Data compression software with high compression ratio / LGPL-2.1 and GPL-2.0 |
| [yaml](http://pyyaml.org/wiki/LibYAML) | 0.2.5 | A C library for parsing and emitting YAML / MIT |
| [zeromq](http://zeromq.org) | 4.3.4 | A high-performance asynchronous messaging library. / LGPL-3.0-or-later |
| [zfp](https://computation.llnl.gov/projects/floating-point-compression) | 0.5.5 | Library for compressed numerical arrays that support high throughput read and write random access / BSD-3-Clause |
| [zict](http://github.com/mrocklin/zict) | 2.0.0 | Composable Dictionary Classes / BSD 3-Clause |
| [zipp](https://github.com/jaraco/zipp) | 3.6.0 | A pathlib-compatible Zipfile object wrapper / MIT |
| [zlib](http://zlib.net/) | 1.2.11 | Massively spiffy yet delicately unobtrusive compression library / zlib |
| zope | 1.0 | web application server / BSD |
| [zope.event](http://www.zope.org/en/latest/) | 4.5.0 | Very basic event publishing system / Zope Public License |
| [zope.interface](https://github.com/zopefoundation/zope.interface) | 5.4.0 | Interfaces for Python / ZPL-2.1 |
| [zstd](http://www.zstd.net) | 1.4.9 | Zstandard - Fast real-time compression algorithm / BSD 3-Clause |
| Name | Version | Summary / License |
|---|---|---|
| [\_libgcc\_mutex](https://github.com/AnacondaRecipes/_libgcc_mutex-feedstock) | 0.1 | Mutex for libgcc and libgcc-ng / None |
| [\_openmp\_mutex](https://github.com/conda-forge/ctng-compilers-feedstock) | 5.1 | OpenMP Implementation Mutex / BSD-3-Clause |
| [adwaita-icon-theme](https://developer.gnome.org) | 40.1.1 | The default icon theme used by the GNOME desktop / LGPL-3.0-or-later OR CC-BY-SA-3.0 |
| [alabaster](http://www.sphinx-doc.org/en/stable/index.html) | 0.7.12 | Configurable, Python 2+3 compatible Sphinx theme. / BSD 3-Clause |
| [anaconda-client](https://github.com/Anaconda-Platform/anaconda-client) | 1.9.0 | Anaconda Cloud command line client library / BSD 3-Clause |
| [anaconda-navigator](https://github.com/ContinuumIO/navigator) | 2.1.1 | Anaconda Navigator / proprietary - Continuum Analytics, Inc. |
| [anaconda-project](https://github.com/Anaconda-Platform/anaconda-project) | 0.10.1 | Tool for encapsulating, running, and reproducing data science projects / BSD-3-Clause |
| [anyio](https://github.com/agronholm/anyio) | 2.2.0 | High level compatibility layer for multiple asynchronous event loop implementations on Python / MIT |
| [appdirs](http://github.com/ActiveState/appdirs) | 1.4.4 | A small Python module for determining appropriate platform-specific dirs. / MIT |
| [argh](https://github.com/neithere/argh) | 0.26.2 | The Natural CLI. / LGPL 3 |
| [argon2-cffi](https://argon2-cffi.readthedocs.org/) | 20.1.0 | The secure Argon2 password hashing algorithm. / MIT |
| [arrow](https://github.com/crsmithdev/arrow) | 0.13.1 | Better dates & times for Python / Apache-2.0 |
| [asn1crypto](https://github.com/wbond/asn1crypto) | 1.4.0 | Python ASN.1 library with a focus on performance and a pythonic API / MIT |
| [astroid](https://www.astroid.org/) | 2.5 | A abstract syntax tree for Python with inference support. / LGPL-2.1-or-later |
| [astropy](http://www.astropy.org/) | 4.3.1 | Community-developed Python Library for Astronomy / BSD-3-Clause |
| [async\_generator](https://github.com/python-trio/async_generator) | 1.10 | Async generators and context managers for Python 3.5+ / MIT |
| [at-spi2-atk](http://www.gtk.org/) | 2.34.2 | bridge for AT-SPI and ATK accessibility technologies / LGPL-2.1-or-later |
| [at-spi2-core](http://www.gtk.org/) | 2.36.0 | D-Bus-based implementation of AT-SPI accessibility framework / LGPL-2.1-or-later |
| [atk-1.0](http://www.gtk.org/) | 2.36.0 | Accessibility Toolkit. / LGPL-2.0-or-later |
| [atomicwrites](https://github.com/untitaker/python-atomicwrites) | 1.4.0 | Atomic file writes / MIT |
| [attrs](https://attrs.readthedocs.io/en/stable/) | 21.2.0 | attrs is the Python package that will bring back the joy of writing classes by relieving you from the drudgery of implementing object protocols (aka dunder methods). / MIT |
| [autopep8](https://github.com/hhatto/autopep8) | 1.5.7 | A tool that automatically formats Python code to conform to the PEP 8 style guide / MIT |
| [babel](http://babel.pocoo.org/) | 2.9.1 | Utilities to internationalize and localize Python applications / BSD 3-clause |
| [backcall](https://github.com/takluyver/backcall/) | 0.2.0 | Specifications for callback functions passed in to an API / BSD-3-Clause |
| [backports](https://bitbucket.org/brandon/backports) | 1.0 | None / BSD |
| [backports.shutil\_get\_terminal\_size](https://github.com/chrippa/backports.shutil_get_terminal_size) | 1.0.0 | A backport of the get\_terminal\_size function from Python 3.3’s shutil. / MIT |
| [beautifulsoup4](http://www.crummy.com/software/BeautifulSoup/) | 4.10.0 | Python library designed for screen-scraping / MIT |
| [binaryornot](https://github.com/audreyr/binaryornot) | 0.4.4 | Ultra-lightweight pure Python package to check if a file is binary or text. / BSD-3-Clause |
| [bitarray](https://github.com/ilanschnell/bitarray) | 1.7.0 | efficient arrays of booleans – C extension / PSF |
| [bkcharts](http://github.com/bokeh/bkcharts) | 0.2 | High level chart types built on top of Bokeh / BSD 3-Clause |
| [black](https://github.com/python/black) | 19.10b0 | The Uncompromising Code Formatter / MIT |
| [blas](http://www.netlib.org/lapack) | 1.0 | Linear Algebra PACKage / BSD-3-Clause |
| [bleach](https://github.com/mozilla/bleach) | 4.0.0 | Easy, whitelist-based HTML-sanitizing tool / Apache-2.0 |
| [blosc](https://github.com/Blosc/c-blosc) | 1.21.0 | A blocking, shuffling and loss-less compression library that can be faster than memcpy() / BSD-3-Clause |
| [bokeh](http://bokeh.pydata.org/) | 2.4.1 | Statistical and novel interactive HTML plots for Python / BSD-3-Clause |
| [boto](https://github.com/boto/boto/) | 2.49.0 | Amazon Web Services Library / MIT |
| [bottleneck](https://github.com/pydata/bottleneck) | 1.3.2 | Fast NumPy array functions written in Cython. / BSD 2-Clause |
| [brotli](http://github.com/google/brotli) | 1.0.9 | Brotli compression format / MIT |
| [brotlipy](https://github.com/python-hyper/brotlipy) | 0.7.0 | Python bindings to the Brotli compression library / MIT |
| [brunsli](https://github.com/google/brunsli) | 0.1 | Practical JPEG Repacker / MIT |
| [bzip2](http://www.bzip.org/) | 1.0.8 | high-quality data compressor / bzip2 |
| [c-ares](https://c-ares.haxx.se/) | 1.17.1 | This is c-ares, an asynchronous resolver library / MIT |
| [ca-certificates](https://github.com/conda-forge/ca-certificates-feedstock) | 2021.10.26 | Certificates for use with other packages. / MPL 2.0 |
| [cached-property](https://github.com/pydanny/cached-property) | 1.5.2 | A decorator for caching properties in classes. / BSD-3-Clause |
| [cairo](http://cairographics.org/) | 1.16.0 | Cairo is a 2D graphics library with support for multiple output devices. / LGPL 2.1 or MPL 1.1 |
| [certifi](http://certifi.io/) | 2021.10.8 | Python package for providing Mozilla’s CA Bundle. / ISC |
| [cffi](http://cffi.readthedocs.org/) | 1.14.5 | Foreign Function Interface for Python calling C code. / MIT |
| [cfitsio](http://heasarc.gsfc.nasa.gov/fitsio/fitsio.html) | 3.470 | A library for reading and writing FITS files / fitsio |
| [chardet](https://github.com/chardet/chardet) | 4.0.0 | Universal character encoding detector / LGPL2 |
| [charls](https://github.com/team-charls/charls) | 2.2.0 | CharLS is a C++ implementation of the JPEG-LS standard for lossless and near-lossless image compression and decompression. JPEG-LS is a low-complexity image compression standard that matches JPEG 2000 compression ratios. / BSD-3-Clause |
| [charset-normalizer](https://github.com/ousret/charset_normalizer) | 2.0.4 | The Real First Universal Charset Detector. Open, modern and actively maintained alternative to Chardet. / MIT |
| [click](https://palletsprojects.com/p/click) | 8.0.3 | Python composable command line interface toolkit / BSD-3-Clause |
| [cloudpickle](https://github.com/cloudpipe/cloudpickle) | 2.0.0 | Extended pickling support for Python objects / BSD-3-Clause |
| [clyent](https://github.com/Anaconda-Platform/clyent) | 1.2.2 | Command line client library for windows and posix / BSD 3-Clause |
| [colorama](https://github.com/tartley/colorama) | 0.4.4 | Cross-platform colored terminal text / BSD-3-Clause |
| [conda](https://conda.io) | 4.10.3 | OS-agnostic, system-level binary package and environment manager. / BSD 3-Clause |
| [conda-build](https://github.com/conda/conda-build) | 3.21.6 | tools for building conda packages / BSD 3-Clause |
| [conda-content-trust](https://github.com/conda/conda-content-trust) | 0.1.1 | Signing and verification tools for conda / BSD-3-Clause |
| [conda-env](https://github.com/conda/conda-env) | 2.6.0 | Tools for interacting with conda environments. / BSD 3-Clause |
| [conda-token](https://github.com/Anaconda/conda-token) | 0.3.0 | Set repository access token / BSD-3-Clause |
| [conda-verify](https://github.com/conda/conda-verify) | 3.4.2 | tool for validating conda recipes and conda packages / BSD 3-Clause |
| [contextlib2](http://contextlib2.readthedocs.org) | 0.6.0.post1 | Backports and enhancements for the contextlib module / PSF 2 |
| [cookiecutter](https://github.com/cookiecutter/cookiecutter) | 1.7.2 | A command-line utility that creates projects from cookiecutters (project templates), e.g. creating a Python package project from a Python package project template. / BSD-3-Clause |
| [cryptography](https://github.com/pyca/cryptography) | 3.4.7 | Provides cryptographic recipes and primitives to Python developers / Apache-2.0 AND BSD-3-Clause AND PSF-2.0 AND MIT |
| [curl](http://curl.haxx.se/) | 7.71.1 | tool and library for transferring data with URL syntax / curl |
| [cycler](http://matplotlib.org/cycler) | 0.10.0 | Composable style cycles. / BSD 3-Clause |
| [cython](http://www.cython.org/) | 0.29.24 | The Cython compiler for writing C extensions for the Python language / Apache-2.0 |
| [cytoolz](https://github.com/pytoolz/cytoolz) | 0.11.0 | Cython implementation of Toolz. High performance functional utilities / BSD-3-Clause |
| [dask](https://dask.org/) | 2021.10.0 | Parallel PyData with Task Scheduling / BSD-3-Clause |
| [dask-core](http://github.com/dask/dask/) | 2021.10.0 | Parallel Python with task scheduling / BSD-3-Clause |
| [dataclasses](https://github.com/ericvsmith/dataclasses) | 0.8 | An implementation of PEP 557: Data Classes / Apache-2.0 |
| [dbus](http://www.freedesktop.org/wiki/Software/dbus/) | 1.13.18 | Simple message bus system for applications to talk to one another / GPL2 |
| [debugpy](https://github.com/Microsoft/debugpy) | 1.4.1 | An implementation of the Debug Adapter Protocol for Python / MIT |
| [decorator](https://github.com/micheles/decorator) | 5.1.0 | Better living through Python with decorators. / BSD-2-Clause |
| [defusedxml](https://bitbucket.org/tiran/defusedxml) | 0.7.1 | XML bomb protection for Python stdlib modules / PSF 2.0 |
| [diff-match-patch](http://code.google.com/p/google-diff-match-patch/) | 20200713 | Diff Match Patch is a high-performance library in multiple languages that manipulates plain text / Apache-2.0 |
| [distributed](http://distributed.readthedocs.io/en/latest/) | 2021.10.0 | Distributed computing with Dask / BSD-3-Clause |
| [docutils](http://docutils.sourceforge.net/) | 0.17 | Docutils – Python Documentation Utilities / Public Domain Dedictation and BSD 2-Clause and PSF 2.1.1 and GPL 3.0 |
| [entrypoints](https://github.com/takluyver/entrypoints) | 0.3 | Discover and load entry points from installed packages. / MIT License |
| [epoxy](https://github.com/anholt/libepoxy) | 1.5.4 | A library for handling OpenGL function pointer management for you. / MIT |
| [et\_xmlfile](https://foss.heptapod.net/openpyxl/et_xmlfile) | 1.1.0 | An implementation of lxml.xmlfile for the standard library / MIT AND PSF-2.0 |
| [expat](http://expat.sourceforge.net/) | 2.4.1 | Expat XML parser library in C / MIT |
| [fastcache](https://github.com/pbrady/fastcache) | 1.1.0 | C implementation of Python 3 lru\_cache / MIT |
| [filelock](https://github.com/benediktschmitt/py-filelock) | 3.3.1 | A platform independent file lock. / Public Domain |
| [flake8](http://flake8.pycqa.org/) | 3.9.2 | Your Tool For Style Guide Enforcement / MIT |
| [flask](http://flask.pocoo.org) | 1.1.2 | A microframework based on Werkzeug, Jinja2 and good intentions. / BSD 3-Clause |
| [fontconfig](http://www.freedesktop.org/wiki/Software/fontconfig/) | 2.13.1 | A library for configuring and customizing font access. / MIT |
| [fonttools](https://github.com/fonttools/fonttools) | 4.25.0 | fontTools is a library for manipulating fonts, written in Python. / MIT |
| [freetype](https://www.freetype.org/) | 2.10.4 | A Free, High-Quality, and Portable Font Engine / GPL-2.0-only and LicenseRef-FreeType |
| [fribidi](https://github.com/fribidi/fribidi) | 1.0.10 | The Free Implementation of the Unicode Bidirectional Algorithm. / LGPL-2.1 |
| [fsspec](https://github.com/martindurant/filesystem_spec) | 2021.8.1 | A specification for pythonic filesystems / BSD-3-Clause |
| [gdk-pixbuf](https://developer.gnome.org/gdk-pixbuf/) | 2.38.2 | GdkPixbuf is a library for image loading and manipulation. / LGPL-2.1-or-later |
| [get\_terminal\_size](https://github.com/chrippa/backports.shutil_get_terminal_size) | 1.0.0 | Get the size of the terminal window. / MIT |
| [gettext](https://www.gnu.org/software/gettext/) | 0.21.0 | Internationalization package / GPL-2.0 |
| [gevent](https://www.gevent.org) | 21.8.0 | Coroutine-based network library / MIT |
| [giflib](http://giflib.sourceforge.net) | 5.2.1 | Library for reading and writing gif images / MIT |
| [glib](https://developer.gnome.org/glib/) | 2.69.1 | Provides core application building blocks for libraries and applications written in C. / LGPL-2.1-or-later |
| [glob2](https://github.com/miracle2k/python-glob2) | 0.7 | Version of the glob module that supports recursion via \*\*, and can capture patterns. / BSD-2-Clause |
| [gmp](http://gmplib.org/) | 6.2.1 | The GNU multiprecision library. / GPL-2.0-or-later AND LGPL-3.0-or-later |
| [gmpy2](https://pypi.python.org/pypi/gmpy2) | 2.0.8 | GMP/MPIR, MPFR, and MPC interface to Python 2.6+ and 3.x / LGPL 3 |
| [gobject-introspection](https://wiki.gnome.org/action/show/Projects/GObjectIntrospection) | 1.68.0 | Middleware for binding GObject-based code to other languages. / LGPL-2.0-or-later |
| [graphite2](http://graphite.sil.org/) | 1.3.14 | A “smart font” system that handles the complexities of lesser-known languages of the world. / LGPLv2 |
| [greenlet](https://github.com/python-greenlet/greenlet) | 1.1.1 | Lightweight in-process concurrent programming / MIT |
| [gst-plugins-base](http://gstreamer.freedesktop.org/) | 1.14.1 | GStreamer Base Plug-ins / GPL2 |
| [gstreamer](http://gstreamer.freedesktop.org/) | 1.14.1 | Library for constructing graphs of media-handling components / LGPL 2 |
| [gtk3](http://www.gtk.org/) | 3.24.21 | Version 3 of the Gtk+ graphical toolkit / LGPL-2.0-or-later |
| [h5py](http://www.h5py.org/) | 3.1.0 | Read and write HDF5 files from Python / BSD-3-Clause |
| [harfbuzz](http://www.freedesktop.org/wiki/Software/HarfBuzz/) | 2.8.0 | An OpenType text shaping engine. / MIT |
| [hdf5](http://www.hdfgroup.org/HDF5/) | 1.12.0 | HDF5 is a data model, library, and file format for storing and managing data / HDF5 |
| [heapdict](http://stutzbachenterprises.com/) | 1.0.1 | A heap with decrease-key and increase-key operations / BSD 3-Clause |
| [hicolor-icon-theme](https://wiki.freedesktop.org/www/Software/icon-theme/) | 0.17 | Fallback theme for FreeDesktop.org icon themes / GPL-2.0-or-later |
| [html5lib](https://github.com/html5lib/html5lib-python) | 1.1 | HTML parser based on the WHATWG HTML specification / MIT |
| [icu](http://site.icu-project.org/) | 68.1 | International Components for Unicode. / MIT |
| [idna](https://github.com/kjd/idna) | 3.2 | Internationalized Domain Names in Applications (IDNA). / BSD-3-Clause |
| [imagecodecs](https://www.lfd.uci.edu/~gohlke/) | 2021.8.26 | Image transformation, compression, and decompression codecs / BSD-3-Clause |
| [imageio](https://imageio.github.io) | 2.9.0 | A Python library for reading and writing image data / BSD-2-Clause |
| [imagesize](https://github.com/shibukawa/imagesize_py) | 1.2.0 | Getting image size from png/jpeg/jpeg2000/gif file / MIT |
| [importlib-metadata](https://github.com/python/importlib_metadata) | 4.8.1 | A library to access the metadata for a Python package / Apache-2.0 |
| [importlib\_metadata](https://github.com/python/importlib_metadata) | 4.8.1 | A library to access the metadata for a Python package / Apache-2.0 |
| [inflection](http://github.com/jpvanhal/inflection) | 0.5.1 | A port of Ruby on Rails inflector to Python / MIT |
| [iniconfig](http://github.com/RonnyPfannschmidt/iniconfig) | 1.1.1 | iniconfig: brain-dead simple config-ini parsing / MIT |
| [intervaltree](https://github.com/chaimleib/intervaltree) | 3.1.0 | Editable interval tree data structure for Python 2 and 3 / Apache-2.0 |
| [ipykernel](https://ipython.org) | 6.4.1 | IPython Kernel for Jupyter / BSD-3-Clause |
| [ipython](https://ipython.org) | 7.29.0 | IPython: Productive Interactive Computing / BSD-3-Clause |
| [ipython\_genutils](http://ipython.org) | 0.2.0 | vestigial utilities from IPython / BSD 3-Clause |
| [ipywidgets](https://github.com/ipython/ipywidgets) | 7.6.5 | Jupyter Interactive Widgets / BSD-3-Clause |
| [isort](https://github.com/timothycrosley/isort) | 5.9.3 | A Python utility / library to sort Python imports. / MIT |
| [itsdangerous](https://github.com/pallets/itsdangerous) | 2.0.1 | Various helpers to pass trusted data to untrusted environments. / BSD-3-Clause |
| [jbig](https://www.cl.cam.ac.uk/~mgk25/jbigkit) | 2.1 | Implementation of the JBIG1 data compression standard / GPL-2.0 |
| [jdcal](https://github.com/phn/jdcal) | 1.4.1 | Julian dates from proleptic Gregorian and Julian calendars. / BSD 2-Clause |
| [jedi](https://github.com/davidhalter/jedi/) | 0.18.0 | An autocompletion tool for Python that can be used for text editors. / MIT |
| [jeepney](https://gitlab.com/takluyver/jeepney) | 0.7.1 | Pure Python DBus interface / MIT |
| [jinja2](http://jinja.pocoo.org) | 2.11.3 | An easy to use stand-alone template engine written in pure python. / BSD-3-Clause |
| [jinja2-time](https://github.com/hackebrot/jinja2-time) | 0.2.0 | Jinja2 Extension for Dates and Times / MIT |
| [joblib](https://joblib.readthedocs.io/en/latest/) | 1.1.0 | Lightweight pipelining: using Python functions as pipeline jobs. / BSD-3-Clause |
| [jpeg](http://www.ijg.org/) | 9d | read/write jpeg COM, EXIF, IPTC medata / Custom free software license |
| [json5](https://github.com/dpranke/pyjson5) | 0.9.6 | A Python implementation of the JSON5 data format / Apache-2.0 |
| [jsonschema](https://github.com/Julian/jsonschema) | 3.2.0 | An implementation of JSON Schema validation for Python / MIT |
| [jupyter](http://jupyter.org) | 1.0.0 | Jupyter metapackage. Install all the Jupyter components in one go. / BSD 3-Clause |
| [jupyter\_client](https://jupyter.org) | 6.1.12 | jupyter\_client contains the reference implementation of the Jupyter protocol. / BSD-3-Clause |
| [jupyter\_console](http://jupyter.org) | 6.4.0 | Jupyter terminal console / BSD-3-Clause |
| [jupyter\_core](https://jupyter.org) | 4.8.1 | Core common functionality of Jupyter projects. / BSD-3-Clause |
| [jupyter\_server](https://jupyter.org) | 1.4.1 | Jupyter Server / BSD-3-Clause |
| [jupyterlab](https://github.com/jupyterlab/jupyterlab) | 3.2.1 | An extensible environment for interactive and reproducible computing, based on the Jupyter Notebook and Architecture. / BSD-3-Clause |
| [jupyterlab\_pygments](http://github.com/JupyterLab/jupyterlab_pygments) | 0.1.2 | Pygments syntax coloring scheme making use of the JupyterLab CSS variables / BSD-3-Clause |
| [jupyterlab\_server](https://github.com/jupyterlab/jupyterlab_server) | 2.8.2 | A set of server components for JupyterLab and JupyterLab like applications. / BSD-3-Clause |
| [jupyterlab\_widgets](https://github.com/jupyter-widgets/ipywidgets) | 1.0.0 | JupyterLab extension providing HTML widgets / BSD-3-Clause |
| [jxrlib](https://packages.debian.org/source/sid/jxrlib) | 1.1 | jxrlib - JPEG XR Library by Microsoft, built from Debian hosted sources. / BSD-2-Clause |
| [keyring](https://github.com/jaraco/keyring) | 22.3.0 | Store and access your passwords safely / MIT |
| [kiwisolver](https://github.com/nucleic/kiwi) | 1.3.1 | An efficient C++ implementation of the Cassowary constraint solver / BSD-3-Clause |
| [krb5](http://web.mit.edu/kerberos/) | 1.19.2 | A network authentication protocol. / MIT |
| [lazy-object-proxy](https://github.com/ionelmc/python-lazy-object-proxy) | 1.6.0 | A fast and thorough lazy object proxy / BSD-2-Clause |
| [lcms2](http://www.littlecms.com/) | 2.12 | Open Source Color Management Engine / MIT |
| [ld\_impl\_linux-aarch64](https://www.gnu.org/software/binutils/) | 2.36.1 | A set of programming tools for creating and managing binary programs, object files, libraries, profile data, and assembly source code. / GPL-3.0-only |
| [lerc](https://github.com/Esri/lerc) | 3.0 | LERC - Limited Error Raster Compression / Apache-2.0 |
| [libaec](https://gitlab.dkrz.de/k202009/libaec) | 1.0.4 | Adaptive Entropy Coding library / BSD-2-Clause |
| [libarchive](http://www.libarchive.org/) | 3.4.2 | Multi-format archive and compression library / BSD-2-Clause |
| [libcups](https://www.cups.org/) | 2.2.12 | CUPS is the standards-based, open source printing system / LGPL-2.0-or-later |
| [libcurl](http://curl.haxx.se/) | 7.71.1 | tool and library for transferring data with URL syntax / curl |
| [libdeflate](https://github.com/ebiggers/libdeflate) | 1.7 | libdeflate is a library for fast, whole-buffer DEFLATE-based compression and decompression. / MIT |
| [libedit](http://thrysoee.dk/editline/) | 3.1.20210910 | Editline Library (libedit) / BSD-2-Clause |
| [libev](http://software.schmorp.de/pkg/libev.html) | 4.33 | A full-featured and high-performance event loop that is loosely modeled after libevent, but without its limitations and bugs. / BSD-2-Clause |
| [libevent](http://libevent.org/) | 2.1.10 | An event notification library. / BSD-3-Clause |
| [libffi](https://sourceware.org/libffi/) | 3.3 | A Portable Foreign Function Interface Library. / MIT |
| [libgcc-ng](https://gcc.gnu.org/onlinedocs/gccint/Libgcc.html) | 10.2.0 | The GCC low-level runtime library / GPL-3.0-only WITH GCC-exception-3.1 |
| [libgfortran-ng](https://gcc.gnu.org/) | 10.2.0 | The GNU Fortran Runtime Library / GPL-3.0-only WITH GCC-exception-3.1 |
| [libgfortran5](http://gcc.gnu.org/) | 10.2.0 | Fortran compiler and libraries from the GNU Compiler Collection / GPL-3.0-only WITH GCC-exception-3.1 |
| [libgomp](https://gcc.gnu.org/onlinedocs/gccint/Libgcc.html) | 10.2.0 | The GCC OpenMP implementation. / GPL-3.0-only WITH GCC-exception-3.1 |
| [liblief](https://lief.quarkslab.com/) | 0.10.1 | A cross platform library to parse, modify and abstract ELF, PE and MachO formats. / Apache-2.0 |
| [libllvm11](http://llvm.org/) | 11.1.0 | Development headers and libraries for LLVM / Apache-2.0 WITH LLVM-exception |
| [libopenblas](http://www.openblas.net/) | 0.3.13 | An Optimized BLAS library / BSD |
| [libpng](http://www.libpng.org/pub/png/libpng.html) | 1.6.37 | PNG reference library / zlib/libpng |
| [libpq](http://www.postgresql.org/) | 12.2 | The postgres runtime libraries and utilities (not the server itself) / PostgreSQL |
| [librsvg](https://wiki.gnome.org/Projects/LibRsvg) | 2.50.7 | librsvg is a library to render SVG files using cairo. / LGPL-2.1-or-later |
| [libsodium](http://libsodium.org) | 1.0.18 | A modern and easy-to-use crypto library. / ISC |
| [libspatialindex](http://libspatialindex.github.io) | 1.9.3 | Extensible framework for robust spatial indexing / MIT |
| [libssh2](https://www.libssh2.org/) | 1.9.0 | the SSH library / BSD-3-Clause |
| [libstdcxx-ng](https://gcc.gnu.org/) | 10.2.0 | The GNU C++ Runtime Library / GPL-3.0-only WITH GCC-exception-3.1 |
| [libtiff](http://www.libtiff.org/) | 4.2.0 | Support for the Tag Image File Format (TIFF). / HPND |
| [libtool](http://www.gnu.org/software/libtool/) | 2.4.6 | The GNU Portable Library Tool / GPL 3 |
| [libuuid](http://sourceforge.net/projects/libuuid/) | 1.0.3 | Portable uuid C library. / BSD 3-Clause |
| [libuv](http://libuv.org/) | 1.40.0 | Cross-platform asynchronous I/O / MIT |
| [libwebp](https://developers.google.com/speed/webp/) | 1.2.0 | WebP image library / Google |
| [libwebp-base](https://developers.google.com/speed/webp) | 1.2.0 | WebP image library / BSD-3-Clause |
| [libxcb](http://xcb.freedesktop.org/) | 1.14 | This is the C-language Binding (XCB) package to the X Window System protocol / MIT |
| [libxkbcommon](https://github.com/xkbcommon/libxkbcommon) | 1.0.1 | keymap handling library for toolkits and window systems / MIT/X11 Derivative |
| [libxml2](http://xmlsoft.org/) | 2.9.12 | The XML C parser and toolkit of Gnome / MIT |
| [libxslt](http://xmlsoft.org/XSLT/) | 1.1.34 | The XSLT C library developed for the GNOME project / MIT |
| [libzopfli](https://github.com/google/zopfli) | 1.0.3 | A compression library programmed in C to perform very good, but slow, deflate or zlib compression. / Apache-2.0 |
| [llvmlite](http://llvmlite.pydata.org) | 0.37.0 | A lightweight LLVM python binding for writing JIT compilers. / BSD-2-Clause |
| [locket](https://github.com/mwilliamson/locket.py) | 0.2.1 | File-based locks for Python for Linux and Windows / BSD 2-Clause |
| [lxml](http://lxml.de/) | 4.6.3 | Pythonic binding for the C libraries libxml2 and libxslt. / BSD-3-Clause and GPL-2.0-only and ZPL-2.0 and LicenseRef-ElementTree |
| [lz4-c](https://www.lz4.org) | 1.9.3 | Extremely Fast Compression algorithm / BSD-2-Clause |
| [lzo](http://www.oberhumer.com/opensource/lzo/) | 2.10 | LZO is a portable lossless data compression library written in ANSI C. / GPL v2+ |
| [markupsafe](https://www.palletsprojects.com/p/markupsafe) | 1.1.1 | A Python module that implements the jinja2.Markup string / BSD-3-Clause |
| [matplotlib](http://matplotlib.org/) | 3.4.3 | Publication quality figures in Python / LicenseRef-PSF-based |
| [matplotlib-base](http://matplotlib.org/) | 3.4.3 | Publication quality figures in Python / LicenseRef-PSF-based |
| [matplotlib-inline](https://github.com/ipython/matplotlib-inline) | 0.1.2 | Inline Matplotlib backend for Jupyter / BSD-3-Clause |
| [mccabe](https://github.com/PyCQA/mccabe) | 0.6.1 | McCabe complexity checker for Python / MIT |
| [mistune](https://github.com/lepture/mistune) | 0.8.4 | The fastest markdown parser in pure Python. / BSD 3-Clause |
| [mock](https://github.com/testing-cabal/mock) | 4.0.3 | A library for testing in Python / BSD-2-Clause |
| [more-itertools](https://github.com/more-itertools/more-itertools) | 8.10.0 | More routines for operating on iterables, beyond itertools / MIT |
| [mpc](http://www.multiprecision.org/) | 1.1.0 | A C library for the arithmetic of complex numbers with arbitrarily high precision. / LGPL 3 |
| [mpfr](http://www.mpfr.org/) | 4.0.2 | The MPFR library is a C library for multiple-precision floating-point computations with correct rounding. / LGPL-3.0-only |
| [mpmath](http://mpmath.org) | 1.2.1 | Python library for arbitrary-precision floating-point arithmetic / BSD 3-Clause |
| [msgpack-python](http://msgpack.org/) | 1.0.2 | MessagePack (de)serializer / Apache-2.0 |
| [multipledispatch](https://github.com/mrocklin/multipledispatch/) | 0.6.0 | Multiple dispatch in Python / BSD 3-Clause |
| [munkres](https://github.com/bmc/munkres) | 1.1.4 | The Munkres module provides an O(n^3) implementation of the Munkres algorithm (also called the Hungarian algorithm or the Kuhn-Munkres algorithm). / Apache-2.0 |
| [mypy\_extensions](http://www.mypy-lang.org/) | 0.4.1 | Experimental type system extensions for programs checked with the mypy typechecker. / MIT |
| [nbclassic](http://github.com/jupyterlab/nbclassic) | 0.2.6 | Jupyter Notebook as a Jupyter Server Extension. / BSD-3-Clause |
| [nbclient](https://jupyter.org) | 0.5.3 | A client library for executing notebooks. Formally nbconvert’s ExecutePreprocessor. / BSD-3-Clause |
| [nbconvert](http://jupyter.org) | 6.1.0 | Converting Jupyter Notebooks / BSD-3-Clause |
| [nbformat](http://jupyter.org) | 5.1.3 | The Jupyter Notebook format / BSD-3-Clause |
| [ncurses](http://www.gnu.org/software/ncurses/) | 6.3 | Library for text-based user interfaces / Free software (MIT-like) |
| [nest-asyncio](https://github.com/erdewit/nest_asyncio) | 1.5.1 | Patch asyncio to allow nested event loops / BSD-2-Clause |
| [networkx](https://networkx.github.io/) | 2.6.3 | Python package for creating and manipulating complex networks / BSD-3-Clause |
| [ninja](https://ninja-build.org/) | 1.10.2 | A small build system with a focus on speed / Apache 2.0 |
| [nltk](http://nltk.org/) | 3.6.5 | Natural Language Toolkit / Apache 2.0 |
| nomkl | 3.0 | None / BSD |
| [nose](http://readthedocs.org/docs/nose/) | 1.3.7 | Nose extends unittest to make testing easier / LGPL-2.1 |
| [notebook](https://jupyter.org) | 6.4.5 | Jupyter Notebook / BSD-3-Clause |
| [numba](http://numba.pydata.org) | 0.54.1 | NumPy aware dynamic Python compiler using LLVM / BSD-2-Clause |
| [numexpr](https://github.com/pydata/numexpr) | 2.7.3 | Fast numerical expression evaluator for NumPy. / MIT |
| [numpy](http://numpy.scipy.org/) | 1.20.3 | Array processing for numbers, strings, records, and objects. / BSD 3-Clause |
| [numpy-base](http://numpy.scipy.org/) | 1.20.3 | Array processing for numbers, strings, records, and objects. / BSD 3-Clause |
| [numpydoc](https://github.com/numpy/numpydoc) | 1.1.0 | Numpy’s Sphinx extensions / BSD 3-Clause |
| [olefile](http://www.decalage.info/python/olefileio) | 0.46 | parse, read and write Microsoft OLE2 files / BSD 2-Clause |
| [openblas](http://www.openblas.net/) | 0.3.13 | An optimized BLAS library / BSD |
| openblas-devel | 0.3.13 | OpenBLAS headers and libraries for developing software that used OpenBLAS. / None |
| [openjpeg](http://www.openjpeg.org/) | 2.4.0 | An open-source JPEG 2000 codec written in C / BSD 2-Clause |
| [openpyxl](https://openpyxl.readthedocs.io) | 3.0.9 | A Python library to read/write Excel 2010 xlsx/xlsm files / MIT |
| [openssl](http://www.openssl.org/) | 1.1.1l | OpenSSL is an open-source implementation of the SSL and TLS protocols / OpenSSL |
| [packaging](https://github.com/pypa/packaging) | 21.0 | Core utilities for Python packages / Apache 2.0 or BSD 2-Clause |
| [pandas](http://pandas.pydata.org) | 1.3.4 | High-performance, easy-to-use data structures and data analysis tools. / BSD-3-Clause |
| [pandocfilters](https://github.com/jgm/pandocfilters) | 1.4.3 | A python module for writing pandoc filters / BSD-3-Clause |
| [pango](http://www.pango.org/) | 1.45.3 | Text layout and rendering engine. / LGPL-2.1 |
| [parso](https://github.com/davidhalter/parso) | 0.8.2 | A Python Parser / MIT |
| [partd](https://github.com/dask/partd) | 1.2.0 | Data structure for on-disk shuffle operations / BSD 3-Clause |
| [patchelf](http://nixos.org/patchelf.html) | 0.13 | A small utility to modify the dynamic linker and RPATH of ELF executables. / GPL-3.0-or-later |
| [path](https://github.com/jaraco/path) | 16.0.0 | A module wrapper for os.path / MIT |
| [path.py](https://github.com/jaraco/path.py) | 12.5.0 | A module wrapper for os.path / MIT |
| [pathlib2](https://github.com/mcmtroffaes/pathlib2) | 2.3.6 | Fork of pathlib aiming to support the full stdlib Python API / MIT |
| [pathspec](https://github.com/cpburnz/python-path-specification) | 0.7.0 | Utility library for gitignore style pattern matching of file paths. / MPL-2.0 |
| [patsy](https://github.com/pydata/patsy) | 0.5.2 | Describing statistical models in Python using symbolic formulas / BSD-2-Clause AND PSF-2.0 |
| [pcre](http://www.pcre.org/) | 8.45 | Regular expression pattern matching using the same syntax and semantics as Perl 5. / BSD 3-Clause |
| [pep8](http://pep8.readthedocs.org/) | 1.7.1 | Python style guide checker / MIT |
| [pexpect](http://pexpect.sourceforge.net/) | 4.8.0 | Pexpect makes Python a better tool for controlling other applications. / ISC |
| [pickleshare](https://github.com/pickleshare/pickleshare/) | 0.7.5 | Tiny ‘shelve’-like database with concurrency support / MIT |
| [pillow](https://pillow.readthedocs.io) | 8.4.0 | Pillow is the friendly PIL fork by Alex Clark and Contributors / LicenseRef-PIL |
| [pip](https://pip.pypa.io/en/stable/) | 21.2.4 | PyPA recommended tool for installing Python packages / MIT |
| [pixman](http://www.pixman.org/) | 0.40.0 | A low-level software library for pixel manipulation. / MIT |
| [pkginfo](https://code.launchpad.net/~tseaver/pkginfo/trunk) | 1.7.1 | Query metadatdata from sdists / bdists / installed packages. / MIT |
| [pluggy](https://github.com/pytest-dev/pluggy) | 0.13.1 | Plugin registration and hook calling for Python / MIT |
| [ply](http://www.dabeaz.com/ply/index.html) | 3.11 | Python Lex-Yacc / BSD 3-clause |
| [poyo](https://github.com/hackebrot/poyo) | 0.5.0 | A lightweight YAML Parser for Python / MIT |
| [prometheus\_client](https://github.com/prometheus/client_python) | 0.11.0 | Python client for the Prometheus monitoring system / Apache-2.0 |
| [prompt-toolkit](https://github.com/jonathanslenders/python-prompt-toolkit) | 3.0.20 | Library for building powerful interactive command lines in Python / BSD-3-Clause |
| [prompt\_toolkit](https://github.com/jonathanslenders/python-prompt-toolkit) | 3.0.20 | Library for building powerful interactive command lines in Python / BSD-3-Clause |
| [psutil](https://github.com/giampaolo/psutil) | 5.8.0 | A cross-platform process and system utilities module for Python / BSD-3-Clause |
| [ptyprocess](https://github.com/pexpect/ptyprocess) | 0.7.0 | Run a subprocess in a pseudo terminal / ISC |
| [py](https://github.com/pytest-dev/py) | 1.10.0 | library with cross-python path, ini-parsing, io, code, log facilities / MIT |
| [py-lief](https://lief.quarkslab.com/) | 0.10.1 | A cross platform library to parse, modify and abstract ELF, PE and MachO formats. / Apache-2.0 |
| [pycodestyle](https://pycodestyle.readthedocs.io/) | 2.7.0 | Python style guide checker / MIT |
| [pycosat](https://github.com/ContinuumIO/pycosat) | 0.6.3 | Bindings to picosat (a SAT solver) / MIT |
| [pycparser](https://github.com/eliben/pycparser) | 2.20 | Complete C99 parser in pure Python / BSD 3-clause |
| [pycurl](http://pycurl.sourceforge.net/) | 7.44.1 | A Python Interface To The cURL library / LGPL, MIT |
| [pydocstyle](https://github.com/PyCQA/pydocstyle) | 6.1.1 | Python docstring style checker (formerly pep257) / MIT |
| [pyerfa](https://pyerfa.readthedocs.io/) | 2.0.0 | Python bindings for ERFA routines / BSD-3-Clause |
| [pyflakes](https://github.com/PyCQA/pyflakes) | 2.3.1 | Pyflakes analyzes programs and detects various errors. / MIT |
| [pygments](http://pygments.org/) | 2.10.0 | Pygments is a generic syntax highlighter suitable for use in code hosting, forums, wikis or other applications that need to prettify source code. / BSD-2-clause |
| [pylint](https://www.pylint.org) | 2.7.4 | python code static checker / GPL-2.0-or-later |
| [pyls-spyder](https://github.com/spyder-ide/pyls-spyder) | 0.4.0 | Spyder extensions for the python-lsp-server / MIT |
| [pyodbc](https://github.com/mkleehammer/pyodbc) | 4.0.30 | DB API Module for ODBC / MIT |
| [pyopenssl](https://github.com/pyca/pyopenssl) | 21.0.0 | Python wrapper module around the OpenSSL library / Apache 2.0 |
| [pyparsing](https://github.com/pyparsing/pyparsing/) | 3.0.4 | Create and execute simple grammars / MIT |
| [pyqt](http://www.riverbankcomputing.co.uk/software/pyqt) | 5.15.2 | Python binding of the cross-platform GUI toolkit Qt. / Commercial, GPL-2.0, GPL-3.0 |
| [pyrsistent](http://github.com/tobgu/pyrsistent/) | 0.18.0 | Persistent/Functional/Immutable data structures / MIT |
| [pysocks](https://github.com/Anorov/PySocks) | 1.7.1 | A Python SOCKS client module. See [Anorov/PySocks](https://github.com/Anorov/PySocks) for more information. / BSD 3-Clause |
| [pytables](http://www.pytables.org) | 3.6.1 | Brings together Python, HDF5 and NumPy to easily handle large amounts of data. / BSD 3-Clause |
| [pytest](https://docs.pytest.org/en/latest/) | 6.2.3 | Simple and powerful testing with Python. / MIT |
| [python](https://www.python.org/) | 3.9.7 | General purpose programming language / Python-2.0 |
| [python-dateutil](https://dateutil.readthedocs.org/) | 2.8.2 | Extensions to the standard Python datetime module. / BSD-3-Clause and Apache |
| [python-libarchive-c](https://github.com/Changaco/python-libarchive-c) | 2.9 | Python interface to libarchive / CC0-1.0 |
| [python-lsp-black](https://github.com/python-lsp/python-lsp-black) | 1.0.0 | Black plugin for the Python LSP Server / MIT |
| [python-lsp-jsonrpc](https://github.com/python-lsp/python-lsp-jsonrpc) | 1.0.0 | A Python 3.6+ server implementation of the JSON RPC 2.0 protocol. / MIT |
| [python-lsp-server](https://github.com/python-lsp/python-lsp-server) | 1.2.4 | An implementation of the Language Server Protocol for Python / MIT |
| [python-slugify](https://github.com/un33k/python-slugify) | 5.0.2 | A Python Slugify application that handles Unicode / MIT |
| [pytz](http://pythonhosted.org/pytz/) | 2021.3 | World timezone definitions, modern and historical. / MIT |
| [pywavelets](https://github.com/PyWavelets/pywt) | 1.1.1 | Discrete Wavelet Transforms in Python / MIT |
| [pyxdg](http://freedesktop.org/wiki/Software/pyxdg) | 0.27 | PyXDG contains implementations of freedesktop.org standards in python. / GNU Lesser General Public v2 (LGPLv2) |
| [pyyaml](http://pyyaml.org/wiki/PyYAML) | 5.4.1 | YAML parser and emitter for Python / MIT |
| [pyzmq](https://github.com/zeromq/pyzmq) | 20.0.0 | Python bindings for zeromq / BSD 3-clause |
| [qdarkstyle](https://github.com/ColinDuquesnoy/QDarkStyleSheet) | 3.0.2 | A dark stylesheet for Qt applications (Qt4, Qt5, PySide, PyQt4, PyQt5, QtPy, PyQtGraph). / MIT |
| [qstylizer](https://github.com/blambright/qstylizer) | 0.1.10 | Qt stylesheet generation utility for PyQt/PySide / MIT |
| [qt](http://qt.io) | 5.15.2 | Qt is a cross-platform application and UI framework. / LGPL-3.0-only |
| [qtawesome](https://github.com/spyder-ide/qtawesome) | 1.0.2 | Iconic fonts in PyQt and PySide applications / MIT |
| [qtconsole](http://jupyter.org) | 5.1.1 | Jupyter Qt Console / BSD-3-Clause |
| [qtpy](https://github.com/spyder-ide/qtpy) | 1.10.0 | Abstraction layer for PyQt5/PyQt4/PySide / MIT |
| [readline](https://cnswww.cns.cwru.edu/php/chet/readline/rltop.html) | 8.1 | library for editing command lines as they are typed in / GPL-3.0 |
| [regex](https://bitbucket.org/mrabarnett/mrab-regex) | 2021.8.3 | Alternative regular expression module, to replace re / Apache 2.0 |
| [requests](http://python-requests.org) | 2.26.0 | Requests is an elegant and simple HTTP library for Python, built with ♥. / Apache-2.0 |
| [rope](https://github.com/python-rope/rope) | 0.19.0 | A python refactoring library / LGPL 3.0 |
| [rtree](http://toblerity.github.com/rtree/) | 0.9.7 | R-Tree spatial index for Python GIS / MIT |
| [ruamel\_yaml](https://sourceforge.net/p/ruamel-yaml/code/ci/default/tree) | 0.15.80 | A patched copy of ruamel.yaml. / MIT |
| [scikit-image](http://scikit-image.org/) | 0.18.3 | Image processing in Python. / BSD-3-Clause |
| [scikit-learn](http://scikit-learn.org/) | 0.24.2 | A set of python modules for machine learning and data mining / BSD-3-Clause |
| [scipy](http://www.scipy.org/) | 1.7.1 | Scientific Library for Python / BSD-3-Clause |
| [seaborn](https://seaborn.pydata.org) | 0.11.2 | Statistical data visualization / BSD 3-Clause |
| [secretstorage](https://github.com/mitya57/secretstorage) | 3.3.1 | Provides a way for securely storing passwords and other secrets. / BSD-3-Clause |
| [send2trash](https://github.com/arsenetar/send2trash) | 1.8.0 | Python library to natively send files to Trash (or Recycle bin) on all platforms. / BSD-3-Clause |
| [setuptools](https://github.com/pypa/setuptools) | 58.0.4 | Download, build, install, upgrade, and uninstall Python packages / MIT |
| [simplegeneric](http://cheeseshop.python.org/pypi/simplegeneric) | 0.8.1 | Simple generic functions (similar to Python’s own len(), pickle.dump(), etc.) / Zope Public |
| [singledispatch](http://docs.python.org/3/library/functools.html#functools.singledispatch) | 3.7.0 | Transforms a function into a single-dispatch generic function / MIT |
| [sip](https://www.riverbankcomputing.com/software/pyqt-builder/intro) | 4.19.25 | Python binding of the cross-platform builder toolkit for Qt. / Commercial, GPL-2.0, GPL-3.0 |
| [six](https://six.readthedocs.io/) | 1.16.0 | Python 2 and 3 compatibility utilities / MIT |
| [snappy](https://github.com/google/snappy) | 1.1.8 | A fast compressor/decompressor / BSD 3-clause |
| [sniffio](https://github.com/python-trio/sniffio) | 1.2.0 | Sniff out which async library your code is running under / Apache-2.0 |
| [snowballstemmer](https://github.com/shibukawa/snowball_py) | 2.1.0 | Snowball stemming library collection for Python / BSD-2-Clause |
| [sortedcollections](http://www.grantjenks.com/docs/sortedcollections/) | 2.1.0 | Python Sorted Collections / Apache-2.0 |
| [sortedcontainers](http://www.grantjenks.com/docs/sortedcontainers/) | 2.4.0 | Python Sorted Container Types: SortedList, SortedDict, and SortedSet / Apache-2.0 |
| [soupsieve](http://facelessuser.github.io/soupsieve) | 2.2.1 | A modern CSS selector implementation for BeautifulSoup / MIT |
| [sphinx](http://www.sphinx-doc.org) | 4.2.0 | Sphinx is a tool that makes it easy to create intelligent and beautiful documentation / BSD-2-Clause |
| sphinxcontrib | 1.0 | Python namespace for sphinxcontrib / BSD |
| [sphinxcontrib-applehelp](https://www.sphinx-doc.org/en/master/) | 1.0.2 | sphinxcontrib-applehelp is a sphinx extension which outputs Apple help books / BSD-2-Clause |
| [sphinxcontrib-devhelp](https://www.sphinx-doc.org/en/master/) | 1.0.2 | sphinxcontrib-devhelp is a sphinx extension which outputs Devhelp document / BSD-2-Clause |
| [sphinxcontrib-htmlhelp](https://www.sphinx-doc.org/en/master/) | 2.0.0 | sphinxcontrib-htmlhelp is a sphinx extension which renders HTML help files. / BSD-2-Clause |
| [sphinxcontrib-jsmath](https://www.sphinx-doc.org/en/master/) | 1.0.1 | A sphinx extension which renders display math in HTML via JavaScript / BSD-2-Clause |
| [sphinxcontrib-qthelp](https://www.sphinx-doc.org/en/master/) | 1.0.3 | sphinxcontrib-qthelp is a sphinx extension which outputs QtHelp document / BSD-2-Clause |
| [sphinxcontrib-serializinghtml](https://www.sphinx-doc.org/en/master/) | 1.1.5 | sphinxcontrib-serializinghtml is a sphinx extension which outputs “serialized” HTML files (json and pickle). / BSD-2-Clause |
| [sphinxcontrib-websupport](https://pypi.python.org/pypi/sphinxcontrib-websupport) | 1.2.4 | Sphinx API for Web Apps / BSD-2-Clause |
| [spyder](https://www.spyder-ide.org/) | 5.1.5 | The Scientific Python Development Environment / MIT |
| [spyder-kernels](https://www.spyder-ide.org/) | 2.1.3 | Jupyter kernels for Spyder’s console / MIT |
| [sqlalchemy](http://www.sqlalchemy.org/) | 1.3.23 | Database Abstraction Library. / MIT |
| [sqlite](http://www.sqlite.org/) | 3.36.0 | Implements a self-contained, zero-configuration, SQL database engine / Public-Domain (`<http://www.sqlite.org/copyright.html>`) |
| [statsmodels](https://www.statsmodels.org) | 0.13.0 | Statistical computations and models for use with SciPy / BSD-3-Clause |
| [sympy](https://sympy.org) | 1.9 | Python library for symbolic mathematics / BSD-3-Clause |
| [tbb](https://github.com/oneapi-src/oneTBB) | 2021.4.0 | High level abstract threading library / Apache-2.0 |
| tbb4py | 2021.4.0 | TBB module for Python / Apache 2.0 |
| [tblib](https://github.com/ionelmc/python-tblib) | 1.7.0 | Traceback serialization library. / BSD 2-Clause |
| [terminado](https://github.com/jupyter/terminado) | 0.9.4 | Terminals served by tornado websockets / BSD-2-Clause |
| [testpath](https://testpath.readthedocs.io) | 0.5.0 | Testpath is a collection of utilities for Python code working with files and commands. / BSD-3-Clause |
| [text-unidecode](https://github.com/kmike/text-unidecode/) | 1.3 | The most basic Text::Unidecode port / Artistic |
| [textdistance](https://github.com/orsinium/textdistance) | 4.2.1 | TextDistance – python library for comparing distance between two or more sequences by many algorithms. / MIT |
| [threadpoolctl](https://github.com/joblib/threadpoolctl) | 2.2.0 | Python helpers to control the threadpools of native libraries / BSD 3-Clause |
| [three-merge](https://github.com/spyder-ide/three-merge) | 0.1.1 | Simple Python library to perform a 3-way merge between strings / MIT |
| [tifffile](https://github.com/cgohlke/tifffile) | 2021.7.2 | Read and write image data from and to TIFF files. / BSD-3-Clause |
| [tinycss](http://tinycss.readthedocs.io/) | 0.4 | Tinycss is a complete yet simple CSS parser for Python. / BSD-3-Clause |
| [tk](http://www.tcl.tk/) | 8.6.11 | A dynamic programming language with GUI support. Bundles Tcl and Tk. / Tcl/Tk |
| [toml](https://github.com/uiri/toml) | 0.10.2 | Python lib for TOML. / MIT |
| [toolz](http://toolz.readthedocs.org/) | 0.11.1 | A functional standard library for Python / BSD-3-Clause |
| [tornado](http://www.tornadoweb.org/) | 6.1 | A Python web framework and asynchronous networking library, originally developed at FriendFeed. / Apache-2.0 |
| [tqdm](https://pypi.python.org/pypi/tqdm) | 4.62.3 | A Fast, Extensible Progress Meter / MPL-2.0 AND MIT |
| [traitlets](http://traitlets.readthedocs.org/) | 5.1.0 | Configuration system for Python applications / BSD-3-Clause |
| [typed-ast](https://github.com/python/typed_ast) | 1.4.3 | a fork of Python 2 and 3 ast modules with type comment support / Apache-2.0 AND PSF-2.0 AND MIT |
| [typing\_extensions](https://github.com/python/typing/tree/master/typing_extensions) | 3.10.0.2 | Backported and Experimental Type Hints for Python / PSF-2.0 |
| [tzdata](https://www.iana.org/time-zones) | 2021e | The Time Zone Database (called tz, tzdb or zoneinfo) / Public-Domain AND BSD-3-clause |
| [ujson](https://github.com/ultrajson/ultrajson) | 4.0.2 | Ultra fast JSON decoder and encoder written in C with Python bindings / BSD-3-Clause |
| [unicodecsv](https://github.com/jdunck/python-unicodecsv) | 0.14.1 | Drop-in replacement for csv module which supports unicode strings / BSD |
| [unidecode](https://pypi.python.org/pypi/Unidecode) | 1.2.0 | ASCII transliterations of Unicode text / GPL-2.0-or-later |
| [unixodbc](http://www.unixodbc.org/) | 2.3.9 | ODBC on non MS Windows platforms / LGPL-2.1 |
| [urllib3](https://urllib3.readthedocs.io/) | 1.26.7 | HTTP library with thread-safe connection pooling, file post, and more. / MIT |
| [watchdog](http://github.com/gorakhargosh/watchdog) | 1.0.2 | Filesystem events monitoring / Apache-2.0 |
| [wcwidth](https://github.com/jquast/wcwidth) | 0.2.5 | Measures number of Terminal column cells of wide-character codes. / MIT |
| [webencodings](https://github.com/gsnedders/python-webencodings) | 0.5.1 | Character encoding aliases for legacy web content / BSD 3-Clause |
| [werkzeug](https://palletsprojects.com/p/werkzeug/) | 2.0.2 | The comprehensive WSGI web application library. / BSD-3-Clause |
| [wheel](https://github.com/pypa/wheel) | 0.37.0 | A built-package format for Python. / MIT |
| [whichcraft](https://github.com/pydanny/whichcraft) | 0.6.1 | This package provides cross-platform cross-python shutil.which functionality. / BSD-3-Clause |
| [widgetsnbextension](http://ipython.org) | 3.5.1 | Interactive Widgets for Jupyter / BSD 3-clause |
| [wrapt](https://github.com/GrahamDumpleton/wrapt) | 1.12.1 | Module for decorators, wrappers and monkey patching / BSD 2-Clause |
| [wurlitzer](https://github.com/minrk/wurlitzer) | 2.0.1 | Capture C-level stdout/stderr in Python / MIT |
| [xlrd](http://www.python-excel.org/) | 2.0.1 | Library for developers to extract data from Microsoft Excel (tm) spreadsheet files / BSD 3-Clause and BSD with advertising |
| [xlsxwriter](https://xlsxwriter.readthedocs.io/) | 3.0.1 | A Python module for creating Excel XLSX files / BSD-2-Clause |
| [xlwt](http://www.python-excel.org/) | 1.3.0 | Writing data and formatting information to Excel files / BSD |
| [xz](http://tukaani.org/xz/) | 5.2.5 | Data compression software with high compression ratio / LGPL-2.1 and GPL-2.0 |
| [yaml](http://pyyaml.org/wiki/LibYAML) | 0.1.7 | A C library for parsing and emitting YAML / MIT |
| [yapf](https://github.com/google/yapf) | 0.31.0 | A formatter for Python files / Apache 2.0 |
| [zeromq](http://zeromq.org) | 4.3.4 | A high-performance asynchronous messaging library. / LGPL-3.0-or-later |
| [zict](http://github.com/mrocklin/zict) | 2.0.0 | Composable Dictionary Classes / BSD 3-Clause |
| [zipp](https://github.com/jaraco/zipp) | 3.6.0 | A pathlib-compatible Zipfile object wrapper / MIT |
| [zlib](http://zlib.net/) | 1.2.11 | Massively spiffy yet delicately unobtrusive compression library / zlib |
| zope | 1.0 | web application server / BSD |
| [zope.event](http://www.zope.org/en/latest/) | 4.5.0 | Very basic event publishing system / Zope Public License |
| [zope.interface](https://github.com/zopefoundation/zope.interface) | 5.4.0 | Interfaces for Python / ZPL-2.1 |
| [zstd](http://www.zstd.net) | 1.4.9 | Zstandard - Fast real-time compression algorithm / BSD 3-Clause |
| Name | Version | Summary / License |
|---|---|---|
| [\_libgcc\_mutex](https://github.com/AnacondaRecipes/_libgcc_mutex-feedstock) | 0.1 | Mutex for libgcc and libgcc-ng / None |
| [\_openmp\_mutex](https://github.com/conda-forge/ctng-compilers-feedstock) | 4.5 | OpenMP Implementation Mutex / BSD-3-Clause |
| [alabaster](http://www.sphinx-doc.org/en/stable/index.html) | 0.7.12 | Configurable, Python 2+3 compatible Sphinx theme. / BSD 3-Clause |
| [anaconda-client](https://github.com/Anaconda-Platform/anaconda-client) | 1.9.0 | Anaconda Cloud command line client library / BSD 3-Clause |
| [anaconda-navigator](https://github.com/ContinuumIO/navigator) | 2.1.1 | Anaconda Navigator / proprietary - Continuum Analytics, Inc. |
| [anaconda-project](https://github.com/Anaconda-Platform/anaconda-project) | 0.10.1 | Tool for encapsulating, running, and reproducing data science projects / BSD-3-Clause |
| [anyio](https://github.com/agronholm/anyio) | 2.2.0 | High level compatibility layer for multiple asynchronous event loop implementations on Python / MIT |
| [appdirs](http://github.com/ActiveState/appdirs) | 1.4.4 | A small Python module for determining appropriate platform-specific dirs. / MIT |
| [argh](https://github.com/neithere/argh) | 0.26.2 | The Natural CLI. / LGPL 3 |
| [argon2-cffi](https://argon2-cffi.readthedocs.org/) | 20.1.0 | The secure Argon2 password hashing algorithm. / MIT |
| [arrow](https://github.com/crsmithdev/arrow) | 0.13.1 | Better dates & times for Python / Apache-2.0 |
| [asn1crypto](https://github.com/wbond/asn1crypto) | 1.4.0 | Python ASN.1 library with a focus on performance and a pythonic API / MIT |
| [astroid](https://www.astroid.org/) | 2.6.6 | A abstract syntax tree for Python with inference support. / LGPL-2.1-or-later |
| [astropy](http://www.astropy.org/) | 4.3.1 | Community-developed Python Library for Astronomy / BSD-3-Clause |
| [async\_generator](https://github.com/python-trio/async_generator) | 1.10 | Async generators and context managers for Python 3.5+ / MIT |
| [atomicwrites](https://github.com/untitaker/python-atomicwrites) | 1.4.0 | Atomic file writes / MIT |
| [attrs](https://attrs.readthedocs.io/en/stable/) | 21.2.0 | attrs is the Python package that will bring back the joy of writing classes by relieving you from the drudgery of implementing object protocols (aka dunder methods). / MIT |
| [autopep8](https://github.com/hhatto/autopep8) | 1.5.7 | A tool that automatically formats Python code to conform to the PEP 8 style guide / MIT |
| [babel](http://babel.pocoo.org/) | 2.9.1 | Utilities to internationalize and localize Python applications / BSD 3-clause |
| [backcall](https://github.com/takluyver/backcall/) | 0.2.0 | Specifications for callback functions passed in to an API / BSD-3-Clause |
| [backports](https://bitbucket.org/brandon/backports) | 1.0 | None / BSD |
| [backports.shutil\_get\_terminal\_size](https://github.com/chrippa/backports.shutil_get_terminal_size) | 1.0.0 | A backport of the get\_terminal\_size function from Python 3.3’s shutil. / MIT |
| [beautifulsoup4](http://www.crummy.com/software/BeautifulSoup/) | 4.10.0 | Python library designed for screen-scraping / MIT |
| [binaryornot](https://github.com/audreyr/binaryornot) | 0.4.4 | Ultra-lightweight pure Python package to check if a file is binary or text. / BSD-3-Clause |
| [bitarray](https://github.com/ilanschnell/bitarray) | 2.3.0 | efficient arrays of booleans – C extension / PSF |
| [bkcharts](http://github.com/bokeh/bkcharts) | 0.2 | High level chart types built on top of Bokeh / BSD 3-Clause |
| [black](https://github.com/python/black) | 19.10b0 | The Uncompromising Code Formatter / MIT |
| [blas](http://www.netlib.org/lapack) | 1.0 | Linear Algebra PACKage / BSD-3-Clause |
| [bleach](https://github.com/mozilla/bleach) | 4.0.0 | Easy, whitelist-based HTML-sanitizing tool / Apache-2.0 |
| [blosc](https://github.com/Blosc/c-blosc) | 1.21.0 | A blocking, shuffling and loss-less compression library that can be faster than memcpy() / BSD-3-Clause |
| [bokeh](http://bokeh.pydata.org/) | 2.4.1 | Statistical and novel interactive HTML plots for Python / BSD-3-Clause |
| [boto](https://github.com/boto/boto/) | 2.49.0 | Amazon Web Services Library / MIT |
| [bottleneck](https://github.com/pydata/bottleneck) | 1.3.2 | Fast NumPy array functions written in Cython. / BSD 2-Clause |
| [brotli](http://github.com/google/brotli) | 1.0.9 | Brotli compression format / MIT |
| [brotlipy](https://github.com/python-hyper/brotlipy) | 0.7.0 | Python bindings to the Brotli compression library / MIT |
| [brunsli](https://github.com/google/brunsli) | 0.1 | Practical JPEG Repacker / MIT |
| [bzip2](http://www.bzip.org/) | 1.0.8 | high-quality data compressor / bzip2 |
| [c-ares](https://c-ares.haxx.se/) | 1.17.1 | This is c-ares, an asynchronous resolver library / MIT |
| [ca-certificates](https://github.com/conda-forge/ca-certificates-feedstock) | 2021.10.26 | Certificates for use with other packages. / MPL 2.0 |
| [cached-property](https://github.com/pydanny/cached-property) | 1.5.2 | A decorator for caching properties in classes. / BSD-3-Clause |
| [cairo](http://cairographics.org/) | 1.16.0 | Cairo is a 2D graphics library with support for multiple output devices. / LGPL 2.1 or MPL 1.1 |
| [certifi](http://certifi.io/) | 2021.10.8 | Python package for providing Mozilla’s CA Bundle. / ISC |
| [cffi](http://cffi.readthedocs.org/) | 1.14.6 | Foreign Function Interface for Python calling C code. / MIT |
| [cfitsio](http://heasarc.gsfc.nasa.gov/fitsio/fitsio.html) | 3.470 | A library for reading and writing FITS files / fitsio |
| [chardet](https://github.com/chardet/chardet) | 4.0.0 | Universal character encoding detector / LGPL2 |
| [charls](https://github.com/team-charls/charls) | 2.2.0 | CharLS is a C++ implementation of the JPEG-LS standard for lossless and near-lossless image compression and decompression. JPEG-LS is a low-complexity image compression standard that matches JPEG 2000 compression ratios. / BSD-3-Clause |
| [charset-normalizer](https://github.com/ousret/charset_normalizer) | 2.0.4 | The Real First Universal Charset Detector. Open, modern and actively maintained alternative to Chardet. / MIT |
| [click](https://palletsprojects.com/p/click) | 8.0.3 | Python composable command line interface toolkit / BSD-3-Clause |
| [cloudpickle](https://github.com/cloudpipe/cloudpickle) | 2.0.0 | Extended pickling support for Python objects / BSD-3-Clause |
| [clyent](https://github.com/Anaconda-Platform/clyent) | 1.2.2 | Command line client library for windows and posix / BSD 3-Clause |
| [colorama](https://github.com/tartley/colorama) | 0.4.4 | Cross-platform colored terminal text / BSD-3-Clause |
| [conda](https://conda.io) | 4.10.3 | OS-agnostic, system-level binary package and environment manager. / BSD 3-Clause |
| [conda-build](https://github.com/conda/conda-build) | 3.21.6 | tools for building conda packages / BSD 3-Clause |
| [conda-content-trust](https://github.com/conda/conda-content-trust) | 0.1.1 | Signing and verification tools for conda / BSD-3-Clause |
| [conda-env](https://github.com/conda/conda-env) | 2.6.0 | Tools for interacting with conda environments. / BSD 3-Clause |
| [conda-token](https://github.com/Anaconda/conda-token) | 0.3.0 | Set repository access token / BSD-3-Clause |
| [conda-verify](https://github.com/conda/conda-verify) | 3.4.2 | tool for validating conda recipes and conda packages / BSD 3-Clause |
| [contextlib2](http://contextlib2.readthedocs.org) | 0.6.0.post1 | Backports and enhancements for the contextlib module / PSF 2 |
| [cookiecutter](https://github.com/cookiecutter/cookiecutter) | 1.7.2 | A command-line utility that creates projects from cookiecutters (project templates), e.g. creating a Python package project from a Python package project template. / BSD-3-Clause |
| [cryptography](https://github.com/pyca/cryptography) | 3.4.8 | Provides cryptographic recipes and primitives to Python developers / Apache-2.0 AND BSD-3-Clause AND PSF-2.0 AND MIT |
| [curl](http://curl.haxx.se/) | 7.78.0 | tool and library for transferring data with URL syntax / curl |
| [cycler](http://matplotlib.org/cycler) | 0.10.0 | Composable style cycles. / BSD 3-Clause |
| [cython](http://www.cython.org/) | 0.29.24 | The Cython compiler for writing C extensions for the Python language / Apache-2.0 |
| [cytoolz](https://github.com/pytoolz/cytoolz) | 0.11.0 | Cython implementation of Toolz. High performance functional utilities / BSD-3-Clause |
| [daal4py](https://intelpython.github.io/daal4py/) | 2021.3.0 | A convenient Python API to Intel (R) oneAPI Data Analytics Library / Apache-2.0 |
| [dal](https://software.intel.com/content/www/us/en/develop/tools.html) | 2021.3.0 | Intel® oneDAL runtime libraries / Intel Simplified Software License |
| [dask](https://dask.org/) | 2021.10.0 | Parallel PyData with Task Scheduling / BSD-3-Clause |
| [dask-core](http://github.com/dask/dask/) | 2021.10.0 | Parallel Python with task scheduling / BSD-3-Clause |
| [dataclasses](https://github.com/ericvsmith/dataclasses) | 0.8 | An implementation of PEP 557: Data Classes / Apache-2.0 |
| [dbus](http://www.freedesktop.org/wiki/Software/dbus/) | 1.13.18 | Simple message bus system for applications to talk to one another / GPL2 |
| [debugpy](https://github.com/Microsoft/debugpy) | 1.4.1 | An implementation of the Debug Adapter Protocol for Python / MIT |
| [decorator](https://github.com/micheles/decorator) | 5.1.0 | Better living through Python with decorators. / BSD-2-Clause |
| [defusedxml](https://bitbucket.org/tiran/defusedxml) | 0.7.1 | XML bomb protection for Python stdlib modules / PSF 2.0 |
| [diff-match-patch](http://code.google.com/p/google-diff-match-patch/) | 20200713 | Diff Match Patch is a high-performance library in multiple languages that manipulates plain text / Apache-2.0 |
| [distributed](http://distributed.readthedocs.io/en/latest/) | 2021.10.0 | Distributed computing with Dask / BSD-3-Clause |
| [docutils](http://docutils.sourceforge.net/) | 0.17.1 | Docutils – Python Documentation Utilities / Public Domain Dedictation and BSD 2-Clause and PSF 2.1.1 and GPL 3.0 |
| [entrypoints](https://github.com/takluyver/entrypoints) | 0.3 | Discover and load entry points from installed packages. / MIT License |
| [et\_xmlfile](https://foss.heptapod.net/openpyxl/et_xmlfile) | 1.1.0 | An implementation of lxml.xmlfile for the standard library / MIT AND PSF-2.0 |
| [expat](http://expat.sourceforge.net/) | 2.4.1 | Expat XML parser library in C / MIT |
| [fastcache](https://github.com/pbrady/fastcache) | 1.1.0 | C implementation of Python 3 lru\_cache / MIT |
| [filelock](https://github.com/benediktschmitt/py-filelock) | 3.3.1 | A platform independent file lock. / Public Domain |
| [flake8](http://flake8.pycqa.org/) | 3.9.2 | Your Tool For Style Guide Enforcement / MIT |
| [flask](http://flask.pocoo.org) | 1.1.2 | A microframework based on Werkzeug, Jinja2 and good intentions. / BSD 3-Clause |
| [fontconfig](http://www.freedesktop.org/wiki/Software/fontconfig/) | 2.13.1 | A library for configuring and customizing font access. / MIT |
| [fonttools](https://github.com/fonttools/fonttools) | 4.25.0 | fontTools is a library for manipulating fonts, written in Python. / MIT |
| [freetype](https://www.freetype.org/) | 2.10.4 | A Free, High-Quality, and Portable Font Engine / GPL-2.0-only and LicenseRef-FreeType |
| [fribidi](https://github.com/fribidi/fribidi) | 1.0.10 | The Free Implementation of the Unicode Bidirectional Algorithm. / LGPL-2.1 |
| [fsspec](https://github.com/martindurant/filesystem_spec) | 2021.8.1 | A specification for pythonic filesystems / BSD-3-Clause |
| [get\_terminal\_size](https://github.com/chrippa/backports.shutil_get_terminal_size) | 1.0.0 | Get the size of the terminal window. / MIT |
| [gevent](https://www.gevent.org) | 21.8.0 | Coroutine-based network library / MIT |
| [giflib](http://giflib.sourceforge.net) | 5.2.1 | Library for reading and writing gif images / MIT |
| [glib](https://developer.gnome.org/glib/) | 2.69.1 | Provides core application building blocks for libraries and applications written in C. / LGPL-2.1-or-later |
| [glob2](https://github.com/miracle2k/python-glob2) | 0.7 | Version of the glob module that supports recursion via \*\*, and can capture patterns. / BSD-2-Clause |
| [gmp](http://gmplib.org/) | 6.2.1 | The GNU multiprecision library. / GPL-2.0-or-later AND LGPL-3.0-or-later |
| [gmpy2](https://pypi.python.org/pypi/gmpy2) | 2.0.8 | GMP/MPIR, MPFR, and MPC interface to Python 2.6+ and 3.x / LGPL 3 |
| [graphite2](http://graphite.sil.org/) | 1.3.14 | A “smart font” system that handles the complexities of lesser-known languages of the world. / LGPLv2 |
| [greenlet](https://github.com/python-greenlet/greenlet) | 1.1.1 | Lightweight in-process concurrent programming / MIT |
| [gst-plugins-base](http://gstreamer.freedesktop.org/) | 1.14.0 | GStreamer Base Plug-ins / GPL2 |
| [gstreamer](http://gstreamer.freedesktop.org/) | 1.14.0 | Library for constructing graphs of media-handling components / LGPL 2 |
| [h5py](http://www.h5py.org/) | 3.3.0 | Read and write HDF5 files from Python / BSD-3-Clause |
| [harfbuzz](http://www.freedesktop.org/wiki/Software/HarfBuzz/) | 2.8.1 | An OpenType text shaping engine. / MIT |
| [hdf5](http://www.hdfgroup.org/HDF5/) | 1.10.6 | HDF5 is a data model, library, and file format for storing and managing data / HDF5 |
| [heapdict](http://stutzbachenterprises.com/) | 1.0.1 | A heap with decrease-key and increase-key operations / BSD 3-Clause |
| [html5lib](https://github.com/html5lib/html5lib-python) | 1.1 | HTML parser based on the WHATWG HTML specification / MIT |
| [icu](http://site.icu-project.org/) | 58.2 | International Components for Unicode. / MIT |
| [idna](https://github.com/kjd/idna) | 3.2 | Internationalized Domain Names in Applications (IDNA). / BSD-3-Clause |
| [imagecodecs](https://www.lfd.uci.edu/~gohlke/) | 2021.8.26 | Image transformation, compression, and decompression codecs / BSD-3-Clause |
| [imageio](https://imageio.github.io) | 2.9.0 | A Python library for reading and writing image data / BSD-2-Clause |
| [imagesize](https://github.com/shibukawa/imagesize_py) | 1.2.0 | Getting image size from png/jpeg/jpeg2000/gif file / MIT |
| [importlib-metadata](https://github.com/python/importlib_metadata) | 4.8.1 | A library to access the metadata for a Python package / Apache-2.0 |
| [importlib\_metadata](https://github.com/python/importlib_metadata) | 4.8.1 | A library to access the metadata for a Python package / Apache-2.0 |
| [inflection](http://github.com/jpvanhal/inflection) | 0.5.1 | A port of Ruby on Rails inflector to Python / MIT |
| [iniconfig](http://github.com/RonnyPfannschmidt/iniconfig) | 1.1.1 | iniconfig: brain-dead simple config-ini parsing / MIT |
| [intel-openmp](https://software.intel.com/en-us/node/522690) | 2021.4.0 | Math library for Intel and compatible processors / LicenseRef-ProprietaryIntel |
| [intervaltree](https://github.com/chaimleib/intervaltree) | 3.1.0 | Editable interval tree data structure for Python 2 and 3 / Apache-2.0 |
| [ipykernel](https://ipython.org) | 6.4.1 | IPython Kernel for Jupyter / BSD-3-Clause |
| [ipython](https://ipython.org) | 7.29.0 | IPython: Productive Interactive Computing / BSD-3-Clause |
| [ipython\_genutils](http://ipython.org) | 0.2.0 | vestigial utilities from IPython / BSD 3-Clause |
| [ipywidgets](https://github.com/ipython/ipywidgets) | 7.6.5 | Jupyter Interactive Widgets / BSD-3-Clause |
| [isort](https://github.com/timothycrosley/isort) | 5.9.3 | A Python utility / library to sort Python imports. / MIT |
| [itsdangerous](https://github.com/pallets/itsdangerous) | 2.0.1 | Various helpers to pass trusted data to untrusted environments. / BSD-3-Clause |
| [jbig](https://www.cl.cam.ac.uk/~mgk25/jbigkit) | 2.1 | Implementation of the JBIG1 data compression standard / GPL-2.0 |
| [jdcal](https://github.com/phn/jdcal) | 1.4.1 | Julian dates from proleptic Gregorian and Julian calendars. / BSD 2-Clause |
| [jedi](https://github.com/davidhalter/jedi/) | 0.18.0 | An autocompletion tool for Python that can be used for text editors. / MIT |
| [jeepney](https://gitlab.com/takluyver/jeepney) | 0.7.1 | Pure Python DBus interface / MIT |
| [jinja2](http://jinja.pocoo.org) | 2.11.3 | An easy to use stand-alone template engine written in pure python. / BSD-3-Clause |
| [jinja2-time](https://github.com/hackebrot/jinja2-time) | 0.2.0 | Jinja2 Extension for Dates and Times / MIT |
| [joblib](https://joblib.readthedocs.io/en/latest/) | 1.1.0 | Lightweight pipelining: using Python functions as pipeline jobs. / BSD-3-Clause |
| [jpeg](http://www.ijg.org/) | 9d | read/write jpeg COM, EXIF, IPTC medata / Custom free software license |
| [json5](https://github.com/dpranke/pyjson5) | 0.9.6 | A Python implementation of the JSON5 data format / Apache-2.0 |
| [jsonschema](https://github.com/Julian/jsonschema) | 3.2.0 | An implementation of JSON Schema validation for Python / MIT |
| [jupyter](http://jupyter.org) | 1.0.0 | Jupyter metapackage. Install all the Jupyter components in one go. / BSD 3-Clause |
| [jupyter\_client](https://jupyter.org) | 6.1.12 | jupyter\_client contains the reference implementation of the Jupyter protocol. / BSD-3-Clause |
| [jupyter\_console](http://jupyter.org) | 6.4.0 | Jupyter terminal console / BSD-3-Clause |
| [jupyter\_core](https://jupyter.org) | 4.8.1 | Core common functionality of Jupyter projects. / BSD-3-Clause |
| [jupyter\_server](https://jupyter.org) | 1.4.1 | Jupyter Server / BSD-3-Clause |
| [jupyterlab](https://github.com/jupyterlab/jupyterlab) | 3.2.1 | An extensible environment for interactive and reproducible computing, based on the Jupyter Notebook and Architecture. / BSD-3-Clause |
| [jupyterlab\_pygments](http://github.com/JupyterLab/jupyterlab_pygments) | 0.1.2 | Pygments syntax coloring scheme making use of the JupyterLab CSS variables / BSD-3-Clause |
| [jupyterlab\_server](https://github.com/jupyterlab/jupyterlab_server) | 2.8.2 | A set of server components for JupyterLab and JupyterLab like applications. / BSD-3-Clause |
| [jupyterlab\_widgets](https://github.com/jupyter-widgets/ipywidgets) | 1.0.0 | JupyterLab extension providing HTML widgets / BSD-3-Clause |
| [jxrlib](https://packages.debian.org/source/sid/jxrlib) | 1.1 | jxrlib - JPEG XR Library by Microsoft, built from Debian hosted sources. / BSD-2-Clause |
| [keyring](https://github.com/jaraco/keyring) | 23.1.0 | Store and access your passwords safely / MIT |
| [kiwisolver](https://github.com/nucleic/kiwi) | 1.3.1 | An efficient C++ implementation of the Cassowary constraint solver / BSD-3-Clause |
| [krb5](http://web.mit.edu/kerberos/) | 1.19.2 | A network authentication protocol. / MIT |
| [lazy-object-proxy](https://github.com/ionelmc/python-lazy-object-proxy) | 1.6.0 | A fast and thorough lazy object proxy / BSD-2-Clause |
| [lcms2](http://www.littlecms.com/) | 2.12 | Open Source Color Management Engine / MIT |
| [ld\_impl\_linux-64](https://www.gnu.org/software/binutils/) | 2.35.1 | A set of programming tools for creating and managing binary programs, object files, libraries, profile data, and assembly source code. / GPL-3.0-only |
| [lerc](https://github.com/Esri/lerc) | 3.0 | LERC - Limited Error Raster Compression / Apache-2.0 |
| [libaec](https://gitlab.dkrz.de/k202009/libaec) | 1.0.4 | Adaptive Entropy Coding library / BSD-2-Clause |
| [libarchive](http://www.libarchive.org/) | 3.4.2 | Multi-format archive and compression library / BSD-2-Clause |
| [libcurl](http://curl.haxx.se/) | 7.78.0 | tool and library for transferring data with URL syntax / curl |
| [libdeflate](https://github.com/ebiggers/libdeflate) | 1.8 | libdeflate is a library for fast, whole-buffer DEFLATE-based compression and decompression. / MIT |
| [libedit](http://thrysoee.dk/editline/) | 3.1.20210910 | Editline Library (libedit) / BSD-2-Clause |
| [libev](http://software.schmorp.de/pkg/libev.html) | 4.33 | A full-featured and high-performance event loop that is loosely modeled after libevent, but without its limitations and bugs. / BSD-2-Clause |
| [libffi](https://sourceware.org/libffi/) | 3.3 | A Portable Foreign Function Interface Library. / MIT |
| [libgcc-ng](https://gcc.gnu.org/onlinedocs/gccint/Libgcc.html) | 9.3.0 | The GCC low-level runtime library / GPL-3.0-only WITH GCC-exception-3.1 |
| [libgfortran-ng](https://gcc.gnu.org/) | 7.5.0 | The GNU Fortran Runtime Library / GPL-3.0-only WITH GCC-exception-3.1 |
| [libgfortran4](https://gcc.gnu.org/) | 7.5.0 | The GNU Fortran Runtime Library / GPL-3.0-only WITH GCC-exception-3.1 |
| [libgomp](https://gcc.gnu.org/onlinedocs/gccint/Libgcc.html) | 9.3.0 | The GCC OpenMP implementation. / GPL-3.0-only WITH GCC-exception-3.1 |
| [liblief](https://lief.quarkslab.com/) | 0.10.1 | A cross platform library to parse, modify and abstract ELF, PE and MachO formats. / Apache-2.0 |
| [libllvm11](http://llvm.org/) | 11.1.0 | Development headers and libraries for LLVM / Apache-2.0 WITH LLVM-exception |
| [libnghttp2](http://github.com/nghttp2/nghttp2) | 1.41.0 | This is an implementation of Hypertext Transfer Protocol version 2. / MIT |
| [libpng](http://www.libpng.org/pub/png/libpng.html) | 1.6.37 | PNG reference library / zlib/libpng |
| [libsodium](http://libsodium.org) | 1.0.18 | A modern and easy-to-use crypto library. / ISC |
| [libspatialindex](http://libspatialindex.github.io) | 1.9.3 | Extensible framework for robust spatial indexing / MIT |
| [libssh2](https://www.libssh2.org/) | 1.9.0 | the SSH library / BSD-3-Clause |
| [libstdcxx-ng](https://gcc.gnu.org/) | 9.3.0 | The GNU C++ Runtime Library / GPL-3.0-only WITH GCC-exception-3.1 |
| [libtiff](http://www.libtiff.org/) | 4.2.0 | Support for the Tag Image File Format (TIFF). / HPND |
| [libtool](http://www.gnu.org/software/libtool/) | 2.4.6 | The GNU Portable Library Tool / GPL 3 |
| [libuuid](http://sourceforge.net/projects/libuuid/) | 1.0.3 | Portable uuid C library. / BSD 3-Clause |
| [libuv](http://libuv.org/) | 1.40.0 | Cross-platform asynchronous I/O / MIT |
| [libwebp](https://developers.google.com/speed/webp/) | 1.2.0 | WebP image library / Google |
| [libwebp-base](https://developers.google.com/speed/webp) | 1.2.0 | WebP image library / BSD-3-Clause |
| [libxcb](http://xcb.freedesktop.org/) | 1.14 | This is the C-language Binding (XCB) package to the X Window System protocol / MIT |
| [libxml2](http://xmlsoft.org/) | 2.9.12 | The XML C parser and toolkit of Gnome / MIT |
| [libxslt](http://xmlsoft.org/XSLT/) | 1.1.34 | The XSLT C library developed for the GNOME project / MIT |
| [libzopfli](https://github.com/google/zopfli) | 1.0.3 | A compression library programmed in C to perform very good, but slow, deflate or zlib compression. / Apache-2.0 |
| [llvmlite](http://llvmlite.pydata.org) | 0.37.0 | A lightweight LLVM python binding for writing JIT compilers. / BSD-2-Clause |
| [locket](https://github.com/mwilliamson/locket.py) | 0.2.1 | File-based locks for Python for Linux and Windows / BSD 2-Clause |
| [lxml](http://lxml.de/) | 4.6.3 | Pythonic binding for the C libraries libxml2 and libxslt. / BSD-3-Clause and GPL-2.0-only and ZPL-2.0 and LicenseRef-ElementTree |
| [lz4-c](https://www.lz4.org) | 1.9.3 | Extremely Fast Compression algorithm / BSD-2-Clause |
| [lzo](http://www.oberhumer.com/opensource/lzo/) | 2.10 | LZO is a portable lossless data compression library written in ANSI C. / GPL v2+ |
| [markupsafe](https://www.palletsprojects.com/p/markupsafe) | 1.1.1 | A Python module that implements the jinja2.Markup string / BSD-3-Clause |
| [matplotlib](http://matplotlib.org/) | 3.4.3 | Publication quality figures in Python / LicenseRef-PSF-based |
| [matplotlib-base](http://matplotlib.org/) | 3.4.3 | Publication quality figures in Python / LicenseRef-PSF-based |
| [matplotlib-inline](https://github.com/ipython/matplotlib-inline) | 0.1.2 | Inline Matplotlib backend for Jupyter / BSD-3-Clause |
| [mccabe](https://github.com/PyCQA/mccabe) | 0.6.1 | McCabe complexity checker for Python / MIT |
| [mistune](https://github.com/lepture/mistune) | 0.8.4 | The fastest markdown parser in pure Python. / BSD 3-Clause |
| [mkl](https://software.intel.com/en-us/mkl) | 2021.4.0 | Math library for Intel and compatible processors / LicenseRef-ProprietaryIntel |
| [mkl-service](http://github.com/IntelPython/mkl-service) | 2.4.0 | Python hooks for Intel(R) Math Kernel Library runtime control settings. / BSD-3-Clause |
| [mkl\_fft](http://github.com/IntelPython/mkl_fft) | 1.3.1 | NumPy-based implementation of Fast Fourier Transform using Intel (R) Math Kernel Library. / BSD 3-Clause |
| [mkl\_random](http://github.com/IntelPython/mkl_random) | 1.2.2 | Intel (R) MKL-powered package for sampling from common probability distributions into NumPy arrays. / BSD-3-Clause |
| [mock](https://github.com/testing-cabal/mock) | 4.0.3 | A library for testing in Python / BSD-2-Clause |
| [more-itertools](https://github.com/more-itertools/more-itertools) | 8.10.0 | More routines for operating on iterables, beyond itertools / MIT |
| [mpc](http://www.multiprecision.org/) | 1.1.0 | A C library for the arithmetic of complex numbers with arbitrarily high precision. / LGPL 3 |
| [mpfr](http://www.mpfr.org/) | 4.0.2 | The MPFR library is a C library for multiple-precision floating-point computations with correct rounding. / LGPL-3.0-only |
| [mpi](http://www.mpich.org/) | 1.0 | A high performance widely portable implementation of the MPI standard. / MPICH |
| [mpich](http://www.mpich.org/) | 3.3.2 | A high performance widely portable implementation of the MPI standard. / MPICH |
| [mpmath](http://mpmath.org) | 1.2.1 | Python library for arbitrary-precision floating-point arithmetic / BSD 3-Clause |
| [msgpack-python](http://msgpack.org/) | 1.0.2 | MessagePack (de)serializer / Apache-2.0 |
| [multipledispatch](https://github.com/mrocklin/multipledispatch/) | 0.6.0 | Multiple dispatch in Python / BSD 3-Clause |
| [munkres](https://github.com/bmc/munkres) | 1.1.4 | The Munkres module provides an O(n^3) implementation of the Munkres algorithm (also called the Hungarian algorithm or the Kuhn-Munkres algorithm). / Apache-2.0 |
| [mypy\_extensions](http://www.mypy-lang.org/) | 0.4.3 | Experimental type system extensions for programs checked with the mypy typechecker. / MIT |
| [nbclassic](http://github.com/jupyterlab/nbclassic) | 0.2.6 | Jupyter Notebook as a Jupyter Server Extension. / BSD-3-Clause |
| [nbclient](https://jupyter.org) | 0.5.3 | A client library for executing notebooks. Formally nbconvert’s ExecutePreprocessor. / BSD-3-Clause |
| [nbconvert](http://jupyter.org) | 6.1.0 | Converting Jupyter Notebooks / BSD-3-Clause |
| [nbformat](http://jupyter.org) | 5.1.3 | The Jupyter Notebook format / BSD-3-Clause |
| [ncurses](http://www.gnu.org/software/ncurses/) | 6.3 | Library for text-based user interfaces / Free software (MIT-like) |
| [nest-asyncio](https://github.com/erdewit/nest_asyncio) | 1.5.1 | Patch asyncio to allow nested event loops / BSD-2-Clause |
| [networkx](https://networkx.github.io/) | 2.6.3 | Python package for creating and manipulating complex networks / BSD-3-Clause |
| [nltk](http://nltk.org/) | 3.6.5 | Natural Language Toolkit / Apache 2.0 |
| [nose](http://readthedocs.org/docs/nose/) | 1.3.7 | Nose extends unittest to make testing easier / LGPL-2.1 |
| [notebook](https://jupyter.org) | 6.4.5 | Jupyter Notebook / BSD-3-Clause |
| [numba](http://numba.pydata.org) | 0.54.1 | NumPy aware dynamic Python compiler using LLVM / BSD-2-Clause |
| [numexpr](https://github.com/pydata/numexpr) | 2.7.3 | Fast numerical expression evaluator for NumPy. / MIT |
| [numpy](http://numpy.scipy.org/) | 1.20.3 | Array processing for numbers, strings, records, and objects. / BSD 3-Clause |
| [numpy-base](http://numpy.scipy.org/) | 1.20.3 | Array processing for numbers, strings, records, and objects. / BSD 3-Clause |
| [numpydoc](https://github.com/numpy/numpydoc) | 1.1.0 | Numpy’s Sphinx extensions / BSD 3-Clause |
| [olefile](http://www.decalage.info/python/olefileio) | 0.46 | parse, read and write Microsoft OLE2 files / BSD 2-Clause |
| [openjpeg](http://www.openjpeg.org/) | 2.4.0 | An open-source JPEG 2000 codec written in C / BSD 2-Clause |
| [openpyxl](https://openpyxl.readthedocs.io) | 3.0.9 | A Python library to read/write Excel 2010 xlsx/xlsm files / MIT |
| [openssl](http://www.openssl.org/) | 1.1.1l | OpenSSL is an open-source implementation of the SSL and TLS protocols / OpenSSL |
| [packaging](https://github.com/pypa/packaging) | 21.0 | Core utilities for Python packages / Apache 2.0 or BSD 2-Clause |
| [pandas](http://pandas.pydata.org) | 1.3.4 | High-performance, easy-to-use data structures and data analysis tools. / BSD-3-Clause |
| [pandocfilters](https://github.com/jgm/pandocfilters) | 1.4.3 | A python module for writing pandoc filters / BSD-3-Clause |
| [pango](http://www.pango.org/) | 1.45.3 | Text layout and rendering engine. / LGPL-2.1 |
| [parso](https://github.com/davidhalter/parso) | 0.8.2 | A Python Parser / MIT |
| [partd](https://github.com/dask/partd) | 1.2.0 | Data structure for on-disk shuffle operations / BSD 3-Clause |
| [patchelf](http://nixos.org/patchelf.html) | 0.13 | A small utility to modify the dynamic linker and RPATH of ELF executables. / GPL-3.0-or-later |
| [path](https://github.com/jaraco/path) | 16.0.0 | A module wrapper for os.path / MIT |
| [path.py](https://github.com/jaraco/path.py) | 12.5.0 | A module wrapper for os.path / MIT |
| [pathlib2](https://github.com/mcmtroffaes/pathlib2) | 2.3.6 | Fork of pathlib aiming to support the full stdlib Python API / MIT |
| [pathspec](https://github.com/cpburnz/python-path-specification) | 0.7.0 | Utility library for gitignore style pattern matching of file paths. / MPL-2.0 |
| [patsy](https://github.com/pydata/patsy) | 0.5.2 | Describing statistical models in Python using symbolic formulas / BSD-2-Clause AND PSF-2.0 |
| [pcre](http://www.pcre.org/) | 8.45 | Regular expression pattern matching using the same syntax and semantics as Perl 5. / BSD 3-Clause |
| [pep8](http://pep8.readthedocs.org/) | 1.7.1 | Python style guide checker / MIT |
| [pexpect](http://pexpect.sourceforge.net/) | 4.8.0 | Pexpect makes Python a better tool for controlling other applications. / ISC |
| [pickleshare](https://github.com/pickleshare/pickleshare/) | 0.7.5 | Tiny ‘shelve’-like database with concurrency support / MIT |
| [pillow](https://pillow.readthedocs.io) | 8.4.0 | Pillow is the friendly PIL fork by Alex Clark and Contributors / LicenseRef-PIL |
| [pip](https://pip.pypa.io/en/stable/) | 21.2.4 | PyPA recommended tool for installing Python packages / MIT |
| [pixman](http://www.pixman.org/) | 0.40.0 | A low-level software library for pixel manipulation. / MIT |
| [pkginfo](https://code.launchpad.net/~tseaver/pkginfo/trunk) | 1.7.1 | Query metadatdata from sdists / bdists / installed packages. / MIT |
| [pluggy](https://github.com/pytest-dev/pluggy) | 0.13.1 | Plugin registration and hook calling for Python / MIT |
| [ply](http://www.dabeaz.com/ply/index.html) | 3.11 | Python Lex-Yacc / BSD 3-clause |
| [poyo](https://github.com/hackebrot/poyo) | 0.5.0 | A lightweight YAML Parser for Python / MIT |
| [prometheus\_client](https://github.com/prometheus/client_python) | 0.11.0 | Python client for the Prometheus monitoring system / Apache-2.0 |
| [prompt-toolkit](https://github.com/jonathanslenders/python-prompt-toolkit) | 3.0.20 | Library for building powerful interactive command lines in Python / BSD-3-Clause |
| [prompt\_toolkit](https://github.com/jonathanslenders/python-prompt-toolkit) | 3.0.20 | Library for building powerful interactive command lines in Python / BSD-3-Clause |
| [psutil](https://github.com/giampaolo/psutil) | 5.8.0 | A cross-platform process and system utilities module for Python / BSD-3-Clause |
| [ptyprocess](https://github.com/pexpect/ptyprocess) | 0.7.0 | Run a subprocess in a pseudo terminal / ISC |
| [py](https://github.com/pytest-dev/py) | 1.10.0 | library with cross-python path, ini-parsing, io, code, log facilities / MIT |
| [py-lief](https://lief.quarkslab.com/) | 0.10.1 | A cross platform library to parse, modify and abstract ELF, PE and MachO formats. / Apache-2.0 |
| [pycodestyle](https://pycodestyle.readthedocs.io/) | 2.7.0 | Python style guide checker / MIT |
| [pycosat](https://github.com/ContinuumIO/pycosat) | 0.6.3 | Bindings to picosat (a SAT solver) / MIT |
| [pycparser](https://github.com/eliben/pycparser) | 2.20 | Complete C99 parser in pure Python / BSD 3-clause |
| [pycurl](http://pycurl.sourceforge.net/) | 7.44.1 | A Python Interface To The cURL library / LGPL, MIT |
| [pydocstyle](https://github.com/PyCQA/pydocstyle) | 6.1.1 | Python docstring style checker (formerly pep257) / MIT |
| [pyerfa](https://pyerfa.readthedocs.io/) | 2.0.0 | Python bindings for ERFA routines / BSD-3-Clause |
| [pyflakes](https://github.com/PyCQA/pyflakes) | 2.3.1 | Pyflakes analyzes programs and detects various errors. / MIT |
| [pygments](http://pygments.org/) | 2.10.0 | Pygments is a generic syntax highlighter suitable for use in code hosting, forums, wikis or other applications that need to prettify source code. / BSD-2-clause |
| [pylint](https://www.pylint.org) | 2.9.6 | python code static checker / GPL-2.0-or-later |
| [pyls-spyder](https://github.com/spyder-ide/pyls-spyder) | 0.4.0 | Spyder extensions for the python-lsp-server / MIT |
| [pyodbc](https://github.com/mkleehammer/pyodbc) | 4.0.31 | DB API Module for ODBC / MIT |
| [pyopenssl](https://github.com/pyca/pyopenssl) | 21.0.0 | Python wrapper module around the OpenSSL library / Apache 2.0 |
| [pyparsing](https://github.com/pyparsing/pyparsing/) | 3.0.4 | Create and execute simple grammars / MIT |
| [pyqt](http://www.riverbankcomputing.co.uk/software/pyqt) | 5.9.2 | Python binding of the cross-platform GUI toolkit Qt. / Commercial, GPL-2.0, GPL-3.0 |
| [pyrsistent](http://github.com/tobgu/pyrsistent/) | 0.18.0 | Persistent/Functional/Immutable data structures / MIT |
| [pysocks](https://github.com/Anorov/PySocks) | 1.7.1 | A Python SOCKS client module. See [Anorov/PySocks](https://github.com/Anorov/PySocks) for more information. / BSD 3-Clause |
| [pytables](http://www.pytables.org) | 3.6.1 | Brings together Python, HDF5 and NumPy to easily handle large amounts of data. / BSD 3-Clause |
| [pytest](https://docs.pytest.org/en/latest/) | 6.2.4 | Simple and powerful testing with Python. / MIT |
| [python](https://www.python.org/) | 3.9.7 | General purpose programming language / Python-2.0 |
| [python-dateutil](https://dateutil.readthedocs.org/) | 2.8.2 | Extensions to the standard Python datetime module. / BSD-3-Clause and Apache |
| [python-libarchive-c](https://github.com/Changaco/python-libarchive-c) | 2.9 | Python interface to libarchive / CC0-1.0 |
| [python-lsp-black](https://github.com/python-lsp/python-lsp-black) | 1.0.0 | Black plugin for the Python LSP Server / MIT |
| [python-lsp-jsonrpc](https://github.com/python-lsp/python-lsp-jsonrpc) | 1.0.0 | A Python 3.6+ server implementation of the JSON RPC 2.0 protocol. / MIT |
| [python-lsp-server](https://github.com/python-lsp/python-lsp-server) | 1.2.4 | An implementation of the Language Server Protocol for Python / MIT |
| [python-slugify](https://github.com/un33k/python-slugify) | 5.0.2 | A Python Slugify application that handles Unicode / MIT |
| [pytz](http://pythonhosted.org/pytz/) | 2021.3 | World timezone definitions, modern and historical. / MIT |
| [pywavelets](https://github.com/PyWavelets/pywt) | 1.1.1 | Discrete Wavelet Transforms in Python / MIT |
| [pyxdg](http://freedesktop.org/wiki/Software/pyxdg) | 0.27 | PyXDG contains implementations of freedesktop.org standards in python. / GNU Lesser General Public v2 (LGPLv2) |
| [pyyaml](http://pyyaml.org/wiki/PyYAML) | 6.0 | YAML parser and emitter for Python / MIT |
| [pyzmq](https://github.com/zeromq/pyzmq) | 22.2.1 | Python bindings for zeromq / BSD 3-clause |
| [qdarkstyle](https://github.com/ColinDuquesnoy/QDarkStyleSheet) | 3.0.2 | A dark stylesheet for Qt applications (Qt4, Qt5, PySide, PyQt4, PyQt5, QtPy, PyQtGraph). / MIT |
| [qstylizer](https://github.com/blambright/qstylizer) | 0.1.10 | Qt stylesheet generation utility for PyQt/PySide / MIT |
| [qt](http://qt.io) | 5.9.7 | Qt is a cross-platform application and UI framework. / LGPL-3.0-only |
| [qtawesome](https://github.com/spyder-ide/qtawesome) | 1.0.2 | Iconic fonts in PyQt and PySide applications / MIT |
| [qtconsole](http://jupyter.org) | 5.1.1 | Jupyter Qt Console / BSD-3-Clause |
| [qtpy](https://github.com/spyder-ide/qtpy) | 1.10.0 | Abstraction layer for PyQt5/PyQt4/PySide / MIT |
| [readline](https://cnswww.cns.cwru.edu/php/chet/readline/rltop.html) | 8.1 | library for editing command lines as they are typed in / GPL-3.0 |
| [regex](https://bitbucket.org/mrabarnett/mrab-regex) | 2021.8.3 | Alternative regular expression module, to replace re / Apache 2.0 |
| [requests](http://python-requests.org) | 2.26.0 | Requests is an elegant and simple HTTP library for Python, built with ♥. / Apache-2.0 |
| ripgrep | 12.1.1 | |
| [rope](https://github.com/python-rope/rope) | 0.19.0 | A python refactoring library / LGPL 3.0 |
| [rtree](http://toblerity.github.com/rtree/) | 0.9.7 | R-Tree spatial index for Python GIS / MIT |
| [ruamel\_yaml](https://sourceforge.net/p/ruamel-yaml/code/ci/default/tree) | 0.15.100 | A patched copy of ruamel.yaml. / MIT |
| [scikit-image](http://scikit-image.org/) | 0.18.3 | Image processing in Python. / BSD-3-Clause |
| [scikit-learn](http://scikit-learn.org/) | 0.24.2 | A set of python modules for machine learning and data mining / BSD-3-Clause |
| [scikit-learn-intelex](https://intel.github.io/scikit-learn-intelex) | 2021.3.0 | Intel(R) Extension for Scikit-learn is a seamless way to speed up your Scikit-learn application. / Apache-2.0 |
| [scipy](http://www.scipy.org/) | 1.7.1 | Scientific Library for Python / BSD-3-Clause |
| [seaborn](https://seaborn.pydata.org) | 0.11.2 | Statistical data visualization / BSD 3-Clause |
| [secretstorage](https://github.com/mitya57/secretstorage) | 3.3.1 | Provides a way for securely storing passwords and other secrets. / BSD-3-Clause |
| [send2trash](https://github.com/arsenetar/send2trash) | 1.8.0 | Python library to natively send files to Trash (or Recycle bin) on all platforms. / BSD-3-Clause |
| [setuptools](https://github.com/pypa/setuptools) | 58.0.4 | Download, build, install, upgrade, and uninstall Python packages / MIT |
| [simplegeneric](http://cheeseshop.python.org/pypi/simplegeneric) | 0.8.1 | Simple generic functions (similar to Python’s own len(), pickle.dump(), etc.) / Zope Public |
| [singledispatch](http://docs.python.org/3/library/functools.html#functools.singledispatch) | 3.7.0 | Transforms a function into a single-dispatch generic function / MIT |
| [sip](https://www.riverbankcomputing.com/software/pyqt-builder/intro) | 4.19.13 | Python binding of the cross-platform builder toolkit for Qt. / Commercial, GPL-2.0, GPL-3.0 |
| [six](https://six.readthedocs.io/) | 1.16.0 | Python 2 and 3 compatibility utilities / MIT |
| [snappy](https://github.com/google/snappy) | 1.1.8 | A fast compressor/decompressor / BSD 3-clause |
| [sniffio](https://github.com/python-trio/sniffio) | 1.2.0 | Sniff out which async library your code is running under / Apache-2.0 |
| [snowballstemmer](https://github.com/shibukawa/snowball_py) | 2.1.0 | Snowball stemming library collection for Python / BSD-2-Clause |
| [sortedcollections](http://www.grantjenks.com/docs/sortedcollections/) | 2.1.0 | Python Sorted Collections / Apache-2.0 |
| [sortedcontainers](http://www.grantjenks.com/docs/sortedcontainers/) | 2.4.0 | Python Sorted Container Types: SortedList, SortedDict, and SortedSet / Apache-2.0 |
| [soupsieve](http://facelessuser.github.io/soupsieve) | 2.2.1 | A modern CSS selector implementation for BeautifulSoup / MIT |
| [sphinx](http://www.sphinx-doc.org) | 4.2.0 | Sphinx is a tool that makes it easy to create intelligent and beautiful documentation / BSD-2-Clause |
| sphinxcontrib | 1.0 | Python namespace for sphinxcontrib / BSD |
| [sphinxcontrib-applehelp](https://www.sphinx-doc.org/en/master/) | 1.0.2 | sphinxcontrib-applehelp is a sphinx extension which outputs Apple help books / BSD-2-Clause |
| [sphinxcontrib-devhelp](https://www.sphinx-doc.org/en/master/) | 1.0.2 | sphinxcontrib-devhelp is a sphinx extension which outputs Devhelp document / BSD-2-Clause |
| [sphinxcontrib-htmlhelp](https://www.sphinx-doc.org/en/master/) | 2.0.0 | sphinxcontrib-htmlhelp is a sphinx extension which renders HTML help files. / BSD-2-Clause |
| [sphinxcontrib-jsmath](https://www.sphinx-doc.org/en/master/) | 1.0.1 | A sphinx extension which renders display math in HTML via JavaScript / BSD-2-Clause |
| [sphinxcontrib-qthelp](https://www.sphinx-doc.org/en/master/) | 1.0.3 | sphinxcontrib-qthelp is a sphinx extension which outputs QtHelp document / BSD-2-Clause |
| [sphinxcontrib-serializinghtml](https://www.sphinx-doc.org/en/master/) | 1.1.5 | sphinxcontrib-serializinghtml is a sphinx extension which outputs “serialized” HTML files (json and pickle). / BSD-2-Clause |
| [sphinxcontrib-websupport](https://pypi.python.org/pypi/sphinxcontrib-websupport) | 1.2.4 | Sphinx API for Web Apps / BSD-2-Clause |
| [spyder](https://www.spyder-ide.org/) | 5.1.5 | The Scientific Python Development Environment / MIT |
| [spyder-kernels](https://www.spyder-ide.org/) | 2.1.3 | Jupyter kernels for Spyder’s console / MIT |
| [sqlalchemy](http://www.sqlalchemy.org/) | 1.4.22 | Database Abstraction Library. / MIT |
| [sqlite](http://www.sqlite.org/) | 3.36.0 | Implements a self-contained, zero-configuration, SQL database engine / Public-Domain (`<http://www.sqlite.org/copyright.html>`) |
| [statsmodels](https://www.statsmodels.org) | 0.12.2 | Statistical computations and models for use with SciPy / BSD-3-Clause |
| [sympy](https://sympy.org) | 1.9 | Python library for symbolic mathematics / BSD-3-Clause |
| [tbb](https://github.com/oneapi-src/oneTBB) | 2021.4.0 | High level abstract threading library / Apache-2.0 |
| tbb4py | 2021.4.0 | TBB module for Python / Apache 2.0 |
| [tblib](https://github.com/ionelmc/python-tblib) | 1.7.0 | Traceback serialization library. / BSD 2-Clause |
| [terminado](https://github.com/jupyter/terminado) | 0.9.4 | Terminals served by tornado websockets / BSD-2-Clause |
| [testpath](https://testpath.readthedocs.io) | 0.5.0 | Testpath is a collection of utilities for Python code working with files and commands. / BSD-3-Clause |
| [text-unidecode](https://github.com/kmike/text-unidecode/) | 1.3 | The most basic Text::Unidecode port / Artistic |
| [textdistance](https://github.com/orsinium/textdistance) | 4.2.1 | TextDistance – python library for comparing distance between two or more sequences by many algorithms. / MIT |
| [threadpoolctl](https://github.com/joblib/threadpoolctl) | 2.2.0 | Python helpers to control the threadpools of native libraries / BSD 3-Clause |
| [three-merge](https://github.com/spyder-ide/three-merge) | 0.1.1 | Simple Python library to perform a 3-way merge between strings / MIT |
| [tifffile](https://github.com/cgohlke/tifffile) | 2021.7.2 | Read and write image data from and to TIFF files. / BSD-3-Clause |
| [tinycss](http://tinycss.readthedocs.io/) | 0.4 | Tinycss is a complete yet simple CSS parser for Python. / BSD-3-Clause |
| [tk](http://www.tcl.tk/) | 8.6.11 | A dynamic programming language with GUI support. Bundles Tcl and Tk. / Tcl/Tk |
| [toml](https://github.com/uiri/toml) | 0.10.2 | Python lib for TOML. / MIT |
| [toolz](http://toolz.readthedocs.org/) | 0.11.1 | A functional standard library for Python / BSD-3-Clause |
| [tornado](http://www.tornadoweb.org/) | 6.1 | A Python web framework and asynchronous networking library, originally developed at FriendFeed. / Apache-2.0 |
| [tqdm](https://pypi.python.org/pypi/tqdm) | 4.62.3 | A Fast, Extensible Progress Meter / MPL-2.0 AND MIT |
| [traitlets](http://traitlets.readthedocs.org/) | 5.1.0 | Configuration system for Python applications / BSD-3-Clause |
| [typed-ast](https://github.com/python/typed_ast) | 1.4.3 | a fork of Python 2 and 3 ast modules with type comment support / Apache-2.0 AND PSF-2.0 AND MIT |
| [typing\_extensions](https://github.com/python/typing/tree/master/typing_extensions) | 3.10.0.2 | Backported and Experimental Type Hints for Python / PSF-2.0 |
| [tzdata](https://www.iana.org/time-zones) | 2021e | The Time Zone Database (called tz, tzdb or zoneinfo) / Public-Domain AND BSD-3-clause |
| [ujson](https://github.com/ultrajson/ultrajson) | 4.0.2 | Ultra fast JSON decoder and encoder written in C with Python bindings / BSD-3-Clause |
| [unicodecsv](https://github.com/jdunck/python-unicodecsv) | 0.14.1 | Drop-in replacement for csv module which supports unicode strings / BSD |
| [unidecode](https://pypi.python.org/pypi/Unidecode) | 1.2.0 | ASCII transliterations of Unicode text / GPL-2.0-or-later |
| [unixodbc](http://www.unixodbc.org/) | 2.3.9 | ODBC on non MS Windows platforms / LGPL-2.1 |
| [urllib3](https://urllib3.readthedocs.io/) | 1.26.7 | HTTP library with thread-safe connection pooling, file post, and more. / MIT |
| [watchdog](http://github.com/gorakhargosh/watchdog) | 2.1.3 | Filesystem events monitoring / Apache-2.0 |
| [wcwidth](https://github.com/jquast/wcwidth) | 0.2.5 | Measures number of Terminal column cells of wide-character codes. / MIT |
| [webencodings](https://github.com/gsnedders/python-webencodings) | 0.5.1 | Character encoding aliases for legacy web content / BSD 3-Clause |
| [werkzeug](https://palletsprojects.com/p/werkzeug/) | 2.0.2 | The comprehensive WSGI web application library. / BSD-3-Clause |
| [wheel](https://github.com/pypa/wheel) | 0.37.0 | A built-package format for Python. / MIT |
| [whichcraft](https://github.com/pydanny/whichcraft) | 0.6.1 | This package provides cross-platform cross-python shutil.which functionality. / BSD-3-Clause |
| [widgetsnbextension](http://ipython.org) | 3.5.1 | Interactive Widgets for Jupyter / BSD 3-clause |
| [wrapt](https://github.com/GrahamDumpleton/wrapt) | 1.12.1 | Module for decorators, wrappers and monkey patching / BSD 2-Clause |
| [wurlitzer](https://github.com/minrk/wurlitzer) | 2.1.1 | Capture C-level stdout/stderr in Python / MIT |
| [xlrd](http://www.python-excel.org/) | 2.0.1 | Library for developers to extract data from Microsoft Excel (tm) spreadsheet files / BSD 3-Clause and BSD with advertising |
| [xlsxwriter](https://xlsxwriter.readthedocs.io/) | 3.0.1 | A Python module for creating Excel XLSX files / BSD-2-Clause |
| [xlwt](http://www.python-excel.org/) | 1.3.0 | Writing data and formatting information to Excel files / BSD |
| [xz](http://tukaani.org/xz/) | 5.2.5 | Data compression software with high compression ratio / LGPL-2.1 and GPL-2.0 |
| [yaml](http://pyyaml.org/wiki/LibYAML) | 0.2.5 | A C library for parsing and emitting YAML / MIT |
| [yapf](https://github.com/google/yapf) | 0.31.0 | A formatter for Python files / Apache 2.0 |
| [zeromq](http://zeromq.org) | 4.3.4 | A high-performance asynchronous messaging library. / LGPL-3.0-or-later |
| [zfp](https://computation.llnl.gov/projects/floating-point-compression) | 0.5.5 | Library for compressed numerical arrays that support high throughput read and write random access / BSD-3-Clause |
| [zict](http://github.com/mrocklin/zict) | 2.0.0 | Composable Dictionary Classes / BSD 3-Clause |
| [zipp](https://github.com/jaraco/zipp) | 3.6.0 | A pathlib-compatible Zipfile object wrapper / MIT |
| [zlib](http://zlib.net/) | 1.2.11 | Massively spiffy yet delicately unobtrusive compression library / zlib |
| zope | 1.0 | web application server / BSD |
| [zope.event](http://www.zope.org/en/latest/) | 4.5.0 | Very basic event publishing system / Zope Public License |
| [zope.interface](https://github.com/zopefoundation/zope.interface) | 5.4.0 | Interfaces for Python / ZPL-2.1 |
| [zstd](http://www.zstd.net) | 1.4.9 | Zstandard - Fast real-time compression algorithm / BSD 3-Clause |
| Name | Version | Summary / License |
|---|---|---|
| [alabaster](http://www.sphinx-doc.org/en/stable/index.html) | 0.7.12 | Configurable, Python 2+3 compatible Sphinx theme. / BSD 3-Clause |
| [anaconda-client](http://anaconda.org) | 1.7.2 | anaconda.org command line client library / BSD 3-clause |
| [anaconda-navigator](https://github.com/ContinuumIO/navigator) | 2.0.3 | Anaconda Navigator / proprietary - Continuum Analytics, Inc. |
| [anaconda-project](https://github.com/Anaconda-Platform/anaconda-project) | 0.9.1 | Tool for encapsulating, running, and reproducing data science projects / BSD-3-Clause |
| [anyio](https://github.com/agronholm/anyio) | 2.2.0 | High level compatibility layer for multiple asynchronous event loop implementations on Python / MIT |
| [appdirs](http://github.com/ActiveState/appdirs) | 1.4.4 | A small Python module for determining appropriate platform-specific dirs. / MIT |
| [argh](https://github.com/neithere/argh) | 0.26.2 | The Natural CLI. / LGPL 3 |
| [argon2-cffi](https://argon2-cffi.readthedocs.org/) | 20.1.0 | The secure Argon2 password hashing algorithm. / MIT |
| [asn1crypto](https://github.com/wbond/asn1crypto) | 1.4.0 | Python ASN.1 library with a focus on performance and a pythonic API / MIT |
| [astroid](https://www.astroid.org/) | 2.5 | A abstract syntax tree for Python with inference support. / LGPL-2.1-only |
| [astropy](http://www.astropy.org/) | 4.2.1 | Community-developed Python Library for Astronomy / BSD-3-Clause |
| [async\_generator](https://github.com/python-trio/async_generator) | 1.10 | Async generators and context managers for Python 3.5+ / MIT |
| [atomicwrites](https://github.com/untitaker/python-atomicwrites) | 1.4.0 | Atomic file writes / MIT |
| [attrs](https://attrs.readthedocs.io/en/stable/) | 20.3.0 | attrs is the Python package that will bring back the joy of writing classes by relieving you from the drudgery of implementing object protocols (aka dunder methods). / MIT |
| [autopep8](https://github.com/hhatto/autopep8) | 1.5.6 | A tool that automatically formats Python code to conform to the PEP 8 style guide / MIT |
| [babel](http://babel.pocoo.org/) | 2.9.0 | Utilities to internationalize and localize Python applications / BSD 3-clause |
| [backcall](https://github.com/takluyver/backcall/) | 0.2.0 | Specifications for callback functions passed in to an API / BSD-3-Clause |
| [backports](https://bitbucket.org/brandon/backports) | 1.0 | None / BSD |
| [backports.shutil\_get\_terminal\_size](https://github.com/chrippa/backports.shutil_get_terminal_size) | 1.0.0 | A backport of the get\_terminal\_size function from Python 3.3’s shutil. / MIT |
| [bcrypt](https://github.com/pyca/bcrypt/) | 3.2.0 | Modern password hashing for your software and your servers / Apache-2.0 |
| [beautifulsoup4](http://www.crummy.com/software/BeautifulSoup/) | 4.9.3 | Python library designed for screen-scraping / MIT |
| [bitarray](https://github.com/ilanschnell/bitarray) | 1.9.2 | efficient arrays of booleans – C extension / PSF |
| [bkcharts](http://github.com/bokeh/bkcharts) | 0.2 | High level chart types built on top of Bokeh / BSD 3-Clause |
| [black](https://github.com/python/black) | 19.10b0 | The Uncompromising Code Formatter / MIT |
| blas | 1.0 | |
| [bleach](https://github.com/mozilla/bleach) | 3.3.0 | Easy, whitelist-based HTML-sanitizing tool / Apache-2.0 |
| [blosc](https://github.com/Blosc/c-blosc) | 1.21.0 | A blocking, shuffling and loss-less compression library that can be faster than memcpy() / BSD-3-Clause |
| [bokeh](http://bokeh.pydata.org/) | 2.3.2 | Statistical and novel interactive HTML plots for Python / BSD-3-Clause |
| [boto](https://github.com/boto/boto/) | 2.49.0 | Amazon Web Services Library / MIT |
| [bottleneck](https://github.com/pydata/bottleneck) | 1.3.2 | Fast NumPy array functions written in Cython. / BSD 2-Clause |
| [brotli](http://github.com/google/brotli) | 1.0.9 | Brotli compression format / MIT |
| [brotlipy](https://github.com/python-hyper/brotlipy) | 0.7.0 | Python bindings to the Brotli compression library / MIT |
| [bzip2](http://www.bzip.org/) | 1.0.8 | high-quality data compressor / bzip2 |
| [ca-certificates](https://github.com/conda-forge/ca-certificates-feedstock) | 2021.4.13 | Certificates for use with other packages. / MPL 2.0 |
| [certifi](http://certifi.io/) | 2020.12.5 | Python package for providing Mozilla’s CA Bundle. / ISC |
| [cffi](https://bitbucket.org/cffi/cffi) | 1.14.5 | Foreign Function Interface for Python calling C code. / MIT |
| [chardet](https://github.com/chardet/chardet) | 4.0.0 | Universal character encoding detector / LGPL2 |
| [charls](https://github.com/team-charls/charls) | 2.2.0 | CharLS is a C++ implementation of the JPEG-LS standard for lossless and near-lossless image compression and decompression. JPEG-LS is a low-complexity image compression standard that matches JPEG 2000 compression ratios. / BSD-3-Clause |
| [click](https://palletsprojects.com/p/click) | 7.1.2 | Python composable command line interface toolkit / BSD-3-Clause |
| [cloudpickle](https://github.com/cloudpipe/cloudpickle) | 1.6.0 | Extended pickling support for Python objects / BSD-3-Clause |
| [clyent](https://github.com/Anaconda-Platform/clyent) | 1.2.2 | Command line client library for windows and posix / BSD 3-Clause |
| [colorama](https://github.com/tartley/colorama) | 0.4.4 | Cross-platform colored terminal text / BSD-3-Clause |
| [comtypes](http://starship.python.net/crew/theller/comtypes/) | 1.1.9 | pure Python COM package / MIT |
| [conda](https://conda.io) | 4.10.1 | OS-agnostic, system-level binary package and environment manager. / BSD 3-Clause |
| [conda-build](https://github.com/conda/conda-build) | 3.21.4 | tools for building conda packages / BSD 3-Clause |
| [conda-env](https://github.com/conda/conda-env) | 2.6.0 | Tools for interacting with conda environments. / BSD 3-Clause |
| [conda-verify](https://github.com/conda/conda-verify) | 3.4.2 | tool for validating conda recipes and conda packages / BSD 3-Clause |
| console\_shortcut | 0.1.1 | Console shortcut creator for Windows (using menuinst) / BSD |
| [contextlib2](http://contextlib2.readthedocs.org) | 0.6.0.post1 | Backports and enhancements for the contextlib module / PSF 2 |
| [cryptography](https://github.com/pyca/cryptography) | 3.4.7 | Provides cryptographic recipes and primitives to Python developers / Apache-2.0 AND BSD-3-Clause AND PSF-2.0 AND MIT |
| [curl](http://curl.haxx.se/) | 7.71.1 | tool and library for transferring data with URL syntax / MIT/X derivate (`<http://curl.haxx.se/docs/copyright.html>`) |
| [cycler](http://matplotlib.org/cycler) | 0.10.0 | Composable style cycles. / BSD 3-Clause |
| [cython](http://www.cython.org/) | 0.29.23 | The Cython compiler for writing C extensions for the Python language / Apache-2.0 |
| [cytoolz](https://github.com/pytoolz/cytoolz) | 0.11.0 | Cython implementation of Toolz. High performance functional utilities / BSD-3-Clause |
| [dask](https://dask.org/) | 2021.4.0 | Parallel PyData with Task Scheduling / BSD-3-Clause |
| [dask-core](http://github.com/dask/dask/) | 2021.4.0 | Parallel Python with task scheduling / BSD-3-Clause |
| [decorator](https://github.com/micheles/decorator) | 5.0.6 | Better living through Python with decorators. / BSD-3-Clause |
| [defusedxml](https://bitbucket.org/tiran/defusedxml) | 0.7.1 | XML bomb protection for Python stdlib modules / PSF 2.0 |
| [diff-match-patch](http://code.google.com/p/google-diff-match-patch/) | 20200713 | Diff Match Patch is a high-performance library in multiple languages that manipulates plain text / Apache-2.0 |
| [distributed](http://distributed.readthedocs.io/en/latest/) | 2021.4.0 | Distributed computing with Dask / BSD-3-Clause |
| [docutils](http://docutils.sourceforge.net/) | 0.17 | Docutils – Python Documentation Utilities / Public Domain Dedictation and BSD 2-Clause and PSF 2.1.1 and GPL 3.0 |
| [entrypoints](https://github.com/takluyver/entrypoints) | 0.3 | Discover and load entry points from installed packages. / MIT License |
| [et\_xmlfile](https://bitbucket.org/openpyxl/et_xmlfile) | 1.0.1 | An implementation of lxml.xmlfile for the standard library / MIT |
| [fastcache](https://github.com/pbrady/fastcache) | 1.1.0 | C implementation of Python 3 lru\_cache / MIT |
| [filelock](https://github.com/benediktschmitt/py-filelock) | 3.0.12 | A platform independent file lock. / Public Domain |
| [flake8](http://flake8.pycqa.org/) | 3.9.0 | Your Tool For Style Guide Enforcement / MIT |
| [flask](http://flask.pocoo.org) | 1.1.2 | A microframework based on Werkzeug, Jinja2 and good intentions. / BSD 3-Clause |
| [freetype](https://www.freetype.org/) | 2.10.4 | A Free, High-Quality, and Portable Font Engine / GPL-2.0-only and LicenseRef-FreeType |
| [fsspec](https://github.com/martindurant/filesystem_spec) | 0.9.0 | A specification for pythonic filesystems / BSD-3-Clause |
| [future](http://python-future.org) | 0.18.2 | Clean single-source support for Python 3 and 2 / MIT |
| [get\_terminal\_size](https://github.com/chrippa/backports.shutil_get_terminal_size) | 1.0.0 | Get the size of the terminal window. / MIT |
| [gevent](https://www.gevent.org) | 21.1.2 | Coroutine-based network library / MIT |
| [giflib](http://giflib.sourceforge.net) | 5.2.1 | Library for reading and writing gif images / MIT |
| [glob2](https://github.com/miracle2k/python-glob2) | 0.7 | Version of the glob module that supports recursion via \*\*, and can capture patterns. / BSD-2-Clause |
| [greenlet](https://github.com/python-greenlet/greenlet) | 1.0.0 | Lightweight in-process concurrent programming / MIT |
| [h5py](http://www.h5py.org/) | 2.10.0 | Read and write HDF5 files from Python. / BSD-3-Clause |
| [hdf5](http://www.hdfgroup.org/HDF5/) | 1.10.4 | HDF5 is a data model, library, and file format for storing and managing data / HDF5 |
| [heapdict](http://stutzbachenterprises.com/) | 1.0.1 | A heap with decrease-key and increase-key operations / BSD 3-Clause |
| [html5lib](https://github.com/html5lib/html5lib-python) | 1.1 | HTML parser based on the WHATWG HTML specification / MIT |
| icc\_rt | 2019.0.0 | Intel runtime libraries for C, C++ and Fortran compilers / Intel proprietary |
| [icu](http://site.icu-project.org/) | 58.2 | International Components for Unicode. / MIT |
| [idna](https://github.com/kjd/idna) | 2.10 | Internationalized Domain Names in Applications (IDNA). / BSD Like |
| [imagecodecs](https://www.lfd.uci.edu/~gohlke/) | 2021.3.31 | Image transformation, compression, and decompression codecs / BSD-3-Clause |
| [imageio](https://imageio.github.io) | 2.9.0 | A Python library for reading and writing image data / BSD-2-Clause |
| [imagesize](https://github.com/shibukawa/imagesize_py) | 1.2.0 | Getting image size from png/jpeg/jpeg2000/gif file / MIT |
| [importlib-metadata](https://github.com/python/importlib_metadata) | 3.10.0 | A library to access the metadata for a Python package / Apache-2.0 |
| [importlib\_metadata](https://github.com/python/importlib_metadata) | 3.10.0 | A library to access the metadata for a Python package / Apache-2.0 |
| [iniconfig](http://github.com/RonnyPfannschmidt/iniconfig) | 1.1.1 | iniconfig: brain-dead simple config-ini parsing / MIT |
| [intel-openmp](https://software.intel.com/en-us/node/522690) | 2021.2.0 | Math library for Intel and compatible processors / LicenseRef-ProprietaryIntel |
| [intervaltree](https://github.com/chaimleib/intervaltree) | 3.1.0 | Editable interval tree data structure for Python 2 and 3 / Apache-2.0 |
| [ipykernel](https://ipython.org) | 5.3.4 | IPython Kernel for Jupyter / BSD-3-Clause |
| [ipython](https://ipython.org) | 7.22.0 | IPython: Productive Interactive Computing / BSD-3-Clause |
| [ipython\_genutils](http://ipython.org) | 0.2.0 | vestigial utilities from IPython / BSD 3-Clause |
| [ipywidgets](https://github.com/ipython/ipywidgets) | 7.6.3 | Jupyter Interactive Widgets / BSD-3-Clause |
| [isort](https://github.com/timothycrosley/isort) | 5.8.0 | A Python utility / library to sort Python imports. / MIT |
| [itsdangerous](https://github.com/pallets/itsdangerous) | 1.1.0 | Various helpers to pass trusted data to untrusted environments. / BSD 3-Clause |
| [jdcal](https://github.com/phn/jdcal) | 1.4.1 | Julian dates from proleptic Gregorian and Julian calendars. / BSD 2-Clause |
| [jedi](https://github.com/davidhalter/jedi/) | 0.17.2 | An autocompletion tool for Python that can be used for text editors. / MIT |
| [jinja2](http://jinja.pocoo.org) | 2.11.3 | An easy to use stand-alone template engine written in pure python. / BSD-3-Clause |
| [joblib](https://pypi.org/project/joblib/) | 1.0.1 | Lightweight pipelining: using Python functions as pipeline jobs. / BSD-3-Clause |
| [jpeg](http://www.ijg.org/) | 9b | read/write jpeg COM, EXIF, IPTC medata / Custom free software license |
| [json5](https://github.com/dpranke/pyjson5) | 0.9.5 | A Python implementation of the JSON5 data format / Apache-2.0 |
| [jsonschema](https://github.com/Julian/jsonschema) | 3.2.0 | An implementation of JSON Schema validation for Python / MIT |
| [jupyter](http://jupyter.org) | 1.0.0 | Jupyter metapackage. Install all the Jupyter components in one go. / BSD 3-Clause |
| [jupyter-packaging](https://github.com/jupyter/jupyter-packaging) | 0.7.12 | Jupyter Packaging Utilities / BSD-3-Clause |
| [jupyter\_client](https://jupyter.org) | 6.1.12 | jupyter\_client contains the reference implementation of the Jupyter protocol. / BSD-3-Clause |
| [jupyter\_console](http://jupyter.org) | 6.4.0 | Jupyter terminal console / BSD-3-Clause |
| [jupyter\_core](https://jupyter.org) | 4.7.1 | Core common functionality of Jupyter projects. / BSD-3-Clause |
| [jupyter\_server](https://jupyter.org) | 1.4.1 | Jupyter Server / BSD-3-Clause |
| [jupyterlab](https://github.com/jupyterlab/jupyterlab) | 3.0.14 | JupyterLab PRE-ALPHA / BSD-3-Clause |
| [jupyterlab\_pygments](http://github.com/JupyterLab/jupyterlab_pygments) | 0.1.2 | Pygments syntax coloring scheme making use of the JupyterLab CSS variables / BSD-3-Clause |
| [jupyterlab\_server](https://github.com/jupyterlab/jupyterlab_server) | 2.4.0 | A set of server components for JupyterLab and JupyterLab like applications. / BSD-3-Clause |
| [jupyterlab\_widgets](https://github.com/jupyter-widgets/ipywidgets) | 1.0.0 | JupyterLab extension providing HTML widgets / BSD-3-Clause |
| [keyring](https://github.com/jaraco/keyring) | 22.3.0 | Store and access your passwords safely / MIT |
| [kiwisolver](https://github.com/nucleic/kiwi) | 1.3.1 | An efficient C++ implementation of the Cassowary constraint solver / BSD-3-Clause |
| [krb5](http://web.mit.edu/kerberos/) | 1.18.2 | A network authentication protocol. / MIT |
| [lazy-object-proxy](https://github.com/ionelmc/python-lazy-object-proxy) | 1.6.0 | A fast and thorough lazy object proxy / BSD-2-Clause |
| [lcms2](http://www.littlecms.com/) | 2.12 | Open Source Color Management Engine / MIT |
| [lerc](https://github.com/Esri/lerc) | 2.2.1 | LERC - Limited Error Raster Compression / Apache-2.0 |
| [libaec](https://gitlab.dkrz.de/k202009/libaec) | 1.0.4 | Adaptive Entropy Coding library / BSD-2-Clause |
| [libarchive](http://www.libarchive.org/) | 3.4.2 | Multi-format archive and compression library / BSD-2-Clause |
| [libcurl](http://curl.haxx.se/) | 7.71.1 | tool and library for transferring data with URL syntax / MIT/X derivate (`<http://curl.haxx.se/docs/copyright.html>`) |
| [libdeflate](https://github.com/ebiggers/libdeflate) | 1.7 | libdeflate is a library for fast, whole-buffer DEFLATE-based compression and decompression. / MIT |
| [libiconv](https://www.gnu.org/software/libiconv/) | 1.15 | Provides iconv for systems which don’t have one (or that cannot convert from/to Unicode.) / GPL and LGPL |
| [liblief](https://lief.quarkslab.com/) | 0.10.1 | A cross platform library to parse, modify and abstract ELF, PE and MachO formats. / Apache-2.0 |
| [libpng](http://www.libpng.org/pub/png/libpng.html) | 1.6.37 | PNG reference library / zlib/libpng |
| [libsodium](http://libsodium.org) | 1.0.18 | A modern and easy-to-use crypto library. / ISC |
| [libspatialindex](http://libspatialindex.github.io) | 1.9.3 | Extensible framework for robust spatial indexing / MIT |
| [libssh2](https://www.libssh2.org/) | 1.9.0 | the SSH library / BSD-3-Clause |
| [libtiff](http://www.libtiff.org/) | 4.2.0 | Support for the Tag Image File Format (TIFF). / HPND |
| [libxml2](http://xmlsoft.org/) | 2.9.10 | The XML C parser and toolkit of Gnome / MIT |
| [libxslt](http://xmlsoft.org/XSLT/) | 1.1.34 | The XSLT C library developed for the GNOME project / MIT |
| [libzopfli](https://github.com/google/zopfli) | 1.0.3 | A compression library programmed in C to perform very good, but slow, deflate or zlib compression. / Apache-2.0 |
| [llvmlite](http://llvmlite.pydata.org) | 0.36.0 | A lightweight LLVM python binding for writing JIT compilers. / BSD-2-Clause |
| [locket](https://github.com/mwilliamson/locket.py) | 0.2.1 | File-based locks for Python for Linux and Windows / BSD 2-Clause |
| [lxml](http://lxml.de/) | 4.6.3 | Pythonic binding for the C libraries libxml2 and libxslt. / BSD-3-Clause and GPL-2.0-only and ZPL-2.0 and LicenseRef-ElementTree |
| [lz4-c](https://www.lz4.org) | 1.9.3 | Extremely Fast Compression algorithm / BSD-2-Clause |
| [lzo](http://www.oberhumer.com/opensource/lzo/) | 2.10 | LZO is a portable lossless data compression library written in ANSI C. / GPL v2+ |
| [m2w64-gcc-libgfortran](https://gcc.gnu.org) | 5.3.0 | GNU Compiler Collection (libgfortran) for MinGW-w64 / GPL, LGPL, FDL, custom |
| m2w64-gcc-libs | 5.3.0 | None / GPL3+, partial:GCCRLE, partial:LGPL2+ |
| [m2w64-gcc-libs-core](https://gcc.gnu.org) | 5.3.0 | GNU Compiler Collection (core libraries) for MinGW-w64 / GPL3+, partial:GCCRLE, partial:LGPL2+ |
| m2w64-gmp | 6.1.0 | None / LGPL3 |
| m2w64-libwinpthread-git | 5.0.0.4634.697f757 | None / MIT, BSD |
| [markupsafe](https://www.palletsprojects.com/p/markupsafe) | 1.1.1 | A Python module that implements the jinja2.Markup string / BSD-3-Clause |
| [matplotlib](http://matplotlib.org/) | 3.3.4 | Publication quality figures in Python / LicenseRef-PSF-based |
| [matplotlib-base](http://matplotlib.org/) | 3.3.4 | Publication quality figures in Python / LicenseRef-PSF-based |
| [mccabe](https://github.com/PyCQA/mccabe) | 0.6.1 | McCabe complexity checker for Python / MIT |
| [menuinst](https://github.com/ContinuumIO/menuinst) | 1.4.16 | cross platform menu item installation / BSD |
| [mistune](https://github.com/lepture/mistune) | 0.8.4 | The fastest markdown parser in pure Python. / BSD 3-Clause |
| [mkl](https://software.intel.com/en-us/mkl) | 2021.2.0 | Math library for Intel and compatible processors / LicenseRef-ProprietaryIntel |
| [mkl-service](https://github.com/ContinuumIO/mkl-service) | 2.3.0 | Python bindings to MKL service functions / 3-clause BSD |
| [mkl\_fft](http://github.com/IntelPython/mkl_fft) | 1.3.0 | NumPy-based implementation of Fast Fourier Transform using Intel (R) Math Kernel Library. / BSD 3-Clause |
| [mkl\_random](http://github.com/IntelPython/mkl_random) | 1.2.1 | Intel (R) MKL-powered package for sampling from common probability distributions into NumPy arrays. / BSD 3-Clause |
| [mock](https://github.com/testing-cabal/mock) | 4.0.3 | A library for testing in Python / BSD-2-Clause |
| [more-itertools](https://github.com/more-itertools/more-itertools) | 8.7.0 | More routines for operating on iterables, beyond itertools / MIT |
| [mpmath](http://mpmath.org) | 1.2.1 | Python library for arbitrary-precision floating-point arithmetic / BSD 3-Clause |
| [msgpack-python](http://msgpack.org/) | 1.0.2 | MessagePack (de)serializer / Apache-2.0 |
| msys2-conda-epoch | 20160418 | |
| [multipledispatch](https://github.com/mrocklin/multipledispatch/) | 0.6.0 | Multiple dispatch in Python / BSD 3-Clause |
| [mypy\_extensions](http://www.mypy-lang.org/) | 0.4.3 | Experimental type system extensions for programs checked with the mypy typechecker. / MIT |
| [nbclassic](http://github.com/jupyterlab/nbclassic) | 0.2.6 | Jupyter Notebook as a Jupyter Server Extension. / BSD-3-Clause |
| [nbclient](https://jupyter.org) | 0.5.3 | A client library for executing notebooks. Formally nbconvert’s ExecutePreprocessor. / BSD-3-Clause |
| [nbconvert](http://jupyter.org) | 6.0.7 | Converting Jupyter Notebooks / BSD-3-Clause |
| [nbformat](http://jupyter.org) | 5.1.3 | The Jupyter Notebook format / BSD-3-Clause |
| [nest-asyncio](https://github.com/erdewit/nest_asyncio) | 1.5.1 | Patch asyncio to allow nested event loops / BSD-2-Clause |
| [networkx](https://networkx.github.io/) | 2.5 | Python package for creating and manipulating complex networks / BSD-3-Clause |
| [nltk](http://nltk.org/) | 3.6.1 | Natural Language Toolkit / Apache 2.0 |
| [nose](http://readthedocs.org/docs/nose/) | 1.3.7 | Nose extends unittest to make testing easier / LGPL-2.1 |
| [notebook](https://jupyter.org) | 6.3.0 | Jupyter Notebook / BSD-3-Clause |
| [numba](http://numba.pydata.org) | 0.53.1 | NumPy aware dynamic Python compiler using LLVM / BSD-2-Clause |
| [numexpr](https://github.com/pydata/numexpr) | 2.7.3 | Fast numerical expression evaluator for NumPy. / MIT |
| [numpy](http://numpy.scipy.org/) | 1.20.1 | Array processing for numbers, strings, records, and objects. / BSD 3-Clause |
| [numpy-base](http://numpy.scipy.org/) | 1.20.1 | Array processing for numbers, strings, records, and objects. / BSD 3-Clause |
| [numpydoc](https://github.com/numpy/numpydoc) | 1.1.0 | Numpy’s Sphinx extensions / BSD 3-Clause |
| [olefile](http://www.decalage.info/python/olefileio) | 0.46 | parse, read and write Microsoft OLE2 files / BSD 2-Clause |
| [openjpeg](http://www.openjpeg.org/) | 2.3.0 | An open-source JPEG 2000 codec written in C / BSD 2-Clause |
| [openpyxl](https://openpyxl.readthedocs.io) | 3.0.7 | A Python library to read/write Excel 2010 xlsx/xlsm files / MIT |
| [openssl](http://www.openssl.org/) | 1.1.1k | OpenSSL is an open-source implementation of the SSL and TLS protocols / OpenSSL |
| [packaging](https://github.com/pypa/packaging) | 20.9 | Core utilities for Python packages / Apache 2.0 or BSD 2-Clause |
| [pandas](http://pandas.pydata.org) | 1.2.4 | High-performance, easy-to-use data structures and data analysis tools. / BSD-3-Clause |
| [pandoc](http://pandoc.org/) | 2.12 | Universal markup converter (repackaged binaries) / GPL-2.0 |
| [pandocfilters](https://github.com/jgm/pandocfilters) | 1.4.3 | A python module for writing pandoc filters / BSD-3-Clause |
| [paramiko](http://www.paramiko.org/) | 2.7.2 | SSH2 protocol library / LGPL-2.1-or-later |
| [parso](https://github.com/davidhalter/parso) | 0.7.0 | A Python Parser / MIT |
| [partd](https://github.com/dask/partd) | 1.2.0 | Data structure for on-disk shuffle operations / BSD 3-Clause |
| [path](https://github.com/jaraco/path) | 15.1.2 | A module wrapper for os.path / MIT |
| [path.py](https://github.com/jaraco/path.py) | 12.5.0 | A module wrapper for os.path / MIT |
| [pathlib2](https://github.com/mcmtroffaes/pathlib2) | 2.3.5 | Fork of pathlib aiming to support the full stdlib Python API / MIT |
| [pathspec](https://github.com/cpburnz/python-path-specification) | 0.7.0 | Utility library for gitignore style pattern matching of file paths. / MPL-2.0 |
| [patsy](https://github.com/pydata/patsy) | 0.5.1 | Describing statistical models in Python using symbolic formulas / BSD-2-Clause, PSF2 |
| [pep8](http://pep8.readthedocs.org/) | 1.7.1 | Python style guide checker / MIT |
| [pexpect](http://pexpect.sourceforge.net/) | 4.8.0 | Pexpect makes Python a better tool for controlling other applications. / ISC |
| [pickleshare](https://github.com/pickleshare/pickleshare/) | 0.7.5 | Tiny ‘shelve’-like database with concurrency support / MIT |
| [pillow](https://pillow.readthedocs.io) | 8.2.0 | Pillow is the friendly PIL fork by Alex Clark and Contributors / LicenseRef-PIL |
| [pip](https://pip.pypa.io/en/stable/) | 21.0.1 | PyPA recommended tool for installing Python packages / MIT |
| [pkginfo](https://code.launchpad.net/~tseaver/pkginfo/trunk) | 1.7.0 | Query metadatdata from sdists / bdists / installed packages. / MIT |
| [pluggy](https://github.com/pytest-dev/pluggy) | 0.13.1 | Plugin registration and hook calling for Python / MIT |
| [ply](http://www.dabeaz.com/ply/index.html) | 3.11 | Python Lex-Yacc / BSD 3-clause |
| powershell\_shortcut | 0.0.1 | Powershell shortcut creator for Windows (using menuinst) / BSD |
| [prometheus\_client](https://github.com/prometheus/client_python) | 0.10.1 | Python client for the Prometheus monitoring system / Apache-2.0 |
| [prompt-toolkit](https://github.com/jonathanslenders/python-prompt-toolkit) | 3.0.17 | Library for building powerful interactive command lines in Python / BSD-3-Clause |
| [prompt\_toolkit](https://github.com/jonathanslenders/python-prompt-toolkit) | 3.0.17 | Library for building powerful interactive command lines in Python / BSD-3-Clause |
| [psutil](https://github.com/giampaolo/psutil) | 5.8.0 | A cross-platform process and system utilities module for Python / BSD-3-Clause |
| [ptyprocess](https://github.com/pexpect/ptyprocess) | 0.7.0 | Run a subprocess in a pseudo terminal / ISC |
| [py](https://github.com/pytest-dev/py) | 1.10.0 | library with cross-python path, ini-parsing, io, code, log facilities / MIT |
| [py-lief](https://lief.quarkslab.com/) | 0.10.1 | A cross platform library to parse, modify and abstract ELF, PE and MachO formats. / Apache-2.0 |
| [pycodestyle](https://pycodestyle.readthedocs.io/) | 2.6.0 | Python style guide checker / MIT |
| [pycosat](https://github.com/ContinuumIO/pycosat) | 0.6.3 | Bindings to picosat (a SAT solver) / MIT |
| [pycparser](https://github.com/eliben/pycparser) | 2.20 | Complete C99 parser in pure Python / BSD 3-clause |
| [pycurl](http://pycurl.sourceforge.net/) | 7.43.0.6 | A Python Interface To The cURL library / LGPL, MIT |
| [pydocstyle](https://github.com/PyCQA/pydocstyle) | 6.0.0 | Python docstring style checker (formerly pep257) / MIT |
| [pyerfa](https://pyerfa.readthedocs.io/) | 1.7.3 | Python bindings for ERFA routines / BSD-3-Clause |
| [pyflakes](https://github.com/PyCQA/pyflakes) | 2.2.0 | Pyflakes analyzes programs and detects various errors. / MIT |
| [pygments](http://pygments.org/) | 2.8.1 | Pygments is a generic syntax highlighter suitable for use in code hosting, forums, wikis or other applications that need to prettify source code. / BSD-2-clause |
| [pylint](http://www.pylint.org/) | 2.7.4 | python code static checker / GPL-2.0-only |
| [pyls-black](https://github.com/rupert/pyls-black) | 0.4.6 | Black plugin for the Python Language Server / MIT |
| [pyls-spyder](https://github.com/spyder-ide/pyls-spyder) | 0.3.2 | Spyder extensions for the python-language-server / MIT |
| [pynacl](https://github.com/pyca/pynacl) | 1.4.0 | PyNaCl is a Python binding to the Networking and Cryptography library, a crypto library with the stated goal of improving usability, security and speed. / Apache-2.0 |
| [pyodbc](https://github.com/mkleehammer/pyodbc) | 4.0.30 | DB API Module for ODBC / MIT |
| [pyopenssl](https://github.com/pyca/pyopenssl) | 20.0.1 | Python wrapper module around the OpenSSL library / Apache 2.0 |
| [pyparsing](http://pyparsing.wikispaces.com/) | 2.4.7 | Create and execute simple grammars / MIT |
| [pyqt](http://www.riverbankcomputing.co.uk/software/pyqt) | 5.9.2 | Python binding of the cross-platform GUI toolkit Qt. / Commercial, GPL-2.0, GPL-3.0 |
| [pyreadline](http://ipython.org/pyreadline) | 2.1 | A python implmementation of GNU readline. / BSD 3-Clause |
| [pyrsistent](http://github.com/tobgu/pyrsistent/) | 0.17.3 | Persistent/Functional/Immutable data structures / MIT |
| [pysocks](https://github.com/Anorov/PySocks) | 1.7.1 | A Python SOCKS client module. See [Anorov/PySocks](https://github.com/Anorov/PySocks) for more information. / BSD 3-Clause |
| [pytables](http://www.pytables.org) | 3.6.1 | Brings together Python, HDF5 and NumPy to easily handle large amounts of data. / BSD 3-Clause |
| [pytest](https://docs.pytest.org/en/latest/) | 6.2.3 | Simple and powerful testing with Python. / MIT |
| [python](https://www.python.org/) | 3.8.8 | General purpose programming language / Python-2.0 |
| [python-dateutil](https://dateutil.readthedocs.org/) | 2.8.1 | Extensions to the standard Python datetime module. / BSD 3 Clause |
| [python-jsonrpc-server](https://github.com/palantir/python-jsonrpc-server) | 0.4.0 | A Python 2.7 and 3.4+ server implementation of the JSON RPC 2.0 protocol. / MIT |
| [python-language-server](https://github.com/palantir/python-language-server) | 0.36.2 | An implementation of the Language Server Protocol for Python / MIT |
| [python-libarchive-c](https://github.com/Changaco/python-libarchive-c) | 2.9 | Python interface to libarchive / CC0-1.0 |
| [pytz](http://pythonhosted.org/pytz/) | 2021.1 | World timezone definitions, modern and historical. / MIT |
| [pywavelets](https://github.com/PyWavelets/pywt) | 1.1.1 | Discrete Wavelet Transforms in Python / MIT |
| [pywin32](https://github.com/mhammond/pywin32) | 227 | Python extensions for Windows / PSF-2.0 |
| [pywin32-ctypes](https://github.com/enthought/pywin32-ctypes) | 0.2.0 | A limited subset of pywin32 re-implemented using ctypes (or cffi) / BSD 3 Clause |
| [pywinpty](https://github.com/spyder-ide/pywinpty) | 0.5.7 | Python bindings for the winpty library / MIT |
| [pyyaml](http://pyyaml.org/wiki/PyYAML) | 5.4.1 | YAML parser and emitter for Python / MIT |
| [pyzmq](https://github.com/zeromq/pyzmq) | 20.0.0 | Python bindings for zeromq / BSD 3-clause |
| [qdarkstyle](https://github.com/ColinDuquesnoy/QDarkStyleSheet) | 2.8.1 | A dark stylesheet for Qt applications (Qt4, Qt5, PySide, PyQt4, PyQt5, QtPy, PyQtGraph). / MIT |
| [qt](http://qt-project.org) | 5.9.7 | Qt is a cross-platform application and UI framework. / LGPL-3.0 |
| [qtawesome](https://github.com/spyder-ide/qtawesome) | 1.0.2 | Iconic fonts in PyQt and PySide applications / MIT |
| [qtconsole](http://jupyter.org) | 5.0.3 | Jupyter Qt Console / BSD-3-Clause |
| [qtpy](https://github.com/spyder-ide/qtpy) | 1.9.0 | Abstraction layer for PyQt5/PyQt4/PySide / MIT |
| [regex](https://bitbucket.org/mrabarnett/mrab-regex) | 2021.4.4 | Alternative regular expression module, to replace re / Python-2.0 |
| [requests](http://python-requests.org) | 2.25.1 | Requests is an elegant and simple HTTP library for Python, built with ♥. / Apache-2.0 |
| [rope](https://github.com/python-rope/rope) | 0.18.0 | A python refactoring library / GPL 2.0 |
| [rtree](http://toblerity.github.com/rtree/) | 0.9.7 | R-Tree spatial index for Python GIS / MIT |
| [ruamel\_yaml](https://sourceforge.net/p/ruamel-yaml/code/ci/default/tree) | 0.15.100 | A patched copy of ruamel.yaml. / MIT |
| [scikit-image](http://scikit-image.org/) | 0.18.1 | Image processing in Python. / BSD-3-Clause |
| [scikit-learn](http://scikit-learn.org/) | 0.24.1 | A set of python modules for machine learning and data mining / BSD-3-Clause |
| [scipy](http://www.scipy.org/) | 1.6.2 | Scientific Library for Python / BSD 3-Clause |
| [seaborn](https://seaborn.pydata.org) | 0.11.1 | Statistical data visualization / BSD 3-Clause |
| [send2trash](https://github.com/hsoft/send2trash) | 1.5.0 | Python library to natively send files to Trash (or Recycle bin) on all platforms. / BSD-3-Clause |
| [setuptools](https://github.com/pypa/setuptools) | 52.0.0 | Download, build, install, upgrade, and uninstall Python packages / MIT |
| [simplegeneric](http://cheeseshop.python.org/pypi/simplegeneric) | 0.8.1 | Simple generic functions (similar to Python’s own len(), pickle.dump(), etc.) / Zope Public |
| [singledispatch](http://docs.python.org/3/library/functools.html#functools.singledispatch) | 3.6.1 | Transforms a function into a single-dispatch generic function / MIT |
| [sip](http://www.riverbankcomputing.com/software/sip/intro) | 4.19.13 | Create Python bindings for C and C++ libraries / GPL-3.0 |
| [six](https://six.readthedocs.io/) | 1.15.0 | Python 2 and 3 compatibility utilities / MIT |
| [snappy](https://github.com/google/snappy) | 1.1.8 | A fast compressor/decompressor / BSD 3-clause |
| [sniffio](https://github.com/python-trio/sniffio) | 1.2.0 | Sniff out which async library your code is running under / Apache-2.0 |
| [snowballstemmer](https://github.com/shibukawa/snowball_py) | 2.1.0 | Snowball stemming library collection for Python / BSD-2-Clause |
| [sortedcollections](http://www.grantjenks.com/docs/sortedcollections/) | 2.1.0 | Python Sorted Collections / Apache-2.0 |
| [sortedcontainers](http://www.grantjenks.com/docs/sortedcontainers/) | 2.3.0 | Python Sorted Container Types: SortedList, SortedDict, and SortedSet / Apache-2.0 |
| [soupsieve](http://facelessuser.github.io/soupsieve) | 2.2.1 | A modern CSS selector implementation for BeautifulSoup / MIT |
| [sphinx](http://www.sphinx-doc.org) | 4.0.1 | Sphinx is a tool that makes it easy to create intelligent and beautiful documentation / BSD-2-Clause |
| sphinxcontrib | 1.0 | Python namespace for sphinxcontrib / BSD |
| [sphinxcontrib-applehelp](https://www.sphinx-doc.org/en/master/) | 1.0.2 | sphinxcontrib-applehelp is a sphinx extension which outputs Apple help books / BSD-2-Clause |
| [sphinxcontrib-devhelp](https://www.sphinx-doc.org/en/master/) | 1.0.2 | sphinxcontrib-devhelp is a sphinx extension which outputs Devhelp document / BSD-2-Clause |
| [sphinxcontrib-htmlhelp](https://www.sphinx-doc.org/en/master/) | 1.0.3 | sphinxcontrib-htmlhelp is a sphinx extension which … / BSD-2-Clause |
| [sphinxcontrib-jsmath](https://www.sphinx-doc.org/en/master/) | 1.0.1 | A sphinx extension which renders display math in HTML via JavaScript / BSD-2-Clause |
| [sphinxcontrib-qthelp](https://www.sphinx-doc.org/en/master/) | 1.0.3 | sphinxcontrib-qthelp is a sphinx extension which outputs QtHelp document / BSD-2-Clause |
| [sphinxcontrib-serializinghtml](https://www.sphinx-doc.org/en/master/) | 1.1.4 | sphinxcontrib-serializinghtml is a sphinx extension which outputs “serialized” HTML files (json and pickle). / BSD-2-Clause |
| [sphinxcontrib-websupport](https://pypi.python.org/pypi/sphinxcontrib-websupport) | 1.2.4 | Sphinx API for Web Apps / BSD-2-Clause |
| [spyder](https://www.spyder-ide.org/) | 4.2.5 | The Scientific Python Development Environment / MIT |
| [spyder-kernels](https://www.spyder-ide.org/) | 1.10.2 | Jupyter kernels for Spyder’s console / MIT |
| [sqlalchemy](http://www.sqlalchemy.org/) | 1.4.7 | Database Abstraction Library. / MIT |
| [sqlite](http://www.sqlite.org/) | 3.35.4 | Implements a self-contained, zero-configuration, SQL database engine / Public-Domain (`<http://www.sqlite.org/copyright.html>`) |
| [statsmodels](https://www.statsmodels.org) | 0.12.2 | Statistical computations and models for use with SciPy / BSD-3-Clause |
| [sympy](https://sympy.org) | 1.8 | Python library for symbolic mathematics / BSD-3-Clause |
| [tbb](https://github.com/oneapi-src/oneTBB) | 2020.3 | High level abstract threading library / Apache-2.0 |
| [tblib](https://github.com/ionelmc/python-tblib) | 1.7.0 | Traceback serialization library. / BSD 2-Clause |
| [terminado](https://github.com/jupyter/terminado) | 0.9.4 | Terminals served by tornado websockets / BSD-2-Clause |
| [testpath](https://testpath.readthedocs.io) | 0.4.4 | Testpath is a collection of utilities for Python code working with files and commands. / BSD-3-Clause |
| [textdistance](https://github.com/orsinium/textdistance) | 4.2.1 | TextDistance – python library for comparing distance between two or more sequences by many algorithms. / MIT |
| [threadpoolctl](https://github.com/joblib/threadpoolctl) | 2.1.0 | Python helpers to control the threadpools of native libraries / BSD 3-Clause |
| [three-merge](https://github.com/spyder-ide/three-merge) | 0.1.1 | Simple Python library to perform a 3-way merge between strings / MIT |
| [tifffile](https://github.com/cgohlke/tifffile) | 2021.4.8 | Read and write image data from and to TIFF files. / BSD-3-Clause |
| [tk](http://www.tcl.tk/) | 8.6.10 | A dynamic programming language with GUI support. Bundles Tcl and Tk. / Tcl/Tk |
| [toml](https://github.com/uiri/toml) | 0.10.2 | Python lib for TOML. / MIT |
| [toolz](http://toolz.readthedocs.org/) | 0.11.1 | A functional standard library for Python / BSD-3-Clause |
| [tornado](http://www.tornadoweb.org/) | 6.1 | A Python web framework and asynchronous networking library, originally developed at FriendFeed. / Apache-2.0 |
| [tqdm](https://pypi.python.org/pypi/tqdm) | 4.59.0 | A Fast, Extensible Progress Meter / MPL-2.0 or MIT |
| [traitlets](http://traitlets.readthedocs.org/) | 5.0.5 | Configuration system for Python applications / BSD-3-Clause |
| [typed-ast](https://github.com/python/typed_ast) | 1.4.2 | a fork of Python 2 and 3 ast modules with type comment support / Apache-2.0 |
| [typing\_extensions](https://github.com/python/typing/tree/master/typing_extensions) | 3.7.4.3 | Backported and Experimental Type Hints for Python / PSF-2.0 |
| [ujson](https://github.com/ultrajson/ultrajson) | 4.0.2 | Ultra fast JSON decoder and encoder written in C with Python bindings / BSD-3-Clause |
| [unicodecsv](https://github.com/jdunck/python-unicodecsv) | 0.14.1 | Drop-in replacement for csv module which supports unicode strings / BSD |
| [urllib3](https://urllib3.readthedocs.io/) | 1.26.4 | HTTP library with thread-safe connection pooling, file post, and more. / MIT |
| [vc](https://github.com/conda/conda/wiki/VC-features) | 14.2 | A meta-package to impose mutual exclusivity among software built with different VS versions / Modified BSD License (3-clause) |
| vs2015\_runtime | 14.27.29016 | MSVC runtimes associated with cl.exe version 19.27.29111 (VS 2019 update 5) / None |
| [watchdog](http://github.com/gorakhargosh/watchdog) | 1.0.2 | Filesystem events monitoring / Apache-2.0 |
| [wcwidth](https://github.com/jquast/wcwidth) | 0.2.5 | Measures number of Terminal column cells of wide-character codes. / MIT |
| [webencodings](https://github.com/gsnedders/python-webencodings) | 0.5.1 | Character encoding aliases for legacy web content / BSD 3-Clause |
| [werkzeug](https://palletsprojects.com/p/werkzeug/) | 1.0.1 | The comprehensive WSGI web application library. / BSD 3-Clause |
| [wheel](https://github.com/pypa/wheel) | 0.36.2 | A built-package format for Python. / MIT |
| [widgetsnbextension](http://ipython.org) | 3.5.1 | Interactive Widgets for Jupyter / BSD 3-clause |
| [win\_inet\_pton](https://github.com/hickeroar/win_inet_pton) | 1.1.0 | Native inet\_pton and inet\_ntop implementation for Python on Windows (with ctypes). / PUBLIC-DOMAIN |
| [win\_unicode\_console](https://github.com/Drekin/win-unicode-console) | 0.5 | A Python package to enable Unicode input and display when running Python from Windows console. / MIT |
| [wincertstore](https://bitbucket.org/tiran/wincertstore) | 0.2 | Python module to extract CA and CRL certs from Windows’ cert store (ctypes based). / PSF 2 |
| [winpty](https://github.com/rprichard/winpty) | 0.4.3 | Winpty provides an interface similar to a Unix pty-master for communicating with Windows console programs. / MIT |
| [wrapt](https://github.com/GrahamDumpleton/wrapt) | 1.12.1 | Module for decorators, wrappers and monkey patching / BSD 2-Clause |
| [xlrd](http://www.python-excel.org/) | 2.0.1 | Library for developers to extract data from Microsoft Excel (tm) spreadsheet files / BSD 3-Clause and BSD with advertising |
| [xlsxwriter](https://xlsxwriter.readthedocs.io/) | 1.3.8 | A Python module for creating Excel XLSX files / BSD-2-Clause |
| [xlwings](http://xlwings.org/) | 0.23.0 | Interact with Excel from Python and vice versa / 3-clause BSD |
| [xlwt](http://www.python-excel.org/) | 1.3.0 | Writing data and formatting information to Excel files / BSD |
| [xz](http://tukaani.org/xz/) | 5.2.5 | Data compression software with high compression ratio / LGPL-2.1 and GPL-2.0 |
| [yaml](http://pyyaml.org/wiki/LibYAML) | 0.2.5 | A C library for parsing and emitting YAML / MIT |
| [yapf](https://github.com/google/yapf) | 0.31.0 | A formatter for Python files / Apache 2.0 |
| [zeromq](http://zeromq.org) | 4.3.3 | A high-performance asynchronous messaging library. / LGPL-3.0-or-later |
| [zfp](https://computation.llnl.gov/projects/floating-point-compression) | 0.5.5 | Library for compressed numerical arrays that support high throughput read and write random access / BSD-3-Clause |
| [zict](http://github.com/mrocklin/zict) | 2.0.0 | Composable Dictionary Classes / BSD 3-Clause |
| [zipp](https://github.com/jaraco/zipp) | 3.4.1 | A pathlib-compatible Zipfile object wrapper / MIT |
| [zlib](http://zlib.net/) | 1.2.11 | Massively spiffy yet delicately unobtrusive compression library / zlib |
| zope | 1.0 | web application server / BSD |
| [zope.event](http://www.zope.org/en/latest/) | 4.5.0 | Very basic event publishing system / Zope Public License |
| [zope.interface](http://docs.zope.org/zope.interface/) | 5.3.0 | Interfaces for Python / ZPL-2.1 |
| [zstd](http://www.zstd.net) | 1.4.5 | Zstandard - Fast real-time compression algorithm / BSD 3-Clause |
| Name | Version | Summary / License |
|---|---|---|
| [alabaster](http://www.sphinx-doc.org/en/stable/index.html) | 0.7.12 | Configurable, Python 2+3 compatible Sphinx theme. / BSD 3-Clause |
| [anaconda-client](http://anaconda.org) | 1.7.2 | anaconda.org command line client library / BSD 3-clause |
| [anaconda-navigator](https://github.com/ContinuumIO/navigator) | 2.0.3 | Anaconda Navigator / proprietary - Continuum Analytics, Inc. |
| [anaconda-project](https://github.com/Anaconda-Platform/anaconda-project) | 0.9.1 | Tool for encapsulating, running, and reproducing data science projects / BSD-3-Clause |
| [anyio](https://github.com/agronholm/anyio) | 2.2.0 | High level compatibility layer for multiple asynchronous event loop implementations on Python / MIT |
| [appdirs](http://github.com/ActiveState/appdirs) | 1.4.4 | A small Python module for determining appropriate platform-specific dirs. / MIT |
| [argh](https://github.com/neithere/argh) | 0.26.2 | The Natural CLI. / LGPL 3 |
| [argon2-cffi](https://argon2-cffi.readthedocs.org/) | 20.1.0 | The secure Argon2 password hashing algorithm. / MIT |
| [asn1crypto](https://github.com/wbond/asn1crypto) | 1.4.0 | Python ASN.1 library with a focus on performance and a pythonic API / MIT |
| [astroid](https://www.astroid.org/) | 2.5 | A abstract syntax tree for Python with inference support. / LGPL-2.1-only |
| [astropy](http://www.astropy.org/) | 4.2.1 | Community-developed Python Library for Astronomy / BSD-3-Clause |
| [async\_generator](https://github.com/python-trio/async_generator) | 1.10 | Async generators and context managers for Python 3.5+ / MIT |
| [atomicwrites](https://github.com/untitaker/python-atomicwrites) | 1.4.0 | Atomic file writes / MIT |
| [attrs](https://attrs.readthedocs.io/en/stable/) | 20.3.0 | attrs is the Python package that will bring back the joy of writing classes by relieving you from the drudgery of implementing object protocols (aka dunder methods). / MIT |
| [autopep8](https://github.com/hhatto/autopep8) | 1.5.6 | A tool that automatically formats Python code to conform to the PEP 8 style guide / MIT |
| [babel](http://babel.pocoo.org/) | 2.9.0 | Utilities to internationalize and localize Python applications / BSD 3-clause |
| [backcall](https://github.com/takluyver/backcall/) | 0.2.0 | Specifications for callback functions passed in to an API / BSD-3-Clause |
| [backports](https://bitbucket.org/brandon/backports) | 1.0 | None / BSD |
| [backports.shutil\_get\_terminal\_size](https://github.com/chrippa/backports.shutil_get_terminal_size) | 1.0.0 | A backport of the get\_terminal\_size function from Python 3.3’s shutil. / MIT |
| [bcrypt](https://github.com/pyca/bcrypt/) | 3.2.0 | Modern password hashing for your software and your servers / Apache-2.0 |
| [beautifulsoup4](http://www.crummy.com/software/BeautifulSoup/) | 4.9.3 | Python library designed for screen-scraping / MIT |
| [bitarray](https://github.com/ilanschnell/bitarray) | 1.9.2 | efficient arrays of booleans – C extension / PSF |
| [bkcharts](http://github.com/bokeh/bkcharts) | 0.2 | High level chart types built on top of Bokeh / BSD 3-Clause |
| [black](https://github.com/python/black) | 19.10b0 | The Uncompromising Code Formatter / MIT |
| blas | 1.0 | |
| [bleach](https://github.com/mozilla/bleach) | 3.3.0 | Easy, whitelist-based HTML-sanitizing tool / Apache-2.0 |
| [blosc](https://github.com/Blosc/c-blosc) | 1.21.0 | A blocking, shuffling and loss-less compression library that can be faster than memcpy() / BSD-3-Clause |
| [bokeh](http://bokeh.pydata.org/) | 2.3.2 | Statistical and novel interactive HTML plots for Python / BSD-3-Clause |
| [boto](https://github.com/boto/boto/) | 2.49.0 | Amazon Web Services Library / MIT |
| [bottleneck](https://github.com/pydata/bottleneck) | 1.3.2 | Fast NumPy array functions written in Cython. / BSD 2-Clause |
| [brotlipy](https://github.com/python-hyper/brotlipy) | 0.7.0 | Python bindings to the Brotli compression library / MIT |
| [bzip2](http://www.bzip.org/) | 1.0.8 | high-quality data compressor / bzip2 |
| [ca-certificates](https://github.com/conda-forge/ca-certificates-feedstock) | 2021.4.13 | Certificates for use with other packages. / MPL 2.0 |
| [certifi](http://certifi.io/) | 2020.12.5 | Python package for providing Mozilla’s CA Bundle. / ISC |
| [cffi](https://bitbucket.org/cffi/cffi) | 1.14.5 | Foreign Function Interface for Python calling C code. / MIT |
| [chardet](https://github.com/chardet/chardet) | 4.0.0 | Universal character encoding detector / LGPL2 |
| [click](https://palletsprojects.com/p/click) | 7.1.2 | Python composable command line interface toolkit / BSD-3-Clause |
| [cloudpickle](https://github.com/cloudpipe/cloudpickle) | 1.6.0 | Extended pickling support for Python objects / BSD-3-Clause |
| [clyent](https://github.com/Anaconda-Platform/clyent) | 1.2.2 | Command line client library for windows and posix / BSD 3-Clause |
| [colorama](https://github.com/tartley/colorama) | 0.4.4 | Cross-platform colored terminal text / BSD-3-Clause |
| [comtypes](http://starship.python.net/crew/theller/comtypes/) | 1.1.9 | pure Python COM package / MIT |
| [conda](https://conda.io) | 4.10.1 | OS-agnostic, system-level binary package and environment manager. / BSD 3-Clause |
| [conda-build](https://github.com/conda/conda-build) | 3.21.4 | tools for building conda packages / BSD 3-Clause |
| [conda-env](https://github.com/conda/conda-env) | 2.6.0 | Tools for interacting with conda environments. / BSD 3-Clause |
| [conda-verify](https://github.com/conda/conda-verify) | 3.4.2 | tool for validating conda recipes and conda packages / BSD 3-Clause |
| console\_shortcut | 0.1.1 | Console shortcut creator for Windows (using menuinst) / BSD |
| [contextlib2](http://contextlib2.readthedocs.org) | 0.6.0.post1 | Backports and enhancements for the contextlib module / PSF 2 |
| [cryptography](https://github.com/pyca/cryptography) | 3.4.7 | Provides cryptographic recipes and primitives to Python developers / Apache-2.0 AND BSD-3-Clause AND PSF-2.0 AND MIT |
| [curl](http://curl.haxx.se/) | 7.71.1 | tool and library for transferring data with URL syntax / MIT/X derivate (`<http://curl.haxx.se/docs/copyright.html>`) |
| [cycler](http://matplotlib.org/cycler) | 0.10.0 | Composable style cycles. / BSD 3-Clause |
| [cython](http://www.cython.org/) | 0.29.23 | The Cython compiler for writing C extensions for the Python language / Apache-2.0 |
| [cytoolz](https://github.com/pytoolz/cytoolz) | 0.11.0 | Cython implementation of Toolz. High performance functional utilities / BSD-3-Clause |
| [dask](https://dask.org/) | 2021.4.0 | Parallel PyData with Task Scheduling / BSD-3-Clause |
| [dask-core](http://github.com/dask/dask/) | 2021.4.0 | Parallel Python with task scheduling / BSD-3-Clause |
| [decorator](https://github.com/micheles/decorator) | 5.0.6 | Better living through Python with decorators. / BSD-3-Clause |
| [defusedxml](https://bitbucket.org/tiran/defusedxml) | 0.7.1 | XML bomb protection for Python stdlib modules / PSF 2.0 |
| [diff-match-patch](http://code.google.com/p/google-diff-match-patch/) | 20200713 | Diff Match Patch is a high-performance library in multiple languages that manipulates plain text / Apache-2.0 |
| [distributed](http://distributed.readthedocs.io/en/latest/) | 2021.4.0 | Distributed computing with Dask / BSD-3-Clause |
| [docutils](http://docutils.sourceforge.net/) | 0.17 | Docutils – Python Documentation Utilities / Public Domain Dedictation and BSD 2-Clause and PSF 2.1.1 and GPL 3.0 |
| [entrypoints](https://github.com/takluyver/entrypoints) | 0.3 | Discover and load entry points from installed packages. / MIT License |
| [et\_xmlfile](https://bitbucket.org/openpyxl/et_xmlfile) | 1.0.1 | An implementation of lxml.xmlfile for the standard library / MIT |
| [fastcache](https://github.com/pbrady/fastcache) | 1.1.0 | C implementation of Python 3 lru\_cache / MIT |
| [filelock](https://github.com/benediktschmitt/py-filelock) | 3.0.12 | A platform independent file lock. / Public Domain |
| [flake8](http://flake8.pycqa.org/) | 3.9.0 | Your Tool For Style Guide Enforcement / MIT |
| [flask](http://flask.pocoo.org) | 1.1.2 | A microframework based on Werkzeug, Jinja2 and good intentions. / BSD 3-Clause |
| [freetype](https://www.freetype.org/) | 2.10.4 | A Free, High-Quality, and Portable Font Engine / GPL-2.0-only and LicenseRef-FreeType |
| [fsspec](https://github.com/martindurant/filesystem_spec) | 0.9.0 | A specification for pythonic filesystems / BSD-3-Clause |
| [future](http://python-future.org) | 0.18.2 | Clean single-source support for Python 3 and 2 / MIT |
| [get\_terminal\_size](https://github.com/chrippa/backports.shutil_get_terminal_size) | 1.0.0 | Get the size of the terminal window. / MIT |
| [gevent](https://www.gevent.org) | 21.1.2 | Coroutine-based network library / MIT |
| [glob2](https://github.com/miracle2k/python-glob2) | 0.7 | Version of the glob module that supports recursion via \*\*, and can capture patterns. / BSD-2-Clause |
| [greenlet](https://github.com/python-greenlet/greenlet) | 1.0.0 | Lightweight in-process concurrent programming / MIT |
| [h5py](http://www.h5py.org/) | 2.10.0 | Read and write HDF5 files from Python. / BSD-3-Clause |
| [hdf5](http://www.hdfgroup.org/HDF5/) | 1.10.4 | HDF5 is a data model, library, and file format for storing and managing data / HDF5 |
| [heapdict](http://stutzbachenterprises.com/) | 1.0.1 | A heap with decrease-key and increase-key operations / BSD 3-Clause |
| [html5lib](https://github.com/html5lib/html5lib-python) | 1.1 | HTML parser based on the WHATWG HTML specification / MIT |
| icc\_rt | 2019.0.0 | Intel runtime libraries for C, C++ and Fortran compilers / Intel proprietary |
| [icu](http://site.icu-project.org/) | 58.2 | International Components for Unicode. / MIT |
| [idna](https://github.com/kjd/idna) | 2.10 | Internationalized Domain Names in Applications (IDNA). / BSD Like |
| [imageio](https://imageio.github.io) | 2.9.0 | A Python library for reading and writing image data / BSD-2-Clause |
| [imagesize](https://github.com/shibukawa/imagesize_py) | 1.2.0 | Getting image size from png/jpeg/jpeg2000/gif file / MIT |
| [importlib-metadata](https://github.com/python/importlib_metadata) | 3.10.0 | A library to access the metadata for a Python package / Apache-2.0 |
| [importlib\_metadata](https://github.com/python/importlib_metadata) | 3.10.0 | A library to access the metadata for a Python package / Apache-2.0 |
| [iniconfig](http://github.com/RonnyPfannschmidt/iniconfig) | 1.1.1 | iniconfig: brain-dead simple config-ini parsing / MIT |
| [intel-openmp](https://software.intel.com/en-us/node/522690) | 2021.2.0 | Math library for Intel and compatible processors / LicenseRef-ProprietaryIntel |
| [intervaltree](https://github.com/chaimleib/intervaltree) | 3.1.0 | Editable interval tree data structure for Python 2 and 3 / Apache-2.0 |
| [ipykernel](https://ipython.org) | 5.3.4 | IPython Kernel for Jupyter / BSD-3-Clause |
| [ipython](https://ipython.org) | 7.22.0 | IPython: Productive Interactive Computing / BSD-3-Clause |
| [ipython\_genutils](http://ipython.org) | 0.2.0 | vestigial utilities from IPython / BSD 3-Clause |
| [ipywidgets](https://github.com/ipython/ipywidgets) | 7.6.3 | Jupyter Interactive Widgets / BSD-3-Clause |
| [isort](https://github.com/timothycrosley/isort) | 5.8.0 | A Python utility / library to sort Python imports. / MIT |
| [itsdangerous](https://github.com/pallets/itsdangerous) | 1.1.0 | Various helpers to pass trusted data to untrusted environments. / BSD 3-Clause |
| [jdcal](https://github.com/phn/jdcal) | 1.4.1 | Julian dates from proleptic Gregorian and Julian calendars. / BSD 2-Clause |
| [jedi](https://github.com/davidhalter/jedi/) | 0.17.2 | An autocompletion tool for Python that can be used for text editors. / MIT |
| [jinja2](http://jinja.pocoo.org) | 2.11.3 | An easy to use stand-alone template engine written in pure python. / BSD-3-Clause |
| [joblib](https://pypi.org/project/joblib/) | 1.0.1 | Lightweight pipelining: using Python functions as pipeline jobs. / BSD-3-Clause |
| [jpeg](http://www.ijg.org/) | 9b | read/write jpeg COM, EXIF, IPTC medata / Custom free software license |
| [json5](https://github.com/dpranke/pyjson5) | 0.9.5 | A Python implementation of the JSON5 data format / Apache-2.0 |
| [jsonschema](https://github.com/Julian/jsonschema) | 3.2.0 | An implementation of JSON Schema validation for Python / MIT |
| [jupyter](http://jupyter.org) | 1.0.0 | Jupyter metapackage. Install all the Jupyter components in one go. / BSD 3-Clause |
| [jupyter-packaging](https://github.com/jupyter/jupyter-packaging) | 0.7.12 | Jupyter Packaging Utilities / BSD-3-Clause |
| [jupyter\_client](https://jupyter.org) | 6.1.12 | jupyter\_client contains the reference implementation of the Jupyter protocol. / BSD-3-Clause |
| [jupyter\_console](http://jupyter.org) | 6.4.0 | Jupyter terminal console / BSD-3-Clause |
| [jupyter\_core](https://jupyter.org) | 4.7.1 | Core common functionality of Jupyter projects. / BSD-3-Clause |
| [jupyter\_server](https://jupyter.org) | 1.4.1 | Jupyter Server / BSD-3-Clause |
| [jupyterlab](https://github.com/jupyterlab/jupyterlab) | 3.0.14 | JupyterLab PRE-ALPHA / BSD-3-Clause |
| [jupyterlab\_pygments](http://github.com/JupyterLab/jupyterlab_pygments) | 0.1.2 | Pygments syntax coloring scheme making use of the JupyterLab CSS variables / BSD-3-Clause |
| [jupyterlab\_server](https://github.com/jupyterlab/jupyterlab_server) | 2.4.0 | A set of server components for JupyterLab and JupyterLab like applications. / BSD-3-Clause |
| [jupyterlab\_widgets](https://github.com/jupyter-widgets/ipywidgets) | 1.0.0 | JupyterLab extension providing HTML widgets / BSD-3-Clause |
| [keyring](https://github.com/jaraco/keyring) | 22.3.0 | Store and access your passwords safely / MIT |
| [kiwisolver](https://github.com/nucleic/kiwi) | 1.3.1 | An efficient C++ implementation of the Cassowary constraint solver / BSD-3-Clause |
| [krb5](http://web.mit.edu/kerberos/) | 1.18.2 | A network authentication protocol. / MIT |
| [lazy-object-proxy](https://github.com/ionelmc/python-lazy-object-proxy) | 1.6.0 | A fast and thorough lazy object proxy / BSD-2-Clause |
| [libarchive](http://www.libarchive.org/) | 3.4.2 | Multi-format archive and compression library / BSD-2-Clause |
| [libcurl](http://curl.haxx.se/) | 7.71.1 | tool and library for transferring data with URL syntax / MIT/X derivate (`<http://curl.haxx.se/docs/copyright.html>`) |
| [libiconv](https://www.gnu.org/software/libiconv/) | 1.15 | Provides iconv for systems which don’t have one (or that cannot convert from/to Unicode.) / GPL and LGPL |
| [liblief](https://lief.quarkslab.com/) | 0.10.1 | A cross platform library to parse, modify and abstract ELF, PE and MachO formats. / Apache-2.0 |
| [libpng](http://www.libpng.org/pub/png/libpng.html) | 1.6.37 | PNG reference library / zlib/libpng |
| [libsodium](http://libsodium.org) | 1.0.18 | A modern and easy-to-use crypto library. / ISC |
| [libspatialindex](http://libspatialindex.github.io) | 1.9.3 | Extensible framework for robust spatial indexing / MIT |
| [libssh2](https://www.libssh2.org/) | 1.9.0 | the SSH library / BSD-3-Clause |
| [libtiff](http://www.libtiff.org/) | 4.2.0 | Support for the Tag Image File Format (TIFF). / HPND |
| [libxml2](http://xmlsoft.org/) | 2.9.10 | The XML C parser and toolkit of Gnome / MIT |
| [libxslt](http://xmlsoft.org/XSLT/) | 1.1.34 | The XSLT C library developed for the GNOME project / MIT |
| [llvmlite](http://llvmlite.pydata.org) | 0.36.0 | A lightweight LLVM python binding for writing JIT compilers. / BSD-2-Clause |
| [locket](https://github.com/mwilliamson/locket.py) | 0.2.1 | File-based locks for Python for Linux and Windows / BSD 2-Clause |
| [lxml](http://lxml.de/) | 4.6.3 | Pythonic binding for the C libraries libxml2 and libxslt. / BSD-3-Clause and GPL-2.0-only and ZPL-2.0 and LicenseRef-ElementTree |
| [lz4-c](https://www.lz4.org) | 1.9.3 | Extremely Fast Compression algorithm / BSD-2-Clause |
| [lzo](http://www.oberhumer.com/opensource/lzo/) | 2.10 | LZO is a portable lossless data compression library written in ANSI C. / GPL v2+ |
| [m2w64-gcc-libgfortran](https://gcc.gnu.org) | 5.3.0 | GNU Compiler Collection (libgfortran) for MinGW-w64 / GPL, LGPL, FDL, custom |
| m2w64-gcc-libs | 5.3.0 | None / GPL3+, partial:GCCRLE, partial:LGPL2+ |
| [m2w64-gcc-libs-core](https://gcc.gnu.org) | 5.3.0 | GNU Compiler Collection (core libraries) for MinGW-w64 / GPL3+, partial:GCCRLE, partial:LGPL2+ |
| m2w64-gmp | 6.1.0 | None / LGPL3 |
| m2w64-libwinpthread-git | 5.0.0.4634.697f757 | None / MIT, BSD |
| [markupsafe](https://www.palletsprojects.com/p/markupsafe) | 1.1.1 | A Python module that implements the jinja2.Markup string / BSD-3-Clause |
| [matplotlib](http://matplotlib.org/) | 3.3.4 | Publication quality figures in Python / LicenseRef-PSF-based |
| [matplotlib-base](http://matplotlib.org/) | 3.3.4 | Publication quality figures in Python / LicenseRef-PSF-based |
| [mccabe](https://github.com/PyCQA/mccabe) | 0.6.1 | McCabe complexity checker for Python / MIT |
| [menuinst](https://github.com/ContinuumIO/menuinst) | 1.4.16 | cross platform menu item installation / BSD |
| [mistune](https://github.com/lepture/mistune) | 0.8.4 | The fastest markdown parser in pure Python. / BSD 3-Clause |
| [mkl](https://software.intel.com/en-us/mkl) | 2020.2 | Math library for Intel and compatible processors / LicenseRef-ProprietaryIntel |
| [mkl-service](https://github.com/ContinuumIO/mkl-service) | 2.3.0 | Python bindings to MKL service functions / 3-clause BSD |
| [mkl\_fft](http://github.com/IntelPython/mkl_fft) | 1.3.0 | NumPy-based implementation of Fast Fourier Transform using Intel (R) Math Kernel Library. / BSD 3-Clause |
| [mkl\_random](http://github.com/IntelPython/mkl_random) | 1.1.1 | Intel (R) MKL-powered package for sampling from common probability distributions into NumPy arrays. / BSD 3-Clause |
| [mock](https://github.com/testing-cabal/mock) | 4.0.3 | A library for testing in Python / BSD-2-Clause |
| [more-itertools](https://github.com/more-itertools/more-itertools) | 8.7.0 | More routines for operating on iterables, beyond itertools / MIT |
| [mpmath](http://mpmath.org) | 1.2.1 | Python library for arbitrary-precision floating-point arithmetic / BSD 3-Clause |
| [msgpack-python](http://msgpack.org/) | 1.0.2 | MessagePack (de)serializer / Apache-2.0 |
| msys2-conda-epoch | 20160418 | |
| [multipledispatch](https://github.com/mrocklin/multipledispatch/) | 0.6.0 | Multiple dispatch in Python / BSD 3-Clause |
| [mypy\_extensions](http://www.mypy-lang.org/) | 0.4.3 | Experimental type system extensions for programs checked with the mypy typechecker. / MIT |
| [nbclassic](http://github.com/jupyterlab/nbclassic) | 0.2.6 | Jupyter Notebook as a Jupyter Server Extension. / BSD-3-Clause |
| [nbclient](https://jupyter.org) | 0.5.3 | A client library for executing notebooks. Formally nbconvert’s ExecutePreprocessor. / BSD-3-Clause |
| [nbconvert](http://jupyter.org) | 6.0.7 | Converting Jupyter Notebooks / BSD-3-Clause |
| [nbformat](http://jupyter.org) | 5.1.3 | The Jupyter Notebook format / BSD-3-Clause |
| [nest-asyncio](https://github.com/erdewit/nest_asyncio) | 1.5.1 | Patch asyncio to allow nested event loops / BSD-2-Clause |
| [networkx](https://networkx.github.io/) | 2.5 | Python package for creating and manipulating complex networks / BSD-3-Clause |
| [nltk](http://nltk.org/) | 3.6.1 | Natural Language Toolkit / Apache 2.0 |
| [nose](http://readthedocs.org/docs/nose/) | 1.3.7 | Nose extends unittest to make testing easier / LGPL-2.1 |
| [notebook](https://jupyter.org) | 6.3.0 | Jupyter Notebook / BSD-3-Clause |
| [numba](http://numba.pydata.org) | 0.53.1 | NumPy aware dynamic Python compiler using LLVM / BSD-2-Clause |
| [numexpr](https://github.com/pydata/numexpr) | 2.7.3 | Fast numerical expression evaluator for NumPy. / MIT |
| [numpy](http://numpy.scipy.org/) | 1.19.2 | Array processing for numbers, strings, records, and objects. / BSD 3-Clause |
| [numpy-base](http://numpy.scipy.org/) | 1.19.2 | Array processing for numbers, strings, records, and objects. / BSD 3-Clause |
| [numpydoc](https://github.com/numpy/numpydoc) | 1.1.0 | Numpy’s Sphinx extensions / BSD 3-Clause |
| [olefile](http://www.decalage.info/python/olefileio) | 0.46 | parse, read and write Microsoft OLE2 files / BSD 2-Clause |
| [openpyxl](https://openpyxl.readthedocs.io) | 3.0.7 | A Python library to read/write Excel 2010 xlsx/xlsm files / MIT |
| [openssl](http://www.openssl.org/) | 1.1.1k | OpenSSL is an open-source implementation of the SSL and TLS protocols / OpenSSL |
| [packaging](https://github.com/pypa/packaging) | 20.9 | Core utilities for Python packages / Apache 2.0 or BSD 2-Clause |
| [pandas](http://pandas.pydata.org) | 1.2.4 | High-performance, easy-to-use data structures and data analysis tools. / BSD-3-Clause |
| [pandoc](http://pandoc.org/) | 2.11 | Universal markup converter (repackaged binaries) / GPL-2.0 |
| [pandocfilters](https://github.com/jgm/pandocfilters) | 1.4.3 | A python module for writing pandoc filters / BSD-3-Clause |
| [paramiko](http://www.paramiko.org/) | 2.7.2 | SSH2 protocol library / LGPL-2.1-or-later |
| [parso](https://github.com/davidhalter/parso) | 0.7.0 | A Python Parser / MIT |
| [partd](https://github.com/dask/partd) | 1.2.0 | Data structure for on-disk shuffle operations / BSD 3-Clause |
| [path](https://github.com/jaraco/path) | 15.1.2 | A module wrapper for os.path / MIT |
| [path.py](https://github.com/jaraco/path.py) | 12.5.0 | A module wrapper for os.path / MIT |
| [pathlib2](https://github.com/mcmtroffaes/pathlib2) | 2.3.5 | Fork of pathlib aiming to support the full stdlib Python API / MIT |
| [pathspec](https://github.com/cpburnz/python-path-specification) | 0.7.0 | Utility library for gitignore style pattern matching of file paths. / MPL-2.0 |
| [patsy](https://github.com/pydata/patsy) | 0.5.1 | Describing statistical models in Python using symbolic formulas / BSD-2-Clause, PSF2 |
| [pep8](http://pep8.readthedocs.org/) | 1.7.1 | Python style guide checker / MIT |
| [pexpect](http://pexpect.sourceforge.net/) | 4.8.0 | Pexpect makes Python a better tool for controlling other applications. / ISC |
| [pickleshare](https://github.com/pickleshare/pickleshare/) | 0.7.5 | Tiny ‘shelve’-like database with concurrency support / MIT |
| [pillow](https://pillow.readthedocs.io) | 8.2.0 | Pillow is the friendly PIL fork by Alex Clark and Contributors / LicenseRef-PIL |
| [pip](https://pip.pypa.io/en/stable/) | 21.0.1 | PyPA recommended tool for installing Python packages / MIT |
| [pkginfo](https://code.launchpad.net/~tseaver/pkginfo/trunk) | 1.7.0 | Query metadatdata from sdists / bdists / installed packages. / MIT |
| [pluggy](https://github.com/pytest-dev/pluggy) | 0.13.1 | Plugin registration and hook calling for Python / MIT |
| [ply](http://www.dabeaz.com/ply/index.html) | 3.11 | Python Lex-Yacc / BSD 3-clause |
| powershell\_shortcut | 0.0.1 | Powershell shortcut creator for Windows (using menuinst) / BSD |
| [prometheus\_client](https://github.com/prometheus/client_python) | 0.10.1 | Python client for the Prometheus monitoring system / Apache-2.0 |
| [prompt-toolkit](https://github.com/jonathanslenders/python-prompt-toolkit) | 3.0.17 | Library for building powerful interactive command lines in Python / BSD-3-Clause |
| [prompt\_toolkit](https://github.com/jonathanslenders/python-prompt-toolkit) | 3.0.17 | Library for building powerful interactive command lines in Python / BSD-3-Clause |
| [psutil](https://github.com/giampaolo/psutil) | 5.8.0 | A cross-platform process and system utilities module for Python / BSD-3-Clause |
| [ptyprocess](https://github.com/pexpect/ptyprocess) | 0.7.0 | Run a subprocess in a pseudo terminal / ISC |
| [py](https://github.com/pytest-dev/py) | 1.10.0 | library with cross-python path, ini-parsing, io, code, log facilities / MIT |
| [py-lief](https://lief.quarkslab.com/) | 0.10.1 | A cross platform library to parse, modify and abstract ELF, PE and MachO formats. / Apache-2.0 |
| [pycodestyle](https://pycodestyle.readthedocs.io/) | 2.6.0 | Python style guide checker / MIT |
| [pycosat](https://github.com/ContinuumIO/pycosat) | 0.6.3 | Bindings to picosat (a SAT solver) / MIT |
| [pycparser](https://github.com/eliben/pycparser) | 2.20 | Complete C99 parser in pure Python / BSD 3-clause |
| [pycurl](http://pycurl.sourceforge.net/) | 7.43.0.6 | A Python Interface To The cURL library / LGPL, MIT |
| [pydocstyle](https://github.com/PyCQA/pydocstyle) | 6.0.0 | Python docstring style checker (formerly pep257) / MIT |
| [pyerfa](https://pyerfa.readthedocs.io/) | 1.7.2 | Python bindings for ERFA routines / BSD-3-Clause |
| [pyflakes](https://github.com/PyCQA/pyflakes) | 2.2.0 | Pyflakes analyzes programs and detects various errors. / MIT |
| [pygments](http://pygments.org/) | 2.8.1 | Pygments is a generic syntax highlighter suitable for use in code hosting, forums, wikis or other applications that need to prettify source code. / BSD-2-clause |
| [pylint](http://www.pylint.org/) | 2.7.4 | python code static checker / GPL-2.0-only |
| [pyls-black](https://github.com/rupert/pyls-black) | 0.4.6 | Black plugin for the Python Language Server / MIT |
| [pyls-spyder](https://github.com/spyder-ide/pyls-spyder) | 0.3.2 | Spyder extensions for the python-language-server / MIT |
| [pynacl](https://github.com/pyca/pynacl) | 1.4.0 | PyNaCl is a Python binding to the Networking and Cryptography library, a crypto library with the stated goal of improving usability, security and speed. / Apache-2.0 |
| [pyodbc](https://github.com/mkleehammer/pyodbc) | 4.0.30 | DB API Module for ODBC / MIT |
| [pyopenssl](https://github.com/pyca/pyopenssl) | 20.0.1 | Python wrapper module around the OpenSSL library / Apache 2.0 |
| [pyparsing](http://pyparsing.wikispaces.com/) | 2.4.7 | Create and execute simple grammars / MIT |
| [pyqt](http://www.riverbankcomputing.co.uk/software/pyqt) | 5.9.2 | Python binding of the cross-platform GUI toolkit Qt. / Commercial, GPL-2.0, GPL-3.0 |
| [pyreadline](http://ipython.org/pyreadline) | 2.1 | A python implmementation of GNU readline. / BSD 3-Clause |
| [pyrsistent](http://github.com/tobgu/pyrsistent/) | 0.17.3 | Persistent/Functional/Immutable data structures / MIT |
| [pysocks](https://github.com/Anorov/PySocks) | 1.7.1 | A Python SOCKS client module. See [Anorov/PySocks](https://github.com/Anorov/PySocks) for more information. / BSD 3-Clause |
| [pytables](http://www.pytables.org) | 3.6.1 | Brings together Python, HDF5 and NumPy to easily handle large amounts of data. / BSD 3-Clause |
| [pytest](https://docs.pytest.org/en/latest/) | 6.2.3 | Simple and powerful testing with Python. / MIT |
| [python](https://www.python.org/) | 3.8.8 | General purpose programming language / Python-2.0 |
| [python-dateutil](https://dateutil.readthedocs.org/) | 2.8.1 | Extensions to the standard Python datetime module. / BSD 3 Clause |
| [python-jsonrpc-server](https://github.com/palantir/python-jsonrpc-server) | 0.4.0 | A Python 2.7 and 3.4+ server implementation of the JSON RPC 2.0 protocol. / MIT |
| [python-language-server](https://github.com/palantir/python-language-server) | 0.36.2 | An implementation of the Language Server Protocol for Python / MIT |
| [python-libarchive-c](https://github.com/Changaco/python-libarchive-c) | 2.9 | Python interface to libarchive / CC0-1.0 |
| [pytz](http://pythonhosted.org/pytz/) | 2021.1 | World timezone definitions, modern and historical. / MIT |
| [pywavelets](https://github.com/PyWavelets/pywt) | 1.1.1 | Discrete Wavelet Transforms in Python / MIT |
| [pywin32](https://github.com/mhammond/pywin32) | 227 | Python extensions for Windows / PSF-2.0 |
| [pywin32-ctypes](https://github.com/enthought/pywin32-ctypes) | 0.2.0 | A limited subset of pywin32 re-implemented using ctypes (or cffi) / BSD 3 Clause |
| [pywinpty](https://github.com/spyder-ide/pywinpty) | 0.5.7 | Python bindings for the winpty library / MIT |
| [pyyaml](http://pyyaml.org/wiki/PyYAML) | 5.4.1 | YAML parser and emitter for Python / MIT |
| [pyzmq](https://github.com/zeromq/pyzmq) | 19.0.2 | Python bindings for zeromq / BSD 3-clause |
| [qdarkstyle](https://github.com/ColinDuquesnoy/QDarkStyleSheet) | 2.8.1 | A dark stylesheet for Qt applications (Qt4, Qt5, PySide, PyQt4, PyQt5, QtPy, PyQtGraph). / MIT |
| [qt](http://qt-project.org) | 5.9.7 | Qt is a cross-platform application and UI framework. / LGPL-3.0 |
| [qtawesome](https://github.com/spyder-ide/qtawesome) | 1.0.2 | Iconic fonts in PyQt and PySide applications / MIT |
| [qtconsole](http://jupyter.org) | 5.0.3 | Jupyter Qt Console / BSD-3-Clause |
| [qtpy](https://github.com/spyder-ide/qtpy) | 1.9.0 | Abstraction layer for PyQt5/PyQt4/PySide / MIT |
| [regex](https://bitbucket.org/mrabarnett/mrab-regex) | 2021.4.4 | Alternative regular expression module, to replace re / Python-2.0 |
| [requests](http://python-requests.org) | 2.25.1 | Requests is an elegant and simple HTTP library for Python, built with ♥. / Apache-2.0 |
| [rope](https://github.com/python-rope/rope) | 0.18.0 | A python refactoring library / GPL 2.0 |
| [rtree](http://toblerity.github.com/rtree/) | 0.9.7 | R-Tree spatial index for Python GIS / MIT |
| [ruamel\_yaml](https://sourceforge.net/p/ruamel-yaml/code/ci/default/tree) | 0.15.100 | A patched copy of ruamel.yaml. / MIT |
| [scikit-image](http://scikit-image.org/) | 0.16.2 | Image processing in Python. / BSD-3-Clause |
| [scikit-learn](http://scikit-learn.org/) | 0.23.1 | A set of python modules for machine learning and data mining / BSD-3-Clause |
| [scipy](http://www.scipy.org/) | 1.6.2 | Scientific Library for Python / BSD 3-Clause |
| [seaborn](https://seaborn.pydata.org) | 0.11.1 | Statistical data visualization / BSD 3-Clause |
| [send2trash](https://github.com/hsoft/send2trash) | 1.5.0 | Python library to natively send files to Trash (or Recycle bin) on all platforms. / BSD-3-Clause |
| [setuptools](https://github.com/pypa/setuptools) | 52.0.0 | Download, build, install, upgrade, and uninstall Python packages / MIT |
| [simplegeneric](http://cheeseshop.python.org/pypi/simplegeneric) | 0.8.1 | Simple generic functions (similar to Python’s own len(), pickle.dump(), etc.) / Zope Public |
| [singledispatch](http://docs.python.org/3/library/functools.html#functools.singledispatch) | 3.6.1 | Transforms a function into a single-dispatch generic function / MIT |
| [sip](http://www.riverbankcomputing.com/software/sip/intro) | 4.19.13 | Create Python bindings for C and C++ libraries / GPL-3.0 |
| [six](https://six.readthedocs.io/) | 1.15.0 | Python 2 and 3 compatibility utilities / MIT |
| [sniffio](https://github.com/python-trio/sniffio) | 1.2.0 | Sniff out which async library your code is running under / Apache-2.0 |
| [snowballstemmer](https://github.com/shibukawa/snowball_py) | 2.1.0 | Snowball stemming library collection for Python / BSD-2-Clause |
| [sortedcollections](http://www.grantjenks.com/docs/sortedcollections/) | 2.1.0 | Python Sorted Collections / Apache-2.0 |
| [sortedcontainers](http://www.grantjenks.com/docs/sortedcontainers/) | 2.3.0 | Python Sorted Container Types: SortedList, SortedDict, and SortedSet / Apache-2.0 |
| [soupsieve](http://facelessuser.github.io/soupsieve) | 2.2.1 | A modern CSS selector implementation for BeautifulSoup / MIT |
| [sphinx](http://www.sphinx-doc.org) | 4.0.1 | Sphinx is a tool that makes it easy to create intelligent and beautiful documentation / BSD-2-Clause |
| sphinxcontrib | 1.0 | Python namespace for sphinxcontrib / BSD |
| [sphinxcontrib-applehelp](https://www.sphinx-doc.org/en/master/) | 1.0.2 | sphinxcontrib-applehelp is a sphinx extension which outputs Apple help books / BSD-2-Clause |
| [sphinxcontrib-devhelp](https://www.sphinx-doc.org/en/master/) | 1.0.2 | sphinxcontrib-devhelp is a sphinx extension which outputs Devhelp document / BSD-2-Clause |
| [sphinxcontrib-htmlhelp](https://www.sphinx-doc.org/en/master/) | 1.0.3 | sphinxcontrib-htmlhelp is a sphinx extension which … / BSD-2-Clause |
| [sphinxcontrib-jsmath](https://www.sphinx-doc.org/en/master/) | 1.0.1 | A sphinx extension which renders display math in HTML via JavaScript / BSD-2-Clause |
| [sphinxcontrib-qthelp](https://www.sphinx-doc.org/en/master/) | 1.0.3 | sphinxcontrib-qthelp is a sphinx extension which outputs QtHelp document / BSD-2-Clause |
| [sphinxcontrib-serializinghtml](https://www.sphinx-doc.org/en/master/) | 1.1.4 | sphinxcontrib-serializinghtml is a sphinx extension which outputs “serialized” HTML files (json and pickle). / BSD-2-Clause |
| [sphinxcontrib-websupport](https://pypi.python.org/pypi/sphinxcontrib-websupport) | 1.2.4 | Sphinx API for Web Apps / BSD-2-Clause |
| [spyder](https://www.spyder-ide.org/) | 4.2.5 | The Scientific Python Development Environment / MIT |
| [spyder-kernels](https://www.spyder-ide.org/) | 1.10.2 | Jupyter kernels for Spyder’s console / MIT |
| [sqlalchemy](http://www.sqlalchemy.org/) | 1.4.7 | Database Abstraction Library. / MIT |
| [sqlite](http://www.sqlite.org/) | 3.35.4 | Implements a self-contained, zero-configuration, SQL database engine / Public-Domain (`<http://www.sqlite.org/copyright.html>`) |
| [statsmodels](https://www.statsmodels.org) | 0.12.2 | Statistical computations and models for use with SciPy / BSD-3-Clause |
| [sympy](https://sympy.org) | 1.8 | Python library for symbolic mathematics / BSD-3-Clause |
| [tbb](https://github.com/oneapi-src/oneTBB) | 2020.0 | High level abstract threading library / Apache-2.0 |
| [tblib](https://github.com/ionelmc/python-tblib) | 1.7.0 | Traceback serialization library. / BSD 2-Clause |
| [terminado](https://github.com/jupyter/terminado) | 0.9.4 | Terminals served by tornado websockets / BSD-2-Clause |
| [testpath](https://testpath.readthedocs.io) | 0.4.4 | Testpath is a collection of utilities for Python code working with files and commands. / BSD-3-Clause |
| [textdistance](https://github.com/orsinium/textdistance) | 4.2.1 | TextDistance – python library for comparing distance between two or more sequences by many algorithms. / MIT |
| [threadpoolctl](https://github.com/joblib/threadpoolctl) | 2.1.0 | Python helpers to control the threadpools of native libraries / BSD 3-Clause |
| [three-merge](https://github.com/spyder-ide/three-merge) | 0.1.1 | Simple Python library to perform a 3-way merge between strings / MIT |
| [tk](http://www.tcl.tk/) | 8.6.10 | A dynamic programming language with GUI support. Bundles Tcl and Tk. / Tcl/Tk |
| [toml](https://github.com/uiri/toml) | 0.10.2 | Python lib for TOML. / MIT |
| [toolz](http://toolz.readthedocs.org/) | 0.11.1 | A functional standard library for Python / BSD-3-Clause |
| [tornado](http://www.tornadoweb.org/) | 6.1 | A Python web framework and asynchronous networking library, originally developed at FriendFeed. / Apache-2.0 |
| [tqdm](https://pypi.python.org/pypi/tqdm) | 4.59.0 | A Fast, Extensible Progress Meter / MPL-2.0 or MIT |
| [traitlets](http://traitlets.readthedocs.org/) | 5.0.5 | Configuration system for Python applications / BSD-3-Clause |
| [typed-ast](https://github.com/python/typed_ast) | 1.4.2 | a fork of Python 2 and 3 ast modules with type comment support / Apache-2.0 |
| [typing\_extensions](https://github.com/python/typing/tree/master/typing_extensions) | 3.7.4.3 | Backported and Experimental Type Hints for Python / PSF-2.0 |
| [ujson](https://github.com/ultrajson/ultrajson) | 4.0.2 | Ultra fast JSON decoder and encoder written in C with Python bindings / BSD-3-Clause |
| [unicodecsv](https://github.com/jdunck/python-unicodecsv) | 0.14.1 | Drop-in replacement for csv module which supports unicode strings / BSD |
| [urllib3](https://urllib3.readthedocs.io/) | 1.26.4 | HTTP library with thread-safe connection pooling, file post, and more. / MIT |
| [vc](https://github.com/conda/conda/wiki/VC-features) | 14.2 | A meta-package to impose mutual exclusivity among software built with different VS versions / Modified BSD License (3-clause) |
| vs2015\_runtime | 14.27.29016 | MSVC runtimes associated with cl.exe version 19.27.29111 (VS 2019 update 5) / None |
| [watchdog](http://github.com/gorakhargosh/watchdog) | 1.0.2 | Filesystem events monitoring / Apache-2.0 |
| [wcwidth](https://github.com/jquast/wcwidth) | 0.2.5 | Measures number of Terminal column cells of wide-character codes. / MIT |
| [webencodings](https://github.com/gsnedders/python-webencodings) | 0.5.1 | Character encoding aliases for legacy web content / BSD 3-Clause |
| [werkzeug](https://palletsprojects.com/p/werkzeug/) | 1.0.1 | The comprehensive WSGI web application library. / BSD 3-Clause |
| [wheel](https://github.com/pypa/wheel) | 0.36.2 | A built-package format for Python. / MIT |
| [widgetsnbextension](http://ipython.org) | 3.5.1 | Interactive Widgets for Jupyter / BSD 3-clause |
| [win\_inet\_pton](https://github.com/hickeroar/win_inet_pton) | 1.1.0 | Native inet\_pton and inet\_ntop implementation for Python on Windows (with ctypes). / PUBLIC-DOMAIN |
| [win\_unicode\_console](https://github.com/Drekin/win-unicode-console) | 0.5 | A Python package to enable Unicode input and display when running Python from Windows console. / MIT |
| [wincertstore](https://bitbucket.org/tiran/wincertstore) | 0.2 | Python module to extract CA and CRL certs from Windows’ cert store (ctypes based). / PSF 2 |
| [winpty](https://github.com/rprichard/winpty) | 0.4.3 | Winpty provides an interface similar to a Unix pty-master for communicating with Windows console programs. / MIT |
| [wrapt](https://github.com/GrahamDumpleton/wrapt) | 1.12.1 | Module for decorators, wrappers and monkey patching / BSD 2-Clause |
| [xlrd](http://www.python-excel.org/) | 2.0.1 | Library for developers to extract data from Microsoft Excel (tm) spreadsheet files / BSD 3-Clause and BSD with advertising |
| [xlsxwriter](https://xlsxwriter.readthedocs.io/) | 1.3.8 | A Python module for creating Excel XLSX files / BSD-2-Clause |
| [xlwings](http://xlwings.org/) | 0.23.0 | Interact with Excel from Python and vice versa / 3-clause BSD |
| [xlwt](http://www.python-excel.org/) | 1.3.0 | Writing data and formatting information to Excel files / BSD |
| [xz](http://tukaani.org/xz/) | 5.2.5 | Data compression software with high compression ratio / LGPL-2.1 and GPL-2.0 |
| [yaml](http://pyyaml.org/wiki/LibYAML) | 0.2.5 | A C library for parsing and emitting YAML / MIT |
| [yapf](https://github.com/google/yapf) | 0.31.0 | A formatter for Python files / Apache 2.0 |
| [zeromq](http://zeromq.org) | 4.3.2 | A high-performance asynchronous messaging library. / LGPL-3.0-or-later |
| [zict](http://github.com/mrocklin/zict) | 2.0.0 | Composable Dictionary Classes / BSD 3-Clause |
| [zipp](https://github.com/jaraco/zipp) | 3.4.1 | A pathlib-compatible Zipfile object wrapper / MIT |
| [zlib](http://zlib.net/) | 1.2.11 | Massively spiffy yet delicately unobtrusive compression library / zlib |
| zope | 1.0 | web application server / BSD |
| [zope.event](http://www.zope.org/en/latest/) | 4.5.0 | Very basic event publishing system / Zope Public License |
| [zope.interface](http://docs.zope.org/zope.interface/) | 5.3.0 | Interfaces for Python / ZPL-2.1 |
| [zstd](http://www.zstd.net) | 1.4.5 | Zstandard - Fast real-time compression algorithm / BSD 3-Clause |
| Name | Version | Summary / License |
|---|---|---|
| [alabaster](http://www.sphinx-doc.org/en/stable/index.html) | 0.7.12 | Configurable, Python 2+3 compatible Sphinx theme. / BSD 3-Clause |
| [anaconda-client](http://anaconda.org) | 1.7.2 | anaconda.org command line client library / BSD 3-clause |
| [anaconda-navigator](https://github.com/ContinuumIO/navigator) | 2.0.3 | Anaconda Navigator / proprietary - Continuum Analytics, Inc. |
| [anaconda-project](https://github.com/Anaconda-Platform/anaconda-project) | 0.9.1 | Tool for encapsulating, running, and reproducing data science projects / BSD-3-Clause |
| [anyio](https://github.com/agronholm/anyio) | 2.2.0 | High level compatibility layer for multiple asynchronous event loop implementations on Python / MIT |
| [appdirs](http://github.com/ActiveState/appdirs) | 1.4.4 | A small Python module for determining appropriate platform-specific dirs. / MIT |
| [applaunchservices](https://github.com/impact27/applaunchservices) | 0.2.1 | Simple package for registering an app with apple Launch Services to handle UTI and URL / MIT |
| [appnope](http://github.com/minrk/appnope) | 0.1.2 | Disable App Nap on OS X 10.9 / BSD 2-Clause |
| [appscript](http://appscript.sourceforge.net) | 1.1.2 | Control AppleScriptable applications from Python. / Public Domain |
| [argh](https://github.com/neithere/argh) | 0.26.2 | The Natural CLI. / LGPL 3 |
| [argon2-cffi](https://argon2-cffi.readthedocs.org/) | 20.1.0 | The secure Argon2 password hashing algorithm. / MIT |
| [asn1crypto](https://github.com/wbond/asn1crypto) | 1.4.0 | Python ASN.1 library with a focus on performance and a pythonic API / MIT |
| [astroid](https://www.astroid.org/) | 2.5 | A abstract syntax tree for Python with inference support. / LGPL-2.1-only |
| [astropy](http://www.astropy.org/) | 4.2.1 | Community-developed Python Library for Astronomy / BSD-3-Clause |
| [async\_generator](https://github.com/python-trio/async_generator) | 1.10 | Async generators and context managers for Python 3.5+ / MIT |
| [atomicwrites](https://github.com/untitaker/python-atomicwrites) | 1.4.0 | Atomic file writes / MIT |
| [attrs](https://attrs.readthedocs.io/en/stable/) | 20.3.0 | attrs is the Python package that will bring back the joy of writing classes by relieving you from the drudgery of implementing object protocols (aka dunder methods). / MIT |
| [autopep8](https://github.com/hhatto/autopep8) | 1.5.6 | A tool that automatically formats Python code to conform to the PEP 8 style guide / MIT |
| [babel](http://babel.pocoo.org/) | 2.9.0 | Utilities to internationalize and localize Python applications / BSD 3-clause |
| [backcall](https://github.com/takluyver/backcall/) | 0.2.0 | Specifications for callback functions passed in to an API / BSD-3-Clause |
| [backports](https://bitbucket.org/brandon/backports) | 1.0 | None / BSD |
| [backports.shutil\_get\_terminal\_size](https://github.com/chrippa/backports.shutil_get_terminal_size) | 1.0.0 | A backport of the get\_terminal\_size function from Python 3.3’s shutil. / MIT |
| [beautifulsoup4](http://www.crummy.com/software/BeautifulSoup/) | 4.9.3 | Python library designed for screen-scraping / MIT |
| [bitarray](https://github.com/ilanschnell/bitarray) | 1.9.2 | efficient arrays of booleans – C extension / PSF |
| [bkcharts](http://github.com/bokeh/bkcharts) | 0.2 | High level chart types built on top of Bokeh / BSD 3-Clause |
| [black](https://github.com/python/black) | 19.10b0 | The Uncompromising Code Formatter / MIT |
| blas | 1.0 | |
| [bleach](https://github.com/mozilla/bleach) | 3.3.0 | Easy, whitelist-based HTML-sanitizing tool / Apache-2.0 |
| [blosc](https://github.com/Blosc/c-blosc) | 1.21.0 | A blocking, shuffling and loss-less compression library that can be faster than memcpy() / BSD-3-Clause |
| [bokeh](http://bokeh.pydata.org/) | 2.3.2 | Statistical and novel interactive HTML plots for Python / BSD-3-Clause |
| [boto](https://github.com/boto/boto/) | 2.49.0 | Amazon Web Services Library / MIT |
| [bottleneck](https://github.com/pydata/bottleneck) | 1.3.2 | Fast NumPy array functions written in Cython. / BSD 2-Clause |
| [brotlipy](https://github.com/python-hyper/brotlipy) | 0.7.0 | Python bindings to the Brotli compression library / MIT |
| [bzip2](http://www.bzip.org/) | 1.0.8 | high-quality data compressor / bzip2 |
| [c-ares](https://c-ares.haxx.se/) | 1.17.1 | This is c-ares, an asynchronous resolver library / MIT |
| [ca-certificates](https://github.com/conda-forge/ca-certificates-feedstock) | 2021.4.13 | Certificates for use with other packages. / MPL 2.0 |
| [certifi](http://certifi.io/) | 2020.12.5 | Python package for providing Mozilla’s CA Bundle. / ISC |
| [cffi](https://bitbucket.org/cffi/cffi) | 1.14.5 | Foreign Function Interface for Python calling C code. / MIT |
| [chardet](https://github.com/chardet/chardet) | 4.0.0 | Universal character encoding detector / LGPL2 |
| [click](https://palletsprojects.com/p/click) | 7.1.2 | Python composable command line interface toolkit / BSD-3-Clause |
| [cloudpickle](https://github.com/cloudpipe/cloudpickle) | 1.6.0 | Extended pickling support for Python objects / BSD-3-Clause |
| [clyent](https://github.com/Anaconda-Platform/clyent) | 1.2.2 | Command line client library for windows and posix / BSD 3-Clause |
| [colorama](https://github.com/tartley/colorama) | 0.4.4 | Cross-platform colored terminal text / BSD-3-Clause |
| [conda](https://conda.io) | 4.10.1 | OS-agnostic, system-level binary package and environment manager. / BSD 3-Clause |
| [conda-build](https://github.com/conda/conda-build) | 3.21.4 | tools for building conda packages / BSD 3-Clause |
| [conda-env](https://github.com/conda/conda-env) | 2.6.0 | Tools for interacting with conda environments. / BSD 3-Clause |
| [conda-verify](https://github.com/conda/conda-verify) | 3.4.2 | tool for validating conda recipes and conda packages / BSD 3-Clause |
| [contextlib2](http://contextlib2.readthedocs.org) | 0.6.0.post1 | Backports and enhancements for the contextlib module / PSF 2 |
| [cryptography](https://github.com/pyca/cryptography) | 3.4.7 | Provides cryptographic recipes and primitives to Python developers / Apache-2.0 AND BSD-3-Clause AND PSF-2.0 AND MIT |
| [curl](http://curl.haxx.se/) | 7.71.1 | tool and library for transferring data with URL syntax / MIT/X derivate (`<http://curl.haxx.se/docs/copyright.html>`) |
| [cycler](http://matplotlib.org/cycler) | 0.10.0 | Composable style cycles. / BSD 3-Clause |
| [cython](http://www.cython.org/) | 0.29.23 | The Cython compiler for writing C extensions for the Python language / Apache-2.0 |
| [cytoolz](https://github.com/pytoolz/cytoolz) | 0.11.0 | Cython implementation of Toolz. High performance functional utilities / BSD-3-Clause |
| [dask](https://dask.org/) | 2021.4.0 | Parallel PyData with Task Scheduling / BSD-3-Clause |
| [dask-core](http://github.com/dask/dask/) | 2021.4.0 | Parallel Python with task scheduling / BSD-3-Clause |
| [dbus](http://www.freedesktop.org/wiki/Software/dbus/) | 1.13.18 | Simple message bus system for applications to talk to one another / GPL2 |
| [decorator](https://github.com/micheles/decorator) | 5.0.6 | Better living through Python with decorators. / BSD-3-Clause |
| [defusedxml](https://bitbucket.org/tiran/defusedxml) | 0.7.1 | XML bomb protection for Python stdlib modules / PSF 2.0 |
| [diff-match-patch](http://code.google.com/p/google-diff-match-patch/) | 20200713 | Diff Match Patch is a high-performance library in multiple languages that manipulates plain text / Apache-2.0 |
| [distributed](http://distributed.readthedocs.io/en/latest/) | 2021.4.0 | Distributed computing with Dask / BSD-3-Clause |
| [docutils](http://docutils.sourceforge.net/) | 0.17 | Docutils – Python Documentation Utilities / Public Domain Dedictation and BSD 2-Clause and PSF 2.1.1 and GPL 3.0 |
| [entrypoints](https://github.com/takluyver/entrypoints) | 0.3 | Discover and load entry points from installed packages. / MIT License |
| [et\_xmlfile](https://bitbucket.org/openpyxl/et_xmlfile) | 1.0.1 | An implementation of lxml.xmlfile for the standard library / MIT |
| [expat](http://expat.sourceforge.net/) | 2.3.0 | Expat XML parser library in C / MIT |
| [fastcache](https://github.com/pbrady/fastcache) | 1.1.0 | C implementation of Python 3 lru\_cache / MIT |
| [filelock](https://github.com/benediktschmitt/py-filelock) | 3.0.12 | A platform independent file lock. / Public Domain |
| [flake8](http://flake8.pycqa.org/) | 3.9.0 | Your Tool For Style Guide Enforcement / MIT |
| [flask](http://flask.pocoo.org) | 1.1.2 | A microframework based on Werkzeug, Jinja2 and good intentions. / BSD 3-Clause |
| [freetype](https://www.freetype.org/) | 2.10.4 | A Free, High-Quality, and Portable Font Engine / GPL-2.0-only and LicenseRef-FreeType |
| [fsspec](https://github.com/martindurant/filesystem_spec) | 0.9.0 | A specification for pythonic filesystems / BSD-3-Clause |
| [future](http://python-future.org) | 0.18.2 | Clean single-source support for Python 3 and 2 / MIT |
| [get\_terminal\_size](https://github.com/chrippa/backports.shutil_get_terminal_size) | 1.0.0 | Get the size of the terminal window. / MIT |
| [gettext](https://www.gnu.org/software/gettext/) | 0.21.0 | Internationalization package / GPL-2.0 |
| [gevent](https://www.gevent.org) | 21.1.2 | Coroutine-based network library / MIT |
| [glib](https://developer.gnome.org/glib/) | 2.68.1 | Provides core application building blocks for libraries and applications written in C. / LGPL-2.1 |
| [glob2](https://github.com/miracle2k/python-glob2) | 0.7 | Version of the glob module that supports recursion via \*\*, and can capture patterns. / BSD-2-Clause |
| [gmp](http://gmplib.org/) | 6.2.1 | The GNU multiprecision library. / GPL-2.0-or-later AND LGPL-3.0-or-later |
| [gmpy2](https://pypi.python.org/pypi/gmpy2) | 2.0.8 | GMP/MPIR, MPFR, and MPC interface to Python 2.6+ and 3.x / LGPL 3 |
| [greenlet](https://github.com/python-greenlet/greenlet) | 1.0.0 | Lightweight in-process concurrent programming / MIT |
| [h5py](http://www.h5py.org/) | 2.10.0 | Read and write HDF5 files from Python. / BSD-3-Clause |
| [hdf5](http://www.hdfgroup.org/HDF5/) | 1.10.4 | HDF5 is a data model, library, and file format for storing and managing data / HDF5 |
| [heapdict](http://stutzbachenterprises.com/) | 1.0.1 | A heap with decrease-key and increase-key operations / BSD 3-Clause |
| [html5lib](https://github.com/html5lib/html5lib-python) | 1.1 | HTML parser based on the WHATWG HTML specification / MIT |
| [icu](http://site.icu-project.org/) | 58.2 | International Components for Unicode. / MIT |
| [idna](https://github.com/kjd/idna) | 2.10 | Internationalized Domain Names in Applications (IDNA). / BSD Like |
| [imageio](https://imageio.github.io) | 2.9.0 | A Python library for reading and writing image data / BSD-2-Clause |
| [imagesize](https://github.com/shibukawa/imagesize_py) | 1.2.0 | Getting image size from png/jpeg/jpeg2000/gif file / MIT |
| [importlib-metadata](https://github.com/python/importlib_metadata) | 3.10.0 | A library to access the metadata for a Python package / Apache-2.0 |
| [importlib\_metadata](https://github.com/python/importlib_metadata) | 3.10.0 | A library to access the metadata for a Python package / Apache-2.0 |
| [iniconfig](http://github.com/RonnyPfannschmidt/iniconfig) | 1.1.1 | iniconfig: brain-dead simple config-ini parsing / MIT |
| [intel-openmp](https://software.intel.com/en-us/node/522690) | 2021.2.0 | Math library for Intel and compatible processors / LicenseRef-ProprietaryIntel |
| [intervaltree](https://github.com/chaimleib/intervaltree) | 3.1.0 | Editable interval tree data structure for Python 2 and 3 / Apache-2.0 |
| [ipykernel](https://ipython.org) | 5.3.4 | IPython Kernel for Jupyter / BSD-3-Clause |
| [ipython](https://ipython.org) | 7.22.0 | IPython: Productive Interactive Computing / BSD-3-Clause |
| [ipython\_genutils](http://ipython.org) | 0.2.0 | vestigial utilities from IPython / BSD 3-Clause |
| [ipywidgets](https://github.com/ipython/ipywidgets) | 7.6.3 | Jupyter Interactive Widgets / BSD-3-Clause |
| [isort](https://github.com/timothycrosley/isort) | 5.8.0 | A Python utility / library to sort Python imports. / MIT |
| [itsdangerous](https://github.com/pallets/itsdangerous) | 1.1.0 | Various helpers to pass trusted data to untrusted environments. / BSD 3-Clause |
| [jbig](https://www.cl.cam.ac.uk/~mgk25/jbigkit) | 2.1 | Implementation of the JBIG1 data compression standard / GPL-2.0 |
| [jdcal](https://github.com/phn/jdcal) | 1.4.1 | Julian dates from proleptic Gregorian and Julian calendars. / BSD 2-Clause |
| [jedi](https://github.com/davidhalter/jedi/) | 0.17.2 | An autocompletion tool for Python that can be used for text editors. / MIT |
| [jinja2](http://jinja.pocoo.org) | 2.11.3 | An easy to use stand-alone template engine written in pure python. / BSD-3-Clause |
| [joblib](https://pypi.org/project/joblib/) | 1.0.1 | Lightweight pipelining: using Python functions as pipeline jobs. / BSD-3-Clause |
| [jpeg](http://www.ijg.org/) | 9b | read/write jpeg COM, EXIF, IPTC medata / Custom free software license |
| [json5](https://github.com/dpranke/pyjson5) | 0.9.5 | A Python implementation of the JSON5 data format / Apache-2.0 |
| [jsonschema](https://github.com/Julian/jsonschema) | 3.2.0 | An implementation of JSON Schema validation for Python / MIT |
| [jupyter](http://jupyter.org) | 1.0.0 | Jupyter metapackage. Install all the Jupyter components in one go. / BSD 3-Clause |
| [jupyter-packaging](https://github.com/jupyter/jupyter-packaging) | 0.7.12 | Jupyter Packaging Utilities / BSD-3-Clause |
| [jupyter\_client](https://jupyter.org) | 6.1.12 | jupyter\_client contains the reference implementation of the Jupyter protocol. / BSD-3-Clause |
| [jupyter\_console](http://jupyter.org) | 6.4.0 | Jupyter terminal console / BSD-3-Clause |
| [jupyter\_core](https://jupyter.org) | 4.7.1 | Core common functionality of Jupyter projects. / BSD-3-Clause |
| [jupyter\_server](https://jupyter.org) | 1.4.1 | Jupyter Server / BSD-3-Clause |
| [jupyterlab](https://github.com/jupyterlab/jupyterlab) | 3.0.14 | JupyterLab PRE-ALPHA / BSD-3-Clause |
| [jupyterlab\_pygments](http://github.com/JupyterLab/jupyterlab_pygments) | 0.1.2 | Pygments syntax coloring scheme making use of the JupyterLab CSS variables / BSD-3-Clause |
| [jupyterlab\_server](https://github.com/jupyterlab/jupyterlab_server) | 2.4.0 | A set of server components for JupyterLab and JupyterLab like applications. / BSD-3-Clause |
| [jupyterlab\_widgets](https://github.com/jupyter-widgets/ipywidgets) | 1.0.0 | JupyterLab extension providing HTML widgets / BSD-3-Clause |
| [keyring](https://github.com/jaraco/keyring) | 22.3.0 | Store and access your passwords safely / MIT |
| [kiwisolver](https://github.com/nucleic/kiwi) | 1.3.1 | An efficient C++ implementation of the Cassowary constraint solver / BSD-3-Clause |
| [krb5](http://web.mit.edu/kerberos/) | 1.18.2 | A network authentication protocol. / MIT |
| [lazy-object-proxy](https://github.com/ionelmc/python-lazy-object-proxy) | 1.6.0 | A fast and thorough lazy object proxy / BSD-2-Clause |
| [lcms2](http://www.littlecms.com/) | 2.12 | Open Source Color Management Engine / MIT |
| [libarchive](http://www.libarchive.org/) | 3.4.2 | Multi-format archive and compression library / BSD-2-Clause |
| [libcurl](http://curl.haxx.se/) | 7.71.1 | tool and library for transferring data with URL syntax / MIT/X derivate (`<http://curl.haxx.se/docs/copyright.html>`) |
| [libcxx](http://llvm.org/) | 10.0.0 | LLVM C++ standard library / Apache-2.0 WITH LLVM-exception |
| [libedit](http://thrysoee.dk/editline/) | 3.1.20210216 | Editline Library (libedit) / BSD-2-Clause |
| [libev](http://software.schmorp.de/pkg/libev.html) | 4.33 | A full-featured and high-performance event loop that is loosely modeled after libevent, but without its limitations and bugs. / BSD-2-Clause |
| [libffi](https://sourceware.org/libffi/) | 3.3 | A Portable Foreign Function Interface Library. / Custom |
| [libgfortran](http://gcc.gnu.org/) | 3.0.1 | Fortran libraries from the GNU Compiler Collection / GPL 3 (with GCC Runtime Library Exception 3.1) |
| [libiconv](https://www.gnu.org/software/libiconv/) | 1.16 | Provides iconv for systems which don’t have one (or that cannot convert from/to Unicode.) / GPL and LGPL |
| [liblief](https://lief.quarkslab.com/) | 0.10.1 | A cross platform library to parse, modify and abstract ELF, PE and MachO formats. / Apache-2.0 |
| [libllvm10](http://llvm.org/) | 10.0.1 | Development headers and libraries for LLVM / Apache-2.0 WITH LLVM-exception |
| [libpng](http://www.libpng.org/pub/png/libpng.html) | 1.6.37 | PNG reference library / zlib/libpng |
| [libsodium](http://libsodium.org) | 1.0.18 | A modern and easy-to-use crypto library. / ISC |
| [libspatialindex](http://libspatialindex.github.io) | 1.9.3 | Extensible framework for robust spatial indexing / MIT |
| [libssh2](https://www.libssh2.org/) | 1.9.0 | the SSH library / BSD-3-Clause |
| [libtiff](http://www.libtiff.org/) | 4.2.0 | Support for the Tag Image File Format (TIFF). / HPND |
| [libuv](http://libuv.org/) | 1.40.0 | Cross-platform asynchronous I/O / MIT |
| [libwebp-base](https://developers.google.com/speed/webp) | 1.2.0 | WebP image library / BSD-3-Clause |
| [libxml2](http://xmlsoft.org/) | 2.9.10 | The XML C parser and toolkit of Gnome / MIT |
| [libxslt](http://xmlsoft.org/XSLT/) | 1.1.34 | The XSLT C library developed for the GNOME project / MIT |
| [llvm-openmp](http://openmp.llvm.org/) | 10.0.0 | The OpenMP API supports multi-platform shared-memory parallel programming in C/C++ and Fortran. / NCSA |
| [llvmlite](http://llvmlite.pydata.org) | 0.36.0 | A lightweight LLVM python binding for writing JIT compilers. / BSD-2-Clause |
| [locket](https://github.com/mwilliamson/locket.py) | 0.2.1 | File-based locks for Python for Linux and Windows / BSD 2-Clause |
| [lxml](http://lxml.de/) | 4.6.3 | Pythonic binding for the C libraries libxml2 and libxslt. / BSD-3-Clause and GPL-2.0-only and ZPL-2.0 and LicenseRef-ElementTree |
| [lz4-c](https://www.lz4.org) | 1.9.3 | Extremely Fast Compression algorithm / BSD-2-Clause |
| [lzo](http://www.oberhumer.com/opensource/lzo/) | 2.10 | LZO is a portable lossless data compression library written in ANSI C. / GPL v2+ |
| [markupsafe](https://www.palletsprojects.com/p/markupsafe) | 1.1.1 | A Python module that implements the jinja2.Markup string / BSD-3-Clause |
| [matplotlib](http://matplotlib.org/) | 3.3.4 | Publication quality figures in Python / LicenseRef-PSF-based |
| [matplotlib-base](http://matplotlib.org/) | 3.3.4 | Publication quality figures in Python / LicenseRef-PSF-based |
| [mccabe](https://github.com/PyCQA/mccabe) | 0.6.1 | McCabe complexity checker for Python / MIT |
| [mistune](https://github.com/lepture/mistune) | 0.8.4 | The fastest markdown parser in pure Python. / BSD 3-Clause |
| [mkl](https://software.intel.com/en-us/mkl) | 2021.2.0 | Math library for Intel and compatible processors / LicenseRef-ProprietaryIntel |
| [mkl-service](https://github.com/ContinuumIO/mkl-service) | 2.3.0 | Python bindings to MKL service functions / 3-clause BSD |
| [mkl\_fft](http://github.com/IntelPython/mkl_fft) | 1.3.0 | NumPy-based implementation of Fast Fourier Transform using Intel (R) Math Kernel Library. / BSD 3-Clause |
| [mkl\_random](http://github.com/IntelPython/mkl_random) | 1.2.1 | Intel (R) MKL-powered package for sampling from common probability distributions into NumPy arrays. / BSD 3-Clause |
| [mock](https://github.com/testing-cabal/mock) | 4.0.3 | A library for testing in Python / BSD-2-Clause |
| [more-itertools](https://github.com/more-itertools/more-itertools) | 8.7.0 | More routines for operating on iterables, beyond itertools / MIT |
| [mpc](http://www.multiprecision.org/) | 1.1.0 | A C library for the arithmetic of complex numbers with arbitrarily high precision. / LGPL 3 |
| [mpfr](http://www.mpfr.org/) | 4.0.2 | The MPFR library is a C library for multiple-precision floating-point computations with correct rounding. / LGPL-3.0-only |
| [mpmath](http://mpmath.org) | 1.2.1 | Python library for arbitrary-precision floating-point arithmetic / BSD 3-Clause |
| [msgpack-python](http://msgpack.org/) | 1.0.2 | MessagePack (de)serializer / Apache-2.0 |
| [multipledispatch](https://github.com/mrocklin/multipledispatch/) | 0.6.0 | Multiple dispatch in Python / BSD 3-Clause |
| [mypy\_extensions](http://www.mypy-lang.org/) | 0.4.3 | Experimental type system extensions for programs checked with the mypy typechecker. / MIT |
| [nbclassic](http://github.com/jupyterlab/nbclassic) | 0.2.6 | Jupyter Notebook as a Jupyter Server Extension. / BSD-3-Clause |
| [nbclient](https://jupyter.org) | 0.5.3 | A client library for executing notebooks. Formally nbconvert’s ExecutePreprocessor. / BSD-3-Clause |
| [nbconvert](http://jupyter.org) | 6.0.7 | Converting Jupyter Notebooks / BSD-3-Clause |
| [nbformat](http://jupyter.org) | 5.1.3 | The Jupyter Notebook format / BSD-3-Clause |
| [ncurses](http://www.gnu.org/software/ncurses/) | 6.2 | Library for text-based user interfaces / Free software (MIT-like) |
| [nest-asyncio](https://github.com/erdewit/nest_asyncio) | 1.5.1 | Patch asyncio to allow nested event loops / BSD-2-Clause |
| [networkx](https://networkx.github.io/) | 2.5 | Python package for creating and manipulating complex networks / BSD-3-Clause |
| [nltk](http://nltk.org/) | 3.6.1 | Natural Language Toolkit / Apache 2.0 |
| [nose](http://readthedocs.org/docs/nose/) | 1.3.7 | Nose extends unittest to make testing easier / LGPL-2.1 |
| [notebook](https://jupyter.org) | 6.3.0 | Jupyter Notebook / BSD-3-Clause |
| [numba](http://numba.pydata.org) | 0.53.1 | NumPy aware dynamic Python compiler using LLVM / BSD-2-Clause |
| [numexpr](https://github.com/pydata/numexpr) | 2.7.3 | Fast numerical expression evaluator for NumPy. / MIT |
| [numpy](http://numpy.scipy.org/) | 1.20.1 | Array processing for numbers, strings, records, and objects. / BSD 3-Clause |
| [numpy-base](http://numpy.scipy.org/) | 1.20.1 | Array processing for numbers, strings, records, and objects. / BSD 3-Clause |
| [numpydoc](https://github.com/numpy/numpydoc) | 1.1.0 | Numpy’s Sphinx extensions / BSD 3-Clause |
| [olefile](http://www.decalage.info/python/olefileio) | 0.46 | parse, read and write Microsoft OLE2 files / BSD 2-Clause |
| [openpyxl](https://openpyxl.readthedocs.io) | 3.0.7 | A Python library to read/write Excel 2010 xlsx/xlsm files / MIT |
| [openssl](http://www.openssl.org/) | 1.1.1k | OpenSSL is an open-source implementation of the SSL and TLS protocols / OpenSSL |
| [packaging](https://github.com/pypa/packaging) | 20.9 | Core utilities for Python packages / Apache 2.0 or BSD 2-Clause |
| [pandas](http://pandas.pydata.org) | 1.2.4 | High-performance, easy-to-use data structures and data analysis tools. / BSD-3-Clause |
| [pandoc](http://pandoc.org/) | 2.12 | Universal markup converter (repackaged binaries) / GPL-2.0 |
| [pandocfilters](https://github.com/jgm/pandocfilters) | 1.4.3 | A python module for writing pandoc filters / BSD-3-Clause |
| [parso](https://github.com/davidhalter/parso) | 0.7.0 | A Python Parser / MIT |
| [partd](https://github.com/dask/partd) | 1.2.0 | Data structure for on-disk shuffle operations / BSD 3-Clause |
| [path](https://github.com/jaraco/path) | 15.1.2 | A module wrapper for os.path / MIT |
| [path.py](https://github.com/jaraco/path.py) | 12.5.0 | A module wrapper for os.path / MIT |
| [pathlib2](https://github.com/mcmtroffaes/pathlib2) | 2.3.5 | Fork of pathlib aiming to support the full stdlib Python API / MIT |
| [pathspec](https://github.com/cpburnz/python-path-specification) | 0.7.0 | Utility library for gitignore style pattern matching of file paths. / MPL-2.0 |
| [patsy](https://github.com/pydata/patsy) | 0.5.1 | Describing statistical models in Python using symbolic formulas / BSD-2-Clause, PSF2 |
| [pcre](http://www.pcre.org/) | 8.44 | Regular expression pattern matching using the same syntax and semantics as Perl 5. / BSD 3-Clause |
| [pep8](http://pep8.readthedocs.org/) | 1.7.1 | Python style guide checker / MIT |
| [pexpect](http://pexpect.sourceforge.net/) | 4.8.0 | Pexpect makes Python a better tool for controlling other applications. / ISC |
| [pickleshare](https://github.com/pickleshare/pickleshare/) | 0.7.5 | Tiny ‘shelve’-like database with concurrency support / MIT |
| [pillow](https://pillow.readthedocs.io) | 8.2.0 | Pillow is the friendly PIL fork by Alex Clark and Contributors / LicenseRef-PIL |
| [pip](https://pip.pypa.io/en/stable/) | 21.0.1 | PyPA recommended tool for installing Python packages / MIT |
| [pkginfo](https://code.launchpad.net/~tseaver/pkginfo/trunk) | 1.7.0 | Query metadatdata from sdists / bdists / installed packages. / MIT |
| [pluggy](https://github.com/pytest-dev/pluggy) | 0.13.1 | Plugin registration and hook calling for Python / MIT |
| [ply](http://www.dabeaz.com/ply/index.html) | 3.11 | Python Lex-Yacc / BSD 3-clause |
| [prometheus\_client](https://github.com/prometheus/client_python) | 0.10.1 | Python client for the Prometheus monitoring system / Apache-2.0 |
| [prompt-toolkit](https://github.com/jonathanslenders/python-prompt-toolkit) | 3.0.17 | Library for building powerful interactive command lines in Python / BSD-3-Clause |
| [prompt\_toolkit](https://github.com/jonathanslenders/python-prompt-toolkit) | 3.0.17 | Library for building powerful interactive command lines in Python / BSD-3-Clause |
| [psutil](https://github.com/giampaolo/psutil) | 5.8.0 | A cross-platform process and system utilities module for Python / BSD-3-Clause |
| [ptyprocess](https://github.com/pexpect/ptyprocess) | 0.7.0 | Run a subprocess in a pseudo terminal / ISC |
| [py](https://github.com/pytest-dev/py) | 1.10.0 | library with cross-python path, ini-parsing, io, code, log facilities / MIT |
| [py-lief](https://lief.quarkslab.com/) | 0.10.1 | A cross platform library to parse, modify and abstract ELF, PE and MachO formats. / Apache-2.0 |
| [pycodestyle](https://pycodestyle.readthedocs.io/) | 2.6.0 | Python style guide checker / MIT |
| [pycosat](https://github.com/ContinuumIO/pycosat) | 0.6.3 | Bindings to picosat (a SAT solver) / MIT |
| [pycparser](https://github.com/eliben/pycparser) | 2.20 | Complete C99 parser in pure Python / BSD 3-clause |
| [pycurl](http://pycurl.sourceforge.net/) | 7.43.0.6 | A Python Interface To The cURL library / LGPL, MIT |
| [pydocstyle](https://github.com/PyCQA/pydocstyle) | 6.0.0 | Python docstring style checker (formerly pep257) / MIT |
| [pyerfa](https://pyerfa.readthedocs.io/) | 1.7.3 | Python bindings for ERFA routines / BSD-3-Clause |
| [pyflakes](https://github.com/PyCQA/pyflakes) | 2.2.0 | Pyflakes analyzes programs and detects various errors. / MIT |
| [pygments](http://pygments.org/) | 2.8.1 | Pygments is a generic syntax highlighter suitable for use in code hosting, forums, wikis or other applications that need to prettify source code. / BSD-2-clause |
| [pylint](http://www.pylint.org/) | 2.7.4 | python code static checker / GPL-2.0-only |
| [pyls-black](https://github.com/rupert/pyls-black) | 0.4.6 | Black plugin for the Python Language Server / MIT |
| [pyls-spyder](https://github.com/spyder-ide/pyls-spyder) | 0.3.2 | Spyder extensions for the python-language-server / MIT |
| [pyodbc](https://github.com/mkleehammer/pyodbc) | 4.0.30 | DB API Module for ODBC / MIT |
| [pyopenssl](https://github.com/pyca/pyopenssl) | 20.0.1 | Python wrapper module around the OpenSSL library / Apache 2.0 |
| [pyparsing](http://pyparsing.wikispaces.com/) | 2.4.7 | Create and execute simple grammars / MIT |
| [pyqt](http://www.riverbankcomputing.co.uk/software/pyqt) | 5.9.2 | Python binding of the cross-platform GUI toolkit Qt. / Commercial, GPL-2.0, GPL-3.0 |
| [pyrsistent](http://github.com/tobgu/pyrsistent/) | 0.17.3 | Persistent/Functional/Immutable data structures / MIT |
| [pysocks](https://github.com/Anorov/PySocks) | 1.7.1 | A Python SOCKS client module. See [Anorov/PySocks](https://github.com/Anorov/PySocks) for more information. / BSD 3-Clause |
| [pytables](http://www.pytables.org) | 3.6.1 | Brings together Python, HDF5 and NumPy to easily handle large amounts of data. / BSD 3-Clause |
| [pytest](https://docs.pytest.org/en/latest/) | 6.2.3 | Simple and powerful testing with Python. / MIT |
| [python](https://www.python.org/) | 3.8.8 | General purpose programming language / Python-2.0 |
| [python-dateutil](https://dateutil.readthedocs.org/) | 2.8.1 | Extensions to the standard Python datetime module. / BSD 3 Clause |
| [python-jsonrpc-server](https://github.com/palantir/python-jsonrpc-server) | 0.4.0 | A Python 2.7 and 3.4+ server implementation of the JSON RPC 2.0 protocol. / MIT |
| [python-language-server](https://github.com/palantir/python-language-server) | 0.36.2 | An implementation of the Language Server Protocol for Python / MIT |
| [python-libarchive-c](https://github.com/Changaco/python-libarchive-c) | 2.9 | Python interface to libarchive / CC0-1.0 |
| [python.app](https://www.python.org/) | 3 | Proxy on macOS letting Python libraries hook into the GUI event loop / BSD-3-Clause |
| [pytz](http://pythonhosted.org/pytz/) | 2021.1 | World timezone definitions, modern and historical. / MIT |
| [pywavelets](https://github.com/PyWavelets/pywt) | 1.1.1 | Discrete Wavelet Transforms in Python / MIT |
| [pyyaml](http://pyyaml.org/wiki/PyYAML) | 5.4.1 | YAML parser and emitter for Python / MIT |
| [pyzmq](https://github.com/zeromq/pyzmq) | 20.0.0 | Python bindings for zeromq / BSD 3-clause |
| [qdarkstyle](https://github.com/ColinDuquesnoy/QDarkStyleSheet) | 2.8.1 | A dark stylesheet for Qt applications (Qt4, Qt5, PySide, PyQt4, PyQt5, QtPy, PyQtGraph). / MIT |
| [qt](http://qt-project.org) | 5.9.7 | Qt is a cross-platform application and UI framework. / LGPL-3.0 |
| [qtawesome](https://github.com/spyder-ide/qtawesome) | 1.0.2 | Iconic fonts in PyQt and PySide applications / MIT |
| [qtconsole](http://jupyter.org) | 5.0.3 | Jupyter Qt Console / BSD-3-Clause |
| [qtpy](https://github.com/spyder-ide/qtpy) | 1.9.0 | Abstraction layer for PyQt5/PyQt4/PySide / MIT |
| [readline](https://cnswww.cns.cwru.edu/php/chet/readline/rltop.html) | 8.1 | library for editing command lines as they are typed in / GPL-3.0 |
| [regex](https://bitbucket.org/mrabarnett/mrab-regex) | 2021.4.4 | Alternative regular expression module, to replace re / Python-2.0 |
| [requests](http://python-requests.org) | 2.25.1 | Requests is an elegant and simple HTTP library for Python, built with ♥. / Apache-2.0 |
| ripgrep | 12.1.1 | |
| [rope](https://github.com/python-rope/rope) | 0.18.0 | A python refactoring library / GPL 2.0 |
| [rtree](http://toblerity.github.com/rtree/) | 0.9.7 | R-Tree spatial index for Python GIS / MIT |
| [ruamel\_yaml](https://sourceforge.net/p/ruamel-yaml/code/ci/default/tree) | 0.15.100 | A patched copy of ruamel.yaml. / MIT |
| [scikit-image](http://scikit-image.org/) | 0.18.1 | Image processing in Python. / BSD-3-Clause |
| [scikit-learn](http://scikit-learn.org/) | 0.24.1 | A set of python modules for machine learning and data mining / BSD-3-Clause |
| [scipy](http://www.scipy.org/) | 1.6.2 | Scientific Library for Python / BSD 3-Clause |
| [seaborn](https://seaborn.pydata.org) | 0.11.1 | Statistical data visualization / BSD 3-Clause |
| [send2trash](https://github.com/hsoft/send2trash) | 1.5.0 | Python library to natively send files to Trash (or Recycle bin) on all platforms. / BSD-3-Clause |
| [setuptools](https://github.com/pypa/setuptools) | 52.0.0 | Download, build, install, upgrade, and uninstall Python packages / MIT |
| [simplegeneric](http://cheeseshop.python.org/pypi/simplegeneric) | 0.8.1 | Simple generic functions (similar to Python’s own len(), pickle.dump(), etc.) / Zope Public |
| [singledispatch](http://docs.python.org/3/library/functools.html#functools.singledispatch) | 3.6.1 | Transforms a function into a single-dispatch generic function / MIT |
| [sip](http://www.riverbankcomputing.com/software/sip/intro) | 4.19.8 | Create Python bindings for C and C++ libraries / GPL-3.0 |
| [six](https://six.readthedocs.io/) | 1.15.0 | Python 2 and 3 compatibility utilities / MIT |
| [sniffio](https://github.com/python-trio/sniffio) | 1.2.0 | Sniff out which async library your code is running under / Apache-2.0 |
| [snowballstemmer](https://github.com/shibukawa/snowball_py) | 2.1.0 | Snowball stemming library collection for Python / BSD-2-Clause |
| [sortedcollections](http://www.grantjenks.com/docs/sortedcollections/) | 2.1.0 | Python Sorted Collections / Apache-2.0 |
| [sortedcontainers](http://www.grantjenks.com/docs/sortedcontainers/) | 2.3.0 | Python Sorted Container Types: SortedList, SortedDict, and SortedSet / Apache-2.0 |
| [soupsieve](http://facelessuser.github.io/soupsieve) | 2.2.1 | A modern CSS selector implementation for BeautifulSoup / MIT |
| [sphinx](http://www.sphinx-doc.org) | 4.0.1 | Sphinx is a tool that makes it easy to create intelligent and beautiful documentation / BSD-2-Clause |
| sphinxcontrib | 1.0 | Python namespace for sphinxcontrib / BSD |
| [sphinxcontrib-applehelp](https://www.sphinx-doc.org/en/master/) | 1.0.2 | sphinxcontrib-applehelp is a sphinx extension which outputs Apple help books / BSD-2-Clause |
| [sphinxcontrib-devhelp](https://www.sphinx-doc.org/en/master/) | 1.0.2 | sphinxcontrib-devhelp is a sphinx extension which outputs Devhelp document / BSD-2-Clause |
| [sphinxcontrib-htmlhelp](https://www.sphinx-doc.org/en/master/) | 1.0.3 | sphinxcontrib-htmlhelp is a sphinx extension which … / BSD-2-Clause |
| [sphinxcontrib-jsmath](https://www.sphinx-doc.org/en/master/) | 1.0.1 | A sphinx extension which renders display math in HTML via JavaScript / BSD-2-Clause |
| [sphinxcontrib-qthelp](https://www.sphinx-doc.org/en/master/) | 1.0.3 | sphinxcontrib-qthelp is a sphinx extension which outputs QtHelp document / BSD-2-Clause |
| [sphinxcontrib-serializinghtml](https://www.sphinx-doc.org/en/master/) | 1.1.4 | sphinxcontrib-serializinghtml is a sphinx extension which outputs “serialized” HTML files (json and pickle). / BSD-2-Clause |
| [sphinxcontrib-websupport](https://pypi.python.org/pypi/sphinxcontrib-websupport) | 1.2.4 | Sphinx API for Web Apps / BSD-2-Clause |
| [spyder](https://www.spyder-ide.org/) | 4.2.5 | The Scientific Python Development Environment / MIT |
| [spyder-kernels](https://www.spyder-ide.org/) | 1.10.2 | Jupyter kernels for Spyder’s console / MIT |
| [sqlalchemy](http://www.sqlalchemy.org/) | 1.4.7 | Database Abstraction Library. / MIT |
| [sqlite](http://www.sqlite.org/) | 3.35.4 | Implements a self-contained, zero-configuration, SQL database engine / Public-Domain (`<http://www.sqlite.org/copyright.html>`) |
| [statsmodels](https://www.statsmodels.org) | 0.12.2 | Statistical computations and models for use with SciPy / BSD-3-Clause |
| [sympy](https://sympy.org) | 1.8 | Python library for symbolic mathematics / BSD-3-Clause |
| [tbb](https://github.com/oneapi-src/oneTBB) | 2020.3 | High level abstract threading library / Apache-2.0 |
| [tblib](https://github.com/ionelmc/python-tblib) | 1.7.0 | Traceback serialization library. / BSD 2-Clause |
| [terminado](https://github.com/jupyter/terminado) | 0.9.4 | Terminals served by tornado websockets / BSD-2-Clause |
| [testpath](https://testpath.readthedocs.io) | 0.4.4 | Testpath is a collection of utilities for Python code working with files and commands. / BSD-3-Clause |
| [textdistance](https://github.com/orsinium/textdistance) | 4.2.1 | TextDistance – python library for comparing distance between two or more sequences by many algorithms. / MIT |
| [threadpoolctl](https://github.com/joblib/threadpoolctl) | 2.1.0 | Python helpers to control the threadpools of native libraries / BSD 3-Clause |
| [three-merge](https://github.com/spyder-ide/three-merge) | 0.1.1 | Simple Python library to perform a 3-way merge between strings / MIT |
| [tifffile](https://github.com/cgohlke/tifffile) | 2020.10.1 | Read and write image data from and to TIFF files. / BSD-3-Clause |
| [tk](http://www.tcl.tk/) | 8.6.10 | A dynamic programming language with GUI support. Bundles Tcl and Tk. / Tcl/Tk |
| [toml](https://github.com/uiri/toml) | 0.10.2 | Python lib for TOML. / MIT |
| [toolz](http://toolz.readthedocs.org/) | 0.11.1 | A functional standard library for Python / BSD-3-Clause |
| [tornado](http://www.tornadoweb.org/) | 6.1 | A Python web framework and asynchronous networking library, originally developed at FriendFeed. / Apache-2.0 |
| [tqdm](https://pypi.python.org/pypi/tqdm) | 4.59.0 | A Fast, Extensible Progress Meter / MPL-2.0 or MIT |
| [traitlets](http://traitlets.readthedocs.org/) | 5.0.5 | Configuration system for Python applications / BSD-3-Clause |
| [typed-ast](https://github.com/python/typed_ast) | 1.4.2 | a fork of Python 2 and 3 ast modules with type comment support / Apache-2.0 |
| [typing\_extensions](https://github.com/python/typing/tree/master/typing_extensions) | 3.7.4.3 | Backported and Experimental Type Hints for Python / PSF-2.0 |
| [ujson](https://github.com/ultrajson/ultrajson) | 4.0.2 | Ultra fast JSON decoder and encoder written in C with Python bindings / BSD-3-Clause |
| [unicodecsv](https://github.com/jdunck/python-unicodecsv) | 0.14.1 | Drop-in replacement for csv module which supports unicode strings / BSD |
| [unixodbc](http://www.unixodbc.org/) | 2.3.9 | ODBC on non MS Windows platforms / LGPL-2.1 |
| [urllib3](https://urllib3.readthedocs.io/) | 1.26.4 | HTTP library with thread-safe connection pooling, file post, and more. / MIT |
| [watchdog](http://github.com/gorakhargosh/watchdog) | 1.0.2 | Filesystem events monitoring / Apache-2.0 |
| [wcwidth](https://github.com/jquast/wcwidth) | 0.2.5 | Measures number of Terminal column cells of wide-character codes. / MIT |
| [webencodings](https://github.com/gsnedders/python-webencodings) | 0.5.1 | Character encoding aliases for legacy web content / BSD 3-Clause |
| [werkzeug](https://palletsprojects.com/p/werkzeug/) | 1.0.1 | The comprehensive WSGI web application library. / BSD 3-Clause |
| [wheel](https://github.com/pypa/wheel) | 0.36.2 | A built-package format for Python. / MIT |
| [widgetsnbextension](http://ipython.org) | 3.5.1 | Interactive Widgets for Jupyter / BSD 3-clause |
| [wrapt](https://github.com/GrahamDumpleton/wrapt) | 1.12.1 | Module for decorators, wrappers and monkey patching / BSD 2-Clause |
| [wurlitzer](https://github.com/minrk/wurlitzer) | 2.1.0 | Capture C-level stdout/stderr in Python / MIT |
| [xlrd](http://www.python-excel.org/) | 2.0.1 | Library for developers to extract data from Microsoft Excel (tm) spreadsheet files / BSD 3-Clause and BSD with advertising |
| [xlsxwriter](https://xlsxwriter.readthedocs.io/) | 1.3.8 | A Python module for creating Excel XLSX files / BSD-2-Clause |
| [xlwings](http://xlwings.org/) | 0.23.0 | Interact with Excel from Python and vice versa / 3-clause BSD |
| [xlwt](http://www.python-excel.org/) | 1.3.0 | Writing data and formatting information to Excel files / BSD |
| [xz](http://tukaani.org/xz/) | 5.2.5 | Data compression software with high compression ratio / LGPL-2.1 and GPL-2.0 |
| [yaml](http://pyyaml.org/wiki/LibYAML) | 0.2.5 | A C library for parsing and emitting YAML / MIT |
| [yapf](https://github.com/google/yapf) | 0.31.0 | A formatter for Python files / Apache 2.0 |
| [zeromq](http://zeromq.org) | 4.3.4 | A high-performance asynchronous messaging library. / LGPL-3.0-or-later |
| [zict](http://github.com/mrocklin/zict) | 2.0.0 | Composable Dictionary Classes / BSD 3-Clause |
| [zipp](https://github.com/jaraco/zipp) | 3.4.1 | A pathlib-compatible Zipfile object wrapper / MIT |
| [zlib](http://zlib.net/) | 1.2.11 | Massively spiffy yet delicately unobtrusive compression library / zlib |
| zope | 1.0 | web application server / BSD |
| [zope.event](http://www.zope.org/en/latest/) | 4.5.0 | Very basic event publishing system / Zope Public License |
| [zope.interface](http://docs.zope.org/zope.interface/) | 5.3.0 | Interfaces for Python / ZPL-2.1 |
| [zstd](http://www.zstd.net) | 1.4.5 | Zstandard - Fast real-time compression algorithm / BSD 3-Clause |
| Name | Version | Summary / License |
|---|---|---|
| [\_libgcc\_mutex](https://github.com/AnacondaRecipes/_libgcc_mutex-feedstock) | 0.1 | Mutex for libgcc and libgcc-ng / None |
| [\_openmp\_mutex](https://github.com/conda-forge/ctng-compilers-feedstock) | 4.5 | OpenMP Implementation Mutex / BSD-3-Clause |
| [alabaster](http://www.sphinx-doc.org/en/stable/index.html) | 0.7.12 | Configurable, Python 2+3 compatible Sphinx theme. / BSD 3-Clause |
| [anaconda-client](http://anaconda.org) | 1.7.2 | anaconda.org command line client library / BSD 3-clause |
| [anaconda-project](https://github.com/Anaconda-Platform/anaconda-project) | 0.9.1 | Tool for encapsulating, running, and reproducing data science projects / BSD-3-Clause |
| [argon2-cffi](https://argon2-cffi.readthedocs.org/) | 20.1.0 | The secure Argon2 password hashing algorithm. / MIT |
| [asn1crypto](https://github.com/wbond/asn1crypto) | 1.4.0 | Python ASN.1 library with a focus on performance and a pythonic API / MIT |
| [astroid](https://www.astroid.org/) | 2.4.2 | A abstract syntax tree for Python with inference support. / LGPL-2.1-only |
| [astropy](http://www.astropy.org/) | 4.2.1 | Community-developed Python Library for Astronomy / BSD-3-Clause |
| [async\_generator](https://github.com/python-trio/async_generator) | 1.10 | Async generators and context managers for Python 3.5+ / MIT |
| [attrs](https://attrs.readthedocs.io/en/stable/) | 20.3.0 | attrs is the Python package that will bring back the joy of writing classes by relieving you from the drudgery of implementing object protocols (aka dunder methods). / MIT |
| [babel](http://babel.pocoo.org/) | 2.9.0 | Utilities to internationalize and localize Python applications / BSD 3-clause |
| [backcall](https://github.com/takluyver/backcall/) | 0.2.0 | Specifications for callback functions passed in to an API / BSD-3-Clause |
| [backports](https://bitbucket.org/brandon/backports) | 1.0 | None / BSD |
| [backports.shutil\_get\_terminal\_size](https://github.com/chrippa/backports.shutil_get_terminal_size) | 1.0.0 | A backport of the get\_terminal\_size function from Python 3.3’s shutil. / MIT |
| [beautifulsoup4](http://www.crummy.com/software/BeautifulSoup/) | 4.9.3 | Python library designed for screen-scraping / MIT |
| [bitarray](https://github.com/ilanschnell/bitarray) | 1.6.1 | efficient arrays of booleans – C extension / PSF |
| [bkcharts](http://github.com/bokeh/bkcharts) | 0.2 | High level chart types built on top of Bokeh / BSD 3-Clause |
| blas | 1.0 | |
| [bleach](https://github.com/mozilla/bleach) | 3.3.0 | Easy, whitelist-based HTML-sanitizing tool / Apache-2.0 |
| [blosc](https://github.com/Blosc/c-blosc) | 1.21.0 | A blocking, shuffling and loss-less compression library that can be faster than memcpy() / BSD-3-Clause |
| [bokeh](http://bokeh.pydata.org/) | 2.3.1 | Statistical and novel interactive HTML plots for Python / BSD-3-Clause |
| [bottleneck](https://github.com/pydata/bottleneck) | 1.3.2 | Fast NumPy array functions written in Cython. / BSD 2-Clause |
| [brotli](http://github.com/google/brotli) | 1.0.9 | Brotli compression format / MIT |
| [brotlipy](https://github.com/python-hyper/brotlipy) | 0.7.0 | Python bindings to the Brotli compression library / MIT |
| [bzip2](http://www.bzip.org/) | 1.0.8 | high-quality data compressor / bzip2 |
| [c-ares](https://c-ares.haxx.se/) | 1.17.1 | This is c-ares, an asynchronous resolver library / MIT |
| [ca-certificates](https://github.com/conda-forge/ca-certificates-feedstock) | 2021.4.13 | Certificates for use with other packages. / MPL 2.0 |
| [cairo](http://cairographics.org/) | 1.16.0 | Cairo is a 2D graphics library with support for multiple output devices. / LGPL 2.1 or MPL 1.1 |
| [certifi](http://certifi.io/) | 2020.12.5 | Python package for providing Mozilla’s CA Bundle. / ISC |
| [cffi](https://bitbucket.org/cffi/cffi) | 1.14.5 | Foreign Function Interface for Python calling C code. / MIT |
| [chardet](https://github.com/chardet/chardet) | 4.0.0 | Universal character encoding detector / LGPL2 |
| [click](https://palletsprojects.com/p/click) | 7.1.2 | Python composable command line interface toolkit / BSD-3-Clause |
| [cloudpickle](https://github.com/cloudpipe/cloudpickle) | 1.6.0 | Extended pickling support for Python objects / BSD-3-Clause |
| [clyent](https://github.com/Anaconda-Platform/clyent) | 1.2.2 | Command line client library for windows and posix / BSD 3-Clause |
| [colorama](https://github.com/tartley/colorama) | 0.4.4 | Cross-platform colored terminal text / BSD-3-Clause |
| [conda](https://conda.io) | 4.10.1 | OS-agnostic, system-level binary package and environment manager. / BSD 3-Clause |
| [conda-build](https://github.com/conda/conda-build) | 3.21.4 | tools for building conda packages / BSD 3-Clause |
| [conda-env](https://github.com/conda/conda-env) | 2.6.0 | Tools for interacting with conda environments. / BSD 3-Clause |
| [conda-verify](https://github.com/conda/conda-verify) | 3.4.2 | tool for validating conda recipes and conda packages / BSD 3-Clause |
| [contextlib2](http://contextlib2.readthedocs.org) | 0.6.0.post1 | Backports and enhancements for the contextlib module / PSF 2 |
| [cryptography](https://github.com/pyca/cryptography) | 3.4.7 | Provides cryptographic recipes and primitives to Python developers / Apache-2.0 AND BSD-3-Clause AND PSF-2.0 AND MIT |
| [curl](http://curl.haxx.se/) | 7.71.1 | tool and library for transferring data with URL syntax / MIT/X derivate (`<http://curl.haxx.se/docs/copyright.html>`) |
| [cycler](http://matplotlib.org/cycler) | 0.10.0 | Composable style cycles. / BSD 3-Clause |
| [cython](http://www.cython.org/) | 0.29.23 | The Cython compiler for writing C extensions for the Python language / Apache-2.0 |
| [cytoolz](https://github.com/pytoolz/cytoolz) | 0.11.0 | Cython implementation of Toolz. High performance functional utilities / BSD-3-Clause |
| [dask](https://dask.org/) | 2021.4.0 | Parallel PyData with Task Scheduling / BSD-3-Clause |
| [dask-core](http://github.com/dask/dask/) | 2021.4.0 | Parallel Python with task scheduling / BSD-3-Clause |
| [dbus](http://www.freedesktop.org/wiki/Software/dbus/) | 1.13.18 | Simple message bus system for applications to talk to one another / GPL2 |
| [decorator](https://github.com/micheles/decorator) | 5.0.6 | Better living through Python with decorators. / BSD-3-Clause |
| [defusedxml](https://bitbucket.org/tiran/defusedxml) | 0.7.1 | XML bomb protection for Python stdlib modules / PSF 2.0 |
| [distributed](http://distributed.readthedocs.io/en/latest/) | 2021.4.0 | Distributed computing with Dask / BSD-3-Clause |
| [docutils](http://docutils.sourceforge.net/) | 0.17 | Docutils – Python Documentation Utilities / Public Domain Dedictation and BSD 2-Clause and PSF 2.1.1 and GPL 3.0 |
| [entrypoints](https://github.com/takluyver/entrypoints) | 0.3 | Discover and load entry points from installed packages. / MIT License |
| [et\_xmlfile](https://bitbucket.org/openpyxl/et_xmlfile) | 1.0.1 | An implementation of lxml.xmlfile for the standard library / MIT |
| [expat](http://expat.sourceforge.net/) | 2.3.0 | Expat XML parser library in C / MIT |
| [fastcache](https://github.com/pbrady/fastcache) | 1.1.0 | C implementation of Python 3 lru\_cache / MIT |
| [filelock](https://github.com/benediktschmitt/py-filelock) | 3.0.12 | A platform independent file lock. / Public Domain |
| [flask](http://flask.pocoo.org) | 1.1.2 | A microframework based on Werkzeug, Jinja2 and good intentions. / BSD 3-Clause |
| [fontconfig](http://www.freedesktop.org/wiki/Software/fontconfig/) | 2.13.1 | A library for configuring and customizing font access. / MIT |
| [freetype](https://www.freetype.org/) | 2.10.4 | A Free, High-Quality, and Portable Font Engine / GPL-2.0-only and LicenseRef-FreeType |
| [fribidi](https://github.com/fribidi/fribidi) | 1.0.10 | The Free Implementation of the Unicode Bidirectional Algorithm. / LGPL-2.1 |
| [fsspec](https://github.com/martindurant/filesystem_spec) | 0.9.0 | A specification for pythonic filesystems / BSD-3-Clause |
| [get\_terminal\_size](https://github.com/chrippa/backports.shutil_get_terminal_size) | 1.0.0 | Get the size of the terminal window. / MIT |
| [gevent](https://www.gevent.org) | 21.1.2 | Coroutine-based network library / MIT |
| [giflib](http://giflib.sourceforge.net) | 5.2.1 | Library for reading and writing gif images / MIT |
| [glib](https://developer.gnome.org/glib/) | 2.68.1 | Provides core application building blocks for libraries and applications written in C. / LGPL-2.1 |
| [glob2](https://github.com/miracle2k/python-glob2) | 0.7 | Version of the glob module that supports recursion via \*\*, and can capture patterns. / BSD-2-Clause |
| [gmp](http://gmplib.org/) | 6.2.1 | The GNU multiprecision library. / GPL-2.0-or-later AND LGPL-3.0-or-later |
| [gmpy2](https://pypi.python.org/pypi/gmpy2) | 2.0.8 | GMP/MPIR, MPFR, and MPC interface to Python 2.6+ and 3.x / LGPL 3 |
| [graphite2](http://graphite.sil.org/) | 1.3.14 | A “smart font” system that handles the complexities of lesser-known languages of the world. / LGPLv2 |
| [greenlet](https://github.com/python-greenlet/greenlet) | 1.0.0 | Lightweight in-process concurrent programming / MIT |
| [h5py](http://www.h5py.org/) | 2.10.0 | Read and write HDF5 files from Python. / BSD-3-Clause |
| [harfbuzz](http://www.freedesktop.org/wiki/Software/HarfBuzz/) | 2.8.0 | An OpenType text shaping engine. / MIT |
| [hdf5](http://www.hdfgroup.org/HDF5/) | 1.10.6 | HDF5 is a data model, library, and file format for storing and managing data / HDF5 |
| [heapdict](http://stutzbachenterprises.com/) | 1.0.1 | A heap with decrease-key and increase-key operations / BSD 3-Clause |
| [html5lib](https://github.com/html5lib/html5lib-python) | 1.1 | HTML parser based on the WHATWG HTML specification / MIT |
| [icu](http://site.icu-project.org/) | 68.1 | International Components for Unicode. / MIT |
| [idna](https://github.com/kjd/idna) | 2.10 | Internationalized Domain Names in Applications (IDNA). / BSD Like |
| [imagecodecs](https://www.lfd.uci.edu/~gohlke/) | 2021.1.11 | Image transformation, compression, and decompression codecs / BSD-3-Clause |
| [imageio](https://imageio.github.io) | 2.9.0 | A Python library for reading and writing image data / BSD-2-Clause |
| [imagesize](https://github.com/shibukawa/imagesize_py) | 1.2.0 | Getting image size from png/jpeg/jpeg2000/gif file / MIT |
| [importlib-metadata](https://github.com/python/importlib_metadata) | 3.10.0 | A library to access the metadata for a Python package / Apache-2.0 |
| [importlib\_metadata](https://github.com/python/importlib_metadata) | 3.10.0 | A library to access the metadata for a Python package / Apache-2.0 |
| [iniconfig](http://github.com/RonnyPfannschmidt/iniconfig) | 1.1.1 | iniconfig: brain-dead simple config-ini parsing / MIT |
| [ipykernel](https://ipython.org) | 5.3.4 | IPython Kernel for Jupyter / BSD-3-Clause |
| [ipython](https://ipython.org) | 7.22.0 | IPython: Productive Interactive Computing / BSD-3-Clause |
| [ipython\_genutils](http://ipython.org) | 0.2.0 | vestigial utilities from IPython / BSD 3-Clause |
| [ipywidgets](https://github.com/ipython/ipywidgets) | 7.6.3 | Jupyter Interactive Widgets / BSD-3-Clause |
| [isort](https://github.com/timothycrosley/isort) | 5.8.0 | A Python utility / library to sort Python imports. / MIT |
| [itsdangerous](https://github.com/pallets/itsdangerous) | 1.1.0 | Various helpers to pass trusted data to untrusted environments. / BSD 3-Clause |
| [jbig](https://www.cl.cam.ac.uk/~mgk25/jbigkit) | 2.1 | Implementation of the JBIG1 data compression standard / GPL-2.0 |
| [jdcal](https://github.com/phn/jdcal) | 1.4.1 | Julian dates from proleptic Gregorian and Julian calendars. / BSD 2-Clause |
| [jedi](https://github.com/davidhalter/jedi/) | 0.17.2 | An autocompletion tool for Python that can be used for text editors. / MIT |
| [jinja2](http://jinja.pocoo.org) | 2.11.3 | An easy to use stand-alone template engine written in pure python. / BSD-3-Clause |
| [joblib](https://pypi.org/project/joblib/) | 1.0.1 | Lightweight pipelining: using Python functions as pipeline jobs. / BSD-3-Clause |
| [jpeg](http://www.ijg.org/) | 9b | read/write jpeg COM, EXIF, IPTC medata / Custom free software license |
| [json5](https://github.com/dpranke/pyjson5) | 0.9.5 | A Python implementation of the JSON5 data format / Apache-2.0 |
| [jsonschema](https://github.com/Julian/jsonschema) | 3.2.0 | An implementation of JSON Schema validation for Python / MIT |
| [jupyter](http://jupyter.org) | 1.0.0 | Jupyter metapackage. Install all the Jupyter components in one go. / BSD 3-Clause |
| [jupyter\_client](https://jupyter.org) | 6.1.12 | jupyter\_client contains the reference implementation of the Jupyter protocol. / BSD-3-Clause |
| [jupyter\_console](http://jupyter.org) | 6.4.0 | Jupyter terminal console / BSD-3-Clause |
| [jupyter\_core](https://jupyter.org) | 4.7.1 | Core common functionality of Jupyter projects. / BSD-3-Clause |
| [jupyterlab](https://github.com/jupyterlab/jupyterlab) | 2.3.1 | JupyterLab PRE-ALPHA / BSD-3-Clause |
| [jupyterlab\_pygments](http://github.com/JupyterLab/jupyterlab_pygments) | 0.1.2 | Pygments syntax coloring scheme making use of the JupyterLab CSS variables / BSD-3-Clause |
| [jupyterlab\_server](https://github.com/jupyterlab/jupyterlab_server) | 1.2.0 | A set of server components for JupyterLab and JupyterLab like applications. / BSD-3-Clause |
| [jupyterlab\_widgets](https://github.com/jupyter-widgets/ipywidgets) | 1.0.0 | JupyterLab extension providing HTML widgets / BSD-3-Clause |
| [jxrlib](https://packages.debian.org/source/sid/jxrlib) | 1.1 | jxrlib - JPEG XR Library by Microsoft, built from Debian hosted sources. / BSD-2-Clause |
| [kiwisolver](https://github.com/nucleic/kiwi) | 1.3.1 | An efficient C++ implementation of the Cassowary constraint solver / BSD-3-Clause |
| [krb5](http://web.mit.edu/kerberos/) | 1.18.2 | A network authentication protocol. / MIT |
| [lazy-object-proxy](https://github.com/ionelmc/python-lazy-object-proxy) | 1.4.3 | A fast and thorough lazy object proxy / BSD-2-Clause |
| [lcms2](http://www.littlecms.com/) | 2.12 | Open Source Color Management Engine / MIT |
| [ld\_impl\_linux-s390x](https://www.gnu.org/software/binutils/) | 2.33.1 | A set of programming tools for creating and managing binary programs, object files, libraries, profile data, and assembly source code. / GPL-3.0-only |
| [libaec](https://gitlab.dkrz.de/k202009/libaec) | 1.0.4 | Adaptive Entropy Coding library / BSD-2-Clause |
| [libarchive](http://www.libarchive.org/) | 3.4.2 | Multi-format archive and compression library / BSD-2-Clause |
| [libcurl](http://curl.haxx.se/) | 7.71.1 | tool and library for transferring data with URL syntax / MIT/X derivate (`<http://curl.haxx.se/docs/copyright.html>`) |
| [libdeflate](https://github.com/ebiggers/libdeflate) | 1.7 | libdeflate is a library for fast, whole-buffer DEFLATE-based compression and decompression. / MIT |
| [libedit](http://thrysoee.dk/editline/) | 3.1.20210216 | Editline Library (libedit) / BSD-2-Clause |
| [libev](http://software.schmorp.de/pkg/libev.html) | 4.33 | A full-featured and high-performance event loop that is loosely modeled after libevent, but without its limitations and bugs. / BSD-2-Clause |
| [libffi](https://sourceware.org/libffi/) | 3.3 | A Portable Foreign Function Interface Library. / Custom |
| [libgcc-ng](https://gcc.gnu.org/onlinedocs/gccint/Libgcc.html) | 9.3.0 | The GCC low-level runtime library / GPL-3.0-only WITH GCC-exception-3.1 |
| [libgfortran-ng](https://gcc.gnu.org/) | 7.5.0 | The GNU Fortran Runtime Library / GPL-3.0-only WITH GCC-exception-3.1 |
| [libgfortran4](https://gcc.gnu.org/) | 7.5.0 | The GNU Fortran Runtime Library / GPL-3.0-only WITH GCC-exception-3.1 |
| [libgomp](https://gcc.gnu.org/onlinedocs/gccint/Libgcc.html) | 9.3.0 | The GCC OpenMP implementation. / GPL-3.0-only WITH GCC-exception-3.1 |
| [liblief](https://lief.quarkslab.com/) | 0.10.1 | A cross platform library to parse, modify and abstract ELF, PE and MachO formats. / Apache-2.0 |
| [libopenblas](http://www.openblas.net/) | 0.3.13 | An Optimized BLAS library / BSD |
| [libpng](http://www.libpng.org/pub/png/libpng.html) | 1.6.37 | PNG reference library / zlib/libpng |
| [libsodium](http://libsodium.org) | 1.0.18 | A modern and easy-to-use crypto library. / ISC |
| [libssh2](https://www.libssh2.org/) | 1.9.0 | the SSH library / BSD-3-Clause |
| [libstdcxx-ng](https://gcc.gnu.org/) | 9.3.0 | The GNU C++ Runtime Library / GPL-3.0-only WITH GCC-exception-3.1 |
| [libtiff](http://www.libtiff.org/) | 4.2.0 | Support for the Tag Image File Format (TIFF). / HPND |
| [libtool](http://www.gnu.org/software/libtool/) | 2.4.6 | The GNU Portable Library Tool / GPL 3 |
| [libuuid](http://sourceforge.net/projects/libuuid/) | 1.0.3 | Portable uuid C library. / BSD 3-Clause |
| [libuv](http://libuv.org/) | 1.40.0 | Cross-platform asynchronous I/O / MIT |
| [libwebp](https://developers.google.com/speed/webp/) | 1.2.0 | WebP image library / Google |
| [libxcb](http://xcb.freedesktop.org/) | 1.14 | This is the C-language Binding (XCB) package to the X Window System protocol / MIT |
| [libxml2](http://xmlsoft.org/) | 2.9.10 | The XML C parser and toolkit of Gnome / MIT |
| [libxslt](http://xmlsoft.org/XSLT/) | 1.1.34 | The XSLT C library developed for the GNOME project / MIT |
| [libzopfli](https://github.com/google/zopfli) | 1.0.3 | A compression library programmed in C to perform very good, but slow, deflate or zlib compression. / Apache-2.0 |
| [locket](https://github.com/mwilliamson/locket.py) | 0.2.1 | File-based locks for Python for Linux and Windows / BSD 2-Clause |
| [lxml](http://lxml.de/) | 4.6.3 | Pythonic binding for the C libraries libxml2 and libxslt. / BSD-3-Clause and GPL-2.0-only and ZPL-2.0 and LicenseRef-ElementTree |
| [lz4-c](https://www.lz4.org) | 1.9.3 | Extremely Fast Compression algorithm / BSD-2-Clause |
| [lzo](http://www.oberhumer.com/opensource/lzo/) | 2.10 | LZO is a portable lossless data compression library written in ANSI C. / GPL v2+ |
| [markupsafe](https://www.palletsprojects.com/p/markupsafe) | 1.1.1 | A Python module that implements the jinja2.Markup string / BSD-3-Clause |
| [matplotlib](http://matplotlib.org/) | 3.3.4 | Publication quality figures in Python / LicenseRef-PSF-based |
| [matplotlib-base](http://matplotlib.org/) | 3.3.4 | Publication quality figures in Python / LicenseRef-PSF-based |
| [mccabe](https://github.com/PyCQA/mccabe) | 0.6.1 | McCabe complexity checker for Python / MIT |
| [mistune](https://github.com/lepture/mistune) | 0.8.4 | The fastest markdown parser in pure Python. / BSD 3-Clause |
| [mock](https://github.com/testing-cabal/mock) | 4.0.3 | A library for testing in Python / BSD-2-Clause |
| [more-itertools](https://github.com/more-itertools/more-itertools) | 8.7.0 | More routines for operating on iterables, beyond itertools / MIT |
| [mpc](http://www.multiprecision.org/) | 1.1.0 | A C library for the arithmetic of complex numbers with arbitrarily high precision. / LGPL 3 |
| [mpfr](http://www.mpfr.org/) | 4.0.2 | The MPFR library is a C library for multiple-precision floating-point computations with correct rounding. / LGPL-3.0-only |
| [mpmath](http://mpmath.org) | 1.2.1 | Python library for arbitrary-precision floating-point arithmetic / BSD 3-Clause |
| [msgpack-python](http://msgpack.org/) | 1.0.2 | MessagePack (de)serializer / Apache-2.0 |
| [multipledispatch](https://github.com/mrocklin/multipledispatch/) | 0.6.0 | Multiple dispatch in Python / BSD 3-Clause |
| [nbclient](https://jupyter.org) | 0.5.3 | A client library for executing notebooks. Formally nbconvert’s ExecutePreprocessor. / BSD-3-Clause |
| [nbconvert](http://jupyter.org) | 6.0.7 | Converting Jupyter Notebooks / BSD-3-Clause |
| [nbformat](http://jupyter.org) | 5.1.3 | The Jupyter Notebook format / BSD-3-Clause |
| [ncurses](http://www.gnu.org/software/ncurses/) | 6.2 | Library for text-based user interfaces / Free software (MIT-like) |
| [nest-asyncio](https://github.com/erdewit/nest_asyncio) | 1.5.1 | Patch asyncio to allow nested event loops / BSD-2-Clause |
| [networkx](https://networkx.github.io/) | 2.5 | Python package for creating and manipulating complex networks / BSD-3-Clause |
| [nltk](http://nltk.org/) | 3.6.1 | Natural Language Toolkit / Apache 2.0 |
| nomkl | 3.0 | None / BSD |
| [nose](http://readthedocs.org/docs/nose/) | 1.3.7 | Nose extends unittest to make testing easier / LGPL-2.1 |
| [notebook](https://jupyter.org) | 6.3.0 | Jupyter Notebook / BSD-3-Clause |
| [numexpr](https://github.com/pydata/numexpr) | 2.7.3 | Fast numerical expression evaluator for NumPy. / MIT |
| [numpy](http://numpy.scipy.org/) | 1.20.1 | Array processing for numbers, strings, records, and objects. / BSD 3-Clause |
| [numpy-base](http://numpy.scipy.org/) | 1.20.1 | Array processing for numbers, strings, records, and objects. / BSD 3-Clause |
| [numpydoc](https://github.com/numpy/numpydoc) | 1.1.0 | Numpy’s Sphinx extensions / BSD 3-Clause |
| [olefile](http://www.decalage.info/python/olefileio) | 0.46 | parse, read and write Microsoft OLE2 files / BSD 2-Clause |
| [openblas](http://www.openblas.net/) | 0.3.13 | An optimized BLAS library / BSD |
| openblas-devel | 0.3.13 | OpenBLAS headers and libraries for developing software that used OpenBLAS. / None |
| [openjpeg](http://www.openjpeg.org/) | 2.3.0 | An open-source JPEG 2000 codec written in C / BSD 2-Clause |
| [openpyxl](https://openpyxl.readthedocs.io) | 3.0.7 | A Python library to read/write Excel 2010 xlsx/xlsm files / MIT |
| [openssl](http://www.openssl.org/) | 1.1.1k | OpenSSL is an open-source implementation of the SSL and TLS protocols / OpenSSL |
| [packaging](https://github.com/pypa/packaging) | 20.9 | Core utilities for Python packages / Apache 2.0 or BSD 2-Clause |
| [pandas](http://pandas.pydata.org) | 1.2.4 | High-performance, easy-to-use data structures and data analysis tools. / BSD-3-Clause |
| [pandoc](http://pandoc.org/) | 1.16.0 | Universal markup converter (repackaged binaries) / GPL-2.0 |
| [pandocfilters](https://github.com/jgm/pandocfilters) | 1.4.3 | A python module for writing pandoc filters / BSD-3-Clause |
| [pango](http://www.pango.org/) | 1.45.3 | Text layout and rendering engine. / LGPL-2.1 |
| [parso](https://github.com/davidhalter/parso) | 0.7.0 | A Python Parser / MIT |
| [partd](https://github.com/dask/partd) | 1.2.0 | Data structure for on-disk shuffle operations / BSD 3-Clause |
| [patchelf](http://nixos.org/patchelf.html) | 0.12 | A small utility to modify the dynamic linker and RPATH of ELF executables. / GPL-3.0-or-later |
| [path](https://github.com/jaraco/path) | 15.1.2 | A module wrapper for os.path / MIT |
| [path.py](https://github.com/jaraco/path.py) | 12.5.0 | A module wrapper for os.path / MIT |
| [pathlib2](https://github.com/mcmtroffaes/pathlib2) | 2.3.5 | Fork of pathlib aiming to support the full stdlib Python API / MIT |
| [patsy](https://github.com/pydata/patsy) | 0.5.1 | Describing statistical models in Python using symbolic formulas / BSD-2-Clause, PSF2 |
| [pcre](http://www.pcre.org/) | 8.44 | Regular expression pattern matching using the same syntax and semantics as Perl 5. / BSD 3-Clause |
| [pep8](http://pep8.readthedocs.org/) | 1.7.1 | Python style guide checker / MIT |
| [pexpect](http://pexpect.sourceforge.net/) | 4.8.0 | Pexpect makes Python a better tool for controlling other applications. / ISC |
| [pickleshare](https://github.com/pickleshare/pickleshare/) | 0.7.5 | Tiny ‘shelve’-like database with concurrency support / MIT |
| [pillow](https://pillow.readthedocs.io) | 8.2.0 | Pillow is the friendly PIL fork by Alex Clark and Contributors / LicenseRef-PIL |
| [pip](https://pip.pypa.io/en/stable/) | 21.0.1 | PyPA recommended tool for installing Python packages / MIT |
| [pixman](http://www.pixman.org/) | 0.40.0 | A low-level software library for pixel manipulation. / MIT |
| [pkginfo](https://code.launchpad.net/~tseaver/pkginfo/trunk) | 1.7.0 | Query metadatdata from sdists / bdists / installed packages. / MIT |
| [pluggy](https://github.com/pytest-dev/pluggy) | 0.13.1 | Plugin registration and hook calling for Python / MIT |
| [ply](http://www.dabeaz.com/ply/index.html) | 3.11 | Python Lex-Yacc / BSD 3-clause |
| [prometheus\_client](https://github.com/prometheus/client_python) | 0.10.1 | Python client for the Prometheus monitoring system / Apache-2.0 |
| [prompt-toolkit](https://github.com/jonathanslenders/python-prompt-toolkit) | 3.0.17 | Library for building powerful interactive command lines in Python / BSD-3-Clause |
| [prompt\_toolkit](https://github.com/jonathanslenders/python-prompt-toolkit) | 3.0.17 | Library for building powerful interactive command lines in Python / BSD-3-Clause |
| [psutil](https://github.com/giampaolo/psutil) | 5.8.0 | A cross-platform process and system utilities module for Python / BSD-3-Clause |
| [ptyprocess](https://github.com/pexpect/ptyprocess) | 0.7.0 | Run a subprocess in a pseudo terminal / ISC |
| [py](https://github.com/pytest-dev/py) | 1.10.0 | library with cross-python path, ini-parsing, io, code, log facilities / MIT |
| [py-lief](https://lief.quarkslab.com/) | 0.10.1 | A cross platform library to parse, modify and abstract ELF, PE and MachO formats. / Apache-2.0 |
| [pycodestyle](https://pycodestyle.readthedocs.io/) | 2.7.0 | Python style guide checker / MIT |
| [pycosat](https://github.com/ContinuumIO/pycosat) | 0.6.3 | Bindings to picosat (a SAT solver) / MIT |
| [pycparser](https://github.com/eliben/pycparser) | 2.20 | Complete C99 parser in pure Python / BSD 3-clause |
| [pycurl](http://pycurl.sourceforge.net/) | 7.43.0.6 | A Python Interface To The cURL library / LGPL, MIT |
| [pyerfa](https://pyerfa.readthedocs.io/) | 1.7.1.1 | Python bindings for ERFA routines / BSD-3-Clause |
| [pyflakes](https://github.com/PyCQA/pyflakes) | 2.3.1 | Pyflakes analyzes programs and detects various errors. / MIT |
| [pygments](http://pygments.org/) | 2.8.1 | Pygments is a generic syntax highlighter suitable for use in code hosting, forums, wikis or other applications that need to prettify source code. / BSD-2-clause |
| [pylint](http://www.pylint.org/) | 2.7.4 | python code static checker / GPL-2.0-only |
| [pyodbc](https://github.com/mkleehammer/pyodbc) | 4.0.30 | DB API Module for ODBC / MIT |
| [pyopenssl](https://github.com/pyca/pyopenssl) | 20.0.1 | Python wrapper module around the OpenSSL library / Apache 2.0 |
| [pyparsing](http://pyparsing.wikispaces.com/) | 2.4.7 | Create and execute simple grammars / MIT |
| [pyrsistent](http://github.com/tobgu/pyrsistent/) | 0.17.3 | Persistent/Functional/Immutable data structures / MIT |
| [pysocks](https://github.com/Anorov/PySocks) | 1.7.1 | A Python SOCKS client module. See [Anorov/PySocks](https://github.com/Anorov/PySocks) for more information. / BSD 3-Clause |
| [pytables](http://www.pytables.org) | 3.6.1 | Brings together Python, HDF5 and NumPy to easily handle large amounts of data. / BSD 3-Clause |
| [pytest](https://docs.pytest.org/en/latest/) | 6.2.3 | Simple and powerful testing with Python. / MIT |
| [python](https://www.python.org/) | 3.8.8 | General purpose programming language / Python-2.0 |
| [python-dateutil](https://dateutil.readthedocs.org/) | 2.8.1 | Extensions to the standard Python datetime module. / BSD 3 Clause |
| [python-libarchive-c](https://github.com/Changaco/python-libarchive-c) | 2.9 | Python interface to libarchive / CC0-1.0 |
| [pytz](http://pythonhosted.org/pytz/) | 2021.1 | World timezone definitions, modern and historical. / MIT |
| [pywavelets](https://github.com/PyWavelets/pywt) | 1.1.1 | Discrete Wavelet Transforms in Python / MIT |
| [pyyaml](http://pyyaml.org/wiki/PyYAML) | 5.4.1 | YAML parser and emitter for Python / MIT |
| [pyzmq](https://github.com/zeromq/pyzmq) | 20.0.0 | Python bindings for zeromq / BSD 3-clause |
| [readline](https://cnswww.cns.cwru.edu/php/chet/readline/rltop.html) | 8.1 | library for editing command lines as they are typed in / GPL-3.0 |
| [regex](https://bitbucket.org/mrabarnett/mrab-regex) | 2021.4.4 | Alternative regular expression module, to replace re / Python-2.0 |
| [requests](http://python-requests.org) | 2.25.1 | Requests is an elegant and simple HTTP library for Python, built with ♥. / Apache-2.0 |
| [rope](https://github.com/python-rope/rope) | 0.18.0 | A python refactoring library / GPL 2.0 |
| [ruamel\_yaml](https://sourceforge.net/p/ruamel-yaml/code/ci/default/tree) | 0.15.80 | A patched copy of ruamel.yaml. / MIT |
| [scikit-image](http://scikit-image.org/) | 0.18.1 | Image processing in Python. / BSD-3-Clause |
| [scikit-learn](http://scikit-learn.org/) | 0.24.1 | A set of python modules for machine learning and data mining / BSD-3-Clause |
| [scipy](http://www.scipy.org/) | 1.6.2 | Scientific Library for Python / BSD 3-Clause |
| [seaborn](https://seaborn.pydata.org) | 0.11.1 | Statistical data visualization / BSD 3-Clause |
| [send2trash](https://github.com/hsoft/send2trash) | 1.5.0 | Python library to natively send files to Trash (or Recycle bin) on all platforms. / BSD-3-Clause |
| [setuptools](https://github.com/pypa/setuptools) | 51.1.2 | Download, build, install, upgrade, and uninstall Python packages / MIT |
| [simplegeneric](http://cheeseshop.python.org/pypi/simplegeneric) | 0.8.1 | Simple generic functions (similar to Python’s own len(), pickle.dump(), etc.) / Zope Public |
| [singledispatch](http://docs.python.org/3/library/functools.html#functools.singledispatch) | 3.6.1 | Transforms a function into a single-dispatch generic function / MIT |
| [sip](http://www.riverbankcomputing.com/software/sip/intro) | 4.19.25 | Create Python bindings for C and C++ libraries / GPL-3.0 |
| [six](https://six.readthedocs.io/) | 1.15.0 | Python 2 and 3 compatibility utilities / MIT |
| [snappy](https://github.com/google/snappy) | 1.1.8 | A fast compressor/decompressor / BSD 3-clause |
| [snowballstemmer](https://github.com/shibukawa/snowball_py) | 2.1.0 | Snowball stemming library collection for Python / BSD-2-Clause |
| [sortedcollections](http://www.grantjenks.com/docs/sortedcollections/) | 2.1.0 | Python Sorted Collections / Apache-2.0 |
| [sortedcontainers](http://www.grantjenks.com/docs/sortedcontainers/) | 2.3.0 | Python Sorted Container Types: SortedList, SortedDict, and SortedSet / Apache-2.0 |
| [soupsieve](http://facelessuser.github.io/soupsieve) | 2.2.1 | A modern CSS selector implementation for BeautifulSoup / MIT |
| [sphinx](http://www.sphinx-doc.org) | 4.0.1 | Sphinx is a tool that makes it easy to create intelligent and beautiful documentation / BSD-2-Clause |
| sphinxcontrib | 1.0 | Python namespace for sphinxcontrib / BSD |
| [sphinxcontrib-applehelp](https://www.sphinx-doc.org/en/master/) | 1.0.2 | sphinxcontrib-applehelp is a sphinx extension which outputs Apple help books / BSD-2-Clause |
| [sphinxcontrib-devhelp](https://www.sphinx-doc.org/en/master/) | 1.0.2 | sphinxcontrib-devhelp is a sphinx extension which outputs Devhelp document / BSD-2-Clause |
| [sphinxcontrib-htmlhelp](https://www.sphinx-doc.org/en/master/) | 1.0.3 | sphinxcontrib-htmlhelp is a sphinx extension which … / BSD-2-Clause |
| [sphinxcontrib-jsmath](https://www.sphinx-doc.org/en/master/) | 1.0.1 | A sphinx extension which renders display math in HTML via JavaScript / BSD-2-Clause |
| [sphinxcontrib-qthelp](https://www.sphinx-doc.org/en/master/) | 1.0.3 | sphinxcontrib-qthelp is a sphinx extension which outputs QtHelp document / BSD-2-Clause |
| [sphinxcontrib-serializinghtml](https://www.sphinx-doc.org/en/master/) | 1.1.4 | sphinxcontrib-serializinghtml is a sphinx extension which outputs “serialized” HTML files (json and pickle). / BSD-2-Clause |
| [sphinxcontrib-websupport](https://pypi.python.org/pypi/sphinxcontrib-websupport) | 1.2.4 | Sphinx API for Web Apps / BSD-2-Clause |
| [sqlalchemy](http://www.sqlalchemy.org/) | 1.3.17 | Database Abstraction Library. / MIT |
| [sqlite](http://www.sqlite.org/) | 3.35.4 | Implements a self-contained, zero-configuration, SQL database engine / Public-Domain (`<http://www.sqlite.org/copyright.html>`) |
| [statsmodels](https://www.statsmodels.org) | 0.12.2 | Statistical computations and models for use with SciPy / BSD-3-Clause |
| [sympy](https://sympy.org) | 1.8 | Python library for symbolic mathematics / BSD-3-Clause |
| [tblib](https://github.com/ionelmc/python-tblib) | 1.7.0 | Traceback serialization library. / BSD 2-Clause |
| [terminado](https://github.com/jupyter/terminado) | 0.9.4 | Terminals served by tornado websockets / BSD-2-Clause |
| [testpath](https://testpath.readthedocs.io) | 0.4.4 | Testpath is a collection of utilities for Python code working with files and commands. / BSD-3-Clause |
| [threadpoolctl](https://github.com/joblib/threadpoolctl) | 2.1.0 | Python helpers to control the threadpools of native libraries / BSD 3-Clause |
| [tifffile](https://github.com/cgohlke/tifffile) | 2021.3.31 | Read and write image data from and to TIFF files. / BSD-3-Clause |
| [tk](http://www.tcl.tk/) | 8.6.10 | A dynamic programming language with GUI support. Bundles Tcl and Tk. / Tcl/Tk |
| [toml](https://github.com/uiri/toml) | 0.10.2 | Python lib for TOML. / MIT |
| [toolz](http://toolz.readthedocs.org/) | 0.11.1 | A functional standard library for Python / BSD-3-Clause |
| [tornado](http://www.tornadoweb.org/) | 6.1 | A Python web framework and asynchronous networking library, originally developed at FriendFeed. / Apache-2.0 |
| [tqdm](https://pypi.python.org/pypi/tqdm) | 4.59.0 | A Fast, Extensible Progress Meter / MPL-2.0 or MIT |
| [traitlets](http://traitlets.readthedocs.org/) | 5.0.5 | Configuration system for Python applications / BSD-3-Clause |
| [typing\_extensions](https://github.com/python/typing/tree/master/typing_extensions) | 3.7.4.3 | Backported and Experimental Type Hints for Python / PSF-2.0 |
| [unicodecsv](https://github.com/jdunck/python-unicodecsv) | 0.14.1 | Drop-in replacement for csv module which supports unicode strings / BSD |
| [unixodbc](http://www.unixodbc.org/) | 2.3.9 | ODBC on non MS Windows platforms / LGPL-2.1 |
| [urllib3](https://urllib3.readthedocs.io/) | 1.26.4 | HTTP library with thread-safe connection pooling, file post, and more. / MIT |
| [wcwidth](https://github.com/jquast/wcwidth) | 0.2.5 | Measures number of Terminal column cells of wide-character codes. / MIT |
| [webencodings](https://github.com/gsnedders/python-webencodings) | 0.5.1 | Character encoding aliases for legacy web content / BSD 3-Clause |
| [werkzeug](https://palletsprojects.com/p/werkzeug/) | 1.0.1 | The comprehensive WSGI web application library. / BSD 3-Clause |
| [wheel](https://github.com/pypa/wheel) | 0.36.2 | A built-package format for Python. / MIT |
| [widgetsnbextension](http://ipython.org) | 3.5.1 | Interactive Widgets for Jupyter / BSD 3-clause |
| [wrapt](https://github.com/GrahamDumpleton/wrapt) | 1.11.2 | Module for decorators, wrappers and monkey patching / BSD 2-Clause |
| [xlrd](http://www.python-excel.org/) | 2.0.1 | Library for developers to extract data from Microsoft Excel (tm) spreadsheet files / BSD 3-Clause and BSD with advertising |
| [xlsxwriter](https://xlsxwriter.readthedocs.io/) | 1.3.8 | A Python module for creating Excel XLSX files / BSD-2-Clause |
| [xlwt](http://www.python-excel.org/) | 1.3.0 | Writing data and formatting information to Excel files / BSD |
| [xz](http://tukaani.org/xz/) | 5.2.5 | Data compression software with high compression ratio / LGPL-2.1 and GPL-2.0 |
| [yaml](http://pyyaml.org/wiki/LibYAML) | 0.1.7 | A C library for parsing and emitting YAML / MIT |
| [zeromq](http://zeromq.org) | 4.3.4 | A high-performance asynchronous messaging library. / LGPL-3.0-or-later |
| [zict](http://github.com/mrocklin/zict) | 2.0.0 | Composable Dictionary Classes / BSD 3-Clause |
| [zipp](https://github.com/jaraco/zipp) | 3.4.1 | A pathlib-compatible Zipfile object wrapper / MIT |
| [zlib](http://zlib.net/) | 1.2.11 | Massively spiffy yet delicately unobtrusive compression library / zlib |
| zope | 1.0 | web application server / BSD |
| [zope.event](http://www.zope.org/en/latest/) | 4.5.0 | Very basic event publishing system / Zope Public License |
| [zope.interface](http://docs.zope.org/zope.interface/) | 5.2.0 | Interfaces for Python / ZPL-2.1 |
| [zstd](http://www.zstd.net) | 1.4.9 | Zstandard - Fast real-time compression algorithm / BSD 3-Clause |
| Name | Version | Summary / License |
|---|---|---|
| [\_libgcc\_mutex](https://github.com/AnacondaRecipes/_libgcc_mutex-feedstock) | 0.1 | Mutex for libgcc and libgcc-ng / None |
| [alabaster](http://www.sphinx-doc.org/en/stable/index.html) | 0.7.12 | Configurable, Python 2+3 compatible Sphinx theme. / BSD 3-Clause |
| [anaconda-client](http://anaconda.org) | 1.7.2 | anaconda.org command line client library / BSD 3-clause |
| [anaconda-project](https://github.com/Anaconda-Platform/anaconda-project) | 0.9.1 | Tool for encapsulating, running, and reproducing data science projects / BSD-3-Clause |
| [argon2-cffi](https://argon2-cffi.readthedocs.org/) | 20.1.0 | The secure Argon2 password hashing algorithm. / MIT |
| [asn1crypto](https://github.com/wbond/asn1crypto) | 1.4.0 | Python ASN.1 library with a focus on performance and a pythonic API / MIT |
| [astroid](https://www.astroid.org/) | 2.5 | A abstract syntax tree for Python with inference support. / LGPL-2.1-only |
| [astropy](http://www.astropy.org/) | 4.2.1 | Community-developed Python Library for Astronomy / BSD-3-Clause |
| [async\_generator](https://github.com/python-trio/async_generator) | 1.10 | Async generators and context managers for Python 3.5+ / MIT |
| [attrs](https://attrs.readthedocs.io/en/stable/) | 20.3.0 | attrs is the Python package that will bring back the joy of writing classes by relieving you from the drudgery of implementing object protocols (aka dunder methods). / MIT |
| [babel](http://babel.pocoo.org/) | 2.9.0 | Utilities to internationalize and localize Python applications / BSD 3-clause |
| [backcall](https://github.com/takluyver/backcall/) | 0.2.0 | Specifications for callback functions passed in to an API / BSD-3-Clause |
| [backports](https://bitbucket.org/brandon/backports) | 1.0 | None / BSD |
| [backports.shutil\_get\_terminal\_size](https://github.com/chrippa/backports.shutil_get_terminal_size) | 1.0.0 | A backport of the get\_terminal\_size function from Python 3.3’s shutil. / MIT |
| [beautifulsoup4](http://www.crummy.com/software/BeautifulSoup/) | 4.9.3 | Python library designed for screen-scraping / MIT |
| [bitarray](https://github.com/ilanschnell/bitarray) | 1.9.2 | efficient arrays of booleans – C extension / PSF |
| [bkcharts](http://github.com/bokeh/bkcharts) | 0.2 | High level chart types built on top of Bokeh / BSD 3-Clause |
| blas | 1.0 | |
| [bleach](https://github.com/mozilla/bleach) | 3.3.0 | Easy, whitelist-based HTML-sanitizing tool / Apache-2.0 |
| [blosc](https://github.com/Blosc/c-blosc) | 1.21.0 | A blocking, shuffling and loss-less compression library that can be faster than memcpy() / BSD-3-Clause |
| [bokeh](http://bokeh.pydata.org/) | 2.3.2 | Statistical and novel interactive HTML plots for Python / BSD-3-Clause |
| [boto](https://github.com/boto/boto/) | 2.49.0 | Amazon Web Services Library / MIT |
| [bottleneck](https://github.com/pydata/bottleneck) | 1.3.2 | Fast NumPy array functions written in Cython. / BSD 2-Clause |
| [brotlipy](https://github.com/python-hyper/brotlipy) | 0.7.0 | Python bindings to the Brotli compression library / MIT |
| [bzip2](http://www.bzip.org/) | 1.0.8 | high-quality data compressor / bzip2 |
| [c-ares](https://c-ares.haxx.se/) | 1.17.1 | This is c-ares, an asynchronous resolver library / MIT |
| [ca-certificates](https://github.com/conda-forge/ca-certificates-feedstock) | 2021.4.13 | Certificates for use with other packages. / MPL 2.0 |
| [cairo](http://cairographics.org/) | 1.16.0 | Cairo is a 2D graphics library with support for multiple output devices. / LGPL 2.1 or MPL 1.1 |
| [certifi](http://certifi.io/) | 2020.12.5 | Python package for providing Mozilla’s CA Bundle. / ISC |
| [cffi](https://bitbucket.org/cffi/cffi) | 1.14.5 | Foreign Function Interface for Python calling C code. / MIT |
| [chardet](https://github.com/chardet/chardet) | 4.0.0 | Universal character encoding detector / LGPL2 |
| [click](https://palletsprojects.com/p/click) | 7.1.2 | Python composable command line interface toolkit / BSD-3-Clause |
| [cloudpickle](https://github.com/cloudpipe/cloudpickle) | 1.6.0 | Extended pickling support for Python objects / BSD-3-Clause |
| [clyent](https://github.com/Anaconda-Platform/clyent) | 1.2.2 | Command line client library for windows and posix / BSD 3-Clause |
| [colorama](https://github.com/tartley/colorama) | 0.4.4 | Cross-platform colored terminal text / BSD-3-Clause |
| [conda](https://conda.io) | 4.10.1 | OS-agnostic, system-level binary package and environment manager. / BSD 3-Clause |
| [conda-build](https://github.com/conda/conda-build) | 3.21.4 | tools for building conda packages / BSD 3-Clause |
| [conda-env](https://github.com/conda/conda-env) | 2.6.0 | Tools for interacting with conda environments. / BSD 3-Clause |
| [conda-verify](https://github.com/conda/conda-verify) | 3.4.2 | tool for validating conda recipes and conda packages / BSD 3-Clause |
| [contextlib2](http://contextlib2.readthedocs.org) | 0.6.0.post1 | Backports and enhancements for the contextlib module / PSF 2 |
| [cryptography](https://github.com/pyca/cryptography) | 3.4.7 | Provides cryptographic recipes and primitives to Python developers / Apache-2.0 AND BSD-3-Clause AND PSF-2.0 AND MIT |
| [curl](http://curl.haxx.se/) | 7.71.1 | tool and library for transferring data with URL syntax / MIT/X derivate (`<http://curl.haxx.se/docs/copyright.html>`) |
| [cycler](http://matplotlib.org/cycler) | 0.10.0 | Composable style cycles. / BSD 3-Clause |
| [cython](http://www.cython.org/) | 0.29.23 | The Cython compiler for writing C extensions for the Python language / Apache-2.0 |
| [cytoolz](https://github.com/pytoolz/cytoolz) | 0.11.0 | Cython implementation of Toolz. High performance functional utilities / BSD-3-Clause |
| [dask](https://dask.org/) | 2021.4.0 | Parallel PyData with Task Scheduling / BSD-3-Clause |
| [dask-core](http://github.com/dask/dask/) | 2021.4.0 | Parallel Python with task scheduling / BSD-3-Clause |
| [decorator](https://github.com/micheles/decorator) | 5.0.6 | Better living through Python with decorators. / BSD-3-Clause |
| [defusedxml](https://bitbucket.org/tiran/defusedxml) | 0.7.1 | XML bomb protection for Python stdlib modules / PSF 2.0 |
| [distributed](http://distributed.readthedocs.io/en/latest/) | 2021.4.0 | Distributed computing with Dask / BSD-3-Clause |
| [docutils](http://docutils.sourceforge.net/) | 0.17 | Docutils – Python Documentation Utilities / Public Domain Dedictation and BSD 2-Clause and PSF 2.1.1 and GPL 3.0 |
| [entrypoints](https://github.com/takluyver/entrypoints) | 0.3 | Discover and load entry points from installed packages. / MIT License |
| [et\_xmlfile](https://bitbucket.org/openpyxl/et_xmlfile) | 1.0.1 | An implementation of lxml.xmlfile for the standard library / MIT |
| [expat](http://expat.sourceforge.net/) | 2.3.0 | Expat XML parser library in C / MIT |
| [fastcache](https://github.com/pbrady/fastcache) | 1.1.0 | C implementation of Python 3 lru\_cache / MIT |
| [filelock](https://github.com/benediktschmitt/py-filelock) | 3.0.12 | A platform independent file lock. / Public Domain |
| [flask](http://flask.pocoo.org) | 1.1.2 | A microframework based on Werkzeug, Jinja2 and good intentions. / BSD 3-Clause |
| [fontconfig](http://www.freedesktop.org/wiki/Software/fontconfig/) | 2.13.1 | A library for configuring and customizing font access. / MIT |
| [freetype](https://www.freetype.org/) | 2.10.4 | A Free, High-Quality, and Portable Font Engine / GPL-2.0-only and LicenseRef-FreeType |
| [fsspec](https://github.com/martindurant/filesystem_spec) | 0.9.0 | A specification for pythonic filesystems / BSD-3-Clause |
| [get\_terminal\_size](https://github.com/chrippa/backports.shutil_get_terminal_size) | 1.0.0 | Get the size of the terminal window. / MIT |
| [gevent](https://www.gevent.org) | 21.1.2 | Coroutine-based network library / MIT |
| [glib](https://developer.gnome.org/glib/) | 2.68.1 | Provides core application building blocks for libraries and applications written in C. / LGPL-2.1 |
| [glob2](https://github.com/miracle2k/python-glob2) | 0.7 | Version of the glob module that supports recursion via \*\*, and can capture patterns. / BSD-2-Clause |
| [gmp](http://gmplib.org/) | 6.2.1 | The GNU multiprecision library. / GPL-2.0-or-later AND LGPL-3.0-or-later |
| [gmpy2](https://pypi.python.org/pypi/gmpy2) | 2.0.8 | GMP/MPIR, MPFR, and MPC interface to Python 2.6+ and 3.x / LGPL 3 |
| [greenlet](https://github.com/python-greenlet/greenlet) | 1.0.0 | Lightweight in-process concurrent programming / MIT |
| [h5py](http://www.h5py.org/) | 2.10.0 | Read and write HDF5 files from Python. / BSD-3-Clause |
| [hdf5](http://www.hdfgroup.org/HDF5/) | 1.10.4 | HDF5 is a data model, library, and file format for storing and managing data / HDF5 |
| [heapdict](http://stutzbachenterprises.com/) | 1.0.1 | A heap with decrease-key and increase-key operations / BSD 3-Clause |
| [html5lib](https://github.com/html5lib/html5lib-python) | 1.1 | HTML parser based on the WHATWG HTML specification / MIT |
| [icu](http://site.icu-project.org/) | 58.2 | International Components for Unicode. / MIT |
| [idna](https://github.com/kjd/idna) | 2.10 | Internationalized Domain Names in Applications (IDNA). / BSD Like |
| [imageio](https://imageio.github.io) | 2.9.0 | A Python library for reading and writing image data / BSD-2-Clause |
| [imagesize](https://github.com/shibukawa/imagesize_py) | 1.2.0 | Getting image size from png/jpeg/jpeg2000/gif file / MIT |
| [importlib-metadata](https://github.com/python/importlib_metadata) | 3.10.0 | A library to access the metadata for a Python package / Apache-2.0 |
| [importlib\_metadata](https://github.com/python/importlib_metadata) | 3.10.0 | A library to access the metadata for a Python package / Apache-2.0 |
| [iniconfig](http://github.com/RonnyPfannschmidt/iniconfig) | 1.1.1 | iniconfig: brain-dead simple config-ini parsing / MIT |
| [ipykernel](https://ipython.org) | 5.3.4 | IPython Kernel for Jupyter / BSD-3-Clause |
| [ipython](https://ipython.org) | 7.22.0 | IPython: Productive Interactive Computing / BSD-3-Clause |
| [ipython\_genutils](http://ipython.org) | 0.2.0 | vestigial utilities from IPython / BSD 3-Clause |
| [ipywidgets](https://github.com/ipython/ipywidgets) | 7.6.3 | Jupyter Interactive Widgets / BSD-3-Clause |
| [isort](https://github.com/timothycrosley/isort) | 5.8.0 | A Python utility / library to sort Python imports. / MIT |
| [itsdangerous](https://github.com/pallets/itsdangerous) | 1.1.0 | Various helpers to pass trusted data to untrusted environments. / BSD 3-Clause |
| [jbig](https://www.cl.cam.ac.uk/~mgk25/jbigkit) | 2.1 | Implementation of the JBIG1 data compression standard / GPL-2.0 |
| [jdcal](https://github.com/phn/jdcal) | 1.4.1 | Julian dates from proleptic Gregorian and Julian calendars. / BSD 2-Clause |
| [jedi](https://github.com/davidhalter/jedi/) | 0.17.2 | An autocompletion tool for Python that can be used for text editors. / MIT |
| [jinja2](http://jinja.pocoo.org) | 2.11.3 | An easy to use stand-alone template engine written in pure python. / BSD-3-Clause |
| [joblib](https://pypi.org/project/joblib/) | 1.0.1 | Lightweight pipelining: using Python functions as pipeline jobs. / BSD-3-Clause |
| [jpeg](http://www.ijg.org/) | 9b | read/write jpeg COM, EXIF, IPTC medata / Custom free software license |
| [jsonschema](https://github.com/Julian/jsonschema) | 3.2.0 | An implementation of JSON Schema validation for Python / MIT |
| [jupyter](http://jupyter.org) | 1.0.0 | Jupyter metapackage. Install all the Jupyter components in one go. / BSD 3-Clause |
| [jupyter\_client](https://jupyter.org) | 6.1.12 | jupyter\_client contains the reference implementation of the Jupyter protocol. / BSD-3-Clause |
| [jupyter\_console](http://jupyter.org) | 6.4.0 | Jupyter terminal console / BSD-3-Clause |
| [jupyter\_core](https://jupyter.org) | 4.7.1 | Core common functionality of Jupyter projects. / BSD-3-Clause |
| [jupyterlab\_pygments](http://github.com/JupyterLab/jupyterlab_pygments) | 0.1.2 | Pygments syntax coloring scheme making use of the JupyterLab CSS variables / BSD-3-Clause |
| [jupyterlab\_widgets](https://github.com/jupyter-widgets/ipywidgets) | 1.0.0 | JupyterLab extension providing HTML widgets / BSD-3-Clause |
| [kiwisolver](https://github.com/nucleic/kiwi) | 1.3.1 | An efficient C++ implementation of the Cassowary constraint solver / BSD-3-Clause |
| [krb5](http://web.mit.edu/kerberos/) | 1.18.2 | A network authentication protocol. / MIT |
| [lazy-object-proxy](https://github.com/ionelmc/python-lazy-object-proxy) | 1.6.0 | A fast and thorough lazy object proxy / BSD-2-Clause |
| [lcms2](http://www.littlecms.com/) | 2.12 | Open Source Color Management Engine / MIT |
| [ld\_impl\_linux-ppc64le](https://www.gnu.org/software/binutils/) | 2.33.1 | A set of programming tools for creating and managing binary programs, object files, libraries, profile data, and assembly source code. / GPL-3.0-only |
| [libarchive](http://www.libarchive.org/) | 3.4.2 | Multi-format archive and compression library / BSD-2-Clause |
| [libcurl](http://curl.haxx.se/) | 7.71.1 | tool and library for transferring data with URL syntax / MIT/X derivate (`<http://curl.haxx.se/docs/copyright.html>`) |
| [libedit](http://thrysoee.dk/editline/) | 3.1.20210216 | Editline Library (libedit) / BSD-2-Clause |
| [libev](http://software.schmorp.de/pkg/libev.html) | 4.33 | A full-featured and high-performance event loop that is loosely modeled after libevent, but without its limitations and bugs. / BSD-2-Clause |
| [libffi](https://sourceware.org/libffi/) | 3.3 | A Portable Foreign Function Interface Library. / Custom |
| [libgcc-ng](https://gcc.gnu.org/onlinedocs/gccint/Libgcc.html) | 8.2.0 | The GCC low-level runtime library / GPL-3.0-only WITH GCC-exception-3.1 |
| [libgfortran-ng](https://gcc.gnu.org/) | 7.3.0 | The GNU Fortran Runtime Library / GPL-3.0-only WITH GCC-exception-3.1 |
| [liblief](https://lief.quarkslab.com/) | 0.10.1 | A cross platform library to parse, modify and abstract ELF, PE and MachO formats. / Apache-2.0 |
| [libopenblas](http://www.openblas.net/) | 0.3.10 | An Optimized BLAS library / BSD |
| [libpng](http://www.libpng.org/pub/png/libpng.html) | 1.6.37 | PNG reference library / zlib/libpng |
| [libsodium](http://libsodium.org) | 1.0.18 | A modern and easy-to-use crypto library. / ISC |
| [libssh2](https://www.libssh2.org/) | 1.9.0 | the SSH library / BSD-3-Clause |
| [libstdcxx-ng](https://gcc.gnu.org/) | 8.2.0 | The GNU C++ Runtime Library / GPL-3.0-only WITH GCC-exception-3.1 |
| [libtiff](http://www.libtiff.org/) | 4.2.0 | Support for the Tag Image File Format (TIFF). / HPND |
| [libuuid](http://sourceforge.net/projects/libuuid/) | 1.0.3 | Portable uuid C library. / BSD 3-Clause |
| [libuv](http://libuv.org/) | 1.40.0 | Cross-platform asynchronous I/O / MIT |
| [libwebp-base](https://developers.google.com/speed/webp) | 1.2.0 | WebP image library / BSD-3-Clause |
| [libxcb](http://xcb.freedesktop.org/) | 1.14 | This is the C-language Binding (XCB) package to the X Window System protocol / MIT |
| [libxml2](http://xmlsoft.org/) | 2.9.10 | The XML C parser and toolkit of Gnome / MIT |
| [libxslt](http://xmlsoft.org/XSLT/) | 1.1.34 | The XSLT C library developed for the GNOME project / MIT |
| [locket](https://github.com/mwilliamson/locket.py) | 0.2.1 | File-based locks for Python for Linux and Windows / BSD 2-Clause |
| [lxml](http://lxml.de/) | 4.6.3 | Pythonic binding for the C libraries libxml2 and libxslt. / BSD-3-Clause and GPL-2.0-only and ZPL-2.0 and LicenseRef-ElementTree |
| [lz4-c](https://www.lz4.org) | 1.9.3 | Extremely Fast Compression algorithm / BSD-2-Clause |
| [lzo](http://www.oberhumer.com/opensource/lzo/) | 2.10 | LZO is a portable lossless data compression library written in ANSI C. / GPL v2+ |
| [markupsafe](https://www.palletsprojects.com/p/markupsafe) | 1.1.1 | A Python module that implements the jinja2.Markup string / BSD-3-Clause |
| [matplotlib](http://matplotlib.org/) | 3.3.4 | Publication quality figures in Python / LicenseRef-PSF-based |
| [matplotlib-base](http://matplotlib.org/) | 3.3.4 | Publication quality figures in Python / LicenseRef-PSF-based |
| [mccabe](https://github.com/PyCQA/mccabe) | 0.6.1 | McCabe complexity checker for Python / MIT |
| [mistune](https://github.com/lepture/mistune) | 0.8.4 | The fastest markdown parser in pure Python. / BSD 3-Clause |
| [mock](https://github.com/testing-cabal/mock) | 4.0.3 | A library for testing in Python / BSD-2-Clause |
| [more-itertools](https://github.com/more-itertools/more-itertools) | 8.7.0 | More routines for operating on iterables, beyond itertools / MIT |
| [mpc](http://www.multiprecision.org/) | 1.1.0 | A C library for the arithmetic of complex numbers with arbitrarily high precision. / LGPL 3 |
| [mpfr](http://www.mpfr.org/) | 4.0.2 | The MPFR library is a C library for multiple-precision floating-point computations with correct rounding. / LGPL-3.0-only |
| [mpmath](http://mpmath.org) | 1.2.1 | Python library for arbitrary-precision floating-point arithmetic / BSD 3-Clause |
| [msgpack-python](http://msgpack.org/) | 1.0.2 | MessagePack (de)serializer / Apache-2.0 |
| [multipledispatch](https://github.com/mrocklin/multipledispatch/) | 0.6.0 | Multiple dispatch in Python / BSD 3-Clause |
| [nbclient](https://jupyter.org) | 0.5.3 | A client library for executing notebooks. Formally nbconvert’s ExecutePreprocessor. / BSD-3-Clause |
| [nbconvert](http://jupyter.org) | 6.0.7 | Converting Jupyter Notebooks / BSD-3-Clause |
| [nbformat](http://jupyter.org) | 5.1.3 | The Jupyter Notebook format / BSD-3-Clause |
| [ncurses](http://www.gnu.org/software/ncurses/) | 6.2 | Library for text-based user interfaces / Free software (MIT-like) |
| [nest-asyncio](https://github.com/erdewit/nest_asyncio) | 1.5.1 | Patch asyncio to allow nested event loops / BSD-2-Clause |
| [networkx](https://networkx.github.io/) | 2.5 | Python package for creating and manipulating complex networks / BSD-3-Clause |
| [nltk](http://nltk.org/) | 3.6.1 | Natural Language Toolkit / Apache 2.0 |
| nomkl | 3.0 | None / BSD |
| [nose](http://readthedocs.org/docs/nose/) | 1.3.7 | Nose extends unittest to make testing easier / LGPL-2.1 |
| [notebook](https://jupyter.org) | 6.3.0 | Jupyter Notebook / BSD-3-Clause |
| [numexpr](https://github.com/pydata/numexpr) | 2.7.3 | Fast numerical expression evaluator for NumPy. / MIT |
| [numpy](http://numpy.scipy.org/) | 1.20.1 | Array processing for numbers, strings, records, and objects. / BSD 3-Clause |
| [numpy-base](http://numpy.scipy.org/) | 1.20.1 | Array processing for numbers, strings, records, and objects. / BSD 3-Clause |
| [numpydoc](https://github.com/numpy/numpydoc) | 1.1.0 | Numpy’s Sphinx extensions / BSD 3-Clause |
| [olefile](http://www.decalage.info/python/olefileio) | 0.46 | parse, read and write Microsoft OLE2 files / BSD 2-Clause |
| [openblas](http://www.openblas.net/) | 0.3.10 | An optimized BLAS library / BSD |
| openblas-devel | 0.3.10 | OpenBLAS headers and libraries for developing software that used OpenBLAS. / None |
| [openpyxl](https://openpyxl.readthedocs.io) | 3.0.7 | A Python library to read/write Excel 2010 xlsx/xlsm files / MIT |
| [openssl](http://www.openssl.org/) | 1.1.1k | OpenSSL is an open-source implementation of the SSL and TLS protocols / OpenSSL |
| [packaging](https://github.com/pypa/packaging) | 20.9 | Core utilities for Python packages / Apache 2.0 or BSD 2-Clause |
| [pandas](http://pandas.pydata.org) | 1.2.4 | High-performance, easy-to-use data structures and data analysis tools. / BSD-3-Clause |
| [pandoc](http://pandoc.org/) | 2.11 | Universal markup converter (repackaged binaries) / GPL-2.0 |
| [pandocfilters](https://github.com/jgm/pandocfilters) | 1.4.3 | A python module for writing pandoc filters / BSD-3-Clause |
| [parso](https://github.com/davidhalter/parso) | 0.7.0 | A Python Parser / MIT |
| [partd](https://github.com/dask/partd) | 1.2.0 | Data structure for on-disk shuffle operations / BSD 3-Clause |
| [patchelf](http://nixos.org/patchelf.html) | 0.12 | A small utility to modify the dynamic linker and RPATH of ELF executables. / GPL-3.0-or-later |
| [path](https://github.com/jaraco/path) | 15.1.2 | A module wrapper for os.path / MIT |
| [path.py](https://github.com/jaraco/path.py) | 12.5.0 | A module wrapper for os.path / MIT |
| [pathlib2](https://github.com/mcmtroffaes/pathlib2) | 2.3.5 | Fork of pathlib aiming to support the full stdlib Python API / MIT |
| [patsy](https://github.com/pydata/patsy) | 0.5.1 | Describing statistical models in Python using symbolic formulas / BSD-2-Clause, PSF2 |
| [pcre](http://www.pcre.org/) | 8.44 | Regular expression pattern matching using the same syntax and semantics as Perl 5. / BSD 3-Clause |
| [pep8](http://pep8.readthedocs.org/) | 1.7.1 | Python style guide checker / MIT |
| [pexpect](http://pexpect.sourceforge.net/) | 4.8.0 | Pexpect makes Python a better tool for controlling other applications. / ISC |
| [pickleshare](https://github.com/pickleshare/pickleshare/) | 0.7.5 | Tiny ‘shelve’-like database with concurrency support / MIT |
| [pillow](https://pillow.readthedocs.io) | 8.2.0 | Pillow is the friendly PIL fork by Alex Clark and Contributors / LicenseRef-PIL |
| [pip](https://pip.pypa.io/en/stable/) | 21.0.1 | PyPA recommended tool for installing Python packages / MIT |
| [pixman](http://www.pixman.org/) | 0.40.0 | A low-level software library for pixel manipulation. / MIT |
| [pkginfo](https://code.launchpad.net/~tseaver/pkginfo/trunk) | 1.7.0 | Query metadatdata from sdists / bdists / installed packages. / MIT |
| [pluggy](https://github.com/pytest-dev/pluggy) | 0.13.1 | Plugin registration and hook calling for Python / MIT |
| [ply](http://www.dabeaz.com/ply/index.html) | 3.11 | Python Lex-Yacc / BSD 3-clause |
| [prometheus\_client](https://github.com/prometheus/client_python) | 0.10.1 | Python client for the Prometheus monitoring system / Apache-2.0 |
| [prompt-toolkit](https://github.com/jonathanslenders/python-prompt-toolkit) | 3.0.17 | Library for building powerful interactive command lines in Python / BSD-3-Clause |
| [prompt\_toolkit](https://github.com/jonathanslenders/python-prompt-toolkit) | 3.0.17 | Library for building powerful interactive command lines in Python / BSD-3-Clause |
| [psutil](https://github.com/giampaolo/psutil) | 5.8.0 | A cross-platform process and system utilities module for Python / BSD-3-Clause |
| [ptyprocess](https://github.com/pexpect/ptyprocess) | 0.7.0 | Run a subprocess in a pseudo terminal / ISC |
| [py](https://github.com/pytest-dev/py) | 1.10.0 | library with cross-python path, ini-parsing, io, code, log facilities / MIT |
| [py-lief](https://lief.quarkslab.com/) | 0.10.1 | A cross platform library to parse, modify and abstract ELF, PE and MachO formats. / Apache-2.0 |
| [pycodestyle](https://pycodestyle.readthedocs.io/) | 2.7.0 | Python style guide checker / MIT |
| [pycosat](https://github.com/ContinuumIO/pycosat) | 0.6.3 | Bindings to picosat (a SAT solver) / MIT |
| [pycparser](https://github.com/eliben/pycparser) | 2.20 | Complete C99 parser in pure Python / BSD 3-clause |
| [pycurl](http://pycurl.sourceforge.net/) | 7.43.0.6 | A Python Interface To The cURL library / LGPL, MIT |
| [pyerfa](https://pyerfa.readthedocs.io/) | 1.7.3 | Python bindings for ERFA routines / BSD-3-Clause |
| [pyflakes](https://github.com/PyCQA/pyflakes) | 2.3.1 | Pyflakes analyzes programs and detects various errors. / MIT |
| [pygments](http://pygments.org/) | 2.8.1 | Pygments is a generic syntax highlighter suitable for use in code hosting, forums, wikis or other applications that need to prettify source code. / BSD-2-clause |
| [pylint](http://www.pylint.org/) | 2.7.4 | python code static checker / GPL-2.0-only |
| [pyodbc](https://github.com/mkleehammer/pyodbc) | 4.0.30 | DB API Module for ODBC / MIT |
| [pyopenssl](https://github.com/pyca/pyopenssl) | 20.0.1 | Python wrapper module around the OpenSSL library / Apache 2.0 |
| [pyparsing](http://pyparsing.wikispaces.com/) | 2.4.7 | Create and execute simple grammars / MIT |
| [pyrsistent](http://github.com/tobgu/pyrsistent/) | 0.17.3 | Persistent/Functional/Immutable data structures / MIT |
| [pysocks](https://github.com/Anorov/PySocks) | 1.7.1 | A Python SOCKS client module. See [Anorov/PySocks](https://github.com/Anorov/PySocks) for more information. / BSD 3-Clause |
| [pytables](http://www.pytables.org) | 3.6.1 | Brings together Python, HDF5 and NumPy to easily handle large amounts of data. / BSD 3-Clause |
| [pytest](https://docs.pytest.org/en/latest/) | 6.2.3 | Simple and powerful testing with Python. / MIT |
| [python](https://www.python.org/) | 3.8.8 | General purpose programming language / Python-2.0 |
| [python-dateutil](https://dateutil.readthedocs.org/) | 2.8.1 | Extensions to the standard Python datetime module. / BSD 3 Clause |
| [python-libarchive-c](https://github.com/Changaco/python-libarchive-c) | 2.9 | Python interface to libarchive / CC0-1.0 |
| [pytz](http://pythonhosted.org/pytz/) | 2021.1 | World timezone definitions, modern and historical. / MIT |
| [pywavelets](https://github.com/PyWavelets/pywt) | 1.1.1 | Discrete Wavelet Transforms in Python / MIT |
| [pyyaml](http://pyyaml.org/wiki/PyYAML) | 5.4.1 | YAML parser and emitter for Python / MIT |
| [pyzmq](https://github.com/zeromq/pyzmq) | 20.0.0 | Python bindings for zeromq / BSD 3-clause |
| [readline](https://cnswww.cns.cwru.edu/php/chet/readline/rltop.html) | 8.1 | library for editing command lines as they are typed in / GPL-3.0 |
| [regex](https://bitbucket.org/mrabarnett/mrab-regex) | 2021.4.4 | Alternative regular expression module, to replace re / Python-2.0 |
| [requests](http://python-requests.org) | 2.25.1 | Requests is an elegant and simple HTTP library for Python, built with ♥. / Apache-2.0 |
| [ruamel\_yaml](https://sourceforge.net/p/ruamel-yaml/code/ci/default/tree) | 0.15.100 | A patched copy of ruamel.yaml. / MIT |
| [scikit-image](http://scikit-image.org/) | 0.18.1 | Image processing in Python. / BSD-3-Clause |
| [scikit-learn](http://scikit-learn.org/) | 0.24.1 | A set of python modules for machine learning and data mining / BSD-3-Clause |
| [scipy](http://www.scipy.org/) | 1.6.2 | Scientific Library for Python / BSD 3-Clause |
| [seaborn](https://seaborn.pydata.org) | 0.11.1 | Statistical data visualization / BSD 3-Clause |
| [send2trash](https://github.com/hsoft/send2trash) | 1.5.0 | Python library to natively send files to Trash (or Recycle bin) on all platforms. / BSD-3-Clause |
| [setuptools](https://github.com/pypa/setuptools) | 52.0.0 | Download, build, install, upgrade, and uninstall Python packages / MIT |
| [simplegeneric](http://cheeseshop.python.org/pypi/simplegeneric) | 0.8.1 | Simple generic functions (similar to Python’s own len(), pickle.dump(), etc.) / Zope Public |
| [singledispatch](http://docs.python.org/3/library/functools.html#functools.singledispatch) | 3.6.1 | Transforms a function into a single-dispatch generic function / MIT |
| [six](https://six.readthedocs.io/) | 1.15.0 | Python 2 and 3 compatibility utilities / MIT |
| [snowballstemmer](https://github.com/shibukawa/snowball_py) | 2.1.0 | Snowball stemming library collection for Python / BSD-2-Clause |
| [sortedcollections](http://www.grantjenks.com/docs/sortedcollections/) | 2.1.0 | Python Sorted Collections / Apache-2.0 |
| [sortedcontainers](http://www.grantjenks.com/docs/sortedcontainers/) | 2.3.0 | Python Sorted Container Types: SortedList, SortedDict, and SortedSet / Apache-2.0 |
| [soupsieve](http://facelessuser.github.io/soupsieve) | 2.2.1 | A modern CSS selector implementation for BeautifulSoup / MIT |
| [sphinx](http://www.sphinx-doc.org) | 4.0.1 | Sphinx is a tool that makes it easy to create intelligent and beautiful documentation / BSD-2-Clause |
| sphinxcontrib | 1.0 | Python namespace for sphinxcontrib / BSD |
| [sphinxcontrib-applehelp](https://www.sphinx-doc.org/en/master/) | 1.0.2 | sphinxcontrib-applehelp is a sphinx extension which outputs Apple help books / BSD-2-Clause |
| [sphinxcontrib-devhelp](https://www.sphinx-doc.org/en/master/) | 1.0.2 | sphinxcontrib-devhelp is a sphinx extension which outputs Devhelp document / BSD-2-Clause |
| [sphinxcontrib-htmlhelp](https://www.sphinx-doc.org/en/master/) | 1.0.3 | sphinxcontrib-htmlhelp is a sphinx extension which … / BSD-2-Clause |
| [sphinxcontrib-jsmath](https://www.sphinx-doc.org/en/master/) | 1.0.1 | A sphinx extension which renders display math in HTML via JavaScript / BSD-2-Clause |
| [sphinxcontrib-qthelp](https://www.sphinx-doc.org/en/master/) | 1.0.3 | sphinxcontrib-qthelp is a sphinx extension which outputs QtHelp document / BSD-2-Clause |
| [sphinxcontrib-serializinghtml](https://www.sphinx-doc.org/en/master/) | 1.1.4 | sphinxcontrib-serializinghtml is a sphinx extension which outputs “serialized” HTML files (json and pickle). / BSD-2-Clause |
| [sphinxcontrib-websupport](https://pypi.python.org/pypi/sphinxcontrib-websupport) | 1.2.4 | Sphinx API for Web Apps / BSD-2-Clause |
| [sqlalchemy](http://www.sqlalchemy.org/) | 1.4.7 | Database Abstraction Library. / MIT |
| [sqlite](http://www.sqlite.org/) | 3.35.4 | Implements a self-contained, zero-configuration, SQL database engine / Public-Domain (`<http://www.sqlite.org/copyright.html>`) |
| [statsmodels](https://www.statsmodels.org) | 0.12.2 | Statistical computations and models for use with SciPy / BSD-3-Clause |
| [sympy](https://sympy.org) | 1.8 | Python library for symbolic mathematics / BSD-3-Clause |
| [tblib](https://github.com/ionelmc/python-tblib) | 1.7.0 | Traceback serialization library. / BSD 2-Clause |
| [terminado](https://github.com/jupyter/terminado) | 0.9.4 | Terminals served by tornado websockets / BSD-2-Clause |
| [testpath](https://testpath.readthedocs.io) | 0.4.4 | Testpath is a collection of utilities for Python code working with files and commands. / BSD-3-Clause |
| [threadpoolctl](https://github.com/joblib/threadpoolctl) | 2.1.0 | Python helpers to control the threadpools of native libraries / BSD 3-Clause |
| [tifffile](https://github.com/cgohlke/tifffile) | 2020.10.1 | Read and write image data from and to TIFF files. / BSD-3-Clause |
| [tk](http://www.tcl.tk/) | 8.6.10 | A dynamic programming language with GUI support. Bundles Tcl and Tk. / Tcl/Tk |
| [toml](https://github.com/uiri/toml) | 0.10.2 | Python lib for TOML. / MIT |
| [toolz](http://toolz.readthedocs.org/) | 0.11.1 | A functional standard library for Python / BSD-3-Clause |
| [tornado](http://www.tornadoweb.org/) | 6.1 | A Python web framework and asynchronous networking library, originally developed at FriendFeed. / Apache-2.0 |
| [tqdm](https://pypi.python.org/pypi/tqdm) | 4.59.0 | A Fast, Extensible Progress Meter / MPL-2.0 or MIT |
| [traitlets](http://traitlets.readthedocs.org/) | 5.0.5 | Configuration system for Python applications / BSD-3-Clause |
| [typing\_extensions](https://github.com/python/typing/tree/master/typing_extensions) | 3.7.4.3 | Backported and Experimental Type Hints for Python / PSF-2.0 |
| [unicodecsv](https://github.com/jdunck/python-unicodecsv) | 0.14.1 | Drop-in replacement for csv module which supports unicode strings / BSD |
| [unixodbc](http://www.unixodbc.org/) | 2.3.9 | ODBC on non MS Windows platforms / LGPL-2.1 |
| [urllib3](https://urllib3.readthedocs.io/) | 1.26.4 | HTTP library with thread-safe connection pooling, file post, and more. / MIT |
| [wcwidth](https://github.com/jquast/wcwidth) | 0.2.5 | Measures number of Terminal column cells of wide-character codes. / MIT |
| [webencodings](https://github.com/gsnedders/python-webencodings) | 0.5.1 | Character encoding aliases for legacy web content / BSD 3-Clause |
| [werkzeug](https://palletsprojects.com/p/werkzeug/) | 1.0.1 | The comprehensive WSGI web application library. / BSD 3-Clause |
| [wheel](https://github.com/pypa/wheel) | 0.36.2 | A built-package format for Python. / MIT |
| [widgetsnbextension](http://ipython.org) | 3.5.1 | Interactive Widgets for Jupyter / BSD 3-clause |
| [wrapt](https://github.com/GrahamDumpleton/wrapt) | 1.12.1 | Module for decorators, wrappers and monkey patching / BSD 2-Clause |
| [xlrd](http://www.python-excel.org/) | 2.0.1 | Library for developers to extract data from Microsoft Excel (tm) spreadsheet files / BSD 3-Clause and BSD with advertising |
| [xlsxwriter](https://xlsxwriter.readthedocs.io/) | 1.3.8 | A Python module for creating Excel XLSX files / BSD-2-Clause |
| [xlwt](http://www.python-excel.org/) | 1.3.0 | Writing data and formatting information to Excel files / BSD |
| [xz](http://tukaani.org/xz/) | 5.2.5 | Data compression software with high compression ratio / LGPL-2.1 and GPL-2.0 |
| [yaml](http://pyyaml.org/wiki/LibYAML) | 0.2.5 | A C library for parsing and emitting YAML / MIT |
| [zeromq](http://zeromq.org) | 4.3.4 | A high-performance asynchronous messaging library. / LGPL-3.0-or-later |
| [zict](http://github.com/mrocklin/zict) | 2.0.0 | Composable Dictionary Classes / BSD 3-Clause |
| [zipp](https://github.com/jaraco/zipp) | 3.4.1 | A pathlib-compatible Zipfile object wrapper / MIT |
| [zlib](http://zlib.net/) | 1.2.11 | Massively spiffy yet delicately unobtrusive compression library / zlib |
| zope | 1.0 | web application server / BSD |
| [zope.event](http://www.zope.org/en/latest/) | 4.5.0 | Very basic event publishing system / Zope Public License |
| [zope.interface](http://docs.zope.org/zope.interface/) | 5.3.0 | Interfaces for Python / ZPL-2.1 |
| [zstd](http://www.zstd.net) | 1.4.5 | Zstandard - Fast real-time compression algorithm / BSD 3-Clause |
| Name | Version | Summary / License |
|---|---|---|
| [\_libgcc\_mutex](https://github.com/AnacondaRecipes/_libgcc_mutex-feedstock) | 0.1 | Mutex for libgcc and libgcc-ng / None |
| [\_openmp\_mutex](https://github.com/conda-forge/ctng-compilers-feedstock) | 5.1 | OpenMP Implementation Mutex / BSD-3-Clause |
| [alabaster](http://www.sphinx-doc.org/en/stable/index.html) | 0.7.12 | Configurable, Python 2+3 compatible Sphinx theme. / BSD 3-Clause |
| [anaconda-client](http://anaconda.org) | 1.7.2 | anaconda.org command line client library / BSD 3-clause |
| [anaconda-project](https://github.com/Anaconda-Platform/anaconda-project) | 0.9.1 | Tool for encapsulating, running, and reproducing data science projects / BSD-3-Clause |
| [anyio](https://github.com/agronholm/anyio) | 2.2.0 | High level compatibility layer for multiple asynchronous event loop implementations on Python / MIT |
| [argon2-cffi](https://argon2-cffi.readthedocs.org/) | 20.1.0 | The secure Argon2 password hashing algorithm. / MIT |
| [asn1crypto](https://github.com/wbond/asn1crypto) | 1.4.0 | Python ASN.1 library with a focus on performance and a pythonic API / MIT |
| [astroid](https://www.astroid.org/) | 2.5 | A abstract syntax tree for Python with inference support. / LGPL-2.1-only |
| [astropy](http://www.astropy.org/) | 4.2.1 | Community-developed Python Library for Astronomy / BSD-3-Clause |
| [async\_generator](https://github.com/python-trio/async_generator) | 1.10 | Async generators and context managers for Python 3.5+ / MIT |
| [attrs](https://attrs.readthedocs.io/en/stable/) | 20.3.0 | attrs is the Python package that will bring back the joy of writing classes by relieving you from the drudgery of implementing object protocols (aka dunder methods). / MIT |
| [babel](http://babel.pocoo.org/) | 2.9.0 | Utilities to internationalize and localize Python applications / BSD 3-clause |
| [backcall](https://github.com/takluyver/backcall/) | 0.2.0 | Specifications for callback functions passed in to an API / BSD-3-Clause |
| [backports](https://bitbucket.org/brandon/backports) | 1.0 | None / BSD |
| [backports.shutil\_get\_terminal\_size](https://github.com/chrippa/backports.shutil_get_terminal_size) | 1.0.0 | A backport of the get\_terminal\_size function from Python 3.3’s shutil. / MIT |
| [beautifulsoup4](http://www.crummy.com/software/BeautifulSoup/) | 4.9.3 | Python library designed for screen-scraping / MIT |
| [bitarray](https://github.com/ilanschnell/bitarray) | 1.7.0 | efficient arrays of booleans – C extension / PSF |
| [bkcharts](http://github.com/bokeh/bkcharts) | 0.2 | High level chart types built on top of Bokeh / BSD 3-Clause |
| blas | 1.0 | |
| [bleach](https://github.com/mozilla/bleach) | 3.3.0 | Easy, whitelist-based HTML-sanitizing tool / Apache-2.0 |
| [blosc](https://github.com/Blosc/c-blosc) | 1.21.0 | A blocking, shuffling and loss-less compression library that can be faster than memcpy() / BSD-3-Clause |
| [bokeh](http://bokeh.pydata.org/) | 2.3.1 | Statistical and novel interactive HTML plots for Python / BSD-3-Clause |
| [boto](https://github.com/boto/boto/) | 2.49.0 | Amazon Web Services Library / MIT |
| [bottleneck](https://github.com/pydata/bottleneck) | 1.3.2 | Fast NumPy array functions written in Cython. / BSD 2-Clause |
| [brotli](http://github.com/google/brotli) | 1.0.9 | Brotli compression format / MIT |
| [brotlipy](https://github.com/python-hyper/brotlipy) | 0.7.0 | Python bindings to the Brotli compression library / MIT |
| [brunsli](https://github.com/google/brunsli) | 0.1 | Practical JPEG Repacker / MIT |
| [bzip2](http://www.bzip.org/) | 1.0.8 | high-quality data compressor / bzip2 |
| [c-ares](https://c-ares.haxx.se/) | 1.17.1 | This is c-ares, an asynchronous resolver library / MIT |
| [ca-certificates](https://github.com/conda-forge/ca-certificates-feedstock) | 2021.4.13 | Certificates for use with other packages. / MPL 2.0 |
| [cached-property](https://github.com/pydanny/cached-property) | 1.5.2 | A decorator for caching properties in classes. / BSD-3-Clause |
| [cairo](http://cairographics.org/) | 1.16.0 | Cairo is a 2D graphics library with support for multiple output devices. / LGPL 2.1 or MPL 1.1 |
| [certifi](http://certifi.io/) | 2020.12.5 | Python package for providing Mozilla’s CA Bundle. / ISC |
| [cffi](https://bitbucket.org/cffi/cffi) | 1.14.5 | Foreign Function Interface for Python calling C code. / MIT |
| [chardet](https://github.com/chardet/chardet) | 4.0.0 | Universal character encoding detector / LGPL2 |
| [charls](https://github.com/team-charls/charls) | 2.2.0 | CharLS is a C++ implementation of the JPEG-LS standard for lossless and near-lossless image compression and decompression. JPEG-LS is a low-complexity image compression standard that matches JPEG 2000 compression ratios. / BSD-3-Clause |
| [click](https://palletsprojects.com/p/click) | 7.1.2 | Python composable command line interface toolkit / BSD-3-Clause |
| [cloudpickle](https://github.com/cloudpipe/cloudpickle) | 1.6.0 | Extended pickling support for Python objects / BSD-3-Clause |
| [clyent](https://github.com/Anaconda-Platform/clyent) | 1.2.2 | Command line client library for windows and posix / BSD 3-Clause |
| [colorama](https://github.com/tartley/colorama) | 0.4.4 | Cross-platform colored terminal text / BSD-3-Clause |
| [conda](https://conda.io) | 4.10.1 | OS-agnostic, system-level binary package and environment manager. / BSD 3-Clause |
| [conda-build](https://github.com/conda/conda-build) | 3.21.4 | tools for building conda packages / BSD 3-Clause |
| [conda-env](https://github.com/conda/conda-env) | 2.6.0 | Tools for interacting with conda environments. / BSD 3-Clause |
| [conda-verify](https://github.com/conda/conda-verify) | 3.4.2 | tool for validating conda recipes and conda packages / BSD 3-Clause |
| [contextlib2](http://contextlib2.readthedocs.org) | 0.6.0.post1 | Backports and enhancements for the contextlib module / PSF 2 |
| [cryptography](https://github.com/pyca/cryptography) | 3.4.7 | Provides cryptographic recipes and primitives to Python developers / Apache-2.0 AND BSD-3-Clause AND PSF-2.0 AND MIT |
| [curl](http://curl.haxx.se/) | 7.71.1 | tool and library for transferring data with URL syntax / MIT/X derivate (`<http://curl.haxx.se/docs/copyright.html>`) |
| [cycler](http://matplotlib.org/cycler) | 0.10.0 | Composable style cycles. / BSD 3-Clause |
| [cython](http://www.cython.org/) | 0.29.23 | The Cython compiler for writing C extensions for the Python language / Apache-2.0 |
| [cytoolz](https://github.com/pytoolz/cytoolz) | 0.11.0 | Cython implementation of Toolz. High performance functional utilities / BSD-3-Clause |
| [dask](https://dask.org/) | 2021.4.0 | Parallel PyData with Task Scheduling / BSD-3-Clause |
| [dask-core](http://github.com/dask/dask/) | 2021.4.0 | Parallel Python with task scheduling / BSD-3-Clause |
| [dbus](http://www.freedesktop.org/wiki/Software/dbus/) | 1.13.18 | Simple message bus system for applications to talk to one another / GPL2 |
| [decorator](https://github.com/micheles/decorator) | 5.0.6 | Better living through Python with decorators. / BSD-3-Clause |
| [defusedxml](https://bitbucket.org/tiran/defusedxml) | 0.7.1 | XML bomb protection for Python stdlib modules / PSF 2.0 |
| [distributed](http://distributed.readthedocs.io/en/latest/) | 2021.4.0 | Distributed computing with Dask / BSD-3-Clause |
| [docutils](http://docutils.sourceforge.net/) | 0.17 | Docutils – Python Documentation Utilities / Public Domain Dedictation and BSD 2-Clause and PSF 2.1.1 and GPL 3.0 |
| [entrypoints](https://github.com/takluyver/entrypoints) | 0.3 | Discover and load entry points from installed packages. / MIT License |
| [et\_xmlfile](https://bitbucket.org/openpyxl/et_xmlfile) | 1.0.1 | An implementation of lxml.xmlfile for the standard library / MIT |
| [expat](http://expat.sourceforge.net/) | 2.3.0 | Expat XML parser library in C / MIT |
| [fastcache](https://github.com/pbrady/fastcache) | 1.1.0 | C implementation of Python 3 lru\_cache / MIT |
| [filelock](https://github.com/benediktschmitt/py-filelock) | 3.0.12 | A platform independent file lock. / Public Domain |
| [flask](http://flask.pocoo.org) | 1.1.2 | A microframework based on Werkzeug, Jinja2 and good intentions. / BSD 3-Clause |
| [fontconfig](http://www.freedesktop.org/wiki/Software/fontconfig/) | 2.13.1 | A library for configuring and customizing font access. / MIT |
| [freetype](https://www.freetype.org/) | 2.10.4 | A Free, High-Quality, and Portable Font Engine / GPL-2.0-only and LicenseRef-FreeType |
| [fribidi](https://github.com/fribidi/fribidi) | 1.0.10 | The Free Implementation of the Unicode Bidirectional Algorithm. / LGPL-2.1 |
| [fsspec](https://github.com/martindurant/filesystem_spec) | 0.9.0 | A specification for pythonic filesystems / BSD-3-Clause |
| [get\_terminal\_size](https://github.com/chrippa/backports.shutil_get_terminal_size) | 1.0.0 | Get the size of the terminal window. / MIT |
| [gevent](https://www.gevent.org) | 21.1.2 | Coroutine-based network library / MIT |
| [giflib](http://giflib.sourceforge.net) | 5.2.1 | Library for reading and writing gif images / MIT |
| [glib](https://developer.gnome.org/glib/) | 2.68.1 | Provides core application building blocks for libraries and applications written in C. / LGPL-2.1 |
| [glob2](https://github.com/miracle2k/python-glob2) | 0.7 | Version of the glob module that supports recursion via \*\*, and can capture patterns. / BSD-2-Clause |
| [gmp](http://gmplib.org/) | 6.2.1 | The GNU multiprecision library. / GPL-2.0-or-later AND LGPL-3.0-or-later |
| [gmpy2](https://pypi.python.org/pypi/gmpy2) | 2.0.8 | GMP/MPIR, MPFR, and MPC interface to Python 2.6+ and 3.x / LGPL 3 |
| [graphite2](http://graphite.sil.org/) | 1.3.14 | A “smart font” system that handles the complexities of lesser-known languages of the world. / LGPLv2 |
| [greenlet](https://github.com/python-greenlet/greenlet) | 1.0.0 | Lightweight in-process concurrent programming / MIT |
| [gst-plugins-base](http://gstreamer.freedesktop.org/) | 1.14.1 | GStreamer Base Plug-ins / GPL2 |
| [gstreamer](http://gstreamer.freedesktop.org/) | 1.14.1 | Library for constructing graphs of media-handling components / LGPL 2 |
| [h5py](http://www.h5py.org/) | 3.1.0 | Read and write HDF5 files from Python. / BSD-3-Clause |
| [harfbuzz](http://www.freedesktop.org/wiki/Software/HarfBuzz/) | 2.8.0 | An OpenType text shaping engine. / MIT |
| [hdf5](http://www.hdfgroup.org/HDF5/) | 1.12.0 | HDF5 is a data model, library, and file format for storing and managing data / HDF5 |
| [heapdict](http://stutzbachenterprises.com/) | 1.0.1 | A heap with decrease-key and increase-key operations / BSD 3-Clause |
| [html5lib](https://github.com/html5lib/html5lib-python) | 1.1 | HTML parser based on the WHATWG HTML specification / MIT |
| [icu](http://site.icu-project.org/) | 68.1 | International Components for Unicode. / MIT |
| [idna](https://github.com/kjd/idna) | 2.10 | Internationalized Domain Names in Applications (IDNA). / BSD Like |
| [imagecodecs](https://www.lfd.uci.edu/~gohlke/) | 2021.1.11 | Image transformation, compression, and decompression codecs / BSD-3-Clause |
| [imageio](https://imageio.github.io) | 2.9.0 | A Python library for reading and writing image data / BSD-2-Clause |
| [imagesize](https://github.com/shibukawa/imagesize_py) | 1.2.0 | Getting image size from png/jpeg/jpeg2000/gif file / MIT |
| [importlib-metadata](https://github.com/python/importlib_metadata) | 2.0.0 | A library to access the metadata for a Python package / Apache-2.0 |
| [importlib\_metadata](https://github.com/python/importlib_metadata) | 2.0.0 | A library to access the metadata for a Python package / Apache-2.0 |
| [iniconfig](http://github.com/RonnyPfannschmidt/iniconfig) | 1.1.1 | iniconfig: brain-dead simple config-ini parsing / MIT |
| [ipykernel](https://ipython.org) | 5.3.4 | IPython Kernel for Jupyter / BSD-3-Clause |
| [ipython](https://ipython.org) | 7.22.0 | IPython: Productive Interactive Computing / BSD-3-Clause |
| [ipython\_genutils](http://ipython.org) | 0.2.0 | vestigial utilities from IPython / BSD 3-Clause |
| [ipywidgets](https://github.com/ipython/ipywidgets) | 7.6.3 | Jupyter Interactive Widgets / BSD-3-Clause |
| [isort](https://github.com/timothycrosley/isort) | 5.8.0 | A Python utility / library to sort Python imports. / MIT |
| [itsdangerous](https://github.com/pallets/itsdangerous) | 1.1.0 | Various helpers to pass trusted data to untrusted environments. / BSD 3-Clause |
| [jbig](https://www.cl.cam.ac.uk/~mgk25/jbigkit) | 2.1 | Implementation of the JBIG1 data compression standard / GPL-2.0 |
| [jdcal](https://github.com/phn/jdcal) | 1.4.1 | Julian dates from proleptic Gregorian and Julian calendars. / BSD 2-Clause |
| [jedi](https://github.com/davidhalter/jedi/) | 0.17.2 | An autocompletion tool for Python that can be used for text editors. / MIT |
| [jinja2](http://jinja.pocoo.org) | 2.11.3 | An easy to use stand-alone template engine written in pure python. / BSD-3-Clause |
| [joblib](https://pypi.org/project/joblib/) | 1.0.1 | Lightweight pipelining: using Python functions as pipeline jobs. / BSD-3-Clause |
| [jpeg](http://www.ijg.org/) | 9d | read/write jpeg COM, EXIF, IPTC medata / Custom free software license |
| [json5](https://github.com/dpranke/pyjson5) | 0.9.5 | A Python implementation of the JSON5 data format / Apache-2.0 |
| [jsonschema](https://github.com/Julian/jsonschema) | 3.2.0 | An implementation of JSON Schema validation for Python / MIT |
| [jupyter](http://jupyter.org) | 1.0.0 | Jupyter metapackage. Install all the Jupyter components in one go. / BSD 3-Clause |
| [jupyter-packaging](https://github.com/jupyter/jupyter-packaging) | 0.7.12 | Jupyter Packaging Utilities / BSD-3-Clause |
| [jupyter\_client](https://jupyter.org) | 6.1.12 | jupyter\_client contains the reference implementation of the Jupyter protocol. / BSD-3-Clause |
| [jupyter\_console](http://jupyter.org) | 6.4.0 | Jupyter terminal console / BSD-3-Clause |
| [jupyter\_core](https://jupyter.org) | 4.7.1 | Core common functionality of Jupyter projects. / BSD-3-Clause |
| [jupyter\_server](https://jupyter.org) | 1.4.1 | Jupyter Server / BSD-3-Clause |
| [jupyterlab](https://github.com/jupyterlab/jupyterlab) | 3.0.14 | JupyterLab PRE-ALPHA / BSD-3-Clause |
| [jupyterlab\_pygments](http://github.com/JupyterLab/jupyterlab_pygments) | 0.1.2 | Pygments syntax coloring scheme making use of the JupyterLab CSS variables / BSD-3-Clause |
| [jupyterlab\_server](https://github.com/jupyterlab/jupyterlab_server) | 2.4.0 | A set of server components for JupyterLab and JupyterLab like applications. / BSD-3-Clause |
| [jupyterlab\_widgets](https://github.com/jupyter-widgets/ipywidgets) | 1.0.0 | JupyterLab extension providing HTML widgets / BSD-3-Clause |
| [jxrlib](https://packages.debian.org/source/sid/jxrlib) | 1.1 | jxrlib - JPEG XR Library by Microsoft, built from Debian hosted sources. / BSD-2-Clause |
| [kiwisolver](https://github.com/nucleic/kiwi) | 1.3.1 | An efficient C++ implementation of the Cassowary constraint solver / BSD-3-Clause |
| [krb5](http://web.mit.edu/kerberos/) | 1.19.1 | A network authentication protocol. / MIT |
| [lazy-object-proxy](https://github.com/ionelmc/python-lazy-object-proxy) | 1.6.0 | A fast and thorough lazy object proxy / BSD-2-Clause |
| [lcms2](http://www.littlecms.com/) | 2.11 | Open Source Color Management Engine / MIT |
| [ld\_impl\_linux-aarch64](https://www.gnu.org/software/binutils/) | 2.36.1 | A set of programming tools for creating and managing binary programs, object files, libraries, profile data, and assembly source code. / GPL-3.0-only |
| [lerc](https://github.com/Esri/lerc) | 2.2.1 | LERC - Limited Error Raster Compression / Apache-2.0 |
| [libaec](https://gitlab.dkrz.de/k202009/libaec) | 1.0.4 | Adaptive Entropy Coding library / BSD-2-Clause |
| [libarchive](http://www.libarchive.org/) | 3.4.2 | Multi-format archive and compression library / BSD-2-Clause |
| [libcurl](http://curl.haxx.se/) | 7.71.1 | tool and library for transferring data with URL syntax / MIT/X derivate (`<http://curl.haxx.se/docs/copyright.html>`) |
| [libdeflate](https://github.com/ebiggers/libdeflate) | 1.7 | libdeflate is a library for fast, whole-buffer DEFLATE-based compression and decompression. / MIT |
| [libedit](http://thrysoee.dk/editline/) | 3.1.20210216 | Editline Library (libedit) / BSD-2-Clause |
| [libev](http://software.schmorp.de/pkg/libev.html) | 4.33 | A full-featured and high-performance event loop that is loosely modeled after libevent, but without its limitations and bugs. / BSD-2-Clause |
| [libffi](https://sourceware.org/libffi/) | 3.3 | A Portable Foreign Function Interface Library. / Custom |
| [libgcc-ng](https://gcc.gnu.org/onlinedocs/gccint/Libgcc.html) | 10.2.0 | The GCC low-level runtime library / GPL-3.0-only WITH GCC-exception-3.1 |
| [libgfortran-ng](https://gcc.gnu.org/) | 10.2.0 | The GNU Fortran Runtime Library / GPL-3.0-only WITH GCC-exception-3.1 |
| [libgfortran5](https://gcc.gnu.org/) | 10.2.0 | The GNU Fortran Runtime Library / GPL-3.0-only WITH GCC-exception-3.1 |
| [libgomp](https://gcc.gnu.org/onlinedocs/gccint/Libgcc.html) | 10.2.0 | The GCC OpenMP implementation. / GPL-3.0-only WITH GCC-exception-3.1 |
| [liblief](https://lief.quarkslab.com/) | 0.10.1 | A cross platform library to parse, modify and abstract ELF, PE and MachO formats. / Apache-2.0 |
| [libllvm10](http://llvm.org/) | 10.0.1 | Development headers and libraries for LLVM / Apache-2.0 WITH LLVM-exception |
| [libopenblas](http://www.openblas.net/) | 0.3.13 | An Optimized BLAS library / BSD |
| [libpng](http://www.libpng.org/pub/png/libpng.html) | 1.6.37 | PNG reference library / zlib/libpng |
| [libsodium](http://libsodium.org) | 1.0.18 | A modern and easy-to-use crypto library. / ISC |
| [libssh2](https://www.libssh2.org/) | 1.9.0 | the SSH library / BSD-3-Clause |
| [libstdcxx-ng](https://gcc.gnu.org/) | 10.2.0 | The GNU C++ Runtime Library / GPL-3.0-only WITH GCC-exception-3.1 |
| [libtiff](http://www.libtiff.org/) | 4.1.0 | Support for the Tag Image File Format (TIFF). / HPND |
| [libtool](http://www.gnu.org/software/libtool/) | 2.4.6 | The GNU Portable Library Tool / GPL 3 |
| [libuuid](http://sourceforge.net/projects/libuuid/) | 1.0.3 | Portable uuid C library. / BSD 3-Clause |
| [libuv](http://libuv.org/) | 1.40.0 | Cross-platform asynchronous I/O / MIT |
| [libwebp](https://developers.google.com/speed/webp/) | 1.2.0 | WebP image library / Google |
| [libxcb](http://xcb.freedesktop.org/) | 1.14 | This is the C-language Binding (XCB) package to the X Window System protocol / MIT |
| [libxml2](http://xmlsoft.org/) | 2.9.10 | The XML C parser and toolkit of Gnome / MIT |
| [libxslt](http://xmlsoft.org/XSLT/) | 1.1.34 | The XSLT C library developed for the GNOME project / MIT |
| [libzopfli](https://github.com/google/zopfli) | 1.0.3 | A compression library programmed in C to perform very good, but slow, deflate or zlib compression. / Apache-2.0 |
| [llvmlite](http://llvmlite.pydata.org) | 0.36.0 | A lightweight LLVM python binding for writing JIT compilers. / BSD-2-Clause |
| [locket](https://github.com/mwilliamson/locket.py) | 0.2.1 | File-based locks for Python for Linux and Windows / BSD 2-Clause |
| [lxml](http://lxml.de/) | 4.6.3 | Pythonic binding for the C libraries libxml2 and libxslt. / BSD-3-Clause and GPL-2.0-only and ZPL-2.0 and LicenseRef-ElementTree |
| [lz4-c](https://www.lz4.org) | 1.9.3 | Extremely Fast Compression algorithm / BSD-2-Clause |
| [lzo](http://www.oberhumer.com/opensource/lzo/) | 2.10 | LZO is a portable lossless data compression library written in ANSI C. / GPL v2+ |
| [markupsafe](https://www.palletsprojects.com/p/markupsafe) | 1.1.1 | A Python module that implements the jinja2.Markup string / BSD-3-Clause |
| [matplotlib](http://matplotlib.org/) | 3.3.4 | Publication quality figures in Python / LicenseRef-PSF-based |
| [matplotlib-base](http://matplotlib.org/) | 3.3.4 | Publication quality figures in Python / LicenseRef-PSF-based |
| [mccabe](https://github.com/PyCQA/mccabe) | 0.6.1 | McCabe complexity checker for Python / MIT |
| [mistune](https://github.com/lepture/mistune) | 0.8.4 | The fastest markdown parser in pure Python. / BSD 3-Clause |
| [mock](https://github.com/testing-cabal/mock) | 4.0.3 | A library for testing in Python / BSD-2-Clause |
| [more-itertools](https://github.com/more-itertools/more-itertools) | 8.7.0 | More routines for operating on iterables, beyond itertools / MIT |
| [mpc](http://www.multiprecision.org/) | 1.1.0 | A C library for the arithmetic of complex numbers with arbitrarily high precision. / LGPL 3 |
| [mpfr](http://www.mpfr.org/) | 4.0.2 | The MPFR library is a C library for multiple-precision floating-point computations with correct rounding. / LGPL-3.0-only |
| [mpmath](http://mpmath.org) | 1.2.1 | Python library for arbitrary-precision floating-point arithmetic / BSD 3-Clause |
| [msgpack-python](http://msgpack.org/) | 1.0.2 | MessagePack (de)serializer / Apache-2.0 |
| [multipledispatch](https://github.com/mrocklin/multipledispatch/) | 0.6.0 | Multiple dispatch in Python / BSD 3-Clause |
| [nbclassic](http://github.com/jupyterlab/nbclassic) | 0.2.6 | Jupyter Notebook as a Jupyter Server Extension. / BSD-3-Clause |
| [nbclient](https://jupyter.org) | 0.5.3 | A client library for executing notebooks. Formally nbconvert’s ExecutePreprocessor. / BSD-3-Clause |
| [nbconvert](http://jupyter.org) | 6.0.7 | Converting Jupyter Notebooks / BSD-3-Clause |
| [nbformat](http://jupyter.org) | 5.1.3 | The Jupyter Notebook format / BSD-3-Clause |
| [ncurses](http://www.gnu.org/software/ncurses/) | 6.2 | Library for text-based user interfaces / Free software (MIT-like) |
| [nest-asyncio](https://github.com/erdewit/nest_asyncio) | 1.5.1 | Patch asyncio to allow nested event loops / BSD-2-Clause |
| [networkx](https://networkx.github.io/) | 2.5 | Python package for creating and manipulating complex networks / BSD-3-Clause |
| [nltk](http://nltk.org/) | 3.6.1 | Natural Language Toolkit / Apache 2.0 |
| nomkl | 3.0 | None / BSD |
| [nose](http://readthedocs.org/docs/nose/) | 1.3.7 | Nose extends unittest to make testing easier / LGPL-2.1 |
| [notebook](https://jupyter.org) | 6.3.0 | Jupyter Notebook / BSD-3-Clause |
| [numba](http://numba.pydata.org) | 0.53.1 | NumPy aware dynamic Python compiler using LLVM / BSD-2-Clause |
| [numexpr](https://github.com/pydata/numexpr) | 2.7.3 | Fast numerical expression evaluator for NumPy. / MIT |
| [numpy](http://numpy.scipy.org/) | 1.20.1 | Array processing for numbers, strings, records, and objects. / BSD 3-Clause |
| [numpy-base](http://numpy.scipy.org/) | 1.20.1 | Array processing for numbers, strings, records, and objects. / BSD 3-Clause |
| [numpydoc](https://github.com/numpy/numpydoc) | 1.1.0 | Numpy’s Sphinx extensions / BSD 3-Clause |
| [olefile](http://www.decalage.info/python/olefileio) | 0.46 | parse, read and write Microsoft OLE2 files / BSD 2-Clause |
| [openblas](http://www.openblas.net/) | 0.3.13 | An optimized BLAS library / BSD |
| openblas-devel | 0.3.13 | OpenBLAS headers and libraries for developing software that used OpenBLAS. / None |
| [openjpeg](http://www.openjpeg.org/) | 2.3.0 | An open-source JPEG 2000 codec written in C / BSD 2-Clause |
| [openpyxl](https://openpyxl.readthedocs.io) | 3.0.7 | A Python library to read/write Excel 2010 xlsx/xlsm files / MIT |
| [openssl](http://www.openssl.org/) | 1.1.1k | OpenSSL is an open-source implementation of the SSL and TLS protocols / OpenSSL |
| [packaging](https://github.com/pypa/packaging) | 20.9 | Core utilities for Python packages / Apache 2.0 or BSD 2-Clause |
| [pandas](http://pandas.pydata.org) | 1.2.4 | High-performance, easy-to-use data structures and data analysis tools. / BSD-3-Clause |
| [pandoc](http://pandoc.org/) | 2.12 | Universal markup converter (repackaged binaries) / GPL-2.0 |
| [pandocfilters](https://github.com/jgm/pandocfilters) | 1.4.3 | A python module for writing pandoc filters / BSD-3-Clause |
| [pango](http://www.pango.org/) | 1.45.3 | Text layout and rendering engine. / LGPL-2.1 |
| [parso](https://github.com/davidhalter/parso) | 0.7.0 | A Python Parser / MIT |
| [partd](https://github.com/dask/partd) | 1.2.0 | Data structure for on-disk shuffle operations / BSD 3-Clause |
| [patchelf](http://nixos.org/patchelf.html) | 0.11 | A small utility to modify the dynamic linker and RPATH of ELF executables. / GPL-3.0-or-later |
| [path](https://github.com/jaraco/path) | 15.1.2 | A module wrapper for os.path / MIT |
| [path.py](https://github.com/jaraco/path.py) | 12.5.0 | A module wrapper for os.path / MIT |
| [pathlib2](https://github.com/mcmtroffaes/pathlib2) | 2.3.5 | Fork of pathlib aiming to support the full stdlib Python API / MIT |
| [patsy](https://github.com/pydata/patsy) | 0.5.1 | Describing statistical models in Python using symbolic formulas / BSD-2-Clause, PSF2 |
| [pcre](http://www.pcre.org/) | 8.44 | Regular expression pattern matching using the same syntax and semantics as Perl 5. / BSD 3-Clause |
| [pep8](http://pep8.readthedocs.org/) | 1.7.1 | Python style guide checker / MIT |
| [pexpect](http://pexpect.sourceforge.net/) | 4.8.0 | Pexpect makes Python a better tool for controlling other applications. / ISC |
| [pickleshare](https://github.com/pickleshare/pickleshare/) | 0.7.5 | Tiny ‘shelve’-like database with concurrency support / MIT |
| [pillow](https://pillow.readthedocs.io) | 8.2.0 | Pillow is the friendly PIL fork by Alex Clark and Contributors / LicenseRef-PIL |
| [pip](https://pip.pypa.io/en/stable/) | 21.0.1 | PyPA recommended tool for installing Python packages / MIT |
| [pixman](http://www.pixman.org/) | 0.40.0 | A low-level software library for pixel manipulation. / MIT |
| [pkginfo](https://code.launchpad.net/~tseaver/pkginfo/trunk) | 1.7.0 | Query metadatdata from sdists / bdists / installed packages. / MIT |
| [pluggy](https://github.com/pytest-dev/pluggy) | 0.13.1 | Plugin registration and hook calling for Python / MIT |
| [ply](http://www.dabeaz.com/ply/index.html) | 3.11 | Python Lex-Yacc / BSD 3-clause |
| [prometheus\_client](https://github.com/prometheus/client_python) | 0.10.1 | Python client for the Prometheus monitoring system / Apache-2.0 |
| [prompt-toolkit](https://github.com/jonathanslenders/python-prompt-toolkit) | 3.0.17 | Library for building powerful interactive command lines in Python / BSD-3-Clause |
| [prompt\_toolkit](https://github.com/jonathanslenders/python-prompt-toolkit) | 3.0.17 | Library for building powerful interactive command lines in Python / BSD-3-Clause |
| [psutil](https://github.com/giampaolo/psutil) | 5.8.0 | A cross-platform process and system utilities module for Python / BSD-3-Clause |
| [ptyprocess](https://github.com/pexpect/ptyprocess) | 0.7.0 | Run a subprocess in a pseudo terminal / ISC |
| [py](https://github.com/pytest-dev/py) | 1.10.0 | library with cross-python path, ini-parsing, io, code, log facilities / MIT |
| [py-lief](https://lief.quarkslab.com/) | 0.10.1 | A cross platform library to parse, modify and abstract ELF, PE and MachO formats. / Apache-2.0 |
| [pycodestyle](https://pycodestyle.readthedocs.io/) | 2.7.0 | Python style guide checker / MIT |
| [pycosat](https://github.com/ContinuumIO/pycosat) | 0.6.3 | Bindings to picosat (a SAT solver) / MIT |
| [pycparser](https://github.com/eliben/pycparser) | 2.20 | Complete C99 parser in pure Python / BSD 3-clause |
| [pycurl](http://pycurl.sourceforge.net/) | 7.43.0.6 | A Python Interface To The cURL library / LGPL, MIT |
| [pyerfa](https://pyerfa.readthedocs.io/) | 1.7.2 | Python bindings for ERFA routines / BSD-3-Clause |
| [pyflakes](https://github.com/PyCQA/pyflakes) | 2.3.1 | Pyflakes analyzes programs and detects various errors. / MIT |
| [pygments](http://pygments.org/) | 2.8.1 | Pygments is a generic syntax highlighter suitable for use in code hosting, forums, wikis or other applications that need to prettify source code. / BSD-2-clause |
| [pylint](http://www.pylint.org/) | 2.7.4 | python code static checker / GPL-2.0-only |
| [pyodbc](https://github.com/mkleehammer/pyodbc) | 4.0.30 | DB API Module for ODBC / MIT |
| [pyopenssl](https://github.com/pyca/pyopenssl) | 20.0.1 | Python wrapper module around the OpenSSL library / Apache 2.0 |
| [pyparsing](http://pyparsing.wikispaces.com/) | 2.4.7 | Create and execute simple grammars / MIT |
| [pyrsistent](http://github.com/tobgu/pyrsistent/) | 0.17.3 | Persistent/Functional/Immutable data structures / MIT |
| [pysocks](https://github.com/Anorov/PySocks) | 1.7.1 | A Python SOCKS client module. See [Anorov/PySocks](https://github.com/Anorov/PySocks) for more information. / BSD 3-Clause |
| [pytables](http://www.pytables.org) | 3.6.1 | Brings together Python, HDF5 and NumPy to easily handle large amounts of data. / BSD 3-Clause |
| [pytest](https://docs.pytest.org/en/latest/) | 6.2.3 | Simple and powerful testing with Python. / MIT |
| [python](https://www.python.org/) | 3.8.8 | General purpose programming language / Python-2.0 |
| [python-dateutil](https://dateutil.readthedocs.org/) | 2.8.1 | Extensions to the standard Python datetime module. / BSD 3 Clause |
| [python-libarchive-c](https://github.com/Changaco/python-libarchive-c) | 2.9 | Python interface to libarchive / CC0-1.0 |
| [pytz](http://pythonhosted.org/pytz/) | 2021.1 | World timezone definitions, modern and historical. / MIT |
| [pywavelets](https://github.com/PyWavelets/pywt) | 1.1.1 | Discrete Wavelet Transforms in Python / MIT |
| [pyyaml](http://pyyaml.org/wiki/PyYAML) | 5.4.1 | YAML parser and emitter for Python / MIT |
| [pyzmq](https://github.com/zeromq/pyzmq) | 20.0.0 | Python bindings for zeromq / BSD 3-clause |
| [readline](https://cnswww.cns.cwru.edu/php/chet/readline/rltop.html) | 8.1 | library for editing command lines as they are typed in / GPL-3.0 |
| [regex](https://bitbucket.org/mrabarnett/mrab-regex) | 2021.4.4 | Alternative regular expression module, to replace re / Python-2.0 |
| [requests](http://python-requests.org) | 2.25.1 | Requests is an elegant and simple HTTP library for Python, built with ♥. / Apache-2.0 |
| [rope](https://github.com/python-rope/rope) | 0.18.0 | A python refactoring library / GPL 2.0 |
| [ruamel\_yaml](https://sourceforge.net/p/ruamel-yaml/code/ci/default/tree) | 0.15.80 | A patched copy of ruamel.yaml. / MIT |
| [scikit-image](http://scikit-image.org/) | 0.18.1 | Image processing in Python. / BSD-3-Clause |
| [scikit-learn](http://scikit-learn.org/) | 0.24.1 | A set of python modules for machine learning and data mining / BSD-3-Clause |
| [scipy](http://www.scipy.org/) | 1.6.2 | Scientific Library for Python / BSD 3-Clause |
| [seaborn](https://seaborn.pydata.org) | 0.11.1 | Statistical data visualization / BSD 3-Clause |
| [send2trash](https://github.com/hsoft/send2trash) | 1.5.0 | Python library to natively send files to Trash (or Recycle bin) on all platforms. / BSD-3-Clause |
| [setuptools](https://github.com/pypa/setuptools) | 52.0.0 | Download, build, install, upgrade, and uninstall Python packages / MIT |
| [simplegeneric](http://cheeseshop.python.org/pypi/simplegeneric) | 0.8.1 | Simple generic functions (similar to Python’s own len(), pickle.dump(), etc.) / Zope Public |
| [singledispatch](http://docs.python.org/3/library/functools.html#functools.singledispatch) | 3.6.1 | Transforms a function into a single-dispatch generic function / MIT |
| [sip](http://www.riverbankcomputing.com/software/sip/intro) | 4.19.25 | Create Python bindings for C and C++ libraries / GPL-3.0 |
| [six](https://six.readthedocs.io/) | 1.15.0 | Python 2 and 3 compatibility utilities / MIT |
| [snappy](https://github.com/google/snappy) | 1.1.8 | A fast compressor/decompressor / BSD 3-clause |
| [sniffio](https://github.com/python-trio/sniffio) | 1.2.0 | Sniff out which async library your code is running under / Apache-2.0 |
| [snowballstemmer](https://github.com/shibukawa/snowball_py) | 2.1.0 | Snowball stemming library collection for Python / BSD-2-Clause |
| [sortedcollections](http://www.grantjenks.com/docs/sortedcollections/) | 2.1.0 | Python Sorted Collections / Apache-2.0 |
| [sortedcontainers](http://www.grantjenks.com/docs/sortedcontainers/) | 2.3.0 | Python Sorted Container Types: SortedList, SortedDict, and SortedSet / Apache-2.0 |
| [soupsieve](http://facelessuser.github.io/soupsieve) | 2.2.1 | A modern CSS selector implementation for BeautifulSoup / MIT |
| [sphinx](http://www.sphinx-doc.org) | 4.0.1 | Sphinx is a tool that makes it easy to create intelligent and beautiful documentation / BSD-2-Clause |
| sphinxcontrib | 1.0 | Python namespace for sphinxcontrib / BSD |
| [sphinxcontrib-applehelp](https://www.sphinx-doc.org/en/master/) | 1.0.2 | sphinxcontrib-applehelp is a sphinx extension which outputs Apple help books / BSD-2-Clause |
| [sphinxcontrib-devhelp](https://www.sphinx-doc.org/en/master/) | 1.0.2 | sphinxcontrib-devhelp is a sphinx extension which outputs Devhelp document / BSD-2-Clause |
| [sphinxcontrib-htmlhelp](https://www.sphinx-doc.org/en/master/) | 1.0.3 | sphinxcontrib-htmlhelp is a sphinx extension which … / BSD-2-Clause |
| [sphinxcontrib-jsmath](https://www.sphinx-doc.org/en/master/) | 1.0.1 | A sphinx extension which renders display math in HTML via JavaScript / BSD-2-Clause |
| [sphinxcontrib-qthelp](https://www.sphinx-doc.org/en/master/) | 1.0.3 | sphinxcontrib-qthelp is a sphinx extension which outputs QtHelp document / BSD-2-Clause |
| [sphinxcontrib-serializinghtml](https://www.sphinx-doc.org/en/master/) | 1.1.4 | sphinxcontrib-serializinghtml is a sphinx extension which outputs “serialized” HTML files (json and pickle). / BSD-2-Clause |
| [sphinxcontrib-websupport](https://pypi.python.org/pypi/sphinxcontrib-websupport) | 1.2.4 | Sphinx API for Web Apps / BSD-2-Clause |
| [sqlalchemy](http://www.sqlalchemy.org/) | 1.3.23 | Database Abstraction Library. / MIT |
| [sqlite](http://www.sqlite.org/) | 3.35.4 | Implements a self-contained, zero-configuration, SQL database engine / Public-Domain (`<http://www.sqlite.org/copyright.html>`) |
| [statsmodels](https://www.statsmodels.org) | 0.12.2 | Statistical computations and models for use with SciPy / BSD-3-Clause |
| [sympy](https://sympy.org) | 1.8 | Python library for symbolic mathematics / BSD-3-Clause |
| [tbb](https://github.com/oneapi-src/oneTBB) | 2020.2 | High level abstract threading library / Apache-2.0 |
| [tblib](https://github.com/ionelmc/python-tblib) | 1.7.0 | Traceback serialization library. / BSD 2-Clause |
| [terminado](https://github.com/jupyter/terminado) | 0.9.4 | Terminals served by tornado websockets / BSD-2-Clause |
| [testpath](https://testpath.readthedocs.io) | 0.4.4 | Testpath is a collection of utilities for Python code working with files and commands. / BSD-3-Clause |
| [threadpoolctl](https://github.com/joblib/threadpoolctl) | 2.1.0 | Python helpers to control the threadpools of native libraries / BSD 3-Clause |
| [tifffile](https://github.com/cgohlke/tifffile) | 2021.3.31 | Read and write image data from and to TIFF files. / BSD-3-Clause |
| [tk](http://www.tcl.tk/) | 8.6.10 | A dynamic programming language with GUI support. Bundles Tcl and Tk. / Tcl/Tk |
| [toml](https://github.com/uiri/toml) | 0.10.2 | Python lib for TOML. / MIT |
| [toolz](http://toolz.readthedocs.org/) | 0.11.1 | A functional standard library for Python / BSD-3-Clause |
| [tornado](http://www.tornadoweb.org/) | 6.1 | A Python web framework and asynchronous networking library, originally developed at FriendFeed. / Apache-2.0 |
| [tqdm](https://pypi.python.org/pypi/tqdm) | 4.59.0 | A Fast, Extensible Progress Meter / MPL-2.0 or MIT |
| [traitlets](http://traitlets.readthedocs.org/) | 5.0.5 | Configuration system for Python applications / BSD-3-Clause |
| [typing\_extensions](https://github.com/python/typing/tree/master/typing_extensions) | 3.7.4.3 | Backported and Experimental Type Hints for Python / PSF-2.0 |
| [unicodecsv](https://github.com/jdunck/python-unicodecsv) | 0.14.1 | Drop-in replacement for csv module which supports unicode strings / BSD |
| [unixodbc](http://www.unixodbc.org/) | 2.3.9 | ODBC on non MS Windows platforms / LGPL-2.1 |
| [urllib3](https://urllib3.readthedocs.io/) | 1.26.4 | HTTP library with thread-safe connection pooling, file post, and more. / MIT |
| [wcwidth](https://github.com/jquast/wcwidth) | 0.2.5 | Measures number of Terminal column cells of wide-character codes. / MIT |
| [webencodings](https://github.com/gsnedders/python-webencodings) | 0.5.1 | Character encoding aliases for legacy web content / BSD 3-Clause |
| [werkzeug](https://palletsprojects.com/p/werkzeug/) | 1.0.1 | The comprehensive WSGI web application library. / BSD 3-Clause |
| [wheel](https://github.com/pypa/wheel) | 0.36.2 | A built-package format for Python. / MIT |
| [widgetsnbextension](http://ipython.org) | 3.5.1 | Interactive Widgets for Jupyter / BSD 3-clause |
| [wrapt](https://github.com/GrahamDumpleton/wrapt) | 1.12.1 | Module for decorators, wrappers and monkey patching / BSD 2-Clause |
| [xlrd](http://www.python-excel.org/) | 2.0.1 | Library for developers to extract data from Microsoft Excel (tm) spreadsheet files / BSD 3-Clause and BSD with advertising |
| [xlsxwriter](https://xlsxwriter.readthedocs.io/) | 1.3.8 | A Python module for creating Excel XLSX files / BSD-2-Clause |
| [xlwt](http://www.python-excel.org/) | 1.3.0 | Writing data and formatting information to Excel files / BSD |
| [xz](http://tukaani.org/xz/) | 5.2.5 | Data compression software with high compression ratio / LGPL-2.1 and GPL-2.0 |
| [yaml](http://pyyaml.org/wiki/LibYAML) | 0.1.7 | A C library for parsing and emitting YAML / MIT |
| [zeromq](http://zeromq.org) | 4.3.4 | A high-performance asynchronous messaging library. / LGPL-3.0-or-later |
| [zfp](https://computation.llnl.gov/projects/floating-point-compression) | 0.5.5 | Library for compressed numerical arrays that support high throughput read and write random access / BSD-3-Clause |
| [zict](http://github.com/mrocklin/zict) | 2.0.0 | Composable Dictionary Classes / BSD 3-Clause |
| [zipp](https://github.com/jaraco/zipp) | 3.4.1 | A pathlib-compatible Zipfile object wrapper / MIT |
| [zlib](http://zlib.net/) | 1.2.11 | Massively spiffy yet delicately unobtrusive compression library / zlib |
| zope | 1.0 | web application server / BSD |
| [zope.event](http://www.zope.org/en/latest/) | 4.5.0 | Very basic event publishing system / Zope Public License |
| [zope.interface](http://docs.zope.org/zope.interface/) | 5.2.0 | Interfaces for Python / ZPL-2.1 |
| [zstd](http://www.zstd.net) | 1.4.9 | Zstandard - Fast real-time compression algorithm / BSD 3-Clause |
| Name | Version | Summary / License |
|---|---|---|
| [\_libgcc\_mutex](https://github.com/AnacondaRecipes/_libgcc_mutex-feedstock) | 0.1 | Mutex for libgcc and libgcc-ng / None |
| [alabaster](http://www.sphinx-doc.org/en/stable/index.html) | 0.7.12 | Configurable, Python 2+3 compatible Sphinx theme. / BSD 3-Clause |
| [anaconda-client](http://anaconda.org) | 1.7.2 | anaconda.org command line client library / BSD 3-clause |
| [anaconda-navigator](https://github.com/ContinuumIO/navigator) | 2.0.3 | Anaconda Navigator / proprietary - Continuum Analytics, Inc. |
| [anaconda-project](https://github.com/Anaconda-Platform/anaconda-project) | 0.9.1 | Tool for encapsulating, running, and reproducing data science projects / BSD-3-Clause |
| [anyio](https://github.com/agronholm/anyio) | 2.2.0 | High level compatibility layer for multiple asynchronous event loop implementations on Python / MIT |
| [appdirs](http://github.com/ActiveState/appdirs) | 1.4.4 | A small Python module for determining appropriate platform-specific dirs. / MIT |
| [argh](https://github.com/neithere/argh) | 0.26.2 | The Natural CLI. / LGPL 3 |
| [argon2-cffi](https://argon2-cffi.readthedocs.org/) | 20.1.0 | The secure Argon2 password hashing algorithm. / MIT |
| [asn1crypto](https://github.com/wbond/asn1crypto) | 1.4.0 | Python ASN.1 library with a focus on performance and a pythonic API / MIT |
| [astroid](https://www.astroid.org/) | 2.5 | A abstract syntax tree for Python with inference support. / LGPL-2.1-only |
| [astropy](http://www.astropy.org/) | 4.2.1 | Community-developed Python Library for Astronomy / BSD-3-Clause |
| [async\_generator](https://github.com/python-trio/async_generator) | 1.10 | Async generators and context managers for Python 3.5+ / MIT |
| [atomicwrites](https://github.com/untitaker/python-atomicwrites) | 1.4.0 | Atomic file writes / MIT |
| [attrs](https://attrs.readthedocs.io/en/stable/) | 20.3.0 | attrs is the Python package that will bring back the joy of writing classes by relieving you from the drudgery of implementing object protocols (aka dunder methods). / MIT |
| [autopep8](https://github.com/hhatto/autopep8) | 1.5.6 | A tool that automatically formats Python code to conform to the PEP 8 style guide / MIT |
| [babel](http://babel.pocoo.org/) | 2.9.0 | Utilities to internationalize and localize Python applications / BSD 3-clause |
| [backcall](https://github.com/takluyver/backcall/) | 0.2.0 | Specifications for callback functions passed in to an API / BSD-3-Clause |
| [backports](https://bitbucket.org/brandon/backports) | 1.0 | None / BSD |
| [backports.shutil\_get\_terminal\_size](https://github.com/chrippa/backports.shutil_get_terminal_size) | 1.0.0 | A backport of the get\_terminal\_size function from Python 3.3’s shutil. / MIT |
| [beautifulsoup4](http://www.crummy.com/software/BeautifulSoup/) | 4.9.3 | Python library designed for screen-scraping / MIT |
| [bitarray](https://github.com/ilanschnell/bitarray) | 2.1.0 | efficient arrays of booleans – C extension / PSF |
| [bkcharts](http://github.com/bokeh/bkcharts) | 0.2 | High level chart types built on top of Bokeh / BSD 3-Clause |
| [black](https://github.com/python/black) | 19.10b0 | The Uncompromising Code Formatter / MIT |
| blas | 1.0 | |
| [bleach](https://github.com/mozilla/bleach) | 3.3.0 | Easy, whitelist-based HTML-sanitizing tool / Apache-2.0 |
| [blosc](https://github.com/Blosc/c-blosc) | 1.21.0 | A blocking, shuffling and loss-less compression library that can be faster than memcpy() / BSD-3-Clause |
| [bokeh](http://bokeh.pydata.org/) | 2.3.2 | Statistical and novel interactive HTML plots for Python / BSD-3-Clause |
| [boto](https://github.com/boto/boto/) | 2.49.0 | Amazon Web Services Library / MIT |
| [bottleneck](https://github.com/pydata/bottleneck) | 1.3.2 | Fast NumPy array functions written in Cython. / BSD 2-Clause |
| [brotlipy](https://github.com/python-hyper/brotlipy) | 0.7.0 | Python bindings to the Brotli compression library / MIT |
| [bzip2](http://www.bzip.org/) | 1.0.8 | high-quality data compressor / bzip2 |
| [c-ares](https://c-ares.haxx.se/) | 1.17.1 | This is c-ares, an asynchronous resolver library / MIT |
| [ca-certificates](https://github.com/conda-forge/ca-certificates-feedstock) | 2021.4.13 | Certificates for use with other packages. / MPL 2.0 |
| [cairo](http://cairographics.org/) | 1.16.0 | Cairo is a 2D graphics library with support for multiple output devices. / LGPL 2.1 or MPL 1.1 |
| [certifi](http://certifi.io/) | 2020.12.5 | Python package for providing Mozilla’s CA Bundle. / ISC |
| [cffi](https://bitbucket.org/cffi/cffi) | 1.14.5 | Foreign Function Interface for Python calling C code. / MIT |
| [chardet](https://github.com/chardet/chardet) | 4.0.0 | Universal character encoding detector / LGPL2 |
| [click](https://palletsprojects.com/p/click) | 7.1.2 | Python composable command line interface toolkit / BSD-3-Clause |
| [cloudpickle](https://github.com/cloudpipe/cloudpickle) | 1.6.0 | Extended pickling support for Python objects / BSD-3-Clause |
| [clyent](https://github.com/Anaconda-Platform/clyent) | 1.2.2 | Command line client library for windows and posix / BSD 3-Clause |
| [colorama](https://github.com/tartley/colorama) | 0.4.4 | Cross-platform colored terminal text / BSD-3-Clause |
| [conda](https://conda.io) | 4.10.1 | OS-agnostic, system-level binary package and environment manager. / BSD 3-Clause |
| [conda-build](https://github.com/conda/conda-build) | 3.21.4 | tools for building conda packages / BSD 3-Clause |
| [conda-env](https://github.com/conda/conda-env) | 2.6.0 | Tools for interacting with conda environments. / BSD 3-Clause |
| [conda-verify](https://github.com/conda/conda-verify) | 3.4.2 | tool for validating conda recipes and conda packages / BSD 3-Clause |
| [contextlib2](http://contextlib2.readthedocs.org) | 0.6.0.post1 | Backports and enhancements for the contextlib module / PSF 2 |
| [cryptography](https://github.com/pyca/cryptography) | 3.4.7 | Provides cryptographic recipes and primitives to Python developers / Apache-2.0 AND BSD-3-Clause AND PSF-2.0 AND MIT |
| [curl](http://curl.haxx.se/) | 7.71.1 | tool and library for transferring data with URL syntax / MIT/X derivate (`<http://curl.haxx.se/docs/copyright.html>`) |
| [cycler](http://matplotlib.org/cycler) | 0.10.0 | Composable style cycles. / BSD 3-Clause |
| [cython](http://www.cython.org/) | 0.29.23 | The Cython compiler for writing C extensions for the Python language / Apache-2.0 |
| [cytoolz](https://github.com/pytoolz/cytoolz) | 0.11.0 | Cython implementation of Toolz. High performance functional utilities / BSD-3-Clause |
| [dask](https://dask.org/) | 2021.4.0 | Parallel PyData with Task Scheduling / BSD-3-Clause |
| [dask-core](http://github.com/dask/dask/) | 2021.4.0 | Parallel Python with task scheduling / BSD-3-Clause |
| [dbus](http://www.freedesktop.org/wiki/Software/dbus/) | 1.13.18 | Simple message bus system for applications to talk to one another / GPL2 |
| [decorator](https://github.com/micheles/decorator) | 5.0.6 | Better living through Python with decorators. / BSD-3-Clause |
| [defusedxml](https://bitbucket.org/tiran/defusedxml) | 0.7.1 | XML bomb protection for Python stdlib modules / PSF 2.0 |
| [diff-match-patch](http://code.google.com/p/google-diff-match-patch/) | 20200713 | Diff Match Patch is a high-performance library in multiple languages that manipulates plain text / Apache-2.0 |
| [distributed](http://distributed.readthedocs.io/en/latest/) | 2021.4.1 | Distributed computing with Dask / BSD-3-Clause |
| [docutils](http://docutils.sourceforge.net/) | 0.17.1 | Docutils – Python Documentation Utilities / Public Domain Dedictation and BSD 2-Clause and PSF 2.1.1 and GPL 3.0 |
| [entrypoints](https://github.com/takluyver/entrypoints) | 0.3 | Discover and load entry points from installed packages. / MIT License |
| [et\_xmlfile](https://bitbucket.org/openpyxl/et_xmlfile) | 1.0.1 | An implementation of lxml.xmlfile for the standard library / MIT |
| [expat](http://expat.sourceforge.net/) | 2.3.0 | Expat XML parser library in C / MIT |
| [fastcache](https://github.com/pbrady/fastcache) | 1.1.0 | C implementation of Python 3 lru\_cache / MIT |
| [filelock](https://github.com/benediktschmitt/py-filelock) | 3.0.12 | A platform independent file lock. / Public Domain |
| [flake8](http://flake8.pycqa.org/) | 3.9.0 | Your Tool For Style Guide Enforcement / MIT |
| [flask](http://flask.pocoo.org) | 1.1.2 | A microframework based on Werkzeug, Jinja2 and good intentions. / BSD 3-Clause |
| [fontconfig](http://www.freedesktop.org/wiki/Software/fontconfig/) | 2.13.1 | A library for configuring and customizing font access. / MIT |
| [freetype](https://www.freetype.org/) | 2.10.4 | A Free, High-Quality, and Portable Font Engine / GPL-2.0-only and LicenseRef-FreeType |
| [fribidi](https://github.com/fribidi/fribidi) | 1.0.10 | The Free Implementation of the Unicode Bidirectional Algorithm. / LGPL-2.1 |
| [fsspec](https://github.com/martindurant/filesystem_spec) | 0.9.0 | A specification for pythonic filesystems / BSD-3-Clause |
| [future](http://python-future.org) | 0.18.2 | Clean single-source support for Python 3 and 2 / MIT |
| [get\_terminal\_size](https://github.com/chrippa/backports.shutil_get_terminal_size) | 1.0.0 | Get the size of the terminal window. / MIT |
| [gevent](https://www.gevent.org) | 21.1.2 | Coroutine-based network library / MIT |
| [glib](https://developer.gnome.org/glib/) | 2.68.1 | Provides core application building blocks for libraries and applications written in C. / LGPL-2.1 |
| [glob2](https://github.com/miracle2k/python-glob2) | 0.7 | Version of the glob module that supports recursion via \*\*, and can capture patterns. / BSD-2-Clause |
| [gmp](http://gmplib.org/) | 6.2.1 | The GNU multiprecision library. / GPL-2.0-or-later AND LGPL-3.0-or-later |
| [gmpy2](https://pypi.python.org/pypi/gmpy2) | 2.0.8 | GMP/MPIR, MPFR, and MPC interface to Python 2.6+ and 3.x / LGPL 3 |
| [graphite2](http://graphite.sil.org/) | 1.3.14 | A “smart font” system that handles the complexities of lesser-known languages of the world. / LGPLv2 |
| [greenlet](https://github.com/python-greenlet/greenlet) | 1.0.0 | Lightweight in-process concurrent programming / MIT |
| [gst-plugins-base](http://gstreamer.freedesktop.org/) | 1.14.0 | GStreamer Base Plug-ins / GPL2 |
| [gstreamer](http://gstreamer.freedesktop.org/) | 1.14.0 | Library for constructing graphs of media-handling components / LGPL 2 |
| [h5py](http://www.h5py.org/) | 2.10.0 | Read and write HDF5 files from Python. / BSD-3-Clause |
| [harfbuzz](http://www.freedesktop.org/wiki/Software/HarfBuzz/) | 2.8.0 | An OpenType text shaping engine. / MIT |
| [hdf5](http://www.hdfgroup.org/HDF5/) | 1.10.4 | HDF5 is a data model, library, and file format for storing and managing data / HDF5 |
| [heapdict](http://stutzbachenterprises.com/) | 1.0.1 | A heap with decrease-key and increase-key operations / BSD 3-Clause |
| [html5lib](https://github.com/html5lib/html5lib-python) | 1.1 | HTML parser based on the WHATWG HTML specification / MIT |
| [icu](http://site.icu-project.org/) | 58.2 | International Components for Unicode. / MIT |
| [idna](https://github.com/kjd/idna) | 2.10 | Internationalized Domain Names in Applications (IDNA). / BSD Like |
| [imageio](https://imageio.github.io) | 2.9.0 | A Python library for reading and writing image data / BSD-2-Clause |
| [imagesize](https://github.com/shibukawa/imagesize_py) | 1.2.0 | Getting image size from png/jpeg/jpeg2000/gif file / MIT |
| [importlib-metadata](https://github.com/python/importlib_metadata) | 3.10.0 | A library to access the metadata for a Python package / Apache-2.0 |
| [importlib\_metadata](https://github.com/python/importlib_metadata) | 3.10.0 | A library to access the metadata for a Python package / Apache-2.0 |
| [iniconfig](http://github.com/RonnyPfannschmidt/iniconfig) | 1.1.1 | iniconfig: brain-dead simple config-ini parsing / MIT |
| [intel-openmp](https://software.intel.com/en-us/node/522690) | 2021.2.0 | Math library for Intel and compatible processors / LicenseRef-ProprietaryIntel |
| [intervaltree](https://github.com/chaimleib/intervaltree) | 3.1.0 | Editable interval tree data structure for Python 2 and 3 / Apache-2.0 |
| [ipykernel](https://ipython.org) | 5.3.4 | IPython Kernel for Jupyter / BSD-3-Clause |
| [ipython](https://ipython.org) | 7.22.0 | IPython: Productive Interactive Computing / BSD-3-Clause |
| [ipython\_genutils](http://ipython.org) | 0.2.0 | vestigial utilities from IPython / BSD 3-Clause |
| [ipywidgets](https://github.com/ipython/ipywidgets) | 7.6.3 | Jupyter Interactive Widgets / BSD-3-Clause |
| [isort](https://github.com/timothycrosley/isort) | 5.8.0 | A Python utility / library to sort Python imports. / MIT |
| [itsdangerous](https://github.com/pallets/itsdangerous) | 1.1.0 | Various helpers to pass trusted data to untrusted environments. / BSD 3-Clause |
| [jbig](https://www.cl.cam.ac.uk/~mgk25/jbigkit) | 2.1 | Implementation of the JBIG1 data compression standard / GPL-2.0 |
| [jdcal](https://github.com/phn/jdcal) | 1.4.1 | Julian dates from proleptic Gregorian and Julian calendars. / BSD 2-Clause |
| [jedi](https://github.com/davidhalter/jedi/) | 0.17.2 | An autocompletion tool for Python that can be used for text editors. / MIT |
| [jeepney](https://gitlab.com/takluyver/jeepney) | 0.6.0 | Pure Python DBus interface / MIT |
| [jinja2](http://jinja.pocoo.org) | 2.11.3 | An easy to use stand-alone template engine written in pure python. / BSD-3-Clause |
| [joblib](https://pypi.org/project/joblib/) | 1.0.1 | Lightweight pipelining: using Python functions as pipeline jobs. / BSD-3-Clause |
| [jpeg](http://www.ijg.org/) | 9b | read/write jpeg COM, EXIF, IPTC medata / Custom free software license |
| [json5](https://github.com/dpranke/pyjson5) | 0.9.5 | A Python implementation of the JSON5 data format / Apache-2.0 |
| [jsonschema](https://github.com/Julian/jsonschema) | 3.2.0 | An implementation of JSON Schema validation for Python / MIT |
| [jupyter](http://jupyter.org) | 1.0.0 | Jupyter metapackage. Install all the Jupyter components in one go. / BSD 3-Clause |
| [jupyter-packaging](https://github.com/jupyter/jupyter-packaging) | 0.7.12 | Jupyter Packaging Utilities / BSD-3-Clause |
| [jupyter\_client](https://jupyter.org) | 6.1.12 | jupyter\_client contains the reference implementation of the Jupyter protocol. / BSD-3-Clause |
| [jupyter\_console](http://jupyter.org) | 6.4.0 | Jupyter terminal console / BSD-3-Clause |
| [jupyter\_core](https://jupyter.org) | 4.7.1 | Core common functionality of Jupyter projects. / BSD-3-Clause |
| [jupyter\_server](https://jupyter.org) | 1.4.1 | Jupyter Server / BSD-3-Clause |
| [jupyterlab](https://github.com/jupyterlab/jupyterlab) | 3.0.14 | JupyterLab PRE-ALPHA / BSD-3-Clause |
| [jupyterlab\_pygments](http://github.com/JupyterLab/jupyterlab_pygments) | 0.1.2 | Pygments syntax coloring scheme making use of the JupyterLab CSS variables / BSD-3-Clause |
| [jupyterlab\_server](https://github.com/jupyterlab/jupyterlab_server) | 2.4.0 | A set of server components for JupyterLab and JupyterLab like applications. / BSD-3-Clause |
| [jupyterlab\_widgets](https://github.com/jupyter-widgets/ipywidgets) | 1.0.0 | JupyterLab extension providing HTML widgets / BSD-3-Clause |
| [keyring](https://github.com/jaraco/keyring) | 22.3.0 | Store and access your passwords safely / MIT |
| [kiwisolver](https://github.com/nucleic/kiwi) | 1.3.1 | An efficient C++ implementation of the Cassowary constraint solver / BSD-3-Clause |
| [krb5](http://web.mit.edu/kerberos/) | 1.18.2 | A network authentication protocol. / MIT |
| [lazy-object-proxy](https://github.com/ionelmc/python-lazy-object-proxy) | 1.6.0 | A fast and thorough lazy object proxy / BSD-2-Clause |
| [lcms2](http://www.littlecms.com/) | 2.12 | Open Source Color Management Engine / MIT |
| [ld\_impl\_linux-64](https://www.gnu.org/software/binutils/) | 2.33.1 | A set of programming tools for creating and managing binary programs, object files, libraries, profile data, and assembly source code. / GPL-3.0-only |
| [libarchive](http://www.libarchive.org/) | 3.4.2 | Multi-format archive and compression library / BSD-2-Clause |
| [libcurl](http://curl.haxx.se/) | 7.71.1 | tool and library for transferring data with URL syntax / MIT/X derivate (`<http://curl.haxx.se/docs/copyright.html>`) |
| [libedit](http://thrysoee.dk/editline/) | 3.1.20210216 | Editline Library (libedit) / BSD-2-Clause |
| [libev](http://software.schmorp.de/pkg/libev.html) | 4.33 | A full-featured and high-performance event loop that is loosely modeled after libevent, but without its limitations and bugs. / BSD-2-Clause |
| [libffi](https://sourceware.org/libffi/) | 3.3 | A Portable Foreign Function Interface Library. / Custom |
| [libgcc-ng](https://gcc.gnu.org/onlinedocs/gccint/Libgcc.html) | 9.1.0 | The GCC low-level runtime library / GPL-3.0-only WITH GCC-exception-3.1 |
| [libgfortran-ng](https://gcc.gnu.org/) | 7.3.0 | The GNU Fortran Runtime Library / GPL-3.0-only WITH GCC-exception-3.1 |
| [liblief](https://lief.quarkslab.com/) | 0.10.1 | A cross platform library to parse, modify and abstract ELF, PE and MachO formats. / Apache-2.0 |
| [libllvm10](http://llvm.org/) | 10.0.1 | Development headers and libraries for LLVM / Apache-2.0 WITH LLVM-exception |
| [libpng](http://www.libpng.org/pub/png/libpng.html) | 1.6.37 | PNG reference library / zlib/libpng |
| [libsodium](http://libsodium.org) | 1.0.18 | A modern and easy-to-use crypto library. / ISC |
| [libspatialindex](http://libspatialindex.github.io) | 1.9.3 | Extensible framework for robust spatial indexing / MIT |
| [libssh2](https://www.libssh2.org/) | 1.9.0 | the SSH library / BSD-3-Clause |
| [libstdcxx-ng](https://gcc.gnu.org/) | 9.1.0 | The GNU C++ Runtime Library / GPL-3.0-only WITH GCC-exception-3.1 |
| [libtiff](http://www.libtiff.org/) | 4.2.0 | Support for the Tag Image File Format (TIFF). / HPND |
| [libtool](http://www.gnu.org/software/libtool/) | 2.4.6 | The GNU Portable Library Tool / GPL 3 |
| [libuuid](http://sourceforge.net/projects/libuuid/) | 1.0.3 | Portable uuid C library. / BSD 3-Clause |
| [libuv](http://libuv.org/) | 1.40.0 | Cross-platform asynchronous I/O / MIT |
| [libwebp-base](https://developers.google.com/speed/webp) | 1.2.0 | WebP image library / BSD-3-Clause |
| [libxcb](http://xcb.freedesktop.org/) | 1.14 | This is the C-language Binding (XCB) package to the X Window System protocol / MIT |
| [libxml2](http://xmlsoft.org/) | 2.9.10 | The XML C parser and toolkit of Gnome / MIT |
| [libxslt](http://xmlsoft.org/XSLT/) | 1.1.34 | The XSLT C library developed for the GNOME project / MIT |
| [llvmlite](http://llvmlite.pydata.org) | 0.36.0 | A lightweight LLVM python binding for writing JIT compilers. / BSD-2-Clause |
| [locket](https://github.com/mwilliamson/locket.py) | 0.2.1 | File-based locks for Python for Linux and Windows / BSD 2-Clause |
| [lxml](http://lxml.de/) | 4.6.3 | Pythonic binding for the C libraries libxml2 and libxslt. / BSD-3-Clause and GPL-2.0-only and ZPL-2.0 and LicenseRef-ElementTree |
| [lz4-c](https://www.lz4.org) | 1.9.3 | Extremely Fast Compression algorithm / BSD-2-Clause |
| [lzo](http://www.oberhumer.com/opensource/lzo/) | 2.10 | LZO is a portable lossless data compression library written in ANSI C. / GPL v2+ |
| [markupsafe](https://www.palletsprojects.com/p/markupsafe) | 1.1.1 | A Python module that implements the jinja2.Markup string / BSD-3-Clause |
| [matplotlib](http://matplotlib.org/) | 3.3.4 | Publication quality figures in Python / LicenseRef-PSF-based |
| [matplotlib-base](http://matplotlib.org/) | 3.3.4 | Publication quality figures in Python / LicenseRef-PSF-based |
| [mccabe](https://github.com/PyCQA/mccabe) | 0.6.1 | McCabe complexity checker for Python / MIT |
| [mistune](https://github.com/lepture/mistune) | 0.8.4 | The fastest markdown parser in pure Python. / BSD 3-Clause |
| [mkl](https://software.intel.com/en-us/mkl) | 2021.2.0 | Math library for Intel and compatible processors / LicenseRef-ProprietaryIntel |
| [mkl-service](https://github.com/ContinuumIO/mkl-service) | 2.3.0 | Python bindings to MKL service functions / 3-clause BSD |
| [mkl\_fft](http://github.com/IntelPython/mkl_fft) | 1.3.0 | NumPy-based implementation of Fast Fourier Transform using Intel (R) Math Kernel Library. / BSD 3-Clause |
| [mkl\_random](http://github.com/IntelPython/mkl_random) | 1.2.1 | Intel (R) MKL-powered package for sampling from common probability distributions into NumPy arrays. / BSD 3-Clause |
| [mock](https://github.com/testing-cabal/mock) | 4.0.3 | A library for testing in Python / BSD-2-Clause |
| [more-itertools](https://github.com/more-itertools/more-itertools) | 8.7.0 | More routines for operating on iterables, beyond itertools / MIT |
| [mpc](http://www.multiprecision.org/) | 1.1.0 | A C library for the arithmetic of complex numbers with arbitrarily high precision. / LGPL 3 |
| [mpfr](http://www.mpfr.org/) | 4.0.2 | The MPFR library is a C library for multiple-precision floating-point computations with correct rounding. / LGPL-3.0-only |
| [mpmath](http://mpmath.org) | 1.2.1 | Python library for arbitrary-precision floating-point arithmetic / BSD 3-Clause |
| [msgpack-python](http://msgpack.org/) | 1.0.2 | MessagePack (de)serializer / Apache-2.0 |
| [multipledispatch](https://github.com/mrocklin/multipledispatch/) | 0.6.0 | Multiple dispatch in Python / BSD 3-Clause |
| [mypy\_extensions](http://www.mypy-lang.org/) | 0.4.3 | Experimental type system extensions for programs checked with the mypy typechecker. / MIT |
| [nbclassic](http://github.com/jupyterlab/nbclassic) | 0.2.6 | Jupyter Notebook as a Jupyter Server Extension. / BSD-3-Clause |
| [nbclient](https://jupyter.org) | 0.5.3 | A client library for executing notebooks. Formally nbconvert’s ExecutePreprocessor. / BSD-3-Clause |
| [nbconvert](http://jupyter.org) | 6.0.7 | Converting Jupyter Notebooks / BSD-3-Clause |
| [nbformat](http://jupyter.org) | 5.1.3 | The Jupyter Notebook format / BSD-3-Clause |
| [ncurses](http://www.gnu.org/software/ncurses/) | 6.2 | Library for text-based user interfaces / Free software (MIT-like) |
| [nest-asyncio](https://github.com/erdewit/nest_asyncio) | 1.5.1 | Patch asyncio to allow nested event loops / BSD-2-Clause |
| [networkx](https://networkx.github.io/) | 2.5 | Python package for creating and manipulating complex networks / BSD-3-Clause |
| [nltk](http://nltk.org/) | 3.6.1 | Natural Language Toolkit / Apache 2.0 |
| [nose](http://readthedocs.org/docs/nose/) | 1.3.7 | Nose extends unittest to make testing easier / LGPL-2.1 |
| [notebook](https://jupyter.org) | 6.3.0 | Jupyter Notebook / BSD-3-Clause |
| [numba](http://numba.pydata.org) | 0.53.1 | NumPy aware dynamic Python compiler using LLVM / BSD-2-Clause |
| [numexpr](https://github.com/pydata/numexpr) | 2.7.3 | Fast numerical expression evaluator for NumPy. / MIT |
| [numpy](http://numpy.scipy.org/) | 1.20.1 | Array processing for numbers, strings, records, and objects. / BSD 3-Clause |
| [numpy-base](http://numpy.scipy.org/) | 1.20.1 | Array processing for numbers, strings, records, and objects. / BSD 3-Clause |
| [numpydoc](https://github.com/numpy/numpydoc) | 1.1.0 | Numpy’s Sphinx extensions / BSD 3-Clause |
| [olefile](http://www.decalage.info/python/olefileio) | 0.46 | parse, read and write Microsoft OLE2 files / BSD 2-Clause |
| [openpyxl](https://openpyxl.readthedocs.io) | 3.0.7 | A Python library to read/write Excel 2010 xlsx/xlsm files / MIT |
| [openssl](http://www.openssl.org/) | 1.1.1k | OpenSSL is an open-source implementation of the SSL and TLS protocols / OpenSSL |
| [packaging](https://github.com/pypa/packaging) | 20.9 | Core utilities for Python packages / Apache 2.0 or BSD 2-Clause |
| [pandas](http://pandas.pydata.org) | 1.2.4 | High-performance, easy-to-use data structures and data analysis tools. / BSD-3-Clause |
| [pandoc](http://pandoc.org/) | 2.12 | Universal markup converter (repackaged binaries) / GPL-2.0 |
| [pandocfilters](https://github.com/jgm/pandocfilters) | 1.4.3 | A python module for writing pandoc filters / BSD-3-Clause |
| [pango](http://www.pango.org/) | 1.45.3 | Text layout and rendering engine. / LGPL-2.1 |
| [parso](https://github.com/davidhalter/parso) | 0.7.0 | A Python Parser / MIT |
| [partd](https://github.com/dask/partd) | 1.2.0 | Data structure for on-disk shuffle operations / BSD 3-Clause |
| [patchelf](http://nixos.org/patchelf.html) | 0.12 | A small utility to modify the dynamic linker and RPATH of ELF executables. / GPL-3.0-or-later |
| [path](https://github.com/jaraco/path) | 15.1.2 | A module wrapper for os.path / MIT |
| [path.py](https://github.com/jaraco/path.py) | 12.5.0 | A module wrapper for os.path / MIT |
| [pathlib2](https://github.com/mcmtroffaes/pathlib2) | 2.3.5 | Fork of pathlib aiming to support the full stdlib Python API / MIT |
| [pathspec](https://github.com/cpburnz/python-path-specification) | 0.7.0 | Utility library for gitignore style pattern matching of file paths. / MPL-2.0 |
| [patsy](https://github.com/pydata/patsy) | 0.5.1 | Describing statistical models in Python using symbolic formulas / BSD-2-Clause, PSF2 |
| [pcre](http://www.pcre.org/) | 8.44 | Regular expression pattern matching using the same syntax and semantics as Perl 5. / BSD 3-Clause |
| [pep8](http://pep8.readthedocs.org/) | 1.7.1 | Python style guide checker / MIT |
| [pexpect](http://pexpect.sourceforge.net/) | 4.8.0 | Pexpect makes Python a better tool for controlling other applications. / ISC |
| [pickleshare](https://github.com/pickleshare/pickleshare/) | 0.7.5 | Tiny ‘shelve’-like database with concurrency support / MIT |
| [pillow](https://pillow.readthedocs.io) | 8.2.0 | Pillow is the friendly PIL fork by Alex Clark and Contributors / LicenseRef-PIL |
| [pip](https://pip.pypa.io/en/stable/) | 21.0.1 | PyPA recommended tool for installing Python packages / MIT |
| [pixman](http://www.pixman.org/) | 0.40.0 | A low-level software library for pixel manipulation. / MIT |
| [pkginfo](https://code.launchpad.net/~tseaver/pkginfo/trunk) | 1.7.0 | Query metadatdata from sdists / bdists / installed packages. / MIT |
| [pluggy](https://github.com/pytest-dev/pluggy) | 0.13.1 | Plugin registration and hook calling for Python / MIT |
| [ply](http://www.dabeaz.com/ply/index.html) | 3.11 | Python Lex-Yacc / BSD 3-clause |
| [prometheus\_client](https://github.com/prometheus/client_python) | 0.10.1 | Python client for the Prometheus monitoring system / Apache-2.0 |
| [prompt-toolkit](https://github.com/jonathanslenders/python-prompt-toolkit) | 3.0.17 | Library for building powerful interactive command lines in Python / BSD-3-Clause |
| [prompt\_toolkit](https://github.com/jonathanslenders/python-prompt-toolkit) | 3.0.17 | Library for building powerful interactive command lines in Python / BSD-3-Clause |
| [psutil](https://github.com/giampaolo/psutil) | 5.8.0 | A cross-platform process and system utilities module for Python / BSD-3-Clause |
| [ptyprocess](https://github.com/pexpect/ptyprocess) | 0.7.0 | Run a subprocess in a pseudo terminal / ISC |
| [py](https://github.com/pytest-dev/py) | 1.10.0 | library with cross-python path, ini-parsing, io, code, log facilities / MIT |
| [py-lief](https://lief.quarkslab.com/) | 0.10.1 | A cross platform library to parse, modify and abstract ELF, PE and MachO formats. / Apache-2.0 |
| [pycodestyle](https://pycodestyle.readthedocs.io/) | 2.6.0 | Python style guide checker / MIT |
| [pycosat](https://github.com/ContinuumIO/pycosat) | 0.6.3 | Bindings to picosat (a SAT solver) / MIT |
| [pycparser](https://github.com/eliben/pycparser) | 2.20 | Complete C99 parser in pure Python / BSD 3-clause |
| [pycurl](http://pycurl.sourceforge.net/) | 7.43.0.6 | A Python Interface To The cURL library / LGPL, MIT |
| [pydocstyle](https://github.com/PyCQA/pydocstyle) | 6.0.0 | Python docstring style checker (formerly pep257) / MIT |
| [pyerfa](https://pyerfa.readthedocs.io/) | 1.7.3 | Python bindings for ERFA routines / BSD-3-Clause |
| [pyflakes](https://github.com/PyCQA/pyflakes) | 2.2.0 | Pyflakes analyzes programs and detects various errors. / MIT |
| [pygments](http://pygments.org/) | 2.8.1 | Pygments is a generic syntax highlighter suitable for use in code hosting, forums, wikis or other applications that need to prettify source code. / BSD-2-clause |
| [pylint](http://www.pylint.org/) | 2.7.4 | python code static checker / GPL-2.0-only |
| [pyls-black](https://github.com/rupert/pyls-black) | 0.4.6 | Black plugin for the Python Language Server / MIT |
| [pyls-spyder](https://github.com/spyder-ide/pyls-spyder) | 0.3.2 | Spyder extensions for the python-language-server / MIT |
| [pyodbc](https://github.com/mkleehammer/pyodbc) | 4.0.30 | DB API Module for ODBC / MIT |
| [pyopenssl](https://github.com/pyca/pyopenssl) | 20.0.1 | Python wrapper module around the OpenSSL library / Apache 2.0 |
| [pyparsing](http://pyparsing.wikispaces.com/) | 2.4.7 | Create and execute simple grammars / MIT |
| [pyqt](http://www.riverbankcomputing.co.uk/software/pyqt) | 5.9.2 | Python binding of the cross-platform GUI toolkit Qt. / Commercial, GPL-2.0, GPL-3.0 |
| [pyrsistent](http://github.com/tobgu/pyrsistent/) | 0.17.3 | Persistent/Functional/Immutable data structures / MIT |
| [pysocks](https://github.com/Anorov/PySocks) | 1.7.1 | A Python SOCKS client module. See [Anorov/PySocks](https://github.com/Anorov/PySocks) for more information. / BSD 3-Clause |
| [pytables](http://www.pytables.org) | 3.6.1 | Brings together Python, HDF5 and NumPy to easily handle large amounts of data. / BSD 3-Clause |
| [pytest](https://docs.pytest.org/en/latest/) | 6.2.3 | Simple and powerful testing with Python. / MIT |
| [python](https://www.python.org/) | 3.8.8 | General purpose programming language / Python-2.0 |
| [python-dateutil](https://dateutil.readthedocs.org/) | 2.8.1 | Extensions to the standard Python datetime module. / BSD 3 Clause |
| [python-jsonrpc-server](https://github.com/palantir/python-jsonrpc-server) | 0.4.0 | A Python 2.7 and 3.4+ server implementation of the JSON RPC 2.0 protocol. / MIT |
| [python-language-server](https://github.com/palantir/python-language-server) | 0.36.2 | An implementation of the Language Server Protocol for Python / MIT |
| [python-libarchive-c](https://github.com/Changaco/python-libarchive-c) | 2.9 | Python interface to libarchive / CC0-1.0 |
| [pytz](http://pythonhosted.org/pytz/) | 2021.1 | World timezone definitions, modern and historical. / MIT |
| [pywavelets](https://github.com/PyWavelets/pywt) | 1.1.1 | Discrete Wavelet Transforms in Python / MIT |
| [pyxdg](http://freedesktop.org/wiki/Software/pyxdg) | 0.27 | PyXDG contains implementations of freedesktop.org standards in python. / GNU Lesser General Public v2 (LGPLv2) |
| [pyyaml](http://pyyaml.org/wiki/PyYAML) | 5.4.1 | YAML parser and emitter for Python / MIT |
| [pyzmq](https://github.com/zeromq/pyzmq) | 20.0.0 | Python bindings for zeromq / BSD 3-clause |
| [qdarkstyle](https://github.com/ColinDuquesnoy/QDarkStyleSheet) | 2.8.1 | A dark stylesheet for Qt applications (Qt4, Qt5, PySide, PyQt4, PyQt5, QtPy, PyQtGraph). / MIT |
| [qt](http://qt-project.org) | 5.9.7 | Qt is a cross-platform application and UI framework. / LGPL-3.0 |
| [qtawesome](https://github.com/spyder-ide/qtawesome) | 1.0.2 | Iconic fonts in PyQt and PySide applications / MIT |
| [qtconsole](http://jupyter.org) | 5.0.3 | Jupyter Qt Console / BSD-3-Clause |
| [qtpy](https://github.com/spyder-ide/qtpy) | 1.9.0 | Abstraction layer for PyQt5/PyQt4/PySide / MIT |
| [readline](https://cnswww.cns.cwru.edu/php/chet/readline/rltop.html) | 8.1 | library for editing command lines as they are typed in / GPL-3.0 |
| [regex](https://bitbucket.org/mrabarnett/mrab-regex) | 2021.4.4 | Alternative regular expression module, to replace re / Python-2.0 |
| [requests](http://python-requests.org) | 2.25.1 | Requests is an elegant and simple HTTP library for Python, built with ♥. / Apache-2.0 |
| ripgrep | 12.1.1 | |
| [rope](https://github.com/python-rope/rope) | 0.18.0 | A python refactoring library / GPL 2.0 |
| [rtree](http://toblerity.github.com/rtree/) | 0.9.7 | R-Tree spatial index for Python GIS / MIT |
| [ruamel\_yaml](https://sourceforge.net/p/ruamel-yaml/code/ci/default/tree) | 0.15.100 | A patched copy of ruamel.yaml. / MIT |
| [scikit-image](http://scikit-image.org/) | 0.18.1 | Image processing in Python. / BSD-3-Clause |
| [scikit-learn](http://scikit-learn.org/) | 0.24.1 | A set of python modules for machine learning and data mining / BSD-3-Clause |
| [scipy](http://www.scipy.org/) | 1.6.2 | Scientific Library for Python / BSD 3-Clause |
| [seaborn](https://seaborn.pydata.org) | 0.11.1 | Statistical data visualization / BSD 3-Clause |
| [secretstorage](https://github.com/mitya57/secretstorage) | 3.3.1 | Provides a way for securely storing passwords and other secrets. / BSD-3-Clause |
| [send2trash](https://github.com/hsoft/send2trash) | 1.5.0 | Python library to natively send files to Trash (or Recycle bin) on all platforms. / BSD-3-Clause |
| [setuptools](https://github.com/pypa/setuptools) | 52.0.0 | Download, build, install, upgrade, and uninstall Python packages / MIT |
| [simplegeneric](http://cheeseshop.python.org/pypi/simplegeneric) | 0.8.1 | Simple generic functions (similar to Python’s own len(), pickle.dump(), etc.) / Zope Public |
| [singledispatch](http://docs.python.org/3/library/functools.html#functools.singledispatch) | 3.6.1 | Transforms a function into a single-dispatch generic function / MIT |
| [sip](http://www.riverbankcomputing.com/software/sip/intro) | 4.19.13 | Create Python bindings for C and C++ libraries / GPL-3.0 |
| [six](https://six.readthedocs.io/) | 1.15.0 | Python 2 and 3 compatibility utilities / MIT |
| [sniffio](https://github.com/python-trio/sniffio) | 1.2.0 | Sniff out which async library your code is running under / Apache-2.0 |
| [snowballstemmer](https://github.com/shibukawa/snowball_py) | 2.1.0 | Snowball stemming library collection for Python / BSD-2-Clause |
| [sortedcollections](http://www.grantjenks.com/docs/sortedcollections/) | 2.1.0 | Python Sorted Collections / Apache-2.0 |
| [sortedcontainers](http://www.grantjenks.com/docs/sortedcontainers/) | 2.3.0 | Python Sorted Container Types: SortedList, SortedDict, and SortedSet / Apache-2.0 |
| [soupsieve](http://facelessuser.github.io/soupsieve) | 2.2.1 | A modern CSS selector implementation for BeautifulSoup / MIT |
| [sphinx](http://www.sphinx-doc.org) | 4.0.1 | Sphinx is a tool that makes it easy to create intelligent and beautiful documentation / BSD-2-Clause |
| sphinxcontrib | 1.0 | Python namespace for sphinxcontrib / BSD |
| [sphinxcontrib-applehelp](https://www.sphinx-doc.org/en/master/) | 1.0.2 | sphinxcontrib-applehelp is a sphinx extension which outputs Apple help books / BSD-2-Clause |
| [sphinxcontrib-devhelp](https://www.sphinx-doc.org/en/master/) | 1.0.2 | sphinxcontrib-devhelp is a sphinx extension which outputs Devhelp document / BSD-2-Clause |
| [sphinxcontrib-htmlhelp](https://www.sphinx-doc.org/en/master/) | 1.0.3 | sphinxcontrib-htmlhelp is a sphinx extension which … / BSD-2-Clause |
| [sphinxcontrib-jsmath](https://www.sphinx-doc.org/en/master/) | 1.0.1 | A sphinx extension which renders display math in HTML via JavaScript / BSD-2-Clause |
| [sphinxcontrib-qthelp](https://www.sphinx-doc.org/en/master/) | 1.0.3 | sphinxcontrib-qthelp is a sphinx extension which outputs QtHelp document / BSD-2-Clause |
| [sphinxcontrib-serializinghtml](https://www.sphinx-doc.org/en/master/) | 1.1.4 | sphinxcontrib-serializinghtml is a sphinx extension which outputs “serialized” HTML files (json and pickle). / BSD-2-Clause |
| [sphinxcontrib-websupport](https://pypi.python.org/pypi/sphinxcontrib-websupport) | 1.2.4 | Sphinx API for Web Apps / BSD-2-Clause |
| [spyder](https://www.spyder-ide.org/) | 4.2.5 | The Scientific Python Development Environment / MIT |
| [spyder-kernels](https://www.spyder-ide.org/) | 1.10.2 | Jupyter kernels for Spyder’s console / MIT |
| [sqlalchemy](http://www.sqlalchemy.org/) | 1.4.15 | Database Abstraction Library. / MIT |
| [sqlite](http://www.sqlite.org/) | 3.35.4 | Implements a self-contained, zero-configuration, SQL database engine / Public-Domain (`<http://www.sqlite.org/copyright.html>`) |
| [statsmodels](https://www.statsmodels.org) | 0.12.2 | Statistical computations and models for use with SciPy / BSD-3-Clause |
| [sympy](https://sympy.org) | 1.8 | Python library for symbolic mathematics / BSD-3-Clause |
| [tbb](https://github.com/oneapi-src/oneTBB) | 2020.3 | High level abstract threading library / Apache-2.0 |
| [tblib](https://github.com/ionelmc/python-tblib) | 1.7.0 | Traceback serialization library. / BSD 2-Clause |
| [terminado](https://github.com/jupyter/terminado) | 0.9.4 | Terminals served by tornado websockets / BSD-2-Clause |
| [testpath](https://testpath.readthedocs.io) | 0.4.4 | Testpath is a collection of utilities for Python code working with files and commands. / BSD-3-Clause |
| [textdistance](https://github.com/orsinium/textdistance) | 4.2.1 | TextDistance – python library for comparing distance between two or more sequences by many algorithms. / MIT |
| [threadpoolctl](https://github.com/joblib/threadpoolctl) | 2.1.0 | Python helpers to control the threadpools of native libraries / BSD 3-Clause |
| [three-merge](https://github.com/spyder-ide/three-merge) | 0.1.1 | Simple Python library to perform a 3-way merge between strings / MIT |
| [tifffile](https://github.com/cgohlke/tifffile) | 2020.10.1 | Read and write image data from and to TIFF files. / BSD-3-Clause |
| [tk](http://www.tcl.tk/) | 8.6.10 | A dynamic programming language with GUI support. Bundles Tcl and Tk. / Tcl/Tk |
| [toml](https://github.com/uiri/toml) | 0.10.2 | Python lib for TOML. / MIT |
| [toolz](http://toolz.readthedocs.org/) | 0.11.1 | A functional standard library for Python / BSD-3-Clause |
| [tornado](http://www.tornadoweb.org/) | 6.1 | A Python web framework and asynchronous networking library, originally developed at FriendFeed. / Apache-2.0 |
| [tqdm](https://pypi.python.org/pypi/tqdm) | 4.59.0 | A Fast, Extensible Progress Meter / MPL-2.0 or MIT |
| [traitlets](http://traitlets.readthedocs.org/) | 5.0.5 | Configuration system for Python applications / BSD-3-Clause |
| [typed-ast](https://github.com/python/typed_ast) | 1.4.2 | a fork of Python 2 and 3 ast modules with type comment support / Apache-2.0 |
| [typing\_extensions](https://github.com/python/typing/tree/master/typing_extensions) | 3.7.4.3 | Backported and Experimental Type Hints for Python / PSF-2.0 |
| [ujson](https://github.com/ultrajson/ultrajson) | 4.0.2 | Ultra fast JSON decoder and encoder written in C with Python bindings / BSD-3-Clause |
| [unicodecsv](https://github.com/jdunck/python-unicodecsv) | 0.14.1 | Drop-in replacement for csv module which supports unicode strings / BSD |
| [unixodbc](http://www.unixodbc.org/) | 2.3.9 | ODBC on non MS Windows platforms / LGPL-2.1 |
| [urllib3](https://urllib3.readthedocs.io/) | 1.26.4 | HTTP library with thread-safe connection pooling, file post, and more. / MIT |
| [watchdog](http://github.com/gorakhargosh/watchdog) | 1.0.2 | Filesystem events monitoring / Apache-2.0 |
| [wcwidth](https://github.com/jquast/wcwidth) | 0.2.5 | Measures number of Terminal column cells of wide-character codes. / MIT |
| [webencodings](https://github.com/gsnedders/python-webencodings) | 0.5.1 | Character encoding aliases for legacy web content / BSD 3-Clause |
| [werkzeug](https://palletsprojects.com/p/werkzeug/) | 1.0.1 | The comprehensive WSGI web application library. / BSD 3-Clause |
| [wheel](https://github.com/pypa/wheel) | 0.36.2 | A built-package format for Python. / MIT |
| [widgetsnbextension](http://ipython.org) | 3.5.1 | Interactive Widgets for Jupyter / BSD 3-clause |
| [wrapt](https://github.com/GrahamDumpleton/wrapt) | 1.12.1 | Module for decorators, wrappers and monkey patching / BSD 2-Clause |
| [wurlitzer](https://github.com/minrk/wurlitzer) | 2.1.0 | Capture C-level stdout/stderr in Python / MIT |
| [xlrd](http://www.python-excel.org/) | 2.0.1 | Library for developers to extract data from Microsoft Excel (tm) spreadsheet files / BSD 3-Clause and BSD with advertising |
| [xlsxwriter](https://xlsxwriter.readthedocs.io/) | 1.3.8 | A Python module for creating Excel XLSX files / BSD-2-Clause |
| [xlwt](http://www.python-excel.org/) | 1.3.0 | Writing data and formatting information to Excel files / BSD |
| [xz](http://tukaani.org/xz/) | 5.2.5 | Data compression software with high compression ratio / LGPL-2.1 and GPL-2.0 |
| [yaml](http://pyyaml.org/wiki/LibYAML) | 0.2.5 | A C library for parsing and emitting YAML / MIT |
| [yapf](https://github.com/google/yapf) | 0.31.0 | A formatter for Python files / Apache 2.0 |
| [zeromq](http://zeromq.org) | 4.3.4 | A high-performance asynchronous messaging library. / LGPL-3.0-or-later |
| [zict](http://github.com/mrocklin/zict) | 2.0.0 | Composable Dictionary Classes / BSD 3-Clause |
| [zipp](https://github.com/jaraco/zipp) | 3.4.1 | A pathlib-compatible Zipfile object wrapper / MIT |
| [zlib](http://zlib.net/) | 1.2.11 | Massively spiffy yet delicately unobtrusive compression library / zlib |
| zope | 1.0 | web application server / BSD |
| [zope.event](http://www.zope.org/en/latest/) | 4.5.0 | Very basic event publishing system / Zope Public License |
| [zope.interface](http://docs.zope.org/zope.interface/) | 5.3.0 | Interfaces for Python / ZPL-2.1 |
| [zstd](http://www.zstd.net) | 1.4.5 | Zstandard - Fast real-time compression algorithm / BSD 3-Clause |
| Name | Version | Summary / License |
|---|---|---|
| [alabaster](http://www.sphinx-doc.org/en/stable/index.html) | 0.7.12 | Configurable, Python 2+3 compatible Sphinx theme. / BSD 3-Clause |
| [anaconda-client](http://anaconda.org) | 1.7.2 | anaconda.org command line client library / BSD 3-clause |
| [anaconda-navigator](https://github.com/ContinuumIO/navigator) | 2.0.3 | Anaconda Navigator / proprietary - Continuum Analytics, Inc. |
| [anaconda-project](https://github.com/Anaconda-Platform/anaconda-project) | 0.9.1 | Tool for encapsulating, running, and reproducing data science projects / BSD-3-Clause |
| [anyio](https://github.com/agronholm/anyio) | 2.2.0 | High level compatibility layer for multiple asynchronous event loop implementations on Python / MIT |
| [appdirs](http://github.com/ActiveState/appdirs) | 1.4.4 | A small Python module for determining appropriate platform-specific dirs. / MIT |
| [argh](https://github.com/neithere/argh) | 0.26.2 | The Natural CLI. / LGPL 3 |
| [argon2-cffi](https://argon2-cffi.readthedocs.org/) | 20.1.0 | The secure Argon2 password hashing algorithm. / MIT |
| [asn1crypto](https://github.com/wbond/asn1crypto) | 1.4.0 | Python ASN.1 library with a focus on performance and a pythonic API / MIT |
| [astroid](https://www.astroid.org/) | 2.5 | A abstract syntax tree for Python with inference support. / LGPL-2.1-only |
| [astropy](http://www.astropy.org/) | 4.2.1 | Community-developed Python Library for Astronomy / BSD-3-Clause |
| [async\_generator](https://github.com/python-trio/async_generator) | 1.10 | Async generators and context managers for Python 3.5+ / MIT |
| [atomicwrites](https://github.com/untitaker/python-atomicwrites) | 1.4.0 | Atomic file writes / MIT |
| [attrs](https://attrs.readthedocs.io/en/stable/) | 20.3.0 | attrs is the Python package that will bring back the joy of writing classes by relieving you from the drudgery of implementing object protocols (aka dunder methods). / MIT |
| [autopep8](https://github.com/hhatto/autopep8) | 1.5.6 | A tool that automatically formats Python code to conform to the PEP 8 style guide / MIT |
| [babel](http://babel.pocoo.org/) | 2.9.0 | Utilities to internationalize and localize Python applications / BSD 3-clause |
| [backcall](https://github.com/takluyver/backcall/) | 0.2.0 | Specifications for callback functions passed in to an API / BSD-3-Clause |
| [backports](https://bitbucket.org/brandon/backports) | 1.0 | None / BSD |
| [backports.shutil\_get\_terminal\_size](https://github.com/chrippa/backports.shutil_get_terminal_size) | 1.0.0 | A backport of the get\_terminal\_size function from Python 3.3’s shutil. / MIT |
| [bcrypt](https://github.com/pyca/bcrypt/) | 3.2.0 | Modern password hashing for your software and your servers / Apache-2.0 |
| [beautifulsoup4](http://www.crummy.com/software/BeautifulSoup/) | 4.9.3 | Python library designed for screen-scraping / MIT |
| [bitarray](https://github.com/ilanschnell/bitarray) | 1.9.2 | efficient arrays of booleans – C extension / PSF |
| [bkcharts](http://github.com/bokeh/bkcharts) | 0.2 | High level chart types built on top of Bokeh / BSD 3-Clause |
| [black](https://github.com/python/black) | 19.10b0 | The Uncompromising Code Formatter / MIT |
| blas | 1.0 | |
| [bleach](https://github.com/mozilla/bleach) | 3.3.0 | Easy, whitelist-based HTML-sanitizing tool / Apache-2.0 |
| [blosc](https://github.com/Blosc/c-blosc) | 1.21.0 | A blocking, shuffling and loss-less compression library that can be faster than memcpy() / BSD-3-Clause |
| [bokeh](http://bokeh.pydata.org/) | 2.3.1 | Statistical and novel interactive HTML plots for Python / BSD-3-Clause |
| [boto](https://github.com/boto/boto/) | 2.49.0 | Amazon Web Services Library / MIT |
| [bottleneck](https://github.com/pydata/bottleneck) | 1.3.2 | Fast NumPy array functions written in Cython. / BSD 2-Clause |
| [brotli](http://github.com/google/brotli) | 1.0.9 | Brotli compression format / MIT |
| [brotlipy](https://github.com/python-hyper/brotlipy) | 0.7.0 | Python bindings to the Brotli compression library / MIT |
| [bzip2](http://www.bzip.org/) | 1.0.8 | high-quality data compressor / bzip2 |
| [ca-certificates](https://github.com/conda-forge/ca-certificates-feedstock) | 2021.4.13 | Certificates for use with other packages. / MPL 2.0 |
| [certifi](http://certifi.io/) | 2020.12.5 | Python package for providing Mozilla’s CA Bundle. / ISC |
| [cffi](https://bitbucket.org/cffi/cffi) | 1.14.5 | Foreign Function Interface for Python calling C code. / MIT |
| [chardet](https://github.com/chardet/chardet) | 4.0.0 | Universal character encoding detector / LGPL2 |
| [charls](https://github.com/team-charls/charls) | 2.2.0 | CharLS is a C++ implementation of the JPEG-LS standard for lossless and near-lossless image compression and decompression. JPEG-LS is a low-complexity image compression standard that matches JPEG 2000 compression ratios. / BSD-3-Clause |
| [click](https://palletsprojects.com/p/click) | 7.1.2 | Python composable command line interface toolkit / BSD-3-Clause |
| [cloudpickle](https://github.com/cloudpipe/cloudpickle) | 1.6.0 | Extended pickling support for Python objects / BSD-3-Clause |
| [clyent](https://github.com/Anaconda-Platform/clyent) | 1.2.2 | Command line client library for windows and posix / BSD 3-Clause |
| [colorama](https://github.com/tartley/colorama) | 0.4.4 | Cross-platform colored terminal text / BSD-3-Clause |
| [comtypes](http://starship.python.net/crew/theller/comtypes/) | 1.1.9 | pure Python COM package / MIT |
| [conda](https://conda.io) | 4.10.1 | OS-agnostic, system-level binary package and environment manager. / BSD 3-Clause |
| [conda-build](https://github.com/conda/conda-build) | 3.21.4 | tools for building conda packages / BSD 3-Clause |
| [conda-env](https://github.com/conda/conda-env) | 2.6.0 | Tools for interacting with conda environments. / BSD 3-Clause |
| [conda-verify](https://github.com/conda/conda-verify) | 3.4.2 | tool for validating conda recipes and conda packages / BSD 3-Clause |
| console\_shortcut | 0.1.1 | Console shortcut creator for Windows (using menuinst) / BSD |
| [contextlib2](http://contextlib2.readthedocs.org) | 0.6.0.post1 | Backports and enhancements for the contextlib module / PSF 2 |
| [cryptography](https://github.com/pyca/cryptography) | 3.4.7 | Provides cryptographic recipes and primitives to Python developers / Apache-2.0 AND BSD-3-Clause AND PSF-2.0 AND MIT |
| [curl](http://curl.haxx.se/) | 7.71.1 | tool and library for transferring data with URL syntax / MIT/X derivate (`<http://curl.haxx.se/docs/copyright.html>`) |
| [cycler](http://matplotlib.org/cycler) | 0.10.0 | Composable style cycles. / BSD 3-Clause |
| [cython](http://www.cython.org/) | 0.29.23 | The Cython compiler for writing C extensions for the Python language / Apache-2.0 |
| [cytoolz](https://github.com/pytoolz/cytoolz) | 0.11.0 | Cython implementation of Toolz. High performance functional utilities / BSD-3-Clause |
| [dask](https://dask.org/) | 2021.4.0 | Parallel PyData with Task Scheduling / BSD-3-Clause |
| [dask-core](http://github.com/dask/dask/) | 2021.4.0 | Parallel Python with task scheduling / BSD-3-Clause |
| [decorator](https://github.com/micheles/decorator) | 5.0.6 | Better living through Python with decorators. / BSD-3-Clause |
| [defusedxml](https://bitbucket.org/tiran/defusedxml) | 0.7.1 | XML bomb protection for Python stdlib modules / PSF 2.0 |
| [diff-match-patch](http://code.google.com/p/google-diff-match-patch/) | 20200713 | Diff Match Patch is a high-performance library in multiple languages that manipulates plain text / Apache-2.0 |
| [distributed](http://distributed.readthedocs.io/en/latest/) | 2021.4.0 | Distributed computing with Dask / BSD-3-Clause |
| [docutils](http://docutils.sourceforge.net/) | 0.17 | Docutils – Python Documentation Utilities / Public Domain Dedictation and BSD 2-Clause and PSF 2.1.1 and GPL 3.0 |
| [entrypoints](https://github.com/takluyver/entrypoints) | 0.3 | Discover and load entry points from installed packages. / MIT License |
| [et\_xmlfile](https://bitbucket.org/openpyxl/et_xmlfile) | 1.0.1 | An implementation of lxml.xmlfile for the standard library / MIT |
| [fastcache](https://github.com/pbrady/fastcache) | 1.1.0 | C implementation of Python 3 lru\_cache / MIT |
| [filelock](https://github.com/benediktschmitt/py-filelock) | 3.0.12 | A platform independent file lock. / Public Domain |
| [flake8](http://flake8.pycqa.org/) | 3.9.0 | Your Tool For Style Guide Enforcement / MIT |
| [flask](http://flask.pocoo.org) | 1.1.2 | A microframework based on Werkzeug, Jinja2 and good intentions. / BSD 3-Clause |
| [freetype](https://www.freetype.org/) | 2.10.4 | A Free, High-Quality, and Portable Font Engine / GPL-2.0-only and LicenseRef-FreeType |
| [fsspec](https://github.com/martindurant/filesystem_spec) | 0.9.0 | A specification for pythonic filesystems / BSD-3-Clause |
| [future](http://python-future.org) | 0.18.2 | Clean single-source support for Python 3 and 2 / MIT |
| [get\_terminal\_size](https://github.com/chrippa/backports.shutil_get_terminal_size) | 1.0.0 | Get the size of the terminal window. / MIT |
| [gevent](https://www.gevent.org) | 21.1.2 | Coroutine-based network library / MIT |
| [giflib](http://giflib.sourceforge.net) | 5.2.1 | Library for reading and writing gif images / MIT |
| [glob2](https://github.com/miracle2k/python-glob2) | 0.7 | Version of the glob module that supports recursion via \*\*, and can capture patterns. / BSD-2-Clause |
| [greenlet](https://github.com/python-greenlet/greenlet) | 1.0.0 | Lightweight in-process concurrent programming / MIT |
| [h5py](http://www.h5py.org/) | 2.10.0 | Read and write HDF5 files from Python. / BSD-3-Clause |
| [hdf5](http://www.hdfgroup.org/HDF5/) | 1.10.4 | HDF5 is a data model, library, and file format for storing and managing data / HDF5 |
| [heapdict](http://stutzbachenterprises.com/) | 1.0.1 | A heap with decrease-key and increase-key operations / BSD 3-Clause |
| [html5lib](https://github.com/html5lib/html5lib-python) | 1.1 | HTML parser based on the WHATWG HTML specification / MIT |
| icc\_rt | 2019.0.0 | Intel runtime libraries for C, C++ and Fortran compilers / Intel proprietary |
| [icu](http://site.icu-project.org/) | 58.2 | International Components for Unicode. / MIT |
| [idna](https://github.com/kjd/idna) | 2.10 | Internationalized Domain Names in Applications (IDNA). / BSD Like |
| [imagecodecs](https://www.lfd.uci.edu/~gohlke/) | 2021.3.31 | Image transformation, compression, and decompression codecs / BSD-3-Clause |
| [imageio](https://imageio.github.io) | 2.9.0 | A Python library for reading and writing image data / BSD-2-Clause |
| [imagesize](https://github.com/shibukawa/imagesize_py) | 1.2.0 | Getting image size from png/jpeg/jpeg2000/gif file / MIT |
| [importlib-metadata](https://github.com/python/importlib_metadata) | 3.10.0 | A library to access the metadata for a Python package / Apache-2.0 |
| [importlib\_metadata](https://github.com/python/importlib_metadata) | 3.10.0 | A library to access the metadata for a Python package / Apache-2.0 |
| [iniconfig](http://github.com/RonnyPfannschmidt/iniconfig) | 1.1.1 | iniconfig: brain-dead simple config-ini parsing / MIT |
| [intel-openmp](https://software.intel.com/en-us/node/522690) | 2021.2.0 | Math library for Intel and compatible processors / LicenseRef-ProprietaryIntel |
| [intervaltree](https://github.com/chaimleib/intervaltree) | 3.1.0 | Editable interval tree data structure for Python 2 and 3 / Apache-2.0 |
| [ipykernel](https://ipython.org) | 5.3.4 | IPython Kernel for Jupyter / BSD-3-Clause |
| [ipython](https://ipython.org) | 7.22.0 | IPython: Productive Interactive Computing / BSD-3-Clause |
| [ipython\_genutils](http://ipython.org) | 0.2.0 | vestigial utilities from IPython / BSD 3-Clause |
| [ipywidgets](https://github.com/ipython/ipywidgets) | 7.6.3 | Jupyter Interactive Widgets / BSD-3-Clause |
| [isort](https://github.com/timothycrosley/isort) | 5.8.0 | A Python utility / library to sort Python imports. / MIT |
| [itsdangerous](https://github.com/pallets/itsdangerous) | 1.1.0 | Various helpers to pass trusted data to untrusted environments. / BSD 3-Clause |
| [jdcal](https://github.com/phn/jdcal) | 1.4.1 | Julian dates from proleptic Gregorian and Julian calendars. / BSD 2-Clause |
| [jedi](https://github.com/davidhalter/jedi/) | 0.17.2 | An autocompletion tool for Python that can be used for text editors. / MIT |
| [jinja2](http://jinja.pocoo.org) | 2.11.3 | An easy to use stand-alone template engine written in pure python. / BSD-3-Clause |
| [joblib](https://pypi.org/project/joblib/) | 1.0.1 | Lightweight pipelining: using Python functions as pipeline jobs. / BSD-3-Clause |
| [jpeg](http://www.ijg.org/) | 9b | read/write jpeg COM, EXIF, IPTC medata / Custom free software license |
| [json5](https://github.com/dpranke/pyjson5) | 0.9.5 | A Python implementation of the JSON5 data format / Apache-2.0 |
| [jsonschema](https://github.com/Julian/jsonschema) | 3.2.0 | An implementation of JSON Schema validation for Python / MIT |
| [jupyter](http://jupyter.org) | 1.0.0 | Jupyter metapackage. Install all the Jupyter components in one go. / BSD 3-Clause |
| [jupyter-packaging](https://github.com/jupyter/jupyter-packaging) | 0.7.12 | Jupyter Packaging Utilities / BSD-3-Clause |
| [jupyter\_client](https://jupyter.org) | 6.1.12 | jupyter\_client contains the reference implementation of the Jupyter protocol. / BSD-3-Clause |
| [jupyter\_console](http://jupyter.org) | 6.4.0 | Jupyter terminal console / BSD-3-Clause |
| [jupyter\_core](https://jupyter.org) | 4.7.1 | Core common functionality of Jupyter projects. / BSD-3-Clause |
| [jupyter\_server](https://jupyter.org) | 1.4.1 | Jupyter Server / BSD-3-Clause |
| [jupyterlab](https://github.com/jupyterlab/jupyterlab) | 3.0.14 | JupyterLab PRE-ALPHA / BSD-3-Clause |
| [jupyterlab\_pygments](http://github.com/JupyterLab/jupyterlab_pygments) | 0.1.2 | Pygments syntax coloring scheme making use of the JupyterLab CSS variables / BSD-3-Clause |
| [jupyterlab\_server](https://github.com/jupyterlab/jupyterlab_server) | 2.4.0 | A set of server components for JupyterLab and JupyterLab like applications. / BSD-3-Clause |
| [jupyterlab\_widgets](https://github.com/jupyter-widgets/ipywidgets) | 1.0.0 | JupyterLab extension providing HTML widgets / BSD-3-Clause |
| [keyring](https://github.com/jaraco/keyring) | 22.3.0 | Store and access your passwords safely / MIT |
| [kiwisolver](https://github.com/nucleic/kiwi) | 1.3.1 | An efficient C++ implementation of the Cassowary constraint solver / BSD-3-Clause |
| [krb5](http://web.mit.edu/kerberos/) | 1.18.2 | A network authentication protocol. / MIT |
| [lazy-object-proxy](https://github.com/ionelmc/python-lazy-object-proxy) | 1.6.0 | A fast and thorough lazy object proxy / BSD-2-Clause |
| [lcms2](http://www.littlecms.com/) | 2.12 | Open Source Color Management Engine / MIT |
| [lerc](https://github.com/Esri/lerc) | 2.2.1 | LERC - Limited Error Raster Compression / Apache-2.0 |
| [libaec](https://gitlab.dkrz.de/k202009/libaec) | 1.0.4 | Adaptive Entropy Coding library / BSD-2-Clause |
| [libarchive](http://www.libarchive.org/) | 3.4.2 | Multi-format archive and compression library / BSD-2-Clause |
| [libcurl](http://curl.haxx.se/) | 7.71.1 | tool and library for transferring data with URL syntax / MIT/X derivate (`<http://curl.haxx.se/docs/copyright.html>`) |
| [libdeflate](https://github.com/ebiggers/libdeflate) | 1.7 | libdeflate is a library for fast, whole-buffer DEFLATE-based compression and decompression. / MIT |
| [libiconv](https://www.gnu.org/software/libiconv/) | 1.15 | Provides iconv for systems which don’t have one (or that cannot convert from/to Unicode.) / GPL and LGPL |
| [liblief](https://lief.quarkslab.com/) | 0.10.1 | A cross platform library to parse, modify and abstract ELF, PE and MachO formats. / Apache-2.0 |
| [libpng](http://www.libpng.org/pub/png/libpng.html) | 1.6.37 | PNG reference library / zlib/libpng |
| [libsodium](http://libsodium.org) | 1.0.18 | A modern and easy-to-use crypto library. / ISC |
| [libspatialindex](http://libspatialindex.github.io) | 1.9.3 | Extensible framework for robust spatial indexing / MIT |
| [libssh2](https://www.libssh2.org/) | 1.9.0 | the SSH library / BSD-3-Clause |
| [libtiff](http://www.libtiff.org/) | 4.2.0 | Support for the Tag Image File Format (TIFF). / HPND |
| [libxml2](http://xmlsoft.org/) | 2.9.10 | The XML C parser and toolkit of Gnome / MIT |
| [libxslt](http://xmlsoft.org/XSLT/) | 1.1.34 | The XSLT C library developed for the GNOME project / MIT |
| [libzopfli](https://github.com/google/zopfli) | 1.0.3 | A compression library programmed in C to perform very good, but slow, deflate or zlib compression. / Apache-2.0 |
| [llvmlite](http://llvmlite.pydata.org) | 0.36.0 | A lightweight LLVM python binding for writing JIT compilers. / BSD-2-Clause |
| [locket](https://github.com/mwilliamson/locket.py) | 0.2.1 | File-based locks for Python for Linux and Windows / BSD 2-Clause |
| [lxml](http://lxml.de/) | 4.6.3 | Pythonic binding for the C libraries libxml2 and libxslt. / BSD-3-Clause and GPL-2.0-only and ZPL-2.0 and LicenseRef-ElementTree |
| [lz4-c](https://www.lz4.org) | 1.9.3 | Extremely Fast Compression algorithm / BSD-2-Clause |
| [lzo](http://www.oberhumer.com/opensource/lzo/) | 2.10 | LZO is a portable lossless data compression library written in ANSI C. / GPL v2+ |
| [m2w64-gcc-libgfortran](https://gcc.gnu.org) | 5.3.0 | GNU Compiler Collection (libgfortran) for MinGW-w64 / GPL, LGPL, FDL, custom |
| m2w64-gcc-libs | 5.3.0 | None / GPL3+, partial:GCCRLE, partial:LGPL2+ |
| [m2w64-gcc-libs-core](https://gcc.gnu.org) | 5.3.0 | GNU Compiler Collection (core libraries) for MinGW-w64 / GPL3+, partial:GCCRLE, partial:LGPL2+ |
| m2w64-gmp | 6.1.0 | None / LGPL3 |
| m2w64-libwinpthread-git | 5.0.0.4634.697f757 | None / MIT, BSD |
| [markupsafe](https://www.palletsprojects.com/p/markupsafe) | 1.1.1 | A Python module that implements the jinja2.Markup string / BSD-3-Clause |
| [matplotlib](http://matplotlib.org/) | 3.3.4 | Publication quality figures in Python / LicenseRef-PSF-based |
| [matplotlib-base](http://matplotlib.org/) | 3.3.4 | Publication quality figures in Python / LicenseRef-PSF-based |
| [mccabe](https://github.com/PyCQA/mccabe) | 0.6.1 | McCabe complexity checker for Python / MIT |
| [menuinst](https://github.com/ContinuumIO/menuinst) | 1.4.16 | cross platform menu item installation / BSD |
| [mistune](https://github.com/lepture/mistune) | 0.8.4 | The fastest markdown parser in pure Python. / BSD 3-Clause |
| [mkl](https://software.intel.com/en-us/mkl) | 2021.2.0 | Math library for Intel and compatible processors / LicenseRef-ProprietaryIntel |
| [mkl-service](https://github.com/ContinuumIO/mkl-service) | 2.3.0 | Python bindings to MKL service functions / 3-clause BSD |
| [mkl\_fft](http://github.com/IntelPython/mkl_fft) | 1.3.0 | NumPy-based implementation of Fast Fourier Transform using Intel (R) Math Kernel Library. / BSD 3-Clause |
| [mkl\_random](http://github.com/IntelPython/mkl_random) | 1.2.1 | Intel (R) MKL-powered package for sampling from common probability distributions into NumPy arrays. / BSD 3-Clause |
| [mock](https://github.com/testing-cabal/mock) | 4.0.3 | A library for testing in Python / BSD-2-Clause |
| [more-itertools](https://github.com/more-itertools/more-itertools) | 8.7.0 | More routines for operating on iterables, beyond itertools / MIT |
| [mpmath](http://mpmath.org) | 1.2.1 | Python library for arbitrary-precision floating-point arithmetic / BSD 3-Clause |
| [msgpack-python](http://msgpack.org/) | 1.0.2 | MessagePack (de)serializer / Apache-2.0 |
| msys2-conda-epoch | 20160418 | |
| [multipledispatch](https://github.com/mrocklin/multipledispatch/) | 0.6.0 | Multiple dispatch in Python / BSD 3-Clause |
| [mypy\_extensions](http://www.mypy-lang.org/) | 0.4.3 | Experimental type system extensions for programs checked with the mypy typechecker. / MIT |
| [nbclassic](http://github.com/jupyterlab/nbclassic) | 0.2.6 | Jupyter Notebook as a Jupyter Server Extension. / BSD-3-Clause |
| [nbclient](https://jupyter.org) | 0.5.3 | A client library for executing notebooks. Formally nbconvert’s ExecutePreprocessor. / BSD-3-Clause |
| [nbconvert](http://jupyter.org) | 6.0.7 | Converting Jupyter Notebooks / BSD-3-Clause |
| [nbformat](http://jupyter.org) | 5.1.3 | The Jupyter Notebook format / BSD-3-Clause |
| [nest-asyncio](https://github.com/erdewit/nest_asyncio) | 1.5.1 | Patch asyncio to allow nested event loops / BSD-2-Clause |
| [networkx](https://networkx.github.io/) | 2.5 | Python package for creating and manipulating complex networks / BSD-3-Clause |
| [nltk](http://nltk.org/) | 3.6.1 | Natural Language Toolkit / Apache 2.0 |
| [nose](http://readthedocs.org/docs/nose/) | 1.3.7 | Nose extends unittest to make testing easier / LGPL-2.1 |
| [notebook](https://jupyter.org) | 6.3.0 | Jupyter Notebook / BSD-3-Clause |
| [numexpr](https://github.com/pydata/numexpr) | 2.7.3 | Fast numerical expression evaluator for NumPy. / MIT |
| [numpy](http://numpy.scipy.org/) | 1.20.1 | Array processing for numbers, strings, records, and objects. / BSD 3-Clause |
| [numpy-base](http://numpy.scipy.org/) | 1.20.1 | Array processing for numbers, strings, records, and objects. / BSD 3-Clause |
| [numpydoc](https://github.com/numpy/numpydoc) | 1.1.0 | Numpy’s Sphinx extensions / BSD 3-Clause |
| [olefile](http://www.decalage.info/python/olefileio) | 0.46 | parse, read and write Microsoft OLE2 files / BSD 2-Clause |
| [openjpeg](http://www.openjpeg.org/) | 2.3.0 | An open-source JPEG 2000 codec written in C / BSD 2-Clause |
| [openpyxl](https://openpyxl.readthedocs.io) | 3.0.7 | A Python library to read/write Excel 2010 xlsx/xlsm files / MIT |
| [openssl](http://www.openssl.org/) | 1.1.1k | OpenSSL is an open-source implementation of the SSL and TLS protocols / OpenSSL |
| [packaging](https://github.com/pypa/packaging) | 20.9 | Core utilities for Python packages / Apache 2.0 or BSD 2-Clause |
| [pandas](http://pandas.pydata.org) | 1.2.4 | High-performance, easy-to-use data structures and data analysis tools. / BSD-3-Clause |
| [pandoc](http://pandoc.org/) | 2.12 | Universal markup converter (repackaged binaries) / GPL-2.0 |
| [pandocfilters](https://github.com/jgm/pandocfilters) | 1.4.3 | A python module for writing pandoc filters / BSD-3-Clause |
| [paramiko](http://www.paramiko.org/) | 2.7.2 | SSH2 protocol library / LGPL-2.1-or-later |
| [parso](https://github.com/davidhalter/parso) | 0.7.0 | A Python Parser / MIT |
| [partd](https://github.com/dask/partd) | 1.2.0 | Data structure for on-disk shuffle operations / BSD 3-Clause |
| [path](https://github.com/jaraco/path) | 15.1.2 | A module wrapper for os.path / MIT |
| [path.py](https://github.com/jaraco/path.py) | 12.5.0 | A module wrapper for os.path / MIT |
| [pathlib2](https://github.com/mcmtroffaes/pathlib2) | 2.3.5 | Fork of pathlib aiming to support the full stdlib Python API / MIT |
| [pathspec](https://github.com/cpburnz/python-path-specification) | 0.7.0 | Utility library for gitignore style pattern matching of file paths. / MPL-2.0 |
| [patsy](https://github.com/pydata/patsy) | 0.5.1 | Describing statistical models in Python using symbolic formulas / BSD-2-Clause, PSF2 |
| [pep8](http://pep8.readthedocs.org/) | 1.7.1 | Python style guide checker / MIT |
| [pexpect](http://pexpect.sourceforge.net/) | 4.8.0 | Pexpect makes Python a better tool for controlling other applications. / ISC |
| [pickleshare](https://github.com/pickleshare/pickleshare/) | 0.7.5 | Tiny ‘shelve’-like database with concurrency support / MIT |
| [pillow](https://pillow.readthedocs.io) | 8.2.0 | Pillow is the friendly PIL fork by Alex Clark and Contributors / LicenseRef-PIL |
| [pip](https://pip.pypa.io/en/stable/) | 21.0.1 | PyPA recommended tool for installing Python packages / MIT |
| [pkginfo](https://code.launchpad.net/~tseaver/pkginfo/trunk) | 1.7.0 | Query metadatdata from sdists / bdists / installed packages. / MIT |
| [pluggy](https://github.com/pytest-dev/pluggy) | 0.13.1 | Plugin registration and hook calling for Python / MIT |
| [ply](http://www.dabeaz.com/ply/index.html) | 3.11 | Python Lex-Yacc / BSD 3-clause |
| powershell\_shortcut | 0.0.1 | Powershell shortcut creator for Windows (using menuinst) / BSD |
| [prometheus\_client](https://github.com/prometheus/client_python) | 0.10.1 | Python client for the Prometheus monitoring system / Apache-2.0 |
| [prompt-toolkit](https://github.com/jonathanslenders/python-prompt-toolkit) | 3.0.17 | Library for building powerful interactive command lines in Python / BSD-3-Clause |
| [prompt\_toolkit](https://github.com/jonathanslenders/python-prompt-toolkit) | 3.0.17 | Library for building powerful interactive command lines in Python / BSD-3-Clause |
| [psutil](https://github.com/giampaolo/psutil) | 5.8.0 | A cross-platform process and system utilities module for Python / BSD-3-Clause |
| [ptyprocess](https://github.com/pexpect/ptyprocess) | 0.7.0 | Run a subprocess in a pseudo terminal / ISC |
| [py](https://github.com/pytest-dev/py) | 1.10.0 | library with cross-python path, ini-parsing, io, code, log facilities / MIT |
| [py-lief](https://lief.quarkslab.com/) | 0.10.1 | A cross platform library to parse, modify and abstract ELF, PE and MachO formats. / Apache-2.0 |
| [pycodestyle](https://pycodestyle.readthedocs.io/) | 2.6.0 | Python style guide checker / MIT |
| [pycosat](https://github.com/ContinuumIO/pycosat) | 0.6.3 | Bindings to picosat (a SAT solver) / MIT |
| [pycparser](https://github.com/eliben/pycparser) | 2.20 | Complete C99 parser in pure Python / BSD 3-clause |
| [pycurl](http://pycurl.sourceforge.net/) | 7.43.0.6 | A Python Interface To The cURL library / LGPL, MIT |
| [pydocstyle](https://github.com/PyCQA/pydocstyle) | 6.0.0 | Python docstring style checker (formerly pep257) / MIT |
| [pyerfa](https://pyerfa.readthedocs.io/) | 1.7.3 | Python bindings for ERFA routines / BSD-3-Clause |
| [pyflakes](https://github.com/PyCQA/pyflakes) | 2.2.0 | Pyflakes analyzes programs and detects various errors. / MIT |
| [pygments](http://pygments.org/) | 2.8.1 | Pygments is a generic syntax highlighter suitable for use in code hosting, forums, wikis or other applications that need to prettify source code. / BSD-2-clause |
| [pylint](http://www.pylint.org/) | 2.7.4 | python code static checker / GPL-2.0-only |
| [pyls-black](https://github.com/rupert/pyls-black) | 0.4.6 | Black plugin for the Python Language Server / MIT |
| [pyls-spyder](https://github.com/spyder-ide/pyls-spyder) | 0.3.2 | Spyder extensions for the python-language-server / MIT |
| [pynacl](https://github.com/pyca/pynacl) | 1.4.0 | PyNaCl is a Python binding to the Networking and Cryptography library, a crypto library with the stated goal of improving usability, security and speed. / Apache-2.0 |
| [pyodbc](https://github.com/mkleehammer/pyodbc) | 4.0.30 | DB API Module for ODBC / MIT |
| [pyopenssl](https://github.com/pyca/pyopenssl) | 20.0.1 | Python wrapper module around the OpenSSL library / Apache 2.0 |
| [pyparsing](http://pyparsing.wikispaces.com/) | 2.4.7 | Create and execute simple grammars / MIT |
| [pyqt](http://www.riverbankcomputing.co.uk/software/pyqt) | 5.9.2 | Python binding of the cross-platform GUI toolkit Qt. / Commercial, GPL-2.0, GPL-3.0 |
| [pyreadline](http://ipython.org/pyreadline) | 2.1 | A python implmementation of GNU readline. / BSD 3-Clause |
| [pyrsistent](http://github.com/tobgu/pyrsistent/) | 0.17.3 | Persistent/Functional/Immutable data structures / MIT |
| [pysocks](https://github.com/Anorov/PySocks) | 1.7.1 | A Python SOCKS client module. See [Anorov/PySocks](https://github.com/Anorov/PySocks) for more information. / BSD 3-Clause |
| [pytables](http://www.pytables.org) | 3.6.1 | Brings together Python, HDF5 and NumPy to easily handle large amounts of data. / BSD 3-Clause |
| [pytest](https://docs.pytest.org/en/latest/) | 6.2.3 | Simple and powerful testing with Python. / MIT |
| [python](https://www.python.org/) | 3.8.8 | General purpose programming language / Python-2.0 |
| [python-dateutil](https://dateutil.readthedocs.org/) | 2.8.1 | Extensions to the standard Python datetime module. / BSD 3 Clause |
| [python-jsonrpc-server](https://github.com/palantir/python-jsonrpc-server) | 0.4.0 | A Python 2.7 and 3.4+ server implementation of the JSON RPC 2.0 protocol. / MIT |
| [python-language-server](https://github.com/palantir/python-language-server) | 0.36.2 | An implementation of the Language Server Protocol for Python / MIT |
| [python-libarchive-c](https://github.com/Changaco/python-libarchive-c) | 2.9 | Python interface to libarchive / CC0-1.0 |
| [pytz](http://pythonhosted.org/pytz/) | 2021.1 | World timezone definitions, modern and historical. / MIT |
| [pywavelets](https://github.com/PyWavelets/pywt) | 1.1.1 | Discrete Wavelet Transforms in Python / MIT |
| [pywin32](https://github.com/mhammond/pywin32) | 227 | Python extensions for Windows / PSF-2.0 |
| [pywin32-ctypes](https://github.com/enthought/pywin32-ctypes) | 0.2.0 | A limited subset of pywin32 re-implemented using ctypes (or cffi) / BSD 3 Clause |
| [pywinpty](https://github.com/spyder-ide/pywinpty) | 0.5.7 | Python bindings for the winpty library / MIT |
| [pyyaml](http://pyyaml.org/wiki/PyYAML) | 5.4.1 | YAML parser and emitter for Python / MIT |
| [pyzmq](https://github.com/zeromq/pyzmq) | 20.0.0 | Python bindings for zeromq / BSD 3-clause |
| [qdarkstyle](https://github.com/ColinDuquesnoy/QDarkStyleSheet) | 2.8.1 | A dark stylesheet for Qt applications (Qt4, Qt5, PySide, PyQt4, PyQt5, QtPy, PyQtGraph). / MIT |
| [qt](http://qt-project.org) | 5.9.7 | Qt is a cross-platform application and UI framework. / LGPL-3.0 |
| [qtawesome](https://github.com/spyder-ide/qtawesome) | 1.0.2 | Iconic fonts in PyQt and PySide applications / MIT |
| [qtconsole](http://jupyter.org) | 5.0.3 | Jupyter Qt Console / BSD-3-Clause |
| [qtpy](https://github.com/spyder-ide/qtpy) | 1.9.0 | Abstraction layer for PyQt5/PyQt4/PySide / MIT |
| [regex](https://bitbucket.org/mrabarnett/mrab-regex) | 2021.4.4 | Alternative regular expression module, to replace re / Python-2.0 |
| [requests](http://python-requests.org) | 2.25.1 | Requests is an elegant and simple HTTP library for Python, built with ♥. / Apache-2.0 |
| [rope](https://github.com/python-rope/rope) | 0.18.0 | A python refactoring library / GPL 2.0 |
| [rtree](http://toblerity.github.com/rtree/) | 0.9.7 | R-Tree spatial index for Python GIS / MIT |
| [ruamel\_yaml](https://sourceforge.net/p/ruamel-yaml/code/ci/default/tree) | 0.15.100 | A patched copy of ruamel.yaml. / MIT |
| [scikit-image](http://scikit-image.org/) | 0.18.1 | Image processing in Python. / BSD-3-Clause |
| [scikit-learn](http://scikit-learn.org/) | 0.24.1 | A set of python modules for machine learning and data mining / BSD-3-Clause |
| [scipy](http://www.scipy.org/) | 1.6.2 | Scientific Library for Python / BSD 3-Clause |
| [seaborn](https://seaborn.pydata.org) | 0.11.1 | Statistical data visualization / BSD 3-Clause |
| [send2trash](https://github.com/hsoft/send2trash) | 1.5.0 | Python library to natively send files to Trash (or Recycle bin) on all platforms. / BSD-3-Clause |
| [setuptools](https://github.com/pypa/setuptools) | 52.0.0 | Download, build, install, upgrade, and uninstall Python packages / MIT |
| [simplegeneric](http://cheeseshop.python.org/pypi/simplegeneric) | 0.8.1 | Simple generic functions (similar to Python’s own len(), pickle.dump(), etc.) / Zope Public |
| [singledispatch](http://docs.python.org/3/library/functools.html#functools.singledispatch) | 3.6.1 | Transforms a function into a single-dispatch generic function / MIT |
| [sip](http://www.riverbankcomputing.com/software/sip/intro) | 4.19.13 | Create Python bindings for C and C++ libraries / GPL-3.0 |
| [six](https://six.readthedocs.io/) | 1.15.0 | Python 2 and 3 compatibility utilities / MIT |
| [snappy](https://github.com/google/snappy) | 1.1.8 | A fast compressor/decompressor / BSD 3-clause |
| [sniffio](https://github.com/python-trio/sniffio) | 1.2.0 | Sniff out which async library your code is running under / Apache-2.0 |
| [snowballstemmer](https://github.com/shibukawa/snowball_py) | 2.1.0 | Snowball stemming library collection for Python / BSD-2-Clause |
| [sortedcollections](http://www.grantjenks.com/docs/sortedcollections/) | 2.1.0 | Python Sorted Collections / Apache-2.0 |
| [sortedcontainers](http://www.grantjenks.com/docs/sortedcontainers/) | 2.3.0 | Python Sorted Container Types: SortedList, SortedDict, and SortedSet / Apache-2.0 |
| [soupsieve](http://facelessuser.github.io/soupsieve) | 2.2.1 | A modern CSS selector implementation for BeautifulSoup / MIT |
| [sphinx](http://www.sphinx-doc.org) | 3.5.3 | Sphinx is a tool that makes it easy to create intelligent and beautiful documentation / BSD-2-Clause |
| sphinxcontrib | 1.0 | Python namespace for sphinxcontrib / BSD |
| [sphinxcontrib-applehelp](https://www.sphinx-doc.org/en/master/) | 1.0.2 | sphinxcontrib-applehelp is a sphinx extension which outputs Apple help books / BSD-2-Clause |
| [sphinxcontrib-devhelp](https://www.sphinx-doc.org/en/master/) | 1.0.2 | sphinxcontrib-devhelp is a sphinx extension which outputs Devhelp document / BSD-2-Clause |
| [sphinxcontrib-htmlhelp](https://www.sphinx-doc.org/en/master/) | 1.0.3 | sphinxcontrib-htmlhelp is a sphinx extension which … / BSD-2-Clause |
| [sphinxcontrib-jsmath](https://www.sphinx-doc.org/en/master/) | 1.0.1 | A sphinx extension which renders display math in HTML via JavaScript / BSD-2-Clause |
| [sphinxcontrib-qthelp](https://www.sphinx-doc.org/en/master/) | 1.0.3 | sphinxcontrib-qthelp is a sphinx extension which outputs QtHelp document / BSD-2-Clause |
| [sphinxcontrib-serializinghtml](https://www.sphinx-doc.org/en/master/) | 1.1.4 | sphinxcontrib-serializinghtml is a sphinx extension which outputs “serialized” HTML files (json and pickle). / BSD-2-Clause |
| [sphinxcontrib-websupport](https://pypi.python.org/pypi/sphinxcontrib-websupport) | 1.2.4 | Sphinx API for Web Apps / BSD-2-Clause |
| [spyder](https://www.spyder-ide.org/) | 4.2.5 | The Scientific Python Development Environment / MIT |
| [spyder-kernels](https://www.spyder-ide.org/) | 1.10.2 | Jupyter kernels for Spyder’s console / MIT |
| [sqlalchemy](http://www.sqlalchemy.org/) | 1.4.7 | Database Abstraction Library. / MIT |
| [sqlite](http://www.sqlite.org/) | 3.35.4 | Implements a self-contained, zero-configuration, SQL database engine / Public-Domain (`<http://www.sqlite.org/copyright.html>`) |
| [statsmodels](https://www.statsmodels.org) | 0.12.2 | Statistical computations and models for use with SciPy / BSD-3-Clause |
| [sympy](https://sympy.org) | 1.8 | Python library for symbolic mathematics / BSD-3-Clause |
| [tblib](https://github.com/ionelmc/python-tblib) | 1.7.0 | Traceback serialization library. / BSD 2-Clause |
| [terminado](https://github.com/jupyter/terminado) | 0.9.4 | Terminals served by tornado websockets / BSD-2-Clause |
| [testpath](https://testpath.readthedocs.io) | 0.4.4 | Testpath is a collection of utilities for Python code working with files and commands. / BSD-3-Clause |
| [textdistance](https://github.com/orsinium/textdistance) | 4.2.1 | TextDistance – python library for comparing distance between two or more sequences by many algorithms. / MIT |
| [threadpoolctl](https://github.com/joblib/threadpoolctl) | 2.1.0 | Python helpers to control the threadpools of native libraries / BSD 3-Clause |
| [three-merge](https://github.com/spyder-ide/three-merge) | 0.1.1 | Simple Python library to perform a 3-way merge between strings / MIT |
| [tifffile](https://github.com/cgohlke/tifffile) | 2021.4.8 | Read and write image data from and to TIFF files. / BSD-3-Clause |
| [tk](http://www.tcl.tk/) | 8.6.10 | A dynamic programming language with GUI support. Bundles Tcl and Tk. / Tcl/Tk |
| [toml](https://github.com/uiri/toml) | 0.10.2 | Python lib for TOML. / MIT |
| [toolz](http://toolz.readthedocs.org/) | 0.11.1 | A functional standard library for Python / BSD-3-Clause |
| [tornado](http://www.tornadoweb.org/) | 6.1 | A Python web framework and asynchronous networking library, originally developed at FriendFeed. / Apache-2.0 |
| [tqdm](https://pypi.python.org/pypi/tqdm) | 4.59.0 | A Fast, Extensible Progress Meter / MPL-2.0 or MIT |
| [traitlets](http://traitlets.readthedocs.org/) | 5.0.5 | Configuration system for Python applications / BSD-3-Clause |
| [typed-ast](https://github.com/python/typed_ast) | 1.4.2 | a fork of Python 2 and 3 ast modules with type comment support / Apache-2.0 |
| [typing\_extensions](https://github.com/python/typing/tree/master/typing_extensions) | 3.7.4.3 | Backported and Experimental Type Hints for Python / PSF-2.0 |
| [ujson](https://github.com/ultrajson/ultrajson) | 4.0.2 | Ultra fast JSON decoder and encoder written in C with Python bindings / BSD-3-Clause |
| [unicodecsv](https://github.com/jdunck/python-unicodecsv) | 0.14.1 | Drop-in replacement for csv module which supports unicode strings / BSD |
| [urllib3](https://urllib3.readthedocs.io/) | 1.26.4 | HTTP library with thread-safe connection pooling, file post, and more. / MIT |
| [vc](https://github.com/conda/conda/wiki/VC-features) | 14.2 | A meta-package to impose mutual exclusivity among software built with different VS versions / Modified BSD License (3-clause) |
| vs2015\_runtime | 14.27.29016 | MSVC runtimes associated with cl.exe version 19.27.29111 (VS 2019 update 5) / None |
| [watchdog](http://github.com/gorakhargosh/watchdog) | 1.0.2 | Filesystem events monitoring / Apache-2.0 |
| [wcwidth](https://github.com/jquast/wcwidth) | 0.2.5 | Measures number of Terminal column cells of wide-character codes. / MIT |
| [webencodings](https://github.com/gsnedders/python-webencodings) | 0.5.1 | Character encoding aliases for legacy web content / BSD 3-Clause |
| [werkzeug](https://palletsprojects.com/p/werkzeug/) | 1.0.1 | The comprehensive WSGI web application library. / BSD 3-Clause |
| [wheel](https://github.com/pypa/wheel) | 0.36.2 | A built-package format for Python. / MIT |
| [widgetsnbextension](http://ipython.org) | 3.5.1 | Interactive Widgets for Jupyter / BSD 3-clause |
| [win\_inet\_pton](https://github.com/hickeroar/win_inet_pton) | 1.1.0 | Native inet\_pton and inet\_ntop implementation for Python on Windows (with ctypes). / PUBLIC-DOMAIN |
| [win\_unicode\_console](https://github.com/Drekin/win-unicode-console) | 0.5 | A Python package to enable Unicode input and display when running Python from Windows console. / MIT |
| [wincertstore](https://bitbucket.org/tiran/wincertstore) | 0.2 | Python module to extract CA and CRL certs from Windows’ cert store (ctypes based). / PSF 2 |
| [winpty](https://github.com/rprichard/winpty) | 0.4.3 | Winpty provides an interface similar to a Unix pty-master for communicating with Windows console programs. / MIT |
| [wrapt](https://github.com/GrahamDumpleton/wrapt) | 1.12.1 | Module for decorators, wrappers and monkey patching / BSD 2-Clause |
| [xlrd](http://www.python-excel.org/) | 2.0.1 | Library for developers to extract data from Microsoft Excel (tm) spreadsheet files / BSD 3-Clause and BSD with advertising |
| [xlsxwriter](https://xlsxwriter.readthedocs.io/) | 1.3.8 | A Python module for creating Excel XLSX files / BSD-2-Clause |
| [xlwings](http://xlwings.org/) | 0.23.0 | Interact with Excel from Python and vice versa / 3-clause BSD |
| [xlwt](http://www.python-excel.org/) | 1.3.0 | Writing data and formatting information to Excel files / BSD |
| [xz](http://tukaani.org/xz/) | 5.2.5 | Data compression software with high compression ratio / LGPL-2.1 and GPL-2.0 |
| [yaml](http://pyyaml.org/wiki/LibYAML) | 0.2.5 | A C library for parsing and emitting YAML / MIT |
| [yapf](https://github.com/google/yapf) | 0.31.0 | A formatter for Python files / Apache 2.0 |
| [zeromq](http://zeromq.org) | 4.3.3 | A high-performance asynchronous messaging library. / LGPL-3.0-or-later |
| [zfp](https://computation.llnl.gov/projects/floating-point-compression) | 0.5.5 | Library for compressed numerical arrays that support high throughput read and write random access / BSD-3-Clause |
| [zict](http://github.com/mrocklin/zict) | 2.0.0 | Composable Dictionary Classes / BSD 3-Clause |
| [zipp](https://github.com/jaraco/zipp) | 3.4.1 | A pathlib-compatible Zipfile object wrapper / MIT |
| [zlib](http://zlib.net/) | 1.2.11 | Massively spiffy yet delicately unobtrusive compression library / zlib |
| zope | 1.0 | web application server / BSD |
| [zope.event](http://www.zope.org/en/latest/) | 4.5.0 | Very basic event publishing system / Zope Public License |
| [zope.interface](http://docs.zope.org/zope.interface/) | 5.3.0 | Interfaces for Python / ZPL-2.1 |
| [zstd](http://www.zstd.net) | 1.4.5 | Zstandard - Fast real-time compression algorithm / BSD 3-Clause |
| Name | Version | Summary / License |
|---|---|---|
| [alabaster](http://www.sphinx-doc.org/en/stable/index.html) | 0.7.12 | Configurable, Python 2+3 compatible Sphinx theme. / BSD 3-Clause |
| [anaconda-client](http://anaconda.org) | 1.7.2 | anaconda.org command line client library / BSD 3-clause |
| [anaconda-navigator](https://github.com/ContinuumIO/navigator) | 2.0.3 | Anaconda Navigator / proprietary - Continuum Analytics, Inc. |
| [anaconda-project](https://github.com/Anaconda-Platform/anaconda-project) | 0.9.1 | Tool for encapsulating, running, and reproducing data science projects / BSD-3-Clause |
| [anyio](https://github.com/agronholm/anyio) | 2.2.0 | High level compatibility layer for multiple asynchronous event loop implementations on Python / MIT |
| [appdirs](http://github.com/ActiveState/appdirs) | 1.4.4 | A small Python module for determining appropriate platform-specific dirs. / MIT |
| [argh](https://github.com/neithere/argh) | 0.26.2 | The Natural CLI. / LGPL 3 |
| [argon2-cffi](https://argon2-cffi.readthedocs.org/) | 20.1.0 | The secure Argon2 password hashing algorithm. / MIT |
| [asn1crypto](https://github.com/wbond/asn1crypto) | 1.4.0 | Python ASN.1 library with a focus on performance and a pythonic API / MIT |
| [astroid](https://www.astroid.org/) | 2.5 | A abstract syntax tree for Python with inference support. / LGPL-2.1-only |
| [astropy](http://www.astropy.org/) | 4.2.1 | Community-developed Python Library for Astronomy / BSD-3-Clause |
| [async\_generator](https://github.com/python-trio/async_generator) | 1.10 | Async generators and context managers for Python 3.5+ / MIT |
| [atomicwrites](https://github.com/untitaker/python-atomicwrites) | 1.4.0 | Atomic file writes / MIT |
| [attrs](https://attrs.readthedocs.io/en/stable/) | 20.3.0 | attrs is the Python package that will bring back the joy of writing classes by relieving you from the drudgery of implementing object protocols (aka dunder methods). / MIT |
| [autopep8](https://github.com/hhatto/autopep8) | 1.5.6 | A tool that automatically formats Python code to conform to the PEP 8 style guide / MIT |
| [babel](http://babel.pocoo.org/) | 2.9.0 | Utilities to internationalize and localize Python applications / BSD 3-clause |
| [backcall](https://github.com/takluyver/backcall/) | 0.2.0 | Specifications for callback functions passed in to an API / BSD-3-Clause |
| [backports](https://bitbucket.org/brandon/backports) | 1.0 | None / BSD |
| [backports.shutil\_get\_terminal\_size](https://github.com/chrippa/backports.shutil_get_terminal_size) | 1.0.0 | A backport of the get\_terminal\_size function from Python 3.3’s shutil. / MIT |
| [bcrypt](https://github.com/pyca/bcrypt/) | 3.2.0 | Modern password hashing for your software and your servers / Apache-2.0 |
| [beautifulsoup4](http://www.crummy.com/software/BeautifulSoup/) | 4.9.3 | Python library designed for screen-scraping / MIT |
| [bitarray](https://github.com/ilanschnell/bitarray) | 1.9.2 | efficient arrays of booleans – C extension / PSF |
| [bkcharts](http://github.com/bokeh/bkcharts) | 0.2 | High level chart types built on top of Bokeh / BSD 3-Clause |
| [black](https://github.com/python/black) | 19.10b0 | The Uncompromising Code Formatter / MIT |
| blas | 1.0 | |
| [bleach](https://github.com/mozilla/bleach) | 3.3.0 | Easy, whitelist-based HTML-sanitizing tool / Apache-2.0 |
| [blosc](https://github.com/Blosc/c-blosc) | 1.21.0 | A blocking, shuffling and loss-less compression library that can be faster than memcpy() / BSD-3-Clause |
| [bokeh](http://bokeh.pydata.org/) | 2.3.1 | Statistical and novel interactive HTML plots for Python / BSD-3-Clause |
| [boto](https://github.com/boto/boto/) | 2.49.0 | Amazon Web Services Library / MIT |
| [bottleneck](https://github.com/pydata/bottleneck) | 1.3.2 | Fast NumPy array functions written in Cython. / BSD 2-Clause |
| [brotlipy](https://github.com/python-hyper/brotlipy) | 0.7.0 | Python bindings to the Brotli compression library / MIT |
| [bzip2](http://www.bzip.org/) | 1.0.8 | high-quality data compressor / bzip2 |
| [ca-certificates](https://github.com/conda-forge/ca-certificates-feedstock) | 2021.4.13 | Certificates for use with other packages. / MPL 2.0 |
| [certifi](http://certifi.io/) | 2020.12.5 | Python package for providing Mozilla’s CA Bundle. / ISC |
| [cffi](https://bitbucket.org/cffi/cffi) | 1.14.5 | Foreign Function Interface for Python calling C code. / MIT |
| [chardet](https://github.com/chardet/chardet) | 4.0.0 | Universal character encoding detector / LGPL2 |
| [click](https://palletsprojects.com/p/click) | 7.1.2 | Python composable command line interface toolkit / BSD-3-Clause |
| [cloudpickle](https://github.com/cloudpipe/cloudpickle) | 1.6.0 | Extended pickling support for Python objects / BSD-3-Clause |
| [clyent](https://github.com/Anaconda-Platform/clyent) | 1.2.2 | Command line client library for windows and posix / BSD 3-Clause |
| [colorama](https://github.com/tartley/colorama) | 0.4.4 | Cross-platform colored terminal text / BSD-3-Clause |
| [comtypes](http://starship.python.net/crew/theller/comtypes/) | 1.1.9 | pure Python COM package / MIT |
| [conda](https://conda.io) | 4.10.1 | OS-agnostic, system-level binary package and environment manager. / BSD 3-Clause |
| [conda-build](https://github.com/conda/conda-build) | 3.21.4 | tools for building conda packages / BSD 3-Clause |
| [conda-env](https://github.com/conda/conda-env) | 2.6.0 | Tools for interacting with conda environments. / BSD 3-Clause |
| [conda-verify](https://github.com/conda/conda-verify) | 3.4.2 | tool for validating conda recipes and conda packages / BSD 3-Clause |
| console\_shortcut | 0.1.1 | Console shortcut creator for Windows (using menuinst) / BSD |
| [contextlib2](http://contextlib2.readthedocs.org) | 0.6.0.post1 | Backports and enhancements for the contextlib module / PSF 2 |
| [cryptography](https://github.com/pyca/cryptography) | 3.4.7 | Provides cryptographic recipes and primitives to Python developers / Apache-2.0 AND BSD-3-Clause AND PSF-2.0 AND MIT |
| [curl](http://curl.haxx.se/) | 7.71.1 | tool and library for transferring data with URL syntax / MIT/X derivate (`<http://curl.haxx.se/docs/copyright.html>`) |
| [cycler](http://matplotlib.org/cycler) | 0.10.0 | Composable style cycles. / BSD 3-Clause |
| [cython](http://www.cython.org/) | 0.29.23 | The Cython compiler for writing C extensions for the Python language / Apache-2.0 |
| [cytoolz](https://github.com/pytoolz/cytoolz) | 0.11.0 | Cython implementation of Toolz. High performance functional utilities / BSD-3-Clause |
| [dask](https://dask.org/) | 2021.4.0 | Parallel PyData with Task Scheduling / BSD-3-Clause |
| [dask-core](http://github.com/dask/dask/) | 2021.4.0 | Parallel Python with task scheduling / BSD-3-Clause |
| [decorator](https://github.com/micheles/decorator) | 5.0.6 | Better living through Python with decorators. / BSD-3-Clause |
| [defusedxml](https://bitbucket.org/tiran/defusedxml) | 0.7.1 | XML bomb protection for Python stdlib modules / PSF 2.0 |
| [diff-match-patch](http://code.google.com/p/google-diff-match-patch/) | 20200713 | Diff Match Patch is a high-performance library in multiple languages that manipulates plain text / Apache-2.0 |
| [distributed](http://distributed.readthedocs.io/en/latest/) | 2021.4.0 | Distributed computing with Dask / BSD-3-Clause |
| [docutils](http://docutils.sourceforge.net/) | 0.17 | Docutils – Python Documentation Utilities / Public Domain Dedictation and BSD 2-Clause and PSF 2.1.1 and GPL 3.0 |
| [entrypoints](https://github.com/takluyver/entrypoints) | 0.3 | Discover and load entry points from installed packages. / MIT License |
| [et\_xmlfile](https://bitbucket.org/openpyxl/et_xmlfile) | 1.0.1 | An implementation of lxml.xmlfile for the standard library / MIT |
| [fastcache](https://github.com/pbrady/fastcache) | 1.1.0 | C implementation of Python 3 lru\_cache / MIT |
| [filelock](https://github.com/benediktschmitt/py-filelock) | 3.0.12 | A platform independent file lock. / Public Domain |
| [flake8](http://flake8.pycqa.org/) | 3.9.0 | Your Tool For Style Guide Enforcement / MIT |
| [flask](http://flask.pocoo.org) | 1.1.2 | A microframework based on Werkzeug, Jinja2 and good intentions. / BSD 3-Clause |
| [freetype](https://www.freetype.org/) | 2.10.4 | A Free, High-Quality, and Portable Font Engine / GPL-2.0-only and LicenseRef-FreeType |
| [fsspec](https://github.com/martindurant/filesystem_spec) | 0.9.0 | A specification for pythonic filesystems / BSD-3-Clause |
| [future](http://python-future.org) | 0.18.2 | Clean single-source support for Python 3 and 2 / MIT |
| [get\_terminal\_size](https://github.com/chrippa/backports.shutil_get_terminal_size) | 1.0.0 | Get the size of the terminal window. / MIT |
| [gevent](https://www.gevent.org) | 21.1.2 | Coroutine-based network library / MIT |
| [glob2](https://github.com/miracle2k/python-glob2) | 0.7 | Version of the glob module that supports recursion via \*\*, and can capture patterns. / BSD-2-Clause |
| [greenlet](https://github.com/python-greenlet/greenlet) | 1.0.0 | Lightweight in-process concurrent programming / MIT |
| [h5py](http://www.h5py.org/) | 2.10.0 | Read and write HDF5 files from Python. / BSD-3-Clause |
| [hdf5](http://www.hdfgroup.org/HDF5/) | 1.10.4 | HDF5 is a data model, library, and file format for storing and managing data / HDF5 |
| [heapdict](http://stutzbachenterprises.com/) | 1.0.1 | A heap with decrease-key and increase-key operations / BSD 3-Clause |
| [html5lib](https://github.com/html5lib/html5lib-python) | 1.1 | HTML parser based on the WHATWG HTML specification / MIT |
| icc\_rt | 2019.0.0 | Intel runtime libraries for C, C++ and Fortran compilers / Intel proprietary |
| [icu](http://site.icu-project.org/) | 58.2 | International Components for Unicode. / MIT |
| [idna](https://github.com/kjd/idna) | 2.10 | Internationalized Domain Names in Applications (IDNA). / BSD Like |
| [imageio](https://imageio.github.io) | 2.9.0 | A Python library for reading and writing image data / BSD-2-Clause |
| [imagesize](https://github.com/shibukawa/imagesize_py) | 1.2.0 | Getting image size from png/jpeg/jpeg2000/gif file / MIT |
| [importlib-metadata](https://github.com/python/importlib_metadata) | 3.10.0 | A library to access the metadata for a Python package / Apache-2.0 |
| [importlib\_metadata](https://github.com/python/importlib_metadata) | 3.10.0 | A library to access the metadata for a Python package / Apache-2.0 |
| [iniconfig](http://github.com/RonnyPfannschmidt/iniconfig) | 1.1.1 | iniconfig: brain-dead simple config-ini parsing / MIT |
| [intel-openmp](https://software.intel.com/en-us/node/522690) | 2021.2.0 | Math library for Intel and compatible processors / LicenseRef-ProprietaryIntel |
| [intervaltree](https://github.com/chaimleib/intervaltree) | 3.1.0 | Editable interval tree data structure for Python 2 and 3 / Apache-2.0 |
| [ipykernel](https://ipython.org) | 5.3.4 | IPython Kernel for Jupyter / BSD-3-Clause |
| [ipython](https://ipython.org) | 7.22.0 | IPython: Productive Interactive Computing / BSD-3-Clause |
| [ipython\_genutils](http://ipython.org) | 0.2.0 | vestigial utilities from IPython / BSD 3-Clause |
| [ipywidgets](https://github.com/ipython/ipywidgets) | 7.6.3 | Jupyter Interactive Widgets / BSD-3-Clause |
| [isort](https://github.com/timothycrosley/isort) | 5.8.0 | A Python utility / library to sort Python imports. / MIT |
| [itsdangerous](https://github.com/pallets/itsdangerous) | 1.1.0 | Various helpers to pass trusted data to untrusted environments. / BSD 3-Clause |
| [jdcal](https://github.com/phn/jdcal) | 1.4.1 | Julian dates from proleptic Gregorian and Julian calendars. / BSD 2-Clause |
| [jedi](https://github.com/davidhalter/jedi/) | 0.17.2 | An autocompletion tool for Python that can be used for text editors. / MIT |
| [jinja2](http://jinja.pocoo.org) | 2.11.3 | An easy to use stand-alone template engine written in pure python. / BSD-3-Clause |
| [joblib](https://pypi.org/project/joblib/) | 1.0.1 | Lightweight pipelining: using Python functions as pipeline jobs. / BSD-3-Clause |
| [jpeg](http://www.ijg.org/) | 9b | read/write jpeg COM, EXIF, IPTC medata / Custom free software license |
| [json5](https://github.com/dpranke/pyjson5) | 0.9.5 | A Python implementation of the JSON5 data format / Apache-2.0 |
| [jsonschema](https://github.com/Julian/jsonschema) | 3.2.0 | An implementation of JSON Schema validation for Python / MIT |
| [jupyter](http://jupyter.org) | 1.0.0 | Jupyter metapackage. Install all the Jupyter components in one go. / BSD 3-Clause |
| [jupyter-packaging](https://github.com/jupyter/jupyter-packaging) | 0.7.12 | Jupyter Packaging Utilities / BSD-3-Clause |
| [jupyter\_client](https://jupyter.org) | 6.1.12 | jupyter\_client contains the reference implementation of the Jupyter protocol. / BSD-3-Clause |
| [jupyter\_console](http://jupyter.org) | 6.4.0 | Jupyter terminal console / BSD-3-Clause |
| [jupyter\_core](https://jupyter.org) | 4.7.1 | Core common functionality of Jupyter projects. / BSD-3-Clause |
| [jupyter\_server](https://jupyter.org) | 1.4.1 | Jupyter Server / BSD-3-Clause |
| [jupyterlab](https://github.com/jupyterlab/jupyterlab) | 3.0.14 | JupyterLab PRE-ALPHA / BSD-3-Clause |
| [jupyterlab\_pygments](http://github.com/JupyterLab/jupyterlab_pygments) | 0.1.2 | Pygments syntax coloring scheme making use of the JupyterLab CSS variables / BSD-3-Clause |
| [jupyterlab\_server](https://github.com/jupyterlab/jupyterlab_server) | 2.4.0 | A set of server components for JupyterLab and JupyterLab like applications. / BSD-3-Clause |
| [jupyterlab\_widgets](https://github.com/jupyter-widgets/ipywidgets) | 1.0.0 | JupyterLab extension providing HTML widgets / BSD-3-Clause |
| [keyring](https://github.com/jaraco/keyring) | 22.3.0 | Store and access your passwords safely / MIT |
| [kiwisolver](https://github.com/nucleic/kiwi) | 1.3.1 | An efficient C++ implementation of the Cassowary constraint solver / BSD-3-Clause |
| [krb5](http://web.mit.edu/kerberos/) | 1.18.2 | A network authentication protocol. / MIT |
| [lazy-object-proxy](https://github.com/ionelmc/python-lazy-object-proxy) | 1.6.0 | A fast and thorough lazy object proxy / BSD-2-Clause |
| [libarchive](http://www.libarchive.org/) | 3.4.2 | Multi-format archive and compression library / BSD-2-Clause |
| [libcurl](http://curl.haxx.se/) | 7.71.1 | tool and library for transferring data with URL syntax / MIT/X derivate (`<http://curl.haxx.se/docs/copyright.html>`) |
| [libiconv](https://www.gnu.org/software/libiconv/) | 1.15 | Provides iconv for systems which don’t have one (or that cannot convert from/to Unicode.) / GPL and LGPL |
| [liblief](https://lief.quarkslab.com/) | 0.10.1 | A cross platform library to parse, modify and abstract ELF, PE and MachO formats. / Apache-2.0 |
| [libpng](http://www.libpng.org/pub/png/libpng.html) | 1.6.37 | PNG reference library / zlib/libpng |
| [libsodium](http://libsodium.org) | 1.0.18 | A modern and easy-to-use crypto library. / ISC |
| [libspatialindex](http://libspatialindex.github.io) | 1.9.3 | Extensible framework for robust spatial indexing / MIT |
| [libssh2](https://www.libssh2.org/) | 1.9.0 | the SSH library / BSD-3-Clause |
| [libtiff](http://www.libtiff.org/) | 4.2.0 | Support for the Tag Image File Format (TIFF). / HPND |
| [libxml2](http://xmlsoft.org/) | 2.9.10 | The XML C parser and toolkit of Gnome / MIT |
| [libxslt](http://xmlsoft.org/XSLT/) | 1.1.34 | The XSLT C library developed for the GNOME project / MIT |
| [llvmlite](http://llvmlite.pydata.org) | 0.36.0 | A lightweight LLVM python binding for writing JIT compilers. / BSD-2-Clause |
| [locket](https://github.com/mwilliamson/locket.py) | 0.2.1 | File-based locks for Python for Linux and Windows / BSD 2-Clause |
| [lxml](http://lxml.de/) | 4.6.3 | Pythonic binding for the C libraries libxml2 and libxslt. / BSD-3-Clause and GPL-2.0-only and ZPL-2.0 and LicenseRef-ElementTree |
| [lz4-c](https://www.lz4.org) | 1.9.3 | Extremely Fast Compression algorithm / BSD-2-Clause |
| [lzo](http://www.oberhumer.com/opensource/lzo/) | 2.10 | LZO is a portable lossless data compression library written in ANSI C. / GPL v2+ |
| [m2w64-gcc-libgfortran](https://gcc.gnu.org) | 5.3.0 | GNU Compiler Collection (libgfortran) for MinGW-w64 / GPL, LGPL, FDL, custom |
| m2w64-gcc-libs | 5.3.0 | None / GPL3+, partial:GCCRLE, partial:LGPL2+ |
| [m2w64-gcc-libs-core](https://gcc.gnu.org) | 5.3.0 | GNU Compiler Collection (core libraries) for MinGW-w64 / GPL3+, partial:GCCRLE, partial:LGPL2+ |
| m2w64-gmp | 6.1.0 | None / LGPL3 |
| m2w64-libwinpthread-git | 5.0.0.4634.697f757 | None / MIT, BSD |
| [markupsafe](https://www.palletsprojects.com/p/markupsafe) | 1.1.1 | A Python module that implements the jinja2.Markup string / BSD-3-Clause |
| [matplotlib](http://matplotlib.org/) | 3.3.4 | Publication quality figures in Python / LicenseRef-PSF-based |
| [matplotlib-base](http://matplotlib.org/) | 3.3.4 | Publication quality figures in Python / LicenseRef-PSF-based |
| [mccabe](https://github.com/PyCQA/mccabe) | 0.6.1 | McCabe complexity checker for Python / MIT |
| [menuinst](https://github.com/ContinuumIO/menuinst) | 1.4.16 | cross platform menu item installation / BSD |
| [mistune](https://github.com/lepture/mistune) | 0.8.4 | The fastest markdown parser in pure Python. / BSD 3-Clause |
| [mkl](https://software.intel.com/en-us/mkl) | 2020.2 | Math library for Intel and compatible processors / LicenseRef-ProprietaryIntel |
| [mkl-service](https://github.com/ContinuumIO/mkl-service) | 2.3.0 | Python bindings to MKL service functions / 3-clause BSD |
| [mkl\_fft](http://github.com/IntelPython/mkl_fft) | 1.3.0 | NumPy-based implementation of Fast Fourier Transform using Intel (R) Math Kernel Library. / BSD 3-Clause |
| [mkl\_random](http://github.com/IntelPython/mkl_random) | 1.1.1 | Intel (R) MKL-powered package for sampling from common probability distributions into NumPy arrays. / BSD 3-Clause |
| [mock](https://github.com/testing-cabal/mock) | 4.0.3 | A library for testing in Python / BSD-2-Clause |
| [more-itertools](https://github.com/more-itertools/more-itertools) | 8.7.0 | More routines for operating on iterables, beyond itertools / MIT |
| [mpmath](http://mpmath.org) | 1.2.1 | Python library for arbitrary-precision floating-point arithmetic / BSD 3-Clause |
| [msgpack-python](http://msgpack.org/) | 1.0.2 | MessagePack (de)serializer / Apache-2.0 |
| msys2-conda-epoch | 20160418 | |
| [multipledispatch](https://github.com/mrocklin/multipledispatch/) | 0.6.0 | Multiple dispatch in Python / BSD 3-Clause |
| [mypy\_extensions](http://www.mypy-lang.org/) | 0.4.3 | Experimental type system extensions for programs checked with the mypy typechecker. / MIT |
| [nbclassic](http://github.com/jupyterlab/nbclassic) | 0.2.6 | Jupyter Notebook as a Jupyter Server Extension. / BSD-3-Clause |
| [nbclient](https://jupyter.org) | 0.5.3 | A client library for executing notebooks. Formally nbconvert’s ExecutePreprocessor. / BSD-3-Clause |
| [nbconvert](http://jupyter.org) | 6.0.7 | Converting Jupyter Notebooks / BSD-3-Clause |
| [nbformat](http://jupyter.org) | 5.1.3 | The Jupyter Notebook format / BSD-3-Clause |
| [nest-asyncio](https://github.com/erdewit/nest_asyncio) | 1.5.1 | Patch asyncio to allow nested event loops / BSD-2-Clause |
| [networkx](https://networkx.github.io/) | 2.5 | Python package for creating and manipulating complex networks / BSD-3-Clause |
| [nltk](http://nltk.org/) | 3.6.1 | Natural Language Toolkit / Apache 2.0 |
| [nose](http://readthedocs.org/docs/nose/) | 1.3.7 | Nose extends unittest to make testing easier / LGPL-2.1 |
| [notebook](https://jupyter.org) | 6.3.0 | Jupyter Notebook / BSD-3-Clause |
| [numexpr](https://github.com/pydata/numexpr) | 2.7.3 | Fast numerical expression evaluator for NumPy. / MIT |
| [numpy](http://numpy.scipy.org/) | 1.19.2 | Array processing for numbers, strings, records, and objects. / BSD 3-Clause |
| [numpy-base](http://numpy.scipy.org/) | 1.19.2 | Array processing for numbers, strings, records, and objects. / BSD 3-Clause |
| [numpydoc](https://github.com/numpy/numpydoc) | 1.1.0 | Numpy’s Sphinx extensions / BSD 3-Clause |
| [olefile](http://www.decalage.info/python/olefileio) | 0.46 | parse, read and write Microsoft OLE2 files / BSD 2-Clause |
| [openpyxl](https://openpyxl.readthedocs.io) | 3.0.7 | A Python library to read/write Excel 2010 xlsx/xlsm files / MIT |
| [openssl](http://www.openssl.org/) | 1.1.1k | OpenSSL is an open-source implementation of the SSL and TLS protocols / OpenSSL |
| [packaging](https://github.com/pypa/packaging) | 20.9 | Core utilities for Python packages / Apache 2.0 or BSD 2-Clause |
| [pandas](http://pandas.pydata.org) | 1.2.4 | High-performance, easy-to-use data structures and data analysis tools. / BSD-3-Clause |
| [pandoc](http://pandoc.org/) | 2.11 | Universal markup converter (repackaged binaries) / GPL-2.0 |
| [pandocfilters](https://github.com/jgm/pandocfilters) | 1.4.3 | A python module for writing pandoc filters / BSD-3-Clause |
| [paramiko](http://www.paramiko.org/) | 2.7.2 | SSH2 protocol library / LGPL-2.1-or-later |
| [parso](https://github.com/davidhalter/parso) | 0.7.0 | A Python Parser / MIT |
| [partd](https://github.com/dask/partd) | 1.2.0 | Data structure for on-disk shuffle operations / BSD 3-Clause |
| [path](https://github.com/jaraco/path) | 15.1.2 | A module wrapper for os.path / MIT |
| [path.py](https://github.com/jaraco/path.py) | 12.5.0 | A module wrapper for os.path / MIT |
| [pathlib2](https://github.com/mcmtroffaes/pathlib2) | 2.3.5 | Fork of pathlib aiming to support the full stdlib Python API / MIT |
| [pathspec](https://github.com/cpburnz/python-path-specification) | 0.7.0 | Utility library for gitignore style pattern matching of file paths. / MPL-2.0 |
| [patsy](https://github.com/pydata/patsy) | 0.5.1 | Describing statistical models in Python using symbolic formulas / BSD-2-Clause, PSF2 |
| [pep8](http://pep8.readthedocs.org/) | 1.7.1 | Python style guide checker / MIT |
| [pexpect](http://pexpect.sourceforge.net/) | 4.8.0 | Pexpect makes Python a better tool for controlling other applications. / ISC |
| [pickleshare](https://github.com/pickleshare/pickleshare/) | 0.7.5 | Tiny ‘shelve’-like database with concurrency support / MIT |
| [pillow](https://pillow.readthedocs.io) | 8.2.0 | Pillow is the friendly PIL fork by Alex Clark and Contributors / LicenseRef-PIL |
| [pip](https://pip.pypa.io/en/stable/) | 21.0.1 | PyPA recommended tool for installing Python packages / MIT |
| [pkginfo](https://code.launchpad.net/~tseaver/pkginfo/trunk) | 1.7.0 | Query metadatdata from sdists / bdists / installed packages. / MIT |
| [pluggy](https://github.com/pytest-dev/pluggy) | 0.13.1 | Plugin registration and hook calling for Python / MIT |
| [ply](http://www.dabeaz.com/ply/index.html) | 3.11 | Python Lex-Yacc / BSD 3-clause |
| powershell\_shortcut | 0.0.1 | Powershell shortcut creator for Windows (using menuinst) / BSD |
| [prometheus\_client](https://github.com/prometheus/client_python) | 0.10.1 | Python client for the Prometheus monitoring system / Apache-2.0 |
| [prompt-toolkit](https://github.com/jonathanslenders/python-prompt-toolkit) | 3.0.17 | Library for building powerful interactive command lines in Python / BSD-3-Clause |
| [prompt\_toolkit](https://github.com/jonathanslenders/python-prompt-toolkit) | 3.0.17 | Library for building powerful interactive command lines in Python / BSD-3-Clause |
| [psutil](https://github.com/giampaolo/psutil) | 5.8.0 | A cross-platform process and system utilities module for Python / BSD-3-Clause |
| [ptyprocess](https://github.com/pexpect/ptyprocess) | 0.7.0 | Run a subprocess in a pseudo terminal / ISC |
| [py](https://github.com/pytest-dev/py) | 1.10.0 | library with cross-python path, ini-parsing, io, code, log facilities / MIT |
| [py-lief](https://lief.quarkslab.com/) | 0.10.1 | A cross platform library to parse, modify and abstract ELF, PE and MachO formats. / Apache-2.0 |
| [pycodestyle](https://pycodestyle.readthedocs.io/) | 2.6.0 | Python style guide checker / MIT |
| [pycosat](https://github.com/ContinuumIO/pycosat) | 0.6.3 | Bindings to picosat (a SAT solver) / MIT |
| [pycparser](https://github.com/eliben/pycparser) | 2.20 | Complete C99 parser in pure Python / BSD 3-clause |
| [pycurl](http://pycurl.sourceforge.net/) | 7.43.0.6 | A Python Interface To The cURL library / LGPL, MIT |
| [pydocstyle](https://github.com/PyCQA/pydocstyle) | 6.0.0 | Python docstring style checker (formerly pep257) / MIT |
| [pyerfa](https://pyerfa.readthedocs.io/) | 1.7.2 | Python bindings for ERFA routines / BSD-3-Clause |
| [pyflakes](https://github.com/PyCQA/pyflakes) | 2.2.0 | Pyflakes analyzes programs and detects various errors. / MIT |
| [pygments](http://pygments.org/) | 2.8.1 | Pygments is a generic syntax highlighter suitable for use in code hosting, forums, wikis or other applications that need to prettify source code. / BSD-2-clause |
| [pylint](http://www.pylint.org/) | 2.7.4 | python code static checker / GPL-2.0-only |
| [pyls-black](https://github.com/rupert/pyls-black) | 0.4.6 | Black plugin for the Python Language Server / MIT |
| [pyls-spyder](https://github.com/spyder-ide/pyls-spyder) | 0.3.2 | Spyder extensions for the python-language-server / MIT |
| [pynacl](https://github.com/pyca/pynacl) | 1.4.0 | PyNaCl is a Python binding to the Networking and Cryptography library, a crypto library with the stated goal of improving usability, security and speed. / Apache-2.0 |
| [pyodbc](https://github.com/mkleehammer/pyodbc) | 4.0.30 | DB API Module for ODBC / MIT |
| [pyopenssl](https://github.com/pyca/pyopenssl) | 20.0.1 | Python wrapper module around the OpenSSL library / Apache 2.0 |
| [pyparsing](http://pyparsing.wikispaces.com/) | 2.4.7 | Create and execute simple grammars / MIT |
| [pyqt](http://www.riverbankcomputing.co.uk/software/pyqt) | 5.9.2 | Python binding of the cross-platform GUI toolkit Qt. / Commercial, GPL-2.0, GPL-3.0 |
| [pyreadline](http://ipython.org/pyreadline) | 2.1 | A python implmementation of GNU readline. / BSD 3-Clause |
| [pyrsistent](http://github.com/tobgu/pyrsistent/) | 0.17.3 | Persistent/Functional/Immutable data structures / MIT |
| [pysocks](https://github.com/Anorov/PySocks) | 1.7.1 | A Python SOCKS client module. See [Anorov/PySocks](https://github.com/Anorov/PySocks) for more information. / BSD 3-Clause |
| [pytables](http://www.pytables.org) | 3.6.1 | Brings together Python, HDF5 and NumPy to easily handle large amounts of data. / BSD 3-Clause |
| [pytest](https://docs.pytest.org/en/latest/) | 6.2.3 | Simple and powerful testing with Python. / MIT |
| [python](https://www.python.org/) | 3.8.8 | General purpose programming language / Python-2.0 |
| [python-dateutil](https://dateutil.readthedocs.org/) | 2.8.1 | Extensions to the standard Python datetime module. / BSD 3 Clause |
| [python-jsonrpc-server](https://github.com/palantir/python-jsonrpc-server) | 0.4.0 | A Python 2.7 and 3.4+ server implementation of the JSON RPC 2.0 protocol. / MIT |
| [python-language-server](https://github.com/palantir/python-language-server) | 0.36.2 | An implementation of the Language Server Protocol for Python / MIT |
| [python-libarchive-c](https://github.com/Changaco/python-libarchive-c) | 2.9 | Python interface to libarchive / CC0-1.0 |
| [pytz](http://pythonhosted.org/pytz/) | 2021.1 | World timezone definitions, modern and historical. / MIT |
| [pywavelets](https://github.com/PyWavelets/pywt) | 1.1.1 | Discrete Wavelet Transforms in Python / MIT |
| [pywin32](https://github.com/mhammond/pywin32) | 227 | Python extensions for Windows / PSF-2.0 |
| [pywin32-ctypes](https://github.com/enthought/pywin32-ctypes) | 0.2.0 | A limited subset of pywin32 re-implemented using ctypes (or cffi) / BSD 3 Clause |
| [pywinpty](https://github.com/spyder-ide/pywinpty) | 0.5.7 | Python bindings for the winpty library / MIT |
| [pyyaml](http://pyyaml.org/wiki/PyYAML) | 5.4.1 | YAML parser and emitter for Python / MIT |
| [pyzmq](https://github.com/zeromq/pyzmq) | 19.0.2 | Python bindings for zeromq / BSD 3-clause |
| [qdarkstyle](https://github.com/ColinDuquesnoy/QDarkStyleSheet) | 2.8.1 | A dark stylesheet for Qt applications (Qt4, Qt5, PySide, PyQt4, PyQt5, QtPy, PyQtGraph). / MIT |
| [qt](http://qt-project.org) | 5.9.7 | Qt is a cross-platform application and UI framework. / LGPL-3.0 |
| [qtawesome](https://github.com/spyder-ide/qtawesome) | 1.0.2 | Iconic fonts in PyQt and PySide applications / MIT |
| [qtconsole](http://jupyter.org) | 5.0.3 | Jupyter Qt Console / BSD-3-Clause |
| [qtpy](https://github.com/spyder-ide/qtpy) | 1.9.0 | Abstraction layer for PyQt5/PyQt4/PySide / MIT |
| [regex](https://bitbucket.org/mrabarnett/mrab-regex) | 2021.4.4 | Alternative regular expression module, to replace re / Python-2.0 |
| [requests](http://python-requests.org) | 2.25.1 | Requests is an elegant and simple HTTP library for Python, built with ♥. / Apache-2.0 |
| [rope](https://github.com/python-rope/rope) | 0.18.0 | A python refactoring library / GPL 2.0 |
| [rtree](http://toblerity.github.com/rtree/) | 0.9.7 | R-Tree spatial index for Python GIS / MIT |
| [ruamel\_yaml](https://sourceforge.net/p/ruamel-yaml/code/ci/default/tree) | 0.15.100 | A patched copy of ruamel.yaml. / MIT |
| [scikit-image](http://scikit-image.org/) | 0.16.2 | Image processing in Python. / BSD-3-Clause |
| [scikit-learn](http://scikit-learn.org/) | 0.23.1 | A set of python modules for machine learning and data mining / BSD-3-Clause |
| [scipy](http://www.scipy.org/) | 1.6.2 | Scientific Library for Python / BSD 3-Clause |
| [seaborn](https://seaborn.pydata.org) | 0.11.1 | Statistical data visualization / BSD 3-Clause |
| [send2trash](https://github.com/hsoft/send2trash) | 1.5.0 | Python library to natively send files to Trash (or Recycle bin) on all platforms. / BSD-3-Clause |
| [setuptools](https://github.com/pypa/setuptools) | 52.0.0 | Download, build, install, upgrade, and uninstall Python packages / MIT |
| [simplegeneric](http://cheeseshop.python.org/pypi/simplegeneric) | 0.8.1 | Simple generic functions (similar to Python’s own len(), pickle.dump(), etc.) / Zope Public |
| [singledispatch](http://docs.python.org/3/library/functools.html#functools.singledispatch) | 3.6.1 | Transforms a function into a single-dispatch generic function / MIT |
| [sip](http://www.riverbankcomputing.com/software/sip/intro) | 4.19.13 | Create Python bindings for C and C++ libraries / GPL-3.0 |
| [six](https://six.readthedocs.io/) | 1.15.0 | Python 2 and 3 compatibility utilities / MIT |
| [sniffio](https://github.com/python-trio/sniffio) | 1.2.0 | Sniff out which async library your code is running under / Apache-2.0 |
| [snowballstemmer](https://github.com/shibukawa/snowball_py) | 2.1.0 | Snowball stemming library collection for Python / BSD-2-Clause |
| [sortedcollections](http://www.grantjenks.com/docs/sortedcollections/) | 2.1.0 | Python Sorted Collections / Apache-2.0 |
| [sortedcontainers](http://www.grantjenks.com/docs/sortedcontainers/) | 2.3.0 | Python Sorted Container Types: SortedList, SortedDict, and SortedSet / Apache-2.0 |
| [soupsieve](http://facelessuser.github.io/soupsieve) | 2.2.1 | A modern CSS selector implementation for BeautifulSoup / MIT |
| [sphinx](http://www.sphinx-doc.org) | 3.5.3 | Sphinx is a tool that makes it easy to create intelligent and beautiful documentation / BSD-2-Clause |
| sphinxcontrib | 1.0 | Python namespace for sphinxcontrib / BSD |
| [sphinxcontrib-applehelp](https://www.sphinx-doc.org/en/master/) | 1.0.2 | sphinxcontrib-applehelp is a sphinx extension which outputs Apple help books / BSD-2-Clause |
| [sphinxcontrib-devhelp](https://www.sphinx-doc.org/en/master/) | 1.0.2 | sphinxcontrib-devhelp is a sphinx extension which outputs Devhelp document / BSD-2-Clause |
| [sphinxcontrib-htmlhelp](https://www.sphinx-doc.org/en/master/) | 1.0.3 | sphinxcontrib-htmlhelp is a sphinx extension which … / BSD-2-Clause |
| [sphinxcontrib-jsmath](https://www.sphinx-doc.org/en/master/) | 1.0.1 | A sphinx extension which renders display math in HTML via JavaScript / BSD-2-Clause |
| [sphinxcontrib-qthelp](https://www.sphinx-doc.org/en/master/) | 1.0.3 | sphinxcontrib-qthelp is a sphinx extension which outputs QtHelp document / BSD-2-Clause |
| [sphinxcontrib-serializinghtml](https://www.sphinx-doc.org/en/master/) | 1.1.4 | sphinxcontrib-serializinghtml is a sphinx extension which outputs “serialized” HTML files (json and pickle). / BSD-2-Clause |
| [sphinxcontrib-websupport](https://pypi.python.org/pypi/sphinxcontrib-websupport) | 1.2.4 | Sphinx API for Web Apps / BSD-2-Clause |
| [spyder](https://www.spyder-ide.org/) | 4.2.5 | The Scientific Python Development Environment / MIT |
| [spyder-kernels](https://www.spyder-ide.org/) | 1.10.2 | Jupyter kernels for Spyder’s console / MIT |
| [sqlalchemy](http://www.sqlalchemy.org/) | 1.4.7 | Database Abstraction Library. / MIT |
| [sqlite](http://www.sqlite.org/) | 3.35.4 | Implements a self-contained, zero-configuration, SQL database engine / Public-Domain (`<http://www.sqlite.org/copyright.html>`) |
| [statsmodels](https://www.statsmodels.org) | 0.12.2 | Statistical computations and models for use with SciPy / BSD-3-Clause |
| [sympy](https://sympy.org) | 1.8 | Python library for symbolic mathematics / BSD-3-Clause |
| [tblib](https://github.com/ionelmc/python-tblib) | 1.7.0 | Traceback serialization library. / BSD 2-Clause |
| [terminado](https://github.com/jupyter/terminado) | 0.9.4 | Terminals served by tornado websockets / BSD-2-Clause |
| [testpath](https://testpath.readthedocs.io) | 0.4.4 | Testpath is a collection of utilities for Python code working with files and commands. / BSD-3-Clause |
| [textdistance](https://github.com/orsinium/textdistance) | 4.2.1 | TextDistance – python library for comparing distance between two or more sequences by many algorithms. / MIT |
| [threadpoolctl](https://github.com/joblib/threadpoolctl) | 2.1.0 | Python helpers to control the threadpools of native libraries / BSD 3-Clause |
| [three-merge](https://github.com/spyder-ide/three-merge) | 0.1.1 | Simple Python library to perform a 3-way merge between strings / MIT |
| [tk](http://www.tcl.tk/) | 8.6.10 | A dynamic programming language with GUI support. Bundles Tcl and Tk. / Tcl/Tk |
| [toml](https://github.com/uiri/toml) | 0.10.2 | Python lib for TOML. / MIT |
| [toolz](http://toolz.readthedocs.org/) | 0.11.1 | A functional standard library for Python / BSD-3-Clause |
| [tornado](http://www.tornadoweb.org/) | 6.1 | A Python web framework and asynchronous networking library, originally developed at FriendFeed. / Apache-2.0 |
| [tqdm](https://pypi.python.org/pypi/tqdm) | 4.59.0 | A Fast, Extensible Progress Meter / MPL-2.0 or MIT |
| [traitlets](http://traitlets.readthedocs.org/) | 5.0.5 | Configuration system for Python applications / BSD-3-Clause |
| [typed-ast](https://github.com/python/typed_ast) | 1.4.2 | a fork of Python 2 and 3 ast modules with type comment support / Apache-2.0 |
| [typing\_extensions](https://github.com/python/typing/tree/master/typing_extensions) | 3.7.4.3 | Backported and Experimental Type Hints for Python / PSF-2.0 |
| [ujson](https://github.com/ultrajson/ultrajson) | 4.0.2 | Ultra fast JSON decoder and encoder written in C with Python bindings / BSD-3-Clause |
| [unicodecsv](https://github.com/jdunck/python-unicodecsv) | 0.14.1 | Drop-in replacement for csv module which supports unicode strings / BSD |
| [urllib3](https://urllib3.readthedocs.io/) | 1.26.4 | HTTP library with thread-safe connection pooling, file post, and more. / MIT |
| [vc](https://github.com/conda/conda/wiki/VC-features) | 14.2 | A meta-package to impose mutual exclusivity among software built with different VS versions / Modified BSD License (3-clause) |
| vs2015\_runtime | 14.27.29016 | MSVC runtimes associated with cl.exe version 19.27.29111 (VS 2019 update 5) / None |
| [watchdog](http://github.com/gorakhargosh/watchdog) | 1.0.2 | Filesystem events monitoring / Apache-2.0 |
| [wcwidth](https://github.com/jquast/wcwidth) | 0.2.5 | Measures number of Terminal column cells of wide-character codes. / MIT |
| [webencodings](https://github.com/gsnedders/python-webencodings) | 0.5.1 | Character encoding aliases for legacy web content / BSD 3-Clause |
| [werkzeug](https://palletsprojects.com/p/werkzeug/) | 1.0.1 | The comprehensive WSGI web application library. / BSD 3-Clause |
| [wheel](https://github.com/pypa/wheel) | 0.36.2 | A built-package format for Python. / MIT |
| [widgetsnbextension](http://ipython.org) | 3.5.1 | Interactive Widgets for Jupyter / BSD 3-clause |
| [win\_inet\_pton](https://github.com/hickeroar/win_inet_pton) | 1.1.0 | Native inet\_pton and inet\_ntop implementation for Python on Windows (with ctypes). / PUBLIC-DOMAIN |
| [win\_unicode\_console](https://github.com/Drekin/win-unicode-console) | 0.5 | A Python package to enable Unicode input and display when running Python from Windows console. / MIT |
| [wincertstore](https://bitbucket.org/tiran/wincertstore) | 0.2 | Python module to extract CA and CRL certs from Windows’ cert store (ctypes based). / PSF 2 |
| [winpty](https://github.com/rprichard/winpty) | 0.4.3 | Winpty provides an interface similar to a Unix pty-master for communicating with Windows console programs. / MIT |
| [wrapt](https://github.com/GrahamDumpleton/wrapt) | 1.12.1 | Module for decorators, wrappers and monkey patching / BSD 2-Clause |
| [xlrd](http://www.python-excel.org/) | 2.0.1 | Library for developers to extract data from Microsoft Excel (tm) spreadsheet files / BSD 3-Clause and BSD with advertising |
| [xlsxwriter](https://xlsxwriter.readthedocs.io/) | 1.3.8 | A Python module for creating Excel XLSX files / BSD-2-Clause |
| [xlwings](http://xlwings.org/) | 0.23.0 | Interact with Excel from Python and vice versa / 3-clause BSD |
| [xlwt](http://www.python-excel.org/) | 1.3.0 | Writing data and formatting information to Excel files / BSD |
| [xz](http://tukaani.org/xz/) | 5.2.5 | Data compression software with high compression ratio / LGPL-2.1 and GPL-2.0 |
| [yaml](http://pyyaml.org/wiki/LibYAML) | 0.2.5 | A C library for parsing and emitting YAML / MIT |
| [yapf](https://github.com/google/yapf) | 0.31.0 | A formatter for Python files / Apache 2.0 |
| [zeromq](http://zeromq.org) | 4.3.2 | A high-performance asynchronous messaging library. / LGPL-3.0-or-later |
| [zict](http://github.com/mrocklin/zict) | 2.0.0 | Composable Dictionary Classes / BSD 3-Clause |
| [zipp](https://github.com/jaraco/zipp) | 3.4.1 | A pathlib-compatible Zipfile object wrapper / MIT |
| [zlib](http://zlib.net/) | 1.2.11 | Massively spiffy yet delicately unobtrusive compression library / zlib |
| zope | 1.0 | web application server / BSD |
| [zope.event](http://www.zope.org/en/latest/) | 4.5.0 | Very basic event publishing system / Zope Public License |
| [zope.interface](http://docs.zope.org/zope.interface/) | 5.3.0 | Interfaces for Python / ZPL-2.1 |
| [zstd](http://www.zstd.net) | 1.4.5 | Zstandard - Fast real-time compression algorithm / BSD 3-Clause |
| Name | Version | Summary / License |
|---|---|---|
| [alabaster](http://www.sphinx-doc.org/en/stable/index.html) | 0.7.12 | Configurable, Python 2+3 compatible Sphinx theme. / BSD 3-Clause |
| [anaconda-client](http://anaconda.org) | 1.7.2 | anaconda.org command line client library / BSD 3-clause |
| [anaconda-navigator](https://github.com/ContinuumIO/navigator) | 2.0.3 | Anaconda Navigator / proprietary - Continuum Analytics, Inc. |
| [anaconda-project](https://github.com/Anaconda-Platform/anaconda-project) | 0.9.1 | Tool for encapsulating, running, and reproducing data science projects / BSD-3-Clause |
| [anyio](https://github.com/agronholm/anyio) | 2.2.0 | High level compatibility layer for multiple asynchronous event loop implementations on Python / MIT |
| [appdirs](http://github.com/ActiveState/appdirs) | 1.4.4 | A small Python module for determining appropriate platform-specific dirs. / MIT |
| [applaunchservices](https://github.com/impact27/applaunchservices) | 0.2.1 | Simple package for registering an app with apple Launch Services to handle UTI and URL / MIT |
| [appnope](http://github.com/minrk/appnope) | 0.1.2 | Disable App Nap on OS X 10.9 / BSD 2-Clause |
| [appscript](http://appscript.sourceforge.net) | 1.1.2 | Control AppleScriptable applications from Python. / Public Domain |
| [argh](https://github.com/neithere/argh) | 0.26.2 | The Natural CLI. / LGPL 3 |
| [argon2-cffi](https://argon2-cffi.readthedocs.org/) | 20.1.0 | The secure Argon2 password hashing algorithm. / MIT |
| [asn1crypto](https://github.com/wbond/asn1crypto) | 1.4.0 | Python ASN.1 library with a focus on performance and a pythonic API / MIT |
| [astroid](https://www.astroid.org/) | 2.5 | A abstract syntax tree for Python with inference support. / LGPL-2.1-only |
| [astropy](http://www.astropy.org/) | 4.2.1 | Community-developed Python Library for Astronomy / BSD-3-Clause |
| [async\_generator](https://github.com/python-trio/async_generator) | 1.10 | Async generators and context managers for Python 3.5+ / MIT |
| [atomicwrites](https://github.com/untitaker/python-atomicwrites) | 1.4.0 | Atomic file writes / MIT |
| [attrs](https://attrs.readthedocs.io/en/stable/) | 20.3.0 | attrs is the Python package that will bring back the joy of writing classes by relieving you from the drudgery of implementing object protocols (aka dunder methods). / MIT |
| [autopep8](https://github.com/hhatto/autopep8) | 1.5.6 | A tool that automatically formats Python code to conform to the PEP 8 style guide / MIT |
| [babel](http://babel.pocoo.org/) | 2.9.0 | Utilities to internationalize and localize Python applications / BSD 3-clause |
| [backcall](https://github.com/takluyver/backcall/) | 0.2.0 | Specifications for callback functions passed in to an API / BSD-3-Clause |
| [backports](https://bitbucket.org/brandon/backports) | 1.0 | None / BSD |
| [backports.shutil\_get\_terminal\_size](https://github.com/chrippa/backports.shutil_get_terminal_size) | 1.0.0 | A backport of the get\_terminal\_size function from Python 3.3’s shutil. / MIT |
| [beautifulsoup4](http://www.crummy.com/software/BeautifulSoup/) | 4.9.3 | Python library designed for screen-scraping / MIT |
| [bitarray](https://github.com/ilanschnell/bitarray) | 1.9.2 | efficient arrays of booleans – C extension / PSF |
| [bkcharts](http://github.com/bokeh/bkcharts) | 0.2 | High level chart types built on top of Bokeh / BSD 3-Clause |
| [black](https://github.com/python/black) | 19.10b0 | The Uncompromising Code Formatter / MIT |
| blas | 1.0 | |
| [bleach](https://github.com/mozilla/bleach) | 3.3.0 | Easy, whitelist-based HTML-sanitizing tool / Apache-2.0 |
| [blosc](https://github.com/Blosc/c-blosc) | 1.21.0 | A blocking, shuffling and loss-less compression library that can be faster than memcpy() / BSD-3-Clause |
| [bokeh](http://bokeh.pydata.org/) | 2.3.1 | Statistical and novel interactive HTML plots for Python / BSD-3-Clause |
| [boto](https://github.com/boto/boto/) | 2.49.0 | Amazon Web Services Library / MIT |
| [bottleneck](https://github.com/pydata/bottleneck) | 1.3.2 | Fast NumPy array functions written in Cython. / BSD 2-Clause |
| [brotlipy](https://github.com/python-hyper/brotlipy) | 0.7.0 | Python bindings to the Brotli compression library / MIT |
| [bzip2](http://www.bzip.org/) | 1.0.8 | high-quality data compressor / bzip2 |
| [c-ares](https://c-ares.haxx.se/) | 1.17.1 | This is c-ares, an asynchronous resolver library / MIT |
| [ca-certificates](https://github.com/conda-forge/ca-certificates-feedstock) | 2021.4.13 | Certificates for use with other packages. / MPL 2.0 |
| [certifi](http://certifi.io/) | 2020.12.5 | Python package for providing Mozilla’s CA Bundle. / ISC |
| [cffi](https://bitbucket.org/cffi/cffi) | 1.14.5 | Foreign Function Interface for Python calling C code. / MIT |
| [chardet](https://github.com/chardet/chardet) | 4.0.0 | Universal character encoding detector / LGPL2 |
| [click](https://palletsprojects.com/p/click) | 7.1.2 | Python composable command line interface toolkit / BSD-3-Clause |
| [cloudpickle](https://github.com/cloudpipe/cloudpickle) | 1.6.0 | Extended pickling support for Python objects / BSD-3-Clause |
| [clyent](https://github.com/Anaconda-Platform/clyent) | 1.2.2 | Command line client library for windows and posix / BSD 3-Clause |
| [colorama](https://github.com/tartley/colorama) | 0.4.4 | Cross-platform colored terminal text / BSD-3-Clause |
| [conda](https://conda.io) | 4.10.1 | OS-agnostic, system-level binary package and environment manager. / BSD 3-Clause |
| [conda-build](https://github.com/conda/conda-build) | 3.21.4 | tools for building conda packages / BSD 3-Clause |
| [conda-env](https://github.com/conda/conda-env) | 2.6.0 | Tools for interacting with conda environments. / BSD 3-Clause |
| [conda-verify](https://github.com/conda/conda-verify) | 3.4.2 | tool for validating conda recipes and conda packages / BSD 3-Clause |
| [contextlib2](http://contextlib2.readthedocs.org) | 0.6.0.post1 | Backports and enhancements for the contextlib module / PSF 2 |
| [cryptography](https://github.com/pyca/cryptography) | 3.4.7 | Provides cryptographic recipes and primitives to Python developers / Apache-2.0 AND BSD-3-Clause AND PSF-2.0 AND MIT |
| [curl](http://curl.haxx.se/) | 7.71.1 | tool and library for transferring data with URL syntax / MIT/X derivate (`<http://curl.haxx.se/docs/copyright.html>`) |
| [cycler](http://matplotlib.org/cycler) | 0.10.0 | Composable style cycles. / BSD 3-Clause |
| [cython](http://www.cython.org/) | 0.29.23 | The Cython compiler for writing C extensions for the Python language / Apache-2.0 |
| [cytoolz](https://github.com/pytoolz/cytoolz) | 0.11.0 | Cython implementation of Toolz. High performance functional utilities / BSD-3-Clause |
| [dask](https://dask.org/) | 2021.4.0 | Parallel PyData with Task Scheduling / BSD-3-Clause |
| [dask-core](http://github.com/dask/dask/) | 2021.4.0 | Parallel Python with task scheduling / BSD-3-Clause |
| [dbus](http://www.freedesktop.org/wiki/Software/dbus/) | 1.13.18 | Simple message bus system for applications to talk to one another / GPL2 |
| [decorator](https://github.com/micheles/decorator) | 5.0.6 | Better living through Python with decorators. / BSD-3-Clause |
| [defusedxml](https://bitbucket.org/tiran/defusedxml) | 0.7.1 | XML bomb protection for Python stdlib modules / PSF 2.0 |
| [diff-match-patch](http://code.google.com/p/google-diff-match-patch/) | 20200713 | Diff Match Patch is a high-performance library in multiple languages that manipulates plain text / Apache-2.0 |
| [distributed](http://distributed.readthedocs.io/en/latest/) | 2021.4.0 | Distributed computing with Dask / BSD-3-Clause |
| [docutils](http://docutils.sourceforge.net/) | 0.17 | Docutils – Python Documentation Utilities / Public Domain Dedictation and BSD 2-Clause and PSF 2.1.1 and GPL 3.0 |
| [entrypoints](https://github.com/takluyver/entrypoints) | 0.3 | Discover and load entry points from installed packages. / MIT License |
| [et\_xmlfile](https://bitbucket.org/openpyxl/et_xmlfile) | 1.0.1 | An implementation of lxml.xmlfile for the standard library / MIT |
| [expat](http://expat.sourceforge.net/) | 2.3.0 | Expat XML parser library in C / MIT |
| [fastcache](https://github.com/pbrady/fastcache) | 1.1.0 | C implementation of Python 3 lru\_cache / MIT |
| [filelock](https://github.com/benediktschmitt/py-filelock) | 3.0.12 | A platform independent file lock. / Public Domain |
| [flake8](http://flake8.pycqa.org/) | 3.9.0 | Your Tool For Style Guide Enforcement / MIT |
| [flask](http://flask.pocoo.org) | 1.1.2 | A microframework based on Werkzeug, Jinja2 and good intentions. / BSD 3-Clause |
| [freetype](https://www.freetype.org/) | 2.10.4 | A Free, High-Quality, and Portable Font Engine / GPL-2.0-only and LicenseRef-FreeType |
| [fsspec](https://github.com/martindurant/filesystem_spec) | 0.9.0 | A specification for pythonic filesystems / BSD-3-Clause |
| [future](http://python-future.org) | 0.18.2 | Clean single-source support for Python 3 and 2 / MIT |
| [get\_terminal\_size](https://github.com/chrippa/backports.shutil_get_terminal_size) | 1.0.0 | Get the size of the terminal window. / MIT |
| [gettext](https://www.gnu.org/software/gettext/) | 0.21.0 | Internationalization package / GPL-2.0 |
| [gevent](https://www.gevent.org) | 21.1.2 | Coroutine-based network library / MIT |
| [glib](https://developer.gnome.org/glib/) | 2.68.1 | Provides core application building blocks for libraries and applications written in C. / LGPL-2.1 |
| [glob2](https://github.com/miracle2k/python-glob2) | 0.7 | Version of the glob module that supports recursion via \*\*, and can capture patterns. / BSD-2-Clause |
| [gmp](http://gmplib.org/) | 6.2.1 | The GNU multiprecision library. / GPL-2.0-or-later AND LGPL-3.0-or-later |
| [gmpy2](https://pypi.python.org/pypi/gmpy2) | 2.0.8 | GMP/MPIR, MPFR, and MPC interface to Python 2.6+ and 3.x / LGPL 3 |
| [greenlet](https://github.com/python-greenlet/greenlet) | 1.0.0 | Lightweight in-process concurrent programming / MIT |
| [h5py](http://www.h5py.org/) | 2.10.0 | Read and write HDF5 files from Python. / BSD-3-Clause |
| [hdf5](http://www.hdfgroup.org/HDF5/) | 1.10.4 | HDF5 is a data model, library, and file format for storing and managing data / HDF5 |
| [heapdict](http://stutzbachenterprises.com/) | 1.0.1 | A heap with decrease-key and increase-key operations / BSD 3-Clause |
| [html5lib](https://github.com/html5lib/html5lib-python) | 1.1 | HTML parser based on the WHATWG HTML specification / MIT |
| [icu](http://site.icu-project.org/) | 58.2 | International Components for Unicode. / MIT |
| [idna](https://github.com/kjd/idna) | 2.10 | Internationalized Domain Names in Applications (IDNA). / BSD Like |
| [imageio](https://imageio.github.io) | 2.9.0 | A Python library for reading and writing image data / BSD-2-Clause |
| [imagesize](https://github.com/shibukawa/imagesize_py) | 1.2.0 | Getting image size from png/jpeg/jpeg2000/gif file / MIT |
| [importlib-metadata](https://github.com/python/importlib_metadata) | 3.10.0 | A library to access the metadata for a Python package / Apache-2.0 |
| [importlib\_metadata](https://github.com/python/importlib_metadata) | 3.10.0 | A library to access the metadata for a Python package / Apache-2.0 |
| [iniconfig](http://github.com/RonnyPfannschmidt/iniconfig) | 1.1.1 | iniconfig: brain-dead simple config-ini parsing / MIT |
| [intel-openmp](https://software.intel.com/en-us/node/522690) | 2021.2.0 | Math library for Intel and compatible processors / LicenseRef-ProprietaryIntel |
| [intervaltree](https://github.com/chaimleib/intervaltree) | 3.1.0 | Editable interval tree data structure for Python 2 and 3 / Apache-2.0 |
| [ipykernel](https://ipython.org) | 5.3.4 | IPython Kernel for Jupyter / BSD-3-Clause |
| [ipython](https://ipython.org) | 7.22.0 | IPython: Productive Interactive Computing / BSD-3-Clause |
| [ipython\_genutils](http://ipython.org) | 0.2.0 | vestigial utilities from IPython / BSD 3-Clause |
| [ipywidgets](https://github.com/ipython/ipywidgets) | 7.6.3 | Jupyter Interactive Widgets / BSD-3-Clause |
| [isort](https://github.com/timothycrosley/isort) | 5.8.0 | A Python utility / library to sort Python imports. / MIT |
| [itsdangerous](https://github.com/pallets/itsdangerous) | 1.1.0 | Various helpers to pass trusted data to untrusted environments. / BSD 3-Clause |
| [jbig](https://www.cl.cam.ac.uk/~mgk25/jbigkit) | 2.1 | Implementation of the JBIG1 data compression standard / GPL-2.0 |
| [jdcal](https://github.com/phn/jdcal) | 1.4.1 | Julian dates from proleptic Gregorian and Julian calendars. / BSD 2-Clause |
| [jedi](https://github.com/davidhalter/jedi/) | 0.17.2 | An autocompletion tool for Python that can be used for text editors. / MIT |
| [jinja2](http://jinja.pocoo.org) | 2.11.3 | An easy to use stand-alone template engine written in pure python. / BSD-3-Clause |
| [joblib](https://pypi.org/project/joblib/) | 1.0.1 | Lightweight pipelining: using Python functions as pipeline jobs. / BSD-3-Clause |
| [jpeg](http://www.ijg.org/) | 9b | read/write jpeg COM, EXIF, IPTC medata / Custom free software license |
| [json5](https://github.com/dpranke/pyjson5) | 0.9.5 | A Python implementation of the JSON5 data format / Apache-2.0 |
| [jsonschema](https://github.com/Julian/jsonschema) | 3.2.0 | An implementation of JSON Schema validation for Python / MIT |
| [jupyter](http://jupyter.org) | 1.0.0 | Jupyter metapackage. Install all the Jupyter components in one go. / BSD 3-Clause |
| [jupyter-packaging](https://github.com/jupyter/jupyter-packaging) | 0.7.12 | Jupyter Packaging Utilities / BSD-3-Clause |
| [jupyter\_client](https://jupyter.org) | 6.1.12 | jupyter\_client contains the reference implementation of the Jupyter protocol. / BSD-3-Clause |
| [jupyter\_console](http://jupyter.org) | 6.4.0 | Jupyter terminal console / BSD-3-Clause |
| [jupyter\_core](https://jupyter.org) | 4.7.1 | Core common functionality of Jupyter projects. / BSD-3-Clause |
| [jupyter\_server](https://jupyter.org) | 1.4.1 | Jupyter Server / BSD-3-Clause |
| [jupyterlab](https://github.com/jupyterlab/jupyterlab) | 3.0.14 | JupyterLab PRE-ALPHA / BSD-3-Clause |
| [jupyterlab\_pygments](http://github.com/JupyterLab/jupyterlab_pygments) | 0.1.2 | Pygments syntax coloring scheme making use of the JupyterLab CSS variables / BSD-3-Clause |
| [jupyterlab\_server](https://github.com/jupyterlab/jupyterlab_server) | 2.4.0 | A set of server components for JupyterLab and JupyterLab like applications. / BSD-3-Clause |
| [jupyterlab\_widgets](https://github.com/jupyter-widgets/ipywidgets) | 1.0.0 | JupyterLab extension providing HTML widgets / BSD-3-Clause |
| [keyring](https://github.com/jaraco/keyring) | 22.3.0 | Store and access your passwords safely / MIT |
| [kiwisolver](https://github.com/nucleic/kiwi) | 1.3.1 | An efficient C++ implementation of the Cassowary constraint solver / BSD-3-Clause |
| [krb5](http://web.mit.edu/kerberos/) | 1.18.2 | A network authentication protocol. / MIT |
| [lazy-object-proxy](https://github.com/ionelmc/python-lazy-object-proxy) | 1.6.0 | A fast and thorough lazy object proxy / BSD-2-Clause |
| [lcms2](http://www.littlecms.com/) | 2.12 | Open Source Color Management Engine / MIT |
| [libarchive](http://www.libarchive.org/) | 3.4.2 | Multi-format archive and compression library / BSD-2-Clause |
| [libcurl](http://curl.haxx.se/) | 7.71.1 | tool and library for transferring data with URL syntax / MIT/X derivate (`<http://curl.haxx.se/docs/copyright.html>`) |
| [libcxx](http://llvm.org/) | 10.0.0 | LLVM C++ standard library / Apache-2.0 WITH LLVM-exception |
| [libedit](http://thrysoee.dk/editline/) | 3.1.20210216 | Editline Library (libedit) / BSD-2-Clause |
| [libev](http://software.schmorp.de/pkg/libev.html) | 4.33 | A full-featured and high-performance event loop that is loosely modeled after libevent, but without its limitations and bugs. / BSD-2-Clause |
| [libffi](https://sourceware.org/libffi/) | 3.3 | A Portable Foreign Function Interface Library. / Custom |
| [libgfortran](http://gcc.gnu.org/) | 3.0.1 | Fortran libraries from the GNU Compiler Collection / GPL 3 (with GCC Runtime Library Exception 3.1) |
| [libiconv](https://www.gnu.org/software/libiconv/) | 1.16 | Provides iconv for systems which don’t have one (or that cannot convert from/to Unicode.) / GPL and LGPL |
| [liblief](https://lief.quarkslab.com/) | 0.10.1 | A cross platform library to parse, modify and abstract ELF, PE and MachO formats. / Apache-2.0 |
| [libllvm10](http://llvm.org/) | 10.0.1 | Development headers and libraries for LLVM / Apache-2.0 WITH LLVM-exception |
| [libpng](http://www.libpng.org/pub/png/libpng.html) | 1.6.37 | PNG reference library / zlib/libpng |
| [libsodium](http://libsodium.org) | 1.0.18 | A modern and easy-to-use crypto library. / ISC |
| [libspatialindex](http://libspatialindex.github.io) | 1.9.3 | Extensible framework for robust spatial indexing / MIT |
| [libssh2](https://www.libssh2.org/) | 1.9.0 | the SSH library / BSD-3-Clause |
| [libtiff](http://www.libtiff.org/) | 4.2.0 | Support for the Tag Image File Format (TIFF). / HPND |
| [libuv](http://libuv.org/) | 1.40.0 | Cross-platform asynchronous I/O / MIT |
| [libwebp-base](https://developers.google.com/speed/webp) | 1.2.0 | WebP image library / BSD-3-Clause |
| [libxml2](http://xmlsoft.org/) | 2.9.10 | The XML C parser and toolkit of Gnome / MIT |
| [libxslt](http://xmlsoft.org/XSLT/) | 1.1.34 | The XSLT C library developed for the GNOME project / MIT |
| [llvm-openmp](http://openmp.llvm.org/) | 10.0.0 | The OpenMP API supports multi-platform shared-memory parallel programming in C/C++ and Fortran. / NCSA |
| [llvmlite](http://llvmlite.pydata.org) | 0.36.0 | A lightweight LLVM python binding for writing JIT compilers. / BSD-2-Clause |
| [locket](https://github.com/mwilliamson/locket.py) | 0.2.1 | File-based locks for Python for Linux and Windows / BSD 2-Clause |
| [lxml](http://lxml.de/) | 4.6.3 | Pythonic binding for the C libraries libxml2 and libxslt. / BSD-3-Clause and GPL-2.0-only and ZPL-2.0 and LicenseRef-ElementTree |
| [lz4-c](https://www.lz4.org) | 1.9.3 | Extremely Fast Compression algorithm / BSD-2-Clause |
| [lzo](http://www.oberhumer.com/opensource/lzo/) | 2.10 | LZO is a portable lossless data compression library written in ANSI C. / GPL v2+ |
| [markupsafe](https://www.palletsprojects.com/p/markupsafe) | 1.1.1 | A Python module that implements the jinja2.Markup string / BSD-3-Clause |
| [matplotlib](http://matplotlib.org/) | 3.3.4 | Publication quality figures in Python / LicenseRef-PSF-based |
| [matplotlib-base](http://matplotlib.org/) | 3.3.4 | Publication quality figures in Python / LicenseRef-PSF-based |
| [mccabe](https://github.com/PyCQA/mccabe) | 0.6.1 | McCabe complexity checker for Python / MIT |
| [mistune](https://github.com/lepture/mistune) | 0.8.4 | The fastest markdown parser in pure Python. / BSD 3-Clause |
| [mkl](https://software.intel.com/en-us/mkl) | 2021.2.0 | Math library for Intel and compatible processors / LicenseRef-ProprietaryIntel |
| [mkl-service](https://github.com/ContinuumIO/mkl-service) | 2.3.0 | Python bindings to MKL service functions / 3-clause BSD |
| [mkl\_fft](http://github.com/IntelPython/mkl_fft) | 1.3.0 | NumPy-based implementation of Fast Fourier Transform using Intel (R) Math Kernel Library. / BSD 3-Clause |
| [mkl\_random](http://github.com/IntelPython/mkl_random) | 1.2.1 | Intel (R) MKL-powered package for sampling from common probability distributions into NumPy arrays. / BSD 3-Clause |
| [mock](https://github.com/testing-cabal/mock) | 4.0.3 | A library for testing in Python / BSD-2-Clause |
| [more-itertools](https://github.com/more-itertools/more-itertools) | 8.7.0 | More routines for operating on iterables, beyond itertools / MIT |
| [mpc](http://www.multiprecision.org/) | 1.1.0 | A C library for the arithmetic of complex numbers with arbitrarily high precision. / LGPL 3 |
| [mpfr](http://www.mpfr.org/) | 4.0.2 | The MPFR library is a C library for multiple-precision floating-point computations with correct rounding. / LGPL-3.0-only |
| [mpmath](http://mpmath.org) | 1.2.1 | Python library for arbitrary-precision floating-point arithmetic / BSD 3-Clause |
| [msgpack-python](http://msgpack.org/) | 1.0.2 | MessagePack (de)serializer / Apache-2.0 |
| [multipledispatch](https://github.com/mrocklin/multipledispatch/) | 0.6.0 | Multiple dispatch in Python / BSD 3-Clause |
| [mypy\_extensions](http://www.mypy-lang.org/) | 0.4.3 | Experimental type system extensions for programs checked with the mypy typechecker. / MIT |
| [nbclassic](http://github.com/jupyterlab/nbclassic) | 0.2.6 | Jupyter Notebook as a Jupyter Server Extension. / BSD-3-Clause |
| [nbclient](https://jupyter.org) | 0.5.3 | A client library for executing notebooks. Formally nbconvert’s ExecutePreprocessor. / BSD-3-Clause |
| [nbconvert](http://jupyter.org) | 6.0.7 | Converting Jupyter Notebooks / BSD-3-Clause |
| [nbformat](http://jupyter.org) | 5.1.3 | The Jupyter Notebook format / BSD-3-Clause |
| [ncurses](http://www.gnu.org/software/ncurses/) | 6.2 | Library for text-based user interfaces / Free software (MIT-like) |
| [nest-asyncio](https://github.com/erdewit/nest_asyncio) | 1.5.1 | Patch asyncio to allow nested event loops / BSD-2-Clause |
| [networkx](https://networkx.github.io/) | 2.5 | Python package for creating and manipulating complex networks / BSD-3-Clause |
| [nltk](http://nltk.org/) | 3.6.1 | Natural Language Toolkit / Apache 2.0 |
| [nose](http://readthedocs.org/docs/nose/) | 1.3.7 | Nose extends unittest to make testing easier / LGPL-2.1 |
| [notebook](https://jupyter.org) | 6.3.0 | Jupyter Notebook / BSD-3-Clause |
| [numexpr](https://github.com/pydata/numexpr) | 2.7.3 | Fast numerical expression evaluator for NumPy. / MIT |
| [numpy](http://numpy.scipy.org/) | 1.20.1 | Array processing for numbers, strings, records, and objects. / BSD 3-Clause |
| [numpy-base](http://numpy.scipy.org/) | 1.20.1 | Array processing for numbers, strings, records, and objects. / BSD 3-Clause |
| [numpydoc](https://github.com/numpy/numpydoc) | 1.1.0 | Numpy’s Sphinx extensions / BSD 3-Clause |
| [olefile](http://www.decalage.info/python/olefileio) | 0.46 | parse, read and write Microsoft OLE2 files / BSD 2-Clause |
| [openpyxl](https://openpyxl.readthedocs.io) | 3.0.7 | A Python library to read/write Excel 2010 xlsx/xlsm files / MIT |
| [openssl](http://www.openssl.org/) | 1.1.1k | OpenSSL is an open-source implementation of the SSL and TLS protocols / OpenSSL |
| [packaging](https://github.com/pypa/packaging) | 20.9 | Core utilities for Python packages / Apache 2.0 or BSD 2-Clause |
| [pandas](http://pandas.pydata.org) | 1.2.4 | High-performance, easy-to-use data structures and data analysis tools. / BSD-3-Clause |
| [pandoc](http://pandoc.org/) | 2.12 | Universal markup converter (repackaged binaries) / GPL-2.0 |
| [pandocfilters](https://github.com/jgm/pandocfilters) | 1.4.3 | A python module for writing pandoc filters / BSD-3-Clause |
| [parso](https://github.com/davidhalter/parso) | 0.7.0 | A Python Parser / MIT |
| [partd](https://github.com/dask/partd) | 1.2.0 | Data structure for on-disk shuffle operations / BSD 3-Clause |
| [path](https://github.com/jaraco/path) | 15.1.2 | A module wrapper for os.path / MIT |
| [path.py](https://github.com/jaraco/path.py) | 12.5.0 | A module wrapper for os.path / MIT |
| [pathlib2](https://github.com/mcmtroffaes/pathlib2) | 2.3.5 | Fork of pathlib aiming to support the full stdlib Python API / MIT |
| [pathspec](https://github.com/cpburnz/python-path-specification) | 0.7.0 | Utility library for gitignore style pattern matching of file paths. / MPL-2.0 |
| [patsy](https://github.com/pydata/patsy) | 0.5.1 | Describing statistical models in Python using symbolic formulas / BSD-2-Clause, PSF2 |
| [pcre](http://www.pcre.org/) | 8.44 | Regular expression pattern matching using the same syntax and semantics as Perl 5. / BSD 3-Clause |
| [pep8](http://pep8.readthedocs.org/) | 1.7.1 | Python style guide checker / MIT |
| [pexpect](http://pexpect.sourceforge.net/) | 4.8.0 | Pexpect makes Python a better tool for controlling other applications. / ISC |
| [pickleshare](https://github.com/pickleshare/pickleshare/) | 0.7.5 | Tiny ‘shelve’-like database with concurrency support / MIT |
| [pillow](https://pillow.readthedocs.io) | 8.2.0 | Pillow is the friendly PIL fork by Alex Clark and Contributors / LicenseRef-PIL |
| [pip](https://pip.pypa.io/en/stable/) | 21.0.1 | PyPA recommended tool for installing Python packages / MIT |
| [pkginfo](https://code.launchpad.net/~tseaver/pkginfo/trunk) | 1.7.0 | Query metadatdata from sdists / bdists / installed packages. / MIT |
| [pluggy](https://github.com/pytest-dev/pluggy) | 0.13.1 | Plugin registration and hook calling for Python / MIT |
| [ply](http://www.dabeaz.com/ply/index.html) | 3.11 | Python Lex-Yacc / BSD 3-clause |
| [prometheus\_client](https://github.com/prometheus/client_python) | 0.10.1 | Python client for the Prometheus monitoring system / Apache-2.0 |
| [prompt-toolkit](https://github.com/jonathanslenders/python-prompt-toolkit) | 3.0.17 | Library for building powerful interactive command lines in Python / BSD-3-Clause |
| [prompt\_toolkit](https://github.com/jonathanslenders/python-prompt-toolkit) | 3.0.17 | Library for building powerful interactive command lines in Python / BSD-3-Clause |
| [psutil](https://github.com/giampaolo/psutil) | 5.8.0 | A cross-platform process and system utilities module for Python / BSD-3-Clause |
| [ptyprocess](https://github.com/pexpect/ptyprocess) | 0.7.0 | Run a subprocess in a pseudo terminal / ISC |
| [py](https://github.com/pytest-dev/py) | 1.10.0 | library with cross-python path, ini-parsing, io, code, log facilities / MIT |
| [py-lief](https://lief.quarkslab.com/) | 0.10.1 | A cross platform library to parse, modify and abstract ELF, PE and MachO formats. / Apache-2.0 |
| [pycodestyle](https://pycodestyle.readthedocs.io/) | 2.6.0 | Python style guide checker / MIT |
| [pycosat](https://github.com/ContinuumIO/pycosat) | 0.6.3 | Bindings to picosat (a SAT solver) / MIT |
| [pycparser](https://github.com/eliben/pycparser) | 2.20 | Complete C99 parser in pure Python / BSD 3-clause |
| [pycurl](http://pycurl.sourceforge.net/) | 7.43.0.6 | A Python Interface To The cURL library / LGPL, MIT |
| [pydocstyle](https://github.com/PyCQA/pydocstyle) | 6.0.0 | Python docstring style checker (formerly pep257) / MIT |
| [pyerfa](https://pyerfa.readthedocs.io/) | 1.7.3 | Python bindings for ERFA routines / BSD-3-Clause |
| [pyflakes](https://github.com/PyCQA/pyflakes) | 2.2.0 | Pyflakes analyzes programs and detects various errors. / MIT |
| [pygments](http://pygments.org/) | 2.8.1 | Pygments is a generic syntax highlighter suitable for use in code hosting, forums, wikis or other applications that need to prettify source code. / BSD-2-clause |
| [pylint](http://www.pylint.org/) | 2.7.4 | python code static checker / GPL-2.0-only |
| [pyls-black](https://github.com/rupert/pyls-black) | 0.4.6 | Black plugin for the Python Language Server / MIT |
| [pyls-spyder](https://github.com/spyder-ide/pyls-spyder) | 0.3.2 | Spyder extensions for the python-language-server / MIT |
| [pyodbc](https://github.com/mkleehammer/pyodbc) | 4.0.30 | DB API Module for ODBC / MIT |
| [pyopenssl](https://github.com/pyca/pyopenssl) | 20.0.1 | Python wrapper module around the OpenSSL library / Apache 2.0 |
| [pyparsing](http://pyparsing.wikispaces.com/) | 2.4.7 | Create and execute simple grammars / MIT |
| [pyqt](http://www.riverbankcomputing.co.uk/software/pyqt) | 5.9.2 | Python binding of the cross-platform GUI toolkit Qt. / Commercial, GPL-2.0, GPL-3.0 |
| [pyrsistent](http://github.com/tobgu/pyrsistent/) | 0.17.3 | Persistent/Functional/Immutable data structures / MIT |
| [pysocks](https://github.com/Anorov/PySocks) | 1.7.1 | A Python SOCKS client module. See [Anorov/PySocks](https://github.com/Anorov/PySocks) for more information. / BSD 3-Clause |
| [pytables](http://www.pytables.org) | 3.6.1 | Brings together Python, HDF5 and NumPy to easily handle large amounts of data. / BSD 3-Clause |
| [pytest](https://docs.pytest.org/en/latest/) | 6.2.3 | Simple and powerful testing with Python. / MIT |
| [python](https://www.python.org/) | 3.8.8 | General purpose programming language / Python-2.0 |
| [python-dateutil](https://dateutil.readthedocs.org/) | 2.8.1 | Extensions to the standard Python datetime module. / BSD 3 Clause |
| [python-jsonrpc-server](https://github.com/palantir/python-jsonrpc-server) | 0.4.0 | A Python 2.7 and 3.4+ server implementation of the JSON RPC 2.0 protocol. / MIT |
| [python-language-server](https://github.com/palantir/python-language-server) | 0.36.2 | An implementation of the Language Server Protocol for Python / MIT |
| [python-libarchive-c](https://github.com/Changaco/python-libarchive-c) | 2.9 | Python interface to libarchive / CC0-1.0 |
| [python.app](https://www.python.org/) | 3 | Proxy on macOS letting Python libraries hook into the GUI event loop / BSD-3-Clause |
| [pytz](http://pythonhosted.org/pytz/) | 2021.1 | World timezone definitions, modern and historical. / MIT |
| [pywavelets](https://github.com/PyWavelets/pywt) | 1.1.1 | Discrete Wavelet Transforms in Python / MIT |
| [pyyaml](http://pyyaml.org/wiki/PyYAML) | 5.4.1 | YAML parser and emitter for Python / MIT |
| [pyzmq](https://github.com/zeromq/pyzmq) | 20.0.0 | Python bindings for zeromq / BSD 3-clause |
| [qdarkstyle](https://github.com/ColinDuquesnoy/QDarkStyleSheet) | 2.8.1 | A dark stylesheet for Qt applications (Qt4, Qt5, PySide, PyQt4, PyQt5, QtPy, PyQtGraph). / MIT |
| [qt](http://qt-project.org) | 5.9.7 | Qt is a cross-platform application and UI framework. / LGPL-3.0 |
| [qtawesome](https://github.com/spyder-ide/qtawesome) | 1.0.2 | Iconic fonts in PyQt and PySide applications / MIT |
| [qtconsole](http://jupyter.org) | 5.0.3 | Jupyter Qt Console / BSD-3-Clause |
| [qtpy](https://github.com/spyder-ide/qtpy) | 1.9.0 | Abstraction layer for PyQt5/PyQt4/PySide / MIT |
| [readline](https://cnswww.cns.cwru.edu/php/chet/readline/rltop.html) | 8.1 | library for editing command lines as they are typed in / GPL-3.0 |
| [regex](https://bitbucket.org/mrabarnett/mrab-regex) | 2021.4.4 | Alternative regular expression module, to replace re / Python-2.0 |
| [requests](http://python-requests.org) | 2.25.1 | Requests is an elegant and simple HTTP library for Python, built with ♥. / Apache-2.0 |
| ripgrep | 12.1.1 | |
| [rope](https://github.com/python-rope/rope) | 0.18.0 | A python refactoring library / GPL 2.0 |
| [rtree](http://toblerity.github.com/rtree/) | 0.9.7 | R-Tree spatial index for Python GIS / MIT |
| [ruamel\_yaml](https://sourceforge.net/p/ruamel-yaml/code/ci/default/tree) | 0.15.100 | A patched copy of ruamel.yaml. / MIT |
| [scikit-image](http://scikit-image.org/) | 0.18.1 | Image processing in Python. / BSD-3-Clause |
| [scikit-learn](http://scikit-learn.org/) | 0.24.1 | A set of python modules for machine learning and data mining / BSD-3-Clause |
| [scipy](http://www.scipy.org/) | 1.6.2 | Scientific Library for Python / BSD 3-Clause |
| [seaborn](https://seaborn.pydata.org) | 0.11.1 | Statistical data visualization / BSD 3-Clause |
| [send2trash](https://github.com/hsoft/send2trash) | 1.5.0 | Python library to natively send files to Trash (or Recycle bin) on all platforms. / BSD-3-Clause |
| [setuptools](https://github.com/pypa/setuptools) | 52.0.0 | Download, build, install, upgrade, and uninstall Python packages / MIT |
| [simplegeneric](http://cheeseshop.python.org/pypi/simplegeneric) | 0.8.1 | Simple generic functions (similar to Python’s own len(), pickle.dump(), etc.) / Zope Public |
| [singledispatch](http://docs.python.org/3/library/functools.html#functools.singledispatch) | 3.6.1 | Transforms a function into a single-dispatch generic function / MIT |
| [sip](http://www.riverbankcomputing.com/software/sip/intro) | 4.19.8 | Create Python bindings for C and C++ libraries / GPL-3.0 |
| [six](https://six.readthedocs.io/) | 1.15.0 | Python 2 and 3 compatibility utilities / MIT |
| [sniffio](https://github.com/python-trio/sniffio) | 1.2.0 | Sniff out which async library your code is running under / Apache-2.0 |
| [snowballstemmer](https://github.com/shibukawa/snowball_py) | 2.1.0 | Snowball stemming library collection for Python / BSD-2-Clause |
| [sortedcollections](http://www.grantjenks.com/docs/sortedcollections/) | 2.1.0 | Python Sorted Collections / Apache-2.0 |
| [sortedcontainers](http://www.grantjenks.com/docs/sortedcontainers/) | 2.3.0 | Python Sorted Container Types: SortedList, SortedDict, and SortedSet / Apache-2.0 |
| [soupsieve](http://facelessuser.github.io/soupsieve) | 2.2.1 | A modern CSS selector implementation for BeautifulSoup / MIT |
| [sphinx](http://www.sphinx-doc.org) | 3.5.3 | Sphinx is a tool that makes it easy to create intelligent and beautiful documentation / BSD-2-Clause |
| sphinxcontrib | 1.0 | Python namespace for sphinxcontrib / BSD |
| [sphinxcontrib-applehelp](https://www.sphinx-doc.org/en/master/) | 1.0.2 | sphinxcontrib-applehelp is a sphinx extension which outputs Apple help books / BSD-2-Clause |
| [sphinxcontrib-devhelp](https://www.sphinx-doc.org/en/master/) | 1.0.2 | sphinxcontrib-devhelp is a sphinx extension which outputs Devhelp document / BSD-2-Clause |
| [sphinxcontrib-htmlhelp](https://www.sphinx-doc.org/en/master/) | 1.0.3 | sphinxcontrib-htmlhelp is a sphinx extension which … / BSD-2-Clause |
| [sphinxcontrib-jsmath](https://www.sphinx-doc.org/en/master/) | 1.0.1 | A sphinx extension which renders display math in HTML via JavaScript / BSD-2-Clause |
| [sphinxcontrib-qthelp](https://www.sphinx-doc.org/en/master/) | 1.0.3 | sphinxcontrib-qthelp is a sphinx extension which outputs QtHelp document / BSD-2-Clause |
| [sphinxcontrib-serializinghtml](https://www.sphinx-doc.org/en/master/) | 1.1.4 | sphinxcontrib-serializinghtml is a sphinx extension which outputs “serialized” HTML files (json and pickle). / BSD-2-Clause |
| [sphinxcontrib-websupport](https://pypi.python.org/pypi/sphinxcontrib-websupport) | 1.2.4 | Sphinx API for Web Apps / BSD-2-Clause |
| [spyder](https://www.spyder-ide.org/) | 4.2.5 | The Scientific Python Development Environment / MIT |
| [spyder-kernels](https://www.spyder-ide.org/) | 1.10.2 | Jupyter kernels for Spyder’s console / MIT |
| [sqlalchemy](http://www.sqlalchemy.org/) | 1.4.7 | Database Abstraction Library. / MIT |
| [sqlite](http://www.sqlite.org/) | 3.35.4 | Implements a self-contained, zero-configuration, SQL database engine / Public-Domain (`<http://www.sqlite.org/copyright.html>`) |
| [statsmodels](https://www.statsmodels.org) | 0.12.2 | Statistical computations and models for use with SciPy / BSD-3-Clause |
| [sympy](https://sympy.org) | 1.8 | Python library for symbolic mathematics / BSD-3-Clause |
| [tblib](https://github.com/ionelmc/python-tblib) | 1.7.0 | Traceback serialization library. / BSD 2-Clause |
| [terminado](https://github.com/jupyter/terminado) | 0.9.4 | Terminals served by tornado websockets / BSD-2-Clause |
| [testpath](https://testpath.readthedocs.io) | 0.4.4 | Testpath is a collection of utilities for Python code working with files and commands. / BSD-3-Clause |
| [textdistance](https://github.com/orsinium/textdistance) | 4.2.1 | TextDistance – python library for comparing distance between two or more sequences by many algorithms. / MIT |
| [threadpoolctl](https://github.com/joblib/threadpoolctl) | 2.1.0 | Python helpers to control the threadpools of native libraries / BSD 3-Clause |
| [three-merge](https://github.com/spyder-ide/three-merge) | 0.1.1 | Simple Python library to perform a 3-way merge between strings / MIT |
| [tifffile](https://github.com/cgohlke/tifffile) | 2020.10.1 | Read and write image data from and to TIFF files. / BSD-3-Clause |
| [tk](http://www.tcl.tk/) | 8.6.10 | A dynamic programming language with GUI support. Bundles Tcl and Tk. / Tcl/Tk |
| [toml](https://github.com/uiri/toml) | 0.10.2 | Python lib for TOML. / MIT |
| [toolz](http://toolz.readthedocs.org/) | 0.11.1 | A functional standard library for Python / BSD-3-Clause |
| [tornado](http://www.tornadoweb.org/) | 6.1 | A Python web framework and asynchronous networking library, originally developed at FriendFeed. / Apache-2.0 |
| [tqdm](https://pypi.python.org/pypi/tqdm) | 4.59.0 | A Fast, Extensible Progress Meter / MPL-2.0 or MIT |
| [traitlets](http://traitlets.readthedocs.org/) | 5.0.5 | Configuration system for Python applications / BSD-3-Clause |
| [typed-ast](https://github.com/python/typed_ast) | 1.4.2 | a fork of Python 2 and 3 ast modules with type comment support / Apache-2.0 |
| [typing\_extensions](https://github.com/python/typing/tree/master/typing_extensions) | 3.7.4.3 | Backported and Experimental Type Hints for Python / PSF-2.0 |
| [ujson](https://github.com/ultrajson/ultrajson) | 4.0.2 | Ultra fast JSON decoder and encoder written in C with Python bindings / BSD-3-Clause |
| [unicodecsv](https://github.com/jdunck/python-unicodecsv) | 0.14.1 | Drop-in replacement for csv module which supports unicode strings / BSD |
| [unixodbc](http://www.unixodbc.org/) | 2.3.9 | ODBC on non MS Windows platforms / LGPL-2.1 |
| [urllib3](https://urllib3.readthedocs.io/) | 1.26.4 | HTTP library with thread-safe connection pooling, file post, and more. / MIT |
| [watchdog](http://github.com/gorakhargosh/watchdog) | 1.0.2 | Filesystem events monitoring / Apache-2.0 |
| [wcwidth](https://github.com/jquast/wcwidth) | 0.2.5 | Measures number of Terminal column cells of wide-character codes. / MIT |
| [webencodings](https://github.com/gsnedders/python-webencodings) | 0.5.1 | Character encoding aliases for legacy web content / BSD 3-Clause |
| [werkzeug](https://palletsprojects.com/p/werkzeug/) | 1.0.1 | The comprehensive WSGI web application library. / BSD 3-Clause |
| [wheel](https://github.com/pypa/wheel) | 0.36.2 | A built-package format for Python. / MIT |
| [widgetsnbextension](http://ipython.org) | 3.5.1 | Interactive Widgets for Jupyter / BSD 3-clause |
| [wrapt](https://github.com/GrahamDumpleton/wrapt) | 1.12.1 | Module for decorators, wrappers and monkey patching / BSD 2-Clause |
| [wurlitzer](https://github.com/minrk/wurlitzer) | 2.1.0 | Capture C-level stdout/stderr in Python / MIT |
| [xlrd](http://www.python-excel.org/) | 2.0.1 | Library for developers to extract data from Microsoft Excel (tm) spreadsheet files / BSD 3-Clause and BSD with advertising |
| [xlsxwriter](https://xlsxwriter.readthedocs.io/) | 1.3.8 | A Python module for creating Excel XLSX files / BSD-2-Clause |
| [xlwings](http://xlwings.org/) | 0.23.0 | Interact with Excel from Python and vice versa / 3-clause BSD |
| [xlwt](http://www.python-excel.org/) | 1.3.0 | Writing data and formatting information to Excel files / BSD |
| [xz](http://tukaani.org/xz/) | 5.2.5 | Data compression software with high compression ratio / LGPL-2.1 and GPL-2.0 |
| [yaml](http://pyyaml.org/wiki/LibYAML) | 0.2.5 | A C library for parsing and emitting YAML / MIT |
| [yapf](https://github.com/google/yapf) | 0.31.0 | A formatter for Python files / Apache 2.0 |
| [zeromq](http://zeromq.org) | 4.3.4 | A high-performance asynchronous messaging library. / LGPL-3.0-or-later |
| [zict](http://github.com/mrocklin/zict) | 2.0.0 | Composable Dictionary Classes / BSD 3-Clause |
| [zipp](https://github.com/jaraco/zipp) | 3.4.1 | A pathlib-compatible Zipfile object wrapper / MIT |
| [zlib](http://zlib.net/) | 1.2.11 | Massively spiffy yet delicately unobtrusive compression library / zlib |
| zope | 1.0 | web application server / BSD |
| [zope.event](http://www.zope.org/en/latest/) | 4.5.0 | Very basic event publishing system / Zope Public License |
| [zope.interface](http://docs.zope.org/zope.interface/) | 5.3.0 | Interfaces for Python / ZPL-2.1 |
| [zstd](http://www.zstd.net) | 1.4.5 | Zstandard - Fast real-time compression algorithm / BSD 3-Clause |
| Name | Version | Summary / License |
|---|---|---|
| [\_libgcc\_mutex](https://github.com/AnacondaRecipes/_libgcc_mutex-feedstock) | 0.1 | Mutex for libgcc and libgcc-ng / None |
| [\_openmp\_mutex](https://github.com/conda-forge/ctng-compilers-feedstock) | 4.5 | OpenMP Implementation Mutex / BSD-3-Clause |
| [alabaster](http://www.sphinx-doc.org/en/stable/index.html) | 0.7.12 | Configurable, Python 2+3 compatible Sphinx theme. / BSD 3-Clause |
| [anaconda-client](http://anaconda.org) | 1.7.2 | anaconda.org command line client library / BSD 3-clause |
| [anaconda-project](https://github.com/Anaconda-Platform/anaconda-project) | 0.9.1 | Tool for encapsulating, running, and reproducing data science projects / BSD-3-Clause |
| [argon2-cffi](https://argon2-cffi.readthedocs.org/) | 20.1.0 | The secure Argon2 password hashing algorithm. / MIT |
| [asn1crypto](https://github.com/wbond/asn1crypto) | 1.4.0 | Python ASN.1 library with a focus on performance and a pythonic API / MIT |
| [astroid](https://www.astroid.org/) | 2.4.2 | A abstract syntax tree for Python with inference support. / LGPL-2.1-only |
| [astropy](http://www.astropy.org/) | 4.2.1 | Community-developed Python Library for Astronomy / BSD-3-Clause |
| [async\_generator](https://github.com/python-trio/async_generator) | 1.10 | Async generators and context managers for Python 3.5+ / MIT |
| [attrs](https://attrs.readthedocs.io/en/stable/) | 20.3.0 | attrs is the Python package that will bring back the joy of writing classes by relieving you from the drudgery of implementing object protocols (aka dunder methods). / MIT |
| [babel](http://babel.pocoo.org/) | 2.9.0 | Utilities to internationalize and localize Python applications / BSD 3-clause |
| [backcall](https://github.com/takluyver/backcall/) | 0.2.0 | Specifications for callback functions passed in to an API / BSD-3-Clause |
| [backports](https://bitbucket.org/brandon/backports) | 1.0 | None / BSD |
| [backports.shutil\_get\_terminal\_size](https://github.com/chrippa/backports.shutil_get_terminal_size) | 1.0.0 | A backport of the get\_terminal\_size function from Python 3.3’s shutil. / MIT |
| [beautifulsoup4](http://www.crummy.com/software/BeautifulSoup/) | 4.9.3 | Python library designed for screen-scraping / MIT |
| [bitarray](https://github.com/ilanschnell/bitarray) | 1.6.1 | efficient arrays of booleans – C extension / PSF |
| [bkcharts](http://github.com/bokeh/bkcharts) | 0.2 | High level chart types built on top of Bokeh / BSD 3-Clause |
| blas | 1.0 | |
| [bleach](https://github.com/mozilla/bleach) | 3.3.0 | Easy, whitelist-based HTML-sanitizing tool / Apache-2.0 |
| [blosc](https://github.com/Blosc/c-blosc) | 1.21.0 | A blocking, shuffling and loss-less compression library that can be faster than memcpy() / BSD-3-Clause |
| [bokeh](http://bokeh.pydata.org/) | 2.3.1 | Statistical and novel interactive HTML plots for Python / BSD-3-Clause |
| [bottleneck](https://github.com/pydata/bottleneck) | 1.3.2 | Fast NumPy array functions written in Cython. / BSD 2-Clause |
| [brotli](http://github.com/google/brotli) | 1.0.9 | Brotli compression format / MIT |
| [brotlipy](https://github.com/python-hyper/brotlipy) | 0.7.0 | Python bindings to the Brotli compression library / MIT |
| [bzip2](http://www.bzip.org/) | 1.0.8 | high-quality data compressor / bzip2 |
| [c-ares](https://c-ares.haxx.se/) | 1.17.1 | This is c-ares, an asynchronous resolver library / MIT |
| [ca-certificates](https://github.com/conda-forge/ca-certificates-feedstock) | 2021.4.13 | Certificates for use with other packages. / MPL 2.0 |
| [cairo](http://cairographics.org/) | 1.16.0 | Cairo is a 2D graphics library with support for multiple output devices. / LGPL 2.1 or MPL 1.1 |
| [certifi](http://certifi.io/) | 2020.12.5 | Python package for providing Mozilla’s CA Bundle. / ISC |
| [cffi](https://bitbucket.org/cffi/cffi) | 1.14.5 | Foreign Function Interface for Python calling C code. / MIT |
| [chardet](https://github.com/chardet/chardet) | 4.0.0 | Universal character encoding detector / LGPL2 |
| [click](https://palletsprojects.com/p/click) | 7.1.2 | Python composable command line interface toolkit / BSD-3-Clause |
| [cloudpickle](https://github.com/cloudpipe/cloudpickle) | 1.6.0 | Extended pickling support for Python objects / BSD-3-Clause |
| [clyent](https://github.com/Anaconda-Platform/clyent) | 1.2.2 | Command line client library for windows and posix / BSD 3-Clause |
| [colorama](https://github.com/tartley/colorama) | 0.4.4 | Cross-platform colored terminal text / BSD-3-Clause |
| [conda](https://conda.io) | 4.10.1 | OS-agnostic, system-level binary package and environment manager. / BSD 3-Clause |
| [conda-build](https://github.com/conda/conda-build) | 3.21.4 | tools for building conda packages / BSD 3-Clause |
| [conda-env](https://github.com/conda/conda-env) | 2.6.0 | Tools for interacting with conda environments. / BSD 3-Clause |
| [conda-verify](https://github.com/conda/conda-verify) | 3.4.2 | tool for validating conda recipes and conda packages / BSD 3-Clause |
| [contextlib2](http://contextlib2.readthedocs.org) | 0.6.0.post1 | Backports and enhancements for the contextlib module / PSF 2 |
| [cryptography](https://github.com/pyca/cryptography) | 3.4.7 | Provides cryptographic recipes and primitives to Python developers / Apache-2.0 AND BSD-3-Clause AND PSF-2.0 AND MIT |
| [curl](http://curl.haxx.se/) | 7.71.1 | tool and library for transferring data with URL syntax / MIT/X derivate (`<http://curl.haxx.se/docs/copyright.html>`) |
| [cycler](http://matplotlib.org/cycler) | 0.10.0 | Composable style cycles. / BSD 3-Clause |
| [cython](http://www.cython.org/) | 0.29.23 | The Cython compiler for writing C extensions for the Python language / Apache-2.0 |
| [cytoolz](https://github.com/pytoolz/cytoolz) | 0.11.0 | Cython implementation of Toolz. High performance functional utilities / BSD-3-Clause |
| [dask](https://dask.org/) | 2021.4.0 | Parallel PyData with Task Scheduling / BSD-3-Clause |
| [dask-core](http://github.com/dask/dask/) | 2021.4.0 | Parallel Python with task scheduling / BSD-3-Clause |
| [dbus](http://www.freedesktop.org/wiki/Software/dbus/) | 1.13.18 | Simple message bus system for applications to talk to one another / GPL2 |
| [decorator](https://github.com/micheles/decorator) | 5.0.6 | Better living through Python with decorators. / BSD-3-Clause |
| [defusedxml](https://bitbucket.org/tiran/defusedxml) | 0.7.1 | XML bomb protection for Python stdlib modules / PSF 2.0 |
| [distributed](http://distributed.readthedocs.io/en/latest/) | 2021.4.0 | Distributed computing with Dask / BSD-3-Clause |
| [docutils](http://docutils.sourceforge.net/) | 0.17 | Docutils – Python Documentation Utilities / Public Domain Dedictation and BSD 2-Clause and PSF 2.1.1 and GPL 3.0 |
| [entrypoints](https://github.com/takluyver/entrypoints) | 0.3 | Discover and load entry points from installed packages. / MIT License |
| [et\_xmlfile](https://bitbucket.org/openpyxl/et_xmlfile) | 1.0.1 | An implementation of lxml.xmlfile for the standard library / MIT |
| [expat](http://expat.sourceforge.net/) | 2.3.0 | Expat XML parser library in C / MIT |
| [fastcache](https://github.com/pbrady/fastcache) | 1.1.0 | C implementation of Python 3 lru\_cache / MIT |
| [filelock](https://github.com/benediktschmitt/py-filelock) | 3.0.12 | A platform independent file lock. / Public Domain |
| [flask](http://flask.pocoo.org) | 1.1.2 | A microframework based on Werkzeug, Jinja2 and good intentions. / BSD 3-Clause |
| [fontconfig](http://www.freedesktop.org/wiki/Software/fontconfig/) | 2.13.1 | A library for configuring and customizing font access. / MIT |
| [freetype](https://www.freetype.org/) | 2.10.4 | A Free, High-Quality, and Portable Font Engine / GPL-2.0-only and LicenseRef-FreeType |
| [fribidi](https://github.com/fribidi/fribidi) | 1.0.10 | The Free Implementation of the Unicode Bidirectional Algorithm. / LGPL-2.1 |
| [fsspec](https://github.com/martindurant/filesystem_spec) | 0.9.0 | A specification for pythonic filesystems / BSD-3-Clause |
| [get\_terminal\_size](https://github.com/chrippa/backports.shutil_get_terminal_size) | 1.0.0 | Get the size of the terminal window. / MIT |
| [gevent](https://www.gevent.org) | 21.1.2 | Coroutine-based network library / MIT |
| [giflib](http://giflib.sourceforge.net) | 5.2.1 | Library for reading and writing gif images / MIT |
| [glib](https://developer.gnome.org/glib/) | 2.68.1 | Provides core application building blocks for libraries and applications written in C. / LGPL-2.1 |
| [glob2](https://github.com/miracle2k/python-glob2) | 0.7 | Version of the glob module that supports recursion via \*\*, and can capture patterns. / BSD-2-Clause |
| [gmp](http://gmplib.org/) | 6.2.1 | The GNU multiprecision library. / GPL-2.0-or-later AND LGPL-3.0-or-later |
| [gmpy2](https://pypi.python.org/pypi/gmpy2) | 2.0.8 | GMP/MPIR, MPFR, and MPC interface to Python 2.6+ and 3.x / LGPL 3 |
| [graphite2](http://graphite.sil.org/) | 1.3.14 | A “smart font” system that handles the complexities of lesser-known languages of the world. / LGPLv2 |
| [greenlet](https://github.com/python-greenlet/greenlet) | 1.0.0 | Lightweight in-process concurrent programming / MIT |
| [h5py](http://www.h5py.org/) | 2.10.0 | Read and write HDF5 files from Python. / BSD-3-Clause |
| [harfbuzz](http://www.freedesktop.org/wiki/Software/HarfBuzz/) | 2.8.0 | An OpenType text shaping engine. / MIT |
| [hdf5](http://www.hdfgroup.org/HDF5/) | 1.10.6 | HDF5 is a data model, library, and file format for storing and managing data / HDF5 |
| [heapdict](http://stutzbachenterprises.com/) | 1.0.1 | A heap with decrease-key and increase-key operations / BSD 3-Clause |
| [html5lib](https://github.com/html5lib/html5lib-python) | 1.1 | HTML parser based on the WHATWG HTML specification / MIT |
| [icu](http://site.icu-project.org/) | 68.1 | International Components for Unicode. / MIT |
| [idna](https://github.com/kjd/idna) | 2.10 | Internationalized Domain Names in Applications (IDNA). / BSD Like |
| [imagecodecs](https://www.lfd.uci.edu/~gohlke/) | 2021.1.11 | Image transformation, compression, and decompression codecs / BSD-3-Clause |
| [imageio](https://imageio.github.io) | 2.9.0 | A Python library for reading and writing image data / BSD-2-Clause |
| [imagesize](https://github.com/shibukawa/imagesize_py) | 1.2.0 | Getting image size from png/jpeg/jpeg2000/gif file / MIT |
| [importlib-metadata](https://github.com/python/importlib_metadata) | 3.10.0 | A library to access the metadata for a Python package / Apache-2.0 |
| [importlib\_metadata](https://github.com/python/importlib_metadata) | 3.10.0 | A library to access the metadata for a Python package / Apache-2.0 |
| [iniconfig](http://github.com/RonnyPfannschmidt/iniconfig) | 1.1.1 | iniconfig: brain-dead simple config-ini parsing / MIT |
| [ipykernel](https://ipython.org) | 5.3.4 | IPython Kernel for Jupyter / BSD-3-Clause |
| [ipython](https://ipython.org) | 7.22.0 | IPython: Productive Interactive Computing / BSD-3-Clause |
| [ipython\_genutils](http://ipython.org) | 0.2.0 | vestigial utilities from IPython / BSD 3-Clause |
| [ipywidgets](https://github.com/ipython/ipywidgets) | 7.6.3 | Jupyter Interactive Widgets / BSD-3-Clause |
| [isort](https://github.com/timothycrosley/isort) | 5.8.0 | A Python utility / library to sort Python imports. / MIT |
| [itsdangerous](https://github.com/pallets/itsdangerous) | 1.1.0 | Various helpers to pass trusted data to untrusted environments. / BSD 3-Clause |
| [jbig](https://www.cl.cam.ac.uk/~mgk25/jbigkit) | 2.1 | Implementation of the JBIG1 data compression standard / GPL-2.0 |
| [jdcal](https://github.com/phn/jdcal) | 1.4.1 | Julian dates from proleptic Gregorian and Julian calendars. / BSD 2-Clause |
| [jedi](https://github.com/davidhalter/jedi/) | 0.17.2 | An autocompletion tool for Python that can be used for text editors. / MIT |
| [jinja2](http://jinja.pocoo.org) | 2.11.3 | An easy to use stand-alone template engine written in pure python. / BSD-3-Clause |
| [joblib](https://pypi.org/project/joblib/) | 1.0.1 | Lightweight pipelining: using Python functions as pipeline jobs. / BSD-3-Clause |
| [jpeg](http://www.ijg.org/) | 9b | read/write jpeg COM, EXIF, IPTC medata / Custom free software license |
| [json5](https://github.com/dpranke/pyjson5) | 0.9.5 | A Python implementation of the JSON5 data format / Apache-2.0 |
| [jsonschema](https://github.com/Julian/jsonschema) | 3.2.0 | An implementation of JSON Schema validation for Python / MIT |
| [jupyter](http://jupyter.org) | 1.0.0 | Jupyter metapackage. Install all the Jupyter components in one go. / BSD 3-Clause |
| [jupyter\_client](https://jupyter.org) | 6.1.12 | jupyter\_client contains the reference implementation of the Jupyter protocol. / BSD-3-Clause |
| [jupyter\_console](http://jupyter.org) | 6.4.0 | Jupyter terminal console / BSD-3-Clause |
| [jupyter\_core](https://jupyter.org) | 4.7.1 | Core common functionality of Jupyter projects. / BSD-3-Clause |
| [jupyterlab](https://github.com/jupyterlab/jupyterlab) | 2.3.1 | JupyterLab PRE-ALPHA / BSD-3-Clause |
| [jupyterlab\_pygments](http://github.com/JupyterLab/jupyterlab_pygments) | 0.1.2 | Pygments syntax coloring scheme making use of the JupyterLab CSS variables / BSD-3-Clause |
| [jupyterlab\_server](https://github.com/jupyterlab/jupyterlab_server) | 1.2.0 | A set of server components for JupyterLab and JupyterLab like applications. / BSD-3-Clause |
| [jupyterlab\_widgets](https://github.com/jupyter-widgets/ipywidgets) | 1.0.0 | JupyterLab extension providing HTML widgets / BSD-3-Clause |
| [jxrlib](https://packages.debian.org/source/sid/jxrlib) | 1.1 | jxrlib - JPEG XR Library by Microsoft, built from Debian hosted sources. / BSD-2-Clause |
| [kiwisolver](https://github.com/nucleic/kiwi) | 1.3.1 | An efficient C++ implementation of the Cassowary constraint solver / BSD-3-Clause |
| [krb5](http://web.mit.edu/kerberos/) | 1.18.2 | A network authentication protocol. / MIT |
| [lazy-object-proxy](https://github.com/ionelmc/python-lazy-object-proxy) | 1.4.3 | A fast and thorough lazy object proxy / BSD-2-Clause |
| [lcms2](http://www.littlecms.com/) | 2.12 | Open Source Color Management Engine / MIT |
| [ld\_impl\_linux-s390x](https://www.gnu.org/software/binutils/) | 2.33.1 | A set of programming tools for creating and managing binary programs, object files, libraries, profile data, and assembly source code. / GPL-3.0-only |
| [libaec](https://gitlab.dkrz.de/k202009/libaec) | 1.0.4 | Adaptive Entropy Coding library / BSD-2-Clause |
| [libarchive](http://www.libarchive.org/) | 3.4.2 | Multi-format archive and compression library / BSD-2-Clause |
| [libcurl](http://curl.haxx.se/) | 7.71.1 | tool and library for transferring data with URL syntax / MIT/X derivate (`<http://curl.haxx.se/docs/copyright.html>`) |
| [libdeflate](https://github.com/ebiggers/libdeflate) | 1.7 | libdeflate is a library for fast, whole-buffer DEFLATE-based compression and decompression. / MIT |
| [libedit](http://thrysoee.dk/editline/) | 3.1.20210216 | Editline Library (libedit) / BSD-2-Clause |
| [libev](http://software.schmorp.de/pkg/libev.html) | 4.33 | A full-featured and high-performance event loop that is loosely modeled after libevent, but without its limitations and bugs. / BSD-2-Clause |
| [libffi](https://sourceware.org/libffi/) | 3.3 | A Portable Foreign Function Interface Library. / Custom |
| [libgcc-ng](https://gcc.gnu.org/onlinedocs/gccint/Libgcc.html) | 9.3.0 | The GCC low-level runtime library / GPL-3.0-only WITH GCC-exception-3.1 |
| [libgfortran-ng](https://gcc.gnu.org/) | 7.5.0 | The GNU Fortran Runtime Library / GPL-3.0-only WITH GCC-exception-3.1 |
| [libgfortran4](https://gcc.gnu.org/) | 7.5.0 | The GNU Fortran Runtime Library / GPL-3.0-only WITH GCC-exception-3.1 |
| [libgomp](https://gcc.gnu.org/onlinedocs/gccint/Libgcc.html) | 9.3.0 | The GCC OpenMP implementation. / GPL-3.0-only WITH GCC-exception-3.1 |
| [liblief](https://lief.quarkslab.com/) | 0.10.1 | A cross platform library to parse, modify and abstract ELF, PE and MachO formats. / Apache-2.0 |
| [libopenblas](http://www.openblas.net/) | 0.3.13 | An Optimized BLAS library / BSD |
| [libpng](http://www.libpng.org/pub/png/libpng.html) | 1.6.37 | PNG reference library / zlib/libpng |
| [libsodium](http://libsodium.org) | 1.0.18 | A modern and easy-to-use crypto library. / ISC |
| [libssh2](https://www.libssh2.org/) | 1.9.0 | the SSH library / BSD-3-Clause |
| [libstdcxx-ng](https://gcc.gnu.org/) | 9.3.0 | The GNU C++ Runtime Library / GPL-3.0-only WITH GCC-exception-3.1 |
| [libtiff](http://www.libtiff.org/) | 4.2.0 | Support for the Tag Image File Format (TIFF). / HPND |
| [libtool](http://www.gnu.org/software/libtool/) | 2.4.6 | The GNU Portable Library Tool / GPL 3 |
| [libuuid](http://sourceforge.net/projects/libuuid/) | 1.0.3 | Portable uuid C library. / BSD 3-Clause |
| [libuv](http://libuv.org/) | 1.40.0 | Cross-platform asynchronous I/O / MIT |
| [libwebp](https://developers.google.com/speed/webp/) | 1.2.0 | WebP image library / Google |
| [libxcb](http://xcb.freedesktop.org/) | 1.14 | This is the C-language Binding (XCB) package to the X Window System protocol / MIT |
| [libxml2](http://xmlsoft.org/) | 2.9.10 | The XML C parser and toolkit of Gnome / MIT |
| [libxslt](http://xmlsoft.org/XSLT/) | 1.1.34 | The XSLT C library developed for the GNOME project / MIT |
| [libzopfli](https://github.com/google/zopfli) | 1.0.3 | A compression library programmed in C to perform very good, but slow, deflate or zlib compression. / Apache-2.0 |
| [locket](https://github.com/mwilliamson/locket.py) | 0.2.1 | File-based locks for Python for Linux and Windows / BSD 2-Clause |
| [lxml](http://lxml.de/) | 4.6.3 | Pythonic binding for the C libraries libxml2 and libxslt. / BSD-3-Clause and GPL-2.0-only and ZPL-2.0 and LicenseRef-ElementTree |
| [lz4-c](https://www.lz4.org) | 1.9.3 | Extremely Fast Compression algorithm / BSD-2-Clause |
| [lzo](http://www.oberhumer.com/opensource/lzo/) | 2.10 | LZO is a portable lossless data compression library written in ANSI C. / GPL v2+ |
| [markupsafe](https://www.palletsprojects.com/p/markupsafe) | 1.1.1 | A Python module that implements the jinja2.Markup string / BSD-3-Clause |
| [matplotlib](http://matplotlib.org/) | 3.3.4 | Publication quality figures in Python / LicenseRef-PSF-based |
| [matplotlib-base](http://matplotlib.org/) | 3.3.4 | Publication quality figures in Python / LicenseRef-PSF-based |
| [mccabe](https://github.com/PyCQA/mccabe) | 0.6.1 | McCabe complexity checker for Python / MIT |
| [mistune](https://github.com/lepture/mistune) | 0.8.4 | The fastest markdown parser in pure Python. / BSD 3-Clause |
| [mock](https://github.com/testing-cabal/mock) | 4.0.3 | A library for testing in Python / BSD-2-Clause |
| [more-itertools](https://github.com/more-itertools/more-itertools) | 8.7.0 | More routines for operating on iterables, beyond itertools / MIT |
| [mpc](http://www.multiprecision.org/) | 1.1.0 | A C library for the arithmetic of complex numbers with arbitrarily high precision. / LGPL 3 |
| [mpfr](http://www.mpfr.org/) | 4.0.2 | The MPFR library is a C library for multiple-precision floating-point computations with correct rounding. / LGPL-3.0-only |
| [mpmath](http://mpmath.org) | 1.2.1 | Python library for arbitrary-precision floating-point arithmetic / BSD 3-Clause |
| [msgpack-python](http://msgpack.org/) | 1.0.2 | MessagePack (de)serializer / Apache-2.0 |
| [multipledispatch](https://github.com/mrocklin/multipledispatch/) | 0.6.0 | Multiple dispatch in Python / BSD 3-Clause |
| [nbclient](https://jupyter.org) | 0.5.3 | A client library for executing notebooks. Formally nbconvert’s ExecutePreprocessor. / BSD-3-Clause |
| [nbconvert](http://jupyter.org) | 6.0.7 | Converting Jupyter Notebooks / BSD-3-Clause |
| [nbformat](http://jupyter.org) | 5.1.3 | The Jupyter Notebook format / BSD-3-Clause |
| [ncurses](http://www.gnu.org/software/ncurses/) | 6.2 | Library for text-based user interfaces / Free software (MIT-like) |
| [nest-asyncio](https://github.com/erdewit/nest_asyncio) | 1.5.1 | Patch asyncio to allow nested event loops / BSD-2-Clause |
| [networkx](https://networkx.github.io/) | 2.5 | Python package for creating and manipulating complex networks / BSD-3-Clause |
| [nltk](http://nltk.org/) | 3.6.1 | Natural Language Toolkit / Apache 2.0 |
| nomkl | 3.0 | None / BSD |
| [nose](http://readthedocs.org/docs/nose/) | 1.3.7 | Nose extends unittest to make testing easier / LGPL-2.1 |
| [notebook](https://jupyter.org) | 6.3.0 | Jupyter Notebook / BSD-3-Clause |
| [numexpr](https://github.com/pydata/numexpr) | 2.7.3 | Fast numerical expression evaluator for NumPy. / MIT |
| [numpy](http://numpy.scipy.org/) | 1.20.1 | Array processing for numbers, strings, records, and objects. / BSD 3-Clause |
| [numpy-base](http://numpy.scipy.org/) | 1.20.1 | Array processing for numbers, strings, records, and objects. / BSD 3-Clause |
| [numpydoc](https://github.com/numpy/numpydoc) | 1.1.0 | Numpy’s Sphinx extensions / BSD 3-Clause |
| [olefile](http://www.decalage.info/python/olefileio) | 0.46 | parse, read and write Microsoft OLE2 files / BSD 2-Clause |
| [openblas](http://www.openblas.net/) | 0.3.13 | An optimized BLAS library / BSD |
| openblas-devel | 0.3.13 | OpenBLAS headers and libraries for developing software that used OpenBLAS. / None |
| [openjpeg](http://www.openjpeg.org/) | 2.3.0 | An open-source JPEG 2000 codec written in C / BSD 2-Clause |
| [openpyxl](https://openpyxl.readthedocs.io) | 3.0.7 | A Python library to read/write Excel 2010 xlsx/xlsm files / MIT |
| [openssl](http://www.openssl.org/) | 1.1.1k | OpenSSL is an open-source implementation of the SSL and TLS protocols / OpenSSL |
| [packaging](https://github.com/pypa/packaging) | 20.9 | Core utilities for Python packages / Apache 2.0 or BSD 2-Clause |
| [pandas](http://pandas.pydata.org) | 1.2.4 | High-performance, easy-to-use data structures and data analysis tools. / BSD-3-Clause |
| [pandoc](http://pandoc.org/) | 1.16.0 | Universal markup converter (repackaged binaries) / GPL-2.0 |
| [pandocfilters](https://github.com/jgm/pandocfilters) | 1.4.3 | A python module for writing pandoc filters / BSD-3-Clause |
| [pango](http://www.pango.org/) | 1.45.3 | Text layout and rendering engine. / LGPL-2.1 |
| [parso](https://github.com/davidhalter/parso) | 0.7.0 | A Python Parser / MIT |
| [partd](https://github.com/dask/partd) | 1.2.0 | Data structure for on-disk shuffle operations / BSD 3-Clause |
| [patchelf](http://nixos.org/patchelf.html) | 0.12 | A small utility to modify the dynamic linker and RPATH of ELF executables. / GPL-3.0-or-later |
| [path](https://github.com/jaraco/path) | 15.1.2 | A module wrapper for os.path / MIT |
| [path.py](https://github.com/jaraco/path.py) | 12.5.0 | A module wrapper for os.path / MIT |
| [pathlib2](https://github.com/mcmtroffaes/pathlib2) | 2.3.5 | Fork of pathlib aiming to support the full stdlib Python API / MIT |
| [patsy](https://github.com/pydata/patsy) | 0.5.1 | Describing statistical models in Python using symbolic formulas / BSD-2-Clause, PSF2 |
| [pcre](http://www.pcre.org/) | 8.44 | Regular expression pattern matching using the same syntax and semantics as Perl 5. / BSD 3-Clause |
| [pep8](http://pep8.readthedocs.org/) | 1.7.1 | Python style guide checker / MIT |
| [pexpect](http://pexpect.sourceforge.net/) | 4.8.0 | Pexpect makes Python a better tool for controlling other applications. / ISC |
| [pickleshare](https://github.com/pickleshare/pickleshare/) | 0.7.5 | Tiny ‘shelve’-like database with concurrency support / MIT |
| [pillow](https://pillow.readthedocs.io) | 8.2.0 | Pillow is the friendly PIL fork by Alex Clark and Contributors / LicenseRef-PIL |
| [pip](https://pip.pypa.io/en/stable/) | 21.0.1 | PyPA recommended tool for installing Python packages / MIT |
| [pixman](http://www.pixman.org/) | 0.40.0 | A low-level software library for pixel manipulation. / MIT |
| [pkginfo](https://code.launchpad.net/~tseaver/pkginfo/trunk) | 1.7.0 | Query metadatdata from sdists / bdists / installed packages. / MIT |
| [pluggy](https://github.com/pytest-dev/pluggy) | 0.13.1 | Plugin registration and hook calling for Python / MIT |
| [ply](http://www.dabeaz.com/ply/index.html) | 3.11 | Python Lex-Yacc / BSD 3-clause |
| [prometheus\_client](https://github.com/prometheus/client_python) | 0.10.1 | Python client for the Prometheus monitoring system / Apache-2.0 |
| [prompt-toolkit](https://github.com/jonathanslenders/python-prompt-toolkit) | 3.0.17 | Library for building powerful interactive command lines in Python / BSD-3-Clause |
| [prompt\_toolkit](https://github.com/jonathanslenders/python-prompt-toolkit) | 3.0.17 | Library for building powerful interactive command lines in Python / BSD-3-Clause |
| [psutil](https://github.com/giampaolo/psutil) | 5.8.0 | A cross-platform process and system utilities module for Python / BSD-3-Clause |
| [ptyprocess](https://github.com/pexpect/ptyprocess) | 0.7.0 | Run a subprocess in a pseudo terminal / ISC |
| [py](https://github.com/pytest-dev/py) | 1.10.0 | library with cross-python path, ini-parsing, io, code, log facilities / MIT |
| [py-lief](https://lief.quarkslab.com/) | 0.10.1 | A cross platform library to parse, modify and abstract ELF, PE and MachO formats. / Apache-2.0 |
| [pycodestyle](https://pycodestyle.readthedocs.io/) | 2.7.0 | Python style guide checker / MIT |
| [pycosat](https://github.com/ContinuumIO/pycosat) | 0.6.3 | Bindings to picosat (a SAT solver) / MIT |
| [pycparser](https://github.com/eliben/pycparser) | 2.20 | Complete C99 parser in pure Python / BSD 3-clause |
| [pycurl](http://pycurl.sourceforge.net/) | 7.43.0.6 | A Python Interface To The cURL library / LGPL, MIT |
| [pyerfa](https://pyerfa.readthedocs.io/) | 1.7.1.1 | Python bindings for ERFA routines / BSD-3-Clause |
| [pyflakes](https://github.com/PyCQA/pyflakes) | 2.3.1 | Pyflakes analyzes programs and detects various errors. / MIT |
| [pygments](http://pygments.org/) | 2.8.1 | Pygments is a generic syntax highlighter suitable for use in code hosting, forums, wikis or other applications that need to prettify source code. / BSD-2-clause |
| [pylint](http://www.pylint.org/) | 2.7.4 | python code static checker / GPL-2.0-only |
| [pyodbc](https://github.com/mkleehammer/pyodbc) | 4.0.30 | DB API Module for ODBC / MIT |
| [pyopenssl](https://github.com/pyca/pyopenssl) | 20.0.1 | Python wrapper module around the OpenSSL library / Apache 2.0 |
| [pyparsing](http://pyparsing.wikispaces.com/) | 2.4.7 | Create and execute simple grammars / MIT |
| [pyrsistent](http://github.com/tobgu/pyrsistent/) | 0.17.3 | Persistent/Functional/Immutable data structures / MIT |
| [pysocks](https://github.com/Anorov/PySocks) | 1.7.1 | A Python SOCKS client module. See [Anorov/PySocks](https://github.com/Anorov/PySocks) for more information. / BSD 3-Clause |
| [pytables](http://www.pytables.org) | 3.6.1 | Brings together Python, HDF5 and NumPy to easily handle large amounts of data. / BSD 3-Clause |
| [pytest](https://docs.pytest.org/en/latest/) | 6.2.3 | Simple and powerful testing with Python. / MIT |
| [python](https://www.python.org/) | 3.8.8 | General purpose programming language / Python-2.0 |
| [python-dateutil](https://dateutil.readthedocs.org/) | 2.8.1 | Extensions to the standard Python datetime module. / BSD 3 Clause |
| [python-libarchive-c](https://github.com/Changaco/python-libarchive-c) | 2.9 | Python interface to libarchive / CC0-1.0 |
| [pytz](http://pythonhosted.org/pytz/) | 2021.1 | World timezone definitions, modern and historical. / MIT |
| [pywavelets](https://github.com/PyWavelets/pywt) | 1.1.1 | Discrete Wavelet Transforms in Python / MIT |
| [pyyaml](http://pyyaml.org/wiki/PyYAML) | 5.4.1 | YAML parser and emitter for Python / MIT |
| [pyzmq](https://github.com/zeromq/pyzmq) | 20.0.0 | Python bindings for zeromq / BSD 3-clause |
| [readline](https://cnswww.cns.cwru.edu/php/chet/readline/rltop.html) | 8.1 | library for editing command lines as they are typed in / GPL-3.0 |
| [regex](https://bitbucket.org/mrabarnett/mrab-regex) | 2021.4.4 | Alternative regular expression module, to replace re / Python-2.0 |
| [requests](http://python-requests.org) | 2.25.1 | Requests is an elegant and simple HTTP library for Python, built with ♥. / Apache-2.0 |
| [rope](https://github.com/python-rope/rope) | 0.18.0 | A python refactoring library / GPL 2.0 |
| [ruamel\_yaml](https://sourceforge.net/p/ruamel-yaml/code/ci/default/tree) | 0.15.80 | A patched copy of ruamel.yaml. / MIT |
| [scikit-image](http://scikit-image.org/) | 0.18.1 | Image processing in Python. / BSD-3-Clause |
| [scikit-learn](http://scikit-learn.org/) | 0.24.1 | A set of python modules for machine learning and data mining / BSD-3-Clause |
| [scipy](http://www.scipy.org/) | 1.6.2 | Scientific Library for Python / BSD 3-Clause |
| [seaborn](https://seaborn.pydata.org) | 0.11.1 | Statistical data visualization / BSD 3-Clause |
| [send2trash](https://github.com/hsoft/send2trash) | 1.5.0 | Python library to natively send files to Trash (or Recycle bin) on all platforms. / BSD-3-Clause |
| [setuptools](https://github.com/pypa/setuptools) | 51.1.2 | Download, build, install, upgrade, and uninstall Python packages / MIT |
| [simplegeneric](http://cheeseshop.python.org/pypi/simplegeneric) | 0.8.1 | Simple generic functions (similar to Python’s own len(), pickle.dump(), etc.) / Zope Public |
| [singledispatch](http://docs.python.org/3/library/functools.html#functools.singledispatch) | 3.6.1 | Transforms a function into a single-dispatch generic function / MIT |
| [sip](http://www.riverbankcomputing.com/software/sip/intro) | 4.19.25 | Create Python bindings for C and C++ libraries / GPL-3.0 |
| [six](https://six.readthedocs.io/) | 1.15.0 | Python 2 and 3 compatibility utilities / MIT |
| [snappy](https://github.com/google/snappy) | 1.1.8 | A fast compressor/decompressor / BSD 3-clause |
| [snowballstemmer](https://github.com/shibukawa/snowball_py) | 2.1.0 | Snowball stemming library collection for Python / BSD-2-Clause |
| [sortedcollections](http://www.grantjenks.com/docs/sortedcollections/) | 2.1.0 | Python Sorted Collections / Apache-2.0 |
| [sortedcontainers](http://www.grantjenks.com/docs/sortedcontainers/) | 2.3.0 | Python Sorted Container Types: SortedList, SortedDict, and SortedSet / Apache-2.0 |
| [soupsieve](http://facelessuser.github.io/soupsieve) | 2.2.1 | A modern CSS selector implementation for BeautifulSoup / MIT |
| [sphinx](http://www.sphinx-doc.org) | 3.5.3 | Sphinx is a tool that makes it easy to create intelligent and beautiful documentation / BSD-2-Clause |
| sphinxcontrib | 1.0 | Python namespace for sphinxcontrib / BSD |
| [sphinxcontrib-applehelp](https://www.sphinx-doc.org/en/master/) | 1.0.2 | sphinxcontrib-applehelp is a sphinx extension which outputs Apple help books / BSD-2-Clause |
| [sphinxcontrib-devhelp](https://www.sphinx-doc.org/en/master/) | 1.0.2 | sphinxcontrib-devhelp is a sphinx extension which outputs Devhelp document / BSD-2-Clause |
| [sphinxcontrib-htmlhelp](https://www.sphinx-doc.org/en/master/) | 1.0.3 | sphinxcontrib-htmlhelp is a sphinx extension which … / BSD-2-Clause |
| [sphinxcontrib-jsmath](https://www.sphinx-doc.org/en/master/) | 1.0.1 | A sphinx extension which renders display math in HTML via JavaScript / BSD-2-Clause |
| [sphinxcontrib-qthelp](https://www.sphinx-doc.org/en/master/) | 1.0.3 | sphinxcontrib-qthelp is a sphinx extension which outputs QtHelp document / BSD-2-Clause |
| [sphinxcontrib-serializinghtml](https://www.sphinx-doc.org/en/master/) | 1.1.4 | sphinxcontrib-serializinghtml is a sphinx extension which outputs “serialized” HTML files (json and pickle). / BSD-2-Clause |
| [sphinxcontrib-websupport](https://pypi.python.org/pypi/sphinxcontrib-websupport) | 1.2.4 | Sphinx API for Web Apps / BSD-2-Clause |
| [sqlalchemy](http://www.sqlalchemy.org/) | 1.3.17 | Database Abstraction Library. / MIT |
| [sqlite](http://www.sqlite.org/) | 3.35.4 | Implements a self-contained, zero-configuration, SQL database engine / Public-Domain (`<http://www.sqlite.org/copyright.html>`) |
| [statsmodels](https://www.statsmodels.org) | 0.12.2 | Statistical computations and models for use with SciPy / BSD-3-Clause |
| [sympy](https://sympy.org) | 1.8 | Python library for symbolic mathematics / BSD-3-Clause |
| [tblib](https://github.com/ionelmc/python-tblib) | 1.7.0 | Traceback serialization library. / BSD 2-Clause |
| [terminado](https://github.com/jupyter/terminado) | 0.9.4 | Terminals served by tornado websockets / BSD-2-Clause |
| [testpath](https://testpath.readthedocs.io) | 0.4.4 | Testpath is a collection of utilities for Python code working with files and commands. / BSD-3-Clause |
| [threadpoolctl](https://github.com/joblib/threadpoolctl) | 2.1.0 | Python helpers to control the threadpools of native libraries / BSD 3-Clause |
| [tifffile](https://github.com/cgohlke/tifffile) | 2021.3.31 | Read and write image data from and to TIFF files. / BSD-3-Clause |
| [tk](http://www.tcl.tk/) | 8.6.10 | A dynamic programming language with GUI support. Bundles Tcl and Tk. / Tcl/Tk |
| [toml](https://github.com/uiri/toml) | 0.10.2 | Python lib for TOML. / MIT |
| [toolz](http://toolz.readthedocs.org/) | 0.11.1 | A functional standard library for Python / BSD-3-Clause |
| [tornado](http://www.tornadoweb.org/) | 6.1 | A Python web framework and asynchronous networking library, originally developed at FriendFeed. / Apache-2.0 |
| [tqdm](https://pypi.python.org/pypi/tqdm) | 4.59.0 | A Fast, Extensible Progress Meter / MPL-2.0 or MIT |
| [traitlets](http://traitlets.readthedocs.org/) | 5.0.5 | Configuration system for Python applications / BSD-3-Clause |
| [typing\_extensions](https://github.com/python/typing/tree/master/typing_extensions) | 3.7.4.3 | Backported and Experimental Type Hints for Python / PSF-2.0 |
| [unicodecsv](https://github.com/jdunck/python-unicodecsv) | 0.14.1 | Drop-in replacement for csv module which supports unicode strings / BSD |
| [unixodbc](http://www.unixodbc.org/) | 2.3.9 | ODBC on non MS Windows platforms / LGPL-2.1 |
| [urllib3](https://urllib3.readthedocs.io/) | 1.26.4 | HTTP library with thread-safe connection pooling, file post, and more. / MIT |
| [wcwidth](https://github.com/jquast/wcwidth) | 0.2.5 | Measures number of Terminal column cells of wide-character codes. / MIT |
| [webencodings](https://github.com/gsnedders/python-webencodings) | 0.5.1 | Character encoding aliases for legacy web content / BSD 3-Clause |
| [werkzeug](https://palletsprojects.com/p/werkzeug/) | 1.0.1 | The comprehensive WSGI web application library. / BSD 3-Clause |
| [wheel](https://github.com/pypa/wheel) | 0.36.2 | A built-package format for Python. / MIT |
| [widgetsnbextension](http://ipython.org) | 3.5.1 | Interactive Widgets for Jupyter / BSD 3-clause |
| [wrapt](https://github.com/GrahamDumpleton/wrapt) | 1.11.2 | Module for decorators, wrappers and monkey patching / BSD 2-Clause |
| [xlrd](http://www.python-excel.org/) | 2.0.1 | Library for developers to extract data from Microsoft Excel (tm) spreadsheet files / BSD 3-Clause and BSD with advertising |
| [xlsxwriter](https://xlsxwriter.readthedocs.io/) | 1.3.8 | A Python module for creating Excel XLSX files / BSD-2-Clause |
| [xlwt](http://www.python-excel.org/) | 1.3.0 | Writing data and formatting information to Excel files / BSD |
| [xz](http://tukaani.org/xz/) | 5.2.5 | Data compression software with high compression ratio / LGPL-2.1 and GPL-2.0 |
| [yaml](http://pyyaml.org/wiki/LibYAML) | 0.1.7 | A C library for parsing and emitting YAML / MIT |
| [zeromq](http://zeromq.org) | 4.3.4 | A high-performance asynchronous messaging library. / LGPL-3.0-or-later |
| [zict](http://github.com/mrocklin/zict) | 2.0.0 | Composable Dictionary Classes / BSD 3-Clause |
| [zipp](https://github.com/jaraco/zipp) | 3.4.1 | A pathlib-compatible Zipfile object wrapper / MIT |
| [zlib](http://zlib.net/) | 1.2.11 | Massively spiffy yet delicately unobtrusive compression library / zlib |
| zope | 1.0 | web application server / BSD |
| [zope.event](http://www.zope.org/en/latest/) | 4.5.0 | Very basic event publishing system / Zope Public License |
| [zope.interface](http://docs.zope.org/zope.interface/) | 5.2.0 | Interfaces for Python / ZPL-2.1 |
| [zstd](http://www.zstd.net) | 1.4.9 | Zstandard - Fast real-time compression algorithm / BSD 3-Clause |
| Name | Version | Summary / License |
|---|---|---|
| [\_libgcc\_mutex](https://github.com/AnacondaRecipes/_libgcc_mutex-feedstock) | 0.1 | Mutex for libgcc and libgcc-ng / None |
| [alabaster](http://www.sphinx-doc.org/en/stable/index.html) | 0.7.12 | Configurable, Python 2+3 compatible Sphinx theme. / BSD 3-Clause |
| [anaconda-client](http://anaconda.org) | 1.7.2 | anaconda.org command line client library / BSD 3-clause |
| [anaconda-project](https://github.com/Anaconda-Platform/anaconda-project) | 0.9.1 | Tool for encapsulating, running, and reproducing data science projects / BSD-3-Clause |
| [argon2-cffi](https://argon2-cffi.readthedocs.org/) | 20.1.0 | The secure Argon2 password hashing algorithm. / MIT |
| [asn1crypto](https://github.com/wbond/asn1crypto) | 1.4.0 | Python ASN.1 library with a focus on performance and a pythonic API / MIT |
| [astroid](https://www.astroid.org/) | 2.5 | A abstract syntax tree for Python with inference support. / LGPL-2.1-only |
| [astropy](http://www.astropy.org/) | 4.2.1 | Community-developed Python Library for Astronomy / BSD-3-Clause |
| [async\_generator](https://github.com/python-trio/async_generator) | 1.10 | Async generators and context managers for Python 3.5+ / MIT |
| [attrs](https://attrs.readthedocs.io/en/stable/) | 20.3.0 | attrs is the Python package that will bring back the joy of writing classes by relieving you from the drudgery of implementing object protocols (aka dunder methods). / MIT |
| [babel](http://babel.pocoo.org/) | 2.9.0 | Utilities to internationalize and localize Python applications / BSD 3-clause |
| [backcall](https://github.com/takluyver/backcall/) | 0.2.0 | Specifications for callback functions passed in to an API / BSD-3-Clause |
| [backports](https://bitbucket.org/brandon/backports) | 1.0 | None / BSD |
| [backports.shutil\_get\_terminal\_size](https://github.com/chrippa/backports.shutil_get_terminal_size) | 1.0.0 | A backport of the get\_terminal\_size function from Python 3.3’s shutil. / MIT |
| [beautifulsoup4](http://www.crummy.com/software/BeautifulSoup/) | 4.9.3 | Python library designed for screen-scraping / MIT |
| [bitarray](https://github.com/ilanschnell/bitarray) | 1.9.2 | efficient arrays of booleans – C extension / PSF |
| [bkcharts](http://github.com/bokeh/bkcharts) | 0.2 | High level chart types built on top of Bokeh / BSD 3-Clause |
| blas | 1.0 | |
| [bleach](https://github.com/mozilla/bleach) | 3.3.0 | Easy, whitelist-based HTML-sanitizing tool / Apache-2.0 |
| [blosc](https://github.com/Blosc/c-blosc) | 1.21.0 | A blocking, shuffling and loss-less compression library that can be faster than memcpy() / BSD-3-Clause |
| [bokeh](http://bokeh.pydata.org/) | 2.3.1 | Statistical and novel interactive HTML plots for Python / BSD-3-Clause |
| [boto](https://github.com/boto/boto/) | 2.49.0 | Amazon Web Services Library / MIT |
| [bottleneck](https://github.com/pydata/bottleneck) | 1.3.2 | Fast NumPy array functions written in Cython. / BSD 2-Clause |
| [brotlipy](https://github.com/python-hyper/brotlipy) | 0.7.0 | Python bindings to the Brotli compression library / MIT |
| [bzip2](http://www.bzip.org/) | 1.0.8 | high-quality data compressor / bzip2 |
| [c-ares](https://c-ares.haxx.se/) | 1.17.1 | This is c-ares, an asynchronous resolver library / MIT |
| [ca-certificates](https://github.com/conda-forge/ca-certificates-feedstock) | 2021.4.13 | Certificates for use with other packages. / MPL 2.0 |
| [cairo](http://cairographics.org/) | 1.16.0 | Cairo is a 2D graphics library with support for multiple output devices. / LGPL 2.1 or MPL 1.1 |
| [certifi](http://certifi.io/) | 2020.12.5 | Python package for providing Mozilla’s CA Bundle. / ISC |
| [cffi](https://bitbucket.org/cffi/cffi) | 1.14.5 | Foreign Function Interface for Python calling C code. / MIT |
| [chardet](https://github.com/chardet/chardet) | 4.0.0 | Universal character encoding detector / LGPL2 |
| [click](https://palletsprojects.com/p/click) | 7.1.2 | Python composable command line interface toolkit / BSD-3-Clause |
| [cloudpickle](https://github.com/cloudpipe/cloudpickle) | 1.6.0 | Extended pickling support for Python objects / BSD-3-Clause |
| [clyent](https://github.com/Anaconda-Platform/clyent) | 1.2.2 | Command line client library for windows and posix / BSD 3-Clause |
| [colorama](https://github.com/tartley/colorama) | 0.4.4 | Cross-platform colored terminal text / BSD-3-Clause |
| [conda](https://conda.io) | 4.10.1 | OS-agnostic, system-level binary package and environment manager. / BSD 3-Clause |
| [conda-build](https://github.com/conda/conda-build) | 3.21.4 | tools for building conda packages / BSD 3-Clause |
| [conda-env](https://github.com/conda/conda-env) | 2.6.0 | Tools for interacting with conda environments. / BSD 3-Clause |
| [conda-verify](https://github.com/conda/conda-verify) | 3.4.2 | tool for validating conda recipes and conda packages / BSD 3-Clause |
| [contextlib2](http://contextlib2.readthedocs.org) | 0.6.0.post1 | Backports and enhancements for the contextlib module / PSF 2 |
| [cryptography](https://github.com/pyca/cryptography) | 3.4.7 | Provides cryptographic recipes and primitives to Python developers / Apache-2.0 AND BSD-3-Clause AND PSF-2.0 AND MIT |
| [curl](http://curl.haxx.se/) | 7.71.1 | tool and library for transferring data with URL syntax / MIT/X derivate (`<http://curl.haxx.se/docs/copyright.html>`) |
| [cycler](http://matplotlib.org/cycler) | 0.10.0 | Composable style cycles. / BSD 3-Clause |
| [cython](http://www.cython.org/) | 0.29.23 | The Cython compiler for writing C extensions for the Python language / Apache-2.0 |
| [cytoolz](https://github.com/pytoolz/cytoolz) | 0.11.0 | Cython implementation of Toolz. High performance functional utilities / BSD-3-Clause |
| [dask](https://dask.org/) | 2021.4.0 | Parallel PyData with Task Scheduling / BSD-3-Clause |
| [dask-core](http://github.com/dask/dask/) | 2021.4.0 | Parallel Python with task scheduling / BSD-3-Clause |
| [decorator](https://github.com/micheles/decorator) | 5.0.6 | Better living through Python with decorators. / BSD-3-Clause |
| [defusedxml](https://bitbucket.org/tiran/defusedxml) | 0.7.1 | XML bomb protection for Python stdlib modules / PSF 2.0 |
| [distributed](http://distributed.readthedocs.io/en/latest/) | 2021.4.0 | Distributed computing with Dask / BSD-3-Clause |
| [docutils](http://docutils.sourceforge.net/) | 0.17 | Docutils – Python Documentation Utilities / Public Domain Dedictation and BSD 2-Clause and PSF 2.1.1 and GPL 3.0 |
| [entrypoints](https://github.com/takluyver/entrypoints) | 0.3 | Discover and load entry points from installed packages. / MIT License |
| [et\_xmlfile](https://bitbucket.org/openpyxl/et_xmlfile) | 1.0.1 | An implementation of lxml.xmlfile for the standard library / MIT |
| [expat](http://expat.sourceforge.net/) | 2.3.0 | Expat XML parser library in C / MIT |
| [fastcache](https://github.com/pbrady/fastcache) | 1.1.0 | C implementation of Python 3 lru\_cache / MIT |
| [filelock](https://github.com/benediktschmitt/py-filelock) | 3.0.12 | A platform independent file lock. / Public Domain |
| [flask](http://flask.pocoo.org) | 1.1.2 | A microframework based on Werkzeug, Jinja2 and good intentions. / BSD 3-Clause |
| [fontconfig](http://www.freedesktop.org/wiki/Software/fontconfig/) | 2.13.1 | A library for configuring and customizing font access. / MIT |
| [freetype](https://www.freetype.org/) | 2.10.4 | A Free, High-Quality, and Portable Font Engine / GPL-2.0-only and LicenseRef-FreeType |
| [fsspec](https://github.com/martindurant/filesystem_spec) | 0.9.0 | A specification for pythonic filesystems / BSD-3-Clause |
| [get\_terminal\_size](https://github.com/chrippa/backports.shutil_get_terminal_size) | 1.0.0 | Get the size of the terminal window. / MIT |
| [gevent](https://www.gevent.org) | 21.1.2 | Coroutine-based network library / MIT |
| [glib](https://developer.gnome.org/glib/) | 2.68.1 | Provides core application building blocks for libraries and applications written in C. / LGPL-2.1 |
| [glob2](https://github.com/miracle2k/python-glob2) | 0.7 | Version of the glob module that supports recursion via \*\*, and can capture patterns. / BSD-2-Clause |
| [gmp](http://gmplib.org/) | 6.2.1 | The GNU multiprecision library. / GPL-2.0-or-later AND LGPL-3.0-or-later |
| [gmpy2](https://pypi.python.org/pypi/gmpy2) | 2.0.8 | GMP/MPIR, MPFR, and MPC interface to Python 2.6+ and 3.x / LGPL 3 |
| [greenlet](https://github.com/python-greenlet/greenlet) | 1.0.0 | Lightweight in-process concurrent programming / MIT |
| [h5py](http://www.h5py.org/) | 2.10.0 | Read and write HDF5 files from Python. / BSD-3-Clause |
| [hdf5](http://www.hdfgroup.org/HDF5/) | 1.10.4 | HDF5 is a data model, library, and file format for storing and managing data / HDF5 |
| [heapdict](http://stutzbachenterprises.com/) | 1.0.1 | A heap with decrease-key and increase-key operations / BSD 3-Clause |
| [html5lib](https://github.com/html5lib/html5lib-python) | 1.1 | HTML parser based on the WHATWG HTML specification / MIT |
| [icu](http://site.icu-project.org/) | 58.2 | International Components for Unicode. / MIT |
| [idna](https://github.com/kjd/idna) | 2.10 | Internationalized Domain Names in Applications (IDNA). / BSD Like |
| [imageio](https://imageio.github.io) | 2.9.0 | A Python library for reading and writing image data / BSD-2-Clause |
| [imagesize](https://github.com/shibukawa/imagesize_py) | 1.2.0 | Getting image size from png/jpeg/jpeg2000/gif file / MIT |
| [importlib-metadata](https://github.com/python/importlib_metadata) | 3.10.0 | A library to access the metadata for a Python package / Apache-2.0 |
| [importlib\_metadata](https://github.com/python/importlib_metadata) | 3.10.0 | A library to access the metadata for a Python package / Apache-2.0 |
| [iniconfig](http://github.com/RonnyPfannschmidt/iniconfig) | 1.1.1 | iniconfig: brain-dead simple config-ini parsing / MIT |
| [ipykernel](https://ipython.org) | 5.3.4 | IPython Kernel for Jupyter / BSD-3-Clause |
| [ipython](https://ipython.org) | 7.22.0 | IPython: Productive Interactive Computing / BSD-3-Clause |
| [ipython\_genutils](http://ipython.org) | 0.2.0 | vestigial utilities from IPython / BSD 3-Clause |
| [ipywidgets](https://github.com/ipython/ipywidgets) | 7.6.3 | Jupyter Interactive Widgets / BSD-3-Clause |
| [isort](https://github.com/timothycrosley/isort) | 5.8.0 | A Python utility / library to sort Python imports. / MIT |
| [itsdangerous](https://github.com/pallets/itsdangerous) | 1.1.0 | Various helpers to pass trusted data to untrusted environments. / BSD 3-Clause |
| [jbig](https://www.cl.cam.ac.uk/~mgk25/jbigkit) | 2.1 | Implementation of the JBIG1 data compression standard / GPL-2.0 |
| [jdcal](https://github.com/phn/jdcal) | 1.4.1 | Julian dates from proleptic Gregorian and Julian calendars. / BSD 2-Clause |
| [jedi](https://github.com/davidhalter/jedi/) | 0.17.2 | An autocompletion tool for Python that can be used for text editors. / MIT |
| [jinja2](http://jinja.pocoo.org) | 2.11.3 | An easy to use stand-alone template engine written in pure python. / BSD-3-Clause |
| [joblib](https://pypi.org/project/joblib/) | 1.0.1 | Lightweight pipelining: using Python functions as pipeline jobs. / BSD-3-Clause |
| [jpeg](http://www.ijg.org/) | 9b | read/write jpeg COM, EXIF, IPTC medata / Custom free software license |
| [jsonschema](https://github.com/Julian/jsonschema) | 3.2.0 | An implementation of JSON Schema validation for Python / MIT |
| [jupyter](http://jupyter.org) | 1.0.0 | Jupyter metapackage. Install all the Jupyter components in one go. / BSD 3-Clause |
| [jupyter\_client](https://jupyter.org) | 6.1.12 | jupyter\_client contains the reference implementation of the Jupyter protocol. / BSD-3-Clause |
| [jupyter\_console](http://jupyter.org) | 6.4.0 | Jupyter terminal console / BSD-3-Clause |
| [jupyter\_core](https://jupyter.org) | 4.7.1 | Core common functionality of Jupyter projects. / BSD-3-Clause |
| [jupyterlab\_pygments](http://github.com/JupyterLab/jupyterlab_pygments) | 0.1.2 | Pygments syntax coloring scheme making use of the JupyterLab CSS variables / BSD-3-Clause |
| [jupyterlab\_widgets](https://github.com/jupyter-widgets/ipywidgets) | 1.0.0 | JupyterLab extension providing HTML widgets / BSD-3-Clause |
| [kiwisolver](https://github.com/nucleic/kiwi) | 1.3.1 | An efficient C++ implementation of the Cassowary constraint solver / BSD-3-Clause |
| [krb5](http://web.mit.edu/kerberos/) | 1.18.2 | A network authentication protocol. / MIT |
| [lazy-object-proxy](https://github.com/ionelmc/python-lazy-object-proxy) | 1.6.0 | A fast and thorough lazy object proxy / BSD-2-Clause |
| [lcms2](http://www.littlecms.com/) | 2.12 | Open Source Color Management Engine / MIT |
| [ld\_impl\_linux-ppc64le](https://www.gnu.org/software/binutils/) | 2.33.1 | A set of programming tools for creating and managing binary programs, object files, libraries, profile data, and assembly source code. / GPL-3.0-only |
| [libarchive](http://www.libarchive.org/) | 3.4.2 | Multi-format archive and compression library / BSD-2-Clause |
| [libcurl](http://curl.haxx.se/) | 7.71.1 | tool and library for transferring data with URL syntax / MIT/X derivate (`<http://curl.haxx.se/docs/copyright.html>`) |
| [libedit](http://thrysoee.dk/editline/) | 3.1.20210216 | Editline Library (libedit) / BSD-2-Clause |
| [libev](http://software.schmorp.de/pkg/libev.html) | 4.33 | A full-featured and high-performance event loop that is loosely modeled after libevent, but without its limitations and bugs. / BSD-2-Clause |
| [libffi](https://sourceware.org/libffi/) | 3.3 | A Portable Foreign Function Interface Library. / Custom |
| [libgcc-ng](https://gcc.gnu.org/onlinedocs/gccint/Libgcc.html) | 8.2.0 | The GCC low-level runtime library / GPL-3.0-only WITH GCC-exception-3.1 |
| [libgfortran-ng](https://gcc.gnu.org/) | 7.3.0 | The GNU Fortran Runtime Library / GPL-3.0-only WITH GCC-exception-3.1 |
| [liblief](https://lief.quarkslab.com/) | 0.10.1 | A cross platform library to parse, modify and abstract ELF, PE and MachO formats. / Apache-2.0 |
| [libopenblas](http://www.openblas.net/) | 0.3.10 | An Optimized BLAS library / BSD |
| [libpng](http://www.libpng.org/pub/png/libpng.html) | 1.6.37 | PNG reference library / zlib/libpng |
| [libsodium](http://libsodium.org) | 1.0.18 | A modern and easy-to-use crypto library. / ISC |
| [libssh2](https://www.libssh2.org/) | 1.9.0 | the SSH library / BSD-3-Clause |
| [libstdcxx-ng](https://gcc.gnu.org/) | 8.2.0 | The GNU C++ Runtime Library / GPL-3.0-only WITH GCC-exception-3.1 |
| [libtiff](http://www.libtiff.org/) | 4.2.0 | Support for the Tag Image File Format (TIFF). / HPND |
| [libuuid](http://sourceforge.net/projects/libuuid/) | 1.0.3 | Portable uuid C library. / BSD 3-Clause |
| [libuv](http://libuv.org/) | 1.40.0 | Cross-platform asynchronous I/O / MIT |
| [libwebp-base](https://developers.google.com/speed/webp) | 1.2.0 | WebP image library / BSD-3-Clause |
| [libxcb](http://xcb.freedesktop.org/) | 1.14 | This is the C-language Binding (XCB) package to the X Window System protocol / MIT |
| [libxml2](http://xmlsoft.org/) | 2.9.10 | The XML C parser and toolkit of Gnome / MIT |
| [libxslt](http://xmlsoft.org/XSLT/) | 1.1.34 | The XSLT C library developed for the GNOME project / MIT |
| [locket](https://github.com/mwilliamson/locket.py) | 0.2.1 | File-based locks for Python for Linux and Windows / BSD 2-Clause |
| [lxml](http://lxml.de/) | 4.6.3 | Pythonic binding for the C libraries libxml2 and libxslt. / BSD-3-Clause and GPL-2.0-only and ZPL-2.0 and LicenseRef-ElementTree |
| [lz4-c](https://www.lz4.org) | 1.9.3 | Extremely Fast Compression algorithm / BSD-2-Clause |
| [lzo](http://www.oberhumer.com/opensource/lzo/) | 2.10 | LZO is a portable lossless data compression library written in ANSI C. / GPL v2+ |
| [markupsafe](https://www.palletsprojects.com/p/markupsafe) | 1.1.1 | A Python module that implements the jinja2.Markup string / BSD-3-Clause |
| [matplotlib](http://matplotlib.org/) | 3.3.4 | Publication quality figures in Python / LicenseRef-PSF-based |
| [matplotlib-base](http://matplotlib.org/) | 3.3.4 | Publication quality figures in Python / LicenseRef-PSF-based |
| [mccabe](https://github.com/PyCQA/mccabe) | 0.6.1 | McCabe complexity checker for Python / MIT |
| [mistune](https://github.com/lepture/mistune) | 0.8.4 | The fastest markdown parser in pure Python. / BSD 3-Clause |
| [mock](https://github.com/testing-cabal/mock) | 4.0.3 | A library for testing in Python / BSD-2-Clause |
| [more-itertools](https://github.com/more-itertools/more-itertools) | 8.7.0 | More routines for operating on iterables, beyond itertools / MIT |
| [mpc](http://www.multiprecision.org/) | 1.1.0 | A C library for the arithmetic of complex numbers with arbitrarily high precision. / LGPL 3 |
| [mpfr](http://www.mpfr.org/) | 4.0.2 | The MPFR library is a C library for multiple-precision floating-point computations with correct rounding. / LGPL-3.0-only |
| [mpmath](http://mpmath.org) | 1.2.1 | Python library for arbitrary-precision floating-point arithmetic / BSD 3-Clause |
| [msgpack-python](http://msgpack.org/) | 1.0.2 | MessagePack (de)serializer / Apache-2.0 |
| [multipledispatch](https://github.com/mrocklin/multipledispatch/) | 0.6.0 | Multiple dispatch in Python / BSD 3-Clause |
| [nbclient](https://jupyter.org) | 0.5.3 | A client library for executing notebooks. Formally nbconvert’s ExecutePreprocessor. / BSD-3-Clause |
| [nbconvert](http://jupyter.org) | 6.0.7 | Converting Jupyter Notebooks / BSD-3-Clause |
| [nbformat](http://jupyter.org) | 5.1.3 | The Jupyter Notebook format / BSD-3-Clause |
| [ncurses](http://www.gnu.org/software/ncurses/) | 6.2 | Library for text-based user interfaces / Free software (MIT-like) |
| [nest-asyncio](https://github.com/erdewit/nest_asyncio) | 1.5.1 | Patch asyncio to allow nested event loops / BSD-2-Clause |
| [networkx](https://networkx.github.io/) | 2.5 | Python package for creating and manipulating complex networks / BSD-3-Clause |
| [nltk](http://nltk.org/) | 3.6.1 | Natural Language Toolkit / Apache 2.0 |
| nomkl | 3.0 | None / BSD |
| [nose](http://readthedocs.org/docs/nose/) | 1.3.7 | Nose extends unittest to make testing easier / LGPL-2.1 |
| [notebook](https://jupyter.org) | 6.3.0 | Jupyter Notebook / BSD-3-Clause |
| [numexpr](https://github.com/pydata/numexpr) | 2.7.3 | Fast numerical expression evaluator for NumPy. / MIT |
| [numpy](http://numpy.scipy.org/) | 1.20.1 | Array processing for numbers, strings, records, and objects. / BSD 3-Clause |
| [numpy-base](http://numpy.scipy.org/) | 1.20.1 | Array processing for numbers, strings, records, and objects. / BSD 3-Clause |
| [numpydoc](https://github.com/numpy/numpydoc) | 1.1.0 | Numpy’s Sphinx extensions / BSD 3-Clause |
| [olefile](http://www.decalage.info/python/olefileio) | 0.46 | parse, read and write Microsoft OLE2 files / BSD 2-Clause |
| [openblas](http://www.openblas.net/) | 0.3.10 | An optimized BLAS library / BSD |
| openblas-devel | 0.3.10 | OpenBLAS headers and libraries for developing software that used OpenBLAS. / None |
| [openpyxl](https://openpyxl.readthedocs.io) | 3.0.7 | A Python library to read/write Excel 2010 xlsx/xlsm files / MIT |
| [openssl](http://www.openssl.org/) | 1.1.1k | OpenSSL is an open-source implementation of the SSL and TLS protocols / OpenSSL |
| [packaging](https://github.com/pypa/packaging) | 20.9 | Core utilities for Python packages / Apache 2.0 or BSD 2-Clause |
| [pandas](http://pandas.pydata.org) | 1.2.4 | High-performance, easy-to-use data structures and data analysis tools. / BSD-3-Clause |
| [pandoc](http://pandoc.org/) | 2.11 | Universal markup converter (repackaged binaries) / GPL-2.0 |
| [pandocfilters](https://github.com/jgm/pandocfilters) | 1.4.3 | A python module for writing pandoc filters / BSD-3-Clause |
| [parso](https://github.com/davidhalter/parso) | 0.7.0 | A Python Parser / MIT |
| [partd](https://github.com/dask/partd) | 1.2.0 | Data structure for on-disk shuffle operations / BSD 3-Clause |
| [patchelf](http://nixos.org/patchelf.html) | 0.12 | A small utility to modify the dynamic linker and RPATH of ELF executables. / GPL-3.0-or-later |
| [path](https://github.com/jaraco/path) | 15.1.2 | A module wrapper for os.path / MIT |
| [path.py](https://github.com/jaraco/path.py) | 12.5.0 | A module wrapper for os.path / MIT |
| [pathlib2](https://github.com/mcmtroffaes/pathlib2) | 2.3.5 | Fork of pathlib aiming to support the full stdlib Python API / MIT |
| [patsy](https://github.com/pydata/patsy) | 0.5.1 | Describing statistical models in Python using symbolic formulas / BSD-2-Clause, PSF2 |
| [pcre](http://www.pcre.org/) | 8.44 | Regular expression pattern matching using the same syntax and semantics as Perl 5. / BSD 3-Clause |
| [pep8](http://pep8.readthedocs.org/) | 1.7.1 | Python style guide checker / MIT |
| [pexpect](http://pexpect.sourceforge.net/) | 4.8.0 | Pexpect makes Python a better tool for controlling other applications. / ISC |
| [pickleshare](https://github.com/pickleshare/pickleshare/) | 0.7.5 | Tiny ‘shelve’-like database with concurrency support / MIT |
| [pillow](https://pillow.readthedocs.io) | 8.2.0 | Pillow is the friendly PIL fork by Alex Clark and Contributors / LicenseRef-PIL |
| [pip](https://pip.pypa.io/en/stable/) | 21.0.1 | PyPA recommended tool for installing Python packages / MIT |
| [pixman](http://www.pixman.org/) | 0.40.0 | A low-level software library for pixel manipulation. / MIT |
| [pkginfo](https://code.launchpad.net/~tseaver/pkginfo/trunk) | 1.7.0 | Query metadatdata from sdists / bdists / installed packages. / MIT |
| [pluggy](https://github.com/pytest-dev/pluggy) | 0.13.1 | Plugin registration and hook calling for Python / MIT |
| [ply](http://www.dabeaz.com/ply/index.html) | 3.11 | Python Lex-Yacc / BSD 3-clause |
| [prometheus\_client](https://github.com/prometheus/client_python) | 0.10.1 | Python client for the Prometheus monitoring system / Apache-2.0 |
| [prompt-toolkit](https://github.com/jonathanslenders/python-prompt-toolkit) | 3.0.17 | Library for building powerful interactive command lines in Python / BSD-3-Clause |
| [prompt\_toolkit](https://github.com/jonathanslenders/python-prompt-toolkit) | 3.0.17 | Library for building powerful interactive command lines in Python / BSD-3-Clause |
| [psutil](https://github.com/giampaolo/psutil) | 5.8.0 | A cross-platform process and system utilities module for Python / BSD-3-Clause |
| [ptyprocess](https://github.com/pexpect/ptyprocess) | 0.7.0 | Run a subprocess in a pseudo terminal / ISC |
| [py](https://github.com/pytest-dev/py) | 1.10.0 | library with cross-python path, ini-parsing, io, code, log facilities / MIT |
| [py-lief](https://lief.quarkslab.com/) | 0.10.1 | A cross platform library to parse, modify and abstract ELF, PE and MachO formats. / Apache-2.0 |
| [pycodestyle](https://pycodestyle.readthedocs.io/) | 2.7.0 | Python style guide checker / MIT |
| [pycosat](https://github.com/ContinuumIO/pycosat) | 0.6.3 | Bindings to picosat (a SAT solver) / MIT |
| [pycparser](https://github.com/eliben/pycparser) | 2.20 | Complete C99 parser in pure Python / BSD 3-clause |
| [pycurl](http://pycurl.sourceforge.net/) | 7.43.0.6 | A Python Interface To The cURL library / LGPL, MIT |
| [pyerfa](https://pyerfa.readthedocs.io/) | 1.7.3 | Python bindings for ERFA routines / BSD-3-Clause |
| [pyflakes](https://github.com/PyCQA/pyflakes) | 2.3.1 | Pyflakes analyzes programs and detects various errors. / MIT |
| [pygments](http://pygments.org/) | 2.8.1 | Pygments is a generic syntax highlighter suitable for use in code hosting, forums, wikis or other applications that need to prettify source code. / BSD-2-clause |
| [pylint](http://www.pylint.org/) | 2.7.4 | python code static checker / GPL-2.0-only |
| [pyodbc](https://github.com/mkleehammer/pyodbc) | 4.0.30 | DB API Module for ODBC / MIT |
| [pyopenssl](https://github.com/pyca/pyopenssl) | 20.0.1 | Python wrapper module around the OpenSSL library / Apache 2.0 |
| [pyparsing](http://pyparsing.wikispaces.com/) | 2.4.7 | Create and execute simple grammars / MIT |
| [pyrsistent](http://github.com/tobgu/pyrsistent/) | 0.17.3 | Persistent/Functional/Immutable data structures / MIT |
| [pysocks](https://github.com/Anorov/PySocks) | 1.7.1 | A Python SOCKS client module. See [Anorov/PySocks](https://github.com/Anorov/PySocks) for more information. / BSD 3-Clause |
| [pytables](http://www.pytables.org) | 3.6.1 | Brings together Python, HDF5 and NumPy to easily handle large amounts of data. / BSD 3-Clause |
| [pytest](https://docs.pytest.org/en/latest/) | 6.2.3 | Simple and powerful testing with Python. / MIT |
| [python](https://www.python.org/) | 3.8.8 | General purpose programming language / Python-2.0 |
| [python-dateutil](https://dateutil.readthedocs.org/) | 2.8.1 | Extensions to the standard Python datetime module. / BSD 3 Clause |
| [python-libarchive-c](https://github.com/Changaco/python-libarchive-c) | 2.9 | Python interface to libarchive / CC0-1.0 |
| [pytz](http://pythonhosted.org/pytz/) | 2021.1 | World timezone definitions, modern and historical. / MIT |
| [pywavelets](https://github.com/PyWavelets/pywt) | 1.1.1 | Discrete Wavelet Transforms in Python / MIT |
| [pyyaml](http://pyyaml.org/wiki/PyYAML) | 5.4.1 | YAML parser and emitter for Python / MIT |
| [pyzmq](https://github.com/zeromq/pyzmq) | 20.0.0 | Python bindings for zeromq / BSD 3-clause |
| [readline](https://cnswww.cns.cwru.edu/php/chet/readline/rltop.html) | 8.1 | library for editing command lines as they are typed in / GPL-3.0 |
| [regex](https://bitbucket.org/mrabarnett/mrab-regex) | 2021.4.4 | Alternative regular expression module, to replace re / Python-2.0 |
| [requests](http://python-requests.org) | 2.25.1 | Requests is an elegant and simple HTTP library for Python, built with ♥. / Apache-2.0 |
| [ruamel\_yaml](https://sourceforge.net/p/ruamel-yaml/code/ci/default/tree) | 0.15.100 | A patched copy of ruamel.yaml. / MIT |
| [scikit-image](http://scikit-image.org/) | 0.18.1 | Image processing in Python. / BSD-3-Clause |
| [scikit-learn](http://scikit-learn.org/) | 0.24.1 | A set of python modules for machine learning and data mining / BSD-3-Clause |
| [scipy](http://www.scipy.org/) | 1.6.2 | Scientific Library for Python / BSD 3-Clause |
| [seaborn](https://seaborn.pydata.org) | 0.11.1 | Statistical data visualization / BSD 3-Clause |
| [send2trash](https://github.com/hsoft/send2trash) | 1.5.0 | Python library to natively send files to Trash (or Recycle bin) on all platforms. / BSD-3-Clause |
| [setuptools](https://github.com/pypa/setuptools) | 52.0.0 | Download, build, install, upgrade, and uninstall Python packages / MIT |
| [simplegeneric](http://cheeseshop.python.org/pypi/simplegeneric) | 0.8.1 | Simple generic functions (similar to Python’s own len(), pickle.dump(), etc.) / Zope Public |
| [singledispatch](http://docs.python.org/3/library/functools.html#functools.singledispatch) | 3.6.1 | Transforms a function into a single-dispatch generic function / MIT |
| [six](https://six.readthedocs.io/) | 1.15.0 | Python 2 and 3 compatibility utilities / MIT |
| [snowballstemmer](https://github.com/shibukawa/snowball_py) | 2.1.0 | Snowball stemming library collection for Python / BSD-2-Clause |
| [sortedcollections](http://www.grantjenks.com/docs/sortedcollections/) | 2.1.0 | Python Sorted Collections / Apache-2.0 |
| [sortedcontainers](http://www.grantjenks.com/docs/sortedcontainers/) | 2.3.0 | Python Sorted Container Types: SortedList, SortedDict, and SortedSet / Apache-2.0 |
| [soupsieve](http://facelessuser.github.io/soupsieve) | 2.2.1 | A modern CSS selector implementation for BeautifulSoup / MIT |
| [sphinx](http://www.sphinx-doc.org) | 3.5.3 | Sphinx is a tool that makes it easy to create intelligent and beautiful documentation / BSD-2-Clause |
| sphinxcontrib | 1.0 | Python namespace for sphinxcontrib / BSD |
| [sphinxcontrib-applehelp](https://www.sphinx-doc.org/en/master/) | 1.0.2 | sphinxcontrib-applehelp is a sphinx extension which outputs Apple help books / BSD-2-Clause |
| [sphinxcontrib-devhelp](https://www.sphinx-doc.org/en/master/) | 1.0.2 | sphinxcontrib-devhelp is a sphinx extension which outputs Devhelp document / BSD-2-Clause |
| [sphinxcontrib-htmlhelp](https://www.sphinx-doc.org/en/master/) | 1.0.3 | sphinxcontrib-htmlhelp is a sphinx extension which … / BSD-2-Clause |
| [sphinxcontrib-jsmath](https://www.sphinx-doc.org/en/master/) | 1.0.1 | A sphinx extension which renders display math in HTML via JavaScript / BSD-2-Clause |
| [sphinxcontrib-qthelp](https://www.sphinx-doc.org/en/master/) | 1.0.3 | sphinxcontrib-qthelp is a sphinx extension which outputs QtHelp document / BSD-2-Clause |
| [sphinxcontrib-serializinghtml](https://www.sphinx-doc.org/en/master/) | 1.1.4 | sphinxcontrib-serializinghtml is a sphinx extension which outputs “serialized” HTML files (json and pickle). / BSD-2-Clause |
| [sphinxcontrib-websupport](https://pypi.python.org/pypi/sphinxcontrib-websupport) | 1.2.4 | Sphinx API for Web Apps / BSD-2-Clause |
| [sqlalchemy](http://www.sqlalchemy.org/) | 1.4.7 | Database Abstraction Library. / MIT |
| [sqlite](http://www.sqlite.org/) | 3.35.4 | Implements a self-contained, zero-configuration, SQL database engine / Public-Domain (`<http://www.sqlite.org/copyright.html>`) |
| [statsmodels](https://www.statsmodels.org) | 0.12.2 | Statistical computations and models for use with SciPy / BSD-3-Clause |
| [sympy](https://sympy.org) | 1.8 | Python library for symbolic mathematics / BSD-3-Clause |
| [tblib](https://github.com/ionelmc/python-tblib) | 1.7.0 | Traceback serialization library. / BSD 2-Clause |
| [terminado](https://github.com/jupyter/terminado) | 0.9.4 | Terminals served by tornado websockets / BSD-2-Clause |
| [testpath](https://testpath.readthedocs.io) | 0.4.4 | Testpath is a collection of utilities for Python code working with files and commands. / BSD-3-Clause |
| [threadpoolctl](https://github.com/joblib/threadpoolctl) | 2.1.0 | Python helpers to control the threadpools of native libraries / BSD 3-Clause |
| [tifffile](https://github.com/cgohlke/tifffile) | 2020.10.1 | Read and write image data from and to TIFF files. / BSD-3-Clause |
| [tk](http://www.tcl.tk/) | 8.6.10 | A dynamic programming language with GUI support. Bundles Tcl and Tk. / Tcl/Tk |
| [toml](https://github.com/uiri/toml) | 0.10.2 | Python lib for TOML. / MIT |
| [toolz](http://toolz.readthedocs.org/) | 0.11.1 | A functional standard library for Python / BSD-3-Clause |
| [tornado](http://www.tornadoweb.org/) | 6.1 | A Python web framework and asynchronous networking library, originally developed at FriendFeed. / Apache-2.0 |
| [tqdm](https://pypi.python.org/pypi/tqdm) | 4.59.0 | A Fast, Extensible Progress Meter / MPL-2.0 or MIT |
| [traitlets](http://traitlets.readthedocs.org/) | 5.0.5 | Configuration system for Python applications / BSD-3-Clause |
| [typing\_extensions](https://github.com/python/typing/tree/master/typing_extensions) | 3.7.4.3 | Backported and Experimental Type Hints for Python / PSF-2.0 |
| [unicodecsv](https://github.com/jdunck/python-unicodecsv) | 0.14.1 | Drop-in replacement for csv module which supports unicode strings / BSD |
| [unixodbc](http://www.unixodbc.org/) | 2.3.9 | ODBC on non MS Windows platforms / LGPL-2.1 |
| [urllib3](https://urllib3.readthedocs.io/) | 1.26.4 | HTTP library with thread-safe connection pooling, file post, and more. / MIT |
| [wcwidth](https://github.com/jquast/wcwidth) | 0.2.5 | Measures number of Terminal column cells of wide-character codes. / MIT |
| [webencodings](https://github.com/gsnedders/python-webencodings) | 0.5.1 | Character encoding aliases for legacy web content / BSD 3-Clause |
| [werkzeug](https://palletsprojects.com/p/werkzeug/) | 1.0.1 | The comprehensive WSGI web application library. / BSD 3-Clause |
| [wheel](https://github.com/pypa/wheel) | 0.36.2 | A built-package format for Python. / MIT |
| [widgetsnbextension](http://ipython.org) | 3.5.1 | Interactive Widgets for Jupyter / BSD 3-clause |
| [wrapt](https://github.com/GrahamDumpleton/wrapt) | 1.12.1 | Module for decorators, wrappers and monkey patching / BSD 2-Clause |
| [xlrd](http://www.python-excel.org/) | 2.0.1 | Library for developers to extract data from Microsoft Excel (tm) spreadsheet files / BSD 3-Clause and BSD with advertising |
| [xlsxwriter](https://xlsxwriter.readthedocs.io/) | 1.3.8 | A Python module for creating Excel XLSX files / BSD-2-Clause |
| [xlwt](http://www.python-excel.org/) | 1.3.0 | Writing data and formatting information to Excel files / BSD |
| [xz](http://tukaani.org/xz/) | 5.2.5 | Data compression software with high compression ratio / LGPL-2.1 and GPL-2.0 |
| [yaml](http://pyyaml.org/wiki/LibYAML) | 0.2.5 | A C library for parsing and emitting YAML / MIT |
| [zeromq](http://zeromq.org) | 4.3.4 | A high-performance asynchronous messaging library. / LGPL-3.0-or-later |
| [zict](http://github.com/mrocklin/zict) | 2.0.0 | Composable Dictionary Classes / BSD 3-Clause |
| [zipp](https://github.com/jaraco/zipp) | 3.4.1 | A pathlib-compatible Zipfile object wrapper / MIT |
| [zlib](http://zlib.net/) | 1.2.11 | Massively spiffy yet delicately unobtrusive compression library / zlib |
| zope | 1.0 | web application server / BSD |
| [zope.event](http://www.zope.org/en/latest/) | 4.5.0 | Very basic event publishing system / Zope Public License |
| [zope.interface](http://docs.zope.org/zope.interface/) | 5.3.0 | Interfaces for Python / ZPL-2.1 |
| [zstd](http://www.zstd.net) | 1.4.5 | Zstandard - Fast real-time compression algorithm / BSD 3-Clause |
| Name | Version | Summary / License |
|---|---|---|
| [\_libgcc\_mutex](https://github.com/AnacondaRecipes/_libgcc_mutex-feedstock) | 0.1 | Mutex for libgcc and libgcc-ng / None |
| [\_openmp\_mutex](https://github.com/conda-forge/ctng-compilers-feedstock) | 5.1 | OpenMP Implementation Mutex / BSD-3-Clause |
| [alabaster](http://www.sphinx-doc.org/en/stable/index.html) | 0.7.12 | Configurable, Python 2+3 compatible Sphinx theme. / BSD 3-Clause |
| [anaconda-client](http://anaconda.org) | 1.7.2 | anaconda.org command line client library / BSD 3-clause |
| [anaconda-project](https://github.com/Anaconda-Platform/anaconda-project) | 0.9.1 | Tool for encapsulating, running, and reproducing data science projects / BSD-3-Clause |
| [anyio](https://github.com/agronholm/anyio) | 2.2.0 | High level compatibility layer for multiple asynchronous event loop implementations on Python / MIT |
| [argon2-cffi](https://argon2-cffi.readthedocs.org/) | 20.1.0 | The secure Argon2 password hashing algorithm. / MIT |
| [asn1crypto](https://github.com/wbond/asn1crypto) | 1.4.0 | Python ASN.1 library with a focus on performance and a pythonic API / MIT |
| [astroid](https://www.astroid.org/) | 2.5 | A abstract syntax tree for Python with inference support. / LGPL-2.1-only |
| [astropy](http://www.astropy.org/) | 4.2.1 | Community-developed Python Library for Astronomy / BSD-3-Clause |
| [async\_generator](https://github.com/python-trio/async_generator) | 1.10 | Async generators and context managers for Python 3.5+ / MIT |
| [attrs](https://attrs.readthedocs.io/en/stable/) | 20.3.0 | attrs is the Python package that will bring back the joy of writing classes by relieving you from the drudgery of implementing object protocols (aka dunder methods). / MIT |
| [babel](http://babel.pocoo.org/) | 2.9.0 | Utilities to internationalize and localize Python applications / BSD 3-clause |
| [backcall](https://github.com/takluyver/backcall/) | 0.2.0 | Specifications for callback functions passed in to an API / BSD-3-Clause |
| [backports](https://bitbucket.org/brandon/backports) | 1.0 | None / BSD |
| [backports.shutil\_get\_terminal\_size](https://github.com/chrippa/backports.shutil_get_terminal_size) | 1.0.0 | A backport of the get\_terminal\_size function from Python 3.3’s shutil. / MIT |
| [beautifulsoup4](http://www.crummy.com/software/BeautifulSoup/) | 4.9.3 | Python library designed for screen-scraping / MIT |
| [bitarray](https://github.com/ilanschnell/bitarray) | 1.7.0 | efficient arrays of booleans – C extension / PSF |
| [bkcharts](http://github.com/bokeh/bkcharts) | 0.2 | High level chart types built on top of Bokeh / BSD 3-Clause |
| blas | 1.0 | |
| [bleach](https://github.com/mozilla/bleach) | 3.3.0 | Easy, whitelist-based HTML-sanitizing tool / Apache-2.0 |
| [blosc](https://github.com/Blosc/c-blosc) | 1.21.0 | A blocking, shuffling and loss-less compression library that can be faster than memcpy() / BSD-3-Clause |
| [bokeh](http://bokeh.pydata.org/) | 2.3.1 | Statistical and novel interactive HTML plots for Python / BSD-3-Clause |
| [boto](https://github.com/boto/boto/) | 2.49.0 | Amazon Web Services Library / MIT |
| [bottleneck](https://github.com/pydata/bottleneck) | 1.3.2 | Fast NumPy array functions written in Cython. / BSD 2-Clause |
| [brotli](http://github.com/google/brotli) | 1.0.9 | Brotli compression format / MIT |
| [brotlipy](https://github.com/python-hyper/brotlipy) | 0.7.0 | Python bindings to the Brotli compression library / MIT |
| [brunsli](https://github.com/google/brunsli) | 0.1 | Practical JPEG Repacker / MIT |
| [bzip2](http://www.bzip.org/) | 1.0.8 | high-quality data compressor / bzip2 |
| [c-ares](https://c-ares.haxx.se/) | 1.17.1 | This is c-ares, an asynchronous resolver library / MIT |
| [ca-certificates](https://github.com/conda-forge/ca-certificates-feedstock) | 2021.4.13 | Certificates for use with other packages. / MPL 2.0 |
| [cached-property](https://github.com/pydanny/cached-property) | 1.5.2 | A decorator for caching properties in classes. / BSD-3-Clause |
| [cairo](http://cairographics.org/) | 1.16.0 | Cairo is a 2D graphics library with support for multiple output devices. / LGPL 2.1 or MPL 1.1 |
| [certifi](http://certifi.io/) | 2020.12.5 | Python package for providing Mozilla’s CA Bundle. / ISC |
| [cffi](https://bitbucket.org/cffi/cffi) | 1.14.5 | Foreign Function Interface for Python calling C code. / MIT |
| [chardet](https://github.com/chardet/chardet) | 4.0.0 | Universal character encoding detector / LGPL2 |
| [charls](https://github.com/team-charls/charls) | 2.2.0 | CharLS is a C++ implementation of the JPEG-LS standard for lossless and near-lossless image compression and decompression. JPEG-LS is a low-complexity image compression standard that matches JPEG 2000 compression ratios. / BSD-3-Clause |
| [click](https://palletsprojects.com/p/click) | 7.1.2 | Python composable command line interface toolkit / BSD-3-Clause |
| [cloudpickle](https://github.com/cloudpipe/cloudpickle) | 1.6.0 | Extended pickling support for Python objects / BSD-3-Clause |
| [clyent](https://github.com/Anaconda-Platform/clyent) | 1.2.2 | Command line client library for windows and posix / BSD 3-Clause |
| [colorama](https://github.com/tartley/colorama) | 0.4.4 | Cross-platform colored terminal text / BSD-3-Clause |
| [conda](https://conda.io) | 4.10.1 | OS-agnostic, system-level binary package and environment manager. / BSD 3-Clause |
| [conda-build](https://github.com/conda/conda-build) | 3.21.4 | tools for building conda packages / BSD 3-Clause |
| [conda-env](https://github.com/conda/conda-env) | 2.6.0 | Tools for interacting with conda environments. / BSD 3-Clause |
| [conda-verify](https://github.com/conda/conda-verify) | 3.4.2 | tool for validating conda recipes and conda packages / BSD 3-Clause |
| [contextlib2](http://contextlib2.readthedocs.org) | 0.6.0.post1 | Backports and enhancements for the contextlib module / PSF 2 |
| [cryptography](https://github.com/pyca/cryptography) | 3.4.7 | Provides cryptographic recipes and primitives to Python developers / Apache-2.0 AND BSD-3-Clause AND PSF-2.0 AND MIT |
| [curl](http://curl.haxx.se/) | 7.71.1 | tool and library for transferring data with URL syntax / MIT/X derivate (`<http://curl.haxx.se/docs/copyright.html>`) |
| [cycler](http://matplotlib.org/cycler) | 0.10.0 | Composable style cycles. / BSD 3-Clause |
| [cython](http://www.cython.org/) | 0.29.23 | The Cython compiler for writing C extensions for the Python language / Apache-2.0 |
| [cytoolz](https://github.com/pytoolz/cytoolz) | 0.11.0 | Cython implementation of Toolz. High performance functional utilities / BSD-3-Clause |
| [dask](https://dask.org/) | 2021.4.0 | Parallel PyData with Task Scheduling / BSD-3-Clause |
| [dask-core](http://github.com/dask/dask/) | 2021.4.0 | Parallel Python with task scheduling / BSD-3-Clause |
| [dbus](http://www.freedesktop.org/wiki/Software/dbus/) | 1.13.18 | Simple message bus system for applications to talk to one another / GPL2 |
| [decorator](https://github.com/micheles/decorator) | 5.0.6 | Better living through Python with decorators. / BSD-3-Clause |
| [defusedxml](https://bitbucket.org/tiran/defusedxml) | 0.7.1 | XML bomb protection for Python stdlib modules / PSF 2.0 |
| [distributed](http://distributed.readthedocs.io/en/latest/) | 2021.4.0 | Distributed computing with Dask / BSD-3-Clause |
| [docutils](http://docutils.sourceforge.net/) | 0.17 | Docutils – Python Documentation Utilities / Public Domain Dedictation and BSD 2-Clause and PSF 2.1.1 and GPL 3.0 |
| [entrypoints](https://github.com/takluyver/entrypoints) | 0.3 | Discover and load entry points from installed packages. / MIT License |
| [et\_xmlfile](https://bitbucket.org/openpyxl/et_xmlfile) | 1.0.1 | An implementation of lxml.xmlfile for the standard library / MIT |
| [expat](http://expat.sourceforge.net/) | 2.3.0 | Expat XML parser library in C / MIT |
| [fastcache](https://github.com/pbrady/fastcache) | 1.1.0 | C implementation of Python 3 lru\_cache / MIT |
| [filelock](https://github.com/benediktschmitt/py-filelock) | 3.0.12 | A platform independent file lock. / Public Domain |
| [flask](http://flask.pocoo.org) | 1.1.2 | A microframework based on Werkzeug, Jinja2 and good intentions. / BSD 3-Clause |
| [fontconfig](http://www.freedesktop.org/wiki/Software/fontconfig/) | 2.13.1 | A library for configuring and customizing font access. / MIT |
| [freetype](https://www.freetype.org/) | 2.10.4 | A Free, High-Quality, and Portable Font Engine / GPL-2.0-only and LicenseRef-FreeType |
| [fribidi](https://github.com/fribidi/fribidi) | 1.0.10 | The Free Implementation of the Unicode Bidirectional Algorithm. / LGPL-2.1 |
| [fsspec](https://github.com/martindurant/filesystem_spec) | 0.9.0 | A specification for pythonic filesystems / BSD-3-Clause |
| [get\_terminal\_size](https://github.com/chrippa/backports.shutil_get_terminal_size) | 1.0.0 | Get the size of the terminal window. / MIT |
| [gevent](https://www.gevent.org) | 21.1.2 | Coroutine-based network library / MIT |
| [giflib](http://giflib.sourceforge.net) | 5.2.1 | Library for reading and writing gif images / MIT |
| [glib](https://developer.gnome.org/glib/) | 2.68.1 | Provides core application building blocks for libraries and applications written in C. / LGPL-2.1 |
| [glob2](https://github.com/miracle2k/python-glob2) | 0.7 | Version of the glob module that supports recursion via \*\*, and can capture patterns. / BSD-2-Clause |
| [gmp](http://gmplib.org/) | 6.2.1 | The GNU multiprecision library. / GPL-2.0-or-later AND LGPL-3.0-or-later |
| [gmpy2](https://pypi.python.org/pypi/gmpy2) | 2.0.8 | GMP/MPIR, MPFR, and MPC interface to Python 2.6+ and 3.x / LGPL 3 |
| [graphite2](http://graphite.sil.org/) | 1.3.14 | A “smart font” system that handles the complexities of lesser-known languages of the world. / LGPLv2 |
| [greenlet](https://github.com/python-greenlet/greenlet) | 1.0.0 | Lightweight in-process concurrent programming / MIT |
| [gst-plugins-base](http://gstreamer.freedesktop.org/) | 1.14.1 | GStreamer Base Plug-ins / GPL2 |
| [gstreamer](http://gstreamer.freedesktop.org/) | 1.14.1 | Library for constructing graphs of media-handling components / LGPL 2 |
| [h5py](http://www.h5py.org/) | 3.1.0 | Read and write HDF5 files from Python. / BSD-3-Clause |
| [harfbuzz](http://www.freedesktop.org/wiki/Software/HarfBuzz/) | 2.8.0 | An OpenType text shaping engine. / MIT |
| [hdf5](http://www.hdfgroup.org/HDF5/) | 1.12.0 | HDF5 is a data model, library, and file format for storing and managing data / HDF5 |
| [heapdict](http://stutzbachenterprises.com/) | 1.0.1 | A heap with decrease-key and increase-key operations / BSD 3-Clause |
| [html5lib](https://github.com/html5lib/html5lib-python) | 1.1 | HTML parser based on the WHATWG HTML specification / MIT |
| [icu](http://site.icu-project.org/) | 68.1 | International Components for Unicode. / MIT |
| [idna](https://github.com/kjd/idna) | 2.10 | Internationalized Domain Names in Applications (IDNA). / BSD Like |
| [imagecodecs](https://www.lfd.uci.edu/~gohlke/) | 2021.1.11 | Image transformation, compression, and decompression codecs / BSD-3-Clause |
| [imageio](https://imageio.github.io) | 2.9.0 | A Python library for reading and writing image data / BSD-2-Clause |
| [imagesize](https://github.com/shibukawa/imagesize_py) | 1.2.0 | Getting image size from png/jpeg/jpeg2000/gif file / MIT |
| [importlib-metadata](https://github.com/python/importlib_metadata) | 2.0.0 | A library to access the metadata for a Python package / Apache-2.0 |
| [importlib\_metadata](https://github.com/python/importlib_metadata) | 2.0.0 | A library to access the metadata for a Python package / Apache-2.0 |
| [iniconfig](http://github.com/RonnyPfannschmidt/iniconfig) | 1.1.1 | iniconfig: brain-dead simple config-ini parsing / MIT |
| [ipykernel](https://ipython.org) | 5.3.4 | IPython Kernel for Jupyter / BSD-3-Clause |
| [ipython](https://ipython.org) | 7.22.0 | IPython: Productive Interactive Computing / BSD-3-Clause |
| [ipython\_genutils](http://ipython.org) | 0.2.0 | vestigial utilities from IPython / BSD 3-Clause |
| [ipywidgets](https://github.com/ipython/ipywidgets) | 7.6.3 | Jupyter Interactive Widgets / BSD-3-Clause |
| [isort](https://github.com/timothycrosley/isort) | 5.8.0 | A Python utility / library to sort Python imports. / MIT |
| [itsdangerous](https://github.com/pallets/itsdangerous) | 1.1.0 | Various helpers to pass trusted data to untrusted environments. / BSD 3-Clause |
| [jbig](https://www.cl.cam.ac.uk/~mgk25/jbigkit) | 2.1 | Implementation of the JBIG1 data compression standard / GPL-2.0 |
| [jdcal](https://github.com/phn/jdcal) | 1.4.1 | Julian dates from proleptic Gregorian and Julian calendars. / BSD 2-Clause |
| [jedi](https://github.com/davidhalter/jedi/) | 0.17.2 | An autocompletion tool for Python that can be used for text editors. / MIT |
| [jinja2](http://jinja.pocoo.org) | 2.11.3 | An easy to use stand-alone template engine written in pure python. / BSD-3-Clause |
| [joblib](https://pypi.org/project/joblib/) | 1.0.1 | Lightweight pipelining: using Python functions as pipeline jobs. / BSD-3-Clause |
| [jpeg](http://www.ijg.org/) | 9d | read/write jpeg COM, EXIF, IPTC medata / Custom free software license |
| [json5](https://github.com/dpranke/pyjson5) | 0.9.5 | A Python implementation of the JSON5 data format / Apache-2.0 |
| [jsonschema](https://github.com/Julian/jsonschema) | 3.2.0 | An implementation of JSON Schema validation for Python / MIT |
| [jupyter](http://jupyter.org) | 1.0.0 | Jupyter metapackage. Install all the Jupyter components in one go. / BSD 3-Clause |
| [jupyter-packaging](https://github.com/jupyter/jupyter-packaging) | 0.7.12 | Jupyter Packaging Utilities / BSD-3-Clause |
| [jupyter\_client](https://jupyter.org) | 6.1.12 | jupyter\_client contains the reference implementation of the Jupyter protocol. / BSD-3-Clause |
| [jupyter\_console](http://jupyter.org) | 6.4.0 | Jupyter terminal console / BSD-3-Clause |
| [jupyter\_core](https://jupyter.org) | 4.7.1 | Core common functionality of Jupyter projects. / BSD-3-Clause |
| [jupyter\_server](https://jupyter.org) | 1.4.1 | Jupyter Server / BSD-3-Clause |
| [jupyterlab](https://github.com/jupyterlab/jupyterlab) | 3.0.14 | JupyterLab PRE-ALPHA / BSD-3-Clause |
| [jupyterlab\_pygments](http://github.com/JupyterLab/jupyterlab_pygments) | 0.1.2 | Pygments syntax coloring scheme making use of the JupyterLab CSS variables / BSD-3-Clause |
| [jupyterlab\_server](https://github.com/jupyterlab/jupyterlab_server) | 2.4.0 | A set of server components for JupyterLab and JupyterLab like applications. / BSD-3-Clause |
| [jupyterlab\_widgets](https://github.com/jupyter-widgets/ipywidgets) | 1.0.0 | JupyterLab extension providing HTML widgets / BSD-3-Clause |
| [jxrlib](https://packages.debian.org/source/sid/jxrlib) | 1.1 | jxrlib - JPEG XR Library by Microsoft, built from Debian hosted sources. / BSD-2-Clause |
| [kiwisolver](https://github.com/nucleic/kiwi) | 1.3.1 | An efficient C++ implementation of the Cassowary constraint solver / BSD-3-Clause |
| [krb5](http://web.mit.edu/kerberos/) | 1.19.1 | A network authentication protocol. / MIT |
| [lazy-object-proxy](https://github.com/ionelmc/python-lazy-object-proxy) | 1.6.0 | A fast and thorough lazy object proxy / BSD-2-Clause |
| [lcms2](http://www.littlecms.com/) | 2.11 | Open Source Color Management Engine / MIT |
| [ld\_impl\_linux-aarch64](https://www.gnu.org/software/binutils/) | 2.36.1 | A set of programming tools for creating and managing binary programs, object files, libraries, profile data, and assembly source code. / GPL-3.0-only |
| [lerc](https://github.com/Esri/lerc) | 2.2.1 | LERC - Limited Error Raster Compression / Apache-2.0 |
| [libaec](https://gitlab.dkrz.de/k202009/libaec) | 1.0.4 | Adaptive Entropy Coding library / BSD-2-Clause |
| [libarchive](http://www.libarchive.org/) | 3.4.2 | Multi-format archive and compression library / BSD-2-Clause |
| [libcurl](http://curl.haxx.se/) | 7.71.1 | tool and library for transferring data with URL syntax / MIT/X derivate (`<http://curl.haxx.se/docs/copyright.html>`) |
| [libdeflate](https://github.com/ebiggers/libdeflate) | 1.7 | libdeflate is a library for fast, whole-buffer DEFLATE-based compression and decompression. / MIT |
| [libedit](http://thrysoee.dk/editline/) | 3.1.20210216 | Editline Library (libedit) / BSD-2-Clause |
| [libev](http://software.schmorp.de/pkg/libev.html) | 4.33 | A full-featured and high-performance event loop that is loosely modeled after libevent, but without its limitations and bugs. / BSD-2-Clause |
| [libffi](https://sourceware.org/libffi/) | 3.3 | A Portable Foreign Function Interface Library. / Custom |
| [libgcc-ng](https://gcc.gnu.org/onlinedocs/gccint/Libgcc.html) | 10.2.0 | The GCC low-level runtime library / GPL-3.0-only WITH GCC-exception-3.1 |
| [libgfortran-ng](https://gcc.gnu.org/) | 10.2.0 | The GNU Fortran Runtime Library / GPL-3.0-only WITH GCC-exception-3.1 |
| [libgfortran5](https://gcc.gnu.org/) | 10.2.0 | The GNU Fortran Runtime Library / GPL-3.0-only WITH GCC-exception-3.1 |
| [libgomp](https://gcc.gnu.org/onlinedocs/gccint/Libgcc.html) | 10.2.0 | The GCC OpenMP implementation. / GPL-3.0-only WITH GCC-exception-3.1 |
| [liblief](https://lief.quarkslab.com/) | 0.10.1 | A cross platform library to parse, modify and abstract ELF, PE and MachO formats. / Apache-2.0 |
| [libllvm10](http://llvm.org/) | 10.0.1 | Development headers and libraries for LLVM / Apache-2.0 WITH LLVM-exception |
| [libopenblas](http://www.openblas.net/) | 0.3.13 | An Optimized BLAS library / BSD |
| [libpng](http://www.libpng.org/pub/png/libpng.html) | 1.6.37 | PNG reference library / zlib/libpng |
| [libsodium](http://libsodium.org) | 1.0.18 | A modern and easy-to-use crypto library. / ISC |
| [libssh2](https://www.libssh2.org/) | 1.9.0 | the SSH library / BSD-3-Clause |
| [libstdcxx-ng](https://gcc.gnu.org/) | 10.2.0 | The GNU C++ Runtime Library / GPL-3.0-only WITH GCC-exception-3.1 |
| [libtiff](http://www.libtiff.org/) | 4.1.0 | Support for the Tag Image File Format (TIFF). / HPND |
| [libtool](http://www.gnu.org/software/libtool/) | 2.4.6 | The GNU Portable Library Tool / GPL 3 |
| [libuuid](http://sourceforge.net/projects/libuuid/) | 1.0.3 | Portable uuid C library. / BSD 3-Clause |
| [libuv](http://libuv.org/) | 1.40.0 | Cross-platform asynchronous I/O / MIT |
| [libwebp](https://developers.google.com/speed/webp/) | 1.2.0 | WebP image library / Google |
| [libxcb](http://xcb.freedesktop.org/) | 1.14 | This is the C-language Binding (XCB) package to the X Window System protocol / MIT |
| [libxml2](http://xmlsoft.org/) | 2.9.10 | The XML C parser and toolkit of Gnome / MIT |
| [libxslt](http://xmlsoft.org/XSLT/) | 1.1.34 | The XSLT C library developed for the GNOME project / MIT |
| [libzopfli](https://github.com/google/zopfli) | 1.0.3 | A compression library programmed in C to perform very good, but slow, deflate or zlib compression. / Apache-2.0 |
| [llvmlite](http://llvmlite.pydata.org) | 0.36.0 | A lightweight LLVM python binding for writing JIT compilers. / BSD-2-Clause |
| [locket](https://github.com/mwilliamson/locket.py) | 0.2.1 | File-based locks for Python for Linux and Windows / BSD 2-Clause |
| [lxml](http://lxml.de/) | 4.6.3 | Pythonic binding for the C libraries libxml2 and libxslt. / BSD-3-Clause and GPL-2.0-only and ZPL-2.0 and LicenseRef-ElementTree |
| [lz4-c](https://www.lz4.org) | 1.9.3 | Extremely Fast Compression algorithm / BSD-2-Clause |
| [lzo](http://www.oberhumer.com/opensource/lzo/) | 2.10 | LZO is a portable lossless data compression library written in ANSI C. / GPL v2+ |
| [markupsafe](https://www.palletsprojects.com/p/markupsafe) | 1.1.1 | A Python module that implements the jinja2.Markup string / BSD-3-Clause |
| [matplotlib](http://matplotlib.org/) | 3.3.4 | Publication quality figures in Python / LicenseRef-PSF-based |
| [matplotlib-base](http://matplotlib.org/) | 3.3.4 | Publication quality figures in Python / LicenseRef-PSF-based |
| [mccabe](https://github.com/PyCQA/mccabe) | 0.6.1 | McCabe complexity checker for Python / MIT |
| [mistune](https://github.com/lepture/mistune) | 0.8.4 | The fastest markdown parser in pure Python. / BSD 3-Clause |
| [mock](https://github.com/testing-cabal/mock) | 4.0.3 | A library for testing in Python / BSD-2-Clause |
| [more-itertools](https://github.com/more-itertools/more-itertools) | 8.7.0 | More routines for operating on iterables, beyond itertools / MIT |
| [mpc](http://www.multiprecision.org/) | 1.1.0 | A C library for the arithmetic of complex numbers with arbitrarily high precision. / LGPL 3 |
| [mpfr](http://www.mpfr.org/) | 4.0.2 | The MPFR library is a C library for multiple-precision floating-point computations with correct rounding. / LGPL-3.0-only |
| [mpmath](http://mpmath.org) | 1.2.1 | Python library for arbitrary-precision floating-point arithmetic / BSD 3-Clause |
| [msgpack-python](http://msgpack.org/) | 1.0.2 | MessagePack (de)serializer / Apache-2.0 |
| [multipledispatch](https://github.com/mrocklin/multipledispatch/) | 0.6.0 | Multiple dispatch in Python / BSD 3-Clause |
| [nbclassic](http://github.com/jupyterlab/nbclassic) | 0.2.6 | Jupyter Notebook as a Jupyter Server Extension. / BSD-3-Clause |
| [nbclient](https://jupyter.org) | 0.5.3 | A client library for executing notebooks. Formally nbconvert’s ExecutePreprocessor. / BSD-3-Clause |
| [nbconvert](http://jupyter.org) | 6.0.7 | Converting Jupyter Notebooks / BSD-3-Clause |
| [nbformat](http://jupyter.org) | 5.1.3 | The Jupyter Notebook format / BSD-3-Clause |
| [ncurses](http://www.gnu.org/software/ncurses/) | 6.2 | Library for text-based user interfaces / Free software (MIT-like) |
| [nest-asyncio](https://github.com/erdewit/nest_asyncio) | 1.5.1 | Patch asyncio to allow nested event loops / BSD-2-Clause |
| [networkx](https://networkx.github.io/) | 2.5 | Python package for creating and manipulating complex networks / BSD-3-Clause |
| [nltk](http://nltk.org/) | 3.6.1 | Natural Language Toolkit / Apache 2.0 |
| nomkl | 3.0 | None / BSD |
| [nose](http://readthedocs.org/docs/nose/) | 1.3.7 | Nose extends unittest to make testing easier / LGPL-2.1 |
| [notebook](https://jupyter.org) | 6.3.0 | Jupyter Notebook / BSD-3-Clause |
| [numexpr](https://github.com/pydata/numexpr) | 2.7.3 | Fast numerical expression evaluator for NumPy. / MIT |
| [numpy](http://numpy.scipy.org/) | 1.20.1 | Array processing for numbers, strings, records, and objects. / BSD 3-Clause |
| [numpy-base](http://numpy.scipy.org/) | 1.20.1 | Array processing for numbers, strings, records, and objects. / BSD 3-Clause |
| [numpydoc](https://github.com/numpy/numpydoc) | 1.1.0 | Numpy’s Sphinx extensions / BSD 3-Clause |
| [olefile](http://www.decalage.info/python/olefileio) | 0.46 | parse, read and write Microsoft OLE2 files / BSD 2-Clause |
| [openblas](http://www.openblas.net/) | 0.3.13 | An optimized BLAS library / BSD |
| openblas-devel | 0.3.13 | OpenBLAS headers and libraries for developing software that used OpenBLAS. / None |
| [openjpeg](http://www.openjpeg.org/) | 2.3.0 | An open-source JPEG 2000 codec written in C / BSD 2-Clause |
| [openpyxl](https://openpyxl.readthedocs.io) | 3.0.7 | A Python library to read/write Excel 2010 xlsx/xlsm files / MIT |
| [openssl](http://www.openssl.org/) | 1.1.1k | OpenSSL is an open-source implementation of the SSL and TLS protocols / OpenSSL |
| [packaging](https://github.com/pypa/packaging) | 20.9 | Core utilities for Python packages / Apache 2.0 or BSD 2-Clause |
| [pandas](http://pandas.pydata.org) | 1.2.4 | High-performance, easy-to-use data structures and data analysis tools. / BSD-3-Clause |
| [pandoc](http://pandoc.org/) | 2.12 | Universal markup converter (repackaged binaries) / GPL-2.0 |
| [pandocfilters](https://github.com/jgm/pandocfilters) | 1.4.3 | A python module for writing pandoc filters / BSD-3-Clause |
| [pango](http://www.pango.org/) | 1.45.3 | Text layout and rendering engine. / LGPL-2.1 |
| [parso](https://github.com/davidhalter/parso) | 0.7.0 | A Python Parser / MIT |
| [partd](https://github.com/dask/partd) | 1.2.0 | Data structure for on-disk shuffle operations / BSD 3-Clause |
| [patchelf](http://nixos.org/patchelf.html) | 0.11 | A small utility to modify the dynamic linker and RPATH of ELF executables. / GPL-3.0-or-later |
| [path](https://github.com/jaraco/path) | 15.1.2 | A module wrapper for os.path / MIT |
| [path.py](https://github.com/jaraco/path.py) | 12.5.0 | A module wrapper for os.path / MIT |
| [pathlib2](https://github.com/mcmtroffaes/pathlib2) | 2.3.5 | Fork of pathlib aiming to support the full stdlib Python API / MIT |
| [patsy](https://github.com/pydata/patsy) | 0.5.1 | Describing statistical models in Python using symbolic formulas / BSD-2-Clause, PSF2 |
| [pcre](http://www.pcre.org/) | 8.44 | Regular expression pattern matching using the same syntax and semantics as Perl 5. / BSD 3-Clause |
| [pep8](http://pep8.readthedocs.org/) | 1.7.1 | Python style guide checker / MIT |
| [pexpect](http://pexpect.sourceforge.net/) | 4.8.0 | Pexpect makes Python a better tool for controlling other applications. / ISC |
| [pickleshare](https://github.com/pickleshare/pickleshare/) | 0.7.5 | Tiny ‘shelve’-like database with concurrency support / MIT |
| [pillow](https://pillow.readthedocs.io) | 8.2.0 | Pillow is the friendly PIL fork by Alex Clark and Contributors / LicenseRef-PIL |
| [pip](https://pip.pypa.io/en/stable/) | 21.0.1 | PyPA recommended tool for installing Python packages / MIT |
| [pixman](http://www.pixman.org/) | 0.40.0 | A low-level software library for pixel manipulation. / MIT |
| [pkginfo](https://code.launchpad.net/~tseaver/pkginfo/trunk) | 1.7.0 | Query metadatdata from sdists / bdists / installed packages. / MIT |
| [pluggy](https://github.com/pytest-dev/pluggy) | 0.13.1 | Plugin registration and hook calling for Python / MIT |
| [ply](http://www.dabeaz.com/ply/index.html) | 3.11 | Python Lex-Yacc / BSD 3-clause |
| [prometheus\_client](https://github.com/prometheus/client_python) | 0.10.1 | Python client for the Prometheus monitoring system / Apache-2.0 |
| [prompt-toolkit](https://github.com/jonathanslenders/python-prompt-toolkit) | 3.0.17 | Library for building powerful interactive command lines in Python / BSD-3-Clause |
| [prompt\_toolkit](https://github.com/jonathanslenders/python-prompt-toolkit) | 3.0.17 | Library for building powerful interactive command lines in Python / BSD-3-Clause |
| [psutil](https://github.com/giampaolo/psutil) | 5.8.0 | A cross-platform process and system utilities module for Python / BSD-3-Clause |
| [ptyprocess](https://github.com/pexpect/ptyprocess) | 0.7.0 | Run a subprocess in a pseudo terminal / ISC |
| [py](https://github.com/pytest-dev/py) | 1.10.0 | library with cross-python path, ini-parsing, io, code, log facilities / MIT |
| [py-lief](https://lief.quarkslab.com/) | 0.10.1 | A cross platform library to parse, modify and abstract ELF, PE and MachO formats. / Apache-2.0 |
| [pycodestyle](https://pycodestyle.readthedocs.io/) | 2.7.0 | Python style guide checker / MIT |
| [pycosat](https://github.com/ContinuumIO/pycosat) | 0.6.3 | Bindings to picosat (a SAT solver) / MIT |
| [pycparser](https://github.com/eliben/pycparser) | 2.20 | Complete C99 parser in pure Python / BSD 3-clause |
| [pycurl](http://pycurl.sourceforge.net/) | 7.43.0.6 | A Python Interface To The cURL library / LGPL, MIT |
| [pyerfa](https://pyerfa.readthedocs.io/) | 1.7.2 | Python bindings for ERFA routines / BSD-3-Clause |
| [pyflakes](https://github.com/PyCQA/pyflakes) | 2.3.1 | Pyflakes analyzes programs and detects various errors. / MIT |
| [pygments](http://pygments.org/) | 2.8.1 | Pygments is a generic syntax highlighter suitable for use in code hosting, forums, wikis or other applications that need to prettify source code. / BSD-2-clause |
| [pylint](http://www.pylint.org/) | 2.7.4 | python code static checker / GPL-2.0-only |
| [pyodbc](https://github.com/mkleehammer/pyodbc) | 4.0.30 | DB API Module for ODBC / MIT |
| [pyopenssl](https://github.com/pyca/pyopenssl) | 20.0.1 | Python wrapper module around the OpenSSL library / Apache 2.0 |
| [pyparsing](http://pyparsing.wikispaces.com/) | 2.4.7 | Create and execute simple grammars / MIT |
| [pyrsistent](http://github.com/tobgu/pyrsistent/) | 0.17.3 | Persistent/Functional/Immutable data structures / MIT |
| [pysocks](https://github.com/Anorov/PySocks) | 1.7.1 | A Python SOCKS client module. See [Anorov/PySocks](https://github.com/Anorov/PySocks) for more information. / BSD 3-Clause |
| [pytables](http://www.pytables.org) | 3.6.1 | Brings together Python, HDF5 and NumPy to easily handle large amounts of data. / BSD 3-Clause |
| [pytest](https://docs.pytest.org/en/latest/) | 6.2.3 | Simple and powerful testing with Python. / MIT |
| [python](https://www.python.org/) | 3.8.8 | General purpose programming language / Python-2.0 |
| [python-dateutil](https://dateutil.readthedocs.org/) | 2.8.1 | Extensions to the standard Python datetime module. / BSD 3 Clause |
| [python-libarchive-c](https://github.com/Changaco/python-libarchive-c) | 2.9 | Python interface to libarchive / CC0-1.0 |
| [pytz](http://pythonhosted.org/pytz/) | 2021.1 | World timezone definitions, modern and historical. / MIT |
| [pywavelets](https://github.com/PyWavelets/pywt) | 1.1.1 | Discrete Wavelet Transforms in Python / MIT |
| [pyyaml](http://pyyaml.org/wiki/PyYAML) | 5.4.1 | YAML parser and emitter for Python / MIT |
| [pyzmq](https://github.com/zeromq/pyzmq) | 20.0.0 | Python bindings for zeromq / BSD 3-clause |
| [readline](https://cnswww.cns.cwru.edu/php/chet/readline/rltop.html) | 8.1 | library for editing command lines as they are typed in / GPL-3.0 |
| [regex](https://bitbucket.org/mrabarnett/mrab-regex) | 2021.4.4 | Alternative regular expression module, to replace re / Python-2.0 |
| [requests](http://python-requests.org) | 2.25.1 | Requests is an elegant and simple HTTP library for Python, built with ♥. / Apache-2.0 |
| [rope](https://github.com/python-rope/rope) | 0.18.0 | A python refactoring library / GPL 2.0 |
| [ruamel\_yaml](https://sourceforge.net/p/ruamel-yaml/code/ci/default/tree) | 0.15.80 | A patched copy of ruamel.yaml. / MIT |
| [scikit-image](http://scikit-image.org/) | 0.18.1 | Image processing in Python. / BSD-3-Clause |
| [scikit-learn](http://scikit-learn.org/) | 0.24.1 | A set of python modules for machine learning and data mining / BSD-3-Clause |
| [scipy](http://www.scipy.org/) | 1.6.2 | Scientific Library for Python / BSD 3-Clause |
| [seaborn](https://seaborn.pydata.org) | 0.11.1 | Statistical data visualization / BSD 3-Clause |
| [send2trash](https://github.com/hsoft/send2trash) | 1.5.0 | Python library to natively send files to Trash (or Recycle bin) on all platforms. / BSD-3-Clause |
| [setuptools](https://github.com/pypa/setuptools) | 52.0.0 | Download, build, install, upgrade, and uninstall Python packages / MIT |
| [simplegeneric](http://cheeseshop.python.org/pypi/simplegeneric) | 0.8.1 | Simple generic functions (similar to Python’s own len(), pickle.dump(), etc.) / Zope Public |
| [singledispatch](http://docs.python.org/3/library/functools.html#functools.singledispatch) | 3.6.1 | Transforms a function into a single-dispatch generic function / MIT |
| [sip](http://www.riverbankcomputing.com/software/sip/intro) | 4.19.25 | Create Python bindings for C and C++ libraries / GPL-3.0 |
| [six](https://six.readthedocs.io/) | 1.15.0 | Python 2 and 3 compatibility utilities / MIT |
| [snappy](https://github.com/google/snappy) | 1.1.8 | A fast compressor/decompressor / BSD 3-clause |
| [sniffio](https://github.com/python-trio/sniffio) | 1.2.0 | Sniff out which async library your code is running under / Apache-2.0 |
| [snowballstemmer](https://github.com/shibukawa/snowball_py) | 2.1.0 | Snowball stemming library collection for Python / BSD-2-Clause |
| [sortedcollections](http://www.grantjenks.com/docs/sortedcollections/) | 2.1.0 | Python Sorted Collections / Apache-2.0 |
| [sortedcontainers](http://www.grantjenks.com/docs/sortedcontainers/) | 2.3.0 | Python Sorted Container Types: SortedList, SortedDict, and SortedSet / Apache-2.0 |
| [soupsieve](http://facelessuser.github.io/soupsieve) | 2.2.1 | A modern CSS selector implementation for BeautifulSoup / MIT |
| [sphinx](http://www.sphinx-doc.org) | 3.5.3 | Sphinx is a tool that makes it easy to create intelligent and beautiful documentation / BSD-2-Clause |
| sphinxcontrib | 1.0 | Python namespace for sphinxcontrib / BSD |
| [sphinxcontrib-applehelp](https://www.sphinx-doc.org/en/master/) | 1.0.2 | sphinxcontrib-applehelp is a sphinx extension which outputs Apple help books / BSD-2-Clause |
| [sphinxcontrib-devhelp](https://www.sphinx-doc.org/en/master/) | 1.0.2 | sphinxcontrib-devhelp is a sphinx extension which outputs Devhelp document / BSD-2-Clause |
| [sphinxcontrib-htmlhelp](https://www.sphinx-doc.org/en/master/) | 1.0.3 | sphinxcontrib-htmlhelp is a sphinx extension which … / BSD-2-Clause |
| [sphinxcontrib-jsmath](https://www.sphinx-doc.org/en/master/) | 1.0.1 | A sphinx extension which renders display math in HTML via JavaScript / BSD-2-Clause |
| [sphinxcontrib-qthelp](https://www.sphinx-doc.org/en/master/) | 1.0.3 | sphinxcontrib-qthelp is a sphinx extension which outputs QtHelp document / BSD-2-Clause |
| [sphinxcontrib-serializinghtml](https://www.sphinx-doc.org/en/master/) | 1.1.4 | sphinxcontrib-serializinghtml is a sphinx extension which outputs “serialized” HTML files (json and pickle). / BSD-2-Clause |
| [sphinxcontrib-websupport](https://pypi.python.org/pypi/sphinxcontrib-websupport) | 1.2.4 | Sphinx API for Web Apps / BSD-2-Clause |
| [sqlalchemy](http://www.sqlalchemy.org/) | 1.3.23 | Database Abstraction Library. / MIT |
| [sqlite](http://www.sqlite.org/) | 3.35.4 | Implements a self-contained, zero-configuration, SQL database engine / Public-Domain (`<http://www.sqlite.org/copyright.html>`) |
| [statsmodels](https://www.statsmodels.org) | 0.12.2 | Statistical computations and models for use with SciPy / BSD-3-Clause |
| [sympy](https://sympy.org) | 1.8 | Python library for symbolic mathematics / BSD-3-Clause |
| [tblib](https://github.com/ionelmc/python-tblib) | 1.7.0 | Traceback serialization library. / BSD 2-Clause |
| [terminado](https://github.com/jupyter/terminado) | 0.9.4 | Terminals served by tornado websockets / BSD-2-Clause |
| [testpath](https://testpath.readthedocs.io) | 0.4.4 | Testpath is a collection of utilities for Python code working with files and commands. / BSD-3-Clause |
| [threadpoolctl](https://github.com/joblib/threadpoolctl) | 2.1.0 | Python helpers to control the threadpools of native libraries / BSD 3-Clause |
| [tifffile](https://github.com/cgohlke/tifffile) | 2021.3.31 | Read and write image data from and to TIFF files. / BSD-3-Clause |
| [tk](http://www.tcl.tk/) | 8.6.10 | A dynamic programming language with GUI support. Bundles Tcl and Tk. / Tcl/Tk |
| [toml](https://github.com/uiri/toml) | 0.10.2 | Python lib for TOML. / MIT |
| [toolz](http://toolz.readthedocs.org/) | 0.11.1 | A functional standard library for Python / BSD-3-Clause |
| [tornado](http://www.tornadoweb.org/) | 6.1 | A Python web framework and asynchronous networking library, originally developed at FriendFeed. / Apache-2.0 |
| [tqdm](https://pypi.python.org/pypi/tqdm) | 4.59.0 | A Fast, Extensible Progress Meter / MPL-2.0 or MIT |
| [traitlets](http://traitlets.readthedocs.org/) | 5.0.5 | Configuration system for Python applications / BSD-3-Clause |
| [typing\_extensions](https://github.com/python/typing/tree/master/typing_extensions) | 3.7.4.3 | Backported and Experimental Type Hints for Python / PSF-2.0 |
| [unicodecsv](https://github.com/jdunck/python-unicodecsv) | 0.14.1 | Drop-in replacement for csv module which supports unicode strings / BSD |
| [unixodbc](http://www.unixodbc.org/) | 2.3.9 | ODBC on non MS Windows platforms / LGPL-2.1 |
| [urllib3](https://urllib3.readthedocs.io/) | 1.26.4 | HTTP library with thread-safe connection pooling, file post, and more. / MIT |
| [wcwidth](https://github.com/jquast/wcwidth) | 0.2.5 | Measures number of Terminal column cells of wide-character codes. / MIT |
| [webencodings](https://github.com/gsnedders/python-webencodings) | 0.5.1 | Character encoding aliases for legacy web content / BSD 3-Clause |
| [werkzeug](https://palletsprojects.com/p/werkzeug/) | 1.0.1 | The comprehensive WSGI web application library. / BSD 3-Clause |
| [wheel](https://github.com/pypa/wheel) | 0.36.2 | A built-package format for Python. / MIT |
| [widgetsnbextension](http://ipython.org) | 3.5.1 | Interactive Widgets for Jupyter / BSD 3-clause |
| [wrapt](https://github.com/GrahamDumpleton/wrapt) | 1.12.1 | Module for decorators, wrappers and monkey patching / BSD 2-Clause |
| [xlrd](http://www.python-excel.org/) | 2.0.1 | Library for developers to extract data from Microsoft Excel (tm) spreadsheet files / BSD 3-Clause and BSD with advertising |
| [xlsxwriter](https://xlsxwriter.readthedocs.io/) | 1.3.8 | A Python module for creating Excel XLSX files / BSD-2-Clause |
| [xlwt](http://www.python-excel.org/) | 1.3.0 | Writing data and formatting information to Excel files / BSD |
| [xz](http://tukaani.org/xz/) | 5.2.5 | Data compression software with high compression ratio / LGPL-2.1 and GPL-2.0 |
| [yaml](http://pyyaml.org/wiki/LibYAML) | 0.1.7 | A C library for parsing and emitting YAML / MIT |
| [zeromq](http://zeromq.org) | 4.3.4 | A high-performance asynchronous messaging library. / LGPL-3.0-or-later |
| [zfp](https://computation.llnl.gov/projects/floating-point-compression) | 0.5.5 | Library for compressed numerical arrays that support high throughput read and write random access / BSD-3-Clause |
| [zict](http://github.com/mrocklin/zict) | 2.0.0 | Composable Dictionary Classes / BSD 3-Clause |
| [zipp](https://github.com/jaraco/zipp) | 3.4.1 | A pathlib-compatible Zipfile object wrapper / MIT |
| [zlib](http://zlib.net/) | 1.2.11 | Massively spiffy yet delicately unobtrusive compression library / zlib |
| zope | 1.0 | web application server / BSD |
| [zope.event](http://www.zope.org/en/latest/) | 4.5.0 | Very basic event publishing system / Zope Public License |
| [zope.interface](http://docs.zope.org/zope.interface/) | 5.2.0 | Interfaces for Python / ZPL-2.1 |
| [zstd](http://www.zstd.net) | 1.4.9 | Zstandard - Fast real-time compression algorithm / BSD 3-Clause |
| Name | Version | Summary / License |
|---|---|---|
| [\_libgcc\_mutex](https://github.com/AnacondaRecipes/_libgcc_mutex-feedstock) | 0.1 | Mutex for libgcc and libgcc-ng / None |
| [alabaster](http://www.sphinx-doc.org/en/stable/index.html) | 0.7.12 | Configurable, Python 2+3 compatible Sphinx theme. / BSD 3-Clause |
| [anaconda-client](http://anaconda.org) | 1.7.2 | anaconda.org command line client library / BSD 3-clause |
| [anaconda-navigator](https://github.com/ContinuumIO/navigator) | 2.0.3 | Anaconda Navigator / proprietary - Continuum Analytics, Inc. |
| [anaconda-project](https://github.com/Anaconda-Platform/anaconda-project) | 0.9.1 | Tool for encapsulating, running, and reproducing data science projects / BSD-3-Clause |
| [anyio](https://github.com/agronholm/anyio) | 2.2.0 | High level compatibility layer for multiple asynchronous event loop implementations on Python / MIT |
| [appdirs](http://github.com/ActiveState/appdirs) | 1.4.4 | A small Python module for determining appropriate platform-specific dirs. / MIT |
| [argh](https://github.com/neithere/argh) | 0.26.2 | The Natural CLI. / LGPL 3 |
| [argon2-cffi](https://argon2-cffi.readthedocs.org/) | 20.1.0 | The secure Argon2 password hashing algorithm. / MIT |
| [asn1crypto](https://github.com/wbond/asn1crypto) | 1.4.0 | Python ASN.1 library with a focus on performance and a pythonic API / MIT |
| [astroid](https://www.astroid.org/) | 2.5 | A abstract syntax tree for Python with inference support. / LGPL-2.1-only |
| [astropy](http://www.astropy.org/) | 4.2.1 | Community-developed Python Library for Astronomy / BSD-3-Clause |
| [async\_generator](https://github.com/python-trio/async_generator) | 1.10 | Async generators and context managers for Python 3.5+ / MIT |
| [atomicwrites](https://github.com/untitaker/python-atomicwrites) | 1.4.0 | Atomic file writes / MIT |
| [attrs](https://attrs.readthedocs.io/en/stable/) | 20.3.0 | attrs is the Python package that will bring back the joy of writing classes by relieving you from the drudgery of implementing object protocols (aka dunder methods). / MIT |
| [autopep8](https://github.com/hhatto/autopep8) | 1.5.6 | A tool that automatically formats Python code to conform to the PEP 8 style guide / MIT |
| [babel](http://babel.pocoo.org/) | 2.9.0 | Utilities to internationalize and localize Python applications / BSD 3-clause |
| [backcall](https://github.com/takluyver/backcall/) | 0.2.0 | Specifications for callback functions passed in to an API / BSD-3-Clause |
| [backports](https://bitbucket.org/brandon/backports) | 1.0 | None / BSD |
| [backports.shutil\_get\_terminal\_size](https://github.com/chrippa/backports.shutil_get_terminal_size) | 1.0.0 | A backport of the get\_terminal\_size function from Python 3.3’s shutil. / MIT |
| [beautifulsoup4](http://www.crummy.com/software/BeautifulSoup/) | 4.9.3 | Python library designed for screen-scraping / MIT |
| [bitarray](https://github.com/ilanschnell/bitarray) | 1.9.2 | efficient arrays of booleans – C extension / PSF |
| [bkcharts](http://github.com/bokeh/bkcharts) | 0.2 | High level chart types built on top of Bokeh / BSD 3-Clause |
| [black](https://github.com/python/black) | 19.10b0 | The Uncompromising Code Formatter / MIT |
| blas | 1.0 | |
| [bleach](https://github.com/mozilla/bleach) | 3.3.0 | Easy, whitelist-based HTML-sanitizing tool / Apache-2.0 |
| [blosc](https://github.com/Blosc/c-blosc) | 1.21.0 | A blocking, shuffling and loss-less compression library that can be faster than memcpy() / BSD-3-Clause |
| [bokeh](http://bokeh.pydata.org/) | 2.3.1 | Statistical and novel interactive HTML plots for Python / BSD-3-Clause |
| [boto](https://github.com/boto/boto/) | 2.49.0 | Amazon Web Services Library / MIT |
| [bottleneck](https://github.com/pydata/bottleneck) | 1.3.2 | Fast NumPy array functions written in Cython. / BSD 2-Clause |
| [brotlipy](https://github.com/python-hyper/brotlipy) | 0.7.0 | Python bindings to the Brotli compression library / MIT |
| [bzip2](http://www.bzip.org/) | 1.0.8 | high-quality data compressor / bzip2 |
| [c-ares](https://c-ares.haxx.se/) | 1.17.1 | This is c-ares, an asynchronous resolver library / MIT |
| [ca-certificates](https://github.com/conda-forge/ca-certificates-feedstock) | 2021.4.13 | Certificates for use with other packages. / MPL 2.0 |
| [cairo](http://cairographics.org/) | 1.16.0 | Cairo is a 2D graphics library with support for multiple output devices. / LGPL 2.1 or MPL 1.1 |
| [certifi](http://certifi.io/) | 2020.12.5 | Python package for providing Mozilla’s CA Bundle. / ISC |
| [cffi](https://bitbucket.org/cffi/cffi) | 1.14.5 | Foreign Function Interface for Python calling C code. / MIT |
| [chardet](https://github.com/chardet/chardet) | 4.0.0 | Universal character encoding detector / LGPL2 |
| [click](https://palletsprojects.com/p/click) | 7.1.2 | Python composable command line interface toolkit / BSD-3-Clause |
| [cloudpickle](https://github.com/cloudpipe/cloudpickle) | 1.6.0 | Extended pickling support for Python objects / BSD-3-Clause |
| [clyent](https://github.com/Anaconda-Platform/clyent) | 1.2.2 | Command line client library for windows and posix / BSD 3-Clause |
| [colorama](https://github.com/tartley/colorama) | 0.4.4 | Cross-platform colored terminal text / BSD-3-Clause |
| [conda](https://conda.io) | 4.10.1 | OS-agnostic, system-level binary package and environment manager. / BSD 3-Clause |
| [conda-build](https://github.com/conda/conda-build) | 3.21.4 | tools for building conda packages / BSD 3-Clause |
| [conda-env](https://github.com/conda/conda-env) | 2.6.0 | Tools for interacting with conda environments. / BSD 3-Clause |
| [conda-verify](https://github.com/conda/conda-verify) | 3.4.2 | tool for validating conda recipes and conda packages / BSD 3-Clause |
| [contextlib2](http://contextlib2.readthedocs.org) | 0.6.0.post1 | Backports and enhancements for the contextlib module / PSF 2 |
| [cryptography](https://github.com/pyca/cryptography) | 3.4.7 | Provides cryptographic recipes and primitives to Python developers / Apache-2.0 AND BSD-3-Clause AND PSF-2.0 AND MIT |
| [curl](http://curl.haxx.se/) | 7.71.1 | tool and library for transferring data with URL syntax / MIT/X derivate (`<http://curl.haxx.se/docs/copyright.html>`) |
| [cycler](http://matplotlib.org/cycler) | 0.10.0 | Composable style cycles. / BSD 3-Clause |
| [cython](http://www.cython.org/) | 0.29.23 | The Cython compiler for writing C extensions for the Python language / Apache-2.0 |
| [cytoolz](https://github.com/pytoolz/cytoolz) | 0.11.0 | Cython implementation of Toolz. High performance functional utilities / BSD-3-Clause |
| [dask](https://dask.org/) | 2021.4.0 | Parallel PyData with Task Scheduling / BSD-3-Clause |
| [dask-core](http://github.com/dask/dask/) | 2021.4.0 | Parallel Python with task scheduling / BSD-3-Clause |
| [dbus](http://www.freedesktop.org/wiki/Software/dbus/) | 1.13.18 | Simple message bus system for applications to talk to one another / GPL2 |
| [decorator](https://github.com/micheles/decorator) | 5.0.6 | Better living through Python with decorators. / BSD-3-Clause |
| [defusedxml](https://bitbucket.org/tiran/defusedxml) | 0.7.1 | XML bomb protection for Python stdlib modules / PSF 2.0 |
| [diff-match-patch](http://code.google.com/p/google-diff-match-patch/) | 20200713 | Diff Match Patch is a high-performance library in multiple languages that manipulates plain text / Apache-2.0 |
| [distributed](http://distributed.readthedocs.io/en/latest/) | 2021.4.0 | Distributed computing with Dask / BSD-3-Clause |
| [docutils](http://docutils.sourceforge.net/) | 0.17 | Docutils – Python Documentation Utilities / Public Domain Dedictation and BSD 2-Clause and PSF 2.1.1 and GPL 3.0 |
| [entrypoints](https://github.com/takluyver/entrypoints) | 0.3 | Discover and load entry points from installed packages. / MIT License |
| [et\_xmlfile](https://bitbucket.org/openpyxl/et_xmlfile) | 1.0.1 | An implementation of lxml.xmlfile for the standard library / MIT |
| [expat](http://expat.sourceforge.net/) | 2.3.0 | Expat XML parser library in C / MIT |
| [fastcache](https://github.com/pbrady/fastcache) | 1.1.0 | C implementation of Python 3 lru\_cache / MIT |
| [filelock](https://github.com/benediktschmitt/py-filelock) | 3.0.12 | A platform independent file lock. / Public Domain |
| [flake8](http://flake8.pycqa.org/) | 3.9.0 | Your Tool For Style Guide Enforcement / MIT |
| [flask](http://flask.pocoo.org) | 1.1.2 | A microframework based on Werkzeug, Jinja2 and good intentions. / BSD 3-Clause |
| [fontconfig](http://www.freedesktop.org/wiki/Software/fontconfig/) | 2.13.1 | A library for configuring and customizing font access. / MIT |
| [freetype](https://www.freetype.org/) | 2.10.4 | A Free, High-Quality, and Portable Font Engine / GPL-2.0-only and LicenseRef-FreeType |
| [fribidi](https://github.com/fribidi/fribidi) | 1.0.10 | The Free Implementation of the Unicode Bidirectional Algorithm. / LGPL-2.1 |
| [fsspec](https://github.com/martindurant/filesystem_spec) | 0.9.0 | A specification for pythonic filesystems / BSD-3-Clause |
| [future](http://python-future.org) | 0.18.2 | Clean single-source support for Python 3 and 2 / MIT |
| [get\_terminal\_size](https://github.com/chrippa/backports.shutil_get_terminal_size) | 1.0.0 | Get the size of the terminal window. / MIT |
| [gevent](https://www.gevent.org) | 21.1.2 | Coroutine-based network library / MIT |
| [glib](https://developer.gnome.org/glib/) | 2.68.1 | Provides core application building blocks for libraries and applications written in C. / LGPL-2.1 |
| [glob2](https://github.com/miracle2k/python-glob2) | 0.7 | Version of the glob module that supports recursion via \*\*, and can capture patterns. / BSD-2-Clause |
| [gmp](http://gmplib.org/) | 6.2.1 | The GNU multiprecision library. / GPL-2.0-or-later AND LGPL-3.0-or-later |
| [gmpy2](https://pypi.python.org/pypi/gmpy2) | 2.0.8 | GMP/MPIR, MPFR, and MPC interface to Python 2.6+ and 3.x / LGPL 3 |
| [graphite2](http://graphite.sil.org/) | 1.3.14 | A “smart font” system that handles the complexities of lesser-known languages of the world. / LGPLv2 |
| [greenlet](https://github.com/python-greenlet/greenlet) | 1.0.0 | Lightweight in-process concurrent programming / MIT |
| [gst-plugins-base](http://gstreamer.freedesktop.org/) | 1.14.0 | GStreamer Base Plug-ins / GPL2 |
| [gstreamer](http://gstreamer.freedesktop.org/) | 1.14.0 | Library for constructing graphs of media-handling components / LGPL 2 |
| [h5py](http://www.h5py.org/) | 2.10.0 | Read and write HDF5 files from Python. / BSD-3-Clause |
| [harfbuzz](http://www.freedesktop.org/wiki/Software/HarfBuzz/) | 2.8.0 | An OpenType text shaping engine. / MIT |
| [hdf5](http://www.hdfgroup.org/HDF5/) | 1.10.4 | HDF5 is a data model, library, and file format for storing and managing data / HDF5 |
| [heapdict](http://stutzbachenterprises.com/) | 1.0.1 | A heap with decrease-key and increase-key operations / BSD 3-Clause |
| [html5lib](https://github.com/html5lib/html5lib-python) | 1.1 | HTML parser based on the WHATWG HTML specification / MIT |
| [icu](http://site.icu-project.org/) | 58.2 | International Components for Unicode. / MIT |
| [idna](https://github.com/kjd/idna) | 2.10 | Internationalized Domain Names in Applications (IDNA). / BSD Like |
| [imageio](https://imageio.github.io) | 2.9.0 | A Python library for reading and writing image data / BSD-2-Clause |
| [imagesize](https://github.com/shibukawa/imagesize_py) | 1.2.0 | Getting image size from png/jpeg/jpeg2000/gif file / MIT |
| [importlib-metadata](https://github.com/python/importlib_metadata) | 3.10.0 | A library to access the metadata for a Python package / Apache-2.0 |
| [importlib\_metadata](https://github.com/python/importlib_metadata) | 3.10.0 | A library to access the metadata for a Python package / Apache-2.0 |
| [iniconfig](http://github.com/RonnyPfannschmidt/iniconfig) | 1.1.1 | iniconfig: brain-dead simple config-ini parsing / MIT |
| [intel-openmp](https://software.intel.com/en-us/node/522690) | 2021.2.0 | Math library for Intel and compatible processors / LicenseRef-ProprietaryIntel |
| [intervaltree](https://github.com/chaimleib/intervaltree) | 3.1.0 | Editable interval tree data structure for Python 2 and 3 / Apache-2.0 |
| [ipykernel](https://ipython.org) | 5.3.4 | IPython Kernel for Jupyter / BSD-3-Clause |
| [ipython](https://ipython.org) | 7.22.0 | IPython: Productive Interactive Computing / BSD-3-Clause |
| [ipython\_genutils](http://ipython.org) | 0.2.0 | vestigial utilities from IPython / BSD 3-Clause |
| [ipywidgets](https://github.com/ipython/ipywidgets) | 7.6.3 | Jupyter Interactive Widgets / BSD-3-Clause |
| [isort](https://github.com/timothycrosley/isort) | 5.8.0 | A Python utility / library to sort Python imports. / MIT |
| [itsdangerous](https://github.com/pallets/itsdangerous) | 1.1.0 | Various helpers to pass trusted data to untrusted environments. / BSD 3-Clause |
| [jbig](https://www.cl.cam.ac.uk/~mgk25/jbigkit) | 2.1 | Implementation of the JBIG1 data compression standard / GPL-2.0 |
| [jdcal](https://github.com/phn/jdcal) | 1.4.1 | Julian dates from proleptic Gregorian and Julian calendars. / BSD 2-Clause |
| [jedi](https://github.com/davidhalter/jedi/) | 0.17.2 | An autocompletion tool for Python that can be used for text editors. / MIT |
| [jeepney](https://gitlab.com/takluyver/jeepney) | 0.6.0 | Pure Python DBus interface / MIT |
| [jinja2](http://jinja.pocoo.org) | 2.11.3 | An easy to use stand-alone template engine written in pure python. / BSD-3-Clause |
| [joblib](https://pypi.org/project/joblib/) | 1.0.1 | Lightweight pipelining: using Python functions as pipeline jobs. / BSD-3-Clause |
| [jpeg](http://www.ijg.org/) | 9b | read/write jpeg COM, EXIF, IPTC medata / Custom free software license |
| [json5](https://github.com/dpranke/pyjson5) | 0.9.5 | A Python implementation of the JSON5 data format / Apache-2.0 |
| [jsonschema](https://github.com/Julian/jsonschema) | 3.2.0 | An implementation of JSON Schema validation for Python / MIT |
| [jupyter](http://jupyter.org) | 1.0.0 | Jupyter metapackage. Install all the Jupyter components in one go. / BSD 3-Clause |
| [jupyter-packaging](https://github.com/jupyter/jupyter-packaging) | 0.7.12 | Jupyter Packaging Utilities / BSD-3-Clause |
| [jupyter\_client](https://jupyter.org) | 6.1.12 | jupyter\_client contains the reference implementation of the Jupyter protocol. / BSD-3-Clause |
| [jupyter\_console](http://jupyter.org) | 6.4.0 | Jupyter terminal console / BSD-3-Clause |
| [jupyter\_core](https://jupyter.org) | 4.7.1 | Core common functionality of Jupyter projects. / BSD-3-Clause |
| [jupyter\_server](https://jupyter.org) | 1.4.1 | Jupyter Server / BSD-3-Clause |
| [jupyterlab](https://github.com/jupyterlab/jupyterlab) | 3.0.14 | JupyterLab PRE-ALPHA / BSD-3-Clause |
| [jupyterlab\_pygments](http://github.com/JupyterLab/jupyterlab_pygments) | 0.1.2 | Pygments syntax coloring scheme making use of the JupyterLab CSS variables / BSD-3-Clause |
| [jupyterlab\_server](https://github.com/jupyterlab/jupyterlab_server) | 2.4.0 | A set of server components for JupyterLab and JupyterLab like applications. / BSD-3-Clause |
| [jupyterlab\_widgets](https://github.com/jupyter-widgets/ipywidgets) | 1.0.0 | JupyterLab extension providing HTML widgets / BSD-3-Clause |
| [keyring](https://github.com/jaraco/keyring) | 22.3.0 | Store and access your passwords safely / MIT |
| [kiwisolver](https://github.com/nucleic/kiwi) | 1.3.1 | An efficient C++ implementation of the Cassowary constraint solver / BSD-3-Clause |
| [krb5](http://web.mit.edu/kerberos/) | 1.18.2 | A network authentication protocol. / MIT |
| [lazy-object-proxy](https://github.com/ionelmc/python-lazy-object-proxy) | 1.6.0 | A fast and thorough lazy object proxy / BSD-2-Clause |
| [lcms2](http://www.littlecms.com/) | 2.12 | Open Source Color Management Engine / MIT |
| [ld\_impl\_linux-64](https://www.gnu.org/software/binutils/) | 2.33.1 | A set of programming tools for creating and managing binary programs, object files, libraries, profile data, and assembly source code. / GPL-3.0-only |
| [libarchive](http://www.libarchive.org/) | 3.4.2 | Multi-format archive and compression library / BSD-2-Clause |
| [libcurl](http://curl.haxx.se/) | 7.71.1 | tool and library for transferring data with URL syntax / MIT/X derivate (`<http://curl.haxx.se/docs/copyright.html>`) |
| [libedit](http://thrysoee.dk/editline/) | 3.1.20210216 | Editline Library (libedit) / BSD-2-Clause |
| [libev](http://software.schmorp.de/pkg/libev.html) | 4.33 | A full-featured and high-performance event loop that is loosely modeled after libevent, but without its limitations and bugs. / BSD-2-Clause |
| [libffi](https://sourceware.org/libffi/) | 3.3 | A Portable Foreign Function Interface Library. / Custom |
| [libgcc-ng](https://gcc.gnu.org/onlinedocs/gccint/Libgcc.html) | 9.1.0 | The GCC low-level runtime library / GPL-3.0-only WITH GCC-exception-3.1 |
| [libgfortran-ng](https://gcc.gnu.org/) | 7.3.0 | The GNU Fortran Runtime Library / GPL-3.0-only WITH GCC-exception-3.1 |
| [liblief](https://lief.quarkslab.com/) | 0.10.1 | A cross platform library to parse, modify and abstract ELF, PE and MachO formats. / Apache-2.0 |
| [libllvm10](http://llvm.org/) | 10.0.1 | Development headers and libraries for LLVM / Apache-2.0 WITH LLVM-exception |
| [libpng](http://www.libpng.org/pub/png/libpng.html) | 1.6.37 | PNG reference library / zlib/libpng |
| [libsodium](http://libsodium.org) | 1.0.18 | A modern and easy-to-use crypto library. / ISC |
| [libspatialindex](http://libspatialindex.github.io) | 1.9.3 | Extensible framework for robust spatial indexing / MIT |
| [libssh2](https://www.libssh2.org/) | 1.9.0 | the SSH library / BSD-3-Clause |
| [libstdcxx-ng](https://gcc.gnu.org/) | 9.1.0 | The GNU C++ Runtime Library / GPL-3.0-only WITH GCC-exception-3.1 |
| [libtiff](http://www.libtiff.org/) | 4.2.0 | Support for the Tag Image File Format (TIFF). / HPND |
| [libtool](http://www.gnu.org/software/libtool/) | 2.4.6 | The GNU Portable Library Tool / GPL 3 |
| [libuuid](http://sourceforge.net/projects/libuuid/) | 1.0.3 | Portable uuid C library. / BSD 3-Clause |
| [libuv](http://libuv.org/) | 1.40.0 | Cross-platform asynchronous I/O / MIT |
| [libwebp-base](https://developers.google.com/speed/webp) | 1.2.0 | WebP image library / BSD-3-Clause |
| [libxcb](http://xcb.freedesktop.org/) | 1.14 | This is the C-language Binding (XCB) package to the X Window System protocol / MIT |
| [libxml2](http://xmlsoft.org/) | 2.9.10 | The XML C parser and toolkit of Gnome / MIT |
| [libxslt](http://xmlsoft.org/XSLT/) | 1.1.34 | The XSLT C library developed for the GNOME project / MIT |
| [llvmlite](http://llvmlite.pydata.org) | 0.36.0 | A lightweight LLVM python binding for writing JIT compilers. / BSD-2-Clause |
| [locket](https://github.com/mwilliamson/locket.py) | 0.2.1 | File-based locks for Python for Linux and Windows / BSD 2-Clause |
| [lxml](http://lxml.de/) | 4.6.3 | Pythonic binding for the C libraries libxml2 and libxslt. / BSD-3-Clause and GPL-2.0-only and ZPL-2.0 and LicenseRef-ElementTree |
| [lz4-c](https://www.lz4.org) | 1.9.3 | Extremely Fast Compression algorithm / BSD-2-Clause |
| [lzo](http://www.oberhumer.com/opensource/lzo/) | 2.10 | LZO is a portable lossless data compression library written in ANSI C. / GPL v2+ |
| [markupsafe](https://www.palletsprojects.com/p/markupsafe) | 1.1.1 | A Python module that implements the jinja2.Markup string / BSD-3-Clause |
| [matplotlib](http://matplotlib.org/) | 3.3.4 | Publication quality figures in Python / LicenseRef-PSF-based |
| [matplotlib-base](http://matplotlib.org/) | 3.3.4 | Publication quality figures in Python / LicenseRef-PSF-based |
| [mccabe](https://github.com/PyCQA/mccabe) | 0.6.1 | McCabe complexity checker for Python / MIT |
| [mistune](https://github.com/lepture/mistune) | 0.8.4 | The fastest markdown parser in pure Python. / BSD 3-Clause |
| [mkl](https://software.intel.com/en-us/mkl) | 2021.2.0 | Math library for Intel and compatible processors / LicenseRef-ProprietaryIntel |
| [mkl-service](https://github.com/ContinuumIO/mkl-service) | 2.3.0 | Python bindings to MKL service functions / 3-clause BSD |
| [mkl\_fft](http://github.com/IntelPython/mkl_fft) | 1.3.0 | NumPy-based implementation of Fast Fourier Transform using Intel (R) Math Kernel Library. / BSD 3-Clause |
| [mkl\_random](http://github.com/IntelPython/mkl_random) | 1.2.1 | Intel (R) MKL-powered package for sampling from common probability distributions into NumPy arrays. / BSD 3-Clause |
| [mock](https://github.com/testing-cabal/mock) | 4.0.3 | A library for testing in Python / BSD-2-Clause |
| [more-itertools](https://github.com/more-itertools/more-itertools) | 8.7.0 | More routines for operating on iterables, beyond itertools / MIT |
| [mpc](http://www.multiprecision.org/) | 1.1.0 | A C library for the arithmetic of complex numbers with arbitrarily high precision. / LGPL 3 |
| [mpfr](http://www.mpfr.org/) | 4.0.2 | The MPFR library is a C library for multiple-precision floating-point computations with correct rounding. / LGPL-3.0-only |
| [mpmath](http://mpmath.org) | 1.2.1 | Python library for arbitrary-precision floating-point arithmetic / BSD 3-Clause |
| [msgpack-python](http://msgpack.org/) | 1.0.2 | MessagePack (de)serializer / Apache-2.0 |
| [multipledispatch](https://github.com/mrocklin/multipledispatch/) | 0.6.0 | Multiple dispatch in Python / BSD 3-Clause |
| [mypy\_extensions](http://www.mypy-lang.org/) | 0.4.3 | Experimental type system extensions for programs checked with the mypy typechecker. / MIT |
| [nbclassic](http://github.com/jupyterlab/nbclassic) | 0.2.6 | Jupyter Notebook as a Jupyter Server Extension. / BSD-3-Clause |
| [nbclient](https://jupyter.org) | 0.5.3 | A client library for executing notebooks. Formally nbconvert’s ExecutePreprocessor. / BSD-3-Clause |
| [nbconvert](http://jupyter.org) | 6.0.7 | Converting Jupyter Notebooks / BSD-3-Clause |
| [nbformat](http://jupyter.org) | 5.1.3 | The Jupyter Notebook format / BSD-3-Clause |
| [ncurses](http://www.gnu.org/software/ncurses/) | 6.2 | Library for text-based user interfaces / Free software (MIT-like) |
| [nest-asyncio](https://github.com/erdewit/nest_asyncio) | 1.5.1 | Patch asyncio to allow nested event loops / BSD-2-Clause |
| [networkx](https://networkx.github.io/) | 2.5 | Python package for creating and manipulating complex networks / BSD-3-Clause |
| [nltk](http://nltk.org/) | 3.6.1 | Natural Language Toolkit / Apache 2.0 |
| [nose](http://readthedocs.org/docs/nose/) | 1.3.7 | Nose extends unittest to make testing easier / LGPL-2.1 |
| [notebook](https://jupyter.org) | 6.3.0 | Jupyter Notebook / BSD-3-Clause |
| [numexpr](https://github.com/pydata/numexpr) | 2.7.3 | Fast numerical expression evaluator for NumPy. / MIT |
| [numpy](http://numpy.scipy.org/) | 1.20.1 | Array processing for numbers, strings, records, and objects. / BSD 3-Clause |
| [numpy-base](http://numpy.scipy.org/) | 1.20.1 | Array processing for numbers, strings, records, and objects. / BSD 3-Clause |
| [numpydoc](https://github.com/numpy/numpydoc) | 1.1.0 | Numpy’s Sphinx extensions / BSD 3-Clause |
| [olefile](http://www.decalage.info/python/olefileio) | 0.46 | parse, read and write Microsoft OLE2 files / BSD 2-Clause |
| [openpyxl](https://openpyxl.readthedocs.io) | 3.0.7 | A Python library to read/write Excel 2010 xlsx/xlsm files / MIT |
| [openssl](http://www.openssl.org/) | 1.1.1k | OpenSSL is an open-source implementation of the SSL and TLS protocols / OpenSSL |
| [packaging](https://github.com/pypa/packaging) | 20.9 | Core utilities for Python packages / Apache 2.0 or BSD 2-Clause |
| [pandas](http://pandas.pydata.org) | 1.2.4 | High-performance, easy-to-use data structures and data analysis tools. / BSD-3-Clause |
| [pandoc](http://pandoc.org/) | 2.12 | Universal markup converter (repackaged binaries) / GPL-2.0 |
| [pandocfilters](https://github.com/jgm/pandocfilters) | 1.4.3 | A python module for writing pandoc filters / BSD-3-Clause |
| [pango](http://www.pango.org/) | 1.45.3 | Text layout and rendering engine. / LGPL-2.1 |
| [parso](https://github.com/davidhalter/parso) | 0.7.0 | A Python Parser / MIT |
| [partd](https://github.com/dask/partd) | 1.2.0 | Data structure for on-disk shuffle operations / BSD 3-Clause |
| [patchelf](http://nixos.org/patchelf.html) | 0.12 | A small utility to modify the dynamic linker and RPATH of ELF executables. / GPL-3.0-or-later |
| [path](https://github.com/jaraco/path) | 15.1.2 | A module wrapper for os.path / MIT |
| [path.py](https://github.com/jaraco/path.py) | 12.5.0 | A module wrapper for os.path / MIT |
| [pathlib2](https://github.com/mcmtroffaes/pathlib2) | 2.3.5 | Fork of pathlib aiming to support the full stdlib Python API / MIT |
| [pathspec](https://github.com/cpburnz/python-path-specification) | 0.7.0 | Utility library for gitignore style pattern matching of file paths. / MPL-2.0 |
| [patsy](https://github.com/pydata/patsy) | 0.5.1 | Describing statistical models in Python using symbolic formulas / BSD-2-Clause, PSF2 |
| [pcre](http://www.pcre.org/) | 8.44 | Regular expression pattern matching using the same syntax and semantics as Perl 5. / BSD 3-Clause |
| [pep8](http://pep8.readthedocs.org/) | 1.7.1 | Python style guide checker / MIT |
| [pexpect](http://pexpect.sourceforge.net/) | 4.8.0 | Pexpect makes Python a better tool for controlling other applications. / ISC |
| [pickleshare](https://github.com/pickleshare/pickleshare/) | 0.7.5 | Tiny ‘shelve’-like database with concurrency support / MIT |
| [pillow](https://pillow.readthedocs.io) | 8.2.0 | Pillow is the friendly PIL fork by Alex Clark and Contributors / LicenseRef-PIL |
| [pip](https://pip.pypa.io/en/stable/) | 21.0.1 | PyPA recommended tool for installing Python packages / MIT |
| [pixman](http://www.pixman.org/) | 0.40.0 | A low-level software library for pixel manipulation. / MIT |
| [pkginfo](https://code.launchpad.net/~tseaver/pkginfo/trunk) | 1.7.0 | Query metadatdata from sdists / bdists / installed packages. / MIT |
| [pluggy](https://github.com/pytest-dev/pluggy) | 0.13.1 | Plugin registration and hook calling for Python / MIT |
| [ply](http://www.dabeaz.com/ply/index.html) | 3.11 | Python Lex-Yacc / BSD 3-clause |
| [prometheus\_client](https://github.com/prometheus/client_python) | 0.10.1 | Python client for the Prometheus monitoring system / Apache-2.0 |
| [prompt-toolkit](https://github.com/jonathanslenders/python-prompt-toolkit) | 3.0.17 | Library for building powerful interactive command lines in Python / BSD-3-Clause |
| [prompt\_toolkit](https://github.com/jonathanslenders/python-prompt-toolkit) | 3.0.17 | Library for building powerful interactive command lines in Python / BSD-3-Clause |
| [psutil](https://github.com/giampaolo/psutil) | 5.8.0 | A cross-platform process and system utilities module for Python / BSD-3-Clause |
| [ptyprocess](https://github.com/pexpect/ptyprocess) | 0.7.0 | Run a subprocess in a pseudo terminal / ISC |
| [py](https://github.com/pytest-dev/py) | 1.10.0 | library with cross-python path, ini-parsing, io, code, log facilities / MIT |
| [py-lief](https://lief.quarkslab.com/) | 0.10.1 | A cross platform library to parse, modify and abstract ELF, PE and MachO formats. / Apache-2.0 |
| [pycodestyle](https://pycodestyle.readthedocs.io/) | 2.6.0 | Python style guide checker / MIT |
| [pycosat](https://github.com/ContinuumIO/pycosat) | 0.6.3 | Bindings to picosat (a SAT solver) / MIT |
| [pycparser](https://github.com/eliben/pycparser) | 2.20 | Complete C99 parser in pure Python / BSD 3-clause |
| [pycurl](http://pycurl.sourceforge.net/) | 7.43.0.6 | A Python Interface To The cURL library / LGPL, MIT |
| [pydocstyle](https://github.com/PyCQA/pydocstyle) | 6.0.0 | Python docstring style checker (formerly pep257) / MIT |
| [pyerfa](https://pyerfa.readthedocs.io/) | 1.7.3 | Python bindings for ERFA routines / BSD-3-Clause |
| [pyflakes](https://github.com/PyCQA/pyflakes) | 2.2.0 | Pyflakes analyzes programs and detects various errors. / MIT |
| [pygments](http://pygments.org/) | 2.8.1 | Pygments is a generic syntax highlighter suitable for use in code hosting, forums, wikis or other applications that need to prettify source code. / BSD-2-clause |
| [pylint](http://www.pylint.org/) | 2.7.4 | python code static checker / GPL-2.0-only |
| [pyls-black](https://github.com/rupert/pyls-black) | 0.4.6 | Black plugin for the Python Language Server / MIT |
| [pyls-spyder](https://github.com/spyder-ide/pyls-spyder) | 0.3.2 | Spyder extensions for the python-language-server / MIT |
| [pyodbc](https://github.com/mkleehammer/pyodbc) | 4.0.30 | DB API Module for ODBC / MIT |
| [pyopenssl](https://github.com/pyca/pyopenssl) | 20.0.1 | Python wrapper module around the OpenSSL library / Apache 2.0 |
| [pyparsing](http://pyparsing.wikispaces.com/) | 2.4.7 | Create and execute simple grammars / MIT |
| [pyqt](http://www.riverbankcomputing.co.uk/software/pyqt) | 5.9.2 | Python binding of the cross-platform GUI toolkit Qt. / Commercial, GPL-2.0, GPL-3.0 |
| [pyrsistent](http://github.com/tobgu/pyrsistent/) | 0.17.3 | Persistent/Functional/Immutable data structures / MIT |
| [pysocks](https://github.com/Anorov/PySocks) | 1.7.1 | A Python SOCKS client module. See [Anorov/PySocks](https://github.com/Anorov/PySocks) for more information. / BSD 3-Clause |
| [pytables](http://www.pytables.org) | 3.6.1 | Brings together Python, HDF5 and NumPy to easily handle large amounts of data. / BSD 3-Clause |
| [pytest](https://docs.pytest.org/en/latest/) | 6.2.3 | Simple and powerful testing with Python. / MIT |
| [python](https://www.python.org/) | 3.8.8 | General purpose programming language / Python-2.0 |
| [python-dateutil](https://dateutil.readthedocs.org/) | 2.8.1 | Extensions to the standard Python datetime module. / BSD 3 Clause |
| [python-jsonrpc-server](https://github.com/palantir/python-jsonrpc-server) | 0.4.0 | A Python 2.7 and 3.4+ server implementation of the JSON RPC 2.0 protocol. / MIT |
| [python-language-server](https://github.com/palantir/python-language-server) | 0.36.2 | An implementation of the Language Server Protocol for Python / MIT |
| [python-libarchive-c](https://github.com/Changaco/python-libarchive-c) | 2.9 | Python interface to libarchive / CC0-1.0 |
| [pytz](http://pythonhosted.org/pytz/) | 2021.1 | World timezone definitions, modern and historical. / MIT |
| [pywavelets](https://github.com/PyWavelets/pywt) | 1.1.1 | Discrete Wavelet Transforms in Python / MIT |
| [pyxdg](http://freedesktop.org/wiki/Software/pyxdg) | 0.27 | PyXDG contains implementations of freedesktop.org standards in python. / GNU Lesser General Public v2 (LGPLv2) |
| [pyyaml](http://pyyaml.org/wiki/PyYAML) | 5.4.1 | YAML parser and emitter for Python / MIT |
| [pyzmq](https://github.com/zeromq/pyzmq) | 20.0.0 | Python bindings for zeromq / BSD 3-clause |
| [qdarkstyle](https://github.com/ColinDuquesnoy/QDarkStyleSheet) | 2.8.1 | A dark stylesheet for Qt applications (Qt4, Qt5, PySide, PyQt4, PyQt5, QtPy, PyQtGraph). / MIT |
| [qt](http://qt-project.org) | 5.9.7 | Qt is a cross-platform application and UI framework. / LGPL-3.0 |
| [qtawesome](https://github.com/spyder-ide/qtawesome) | 1.0.2 | Iconic fonts in PyQt and PySide applications / MIT |
| [qtconsole](http://jupyter.org) | 5.0.3 | Jupyter Qt Console / BSD-3-Clause |
| [qtpy](https://github.com/spyder-ide/qtpy) | 1.9.0 | Abstraction layer for PyQt5/PyQt4/PySide / MIT |
| [readline](https://cnswww.cns.cwru.edu/php/chet/readline/rltop.html) | 8.1 | library for editing command lines as they are typed in / GPL-3.0 |
| [regex](https://bitbucket.org/mrabarnett/mrab-regex) | 2021.4.4 | Alternative regular expression module, to replace re / Python-2.0 |
| [requests](http://python-requests.org) | 2.25.1 | Requests is an elegant and simple HTTP library for Python, built with ♥. / Apache-2.0 |
| ripgrep | 12.1.1 | |
| [rope](https://github.com/python-rope/rope) | 0.18.0 | A python refactoring library / GPL 2.0 |
| [rtree](http://toblerity.github.com/rtree/) | 0.9.7 | R-Tree spatial index for Python GIS / MIT |
| [ruamel\_yaml](https://sourceforge.net/p/ruamel-yaml/code/ci/default/tree) | 0.15.100 | A patched copy of ruamel.yaml. / MIT |
| [scikit-image](http://scikit-image.org/) | 0.18.1 | Image processing in Python. / BSD-3-Clause |
| [scikit-learn](http://scikit-learn.org/) | 0.24.1 | A set of python modules for machine learning and data mining / BSD-3-Clause |
| [scipy](http://www.scipy.org/) | 1.6.2 | Scientific Library for Python / BSD 3-Clause |
| [seaborn](https://seaborn.pydata.org) | 0.11.1 | Statistical data visualization / BSD 3-Clause |
| [secretstorage](https://github.com/mitya57/secretstorage) | 3.3.1 | Provides a way for securely storing passwords and other secrets. / BSD-3-Clause |
| [send2trash](https://github.com/hsoft/send2trash) | 1.5.0 | Python library to natively send files to Trash (or Recycle bin) on all platforms. / BSD-3-Clause |
| [setuptools](https://github.com/pypa/setuptools) | 52.0.0 | Download, build, install, upgrade, and uninstall Python packages / MIT |
| [simplegeneric](http://cheeseshop.python.org/pypi/simplegeneric) | 0.8.1 | Simple generic functions (similar to Python’s own len(), pickle.dump(), etc.) / Zope Public |
| [singledispatch](http://docs.python.org/3/library/functools.html#functools.singledispatch) | 3.6.1 | Transforms a function into a single-dispatch generic function / MIT |
| [sip](http://www.riverbankcomputing.com/software/sip/intro) | 4.19.13 | Create Python bindings for C and C++ libraries / GPL-3.0 |
| [six](https://six.readthedocs.io/) | 1.15.0 | Python 2 and 3 compatibility utilities / MIT |
| [sniffio](https://github.com/python-trio/sniffio) | 1.2.0 | Sniff out which async library your code is running under / Apache-2.0 |
| [snowballstemmer](https://github.com/shibukawa/snowball_py) | 2.1.0 | Snowball stemming library collection for Python / BSD-2-Clause |
| [sortedcollections](http://www.grantjenks.com/docs/sortedcollections/) | 2.1.0 | Python Sorted Collections / Apache-2.0 |
| [sortedcontainers](http://www.grantjenks.com/docs/sortedcontainers/) | 2.3.0 | Python Sorted Container Types: SortedList, SortedDict, and SortedSet / Apache-2.0 |
| [soupsieve](http://facelessuser.github.io/soupsieve) | 2.2.1 | A modern CSS selector implementation for BeautifulSoup / MIT |
| [sphinx](http://www.sphinx-doc.org) | 3.5.3 | Sphinx is a tool that makes it easy to create intelligent and beautiful documentation / BSD-2-Clause |
| sphinxcontrib | 1.0 | Python namespace for sphinxcontrib / BSD |
| [sphinxcontrib-applehelp](https://www.sphinx-doc.org/en/master/) | 1.0.2 | sphinxcontrib-applehelp is a sphinx extension which outputs Apple help books / BSD-2-Clause |
| [sphinxcontrib-devhelp](https://www.sphinx-doc.org/en/master/) | 1.0.2 | sphinxcontrib-devhelp is a sphinx extension which outputs Devhelp document / BSD-2-Clause |
| [sphinxcontrib-htmlhelp](https://www.sphinx-doc.org/en/master/) | 1.0.3 | sphinxcontrib-htmlhelp is a sphinx extension which … / BSD-2-Clause |
| [sphinxcontrib-jsmath](https://www.sphinx-doc.org/en/master/) | 1.0.1 | A sphinx extension which renders display math in HTML via JavaScript / BSD-2-Clause |
| [sphinxcontrib-qthelp](https://www.sphinx-doc.org/en/master/) | 1.0.3 | sphinxcontrib-qthelp is a sphinx extension which outputs QtHelp document / BSD-2-Clause |
| [sphinxcontrib-serializinghtml](https://www.sphinx-doc.org/en/master/) | 1.1.4 | sphinxcontrib-serializinghtml is a sphinx extension which outputs “serialized” HTML files (json and pickle). / BSD-2-Clause |
| [sphinxcontrib-websupport](https://pypi.python.org/pypi/sphinxcontrib-websupport) | 1.2.4 | Sphinx API for Web Apps / BSD-2-Clause |
| [spyder](https://www.spyder-ide.org/) | 4.2.5 | The Scientific Python Development Environment / MIT |
| [spyder-kernels](https://www.spyder-ide.org/) | 1.10.2 | Jupyter kernels for Spyder’s console / MIT |
| [sqlalchemy](http://www.sqlalchemy.org/) | 1.4.7 | Database Abstraction Library. / MIT |
| [sqlite](http://www.sqlite.org/) | 3.35.4 | Implements a self-contained, zero-configuration, SQL database engine / Public-Domain (`<http://www.sqlite.org/copyright.html>`) |
| [statsmodels](https://www.statsmodels.org) | 0.12.2 | Statistical computations and models for use with SciPy / BSD-3-Clause |
| [sympy](https://sympy.org) | 1.8 | Python library for symbolic mathematics / BSD-3-Clause |
| [tblib](https://github.com/ionelmc/python-tblib) | 1.7.0 | Traceback serialization library. / BSD 2-Clause |
| [terminado](https://github.com/jupyter/terminado) | 0.9.4 | Terminals served by tornado websockets / BSD-2-Clause |
| [testpath](https://testpath.readthedocs.io) | 0.4.4 | Testpath is a collection of utilities for Python code working with files and commands. / BSD-3-Clause |
| [textdistance](https://github.com/orsinium/textdistance) | 4.2.1 | TextDistance – python library for comparing distance between two or more sequences by many algorithms. / MIT |
| [threadpoolctl](https://github.com/joblib/threadpoolctl) | 2.1.0 | Python helpers to control the threadpools of native libraries / BSD 3-Clause |
| [three-merge](https://github.com/spyder-ide/three-merge) | 0.1.1 | Simple Python library to perform a 3-way merge between strings / MIT |
| [tifffile](https://github.com/cgohlke/tifffile) | 2020.10.1 | Read and write image data from and to TIFF files. / BSD-3-Clause |
| [tk](http://www.tcl.tk/) | 8.6.10 | A dynamic programming language with GUI support. Bundles Tcl and Tk. / Tcl/Tk |
| [toml](https://github.com/uiri/toml) | 0.10.2 | Python lib for TOML. / MIT |
| [toolz](http://toolz.readthedocs.org/) | 0.11.1 | A functional standard library for Python / BSD-3-Clause |
| [tornado](http://www.tornadoweb.org/) | 6.1 | A Python web framework and asynchronous networking library, originally developed at FriendFeed. / Apache-2.0 |
| [tqdm](https://pypi.python.org/pypi/tqdm) | 4.59.0 | A Fast, Extensible Progress Meter / MPL-2.0 or MIT |
| [traitlets](http://traitlets.readthedocs.org/) | 5.0.5 | Configuration system for Python applications / BSD-3-Clause |
| [typed-ast](https://github.com/python/typed_ast) | 1.4.2 | a fork of Python 2 and 3 ast modules with type comment support / Apache-2.0 |
| [typing\_extensions](https://github.com/python/typing/tree/master/typing_extensions) | 3.7.4.3 | Backported and Experimental Type Hints for Python / PSF-2.0 |
| [ujson](https://github.com/ultrajson/ultrajson) | 4.0.2 | Ultra fast JSON decoder and encoder written in C with Python bindings / BSD-3-Clause |
| [unicodecsv](https://github.com/jdunck/python-unicodecsv) | 0.14.1 | Drop-in replacement for csv module which supports unicode strings / BSD |
| [unixodbc](http://www.unixodbc.org/) | 2.3.9 | ODBC on non MS Windows platforms / LGPL-2.1 |
| [urllib3](https://urllib3.readthedocs.io/) | 1.26.4 | HTTP library with thread-safe connection pooling, file post, and more. / MIT |
| [watchdog](http://github.com/gorakhargosh/watchdog) | 1.0.2 | Filesystem events monitoring / Apache-2.0 |
| [wcwidth](https://github.com/jquast/wcwidth) | 0.2.5 | Measures number of Terminal column cells of wide-character codes. / MIT |
| [webencodings](https://github.com/gsnedders/python-webencodings) | 0.5.1 | Character encoding aliases for legacy web content / BSD 3-Clause |
| [werkzeug](https://palletsprojects.com/p/werkzeug/) | 1.0.1 | The comprehensive WSGI web application library. / BSD 3-Clause |
| [wheel](https://github.com/pypa/wheel) | 0.36.2 | A built-package format for Python. / MIT |
| [widgetsnbextension](http://ipython.org) | 3.5.1 | Interactive Widgets for Jupyter / BSD 3-clause |
| [wrapt](https://github.com/GrahamDumpleton/wrapt) | 1.12.1 | Module for decorators, wrappers and monkey patching / BSD 2-Clause |
| [wurlitzer](https://github.com/minrk/wurlitzer) | 2.1.0 | Capture C-level stdout/stderr in Python / MIT |
| [xlrd](http://www.python-excel.org/) | 2.0.1 | Library for developers to extract data from Microsoft Excel (tm) spreadsheet files / BSD 3-Clause and BSD with advertising |
| [xlsxwriter](https://xlsxwriter.readthedocs.io/) | 1.3.8 | A Python module for creating Excel XLSX files / BSD-2-Clause |
| [xlwt](http://www.python-excel.org/) | 1.3.0 | Writing data and formatting information to Excel files / BSD |
| [xz](http://tukaani.org/xz/) | 5.2.5 | Data compression software with high compression ratio / LGPL-2.1 and GPL-2.0 |
| [yaml](http://pyyaml.org/wiki/LibYAML) | 0.2.5 | A C library for parsing and emitting YAML / MIT |
| [yapf](https://github.com/google/yapf) | 0.31.0 | A formatter for Python files / Apache 2.0 |
| [zeromq](http://zeromq.org) | 4.3.4 | A high-performance asynchronous messaging library. / LGPL-3.0-or-later |
| [zict](http://github.com/mrocklin/zict) | 2.0.0 | Composable Dictionary Classes / BSD 3-Clause |
| [zipp](https://github.com/jaraco/zipp) | 3.4.1 | A pathlib-compatible Zipfile object wrapper / MIT |
| [zlib](http://zlib.net/) | 1.2.11 | Massively spiffy yet delicately unobtrusive compression library / zlib |
| zope | 1.0 | web application server / BSD |
| [zope.event](http://www.zope.org/en/latest/) | 4.5.0 | Very basic event publishing system / Zope Public License |
| [zope.interface](http://docs.zope.org/zope.interface/) | 5.3.0 | Interfaces for Python / ZPL-2.1 |
| [zstd](http://www.zstd.net) | 1.4.5 | Zstandard - Fast real-time compression algorithm / BSD 3-Clause |
| Name | Version | Summary / License |
|---|---|---|
| [alabaster](http://www.sphinx-doc.org/en/stable/index.html) | 0.7.12 | Configurable, Python 2+3 compatible Sphinx theme. / BSD 3-Clause |
| [anaconda-client](https://anaconda.org) | 1.11.0 | anaconda.org command line client library / BSD-3-Clause |
| [anaconda-navigator](https://github.com/ContinuumIO/navigator) | 2.3.2 | Anaconda Navigator / proprietary - Continuum Analytics, Inc. |
| [anaconda-project](https://github.com/Anaconda-Platform/anaconda-project) | 0.11.1 | Tool for encapsulating, running, and reproducing data science projects / BSD-3-Clause |
| [anyio](https://github.com/agronholm/anyio) | 3.5.0 | High level compatibility layer for multiple asynchronous event loop implementations on Python / MIT |
| [appdirs](http://github.com/ActiveState/appdirs) | 1.4.4 | A small Python module for determining appropriate platform-specific dirs. / MIT |
| [argon2-cffi](https://argon2-cffi.readthedocs.org/) | 21.3.0 | The secure Argon2 password hashing algorithm. / MIT |
| [argon2-cffi-bindings](https://github.com/hynek/argon2-cffi-bindings) | 21.2.0 | Low-level Python CFFI Bindings for Argon2 / MIT |
| [arrow](https://github.com/arrow-py/arrow) | 1.2.2 | Better dates & times for Python / Apache-2.0 |
| [astroid](https://github.com/PyCQA/astroid) | 2.11.7 | A abstract syntax tree for Python with inference support. / LGPL-2.1-or-later |
| [astropy](https://www.astropy.org/) | 5.1 | Community-developed Python Library for Astronomy / BSD-3-Clause |
| [atomicwrites](https://github.com/untitaker/python-atomicwrites) | 1.4.0 | Atomic file writes / MIT |
| [attrs](https://attrs.readthedocs.io/en/stable/) | 21.4.0 | attrs is the Python package that will bring back the joy of writing classes by relieving you from the drudgery of implementing object protocols (aka dunder methods). / MIT |
| [automat](https://github.com/glyph/Automat) | 20.2.0 | self-service finite-state machines for the programmer on the go / MIT |
| [autopep8](https://github.com/hhatto/autopep8) | 1.6.0 | A tool that automatically formats Python code to conform to the PEP 8 style guide / MIT |
| [babel](http://babel.pocoo.org/) | 2.9.1 | Utilities to internationalize and localize Python applications / BSD 3-clause |
| [backcall](https://github.com/takluyver/backcall/) | 0.2.0 | Specifications for callback functions passed in to an API / BSD-3-Clause |
| [backports](https://github.com/brandon-rhodes/backports) | 1.1 | Namespace for backported Python features. / MIT |
| [backports.functools\_lru\_cache](https://github.com/jaraco/backports.functools_lru_cache) | 1.6.4 | Backport of functools.lru\_cache from Python 3.3 as published at ActiveState. / MIT |
| [backports.tempfile](https://github.com/pjdelport/backports.tempfile) | 1.0 | Backports of new features in Python’s tempfile module / PSF 2 |
| [backports.weakref](https://github.com/pjdelport/backports.weakref) | 1.0.post1 | Backport of new features in Python’s weakref module / Python-2.0 |
| [bcrypt](https://github.com/pyca/bcrypt/) | 3.2.0 | Modern password hashing for your software and your servers / Apache-2.0 |
| [beautifulsoup4](https://www.crummy.com/software/BeautifulSoup/) | 4.11.1 | Python library designed for screen-scraping / MIT |
| [binaryornot](https://github.com/audreyr/binaryornot) | 0.4.4 | Ultra-lightweight pure Python package to check if a file is binary or text. / BSD-3-Clause |
| [bitarray](https://github.com/ilanschnell/bitarray) | 2.5.1 | efficient arrays of booleans – C extension / PSF-2.0 |
| [bkcharts](http://github.com/bokeh/bkcharts) | 0.2 | High level chart types built on top of Bokeh / BSD 3-Clause |
| [black](https://github.com/psf/black) | 22.6.0 | The Uncompromising Code Formatter / MIT |
| [blas](http://www.netlib.org/lapack) | 1.0 | Linear Algebra PACKage / BSD-3-Clause |
| [bleach](https://github.com/mozilla/bleach) | 4.1.0 | Easy, whitelist-based HTML-sanitizing tool / Apache-2.0 |
| [blosc](https://github.com/Blosc/c-blosc) | 1.21.0 | A blocking, shuffling and loss-less compression library that can be faster than memcpy() / BSD-3-Clause |
| [bokeh](https://bokeh.org/) | 2.4.3 | Bokeh is an interactive visualization library for modern web browsers. / BSD-3-Clause |
| [boto3](https://aws.amazon.com/sdk-for-python) | 1.24.28 | Amazon Web Services SDK for Python / Apache-2.0 |
| [botocore](https://aws.amazon.com/sdk-for-python/) | 1.27.28 | Low-level, data-driven core of boto 3. / Apache-2.0 |
| [bottleneck](https://github.com/pydata/bottleneck) | 1.3.5 | Fast NumPy array functions written in Cython. / BSD-2-Clause |
| [brotli](https://github.com/google/brotli) | 1.0.9 | Brotli compression format / MIT |
| [brotli-bin](https://github.com/google/brotli) | 1.0.9 | Brotli compression format / MIT |
| [brotlipy](https://github.com/python-hyper/brotlipy) | 0.7.0 | Python bindings to the Brotli compression library / MIT |
| [bzip2](http://www.bzip.org/) | 1.0.8 | high-quality data compressor / bzip2 |
| [ca-certificates](https://curl.se/docs/caextract.html) | 2022.07.19 | Certificates for use with other packages. / MPL-2.0 |
| [certifi](https://certifi.io/) | 2022.9.14 | Python package for providing Mozilla’s CA Bundle. / MPL-2.0 |
| [cffi](https://cffi.readthedocs.org/) | 1.15.1 | Foreign Function Interface for Python calling C code. / MIT |
| [cfitsio](http://heasarc.gsfc.nasa.gov/fitsio/fitsio.html) | 3.470 | A library for reading and writing FITS files / fitsio |
| [chardet](https://github.com/chardet/chardet) | 4.0.0 | Universal character encoding detector / LGPL2 |
| [charls](https://github.com/team-charls/charls) | 2.2.0 | CharLS is a C++ implementation of the JPEG-LS standard for lossless and near-lossless image compression and decompression. JPEG-LS is a low-complexity image compression standard that matches JPEG 2000 compression ratios. / BSD-3-Clause |
| [charset-normalizer](https://github.com/ousret/charset_normalizer) | 2.0.4 | The Real First Universal Charset Detector. Open, modern and actively maintained alternative to Chardet. / MIT |
| [click](https://palletsprojects.com/p/click) | 8.0.4 | Python composable command line interface toolkit / BSD-3-Clause |
| [cloudpickle](https://github.com/cloudpipe/cloudpickle) | 2.0.0 | Extended pickling support for Python objects / BSD-3-Clause |
| [clyent](https://github.com/Anaconda-Platform/clyent) | 1.2.2 | Command line client library for windows and posix / BSD 3-Clause |
| [colorama](https://github.com/tartley/colorama) | 0.4.5 | Cross-platform colored terminal text / BSD-3-Clause |
| [colorcet](https://colorcet.holoviz.org/index.html) | 3.0.0 | Collection of perceptually uniform colormaps / CC-BY-4.0 |
| [comtypes](http://starship.python.net/crew/theller/comtypes/) | 1.1.10 | pure Python COM package / MIT |
| [conda](https://conda.io) | 22.9.0 | OS-agnostic, system-level binary package and environment manager. / BSD-3-Clause |
| [conda-build](https://github.com/conda/conda-build) | 3.22.0 | tools for building conda packages / BSD-3-Clause |
| [conda-content-trust](https://github.com/conda/conda-content-trust) | 0.1.3 | Signing and verification tools for conda / BSD-3-Clause |
| [conda-env](https://github.com/conda/conda-env) | 2.6.0 | Tools for interacting with conda environments. / BSD 3-Clause |
| [conda-token](https://github.com/Anaconda/conda-token) | 0.4.0 | Set repository access token / BSD-3-Clause |
| [conda-verify](https://github.com/conda/conda-verify) | 3.4.2 | tool for validating conda recipes and conda packages / BSD 3-Clause |
| console\_shortcut | 0.1.1 | Console shortcut creator for Windows (using menuinst) / BSD |
| [constantly](https://github.com/twisted/constantly) | 15.1.0 | Symbolic constants in Python / MIT |
| [cookiecutter](https://github.com/cookiecutter/cookiecutter) | 1.7.3 | A command-line utility that creates projects from cookiecutters (project templates), e.g. creating a Python package project from a Python package project template. / BSD-3-Clause |
| [cryptography](https://github.com/pyca/cryptography) | 37.0.1 | Provides cryptographic recipes and primitives to Python developers / (BSD-3-Clause OR Apache-2.0) AND PSF-2.0 AND MIT |
| [cssselect](https://pythonhosted.org/cssselect/) | 1.1.0 | CSS Selectors for Python / BSD 3-Clause |
| [curl](https://curl.se/) | 7.84.0 | tool and library for transferring data with URL syntax / curl |
| [cycler](http://matplotlib.org/cycler) | 0.11.0 | Composable style cycles. / BSD-3-Clause |
| [cython](https://cython.org/) | 0.29.32 | The Cython compiler for writing C extensions for the Python language / Apache-2.0 |
| [cytoolz](https://github.com/pytoolz/cytoolz) | 0.11.0 | Cython implementation of Toolz. High performance functional utilities / BSD-3-Clause |
| [daal4py](https://intelpython.github.io/daal4py/) | 2021.6.0 | A convenient Python API to Intel (R) oneAPI Data Analytics Library / Apache-2.0 |
| [dal](https://software.intel.com/content/www/us/en/develop/tools.html) | 2021.6.0 | Intel® oneDAL runtime libraries / Intel Simplified Software License |
| [dask](https://dask.org/) | 2022.7.0 | Parallel PyData with Task Scheduling / BSD-3-Clause |
| [dask-core](https://github.com/dask/dask/) | 2022.7.0 | Parallel Python with task scheduling / BSD-3-Clause |
| [dataclasses](https://github.com/ericvsmith/dataclasses) | 0.8 | An implementation of PEP 557: Data Classes / Apache-2.0 |
| [datashader](https://datashader.org) | 0.14.1 | Data visualization toolchain based on aggregating into a grid / BSD-3-Clause |
| [datashape](http://datashape.pydata.org) | 0.5.4 | A data description language. / BSD 2-Clause |
| [debugpy](https://github.com/Microsoft/debugpy) | 1.5.1 | An implementation of the Debug Adapter Protocol for Python / MIT |
| [decorator](https://github.com/micheles/decorator) | 5.1.1 | Better living through Python with decorators. / BSD-2-Clause |
| [defusedxml](https://bitbucket.org/tiran/defusedxml) | 0.7.1 | XML bomb protection for Python stdlib modules / PSF 2.0 |
| [diff-match-patch](http://code.google.com/p/google-diff-match-patch/) | 20200713 | Diff Match Patch is a high-performance library in multiple languages that manipulates plain text / Apache-2.0 |
| [dill](http://www.cacr.caltech.edu/~mmckerns/dill.htm) | 0.3.4 | Serialize all of python (almost) / BSD-3-Clause |
| [distributed](https://distributed.readthedocs.io/en/latest/) | 2022.7.0 | Distributed computing with Dask / BSD-3-Clause |
| [docutils](http://docutils.sourceforge.net/) | 0.18.1 | Docutils – Python Documentation Utilities / LicenseRef-Public-Domain-Dedictation and BSD-2-Clause and LicenseRef-PSF-2.1.1 and GPL-3.0-or-later |
| [entrypoints](https://github.com/takluyver/entrypoints) | 0.4 | Discover and load entry points from installed packages. / MIT License |
| [et\_xmlfile](https://foss.heptapod.net/openpyxl/et_xmlfile) | 1.1.0 | An implementation of lxml.xmlfile for the standard library / MIT AND PSF-2.0 |
| [fftw](http://fftw.org) | 3.3.9 | The fastest Fourier transform in the west. / GPL 2 |
| [filelock](https://github.com/tox-dev/py-filelock) | 3.6.0 | A platform independent file lock. / Unlicense |
| [flake8](http://flake8.pycqa.org/) | 4.0.1 | Your Tool For Style Guide Enforcement / MIT |
| [flask](https://palletsprojects.com/p/flask) | 1.1.2 | A simple framework for building complex web applications. / BSD-3-Clause |
| [fonttools](https://github.com/fonttools/fonttools) | 4.25.0 | fontTools is a library for manipulating fonts, written in Python. / MIT |
| [freetype](https://freetype.org/) | 2.10.4 | A Free, High-Quality, and Portable Font Engine / GPL-2-only and LicenseRef-FreeType |
| [fsspec](https://github.com/fsspec/filesystem_spec) | 2022.7.1 | A specification for pythonic filesystems / BSD-3-Clause |
| [future](http://python-future.org) | 0.18.2 | Clean single-source support for Python 3 and 2 / MIT |
| [gensim](https://github.com/RaRe-Technologies/gensim) | 4.1.2 | Topic Modelling for Humans / LGPL-2.1-only |
| [giflib](http://giflib.sourceforge.net) | 5.2.1 | Library for reading and writing gif images / MIT |
| [glob2](https://github.com/miracle2k/python-glob2) | 0.7 | Version of the glob module that supports recursion via \*\*, and can capture patterns. / BSD-2-Clause |
| [greenlet](https://github.com/python-greenlet/greenlet) | 1.1.1 | Lightweight in-process concurrent programming / MIT |
| [h5py](https://www.h5py.org/) | 3.7.0 | Read and write HDF5 files from Python / BSD-3-Clause |
| [hdf5](http://www.hdfgroup.org/HDF5/) | 1.10.6 | HDF5 is a data model, library, and file format for storing and managing data / HDF5 |
| [heapdict](http://stutzbachenterprises.com/) | 1.0.1 | A heap with decrease-key and increase-key operations / BSD 3-Clause |
| [holoviews](https://holoviews.org) | 1.15.0 | Stop plotting your data - annotate your data and let it visualize itself. / BSD-3-Clause |
| [hvplot](https://hvplot.holoviz.org) | 0.8.0 | A high-level plotting API for the PyData ecosystem built on HoloViews / BSD-3-Clause |
| [hyperlink](https://github.com/python-hyper/hyperlink) | 21.0.0 | Immutable, Pythonic, correct URLs. / MIT |
| icc\_rt | 2022.1.0 | Intel runtime libraries for C, C++ and Fortran compilers / Intel proprietary |
| [icu](http://site.icu-project.org/) | 58.2 | International Components for Unicode. / MIT |
| [idna](https://github.com/kjd/idna) | 3.3 | Internationalized Domain Names in Applications (IDNA). / BSD-3-Clause |
| [imagecodecs](https://www.lfd.uci.edu/~gohlke/) | 2021.8.26 | Image transformation, compression, and decompression codecs / BSD-3-Clause |
| [imageio](https://imageio.github.io) | 2.19.3 | A Python library for reading and writing image data / BSD-2-Clause |
| [imagesize](https://github.com/shibukawa/imagesize_py) | 1.4.1 | Getting image size from png/jpeg/jpeg2000/gif file / MIT |
| [importlib-metadata](https://github.com/python/importlib_metadata) | 4.11.3 | A library to access the metadata for a Python package. / Apache-2.0 |
| [importlib\_metadata](https://github.com/python/importlib_metadata) | 4.11.3 | A library to access the metadata for a Python package. / Apache-2.0 |
| [incremental](https://github.com/hawkowl/incremental) | 21.3.0 | Incremental is a small library that versions your Python projects. / MIT |
| [inflection](http://github.com/jpvanhal/inflection) | 0.5.1 | A port of Ruby on Rails inflector to Python / MIT |
| [iniconfig](http://github.com/RonnyPfannschmidt/iniconfig) | 1.1.1 | iniconfig: brain-dead simple config-ini parsing / MIT |
| [intake](https://github.com/ContinuumIO/intake) | 0.6.5 | Data load and catalog system / BSD-2-Clause |
| [intel-openmp](https://software.intel.com/en-us/node/522690) | 2021.4.0 | Math library for Intel and compatible processors / LicenseRef-ProprietaryIntel |
| [intervaltree](https://github.com/chaimleib/intervaltree) | 3.1.0 | Editable interval tree data structure for Python 2 and 3 / Apache-2.0 |
| [ipykernel](https://ipython.org) | 6.15.2 | IPython Kernel for Jupyter / BSD-3-Clause |
| [ipython](https://ipython.org) | 7.31.1 | IPython: Productive Interactive Computing / BSD-3-Clause |
| [ipython\_genutils](http://ipython.org) | 0.2.0 | vestigial utilities from IPython / BSD 3-Clause |
| [ipywidgets](https://github.com/ipython/ipywidgets) | 7.6.5 | Jupyter Interactive Widgets / BSD-3-Clause |
| [isort](https://github.com/timothycrosley/isort) | 5.9.3 | A Python utility / library to sort Python imports. / MIT |
| [itemadapter](https://github.com/scrapy/itemadapter) | 0.3.0 | Common interface for different data containers / BSD-3-Clause |
| [itemloaders](https://github.com/scrapy/itemadapter) | 1.0.4 | Collect data from HTML and XML sources / BSD-3-Clause |
| [itsdangerous](https://github.com/pallets/itsdangerous) | 2.0.1 | Various helpers to pass trusted data to untrusted environments. / BSD-3-Clause |
| [jdcal](https://github.com/phn/jdcal) | 1.4.1 | Julian dates from proleptic Gregorian and Julian calendars. / BSD 2-Clause |
| [jedi](https://github.com/davidhalter/jedi/) | 0.18.1 | An autocompletion tool for Python that can be used for text editors. / MIT |
| [jellyfish](https://github.com/jamesturk/jellyfish) | 0.9.0 | a library for doing approximate and phonetic matching of strings. / BSD-2-Clause |
| [jinja2](https://palletsprojects.com/p/jinja/) | 2.11.3 | A very fast and expressive template engine. / BSD-3-Clause |
| [jinja2-time](https://github.com/hackebrot/jinja2-time) | 0.2.0 | Jinja2 Extension for Dates and Times / MIT |
| [jmespath](http://jmespath.org/) | 0.10.0 | Query language for JSON / MIT |
| [joblib](https://joblib.readthedocs.io/en/latest/) | 1.1.0 | Lightweight pipelining: using Python functions as pipeline jobs. / BSD-3-Clause |
| [jpeg](https://www.ijg.org/) | 9e | read/write jpeg COM, EXIF, IPTC medata / IJG |
| [jq](http://stedolan.github.io/jq/) | 1.6 | A command-line JSON processor. / MIT |
| [json5](https://github.com/dpranke/pyjson5) | 0.9.6 | A Python implementation of the JSON5 data format / Apache-2.0 |
| [jsonschema](https://github.com/python-jsonschema/jsonschema) | 4.16.0 | An implementation of JSON Schema validation for Python / MIT |
| [jupyter](http://jupyter.org) | 1.0.0 | Jupyter metapackage. Install all the Jupyter components in one go. / BSD 3-Clause |
| [jupyter\_client](https://jupyter.org) | 7.3.4 | jupyter\_client contains the reference implementation of the Jupyter protocol. / BSD-3-Clause |
| [jupyter\_console](https://jupyter.org) | 6.4.3 | Jupyter terminal console / BSD-3-Clause |
| [jupyter\_core](https://jupyter.org) | 4.11.1 | Core common functionality of Jupyter projects. / BSD-3-Clause |
| [jupyter\_server](https://jupyter.org) | 1.18.1 | Jupyter Server / BSD-3-Clause |
| [jupyterlab](https://github.com/jupyterlab/jupyterlab) | 3.4.4 | JupyterLab PRE-ALPHA / BSD-3-Clause |
| [jupyterlab\_pygments](http://github.com/JupyterLab/jupyterlab_pygments) | 0.1.2 | Pygments syntax coloring scheme making use of the JupyterLab CSS variables / BSD-3-Clause |
| [jupyterlab\_server](https://github.com/jupyterlab/jupyterlab_server) | 2.10.3 | A set of server components for JupyterLab and JupyterLab like applications. / BSD-3-Clause |
| [jupyterlab\_widgets](https://github.com/jupyter-widgets/ipywidgets) | 1.0.0 | JupyterLab extension providing HTML widgets / BSD-3-Clause |
| [keyring](https://github.com/jaraco/keyring) | 23.4.0 | Store and access your passwords safely / MIT |
| [kiwisolver](https://github.com/nucleic/kiwi) | 1.4.2 | An efficient C++ implementation of the Cassowary constraint solver / BSD-3-Clause |
| [lazy-object-proxy](https://github.com/ionelmc/python-lazy-object-proxy) | 1.6.0 | A fast and thorough lazy object proxy / BSD-2-Clause |
| [lcms2](http://www.littlecms.com/) | 2.12 | Open Source Color Management Engine / MIT |
| [lerc](https://github.com/Esri/lerc) | 3.0 | LERC - Limited Error Raster Compression / Apache-2.0 |
| [libaec](https://gitlab.dkrz.de/k202009/libaec) | 1.0.4 | Adaptive Entropy Coding library / BSD-2-Clause |
| [libarchive](https://libarchive.org/) | 3.6.1 | Multi-format archive and compression library / BSD-2-Clause |
| [libbrotlicommon](https://github.com/google/brotli) | 1.0.9 | Brotli compression format / MIT |
| [libbrotlidec](https://github.com/google/brotli) | 1.0.9 | Brotli compression format / MIT |
| [libbrotlienc](https://github.com/google/brotli) | 1.0.9 | Brotli compression format / MIT |
| [libcurl](https://curl.se/) | 7.84.0 | tool and library for transferring data with URL syntax / curl |
| [libdeflate](https://github.com/ebiggers/libdeflate) | 1.8 | libdeflate is a library for fast, whole-buffer DEFLATE-based compression and decompression. / MIT |
| [libiconv](https://www.gnu.org/software/libiconv/) | 1.16 | Provides iconv for systems which don’t have one (or that cannot convert from/to Unicode.) / GPL and LGPL |
| [liblief](https://lief.quarkslab.com/) | 0.11.5 | A cross platform library to parse, modify and abstract ELF, PE and MachO formats. / Apache-2.0 |
| [libpng](http://www.libpng.org/pub/png/libpng.html) | 1.6.37 | PNG reference library / zlib/libpng |
| [libsodium](http://libsodium.org) | 1.0.18 | A modern and easy-to-use crypto library. / ISC |
| [libspatialindex](http://libspatialindex.github.io) | 1.9.3 | Extensible framework for robust spatial indexing / MIT |
| [libssh2](https://www.libssh2.org/) | 1.10.0 | the SSH library / BSD-3-Clause |
| [libtiff](http://www.simplesystems.org/libtiff/) | 4.4.0 | Support for the Tag Image File Format (TIFF). / HPND |
| [libwebp](https://developers.google.com/speed/webp/) | 1.2.2 | WebP image library / BSD-3-Clause |
| [libxml2](https://gitlab.gnome.org/GNOME/libxml2/) | 2.9.14 | The XML C parser and toolkit of Gnome / MIT |
| [libxslt](https://gitlab.gnome.org/GNOME/libxslt) | 1.1.35 | The XSLT C library developed for the GNOME project / MIT |
| [libzopfli](https://github.com/google/zopfli) | 1.0.3 | A compression library programmed in C to perform very good, but slow, deflate or zlib compression. / Apache-2.0 |
| [llvmlite](https://llvmlite.pydata.org) | 0.38.0 | A lightweight LLVM python binding for writing JIT compilers. / BSD-2-Clause |
| [locket](https://github.com/mwilliamson/locket.py) | 1.0.0 | File-based locks for Python for Linux and Windows / BSD-2-Clause |
| [lxml](https://lxml.de/) | 4.9.1 | Pythonic binding for the C libraries libxml2 and libxslt. / BSD-3-Clause and GPL-2.0-only and ZPL-2.0 and LicenseRef-ElementTree |
| [lz4](https://github.com/python-lz4/python-lz4) | 3.1.3 | LZ4 Bindings for Python / BSD-3-Clause |
| [lz4-c](https://www.lz4.org) | 1.9.3 | Extremely Fast Compression algorithm / BSD-2-Clause |
| [lzo](http://www.oberhumer.com/opensource/lzo/) | 2.10 | LZO is a portable lossless data compression library written in ANSI C. / GPL v2+ |
| [m2-msys2-runtime](https://sourceforge.net/projects/msys2/) | 2.5.0.17080.65c939c | Posix emulation engine for Windows / GPL |
| [m2-patch](http://www.gnu.org/software/patch/patch.html) | 2.7.5 | A utility to apply patch files to original sources / GPL |
| m2w64-libwinpthread-git | 5.0.0.4634.697f757 | / MIT, BSD |
| [markdown](https://pythonhosted.org/Markdown/) | 3.3.4 | Python implementation of Markdown. / BSD-3-Clause |
| [markupsafe](https://www.palletsprojects.com/p/markupsafe) | 2.0.1 | Safely add untrusted strings to HTML/XML markup. / BSD-3-Clause |
| [matplotlib](https://matplotlib.org/) | 3.5.2 | Publication quality figures in Python / LicenseRef-PSF-based |
| [matplotlib-base](https://matplotlib.org/) | 3.5.2 | Publication quality figures in Python / LicenseRef-PSF-based |
| [matplotlib-inline](https://github.com/ipython/matplotlib-inline) | 0.1.6 | Inline Matplotlib backend for Jupyter / BSD-3-Clause |
| [mccabe](https://github.com/PyCQA/mccabe) | 0.6.1 | McCabe complexity checker for Python / MIT |
| [menuinst](https://github.com/conda/menuinst) | 1.4.19 | cross platform install of menu items / BSD-3-Clause |
| [mistune](https://github.com/lepture/mistune) | 0.8.4 | A sane Markdown parser with useful plugins and renderers. / BSD-3-Clause |
| [mkl](https://software.intel.com/en-us/mkl) | 2021.4.0 | Math library for Intel and compatible processors / LicenseRef-ProprietaryIntel |
| [mkl-service](http://github.com/IntelPython/mkl-service) | 2.4.0 | Python hooks for Intel(R) Math Kernel Library runtime control settings. / BSD-3-Clause |
| [mkl\_fft](http://github.com/IntelPython/mkl_fft) | 1.3.1 | NumPy-based implementation of Fast Fourier Transform using Intel (R) Math Kernel Library. / BSD 3-Clause |
| [mkl\_random](http://github.com/IntelPython/mkl_random) | 1.2.2 | Intel (R) MKL-powered package for sampling from common probability distributions into NumPy arrays. / BSD-3-Clause |
| [mock](https://github.com/testing-cabal/mock) | 4.0.3 | A library for testing in Python / BSD-2-Clause |
| [mpmath](http://mpmath.org) | 1.2.1 | Python library for arbitrary-precision floating-point arithmetic / BSD 3-Clause |
| [msgpack-python](https://msgpack.org/) | 1.0.3 | MessagePack (de)serializer / Apache-2.0 |
| msys2-conda-epoch | 20160418 | / |
| [multipledispatch](https://github.com/mrocklin/multipledispatch/) | 0.6.0 | Multiple dispatch in Python / BSD 3-Clause |
| [munkres](https://github.com/bmc/munkres) | 1.1.4 | The Munkres module provides an O(n^3) implementation of the Munkres algorithm (also called the Hungarian algorithm or the Kuhn-Munkres algorithm). / Apache-2.0 |
| [mypy\_extensions](http://www.mypy-lang.org/) | 0.4.3 | Experimental type system extensions for programs checked with the mypy typechecker. / MIT |
| [nbclassic](http://github.com/jupyterlab/nbclassic) | 0.3.5 | Jupyter Notebook as a Jupyter Server Extension. / BSD-3-Clause |
| [nbclient](https://jupyter.org) | 0.5.13 | A client library for executing notebooks. Formally nbconvert’s ExecutePreprocessor. / BSD-3-Clause |
| [nbconvert](https://jupyter.org) | 6.4.4 | Converting Jupyter Notebooks / BSD-3-Clause |
| [nbformat](https://jupyter.org) | 5.5.0 | The Jupyter Notebook format / BSD-3-Clause |
| [nest-asyncio](https://github.com/erdewit/nest_asyncio) | 1.5.5 | Patch asyncio to allow nested event loops / BSD-2-Clause |
| [networkx](https://networkx.github.io/) | 2.8.4 | Python package for creating and manipulating complex networks / BSD-3-Clause |
| [nltk](https://nltk.org/) | 3.7 | Natural Language Toolkit / Apache-2.0 |
| [nose](http://readthedocs.org/docs/nose/) | 1.3.7 | Nose extends unittest to make testing easier / LGPL-2.1 |
| [notebook](https://jupyter.org) | 6.4.12 | Jupyter Notebook / BSD-3-Clause |
| [numba](https://numba.pydata.org) | 0.55.1 | NumPy aware dynamic Python compiler using LLVM / BSD-2-Clause |
| [numexpr](https://github.com/pydata/numexpr) | 2.8.3 | Fast numerical expression evaluator for NumPy. / MIT |
| [numpy](https://numpy.org/) | 1.21.5 | Array processing for numbers, strings, records, and objects. / BSD-3-Clause |
| [numpy-base](https://numpy.org/) | 1.21.5 | Array processing for numbers, strings, records, and objects. / BSD-3-Clause |
| [numpydoc](https://github.com/numpy/numpydoc) | 1.4.0 | Numpy’s Sphinx extensions / BSD-3-Clause |
| [olefile](http://www.decalage.info/python/olefileio) | 0.46 | parse, read and write Microsoft OLE2 files / BSD 2-Clause |
| [openjpeg](http://www.openjpeg.org/) | 2.4.0 | An open-source JPEG 2000 codec written in C / BSD 2-Clause |
| [openpyxl](https://openpyxl.readthedocs.io) | 3.0.10 | A Python library to read/write Excel 2010 xlsx/xlsm files / MIT |
| [openssl](https://www.openssl.org/) | 1.1.1q | OpenSSL is an open-source implementation of the SSL and TLS protocols / OpenSSL |
| [packaging](https://github.com/pypa/packaging) | 21.3 | Core utilities for Python packages / Apache-2.0 or BSD-2-Clause |
| [pandas](https://pandas.pydata.org) | 1.4.4 | High-performance, easy-to-use data structures and data analysis tools. / BSD-3-Clause |
| [pandocfilters](https://github.com/jgm/pandocfilters) | 1.5.0 | A python module for writing pandoc filters / BSD-3-Clause |
| [panel](https://panel.holoviz.org) | 0.13.1 | A high-level app and dashboarding solution for Python / BSD-3-Clause |
| [param](http://ioam.github.io/param/) | 1.12.0 | Param: Make your Python code clearer and more reliable by declaring Parameters / BSD-3-Clause |
| [paramiko](http://www.paramiko.org/) | 2.8.1 | SSH2 protocol library / LGPL-2.1-or-later |
| [parsel](https://github.com/scrapy/parsel) | 1.6.0 | library to extract data from HTML and XML using XPath and CSS selectors / BSD-3-Clause |
| [parso](https://github.com/davidhalter/parso) | 0.8.3 | A Python Parser / MIT |
| [partd](https://github.com/dask/partd) | 1.2.0 | Data structure for on-disk shuffle operations / BSD 3-Clause |
| [pathspec](https://github.com/cpburnz/python-path-specification) | 0.9.0 | Utility library for gitignore style pattern matching of file paths. / MPL-2.0 |
| [patsy](https://github.com/pydata/patsy) | 0.5.2 | Describing statistical models in Python using symbolic formulas / BSD-2-Clause AND PSF-2.0 |
| [pep8](http://pep8.readthedocs.org/) | 1.7.1 | Python style guide checker / MIT |
| [pexpect](http://pexpect.sourceforge.net/) | 4.8.0 | Pexpect makes Python a better tool for controlling other applications. / ISC |
| [pickleshare](https://github.com/pickleshare/pickleshare/) | 0.7.5 | Tiny ‘shelve’-like database with concurrency support / MIT |
| [pillow](https://pillow.readthedocs.io) | 9.2.0 | Pillow is the friendly PIL fork by Alex Clark and Contributors / LicenseRef-PIL |
| [pip](https://pip.pypa.io/en/stable/) | 22.2.2 | PyPA recommended tool for installing Python packages / MIT |
| [pkginfo](https://code.launchpad.net/~tseaver/pkginfo/trunk) | 1.8.2 | Query metadatdata from sdists / bdists / installed packages. / MIT |
| [platformdirs](https://github.com/platformdirs/platformdirs) | 2.5.2 | A small Python module for determining appropriate platform-specific dirs, e.g. a “user data dir”. / MIT |
| [plotly](https://plot.ly/python/) | 5.9.0 | An interactive JavaScript-based visualization library for Python / MIT |
| [pluggy](https://github.com/pytest-dev/pluggy) | 1.0.0 | Plugin registration and hook calling for Python / MIT |
| powershell\_shortcut | 0.0.1 | Powershell shortcut creator for Windows (using menuinst) / BSD |
| [poyo](https://github.com/hackebrot/poyo) | 0.5.0 | A lightweight YAML Parser for Python / MIT |
| [prometheus\_client](https://github.com/prometheus/client_python) | 0.14.1 | Python client for the Prometheus monitoring system / Apache-2.0 |
| [prompt-toolkit](https://github.com/jonathanslenders/python-prompt-toolkit) | 3.0.20 | Library for building powerful interactive command lines in Python / BSD-3-Clause |
| [prompt\_toolkit](https://github.com/jonathanslenders/python-prompt-toolkit) | 3.0.20 | Library for building powerful interactive command lines in Python / BSD-3-Clause |
| [protego](https://github.com/scrapy/protego) | 0.1.16 | A pure-Python robots.txt parser with support for modern conventions / BSD 3-Clauses |
| [psutil](https://github.com/giampaolo/psutil) | 5.9.0 | A cross-platform process and system utilities module for Python / BSD-3-Clause |
| [ptyprocess](https://github.com/pexpect/ptyprocess) | 0.7.0 | Run a subprocess in a pseudo terminal / ISC |
| [py](https://github.com/pytest-dev/py) | 1.11.0 | library with cross-python path, ini-parsing, io, code, log facilities / MIT |
| [py-lief](https://lief.quarkslab.com/) | 0.11.5 | A cross platform library to parse, modify and abstract ELF, PE and MachO formats. / Apache-2.0 |
| [pyasn1](https://github.com/etingof/pyasn1) | 0.4.8 | ASN.1 types and codecs / BSD 2-Clause |
| [pyasn1-modules](http://pyasn1.sourceforge.net/) | 0.2.8 | A collection of ASN.1-based protocols modules. / BSD 2-Clause |
| [pycodestyle](https://pycodestyle.readthedocs.io/) | 2.8.0 | Python style guide checker / MIT |
| [pycosat](https://github.com/ContinuumIO/pycosat) | 0.6.3 | Bindings to picosat (a SAT solver) / MIT |
| [pycparser](https://github.com/eliben/pycparser) | 2.21 | Complete C99 parser in pure Python / BSD-3-clause |
| [pyct](http://github.com/pyviz/pyct) | 0.4.8 | python package common tasks for users (e.g. copy examples, fetch data, …) / BSD 3-Clause |
| [pycurl](http://pycurl.sourceforge.net/) | 7.45.1 | A Python Interface To The cURL library / LGPL-2.1-only, MIT |
| [pydispatcher](http://pydispatcher.sourceforge.net) | 2.0.5 | Multi-producer-multi-consumer signal dispatching mechanism / BSD 3-Clause |
| [pydocstyle](https://github.com/PyCQA/pydocstyle) | 6.1.1 | Python docstring style checker (formerly pep257) / MIT |
| [pyerfa](https://pyerfa.readthedocs.io/) | 2.0.0 | Python bindings for ERFA routines / BSD-3-Clause |
| [pyflakes](https://github.com/PyCQA/pyflakes) | 2.4.0 | Pyflakes analyzes programs and detects various errors. / MIT |
| [pygments](https://pygments.org/) | 2.11.2 | Pygments is a generic syntax highlighter suitable for use in code hosting, forums, wikis or other applications that need to prettify source code. / BSD-2-Clause |
| [pyhamcrest](https://github.com/hamcrest/PyHamcrest) | 2.0.2 | Hamcrest framework for matcher objects / BSD 3-Clause |
| [pylint](https://www.pylint.org) | 2.14.5 | python code static checker / GPL-2.0-or-later |
| [pyls-spyder](https://github.com/spyder-ide/pyls-spyder) | 0.4.0 | Spyder extensions for the python-lsp-server / MIT |
| [pynacl](https://github.com/pyca/pynacl) | 1.5.0 | PyNaCl is a Python binding to the Networking and Cryptography library, a crypto library with the stated goal of improving usability, security and speed. / Apache-2.0 |
| [pyodbc](https://github.com/mkleehammer/pyodbc) | 4.0.34 | DB API Module for ODBC / MIT-0 |
| [pyopenssl](https://github.com/pyca/pyopenssl) | 22.0.0 | Python wrapper module around the OpenSSL library / Apache-2.0 |
| [pyparsing](https://github.com/pyparsing/pyparsing/) | 3.0.9 | Create and execute simple grammars / MIT |
| [pyqt](https://www.riverbankcomputing.com/software/pyqt/) | 5.9.2 | Python bindings for the Qt cross platform application toolkit / GPL-3.0-only |
| [pyrsistent](http://github.com/tobgu/pyrsistent/) | 0.18.0 | Persistent/Functional/Immutable data structures / MIT |
| [pysocks](https://github.com/Anorov/PySocks) | 1.7.1 | A Python SOCKS client module. See [Anorov/PySocks](https://github.com/Anorov/PySocks) for more information. / BSD 3-Clause |
| [pytables](https://www.pytables.org) | 3.6.1 | Brings together Python, HDF5 and NumPy to easily handle large amounts of data. / BSD-3-Clause |
| [pytest](https://docs.pytest.org/en/latest/) | 7.1.2 | Simple and powerful testing with Python. / MIT |
| [python](https://www.python.org/) | 3.9.13 | General purpose programming language / PSF-2.0 |
| [python-dateutil](https://dateutil.readthedocs.org/) | 2.8.2 | Extensions to the standard Python datetime module. / BSD-3-Clause and Apache |
| [python-fastjsonschema](https://github.com/horejsek/python-fastjsonschema) | 2.16.2 | Fastest Python implementation of JSON schema / BSD-3-Clause |
| [python-libarchive-c](https://github.com/Changaco/python-libarchive-c) | 2.9 | Python interface to libarchive / CC0-1.0 |
| [python-lsp-black](https://github.com/python-lsp/python-lsp-black) | 1.0.0 | Black plugin for the Python LSP Server / MIT |
| [python-lsp-jsonrpc](https://github.com/python-lsp/python-lsp-jsonrpc) | 1.0.0 | A Python 3.6+ server implementation of the JSON RPC 2.0 protocol. / MIT |
| [python-lsp-server](https://github.com/python-lsp/python-lsp-server) | 1.3.3 | An implementation of the Language Server Protocol for Python / MIT |
| [python-slugify](https://github.com/un33k/python-slugify) | 5.0.2 | A Python Slugify application that handles Unicode / MIT |
| [python-snappy](https://github.com/andrix/python-snappy) | 0.6.0 | Python library for the snappy compression library from Google / BSD-3-Clause |
| [pytz](http://pythonhosted.org/pytz/) | 2022.1 | World timezone definitions, modern and historical. / MIT |
| [pyviz\_comms](https://www.holoviz.org) | 2.0.2 | Bidirectional communication for PyViz / BSD-3-Clause |
| [pywavelets](https://github.com/PyWavelets/pywt) | 1.3.0 | Discrete Wavelet Transforms in Python / MIT |
| [pywin32](https://github.com/mhammond/pywin32) | 302 | Python extensions for Windows / PSF-2.0 |
| [pywin32-ctypes](https://github.com/enthought/pywin32-ctypes) | 0.2.0 | A limited subset of pywin32 re-implemented using ctypes (or cffi) / BSD 3 Clause |
| [pywinpty](https://github.com/spyder-ide/pywinpty) | 2.0.2 | Pseudoterminals for Windows in Python / MIT |
| [pyyaml](http://pyyaml.org/wiki/PyYAML) | 6.0 | YAML parser and emitter for Python / MIT |
| [pyzmq](https://github.com/zeromq/pyzmq) | 23.2.0 | Python bindings for zeromq / BSD-3-Clause AND LGPL-3.0-or-later |
| [qdarkstyle](https://github.com/ColinDuquesnoy/QDarkStyleSheet) | 3.0.2 | A dark stylesheet for Qt applications (Qt4, Qt5, PySide, PyQt4, PyQt5, QtPy, PyQtGraph). / MIT |
| [qstylizer](https://github.com/blambright/qstylizer) | 0.1.10 | Qt stylesheet generation utility for PyQt/PySide / MIT |
| [qt](http://qt.io) | 5.9.7 | Qt is a cross-platform application and UI framework. / LGPL-3.0-only |
| [qtawesome](https://github.com/spyder-ide/qtawesome) | 1.0.3 | Iconic fonts in PyQt and PySide applications / MIT |
| [qtconsole](https://jupyter.org) | 5.2.2 | Jupyter Qt Console / BSD-3-Clause |
| [qtpy](https://github.com/spyder-ide/qtpy) | 2.2.0 | Abstraction layer for PyQt5/PyQt4/PySide / MIT |
| [queuelib](https://github.com/scrapy/queuelib) | 1.5.0 | Collection of persistent (disk-based) queues / BSD |
| [regex](https://github.com/mrabarnett/mrab-regex) | 2022.7.9 | Alternative regular expression module, to replace re / Apache-2.0 |
| [requests](https://requests.readthedocs.io/en/latest/) | 2.28.1 | Requests is an elegant and simple HTTP library for Python, built with ♥. / Apache-2.0 |
| [requests-file](http://github.com/dashea/requests-file) | 1.5.1 | file transport adapter for Requests / Apache |
| [rope](https://github.com/python-rope/rope) | 0.22.0 | A python refactoring library / LGPL-3.0-or-later |
| [rtree](http://toblerity.github.com/rtree/) | 0.9.7 | R-Tree spatial index for Python GIS / MIT |
| [ruamel\_yaml](https://sourceforge.net/p/ruamel-yaml/code/ci/default/tree) | 0.15.100 | A patched copy of ruamel.yaml. / MIT |
| [s3transfer](https://github.com/boto/s3transfer) | 0.6.0 | An Amazon S3 Transfer Manager / Apache-2.0 |
| [scikit-image](https://scikit-image.org/) | 0.19.2 | Image processing in Python. / BSD-3-Clause |
| [scikit-learn](https://scikit-learn.org/) | 1.0.2 | A set of python modules for machine learning and data mining / BSD-3-Clause |
| [scikit-learn-intelex](https://intel.github.io/scikit-learn-intelex) | 2021.6.0 | Intel(R) Extension for Scikit-learn is a seamless way to speed up your Scikit-learn application. / Apache-2.0 |
| [scipy](https://scipy.org/) | 1.9.1 | Scientific Library for Python / BSD-3-Clause |
| [scrapy](https://scrapy.org/) | 2.6.2 | A high-level Python Screen Scraping framework / BSD-3-Clause |
| [seaborn](https://seaborn.pydata.org) | 0.11.2 | Statistical data visualization / BSD-3-Clause |
| [send2trash](https://github.com/arsenetar/send2trash) | 1.8.0 | Python library to natively send files to Trash (or Recycle bin) on all platforms. / BSD-3-Clause |
| [service\_identity](https://github.com/pyca/service_identity) | 18.1.0 | Service identity verification for pyOpenSSL. / MIT |
| [setuptools](https://github.com/pypa/setuptools) | 63.4.1 | Download, build, install, upgrade, and uninstall Python packages / MIT |
| [sip](https://www.riverbankcomputing.com/software/sip/) | 4.19.13 | A Python bindings generator for C/C++ libraries / GPL-3.0-only |
| [six](https://six.readthedocs.io/) | 1.16.0 | Python 2 and 3 compatibility utilities / MIT |
| [smart\_open](https://github.com/RaRe-Technologies/smart_open) | 5.2.1 | Python library for efficient streaming of large files / MIT |
| [snappy](https://github.com/google/snappy) | 1.1.9 | A fast compressor/decompressor / BSD-3-clause AND CC-BY-3.0 AND MIT AND CC-BY AND Public Domain |
| [sniffio](https://github.com/python-trio/sniffio) | 1.2.0 | Sniff out which async library your code is running under / Apache-2.0 |
| [snowballstemmer](https://github.com/snowballstem/snowball) | 2.2.0 | Snowball stemming library collection for Python / BSD-3-Clause |
| [sortedcollections](http://www.grantjenks.com/docs/sortedcollections/) | 2.1.0 | Python Sorted Collections / Apache-2.0 |
| [sortedcontainers](http://www.grantjenks.com/docs/sortedcontainers/) | 2.4.0 | Python Sorted Container Types: SortedList, SortedDict, and SortedSet / Apache-2.0 |
| [soupsieve](https://facelessuser.github.io/soupsieve) | 2.3.1 | A modern CSS selector implementation for BeautifulSoup / MIT |
| [sphinx](https://www.sphinx-doc.org) | 5.0.2 | Sphinx is a tool that makes it easy to create intelligent and beautiful documentation / BSD-2-Clause |
| [sphinxcontrib-applehelp](https://www.sphinx-doc.org/en/master/) | 1.0.2 | sphinxcontrib-applehelp is a sphinx extension which outputs Apple help books / BSD-2-Clause |
| [sphinxcontrib-devhelp](https://www.sphinx-doc.org/en/master/) | 1.0.2 | sphinxcontrib-devhelp is a sphinx extension which outputs Devhelp document / BSD-2-Clause |
| [sphinxcontrib-htmlhelp](https://www.sphinx-doc.org/en/master/) | 2.0.0 | sphinxcontrib-htmlhelp is a sphinx extension which renders HTML help files. / BSD-2-Clause |
| [sphinxcontrib-jsmath](https://www.sphinx-doc.org/en/master/) | 1.0.1 | A sphinx extension which renders display math in HTML via JavaScript / BSD-2-Clause |
| [sphinxcontrib-qthelp](https://www.sphinx-doc.org/en/master/) | 1.0.3 | sphinxcontrib-qthelp is a sphinx extension which outputs QtHelp document / BSD-2-Clause |
| [sphinxcontrib-serializinghtml](https://www.sphinx-doc.org/en/master/) | 1.1.5 | sphinxcontrib-serializinghtml is a sphinx extension which outputs “serialized” HTML files (json and pickle). / BSD-2-Clause |
| [spyder](https://www.spyder-ide.org/) | 5.2.2 | The Scientific Python Development Environment / MIT |
| [spyder-kernels](https://www.spyder-ide.org/) | 2.2.1 | Jupyter kernels for Spyder’s console / MIT |
| [sqlalchemy](https://www.sqlalchemy.org/) | 1.4.39 | Database Abstraction Library. / MIT |
| [sqlite](https://www.sqlite.org/) | 3.39.3 | Implements a self-contained, zero-configuration, SQL database engine / blessing |
| [statsmodels](https://www.statsmodels.org) | 0.13.2 | Statistical computations and models for use with SciPy / BSD-3-Clause |
| [sympy](https://sympy.org) | 1.10.1 | Python library for symbolic mathematics / BSD-3-Clause AND MIT |
| [tabulate](https://github.com/astanin/python-tabulate) | 0.8.10 | Pretty-print tabular data in Python, a library and a command-line utility. / MIT |
| [tbb](https://github.com/oneapi-src/oneTBB) | 2021.6.0 | High level abstract threading library / Apache-2.0 |
| tbb4py | 2021.6.0 | TBB module for Python / Apache-2.0 |
| [tblib](https://github.com/ionelmc/python-tblib) | 1.7.0 | Traceback serialization library. / BSD 2-Clause |
| [tenacity](http://github.com/jd/tenacity) | 8.0.1 | Retry a flaky function whenever an exception occurs until it works / Apache-2.0 |
| [terminado](https://github.com/jupyter/terminado) | 0.13.1 | Terminals served by tornado websockets / BSD-2-Clause |
| [testpath](https://testpath.readthedocs.io) | 0.6.0 | Testpath is a collection of utilities for Python code working with files and commands. / BSD-3-Clause |
| [text-unidecode](https://github.com/kmike/text-unidecode/) | 1.3 | The most basic Text::Unidecode port / Artistic |
| [textdistance](https://github.com/orsinium/textdistance) | 4.2.1 | TextDistance – python library for comparing distance between two or more sequences by many algorithms. / MIT |
| [threadpoolctl](https://github.com/joblib/threadpoolctl) | 2.2.0 | Python helpers to control the threadpools of native libraries / BSD 3-Clause |
| [three-merge](https://github.com/spyder-ide/three-merge) | 0.1.1 | Simple Python library to perform a 3-way merge between strings / MIT |
| [tifffile](https://github.com/cgohlke/tifffile) | 2021.7.2 | Read and write image data from and to TIFF files. / BSD-3-Clause |
| [tinycss](http://tinycss.readthedocs.io/) | 0.4 | Tinycss is a complete yet simple CSS parser for Python. / BSD-3-Clause |
| [tk](https://www.tcl.tk/) | 8.6.12 | A dynamic programming language with GUI support. Bundles Tcl and Tk. / TCL |
| [tldextract](https://github.com/john-kurkowski/tldextract) | 3.2.0 | Accurately separate the TLD from the registered domain andsubdomains of a URL, using the Public Suffix List. / BSD-3-Clause |
| [toml](https://github.com/uiri/toml) | 0.10.2 | Python lib for TOML. / MIT |
| [tomli](https://github.com/hukkin/tomli) | 2.0.1 | A simple TOML parser / MIT |
| [tomlkit](https://github.com/sdispater/tomlkit) | 0.11.1 | Style preserving TOML library / MIT |
| [toolz](http://toolz.readthedocs.org/) | 0.11.2 | List processing tools and functional utilities / BSD-3-Clause |
| [tornado](https://www.tornadoweb.org/) | 6.1 | A Python web framework and asynchronous networking library, originally developed at FriendFeed. / Apache-2.0 |
| [tqdm](https://tqdm.github.io/) | 4.64.1 | A Fast, Extensible Progress Meter / MPL-2.0 AND MIT |
| [traitlets](http://traitlets.readthedocs.org/) | 5.1.1 | Configuration system for Python applications / BSD-3-Clause |
| [twisted](https://twistedmatrix.com/) | 22.2.0 | An asynchronous networking framework written in Python / MIT |
| [twisted-iocpsupport](https://github.com/twisted/twisted-iocpsupport) | 1.0.2 | An extension for use in the twisted I/O Completion Ports reactor. / MIT |
| [typing-extensions](https://github.com/python/typing_extensions) | 4.3.0 | Backported and Experimental Type Hints for Python / PSF-2.0 |
| [typing\_extensions](https://github.com/python/typing_extensions) | 4.3.0 | Backported and Experimental Type Hints for Python / PSF-2.0 |
| [tzdata](https://www.iana.org/time-zones) | 2022c | The Time Zone Database (called tz, tzdb or zoneinfo) / CC-PDDC OR BSD-3-Clause |
| [ujson](https://github.com/ultrajson/ultrajson) | 5.4.0 | Ultra fast JSON decoder and encoder written in C with Python bindings / BSD-3-Clause |
| [unidecode](https://pypi.python.org/pypi/Unidecode) | 1.2.0 | ASCII transliterations of Unicode text / GPL-2.0-or-later |
| [urllib3](https://urllib3.readthedocs.io/) | 1.26.11 | HTTP library with thread-safe connection pooling, file post, and more. / MIT |
| [vc](https://github.com/conda/conda/wiki/VC-features) | 14.2 | A meta-package to impose mutual exclusivity among software built with different VS versions / Modified BSD License (3-clause) |
| vs2015\_runtime | 14.27.29016 | MSVC runtimes associated with cl.exe version 19.27.29111 (VS 2019 update 5) / |
| [w3lib](https://github.com/scrapy/w3lib) | 1.21.0 | Library of web-related functions / BSD |
| [watchdog](http://github.com/gorakhargosh/watchdog) | 2.1.6 | Filesystem events monitoring / Apache-2.0 |
| [wcwidth](https://github.com/jquast/wcwidth) | 0.2.5 | Measures number of Terminal column cells of wide-character codes. / MIT |
| [webencodings](https://github.com/gsnedders/python-webencodings) | 0.5.1 | Character encoding aliases for legacy web content / BSD 3-Clause |
| [websocket-client](https://github.com/liris/websocket-client) | 0.58.0 | WebSocket client for python. hybi13 is supported. / BSD-3-Clause |
| [werkzeug](https://palletsprojects.com/p/werkzeug/) | 2.0.3 | The comprehensive WSGI web application library. / BSD-3-Clause |
| [wheel](https://github.com/pypa/wheel) | 0.37.1 | A built-package format for Python. / MIT |
| [widgetsnbextension](http://ipython.org) | 3.5.2 | Interactive Widgets for Jupyter / BSD-3-Clause |
| [win\_inet\_pton](https://github.com/hickeroar/win_inet_pton) | 1.1.0 | Native inet\_pton and inet\_ntop implementation for Python on Windows (with ctypes). / PUBLIC-DOMAIN |
| [win\_unicode\_console](https://github.com/Drekin/win-unicode-console) | 0.5 | A Python package to enable Unicode input and display when running Python from Windows console. / MIT |
| [wincertstore](https://bitbucket.org/tiran/wincertstore) | 0.2 | Python module to extract CA and CRL certs from Windows’ cert store (ctypes based). / PSF 2 |
| [winpty](https://github.com/rprichard/winpty) | 0.4.3 | Winpty provides an interface similar to a Unix pty-master for communicating with Windows console programs. / MIT |
| [wrapt](https://github.com/GrahamDumpleton/wrapt) | 1.14.1 | Module for decorators, wrappers and monkey patching / BSD-2-Clause |
| [xarray](https://github.com/pydata/xarray) | 0.20.1 | N-D labeled arrays and datasets in Python. / Apache-2.0 |
| [xlrd](http://www.python-excel.org/) | 2.0.1 | Library for developers to extract data from Microsoft Excel (tm) spreadsheet files / BSD 3-Clause and BSD with advertising |
| [xlsxwriter](https://xlsxwriter.readthedocs.io/) | 3.0.3 | A Python module for creating Excel XLSX files / BSD-2-Clause |
| [xlwings](https://www.xlwings.org/) | 0.27.15 | Interact with Excel from Python and vice versa / BSD-3-Clause |
| [xz](https://tukaani.org/xz/) | 5.2.6 | Data compression software with high compression ratio / LGPL-2.1-or-later and GPL-2.0-or-later |
| [yaml](http://pyyaml.org/wiki/LibYAML) | 0.2.5 | A C library for parsing and emitting YAML / MIT |
| [yapf](https://github.com/google/yapf) | 0.31.0 | A formatter for Python files / Apache 2.0 |
| [zeromq](http://zeromq.org) | 4.3.4 | A high-performance asynchronous messaging library. / LGPL-3.0-or-later |
| [zfp](https://computation.llnl.gov/projects/floating-point-compression) | 0.5.5 | Library for compressed numerical arrays that support high throughput read and write random access / BSD-3-Clause |
| [zict](https://github.com/mrocklin/zict) | 2.1.0 | Composable Dictionary Classes / BSD-3-Clause |
| [zipp](https://github.com/jaraco/zipp) | 3.8.0 | A pathlib-compatible Zipfile object wrapper / MIT |
| [zlib](https://zlib.net/) | 1.2.12 | Massively spiffy yet delicately unobtrusive compression library / Zlib |
| zope | 1.0 | web application server / BSD |
| [zope.interface](https://github.com/zopefoundation/zope.interface) | 5.4.0 | Interfaces for Python / ZPL-2.1 |
| [zstd](https://www.zstd.net) | 1.5.2 | Zstandard - Fast real-time compression algorithm / BSD-3-Clause AND GPL-2.0-or-later |
| Name | Version | Summary / License |
|---|---|---|
| [alabaster](http://www.sphinx-doc.org/en/stable/index.html) | 0.7.12 | Configurable, Python 2+3 compatible Sphinx theme. / BSD 3-Clause |
| [anaconda-client](https://anaconda.org) | 1.11.0 | anaconda.org command line client library / BSD-3-Clause |
| [anaconda-navigator](https://github.com/ContinuumIO/navigator) | 2.3.2 | Anaconda Navigator / proprietary - Continuum Analytics, Inc. |
| [anaconda-project](https://github.com/Anaconda-Platform/anaconda-project) | 0.11.1 | Tool for encapsulating, running, and reproducing data science projects / BSD-3-Clause |
| [anyio](https://github.com/agronholm/anyio) | 3.5.0 | High level compatibility layer for multiple asynchronous event loop implementations on Python / MIT |
| [appdirs](http://github.com/ActiveState/appdirs) | 1.4.4 | A small Python module for determining appropriate platform-specific dirs. / MIT |
| [appnope](http://github.com/minrk/appnope) | 0.1.2 | Disable App Nap on OS X 10.9 / BSD 2-Clause |
| [appscript](http://appscript.sourceforge.net) | 1.1.2 | Control AppleScriptable applications from Python. / Public Domain |
| [argon2-cffi](https://argon2-cffi.readthedocs.org/) | 21.3.0 | The secure Argon2 password hashing algorithm. / MIT |
| [argon2-cffi-bindings](https://github.com/hynek/argon2-cffi-bindings) | 21.2.0 | Low-level Python CFFI Bindings for Argon2 / MIT |
| [astroid](https://github.com/PyCQA/astroid) | 2.11.7 | A abstract syntax tree for Python with inference support. / LGPL-2.1-or-later |
| [astropy](https://www.astropy.org/) | 5.1 | Community-developed Python Library for Astronomy / BSD-3-Clause |
| [asttokens](https://github.com/gristlabs/asttokens) | 2.0.5 | The asttokens module annotates Python abstract syntax trees (ASTs) with the positions of tokens and text in the source code that generated them. / Apache-2.0 |
| [attrs](https://attrs.readthedocs.io/en/stable/) | 21.4.0 | attrs is the Python package that will bring back the joy of writing classes by relieving you from the drudgery of implementing object protocols (aka dunder methods). / MIT |
| [automat](https://github.com/glyph/Automat) | 20.2.0 | self-service finite-state machines for the programmer on the go / MIT |
| [babel](http://babel.pocoo.org/) | 2.9.1 | Utilities to internationalize and localize Python applications / BSD 3-clause |
| [backcall](https://github.com/takluyver/backcall/) | 0.2.0 | Specifications for callback functions passed in to an API / BSD-3-Clause |
| [backports](https://github.com/brandon-rhodes/backports) | 1.1 | Namespace for backported Python features. / MIT |
| [backports.functools\_lru\_cache](https://github.com/jaraco/backports.functools_lru_cache) | 1.6.4 | Backport of functools.lru\_cache from Python 3.3 as published at ActiveState. / MIT |
| [backports.tempfile](https://github.com/pjdelport/backports.tempfile) | 1.0 | Backports of new features in Python’s tempfile module / PSF 2 |
| [backports.weakref](https://github.com/pjdelport/backports.weakref) | 1.0.post1 | Backport of new features in Python’s weakref module / Python-2.0 |
| [bcrypt](https://github.com/pyca/bcrypt/) | 3.2.0 | Modern password hashing for your software and your servers / Apache-2.0 |
| [beautifulsoup4](https://www.crummy.com/software/BeautifulSoup/) | 4.11.1 | Python library designed for screen-scraping / MIT |
| [bitarray](https://github.com/ilanschnell/bitarray) | 2.5.1 | efficient arrays of booleans – C extension / PSF-2.0 |
| [bkcharts](http://github.com/bokeh/bkcharts) | 0.2 | High level chart types built on top of Bokeh / BSD 3-Clause |
| [blas](http://www.netlib.org/lapack) | 1.0 | Linear Algebra PACKage / BSD-3-Clause |
| [bleach](https://github.com/mozilla/bleach) | 4.1.0 | Easy, whitelist-based HTML-sanitizing tool / Apache-2.0 |
| [blosc](https://github.com/Blosc/c-blosc) | 1.21.0 | A blocking, shuffling and loss-less compression library that can be faster than memcpy() / BSD-3-Clause |
| [bokeh](https://bokeh.org/) | 2.4.3 | Bokeh is an interactive visualization library for modern web browsers. / BSD-3-Clause |
| [boto3](https://aws.amazon.com/sdk-for-python) | 1.24.28 | Amazon Web Services SDK for Python / Apache-2.0 |
| [botocore](https://aws.amazon.com/sdk-for-python/) | 1.27.28 | Low-level, data-driven core of boto 3. / Apache-2.0 |
| [bottleneck](https://github.com/pydata/bottleneck) | 1.3.5 | Fast NumPy array functions written in Cython. / BSD-2-Clause |
| [brotli](https://github.com/google/brotli) | 1.0.9 | Brotli compression format / MIT |
| [brotli-bin](https://github.com/google/brotli) | 1.0.9 | Brotli compression format / MIT |
| [brotlipy](https://github.com/python-hyper/brotlipy) | 0.7.0 | Python bindings to the Brotli compression library / MIT |
| [brunsli](https://github.com/google/brunsli) | 0.1 | Practical JPEG Repacker / MIT |
| [bzip2](http://www.bzip.org/) | 1.0.8 | high-quality data compressor / bzip2 |
| [c-ares](https://c-ares.org/) | 1.18.1 | This is c-ares, an asynchronous resolver library / MIT |
| [ca-certificates](https://curl.se/docs/caextract.html) | 2022.07.19 | Certificates for use with other packages. / MPL-2.0 |
| [cctools](https://github.com/tpoechtrager/cctools-port) | 949.0.1 | Native assembler, archiver, ranlib, libtool, otool et al for Darwin Mach-O files / APSL-2.0 |
| [cctools\_osx-arm64](https://github.com/tpoechtrager/cctools-port) | 949.0.1 | Assembler, archiver, ranlib, libtool, otool et al for Darwin Mach-O files / APSL-2.0 |
| [certifi](https://certifi.io/) | 2022.9.24 | Python package for providing Mozilla’s CA Bundle. / MPL-2.0 |
| [cffi](https://cffi.readthedocs.org/) | 1.15.1 | Foreign Function Interface for Python calling C code. / MIT |
| [cfitsio](http://heasarc.gsfc.nasa.gov/fitsio/fitsio.html) | 3.470 | A library for reading and writing FITS files / fitsio |
| [chardet](https://github.com/chardet/chardet) | 4.0.0 | Universal character encoding detector / LGPL2 |
| [charls](https://github.com/team-charls/charls) | 2.2.0 | CharLS is a C++ implementation of the JPEG-LS standard for lossless and near-lossless image compression and decompression. JPEG-LS is a low-complexity image compression standard that matches JPEG 2000 compression ratios. / BSD-3-Clause |
| [charset-normalizer](https://github.com/ousret/charset_normalizer) | 2.0.4 | The Real First Universal Charset Detector. Open, modern and actively maintained alternative to Chardet. / MIT |
| [click](https://palletsprojects.com/p/click) | 8.0.4 | Python composable command line interface toolkit / BSD-3-Clause |
| [cloudpickle](https://github.com/cloudpipe/cloudpickle) | 2.0.0 | Extended pickling support for Python objects / BSD-3-Clause |
| [clyent](https://github.com/Anaconda-Platform/clyent) | 1.2.2 | Command line client library for windows and posix / BSD 3-Clause |
| [colorama](https://github.com/tartley/colorama) | 0.4.5 | Cross-platform colored terminal text / BSD-3-Clause |
| [colorcet](https://colorcet.holoviz.org/index.html) | 3.0.0 | Collection of perceptually uniform colormaps / CC-BY-4.0 |
| [conda](https://conda.io) | 22.9.0 | OS-agnostic, system-level binary package and environment manager. / BSD-3-Clause |
| [conda-build](https://github.com/conda/conda-build) | 3.22.0 | tools for building conda packages / BSD-3-Clause |
| [conda-content-trust](https://github.com/conda/conda-content-trust) | 0.1.3 | Signing and verification tools for conda / BSD-3-Clause |
| [conda-env](https://github.com/conda/conda-env) | 2.6.0 | Tools for interacting with conda environments. / BSD 3-Clause |
| [conda-token](https://github.com/Anaconda/conda-token) | 0.4.0 | Set repository access token / BSD-3-Clause |
| [conda-verify](https://github.com/conda/conda-verify) | 3.4.2 | tool for validating conda recipes and conda packages / BSD 3-Clause |
| [constantly](https://github.com/twisted/constantly) | 15.1.0 | Symbolic constants in Python / MIT |
| [cryptography](https://github.com/pyca/cryptography) | 37.0.1 | Provides cryptographic recipes and primitives to Python developers / (BSD-3-Clause OR Apache-2.0) AND PSF-2.0 AND MIT |
| [cssselect](https://pythonhosted.org/cssselect/) | 1.1.0 | CSS Selectors for Python / BSD 3-Clause |
| [curl](https://curl.se/) | 7.84.0 | tool and library for transferring data with URL syntax / curl |
| [cycler](http://matplotlib.org/cycler) | 0.11.0 | Composable style cycles. / BSD-3-Clause |
| [cython](https://cython.org/) | 0.29.32 | The Cython compiler for writing C extensions for the Python language / Apache-2.0 |
| [cytoolz](https://github.com/pytoolz/cytoolz) | 0.11.0 | Cython implementation of Toolz. High performance functional utilities / BSD-3-Clause |
| [dask](https://dask.org/) | 2022.7.0 | Parallel PyData with Task Scheduling / BSD-3-Clause |
| [dask-core](https://github.com/dask/dask/) | 2022.7.0 | Parallel Python with task scheduling / BSD-3-Clause |
| [dataclasses](https://github.com/ericvsmith/dataclasses) | 0.8 | An implementation of PEP 557: Data Classes / Apache-2.0 |
| [datashader](https://datashader.org) | 0.14.1 | Data visualization toolchain based on aggregating into a grid / BSD-3-Clause |
| [datashape](http://datashape.pydata.org) | 0.5.4 | A data description language. / BSD 2-Clause |
| [debugpy](https://github.com/Microsoft/debugpy) | 1.5.1 | An implementation of the Debug Adapter Protocol for Python / MIT |
| [decorator](https://github.com/micheles/decorator) | 5.1.1 | Better living through Python with decorators. / BSD-2-Clause |
| [defusedxml](https://bitbucket.org/tiran/defusedxml) | 0.7.1 | XML bomb protection for Python stdlib modules / PSF 2.0 |
| [dill](http://www.cacr.caltech.edu/~mmckerns/dill.htm) | 0.3.4 | Serialize all of python (almost) / BSD-3-Clause |
| [distributed](https://distributed.readthedocs.io/en/latest/) | 2022.7.0 | Distributed computing with Dask / BSD-3-Clause |
| [docutils](http://docutils.sourceforge.net/) | 0.18.1 | Docutils – Python Documentation Utilities / LicenseRef-Public-Domain-Dedictation and BSD-2-Clause and LicenseRef-PSF-2.1.1 and GPL-3.0-or-later |
| [entrypoints](https://github.com/takluyver/entrypoints) | 0.4 | Discover and load entry points from installed packages. / MIT License |
| [et\_xmlfile](https://foss.heptapod.net/openpyxl/et_xmlfile) | 1.1.0 | An implementation of lxml.xmlfile for the standard library / MIT AND PSF-2.0 |
| [executing](https://pypi.org/project/executing) | 0.8.3 | Get the currently executing AST node of a frame, and other information / MIT |
| [fftw](http://fftw.org) | 3.3.9 | The fastest Fourier transform in the west. / GPL 2 |
| [filelock](https://github.com/tox-dev/py-filelock) | 3.6.0 | A platform independent file lock. / Unlicense |
| [flask](https://palletsprojects.com/p/flask) | 1.1.2 | A simple framework for building complex web applications. / BSD-3-Clause |
| [fonttools](https://github.com/fonttools/fonttools) | 4.25.0 | fontTools is a library for manipulating fonts, written in Python. / MIT |
| [freetype](https://freetype.org/) | 2.11.0 | A Free, High-Quality, and Portable Font Engine / GPL-2-only and LicenseRef-FreeType |
| [fsspec](https://github.com/fsspec/filesystem_spec) | 2022.7.1 | A specification for pythonic filesystems / BSD-3-Clause |
| [future](http://python-future.org) | 0.18.2 | Clean single-source support for Python 3 and 2 / MIT |
| [gensim](https://github.com/RaRe-Technologies/gensim) | 4.1.2 | Topic Modelling for Humans / LGPL-2.1-only |
| [giflib](http://giflib.sourceforge.net) | 5.2.1 | Library for reading and writing gif images / MIT |
| [glob2](https://github.com/miracle2k/python-glob2) | 0.7 | Version of the glob module that supports recursion via \*\*, and can capture patterns. / BSD-2-Clause |
| [gmp](http://gmplib.org/) | 6.2.1 | The GNU multiprecision library. / GPL-2.0-or-later AND LGPL-3.0-or-later |
| [gmpy2](https://pypi.python.org/pypi/gmpy2) | 2.1.2 | GMP/MPIR, MPFR, and MPC interface to Python 2.6+ and 3.x / LGPL-3.0-or-later |
| [greenlet](https://github.com/python-greenlet/greenlet) | 1.1.0 | Lightweight in-process concurrent programming / MIT |
| [h5py](https://www.h5py.org/) | 3.7.0 | Read and write HDF5 files from Python / BSD-3-Clause |
| [hdf5](http://www.hdfgroup.org/HDF5/) | 1.12.1 | HDF5 is a data model, library, and file format for storing and managing data / HDF5 |
| [heapdict](http://stutzbachenterprises.com/) | 1.0.1 | A heap with decrease-key and increase-key operations / BSD 3-Clause |
| [holoviews](https://holoviews.org) | 1.15.0 | Stop plotting your data - annotate your data and let it visualize itself. / BSD-3-Clause |
| [hvplot](https://hvplot.holoviz.org) | 0.8.0 | A high-level plotting API for the PyData ecosystem built on HoloViews / BSD-3-Clause |
| [hyperlink](https://github.com/python-hyper/hyperlink) | 21.0.0 | Immutable, Pythonic, correct URLs. / MIT |
| [icu](http://site.icu-project.org/) | 68.1 | International Components for Unicode. / MIT |
| [idna](https://github.com/kjd/idna) | 3.3 | Internationalized Domain Names in Applications (IDNA). / BSD-3-Clause |
| [imagecodecs](https://www.lfd.uci.edu/~gohlke/) | 2021.8.26 | Image transformation, compression, and decompression codecs / BSD-3-Clause |
| [imageio](https://imageio.github.io) | 2.19.3 | A Python library for reading and writing image data / BSD-2-Clause |
| [imagesize](https://github.com/shibukawa/imagesize_py) | 1.4.1 | Getting image size from png/jpeg/jpeg2000/gif file / MIT |
| [importlib-metadata](https://github.com/python/importlib_metadata) | 4.11.3 | A library to access the metadata for a Python package. / Apache-2.0 |
| [incremental](https://github.com/hawkowl/incremental) | 21.3.0 | Incremental is a small library that versions your Python projects. / MIT |
| [iniconfig](http://github.com/RonnyPfannschmidt/iniconfig) | 1.1.1 | iniconfig: brain-dead simple config-ini parsing / MIT |
| [intake](https://github.com/ContinuumIO/intake) | 0.6.5 | Data load and catalog system / BSD-2-Clause |
| [ipykernel](https://ipython.org) | 6.15.2 | IPython Kernel for Jupyter / BSD-3-Clause |
| [ipython](https://ipython.org) | 8.4.0 | IPython: Productive Interactive Computing / BSD-3-Clause |
| [ipython\_genutils](http://ipython.org) | 0.2.0 | vestigial utilities from IPython / BSD 3-Clause |
| [ipywidgets](https://github.com/ipython/ipywidgets) | 7.6.5 | Jupyter Interactive Widgets / BSD-3-Clause |
| [isort](https://github.com/timothycrosley/isort) | 5.9.3 | A Python utility / library to sort Python imports. / MIT |
| [itemadapter](https://github.com/scrapy/itemadapter) | 0.3.0 | Common interface for different data containers / BSD-3-Clause |
| [itemloaders](https://github.com/scrapy/itemadapter) | 1.0.4 | Collect data from HTML and XML sources / BSD-3-Clause |
| [itsdangerous](https://github.com/pallets/itsdangerous) | 2.0.1 | Various helpers to pass trusted data to untrusted environments. / BSD-3-Clause |
| [jdcal](https://github.com/phn/jdcal) | 1.4.1 | Julian dates from proleptic Gregorian and Julian calendars. / BSD 2-Clause |
| [jedi](https://github.com/davidhalter/jedi/) | 0.18.1 | An autocompletion tool for Python that can be used for text editors. / MIT |
| [jinja2](https://palletsprojects.com/p/jinja/) | 2.11.3 | A very fast and expressive template engine. / BSD-3-Clause |
| [jmespath](http://jmespath.org/) | 0.10.0 | Query language for JSON / MIT |
| [joblib](https://joblib.readthedocs.io/en/latest/) | 1.1.0 | Lightweight pipelining: using Python functions as pipeline jobs. / BSD-3-Clause |
| [jpeg](https://www.ijg.org/) | 9e | read/write jpeg COM, EXIF, IPTC medata / IJG |
| [jq](http://stedolan.github.io/jq/) | 1.6 | A command-line JSON processor. / MIT |
| [json5](https://github.com/dpranke/pyjson5) | 0.9.6 | A Python implementation of the JSON5 data format / Apache-2.0 |
| [jsonschema](https://github.com/python-jsonschema/jsonschema) | 4.16.0 | An implementation of JSON Schema validation for Python / MIT |
| [jupyter\_client](https://jupyter.org) | 7.3.4 | jupyter\_client contains the reference implementation of the Jupyter protocol. / BSD-3-Clause |
| [jupyter\_console](https://jupyter.org) | 6.4.3 | Jupyter terminal console / BSD-3-Clause |
| [jupyter\_core](https://jupyter.org) | 4.11.1 | Core common functionality of Jupyter projects. / BSD-3-Clause |
| [jupyter\_server](https://jupyter.org) | 1.18.1 | Jupyter Server / BSD-3-Clause |
| [jupyterlab](https://github.com/jupyterlab/jupyterlab) | 3.4.4 | JupyterLab PRE-ALPHA / BSD-3-Clause |
| [jupyterlab\_pygments](http://github.com/JupyterLab/jupyterlab_pygments) | 0.1.2 | Pygments syntax coloring scheme making use of the JupyterLab CSS variables / BSD-3-Clause |
| [jupyterlab\_server](https://github.com/jupyterlab/jupyterlab_server) | 2.10.3 | A set of server components for JupyterLab and JupyterLab like applications. / BSD-3-Clause |
| [jupyterlab\_widgets](https://github.com/jupyter-widgets/ipywidgets) | 1.0.0 | JupyterLab extension providing HTML widgets / BSD-3-Clause |
| [jxrlib](https://packages.debian.org/source/sid/jxrlib) | 1.1 | jxrlib - JPEG XR Library by Microsoft, built from Debian hosted sources. / BSD-2-Clause |
| [kiwisolver](https://github.com/nucleic/kiwi) | 1.4.2 | An efficient C++ implementation of the Cassowary constraint solver / BSD-3-Clause |
| [krb5](http://web.mit.edu/kerberos/) | 1.19.2 | A network authentication protocol. / MIT |
| [lazy-object-proxy](https://github.com/ionelmc/python-lazy-object-proxy) | 1.6.0 | A fast and thorough lazy object proxy / BSD-2-Clause |
| [lcms2](http://www.littlecms.com/) | 2.12 | Open Source Color Management Engine / MIT |
| [ld64](https://github.com/tpoechtrager/cctools-port) | 530 | Darwin Mach-O native linker / APSL-2.0 |
| [ld64\_osx-arm64](https://github.com/tpoechtrager/cctools-port) | 530 | Darwin Mach-O cross linker / APSL-2.0 |
| [ldid](https://cydia.saurik.com/info/ldid/) | 2.1.2 | pseudo-codesign Mach-O files / AGPL-3.0-only |
| [lerc](https://github.com/Esri/lerc) | 3.0 | LERC - Limited Error Raster Compression / Apache-2.0 |
| [libaec](https://gitlab.dkrz.de/k202009/libaec) | 1.0.4 | Adaptive Entropy Coding library / BSD-2-Clause |
| [libarchive](https://libarchive.org/) | 3.6.1 | Multi-format archive and compression library / BSD-2-Clause |
| [libbrotlicommon](https://github.com/google/brotli) | 1.0.9 | Brotli compression format / MIT |
| [libbrotlidec](https://github.com/google/brotli) | 1.0.9 | Brotli compression format / MIT |
| [libbrotlienc](https://github.com/google/brotli) | 1.0.9 | Brotli compression format / MIT |
| [libcurl](https://curl.se/) | 7.84.0 | tool and library for transferring data with URL syntax / curl |
| [libcxx](https://libcxx.llvm.org/) | 14.0.6 | LLVM C++ standard library / Apache-2.0 WITH LLVM-exception |
| [libdeflate](https://github.com/ebiggers/libdeflate) | 1.8 | libdeflate is a library for fast, whole-buffer DEFLATE-based compression and decompression. / MIT |
| [libedit](http://thrysoee.dk/editline/) | 3.1.20210910 | Editline Library (libedit) / BSD-2-Clause |
| [libev](http://software.schmorp.de/pkg/libev.html) | 4.33 | A full-featured and high-performance event loop that is loosely modeled after libevent, but without its limitations and bugs. / BSD-2-Clause |
| [libffi](https://sourceware.org/libffi/) | 3.4.2 | A Portable Foreign Function Interface Library. / MIT |
| [libgfortran](https://gcc.gnu.org/) | 5.0.0 | Fortran compiler and libraries from the GNU Compiler Collection / GPL-3.0-only WITH GCC-exception-3.1 |
| [libgfortran5](https://gcc.gnu.org/) | 11.2.0 | Fortran compiler and libraries from the GNU Compiler Collection / GPL-3.0-only WITH GCC-exception-3.1 |
| [libiconv](https://www.gnu.org/software/libiconv/) | 1.16 | Provides iconv for systems which don’t have one (or that cannot convert from/to Unicode.) / GPL and LGPL |
| [libidn2](https://www.gnu.org/software/libidn/#libidn2) | 2.3.1 | Library for internationalized domain names (IDNA2008) support / LGPLv2 AND LGPL-3.0-or-later AND GPL-3.0-or-later |
| [liblief](https://lief.quarkslab.com/) | 0.11.5 | A cross platform library to parse, modify and abstract ELF, PE and MachO formats. / Apache-2.0 |
| [libllvm11](https://llvm.org/) | 11.1.0 | Development headers and libraries for LLVM / Apache-2.0 WITH LLVM-exception |
| [libllvm14](https://llvm.org/) | 14.0.6 | Development headers and libraries for LLVM / Apache-2.0 WITH LLVM-exception |
| [libnghttp2](http://github.com/nghttp2/nghttp2) | 1.46.0 | This is an implementation of Hypertext Transfer Protocol version 2. / MIT |
| [libopenblas](https://www.openblas.net/) | 0.3.21 | An Optimized BLAS library / BSD-3-Clause |
| [libpng](http://www.libpng.org/pub/png/libpng.html) | 1.6.37 | PNG reference library / zlib/libpng |
| [libsodium](http://libsodium.org) | 1.0.18 | A modern and easy-to-use crypto library. / ISC |
| [libssh2](https://www.libssh2.org/) | 1.10.0 | the SSH library / BSD-3-Clause |
| [libtiff](http://www.simplesystems.org/libtiff/) | 4.4.0 | Support for the Tag Image File Format (TIFF). / HPND |
| [libunistring](https://www.gnu.org/software/libunistring) | 0.9.10 | This library provides functions for manipulating Unicode strings and for manipulating C strings according to the Unicode standard. / LGPL |
| [libwebp](https://developers.google.com/speed/webp/) | 1.2.2 | WebP image library / BSD-3-Clause |
| [libwebp-base](https://developers.google.com/speed/webp) | 1.2.2 | WebP image library / BSD-3-Clause |
| [libxml2](https://gitlab.gnome.org/GNOME/libxml2/) | 2.9.14 | The XML C parser and toolkit of Gnome / MIT |
| [libxslt](https://gitlab.gnome.org/GNOME/libxslt) | 1.1.35 | The XSLT C library developed for the GNOME project / MIT |
| [libzopfli](https://github.com/google/zopfli) | 1.0.3 | A compression library programmed in C to perform very good, but slow, deflate or zlib compression. / Apache-2.0 |
| [llvm-openmp](https://openmp.llvm.org/) | 14.0.6 | The OpenMP API supports multi-platform shared-memory parallel programming in C/C++ and Fortran. / Apache-2.0 WITH LLVM-exception |
| [llvmlite](https://llvmlite.pydata.org) | 0.38.0 | A lightweight LLVM python binding for writing JIT compilers. / BSD-2-Clause |
| [locket](https://github.com/mwilliamson/locket.py) | 1.0.0 | File-based locks for Python for Linux and Windows / BSD-2-Clause |
| [lxml](https://lxml.de/) | 4.9.1 | Pythonic binding for the C libraries libxml2 and libxslt. / BSD-3-Clause and GPL-2.0-only and ZPL-2.0 and LicenseRef-ElementTree |
| [lz4](https://github.com/python-lz4/python-lz4) | 3.1.3 | LZ4 Bindings for Python / BSD-3-Clause |
| [lz4-c](https://www.lz4.org) | 1.9.3 | Extremely Fast Compression algorithm / BSD-2-Clause |
| [lzo](http://www.oberhumer.com/opensource/lzo/) | 2.10 | LZO is a portable lossless data compression library written in ANSI C. / GPL v2+ |
| [markdown](https://pythonhosted.org/Markdown/) | 3.3.4 | Python implementation of Markdown. / BSD-3-Clause |
| [markupsafe](https://www.palletsprojects.com/p/markupsafe) | 2.0.1 | Safely add untrusted strings to HTML/XML markup. / BSD-3-Clause |
| [matplotlib](https://matplotlib.org/) | 3.5.2 | Publication quality figures in Python / LicenseRef-PSF-based |
| [matplotlib-base](https://matplotlib.org/) | 3.5.2 | Publication quality figures in Python / LicenseRef-PSF-based |
| [matplotlib-inline](https://github.com/ipython/matplotlib-inline) | 0.1.6 | Inline Matplotlib backend for Jupyter / BSD-3-Clause |
| [mccabe](https://github.com/PyCQA/mccabe) | 0.7.0 | McCabe complexity checker for Python / MIT |
| [mistune](https://github.com/lepture/mistune) | 0.8.4 | A sane Markdown parser with useful plugins and renderers. / BSD-3-Clause |
| [mock](https://github.com/testing-cabal/mock) | 4.0.3 | A library for testing in Python / BSD-2-Clause |
| [mpc](http://www.multiprecision.org/) | 1.1.0 | A C library for the arithmetic of complex numbers with arbitrarily high precision. / LGPL-3-or-later |
| [mpfr](http://www.mpfr.org/) | 4.0.2 | The MPFR library is a C library for multiple-precision floating-point computations with correct rounding. / LGPL-3.0-only |
| [mpmath](http://mpmath.org) | 1.2.1 | Python library for arbitrary-precision floating-point arithmetic / BSD 3-Clause |
| [msgpack-python](https://msgpack.org/) | 1.0.3 | MessagePack (de)serializer / Apache-2.0 |
| [multipledispatch](https://github.com/mrocklin/multipledispatch/) | 0.6.0 | Multiple dispatch in Python / BSD 3-Clause |
| [munkres](https://github.com/bmc/munkres) | 1.1.4 | The Munkres module provides an O(n^3) implementation of the Munkres algorithm (also called the Hungarian algorithm or the Kuhn-Munkres algorithm). / Apache-2.0 |
| [nbclassic](http://github.com/jupyterlab/nbclassic) | 0.3.5 | Jupyter Notebook as a Jupyter Server Extension. / BSD-3-Clause |
| [nbclient](https://jupyter.org) | 0.5.13 | A client library for executing notebooks. Formally nbconvert’s ExecutePreprocessor. / BSD-3-Clause |
| [nbconvert](https://jupyter.org) | 6.4.4 | Converting Jupyter Notebooks / BSD-3-Clause |
| [nbformat](https://jupyter.org) | 5.5.0 | The Jupyter Notebook format / BSD-3-Clause |
| [ncurses](http://www.gnu.org/software/ncurses/) | 6.3 | Library for text-based user interfaces / Free software (MIT-like) |
| [nest-asyncio](https://github.com/erdewit/nest_asyncio) | 1.5.5 | Patch asyncio to allow nested event loops / BSD-2-Clause |
| [networkx](https://networkx.github.io/) | 2.8.4 | Python package for creating and manipulating complex networks / BSD-3-Clause |
| [nltk](https://nltk.org/) | 3.7 | Natural Language Toolkit / Apache-2.0 |
| nomkl | 3.0 | / BSD |
| [nose](http://readthedocs.org/docs/nose/) | 1.3.7 | Nose extends unittest to make testing easier / LGPL-2.1 |
| [notebook](https://jupyter.org) | 6.4.12 | Jupyter Notebook / BSD-3-Clause |
| [numba](https://numba.pydata.org) | 0.55.1 | NumPy aware dynamic Python compiler using LLVM / BSD-2-Clause |
| [numexpr](https://github.com/pydata/numexpr) | 2.8.3 | Fast numerical expression evaluator for NumPy. / MIT |
| [numpy](https://numpy.org/) | 1.21.5 | Array processing for numbers, strings, records, and objects. / BSD-3-Clause |
| [numpy-base](https://numpy.org/) | 1.21.5 | Array processing for numbers, strings, records, and objects. / BSD-3-Clause |
| [numpydoc](https://github.com/numpy/numpydoc) | 1.4.0 | Numpy’s Sphinx extensions / BSD-3-Clause |
| [olefile](http://www.decalage.info/python/olefileio) | 0.46 | parse, read and write Microsoft OLE2 files / BSD 2-Clause |
| [oniguruma](https://github.com/kkos/oniguruma) | 6.9.7.1 | A regular expression library. / BSD-2-Clause |
| [openblas](https://www.openblas.net/) | 0.3.21 | An optimized BLAS library / BSD-3-Clause |
| [openblas-devel](https://www.openblas.net/) | 0.3.21 | OpenBLAS headers and libraries for developing software that used OpenBLAS. / BSD-3-Clause |
| [openjpeg](http://www.openjpeg.org/) | 2.3.0 | An open-source JPEG 2000 codec written in C / BSD 2-Clause |
| [openpyxl](https://openpyxl.readthedocs.io) | 3.0.10 | A Python library to read/write Excel 2010 xlsx/xlsm files / MIT |
| [openssl](https://www.openssl.org/) | 1.1.1q | OpenSSL is an open-source implementation of the SSL and TLS protocols / OpenSSL |
| [packaging](https://github.com/pypa/packaging) | 21.3 | Core utilities for Python packages / Apache-2.0 or BSD-2-Clause |
| [pandas](https://pandas.pydata.org) | 1.4.4 | High-performance, easy-to-use data structures and data analysis tools. / BSD-3-Clause |
| [pandocfilters](https://github.com/jgm/pandocfilters) | 1.5.0 | A python module for writing pandoc filters / BSD-3-Clause |
| [panel](https://panel.holoviz.org) | 0.13.1 | A high-level app and dashboarding solution for Python / BSD-3-Clause |
| [param](http://ioam.github.io/param/) | 1.12.0 | Param: Make your Python code clearer and more reliable by declaring Parameters / BSD-3-Clause |
| [parsel](https://github.com/scrapy/parsel) | 1.6.0 | library to extract data from HTML and XML using XPath and CSS selectors / BSD-3-Clause |
| [parso](https://github.com/davidhalter/parso) | 0.8.3 | A Python Parser / MIT |
| [partd](https://github.com/dask/partd) | 1.2.0 | Data structure for on-disk shuffle operations / BSD 3-Clause |
| [patch](http://savannah.gnu.org/projects/patch/) | 2.7.6 | Native Win32 versions of common unix tools / GPL 3 |
| [patsy](https://github.com/pydata/patsy) | 0.5.2 | Describing statistical models in Python using symbolic formulas / BSD-2-Clause AND PSF-2.0 |
| [pep8](http://pep8.readthedocs.org/) | 1.7.1 | Python style guide checker / MIT |
| [pexpect](http://pexpect.sourceforge.net/) | 4.8.0 | Pexpect makes Python a better tool for controlling other applications. / ISC |
| [pickleshare](https://github.com/pickleshare/pickleshare/) | 0.7.5 | Tiny ‘shelve’-like database with concurrency support / MIT |
| [pillow](https://pillow.readthedocs.io) | 9.2.0 | Pillow is the friendly PIL fork by Alex Clark and Contributors / LicenseRef-PIL |
| [pip](https://pip.pypa.io/en/stable/) | 22.2.2 | PyPA recommended tool for installing Python packages / MIT |
| [pkginfo](https://code.launchpad.net/~tseaver/pkginfo/trunk) | 1.8.2 | Query metadatdata from sdists / bdists / installed packages. / MIT |
| [platformdirs](https://github.com/platformdirs/platformdirs) | 2.5.2 | A small Python module for determining appropriate platform-specific dirs, e.g. a “user data dir”. / MIT |
| [plotly](https://plot.ly/python/) | 5.9.0 | An interactive JavaScript-based visualization library for Python / MIT |
| [pluggy](https://github.com/pytest-dev/pluggy) | 1.0.0 | Plugin registration and hook calling for Python / MIT |
| [ply](http://www.dabeaz.com/ply/index.html) | 3.11 | Python Lex-Yacc / BSD 3-clause |
| [prometheus\_client](https://github.com/prometheus/client_python) | 0.14.1 | Python client for the Prometheus monitoring system / Apache-2.0 |
| [prompt-toolkit](https://github.com/jonathanslenders/python-prompt-toolkit) | 3.0.20 | Library for building powerful interactive command lines in Python / BSD-3-Clause |
| [prompt\_toolkit](https://github.com/jonathanslenders/python-prompt-toolkit) | 3.0.20 | Library for building powerful interactive command lines in Python / BSD-3-Clause |
| [protego](https://github.com/scrapy/protego) | 0.1.16 | A pure-Python robots.txt parser with support for modern conventions / BSD 3-Clauses |
| [psutil](https://github.com/giampaolo/psutil) | 5.9.0 | A cross-platform process and system utilities module for Python / BSD-3-Clause |
| [ptyprocess](https://github.com/pexpect/ptyprocess) | 0.7.0 | Run a subprocess in a pseudo terminal / ISC |
| [pure\_eval](https://github.com/alexmojaki/pure_eval) | 0.2.2 | Safely evaluate AST nodes without side effects / MIT |
| [py](https://github.com/pytest-dev/py) | 1.11.0 | library with cross-python path, ini-parsing, io, code, log facilities / MIT |
| [py-lief](https://lief.quarkslab.com/) | 0.11.5 | A cross platform library to parse, modify and abstract ELF, PE and MachO formats. / Apache-2.0 |
| [pyasn1](https://github.com/etingof/pyasn1) | 0.4.8 | ASN.1 types and codecs / BSD 2-Clause |
| [pyasn1-modules](http://pyasn1.sourceforge.net/) | 0.2.8 | A collection of ASN.1-based protocols modules. / BSD 2-Clause |
| [pycodestyle](https://pycodestyle.readthedocs.io/) | 2.8.0 | Python style guide checker / MIT |
| [pycosat](https://github.com/ContinuumIO/pycosat) | 0.6.3 | Bindings to picosat (a SAT solver) / MIT |
| [pycparser](https://github.com/eliben/pycparser) | 2.21 | Complete C99 parser in pure Python / BSD-3-clause |
| [pyct](http://github.com/pyviz/pyct) | 0.4.8 | python package common tasks for users (e.g. copy examples, fetch data, …) / BSD 3-Clause |
| [pycurl](http://pycurl.sourceforge.net/) | 7.45.1 | A Python Interface To The cURL library / LGPL-2.1-only, MIT |
| [pydispatcher](http://pydispatcher.sourceforge.net) | 2.0.5 | Multi-producer-multi-consumer signal dispatching mechanism / BSD 3-Clause |
| [pyerfa](https://pyerfa.readthedocs.io/) | 2.0.0 | Python bindings for ERFA routines / BSD-3-Clause |
| [pyflakes](https://github.com/PyCQA/pyflakes) | 2.4.0 | Pyflakes analyzes programs and detects various errors. / MIT |
| [pygments](https://pygments.org/) | 2.11.2 | Pygments is a generic syntax highlighter suitable for use in code hosting, forums, wikis or other applications that need to prettify source code. / BSD-2-Clause |
| [pyhamcrest](https://github.com/hamcrest/PyHamcrest) | 2.0.2 | Hamcrest framework for matcher objects / BSD 3-Clause |
| [pylint](https://www.pylint.org) | 2.14.5 | python code static checker / GPL-2.0-or-later |
| [pyodbc](https://github.com/mkleehammer/pyodbc) | 4.0.34 | DB API Module for ODBC / MIT-0 |
| [pyopenssl](https://github.com/pyca/pyopenssl) | 22.0.0 | Python wrapper module around the OpenSSL library / Apache-2.0 |
| [pyparsing](https://github.com/pyparsing/pyparsing/) | 3.0.9 | Create and execute simple grammars / MIT |
| [pyrsistent](http://github.com/tobgu/pyrsistent/) | 0.18.0 | Persistent/Functional/Immutable data structures / MIT |
| [pysocks](https://github.com/Anorov/PySocks) | 1.7.1 | A Python SOCKS client module. See [Anorov/PySocks](https://github.com/Anorov/PySocks) for more information. / BSD 3-Clause |
| [pytables](https://www.pytables.org) | 3.7.0 | Brings together Python, HDF5 and NumPy to easily handle large amounts of data. / BSD-3-Clause |
| [pytest](https://docs.pytest.org/en/latest/) | 7.1.2 | Simple and powerful testing with Python. / MIT |
| [python](https://www.python.org/) | 3.9.13 | General purpose programming language / PSF-2.0 |
| [python-dateutil](https://dateutil.readthedocs.org/) | 2.8.2 | Extensions to the standard Python datetime module. / BSD-3-Clause and Apache |
| [python-fastjsonschema](https://github.com/horejsek/python-fastjsonschema) | 2.16.2 | Fastest Python implementation of JSON schema / BSD-3-Clause |
| [python-libarchive-c](https://github.com/Changaco/python-libarchive-c) | 2.9 | Python interface to libarchive / CC0-1.0 |
| [python-snappy](https://github.com/andrix/python-snappy) | 0.6.0 | Python library for the snappy compression library from Google / BSD-3-Clause |
| [python.app](https://www.python.org/) | 3 | Proxy on macOS letting Python libraries hook into the GUI event loop / BSD-3-Clause |
| [pytz](http://pythonhosted.org/pytz/) | 2022.1 | World timezone definitions, modern and historical. / MIT |
| [pyviz\_comms](https://www.holoviz.org) | 2.0.2 | Bidirectional communication for PyViz / BSD-3-Clause |
| [pywavelets](https://github.com/PyWavelets/pywt) | 1.3.0 | Discrete Wavelet Transforms in Python / MIT |
| [pyyaml](http://pyyaml.org/wiki/PyYAML) | 6.0 | YAML parser and emitter for Python / MIT |
| [pyzmq](https://github.com/zeromq/pyzmq) | 23.2.0 | Python bindings for zeromq / BSD-3-Clause AND LGPL-3.0-or-later |
| [queuelib](https://github.com/scrapy/queuelib) | 1.5.0 | Collection of persistent (disk-based) queues / BSD |
| [readline](https://tiswww.case.edu/php/chet/readline/rltop.html) | 8.1.2 | library for editing command lines as they are typed in / GPL-3.0-only |
| [regex](https://github.com/mrabarnett/mrab-regex) | 2022.7.9 | Alternative regular expression module, to replace re / Apache-2.0 |
| [requests](https://requests.readthedocs.io/en/latest/) | 2.28.1 | Requests is an elegant and simple HTTP library for Python, built with ♥. / Apache-2.0 |
| [requests-file](http://github.com/dashea/requests-file) | 1.5.1 | file transport adapter for Requests / Apache |
| [rope](https://github.com/python-rope/rope) | 0.22.0 | A python refactoring library / LGPL-3.0-or-later |
| [ruamel\_yaml](https://sourceforge.net/p/ruamel-yaml/code/ci/default/tree) | 0.15.100 | A patched copy of ruamel.yaml. / MIT |
| [s3transfer](https://github.com/boto/s3transfer) | 0.6.0 | An Amazon S3 Transfer Manager / Apache-2.0 |
| [scikit-image](https://scikit-image.org/) | 0.19.2 | Image processing in Python. / BSD-3-Clause |
| [scikit-learn](https://scikit-learn.org/) | 1.1.1 | A set of python modules for machine learning and data mining / BSD-3-Clause |
| [scipy](https://scipy.org/) | 1.9.1 | Scientific Library for Python / BSD-3-Clause |
| [scrapy](https://scrapy.org/) | 2.6.2 | A high-level Python Screen Scraping framework / BSD-3-Clause |
| [seaborn](https://seaborn.pydata.org) | 0.11.2 | Statistical data visualization / BSD-3-Clause |
| [send2trash](https://github.com/arsenetar/send2trash) | 1.8.0 | Python library to natively send files to Trash (or Recycle bin) on all platforms. / BSD-3-Clause |
| [service\_identity](https://github.com/pyca/service_identity) | 18.1.0 | Service identity verification for pyOpenSSL. / MIT |
| [setuptools](https://github.com/pypa/setuptools) | 63.4.1 | Download, build, install, upgrade, and uninstall Python packages / MIT |
| [sip](https://www.riverbankcomputing.com/software/sip/) | 6.6.2 | A Python bindings generator for C/C++ libraries / GPL-3.0-only |
| [six](https://six.readthedocs.io/) | 1.16.0 | Python 2 and 3 compatibility utilities / MIT |
| [smart\_open](https://github.com/RaRe-Technologies/smart_open) | 5.2.1 | Python library for efficient streaming of large files / MIT |
| [snappy](https://github.com/google/snappy) | 1.1.9 | A fast compressor/decompressor / BSD-3-clause AND CC-BY-3.0 AND MIT AND CC-BY AND Public Domain |
| [sniffio](https://github.com/python-trio/sniffio) | 1.2.0 | Sniff out which async library your code is running under / Apache-2.0 |
| [snowballstemmer](https://github.com/snowballstem/snowball) | 2.2.0 | Snowball stemming library collection for Python / BSD-3-Clause |
| [sortedcollections](http://www.grantjenks.com/docs/sortedcollections/) | 2.1.0 | Python Sorted Collections / Apache-2.0 |
| [sortedcontainers](http://www.grantjenks.com/docs/sortedcontainers/) | 2.4.0 | Python Sorted Container Types: SortedList, SortedDict, and SortedSet / Apache-2.0 |
| [soupsieve](https://facelessuser.github.io/soupsieve) | 2.3.1 | A modern CSS selector implementation for BeautifulSoup / MIT |
| [sphinx](https://www.sphinx-doc.org) | 5.0.2 | Sphinx is a tool that makes it easy to create intelligent and beautiful documentation / BSD-2-Clause |
| [sphinxcontrib-applehelp](https://www.sphinx-doc.org/en/master/) | 1.0.2 | sphinxcontrib-applehelp is a sphinx extension which outputs Apple help books / BSD-2-Clause |
| [sphinxcontrib-devhelp](https://www.sphinx-doc.org/en/master/) | 1.0.2 | sphinxcontrib-devhelp is a sphinx extension which outputs Devhelp document / BSD-2-Clause |
| [sphinxcontrib-htmlhelp](https://www.sphinx-doc.org/en/master/) | 2.0.0 | sphinxcontrib-htmlhelp is a sphinx extension which renders HTML help files. / BSD-2-Clause |
| [sphinxcontrib-jsmath](https://www.sphinx-doc.org/en/master/) | 1.0.1 | A sphinx extension which renders display math in HTML via JavaScript / BSD-2-Clause |
| [sphinxcontrib-qthelp](https://www.sphinx-doc.org/en/master/) | 1.0.3 | sphinxcontrib-qthelp is a sphinx extension which outputs QtHelp document / BSD-2-Clause |
| [sphinxcontrib-serializinghtml](https://www.sphinx-doc.org/en/master/) | 1.1.5 | sphinxcontrib-serializinghtml is a sphinx extension which outputs “serialized” HTML files (json and pickle). / BSD-2-Clause |
| [sqlalchemy](https://www.sqlalchemy.org/) | 1.4.39 | Database Abstraction Library. / MIT |
| [sqlite](https://www.sqlite.org/) | 3.39.3 | Implements a self-contained, zero-configuration, SQL database engine / blessing |
| [stack\_data](https://github.com/alexmojaki/stack_data) | 0.2.0 | Extract data from python stack frames and tracebacks for informative displays / MIT |
| [statsmodels](https://www.statsmodels.org) | 0.13.2 | Statistical computations and models for use with SciPy / BSD-3-Clause |
| [sympy](https://sympy.org) | 1.10.1 | Python library for symbolic mathematics / BSD-3-Clause AND MIT |
| [tabulate](https://github.com/astanin/python-tabulate) | 0.8.10 | Pretty-print tabular data in Python, a library and a command-line utility. / MIT |
| [tapi](https://opensource.apple.com/source/tapi) | 1100.0.11 | TAPI is a Text-based Application Programming Interface / NCSA |
| [tbb](https://github.com/oneapi-src/oneTBB) | 2021.5.0 | High level abstract threading library / Apache-2.0 |
| tbb4py | 2021.5.0 | TBB module for Python / Apache-2.0 |
| [tblib](https://github.com/ionelmc/python-tblib) | 1.7.0 | Traceback serialization library. / BSD 2-Clause |
| [tenacity](http://github.com/jd/tenacity) | 8.0.1 | Retry a flaky function whenever an exception occurs until it works / Apache-2.0 |
| [terminado](https://github.com/jupyter/terminado) | 0.13.1 | Terminals served by tornado websockets / BSD-2-Clause |
| [testpath](https://testpath.readthedocs.io) | 0.6.0 | Testpath is a collection of utilities for Python code working with files and commands. / BSD-3-Clause |
| [threadpoolctl](https://github.com/joblib/threadpoolctl) | 2.2.0 | Python helpers to control the threadpools of native libraries / BSD 3-Clause |
| [tifffile](https://github.com/cgohlke/tifffile) | 2021.7.2 | Read and write image data from and to TIFF files. / BSD-3-Clause |
| [tk](https://www.tcl.tk/) | 8.6.12 | A dynamic programming language with GUI support. Bundles Tcl and Tk. / TCL |
| [tldextract](https://github.com/john-kurkowski/tldextract) | 3.2.0 | Accurately separate the TLD from the registered domain andsubdomains of a URL, using the Public Suffix List. / BSD-3-Clause |
| [toml](https://github.com/uiri/toml) | 0.10.2 | Python lib for TOML. / MIT |
| [tomli](https://github.com/hukkin/tomli) | 2.0.1 | A simple TOML parser / MIT |
| [tomlkit](https://github.com/sdispater/tomlkit) | 0.11.1 | Style preserving TOML library / MIT |
| [toolz](http://toolz.readthedocs.org/) | 0.11.2 | List processing tools and functional utilities / BSD-3-Clause |
| [tornado](https://www.tornadoweb.org/) | 6.1 | A Python web framework and asynchronous networking library, originally developed at FriendFeed. / Apache-2.0 |
| [tqdm](https://tqdm.github.io/) | 4.64.1 | A Fast, Extensible Progress Meter / MPL-2.0 AND MIT |
| [traitlets](http://traitlets.readthedocs.org/) | 5.1.1 | Configuration system for Python applications / BSD-3-Clause |
| [twisted](https://twistedmatrix.com/) | 22.2.0 | An asynchronous networking framework written in Python / MIT |
| [typing-extensions](https://github.com/python/typing_extensions) | 4.3.0 | Backported and Experimental Type Hints for Python / PSF-2.0 |
| [typing\_extensions](https://github.com/python/typing_extensions) | 4.3.0 | Backported and Experimental Type Hints for Python / PSF-2.0 |
| [tzdata](https://www.iana.org/time-zones) | 2022c | The Time Zone Database (called tz, tzdb or zoneinfo) / CC-PDDC OR BSD-3-Clause |
| [unixodbc](http://www.unixodbc.org/) | 2.3.11 | ODBC on non MS Windows platforms / LGPL-2.1-or-later |
| [urllib3](https://urllib3.readthedocs.io/) | 1.26.11 | HTTP library with thread-safe connection pooling, file post, and more. / MIT |
| [w3lib](https://github.com/scrapy/w3lib) | 1.21.0 | Library of web-related functions / BSD |
| [wcwidth](https://github.com/jquast/wcwidth) | 0.2.5 | Measures number of Terminal column cells of wide-character codes. / MIT |
| [webencodings](https://github.com/gsnedders/python-webencodings) | 0.5.1 | Character encoding aliases for legacy web content / BSD 3-Clause |
| [websocket-client](https://github.com/liris/websocket-client) | 0.58.0 | WebSocket client for python. hybi13 is supported. / BSD-3-Clause |
| [werkzeug](https://palletsprojects.com/p/werkzeug/) | 2.0.3 | The comprehensive WSGI web application library. / BSD-3-Clause |
| [wget](https://www.gnu.org/software/wget/) | 1.21.3 | utility for non-interactive download of files from the Web / GPL-3.0-or-later |
| [wheel](https://github.com/pypa/wheel) | 0.37.1 | A built-package format for Python. / MIT |
| [widgetsnbextension](http://ipython.org) | 3.5.2 | Interactive Widgets for Jupyter / BSD-3-Clause |
| [wrapt](https://github.com/GrahamDumpleton/wrapt) | 1.14.1 | Module for decorators, wrappers and monkey patching / BSD-2-Clause |
| [xarray](https://github.com/pydata/xarray) | 0.20.1 | N-D labeled arrays and datasets in Python. / Apache-2.0 |
| [xlrd](http://www.python-excel.org/) | 2.0.1 | Library for developers to extract data from Microsoft Excel (tm) spreadsheet files / BSD 3-Clause and BSD with advertising |
| [xlsxwriter](https://xlsxwriter.readthedocs.io/) | 3.0.3 | A Python module for creating Excel XLSX files / BSD-2-Clause |
| [xlwings](https://www.xlwings.org/) | 0.27.15 | Interact with Excel from Python and vice versa / BSD-3-Clause |
| [xz](https://tukaani.org/xz/) | 5.2.6 | Data compression software with high compression ratio / LGPL-2.1-or-later and GPL-2.0-or-later |
| [yaml](http://pyyaml.org/wiki/LibYAML) | 0.2.5 | A C library for parsing and emitting YAML / MIT |
| [zeromq](http://zeromq.org) | 4.3.4 | A high-performance asynchronous messaging library. / LGPL-3.0-or-later |
| [zfp](https://computation.llnl.gov/projects/floating-point-compression) | 0.5.5 | Library for compressed numerical arrays that support high throughput read and write random access / BSD-3-Clause |
| [zict](https://github.com/mrocklin/zict) | 2.1.0 | Composable Dictionary Classes / BSD-3-Clause |
| [zipp](https://github.com/jaraco/zipp) | 3.8.0 | A pathlib-compatible Zipfile object wrapper / MIT |
| [zlib](https://zlib.net/) | 1.2.12 | Massively spiffy yet delicately unobtrusive compression library / Zlib |
| zope | 1.0 | web application server / BSD |
| [zope.interface](https://github.com/zopefoundation/zope.interface) | 5.4.0 | Interfaces for Python / ZPL-2.1 |
| [zstd](https://www.zstd.net) | 1.5.2 | Zstandard - Fast real-time compression algorithm / BSD-3-Clause AND GPL-2.0-or-later |
| Name | Version | Summary / License |
|---|---|---|
| [alabaster](http://www.sphinx-doc.org/en/stable/index.html) | 0.7.12 | Configurable, Python 2+3 compatible Sphinx theme. / BSD 3-Clause |
| [anaconda-client](https://anaconda.org) | 1.11.0 | anaconda.org command line client library / BSD-3-Clause |
| [anaconda-navigator](https://github.com/ContinuumIO/navigator) | 2.3.2 | Anaconda Navigator / proprietary - Continuum Analytics, Inc. |
| [anaconda-project](https://github.com/Anaconda-Platform/anaconda-project) | 0.11.1 | Tool for encapsulating, running, and reproducing data science projects / BSD-3-Clause |
| [anyio](https://github.com/agronholm/anyio) | 3.5.0 | High level compatibility layer for multiple asynchronous event loop implementations on Python / MIT |
| [appdirs](http://github.com/ActiveState/appdirs) | 1.4.4 | A small Python module for determining appropriate platform-specific dirs. / MIT |
| [applaunchservices](https://github.com/impact27/applaunchservices) | 0.3.0 | Simple package for registering an app with apple Launch Services to handle UTI and URL / MIT |
| [appnope](http://github.com/minrk/appnope) | 0.1.2 | Disable App Nap on OS X 10.9 / BSD 2-Clause |
| [appscript](http://appscript.sourceforge.net) | 1.1.2 | Control AppleScriptable applications from Python. / Public Domain |
| [argon2-cffi](https://argon2-cffi.readthedocs.org/) | 21.3.0 | The secure Argon2 password hashing algorithm. / MIT |
| [argon2-cffi-bindings](https://github.com/hynek/argon2-cffi-bindings) | 21.2.0 | Low-level Python CFFI Bindings for Argon2 / MIT |
| [arrow](https://github.com/arrow-py/arrow) | 1.2.2 | Better dates & times for Python / Apache-2.0 |
| [astroid](https://github.com/PyCQA/astroid) | 2.11.7 | A abstract syntax tree for Python with inference support. / LGPL-2.1-or-later |
| [astropy](https://www.astropy.org/) | 5.1 | Community-developed Python Library for Astronomy / BSD-3-Clause |
| [atomicwrites](https://github.com/untitaker/python-atomicwrites) | 1.4.0 | Atomic file writes / MIT |
| [attrs](https://attrs.readthedocs.io/en/stable/) | 21.4.0 | attrs is the Python package that will bring back the joy of writing classes by relieving you from the drudgery of implementing object protocols (aka dunder methods). / MIT |
| [automat](https://github.com/glyph/Automat) | 20.2.0 | self-service finite-state machines for the programmer on the go / MIT |
| [autopep8](https://github.com/hhatto/autopep8) | 1.6.0 | A tool that automatically formats Python code to conform to the PEP 8 style guide / MIT |
| [babel](http://babel.pocoo.org/) | 2.9.1 | Utilities to internationalize and localize Python applications / BSD 3-clause |
| [backcall](https://github.com/takluyver/backcall/) | 0.2.0 | Specifications for callback functions passed in to an API / BSD-3-Clause |
| [backports](https://github.com/brandon-rhodes/backports) | 1.1 | Namespace for backported Python features. / MIT |
| [backports.functools\_lru\_cache](https://github.com/jaraco/backports.functools_lru_cache) | 1.6.4 | Backport of functools.lru\_cache from Python 3.3 as published at ActiveState. / MIT |
| [backports.tempfile](https://github.com/pjdelport/backports.tempfile) | 1.0 | Backports of new features in Python’s tempfile module / PSF 2 |
| [backports.weakref](https://github.com/pjdelport/backports.weakref) | 1.0.post1 | Backport of new features in Python’s weakref module / Python-2.0 |
| [bcrypt](https://github.com/pyca/bcrypt/) | 3.2.0 | Modern password hashing for your software and your servers / Apache-2.0 |
| [beautifulsoup4](https://www.crummy.com/software/BeautifulSoup/) | 4.11.1 | Python library designed for screen-scraping / MIT |
| [binaryornot](https://github.com/audreyr/binaryornot) | 0.4.4 | Ultra-lightweight pure Python package to check if a file is binary or text. / BSD-3-Clause |
| [bitarray](https://github.com/ilanschnell/bitarray) | 2.5.1 | efficient arrays of booleans – C extension / PSF-2.0 |
| [bkcharts](http://github.com/bokeh/bkcharts) | 0.2 | High level chart types built on top of Bokeh / BSD 3-Clause |
| [black](https://github.com/psf/black) | 22.6.0 | The Uncompromising Code Formatter / MIT |
| [blas](http://www.netlib.org/lapack) | 1.0 | Linear Algebra PACKage / BSD-3-Clause |
| [bleach](https://github.com/mozilla/bleach) | 4.1.0 | Easy, whitelist-based HTML-sanitizing tool / Apache-2.0 |
| [blosc](https://github.com/Blosc/c-blosc) | 1.21.0 | A blocking, shuffling and loss-less compression library that can be faster than memcpy() / BSD-3-Clause |
| [bokeh](https://bokeh.org/) | 2.4.3 | Bokeh is an interactive visualization library for modern web browsers. / BSD-3-Clause |
| [boto3](https://aws.amazon.com/sdk-for-python) | 1.24.28 | Amazon Web Services SDK for Python / Apache-2.0 |
| [botocore](https://aws.amazon.com/sdk-for-python/) | 1.27.28 | Low-level, data-driven core of boto 3. / Apache-2.0 |
| [bottleneck](https://github.com/pydata/bottleneck) | 1.3.5 | Fast NumPy array functions written in Cython. / BSD-2-Clause |
| [brotli](https://github.com/google/brotli) | 1.0.9 | Brotli compression format / MIT |
| [brotli-bin](https://github.com/google/brotli) | 1.0.9 | Brotli compression format / MIT |
| [brotlipy](https://github.com/python-hyper/brotlipy) | 0.7.0 | Python bindings to the Brotli compression library / MIT |
| [brunsli](https://github.com/google/brunsli) | 0.1 | Practical JPEG Repacker / MIT |
| [bzip2](http://www.bzip.org/) | 1.0.8 | high-quality data compressor / bzip2 |
| [c-ares](https://c-ares.org/) | 1.18.1 | This is c-ares, an asynchronous resolver library / MIT |
| [ca-certificates](https://curl.se/docs/caextract.html) | 2022.07.19 | Certificates for use with other packages. / MPL-2.0 |
| [cctools](https://github.com/tpoechtrager/cctools-port) | 949.0.1 | Native assembler, archiver, ranlib, libtool, otool et al for Darwin Mach-O files / APSL-2.0 |
| [cctools\_osx-64](https://github.com/tpoechtrager/cctools-port) | 949.0.1 | Assembler, archiver, ranlib, libtool, otool et al for Darwin Mach-O files / APSL-2.0 |
| [certifi](https://certifi.io/) | 2022.9.24 | Python package for providing Mozilla’s CA Bundle. / MPL-2.0 |
| [cffi](https://cffi.readthedocs.org/) | 1.15.1 | Foreign Function Interface for Python calling C code. / MIT |
| [cfitsio](http://heasarc.gsfc.nasa.gov/fitsio/fitsio.html) | 3.470 | A library for reading and writing FITS files / fitsio |
| [chardet](https://github.com/chardet/chardet) | 4.0.0 | Universal character encoding detector / LGPL2 |
| [charls](https://github.com/team-charls/charls) | 2.2.0 | CharLS is a C++ implementation of the JPEG-LS standard for lossless and near-lossless image compression and decompression. JPEG-LS is a low-complexity image compression standard that matches JPEG 2000 compression ratios. / BSD-3-Clause |
| [charset-normalizer](https://github.com/ousret/charset_normalizer) | 2.0.4 | The Real First Universal Charset Detector. Open, modern and actively maintained alternative to Chardet. / MIT |
| [click](https://palletsprojects.com/p/click) | 8.0.4 | Python composable command line interface toolkit / BSD-3-Clause |
| [cloudpickle](https://github.com/cloudpipe/cloudpickle) | 2.0.0 | Extended pickling support for Python objects / BSD-3-Clause |
| [clyent](https://github.com/Anaconda-Platform/clyent) | 1.2.2 | Command line client library for windows and posix / BSD 3-Clause |
| [colorama](https://github.com/tartley/colorama) | 0.4.5 | Cross-platform colored terminal text / BSD-3-Clause |
| [colorcet](https://colorcet.holoviz.org/index.html) | 3.0.0 | Collection of perceptually uniform colormaps / CC-BY-4.0 |
| [conda](https://conda.io) | 22.9.0 | OS-agnostic, system-level binary package and environment manager. / BSD-3-Clause |
| [conda-build](https://github.com/conda/conda-build) | 3.22.0 | tools for building conda packages / BSD-3-Clause |
| [conda-content-trust](https://github.com/conda/conda-content-trust) | 0.1.3 | Signing and verification tools for conda / BSD-3-Clause |
| [conda-env](https://github.com/conda/conda-env) | 2.6.0 | Tools for interacting with conda environments. / BSD 3-Clause |
| [conda-token](https://github.com/Anaconda/conda-token) | 0.4.0 | Set repository access token / BSD-3-Clause |
| [conda-verify](https://github.com/conda/conda-verify) | 3.4.2 | tool for validating conda recipes and conda packages / BSD 3-Clause |
| [constantly](https://github.com/twisted/constantly) | 15.1.0 | Symbolic constants in Python / MIT |
| [cookiecutter](https://github.com/cookiecutter/cookiecutter) | 1.7.3 | A command-line utility that creates projects from cookiecutters (project templates), e.g. creating a Python package project from a Python package project template. / BSD-3-Clause |
| [cryptography](https://github.com/pyca/cryptography) | 37.0.1 | Provides cryptographic recipes and primitives to Python developers / (BSD-3-Clause OR Apache-2.0) AND PSF-2.0 AND MIT |
| [cssselect](https://pythonhosted.org/cssselect/) | 1.1.0 | CSS Selectors for Python / BSD 3-Clause |
| [curl](https://curl.se/) | 7.84.0 | tool and library for transferring data with URL syntax / curl |
| [cycler](http://matplotlib.org/cycler) | 0.11.0 | Composable style cycles. / BSD-3-Clause |
| [cython](https://cython.org/) | 0.29.32 | The Cython compiler for writing C extensions for the Python language / Apache-2.0 |
| [cytoolz](https://github.com/pytoolz/cytoolz) | 0.11.0 | Cython implementation of Toolz. High performance functional utilities / BSD-3-Clause |
| [daal4py](https://intelpython.github.io/daal4py/) | 2021.6.0 | A convenient Python API to Intel (R) oneAPI Data Analytics Library / Apache-2.0 |
| [dal](https://software.intel.com/content/www/us/en/develop/tools.html) | 2021.6.0 | Intel® oneDAL runtime libraries / Intel Simplified Software License |
| [dask](https://dask.org/) | 2022.7.0 | Parallel PyData with Task Scheduling / BSD-3-Clause |
| [dask-core](https://github.com/dask/dask/) | 2022.7.0 | Parallel Python with task scheduling / BSD-3-Clause |
| [dataclasses](https://github.com/ericvsmith/dataclasses) | 0.8 | An implementation of PEP 557: Data Classes / Apache-2.0 |
| [datashader](https://datashader.org) | 0.14.1 | Data visualization toolchain based on aggregating into a grid / BSD-3-Clause |
| [datashape](http://datashape.pydata.org) | 0.5.4 | A data description language. / BSD 2-Clause |
| [debugpy](https://github.com/Microsoft/debugpy) | 1.5.1 | An implementation of the Debug Adapter Protocol for Python / MIT |
| [decorator](https://github.com/micheles/decorator) | 5.1.1 | Better living through Python with decorators. / BSD-2-Clause |
| [defusedxml](https://bitbucket.org/tiran/defusedxml) | 0.7.1 | XML bomb protection for Python stdlib modules / PSF 2.0 |
| [diff-match-patch](http://code.google.com/p/google-diff-match-patch/) | 20200713 | Diff Match Patch is a high-performance library in multiple languages that manipulates plain text / Apache-2.0 |
| [dill](http://www.cacr.caltech.edu/~mmckerns/dill.htm) | 0.3.4 | Serialize all of python (almost) / BSD-3-Clause |
| [distributed](https://distributed.readthedocs.io/en/latest/) | 2022.7.0 | Distributed computing with Dask / BSD-3-Clause |
| [docutils](http://docutils.sourceforge.net/) | 0.18.1 | Docutils – Python Documentation Utilities / LicenseRef-Public-Domain-Dedictation and BSD-2-Clause and LicenseRef-PSF-2.1.1 and GPL-3.0-or-later |
| [entrypoints](https://github.com/takluyver/entrypoints) | 0.4 | Discover and load entry points from installed packages. / MIT License |
| [et\_xmlfile](https://foss.heptapod.net/openpyxl/et_xmlfile) | 1.1.0 | An implementation of lxml.xmlfile for the standard library / MIT AND PSF-2.0 |
| [fftw](http://fftw.org) | 3.3.9 | The fastest Fourier transform in the west. / GPL 2 |
| [filelock](https://github.com/tox-dev/py-filelock) | 3.6.0 | A platform independent file lock. / Unlicense |
| [flake8](http://flake8.pycqa.org/) | 4.0.1 | Your Tool For Style Guide Enforcement / MIT |
| [flask](https://palletsprojects.com/p/flask) | 1.1.2 | A simple framework for building complex web applications. / BSD-3-Clause |
| [fonttools](https://github.com/fonttools/fonttools) | 4.25.0 | fontTools is a library for manipulating fonts, written in Python. / MIT |
| [freetype](https://freetype.org/) | 2.11.0 | A Free, High-Quality, and Portable Font Engine / GPL-2-only and LicenseRef-FreeType |
| [fsspec](https://github.com/fsspec/filesystem_spec) | 2022.7.1 | A specification for pythonic filesystems / BSD-3-Clause |
| [future](http://python-future.org) | 0.18.2 | Clean single-source support for Python 3 and 2 / MIT |
| [gensim](https://github.com/RaRe-Technologies/gensim) | 4.1.2 | Topic Modelling for Humans / LGPL-2.1-only |
| [gettext](https://www.gnu.org/software/gettext/) | 0.21.0 | Internationalization package / GPL-2.0 |
| [giflib](http://giflib.sourceforge.net) | 5.2.1 | Library for reading and writing gif images / MIT |
| [glib](https://developer.gnome.org/glib/) | 2.69.1 | Provides core application building blocks for libraries and applications written in C. / LGPL-2.1-or-later |
| [glob2](https://github.com/miracle2k/python-glob2) | 0.7 | Version of the glob module that supports recursion via \*\*, and can capture patterns. / BSD-2-Clause |
| [gmp](http://gmplib.org/) | 6.2.1 | The GNU multiprecision library. / GPL-2.0-or-later AND LGPL-3.0-or-later |
| [gmpy2](https://pypi.python.org/pypi/gmpy2) | 2.1.2 | GMP/MPIR, MPFR, and MPC interface to Python 2.6+ and 3.x / LGPL-3.0-or-later |
| [greenlet](https://github.com/python-greenlet/greenlet) | 1.1.1 | Lightweight in-process concurrent programming / MIT |
| [gst-plugins-base](http://gstreamer.freedesktop.org/) | 1.14.0 | GStreamer Base Plug-ins / GPL2 |
| [gstreamer](http://gstreamer.freedesktop.org/) | 1.14.0 | Library for constructing graphs of media-handling components / LGPL 2 |
| [h5py](https://www.h5py.org/) | 3.7.0 | Read and write HDF5 files from Python / BSD-3-Clause |
| [hdf5](http://www.hdfgroup.org/HDF5/) | 1.10.6 | HDF5 is a data model, library, and file format for storing and managing data / HDF5 |
| [heapdict](http://stutzbachenterprises.com/) | 1.0.1 | A heap with decrease-key and increase-key operations / BSD 3-Clause |
| [holoviews](https://holoviews.org) | 1.15.0 | Stop plotting your data - annotate your data and let it visualize itself. / BSD-3-Clause |
| [hvplot](https://hvplot.holoviz.org) | 0.8.0 | A high-level plotting API for the PyData ecosystem built on HoloViews / BSD-3-Clause |
| [hyperlink](https://github.com/python-hyper/hyperlink) | 21.0.0 | Immutable, Pythonic, correct URLs. / MIT |
| [icu](http://site.icu-project.org/) | 58.2 | International Components for Unicode. / MIT |
| [idna](https://github.com/kjd/idna) | 3.3 | Internationalized Domain Names in Applications (IDNA). / BSD-3-Clause |
| [imagecodecs](https://www.lfd.uci.edu/~gohlke/) | 2021.8.26 | Image transformation, compression, and decompression codecs / BSD-3-Clause |
| [imageio](https://imageio.github.io) | 2.19.3 | A Python library for reading and writing image data / BSD-2-Clause |
| [imagesize](https://github.com/shibukawa/imagesize_py) | 1.4.1 | Getting image size from png/jpeg/jpeg2000/gif file / MIT |
| [importlib-metadata](https://github.com/python/importlib_metadata) | 4.11.3 | A library to access the metadata for a Python package. / Apache-2.0 |
| [importlib\_metadata](https://github.com/python/importlib_metadata) | 4.11.3 | A library to access the metadata for a Python package. / Apache-2.0 |
| [incremental](https://github.com/hawkowl/incremental) | 21.3.0 | Incremental is a small library that versions your Python projects. / MIT |
| [inflection](http://github.com/jpvanhal/inflection) | 0.5.1 | A port of Ruby on Rails inflector to Python / MIT |
| [iniconfig](http://github.com/RonnyPfannschmidt/iniconfig) | 1.1.1 | iniconfig: brain-dead simple config-ini parsing / MIT |
| [intake](https://github.com/ContinuumIO/intake) | 0.6.5 | Data load and catalog system / BSD-2-Clause |
| [intel-openmp](https://software.intel.com/en-us/node/522690) | 2021.4.0 | Math library for Intel and compatible processors / LicenseRef-ProprietaryIntel |
| [intervaltree](https://github.com/chaimleib/intervaltree) | 3.1.0 | Editable interval tree data structure for Python 2 and 3 / Apache-2.0 |
| [ipykernel](https://ipython.org) | 6.15.2 | IPython Kernel for Jupyter / BSD-3-Clause |
| [ipython](https://ipython.org) | 7.31.1 | IPython: Productive Interactive Computing / BSD-3-Clause |
| [ipython\_genutils](http://ipython.org) | 0.2.0 | vestigial utilities from IPython / BSD 3-Clause |
| [ipywidgets](https://github.com/ipython/ipywidgets) | 7.6.5 | Jupyter Interactive Widgets / BSD-3-Clause |
| [isort](https://github.com/timothycrosley/isort) | 5.9.3 | A Python utility / library to sort Python imports. / MIT |
| [itemadapter](https://github.com/scrapy/itemadapter) | 0.3.0 | Common interface for different data containers / BSD-3-Clause |
| [itemloaders](https://github.com/scrapy/itemadapter) | 1.0.4 | Collect data from HTML and XML sources / BSD-3-Clause |
| [itsdangerous](https://github.com/pallets/itsdangerous) | 2.0.1 | Various helpers to pass trusted data to untrusted environments. / BSD-3-Clause |
| [jdcal](https://github.com/phn/jdcal) | 1.4.1 | Julian dates from proleptic Gregorian and Julian calendars. / BSD 2-Clause |
| [jedi](https://github.com/davidhalter/jedi/) | 0.18.1 | An autocompletion tool for Python that can be used for text editors. / MIT |
| [jellyfish](https://github.com/jamesturk/jellyfish) | 0.9.0 | a library for doing approximate and phonetic matching of strings. / BSD-2-Clause |
| [jinja2](https://palletsprojects.com/p/jinja/) | 2.11.3 | A very fast and expressive template engine. / BSD-3-Clause |
| [jinja2-time](https://github.com/hackebrot/jinja2-time) | 0.2.0 | Jinja2 Extension for Dates and Times / MIT |
| [jmespath](http://jmespath.org/) | 0.10.0 | Query language for JSON / MIT |
| [joblib](https://joblib.readthedocs.io/en/latest/) | 1.1.0 | Lightweight pipelining: using Python functions as pipeline jobs. / BSD-3-Clause |
| [jpeg](https://www.ijg.org/) | 9e | read/write jpeg COM, EXIF, IPTC medata / IJG |
| [jq](http://stedolan.github.io/jq/) | 1.6 | A command-line JSON processor. / MIT |
| [json5](https://github.com/dpranke/pyjson5) | 0.9.6 | A Python implementation of the JSON5 data format / Apache-2.0 |
| [jsonschema](https://github.com/python-jsonschema/jsonschema) | 4.16.0 | An implementation of JSON Schema validation for Python / MIT |
| [jupyter](http://jupyter.org) | 1.0.0 | Jupyter metapackage. Install all the Jupyter components in one go. / BSD 3-Clause |
| [jupyter\_client](https://jupyter.org) | 7.3.4 | jupyter\_client contains the reference implementation of the Jupyter protocol. / BSD-3-Clause |
| [jupyter\_console](https://jupyter.org) | 6.4.3 | Jupyter terminal console / BSD-3-Clause |
| [jupyter\_core](https://jupyter.org) | 4.11.1 | Core common functionality of Jupyter projects. / BSD-3-Clause |
| [jupyter\_server](https://jupyter.org) | 1.18.1 | Jupyter Server / BSD-3-Clause |
| [jupyterlab](https://github.com/jupyterlab/jupyterlab) | 3.4.4 | JupyterLab PRE-ALPHA / BSD-3-Clause |
| [jupyterlab\_pygments](http://github.com/JupyterLab/jupyterlab_pygments) | 0.1.2 | Pygments syntax coloring scheme making use of the JupyterLab CSS variables / BSD-3-Clause |
| [jupyterlab\_server](https://github.com/jupyterlab/jupyterlab_server) | 2.10.3 | A set of server components for JupyterLab and JupyterLab like applications. / BSD-3-Clause |
| [jupyterlab\_widgets](https://github.com/jupyter-widgets/ipywidgets) | 1.0.0 | JupyterLab extension providing HTML widgets / BSD-3-Clause |
| [jxrlib](https://packages.debian.org/source/sid/jxrlib) | 1.1 | jxrlib - JPEG XR Library by Microsoft, built from Debian hosted sources. / BSD-2-Clause |
| [keyring](https://github.com/jaraco/keyring) | 23.4.0 | Store and access your passwords safely / MIT |
| [kiwisolver](https://github.com/nucleic/kiwi) | 1.4.2 | An efficient C++ implementation of the Cassowary constraint solver / BSD-3-Clause |
| [krb5](http://web.mit.edu/kerberos/) | 1.19.2 | A network authentication protocol. / MIT |
| [lazy-object-proxy](https://github.com/ionelmc/python-lazy-object-proxy) | 1.6.0 | A fast and thorough lazy object proxy / BSD-2-Clause |
| [lcms2](http://www.littlecms.com/) | 2.12 | Open Source Color Management Engine / MIT |
| [ld64](https://github.com/tpoechtrager/cctools-port) | 530 | Darwin Mach-O native linker / APSL-2.0 |
| [ld64\_osx-64](https://github.com/tpoechtrager/cctools-port) | 530 | Darwin Mach-O cross linker / APSL-2.0 |
| [ldid](https://cydia.saurik.com/info/ldid/) | 2.1.2 | pseudo-codesign Mach-O files / AGPL-3.0-only |
| [lerc](https://github.com/Esri/lerc) | 3.0 | LERC - Limited Error Raster Compression / Apache-2.0 |
| [libaec](https://gitlab.dkrz.de/k202009/libaec) | 1.0.4 | Adaptive Entropy Coding library / BSD-2-Clause |
| [libarchive](https://libarchive.org/) | 3.6.1 | Multi-format archive and compression library / BSD-2-Clause |
| [libbrotlicommon](https://github.com/google/brotli) | 1.0.9 | Brotli compression format / MIT |
| [libbrotlidec](https://github.com/google/brotli) | 1.0.9 | Brotli compression format / MIT |
| [libbrotlienc](https://github.com/google/brotli) | 1.0.9 | Brotli compression format / MIT |
| [libclang](https://llvm.org/) | 12.0.0 | Development headers and libraries for Clang / Apache-2.0 WITH LLVM-exception |
| [libcurl](https://curl.se/) | 7.84.0 | tool and library for transferring data with URL syntax / curl |
| [libcxx](https://libcxx.llvm.org/) | 14.0.6 | LLVM C++ standard library / Apache-2.0 WITH LLVM-exception |
| [libdeflate](https://github.com/ebiggers/libdeflate) | 1.8 | libdeflate is a library for fast, whole-buffer DEFLATE-based compression and decompression. / MIT |
| [libedit](http://thrysoee.dk/editline/) | 3.1.20210910 | Editline Library (libedit) / BSD-2-Clause |
| [libev](http://software.schmorp.de/pkg/libev.html) | 4.33 | A full-featured and high-performance event loop that is loosely modeled after libevent, but without its limitations and bugs. / BSD-2-Clause |
| [libffi](https://sourceware.org/libffi/) | 3.3 | A Portable Foreign Function Interface Library. / MIT |
| [libgfortran](https://gcc.gnu.org/) | 5.0.0 | Fortran compiler and libraries from the GNU Compiler Collection / GPL-3.0-only WITH GCC-exception-3.1 |
| [libgfortran5](https://gcc.gnu.org/) | 11.2.0 | Fortran compiler and libraries from the GNU Compiler Collection / GPL-3.0-only WITH GCC-exception-3.1 |
| [libiconv](https://www.gnu.org/software/libiconv/) | 1.16 | Provides iconv for systems which don’t have one (or that cannot convert from/to Unicode.) / GPL and LGPL |
| [libidn2](https://www.gnu.org/software/libidn/#libidn2) | 2.3.2 | Library for internationalized domain names (IDNA2008) support / LGPLv2 AND LGPL-3.0-or-later AND GPL-3.0-or-later |
| [liblief](https://lief.quarkslab.com/) | 0.11.5 | A cross platform library to parse, modify and abstract ELF, PE and MachO formats. / Apache-2.0 |
| [libllvm11](https://llvm.org/) | 11.1.0 | Development headers and libraries for LLVM / Apache-2.0 WITH LLVM-exception |
| [libllvm12](http://llvm.org/) | 12.0.0 | Development headers and libraries for LLVM / Apache-2.0 WITH LLVM-exception |
| [libllvm14](https://llvm.org/) | 14.0.6 | Development headers and libraries for LLVM / Apache-2.0 WITH LLVM-exception |
| [libnghttp2](http://github.com/nghttp2/nghttp2) | 1.46.0 | This is an implementation of Hypertext Transfer Protocol version 2. / MIT |
| [libpng](http://www.libpng.org/pub/png/libpng.html) | 1.6.37 | PNG reference library / zlib/libpng |
| [libpq](http://www.postgresql.org/) | 12.9 | The postgres runtime libraries and utilities (not the server itself) / PostgreSQL |
| [libsodium](http://libsodium.org) | 1.0.18 | A modern and easy-to-use crypto library. / ISC |
| [libspatialindex](http://libspatialindex.github.io) | 1.9.3 | Extensible framework for robust spatial indexing / MIT |
| [libssh2](https://www.libssh2.org/) | 1.10.0 | the SSH library / BSD-3-Clause |
| [libtiff](http://www.simplesystems.org/libtiff/) | 4.4.0 | Support for the Tag Image File Format (TIFF). / HPND |
| [libunistring](https://www.gnu.org/software/libunistring) | 0.9.10 | This library provides functions for manipulating Unicode strings and for manipulating C strings according to the Unicode standard. / LGPL |
| [libwebp](https://developers.google.com/speed/webp/) | 1.2.2 | WebP image library / BSD-3-Clause |
| [libwebp-base](https://developers.google.com/speed/webp) | 1.2.2 | WebP image library / BSD-3-Clause |
| [libxml2](https://gitlab.gnome.org/GNOME/libxml2/) | 2.9.14 | The XML C parser and toolkit of Gnome / MIT |
| [libxslt](https://gitlab.gnome.org/GNOME/libxslt) | 1.1.35 | The XSLT C library developed for the GNOME project / MIT |
| [libzopfli](https://github.com/google/zopfli) | 1.0.3 | A compression library programmed in C to perform very good, but slow, deflate or zlib compression. / Apache-2.0 |
| [llvm-openmp](https://openmp.llvm.org/) | 14.0.6 | The OpenMP API supports multi-platform shared-memory parallel programming in C/C++ and Fortran. / Apache-2.0 WITH LLVM-exception |
| [llvmlite](https://llvmlite.pydata.org) | 0.38.0 | A lightweight LLVM python binding for writing JIT compilers. / BSD-2-Clause |
| [locket](https://github.com/mwilliamson/locket.py) | 1.0.0 | File-based locks for Python for Linux and Windows / BSD-2-Clause |
| [lxml](https://lxml.de/) | 4.9.1 | Pythonic binding for the C libraries libxml2 and libxslt. / BSD-3-Clause and GPL-2.0-only and ZPL-2.0 and LicenseRef-ElementTree |
| [lz4](https://github.com/python-lz4/python-lz4) | 3.1.3 | LZ4 Bindings for Python / BSD-3-Clause |
| [lz4-c](https://www.lz4.org) | 1.9.3 | Extremely Fast Compression algorithm / BSD-2-Clause |
| [lzo](http://www.oberhumer.com/opensource/lzo/) | 2.10 | LZO is a portable lossless data compression library written in ANSI C. / GPL v2+ |
| [markdown](https://pythonhosted.org/Markdown/) | 3.3.4 | Python implementation of Markdown. / BSD-3-Clause |
| [markupsafe](https://www.palletsprojects.com/p/markupsafe) | 2.0.1 | Safely add untrusted strings to HTML/XML markup. / BSD-3-Clause |
| [matplotlib](https://matplotlib.org/) | 3.5.2 | Publication quality figures in Python / LicenseRef-PSF-based |
| [matplotlib-base](https://matplotlib.org/) | 3.5.2 | Publication quality figures in Python / LicenseRef-PSF-based |
| [matplotlib-inline](https://github.com/ipython/matplotlib-inline) | 0.1.6 | Inline Matplotlib backend for Jupyter / BSD-3-Clause |
| [mccabe](https://github.com/PyCQA/mccabe) | 0.7.0 | McCabe complexity checker for Python / MIT |
| [mistune](https://github.com/lepture/mistune) | 0.8.4 | A sane Markdown parser with useful plugins and renderers. / BSD-3-Clause |
| [mkl](https://software.intel.com/en-us/mkl) | 2021.4.0 | Math library for Intel and compatible processors / LicenseRef-ProprietaryIntel |
| [mkl-service](http://github.com/IntelPython/mkl-service) | 2.4.0 | Python hooks for Intel(R) Math Kernel Library runtime control settings. / BSD-3-Clause |
| [mkl\_fft](http://github.com/IntelPython/mkl_fft) | 1.3.1 | NumPy-based implementation of Fast Fourier Transform using Intel (R) Math Kernel Library. / BSD 3-Clause |
| [mkl\_random](http://github.com/IntelPython/mkl_random) | 1.2.2 | Intel (R) MKL-powered package for sampling from common probability distributions into NumPy arrays. / BSD-3-Clause |
| [mock](https://github.com/testing-cabal/mock) | 4.0.3 | A library for testing in Python / BSD-2-Clause |
| [mpc](http://www.multiprecision.org/) | 1.1.0 | A C library for the arithmetic of complex numbers with arbitrarily high precision. / LGPL-3-or-later |
| [mpfr](http://www.mpfr.org/) | 4.0.2 | The MPFR library is a C library for multiple-precision floating-point computations with correct rounding. / LGPL-3.0-only |
| [mpi](http://www.mpich.org/) | 1.0 | A high performance widely portable implementation of the MPI standard. / MPICH |
| [mpich](http://www.mpich.org/) | 3.3.2 | A high performance widely portable implementation of the MPI standard. / MPICH |
| [mpmath](http://mpmath.org) | 1.2.1 | Python library for arbitrary-precision floating-point arithmetic / BSD 3-Clause |
| [msgpack-python](https://msgpack.org/) | 1.0.3 | MessagePack (de)serializer / Apache-2.0 |
| [multipledispatch](https://github.com/mrocklin/multipledispatch/) | 0.6.0 | Multiple dispatch in Python / BSD 3-Clause |
| [munkres](https://github.com/bmc/munkres) | 1.1.4 | The Munkres module provides an O(n^3) implementation of the Munkres algorithm (also called the Hungarian algorithm or the Kuhn-Munkres algorithm). / Apache-2.0 |
| [mypy\_extensions](http://www.mypy-lang.org/) | 0.4.3 | Experimental type system extensions for programs checked with the mypy typechecker. / MIT |
| [nbclassic](http://github.com/jupyterlab/nbclassic) | 0.3.5 | Jupyter Notebook as a Jupyter Server Extension. / BSD-3-Clause |
| [nbclient](https://jupyter.org) | 0.5.13 | A client library for executing notebooks. Formally nbconvert’s ExecutePreprocessor. / BSD-3-Clause |
| [nbconvert](https://jupyter.org) | 6.4.4 | Converting Jupyter Notebooks / BSD-3-Clause |
| [nbformat](https://jupyter.org) | 5.5.0 | The Jupyter Notebook format / BSD-3-Clause |
| [ncurses](http://www.gnu.org/software/ncurses/) | 6.3 | Library for text-based user interfaces / Free software (MIT-like) |
| [nest-asyncio](https://github.com/erdewit/nest_asyncio) | 1.5.5 | Patch asyncio to allow nested event loops / BSD-2-Clause |
| [networkx](https://networkx.github.io/) | 2.8.4 | Python package for creating and manipulating complex networks / BSD-3-Clause |
| [nltk](https://nltk.org/) | 3.7 | Natural Language Toolkit / Apache-2.0 |
| [nose](http://readthedocs.org/docs/nose/) | 1.3.7 | Nose extends unittest to make testing easier / LGPL-2.1 |
| [notebook](https://jupyter.org) | 6.4.12 | Jupyter Notebook / BSD-3-Clause |
| [nspr](https://hg.mozilla.org/projects/nspr) | 4.33 | A platform-neutral API for system level and libc-like functions. / MPL-2.0 |
| [nss](https://developer.mozilla.org/en-US/docs/Mozilla/Projects/NSS) | 3.74 | A set of libraries designed to support cross-platform development of security-enabled client and server applications. / MPL-2.0 |
| [numba](https://numba.pydata.org) | 0.55.1 | NumPy aware dynamic Python compiler using LLVM / BSD-2-Clause |
| [numexpr](https://github.com/pydata/numexpr) | 2.8.3 | Fast numerical expression evaluator for NumPy. / MIT |
| [numpy](https://numpy.org/) | 1.21.5 | Array processing for numbers, strings, records, and objects. / BSD-3-Clause |
| [numpy-base](https://numpy.org/) | 1.21.5 | Array processing for numbers, strings, records, and objects. / BSD-3-Clause |
| [numpydoc](https://github.com/numpy/numpydoc) | 1.4.0 | Numpy’s Sphinx extensions / BSD-3-Clause |
| [olefile](http://www.decalage.info/python/olefileio) | 0.46 | parse, read and write Microsoft OLE2 files / BSD 2-Clause |
| [oniguruma](https://github.com/kkos/oniguruma) | 6.9.7.1 | A regular expression library. / BSD-2-Clause |
| [openjpeg](http://www.openjpeg.org/) | 2.4.0 | An open-source JPEG 2000 codec written in C / BSD 2-Clause |
| [openpyxl](https://openpyxl.readthedocs.io) | 3.0.10 | A Python library to read/write Excel 2010 xlsx/xlsm files / MIT |
| [openssl](https://www.openssl.org/) | 1.1.1q | OpenSSL is an open-source implementation of the SSL and TLS protocols / OpenSSL |
| [packaging](https://github.com/pypa/packaging) | 21.3 | Core utilities for Python packages / Apache-2.0 or BSD-2-Clause |
| [pandas](https://pandas.pydata.org) | 1.4.4 | High-performance, easy-to-use data structures and data analysis tools. / BSD-3-Clause |
| [pandocfilters](https://github.com/jgm/pandocfilters) | 1.5.0 | A python module for writing pandoc filters / BSD-3-Clause |
| [panel](https://panel.holoviz.org) | 0.13.1 | A high-level app and dashboarding solution for Python / BSD-3-Clause |
| [param](http://ioam.github.io/param/) | 1.12.0 | Param: Make your Python code clearer and more reliable by declaring Parameters / BSD-3-Clause |
| [parsel](https://github.com/scrapy/parsel) | 1.6.0 | library to extract data from HTML and XML using XPath and CSS selectors / BSD-3-Clause |
| [parso](https://github.com/davidhalter/parso) | 0.8.3 | A Python Parser / MIT |
| [partd](https://github.com/dask/partd) | 1.2.0 | Data structure for on-disk shuffle operations / BSD 3-Clause |
| [patch](http://savannah.gnu.org/projects/patch/) | 2.7.6 | Native Win32 versions of common unix tools / GPL 3 |
| [pathspec](https://github.com/cpburnz/python-path-specification) | 0.9.0 | Utility library for gitignore style pattern matching of file paths. / MPL-2.0 |
| [patsy](https://github.com/pydata/patsy) | 0.5.2 | Describing statistical models in Python using symbolic formulas / BSD-2-Clause AND PSF-2.0 |
| [pcre](http://www.pcre.org/) | 8.45 | Regular expression pattern matching using the same syntax and semantics as Perl 5. / BSD 3-Clause |
| [pep8](http://pep8.readthedocs.org/) | 1.7.1 | Python style guide checker / MIT |
| [pexpect](http://pexpect.sourceforge.net/) | 4.8.0 | Pexpect makes Python a better tool for controlling other applications. / ISC |
| [pickleshare](https://github.com/pickleshare/pickleshare/) | 0.7.5 | Tiny ‘shelve’-like database with concurrency support / MIT |
| [pillow](https://pillow.readthedocs.io) | 9.2.0 | Pillow is the friendly PIL fork by Alex Clark and Contributors / LicenseRef-PIL |
| [pip](https://pip.pypa.io/en/stable/) | 22.2.2 | PyPA recommended tool for installing Python packages / MIT |
| [pkginfo](https://code.launchpad.net/~tseaver/pkginfo/trunk) | 1.8.2 | Query metadatdata from sdists / bdists / installed packages. / MIT |
| [platformdirs](https://github.com/platformdirs/platformdirs) | 2.5.2 | A small Python module for determining appropriate platform-specific dirs, e.g. a “user data dir”. / MIT |
| [plotly](https://plot.ly/python/) | 5.9.0 | An interactive JavaScript-based visualization library for Python / MIT |
| [pluggy](https://github.com/pytest-dev/pluggy) | 1.0.0 | Plugin registration and hook calling for Python / MIT |
| [ply](http://www.dabeaz.com/ply/index.html) | 3.11 | Python Lex-Yacc / BSD 3-clause |
| [poyo](https://github.com/hackebrot/poyo) | 0.5.0 | A lightweight YAML Parser for Python / MIT |
| [prometheus\_client](https://github.com/prometheus/client_python) | 0.14.1 | Python client for the Prometheus monitoring system / Apache-2.0 |
| [prompt-toolkit](https://github.com/jonathanslenders/python-prompt-toolkit) | 3.0.20 | Library for building powerful interactive command lines in Python / BSD-3-Clause |
| [prompt\_toolkit](https://github.com/jonathanslenders/python-prompt-toolkit) | 3.0.20 | Library for building powerful interactive command lines in Python / BSD-3-Clause |
| [protego](https://github.com/scrapy/protego) | 0.1.16 | A pure-Python robots.txt parser with support for modern conventions / BSD 3-Clauses |
| [psutil](https://github.com/giampaolo/psutil) | 5.9.0 | A cross-platform process and system utilities module for Python / BSD-3-Clause |
| [ptyprocess](https://github.com/pexpect/ptyprocess) | 0.7.0 | Run a subprocess in a pseudo terminal / ISC |
| [py](https://github.com/pytest-dev/py) | 1.11.0 | library with cross-python path, ini-parsing, io, code, log facilities / MIT |
| [py-lief](https://lief.quarkslab.com/) | 0.11.5 | A cross platform library to parse, modify and abstract ELF, PE and MachO formats. / Apache-2.0 |
| [pyasn1](https://github.com/etingof/pyasn1) | 0.4.8 | ASN.1 types and codecs / BSD 2-Clause |
| [pyasn1-modules](http://pyasn1.sourceforge.net/) | 0.2.8 | A collection of ASN.1-based protocols modules. / BSD 2-Clause |
| [pycodestyle](https://pycodestyle.readthedocs.io/) | 2.8.0 | Python style guide checker / MIT |
| [pycosat](https://github.com/ContinuumIO/pycosat) | 0.6.3 | Bindings to picosat (a SAT solver) / MIT |
| [pycparser](https://github.com/eliben/pycparser) | 2.21 | Complete C99 parser in pure Python / BSD-3-clause |
| [pyct](http://github.com/pyviz/pyct) | 0.4.8 | python package common tasks for users (e.g. copy examples, fetch data, …) / BSD 3-Clause |
| [pycurl](http://pycurl.sourceforge.net/) | 7.45.1 | A Python Interface To The cURL library / LGPL-2.1-only, MIT |
| [pydispatcher](http://pydispatcher.sourceforge.net) | 2.0.5 | Multi-producer-multi-consumer signal dispatching mechanism / BSD 3-Clause |
| [pydocstyle](https://github.com/PyCQA/pydocstyle) | 6.1.1 | Python docstring style checker (formerly pep257) / MIT |
| [pyerfa](https://pyerfa.readthedocs.io/) | 2.0.0 | Python bindings for ERFA routines / BSD-3-Clause |
| [pyflakes](https://github.com/PyCQA/pyflakes) | 2.4.0 | Pyflakes analyzes programs and detects various errors. / MIT |
| [pygments](https://pygments.org/) | 2.11.2 | Pygments is a generic syntax highlighter suitable for use in code hosting, forums, wikis or other applications that need to prettify source code. / BSD-2-Clause |
| [pyhamcrest](https://github.com/hamcrest/PyHamcrest) | 2.0.2 | Hamcrest framework for matcher objects / BSD 3-Clause |
| [pylint](https://www.pylint.org) | 2.14.5 | python code static checker / GPL-2.0-or-later |
| [pyls-spyder](https://github.com/spyder-ide/pyls-spyder) | 0.4.0 | Spyder extensions for the python-lsp-server / MIT |
| [pyobjc-core](https://github.com/ronaldoussoren/pyobjc) | 8.5 | `Python<->ObjC` Interoperability Module / MIT |
| [pyobjc-framework-cocoa](https://github.com/ronaldoussoren/pyobjc) | 8.5 | Wrappers for the Cocoa frameworks on Mac OS X / MIT |
| [pyobjc-framework-coreservices](https://github.com/ronaldoussoren/pyobjc) | 8.5 | Wrappers for the “CoreServices” framework on macOS. / MIT |
| [pyobjc-framework-fsevents](https://github.com/ronaldoussoren/pyobjc) | 8.5 | Wrappers for the framework FSEvents on macOS / MIT |
| [pyodbc](https://github.com/mkleehammer/pyodbc) | 4.0.34 | DB API Module for ODBC / MIT-0 |
| [pyopenssl](https://github.com/pyca/pyopenssl) | 22.0.0 | Python wrapper module around the OpenSSL library / Apache-2.0 |
| [pyparsing](https://github.com/pyparsing/pyparsing/) | 3.0.9 | Create and execute simple grammars / MIT |
| [pyqt](https://www.riverbankcomputing.com/software/pyqt/) | 5.15.7 | Python bindings for the Qt cross platform application toolkit / GPL-3.0-only |
| [pyqt5-sip](https://www.riverbankcomputing.com/software/pyqt/) | 12.11.0 | Python bindings for the Qt cross platform application toolkit / GPL-3.0-only |
| [pyqtwebengine](https://www.riverbankcomputing.com/software/pyqt/) | 5.15.7 | Python bindings for the Qt cross platform application toolkit / GPL-3.0-only |
| [pyrsistent](http://github.com/tobgu/pyrsistent/) | 0.18.0 | Persistent/Functional/Immutable data structures / MIT |
| [pysocks](https://github.com/Anorov/PySocks) | 1.7.1 | A Python SOCKS client module. See [Anorov/PySocks](https://github.com/Anorov/PySocks) for more information. / BSD 3-Clause |
| [pytables](https://www.pytables.org) | 3.6.1 | Brings together Python, HDF5 and NumPy to easily handle large amounts of data. / BSD-3-Clause |
| [pytest](https://docs.pytest.org/en/latest/) | 7.1.2 | Simple and powerful testing with Python. / MIT |
| [python](https://www.python.org/) | 3.9.13 | General purpose programming language / PSF-2.0 |
| [python-dateutil](https://dateutil.readthedocs.org/) | 2.8.2 | Extensions to the standard Python datetime module. / BSD-3-Clause and Apache |
| [python-fastjsonschema](https://github.com/horejsek/python-fastjsonschema) | 2.16.2 | Fastest Python implementation of JSON schema / BSD-3-Clause |
| [python-libarchive-c](https://github.com/Changaco/python-libarchive-c) | 2.9 | Python interface to libarchive / CC0-1.0 |
| [python-lsp-black](https://github.com/python-lsp/python-lsp-black) | 1.2.1 | Black plugin for the Python LSP Server / MIT |
| [python-lsp-jsonrpc](https://github.com/python-lsp/python-lsp-jsonrpc) | 1.0.0 | A Python 3.6+ server implementation of the JSON RPC 2.0 protocol. / MIT |
| [python-lsp-server](https://github.com/python-lsp/python-lsp-server) | 1.5.0 | An implementation of the Language Server Protocol for Python / MIT |
| [python-slugify](https://github.com/un33k/python-slugify) | 5.0.2 | A Python Slugify application that handles Unicode / MIT |
| [python-snappy](https://github.com/andrix/python-snappy) | 0.6.0 | Python library for the snappy compression library from Google / BSD-3-Clause |
| [python.app](https://www.python.org/) | 3 | Proxy on macOS letting Python libraries hook into the GUI event loop / BSD-3-Clause |
| [pytz](http://pythonhosted.org/pytz/) | 2022.1 | World timezone definitions, modern and historical. / MIT |
| [pyviz\_comms](https://www.holoviz.org) | 2.0.2 | Bidirectional communication for PyViz / BSD-3-Clause |
| [pywavelets](https://github.com/PyWavelets/pywt) | 1.3.0 | Discrete Wavelet Transforms in Python / MIT |
| [pyyaml](http://pyyaml.org/wiki/PyYAML) | 6.0 | YAML parser and emitter for Python / MIT |
| [pyzmq](https://github.com/zeromq/pyzmq) | 23.2.0 | Python bindings for zeromq / BSD-3-Clause AND LGPL-3.0-or-later |
| [qdarkstyle](https://github.com/ColinDuquesnoy/QDarkStyleSheet) | 3.0.2 | A dark stylesheet for Qt applications (Qt4, Qt5, PySide, PyQt4, PyQt5, QtPy, PyQtGraph). / MIT |
| [qstylizer](https://github.com/blambright/qstylizer) | 0.1.10 | Qt stylesheet generation utility for PyQt/PySide / MIT |
| [qt](http://qt.io) | 5.15.9 | Qt is a cross-platform application and UI framework. / LGPL-3.0-only |
| [qt-main](http://qt.io) | 5.15.2 | Qt is a cross-platform application and UI framework. / LGPL-3.0-only |
| [qt-webengine](http://qt.io) | 5.15.9 | Qt is a cross-platform application and UI framework. / LGPL-3.0-only |
| [qtawesome](https://github.com/spyder-ide/qtawesome) | 1.0.3 | Iconic fonts in PyQt and PySide applications / MIT |
| [qtconsole](https://jupyter.org) | 5.3.2 | Jupyter Qt Console / BSD-3-Clause |
| [qtpy](https://github.com/spyder-ide/qtpy) | 2.2.0 | Abstraction layer for PyQt5/PyQt4/PySide / MIT |
| [qtwebkit](https://wiki.qt.io/Qt_WebKit) | 5.212 | WebKit is one of the major engine to render webpages and execute JavaScript code / LGPL-2.1-only |
| [queuelib](https://github.com/scrapy/queuelib) | 1.5.0 | Collection of persistent (disk-based) queues / BSD |
| [readline](https://tiswww.case.edu/php/chet/readline/rltop.html) | 8.1.2 | library for editing command lines as they are typed in / GPL-3.0-only |
| [regex](https://github.com/mrabarnett/mrab-regex) | 2022.7.9 | Alternative regular expression module, to replace re / Apache-2.0 |
| [requests](https://requests.readthedocs.io/en/latest/) | 2.28.1 | Requests is an elegant and simple HTTP library for Python, built with ♥. / Apache-2.0 |
| [requests-file](http://github.com/dashea/requests-file) | 1.5.1 | file transport adapter for Requests / Apache |
| [ripgrep](https://github.com/BurntSushi/ripgrep) | 13.0.0 | ripgrep is a line-oriented search tool that recursively searches the current directory for a regex pattern. / MIT AND Unlicense |
| [rope](https://github.com/python-rope/rope) | 0.22.0 | A python refactoring library / LGPL-3.0-or-later |
| [rtree](http://toblerity.github.com/rtree/) | 0.9.7 | R-Tree spatial index for Python GIS / MIT |
| [ruamel\_yaml](https://sourceforge.net/p/ruamel-yaml/code/ci/default/tree) | 0.15.100 | A patched copy of ruamel.yaml. / MIT |
| [s3transfer](https://github.com/boto/s3transfer) | 0.6.0 | An Amazon S3 Transfer Manager / Apache-2.0 |
| [scikit-image](https://scikit-image.org/) | 0.19.2 | Image processing in Python. / BSD-3-Clause |
| [scikit-learn](https://scikit-learn.org/) | 1.0.2 | A set of python modules for machine learning and data mining / BSD-3-Clause |
| [scikit-learn-intelex](https://intel.github.io/scikit-learn-intelex) | 2021.6.0 | Intel(R) Extension for Scikit-learn is a seamless way to speed up your Scikit-learn application. / Apache-2.0 |
| [scipy](https://scipy.org/) | 1.9.1 | Scientific Library for Python / BSD-3-Clause |
| [scrapy](https://scrapy.org/) | 2.6.2 | A high-level Python Screen Scraping framework / BSD-3-Clause |
| [seaborn](https://seaborn.pydata.org) | 0.11.2 | Statistical data visualization / BSD-3-Clause |
| [send2trash](https://github.com/arsenetar/send2trash) | 1.8.0 | Python library to natively send files to Trash (or Recycle bin) on all platforms. / BSD-3-Clause |
| [service\_identity](https://github.com/pyca/service_identity) | 18.1.0 | Service identity verification for pyOpenSSL. / MIT |
| [setuptools](https://github.com/pypa/setuptools) | 63.4.1 | Download, build, install, upgrade, and uninstall Python packages / MIT |
| [sip](https://www.riverbankcomputing.com/software/sip/) | 6.6.2 | A Python bindings generator for C/C++ libraries / GPL-3.0-only |
| [six](https://six.readthedocs.io/) | 1.16.0 | Python 2 and 3 compatibility utilities / MIT |
| [smart\_open](https://github.com/RaRe-Technologies/smart_open) | 5.2.1 | Python library for efficient streaming of large files / MIT |
| [snappy](https://github.com/google/snappy) | 1.1.9 | A fast compressor/decompressor / BSD-3-clause AND CC-BY-3.0 AND MIT AND CC-BY AND Public Domain |
| [sniffio](https://github.com/python-trio/sniffio) | 1.2.0 | Sniff out which async library your code is running under / Apache-2.0 |
| [snowballstemmer](https://github.com/snowballstem/snowball) | 2.2.0 | Snowball stemming library collection for Python / BSD-3-Clause |
| [sortedcollections](http://www.grantjenks.com/docs/sortedcollections/) | 2.1.0 | Python Sorted Collections / Apache-2.0 |
| [sortedcontainers](http://www.grantjenks.com/docs/sortedcontainers/) | 2.4.0 | Python Sorted Container Types: SortedList, SortedDict, and SortedSet / Apache-2.0 |
| [soupsieve](https://facelessuser.github.io/soupsieve) | 2.3.1 | A modern CSS selector implementation for BeautifulSoup / MIT |
| [sphinx](https://www.sphinx-doc.org) | 5.0.2 | Sphinx is a tool that makes it easy to create intelligent and beautiful documentation / BSD-2-Clause |
| [sphinxcontrib-applehelp](https://www.sphinx-doc.org/en/master/) | 1.0.2 | sphinxcontrib-applehelp is a sphinx extension which outputs Apple help books / BSD-2-Clause |
| [sphinxcontrib-devhelp](https://www.sphinx-doc.org/en/master/) | 1.0.2 | sphinxcontrib-devhelp is a sphinx extension which outputs Devhelp document / BSD-2-Clause |
| [sphinxcontrib-htmlhelp](https://www.sphinx-doc.org/en/master/) | 2.0.0 | sphinxcontrib-htmlhelp is a sphinx extension which renders HTML help files. / BSD-2-Clause |
| [sphinxcontrib-jsmath](https://www.sphinx-doc.org/en/master/) | 1.0.1 | A sphinx extension which renders display math in HTML via JavaScript / BSD-2-Clause |
| [sphinxcontrib-qthelp](https://www.sphinx-doc.org/en/master/) | 1.0.3 | sphinxcontrib-qthelp is a sphinx extension which outputs QtHelp document / BSD-2-Clause |
| [sphinxcontrib-serializinghtml](https://www.sphinx-doc.org/en/master/) | 1.1.5 | sphinxcontrib-serializinghtml is a sphinx extension which outputs “serialized” HTML files (json and pickle). / BSD-2-Clause |
| [spyder](https://www.spyder-ide.org/) | 5.3.3 | The Scientific Python Development Environment / MIT |
| [spyder-kernels](https://www.spyder-ide.org/) | 2.3.3 | Jupyter kernels for Spyder’s console / MIT |
| [sqlalchemy](https://www.sqlalchemy.org/) | 1.4.39 | Database Abstraction Library. / MIT |
| [sqlite](https://www.sqlite.org/) | 3.39.3 | Implements a self-contained, zero-configuration, SQL database engine / blessing |
| [statsmodels](https://www.statsmodels.org) | 0.13.2 | Statistical computations and models for use with SciPy / BSD-3-Clause |
| [sympy](https://sympy.org) | 1.10.1 | Python library for symbolic mathematics / BSD-3-Clause AND MIT |
| [tabulate](https://github.com/astanin/python-tabulate) | 0.8.10 | Pretty-print tabular data in Python, a library and a command-line utility. / MIT |
| [tapi](https://opensource.apple.com/source/tapi) | 1000.10.8 | TAPI is a Text-based Application Programming Interface / NCSA |
| [tbb](https://github.com/oneapi-src/oneTBB) | 2021.6.0 | High level abstract threading library / Apache-2.0 |
| tbb4py | 2021.6.0 | TBB module for Python / Apache-2.0 |
| [tblib](https://github.com/ionelmc/python-tblib) | 1.7.0 | Traceback serialization library. / BSD 2-Clause |
| [tenacity](http://github.com/jd/tenacity) | 8.0.1 | Retry a flaky function whenever an exception occurs until it works / Apache-2.0 |
| [terminado](https://github.com/jupyter/terminado) | 0.13.1 | Terminals served by tornado websockets / BSD-2-Clause |
| [testpath](https://testpath.readthedocs.io) | 0.6.0 | Testpath is a collection of utilities for Python code working with files and commands. / BSD-3-Clause |
| [text-unidecode](https://github.com/kmike/text-unidecode/) | 1.3 | The most basic Text::Unidecode port / Artistic |
| [textdistance](https://github.com/orsinium/textdistance) | 4.2.1 | TextDistance – python library for comparing distance between two or more sequences by many algorithms. / MIT |
| [threadpoolctl](https://github.com/joblib/threadpoolctl) | 2.2.0 | Python helpers to control the threadpools of native libraries / BSD 3-Clause |
| [three-merge](https://github.com/spyder-ide/three-merge) | 0.1.1 | Simple Python library to perform a 3-way merge between strings / MIT |
| [tifffile](https://github.com/cgohlke/tifffile) | 2021.7.2 | Read and write image data from and to TIFF files. / BSD-3-Clause |
| [tinycss](http://tinycss.readthedocs.io/) | 0.4 | Tinycss is a complete yet simple CSS parser for Python. / BSD-3-Clause |
| [tk](https://www.tcl.tk/) | 8.6.12 | A dynamic programming language with GUI support. Bundles Tcl and Tk. / TCL |
| [tldextract](https://github.com/john-kurkowski/tldextract) | 3.2.0 | Accurately separate the TLD from the registered domain andsubdomains of a URL, using the Public Suffix List. / BSD-3-Clause |
| [toml](https://github.com/uiri/toml) | 0.10.2 | Python lib for TOML. / MIT |
| [tomli](https://github.com/hukkin/tomli) | 2.0.1 | A simple TOML parser / MIT |
| [tomlkit](https://github.com/sdispater/tomlkit) | 0.11.1 | Style preserving TOML library / MIT |
| [toolz](http://toolz.readthedocs.org/) | 0.11.2 | List processing tools and functional utilities / BSD-3-Clause |
| [tornado](https://www.tornadoweb.org/) | 6.1 | A Python web framework and asynchronous networking library, originally developed at FriendFeed. / Apache-2.0 |
| [tqdm](https://tqdm.github.io/) | 4.64.1 | A Fast, Extensible Progress Meter / MPL-2.0 AND MIT |
| [traitlets](http://traitlets.readthedocs.org/) | 5.1.1 | Configuration system for Python applications / BSD-3-Clause |
| [twisted](https://twistedmatrix.com/) | 22.2.0 | An asynchronous networking framework written in Python / MIT |
| [typing-extensions](https://github.com/python/typing_extensions) | 4.3.0 | Backported and Experimental Type Hints for Python / PSF-2.0 |
| [typing\_extensions](https://github.com/python/typing_extensions) | 4.3.0 | Backported and Experimental Type Hints for Python / PSF-2.0 |
| [tzdata](https://www.iana.org/time-zones) | 2022c | The Time Zone Database (called tz, tzdb or zoneinfo) / CC-PDDC OR BSD-3-Clause |
| [ujson](https://github.com/ultrajson/ultrajson) | 5.4.0 | Ultra fast JSON decoder and encoder written in C with Python bindings / BSD-3-Clause |
| [unidecode](https://pypi.python.org/pypi/Unidecode) | 1.2.0 | ASCII transliterations of Unicode text / GPL-2.0-or-later |
| [unixodbc](http://www.unixodbc.org/) | 2.3.11 | ODBC on non MS Windows platforms / LGPL-2.1-or-later |
| [urllib3](https://urllib3.readthedocs.io/) | 1.26.11 | HTTP library with thread-safe connection pooling, file post, and more. / MIT |
| [w3lib](https://github.com/scrapy/w3lib) | 1.21.0 | Library of web-related functions / BSD |
| [watchdog](http://github.com/gorakhargosh/watchdog) | 2.1.6 | Filesystem events monitoring / Apache-2.0 |
| [wcwidth](https://github.com/jquast/wcwidth) | 0.2.5 | Measures number of Terminal column cells of wide-character codes. / MIT |
| [webencodings](https://github.com/gsnedders/python-webencodings) | 0.5.1 | Character encoding aliases for legacy web content / BSD 3-Clause |
| [websocket-client](https://github.com/liris/websocket-client) | 0.58.0 | WebSocket client for python. hybi13 is supported. / BSD-3-Clause |
| [werkzeug](https://palletsprojects.com/p/werkzeug/) | 2.0.3 | The comprehensive WSGI web application library. / BSD-3-Clause |
| [wget](https://www.gnu.org/software/wget/) | 1.21.3 | utility for non-interactive download of files from the Web / GPL-3.0-or-later |
| [whatthepatch](https://github.com/cscorley/whatthepatch) | 1.0.2 | What The Patch!? is a library for both parsing and applying patch files / MIT |
| [wheel](https://github.com/pypa/wheel) | 0.37.1 | A built-package format for Python. / MIT |
| [widgetsnbextension](http://ipython.org) | 3.5.2 | Interactive Widgets for Jupyter / BSD-3-Clause |
| [wrapt](https://github.com/GrahamDumpleton/wrapt) | 1.14.1 | Module for decorators, wrappers and monkey patching / BSD-2-Clause |
| [wurlitzer](https://github.com/minrk/wurlitzer) | 3.0.2 | Capture C-level stdout/stderr in Python / MIT |
| [xarray](https://github.com/pydata/xarray) | 0.20.1 | N-D labeled arrays and datasets in Python. / Apache-2.0 |
| [xlrd](http://www.python-excel.org/) | 2.0.1 | Library for developers to extract data from Microsoft Excel (tm) spreadsheet files / BSD 3-Clause and BSD with advertising |
| [xlsxwriter](https://xlsxwriter.readthedocs.io/) | 3.0.3 | A Python module for creating Excel XLSX files / BSD-2-Clause |
| [xlwings](https://www.xlwings.org/) | 0.27.15 | Interact with Excel from Python and vice versa / BSD-3-Clause |
| [xz](https://tukaani.org/xz/) | 5.2.6 | Data compression software with high compression ratio / LGPL-2.1-or-later and GPL-2.0-or-later |
| [yaml](http://pyyaml.org/wiki/LibYAML) | 0.2.5 | A C library for parsing and emitting YAML / MIT |
| [yapf](https://github.com/google/yapf) | 0.31.0 | A formatter for Python files / Apache 2.0 |
| [zeromq](http://zeromq.org) | 4.3.4 | A high-performance asynchronous messaging library. / LGPL-3.0-or-later |
| [zfp](https://computation.llnl.gov/projects/floating-point-compression) | 0.5.5 | Library for compressed numerical arrays that support high throughput read and write random access / BSD-3-Clause |
| [zict](https://github.com/mrocklin/zict) | 2.1.0 | Composable Dictionary Classes / BSD-3-Clause |
| [zipp](https://github.com/jaraco/zipp) | 3.8.0 | A pathlib-compatible Zipfile object wrapper / MIT |
| [zlib](https://zlib.net/) | 1.2.12 | Massively spiffy yet delicately unobtrusive compression library / Zlib |
| zope | 1.0 | web application server / BSD |
| [zope.interface](https://github.com/zopefoundation/zope.interface) | 5.4.0 | Interfaces for Python / ZPL-2.1 |
| [zstd](https://www.zstd.net) | 1.5.2 | Zstandard - Fast real-time compression algorithm / BSD-3-Clause AND GPL-2.0-or-later |
| Name | Version | Summary / License |
|---|---|---|
| [\_libgcc\_mutex](https://github.com/AnacondaRecipes/_libgcc_mutex-feedstock) | 0.1 | Mutex for libgcc and libgcc-ng / None |
| [\_openmp\_mutex](https://github.com/conda-forge/ctng-compilers-feedstock) | 5.1 | OpenMP Implementation Mutex / BSD-3-Clause |
| [alabaster](http://www.sphinx-doc.org/en/stable/index.html) | 0.7.12 | Configurable, Python 2+3 compatible Sphinx theme. / BSD 3-Clause |
| [anaconda-client](https://anaconda.org) | 1.11.0 | anaconda.org command line client library / BSD-3-Clause |
| [anaconda-project](https://github.com/Anaconda-Platform/anaconda-project) | 0.11.1 | Tool for encapsulating, running, and reproducing data science projects / BSD-3-Clause |
| [anyio](https://github.com/agronholm/anyio) | 3.5.0 | High level compatibility layer for multiple asynchronous event loop implementations on Python / MIT |
| [appdirs](http://github.com/ActiveState/appdirs) | 1.4.4 | A small Python module for determining appropriate platform-specific dirs. / MIT |
| [argon2-cffi](https://argon2-cffi.readthedocs.org/) | 21.3.0 | The secure Argon2 password hashing algorithm. / MIT |
| [argon2-cffi-bindings](https://github.com/hynek/argon2-cffi-bindings) | 21.2.0 | Low-level Python CFFI Bindings for Argon2 / MIT |
| [astroid](https://github.com/PyCQA/astroid) | 2.11.7 | A abstract syntax tree for Python with inference support. / LGPL-2.1-or-later |
| [astropy](https://www.astropy.org/) | 5.1 | Community-developed Python Library for Astronomy / BSD-3-Clause |
| [asttokens](https://github.com/gristlabs/asttokens) | 2.0.5 | The asttokens module annotates Python abstract syntax trees (ASTs) with the positions of tokens and text in the source code that generated them. / Apache-2.0 |
| [attrs](https://attrs.readthedocs.io/en/stable/) | 21.4.0 | attrs is the Python package that will bring back the joy of writing classes by relieving you from the drudgery of implementing object protocols (aka dunder methods). / MIT |
| [babel](http://babel.pocoo.org/) | 2.9.1 | Utilities to internationalize and localize Python applications / BSD 3-clause |
| [backcall](https://github.com/takluyver/backcall/) | 0.2.0 | Specifications for callback functions passed in to an API / BSD-3-Clause |
| [backports](https://github.com/brandon-rhodes/backports) | 1.1 | Namespace for backported Python features. / MIT |
| [backports.functools\_lru\_cache](https://github.com/jaraco/backports.functools_lru_cache) | 1.6.4 | Backport of functools.lru\_cache from Python 3.3 as published at ActiveState. / MIT |
| [backports.tempfile](https://github.com/pjdelport/backports.tempfile) | 1.0 | Backports of new features in Python’s tempfile module / PSF 2 |
| [backports.weakref](https://github.com/pjdelport/backports.weakref) | 1.0.post1 | Backport of new features in Python’s weakref module / Python-2.0 |
| [beautifulsoup4](https://www.crummy.com/software/BeautifulSoup/) | 4.11.1 | Python library designed for screen-scraping / MIT |
| [bitarray](https://github.com/ilanschnell/bitarray) | 2.5.1 | efficient arrays of booleans – C extension / PSF-2.0 |
| [bkcharts](http://github.com/bokeh/bkcharts) | 0.2 | High level chart types built on top of Bokeh / BSD 3-Clause |
| [blas](http://www.netlib.org/lapack) | 1.0 | Linear Algebra PACKage / BSD-3-Clause |
| [bleach](https://github.com/mozilla/bleach) | 4.1.0 | Easy, whitelist-based HTML-sanitizing tool / Apache-2.0 |
| [blosc](https://github.com/Blosc/c-blosc) | 1.21.0 | A blocking, shuffling and loss-less compression library that can be faster than memcpy() / BSD-3-Clause |
| [bokeh](https://bokeh.org/) | 2.4.3 | Bokeh is an interactive visualization library for modern web browsers. / BSD-3-Clause |
| [boto3](https://aws.amazon.com/sdk-for-python) | 1.24.28 | Amazon Web Services SDK for Python / Apache-2.0 |
| [botocore](https://aws.amazon.com/sdk-for-python/) | 1.27.28 | Low-level, data-driven core of boto 3. / Apache-2.0 |
| [bottleneck](https://github.com/pydata/bottleneck) | 1.3.5 | Fast NumPy array functions written in Cython. / BSD-2-Clause |
| [brotli](https://github.com/google/brotli) | 1.0.9 | Brotli compression format / MIT |
| [brotli-bin](https://github.com/google/brotli) | 1.0.9 | Brotli compression format / MIT |
| [brotlipy](https://github.com/python-hyper/brotlipy) | 0.7.0 | Python bindings to the Brotli compression library / MIT |
| [bzip2](http://www.bzip.org/) | 1.0.8 | high-quality data compressor / bzip2 |
| [c-ares](https://c-ares.org/) | 1.18.1 | This is c-ares, an asynchronous resolver library / MIT |
| [ca-certificates](https://curl.se/docs/caextract.html) | 2022.07.19 | Certificates for use with other packages. / MPL-2.0 |
| [certifi](https://certifi.io/) | 2022.9.24 | Python package for providing Mozilla’s CA Bundle. / MPL-2.0 |
| [cffi](https://cffi.readthedocs.org/) | 1.15.1 | Foreign Function Interface for Python calling C code. / MIT |
| [cfitsio](http://heasarc.gsfc.nasa.gov/fitsio/fitsio.html) | 3.470 | A library for reading and writing FITS files / fitsio |
| [chardet](https://github.com/chardet/chardet) | 4.0.0 | Universal character encoding detector / LGPL2 |
| [charset-normalizer](https://github.com/ousret/charset_normalizer) | 2.0.4 | The Real First Universal Charset Detector. Open, modern and actively maintained alternative to Chardet. / MIT |
| [click](https://palletsprojects.com/p/click) | 8.0.4 | Python composable command line interface toolkit / BSD-3-Clause |
| [cloudpickle](https://github.com/cloudpipe/cloudpickle) | 2.0.0 | Extended pickling support for Python objects / BSD-3-Clause |
| [clyent](https://github.com/Anaconda-Platform/clyent) | 1.2.2 | Command line client library for windows and posix / BSD 3-Clause |
| [colorama](https://github.com/tartley/colorama) | 0.4.5 | Cross-platform colored terminal text / BSD-3-Clause |
| [colorcet](https://colorcet.holoviz.org/index.html) | 3.0.0 | Collection of perceptually uniform colormaps / CC-BY-4.0 |
| [conda](https://conda.io) | 22.9.0 | OS-agnostic, system-level binary package and environment manager. / BSD-3-Clause |
| [conda-build](https://github.com/conda/conda-build) | 3.22.0 | tools for building conda packages / BSD-3-Clause |
| [conda-content-trust](https://github.com/conda/conda-content-trust) | 0.1.3 | Signing and verification tools for conda / BSD-3-Clause |
| [conda-env](https://github.com/conda/conda-env) | 2.6.0 | Tools for interacting with conda environments. / BSD 3-Clause |
| [conda-token](https://github.com/Anaconda/conda-token) | 0.4.0 | Set repository access token / BSD-3-Clause |
| [conda-verify](https://github.com/conda/conda-verify) | 3.4.2 | tool for validating conda recipes and conda packages / BSD 3-Clause |
| [cryptography](https://github.com/pyca/cryptography) | 37.0.1 | Provides cryptographic recipes and primitives to Python developers / (BSD-3-Clause OR Apache-2.0) AND PSF-2.0 AND MIT |
| [curl](https://curl.se/) | 7.84.0 | tool and library for transferring data with URL syntax / curl |
| [cycler](http://matplotlib.org/cycler) | 0.11.0 | Composable style cycles. / BSD-3-Clause |
| [cython](https://cython.org/) | 0.29.32 | The Cython compiler for writing C extensions for the Python language / Apache-2.0 |
| [cytoolz](https://github.com/pytoolz/cytoolz) | 0.11.0 | Cython implementation of Toolz. High performance functional utilities / BSD-3-Clause |
| [dask](https://dask.org/) | 2022.7.0 | Parallel PyData with Task Scheduling / BSD-3-Clause |
| [dask-core](https://github.com/dask/dask/) | 2022.7.0 | Parallel Python with task scheduling / BSD-3-Clause |
| [dataclasses](https://github.com/ericvsmith/dataclasses) | 0.8 | An implementation of PEP 557: Data Classes / Apache-2.0 |
| [dbus](http://www.freedesktop.org/wiki/Software/dbus/) | 1.13.18 | Simple message bus system for applications to talk to one another / GPL2 |
| [debugpy](https://github.com/Microsoft/debugpy) | 1.5.1 | An implementation of the Debug Adapter Protocol for Python / MIT |
| [decorator](https://github.com/micheles/decorator) | 5.1.1 | Better living through Python with decorators. / BSD-2-Clause |
| [defusedxml](https://bitbucket.org/tiran/defusedxml) | 0.7.1 | XML bomb protection for Python stdlib modules / PSF 2.0 |
| [dill](http://www.cacr.caltech.edu/~mmckerns/dill.htm) | 0.3.4 | Serialize all of python (almost) / BSD-3-Clause |
| [distributed](https://distributed.readthedocs.io/en/latest/) | 2022.7.0 | Distributed computing with Dask / BSD-3-Clause |
| [docutils](http://docutils.sourceforge.net/) | 0.18.1 | Docutils – Python Documentation Utilities / LicenseRef-Public-Domain-Dedictation and BSD-2-Clause and LicenseRef-PSF-2.1.1 and GPL-3.0-or-later |
| [entrypoints](https://github.com/takluyver/entrypoints) | 0.4 | Discover and load entry points from installed packages. / MIT License |
| [et\_xmlfile](https://foss.heptapod.net/openpyxl/et_xmlfile) | 1.1.0 | An implementation of lxml.xmlfile for the standard library / MIT AND PSF-2.0 |
| [executing](https://pypi.org/project/executing) | 0.8.3 | Get the currently executing AST node of a frame, and other information / MIT |
| [expat](https://libexpat.github.io) | 2.4.9 | Expat XML parser library in C / MIT |
| [filelock](https://github.com/tox-dev/py-filelock) | 3.6.0 | A platform independent file lock. / Unlicense |
| [flask](https://palletsprojects.com/p/flask) | 1.1.2 | A simple framework for building complex web applications. / BSD-3-Clause |
| [fontconfig](http://www.freedesktop.org/wiki/Software/fontconfig/) | 2.13.1 | A library for configuring and customizing font access. / MIT |
| [fonttools](https://github.com/fonttools/fonttools) | 4.25.0 | fontTools is a library for manipulating fonts, written in Python. / MIT |
| [freetype](https://freetype.org/) | 2.11.0 | A Free, High-Quality, and Portable Font Engine / GPL-2-only and LicenseRef-FreeType |
| [fsspec](https://github.com/fsspec/filesystem_spec) | 2022.7.1 | A specification for pythonic filesystems / BSD-3-Clause |
| [future](http://python-future.org) | 0.18.2 | Clean single-source support for Python 3 and 2 / MIT |
| [giflib](http://giflib.sourceforge.net) | 5.2.1 | Library for reading and writing gif images / MIT |
| [glib](https://developer.gnome.org/glib/) | 2.69.1 | Provides core application building blocks for libraries and applications written in C. / LGPL-2.1-or-later |
| [glob2](https://github.com/miracle2k/python-glob2) | 0.7 | Version of the glob module that supports recursion via \*\*, and can capture patterns. / BSD-2-Clause |
| [gmp](http://gmplib.org/) | 6.2.1 | The GNU multiprecision library. / GPL-2.0-or-later AND LGPL-3.0-or-later |
| [gmpy2](https://pypi.python.org/pypi/gmpy2) | 2.1.2 | GMP/MPIR, MPFR, and MPC interface to Python 2.6+ and 3.x / LGPL-3.0-or-later |
| [greenlet](https://github.com/python-greenlet/greenlet) | 1.1.1 | Lightweight in-process concurrent programming / MIT |
| [h5py](https://www.h5py.org/) | 3.7.0 | Read and write HDF5 files from Python / BSD-3-Clause |
| [hdf5](http://www.hdfgroup.org/HDF5/) | 1.10.6 | HDF5 is a data model, library, and file format for storing and managing data / HDF5 |
| [heapdict](http://stutzbachenterprises.com/) | 1.0.1 | A heap with decrease-key and increase-key operations / BSD 3-Clause |
| [holoviews](https://holoviews.org) | 1.14.8 | Stop plotting your data - annotate your data and let it visualize itself. / BSD-3-Clause |
| [hvplot](https://hvplot.holoviz.org) | 0.8.0 | A high-level plotting API for the PyData ecosystem built on HoloViews / BSD-3-Clause |
| [icu](http://site.icu-project.org/) | 68.1 | International Components for Unicode. / MIT |
| [idna](https://github.com/kjd/idna) | 3.3 | Internationalized Domain Names in Applications (IDNA). / BSD-3-Clause |
| [imagecodecs](https://www.lfd.uci.edu/~gohlke/) | 2021.8.26 | Image transformation, compression, and decompression codecs / BSD-3-Clause |
| [imageio](https://imageio.github.io) | 2.19.3 | A Python library for reading and writing image data / BSD-2-Clause |
| [imagesize](https://github.com/shibukawa/imagesize_py) | 1.4.1 | Getting image size from png/jpeg/jpeg2000/gif file / MIT |
| [importlib-metadata](https://github.com/python/importlib_metadata) | 4.11.3 | A library to access the metadata for a Python package. / Apache-2.0 |
| [iniconfig](http://github.com/RonnyPfannschmidt/iniconfig) | 1.1.1 | iniconfig: brain-dead simple config-ini parsing / MIT |
| [intake](https://github.com/ContinuumIO/intake) | 0.6.2 | Data load and catalog system / BSD-2-Clause |
| [ipykernel](https://ipython.org) | 6.15.2 | IPython Kernel for Jupyter / BSD-3-Clause |
| [ipython](https://ipython.org) | 8.4.0 | IPython: Productive Interactive Computing / BSD-3-Clause |
| [ipython\_genutils](http://ipython.org) | 0.2.0 | vestigial utilities from IPython / BSD 3-Clause |
| [ipywidgets](https://github.com/ipython/ipywidgets) | 7.6.5 | Jupyter Interactive Widgets / BSD-3-Clause |
| [isort](https://github.com/timothycrosley/isort) | 5.9.3 | A Python utility / library to sort Python imports. / MIT |
| [itsdangerous](https://github.com/pallets/itsdangerous) | 2.0.1 | Various helpers to pass trusted data to untrusted environments. / BSD-3-Clause |
| [jdcal](https://github.com/phn/jdcal) | 1.4.1 | Julian dates from proleptic Gregorian and Julian calendars. / BSD 2-Clause |
| [jedi](https://github.com/davidhalter/jedi/) | 0.18.1 | An autocompletion tool for Python that can be used for text editors. / MIT |
| [jinja2](https://palletsprojects.com/p/jinja/) | 2.11.3 | A very fast and expressive template engine. / BSD-3-Clause |
| [jmespath](http://jmespath.org/) | 0.10.0 | Query language for JSON / MIT |
| [joblib](https://joblib.readthedocs.io/en/latest/) | 1.1.0 | Lightweight pipelining: using Python functions as pipeline jobs. / BSD-3-Clause |
| [jpeg](https://www.ijg.org/) | 9e | read/write jpeg COM, EXIF, IPTC medata / IJG |
| [json5](https://github.com/dpranke/pyjson5) | 0.9.6 | A Python implementation of the JSON5 data format / Apache-2.0 |
| [jsonschema](https://github.com/python-jsonschema/jsonschema) | 4.16.0 | An implementation of JSON Schema validation for Python / MIT |
| [jupyter](http://jupyter.org) | 1.0.0 | Jupyter metapackage. Install all the Jupyter components in one go. / BSD 3-Clause |
| [jupyter\_client](https://jupyter.org) | 7.3.4 | jupyter\_client contains the reference implementation of the Jupyter protocol. / BSD-3-Clause |
| [jupyter\_console](https://jupyter.org) | 6.4.3 | Jupyter terminal console / BSD-3-Clause |
| [jupyter\_core](https://jupyter.org) | 4.11.1 | Core common functionality of Jupyter projects. / BSD-3-Clause |
| [jupyter\_server](https://jupyter.org) | 1.18.1 | Jupyter Server / BSD-3-Clause |
| [jupyterlab](https://github.com/jupyterlab/jupyterlab) | 3.3.2 | JupyterLab PRE-ALPHA / BSD-3-Clause |
| [jupyterlab\_pygments](http://github.com/JupyterLab/jupyterlab_pygments) | 0.1.2 | Pygments syntax coloring scheme making use of the JupyterLab CSS variables / BSD-3-Clause |
| [jupyterlab\_server](https://github.com/jupyterlab/jupyterlab_server) | 2.10.3 | A set of server components for JupyterLab and JupyterLab like applications. / BSD-3-Clause |
| [jupyterlab\_widgets](https://github.com/jupyter-widgets/ipywidgets) | 1.0.0 | JupyterLab extension providing HTML widgets / BSD-3-Clause |
| [jxrlib](https://packages.debian.org/source/sid/jxrlib) | 1.1 | jxrlib - JPEG XR Library by Microsoft, built from Debian hosted sources. / BSD-2-Clause |
| [kiwisolver](https://github.com/nucleic/kiwi) | 1.4.2 | An efficient C++ implementation of the Cassowary constraint solver / BSD-3-Clause |
| [krb5](http://web.mit.edu/kerberos/) | 1.19.2 | A network authentication protocol. / MIT |
| [lazy-object-proxy](https://github.com/ionelmc/python-lazy-object-proxy) | 1.6.0 | A fast and thorough lazy object proxy / BSD-2-Clause |
| [lcms2](http://www.littlecms.com/) | 2.12 | Open Source Color Management Engine / MIT |
| [ld\_impl\_linux-s390x](https://www.gnu.org/software/binutils/) | 2.38 | A set of programming tools for creating and managing binary programs, object files, libraries, profile data, and assembly source code. / GPL-3.0-only |
| [lerc](https://github.com/Esri/lerc) | 3.0 | LERC - Limited Error Raster Compression / Apache-2.0 |
| [libaec](https://gitlab.dkrz.de/k202009/libaec) | 1.0.4 | Adaptive Entropy Coding library / BSD-2-Clause |
| [libarchive](https://libarchive.org/) | 3.6.1 | Multi-format archive and compression library / BSD-2-Clause |
| [libbrotlicommon](https://github.com/google/brotli) | 1.0.9 | Brotli compression format / MIT |
| [libbrotlidec](https://github.com/google/brotli) | 1.0.9 | Brotli compression format / MIT |
| [libbrotlienc](https://github.com/google/brotli) | 1.0.9 | Brotli compression format / MIT |
| [libcurl](https://curl.se/) | 7.84.0 | tool and library for transferring data with URL syntax / curl |
| [libdeflate](https://github.com/ebiggers/libdeflate) | 1.7 | libdeflate is a library for fast, whole-buffer DEFLATE-based compression and decompression. / MIT |
| [libedit](http://thrysoee.dk/editline/) | 3.1.20210910 | Editline Library (libedit) / BSD-2-Clause |
| [libev](http://software.schmorp.de/pkg/libev.html) | 4.33 | A full-featured and high-performance event loop that is loosely modeled after libevent, but without its limitations and bugs. / BSD-2-Clause |
| [libffi](https://sourceware.org/libffi/) | 3.3 | A Portable Foreign Function Interface Library. / MIT |
| [libgcc-ng](https://gcc.gnu.org/onlinedocs/gccint/Libgcc.html) | 11.2.0 | The GCC low-level runtime library / GPL-3.0-only WITH GCC-exception-3.1 |
| [libgfortran-ng](https://gcc.gnu.org/) | 11.2.0 | The GNU Fortran Runtime Library / GPL-3.0-only WITH GCC-exception-3.1 |
| [libgfortran5](https://gcc.gnu.org/) | 11.2.0 | Fortran compiler and libraries from the GNU Compiler Collection / GPL-3.0-only WITH GCC-exception-3.1 |
| [libgomp](https://gcc.gnu.org/onlinedocs/gccint/Libgcc.html) | 11.2.0 | The GCC OpenMP implementation. / GPL-3.0-only WITH GCC-exception-3.1 |
| [libidn2](https://www.gnu.org/software/libidn/#libidn2) | 2.3.0 | Library for internationalized domain names (IDNA2008) support / LGPLv2 AND LGPL-3.0-or-later AND GPL-3.0-or-later |
| [liblief](https://lief.quarkslab.com/) | 0.11.5 | A cross platform library to parse, modify and abstract ELF, PE and MachO formats. / Apache-2.0 |
| [libnghttp2](http://github.com/nghttp2/nghttp2) | 1.46.0 | This is an implementation of Hypertext Transfer Protocol version 2. / MIT |
| [libopenblas](https://www.openblas.net/) | 0.3.21 | An Optimized BLAS library / BSD-3-Clause |
| [libpng](http://www.libpng.org/pub/png/libpng.html) | 1.6.37 | PNG reference library / zlib/libpng |
| [libsodium](http://libsodium.org) | 1.0.18 | A modern and easy-to-use crypto library. / ISC |
| [libssh2](https://www.libssh2.org/) | 1.10.0 | the SSH library / BSD-3-Clause |
| [libstdcxx-ng](https://gcc.gnu.org/) | 11.2.0 | The GNU C++ Runtime Library / GPL-3.0-only WITH GCC-exception-3.1 |
| [libtiff](http://www.simplesystems.org/libtiff/) | 4.4.0 | Support for the Tag Image File Format (TIFF). / HPND |
| [libunistring](https://www.gnu.org/software/libunistring) | 0.9.10 | This library provides functions for manipulating Unicode strings and for manipulating C strings according to the Unicode standard. / LGPL |
| [libuuid](http://sourceforge.net/projects/libuuid/) | 1.0.3 | Portable uuid C library. / BSD 3-Clause |
| [libwebp](https://developers.google.com/speed/webp/) | 1.2.2 | WebP image library / BSD-3-Clause |
| [libwebp-base](https://developers.google.com/speed/webp) | 1.2.2 | WebP image library / BSD-3-Clause |
| [libxcb](http://xcb.freedesktop.org/) | 1.15 | This is the C-language Binding (XCB) package to the X Window System protocol / MIT |
| [libxml2](https://gitlab.gnome.org/GNOME/libxml2/) | 2.9.14 | The XML C parser and toolkit of Gnome / MIT |
| [libxslt](https://gitlab.gnome.org/GNOME/libxslt) | 1.1.35 | The XSLT C library developed for the GNOME project / MIT |
| [libzopfli](https://github.com/google/zopfli) | 1.0.3 | A compression library programmed in C to perform very good, but slow, deflate or zlib compression. / Apache-2.0 |
| [locket](https://github.com/mwilliamson/locket.py) | 1.0.0 | File-based locks for Python for Linux and Windows / BSD-2-Clause |
| [lxml](https://lxml.de/) | 4.9.1 | Pythonic binding for the C libraries libxml2 and libxslt. / BSD-3-Clause and GPL-2.0-only and ZPL-2.0 and LicenseRef-ElementTree |
| [lz4](https://github.com/python-lz4/python-lz4) | 3.1.0 | LZ4 Bindings for Python / BSD-3-Clause |
| [lz4-c](https://www.lz4.org) | 1.9.3 | Extremely Fast Compression algorithm / BSD-2-Clause |
| [lzo](http://www.oberhumer.com/opensource/lzo/) | 2.10 | LZO is a portable lossless data compression library written in ANSI C. / GPL v2+ |
| [markdown](https://pythonhosted.org/Markdown/) | 3.3.3 | Python implementation of Markdown. / BSD-3-Clause |
| [markupsafe](https://www.palletsprojects.com/p/markupsafe) | 2.0.1 | Safely add untrusted strings to HTML/XML markup. / BSD-3-Clause |
| [matplotlib](https://matplotlib.org/) | 3.5.2 | Publication quality figures in Python / LicenseRef-PSF-based |
| [matplotlib-base](https://matplotlib.org/) | 3.5.2 | Publication quality figures in Python / LicenseRef-PSF-based |
| [matplotlib-inline](https://github.com/ipython/matplotlib-inline) | 0.1.6 | Inline Matplotlib backend for Jupyter / BSD-3-Clause |
| [mccabe](https://github.com/PyCQA/mccabe) | 0.7.0 | McCabe complexity checker for Python / MIT |
| [mistune](https://github.com/lepture/mistune) | 0.8.4 | A sane Markdown parser with useful plugins and renderers. / BSD-3-Clause |
| [mock](https://github.com/testing-cabal/mock) | 4.0.3 | A library for testing in Python / BSD-2-Clause |
| [mpc](http://www.multiprecision.org/) | 1.1.0 | A C library for the arithmetic of complex numbers with arbitrarily high precision. / LGPL-3-or-later |
| [mpfr](http://www.mpfr.org/) | 4.0.2 | The MPFR library is a C library for multiple-precision floating-point computations with correct rounding. / LGPL-3.0-only |
| [mpmath](http://mpmath.org) | 1.2.1 | Python library for arbitrary-precision floating-point arithmetic / BSD 3-Clause |
| [msgpack-python](https://msgpack.org/) | 1.0.3 | MessagePack (de)serializer / Apache-2.0 |
| [munkres](https://github.com/bmc/munkres) | 1.1.4 | The Munkres module provides an O(n^3) implementation of the Munkres algorithm (also called the Hungarian algorithm or the Kuhn-Munkres algorithm). / Apache-2.0 |
| [nbclassic](http://github.com/jupyterlab/nbclassic) | 0.3.5 | Jupyter Notebook as a Jupyter Server Extension. / BSD-3-Clause |
| [nbclient](https://jupyter.org) | 0.5.13 | A client library for executing notebooks. Formally nbconvert’s ExecutePreprocessor. / BSD-3-Clause |
| [nbconvert](https://jupyter.org) | 6.4.4 | Converting Jupyter Notebooks / BSD-3-Clause |
| [nbformat](https://jupyter.org) | 5.5.0 | The Jupyter Notebook format / BSD-3-Clause |
| [ncurses](http://www.gnu.org/software/ncurses/) | 6.3 | Library for text-based user interfaces / Free software (MIT-like) |
| [nest-asyncio](https://github.com/erdewit/nest_asyncio) | 1.5.5 | Patch asyncio to allow nested event loops / BSD-2-Clause |
| [networkx](https://networkx.github.io/) | 2.8.4 | Python package for creating and manipulating complex networks / BSD-3-Clause |
| [nltk](https://nltk.org/) | 3.7 | Natural Language Toolkit / Apache-2.0 |
| nomkl | 3.0 | / BSD |
| [nose](http://readthedocs.org/docs/nose/) | 1.3.7 | Nose extends unittest to make testing easier / LGPL-2.1 |
| [notebook](https://jupyter.org) | 6.4.12 | Jupyter Notebook / BSD-3-Clause |
| [numexpr](https://github.com/pydata/numexpr) | 2.8.3 | Fast numerical expression evaluator for NumPy. / MIT |
| [numpy](https://numpy.org/) | 1.21.5 | Array processing for numbers, strings, records, and objects. / BSD-3-Clause |
| [numpy-base](https://numpy.org/) | 1.21.5 | Array processing for numbers, strings, records, and objects. / BSD-3-Clause |
| [numpydoc](https://github.com/numpy/numpydoc) | 1.4.0 | Numpy’s Sphinx extensions / BSD-3-Clause |
| [olefile](http://www.decalage.info/python/olefileio) | 0.46 | parse, read and write Microsoft OLE2 files / BSD 2-Clause |
| [openblas](https://www.openblas.net/) | 0.3.21 | An optimized BLAS library / BSD-3-Clause |
| [openblas-devel](https://www.openblas.net/) | 0.3.21 | OpenBLAS headers and libraries for developing software that used OpenBLAS. / BSD-3-Clause |
| [openjpeg](http://www.openjpeg.org/) | 2.4.0 | An open-source JPEG 2000 codec written in C / BSD 2-Clause |
| [openpyxl](https://openpyxl.readthedocs.io) | 3.0.10 | A Python library to read/write Excel 2010 xlsx/xlsm files / MIT |
| [openssl](https://www.openssl.org/) | 1.1.1q | OpenSSL is an open-source implementation of the SSL and TLS protocols / OpenSSL |
| [packaging](https://github.com/pypa/packaging) | 21.3 | Core utilities for Python packages / Apache-2.0 or BSD-2-Clause |
| [pandas](https://pandas.pydata.org) | 1.4.4 | High-performance, easy-to-use data structures and data analysis tools. / BSD-3-Clause |
| [pandocfilters](https://github.com/jgm/pandocfilters) | 1.5.0 | A python module for writing pandoc filters / BSD-3-Clause |
| [panel](https://panel.holoviz.org) | 0.12.6 | A high-level app and dashboarding solution for Python / BSD-3-Clause |
| [param](http://ioam.github.io/param/) | 1.12.0 | Param: Make your Python code clearer and more reliable by declaring Parameters / BSD-3-Clause |
| [parso](https://github.com/davidhalter/parso) | 0.8.3 | A Python Parser / MIT |
| [partd](https://github.com/dask/partd) | 1.2.0 | Data structure for on-disk shuffle operations / BSD 3-Clause |
| [patch](http://savannah.gnu.org/projects/patch/) | 2.7.6 | Native Win32 versions of common unix tools / GPL 3 |
| [patchelf](http://nixos.org/patchelf.html) | 0.13 | A small utility to modify the dynamic linker and RPATH of ELF executables. / GPL-3.0-or-later |
| [patsy](https://github.com/pydata/patsy) | 0.5.2 | Describing statistical models in Python using symbolic formulas / BSD-2-Clause AND PSF-2.0 |
| [pcre](http://www.pcre.org/) | 8.45 | Regular expression pattern matching using the same syntax and semantics as Perl 5. / BSD 3-Clause |
| [pep8](http://pep8.readthedocs.org/) | 1.7.1 | Python style guide checker / MIT |
| [pexpect](http://pexpect.sourceforge.net/) | 4.8.0 | Pexpect makes Python a better tool for controlling other applications. / ISC |
| [pickleshare](https://github.com/pickleshare/pickleshare/) | 0.7.5 | Tiny ‘shelve’-like database with concurrency support / MIT |
| [pillow](https://pillow.readthedocs.io) | 9.2.0 | Pillow is the friendly PIL fork by Alex Clark and Contributors / LicenseRef-PIL |
| [pip](https://pip.pypa.io/en/stable/) | 22.2.2 | PyPA recommended tool for installing Python packages / MIT |
| [pkginfo](https://code.launchpad.net/~tseaver/pkginfo/trunk) | 1.8.2 | Query metadatdata from sdists / bdists / installed packages. / MIT |
| [platformdirs](https://github.com/platformdirs/platformdirs) | 2.5.2 | A small Python module for determining appropriate platform-specific dirs, e.g. a “user data dir”. / MIT |
| [plotly](https://plot.ly/python/) | 5.9.0 | An interactive JavaScript-based visualization library for Python / MIT |
| [pluggy](https://github.com/pytest-dev/pluggy) | 1.0.0 | Plugin registration and hook calling for Python / MIT |
| [ply](http://www.dabeaz.com/ply/index.html) | 3.11 | Python Lex-Yacc / BSD 3-clause |
| [prometheus\_client](https://github.com/prometheus/client_python) | 0.14.1 | Python client for the Prometheus monitoring system / Apache-2.0 |
| [prompt-toolkit](https://github.com/jonathanslenders/python-prompt-toolkit) | 3.0.20 | Library for building powerful interactive command lines in Python / BSD-3-Clause |
| [prompt\_toolkit](https://github.com/jonathanslenders/python-prompt-toolkit) | 3.0.20 | Library for building powerful interactive command lines in Python / BSD-3-Clause |
| [psutil](https://github.com/giampaolo/psutil) | 5.9.0 | A cross-platform process and system utilities module for Python / BSD-3-Clause |
| [ptyprocess](https://github.com/pexpect/ptyprocess) | 0.7.0 | Run a subprocess in a pseudo terminal / ISC |
| [pure\_eval](https://github.com/alexmojaki/pure_eval) | 0.2.2 | Safely evaluate AST nodes without side effects / MIT |
| [py](https://github.com/pytest-dev/py) | 1.11.0 | library with cross-python path, ini-parsing, io, code, log facilities / MIT |
| [py-lief](https://lief.quarkslab.com/) | 0.11.5 | A cross platform library to parse, modify and abstract ELF, PE and MachO formats. / Apache-2.0 |
| [pycodestyle](https://pycodestyle.readthedocs.io/) | 2.8.0 | Python style guide checker / MIT |
| [pycosat](https://github.com/ContinuumIO/pycosat) | 0.6.3 | Bindings to picosat (a SAT solver) / MIT |
| [pycparser](https://github.com/eliben/pycparser) | 2.21 | Complete C99 parser in pure Python / BSD-3-clause |
| [pyct](http://github.com/pyviz/pyct) | 0.4.8 | python package common tasks for users (e.g. copy examples, fetch data, …) / BSD 3-Clause |
| [pycurl](http://pycurl.sourceforge.net/) | 7.45.1 | A Python Interface To The cURL library / LGPL-2.1-only, MIT |
| [pyerfa](https://pyerfa.readthedocs.io/) | 2.0.0 | Python bindings for ERFA routines / BSD-3-Clause |
| [pyflakes](https://github.com/PyCQA/pyflakes) | 2.4.0 | Pyflakes analyzes programs and detects various errors. / MIT |
| [pygments](https://pygments.org/) | 2.11.2 | Pygments is a generic syntax highlighter suitable for use in code hosting, forums, wikis or other applications that need to prettify source code. / BSD-2-Clause |
| [pylint](https://www.pylint.org) | 2.14.5 | python code static checker / GPL-2.0-or-later |
| [pyodbc](https://github.com/mkleehammer/pyodbc) | 4.0.34 | DB API Module for ODBC / MIT-0 |
| [pyopenssl](https://github.com/pyca/pyopenssl) | 22.0.0 | Python wrapper module around the OpenSSL library / Apache-2.0 |
| [pyparsing](https://github.com/pyparsing/pyparsing/) | 3.0.9 | Create and execute simple grammars / MIT |
| [pyrsistent](http://github.com/tobgu/pyrsistent/) | 0.18.0 | Persistent/Functional/Immutable data structures / MIT |
| [pysocks](https://github.com/Anorov/PySocks) | 1.7.1 | A Python SOCKS client module. See [Anorov/PySocks](https://github.com/Anorov/PySocks) for more information. / BSD 3-Clause |
| [pytables](https://www.pytables.org) | 3.6.1 | Brings together Python, HDF5 and NumPy to easily handle large amounts of data. / BSD-3-Clause |
| [pytest](https://docs.pytest.org/en/latest/) | 7.1.2 | Simple and powerful testing with Python. / MIT |
| [python](https://www.python.org/) | 3.9.13 | General purpose programming language / PSF-2.0 |
| [python-dateutil](https://dateutil.readthedocs.org/) | 2.8.2 | Extensions to the standard Python datetime module. / BSD-3-Clause and Apache |
| [python-fastjsonschema](https://github.com/horejsek/python-fastjsonschema) | 2.16.2 | Fastest Python implementation of JSON schema / BSD-3-Clause |
| [python-libarchive-c](https://github.com/Changaco/python-libarchive-c) | 2.9 | Python interface to libarchive / CC0-1.0 |
| [pytz](http://pythonhosted.org/pytz/) | 2022.1 | World timezone definitions, modern and historical. / MIT |
| [pyviz\_comms](https://www.holoviz.org) | 2.0.2 | Bidirectional communication for PyViz / BSD-3-Clause |
| [pywavelets](https://github.com/PyWavelets/pywt) | 1.3.0 | Discrete Wavelet Transforms in Python / MIT |
| [pyyaml](http://pyyaml.org/wiki/PyYAML) | 6.0 | YAML parser and emitter for Python / MIT |
| [pyzmq](https://github.com/zeromq/pyzmq) | 23.2.0 | Python bindings for zeromq / BSD-3-Clause AND LGPL-3.0-or-later |
| [readline](https://tiswww.case.edu/php/chet/readline/rltop.html) | 8.1.2 | library for editing command lines as they are typed in / GPL-3.0-only |
| [regex](https://github.com/mrabarnett/mrab-regex) | 2022.7.9 | Alternative regular expression module, to replace re / Apache-2.0 |
| [requests](https://requests.readthedocs.io/en/latest/) | 2.28.1 | Requests is an elegant and simple HTTP library for Python, built with ♥. / Apache-2.0 |
| [rope](https://github.com/python-rope/rope) | 0.22.0 | A python refactoring library / LGPL-3.0-or-later |
| [ruamel\_yaml](https://sourceforge.net/p/ruamel-yaml/code/ci/default/tree) | 0.15.100 | A patched copy of ruamel.yaml. / MIT |
| [s3transfer](https://github.com/boto/s3transfer) | 0.6.0 | An Amazon S3 Transfer Manager / Apache-2.0 |
| [scikit-image](https://scikit-image.org/) | 0.19.2 | Image processing in Python. / BSD-3-Clause |
| [scikit-learn](https://scikit-learn.org/) | 1.1.1 | A set of python modules for machine learning and data mining / BSD-3-Clause |
| [scipy](https://scipy.org/) | 1.9.1 | Scientific Library for Python / BSD-3-Clause |
| [seaborn](https://seaborn.pydata.org) | 0.11.2 | Statistical data visualization / BSD-3-Clause |
| [send2trash](https://github.com/arsenetar/send2trash) | 1.8.0 | Python library to natively send files to Trash (or Recycle bin) on all platforms. / BSD-3-Clause |
| [setuptools](https://github.com/pypa/setuptools) | 63.4.1 | Download, build, install, upgrade, and uninstall Python packages / MIT |
| [sip](https://www.riverbankcomputing.com/software/sip/) | 6.6.2 | A Python bindings generator for C/C++ libraries / GPL-3.0-only |
| [six](https://six.readthedocs.io/) | 1.16.0 | Python 2 and 3 compatibility utilities / MIT |
| [snappy](https://github.com/google/snappy) | 1.1.9 | A fast compressor/decompressor / BSD-3-clause AND CC-BY-3.0 AND MIT AND CC-BY AND Public Domain |
| [sniffio](https://github.com/python-trio/sniffio) | 1.1.0 | Sniff out which async library your code is running under / Apache-2.0 |
| [snowballstemmer](https://github.com/snowballstem/snowball) | 2.2.0 | Snowball stemming library collection for Python / BSD-3-Clause |
| [sortedcollections](http://www.grantjenks.com/docs/sortedcollections/) | 2.1.0 | Python Sorted Collections / Apache-2.0 |
| [sortedcontainers](http://www.grantjenks.com/docs/sortedcontainers/) | 2.4.0 | Python Sorted Container Types: SortedList, SortedDict, and SortedSet / Apache-2.0 |
| [soupsieve](https://facelessuser.github.io/soupsieve) | 2.3.1 | A modern CSS selector implementation for BeautifulSoup / MIT |
| [sphinx](https://www.sphinx-doc.org) | 5.0.2 | Sphinx is a tool that makes it easy to create intelligent and beautiful documentation / BSD-2-Clause |
| [sphinxcontrib-applehelp](https://www.sphinx-doc.org/en/master/) | 1.0.2 | sphinxcontrib-applehelp is a sphinx extension which outputs Apple help books / BSD-2-Clause |
| [sphinxcontrib-devhelp](https://www.sphinx-doc.org/en/master/) | 1.0.2 | sphinxcontrib-devhelp is a sphinx extension which outputs Devhelp document / BSD-2-Clause |
| [sphinxcontrib-htmlhelp](https://www.sphinx-doc.org/en/master/) | 2.0.0 | sphinxcontrib-htmlhelp is a sphinx extension which renders HTML help files. / BSD-2-Clause |
| [sphinxcontrib-jsmath](https://www.sphinx-doc.org/en/master/) | 1.0.1 | A sphinx extension which renders display math in HTML via JavaScript / BSD-2-Clause |
| [sphinxcontrib-qthelp](https://www.sphinx-doc.org/en/master/) | 1.0.3 | sphinxcontrib-qthelp is a sphinx extension which outputs QtHelp document / BSD-2-Clause |
| [sphinxcontrib-serializinghtml](https://www.sphinx-doc.org/en/master/) | 1.1.5 | sphinxcontrib-serializinghtml is a sphinx extension which outputs “serialized” HTML files (json and pickle). / BSD-2-Clause |
| [sqlalchemy](https://www.sqlalchemy.org/) | 1.4.39 | Database Abstraction Library. / MIT |
| [sqlite](https://www.sqlite.org/) | 3.39.3 | Implements a self-contained, zero-configuration, SQL database engine / blessing |
| [stack\_data](https://github.com/alexmojaki/stack_data) | 0.2.0 | Extract data from python stack frames and tracebacks for informative displays / MIT |
| [statsmodels](https://www.statsmodels.org) | 0.13.2 | Statistical computations and models for use with SciPy / BSD-3-Clause |
| [sympy](https://sympy.org) | 1.10.1 | Python library for symbolic mathematics / BSD-3-Clause AND MIT |
| [tabulate](https://github.com/astanin/python-tabulate) | 0.8.10 | Pretty-print tabular data in Python, a library and a command-line utility. / MIT |
| [tblib](https://github.com/ionelmc/python-tblib) | 1.7.0 | Traceback serialization library. / BSD 2-Clause |
| [tenacity](http://github.com/jd/tenacity) | 8.0.1 | Retry a flaky function whenever an exception occurs until it works / Apache-2.0 |
| [terminado](https://github.com/jupyter/terminado) | 0.13.1 | Terminals served by tornado websockets / BSD-2-Clause |
| [testpath](https://testpath.readthedocs.io) | 0.6.0 | Testpath is a collection of utilities for Python code working with files and commands. / BSD-3-Clause |
| [threadpoolctl](https://github.com/joblib/threadpoolctl) | 2.2.0 | Python helpers to control the threadpools of native libraries / BSD 3-Clause |
| [tifffile](https://github.com/cgohlke/tifffile) | 2021.7.2 | Read and write image data from and to TIFF files. / BSD-3-Clause |
| [tk](https://www.tcl.tk/) | 8.6.12 | A dynamic programming language with GUI support. Bundles Tcl and Tk. / TCL |
| [toml](https://github.com/uiri/toml) | 0.10.2 | Python lib for TOML. / MIT |
| [tomli](https://github.com/hukkin/tomli) | 2.0.1 | A simple TOML parser / MIT |
| [tomlkit](https://github.com/sdispater/tomlkit) | 0.11.1 | Style preserving TOML library / MIT |
| [toolz](http://toolz.readthedocs.org/) | 0.11.2 | List processing tools and functional utilities / BSD-3-Clause |
| [tornado](https://www.tornadoweb.org/) | 6.1 | A Python web framework and asynchronous networking library, originally developed at FriendFeed. / Apache-2.0 |
| [tqdm](https://tqdm.github.io/) | 4.64.1 | A Fast, Extensible Progress Meter / MPL-2.0 AND MIT |
| [traitlets](http://traitlets.readthedocs.org/) | 5.1.1 | Configuration system for Python applications / BSD-3-Clause |
| [typing-extensions](https://github.com/python/typing_extensions) | 4.3.0 | Backported and Experimental Type Hints for Python / PSF-2.0 |
| [typing\_extensions](https://github.com/python/typing_extensions) | 4.3.0 | Backported and Experimental Type Hints for Python / PSF-2.0 |
| [tzdata](https://www.iana.org/time-zones) | 2022c | The Time Zone Database (called tz, tzdb or zoneinfo) / CC-PDDC OR BSD-3-Clause |
| [unixodbc](http://www.unixodbc.org/) | 2.3.11 | ODBC on non MS Windows platforms / LGPL-2.1-or-later |
| [urllib3](https://urllib3.readthedocs.io/) | 1.26.11 | HTTP library with thread-safe connection pooling, file post, and more. / MIT |
| [wcwidth](https://github.com/jquast/wcwidth) | 0.2.5 | Measures number of Terminal column cells of wide-character codes. / MIT |
| [webencodings](https://github.com/gsnedders/python-webencodings) | 0.5.1 | Character encoding aliases for legacy web content / BSD 3-Clause |
| [websocket-client](https://github.com/liris/websocket-client) | 0.58.0 | WebSocket client for python. hybi13 is supported. / BSD-3-Clause |
| [werkzeug](https://palletsprojects.com/p/werkzeug/) | 2.0.3 | The comprehensive WSGI web application library. / BSD-3-Clause |
| [wget](https://www.gnu.org/software/wget/) | 1.21.3 | utility for non-interactive download of files from the Web / GPL-3.0-or-later |
| [wheel](https://github.com/pypa/wheel) | 0.37.1 | A built-package format for Python. / MIT |
| [widgetsnbextension](http://ipython.org) | 3.5.2 | Interactive Widgets for Jupyter / BSD-3-Clause |
| [wrapt](https://github.com/GrahamDumpleton/wrapt) | 1.14.1 | Module for decorators, wrappers and monkey patching / BSD-2-Clause |
| [xlrd](http://www.python-excel.org/) | 2.0.1 | Library for developers to extract data from Microsoft Excel (tm) spreadsheet files / BSD 3-Clause and BSD with advertising |
| [xlsxwriter](https://xlsxwriter.readthedocs.io/) | 3.0.3 | A Python module for creating Excel XLSX files / BSD-2-Clause |
| [xz](https://tukaani.org/xz/) | 5.2.6 | Data compression software with high compression ratio / LGPL-2.1-or-later and GPL-2.0-or-later |
| [yaml](http://pyyaml.org/wiki/LibYAML) | 0.2.5 | A C library for parsing and emitting YAML / MIT |
| [zeromq](http://zeromq.org) | 4.3.4 | A high-performance asynchronous messaging library. / LGPL-3.0-or-later |
| [zict](https://github.com/mrocklin/zict) | 2.1.0 | Composable Dictionary Classes / BSD-3-Clause |
| [zipp](https://github.com/jaraco/zipp) | 3.8.0 | A pathlib-compatible Zipfile object wrapper / MIT |
| [zlib](https://zlib.net/) | 1.2.12 | Massively spiffy yet delicately unobtrusive compression library / Zlib |
| [zstd](https://www.zstd.net) | 1.5.2 | Zstandard - Fast real-time compression algorithm / BSD-3-Clause AND GPL-2.0-or-later |
| Name | Version | Summary / License |
|---|---|---|
| [\_libgcc\_mutex](https://github.com/AnacondaRecipes/_libgcc_mutex-feedstock) | 0.1 | Mutex for libgcc and libgcc-ng / None |
| [\_openmp\_mutex](https://github.com/conda-forge/ctng-compilers-feedstock) | 5.1 | OpenMP Implementation Mutex / BSD-3-Clause |
| [alabaster](http://www.sphinx-doc.org/en/stable/index.html) | 0.7.12 | Configurable, Python 2+3 compatible Sphinx theme. / BSD 3-Clause |
| [anaconda-client](https://anaconda.org) | 1.11.0 | anaconda.org command line client library / BSD-3-Clause |
| [anaconda-project](https://github.com/Anaconda-Platform/anaconda-project) | 0.11.1 | Tool for encapsulating, running, and reproducing data science projects / BSD-3-Clause |
| [anyio](https://github.com/agronholm/anyio) | 3.5.0 | High level compatibility layer for multiple asynchronous event loop implementations on Python / MIT |
| [appdirs](http://github.com/ActiveState/appdirs) | 1.4.4 | A small Python module for determining appropriate platform-specific dirs. / MIT |
| [argon2-cffi](https://argon2-cffi.readthedocs.org/) | 21.3.0 | The secure Argon2 password hashing algorithm. / MIT |
| [argon2-cffi-bindings](https://github.com/hynek/argon2-cffi-bindings) | 21.2.0 | Low-level Python CFFI Bindings for Argon2 / MIT |
| [astroid](https://github.com/PyCQA/astroid) | 2.11.7 | A abstract syntax tree for Python with inference support. / LGPL-2.1-or-later |
| [astropy](https://www.astropy.org/) | 5.1 | Community-developed Python Library for Astronomy / BSD-3-Clause |
| [asttokens](https://github.com/gristlabs/asttokens) | 2.0.5 | The asttokens module annotates Python abstract syntax trees (ASTs) with the positions of tokens and text in the source code that generated them. / Apache-2.0 |
| [attrs](https://attrs.readthedocs.io/en/stable/) | 21.4.0 | attrs is the Python package that will bring back the joy of writing classes by relieving you from the drudgery of implementing object protocols (aka dunder methods). / MIT |
| [automat](https://github.com/glyph/Automat) | 20.2.0 | self-service finite-state machines for the programmer on the go / MIT |
| [babel](http://babel.pocoo.org/) | 2.9.1 | Utilities to internationalize and localize Python applications / BSD 3-clause |
| [backcall](https://github.com/takluyver/backcall/) | 0.2.0 | Specifications for callback functions passed in to an API / BSD-3-Clause |
| [backports](https://github.com/brandon-rhodes/backports) | 1.1 | Namespace for backported Python features. / MIT |
| [backports.functools\_lru\_cache](https://github.com/jaraco/backports.functools_lru_cache) | 1.6.4 | Backport of functools.lru\_cache from Python 3.3 as published at ActiveState. / MIT |
| [backports.tempfile](https://github.com/pjdelport/backports.tempfile) | 1.0 | Backports of new features in Python’s tempfile module / PSF 2 |
| [backports.weakref](https://github.com/pjdelport/backports.weakref) | 1.0.post1 | Backport of new features in Python’s weakref module / Python-2.0 |
| [bcrypt](https://github.com/pyca/bcrypt/) | 3.2.0 | Modern password hashing for your software and your servers / Apache-2.0 |
| [beautifulsoup4](https://www.crummy.com/software/BeautifulSoup/) | 4.11.1 | Python library designed for screen-scraping / MIT |
| [bitarray](https://github.com/ilanschnell/bitarray) | 2.5.1 | efficient arrays of booleans – C extension / PSF-2.0 |
| [bkcharts](http://github.com/bokeh/bkcharts) | 0.2 | High level chart types built on top of Bokeh / BSD 3-Clause |
| [blas](http://www.netlib.org/lapack) | 1.0 | Linear Algebra PACKage / BSD-3-Clause |
| [bleach](https://github.com/mozilla/bleach) | 4.1.0 | Easy, whitelist-based HTML-sanitizing tool / Apache-2.0 |
| [blosc](https://github.com/Blosc/c-blosc) | 1.21.0 | A blocking, shuffling and loss-less compression library that can be faster than memcpy() / BSD-3-Clause |
| [bokeh](https://bokeh.org/) | 2.4.3 | Bokeh is an interactive visualization library for modern web browsers. / BSD-3-Clause |
| [boto3](https://aws.amazon.com/sdk-for-python) | 1.24.28 | Amazon Web Services SDK for Python / Apache-2.0 |
| [botocore](https://aws.amazon.com/sdk-for-python/) | 1.27.28 | Low-level, data-driven core of boto 3. / Apache-2.0 |
| [bottleneck](https://github.com/pydata/bottleneck) | 1.3.5 | Fast NumPy array functions written in Cython. / BSD-2-Clause |
| [brotli](https://github.com/google/brotli) | 1.0.9 | Brotli compression format / MIT |
| [brotli-bin](https://github.com/google/brotli) | 1.0.9 | Brotli compression format / MIT |
| [brotlipy](https://github.com/python-hyper/brotlipy) | 0.7.0 | Python bindings to the Brotli compression library / MIT |
| [brunsli](https://github.com/google/brunsli) | 0.1 | Practical JPEG Repacker / MIT |
| [bzip2](http://www.bzip.org/) | 1.0.8 | high-quality data compressor / bzip2 |
| [c-ares](https://c-ares.org/) | 1.18.1 | This is c-ares, an asynchronous resolver library / MIT |
| [ca-certificates](https://curl.se/docs/caextract.html) | 2022.07.19 | Certificates for use with other packages. / MPL-2.0 |
| [certifi](https://certifi.io/) | 2022.9.14 | Python package for providing Mozilla’s CA Bundle. / MPL-2.0 |
| [cffi](https://cffi.readthedocs.org/) | 1.15.1 | Foreign Function Interface for Python calling C code. / MIT |
| [cfitsio](http://heasarc.gsfc.nasa.gov/fitsio/fitsio.html) | 3.470 | A library for reading and writing FITS files / fitsio |
| [chardet](https://github.com/chardet/chardet) | 4.0.0 | Universal character encoding detector / LGPL2 |
| [charls](https://github.com/team-charls/charls) | 2.2.0 | CharLS is a C++ implementation of the JPEG-LS standard for lossless and near-lossless image compression and decompression. JPEG-LS is a low-complexity image compression standard that matches JPEG 2000 compression ratios. / BSD-3-Clause |
| [charset-normalizer](https://github.com/ousret/charset_normalizer) | 2.0.4 | The Real First Universal Charset Detector. Open, modern and actively maintained alternative to Chardet. / MIT |
| [click](https://palletsprojects.com/p/click) | 8.0.4 | Python composable command line interface toolkit / BSD-3-Clause |
| [cloudpickle](https://github.com/cloudpipe/cloudpickle) | 2.0.0 | Extended pickling support for Python objects / BSD-3-Clause |
| [clyent](https://github.com/Anaconda-Platform/clyent) | 1.2.2 | Command line client library for windows and posix / BSD 3-Clause |
| [colorama](https://github.com/tartley/colorama) | 0.4.5 | Cross-platform colored terminal text / BSD-3-Clause |
| [colorcet](https://colorcet.holoviz.org/index.html) | 3.0.0 | Collection of perceptually uniform colormaps / CC-BY-4.0 |
| [conda](https://conda.io) | 22.9.0 | OS-agnostic, system-level binary package and environment manager. / BSD-3-Clause |
| [conda-build](https://github.com/conda/conda-build) | 3.22.0 | tools for building conda packages / BSD-3-Clause |
| [conda-content-trust](https://github.com/conda/conda-content-trust) | 0.1.3 | Signing and verification tools for conda / BSD-3-Clause |
| [conda-env](https://github.com/conda/conda-env) | 2.6.0 | Tools for interacting with conda environments. / BSD 3-Clause |
| [conda-token](https://github.com/Anaconda/conda-token) | 0.4.0 | Set repository access token / BSD-3-Clause |
| [conda-verify](https://github.com/conda/conda-verify) | 3.4.2 | tool for validating conda recipes and conda packages / BSD 3-Clause |
| [constantly](https://github.com/twisted/constantly) | 15.1.0 | Symbolic constants in Python / MIT |
| [cryptography](https://github.com/pyca/cryptography) | 37.0.1 | Provides cryptographic recipes and primitives to Python developers / (BSD-3-Clause OR Apache-2.0) AND PSF-2.0 AND MIT |
| [cssselect](https://pythonhosted.org/cssselect/) | 1.1.0 | CSS Selectors for Python / BSD 3-Clause |
| [curl](https://curl.se/) | 7.84.0 | tool and library for transferring data with URL syntax / curl |
| [cycler](http://matplotlib.org/cycler) | 0.11.0 | Composable style cycles. / BSD-3-Clause |
| [cython](https://cython.org/) | 0.29.32 | The Cython compiler for writing C extensions for the Python language / Apache-2.0 |
| [cytoolz](https://github.com/pytoolz/cytoolz) | 0.11.0 | Cython implementation of Toolz. High performance functional utilities / BSD-3-Clause |
| [dask](https://dask.org/) | 2022.7.0 | Parallel PyData with Task Scheduling / BSD-3-Clause |
| [dask-core](https://github.com/dask/dask/) | 2022.7.0 | Parallel Python with task scheduling / BSD-3-Clause |
| [dataclasses](https://github.com/ericvsmith/dataclasses) | 0.8 | An implementation of PEP 557: Data Classes / Apache-2.0 |
| [datashader](https://datashader.org) | 0.14.1 | Data visualization toolchain based on aggregating into a grid / BSD-3-Clause |
| [datashape](http://datashape.pydata.org) | 0.5.4 | A data description language. / BSD 2-Clause |
| [debugpy](https://github.com/Microsoft/debugpy) | 1.5.1 | An implementation of the Debug Adapter Protocol for Python / MIT |
| [decorator](https://github.com/micheles/decorator) | 5.1.1 | Better living through Python with decorators. / BSD-2-Clause |
| [defusedxml](https://bitbucket.org/tiran/defusedxml) | 0.7.1 | XML bomb protection for Python stdlib modules / PSF 2.0 |
| [dill](http://www.cacr.caltech.edu/~mmckerns/dill.htm) | 0.3.4 | Serialize all of python (almost) / BSD-3-Clause |
| [distributed](https://distributed.readthedocs.io/en/latest/) | 2022.7.0 | Distributed computing with Dask / BSD-3-Clause |
| [docutils](http://docutils.sourceforge.net/) | 0.18.1 | Docutils – Python Documentation Utilities / LicenseRef-Public-Domain-Dedictation and BSD-2-Clause and LicenseRef-PSF-2.1.1 and GPL-3.0-or-later |
| [entrypoints](https://github.com/takluyver/entrypoints) | 0.4 | Discover and load entry points from installed packages. / MIT License |
| [et\_xmlfile](https://foss.heptapod.net/openpyxl/et_xmlfile) | 1.1.0 | An implementation of lxml.xmlfile for the standard library / MIT AND PSF-2.0 |
| [executing](https://pypi.org/project/executing) | 0.8.3 | Get the currently executing AST node of a frame, and other information / MIT |
| [expat](https://libexpat.github.io) | 2.4.9 | Expat XML parser library in C / MIT |
| [fftw](http://fftw.org) | 3.3.9 | The fastest Fourier transform in the west. / GPL 2 |
| [filelock](https://github.com/tox-dev/py-filelock) | 3.6.0 | A platform independent file lock. / Unlicense |
| [flask](https://palletsprojects.com/p/flask) | 1.1.2 | A simple framework for building complex web applications. / BSD-3-Clause |
| [fontconfig](http://www.freedesktop.org/wiki/Software/fontconfig/) | 2.13.1 | A library for configuring and customizing font access. / MIT |
| [fonttools](https://github.com/fonttools/fonttools) | 4.25.0 | fontTools is a library for manipulating fonts, written in Python. / MIT |
| [freetype](https://freetype.org/) | 2.11.0 | A Free, High-Quality, and Portable Font Engine / GPL-2-only and LicenseRef-FreeType |
| [fsspec](https://github.com/fsspec/filesystem_spec) | 2022.7.1 | A specification for pythonic filesystems / BSD-3-Clause |
| [future](http://python-future.org) | 0.18.2 | Clean single-source support for Python 3 and 2 / MIT |
| [gensim](https://github.com/RaRe-Technologies/gensim) | 4.1.2 | Topic Modelling for Humans / LGPL-2.1-only |
| [giflib](http://giflib.sourceforge.net) | 5.2.1 | Library for reading and writing gif images / MIT |
| [glob2](https://github.com/miracle2k/python-glob2) | 0.7 | Version of the glob module that supports recursion via \*\*, and can capture patterns. / BSD-2-Clause |
| [gmp](http://gmplib.org/) | 6.2.1 | The GNU multiprecision library. / GPL-2.0-or-later AND LGPL-3.0-or-later |
| [gmpy2](https://pypi.python.org/pypi/gmpy2) | 2.1.2 | GMP/MPIR, MPFR, and MPC interface to Python 2.6+ and 3.x / LGPL-3.0-or-later |
| [greenlet](https://github.com/python-greenlet/greenlet) | 1.1.1 | Lightweight in-process concurrent programming / MIT |
| [h5py](https://www.h5py.org/) | 3.7.0 | Read and write HDF5 files from Python / BSD-3-Clause |
| [hdf5](http://www.hdfgroup.org/HDF5/) | 1.10.6 | HDF5 is a data model, library, and file format for storing and managing data / HDF5 |
| [heapdict](http://stutzbachenterprises.com/) | 1.0.1 | A heap with decrease-key and increase-key operations / BSD 3-Clause |
| [holoviews](https://holoviews.org) | 1.15.0 | Stop plotting your data - annotate your data and let it visualize itself. / BSD-3-Clause |
| [hvplot](https://hvplot.holoviz.org) | 0.8.0 | A high-level plotting API for the PyData ecosystem built on HoloViews / BSD-3-Clause |
| [hyperlink](https://github.com/python-hyper/hyperlink) | 21.0.0 | Immutable, Pythonic, correct URLs. / MIT |
| [icu](http://site.icu-project.org/) | 58.2 | International Components for Unicode. / MIT |
| [idna](https://github.com/kjd/idna) | 3.3 | Internationalized Domain Names in Applications (IDNA). / BSD-3-Clause |
| [imagecodecs](https://www.lfd.uci.edu/~gohlke/) | 2021.8.26 | Image transformation, compression, and decompression codecs / BSD-3-Clause |
| [imageio](https://imageio.github.io) | 2.19.3 | A Python library for reading and writing image data / BSD-2-Clause |
| [imagesize](https://github.com/shibukawa/imagesize_py) | 1.4.1 | Getting image size from png/jpeg/jpeg2000/gif file / MIT |
| [importlib-metadata](https://github.com/python/importlib_metadata) | 4.11.3 | A library to access the metadata for a Python package. / Apache-2.0 |
| [incremental](https://github.com/hawkowl/incremental) | 21.3.0 | Incremental is a small library that versions your Python projects. / MIT |
| [iniconfig](http://github.com/RonnyPfannschmidt/iniconfig) | 1.1.1 | iniconfig: brain-dead simple config-ini parsing / MIT |
| [intake](https://github.com/ContinuumIO/intake) | 0.6.5 | Data load and catalog system / BSD-2-Clause |
| [ipykernel](https://ipython.org) | 6.15.2 | IPython Kernel for Jupyter / BSD-3-Clause |
| [ipython](https://ipython.org) | 8.4.0 | IPython: Productive Interactive Computing / BSD-3-Clause |
| [ipython\_genutils](http://ipython.org) | 0.2.0 | vestigial utilities from IPython / BSD 3-Clause |
| [ipywidgets](https://github.com/ipython/ipywidgets) | 7.6.5 | Jupyter Interactive Widgets / BSD-3-Clause |
| [isort](https://github.com/timothycrosley/isort) | 5.9.3 | A Python utility / library to sort Python imports. / MIT |
| [itemadapter](https://github.com/scrapy/itemadapter) | 0.3.0 | Common interface for different data containers / BSD-3-Clause |
| [itemloaders](https://github.com/scrapy/itemadapter) | 1.0.4 | Collect data from HTML and XML sources / BSD-3-Clause |
| [itsdangerous](https://github.com/pallets/itsdangerous) | 2.0.1 | Various helpers to pass trusted data to untrusted environments. / BSD-3-Clause |
| [jdcal](https://github.com/phn/jdcal) | 1.4.1 | Julian dates from proleptic Gregorian and Julian calendars. / BSD 2-Clause |
| [jedi](https://github.com/davidhalter/jedi/) | 0.18.1 | An autocompletion tool for Python that can be used for text editors. / MIT |
| [jinja2](https://palletsprojects.com/p/jinja/) | 2.11.3 | A very fast and expressive template engine. / BSD-3-Clause |
| [jmespath](http://jmespath.org/) | 0.10.0 | Query language for JSON / MIT |
| [joblib](https://joblib.readthedocs.io/en/latest/) | 1.1.0 | Lightweight pipelining: using Python functions as pipeline jobs. / BSD-3-Clause |
| [jpeg](https://www.ijg.org/) | 9e | read/write jpeg COM, EXIF, IPTC medata / IJG |
| [jq](http://stedolan.github.io/jq/) | 1.6 | A command-line JSON processor. / MIT |
| [json5](https://github.com/dpranke/pyjson5) | 0.9.6 | A Python implementation of the JSON5 data format / Apache-2.0 |
| [jsonschema](https://github.com/python-jsonschema/jsonschema) | 4.16.0 | An implementation of JSON Schema validation for Python / MIT |
| [jupyter](http://jupyter.org) | 1.0.0 | Jupyter metapackage. Install all the Jupyter components in one go. / BSD 3-Clause |
| [jupyter\_client](https://jupyter.org) | 7.3.4 | jupyter\_client contains the reference implementation of the Jupyter protocol. / BSD-3-Clause |
| [jupyter\_console](https://jupyter.org) | 6.4.3 | Jupyter terminal console / BSD-3-Clause |
| [jupyter\_core](https://jupyter.org) | 4.11.1 | Core common functionality of Jupyter projects. / BSD-3-Clause |
| [jupyter\_server](https://jupyter.org) | 1.18.1 | Jupyter Server / BSD-3-Clause |
| [jupyterlab](https://github.com/jupyterlab/jupyterlab) | 3.4.4 | JupyterLab PRE-ALPHA / BSD-3-Clause |
| [jupyterlab\_pygments](http://github.com/JupyterLab/jupyterlab_pygments) | 0.1.2 | Pygments syntax coloring scheme making use of the JupyterLab CSS variables / BSD-3-Clause |
| [jupyterlab\_server](https://github.com/jupyterlab/jupyterlab_server) | 2.10.3 | A set of server components for JupyterLab and JupyterLab like applications. / BSD-3-Clause |
| [jupyterlab\_widgets](https://github.com/jupyter-widgets/ipywidgets) | 1.0.0 | JupyterLab extension providing HTML widgets / BSD-3-Clause |
| [jxrlib](https://packages.debian.org/source/sid/jxrlib) | 1.1 | jxrlib - JPEG XR Library by Microsoft, built from Debian hosted sources. / BSD-2-Clause |
| [kiwisolver](https://github.com/nucleic/kiwi) | 1.4.2 | An efficient C++ implementation of the Cassowary constraint solver / BSD-3-Clause |
| [krb5](http://web.mit.edu/kerberos/) | 1.19.2 | A network authentication protocol. / MIT |
| [lazy-object-proxy](https://github.com/ionelmc/python-lazy-object-proxy) | 1.6.0 | A fast and thorough lazy object proxy / BSD-2-Clause |
| [lcms2](http://www.littlecms.com/) | 2.12 | Open Source Color Management Engine / MIT |
| [ld\_impl\_linux-ppc64le](https://www.gnu.org/software/binutils/) | 2.38 | A set of programming tools for creating and managing binary programs, object files, libraries, profile data, and assembly source code. / GPL-3.0-only |
| [lerc](https://github.com/Esri/lerc) | 3.0 | LERC - Limited Error Raster Compression / Apache-2.0 |
| [libaec](https://gitlab.dkrz.de/k202009/libaec) | 1.0.4 | Adaptive Entropy Coding library / BSD-2-Clause |
| [libarchive](https://libarchive.org/) | 3.4.2 | Multi-format archive and compression library / BSD-2-Clause |
| [libbrotlicommon](https://github.com/google/brotli) | 1.0.9 | Brotli compression format / MIT |
| [libbrotlidec](https://github.com/google/brotli) | 1.0.9 | Brotli compression format / MIT |
| [libbrotlienc](https://github.com/google/brotli) | 1.0.9 | Brotli compression format / MIT |
| [libcurl](https://curl.se/) | 7.84.0 | tool and library for transferring data with URL syntax / curl |
| [libdeflate](https://github.com/ebiggers/libdeflate) | 1.8 | libdeflate is a library for fast, whole-buffer DEFLATE-based compression and decompression. / MIT |
| [libedit](http://thrysoee.dk/editline/) | 3.1.20210910 | Editline Library (libedit) / BSD-2-Clause |
| [libev](http://software.schmorp.de/pkg/libev.html) | 4.33 | A full-featured and high-performance event loop that is loosely modeled after libevent, but without its limitations and bugs. / BSD-2-Clause |
| [libffi](https://sourceware.org/libffi/) | 3.3 | A Portable Foreign Function Interface Library. / MIT |
| [libgcc-ng](https://gcc.gnu.org/onlinedocs/gccint/Libgcc.html) | 11.2.0 | The GCC low-level runtime library / GPL-3.0-only WITH GCC-exception-3.1 |
| [libgfortran-ng](https://gcc.gnu.org/) | 11.2.0 | The GNU Fortran Runtime Library / GPL-3.0-only WITH GCC-exception-3.1 |
| [libgfortran5](https://gcc.gnu.org/) | 11.2.0 | Fortran compiler and libraries from the GNU Compiler Collection / GPL-3.0-only WITH GCC-exception-3.1 |
| [libgomp](https://gcc.gnu.org/onlinedocs/gccint/Libgcc.html) | 11.2.0 | The GCC OpenMP implementation. / GPL-3.0-only WITH GCC-exception-3.1 |
| [libidn2](https://www.gnu.org/software/libidn/#libidn2) | 2.3.2 | Library for internationalized domain names (IDNA2008) support / LGPLv2 AND LGPL-3.0-or-later AND GPL-3.0-or-later |
| [liblief](https://lief.quarkslab.com/) | 0.11.5 | A cross platform library to parse, modify and abstract ELF, PE and MachO formats. / Apache-2.0 |
| [libllvm11](https://llvm.org/) | 11.1.0 | Development headers and libraries for LLVM / Apache-2.0 WITH LLVM-exception |
| [libnghttp2](http://github.com/nghttp2/nghttp2) | 1.46.0 | This is an implementation of Hypertext Transfer Protocol version 2. / MIT |
| [libopenblas](https://www.openblas.net/) | 0.3.21 | An Optimized BLAS library / BSD-3-Clause |
| [libpng](http://www.libpng.org/pub/png/libpng.html) | 1.6.37 | PNG reference library / zlib/libpng |
| [libsodium](http://libsodium.org) | 1.0.18 | A modern and easy-to-use crypto library. / ISC |
| [libssh2](https://www.libssh2.org/) | 1.10.0 | the SSH library / BSD-3-Clause |
| [libstdcxx-ng](https://gcc.gnu.org/) | 11.2.0 | The GNU C++ Runtime Library / GPL-3.0-only WITH GCC-exception-3.1 |
| [libtiff](http://www.simplesystems.org/libtiff/) | 4.2.0 | Support for the Tag Image File Format (TIFF). / HPND |
| [libunistring](https://www.gnu.org/software/libunistring) | 0.9.10 | This library provides functions for manipulating Unicode strings and for manipulating C strings according to the Unicode standard. / LGPL |
| [libuuid](http://sourceforge.net/projects/libuuid/) | 1.0.3 | Portable uuid C library. / BSD 3-Clause |
| [libwebp](https://developers.google.com/speed/webp/) | 1.2.2 | WebP image library / BSD-3-Clause |
| [libwebp-base](https://developers.google.com/speed/webp) | 1.2.2 | WebP image library / BSD-3-Clause |
| [libxml2](https://gitlab.gnome.org/GNOME/libxml2/) | 2.9.14 | The XML C parser and toolkit of Gnome / MIT |
| [libxslt](https://gitlab.gnome.org/GNOME/libxslt) | 1.1.35 | The XSLT C library developed for the GNOME project / MIT |
| [libzopfli](https://github.com/google/zopfli) | 1.0.3 | A compression library programmed in C to perform very good, but slow, deflate or zlib compression. / Apache-2.0 |
| [llvmlite](https://llvmlite.pydata.org) | 0.38.0 | A lightweight LLVM python binding for writing JIT compilers. / BSD-2-Clause |
| [locket](https://github.com/mwilliamson/locket.py) | 1.0.0 | File-based locks for Python for Linux and Windows / BSD-2-Clause |
| [lxml](https://lxml.de/) | 4.9.1 | Pythonic binding for the C libraries libxml2 and libxslt. / BSD-3-Clause and GPL-2.0-only and ZPL-2.0 and LicenseRef-ElementTree |
| [lz4](https://github.com/python-lz4/python-lz4) | 3.1.3 | LZ4 Bindings for Python / BSD-3-Clause |
| [lz4-c](https://www.lz4.org) | 1.9.3 | Extremely Fast Compression algorithm / BSD-2-Clause |
| [lzo](http://www.oberhumer.com/opensource/lzo/) | 2.10 | LZO is a portable lossless data compression library written in ANSI C. / GPL v2+ |
| [markdown](https://pythonhosted.org/Markdown/) | 3.3.4 | Python implementation of Markdown. / BSD-3-Clause |
| [markupsafe](https://www.palletsprojects.com/p/markupsafe) | 2.0.1 | Safely add untrusted strings to HTML/XML markup. / BSD-3-Clause |
| [matplotlib](https://matplotlib.org/) | 3.5.2 | Publication quality figures in Python / LicenseRef-PSF-based |
| [matplotlib-base](https://matplotlib.org/) | 3.5.2 | Publication quality figures in Python / LicenseRef-PSF-based |
| [matplotlib-inline](https://github.com/ipython/matplotlib-inline) | 0.1.6 | Inline Matplotlib backend for Jupyter / BSD-3-Clause |
| [mccabe](https://github.com/PyCQA/mccabe) | 0.7.0 | McCabe complexity checker for Python / MIT |
| [mistune](https://github.com/lepture/mistune) | 0.8.4 | A sane Markdown parser with useful plugins and renderers. / BSD-3-Clause |
| [mock](https://github.com/testing-cabal/mock) | 4.0.3 | A library for testing in Python / BSD-2-Clause |
| [mpc](http://www.multiprecision.org/) | 1.1.0 | A C library for the arithmetic of complex numbers with arbitrarily high precision. / LGPL-3-or-later |
| [mpfr](http://www.mpfr.org/) | 4.0.2 | The MPFR library is a C library for multiple-precision floating-point computations with correct rounding. / LGPL-3.0-only |
| [mpmath](http://mpmath.org) | 1.2.1 | Python library for arbitrary-precision floating-point arithmetic / BSD 3-Clause |
| [msgpack-python](https://msgpack.org/) | 1.0.3 | MessagePack (de)serializer / Apache-2.0 |
| [multipledispatch](https://github.com/mrocklin/multipledispatch/) | 0.6.0 | Multiple dispatch in Python / BSD 3-Clause |
| [munkres](https://github.com/bmc/munkres) | 1.1.4 | The Munkres module provides an O(n^3) implementation of the Munkres algorithm (also called the Hungarian algorithm or the Kuhn-Munkres algorithm). / Apache-2.0 |
| [nbclassic](http://github.com/jupyterlab/nbclassic) | 0.3.5 | Jupyter Notebook as a Jupyter Server Extension. / BSD-3-Clause |
| [nbclient](https://jupyter.org) | 0.5.13 | A client library for executing notebooks. Formally nbconvert’s ExecutePreprocessor. / BSD-3-Clause |
| [nbconvert](https://jupyter.org) | 6.4.4 | Converting Jupyter Notebooks / BSD-3-Clause |
| [nbformat](https://jupyter.org) | 5.5.0 | The Jupyter Notebook format / BSD-3-Clause |
| [ncurses](http://www.gnu.org/software/ncurses/) | 6.3 | Library for text-based user interfaces / Free software (MIT-like) |
| [nest-asyncio](https://github.com/erdewit/nest_asyncio) | 1.5.5 | Patch asyncio to allow nested event loops / BSD-2-Clause |
| [networkx](https://networkx.github.io/) | 2.8.4 | Python package for creating and manipulating complex networks / BSD-3-Clause |
| [nltk](https://nltk.org/) | 3.7 | Natural Language Toolkit / Apache-2.0 |
| nomkl | 3.0 | / BSD |
| [nose](http://readthedocs.org/docs/nose/) | 1.3.7 | Nose extends unittest to make testing easier / LGPL-2.1 |
| [notebook](https://jupyter.org) | 6.4.12 | Jupyter Notebook / BSD-3-Clause |
| [numba](https://numba.pydata.org) | 0.55.1 | NumPy aware dynamic Python compiler using LLVM / BSD-2-Clause |
| [numexpr](https://github.com/pydata/numexpr) | 2.8.3 | Fast numerical expression evaluator for NumPy. / MIT |
| [numpy](https://numpy.org/) | 1.21.5 | Array processing for numbers, strings, records, and objects. / BSD-3-Clause |
| [numpy-base](https://numpy.org/) | 1.21.5 | Array processing for numbers, strings, records, and objects. / BSD-3-Clause |
| [numpydoc](https://github.com/numpy/numpydoc) | 1.4.0 | Numpy’s Sphinx extensions / BSD-3-Clause |
| [olefile](http://www.decalage.info/python/olefileio) | 0.46 | parse, read and write Microsoft OLE2 files / BSD 2-Clause |
| [oniguruma](https://github.com/kkos/oniguruma) | 6.9.7.1 | A regular expression library. / BSD-2-Clause |
| [openblas](https://www.openblas.net/) | 0.3.21 | An optimized BLAS library / BSD-3-Clause |
| [openblas-devel](https://www.openblas.net/) | 0.3.21 | OpenBLAS headers and libraries for developing software that used OpenBLAS. / BSD-3-Clause |
| [openjpeg](http://www.openjpeg.org/) | 2.4.0 | An open-source JPEG 2000 codec written in C / BSD 2-Clause |
| [openpyxl](https://openpyxl.readthedocs.io) | 3.0.10 | A Python library to read/write Excel 2010 xlsx/xlsm files / MIT |
| [openssl](https://www.openssl.org/) | 1.1.1q | OpenSSL is an open-source implementation of the SSL and TLS protocols / OpenSSL |
| [packaging](https://github.com/pypa/packaging) | 21.3 | Core utilities for Python packages / Apache-2.0 or BSD-2-Clause |
| [pandas](https://pandas.pydata.org) | 1.4.4 | High-performance, easy-to-use data structures and data analysis tools. / BSD-3-Clause |
| [pandocfilters](https://github.com/jgm/pandocfilters) | 1.5.0 | A python module for writing pandoc filters / BSD-3-Clause |
| [panel](https://panel.holoviz.org) | 0.13.1 | A high-level app and dashboarding solution for Python / BSD-3-Clause |
| [param](http://ioam.github.io/param/) | 1.12.0 | Param: Make your Python code clearer and more reliable by declaring Parameters / BSD-3-Clause |
| [parsel](https://github.com/scrapy/parsel) | 1.6.0 | library to extract data from HTML and XML using XPath and CSS selectors / BSD-3-Clause |
| [parso](https://github.com/davidhalter/parso) | 0.8.3 | A Python Parser / MIT |
| [partd](https://github.com/dask/partd) | 1.2.0 | Data structure for on-disk shuffle operations / BSD 3-Clause |
| [patch](http://savannah.gnu.org/projects/patch/) | 2.7.6 | Native Win32 versions of common unix tools / GPL 3 |
| [patchelf](http://nixos.org/patchelf.html) | 0.13 | A small utility to modify the dynamic linker and RPATH of ELF executables. / GPL-3.0-or-later |
| [patsy](https://github.com/pydata/patsy) | 0.5.2 | Describing statistical models in Python using symbolic formulas / BSD-2-Clause AND PSF-2.0 |
| [pcre](http://www.pcre.org/) | 8.45 | Regular expression pattern matching using the same syntax and semantics as Perl 5. / BSD 3-Clause |
| [pep8](http://pep8.readthedocs.org/) | 1.7.1 | Python style guide checker / MIT |
| [pexpect](http://pexpect.sourceforge.net/) | 4.8.0 | Pexpect makes Python a better tool for controlling other applications. / ISC |
| [pickleshare](https://github.com/pickleshare/pickleshare/) | 0.7.5 | Tiny ‘shelve’-like database with concurrency support / MIT |
| [pillow](https://pillow.readthedocs.io) | 9.2.0 | Pillow is the friendly PIL fork by Alex Clark and Contributors / LicenseRef-PIL |
| [pip](https://pip.pypa.io/en/stable/) | 22.2.2 | PyPA recommended tool for installing Python packages / MIT |
| [pkginfo](https://code.launchpad.net/~tseaver/pkginfo/trunk) | 1.8.2 | Query metadatdata from sdists / bdists / installed packages. / MIT |
| [platformdirs](https://github.com/platformdirs/platformdirs) | 2.5.2 | A small Python module for determining appropriate platform-specific dirs, e.g. a “user data dir”. / MIT |
| [plotly](https://plot.ly/python/) | 5.9.0 | An interactive JavaScript-based visualization library for Python / MIT |
| [pluggy](https://github.com/pytest-dev/pluggy) | 1.0.0 | Plugin registration and hook calling for Python / MIT |
| [prometheus\_client](https://github.com/prometheus/client_python) | 0.14.1 | Python client for the Prometheus monitoring system / Apache-2.0 |
| [prompt-toolkit](https://github.com/jonathanslenders/python-prompt-toolkit) | 3.0.20 | Library for building powerful interactive command lines in Python / BSD-3-Clause |
| [prompt\_toolkit](https://github.com/jonathanslenders/python-prompt-toolkit) | 3.0.20 | Library for building powerful interactive command lines in Python / BSD-3-Clause |
| [protego](https://github.com/scrapy/protego) | 0.1.16 | A pure-Python robots.txt parser with support for modern conventions / BSD 3-Clauses |
| [psutil](https://github.com/giampaolo/psutil) | 5.9.0 | A cross-platform process and system utilities module for Python / BSD-3-Clause |
| [ptyprocess](https://github.com/pexpect/ptyprocess) | 0.7.0 | Run a subprocess in a pseudo terminal / ISC |
| [pure\_eval](https://github.com/alexmojaki/pure_eval) | 0.2.2 | Safely evaluate AST nodes without side effects / MIT |
| [py](https://github.com/pytest-dev/py) | 1.11.0 | library with cross-python path, ini-parsing, io, code, log facilities / MIT |
| [py-lief](https://lief.quarkslab.com/) | 0.11.5 | A cross platform library to parse, modify and abstract ELF, PE and MachO formats. / Apache-2.0 |
| [pyasn1](https://github.com/etingof/pyasn1) | 0.4.8 | ASN.1 types and codecs / BSD 2-Clause |
| [pyasn1-modules](http://pyasn1.sourceforge.net/) | 0.2.8 | A collection of ASN.1-based protocols modules. / BSD 2-Clause |
| [pycodestyle](https://pycodestyle.readthedocs.io/) | 2.8.0 | Python style guide checker / MIT |
| [pycosat](https://github.com/ContinuumIO/pycosat) | 0.6.3 | Bindings to picosat (a SAT solver) / MIT |
| [pycparser](https://github.com/eliben/pycparser) | 2.21 | Complete C99 parser in pure Python / BSD-3-clause |
| [pyct](http://github.com/pyviz/pyct) | 0.4.8 | python package common tasks for users (e.g. copy examples, fetch data, …) / BSD 3-Clause |
| [pycurl](http://pycurl.sourceforge.net/) | 7.45.1 | A Python Interface To The cURL library / LGPL-2.1-only, MIT |
| [pydispatcher](http://pydispatcher.sourceforge.net) | 2.0.5 | Multi-producer-multi-consumer signal dispatching mechanism / BSD 3-Clause |
| [pyerfa](https://pyerfa.readthedocs.io/) | 2.0.0 | Python bindings for ERFA routines / BSD-3-Clause |
| [pyflakes](https://github.com/PyCQA/pyflakes) | 2.4.0 | Pyflakes analyzes programs and detects various errors. / MIT |
| [pygments](https://pygments.org/) | 2.11.2 | Pygments is a generic syntax highlighter suitable for use in code hosting, forums, wikis or other applications that need to prettify source code. / BSD-2-Clause |
| [pyhamcrest](https://github.com/hamcrest/PyHamcrest) | 2.0.2 | Hamcrest framework for matcher objects / BSD 3-Clause |
| [pylint](https://www.pylint.org) | 2.14.5 | python code static checker / GPL-2.0-or-later |
| [pyodbc](https://github.com/mkleehammer/pyodbc) | 4.0.34 | DB API Module for ODBC / MIT-0 |
| [pyopenssl](https://github.com/pyca/pyopenssl) | 22.0.0 | Python wrapper module around the OpenSSL library / Apache-2.0 |
| [pyparsing](https://github.com/pyparsing/pyparsing/) | 3.0.9 | Create and execute simple grammars / MIT |
| [pyrsistent](http://github.com/tobgu/pyrsistent/) | 0.18.0 | Persistent/Functional/Immutable data structures / MIT |
| [pysocks](https://github.com/Anorov/PySocks) | 1.7.1 | A Python SOCKS client module. See [Anorov/PySocks](https://github.com/Anorov/PySocks) for more information. / BSD 3-Clause |
| [pytables](https://www.pytables.org) | 3.6.1 | Brings together Python, HDF5 and NumPy to easily handle large amounts of data. / BSD-3-Clause |
| [pytest](https://docs.pytest.org/en/latest/) | 7.1.2 | Simple and powerful testing with Python. / MIT |
| [python](https://www.python.org/) | 3.9.13 | General purpose programming language / PSF-2.0 |
| [python-dateutil](https://dateutil.readthedocs.org/) | 2.8.2 | Extensions to the standard Python datetime module. / BSD-3-Clause and Apache |
| [python-fastjsonschema](https://github.com/horejsek/python-fastjsonschema) | 2.16.2 | Fastest Python implementation of JSON schema / BSD-3-Clause |
| [python-libarchive-c](https://github.com/Changaco/python-libarchive-c) | 2.9 | Python interface to libarchive / CC0-1.0 |
| [python-snappy](https://github.com/andrix/python-snappy) | 0.6.0 | Python library for the snappy compression library from Google / BSD-3-Clause |
| [pytz](http://pythonhosted.org/pytz/) | 2022.1 | World timezone definitions, modern and historical. / MIT |
| [pyviz\_comms](https://www.holoviz.org) | 2.0.2 | Bidirectional communication for PyViz / BSD-3-Clause |
| [pywavelets](https://github.com/PyWavelets/pywt) | 1.3.0 | Discrete Wavelet Transforms in Python / MIT |
| [pyyaml](http://pyyaml.org/wiki/PyYAML) | 6.0 | YAML parser and emitter for Python / MIT |
| [pyzmq](https://github.com/zeromq/pyzmq) | 23.2.0 | Python bindings for zeromq / BSD-3-Clause AND LGPL-3.0-or-later |
| [queuelib](https://github.com/scrapy/queuelib) | 1.5.0 | Collection of persistent (disk-based) queues / BSD |
| [readline](https://tiswww.case.edu/php/chet/readline/rltop.html) | 8.1.2 | library for editing command lines as they are typed in / GPL-3.0-only |
| [regex](https://github.com/mrabarnett/mrab-regex) | 2022.7.9 | Alternative regular expression module, to replace re / Apache-2.0 |
| [requests](https://requests.readthedocs.io/en/latest/) | 2.28.1 | Requests is an elegant and simple HTTP library for Python, built with ♥. / Apache-2.0 |
| [requests-file](http://github.com/dashea/requests-file) | 1.5.1 | file transport adapter for Requests / Apache |
| [ruamel\_yaml](https://sourceforge.net/p/ruamel-yaml/code/ci/default/tree) | 0.15.100 | A patched copy of ruamel.yaml. / MIT |
| [s3transfer](https://github.com/boto/s3transfer) | 0.6.0 | An Amazon S3 Transfer Manager / Apache-2.0 |
| [scikit-image](https://scikit-image.org/) | 0.19.2 | Image processing in Python. / BSD-3-Clause |
| [scikit-learn](https://scikit-learn.org/) | 1.1.1 | A set of python modules for machine learning and data mining / BSD-3-Clause |
| [scipy](https://scipy.org/) | 1.9.1 | Scientific Library for Python / BSD-3-Clause |
| [scrapy](https://scrapy.org/) | 2.6.2 | A high-level Python Screen Scraping framework / BSD-3-Clause |
| [seaborn](https://seaborn.pydata.org) | 0.11.2 | Statistical data visualization / BSD-3-Clause |
| [send2trash](https://github.com/arsenetar/send2trash) | 1.8.0 | Python library to natively send files to Trash (or Recycle bin) on all platforms. / BSD-3-Clause |
| [service\_identity](https://github.com/pyca/service_identity) | 18.1.0 | Service identity verification for pyOpenSSL. / MIT |
| [setuptools](https://github.com/pypa/setuptools) | 63.4.1 | Download, build, install, upgrade, and uninstall Python packages / MIT |
| [six](https://six.readthedocs.io/) | 1.16.0 | Python 2 and 3 compatibility utilities / MIT |
| [smart\_open](https://github.com/RaRe-Technologies/smart_open) | 5.2.1 | Python library for efficient streaming of large files / MIT |
| [snappy](https://github.com/google/snappy) | 1.1.9 | A fast compressor/decompressor / BSD-3-clause AND CC-BY-3.0 AND MIT AND CC-BY AND Public Domain |
| [sniffio](https://github.com/python-trio/sniffio) | 1.2.0 | Sniff out which async library your code is running under / Apache-2.0 |
| [snowballstemmer](https://github.com/snowballstem/snowball) | 2.2.0 | Snowball stemming library collection for Python / BSD-3-Clause |
| [sortedcollections](http://www.grantjenks.com/docs/sortedcollections/) | 2.1.0 | Python Sorted Collections / Apache-2.0 |
| [sortedcontainers](http://www.grantjenks.com/docs/sortedcontainers/) | 2.4.0 | Python Sorted Container Types: SortedList, SortedDict, and SortedSet / Apache-2.0 |
| [soupsieve](https://facelessuser.github.io/soupsieve) | 2.3.1 | A modern CSS selector implementation for BeautifulSoup / MIT |
| [sphinx](https://www.sphinx-doc.org) | 5.0.2 | Sphinx is a tool that makes it easy to create intelligent and beautiful documentation / BSD-2-Clause |
| [sphinxcontrib-applehelp](https://www.sphinx-doc.org/en/master/) | 1.0.2 | sphinxcontrib-applehelp is a sphinx extension which outputs Apple help books / BSD-2-Clause |
| [sphinxcontrib-devhelp](https://www.sphinx-doc.org/en/master/) | 1.0.2 | sphinxcontrib-devhelp is a sphinx extension which outputs Devhelp document / BSD-2-Clause |
| [sphinxcontrib-htmlhelp](https://www.sphinx-doc.org/en/master/) | 2.0.0 | sphinxcontrib-htmlhelp is a sphinx extension which renders HTML help files. / BSD-2-Clause |
| [sphinxcontrib-jsmath](https://www.sphinx-doc.org/en/master/) | 1.0.1 | A sphinx extension which renders display math in HTML via JavaScript / BSD-2-Clause |
| [sphinxcontrib-qthelp](https://www.sphinx-doc.org/en/master/) | 1.0.3 | sphinxcontrib-qthelp is a sphinx extension which outputs QtHelp document / BSD-2-Clause |
| [sphinxcontrib-serializinghtml](https://www.sphinx-doc.org/en/master/) | 1.1.5 | sphinxcontrib-serializinghtml is a sphinx extension which outputs “serialized” HTML files (json and pickle). / BSD-2-Clause |
| [sqlalchemy](https://www.sqlalchemy.org/) | 1.4.39 | Database Abstraction Library. / MIT |
| [sqlite](https://www.sqlite.org/) | 3.39.3 | Implements a self-contained, zero-configuration, SQL database engine / blessing |
| [stack\_data](https://github.com/alexmojaki/stack_data) | 0.2.0 | Extract data from python stack frames and tracebacks for informative displays / MIT |
| [statsmodels](https://www.statsmodels.org) | 0.13.2 | Statistical computations and models for use with SciPy / BSD-3-Clause |
| [sympy](https://sympy.org) | 1.10.1 | Python library for symbolic mathematics / BSD-3-Clause AND MIT |
| [tabulate](https://github.com/astanin/python-tabulate) | 0.8.10 | Pretty-print tabular data in Python, a library and a command-line utility. / MIT |
| [tbb](https://github.com/oneapi-src/oneTBB) | 2021.6.0 | High level abstract threading library / Apache-2.0 |
| tbb4py | 2021.6.0 | TBB module for Python / Apache-2.0 |
| [tblib](https://github.com/ionelmc/python-tblib) | 1.7.0 | Traceback serialization library. / BSD 2-Clause |
| [tenacity](http://github.com/jd/tenacity) | 8.0.1 | Retry a flaky function whenever an exception occurs until it works / Apache-2.0 |
| [terminado](https://github.com/jupyter/terminado) | 0.13.1 | Terminals served by tornado websockets / BSD-2-Clause |
| [testpath](https://testpath.readthedocs.io) | 0.6.0 | Testpath is a collection of utilities for Python code working with files and commands. / BSD-3-Clause |
| [threadpoolctl](https://github.com/joblib/threadpoolctl) | 2.2.0 | Python helpers to control the threadpools of native libraries / BSD 3-Clause |
| [tifffile](https://github.com/cgohlke/tifffile) | 2021.7.2 | Read and write image data from and to TIFF files. / BSD-3-Clause |
| [tk](https://www.tcl.tk/) | 8.6.12 | A dynamic programming language with GUI support. Bundles Tcl and Tk. / TCL |
| [tldextract](https://github.com/john-kurkowski/tldextract) | 3.2.0 | Accurately separate the TLD from the registered domain andsubdomains of a URL, using the Public Suffix List. / BSD-3-Clause |
| [toml](https://github.com/uiri/toml) | 0.10.2 | Python lib for TOML. / MIT |
| [tomli](https://github.com/hukkin/tomli) | 2.0.1 | A simple TOML parser / MIT |
| [tomlkit](https://github.com/sdispater/tomlkit) | 0.11.1 | Style preserving TOML library / MIT |
| [toolz](http://toolz.readthedocs.org/) | 0.11.2 | List processing tools and functional utilities / BSD-3-Clause |
| [tornado](https://www.tornadoweb.org/) | 6.1 | A Python web framework and asynchronous networking library, originally developed at FriendFeed. / Apache-2.0 |
| [tqdm](https://tqdm.github.io/) | 4.64.1 | A Fast, Extensible Progress Meter / MPL-2.0 AND MIT |
| [traitlets](http://traitlets.readthedocs.org/) | 5.1.1 | Configuration system for Python applications / BSD-3-Clause |
| [twisted](https://twistedmatrix.com/) | 22.2.0 | An asynchronous networking framework written in Python / MIT |
| [typing-extensions](https://github.com/python/typing_extensions) | 4.3.0 | Backported and Experimental Type Hints for Python / PSF-2.0 |
| [typing\_extensions](https://github.com/python/typing_extensions) | 4.3.0 | Backported and Experimental Type Hints for Python / PSF-2.0 |
| [tzdata](https://www.iana.org/time-zones) | 2022c | The Time Zone Database (called tz, tzdb or zoneinfo) / CC-PDDC OR BSD-3-Clause |
| [unixodbc](http://www.unixodbc.org/) | 2.3.11 | ODBC on non MS Windows platforms / LGPL-2.1-or-later |
| [urllib3](https://urllib3.readthedocs.io/) | 1.26.11 | HTTP library with thread-safe connection pooling, file post, and more. / MIT |
| [w3lib](https://github.com/scrapy/w3lib) | 1.21.0 | Library of web-related functions / BSD |
| [wcwidth](https://github.com/jquast/wcwidth) | 0.2.5 | Measures number of Terminal column cells of wide-character codes. / MIT |
| [webencodings](https://github.com/gsnedders/python-webencodings) | 0.5.1 | Character encoding aliases for legacy web content / BSD 3-Clause |
| [websocket-client](https://github.com/liris/websocket-client) | 0.58.0 | WebSocket client for python. hybi13 is supported. / BSD-3-Clause |
| [werkzeug](https://palletsprojects.com/p/werkzeug/) | 2.0.3 | The comprehensive WSGI web application library. / BSD-3-Clause |
| [wget](https://www.gnu.org/software/wget/) | 1.21.3 | utility for non-interactive download of files from the Web / GPL-3.0-or-later |
| [wheel](https://github.com/pypa/wheel) | 0.37.1 | A built-package format for Python. / MIT |
| [widgetsnbextension](http://ipython.org) | 3.5.2 | Interactive Widgets for Jupyter / BSD-3-Clause |
| [wrapt](https://github.com/GrahamDumpleton/wrapt) | 1.14.1 | Module for decorators, wrappers and monkey patching / BSD-2-Clause |
| [xarray](https://github.com/pydata/xarray) | 0.20.1 | N-D labeled arrays and datasets in Python. / Apache-2.0 |
| [xlrd](http://www.python-excel.org/) | 2.0.1 | Library for developers to extract data from Microsoft Excel (tm) spreadsheet files / BSD 3-Clause and BSD with advertising |
| [xlsxwriter](https://xlsxwriter.readthedocs.io/) | 3.0.3 | A Python module for creating Excel XLSX files / BSD-2-Clause |
| [xz](https://tukaani.org/xz/) | 5.2.6 | Data compression software with high compression ratio / LGPL-2.1-or-later and GPL-2.0-or-later |
| [yaml](http://pyyaml.org/wiki/LibYAML) | 0.2.5 | A C library for parsing and emitting YAML / MIT |
| [zeromq](http://zeromq.org) | 4.3.4 | A high-performance asynchronous messaging library. / LGPL-3.0-or-later |
| [zfp](https://computation.llnl.gov/projects/floating-point-compression) | 0.5.5 | Library for compressed numerical arrays that support high throughput read and write random access / BSD-3-Clause |
| [zict](https://github.com/mrocklin/zict) | 2.1.0 | Composable Dictionary Classes / BSD-3-Clause |
| [zipp](https://github.com/jaraco/zipp) | 3.8.0 | A pathlib-compatible Zipfile object wrapper / MIT |
| [zlib](https://zlib.net/) | 1.2.12 | Massively spiffy yet delicately unobtrusive compression library / Zlib |
| zope | 1.0 | web application server / BSD |
| [zope.interface](https://github.com/zopefoundation/zope.interface) | 5.4.0 | Interfaces for Python / ZPL-2.1 |
| [zstd](https://www.zstd.net) | 1.4.9 | Zstandard - Fast real-time compression algorithm / BSD-3-Clause AND GPL-2.0-or-later |
| Name | Version | Summary / License |
|---|---|---|
| [\_libgcc\_mutex](https://github.com/AnacondaRecipes/_libgcc_mutex-feedstock) | 0.1 | Mutex for libgcc and libgcc-ng / None |
| [\_openmp\_mutex](https://github.com/conda-forge/ctng-compilers-feedstock) | 5.1 | OpenMP Implementation Mutex / BSD-3-Clause |
| [alabaster](http://www.sphinx-doc.org/en/stable/index.html) | 0.7.12 | Configurable, Python 2+3 compatible Sphinx theme. / BSD 3-Clause |
| [anaconda-client](https://anaconda.org) | 1.11.0 | anaconda.org command line client library / BSD-3-Clause |
| [anaconda-navigator](https://github.com/ContinuumIO/navigator) | 2.3.2 | Anaconda Navigator / proprietary - Continuum Analytics, Inc. |
| [anaconda-project](https://github.com/Anaconda-Platform/anaconda-project) | 0.11.1 | Tool for encapsulating, running, and reproducing data science projects / BSD-3-Clause |
| [anyio](https://github.com/agronholm/anyio) | 3.5.0 | High level compatibility layer for multiple asynchronous event loop implementations on Python / MIT |
| [appdirs](http://github.com/ActiveState/appdirs) | 1.4.4 | A small Python module for determining appropriate platform-specific dirs. / MIT |
| [argon2-cffi](https://argon2-cffi.readthedocs.org/) | 21.3.0 | The secure Argon2 password hashing algorithm. / MIT |
| [argon2-cffi-bindings](https://github.com/hynek/argon2-cffi-bindings) | 21.2.0 | Low-level Python CFFI Bindings for Argon2 / MIT |
| [arrow](https://github.com/arrow-py/arrow) | 1.2.2 | Better dates & times for Python / Apache-2.0 |
| [astroid](https://github.com/PyCQA/astroid) | 2.11.7 | A abstract syntax tree for Python with inference support. / LGPL-2.1-or-later |
| [astropy](https://www.astropy.org/) | 5.1 | Community-developed Python Library for Astronomy / BSD-3-Clause |
| [atomicwrites](https://github.com/untitaker/python-atomicwrites) | 1.4.0 | Atomic file writes / MIT |
| [attrs](https://attrs.readthedocs.io/en/stable/) | 21.4.0 | attrs is the Python package that will bring back the joy of writing classes by relieving you from the drudgery of implementing object protocols (aka dunder methods). / MIT |
| [automat](https://github.com/glyph/Automat) | 20.2.0 | self-service finite-state machines for the programmer on the go / MIT |
| [autopep8](https://github.com/hhatto/autopep8) | 1.6.0 | A tool that automatically formats Python code to conform to the PEP 8 style guide / MIT |
| [babel](http://babel.pocoo.org/) | 2.9.1 | Utilities to internationalize and localize Python applications / BSD 3-clause |
| [backcall](https://github.com/takluyver/backcall/) | 0.2.0 | Specifications for callback functions passed in to an API / BSD-3-Clause |
| [backports](https://github.com/brandon-rhodes/backports) | 1.1 | Namespace for backported Python features. / MIT |
| [backports.functools\_lru\_cache](https://github.com/jaraco/backports.functools_lru_cache) | 1.6.4 | Backport of functools.lru\_cache from Python 3.3 as published at ActiveState. / MIT |
| [backports.tempfile](https://github.com/pjdelport/backports.tempfile) | 1.0 | Backports of new features in Python’s tempfile module / PSF 2 |
| [backports.weakref](https://github.com/pjdelport/backports.weakref) | 1.0.post1 | Backport of new features in Python’s weakref module / Python-2.0 |
| [bcrypt](https://github.com/pyca/bcrypt/) | 3.2.0 | Modern password hashing for your software and your servers / Apache-2.0 |
| [beautifulsoup4](https://www.crummy.com/software/BeautifulSoup/) | 4.11.1 | Python library designed for screen-scraping / MIT |
| [binaryornot](https://github.com/audreyr/binaryornot) | 0.4.4 | Ultra-lightweight pure Python package to check if a file is binary or text. / BSD-3-Clause |
| [bitarray](https://github.com/ilanschnell/bitarray) | 2.5.1 | efficient arrays of booleans – C extension / PSF-2.0 |
| [bkcharts](http://github.com/bokeh/bkcharts) | 0.2 | High level chart types built on top of Bokeh / BSD 3-Clause |
| [black](https://github.com/psf/black) | 22.6.0 | The Uncompromising Code Formatter / MIT |
| [blas](http://www.netlib.org/lapack) | 1.0 | Linear Algebra PACKage / BSD-3-Clause |
| [bleach](https://github.com/mozilla/bleach) | 4.1.0 | Easy, whitelist-based HTML-sanitizing tool / Apache-2.0 |
| [blosc](https://github.com/Blosc/c-blosc) | 1.21.0 | A blocking, shuffling and loss-less compression library that can be faster than memcpy() / BSD-3-Clause |
| [bokeh](https://bokeh.org/) | 2.4.3 | Bokeh is an interactive visualization library for modern web browsers. / BSD-3-Clause |
| [boto3](https://aws.amazon.com/sdk-for-python) | 1.24.28 | Amazon Web Services SDK for Python / Apache-2.0 |
| [botocore](https://aws.amazon.com/sdk-for-python/) | 1.27.28 | Low-level, data-driven core of boto 3. / Apache-2.0 |
| [bottleneck](https://github.com/pydata/bottleneck) | 1.3.5 | Fast NumPy array functions written in Cython. / BSD-2-Clause |
| [brotli](https://github.com/google/brotli) | 1.0.9 | Brotli compression format / MIT |
| [brotli-bin](https://github.com/google/brotli) | 1.0.9 | Brotli compression format / MIT |
| [brotlipy](https://github.com/python-hyper/brotlipy) | 0.7.0 | Python bindings to the Brotli compression library / MIT |
| [brunsli](https://github.com/google/brunsli) | 0.1 | Practical JPEG Repacker / MIT |
| [bzip2](http://www.bzip.org/) | 1.0.8 | high-quality data compressor / bzip2 |
| [c-ares](https://c-ares.org/) | 1.18.1 | This is c-ares, an asynchronous resolver library / MIT |
| [ca-certificates](https://curl.se/docs/caextract.html) | 2022.07.19 | Certificates for use with other packages. / MPL-2.0 |
| [cached-property](https://github.com/pydanny/cached-property) | 1.5.2 | A decorator for caching properties in classes. / BSD-3-Clause |
| [certifi](https://certifi.io/) | 2022.9.24 | Python package for providing Mozilla’s CA Bundle. / MPL-2.0 |
| [cffi](https://cffi.readthedocs.org/) | 1.15.1 | Foreign Function Interface for Python calling C code. / MIT |
| [cfitsio](http://heasarc.gsfc.nasa.gov/fitsio/fitsio.html) | 3.470 | A library for reading and writing FITS files / fitsio |
| [chardet](https://github.com/chardet/chardet) | 4.0.0 | Universal character encoding detector / LGPL2 |
| [charls](https://github.com/team-charls/charls) | 2.2.0 | CharLS is a C++ implementation of the JPEG-LS standard for lossless and near-lossless image compression and decompression. JPEG-LS is a low-complexity image compression standard that matches JPEG 2000 compression ratios. / BSD-3-Clause |
| [charset-normalizer](https://github.com/ousret/charset_normalizer) | 2.0.4 | The Real First Universal Charset Detector. Open, modern and actively maintained alternative to Chardet. / MIT |
| [click](https://palletsprojects.com/p/click) | 8.0.4 | Python composable command line interface toolkit / BSD-3-Clause |
| [cloudpickle](https://github.com/cloudpipe/cloudpickle) | 2.0.0 | Extended pickling support for Python objects / BSD-3-Clause |
| [clyent](https://github.com/Anaconda-Platform/clyent) | 1.2.2 | Command line client library for windows and posix / BSD 3-Clause |
| [colorama](https://github.com/tartley/colorama) | 0.4.5 | Cross-platform colored terminal text / BSD-3-Clause |
| [colorcet](https://colorcet.holoviz.org/index.html) | 3.0.0 | Collection of perceptually uniform colormaps / CC-BY-4.0 |
| [conda](https://conda.io) | 22.9.0 | OS-agnostic, system-level binary package and environment manager. / BSD-3-Clause |
| [conda-build](https://github.com/conda/conda-build) | 3.22.0 | tools for building conda packages / BSD-3-Clause |
| [conda-content-trust](https://github.com/conda/conda-content-trust) | 0.1.3 | Signing and verification tools for conda / BSD-3-Clause |
| [conda-env](https://github.com/conda/conda-env) | 2.6.0 | Tools for interacting with conda environments. / BSD 3-Clause |
| [conda-token](https://github.com/Anaconda/conda-token) | 0.4.0 | Set repository access token / BSD-3-Clause |
| [conda-verify](https://github.com/conda/conda-verify) | 3.4.2 | tool for validating conda recipes and conda packages / BSD 3-Clause |
| [constantly](https://github.com/twisted/constantly) | 15.1.0 | Symbolic constants in Python / MIT |
| [cookiecutter](https://github.com/cookiecutter/cookiecutter) | 1.7.3 | A command-line utility that creates projects from cookiecutters (project templates), e.g. creating a Python package project from a Python package project template. / BSD-3-Clause |
| [cryptography](https://github.com/pyca/cryptography) | 37.0.1 | Provides cryptographic recipes and primitives to Python developers / (BSD-3-Clause OR Apache-2.0) AND PSF-2.0 AND MIT |
| [cssselect](https://pythonhosted.org/cssselect/) | 1.1.0 | CSS Selectors for Python / BSD 3-Clause |
| [curl](https://curl.se/) | 7.84.0 | tool and library for transferring data with URL syntax / curl |
| [cycler](http://matplotlib.org/cycler) | 0.11.0 | Composable style cycles. / BSD-3-Clause |
| [cython](https://cython.org/) | 0.29.32 | The Cython compiler for writing C extensions for the Python language / Apache-2.0 |
| [cytoolz](https://github.com/pytoolz/cytoolz) | 0.11.0 | Cython implementation of Toolz. High performance functional utilities / BSD-3-Clause |
| [dask](https://dask.org/) | 2022.7.0 | Parallel PyData with Task Scheduling / BSD-3-Clause |
| [dask-core](https://github.com/dask/dask/) | 2022.7.0 | Parallel Python with task scheduling / BSD-3-Clause |
| [dataclasses](https://github.com/ericvsmith/dataclasses) | 0.8 | An implementation of PEP 557: Data Classes / Apache-2.0 |
| [datashader](https://datashader.org) | 0.14.1 | Data visualization toolchain based on aggregating into a grid / BSD-3-Clause |
| [datashape](http://datashape.pydata.org) | 0.5.4 | A data description language. / BSD 2-Clause |
| [dbus](http://www.freedesktop.org/wiki/Software/dbus/) | 1.13.18 | Simple message bus system for applications to talk to one another / GPL2 |
| [debugpy](https://github.com/Microsoft/debugpy) | 1.5.1 | An implementation of the Debug Adapter Protocol for Python / MIT |
| [decorator](https://github.com/micheles/decorator) | 5.1.1 | Better living through Python with decorators. / BSD-2-Clause |
| [defusedxml](https://bitbucket.org/tiran/defusedxml) | 0.7.1 | XML bomb protection for Python stdlib modules / PSF 2.0 |
| [diff-match-patch](http://code.google.com/p/google-diff-match-patch/) | 20200713 | Diff Match Patch is a high-performance library in multiple languages that manipulates plain text / Apache-2.0 |
| [dill](http://www.cacr.caltech.edu/~mmckerns/dill.htm) | 0.3.4 | Serialize all of python (almost) / BSD-3-Clause |
| [distributed](https://distributed.readthedocs.io/en/latest/) | 2022.7.0 | Distributed computing with Dask / BSD-3-Clause |
| [docutils](http://docutils.sourceforge.net/) | 0.18.1 | Docutils – Python Documentation Utilities / LicenseRef-Public-Domain-Dedictation and BSD-2-Clause and LicenseRef-PSF-2.1.1 and GPL-3.0-or-later |
| [entrypoints](https://github.com/takluyver/entrypoints) | 0.4 | Discover and load entry points from installed packages. / MIT License |
| [et\_xmlfile](https://foss.heptapod.net/openpyxl/et_xmlfile) | 1.1.0 | An implementation of lxml.xmlfile for the standard library / MIT AND PSF-2.0 |
| [expat](https://libexpat.github.io) | 2.4.9 | Expat XML parser library in C / MIT |
| [fftw](http://fftw.org) | 3.3.9 | The fastest Fourier transform in the west. / GPL 2 |
| [filelock](https://github.com/tox-dev/py-filelock) | 3.6.0 | A platform independent file lock. / Unlicense |
| [flake8](http://flake8.pycqa.org/) | 4.0.1 | Your Tool For Style Guide Enforcement / MIT |
| [flask](https://palletsprojects.com/p/flask) | 1.1.2 | A simple framework for building complex web applications. / BSD-3-Clause |
| [fontconfig](http://www.freedesktop.org/wiki/Software/fontconfig/) | 2.13.1 | A library for configuring and customizing font access. / MIT |
| [fonttools](https://github.com/fonttools/fonttools) | 4.25.0 | fontTools is a library for manipulating fonts, written in Python. / MIT |
| [freetype](https://freetype.org/) | 2.11.0 | A Free, High-Quality, and Portable Font Engine / GPL-2-only and LicenseRef-FreeType |
| [fsspec](https://github.com/fsspec/filesystem_spec) | 2022.7.1 | A specification for pythonic filesystems / BSD-3-Clause |
| [future](http://python-future.org) | 0.18.2 | Clean single-source support for Python 3 and 2 / MIT |
| [gensim](https://github.com/RaRe-Technologies/gensim) | 4.1.2 | Topic Modelling for Humans / LGPL-2.1-only |
| [giflib](http://giflib.sourceforge.net) | 5.2.1 | Library for reading and writing gif images / MIT |
| [glib](https://developer.gnome.org/glib/) | 2.69.1 | Provides core application building blocks for libraries and applications written in C. / LGPL-2.1-or-later |
| [glob2](https://github.com/miracle2k/python-glob2) | 0.7 | Version of the glob module that supports recursion via \*\*, and can capture patterns. / BSD-2-Clause |
| [gmp](http://gmplib.org/) | 6.2.1 | The GNU multiprecision library. / GPL-2.0-or-later AND LGPL-3.0-or-later |
| [gmpy2](https://pypi.python.org/pypi/gmpy2) | 2.1.2 | GMP/MPIR, MPFR, and MPC interface to Python 2.6+ and 3.x / LGPL-3.0-or-later |
| [greenlet](https://github.com/python-greenlet/greenlet) | 1.1.1 | Lightweight in-process concurrent programming / MIT |
| [gst-plugins-base](http://gstreamer.freedesktop.org/) | 1.14.1 | GStreamer Base Plug-ins / GPL2 |
| [gstreamer](http://gstreamer.freedesktop.org/) | 1.14.1 | Library for constructing graphs of media-handling components / LGPL 2 |
| [h5py](https://www.h5py.org/) | 3.1.0 | Read and write HDF5 files from Python / BSD-3-Clause |
| [hdf5](http://www.hdfgroup.org/HDF5/) | 1.12.0 | HDF5 is a data model, library, and file format for storing and managing data / HDF5 |
| [heapdict](http://stutzbachenterprises.com/) | 1.0.1 | A heap with decrease-key and increase-key operations / BSD 3-Clause |
| [holoviews](https://holoviews.org) | 1.15.0 | Stop plotting your data - annotate your data and let it visualize itself. / BSD-3-Clause |
| [hvplot](https://hvplot.holoviz.org) | 0.8.0 | A high-level plotting API for the PyData ecosystem built on HoloViews / BSD-3-Clause |
| [hyperlink](https://github.com/python-hyper/hyperlink) | 21.0.0 | Immutable, Pythonic, correct URLs. / MIT |
| [icu](http://site.icu-project.org/) | 68.1 | International Components for Unicode. / MIT |
| [idna](https://github.com/kjd/idna) | 3.3 | Internationalized Domain Names in Applications (IDNA). / BSD-3-Clause |
| [imagecodecs](https://www.lfd.uci.edu/~gohlke/) | 2021.8.26 | Image transformation, compression, and decompression codecs / BSD-3-Clause |
| [imageio](https://imageio.github.io) | 2.19.3 | A Python library for reading and writing image data / BSD-2-Clause |
| [imagesize](https://github.com/shibukawa/imagesize_py) | 1.4.1 | Getting image size from png/jpeg/jpeg2000/gif file / MIT |
| [importlib-metadata](https://github.com/python/importlib_metadata) | 4.11.3 | A library to access the metadata for a Python package. / Apache-2.0 |
| [importlib\_metadata](https://github.com/python/importlib_metadata) | 4.11.3 | A library to access the metadata for a Python package. / Apache-2.0 |
| [incremental](https://github.com/hawkowl/incremental) | 21.3.0 | Incremental is a small library that versions your Python projects. / MIT |
| [inflection](http://github.com/jpvanhal/inflection) | 0.5.1 | A port of Ruby on Rails inflector to Python / MIT |
| [iniconfig](http://github.com/RonnyPfannschmidt/iniconfig) | 1.1.1 | iniconfig: brain-dead simple config-ini parsing / MIT |
| [intake](https://github.com/ContinuumIO/intake) | 0.6.5 | Data load and catalog system / BSD-2-Clause |
| [intervaltree](https://github.com/chaimleib/intervaltree) | 3.1.0 | Editable interval tree data structure for Python 2 and 3 / Apache-2.0 |
| [ipykernel](https://ipython.org) | 6.15.2 | IPython Kernel for Jupyter / BSD-3-Clause |
| [ipython](https://ipython.org) | 7.31.1 | IPython: Productive Interactive Computing / BSD-3-Clause |
| [ipython\_genutils](http://ipython.org) | 0.2.0 | vestigial utilities from IPython / BSD 3-Clause |
| [ipywidgets](https://github.com/ipython/ipywidgets) | 7.6.5 | Jupyter Interactive Widgets / BSD-3-Clause |
| [isort](https://github.com/timothycrosley/isort) | 5.9.3 | A Python utility / library to sort Python imports. / MIT |
| [itemadapter](https://github.com/scrapy/itemadapter) | 0.3.0 | Common interface for different data containers / BSD-3-Clause |
| [itemloaders](https://github.com/scrapy/itemadapter) | 1.0.4 | Collect data from HTML and XML sources / BSD-3-Clause |
| [itsdangerous](https://github.com/pallets/itsdangerous) | 2.0.1 | Various helpers to pass trusted data to untrusted environments. / BSD-3-Clause |
| [jdcal](https://github.com/phn/jdcal) | 1.4.1 | Julian dates from proleptic Gregorian and Julian calendars. / BSD 2-Clause |
| [jedi](https://github.com/davidhalter/jedi/) | 0.18.1 | An autocompletion tool for Python that can be used for text editors. / MIT |
| [jeepney](https://gitlab.com/takluyver/jeepney) | 0.7.1 | Pure Python DBus interface / MIT |
| [jellyfish](https://github.com/jamesturk/jellyfish) | 0.9.0 | a library for doing approximate and phonetic matching of strings. / BSD-2-Clause |
| [jinja2](https://palletsprojects.com/p/jinja/) | 2.11.3 | A very fast and expressive template engine. / BSD-3-Clause |
| [jinja2-time](https://github.com/hackebrot/jinja2-time) | 0.2.0 | Jinja2 Extension for Dates and Times / MIT |
| [jmespath](http://jmespath.org/) | 0.10.0 | Query language for JSON / MIT |
| [joblib](https://joblib.readthedocs.io/en/latest/) | 1.1.0 | Lightweight pipelining: using Python functions as pipeline jobs. / BSD-3-Clause |
| [jpeg](https://www.ijg.org/) | 9e | read/write jpeg COM, EXIF, IPTC medata / IJG |
| [jq](http://stedolan.github.io/jq/) | 1.6 | A command-line JSON processor. / MIT |
| [json5](https://github.com/dpranke/pyjson5) | 0.9.6 | A Python implementation of the JSON5 data format / Apache-2.0 |
| [jsonschema](https://github.com/python-jsonschema/jsonschema) | 4.16.0 | An implementation of JSON Schema validation for Python / MIT |
| [jupyter](http://jupyter.org) | 1.0.0 | Jupyter metapackage. Install all the Jupyter components in one go. / BSD 3-Clause |
| [jupyter\_client](https://jupyter.org) | 7.3.4 | jupyter\_client contains the reference implementation of the Jupyter protocol. / BSD-3-Clause |
| [jupyter\_console](https://jupyter.org) | 6.4.3 | Jupyter terminal console / BSD-3-Clause |
| [jupyter\_core](https://jupyter.org) | 4.11.1 | Core common functionality of Jupyter projects. / BSD-3-Clause |
| [jupyter\_server](https://jupyter.org) | 1.18.1 | Jupyter Server / BSD-3-Clause |
| [jupyterlab](https://github.com/jupyterlab/jupyterlab) | 3.4.4 | JupyterLab PRE-ALPHA / BSD-3-Clause |
| [jupyterlab\_pygments](http://github.com/JupyterLab/jupyterlab_pygments) | 0.1.2 | Pygments syntax coloring scheme making use of the JupyterLab CSS variables / BSD-3-Clause |
| [jupyterlab\_server](https://github.com/jupyterlab/jupyterlab_server) | 2.10.3 | A set of server components for JupyterLab and JupyterLab like applications. / BSD-3-Clause |
| [jupyterlab\_widgets](https://github.com/jupyter-widgets/ipywidgets) | 1.0.0 | JupyterLab extension providing HTML widgets / BSD-3-Clause |
| [jxrlib](https://packages.debian.org/source/sid/jxrlib) | 1.1 | jxrlib - JPEG XR Library by Microsoft, built from Debian hosted sources. / BSD-2-Clause |
| [keyring](https://github.com/jaraco/keyring) | 23.4.0 | Store and access your passwords safely / MIT |
| [kiwisolver](https://github.com/nucleic/kiwi) | 1.4.2 | An efficient C++ implementation of the Cassowary constraint solver / BSD-3-Clause |
| [krb5](http://web.mit.edu/kerberos/) | 1.19.2 | A network authentication protocol. / MIT |
| [lazy-object-proxy](https://github.com/ionelmc/python-lazy-object-proxy) | 1.6.0 | A fast and thorough lazy object proxy / BSD-2-Clause |
| [lcms2](http://www.littlecms.com/) | 2.12 | Open Source Color Management Engine / MIT |
| [ld\_impl\_linux-aarch64](https://www.gnu.org/software/binutils/) | 2.38 | A set of programming tools for creating and managing binary programs, object files, libraries, profile data, and assembly source code. / GPL-3.0-only |
| [lerc](https://github.com/Esri/lerc) | 3.0 | LERC - Limited Error Raster Compression / Apache-2.0 |
| [libaec](https://gitlab.dkrz.de/k202009/libaec) | 1.0.4 | Adaptive Entropy Coding library / BSD-2-Clause |
| [libarchive](https://libarchive.org/) | 3.6.1 | Multi-format archive and compression library / BSD-2-Clause |
| [libbrotlicommon](https://github.com/google/brotli) | 1.0.9 | Brotli compression format / MIT |
| [libbrotlidec](https://github.com/google/brotli) | 1.0.9 | Brotli compression format / MIT |
| [libbrotlienc](https://github.com/google/brotli) | 1.0.9 | Brotli compression format / MIT |
| [libclang](https://llvm.org/) | 10.0.1 | Development headers and libraries for Clang / Apache-2.0 WITH LLVM-exception |
| [libcurl](https://curl.se/) | 7.84.0 | tool and library for transferring data with URL syntax / curl |
| [libdeflate](https://github.com/ebiggers/libdeflate) | 1.7 | libdeflate is a library for fast, whole-buffer DEFLATE-based compression and decompression. / MIT |
| [libedit](http://thrysoee.dk/editline/) | 3.1.20210910 | Editline Library (libedit) / BSD-2-Clause |
| [libev](http://software.schmorp.de/pkg/libev.html) | 4.33 | A full-featured and high-performance event loop that is loosely modeled after libevent, but without its limitations and bugs. / BSD-2-Clause |
| [libevent](http://libevent.org/) | 2.1.12 | An event notification library. / BSD-3-Clause |
| [libffi](https://sourceware.org/libffi/) | 3.3 | A Portable Foreign Function Interface Library. / MIT |
| [libgcc-ng](https://gcc.gnu.org/onlinedocs/gccint/Libgcc.html) | 11.2.0 | The GCC low-level runtime library / GPL-3.0-only WITH GCC-exception-3.1 |
| [libgfortran-ng](https://gcc.gnu.org/) | 11.2.0 | The GNU Fortran Runtime Library / GPL-3.0-only WITH GCC-exception-3.1 |
| [libgfortran5](https://gcc.gnu.org/) | 11.2.0 | Fortran compiler and libraries from the GNU Compiler Collection / GPL-3.0-only WITH GCC-exception-3.1 |
| [libgomp](https://gcc.gnu.org/onlinedocs/gccint/Libgcc.html) | 11.2.0 | The GCC OpenMP implementation. / GPL-3.0-only WITH GCC-exception-3.1 |
| [libidn2](https://www.gnu.org/software/libidn/#libidn2) | 2.3.1 | Library for internationalized domain names (IDNA2008) support / LGPLv2 AND LGPL-3.0-or-later AND GPL-3.0-or-later |
| [liblief](https://lief.quarkslab.com/) | 0.11.5 | A cross platform library to parse, modify and abstract ELF, PE and MachO formats. / Apache-2.0 |
| [libllvm10](http://llvm.org/) | 10.0.1 | Development headers and libraries for LLVM / Apache-2.0 WITH LLVM-exception |
| [libllvm11](https://llvm.org/) | 11.1.0 | Development headers and libraries for LLVM / Apache-2.0 WITH LLVM-exception |
| [libnghttp2](http://github.com/nghttp2/nghttp2) | 1.46.0 | This is an implementation of Hypertext Transfer Protocol version 2. / MIT |
| [libopenblas](https://www.openblas.net/) | 0.3.21 | An Optimized BLAS library / BSD-3-Clause |
| [libpng](http://www.libpng.org/pub/png/libpng.html) | 1.6.37 | PNG reference library / zlib/libpng |
| [libpq](http://www.postgresql.org/) | 12.9 | The postgres runtime libraries and utilities (not the server itself) / PostgreSQL |
| [libsodium](http://libsodium.org) | 1.0.18 | A modern and easy-to-use crypto library. / ISC |
| [libspatialindex](http://libspatialindex.github.io) | 1.9.3 | Extensible framework for robust spatial indexing / MIT |
| [libssh2](https://www.libssh2.org/) | 1.10.0 | the SSH library / BSD-3-Clause |
| [libstdcxx-ng](https://gcc.gnu.org/) | 11.2.0 | The GNU C++ Runtime Library / GPL-3.0-only WITH GCC-exception-3.1 |
| [libtiff](http://www.simplesystems.org/libtiff/) | 4.4.0 | Support for the Tag Image File Format (TIFF). / HPND |
| [libunistring](https://www.gnu.org/software/libunistring) | 0.9.10 | This library provides functions for manipulating Unicode strings and for manipulating C strings according to the Unicode standard. / LGPL |
| [libuuid](http://sourceforge.net/projects/libuuid/) | 1.0.3 | Portable uuid C library. / BSD 3-Clause |
| [libwebp](https://developers.google.com/speed/webp/) | 1.2.2 | WebP image library / BSD-3-Clause |
| [libwebp-base](https://developers.google.com/speed/webp) | 1.2.2 | WebP image library / BSD-3-Clause |
| [libxcb](http://xcb.freedesktop.org/) | 1.15 | This is the C-language Binding (XCB) package to the X Window System protocol / MIT |
| [libxkbcommon](https://github.com/xkbcommon/libxkbcommon) | 1.0.1 | keymap handling library for toolkits and window systems / MIT/X11 Derivative |
| [libxml2](https://gitlab.gnome.org/GNOME/libxml2/) | 2.9.14 | The XML C parser and toolkit of Gnome / MIT |
| [libxslt](https://gitlab.gnome.org/GNOME/libxslt) | 1.1.35 | The XSLT C library developed for the GNOME project / MIT |
| [libzopfli](https://github.com/google/zopfli) | 1.0.3 | A compression library programmed in C to perform very good, but slow, deflate or zlib compression. / Apache-2.0 |
| [llvmlite](https://llvmlite.pydata.org) | 0.38.0 | A lightweight LLVM python binding for writing JIT compilers. / BSD-2-Clause |
| [locket](https://github.com/mwilliamson/locket.py) | 1.0.0 | File-based locks for Python for Linux and Windows / BSD-2-Clause |
| [lxml](https://lxml.de/) | 4.9.1 | Pythonic binding for the C libraries libxml2 and libxslt. / BSD-3-Clause and GPL-2.0-only and ZPL-2.0 and LicenseRef-ElementTree |
| [lz4](https://github.com/python-lz4/python-lz4) | 3.1.3 | LZ4 Bindings for Python / BSD-3-Clause |
| [lz4-c](https://www.lz4.org) | 1.9.3 | Extremely Fast Compression algorithm / BSD-2-Clause |
| [lzo](http://www.oberhumer.com/opensource/lzo/) | 2.10 | LZO is a portable lossless data compression library written in ANSI C. / GPL v2+ |
| [markdown](https://pythonhosted.org/Markdown/) | 3.3.4 | Python implementation of Markdown. / BSD-3-Clause |
| [markupsafe](https://www.palletsprojects.com/p/markupsafe) | 2.0.1 | Safely add untrusted strings to HTML/XML markup. / BSD-3-Clause |
| [matplotlib](https://matplotlib.org/) | 3.5.2 | Publication quality figures in Python / LicenseRef-PSF-based |
| [matplotlib-base](https://matplotlib.org/) | 3.5.2 | Publication quality figures in Python / LicenseRef-PSF-based |
| [matplotlib-inline](https://github.com/ipython/matplotlib-inline) | 0.1.6 | Inline Matplotlib backend for Jupyter / BSD-3-Clause |
| [mccabe](https://github.com/PyCQA/mccabe) | 0.7.0 | McCabe complexity checker for Python / MIT |
| [mistune](https://github.com/lepture/mistune) | 0.8.4 | A sane Markdown parser with useful plugins and renderers. / BSD-3-Clause |
| [mock](https://github.com/testing-cabal/mock) | 4.0.3 | A library for testing in Python / BSD-2-Clause |
| [mpc](http://www.multiprecision.org/) | 1.1.0 | A C library for the arithmetic of complex numbers with arbitrarily high precision. / LGPL-3-or-later |
| [mpfr](http://www.mpfr.org/) | 4.0.2 | The MPFR library is a C library for multiple-precision floating-point computations with correct rounding. / LGPL-3.0-only |
| [mpmath](http://mpmath.org) | 1.2.1 | Python library for arbitrary-precision floating-point arithmetic / BSD 3-Clause |
| [msgpack-python](https://msgpack.org/) | 1.0.3 | MessagePack (de)serializer / Apache-2.0 |
| [multipledispatch](https://github.com/mrocklin/multipledispatch/) | 0.6.0 | Multiple dispatch in Python / BSD 3-Clause |
| [munkres](https://github.com/bmc/munkres) | 1.1.4 | The Munkres module provides an O(n^3) implementation of the Munkres algorithm (also called the Hungarian algorithm or the Kuhn-Munkres algorithm). / Apache-2.0 |
| [mypy\_extensions](http://www.mypy-lang.org/) | 0.4.3 | Experimental type system extensions for programs checked with the mypy typechecker. / MIT |
| [nbclassic](http://github.com/jupyterlab/nbclassic) | 0.3.5 | Jupyter Notebook as a Jupyter Server Extension. / BSD-3-Clause |
| [nbclient](https://jupyter.org) | 0.5.13 | A client library for executing notebooks. Formally nbconvert’s ExecutePreprocessor. / BSD-3-Clause |
| [nbconvert](https://jupyter.org) | 6.4.4 | Converting Jupyter Notebooks / BSD-3-Clause |
| [nbformat](https://jupyter.org) | 5.5.0 | The Jupyter Notebook format / BSD-3-Clause |
| [ncurses](http://www.gnu.org/software/ncurses/) | 6.3 | Library for text-based user interfaces / Free software (MIT-like) |
| [nest-asyncio](https://github.com/erdewit/nest_asyncio) | 1.5.5 | Patch asyncio to allow nested event loops / BSD-2-Clause |
| [networkx](https://networkx.github.io/) | 2.8.4 | Python package for creating and manipulating complex networks / BSD-3-Clause |
| [nltk](https://nltk.org/) | 3.7 | Natural Language Toolkit / Apache-2.0 |
| nomkl | 3.0 | / BSD |
| [nose](http://readthedocs.org/docs/nose/) | 1.3.7 | Nose extends unittest to make testing easier / LGPL-2.1 |
| [notebook](https://jupyter.org) | 6.4.12 | Jupyter Notebook / BSD-3-Clause |
| [nspr](https://hg.mozilla.org/projects/nspr) | 4.33 | A platform-neutral API for system level and libc-like functions. / MPL-2.0 |
| [nss](https://developer.mozilla.org/en-US/docs/Mozilla/Projects/NSS) | 3.74 | A set of libraries designed to support cross-platform development of security-enabled client and server applications. / MPL-2.0 |
| [numba](https://numba.pydata.org) | 0.55.1 | NumPy aware dynamic Python compiler using LLVM / BSD-2-Clause |
| [numexpr](https://github.com/pydata/numexpr) | 2.8.3 | Fast numerical expression evaluator for NumPy. / MIT |
| [numpy](https://numpy.org/) | 1.21.5 | Array processing for numbers, strings, records, and objects. / BSD-3-Clause |
| [numpy-base](https://numpy.org/) | 1.21.5 | Array processing for numbers, strings, records, and objects. / BSD-3-Clause |
| [numpydoc](https://github.com/numpy/numpydoc) | 1.4.0 | Numpy’s Sphinx extensions / BSD-3-Clause |
| [olefile](http://www.decalage.info/python/olefileio) | 0.46 | parse, read and write Microsoft OLE2 files / BSD 2-Clause |
| [oniguruma](https://github.com/kkos/oniguruma) | 6.9.7.1 | A regular expression library. / BSD-2-Clause |
| [openblas](https://www.openblas.net/) | 0.3.21 | An optimized BLAS library / BSD-3-Clause |
| [openblas-devel](https://www.openblas.net/) | 0.3.21 | OpenBLAS headers and libraries for developing software that used OpenBLAS. / BSD-3-Clause |
| [openjpeg](http://www.openjpeg.org/) | 2.4.0 | An open-source JPEG 2000 codec written in C / BSD 2-Clause |
| [openpyxl](https://openpyxl.readthedocs.io) | 3.0.10 | A Python library to read/write Excel 2010 xlsx/xlsm files / MIT |
| [openssl](https://www.openssl.org/) | 1.1.1q | OpenSSL is an open-source implementation of the SSL and TLS protocols / OpenSSL |
| [packaging](https://github.com/pypa/packaging) | 21.3 | Core utilities for Python packages / Apache-2.0 or BSD-2-Clause |
| [pandas](https://pandas.pydata.org) | 1.4.4 | High-performance, easy-to-use data structures and data analysis tools. / BSD-3-Clause |
| [pandocfilters](https://github.com/jgm/pandocfilters) | 1.5.0 | A python module for writing pandoc filters / BSD-3-Clause |
| [panel](https://panel.holoviz.org) | 0.13.1 | A high-level app and dashboarding solution for Python / BSD-3-Clause |
| [param](http://ioam.github.io/param/) | 1.12.0 | Param: Make your Python code clearer and more reliable by declaring Parameters / BSD-3-Clause |
| [parsel](https://github.com/scrapy/parsel) | 1.6.0 | library to extract data from HTML and XML using XPath and CSS selectors / BSD-3-Clause |
| [parso](https://github.com/davidhalter/parso) | 0.8.3 | A Python Parser / MIT |
| [partd](https://github.com/dask/partd) | 1.2.0 | Data structure for on-disk shuffle operations / BSD 3-Clause |
| [patch](http://savannah.gnu.org/projects/patch/) | 2.7.6 | Native Win32 versions of common unix tools / GPL 3 |
| [patchelf](http://nixos.org/patchelf.html) | 0.13 | A small utility to modify the dynamic linker and RPATH of ELF executables. / GPL-3.0-or-later |
| [pathspec](https://github.com/cpburnz/python-path-specification) | 0.9.0 | Utility library for gitignore style pattern matching of file paths. / MPL-2.0 |
| [patsy](https://github.com/pydata/patsy) | 0.5.2 | Describing statistical models in Python using symbolic formulas / BSD-2-Clause AND PSF-2.0 |
| [pcre](http://www.pcre.org/) | 8.45 | Regular expression pattern matching using the same syntax and semantics as Perl 5. / BSD 3-Clause |
| [pep8](http://pep8.readthedocs.org/) | 1.7.1 | Python style guide checker / MIT |
| [pexpect](http://pexpect.sourceforge.net/) | 4.8.0 | Pexpect makes Python a better tool for controlling other applications. / ISC |
| [pickleshare](https://github.com/pickleshare/pickleshare/) | 0.7.5 | Tiny ‘shelve’-like database with concurrency support / MIT |
| [pillow](https://pillow.readthedocs.io) | 9.2.0 | Pillow is the friendly PIL fork by Alex Clark and Contributors / LicenseRef-PIL |
| [pip](https://pip.pypa.io/en/stable/) | 22.2.2 | PyPA recommended tool for installing Python packages / MIT |
| [pkginfo](https://code.launchpad.net/~tseaver/pkginfo/trunk) | 1.8.2 | Query metadatdata from sdists / bdists / installed packages. / MIT |
| [platformdirs](https://github.com/platformdirs/platformdirs) | 2.5.2 | A small Python module for determining appropriate platform-specific dirs, e.g. a “user data dir”. / MIT |
| [plotly](https://plot.ly/python/) | 5.9.0 | An interactive JavaScript-based visualization library for Python / MIT |
| [pluggy](https://github.com/pytest-dev/pluggy) | 1.0.0 | Plugin registration and hook calling for Python / MIT |
| [ply](http://www.dabeaz.com/ply/index.html) | 3.11 | Python Lex-Yacc / BSD 3-clause |
| [poyo](https://github.com/hackebrot/poyo) | 0.5.0 | A lightweight YAML Parser for Python / MIT |
| [prometheus\_client](https://github.com/prometheus/client_python) | 0.14.1 | Python client for the Prometheus monitoring system / Apache-2.0 |
| [prompt-toolkit](https://github.com/jonathanslenders/python-prompt-toolkit) | 3.0.20 | Library for building powerful interactive command lines in Python / BSD-3-Clause |
| [prompt\_toolkit](https://github.com/jonathanslenders/python-prompt-toolkit) | 3.0.20 | Library for building powerful interactive command lines in Python / BSD-3-Clause |
| [protego](https://github.com/scrapy/protego) | 0.1.16 | A pure-Python robots.txt parser with support for modern conventions / BSD 3-Clauses |
| [psutil](https://github.com/giampaolo/psutil) | 5.9.0 | A cross-platform process and system utilities module for Python / BSD-3-Clause |
| [ptyprocess](https://github.com/pexpect/ptyprocess) | 0.7.0 | Run a subprocess in a pseudo terminal / ISC |
| [py](https://github.com/pytest-dev/py) | 1.11.0 | library with cross-python path, ini-parsing, io, code, log facilities / MIT |
| [py-lief](https://lief.quarkslab.com/) | 0.11.5 | A cross platform library to parse, modify and abstract ELF, PE and MachO formats. / Apache-2.0 |
| [pyasn1](https://github.com/etingof/pyasn1) | 0.4.8 | ASN.1 types and codecs / BSD 2-Clause |
| [pyasn1-modules](http://pyasn1.sourceforge.net/) | 0.2.8 | A collection of ASN.1-based protocols modules. / BSD 2-Clause |
| [pycodestyle](https://pycodestyle.readthedocs.io/) | 2.8.0 | Python style guide checker / MIT |
| [pycosat](https://github.com/ContinuumIO/pycosat) | 0.6.3 | Bindings to picosat (a SAT solver) / MIT |
| [pycparser](https://github.com/eliben/pycparser) | 2.21 | Complete C99 parser in pure Python / BSD-3-clause |
| [pyct](http://github.com/pyviz/pyct) | 0.4.8 | python package common tasks for users (e.g. copy examples, fetch data, …) / BSD 3-Clause |
| [pycurl](http://pycurl.sourceforge.net/) | 7.45.1 | A Python Interface To The cURL library / LGPL-2.1-only, MIT |
| [pydispatcher](http://pydispatcher.sourceforge.net) | 2.0.5 | Multi-producer-multi-consumer signal dispatching mechanism / BSD 3-Clause |
| [pydocstyle](https://github.com/PyCQA/pydocstyle) | 6.1.1 | Python docstring style checker (formerly pep257) / MIT |
| [pyerfa](https://pyerfa.readthedocs.io/) | 2.0.0 | Python bindings for ERFA routines / BSD-3-Clause |
| [pyflakes](https://github.com/PyCQA/pyflakes) | 2.4.0 | Pyflakes analyzes programs and detects various errors. / MIT |
| [pygments](https://pygments.org/) | 2.11.2 | Pygments is a generic syntax highlighter suitable for use in code hosting, forums, wikis or other applications that need to prettify source code. / BSD-2-Clause |
| [pyhamcrest](https://github.com/hamcrest/PyHamcrest) | 2.0.2 | Hamcrest framework for matcher objects / BSD 3-Clause |
| [pylint](https://www.pylint.org) | 2.14.5 | python code static checker / GPL-2.0-or-later |
| [pyls-spyder](https://github.com/spyder-ide/pyls-spyder) | 0.4.0 | Spyder extensions for the python-lsp-server / MIT |
| [pyodbc](https://github.com/mkleehammer/pyodbc) | 4.0.34 | DB API Module for ODBC / MIT-0 |
| [pyopenssl](https://github.com/pyca/pyopenssl) | 22.0.0 | Python wrapper module around the OpenSSL library / Apache-2.0 |
| [pyparsing](https://github.com/pyparsing/pyparsing/) | 3.0.9 | Create and execute simple grammars / MIT |
| [pyqt](https://www.riverbankcomputing.com/software/pyqt/) | 5.15.7 | Python bindings for the Qt cross platform application toolkit / GPL-3.0-only |
| [pyqt5-sip](https://www.riverbankcomputing.com/software/pyqt/) | 12.11.0 | Python bindings for the Qt cross platform application toolkit / GPL-3.0-only |
| [pyqtwebengine](https://www.riverbankcomputing.com/software/pyqt/) | 5.15.7 | Python bindings for the Qt cross platform application toolkit / GPL-3.0-only |
| [pyrsistent](http://github.com/tobgu/pyrsistent/) | 0.18.0 | Persistent/Functional/Immutable data structures / MIT |
| [pysocks](https://github.com/Anorov/PySocks) | 1.7.1 | A Python SOCKS client module. See [Anorov/PySocks](https://github.com/Anorov/PySocks) for more information. / BSD 3-Clause |
| [pytables](https://www.pytables.org) | 3.6.1 | Brings together Python, HDF5 and NumPy to easily handle large amounts of data. / BSD-3-Clause |
| [pytest](https://docs.pytest.org/en/latest/) | 7.1.2 | Simple and powerful testing with Python. / MIT |
| [python](https://www.python.org/) | 3.9.13 | General purpose programming language / PSF-2.0 |
| [python-dateutil](https://dateutil.readthedocs.org/) | 2.8.2 | Extensions to the standard Python datetime module. / BSD-3-Clause and Apache |
| [python-fastjsonschema](https://github.com/horejsek/python-fastjsonschema) | 2.16.2 | Fastest Python implementation of JSON schema / BSD-3-Clause |
| [python-libarchive-c](https://github.com/Changaco/python-libarchive-c) | 2.9 | Python interface to libarchive / CC0-1.0 |
| [python-lsp-black](https://github.com/python-lsp/python-lsp-black) | 1.2.1 | Black plugin for the Python LSP Server / MIT |
| [python-lsp-jsonrpc](https://github.com/python-lsp/python-lsp-jsonrpc) | 1.0.0 | A Python 3.6+ server implementation of the JSON RPC 2.0 protocol. / MIT |
| [python-lsp-server](https://github.com/python-lsp/python-lsp-server) | 1.5.0 | An implementation of the Language Server Protocol for Python / MIT |
| [python-slugify](https://github.com/un33k/python-slugify) | 5.0.2 | A Python Slugify application that handles Unicode / MIT |
| [python-snappy](https://github.com/andrix/python-snappy) | 0.6.0 | Python library for the snappy compression library from Google / BSD-3-Clause |
| [pytz](http://pythonhosted.org/pytz/) | 2022.1 | World timezone definitions, modern and historical. / MIT |
| [pyviz\_comms](https://www.holoviz.org) | 2.0.2 | Bidirectional communication for PyViz / BSD-3-Clause |
| [pywavelets](https://github.com/PyWavelets/pywt) | 1.3.0 | Discrete Wavelet Transforms in Python / MIT |
| [pyxdg](http://freedesktop.org/wiki/Software/pyxdg) | 0.27 | PyXDG contains implementations of freedesktop.org standards in python. / GNU Lesser General Public v2 (LGPLv2) |
| [pyyaml](http://pyyaml.org/wiki/PyYAML) | 6.0 | YAML parser and emitter for Python / MIT |
| [pyzmq](https://github.com/zeromq/pyzmq) | 23.2.0 | Python bindings for zeromq / BSD-3-Clause AND LGPL-3.0-or-later |
| [qdarkstyle](https://github.com/ColinDuquesnoy/QDarkStyleSheet) | 3.0.2 | A dark stylesheet for Qt applications (Qt4, Qt5, PySide, PyQt4, PyQt5, QtPy, PyQtGraph). / MIT |
| [qstylizer](https://github.com/blambright/qstylizer) | 0.1.10 | Qt stylesheet generation utility for PyQt/PySide / MIT |
| [qt](http://qt.io) | 5.15.9 | Qt is a cross-platform application and UI framework. / LGPL-3.0-only |
| [qt-main](http://qt.io) | 5.15.2 | Qt is a cross-platform application and UI framework. / LGPL-3.0-only |
| [qt-webengine](http://qt.io) | 5.15.9 | Qt is a cross-platform application and UI framework. / LGPL-3.0-only |
| [qtawesome](https://github.com/spyder-ide/qtawesome) | 1.0.3 | Iconic fonts in PyQt and PySide applications / MIT |
| [qtconsole](https://jupyter.org) | 5.3.2 | Jupyter Qt Console / BSD-3-Clause |
| [qtpy](https://github.com/spyder-ide/qtpy) | 2.2.0 | Abstraction layer for PyQt5/PyQt4/PySide / MIT |
| [qtwebkit](https://wiki.qt.io/Qt_WebKit) | 5.212 | WebKit is one of the major engine to render webpages and execute JavaScript code / LGPL-2.1-only |
| [queuelib](https://github.com/scrapy/queuelib) | 1.5.0 | Collection of persistent (disk-based) queues / BSD |
| [readline](https://tiswww.case.edu/php/chet/readline/rltop.html) | 8.1.2 | library for editing command lines as they are typed in / GPL-3.0-only |
| [regex](https://github.com/mrabarnett/mrab-regex) | 2022.7.9 | Alternative regular expression module, to replace re / Apache-2.0 |
| [requests](https://requests.readthedocs.io/en/latest/) | 2.28.1 | Requests is an elegant and simple HTTP library for Python, built with ♥. / Apache-2.0 |
| [requests-file](http://github.com/dashea/requests-file) | 1.5.1 | file transport adapter for Requests / Apache |
| [rope](https://github.com/python-rope/rope) | 0.22.0 | A python refactoring library / LGPL-3.0-or-later |
| [rtree](http://toblerity.github.com/rtree/) | 0.9.7 | R-Tree spatial index for Python GIS / MIT |
| [ruamel\_yaml](https://sourceforge.net/p/ruamel-yaml/code/ci/default/tree) | 0.15.100 | A patched copy of ruamel.yaml. / MIT |
| [s3transfer](https://github.com/boto/s3transfer) | 0.6.0 | An Amazon S3 Transfer Manager / Apache-2.0 |
| [scikit-image](https://scikit-image.org/) | 0.19.2 | Image processing in Python. / BSD-3-Clause |
| [scikit-learn](https://scikit-learn.org/) | 1.1.1 | A set of python modules for machine learning and data mining / BSD-3-Clause |
| [scipy](https://scipy.org/) | 1.9.1 | Scientific Library for Python / BSD-3-Clause |
| [scrapy](https://scrapy.org/) | 2.6.2 | A high-level Python Screen Scraping framework / BSD-3-Clause |
| [seaborn](https://seaborn.pydata.org) | 0.11.2 | Statistical data visualization / BSD-3-Clause |
| [secretstorage](https://github.com/mitya57/secretstorage) | 3.3.1 | Provides a way for securely storing passwords and other secrets. / BSD-3-Clause |
| [send2trash](https://github.com/arsenetar/send2trash) | 1.8.0 | Python library to natively send files to Trash (or Recycle bin) on all platforms. / BSD-3-Clause |
| [service\_identity](https://github.com/pyca/service_identity) | 18.1.0 | Service identity verification for pyOpenSSL. / MIT |
| [setuptools](https://github.com/pypa/setuptools) | 63.4.1 | Download, build, install, upgrade, and uninstall Python packages / MIT |
| [sip](https://www.riverbankcomputing.com/software/sip/) | 6.6.2 | A Python bindings generator for C/C++ libraries / GPL-3.0-only |
| [six](https://six.readthedocs.io/) | 1.16.0 | Python 2 and 3 compatibility utilities / MIT |
| [smart\_open](https://github.com/RaRe-Technologies/smart_open) | 5.2.1 | Python library for efficient streaming of large files / MIT |
| [snappy](https://github.com/google/snappy) | 1.1.9 | A fast compressor/decompressor / BSD-3-clause AND CC-BY-3.0 AND MIT AND CC-BY AND Public Domain |
| [sniffio](https://github.com/python-trio/sniffio) | 1.2.0 | Sniff out which async library your code is running under / Apache-2.0 |
| [snowballstemmer](https://github.com/snowballstem/snowball) | 2.2.0 | Snowball stemming library collection for Python / BSD-3-Clause |
| [sortedcollections](http://www.grantjenks.com/docs/sortedcollections/) | 2.1.0 | Python Sorted Collections / Apache-2.0 |
| [sortedcontainers](http://www.grantjenks.com/docs/sortedcontainers/) | 2.4.0 | Python Sorted Container Types: SortedList, SortedDict, and SortedSet / Apache-2.0 |
| [soupsieve](https://facelessuser.github.io/soupsieve) | 2.3.1 | A modern CSS selector implementation for BeautifulSoup / MIT |
| [sphinx](https://www.sphinx-doc.org) | 5.0.2 | Sphinx is a tool that makes it easy to create intelligent and beautiful documentation / BSD-2-Clause |
| [sphinxcontrib-applehelp](https://www.sphinx-doc.org/en/master/) | 1.0.2 | sphinxcontrib-applehelp is a sphinx extension which outputs Apple help books / BSD-2-Clause |
| [sphinxcontrib-devhelp](https://www.sphinx-doc.org/en/master/) | 1.0.2 | sphinxcontrib-devhelp is a sphinx extension which outputs Devhelp document / BSD-2-Clause |
| [sphinxcontrib-htmlhelp](https://www.sphinx-doc.org/en/master/) | 2.0.0 | sphinxcontrib-htmlhelp is a sphinx extension which renders HTML help files. / BSD-2-Clause |
| [sphinxcontrib-jsmath](https://www.sphinx-doc.org/en/master/) | 1.0.1 | A sphinx extension which renders display math in HTML via JavaScript / BSD-2-Clause |
| [sphinxcontrib-qthelp](https://www.sphinx-doc.org/en/master/) | 1.0.3 | sphinxcontrib-qthelp is a sphinx extension which outputs QtHelp document / BSD-2-Clause |
| [sphinxcontrib-serializinghtml](https://www.sphinx-doc.org/en/master/) | 1.1.5 | sphinxcontrib-serializinghtml is a sphinx extension which outputs “serialized” HTML files (json and pickle). / BSD-2-Clause |
| [spyder](https://www.spyder-ide.org/) | 5.3.3 | The Scientific Python Development Environment / MIT |
| [spyder-kernels](https://www.spyder-ide.org/) | 2.3.3 | Jupyter kernels for Spyder’s console / MIT |
| [sqlalchemy](https://www.sqlalchemy.org/) | 1.4.39 | Database Abstraction Library. / MIT |
| [sqlite](https://www.sqlite.org/) | 3.39.3 | Implements a self-contained, zero-configuration, SQL database engine / blessing |
| [statsmodels](https://www.statsmodels.org) | 0.13.2 | Statistical computations and models for use with SciPy / BSD-3-Clause |
| [sympy](https://sympy.org) | 1.10.1 | Python library for symbolic mathematics / BSD-3-Clause AND MIT |
| [tabulate](https://github.com/astanin/python-tabulate) | 0.8.10 | Pretty-print tabular data in Python, a library and a command-line utility. / MIT |
| [tbb](https://github.com/oneapi-src/oneTBB) | 2021.6.0 | High level abstract threading library / Apache-2.0 |
| tbb4py | 2021.6.0 | TBB module for Python / Apache-2.0 |
| [tblib](https://github.com/ionelmc/python-tblib) | 1.7.0 | Traceback serialization library. / BSD 2-Clause |
| [tenacity](http://github.com/jd/tenacity) | 8.0.1 | Retry a flaky function whenever an exception occurs until it works / Apache-2.0 |
| [terminado](https://github.com/jupyter/terminado) | 0.13.1 | Terminals served by tornado websockets / BSD-2-Clause |
| [testpath](https://testpath.readthedocs.io) | 0.6.0 | Testpath is a collection of utilities for Python code working with files and commands. / BSD-3-Clause |
| [text-unidecode](https://github.com/kmike/text-unidecode/) | 1.3 | The most basic Text::Unidecode port / Artistic |
| [textdistance](https://github.com/orsinium/textdistance) | 4.2.1 | TextDistance – python library for comparing distance between two or more sequences by many algorithms. / MIT |
| [threadpoolctl](https://github.com/joblib/threadpoolctl) | 2.2.0 | Python helpers to control the threadpools of native libraries / BSD 3-Clause |
| [three-merge](https://github.com/spyder-ide/three-merge) | 0.1.1 | Simple Python library to perform a 3-way merge between strings / MIT |
| [tifffile](https://github.com/cgohlke/tifffile) | 2021.7.2 | Read and write image data from and to TIFF files. / BSD-3-Clause |
| [tinycss](http://tinycss.readthedocs.io/) | 0.4 | Tinycss is a complete yet simple CSS parser for Python. / BSD-3-Clause |
| [tk](https://www.tcl.tk/) | 8.6.12 | A dynamic programming language with GUI support. Bundles Tcl and Tk. / TCL |
| [tldextract](https://github.com/john-kurkowski/tldextract) | 3.2.0 | Accurately separate the TLD from the registered domain andsubdomains of a URL, using the Public Suffix List. / BSD-3-Clause |
| [toml](https://github.com/uiri/toml) | 0.10.2 | Python lib for TOML. / MIT |
| [tomli](https://github.com/hukkin/tomli) | 2.0.1 | A simple TOML parser / MIT |
| [tomlkit](https://github.com/sdispater/tomlkit) | 0.11.1 | Style preserving TOML library / MIT |
| [toolz](http://toolz.readthedocs.org/) | 0.11.2 | List processing tools and functional utilities / BSD-3-Clause |
| [tornado](https://www.tornadoweb.org/) | 6.1 | A Python web framework and asynchronous networking library, originally developed at FriendFeed. / Apache-2.0 |
| [tqdm](https://tqdm.github.io/) | 4.64.1 | A Fast, Extensible Progress Meter / MPL-2.0 AND MIT |
| [traitlets](http://traitlets.readthedocs.org/) | 5.1.1 | Configuration system for Python applications / BSD-3-Clause |
| [twisted](https://twistedmatrix.com/) | 22.2.0 | An asynchronous networking framework written in Python / MIT |
| [typing-extensions](https://github.com/python/typing_extensions) | 4.3.0 | Backported and Experimental Type Hints for Python / PSF-2.0 |
| [typing\_extensions](https://github.com/python/typing_extensions) | 4.3.0 | Backported and Experimental Type Hints for Python / PSF-2.0 |
| [tzdata](https://www.iana.org/time-zones) | 2022c | The Time Zone Database (called tz, tzdb or zoneinfo) / CC-PDDC OR BSD-3-Clause |
| [ujson](https://github.com/ultrajson/ultrajson) | 5.4.0 | Ultra fast JSON decoder and encoder written in C with Python bindings / BSD-3-Clause |
| [unidecode](https://pypi.python.org/pypi/Unidecode) | 1.2.0 | ASCII transliterations of Unicode text / GPL-2.0-or-later |
| [unixodbc](http://www.unixodbc.org/) | 2.3.11 | ODBC on non MS Windows platforms / LGPL-2.1-or-later |
| [urllib3](https://urllib3.readthedocs.io/) | 1.26.11 | HTTP library with thread-safe connection pooling, file post, and more. / MIT |
| [w3lib](https://github.com/scrapy/w3lib) | 1.21.0 | Library of web-related functions / BSD |
| [watchdog](http://github.com/gorakhargosh/watchdog) | 2.1.6 | Filesystem events monitoring / Apache-2.0 |
| [wcwidth](https://github.com/jquast/wcwidth) | 0.2.5 | Measures number of Terminal column cells of wide-character codes. / MIT |
| [webencodings](https://github.com/gsnedders/python-webencodings) | 0.5.1 | Character encoding aliases for legacy web content / BSD 3-Clause |
| [websocket-client](https://github.com/liris/websocket-client) | 0.58.0 | WebSocket client for python. hybi13 is supported. / BSD-3-Clause |
| [werkzeug](https://palletsprojects.com/p/werkzeug/) | 2.0.3 | The comprehensive WSGI web application library. / BSD-3-Clause |
| [wget](https://www.gnu.org/software/wget/) | 1.21.3 | utility for non-interactive download of files from the Web / GPL-3.0-or-later |
| [whatthepatch](https://github.com/cscorley/whatthepatch) | 1.0.2 | What The Patch!? is a library for both parsing and applying patch files / MIT |
| [wheel](https://github.com/pypa/wheel) | 0.37.1 | A built-package format for Python. / MIT |
| [widgetsnbextension](http://ipython.org) | 3.5.2 | Interactive Widgets for Jupyter / BSD-3-Clause |
| [wrapt](https://github.com/GrahamDumpleton/wrapt) | 1.14.1 | Module for decorators, wrappers and monkey patching / BSD-2-Clause |
| [wurlitzer](https://github.com/minrk/wurlitzer) | 3.0.2 | Capture C-level stdout/stderr in Python / MIT |
| [xarray](https://github.com/pydata/xarray) | 0.20.1 | N-D labeled arrays and datasets in Python. / Apache-2.0 |
| [xlrd](http://www.python-excel.org/) | 2.0.1 | Library for developers to extract data from Microsoft Excel (tm) spreadsheet files / BSD 3-Clause and BSD with advertising |
| [xlsxwriter](https://xlsxwriter.readthedocs.io/) | 3.0.3 | A Python module for creating Excel XLSX files / BSD-2-Clause |
| [xz](https://tukaani.org/xz/) | 5.2.6 | Data compression software with high compression ratio / LGPL-2.1-or-later and GPL-2.0-or-later |
| [yaml](http://pyyaml.org/wiki/LibYAML) | 0.2.5 | A C library for parsing and emitting YAML / MIT |
| [yapf](https://github.com/google/yapf) | 0.31.0 | A formatter for Python files / Apache 2.0 |
| [zeromq](http://zeromq.org) | 4.3.4 | A high-performance asynchronous messaging library. / LGPL-3.0-or-later |
| [zict](https://github.com/mrocklin/zict) | 2.1.0 | Composable Dictionary Classes / BSD-3-Clause |
| [zipp](https://github.com/jaraco/zipp) | 3.8.0 | A pathlib-compatible Zipfile object wrapper / MIT |
| [zlib](https://zlib.net/) | 1.2.12 | Massively spiffy yet delicately unobtrusive compression library / Zlib |
| zope | 1.0 | web application server / BSD |
| [zope.interface](https://github.com/zopefoundation/zope.interface) | 5.4.0 | Interfaces for Python / ZPL-2.1 |
| [zstd](https://www.zstd.net) | 1.5.2 | Zstandard - Fast real-time compression algorithm / BSD-3-Clause AND GPL-2.0-or-later |
| Name | Version | Summary / License |
|---|---|---|
| [\_libgcc\_mutex](https://github.com/AnacondaRecipes/_libgcc_mutex-feedstock) | 0.1 | Mutex for libgcc and libgcc-ng / None |
| [\_openmp\_mutex](https://github.com/conda-forge/ctng-compilers-feedstock) | 5.1 | OpenMP Implementation Mutex / BSD-3-Clause |
| [alabaster](http://www.sphinx-doc.org/en/stable/index.html) | 0.7.12 | Configurable, Python 2+3 compatible Sphinx theme. / BSD 3-Clause |
| [anaconda-client](https://anaconda.org) | 1.11.0 | anaconda.org command line client library / BSD-3-Clause |
| [anaconda-navigator](https://github.com/ContinuumIO/navigator) | 2.3.2 | Anaconda Navigator / proprietary - Continuum Analytics, Inc. |
| [anaconda-project](https://github.com/Anaconda-Platform/anaconda-project) | 0.11.1 | Tool for encapsulating, running, and reproducing data science projects / BSD-3-Clause |
| [anyio](https://github.com/agronholm/anyio) | 3.5.0 | High level compatibility layer for multiple asynchronous event loop implementations on Python / MIT |
| [appdirs](http://github.com/ActiveState/appdirs) | 1.4.4 | A small Python module for determining appropriate platform-specific dirs. / MIT |
| [argon2-cffi](https://argon2-cffi.readthedocs.org/) | 21.3.0 | The secure Argon2 password hashing algorithm. / MIT |
| [argon2-cffi-bindings](https://github.com/hynek/argon2-cffi-bindings) | 21.2.0 | Low-level Python CFFI Bindings for Argon2 / MIT |
| [arrow](https://github.com/arrow-py/arrow) | 1.2.2 | Better dates & times for Python / Apache-2.0 |
| [astroid](https://github.com/PyCQA/astroid) | 2.11.7 | A abstract syntax tree for Python with inference support. / LGPL-2.1-or-later |
| [astropy](https://www.astropy.org/) | 5.1 | Community-developed Python Library for Astronomy / BSD-3-Clause |
| [atomicwrites](https://github.com/untitaker/python-atomicwrites) | 1.4.0 | Atomic file writes / MIT |
| [attrs](https://attrs.readthedocs.io/en/stable/) | 21.4.0 | attrs is the Python package that will bring back the joy of writing classes by relieving you from the drudgery of implementing object protocols (aka dunder methods). / MIT |
| [automat](https://github.com/glyph/Automat) | 20.2.0 | self-service finite-state machines for the programmer on the go / MIT |
| [autopep8](https://github.com/hhatto/autopep8) | 1.6.0 | A tool that automatically formats Python code to conform to the PEP 8 style guide / MIT |
| [babel](http://babel.pocoo.org/) | 2.9.1 | Utilities to internationalize and localize Python applications / BSD 3-clause |
| [backcall](https://github.com/takluyver/backcall/) | 0.2.0 | Specifications for callback functions passed in to an API / BSD-3-Clause |
| [backports](https://github.com/brandon-rhodes/backports) | 1.1 | Namespace for backported Python features. / MIT |
| [backports.functools\_lru\_cache](https://github.com/jaraco/backports.functools_lru_cache) | 1.6.4 | Backport of functools.lru\_cache from Python 3.3 as published at ActiveState. / MIT |
| [backports.tempfile](https://github.com/pjdelport/backports.tempfile) | 1.0 | Backports of new features in Python’s tempfile module / PSF 2 |
| [backports.weakref](https://github.com/pjdelport/backports.weakref) | 1.0.post1 | Backport of new features in Python’s weakref module / Python-2.0 |
| [bcrypt](https://github.com/pyca/bcrypt/) | 3.2.0 | Modern password hashing for your software and your servers / Apache-2.0 |
| [beautifulsoup4](https://www.crummy.com/software/BeautifulSoup/) | 4.11.1 | Python library designed for screen-scraping / MIT |
| [binaryornot](https://github.com/audreyr/binaryornot) | 0.4.4 | Ultra-lightweight pure Python package to check if a file is binary or text. / BSD-3-Clause |
| [bitarray](https://github.com/ilanschnell/bitarray) | 2.5.1 | efficient arrays of booleans – C extension / PSF-2.0 |
| [bkcharts](http://github.com/bokeh/bkcharts) | 0.2 | High level chart types built on top of Bokeh / BSD 3-Clause |
| [black](https://github.com/psf/black) | 22.6.0 | The Uncompromising Code Formatter / MIT |
| [blas](http://www.netlib.org/lapack) | 1.0 | Linear Algebra PACKage / BSD-3-Clause |
| [bleach](https://github.com/mozilla/bleach) | 4.1.0 | Easy, whitelist-based HTML-sanitizing tool / Apache-2.0 |
| [blosc](https://github.com/Blosc/c-blosc) | 1.21.0 | A blocking, shuffling and loss-less compression library that can be faster than memcpy() / BSD-3-Clause |
| [bokeh](https://bokeh.org/) | 2.4.3 | Bokeh is an interactive visualization library for modern web browsers. / BSD-3-Clause |
| [boto3](https://aws.amazon.com/sdk-for-python) | 1.24.28 | Amazon Web Services SDK for Python / Apache-2.0 |
| [botocore](https://aws.amazon.com/sdk-for-python/) | 1.27.28 | Low-level, data-driven core of boto 3. / Apache-2.0 |
| [bottleneck](https://github.com/pydata/bottleneck) | 1.3.5 | Fast NumPy array functions written in Cython. / BSD-2-Clause |
| [brotli](https://github.com/google/brotli) | 1.0.9 | Brotli compression format / MIT |
| [brotli-bin](https://github.com/google/brotli) | 1.0.9 | Brotli compression format / MIT |
| [brotlipy](https://github.com/python-hyper/brotlipy) | 0.7.0 | Python bindings to the Brotli compression library / MIT |
| [brunsli](https://github.com/google/brunsli) | 0.1 | Practical JPEG Repacker / MIT |
| [bzip2](http://www.bzip.org/) | 1.0.8 | high-quality data compressor / bzip2 |
| [c-ares](https://c-ares.org/) | 1.18.1 | This is c-ares, an asynchronous resolver library / MIT |
| [ca-certificates](https://curl.se/docs/caextract.html) | 2022.07.19 | Certificates for use with other packages. / MPL-2.0 |
| [certifi](https://certifi.io/) | 2022.9.14 | Python package for providing Mozilla’s CA Bundle. / MPL-2.0 |
| [cffi](https://cffi.readthedocs.org/) | 1.15.1 | Foreign Function Interface for Python calling C code. / MIT |
| [cfitsio](http://heasarc.gsfc.nasa.gov/fitsio/fitsio.html) | 3.470 | A library for reading and writing FITS files / fitsio |
| [chardet](https://github.com/chardet/chardet) | 4.0.0 | Universal character encoding detector / LGPL2 |
| [charls](https://github.com/team-charls/charls) | 2.2.0 | CharLS is a C++ implementation of the JPEG-LS standard for lossless and near-lossless image compression and decompression. JPEG-LS is a low-complexity image compression standard that matches JPEG 2000 compression ratios. / BSD-3-Clause |
| [charset-normalizer](https://github.com/ousret/charset_normalizer) | 2.0.4 | The Real First Universal Charset Detector. Open, modern and actively maintained alternative to Chardet. / MIT |
| [click](https://palletsprojects.com/p/click) | 8.0.4 | Python composable command line interface toolkit / BSD-3-Clause |
| [cloudpickle](https://github.com/cloudpipe/cloudpickle) | 2.0.0 | Extended pickling support for Python objects / BSD-3-Clause |
| [clyent](https://github.com/Anaconda-Platform/clyent) | 1.2.2 | Command line client library for windows and posix / BSD 3-Clause |
| [colorama](https://github.com/tartley/colorama) | 0.4.5 | Cross-platform colored terminal text / BSD-3-Clause |
| [colorcet](https://colorcet.holoviz.org/index.html) | 3.0.0 | Collection of perceptually uniform colormaps / CC-BY-4.0 |
| [conda](https://conda.io) | 22.9.0 | OS-agnostic, system-level binary package and environment manager. / BSD-3-Clause |
| [conda-build](https://github.com/conda/conda-build) | 3.22.0 | tools for building conda packages / BSD-3-Clause |
| [conda-content-trust](https://github.com/conda/conda-content-trust) | 0.1.3 | Signing and verification tools for conda / BSD-3-Clause |
| [conda-env](https://github.com/conda/conda-env) | 2.6.0 | Tools for interacting with conda environments. / BSD 3-Clause |
| [conda-token](https://github.com/Anaconda/conda-token) | 0.4.0 | Set repository access token / BSD-3-Clause |
| [conda-verify](https://github.com/conda/conda-verify) | 3.4.2 | tool for validating conda recipes and conda packages / BSD 3-Clause |
| [constantly](https://github.com/twisted/constantly) | 15.1.0 | Symbolic constants in Python / MIT |
| [cookiecutter](https://github.com/cookiecutter/cookiecutter) | 1.7.3 | A command-line utility that creates projects from cookiecutters (project templates), e.g. creating a Python package project from a Python package project template. / BSD-3-Clause |
| [cryptography](https://github.com/pyca/cryptography) | 37.0.1 | Provides cryptographic recipes and primitives to Python developers / (BSD-3-Clause OR Apache-2.0) AND PSF-2.0 AND MIT |
| [cssselect](https://pythonhosted.org/cssselect/) | 1.1.0 | CSS Selectors for Python / BSD 3-Clause |
| [curl](https://curl.se/) | 7.84.0 | tool and library for transferring data with URL syntax / curl |
| [cycler](http://matplotlib.org/cycler) | 0.11.0 | Composable style cycles. / BSD-3-Clause |
| [cython](https://cython.org/) | 0.29.32 | The Cython compiler for writing C extensions for the Python language / Apache-2.0 |
| [cytoolz](https://github.com/pytoolz/cytoolz) | 0.11.0 | Cython implementation of Toolz. High performance functional utilities / BSD-3-Clause |
| [daal4py](https://intelpython.github.io/daal4py/) | 2021.6.0 | A convenient Python API to Intel (R) oneAPI Data Analytics Library / Apache-2.0 |
| [dal](https://software.intel.com/content/www/us/en/develop/tools.html) | 2021.6.0 | Intel® oneDAL runtime libraries / Intel Simplified Software License |
| [dask](https://dask.org/) | 2022.7.0 | Parallel PyData with Task Scheduling / BSD-3-Clause |
| [dask-core](https://github.com/dask/dask/) | 2022.7.0 | Parallel Python with task scheduling / BSD-3-Clause |
| [dataclasses](https://github.com/ericvsmith/dataclasses) | 0.8 | An implementation of PEP 557: Data Classes / Apache-2.0 |
| [datashader](https://datashader.org) | 0.14.1 | Data visualization toolchain based on aggregating into a grid / BSD-3-Clause |
| [datashape](http://datashape.pydata.org) | 0.5.4 | A data description language. / BSD 2-Clause |
| [dbus](http://www.freedesktop.org/wiki/Software/dbus/) | 1.13.18 | Simple message bus system for applications to talk to one another / GPL2 |
| [debugpy](https://github.com/Microsoft/debugpy) | 1.5.1 | An implementation of the Debug Adapter Protocol for Python / MIT |
| [decorator](https://github.com/micheles/decorator) | 5.1.1 | Better living through Python with decorators. / BSD-2-Clause |
| [defusedxml](https://bitbucket.org/tiran/defusedxml) | 0.7.1 | XML bomb protection for Python stdlib modules / PSF 2.0 |
| [diff-match-patch](http://code.google.com/p/google-diff-match-patch/) | 20200713 | Diff Match Patch is a high-performance library in multiple languages that manipulates plain text / Apache-2.0 |
| [dill](http://www.cacr.caltech.edu/~mmckerns/dill.htm) | 0.3.4 | Serialize all of python (almost) / BSD-3-Clause |
| [distributed](https://distributed.readthedocs.io/en/latest/) | 2022.7.0 | Distributed computing with Dask / BSD-3-Clause |
| [docutils](http://docutils.sourceforge.net/) | 0.18.1 | Docutils – Python Documentation Utilities / LicenseRef-Public-Domain-Dedictation and BSD-2-Clause and LicenseRef-PSF-2.1.1 and GPL-3.0-or-later |
| [entrypoints](https://github.com/takluyver/entrypoints) | 0.4 | Discover and load entry points from installed packages. / MIT License |
| [et\_xmlfile](https://foss.heptapod.net/openpyxl/et_xmlfile) | 1.1.0 | An implementation of lxml.xmlfile for the standard library / MIT AND PSF-2.0 |
| [expat](https://libexpat.github.io) | 2.4.9 | Expat XML parser library in C / MIT |
| [fftw](http://fftw.org) | 3.3.9 | The fastest Fourier transform in the west. / GPL 2 |
| [filelock](https://github.com/tox-dev/py-filelock) | 3.6.0 | A platform independent file lock. / Unlicense |
| [flake8](http://flake8.pycqa.org/) | 4.0.1 | Your Tool For Style Guide Enforcement / MIT |
| [flask](https://palletsprojects.com/p/flask) | 1.1.2 | A simple framework for building complex web applications. / BSD-3-Clause |
| [fontconfig](http://www.freedesktop.org/wiki/Software/fontconfig/) | 2.13.1 | A library for configuring and customizing font access. / MIT |
| [fonttools](https://github.com/fonttools/fonttools) | 4.25.0 | fontTools is a library for manipulating fonts, written in Python. / MIT |
| [freetype](https://freetype.org/) | 2.11.0 | A Free, High-Quality, and Portable Font Engine / GPL-2-only and LicenseRef-FreeType |
| [fsspec](https://github.com/fsspec/filesystem_spec) | 2022.7.1 | A specification for pythonic filesystems / BSD-3-Clause |
| [future](http://python-future.org) | 0.18.2 | Clean single-source support for Python 3 and 2 / MIT |
| [gensim](https://github.com/RaRe-Technologies/gensim) | 4.1.2 | Topic Modelling for Humans / LGPL-2.1-only |
| [giflib](http://giflib.sourceforge.net) | 5.2.1 | Library for reading and writing gif images / MIT |
| [glib](https://developer.gnome.org/glib/) | 2.69.1 | Provides core application building blocks for libraries and applications written in C. / LGPL-2.1-or-later |
| [glob2](https://github.com/miracle2k/python-glob2) | 0.7 | Version of the glob module that supports recursion via \*\*, and can capture patterns. / BSD-2-Clause |
| [gmp](http://gmplib.org/) | 6.2.1 | The GNU multiprecision library. / GPL-2.0-or-later AND LGPL-3.0-or-later |
| [gmpy2](https://pypi.python.org/pypi/gmpy2) | 2.1.2 | GMP/MPIR, MPFR, and MPC interface to Python 2.6+ and 3.x / LGPL-3.0-or-later |
| [greenlet](https://github.com/python-greenlet/greenlet) | 1.1.1 | Lightweight in-process concurrent programming / MIT |
| [gst-plugins-base](http://gstreamer.freedesktop.org/) | 1.14.0 | GStreamer Base Plug-ins / GPL2 |
| [gstreamer](http://gstreamer.freedesktop.org/) | 1.14.0 | Library for constructing graphs of media-handling components / LGPL 2 |
| [h5py](https://www.h5py.org/) | 3.7.0 | Read and write HDF5 files from Python / BSD-3-Clause |
| [hdf5](http://www.hdfgroup.org/HDF5/) | 1.10.6 | HDF5 is a data model, library, and file format for storing and managing data / HDF5 |
| [heapdict](http://stutzbachenterprises.com/) | 1.0.1 | A heap with decrease-key and increase-key operations / BSD 3-Clause |
| [holoviews](https://holoviews.org) | 1.15.0 | Stop plotting your data - annotate your data and let it visualize itself. / BSD-3-Clause |
| [hvplot](https://hvplot.holoviz.org) | 0.8.0 | A high-level plotting API for the PyData ecosystem built on HoloViews / BSD-3-Clause |
| [hyperlink](https://github.com/python-hyper/hyperlink) | 21.0.0 | Immutable, Pythonic, correct URLs. / MIT |
| [icu](http://site.icu-project.org/) | 58.2 | International Components for Unicode. / MIT |
| [idna](https://github.com/kjd/idna) | 3.3 | Internationalized Domain Names in Applications (IDNA). / BSD-3-Clause |
| [imagecodecs](https://www.lfd.uci.edu/~gohlke/) | 2021.8.26 | Image transformation, compression, and decompression codecs / BSD-3-Clause |
| [imageio](https://imageio.github.io) | 2.19.3 | A Python library for reading and writing image data / BSD-2-Clause |
| [imagesize](https://github.com/shibukawa/imagesize_py) | 1.4.1 | Getting image size from png/jpeg/jpeg2000/gif file / MIT |
| [importlib-metadata](https://github.com/python/importlib_metadata) | 4.11.3 | A library to access the metadata for a Python package. / Apache-2.0 |
| [importlib\_metadata](https://github.com/python/importlib_metadata) | 4.11.3 | A library to access the metadata for a Python package. / Apache-2.0 |
| [incremental](https://github.com/hawkowl/incremental) | 21.3.0 | Incremental is a small library that versions your Python projects. / MIT |
| [inflection](http://github.com/jpvanhal/inflection) | 0.5.1 | A port of Ruby on Rails inflector to Python / MIT |
| [iniconfig](http://github.com/RonnyPfannschmidt/iniconfig) | 1.1.1 | iniconfig: brain-dead simple config-ini parsing / MIT |
| [intake](https://github.com/ContinuumIO/intake) | 0.6.5 | Data load and catalog system / BSD-2-Clause |
| [intel-openmp](https://software.intel.com/en-us/node/522690) | 2021.4.0 | Math library for Intel and compatible processors / LicenseRef-ProprietaryIntel |
| [intervaltree](https://github.com/chaimleib/intervaltree) | 3.1.0 | Editable interval tree data structure for Python 2 and 3 / Apache-2.0 |
| [ipykernel](https://ipython.org) | 6.15.2 | IPython Kernel for Jupyter / BSD-3-Clause |
| [ipython](https://ipython.org) | 7.31.1 | IPython: Productive Interactive Computing / BSD-3-Clause |
| [ipython\_genutils](http://ipython.org) | 0.2.0 | vestigial utilities from IPython / BSD 3-Clause |
| [ipywidgets](https://github.com/ipython/ipywidgets) | 7.6.5 | Jupyter Interactive Widgets / BSD-3-Clause |
| [isort](https://github.com/timothycrosley/isort) | 5.9.3 | A Python utility / library to sort Python imports. / MIT |
| [itemadapter](https://github.com/scrapy/itemadapter) | 0.3.0 | Common interface for different data containers / BSD-3-Clause |
| [itemloaders](https://github.com/scrapy/itemadapter) | 1.0.4 | Collect data from HTML and XML sources / BSD-3-Clause |
| [itsdangerous](https://github.com/pallets/itsdangerous) | 2.0.1 | Various helpers to pass trusted data to untrusted environments. / BSD-3-Clause |
| [jdcal](https://github.com/phn/jdcal) | 1.4.1 | Julian dates from proleptic Gregorian and Julian calendars. / BSD 2-Clause |
| [jedi](https://github.com/davidhalter/jedi/) | 0.18.1 | An autocompletion tool for Python that can be used for text editors. / MIT |
| [jeepney](https://gitlab.com/takluyver/jeepney) | 0.7.1 | Pure Python DBus interface / MIT |
| [jellyfish](https://github.com/jamesturk/jellyfish) | 0.9.0 | a library for doing approximate and phonetic matching of strings. / BSD-2-Clause |
| [jinja2](https://palletsprojects.com/p/jinja/) | 2.11.3 | A very fast and expressive template engine. / BSD-3-Clause |
| [jinja2-time](https://github.com/hackebrot/jinja2-time) | 0.2.0 | Jinja2 Extension for Dates and Times / MIT |
| [jmespath](http://jmespath.org/) | 0.10.0 | Query language for JSON / MIT |
| [joblib](https://joblib.readthedocs.io/en/latest/) | 1.1.0 | Lightweight pipelining: using Python functions as pipeline jobs. / BSD-3-Clause |
| [jpeg](https://www.ijg.org/) | 9e | read/write jpeg COM, EXIF, IPTC medata / IJG |
| [jq](http://stedolan.github.io/jq/) | 1.6 | A command-line JSON processor. / MIT |
| [json5](https://github.com/dpranke/pyjson5) | 0.9.6 | A Python implementation of the JSON5 data format / Apache-2.0 |
| [jsonschema](https://github.com/python-jsonschema/jsonschema) | 4.16.0 | An implementation of JSON Schema validation for Python / MIT |
| [jupyter](http://jupyter.org) | 1.0.0 | Jupyter metapackage. Install all the Jupyter components in one go. / BSD 3-Clause |
| [jupyter\_client](https://jupyter.org) | 7.3.4 | jupyter\_client contains the reference implementation of the Jupyter protocol. / BSD-3-Clause |
| [jupyter\_console](https://jupyter.org) | 6.4.3 | Jupyter terminal console / BSD-3-Clause |
| [jupyter\_core](https://jupyter.org) | 4.11.1 | Core common functionality of Jupyter projects. / BSD-3-Clause |
| [jupyter\_server](https://jupyter.org) | 1.18.1 | Jupyter Server / BSD-3-Clause |
| [jupyterlab](https://github.com/jupyterlab/jupyterlab) | 3.4.4 | JupyterLab PRE-ALPHA / BSD-3-Clause |
| [jupyterlab\_pygments](http://github.com/JupyterLab/jupyterlab_pygments) | 0.1.2 | Pygments syntax coloring scheme making use of the JupyterLab CSS variables / BSD-3-Clause |
| [jupyterlab\_server](https://github.com/jupyterlab/jupyterlab_server) | 2.10.3 | A set of server components for JupyterLab and JupyterLab like applications. / BSD-3-Clause |
| [jupyterlab\_widgets](https://github.com/jupyter-widgets/ipywidgets) | 1.0.0 | JupyterLab extension providing HTML widgets / BSD-3-Clause |
| [jxrlib](https://packages.debian.org/source/sid/jxrlib) | 1.1 | jxrlib - JPEG XR Library by Microsoft, built from Debian hosted sources. / BSD-2-Clause |
| [keyring](https://github.com/jaraco/keyring) | 23.4.0 | Store and access your passwords safely / MIT |
| [kiwisolver](https://github.com/nucleic/kiwi) | 1.4.2 | An efficient C++ implementation of the Cassowary constraint solver / BSD-3-Clause |
| [krb5](http://web.mit.edu/kerberos/) | 1.19.2 | A network authentication protocol. / MIT |
| [lazy-object-proxy](https://github.com/ionelmc/python-lazy-object-proxy) | 1.6.0 | A fast and thorough lazy object proxy / BSD-2-Clause |
| [lcms2](http://www.littlecms.com/) | 2.12 | Open Source Color Management Engine / MIT |
| [ld\_impl\_linux-64](https://www.gnu.org/software/binutils/) | 2.38 | A set of programming tools for creating and managing binary programs, object files, libraries, profile data, and assembly source code. / GPL-3.0-only |
| [lerc](https://github.com/Esri/lerc) | 3.0 | LERC - Limited Error Raster Compression / Apache-2.0 |
| [libaec](https://gitlab.dkrz.de/k202009/libaec) | 1.0.4 | Adaptive Entropy Coding library / BSD-2-Clause |
| [libarchive](https://libarchive.org/) | 3.6.1 | Multi-format archive and compression library / BSD-2-Clause |
| [libbrotlicommon](https://github.com/google/brotli) | 1.0.9 | Brotli compression format / MIT |
| [libbrotlidec](https://github.com/google/brotli) | 1.0.9 | Brotli compression format / MIT |
| [libbrotlienc](https://github.com/google/brotli) | 1.0.9 | Brotli compression format / MIT |
| [libclang](https://llvm.org/) | 10.0.1 | Development headers and libraries for Clang / Apache-2.0 WITH LLVM-exception |
| [libcurl](https://curl.se/) | 7.84.0 | tool and library for transferring data with URL syntax / curl |
| [libdeflate](https://github.com/ebiggers/libdeflate) | 1.8 | libdeflate is a library for fast, whole-buffer DEFLATE-based compression and decompression. / MIT |
| [libedit](http://thrysoee.dk/editline/) | 3.1.20210910 | Editline Library (libedit) / BSD-2-Clause |
| [libev](http://software.schmorp.de/pkg/libev.html) | 4.33 | A full-featured and high-performance event loop that is loosely modeled after libevent, but without its limitations and bugs. / BSD-2-Clause |
| [libevent](http://libevent.org/) | 2.1.12 | An event notification library. / BSD-3-Clause |
| [libffi](https://sourceware.org/libffi/) | 3.3 | A Portable Foreign Function Interface Library. / MIT |
| [libgcc-ng](https://gcc.gnu.org/onlinedocs/gccint/Libgcc.html) | 11.2.0 | The GCC low-level runtime library / GPL-3.0-only WITH GCC-exception-3.1 |
| [libgfortran-ng](https://gcc.gnu.org/) | 11.2.0 | The GNU Fortran Runtime Library / GPL-3.0-only WITH GCC-exception-3.1 |
| [libgfortran5](https://gcc.gnu.org/) | 11.2.0 | Fortran compiler and libraries from the GNU Compiler Collection / GPL-3.0-only WITH GCC-exception-3.1 |
| [libgomp](https://gcc.gnu.org/onlinedocs/gccint/Libgcc.html) | 11.2.0 | The GCC OpenMP implementation. / GPL-3.0-only WITH GCC-exception-3.1 |
| [libidn2](https://www.gnu.org/software/libidn/#libidn2) | 2.3.2 | Library for internationalized domain names (IDNA2008) support / LGPLv2 AND LGPL-3.0-or-later AND GPL-3.0-or-later |
| [liblief](https://lief.quarkslab.com/) | 0.11.5 | A cross platform library to parse, modify and abstract ELF, PE and MachO formats. / Apache-2.0 |
| [libllvm10](http://llvm.org/) | 10.0.1 | Development headers and libraries for LLVM / Apache-2.0 WITH LLVM-exception |
| [libllvm11](https://llvm.org/) | 11.1.0 | Development headers and libraries for LLVM / Apache-2.0 WITH LLVM-exception |
| [libnghttp2](http://github.com/nghttp2/nghttp2) | 1.46.0 | This is an implementation of Hypertext Transfer Protocol version 2. / MIT |
| [libpng](http://www.libpng.org/pub/png/libpng.html) | 1.6.37 | PNG reference library / zlib/libpng |
| [libpq](http://www.postgresql.org/) | 12.9 | The postgres runtime libraries and utilities (not the server itself) / PostgreSQL |
| [libsodium](http://libsodium.org) | 1.0.18 | A modern and easy-to-use crypto library. / ISC |
| [libspatialindex](http://libspatialindex.github.io) | 1.9.3 | Extensible framework for robust spatial indexing / MIT |
| [libssh2](https://www.libssh2.org/) | 1.10.0 | the SSH library / BSD-3-Clause |
| [libstdcxx-ng](https://gcc.gnu.org/) | 11.2.0 | The GNU C++ Runtime Library / GPL-3.0-only WITH GCC-exception-3.1 |
| [libtiff](http://www.simplesystems.org/libtiff/) | 4.4.0 | Support for the Tag Image File Format (TIFF). / HPND |
| [libunistring](https://www.gnu.org/software/libunistring) | 0.9.10 | This library provides functions for manipulating Unicode strings and for manipulating C strings according to the Unicode standard. / LGPL |
| [libuuid](http://sourceforge.net/projects/libuuid/) | 1.0.3 | Portable uuid C library. / BSD 3-Clause |
| [libwebp](https://developers.google.com/speed/webp/) | 1.2.2 | WebP image library / BSD-3-Clause |
| [libwebp-base](https://developers.google.com/speed/webp) | 1.2.2 | WebP image library / BSD-3-Clause |
| [libxcb](http://xcb.freedesktop.org/) | 1.15 | This is the C-language Binding (XCB) package to the X Window System protocol / MIT |
| [libxkbcommon](https://github.com/xkbcommon/libxkbcommon) | 1.0.1 | keymap handling library for toolkits and window systems / MIT/X11 Derivative |
| [libxml2](https://gitlab.gnome.org/GNOME/libxml2/) | 2.9.14 | The XML C parser and toolkit of Gnome / MIT |
| [libxslt](https://gitlab.gnome.org/GNOME/libxslt) | 1.1.35 | The XSLT C library developed for the GNOME project / MIT |
| [libzopfli](https://github.com/google/zopfli) | 1.0.3 | A compression library programmed in C to perform very good, but slow, deflate or zlib compression. / Apache-2.0 |
| [llvmlite](https://llvmlite.pydata.org) | 0.38.0 | A lightweight LLVM python binding for writing JIT compilers. / BSD-2-Clause |
| [locket](https://github.com/mwilliamson/locket.py) | 1.0.0 | File-based locks for Python for Linux and Windows / BSD-2-Clause |
| [lxml](https://lxml.de/) | 4.9.1 | Pythonic binding for the C libraries libxml2 and libxslt. / BSD-3-Clause and GPL-2.0-only and ZPL-2.0 and LicenseRef-ElementTree |
| [lz4](https://github.com/python-lz4/python-lz4) | 3.1.3 | LZ4 Bindings for Python / BSD-3-Clause |
| [lz4-c](https://www.lz4.org) | 1.9.3 | Extremely Fast Compression algorithm / BSD-2-Clause |
| [lzo](http://www.oberhumer.com/opensource/lzo/) | 2.10 | LZO is a portable lossless data compression library written in ANSI C. / GPL v2+ |
| [markdown](https://pythonhosted.org/Markdown/) | 3.3.4 | Python implementation of Markdown. / BSD-3-Clause |
| [markupsafe](https://www.palletsprojects.com/p/markupsafe) | 2.0.1 | Safely add untrusted strings to HTML/XML markup. / BSD-3-Clause |
| [matplotlib](https://matplotlib.org/) | 3.5.2 | Publication quality figures in Python / LicenseRef-PSF-based |
| [matplotlib-base](https://matplotlib.org/) | 3.5.2 | Publication quality figures in Python / LicenseRef-PSF-based |
| [matplotlib-inline](https://github.com/ipython/matplotlib-inline) | 0.1.6 | Inline Matplotlib backend for Jupyter / BSD-3-Clause |
| [mccabe](https://github.com/PyCQA/mccabe) | 0.7.0 | McCabe complexity checker for Python / MIT |
| [mistune](https://github.com/lepture/mistune) | 0.8.4 | A sane Markdown parser with useful plugins and renderers. / BSD-3-Clause |
| [mkl](https://software.intel.com/en-us/mkl) | 2021.4.0 | Math library for Intel and compatible processors / LicenseRef-ProprietaryIntel |
| [mkl-service](http://github.com/IntelPython/mkl-service) | 2.4.0 | Python hooks for Intel(R) Math Kernel Library runtime control settings. / BSD-3-Clause |
| [mkl\_fft](http://github.com/IntelPython/mkl_fft) | 1.3.1 | NumPy-based implementation of Fast Fourier Transform using Intel (R) Math Kernel Library. / BSD 3-Clause |
| [mkl\_random](http://github.com/IntelPython/mkl_random) | 1.2.2 | Intel (R) MKL-powered package for sampling from common probability distributions into NumPy arrays. / BSD-3-Clause |
| [mock](https://github.com/testing-cabal/mock) | 4.0.3 | A library for testing in Python / BSD-2-Clause |
| [mpc](http://www.multiprecision.org/) | 1.1.0 | A C library for the arithmetic of complex numbers with arbitrarily high precision. / LGPL-3-or-later |
| [mpfr](http://www.mpfr.org/) | 4.0.2 | The MPFR library is a C library for multiple-precision floating-point computations with correct rounding. / LGPL-3.0-only |
| [mpi](http://www.mpich.org/) | 1.0 | A high performance widely portable implementation of the MPI standard. / MPICH |
| [mpich](http://www.mpich.org/) | 3.3.2 | A high performance widely portable implementation of the MPI standard. / MPICH |
| [mpmath](http://mpmath.org) | 1.2.1 | Python library for arbitrary-precision floating-point arithmetic / BSD 3-Clause |
| [msgpack-python](https://msgpack.org/) | 1.0.3 | MessagePack (de)serializer / Apache-2.0 |
| [multipledispatch](https://github.com/mrocklin/multipledispatch/) | 0.6.0 | Multiple dispatch in Python / BSD 3-Clause |
| [munkres](https://github.com/bmc/munkres) | 1.1.4 | The Munkres module provides an O(n^3) implementation of the Munkres algorithm (also called the Hungarian algorithm or the Kuhn-Munkres algorithm). / Apache-2.0 |
| [mypy\_extensions](http://www.mypy-lang.org/) | 0.4.3 | Experimental type system extensions for programs checked with the mypy typechecker. / MIT |
| [nbclassic](http://github.com/jupyterlab/nbclassic) | 0.3.5 | Jupyter Notebook as a Jupyter Server Extension. / BSD-3-Clause |
| [nbclient](https://jupyter.org) | 0.5.13 | A client library for executing notebooks. Formally nbconvert’s ExecutePreprocessor. / BSD-3-Clause |
| [nbconvert](https://jupyter.org) | 6.4.4 | Converting Jupyter Notebooks / BSD-3-Clause |
| [nbformat](https://jupyter.org) | 5.5.0 | The Jupyter Notebook format / BSD-3-Clause |
| [ncurses](http://www.gnu.org/software/ncurses/) | 6.3 | Library for text-based user interfaces / Free software (MIT-like) |
| [nest-asyncio](https://github.com/erdewit/nest_asyncio) | 1.5.5 | Patch asyncio to allow nested event loops / BSD-2-Clause |
| [networkx](https://networkx.github.io/) | 2.8.4 | Python package for creating and manipulating complex networks / BSD-3-Clause |
| [nltk](https://nltk.org/) | 3.7 | Natural Language Toolkit / Apache-2.0 |
| [nose](http://readthedocs.org/docs/nose/) | 1.3.7 | Nose extends unittest to make testing easier / LGPL-2.1 |
| [notebook](https://jupyter.org) | 6.4.12 | Jupyter Notebook / BSD-3-Clause |
| [nspr](https://hg.mozilla.org/projects/nspr) | 4.33 | A platform-neutral API for system level and libc-like functions. / MPL-2.0 |
| [nss](https://developer.mozilla.org/en-US/docs/Mozilla/Projects/NSS) | 3.74 | A set of libraries designed to support cross-platform development of security-enabled client and server applications. / MPL-2.0 |
| [numba](https://numba.pydata.org) | 0.55.1 | NumPy aware dynamic Python compiler using LLVM / BSD-2-Clause |
| [numexpr](https://github.com/pydata/numexpr) | 2.8.3 | Fast numerical expression evaluator for NumPy. / MIT |
| [numpy](https://numpy.org/) | 1.21.5 | Array processing for numbers, strings, records, and objects. / BSD-3-Clause |
| [numpy-base](https://numpy.org/) | 1.21.5 | Array processing for numbers, strings, records, and objects. / BSD-3-Clause |
| [numpydoc](https://github.com/numpy/numpydoc) | 1.4.0 | Numpy’s Sphinx extensions / BSD-3-Clause |
| [olefile](http://www.decalage.info/python/olefileio) | 0.46 | parse, read and write Microsoft OLE2 files / BSD 2-Clause |
| [oniguruma](https://github.com/kkos/oniguruma) | 6.9.7.1 | A regular expression library. / BSD-2-Clause |
| [openjpeg](http://www.openjpeg.org/) | 2.4.0 | An open-source JPEG 2000 codec written in C / BSD 2-Clause |
| [openpyxl](https://openpyxl.readthedocs.io) | 3.0.10 | A Python library to read/write Excel 2010 xlsx/xlsm files / MIT |
| [openssl](https://www.openssl.org/) | 1.1.1q | OpenSSL is an open-source implementation of the SSL and TLS protocols / OpenSSL |
| [packaging](https://github.com/pypa/packaging) | 21.3 | Core utilities for Python packages / Apache-2.0 or BSD-2-Clause |
| [pandas](https://pandas.pydata.org) | 1.4.4 | High-performance, easy-to-use data structures and data analysis tools. / BSD-3-Clause |
| [pandocfilters](https://github.com/jgm/pandocfilters) | 1.5.0 | A python module for writing pandoc filters / BSD-3-Clause |
| [panel](https://panel.holoviz.org) | 0.13.1 | A high-level app and dashboarding solution for Python / BSD-3-Clause |
| [param](http://ioam.github.io/param/) | 1.12.0 | Param: Make your Python code clearer and more reliable by declaring Parameters / BSD-3-Clause |
| [parsel](https://github.com/scrapy/parsel) | 1.6.0 | library to extract data from HTML and XML using XPath and CSS selectors / BSD-3-Clause |
| [parso](https://github.com/davidhalter/parso) | 0.8.3 | A Python Parser / MIT |
| [partd](https://github.com/dask/partd) | 1.2.0 | Data structure for on-disk shuffle operations / BSD 3-Clause |
| [patch](http://savannah.gnu.org/projects/patch/) | 2.7.6 | Native Win32 versions of common unix tools / GPL 3 |
| [patchelf](http://nixos.org/patchelf.html) | 0.13 | A small utility to modify the dynamic linker and RPATH of ELF executables. / GPL-3.0-or-later |
| [pathspec](https://github.com/cpburnz/python-path-specification) | 0.9.0 | Utility library for gitignore style pattern matching of file paths. / MPL-2.0 |
| [patsy](https://github.com/pydata/patsy) | 0.5.2 | Describing statistical models in Python using symbolic formulas / BSD-2-Clause AND PSF-2.0 |
| [pcre](http://www.pcre.org/) | 8.45 | Regular expression pattern matching using the same syntax and semantics as Perl 5. / BSD 3-Clause |
| [pep8](http://pep8.readthedocs.org/) | 1.7.1 | Python style guide checker / MIT |
| [pexpect](http://pexpect.sourceforge.net/) | 4.8.0 | Pexpect makes Python a better tool for controlling other applications. / ISC |
| [pickleshare](https://github.com/pickleshare/pickleshare/) | 0.7.5 | Tiny ‘shelve’-like database with concurrency support / MIT |
| [pillow](https://pillow.readthedocs.io) | 9.2.0 | Pillow is the friendly PIL fork by Alex Clark and Contributors / LicenseRef-PIL |
| [pip](https://pip.pypa.io/en/stable/) | 22.2.2 | PyPA recommended tool for installing Python packages / MIT |
| [pkginfo](https://code.launchpad.net/~tseaver/pkginfo/trunk) | 1.8.2 | Query metadatdata from sdists / bdists / installed packages. / MIT |
| [platformdirs](https://github.com/platformdirs/platformdirs) | 2.5.2 | A small Python module for determining appropriate platform-specific dirs, e.g. a “user data dir”. / MIT |
| [plotly](https://plot.ly/python/) | 5.9.0 | An interactive JavaScript-based visualization library for Python / MIT |
| [pluggy](https://github.com/pytest-dev/pluggy) | 1.0.0 | Plugin registration and hook calling for Python / MIT |
| [ply](http://www.dabeaz.com/ply/index.html) | 3.11 | Python Lex-Yacc / BSD 3-clause |
| [poyo](https://github.com/hackebrot/poyo) | 0.5.0 | A lightweight YAML Parser for Python / MIT |
| [prometheus\_client](https://github.com/prometheus/client_python) | 0.14.1 | Python client for the Prometheus monitoring system / Apache-2.0 |
| [prompt-toolkit](https://github.com/jonathanslenders/python-prompt-toolkit) | 3.0.20 | Library for building powerful interactive command lines in Python / BSD-3-Clause |
| [prompt\_toolkit](https://github.com/jonathanslenders/python-prompt-toolkit) | 3.0.20 | Library for building powerful interactive command lines in Python / BSD-3-Clause |
| [protego](https://github.com/scrapy/protego) | 0.1.16 | A pure-Python robots.txt parser with support for modern conventions / BSD 3-Clauses |
| [psutil](https://github.com/giampaolo/psutil) | 5.9.0 | A cross-platform process and system utilities module for Python / BSD-3-Clause |
| [ptyprocess](https://github.com/pexpect/ptyprocess) | 0.7.0 | Run a subprocess in a pseudo terminal / ISC |
| [py](https://github.com/pytest-dev/py) | 1.11.0 | library with cross-python path, ini-parsing, io, code, log facilities / MIT |
| [py-lief](https://lief.quarkslab.com/) | 0.11.5 | A cross platform library to parse, modify and abstract ELF, PE and MachO formats. / Apache-2.0 |
| [pyasn1](https://github.com/etingof/pyasn1) | 0.4.8 | ASN.1 types and codecs / BSD 2-Clause |
| [pyasn1-modules](http://pyasn1.sourceforge.net/) | 0.2.8 | A collection of ASN.1-based protocols modules. / BSD 2-Clause |
| [pycodestyle](https://pycodestyle.readthedocs.io/) | 2.8.0 | Python style guide checker / MIT |
| [pycosat](https://github.com/ContinuumIO/pycosat) | 0.6.3 | Bindings to picosat (a SAT solver) / MIT |
| [pycparser](https://github.com/eliben/pycparser) | 2.21 | Complete C99 parser in pure Python / BSD-3-clause |
| [pyct](http://github.com/pyviz/pyct) | 0.4.8 | python package common tasks for users (e.g. copy examples, fetch data, …) / BSD 3-Clause |
| [pycurl](http://pycurl.sourceforge.net/) | 7.45.1 | A Python Interface To The cURL library / LGPL-2.1-only, MIT |
| [pydispatcher](http://pydispatcher.sourceforge.net) | 2.0.5 | Multi-producer-multi-consumer signal dispatching mechanism / BSD 3-Clause |
| [pydocstyle](https://github.com/PyCQA/pydocstyle) | 6.1.1 | Python docstring style checker (formerly pep257) / MIT |
| [pyerfa](https://pyerfa.readthedocs.io/) | 2.0.0 | Python bindings for ERFA routines / BSD-3-Clause |
| [pyflakes](https://github.com/PyCQA/pyflakes) | 2.4.0 | Pyflakes analyzes programs and detects various errors. / MIT |
| [pygments](https://pygments.org/) | 2.11.2 | Pygments is a generic syntax highlighter suitable for use in code hosting, forums, wikis or other applications that need to prettify source code. / BSD-2-Clause |
| [pyhamcrest](https://github.com/hamcrest/PyHamcrest) | 2.0.2 | Hamcrest framework for matcher objects / BSD 3-Clause |
| [pylint](https://www.pylint.org) | 2.14.5 | python code static checker / GPL-2.0-or-later |
| [pyls-spyder](https://github.com/spyder-ide/pyls-spyder) | 0.4.0 | Spyder extensions for the python-lsp-server / MIT |
| [pyodbc](https://github.com/mkleehammer/pyodbc) | 4.0.34 | DB API Module for ODBC / MIT-0 |
| [pyopenssl](https://github.com/pyca/pyopenssl) | 22.0.0 | Python wrapper module around the OpenSSL library / Apache-2.0 |
| [pyparsing](https://github.com/pyparsing/pyparsing/) | 3.0.9 | Create and execute simple grammars / MIT |
| [pyqt](https://www.riverbankcomputing.com/software/pyqt/) | 5.15.7 | Python bindings for the Qt cross platform application toolkit / GPL-3.0-only |
| [pyqt5-sip](https://www.riverbankcomputing.com/software/pyqt/) | 12.11.0 | Python bindings for the Qt cross platform application toolkit / GPL-3.0-only |
| [pyqtwebengine](https://www.riverbankcomputing.com/software/pyqt/) | 5.15.7 | Python bindings for the Qt cross platform application toolkit / GPL-3.0-only |
| [pyrsistent](http://github.com/tobgu/pyrsistent/) | 0.18.0 | Persistent/Functional/Immutable data structures / MIT |
| [pysocks](https://github.com/Anorov/PySocks) | 1.7.1 | A Python SOCKS client module. See [Anorov/PySocks](https://github.com/Anorov/PySocks) for more information. / BSD 3-Clause |
| [pytables](https://www.pytables.org) | 3.6.1 | Brings together Python, HDF5 and NumPy to easily handle large amounts of data. / BSD-3-Clause |
| [pytest](https://docs.pytest.org/en/latest/) | 7.1.2 | Simple and powerful testing with Python. / MIT |
| [python](https://www.python.org/) | 3.9.13 | General purpose programming language / PSF-2.0 |
| [python-dateutil](https://dateutil.readthedocs.org/) | 2.8.2 | Extensions to the standard Python datetime module. / BSD-3-Clause and Apache |
| [python-fastjsonschema](https://github.com/horejsek/python-fastjsonschema) | 2.16.2 | Fastest Python implementation of JSON schema / BSD-3-Clause |
| [python-libarchive-c](https://github.com/Changaco/python-libarchive-c) | 2.9 | Python interface to libarchive / CC0-1.0 |
| [python-lsp-black](https://github.com/python-lsp/python-lsp-black) | 1.2.1 | Black plugin for the Python LSP Server / MIT |
| [python-lsp-jsonrpc](https://github.com/python-lsp/python-lsp-jsonrpc) | 1.0.0 | A Python 3.6+ server implementation of the JSON RPC 2.0 protocol. / MIT |
| [python-lsp-server](https://github.com/python-lsp/python-lsp-server) | 1.5.0 | An implementation of the Language Server Protocol for Python / MIT |
| [python-slugify](https://github.com/un33k/python-slugify) | 5.0.2 | A Python Slugify application that handles Unicode / MIT |
| [python-snappy](https://github.com/andrix/python-snappy) | 0.6.0 | Python library for the snappy compression library from Google / BSD-3-Clause |
| [pytz](http://pythonhosted.org/pytz/) | 2022.1 | World timezone definitions, modern and historical. / MIT |
| [pyviz\_comms](https://www.holoviz.org) | 2.0.2 | Bidirectional communication for PyViz / BSD-3-Clause |
| [pywavelets](https://github.com/PyWavelets/pywt) | 1.3.0 | Discrete Wavelet Transforms in Python / MIT |
| [pyxdg](http://freedesktop.org/wiki/Software/pyxdg) | 0.27 | PyXDG contains implementations of freedesktop.org standards in python. / GNU Lesser General Public v2 (LGPLv2) |
| [pyyaml](http://pyyaml.org/wiki/PyYAML) | 6.0 | YAML parser and emitter for Python / MIT |
| [pyzmq](https://github.com/zeromq/pyzmq) | 23.2.0 | Python bindings for zeromq / BSD-3-Clause AND LGPL-3.0-or-later |
| [qdarkstyle](https://github.com/ColinDuquesnoy/QDarkStyleSheet) | 3.0.2 | A dark stylesheet for Qt applications (Qt4, Qt5, PySide, PyQt4, PyQt5, QtPy, PyQtGraph). / MIT |
| [qstylizer](https://github.com/blambright/qstylizer) | 0.1.10 | Qt stylesheet generation utility for PyQt/PySide / MIT |
| [qt](http://qt.io) | 5.15.9 | Qt is a cross-platform application and UI framework. / LGPL-3.0-only |
| [qt-main](http://qt.io) | 5.15.2 | Qt is a cross-platform application and UI framework. / LGPL-3.0-only |
| [qt-webengine](http://qt.io) | 5.15.9 | Qt is a cross-platform application and UI framework. / LGPL-3.0-only |
| [qtawesome](https://github.com/spyder-ide/qtawesome) | 1.0.3 | Iconic fonts in PyQt and PySide applications / MIT |
| [qtconsole](https://jupyter.org) | 5.3.2 | Jupyter Qt Console / BSD-3-Clause |
| [qtpy](https://github.com/spyder-ide/qtpy) | 2.2.0 | Abstraction layer for PyQt5/PyQt4/PySide / MIT |
| [qtwebkit](https://wiki.qt.io/Qt_WebKit) | 5.212 | WebKit is one of the major engine to render webpages and execute JavaScript code / LGPL-2.1-only |
| [queuelib](https://github.com/scrapy/queuelib) | 1.5.0 | Collection of persistent (disk-based) queues / BSD |
| [readline](https://tiswww.case.edu/php/chet/readline/rltop.html) | 8.1.2 | library for editing command lines as they are typed in / GPL-3.0-only |
| [regex](https://github.com/mrabarnett/mrab-regex) | 2022.7.9 | Alternative regular expression module, to replace re / Apache-2.0 |
| [requests](https://requests.readthedocs.io/en/latest/) | 2.28.1 | Requests is an elegant and simple HTTP library for Python, built with ♥. / Apache-2.0 |
| [requests-file](http://github.com/dashea/requests-file) | 1.5.1 | file transport adapter for Requests / Apache |
| [ripgrep](https://github.com/BurntSushi/ripgrep) | 13.0.0 | ripgrep is a line-oriented search tool that recursively searches the current directory for a regex pattern. / MIT AND Unlicense |
| [rope](https://github.com/python-rope/rope) | 0.22.0 | A python refactoring library / LGPL-3.0-or-later |
| [rtree](http://toblerity.github.com/rtree/) | 0.9.7 | R-Tree spatial index for Python GIS / MIT |
| [ruamel\_yaml](https://sourceforge.net/p/ruamel-yaml/code/ci/default/tree) | 0.15.100 | A patched copy of ruamel.yaml. / MIT |
| [s3transfer](https://github.com/boto/s3transfer) | 0.6.0 | An Amazon S3 Transfer Manager / Apache-2.0 |
| [scikit-image](https://scikit-image.org/) | 0.19.2 | Image processing in Python. / BSD-3-Clause |
| [scikit-learn](https://scikit-learn.org/) | 1.0.2 | A set of python modules for machine learning and data mining / BSD-3-Clause |
| [scikit-learn-intelex](https://intel.github.io/scikit-learn-intelex) | 2021.6.0 | Intel(R) Extension for Scikit-learn is a seamless way to speed up your Scikit-learn application. / Apache-2.0 |
| [scipy](https://scipy.org/) | 1.9.1 | Scientific Library for Python / BSD-3-Clause |
| [scrapy](https://scrapy.org/) | 2.6.2 | A high-level Python Screen Scraping framework / BSD-3-Clause |
| [seaborn](https://seaborn.pydata.org) | 0.11.2 | Statistical data visualization / BSD-3-Clause |
| [secretstorage](https://github.com/mitya57/secretstorage) | 3.3.1 | Provides a way for securely storing passwords and other secrets. / BSD-3-Clause |
| [send2trash](https://github.com/arsenetar/send2trash) | 1.8.0 | Python library to natively send files to Trash (or Recycle bin) on all platforms. / BSD-3-Clause |
| [service\_identity](https://github.com/pyca/service_identity) | 18.1.0 | Service identity verification for pyOpenSSL. / MIT |
| [setuptools](https://github.com/pypa/setuptools) | 63.4.1 | Download, build, install, upgrade, and uninstall Python packages / MIT |
| [sip](https://www.riverbankcomputing.com/software/sip/) | 6.6.2 | A Python bindings generator for C/C++ libraries / GPL-3.0-only |
| [six](https://six.readthedocs.io/) | 1.16.0 | Python 2 and 3 compatibility utilities / MIT |
| [smart\_open](https://github.com/RaRe-Technologies/smart_open) | 5.2.1 | Python library for efficient streaming of large files / MIT |
| [snappy](https://github.com/google/snappy) | 1.1.9 | A fast compressor/decompressor / BSD-3-clause AND CC-BY-3.0 AND MIT AND CC-BY AND Public Domain |
| [sniffio](https://github.com/python-trio/sniffio) | 1.2.0 | Sniff out which async library your code is running under / Apache-2.0 |
| [snowballstemmer](https://github.com/snowballstem/snowball) | 2.2.0 | Snowball stemming library collection for Python / BSD-3-Clause |
| [sortedcollections](http://www.grantjenks.com/docs/sortedcollections/) | 2.1.0 | Python Sorted Collections / Apache-2.0 |
| [sortedcontainers](http://www.grantjenks.com/docs/sortedcontainers/) | 2.4.0 | Python Sorted Container Types: SortedList, SortedDict, and SortedSet / Apache-2.0 |
| [soupsieve](https://facelessuser.github.io/soupsieve) | 2.3.1 | A modern CSS selector implementation for BeautifulSoup / MIT |
| [sphinx](https://www.sphinx-doc.org) | 5.0.2 | Sphinx is a tool that makes it easy to create intelligent and beautiful documentation / BSD-2-Clause |
| [sphinxcontrib-applehelp](https://www.sphinx-doc.org/en/master/) | 1.0.2 | sphinxcontrib-applehelp is a sphinx extension which outputs Apple help books / BSD-2-Clause |
| [sphinxcontrib-devhelp](https://www.sphinx-doc.org/en/master/) | 1.0.2 | sphinxcontrib-devhelp is a sphinx extension which outputs Devhelp document / BSD-2-Clause |
| [sphinxcontrib-htmlhelp](https://www.sphinx-doc.org/en/master/) | 2.0.0 | sphinxcontrib-htmlhelp is a sphinx extension which renders HTML help files. / BSD-2-Clause |
| [sphinxcontrib-jsmath](https://www.sphinx-doc.org/en/master/) | 1.0.1 | A sphinx extension which renders display math in HTML via JavaScript / BSD-2-Clause |
| [sphinxcontrib-qthelp](https://www.sphinx-doc.org/en/master/) | 1.0.3 | sphinxcontrib-qthelp is a sphinx extension which outputs QtHelp document / BSD-2-Clause |
| [sphinxcontrib-serializinghtml](https://www.sphinx-doc.org/en/master/) | 1.1.5 | sphinxcontrib-serializinghtml is a sphinx extension which outputs “serialized” HTML files (json and pickle). / BSD-2-Clause |
| [spyder](https://www.spyder-ide.org/) | 5.3.3 | The Scientific Python Development Environment / MIT |
| [spyder-kernels](https://www.spyder-ide.org/) | 2.3.3 | Jupyter kernels for Spyder’s console / MIT |
| [sqlalchemy](https://www.sqlalchemy.org/) | 1.4.39 | Database Abstraction Library. / MIT |
| [sqlite](https://www.sqlite.org/) | 3.39.3 | Implements a self-contained, zero-configuration, SQL database engine / blessing |
| [statsmodels](https://www.statsmodels.org) | 0.13.2 | Statistical computations and models for use with SciPy / BSD-3-Clause |
| [sympy](https://sympy.org) | 1.10.1 | Python library for symbolic mathematics / BSD-3-Clause AND MIT |
| [tabulate](https://github.com/astanin/python-tabulate) | 0.8.10 | Pretty-print tabular data in Python, a library and a command-line utility. / MIT |
| [tbb](https://github.com/oneapi-src/oneTBB) | 2021.6.0 | High level abstract threading library / Apache-2.0 |
| tbb4py | 2021.6.0 | TBB module for Python / Apache-2.0 |
| [tblib](https://github.com/ionelmc/python-tblib) | 1.7.0 | Traceback serialization library. / BSD 2-Clause |
| [tenacity](http://github.com/jd/tenacity) | 8.0.1 | Retry a flaky function whenever an exception occurs until it works / Apache-2.0 |
| [terminado](https://github.com/jupyter/terminado) | 0.13.1 | Terminals served by tornado websockets / BSD-2-Clause |
| [testpath](https://testpath.readthedocs.io) | 0.6.0 | Testpath is a collection of utilities for Python code working with files and commands. / BSD-3-Clause |
| [text-unidecode](https://github.com/kmike/text-unidecode/) | 1.3 | The most basic Text::Unidecode port / Artistic |
| [textdistance](https://github.com/orsinium/textdistance) | 4.2.1 | TextDistance – python library for comparing distance between two or more sequences by many algorithms. / MIT |
| [threadpoolctl](https://github.com/joblib/threadpoolctl) | 2.2.0 | Python helpers to control the threadpools of native libraries / BSD 3-Clause |
| [three-merge](https://github.com/spyder-ide/three-merge) | 0.1.1 | Simple Python library to perform a 3-way merge between strings / MIT |
| [tifffile](https://github.com/cgohlke/tifffile) | 2021.7.2 | Read and write image data from and to TIFF files. / BSD-3-Clause |
| [tinycss](http://tinycss.readthedocs.io/) | 0.4 | Tinycss is a complete yet simple CSS parser for Python. / BSD-3-Clause |
| [tk](https://www.tcl.tk/) | 8.6.12 | A dynamic programming language with GUI support. Bundles Tcl and Tk. / TCL |
| [tldextract](https://github.com/john-kurkowski/tldextract) | 3.2.0 | Accurately separate the TLD from the registered domain andsubdomains of a URL, using the Public Suffix List. / BSD-3-Clause |
| [toml](https://github.com/uiri/toml) | 0.10.2 | Python lib for TOML. / MIT |
| [tomli](https://github.com/hukkin/tomli) | 2.0.1 | A simple TOML parser / MIT |
| [tomlkit](https://github.com/sdispater/tomlkit) | 0.11.1 | Style preserving TOML library / MIT |
| [toolz](http://toolz.readthedocs.org/) | 0.11.2 | List processing tools and functional utilities / BSD-3-Clause |
| [tornado](https://www.tornadoweb.org/) | 6.1 | A Python web framework and asynchronous networking library, originally developed at FriendFeed. / Apache-2.0 |
| [tqdm](https://tqdm.github.io/) | 4.64.1 | A Fast, Extensible Progress Meter / MPL-2.0 AND MIT |
| [traitlets](http://traitlets.readthedocs.org/) | 5.1.1 | Configuration system for Python applications / BSD-3-Clause |
| [twisted](https://twistedmatrix.com/) | 22.2.0 | An asynchronous networking framework written in Python / MIT |
| [typing-extensions](https://github.com/python/typing_extensions) | 4.3.0 | Backported and Experimental Type Hints for Python / PSF-2.0 |
| [typing\_extensions](https://github.com/python/typing_extensions) | 4.3.0 | Backported and Experimental Type Hints for Python / PSF-2.0 |
| [tzdata](https://www.iana.org/time-zones) | 2022c | The Time Zone Database (called tz, tzdb or zoneinfo) / CC-PDDC OR BSD-3-Clause |
| [ujson](https://github.com/ultrajson/ultrajson) | 5.4.0 | Ultra fast JSON decoder and encoder written in C with Python bindings / BSD-3-Clause |
| [unidecode](https://pypi.python.org/pypi/Unidecode) | 1.2.0 | ASCII transliterations of Unicode text / GPL-2.0-or-later |
| [unixodbc](http://www.unixodbc.org/) | 2.3.11 | ODBC on non MS Windows platforms / LGPL-2.1-or-later |
| [urllib3](https://urllib3.readthedocs.io/) | 1.26.11 | HTTP library with thread-safe connection pooling, file post, and more. / MIT |
| [w3lib](https://github.com/scrapy/w3lib) | 1.21.0 | Library of web-related functions / BSD |
| [watchdog](http://github.com/gorakhargosh/watchdog) | 2.1.6 | Filesystem events monitoring / Apache-2.0 |
| [wcwidth](https://github.com/jquast/wcwidth) | 0.2.5 | Measures number of Terminal column cells of wide-character codes. / MIT |
| [webencodings](https://github.com/gsnedders/python-webencodings) | 0.5.1 | Character encoding aliases for legacy web content / BSD 3-Clause |
| [websocket-client](https://github.com/liris/websocket-client) | 0.58.0 | WebSocket client for python. hybi13 is supported. / BSD-3-Clause |
| [werkzeug](https://palletsprojects.com/p/werkzeug/) | 2.0.3 | The comprehensive WSGI web application library. / BSD-3-Clause |
| [wget](https://www.gnu.org/software/wget/) | 1.21.3 | utility for non-interactive download of files from the Web / GPL-3.0-or-later |
| [whatthepatch](https://github.com/cscorley/whatthepatch) | 1.0.2 | What The Patch!? is a library for both parsing and applying patch files / MIT |
| [wheel](https://github.com/pypa/wheel) | 0.37.1 | A built-package format for Python. / MIT |
| [widgetsnbextension](http://ipython.org) | 3.5.2 | Interactive Widgets for Jupyter / BSD-3-Clause |
| [wrapt](https://github.com/GrahamDumpleton/wrapt) | 1.14.1 | Module for decorators, wrappers and monkey patching / BSD-2-Clause |
| [wurlitzer](https://github.com/minrk/wurlitzer) | 3.0.2 | Capture C-level stdout/stderr in Python / MIT |
| [xarray](https://github.com/pydata/xarray) | 0.20.1 | N-D labeled arrays and datasets in Python. / Apache-2.0 |
| [xlrd](http://www.python-excel.org/) | 2.0.1 | Library for developers to extract data from Microsoft Excel (tm) spreadsheet files / BSD 3-Clause and BSD with advertising |
| [xlsxwriter](https://xlsxwriter.readthedocs.io/) | 3.0.3 | A Python module for creating Excel XLSX files / BSD-2-Clause |
| [xz](https://tukaani.org/xz/) | 5.2.6 | Data compression software with high compression ratio / LGPL-2.1-or-later and GPL-2.0-or-later |
| [yaml](http://pyyaml.org/wiki/LibYAML) | 0.2.5 | A C library for parsing and emitting YAML / MIT |
| [yapf](https://github.com/google/yapf) | 0.31.0 | A formatter for Python files / Apache 2.0 |
| [zeromq](http://zeromq.org) | 4.3.4 | A high-performance asynchronous messaging library. / LGPL-3.0-or-later |
| [zfp](https://computation.llnl.gov/projects/floating-point-compression) | 0.5.5 | Library for compressed numerical arrays that support high throughput read and write random access / BSD-3-Clause |
| [zict](https://github.com/mrocklin/zict) | 2.1.0 | Composable Dictionary Classes / BSD-3-Clause |
| [zipp](https://github.com/jaraco/zipp) | 3.8.0 | A pathlib-compatible Zipfile object wrapper / MIT |
| [zlib](https://zlib.net/) | 1.2.12 | Massively spiffy yet delicately unobtrusive compression library / Zlib |
| zope | 1.0 | web application server / BSD |
| [zope.interface](https://github.com/zopefoundation/zope.interface) | 5.4.0 | Interfaces for Python / ZPL-2.1 |
| [zstd](https://www.zstd.net) | 1.5.2 | Zstandard - Fast real-time compression algorithm / BSD-3-Clause AND GPL-2.0-or-later |
| Name | Version | Summary / License |
|---|---|---|
| [aiohttp](https://github.com/aio-libs/aiohttp) | 3.8.1 | Async http client/server framework (asyncio) / Apache-2.0 |
| [aiosignal](https://github.com/aio-libs/aiosignal) | 1.2.0 | aiosignal: a list of registered asynchronous callbacks / Apache-2.0 |
| [alabaster](http://www.sphinx-doc.org/en/stable/index.html) | 0.7.12 | Configurable, Python 2+3 compatible Sphinx theme. / BSD 3-Clause |
| [anaconda-client](https://github.com/Anaconda-Platform/anaconda-client) | 1.9.0 | Anaconda Cloud command line client library / BSD 3-Clause |
| [anaconda-navigator](https://github.com/ContinuumIO/navigator) | 2.1.4 | Anaconda Navigator / proprietary - Continuum Analytics, Inc. |
| [anaconda-project](https://github.com/Anaconda-Platform/anaconda-project) | 0.10.2 | Tool for encapsulating, running, and reproducing data science projects / BSD-3-Clause |
| [anyio](https://github.com/agronholm/anyio) | 3.5.0 | High level compatibility layer for multiple asynchronous event loop implementations on Python / MIT |
| [appdirs](http://github.com/ActiveState/appdirs) | 1.4.4 | A small Python module for determining appropriate platform-specific dirs. / MIT |
| [argon2-cffi](https://argon2-cffi.readthedocs.org/) | 21.3.0 | The secure Argon2 password hashing algorithm. / MIT |
| [argon2-cffi-bindings](https://github.com/hynek/argon2-cffi-bindings) | 21.2.0 | Low-level Python CFFI Bindings for Argon2 / MIT |
| [arrow](https://github.com/crsmithdev/arrow) | 1.2.2 | Better dates & times for Python / Apache-2.0 |
| [astroid](https://www.astroid.org/) | 2.6.6 | A abstract syntax tree for Python with inference support. / LGPL-2.1-or-later |
| [astropy](https://www.astropy.org/) | 5.0.4 | Community-developed Python Library for Astronomy / BSD-3-Clause |
| [asttokens](https://github.com/gristlabs/asttokens) | 2.0.5 | The asttokens module annotates Python abstract syntax trees (ASTs) with the positions of tokens and text in the source code that generated them. / Apache-2.0 |
| [async-timeout](http://github.com/aio-libs/async_timeout) | 4.0.1 | Timeout context manager for asyncio programs / Apache-2.0 |
| [atomicwrites](https://github.com/untitaker/python-atomicwrites) | 1.4.0 | Atomic file writes / MIT |
| [attrs](https://attrs.readthedocs.io/en/stable/) | 21.4.0 | attrs is the Python package that will bring back the joy of writing classes by relieving you from the drudgery of implementing object protocols (aka dunder methods). / MIT |
| [automat](https://github.com/glyph/Automat) | 20.2.0 | self-service finite-state machines for the programmer on the go / MIT |
| [autopep8](https://github.com/hhatto/autopep8) | 1.6.0 | A tool that automatically formats Python code to conform to the PEP 8 style guide / MIT |
| [babel](http://babel.pocoo.org/) | 2.9.1 | Utilities to internationalize and localize Python applications / BSD 3-clause |
| [backcall](https://github.com/takluyver/backcall/) | 0.2.0 | Specifications for callback functions passed in to an API / BSD-3-Clause |
| [backports](https://github.com/brandon-rhodes/backports) | 1.1 | Namespace for backported Python features. / MIT |
| [backports.functools\_lru\_cache](https://github.com/jaraco/backports.functools_lru_cache) | 1.6.4 | Backport of functools.lru\_cache from Python 3.3 as published at ActiveState. / MIT |
| [backports.tempfile](https://github.com/pjdelport/backports.tempfile) | 1.0 | Backports of new features in Python’s tempfile module / PSF 2 |
| [backports.weakref](https://github.com/pjdelport/backports.weakref) | 1.0.post1 | Backport of new features in Python’s weakref module / Python-2.0 |
| [bcrypt](https://github.com/pyca/bcrypt/) | 3.2.0 | Modern password hashing for your software and your servers / Apache-2.0 |
| [beautifulsoup4](https://www.crummy.com/software/BeautifulSoup/) | 4.11.1 | Python library designed for screen-scraping / MIT |
| [binaryornot](https://github.com/audreyr/binaryornot) | 0.4.4 | Ultra-lightweight pure Python package to check if a file is binary or text. / BSD-3-Clause |
| [bitarray](https://github.com/ilanschnell/bitarray) | 2.4.1 | efficient arrays of booleans – C extension / PSF-2.0 |
| [bkcharts](http://github.com/bokeh/bkcharts) | 0.2 | High level chart types built on top of Bokeh / BSD 3-Clause |
| [black](https://github.com/python/black) | 19.10b0 | The Uncompromising Code Formatter / MIT |
| [blas](http://www.netlib.org/lapack) | 1.0 | Linear Algebra PACKage / BSD-3-Clause |
| [bleach](https://github.com/mozilla/bleach) | 4.1.0 | Easy, whitelist-based HTML-sanitizing tool / Apache-2.0 |
| [blosc](https://github.com/Blosc/c-blosc) | 1.21.0 | A blocking, shuffling and loss-less compression library that can be faster than memcpy() / BSD-3-Clause |
| [bokeh](http://bokeh.pydata.org/) | 2.4.2 | Statistical and novel interactive HTML plots for Python / BSD-3-Clause |
| [boto3](https://aws.amazon.com/sdk-for-python) | 1.21.32 | Amazon Web Services SDK for Python / Apache-2.0 |
| [botocore](https://aws.amazon.com/sdk-for-python/) | 1.24.32 | Low-level, data-driven core of boto 3. / Apache-2.0 |
| [bottleneck](https://github.com/pydata/bottleneck) | 1.3.4 | Fast NumPy array functions written in Cython. / BSD-2-Clause |
| [brotli](http://github.com/google/brotli) | 1.0.9 | Brotli compression format / MIT |
| [brotlipy](https://github.com/python-hyper/brotlipy) | 0.7.0 | Python bindings to the Brotli compression library / MIT |
| [bzip2](http://www.bzip.org/) | 1.0.8 | high-quality data compressor / bzip2 |
| [ca-certificates](https://curl.se/docs/caextract.html) | 2022.3.29 | Certificates for use with other packages. / MPL-2.0 |
| [cachetools](https://github.com/tkem/cachetools) | 4.2.2 | Extensible memoizing collections and decorators / MIT |
| [certifi](http://certifi.io/) | 2021.10.8 | Python package for providing Mozilla’s CA Bundle. / ISC |
| [cffi](http://cffi.readthedocs.org/) | 1.15.0 | Foreign Function Interface for Python calling C code. / MIT |
| [cfitsio](http://heasarc.gsfc.nasa.gov/fitsio/fitsio.html) | 3.470 | A library for reading and writing FITS files / fitsio |
| [chardet](https://github.com/chardet/chardet) | 4.0.0 | Universal character encoding detector / LGPL2 |
| [charls](https://github.com/team-charls/charls) | 2.2.0 | CharLS is a C++ implementation of the JPEG-LS standard for lossless and near-lossless image compression and decompression. JPEG-LS is a low-complexity image compression standard that matches JPEG 2000 compression ratios. / BSD-3-Clause |
| [charset-normalizer](https://github.com/ousret/charset_normalizer) | 2.0.4 | The Real First Universal Charset Detector. Open, modern and actively maintained alternative to Chardet. / MIT |
| [click](https://palletsprojects.com/p/click) | 8.0.4 | Python composable command line interface toolkit / BSD-3-Clause |
| [cloudpickle](https://github.com/cloudpipe/cloudpickle) | 2.0.0 | Extended pickling support for Python objects / BSD-3-Clause |
| [clyent](https://github.com/Anaconda-Platform/clyent) | 1.2.2 | Command line client library for windows and posix / BSD 3-Clause |
| [colorama](https://github.com/tartley/colorama) | 0.4.4 | Cross-platform colored terminal text / BSD-3-Clause |
| [colorcet](http://github.com/pyviz/colorcet) | 2.0.6 | Collection of perceptually uniform colormaps / CC-BY-4.0 |
| [comtypes](http://starship.python.net/crew/theller/comtypes/) | 1.1.10 | pure Python COM package / MIT |
| [conda](https://conda.io) | 4.12.0 | OS-agnostic, system-level binary package and environment manager. / BSD-3-Clause |
| [conda-build](https://github.com/conda/conda-build) | 3.21.8 | tools for building conda packages / BSD-3-Clause |
| [conda-content-trust](https://github.com/conda/conda-content-trust) | 0.1.1 | Signing and verification tools for conda / BSD-3-Clause |
| [conda-env](https://github.com/conda/conda-env) | 2.6.0 | Tools for interacting with conda environments. / BSD 3-Clause |
| [conda-token](https://github.com/Anaconda/conda-token) | 0.3.0 | Set repository access token / BSD-3-Clause |
| [conda-verify](https://github.com/conda/conda-verify) | 3.4.2 | tool for validating conda recipes and conda packages / BSD 3-Clause |
| console\_shortcut | 0.1.1 | Console shortcut creator for Windows (using menuinst) / BSD |
| [constantly](https://github.com/twisted/constantly) | 15.1.0 | Symbolic constants in Python / MIT |
| [cookiecutter](https://github.com/cookiecutter/cookiecutter) | 1.7.3 | A command-line utility that creates projects from cookiecutters (project templates), e.g. creating a Python package project from a Python package project template. / BSD-3-Clause |
| [cryptography](https://github.com/pyca/cryptography) | 3.4.8 | Provides cryptographic recipes and primitives to Python developers / Apache-2.0 AND BSD-3-Clause AND PSF-2.0 AND MIT |
| [cssselect](https://pythonhosted.org/cssselect/) | 1.1.0 | CSS Selectors for Python / BSD 3-Clause |
| [curl](https://curl.haxx.se/) | 7.82.0 | tool and library for transferring data with URL syntax / curl |
| [cycler](http://matplotlib.org/cycler) | 0.11.0 | Composable style cycles. / BSD-3-Clause |
| [cython](https://cython.org/) | 0.29.28 | The Cython compiler for writing C extensions for the Python language / Apache-2.0 |
| [cytoolz](https://github.com/pytoolz/cytoolz) | 0.11.0 | Cython implementation of Toolz. High performance functional utilities / BSD-3-Clause |
| [daal4py](https://intelpython.github.io/daal4py/) | 2021.5.0 | A convenient Python API to Intel (R) oneAPI Data Analytics Library / Apache-2.0 |
| [dal](https://software.intel.com/content/www/us/en/develop/tools.html) | 2021.5.0 | Intel® oneDAL runtime libraries / Intel Simplified Software License |
| [dask](https://dask.org/) | 2022.2.1 | Parallel PyData with Task Scheduling / BSD-3-Clause |
| [dask-core](https://github.com/dask/dask/) | 2022.2.1 | Parallel Python with task scheduling / BSD-3-Clause |
| [dataclasses](https://github.com/ericvsmith/dataclasses) | 0.8 | An implementation of PEP 557: Data Classes / Apache-2.0 |
| [datashader](https://datashader.org) | 0.13.0 | Data visualization toolchain based on aggregating into a grid / BSD-3-Clause |
| [datashape](http://datashape.pydata.org) | 0.5.4 | A data description language. / BSD 2-Clause |
| [debugpy](https://github.com/Microsoft/debugpy) | 1.5.1 | An implementation of the Debug Adapter Protocol for Python / MIT |
| [decorator](https://github.com/micheles/decorator) | 5.1.1 | Better living through Python with decorators. / BSD-2-Clause |
| [defusedxml](https://bitbucket.org/tiran/defusedxml) | 0.7.1 | XML bomb protection for Python stdlib modules / PSF 2.0 |
| [diff-match-patch](http://code.google.com/p/google-diff-match-patch/) | 20200713 | Diff Match Patch is a high-performance library in multiple languages that manipulates plain text / Apache-2.0 |
| [distributed](https://distributed.readthedocs.io/en/latest/) | 2022.2.1 | Distributed computing with Dask / BSD-3-Clause |
| [docutils](http://docutils.sourceforge.net/) | 0.17.1 | Docutils – Python Documentation Utilities / LicenseRef-Public-Domain-Dedictation and BSD-2-Clause and LicenseRef-PSF-2.1.1 and GPL-3.0-or-later |
| [entrypoints](https://github.com/takluyver/entrypoints) | 0.4 | Discover and load entry points from installed packages. / MIT License |
| [et\_xmlfile](https://foss.heptapod.net/openpyxl/et_xmlfile) | 1.1.0 | An implementation of lxml.xmlfile for the standard library / MIT AND PSF-2.0 |
| [executing](https://pypi.org/project/executing) | 0.8.3 | Get the currently executing AST node of a frame, and other information / MIT |
| [filelock](https://github.com/tox-dev/py-filelock) | 3.6.0 | A platform independent file lock. / Unlicense |
| [flake8](http://flake8.pycqa.org/) | 3.9.2 | Your Tool For Style Guide Enforcement / MIT |
| [flask](https://flask.pocoo.org) | 1.1.2 | A microframework based on Werkzeug, Jinja2 and good intentions. / BSD 3-Clause |
| [fonttools](https://github.com/fonttools/fonttools) | 4.25.0 | fontTools is a library for manipulating fonts, written in Python. / MIT |
| [freetype](https://www.freetype.org/) | 2.10.4 | A Free, High-Quality, and Portable Font Engine / GPL-2.0-only and LicenseRef-FreeType |
| [frozenlist](https://github.com/aio-libs/frozenlist) | 1.2.0 | A list-like structure which implements collections.abc.MutableSequence / Apache-2.0 |
| [fsspec](https://github.com/martindurant/filesystem_spec) | 2022.2.0 | A specification for pythonic filesystems / BSD-3-Clause |
| [future](http://python-future.org) | 0.18.2 | Clean single-source support for Python 3 and 2 / MIT |
| [gensim](https://github.com/RaRe-Technologies/gensim) | 4.1.2 | Topic Modelling for Humans / LGPL-2.1-only |
| [giflib](http://giflib.sourceforge.net) | 5.2.1 | Library for reading and writing gif images / MIT |
| [glob2](https://github.com/miracle2k/python-glob2) | 0.7 | Version of the glob module that supports recursion via \*\*, and can capture patterns. / BSD-2-Clause |
| [google-api-core](https://github.com/googleapis/python-api-core) | 1.25.1 | Core Library for Google Client Libraries / Apache-2.0 |
| [google-auth](https://github.com/googleapis/google-auth-library-python) | 1.33.0 | Google authentication library for Python / Apache-2.0 |
| [google-cloud-core](https://github.com/googleapis/python-cloud-core) | 1.7.1 | API Client library for Google Cloud: Core Helpers / Apache-2.0 |
| [google-cloud-storage](https://github.com/googleapis/python-storage) | 1.31.0 | Python Client for Google Cloud Storage / Apache-2.0 |
| [google-crc32c](https://github.com/googleapis/python-crc32c) | 1.1.2 | Python wrapper for a hardware-based implementation of the CRC32C hashing algorithm / Apache-2.0 |
| [google-resumable-media](https://github.com/googleapis/google-resumable-media-python) | 1.3.1 | Utilities for Google Media Downloads and Resumable Uploads / Apache-2.0 |
| [googleapis-common-protos](https://github.com/googleapis/api-common-protos) | 1.53.0 | Common protobufs used in Google APIs / Apache-2.0 |
| [greenlet](https://github.com/python-greenlet/greenlet) | 1.1.1 | Lightweight in-process concurrent programming / MIT |
| [grpcio](https://grpc.io) | 1.42.0 | HTTP/2-based RPC framework / Apache-2.0 |
| [h5py](http://www.h5py.org/) | 3.6.0 | Read and write HDF5 files from Python / BSD-3-Clause |
| [hdf5](http://www.hdfgroup.org/HDF5/) | 1.10.6 | HDF5 is a data model, library, and file format for storing and managing data / HDF5 |
| [heapdict](http://stutzbachenterprises.com/) | 1.0.1 | A heap with decrease-key and increase-key operations / BSD 3-Clause |
| [holoviews](https://holoviews.org) | 1.14.8 | Stop plotting your data - annotate your data and let it visualize itself. / BSD-3-Clause |
| [hvplot](https://hvplot.holoviz.org/) | 0.7.3 | A high-level plotting API for the PyData ecosystem built on HoloViews / BSD-3-Clause |
| [hyperlink](https://github.com/python-hyper/hyperlink) | 21.0.0 | Immutable, Pythonic, correct URLs. / MIT |
| icc\_rt | 2019.0.0 | Intel runtime libraries for C, C++ and Fortran compilers / Intel proprietary |
| [icu](http://site.icu-project.org/) | 58.2 | International Components for Unicode. / MIT |
| [idna](https://github.com/kjd/idna) | 3.3 | Internationalized Domain Names in Applications (IDNA). / BSD-3-Clause |
| [imagecodecs](https://www.lfd.uci.edu/~gohlke/) | 2021.8.26 | Image transformation, compression, and decompression codecs / BSD-3-Clause |
| [imageio](https://imageio.github.io) | 2.9.0 | A Python library for reading and writing image data / BSD-2-Clause |
| [imagesize](https://github.com/shibukawa/imagesize_py) | 1.3.0 | Getting image size from png/jpeg/jpeg2000/gif file / MIT |
| [importlib-metadata](https://github.com/python/importlib_metadata) | 4.11.3 | A library to access the metadata for a Python package. / Apache-2.0 |
| [importlib\_metadata](https://github.com/python/importlib_metadata) | 4.11.3 | A library to access the metadata for a Python package. / Apache-2.0 |
| [incremental](https://github.com/hawkowl/incremental) | 21.3.0 | Incremental is a small library that versions your Python projects. / MIT |
| [inflection](http://github.com/jpvanhal/inflection) | 0.5.1 | A port of Ruby on Rails inflector to Python / MIT |
| [iniconfig](http://github.com/RonnyPfannschmidt/iniconfig) | 1.1.1 | iniconfig: brain-dead simple config-ini parsing / MIT |
| [intake](https://github.com/ContinuumIO/intake) | 0.6.5 | Data load and catalog system / BSD-2-Clause |
| [intel-openmp](https://software.intel.com/en-us/node/522690) | 2021.4.0 | Math library for Intel and compatible processors / LicenseRef-ProprietaryIntel |
| [intervaltree](https://github.com/chaimleib/intervaltree) | 3.1.0 | Editable interval tree data structure for Python 2 and 3 / Apache-2.0 |
| [ipykernel](https://ipython.org) | 6.9.1 | IPython Kernel for Jupyter / BSD-3-Clause |
| [ipython](https://ipython.org) | 8.2.0 | IPython: Productive Interactive Computing / BSD-3-Clause |
| [ipython\_genutils](http://ipython.org) | 0.2.0 | vestigial utilities from IPython / BSD 3-Clause |
| [ipywidgets](https://github.com/ipython/ipywidgets) | 7.6.5 | Jupyter Interactive Widgets / BSD-3-Clause |
| [isort](https://github.com/timothycrosley/isort) | 5.9.3 | A Python utility / library to sort Python imports. / MIT |
| [itemadapter](https://github.com/scrapy/itemadapter) | 0.3.0 | Common interface for different data containers / BSD-3-Clause |
| [itemloaders](https://github.com/scrapy/itemadapter) | 1.0.4 | Collect data from HTML and XML sources / BSD-3-Clause |
| [itsdangerous](https://github.com/pallets/itsdangerous) | 2.0.1 | Various helpers to pass trusted data to untrusted environments. / BSD-3-Clause |
| [jdcal](https://github.com/phn/jdcal) | 1.4.1 | Julian dates from proleptic Gregorian and Julian calendars. / BSD 2-Clause |
| [jedi](https://github.com/davidhalter/jedi/) | 0.18.1 | An autocompletion tool for Python that can be used for text editors. / MIT |
| [jinja2](https://jinja.pocoo.org) | 2.11.3 | An easy to use stand-alone template engine written in pure python. / BSD-3-Clause |
| [jinja2-time](https://github.com/hackebrot/jinja2-time) | 0.2.0 | Jinja2 Extension for Dates and Times / MIT |
| [jmespath](http://jmespath.org/) | 0.10.0 | Query language for JSON / MIT |
| [joblib](https://joblib.readthedocs.io/en/latest/) | 1.1.0 | Lightweight pipelining: using Python functions as pipeline jobs. / BSD-3-Clause |
| [jpeg](https://www.ijg.org/) | 9e | read/write jpeg COM, EXIF, IPTC medata / IJG |
| [jq](http://stedolan.github.io/jq/) | 1.6 | A command-line JSON processor. / MIT |
| [json5](https://github.com/dpranke/pyjson5) | 0.9.6 | A Python implementation of the JSON5 data format / Apache-2.0 |
| [jsonschema](https://github.com/Julian/jsonschema) | 4.4.0 | An implementation of JSON Schema validation for Python / MIT |
| [jupyter](http://jupyter.org) | 1.0.0 | Jupyter metapackage. Install all the Jupyter components in one go. / BSD 3-Clause |
| [jupyter\_client](https://jupyter.org) | 6.1.12 | jupyter\_client contains the reference implementation of the Jupyter protocol. / BSD-3-Clause |
| [jupyter\_console](https://jupyter.org) | 6.4.0 | Jupyter terminal console / BSD-3-Clause |
| [jupyter\_core](https://jupyter.org) | 4.9.2 | Core common functionality of Jupyter projects. / BSD-3-Clause |
| [jupyter\_server](https://jupyter.org) | 1.13.5 | Jupyter Server / BSD-3-Clause |
| [jupyterlab](https://github.com/jupyterlab/jupyterlab) | 3.3.2 | JupyterLab PRE-ALPHA / BSD-3-Clause |
| [jupyterlab\_pygments](http://github.com/JupyterLab/jupyterlab_pygments) | 0.1.2 | Pygments syntax coloring scheme making use of the JupyterLab CSS variables / BSD-3-Clause |
| [jupyterlab\_server](https://github.com/jupyterlab/jupyterlab_server) | 2.10.3 | A set of server components for JupyterLab and JupyterLab like applications. / BSD-3-Clause |
| [jupyterlab\_widgets](https://github.com/jupyter-widgets/ipywidgets) | 1.0.0 | JupyterLab extension providing HTML widgets / BSD-3-Clause |
| [keyring](https://github.com/jaraco/keyring) | 23.4.0 | Store and access your passwords safely / MIT |
| [kiwisolver](https://github.com/nucleic/kiwi) | 1.3.2 | An efficient C++ implementation of the Cassowary constraint solver / BSD-3-Clause |
| [lazy-object-proxy](https://github.com/ionelmc/python-lazy-object-proxy) | 1.6.0 | A fast and thorough lazy object proxy / BSD-2-Clause |
| [lcms2](http://www.littlecms.com/) | 2.12 | Open Source Color Management Engine / MIT |
| [lerc](https://github.com/Esri/lerc) | 3.0 | LERC - Limited Error Raster Compression / Apache-2.0 |
| [libaec](https://gitlab.dkrz.de/k202009/libaec) | 1.0.4 | Adaptive Entropy Coding library / BSD-2-Clause |
| [libarchive](http://www.libarchive.org/) | 3.4.2 | Multi-format archive and compression library / BSD-2-Clause |
| [libcrc32c](https://github.com/google/crc32c) | 1.1.1 | CRC32C implementation with support for CPU-specific acceleration instructions / BSD-3-Clause |
| [libcurl](https://curl.haxx.se/) | 7.82.0 | tool and library for transferring data with URL syntax / curl |
| [libdeflate](https://github.com/ebiggers/libdeflate) | 1.8 | libdeflate is a library for fast, whole-buffer DEFLATE-based compression and decompression. / MIT |
| [libiconv](https://www.gnu.org/software/libiconv/) | 1.16 | Provides iconv for systems which don’t have one (or that cannot convert from/to Unicode.) / GPL and LGPL |
| [liblief](https://lief.quarkslab.com/) | 0.11.5 | A cross platform library to parse, modify and abstract ELF, PE and MachO formats. / Apache-2.0 |
| [libpng](http://www.libpng.org/pub/png/libpng.html) | 1.6.37 | PNG reference library / zlib/libpng |
| [libprotobuf](https://developers.google.com/protocol-buffers/) | 3.19.1 | Protocol Buffers - Google’s data interchange format. C++ Libraries and protoc, the protobuf compiler. / BSD-3-Clause |
| [libspatialindex](http://libspatialindex.github.io) | 1.9.3 | Extensible framework for robust spatial indexing / MIT |
| [libssh2](https://www.libssh2.org/) | 1.10.0 | the SSH library / BSD-3-Clause |
| [libtiff](http://www.libtiff.org/) | 4.2.0 | Support for the Tag Image File Format (TIFF). / HPND |
| [libwebp](https://developers.google.com/speed/webp/) | 1.2.2 | WebP image library / BSD-3-Clause |
| [libxml2](http://xmlsoft.org/) | 2.9.12 | The XML C parser and toolkit of Gnome / MIT |
| [libxslt](http://xmlsoft.org/XSLT/) | 1.1.34 | The XSLT C library developed for the GNOME project / MIT |
| [libzopfli](https://github.com/google/zopfli) | 1.0.3 | A compression library programmed in C to perform very good, but slow, deflate or zlib compression. / Apache-2.0 |
| [llvmlite](http://llvmlite.pydata.org) | 0.38.0 | A lightweight LLVM python binding for writing JIT compilers. / BSD-2-Clause |
| [locket](https://github.com/mwilliamson/locket.py) | 0.2.1 | File-based locks for Python for Linux and Windows / BSD 2-Clause |
| [lxml](https://lxml.de/) | 4.8.0 | Pythonic binding for the C libraries libxml2 and libxslt. / BSD-3-Clause and GPL-2.0-only and ZPL-2.0 and LicenseRef-ElementTree |
| [lz4-c](https://www.lz4.org) | 1.9.3 | Extremely Fast Compression algorithm / BSD-2-Clause |
| [lzo](http://www.oberhumer.com/opensource/lzo/) | 2.10 | LZO is a portable lossless data compression library written in ANSI C. / GPL v2+ |
| m2w64-libwinpthread-git | 5.0.0.4634.697f757 | None / MIT, BSD |
| [markdown](https://pythonhosted.org/Markdown/) | 3.3.4 | Python implementation of Markdown. / BSD-3-Clause |
| [markupsafe](https://www.palletsprojects.com/p/markupsafe) | 2.0.1 | A Python module that implements the jinja2.Markup string / BSD-3-Clause |
| [matplotlib](https://matplotlib.org/) | 3.5.1 | Publication quality figures in Python / LicenseRef-PSF-based |
| [matplotlib-base](https://matplotlib.org/) | 3.5.1 | Publication quality figures in Python / LicenseRef-PSF-based |
| [matplotlib-inline](https://github.com/ipython/matplotlib-inline) | 0.1.2 | Inline Matplotlib backend for Jupyter / BSD-3-Clause |
| [mccabe](https://github.com/PyCQA/mccabe) | 0.6.1 | McCabe complexity checker for Python / MIT |
| [menuinst](https://github.com/conda/menuinst) | 1.4.18 | cross platform install of menu items / BSD-3-Clause |
| [mistune](https://github.com/lepture/mistune) | 0.8.4 | A sane Markdown parser with useful plugins and renderers. / BSD-3-Clause |
| [mkl](https://software.intel.com/en-us/mkl) | 2021.4.0 | Math library for Intel and compatible processors / LicenseRef-ProprietaryIntel |
| [mkl-service](http://github.com/IntelPython/mkl-service) | 2.4.0 | Python hooks for Intel(R) Math Kernel Library runtime control settings. / BSD-3-Clause |
| [mkl\_fft](http://github.com/IntelPython/mkl_fft) | 1.3.1 | NumPy-based implementation of Fast Fourier Transform using Intel (R) Math Kernel Library. / BSD 3-Clause |
| [mkl\_random](http://github.com/IntelPython/mkl_random) | 1.2.2 | Intel (R) MKL-powered package for sampling from common probability distributions into NumPy arrays. / BSD-3-Clause |
| [mock](https://github.com/testing-cabal/mock) | 4.0.3 | A library for testing in Python / BSD-2-Clause |
| [mpmath](http://mpmath.org) | 1.2.1 | Python library for arbitrary-precision floating-point arithmetic / BSD 3-Clause |
| [msgpack-python](http://msgpack.org/) | 1.0.2 | MessagePack (de)serializer / Apache-2.0 |
| msys2-conda-epoch | 20160418 | |
| [multidict](http://github.com/aio-libs/multidict) | 5.1.0 | multidict implementation / Apache 2.0 |
| [multipledispatch](https://github.com/mrocklin/multipledispatch/) | 0.6.0 | Multiple dispatch in Python / BSD 3-Clause |
| [munkres](https://github.com/bmc/munkres) | 1.1.4 | The Munkres module provides an O(n^3) implementation of the Munkres algorithm (also called the Hungarian algorithm or the Kuhn-Munkres algorithm). / Apache-2.0 |
| [mypy\_extensions](http://www.mypy-lang.org/) | 0.4.3 | Experimental type system extensions for programs checked with the mypy typechecker. / MIT |
| [nbclassic](http://github.com/jupyterlab/nbclassic) | 0.3.5 | Jupyter Notebook as a Jupyter Server Extension. / BSD-3-Clause |
| [nbclient](https://jupyter.org) | 0.5.13 | A client library for executing notebooks. Formally nbconvert’s ExecutePreprocessor. / BSD-3-Clause |
| [nbconvert](https://jupyter.org) | 6.4.4 | Converting Jupyter Notebooks / BSD-3-Clause |
| [nbformat](https://jupyter.org) | 5.3.0 | The Jupyter Notebook format / BSD-3-Clause |
| [nest-asyncio](https://github.com/erdewit/nest_asyncio) | 1.5.5 | Patch asyncio to allow nested event loops / BSD-2-Clause |
| [networkx](https://networkx.github.io/) | 2.7.1 | Python package for creating and manipulating complex networks / BSD-3-Clause |
| [nltk](https://nltk.org/) | 3.7 | Natural Language Toolkit / Apache-2.0 |
| [nose](http://readthedocs.org/docs/nose/) | 1.3.7 | Nose extends unittest to make testing easier / LGPL-2.1 |
| [notebook](https://jupyter.org) | 6.4.8 | Jupyter Notebook / BSD-3-Clause |
| [numba](http://numba.pydata.org) | 0.55.1 | NumPy aware dynamic Python compiler using LLVM / BSD-2-Clause |
| [numexpr](https://github.com/pydata/numexpr) | 2.8.1 | Fast numerical expression evaluator for NumPy. / MIT |
| [numpy](http://numpy.scipy.org/) | 1.21.5 | Array processing for numbers, strings, records, and objects. / BSD 3-Clause |
| [numpy-base](http://numpy.scipy.org/) | 1.21.5 | Array processing for numbers, strings, records, and objects. / BSD 3-Clause |
| [numpydoc](https://github.com/numpy/numpydoc) | 1.2 | Numpy’s Sphinx extensions / BSD-3-Clause |
| [olefile](http://www.decalage.info/python/olefileio) | 0.46 | parse, read and write Microsoft OLE2 files / BSD 2-Clause |
| [openjpeg](http://www.openjpeg.org/) | 2.4.0 | An open-source JPEG 2000 codec written in C / BSD 2-Clause |
| [openpyxl](https://openpyxl.readthedocs.io) | 3.0.9 | A Python library to read/write Excel 2010 xlsx/xlsm files / MIT |
| [openssl](https://www.openssl.org/) | 1.1.1n | OpenSSL is an open-source implementation of the SSL and TLS protocols / OpenSSL |
| [packaging](https://github.com/pypa/packaging) | 21.3 | Core utilities for Python packages / Apache-2.0 or BSD-2-Clause |
| [pandas](https://pandas.pydata.org) | 1.4.2 | High-performance, easy-to-use data structures and data analysis tools. / BSD-3-Clause |
| [pandocfilters](https://github.com/jgm/pandocfilters) | 1.5.0 | A python module for writing pandoc filters / BSD-3-Clause |
| [panel](https://panel.holoviz.org) | 0.13.0 | A high-level app and dashboarding solution for Python / BSD-3-Clause |
| [param](http://ioam.github.io/param/) | 1.12.0 | Param: Make your Python code clearer and more reliable by declaring Parameters / BSD-3-Clause |
| [paramiko](http://www.paramiko.org/) | 2.8.1 | SSH2 protocol library / LGPL-2.1-or-later |
| [parsel](https://github.com/scrapy/parsel) | 1.6.0 | library to extract data from HTML and XML using XPath and CSS selectors / BSD-3-Clause |
| [parso](https://github.com/davidhalter/parso) | 0.8.3 | A Python Parser / MIT |
| [partd](https://github.com/dask/partd) | 1.2.0 | Data structure for on-disk shuffle operations / BSD 3-Clause |
| [pathspec](https://github.com/cpburnz/python-path-specification) | 0.7.0 | Utility library for gitignore style pattern matching of file paths. / MPL-2.0 |
| [patsy](https://github.com/pydata/patsy) | 0.5.2 | Describing statistical models in Python using symbolic formulas / BSD-2-Clause AND PSF-2.0 |
| [pep8](http://pep8.readthedocs.org/) | 1.7.1 | Python style guide checker / MIT |
| [pexpect](http://pexpect.sourceforge.net/) | 4.8.0 | Pexpect makes Python a better tool for controlling other applications. / ISC |
| [pickleshare](https://github.com/pickleshare/pickleshare/) | 0.7.5 | Tiny ‘shelve’-like database with concurrency support / MIT |
| [pillow](https://pillow.readthedocs.io) | 9.0.1 | Pillow is the friendly PIL fork by Alex Clark and Contributors / LicenseRef-PIL |
| [pip](https://pip.pypa.io/en/stable/) | 21.2.4 | PyPA recommended tool for installing Python packages / MIT |
| [pkginfo](https://code.launchpad.net/~tseaver/pkginfo/trunk) | 1.8.2 | Query metadatdata from sdists / bdists / installed packages. / MIT |
| [plotly](https://plot.ly/python/) | 5.6.0 | An interactive JavaScript-based visualization library for Python / MIT |
| [pluggy](https://github.com/pytest-dev/pluggy) | 1.0.0 | Plugin registration and hook calling for Python / MIT |
| powershell\_shortcut | 0.0.1 | Powershell shortcut creator for Windows (using menuinst) / BSD |
| [poyo](https://github.com/hackebrot/poyo) | 0.5.0 | A lightweight YAML Parser for Python / MIT |
| [prometheus\_client](https://github.com/prometheus/client_python) | 0.13.1 | Python client for the Prometheus monitoring system / Apache-2.0 |
| [prompt-toolkit](https://github.com/jonathanslenders/python-prompt-toolkit) | 3.0.20 | Library for building powerful interactive command lines in Python / BSD-3-Clause |
| [prompt\_toolkit](https://github.com/jonathanslenders/python-prompt-toolkit) | 3.0.20 | Library for building powerful interactive command lines in Python / BSD-3-Clause |
| [protego](https://github.com/scrapy/protego) | 0.1.16 | A pure-Python robots.txt parser with support for modern conventions / BSD 3-Clauses |
| [protobuf](https://developers.google.com/protocol-buffers/) | 3.19.1 | Protocol Buffers - Google’s data interchange format. / BSD-3-Clause |
| [psutil](https://github.com/giampaolo/psutil) | 5.8.0 | A cross-platform process and system utilities module for Python / BSD-3-Clause |
| [ptyprocess](https://github.com/pexpect/ptyprocess) | 0.7.0 | Run a subprocess in a pseudo terminal / ISC |
| [pure\_eval](https://github.com/alexmojaki/pure_eval) | 0.2.2 | Safely evaluate AST nodes without side effects / MIT |
| [py](https://github.com/pytest-dev/py) | 1.11.0 | library with cross-python path, ini-parsing, io, code, log facilities / MIT |
| [py-lief](https://lief.quarkslab.com/) | 0.11.5 | A cross platform library to parse, modify and abstract ELF, PE and MachO formats. / Apache-2.0 |
| [pyasn1](https://github.com/etingof/pyasn1) | 0.4.8 | ASN.1 types and codecs / BSD 2-Clause |
| [pyasn1-modules](http://pyasn1.sourceforge.net/) | 0.2.8 | A collection of ASN.1-based protocols modules. / BSD 2-Clause |
| [pycodestyle](https://pycodestyle.readthedocs.io/) | 2.7.0 | Python style guide checker / MIT |
| [pycosat](https://github.com/ContinuumIO/pycosat) | 0.6.3 | Bindings to picosat (a SAT solver) / MIT |
| [pycparser](https://github.com/eliben/pycparser) | 2.21 | Complete C99 parser in pure Python / BSD-3-clause |
| [pyct](http://github.com/pyviz/pyct) | 0.4.6 | python package common tasks for users (e.g. copy examples, fetch data, …) / BSD 3-Clause |
| [pycurl](http://pycurl.sourceforge.net/) | 7.44.1 | A Python Interface To The cURL library / LGPL, MIT |
| [pydispatcher](http://pydispatcher.sourceforge.net) | 2.0.5 | Multi-producer-multi-consumer signal dispatching mechanism / BSD 3-Clause |
| [pydocstyle](https://github.com/PyCQA/pydocstyle) | 6.1.1 | Python docstring style checker (formerly pep257) / MIT |
| [pyerfa](https://pyerfa.readthedocs.io/) | 2.0.0 | Python bindings for ERFA routines / BSD-3-Clause |
| [pyflakes](https://github.com/PyCQA/pyflakes) | 2.3.1 | Pyflakes analyzes programs and detects various errors. / MIT |
| [pygments](https://pygments.org/) | 2.11.2 | Pygments is a generic syntax highlighter suitable for use in code hosting, forums, wikis or other applications that need to prettify source code. / BSD-2-Clause |
| [pyhamcrest](https://github.com/hamcrest/PyHamcrest) | 2.0.2 | Hamcrest framework for matcher objects / BSD 3-Clause |
| [pylint](https://www.pylint.org) | 2.9.6 | python code static checker / GPL-2.0-or-later |
| [pyls-spyder](https://github.com/spyder-ide/pyls-spyder) | 0.4.0 | Spyder extensions for the python-lsp-server / MIT |
| [pynacl](https://github.com/pyca/pynacl) | 1.4.0 | PyNaCl is a Python binding to the Networking and Cryptography library, a crypto library with the stated goal of improving usability, security and speed. / Apache-2.0 |
| [pyodbc](https://github.com/mkleehammer/pyodbc) | 4.0.32 | DB API Module for ODBC / MIT |
| [pyopenssl](https://github.com/pyca/pyopenssl) | 21.0.0 | Python wrapper module around the OpenSSL library / Apache-2.0 |
| [pyparsing](https://github.com/pyparsing/pyparsing/) | 3.0.4 | Create and execute simple grammars / MIT |
| [pyqt](http://www.riverbankcomputing.co.uk/software/pyqt) | 5.9.2 | Python binding of the cross-platform GUI toolkit Qt. / Commercial, GPL-2.0, GPL-3.0 |
| [pyreadline](http://ipython.org/pyreadline) | 2.1 | A python implmementation of GNU readline. / BSD 3-Clause |
| [pyrsistent](http://github.com/tobgu/pyrsistent/) | 0.18.0 | Persistent/Functional/Immutable data structures / MIT |
| [pysocks](https://github.com/Anorov/PySocks) | 1.7.1 | A Python SOCKS client module. See [Anorov/PySocks](https://github.com/Anorov/PySocks) for more information. / BSD 3-Clause |
| [pytables](https://www.pytables.org) | 3.6.1 | Brings together Python, HDF5 and NumPy to easily handle large amounts of data. / BSD-3-Clause |
| [pytest](https://docs.pytest.org/en/latest/) | 7.1.1 | Simple and powerful testing with Python. / MIT |
| [python](https://www.python.org/) | 3.9.12 | General purpose programming language / PSF-2.0 |
| [python-dateutil](https://dateutil.readthedocs.org/) | 2.8.2 | Extensions to the standard Python datetime module. / BSD-3-Clause and Apache |
| [python-fastjsonschema](https://github.com/horejsek/python-fastjsonschema) | 2.15.1 | Fastest Python implementation of JSON schema / BSD-3-Clause |
| [python-libarchive-c](https://github.com/Changaco/python-libarchive-c) | 2.9 | Python interface to libarchive / CC0-1.0 |
| [python-lsp-black](https://github.com/python-lsp/python-lsp-black) | 1.0.0 | Black plugin for the Python LSP Server / MIT |
| [python-lsp-jsonrpc](https://github.com/python-lsp/python-lsp-jsonrpc) | 1.0.0 | A Python 3.6+ server implementation of the JSON RPC 2.0 protocol. / MIT |
| [python-lsp-server](https://github.com/python-lsp/python-lsp-server) | 1.2.4 | An implementation of the Language Server Protocol for Python / MIT |
| [python-slugify](https://github.com/un33k/python-slugify) | 5.0.2 | A Python Slugify application that handles Unicode / MIT |
| [python-snappy](https://github.com/andrix/python-snappy) | 0.6.0 | Python library for the snappy compression library from Google / BSD-3-Clause |
| [pytz](http://pythonhosted.org/pytz/) | 2021.3 | World timezone definitions, modern and historical. / MIT |
| [pyviz\_comms](https://www.holoviz.org) | 2.0.2 | Bidirectional communication for PyViz / BSD-3-Clause |
| [pywavelets](https://github.com/PyWavelets/pywt) | 1.3.0 | Discrete Wavelet Transforms in Python / MIT |
| [pywin32](https://github.com/mhammond/pywin32) | 302 | Python extensions for Windows / PSF-2.0 |
| [pywin32-ctypes](https://github.com/enthought/pywin32-ctypes) | 0.2.0 | A limited subset of pywin32 re-implemented using ctypes (or cffi) / BSD 3 Clause |
| [pywinpty](https://github.com/spyder-ide/pywinpty) | 2.0.2 | Pseudoterminals for Windows in Python / MIT |
| [pyyaml](http://pyyaml.org/wiki/PyYAML) | 6.0 | YAML parser and emitter for Python / MIT |
| [pyzmq](https://github.com/zeromq/pyzmq) | 22.3.0 | Python bindings for zeromq / BSD-3-clause |
| [qdarkstyle](https://github.com/ColinDuquesnoy/QDarkStyleSheet) | 3.0.2 | A dark stylesheet for Qt applications (Qt4, Qt5, PySide, PyQt4, PyQt5, QtPy, PyQtGraph). / MIT |
| [qstylizer](https://github.com/blambright/qstylizer) | 0.1.10 | Qt stylesheet generation utility for PyQt/PySide / MIT |
| [qt](http://qt.io) | 5.9.7 | Qt is a cross-platform application and UI framework. / LGPL-3.0-only |
| [qtawesome](https://github.com/spyder-ide/qtawesome) | 1.0.3 | Iconic fonts in PyQt and PySide applications / MIT |
| [qtconsole](http://jupyter.org) | 5.3.0 | Jupyter Qt Console / BSD-3-Clause |
| [qtpy](https://github.com/spyder-ide/qtpy) | 2.0.1 | Abstraction layer for PyQt5/PyQt4/PySide / MIT |
| [queuelib](https://github.com/scrapy/queuelib) | 1.5.0 | Collection of persistent (disk-based) queues / BSD |
| [regex](https://github.com/mrabarnett/mrab-regex) | 2022.3.15 | Alternative regular expression module, to replace re / Apache-2.0 |
| [requests](http://python-requests.org) | 2.27.1 | Requests is an elegant and simple HTTP library for Python, built with ♥. / Apache-2.0 |
| [requests-file](http://github.com/dashea/requests-file) | 1.5.1 | file transport adapter for Requests / Apache |
| [rope](https://github.com/python-rope/rope) | 0.22.0 | A python refactoring library / LGPL-3.0-or-later |
| [rsa](https://stuvel.eu/rsa) | 4.7.2 | Pure-Python RSA implementation / Apache-2.0 |
| [rtree](http://toblerity.github.com/rtree/) | 0.9.7 | R-Tree spatial index for Python GIS / MIT |
| [ruamel\_yaml](https://sourceforge.net/p/ruamel-yaml/code/ci/default/tree) | 0.15.100 | A patched copy of ruamel.yaml. / MIT |
| [s3transfer](https://github.com/boto/s3transfer) | 0.5.0 | An Amazon S3 Transfer Manager / Apache-2.0 |
| [scikit-image](https://scikit-image.org/) | 0.19.2 | Image processing in Python. / BSD-3-Clause |
| [scikit-learn](http://scikit-learn.org/) | 1.0.2 | A set of python modules for machine learning and data mining / BSD-3-Clause |
| [scikit-learn-intelex](https://intel.github.io/scikit-learn-intelex) | 2021.5.0 | Intel(R) Extension for Scikit-learn is a seamless way to speed up your Scikit-learn application. / Apache-2.0 |
| [scipy](http://www.scipy.org/) | 1.7.3 | Scientific Library for Python / BSD 3-Clause |
| [scrapy](https://scrapy.org/) | 2.6.1 | A high-level Python Screen Scraping framework / BSD-3-Clause-Clear |
| [seaborn](https://seaborn.pydata.org) | 0.11.2 | Statistical data visualization / BSD 3-Clause |
| [send2trash](https://github.com/arsenetar/send2trash) | 1.8.0 | Python library to natively send files to Trash (or Recycle bin) on all platforms. / BSD-3-Clause |
| [service\_identity](https://github.com/pyca/service_identity) | 18.1.0 | Service identity verification for pyOpenSSL. / MIT |
| [setuptools](https://github.com/pypa/setuptools) | 61.2.0 | Download, build, install, upgrade, and uninstall Python packages / MIT |
| [sip](https://www.riverbankcomputing.com/software/sip/) | 4.19.13 | A Python bindings generator for C/C++ libraries / GPL-3.0-only |
| [six](https://six.readthedocs.io/) | 1.16.0 | Python 2 and 3 compatibility utilities / MIT |
| [smart\_open](https://github.com/RaRe-Technologies/smart_open) | 5.1.0 | Python library for efficient streaming of large files / MIT |
| [snappy](https://github.com/google/snappy) | 1.1.9 | A fast compressor/decompressor / BSD-3-clause AND CC-BY-3.0 AND MIT AND CC-BY AND Public Domain |
| [sniffio](https://github.com/python-trio/sniffio) | 1.2.0 | Sniff out which async library your code is running under / Apache-2.0 |
| [snowballstemmer](https://github.com/snowballstem/snowball) | 2.2.0 | Snowball stemming library collection for Python / BSD-3-Clause |
| [sortedcollections](http://www.grantjenks.com/docs/sortedcollections/) | 2.1.0 | Python Sorted Collections / Apache-2.0 |
| [sortedcontainers](http://www.grantjenks.com/docs/sortedcontainers/) | 2.4.0 | Python Sorted Container Types: SortedList, SortedDict, and SortedSet / Apache-2.0 |
| [soupsieve](http://facelessuser.github.io/soupsieve) | 2.3.1 | A modern CSS selector implementation for BeautifulSoup / MIT |
| [sphinx](https://www.sphinx-doc.org) | 4.4.0 | Sphinx is a tool that makes it easy to create intelligent and beautiful documentation / BSD-2-Clause |
| [sphinxcontrib-applehelp](https://www.sphinx-doc.org/en/master/) | 1.0.2 | sphinxcontrib-applehelp is a sphinx extension which outputs Apple help books / BSD-2-Clause |
| [sphinxcontrib-devhelp](https://www.sphinx-doc.org/en/master/) | 1.0.2 | sphinxcontrib-devhelp is a sphinx extension which outputs Devhelp document / BSD-2-Clause |
| [sphinxcontrib-htmlhelp](https://www.sphinx-doc.org/en/master/) | 2.0.0 | sphinxcontrib-htmlhelp is a sphinx extension which renders HTML help files. / BSD-2-Clause |
| [sphinxcontrib-jsmath](https://www.sphinx-doc.org/en/master/) | 1.0.1 | A sphinx extension which renders display math in HTML via JavaScript / BSD-2-Clause |
| [sphinxcontrib-qthelp](https://www.sphinx-doc.org/en/master/) | 1.0.3 | sphinxcontrib-qthelp is a sphinx extension which outputs QtHelp document / BSD-2-Clause |
| [sphinxcontrib-serializinghtml](https://www.sphinx-doc.org/en/master/) | 1.1.5 | sphinxcontrib-serializinghtml is a sphinx extension which outputs “serialized” HTML files (json and pickle). / BSD-2-Clause |
| [spyder](https://www.spyder-ide.org/) | 5.1.5 | The Scientific Python Development Environment / MIT |
| [spyder-kernels](https://www.spyder-ide.org/) | 2.1.3 | Jupyter kernels for Spyder’s console / MIT |
| [sqlalchemy](https://www.sqlalchemy.org/) | 1.4.32 | Database Abstraction Library. / MIT |
| [sqlite](https://www.sqlite.org/) | 3.38.2 | Implements a self-contained, zero-configuration, SQL database engine / blessing |
| [stack\_data](https://github.com/alexmojaki/stack_data) | 0.2.0 | Extract data from python stack frames and tracebacks for informative displays / MIT |
| [statsmodels](https://www.statsmodels.org) | 0.13.2 | Statistical computations and models for use with SciPy / BSD-3-Clause |
| [sympy](https://sympy.org) | 1.10.1 | Python library for symbolic mathematics / BSD-3-Clause AND MIT |
| [tabulate](https://bitbucket.org/astanin/python-tabulate) | 0.8.9 | Pretty-print tabular data in Python, a library and a command-line utility. / MIT |
| [tbb](https://github.com/oneapi-src/oneTBB) | 2021.5.0 | High level abstract threading library / Apache-2.0 |
| tbb4py | 2021.5.0 | TBB module for Python / Apache 2.0 |
| [tblib](https://github.com/ionelmc/python-tblib) | 1.7.0 | Traceback serialization library. / BSD 2-Clause |
| [tenacity](http://github.com/jd/tenacity) | 8.0.1 | Retry a flaky function whenever an exception occurs until it works / Apache-2.0 |
| [terminado](https://github.com/jupyter/terminado) | 0.13.1 | Terminals served by tornado websockets / BSD-2-Clause |
| [testpath](https://testpath.readthedocs.io) | 0.5.0 | Testpath is a collection of utilities for Python code working with files and commands. / BSD-3-Clause |
| [text-unidecode](https://github.com/kmike/text-unidecode/) | 1.3 | The most basic Text::Unidecode port / Artistic |
| [textdistance](https://github.com/orsinium/textdistance) | 4.2.1 | TextDistance – python library for comparing distance between two or more sequences by many algorithms. / MIT |
| [threadpoolctl](https://github.com/joblib/threadpoolctl) | 2.2.0 | Python helpers to control the threadpools of native libraries / BSD 3-Clause |
| [three-merge](https://github.com/spyder-ide/three-merge) | 0.1.1 | Simple Python library to perform a 3-way merge between strings / MIT |
| [tifffile](https://github.com/cgohlke/tifffile) | 2021.7.2 | Read and write image data from and to TIFF files. / BSD-3-Clause |
| [tinycss](http://tinycss.readthedocs.io/) | 0.4 | Tinycss is a complete yet simple CSS parser for Python. / BSD-3-Clause |
| [tk](http://www.tcl.tk/) | 8.6.11 | A dynamic programming language with GUI support. Bundles Tcl and Tk. / Tcl/Tk |
| [tldextract](https://github.com/john-kurkowski/tldextract) | 3.2.0 | Accurately separate the TLD from the registered domain andsubdomains of a URL, using the Public Suffix List. / BSD-3-Clause |
| [toml](https://github.com/uiri/toml) | 0.10.2 | Python lib for TOML. / MIT |
| [tomli](https://github.com/hukkin/tomli) | 1.2.2 | A simple TOML parser / MIT |
| [toolz](http://toolz.readthedocs.org/) | 0.11.2 | List processing tools and functional utilities / BSD-3-Clause |
| [tornado](http://www.tornadoweb.org/) | 6.1 | A Python web framework and asynchronous networking library, originally developed at FriendFeed. / Apache-2.0 |
| [tqdm](https://pypi.python.org/pypi/tqdm) | 4.64.0 | A Fast, Extensible Progress Meter / MPL-2.0 AND MIT |
| [traitlets](http://traitlets.readthedocs.org/) | 5.1.1 | Configuration system for Python applications / BSD-3-Clause |
| [twisted](https://twistedmatrix.com/) | 22.2.0 | An asynchronous networking framework written in Python / MIT |
| [twisted-iocpsupport](https://github.com/twisted/twisted-iocpsupport) | 1.0.2 | An extension for use in the twisted I/O Completion Ports reactor. / MIT |
| [typed-ast](https://github.com/python/typed_ast) | 1.4.3 | a fork of Python 2 and 3 ast modules with type comment support / Apache-2.0 AND PSF-2.0 AND MIT |
| [typing-extensions](https://github.com/python/typing/tree/master/typing_extensions) | 4.1.1 | Backported and Experimental Type Hints for Python / PSF-2.0 |
| [typing\_extensions](https://github.com/python/typing/tree/master/typing_extensions) | 4.1.1 | Backported and Experimental Type Hints for Python / PSF-2.0 |
| [tzdata](https://www.iana.org/time-zones) | 2022a | The Time Zone Database (called tz, tzdb or zoneinfo) / Public-Domain AND BSD-3-clause |
| [ujson](https://github.com/ultrajson/ultrajson) | 5.1.0 | Ultra fast JSON decoder and encoder written in C with Python bindings / BSD-3-Clause |
| [unidecode](https://pypi.python.org/pypi/Unidecode) | 1.2.0 | ASCII transliterations of Unicode text / GPL-2.0-or-later |
| [urllib3](https://urllib3.readthedocs.io/) | 1.26.9 | HTTP library with thread-safe connection pooling, file post, and more. / MIT |
| [vc](https://github.com/conda/conda/wiki/VC-features) | 14.2 | A meta-package to impose mutual exclusivity among software built with different VS versions / Modified BSD License (3-clause) |
| vs2015\_runtime | 14.27.29016 | MSVC runtimes associated with cl.exe version 19.27.29111 (VS 2019 update 5) / None |
| [w3lib](https://github.com/scrapy/w3lib) | 1.21.0 | Library of web-related functions / BSD |
| [watchdog](http://github.com/gorakhargosh/watchdog) | 2.1.6 | Filesystem events monitoring / Apache-2.0 |
| [wcwidth](https://github.com/jquast/wcwidth) | 0.2.5 | Measures number of Terminal column cells of wide-character codes. / MIT |
| [webencodings](https://github.com/gsnedders/python-webencodings) | 0.5.1 | Character encoding aliases for legacy web content / BSD 3-Clause |
| [websocket-client](https://github.com/liris/websocket-client) | 0.58.0 | WebSocket client for python. hybi13 is supported. / BSD-3-Clause |
| [werkzeug](https://palletsprojects.com/p/werkzeug/) | 2.0.3 | The comprehensive WSGI web application library. / BSD-3-Clause |
| [wheel](https://github.com/pypa/wheel) | 0.37.1 | A built-package format for Python. / MIT |
| [widgetsnbextension](http://ipython.org) | 3.5.2 | Interactive Widgets for Jupyter / BSD-3-Clause |
| [win\_inet\_pton](https://github.com/hickeroar/win_inet_pton) | 1.1.0 | Native inet\_pton and inet\_ntop implementation for Python on Windows (with ctypes). / PUBLIC-DOMAIN |
| [win\_unicode\_console](https://github.com/Drekin/win-unicode-console) | 0.5 | A Python package to enable Unicode input and display when running Python from Windows console. / MIT |
| [wincertstore](https://bitbucket.org/tiran/wincertstore) | 0.2 | Python module to extract CA and CRL certs from Windows’ cert store (ctypes based). / PSF 2 |
| [winpty](https://github.com/rprichard/winpty) | 0.4.3 | Winpty provides an interface similar to a Unix pty-master for communicating with Windows console programs. / MIT |
| [wrapt](https://github.com/GrahamDumpleton/wrapt) | 1.12.1 | Module for decorators, wrappers and monkey patching / BSD-2-Clause |
| [xarray](https://github.com/pydata/xarray) | 0.20.1 | N-D labeled arrays and datasets in Python. / Apache-2.0 |
| [xlrd](http://www.python-excel.org/) | 2.0.1 | Library for developers to extract data from Microsoft Excel (tm) spreadsheet files / BSD 3-Clause and BSD with advertising |
| [xlsxwriter](https://xlsxwriter.readthedocs.io/) | 3.0.3 | A Python module for creating Excel XLSX files / BSD-2-Clause |
| [xlwings](http://xlwings.org/) | 0.24.9 | Interact with Excel from Python and vice versa / BSD-3-clause |
| [xz](http://tukaani.org/xz/) | 5.2.5 | Data compression software with high compression ratio / LGPL-2.1 and GPL-2.0 |
| [yaml](http://pyyaml.org/wiki/LibYAML) | 0.2.5 | A C library for parsing and emitting YAML / MIT |
| [yapf](https://github.com/google/yapf) | 0.31.0 | A formatter for Python files / Apache 2.0 |
| [yarl](https://github.com/aio-libs/yarl) | 1.6.3 | Yet another URL library / Apache 2.0 |
| [zfp](https://computation.llnl.gov/projects/floating-point-compression) | 0.5.5 | Library for compressed numerical arrays that support high throughput read and write random access / BSD-3-Clause |
| [zict](http://github.com/mrocklin/zict) | 2.0.0 | Composable Dictionary Classes / BSD 3-Clause |
| [zipp](https://github.com/jaraco/zipp) | 3.7.0 | A pathlib-compatible Zipfile object wrapper / MIT |
| [zlib](http://zlib.net/) | 1.2.12 | Massively spiffy yet delicately unobtrusive compression library / Zlib |
| zope | 1.0 | web application server / BSD |
| [zope.interface](https://github.com/zopefoundation/zope.interface) | 5.4.0 | Interfaces for Python / ZPL-2.1 |
| [zstd](https://www.zstd.net) | 1.4.9 | Zstandard - Fast real-time compression algorithm / BSD-3-Clause AND GPL-2.0-or-later |
| Name | Version | Summary / License |
|---|---|---|
| [aiohttp](https://github.com/aio-libs/aiohttp) | 3.8.1 | Async http client/server framework (asyncio) / Apache-2.0 |
| [aiosignal](https://github.com/aio-libs/aiosignal) | 1.2.0 | aiosignal: a list of registered asynchronous callbacks / Apache-2.0 |
| [alabaster](http://www.sphinx-doc.org/en/stable/index.html) | 0.7.12 | Configurable, Python 2+3 compatible Sphinx theme. / BSD 3-Clause |
| [anaconda-client](https://github.com/Anaconda-Platform/anaconda-client) | 1.9.0 | Anaconda Cloud command line client library / BSD 3-Clause |
| [anaconda-navigator](https://github.com/ContinuumIO/navigator) | 2.1.4 | Anaconda Navigator / proprietary - Continuum Analytics, Inc. |
| [anaconda-project](https://github.com/Anaconda-Platform/anaconda-project) | 0.10.2 | Tool for encapsulating, running, and reproducing data science projects / BSD-3-Clause |
| [anyio](https://github.com/agronholm/anyio) | 3.5.0 | High level compatibility layer for multiple asynchronous event loop implementations on Python / MIT |
| [appdirs](http://github.com/ActiveState/appdirs) | 1.4.4 | A small Python module for determining appropriate platform-specific dirs. / MIT |
| [argon2-cffi](https://argon2-cffi.readthedocs.org/) | 21.3.0 | The secure Argon2 password hashing algorithm. / MIT |
| [argon2-cffi-bindings](https://github.com/hynek/argon2-cffi-bindings) | 21.2.0 | Low-level Python CFFI Bindings for Argon2 / MIT |
| [arrow](https://github.com/crsmithdev/arrow) | 1.2.2 | Better dates & times for Python / Apache-2.0 |
| [astroid](https://www.astroid.org/) | 2.6.6 | A abstract syntax tree for Python with inference support. / LGPL-2.1-or-later |
| [astropy](https://www.astropy.org/) | 5.0.4 | Community-developed Python Library for Astronomy / BSD-3-Clause |
| [asttokens](https://github.com/gristlabs/asttokens) | 2.0.5 | The asttokens module annotates Python abstract syntax trees (ASTs) with the positions of tokens and text in the source code that generated them. / Apache-2.0 |
| [async-timeout](http://github.com/aio-libs/async_timeout) | 4.0.1 | Timeout context manager for asyncio programs / Apache-2.0 |
| [atomicwrites](https://github.com/untitaker/python-atomicwrites) | 1.4.0 | Atomic file writes / MIT |
| [attrs](https://attrs.readthedocs.io/en/stable/) | 21.4.0 | attrs is the Python package that will bring back the joy of writing classes by relieving you from the drudgery of implementing object protocols (aka dunder methods). / MIT |
| [automat](https://github.com/glyph/Automat) | 20.2.0 | self-service finite-state machines for the programmer on the go / MIT |
| [autopep8](https://github.com/hhatto/autopep8) | 1.6.0 | A tool that automatically formats Python code to conform to the PEP 8 style guide / MIT |
| [babel](http://babel.pocoo.org/) | 2.9.1 | Utilities to internationalize and localize Python applications / BSD 3-clause |
| [backcall](https://github.com/takluyver/backcall/) | 0.2.0 | Specifications for callback functions passed in to an API / BSD-3-Clause |
| [backports](https://github.com/brandon-rhodes/backports) | 1.1 | Namespace for backported Python features. / MIT |
| [backports.functools\_lru\_cache](https://github.com/jaraco/backports.functools_lru_cache) | 1.6.4 | Backport of functools.lru\_cache from Python 3.3 as published at ActiveState. / MIT |
| [backports.tempfile](https://github.com/pjdelport/backports.tempfile) | 1.0 | Backports of new features in Python’s tempfile module / PSF 2 |
| [backports.weakref](https://github.com/pjdelport/backports.weakref) | 1.0.post1 | Backport of new features in Python’s weakref module / Python-2.0 |
| [bcrypt](https://github.com/pyca/bcrypt/) | 3.2.0 | Modern password hashing for your software and your servers / Apache-2.0 |
| [beautifulsoup4](https://www.crummy.com/software/BeautifulSoup/) | 4.10.0 | Python library designed for screen-scraping / MIT |
| [binaryornot](https://github.com/audreyr/binaryornot) | 0.4.4 | Ultra-lightweight pure Python package to check if a file is binary or text. / BSD-3-Clause |
| [bitarray](https://github.com/ilanschnell/bitarray) | 2.4.1 | efficient arrays of booleans – C extension / PSF-2.0 |
| [bkcharts](http://github.com/bokeh/bkcharts) | 0.2 | High level chart types built on top of Bokeh / BSD 3-Clause |
| [black](https://github.com/python/black) | 19.10b0 | The Uncompromising Code Formatter / MIT |
| [blas](http://www.netlib.org/lapack) | 1.0 | Linear Algebra PACKage / BSD-3-Clause |
| [bleach](https://github.com/mozilla/bleach) | 4.1.0 | Easy, whitelist-based HTML-sanitizing tool / Apache-2.0 |
| [blosc](https://github.com/Blosc/c-blosc) | 1.21.0 | A blocking, shuffling and loss-less compression library that can be faster than memcpy() / BSD-3-Clause |
| [bokeh](http://bokeh.pydata.org/) | 2.4.2 | Statistical and novel interactive HTML plots for Python / BSD-3-Clause |
| [boto3](https://aws.amazon.com/sdk-for-python) | 1.21.32 | Amazon Web Services SDK for Python / Apache-2.0 |
| [botocore](https://aws.amazon.com/sdk-for-python/) | 1.24.32 | Low-level, data-driven core of boto 3. / Apache-2.0 |
| [bottleneck](https://github.com/pydata/bottleneck) | 1.3.4 | Fast NumPy array functions written in Cython. / BSD-2-Clause |
| [brotli](http://github.com/google/brotli) | 1.0.9 | Brotli compression format / MIT |
| [brotlipy](https://github.com/python-hyper/brotlipy) | 0.7.0 | Python bindings to the Brotli compression library / MIT |
| [bzip2](http://www.bzip.org/) | 1.0.8 | high-quality data compressor / bzip2 |
| [ca-certificates](https://curl.se/docs/caextract.html) | 2022.3.29 | Certificates for use with other packages. / MPL-2.0 |
| [cachetools](https://github.com/tkem/cachetools) | 4.2.2 | Extensible memoizing collections and decorators / MIT |
| [certifi](http://certifi.io/) | 2021.10.8 | Python package for providing Mozilla’s CA Bundle. / ISC |
| [cffi](http://cffi.readthedocs.org/) | 1.15.0 | Foreign Function Interface for Python calling C code. / MIT |
| [chardet](https://github.com/chardet/chardet) | 4.0.0 | Universal character encoding detector / LGPL2 |
| [charset-normalizer](https://github.com/ousret/charset_normalizer) | 2.0.4 | The Real First Universal Charset Detector. Open, modern and actively maintained alternative to Chardet. / MIT |
| [click](https://palletsprojects.com/p/click) | 8.0.4 | Python composable command line interface toolkit / BSD-3-Clause |
| [cloudpickle](https://github.com/cloudpipe/cloudpickle) | 2.0.0 | Extended pickling support for Python objects / BSD-3-Clause |
| [clyent](https://github.com/Anaconda-Platform/clyent) | 1.2.2 | Command line client library for windows and posix / BSD 3-Clause |
| [colorama](https://github.com/tartley/colorama) | 0.4.4 | Cross-platform colored terminal text / BSD-3-Clause |
| [colorcet](http://github.com/pyviz/colorcet) | 2.0.6 | Collection of perceptually uniform colormaps / CC-BY-4.0 |
| [comtypes](http://starship.python.net/crew/theller/comtypes/) | 1.1.10 | pure Python COM package / MIT |
| [conda](https://conda.io) | 4.12.0 | OS-agnostic, system-level binary package and environment manager. / BSD-3-Clause |
| [conda-build](https://github.com/conda/conda-build) | 3.21.8 | tools for building conda packages / BSD-3-Clause |
| [conda-content-trust](https://github.com/conda/conda-content-trust) | 0.1.1 | Signing and verification tools for conda / BSD-3-Clause |
| [conda-env](https://github.com/conda/conda-env) | 2.6.0 | Tools for interacting with conda environments. / BSD 3-Clause |
| [conda-token](https://github.com/Anaconda/conda-token) | 0.3.0 | Set repository access token / BSD-3-Clause |
| [conda-verify](https://github.com/conda/conda-verify) | 3.4.2 | tool for validating conda recipes and conda packages / BSD 3-Clause |
| console\_shortcut | 0.1.1 | Console shortcut creator for Windows (using menuinst) / BSD |
| [constantly](https://github.com/twisted/constantly) | 15.1.0 | Symbolic constants in Python / MIT |
| [cookiecutter](https://github.com/cookiecutter/cookiecutter) | 1.7.3 | A command-line utility that creates projects from cookiecutters (project templates), e.g. creating a Python package project from a Python package project template. / BSD-3-Clause |
| [cryptography](https://github.com/pyca/cryptography) | 3.4.7 | Provides cryptographic recipes and primitives to Python developers / Apache-2.0 AND BSD-3-Clause AND PSF-2.0 AND MIT |
| [cssselect](https://pythonhosted.org/cssselect/) | 1.1.0 | CSS Selectors for Python / BSD 3-Clause |
| [curl](https://curl.haxx.se/) | 7.82.0 | tool and library for transferring data with URL syntax / curl |
| [cycler](http://matplotlib.org/cycler) | 0.11.0 | Composable style cycles. / BSD-3-Clause |
| [cython](https://cython.org/) | 0.29.28 | The Cython compiler for writing C extensions for the Python language / Apache-2.0 |
| [cytoolz](https://github.com/pytoolz/cytoolz) | 0.11.0 | Cython implementation of Toolz. High performance functional utilities / BSD-3-Clause |
| [dask](https://dask.org/) | 2022.2.1 | Parallel PyData with Task Scheduling / BSD-3-Clause |
| [dask-core](https://github.com/dask/dask/) | 2022.2.1 | Parallel Python with task scheduling / BSD-3-Clause |
| [dataclasses](https://github.com/ericvsmith/dataclasses) | 0.8 | An implementation of PEP 557: Data Classes / Apache-2.0 |
| [datashader](https://datashader.org) | 0.13.0 | Data visualization toolchain based on aggregating into a grid / BSD-3-Clause |
| [datashape](http://datashape.pydata.org) | 0.5.4 | A data description language. / BSD 2-Clause |
| [debugpy](https://github.com/Microsoft/debugpy) | 1.5.1 | An implementation of the Debug Adapter Protocol for Python / MIT |
| [decorator](https://github.com/micheles/decorator) | 5.1.1 | Better living through Python with decorators. / BSD-2-Clause |
| [defusedxml](https://bitbucket.org/tiran/defusedxml) | 0.7.1 | XML bomb protection for Python stdlib modules / PSF 2.0 |
| [diff-match-patch](http://code.google.com/p/google-diff-match-patch/) | 20200713 | Diff Match Patch is a high-performance library in multiple languages that manipulates plain text / Apache-2.0 |
| [distributed](https://distributed.readthedocs.io/en/latest/) | 2022.2.1 | Distributed computing with Dask / BSD-3-Clause |
| [docutils](http://docutils.sourceforge.net/) | 0.17.1 | Docutils – Python Documentation Utilities / LicenseRef-Public-Domain-Dedictation and BSD-2-Clause and LicenseRef-PSF-2.1.1 and GPL-3.0-or-later |
| [entrypoints](https://github.com/takluyver/entrypoints) | 0.4 | Discover and load entry points from installed packages. / MIT License |
| [et\_xmlfile](https://foss.heptapod.net/openpyxl/et_xmlfile) | 1.1.0 | An implementation of lxml.xmlfile for the standard library / MIT AND PSF-2.0 |
| [executing](https://pypi.org/project/executing) | 0.8.3 | Get the currently executing AST node of a frame, and other information / MIT |
| [filelock](https://github.com/tox-dev/py-filelock) | 3.6.0 | A platform independent file lock. / Unlicense |
| [flake8](http://flake8.pycqa.org/) | 3.9.2 | Your Tool For Style Guide Enforcement / MIT |
| [flask](https://flask.pocoo.org) | 1.1.2 | A microframework based on Werkzeug, Jinja2 and good intentions. / BSD 3-Clause |
| [fonttools](https://github.com/fonttools/fonttools) | 4.25.0 | fontTools is a library for manipulating fonts, written in Python. / MIT |
| [freetype](https://www.freetype.org/) | 2.10.4 | A Free, High-Quality, and Portable Font Engine / GPL-2.0-only and LicenseRef-FreeType |
| [frozenlist](https://github.com/aio-libs/frozenlist) | 1.2.0 | A list-like structure which implements collections.abc.MutableSequence / Apache-2.0 |
| [fsspec](https://github.com/martindurant/filesystem_spec) | 2022.2.0 | A specification for pythonic filesystems / BSD-3-Clause |
| [future](http://python-future.org) | 0.18.2 | Clean single-source support for Python 3 and 2 / MIT |
| [gensim](https://github.com/RaRe-Technologies/gensim) | 4.1.2 | Topic Modelling for Humans / LGPL-2.1-only |
| [glob2](https://github.com/miracle2k/python-glob2) | 0.7 | Version of the glob module that supports recursion via \*\*, and can capture patterns. / BSD-2-Clause |
| [google-api-core](https://github.com/googleapis/python-api-core) | 1.25.1 | Core Library for Google Client Libraries / Apache-2.0 |
| [google-auth](https://github.com/googleapis/google-auth-library-python) | 1.33.0 | Google authentication library for Python / Apache-2.0 |
| [google-cloud-core](https://github.com/googleapis/python-cloud-core) | 1.7.1 | API Client library for Google Cloud: Core Helpers / Apache-2.0 |
| [google-cloud-storage](https://github.com/googleapis/python-storage) | 1.28.1 | Python Client for Google Cloud Storage / Apache-2.0 |
| [google-resumable-media](https://github.com/googleapis/google-resumable-media-python) | 0.5.1 | Utilities for Google Media Downloads and Resumable Uploads / Apache-2.0 |
| [googleapis-common-protos](https://github.com/googleapis/api-common-protos) | 1.53.0 | Common protobufs used in Google APIs / Apache-2.0 |
| [greenlet](https://github.com/python-greenlet/greenlet) | 1.1.1 | Lightweight in-process concurrent programming / MIT |
| [grpcio](https://grpc.io) | 1.42.0 | HTTP/2-based RPC framework / Apache-2.0 |
| [h5py](http://www.h5py.org/) | 3.6.0 | Read and write HDF5 files from Python / BSD-3-Clause |
| [hdf5](http://www.hdfgroup.org/HDF5/) | 1.10.6 | HDF5 is a data model, library, and file format for storing and managing data / HDF5 |
| [heapdict](http://stutzbachenterprises.com/) | 1.0.1 | A heap with decrease-key and increase-key operations / BSD 3-Clause |
| [holoviews](https://holoviews.org) | 1.14.8 | Stop plotting your data - annotate your data and let it visualize itself. / BSD-3-Clause |
| [hvplot](https://hvplot.holoviz.org/) | 0.7.3 | A high-level plotting API for the PyData ecosystem built on HoloViews / BSD-3-Clause |
| [hyperlink](https://github.com/python-hyper/hyperlink) | 21.0.0 | Immutable, Pythonic, correct URLs. / MIT |
| icc\_rt | 2019.0.0 | Intel runtime libraries for C, C++ and Fortran compilers / Intel proprietary |
| [icu](http://site.icu-project.org/) | 58.2 | International Components for Unicode. / MIT |
| [idna](https://github.com/kjd/idna) | 3.3 | Internationalized Domain Names in Applications (IDNA). / BSD-3-Clause |
| [imageio](https://imageio.github.io) | 2.9.0 | A Python library for reading and writing image data / BSD-2-Clause |
| [imagesize](https://github.com/shibukawa/imagesize_py) | 1.3.0 | Getting image size from png/jpeg/jpeg2000/gif file / MIT |
| [importlib-metadata](https://github.com/python/importlib_metadata) | 4.11.3 | A library to access the metadata for a Python package. / Apache-2.0 |
| [importlib\_metadata](https://github.com/python/importlib_metadata) | 4.11.3 | A library to access the metadata for a Python package. / Apache-2.0 |
| [incremental](https://github.com/hawkowl/incremental) | 21.3.0 | Incremental is a small library that versions your Python projects. / MIT |
| [inflection](http://github.com/jpvanhal/inflection) | 0.5.1 | A port of Ruby on Rails inflector to Python / MIT |
| [iniconfig](http://github.com/RonnyPfannschmidt/iniconfig) | 1.1.1 | iniconfig: brain-dead simple config-ini parsing / MIT |
| [intake](https://github.com/ContinuumIO/intake) | 0.6.5 | Data load and catalog system / BSD-2-Clause |
| [intel-openmp](https://software.intel.com/en-us/node/522690) | 2021.4.0 | Math library for Intel and compatible processors / LicenseRef-ProprietaryIntel |
| [intervaltree](https://github.com/chaimleib/intervaltree) | 3.1.0 | Editable interval tree data structure for Python 2 and 3 / Apache-2.0 |
| [ipykernel](https://ipython.org) | 6.9.1 | IPython Kernel for Jupyter / BSD-3-Clause |
| [ipython](https://ipython.org) | 8.2.0 | IPython: Productive Interactive Computing / BSD-3-Clause |
| [ipython\_genutils](http://ipython.org) | 0.2.0 | vestigial utilities from IPython / BSD 3-Clause |
| [ipywidgets](https://github.com/ipython/ipywidgets) | 7.6.5 | Jupyter Interactive Widgets / BSD-3-Clause |
| [isort](https://github.com/timothycrosley/isort) | 5.9.3 | A Python utility / library to sort Python imports. / MIT |
| [itemadapter](https://github.com/scrapy/itemadapter) | 0.3.0 | Common interface for different data containers / BSD-3-Clause |
| [itemloaders](https://github.com/scrapy/itemadapter) | 1.0.4 | Collect data from HTML and XML sources / BSD-3-Clause |
| [itsdangerous](https://github.com/pallets/itsdangerous) | 2.0.1 | Various helpers to pass trusted data to untrusted environments. / BSD-3-Clause |
| [jdcal](https://github.com/phn/jdcal) | 1.4.1 | Julian dates from proleptic Gregorian and Julian calendars. / BSD 2-Clause |
| [jedi](https://github.com/davidhalter/jedi/) | 0.18.1 | An autocompletion tool for Python that can be used for text editors. / MIT |
| [jinja2](https://jinja.pocoo.org) | 2.11.3 | An easy to use stand-alone template engine written in pure python. / BSD-3-Clause |
| [jinja2-time](https://github.com/hackebrot/jinja2-time) | 0.2.0 | Jinja2 Extension for Dates and Times / MIT |
| [jmespath](http://jmespath.org/) | 0.10.0 | Query language for JSON / MIT |
| [joblib](https://joblib.readthedocs.io/en/latest/) | 1.1.0 | Lightweight pipelining: using Python functions as pipeline jobs. / BSD-3-Clause |
| [jpeg](https://www.ijg.org/) | 9e | read/write jpeg COM, EXIF, IPTC medata / IJG |
| [jq](http://stedolan.github.io/jq/) | 1.6 | A command-line JSON processor. / MIT |
| [json5](https://github.com/dpranke/pyjson5) | 0.9.6 | A Python implementation of the JSON5 data format / Apache-2.0 |
| [jsonschema](https://github.com/Julian/jsonschema) | 4.4.0 | An implementation of JSON Schema validation for Python / MIT |
| [jupyter](http://jupyter.org) | 1.0.0 | Jupyter metapackage. Install all the Jupyter components in one go. / BSD 3-Clause |
| [jupyter\_client](https://jupyter.org) | 6.1.12 | jupyter\_client contains the reference implementation of the Jupyter protocol. / BSD-3-Clause |
| [jupyter\_console](https://jupyter.org) | 6.4.0 | Jupyter terminal console / BSD-3-Clause |
| [jupyter\_core](https://jupyter.org) | 4.9.2 | Core common functionality of Jupyter projects. / BSD-3-Clause |
| [jupyter\_server](https://jupyter.org) | 1.13.5 | Jupyter Server / BSD-3-Clause |
| [jupyterlab](https://github.com/jupyterlab/jupyterlab) | 3.3.2 | JupyterLab PRE-ALPHA / BSD-3-Clause |
| [jupyterlab\_pygments](http://github.com/JupyterLab/jupyterlab_pygments) | 0.1.2 | Pygments syntax coloring scheme making use of the JupyterLab CSS variables / BSD-3-Clause |
| [jupyterlab\_server](https://github.com/jupyterlab/jupyterlab_server) | 2.10.3 | A set of server components for JupyterLab and JupyterLab like applications. / BSD-3-Clause |
| [jupyterlab\_widgets](https://github.com/jupyter-widgets/ipywidgets) | 1.0.0 | JupyterLab extension providing HTML widgets / BSD-3-Clause |
| [keyring](https://github.com/jaraco/keyring) | 23.4.0 | Store and access your passwords safely / MIT |
| [kiwisolver](https://github.com/nucleic/kiwi) | 1.3.2 | An efficient C++ implementation of the Cassowary constraint solver / BSD-3-Clause |
| [lazy-object-proxy](https://github.com/ionelmc/python-lazy-object-proxy) | 1.6.0 | A fast and thorough lazy object proxy / BSD-2-Clause |
| [libarchive](http://www.libarchive.org/) | 3.4.2 | Multi-format archive and compression library / BSD-2-Clause |
| [libcurl](https://curl.haxx.se/) | 7.82.0 | tool and library for transferring data with URL syntax / curl |
| [libiconv](https://www.gnu.org/software/libiconv/) | 1.16 | Provides iconv for systems which don’t have one (or that cannot convert from/to Unicode.) / GPL and LGPL |
| [liblief](https://lief.quarkslab.com/) | 0.11.5 | A cross platform library to parse, modify and abstract ELF, PE and MachO formats. / Apache-2.0 |
| [libpng](http://www.libpng.org/pub/png/libpng.html) | 1.6.37 | PNG reference library / zlib/libpng |
| [libprotobuf](https://developers.google.com/protocol-buffers/) | 3.14.0 | Protocol Buffers - Google’s data interchange format. C++ Libraries and protoc, the protobuf compiler. / BSD-3-Clause |
| [libspatialindex](http://libspatialindex.github.io) | 1.9.3 | Extensible framework for robust spatial indexing / MIT |
| [libssh2](https://www.libssh2.org/) | 1.10.0 | the SSH library / BSD-3-Clause |
| [libtiff](http://www.libtiff.org/) | 4.2.0 | Support for the Tag Image File Format (TIFF). / HPND |
| [libwebp](https://developers.google.com/speed/webp/) | 1.2.2 | WebP image library / BSD-3-Clause |
| [libxml2](http://xmlsoft.org/) | 2.9.12 | The XML C parser and toolkit of Gnome / MIT |
| [libxslt](http://xmlsoft.org/XSLT/) | 1.1.34 | The XSLT C library developed for the GNOME project / MIT |
| [llvmlite](http://llvmlite.pydata.org) | 0.38.0 | A lightweight LLVM python binding for writing JIT compilers. / BSD-2-Clause |
| [locket](https://github.com/mwilliamson/locket.py) | 0.2.1 | File-based locks for Python for Linux and Windows / BSD 2-Clause |
| [lxml](https://lxml.de/) | 4.8.0 | Pythonic binding for the C libraries libxml2 and libxslt. / BSD-3-Clause and GPL-2.0-only and ZPL-2.0 and LicenseRef-ElementTree |
| [lz4-c](https://www.lz4.org) | 1.9.3 | Extremely Fast Compression algorithm / BSD-2-Clause |
| [lzo](http://www.oberhumer.com/opensource/lzo/) | 2.10 | LZO is a portable lossless data compression library written in ANSI C. / GPL v2+ |
| m2w64-libwinpthread-git | 5.0.0.4634.697f757 | None / MIT, BSD |
| [markdown](https://pythonhosted.org/Markdown/) | 3.3.4 | Python implementation of Markdown. / BSD-3-Clause |
| [markupsafe](https://www.palletsprojects.com/p/markupsafe) | 2.0.1 | A Python module that implements the jinja2.Markup string / BSD-3-Clause |
| [matplotlib](https://matplotlib.org/) | 3.5.1 | Publication quality figures in Python / LicenseRef-PSF-based |
| [matplotlib-base](https://matplotlib.org/) | 3.5.1 | Publication quality figures in Python / LicenseRef-PSF-based |
| [matplotlib-inline](https://github.com/ipython/matplotlib-inline) | 0.1.2 | Inline Matplotlib backend for Jupyter / BSD-3-Clause |
| [mccabe](https://github.com/PyCQA/mccabe) | 0.6.1 | McCabe complexity checker for Python / MIT |
| [menuinst](https://github.com/conda/menuinst) | 1.4.18 | cross platform install of menu items / BSD-3-Clause |
| [mistune](https://github.com/lepture/mistune) | 0.8.4 | A sane Markdown parser with useful plugins and renderers. / BSD-3-Clause |
| [mkl](https://software.intel.com/en-us/mkl) | 2021.4.0 | Math library for Intel and compatible processors / LicenseRef-ProprietaryIntel |
| [mkl-service](http://github.com/IntelPython/mkl-service) | 2.4.0 | Python hooks for Intel(R) Math Kernel Library runtime control settings. / BSD-3-Clause |
| [mkl\_fft](http://github.com/IntelPython/mkl_fft) | 1.3.1 | NumPy-based implementation of Fast Fourier Transform using Intel (R) Math Kernel Library. / BSD 3-Clause |
| [mkl\_random](http://github.com/IntelPython/mkl_random) | 1.2.2 | Intel (R) MKL-powered package for sampling from common probability distributions into NumPy arrays. / BSD-3-Clause |
| [mock](https://github.com/testing-cabal/mock) | 4.0.3 | A library for testing in Python / BSD-2-Clause |
| [mpmath](http://mpmath.org) | 1.2.1 | Python library for arbitrary-precision floating-point arithmetic / BSD 3-Clause |
| [msgpack-python](http://msgpack.org/) | 1.0.2 | MessagePack (de)serializer / Apache-2.0 |
| msys2-conda-epoch | 20160418 | |
| [multidict](http://github.com/aio-libs/multidict) | 5.1.0 | multidict implementation / Apache 2.0 |
| [multipledispatch](https://github.com/mrocklin/multipledispatch/) | 0.6.0 | Multiple dispatch in Python / BSD 3-Clause |
| [munkres](https://github.com/bmc/munkres) | 1.1.4 | The Munkres module provides an O(n^3) implementation of the Munkres algorithm (also called the Hungarian algorithm or the Kuhn-Munkres algorithm). / Apache-2.0 |
| [mypy\_extensions](http://www.mypy-lang.org/) | 0.4.3 | Experimental type system extensions for programs checked with the mypy typechecker. / MIT |
| [nbclassic](http://github.com/jupyterlab/nbclassic) | 0.3.5 | Jupyter Notebook as a Jupyter Server Extension. / BSD-3-Clause |
| [nbclient](https://jupyter.org) | 0.5.13 | A client library for executing notebooks. Formally nbconvert’s ExecutePreprocessor. / BSD-3-Clause |
| [nbconvert](https://jupyter.org) | 6.4.4 | Converting Jupyter Notebooks / BSD-3-Clause |
| [nbformat](https://jupyter.org) | 5.3.0 | The Jupyter Notebook format / BSD-3-Clause |
| [nest-asyncio](https://github.com/erdewit/nest_asyncio) | 1.5.5 | Patch asyncio to allow nested event loops / BSD-2-Clause |
| [networkx](https://networkx.github.io/) | 2.7.1 | Python package for creating and manipulating complex networks / BSD-3-Clause |
| [nltk](https://nltk.org/) | 3.7 | Natural Language Toolkit / Apache-2.0 |
| [nose](http://readthedocs.org/docs/nose/) | 1.3.7 | Nose extends unittest to make testing easier / LGPL-2.1 |
| [notebook](https://jupyter.org) | 6.4.8 | Jupyter Notebook / BSD-3-Clause |
| [numba](http://numba.pydata.org) | 0.55.1 | NumPy aware dynamic Python compiler using LLVM / BSD-2-Clause |
| [numexpr](https://github.com/pydata/numexpr) | 2.8.1 | Fast numerical expression evaluator for NumPy. / MIT |
| [numpy](http://numpy.scipy.org/) | 1.21.5 | Array processing for numbers, strings, records, and objects. / BSD 3-Clause |
| [numpy-base](http://numpy.scipy.org/) | 1.21.5 | Array processing for numbers, strings, records, and objects. / BSD 3-Clause |
| [numpydoc](https://github.com/numpy/numpydoc) | 1.2 | Numpy’s Sphinx extensions / BSD-3-Clause |
| [olefile](http://www.decalage.info/python/olefileio) | 0.46 | parse, read and write Microsoft OLE2 files / BSD 2-Clause |
| [openpyxl](https://openpyxl.readthedocs.io) | 3.0.9 | A Python library to read/write Excel 2010 xlsx/xlsm files / MIT |
| [openssl](https://www.openssl.org/) | 1.1.1n | OpenSSL is an open-source implementation of the SSL and TLS protocols / OpenSSL |
| [packaging](https://github.com/pypa/packaging) | 21.3 | Core utilities for Python packages / Apache-2.0 or BSD-2-Clause |
| [pandas](https://pandas.pydata.org) | 1.4.2 | High-performance, easy-to-use data structures and data analysis tools. / BSD-3-Clause |
| [pandocfilters](https://github.com/jgm/pandocfilters) | 1.5.0 | A python module for writing pandoc filters / BSD-3-Clause |
| [panel](https://panel.holoviz.org) | 0.13.0 | A high-level app and dashboarding solution for Python / BSD-3-Clause |
| [param](http://ioam.github.io/param/) | 1.12.0 | Param: Make your Python code clearer and more reliable by declaring Parameters / BSD-3-Clause |
| [paramiko](http://www.paramiko.org/) | 2.8.1 | SSH2 protocol library / LGPL-2.1-or-later |
| [parsel](https://github.com/scrapy/parsel) | 1.6.0 | library to extract data from HTML and XML using XPath and CSS selectors / BSD-3-Clause |
| [parso](https://github.com/davidhalter/parso) | 0.8.3 | A Python Parser / MIT |
| [partd](https://github.com/dask/partd) | 1.2.0 | Data structure for on-disk shuffle operations / BSD 3-Clause |
| [pathspec](https://github.com/cpburnz/python-path-specification) | 0.7.0 | Utility library for gitignore style pattern matching of file paths. / MPL-2.0 |
| [patsy](https://github.com/pydata/patsy) | 0.5.2 | Describing statistical models in Python using symbolic formulas / BSD-2-Clause AND PSF-2.0 |
| [pep8](http://pep8.readthedocs.org/) | 1.7.1 | Python style guide checker / MIT |
| [pexpect](http://pexpect.sourceforge.net/) | 4.8.0 | Pexpect makes Python a better tool for controlling other applications. / ISC |
| [pickleshare](https://github.com/pickleshare/pickleshare/) | 0.7.5 | Tiny ‘shelve’-like database with concurrency support / MIT |
| [pillow](https://pillow.readthedocs.io) | 9.0.1 | Pillow is the friendly PIL fork by Alex Clark and Contributors / LicenseRef-PIL |
| [pip](https://pip.pypa.io/en/stable/) | 21.2.4 | PyPA recommended tool for installing Python packages / MIT |
| [pkginfo](https://code.launchpad.net/~tseaver/pkginfo/trunk) | 1.8.2 | Query metadatdata from sdists / bdists / installed packages. / MIT |
| [plotly](https://plot.ly/python/) | 5.6.0 | An interactive JavaScript-based visualization library for Python / MIT |
| [pluggy](https://github.com/pytest-dev/pluggy) | 1.0.0 | Plugin registration and hook calling for Python / MIT |
| powershell\_shortcut | 0.0.1 | Powershell shortcut creator for Windows (using menuinst) / BSD |
| [poyo](https://github.com/hackebrot/poyo) | 0.5.0 | A lightweight YAML Parser for Python / MIT |
| [prometheus\_client](https://github.com/prometheus/client_python) | 0.13.1 | Python client for the Prometheus monitoring system / Apache-2.0 |
| [prompt-toolkit](https://github.com/jonathanslenders/python-prompt-toolkit) | 3.0.20 | Library for building powerful interactive command lines in Python / BSD-3-Clause |
| [prompt\_toolkit](https://github.com/jonathanslenders/python-prompt-toolkit) | 3.0.20 | Library for building powerful interactive command lines in Python / BSD-3-Clause |
| [protego](https://github.com/scrapy/protego) | 0.1.16 | A pure-Python robots.txt parser with support for modern conventions / BSD 3-Clauses |
| [protobuf](https://developers.google.com/protocol-buffers/) | 3.14.0 | Protocol Buffers - Google’s data interchange format. / BSD-3-Clause |
| [psutil](https://github.com/giampaolo/psutil) | 5.8.0 | A cross-platform process and system utilities module for Python / BSD-3-Clause |
| [ptyprocess](https://github.com/pexpect/ptyprocess) | 0.7.0 | Run a subprocess in a pseudo terminal / ISC |
| [pure\_eval](https://github.com/alexmojaki/pure_eval) | 0.2.2 | Safely evaluate AST nodes without side effects / MIT |
| [py](https://github.com/pytest-dev/py) | 1.11.0 | library with cross-python path, ini-parsing, io, code, log facilities / MIT |
| [py-lief](https://lief.quarkslab.com/) | 0.11.5 | A cross platform library to parse, modify and abstract ELF, PE and MachO formats. / Apache-2.0 |
| [pyasn1](https://github.com/etingof/pyasn1) | 0.4.8 | ASN.1 types and codecs / BSD 2-Clause |
| [pyasn1-modules](http://pyasn1.sourceforge.net/) | 0.2.8 | A collection of ASN.1-based protocols modules. / BSD 2-Clause |
| [pycodestyle](https://pycodestyle.readthedocs.io/) | 2.7.0 | Python style guide checker / MIT |
| [pycosat](https://github.com/ContinuumIO/pycosat) | 0.6.3 | Bindings to picosat (a SAT solver) / MIT |
| [pycparser](https://github.com/eliben/pycparser) | 2.21 | Complete C99 parser in pure Python / BSD-3-clause |
| [pyct](http://github.com/pyviz/pyct) | 0.4.6 | python package common tasks for users (e.g. copy examples, fetch data, …) / BSD 3-Clause |
| [pycurl](http://pycurl.sourceforge.net/) | 7.44.1 | A Python Interface To The cURL library / LGPL, MIT |
| [pydispatcher](http://pydispatcher.sourceforge.net) | 2.0.5 | Multi-producer-multi-consumer signal dispatching mechanism / BSD 3-Clause |
| [pydocstyle](https://github.com/PyCQA/pydocstyle) | 6.1.1 | Python docstring style checker (formerly pep257) / MIT |
| [pyerfa](https://pyerfa.readthedocs.io/) | 2.0.0 | Python bindings for ERFA routines / BSD-3-Clause |
| [pyflakes](https://github.com/PyCQA/pyflakes) | 2.3.1 | Pyflakes analyzes programs and detects various errors. / MIT |
| [pygments](https://pygments.org/) | 2.11.2 | Pygments is a generic syntax highlighter suitable for use in code hosting, forums, wikis or other applications that need to prettify source code. / BSD-2-Clause |
| [pyhamcrest](https://github.com/hamcrest/PyHamcrest) | 2.0.2 | Hamcrest framework for matcher objects / BSD 3-Clause |
| [pylint](https://www.pylint.org) | 2.9.6 | python code static checker / GPL-2.0-or-later |
| [pyls-spyder](https://github.com/spyder-ide/pyls-spyder) | 0.4.0 | Spyder extensions for the python-lsp-server / MIT |
| [pynacl](https://github.com/pyca/pynacl) | 1.4.0 | PyNaCl is a Python binding to the Networking and Cryptography library, a crypto library with the stated goal of improving usability, security and speed. / Apache-2.0 |
| [pyodbc](https://github.com/mkleehammer/pyodbc) | 4.0.32 | DB API Module for ODBC / MIT |
| [pyopenssl](https://github.com/pyca/pyopenssl) | 21.0.0 | Python wrapper module around the OpenSSL library / Apache-2.0 |
| [pyparsing](https://github.com/pyparsing/pyparsing/) | 3.0.4 | Create and execute simple grammars / MIT |
| [pyqt](http://www.riverbankcomputing.co.uk/software/pyqt) | 5.9.2 | Python binding of the cross-platform GUI toolkit Qt. / Commercial, GPL-2.0, GPL-3.0 |
| [pyreadline](http://ipython.org/pyreadline) | 2.1 | A python implmementation of GNU readline. / BSD 3-Clause |
| [pyrsistent](http://github.com/tobgu/pyrsistent/) | 0.18.0 | Persistent/Functional/Immutable data structures / MIT |
| [pysocks](https://github.com/Anorov/PySocks) | 1.7.1 | A Python SOCKS client module. See [Anorov/PySocks](https://github.com/Anorov/PySocks) for more information. / BSD 3-Clause |
| [pytables](https://www.pytables.org) | 3.6.1 | Brings together Python, HDF5 and NumPy to easily handle large amounts of data. / BSD-3-Clause |
| [pytest](https://docs.pytest.org/en/latest/) | 7.1.1 | Simple and powerful testing with Python. / MIT |
| [python](https://www.python.org/) | 3.9.12 | General purpose programming language / PSF-2.0 |
| [python-dateutil](https://dateutil.readthedocs.org/) | 2.8.2 | Extensions to the standard Python datetime module. / BSD-3-Clause and Apache |
| [python-fastjsonschema](https://github.com/horejsek/python-fastjsonschema) | 2.15.1 | Fastest Python implementation of JSON schema / BSD-3-Clause |
| [python-libarchive-c](https://github.com/Changaco/python-libarchive-c) | 2.9 | Python interface to libarchive / CC0-1.0 |
| [python-lsp-black](https://github.com/python-lsp/python-lsp-black) | 1.0.0 | Black plugin for the Python LSP Server / MIT |
| [python-lsp-jsonrpc](https://github.com/python-lsp/python-lsp-jsonrpc) | 1.0.0 | A Python 3.6+ server implementation of the JSON RPC 2.0 protocol. / MIT |
| [python-lsp-server](https://github.com/python-lsp/python-lsp-server) | 1.2.4 | An implementation of the Language Server Protocol for Python / MIT |
| [python-slugify](https://github.com/un33k/python-slugify) | 5.0.2 | A Python Slugify application that handles Unicode / MIT |
| [python-snappy](https://github.com/andrix/python-snappy) | 0.6.0 | Python library for the snappy compression library from Google / BSD-3-Clause |
| [pytz](http://pythonhosted.org/pytz/) | 2021.3 | World timezone definitions, modern and historical. / MIT |
| [pyviz\_comms](https://www.holoviz.org) | 2.0.2 | Bidirectional communication for PyViz / BSD-3-Clause |
| [pywavelets](https://github.com/PyWavelets/pywt) | 1.3.0 | Discrete Wavelet Transforms in Python / MIT |
| [pywin32](https://github.com/mhammond/pywin32) | 302 | Python extensions for Windows / PSF-2.0 |
| [pywin32-ctypes](https://github.com/enthought/pywin32-ctypes) | 0.2.0 | A limited subset of pywin32 re-implemented using ctypes (or cffi) / BSD 3 Clause |
| [pywinpty](https://github.com/spyder-ide/pywinpty) | 2.0.2 | Pseudoterminals for Windows in Python / MIT |
| [pyyaml](http://pyyaml.org/wiki/PyYAML) | 6.0 | YAML parser and emitter for Python / MIT |
| [pyzmq](https://github.com/zeromq/pyzmq) | 22.3.0 | Python bindings for zeromq / BSD-3-clause |
| [qdarkstyle](https://github.com/ColinDuquesnoy/QDarkStyleSheet) | 3.0.2 | A dark stylesheet for Qt applications (Qt4, Qt5, PySide, PyQt4, PyQt5, QtPy, PyQtGraph). / MIT |
| [qstylizer](https://github.com/blambright/qstylizer) | 0.1.10 | Qt stylesheet generation utility for PyQt/PySide / MIT |
| [qt](http://qt.io) | 5.9.7 | Qt is a cross-platform application and UI framework. / LGPL-3.0-only |
| [qtawesome](https://github.com/spyder-ide/qtawesome) | 1.0.3 | Iconic fonts in PyQt and PySide applications / MIT |
| [qtconsole](http://jupyter.org) | 5.3.0 | Jupyter Qt Console / BSD-3-Clause |
| [qtpy](https://github.com/spyder-ide/qtpy) | 2.0.1 | Abstraction layer for PyQt5/PyQt4/PySide / MIT |
| [queuelib](https://github.com/scrapy/queuelib) | 1.5.0 | Collection of persistent (disk-based) queues / BSD |
| [regex](https://github.com/mrabarnett/mrab-regex) | 2022.3.15 | Alternative regular expression module, to replace re / Apache-2.0 |
| [requests](http://python-requests.org) | 2.27.1 | Requests is an elegant and simple HTTP library for Python, built with ♥. / Apache-2.0 |
| [requests-file](http://github.com/dashea/requests-file) | 1.5.1 | file transport adapter for Requests / Apache |
| [rope](https://github.com/python-rope/rope) | 0.22.0 | A python refactoring library / LGPL-3.0-or-later |
| [rsa](https://stuvel.eu/rsa) | 4.7.2 | Pure-Python RSA implementation / Apache-2.0 |
| [rtree](http://toblerity.github.com/rtree/) | 0.9.7 | R-Tree spatial index for Python GIS / MIT |
| [ruamel\_yaml](https://sourceforge.net/p/ruamel-yaml/code/ci/default/tree) | 0.15.100 | A patched copy of ruamel.yaml. / MIT |
| [s3transfer](https://github.com/boto/s3transfer) | 0.5.0 | An Amazon S3 Transfer Manager / Apache-2.0 |
| [scikit-image](https://scikit-image.org/) | 0.16.2 | Image processing in Python. / BSD-3-Clause |
| [scikit-learn](http://scikit-learn.org/) | 1.0.2 | A set of python modules for machine learning and data mining / BSD-3-Clause |
| [scipy](http://www.scipy.org/) | 1.7.3 | Scientific Library for Python / BSD 3-Clause |
| [scrapy](https://scrapy.org/) | 2.6.1 | A high-level Python Screen Scraping framework / BSD-3-Clause-Clear |
| [seaborn](https://seaborn.pydata.org) | 0.11.2 | Statistical data visualization / BSD 3-Clause |
| [send2trash](https://github.com/arsenetar/send2trash) | 1.8.0 | Python library to natively send files to Trash (or Recycle bin) on all platforms. / BSD-3-Clause |
| [service\_identity](https://github.com/pyca/service_identity) | 18.1.0 | Service identity verification for pyOpenSSL. / MIT |
| [setuptools](https://github.com/pypa/setuptools) | 61.2.0 | Download, build, install, upgrade, and uninstall Python packages / MIT |
| [sip](https://www.riverbankcomputing.com/software/sip/) | 4.19.13 | A Python bindings generator for C/C++ libraries / GPL-3.0-only |
| [six](https://six.readthedocs.io/) | 1.16.0 | Python 2 and 3 compatibility utilities / MIT |
| [smart\_open](https://github.com/RaRe-Technologies/smart_open) | 5.1.0 | Python library for efficient streaming of large files / MIT |
| [snappy](https://github.com/google/snappy) | 1.1.9 | A fast compressor/decompressor / BSD-3-clause AND CC-BY-3.0 AND MIT AND CC-BY AND Public Domain |
| [sniffio](https://github.com/python-trio/sniffio) | 1.2.0 | Sniff out which async library your code is running under / Apache-2.0 |
| [snowballstemmer](https://github.com/snowballstem/snowball) | 2.2.0 | Snowball stemming library collection for Python / BSD-3-Clause |
| [sortedcollections](http://www.grantjenks.com/docs/sortedcollections/) | 2.1.0 | Python Sorted Collections / Apache-2.0 |
| [sortedcontainers](http://www.grantjenks.com/docs/sortedcontainers/) | 2.4.0 | Python Sorted Container Types: SortedList, SortedDict, and SortedSet / Apache-2.0 |
| [soupsieve](http://facelessuser.github.io/soupsieve) | 2.3.1 | A modern CSS selector implementation for BeautifulSoup / MIT |
| [sphinx](https://www.sphinx-doc.org) | 4.4.0 | Sphinx is a tool that makes it easy to create intelligent and beautiful documentation / BSD-2-Clause |
| [sphinxcontrib-applehelp](https://www.sphinx-doc.org/en/master/) | 1.0.2 | sphinxcontrib-applehelp is a sphinx extension which outputs Apple help books / BSD-2-Clause |
| [sphinxcontrib-devhelp](https://www.sphinx-doc.org/en/master/) | 1.0.2 | sphinxcontrib-devhelp is a sphinx extension which outputs Devhelp document / BSD-2-Clause |
| [sphinxcontrib-htmlhelp](https://www.sphinx-doc.org/en/master/) | 2.0.0 | sphinxcontrib-htmlhelp is a sphinx extension which renders HTML help files. / BSD-2-Clause |
| [sphinxcontrib-jsmath](https://www.sphinx-doc.org/en/master/) | 1.0.1 | A sphinx extension which renders display math in HTML via JavaScript / BSD-2-Clause |
| [sphinxcontrib-qthelp](https://www.sphinx-doc.org/en/master/) | 1.0.3 | sphinxcontrib-qthelp is a sphinx extension which outputs QtHelp document / BSD-2-Clause |
| [sphinxcontrib-serializinghtml](https://www.sphinx-doc.org/en/master/) | 1.1.5 | sphinxcontrib-serializinghtml is a sphinx extension which outputs “serialized” HTML files (json and pickle). / BSD-2-Clause |
| [spyder](https://www.spyder-ide.org/) | 5.1.5 | The Scientific Python Development Environment / MIT |
| [spyder-kernels](https://www.spyder-ide.org/) | 2.1.3 | Jupyter kernels for Spyder’s console / MIT |
| [sqlalchemy](https://www.sqlalchemy.org/) | 1.4.32 | Database Abstraction Library. / MIT |
| [sqlite](https://www.sqlite.org/) | 3.38.2 | Implements a self-contained, zero-configuration, SQL database engine / blessing |
| [stack\_data](https://github.com/alexmojaki/stack_data) | 0.2.0 | Extract data from python stack frames and tracebacks for informative displays / MIT |
| [statsmodels](https://www.statsmodels.org) | 0.13.2 | Statistical computations and models for use with SciPy / BSD-3-Clause |
| [sympy](https://sympy.org) | 1.10.1 | Python library for symbolic mathematics / BSD-3-Clause AND MIT |
| [tabulate](https://bitbucket.org/astanin/python-tabulate) | 0.8.9 | Pretty-print tabular data in Python, a library and a command-line utility. / MIT |
| [tbb](https://github.com/oneapi-src/oneTBB) | 2021.5.0 | High level abstract threading library / Apache-2.0 |
| tbb4py | 2021.5.0 | TBB module for Python / Apache 2.0 |
| [tblib](https://github.com/ionelmc/python-tblib) | 1.7.0 | Traceback serialization library. / BSD 2-Clause |
| [tenacity](http://github.com/jd/tenacity) | 8.0.1 | Retry a flaky function whenever an exception occurs until it works / Apache-2.0 |
| [terminado](https://github.com/jupyter/terminado) | 0.13.1 | Terminals served by tornado websockets / BSD-2-Clause |
| [testpath](https://testpath.readthedocs.io) | 0.5.0 | Testpath is a collection of utilities for Python code working with files and commands. / BSD-3-Clause |
| [text-unidecode](https://github.com/kmike/text-unidecode/) | 1.3 | The most basic Text::Unidecode port / Artistic |
| [textdistance](https://github.com/orsinium/textdistance) | 4.2.1 | TextDistance – python library for comparing distance between two or more sequences by many algorithms. / MIT |
| [threadpoolctl](https://github.com/joblib/threadpoolctl) | 2.2.0 | Python helpers to control the threadpools of native libraries / BSD 3-Clause |
| [three-merge](https://github.com/spyder-ide/three-merge) | 0.1.1 | Simple Python library to perform a 3-way merge between strings / MIT |
| [tinycss](http://tinycss.readthedocs.io/) | 0.4 | Tinycss is a complete yet simple CSS parser for Python. / BSD-3-Clause |
| [tk](http://www.tcl.tk/) | 8.6.11 | A dynamic programming language with GUI support. Bundles Tcl and Tk. / Tcl/Tk |
| [tldextract](https://github.com/john-kurkowski/tldextract) | 3.2.0 | Accurately separate the TLD from the registered domain andsubdomains of a URL, using the Public Suffix List. / BSD-3-Clause |
| [toml](https://github.com/uiri/toml) | 0.10.2 | Python lib for TOML. / MIT |
| [tomli](https://github.com/hukkin/tomli) | 1.2.2 | A simple TOML parser / MIT |
| [toolz](http://toolz.readthedocs.org/) | 0.11.2 | List processing tools and functional utilities / BSD-3-Clause |
| [tornado](http://www.tornadoweb.org/) | 6.1 | A Python web framework and asynchronous networking library, originally developed at FriendFeed. / Apache-2.0 |
| [tqdm](https://pypi.python.org/pypi/tqdm) | 4.64.0 | A Fast, Extensible Progress Meter / MPL-2.0 AND MIT |
| [traitlets](http://traitlets.readthedocs.org/) | 5.1.1 | Configuration system for Python applications / BSD-3-Clause |
| [twisted](https://twistedmatrix.com/) | 22.2.0 | An asynchronous networking framework written in Python / MIT |
| [twisted-iocpsupport](https://github.com/twisted/twisted-iocpsupport) | 1.0.2 | An extension for use in the twisted I/O Completion Ports reactor. / MIT |
| [typed-ast](https://github.com/python/typed_ast) | 1.4.3 | a fork of Python 2 and 3 ast modules with type comment support / Apache-2.0 AND PSF-2.0 AND MIT |
| [typing-extensions](https://github.com/python/typing/tree/master/typing_extensions) | 4.1.1 | Backported and Experimental Type Hints for Python / PSF-2.0 |
| [typing\_extensions](https://github.com/python/typing/tree/master/typing_extensions) | 4.1.1 | Backported and Experimental Type Hints for Python / PSF-2.0 |
| [tzdata](https://www.iana.org/time-zones) | 2022a | The Time Zone Database (called tz, tzdb or zoneinfo) / Public-Domain AND BSD-3-clause |
| [ujson](https://github.com/ultrajson/ultrajson) | 5.1.0 | Ultra fast JSON decoder and encoder written in C with Python bindings / BSD-3-Clause |
| [unidecode](https://pypi.python.org/pypi/Unidecode) | 1.2.0 | ASCII transliterations of Unicode text / GPL-2.0-or-later |
| [urllib3](https://urllib3.readthedocs.io/) | 1.26.9 | HTTP library with thread-safe connection pooling, file post, and more. / MIT |
| [vc](https://github.com/conda/conda/wiki/VC-features) | 14.2 | A meta-package to impose mutual exclusivity among software built with different VS versions / Modified BSD License (3-clause) |
| vs2015\_runtime | 14.27.29016 | MSVC runtimes associated with cl.exe version 19.27.29111 (VS 2019 update 5) / None |
| [w3lib](https://github.com/scrapy/w3lib) | 1.21.0 | Library of web-related functions / BSD |
| [watchdog](http://github.com/gorakhargosh/watchdog) | 2.1.6 | Filesystem events monitoring / Apache-2.0 |
| [wcwidth](https://github.com/jquast/wcwidth) | 0.2.5 | Measures number of Terminal column cells of wide-character codes. / MIT |
| [webencodings](https://github.com/gsnedders/python-webencodings) | 0.5.1 | Character encoding aliases for legacy web content / BSD 3-Clause |
| [websocket-client](https://github.com/liris/websocket-client) | 0.58.0 | WebSocket client for python. hybi13 is supported. / BSD-3-Clause |
| [werkzeug](https://palletsprojects.com/p/werkzeug/) | 2.0.3 | The comprehensive WSGI web application library. / BSD-3-Clause |
| [wheel](https://github.com/pypa/wheel) | 0.37.1 | A built-package format for Python. / MIT |
| [widgetsnbextension](http://ipython.org) | 3.5.2 | Interactive Widgets for Jupyter / BSD-3-Clause |
| [win\_inet\_pton](https://github.com/hickeroar/win_inet_pton) | 1.1.0 | Native inet\_pton and inet\_ntop implementation for Python on Windows (with ctypes). / PUBLIC-DOMAIN |
| [win\_unicode\_console](https://github.com/Drekin/win-unicode-console) | 0.5 | A Python package to enable Unicode input and display when running Python from Windows console. / MIT |
| [wincertstore](https://bitbucket.org/tiran/wincertstore) | 0.2 | Python module to extract CA and CRL certs from Windows’ cert store (ctypes based). / PSF 2 |
| [winpty](https://github.com/rprichard/winpty) | 0.4.3 | Winpty provides an interface similar to a Unix pty-master for communicating with Windows console programs. / MIT |
| [wrapt](https://github.com/GrahamDumpleton/wrapt) | 1.12.1 | Module for decorators, wrappers and monkey patching / BSD-2-Clause |
| [xarray](https://github.com/pydata/xarray) | 0.20.1 | N-D labeled arrays and datasets in Python. / Apache-2.0 |
| [xlrd](http://www.python-excel.org/) | 2.0.1 | Library for developers to extract data from Microsoft Excel (tm) spreadsheet files / BSD 3-Clause and BSD with advertising |
| [xlsxwriter](https://xlsxwriter.readthedocs.io/) | 3.0.3 | A Python module for creating Excel XLSX files / BSD-2-Clause |
| [xlwings](http://xlwings.org/) | 0.24.9 | Interact with Excel from Python and vice versa / BSD-3-clause |
| [xz](http://tukaani.org/xz/) | 5.2.5 | Data compression software with high compression ratio / LGPL-2.1 and GPL-2.0 |
| [yaml](http://pyyaml.org/wiki/LibYAML) | 0.2.5 | A C library for parsing and emitting YAML / MIT |
| [yapf](https://github.com/google/yapf) | 0.31.0 | A formatter for Python files / Apache 2.0 |
| [yarl](https://github.com/aio-libs/yarl) | 1.6.3 | Yet another URL library / Apache 2.0 |
| [zict](http://github.com/mrocklin/zict) | 2.0.0 | Composable Dictionary Classes / BSD 3-Clause |
| [zipp](https://github.com/jaraco/zipp) | 3.7.0 | A pathlib-compatible Zipfile object wrapper / MIT |
| [zlib](http://zlib.net/) | 1.2.12 | Massively spiffy yet delicately unobtrusive compression library / Zlib |
| zope | 1.0 | web application server / BSD |
| [zope.interface](https://github.com/zopefoundation/zope.interface) | 5.4.0 | Interfaces for Python / ZPL-2.1 |
| [zstd](https://www.zstd.net) | 1.4.9 | Zstandard - Fast real-time compression algorithm / BSD-3-Clause AND GPL-2.0-or-later |
| Name | Version | Summary / License |
|---|---|---|
| [alabaster](http://www.sphinx-doc.org/en/stable/index.html) | 0.7.12 | Configurable, Python 2+3 compatible Sphinx theme. / BSD 3-Clause |
| [anaconda-client](https://github.com/Anaconda-Platform/anaconda-client) | 1.9.0 | Anaconda Cloud command line client library / BSD 3-Clause |
| [anaconda-navigator](https://github.com/ContinuumIO/navigator) | 2.2.0 | Anaconda Navigator / proprietary - Continuum Analytics, Inc. |
| [anaconda-project](https://github.com/Anaconda-Platform/anaconda-project) | 0.10.2 | Tool for encapsulating, running, and reproducing data science projects / BSD-3-Clause |
| [anyio](https://github.com/agronholm/anyio) | 3.5.0 | High level compatibility layer for multiple asynchronous event loop implementations on Python / MIT |
| [appdirs](http://github.com/ActiveState/appdirs) | 1.4.4 | A small Python module for determining appropriate platform-specific dirs. / MIT |
| [appnope](http://github.com/minrk/appnope) | 0.1.2 | Disable App Nap on OS X 10.9 / BSD 2-Clause |
| [appscript](http://appscript.sourceforge.net) | 1.1.2 | Control AppleScriptable applications from Python. / Public Domain |
| [argon2-cffi](https://argon2-cffi.readthedocs.org/) | 21.3.0 | The secure Argon2 password hashing algorithm. / MIT |
| [argon2-cffi-bindings](https://github.com/hynek/argon2-cffi-bindings) | 21.2.0 | Low-level Python CFFI Bindings for Argon2 / MIT |
| [astroid](https://www.astroid.org/) | 2.9.0 | A abstract syntax tree for Python with inference support. / LGPL-2.1-or-later |
| [astropy](https://www.astropy.org/) | 5.0.4 | Community-developed Python Library for Astronomy / BSD-3-Clause |
| [asttokens](https://github.com/gristlabs/asttokens) | 2.0.5 | The asttokens module annotates Python abstract syntax trees (ASTs) with the positions of tokens and text in the source code that generated them. / Apache-2.0 |
| [attrs](https://attrs.readthedocs.io/en/stable/) | 21.4.0 | attrs is the Python package that will bring back the joy of writing classes by relieving you from the drudgery of implementing object protocols (aka dunder methods). / MIT |
| [automat](https://github.com/glyph/Automat) | 20.2.0 | self-service finite-state machines for the programmer on the go / MIT |
| [babel](http://babel.pocoo.org/) | 2.9.1 | Utilities to internationalize and localize Python applications / BSD 3-clause |
| [backcall](https://github.com/takluyver/backcall/) | 0.2.0 | Specifications for callback functions passed in to an API / BSD-3-Clause |
| [backports](https://github.com/brandon-rhodes/backports) | 1.1 | Namespace for backported Python features. / MIT |
| [backports.functools\_lru\_cache](https://github.com/jaraco/backports.functools_lru_cache) | 1.6.4 | Backport of functools.lru\_cache from Python 3.3 as published at ActiveState. / MIT |
| [backports.tempfile](https://github.com/pjdelport/backports.tempfile) | 1.0 | Backports of new features in Python’s tempfile module / PSF 2 |
| [backports.weakref](https://github.com/pjdelport/backports.weakref) | 1.0.post1 | Backport of new features in Python’s weakref module / Python-2.0 |
| [bcrypt](https://github.com/pyca/bcrypt/) | 3.2.0 | Modern password hashing for your software and your servers / Apache-2.0 |
| [beautifulsoup4](https://www.crummy.com/software/BeautifulSoup/) | 4.11.1 | Python library designed for screen-scraping / MIT |
| [bitarray](https://github.com/ilanschnell/bitarray) | 2.5.0 | efficient arrays of booleans – C extension / PSF-2.0 |
| [bkcharts](http://github.com/bokeh/bkcharts) | 0.2 | High level chart types built on top of Bokeh / BSD 3-Clause |
| [blas](http://www.netlib.org/lapack) | 1.0 | Linear Algebra PACKage / BSD-3-Clause |
| [bleach](https://github.com/mozilla/bleach) | 4.1.0 | Easy, whitelist-based HTML-sanitizing tool / Apache-2.0 |
| [blosc](https://github.com/Blosc/c-blosc) | 1.21.0 | A blocking, shuffling and loss-less compression library that can be faster than memcpy() / BSD-3-Clause |
| [bokeh](http://bokeh.pydata.org/) | 2.4.2 | Statistical and novel interactive HTML plots for Python / BSD-3-Clause |
| [boto3](https://aws.amazon.com/sdk-for-python) | 1.21.32 | Amazon Web Services SDK for Python / Apache-2.0 |
| [botocore](https://aws.amazon.com/sdk-for-python/) | 1.24.32 | Low-level, data-driven core of boto 3. / Apache-2.0 |
| [bottleneck](https://github.com/pydata/bottleneck) | 1.3.4 | Fast NumPy array functions written in Cython. / BSD-2-Clause |
| [brotli](http://github.com/google/brotli) | 1.0.7 | Brotli compression format / MIT |
| [brotlipy](https://github.com/python-hyper/brotlipy) | 0.7.0 | Python bindings to the Brotli compression library / MIT |
| [brunsli](https://github.com/google/brunsli) | 0.1 | Practical JPEG Repacker / MIT |
| [bzip2](http://www.bzip.org/) | 1.0.8 | high-quality data compressor / bzip2 |
| [c-ares](https://c-ares.org/) | 1.18.1 | This is c-ares, an asynchronous resolver library / MIT |
| [ca-certificates](https://curl.se/docs/caextract.html) | 2022.4.26 | Certificates for use with other packages. / MPL-2.0 |
| [certifi](https://github.com/certifi/python-certifi) | 2022.5.18.1 | Python package for providing Mozilla’s CA Bundle. / MPL-2.0 |
| [cffi](http://cffi.readthedocs.org/) | 1.15.0 | Foreign Function Interface for Python calling C code. / MIT |
| [cfitsio](http://heasarc.gsfc.nasa.gov/fitsio/fitsio.html) | 3.470 | A library for reading and writing FITS files / fitsio |
| [chardet](https://github.com/chardet/chardet) | 4.0.0 | Universal character encoding detector / LGPL2 |
| [charls](https://github.com/team-charls/charls) | 2.2.0 | CharLS is a C++ implementation of the JPEG-LS standard for lossless and near-lossless image compression and decompression. JPEG-LS is a low-complexity image compression standard that matches JPEG 2000 compression ratios. / BSD-3-Clause |
| [charset-normalizer](https://github.com/ousret/charset_normalizer) | 2.0.4 | The Real First Universal Charset Detector. Open, modern and actively maintained alternative to Chardet. / MIT |
| [click](https://palletsprojects.com/p/click) | 8.0.4 | Python composable command line interface toolkit / BSD-3-Clause |
| [cloudpickle](https://github.com/cloudpipe/cloudpickle) | 2.0.0 | Extended pickling support for Python objects / BSD-3-Clause |
| [clyent](https://github.com/Anaconda-Platform/clyent) | 1.2.2 | Command line client library for windows and posix / BSD 3-Clause |
| [colorama](https://github.com/tartley/colorama) | 0.4.4 | Cross-platform colored terminal text / BSD-3-Clause |
| [colorcet](https://colorcet.holoviz.org/index.html) | 3.0.0 | Collection of perceptually uniform colormaps / CC-BY-4.0 |
| [conda](https://conda.io) | 4.13.0 | OS-agnostic, system-level binary package and environment manager. / BSD-3-Clause |
| [conda-build](https://github.com/conda/conda-build) | 3.21.9 | tools for building conda packages / BSD-3-Clause |
| [conda-content-trust](https://github.com/conda/conda-content-trust) | 0.1.1 | Signing and verification tools for conda / BSD-3-Clause |
| [conda-env](https://github.com/conda/conda-env) | 2.6.0 | Tools for interacting with conda environments. / BSD 3-Clause |
| [conda-token](https://github.com/Anaconda/conda-token) | 0.3.0 | Set repository access token / BSD-3-Clause |
| [conda-verify](https://github.com/conda/conda-verify) | 3.4.2 | tool for validating conda recipes and conda packages / BSD 3-Clause |
| [constantly](https://github.com/twisted/constantly) | 15.1.0 | Symbolic constants in Python / MIT |
| [cryptography](https://github.com/pyca/cryptography) | 3.4.7 | Provides cryptographic recipes and primitives to Python developers / (BSD-3-Clause OR Apache-2.0) AND PSF-2.0 AND MIT |
| [cssselect](https://pythonhosted.org/cssselect/) | 1.1.0 | CSS Selectors for Python / BSD 3-Clause |
| [curl](https://curl.haxx.se/) | 7.82.0 | tool and library for transferring data with URL syntax / curl |
| [cycler](http://matplotlib.org/cycler) | 0.11.0 | Composable style cycles. / BSD-3-Clause |
| [cython](https://cython.org/) | 0.29.28 | The Cython compiler for writing C extensions for the Python language / Apache-2.0 |
| [cytoolz](https://github.com/pytoolz/cytoolz) | 0.11.0 | Cython implementation of Toolz. High performance functional utilities / BSD-3-Clause |
| [dask](https://dask.org/) | 2022.5.0 | Parallel PyData with Task Scheduling / BSD-3-Clause |
| [dask-core](https://github.com/dask/dask/) | 2022.5.0 | Parallel Python with task scheduling / BSD-3-Clause |
| [dataclasses](https://github.com/ericvsmith/dataclasses) | 0.8 | An implementation of PEP 557: Data Classes / Apache-2.0 |
| [datashader](https://datashader.org) | 0.13.0 | Data visualization toolchain based on aggregating into a grid / BSD-3-Clause |
| [datashape](http://datashape.pydata.org) | 0.5.4 | A data description language. / BSD 2-Clause |
| [debugpy](https://github.com/Microsoft/debugpy) | 1.5.1 | An implementation of the Debug Adapter Protocol for Python / MIT |
| [decorator](https://github.com/micheles/decorator) | 5.1.1 | Better living through Python with decorators. / BSD-2-Clause |
| [defusedxml](https://bitbucket.org/tiran/defusedxml) | 0.7.1 | XML bomb protection for Python stdlib modules / PSF 2.0 |
| [distributed](https://distributed.readthedocs.io/en/latest/) | 2022.5.0 | Distributed computing with Dask / BSD-3-Clause |
| [docutils](http://docutils.sourceforge.net/) | 0.17.1 | Docutils – Python Documentation Utilities / LicenseRef-Public-Domain-Dedictation and BSD-2-Clause and LicenseRef-PSF-2.1.1 and GPL-3.0-or-later |
| [entrypoints](https://github.com/takluyver/entrypoints) | 0.4 | Discover and load entry points from installed packages. / MIT License |
| [et\_xmlfile](https://foss.heptapod.net/openpyxl/et_xmlfile) | 1.1.0 | An implementation of lxml.xmlfile for the standard library / MIT AND PSF-2.0 |
| [executing](https://pypi.org/project/executing) | 0.8.3 | Get the currently executing AST node of a frame, and other information / MIT |
| [filelock](https://github.com/tox-dev/py-filelock) | 3.6.0 | A platform independent file lock. / Unlicense |
| [flask](https://flask.pocoo.org) | 1.1.2 | A microframework based on Werkzeug, Jinja2 and good intentions. / BSD 3-Clause |
| [fonttools](https://github.com/fonttools/fonttools) | 4.25.0 | fontTools is a library for manipulating fonts, written in Python. / MIT |
| [freetype](https://www.freetype.org/) | 2.11.0 | A Free, High-Quality, and Portable Font Engine / GPL-2.0-only and LicenseRef-FreeType |
| [fsspec](https://github.com/fsspec/filesystem_spec) | 2022.3.0 | A specification for pythonic filesystems / BSD-3-Clause |
| [future](http://python-future.org) | 0.18.2 | Clean single-source support for Python 3 and 2 / MIT |
| [gensim](https://github.com/RaRe-Technologies/gensim) | 4.1.2 | Topic Modelling for Humans / LGPL-2.1-only |
| [giflib](http://giflib.sourceforge.net) | 5.2.1 | Library for reading and writing gif images / MIT |
| [glob2](https://github.com/miracle2k/python-glob2) | 0.7 | Version of the glob module that supports recursion via \*\*, and can capture patterns. / BSD-2-Clause |
| [gmp](http://gmplib.org/) | 6.2.1 | The GNU multiprecision library. / GPL-2.0-or-later AND LGPL-3.0-or-later |
| [gmpy2](https://pypi.python.org/pypi/gmpy2) | 2.1.2 | GMP/MPIR, MPFR, and MPC interface to Python 2.6+ and 3.x / LGPL-3.0-or-later |
| [greenlet](https://github.com/python-greenlet/greenlet) | 1.1.0 | Lightweight in-process concurrent programming / MIT |
| [h5py](http://www.h5py.org/) | 3.6.0 | Read and write HDF5 files from Python / BSD-3-Clause |
| [hdf5](http://www.hdfgroup.org/HDF5/) | 1.12.1 | HDF5 is a data model, library, and file format for storing and managing data / HDF5 |
| [heapdict](http://stutzbachenterprises.com/) | 1.0.1 | A heap with decrease-key and increase-key operations / BSD 3-Clause |
| [holoviews](https://holoviews.org) | 1.14.8 | Stop plotting your data - annotate your data and let it visualize itself. / BSD-3-Clause |
| [hvplot](https://hvplot.holoviz.org/) | 0.7.3 | A high-level plotting API for the PyData ecosystem built on HoloViews / BSD-3-Clause |
| [hyperlink](https://github.com/python-hyper/hyperlink) | 21.0.0 | Immutable, Pythonic, correct URLs. / MIT |
| [icu](http://site.icu-project.org/) | 68.1 | International Components for Unicode. / MIT |
| [idna](https://github.com/kjd/idna) | 3.3 | Internationalized Domain Names in Applications (IDNA). / BSD-3-Clause |
| [imagecodecs](https://www.lfd.uci.edu/~gohlke/) | 2021.8.26 | Image transformation, compression, and decompression codecs / BSD-3-Clause |
| [imageio](https://imageio.github.io) | 2.9.0 | A Python library for reading and writing image data / BSD-2-Clause |
| [imagesize](https://github.com/shibukawa/imagesize_py) | 1.3.0 | Getting image size from png/jpeg/jpeg2000/gif file / MIT |
| [importlib-metadata](https://github.com/python/importlib_metadata) | 4.11.3 | A library to access the metadata for a Python package. / Apache-2.0 |
| [incremental](https://github.com/hawkowl/incremental) | 21.3.0 | Incremental is a small library that versions your Python projects. / MIT |
| [iniconfig](http://github.com/RonnyPfannschmidt/iniconfig) | 1.1.1 | iniconfig: brain-dead simple config-ini parsing / MIT |
| [intake](https://github.com/ContinuumIO/intake) | 0.6.5 | Data load and catalog system / BSD-2-Clause |
| [ipykernel](https://ipython.org) | 6.9.1 | IPython Kernel for Jupyter / BSD-3-Clause |
| [ipython](https://ipython.org) | 8.3.0 | IPython: Productive Interactive Computing / BSD-3-Clause |
| [ipython\_genutils](http://ipython.org) | 0.2.0 | vestigial utilities from IPython / BSD 3-Clause |
| [ipywidgets](https://github.com/ipython/ipywidgets) | 7.6.5 | Jupyter Interactive Widgets / BSD-3-Clause |
| [isort](https://github.com/timothycrosley/isort) | 5.9.3 | A Python utility / library to sort Python imports. / MIT |
| [itemadapter](https://github.com/scrapy/itemadapter) | 0.3.0 | Common interface for different data containers / BSD-3-Clause |
| [itemloaders](https://github.com/scrapy/itemadapter) | 1.0.4 | Collect data from HTML and XML sources / BSD-3-Clause |
| [itsdangerous](https://github.com/pallets/itsdangerous) | 2.0.1 | Various helpers to pass trusted data to untrusted environments. / BSD-3-Clause |
| [jdcal](https://github.com/phn/jdcal) | 1.4.1 | Julian dates from proleptic Gregorian and Julian calendars. / BSD 2-Clause |
| [jedi](https://github.com/davidhalter/jedi/) | 0.18.1 | An autocompletion tool for Python that can be used for text editors. / MIT |
| [jinja2](https://jinja.pocoo.org) | 2.11.3 | An easy to use stand-alone template engine written in pure python. / BSD-3-Clause |
| [jmespath](http://jmespath.org/) | 0.10.0 | Query language for JSON / MIT |
| [joblib](https://joblib.readthedocs.io/en/latest/) | 1.1.0 | Lightweight pipelining: using Python functions as pipeline jobs. / BSD-3-Clause |
| [jpeg](https://www.ijg.org/) | 9e | read/write jpeg COM, EXIF, IPTC medata / IJG |
| [jq](http://stedolan.github.io/jq/) | 1.6 | A command-line JSON processor. / MIT |
| [json5](https://github.com/dpranke/pyjson5) | 0.9.6 | A Python implementation of the JSON5 data format / Apache-2.0 |
| [jsonschema](https://github.com/Julian/jsonschema) | 4.4.0 | An implementation of JSON Schema validation for Python / MIT |
| [jupyter\_client](https://jupyter.org) | 7.2.2 | jupyter\_client contains the reference implementation of the Jupyter protocol. / BSD-3-Clause |
| [jupyter\_console](https://jupyter.org) | 6.4.3 | Jupyter terminal console / BSD-3-Clause |
| [jupyter\_core](https://jupyter.org) | 4.10.0 | Core common functionality of Jupyter projects. / BSD-3-Clause |
| [jupyter\_server](https://jupyter.org) | 1.13.5 | Jupyter Server / BSD-3-Clause |
| [jupyterlab](https://github.com/jupyterlab/jupyterlab) | 3.3.2 | JupyterLab PRE-ALPHA / BSD-3-Clause |
| [jupyterlab\_pygments](http://github.com/JupyterLab/jupyterlab_pygments) | 0.1.2 | Pygments syntax coloring scheme making use of the JupyterLab CSS variables / BSD-3-Clause |
| [jupyterlab\_server](https://github.com/jupyterlab/jupyterlab_server) | 2.10.3 | A set of server components for JupyterLab and JupyterLab like applications. / BSD-3-Clause |
| [jupyterlab\_widgets](https://github.com/jupyter-widgets/ipywidgets) | 1.0.0 | JupyterLab extension providing HTML widgets / BSD-3-Clause |
| [jxrlib](https://packages.debian.org/source/sid/jxrlib) | 1.1 | jxrlib - JPEG XR Library by Microsoft, built from Debian hosted sources. / BSD-2-Clause |
| [kiwisolver](https://github.com/nucleic/kiwi) | 1.4.2 | An efficient C++ implementation of the Cassowary constraint solver / BSD-3-Clause |
| [krb5](http://web.mit.edu/kerberos/) | 1.19.2 | A network authentication protocol. / MIT |
| [lazy-object-proxy](https://github.com/ionelmc/python-lazy-object-proxy) | 1.6.0 | A fast and thorough lazy object proxy / BSD-2-Clause |
| [lcms2](http://www.littlecms.com/) | 2.12 | Open Source Color Management Engine / MIT |
| [lerc](https://github.com/Esri/lerc) | 3.0 | LERC - Limited Error Raster Compression / Apache-2.0 |
| [libaec](https://gitlab.dkrz.de/k202009/libaec) | 1.0.4 | Adaptive Entropy Coding library / BSD-2-Clause |
| [libarchive](https://libarchive.org/) | 3.4.2 | Multi-format archive and compression library / BSD-2-Clause |
| [libcurl](https://curl.haxx.se/) | 7.82.0 | tool and library for transferring data with URL syntax / curl |
| [libcxx](http://llvm.org/) | 12.0.0 | LLVM C++ standard library / Apache-2.0 WITH LLVM-exception |
| [libdeflate](https://github.com/ebiggers/libdeflate) | 1.8 | libdeflate is a library for fast, whole-buffer DEFLATE-based compression and decompression. / MIT |
| [libedit](http://thrysoee.dk/editline/) | 3.1.20210910 | Editline Library (libedit) / BSD-2-Clause |
| [libev](http://software.schmorp.de/pkg/libev.html) | 4.33 | A full-featured and high-performance event loop that is loosely modeled after libevent, but without its limitations and bugs. / BSD-2-Clause |
| [libffi](https://sourceware.org/libffi/) | 3.4.2 | A Portable Foreign Function Interface Library. / MIT |
| [libgfortran](http://gcc.gnu.org/) | 5.0.0 | Fortran compiler and libraries from the GNU Compiler Collection / GPL-3.0-only WITH GCC-exception-3.1 |
| [libgfortran5](https://gcc.gnu.org/) | 11.2.0 | The GNU Fortran Runtime Library / GPL-3.0-only WITH GCC-exception-3.1 |
| [libiconv](https://www.gnu.org/software/libiconv/) | 1.16 | Provides iconv for systems which don’t have one (or that cannot convert from/to Unicode.) / GPL and LGPL |
| [libidn2](https://www.gnu.org/software/libidn/#libidn2) | 2.3.1 | Library for internationalized domain names (IDNA2008) support / LGPLv2 AND LGPL-3.0-or-later AND GPL-3.0-or-later |
| [liblief](https://lief.quarkslab.com/) | 0.11.5 | A cross platform library to parse, modify and abstract ELF, PE and MachO formats. / Apache-2.0 |
| [libllvm11](http://llvm.org/) | 11.1.0 | Development headers and libraries for LLVM / Apache-2.0 WITH LLVM-exception |
| [libnghttp2](http://github.com/nghttp2/nghttp2) | 1.46.0 | This is an implementation of Hypertext Transfer Protocol version 2. / MIT |
| [libopenblas](https://www.openblas.net/) | 0.3.20 | An Optimized BLAS library / BSD-3-clause |
| [libpng](http://www.libpng.org/pub/png/libpng.html) | 1.6.37 | PNG reference library / zlib/libpng |
| [libsodium](http://libsodium.org) | 1.0.18 | A modern and easy-to-use crypto library. / ISC |
| [libssh2](https://www.libssh2.org/) | 1.10.0 | the SSH library / BSD-3-Clause |
| [libtiff](http://www.libtiff.org/) | 4.2.0 | Support for the Tag Image File Format (TIFF). / HPND |
| [libunistring](https://www.gnu.org/software/libunistring) | 0.9.10 | This library provides functions for manipulating Unicode strings and for manipulating C strings according to the Unicode standard. / LGPL |
| [libwebp](https://developers.google.com/speed/webp/) | 1.2.2 | WebP image library / BSD-3-Clause |
| [libwebp-base](https://developers.google.com/speed/webp) | 1.2.2 | WebP image library / BSD-3-Clause |
| [libxml2](https://gitlab.gnome.org/GNOME/libxml2/) | 2.9.14 | The XML C parser and toolkit of Gnome / MIT |
| [libxslt](https://gitlab.gnome.org/GNOME/libxslt) | 1.1.35 | The XSLT C library developed for the GNOME project / MIT |
| [libzopfli](https://github.com/google/zopfli) | 1.0.3 | A compression library programmed in C to perform very good, but slow, deflate or zlib compression. / Apache-2.0 |
| [llvm-openmp](http://openmp.llvm.org/) | 12.0.0 | The OpenMP API supports multi-platform shared-memory parallel programming in C/C++ and Fortran. / NCSA |
| [llvmlite](http://llvmlite.pydata.org) | 0.38.0 | A lightweight LLVM python binding for writing JIT compilers. / BSD-2-Clause |
| [locket](https://github.com/mwilliamson/locket.py) | 1.0.0 | File-based locks for Python for Linux and Windows / BSD-2-Clause |
| [lxml](https://lxml.de/) | 4.8.0 | Pythonic binding for the C libraries libxml2 and libxslt. / BSD-3-Clause and GPL-2.0-only and ZPL-2.0 and LicenseRef-ElementTree |
| [lz4](https://github.com/python-lz4/python-lz4) | 3.1.3 | LZ4 Bindings for Python / BSD-3-Clause |
| [lz4-c](https://www.lz4.org) | 1.9.3 | Extremely Fast Compression algorithm / BSD-2-Clause |
| [lzo](http://www.oberhumer.com/opensource/lzo/) | 2.10 | LZO is a portable lossless data compression library written in ANSI C. / GPL v2+ |
| [markdown](https://pythonhosted.org/Markdown/) | 3.3.4 | Python implementation of Markdown. / BSD-3-Clause |
| [markupsafe](https://www.palletsprojects.com/p/markupsafe) | 2.0.1 | Safely add untrusted strings to HTML/XML markup. / BSD-3-Clause |
| [matplotlib](https://matplotlib.org/) | 3.5.1 | Publication quality figures in Python / LicenseRef-PSF-based |
| [matplotlib-base](https://matplotlib.org/) | 3.5.1 | Publication quality figures in Python / LicenseRef-PSF-based |
| [matplotlib-inline](https://github.com/ipython/matplotlib-inline) | 0.1.2 | Inline Matplotlib backend for Jupyter / BSD-3-Clause |
| [mccabe](https://github.com/PyCQA/mccabe) | 0.7.0 | McCabe complexity checker for Python / MIT |
| [mistune](https://github.com/lepture/mistune) | 0.8.4 | A sane Markdown parser with useful plugins and renderers. / BSD-3-Clause |
| [mock](https://github.com/testing-cabal/mock) | 4.0.3 | A library for testing in Python / BSD-2-Clause |
| [mpc](http://www.multiprecision.org/) | 1.1.0 | A C library for the arithmetic of complex numbers with arbitrarily high precision. / LGPL 3 |
| [mpfr](http://www.mpfr.org/) | 4.0.2 | The MPFR library is a C library for multiple-precision floating-point computations with correct rounding. / LGPL-3.0-only |
| [mpmath](http://mpmath.org) | 1.2.1 | Python library for arbitrary-precision floating-point arithmetic / BSD 3-Clause |
| [msgpack-python](https://msgpack.org/) | 1.0.3 | MessagePack (de)serializer / Apache-2.0 |
| [multipledispatch](https://github.com/mrocklin/multipledispatch/) | 0.6.0 | Multiple dispatch in Python / BSD 3-Clause |
| [munkres](https://github.com/bmc/munkres) | 1.1.4 | The Munkres module provides an O(n^3) implementation of the Munkres algorithm (also called the Hungarian algorithm or the Kuhn-Munkres algorithm). / Apache-2.0 |
| [nbclassic](http://github.com/jupyterlab/nbclassic) | 0.3.5 | Jupyter Notebook as a Jupyter Server Extension. / BSD-3-Clause |
| [nbclient](https://jupyter.org) | 0.5.13 | A client library for executing notebooks. Formally nbconvert’s ExecutePreprocessor. / BSD-3-Clause |
| [nbconvert](https://jupyter.org) | 6.4.4 | Converting Jupyter Notebooks / BSD-3-Clause |
| [nbformat](https://jupyter.org) | 5.3.0 | The Jupyter Notebook format / BSD-3-Clause |
| [ncurses](http://www.gnu.org/software/ncurses/) | 6.3 | Library for text-based user interfaces / Free software (MIT-like) |
| [nest-asyncio](https://github.com/erdewit/nest_asyncio) | 1.5.5 | Patch asyncio to allow nested event loops / BSD-2-Clause |
| [networkx](https://networkx.github.io/) | 2.7.1 | Python package for creating and manipulating complex networks / BSD-3-Clause |
| [nltk](https://nltk.org/) | 3.7 | Natural Language Toolkit / Apache-2.0 |
| nomkl | 3.0 | None / BSD |
| [nose](http://readthedocs.org/docs/nose/) | 1.3.7 | Nose extends unittest to make testing easier / LGPL-2.1 |
| [notebook](https://jupyter.org) | 6.4.11 | Jupyter Notebook / BSD-3-Clause |
| [numba](http://numba.pydata.org) | 0.55.1 | NumPy aware dynamic Python compiler using LLVM / BSD-2-Clause |
| [numexpr](https://github.com/pydata/numexpr) | 2.8.1 | Fast numerical expression evaluator for NumPy. / MIT |
| [numpy](https://numpy.org/) | 1.21.5 | Array processing for numbers, strings, records, and objects. / BSD-3-Clause |
| [numpy-base](https://numpy.org/) | 1.21.5 | Array processing for numbers, strings, records, and objects. / BSD-3-Clause |
| [numpydoc](https://github.com/numpy/numpydoc) | 1.2 | Numpy’s Sphinx extensions / BSD-3-Clause |
| [olefile](http://www.decalage.info/python/olefileio) | 0.46 | parse, read and write Microsoft OLE2 files / BSD 2-Clause |
| [oniguruma](https://github.com/kkos/oniguruma) | 6.9.7.1 | A regular expression library. / BSD-2-Clause |
| [openblas](https://www.openblas.net/) | 0.3.20 | An optimized BLAS library / BSD-3-clause |
| openblas-devel | 0.3.20 | OpenBLAS headers and libraries for developing software that used OpenBLAS. / None |
| [openjpeg](http://www.openjpeg.org/) | 2.3.0 | An open-source JPEG 2000 codec written in C / BSD 2-Clause |
| [openpyxl](https://openpyxl.readthedocs.io) | 3.0.9 | A Python library to read/write Excel 2010 xlsx/xlsm files / MIT |
| [openssl](https://www.openssl.org/) | 1.1.1o | OpenSSL is an open-source implementation of the SSL and TLS protocols / OpenSSL |
| [packaging](https://github.com/pypa/packaging) | 21.3 | Core utilities for Python packages / Apache-2.0 or BSD-2-Clause |
| [pandas](https://pandas.pydata.org) | 1.4.2 | High-performance, easy-to-use data structures and data analysis tools. / BSD-3-Clause |
| [pandocfilters](https://github.com/jgm/pandocfilters) | 1.5.0 | A python module for writing pandoc filters / BSD-3-Clause |
| [panel](https://panel.holoviz.org) | 0.13.0 | A high-level app and dashboarding solution for Python / BSD-3-Clause |
| [param](http://ioam.github.io/param/) | 1.12.0 | Param: Make your Python code clearer and more reliable by declaring Parameters / BSD-3-Clause |
| [parsel](https://github.com/scrapy/parsel) | 1.6.0 | library to extract data from HTML and XML using XPath and CSS selectors / BSD-3-Clause |
| [parso](https://github.com/davidhalter/parso) | 0.8.3 | A Python Parser / MIT |
| [partd](https://github.com/dask/partd) | 1.2.0 | Data structure for on-disk shuffle operations / BSD 3-Clause |
| [patsy](https://github.com/pydata/patsy) | 0.5.2 | Describing statistical models in Python using symbolic formulas / BSD-2-Clause AND PSF-2.0 |
| [pep8](http://pep8.readthedocs.org/) | 1.7.1 | Python style guide checker / MIT |
| [pexpect](http://pexpect.sourceforge.net/) | 4.8.0 | Pexpect makes Python a better tool for controlling other applications. / ISC |
| [pickleshare](https://github.com/pickleshare/pickleshare/) | 0.7.5 | Tiny ‘shelve’-like database with concurrency support / MIT |
| [pillow](https://pillow.readthedocs.io) | 9.0.1 | Pillow is the friendly PIL fork by Alex Clark and Contributors / LicenseRef-PIL |
| [pip](https://pip.pypa.io/en/stable/) | 21.2.4 | PyPA recommended tool for installing Python packages / MIT |
| [pkginfo](https://code.launchpad.net/~tseaver/pkginfo/trunk) | 1.8.2 | Query metadatdata from sdists / bdists / installed packages. / MIT |
| [platformdirs](https://github.com/platformdirs/platformdirs) | 2.4.0 | A small Python module for determining appropriate platform-specific dirs, e.g. a “user data dir”. / MIT |
| [plotly](https://plot.ly/python/) | 5.6.0 | An interactive JavaScript-based visualization library for Python / MIT |
| [pluggy](https://github.com/pytest-dev/pluggy) | 1.0.0 | Plugin registration and hook calling for Python / MIT |
| [prometheus\_client](https://github.com/prometheus/client_python) | 0.13.1 | Python client for the Prometheus monitoring system / Apache-2.0 |
| [prompt-toolkit](https://github.com/jonathanslenders/python-prompt-toolkit) | 3.0.20 | Library for building powerful interactive command lines in Python / BSD-3-Clause |
| [prompt\_toolkit](https://github.com/jonathanslenders/python-prompt-toolkit) | 3.0.20 | Library for building powerful interactive command lines in Python / BSD-3-Clause |
| [protego](https://github.com/scrapy/protego) | 0.1.16 | A pure-Python robots.txt parser with support for modern conventions / BSD 3-Clauses |
| [psutil](https://github.com/giampaolo/psutil) | 5.8.0 | A cross-platform process and system utilities module for Python / BSD-3-Clause |
| [ptyprocess](https://github.com/pexpect/ptyprocess) | 0.7.0 | Run a subprocess in a pseudo terminal / ISC |
| [pure\_eval](https://github.com/alexmojaki/pure_eval) | 0.2.2 | Safely evaluate AST nodes without side effects / MIT |
| [py](https://github.com/pytest-dev/py) | 1.11.0 | library with cross-python path, ini-parsing, io, code, log facilities / MIT |
| [py-lief](https://lief.quarkslab.com/) | 0.11.5 | A cross platform library to parse, modify and abstract ELF, PE and MachO formats. / Apache-2.0 |
| [pyasn1](https://github.com/etingof/pyasn1) | 0.4.8 | ASN.1 types and codecs / BSD 2-Clause |
| [pyasn1-modules](http://pyasn1.sourceforge.net/) | 0.2.8 | A collection of ASN.1-based protocols modules. / BSD 2-Clause |
| [pycodestyle](https://pycodestyle.readthedocs.io/) | 2.8.0 | Python style guide checker / MIT |
| [pycosat](https://github.com/ContinuumIO/pycosat) | 0.6.3 | Bindings to picosat (a SAT solver) / MIT |
| [pycparser](https://github.com/eliben/pycparser) | 2.21 | Complete C99 parser in pure Python / BSD-3-clause |
| [pyct](http://github.com/pyviz/pyct) | 0.4.6 | python package common tasks for users (e.g. copy examples, fetch data, …) / BSD 3-Clause |
| [pycurl](http://pycurl.sourceforge.net/) | 7.43.0.6 | A Python Interface To The cURL library / LGPL, MIT |
| [pydispatcher](http://pydispatcher.sourceforge.net) | 2.0.5 | Multi-producer-multi-consumer signal dispatching mechanism / BSD 3-Clause |
| [pyerfa](https://pyerfa.readthedocs.io/) | 2.0.0 | Python bindings for ERFA routines / BSD-3-Clause |
| [pyflakes](https://github.com/PyCQA/pyflakes) | 2.4.0 | Pyflakes analyzes programs and detects various errors. / MIT |
| [pygments](https://pygments.org/) | 2.11.2 | Pygments is a generic syntax highlighter suitable for use in code hosting, forums, wikis or other applications that need to prettify source code. / BSD-2-Clause |
| [pyhamcrest](https://github.com/hamcrest/PyHamcrest) | 2.0.2 | Hamcrest framework for matcher objects / BSD 3-Clause |
| [pylint](https://www.pylint.org) | 2.12.2 | python code static checker / GPL-2.0-or-later |
| [pyodbc](https://github.com/mkleehammer/pyodbc) | 4.0.32 | DB API Module for ODBC / MIT |
| [pyopenssl](https://github.com/pyca/pyopenssl) | 21.0.0 | Python wrapper module around the OpenSSL library / Apache-2.0 |
| [pyparsing](https://github.com/pyparsing/pyparsing/) | 3.0.4 | Create and execute simple grammars / MIT |
| [pyrsistent](http://github.com/tobgu/pyrsistent/) | 0.18.0 | Persistent/Functional/Immutable data structures / MIT |
| [pysocks](https://github.com/Anorov/PySocks) | 1.7.1 | A Python SOCKS client module. See [Anorov/PySocks](https://github.com/Anorov/PySocks) for more information. / BSD 3-Clause |
| [pytables](https://www.pytables.org) | 3.7.0 | Brings together Python, HDF5 and NumPy to easily handle large amounts of data. / BSD-3-Clause |
| [pytest](https://docs.pytest.org/en/latest/) | 7.1.1 | Simple and powerful testing with Python. / MIT |
| [python](https://www.python.org/) | 3.9.12 | General purpose programming language / PSF-2.0 |
| [python-dateutil](https://dateutil.readthedocs.org/) | 2.8.2 | Extensions to the standard Python datetime module. / BSD-3-Clause and Apache |
| [python-fastjsonschema](https://github.com/horejsek/python-fastjsonschema) | 2.15.1 | Fastest Python implementation of JSON schema / BSD-3-Clause |
| [python-libarchive-c](https://github.com/Changaco/python-libarchive-c) | 2.9 | Python interface to libarchive / CC0-1.0 |
| [python-snappy](https://github.com/andrix/python-snappy) | 0.6.0 | Python library for the snappy compression library from Google / BSD-3-Clause |
| [python.app](https://www.python.org/) | 3 | Proxy on macOS letting Python libraries hook into the GUI event loop / BSD-3-Clause |
| [pytz](http://pythonhosted.org/pytz/) | 2021.3 | World timezone definitions, modern and historical. / MIT |
| [pyviz\_comms](https://www.holoviz.org) | 2.0.2 | Bidirectional communication for PyViz / BSD-3-Clause |
| [pywavelets](https://github.com/PyWavelets/pywt) | 1.3.0 | Discrete Wavelet Transforms in Python / MIT |
| [pyyaml](http://pyyaml.org/wiki/PyYAML) | 6.0 | YAML parser and emitter for Python / MIT |
| [pyzmq](https://github.com/zeromq/pyzmq) | 22.3.0 | Python bindings for zeromq / BSD-3-clause |
| [queuelib](https://github.com/scrapy/queuelib) | 1.5.0 | Collection of persistent (disk-based) queues / BSD |
| [readline](https://tiswww.case.edu/php/chet/readline/rltop.html) | 8.1.2 | library for editing command lines as they are typed in / GPL-3.0-only |
| [regex](https://github.com/mrabarnett/mrab-regex) | 2022.3.15 | Alternative regular expression module, to replace re / Apache-2.0 |
| [requests](http://python-requests.org) | 2.27.1 | Requests is an elegant and simple HTTP library for Python, built with ♥. / Apache-2.0 |
| [requests-file](http://github.com/dashea/requests-file) | 1.5.1 | file transport adapter for Requests / Apache |
| [rope](https://github.com/python-rope/rope) | 0.22.0 | A python refactoring library / LGPL-3.0-or-later |
| [ruamel\_yaml](https://sourceforge.net/p/ruamel-yaml/code/ci/default/tree) | 0.15.100 | A patched copy of ruamel.yaml. / MIT |
| [s3transfer](https://github.com/boto/s3transfer) | 0.5.0 | An Amazon S3 Transfer Manager / Apache-2.0 |
| [scikit-image](https://scikit-image.org/) | 0.19.2 | Image processing in Python. / BSD-3-Clause |
| [scikit-learn](http://scikit-learn.org/) | 1.0.2 | A set of python modules for machine learning and data mining / BSD-3-Clause |
| [scipy](http://www.scipy.org/) | 1.7.3 | Scientific Library for Python / BSD 3-Clause |
| [scrapy](https://scrapy.org/) | 2.6.1 | A high-level Python Screen Scraping framework / BSD-3-Clause-Clear |
| [seaborn](https://seaborn.pydata.org) | 0.11.2 | Statistical data visualization / BSD 3-Clause |
| [send2trash](https://github.com/arsenetar/send2trash) | 1.8.0 | Python library to natively send files to Trash (or Recycle bin) on all platforms. / BSD-3-Clause |
| [service\_identity](https://github.com/pyca/service_identity) | 18.1.0 | Service identity verification for pyOpenSSL. / MIT |
| [setuptools](https://github.com/pypa/setuptools) | 61.2.0 | Download, build, install, upgrade, and uninstall Python packages / MIT |
| [sip](https://www.riverbankcomputing.com/software/sip/) | 6.5.1 | A Python bindings generator for C/C++ libraries / GPL-3.0-only |
| [six](https://six.readthedocs.io/) | 1.16.0 | Python 2 and 3 compatibility utilities / MIT |
| [smart\_open](https://github.com/RaRe-Technologies/smart_open) | 5.2.1 | Python library for efficient streaming of large files / MIT |
| [snappy](https://github.com/google/snappy) | 1.1.9 | A fast compressor/decompressor / BSD-3-clause AND CC-BY-3.0 AND MIT AND CC-BY AND Public Domain |
| [sniffio](https://github.com/python-trio/sniffio) | 1.2.0 | Sniff out which async library your code is running under / Apache-2.0 |
| [snowballstemmer](https://github.com/snowballstem/snowball) | 2.2.0 | Snowball stemming library collection for Python / BSD-3-Clause |
| [sortedcollections](http://www.grantjenks.com/docs/sortedcollections/) | 2.1.0 | Python Sorted Collections / Apache-2.0 |
| [sortedcontainers](http://www.grantjenks.com/docs/sortedcontainers/) | 2.4.0 | Python Sorted Container Types: SortedList, SortedDict, and SortedSet / Apache-2.0 |
| [soupsieve](http://facelessuser.github.io/soupsieve) | 2.3.1 | A modern CSS selector implementation for BeautifulSoup / MIT |
| [sphinx](https://www.sphinx-doc.org) | 4.4.0 | Sphinx is a tool that makes it easy to create intelligent and beautiful documentation / BSD-2-Clause |
| [sphinxcontrib-applehelp](https://www.sphinx-doc.org/en/master/) | 1.0.2 | sphinxcontrib-applehelp is a sphinx extension which outputs Apple help books / BSD-2-Clause |
| [sphinxcontrib-devhelp](https://www.sphinx-doc.org/en/master/) | 1.0.2 | sphinxcontrib-devhelp is a sphinx extension which outputs Devhelp document / BSD-2-Clause |
| [sphinxcontrib-htmlhelp](https://www.sphinx-doc.org/en/master/) | 2.0.0 | sphinxcontrib-htmlhelp is a sphinx extension which renders HTML help files. / BSD-2-Clause |
| [sphinxcontrib-jsmath](https://www.sphinx-doc.org/en/master/) | 1.0.1 | A sphinx extension which renders display math in HTML via JavaScript / BSD-2-Clause |
| [sphinxcontrib-qthelp](https://www.sphinx-doc.org/en/master/) | 1.0.3 | sphinxcontrib-qthelp is a sphinx extension which outputs QtHelp document / BSD-2-Clause |
| [sphinxcontrib-serializinghtml](https://www.sphinx-doc.org/en/master/) | 1.1.5 | sphinxcontrib-serializinghtml is a sphinx extension which outputs “serialized” HTML files (json and pickle). / BSD-2-Clause |
| [sqlalchemy](https://www.sqlalchemy.org/) | 1.4.32 | Database Abstraction Library. / MIT |
| [sqlite](https://www.sqlite.org/) | 3.38.3 | Implements a self-contained, zero-configuration, SQL database engine / blessing |
| [stack\_data](https://github.com/alexmojaki/stack_data) | 0.2.0 | Extract data from python stack frames and tracebacks for informative displays / MIT |
| [statsmodels](https://www.statsmodels.org) | 0.13.2 | Statistical computations and models for use with SciPy / BSD-3-Clause |
| [sympy](https://sympy.org) | 1.10.1 | Python library for symbolic mathematics / BSD-3-Clause AND MIT |
| [tabulate](https://bitbucket.org/astanin/python-tabulate) | 0.8.9 | Pretty-print tabular data in Python, a library and a command-line utility. / MIT |
| [tbb](https://github.com/oneapi-src/oneTBB) | 2021.5.0 | High level abstract threading library / Apache-2.0 |
| tbb4py | 2021.5.0 | TBB module for Python / Apache 2.0 |
| [tblib](https://github.com/ionelmc/python-tblib) | 1.7.0 | Traceback serialization library. / BSD 2-Clause |
| [tenacity](http://github.com/jd/tenacity) | 8.0.1 | Retry a flaky function whenever an exception occurs until it works / Apache-2.0 |
| [terminado](https://github.com/jupyter/terminado) | 0.13.1 | Terminals served by tornado websockets / BSD-2-Clause |
| [testpath](https://testpath.readthedocs.io) | 0.5.0 | Testpath is a collection of utilities for Python code working with files and commands. / BSD-3-Clause |
| [threadpoolctl](https://github.com/joblib/threadpoolctl) | 2.2.0 | Python helpers to control the threadpools of native libraries / BSD 3-Clause |
| [tifffile](https://github.com/cgohlke/tifffile) | 2021.7.2 | Read and write image data from and to TIFF files. / BSD-3-Clause |
| [tk](https://www.tcl.tk/) | 8.6.12 | A dynamic programming language with GUI support. Bundles Tcl and Tk. / TCL |
| [tldextract](https://github.com/john-kurkowski/tldextract) | 3.2.0 | Accurately separate the TLD from the registered domain andsubdomains of a URL, using the Public Suffix List. / BSD-3-Clause |
| [toml](https://github.com/uiri/toml) | 0.10.2 | Python lib for TOML. / MIT |
| [tomli](https://github.com/hukkin/tomli) | 1.2.2 | A simple TOML parser / MIT |
| [toolz](http://toolz.readthedocs.org/) | 0.11.2 | List processing tools and functional utilities / BSD-3-Clause |
| [tornado](http://www.tornadoweb.org/) | 6.1 | A Python web framework and asynchronous networking library, originally developed at FriendFeed. / Apache-2.0 |
| [tqdm](https://pypi.python.org/pypi/tqdm) | 4.64.0 | A Fast, Extensible Progress Meter / MPL-2.0 AND MIT |
| [traitlets](http://traitlets.readthedocs.org/) | 5.1.1 | Configuration system for Python applications / BSD-3-Clause |
| [twisted](https://twistedmatrix.com/) | 22.2.0 | An asynchronous networking framework written in Python / MIT |
| [typing-extensions](https://github.com/python/typing/tree/master/typing_extensions) | 4.1.1 | Backported and Experimental Type Hints for Python / PSF-2.0 |
| [typing\_extensions](https://github.com/python/typing/tree/master/typing_extensions) | 4.1.1 | Backported and Experimental Type Hints for Python / PSF-2.0 |
| [tzdata](https://www.iana.org/time-zones) | 2022a | The Time Zone Database (called tz, tzdb or zoneinfo) / Public-Domain AND BSD-3-clause |
| [unixodbc](http://www.unixodbc.org/) | 2.3.9 | ODBC on non MS Windows platforms / LGPL-2.1 |
| [urllib3](https://urllib3.readthedocs.io/) | 1.26.9 | HTTP library with thread-safe connection pooling, file post, and more. / MIT |
| [w3lib](https://github.com/scrapy/w3lib) | 1.21.0 | Library of web-related functions / BSD |
| [wcwidth](https://github.com/jquast/wcwidth) | 0.2.5 | Measures number of Terminal column cells of wide-character codes. / MIT |
| [webencodings](https://github.com/gsnedders/python-webencodings) | 0.5.1 | Character encoding aliases for legacy web content / BSD 3-Clause |
| [websocket-client](https://github.com/liris/websocket-client) | 0.58.0 | WebSocket client for python. hybi13 is supported. / BSD-3-Clause |
| [werkzeug](https://palletsprojects.com/p/werkzeug/) | 2.0.3 | The comprehensive WSGI web application library. / BSD-3-Clause |
| [wget](https://www.gnu.org/software/wget/) | 1.21.3 | utility for non-interactive download of files from the Web / GPL-3.0-or-later |
| [wheel](https://github.com/pypa/wheel) | 0.37.1 | A built-package format for Python. / MIT |
| [widgetsnbextension](http://ipython.org) | 3.5.2 | Interactive Widgets for Jupyter / BSD-3-Clause |
| [wrapt](https://github.com/GrahamDumpleton/wrapt) | 1.13.3 | Module for decorators, wrappers and monkey patching / BSD-2-Clause |
| [xarray](https://github.com/pydata/xarray) | 0.20.1 | N-D labeled arrays and datasets in Python. / Apache-2.0 |
| [xlrd](http://www.python-excel.org/) | 2.0.1 | Library for developers to extract data from Microsoft Excel (tm) spreadsheet files / BSD 3-Clause and BSD with advertising |
| [xlsxwriter](https://xlsxwriter.readthedocs.io/) | 3.0.3 | A Python module for creating Excel XLSX files / BSD-2-Clause |
| [xlwings](http://xlwings.org/) | 0.24.6 | Interact with Excel from Python and vice versa / BSD-3-clause |
| [xz](http://tukaani.org/xz/) | 5.2.5 | Data compression software with high compression ratio / LGPL-2.1 and GPL-2.0 |
| [yaml](http://pyyaml.org/wiki/LibYAML) | 0.2.5 | A C library for parsing and emitting YAML / MIT |
| [zeromq](http://zeromq.org) | 4.3.4 | A high-performance asynchronous messaging library. / LGPL-3.0-or-later |
| [zfp](https://computation.llnl.gov/projects/floating-point-compression) | 0.5.5 | Library for compressed numerical arrays that support high throughput read and write random access / BSD-3-Clause |
| [zict](http://github.com/mrocklin/zict) | 2.0.0 | Composable Dictionary Classes / BSD 3-Clause |
| [zipp](https://github.com/jaraco/zipp) | 3.8.0 | A pathlib-compatible Zipfile object wrapper / MIT |
| [zlib](http://zlib.net/) | 1.2.12 | Massively spiffy yet delicately unobtrusive compression library / Zlib |
| zope | 1.0 | web application server / BSD |
| [zope.interface](https://github.com/zopefoundation/zope.interface) | 5.4.0 | Interfaces for Python / ZPL-2.1 |
| [zstd](https://www.zstd.net) | 1.4.9 | Zstandard - Fast real-time compression algorithm / BSD-3-Clause AND GPL-2.0-or-later |
| Name | Version | Summary / License |
|---|---|---|
| [aiohttp](https://github.com/aio-libs/aiohttp) | 3.8.1 | Async http client/server framework (asyncio) / Apache-2.0 |
| [aiosignal](https://github.com/aio-libs/aiosignal) | 1.2.0 | aiosignal: a list of registered asynchronous callbacks / Apache-2.0 |
| [alabaster](http://www.sphinx-doc.org/en/stable/index.html) | 0.7.12 | Configurable, Python 2+3 compatible Sphinx theme. / BSD 3-Clause |
| [anaconda-client](https://github.com/Anaconda-Platform/anaconda-client) | 1.9.0 | Anaconda Cloud command line client library / BSD 3-Clause |
| [anaconda-navigator](https://github.com/ContinuumIO/navigator) | 2.1.4 | Anaconda Navigator / proprietary - Continuum Analytics, Inc. |
| [anaconda-project](https://github.com/Anaconda-Platform/anaconda-project) | 0.10.2 | Tool for encapsulating, running, and reproducing data science projects / BSD-3-Clause |
| [anyio](https://github.com/agronholm/anyio) | 3.5.0 | High level compatibility layer for multiple asynchronous event loop implementations on Python / MIT |
| [appdirs](http://github.com/ActiveState/appdirs) | 1.4.4 | A small Python module for determining appropriate platform-specific dirs. / MIT |
| [applaunchservices](https://github.com/impact27/applaunchservices) | 0.2.1 | Simple package for registering an app with apple Launch Services to handle UTI and URL / MIT |
| [appnope](http://github.com/minrk/appnope) | 0.1.2 | Disable App Nap on OS X 10.9 / BSD 2-Clause |
| [appscript](http://appscript.sourceforge.net) | 1.1.2 | Control AppleScriptable applications from Python. / Public Domain |
| [argon2-cffi](https://argon2-cffi.readthedocs.org/) | 21.3.0 | The secure Argon2 password hashing algorithm. / MIT |
| [argon2-cffi-bindings](https://github.com/hynek/argon2-cffi-bindings) | 21.2.0 | Low-level Python CFFI Bindings for Argon2 / MIT |
| [arrow](https://github.com/crsmithdev/arrow) | 1.2.2 | Better dates & times for Python / Apache-2.0 |
| [astroid](https://www.astroid.org/) | 2.6.6 | A abstract syntax tree for Python with inference support. / LGPL-2.1-or-later |
| [astropy](https://www.astropy.org/) | 5.0.4 | Community-developed Python Library for Astronomy / BSD-3-Clause |
| [asttokens](https://github.com/gristlabs/asttokens) | 2.0.5 | The asttokens module annotates Python abstract syntax trees (ASTs) with the positions of tokens and text in the source code that generated them. / Apache-2.0 |
| [async-timeout](http://github.com/aio-libs/async_timeout) | 4.0.1 | Timeout context manager for asyncio programs / Apache-2.0 |
| [atomicwrites](https://github.com/untitaker/python-atomicwrites) | 1.4.0 | Atomic file writes / MIT |
| [attrs](https://attrs.readthedocs.io/en/stable/) | 21.4.0 | attrs is the Python package that will bring back the joy of writing classes by relieving you from the drudgery of implementing object protocols (aka dunder methods). / MIT |
| [automat](https://github.com/glyph/Automat) | 20.2.0 | self-service finite-state machines for the programmer on the go / MIT |
| [autopep8](https://github.com/hhatto/autopep8) | 1.6.0 | A tool that automatically formats Python code to conform to the PEP 8 style guide / MIT |
| [babel](http://babel.pocoo.org/) | 2.9.1 | Utilities to internationalize and localize Python applications / BSD 3-clause |
| [backcall](https://github.com/takluyver/backcall/) | 0.2.0 | Specifications for callback functions passed in to an API / BSD-3-Clause |
| [backports](https://github.com/brandon-rhodes/backports) | 1.1 | Namespace for backported Python features. / MIT |
| [backports.functools\_lru\_cache](https://github.com/jaraco/backports.functools_lru_cache) | 1.6.4 | Backport of functools.lru\_cache from Python 3.3 as published at ActiveState. / MIT |
| [backports.tempfile](https://github.com/pjdelport/backports.tempfile) | 1.0 | Backports of new features in Python’s tempfile module / PSF 2 |
| [backports.weakref](https://github.com/pjdelport/backports.weakref) | 1.0.post1 | Backport of new features in Python’s weakref module / Python-2.0 |
| [bcrypt](https://github.com/pyca/bcrypt/) | 3.2.0 | Modern password hashing for your software and your servers / Apache-2.0 |
| [beautifulsoup4](https://www.crummy.com/software/BeautifulSoup/) | 4.11.1 | Python library designed for screen-scraping / MIT |
| [binaryornot](https://github.com/audreyr/binaryornot) | 0.4.4 | Ultra-lightweight pure Python package to check if a file is binary or text. / BSD-3-Clause |
| [bitarray](https://github.com/ilanschnell/bitarray) | 2.4.1 | efficient arrays of booleans – C extension / PSF-2.0 |
| [bkcharts](http://github.com/bokeh/bkcharts) | 0.2 | High level chart types built on top of Bokeh / BSD 3-Clause |
| [black](https://github.com/python/black) | 19.10b0 | The Uncompromising Code Formatter / MIT |
| [blas](http://www.netlib.org/lapack) | 1.0 | Linear Algebra PACKage / BSD-3-Clause |
| [bleach](https://github.com/mozilla/bleach) | 4.1.0 | Easy, whitelist-based HTML-sanitizing tool / Apache-2.0 |
| [blosc](https://github.com/Blosc/c-blosc) | 1.21.0 | A blocking, shuffling and loss-less compression library that can be faster than memcpy() / BSD-3-Clause |
| [bokeh](http://bokeh.pydata.org/) | 2.4.2 | Statistical and novel interactive HTML plots for Python / BSD-3-Clause |
| [boto3](https://aws.amazon.com/sdk-for-python) | 1.21.32 | Amazon Web Services SDK for Python / Apache-2.0 |
| [botocore](https://aws.amazon.com/sdk-for-python/) | 1.24.32 | Low-level, data-driven core of boto 3. / Apache-2.0 |
| [bottleneck](https://github.com/pydata/bottleneck) | 1.3.4 | Fast NumPy array functions written in Cython. / BSD-2-Clause |
| [brotli](http://github.com/google/brotli) | 1.0.9 | Brotli compression format / MIT |
| [brotlipy](https://github.com/python-hyper/brotlipy) | 0.7.0 | Python bindings to the Brotli compression library / MIT |
| [brunsli](https://github.com/google/brunsli) | 0.1 | Practical JPEG Repacker / MIT |
| [bzip2](http://www.bzip.org/) | 1.0.8 | high-quality data compressor / bzip2 |
| [c-ares](https://c-ares.org/) | 1.18.1 | This is c-ares, an asynchronous resolver library / MIT |
| [ca-certificates](https://curl.se/docs/caextract.html) | 2022.3.29 | Certificates for use with other packages. / MPL-2.0 |
| [cachetools](https://github.com/tkem/cachetools) | 4.2.2 | Extensible memoizing collections and decorators / MIT |
| [certifi](http://certifi.io/) | 2021.10.8 | Python package for providing Mozilla’s CA Bundle. / ISC |
| [cffi](http://cffi.readthedocs.org/) | 1.15.0 | Foreign Function Interface for Python calling C code. / MIT |
| [cfitsio](http://heasarc.gsfc.nasa.gov/fitsio/fitsio.html) | 3.470 | A library for reading and writing FITS files / fitsio |
| [chardet](https://github.com/chardet/chardet) | 4.0.0 | Universal character encoding detector / LGPL2 |
| [charls](https://github.com/team-charls/charls) | 2.2.0 | CharLS is a C++ implementation of the JPEG-LS standard for lossless and near-lossless image compression and decompression. JPEG-LS is a low-complexity image compression standard that matches JPEG 2000 compression ratios. / BSD-3-Clause |
| [charset-normalizer](https://github.com/ousret/charset_normalizer) | 2.0.4 | The Real First Universal Charset Detector. Open, modern and actively maintained alternative to Chardet. / MIT |
| [click](https://palletsprojects.com/p/click) | 8.0.4 | Python composable command line interface toolkit / BSD-3-Clause |
| [cloudpickle](https://github.com/cloudpipe/cloudpickle) | 2.0.0 | Extended pickling support for Python objects / BSD-3-Clause |
| [clyent](https://github.com/Anaconda-Platform/clyent) | 1.2.2 | Command line client library for windows and posix / BSD 3-Clause |
| [colorama](https://github.com/tartley/colorama) | 0.4.4 | Cross-platform colored terminal text / BSD-3-Clause |
| [colorcet](http://github.com/pyviz/colorcet) | 2.0.6 | Collection of perceptually uniform colormaps / CC-BY-4.0 |
| [conda](https://conda.io) | 4.12.0 | OS-agnostic, system-level binary package and environment manager. / BSD-3-Clause |
| [conda-build](https://github.com/conda/conda-build) | 3.21.8 | tools for building conda packages / BSD-3-Clause |
| [conda-content-trust](https://github.com/conda/conda-content-trust) | 0.1.1 | Signing and verification tools for conda / BSD-3-Clause |
| [conda-env](https://github.com/conda/conda-env) | 2.6.0 | Tools for interacting with conda environments. / BSD 3-Clause |
| [conda-token](https://github.com/Anaconda/conda-token) | 0.3.0 | Set repository access token / BSD-3-Clause |
| [conda-verify](https://github.com/conda/conda-verify) | 3.4.2 | tool for validating conda recipes and conda packages / BSD 3-Clause |
| [constantly](https://github.com/twisted/constantly) | 15.1.0 | Symbolic constants in Python / MIT |
| [cookiecutter](https://github.com/cookiecutter/cookiecutter) | 1.7.3 | A command-line utility that creates projects from cookiecutters (project templates), e.g. creating a Python package project from a Python package project template. / BSD-3-Clause |
| [cryptography](https://github.com/pyca/cryptography) | 3.4.8 | Provides cryptographic recipes and primitives to Python developers / Apache-2.0 AND BSD-3-Clause AND PSF-2.0 AND MIT |
| [cssselect](https://pythonhosted.org/cssselect/) | 1.1.0 | CSS Selectors for Python / BSD 3-Clause |
| [curl](https://curl.haxx.se/) | 7.82.0 | tool and library for transferring data with URL syntax / curl |
| [cycler](http://matplotlib.org/cycler) | 0.11.0 | Composable style cycles. / BSD-3-Clause |
| [cython](https://cython.org/) | 0.29.28 | The Cython compiler for writing C extensions for the Python language / Apache-2.0 |
| [cytoolz](https://github.com/pytoolz/cytoolz) | 0.11.0 | Cython implementation of Toolz. High performance functional utilities / BSD-3-Clause |
| [daal4py](https://intelpython.github.io/daal4py/) | 2021.5.0 | A convenient Python API to Intel (R) oneAPI Data Analytics Library / Apache-2.0 |
| [dal](https://software.intel.com/content/www/us/en/develop/tools.html) | 2021.5.0 | Intel® oneDAL runtime libraries / Intel Simplified Software License |
| [dask](https://dask.org/) | 2022.2.1 | Parallel PyData with Task Scheduling / BSD-3-Clause |
| [dask-core](https://github.com/dask/dask/) | 2022.2.1 | Parallel Python with task scheduling / BSD-3-Clause |
| [dataclasses](https://github.com/ericvsmith/dataclasses) | 0.8 | An implementation of PEP 557: Data Classes / Apache-2.0 |
| [datashader](https://datashader.org) | 0.13.0 | Data visualization toolchain based on aggregating into a grid / BSD-3-Clause |
| [datashape](http://datashape.pydata.org) | 0.5.4 | A data description language. / BSD 2-Clause |
| [debugpy](https://github.com/Microsoft/debugpy) | 1.5.1 | An implementation of the Debug Adapter Protocol for Python / MIT |
| [decorator](https://github.com/micheles/decorator) | 5.1.1 | Better living through Python with decorators. / BSD-2-Clause |
| [defusedxml](https://bitbucket.org/tiran/defusedxml) | 0.7.1 | XML bomb protection for Python stdlib modules / PSF 2.0 |
| [diff-match-patch](http://code.google.com/p/google-diff-match-patch/) | 20200713 | Diff Match Patch is a high-performance library in multiple languages that manipulates plain text / Apache-2.0 |
| [distributed](https://distributed.readthedocs.io/en/latest/) | 2022.2.1 | Distributed computing with Dask / BSD-3-Clause |
| [docutils](http://docutils.sourceforge.net/) | 0.17.1 | Docutils – Python Documentation Utilities / LicenseRef-Public-Domain-Dedictation and BSD-2-Clause and LicenseRef-PSF-2.1.1 and GPL-3.0-or-later |
| [entrypoints](https://github.com/takluyver/entrypoints) | 0.4 | Discover and load entry points from installed packages. / MIT License |
| [et\_xmlfile](https://foss.heptapod.net/openpyxl/et_xmlfile) | 1.1.0 | An implementation of lxml.xmlfile for the standard library / MIT AND PSF-2.0 |
| [executing](https://pypi.org/project/executing) | 0.8.3 | Get the currently executing AST node of a frame, and other information / MIT |
| [filelock](https://github.com/tox-dev/py-filelock) | 3.6.0 | A platform independent file lock. / Unlicense |
| [flake8](http://flake8.pycqa.org/) | 3.9.2 | Your Tool For Style Guide Enforcement / MIT |
| [flask](https://flask.pocoo.org) | 1.1.2 | A microframework based on Werkzeug, Jinja2 and good intentions. / BSD 3-Clause |
| [fonttools](https://github.com/fonttools/fonttools) | 4.25.0 | fontTools is a library for manipulating fonts, written in Python. / MIT |
| [freetype](https://www.freetype.org/) | 2.11.0 | A Free, High-Quality, and Portable Font Engine / GPL-2.0-only and LicenseRef-FreeType |
| [frozenlist](https://github.com/aio-libs/frozenlist) | 1.2.0 | A list-like structure which implements collections.abc.MutableSequence / Apache-2.0 |
| [fsspec](https://github.com/martindurant/filesystem_spec) | 2022.2.0 | A specification for pythonic filesystems / BSD-3-Clause |
| [future](http://python-future.org) | 0.18.2 | Clean single-source support for Python 3 and 2 / MIT |
| [gensim](https://github.com/RaRe-Technologies/gensim) | 4.1.2 | Topic Modelling for Humans / LGPL-2.1-only |
| [giflib](http://giflib.sourceforge.net) | 5.2.1 | Library for reading and writing gif images / MIT |
| [glob2](https://github.com/miracle2k/python-glob2) | 0.7 | Version of the glob module that supports recursion via \*\*, and can capture patterns. / BSD-2-Clause |
| [gmp](http://gmplib.org/) | 6.2.1 | The GNU multiprecision library. / GPL-2.0-or-later AND LGPL-3.0-or-later |
| [gmpy2](https://pypi.python.org/pypi/gmpy2) | 2.1.2 | GMP/MPIR, MPFR, and MPC interface to Python 2.6+ and 3.x / LGPL-3.0-or-later |
| [google-api-core](https://github.com/googleapis/python-api-core) | 1.25.1 | Core Library for Google Client Libraries / Apache-2.0 |
| [google-auth](https://github.com/googleapis/google-auth-library-python) | 1.33.0 | Google authentication library for Python / Apache-2.0 |
| [google-cloud-core](https://github.com/googleapis/python-cloud-core) | 1.7.1 | API Client library for Google Cloud: Core Helpers / Apache-2.0 |
| [google-cloud-storage](https://github.com/googleapis/python-storage) | 1.31.0 | Python Client for Google Cloud Storage / Apache-2.0 |
| [google-crc32c](https://github.com/googleapis/python-crc32c) | 1.1.2 | Python wrapper for a hardware-based implementation of the CRC32C hashing algorithm / Apache-2.0 |
| [google-resumable-media](https://github.com/googleapis/google-resumable-media-python) | 1.3.1 | Utilities for Google Media Downloads and Resumable Uploads / Apache-2.0 |
| [googleapis-common-protos](https://github.com/googleapis/api-common-protos) | 1.53.0 | Common protobufs used in Google APIs / Apache-2.0 |
| [greenlet](https://github.com/python-greenlet/greenlet) | 1.1.1 | Lightweight in-process concurrent programming / MIT |
| [grpcio](https://grpc.io) | 1.42.0 | HTTP/2-based RPC framework / Apache-2.0 |
| [h5py](http://www.h5py.org/) | 3.6.0 | Read and write HDF5 files from Python / BSD-3-Clause |
| [hdf5](http://www.hdfgroup.org/HDF5/) | 1.10.6 | HDF5 is a data model, library, and file format for storing and managing data / HDF5 |
| [heapdict](http://stutzbachenterprises.com/) | 1.0.1 | A heap with decrease-key and increase-key operations / BSD 3-Clause |
| [holoviews](https://holoviews.org) | 1.14.8 | Stop plotting your data - annotate your data and let it visualize itself. / BSD-3-Clause |
| [hvplot](https://hvplot.holoviz.org/) | 0.7.3 | A high-level plotting API for the PyData ecosystem built on HoloViews / BSD-3-Clause |
| [hyperlink](https://github.com/python-hyper/hyperlink) | 21.0.0 | Immutable, Pythonic, correct URLs. / MIT |
| [icu](http://site.icu-project.org/) | 58.2 | International Components for Unicode. / MIT |
| [idna](https://github.com/kjd/idna) | 3.3 | Internationalized Domain Names in Applications (IDNA). / BSD-3-Clause |
| [imagecodecs](https://www.lfd.uci.edu/~gohlke/) | 2021.8.26 | Image transformation, compression, and decompression codecs / BSD-3-Clause |
| [imageio](https://imageio.github.io) | 2.9.0 | A Python library for reading and writing image data / BSD-2-Clause |
| [imagesize](https://github.com/shibukawa/imagesize_py) | 1.3.0 | Getting image size from png/jpeg/jpeg2000/gif file / MIT |
| [importlib-metadata](https://github.com/python/importlib_metadata) | 4.11.3 | A library to access the metadata for a Python package. / Apache-2.0 |
| [importlib\_metadata](https://github.com/python/importlib_metadata) | 4.11.3 | A library to access the metadata for a Python package. / Apache-2.0 |
| [incremental](https://github.com/hawkowl/incremental) | 21.3.0 | Incremental is a small library that versions your Python projects. / MIT |
| [inflection](http://github.com/jpvanhal/inflection) | 0.5.1 | A port of Ruby on Rails inflector to Python / MIT |
| [iniconfig](http://github.com/RonnyPfannschmidt/iniconfig) | 1.1.1 | iniconfig: brain-dead simple config-ini parsing / MIT |
| [intake](https://github.com/ContinuumIO/intake) | 0.6.5 | Data load and catalog system / BSD-2-Clause |
| [intel-openmp](https://software.intel.com/en-us/node/522690) | 2021.4.0 | Math library for Intel and compatible processors / LicenseRef-ProprietaryIntel |
| [intervaltree](https://github.com/chaimleib/intervaltree) | 3.1.0 | Editable interval tree data structure for Python 2 and 3 / Apache-2.0 |
| [ipykernel](https://ipython.org) | 6.9.1 | IPython Kernel for Jupyter / BSD-3-Clause |
| [ipython](https://ipython.org) | 8.2.0 | IPython: Productive Interactive Computing / BSD-3-Clause |
| [ipython\_genutils](http://ipython.org) | 0.2.0 | vestigial utilities from IPython / BSD 3-Clause |
| [ipywidgets](https://github.com/ipython/ipywidgets) | 7.6.5 | Jupyter Interactive Widgets / BSD-3-Clause |
| [isort](https://github.com/timothycrosley/isort) | 5.9.3 | A Python utility / library to sort Python imports. / MIT |
| [itemadapter](https://github.com/scrapy/itemadapter) | 0.3.0 | Common interface for different data containers / BSD-3-Clause |
| [itemloaders](https://github.com/scrapy/itemadapter) | 1.0.4 | Collect data from HTML and XML sources / BSD-3-Clause |
| [itsdangerous](https://github.com/pallets/itsdangerous) | 2.0.1 | Various helpers to pass trusted data to untrusted environments. / BSD-3-Clause |
| [jdcal](https://github.com/phn/jdcal) | 1.4.1 | Julian dates from proleptic Gregorian and Julian calendars. / BSD 2-Clause |
| [jedi](https://github.com/davidhalter/jedi/) | 0.18.1 | An autocompletion tool for Python that can be used for text editors. / MIT |
| [jinja2](https://jinja.pocoo.org) | 2.11.3 | An easy to use stand-alone template engine written in pure python. / BSD-3-Clause |
| [jinja2-time](https://github.com/hackebrot/jinja2-time) | 0.2.0 | Jinja2 Extension for Dates and Times / MIT |
| [jmespath](http://jmespath.org/) | 0.10.0 | Query language for JSON / MIT |
| [joblib](https://joblib.readthedocs.io/en/latest/) | 1.1.0 | Lightweight pipelining: using Python functions as pipeline jobs. / BSD-3-Clause |
| [jpeg](https://www.ijg.org/) | 9e | read/write jpeg COM, EXIF, IPTC medata / IJG |
| [jq](http://stedolan.github.io/jq/) | 1.6 | A command-line JSON processor. / MIT |
| [json5](https://github.com/dpranke/pyjson5) | 0.9.6 | A Python implementation of the JSON5 data format / Apache-2.0 |
| [jsonschema](https://github.com/Julian/jsonschema) | 4.4.0 | An implementation of JSON Schema validation for Python / MIT |
| [jupyter](http://jupyter.org) | 1.0.0 | Jupyter metapackage. Install all the Jupyter components in one go. / BSD 3-Clause |
| [jupyter\_client](https://jupyter.org) | 6.1.12 | jupyter\_client contains the reference implementation of the Jupyter protocol. / BSD-3-Clause |
| [jupyter\_console](https://jupyter.org) | 6.4.0 | Jupyter terminal console / BSD-3-Clause |
| [jupyter\_core](https://jupyter.org) | 4.9.2 | Core common functionality of Jupyter projects. / BSD-3-Clause |
| [jupyter\_server](https://jupyter.org) | 1.13.5 | Jupyter Server / BSD-3-Clause |
| [jupyterlab](https://github.com/jupyterlab/jupyterlab) | 3.3.2 | JupyterLab PRE-ALPHA / BSD-3-Clause |
| [jupyterlab\_pygments](http://github.com/JupyterLab/jupyterlab_pygments) | 0.1.2 | Pygments syntax coloring scheme making use of the JupyterLab CSS variables / BSD-3-Clause |
| [jupyterlab\_server](https://github.com/jupyterlab/jupyterlab_server) | 2.10.3 | A set of server components for JupyterLab and JupyterLab like applications. / BSD-3-Clause |
| [jupyterlab\_widgets](https://github.com/jupyter-widgets/ipywidgets) | 1.0.0 | JupyterLab extension providing HTML widgets / BSD-3-Clause |
| [jxrlib](https://packages.debian.org/source/sid/jxrlib) | 1.1 | jxrlib - JPEG XR Library by Microsoft, built from Debian hosted sources. / BSD-2-Clause |
| [keyring](https://github.com/jaraco/keyring) | 23.4.0 | Store and access your passwords safely / MIT |
| [kiwisolver](https://github.com/nucleic/kiwi) | 1.3.2 | An efficient C++ implementation of the Cassowary constraint solver / BSD-3-Clause |
| [krb5](http://web.mit.edu/kerberos/) | 1.19.2 | A network authentication protocol. / MIT |
| [lazy-object-proxy](https://github.com/ionelmc/python-lazy-object-proxy) | 1.6.0 | A fast and thorough lazy object proxy / BSD-2-Clause |
| [lcms2](http://www.littlecms.com/) | 2.12 | Open Source Color Management Engine / MIT |
| [lerc](https://github.com/Esri/lerc) | 3.0 | LERC - Limited Error Raster Compression / Apache-2.0 |
| [libaec](https://gitlab.dkrz.de/k202009/libaec) | 1.0.4 | Adaptive Entropy Coding library / BSD-2-Clause |
| [libarchive](http://www.libarchive.org/) | 3.4.2 | Multi-format archive and compression library / BSD-2-Clause |
| [libcrc32c](https://github.com/google/crc32c) | 1.1.1 | CRC32C implementation with support for CPU-specific acceleration instructions / BSD-3-Clause |
| [libcurl](https://curl.haxx.se/) | 7.82.0 | tool and library for transferring data with URL syntax / curl |
| [libcxx](http://llvm.org/) | 12.0.0 | LLVM C++ standard library / Apache-2.0 WITH LLVM-exception |
| [libdeflate](https://github.com/ebiggers/libdeflate) | 1.8 | libdeflate is a library for fast, whole-buffer DEFLATE-based compression and decompression. / MIT |
| [libedit](http://thrysoee.dk/editline/) | 3.1.20210910 | Editline Library (libedit) / BSD-2-Clause |
| [libev](http://software.schmorp.de/pkg/libev.html) | 4.33 | A full-featured and high-performance event loop that is loosely modeled after libevent, but without its limitations and bugs. / BSD-2-Clause |
| [libffi](https://sourceware.org/libffi/) | 3.3 | A Portable Foreign Function Interface Library. / MIT |
| [libgfortran](http://gcc.gnu.org/) | 3.0.1 | Fortran compiler and libraries from the GNU Compiler Collection / GPL-3.0-only WITH GCC-exception-3.1 |
| [libiconv](https://www.gnu.org/software/libiconv/) | 1.16 | Provides iconv for systems which don’t have one (or that cannot convert from/to Unicode.) / GPL and LGPL |
| [libidn2](https://www.gnu.org/software/libidn/#libidn2) | 2.3.2 | Library for internationalized domain names (IDNA2008) support / LGPLv2 AND LGPL-3.0-or-later AND GPL-3.0-or-later |
| [liblief](https://lief.quarkslab.com/) | 0.11.5 | A cross platform library to parse, modify and abstract ELF, PE and MachO formats. / Apache-2.0 |
| [libllvm11](http://llvm.org/) | 11.1.0 | Development headers and libraries for LLVM / Apache-2.0 WITH LLVM-exception |
| [libnghttp2](http://github.com/nghttp2/nghttp2) | 1.46.0 | This is an implementation of Hypertext Transfer Protocol version 2. / MIT |
| [libpng](http://www.libpng.org/pub/png/libpng.html) | 1.6.37 | PNG reference library / zlib/libpng |
| [libprotobuf](https://developers.google.com/protocol-buffers/) | 3.19.1 | Protocol Buffers - Google’s data interchange format. C++ Libraries and protoc, the protobuf compiler. / BSD-3-Clause |
| [libsodium](http://libsodium.org) | 1.0.18 | A modern and easy-to-use crypto library. / ISC |
| [libspatialindex](http://libspatialindex.github.io) | 1.9.3 | Extensible framework for robust spatial indexing / MIT |
| [libssh2](https://www.libssh2.org/) | 1.10.0 | the SSH library / BSD-3-Clause |
| [libtiff](http://www.libtiff.org/) | 4.2.0 | Support for the Tag Image File Format (TIFF). / HPND |
| [libunistring](https://www.gnu.org/software/libunistring) | 0.9.10 | This library provides functions for manipulating Unicode strings and for manipulating C strings according to the Unicode standard. / LGPL |
| [libwebp](https://developers.google.com/speed/webp/) | 1.2.2 | WebP image library / BSD-3-Clause |
| [libwebp-base](https://developers.google.com/speed/webp) | 1.2.2 | WebP image library / BSD-3-Clause |
| [libxml2](http://xmlsoft.org/) | 2.9.12 | The XML C parser and toolkit of Gnome / MIT |
| [libxslt](http://xmlsoft.org/XSLT/) | 1.1.34 | The XSLT C library developed for the GNOME project / MIT |
| [libzopfli](https://github.com/google/zopfli) | 1.0.3 | A compression library programmed in C to perform very good, but slow, deflate or zlib compression. / Apache-2.0 |
| [llvm-openmp](http://openmp.llvm.org/) | 12.0.0 | The OpenMP API supports multi-platform shared-memory parallel programming in C/C++ and Fortran. / NCSA |
| [llvmlite](http://llvmlite.pydata.org) | 0.38.0 | A lightweight LLVM python binding for writing JIT compilers. / BSD-2-Clause |
| [locket](https://github.com/mwilliamson/locket.py) | 0.2.1 | File-based locks for Python for Linux and Windows / BSD 2-Clause |
| [lxml](https://lxml.de/) | 4.8.0 | Pythonic binding for the C libraries libxml2 and libxslt. / BSD-3-Clause and GPL-2.0-only and ZPL-2.0 and LicenseRef-ElementTree |
| [lz4-c](https://www.lz4.org) | 1.9.3 | Extremely Fast Compression algorithm / BSD-2-Clause |
| [lzo](http://www.oberhumer.com/opensource/lzo/) | 2.10 | LZO is a portable lossless data compression library written in ANSI C. / GPL v2+ |
| [markdown](https://pythonhosted.org/Markdown/) | 3.3.4 | Python implementation of Markdown. / BSD-3-Clause |
| [markupsafe](https://www.palletsprojects.com/p/markupsafe) | 2.0.1 | A Python module that implements the jinja2.Markup string / BSD-3-Clause |
| [matplotlib](https://matplotlib.org/) | 3.5.1 | Publication quality figures in Python / LicenseRef-PSF-based |
| [matplotlib-base](https://matplotlib.org/) | 3.5.1 | Publication quality figures in Python / LicenseRef-PSF-based |
| [matplotlib-inline](https://github.com/ipython/matplotlib-inline) | 0.1.2 | Inline Matplotlib backend for Jupyter / BSD-3-Clause |
| [mccabe](https://github.com/PyCQA/mccabe) | 0.6.1 | McCabe complexity checker for Python / MIT |
| [mistune](https://github.com/lepture/mistune) | 0.8.4 | A sane Markdown parser with useful plugins and renderers. / BSD-3-Clause |
| [mkl](https://software.intel.com/en-us/mkl) | 2021.4.0 | Math library for Intel and compatible processors / LicenseRef-ProprietaryIntel |
| [mkl-service](http://github.com/IntelPython/mkl-service) | 2.4.0 | Python hooks for Intel(R) Math Kernel Library runtime control settings. / BSD-3-Clause |
| [mkl\_fft](http://github.com/IntelPython/mkl_fft) | 1.3.1 | NumPy-based implementation of Fast Fourier Transform using Intel (R) Math Kernel Library. / BSD 3-Clause |
| [mkl\_random](http://github.com/IntelPython/mkl_random) | 1.2.2 | Intel (R) MKL-powered package for sampling from common probability distributions into NumPy arrays. / BSD-3-Clause |
| [mock](https://github.com/testing-cabal/mock) | 4.0.3 | A library for testing in Python / BSD-2-Clause |
| [mpc](http://www.multiprecision.org/) | 1.1.0 | A C library for the arithmetic of complex numbers with arbitrarily high precision. / LGPL 3 |
| [mpfr](http://www.mpfr.org/) | 4.0.2 | The MPFR library is a C library for multiple-precision floating-point computations with correct rounding. / LGPL-3.0-only |
| [mpi](http://www.mpich.org/) | 1.0 | A high performance widely portable implementation of the MPI standard. / MPICH |
| [mpich](http://www.mpich.org/) | 3.3.2 | A high performance widely portable implementation of the MPI standard. / MPICH |
| [mpmath](http://mpmath.org) | 1.2.1 | Python library for arbitrary-precision floating-point arithmetic / BSD 3-Clause |
| [msgpack-python](http://msgpack.org/) | 1.0.2 | MessagePack (de)serializer / Apache-2.0 |
| [multidict](http://github.com/aio-libs/multidict) | 5.2.0 | multidict implementation / Apache 2.0 |
| [multipledispatch](https://github.com/mrocklin/multipledispatch/) | 0.6.0 | Multiple dispatch in Python / BSD 3-Clause |
| [munkres](https://github.com/bmc/munkres) | 1.1.4 | The Munkres module provides an O(n^3) implementation of the Munkres algorithm (also called the Hungarian algorithm or the Kuhn-Munkres algorithm). / Apache-2.0 |
| [mypy\_extensions](http://www.mypy-lang.org/) | 0.4.3 | Experimental type system extensions for programs checked with the mypy typechecker. / MIT |
| [nbclassic](http://github.com/jupyterlab/nbclassic) | 0.3.5 | Jupyter Notebook as a Jupyter Server Extension. / BSD-3-Clause |
| [nbclient](https://jupyter.org) | 0.5.13 | A client library for executing notebooks. Formally nbconvert’s ExecutePreprocessor. / BSD-3-Clause |
| [nbconvert](https://jupyter.org) | 6.4.4 | Converting Jupyter Notebooks / BSD-3-Clause |
| [nbformat](https://jupyter.org) | 5.3.0 | The Jupyter Notebook format / BSD-3-Clause |
| [ncurses](http://www.gnu.org/software/ncurses/) | 6.3 | Library for text-based user interfaces / Free software (MIT-like) |
| [nest-asyncio](https://github.com/erdewit/nest_asyncio) | 1.5.5 | Patch asyncio to allow nested event loops / BSD-2-Clause |
| [networkx](https://networkx.github.io/) | 2.7.1 | Python package for creating and manipulating complex networks / BSD-3-Clause |
| [nltk](https://nltk.org/) | 3.7 | Natural Language Toolkit / Apache-2.0 |
| [nose](http://readthedocs.org/docs/nose/) | 1.3.7 | Nose extends unittest to make testing easier / LGPL-2.1 |
| [notebook](https://jupyter.org) | 6.4.8 | Jupyter Notebook / BSD-3-Clause |
| [numba](http://numba.pydata.org) | 0.55.1 | NumPy aware dynamic Python compiler using LLVM / BSD-2-Clause |
| [numexpr](https://github.com/pydata/numexpr) | 2.8.1 | Fast numerical expression evaluator for NumPy. / MIT |
| [numpy](http://numpy.scipy.org/) | 1.21.5 | Array processing for numbers, strings, records, and objects. / BSD 3-Clause |
| [numpy-base](http://numpy.scipy.org/) | 1.21.5 | Array processing for numbers, strings, records, and objects. / BSD 3-Clause |
| [numpydoc](https://github.com/numpy/numpydoc) | 1.2 | Numpy’s Sphinx extensions / BSD-3-Clause |
| [olefile](http://www.decalage.info/python/olefileio) | 0.46 | parse, read and write Microsoft OLE2 files / BSD 2-Clause |
| [oniguruma](https://github.com/kkos/oniguruma) | 6.9.7.1 | A regular expression library. / BSD-2-Clause |
| [openjpeg](http://www.openjpeg.org/) | 2.4.0 | An open-source JPEG 2000 codec written in C / BSD 2-Clause |
| [openpyxl](https://openpyxl.readthedocs.io) | 3.0.9 | A Python library to read/write Excel 2010 xlsx/xlsm files / MIT |
| [openssl](https://www.openssl.org/) | 1.1.1n | OpenSSL is an open-source implementation of the SSL and TLS protocols / OpenSSL |
| [packaging](https://github.com/pypa/packaging) | 21.3 | Core utilities for Python packages / Apache-2.0 or BSD-2-Clause |
| [pandas](https://pandas.pydata.org) | 1.4.2 | High-performance, easy-to-use data structures and data analysis tools. / BSD-3-Clause |
| [pandocfilters](https://github.com/jgm/pandocfilters) | 1.5.0 | A python module for writing pandoc filters / BSD-3-Clause |
| [panel](https://panel.holoviz.org) | 0.13.0 | A high-level app and dashboarding solution for Python / BSD-3-Clause |
| [param](http://ioam.github.io/param/) | 1.12.0 | Param: Make your Python code clearer and more reliable by declaring Parameters / BSD-3-Clause |
| [parsel](https://github.com/scrapy/parsel) | 1.6.0 | library to extract data from HTML and XML using XPath and CSS selectors / BSD-3-Clause |
| [parso](https://github.com/davidhalter/parso) | 0.8.3 | A Python Parser / MIT |
| [partd](https://github.com/dask/partd) | 1.2.0 | Data structure for on-disk shuffle operations / BSD 3-Clause |
| [pathspec](https://github.com/cpburnz/python-path-specification) | 0.7.0 | Utility library for gitignore style pattern matching of file paths. / MPL-2.0 |
| [patsy](https://github.com/pydata/patsy) | 0.5.2 | Describing statistical models in Python using symbolic formulas / BSD-2-Clause AND PSF-2.0 |
| [pep8](http://pep8.readthedocs.org/) | 1.7.1 | Python style guide checker / MIT |
| [pexpect](http://pexpect.sourceforge.net/) | 4.8.0 | Pexpect makes Python a better tool for controlling other applications. / ISC |
| [pickleshare](https://github.com/pickleshare/pickleshare/) | 0.7.5 | Tiny ‘shelve’-like database with concurrency support / MIT |
| [pillow](https://pillow.readthedocs.io) | 9.0.1 | Pillow is the friendly PIL fork by Alex Clark and Contributors / LicenseRef-PIL |
| [pip](https://pip.pypa.io/en/stable/) | 21.2.4 | PyPA recommended tool for installing Python packages / MIT |
| [pkginfo](https://code.launchpad.net/~tseaver/pkginfo/trunk) | 1.8.2 | Query metadatdata from sdists / bdists / installed packages. / MIT |
| [plotly](https://plot.ly/python/) | 5.6.0 | An interactive JavaScript-based visualization library for Python / MIT |
| [pluggy](https://github.com/pytest-dev/pluggy) | 1.0.0 | Plugin registration and hook calling for Python / MIT |
| [poyo](https://github.com/hackebrot/poyo) | 0.5.0 | A lightweight YAML Parser for Python / MIT |
| [prometheus\_client](https://github.com/prometheus/client_python) | 0.13.1 | Python client for the Prometheus monitoring system / Apache-2.0 |
| [prompt-toolkit](https://github.com/jonathanslenders/python-prompt-toolkit) | 3.0.20 | Library for building powerful interactive command lines in Python / BSD-3-Clause |
| [prompt\_toolkit](https://github.com/jonathanslenders/python-prompt-toolkit) | 3.0.20 | Library for building powerful interactive command lines in Python / BSD-3-Clause |
| [protego](https://github.com/scrapy/protego) | 0.1.16 | A pure-Python robots.txt parser with support for modern conventions / BSD 3-Clauses |
| [protobuf](https://developers.google.com/protocol-buffers/) | 3.19.1 | Protocol Buffers - Google’s data interchange format. / BSD-3-Clause |
| [psutil](https://github.com/giampaolo/psutil) | 5.8.0 | A cross-platform process and system utilities module for Python / BSD-3-Clause |
| [ptyprocess](https://github.com/pexpect/ptyprocess) | 0.7.0 | Run a subprocess in a pseudo terminal / ISC |
| [pure\_eval](https://github.com/alexmojaki/pure_eval) | 0.2.2 | Safely evaluate AST nodes without side effects / MIT |
| [py](https://github.com/pytest-dev/py) | 1.11.0 | library with cross-python path, ini-parsing, io, code, log facilities / MIT |
| [py-lief](https://lief.quarkslab.com/) | 0.11.5 | A cross platform library to parse, modify and abstract ELF, PE and MachO formats. / Apache-2.0 |
| [pyasn1](https://github.com/etingof/pyasn1) | 0.4.8 | ASN.1 types and codecs / BSD 2-Clause |
| [pyasn1-modules](http://pyasn1.sourceforge.net/) | 0.2.8 | A collection of ASN.1-based protocols modules. / BSD 2-Clause |
| [pycodestyle](https://pycodestyle.readthedocs.io/) | 2.7.0 | Python style guide checker / MIT |
| [pycosat](https://github.com/ContinuumIO/pycosat) | 0.6.3 | Bindings to picosat (a SAT solver) / MIT |
| [pycparser](https://github.com/eliben/pycparser) | 2.21 | Complete C99 parser in pure Python / BSD-3-clause |
| [pyct](http://github.com/pyviz/pyct) | 0.4.6 | python package common tasks for users (e.g. copy examples, fetch data, …) / BSD 3-Clause |
| [pycurl](http://pycurl.sourceforge.net/) | 7.44.1 | A Python Interface To The cURL library / LGPL, MIT |
| [pydispatcher](http://pydispatcher.sourceforge.net) | 2.0.5 | Multi-producer-multi-consumer signal dispatching mechanism / BSD 3-Clause |
| [pydocstyle](https://github.com/PyCQA/pydocstyle) | 6.1.1 | Python docstring style checker (formerly pep257) / MIT |
| [pyerfa](https://pyerfa.readthedocs.io/) | 2.0.0 | Python bindings for ERFA routines / BSD-3-Clause |
| [pyflakes](https://github.com/PyCQA/pyflakes) | 2.3.1 | Pyflakes analyzes programs and detects various errors. / MIT |
| [pygments](https://pygments.org/) | 2.11.2 | Pygments is a generic syntax highlighter suitable for use in code hosting, forums, wikis or other applications that need to prettify source code. / BSD-2-Clause |
| [pyhamcrest](https://github.com/hamcrest/PyHamcrest) | 2.0.2 | Hamcrest framework for matcher objects / BSD 3-Clause |
| [pylint](https://www.pylint.org) | 2.9.6 | python code static checker / GPL-2.0-or-later |
| [pyls-spyder](https://github.com/spyder-ide/pyls-spyder) | 0.4.0 | Spyder extensions for the python-lsp-server / MIT |
| [pyodbc](https://github.com/mkleehammer/pyodbc) | 4.0.32 | DB API Module for ODBC / MIT |
| [pyopenssl](https://github.com/pyca/pyopenssl) | 21.0.0 | Python wrapper module around the OpenSSL library / Apache-2.0 |
| [pyparsing](https://github.com/pyparsing/pyparsing/) | 3.0.4 | Create and execute simple grammars / MIT |
| [pyqt](http://www.riverbankcomputing.co.uk/software/pyqt) | 5.9.2 | Python binding of the cross-platform GUI toolkit Qt. / Commercial, GPL-2.0, GPL-3.0 |
| [pyrsistent](http://github.com/tobgu/pyrsistent/) | 0.18.0 | Persistent/Functional/Immutable data structures / MIT |
| [pysocks](https://github.com/Anorov/PySocks) | 1.7.1 | A Python SOCKS client module. See [Anorov/PySocks](https://github.com/Anorov/PySocks) for more information. / BSD 3-Clause |
| [pytables](https://www.pytables.org) | 3.6.1 | Brings together Python, HDF5 and NumPy to easily handle large amounts of data. / BSD-3-Clause |
| [pytest](https://docs.pytest.org/en/latest/) | 7.1.1 | Simple and powerful testing with Python. / MIT |
| [python](https://www.python.org/) | 3.9.12 | General purpose programming language / PSF-2.0 |
| [python-dateutil](https://dateutil.readthedocs.org/) | 2.8.2 | Extensions to the standard Python datetime module. / BSD-3-Clause and Apache |
| [python-fastjsonschema](https://github.com/horejsek/python-fastjsonschema) | 2.15.1 | Fastest Python implementation of JSON schema / BSD-3-Clause |
| [python-libarchive-c](https://github.com/Changaco/python-libarchive-c) | 2.9 | Python interface to libarchive / CC0-1.0 |
| [python-lsp-black](https://github.com/python-lsp/python-lsp-black) | 1.0.0 | Black plugin for the Python LSP Server / MIT |
| [python-lsp-jsonrpc](https://github.com/python-lsp/python-lsp-jsonrpc) | 1.0.0 | A Python 3.6+ server implementation of the JSON RPC 2.0 protocol. / MIT |
| [python-lsp-server](https://github.com/python-lsp/python-lsp-server) | 1.2.4 | An implementation of the Language Server Protocol for Python / MIT |
| [python-slugify](https://github.com/un33k/python-slugify) | 5.0.2 | A Python Slugify application that handles Unicode / MIT |
| [python-snappy](https://github.com/andrix/python-snappy) | 0.6.0 | Python library for the snappy compression library from Google / BSD-3-Clause |
| [python.app](https://www.python.org/) | 3 | Proxy on macOS letting Python libraries hook into the GUI event loop / BSD-3-Clause |
| [pytz](http://pythonhosted.org/pytz/) | 2021.3 | World timezone definitions, modern and historical. / MIT |
| [pyviz\_comms](https://www.holoviz.org) | 2.0.2 | Bidirectional communication for PyViz / BSD-3-Clause |
| [pywavelets](https://github.com/PyWavelets/pywt) | 1.3.0 | Discrete Wavelet Transforms in Python / MIT |
| [pyyaml](http://pyyaml.org/wiki/PyYAML) | 6.0 | YAML parser and emitter for Python / MIT |
| [pyzmq](https://github.com/zeromq/pyzmq) | 22.3.0 | Python bindings for zeromq / BSD-3-clause |
| [qdarkstyle](https://github.com/ColinDuquesnoy/QDarkStyleSheet) | 3.0.2 | A dark stylesheet for Qt applications (Qt4, Qt5, PySide, PyQt4, PyQt5, QtPy, PyQtGraph). / MIT |
| [qstylizer](https://github.com/blambright/qstylizer) | 0.1.10 | Qt stylesheet generation utility for PyQt/PySide / MIT |
| [qt](http://qt.io) | 5.9.7 | Qt is a cross-platform application and UI framework. / LGPL-3.0-only |
| [qtawesome](https://github.com/spyder-ide/qtawesome) | 1.0.3 | Iconic fonts in PyQt and PySide applications / MIT |
| [qtconsole](http://jupyter.org) | 5.3.0 | Jupyter Qt Console / BSD-3-Clause |
| [qtpy](https://github.com/spyder-ide/qtpy) | 2.0.1 | Abstraction layer for PyQt5/PyQt4/PySide / MIT |
| [queuelib](https://github.com/scrapy/queuelib) | 1.5.0 | Collection of persistent (disk-based) queues / BSD |
| [readline](https://tiswww.case.edu/php/chet/readline/rltop.html) | 8.1.2 | library for editing command lines as they are typed in / GPL-3.0-only |
| [regex](https://github.com/mrabarnett/mrab-regex) | 2022.3.15 | Alternative regular expression module, to replace re / Apache-2.0 |
| [requests](http://python-requests.org) | 2.27.1 | Requests is an elegant and simple HTTP library for Python, built with ♥. / Apache-2.0 |
| [requests-file](http://github.com/dashea/requests-file) | 1.5.1 | file transport adapter for Requests / Apache |
| ripgrep | 12.1.1 | |
| [rope](https://github.com/python-rope/rope) | 0.22.0 | A python refactoring library / LGPL-3.0-or-later |
| [rsa](https://stuvel.eu/rsa) | 4.7.2 | Pure-Python RSA implementation / Apache-2.0 |
| [rtree](http://toblerity.github.com/rtree/) | 0.9.7 | R-Tree spatial index for Python GIS / MIT |
| [ruamel\_yaml](https://sourceforge.net/p/ruamel-yaml/code/ci/default/tree) | 0.15.100 | A patched copy of ruamel.yaml. / MIT |
| [s3transfer](https://github.com/boto/s3transfer) | 0.5.0 | An Amazon S3 Transfer Manager / Apache-2.0 |
| [scikit-image](https://scikit-image.org/) | 0.19.2 | Image processing in Python. / BSD-3-Clause |
| [scikit-learn](http://scikit-learn.org/) | 1.0.2 | A set of python modules for machine learning and data mining / BSD-3-Clause |
| [scikit-learn-intelex](https://intel.github.io/scikit-learn-intelex) | 2021.5.0 | Intel(R) Extension for Scikit-learn is a seamless way to speed up your Scikit-learn application. / Apache-2.0 |
| [scipy](http://www.scipy.org/) | 1.7.3 | Scientific Library for Python / BSD 3-Clause |
| [scrapy](https://scrapy.org/) | 2.6.1 | A high-level Python Screen Scraping framework / BSD-3-Clause-Clear |
| [seaborn](https://seaborn.pydata.org) | 0.11.2 | Statistical data visualization / BSD 3-Clause |
| [send2trash](https://github.com/arsenetar/send2trash) | 1.8.0 | Python library to natively send files to Trash (or Recycle bin) on all platforms. / BSD-3-Clause |
| [service\_identity](https://github.com/pyca/service_identity) | 18.1.0 | Service identity verification for pyOpenSSL. / MIT |
| [setuptools](https://github.com/pypa/setuptools) | 61.2.0 | Download, build, install, upgrade, and uninstall Python packages / MIT |
| [sip](https://www.riverbankcomputing.com/software/sip/) | 4.19.13 | A Python bindings generator for C/C++ libraries / GPL-3.0-only |
| [six](https://six.readthedocs.io/) | 1.16.0 | Python 2 and 3 compatibility utilities / MIT |
| [smart\_open](https://github.com/RaRe-Technologies/smart_open) | 5.1.0 | Python library for efficient streaming of large files / MIT |
| [snappy](https://github.com/google/snappy) | 1.1.9 | A fast compressor/decompressor / BSD-3-clause AND CC-BY-3.0 AND MIT AND CC-BY AND Public Domain |
| [sniffio](https://github.com/python-trio/sniffio) | 1.2.0 | Sniff out which async library your code is running under / Apache-2.0 |
| [snowballstemmer](https://github.com/snowballstem/snowball) | 2.2.0 | Snowball stemming library collection for Python / BSD-3-Clause |
| [sortedcollections](http://www.grantjenks.com/docs/sortedcollections/) | 2.1.0 | Python Sorted Collections / Apache-2.0 |
| [sortedcontainers](http://www.grantjenks.com/docs/sortedcontainers/) | 2.4.0 | Python Sorted Container Types: SortedList, SortedDict, and SortedSet / Apache-2.0 |
| [soupsieve](http://facelessuser.github.io/soupsieve) | 2.3.1 | A modern CSS selector implementation for BeautifulSoup / MIT |
| [sphinx](https://www.sphinx-doc.org) | 4.4.0 | Sphinx is a tool that makes it easy to create intelligent and beautiful documentation / BSD-2-Clause |
| [sphinxcontrib-applehelp](https://www.sphinx-doc.org/en/master/) | 1.0.2 | sphinxcontrib-applehelp is a sphinx extension which outputs Apple help books / BSD-2-Clause |
| [sphinxcontrib-devhelp](https://www.sphinx-doc.org/en/master/) | 1.0.2 | sphinxcontrib-devhelp is a sphinx extension which outputs Devhelp document / BSD-2-Clause |
| [sphinxcontrib-htmlhelp](https://www.sphinx-doc.org/en/master/) | 2.0.0 | sphinxcontrib-htmlhelp is a sphinx extension which renders HTML help files. / BSD-2-Clause |
| [sphinxcontrib-jsmath](https://www.sphinx-doc.org/en/master/) | 1.0.1 | A sphinx extension which renders display math in HTML via JavaScript / BSD-2-Clause |
| [sphinxcontrib-qthelp](https://www.sphinx-doc.org/en/master/) | 1.0.3 | sphinxcontrib-qthelp is a sphinx extension which outputs QtHelp document / BSD-2-Clause |
| [sphinxcontrib-serializinghtml](https://www.sphinx-doc.org/en/master/) | 1.1.5 | sphinxcontrib-serializinghtml is a sphinx extension which outputs “serialized” HTML files (json and pickle). / BSD-2-Clause |
| [spyder](https://www.spyder-ide.org/) | 5.1.5 | The Scientific Python Development Environment / MIT |
| [spyder-kernels](https://www.spyder-ide.org/) | 2.1.3 | Jupyter kernels for Spyder’s console / MIT |
| [sqlalchemy](https://www.sqlalchemy.org/) | 1.4.32 | Database Abstraction Library. / MIT |
| [sqlite](https://www.sqlite.org/) | 3.38.2 | Implements a self-contained, zero-configuration, SQL database engine / blessing |
| [stack\_data](https://github.com/alexmojaki/stack_data) | 0.2.0 | Extract data from python stack frames and tracebacks for informative displays / MIT |
| [statsmodels](https://www.statsmodels.org) | 0.13.2 | Statistical computations and models for use with SciPy / BSD-3-Clause |
| [sympy](https://sympy.org) | 1.10.1 | Python library for symbolic mathematics / BSD-3-Clause AND MIT |
| [tabulate](https://bitbucket.org/astanin/python-tabulate) | 0.8.9 | Pretty-print tabular data in Python, a library and a command-line utility. / MIT |
| [tbb](https://github.com/oneapi-src/oneTBB) | 2021.5.0 | High level abstract threading library / Apache-2.0 |
| tbb4py | 2021.5.0 | TBB module for Python / Apache 2.0 |
| [tblib](https://github.com/ionelmc/python-tblib) | 1.7.0 | Traceback serialization library. / BSD 2-Clause |
| [tenacity](http://github.com/jd/tenacity) | 8.0.1 | Retry a flaky function whenever an exception occurs until it works / Apache-2.0 |
| [terminado](https://github.com/jupyter/terminado) | 0.13.1 | Terminals served by tornado websockets / BSD-2-Clause |
| [testpath](https://testpath.readthedocs.io) | 0.5.0 | Testpath is a collection of utilities for Python code working with files and commands. / BSD-3-Clause |
| [text-unidecode](https://github.com/kmike/text-unidecode/) | 1.3 | The most basic Text::Unidecode port / Artistic |
| [textdistance](https://github.com/orsinium/textdistance) | 4.2.1 | TextDistance – python library for comparing distance between two or more sequences by many algorithms. / MIT |
| [threadpoolctl](https://github.com/joblib/threadpoolctl) | 2.2.0 | Python helpers to control the threadpools of native libraries / BSD 3-Clause |
| [three-merge](https://github.com/spyder-ide/three-merge) | 0.1.1 | Simple Python library to perform a 3-way merge between strings / MIT |
| [tifffile](https://github.com/cgohlke/tifffile) | 2021.7.2 | Read and write image data from and to TIFF files. / BSD-3-Clause |
| [tinycss](http://tinycss.readthedocs.io/) | 0.4 | Tinycss is a complete yet simple CSS parser for Python. / BSD-3-Clause |
| [tk](http://www.tcl.tk/) | 8.6.11 | A dynamic programming language with GUI support. Bundles Tcl and Tk. / Tcl/Tk |
| [tldextract](https://github.com/john-kurkowski/tldextract) | 3.2.0 | Accurately separate the TLD from the registered domain andsubdomains of a URL, using the Public Suffix List. / BSD-3-Clause |
| [toml](https://github.com/uiri/toml) | 0.10.2 | Python lib for TOML. / MIT |
| [tomli](https://github.com/hukkin/tomli) | 1.2.2 | A simple TOML parser / MIT |
| [toolz](http://toolz.readthedocs.org/) | 0.11.2 | List processing tools and functional utilities / BSD-3-Clause |
| [tornado](http://www.tornadoweb.org/) | 6.1 | A Python web framework and asynchronous networking library, originally developed at FriendFeed. / Apache-2.0 |
| [tqdm](https://pypi.python.org/pypi/tqdm) | 4.64.0 | A Fast, Extensible Progress Meter / MPL-2.0 AND MIT |
| [traitlets](http://traitlets.readthedocs.org/) | 5.1.1 | Configuration system for Python applications / BSD-3-Clause |
| [twisted](https://twistedmatrix.com/) | 22.2.0 | An asynchronous networking framework written in Python / MIT |
| [typed-ast](https://github.com/python/typed_ast) | 1.4.3 | a fork of Python 2 and 3 ast modules with type comment support / Apache-2.0 AND PSF-2.0 AND MIT |
| [typing-extensions](https://github.com/python/typing/tree/master/typing_extensions) | 4.1.1 | Backported and Experimental Type Hints for Python / PSF-2.0 |
| [typing\_extensions](https://github.com/python/typing/tree/master/typing_extensions) | 4.1.1 | Backported and Experimental Type Hints for Python / PSF-2.0 |
| [tzdata](https://www.iana.org/time-zones) | 2022a | The Time Zone Database (called tz, tzdb or zoneinfo) / Public-Domain AND BSD-3-clause |
| [ujson](https://github.com/ultrajson/ultrajson) | 5.1.0 | Ultra fast JSON decoder and encoder written in C with Python bindings / BSD-3-Clause |
| [unidecode](https://pypi.python.org/pypi/Unidecode) | 1.2.0 | ASCII transliterations of Unicode text / GPL-2.0-or-later |
| [unixodbc](http://www.unixodbc.org/) | 2.3.9 | ODBC on non MS Windows platforms / LGPL-2.1 |
| [urllib3](https://urllib3.readthedocs.io/) | 1.26.9 | HTTP library with thread-safe connection pooling, file post, and more. / MIT |
| [w3lib](https://github.com/scrapy/w3lib) | 1.21.0 | Library of web-related functions / BSD |
| [watchdog](http://github.com/gorakhargosh/watchdog) | 2.1.6 | Filesystem events monitoring / Apache-2.0 |
| [wcwidth](https://github.com/jquast/wcwidth) | 0.2.5 | Measures number of Terminal column cells of wide-character codes. / MIT |
| [webencodings](https://github.com/gsnedders/python-webencodings) | 0.5.1 | Character encoding aliases for legacy web content / BSD 3-Clause |
| [websocket-client](https://github.com/liris/websocket-client) | 0.58.0 | WebSocket client for python. hybi13 is supported. / BSD-3-Clause |
| [werkzeug](https://palletsprojects.com/p/werkzeug/) | 2.0.3 | The comprehensive WSGI web application library. / BSD-3-Clause |
| [wget](https://www.gnu.org/software/wget/) | 1.21.3 | utility for non-interactive download of files from the Web / GPL-3.0-or-later |
| [wheel](https://github.com/pypa/wheel) | 0.37.1 | A built-package format for Python. / MIT |
| [widgetsnbextension](http://ipython.org) | 3.5.2 | Interactive Widgets for Jupyter / BSD-3-Clause |
| [wrapt](https://github.com/GrahamDumpleton/wrapt) | 1.12.1 | Module for decorators, wrappers and monkey patching / BSD-2-Clause |
| [wurlitzer](https://github.com/minrk/wurlitzer) | 3.0.2 | Capture C-level stdout/stderr in Python / MIT |
| [xarray](https://github.com/pydata/xarray) | 0.20.1 | N-D labeled arrays and datasets in Python. / Apache-2.0 |
| [xlrd](http://www.python-excel.org/) | 2.0.1 | Library for developers to extract data from Microsoft Excel (tm) spreadsheet files / BSD 3-Clause and BSD with advertising |
| [xlsxwriter](https://xlsxwriter.readthedocs.io/) | 3.0.3 | A Python module for creating Excel XLSX files / BSD-2-Clause |
| [xlwings](http://xlwings.org/) | 0.24.9 | Interact with Excel from Python and vice versa / BSD-3-clause |
| [xz](http://tukaani.org/xz/) | 5.2.5 | Data compression software with high compression ratio / LGPL-2.1 and GPL-2.0 |
| [yaml](http://pyyaml.org/wiki/LibYAML) | 0.2.5 | A C library for parsing and emitting YAML / MIT |
| [yapf](https://github.com/google/yapf) | 0.31.0 | A formatter for Python files / Apache 2.0 |
| [yarl](https://github.com/aio-libs/yarl) | 1.6.3 | Yet another URL library / Apache 2.0 |
| [zeromq](http://zeromq.org) | 4.3.4 | A high-performance asynchronous messaging library. / LGPL-3.0-or-later |
| [zfp](https://computation.llnl.gov/projects/floating-point-compression) | 0.5.5 | Library for compressed numerical arrays that support high throughput read and write random access / BSD-3-Clause |
| [zict](http://github.com/mrocklin/zict) | 2.0.0 | Composable Dictionary Classes / BSD 3-Clause |
| [zipp](https://github.com/jaraco/zipp) | 3.7.0 | A pathlib-compatible Zipfile object wrapper / MIT |
| [zlib](http://zlib.net/) | 1.2.12 | Massively spiffy yet delicately unobtrusive compression library / Zlib |
| zope | 1.0 | web application server / BSD |
| [zope.interface](https://github.com/zopefoundation/zope.interface) | 5.4.0 | Interfaces for Python / ZPL-2.1 |
| [zstd](https://www.zstd.net) | 1.4.9 | Zstandard - Fast real-time compression algorithm / BSD-3-Clause AND GPL-2.0-or-later |
| Name | Version | Summary / License |
|---|---|---|
| [\_libgcc\_mutex](https://github.com/AnacondaRecipes/_libgcc_mutex-feedstock) | 0.1 | Mutex for libgcc and libgcc-ng / None |
| [\_openmp\_mutex](https://github.com/conda-forge/ctng-compilers-feedstock) | 4.5 | OpenMP Implementation Mutex / BSD-3-Clause |
| [alabaster](http://www.sphinx-doc.org/en/stable/index.html) | 0.7.12 | Configurable, Python 2+3 compatible Sphinx theme. / BSD 3-Clause |
| [anaconda-client](https://github.com/Anaconda-Platform/anaconda-client) | 1.9.0 | Anaconda Cloud command line client library / BSD 3-Clause |
| [anaconda-project](https://github.com/Anaconda-Platform/anaconda-project) | 0.10.2 | Tool for encapsulating, running, and reproducing data science projects / BSD-3-Clause |
| [anyio](https://github.com/agronholm/anyio) | 2.0.2 | High level compatibility layer for multiple asynchronous event loop implementations on Python / MIT |
| [appdirs](http://github.com/ActiveState/appdirs) | 1.4.4 | A small Python module for determining appropriate platform-specific dirs. / MIT |
| [argon2-cffi](https://argon2-cffi.readthedocs.org/) | 21.3.0 | The secure Argon2 password hashing algorithm. / MIT |
| [argon2-cffi-bindings](https://github.com/hynek/argon2-cffi-bindings) | 21.2.0 | Low-level Python CFFI Bindings for Argon2 / MIT |
| [astroid](https://www.astroid.org/) | 2.9.0 | A abstract syntax tree for Python with inference support. / LGPL-2.1-or-later |
| [astropy](https://www.astropy.org/) | 5.0.4 | Community-developed Python Library for Astronomy / BSD-3-Clause |
| [asttokens](https://github.com/gristlabs/asttokens) | 2.0.5 | The asttokens module annotates Python abstract syntax trees (ASTs) with the positions of tokens and text in the source code that generated them. / Apache-2.0 |
| [attrs](https://attrs.readthedocs.io/en/stable/) | 21.4.0 | attrs is the Python package that will bring back the joy of writing classes by relieving you from the drudgery of implementing object protocols (aka dunder methods). / MIT |
| [babel](http://babel.pocoo.org/) | 2.9.1 | Utilities to internationalize and localize Python applications / BSD 3-clause |
| [backcall](https://github.com/takluyver/backcall/) | 0.2.0 | Specifications for callback functions passed in to an API / BSD-3-Clause |
| [backports](https://github.com/brandon-rhodes/backports) | 1.1 | Namespace for backported Python features. / MIT |
| [backports.functools\_lru\_cache](https://github.com/jaraco/backports.functools_lru_cache) | 1.6.4 | Backport of functools.lru\_cache from Python 3.3 as published at ActiveState. / MIT |
| [backports.tempfile](https://github.com/pjdelport/backports.tempfile) | 1.0 | Backports of new features in Python’s tempfile module / PSF 2 |
| [backports.weakref](https://github.com/pjdelport/backports.weakref) | 1.0.post1 | Backport of new features in Python’s weakref module / Python-2.0 |
| [beautifulsoup4](https://www.crummy.com/software/BeautifulSoup/) | 4.11.1 | Python library designed for screen-scraping / MIT |
| [bitarray](https://github.com/ilanschnell/bitarray) | 2.4.1 | efficient arrays of booleans – C extension / PSF-2.0 |
| [bkcharts](http://github.com/bokeh/bkcharts) | 0.2 | High level chart types built on top of Bokeh / BSD 3-Clause |
| [blas](http://www.netlib.org/lapack) | 1.0 | Linear Algebra PACKage / BSD-3-Clause |
| [bleach](https://github.com/mozilla/bleach) | 4.1.0 | Easy, whitelist-based HTML-sanitizing tool / Apache-2.0 |
| [blosc](https://github.com/Blosc/c-blosc) | 1.21.0 | A blocking, shuffling and loss-less compression library that can be faster than memcpy() / BSD-3-Clause |
| [bokeh](http://bokeh.pydata.org/) | 2.4.2 | Statistical and novel interactive HTML plots for Python / BSD-3-Clause |
| [boto3](https://aws.amazon.com/sdk-for-python) | 1.21.32 | Amazon Web Services SDK for Python / Apache-2.0 |
| [botocore](https://aws.amazon.com/sdk-for-python/) | 1.24.32 | Low-level, data-driven core of boto 3. / Apache-2.0 |
| [bottleneck](https://github.com/pydata/bottleneck) | 1.3.4 | Fast NumPy array functions written in Cython. / BSD-2-Clause |
| [brotli](http://github.com/google/brotli) | 1.0.9 | Brotli compression format / MIT |
| [brotlipy](https://github.com/python-hyper/brotlipy) | 0.7.0 | Python bindings to the Brotli compression library / MIT |
| [bzip2](http://www.bzip.org/) | 1.0.8 | high-quality data compressor / bzip2 |
| [c-ares](https://c-ares.org/) | 1.18.1 | This is c-ares, an asynchronous resolver library / MIT |
| [ca-certificates](https://curl.se/docs/caextract.html) | 2022.3.29 | Certificates for use with other packages. / MPL-2.0 |
| [certifi](http://certifi.io/) | 2021.10.8 | Python package for providing Mozilla’s CA Bundle. / ISC |
| [cffi](http://cffi.readthedocs.org/) | 1.15.0 | Foreign Function Interface for Python calling C code. / MIT |
| [chardet](https://github.com/chardet/chardet) | 4.0.0 | Universal character encoding detector / LGPL2 |
| [charset-normalizer](https://github.com/ousret/charset_normalizer) | 2.0.4 | The Real First Universal Charset Detector. Open, modern and actively maintained alternative to Chardet. / MIT |
| [click](https://palletsprojects.com/p/click) | 8.0.4 | Python composable command line interface toolkit / BSD-3-Clause |
| [cloudpickle](https://github.com/cloudpipe/cloudpickle) | 2.0.0 | Extended pickling support for Python objects / BSD-3-Clause |
| [clyent](https://github.com/Anaconda-Platform/clyent) | 1.2.2 | Command line client library for windows and posix / BSD 3-Clause |
| [colorama](https://github.com/tartley/colorama) | 0.4.4 | Cross-platform colored terminal text / BSD-3-Clause |
| [colorcet](http://github.com/pyviz/colorcet) | 2.0.6 | Collection of perceptually uniform colormaps / CC-BY-4.0 |
| [conda](https://conda.io) | 4.12.0 | OS-agnostic, system-level binary package and environment manager. / BSD-3-Clause |
| [conda-build](https://github.com/conda/conda-build) | 3.21.8 | tools for building conda packages / BSD-3-Clause |
| [conda-content-trust](https://github.com/conda/conda-content-trust) | 0.1.1 | Signing and verification tools for conda / BSD-3-Clause |
| [conda-env](https://github.com/conda/conda-env) | 2.6.0 | Tools for interacting with conda environments. / BSD 3-Clause |
| [conda-token](https://github.com/Anaconda/conda-token) | 0.3.0 | Set repository access token / BSD-3-Clause |
| [conda-verify](https://github.com/conda/conda-verify) | 3.4.2 | tool for validating conda recipes and conda packages / BSD 3-Clause |
| [cryptography](https://github.com/pyca/cryptography) | 3.4.7 | Provides cryptographic recipes and primitives to Python developers / Apache-2.0 AND BSD-3-Clause AND PSF-2.0 AND MIT |
| [curl](https://curl.haxx.se/) | 7.82.0 | tool and library for transferring data with URL syntax / curl |
| [cycler](http://matplotlib.org/cycler) | 0.11.0 | Composable style cycles. / BSD-3-Clause |
| [cython](https://cython.org/) | 0.29.28 | The Cython compiler for writing C extensions for the Python language / Apache-2.0 |
| [cytoolz](https://github.com/pytoolz/cytoolz) | 0.11.0 | Cython implementation of Toolz. High performance functional utilities / BSD-3-Clause |
| [dask](https://dask.org/) | 2022.2.1 | Parallel PyData with Task Scheduling / BSD-3-Clause |
| [dask-core](https://github.com/dask/dask/) | 2022.2.1 | Parallel Python with task scheduling / BSD-3-Clause |
| [dataclasses](https://github.com/ericvsmith/dataclasses) | 0.8 | An implementation of PEP 557: Data Classes / Apache-2.0 |
| [dbus](http://www.freedesktop.org/wiki/Software/dbus/) | 1.13.18 | Simple message bus system for applications to talk to one another / GPL2 |
| [debugpy](https://github.com/Microsoft/debugpy) | 1.5.1 | An implementation of the Debug Adapter Protocol for Python / MIT |
| [decorator](https://github.com/micheles/decorator) | 5.1.1 | Better living through Python with decorators. / BSD-2-Clause |
| [defusedxml](https://bitbucket.org/tiran/defusedxml) | 0.7.1 | XML bomb protection for Python stdlib modules / PSF 2.0 |
| [distributed](https://distributed.readthedocs.io/en/latest/) | 2022.2.1 | Distributed computing with Dask / BSD-3-Clause |
| [docutils](http://docutils.sourceforge.net/) | 0.17 | Docutils – Python Documentation Utilities / LicenseRef-Public-Domain-Dedictation and BSD-2-Clause and LicenseRef-PSF-2.1.1 and GPL-3.0-or-later |
| [entrypoints](https://github.com/takluyver/entrypoints) | 0.4 | Discover and load entry points from installed packages. / MIT License |
| [et\_xmlfile](https://foss.heptapod.net/openpyxl/et_xmlfile) | 1.1.0 | An implementation of lxml.xmlfile for the standard library / MIT AND PSF-2.0 |
| [executing](https://pypi.org/project/executing) | 0.8.3 | Get the currently executing AST node of a frame, and other information / MIT |
| [expat](https://libexpat.github.io) | 2.4.4 | Expat XML parser library in C / MIT |
| [filelock](https://github.com/tox-dev/py-filelock) | 3.6.0 | A platform independent file lock. / Unlicense |
| [flask](https://flask.pocoo.org) | 1.1.2 | A microframework based on Werkzeug, Jinja2 and good intentions. / BSD 3-Clause |
| [fontconfig](http://www.freedesktop.org/wiki/Software/fontconfig/) | 2.13.1 | A library for configuring and customizing font access. / MIT |
| [fonttools](https://github.com/fonttools/fonttools) | 4.25.0 | fontTools is a library for manipulating fonts, written in Python. / MIT |
| [freetype](https://www.freetype.org/) | 2.11.0 | A Free, High-Quality, and Portable Font Engine / GPL-2.0-only and LicenseRef-FreeType |
| [fsspec](https://github.com/martindurant/filesystem_spec) | 2022.2.0 | A specification for pythonic filesystems / BSD-3-Clause |
| [future](http://python-future.org) | 0.18.2 | Clean single-source support for Python 3 and 2 / MIT |
| [giflib](http://giflib.sourceforge.net) | 5.2.1 | Library for reading and writing gif images / MIT |
| [glib](https://developer.gnome.org/glib/) | 2.69.1 | Provides core application building blocks for libraries and applications written in C. / LGPL-2.1-or-later |
| [glob2](https://github.com/miracle2k/python-glob2) | 0.7 | Version of the glob module that supports recursion via \*\*, and can capture patterns. / BSD-2-Clause |
| [gmp](http://gmplib.org/) | 6.2.1 | The GNU multiprecision library. / GPL-2.0-or-later AND LGPL-3.0-or-later |
| [gmpy2](https://pypi.python.org/pypi/gmpy2) | 2.1.2 | GMP/MPIR, MPFR, and MPC interface to Python 2.6+ and 3.x / LGPL-3.0-or-later |
| [greenlet](https://github.com/python-greenlet/greenlet) | 1.1.1 | Lightweight in-process concurrent programming / MIT |
| [h5py](http://www.h5py.org/) | 3.6.0 | Read and write HDF5 files from Python / BSD-3-Clause |
| [hdf5](http://www.hdfgroup.org/HDF5/) | 1.10.6 | HDF5 is a data model, library, and file format for storing and managing data / HDF5 |
| [heapdict](http://stutzbachenterprises.com/) | 1.0.1 | A heap with decrease-key and increase-key operations / BSD 3-Clause |
| [holoviews](https://holoviews.org) | 1.14.8 | Stop plotting your data - annotate your data and let it visualize itself. / BSD-3-Clause |
| [hvplot](https://hvplot.holoviz.org/) | 0.7.3 | A high-level plotting API for the PyData ecosystem built on HoloViews / BSD-3-Clause |
| [icu](http://site.icu-project.org/) | 68.1 | International Components for Unicode. / MIT |
| [idna](https://github.com/kjd/idna) | 3.3 | Internationalized Domain Names in Applications (IDNA). / BSD-3-Clause |
| [imagecodecs](https://www.lfd.uci.edu/~gohlke/) | 2021.1.11 | Image transformation, compression, and decompression codecs / BSD-3-Clause |
| [imageio](https://imageio.github.io) | 2.9.0 | A Python library for reading and writing image data / BSD-2-Clause |
| [imagesize](https://github.com/shibukawa/imagesize_py) | 1.3.0 | Getting image size from png/jpeg/jpeg2000/gif file / MIT |
| [importlib-metadata](https://github.com/python/importlib_metadata) | 4.11.3 | A library to access the metadata for a Python package. / Apache-2.0 |
| [iniconfig](http://github.com/RonnyPfannschmidt/iniconfig) | 1.1.1 | iniconfig: brain-dead simple config-ini parsing / MIT |
| [intake](https://github.com/ContinuumIO/intake) | 0.6.2 | Data load and catalog system / BSD-2-Clause |
| [ipykernel](https://ipython.org) | 6.9.1 | IPython Kernel for Jupyter / BSD-3-Clause |
| [ipython](https://ipython.org) | 8.2.0 | IPython: Productive Interactive Computing / BSD-3-Clause |
| [ipython\_genutils](http://ipython.org) | 0.2.0 | vestigial utilities from IPython / BSD 3-Clause |
| [ipywidgets](https://github.com/ipython/ipywidgets) | 7.6.5 | Jupyter Interactive Widgets / BSD-3-Clause |
| [isort](https://github.com/timothycrosley/isort) | 5.9.3 | A Python utility / library to sort Python imports. / MIT |
| [itsdangerous](https://github.com/pallets/itsdangerous) | 2.0.1 | Various helpers to pass trusted data to untrusted environments. / BSD-3-Clause |
| [jdcal](https://github.com/phn/jdcal) | 1.4.1 | Julian dates from proleptic Gregorian and Julian calendars. / BSD 2-Clause |
| [jedi](https://github.com/davidhalter/jedi/) | 0.18.1 | An autocompletion tool for Python that can be used for text editors. / MIT |
| [jinja2](https://jinja.pocoo.org) | 2.11.3 | An easy to use stand-alone template engine written in pure python. / BSD-3-Clause |
| [jmespath](http://jmespath.org/) | 0.10.0 | Query language for JSON / MIT |
| [joblib](https://joblib.readthedocs.io/en/latest/) | 1.1.0 | Lightweight pipelining: using Python functions as pipeline jobs. / BSD-3-Clause |
| [jpeg](https://www.ijg.org/) | 9e | read/write jpeg COM, EXIF, IPTC medata / IJG |
| [json5](https://github.com/dpranke/pyjson5) | 0.9.6 | A Python implementation of the JSON5 data format / Apache-2.0 |
| [jsonschema](https://github.com/Julian/jsonschema) | 4.4.0 | An implementation of JSON Schema validation for Python / MIT |
| [jupyter](http://jupyter.org) | 1.0.0 | Jupyter metapackage. Install all the Jupyter components in one go. / BSD 3-Clause |
| [jupyter\_client](https://jupyter.org) | 7.2.2 | jupyter\_client contains the reference implementation of the Jupyter protocol. / BSD-3-Clause |
| [jupyter\_console](https://jupyter.org) | 6.4.3 | Jupyter terminal console / BSD-3-Clause |
| [jupyter\_core](https://jupyter.org) | 4.9.2 | Core common functionality of Jupyter projects. / BSD-3-Clause |
| [jupyter\_server](https://jupyter.org) | 1.4.1 | Jupyter Server / BSD-3-Clause |
| [jupyterlab](https://github.com/jupyterlab/jupyterlab) | 3.3.2 | JupyterLab PRE-ALPHA / BSD-3-Clause |
| [jupyterlab\_pygments](http://github.com/JupyterLab/jupyterlab_pygments) | 0.1.2 | Pygments syntax coloring scheme making use of the JupyterLab CSS variables / BSD-3-Clause |
| [jupyterlab\_server](https://github.com/jupyterlab/jupyterlab_server) | 2.10.3 | A set of server components for JupyterLab and JupyterLab like applications. / BSD-3-Clause |
| [jupyterlab\_widgets](https://github.com/jupyter-widgets/ipywidgets) | 1.0.0 | JupyterLab extension providing HTML widgets / BSD-3-Clause |
| [jxrlib](https://packages.debian.org/source/sid/jxrlib) | 1.1 | jxrlib - JPEG XR Library by Microsoft, built from Debian hosted sources. / BSD-2-Clause |
| [kiwisolver](https://github.com/nucleic/kiwi) | 1.3.2 | An efficient C++ implementation of the Cassowary constraint solver / BSD-3-Clause |
| [krb5](http://web.mit.edu/kerberos/) | 1.19.2 | A network authentication protocol. / MIT |
| [lazy-object-proxy](https://github.com/ionelmc/python-lazy-object-proxy) | 1.6.0 | A fast and thorough lazy object proxy / BSD-2-Clause |
| [lcms2](http://www.littlecms.com/) | 2.12 | Open Source Color Management Engine / MIT |
| [ld\_impl\_linux-s390x](https://www.gnu.org/software/binutils/) | 2.33.1 | A set of programming tools for creating and managing binary programs, object files, libraries, profile data, and assembly source code. / GPL-3.0-only |
| [libaec](https://gitlab.dkrz.de/k202009/libaec) | 1.0.4 | Adaptive Entropy Coding library / BSD-2-Clause |
| [libarchive](http://www.libarchive.org/) | 3.4.2 | Multi-format archive and compression library / BSD-2-Clause |
| [libcurl](https://curl.haxx.se/) | 7.82.0 | tool and library for transferring data with URL syntax / curl |
| [libdeflate](https://github.com/ebiggers/libdeflate) | 1.7 | libdeflate is a library for fast, whole-buffer DEFLATE-based compression and decompression. / MIT |
| [libedit](http://thrysoee.dk/editline/) | 3.1.20210910 | Editline Library (libedit) / BSD-2-Clause |
| [libev](http://software.schmorp.de/pkg/libev.html) | 4.33 | A full-featured and high-performance event loop that is loosely modeled after libevent, but without its limitations and bugs. / BSD-2-Clause |
| [libffi](https://sourceware.org/libffi/) | 3.3 | A Portable Foreign Function Interface Library. / MIT |
| [libgcc-ng](https://gcc.gnu.org/onlinedocs/gccint/Libgcc.html) | 9.3.0 | The GCC low-level runtime library / GPL-3.0-only WITH GCC-exception-3.1 |
| [libgfortran-ng](https://gcc.gnu.org/) | 7.5.0 | The GNU Fortran Runtime Library / GPL-3.0-only WITH GCC-exception-3.1 |
| [libgfortran4](https://gcc.gnu.org/) | 7.5.0 | The GNU Fortran Runtime Library / GPL-3.0-only WITH GCC-exception-3.1 |
| [libgomp](https://gcc.gnu.org/onlinedocs/gccint/Libgcc.html) | 9.3.0 | The GCC OpenMP implementation. / GPL-3.0-only WITH GCC-exception-3.1 |
| [libidn2](https://www.gnu.org/software/libidn/#libidn2) | 2.3.0 | Library for internationalized domain names (IDNA2008) support / LGPLv2 AND LGPL-3.0-or-later AND GPL-3.0-or-later |
| [liblief](https://lief.quarkslab.com/) | 0.11.5 | A cross platform library to parse, modify and abstract ELF, PE and MachO formats. / Apache-2.0 |
| [libnghttp2](http://github.com/nghttp2/nghttp2) | 1.46.0 | This is an implementation of Hypertext Transfer Protocol version 2. / MIT |
| [libopenblas](https://www.openblas.net/) | 0.3.18 | An Optimized BLAS library / BSD-3-clause |
| [libpng](http://www.libpng.org/pub/png/libpng.html) | 1.6.37 | PNG reference library / zlib/libpng |
| [libsodium](http://libsodium.org) | 1.0.18 | A modern and easy-to-use crypto library. / ISC |
| [libssh2](https://www.libssh2.org/) | 1.10.0 | the SSH library / BSD-3-Clause |
| [libstdcxx-ng](https://gcc.gnu.org/) | 9.3.0 | The GNU C++ Runtime Library / GPL-3.0-only WITH GCC-exception-3.1 |
| [libtiff](http://www.libtiff.org/) | 4.2.0 | Support for the Tag Image File Format (TIFF). / HPND |
| [libunistring](https://www.gnu.org/software/libunistring) | 0.9.10 | This library provides functions for manipulating Unicode strings and for manipulating C strings according to the Unicode standard. / LGPL |
| [libuuid](http://sourceforge.net/projects/libuuid/) | 1.0.3 | Portable uuid C library. / BSD 3-Clause |
| [libwebp](https://developers.google.com/speed/webp/) | 1.2.2 | WebP image library / BSD-3-Clause |
| [libwebp-base](https://developers.google.com/speed/webp) | 1.2.2 | WebP image library / BSD-3-Clause |
| [libxcb](http://xcb.freedesktop.org/) | 1.14 | This is the C-language Binding (XCB) package to the X Window System protocol / MIT |
| [libxml2](http://xmlsoft.org/) | 2.9.12 | The XML C parser and toolkit of Gnome / MIT |
| [libxslt](http://xmlsoft.org/XSLT/) | 1.1.34 | The XSLT C library developed for the GNOME project / MIT |
| [libzopfli](https://github.com/google/zopfli) | 1.0.3 | A compression library programmed in C to perform very good, but slow, deflate or zlib compression. / Apache-2.0 |
| [locket](https://github.com/mwilliamson/locket.py) | 0.2.1 | File-based locks for Python for Linux and Windows / BSD 2-Clause |
| [lxml](https://lxml.de/) | 4.8.0 | Pythonic binding for the C libraries libxml2 and libxslt. / BSD-3-Clause and GPL-2.0-only and ZPL-2.0 and LicenseRef-ElementTree |
| [lz4-c](https://www.lz4.org) | 1.9.3 | Extremely Fast Compression algorithm / BSD-2-Clause |
| [lzo](http://www.oberhumer.com/opensource/lzo/) | 2.10 | LZO is a portable lossless data compression library written in ANSI C. / GPL v2+ |
| [markdown](https://pythonhosted.org/Markdown/) | 3.3.3 | Python implementation of Markdown. / BSD-3-Clause |
| [markupsafe](https://www.palletsprojects.com/p/markupsafe) | 2.0.1 | A Python module that implements the jinja2.Markup string / BSD-3-Clause |
| [matplotlib](https://matplotlib.org/) | 3.5.1 | Publication quality figures in Python / LicenseRef-PSF-based |
| [matplotlib-base](https://matplotlib.org/) | 3.5.1 | Publication quality figures in Python / LicenseRef-PSF-based |
| [matplotlib-inline](https://github.com/ipython/matplotlib-inline) | 0.1.2 | Inline Matplotlib backend for Jupyter / BSD-3-Clause |
| [mccabe](https://github.com/PyCQA/mccabe) | 0.7.0 | McCabe complexity checker for Python / MIT |
| [mistune](https://github.com/lepture/mistune) | 0.8.4 | A sane Markdown parser with useful plugins and renderers. / BSD-3-Clause |
| [mock](https://github.com/testing-cabal/mock) | 4.0.3 | A library for testing in Python / BSD-2-Clause |
| [mpc](http://www.multiprecision.org/) | 1.1.0 | A C library for the arithmetic of complex numbers with arbitrarily high precision. / LGPL 3 |
| [mpfr](http://www.mpfr.org/) | 4.0.2 | The MPFR library is a C library for multiple-precision floating-point computations with correct rounding. / LGPL-3.0-only |
| [mpmath](http://mpmath.org) | 1.2.1 | Python library for arbitrary-precision floating-point arithmetic / BSD 3-Clause |
| [msgpack-python](http://msgpack.org/) | 1.0.2 | MessagePack (de)serializer / Apache-2.0 |
| [munkres](https://github.com/bmc/munkres) | 1.1.4 | The Munkres module provides an O(n^3) implementation of the Munkres algorithm (also called the Hungarian algorithm or the Kuhn-Munkres algorithm). / Apache-2.0 |
| [nbclassic](http://github.com/jupyterlab/nbclassic) | 0.2.6 | Jupyter Notebook as a Jupyter Server Extension. / BSD-3-Clause |
| [nbclient](https://jupyter.org) | 0.5.13 | A client library for executing notebooks. Formally nbconvert’s ExecutePreprocessor. / BSD-3-Clause |
| [nbconvert](https://jupyter.org) | 6.4.4 | Converting Jupyter Notebooks / BSD-3-Clause |
| [nbformat](https://jupyter.org) | 5.3.0 | The Jupyter Notebook format / BSD-3-Clause |
| [ncurses](http://www.gnu.org/software/ncurses/) | 6.3 | Library for text-based user interfaces / Free software (MIT-like) |
| [nest-asyncio](https://github.com/erdewit/nest_asyncio) | 1.5.5 | Patch asyncio to allow nested event loops / BSD-2-Clause |
| [networkx](https://networkx.github.io/) | 2.7.1 | Python package for creating and manipulating complex networks / BSD-3-Clause |
| [nltk](https://nltk.org/) | 3.7 | Natural Language Toolkit / Apache-2.0 |
| nomkl | 3.0 | None / BSD |
| [nose](http://readthedocs.org/docs/nose/) | 1.3.7 | Nose extends unittest to make testing easier / LGPL-2.1 |
| [notebook](https://jupyter.org) | 6.4.8 | Jupyter Notebook / BSD-3-Clause |
| [numexpr](https://github.com/pydata/numexpr) | 2.8.1 | Fast numerical expression evaluator for NumPy. / MIT |
| [numpy](http://numpy.scipy.org/) | 1.21.5 | Array processing for numbers, strings, records, and objects. / BSD 3-Clause |
| [numpy-base](http://numpy.scipy.org/) | 1.21.5 | Array processing for numbers, strings, records, and objects. / BSD 3-Clause |
| [numpydoc](https://github.com/numpy/numpydoc) | 1.2 | Numpy’s Sphinx extensions / BSD-3-Clause |
| [olefile](http://www.decalage.info/python/olefileio) | 0.46 | parse, read and write Microsoft OLE2 files / BSD 2-Clause |
| [openblas](https://www.openblas.net/) | 0.3.18 | An optimized BLAS library / BSD-3-clause |
| openblas-devel | 0.3.18 | OpenBLAS headers and libraries for developing software that used OpenBLAS. / None |
| [openjpeg](http://www.openjpeg.org/) | 2.4.0 | An open-source JPEG 2000 codec written in C / BSD 2-Clause |
| [openpyxl](https://openpyxl.readthedocs.io) | 3.0.9 | A Python library to read/write Excel 2010 xlsx/xlsm files / MIT |
| [openssl](https://www.openssl.org/) | 1.1.1n | OpenSSL is an open-source implementation of the SSL and TLS protocols / OpenSSL |
| [packaging](https://github.com/pypa/packaging) | 21.3 | Core utilities for Python packages / Apache-2.0 or BSD-2-Clause |
| [pandas](https://pandas.pydata.org) | 1.4.2 | High-performance, easy-to-use data structures and data analysis tools. / BSD-3-Clause |
| [pandocfilters](https://github.com/jgm/pandocfilters) | 1.5.0 | A python module for writing pandoc filters / BSD-3-Clause |
| [panel](https://panel.holoviz.org) | 0.12.7 | A high-level app and dashboarding solution for Python / BSD-3-Clause |
| [param](http://ioam.github.io/param/) | 1.12.0 | Param: Make your Python code clearer and more reliable by declaring Parameters / BSD-3-Clause |
| [parso](https://github.com/davidhalter/parso) | 0.8.3 | A Python Parser / MIT |
| [partd](https://github.com/dask/partd) | 1.2.0 | Data structure for on-disk shuffle operations / BSD 3-Clause |
| [patchelf](http://nixos.org/patchelf.html) | 0.13 | A small utility to modify the dynamic linker and RPATH of ELF executables. / GPL-3.0-or-later |
| [patsy](https://github.com/pydata/patsy) | 0.5.2 | Describing statistical models in Python using symbolic formulas / BSD-2-Clause AND PSF-2.0 |
| [pcre](http://www.pcre.org/) | 8.45 | Regular expression pattern matching using the same syntax and semantics as Perl 5. / BSD 3-Clause |
| [pep8](http://pep8.readthedocs.org/) | 1.7.1 | Python style guide checker / MIT |
| [pexpect](http://pexpect.sourceforge.net/) | 4.8.0 | Pexpect makes Python a better tool for controlling other applications. / ISC |
| [pickleshare](https://github.com/pickleshare/pickleshare/) | 0.7.5 | Tiny ‘shelve’-like database with concurrency support / MIT |
| [pillow](https://pillow.readthedocs.io) | 9.0.1 | Pillow is the friendly PIL fork by Alex Clark and Contributors / LicenseRef-PIL |
| [pip](https://pip.pypa.io/en/stable/) | 21.2.4 | PyPA recommended tool for installing Python packages / MIT |
| [pkginfo](https://code.launchpad.net/~tseaver/pkginfo/trunk) | 1.8.2 | Query metadatdata from sdists / bdists / installed packages. / MIT |
| [platformdirs](https://github.com/platformdirs/platformdirs) | 2.4.0 | A small Python module for determining appropriate platform-specific dirs, e.g. a “user data dir”. / MIT |
| [plotly](https://plot.ly/python/) | 4.14.3 | An interactive JavaScript-based visualization library for Python / MIT |
| [pluggy](https://github.com/pytest-dev/pluggy) | 1.0.0 | Plugin registration and hook calling for Python / MIT |
| [prometheus\_client](https://github.com/prometheus/client_python) | 0.13.1 | Python client for the Prometheus monitoring system / Apache-2.0 |
| [prompt-toolkit](https://github.com/jonathanslenders/python-prompt-toolkit) | 3.0.20 | Library for building powerful interactive command lines in Python / BSD-3-Clause |
| [prompt\_toolkit](https://github.com/jonathanslenders/python-prompt-toolkit) | 3.0.20 | Library for building powerful interactive command lines in Python / BSD-3-Clause |
| [psutil](https://github.com/giampaolo/psutil) | 5.8.0 | A cross-platform process and system utilities module for Python / BSD-3-Clause |
| [ptyprocess](https://github.com/pexpect/ptyprocess) | 0.7.0 | Run a subprocess in a pseudo terminal / ISC |
| [pure\_eval](https://github.com/alexmojaki/pure_eval) | 0.2.2 | Safely evaluate AST nodes without side effects / MIT |
| [py](https://github.com/pytest-dev/py) | 1.11.0 | library with cross-python path, ini-parsing, io, code, log facilities / MIT |
| [py-lief](https://lief.quarkslab.com/) | 0.11.5 | A cross platform library to parse, modify and abstract ELF, PE and MachO formats. / Apache-2.0 |
| [pycodestyle](https://pycodestyle.readthedocs.io/) | 2.8.0 | Python style guide checker / MIT |
| [pycosat](https://github.com/ContinuumIO/pycosat) | 0.6.3 | Bindings to picosat (a SAT solver) / MIT |
| [pycparser](https://github.com/eliben/pycparser) | 2.21 | Complete C99 parser in pure Python / BSD-3-clause |
| [pyct](http://github.com/pyviz/pyct) | 0.4.6 | python package common tasks for users (e.g. copy examples, fetch data, …) / BSD 3-Clause |
| [pycurl](http://pycurl.sourceforge.net/) | 7.44.1 | A Python Interface To The cURL library / LGPL, MIT |
| [pyerfa](https://pyerfa.readthedocs.io/) | 2.0.0 | Python bindings for ERFA routines / BSD-3-Clause |
| [pyflakes](https://github.com/PyCQA/pyflakes) | 2.4.0 | Pyflakes analyzes programs and detects various errors. / MIT |
| [pygments](https://pygments.org/) | 2.11.2 | Pygments is a generic syntax highlighter suitable for use in code hosting, forums, wikis or other applications that need to prettify source code. / BSD-2-Clause |
| [pylint](https://www.pylint.org) | 2.12.2 | python code static checker / GPL-2.0-or-later |
| [pyodbc](https://github.com/mkleehammer/pyodbc) | 4.0.32 | DB API Module for ODBC / MIT |
| [pyopenssl](https://github.com/pyca/pyopenssl) | 21.0.0 | Python wrapper module around the OpenSSL library / Apache-2.0 |
| [pyparsing](https://github.com/pyparsing/pyparsing/) | 3.0.4 | Create and execute simple grammars / MIT |
| [pyrsistent](http://github.com/tobgu/pyrsistent/) | 0.18.0 | Persistent/Functional/Immutable data structures / MIT |
| [pysocks](https://github.com/Anorov/PySocks) | 1.7.1 | A Python SOCKS client module. See [Anorov/PySocks](https://github.com/Anorov/PySocks) for more information. / BSD 3-Clause |
| [pytables](https://www.pytables.org) | 3.6.1 | Brings together Python, HDF5 and NumPy to easily handle large amounts of data. / BSD-3-Clause |
| [pytest](https://docs.pytest.org/en/latest/) | 7.1.1 | Simple and powerful testing with Python. / MIT |
| [python](https://www.python.org/) | 3.9.12 | General purpose programming language / PSF-2.0 |
| [python-dateutil](https://dateutil.readthedocs.org/) | 2.8.2 | Extensions to the standard Python datetime module. / BSD-3-Clause and Apache |
| [python-fastjsonschema](https://github.com/horejsek/python-fastjsonschema) | 2.15.1 | Fastest Python implementation of JSON schema / BSD-3-Clause |
| [python-libarchive-c](https://github.com/Changaco/python-libarchive-c) | 2.9 | Python interface to libarchive / CC0-1.0 |
| [pytz](http://pythonhosted.org/pytz/) | 2021.3 | World timezone definitions, modern and historical. / MIT |
| [pyviz\_comms](https://www.holoviz.org) | 2.0.2 | Bidirectional communication for PyViz / BSD-3-Clause |
| [pywavelets](https://github.com/PyWavelets/pywt) | 1.3.0 | Discrete Wavelet Transforms in Python / MIT |
| [pyyaml](http://pyyaml.org/wiki/PyYAML) | 6.0 | YAML parser and emitter for Python / MIT |
| [pyzmq](https://github.com/zeromq/pyzmq) | 22.3.0 | Python bindings for zeromq / BSD-3-clause |
| [readline](https://tiswww.case.edu/php/chet/readline/rltop.html) | 8.1.2 | library for editing command lines as they are typed in / GPL-3.0-only |
| [regex](https://github.com/mrabarnett/mrab-regex) | 2022.3.15 | Alternative regular expression module, to replace re / Apache-2.0 |
| [requests](http://python-requests.org) | 2.27.1 | Requests is an elegant and simple HTTP library for Python, built with ♥. / Apache-2.0 |
| [retrying](https://github.com/rholder/retrying) | 1.3.3 | Simplify the task of adding retry behavior to just about anything. / Apache 2.0 |
| [rope](https://github.com/python-rope/rope) | 0.22.0 | A python refactoring library / LGPL-3.0-or-later |
| [ruamel\_yaml](https://sourceforge.net/p/ruamel-yaml/code/ci/default/tree) | 0.15.100 | A patched copy of ruamel.yaml. / MIT |
| [s3transfer](https://github.com/boto/s3transfer) | 0.5.0 | An Amazon S3 Transfer Manager / Apache-2.0 |
| [scikit-image](https://scikit-image.org/) | 0.19.2 | Image processing in Python. / BSD-3-Clause |
| [scikit-learn](http://scikit-learn.org/) | 1.0.2 | A set of python modules for machine learning and data mining / BSD-3-Clause |
| [scipy](http://www.scipy.org/) | 1.7.3 | Scientific Library for Python / BSD 3-Clause |
| [seaborn](https://seaborn.pydata.org) | 0.11.2 | Statistical data visualization / BSD 3-Clause |
| [send2trash](https://github.com/arsenetar/send2trash) | 1.8.0 | Python library to natively send files to Trash (or Recycle bin) on all platforms. / BSD-3-Clause |
| [setuptools](https://github.com/pypa/setuptools) | 58.0.4 | Download, build, install, upgrade, and uninstall Python packages / MIT |
| [sip](https://www.riverbankcomputing.com/software/sip/) | 6.5.1 | A Python bindings generator for C/C++ libraries / GPL-3.0-only |
| [six](https://six.readthedocs.io/) | 1.16.0 | Python 2 and 3 compatibility utilities / MIT |
| [snappy](https://github.com/google/snappy) | 1.1.9 | A fast compressor/decompressor / BSD-3-clause AND CC-BY-3.0 AND MIT AND CC-BY AND Public Domain |
| [sniffio](https://github.com/python-trio/sniffio) | 1.1.0 | Sniff out which async library your code is running under / Apache-2.0 |
| [snowballstemmer](https://github.com/snowballstem/snowball) | 2.2.0 | Snowball stemming library collection for Python / BSD-3-Clause |
| [sortedcollections](http://www.grantjenks.com/docs/sortedcollections/) | 2.1.0 | Python Sorted Collections / Apache-2.0 |
| [sortedcontainers](http://www.grantjenks.com/docs/sortedcontainers/) | 2.4.0 | Python Sorted Container Types: SortedList, SortedDict, and SortedSet / Apache-2.0 |
| [soupsieve](http://facelessuser.github.io/soupsieve) | 2.3.1 | A modern CSS selector implementation for BeautifulSoup / MIT |
| [sphinx](https://www.sphinx-doc.org) | 4.4.0 | Sphinx is a tool that makes it easy to create intelligent and beautiful documentation / BSD-2-Clause |
| [sphinxcontrib-applehelp](https://www.sphinx-doc.org/en/master/) | 1.0.2 | sphinxcontrib-applehelp is a sphinx extension which outputs Apple help books / BSD-2-Clause |
| [sphinxcontrib-devhelp](https://www.sphinx-doc.org/en/master/) | 1.0.2 | sphinxcontrib-devhelp is a sphinx extension which outputs Devhelp document / BSD-2-Clause |
| [sphinxcontrib-htmlhelp](https://www.sphinx-doc.org/en/master/) | 2.0.0 | sphinxcontrib-htmlhelp is a sphinx extension which renders HTML help files. / BSD-2-Clause |
| [sphinxcontrib-jsmath](https://www.sphinx-doc.org/en/master/) | 1.0.1 | A sphinx extension which renders display math in HTML via JavaScript / BSD-2-Clause |
| [sphinxcontrib-qthelp](https://www.sphinx-doc.org/en/master/) | 1.0.3 | sphinxcontrib-qthelp is a sphinx extension which outputs QtHelp document / BSD-2-Clause |
| [sphinxcontrib-serializinghtml](https://www.sphinx-doc.org/en/master/) | 1.1.5 | sphinxcontrib-serializinghtml is a sphinx extension which outputs “serialized” HTML files (json and pickle). / BSD-2-Clause |
| [sqlalchemy](https://www.sqlalchemy.org/) | 1.4.32 | Database Abstraction Library. / MIT |
| [sqlite](https://www.sqlite.org/) | 3.38.2 | Implements a self-contained, zero-configuration, SQL database engine / blessing |
| [stack\_data](https://github.com/alexmojaki/stack_data) | 0.2.0 | Extract data from python stack frames and tracebacks for informative displays / MIT |
| [statsmodels](https://www.statsmodels.org) | 0.13.2 | Statistical computations and models for use with SciPy / BSD-3-Clause |
| [sympy](https://sympy.org) | 1.10.1 | Python library for symbolic mathematics / BSD-3-Clause AND MIT |
| [tabulate](https://bitbucket.org/astanin/python-tabulate) | 0.8.7 | Pretty-print tabular data in Python, a library and a command-line utility. / MIT |
| [tblib](https://github.com/ionelmc/python-tblib) | 1.7.0 | Traceback serialization library. / BSD 2-Clause |
| [terminado](https://github.com/jupyter/terminado) | 0.13.1 | Terminals served by tornado websockets / BSD-2-Clause |
| [testpath](https://testpath.readthedocs.io) | 0.5.0 | Testpath is a collection of utilities for Python code working with files and commands. / BSD-3-Clause |
| [threadpoolctl](https://github.com/joblib/threadpoolctl) | 2.2.0 | Python helpers to control the threadpools of native libraries / BSD 3-Clause |
| [tifffile](https://github.com/cgohlke/tifffile) | 2021.3.17 | Read and write image data from and to TIFF files. / BSD-3-Clause |
| [tk](http://www.tcl.tk/) | 8.6.11 | A dynamic programming language with GUI support. Bundles Tcl and Tk. / Tcl/Tk |
| [toml](https://github.com/uiri/toml) | 0.10.2 | Python lib for TOML. / MIT |
| [tomli](https://github.com/hukkin/tomli) | 1.2.2 | A simple TOML parser / MIT |
| [toolz](http://toolz.readthedocs.org/) | 0.11.2 | List processing tools and functional utilities / BSD-3-Clause |
| [tornado](http://www.tornadoweb.org/) | 6.1 | A Python web framework and asynchronous networking library, originally developed at FriendFeed. / Apache-2.0 |
| [tqdm](https://pypi.python.org/pypi/tqdm) | 4.64.0 | A Fast, Extensible Progress Meter / MPL-2.0 AND MIT |
| [traitlets](http://traitlets.readthedocs.org/) | 5.1.1 | Configuration system for Python applications / BSD-3-Clause |
| [typing-extensions](https://github.com/python/typing/tree/master/typing_extensions) | 4.1.1 | Backported and Experimental Type Hints for Python / PSF-2.0 |
| [typing\_extensions](https://github.com/python/typing/tree/master/typing_extensions) | 4.1.1 | Backported and Experimental Type Hints for Python / PSF-2.0 |
| [tzdata](https://www.iana.org/time-zones) | 2022a | The Time Zone Database (called tz, tzdb or zoneinfo) / Public-Domain AND BSD-3-clause |
| [unixodbc](http://www.unixodbc.org/) | 2.3.9 | ODBC on non MS Windows platforms / LGPL-2.1 |
| [urllib3](https://urllib3.readthedocs.io/) | 1.26.9 | HTTP library with thread-safe connection pooling, file post, and more. / MIT |
| [wcwidth](https://github.com/jquast/wcwidth) | 0.2.5 | Measures number of Terminal column cells of wide-character codes. / MIT |
| [webencodings](https://github.com/gsnedders/python-webencodings) | 0.5.1 | Character encoding aliases for legacy web content / BSD 3-Clause |
| [werkzeug](https://palletsprojects.com/p/werkzeug/) | 2.0.3 | The comprehensive WSGI web application library. / BSD-3-Clause |
| [wget](https://www.gnu.org/software/wget/) | 1.21.3 | utility for non-interactive download of files from the Web / GPL-3.0-or-later |
| [wheel](https://github.com/pypa/wheel) | 0.37.1 | A built-package format for Python. / MIT |
| [widgetsnbextension](http://ipython.org) | 3.5.2 | Interactive Widgets for Jupyter / BSD-3-Clause |
| [wrapt](https://github.com/GrahamDumpleton/wrapt) | 1.13.3 | Module for decorators, wrappers and monkey patching / BSD-2-Clause |
| [xlrd](http://www.python-excel.org/) | 2.0.1 | Library for developers to extract data from Microsoft Excel (tm) spreadsheet files / BSD 3-Clause and BSD with advertising |
| [xlsxwriter](https://xlsxwriter.readthedocs.io/) | 3.0.3 | A Python module for creating Excel XLSX files / BSD-2-Clause |
| [xz](http://tukaani.org/xz/) | 5.2.5 | Data compression software with high compression ratio / LGPL-2.1 and GPL-2.0 |
| [yaml](http://pyyaml.org/wiki/LibYAML) | 0.2.5 | A C library for parsing and emitting YAML / MIT |
| [zeromq](http://zeromq.org) | 4.3.4 | A high-performance asynchronous messaging library. / LGPL-3.0-or-later |
| [zict](http://github.com/mrocklin/zict) | 2.0.0 | Composable Dictionary Classes / BSD 3-Clause |
| [zipp](https://github.com/jaraco/zipp) | 3.7.0 | A pathlib-compatible Zipfile object wrapper / MIT |
| [zlib](http://zlib.net/) | 1.2.12 | Massively spiffy yet delicately unobtrusive compression library / Zlib |
| [zstd](https://www.zstd.net) | 1.4.9 | Zstandard - Fast real-time compression algorithm / BSD-3-Clause AND GPL-2.0-or-later |
| Name | Version | Summary / License |
|---|---|---|
| [\_libgcc\_mutex](https://github.com/AnacondaRecipes/_libgcc_mutex-feedstock) | 0.1 | Mutex for libgcc and libgcc-ng / None |
| [aiohttp](https://github.com/aio-libs/aiohttp) | 3.8.1 | Async http client/server framework (asyncio) / Apache-2.0 |
| [aiosignal](https://github.com/aio-libs/aiosignal) | 1.2.0 | aiosignal: a list of registered asynchronous callbacks / Apache-2.0 |
| [alabaster](http://www.sphinx-doc.org/en/stable/index.html) | 0.7.12 | Configurable, Python 2+3 compatible Sphinx theme. / BSD 3-Clause |
| [anaconda-client](https://github.com/Anaconda-Platform/anaconda-client) | 1.9.0 | Anaconda Cloud command line client library / BSD 3-Clause |
| [anaconda-project](https://github.com/Anaconda-Platform/anaconda-project) | 0.10.2 | Tool for encapsulating, running, and reproducing data science projects / BSD-3-Clause |
| [appdirs](http://github.com/ActiveState/appdirs) | 1.4.4 | A small Python module for determining appropriate platform-specific dirs. / MIT |
| [argon2-cffi](https://argon2-cffi.readthedocs.org/) | 21.3.0 | The secure Argon2 password hashing algorithm. / MIT |
| [argon2-cffi-bindings](https://github.com/hynek/argon2-cffi-bindings) | 21.2.0 | Low-level Python CFFI Bindings for Argon2 / MIT |
| [astroid](https://www.astroid.org/) | 2.9.0 | A abstract syntax tree for Python with inference support. / LGPL-2.1-or-later |
| [astropy](https://www.astropy.org/) | 5.0.4 | Community-developed Python Library for Astronomy / BSD-3-Clause |
| [asttokens](https://github.com/gristlabs/asttokens) | 2.0.5 | The asttokens module annotates Python abstract syntax trees (ASTs) with the positions of tokens and text in the source code that generated them. / Apache-2.0 |
| [async-timeout](http://github.com/aio-libs/async_timeout) | 4.0.1 | Timeout context manager for asyncio programs / Apache-2.0 |
| [attrs](https://attrs.readthedocs.io/en/stable/) | 21.4.0 | attrs is the Python package that will bring back the joy of writing classes by relieving you from the drudgery of implementing object protocols (aka dunder methods). / MIT |
| [automat](https://github.com/glyph/Automat) | 20.2.0 | self-service finite-state machines for the programmer on the go / MIT |
| [babel](http://babel.pocoo.org/) | 2.9.1 | Utilities to internationalize and localize Python applications / BSD 3-clause |
| [backcall](https://github.com/takluyver/backcall/) | 0.2.0 | Specifications for callback functions passed in to an API / BSD-3-Clause |
| [backports](https://github.com/brandon-rhodes/backports) | 1.1 | Namespace for backported Python features. / MIT |
| [backports.functools\_lru\_cache](https://github.com/jaraco/backports.functools_lru_cache) | 1.6.4 | Backport of functools.lru\_cache from Python 3.3 as published at ActiveState. / MIT |
| [backports.tempfile](https://github.com/pjdelport/backports.tempfile) | 1.0 | Backports of new features in Python’s tempfile module / PSF 2 |
| [backports.weakref](https://github.com/pjdelport/backports.weakref) | 1.0.post1 | Backport of new features in Python’s weakref module / Python-2.0 |
| [bcrypt](https://github.com/pyca/bcrypt/) | 3.2.0 | Modern password hashing for your software and your servers / Apache-2.0 |
| [beautifulsoup4](https://www.crummy.com/software/BeautifulSoup/) | 4.11.1 | Python library designed for screen-scraping / MIT |
| [bitarray](https://github.com/ilanschnell/bitarray) | 2.4.1 | efficient arrays of booleans – C extension / PSF-2.0 |
| [bkcharts](http://github.com/bokeh/bkcharts) | 0.2 | High level chart types built on top of Bokeh / BSD 3-Clause |
| [blas](http://www.netlib.org/lapack) | 1.0 | Linear Algebra PACKage / BSD-3-Clause |
| [bleach](https://github.com/mozilla/bleach) | 4.1.0 | Easy, whitelist-based HTML-sanitizing tool / Apache-2.0 |
| [blosc](https://github.com/Blosc/c-blosc) | 1.21.0 | A blocking, shuffling and loss-less compression library that can be faster than memcpy() / BSD-3-Clause |
| [bokeh](http://bokeh.pydata.org/) | 2.4.2 | Statistical and novel interactive HTML plots for Python / BSD-3-Clause |
| [boto3](https://aws.amazon.com/sdk-for-python) | 1.21.32 | Amazon Web Services SDK for Python / Apache-2.0 |
| [botocore](https://aws.amazon.com/sdk-for-python/) | 1.24.32 | Low-level, data-driven core of boto 3. / Apache-2.0 |
| [bottleneck](https://github.com/pydata/bottleneck) | 1.3.4 | Fast NumPy array functions written in Cython. / BSD-2-Clause |
| [brotli](http://github.com/google/brotli) | 1.0.9 | Brotli compression format / MIT |
| [brotlipy](https://github.com/python-hyper/brotlipy) | 0.7.0 | Python bindings to the Brotli compression library / MIT |
| [brunsli](https://github.com/google/brunsli) | 0.1 | Practical JPEG Repacker / MIT |
| [bzip2](http://www.bzip.org/) | 1.0.8 | high-quality data compressor / bzip2 |
| [c-ares](https://c-ares.org/) | 1.18.1 | This is c-ares, an asynchronous resolver library / MIT |
| [ca-certificates](https://curl.se/docs/caextract.html) | 2022.3.29 | Certificates for use with other packages. / MPL-2.0 |
| [cachetools](https://github.com/tkem/cachetools) | 4.2.2 | Extensible memoizing collections and decorators / MIT |
| [certifi](http://certifi.io/) | 2021.10.8 | Python package for providing Mozilla’s CA Bundle. / ISC |
| [cffi](http://cffi.readthedocs.org/) | 1.15.0 | Foreign Function Interface for Python calling C code. / MIT |
| [cfitsio](http://heasarc.gsfc.nasa.gov/fitsio/fitsio.html) | 3.470 | A library for reading and writing FITS files / fitsio |
| [chardet](https://github.com/chardet/chardet) | 4.0.0 | Universal character encoding detector / LGPL2 |
| [charls](https://github.com/team-charls/charls) | 2.2.0 | CharLS is a C++ implementation of the JPEG-LS standard for lossless and near-lossless image compression and decompression. JPEG-LS is a low-complexity image compression standard that matches JPEG 2000 compression ratios. / BSD-3-Clause |
| [charset-normalizer](https://github.com/ousret/charset_normalizer) | 2.0.4 | The Real First Universal Charset Detector. Open, modern and actively maintained alternative to Chardet. / MIT |
| [click](https://palletsprojects.com/p/click) | 8.0.4 | Python composable command line interface toolkit / BSD-3-Clause |
| [cloudpickle](https://github.com/cloudpipe/cloudpickle) | 2.0.0 | Extended pickling support for Python objects / BSD-3-Clause |
| [clyent](https://github.com/Anaconda-Platform/clyent) | 1.2.2 | Command line client library for windows and posix / BSD 3-Clause |
| [colorama](https://github.com/tartley/colorama) | 0.4.4 | Cross-platform colored terminal text / BSD-3-Clause |
| [colorcet](http://github.com/pyviz/colorcet) | 2.0.6 | Collection of perceptually uniform colormaps / CC-BY-4.0 |
| [conda](https://conda.io) | 4.12.0 | OS-agnostic, system-level binary package and environment manager. / BSD-3-Clause |
| [conda-build](https://github.com/conda/conda-build) | 3.21.8 | tools for building conda packages / BSD-3-Clause |
| [conda-content-trust](https://github.com/conda/conda-content-trust) | 0.1.1 | Signing and verification tools for conda / BSD-3-Clause |
| [conda-env](https://github.com/conda/conda-env) | 2.6.0 | Tools for interacting with conda environments. / BSD 3-Clause |
| [conda-token](https://github.com/Anaconda/conda-token) | 0.3.0 | Set repository access token / BSD-3-Clause |
| [conda-verify](https://github.com/conda/conda-verify) | 3.4.2 | tool for validating conda recipes and conda packages / BSD 3-Clause |
| [constantly](https://github.com/twisted/constantly) | 15.1.0 | Symbolic constants in Python / MIT |
| [cryptography](https://github.com/pyca/cryptography) | 3.4.8 | Provides cryptographic recipes and primitives to Python developers / Apache-2.0 AND BSD-3-Clause AND PSF-2.0 AND MIT |
| [cssselect](https://pythonhosted.org/cssselect/) | 1.1.0 | CSS Selectors for Python / BSD 3-Clause |
| [curl](https://curl.haxx.se/) | 7.82.0 | tool and library for transferring data with URL syntax / curl |
| [cycler](http://matplotlib.org/cycler) | 0.11.0 | Composable style cycles. / BSD-3-Clause |
| [cython](https://cython.org/) | 0.29.28 | The Cython compiler for writing C extensions for the Python language / Apache-2.0 |
| [cytoolz](https://github.com/pytoolz/cytoolz) | 0.11.0 | Cython implementation of Toolz. High performance functional utilities / BSD-3-Clause |
| [dask](https://dask.org/) | 2022.2.1 | Parallel PyData with Task Scheduling / BSD-3-Clause |
| [dask-core](https://github.com/dask/dask/) | 2022.2.1 | Parallel Python with task scheduling / BSD-3-Clause |
| [dataclasses](https://github.com/ericvsmith/dataclasses) | 0.8 | An implementation of PEP 557: Data Classes / Apache-2.0 |
| [datashader](https://datashader.org) | 0.13.0 | Data visualization toolchain based on aggregating into a grid / BSD-3-Clause |
| [datashape](http://datashape.pydata.org) | 0.5.4 | A data description language. / BSD 2-Clause |
| [debugpy](https://github.com/Microsoft/debugpy) | 1.5.1 | An implementation of the Debug Adapter Protocol for Python / MIT |
| [decorator](https://github.com/micheles/decorator) | 5.1.1 | Better living through Python with decorators. / BSD-2-Clause |
| [defusedxml](https://bitbucket.org/tiran/defusedxml) | 0.7.1 | XML bomb protection for Python stdlib modules / PSF 2.0 |
| [distributed](https://distributed.readthedocs.io/en/latest/) | 2022.2.1 | Distributed computing with Dask / BSD-3-Clause |
| [docutils](http://docutils.sourceforge.net/) | 0.17.1 | Docutils – Python Documentation Utilities / LicenseRef-Public-Domain-Dedictation and BSD-2-Clause and LicenseRef-PSF-2.1.1 and GPL-3.0-or-later |
| [entrypoints](https://github.com/takluyver/entrypoints) | 0.4 | Discover and load entry points from installed packages. / MIT License |
| [et\_xmlfile](https://foss.heptapod.net/openpyxl/et_xmlfile) | 1.1.0 | An implementation of lxml.xmlfile for the standard library / MIT AND PSF-2.0 |
| [executing](https://pypi.org/project/executing) | 0.8.3 | Get the currently executing AST node of a frame, and other information / MIT |
| [expat](https://libexpat.github.io) | 2.4.4 | Expat XML parser library in C / MIT |
| [filelock](https://github.com/tox-dev/py-filelock) | 3.6.0 | A platform independent file lock. / Unlicense |
| [flask](https://flask.pocoo.org) | 1.1.2 | A microframework based on Werkzeug, Jinja2 and good intentions. / BSD 3-Clause |
| [fontconfig](http://www.freedesktop.org/wiki/Software/fontconfig/) | 2.13.1 | A library for configuring and customizing font access. / MIT |
| [fonttools](https://github.com/fonttools/fonttools) | 4.25.0 | fontTools is a library for manipulating fonts, written in Python. / MIT |
| [freetype](https://www.freetype.org/) | 2.11.0 | A Free, High-Quality, and Portable Font Engine / GPL-2.0-only and LicenseRef-FreeType |
| [frozenlist](https://github.com/aio-libs/frozenlist) | 1.2.0 | A list-like structure which implements collections.abc.MutableSequence / Apache-2.0 |
| [fsspec](https://github.com/martindurant/filesystem_spec) | 2022.2.0 | A specification for pythonic filesystems / BSD-3-Clause |
| [future](http://python-future.org) | 0.18.2 | Clean single-source support for Python 3 and 2 / MIT |
| [gensim](https://github.com/RaRe-Technologies/gensim) | 4.1.2 | Topic Modelling for Humans / LGPL-2.1-only |
| [giflib](http://giflib.sourceforge.net) | 5.2.1 | Library for reading and writing gif images / MIT |
| [glob2](https://github.com/miracle2k/python-glob2) | 0.7 | Version of the glob module that supports recursion via \*\*, and can capture patterns. / BSD-2-Clause |
| [gmp](http://gmplib.org/) | 6.2.1 | The GNU multiprecision library. / GPL-2.0-or-later AND LGPL-3.0-or-later |
| [gmpy2](https://pypi.python.org/pypi/gmpy2) | 2.1.2 | GMP/MPIR, MPFR, and MPC interface to Python 2.6+ and 3.x / LGPL-3.0-or-later |
| [google-api-core](https://github.com/googleapis/python-api-core) | 1.25.1 | Core Library for Google Client Libraries / Apache-2.0 |
| [google-auth](https://github.com/googleapis/google-auth-library-python) | 1.33.0 | Google authentication library for Python / Apache-2.0 |
| [google-cloud-core](https://github.com/googleapis/python-cloud-core) | 1.7.1 | API Client library for Google Cloud: Core Helpers / Apache-2.0 |
| [google-cloud-storage](https://github.com/googleapis/python-storage) | 1.31.0 | Python Client for Google Cloud Storage / Apache-2.0 |
| [google-crc32c](https://github.com/googleapis/python-crc32c) | 1.1.2 | Python wrapper for a hardware-based implementation of the CRC32C hashing algorithm / Apache-2.0 |
| [google-resumable-media](https://github.com/googleapis/google-resumable-media-python) | 1.3.1 | Utilities for Google Media Downloads and Resumable Uploads / Apache-2.0 |
| [googleapis-common-protos](https://github.com/googleapis/api-common-protos) | 1.53.0 | Common protobufs used in Google APIs / Apache-2.0 |
| [greenlet](https://github.com/python-greenlet/greenlet) | 1.1.1 | Lightweight in-process concurrent programming / MIT |
| [grpcio](https://grpc.io) | 1.42.0 | HTTP/2-based RPC framework / Apache-2.0 |
| [h5py](http://www.h5py.org/) | 3.6.0 | Read and write HDF5 files from Python / BSD-3-Clause |
| [hdf5](http://www.hdfgroup.org/HDF5/) | 1.10.6 | HDF5 is a data model, library, and file format for storing and managing data / HDF5 |
| [heapdict](http://stutzbachenterprises.com/) | 1.0.1 | A heap with decrease-key and increase-key operations / BSD 3-Clause |
| [holoviews](https://holoviews.org) | 1.14.8 | Stop plotting your data - annotate your data and let it visualize itself. / BSD-3-Clause |
| [hvplot](https://hvplot.holoviz.org/) | 0.7.3 | A high-level plotting API for the PyData ecosystem built on HoloViews / BSD-3-Clause |
| [hyperlink](https://github.com/python-hyper/hyperlink) | 21.0.0 | Immutable, Pythonic, correct URLs. / MIT |
| [icu](http://site.icu-project.org/) | 58.2 | International Components for Unicode. / MIT |
| [idna](https://github.com/kjd/idna) | 3.3 | Internationalized Domain Names in Applications (IDNA). / BSD-3-Clause |
| [imagecodecs](https://www.lfd.uci.edu/~gohlke/) | 2021.8.26 | Image transformation, compression, and decompression codecs / BSD-3-Clause |
| [imageio](https://imageio.github.io) | 2.9.0 | A Python library for reading and writing image data / BSD-2-Clause |
| [imagesize](https://github.com/shibukawa/imagesize_py) | 1.3.0 | Getting image size from png/jpeg/jpeg2000/gif file / MIT |
| [importlib-metadata](https://github.com/python/importlib_metadata) | 4.11.3 | A library to access the metadata for a Python package. / Apache-2.0 |
| [incremental](https://github.com/hawkowl/incremental) | 21.3.0 | Incremental is a small library that versions your Python projects. / MIT |
| [iniconfig](http://github.com/RonnyPfannschmidt/iniconfig) | 1.1.1 | iniconfig: brain-dead simple config-ini parsing / MIT |
| [intake](https://github.com/ContinuumIO/intake) | 0.6.5 | Data load and catalog system / BSD-2-Clause |
| [ipykernel](https://ipython.org) | 6.9.1 | IPython Kernel for Jupyter / BSD-3-Clause |
| [ipython](https://ipython.org) | 8.2.0 | IPython: Productive Interactive Computing / BSD-3-Clause |
| [ipython\_genutils](http://ipython.org) | 0.2.0 | vestigial utilities from IPython / BSD 3-Clause |
| [ipywidgets](https://github.com/ipython/ipywidgets) | 7.6.5 | Jupyter Interactive Widgets / BSD-3-Clause |
| [isort](https://github.com/timothycrosley/isort) | 5.9.3 | A Python utility / library to sort Python imports. / MIT |
| [itemadapter](https://github.com/scrapy/itemadapter) | 0.3.0 | Common interface for different data containers / BSD-3-Clause |
| [itemloaders](https://github.com/scrapy/itemadapter) | 1.0.4 | Collect data from HTML and XML sources / BSD-3-Clause |
| [itsdangerous](https://github.com/pallets/itsdangerous) | 2.0.1 | Various helpers to pass trusted data to untrusted environments. / BSD-3-Clause |
| [jdcal](https://github.com/phn/jdcal) | 1.4.1 | Julian dates from proleptic Gregorian and Julian calendars. / BSD 2-Clause |
| [jedi](https://github.com/davidhalter/jedi/) | 0.18.1 | An autocompletion tool for Python that can be used for text editors. / MIT |
| [jinja2](https://jinja.pocoo.org) | 2.11.3 | An easy to use stand-alone template engine written in pure python. / BSD-3-Clause |
| [jmespath](http://jmespath.org/) | 0.10.0 | Query language for JSON / MIT |
| [joblib](https://joblib.readthedocs.io/en/latest/) | 1.1.0 | Lightweight pipelining: using Python functions as pipeline jobs. / BSD-3-Clause |
| [jpeg](https://www.ijg.org/) | 9e | read/write jpeg COM, EXIF, IPTC medata / IJG |
| [jq](http://stedolan.github.io/jq/) | 1.6 | A command-line JSON processor. / MIT |
| [jsonschema](https://github.com/Julian/jsonschema) | 4.4.0 | An implementation of JSON Schema validation for Python / MIT |
| [jupyter](http://jupyter.org) | 1.0.0 | Jupyter metapackage. Install all the Jupyter components in one go. / BSD 3-Clause |
| [jupyter\_client](https://jupyter.org) | 7.2.2 | jupyter\_client contains the reference implementation of the Jupyter protocol. / BSD-3-Clause |
| [jupyter\_console](https://jupyter.org) | 6.4.3 | Jupyter terminal console / BSD-3-Clause |
| [jupyter\_core](https://jupyter.org) | 4.9.2 | Core common functionality of Jupyter projects. / BSD-3-Clause |
| [jupyterlab\_pygments](http://github.com/JupyterLab/jupyterlab_pygments) | 0.1.2 | Pygments syntax coloring scheme making use of the JupyterLab CSS variables / BSD-3-Clause |
| [jupyterlab\_widgets](https://github.com/jupyter-widgets/ipywidgets) | 1.0.0 | JupyterLab extension providing HTML widgets / BSD-3-Clause |
| [jxrlib](https://packages.debian.org/source/sid/jxrlib) | 1.1 | jxrlib - JPEG XR Library by Microsoft, built from Debian hosted sources. / BSD-2-Clause |
| [kiwisolver](https://github.com/nucleic/kiwi) | 1.3.2 | An efficient C++ implementation of the Cassowary constraint solver / BSD-3-Clause |
| [krb5](http://web.mit.edu/kerberos/) | 1.19.2 | A network authentication protocol. / MIT |
| [lazy-object-proxy](https://github.com/ionelmc/python-lazy-object-proxy) | 1.6.0 | A fast and thorough lazy object proxy / BSD-2-Clause |
| [lcms2](http://www.littlecms.com/) | 2.12 | Open Source Color Management Engine / MIT |
| [ld\_impl\_linux-ppc64le](https://www.gnu.org/software/binutils/) | 2.33.1 | A set of programming tools for creating and managing binary programs, object files, libraries, profile data, and assembly source code. / GPL-3.0-only |
| [lerc](https://github.com/Esri/lerc) | 3.0 | LERC - Limited Error Raster Compression / Apache-2.0 |
| [libaec](https://gitlab.dkrz.de/k202009/libaec) | 1.0.4 | Adaptive Entropy Coding library / BSD-2-Clause |
| [libarchive](http://www.libarchive.org/) | 3.4.2 | Multi-format archive and compression library / BSD-2-Clause |
| [libcrc32c](https://github.com/google/crc32c) | 1.1.1 | CRC32C implementation with support for CPU-specific acceleration instructions / BSD-3-Clause |
| [libcurl](https://curl.haxx.se/) | 7.82.0 | tool and library for transferring data with URL syntax / curl |
| [libdeflate](https://github.com/ebiggers/libdeflate) | 1.8 | libdeflate is a library for fast, whole-buffer DEFLATE-based compression and decompression. / MIT |
| [libedit](http://thrysoee.dk/editline/) | 3.1.20210910 | Editline Library (libedit) / BSD-2-Clause |
| [libev](http://software.schmorp.de/pkg/libev.html) | 4.33 | A full-featured and high-performance event loop that is loosely modeled after libevent, but without its limitations and bugs. / BSD-2-Clause |
| [libffi](https://sourceware.org/libffi/) | 3.3 | A Portable Foreign Function Interface Library. / MIT |
| [libgcc-ng](https://gcc.gnu.org/onlinedocs/gccint/Libgcc.html) | 8.2.0 | The GCC low-level runtime library / GPL-3.0-only WITH GCC-exception-3.1 |
| [libgfortran-ng](https://gcc.gnu.org/) | 7.3.0 | The GNU Fortran Runtime Library / GPL-3.0-only WITH GCC-exception-3.1 |
| [libidn2](https://www.gnu.org/software/libidn/#libidn2) | 2.3.2 | Library for internationalized domain names (IDNA2008) support / LGPLv2 AND LGPL-3.0-or-later AND GPL-3.0-or-later |
| [liblief](https://lief.quarkslab.com/) | 0.11.5 | A cross platform library to parse, modify and abstract ELF, PE and MachO formats. / Apache-2.0 |
| [libllvm11](http://llvm.org/) | 11.1.0 | Development headers and libraries for LLVM / Apache-2.0 WITH LLVM-exception |
| [libnghttp2](http://github.com/nghttp2/nghttp2) | 1.46.0 | This is an implementation of Hypertext Transfer Protocol version 2. / MIT |
| [libopenblas](https://www.openblas.net/) | 0.3.18 | An Optimized BLAS library / BSD-3-clause |
| [libpng](http://www.libpng.org/pub/png/libpng.html) | 1.6.37 | PNG reference library / zlib/libpng |
| [libprotobuf](https://developers.google.com/protocol-buffers/) | 3.19.1 | Protocol Buffers - Google’s data interchange format. C++ Libraries and protoc, the protobuf compiler. / BSD-3-Clause |
| [libsodium](http://libsodium.org) | 1.0.18 | A modern and easy-to-use crypto library. / ISC |
| [libssh2](https://www.libssh2.org/) | 1.10.0 | the SSH library / BSD-3-Clause |
| [libstdcxx-ng](https://gcc.gnu.org/) | 8.2.0 | The GNU C++ Runtime Library / GPL-3.0-only WITH GCC-exception-3.1 |
| [libtiff](http://www.libtiff.org/) | 4.2.0 | Support for the Tag Image File Format (TIFF). / HPND |
| [libunistring](https://www.gnu.org/software/libunistring) | 0.9.10 | This library provides functions for manipulating Unicode strings and for manipulating C strings according to the Unicode standard. / LGPL |
| [libuuid](http://sourceforge.net/projects/libuuid/) | 1.0.3 | Portable uuid C library. / BSD 3-Clause |
| [libwebp](https://developers.google.com/speed/webp/) | 1.2.2 | WebP image library / BSD-3-Clause |
| [libwebp-base](https://developers.google.com/speed/webp) | 1.2.2 | WebP image library / BSD-3-Clause |
| [libxml2](http://xmlsoft.org/) | 2.9.12 | The XML C parser and toolkit of Gnome / MIT |
| [libxslt](http://xmlsoft.org/XSLT/) | 1.1.34 | The XSLT C library developed for the GNOME project / MIT |
| [libzopfli](https://github.com/google/zopfli) | 1.0.3 | A compression library programmed in C to perform very good, but slow, deflate or zlib compression. / Apache-2.0 |
| [llvmlite](http://llvmlite.pydata.org) | 0.38.0 | A lightweight LLVM python binding for writing JIT compilers. / BSD-2-Clause |
| [locket](https://github.com/mwilliamson/locket.py) | 0.2.1 | File-based locks for Python for Linux and Windows / BSD 2-Clause |
| [lxml](https://lxml.de/) | 4.8.0 | Pythonic binding for the C libraries libxml2 and libxslt. / BSD-3-Clause and GPL-2.0-only and ZPL-2.0 and LicenseRef-ElementTree |
| [lz4-c](https://www.lz4.org) | 1.9.3 | Extremely Fast Compression algorithm / BSD-2-Clause |
| [lzo](http://www.oberhumer.com/opensource/lzo/) | 2.10 | LZO is a portable lossless data compression library written in ANSI C. / GPL v2+ |
| [markdown](https://pythonhosted.org/Markdown/) | 3.3.4 | Python implementation of Markdown. / BSD-3-Clause |
| [markupsafe](https://www.palletsprojects.com/p/markupsafe) | 2.0.1 | A Python module that implements the jinja2.Markup string / BSD-3-Clause |
| [matplotlib](https://matplotlib.org/) | 3.5.1 | Publication quality figures in Python / LicenseRef-PSF-based |
| [matplotlib-base](https://matplotlib.org/) | 3.5.1 | Publication quality figures in Python / LicenseRef-PSF-based |
| [matplotlib-inline](https://github.com/ipython/matplotlib-inline) | 0.1.2 | Inline Matplotlib backend for Jupyter / BSD-3-Clause |
| [mccabe](https://github.com/PyCQA/mccabe) | 0.7.0 | McCabe complexity checker for Python / MIT |
| [mistune](https://github.com/lepture/mistune) | 0.8.4 | A sane Markdown parser with useful plugins and renderers. / BSD-3-Clause |
| [mock](https://github.com/testing-cabal/mock) | 4.0.3 | A library for testing in Python / BSD-2-Clause |
| [mpc](http://www.multiprecision.org/) | 1.1.0 | A C library for the arithmetic of complex numbers with arbitrarily high precision. / LGPL 3 |
| [mpfr](http://www.mpfr.org/) | 4.0.2 | The MPFR library is a C library for multiple-precision floating-point computations with correct rounding. / LGPL-3.0-only |
| [mpmath](http://mpmath.org) | 1.2.1 | Python library for arbitrary-precision floating-point arithmetic / BSD 3-Clause |
| [msgpack-python](http://msgpack.org/) | 1.0.2 | MessagePack (de)serializer / Apache-2.0 |
| [multidict](http://github.com/aio-libs/multidict) | 5.2.0 | multidict implementation / Apache 2.0 |
| [multipledispatch](https://github.com/mrocklin/multipledispatch/) | 0.6.0 | Multiple dispatch in Python / BSD 3-Clause |
| [munkres](https://github.com/bmc/munkres) | 1.1.4 | The Munkres module provides an O(n^3) implementation of the Munkres algorithm (also called the Hungarian algorithm or the Kuhn-Munkres algorithm). / Apache-2.0 |
| [nbclient](https://jupyter.org) | 0.5.13 | A client library for executing notebooks. Formally nbconvert’s ExecutePreprocessor. / BSD-3-Clause |
| [nbconvert](https://jupyter.org) | 6.4.4 | Converting Jupyter Notebooks / BSD-3-Clause |
| [nbformat](https://jupyter.org) | 5.3.0 | The Jupyter Notebook format / BSD-3-Clause |
| [ncurses](http://www.gnu.org/software/ncurses/) | 6.3 | Library for text-based user interfaces / Free software (MIT-like) |
| [nest-asyncio](https://github.com/erdewit/nest_asyncio) | 1.5.5 | Patch asyncio to allow nested event loops / BSD-2-Clause |
| [networkx](https://networkx.github.io/) | 2.7.1 | Python package for creating and manipulating complex networks / BSD-3-Clause |
| [nltk](https://nltk.org/) | 3.7 | Natural Language Toolkit / Apache-2.0 |
| nomkl | 3.0 | None / BSD |
| [nose](http://readthedocs.org/docs/nose/) | 1.3.7 | Nose extends unittest to make testing easier / LGPL-2.1 |
| [notebook](https://jupyter.org) | 6.4.8 | Jupyter Notebook / BSD-3-Clause |
| [numba](http://numba.pydata.org) | 0.55.1 | NumPy aware dynamic Python compiler using LLVM / BSD-2-Clause |
| [numexpr](https://github.com/pydata/numexpr) | 2.8.1 | Fast numerical expression evaluator for NumPy. / MIT |
| [numpy](http://numpy.scipy.org/) | 1.21.5 | Array processing for numbers, strings, records, and objects. / BSD 3-Clause |
| [numpy-base](http://numpy.scipy.org/) | 1.21.5 | Array processing for numbers, strings, records, and objects. / BSD 3-Clause |
| [numpydoc](https://github.com/numpy/numpydoc) | 1.2 | Numpy’s Sphinx extensions / BSD-3-Clause |
| [olefile](http://www.decalage.info/python/olefileio) | 0.46 | parse, read and write Microsoft OLE2 files / BSD 2-Clause |
| [oniguruma](https://github.com/kkos/oniguruma) | 6.9.7.1 | A regular expression library. / BSD-2-Clause |
| [openblas](https://www.openblas.net/) | 0.3.18 | An optimized BLAS library / BSD-3-clause |
| openblas-devel | 0.3.18 | OpenBLAS headers and libraries for developing software that used OpenBLAS. / None |
| [openjpeg](http://www.openjpeg.org/) | 2.4.0 | An open-source JPEG 2000 codec written in C / BSD 2-Clause |
| [openpyxl](https://openpyxl.readthedocs.io) | 3.0.9 | A Python library to read/write Excel 2010 xlsx/xlsm files / MIT |
| [openssl](https://www.openssl.org/) | 1.1.1n | OpenSSL is an open-source implementation of the SSL and TLS protocols / OpenSSL |
| [packaging](https://github.com/pypa/packaging) | 21.3 | Core utilities for Python packages / Apache-2.0 or BSD-2-Clause |
| [pandas](https://pandas.pydata.org) | 1.4.2 | High-performance, easy-to-use data structures and data analysis tools. / BSD-3-Clause |
| [pandocfilters](https://github.com/jgm/pandocfilters) | 1.5.0 | A python module for writing pandoc filters / BSD-3-Clause |
| [panel](https://panel.holoviz.org) | 0.13.0 | A high-level app and dashboarding solution for Python / BSD-3-Clause |
| [param](http://ioam.github.io/param/) | 1.12.0 | Param: Make your Python code clearer and more reliable by declaring Parameters / BSD-3-Clause |
| [parsel](https://github.com/scrapy/parsel) | 1.6.0 | library to extract data from HTML and XML using XPath and CSS selectors / BSD-3-Clause |
| [parso](https://github.com/davidhalter/parso) | 0.8.3 | A Python Parser / MIT |
| [partd](https://github.com/dask/partd) | 1.2.0 | Data structure for on-disk shuffle operations / BSD 3-Clause |
| [patchelf](http://nixos.org/patchelf.html) | 0.13 | A small utility to modify the dynamic linker and RPATH of ELF executables. / GPL-3.0-or-later |
| [patsy](https://github.com/pydata/patsy) | 0.5.2 | Describing statistical models in Python using symbolic formulas / BSD-2-Clause AND PSF-2.0 |
| [pcre](http://www.pcre.org/) | 8.45 | Regular expression pattern matching using the same syntax and semantics as Perl 5. / BSD 3-Clause |
| [pep8](http://pep8.readthedocs.org/) | 1.7.1 | Python style guide checker / MIT |
| [pexpect](http://pexpect.sourceforge.net/) | 4.8.0 | Pexpect makes Python a better tool for controlling other applications. / ISC |
| [pickleshare](https://github.com/pickleshare/pickleshare/) | 0.7.5 | Tiny ‘shelve’-like database with concurrency support / MIT |
| [pillow](https://pillow.readthedocs.io) | 9.0.1 | Pillow is the friendly PIL fork by Alex Clark and Contributors / LicenseRef-PIL |
| [pip](https://pip.pypa.io/en/stable/) | 21.2.4 | PyPA recommended tool for installing Python packages / MIT |
| [pkginfo](https://code.launchpad.net/~tseaver/pkginfo/trunk) | 1.8.2 | Query metadatdata from sdists / bdists / installed packages. / MIT |
| [platformdirs](https://github.com/platformdirs/platformdirs) | 2.4.0 | A small Python module for determining appropriate platform-specific dirs, e.g. a “user data dir”. / MIT |
| [plotly](https://plot.ly/python/) | 5.6.0 | An interactive JavaScript-based visualization library for Python / MIT |
| [pluggy](https://github.com/pytest-dev/pluggy) | 1.0.0 | Plugin registration and hook calling for Python / MIT |
| [prometheus\_client](https://github.com/prometheus/client_python) | 0.13.1 | Python client for the Prometheus monitoring system / Apache-2.0 |
| [prompt-toolkit](https://github.com/jonathanslenders/python-prompt-toolkit) | 3.0.20 | Library for building powerful interactive command lines in Python / BSD-3-Clause |
| [prompt\_toolkit](https://github.com/jonathanslenders/python-prompt-toolkit) | 3.0.20 | Library for building powerful interactive command lines in Python / BSD-3-Clause |
| [protego](https://github.com/scrapy/protego) | 0.1.16 | A pure-Python robots.txt parser with support for modern conventions / BSD 3-Clauses |
| [protobuf](https://developers.google.com/protocol-buffers/) | 3.19.1 | Protocol Buffers - Google’s data interchange format. / BSD-3-Clause |
| [psutil](https://github.com/giampaolo/psutil) | 5.8.0 | A cross-platform process and system utilities module for Python / BSD-3-Clause |
| [ptyprocess](https://github.com/pexpect/ptyprocess) | 0.7.0 | Run a subprocess in a pseudo terminal / ISC |
| [pure\_eval](https://github.com/alexmojaki/pure_eval) | 0.2.2 | Safely evaluate AST nodes without side effects / MIT |
| [py](https://github.com/pytest-dev/py) | 1.11.0 | library with cross-python path, ini-parsing, io, code, log facilities / MIT |
| [py-lief](https://lief.quarkslab.com/) | 0.11.5 | A cross platform library to parse, modify and abstract ELF, PE and MachO formats. / Apache-2.0 |
| [pyasn1](https://github.com/etingof/pyasn1) | 0.4.8 | ASN.1 types and codecs / BSD 2-Clause |
| [pyasn1-modules](http://pyasn1.sourceforge.net/) | 0.2.8 | A collection of ASN.1-based protocols modules. / BSD 2-Clause |
| [pycodestyle](https://pycodestyle.readthedocs.io/) | 2.8.0 | Python style guide checker / MIT |
| [pycosat](https://github.com/ContinuumIO/pycosat) | 0.6.3 | Bindings to picosat (a SAT solver) / MIT |
| [pycparser](https://github.com/eliben/pycparser) | 2.21 | Complete C99 parser in pure Python / BSD-3-clause |
| [pyct](http://github.com/pyviz/pyct) | 0.4.6 | python package common tasks for users (e.g. copy examples, fetch data, …) / BSD 3-Clause |
| [pycurl](http://pycurl.sourceforge.net/) | 7.44.1 | A Python Interface To The cURL library / LGPL, MIT |
| [pydispatcher](http://pydispatcher.sourceforge.net) | 2.0.5 | Multi-producer-multi-consumer signal dispatching mechanism / BSD 3-Clause |
| [pyerfa](https://pyerfa.readthedocs.io/) | 2.0.0 | Python bindings for ERFA routines / BSD-3-Clause |
| [pyflakes](https://github.com/PyCQA/pyflakes) | 2.4.0 | Pyflakes analyzes programs and detects various errors. / MIT |
| [pygments](https://pygments.org/) | 2.11.2 | Pygments is a generic syntax highlighter suitable for use in code hosting, forums, wikis or other applications that need to prettify source code. / BSD-2-Clause |
| [pyhamcrest](https://github.com/hamcrest/PyHamcrest) | 2.0.2 | Hamcrest framework for matcher objects / BSD 3-Clause |
| [pylint](https://www.pylint.org) | 2.12.2 | python code static checker / GPL-2.0-or-later |
| [pyodbc](https://github.com/mkleehammer/pyodbc) | 4.0.32 | DB API Module for ODBC / MIT |
| [pyopenssl](https://github.com/pyca/pyopenssl) | 21.0.0 | Python wrapper module around the OpenSSL library / Apache-2.0 |
| [pyparsing](https://github.com/pyparsing/pyparsing/) | 3.0.4 | Create and execute simple grammars / MIT |
| [pyrsistent](http://github.com/tobgu/pyrsistent/) | 0.18.0 | Persistent/Functional/Immutable data structures / MIT |
| [pysocks](https://github.com/Anorov/PySocks) | 1.7.1 | A Python SOCKS client module. See [Anorov/PySocks](https://github.com/Anorov/PySocks) for more information. / BSD 3-Clause |
| [pytables](https://www.pytables.org) | 3.6.1 | Brings together Python, HDF5 and NumPy to easily handle large amounts of data. / BSD-3-Clause |
| [pytest](https://docs.pytest.org/en/latest/) | 7.1.1 | Simple and powerful testing with Python. / MIT |
| [python](https://www.python.org/) | 3.9.12 | General purpose programming language / PSF-2.0 |
| [python-dateutil](https://dateutil.readthedocs.org/) | 2.8.2 | Extensions to the standard Python datetime module. / BSD-3-Clause and Apache |
| [python-fastjsonschema](https://github.com/horejsek/python-fastjsonschema) | 2.15.1 | Fastest Python implementation of JSON schema / BSD-3-Clause |
| [python-libarchive-c](https://github.com/Changaco/python-libarchive-c) | 2.9 | Python interface to libarchive / CC0-1.0 |
| [python-snappy](https://github.com/andrix/python-snappy) | 0.6.0 | Python library for the snappy compression library from Google / BSD-3-Clause |
| [pytz](http://pythonhosted.org/pytz/) | 2021.3 | World timezone definitions, modern and historical. / MIT |
| [pyviz\_comms](https://www.holoviz.org) | 2.0.2 | Bidirectional communication for PyViz / BSD-3-Clause |
| [pywavelets](https://github.com/PyWavelets/pywt) | 1.3.0 | Discrete Wavelet Transforms in Python / MIT |
| [pyyaml](http://pyyaml.org/wiki/PyYAML) | 6.0 | YAML parser and emitter for Python / MIT |
| [pyzmq](https://github.com/zeromq/pyzmq) | 22.3.0 | Python bindings for zeromq / BSD-3-clause |
| [queuelib](https://github.com/scrapy/queuelib) | 1.5.0 | Collection of persistent (disk-based) queues / BSD |
| [readline](https://tiswww.case.edu/php/chet/readline/rltop.html) | 8.1.2 | library for editing command lines as they are typed in / GPL-3.0-only |
| [regex](https://github.com/mrabarnett/mrab-regex) | 2022.3.15 | Alternative regular expression module, to replace re / Apache-2.0 |
| [requests](http://python-requests.org) | 2.27.1 | Requests is an elegant and simple HTTP library for Python, built with ♥. / Apache-2.0 |
| [requests-file](http://github.com/dashea/requests-file) | 1.5.1 | file transport adapter for Requests / Apache |
| [rsa](https://stuvel.eu/rsa) | 4.7.2 | Pure-Python RSA implementation / Apache-2.0 |
| [ruamel\_yaml](https://sourceforge.net/p/ruamel-yaml/code/ci/default/tree) | 0.15.100 | A patched copy of ruamel.yaml. / MIT |
| [s3transfer](https://github.com/boto/s3transfer) | 0.5.0 | An Amazon S3 Transfer Manager / Apache-2.0 |
| [scikit-image](https://scikit-image.org/) | 0.19.2 | Image processing in Python. / BSD-3-Clause |
| [scikit-learn](http://scikit-learn.org/) | 1.0.2 | A set of python modules for machine learning and data mining / BSD-3-Clause |
| [scipy](http://www.scipy.org/) | 1.7.3 | Scientific Library for Python / BSD 3-Clause |
| [scrapy](https://scrapy.org/) | 2.6.1 | A high-level Python Screen Scraping framework / BSD-3-Clause-Clear |
| [seaborn](https://seaborn.pydata.org) | 0.11.2 | Statistical data visualization / BSD 3-Clause |
| [send2trash](https://github.com/arsenetar/send2trash) | 1.8.0 | Python library to natively send files to Trash (or Recycle bin) on all platforms. / BSD-3-Clause |
| [service\_identity](https://github.com/pyca/service_identity) | 18.1.0 | Service identity verification for pyOpenSSL. / MIT |
| [setuptools](https://github.com/pypa/setuptools) | 61.2.0 | Download, build, install, upgrade, and uninstall Python packages / MIT |
| [six](https://six.readthedocs.io/) | 1.16.0 | Python 2 and 3 compatibility utilities / MIT |
| [smart\_open](https://github.com/RaRe-Technologies/smart_open) | 5.1.0 | Python library for efficient streaming of large files / MIT |
| [snappy](https://github.com/google/snappy) | 1.1.9 | A fast compressor/decompressor / BSD-3-clause AND CC-BY-3.0 AND MIT AND CC-BY AND Public Domain |
| [snowballstemmer](https://github.com/snowballstem/snowball) | 2.2.0 | Snowball stemming library collection for Python / BSD-3-Clause |
| [sortedcollections](http://www.grantjenks.com/docs/sortedcollections/) | 2.1.0 | Python Sorted Collections / Apache-2.0 |
| [sortedcontainers](http://www.grantjenks.com/docs/sortedcontainers/) | 2.4.0 | Python Sorted Container Types: SortedList, SortedDict, and SortedSet / Apache-2.0 |
| [soupsieve](http://facelessuser.github.io/soupsieve) | 2.3.1 | A modern CSS selector implementation for BeautifulSoup / MIT |
| [sphinx](https://www.sphinx-doc.org) | 4.4.0 | Sphinx is a tool that makes it easy to create intelligent and beautiful documentation / BSD-2-Clause |
| [sphinxcontrib-applehelp](https://www.sphinx-doc.org/en/master/) | 1.0.2 | sphinxcontrib-applehelp is a sphinx extension which outputs Apple help books / BSD-2-Clause |
| [sphinxcontrib-devhelp](https://www.sphinx-doc.org/en/master/) | 1.0.2 | sphinxcontrib-devhelp is a sphinx extension which outputs Devhelp document / BSD-2-Clause |
| [sphinxcontrib-htmlhelp](https://www.sphinx-doc.org/en/master/) | 2.0.0 | sphinxcontrib-htmlhelp is a sphinx extension which renders HTML help files. / BSD-2-Clause |
| [sphinxcontrib-jsmath](https://www.sphinx-doc.org/en/master/) | 1.0.1 | A sphinx extension which renders display math in HTML via JavaScript / BSD-2-Clause |
| [sphinxcontrib-qthelp](https://www.sphinx-doc.org/en/master/) | 1.0.3 | sphinxcontrib-qthelp is a sphinx extension which outputs QtHelp document / BSD-2-Clause |
| [sphinxcontrib-serializinghtml](https://www.sphinx-doc.org/en/master/) | 1.1.5 | sphinxcontrib-serializinghtml is a sphinx extension which outputs “serialized” HTML files (json and pickle). / BSD-2-Clause |
| [sqlalchemy](https://www.sqlalchemy.org/) | 1.4.32 | Database Abstraction Library. / MIT |
| [sqlite](https://www.sqlite.org/) | 3.38.2 | Implements a self-contained, zero-configuration, SQL database engine / blessing |
| [stack\_data](https://github.com/alexmojaki/stack_data) | 0.2.0 | Extract data from python stack frames and tracebacks for informative displays / MIT |
| [statsmodels](https://www.statsmodels.org) | 0.13.2 | Statistical computations and models for use with SciPy / BSD-3-Clause |
| [sympy](https://sympy.org) | 1.10.1 | Python library for symbolic mathematics / BSD-3-Clause AND MIT |
| [tabulate](https://bitbucket.org/astanin/python-tabulate) | 0.8.9 | Pretty-print tabular data in Python, a library and a command-line utility. / MIT |
| [tbb](https://github.com/oneapi-src/oneTBB) | 2021.5.0 | High level abstract threading library / Apache-2.0 |
| tbb4py | 2021.5.0 | TBB module for Python / Apache 2.0 |
| [tblib](https://github.com/ionelmc/python-tblib) | 1.7.0 | Traceback serialization library. / BSD 2-Clause |
| [tenacity](http://github.com/jd/tenacity) | 8.0.1 | Retry a flaky function whenever an exception occurs until it works / Apache-2.0 |
| [terminado](https://github.com/jupyter/terminado) | 0.13.1 | Terminals served by tornado websockets / BSD-2-Clause |
| [testpath](https://testpath.readthedocs.io) | 0.5.0 | Testpath is a collection of utilities for Python code working with files and commands. / BSD-3-Clause |
| [threadpoolctl](https://github.com/joblib/threadpoolctl) | 2.2.0 | Python helpers to control the threadpools of native libraries / BSD 3-Clause |
| [tifffile](https://github.com/cgohlke/tifffile) | 2021.7.2 | Read and write image data from and to TIFF files. / BSD-3-Clause |
| [tk](http://www.tcl.tk/) | 8.6.11 | A dynamic programming language with GUI support. Bundles Tcl and Tk. / Tcl/Tk |
| [tldextract](https://github.com/john-kurkowski/tldextract) | 3.2.0 | Accurately separate the TLD from the registered domain andsubdomains of a URL, using the Public Suffix List. / BSD-3-Clause |
| [toml](https://github.com/uiri/toml) | 0.10.2 | Python lib for TOML. / MIT |
| [tomli](https://github.com/hukkin/tomli) | 1.2.2 | A simple TOML parser / MIT |
| [toolz](http://toolz.readthedocs.org/) | 0.11.2 | List processing tools and functional utilities / BSD-3-Clause |
| [tornado](http://www.tornadoweb.org/) | 6.1 | A Python web framework and asynchronous networking library, originally developed at FriendFeed. / Apache-2.0 |
| [tqdm](https://pypi.python.org/pypi/tqdm) | 4.64.0 | A Fast, Extensible Progress Meter / MPL-2.0 AND MIT |
| [traitlets](http://traitlets.readthedocs.org/) | 5.1.1 | Configuration system for Python applications / BSD-3-Clause |
| [twisted](https://twistedmatrix.com/) | 22.2.0 | An asynchronous networking framework written in Python / MIT |
| [typing-extensions](https://github.com/python/typing/tree/master/typing_extensions) | 4.1.1 | Backported and Experimental Type Hints for Python / PSF-2.0 |
| [typing\_extensions](https://github.com/python/typing/tree/master/typing_extensions) | 4.1.1 | Backported and Experimental Type Hints for Python / PSF-2.0 |
| [tzdata](https://www.iana.org/time-zones) | 2022a | The Time Zone Database (called tz, tzdb or zoneinfo) / Public-Domain AND BSD-3-clause |
| [unixodbc](http://www.unixodbc.org/) | 2.3.9 | ODBC on non MS Windows platforms / LGPL-2.1 |
| [urllib3](https://urllib3.readthedocs.io/) | 1.26.9 | HTTP library with thread-safe connection pooling, file post, and more. / MIT |
| [w3lib](https://github.com/scrapy/w3lib) | 1.21.0 | Library of web-related functions / BSD |
| [wcwidth](https://github.com/jquast/wcwidth) | 0.2.5 | Measures number of Terminal column cells of wide-character codes. / MIT |
| [webencodings](https://github.com/gsnedders/python-webencodings) | 0.5.1 | Character encoding aliases for legacy web content / BSD 3-Clause |
| [werkzeug](https://palletsprojects.com/p/werkzeug/) | 2.0.3 | The comprehensive WSGI web application library. / BSD-3-Clause |
| [wget](https://www.gnu.org/software/wget/) | 1.21.3 | utility for non-interactive download of files from the Web / GPL-3.0-or-later |
| [wheel](https://github.com/pypa/wheel) | 0.37.1 | A built-package format for Python. / MIT |
| [widgetsnbextension](http://ipython.org) | 3.5.2 | Interactive Widgets for Jupyter / BSD-3-Clause |
| [wrapt](https://github.com/GrahamDumpleton/wrapt) | 1.13.3 | Module for decorators, wrappers and monkey patching / BSD-2-Clause |
| [xarray](https://github.com/pydata/xarray) | 0.20.1 | N-D labeled arrays and datasets in Python. / Apache-2.0 |
| [xlrd](http://www.python-excel.org/) | 2.0.1 | Library for developers to extract data from Microsoft Excel (tm) spreadsheet files / BSD 3-Clause and BSD with advertising |
| [xlsxwriter](https://xlsxwriter.readthedocs.io/) | 3.0.3 | A Python module for creating Excel XLSX files / BSD-2-Clause |
| [xz](http://tukaani.org/xz/) | 5.2.5 | Data compression software with high compression ratio / LGPL-2.1 and GPL-2.0 |
| [yaml](http://pyyaml.org/wiki/LibYAML) | 0.2.5 | A C library for parsing and emitting YAML / MIT |
| [yarl](https://github.com/aio-libs/yarl) | 1.6.3 | Yet another URL library / Apache 2.0 |
| [zeromq](http://zeromq.org) | 4.3.4 | A high-performance asynchronous messaging library. / LGPL-3.0-or-later |
| [zfp](https://computation.llnl.gov/projects/floating-point-compression) | 0.5.5 | Library for compressed numerical arrays that support high throughput read and write random access / BSD-3-Clause |
| [zict](http://github.com/mrocklin/zict) | 2.0.0 | Composable Dictionary Classes / BSD 3-Clause |
| [zipp](https://github.com/jaraco/zipp) | 3.7.0 | A pathlib-compatible Zipfile object wrapper / MIT |
| [zlib](http://zlib.net/) | 1.2.12 | Massively spiffy yet delicately unobtrusive compression library / Zlib |
| zope | 1.0 | web application server / BSD |
| [zope.interface](https://github.com/zopefoundation/zope.interface) | 5.4.0 | Interfaces for Python / ZPL-2.1 |
| [zstd](https://www.zstd.net) | 1.4.9 | Zstandard - Fast real-time compression algorithm / BSD-3-Clause AND GPL-2.0-or-later |
| Name | Version | Summary / License |
|---|---|---|
| [\_libgcc\_mutex](https://github.com/AnacondaRecipes/_libgcc_mutex-feedstock) | 0.1 | Mutex for libgcc and libgcc-ng / None |
| [\_openmp\_mutex](https://github.com/conda-forge/ctng-compilers-feedstock) | 5.1 | OpenMP Implementation Mutex / BSD-3-Clause |
| [adwaita-icon-theme](https://developer.gnome.org) | 40.1.1 | The default icon theme used by the GNOME desktop / LGPL-3.0-or-later OR CC-BY-SA-3.0 |
| [aiohttp](https://github.com/aio-libs/aiohttp) | 3.8.1 | Async http client/server framework (asyncio) / Apache-2.0 |
| [aiosignal](https://github.com/aio-libs/aiosignal) | 1.2.0 | aiosignal: a list of registered asynchronous callbacks / Apache-2.0 |
| [alabaster](http://www.sphinx-doc.org/en/stable/index.html) | 0.7.12 | Configurable, Python 2+3 compatible Sphinx theme. / BSD 3-Clause |
| [anaconda-client](https://github.com/Anaconda-Platform/anaconda-client) | 1.9.0 | Anaconda Cloud command line client library / BSD 3-Clause |
| [anaconda-navigator](https://github.com/ContinuumIO/navigator) | 2.1.4 | Anaconda Navigator / proprietary - Continuum Analytics, Inc. |
| [anaconda-project](https://github.com/Anaconda-Platform/anaconda-project) | 0.10.2 | Tool for encapsulating, running, and reproducing data science projects / BSD-3-Clause |
| [anyio](https://github.com/agronholm/anyio) | 3.5.0 | High level compatibility layer for multiple asynchronous event loop implementations on Python / MIT |
| [appdirs](http://github.com/ActiveState/appdirs) | 1.4.4 | A small Python module for determining appropriate platform-specific dirs. / MIT |
| [argon2-cffi](https://argon2-cffi.readthedocs.org/) | 21.3.0 | The secure Argon2 password hashing algorithm. / MIT |
| [argon2-cffi-bindings](https://github.com/hynek/argon2-cffi-bindings) | 21.2.0 | Low-level Python CFFI Bindings for Argon2 / MIT |
| [arrow](https://github.com/crsmithdev/arrow) | 1.2.2 | Better dates & times for Python / Apache-2.0 |
| [astroid](https://www.astroid.org/) | 2.5 | A abstract syntax tree for Python with inference support. / LGPL-2.1-or-later |
| [astropy](https://www.astropy.org/) | 5.0.4 | Community-developed Python Library for Astronomy / BSD-3-Clause |
| [asttokens](https://github.com/gristlabs/asttokens) | 2.0.5 | The asttokens module annotates Python abstract syntax trees (ASTs) with the positions of tokens and text in the source code that generated them. / Apache-2.0 |
| [async-timeout](http://github.com/aio-libs/async_timeout) | 4.0.1 | Timeout context manager for asyncio programs / Apache-2.0 |
| [at-spi2-atk](http://www.gtk.org/) | 2.34.2 | bridge for AT-SPI and ATK accessibility technologies / LGPL-2.1-or-later |
| [at-spi2-core](http://www.gtk.org/) | 2.36.0 | D-Bus-based implementation of AT-SPI accessibility framework / LGPL-2.1-or-later |
| [atk-1.0](http://www.gtk.org/) | 2.36.0 | Accessibility Toolkit. / LGPL-2.0-or-later |
| [atomicwrites](https://github.com/untitaker/python-atomicwrites) | 1.4.0 | Atomic file writes / MIT |
| [attrs](https://attrs.readthedocs.io/en/stable/) | 21.4.0 | attrs is the Python package that will bring back the joy of writing classes by relieving you from the drudgery of implementing object protocols (aka dunder methods). / MIT |
| [automat](https://github.com/glyph/Automat) | 20.2.0 | self-service finite-state machines for the programmer on the go / MIT |
| [autopep8](https://github.com/hhatto/autopep8) | 1.6.0 | A tool that automatically formats Python code to conform to the PEP 8 style guide / MIT |
| [babel](http://babel.pocoo.org/) | 2.9.1 | Utilities to internationalize and localize Python applications / BSD 3-clause |
| [backcall](https://github.com/takluyver/backcall/) | 0.2.0 | Specifications for callback functions passed in to an API / BSD-3-Clause |
| [backports](https://github.com/brandon-rhodes/backports) | 1.1 | Namespace for backported Python features. / MIT |
| [backports.functools\_lru\_cache](https://github.com/jaraco/backports.functools_lru_cache) | 1.6.4 | Backport of functools.lru\_cache from Python 3.3 as published at ActiveState. / MIT |
| [backports.tempfile](https://github.com/pjdelport/backports.tempfile) | 1.0 | Backports of new features in Python’s tempfile module / PSF 2 |
| [backports.weakref](https://github.com/pjdelport/backports.weakref) | 1.0.post1 | Backport of new features in Python’s weakref module / Python-2.0 |
| [bcrypt](https://github.com/pyca/bcrypt/) | 3.2.0 | Modern password hashing for your software and your servers / Apache-2.0 |
| [beautifulsoup4](https://www.crummy.com/software/BeautifulSoup/) | 4.11.1 | Python library designed for screen-scraping / MIT |
| [binaryornot](https://github.com/audreyr/binaryornot) | 0.4.4 | Ultra-lightweight pure Python package to check if a file is binary or text. / BSD-3-Clause |
| [bitarray](https://github.com/ilanschnell/bitarray) | 2.4.1 | efficient arrays of booleans – C extension / PSF-2.0 |
| [bkcharts](http://github.com/bokeh/bkcharts) | 0.2 | High level chart types built on top of Bokeh / BSD 3-Clause |
| [black](https://github.com/python/black) | 19.10b0 | The Uncompromising Code Formatter / MIT |
| [blas](http://www.netlib.org/lapack) | 1.0 | Linear Algebra PACKage / BSD-3-Clause |
| [bleach](https://github.com/mozilla/bleach) | 4.1.0 | Easy, whitelist-based HTML-sanitizing tool / Apache-2.0 |
| [blosc](https://github.com/Blosc/c-blosc) | 1.21.0 | A blocking, shuffling and loss-less compression library that can be faster than memcpy() / BSD-3-Clause |
| [bokeh](http://bokeh.pydata.org/) | 2.4.2 | Statistical and novel interactive HTML plots for Python / BSD-3-Clause |
| [boto3](https://aws.amazon.com/sdk-for-python) | 1.21.32 | Amazon Web Services SDK for Python / Apache-2.0 |
| [botocore](https://aws.amazon.com/sdk-for-python/) | 1.24.32 | Low-level, data-driven core of boto 3. / Apache-2.0 |
| [bottleneck](https://github.com/pydata/bottleneck) | 1.3.4 | Fast NumPy array functions written in Cython. / BSD-2-Clause |
| [brotli](http://github.com/google/brotli) | 1.0.9 | Brotli compression format / MIT |
| [brotlipy](https://github.com/python-hyper/brotlipy) | 0.7.0 | Python bindings to the Brotli compression library / MIT |
| [brunsli](https://github.com/google/brunsli) | 0.1 | Practical JPEG Repacker / MIT |
| [bzip2](http://www.bzip.org/) | 1.0.8 | high-quality data compressor / bzip2 |
| [c-ares](https://c-ares.org/) | 1.18.1 | This is c-ares, an asynchronous resolver library / MIT |
| [ca-certificates](https://curl.se/docs/caextract.html) | 2022.3.29 | Certificates for use with other packages. / MPL-2.0 |
| [cached-property](https://github.com/pydanny/cached-property) | 1.5.2 | A decorator for caching properties in classes. / BSD-3-Clause |
| [cachetools](https://github.com/tkem/cachetools) | 4.2.2 | Extensible memoizing collections and decorators / MIT |
| [cairo](http://cairographics.org/) | 1.16.0 | Cairo is a 2D graphics library with support for multiple output devices. / LGPL 2.1 or MPL 1.1 |
| [certifi](http://certifi.io/) | 2021.10.8 | Python package for providing Mozilla’s CA Bundle. / ISC |
| [cffi](http://cffi.readthedocs.org/) | 1.15.0 | Foreign Function Interface for Python calling C code. / MIT |
| [cfitsio](http://heasarc.gsfc.nasa.gov/fitsio/fitsio.html) | 3.470 | A library for reading and writing FITS files / fitsio |
| [chardet](https://github.com/chardet/chardet) | 4.0.0 | Universal character encoding detector / LGPL2 |
| [charls](https://github.com/team-charls/charls) | 2.2.0 | CharLS is a C++ implementation of the JPEG-LS standard for lossless and near-lossless image compression and decompression. JPEG-LS is a low-complexity image compression standard that matches JPEG 2000 compression ratios. / BSD-3-Clause |
| [charset-normalizer](https://github.com/ousret/charset_normalizer) | 2.0.4 | The Real First Universal Charset Detector. Open, modern and actively maintained alternative to Chardet. / MIT |
| [click](https://palletsprojects.com/p/click) | 8.0.4 | Python composable command line interface toolkit / BSD-3-Clause |
| [cloudpickle](https://github.com/cloudpipe/cloudpickle) | 2.0.0 | Extended pickling support for Python objects / BSD-3-Clause |
| [clyent](https://github.com/Anaconda-Platform/clyent) | 1.2.2 | Command line client library for windows and posix / BSD 3-Clause |
| [colorama](https://github.com/tartley/colorama) | 0.4.4 | Cross-platform colored terminal text / BSD-3-Clause |
| [colorcet](http://github.com/pyviz/colorcet) | 2.0.6 | Collection of perceptually uniform colormaps / CC-BY-4.0 |
| [conda](https://conda.io) | 4.12.0 | OS-agnostic, system-level binary package and environment manager. / BSD-3-Clause |
| [conda-build](https://github.com/conda/conda-build) | 3.21.8 | tools for building conda packages / BSD-3-Clause |
| [conda-content-trust](https://github.com/conda/conda-content-trust) | 0.1.1 | Signing and verification tools for conda / BSD-3-Clause |
| [conda-env](https://github.com/conda/conda-env) | 2.6.0 | Tools for interacting with conda environments. / BSD 3-Clause |
| [conda-token](https://github.com/Anaconda/conda-token) | 0.3.0 | Set repository access token / BSD-3-Clause |
| [conda-verify](https://github.com/conda/conda-verify) | 3.4.2 | tool for validating conda recipes and conda packages / BSD 3-Clause |
| [constantly](https://github.com/twisted/constantly) | 15.1.0 | Symbolic constants in Python / MIT |
| [cookiecutter](https://github.com/cookiecutter/cookiecutter) | 1.7.3 | A command-line utility that creates projects from cookiecutters (project templates), e.g. creating a Python package project from a Python package project template. / BSD-3-Clause |
| [cryptography](https://github.com/pyca/cryptography) | 3.4.7 | Provides cryptographic recipes and primitives to Python developers / Apache-2.0 AND BSD-3-Clause AND PSF-2.0 AND MIT |
| [cssselect](https://pythonhosted.org/cssselect/) | 1.1.0 | CSS Selectors for Python / BSD 3-Clause |
| [curl](https://curl.haxx.se/) | 7.82.0 | tool and library for transferring data with URL syntax / curl |
| [cycler](http://matplotlib.org/cycler) | 0.11.0 | Composable style cycles. / BSD-3-Clause |
| [cython](https://cython.org/) | 0.29.28 | The Cython compiler for writing C extensions for the Python language / Apache-2.0 |
| [cytoolz](https://github.com/pytoolz/cytoolz) | 0.11.0 | Cython implementation of Toolz. High performance functional utilities / BSD-3-Clause |
| [dask](https://dask.org/) | 2022.2.1 | Parallel PyData with Task Scheduling / BSD-3-Clause |
| [dask-core](https://github.com/dask/dask/) | 2022.2.1 | Parallel Python with task scheduling / BSD-3-Clause |
| [dataclasses](https://github.com/ericvsmith/dataclasses) | 0.8 | An implementation of PEP 557: Data Classes / Apache-2.0 |
| [datashader](https://datashader.org) | 0.13.0 | Data visualization toolchain based on aggregating into a grid / BSD-3-Clause |
| [datashape](http://datashape.pydata.org) | 0.5.4 | A data description language. / BSD 2-Clause |
| [dbus](http://www.freedesktop.org/wiki/Software/dbus/) | 1.13.18 | Simple message bus system for applications to talk to one another / GPL2 |
| [debugpy](https://github.com/Microsoft/debugpy) | 1.5.1 | An implementation of the Debug Adapter Protocol for Python / MIT |
| [decorator](https://github.com/micheles/decorator) | 5.1.1 | Better living through Python with decorators. / BSD-2-Clause |
| [defusedxml](https://bitbucket.org/tiran/defusedxml) | 0.7.1 | XML bomb protection for Python stdlib modules / PSF 2.0 |
| [diff-match-patch](http://code.google.com/p/google-diff-match-patch/) | 20200713 | Diff Match Patch is a high-performance library in multiple languages that manipulates plain text / Apache-2.0 |
| [distributed](https://distributed.readthedocs.io/en/latest/) | 2022.2.1 | Distributed computing with Dask / BSD-3-Clause |
| [docutils](http://docutils.sourceforge.net/) | 0.17 | Docutils – Python Documentation Utilities / LicenseRef-Public-Domain-Dedictation and BSD-2-Clause and LicenseRef-PSF-2.1.1 and GPL-3.0-or-later |
| [entrypoints](https://github.com/takluyver/entrypoints) | 0.4 | Discover and load entry points from installed packages. / MIT License |
| [epoxy](https://github.com/anholt/libepoxy) | 1.5.4 | A library for handling OpenGL function pointer management for you. / MIT |
| [et\_xmlfile](https://foss.heptapod.net/openpyxl/et_xmlfile) | 1.1.0 | An implementation of lxml.xmlfile for the standard library / MIT AND PSF-2.0 |
| [executing](https://pypi.org/project/executing) | 0.8.3 | Get the currently executing AST node of a frame, and other information / MIT |
| [expat](https://libexpat.github.io) | 2.4.4 | Expat XML parser library in C / MIT |
| [filelock](https://github.com/tox-dev/py-filelock) | 3.6.0 | A platform independent file lock. / Unlicense |
| [flake8](http://flake8.pycqa.org/) | 3.9.2 | Your Tool For Style Guide Enforcement / MIT |
| [flask](https://flask.pocoo.org) | 1.1.2 | A microframework based on Werkzeug, Jinja2 and good intentions. / BSD 3-Clause |
| [fontconfig](http://www.freedesktop.org/wiki/Software/fontconfig/) | 2.13.1 | A library for configuring and customizing font access. / MIT |
| [fonttools](https://github.com/fonttools/fonttools) | 4.25.0 | fontTools is a library for manipulating fonts, written in Python. / MIT |
| [freetype](https://www.freetype.org/) | 2.11.0 | A Free, High-Quality, and Portable Font Engine / GPL-2.0-only and LicenseRef-FreeType |
| [fribidi](https://github.com/fribidi/fribidi) | 1.0.10 | The Free Implementation of the Unicode Bidirectional Algorithm. / LGPL-2.1 |
| [frozenlist](https://github.com/aio-libs/frozenlist) | 1.2.0 | A list-like structure which implements collections.abc.MutableSequence / Apache-2.0 |
| [fsspec](https://github.com/martindurant/filesystem_spec) | 2022.2.0 | A specification for pythonic filesystems / BSD-3-Clause |
| [future](http://python-future.org) | 0.18.2 | Clean single-source support for Python 3 and 2 / MIT |
| [gdk-pixbuf](https://developer.gnome.org/gdk-pixbuf/) | 2.38.2 | GdkPixbuf is a library for image loading and manipulation. / LGPL-2.1-or-later |
| [gensim](https://github.com/RaRe-Technologies/gensim) | 4.1.2 | Topic Modelling for Humans / LGPL-2.1-only |
| [gettext](https://www.gnu.org/software/gettext/) | 0.21.0 | Internationalization package / GPL-2.0 |
| [giflib](http://giflib.sourceforge.net) | 5.2.1 | Library for reading and writing gif images / MIT |
| [glib](https://developer.gnome.org/glib/) | 2.69.1 | Provides core application building blocks for libraries and applications written in C. / LGPL-2.1-or-later |
| [glob2](https://github.com/miracle2k/python-glob2) | 0.7 | Version of the glob module that supports recursion via \*\*, and can capture patterns. / BSD-2-Clause |
| [gmp](http://gmplib.org/) | 6.2.1 | The GNU multiprecision library. / GPL-2.0-or-later AND LGPL-3.0-or-later |
| [gmpy2](https://pypi.python.org/pypi/gmpy2) | 2.1.2 | GMP/MPIR, MPFR, and MPC interface to Python 2.6+ and 3.x / LGPL-3.0-or-later |
| [gobject-introspection](https://wiki.gnome.org/action/show/Projects/GObjectIntrospection) | 1.68.0 | Middleware for binding GObject-based code to other languages. / LGPL-2.0-or-later |
| [google-api-core](https://github.com/googleapis/python-api-core) | 1.25.1 | Core Library for Google Client Libraries / Apache-2.0 |
| [google-auth](https://github.com/googleapis/google-auth-library-python) | 1.33.0 | Google authentication library for Python / Apache-2.0 |
| [google-cloud-core](https://github.com/googleapis/python-cloud-core) | 1.7.1 | API Client library for Google Cloud: Core Helpers / Apache-2.0 |
| [google-cloud-storage](https://github.com/googleapis/python-storage) | 1.31.0 | Python Client for Google Cloud Storage / Apache-2.0 |
| [google-crc32c](https://github.com/googleapis/python-crc32c) | 1.1.2 | Python wrapper for a hardware-based implementation of the CRC32C hashing algorithm / Apache-2.0 |
| [google-resumable-media](https://github.com/googleapis/google-resumable-media-python) | 1.3.1 | Utilities for Google Media Downloads and Resumable Uploads / Apache-2.0 |
| [googleapis-common-protos](https://github.com/googleapis/api-common-protos) | 1.53.0 | Common protobufs used in Google APIs / Apache-2.0 |
| [graphite2](http://graphite.sil.org/) | 1.3.14 | A “smart font” system that handles the complexities of lesser-known languages of the world. / LGPLv2 |
| [greenlet](https://github.com/python-greenlet/greenlet) | 1.1.1 | Lightweight in-process concurrent programming / MIT |
| [grpcio](https://grpc.io) | 1.42.0 | HTTP/2-based RPC framework / Apache-2.0 |
| [gst-plugins-base](http://gstreamer.freedesktop.org/) | 1.14.1 | GStreamer Base Plug-ins / GPL2 |
| [gstreamer](http://gstreamer.freedesktop.org/) | 1.14.1 | Library for constructing graphs of media-handling components / LGPL 2 |
| [gtk3](http://www.gtk.org/) | 3.24.21 | Version 3 of the Gtk+ graphical toolkit / LGPL-2.0-or-later |
| [h5py](http://www.h5py.org/) | 3.1.0 | Read and write HDF5 files from Python / BSD-3-Clause |
| [harfbuzz](http://www.freedesktop.org/wiki/Software/HarfBuzz/) | 2.8.0 | An OpenType text shaping engine. / MIT |
| [hdf5](http://www.hdfgroup.org/HDF5/) | 1.12.0 | HDF5 is a data model, library, and file format for storing and managing data / HDF5 |
| [heapdict](http://stutzbachenterprises.com/) | 1.0.1 | A heap with decrease-key and increase-key operations / BSD 3-Clause |
| [hicolor-icon-theme](https://wiki.freedesktop.org/www/Software/icon-theme/) | 0.17 | Fallback theme for FreeDesktop.org icon themes / GPL-2.0-or-later |
| [holoviews](https://holoviews.org) | 1.14.8 | Stop plotting your data - annotate your data and let it visualize itself. / BSD-3-Clause |
| [hvplot](https://hvplot.holoviz.org/) | 0.7.3 | A high-level plotting API for the PyData ecosystem built on HoloViews / BSD-3-Clause |
| [hyperlink](https://github.com/python-hyper/hyperlink) | 21.0.0 | Immutable, Pythonic, correct URLs. / MIT |
| [icu](http://site.icu-project.org/) | 68.1 | International Components for Unicode. / MIT |
| [idna](https://github.com/kjd/idna) | 3.3 | Internationalized Domain Names in Applications (IDNA). / BSD-3-Clause |
| [imagecodecs](https://www.lfd.uci.edu/~gohlke/) | 2021.8.26 | Image transformation, compression, and decompression codecs / BSD-3-Clause |
| [imageio](https://imageio.github.io) | 2.9.0 | A Python library for reading and writing image data / BSD-2-Clause |
| [imagesize](https://github.com/shibukawa/imagesize_py) | 1.3.0 | Getting image size from png/jpeg/jpeg2000/gif file / MIT |
| [importlib-metadata](https://github.com/python/importlib_metadata) | 4.11.3 | A library to access the metadata for a Python package. / Apache-2.0 |
| [importlib\_metadata](https://github.com/python/importlib_metadata) | 4.11.3 | A library to access the metadata for a Python package. / Apache-2.0 |
| [incremental](https://github.com/hawkowl/incremental) | 21.3.0 | Incremental is a small library that versions your Python projects. / MIT |
| [inflection](http://github.com/jpvanhal/inflection) | 0.5.1 | A port of Ruby on Rails inflector to Python / MIT |
| [iniconfig](http://github.com/RonnyPfannschmidt/iniconfig) | 1.1.1 | iniconfig: brain-dead simple config-ini parsing / MIT |
| [intake](https://github.com/ContinuumIO/intake) | 0.6.5 | Data load and catalog system / BSD-2-Clause |
| [intervaltree](https://github.com/chaimleib/intervaltree) | 3.1.0 | Editable interval tree data structure for Python 2 and 3 / Apache-2.0 |
| [ipykernel](https://ipython.org) | 6.9.1 | IPython Kernel for Jupyter / BSD-3-Clause |
| [ipython](https://ipython.org) | 8.2.0 | IPython: Productive Interactive Computing / BSD-3-Clause |
| [ipython\_genutils](http://ipython.org) | 0.2.0 | vestigial utilities from IPython / BSD 3-Clause |
| [ipywidgets](https://github.com/ipython/ipywidgets) | 7.6.5 | Jupyter Interactive Widgets / BSD-3-Clause |
| [isort](https://github.com/timothycrosley/isort) | 5.9.3 | A Python utility / library to sort Python imports. / MIT |
| [itemadapter](https://github.com/scrapy/itemadapter) | 0.3.0 | Common interface for different data containers / BSD-3-Clause |
| [itemloaders](https://github.com/scrapy/itemadapter) | 1.0.4 | Collect data from HTML and XML sources / BSD-3-Clause |
| [itsdangerous](https://github.com/pallets/itsdangerous) | 2.0.1 | Various helpers to pass trusted data to untrusted environments. / BSD-3-Clause |
| [jdcal](https://github.com/phn/jdcal) | 1.4.1 | Julian dates from proleptic Gregorian and Julian calendars. / BSD 2-Clause |
| [jedi](https://github.com/davidhalter/jedi/) | 0.18.1 | An autocompletion tool for Python that can be used for text editors. / MIT |
| [jeepney](https://gitlab.com/takluyver/jeepney) | 0.7.1 | Pure Python DBus interface / MIT |
| [jinja2](https://jinja.pocoo.org) | 2.11.3 | An easy to use stand-alone template engine written in pure python. / BSD-3-Clause |
| [jinja2-time](https://github.com/hackebrot/jinja2-time) | 0.2.0 | Jinja2 Extension for Dates and Times / MIT |
| [jmespath](http://jmespath.org/) | 0.10.0 | Query language for JSON / MIT |
| [joblib](https://joblib.readthedocs.io/en/latest/) | 1.1.0 | Lightweight pipelining: using Python functions as pipeline jobs. / BSD-3-Clause |
| [jpeg](https://www.ijg.org/) | 9e | read/write jpeg COM, EXIF, IPTC medata / IJG |
| [json5](https://github.com/dpranke/pyjson5) | 0.9.6 | A Python implementation of the JSON5 data format / Apache-2.0 |
| [jsonschema](https://github.com/Julian/jsonschema) | 4.4.0 | An implementation of JSON Schema validation for Python / MIT |
| [jupyter](http://jupyter.org) | 1.0.0 | Jupyter metapackage. Install all the Jupyter components in one go. / BSD 3-Clause |
| [jupyter\_client](https://jupyter.org) | 6.1.12 | jupyter\_client contains the reference implementation of the Jupyter protocol. / BSD-3-Clause |
| [jupyter\_console](https://jupyter.org) | 6.4.0 | Jupyter terminal console / BSD-3-Clause |
| [jupyter\_core](https://jupyter.org) | 4.9.2 | Core common functionality of Jupyter projects. / BSD-3-Clause |
| [jupyter\_server](https://jupyter.org) | 1.13.5 | Jupyter Server / BSD-3-Clause |
| [jupyterlab](https://github.com/jupyterlab/jupyterlab) | 3.3.2 | JupyterLab PRE-ALPHA / BSD-3-Clause |
| [jupyterlab\_pygments](http://github.com/JupyterLab/jupyterlab_pygments) | 0.1.2 | Pygments syntax coloring scheme making use of the JupyterLab CSS variables / BSD-3-Clause |
| [jupyterlab\_server](https://github.com/jupyterlab/jupyterlab_server) | 2.10.3 | A set of server components for JupyterLab and JupyterLab like applications. / BSD-3-Clause |
| [jupyterlab\_widgets](https://github.com/jupyter-widgets/ipywidgets) | 1.0.0 | JupyterLab extension providing HTML widgets / BSD-3-Clause |
| [jxrlib](https://packages.debian.org/source/sid/jxrlib) | 1.1 | jxrlib - JPEG XR Library by Microsoft, built from Debian hosted sources. / BSD-2-Clause |
| [keyring](https://github.com/jaraco/keyring) | 23.4.0 | Store and access your passwords safely / MIT |
| [kiwisolver](https://github.com/nucleic/kiwi) | 1.3.2 | An efficient C++ implementation of the Cassowary constraint solver / BSD-3-Clause |
| [krb5](http://web.mit.edu/kerberos/) | 1.19.2 | A network authentication protocol. / MIT |
| [lazy-object-proxy](https://github.com/ionelmc/python-lazy-object-proxy) | 1.6.0 | A fast and thorough lazy object proxy / BSD-2-Clause |
| [lcms2](http://www.littlecms.com/) | 2.12 | Open Source Color Management Engine / MIT |
| [ld\_impl\_linux-aarch64](https://www.gnu.org/software/binutils/) | 2.36.1 | A set of programming tools for creating and managing binary programs, object files, libraries, profile data, and assembly source code. / GPL-3.0-only |
| [lerc](https://github.com/Esri/lerc) | 3.0 | LERC - Limited Error Raster Compression / Apache-2.0 |
| [libaec](https://gitlab.dkrz.de/k202009/libaec) | 1.0.4 | Adaptive Entropy Coding library / BSD-2-Clause |
| [libarchive](http://www.libarchive.org/) | 3.4.2 | Multi-format archive and compression library / BSD-2-Clause |
| [libcrc32c](https://github.com/google/crc32c) | 1.1.1 | CRC32C implementation with support for CPU-specific acceleration instructions / BSD-3-Clause |
| [libcups](https://www.cups.org/) | 2.2.12 | CUPS is the standards-based, open source printing system / LGPL-2.0-or-later |
| [libcurl](https://curl.haxx.se/) | 7.82.0 | tool and library for transferring data with URL syntax / curl |
| [libdeflate](https://github.com/ebiggers/libdeflate) | 1.7 | libdeflate is a library for fast, whole-buffer DEFLATE-based compression and decompression. / MIT |
| [libedit](http://thrysoee.dk/editline/) | 3.1.20210910 | Editline Library (libedit) / BSD-2-Clause |
| [libev](http://software.schmorp.de/pkg/libev.html) | 4.33 | A full-featured and high-performance event loop that is loosely modeled after libevent, but without its limitations and bugs. / BSD-2-Clause |
| [libevent](http://libevent.org/) | 2.1.10 | An event notification library. / BSD-3-Clause |
| [libffi](https://sourceware.org/libffi/) | 3.3 | A Portable Foreign Function Interface Library. / MIT |
| [libgcc-ng](https://gcc.gnu.org/onlinedocs/gccint/Libgcc.html) | 10.2.0 | The GCC low-level runtime library / GPL-3.0-only WITH GCC-exception-3.1 |
| [libgfortran-ng](https://gcc.gnu.org/) | 10.2.0 | The GNU Fortran Runtime Library / GPL-3.0-only WITH GCC-exception-3.1 |
| [libgfortran5](http://gcc.gnu.org/) | 10.2.0 | Fortran compiler and libraries from the GNU Compiler Collection / GPL-3.0-only WITH GCC-exception-3.1 |
| [libgomp](https://gcc.gnu.org/onlinedocs/gccint/Libgcc.html) | 10.2.0 | The GCC OpenMP implementation. / GPL-3.0-only WITH GCC-exception-3.1 |
| [libidn2](https://www.gnu.org/software/libidn/#libidn2) | 2.3.1 | Library for internationalized domain names (IDNA2008) support / LGPLv2 AND LGPL-3.0-or-later AND GPL-3.0-or-later |
| [liblief](https://lief.quarkslab.com/) | 0.11.5 | A cross platform library to parse, modify and abstract ELF, PE and MachO formats. / Apache-2.0 |
| [libllvm11](http://llvm.org/) | 11.1.0 | Development headers and libraries for LLVM / Apache-2.0 WITH LLVM-exception |
| [libnghttp2](http://github.com/nghttp2/nghttp2) | 1.46.0 | This is an implementation of Hypertext Transfer Protocol version 2. / MIT |
| [libopenblas](https://www.openblas.net/) | 0.3.18 | An Optimized BLAS library / BSD-3-clause |
| [libpng](http://www.libpng.org/pub/png/libpng.html) | 1.6.37 | PNG reference library / zlib/libpng |
| [libpq](http://www.postgresql.org/) | 12.9 | The postgres runtime libraries and utilities (not the server itself) / PostgreSQL |
| [libprotobuf](https://developers.google.com/protocol-buffers/) | 3.19.1 | Protocol Buffers - Google’s data interchange format. C++ Libraries and protoc, the protobuf compiler. / BSD-3-Clause |
| [librsvg](https://wiki.gnome.org/Projects/LibRsvg) | 2.50.7 | librsvg is a library to render SVG files using cairo. / LGPL-2.1-or-later |
| [libsodium](http://libsodium.org) | 1.0.18 | A modern and easy-to-use crypto library. / ISC |
| [libspatialindex](http://libspatialindex.github.io) | 1.9.3 | Extensible framework for robust spatial indexing / MIT |
| [libssh2](https://www.libssh2.org/) | 1.10.0 | the SSH library / BSD-3-Clause |
| [libstdcxx-ng](https://gcc.gnu.org/) | 10.2.0 | The GNU C++ Runtime Library / GPL-3.0-only WITH GCC-exception-3.1 |
| [libtiff](http://www.libtiff.org/) | 4.2.0 | Support for the Tag Image File Format (TIFF). / HPND |
| [libunistring](https://www.gnu.org/software/libunistring) | 0.9.10 | This library provides functions for manipulating Unicode strings and for manipulating C strings according to the Unicode standard. / LGPL |
| [libuuid](http://sourceforge.net/projects/libuuid/) | 1.0.3 | Portable uuid C library. / BSD 3-Clause |
| [libwebp](https://developers.google.com/speed/webp/) | 1.2.2 | WebP image library / BSD-3-Clause |
| [libwebp-base](https://developers.google.com/speed/webp) | 1.2.2 | WebP image library / BSD-3-Clause |
| [libxcb](http://xcb.freedesktop.org/) | 1.14 | This is the C-language Binding (XCB) package to the X Window System protocol / MIT |
| [libxkbcommon](https://github.com/xkbcommon/libxkbcommon) | 1.0.1 | keymap handling library for toolkits and window systems / MIT/X11 Derivative |
| [libxml2](http://xmlsoft.org/) | 2.9.12 | The XML C parser and toolkit of Gnome / MIT |
| [libxslt](http://xmlsoft.org/XSLT/) | 1.1.34 | The XSLT C library developed for the GNOME project / MIT |
| [libzopfli](https://github.com/google/zopfli) | 1.0.3 | A compression library programmed in C to perform very good, but slow, deflate or zlib compression. / Apache-2.0 |
| [llvmlite](http://llvmlite.pydata.org) | 0.38.0 | A lightweight LLVM python binding for writing JIT compilers. / BSD-2-Clause |
| [locket](https://github.com/mwilliamson/locket.py) | 0.2.1 | File-based locks for Python for Linux and Windows / BSD 2-Clause |
| [lxml](https://lxml.de/) | 4.8.0 | Pythonic binding for the C libraries libxml2 and libxslt. / BSD-3-Clause and GPL-2.0-only and ZPL-2.0 and LicenseRef-ElementTree |
| [lz4-c](https://www.lz4.org) | 1.9.3 | Extremely Fast Compression algorithm / BSD-2-Clause |
| [lzo](http://www.oberhumer.com/opensource/lzo/) | 2.10 | LZO is a portable lossless data compression library written in ANSI C. / GPL v2+ |
| [markdown](https://pythonhosted.org/Markdown/) | 3.3.4 | Python implementation of Markdown. / BSD-3-Clause |
| [markupsafe](https://www.palletsprojects.com/p/markupsafe) | 2.0.1 | A Python module that implements the jinja2.Markup string / BSD-3-Clause |
| [matplotlib](https://matplotlib.org/) | 3.5.1 | Publication quality figures in Python / LicenseRef-PSF-based |
| [matplotlib-base](https://matplotlib.org/) | 3.5.1 | Publication quality figures in Python / LicenseRef-PSF-based |
| [matplotlib-inline](https://github.com/ipython/matplotlib-inline) | 0.1.2 | Inline Matplotlib backend for Jupyter / BSD-3-Clause |
| [mccabe](https://github.com/PyCQA/mccabe) | 0.6.1 | McCabe complexity checker for Python / MIT |
| [mistune](https://github.com/lepture/mistune) | 0.8.4 | A sane Markdown parser with useful plugins and renderers. / BSD-3-Clause |
| [mock](https://github.com/testing-cabal/mock) | 4.0.3 | A library for testing in Python / BSD-2-Clause |
| [mpc](http://www.multiprecision.org/) | 1.1.0 | A C library for the arithmetic of complex numbers with arbitrarily high precision. / LGPL 3 |
| [mpfr](http://www.mpfr.org/) | 4.0.2 | The MPFR library is a C library for multiple-precision floating-point computations with correct rounding. / LGPL-3.0-only |
| [mpmath](http://mpmath.org) | 1.2.1 | Python library for arbitrary-precision floating-point arithmetic / BSD 3-Clause |
| [msgpack-python](http://msgpack.org/) | 1.0.2 | MessagePack (de)serializer / Apache-2.0 |
| [multidict](http://github.com/aio-libs/multidict) | 5.2.0 | multidict implementation / Apache 2.0 |
| [multipledispatch](https://github.com/mrocklin/multipledispatch/) | 0.6.0 | Multiple dispatch in Python / BSD 3-Clause |
| [munkres](https://github.com/bmc/munkres) | 1.1.4 | The Munkres module provides an O(n^3) implementation of the Munkres algorithm (also called the Hungarian algorithm or the Kuhn-Munkres algorithm). / Apache-2.0 |
| [mypy\_extensions](http://www.mypy-lang.org/) | 0.4.3 | Experimental type system extensions for programs checked with the mypy typechecker. / MIT |
| [nbclassic](http://github.com/jupyterlab/nbclassic) | 0.3.5 | Jupyter Notebook as a Jupyter Server Extension. / BSD-3-Clause |
| [nbclient](https://jupyter.org) | 0.5.13 | A client library for executing notebooks. Formally nbconvert’s ExecutePreprocessor. / BSD-3-Clause |
| [nbconvert](https://jupyter.org) | 6.4.4 | Converting Jupyter Notebooks / BSD-3-Clause |
| [nbformat](https://jupyter.org) | 5.3.0 | The Jupyter Notebook format / BSD-3-Clause |
| [ncurses](http://www.gnu.org/software/ncurses/) | 6.3 | Library for text-based user interfaces / Free software (MIT-like) |
| [nest-asyncio](https://github.com/erdewit/nest_asyncio) | 1.5.5 | Patch asyncio to allow nested event loops / BSD-2-Clause |
| [networkx](https://networkx.github.io/) | 2.7.1 | Python package for creating and manipulating complex networks / BSD-3-Clause |
| [ninja](https://ninja-build.org/) | 1.10.2 | A small build system with a focus on speed / Apache 2.0 |
| [nltk](https://nltk.org/) | 3.7 | Natural Language Toolkit / Apache-2.0 |
| nomkl | 3.0 | None / BSD |
| [nose](http://readthedocs.org/docs/nose/) | 1.3.7 | Nose extends unittest to make testing easier / LGPL-2.1 |
| [notebook](https://jupyter.org) | 6.4.8 | Jupyter Notebook / BSD-3-Clause |
| [numba](http://numba.pydata.org) | 0.55.1 | NumPy aware dynamic Python compiler using LLVM / BSD-2-Clause |
| [numexpr](https://github.com/pydata/numexpr) | 2.8.1 | Fast numerical expression evaluator for NumPy. / MIT |
| [numpy](http://numpy.scipy.org/) | 1.21.5 | Array processing for numbers, strings, records, and objects. / BSD 3-Clause |
| [numpy-base](http://numpy.scipy.org/) | 1.21.5 | Array processing for numbers, strings, records, and objects. / BSD 3-Clause |
| [numpydoc](https://github.com/numpy/numpydoc) | 1.2 | Numpy’s Sphinx extensions / BSD-3-Clause |
| [olefile](http://www.decalage.info/python/olefileio) | 0.46 | parse, read and write Microsoft OLE2 files / BSD 2-Clause |
| [openblas](https://www.openblas.net/) | 0.3.18 | An optimized BLAS library / BSD-3-clause |
| openblas-devel | 0.3.18 | OpenBLAS headers and libraries for developing software that used OpenBLAS. / None |
| [openjpeg](http://www.openjpeg.org/) | 2.4.0 | An open-source JPEG 2000 codec written in C / BSD 2-Clause |
| [openpyxl](https://openpyxl.readthedocs.io) | 3.0.9 | A Python library to read/write Excel 2010 xlsx/xlsm files / MIT |
| [openssl](https://www.openssl.org/) | 1.1.1n | OpenSSL is an open-source implementation of the SSL and TLS protocols / OpenSSL |
| [packaging](https://github.com/pypa/packaging) | 21.3 | Core utilities for Python packages / Apache-2.0 or BSD-2-Clause |
| [pandas](https://pandas.pydata.org) | 1.4.2 | High-performance, easy-to-use data structures and data analysis tools. / BSD-3-Clause |
| [pandocfilters](https://github.com/jgm/pandocfilters) | 1.5.0 | A python module for writing pandoc filters / BSD-3-Clause |
| [panel](https://panel.holoviz.org) | 0.13.0 | A high-level app and dashboarding solution for Python / BSD-3-Clause |
| [pango](http://www.pango.org/) | 1.45.3 | Text layout and rendering engine. / LGPL-2.1 |
| [param](http://ioam.github.io/param/) | 1.12.0 | Param: Make your Python code clearer and more reliable by declaring Parameters / BSD-3-Clause |
| [parsel](https://github.com/scrapy/parsel) | 1.6.0 | library to extract data from HTML and XML using XPath and CSS selectors / BSD-3-Clause |
| [parso](https://github.com/davidhalter/parso) | 0.8.3 | A Python Parser / MIT |
| [partd](https://github.com/dask/partd) | 1.2.0 | Data structure for on-disk shuffle operations / BSD 3-Clause |
| [patchelf](http://nixos.org/patchelf.html) | 0.13 | A small utility to modify the dynamic linker and RPATH of ELF executables. / GPL-3.0-or-later |
| [pathspec](https://github.com/cpburnz/python-path-specification) | 0.7.0 | Utility library for gitignore style pattern matching of file paths. / MPL-2.0 |
| [patsy](https://github.com/pydata/patsy) | 0.5.2 | Describing statistical models in Python using symbolic formulas / BSD-2-Clause AND PSF-2.0 |
| [pcre](http://www.pcre.org/) | 8.45 | Regular expression pattern matching using the same syntax and semantics as Perl 5. / BSD 3-Clause |
| [pep8](http://pep8.readthedocs.org/) | 1.7.1 | Python style guide checker / MIT |
| [pexpect](http://pexpect.sourceforge.net/) | 4.8.0 | Pexpect makes Python a better tool for controlling other applications. / ISC |
| [pickleshare](https://github.com/pickleshare/pickleshare/) | 0.7.5 | Tiny ‘shelve’-like database with concurrency support / MIT |
| [pillow](https://pillow.readthedocs.io) | 9.0.1 | Pillow is the friendly PIL fork by Alex Clark and Contributors / LicenseRef-PIL |
| [pip](https://pip.pypa.io/en/stable/) | 21.2.4 | PyPA recommended tool for installing Python packages / MIT |
| [pixman](http://www.pixman.org/) | 0.40.0 | A low-level software library for pixel manipulation. / MIT |
| [pkginfo](https://code.launchpad.net/~tseaver/pkginfo/trunk) | 1.8.2 | Query metadatdata from sdists / bdists / installed packages. / MIT |
| [plotly](https://plot.ly/python/) | 5.6.0 | An interactive JavaScript-based visualization library for Python / MIT |
| [pluggy](https://github.com/pytest-dev/pluggy) | 1.0.0 | Plugin registration and hook calling for Python / MIT |
| [poyo](https://github.com/hackebrot/poyo) | 0.5.0 | A lightweight YAML Parser for Python / MIT |
| [prometheus\_client](https://github.com/prometheus/client_python) | 0.13.1 | Python client for the Prometheus monitoring system / Apache-2.0 |
| [prompt-toolkit](https://github.com/jonathanslenders/python-prompt-toolkit) | 3.0.20 | Library for building powerful interactive command lines in Python / BSD-3-Clause |
| [prompt\_toolkit](https://github.com/jonathanslenders/python-prompt-toolkit) | 3.0.20 | Library for building powerful interactive command lines in Python / BSD-3-Clause |
| [protego](https://github.com/scrapy/protego) | 0.1.16 | A pure-Python robots.txt parser with support for modern conventions / BSD 3-Clauses |
| [protobuf](https://developers.google.com/protocol-buffers/) | 3.19.1 | Protocol Buffers - Google’s data interchange format. / BSD-3-Clause |
| [psutil](https://github.com/giampaolo/psutil) | 5.8.0 | A cross-platform process and system utilities module for Python / BSD-3-Clause |
| [ptyprocess](https://github.com/pexpect/ptyprocess) | 0.7.0 | Run a subprocess in a pseudo terminal / ISC |
| [pure\_eval](https://github.com/alexmojaki/pure_eval) | 0.2.2 | Safely evaluate AST nodes without side effects / MIT |
| [py](https://github.com/pytest-dev/py) | 1.11.0 | library with cross-python path, ini-parsing, io, code, log facilities / MIT |
| [py-lief](https://lief.quarkslab.com/) | 0.11.5 | A cross platform library to parse, modify and abstract ELF, PE and MachO formats. / Apache-2.0 |
| [pyasn1](https://github.com/etingof/pyasn1) | 0.4.8 | ASN.1 types and codecs / BSD 2-Clause |
| [pyasn1-modules](http://pyasn1.sourceforge.net/) | 0.2.8 | A collection of ASN.1-based protocols modules. / BSD 2-Clause |
| [pycodestyle](https://pycodestyle.readthedocs.io/) | 2.7.0 | Python style guide checker / MIT |
| [pycosat](https://github.com/ContinuumIO/pycosat) | 0.6.3 | Bindings to picosat (a SAT solver) / MIT |
| [pycparser](https://github.com/eliben/pycparser) | 2.21 | Complete C99 parser in pure Python / BSD-3-clause |
| [pyct](http://github.com/pyviz/pyct) | 0.4.8 | python package common tasks for users (e.g. copy examples, fetch data, …) / BSD 3-Clause |
| [pycurl](http://pycurl.sourceforge.net/) | 7.44.1 | A Python Interface To The cURL library / LGPL, MIT |
| [pydispatcher](http://pydispatcher.sourceforge.net) | 2.0.5 | Multi-producer-multi-consumer signal dispatching mechanism / BSD 3-Clause |
| [pydocstyle](https://github.com/PyCQA/pydocstyle) | 6.1.1 | Python docstring style checker (formerly pep257) / MIT |
| [pyerfa](https://pyerfa.readthedocs.io/) | 2.0.0 | Python bindings for ERFA routines / BSD-3-Clause |
| [pyflakes](https://github.com/PyCQA/pyflakes) | 2.3.1 | Pyflakes analyzes programs and detects various errors. / MIT |
| [pygments](https://pygments.org/) | 2.11.2 | Pygments is a generic syntax highlighter suitable for use in code hosting, forums, wikis or other applications that need to prettify source code. / BSD-2-Clause |
| [pyhamcrest](https://github.com/hamcrest/PyHamcrest) | 2.0.2 | Hamcrest framework for matcher objects / BSD 3-Clause |
| [pylint](https://www.pylint.org) | 2.7.4 | python code static checker / GPL-2.0-or-later |
| [pyls-spyder](https://github.com/spyder-ide/pyls-spyder) | 0.4.0 | Spyder extensions for the python-lsp-server / MIT |
| [pyodbc](https://github.com/mkleehammer/pyodbc) | 4.0.32 | DB API Module for ODBC / MIT |
| [pyopenssl](https://github.com/pyca/pyopenssl) | 21.0.0 | Python wrapper module around the OpenSSL library / Apache-2.0 |
| [pyparsing](https://github.com/pyparsing/pyparsing/) | 3.0.4 | Create and execute simple grammars / MIT |
| [pyqt](http://www.riverbankcomputing.co.uk/software/pyqt) | 5.15.2 | Python binding of the cross-platform GUI toolkit Qt. / Commercial, GPL-2.0, GPL-3.0 |
| [pyrsistent](http://github.com/tobgu/pyrsistent/) | 0.18.0 | Persistent/Functional/Immutable data structures / MIT |
| [pysocks](https://github.com/Anorov/PySocks) | 1.7.1 | A Python SOCKS client module. See [Anorov/PySocks](https://github.com/Anorov/PySocks) for more information. / BSD 3-Clause |
| [pytables](https://www.pytables.org) | 3.6.1 | Brings together Python, HDF5 and NumPy to easily handle large amounts of data. / BSD-3-Clause |
| [pytest](https://docs.pytest.org/en/latest/) | 7.1.1 | Simple and powerful testing with Python. / MIT |
| [python](https://www.python.org/) | 3.9.12 | General purpose programming language / PSF-2.0 |
| [python-dateutil](https://dateutil.readthedocs.org/) | 2.8.2 | Extensions to the standard Python datetime module. / BSD-3-Clause and Apache |
| [python-fastjsonschema](https://github.com/horejsek/python-fastjsonschema) | 2.15.1 | Fastest Python implementation of JSON schema / BSD-3-Clause |
| [python-libarchive-c](https://github.com/Changaco/python-libarchive-c) | 2.9 | Python interface to libarchive / CC0-1.0 |
| [python-lsp-black](https://github.com/python-lsp/python-lsp-black) | 1.0.0 | Black plugin for the Python LSP Server / MIT |
| [python-lsp-jsonrpc](https://github.com/python-lsp/python-lsp-jsonrpc) | 1.0.0 | A Python 3.6+ server implementation of the JSON RPC 2.0 protocol. / MIT |
| [python-lsp-server](https://github.com/python-lsp/python-lsp-server) | 1.2.4 | An implementation of the Language Server Protocol for Python / MIT |
| [python-slugify](https://github.com/un33k/python-slugify) | 5.0.2 | A Python Slugify application that handles Unicode / MIT |
| [python-snappy](https://github.com/andrix/python-snappy) | 0.6.0 | Python library for the snappy compression library from Google / BSD-3-Clause |
| [pytz](http://pythonhosted.org/pytz/) | 2021.3 | World timezone definitions, modern and historical. / MIT |
| [pyviz\_comms](https://www.holoviz.org) | 2.0.2 | Bidirectional communication for PyViz / BSD-3-Clause |
| [pywavelets](https://github.com/PyWavelets/pywt) | 1.3.0 | Discrete Wavelet Transforms in Python / MIT |
| [pyxdg](http://freedesktop.org/wiki/Software/pyxdg) | 0.27 | PyXDG contains implementations of freedesktop.org standards in python. / GNU Lesser General Public v2 (LGPLv2) |
| [pyyaml](http://pyyaml.org/wiki/PyYAML) | 6.0 | YAML parser and emitter for Python / MIT |
| [pyzmq](https://github.com/zeromq/pyzmq) | 22.3.0 | Python bindings for zeromq / BSD-3-clause |
| [qdarkstyle](https://github.com/ColinDuquesnoy/QDarkStyleSheet) | 3.0.2 | A dark stylesheet for Qt applications (Qt4, Qt5, PySide, PyQt4, PyQt5, QtPy, PyQtGraph). / MIT |
| [qstylizer](https://github.com/blambright/qstylizer) | 0.1.10 | Qt stylesheet generation utility for PyQt/PySide / MIT |
| [qt](http://qt.io) | 5.15.2 | Qt is a cross-platform application and UI framework. / LGPL-3.0-only |
| [qtawesome](https://github.com/spyder-ide/qtawesome) | 1.0.3 | Iconic fonts in PyQt and PySide applications / MIT |
| [qtconsole](http://jupyter.org) | 5.3.0 | Jupyter Qt Console / BSD-3-Clause |
| [qtpy](https://github.com/spyder-ide/qtpy) | 2.0.1 | Abstraction layer for PyQt5/PyQt4/PySide / MIT |
| [queuelib](https://github.com/scrapy/queuelib) | 1.5.0 | Collection of persistent (disk-based) queues / BSD |
| [readline](https://tiswww.case.edu/php/chet/readline/rltop.html) | 8.1.2 | library for editing command lines as they are typed in / GPL-3.0-only |
| [regex](https://github.com/mrabarnett/mrab-regex) | 2022.3.15 | Alternative regular expression module, to replace re / Apache-2.0 |
| [requests](http://python-requests.org) | 2.27.1 | Requests is an elegant and simple HTTP library for Python, built with ♥. / Apache-2.0 |
| [requests-file](http://github.com/dashea/requests-file) | 1.5.1 | file transport adapter for Requests / Apache |
| [rope](https://github.com/python-rope/rope) | 0.22.0 | A python refactoring library / LGPL-3.0-or-later |
| [rsa](https://stuvel.eu/rsa) | 4.7.2 | Pure-Python RSA implementation / Apache-2.0 |
| [rtree](http://toblerity.github.com/rtree/) | 0.9.7 | R-Tree spatial index for Python GIS / MIT |
| [ruamel\_yaml](https://sourceforge.net/p/ruamel-yaml/code/ci/default/tree) | 0.15.100 | A patched copy of ruamel.yaml. / MIT |
| [s3transfer](https://github.com/boto/s3transfer) | 0.5.0 | An Amazon S3 Transfer Manager / Apache-2.0 |
| [scikit-image](https://scikit-image.org/) | 0.19.2 | Image processing in Python. / BSD-3-Clause |
| [scikit-learn](http://scikit-learn.org/) | 1.0.2 | A set of python modules for machine learning and data mining / BSD-3-Clause |
| [scipy](http://www.scipy.org/) | 1.7.1 | Scientific Library for Python / BSD 3-Clause |
| [scrapy](https://scrapy.org/) | 2.6.1 | A high-level Python Screen Scraping framework / BSD-3-Clause-Clear |
| [seaborn](https://seaborn.pydata.org) | 0.11.2 | Statistical data visualization / BSD 3-Clause |
| [secretstorage](https://github.com/mitya57/secretstorage) | 3.3.1 | Provides a way for securely storing passwords and other secrets. / BSD-3-Clause |
| [send2trash](https://github.com/arsenetar/send2trash) | 1.8.0 | Python library to natively send files to Trash (or Recycle bin) on all platforms. / BSD-3-Clause |
| [service\_identity](https://github.com/pyca/service_identity) | 18.1.0 | Service identity verification for pyOpenSSL. / MIT |
| [setuptools](https://github.com/pypa/setuptools) | 61.2.0 | Download, build, install, upgrade, and uninstall Python packages / MIT |
| [sip](https://www.riverbankcomputing.com/software/sip/) | 6.5.1 | A Python bindings generator for C/C++ libraries / GPL-3.0-only |
| [six](https://six.readthedocs.io/) | 1.16.0 | Python 2 and 3 compatibility utilities / MIT |
| [smart\_open](https://github.com/RaRe-Technologies/smart_open) | 5.1.0 | Python library for efficient streaming of large files / MIT |
| [snappy](https://github.com/google/snappy) | 1.1.9 | A fast compressor/decompressor / BSD-3-clause AND CC-BY-3.0 AND MIT AND CC-BY AND Public Domain |
| [sniffio](https://github.com/python-trio/sniffio) | 1.2.0 | Sniff out which async library your code is running under / Apache-2.0 |
| [snowballstemmer](https://github.com/snowballstem/snowball) | 2.2.0 | Snowball stemming library collection for Python / BSD-3-Clause |
| [sortedcollections](http://www.grantjenks.com/docs/sortedcollections/) | 2.1.0 | Python Sorted Collections / Apache-2.0 |
| [sortedcontainers](http://www.grantjenks.com/docs/sortedcontainers/) | 2.4.0 | Python Sorted Container Types: SortedList, SortedDict, and SortedSet / Apache-2.0 |
| [soupsieve](http://facelessuser.github.io/soupsieve) | 2.3.1 | A modern CSS selector implementation for BeautifulSoup / MIT |
| [sphinx](https://www.sphinx-doc.org) | 4.4.0 | Sphinx is a tool that makes it easy to create intelligent and beautiful documentation / BSD-2-Clause |
| [sphinxcontrib-applehelp](https://www.sphinx-doc.org/en/master/) | 1.0.2 | sphinxcontrib-applehelp is a sphinx extension which outputs Apple help books / BSD-2-Clause |
| [sphinxcontrib-devhelp](https://www.sphinx-doc.org/en/master/) | 1.0.2 | sphinxcontrib-devhelp is a sphinx extension which outputs Devhelp document / BSD-2-Clause |
| [sphinxcontrib-htmlhelp](https://www.sphinx-doc.org/en/master/) | 2.0.0 | sphinxcontrib-htmlhelp is a sphinx extension which renders HTML help files. / BSD-2-Clause |
| [sphinxcontrib-jsmath](https://www.sphinx-doc.org/en/master/) | 1.0.1 | A sphinx extension which renders display math in HTML via JavaScript / BSD-2-Clause |
| [sphinxcontrib-qthelp](https://www.sphinx-doc.org/en/master/) | 1.0.3 | sphinxcontrib-qthelp is a sphinx extension which outputs QtHelp document / BSD-2-Clause |
| [sphinxcontrib-serializinghtml](https://www.sphinx-doc.org/en/master/) | 1.1.5 | sphinxcontrib-serializinghtml is a sphinx extension which outputs “serialized” HTML files (json and pickle). / BSD-2-Clause |
| [spyder](https://www.spyder-ide.org/) | 5.1.5 | The Scientific Python Development Environment / MIT |
| [spyder-kernels](https://www.spyder-ide.org/) | 2.1.3 | Jupyter kernels for Spyder’s console / MIT |
| [sqlalchemy](https://www.sqlalchemy.org/) | 1.4.32 | Database Abstraction Library. / MIT |
| [sqlite](https://www.sqlite.org/) | 3.38.2 | Implements a self-contained, zero-configuration, SQL database engine / blessing |
| [stack\_data](https://github.com/alexmojaki/stack_data) | 0.2.0 | Extract data from python stack frames and tracebacks for informative displays / MIT |
| [statsmodels](https://www.statsmodels.org) | 0.13.2 | Statistical computations and models for use with SciPy / BSD-3-Clause |
| [sympy](https://sympy.org) | 1.10.1 | Python library for symbolic mathematics / BSD-3-Clause AND MIT |
| [tabulate](https://bitbucket.org/astanin/python-tabulate) | 0.8.9 | Pretty-print tabular data in Python, a library and a command-line utility. / MIT |
| [tbb](https://github.com/oneapi-src/oneTBB) | 2021.5.0 | High level abstract threading library / Apache-2.0 |
| tbb4py | 2021.5.0 | TBB module for Python / Apache 2.0 |
| [tblib](https://github.com/ionelmc/python-tblib) | 1.7.0 | Traceback serialization library. / BSD 2-Clause |
| [tenacity](http://github.com/jd/tenacity) | 8.0.1 | Retry a flaky function whenever an exception occurs until it works / Apache-2.0 |
| [terminado](https://github.com/jupyter/terminado) | 0.13.1 | Terminals served by tornado websockets / BSD-2-Clause |
| [testpath](https://testpath.readthedocs.io) | 0.5.0 | Testpath is a collection of utilities for Python code working with files and commands. / BSD-3-Clause |
| [text-unidecode](https://github.com/kmike/text-unidecode/) | 1.3 | The most basic Text::Unidecode port / Artistic |
| [textdistance](https://github.com/orsinium/textdistance) | 4.2.1 | TextDistance – python library for comparing distance between two or more sequences by many algorithms. / MIT |
| [threadpoolctl](https://github.com/joblib/threadpoolctl) | 2.2.0 | Python helpers to control the threadpools of native libraries / BSD 3-Clause |
| [three-merge](https://github.com/spyder-ide/three-merge) | 0.1.1 | Simple Python library to perform a 3-way merge between strings / MIT |
| [tifffile](https://github.com/cgohlke/tifffile) | 2021.7.2 | Read and write image data from and to TIFF files. / BSD-3-Clause |
| [tinycss](http://tinycss.readthedocs.io/) | 0.4 | Tinycss is a complete yet simple CSS parser for Python. / BSD-3-Clause |
| [tk](http://www.tcl.tk/) | 8.6.11 | A dynamic programming language with GUI support. Bundles Tcl and Tk. / Tcl/Tk |
| [tldextract](https://github.com/john-kurkowski/tldextract) | 3.2.0 | Accurately separate the TLD from the registered domain andsubdomains of a URL, using the Public Suffix List. / BSD-3-Clause |
| [toml](https://github.com/uiri/toml) | 0.10.2 | Python lib for TOML. / MIT |
| [tomli](https://github.com/hukkin/tomli) | 1.2.2 | A simple TOML parser / MIT |
| [toolz](http://toolz.readthedocs.org/) | 0.11.2 | List processing tools and functional utilities / BSD-3-Clause |
| [tornado](http://www.tornadoweb.org/) | 6.1 | A Python web framework and asynchronous networking library, originally developed at FriendFeed. / Apache-2.0 |
| [tqdm](https://pypi.python.org/pypi/tqdm) | 4.64.0 | A Fast, Extensible Progress Meter / MPL-2.0 AND MIT |
| [traitlets](http://traitlets.readthedocs.org/) | 5.1.1 | Configuration system for Python applications / BSD-3-Clause |
| [twisted](https://twistedmatrix.com/) | 22.2.0 | An asynchronous networking framework written in Python / MIT |
| [typed-ast](https://github.com/python/typed_ast) | 1.4.3 | a fork of Python 2 and 3 ast modules with type comment support / Apache-2.0 AND PSF-2.0 AND MIT |
| [typing-extensions](https://github.com/python/typing/tree/master/typing_extensions) | 4.1.1 | Backported and Experimental Type Hints for Python / PSF-2.0 |
| [typing\_extensions](https://github.com/python/typing/tree/master/typing_extensions) | 4.1.1 | Backported and Experimental Type Hints for Python / PSF-2.0 |
| [tzdata](https://www.iana.org/time-zones) | 2022a | The Time Zone Database (called tz, tzdb or zoneinfo) / Public-Domain AND BSD-3-clause |
| [ujson](https://github.com/ultrajson/ultrajson) | 5.1.0 | Ultra fast JSON decoder and encoder written in C with Python bindings / BSD-3-Clause |
| [unidecode](https://pypi.python.org/pypi/Unidecode) | 1.2.0 | ASCII transliterations of Unicode text / GPL-2.0-or-later |
| [unixodbc](http://www.unixodbc.org/) | 2.3.9 | ODBC on non MS Windows platforms / LGPL-2.1 |
| [urllib3](https://urllib3.readthedocs.io/) | 1.26.9 | HTTP library with thread-safe connection pooling, file post, and more. / MIT |
| [w3lib](https://github.com/scrapy/w3lib) | 1.21.0 | Library of web-related functions / BSD |
| [watchdog](http://github.com/gorakhargosh/watchdog) | 2.1.6 | Filesystem events monitoring / Apache-2.0 |
| [wcwidth](https://github.com/jquast/wcwidth) | 0.2.5 | Measures number of Terminal column cells of wide-character codes. / MIT |
| [webencodings](https://github.com/gsnedders/python-webencodings) | 0.5.1 | Character encoding aliases for legacy web content / BSD 3-Clause |
| [websocket-client](https://github.com/liris/websocket-client) | 0.58.0 | WebSocket client for python. hybi13 is supported. / BSD-3-Clause |
| [werkzeug](https://palletsprojects.com/p/werkzeug/) | 2.0.3 | The comprehensive WSGI web application library. / BSD-3-Clause |
| [wget](https://www.gnu.org/software/wget/) | 1.21.3 | utility for non-interactive download of files from the Web / GPL-3.0-or-later |
| [wheel](https://github.com/pypa/wheel) | 0.37.1 | A built-package format for Python. / MIT |
| [widgetsnbextension](http://ipython.org) | 3.5.2 | Interactive Widgets for Jupyter / BSD-3-Clause |
| [wrapt](https://github.com/GrahamDumpleton/wrapt) | 1.13.3 | Module for decorators, wrappers and monkey patching / BSD-2-Clause |
| [wurlitzer](https://github.com/minrk/wurlitzer) | 3.0.2 | Capture C-level stdout/stderr in Python / MIT |
| [xarray](https://github.com/pydata/xarray) | 0.20.1 | N-D labeled arrays and datasets in Python. / Apache-2.0 |
| [xlrd](http://www.python-excel.org/) | 2.0.1 | Library for developers to extract data from Microsoft Excel (tm) spreadsheet files / BSD 3-Clause and BSD with advertising |
| [xlsxwriter](https://xlsxwriter.readthedocs.io/) | 3.0.3 | A Python module for creating Excel XLSX files / BSD-2-Clause |
| [xz](http://tukaani.org/xz/) | 5.2.5 | Data compression software with high compression ratio / LGPL-2.1 and GPL-2.0 |
| [yaml](http://pyyaml.org/wiki/LibYAML) | 0.2.5 | A C library for parsing and emitting YAML / MIT |
| [yapf](https://github.com/google/yapf) | 0.31.0 | A formatter for Python files / Apache 2.0 |
| [yarl](https://github.com/aio-libs/yarl) | 1.6.3 | Yet another URL library / Apache 2.0 |
| [zeromq](http://zeromq.org) | 4.3.4 | A high-performance asynchronous messaging library. / LGPL-3.0-or-later |
| [zict](http://github.com/mrocklin/zict) | 2.0.0 | Composable Dictionary Classes / BSD 3-Clause |
| [zipp](https://github.com/jaraco/zipp) | 3.7.0 | A pathlib-compatible Zipfile object wrapper / MIT |
| [zlib](http://zlib.net/) | 1.2.12 | Massively spiffy yet delicately unobtrusive compression library / Zlib |
| zope | 1.0 | web application server / BSD |
| [zope.interface](https://github.com/zopefoundation/zope.interface) | 5.4.0 | Interfaces for Python / ZPL-2.1 |
| [zstd](https://www.zstd.net) | 1.4.9 | Zstandard - Fast real-time compression algorithm / BSD-3-Clause AND GPL-2.0-or-later |
| Name | Version | Summary / License |
|---|---|---|
| [\_libgcc\_mutex](https://github.com/AnacondaRecipes/_libgcc_mutex-feedstock) | 0.1 | Mutex for libgcc and libgcc-ng / None |
| [\_openmp\_mutex](https://github.com/conda-forge/ctng-compilers-feedstock) | 4.5 | OpenMP Implementation Mutex / BSD-3-Clause |
| [aiohttp](https://github.com/aio-libs/aiohttp) | 3.8.1 | Async http client/server framework (asyncio) / Apache-2.0 |
| [aiosignal](https://github.com/aio-libs/aiosignal) | 1.2.0 | aiosignal: a list of registered asynchronous callbacks / Apache-2.0 |
| [alabaster](http://www.sphinx-doc.org/en/stable/index.html) | 0.7.12 | Configurable, Python 2+3 compatible Sphinx theme. / BSD 3-Clause |
| [anaconda-client](https://github.com/Anaconda-Platform/anaconda-client) | 1.9.0 | Anaconda Cloud command line client library / BSD 3-Clause |
| [anaconda-navigator](https://github.com/ContinuumIO/navigator) | 2.1.4 | Anaconda Navigator / proprietary - Continuum Analytics, Inc. |
| [anaconda-project](https://github.com/Anaconda-Platform/anaconda-project) | 0.10.2 | Tool for encapsulating, running, and reproducing data science projects / BSD-3-Clause |
| [anyio](https://github.com/agronholm/anyio) | 3.5.0 | High level compatibility layer for multiple asynchronous event loop implementations on Python / MIT |
| [appdirs](http://github.com/ActiveState/appdirs) | 1.4.4 | A small Python module for determining appropriate platform-specific dirs. / MIT |
| [argon2-cffi](https://argon2-cffi.readthedocs.org/) | 21.3.0 | The secure Argon2 password hashing algorithm. / MIT |
| [argon2-cffi-bindings](https://github.com/hynek/argon2-cffi-bindings) | 21.2.0 | Low-level Python CFFI Bindings for Argon2 / MIT |
| [arrow](https://github.com/crsmithdev/arrow) | 1.2.2 | Better dates & times for Python / Apache-2.0 |
| [astroid](https://www.astroid.org/) | 2.6.6 | A abstract syntax tree for Python with inference support. / LGPL-2.1-or-later |
| [astropy](https://www.astropy.org/) | 5.0.4 | Community-developed Python Library for Astronomy / BSD-3-Clause |
| [asttokens](https://github.com/gristlabs/asttokens) | 2.0.5 | The asttokens module annotates Python abstract syntax trees (ASTs) with the positions of tokens and text in the source code that generated them. / Apache-2.0 |
| [async-timeout](http://github.com/aio-libs/async_timeout) | 4.0.1 | Timeout context manager for asyncio programs / Apache-2.0 |
| [atomicwrites](https://github.com/untitaker/python-atomicwrites) | 1.4.0 | Atomic file writes / MIT |
| [attrs](https://attrs.readthedocs.io/en/stable/) | 21.4.0 | attrs is the Python package that will bring back the joy of writing classes by relieving you from the drudgery of implementing object protocols (aka dunder methods). / MIT |
| [automat](https://github.com/glyph/Automat) | 20.2.0 | self-service finite-state machines for the programmer on the go / MIT |
| [autopep8](https://github.com/hhatto/autopep8) | 1.6.0 | A tool that automatically formats Python code to conform to the PEP 8 style guide / MIT |
| [babel](http://babel.pocoo.org/) | 2.9.1 | Utilities to internationalize and localize Python applications / BSD 3-clause |
| [backcall](https://github.com/takluyver/backcall/) | 0.2.0 | Specifications for callback functions passed in to an API / BSD-3-Clause |
| [backports](https://github.com/brandon-rhodes/backports) | 1.1 | Namespace for backported Python features. / MIT |
| [backports.functools\_lru\_cache](https://github.com/jaraco/backports.functools_lru_cache) | 1.6.4 | Backport of functools.lru\_cache from Python 3.3 as published at ActiveState. / MIT |
| [backports.tempfile](https://github.com/pjdelport/backports.tempfile) | 1.0 | Backports of new features in Python’s tempfile module / PSF 2 |
| [backports.weakref](https://github.com/pjdelport/backports.weakref) | 1.0.post1 | Backport of new features in Python’s weakref module / Python-2.0 |
| [bcrypt](https://github.com/pyca/bcrypt/) | 3.2.0 | Modern password hashing for your software and your servers / Apache-2.0 |
| [beautifulsoup4](https://www.crummy.com/software/BeautifulSoup/) | 4.11.1 | Python library designed for screen-scraping / MIT |
| [binaryornot](https://github.com/audreyr/binaryornot) | 0.4.4 | Ultra-lightweight pure Python package to check if a file is binary or text. / BSD-3-Clause |
| [bitarray](https://github.com/ilanschnell/bitarray) | 2.4.1 | efficient arrays of booleans – C extension / PSF-2.0 |
| [bkcharts](http://github.com/bokeh/bkcharts) | 0.2 | High level chart types built on top of Bokeh / BSD 3-Clause |
| [black](https://github.com/python/black) | 19.10b0 | The Uncompromising Code Formatter / MIT |
| [blas](http://www.netlib.org/lapack) | 1.0 | Linear Algebra PACKage / BSD-3-Clause |
| [bleach](https://github.com/mozilla/bleach) | 4.1.0 | Easy, whitelist-based HTML-sanitizing tool / Apache-2.0 |
| [blosc](https://github.com/Blosc/c-blosc) | 1.21.0 | A blocking, shuffling and loss-less compression library that can be faster than memcpy() / BSD-3-Clause |
| [bokeh](http://bokeh.pydata.org/) | 2.4.2 | Statistical and novel interactive HTML plots for Python / BSD-3-Clause |
| [boto3](https://aws.amazon.com/sdk-for-python) | 1.21.32 | Amazon Web Services SDK for Python / Apache-2.0 |
| [botocore](https://aws.amazon.com/sdk-for-python/) | 1.24.32 | Low-level, data-driven core of boto 3. / Apache-2.0 |
| [bottleneck](https://github.com/pydata/bottleneck) | 1.3.4 | Fast NumPy array functions written in Cython. / BSD-2-Clause |
| [brotli](http://github.com/google/brotli) | 1.0.9 | Brotli compression format / MIT |
| [brotlipy](https://github.com/python-hyper/brotlipy) | 0.7.0 | Python bindings to the Brotli compression library / MIT |
| [brunsli](https://github.com/google/brunsli) | 0.1 | Practical JPEG Repacker / MIT |
| [bzip2](http://www.bzip.org/) | 1.0.8 | high-quality data compressor / bzip2 |
| [c-ares](https://c-ares.org/) | 1.18.1 | This is c-ares, an asynchronous resolver library / MIT |
| [ca-certificates](https://curl.se/docs/caextract.html) | 2022.3.29 | Certificates for use with other packages. / MPL-2.0 |
| [cachetools](https://github.com/tkem/cachetools) | 4.2.2 | Extensible memoizing collections and decorators / MIT |
| [certifi](http://certifi.io/) | 2021.10.8 | Python package for providing Mozilla’s CA Bundle. / ISC |
| [cffi](http://cffi.readthedocs.org/) | 1.15.0 | Foreign Function Interface for Python calling C code. / MIT |
| [cfitsio](http://heasarc.gsfc.nasa.gov/fitsio/fitsio.html) | 3.470 | A library for reading and writing FITS files / fitsio |
| [chardet](https://github.com/chardet/chardet) | 4.0.0 | Universal character encoding detector / LGPL2 |
| [charls](https://github.com/team-charls/charls) | 2.2.0 | CharLS is a C++ implementation of the JPEG-LS standard for lossless and near-lossless image compression and decompression. JPEG-LS is a low-complexity image compression standard that matches JPEG 2000 compression ratios. / BSD-3-Clause |
| [charset-normalizer](https://github.com/ousret/charset_normalizer) | 2.0.4 | The Real First Universal Charset Detector. Open, modern and actively maintained alternative to Chardet. / MIT |
| [click](https://palletsprojects.com/p/click) | 8.0.4 | Python composable command line interface toolkit / BSD-3-Clause |
| [cloudpickle](https://github.com/cloudpipe/cloudpickle) | 2.0.0 | Extended pickling support for Python objects / BSD-3-Clause |
| [clyent](https://github.com/Anaconda-Platform/clyent) | 1.2.2 | Command line client library for windows and posix / BSD 3-Clause |
| [colorama](https://github.com/tartley/colorama) | 0.4.4 | Cross-platform colored terminal text / BSD-3-Clause |
| [colorcet](http://github.com/pyviz/colorcet) | 2.0.6 | Collection of perceptually uniform colormaps / CC-BY-4.0 |
| [conda](https://conda.io) | 4.12.0 | OS-agnostic, system-level binary package and environment manager. / BSD-3-Clause |
| [conda-build](https://github.com/conda/conda-build) | 3.21.8 | tools for building conda packages / BSD-3-Clause |
| [conda-content-trust](https://github.com/conda/conda-content-trust) | 0.1.1 | Signing and verification tools for conda / BSD-3-Clause |
| [conda-env](https://github.com/conda/conda-env) | 2.6.0 | Tools for interacting with conda environments. / BSD 3-Clause |
| [conda-token](https://github.com/Anaconda/conda-token) | 0.3.0 | Set repository access token / BSD-3-Clause |
| [conda-verify](https://github.com/conda/conda-verify) | 3.4.2 | tool for validating conda recipes and conda packages / BSD 3-Clause |
| [constantly](https://github.com/twisted/constantly) | 15.1.0 | Symbolic constants in Python / MIT |
| [cookiecutter](https://github.com/cookiecutter/cookiecutter) | 1.7.3 | A command-line utility that creates projects from cookiecutters (project templates), e.g. creating a Python package project from a Python package project template. / BSD-3-Clause |
| [cryptography](https://github.com/pyca/cryptography) | 3.4.8 | Provides cryptographic recipes and primitives to Python developers / Apache-2.0 AND BSD-3-Clause AND PSF-2.0 AND MIT |
| [cssselect](https://pythonhosted.org/cssselect/) | 1.1.0 | CSS Selectors for Python / BSD 3-Clause |
| [curl](https://curl.haxx.se/) | 7.82.0 | tool and library for transferring data with URL syntax / curl |
| [cycler](http://matplotlib.org/cycler) | 0.11.0 | Composable style cycles. / BSD-3-Clause |
| [cython](https://cython.org/) | 0.29.28 | The Cython compiler for writing C extensions for the Python language / Apache-2.0 |
| [cytoolz](https://github.com/pytoolz/cytoolz) | 0.11.0 | Cython implementation of Toolz. High performance functional utilities / BSD-3-Clause |
| [daal4py](https://intelpython.github.io/daal4py/) | 2021.5.0 | A convenient Python API to Intel (R) oneAPI Data Analytics Library / Apache-2.0 |
| [dal](https://software.intel.com/content/www/us/en/develop/tools.html) | 2021.5.1 | Intel® oneDAL runtime libraries / Intel Simplified Software License |
| [dask](https://dask.org/) | 2022.2.1 | Parallel PyData with Task Scheduling / BSD-3-Clause |
| [dask-core](https://github.com/dask/dask/) | 2022.2.1 | Parallel Python with task scheduling / BSD-3-Clause |
| [dataclasses](https://github.com/ericvsmith/dataclasses) | 0.8 | An implementation of PEP 557: Data Classes / Apache-2.0 |
| [datashader](https://datashader.org) | 0.13.0 | Data visualization toolchain based on aggregating into a grid / BSD-3-Clause |
| [datashape](http://datashape.pydata.org) | 0.5.4 | A data description language. / BSD 2-Clause |
| [dbus](http://www.freedesktop.org/wiki/Software/dbus/) | 1.13.18 | Simple message bus system for applications to talk to one another / GPL2 |
| [debugpy](https://github.com/Microsoft/debugpy) | 1.5.1 | An implementation of the Debug Adapter Protocol for Python / MIT |
| [decorator](https://github.com/micheles/decorator) | 5.1.1 | Better living through Python with decorators. / BSD-2-Clause |
| [defusedxml](https://bitbucket.org/tiran/defusedxml) | 0.7.1 | XML bomb protection for Python stdlib modules / PSF 2.0 |
| [diff-match-patch](http://code.google.com/p/google-diff-match-patch/) | 20200713 | Diff Match Patch is a high-performance library in multiple languages that manipulates plain text / Apache-2.0 |
| [distributed](https://distributed.readthedocs.io/en/latest/) | 2022.2.1 | Distributed computing with Dask / BSD-3-Clause |
| [docutils](http://docutils.sourceforge.net/) | 0.17.1 | Docutils – Python Documentation Utilities / LicenseRef-Public-Domain-Dedictation and BSD-2-Clause and LicenseRef-PSF-2.1.1 and GPL-3.0-or-later |
| [entrypoints](https://github.com/takluyver/entrypoints) | 0.4 | Discover and load entry points from installed packages. / MIT License |
| [et\_xmlfile](https://foss.heptapod.net/openpyxl/et_xmlfile) | 1.1.0 | An implementation of lxml.xmlfile for the standard library / MIT AND PSF-2.0 |
| [executing](https://pypi.org/project/executing) | 0.8.3 | Get the currently executing AST node of a frame, and other information / MIT |
| [expat](https://libexpat.github.io) | 2.4.4 | Expat XML parser library in C / MIT |
| [filelock](https://github.com/tox-dev/py-filelock) | 3.6.0 | A platform independent file lock. / Unlicense |
| [flake8](http://flake8.pycqa.org/) | 3.9.2 | Your Tool For Style Guide Enforcement / MIT |
| [flask](https://flask.pocoo.org) | 1.1.2 | A microframework based on Werkzeug, Jinja2 and good intentions. / BSD 3-Clause |
| [fontconfig](http://www.freedesktop.org/wiki/Software/fontconfig/) | 2.13.1 | A library for configuring and customizing font access. / MIT |
| [fonttools](https://github.com/fonttools/fonttools) | 4.25.0 | fontTools is a library for manipulating fonts, written in Python. / MIT |
| [freetype](https://www.freetype.org/) | 2.11.0 | A Free, High-Quality, and Portable Font Engine / GPL-2.0-only and LicenseRef-FreeType |
| [frozenlist](https://github.com/aio-libs/frozenlist) | 1.2.0 | A list-like structure which implements collections.abc.MutableSequence / Apache-2.0 |
| [fsspec](https://github.com/martindurant/filesystem_spec) | 2022.2.0 | A specification for pythonic filesystems / BSD-3-Clause |
| [future](http://python-future.org) | 0.18.2 | Clean single-source support for Python 3 and 2 / MIT |
| [gensim](https://github.com/RaRe-Technologies/gensim) | 4.1.2 | Topic Modelling for Humans / LGPL-2.1-only |
| [giflib](http://giflib.sourceforge.net) | 5.2.1 | Library for reading and writing gif images / MIT |
| [glib](https://developer.gnome.org/glib/) | 2.69.1 | Provides core application building blocks for libraries and applications written in C. / LGPL-2.1-or-later |
| [glob2](https://github.com/miracle2k/python-glob2) | 0.7 | Version of the glob module that supports recursion via \*\*, and can capture patterns. / BSD-2-Clause |
| [gmp](http://gmplib.org/) | 6.2.1 | The GNU multiprecision library. / GPL-2.0-or-later AND LGPL-3.0-or-later |
| [gmpy2](https://pypi.python.org/pypi/gmpy2) | 2.1.2 | GMP/MPIR, MPFR, and MPC interface to Python 2.6+ and 3.x / LGPL-3.0-or-later |
| [google-api-core](https://github.com/googleapis/python-api-core) | 1.25.1 | Core Library for Google Client Libraries / Apache-2.0 |
| [google-auth](https://github.com/googleapis/google-auth-library-python) | 1.33.0 | Google authentication library for Python / Apache-2.0 |
| [google-cloud-core](https://github.com/googleapis/python-cloud-core) | 1.7.1 | API Client library for Google Cloud: Core Helpers / Apache-2.0 |
| [google-cloud-storage](https://github.com/googleapis/python-storage) | 1.31.0 | Python Client for Google Cloud Storage / Apache-2.0 |
| [google-crc32c](https://github.com/googleapis/python-crc32c) | 1.1.2 | Python wrapper for a hardware-based implementation of the CRC32C hashing algorithm / Apache-2.0 |
| [google-resumable-media](https://github.com/googleapis/google-resumable-media-python) | 1.3.1 | Utilities for Google Media Downloads and Resumable Uploads / Apache-2.0 |
| [googleapis-common-protos](https://github.com/googleapis/api-common-protos) | 1.53.0 | Common protobufs used in Google APIs / Apache-2.0 |
| [greenlet](https://github.com/python-greenlet/greenlet) | 1.1.1 | Lightweight in-process concurrent programming / MIT |
| [grpcio](https://grpc.io) | 1.42.0 | HTTP/2-based RPC framework / Apache-2.0 |
| [gst-plugins-base](http://gstreamer.freedesktop.org/) | 1.14.0 | GStreamer Base Plug-ins / GPL2 |
| [gstreamer](http://gstreamer.freedesktop.org/) | 1.14.0 | Library for constructing graphs of media-handling components / LGPL 2 |
| [h5py](http://www.h5py.org/) | 3.6.0 | Read and write HDF5 files from Python / BSD-3-Clause |
| [hdf5](http://www.hdfgroup.org/HDF5/) | 1.10.6 | HDF5 is a data model, library, and file format for storing and managing data / HDF5 |
| [heapdict](http://stutzbachenterprises.com/) | 1.0.1 | A heap with decrease-key and increase-key operations / BSD 3-Clause |
| [holoviews](https://holoviews.org) | 1.14.8 | Stop plotting your data - annotate your data and let it visualize itself. / BSD-3-Clause |
| [hvplot](https://hvplot.holoviz.org/) | 0.7.3 | A high-level plotting API for the PyData ecosystem built on HoloViews / BSD-3-Clause |
| [hyperlink](https://github.com/python-hyper/hyperlink) | 21.0.0 | Immutable, Pythonic, correct URLs. / MIT |
| [icu](http://site.icu-project.org/) | 58.2 | International Components for Unicode. / MIT |
| [idna](https://github.com/kjd/idna) | 3.3 | Internationalized Domain Names in Applications (IDNA). / BSD-3-Clause |
| [imagecodecs](https://www.lfd.uci.edu/~gohlke/) | 2021.8.26 | Image transformation, compression, and decompression codecs / BSD-3-Clause |
| [imageio](https://imageio.github.io) | 2.9.0 | A Python library for reading and writing image data / BSD-2-Clause |
| [imagesize](https://github.com/shibukawa/imagesize_py) | 1.3.0 | Getting image size from png/jpeg/jpeg2000/gif file / MIT |
| [importlib-metadata](https://github.com/python/importlib_metadata) | 4.11.3 | A library to access the metadata for a Python package. / Apache-2.0 |
| [importlib\_metadata](https://github.com/python/importlib_metadata) | 4.11.3 | A library to access the metadata for a Python package. / Apache-2.0 |
| [incremental](https://github.com/hawkowl/incremental) | 21.3.0 | Incremental is a small library that versions your Python projects. / MIT |
| [inflection](http://github.com/jpvanhal/inflection) | 0.5.1 | A port of Ruby on Rails inflector to Python / MIT |
| [iniconfig](http://github.com/RonnyPfannschmidt/iniconfig) | 1.1.1 | iniconfig: brain-dead simple config-ini parsing / MIT |
| [intake](https://github.com/ContinuumIO/intake) | 0.6.5 | Data load and catalog system / BSD-2-Clause |
| [intel-openmp](https://software.intel.com/en-us/node/522690) | 2021.4.0 | Math library for Intel and compatible processors / LicenseRef-ProprietaryIntel |
| [intervaltree](https://github.com/chaimleib/intervaltree) | 3.1.0 | Editable interval tree data structure for Python 2 and 3 / Apache-2.0 |
| [ipykernel](https://ipython.org) | 6.9.1 | IPython Kernel for Jupyter / BSD-3-Clause |
| [ipython](https://ipython.org) | 8.2.0 | IPython: Productive Interactive Computing / BSD-3-Clause |
| [ipython\_genutils](http://ipython.org) | 0.2.0 | vestigial utilities from IPython / BSD 3-Clause |
| [ipywidgets](https://github.com/ipython/ipywidgets) | 7.6.5 | Jupyter Interactive Widgets / BSD-3-Clause |
| [isort](https://github.com/timothycrosley/isort) | 5.9.3 | A Python utility / library to sort Python imports. / MIT |
| [itemadapter](https://github.com/scrapy/itemadapter) | 0.3.0 | Common interface for different data containers / BSD-3-Clause |
| [itemloaders](https://github.com/scrapy/itemadapter) | 1.0.4 | Collect data from HTML and XML sources / BSD-3-Clause |
| [itsdangerous](https://github.com/pallets/itsdangerous) | 2.0.1 | Various helpers to pass trusted data to untrusted environments. / BSD-3-Clause |
| [jdcal](https://github.com/phn/jdcal) | 1.4.1 | Julian dates from proleptic Gregorian and Julian calendars. / BSD 2-Clause |
| [jedi](https://github.com/davidhalter/jedi/) | 0.18.1 | An autocompletion tool for Python that can be used for text editors. / MIT |
| [jeepney](https://gitlab.com/takluyver/jeepney) | 0.7.1 | Pure Python DBus interface / MIT |
| [jinja2](https://jinja.pocoo.org) | 2.11.3 | An easy to use stand-alone template engine written in pure python. / BSD-3-Clause |
| [jinja2-time](https://github.com/hackebrot/jinja2-time) | 0.2.0 | Jinja2 Extension for Dates and Times / MIT |
| [jmespath](http://jmespath.org/) | 0.10.0 | Query language for JSON / MIT |
| [joblib](https://joblib.readthedocs.io/en/latest/) | 1.1.0 | Lightweight pipelining: using Python functions as pipeline jobs. / BSD-3-Clause |
| [jpeg](https://www.ijg.org/) | 9e | read/write jpeg COM, EXIF, IPTC medata / IJG |
| [jq](http://stedolan.github.io/jq/) | 1.6 | A command-line JSON processor. / MIT |
| [json5](https://github.com/dpranke/pyjson5) | 0.9.6 | A Python implementation of the JSON5 data format / Apache-2.0 |
| [jsonschema](https://github.com/Julian/jsonschema) | 4.4.0 | An implementation of JSON Schema validation for Python / MIT |
| [jupyter](http://jupyter.org) | 1.0.0 | Jupyter metapackage. Install all the Jupyter components in one go. / BSD 3-Clause |
| [jupyter\_client](https://jupyter.org) | 6.1.12 | jupyter\_client contains the reference implementation of the Jupyter protocol. / BSD-3-Clause |
| [jupyter\_console](https://jupyter.org) | 6.4.0 | Jupyter terminal console / BSD-3-Clause |
| [jupyter\_core](https://jupyter.org) | 4.9.2 | Core common functionality of Jupyter projects. / BSD-3-Clause |
| [jupyter\_server](https://jupyter.org) | 1.13.5 | Jupyter Server / BSD-3-Clause |
| [jupyterlab](https://github.com/jupyterlab/jupyterlab) | 3.3.2 | JupyterLab PRE-ALPHA / BSD-3-Clause |
| [jupyterlab\_pygments](http://github.com/JupyterLab/jupyterlab_pygments) | 0.1.2 | Pygments syntax coloring scheme making use of the JupyterLab CSS variables / BSD-3-Clause |
| [jupyterlab\_server](https://github.com/jupyterlab/jupyterlab_server) | 2.10.3 | A set of server components for JupyterLab and JupyterLab like applications. / BSD-3-Clause |
| [jupyterlab\_widgets](https://github.com/jupyter-widgets/ipywidgets) | 1.0.0 | JupyterLab extension providing HTML widgets / BSD-3-Clause |
| [jxrlib](https://packages.debian.org/source/sid/jxrlib) | 1.1 | jxrlib - JPEG XR Library by Microsoft, built from Debian hosted sources. / BSD-2-Clause |
| [keyring](https://github.com/jaraco/keyring) | 23.4.0 | Store and access your passwords safely / MIT |
| [kiwisolver](https://github.com/nucleic/kiwi) | 1.3.2 | An efficient C++ implementation of the Cassowary constraint solver / BSD-3-Clause |
| [krb5](http://web.mit.edu/kerberos/) | 1.19.2 | A network authentication protocol. / MIT |
| [lazy-object-proxy](https://github.com/ionelmc/python-lazy-object-proxy) | 1.6.0 | A fast and thorough lazy object proxy / BSD-2-Clause |
| [lcms2](http://www.littlecms.com/) | 2.12 | Open Source Color Management Engine / MIT |
| [ld\_impl\_linux-64](https://www.gnu.org/software/binutils/) | 2.35.1 | A set of programming tools for creating and managing binary programs, object files, libraries, profile data, and assembly source code. / GPL-3.0-only |
| [lerc](https://github.com/Esri/lerc) | 3.0 | LERC - Limited Error Raster Compression / Apache-2.0 |
| [libaec](https://gitlab.dkrz.de/k202009/libaec) | 1.0.4 | Adaptive Entropy Coding library / BSD-2-Clause |
| [libarchive](http://www.libarchive.org/) | 3.4.2 | Multi-format archive and compression library / BSD-2-Clause |
| [libcrc32c](https://github.com/google/crc32c) | 1.1.1 | CRC32C implementation with support for CPU-specific acceleration instructions / BSD-3-Clause |
| [libcurl](https://curl.haxx.se/) | 7.82.0 | tool and library for transferring data with URL syntax / curl |
| [libdeflate](https://github.com/ebiggers/libdeflate) | 1.8 | libdeflate is a library for fast, whole-buffer DEFLATE-based compression and decompression. / MIT |
| [libedit](http://thrysoee.dk/editline/) | 3.1.20210910 | Editline Library (libedit) / BSD-2-Clause |
| [libev](http://software.schmorp.de/pkg/libev.html) | 4.33 | A full-featured and high-performance event loop that is loosely modeled after libevent, but without its limitations and bugs. / BSD-2-Clause |
| [libffi](https://sourceware.org/libffi/) | 3.3 | A Portable Foreign Function Interface Library. / MIT |
| [libgcc-ng](https://gcc.gnu.org/onlinedocs/gccint/Libgcc.html) | 9.3.0 | The GCC low-level runtime library / GPL-3.0-only WITH GCC-exception-3.1 |
| [libgfortran-ng](https://gcc.gnu.org/) | 7.5.0 | The GNU Fortran Runtime Library / GPL-3.0-only WITH GCC-exception-3.1 |
| [libgfortran4](https://gcc.gnu.org/) | 7.5.0 | The GNU Fortran Runtime Library / GPL-3.0-only WITH GCC-exception-3.1 |
| [libgomp](https://gcc.gnu.org/onlinedocs/gccint/Libgcc.html) | 9.3.0 | The GCC OpenMP implementation. / GPL-3.0-only WITH GCC-exception-3.1 |
| [libidn2](https://www.gnu.org/software/libidn/#libidn2) | 2.3.2 | Library for internationalized domain names (IDNA2008) support / LGPLv2 AND LGPL-3.0-or-later AND GPL-3.0-or-later |
| [liblief](https://lief.quarkslab.com/) | 0.11.5 | A cross platform library to parse, modify and abstract ELF, PE and MachO formats. / Apache-2.0 |
| [libllvm11](http://llvm.org/) | 11.1.0 | Development headers and libraries for LLVM / Apache-2.0 WITH LLVM-exception |
| [libnghttp2](http://github.com/nghttp2/nghttp2) | 1.46.0 | This is an implementation of Hypertext Transfer Protocol version 2. / MIT |
| [libpng](http://www.libpng.org/pub/png/libpng.html) | 1.6.37 | PNG reference library / zlib/libpng |
| [libprotobuf](https://developers.google.com/protocol-buffers/) | 3.19.1 | Protocol Buffers - Google’s data interchange format. C++ Libraries and protoc, the protobuf compiler. / BSD-3-Clause |
| [libsodium](http://libsodium.org) | 1.0.18 | A modern and easy-to-use crypto library. / ISC |
| [libspatialindex](http://libspatialindex.github.io) | 1.9.3 | Extensible framework for robust spatial indexing / MIT |
| [libssh2](https://www.libssh2.org/) | 1.10.0 | the SSH library / BSD-3-Clause |
| [libstdcxx-ng](https://gcc.gnu.org/) | 9.3.0 | The GNU C++ Runtime Library / GPL-3.0-only WITH GCC-exception-3.1 |
| [libtiff](http://www.libtiff.org/) | 4.2.0 | Support for the Tag Image File Format (TIFF). / HPND |
| [libunistring](https://www.gnu.org/software/libunistring) | 0.9.10 | This library provides functions for manipulating Unicode strings and for manipulating C strings according to the Unicode standard. / LGPL |
| [libuuid](http://sourceforge.net/projects/libuuid/) | 1.0.3 | Portable uuid C library. / BSD 3-Clause |
| [libwebp](https://developers.google.com/speed/webp/) | 1.2.2 | WebP image library / BSD-3-Clause |
| [libwebp-base](https://developers.google.com/speed/webp) | 1.2.2 | WebP image library / BSD-3-Clause |
| [libxcb](http://xcb.freedesktop.org/) | 1.14 | This is the C-language Binding (XCB) package to the X Window System protocol / MIT |
| [libxml2](http://xmlsoft.org/) | 2.9.12 | The XML C parser and toolkit of Gnome / MIT |
| [libxslt](http://xmlsoft.org/XSLT/) | 1.1.34 | The XSLT C library developed for the GNOME project / MIT |
| [libzopfli](https://github.com/google/zopfli) | 1.0.3 | A compression library programmed in C to perform very good, but slow, deflate or zlib compression. / Apache-2.0 |
| [llvmlite](http://llvmlite.pydata.org) | 0.38.0 | A lightweight LLVM python binding for writing JIT compilers. / BSD-2-Clause |
| [locket](https://github.com/mwilliamson/locket.py) | 0.2.1 | File-based locks for Python for Linux and Windows / BSD 2-Clause |
| [lxml](https://lxml.de/) | 4.8.0 | Pythonic binding for the C libraries libxml2 and libxslt. / BSD-3-Clause and GPL-2.0-only and ZPL-2.0 and LicenseRef-ElementTree |
| [lz4-c](https://www.lz4.org) | 1.9.3 | Extremely Fast Compression algorithm / BSD-2-Clause |
| [lzo](http://www.oberhumer.com/opensource/lzo/) | 2.10 | LZO is a portable lossless data compression library written in ANSI C. / GPL v2+ |
| [markdown](https://pythonhosted.org/Markdown/) | 3.3.4 | Python implementation of Markdown. / BSD-3-Clause |
| [markupsafe](https://www.palletsprojects.com/p/markupsafe) | 2.0.1 | A Python module that implements the jinja2.Markup string / BSD-3-Clause |
| [matplotlib](https://matplotlib.org/) | 3.5.1 | Publication quality figures in Python / LicenseRef-PSF-based |
| [matplotlib-base](https://matplotlib.org/) | 3.5.1 | Publication quality figures in Python / LicenseRef-PSF-based |
| [matplotlib-inline](https://github.com/ipython/matplotlib-inline) | 0.1.2 | Inline Matplotlib backend for Jupyter / BSD-3-Clause |
| [mccabe](https://github.com/PyCQA/mccabe) | 0.6.1 | McCabe complexity checker for Python / MIT |
| [mistune](https://github.com/lepture/mistune) | 0.8.4 | A sane Markdown parser with useful plugins and renderers. / BSD-3-Clause |
| [mkl](https://software.intel.com/en-us/mkl) | 2021.4.0 | Math library for Intel and compatible processors / LicenseRef-ProprietaryIntel |
| [mkl-service](http://github.com/IntelPython/mkl-service) | 2.4.0 | Python hooks for Intel(R) Math Kernel Library runtime control settings. / BSD-3-Clause |
| [mkl\_fft](http://github.com/IntelPython/mkl_fft) | 1.3.1 | NumPy-based implementation of Fast Fourier Transform using Intel (R) Math Kernel Library. / BSD 3-Clause |
| [mkl\_random](http://github.com/IntelPython/mkl_random) | 1.2.2 | Intel (R) MKL-powered package for sampling from common probability distributions into NumPy arrays. / BSD-3-Clause |
| [mock](https://github.com/testing-cabal/mock) | 4.0.3 | A library for testing in Python / BSD-2-Clause |
| [mpc](http://www.multiprecision.org/) | 1.1.0 | A C library for the arithmetic of complex numbers with arbitrarily high precision. / LGPL 3 |
| [mpfr](http://www.mpfr.org/) | 4.0.2 | The MPFR library is a C library for multiple-precision floating-point computations with correct rounding. / LGPL-3.0-only |
| [mpi](http://www.mpich.org/) | 1.0 | A high performance widely portable implementation of the MPI standard. / MPICH |
| [mpich](http://www.mpich.org/) | 3.3.2 | A high performance widely portable implementation of the MPI standard. / MPICH |
| [mpmath](http://mpmath.org) | 1.2.1 | Python library for arbitrary-precision floating-point arithmetic / BSD 3-Clause |
| [msgpack-python](http://msgpack.org/) | 1.0.2 | MessagePack (de)serializer / Apache-2.0 |
| [multidict](http://github.com/aio-libs/multidict) | 5.2.0 | multidict implementation / Apache 2.0 |
| [multipledispatch](https://github.com/mrocklin/multipledispatch/) | 0.6.0 | Multiple dispatch in Python / BSD 3-Clause |
| [munkres](https://github.com/bmc/munkres) | 1.1.4 | The Munkres module provides an O(n^3) implementation of the Munkres algorithm (also called the Hungarian algorithm or the Kuhn-Munkres algorithm). / Apache-2.0 |
| [mypy\_extensions](http://www.mypy-lang.org/) | 0.4.3 | Experimental type system extensions for programs checked with the mypy typechecker. / MIT |
| [nbclassic](http://github.com/jupyterlab/nbclassic) | 0.3.5 | Jupyter Notebook as a Jupyter Server Extension. / BSD-3-Clause |
| [nbclient](https://jupyter.org) | 0.5.13 | A client library for executing notebooks. Formally nbconvert’s ExecutePreprocessor. / BSD-3-Clause |
| [nbconvert](https://jupyter.org) | 6.4.4 | Converting Jupyter Notebooks / BSD-3-Clause |
| [nbformat](https://jupyter.org) | 5.3.0 | The Jupyter Notebook format / BSD-3-Clause |
| [ncurses](http://www.gnu.org/software/ncurses/) | 6.3 | Library for text-based user interfaces / Free software (MIT-like) |
| [nest-asyncio](https://github.com/erdewit/nest_asyncio) | 1.5.5 | Patch asyncio to allow nested event loops / BSD-2-Clause |
| [networkx](https://networkx.github.io/) | 2.7.1 | Python package for creating and manipulating complex networks / BSD-3-Clause |
| [nltk](https://nltk.org/) | 3.7 | Natural Language Toolkit / Apache-2.0 |
| [nose](http://readthedocs.org/docs/nose/) | 1.3.7 | Nose extends unittest to make testing easier / LGPL-2.1 |
| [notebook](https://jupyter.org) | 6.4.8 | Jupyter Notebook / BSD-3-Clause |
| [numba](http://numba.pydata.org) | 0.55.1 | NumPy aware dynamic Python compiler using LLVM / BSD-2-Clause |
| [numexpr](https://github.com/pydata/numexpr) | 2.8.1 | Fast numerical expression evaluator for NumPy. / MIT |
| [numpy](http://numpy.scipy.org/) | 1.21.5 | Array processing for numbers, strings, records, and objects. / BSD 3-Clause |
| [numpy-base](http://numpy.scipy.org/) | 1.21.5 | Array processing for numbers, strings, records, and objects. / BSD 3-Clause |
| [numpydoc](https://github.com/numpy/numpydoc) | 1.2 | Numpy’s Sphinx extensions / BSD-3-Clause |
| [olefile](http://www.decalage.info/python/olefileio) | 0.46 | parse, read and write Microsoft OLE2 files / BSD 2-Clause |
| [oniguruma](https://github.com/kkos/oniguruma) | 6.9.7.1 | A regular expression library. / BSD-2-Clause |
| [openjpeg](http://www.openjpeg.org/) | 2.4.0 | An open-source JPEG 2000 codec written in C / BSD 2-Clause |
| [openpyxl](https://openpyxl.readthedocs.io) | 3.0.9 | A Python library to read/write Excel 2010 xlsx/xlsm files / MIT |
| [openssl](https://www.openssl.org/) | 1.1.1n | OpenSSL is an open-source implementation of the SSL and TLS protocols / OpenSSL |
| [packaging](https://github.com/pypa/packaging) | 21.3 | Core utilities for Python packages / Apache-2.0 or BSD-2-Clause |
| [pandas](https://pandas.pydata.org) | 1.4.2 | High-performance, easy-to-use data structures and data analysis tools. / BSD-3-Clause |
| [pandocfilters](https://github.com/jgm/pandocfilters) | 1.5.0 | A python module for writing pandoc filters / BSD-3-Clause |
| [panel](https://panel.holoviz.org) | 0.13.0 | A high-level app and dashboarding solution for Python / BSD-3-Clause |
| [param](http://ioam.github.io/param/) | 1.12.0 | Param: Make your Python code clearer and more reliable by declaring Parameters / BSD-3-Clause |
| [parsel](https://github.com/scrapy/parsel) | 1.6.0 | library to extract data from HTML and XML using XPath and CSS selectors / BSD-3-Clause |
| [parso](https://github.com/davidhalter/parso) | 0.8.3 | A Python Parser / MIT |
| [partd](https://github.com/dask/partd) | 1.2.0 | Data structure for on-disk shuffle operations / BSD 3-Clause |
| [patchelf](http://nixos.org/patchelf.html) | 0.13 | A small utility to modify the dynamic linker and RPATH of ELF executables. / GPL-3.0-or-later |
| [pathspec](https://github.com/cpburnz/python-path-specification) | 0.7.0 | Utility library for gitignore style pattern matching of file paths. / MPL-2.0 |
| [patsy](https://github.com/pydata/patsy) | 0.5.2 | Describing statistical models in Python using symbolic formulas / BSD-2-Clause AND PSF-2.0 |
| [pcre](http://www.pcre.org/) | 8.45 | Regular expression pattern matching using the same syntax and semantics as Perl 5. / BSD 3-Clause |
| [pep8](http://pep8.readthedocs.org/) | 1.7.1 | Python style guide checker / MIT |
| [pexpect](http://pexpect.sourceforge.net/) | 4.8.0 | Pexpect makes Python a better tool for controlling other applications. / ISC |
| [pickleshare](https://github.com/pickleshare/pickleshare/) | 0.7.5 | Tiny ‘shelve’-like database with concurrency support / MIT |
| [pillow](https://pillow.readthedocs.io) | 9.0.1 | Pillow is the friendly PIL fork by Alex Clark and Contributors / LicenseRef-PIL |
| [pip](https://pip.pypa.io/en/stable/) | 21.2.4 | PyPA recommended tool for installing Python packages / MIT |
| [pkginfo](https://code.launchpad.net/~tseaver/pkginfo/trunk) | 1.8.2 | Query metadatdata from sdists / bdists / installed packages. / MIT |
| [plotly](https://plot.ly/python/) | 5.6.0 | An interactive JavaScript-based visualization library for Python / MIT |
| [pluggy](https://github.com/pytest-dev/pluggy) | 1.0.0 | Plugin registration and hook calling for Python / MIT |
| [poyo](https://github.com/hackebrot/poyo) | 0.5.0 | A lightweight YAML Parser for Python / MIT |
| [prometheus\_client](https://github.com/prometheus/client_python) | 0.13.1 | Python client for the Prometheus monitoring system / Apache-2.0 |
| [prompt-toolkit](https://github.com/jonathanslenders/python-prompt-toolkit) | 3.0.20 | Library for building powerful interactive command lines in Python / BSD-3-Clause |
| [prompt\_toolkit](https://github.com/jonathanslenders/python-prompt-toolkit) | 3.0.20 | Library for building powerful interactive command lines in Python / BSD-3-Clause |
| [protego](https://github.com/scrapy/protego) | 0.1.16 | A pure-Python robots.txt parser with support for modern conventions / BSD 3-Clauses |
| [protobuf](https://developers.google.com/protocol-buffers/) | 3.19.1 | Protocol Buffers - Google’s data interchange format. / BSD-3-Clause |
| [psutil](https://github.com/giampaolo/psutil) | 5.8.0 | A cross-platform process and system utilities module for Python / BSD-3-Clause |
| [ptyprocess](https://github.com/pexpect/ptyprocess) | 0.7.0 | Run a subprocess in a pseudo terminal / ISC |
| [pure\_eval](https://github.com/alexmojaki/pure_eval) | 0.2.2 | Safely evaluate AST nodes without side effects / MIT |
| [py](https://github.com/pytest-dev/py) | 1.11.0 | library with cross-python path, ini-parsing, io, code, log facilities / MIT |
| [py-lief](https://lief.quarkslab.com/) | 0.11.5 | A cross platform library to parse, modify and abstract ELF, PE and MachO formats. / Apache-2.0 |
| [pyasn1](https://github.com/etingof/pyasn1) | 0.4.8 | ASN.1 types and codecs / BSD 2-Clause |
| [pyasn1-modules](http://pyasn1.sourceforge.net/) | 0.2.8 | A collection of ASN.1-based protocols modules. / BSD 2-Clause |
| [pycodestyle](https://pycodestyle.readthedocs.io/) | 2.7.0 | Python style guide checker / MIT |
| [pycosat](https://github.com/ContinuumIO/pycosat) | 0.6.3 | Bindings to picosat (a SAT solver) / MIT |
| [pycparser](https://github.com/eliben/pycparser) | 2.21 | Complete C99 parser in pure Python / BSD-3-clause |
| [pyct](http://github.com/pyviz/pyct) | 0.4.6 | python package common tasks for users (e.g. copy examples, fetch data, …) / BSD 3-Clause |
| [pycurl](http://pycurl.sourceforge.net/) | 7.44.1 | A Python Interface To The cURL library / LGPL, MIT |
| [pydispatcher](http://pydispatcher.sourceforge.net) | 2.0.5 | Multi-producer-multi-consumer signal dispatching mechanism / BSD 3-Clause |
| [pydocstyle](https://github.com/PyCQA/pydocstyle) | 6.1.1 | Python docstring style checker (formerly pep257) / MIT |
| [pyerfa](https://pyerfa.readthedocs.io/) | 2.0.0 | Python bindings for ERFA routines / BSD-3-Clause |
| [pyflakes](https://github.com/PyCQA/pyflakes) | 2.3.1 | Pyflakes analyzes programs and detects various errors. / MIT |
| [pygments](https://pygments.org/) | 2.11.2 | Pygments is a generic syntax highlighter suitable for use in code hosting, forums, wikis or other applications that need to prettify source code. / BSD-2-Clause |
| [pyhamcrest](https://github.com/hamcrest/PyHamcrest) | 2.0.2 | Hamcrest framework for matcher objects / BSD 3-Clause |
| [pylint](https://www.pylint.org) | 2.9.6 | python code static checker / GPL-2.0-or-later |
| [pyls-spyder](https://github.com/spyder-ide/pyls-spyder) | 0.4.0 | Spyder extensions for the python-lsp-server / MIT |
| [pyodbc](https://github.com/mkleehammer/pyodbc) | 4.0.32 | DB API Module for ODBC / MIT |
| [pyopenssl](https://github.com/pyca/pyopenssl) | 21.0.0 | Python wrapper module around the OpenSSL library / Apache-2.0 |
| [pyparsing](https://github.com/pyparsing/pyparsing/) | 3.0.4 | Create and execute simple grammars / MIT |
| [pyqt](http://www.riverbankcomputing.co.uk/software/pyqt) | 5.9.2 | Python binding of the cross-platform GUI toolkit Qt. / Commercial, GPL-2.0, GPL-3.0 |
| [pyrsistent](http://github.com/tobgu/pyrsistent/) | 0.18.0 | Persistent/Functional/Immutable data structures / MIT |
| [pysocks](https://github.com/Anorov/PySocks) | 1.7.1 | A Python SOCKS client module. See [Anorov/PySocks](https://github.com/Anorov/PySocks) for more information. / BSD 3-Clause |
| [pytables](https://www.pytables.org) | 3.6.1 | Brings together Python, HDF5 and NumPy to easily handle large amounts of data. / BSD-3-Clause |
| [pytest](https://docs.pytest.org/en/latest/) | 7.1.1 | Simple and powerful testing with Python. / MIT |
| [python](https://www.python.org/) | 3.9.12 | General purpose programming language / PSF-2.0 |
| [python-dateutil](https://dateutil.readthedocs.org/) | 2.8.2 | Extensions to the standard Python datetime module. / BSD-3-Clause and Apache |
| [python-fastjsonschema](https://github.com/horejsek/python-fastjsonschema) | 2.15.1 | Fastest Python implementation of JSON schema / BSD-3-Clause |
| [python-libarchive-c](https://github.com/Changaco/python-libarchive-c) | 2.9 | Python interface to libarchive / CC0-1.0 |
| [python-lsp-black](https://github.com/python-lsp/python-lsp-black) | 1.0.0 | Black plugin for the Python LSP Server / MIT |
| [python-lsp-jsonrpc](https://github.com/python-lsp/python-lsp-jsonrpc) | 1.0.0 | A Python 3.6+ server implementation of the JSON RPC 2.0 protocol. / MIT |
| [python-lsp-server](https://github.com/python-lsp/python-lsp-server) | 1.2.4 | An implementation of the Language Server Protocol for Python / MIT |
| [python-slugify](https://github.com/un33k/python-slugify) | 5.0.2 | A Python Slugify application that handles Unicode / MIT |
| [python-snappy](https://github.com/andrix/python-snappy) | 0.6.0 | Python library for the snappy compression library from Google / BSD-3-Clause |
| [pytz](http://pythonhosted.org/pytz/) | 2021.3 | World timezone definitions, modern and historical. / MIT |
| [pyviz\_comms](https://www.holoviz.org) | 2.0.2 | Bidirectional communication for PyViz / BSD-3-Clause |
| [pywavelets](https://github.com/PyWavelets/pywt) | 1.3.0 | Discrete Wavelet Transforms in Python / MIT |
| [pyxdg](http://freedesktop.org/wiki/Software/pyxdg) | 0.27 | PyXDG contains implementations of freedesktop.org standards in python. / GNU Lesser General Public v2 (LGPLv2) |
| [pyyaml](http://pyyaml.org/wiki/PyYAML) | 6.0 | YAML parser and emitter for Python / MIT |
| [pyzmq](https://github.com/zeromq/pyzmq) | 22.3.0 | Python bindings for zeromq / BSD-3-clause |
| [qdarkstyle](https://github.com/ColinDuquesnoy/QDarkStyleSheet) | 3.0.2 | A dark stylesheet for Qt applications (Qt4, Qt5, PySide, PyQt4, PyQt5, QtPy, PyQtGraph). / MIT |
| [qstylizer](https://github.com/blambright/qstylizer) | 0.1.10 | Qt stylesheet generation utility for PyQt/PySide / MIT |
| [qt](http://qt.io) | 5.9.7 | Qt is a cross-platform application and UI framework. / LGPL-3.0-only |
| [qtawesome](https://github.com/spyder-ide/qtawesome) | 1.0.3 | Iconic fonts in PyQt and PySide applications / MIT |
| [qtconsole](http://jupyter.org) | 5.3.0 | Jupyter Qt Console / BSD-3-Clause |
| [qtpy](https://github.com/spyder-ide/qtpy) | 2.0.1 | Abstraction layer for PyQt5/PyQt4/PySide / MIT |
| [queuelib](https://github.com/scrapy/queuelib) | 1.5.0 | Collection of persistent (disk-based) queues / BSD |
| [readline](https://tiswww.case.edu/php/chet/readline/rltop.html) | 8.1.2 | library for editing command lines as they are typed in / GPL-3.0-only |
| [regex](https://github.com/mrabarnett/mrab-regex) | 2022.3.15 | Alternative regular expression module, to replace re / Apache-2.0 |
| [requests](http://python-requests.org) | 2.27.1 | Requests is an elegant and simple HTTP library for Python, built with ♥. / Apache-2.0 |
| [requests-file](http://github.com/dashea/requests-file) | 1.5.1 | file transport adapter for Requests / Apache |
| ripgrep | 12.1.1 | |
| [rope](https://github.com/python-rope/rope) | 0.22.0 | A python refactoring library / LGPL-3.0-or-later |
| [rsa](https://stuvel.eu/rsa) | 4.7.2 | Pure-Python RSA implementation / Apache-2.0 |
| [rtree](http://toblerity.github.com/rtree/) | 0.9.7 | R-Tree spatial index for Python GIS / MIT |
| [ruamel\_yaml](https://sourceforge.net/p/ruamel-yaml/code/ci/default/tree) | 0.15.100 | A patched copy of ruamel.yaml. / MIT |
| [s3transfer](https://github.com/boto/s3transfer) | 0.5.0 | An Amazon S3 Transfer Manager / Apache-2.0 |
| [scikit-image](https://scikit-image.org/) | 0.19.2 | Image processing in Python. / BSD-3-Clause |
| [scikit-learn](http://scikit-learn.org/) | 1.0.2 | A set of python modules for machine learning and data mining / BSD-3-Clause |
| [scikit-learn-intelex](https://intel.github.io/scikit-learn-intelex) | 2021.5.0 | Intel(R) Extension for Scikit-learn is a seamless way to speed up your Scikit-learn application. / Apache-2.0 |
| [scipy](http://www.scipy.org/) | 1.7.3 | Scientific Library for Python / BSD 3-Clause |
| [scrapy](https://scrapy.org/) | 2.6.1 | A high-level Python Screen Scraping framework / BSD-3-Clause-Clear |
| [seaborn](https://seaborn.pydata.org) | 0.11.2 | Statistical data visualization / BSD 3-Clause |
| [secretstorage](https://github.com/mitya57/secretstorage) | 3.3.1 | Provides a way for securely storing passwords and other secrets. / BSD-3-Clause |
| [send2trash](https://github.com/arsenetar/send2trash) | 1.8.0 | Python library to natively send files to Trash (or Recycle bin) on all platforms. / BSD-3-Clause |
| [service\_identity](https://github.com/pyca/service_identity) | 18.1.0 | Service identity verification for pyOpenSSL. / MIT |
| [setuptools](https://github.com/pypa/setuptools) | 61.2.0 | Download, build, install, upgrade, and uninstall Python packages / MIT |
| [sip](https://www.riverbankcomputing.com/software/sip/) | 4.19.13 | A Python bindings generator for C/C++ libraries / GPL-3.0-only |
| [six](https://six.readthedocs.io/) | 1.16.0 | Python 2 and 3 compatibility utilities / MIT |
| [smart\_open](https://github.com/RaRe-Technologies/smart_open) | 5.1.0 | Python library for efficient streaming of large files / MIT |
| [snappy](https://github.com/google/snappy) | 1.1.9 | A fast compressor/decompressor / BSD-3-clause AND CC-BY-3.0 AND MIT AND CC-BY AND Public Domain |
| [sniffio](https://github.com/python-trio/sniffio) | 1.2.0 | Sniff out which async library your code is running under / Apache-2.0 |
| [snowballstemmer](https://github.com/snowballstem/snowball) | 2.2.0 | Snowball stemming library collection for Python / BSD-3-Clause |
| [sortedcollections](http://www.grantjenks.com/docs/sortedcollections/) | 2.1.0 | Python Sorted Collections / Apache-2.0 |
| [sortedcontainers](http://www.grantjenks.com/docs/sortedcontainers/) | 2.4.0 | Python Sorted Container Types: SortedList, SortedDict, and SortedSet / Apache-2.0 |
| [soupsieve](http://facelessuser.github.io/soupsieve) | 2.3.1 | A modern CSS selector implementation for BeautifulSoup / MIT |
| [sphinx](https://www.sphinx-doc.org) | 4.4.0 | Sphinx is a tool that makes it easy to create intelligent and beautiful documentation / BSD-2-Clause |
| [sphinxcontrib-applehelp](https://www.sphinx-doc.org/en/master/) | 1.0.2 | sphinxcontrib-applehelp is a sphinx extension which outputs Apple help books / BSD-2-Clause |
| [sphinxcontrib-devhelp](https://www.sphinx-doc.org/en/master/) | 1.0.2 | sphinxcontrib-devhelp is a sphinx extension which outputs Devhelp document / BSD-2-Clause |
| [sphinxcontrib-htmlhelp](https://www.sphinx-doc.org/en/master/) | 2.0.0 | sphinxcontrib-htmlhelp is a sphinx extension which renders HTML help files. / BSD-2-Clause |
| [sphinxcontrib-jsmath](https://www.sphinx-doc.org/en/master/) | 1.0.1 | A sphinx extension which renders display math in HTML via JavaScript / BSD-2-Clause |
| [sphinxcontrib-qthelp](https://www.sphinx-doc.org/en/master/) | 1.0.3 | sphinxcontrib-qthelp is a sphinx extension which outputs QtHelp document / BSD-2-Clause |
| [sphinxcontrib-serializinghtml](https://www.sphinx-doc.org/en/master/) | 1.1.5 | sphinxcontrib-serializinghtml is a sphinx extension which outputs “serialized” HTML files (json and pickle). / BSD-2-Clause |
| [spyder](https://www.spyder-ide.org/) | 5.1.5 | The Scientific Python Development Environment / MIT |
| [spyder-kernels](https://www.spyder-ide.org/) | 2.1.3 | Jupyter kernels for Spyder’s console / MIT |
| [sqlalchemy](https://www.sqlalchemy.org/) | 1.4.32 | Database Abstraction Library. / MIT |
| [sqlite](https://www.sqlite.org/) | 3.38.2 | Implements a self-contained, zero-configuration, SQL database engine / blessing |
| [stack\_data](https://github.com/alexmojaki/stack_data) | 0.2.0 | Extract data from python stack frames and tracebacks for informative displays / MIT |
| [statsmodels](https://www.statsmodels.org) | 0.13.2 | Statistical computations and models for use with SciPy / BSD-3-Clause |
| [sympy](https://sympy.org) | 1.10.1 | Python library for symbolic mathematics / BSD-3-Clause AND MIT |
| [tabulate](https://bitbucket.org/astanin/python-tabulate) | 0.8.9 | Pretty-print tabular data in Python, a library and a command-line utility. / MIT |
| [tbb](https://github.com/oneapi-src/oneTBB) | 2021.5.0 | High level abstract threading library / Apache-2.0 |
| tbb4py | 2021.5.0 | TBB module for Python / Apache 2.0 |
| [tblib](https://github.com/ionelmc/python-tblib) | 1.7.0 | Traceback serialization library. / BSD 2-Clause |
| [tenacity](http://github.com/jd/tenacity) | 8.0.1 | Retry a flaky function whenever an exception occurs until it works / Apache-2.0 |
| [terminado](https://github.com/jupyter/terminado) | 0.13.1 | Terminals served by tornado websockets / BSD-2-Clause |
| [testpath](https://testpath.readthedocs.io) | 0.5.0 | Testpath is a collection of utilities for Python code working with files and commands. / BSD-3-Clause |
| [text-unidecode](https://github.com/kmike/text-unidecode/) | 1.3 | The most basic Text::Unidecode port / Artistic |
| [textdistance](https://github.com/orsinium/textdistance) | 4.2.1 | TextDistance – python library for comparing distance between two or more sequences by many algorithms. / MIT |
| [threadpoolctl](https://github.com/joblib/threadpoolctl) | 2.2.0 | Python helpers to control the threadpools of native libraries / BSD 3-Clause |
| [three-merge](https://github.com/spyder-ide/three-merge) | 0.1.1 | Simple Python library to perform a 3-way merge between strings / MIT |
| [tifffile](https://github.com/cgohlke/tifffile) | 2021.7.2 | Read and write image data from and to TIFF files. / BSD-3-Clause |
| [tinycss](http://tinycss.readthedocs.io/) | 0.4 | Tinycss is a complete yet simple CSS parser for Python. / BSD-3-Clause |
| [tk](http://www.tcl.tk/) | 8.6.11 | A dynamic programming language with GUI support. Bundles Tcl and Tk. / Tcl/Tk |
| [tldextract](https://github.com/john-kurkowski/tldextract) | 3.2.0 | Accurately separate the TLD from the registered domain andsubdomains of a URL, using the Public Suffix List. / BSD-3-Clause |
| [toml](https://github.com/uiri/toml) | 0.10.2 | Python lib for TOML. / MIT |
| [tomli](https://github.com/hukkin/tomli) | 1.2.2 | A simple TOML parser / MIT |
| [toolz](http://toolz.readthedocs.org/) | 0.11.2 | List processing tools and functional utilities / BSD-3-Clause |
| [tornado](http://www.tornadoweb.org/) | 6.1 | A Python web framework and asynchronous networking library, originally developed at FriendFeed. / Apache-2.0 |
| [tqdm](https://pypi.python.org/pypi/tqdm) | 4.64.0 | A Fast, Extensible Progress Meter / MPL-2.0 AND MIT |
| [traitlets](http://traitlets.readthedocs.org/) | 5.1.1 | Configuration system for Python applications / BSD-3-Clause |
| [twisted](https://twistedmatrix.com/) | 22.2.0 | An asynchronous networking framework written in Python / MIT |
| [typed-ast](https://github.com/python/typed_ast) | 1.4.3 | a fork of Python 2 and 3 ast modules with type comment support / Apache-2.0 AND PSF-2.0 AND MIT |
| [typing-extensions](https://github.com/python/typing/tree/master/typing_extensions) | 4.1.1 | Backported and Experimental Type Hints for Python / PSF-2.0 |
| [typing\_extensions](https://github.com/python/typing/tree/master/typing_extensions) | 4.1.1 | Backported and Experimental Type Hints for Python / PSF-2.0 |
| [tzdata](https://www.iana.org/time-zones) | 2022a | The Time Zone Database (called tz, tzdb or zoneinfo) / Public-Domain AND BSD-3-clause |
| [ujson](https://github.com/ultrajson/ultrajson) | 5.1.0 | Ultra fast JSON decoder and encoder written in C with Python bindings / BSD-3-Clause |
| [unidecode](https://pypi.python.org/pypi/Unidecode) | 1.2.0 | ASCII transliterations of Unicode text / GPL-2.0-or-later |
| [unixodbc](http://www.unixodbc.org/) | 2.3.9 | ODBC on non MS Windows platforms / LGPL-2.1 |
| [urllib3](https://urllib3.readthedocs.io/) | 1.26.9 | HTTP library with thread-safe connection pooling, file post, and more. / MIT |
| [w3lib](https://github.com/scrapy/w3lib) | 1.21.0 | Library of web-related functions / BSD |
| [watchdog](http://github.com/gorakhargosh/watchdog) | 2.1.6 | Filesystem events monitoring / Apache-2.0 |
| [wcwidth](https://github.com/jquast/wcwidth) | 0.2.5 | Measures number of Terminal column cells of wide-character codes. / MIT |
| [webencodings](https://github.com/gsnedders/python-webencodings) | 0.5.1 | Character encoding aliases for legacy web content / BSD 3-Clause |
| [websocket-client](https://github.com/liris/websocket-client) | 0.58.0 | WebSocket client for python. hybi13 is supported. / BSD-3-Clause |
| [werkzeug](https://palletsprojects.com/p/werkzeug/) | 2.0.3 | The comprehensive WSGI web application library. / BSD-3-Clause |
| [wget](https://www.gnu.org/software/wget/) | 1.21.3 | utility for non-interactive download of files from the Web / GPL-3.0-or-later |
| [wheel](https://github.com/pypa/wheel) | 0.37.1 | A built-package format for Python. / MIT |
| [widgetsnbextension](http://ipython.org) | 3.5.2 | Interactive Widgets for Jupyter / BSD-3-Clause |
| [wrapt](https://github.com/GrahamDumpleton/wrapt) | 1.12.1 | Module for decorators, wrappers and monkey patching / BSD-2-Clause |
| [wurlitzer](https://github.com/minrk/wurlitzer) | 3.0.2 | Capture C-level stdout/stderr in Python / MIT |
| [xarray](https://github.com/pydata/xarray) | 0.20.1 | N-D labeled arrays and datasets in Python. / Apache-2.0 |
| [xlrd](http://www.python-excel.org/) | 2.0.1 | Library for developers to extract data from Microsoft Excel (tm) spreadsheet files / BSD 3-Clause and BSD with advertising |
| [xlsxwriter](https://xlsxwriter.readthedocs.io/) | 3.0.3 | A Python module for creating Excel XLSX files / BSD-2-Clause |
| [xz](http://tukaani.org/xz/) | 5.2.5 | Data compression software with high compression ratio / LGPL-2.1 and GPL-2.0 |
| [yaml](http://pyyaml.org/wiki/LibYAML) | 0.2.5 | A C library for parsing and emitting YAML / MIT |
| [yapf](https://github.com/google/yapf) | 0.31.0 | A formatter for Python files / Apache 2.0 |
| [yarl](https://github.com/aio-libs/yarl) | 1.6.3 | Yet another URL library / Apache 2.0 |
| [zeromq](http://zeromq.org) | 4.3.4 | A high-performance asynchronous messaging library. / LGPL-3.0-or-later |
| [zfp](https://computation.llnl.gov/projects/floating-point-compression) | 0.5.5 | Library for compressed numerical arrays that support high throughput read and write random access / BSD-3-Clause |
| [zict](http://github.com/mrocklin/zict) | 2.0.0 | Composable Dictionary Classes / BSD 3-Clause |
| [zipp](https://github.com/jaraco/zipp) | 3.7.0 | A pathlib-compatible Zipfile object wrapper / MIT |
| [zlib](http://zlib.net/) | 1.2.12 | Massively spiffy yet delicately unobtrusive compression library / Zlib |
| zope | 1.0 | web application server / BSD |
| [zope.interface](https://github.com/zopefoundation/zope.interface) | 5.4.0 | Interfaces for Python / ZPL-2.1 |
| [zstd](https://www.zstd.net) | 1.4.9 | Zstandard - Fast real-time compression algorithm / BSD-3-Clause AND GPL-2.0-or-later |
| Package Name | linux-64 | linux-aarch64 | linux-ppc64le | linux-s390x | osx-arm64 | osx-64 | win-64 |
|---|---|---|---|---|---|---|---|
| \_anaconda\_depends | 2023.09 | 2023.09 | 2023.09 | 2023.09 | 2023.09 | 2023.09 | 2023.09 |
| \_libgcc\_mutex | 0.1 | 0.1 | 0.1 | 0.1 | |||
| \_openmp\_mutex | 5.1 | 5.1 | 5.1 | 5.1 | |||
| abseil-cpp | 20211102.0 | 20211102.0 | 20211102.0 | 20211102.0 | 20211102.0 | 20211102.0 | |
| aiobotocore | 2.5.0 | 2.5.0 | 2.5.0 | 2.5.0 | 2.5.0 | 2.5.0 | 2.5.0 |
| aiofiles | 22.1.0 | 22.1.0 | 22.1.0 | 22.1.0 | 22.1.0 | 22.1.0 | |
| aiohttp | 3.8.5 | 3.8.5 | 3.8.5 | 3.8.5 | 3.8.5 | 3.8.5 | 3.8.5 |
| aioitertools | 0.7.1 | 0.7.1 | 0.7.1 | 0.7.1 | 0.7.1 | 0.7.1 | 0.7.1 |
| aiosignal | 1.2.0 | 1.2.0 | 1.2.0 | 1.2.0 | 1.2.0 | 1.2.0 | 1.2.0 |
| aiosqlite | 0.18.0 | 0.18.0 | 0.18.0 | 0.18.0 | 0.18.0 | 0.18.0 | |
| alabaster | 0.7.12 | 0.7.12 | 0.7.12 | 0.7.12 | 0.7.12 | ||
| anaconda-anon-usage | 0.4.2 | 0.4.2 | 0.4.2 | 0.4.2 | 0.4.2 | 0.4.2 | 0.4.2 |
| anaconda-catalogs | 0.2.0 | 0.2.0 | 0.2.0 | 0.2.0 | 0.2.0 | 0.2.0 | 0.2.0 |
| anaconda-client | 1.12.1 | 1.12.1 | 1.12.1 | 1.12.1 | 1.12.1 | 1.12.1 | 1.12.1 |
| anaconda-cloud-auth | 0.1.3 | 0.1.3 | 0.1.3 | 0.1.3 | 0.1.3 | ||
| anaconda-navigator | 2.5.0 | 2.5.0 | 2.5.0 | 2.5.0 | 2.5.0 | ||
| anaconda-project | 0.11.1 | 0.11.1 | 0.11.1 | 0.11.1 | 0.11.1 | 0.11.1 | 0.11.1 |
| anyio | 3.5.0 | 3.5.0 | 3.5.0 | 3.5.0 | 3.5.0 | 3.5.0 | 3.5.0 |
| aom | 3.6.0 | 3.6.0 | 3.6.0 | 3.6.0 | 3.6.0 | 3.6.0 | 3.6.0 |
| appdirs | 1.4.4 | 1.4.4 | 1.4.4 | 1.4.4 | 1.4.4 | 1.4.4 | 1.4.4 |
| applaunchservices | 0.3.0 | 0.3.0 | |||||
| appnope | 0.1.2 | 0.1.2 | |||||
| appscript | 1.1.2 | 1.1.2 | |||||
| argon2-cffi | 21.3.0 | 21.3.0 | 21.3.0 | 21.3.0 | 21.3.0 | 21.3.0 | 21.3.0 |
| argon2-cffi-bindings | 21.2.0 | 21.2.0 | 21.2.0 | 21.2.0 | 21.2.0 | 21.2.0 | 21.2.0 |
| arrow | 1.2.3 | 1.2.3 | 1.2.3 | 1.2.3 | 1.2.3 | ||
| arrow-cpp | 11.0.0 | 11.0.0 | 11.0.0 | 11.0.0 | 11.0.0 | 11.0.0 | |
| astroid | 2.14.2 | 2.14.2 | 2.14.2 | 2.14.2 | 2.14.2 | 2.14.2 | 2.14.2 |
| astropy | 5.1 | 5.1 | 5.1 | 5.1 | 5.1 | 5.1 | 5.1 |
| asttokens | 2.0.5 | 2.0.5 | 2.0.5 | 2.0.5 | 2.0.5 | 2.0.5 | 2.0.5 |
| async-timeout | 4.0.2 | 4.0.2 | 4.0.2 | 4.0.2 | 4.0.2 | 4.0.2 | 4.0.2 |
| atomicwrites | 1.4.0 | 1.4.0 | 1.4.0 | 1.4.0 | 1.4.0 | ||
| attrs | 22.1.0 | 22.1.0 | 22.1.0 | 22.1.0 | 22.1.0 | 22.1.0 | 22.1.0 |
| automat | 20.2.0 | 20.2.0 | 20.2.0 | 20.2.0 | 20.2.0 | 20.2.0 | |
| autopep8 | 1.6.0 | 1.6.0 | 1.6.0 | 1.6.0 | 1.6.0 | ||
| aws-c-common | 0.6.8 | 0.6.8 | 0.6.8 | 0.6.8 | 0.6.8 | 0.6.8 | |
| aws-c-event-stream | 0.1.6 | 0.1.6 | 0.1.6 | 0.1.6 | 0.1.6 | 0.1.6 | |
| aws-checksums | 0.1.11 | 0.1.11 | 0.1.11 | 0.1.11 | 0.1.11 | 0.1.11 | |
| aws-sdk-cpp | 1.8.185 | 1.8.185 | 1.8.185 | 1.8.185 | 1.8.185 | 1.8.185 | |
| babel | 2.11.0 | 2.11.0 | 2.11.0 | 2.11.0 | 2.11.0 | 2.11.0 | 2.11.0 |
| backcall | 0.2.0 | 0.2.0 | 0.2.0 | 0.2.0 | 0.2.0 | 0.2.0 | 0.2.0 |
| backports | 1.1 | 1.1 | 1.1 | 1.1 | 1.1 | 1.1 | 1.1 |
| backports.functools\_lru\_cache | 1.6.4 | 1.6.4 | 1.6.4 | 1.6.4 | 1.6.4 | 1.6.4 | 1.6.4 |
| backports.tempfile | 1.0 | 1.0 | 1.0 | 1.0 | 1.0 | 1.0 | 1.0 |
| backports.weakref | 1.0.post1 | 1.0.post1 | 1.0.post1 | 1.0.post1 | 1.0.post1 | 1.0.post1 | 1.0.post1 |
| bcrypt | 3.2.0 | 3.2.0 | 3.2.0 | 3.2.0 | 3.2.0 | 3.2.0 | |
| beautifulsoup4 | 4.12.2 | 4.12.2 | 4.12.2 | 4.12.2 | 4.12.2 | 4.12.2 | 4.12.2 |
| binaryornot | 0.4.4 | 0.4.4 | 0.4.4 | 0.4.4 | 0.4.4 | ||
| black | 23.3.0 | 23.3.0 | 23.3.0 | 23.3.0 | 23.3.0 | ||
| blas | 1.0 | 1.0 | 1.0 | 1.0 | 1.0 | 1.0 | 1.0 |
| bleach | 4.1.0 | 4.1.0 | 4.1.0 | 4.1.0 | 4.1.0 | 4.1.0 | 4.1.0 |
| blosc | 1.21.3 | 1.21.3 | 1.21.3 | 1.21.3 | 1.21.3 | 1.21.3 | 1.21.3 |
| bokeh | 3.2.1 | 3.2.1 | 3.2.1 | 2.4.3 | 3.2.1 | 3.2.1 | 3.2.1 |
| boltons | 23.0.0 | 23.0.0 | 23.0.0 | 23.0.0 | 23.0.0 | 23.0.0 | 23.0.0 |
| boost-cpp | 1.73.0 | 1.73.0 | 1.82.0 | 1.73.0 | 1.73.0 | 1.82.0 | |
| boto3 | 1.26.76 | ||||||
| botocore | 1.29.76 | 1.29.76 | 1.29.76 | 1.29.76 | 1.29.76 | 1.29.76 | 1.29.76 |
| bottleneck | 1.3.5 | 1.3.5 | 1.3.5 | 1.3.5 | 1.3.5 | 1.3.5 | 1.3.5 |
| brotli | 1.0.9 | 1.0.9 | 1.0.9 | 1.0.9 | 1.0.9 | 1.0.9 | 1.0.9 |
| brotli-bin | 1.0.9 | 1.0.9 | 1.0.9 | 1.0.9 | 1.0.9 | 1.0.9 | 1.0.9 |
| brotlipy | 0.7.0 | 0.7.0 | 0.7.0 | 0.7.0 | 0.7.0 | 0.7.0 | 0.7.0 |
| brunsli | 0.1 | 0.1 | 0.1 | 0.1 | 0.1 | ||
| bzip2 | 1.0.8 | 1.0.8 | 1.0.8 | 1.0.8 | 1.0.8 | 1.0.8 | 1.0.8 |
| c-ares | 1.19.1 | 1.19.1 | 1.19.1 | 1.19.1 | 1.19.1 | 1.19.1 | 1.19.1 |
| c-blosc2 | 2.8.0 | 2.8.0 | 2.8.0 | 2.8.0 | 2.8.0 | 2.8.0 | |
| ca-certificates | 2023.08.22 | 2023.08.22 | 2023.08.22 | 2023.08.22 | 2023.08.22 | 2023.08.22 | 2023.08.22 |
| cctools | 949.0.1 | 949.0.1 | |||||
| cctools\_osx-64 | 949.0.1 | ||||||
| cctools\_osx-arm64 | 949.0.1 | ||||||
| certifi | 2023.7.22 | 2023.7.22 | 2023.7.22 | 2023.7.22 | 2023.7.22 | 2023.7.22 | 2023.7.22 |
| cffi | 1.15.1 | 1.15.1 | 1.15.1 | 1.15.1 | 1.15.1 | 1.15.1 | 1.15.1 |
| cfitsio | 3.470 | 3.470 | 3.470 | 3.470 | 3.470 | 3.470 | 3.470 |
| chardet | 4.0.0 | 4.0.0 | 4.0.0 | 4.0.0 | 4.0.0 | 4.0.0 | 4.0.0 |
| charls | 2.2.0 | 2.2.0 | 2.2.0 | 2.2.0 | 2.2.0 | 2.2.0 | |
| charset-normalizer | 2.0.4 | 2.0.4 | 2.0.4 | 2.0.4 | 2.0.4 | 2.0.4 | 2.0.4 |
| click | 8.0.4 | 8.0.4 | 8.0.4 | 8.0.4 | 8.0.4 | 8.0.4 | 8.0.4 |
| cloudpickle | 2.2.1 | 2.2.1 | 2.2.1 | 2.2.1 | 2.2.1 | 2.2.1 | 2.2.1 |
| clyent | 1.2.2 | 1.2.2 | 1.2.2 | 1.2.2 | 1.2.2 | 1.2.2 | 1.2.2 |
| colorama | 0.4.6 | 0.4.6 | 0.4.6 | 0.4.6 | 0.4.6 | 0.4.6 | 0.4.6 |
| colorcet | 3.0.1 | 3.0.1 | 3.0.1 | 3.0.1 | 3.0.1 | 3.0.1 | 3.0.1 |
| comm | 0.1.2 | 0.1.2 | 0.1.2 | 0.1.2 | 0.1.2 | 0.1.2 | 0.1.2 |
| conda | 23.7.4 | 23.7.4 | 23.7.4 | 23.7.4 | 23.7.4 | 23.7.4 | 23.7.4 |
| conda-build | 3.26.1 | 3.26.1 | 3.26.1 | 3.26.1 | 3.26.1 | 3.26.1 | 3.26.1 |
| conda-content-trust | 0.2.0 | 0.2.0 | 0.2.0 | 0.2.0 | 0.2.0 | 0.2.0 | 0.2.0 |
| conda-index | 0.3.0 | 0.3.0 | 0.3.0 | 0.3.0 | 0.3.0 | 0.3.0 | 0.3.0 |
| conda-libmamba-solver | 23.7.0 | 23.7.0 | 23.7.0 | 23.7.0 | 23.7.0 | 23.7.0 | 23.7.0 |
| conda-pack | 0.6.0 | 0.6.0 | 0.6.0 | 0.6.0 | 0.6.0 | 0.6.0 | 0.6.0 |
| conda-package-handling | 2.2.0 | 2.2.0 | 2.2.0 | 2.2.0 | 2.2.0 | 2.2.0 | 2.2.0 |
| conda-package-streaming | 0.9.0 | 0.9.0 | 0.9.0 | 0.9.0 | 0.9.0 | 0.9.0 | 0.9.0 |
| conda-repo-cli | 1.0.75 | 1.0.75 | 1.0.75 | 1.0.75 | 1.0.75 | ||
| conda-token | 0.4.0 | 0.4.0 | 0.4.0 | 0.4.0 | 0.4.0 | 0.4.0 | 0.4.0 |
| conda-verify | 3.4.2 | 3.4.2 | 3.4.2 | 3.4.2 | 3.4.2 | 3.4.2 | 3.4.2 |
| console\_shortcut | 0.1.1 | ||||||
| constantly | 15.1.0 | 15.1.0 | 15.1.0 | 15.1.0 | 15.1.0 | 15.1.0 | |
| contourpy | 1.0.5 | 1.0.5 | 1.0.5 | 1.0.5 | 1.0.5 | 1.0.5 | 1.0.5 |
| cookiecutter | 1.7.3 | 1.7.3 | 1.7.3 | 1.7.3 | 1.7.3 | ||
| cryptography | 41.0.3 | 41.0.3 | 41.0.3 | 41.0.3 | 41.0.3 | 41.0.3 | 41.0.3 |
| cssselect | 1.1.0 | 1.1.0 | 1.1.0 | 1.1.0 | 1.1.0 | 1.1.0 | |
| curl | 8.2.1 | 8.2.1 | 8.2.1 | 8.2.1 | 8.2.1 | 8.2.1 | 8.1.1 |
| cycler | 0.11.0 | 0.11.0 | 0.11.0 | 0.11.0 | 0.11.0 | 0.11.0 | 0.11.0 |
| cyrus-sasl | 2.1.28 | 2.1.28 | 2.1.28 | 2.1.28 | |||
| cytoolz | 0.12.0 | 0.12.0 | 0.12.0 | 0.12.0 | 0.12.0 | 0.12.0 | 0.12.0 |
| daal4py | 2023.1.1 | 2023.1.1 | |||||
| dal | 2023.1.1 | 2023.1.1 | |||||
| dask | 2023.6.0 | 2023.6.0 | 2023.6.0 | 2023.6.0 | 2023.6.0 | 2023.6.0 | 2023.6.0 |
| dask-core | 2023.6.0 | 2023.6.0 | 2023.6.0 | 2023.6.0 | 2023.6.0 | 2023.6.0 | 2023.6.0 |
| datasets | 2.12.0 | 2.12.0 | 2.12.0 | 2.12.0 | 2.12.0 | 2.12.0 | |
| datashader | 0.15.2 | 0.15.2 | 0.15.2 | 0.15.2 | 0.15.2 | 0.15.2 | |
| datashape | 0.5.4 | 0.5.4 | 0.5.4 | 0.5.4 | 0.5.4 | 0.5.4 | |
| dav1d | 1.2.1 | 1.2.1 | 1.2.1 | 1.2.1 | 1.2.1 | 1.2.1 | 1.2.1 |
| dbus | 1.13.18 | 1.13.18 | |||||
| debugpy | 1.6.7 | 1.6.7 | 1.6.7 | 1.6.7 | 1.6.7 | 1.6.7 | 1.6.7 |
| decorator | 5.1.1 | 5.1.1 | 5.1.1 | 5.1.1 | 5.1.1 | 5.1.1 | 5.1.1 |
| defusedxml | 0.7.1 | 0.7.1 | 0.7.1 | 0.7.1 | 0.7.1 | 0.7.1 | 0.7.1 |
| diff-match-patch | 20200713 | 20200713 | 20200713 | 20200713 | 20200713 | ||
| dill | 0.3.6 | 0.3.6 | 0.3.6 | 0.3.7 | 0.3.6 | 0.3.6 | 0.3.6 |
| distributed | 2023.6.0 | 2023.6.0 | 2023.6.0 | 2023.6.0 | 2023.6.0 | 2023.6.0 | 2023.6.0 |
| docstring-to-markdown | 0.11 | 0.11 | 0.11 | 0.11 | 0.11 | ||
| docutils | 0.18.1 | 0.18.1 | 0.18.1 | 0.18.1 | 0.18.1 | ||
| entrypoints | 0.4 | 0.4 | 0.4 | 0.4 | 0.4 | 0.4 | 0.4 |
| et\_xmlfile | 1.1.0 | 1.1.0 | 1.1.0 | 1.1.0 | 1.1.0 | 1.1.0 | 1.1.0 |
| executing | 0.8.3 | 0.8.3 | 0.8.3 | 0.8.3 | 0.8.3 | 0.8.3 | 0.8.3 |
| expat | 2.5.0 | 2.5.0 | |||||
| filelock | 3.9.0 | 3.9.0 | 3.9.0 | 3.9.0 | 3.9.0 | 3.9.0 | 3.9.0 |
| flake8 | 6.0.0 | 6.0.0 | 6.0.0 | 6.0.0 | 6.0.0 | ||
| flask | 2.2.2 | 2.2.2 | 2.2.2 | 2.2.2 | 2.2.2 | 2.2.2 | 2.2.2 |
| fmt | 9.1.0 | 9.1.0 | 9.1.0 | 9.1.0 | 9.1.0 | 9.1.0 | 9.1.0 |
| font-ttf-dejavu-sans-mono | 2.37 | 2.37 | |||||
| font-ttf-inconsolata | 2.001 | 2.001 | |||||
| font-ttf-source-code-pro | 2.030 | 2.030 | |||||
| font-ttf-ubuntu | 0.83 | 0.83 | |||||
| fontconfig | 2.14.1 | 2.14.1 | |||||
| fonts-anaconda | 1 | 1 | |||||
| fonttools | 4.25.0 | 4.25.0 | 4.25.0 | 4.25.0 | 4.25.0 | 4.25.0 | 4.25.0 |
| freetype | 2.12.1 | 2.12.1 | 2.12.1 | 2.12.1 | 2.12.1 | 2.12.1 | 2.12.1 |
| frozenlist | 1.3.3 | 1.3.3 | 1.3.3 | 1.3.3 | 1.3.3 | 1.3.3 | 1.3.3 |
| fsspec | 2023.4.0 | 2023.4.0 | 2023.4.0 | 2023.4.0 | 2023.4.0 | 2023.4.0 | 2023.4.0 |
| future | 0.18.3 | 0.18.3 | 0.18.3 | 0.18.3 | 0.18.3 | 0.18.3 | 0.18.3 |
| gensim | 4.3.0 | 4.3.0 | 4.3.0 | 4.3.0 | 4.3.0 | 4.3.0 | |
| gettext | 0.21.0 | 0.21.0 | |||||
| gflags | 2.2.2 | 2.2.2 | 2.2.2 | 2.2.2 | 2.2.2 | 2.2.2 | |
| giflib | 5.2.1 | 5.2.1 | 5.2.1 | 5.2.1 | 5.2.1 | 5.2.1 | 5.2.1 |
| glib | 2.69.1 | 2.69.1 | 2.69.1 | 2.69.1 | 2.69.1 | ||
| glob2 | 0.7 | 0.7 | 0.7 | 0.7 | 0.7 | 0.7 | 0.7 |
| glog | 0.5.0 | 0.5.0 | 0.5.0 | 0.5.0 | 0.5.0 | 0.5.0 | |
| gmp | 6.2.1 | 6.2.1 | 6.2.1 | 6.2.1 | 6.2.1 | 6.2.1 | |
| gmpy2 | 2.1.2 | 2.1.2 | 2.1.2 | 2.1.2 | 2.1.2 | 2.1.2 | |
| greenlet | 2.0.1 | 2.0.1 | 2.0.1 | 2.0.1 | 2.0.1 | 2.0.1 | 2.0.1 |
| grpc-cpp | 1.48.2 | 1.48.2 | 1.48.2 | 1.48.2 | 1.48.2 | 1.48.2 | |
| gst-plugins-base | 1.14.1 | 1.14.1 | 1.14.1 | 1.14.1 | |||
| gstreamer | 1.14.1 | 1.14.1 | 1.14.1 | 1.14.1 | |||
| h5py | 3.9.0 | 3.9.0 | 3.9.0 | 3.7.0 | 3.9.0 | 3.9.0 | 3.9.0 |
| hdf5 | 1.12.1 | 1.12.1 | 1.12.1 | 1.10.6 | 1.12.1 | 1.12.1 | 1.12.1 |
| heapdict | 1.0.1 | 1.0.1 | 1.0.1 | 1.0.1 | 1.0.1 | 1.0.1 | 1.0.1 |
| holoviews | 1.17.1 | 1.17.1 | 1.17.1 | 1.14.8 | 1.17.1 | 1.17.1 | 1.17.1 |
| huggingface\_hub | 0.15.1 | 0.15.1 | 0.15.1 | 0.15.1 | 0.15.1 | 0.15.1 | |
| hvplot | 0.8.4 | 0.8.4 | 0.8.4 | 0.7.3 | 0.8.4 | 0.8.4 | 0.8.4 |
| hyperlink | 21.0.0 | 21.0.0 | 21.0.0 | 21.0.0 | 21.0.0 | 21.0.0 | |
| icc\_rt | 2022.1.0 | ||||||
| icu | 58.2 | 68.1 | 73.1 | 73.1 | 68.1 | 58.2 | 58.2 |
| idna | 3.4 | 3.4 | 3.4 | 3.3 | 3.4 | 3.4 | 3.4 |
| imagecodecs | 2023.1.23 | 2023.1.23 | 2023.1.23 | 2023.1.23 | 2023.1.23 | 2023.1.23 | 2023.1.23 |
| imageio | 2.31.1 | 2.31.1 | 2.31.1 | 2.26.0 | 2.31.1 | 2.31.1 | 2.26.0 |
| imagesize | 1.4.1 | 1.4.1 | 1.4.1 | 1.4.1 | 1.4.1 | ||
| imbalanced-learn | 0.10.1 | 0.10.1 | 0.10.1 | 0.10.1 | 0.10.1 | 0.10.1 | 0.10.1 |
| importlib-metadata | 6.0.0 | 6.0.0 | 6.0.0 | 6.0.0 | 6.0.0 | 6.0.0 | 6.0.0 |
| importlib\_metadata | 6.0.0 | 6.0.0 | 6.0.0 | 6.0.0 | 6.0.0 | ||
| incremental | 21.3.0 | 21.3.0 | 21.3.0 | 21.3.0 | 21.3.0 | 21.3.0 | |
| inflection | 0.5.1 | 0.5.1 | 0.5.1 | 0.5.1 | 0.5.1 | ||
| iniconfig | 1.1.1 | 1.1.1 | 1.1.1 | 1.1.1 | 1.1.1 | 1.1.1 | 1.1.1 |
| intake | 0.6.8 | 0.6.8 | 0.6.8 | 0.6.8 | 0.6.8 | 0.6.8 | 0.6.8 |
| intel-openmp | 2023.1.0 | 2023.1.0 | |||||
| intervaltree | 3.1.0 | 3.1.0 | 3.1.0 | 3.1.0 | 3.1.0 | ||
| ipykernel | 6.25.0 | 6.25.0 | 6.25.0 | 6.25.0 | 6.25.0 | 6.25.0 | 6.25.0 |
| ipython | 8.15.0 | 8.15.0 | 8.15.0 | 8.15.0 | 8.15.0 | 8.15.0 | 8.15.0 |
| ipython\_genutils | 0.2.0 | 0.2.0 | 0.2.0 | 0.2.0 | 0.2.0 | 0.2.0 | 0.2.0 |
| ipywidgets | 8.0.4 | 8.0.4 | 8.0.4 | 8.0.4 | 8.0.4 | 8.0.4 | 8.0.4 |
| isort | 5.9.3 | 5.9.3 | 5.9.3 | 5.9.3 | 5.9.3 | 5.9.3 | 5.9.3 |
| itemadapter | 0.3.0 | 0.3.0 | 0.3.0 | 0.3.0 | 0.3.0 | 0.3.0 | |
| itemloaders | 1.0.4 | 1.0.4 | 1.0.4 | 1.0.4 | 1.0.4 | 1.0.4 | |
| itsdangerous | 2.0.1 | 2.0.1 | 2.0.1 | 2.0.1 | 2.0.1 | 2.0.1 | 2.0.1 |
| jaraco.classes | 3.2.1 | 3.2.1 | 3.2.1 | 3.2.1 | 3.2.1 | ||
| jedi | 0.18.1 | 0.18.1 | 0.18.1 | 0.18.1 | 0.18.1 | 0.18.1 | 0.18.1 |
| jeepney | 0.7.1 | 0.7.1 | |||||
| jellyfish | 1.0.1 | 1.0.1 | 1.0.1 | 1.0.1 | 1.0.1 | ||
| jinja2 | 3.1.2 | 3.1.2 | 3.1.2 | 3.1.2 | 3.1.2 | 3.1.2 | 3.1.2 |
| jinja2-time | 0.2.0 | 0.2.0 | 0.2.0 | 0.2.0 | 0.2.0 | ||
| jmespath | 0.10.0 | 0.10.0 | 0.10.0 | 0.10.0 | 0.10.0 | 0.10.0 | 0.10.0 |
| joblib | 1.2.0 | 1.2.0 | 1.2.0 | 1.2.0 | 1.2.0 | 1.2.0 | 1.2.0 |
| jpeg | 9e | 9e | 9e | 9e | 9e | 9e | 9e |
| jq | 1.6 | 1.6 | 1.6 | 1.6 | 1.6 | 1.6 | |
| json5 | 0.9.6 | 0.9.6 | 0.9.6 | 0.9.6 | 0.9.6 | 0.9.6 | 0.9.6 |
| jsonpatch | 1.32 | 1.32 | 1.32 | 1.32 | 1.32 | 1.32 | 1.32 |
| jsonpointer | 2.1 | 2.1 | 2.1 | 2.1 | 2.1 | 2.1 | 2.1 |
| jsonschema | 4.17.3 | 4.17.3 | 4.17.3 | 4.17.3 | 4.17.3 | 4.17.3 | 4.17.3 |
| jupyter | 1.0.0 | 1.0.0 | 1.0.0 | 1.0.0 | 1.0.0 | 1.0.0 | 1.0.0 |
| jupyter\_client | 7.4.9 | 7.4.9 | 7.4.9 | 7.4.9 | 7.4.9 | 7.4.9 | 7.4.9 |
| jupyter\_console | 6.6.3 | 6.6.3 | 6.6.3 | 6.6.3 | 6.6.3 | 6.6.3 | 6.6.3 |
| jupyter\_core | 5.3.0 | 5.3.0 | 5.3.0 | 5.3.0 | 5.3.0 | 5.3.0 | 5.3.0 |
| jupyter\_events | 0.6.3 | 0.6.3 | 0.6.3 | 0.6.3 | 0.6.3 | 0.6.3 | |
| jupyter\_server | 1.23.4 | 1.23.4 | 1.23.4 | 1.23.4 | 1.23.4 | 1.23.4 | 1.23.4 |
| jupyter\_server\_fileid | 0.9.0 | 0.9.0 | 0.9.0 | 0.9.0 | 0.9.0 | 0.9.0 | |
| jupyter\_server\_ydoc | 0.8.0 | 0.8.0 | 0.8.0 | 0.8.0 | 0.8.0 | 0.8.0 | |
| jupyter\_ydoc | 0.2.4 | 0.2.4 | 0.2.4 | 0.2.4 | 0.2.4 | 0.2.4 | |
| jupyterlab | 3.6.3 | 3.6.3 | 3.6.3 | 3.3.2 | 3.6.3 | 3.6.3 | 3.6.3 |
| jupyterlab\_pygments | 0.1.2 | 0.1.2 | 0.1.2 | 0.1.2 | 0.1.2 | 0.1.2 | 0.1.2 |
| jupyterlab\_server | 2.22.0 | 2.22.0 | 2.22.0 | 2.21.0 | 2.22.0 | 2.22.0 | 2.22.0 |
| jupyterlab\_widgets | 3.0.5 | 3.0.5 | 3.0.5 | 3.0.5 | 3.0.5 | 3.0.5 | 3.0.5 |
| jxrlib | 1.1 | 1.1 | 1.1 | 1.1 | 1.1 | 1.1 | |
| kaleido-core | 0.2.1 | 0.2.1 | 0.2.1 | 0.2.1 | 0.2.1 | ||
| keyring | 23.13.1 | 23.13.1 | 23.13.1 | 23.13.1 | 23.13.1 | ||
| kiwisolver | 1.4.4 | 1.4.4 | 1.4.4 | 1.4.4 | 1.4.4 | 1.4.4 | 1.4.4 |
| krb5 | 1.20.1 | 1.20.1 | 1.20.1 | 1.20.1 | 1.20.1 | 1.20.1 | 1.20.1 |
| lazy-object-proxy | 1.6.0 | 1.6.0 | 1.6.0 | 1.6.0 | 1.6.0 | 1.6.0 | 1.6.0 |
| lazy\_loader | 0.2 | 0.2 | 0.2 | 0.1 | 0.2 | 0.2 | 0.2 |
| lcms2 | 2.12 | 2.12 | 2.12 | 2.12 | 2.12 | 2.12 | 2.12 |
| ld64 | 530 | 530 | |||||
| ld64\_osx-64 | 530 | ||||||
| ld64\_osx-arm64 | 530 | ||||||
| ld\_impl\_linux-64 | 2.38 | ||||||
| ld\_impl\_linux-aarch64 | 2.38 | ||||||
| ld\_impl\_linux-ppc64le | 2.38 | ||||||
| ld\_impl\_linux-s390x | 2.38 | ||||||
| ldid | 2.1.5 | 2.1.5 | |||||
| lerc | 3.0 | 3.0 | 3.0 | 3.0 | 3.0 | 3.0 | 3.0 |
| libaec | 1.0.4 | 1.0.4 | 1.0.4 | 1.0.4 | 1.0.4 | 1.0.4 | 1.0.4 |
| libarchive | 3.6.2 | 3.6.2 | 3.6.2 | 3.6.2 | 3.6.2 | 3.6.2 | 3.6.2 |
| libavif | 0.11.1 | 0.11.1 | 0.11.1 | 0.11.1 | 0.11.1 | 0.11.1 | 0.11.1 |
| libboost | 1.73.0 | 1.73.0 | 1.82.0 | 1.73.0 | 1.73.0 | 1.82.0 | |
| libbrotlicommon | 1.0.9 | 1.0.9 | 1.0.9 | 1.0.9 | 1.0.9 | 1.0.9 | 1.0.9 |
| libbrotlidec | 1.0.9 | 1.0.9 | 1.0.9 | 1.0.9 | 1.0.9 | 1.0.9 | 1.0.9 |
| libbrotlienc | 1.0.9 | 1.0.9 | 1.0.9 | 1.0.9 | 1.0.9 | 1.0.9 | 1.0.9 |
| libclang | 14.0.6 | 14.0.6 | 14.0.6 | 14.0.6 | 14.0.6 | ||
| libclang13 | 14.0.6 | 14.0.6 | 14.0.6 | 14.0.6 | 14.0.6 | ||
| libcups | 2.4.2 | 2.4.2 | |||||
| libcurl | 8.2.1 | 8.2.1 | 8.2.1 | 8.2.1 | 8.2.1 | 8.2.1 | 8.1.1 |
| libcxx | 14.0.6 | 14.0.6 | |||||
| libdeflate | 1.17 | 1.17 | 1.17 | 1.17 | 1.17 | 1.17 | 1.17 |
| libedit | 3.1.20221030 | 3.1.20221030 | 3.1.20221030 | 3.1.20221030 | 3.1.20221030 | 3.1.20221030 | |
| libev | 4.33 | 4.33 | 4.33 | 4.33 | 4.33 | 4.33 | |
| libevent | 2.1.12 | 2.1.12 | 2.1.12 | 2.1.12 | 2.1.12 | 2.1.12 | |
| libffi | 3.4.4 | 3.4.4 | 3.4.4 | 3.4.2 | 3.4.4 | 3.4.4 | 3.4.4 |
| libgcc-ng | 11.2.0 | 11.2.0 | 11.2.0 | 11.2.0 | |||
| libgfortran | 5.0.0 | 5.0.0 | |||||
| libgfortran-ng | 11.2.0 | 11.2.0 | 11.2.0 | 11.2.0 | |||
| libgfortran5 | 11.2.0 | 11.2.0 | 11.2.0 | 11.2.0 | 11.3.0 | 11.3.0 | |
| libgomp | 11.2.0 | 11.2.0 | 11.2.0 | 11.2.0 | |||
| libiconv | 1.16 | 1.16 | 1.16 | ||||
| liblief | 0.12.3 | 0.12.3 | 0.12.3 | 0.12.3 | 0.12.3 | 0.12.3 | 0.12.3 |
| libllvm14 | 14.0.6 | 14.0.6 | 14.0.6 | 14.0.6 | 14.0.6 | ||
| libmamba | 1.5.1 | 1.5.1 | 1.5.1 | 1.5.1 | 1.5.1 | 1.5.1 | 1.5.1 |
| libmambapy | 1.5.1 | 1.5.1 | 1.5.1 | 1.5.1 | 1.5.1 | 1.5.1 | 1.5.1 |
| libnghttp2 | 1.52.0 | 1.52.0 | 1.52.0 | 1.52.0 | 1.52.0 | 1.52.0 | |
| libopenblas | 0.3.21 | 0.3.21 | 0.3.21 | 0.3.21 | 0.3.21 | ||
| libpng | 1.6.39 | 1.6.39 | 1.6.39 | 1.6.39 | 1.6.39 | 1.6.39 | 1.6.39 |
| libpq | 12.15 | 12.15 | 12.15 | 12.15 | 12.15 | ||
| libprotobuf | 3.20.3 | 3.20.3 | 3.20.3 | 3.20.3 | 3.20.3 | 3.20.3 | |
| libsodium | 1.0.18 | 1.0.18 | 1.0.18 | 1.0.18 | 1.0.18 | 1.0.18 | 1.0.18 |
| libsolv | 0.7.24 | 0.7.24 | 0.7.24 | 0.7.24 | 0.7.24 | 0.7.24 | 0.7.24 |
| libspatialindex | 1.9.3 | 1.9.3 | 1.9.3 | 1.9.3 | 1.9.3 | ||
| libssh2 | 1.10.0 | 1.10.0 | 1.10.0 | 1.10.0 | 1.10.0 | 1.10.0 | 1.10.0 |
| libstdcxx-ng | 11.2.0 | 11.2.0 | 11.2.0 | 11.2.0 | |||
| libthrift | 0.15.0 | 0.15.0 | 0.15.0 | 0.15.0 | 0.15.0 | 0.15.0 | |
| libtiff | 4.5.1 | 4.5.1 | 4.5.1 | 4.5.1 | 4.5.1 | 4.5.1 | 4.5.1 |
| libuuid | 1.41.5 | 1.41.5 | 1.41.5 | 1.41.5 | |||
| libwebp | 1.3.2 | 1.3.2 | 1.3.2 | 1.3.2 | 1.3.2 | 1.3.2 | 1.3.2 |
| libwebp-base | 1.3.2 | 1.3.2 | 1.3.2 | 1.3.2 | 1.3.2 | 1.3.2 | 1.3.2 |
| libxcb | 1.15 | 1.15 | |||||
| libxkbcommon | 1.0.1 | 1.0.1 | |||||
| libxml2 | 2.10.4 | 2.10.4 | 2.10.4 | 2.10.4 | 2.10.4 | 2.10.4 | 2.10.4 |
| libxslt | 1.1.37 | 1.1.37 | 1.1.37 | 1.1.37 | 1.1.37 | 1.1.37 | 1.1.37 |
| libzopfli | 1.0.3 | 1.0.3 | 1.0.3 | 1.0.3 | 1.0.3 | 1.0.3 | 1.0.3 |
| linkify-it-py | 2.0.0 | 2.0.0 | 2.0.0 | 2.0.0 | 2.0.0 | 2.0.0 | |
| llvm-openmp | 14.0.6 | 14.0.6 | |||||
| llvmlite | 0.40.0 | 0.40.0 | 0.40.0 | 0.40.0 | 0.40.0 | 0.40.0 | |
| locket | 1.0.0 | 1.0.0 | 1.0.0 | 1.0.0 | 1.0.0 | 1.0.0 | 1.0.0 |
| lxml | 4.9.3 | 4.9.3 | 4.9.3 | 4.9.3 | 4.9.3 | 4.9.3 | 4.9.3 |
| lz4 | 4.3.2 | 4.3.2 | 4.3.2 | 4.3.2 | 4.3.2 | 4.3.2 | 4.3.2 |
| lz4-c | 1.9.4 | 1.9.4 | 1.9.4 | 1.9.4 | 1.9.4 | 1.9.4 | 1.9.4 |
| lzo | 2.10 | 2.10 | 2.10 | 2.10 | 2.10 | 2.10 | 2.10 |
| m2-msys2-runtime | 2.5.0.17080.65c939c | ||||||
| m2-patch | 2.7.5 | ||||||
| m2w64-libwinpthread-git | 5.0.0.4634.697f757 | ||||||
| markdown | 3.4.1 | 3.4.1 | 3.4.1 | 3.4.1 | 3.4.1 | 3.4.1 | 3.4.1 |
| markdown-it-py | 2.2.0 | 2.2.0 | 2.2.0 | 2.2.0 | 2.2.0 | 2.2.0 | |
| markupsafe | 2.1.1 | 2.1.1 | 2.1.1 | 2.1.1 | 2.1.1 | 2.1.1 | 2.1.1 |
| mathjax | 2.7.5 | 2.7.5 | 2.7.5 | 2.7.5 | 2.7.5 | ||
| matplotlib | 3.7.2 | 3.7.2 | 3.7.2 | 3.7.2 | 3.7.2 | 3.7.2 | 3.7.2 |
| matplotlib-base | 3.7.2 | 3.7.2 | 3.7.2 | 3.7.2 | 3.7.2 | 3.7.2 | 3.7.2 |
| matplotlib-inline | 0.1.6 | 0.1.6 | 0.1.6 | 0.1.6 | 0.1.6 | 0.1.6 | 0.1.6 |
| mccabe | 0.7.0 | 0.7.0 | 0.7.0 | 0.7.0 | 0.7.0 | 0.7.0 | 0.7.0 |
| mdit-py-plugins | 0.3.0 | 0.3.0 | 0.3.0 | 0.3.0 | 0.3.0 | 0.3.0 | |
| mdurl | 0.1.0 | 0.1.0 | 0.1.0 | 0.1.0 | 0.1.0 | 0.1.0 | |
| menuinst | 1.4.19 | ||||||
| mistune | 0.8.4 | 0.8.4 | 0.8.4 | 0.8.4 | 0.8.4 | 0.8.4 | 0.8.4 |
| mkl | 2023.1.0 | 2023.1.0 | |||||
| mkl-service | 2.4.0 | 2.4.0 | |||||
| mkl\_fft | 1.3.8 | 1.3.8 | |||||
| mkl\_random | 1.2.4 | 1.2.4 | |||||
| mock | 4.0.3 | ||||||
| more-itertools | 8.12.0 | 8.12.0 | 8.12.0 | 8.12.0 | 8.12.0 | 8.12.0 | 8.12.0 |
| mpc | 1.1.0 | 1.1.0 | 1.1.0 | 1.1.0 | 1.1.0 | 1.1.0 | |
| mpfr | 4.0.2 | 4.0.2 | 4.0.2 | 4.0.2 | 4.0.2 | 4.0.2 | |
| mpi | 1.0 | ||||||
| mpich | 4.1.1 | ||||||
| mpmath | 1.3.0 | 1.3.0 | 1.3.0 | 1.3.0 | 1.3.0 | 1.3.0 | 1.3.0 |
| msgpack-python | 1.0.3 | 1.0.3 | 1.0.3 | 1.0.3 | 1.0.3 | 1.0.3 | 1.0.3 |
| msys2-conda-epoch | 20160418 | ||||||
| multidict | 6.0.2 | 6.0.2 | 6.0.2 | 6.0.2 | 6.0.2 | 6.0.2 | 6.0.2 |
| multipledispatch | 0.6.0 | 0.6.0 | 0.6.0 | 0.6.0 | 0.6.0 | 0.6.0 | |
| multiprocess | 0.70.14 | 0.70.14 | 0.70.14 | 0.70.14 | 0.70.14 | 0.70.14 | |
| munkres | 1.1.4 | 1.1.4 | 1.1.4 | 1.1.4 | 1.1.4 | 1.1.4 | 1.1.4 |
| mypy\_extensions | 1.0.0 | 1.0.0 | 1.0.0 | 1.0.0 | 1.0.0 | ||
| mysql | 5.7.24 | 5.7.24 | 5.7.24 | 5.7.24 | |||
| navigator-updater | 0.4.0 | 0.4.0 | 0.4.0 | 0.4.0 | 0.4.0 | ||
| nbclassic | 0.5.5 | 0.5.5 | 0.5.5 | 0.5.5 | 0.5.5 | 0.5.5 | 0.5.5 |
| nbclient | 0.5.13 | 0.5.13 | 0.5.13 | 0.5.13 | 0.5.13 | 0.5.13 | 0.5.13 |
| nbconvert | 6.5.4 | 6.5.4 | 6.5.4 | 6.5.4 | 6.5.4 | 6.5.4 | 6.5.4 |
| nbformat | 5.9.2 | 5.9.2 | 5.9.2 | 5.9.2 | 5.9.2 | 5.9.2 | 5.9.2 |
| ncurses | 6.4 | 6.4 | 6.4 | 6.4 | 6.4 | 6.4 | |
| nest-asyncio | 1.5.6 | 1.5.6 | 1.5.6 | 1.5.6 | 1.5.6 | 1.5.6 | 1.5.6 |
| networkx | 3.1 | 3.1 | 3.1 | 3.1 | 3.1 | 3.1 | 3.1 |
| nltk | 3.8.1 | 3.8.1 | 3.8.1 | 3.8.1 | 3.8.1 | 3.8.1 | 3.8.1 |
| notebook | 6.5.4 | 6.5.4 | 6.5.4 | 6.5.4 | 6.5.4 | 6.5.4 | 6.5.4 |
| notebook-shim | 0.2.2 | 0.2.2 | 0.2.2 | 0.2.2 | 0.2.2 | 0.2.2 | 0.2.2 |
| nspr | 4.35 | 4.35 | |||||
| nss | 3.89.1 | 3.89.1 | |||||
| numba | 0.57.1 | 0.57.1 | 0.57.1 | 0.57.1 | 0.57.0 | 0.57.1 | |
| numexpr | 2.8.4 | 2.8.4 | 2.8.4 | 2.8.4 | 2.8.4 | 2.8.4 | 2.8.4 |
| numpy | 1.24.3 | 1.24.3 | 1.24.3 | 1.25.2 | 1.24.3 | 1.24.3 | 1.24.3 |
| numpy-base | 1.24.3 | 1.24.3 | 1.24.3 | 1.25.2 | 1.24.3 | 1.24.3 | 1.24.3 |
| numpydoc | 1.5.0 | 1.5.0 | 1.5.0 | 1.5.0 | 1.5.0 | ||
| oniguruma | 6.9.7.1 | 6.9.7.1 | 6.9.7.1 | 6.9.7.1 | 6.9.7.1 | ||
| openjpeg | 2.4.0 | 2.4.0 | 2.4.0 | 2.4.0 | 2.3.0 | 2.4.0 | 2.4.0 |
| openpyxl | 3.0.10 | 3.0.10 | 3.0.10 | 3.0.10 | 3.0.10 | 3.0.10 | 3.0.10 |
| openssl | 3.0.10 | 3.0.10 | 3.0.10 | 3.0.10 | 3.0.10 | 3.0.10 | 3.0.10 |
| orc | 1.7.4 | 1.7.4 | 1.7.4 | 1.7.4 | 1.7.4 | 1.7.4 | |
| packaging | 23.1 | 23.1 | 23.1 | 23.1 | 23.1 | 23.1 | 23.1 |
| pandas | 2.0.3 | 2.0.3 | 2.0.3 | 2.0.3 | 2.0.3 | 2.0.3 | 2.0.3 |
| pandocfilters | 1.5.0 | 1.5.0 | 1.5.0 | 1.5.0 | 1.5.0 | 1.5.0 | 1.5.0 |
| panel | 1.2.3 | 1.2.3 | 1.2.3 | 0.12.6 | 1.2.3 | 1.2.3 | 1.2.3 |
| param | 1.13.0 | 1.13.0 | 1.13.0 | 1.13.0 | 1.13.0 | 1.13.0 | 1.13.0 |
| paramiko | 2.8.1 | ||||||
| parsel | 1.6.0 | 1.6.0 | 1.6.0 | 1.6.0 | 1.6.0 | 1.6.0 | |
| parso | 0.8.3 | 0.8.3 | 0.8.3 | 0.8.3 | 0.8.3 | 0.8.3 | 0.8.3 |
| partd | 1.4.0 | 1.4.0 | 1.4.0 | 1.4.0 | 1.4.0 | 1.4.0 | 1.4.0 |
| patch | 2.7.6 | 2.7.6 | 2.7.6 | 2.7.6 | 2.7.6 | 2.7.6 | |
| patchelf | 0.17.2 | 0.17.2 | 0.17.2 | 0.17.2 | |||
| pathlib | 1.0.1 | 1.0.1 | 1.0.1 | 1.0.1 | 1.0.1 | ||
| pathspec | 0.10.3 | 0.10.3 | 0.10.3 | 0.10.3 | 0.10.3 | ||
| patsy | 0.5.3 | 0.5.3 | 0.5.3 | 0.5.3 | 0.5.3 | 0.5.3 | 0.5.3 |
| pcre | 8.45 | 8.45 | 8.45 | 8.45 | 8.45 | ||
| pcre2 | 10.42 | 10.42 | 10.42 | 10.42 | 10.42 | 10.42 | 10.42 |
| pep8 | 1.7.1 | 1.7.1 | 1.7.1 | 1.7.1 | 1.7.1 | 1.7.1 | 1.7.1 |
| pexpect | 4.8.0 | 4.8.0 | 4.8.0 | 4.8.0 | 4.8.0 | 4.8.0 | 4.8.0 |
| pickleshare | 0.7.5 | 0.7.5 | 0.7.5 | 0.7.5 | 0.7.5 | 0.7.5 | 0.7.5 |
| pillow | 9.4.0 | 9.4.0 | 9.4.0 | 9.4.0 | 9.4.0 | 9.4.0 | 9.4.0 |
| pip | 23.2.1 | 23.2.1 | 23.2.1 | 23.2.1 | 23.2.1 | 23.2.1 | 23.2.1 |
| pkce | 1.0.3 | 1.0.3 | 1.0.3 | 1.0.3 | 1.0.3 | ||
| pkginfo | 1.9.6 | 1.9.6 | 1.9.6 | 1.9.6 | 1.9.6 | 1.9.6 | 1.9.6 |
| platformdirs | 3.10.0 | 3.10.0 | 3.10.0 | 3.10.0 | 3.10.0 | 3.10.0 | 3.10.0 |
| plotly | 5.9.0 | 5.9.0 | 5.9.0 | 5.9.0 | 5.9.0 | 5.9.0 | 5.9.0 |
| pluggy | 1.0.0 | 1.0.0 | 1.0.0 | 1.0.0 | 1.0.0 | 1.0.0 | 1.0.0 |
| ply | 3.11 | 3.11 | 3.11 | 3.11 | 3.11 | ||
| powershell\_shortcut | 0.0.1 | ||||||
| poyo | 0.5.0 | 0.5.0 | 0.5.0 | 0.5.0 | 0.5.0 | ||
| prometheus\_client | 0.14.1 | 0.14.1 | 0.14.1 | 0.14.1 | 0.14.1 | 0.14.1 | 0.14.1 |
| prompt-toolkit | 3.0.36 | 3.0.36 | 3.0.36 | 3.0.36 | 3.0.36 | 3.0.36 | 3.0.36 |
| prompt\_toolkit | 3.0.36 | 3.0.36 | 3.0.36 | 3.0.36 | 3.0.36 | 3.0.36 | 3.0.36 |
| protego | 0.1.16 | 0.1.16 | 0.1.16 | 0.1.16 | 0.1.16 | 0.1.16 | |
| psutil | 5.9.0 | 5.9.0 | 5.9.0 | 5.9.0 | 5.9.0 | 5.9.0 | 5.9.0 |
| ptyprocess | 0.7.0 | 0.7.0 | 0.7.0 | 0.7.0 | 0.7.0 | 0.7.0 | 0.7.0 |
| pure\_eval | 0.2.2 | 0.2.2 | 0.2.2 | 0.2.2 | 0.2.2 | 0.2.2 | 0.2.2 |
| py-cpuinfo | 8.0.0 | 8.0.0 | 8.0.0 | 8.0.0 | 8.0.0 | 8.0.0 | |
| py-lief | 0.12.3 | 0.12.3 | 0.12.3 | 0.12.3 | 0.12.3 | 0.12.3 | 0.12.3 |
| pyarrow | 11.0.0 | 11.0.0 | 11.0.0 | 11.0.0 | 11.0.0 | 11.0.0 | |
| pyasn1 | 0.4.8 | 0.4.8 | 0.4.8 | 0.4.8 | 0.4.8 | 0.4.8 | |
| pyasn1-modules | 0.2.8 | 0.2.8 | 0.2.8 | 0.2.8 | 0.2.8 | 0.2.8 | |
| pybind11-abi | 4 | 4 | 4 | 4 | 4 | 4 | 4 |
| pycodestyle | 2.10.0 | 2.10.0 | 2.10.0 | 2.10.0 | 2.10.0 | ||
| pycosat | 0.6.4 | 0.6.4 | 0.6.4 | 0.6.4 | 0.6.4 | 0.6.4 | 0.6.4 |
| pycparser | 2.21 | 2.21 | 2.21 | 2.21 | 2.21 | 2.21 | 2.21 |
| pyct | 0.5.0 | 0.5.0 | 0.5.0 | 0.5.0 | 0.5.0 | 0.5.0 | 0.5.0 |
| pycurl | 7.45.2 | 7.45.2 | 7.45.2 | 7.45.2 | 7.45.2 | 7.45.2 | 7.45.2 |
| pydantic | 1.10.8 | 1.10.8 | 1.10.8 | 1.10.8 | 1.10.8 | ||
| pydispatcher | 2.0.5 | 2.0.5 | 2.0.5 | 2.0.5 | 2.0.5 | 2.0.5 | |
| pydocstyle | 6.3.0 | 6.3.0 | 6.3.0 | 6.3.0 | 6.3.0 | ||
| pyerfa | 2.0.0 | 2.0.0 | 2.0.0 | 2.0.0 | 2.0.0 | 2.0.0 | 2.0.0 |
| pyflakes | 3.0.1 | 3.0.1 | 3.0.1 | 3.0.1 | 3.0.1 | 3.0.1 | 3.0.1 |
| pygments | 2.15.1 | 2.15.1 | 2.15.1 | 2.15.1 | 2.15.1 | 2.15.1 | 2.15.1 |
| pyjwt | 2.4.0 | 2.4.0 | 2.4.0 | 2.4.0 | 2.4.0 | ||
| pylint | 2.16.2 | 2.16.2 | 2.16.2 | 2.16.2 | 2.16.2 | 2.16.2 | 2.16.2 |
| pylint-venv | 2.3.0 | 2.3.0 | 2.3.0 | 2.3.0 | 2.3.0 | ||
| pyls-spyder | 0.4.0 | 0.4.0 | 0.4.0 | 0.4.0 | 0.4.0 | ||
| pynacl | 1.5.0 | ||||||
| pyobjc-core | 9.0 | 9.0 | |||||
| pyobjc-framework-cocoa | 9.0 | 9.0 | |||||
| pyobjc-framework-coreservices | 9.0 | 9.0 | |||||
| pyobjc-framework-fsevents | 9.0 | 9.0 | |||||
| pyodbc | 4.0.34 | 4.0.34 | 4.0.34 | 4.0.34 | 4.0.34 | 4.0.34 | 4.0.34 |
| pyopenssl | 23.2.0 | 23.2.0 | 23.2.0 | 23.2.0 | 23.2.0 | 23.2.0 | 23.2.0 |
| pyparsing | 3.0.9 | 3.0.9 | 3.0.9 | 3.0.9 | 3.0.9 | 3.0.9 | 3.0.9 |
| pyqt | 5.15.7 | 5.15.7 | 5.15.7 | 5.15.7 | 5.15.7 | ||
| pyqt5-sip | 12.11.0 | 12.11.0 | 12.11.0 | 12.11.0 | 12.11.0 | ||
| pyqtwebengine | 5.15.7 | 5.15.7 | 5.15.7 | 5.15.7 | 5.15.7 | ||
| pyrsistent | 0.18.0 | 0.18.0 | 0.18.0 | 0.18.0 | 0.18.0 | 0.18.0 | 0.18.0 |
| pysocks | 1.7.1 | 1.7.1 | 1.7.1 | 1.7.1 | 1.7.1 | 1.7.1 | 1.7.1 |
| pytables | 3.8.0 | 3.8.0 | 3.8.0 | 3.7.0 | 3.8.0 | 3.8.0 | 3.8.0 |
| pytest | 7.4.0 | 7.4.0 | 7.4.0 | 7.4.0 | 7.4.0 | 7.4.0 | 7.4.0 |
| python | 3.11.5 | 3.11.5 | 3.11.5 | 3.11.5 | 3.11.5 | 3.11.5 | 3.11.5 |
| python-dateutil | 2.8.2 | 2.8.2 | 2.8.2 | 2.8.2 | 2.8.2 | 2.8.2 | 2.8.2 |
| python-dotenv | 0.21.0 | 0.21.0 | 0.21.0 | 0.21.0 | 0.21.0 | ||
| python-fastjsonschema | 2.16.2 | 2.16.2 | 2.16.2 | 2.16.2 | 2.16.2 | 2.16.2 | 2.16.2 |
| python-json-logger | 2.0.7 | 2.0.7 | 2.0.7 | 2.0.7 | 2.0.7 | 2.0.7 | |
| python-kaleido | 0.2.1 | 0.2.1 | 0.2.1 | 0.2.1 | 0.2.1 | ||
| python-libarchive-c | 2.9 | 2.9 | 2.9 | 2.9 | 2.9 | 2.9 | 2.9 |
| python-lmdb | 1.4.1 | 1.4.1 | 1.4.1 | 1.4.1 | 1.4.1 | 1.4.1 | 1.4.1 |
| python-lsp-black | 1.2.1 | 1.2.1 | 1.2.1 | 1.2.1 | 1.2.1 | ||
| python-lsp-jsonrpc | 1.0.0 | 1.0.0 | 1.0.0 | 1.0.0 | 1.0.0 | ||
| python-lsp-server | 1.7.2 | 1.7.2 | 1.7.2 | 1.7.2 | 1.7.2 | ||
| python-slugify | 5.0.2 | 5.0.2 | 5.0.2 | 5.0.2 | 5.0.2 | ||
| python-snappy | 0.6.1 | 0.6.1 | 0.6.1 | 0.6.1 | 0.6.1 | 0.6.1 | 0.6.1 |
| python-tzdata | 2023.3 | 2023.3 | 2023.3 | 2023.3 | 2023.3 | 2023.3 | 2023.3 |
| python-xxhash | 2.0.2 | 2.0.2 | 2.0.2 | 2.0.2 | 2.0.2 | 2.0.2 | |
| python.app | 3 | 3 | |||||
| pytoolconfig | 1.2.5 | 1.2.5 | 1.2.5 | 1.2.5 | 1.2.5 | ||
| pytz | 2023.3.post1 | 2023.3.post1 | 2023.3.post1 | 2023.3.post1 | 2023.3.post1 | 2023.3.post1 | 2023.3.post1 |
| pyviz\_comms | 2.3.0 | 2.3.0 | 2.3.0 | 2.3.0 | 2.3.0 | 2.3.0 | 2.3.0 |
| pywavelets | 1.4.1 | 1.4.1 | 1.4.1 | 1.4.1 | 1.4.1 | 1.4.1 | 1.4.1 |
| pywin32 | 305 | ||||||
| pywin32-ctypes | 0.2.0 | ||||||
| pywinpty | 2.0.10 | ||||||
| pyxdg | 0.27 | 0.27 | |||||
| pyyaml | 6.0 | 6.0 | 6.0 | 6.0 | 6.0 | 6.0 | 6.0 |
| pyzmq | 23.2.0 | 23.2.0 | 23.2.0 | 23.2.0 | 23.2.0 | 23.2.0 | 23.2.0 |
| qdarkstyle | 3.0.2 | 3.0.2 | 3.0.2 | 3.0.2 | 3.0.2 | ||
| qstylizer | 0.2.2 | 0.2.2 | 0.2.2 | 0.2.2 | 0.2.2 | ||
| qt-main | 5.15.2 | 5.15.2 | 5.15.2 | 5.15.2 | 5.15.2 | ||
| qt-webengine | 5.15.9 | 5.15.9 | 5.15.9 | 5.15.9 | 5.15.9 | ||
| qtawesome | 1.2.2 | 1.2.2 | 1.2.2 | 1.2.2 | 1.2.2 | ||
| qtconsole | 5.4.2 | 5.4.2 | 5.4.2 | 5.4.2 | 5.4.2 | ||
| qtpy | 2.2.0 | 2.2.0 | 2.2.0 | 2.2.0 | 2.2.0 | ||
| qtwebkit | 5.212 | 5.212 | 5.212 | 5.212 | 5.212 | ||
| queuelib | 1.5.0 | 1.5.0 | 1.5.0 | 1.5.0 | 1.5.0 | 1.5.0 | |
| re2 | 2022.04.01 | 2022.04.01 | 2022.04.01 | 2022.04.01 | 2022.04.01 | 2022.04.01 | |
| readline | 8.2 | 8.2 | 8.2 | 8.2 | 8.2 | 8.2 | |
| regex | 2022.7.9 | 2022.7.9 | 2022.7.9 | 2022.7.9 | 2022.7.9 | 2022.7.9 | 2022.7.9 |
| reproc | 14.2.4 | 14.2.4 | 14.2.4 | 14.2.4 | 14.2.4 | 14.2.4 | 14.2.4 |
| reproc-cpp | 14.2.4 | 14.2.4 | 14.2.4 | 14.2.4 | 14.2.4 | 14.2.4 | 14.2.4 |
| requests | 2.31.0 | 2.31.0 | 2.31.0 | 2.31.0 | 2.31.0 | 2.31.0 | 2.31.0 |
| requests-file | 1.5.1 | 1.5.1 | 1.5.1 | 1.5.1 | 1.5.1 | 1.5.1 | |
| requests-toolbelt | 1.0.0 | 1.0.0 | 1.0.0 | 1.0.0 | 1.0.0 | 1.0.0 | 1.0.0 |
| responses | 0.13.3 | 0.13.3 | 0.13.3 | 0.13.3 | 0.13.3 | 0.13.3 | |
| rfc3339-validator | 0.1.4 | 0.1.4 | 0.1.4 | 0.1.4 | 0.1.4 | 0.1.4 | |
| rfc3986-validator | 0.1.1 | 0.1.1 | 0.1.1 | 0.1.1 | 0.1.1 | 0.1.1 | |
| rope | 1.7.0 | 1.7.0 | 1.7.0 | 1.7.0 | 1.7.0 | ||
| rtree | 1.0.1 | 1.0.1 | 1.0.1 | 1.0.1 | 1.0.1 | ||
| ruamel.yaml | 0.17.21 | 0.17.21 | 0.17.21 | 0.17.21 | 0.17.21 | 0.17.21 | 0.17.21 |
| ruamel\_yaml | 0.17.21 | 0.17.21 | 0.17.21 | 0.17.21 | 0.17.21 | 0.17.21 | 0.17.21 |
| s3fs | 2023.4.0 | 2023.4.0 | 2023.4.0 | 2023.4.0 | 2023.4.0 | 2023.4.0 | 2023.4.0 |
| s3transfer | 0.6.0 | ||||||
| sacremoses | 0.0.43 | ||||||
| safetensors | 0.3.2 | 0.3.2 | 0.3.2 | 0.3.2 | 0.3.2 | 0.3.2 | |
| scikit-image | 0.20.0 | 0.20.0 | 0.20.0 | 0.20.0 | 0.20.0 | 0.20.0 | 0.20.0 |
| scikit-learn | 1.3.0 | 1.3.0 | 1.3.0 | 1.2.2 | 1.3.0 | 1.3.0 | 1.3.0 |
| scikit-learn-intelex | 2023.1.1 | 2023.1.1 | |||||
| scipy | 1.11.1 | 1.11.1 | 1.11.1 | 1.11.1 | 1.11.1 | 1.11.1 | 1.11.1 |
| scrapy | 2.8.0 | 2.8.0 | 2.8.0 | 2.8.0 | 2.8.0 | 2.8.0 | |
| seaborn | 0.12.2 | 0.12.2 | 0.12.2 | 0.12.2 | 0.12.2 | 0.12.2 | 0.12.2 |
| secretstorage | 3.3.1 | 3.3.1 | |||||
| send2trash | 1.8.0 | 1.8.0 | 1.8.0 | 1.8.0 | 1.8.0 | 1.8.0 | 1.8.0 |
| service\_identity | 18.1.0 | 18.1.0 | 18.1.0 | 18.1.0 | 18.1.0 | 18.1.0 | |
| setuptools | 68.0.0 | 68.0.0 | 68.0.0 | 68.0.0 | 68.0.0 | 68.0.0 | 68.0.0 |
| sip | 6.6.2 | 6.6.2 | 6.6.2 | 6.6.2 | 6.6.2 | ||
| six | 1.16.0 | 1.16.0 | 1.16.0 | 1.16.0 | 1.16.0 | 1.16.0 | 1.16.0 |
| smart\_open | 5.2.1 | 5.2.1 | 5.2.1 | 5.2.1 | 5.2.1 | 5.2.1 | |
| snappy | 1.1.9 | 1.1.9 | 1.1.9 | 1.1.9 | 1.1.9 | 1.1.9 | 1.1.9 |
| sniffio | 1.2.0 | 1.2.0 | 1.2.0 | 1.2.0 | 1.2.0 | 1.2.0 | 1.2.0 |
| snowballstemmer | 2.2.0 | 2.2.0 | 2.2.0 | 2.2.0 | 2.2.0 | 2.2.0 | 2.2.0 |
| sortedcontainers | 2.4.0 | 2.4.0 | 2.4.0 | 2.4.0 | 2.4.0 | 2.4.0 | 2.4.0 |
| soupsieve | 2.4 | 2.4 | 2.4 | 2.4 | 2.4 | 2.4 | 2.4 |
| sphinx | 5.0.2 | 5.0.2 | 5.0.2 | 5.0.2 | 5.0.2 | ||
| sphinxcontrib-applehelp | 1.0.2 | 1.0.2 | 1.0.2 | 1.0.2 | 1.0.2 | ||
| sphinxcontrib-devhelp | 1.0.2 | 1.0.2 | 1.0.2 | 1.0.2 | 1.0.2 | ||
| sphinxcontrib-htmlhelp | 2.0.0 | 2.0.0 | 2.0.0 | 2.0.0 | 2.0.0 | ||
| sphinxcontrib-jsmath | 1.0.1 | 1.0.1 | 1.0.1 | 1.0.1 | 1.0.1 | ||
| sphinxcontrib-qthelp | 1.0.3 | 1.0.3 | 1.0.3 | 1.0.3 | 1.0.3 | ||
| sphinxcontrib-serializinghtml | 1.1.5 | 1.1.5 | 1.1.5 | 1.1.5 | 1.1.5 | ||
| spyder | 5.4.3 | 5.4.3 | 5.4.3 | 5.4.3 | 5.4.3 | ||
| spyder-kernels | 2.4.4 | 2.4.4 | 2.4.4 | 2.4.4 | 2.4.4 | ||
| sqlalchemy | 1.4.39 | 1.4.39 | 1.4.39 | 1.4.39 | 1.4.39 | 1.4.39 | 1.4.39 |
| sqlite | 3.41.2 | 3.41.2 | 3.41.2 | 3.41.2 | 3.41.2 | 3.41.2 | 3.41.2 |
| stack\_data | 0.2.0 | 0.2.0 | 0.2.0 | 0.2.0 | 0.2.0 | 0.2.0 | 0.2.0 |
| statsmodels | 0.14.0 | 0.14.0 | 0.14.0 | 0.14.0 | 0.14.0 | 0.14.0 | 0.14.0 |
| sympy | 1.11.1 | 1.11.1 | 1.11.1 | 1.11.1 | 1.11.1 | 1.11.1 | 1.11.1 |
| tabulate | 0.8.10 | 0.8.10 | 0.8.10 | 0.8.10 | 0.8.10 | 0.8.10 | 0.8.10 |
| tapi | 1100.0.11 | 1000.10.8 | |||||
| tbb | 2021.8.0 | 2021.8.0 | 2021.8.0 | 2021.8.0 | 2021.8.0 | 2021.8.0 | |
| tbb4py | 2021.8.0 | 2021.8.0 | |||||
| tblib | 1.7.0 | 1.7.0 | 1.7.0 | 1.7.0 | 1.7.0 | 1.7.0 | 1.7.0 |
| tenacity | 8.2.2 | 8.2.2 | 8.2.2 | 8.2.2 | 8.2.2 | 8.2.2 | 8.2.2 |
| terminado | 0.17.1 | 0.17.1 | 0.17.1 | 0.17.1 | 0.17.1 | 0.17.1 | 0.17.1 |
| text-unidecode | 1.3 | 1.3 | 1.3 | 1.3 | 1.3 | ||
| textdistance | 4.2.1 | 4.2.1 | 4.2.1 | 4.2.1 | 4.2.1 | ||
| threadpoolctl | 2.2.0 | 2.2.0 | 2.2.0 | 2.2.0 | 2.2.0 | 2.2.0 | 2.2.0 |
| three-merge | 0.1.1 | 0.1.1 | 0.1.1 | 0.1.1 | 0.1.1 | ||
| tifffile | 2023.4.12 | 2023.4.12 | 2023.4.12 | 2023.4.12 | 2023.4.12 | 2023.4.12 | 2023.4.12 |
| tinycss2 | 1.2.1 | 1.2.1 | 1.2.1 | 1.2.1 | 1.2.1 | 1.2.1 | 1.2.1 |
| tk | 8.6.12 | 8.6.12 | 8.6.12 | 8.6.12 | 8.6.12 | 8.6.12 | 8.6.12 |
| tldextract | 3.2.0 | 3.2.0 | 3.2.0 | 3.2.0 | 3.2.0 | 3.2.0 | |
| tokenizers | 0.13.2 | 0.13.2 | 0.13.2 | 0.13.2 | 0.13.2 | 0.13.2 | |
| toml | 0.10.2 | 0.10.2 | 0.10.2 | 0.10.2 | 0.10.2 | ||
| tomlkit | 0.11.1 | 0.11.1 | 0.11.1 | 0.11.1 | 0.11.1 | 0.11.1 | 0.11.1 |
| toolz | 0.12.0 | 0.12.0 | 0.12.0 | 0.12.0 | 0.12.0 | 0.12.0 | 0.12.0 |
| tornado | 6.3.2 | 6.3.2 | 6.3.2 | 6.3.2 | 6.3.2 | 6.3.2 | 6.3.2 |
| tqdm | 4.65.0 | 4.65.0 | 4.65.0 | 4.65.0 | 4.65.0 | 4.65.0 | 4.65.0 |
| traitlets | 5.7.1 | 5.7.1 | 5.7.1 | 5.7.1 | 5.7.1 | 5.7.1 | 5.7.1 |
| transformers | 4.32.1 | 4.32.1 | 4.32.1 | 2.1.1 | 4.32.1 | 4.32.1 | 4.32.1 |
| twisted | 22.10.0 | 22.10.0 | 22.10.0 | 22.10.0 | 22.10.0 | 22.10.0 | |
| twisted-iocpsupport | 1.0.2 | ||||||
| typing-extensions | 4.7.1 | 4.7.1 | 4.7.1 | 4.7.1 | 4.7.1 | 4.7.1 | 4.7.1 |
| typing\_extensions | 4.7.1 | 4.7.1 | 4.7.1 | 4.7.1 | 4.7.1 | 4.7.1 | 4.7.1 |
| tzdata | 2023c | 2023c | 2023c | 2023c | 2023c | 2023c | 2023c |
| uc-micro-py | 1.0.1 | 1.0.1 | 1.0.1 | 1.0.1 | 1.0.1 | 1.0.1 | |
| ujson | 5.4.0 | 5.4.0 | 5.4.0 | 5.4.0 | 5.4.0 | ||
| unidecode | 1.2.0 | 1.2.0 | 1.2.0 | 1.2.0 | 1.2.0 | ||
| unixodbc | 2.3.11 | 2.3.11 | 2.3.11 | 2.3.11 | 2.3.11 | 2.3.11 | |
| urllib3 | 1.26.16 | 1.26.16 | 1.26.16 | 1.26.16 | 1.26.16 | 1.26.16 | 1.26.16 |
| utf8proc | 2.6.1 | 2.6.1 | 2.6.1 | 2.6.1 | 2.6.1 | 2.6.1 | |
| vc | 14.2 | ||||||
| vs2015\_runtime | 14.27.29016 | ||||||
| w3lib | 1.21.0 | 1.21.0 | 1.21.0 | 1.21.0 | 1.21.0 | 1.21.0 | |
| watchdog | 2.1.6 | 2.1.6 | 2.1.6 | 2.1.6 | 2.1.6 | ||
| wcwidth | 0.2.5 | 0.2.5 | 0.2.5 | 0.2.5 | 0.2.5 | 0.2.5 | 0.2.5 |
| webencodings | 0.5.1 | 0.5.1 | 0.5.1 | 0.5.1 | 0.5.1 | 0.5.1 | 0.5.1 |
| websocket-client | 0.58.0 | 0.58.0 | 0.58.0 | 0.58.0 | 0.58.0 | 0.58.0 | 0.58.0 |
| werkzeug | 2.2.3 | 2.2.3 | 2.2.3 | 2.2.3 | 2.2.3 | 2.2.3 | 2.2.3 |
| whatthepatch | 1.0.2 | 1.0.2 | 1.0.2 | 1.0.2 | 1.0.2 | ||
| wheel | 0.38.4 | 0.38.4 | 0.38.4 | 0.38.4 | 0.38.4 | 0.38.4 | 0.38.4 |
| widgetsnbextension | 4.0.5 | 4.0.5 | 4.0.5 | 4.0.5 | 4.0.5 | 4.0.5 | 4.0.5 |
| win\_inet\_pton | 1.1.0 | ||||||
| winpty | 0.4.3 | ||||||
| wrapt | 1.14.1 | 1.14.1 | 1.14.1 | 1.14.1 | 1.14.1 | 1.14.1 | 1.14.1 |
| wurlitzer | 3.0.2 | 3.0.2 | 3.0.2 | 3.0.2 | |||
| xarray | 2023.6.0 | 2023.6.0 | 2023.6.0 | 2023.6.0 | 2023.6.0 | 2023.6.0 | |
| xlwings | 0.29.1 | 0.29.1 | 0.29.1 | ||||
| xxhash | 0.8.0 | 0.8.0 | 0.8.0 | 0.8.0 | 0.8.0 | 0.8.0 | |
| xyzservices | 2022.9.0 | 2022.9.0 | 2022.9.0 | 2022.9.0 | 2022.9.0 | 2022.9.0 | |
| xz | 5.4.2 | 5.4.2 | 5.4.2 | 5.4.2 | 5.4.2 | 5.4.2 | 5.4.2 |
| y-py | 0.5.9 | 0.5.9 | 0.5.9 | 0.5.9 | 0.5.9 | 0.5.9 | |
| yaml | 0.2.5 | 0.2.5 | 0.2.5 | 0.2.5 | 0.2.5 | 0.2.5 | 0.2.5 |
| yaml-cpp | 0.7.0 | 0.7.0 | 0.7.0 | 0.7.0 | 0.7.0 | 0.7.0 | 0.7.0 |
| yapf | 0.31.0 | 0.31.0 | 0.31.0 | 0.31.0 | 0.31.0 | ||
| yarl | 1.8.1 | 1.8.1 | 1.8.1 | 1.8.1 | 1.8.1 | 1.8.1 | 1.8.1 |
| ypy-websocket | 0.8.2 | 0.8.2 | 0.8.2 | 0.8.2 | 0.8.2 | 0.8.2 | |
| zeromq | 4.3.4 | 4.3.4 | 4.3.4 | 4.3.4 | 4.3.4 | 4.3.4 | 4.3.4 |
| zfp | 1.0.0 | 1.0.0 | 1.0.0 | 1.0.0 | 1.0.0 | ||
| zict | 2.2.0 | 2.2.0 | 2.2.0 | 2.2.0 | 2.2.0 | 2.2.0 | 2.2.0 |
| zipp | 3.11.0 | 3.11.0 | 3.11.0 | 3.11.0 | 3.11.0 | 3.11.0 | 3.11.0 |
| zlib | 1.2.13 | 1.2.13 | 1.2.13 | 1.2.13 | 1.2.13 | 1.2.13 | 1.2.13 |
| zlib-ng | 2.0.7 | 2.0.7 | 2.0.7 | 2.0.7 | 2.0.7 | 2.0.7 | |
| zope | 1.0 | 1.0 | 1.0 | 1.0 | 1.0 | 1.0 | |
| zope.interface | 5.4.0 | 5.4.0 | 5.4.0 | 5.4.0 | 5.4.0 | 5.4.0 | |
| zstandard | 0.19.0 | 0.19.0 | 0.19.0 | 0.19.0 | 0.19.0 | 0.19.0 | 0.19.0 |
| zstd | 1.5.5 | 1.5.5 | 1.5.5 | 1.5.5 | 1.5.5 | 1.5.5 | 1.5.5 |
| Package Name | linux-64 | linux-aarch64 | linux-ppc64le | linux-s390x |
|---|---|---|---|---|
| \_anaconda\_depends | 2023.09 | 2023.09 | 2023.09 | 2023.09 |
| \_libgcc\_mutex | 0.1 | 0.1 | 0.1 | 0.1 |
| \_openmp\_mutex | 5.1 | 5.1 | 5.1 | 5.1 |
| abseil-cpp | 20211102.0 | 20211102.0 | 20211102.0 | |
| aiobotocore | 2.5.0 | 2.5.0 | 2.5.0 | 2.5.0 |
| aiofiles | 22.1.0 | 22.1.0 | 22.1.0 | |
| aiohttp | 3.8.5 | 3.8.5 | 3.8.5 | 3.8.5 |
| aioitertools | 0.7.1 | 0.7.1 | 0.7.1 | 0.7.1 |
| aiosignal | 1.2.0 | 1.2.0 | 1.2.0 | 1.2.0 |
| aiosqlite | 0.18.0 | 0.18.0 | 0.18.0 | |
| alabaster | 0.7.12 | 0.7.12 | ||
| anaconda-anon-usage | 0.4.2 | 0.4.2 | 0.4.2 | 0.4.2 |
| anaconda-catalogs | 0.2.0 | 0.2.0 | 0.2.0 | 0.2.0 |
| anaconda-client | 1.12.1 | 1.12.1 | 1.12.1 | 1.12.1 |
| anaconda-cloud-auth | 0.1.3 | 0.1.3 | ||
| anaconda-navigator | 2.5.0 | 2.5.0 | ||
| anaconda-project | 0.11.1 | 0.11.1 | 0.11.1 | 0.11.1 |
| anyio | 3.5.0 | 3.5.0 | 3.5.0 | 3.5.0 |
| aom | 3.6.0 | 3.6.0 | 3.6.0 | 3.6.0 |
| appdirs | 1.4.4 | 1.4.4 | 1.4.4 | 1.4.4 |
| argon2-cffi | 21.3.0 | 21.3.0 | 21.3.0 | 21.3.0 |
| argon2-cffi-bindings | 21.2.0 | 21.2.0 | 21.2.0 | 21.2.0 |
| arrow | 1.2.3 | 1.2.3 | ||
| arrow-cpp | 11.0.0 | 11.0.0 | 11.0.0 | |
| astroid | 2.14.2 | 2.14.2 | 2.14.2 | 2.14.2 |
| astropy | 5.1 | 5.1 | 5.1 | 5.1 |
| asttokens | 2.0.5 | 2.0.5 | 2.0.5 | 2.0.5 |
| async-timeout | 4.0.2 | 4.0.2 | 4.0.2 | 4.0.2 |
| atomicwrites | 1.4.0 | 1.4.0 | ||
| attrs | 22.1.0 | 22.1.0 | 22.1.0 | 22.1.0 |
| automat | 20.2.0 | 20.2.0 | 20.2.0 | |
| autopep8 | 1.6.0 | 1.6.0 | ||
| aws-c-common | 0.6.8 | 0.6.8 | 0.6.8 | |
| aws-c-event-stream | 0.1.6 | 0.1.6 | 0.1.6 | |
| aws-checksums | 0.1.11 | 0.1.11 | 0.1.11 | |
| aws-sdk-cpp | 1.8.185 | 1.8.185 | 1.8.185 | |
| babel | 2.11.0 | 2.11.0 | 2.11.0 | 2.11.0 |
| backcall | 0.2.0 | 0.2.0 | 0.2.0 | 0.2.0 |
| backports | 1.1 | 1.1 | 1.1 | 1.1 |
| backports.functools\_lru\_cache | 1.6.4 | 1.6.4 | 1.6.4 | 1.6.4 |
| backports.tempfile | 1.0 | 1.0 | 1.0 | 1.0 |
| backports.weakref | 1.0.post1 | 1.0.post1 | 1.0.post1 | 1.0.post1 |
| bcrypt | 3.2.0 | 3.2.0 | 3.2.0 | |
| beautifulsoup4 | 4.12.2 | 4.12.2 | 4.12.2 | 4.12.2 |
| binaryornot | 0.4.4 | 0.4.4 | ||
| black | 23.3.0 | 23.3.0 | ||
| blas | 1.0 | 1.0 | 1.0 | 1.0 |
| bleach | 4.1.0 | 4.1.0 | 4.1.0 | 4.1.0 |
| blosc | 1.21.3 | 1.21.3 | 1.21.3 | 1.21.3 |
| bokeh | 3.2.1 | 3.2.1 | 3.2.1 | 2.4.3 |
| boltons | 23.0.0 | 23.0.0 | 23.0.0 | 23.0.0 |
| boost-cpp | 1.73.0 | 1.73.0 | 1.82.0 | |
| boto3 | 1.26.76 | |||
| botocore | 1.29.76 | 1.29.76 | 1.29.76 | 1.29.76 |
| bottleneck | 1.3.5 | 1.3.5 | 1.3.5 | 1.3.5 |
| brotli | 1.0.9 | 1.0.9 | 1.0.9 | 1.0.9 |
| brotli-bin | 1.0.9 | 1.0.9 | 1.0.9 | 1.0.9 |
| brotlipy | 0.7.0 | 0.7.0 | 0.7.0 | 0.7.0 |
| brunsli | 0.1 | 0.1 | 0.1 | |
| bzip2 | 1.0.8 | 1.0.8 | 1.0.8 | 1.0.8 |
| c-ares | 1.19.1 | 1.19.1 | 1.19.1 | 1.19.1 |
| c-blosc2 | 2.8.0 | 2.8.0 | 2.8.0 | |
| ca-certificates | 2023.08.22 | 2023.08.22 | 2023.08.22 | 2023.08.22 |
| certifi | 2023.7.22 | 2023.7.22 | 2023.7.22 | 2023.7.22 |
| cffi | 1.15.1 | 1.15.1 | 1.15.1 | 1.15.1 |
| cfitsio | 3.470 | 3.470 | 3.470 | 3.470 |
| chardet | 4.0.0 | 4.0.0 | 4.0.0 | 4.0.0 |
| charls | 2.2.0 | 2.2.0 | 2.2.0 | |
| charset-normalizer | 2.0.4 | 2.0.4 | 2.0.4 | 2.0.4 |
| click | 8.0.4 | 8.0.4 | 8.0.4 | 8.0.4 |
| cloudpickle | 2.2.1 | 2.2.1 | 2.2.1 | 2.2.1 |
| clyent | 1.2.2 | 1.2.2 | 1.2.2 | 1.2.2 |
| colorama | 0.4.6 | 0.4.6 | 0.4.6 | 0.4.6 |
| colorcet | 3.0.1 | 3.0.1 | 3.0.1 | 3.0.1 |
| comm | 0.1.2 | 0.1.2 | 0.1.2 | 0.1.2 |
| conda | 23.7.4 | 23.7.4 | 23.7.4 | 23.7.4 |
| conda-build | 3.26.1 | 3.26.1 | 3.26.1 | 3.26.1 |
| conda-content-trust | 0.2.0 | 0.2.0 | 0.2.0 | 0.2.0 |
| conda-index | 0.3.0 | 0.3.0 | 0.3.0 | 0.3.0 |
| conda-libmamba-solver | 23.7.0 | 23.7.0 | 23.7.0 | 23.7.0 |
| conda-pack | 0.6.0 | 0.6.0 | 0.6.0 | 0.6.0 |
| conda-package-handling | 2.2.0 | 2.2.0 | 2.2.0 | 2.2.0 |
| conda-package-streaming | 0.9.0 | 0.9.0 | 0.9.0 | 0.9.0 |
| conda-repo-cli | 1.0.75 | 1.0.75 | ||
| conda-token | 0.4.0 | 0.4.0 | 0.4.0 | 0.4.0 |
| conda-verify | 3.4.2 | 3.4.2 | 3.4.2 | 3.4.2 |
| constantly | 15.1.0 | 15.1.0 | 15.1.0 | |
| contourpy | 1.0.5 | 1.0.5 | 1.0.5 | 1.0.5 |
| cookiecutter | 1.7.3 | 1.7.3 | ||
| cryptography | 41.0.3 | 41.0.3 | 41.0.3 | 41.0.3 |
| cssselect | 1.1.0 | 1.1.0 | 1.1.0 | |
| curl | 8.2.1 | 8.2.1 | 8.2.1 | 8.2.1 |
| cycler | 0.11.0 | 0.11.0 | 0.11.0 | 0.11.0 |
| cyrus-sasl | 2.1.28 | 2.1.28 | ||
| cytoolz | 0.12.0 | 0.12.0 | 0.12.0 | 0.12.0 |
| daal4py | 2023.1.1 | |||
| dal | 2023.1.1 | |||
| dask | 2023.6.0 | 2023.6.0 | 2023.6.0 | 2023.6.0 |
| dask-core | 2023.6.0 | 2023.6.0 | 2023.6.0 | 2023.6.0 |
| datasets | 2.12.0 | 2.12.0 | 2.12.0 | |
| datashader | 0.15.2 | 0.15.2 | 0.15.2 | |
| datashape | 0.5.4 | 0.5.4 | 0.5.4 | |
| dav1d | 1.2.1 | 1.2.1 | 1.2.1 | 1.2.1 |
| dbus | 1.13.18 | 1.13.18 | ||
| debugpy | 1.6.7 | 1.6.7 | 1.6.7 | 1.6.7 |
| decorator | 5.1.1 | 5.1.1 | 5.1.1 | 5.1.1 |
| defusedxml | 0.7.1 | 0.7.1 | 0.7.1 | 0.7.1 |
| diff-match-patch | 20200713 | 20200713 | ||
| dill | 0.3.6 | 0.3.6 | 0.3.6 | 0.3.7 |
| distributed | 2023.6.0 | 2023.6.0 | 2023.6.0 | 2023.6.0 |
| docstring-to-markdown | 0.11 | 0.11 | ||
| docutils | 0.18.1 | 0.18.1 | ||
| entrypoints | 0.4 | 0.4 | 0.4 | 0.4 |
| et\_xmlfile | 1.1.0 | 1.1.0 | 1.1.0 | 1.1.0 |
| executing | 0.8.3 | 0.8.3 | 0.8.3 | 0.8.3 |
| expat | 2.5.0 | 2.5.0 | ||
| filelock | 3.9.0 | 3.9.0 | 3.9.0 | 3.9.0 |
| flake8 | 6.0.0 | 6.0.0 | ||
| flask | 2.2.2 | 2.2.2 | 2.2.2 | 2.2.2 |
| fmt | 9.1.0 | 9.1.0 | 9.1.0 | 9.1.0 |
| font-ttf-dejavu-sans-mono | 2.37 | 2.37 | ||
| font-ttf-inconsolata | 2.001 | 2.001 | ||
| font-ttf-source-code-pro | 2.030 | 2.030 | ||
| font-ttf-ubuntu | 0.83 | 0.83 | ||
| fontconfig | 2.14.1 | 2.14.1 | ||
| fonts-anaconda | 1 | 1 | ||
| fonttools | 4.25.0 | 4.25.0 | 4.25.0 | 4.25.0 |
| freetype | 2.12.1 | 2.12.1 | 2.12.1 | 2.12.1 |
| frozenlist | 1.3.3 | 1.3.3 | 1.3.3 | 1.3.3 |
| fsspec | 2023.4.0 | 2023.4.0 | 2023.4.0 | 2023.4.0 |
| future | 0.18.3 | 0.18.3 | 0.18.3 | 0.18.3 |
| gensim | 4.3.0 | 4.3.0 | 4.3.0 | |
| gflags | 2.2.2 | 2.2.2 | 2.2.2 | |
| giflib | 5.2.1 | 5.2.1 | 5.2.1 | 5.2.1 |
| glib | 2.69.1 | 2.69.1 | ||
| glob2 | 0.7 | 0.7 | 0.7 | 0.7 |
| glog | 0.5.0 | 0.5.0 | 0.5.0 | |
| gmp | 6.2.1 | 6.2.1 | 6.2.1 | 6.2.1 |
| gmpy2 | 2.1.2 | 2.1.2 | 2.1.2 | 2.1.2 |
| greenlet | 2.0.1 | 2.0.1 | 2.0.1 | 2.0.1 |
| grpc-cpp | 1.48.2 | 1.48.2 | 1.48.2 | |
| gst-plugins-base | 1.14.1 | 1.14.1 | ||
| gstreamer | 1.14.1 | 1.14.1 | ||
| h5py | 3.9.0 | 3.9.0 | 3.9.0 | 3.7.0 |
| hdf5 | 1.12.1 | 1.12.1 | 1.12.1 | 1.10.6 |
| heapdict | 1.0.1 | 1.0.1 | 1.0.1 | 1.0.1 |
| holoviews | 1.17.1 | 1.17.1 | 1.17.1 | 1.14.8 |
| huggingface\_hub | 0.15.1 | 0.15.1 | 0.15.1 | |
| hvplot | 0.8.4 | 0.8.4 | 0.8.4 | 0.7.3 |
| hyperlink | 21.0.0 | 21.0.0 | 21.0.0 | |
| icu | 58.2 | 68.1 | 73.1 | 73.1 |
| idna | 3.4 | 3.4 | 3.4 | 3.3 |
| imagecodecs | 2023.1.23 | 2023.1.23 | 2023.1.23 | 2023.1.23 |
| imageio | 2.31.1 | 2.31.1 | 2.31.1 | 2.26.0 |
| imagesize | 1.4.1 | 1.4.1 | ||
| imbalanced-learn | 0.10.1 | 0.10.1 | 0.10.1 | 0.10.1 |
| importlib-metadata | 6.0.0 | 6.0.0 | 6.0.0 | 6.0.0 |
| importlib\_metadata | 6.0.0 | 6.0.0 | ||
| incremental | 21.3.0 | 21.3.0 | 21.3.0 | |
| inflection | 0.5.1 | 0.5.1 | ||
| iniconfig | 1.1.1 | 1.1.1 | 1.1.1 | 1.1.1 |
| intake | 0.6.8 | 0.6.8 | 0.6.8 | 0.6.8 |
| intel-openmp | 2023.1.0 | |||
| intervaltree | 3.1.0 | 3.1.0 | ||
| ipykernel | 6.25.0 | 6.25.0 | 6.25.0 | 6.25.0 |
| ipython | 8.15.0 | 8.15.0 | 8.15.0 | 8.15.0 |
| ipython\_genutils | 0.2.0 | 0.2.0 | 0.2.0 | 0.2.0 |
| ipywidgets | 8.0.4 | 8.0.4 | 8.0.4 | 8.0.4 |
| isort | 5.9.3 | 5.9.3 | 5.9.3 | 5.9.3 |
| itemadapter | 0.3.0 | 0.3.0 | 0.3.0 | |
| itemloaders | 1.0.4 | 1.0.4 | 1.0.4 | |
| itsdangerous | 2.0.1 | 2.0.1 | 2.0.1 | 2.0.1 |
| jaraco.classes | 3.2.1 | 3.2.1 | ||
| jedi | 0.18.1 | 0.18.1 | 0.18.1 | 0.18.1 |
| jeepney | 0.7.1 | 0.7.1 | ||
| jellyfish | 1.0.1 | 1.0.1 | ||
| jinja2 | 3.1.2 | 3.1.2 | 3.1.2 | 3.1.2 |
| jinja2-time | 0.2.0 | 0.2.0 | ||
| jmespath | 0.10.0 | 0.10.0 | 0.10.0 | 0.10.0 |
| joblib | 1.2.0 | 1.2.0 | 1.2.0 | 1.2.0 |
| jpeg | 9e | 9e | 9e | 9e |
| jq | 1.6 | 1.6 | 1.6 | |
| json5 | 0.9.6 | 0.9.6 | 0.9.6 | 0.9.6 |
| jsonpatch | 1.32 | 1.32 | 1.32 | 1.32 |
| jsonpointer | 2.1 | 2.1 | 2.1 | 2.1 |
| jsonschema | 4.17.3 | 4.17.3 | 4.17.3 | 4.17.3 |
| jupyter | 1.0.0 | 1.0.0 | 1.0.0 | 1.0.0 |
| jupyter\_client | 7.4.9 | 7.4.9 | 7.4.9 | 7.4.9 |
| jupyter\_console | 6.6.3 | 6.6.3 | 6.6.3 | 6.6.3 |
| jupyter\_core | 5.3.0 | 5.3.0 | 5.3.0 | 5.3.0 |
| jupyter\_events | 0.6.3 | 0.6.3 | 0.6.3 | |
| jupyter\_server | 1.23.4 | 1.23.4 | 1.23.4 | 1.23.4 |
| jupyter\_server\_fileid | 0.9.0 | 0.9.0 | 0.9.0 | |
| jupyter\_server\_ydoc | 0.8.0 | 0.8.0 | 0.8.0 | |
| jupyter\_ydoc | 0.2.4 | 0.2.4 | 0.2.4 | |
| jupyterlab | 3.6.3 | 3.6.3 | 3.6.3 | 3.3.2 |
| jupyterlab\_pygments | 0.1.2 | 0.1.2 | 0.1.2 | 0.1.2 |
| jupyterlab\_server | 2.22.0 | 2.22.0 | 2.22.0 | 2.21.0 |
| jupyterlab\_widgets | 3.0.5 | 3.0.5 | 3.0.5 | 3.0.5 |
| jxrlib | 1.1 | 1.1 | 1.1 | 1.1 |
| kaleido-core | 0.2.1 | 0.2.1 | ||
| keyring | 23.13.1 | 23.13.1 | ||
| kiwisolver | 1.4.4 | 1.4.4 | 1.4.4 | 1.4.4 |
| krb5 | 1.20.1 | 1.20.1 | 1.20.1 | 1.20.1 |
| lazy-object-proxy | 1.6.0 | 1.6.0 | 1.6.0 | 1.6.0 |
| lazy\_loader | 0.2 | 0.2 | 0.2 | 0.1 |
| lcms2 | 2.12 | 2.12 | 2.12 | 2.12 |
| ld\_impl\_linux-64 | 2.38 | |||
| ld\_impl\_linux-aarch64 | 2.38 | |||
| ld\_impl\_linux-ppc64le | 2.38 | |||
| ld\_impl\_linux-s390x | 2.38 | |||
| lerc | 3.0 | 3.0 | 3.0 | 3.0 |
| libaec | 1.0.4 | 1.0.4 | 1.0.4 | 1.0.4 |
| libarchive | 3.6.2 | 3.6.2 | 3.6.2 | 3.6.2 |
| libavif | 0.11.1 | 0.11.1 | 0.11.1 | 0.11.1 |
| libboost | 1.73.0 | 1.73.0 | 1.82.0 | |
| libbrotlicommon | 1.0.9 | 1.0.9 | 1.0.9 | 1.0.9 |
| libbrotlidec | 1.0.9 | 1.0.9 | 1.0.9 | 1.0.9 |
| libbrotlienc | 1.0.9 | 1.0.9 | 1.0.9 | 1.0.9 |
| libclang | 14.0.6 | 14.0.6 | ||
| libclang13 | 14.0.6 | 14.0.6 | ||
| libcups | 2.4.2 | 2.4.2 | ||
| libcurl | 8.2.1 | 8.2.1 | 8.2.1 | 8.2.1 |
| libdeflate | 1.17 | 1.17 | 1.17 | 1.17 |
| libedit | 3.1.20221030 | 3.1.20221030 | 3.1.20221030 | 3.1.20221030 |
| libev | 4.33 | 4.33 | 4.33 | 4.33 |
| libevent | 2.1.12 | 2.1.12 | 2.1.12 | |
| libffi | 3.4.4 | 3.4.4 | 3.4.4 | 3.4.2 |
| libgcc-ng | 11.2.0 | 11.2.0 | 11.2.0 | 11.2.0 |
| libgfortran-ng | 11.2.0 | 11.2.0 | 11.2.0 | 11.2.0 |
| libgfortran5 | 11.2.0 | 11.2.0 | 11.2.0 | 11.2.0 |
| libgomp | 11.2.0 | 11.2.0 | 11.2.0 | 11.2.0 |
| liblief | 0.12.3 | 0.12.3 | 0.12.3 | 0.12.3 |
| libllvm14 | 14.0.6 | 14.0.6 | 14.0.6 | |
| libmamba | 1.5.1 | 1.5.1 | 1.5.1 | 1.5.1 |
| libmambapy | 1.5.1 | 1.5.1 | 1.5.1 | 1.5.1 |
| libnghttp2 | 1.52.0 | 1.52.0 | 1.52.0 | 1.52.0 |
| libopenblas | 0.3.21 | 0.3.21 | 0.3.21 | |
| libpng | 1.6.39 | 1.6.39 | 1.6.39 | 1.6.39 |
| libpq | 12.15 | 12.15 | ||
| libprotobuf | 3.20.3 | 3.20.3 | 3.20.3 | |
| libsodium | 1.0.18 | 1.0.18 | 1.0.18 | 1.0.18 |
| libsolv | 0.7.24 | 0.7.24 | 0.7.24 | 0.7.24 |
| libspatialindex | 1.9.3 | 1.9.3 | ||
| libssh2 | 1.10.0 | 1.10.0 | 1.10.0 | 1.10.0 |
| libstdcxx-ng | 11.2.0 | 11.2.0 | 11.2.0 | 11.2.0 |
| libthrift | 0.15.0 | 0.15.0 | 0.15.0 | |
| libtiff | 4.5.1 | 4.5.1 | 4.5.1 | 4.5.1 |
| libuuid | 1.41.5 | 1.41.5 | 1.41.5 | 1.41.5 |
| libwebp | 1.3.2 | 1.3.2 | 1.3.2 | 1.3.2 |
| libwebp-base | 1.3.2 | 1.3.2 | 1.3.2 | 1.3.2 |
| libxcb | 1.15 | 1.15 | ||
| libxkbcommon | 1.0.1 | 1.0.1 | ||
| libxml2 | 2.10.4 | 2.10.4 | 2.10.4 | 2.10.4 |
| libxslt | 1.1.37 | 1.1.37 | 1.1.37 | 1.1.37 |
| libzopfli | 1.0.3 | 1.0.3 | 1.0.3 | 1.0.3 |
| linkify-it-py | 2.0.0 | 2.0.0 | 2.0.0 | |
| llvmlite | 0.40.0 | 0.40.0 | 0.40.0 | |
| locket | 1.0.0 | 1.0.0 | 1.0.0 | 1.0.0 |
| lxml | 4.9.3 | 4.9.3 | 4.9.3 | 4.9.3 |
| lz4 | 4.3.2 | 4.3.2 | 4.3.2 | 4.3.2 |
| lz4-c | 1.9.4 | 1.9.4 | 1.9.4 | 1.9.4 |
| lzo | 2.10 | 2.10 | 2.10 | 2.10 |
| markdown | 3.4.1 | 3.4.1 | 3.4.1 | 3.4.1 |
| markdown-it-py | 2.2.0 | 2.2.0 | 2.2.0 | |
| markupsafe | 2.1.1 | 2.1.1 | 2.1.1 | 2.1.1 |
| mathjax | 2.7.5 | 2.7.5 | ||
| matplotlib | 3.7.2 | 3.7.2 | 3.7.2 | 3.7.2 |
| matplotlib-base | 3.7.2 | 3.7.2 | 3.7.2 | 3.7.2 |
| matplotlib-inline | 0.1.6 | 0.1.6 | 0.1.6 | 0.1.6 |
| mccabe | 0.7.0 | 0.7.0 | 0.7.0 | 0.7.0 |
| mdit-py-plugins | 0.3.0 | 0.3.0 | 0.3.0 | |
| mdurl | 0.1.0 | 0.1.0 | 0.1.0 | |
| mistune | 0.8.4 | 0.8.4 | 0.8.4 | 0.8.4 |
| mkl | 2023.1.0 | |||
| mkl-service | 2.4.0 | |||
| mkl\_fft | 1.3.8 | |||
| mkl\_random | 1.2.4 | |||
| mock | 4.0.3 | |||
| more-itertools | 8.12.0 | 8.12.0 | 8.12.0 | 8.12.0 |
| mpc | 1.1.0 | 1.1.0 | 1.1.0 | 1.1.0 |
| mpfr | 4.0.2 | 4.0.2 | 4.0.2 | 4.0.2 |
| mpi | 1.0 | |||
| mpich | 4.1.1 | |||
| mpmath | 1.3.0 | 1.3.0 | 1.3.0 | 1.3.0 |
| msgpack-python | 1.0.3 | 1.0.3 | 1.0.3 | 1.0.3 |
| multidict | 6.0.2 | 6.0.2 | 6.0.2 | 6.0.2 |
| multipledispatch | 0.6.0 | 0.6.0 | 0.6.0 | |
| multiprocess | 0.70.14 | 0.70.14 | 0.70.14 | |
| munkres | 1.1.4 | 1.1.4 | 1.1.4 | 1.1.4 |
| mypy\_extensions | 1.0.0 | 1.0.0 | ||
| mysql | 5.7.24 | 5.7.24 | ||
| navigator-updater | 0.4.0 | 0.4.0 | ||
| nbclassic | 0.5.5 | 0.5.5 | 0.5.5 | 0.5.5 |
| nbclient | 0.5.13 | 0.5.13 | 0.5.13 | 0.5.13 |
| nbconvert | 6.5.4 | 6.5.4 | 6.5.4 | 6.5.4 |
| nbformat | 5.9.2 | 5.9.2 | 5.9.2 | 5.9.2 |
| ncurses | 6.4 | 6.4 | 6.4 | 6.4 |
| nest-asyncio | 1.5.6 | 1.5.6 | 1.5.6 | 1.5.6 |
| networkx | 3.1 | 3.1 | 3.1 | 3.1 |
| nltk | 3.8.1 | 3.8.1 | 3.8.1 | 3.8.1 |
| notebook | 6.5.4 | 6.5.4 | 6.5.4 | 6.5.4 |
| notebook-shim | 0.2.2 | 0.2.2 | 0.2.2 | 0.2.2 |
| nspr | 4.35 | 4.35 | ||
| nss | 3.89.1 | 3.89.1 | ||
| numba | 0.57.1 | 0.57.1 | 0.57.1 | |
| numexpr | 2.8.4 | 2.8.4 | 2.8.4 | 2.8.4 |
| numpy | 1.24.3 | 1.24.3 | 1.24.3 | 1.25.2 |
| numpy-base | 1.24.3 | 1.24.3 | 1.24.3 | 1.25.2 |
| numpydoc | 1.5.0 | 1.5.0 | ||
| oniguruma | 6.9.7.1 | 6.9.7.1 | 6.9.7.1 | |
| openjpeg | 2.4.0 | 2.4.0 | 2.4.0 | 2.4.0 |
| openpyxl | 3.0.10 | 3.0.10 | 3.0.10 | 3.0.10 |
| openssl | 3.0.10 | 3.0.10 | 3.0.10 | 3.0.10 |
| orc | 1.7.4 | 1.7.4 | 1.7.4 | |
| packaging | 23.1 | 23.1 | 23.1 | 23.1 |
| pandas | 2.0.3 | 2.0.3 | 2.0.3 | 2.0.3 |
| pandocfilters | 1.5.0 | 1.5.0 | 1.5.0 | 1.5.0 |
| panel | 1.2.3 | 1.2.3 | 1.2.3 | 0.12.6 |
| param | 1.13.0 | 1.13.0 | 1.13.0 | 1.13.0 |
| parsel | 1.6.0 | 1.6.0 | 1.6.0 | |
| parso | 0.8.3 | 0.8.3 | 0.8.3 | 0.8.3 |
| partd | 1.4.0 | 1.4.0 | 1.4.0 | 1.4.0 |
| patch | 2.7.6 | 2.7.6 | 2.7.6 | 2.7.6 |
| patchelf | 0.17.2 | 0.17.2 | 0.17.2 | 0.17.2 |
| pathlib | 1.0.1 | 1.0.1 | ||
| pathspec | 0.10.3 | 0.10.3 | ||
| patsy | 0.5.3 | 0.5.3 | 0.5.3 | 0.5.3 |
| pcre | 8.45 | 8.45 | ||
| pcre2 | 10.42 | 10.42 | 10.42 | 10.42 |
| pep8 | 1.7.1 | 1.7.1 | 1.7.1 | 1.7.1 |
| pexpect | 4.8.0 | 4.8.0 | 4.8.0 | 4.8.0 |
| pickleshare | 0.7.5 | 0.7.5 | 0.7.5 | 0.7.5 |
| pillow | 9.4.0 | 9.4.0 | 9.4.0 | 9.4.0 |
| pip | 23.2.1 | 23.2.1 | 23.2.1 | 23.2.1 |
| pkce | 1.0.3 | 1.0.3 | ||
| pkginfo | 1.9.6 | 1.9.6 | 1.9.6 | 1.9.6 |
| platformdirs | 3.10.0 | 3.10.0 | 3.10.0 | 3.10.0 |
| plotly | 5.9.0 | 5.9.0 | 5.9.0 | 5.9.0 |
| pluggy | 1.0.0 | 1.0.0 | 1.0.0 | 1.0.0 |
| ply | 3.11 | 3.11 | ||
| poyo | 0.5.0 | 0.5.0 | ||
| prometheus\_client | 0.14.1 | 0.14.1 | 0.14.1 | 0.14.1 |
| prompt-toolkit | 3.0.36 | 3.0.36 | 3.0.36 | 3.0.36 |
| prompt\_toolkit | 3.0.36 | 3.0.36 | 3.0.36 | 3.0.36 |
| protego | 0.1.16 | 0.1.16 | 0.1.16 | |
| psutil | 5.9.0 | 5.9.0 | 5.9.0 | 5.9.0 |
| ptyprocess | 0.7.0 | 0.7.0 | 0.7.0 | 0.7.0 |
| pure\_eval | 0.2.2 | 0.2.2 | 0.2.2 | 0.2.2 |
| py-cpuinfo | 8.0.0 | 8.0.0 | 8.0.0 | |
| py-lief | 0.12.3 | 0.12.3 | 0.12.3 | 0.12.3 |
| pyarrow | 11.0.0 | 11.0.0 | 11.0.0 | |
| pyasn1 | 0.4.8 | 0.4.8 | 0.4.8 | |
| pyasn1-modules | 0.2.8 | 0.2.8 | 0.2.8 | |
| pybind11-abi | 4 | 4 | 4 | 4 |
| pycodestyle | 2.10.0 | 2.10.0 | ||
| pycosat | 0.6.4 | 0.6.4 | 0.6.4 | 0.6.4 |
| pycparser | 2.21 | 2.21 | 2.21 | 2.21 |
| pyct | 0.5.0 | 0.5.0 | 0.5.0 | 0.5.0 |
| pycurl | 7.45.2 | 7.45.2 | 7.45.2 | 7.45.2 |
| pydantic | 1.10.8 | 1.10.8 | ||
| pydispatcher | 2.0.5 | 2.0.5 | 2.0.5 | |
| pydocstyle | 6.3.0 | 6.3.0 | ||
| pyerfa | 2.0.0 | 2.0.0 | 2.0.0 | 2.0.0 |
| pyflakes | 3.0.1 | 3.0.1 | 3.0.1 | 3.0.1 |
| pygments | 2.15.1 | 2.15.1 | 2.15.1 | 2.15.1 |
| pyjwt | 2.4.0 | 2.4.0 | ||
| pylint | 2.16.2 | 2.16.2 | 2.16.2 | 2.16.2 |
| pylint-venv | 2.3.0 | 2.3.0 | ||
| pyls-spyder | 0.4.0 | 0.4.0 | ||
| pyodbc | 4.0.34 | 4.0.34 | 4.0.34 | 4.0.34 |
| pyopenssl | 23.2.0 | 23.2.0 | 23.2.0 | 23.2.0 |
| pyparsing | 3.0.9 | 3.0.9 | 3.0.9 | 3.0.9 |
| pyqt | 5.15.7 | 5.15.7 | ||
| pyqt5-sip | 12.11.0 | 12.11.0 | ||
| pyqtwebengine | 5.15.7 | 5.15.7 | ||
| pyrsistent | 0.18.0 | 0.18.0 | 0.18.0 | 0.18.0 |
| pysocks | 1.7.1 | 1.7.1 | 1.7.1 | 1.7.1 |
| pytables | 3.8.0 | 3.8.0 | 3.8.0 | 3.7.0 |
| pytest | 7.4.0 | 7.4.0 | 7.4.0 | 7.4.0 |
| python | 3.11.5 | 3.11.5 | 3.11.5 | 3.11.5 |
| python-dateutil | 2.8.2 | 2.8.2 | 2.8.2 | 2.8.2 |
| python-dotenv | 0.21.0 | 0.21.0 | ||
| python-fastjsonschema | 2.16.2 | 2.16.2 | 2.16.2 | 2.16.2 |
| python-json-logger | 2.0.7 | 2.0.7 | 2.0.7 | |
| python-kaleido | 0.2.1 | 0.2.1 | ||
| python-libarchive-c | 2.9 | 2.9 | 2.9 | 2.9 |
| python-lmdb | 1.4.1 | 1.4.1 | 1.4.1 | 1.4.1 |
| python-lsp-black | 1.2.1 | 1.2.1 | ||
| python-lsp-jsonrpc | 1.0.0 | 1.0.0 | ||
| python-lsp-server | 1.7.2 | 1.7.2 | ||
| python-slugify | 5.0.2 | 5.0.2 | ||
| python-snappy | 0.6.1 | 0.6.1 | 0.6.1 | 0.6.1 |
| python-tzdata | 2023.3 | 2023.3 | 2023.3 | 2023.3 |
| python-xxhash | 2.0.2 | 2.0.2 | 2.0.2 | |
| pytoolconfig | 1.2.5 | 1.2.5 | ||
| pytz | 2023.3.post1 | 2023.3.post1 | 2023.3.post1 | 2023.3.post1 |
| pyviz\_comms | 2.3.0 | 2.3.0 | 2.3.0 | 2.3.0 |
| pywavelets | 1.4.1 | 1.4.1 | 1.4.1 | 1.4.1 |
| pyxdg | 0.27 | 0.27 | ||
| pyyaml | 6.0 | 6.0 | 6.0 | 6.0 |
| pyzmq | 23.2.0 | 23.2.0 | 23.2.0 | 23.2.0 |
| qdarkstyle | 3.0.2 | 3.0.2 | ||
| qstylizer | 0.2.2 | 0.2.2 | ||
| qt-main | 5.15.2 | 5.15.2 | ||
| qt-webengine | 5.15.9 | 5.15.9 | ||
| qtawesome | 1.2.2 | 1.2.2 | ||
| qtconsole | 5.4.2 | 5.4.2 | ||
| qtpy | 2.2.0 | 2.2.0 | ||
| qtwebkit | 5.212 | 5.212 | ||
| queuelib | 1.5.0 | 1.5.0 | 1.5.0 | |
| re2 | 2022.04.01 | 2022.04.01 | 2022.04.01 | |
| readline | 8.2 | 8.2 | 8.2 | 8.2 |
| regex | 2022.7.9 | 2022.7.9 | 2022.7.9 | 2022.7.9 |
| reproc | 14.2.4 | 14.2.4 | 14.2.4 | 14.2.4 |
| reproc-cpp | 14.2.4 | 14.2.4 | 14.2.4 | 14.2.4 |
| requests | 2.31.0 | 2.31.0 | 2.31.0 | 2.31.0 |
| requests-file | 1.5.1 | 1.5.1 | 1.5.1 | |
| requests-toolbelt | 1.0.0 | 1.0.0 | 1.0.0 | 1.0.0 |
| responses | 0.13.3 | 0.13.3 | 0.13.3 | |
| rfc3339-validator | 0.1.4 | 0.1.4 | 0.1.4 | |
| rfc3986-validator | 0.1.1 | 0.1.1 | 0.1.1 | |
| rope | 1.7.0 | 1.7.0 | ||
| rtree | 1.0.1 | 1.0.1 | ||
| ruamel.yaml | 0.17.21 | 0.17.21 | 0.17.21 | 0.17.21 |
| ruamel\_yaml | 0.17.21 | 0.17.21 | 0.17.21 | 0.17.21 |
| s3fs | 2023.4.0 | 2023.4.0 | 2023.4.0 | 2023.4.0 |
| s3transfer | 0.6.0 | |||
| sacremoses | 0.0.43 | |||
| safetensors | 0.3.2 | 0.3.2 | 0.3.2 | |
| scikit-image | 0.20.0 | 0.20.0 | 0.20.0 | 0.20.0 |
| scikit-learn | 1.3.0 | 1.3.0 | 1.3.0 | 1.2.2 |
| scikit-learn-intelex | 2023.1.1 | |||
| scipy | 1.11.1 | 1.11.1 | 1.11.1 | 1.11.1 |
| scrapy | 2.8.0 | 2.8.0 | 2.8.0 | |
| seaborn | 0.12.2 | 0.12.2 | 0.12.2 | 0.12.2 |
| secretstorage | 3.3.1 | 3.3.1 | ||
| send2trash | 1.8.0 | 1.8.0 | 1.8.0 | 1.8.0 |
| service\_identity | 18.1.0 | 18.1.0 | 18.1.0 | |
| setuptools | 68.0.0 | 68.0.0 | 68.0.0 | 68.0.0 |
| sip | 6.6.2 | 6.6.2 | ||
| six | 1.16.0 | 1.16.0 | 1.16.0 | 1.16.0 |
| smart\_open | 5.2.1 | 5.2.1 | 5.2.1 | |
| snappy | 1.1.9 | 1.1.9 | 1.1.9 | 1.1.9 |
| sniffio | 1.2.0 | 1.2.0 | 1.2.0 | 1.2.0 |
| snowballstemmer | 2.2.0 | 2.2.0 | 2.2.0 | 2.2.0 |
| sortedcontainers | 2.4.0 | 2.4.0 | 2.4.0 | 2.4.0 |
| soupsieve | 2.4 | 2.4 | 2.4 | 2.4 |
| sphinx | 5.0.2 | 5.0.2 | ||
| sphinxcontrib-applehelp | 1.0.2 | 1.0.2 | ||
| sphinxcontrib-devhelp | 1.0.2 | 1.0.2 | ||
| sphinxcontrib-htmlhelp | 2.0.0 | 2.0.0 | ||
| sphinxcontrib-jsmath | 1.0.1 | 1.0.1 | ||
| sphinxcontrib-qthelp | 1.0.3 | 1.0.3 | ||
| sphinxcontrib-serializinghtml | 1.1.5 | 1.1.5 | ||
| spyder | 5.4.3 | 5.4.3 | ||
| spyder-kernels | 2.4.4 | 2.4.4 | ||
| sqlalchemy | 1.4.39 | 1.4.39 | 1.4.39 | 1.4.39 |
| sqlite | 3.41.2 | 3.41.2 | 3.41.2 | 3.41.2 |
| stack\_data | 0.2.0 | 0.2.0 | 0.2.0 | 0.2.0 |
| statsmodels | 0.14.0 | 0.14.0 | 0.14.0 | 0.14.0 |
| sympy | 1.11.1 | 1.11.1 | 1.11.1 | 1.11.1 |
| tabulate | 0.8.10 | 0.8.10 | 0.8.10 | 0.8.10 |
| tbb | 2021.8.0 | 2021.8.0 | 2021.8.0 | |
| tbb4py | 2021.8.0 | |||
| tblib | 1.7.0 | 1.7.0 | 1.7.0 | 1.7.0 |
| tenacity | 8.2.2 | 8.2.2 | 8.2.2 | 8.2.2 |
| terminado | 0.17.1 | 0.17.1 | 0.17.1 | 0.17.1 |
| text-unidecode | 1.3 | 1.3 | ||
| textdistance | 4.2.1 | 4.2.1 | ||
| threadpoolctl | 2.2.0 | 2.2.0 | 2.2.0 | 2.2.0 |
| three-merge | 0.1.1 | 0.1.1 | ||
| tifffile | 2023.4.12 | 2023.4.12 | 2023.4.12 | 2023.4.12 |
| tinycss2 | 1.2.1 | 1.2.1 | 1.2.1 | 1.2.1 |
| tk | 8.6.12 | 8.6.12 | 8.6.12 | 8.6.12 |
| tldextract | 3.2.0 | 3.2.0 | 3.2.0 | |
| tokenizers | 0.13.2 | 0.13.2 | 0.13.2 | |
| toml | 0.10.2 | 0.10.2 | ||
| tomlkit | 0.11.1 | 0.11.1 | 0.11.1 | 0.11.1 |
| toolz | 0.12.0 | 0.12.0 | 0.12.0 | 0.12.0 |
| tornado | 6.3.2 | 6.3.2 | 6.3.2 | 6.3.2 |
| tqdm | 4.65.0 | 4.65.0 | 4.65.0 | 4.65.0 |
| traitlets | 5.7.1 | 5.7.1 | 5.7.1 | 5.7.1 |
| transformers | 4.32.1 | 4.32.1 | 4.32.1 | 2.1.1 |
| twisted | 22.10.0 | 22.10.0 | 22.10.0 | |
| typing-extensions | 4.7.1 | 4.7.1 | 4.7.1 | 4.7.1 |
| typing\_extensions | 4.7.1 | 4.7.1 | 4.7.1 | 4.7.1 |
| tzdata | 2023c | 2023c | 2023c | 2023c |
| uc-micro-py | 1.0.1 | 1.0.1 | 1.0.1 | |
| ujson | 5.4.0 | 5.4.0 | ||
| unidecode | 1.2.0 | 1.2.0 | ||
| unixodbc | 2.3.11 | 2.3.11 | 2.3.11 | 2.3.11 |
| urllib3 | 1.26.16 | 1.26.16 | 1.26.16 | 1.26.16 |
| utf8proc | 2.6.1 | 2.6.1 | 2.6.1 | |
| w3lib | 1.21.0 | 1.21.0 | 1.21.0 | |
| watchdog | 2.1.6 | 2.1.6 | ||
| wcwidth | 0.2.5 | 0.2.5 | 0.2.5 | 0.2.5 |
| webencodings | 0.5.1 | 0.5.1 | 0.5.1 | 0.5.1 |
| websocket-client | 0.58.0 | 0.58.0 | 0.58.0 | 0.58.0 |
| werkzeug | 2.2.3 | 2.2.3 | 2.2.3 | 2.2.3 |
| whatthepatch | 1.0.2 | 1.0.2 | ||
| wheel | 0.38.4 | 0.38.4 | 0.38.4 | 0.38.4 |
| widgetsnbextension | 4.0.5 | 4.0.5 | 4.0.5 | 4.0.5 |
| wrapt | 1.14.1 | 1.14.1 | 1.14.1 | 1.14.1 |
| wurlitzer | 3.0.2 | 3.0.2 | ||
| xarray | 2023.6.0 | 2023.6.0 | 2023.6.0 | |
| xxhash | 0.8.0 | 0.8.0 | 0.8.0 | |
| xyzservices | 2022.9.0 | 2022.9.0 | 2022.9.0 | |
| xz | 5.4.2 | 5.4.2 | 5.4.2 | 5.4.2 |
| y-py | 0.5.9 | 0.5.9 | 0.5.9 | |
| yaml | 0.2.5 | 0.2.5 | 0.2.5 | 0.2.5 |
| yaml-cpp | 0.7.0 | 0.7.0 | 0.7.0 | 0.7.0 |
| yapf | 0.31.0 | 0.31.0 | ||
| yarl | 1.8.1 | 1.8.1 | 1.8.1 | 1.8.1 |
| ypy-websocket | 0.8.2 | 0.8.2 | 0.8.2 | |
| zeromq | 4.3.4 | 4.3.4 | 4.3.4 | 4.3.4 |
| zfp | 1.0.0 | 1.0.0 | ||
| zict | 2.2.0 | 2.2.0 | 2.2.0 | 2.2.0 |
| zipp | 3.11.0 | 3.11.0 | 3.11.0 | 3.11.0 |
| zlib | 1.2.13 | 1.2.13 | 1.2.13 | 1.2.13 |
| zlib-ng | 2.0.7 | 2.0.7 | 2.0.7 | |
| zope | 1.0 | 1.0 | 1.0 | |
| zope.interface | 5.4.0 | 5.4.0 | 5.4.0 | |
| zstandard | 0.19.0 | 0.19.0 | 0.19.0 | 0.19.0 |
| zstd | 1.5.5 | 1.5.5 | 1.5.5 | 1.5.5 |
| Package Name | osx-arm64 | osx-64 |
|---|---|---|
| \_anaconda\_depends | 2023.09 | 2023.09 |
| abseil-cpp | 20211102.0 | 20211102.0 |
| aiobotocore | 2.5.0 | 2.5.0 |
| aiofiles | 22.1.0 | 22.1.0 |
| aiohttp | 3.8.5 | 3.8.5 |
| aioitertools | 0.7.1 | 0.7.1 |
| aiosignal | 1.2.0 | 1.2.0 |
| aiosqlite | 0.18.0 | 0.18.0 |
| alabaster | 0.7.12 | 0.7.12 |
| anaconda-anon-usage | 0.4.2 | 0.4.2 |
| anaconda-catalogs | 0.2.0 | 0.2.0 |
| anaconda-client | 1.12.1 | 1.12.1 |
| anaconda-cloud-auth | 0.1.3 | 0.1.3 |
| anaconda-navigator | 2.5.0 | 2.5.0 |
| anaconda-project | 0.11.1 | 0.11.1 |
| anyio | 3.5.0 | 3.5.0 |
| aom | 3.6.0 | 3.6.0 |
| appdirs | 1.4.4 | 1.4.4 |
| applaunchservices | 0.3.0 | 0.3.0 |
| appnope | 0.1.2 | 0.1.2 |
| appscript | 1.1.2 | 1.1.2 |
| argon2-cffi | 21.3.0 | 21.3.0 |
| argon2-cffi-bindings | 21.2.0 | 21.2.0 |
| arrow | 1.2.3 | 1.2.3 |
| arrow-cpp | 11.0.0 | 11.0.0 |
| astroid | 2.14.2 | 2.14.2 |
| astropy | 5.1 | 5.1 |
| asttokens | 2.0.5 | 2.0.5 |
| async-timeout | 4.0.2 | 4.0.2 |
| atomicwrites | 1.4.0 | 1.4.0 |
| attrs | 22.1.0 | 22.1.0 |
| automat | 20.2.0 | 20.2.0 |
| autopep8 | 1.6.0 | 1.6.0 |
| aws-c-common | 0.6.8 | 0.6.8 |
| aws-c-event-stream | 0.1.6 | 0.1.6 |
| aws-checksums | 0.1.11 | 0.1.11 |
| aws-sdk-cpp | 1.8.185 | 1.8.185 |
| babel | 2.11.0 | 2.11.0 |
| backcall | 0.2.0 | 0.2.0 |
| backports | 1.1 | 1.1 |
| backports.functools\_lru\_cache | 1.6.4 | 1.6.4 |
| backports.tempfile | 1.0 | 1.0 |
| backports.weakref | 1.0.post1 | 1.0.post1 |
| bcrypt | 3.2.0 | 3.2.0 |
| beautifulsoup4 | 4.12.2 | 4.12.2 |
| binaryornot | 0.4.4 | 0.4.4 |
| black | 23.3.0 | 23.3.0 |
| blas | 1.0 | 1.0 |
| bleach | 4.1.0 | 4.1.0 |
| blosc | 1.21.3 | 1.21.3 |
| bokeh | 3.2.1 | 3.2.1 |
| boltons | 23.0.0 | 23.0.0 |
| boost-cpp | 1.73.0 | 1.73.0 |
| botocore | 1.29.76 | 1.29.76 |
| bottleneck | 1.3.5 | 1.3.5 |
| brotli | 1.0.9 | 1.0.9 |
| brotli-bin | 1.0.9 | 1.0.9 |
| brotlipy | 0.7.0 | 0.7.0 |
| brunsli | 0.1 | 0.1 |
| bzip2 | 1.0.8 | 1.0.8 |
| c-ares | 1.19.1 | 1.19.1 |
| c-blosc2 | 2.8.0 | 2.8.0 |
| ca-certificates | 2023.08.22 | 2023.08.22 |
| cctools | 949.0.1 | 949.0.1 |
| cctools\_osx-64 | 949.0.1 | |
| cctools\_osx-arm64 | 949.0.1 | |
| certifi | 2023.7.22 | 2023.7.22 |
| cffi | 1.15.1 | 1.15.1 |
| cfitsio | 3.470 | 3.470 |
| chardet | 4.0.0 | 4.0.0 |
| charls | 2.2.0 | 2.2.0 |
| charset-normalizer | 2.0.4 | 2.0.4 |
| click | 8.0.4 | 8.0.4 |
| cloudpickle | 2.2.1 | 2.2.1 |
| clyent | 1.2.2 | 1.2.2 |
| colorama | 0.4.6 | 0.4.6 |
| colorcet | 3.0.1 | 3.0.1 |
| comm | 0.1.2 | 0.1.2 |
| conda | 23.7.4 | 23.7.4 |
| conda-build | 3.26.1 | 3.26.1 |
| conda-content-trust | 0.2.0 | 0.2.0 |
| conda-index | 0.3.0 | 0.3.0 |
| conda-libmamba-solver | 23.7.0 | 23.7.0 |
| conda-pack | 0.6.0 | 0.6.0 |
| conda-package-handling | 2.2.0 | 2.2.0 |
| conda-package-streaming | 0.9.0 | 0.9.0 |
| conda-repo-cli | 1.0.75 | 1.0.75 |
| conda-token | 0.4.0 | 0.4.0 |
| conda-verify | 3.4.2 | 3.4.2 |
| constantly | 15.1.0 | 15.1.0 |
| contourpy | 1.0.5 | 1.0.5 |
| cookiecutter | 1.7.3 | 1.7.3 |
| cryptography | 41.0.3 | 41.0.3 |
| cssselect | 1.1.0 | 1.1.0 |
| curl | 8.2.1 | 8.2.1 |
| cycler | 0.11.0 | 0.11.0 |
| cyrus-sasl | 2.1.28 | 2.1.28 |
| cytoolz | 0.12.0 | 0.12.0 |
| dask | 2023.6.0 | 2023.6.0 |
| dask-core | 2023.6.0 | 2023.6.0 |
| datasets | 2.12.0 | 2.12.0 |
| datashader | 0.15.2 | 0.15.2 |
| datashape | 0.5.4 | 0.5.4 |
| dav1d | 1.2.1 | 1.2.1 |
| debugpy | 1.6.7 | 1.6.7 |
| decorator | 5.1.1 | 5.1.1 |
| defusedxml | 0.7.1 | 0.7.1 |
| diff-match-patch | 20200713 | 20200713 |
| dill | 0.3.6 | 0.3.6 |
| distributed | 2023.6.0 | 2023.6.0 |
| docstring-to-markdown | 0.11 | 0.11 |
| docutils | 0.18.1 | 0.18.1 |
| entrypoints | 0.4 | 0.4 |
| et\_xmlfile | 1.1.0 | 1.1.0 |
| executing | 0.8.3 | 0.8.3 |
| filelock | 3.9.0 | 3.9.0 |
| flake8 | 6.0.0 | 6.0.0 |
| flask | 2.2.2 | 2.2.2 |
| fmt | 9.1.0 | 9.1.0 |
| fonttools | 4.25.0 | 4.25.0 |
| freetype | 2.12.1 | 2.12.1 |
| frozenlist | 1.3.3 | 1.3.3 |
| fsspec | 2023.4.0 | 2023.4.0 |
| future | 0.18.3 | 0.18.3 |
| gensim | 4.3.0 | 4.3.0 |
| gettext | 0.21.0 | 0.21.0 |
| gflags | 2.2.2 | 2.2.2 |
| giflib | 5.2.1 | 5.2.1 |
| glib | 2.69.1 | 2.69.1 |
| glob2 | 0.7 | 0.7 |
| glog | 0.5.0 | 0.5.0 |
| gmp | 6.2.1 | 6.2.1 |
| gmpy2 | 2.1.2 | 2.1.2 |
| greenlet | 2.0.1 | 2.0.1 |
| grpc-cpp | 1.48.2 | 1.48.2 |
| gst-plugins-base | 1.14.1 | 1.14.1 |
| gstreamer | 1.14.1 | 1.14.1 |
| h5py | 3.9.0 | 3.9.0 |
| hdf5 | 1.12.1 | 1.12.1 |
| heapdict | 1.0.1 | 1.0.1 |
| holoviews | 1.17.1 | 1.17.1 |
| huggingface\_hub | 0.15.1 | 0.15.1 |
| hvplot | 0.8.4 | 0.8.4 |
| hyperlink | 21.0.0 | 21.0.0 |
| icu | 68.1 | 58.2 |
| idna | 3.4 | 3.4 |
| imagecodecs | 2023.1.23 | 2023.1.23 |
| imageio | 2.31.1 | 2.31.1 |
| imagesize | 1.4.1 | 1.4.1 |
| imbalanced-learn | 0.10.1 | 0.10.1 |
| importlib-metadata | 6.0.0 | 6.0.0 |
| importlib\_metadata | 6.0.0 | 6.0.0 |
| incremental | 21.3.0 | 21.3.0 |
| inflection | 0.5.1 | 0.5.1 |
| iniconfig | 1.1.1 | 1.1.1 |
| intake | 0.6.8 | 0.6.8 |
| intervaltree | 3.1.0 | 3.1.0 |
| ipykernel | 6.25.0 | 6.25.0 |
| ipython | 8.15.0 | 8.15.0 |
| ipython\_genutils | 0.2.0 | 0.2.0 |
| ipywidgets | 8.0.4 | 8.0.4 |
| isort | 5.9.3 | 5.9.3 |
| itemadapter | 0.3.0 | 0.3.0 |
| itemloaders | 1.0.4 | 1.0.4 |
| itsdangerous | 2.0.1 | 2.0.1 |
| jaraco.classes | 3.2.1 | 3.2.1 |
| jedi | 0.18.1 | 0.18.1 |
| jellyfish | 1.0.1 | 1.0.1 |
| jinja2 | 3.1.2 | 3.1.2 |
| jinja2-time | 0.2.0 | 0.2.0 |
| jmespath | 0.10.0 | 0.10.0 |
| joblib | 1.2.0 | 1.2.0 |
| jpeg | 9e | 9e |
| jq | 1.6 | 1.6 |
| json5 | 0.9.6 | 0.9.6 |
| jsonpatch | 1.32 | 1.32 |
| jsonpointer | 2.1 | 2.1 |
| jsonschema | 4.17.3 | 4.17.3 |
| jupyter | 1.0.0 | 1.0.0 |
| jupyter\_client | 7.4.9 | 7.4.9 |
| jupyter\_console | 6.6.3 | 6.6.3 |
| jupyter\_core | 5.3.0 | 5.3.0 |
| jupyter\_events | 0.6.3 | 0.6.3 |
| jupyter\_server | 1.23.4 | 1.23.4 |
| jupyter\_server\_fileid | 0.9.0 | 0.9.0 |
| jupyter\_server\_ydoc | 0.8.0 | 0.8.0 |
| jupyter\_ydoc | 0.2.4 | 0.2.4 |
| jupyterlab | 3.6.3 | 3.6.3 |
| jupyterlab\_pygments | 0.1.2 | 0.1.2 |
| jupyterlab\_server | 2.22.0 | 2.22.0 |
| jupyterlab\_widgets | 3.0.5 | 3.0.5 |
| jxrlib | 1.1 | 1.1 |
| kaleido-core | 0.2.1 | 0.2.1 |
| keyring | 23.13.1 | 23.13.1 |
| kiwisolver | 1.4.4 | 1.4.4 |
| krb5 | 1.20.1 | 1.20.1 |
| lazy-object-proxy | 1.6.0 | 1.6.0 |
| lazy\_loader | 0.2 | 0.2 |
| lcms2 | 2.12 | 2.12 |
| ld64 | 530 | 530 |
| ld64\_osx-64 | 530 | |
| ld64\_osx-arm64 | 530 | |
| ldid | 2.1.5 | 2.1.5 |
| lerc | 3.0 | 3.0 |
| libaec | 1.0.4 | 1.0.4 |
| libarchive | 3.6.2 | 3.6.2 |
| libavif | 0.11.1 | 0.11.1 |
| libboost | 1.73.0 | 1.73.0 |
| libbrotlicommon | 1.0.9 | 1.0.9 |
| libbrotlidec | 1.0.9 | 1.0.9 |
| libbrotlienc | 1.0.9 | 1.0.9 |
| libclang | 14.0.6 | 14.0.6 |
| libclang13 | 14.0.6 | 14.0.6 |
| libcurl | 8.2.1 | 8.2.1 |
| libcxx | 14.0.6 | 14.0.6 |
| libdeflate | 1.17 | 1.17 |
| libedit | 3.1.20221030 | 3.1.20221030 |
| libev | 4.33 | 4.33 |
| libevent | 2.1.12 | 2.1.12 |
| libffi | 3.4.4 | 3.4.4 |
| libgfortran | 5.0.0 | 5.0.0 |
| libgfortran5 | 11.3.0 | 11.3.0 |
| libiconv | 1.16 | 1.16 |
| liblief | 0.12.3 | 0.12.3 |
| libllvm14 | 14.0.6 | 14.0.6 |
| libmamba | 1.5.1 | 1.5.1 |
| libmambapy | 1.5.1 | 1.5.1 |
| libnghttp2 | 1.52.0 | 1.52.0 |
| libopenblas | 0.3.21 | 0.3.21 |
| libpng | 1.6.39 | 1.6.39 |
| libpq | 12.15 | 12.15 |
| libprotobuf | 3.20.3 | 3.20.3 |
| libsodium | 1.0.18 | 1.0.18 |
| libsolv | 0.7.24 | 0.7.24 |
| libspatialindex | 1.9.3 | 1.9.3 |
| libssh2 | 1.10.0 | 1.10.0 |
| libthrift | 0.15.0 | 0.15.0 |
| libtiff | 4.5.1 | 4.5.1 |
| libwebp | 1.3.2 | 1.3.2 |
| libwebp-base | 1.3.2 | 1.3.2 |
| libxml2 | 2.10.4 | 2.10.4 |
| libxslt | 1.1.37 | 1.1.37 |
| libzopfli | 1.0.3 | 1.0.3 |
| linkify-it-py | 2.0.0 | 2.0.0 |
| llvm-openmp | 14.0.6 | 14.0.6 |
| llvmlite | 0.40.0 | 0.40.0 |
| locket | 1.0.0 | 1.0.0 |
| lxml | 4.9.3 | 4.9.3 |
| lz4 | 4.3.2 | 4.3.2 |
| lz4-c | 1.9.4 | 1.9.4 |
| lzo | 2.10 | 2.10 |
| markdown | 3.4.1 | 3.4.1 |
| markdown-it-py | 2.2.0 | 2.2.0 |
| markupsafe | 2.1.1 | 2.1.1 |
| mathjax | 2.7.5 | 2.7.5 |
| matplotlib | 3.7.2 | 3.7.2 |
| matplotlib-base | 3.7.2 | 3.7.2 |
| matplotlib-inline | 0.1.6 | 0.1.6 |
| mccabe | 0.7.0 | 0.7.0 |
| mdit-py-plugins | 0.3.0 | 0.3.0 |
| mdurl | 0.1.0 | 0.1.0 |
| mistune | 0.8.4 | 0.8.4 |
| more-itertools | 8.12.0 | 8.12.0 |
| mpc | 1.1.0 | 1.1.0 |
| mpfr | 4.0.2 | 4.0.2 |
| mpmath | 1.3.0 | 1.3.0 |
| msgpack-python | 1.0.3 | 1.0.3 |
| multidict | 6.0.2 | 6.0.2 |
| multipledispatch | 0.6.0 | 0.6.0 |
| multiprocess | 0.70.14 | 0.70.14 |
| munkres | 1.1.4 | 1.1.4 |
| mypy\_extensions | 1.0.0 | 1.0.0 |
| mysql | 5.7.24 | 5.7.24 |
| navigator-updater | 0.4.0 | 0.4.0 |
| nbclassic | 0.5.5 | 0.5.5 |
| nbclient | 0.5.13 | 0.5.13 |
| nbconvert | 6.5.4 | 6.5.4 |
| nbformat | 5.9.2 | 5.9.2 |
| ncurses | 6.4 | 6.4 |
| nest-asyncio | 1.5.6 | 1.5.6 |
| networkx | 3.1 | 3.1 |
| nltk | 3.8.1 | 3.8.1 |
| notebook | 6.5.4 | 6.5.4 |
| notebook-shim | 0.2.2 | 0.2.2 |
| numba | 0.57.1 | 0.57.0 |
| numexpr | 2.8.4 | 2.8.4 |
| numpy | 1.24.3 | 1.24.3 |
| numpy-base | 1.24.3 | 1.24.3 |
| numpydoc | 1.5.0 | 1.5.0 |
| oniguruma | 6.9.7.1 | 6.9.7.1 |
| openjpeg | 2.3.0 | 2.4.0 |
| openpyxl | 3.0.10 | 3.0.10 |
| openssl | 3.0.10 | 3.0.10 |
| orc | 1.7.4 | 1.7.4 |
| packaging | 23.1 | 23.1 |
| pandas | 2.0.3 | 2.0.3 |
| pandocfilters | 1.5.0 | 1.5.0 |
| panel | 1.2.3 | 1.2.3 |
| param | 1.13.0 | 1.13.0 |
| parsel | 1.6.0 | 1.6.0 |
| parso | 0.8.3 | 0.8.3 |
| partd | 1.4.0 | 1.4.0 |
| patch | 2.7.6 | 2.7.6 |
| pathlib | 1.0.1 | 1.0.1 |
| pathspec | 0.10.3 | 0.10.3 |
| patsy | 0.5.3 | 0.5.3 |
| pcre | 8.45 | 8.45 |
| pcre2 | 10.42 | 10.42 |
| pep8 | 1.7.1 | 1.7.1 |
| pexpect | 4.8.0 | 4.8.0 |
| pickleshare | 0.7.5 | 0.7.5 |
| pillow | 9.4.0 | 9.4.0 |
| pip | 23.2.1 | 23.2.1 |
| pkce | 1.0.3 | 1.0.3 |
| pkginfo | 1.9.6 | 1.9.6 |
| platformdirs | 3.10.0 | 3.10.0 |
| plotly | 5.9.0 | 5.9.0 |
| pluggy | 1.0.0 | 1.0.0 |
| ply | 3.11 | 3.11 |
| poyo | 0.5.0 | 0.5.0 |
| prometheus\_client | 0.14.1 | 0.14.1 |
| prompt-toolkit | 3.0.36 | 3.0.36 |
| prompt\_toolkit | 3.0.36 | 3.0.36 |
| protego | 0.1.16 | 0.1.16 |
| psutil | 5.9.0 | 5.9.0 |
| ptyprocess | 0.7.0 | 0.7.0 |
| pure\_eval | 0.2.2 | 0.2.2 |
| py-cpuinfo | 8.0.0 | 8.0.0 |
| py-lief | 0.12.3 | 0.12.3 |
| pyarrow | 11.0.0 | 11.0.0 |
| pyasn1 | 0.4.8 | 0.4.8 |
| pyasn1-modules | 0.2.8 | 0.2.8 |
| pybind11-abi | 4 | 4 |
| pycodestyle | 2.10.0 | 2.10.0 |
| pycosat | 0.6.4 | 0.6.4 |
| pycparser | 2.21 | 2.21 |
| pyct | 0.5.0 | 0.5.0 |
| pycurl | 7.45.2 | 7.45.2 |
| pydantic | 1.10.8 | 1.10.8 |
| pydispatcher | 2.0.5 | 2.0.5 |
| pydocstyle | 6.3.0 | 6.3.0 |
| pyerfa | 2.0.0 | 2.0.0 |
| pyflakes | 3.0.1 | 3.0.1 |
| pygments | 2.15.1 | 2.15.1 |
| pyjwt | 2.4.0 | 2.4.0 |
| pylint | 2.16.2 | 2.16.2 |
| pylint-venv | 2.3.0 | 2.3.0 |
| pyls-spyder | 0.4.0 | 0.4.0 |
| pyobjc-core | 9.0 | 9.0 |
| pyobjc-framework-cocoa | 9.0 | 9.0 |
| pyobjc-framework-coreservices | 9.0 | 9.0 |
| pyobjc-framework-fsevents | 9.0 | 9.0 |
| pyodbc | 4.0.34 | 4.0.34 |
| pyopenssl | 23.2.0 | 23.2.0 |
| pyparsing | 3.0.9 | 3.0.9 |
| pyqt | 5.15.7 | 5.15.7 |
| pyqt5-sip | 12.11.0 | 12.11.0 |
| pyqtwebengine | 5.15.7 | 5.15.7 |
| pyrsistent | 0.18.0 | 0.18.0 |
| pysocks | 1.7.1 | 1.7.1 |
| pytables | 3.8.0 | 3.8.0 |
| pytest | 7.4.0 | 7.4.0 |
| python | 3.11.5 | 3.11.5 |
| python-dateutil | 2.8.2 | 2.8.2 |
| python-dotenv | 0.21.0 | 0.21.0 |
| python-fastjsonschema | 2.16.2 | 2.16.2 |
| python-json-logger | 2.0.7 | 2.0.7 |
| python-kaleido | 0.2.1 | 0.2.1 |
| python-libarchive-c | 2.9 | 2.9 |
| python-lmdb | 1.4.1 | 1.4.1 |
| python-lsp-black | 1.2.1 | 1.2.1 |
| python-lsp-jsonrpc | 1.0.0 | 1.0.0 |
| python-lsp-server | 1.7.2 | 1.7.2 |
| python-slugify | 5.0.2 | 5.0.2 |
| python-snappy | 0.6.1 | 0.6.1 |
| python-tzdata | 2023.3 | 2023.3 |
| python-xxhash | 2.0.2 | 2.0.2 |
| python.app | 3 | 3 |
| pytoolconfig | 1.2.5 | 1.2.5 |
| pytz | 2023.3.post1 | 2023.3.post1 |
| pyviz\_comms | 2.3.0 | 2.3.0 |
| pywavelets | 1.4.1 | 1.4.1 |
| pyyaml | 6.0 | 6.0 |
| pyzmq | 23.2.0 | 23.2.0 |
| qdarkstyle | 3.0.2 | 3.0.2 |
| qstylizer | 0.2.2 | 0.2.2 |
| qt-main | 5.15.2 | 5.15.2 |
| qt-webengine | 5.15.9 | 5.15.9 |
| qtawesome | 1.2.2 | 1.2.2 |
| qtconsole | 5.4.2 | 5.4.2 |
| qtpy | 2.2.0 | 2.2.0 |
| qtwebkit | 5.212 | 5.212 |
| queuelib | 1.5.0 | 1.5.0 |
| re2 | 2022.04.01 | 2022.04.01 |
| readline | 8.2 | 8.2 |
| regex | 2022.7.9 | 2022.7.9 |
| reproc | 14.2.4 | 14.2.4 |
| reproc-cpp | 14.2.4 | 14.2.4 |
| requests | 2.31.0 | 2.31.0 |
| requests-file | 1.5.1 | 1.5.1 |
| requests-toolbelt | 1.0.0 | 1.0.0 |
| responses | 0.13.3 | 0.13.3 |
| rfc3339-validator | 0.1.4 | 0.1.4 |
| rfc3986-validator | 0.1.1 | 0.1.1 |
| rope | 1.7.0 | 1.7.0 |
| rtree | 1.0.1 | 1.0.1 |
| ruamel.yaml | 0.17.21 | 0.17.21 |
| ruamel\_yaml | 0.17.21 | 0.17.21 |
| s3fs | 2023.4.0 | 2023.4.0 |
| safetensors | 0.3.2 | 0.3.2 |
| scikit-image | 0.20.0 | 0.20.0 |
| scikit-learn | 1.3.0 | 1.3.0 |
| scipy | 1.11.1 | 1.11.1 |
| scrapy | 2.8.0 | 2.8.0 |
| seaborn | 0.12.2 | 0.12.2 |
| send2trash | 1.8.0 | 1.8.0 |
| service\_identity | 18.1.0 | 18.1.0 |
| setuptools | 68.0.0 | 68.0.0 |
| sip | 6.6.2 | 6.6.2 |
| six | 1.16.0 | 1.16.0 |
| smart\_open | 5.2.1 | 5.2.1 |
| snappy | 1.1.9 | 1.1.9 |
| sniffio | 1.2.0 | 1.2.0 |
| snowballstemmer | 2.2.0 | 2.2.0 |
| sortedcontainers | 2.4.0 | 2.4.0 |
| soupsieve | 2.4 | 2.4 |
| sphinx | 5.0.2 | 5.0.2 |
| sphinxcontrib-applehelp | 1.0.2 | 1.0.2 |
| sphinxcontrib-devhelp | 1.0.2 | 1.0.2 |
| sphinxcontrib-htmlhelp | 2.0.0 | 2.0.0 |
| sphinxcontrib-jsmath | 1.0.1 | 1.0.1 |
| sphinxcontrib-qthelp | 1.0.3 | 1.0.3 |
| sphinxcontrib-serializinghtml | 1.1.5 | 1.1.5 |
| spyder | 5.4.3 | 5.4.3 |
| spyder-kernels | 2.4.4 | 2.4.4 |
| sqlalchemy | 1.4.39 | 1.4.39 |
| sqlite | 3.41.2 | 3.41.2 |
| stack\_data | 0.2.0 | 0.2.0 |
| statsmodels | 0.14.0 | 0.14.0 |
| sympy | 1.11.1 | 1.11.1 |
| tabulate | 0.8.10 | 0.8.10 |
| tapi | 1100.0.11 | 1000.10.8 |
| tbb | 2021.8.0 | 2021.8.0 |
| tblib | 1.7.0 | 1.7.0 |
| tenacity | 8.2.2 | 8.2.2 |
| terminado | 0.17.1 | 0.17.1 |
| text-unidecode | 1.3 | 1.3 |
| textdistance | 4.2.1 | 4.2.1 |
| threadpoolctl | 2.2.0 | 2.2.0 |
| three-merge | 0.1.1 | 0.1.1 |
| tifffile | 2023.4.12 | 2023.4.12 |
| tinycss2 | 1.2.1 | 1.2.1 |
| tk | 8.6.12 | 8.6.12 |
| tldextract | 3.2.0 | 3.2.0 |
| tokenizers | 0.13.2 | 0.13.2 |
| toml | 0.10.2 | 0.10.2 |
| tomlkit | 0.11.1 | 0.11.1 |
| toolz | 0.12.0 | 0.12.0 |
| tornado | 6.3.2 | 6.3.2 |
| tqdm | 4.65.0 | 4.65.0 |
| traitlets | 5.7.1 | 5.7.1 |
| transformers | 4.32.1 | 4.32.1 |
| twisted | 22.10.0 | 22.10.0 |
| typing-extensions | 4.7.1 | 4.7.1 |
| typing\_extensions | 4.7.1 | 4.7.1 |
| tzdata | 2023c | 2023c |
| uc-micro-py | 1.0.1 | 1.0.1 |
| ujson | 5.4.0 | 5.4.0 |
| unidecode | 1.2.0 | 1.2.0 |
| unixodbc | 2.3.11 | 2.3.11 |
| urllib3 | 1.26.16 | 1.26.16 |
| utf8proc | 2.6.1 | 2.6.1 |
| w3lib | 1.21.0 | 1.21.0 |
| watchdog | 2.1.6 | 2.1.6 |
| wcwidth | 0.2.5 | 0.2.5 |
| webencodings | 0.5.1 | 0.5.1 |
| websocket-client | 0.58.0 | 0.58.0 |
| werkzeug | 2.2.3 | 2.2.3 |
| whatthepatch | 1.0.2 | 1.0.2 |
| wheel | 0.38.4 | 0.38.4 |
| widgetsnbextension | 4.0.5 | 4.0.5 |
| wrapt | 1.14.1 | 1.14.1 |
| wurlitzer | 3.0.2 | 3.0.2 |
| xarray | 2023.6.0 | 2023.6.0 |
| xlwings | 0.29.1 | 0.29.1 |
| xxhash | 0.8.0 | 0.8.0 |
| xyzservices | 2022.9.0 | 2022.9.0 |
| xz | 5.4.2 | 5.4.2 |
| y-py | 0.5.9 | 0.5.9 |
| yaml | 0.2.5 | 0.2.5 |
| yaml-cpp | 0.7.0 | 0.7.0 |
| yapf | 0.31.0 | 0.31.0 |
| yarl | 1.8.1 | 1.8.1 |
| ypy-websocket | 0.8.2 | 0.8.2 |
| zeromq | 4.3.4 | 4.3.4 |
| zfp | 1.0.0 | 1.0.0 |
| zict | 2.2.0 | 2.2.0 |
| zipp | 3.11.0 | 3.11.0 |
| zlib | 1.2.13 | 1.2.13 |
| zlib-ng | 2.0.7 | 2.0.7 |
| zope | 1.0 | 1.0 |
| zope.interface | 5.4.0 | 5.4.0 |
| zstandard | 0.19.0 | 0.19.0 |
| zstd | 1.5.5 | 1.5.5 |
| Package Name | win-64 |
|---|---|
| \_anaconda\_depends | 2023.09 |
| abseil-cpp | 20211102.0 |
| aiobotocore | 2.5.0 |
| aiofiles | 22.1.0 |
| aiohttp | 3.8.5 |
| aioitertools | 0.7.1 |
| aiosignal | 1.2.0 |
| aiosqlite | 0.18.0 |
| alabaster | 0.7.12 |
| anaconda-anon-usage | 0.4.2 |
| anaconda-catalogs | 0.2.0 |
| anaconda-client | 1.12.1 |
| anaconda-cloud-auth | 0.1.3 |
| anaconda-navigator | 2.5.0 |
| anaconda-project | 0.11.1 |
| anyio | 3.5.0 |
| aom | 3.6.0 |
| appdirs | 1.4.4 |
| argon2-cffi | 21.3.0 |
| argon2-cffi-bindings | 21.2.0 |
| arrow | 1.2.3 |
| arrow-cpp | 11.0.0 |
| astroid | 2.14.2 |
| astropy | 5.1 |
| asttokens | 2.0.5 |
| async-timeout | 4.0.2 |
| atomicwrites | 1.4.0 |
| attrs | 22.1.0 |
| automat | 20.2.0 |
| autopep8 | 1.6.0 |
| aws-c-common | 0.6.8 |
| aws-c-event-stream | 0.1.6 |
| aws-checksums | 0.1.11 |
| aws-sdk-cpp | 1.8.185 |
| babel | 2.11.0 |
| backcall | 0.2.0 |
| backports | 1.1 |
| backports.functools\_lru\_cache | 1.6.4 |
| backports.tempfile | 1.0 |
| backports.weakref | 1.0.post1 |
| bcrypt | 3.2.0 |
| beautifulsoup4 | 4.12.2 |
| binaryornot | 0.4.4 |
| black | 23.3.0 |
| blas | 1.0 |
| bleach | 4.1.0 |
| blosc | 1.21.3 |
| bokeh | 3.2.1 |
| boltons | 23.0.0 |
| boost-cpp | 1.82.0 |
| botocore | 1.29.76 |
| bottleneck | 1.3.5 |
| brotli | 1.0.9 |
| brotli-bin | 1.0.9 |
| brotlipy | 0.7.0 |
| bzip2 | 1.0.8 |
| c-ares | 1.19.1 |
| c-blosc2 | 2.8.0 |
| ca-certificates | 2023.08.22 |
| certifi | 2023.7.22 |
| cffi | 1.15.1 |
| cfitsio | 3.470 |
| chardet | 4.0.0 |
| charls | 2.2.0 |
| charset-normalizer | 2.0.4 |
| click | 8.0.4 |
| cloudpickle | 2.2.1 |
| clyent | 1.2.2 |
| colorama | 0.4.6 |
| colorcet | 3.0.1 |
| comm | 0.1.2 |
| conda | 23.7.4 |
| conda-build | 3.26.1 |
| conda-content-trust | 0.2.0 |
| conda-index | 0.3.0 |
| conda-libmamba-solver | 23.7.0 |
| conda-pack | 0.6.0 |
| conda-package-handling | 2.2.0 |
| conda-package-streaming | 0.9.0 |
| conda-repo-cli | 1.0.75 |
| conda-token | 0.4.0 |
| conda-verify | 3.4.2 |
| console\_shortcut | 0.1.1 |
| constantly | 15.1.0 |
| contourpy | 1.0.5 |
| cookiecutter | 1.7.3 |
| cryptography | 41.0.3 |
| cssselect | 1.1.0 |
| curl | 8.1.1 |
| cycler | 0.11.0 |
| cytoolz | 0.12.0 |
| daal4py | 2023.1.1 |
| dal | 2023.1.1 |
| dask | 2023.6.0 |
| dask-core | 2023.6.0 |
| datasets | 2.12.0 |
| datashader | 0.15.2 |
| datashape | 0.5.4 |
| dav1d | 1.2.1 |
| debugpy | 1.6.7 |
| decorator | 5.1.1 |
| defusedxml | 0.7.1 |
| diff-match-patch | 20200713 |
| dill | 0.3.6 |
| distributed | 2023.6.0 |
| docstring-to-markdown | 0.11 |
| docutils | 0.18.1 |
| entrypoints | 0.4 |
| et\_xmlfile | 1.1.0 |
| executing | 0.8.3 |
| filelock | 3.9.0 |
| flake8 | 6.0.0 |
| flask | 2.2.2 |
| fmt | 9.1.0 |
| fonttools | 4.25.0 |
| freetype | 2.12.1 |
| frozenlist | 1.3.3 |
| fsspec | 2023.4.0 |
| future | 0.18.3 |
| gensim | 4.3.0 |
| gflags | 2.2.2 |
| giflib | 5.2.1 |
| glib | 2.69.1 |
| glob2 | 0.7 |
| glog | 0.5.0 |
| greenlet | 2.0.1 |
| grpc-cpp | 1.48.2 |
| h5py | 3.9.0 |
| hdf5 | 1.12.1 |
| heapdict | 1.0.1 |
| holoviews | 1.17.1 |
| huggingface\_hub | 0.15.1 |
| hvplot | 0.8.4 |
| hyperlink | 21.0.0 |
| icc\_rt | 2022.1.0 |
| icu | 58.2 |
| idna | 3.4 |
| imagecodecs | 2023.1.23 |
| imageio | 2.26.0 |
| imagesize | 1.4.1 |
| imbalanced-learn | 0.10.1 |
| importlib-metadata | 6.0.0 |
| importlib\_metadata | 6.0.0 |
| incremental | 21.3.0 |
| inflection | 0.5.1 |
| iniconfig | 1.1.1 |
| intake | 0.6.8 |
| intel-openmp | 2023.1.0 |
| intervaltree | 3.1.0 |
| ipykernel | 6.25.0 |
| ipython | 8.15.0 |
| ipython\_genutils | 0.2.0 |
| ipywidgets | 8.0.4 |
| isort | 5.9.3 |
| itemadapter | 0.3.0 |
| itemloaders | 1.0.4 |
| itsdangerous | 2.0.1 |
| jaraco.classes | 3.2.1 |
| jedi | 0.18.1 |
| jellyfish | 1.0.1 |
| jinja2 | 3.1.2 |
| jinja2-time | 0.2.0 |
| jmespath | 0.10.0 |
| joblib | 1.2.0 |
| jpeg | 9e |
| jq | 1.6 |
| json5 | 0.9.6 |
| jsonpatch | 1.32 |
| jsonpointer | 2.1 |
| jsonschema | 4.17.3 |
| jupyter | 1.0.0 |
| jupyter\_client | 7.4.9 |
| jupyter\_console | 6.6.3 |
| jupyter\_core | 5.3.0 |
| jupyter\_events | 0.6.3 |
| jupyter\_server | 1.23.4 |
| jupyter\_server\_fileid | 0.9.0 |
| jupyter\_server\_ydoc | 0.8.0 |
| jupyter\_ydoc | 0.2.4 |
| jupyterlab | 3.6.3 |
| jupyterlab\_pygments | 0.1.2 |
| jupyterlab\_server | 2.22.0 |
| jupyterlab\_widgets | 3.0.5 |
| kaleido-core | 0.2.1 |
| keyring | 23.13.1 |
| kiwisolver | 1.4.4 |
| krb5 | 1.20.1 |
| lazy-object-proxy | 1.6.0 |
| lazy\_loader | 0.2 |
| lcms2 | 2.12 |
| lerc | 3.0 |
| libaec | 1.0.4 |
| libarchive | 3.6.2 |
| libavif | 0.11.1 |
| libboost | 1.82.0 |
| libbrotlicommon | 1.0.9 |
| libbrotlidec | 1.0.9 |
| libbrotlienc | 1.0.9 |
| libclang | 14.0.6 |
| libclang13 | 14.0.6 |
| libcurl | 8.1.1 |
| libdeflate | 1.17 |
| libevent | 2.1.12 |
| libffi | 3.4.4 |
| libiconv | 1.16 |
| liblief | 0.12.3 |
| libmamba | 1.5.1 |
| libmambapy | 1.5.1 |
| libpng | 1.6.39 |
| libpq | 12.15 |
| libprotobuf | 3.20.3 |
| libsodium | 1.0.18 |
| libsolv | 0.7.24 |
| libspatialindex | 1.9.3 |
| libssh2 | 1.10.0 |
| libthrift | 0.15.0 |
| libtiff | 4.5.1 |
| libwebp | 1.3.2 |
| libwebp-base | 1.3.2 |
| libxml2 | 2.10.4 |
| libxslt | 1.1.37 |
| libzopfli | 1.0.3 |
| linkify-it-py | 2.0.0 |
| llvmlite | 0.40.0 |
| locket | 1.0.0 |
| lxml | 4.9.3 |
| lz4 | 4.3.2 |
| lz4-c | 1.9.4 |
| lzo | 2.10 |
| m2-msys2-runtime | 2.5.0.17080.65c939c |
| m2-patch | 2.7.5 |
| m2w64-libwinpthread-git | 5.0.0.4634.697f757 |
| markdown | 3.4.1 |
| markdown-it-py | 2.2.0 |
| markupsafe | 2.1.1 |
| mathjax | 2.7.5 |
| matplotlib | 3.7.2 |
| matplotlib-base | 3.7.2 |
| matplotlib-inline | 0.1.6 |
| mccabe | 0.7.0 |
| mdit-py-plugins | 0.3.0 |
| mdurl | 0.1.0 |
| menuinst | 1.4.19 |
| mistune | 0.8.4 |
| mkl | 2023.1.0 |
| mkl-service | 2.4.0 |
| mkl\_fft | 1.3.8 |
| mkl\_random | 1.2.4 |
| more-itertools | 8.12.0 |
| mpmath | 1.3.0 |
| msgpack-python | 1.0.3 |
| msys2-conda-epoch | 20160418 |
| multidict | 6.0.2 |
| multipledispatch | 0.6.0 |
| multiprocess | 0.70.14 |
| munkres | 1.1.4 |
| mypy\_extensions | 1.0.0 |
| navigator-updater | 0.4.0 |
| nbclassic | 0.5.5 |
| nbclient | 0.5.13 |
| nbconvert | 6.5.4 |
| nbformat | 5.9.2 |
| nest-asyncio | 1.5.6 |
| networkx | 3.1 |
| nltk | 3.8.1 |
| notebook | 6.5.4 |
| notebook-shim | 0.2.2 |
| numba | 0.57.1 |
| numexpr | 2.8.4 |
| numpy | 1.24.3 |
| numpy-base | 1.24.3 |
| numpydoc | 1.5.0 |
| openjpeg | 2.4.0 |
| openpyxl | 3.0.10 |
| openssl | 3.0.10 |
| orc | 1.7.4 |
| packaging | 23.1 |
| pandas | 2.0.3 |
| pandocfilters | 1.5.0 |
| panel | 1.2.3 |
| param | 1.13.0 |
| paramiko | 2.8.1 |
| parsel | 1.6.0 |
| parso | 0.8.3 |
| partd | 1.4.0 |
| pathlib | 1.0.1 |
| pathspec | 0.10.3 |
| patsy | 0.5.3 |
| pcre | 8.45 |
| pcre2 | 10.42 |
| pep8 | 1.7.1 |
| pexpect | 4.8.0 |
| pickleshare | 0.7.5 |
| pillow | 9.4.0 |
| pip | 23.2.1 |
| pkce | 1.0.3 |
| pkginfo | 1.9.6 |
| platformdirs | 3.10.0 |
| plotly | 5.9.0 |
| pluggy | 1.0.0 |
| ply | 3.11 |
| powershell\_shortcut | 0.0.1 |
| poyo | 0.5.0 |
| prometheus\_client | 0.14.1 |
| prompt-toolkit | 3.0.36 |
| prompt\_toolkit | 3.0.36 |
| protego | 0.1.16 |
| psutil | 5.9.0 |
| ptyprocess | 0.7.0 |
| pure\_eval | 0.2.2 |
| py-cpuinfo | 8.0.0 |
| py-lief | 0.12.3 |
| pyarrow | 11.0.0 |
| pyasn1 | 0.4.8 |
| pyasn1-modules | 0.2.8 |
| pybind11-abi | 4 |
| pycodestyle | 2.10.0 |
| pycosat | 0.6.4 |
| pycparser | 2.21 |
| pyct | 0.5.0 |
| pycurl | 7.45.2 |
| pydantic | 1.10.8 |
| pydispatcher | 2.0.5 |
| pydocstyle | 6.3.0 |
| pyerfa | 2.0.0 |
| pyflakes | 3.0.1 |
| pygments | 2.15.1 |
| pyjwt | 2.4.0 |
| pylint | 2.16.2 |
| pylint-venv | 2.3.0 |
| pyls-spyder | 0.4.0 |
| pynacl | 1.5.0 |
| pyodbc | 4.0.34 |
| pyopenssl | 23.2.0 |
| pyparsing | 3.0.9 |
| pyqt | 5.15.7 |
| pyqt5-sip | 12.11.0 |
| pyqtwebengine | 5.15.7 |
| pyrsistent | 0.18.0 |
| pysocks | 1.7.1 |
| pytables | 3.8.0 |
| pytest | 7.4.0 |
| python | 3.11.5 |
| python-dateutil | 2.8.2 |
| python-dotenv | 0.21.0 |
| python-fastjsonschema | 2.16.2 |
| python-json-logger | 2.0.7 |
| python-kaleido | 0.2.1 |
| python-libarchive-c | 2.9 |
| python-lmdb | 1.4.1 |
| python-lsp-black | 1.2.1 |
| python-lsp-jsonrpc | 1.0.0 |
| python-lsp-server | 1.7.2 |
| python-slugify | 5.0.2 |
| python-snappy | 0.6.1 |
| python-tzdata | 2023.3 |
| python-xxhash | 2.0.2 |
| pytoolconfig | 1.2.5 |
| pytz | 2023.3.post1 |
| pyviz\_comms | 2.3.0 |
| pywavelets | 1.4.1 |
| pywin32 | 305 |
| pywin32-ctypes | 0.2.0 |
| pywinpty | 2.0.10 |
| pyyaml | 6.0 |
| pyzmq | 23.2.0 |
| qdarkstyle | 3.0.2 |
| qstylizer | 0.2.2 |
| qt-main | 5.15.2 |
| qt-webengine | 5.15.9 |
| qtawesome | 1.2.2 |
| qtconsole | 5.4.2 |
| qtpy | 2.2.0 |
| qtwebkit | 5.212 |
| queuelib | 1.5.0 |
| re2 | 2022.04.01 |
| regex | 2022.7.9 |
| reproc | 14.2.4 |
| reproc-cpp | 14.2.4 |
| requests | 2.31.0 |
| requests-file | 1.5.1 |
| requests-toolbelt | 1.0.0 |
| responses | 0.13.3 |
| rfc3339-validator | 0.1.4 |
| rfc3986-validator | 0.1.1 |
| rope | 1.7.0 |
| rtree | 1.0.1 |
| ruamel.yaml | 0.17.21 |
| ruamel\_yaml | 0.17.21 |
| s3fs | 2023.4.0 |
| safetensors | 0.3.2 |
| scikit-image | 0.20.0 |
| scikit-learn | 1.3.0 |
| scikit-learn-intelex | 2023.1.1 |
| scipy | 1.11.1 |
| scrapy | 2.8.0 |
| seaborn | 0.12.2 |
| send2trash | 1.8.0 |
| service\_identity | 18.1.0 |
| setuptools | 68.0.0 |
| sip | 6.6.2 |
| six | 1.16.0 |
| smart\_open | 5.2.1 |
| snappy | 1.1.9 |
| sniffio | 1.2.0 |
| snowballstemmer | 2.2.0 |
| sortedcontainers | 2.4.0 |
| soupsieve | 2.4 |
| sphinx | 5.0.2 |
| sphinxcontrib-applehelp | 1.0.2 |
| sphinxcontrib-devhelp | 1.0.2 |
| sphinxcontrib-htmlhelp | 2.0.0 |
| sphinxcontrib-jsmath | 1.0.1 |
| sphinxcontrib-qthelp | 1.0.3 |
| sphinxcontrib-serializinghtml | 1.1.5 |
| spyder | 5.4.3 |
| spyder-kernels | 2.4.4 |
| sqlalchemy | 1.4.39 |
| sqlite | 3.41.2 |
| stack\_data | 0.2.0 |
| statsmodels | 0.14.0 |
| sympy | 1.11.1 |
| tabulate | 0.8.10 |
| tbb | 2021.8.0 |
| tbb4py | 2021.8.0 |
| tblib | 1.7.0 |
| tenacity | 8.2.2 |
| terminado | 0.17.1 |
| text-unidecode | 1.3 |
| textdistance | 4.2.1 |
| threadpoolctl | 2.2.0 |
| three-merge | 0.1.1 |
| tifffile | 2023.4.12 |
| tinycss2 | 1.2.1 |
| tk | 8.6.12 |
| tldextract | 3.2.0 |
| tokenizers | 0.13.2 |
| toml | 0.10.2 |
| tomlkit | 0.11.1 |
| toolz | 0.12.0 |
| tornado | 6.3.2 |
| tqdm | 4.65.0 |
| traitlets | 5.7.1 |
| transformers | 4.32.1 |
| twisted | 22.10.0 |
| twisted-iocpsupport | 1.0.2 |
| typing-extensions | 4.7.1 |
| typing\_extensions | 4.7.1 |
| tzdata | 2023c |
| uc-micro-py | 1.0.1 |
| ujson | 5.4.0 |
| unidecode | 1.2.0 |
| urllib3 | 1.26.16 |
| utf8proc | 2.6.1 |
| vc | 14.2 |
| vs2015\_runtime | 14.27.29016 |
| w3lib | 1.21.0 |
| watchdog | 2.1.6 |
| wcwidth | 0.2.5 |
| webencodings | 0.5.1 |
| websocket-client | 0.58.0 |
| werkzeug | 2.2.3 |
| whatthepatch | 1.0.2 |
| wheel | 0.38.4 |
| widgetsnbextension | 4.0.5 |
| win\_inet\_pton | 1.1.0 |
| winpty | 0.4.3 |
| wrapt | 1.14.1 |
| xarray | 2023.6.0 |
| xlwings | 0.29.1 |
| xxhash | 0.8.0 |
| xyzservices | 2022.9.0 |
| xz | 5.4.2 |
| y-py | 0.5.9 |
| yaml | 0.2.5 |
| yaml-cpp | 0.7.0 |
| yapf | 0.31.0 |
| yarl | 1.8.1 |
| ypy-websocket | 0.8.2 |
| zeromq | 4.3.4 |
| zfp | 1.0.0 |
| zict | 2.2.0 |
| zipp | 3.11.0 |
| zlib | 1.2.13 |
| zlib-ng | 2.0.7 |
| zope | 1.0 |
| zope.interface | 5.4.0 |
| zstandard | 0.19.0 |
| zstd | 1.5.5 |
| Package Name | linux-64 | linux-aarch64 | linux-ppc64le | linux-s390x | osx-arm64 | osx-64 | win-64 |
|---|---|---|---|---|---|---|---|
| \_anaconda\_depends | 2023.07 | 2023.07 | 2023.07 | 2023.07 | 2023.07 | 2023.07 | 2023.07 |
| \_libgcc\_mutex | 0.1 | 0.1 | 0.1 | 0.1 | |||
| \_openmp\_mutex | 5.1 | 5.1 | 5.1 | 5.1 | |||
| abseil-cpp | 20211102.0 | 20211102.0 | 20211102.0 | 20211102.0 | 20211102.0 | 20211102.0 | |
| aiobotocore | 2.5.0 | 2.5.0 | 2.4.2 | 2.4.2 | 2.5.0 | 2.4.2 | 2.4.2 |
| aiofiles | 22.1.0 | 22.1.0 | 22.1.0 | 22.1.0 | 22.1.0 | 22.1.0 | |
| aiohttp | 3.8.3 | 3.8.3 | 3.8.3 | 3.8.3 | 3.8.3 | 3.8.3 | 3.8.3 |
| aioitertools | 0.7.1 | 0.7.1 | 0.7.1 | 0.7.1 | 0.7.1 | 0.7.1 | 0.7.1 |
| aiosignal | 1.2.0 | 1.2.0 | 1.2.0 | 1.2.0 | 1.2.0 | 1.2.0 | 1.2.0 |
| aiosqlite | 0.18.0 | 0.18.0 | 0.18.0 | 0.18.0 | 0.18.0 | 0.18.0 | |
| alabaster | 0.7.12 | 0.7.12 | 0.7.12 | 0.7.12 | 0.7.12 | ||
| anaconda-catalogs | 0.2.0 | 0.2.0 | 0.2.0 | 0.2.0 | 0.2.0 | 0.2.0 | 0.2.0 |
| anaconda-client | 1.12.0 | 1.12.0 | 1.12.0 | 1.12.0 | 1.12.0 | 1.12.0 | 1.12.0 |
| anaconda-navigator | 2.4.2 | 2.4.2 | 2.4.2 | 2.4.2 | 2.4.2 | ||
| anaconda-project | 0.11.1 | 0.11.1 | 0.11.1 | 0.11.1 | 0.11.1 | 0.11.1 | 0.11.1 |
| anyio | 3.5.0 | 3.5.0 | 3.5.0 | 3.5.0 | 3.5.0 | 3.5.0 | 3.5.0 |
| appdirs | 1.4.4 | 1.4.4 | 1.4.4 | 1.4.4 | 1.4.4 | 1.4.4 | 1.4.4 |
| applaunchservices | 0.3.0 | 0.3.0 | |||||
| appnope | 0.1.2 | 0.1.2 | |||||
| appscript | 1.1.2 | 1.1.2 | |||||
| argon2-cffi | 21.3.0 | 21.3.0 | 21.3.0 | 21.3.0 | 21.3.0 | 21.3.0 | 21.3.0 |
| argon2-cffi-bindings | 21.2.0 | 21.2.0 | 21.2.0 | 21.2.0 | 21.2.0 | 21.2.0 | 21.2.0 |
| arrow | 1.2.3 | 1.2.3 | 1.2.3 | 1.2.3 | 1.2.3 | ||
| arrow-cpp | 11.0.0 | 11.0.0 | 11.0.0 | 11.0.0 | 11.0.0 | 11.0.0 | |
| astroid | 2.14.2 | 2.14.2 | 2.14.2 | 2.14.2 | 2.14.2 | 2.14.2 | 2.14.2 |
| astropy | 5.1 | 5.1 | 5.1 | 5.1 | 5.1 | 5.1 | 5.1 |
| asttokens | 2.0.5 | 2.0.5 | 2.0.5 | 2.0.5 | 2.0.5 | 2.0.5 | 2.0.5 |
| async-timeout | 4.0.2 | 4.0.2 | 4.0.2 | 4.0.2 | 4.0.2 | 4.0.2 | 4.0.2 |
| atomicwrites | 1.4.0 | 1.4.0 | 1.4.0 | 1.4.0 | 1.4.0 | ||
| attrs | 22.1.0 | 22.1.0 | 22.1.0 | 22.1.0 | 22.1.0 | 22.1.0 | 22.1.0 |
| automat | 20.2.0 | 20.2.0 | 20.2.0 | 20.2.0 | 20.2.0 | 20.2.0 | |
| autopep8 | 1.6.0 | 1.6.0 | 1.6.0 | 1.6.0 | 1.6.0 | ||
| aws-c-common | 0.4.57 | 0.5.11 | 0.4.57 | 0.6.8 | 0.4.57 | 0.4.57 | |
| aws-c-event-stream | 0.1.6 | 0.1.6 | 0.1.6 | 0.1.6 | 0.1.6 | 0.1.6 | |
| aws-checksums | 0.1.9 | 0.1.11 | 0.1.9 | 0.1.11 | 0.1.9 | 0.1.9 | |
| aws-sdk-cpp | 1.8.185 | 1.8.185 | 1.8.185 | 1.8.185 | 1.8.185 | 1.8.185 | |
| babel | 2.11.0 | 2.11.0 | 2.11.0 | 2.11.0 | 2.11.0 | 2.11.0 | 2.11.0 |
| backcall | 0.2.0 | 0.2.0 | 0.2.0 | 0.2.0 | 0.2.0 | 0.2.0 | 0.2.0 |
| backports | 1.1 | 1.1 | 1.1 | 1.1 | 1.1 | 1.1 | 1.1 |
| backports.functools\_lru\_cache | 1.6.4 | 1.6.4 | 1.6.4 | 1.6.4 | 1.6.4 | 1.6.4 | 1.6.4 |
| backports.tempfile | 1.0 | 1.0 | 1.0 | 1.0 | 1.0 | 1.0 | 1.0 |
| backports.weakref | 1.0.post1 | 1.0.post1 | 1.0.post1 | 1.0.post1 | 1.0.post1 | 1.0.post1 | 1.0.post1 |
| bcrypt | 3.2.0 | 3.2.0 | 3.2.0 | 3.2.0 | 3.2.0 | 3.2.0 | |
| beautifulsoup4 | 4.12.2 | 4.12.2 | 4.12.2 | 4.12.2 | 4.12.2 | 4.12.2 | 4.12.2 |
| binaryornot | 0.4.4 | 0.4.4 | 0.4.4 | 0.4.4 | 0.4.4 | ||
| black | 23.3.0 | 23.3.0 | 23.3.0 | 23.3.0 | 23.3.0 | ||
| blas | 1.0 | 1.0 | 1.0 | 1.0 | 1.0 | 1.0 | 1.0 |
| bleach | 4.1.0 | 4.1.0 | 4.1.0 | 4.1.0 | 4.1.0 | 4.1.0 | 4.1.0 |
| blosc | 1.21.3 | 1.21.3 | 1.21.3 | 1.21.3 | 1.21.3 | 1.21.3 | 1.21.3 |
| bokeh | 3.2.1 | 2.4.3 | 3.2.1 | 2.4.3 | 3.2.1 | 3.2.1 | 3.2.1 |
| boltons | 23.0.0 | 23.0.0 | 23.0.0 | 23.0.0 | 23.0.0 | 23.0.0 | 23.0.0 |
| boost-cpp | 1.73.0 | 1.73.0 | 1.73.0 | 1.73.0 | 1.73.0 | 1.73.0 | |
| boto3 | 1.24.28 | 1.24.28 | 1.24.28 | 1.24.28 | |||
| botocore | 1.29.76 | 1.29.76 | 1.27.59 | 1.27.59 | 1.29.76 | 1.27.59 | 1.27.59 |
| bottleneck | 1.3.5 | 1.3.5 | 1.3.5 | 1.3.5 | 1.3.5 | 1.3.5 | 1.3.5 |
| brotli | 1.0.9 | 1.0.9 | 1.0.9 | 1.0.9 | 1.0.9 | 1.0.9 | 1.0.9 |
| brotli-bin | 1.0.9 | 1.0.9 | 1.0.9 | 1.0.9 | 1.0.9 | 1.0.9 | 1.0.9 |
| brotlipy | 0.7.0 | 0.7.0 | 0.7.0 | 0.7.0 | 0.7.0 | 0.7.0 | 0.7.0 |
| brunsli | 0.1 | 0.1 | 0.1 | 0.1 | 0.1 | ||
| bzip2 | 1.0.8 | 1.0.8 | 1.0.8 | 1.0.8 | 1.0.8 | 1.0.8 | 1.0.8 |
| c-ares | 1.19.0 | 1.19.0 | 1.19.0 | 1.19.0 | 1.19.0 | 1.19.0 | 1.19.0 |
| c-blosc2 | 2.8.0 | 2.8.0 | 2.8.0 | 2.8.0 | 2.8.0 | 2.8.0 | |
| ca-certificates | 2023.05.30 | 2023.05.30 | 2023.05.30 | 2023.05.30 | 2023.05.30 | 2023.05.30 | 2023.05.30 |
| cctools | 949.0.1 | 949.0.1 | |||||
| cctools\_osx-64 | 949.0.1 | ||||||
| cctools\_osx-arm64 | 949.0.1 | ||||||
| certifi | 2023.7.22 | 2023.7.22 | 2023.7.22 | 2023.7.22 | 2023.7.22 | 2023.7.22 | 2023.7.22 |
| cffi | 1.15.1 | 1.15.1 | 1.15.1 | 1.15.1 | 1.15.1 | 1.15.1 | 1.15.1 |
| cfitsio | 3.470 | 3.470 | 3.470 | 3.470 | 3.470 | 3.470 | 3.470 |
| chardet | 4.0.0 | 4.0.0 | 4.0.0 | 4.0.0 | 4.0.0 | 4.0.0 | 4.0.0 |
| charls | 2.2.0 | 2.2.0 | 2.2.0 | 2.2.0 | 2.2.0 | 2.2.0 | |
| charset-normalizer | 2.0.4 | 2.0.4 | 2.0.4 | 2.0.4 | 2.0.4 | 2.0.4 | 2.0.4 |
| click | 8.0.4 | 8.0.4 | 8.0.4 | 8.0.4 | 8.0.4 | 8.0.4 | 8.0.4 |
| cloudpickle | 2.2.1 | 2.2.1 | 2.2.1 | 2.2.1 | 2.2.1 | 2.2.1 | 2.2.1 |
| clyent | 1.2.2 | 1.2.2 | 1.2.2 | 1.2.2 | 1.2.2 | 1.2.2 | 1.2.2 |
| colorama | 0.4.6 | 0.4.6 | 0.4.6 | 0.4.6 | 0.4.6 | 0.4.6 | 0.4.6 |
| colorcet | 3.0.1 | 3.0.1 | 3.0.1 | 3.0.1 | 3.0.1 | 3.0.1 | 3.0.1 |
| comm | 0.1.2 | 0.1.2 | 0.1.2 | 0.1.2 | 0.1.2 | 0.1.2 | 0.1.2 |
| conda | 23.7.2 | 23.7.2 | 23.7.2 | 23.7.2 | 23.7.2 | 23.7.2 | 23.7.2 |
| conda-build | 3.26.0 | 3.26.0 | 3.26.0 | 3.26.0 | 3.26.0 | 3.26.0 | 3.26.0 |
| conda-content-trust | 0.1.1 | 0.1.1 | 0.1.3 | 0.1.1 | 0.1.1 | 0.1.1 | 0.1.1 |
| conda-index | 0.2.3 | 0.2.3 | 0.2.3 | 0.2.3 | 0.2.3 | 0.2.3 | 0.2.3 |
| conda-libmamba-solver | 23.5.0 | 23.5.0 | 23.5.0 | 23.5.0 | 23.5.0 | 23.5.0 | 23.5.0 |
| conda-pack | 0.6.0 | 0.6.0 | 0.6.0 | 0.6.0 | 0.6.0 | 0.6.0 | 0.6.0 |
| conda-package-handling | 2.2.0 | 2.2.0 | 2.2.0 | 2.2.0 | 2.2.0 | 2.2.0 | 2.2.0 |
| conda-package-streaming | 0.9.0 | 0.9.0 | 0.9.0 | 0.9.0 | 0.9.0 | 0.9.0 | 0.9.0 |
| conda-repo-cli | 1.0.41 | 1.0.41 | 1.0.41 | 1.0.41 | 1.0.41 | ||
| conda-token | 0.4.0 | 0.4.0 | 0.4.0 | 0.4.0 | 0.4.0 | 0.4.0 | 0.4.0 |
| conda-verify | 3.4.2 | 3.4.2 | 3.4.2 | 3.4.2 | 3.4.2 | 3.4.2 | 3.4.2 |
| console\_shortcut | 0.1.1 | ||||||
| constantly | 15.1.0 | 15.1.0 | 15.1.0 | 15.1.0 | 15.1.0 | 15.1.0 | |
| contourpy | 1.0.5 | 1.0.5 | 1.0.5 | 1.0.5 | 1.0.5 | 1.0.5 | 1.0.5 |
| cookiecutter | 1.7.3 | 1.7.3 | 1.7.3 | 1.7.3 | 1.7.3 | ||
| cryptography | 41.0.2 | 41.0.2 | 39.0.1 | 41.0.2 | 41.0.2 | 41.0.2 | 41.0.2 |
| cssselect | 1.1.0 | 1.1.0 | 1.1.0 | 1.1.0 | 1.1.0 | 1.1.0 | |
| curl | 8.1.1 | 8.1.1 | 8.1.1 | 8.1.1 | 8.1.1 | 8.1.1 | 8.1.1 |
| cycler | 0.11.0 | 0.11.0 | 0.11.0 | 0.11.0 | 0.11.0 | 0.11.0 | 0.11.0 |
| cytoolz | 0.12.0 | 0.12.0 | 0.12.0 | 0.12.0 | 0.12.0 | 0.12.0 | 0.12.0 |
| daal4py | 2023.1.1 | 2023.1.1 | |||||
| dal | 2023.1.1 | 2023.1.1 | |||||
| dask | 2023.6.0 | 2023.4.1 | 2023.6.0 | 2023.6.0 | 2023.6.0 | 2023.6.0 | 2023.6.0 |
| dask-core | 2023.6.0 | 2023.4.1 | 2023.6.0 | 2023.6.0 | 2023.6.0 | 2023.6.0 | 2023.6.0 |
| datasets | 2.12.0 | 2.12.0 | 2.12.0 | ||||
| datashader | 0.15.1 | 0.15.1 | 0.15.1 | 0.15.1 | 0.15.1 | 0.15.1 | |
| datashape | 0.5.4 | 0.5.4 | 0.5.4 | 0.5.4 | 0.5.4 | 0.5.4 | |
| dbus | 1.13.18 | 1.13.18 | |||||
| debugpy | 1.6.7 | 1.6.7 | 1.6.7 | 1.6.7 | 1.6.7 | 1.6.7 | 1.6.7 |
| decorator | 5.1.1 | 5.1.1 | 5.1.1 | 5.1.1 | 5.1.1 | 5.1.1 | 5.1.1 |
| defusedxml | 0.7.1 | 0.7.1 | 0.7.1 | 0.7.1 | 0.7.1 | 0.7.1 | 0.7.1 |
| diff-match-patch | 20200713 | 20200713 | 20200713 | 20200713 | 20200713 | ||
| dill | 0.3.6 | 0.3.6 | 0.3.6 | 0.3.6 | 0.3.6 | 0.3.6 | 0.3.6 |
| distributed | 2023.6.0 | 2023.4.1 | 2023.6.0 | 2023.6.0 | 2023.6.0 | 2023.6.0 | 2023.6.0 |
| docstring-to-markdown | 0.11 | 0.11 | 0.11 | 0.11 | 0.11 | ||
| docutils | 0.18.1 | 0.18.1 | 0.18.1 | 0.18.1 | 0.18.1 | ||
| entrypoints | 0.4 | 0.4 | 0.4 | 0.4 | 0.4 | 0.4 | 0.4 |
| et\_xmlfile | 1.1.0 | 1.1.0 | 1.1.0 | 1.1.0 | 1.1.0 | 1.1.0 | 1.1.0 |
| executing | 0.8.3 | 0.8.3 | 0.8.3 | 0.8.3 | 0.8.3 | 0.8.3 | 0.8.3 |
| expat | 2.4.9 | 2.4.9 | |||||
| filelock | 3.9.0 | 3.9.0 | 3.9.0 | 3.9.0 | 3.9.0 | 3.9.0 | 3.9.0 |
| flake8 | 6.0.0 | 6.0.0 | 6.0.0 | 6.0.0 | 6.0.0 | ||
| flask | 2.2.2 | 2.2.2 | 2.2.2 | 2.2.2 | 2.2.2 | 2.2.2 | 2.2.2 |
| fmt | 9.1.0 | 9.1.0 | 9.1.0 | 9.1.0 | 9.1.0 | 9.1.0 | 9.1.0 |
| fontconfig | 2.14.1 | 2.14.1 | |||||
| fonttools | 4.25.0 | 4.25.0 | 4.25.0 | 4.25.0 | 4.25.0 | 4.25.0 | 4.25.0 |
| freetype | 2.12.1 | 2.12.1 | 2.12.1 | 2.12.1 | 2.12.1 | 2.12.1 | 2.12.1 |
| frozenlist | 1.3.3 | 1.3.3 | 1.3.3 | 1.3.3 | 1.3.3 | 1.3.3 | 1.3.3 |
| fsspec | 2023.4.0 | 2023.4.0 | 2023.3.0 | 2023.3.0 | 2023.4.0 | 2023.3.0 | 2023.3.0 |
| future | 0.18.3 | 0.18.3 | 0.18.3 | 0.18.3 | 0.18.3 | 0.18.3 | 0.18.3 |
| gensim | 4.3.0 | 4.3.0 | 4.3.0 | 4.3.0 | 4.3.0 | 4.3.0 | |
| gettext | 0.21.0 | 0.21.0 | |||||
| gflags | 2.2.2 | 2.2.2 | 2.2.2 | 2.2.2 | 2.2.2 | 2.2.2 | |
| giflib | 5.2.1 | 5.2.1 | 5.2.1 | 5.2.1 | 5.2.1 | 5.2.1 | 5.2.1 |
| glib | 2.69.1 | 2.69.1 | 2.69.1 | 2.69.1 | 2.69.1 | ||
| glob2 | 0.7 | 0.7 | 0.7 | 0.7 | 0.7 | 0.7 | 0.7 |
| glog | 0.5.0 | 0.5.0 | 0.5.0 | 0.5.0 | 0.5.0 | 0.5.0 | |
| gmp | 6.2.1 | 6.2.1 | 6.2.1 | 6.2.1 | 6.2.1 | 6.2.1 | |
| gmpy2 | 2.1.2 | 2.1.2 | 2.1.2 | 2.1.2 | 2.1.2 | 2.1.2 | |
| greenlet | 2.0.1 | 2.0.1 | 2.0.1 | 2.0.1 | 2.0.1 | 2.0.1 | 2.0.1 |
| grpc-cpp | 1.46.1 | 1.46.1 | 1.46.1 | 1.46.1 | 1.46.1 | ||
| gst-plugins-base | 1.14.1 | 1.14.1 | 1.14.1 | 1.14.1 | 1.18.5 | ||
| gstreamer | 1.14.1 | 1.14.1 | 1.14.1 | 1.14.1 | 1.18.5 | ||
| h5py | 3.7.0 | 3.7.0 | 3.7.0 | 3.7.0 | 3.7.0 | 3.7.0 | 3.7.0 |
| hdf5 | 1.10.6 | 1.10.6 | 1.10.6 | 1.10.6 | 1.12.1 | 1.10.6 | 1.10.6 |
| heapdict | 1.0.1 | 1.0.1 | 1.0.1 | 1.0.1 | 1.0.1 | 1.0.1 | 1.0.1 |
| holoviews | 1.17.0 | 1.17.0 | 1.17.0 | 1.14.8 | 1.17.0 | 1.17.0 | 1.17.0 |
| huggingface\_hub | 0.15.1 | 0.15.1 | 0.15.1 | ||||
| hvplot | 0.8.4 | 0.8.4 | 0.8.4 | 0.7.3 | 0.8.4 | 0.8.4 | 0.8.4 |
| hyperlink | 21.0.0 | 21.0.0 | 21.0.0 | 21.0.0 | 21.0.0 | 21.0.0 | |
| icc\_rt | 2022.1.0 | ||||||
| icu | 58.2 | 68.1 | 58.2 | 68.1 | 68.1 | 58.2 | 58.2 |
| idna | 3.4 | 3.4 | 3.4 | 3.3 | 3.4 | 3.4 | 3.4 |
| imagecodecs | 2021.8.26 | 2021.8.26 | 2021.8.26 | 2021.8.26 | 2021.8.26 | 2021.8.26 | 2021.8.26 |
| imageio | 2.31.1 | 2.31.1 | 2.31.1 | 2.26.0 | 2.31.1 | 2.31.1 | 2.26.0 |
| imagesize | 1.4.1 | 1.4.1 | 1.4.1 | 1.4.1 | 1.4.1 | ||
| imbalanced-learn | 0.10.1 | 0.10.1 | 0.10.1 | 0.10.1 | 0.10.1 | 0.10.1 | 0.10.1 |
| importlib-metadata | 6.0.0 | 6.0.0 | 6.0.0 | 6.0.0 | 6.0.0 | 6.0.0 | 6.0.0 |
| importlib\_metadata | 6.0.0 | 6.0.0 | 6.0.0 | 6.0.0 | 6.0.0 | ||
| incremental | 21.3.0 | 21.3.0 | 21.3.0 | 21.3.0 | 21.3.0 | 21.3.0 | |
| inflection | 0.5.1 | 0.5.1 | 0.5.1 | 0.5.1 | 0.5.1 | ||
| iniconfig | 1.1.1 | 1.1.1 | 1.1.1 | 1.1.1 | 1.1.1 | 1.1.1 | 1.1.1 |
| intake | 0.6.8 | 0.6.8 | 0.6.8 | 0.6.8 | 0.6.8 | 0.6.8 | 0.6.8 |
| intel-openmp | 2023.1.0 | 2023.1.0 | |||||
| intervaltree | 3.1.0 | 3.1.0 | 3.1.0 | 3.1.0 | 3.1.0 | ||
| ipykernel | 6.19.2 | 6.19.2 | 6.19.2 | 6.19.2 | 6.19.2 | 6.19.2 | 6.19.2 |
| ipython | 8.12.0 | 8.12.0 | 8.12.0 | 8.12.0 | 8.12.0 | 8.12.0 | 8.12.0 |
| ipython\_genutils | 0.2.0 | 0.2.0 | 0.2.0 | 0.2.0 | 0.2.0 | 0.2.0 | 0.2.0 |
| ipywidgets | 8.0.4 | 8.0.4 | 8.0.4 | 8.0.4 | 8.0.4 | 8.0.4 | 8.0.4 |
| isort | 5.9.3 | 5.9.3 | 5.9.3 | 5.9.3 | 5.9.3 | 5.9.3 | 5.9.3 |
| itemadapter | 0.3.0 | 0.3.0 | 0.3.0 | 0.3.0 | 0.3.0 | 0.3.0 | |
| itemloaders | 1.0.4 | 1.0.4 | 1.0.4 | 1.0.4 | 1.0.4 | 1.0.4 | |
| itsdangerous | 2.0.1 | 2.0.1 | 2.0.1 | 2.0.1 | 2.0.1 | 2.0.1 | 2.0.1 |
| jaraco.classes | 3.2.1 | 3.2.1 | 3.2.1 | 3.2.1 | 3.2.1 | ||
| jedi | 0.18.1 | 0.18.1 | 0.18.1 | 0.18.1 | 0.18.1 | 0.18.1 | 0.18.1 |
| jeepney | 0.7.1 | 0.7.1 | |||||
| jellyfish | 0.9.0 | 0.9.0 | 0.9.0 | 0.9.0 | 0.9.0 | ||
| jinja2 | 3.1.2 | 3.1.2 | 3.1.2 | 3.1.2 | 3.1.2 | 3.1.2 | 3.1.2 |
| jinja2-time | 0.2.0 | 0.2.0 | 0.2.0 | 0.2.0 | 0.2.0 | ||
| jmespath | 0.10.0 | 0.10.0 | 0.10.0 | 0.10.0 | 0.10.0 | 0.10.0 | 0.10.0 |
| joblib | 1.2.0 | 1.2.0 | 1.2.0 | 1.2.0 | 1.2.0 | 1.2.0 | 1.2.0 |
| jpeg | 9e | 9e | 9e | 9e | 9e | 9e | 9e |
| jq | 1.6 | 1.6 | 1.6 | 1.6 | 1.6 | 1.6 | |
| json5 | 0.9.6 | 0.9.6 | 0.9.6 | 0.9.6 | 0.9.6 | 0.9.6 | 0.9.6 |
| jsonpatch | 1.32 | 1.32 | 1.32 | 1.32 | 1.32 | 1.32 | 1.32 |
| jsonpointer | 2.1 | 2.1 | 2.1 | 2.1 | 2.1 | 2.1 | 2.1 |
| jsonschema | 4.17.3 | 4.17.3 | 4.17.3 | 4.17.3 | 4.17.3 | 4.17.3 | 4.17.3 |
| jupyter | 1.0.0 | 1.0.0 | 1.0.0 | 1.0.0 | 1.0.0 | 1.0.0 | 1.0.0 |
| jupyter\_client | 7.4.9 | 7.4.9 | 7.4.9 | 7.4.9 | 7.4.9 | 7.4.9 | 7.4.9 |
| jupyter\_console | 6.6.3 | 6.6.3 | 6.6.3 | 6.6.3 | 6.6.3 | 6.6.3 | 6.6.3 |
| jupyter\_core | 5.3.0 | 5.3.0 | 5.3.0 | 5.3.0 | 5.3.0 | 5.3.0 | 5.3.0 |
| jupyter\_events | 0.6.3 | 0.6.3 | 0.6.3 | 0.6.3 | 0.6.3 | 0.6.3 | |
| jupyter\_server | 1.23.4 | 1.23.4 | 1.23.4 | 1.23.4 | 1.23.4 | 1.23.4 | 1.23.4 |
| jupyter\_server\_fileid | 0.9.0 | 0.9.0 | 0.9.0 | 0.9.0 | 0.9.0 | 0.9.0 | |
| jupyter\_server\_ydoc | 0.8.0 | 0.8.0 | 0.8.0 | 0.8.0 | 0.8.0 | 0.8.0 | |
| jupyter\_ydoc | 0.2.4 | 0.2.4 | 0.2.4 | 0.2.4 | 0.2.4 | 0.2.4 | |
| jupyterlab | 3.6.3 | 3.6.3 | 3.6.3 | 3.3.2 | 3.6.3 | 3.6.3 | 3.6.3 |
| jupyterlab\_pygments | 0.1.2 | 0.1.2 | 0.1.2 | 0.1.2 | 0.1.2 | 0.1.2 | 0.1.2 |
| jupyterlab\_server | 2.22.0 | 2.22.0 | 2.22.0 | 2.21.0 | 2.22.0 | 2.22.0 | 2.22.0 |
| jupyterlab\_widgets | 3.0.5 | 3.0.5 | 3.0.5 | 3.0.5 | 3.0.5 | 3.0.5 | 3.0.5 |
| jxrlib | 1.1 | 1.1 | 1.1 | 1.1 | 1.1 | 1.1 | 1.1 |
| keyring | 23.13.1 | 23.13.1 | 23.13.1 | 23.13.1 | 23.13.1 | ||
| kiwisolver | 1.4.4 | 1.4.4 | 1.4.4 | 1.4.4 | 1.4.4 | 1.4.4 | 1.4.4 |
| krb5 | 1.20.1 | 1.20.1 | 1.20.1 | 1.20.1 | 1.20.1 | 1.20.1 | 1.19.4 |
| lazy-object-proxy | 1.6.0 | 1.6.0 | 1.6.0 | 1.6.0 | 1.6.0 | 1.6.0 | 1.6.0 |
| lazy\_loader | 0.2 | 0.2 | 0.2 | 0.1 | 0.2 | 0.2 | 0.2 |
| lcms2 | 2.12 | 2.12 | 2.12 | 2.12 | 2.12 | 2.12 | 2.12 |
| ld64 | 530 | 530 | |||||
| ld64\_osx-64 | 530 | ||||||
| ld64\_osx-arm64 | 530 | ||||||
| ld\_impl\_linux-64 | 2.38 | ||||||
| ld\_impl\_linux-aarch64 | 2.38 | ||||||
| ld\_impl\_linux-ppc64le | 2.38 | ||||||
| ld\_impl\_linux-s390x | 2.38 | ||||||
| ldid | 2.1.5 | 2.1.5 | |||||
| lerc | 3.0 | 3.0 | 3.0 | 3.0 | 3.0 | 3.0 | 3.0 |
| libaec | 1.0.4 | 1.0.4 | 1.0.4 | 1.0.4 | 1.0.4 | 1.0.4 | 1.0.4 |
| libarchive | 3.6.2 | 3.6.2 | 3.6.2 | 3.6.2 | 3.6.2 | 3.6.2 | 3.6.2 |
| libboost | 1.73.0 | 1.73.0 | 1.73.0 | 1.73.0 | 1.73.0 | 1.73.0 | |
| libbrotlicommon | 1.0.9 | 1.0.9 | 1.0.9 | 1.0.9 | 1.0.9 | 1.0.9 | 1.0.9 |
| libbrotlidec | 1.0.9 | 1.0.9 | 1.0.9 | 1.0.9 | 1.0.9 | 1.0.9 | 1.0.9 |
| libbrotlienc | 1.0.9 | 1.0.9 | 1.0.9 | 1.0.9 | 1.0.9 | 1.0.9 | 1.0.9 |
| libclang | 10.0.1 | 10.0.1 | 12.0.0 | 12.0.0 | 14.0.6 | ||
| libclang13 | 14.0.6 | ||||||
| libcurl | 8.1.1 | 8.1.1 | 8.1.1 | 8.1.1 | 8.1.1 | 8.1.1 | 8.1.1 |
| libcxx | 14.0.6 | 14.0.6 | |||||
| libdeflate | 1.17 | 1.17 | 1.17 | 1.17 | 1.17 | 1.17 | 1.17 |
| libedit | 3.1.20221030 | 3.1.20221030 | 3.1.20221030 | 3.1.20221030 | 3.1.20221030 | 3.1.20221030 | |
| libev | 4.33 | 4.33 | 4.33 | 4.33 | 4.33 | 4.33 | |
| libevent | 2.1.12 | 2.1.12 | 2.1.12 | 2.1.12 | 2.1.12 | 2.1.12 | |
| libffi | 3.4.4 | 3.4.4 | 3.4.4 | 3.4.2 | 3.4.4 | 3.4.4 | 3.4.4 |
| libgcc-ng | 11.2.0 | 11.2.0 | 11.2.0 | 11.2.0 | |||
| libgfortran | 5.0.0 | 5.0.0 | |||||
| libgfortran-ng | 11.2.0 | 11.2.0 | 11.2.0 | 11.2.0 | |||
| libgfortran5 | 11.2.0 | 11.2.0 | 11.2.0 | 11.2.0 | 11.3.0 | 11.3.0 | |
| libgomp | 11.2.0 | 11.2.0 | 11.2.0 | 11.2.0 | |||
| libiconv | 1.16 | 1.16 | 1.16 | ||||
| liblief | 0.12.3 | 0.12.3 | 0.12.3 | 0.12.3 | 0.12.3 | 0.12.3 | 0.12.3 |
| libllvm10 | 10.0.1 | 10.0.1 | |||||
| libllvm12 | 12.0.0 | 12.0.0 | |||||
| libllvm14 | 14.0.6 | 14.0.6 | 14.0.6 | 14.0.6 | 14.0.6 | 14.0.6 | |
| libmamba | 1.4.1 | 1.4.1 | 1.4.1 | 1.4.1 | 1.4.1 | 1.4.1 | 1.4.1 |
| libmambapy | 1.4.1 | 1.4.1 | 1.4.1 | 1.4.1 | 1.4.1 | 1.4.1 | 1.4.1 |
| libnghttp2 | 1.52.0 | 1.52.0 | 1.52.0 | 1.52.0 | 1.52.0 | 1.52.0 | |
| libogg | 1.3.5 | ||||||
| libopenblas | 0.3.21 | 0.3.21 | 0.3.21 | 0.3.21 | 0.3.21 | ||
| libpng | 1.6.39 | 1.6.39 | 1.6.39 | 1.6.39 | 1.6.39 | 1.6.39 | 1.6.39 |
| libpq | 12.15 | 12.15 | 12.15 | 12.15 | |||
| libprotobuf | 3.20.3 | 3.20.3 | 3.20.3 | 3.20.3 | 3.20.3 | 3.20.3 | |
| libsodium | 1.0.18 | 1.0.18 | 1.0.18 | 1.0.18 | 1.0.18 | 1.0.18 | 1.0.18 |
| libsolv | 0.7.22 | 0.7.22 | 0.7.22 | 0.7.22 | 0.7.22 | 0.7.22 | 0.7.22 |
| libspatialindex | 1.9.3 | 1.9.3 | 1.9.3 | 1.9.3 | 1.9.3 | ||
| libssh2 | 1.10.0 | 1.10.0 | 1.10.0 | 1.10.0 | 1.10.0 | 1.10.0 | 1.10.0 |
| libstdcxx-ng | 11.2.0 | 11.2.0 | 11.2.0 | 11.2.0 | |||
| libthrift | 0.15.0 | 0.15.0 | 0.15.0 | 0.13.0 | 0.15.0 | 0.15.0 | |
| libtiff | 4.5.0 | 4.5.0 | 4.5.0 | 4.5.0 | 4.5.0 | 4.5.0 | 4.5.0 |
| libuuid | 1.41.5 | 1.41.5 | 1.41.5 | 1.41.5 | |||
| libuv | 1.44.2 | ||||||
| libvorbis | 1.3.7 | ||||||
| libwebp | 1.2.4 | 1.2.4 | 1.2.4 | 1.2.4 | 1.2.4 | 1.2.4 | 1.2.4 |
| libwebp-base | 1.2.4 | 1.2.4 | 1.2.4 | 1.2.4 | 1.2.4 | 1.2.4 | 1.2.4 |
| libxcb | 1.15 | 1.15 | |||||
| libxkbcommon | 1.0.1 | 1.0.1 | |||||
| libxml2 | 2.9.14 | 2.9.14 | 2.10.3 | 2.10.3 | 2.10.3 | 2.10.3 | 2.10.3 |
| libxslt | 1.1.35 | 1.1.35 | 1.1.37 | 1.1.37 | 1.1.37 | 1.1.37 | 1.1.37 |
| libzopfli | 1.0.3 | 1.0.3 | 1.0.3 | 1.0.3 | 1.0.3 | 1.0.3 | 1.0.3 |
| linkify-it-py | 2.0.0 | 2.0.0 | 2.0.0 | 2.0.0 | 2.0.0 | ||
| llvm-openmp | 14.0.6 | 14.0.6 | |||||
| llvmlite | 0.40.0 | 0.40.0 | 0.40.0 | 0.40.0 | 0.40.0 | 0.40.0 | |
| locket | 1.0.0 | 1.0.0 | 1.0.0 | 1.0.0 | 1.0.0 | 1.0.0 | 1.0.0 |
| lxml | 4.9.1 | 4.9.1 | 4.9.2 | 4.9.2 | 4.9.2 | 4.9.2 | 4.9.2 |
| lz4 | 4.3.2 | 4.3.2 | 4.3.2 | 4.3.2 | 4.3.2 | 4.3.2 | |
| lz4-c | 1.9.4 | 1.9.4 | 1.9.4 | 1.9.4 | 1.9.4 | 1.9.4 | 1.9.4 |
| lzo | 2.10 | 2.10 | 2.10 | 2.10 | 2.10 | 2.10 | 2.10 |
| m2-msys2-runtime | 2.5.0.17080.65c939c | ||||||
| m2-patch | 2.7.5 | ||||||
| m2w64-libwinpthread-git | 5.0.0.4634.697f757 | ||||||
| markdown | 3.4.1 | 3.4.1 | 3.4.1 | 3.4.1 | 3.4.1 | 3.4.1 | 3.4.1 |
| markdown-it-py | 2.2.0 | 2.2.0 | 2.2.0 | 2.2.0 | 2.2.0 | ||
| markupsafe | 2.1.1 | 2.1.1 | 2.1.1 | 2.1.1 | 2.1.1 | 2.1.1 | 2.1.1 |
| matplotlib | 3.7.1 | 3.7.1 | 3.7.1 | 3.7.1 | 3.7.1 | 3.7.1 | 3.7.1 |
| matplotlib-base | 3.7.1 | 3.7.1 | 3.7.1 | 3.7.1 | 3.7.1 | 3.7.1 | 3.7.1 |
| matplotlib-inline | 0.1.6 | 0.1.6 | 0.1.6 | 0.1.6 | 0.1.6 | 0.1.6 | 0.1.6 |
| mccabe | 0.7.0 | 0.7.0 | 0.7.0 | 0.7.0 | 0.7.0 | 0.7.0 | 0.7.0 |
| mdit-py-plugins | 0.3.0 | 0.3.0 | 0.3.0 | 0.3.0 | 0.3.0 | ||
| mdurl | 0.1.0 | 0.1.0 | 0.1.0 | 0.1.0 | 0.1.0 | ||
| menuinst | 1.4.19 | ||||||
| mistune | 0.8.4 | 0.8.4 | 0.8.4 | 0.8.4 | 0.8.4 | 0.8.4 | 0.8.4 |
| mkl | 2023.1.0 | 2023.1.0 | |||||
| mkl-service | 2.4.0 | 2.4.0 | |||||
| mkl\_fft | 1.3.6 | 1.3.6 | |||||
| mkl\_random | 1.2.2 | 1.2.2 | |||||
| mock | 4.0.3 | ||||||
| more-itertools | 8.12.0 | 8.12.0 | 8.12.0 | 8.12.0 | 8.12.0 | 8.12.0 | 8.12.0 |
| mpc | 1.1.0 | 1.1.0 | 1.1.0 | 1.1.0 | 1.1.0 | 1.1.0 | |
| mpfr | 4.0.2 | 4.0.2 | 4.0.2 | 4.0.2 | 4.0.2 | 4.0.2 | |
| mpi | 1.0 | ||||||
| mpich | 4.1.1 | ||||||
| mpmath | 1.3.0 | 1.3.0 | 1.3.0 | 1.3.0 | 1.3.0 | 1.3.0 | 1.3.0 |
| msgpack-python | 1.0.3 | 1.0.3 | 1.0.3 | 1.0.3 | 1.0.3 | 1.0.3 | 1.0.3 |
| msys2-conda-epoch | 20160418 | ||||||
| multidict | 6.0.2 | 6.0.2 | 6.0.2 | 6.0.2 | 6.0.2 | 6.0.2 | 6.0.2 |
| multipledispatch | 0.6.0 | 0.6.0 | 0.6.0 | 0.6.0 | 0.6.0 | 0.6.0 | |
| multiprocess | 0.70.14 | 0.70.14 | 0.70.14 | ||||
| munkres | 1.1.4 | 1.1.4 | 1.1.4 | 1.1.4 | 1.1.4 | 1.1.4 | 1.1.4 |
| mypy\_extensions | 0.4.3 | 0.4.3 | 0.4.3 | 0.4.3 | 0.4.3 | ||
| navigator-updater | 0.4.0 | 0.4.0 | 0.4.0 | 0.4.0 | 0.4.0 | ||
| nbclassic | 0.5.5 | 0.5.5 | 0.5.5 | 0.5.5 | 0.5.5 | 0.5.5 | 0.5.5 |
| nbclient | 0.5.13 | 0.5.13 | 0.5.13 | 0.5.13 | 0.5.13 | 0.5.13 | 0.5.13 |
| nbconvert | 6.5.4 | 6.5.4 | 6.5.4 | 6.5.4 | 6.5.4 | 6.5.4 | 6.5.4 |
| nbformat | 5.7.0 | 5.7.0 | 5.7.0 | 5.7.0 | 5.7.0 | 5.7.0 | 5.7.0 |
| ncurses | 6.4 | 6.4 | 6.4 | 6.4 | 6.4 | 6.4 | |
| nest-asyncio | 1.5.6 | 1.5.6 | 1.5.6 | 1.5.6 | 1.5.6 | 1.5.6 | 1.5.6 |
| networkx | 3.1 | 3.1 | 3.1 | 3.1 | 3.1 | 3.1 | 3.1 |
| ninja | 1.10.2 | 1.10.2 | 1.10.2 | ||||
| ninja-base | 1.10.2 | 1.10.2 | 1.10.2 | ||||
| nltk | 3.8.1 | 3.8.1 | 3.8.1 | 3.8.1 | 3.8.1 | 3.8.1 | 3.8.1 |
| notebook | 6.5.4 | 6.5.4 | 6.5.4 | 6.5.4 | 6.5.4 | 6.5.4 | 6.5.4 |
| notebook-shim | 0.2.2 | 0.2.2 | 0.2.2 | 0.2.2 | 0.2.2 | 0.2.2 | 0.2.2 |
| nspr | 4.35 | 4.35 | 4.35 | 4.35 | |||
| nss | 3.89.1 | 3.89.1 | 3.89.1 | 3.89.1 | |||
| numba | 0.57.0 | 0.57.0 | 0.57.0 | 0.57.0 | 0.57.0 | 0.57.0 | |
| numexpr | 2.8.4 | 2.8.4 | 2.8.4 | 2.8.4 | 2.8.4 | 2.8.4 | 2.8.4 |
| numpy | 1.24.3 | 1.24.3 | 1.24.3 | 1.25.0 | 1.24.3 | 1.24.3 | 1.24.3 |
| numpy-base | 1.24.3 | 1.24.3 | 1.24.3 | 1.25.0 | 1.24.3 | 1.24.3 | 1.24.3 |
| numpydoc | 1.5.0 | 1.5.0 | 1.5.0 | 1.5.0 | 1.5.0 | ||
| oniguruma | 6.9.7.1 | 6.9.7.1 | 6.9.7.1 | 6.9.7.1 | 6.9.7.1 | ||
| openjpeg | 2.4.0 | 2.4.0 | 2.4.0 | 2.4.0 | 2.3.0 | 2.4.0 | 2.4.0 |
| openpyxl | 3.0.10 | 3.0.10 | 3.0.10 | 3.0.10 | 3.0.10 | 3.0.10 | 3.0.10 |
| openssl | 1.1.1u | 1.1.1u | 1.1.1u | 1.1.1u | 1.1.1u | 1.1.1u | 1.1.1u |
| orc | 1.7.4 | 1.7.4 | 1.7.4 | 1.7.4 | 1.7.4 | 1.7.4 | |
| packaging | 23.0 | 23.0 | 23.0 | 23.0 | 23.0 | 23.0 | 23.0 |
| pandas | 1.5.3 | 1.5.3 | 1.5.3 | 1.5.3 | 1.5.3 | 1.5.3 | 1.5.3 |
| pandocfilters | 1.5.0 | 1.5.0 | 1.5.0 | 1.5.0 | 1.5.0 | 1.5.0 | 1.5.0 |
| panel | 1.2.1 | 0.14.3 | 1.2.1 | 0.12.6 | 1.2.1 | 1.2.1 | 1.2.1 |
| param | 1.13.0 | 1.13.0 | 1.13.0 | 1.13.0 | 1.13.0 | 1.13.0 | 1.13.0 |
| paramiko | 2.8.1 | ||||||
| parsel | 1.6.0 | 1.6.0 | 1.6.0 | 1.6.0 | 1.6.0 | 1.6.0 | |
| parso | 0.8.3 | 0.8.3 | 0.8.3 | 0.8.3 | 0.8.3 | 0.8.3 | 0.8.3 |
| partd | 1.2.0 | 1.2.0 | 1.2.0 | 1.2.0 | 1.2.0 | 1.2.0 | 1.2.0 |
| patch | 2.7.6 | 2.7.6 | 2.7.6 | 2.7.6 | 2.7.6 | 2.7.6 | |
| patchelf | 0.17.2 | 0.17.2 | 0.17.2 | 0.17.2 | |||
| pathlib | 1.0.1 | 1.0.1 | 1.0.1 | 1.0.1 | 1.0.1 | ||
| pathspec | 0.10.3 | 0.10.3 | 0.10.3 | 0.10.3 | 0.10.3 | ||
| patsy | 0.5.3 | 0.5.3 | 0.5.3 | 0.5.3 | 0.5.3 | 0.5.3 | 0.5.3 |
| pcre | 8.45 | 8.45 | 8.45 | 8.45 | 8.45 | ||
| pcre2 | 10.37 | 10.37 | 10.37 | 10.37 | 10.37 | 10.37 | 10.37 |
| pep8 | 1.7.1 | 1.7.1 | 1.7.1 | 1.7.1 | 1.7.1 | 1.7.1 | 1.7.1 |
| pexpect | 4.8.0 | 4.8.0 | 4.8.0 | 4.8.0 | 4.8.0 | 4.8.0 | 4.8.0 |
| pickleshare | 0.7.5 | 0.7.5 | 0.7.5 | 0.7.5 | 0.7.5 | 0.7.5 | 0.7.5 |
| pillow | 9.4.0 | 9.4.0 | 9.4.0 | 9.4.0 | 9.4.0 | 9.4.0 | 9.4.0 |
| pip | 23.2.1 | 23.2.1 | 23.2.1 | 23.2.1 | 23.2.1 | 23.2.1 | 23.2.1 |
| pkginfo | 1.9.6 | 1.9.6 | 1.9.6 | 1.9.6 | 1.9.6 | 1.9.6 | 1.9.6 |
| platformdirs | 2.5.2 | 2.5.2 | 2.5.2 | 2.5.2 | 2.5.2 | 2.5.2 | 2.5.2 |
| plotly | 5.9.0 | 5.9.0 | 5.9.0 | 5.9.0 | 5.9.0 | 5.9.0 | 5.9.0 |
| pluggy | 1.0.0 | 1.0.0 | 1.0.0 | 1.0.0 | 1.0.0 | 1.0.0 | 1.0.0 |
| ply | 3.11 | 3.11 | 3.11 | 3.11 | 3.11 | ||
| pooch | 1.4.0 | 1.4.0 | 1.4.0 | 1.4.0 | 1.4.0 | 1.4.0 | 1.4.0 |
| powershell\_shortcut | 0.0.1 | ||||||
| poyo | 0.5.0 | 0.5.0 | 0.5.0 | 0.5.0 | 0.5.0 | ||
| prometheus\_client | 0.14.1 | 0.14.1 | 0.14.1 | 0.14.1 | 0.14.1 | 0.14.1 | 0.14.1 |
| prompt-toolkit | 3.0.36 | 3.0.36 | 3.0.36 | 3.0.36 | 3.0.36 | 3.0.36 | 3.0.36 |
| prompt\_toolkit | 3.0.36 | 3.0.36 | 3.0.36 | 3.0.36 | 3.0.36 | 3.0.36 | 3.0.36 |
| protego | 0.1.16 | 0.1.16 | 0.1.16 | 0.1.16 | 0.1.16 | 0.1.16 | |
| psutil | 5.9.0 | 5.9.0 | 5.9.0 | 5.9.0 | 5.9.0 | 5.9.0 | 5.9.0 |
| ptyprocess | 0.7.0 | 0.7.0 | 0.7.0 | 0.7.0 | 0.7.0 | 0.7.0 | 0.7.0 |
| pure\_eval | 0.2.2 | 0.2.2 | 0.2.2 | 0.2.2 | 0.2.2 | 0.2.2 | 0.2.2 |
| py-cpuinfo | 8.0.0 | 8.0.0 | 8.0.0 | 8.0.0 | 8.0.0 | 8.0.0 | |
| py-lief | 0.12.3 | 0.12.3 | 0.12.3 | 0.12.3 | 0.12.3 | 0.12.3 | 0.12.3 |
| pyarrow | 11.0.0 | 11.0.0 | 11.0.0 | 11.0.0 | 11.0.0 | 11.0.0 | |
| pyasn1 | 0.4.8 | 0.4.8 | 0.4.8 | 0.4.8 | 0.4.8 | 0.4.8 | |
| pyasn1-modules | 0.2.8 | 0.2.8 | 0.2.8 | 0.2.8 | 0.2.8 | 0.2.8 | |
| pybind11-abi | 4 | 4 | 4 | 4 | 4 | 4 | 4 |
| pycodestyle | 2.10.0 | 2.10.0 | 2.10.0 | 2.10.0 | 2.10.0 | ||
| pycosat | 0.6.4 | 0.6.4 | 0.6.4 | 0.6.4 | 0.6.4 | 0.6.4 | 0.6.4 |
| pycparser | 2.21 | 2.21 | 2.21 | 2.21 | 2.21 | 2.21 | 2.21 |
| pyct | 0.5.0 | 0.5.0 | 0.5.0 | 0.5.0 | 0.5.0 | 0.5.0 | 0.5.0 |
| pycurl | 7.45.2 | 7.45.2 | 7.45.2 | 7.45.2 | 7.45.2 | 7.45.2 | 7.45.2 |
| pydispatcher | 2.0.5 | 2.0.5 | 2.0.5 | 2.0.5 | 2.0.5 | 2.0.5 | |
| pydocstyle | 6.3.0 | 6.3.0 | 6.3.0 | 6.3.0 | 6.3.0 | ||
| pyerfa | 2.0.0 | 2.0.0 | 2.0.0 | 2.0.0 | 2.0.0 | 2.0.0 | 2.0.0 |
| pyflakes | 3.0.1 | 3.0.1 | 3.0.1 | 3.0.1 | 3.0.1 | 3.0.1 | 3.0.1 |
| pygments | 2.15.1 | 2.15.1 | 2.15.1 | 2.15.1 | 2.15.1 | 2.15.1 | 2.15.1 |
| pyjwt | 2.4.0 | 2.4.0 | 2.4.0 | 2.4.0 | 2.4.0 | ||
| pylint | 2.16.2 | 2.16.2 | 2.16.2 | 2.16.2 | 2.16.2 | 2.16.2 | 2.16.2 |
| pylint-venv | 2.3.0 | 2.3.0 | 2.3.0 | 2.3.0 | 2.3.0 | ||
| pyls-spyder | 0.4.0 | 0.4.0 | 0.4.0 | 0.4.0 | 0.4.0 | ||
| pynacl | 1.5.0 | ||||||
| pyobjc-core | 9.0 | 9.0 | |||||
| pyobjc-framework-cocoa | 9.0 | 9.0 | |||||
| pyobjc-framework-coreservices | 9.0 | 9.0 | |||||
| pyobjc-framework-fsevents | 9.0 | 9.0 | |||||
| pyodbc | 4.0.34 | 4.0.34 | 4.0.34 | 4.0.34 | 4.0.34 | 4.0.34 | 4.0.34 |
| pyopenssl | 23.2.0 | 23.2.0 | 23.2.0 | 23.2.0 | 23.2.0 | 23.2.0 | 23.2.0 |
| pyparsing | 3.0.9 | 3.0.9 | 3.0.9 | 3.0.9 | 3.0.9 | 3.0.9 | 3.0.9 |
| pyqt | 5.15.7 | 5.15.7 | 5.15.7 | 5.15.7 | 5.15.7 | ||
| pyqt5-sip | 12.11.0 | 12.11.0 | 12.11.0 | 12.11.0 | 12.11.0 | ||
| pyqtwebengine | 5.15.7 | 5.15.7 | 5.15.7 | 5.15.7 | 5.15.7 | ||
| pyrsistent | 0.18.0 | 0.18.0 | 0.18.0 | 0.18.0 | 0.18.0 | 0.18.0 | 0.18.0 |
| pysocks | 1.7.1 | 1.7.1 | 1.7.1 | 1.7.1 | 1.7.1 | 1.7.1 | 1.7.1 |
| pytables | 3.8.0 | 3.8.0 | 3.8.0 | 3.7.0 | 3.8.0 | 3.8.0 | 3.8.0 |
| pytest | 7.4.0 | 7.4.0 | 7.4.0 | 7.4.0 | 7.4.0 | 7.4.0 | 7.4.0 |
| python | 3.11.4 | 3.11.4 | 3.11.4 | 3.11.4 | 3.11.4 | 3.11.4 | 3.11.4 |
| python-dateutil | 2.8.2 | 2.8.2 | 2.8.2 | 2.8.2 | 2.8.2 | 2.8.2 | 2.8.2 |
| python-fastjsonschema | 2.16.2 | 2.16.2 | 2.16.2 | 2.16.2 | 2.16.2 | 2.16.2 | 2.16.2 |
| python-json-logger | 2.0.7 | 2.0.7 | 2.0.7 | 2.0.7 | 2.0.7 | 2.0.7 | |
| python-libarchive-c | 2.9 | 2.9 | 2.9 | 2.9 | 2.9 | 2.9 | 2.9 |
| python-lmdb | 1.4.1 | 1.4.1 | 1.4.1 | 1.4.1 | 1.4.1 | 1.4.1 | 1.4.1 |
| python-lsp-black | 1.2.1 | 1.2.1 | 1.2.1 | 1.2.1 | 1.2.1 | ||
| python-lsp-jsonrpc | 1.0.0 | 1.0.0 | 1.0.0 | 1.0.0 | 1.0.0 | ||
| python-lsp-server | 1.7.2 | 1.7.2 | 1.7.2 | 1.7.2 | 1.7.2 | ||
| python-slugify | 5.0.2 | 5.0.2 | 5.0.2 | 5.0.2 | 5.0.2 | ||
| python-snappy | 0.6.1 | 0.6.1 | 0.6.1 | 0.6.1 | 0.6.1 | 0.6.1 | 0.6.1 |
| python-xxhash | 2.0.2 | 2.0.2 | 2.0.2 | ||||
| python.app | 3 | 3 | |||||
| pytoolconfig | 1.2.5 | 1.2.5 | 1.2.5 | 1.2.5 | 1.2.5 | ||
| pytorch | 2.0.1 | 2.0.1 | 2.0.1 | ||||
| pytz | 2022.7 | 2022.7 | 2022.7 | 2022.7 | 2022.7 | 2022.7 | 2022.7 |
| pyviz\_comms | 2.3.0 | 2.3.0 | 2.3.0 | 2.3.0 | 2.3.0 | 2.3.0 | 2.3.0 |
| pywavelets | 1.4.1 | 1.4.1 | 1.4.1 | 1.4.1 | 1.4.1 | 1.4.1 | 1.4.1 |
| pywin32 | 305 | ||||||
| pywin32-ctypes | 0.2.0 | ||||||
| pywinpty | 2.0.10 | ||||||
| pyxdg | 0.27 | 0.27 | |||||
| pyyaml | 6.0 | 6.0 | 6.0 | 6.0 | 6.0 | 6.0 | 6.0 |
| pyzmq | 23.2.0 | 23.2.0 | 23.2.0 | 23.2.0 | 23.2.0 | 23.2.0 | 23.2.0 |
| qdarkstyle | 3.0.2 | 3.0.2 | 3.0.2 | 3.0.2 | 3.0.2 | ||
| qstylizer | 0.2.2 | 0.2.2 | 0.2.2 | 0.2.2 | 0.2.2 | ||
| qt-main | 5.15.2 | 5.15.2 | 5.15.2 | 5.15.2 | 5.15.2 | ||
| qt-webengine | 5.15.9 | 5.15.9 | 5.15.9 | 5.15.9 | 5.15.9 | ||
| qtawesome | 1.2.2 | 1.2.2 | 1.2.2 | 1.2.2 | 1.2.2 | ||
| qtconsole | 5.4.2 | 5.4.2 | 5.4.2 | 5.4.2 | 5.4.2 | ||
| qtpy | 2.2.0 | 2.2.0 | 2.2.0 | 2.2.0 | 2.2.0 | ||
| qtwebkit | 5.212 | 5.212 | 5.212 | 5.212 | 5.212 | ||
| queuelib | 1.5.0 | 1.5.0 | 1.5.0 | 1.5.0 | 1.5.0 | 1.5.0 | |
| re2 | 2022.04.01 | 2022.04.01 | 2022.04.01 | 2022.04.01 | 2022.04.01 | 2022.04.01 | |
| readline | 8.2 | 8.2 | 8.2 | 8.2 | 8.2 | 8.2 | |
| regex | 2022.7.9 | 2022.7.9 | 2022.7.9 | 2022.7.9 | 2022.7.9 | 2022.7.9 | 2022.7.9 |
| reproc | 14.2.4 | 14.2.4 | 14.2.4 | 14.2.4 | 14.2.4 | 14.2.4 | 14.2.4 |
| reproc-cpp | 14.2.4 | 14.2.4 | 14.2.4 | 14.2.4 | 14.2.4 | 14.2.4 | 14.2.4 |
| requests | 2.31.0 | 2.31.0 | 2.31.0 | 2.31.0 | 2.31.0 | 2.31.0 | 2.31.0 |
| requests-file | 1.5.1 | 1.5.1 | 1.5.1 | 1.5.1 | 1.5.1 | 1.5.1 | |
| requests-toolbelt | 1.0.0 | 1.0.0 | 1.0.0 | 1.0.0 | 1.0.0 | 1.0.0 | 1.0.0 |
| responses | 0.13.3 | 0.13.3 | 0.13.3 | ||||
| rfc3339-validator | 0.1.4 | 0.1.4 | 0.1.4 | 0.1.4 | 0.1.4 | 0.1.4 | |
| rfc3986-validator | 0.1.1 | 0.1.1 | 0.1.1 | 0.1.1 | 0.1.1 | 0.1.1 | |
| rope | 1.7.0 | 1.7.0 | 1.7.0 | 1.7.0 | 1.7.0 | ||
| rtree | 1.0.1 | 1.0.1 | 1.0.1 | 1.0.1 | 1.0.1 | ||
| ruamel.yaml | 0.17.21 | 0.17.21 | 0.17.21 | 0.17.21 | 0.17.21 | 0.17.21 | 0.17.21 |
| ruamel\_yaml | 0.17.21 | 0.17.21 | 0.17.21 | 0.17.21 | 0.17.21 | 0.17.21 | 0.17.21 |
| s3fs | 2023.4.0 | 2023.4.0 | 2023.3.0 | 2023.3.0 | 2023.4.0 | 2023.3.0 | 2023.3.0 |
| s3transfer | 0.6.0 | 0.6.0 | 0.6.0 | 0.6.0 | |||
| sacremoses | 0.0.43 | 0.0.43 | 0.0.43 | 0.0.43 | 0.0.43 | 0.0.43 | 0.0.43 |
| scikit-image | 0.20.0 | 0.20.0 | 0.20.0 | 0.20.0 | 0.20.0 | 0.20.0 | 0.20.0 |
| scikit-learn | 1.3.0 | 1.3.0 | 1.3.0 | 1.2.2 | 1.3.0 | 1.3.0 | 1.3.0 |
| scikit-learn-intelex | 2023.1.1 | 2023.1.1 | |||||
| scipy | 1.10.1 | 1.10.1 | 1.10.1 | 1.10.1 | 1.10.1 | 1.10.1 | 1.10.1 |
| scrapy | 2.8.0 | 2.8.0 | 2.8.0 | 2.8.0 | 2.8.0 | 2.8.0 | |
| seaborn | 0.12.2 | 0.12.2 | 0.12.2 | 0.12.2 | 0.12.2 | 0.12.2 | 0.12.2 |
| secretstorage | 3.3.1 | 3.3.1 | |||||
| send2trash | 1.8.0 | 1.8.0 | 1.8.0 | 1.8.0 | 1.8.0 | 1.8.0 | 1.8.0 |
| service\_identity | 18.1.0 | 18.1.0 | 18.1.0 | 18.1.0 | 18.1.0 | 18.1.0 | |
| setuptools | 68.0.0 | 68.0.0 | 68.0.0 | 68.0.0 | 68.0.0 | 68.0.0 | 68.0.0 |
| sip | 6.6.2 | 6.6.2 | 6.6.2 | 6.6.2 | 6.6.2 | ||
| six | 1.16.0 | 1.16.0 | 1.16.0 | 1.16.0 | 1.16.0 | 1.16.0 | 1.16.0 |
| sleef | 3.5.1 | ||||||
| smart\_open | 5.2.1 | 5.2.1 | 5.2.1 | 5.2.1 | 5.2.1 | 5.2.1 | |
| snappy | 1.1.9 | 1.1.9 | 1.1.9 | 1.1.9 | 1.1.9 | 1.1.9 | 1.1.9 |
| sniffio | 1.2.0 | 1.2.0 | 1.2.0 | 1.2.0 | 1.2.0 | 1.2.0 | 1.2.0 |
| snowballstemmer | 2.2.0 | 2.2.0 | 2.2.0 | 2.2.0 | 2.2.0 | 2.2.0 | 2.2.0 |
| sortedcontainers | 2.4.0 | 2.4.0 | 2.4.0 | 2.4.0 | 2.4.0 | 2.4.0 | 2.4.0 |
| soupsieve | 2.4 | 2.4 | 2.4 | 2.4 | 2.4 | 2.4 | 2.4 |
| sphinx | 5.0.2 | 5.0.2 | 5.0.2 | 5.0.2 | 5.0.2 | ||
| sphinxcontrib-applehelp | 1.0.2 | 1.0.2 | 1.0.2 | 1.0.2 | 1.0.2 | ||
| sphinxcontrib-devhelp | 1.0.2 | 1.0.2 | 1.0.2 | 1.0.2 | 1.0.2 | ||
| sphinxcontrib-htmlhelp | 2.0.0 | 2.0.0 | 2.0.0 | 2.0.0 | 2.0.0 | ||
| sphinxcontrib-jsmath | 1.0.1 | 1.0.1 | 1.0.1 | 1.0.1 | 1.0.1 | ||
| sphinxcontrib-qthelp | 1.0.3 | 1.0.3 | 1.0.3 | 1.0.3 | 1.0.3 | ||
| sphinxcontrib-serializinghtml | 1.1.5 | 1.1.5 | 1.1.5 | 1.1.5 | 1.1.5 | ||
| spyder | 5.4.3 | 5.4.3 | 5.4.3 | 5.4.3 | 5.4.3 | ||
| spyder-kernels | 2.4.3 | 2.4.3 | 2.4.3 | 2.4.3 | 2.4.3 | ||
| sqlalchemy | 1.4.39 | 1.4.39 | 1.4.39 | 1.4.39 | 1.4.39 | 1.4.39 | 1.4.39 |
| sqlite | 3.41.2 | 3.41.2 | 3.41.2 | 3.41.2 | 3.41.2 | 3.41.2 | 3.41.2 |
| stack\_data | 0.2.0 | 0.2.0 | 0.2.0 | 0.2.0 | 0.2.0 | 0.2.0 | 0.2.0 |
| statsmodels | 0.14.0 | 0.14.0 | 0.14.0 | 0.14.0 | 0.14.0 | 0.14.0 | 0.14.0 |
| sympy | 1.11.1 | 1.11.1 | 1.11.1 | 1.11.1 | 1.11.1 | 1.11.1 | 1.11.1 |
| tabulate | 0.8.10 | 0.8.10 | 0.8.10 | 0.8.10 | 0.8.10 | 0.8.10 | 0.8.10 |
| tapi | 1100.0.11 | 1000.10.8 | |||||
| tbb | 2021.8.0 | 2021.8.0 | 2021.8.0 | 2021.8.0 | 2021.8.0 | 2021.8.0 | 2021.8.0 |
| tbb4py | 2021.8.0 | 2021.8.0 | 2021.8.0 | 2021.8.0 | 2021.8.0 | 2021.8.0 | 2021.8.0 |
| tblib | 1.7.0 | 1.7.0 | 1.7.0 | 1.7.0 | 1.7.0 | 1.7.0 | 1.7.0 |
| tenacity | 8.2.2 | 8.2.2 | 8.2.2 | 8.2.2 | 8.2.2 | 8.2.2 | 8.2.2 |
| terminado | 0.17.1 | 0.17.1 | 0.17.1 | 0.17.1 | 0.17.1 | 0.17.1 | 0.17.1 |
| text-unidecode | 1.3 | 1.3 | 1.3 | 1.3 | 1.3 | ||
| textdistance | 4.2.1 | 4.2.1 | 4.2.1 | 4.2.1 | 4.2.1 | ||
| threadpoolctl | 2.2.0 | 2.2.0 | 2.2.0 | 2.2.0 | 2.2.0 | 2.2.0 | 2.2.0 |
| three-merge | 0.1.1 | 0.1.1 | 0.1.1 | 0.1.1 | 0.1.1 | ||
| tifffile | 2021.7.2 | 2021.7.2 | 2021.7.2 | 2021.7.2 | 2021.7.2 | 2021.7.2 | 2021.7.2 |
| tinycss2 | 1.2.1 | 1.2.1 | 1.2.1 | 1.2.1 | 1.2.1 | 1.2.1 | 1.2.1 |
| tk | 8.6.12 | 8.6.12 | 8.6.12 | 8.6.12 | 8.6.12 | 8.6.12 | 8.6.12 |
| tldextract | 3.2.0 | 3.2.0 | 3.2.0 | 3.2.0 | 3.2.0 | 3.2.0 | |
| tokenizers | 0.13.2 | 0.13.2 | 0.13.2 | ||||
| toml | 0.10.2 | 0.10.2 | 0.10.2 | 0.10.2 | 0.10.2 | ||
| tomlkit | 0.11.1 | 0.11.1 | 0.11.1 | 0.11.1 | 0.11.1 | 0.11.1 | 0.11.1 |
| toolz | 0.12.0 | 0.12.0 | 0.12.0 | 0.12.0 | 0.12.0 | 0.12.0 | 0.12.0 |
| tornado | 6.3.2 | 6.3.2 | 6.3.2 | 6.3.2 | 6.3.2 | 6.3.2 | 6.3.2 |
| tqdm | 4.65.0 | 4.65.0 | 4.65.0 | 4.65.0 | 4.65.0 | 4.65.0 | 4.65.0 |
| traitlets | 5.7.1 | 5.7.1 | 5.7.1 | 5.7.1 | 5.7.1 | 5.7.1 | 5.7.1 |
| transformers | 4.29.2 | 4.29.2 | 2.1.1 | 2.1.1 | 4.29.2 | 2.1.1 | 2.1.1 |
| twisted | 22.10.0 | 22.10.0 | 22.10.0 | 22.10.0 | 22.10.0 | 22.10.0 | |
| twisted-iocpsupport | 1.0.2 | ||||||
| typing-extensions | 4.7.1 | 4.7.1 | 4.7.1 | 4.7.1 | 4.7.1 | 4.7.1 | 4.7.1 |
| typing\_extensions | 4.7.1 | 4.7.1 | 4.7.1 | 4.7.1 | 4.7.1 | 4.7.1 | 4.7.1 |
| tzdata | 2023c | 2023c | 2023c | 2023c | 2023c | 2023c | 2023c |
| uc-micro-py | 1.0.1 | 1.0.1 | 1.0.1 | 1.0.1 | 1.0.1 | ||
| ujson | 5.4.0 | 5.4.0 | 5.4.0 | 5.4.0 | 5.4.0 | ||
| unidecode | 1.2.0 | 1.2.0 | 1.2.0 | 1.2.0 | 1.2.0 | ||
| unixodbc | 2.3.11 | 2.3.11 | 2.3.11 | 2.3.11 | 2.3.11 | 2.3.11 | |
| urllib3 | 1.26.16 | 1.26.16 | 1.26.16 | 1.26.16 | 1.26.16 | 1.26.16 | 1.26.16 |
| utf8proc | 2.6.1 | 2.6.1 | 2.6.1 | 2.6.1 | 2.6.1 | 2.6.1 | |
| vc | 14.2 | ||||||
| vs2015\_runtime | 14.27.29016 | ||||||
| w3lib | 1.21.0 | 1.21.0 | 1.21.0 | 1.21.0 | 1.21.0 | 1.21.0 | |
| watchdog | 2.1.6 | 2.1.6 | 2.1.6 | 2.1.6 | 2.1.6 | ||
| wcwidth | 0.2.5 | 0.2.5 | 0.2.5 | 0.2.5 | 0.2.5 | 0.2.5 | 0.2.5 |
| webencodings | 0.5.1 | 0.5.1 | 0.5.1 | 0.5.1 | 0.5.1 | 0.5.1 | 0.5.1 |
| websocket-client | 0.58.0 | 0.58.0 | 0.58.0 | 0.58.0 | 0.58.0 | 0.58.0 | 0.58.0 |
| werkzeug | 2.2.3 | 2.2.3 | 2.2.3 | 2.2.3 | 2.2.3 | 2.2.3 | 2.2.3 |
| whatthepatch | 1.0.2 | 1.0.2 | 1.0.2 | 1.0.2 | 1.0.2 | ||
| wheel | 0.38.4 | 0.38.4 | 0.38.4 | 0.38.4 | 0.38.4 | 0.38.4 | 0.38.4 |
| widgetsnbextension | 4.0.5 | 4.0.5 | 4.0.5 | 4.0.5 | 4.0.5 | 4.0.5 | 4.0.5 |
| win\_inet\_pton | 1.1.0 | ||||||
| winpty | 0.4.3 | ||||||
| wrapt | 1.14.1 | 1.14.1 | 1.14.1 | 1.14.1 | 1.14.1 | 1.14.1 | 1.14.1 |
| wurlitzer | 3.0.2 | 3.0.2 | 3.0.2 | 3.0.2 | |||
| xarray | 2023.6.0 | 2023.6.0 | 2023.6.0 | 2023.6.0 | 2023.6.0 | 2023.6.0 | |
| xlwings | 0.29.1 | 0.29.1 | 0.29.1 | ||||
| xxhash | 0.8.0 | 0.8.0 | 0.8.0 | ||||
| xyzservices | 2022.9.0 | 2022.9.0 | 2022.9.0 | 2022.9.0 | 2022.9.0 | ||
| xz | 5.4.2 | 5.4.2 | 5.4.2 | 5.4.2 | 5.4.2 | 5.4.2 | 5.4.2 |
| y-py | 0.5.9 | 0.5.9 | 0.5.9 | 0.5.9 | 0.5.9 | 0.5.9 | |
| yaml | 0.2.5 | 0.2.5 | 0.2.5 | 0.2.5 | 0.2.5 | 0.2.5 | 0.2.5 |
| yaml-cpp | 0.7.0 | 0.7.0 | 0.7.0 | 0.7.0 | 0.7.0 | 0.7.0 | 0.7.0 |
| yapf | 0.31.0 | 0.31.0 | 0.31.0 | 0.31.0 | 0.31.0 | ||
| yarl | 1.8.1 | 1.8.1 | 1.8.1 | 1.8.1 | 1.8.1 | 1.8.1 | 1.8.1 |
| ypy-websocket | 0.8.2 | 0.8.2 | 0.8.2 | 0.8.2 | 0.8.2 | 0.8.2 | |
| zeromq | 4.3.4 | 4.3.4 | 4.3.4 | 4.3.4 | 4.3.4 | 4.3.4 | 4.3.4 |
| zfp | 0.5.5 | 0.5.5 | 0.5.5 | 0.5.5 | 0.5.5 | ||
| zict | 2.2.0 | 2.2.0 | 2.2.0 | 2.2.0 | 2.2.0 | 2.2.0 | 2.2.0 |
| zipp | 3.11.0 | 3.11.0 | 3.11.0 | 3.11.0 | 3.11.0 | 3.11.0 | 3.11.0 |
| zlib | 1.2.13 | 1.2.13 | 1.2.13 | 1.2.13 | 1.2.13 | 1.2.13 | 1.2.13 |
| zlib-ng | 2.0.7 | 2.0.7 | 2.0.7 | 2.0.7 | 2.0.7 | 2.0.7 | |
| zope | 1.0 | 1.0 | 1.0 | 1.0 | 1.0 | 1.0 | |
| zope.interface | 5.4.0 | 5.4.0 | 5.4.0 | 5.4.0 | 5.4.0 | 5.4.0 | |
| zstandard | 0.19.0 | 0.19.0 | 0.19.0 | 0.19.0 | 0.19.0 | 0.19.0 | 0.19.0 |
| zstd | 1.5.5 | 1.5.5 | 1.5.5 | 1.5.5 | 1.5.5 | 1.5.5 | 1.5.5 |
| Package Name | linux-64 | linux-aarch64 | linux-ppc64le | linux-s390x |
|---|---|---|---|---|
| \_anaconda\_depends | 2023.07 | 2023.07 | 2023.07 | 2023.07 |
| \_libgcc\_mutex | 0.1 | 0.1 | 0.1 | 0.1 |
| \_openmp\_mutex | 5.1 | 5.1 | 5.1 | 5.1 |
| abseil-cpp | 20211102.0 | 20211102.0 | 20211102.0 | |
| aiobotocore | 2.5.0 | 2.5.0 | 2.4.2 | 2.4.2 |
| aiofiles | 22.1.0 | 22.1.0 | 22.1.0 | |
| aiohttp | 3.8.3 | 3.8.3 | 3.8.3 | 3.8.3 |
| aioitertools | 0.7.1 | 0.7.1 | 0.7.1 | 0.7.1 |
| aiosignal | 1.2.0 | 1.2.0 | 1.2.0 | 1.2.0 |
| aiosqlite | 0.18.0 | 0.18.0 | 0.18.0 | |
| alabaster | 0.7.12 | 0.7.12 | ||
| anaconda-catalogs | 0.2.0 | 0.2.0 | 0.2.0 | 0.2.0 |
| anaconda-client | 1.12.0 | 1.12.0 | 1.12.0 | 1.12.0 |
| anaconda-navigator | 2.4.2 | 2.4.2 | ||
| anaconda-project | 0.11.1 | 0.11.1 | 0.11.1 | 0.11.1 |
| anyio | 3.5.0 | 3.5.0 | 3.5.0 | 3.5.0 |
| appdirs | 1.4.4 | 1.4.4 | 1.4.4 | 1.4.4 |
| argon2-cffi | 21.3.0 | 21.3.0 | 21.3.0 | 21.3.0 |
| argon2-cffi-bindings | 21.2.0 | 21.2.0 | 21.2.0 | 21.2.0 |
| arrow | 1.2.3 | 1.2.3 | ||
| arrow-cpp | 11.0.0 | 11.0.0 | 11.0.0 | |
| astroid | 2.14.2 | 2.14.2 | 2.14.2 | 2.14.2 |
| astropy | 5.1 | 5.1 | 5.1 | 5.1 |
| asttokens | 2.0.5 | 2.0.5 | 2.0.5 | 2.0.5 |
| async-timeout | 4.0.2 | 4.0.2 | 4.0.2 | 4.0.2 |
| atomicwrites | 1.4.0 | 1.4.0 | ||
| attrs | 22.1.0 | 22.1.0 | 22.1.0 | 22.1.0 |
| automat | 20.2.0 | 20.2.0 | 20.2.0 | |
| autopep8 | 1.6.0 | 1.6.0 | ||
| aws-c-common | 0.4.57 | 0.5.11 | 0.4.57 | |
| aws-c-event-stream | 0.1.6 | 0.1.6 | 0.1.6 | |
| aws-checksums | 0.1.9 | 0.1.11 | 0.1.9 | |
| aws-sdk-cpp | 1.8.185 | 1.8.185 | 1.8.185 | |
| babel | 2.11.0 | 2.11.0 | 2.11.0 | 2.11.0 |
| backcall | 0.2.0 | 0.2.0 | 0.2.0 | 0.2.0 |
| backports | 1.1 | 1.1 | 1.1 | 1.1 |
| backports.functools\_lru\_cache | 1.6.4 | 1.6.4 | 1.6.4 | 1.6.4 |
| backports.tempfile | 1.0 | 1.0 | 1.0 | 1.0 |
| backports.weakref | 1.0.post1 | 1.0.post1 | 1.0.post1 | 1.0.post1 |
| bcrypt | 3.2.0 | 3.2.0 | 3.2.0 | |
| beautifulsoup4 | 4.12.2 | 4.12.2 | 4.12.2 | 4.12.2 |
| binaryornot | 0.4.4 | 0.4.4 | ||
| black | 23.3.0 | 23.3.0 | ||
| blas | 1.0 | 1.0 | 1.0 | 1.0 |
| bleach | 4.1.0 | 4.1.0 | 4.1.0 | 4.1.0 |
| blosc | 1.21.3 | 1.21.3 | 1.21.3 | 1.21.3 |
| bokeh | 3.2.1 | 2.4.3 | 3.2.1 | 2.4.3 |
| boltons | 23.0.0 | 23.0.0 | 23.0.0 | 23.0.0 |
| boost-cpp | 1.73.0 | 1.73.0 | 1.73.0 | |
| boto3 | 1.24.28 | 1.24.28 | ||
| botocore | 1.29.76 | 1.29.76 | 1.27.59 | 1.27.59 |
| bottleneck | 1.3.5 | 1.3.5 | 1.3.5 | 1.3.5 |
| brotli | 1.0.9 | 1.0.9 | 1.0.9 | 1.0.9 |
| brotli-bin | 1.0.9 | 1.0.9 | 1.0.9 | 1.0.9 |
| brotlipy | 0.7.0 | 0.7.0 | 0.7.0 | 0.7.0 |
| brunsli | 0.1 | 0.1 | 0.1 | |
| bzip2 | 1.0.8 | 1.0.8 | 1.0.8 | 1.0.8 |
| c-ares | 1.19.0 | 1.19.0 | 1.19.0 | 1.19.0 |
| c-blosc2 | 2.8.0 | 2.8.0 | 2.8.0 | |
| ca-certificates | 2023.05.30 | 2023.05.30 | 2023.05.30 | 2023.05.30 |
| certifi | 2023.7.22 | 2023.7.22 | 2023.7.22 | 2023.7.22 |
| cffi | 1.15.1 | 1.15.1 | 1.15.1 | 1.15.1 |
| cfitsio | 3.470 | 3.470 | 3.470 | 3.470 |
| chardet | 4.0.0 | 4.0.0 | 4.0.0 | 4.0.0 |
| charls | 2.2.0 | 2.2.0 | 2.2.0 | |
| charset-normalizer | 2.0.4 | 2.0.4 | 2.0.4 | 2.0.4 |
| click | 8.0.4 | 8.0.4 | 8.0.4 | 8.0.4 |
| cloudpickle | 2.2.1 | 2.2.1 | 2.2.1 | 2.2.1 |
| clyent | 1.2.2 | 1.2.2 | 1.2.2 | 1.2.2 |
| colorama | 0.4.6 | 0.4.6 | 0.4.6 | 0.4.6 |
| colorcet | 3.0.1 | 3.0.1 | 3.0.1 | 3.0.1 |
| comm | 0.1.2 | 0.1.2 | 0.1.2 | 0.1.2 |
| conda | 23.7.2 | 23.7.2 | 23.7.2 | 23.7.2 |
| conda-build | 3.26.0 | 3.26.0 | 3.26.0 | 3.26.0 |
| conda-content-trust | 0.1.1 | 0.1.1 | 0.1.3 | 0.1.1 |
| conda-index | 0.2.3 | 0.2.3 | 0.2.3 | 0.2.3 |
| conda-libmamba-solver | 23.5.0 | 23.5.0 | 23.5.0 | 23.5.0 |
| conda-pack | 0.6.0 | 0.6.0 | 0.6.0 | 0.6.0 |
| conda-package-handling | 2.2.0 | 2.2.0 | 2.2.0 | 2.2.0 |
| conda-package-streaming | 0.9.0 | 0.9.0 | 0.9.0 | 0.9.0 |
| conda-repo-cli | 1.0.41 | 1.0.41 | ||
| conda-token | 0.4.0 | 0.4.0 | 0.4.0 | 0.4.0 |
| conda-verify | 3.4.2 | 3.4.2 | 3.4.2 | 3.4.2 |
| constantly | 15.1.0 | 15.1.0 | 15.1.0 | |
| contourpy | 1.0.5 | 1.0.5 | 1.0.5 | 1.0.5 |
| cookiecutter | 1.7.3 | 1.7.3 | ||
| cryptography | 41.0.2 | 41.0.2 | 39.0.1 | 41.0.2 |
| cssselect | 1.1.0 | 1.1.0 | 1.1.0 | |
| curl | 8.1.1 | 8.1.1 | 8.1.1 | 8.1.1 |
| cycler | 0.11.0 | 0.11.0 | 0.11.0 | 0.11.0 |
| cytoolz | 0.12.0 | 0.12.0 | 0.12.0 | 0.12.0 |
| daal4py | 2023.1.1 | |||
| dal | 2023.1.1 | |||
| dask | 2023.6.0 | 2023.4.1 | 2023.6.0 | 2023.6.0 |
| dask-core | 2023.6.0 | 2023.4.1 | 2023.6.0 | 2023.6.0 |
| datasets | 2.12.0 | 2.12.0 | ||
| datashader | 0.15.1 | 0.15.1 | 0.15.1 | |
| datashape | 0.5.4 | 0.5.4 | 0.5.4 | |
| dbus | 1.13.18 | 1.13.18 | ||
| debugpy | 1.6.7 | 1.6.7 | 1.6.7 | 1.6.7 |
| decorator | 5.1.1 | 5.1.1 | 5.1.1 | 5.1.1 |
| defusedxml | 0.7.1 | 0.7.1 | 0.7.1 | 0.7.1 |
| diff-match-patch | 20200713 | 20200713 | ||
| dill | 0.3.6 | 0.3.6 | 0.3.6 | 0.3.6 |
| distributed | 2023.6.0 | 2023.4.1 | 2023.6.0 | 2023.6.0 |
| docstring-to-markdown | 0.11 | 0.11 | ||
| docutils | 0.18.1 | 0.18.1 | ||
| entrypoints | 0.4 | 0.4 | 0.4 | 0.4 |
| et\_xmlfile | 1.1.0 | 1.1.0 | 1.1.0 | 1.1.0 |
| executing | 0.8.3 | 0.8.3 | 0.8.3 | 0.8.3 |
| expat | 2.4.9 | 2.4.9 | ||
| filelock | 3.9.0 | 3.9.0 | 3.9.0 | 3.9.0 |
| flake8 | 6.0.0 | 6.0.0 | ||
| flask | 2.2.2 | 2.2.2 | 2.2.2 | 2.2.2 |
| fmt | 9.1.0 | 9.1.0 | 9.1.0 | 9.1.0 |
| fontconfig | 2.14.1 | 2.14.1 | ||
| fonttools | 4.25.0 | 4.25.0 | 4.25.0 | 4.25.0 |
| freetype | 2.12.1 | 2.12.1 | 2.12.1 | 2.12.1 |
| frozenlist | 1.3.3 | 1.3.3 | 1.3.3 | 1.3.3 |
| fsspec | 2023.4.0 | 2023.4.0 | 2023.3.0 | 2023.3.0 |
| future | 0.18.3 | 0.18.3 | 0.18.3 | 0.18.3 |
| gensim | 4.3.0 | 4.3.0 | 4.3.0 | |
| gflags | 2.2.2 | 2.2.2 | 2.2.2 | |
| giflib | 5.2.1 | 5.2.1 | 5.2.1 | 5.2.1 |
| glib | 2.69.1 | 2.69.1 | ||
| glob2 | 0.7 | 0.7 | 0.7 | 0.7 |
| glog | 0.5.0 | 0.5.0 | 0.5.0 | |
| gmp | 6.2.1 | 6.2.1 | 6.2.1 | 6.2.1 |
| gmpy2 | 2.1.2 | 2.1.2 | 2.1.2 | 2.1.2 |
| greenlet | 2.0.1 | 2.0.1 | 2.0.1 | 2.0.1 |
| grpc-cpp | 1.46.1 | 1.46.1 | 1.46.1 | |
| gst-plugins-base | 1.14.1 | 1.14.1 | ||
| gstreamer | 1.14.1 | 1.14.1 | ||
| h5py | 3.7.0 | 3.7.0 | 3.7.0 | 3.7.0 |
| hdf5 | 1.10.6 | 1.10.6 | 1.10.6 | 1.10.6 |
| heapdict | 1.0.1 | 1.0.1 | 1.0.1 | 1.0.1 |
| holoviews | 1.17.0 | 1.17.0 | 1.17.0 | 1.14.8 |
| huggingface\_hub | 0.15.1 | 0.15.1 | ||
| hvplot | 0.8.4 | 0.8.4 | 0.8.4 | 0.7.3 |
| hyperlink | 21.0.0 | 21.0.0 | 21.0.0 | |
| icu | 58.2 | 68.1 | 58.2 | 68.1 |
| idna | 3.4 | 3.4 | 3.4 | 3.3 |
| imagecodecs | 2021.8.26 | 2021.8.26 | 2021.8.26 | 2021.8.26 |
| imageio | 2.31.1 | 2.31.1 | 2.31.1 | 2.26.0 |
| imagesize | 1.4.1 | 1.4.1 | ||
| imbalanced-learn | 0.10.1 | 0.10.1 | 0.10.1 | 0.10.1 |
| importlib-metadata | 6.0.0 | 6.0.0 | 6.0.0 | 6.0.0 |
| importlib\_metadata | 6.0.0 | 6.0.0 | ||
| incremental | 21.3.0 | 21.3.0 | 21.3.0 | |
| inflection | 0.5.1 | 0.5.1 | ||
| iniconfig | 1.1.1 | 1.1.1 | 1.1.1 | 1.1.1 |
| intake | 0.6.8 | 0.6.8 | 0.6.8 | 0.6.8 |
| intel-openmp | 2023.1.0 | |||
| intervaltree | 3.1.0 | 3.1.0 | ||
| ipykernel | 6.19.2 | 6.19.2 | 6.19.2 | 6.19.2 |
| ipython | 8.12.0 | 8.12.0 | 8.12.0 | 8.12.0 |
| ipython\_genutils | 0.2.0 | 0.2.0 | 0.2.0 | 0.2.0 |
| ipywidgets | 8.0.4 | 8.0.4 | 8.0.4 | 8.0.4 |
| isort | 5.9.3 | 5.9.3 | 5.9.3 | 5.9.3 |
| itemadapter | 0.3.0 | 0.3.0 | 0.3.0 | |
| itemloaders | 1.0.4 | 1.0.4 | 1.0.4 | |
| itsdangerous | 2.0.1 | 2.0.1 | 2.0.1 | 2.0.1 |
| jaraco.classes | 3.2.1 | 3.2.1 | ||
| jedi | 0.18.1 | 0.18.1 | 0.18.1 | 0.18.1 |
| jeepney | 0.7.1 | 0.7.1 | ||
| jellyfish | 0.9.0 | 0.9.0 | ||
| jinja2 | 3.1.2 | 3.1.2 | 3.1.2 | 3.1.2 |
| jinja2-time | 0.2.0 | 0.2.0 | ||
| jmespath | 0.10.0 | 0.10.0 | 0.10.0 | 0.10.0 |
| joblib | 1.2.0 | 1.2.0 | 1.2.0 | 1.2.0 |
| jpeg | 9e | 9e | 9e | 9e |
| jq | 1.6 | 1.6 | 1.6 | |
| json5 | 0.9.6 | 0.9.6 | 0.9.6 | 0.9.6 |
| jsonpatch | 1.32 | 1.32 | 1.32 | 1.32 |
| jsonpointer | 2.1 | 2.1 | 2.1 | 2.1 |
| jsonschema | 4.17.3 | 4.17.3 | 4.17.3 | 4.17.3 |
| jupyter | 1.0.0 | 1.0.0 | 1.0.0 | 1.0.0 |
| jupyter\_client | 7.4.9 | 7.4.9 | 7.4.9 | 7.4.9 |
| jupyter\_console | 6.6.3 | 6.6.3 | 6.6.3 | 6.6.3 |
| jupyter\_core | 5.3.0 | 5.3.0 | 5.3.0 | 5.3.0 |
| jupyter\_events | 0.6.3 | 0.6.3 | 0.6.3 | |
| jupyter\_server | 1.23.4 | 1.23.4 | 1.23.4 | 1.23.4 |
| jupyter\_server\_fileid | 0.9.0 | 0.9.0 | 0.9.0 | |
| jupyter\_server\_ydoc | 0.8.0 | 0.8.0 | 0.8.0 | |
| jupyter\_ydoc | 0.2.4 | 0.2.4 | 0.2.4 | |
| jupyterlab | 3.6.3 | 3.6.3 | 3.6.3 | 3.3.2 |
| jupyterlab\_pygments | 0.1.2 | 0.1.2 | 0.1.2 | 0.1.2 |
| jupyterlab\_server | 2.22.0 | 2.22.0 | 2.22.0 | 2.21.0 |
| jupyterlab\_widgets | 3.0.5 | 3.0.5 | 3.0.5 | 3.0.5 |
| jxrlib | 1.1 | 1.1 | 1.1 | 1.1 |
| keyring | 23.13.1 | 23.13.1 | ||
| kiwisolver | 1.4.4 | 1.4.4 | 1.4.4 | 1.4.4 |
| krb5 | 1.20.1 | 1.20.1 | 1.20.1 | 1.20.1 |
| lazy-object-proxy | 1.6.0 | 1.6.0 | 1.6.0 | 1.6.0 |
| lazy\_loader | 0.2 | 0.2 | 0.2 | 0.1 |
| lcms2 | 2.12 | 2.12 | 2.12 | 2.12 |
| ld\_impl\_linux-64 | 2.38 | |||
| ld\_impl\_linux-aarch64 | 2.38 | |||
| ld\_impl\_linux-ppc64le | 2.38 | |||
| ld\_impl\_linux-s390x | 2.38 | |||
| lerc | 3.0 | 3.0 | 3.0 | 3.0 |
| libaec | 1.0.4 | 1.0.4 | 1.0.4 | 1.0.4 |
| libarchive | 3.6.2 | 3.6.2 | 3.6.2 | 3.6.2 |
| libboost | 1.73.0 | 1.73.0 | 1.73.0 | |
| libbrotlicommon | 1.0.9 | 1.0.9 | 1.0.9 | 1.0.9 |
| libbrotlidec | 1.0.9 | 1.0.9 | 1.0.9 | 1.0.9 |
| libbrotlienc | 1.0.9 | 1.0.9 | 1.0.9 | 1.0.9 |
| libclang | 10.0.1 | 10.0.1 | ||
| libcurl | 8.1.1 | 8.1.1 | 8.1.1 | 8.1.1 |
| libdeflate | 1.17 | 1.17 | 1.17 | 1.17 |
| libedit | 3.1.20221030 | 3.1.20221030 | 3.1.20221030 | 3.1.20221030 |
| libev | 4.33 | 4.33 | 4.33 | 4.33 |
| libevent | 2.1.12 | 2.1.12 | 2.1.12 | |
| libffi | 3.4.4 | 3.4.4 | 3.4.4 | 3.4.2 |
| libgcc-ng | 11.2.0 | 11.2.0 | 11.2.0 | 11.2.0 |
| libgfortran-ng | 11.2.0 | 11.2.0 | 11.2.0 | 11.2.0 |
| libgfortran5 | 11.2.0 | 11.2.0 | 11.2.0 | 11.2.0 |
| libgomp | 11.2.0 | 11.2.0 | 11.2.0 | 11.2.0 |
| liblief | 0.12.3 | 0.12.3 | 0.12.3 | 0.12.3 |
| libllvm10 | 10.0.1 | 10.0.1 | ||
| libllvm14 | 14.0.6 | 14.0.6 | 14.0.6 | |
| libmamba | 1.4.1 | 1.4.1 | 1.4.1 | 1.4.1 |
| libmambapy | 1.4.1 | 1.4.1 | 1.4.1 | 1.4.1 |
| libnghttp2 | 1.52.0 | 1.52.0 | 1.52.0 | 1.52.0 |
| libopenblas | 0.3.21 | 0.3.21 | 0.3.21 | |
| libpng | 1.6.39 | 1.6.39 | 1.6.39 | 1.6.39 |
| libpq | 12.15 | 12.15 | ||
| libprotobuf | 3.20.3 | 3.20.3 | 3.20.3 | |
| libsodium | 1.0.18 | 1.0.18 | 1.0.18 | 1.0.18 |
| libsolv | 0.7.22 | 0.7.22 | 0.7.22 | 0.7.22 |
| libspatialindex | 1.9.3 | 1.9.3 | ||
| libssh2 | 1.10.0 | 1.10.0 | 1.10.0 | 1.10.0 |
| libstdcxx-ng | 11.2.0 | 11.2.0 | 11.2.0 | 11.2.0 |
| libthrift | 0.15.0 | 0.15.0 | 0.15.0 | |
| libtiff | 4.5.0 | 4.5.0 | 4.5.0 | 4.5.0 |
| libuuid | 1.41.5 | 1.41.5 | 1.41.5 | 1.41.5 |
| libwebp | 1.2.4 | 1.2.4 | 1.2.4 | 1.2.4 |
| libwebp-base | 1.2.4 | 1.2.4 | 1.2.4 | 1.2.4 |
| libxcb | 1.15 | 1.15 | ||
| libxkbcommon | 1.0.1 | 1.0.1 | ||
| libxml2 | 2.9.14 | 2.9.14 | 2.10.3 | 2.10.3 |
| libxslt | 1.1.35 | 1.1.35 | 1.1.37 | 1.1.37 |
| libzopfli | 1.0.3 | 1.0.3 | 1.0.3 | 1.0.3 |
| linkify-it-py | 2.0.0 | 2.0.0 | ||
| llvmlite | 0.40.0 | 0.40.0 | 0.40.0 | |
| locket | 1.0.0 | 1.0.0 | 1.0.0 | 1.0.0 |
| lxml | 4.9.1 | 4.9.1 | 4.9.2 | 4.9.2 |
| lz4 | 4.3.2 | 4.3.2 | 4.3.2 | |
| lz4-c | 1.9.4 | 1.9.4 | 1.9.4 | 1.9.4 |
| lzo | 2.10 | 2.10 | 2.10 | 2.10 |
| markdown | 3.4.1 | 3.4.1 | 3.4.1 | 3.4.1 |
| markdown-it-py | 2.2.0 | 2.2.0 | ||
| markupsafe | 2.1.1 | 2.1.1 | 2.1.1 | 2.1.1 |
| matplotlib | 3.7.1 | 3.7.1 | 3.7.1 | 3.7.1 |
| matplotlib-base | 3.7.1 | 3.7.1 | 3.7.1 | 3.7.1 |
| matplotlib-inline | 0.1.6 | 0.1.6 | 0.1.6 | 0.1.6 |
| mccabe | 0.7.0 | 0.7.0 | 0.7.0 | 0.7.0 |
| mdit-py-plugins | 0.3.0 | 0.3.0 | ||
| mdurl | 0.1.0 | 0.1.0 | ||
| mistune | 0.8.4 | 0.8.4 | 0.8.4 | 0.8.4 |
| mkl | 2023.1.0 | |||
| mkl-service | 2.4.0 | |||
| mkl\_fft | 1.3.6 | |||
| mkl\_random | 1.2.2 | |||
| mock | 4.0.3 | |||
| more-itertools | 8.12.0 | 8.12.0 | 8.12.0 | 8.12.0 |
| mpc | 1.1.0 | 1.1.0 | 1.1.0 | 1.1.0 |
| mpfr | 4.0.2 | 4.0.2 | 4.0.2 | 4.0.2 |
| mpi | 1.0 | |||
| mpich | 4.1.1 | |||
| mpmath | 1.3.0 | 1.3.0 | 1.3.0 | 1.3.0 |
| msgpack-python | 1.0.3 | 1.0.3 | 1.0.3 | 1.0.3 |
| multidict | 6.0.2 | 6.0.2 | 6.0.2 | 6.0.2 |
| multipledispatch | 0.6.0 | 0.6.0 | 0.6.0 | |
| multiprocess | 0.70.14 | 0.70.14 | ||
| munkres | 1.1.4 | 1.1.4 | 1.1.4 | 1.1.4 |
| mypy\_extensions | 0.4.3 | 0.4.3 | ||
| navigator-updater | 0.4.0 | 0.4.0 | ||
| nbclassic | 0.5.5 | 0.5.5 | 0.5.5 | 0.5.5 |
| nbclient | 0.5.13 | 0.5.13 | 0.5.13 | 0.5.13 |
| nbconvert | 6.5.4 | 6.5.4 | 6.5.4 | 6.5.4 |
| nbformat | 5.7.0 | 5.7.0 | 5.7.0 | 5.7.0 |
| ncurses | 6.4 | 6.4 | 6.4 | 6.4 |
| nest-asyncio | 1.5.6 | 1.5.6 | 1.5.6 | 1.5.6 |
| networkx | 3.1 | 3.1 | 3.1 | 3.1 |
| ninja | 1.10.2 | 1.10.2 | ||
| ninja-base | 1.10.2 | 1.10.2 | ||
| nltk | 3.8.1 | 3.8.1 | 3.8.1 | 3.8.1 |
| notebook | 6.5.4 | 6.5.4 | 6.5.4 | 6.5.4 |
| notebook-shim | 0.2.2 | 0.2.2 | 0.2.2 | 0.2.2 |
| nspr | 4.35 | 4.35 | ||
| nss | 3.89.1 | 3.89.1 | ||
| numba | 0.57.0 | 0.57.0 | 0.57.0 | |
| numexpr | 2.8.4 | 2.8.4 | 2.8.4 | 2.8.4 |
| numpy | 1.24.3 | 1.24.3 | 1.24.3 | 1.25.0 |
| numpy-base | 1.24.3 | 1.24.3 | 1.24.3 | 1.25.0 |
| numpydoc | 1.5.0 | 1.5.0 | ||
| oniguruma | 6.9.7.1 | 6.9.7.1 | 6.9.7.1 | |
| openjpeg | 2.4.0 | 2.4.0 | 2.4.0 | 2.4.0 |
| openpyxl | 3.0.10 | 3.0.10 | 3.0.10 | 3.0.10 |
| openssl | 1.1.1u | 1.1.1u | 1.1.1u | 1.1.1u |
| orc | 1.7.4 | 1.7.4 | 1.7.4 | |
| packaging | 23.0 | 23.0 | 23.0 | 23.0 |
| pandas | 1.5.3 | 1.5.3 | 1.5.3 | 1.5.3 |
| pandocfilters | 1.5.0 | 1.5.0 | 1.5.0 | 1.5.0 |
| panel | 1.2.1 | 0.14.3 | 1.2.1 | 0.12.6 |
| param | 1.13.0 | 1.13.0 | 1.13.0 | 1.13.0 |
| parsel | 1.6.0 | 1.6.0 | 1.6.0 | |
| parso | 0.8.3 | 0.8.3 | 0.8.3 | 0.8.3 |
| partd | 1.2.0 | 1.2.0 | 1.2.0 | 1.2.0 |
| patch | 2.7.6 | 2.7.6 | 2.7.6 | 2.7.6 |
| patchelf | 0.17.2 | 0.17.2 | 0.17.2 | 0.17.2 |
| pathlib | 1.0.1 | 1.0.1 | ||
| pathspec | 0.10.3 | 0.10.3 | ||
| patsy | 0.5.3 | 0.5.3 | 0.5.3 | 0.5.3 |
| pcre | 8.45 | 8.45 | ||
| pcre2 | 10.37 | 10.37 | 10.37 | 10.37 |
| pep8 | 1.7.1 | 1.7.1 | 1.7.1 | 1.7.1 |
| pexpect | 4.8.0 | 4.8.0 | 4.8.0 | 4.8.0 |
| pickleshare | 0.7.5 | 0.7.5 | 0.7.5 | 0.7.5 |
| pillow | 9.4.0 | 9.4.0 | 9.4.0 | 9.4.0 |
| pip | 23.2.1 | 23.2.1 | 23.2.1 | 23.2.1 |
| pkginfo | 1.9.6 | 1.9.6 | 1.9.6 | 1.9.6 |
| platformdirs | 2.5.2 | 2.5.2 | 2.5.2 | 2.5.2 |
| plotly | 5.9.0 | 5.9.0 | 5.9.0 | 5.9.0 |
| pluggy | 1.0.0 | 1.0.0 | 1.0.0 | 1.0.0 |
| ply | 3.11 | 3.11 | ||
| pooch | 1.4.0 | 1.4.0 | 1.4.0 | 1.4.0 |
| poyo | 0.5.0 | 0.5.0 | ||
| prometheus\_client | 0.14.1 | 0.14.1 | 0.14.1 | 0.14.1 |
| prompt-toolkit | 3.0.36 | 3.0.36 | 3.0.36 | 3.0.36 |
| prompt\_toolkit | 3.0.36 | 3.0.36 | 3.0.36 | 3.0.36 |
| protego | 0.1.16 | 0.1.16 | 0.1.16 | |
| psutil | 5.9.0 | 5.9.0 | 5.9.0 | 5.9.0 |
| ptyprocess | 0.7.0 | 0.7.0 | 0.7.0 | 0.7.0 |
| pure\_eval | 0.2.2 | 0.2.2 | 0.2.2 | 0.2.2 |
| py-cpuinfo | 8.0.0 | 8.0.0 | 8.0.0 | |
| py-lief | 0.12.3 | 0.12.3 | 0.12.3 | 0.12.3 |
| pyarrow | 11.0.0 | 11.0.0 | 11.0.0 | |
| pyasn1 | 0.4.8 | 0.4.8 | 0.4.8 | |
| pyasn1-modules | 0.2.8 | 0.2.8 | 0.2.8 | |
| pybind11-abi | 4 | 4 | 4 | 4 |
| pycodestyle | 2.10.0 | 2.10.0 | ||
| pycosat | 0.6.4 | 0.6.4 | 0.6.4 | 0.6.4 |
| pycparser | 2.21 | 2.21 | 2.21 | 2.21 |
| pyct | 0.5.0 | 0.5.0 | 0.5.0 | 0.5.0 |
| pycurl | 7.45.2 | 7.45.2 | 7.45.2 | 7.45.2 |
| pydispatcher | 2.0.5 | 2.0.5 | 2.0.5 | |
| pydocstyle | 6.3.0 | 6.3.0 | ||
| pyerfa | 2.0.0 | 2.0.0 | 2.0.0 | 2.0.0 |
| pyflakes | 3.0.1 | 3.0.1 | 3.0.1 | 3.0.1 |
| pygments | 2.15.1 | 2.15.1 | 2.15.1 | 2.15.1 |
| pyjwt | 2.4.0 | 2.4.0 | ||
| pylint | 2.16.2 | 2.16.2 | 2.16.2 | 2.16.2 |
| pylint-venv | 2.3.0 | 2.3.0 | ||
| pyls-spyder | 0.4.0 | 0.4.0 | ||
| pyodbc | 4.0.34 | 4.0.34 | 4.0.34 | 4.0.34 |
| pyopenssl | 23.2.0 | 23.2.0 | 23.2.0 | 23.2.0 |
| pyparsing | 3.0.9 | 3.0.9 | 3.0.9 | 3.0.9 |
| pyqt | 5.15.7 | 5.15.7 | ||
| pyqt5-sip | 12.11.0 | 12.11.0 | ||
| pyqtwebengine | 5.15.7 | 5.15.7 | ||
| pyrsistent | 0.18.0 | 0.18.0 | 0.18.0 | 0.18.0 |
| pysocks | 1.7.1 | 1.7.1 | 1.7.1 | 1.7.1 |
| pytables | 3.8.0 | 3.8.0 | 3.8.0 | 3.7.0 |
| pytest | 7.4.0 | 7.4.0 | 7.4.0 | 7.4.0 |
| python | 3.11.4 | 3.11.4 | 3.11.4 | 3.11.4 |
| python-dateutil | 2.8.2 | 2.8.2 | 2.8.2 | 2.8.2 |
| python-fastjsonschema | 2.16.2 | 2.16.2 | 2.16.2 | 2.16.2 |
| python-json-logger | 2.0.7 | 2.0.7 | 2.0.7 | |
| python-libarchive-c | 2.9 | 2.9 | 2.9 | 2.9 |
| python-lmdb | 1.4.1 | 1.4.1 | 1.4.1 | 1.4.1 |
| python-lsp-black | 1.2.1 | 1.2.1 | ||
| python-lsp-jsonrpc | 1.0.0 | 1.0.0 | ||
| python-lsp-server | 1.7.2 | 1.7.2 | ||
| python-slugify | 5.0.2 | 5.0.2 | ||
| python-snappy | 0.6.1 | 0.6.1 | 0.6.1 | 0.6.1 |
| python-xxhash | 2.0.2 | 2.0.2 | ||
| pytoolconfig | 1.2.5 | 1.2.5 | ||
| pytorch | 2.0.1 | 2.0.1 | ||
| pytz | 2022.7 | 2022.7 | 2022.7 | 2022.7 |
| pyviz\_comms | 2.3.0 | 2.3.0 | 2.3.0 | 2.3.0 |
| pywavelets | 1.4.1 | 1.4.1 | 1.4.1 | 1.4.1 |
| pyxdg | 0.27 | 0.27 | ||
| pyyaml | 6.0 | 6.0 | 6.0 | 6.0 |
| pyzmq | 23.2.0 | 23.2.0 | 23.2.0 | 23.2.0 |
| qdarkstyle | 3.0.2 | 3.0.2 | ||
| qstylizer | 0.2.2 | 0.2.2 | ||
| qt-main | 5.15.2 | 5.15.2 | ||
| qt-webengine | 5.15.9 | 5.15.9 | ||
| qtawesome | 1.2.2 | 1.2.2 | ||
| qtconsole | 5.4.2 | 5.4.2 | ||
| qtpy | 2.2.0 | 2.2.0 | ||
| qtwebkit | 5.212 | 5.212 | ||
| queuelib | 1.5.0 | 1.5.0 | 1.5.0 | |
| re2 | 2022.04.01 | 2022.04.01 | 2022.04.01 | |
| readline | 8.2 | 8.2 | 8.2 | 8.2 |
| regex | 2022.7.9 | 2022.7.9 | 2022.7.9 | 2022.7.9 |
| reproc | 14.2.4 | 14.2.4 | 14.2.4 | 14.2.4 |
| reproc-cpp | 14.2.4 | 14.2.4 | 14.2.4 | 14.2.4 |
| requests | 2.31.0 | 2.31.0 | 2.31.0 | 2.31.0 |
| requests-file | 1.5.1 | 1.5.1 | 1.5.1 | |
| requests-toolbelt | 1.0.0 | 1.0.0 | 1.0.0 | 1.0.0 |
| responses | 0.13.3 | 0.13.3 | ||
| rfc3339-validator | 0.1.4 | 0.1.4 | 0.1.4 | |
| rfc3986-validator | 0.1.1 | 0.1.1 | 0.1.1 | |
| rope | 1.7.0 | 1.7.0 | ||
| rtree | 1.0.1 | 1.0.1 | ||
| ruamel.yaml | 0.17.21 | 0.17.21 | 0.17.21 | 0.17.21 |
| ruamel\_yaml | 0.17.21 | 0.17.21 | 0.17.21 | 0.17.21 |
| s3fs | 2023.4.0 | 2023.4.0 | 2023.3.0 | 2023.3.0 |
| s3transfer | 0.6.0 | 0.6.0 | ||
| sacremoses | 0.0.43 | 0.0.43 | 0.0.43 | 0.0.43 |
| scikit-image | 0.20.0 | 0.20.0 | 0.20.0 | 0.20.0 |
| scikit-learn | 1.3.0 | 1.3.0 | 1.3.0 | 1.2.2 |
| scikit-learn-intelex | 2023.1.1 | |||
| scipy | 1.10.1 | 1.10.1 | 1.10.1 | 1.10.1 |
| scrapy | 2.8.0 | 2.8.0 | 2.8.0 | |
| seaborn | 0.12.2 | 0.12.2 | 0.12.2 | 0.12.2 |
| secretstorage | 3.3.1 | 3.3.1 | ||
| send2trash | 1.8.0 | 1.8.0 | 1.8.0 | 1.8.0 |
| service\_identity | 18.1.0 | 18.1.0 | 18.1.0 | |
| setuptools | 68.0.0 | 68.0.0 | 68.0.0 | 68.0.0 |
| sip | 6.6.2 | 6.6.2 | ||
| six | 1.16.0 | 1.16.0 | 1.16.0 | 1.16.0 |
| smart\_open | 5.2.1 | 5.2.1 | 5.2.1 | |
| snappy | 1.1.9 | 1.1.9 | 1.1.9 | 1.1.9 |
| sniffio | 1.2.0 | 1.2.0 | 1.2.0 | 1.2.0 |
| snowballstemmer | 2.2.0 | 2.2.0 | 2.2.0 | 2.2.0 |
| sortedcontainers | 2.4.0 | 2.4.0 | 2.4.0 | 2.4.0 |
| soupsieve | 2.4 | 2.4 | 2.4 | 2.4 |
| sphinx | 5.0.2 | 5.0.2 | ||
| sphinxcontrib-applehelp | 1.0.2 | 1.0.2 | ||
| sphinxcontrib-devhelp | 1.0.2 | 1.0.2 | ||
| sphinxcontrib-htmlhelp | 2.0.0 | 2.0.0 | ||
| sphinxcontrib-jsmath | 1.0.1 | 1.0.1 | ||
| sphinxcontrib-qthelp | 1.0.3 | 1.0.3 | ||
| sphinxcontrib-serializinghtml | 1.1.5 | 1.1.5 | ||
| spyder | 5.4.3 | 5.4.3 | ||
| spyder-kernels | 2.4.3 | 2.4.3 | ||
| sqlalchemy | 1.4.39 | 1.4.39 | 1.4.39 | 1.4.39 |
| sqlite | 3.41.2 | 3.41.2 | 3.41.2 | 3.41.2 |
| stack\_data | 0.2.0 | 0.2.0 | 0.2.0 | 0.2.0 |
| statsmodels | 0.14.0 | 0.14.0 | 0.14.0 | 0.14.0 |
| sympy | 1.11.1 | 1.11.1 | 1.11.1 | 1.11.1 |
| tabulate | 0.8.10 | 0.8.10 | 0.8.10 | 0.8.10 |
| tbb | 2021.8.0 | 2021.8.0 | 2021.8.0 | 2021.8.0 |
| tbb4py | 2021.8.0 | 2021.8.0 | 2021.8.0 | 2021.8.0 |
| tblib | 1.7.0 | 1.7.0 | 1.7.0 | 1.7.0 |
| tenacity | 8.2.2 | 8.2.2 | 8.2.2 | 8.2.2 |
| terminado | 0.17.1 | 0.17.1 | 0.17.1 | 0.17.1 |
| text-unidecode | 1.3 | 1.3 | ||
| textdistance | 4.2.1 | 4.2.1 | ||
| threadpoolctl | 2.2.0 | 2.2.0 | 2.2.0 | 2.2.0 |
| three-merge | 0.1.1 | 0.1.1 | ||
| tifffile | 2021.7.2 | 2021.7.2 | 2021.7.2 | 2021.7.2 |
| tinycss2 | 1.2.1 | 1.2.1 | 1.2.1 | 1.2.1 |
| tk | 8.6.12 | 8.6.12 | 8.6.12 | 8.6.12 |
| tldextract | 3.2.0 | 3.2.0 | 3.2.0 | |
| tokenizers | 0.13.2 | 0.13.2 | ||
| toml | 0.10.2 | 0.10.2 | ||
| tomlkit | 0.11.1 | 0.11.1 | 0.11.1 | 0.11.1 |
| toolz | 0.12.0 | 0.12.0 | 0.12.0 | 0.12.0 |
| tornado | 6.3.2 | 6.3.2 | 6.3.2 | 6.3.2 |
| tqdm | 4.65.0 | 4.65.0 | 4.65.0 | 4.65.0 |
| traitlets | 5.7.1 | 5.7.1 | 5.7.1 | 5.7.1 |
| transformers | 4.29.2 | 4.29.2 | 2.1.1 | 2.1.1 |
| twisted | 22.10.0 | 22.10.0 | 22.10.0 | |
| typing-extensions | 4.7.1 | 4.7.1 | 4.7.1 | 4.7.1 |
| typing\_extensions | 4.7.1 | 4.7.1 | 4.7.1 | 4.7.1 |
| tzdata | 2023c | 2023c | 2023c | 2023c |
| uc-micro-py | 1.0.1 | 1.0.1 | ||
| ujson | 5.4.0 | 5.4.0 | ||
| unidecode | 1.2.0 | 1.2.0 | ||
| unixodbc | 2.3.11 | 2.3.11 | 2.3.11 | 2.3.11 |
| urllib3 | 1.26.16 | 1.26.16 | 1.26.16 | 1.26.16 |
| utf8proc | 2.6.1 | 2.6.1 | 2.6.1 | |
| w3lib | 1.21.0 | 1.21.0 | 1.21.0 | |
| watchdog | 2.1.6 | 2.1.6 | ||
| wcwidth | 0.2.5 | 0.2.5 | 0.2.5 | 0.2.5 |
| webencodings | 0.5.1 | 0.5.1 | 0.5.1 | 0.5.1 |
| websocket-client | 0.58.0 | 0.58.0 | 0.58.0 | 0.58.0 |
| werkzeug | 2.2.3 | 2.2.3 | 2.2.3 | 2.2.3 |
| whatthepatch | 1.0.2 | 1.0.2 | ||
| wheel | 0.38.4 | 0.38.4 | 0.38.4 | 0.38.4 |
| widgetsnbextension | 4.0.5 | 4.0.5 | 4.0.5 | 4.0.5 |
| wrapt | 1.14.1 | 1.14.1 | 1.14.1 | 1.14.1 |
| wurlitzer | 3.0.2 | 3.0.2 | ||
| xarray | 2023.6.0 | 2023.6.0 | 2023.6.0 | |
| xxhash | 0.8.0 | 0.8.0 | ||
| xyzservices | 2022.9.0 | 2022.9.0 | ||
| xz | 5.4.2 | 5.4.2 | 5.4.2 | 5.4.2 |
| y-py | 0.5.9 | 0.5.9 | 0.5.9 | |
| yaml | 0.2.5 | 0.2.5 | 0.2.5 | 0.2.5 |
| yaml-cpp | 0.7.0 | 0.7.0 | 0.7.0 | 0.7.0 |
| yapf | 0.31.0 | 0.31.0 | ||
| yarl | 1.8.1 | 1.8.1 | 1.8.1 | 1.8.1 |
| ypy-websocket | 0.8.2 | 0.8.2 | 0.8.2 | |
| zeromq | 4.3.4 | 4.3.4 | 4.3.4 | 4.3.4 |
| zfp | 0.5.5 | 0.5.5 | ||
| zict | 2.2.0 | 2.2.0 | 2.2.0 | 2.2.0 |
| zipp | 3.11.0 | 3.11.0 | 3.11.0 | 3.11.0 |
| zlib | 1.2.13 | 1.2.13 | 1.2.13 | 1.2.13 |
| zlib-ng | 2.0.7 | 2.0.7 | 2.0.7 | |
| zope | 1.0 | 1.0 | 1.0 | |
| zope.interface | 5.4.0 | 5.4.0 | 5.4.0 | |
| zstandard | 0.19.0 | 0.19.0 | 0.19.0 | 0.19.0 |
| zstd | 1.5.5 | 1.5.5 | 1.5.5 | 1.5.5 |
| Package Name | osx-arm64 | osx-64 |
|---|---|---|
| \_anaconda\_depends | 2023.07 | 2023.07 |
| abseil-cpp | 20211102.0 | 20211102.0 |
| aiobotocore | 2.5.0 | 2.4.2 |
| aiofiles | 22.1.0 | 22.1.0 |
| aiohttp | 3.8.3 | 3.8.3 |
| aioitertools | 0.7.1 | 0.7.1 |
| aiosignal | 1.2.0 | 1.2.0 |
| aiosqlite | 0.18.0 | 0.18.0 |
| alabaster | 0.7.12 | 0.7.12 |
| anaconda-catalogs | 0.2.0 | 0.2.0 |
| anaconda-client | 1.12.0 | 1.12.0 |
| anaconda-navigator | 2.4.2 | 2.4.2 |
| anaconda-project | 0.11.1 | 0.11.1 |
| anyio | 3.5.0 | 3.5.0 |
| appdirs | 1.4.4 | 1.4.4 |
| applaunchservices | 0.3.0 | 0.3.0 |
| appnope | 0.1.2 | 0.1.2 |
| appscript | 1.1.2 | 1.1.2 |
| argon2-cffi | 21.3.0 | 21.3.0 |
| argon2-cffi-bindings | 21.2.0 | 21.2.0 |
| arrow | 1.2.3 | 1.2.3 |
| arrow-cpp | 11.0.0 | 11.0.0 |
| astroid | 2.14.2 | 2.14.2 |
| astropy | 5.1 | 5.1 |
| asttokens | 2.0.5 | 2.0.5 |
| async-timeout | 4.0.2 | 4.0.2 |
| atomicwrites | 1.4.0 | 1.4.0 |
| attrs | 22.1.0 | 22.1.0 |
| automat | 20.2.0 | 20.2.0 |
| autopep8 | 1.6.0 | 1.6.0 |
| aws-c-common | 0.6.8 | 0.4.57 |
| aws-c-event-stream | 0.1.6 | 0.1.6 |
| aws-checksums | 0.1.11 | 0.1.9 |
| aws-sdk-cpp | 1.8.185 | 1.8.185 |
| babel | 2.11.0 | 2.11.0 |
| backcall | 0.2.0 | 0.2.0 |
| backports | 1.1 | 1.1 |
| backports.functools\_lru\_cache | 1.6.4 | 1.6.4 |
| backports.tempfile | 1.0 | 1.0 |
| backports.weakref | 1.0.post1 | 1.0.post1 |
| bcrypt | 3.2.0 | 3.2.0 |
| beautifulsoup4 | 4.12.2 | 4.12.2 |
| binaryornot | 0.4.4 | 0.4.4 |
| black | 23.3.0 | 23.3.0 |
| blas | 1.0 | 1.0 |
| bleach | 4.1.0 | 4.1.0 |
| blosc | 1.21.3 | 1.21.3 |
| bokeh | 3.2.1 | 3.2.1 |
| boltons | 23.0.0 | 23.0.0 |
| boost-cpp | 1.73.0 | 1.73.0 |
| boto3 | 1.24.28 | |
| botocore | 1.29.76 | 1.27.59 |
| bottleneck | 1.3.5 | 1.3.5 |
| brotli | 1.0.9 | 1.0.9 |
| brotli-bin | 1.0.9 | 1.0.9 |
| brotlipy | 0.7.0 | 0.7.0 |
| brunsli | 0.1 | 0.1 |
| bzip2 | 1.0.8 | 1.0.8 |
| c-ares | 1.19.0 | 1.19.0 |
| c-blosc2 | 2.8.0 | 2.8.0 |
| ca-certificates | 2023.05.30 | 2023.05.30 |
| cctools | 949.0.1 | 949.0.1 |
| cctools\_osx-64 | 949.0.1 | |
| cctools\_osx-arm64 | 949.0.1 | |
| certifi | 2023.7.22 | 2023.7.22 |
| cffi | 1.15.1 | 1.15.1 |
| cfitsio | 3.470 | 3.470 |
| chardet | 4.0.0 | 4.0.0 |
| charls | 2.2.0 | 2.2.0 |
| charset-normalizer | 2.0.4 | 2.0.4 |
| click | 8.0.4 | 8.0.4 |
| cloudpickle | 2.2.1 | 2.2.1 |
| clyent | 1.2.2 | 1.2.2 |
| colorama | 0.4.6 | 0.4.6 |
| colorcet | 3.0.1 | 3.0.1 |
| comm | 0.1.2 | 0.1.2 |
| conda | 23.7.2 | 23.7.2 |
| conda-build | 3.26.0 | 3.26.0 |
| conda-content-trust | 0.1.1 | 0.1.1 |
| conda-index | 0.2.3 | 0.2.3 |
| conda-libmamba-solver | 23.5.0 | 23.5.0 |
| conda-pack | 0.6.0 | 0.6.0 |
| conda-package-handling | 2.2.0 | 2.2.0 |
| conda-package-streaming | 0.9.0 | 0.9.0 |
| conda-repo-cli | 1.0.41 | 1.0.41 |
| conda-token | 0.4.0 | 0.4.0 |
| conda-verify | 3.4.2 | 3.4.2 |
| constantly | 15.1.0 | 15.1.0 |
| contourpy | 1.0.5 | 1.0.5 |
| cookiecutter | 1.7.3 | 1.7.3 |
| cryptography | 41.0.2 | 41.0.2 |
| cssselect | 1.1.0 | 1.1.0 |
| curl | 8.1.1 | 8.1.1 |
| cycler | 0.11.0 | 0.11.0 |
| cytoolz | 0.12.0 | 0.12.0 |
| dask | 2023.6.0 | 2023.6.0 |
| dask-core | 2023.6.0 | 2023.6.0 |
| datasets | 2.12.0 | |
| datashader | 0.15.1 | 0.15.1 |
| datashape | 0.5.4 | 0.5.4 |
| debugpy | 1.6.7 | 1.6.7 |
| decorator | 5.1.1 | 5.1.1 |
| defusedxml | 0.7.1 | 0.7.1 |
| diff-match-patch | 20200713 | 20200713 |
| dill | 0.3.6 | 0.3.6 |
| distributed | 2023.6.0 | 2023.6.0 |
| docstring-to-markdown | 0.11 | 0.11 |
| docutils | 0.18.1 | 0.18.1 |
| entrypoints | 0.4 | 0.4 |
| et\_xmlfile | 1.1.0 | 1.1.0 |
| executing | 0.8.3 | 0.8.3 |
| filelock | 3.9.0 | 3.9.0 |
| flake8 | 6.0.0 | 6.0.0 |
| flask | 2.2.2 | 2.2.2 |
| fmt | 9.1.0 | 9.1.0 |
| fonttools | 4.25.0 | 4.25.0 |
| freetype | 2.12.1 | 2.12.1 |
| frozenlist | 1.3.3 | 1.3.3 |
| fsspec | 2023.4.0 | 2023.3.0 |
| future | 0.18.3 | 0.18.3 |
| gensim | 4.3.0 | 4.3.0 |
| gettext | 0.21.0 | 0.21.0 |
| gflags | 2.2.2 | 2.2.2 |
| giflib | 5.2.1 | 5.2.1 |
| glib | 2.69.1 | 2.69.1 |
| glob2 | 0.7 | 0.7 |
| glog | 0.5.0 | 0.5.0 |
| gmp | 6.2.1 | 6.2.1 |
| gmpy2 | 2.1.2 | 2.1.2 |
| greenlet | 2.0.1 | 2.0.1 |
| grpc-cpp | 1.46.1 | 1.46.1 |
| gst-plugins-base | 1.14.1 | 1.14.1 |
| gstreamer | 1.14.1 | 1.14.1 |
| h5py | 3.7.0 | 3.7.0 |
| hdf5 | 1.12.1 | 1.10.6 |
| heapdict | 1.0.1 | 1.0.1 |
| holoviews | 1.17.0 | 1.17.0 |
| huggingface\_hub | 0.15.1 | |
| hvplot | 0.8.4 | 0.8.4 |
| hyperlink | 21.0.0 | 21.0.0 |
| icu | 68.1 | 58.2 |
| idna | 3.4 | 3.4 |
| imagecodecs | 2021.8.26 | 2021.8.26 |
| imageio | 2.31.1 | 2.31.1 |
| imagesize | 1.4.1 | 1.4.1 |
| imbalanced-learn | 0.10.1 | 0.10.1 |
| importlib-metadata | 6.0.0 | 6.0.0 |
| importlib\_metadata | 6.0.0 | 6.0.0 |
| incremental | 21.3.0 | 21.3.0 |
| inflection | 0.5.1 | 0.5.1 |
| iniconfig | 1.1.1 | 1.1.1 |
| intake | 0.6.8 | 0.6.8 |
| intervaltree | 3.1.0 | 3.1.0 |
| ipykernel | 6.19.2 | 6.19.2 |
| ipython | 8.12.0 | 8.12.0 |
| ipython\_genutils | 0.2.0 | 0.2.0 |
| ipywidgets | 8.0.4 | 8.0.4 |
| isort | 5.9.3 | 5.9.3 |
| itemadapter | 0.3.0 | 0.3.0 |
| itemloaders | 1.0.4 | 1.0.4 |
| itsdangerous | 2.0.1 | 2.0.1 |
| jaraco.classes | 3.2.1 | 3.2.1 |
| jedi | 0.18.1 | 0.18.1 |
| jellyfish | 0.9.0 | 0.9.0 |
| jinja2 | 3.1.2 | 3.1.2 |
| jinja2-time | 0.2.0 | 0.2.0 |
| jmespath | 0.10.0 | 0.10.0 |
| joblib | 1.2.0 | 1.2.0 |
| jpeg | 9e | 9e |
| jq | 1.6 | 1.6 |
| json5 | 0.9.6 | 0.9.6 |
| jsonpatch | 1.32 | 1.32 |
| jsonpointer | 2.1 | 2.1 |
| jsonschema | 4.17.3 | 4.17.3 |
| jupyter | 1.0.0 | 1.0.0 |
| jupyter\_client | 7.4.9 | 7.4.9 |
| jupyter\_console | 6.6.3 | 6.6.3 |
| jupyter\_core | 5.3.0 | 5.3.0 |
| jupyter\_events | 0.6.3 | 0.6.3 |
| jupyter\_server | 1.23.4 | 1.23.4 |
| jupyter\_server\_fileid | 0.9.0 | 0.9.0 |
| jupyter\_server\_ydoc | 0.8.0 | 0.8.0 |
| jupyter\_ydoc | 0.2.4 | 0.2.4 |
| jupyterlab | 3.6.3 | 3.6.3 |
| jupyterlab\_pygments | 0.1.2 | 0.1.2 |
| jupyterlab\_server | 2.22.0 | 2.22.0 |
| jupyterlab\_widgets | 3.0.5 | 3.0.5 |
| jxrlib | 1.1 | 1.1 |
| keyring | 23.13.1 | 23.13.1 |
| kiwisolver | 1.4.4 | 1.4.4 |
| krb5 | 1.20.1 | 1.20.1 |
| lazy-object-proxy | 1.6.0 | 1.6.0 |
| lazy\_loader | 0.2 | 0.2 |
| lcms2 | 2.12 | 2.12 |
| ld64 | 530 | 530 |
| ld64\_osx-64 | 530 | |
| ld64\_osx-arm64 | 530 | |
| ldid | 2.1.5 | 2.1.5 |
| lerc | 3.0 | 3.0 |
| libaec | 1.0.4 | 1.0.4 |
| libarchive | 3.6.2 | 3.6.2 |
| libboost | 1.73.0 | 1.73.0 |
| libbrotlicommon | 1.0.9 | 1.0.9 |
| libbrotlidec | 1.0.9 | 1.0.9 |
| libbrotlienc | 1.0.9 | 1.0.9 |
| libclang | 12.0.0 | 12.0.0 |
| libcurl | 8.1.1 | 8.1.1 |
| libcxx | 14.0.6 | 14.0.6 |
| libdeflate | 1.17 | 1.17 |
| libedit | 3.1.20221030 | 3.1.20221030 |
| libev | 4.33 | 4.33 |
| libevent | 2.1.12 | 2.1.12 |
| libffi | 3.4.4 | 3.4.4 |
| libgfortran | 5.0.0 | 5.0.0 |
| libgfortran5 | 11.3.0 | 11.3.0 |
| libiconv | 1.16 | 1.16 |
| liblief | 0.12.3 | 0.12.3 |
| libllvm12 | 12.0.0 | 12.0.0 |
| libllvm14 | 14.0.6 | 14.0.6 |
| libmamba | 1.4.1 | 1.4.1 |
| libmambapy | 1.4.1 | 1.4.1 |
| libnghttp2 | 1.52.0 | 1.52.0 |
| libopenblas | 0.3.21 | 0.3.21 |
| libpng | 1.6.39 | 1.6.39 |
| libpq | 12.15 | 12.15 |
| libprotobuf | 3.20.3 | 3.20.3 |
| libsodium | 1.0.18 | 1.0.18 |
| libsolv | 0.7.22 | 0.7.22 |
| libspatialindex | 1.9.3 | 1.9.3 |
| libssh2 | 1.10.0 | 1.10.0 |
| libthrift | 0.13.0 | 0.15.0 |
| libtiff | 4.5.0 | 4.5.0 |
| libuv | 1.44.2 | |
| libwebp | 1.2.4 | 1.2.4 |
| libwebp-base | 1.2.4 | 1.2.4 |
| libxml2 | 2.10.3 | 2.10.3 |
| libxslt | 1.1.37 | 1.1.37 |
| libzopfli | 1.0.3 | 1.0.3 |
| linkify-it-py | 2.0.0 | 2.0.0 |
| llvm-openmp | 14.0.6 | 14.0.6 |
| llvmlite | 0.40.0 | 0.40.0 |
| locket | 1.0.0 | 1.0.0 |
| lxml | 4.9.2 | 4.9.2 |
| lz4 | 4.3.2 | 4.3.2 |
| lz4-c | 1.9.4 | 1.9.4 |
| lzo | 2.10 | 2.10 |
| markdown | 3.4.1 | 3.4.1 |
| markdown-it-py | 2.2.0 | 2.2.0 |
| markupsafe | 2.1.1 | 2.1.1 |
| matplotlib | 3.7.1 | 3.7.1 |
| matplotlib-base | 3.7.1 | 3.7.1 |
| matplotlib-inline | 0.1.6 | 0.1.6 |
| mccabe | 0.7.0 | 0.7.0 |
| mdit-py-plugins | 0.3.0 | 0.3.0 |
| mdurl | 0.1.0 | 0.1.0 |
| mistune | 0.8.4 | 0.8.4 |
| more-itertools | 8.12.0 | 8.12.0 |
| mpc | 1.1.0 | 1.1.0 |
| mpfr | 4.0.2 | 4.0.2 |
| mpmath | 1.3.0 | 1.3.0 |
| msgpack-python | 1.0.3 | 1.0.3 |
| multidict | 6.0.2 | 6.0.2 |
| multipledispatch | 0.6.0 | 0.6.0 |
| multiprocess | 0.70.14 | |
| munkres | 1.1.4 | 1.1.4 |
| mypy\_extensions | 0.4.3 | 0.4.3 |
| navigator-updater | 0.4.0 | 0.4.0 |
| nbclassic | 0.5.5 | 0.5.5 |
| nbclient | 0.5.13 | 0.5.13 |
| nbconvert | 6.5.4 | 6.5.4 |
| nbformat | 5.7.0 | 5.7.0 |
| ncurses | 6.4 | 6.4 |
| nest-asyncio | 1.5.6 | 1.5.6 |
| networkx | 3.1 | 3.1 |
| ninja | 1.10.2 | |
| ninja-base | 1.10.2 | |
| nltk | 3.8.1 | 3.8.1 |
| notebook | 6.5.4 | 6.5.4 |
| notebook-shim | 0.2.2 | 0.2.2 |
| nspr | 4.35 | 4.35 |
| nss | 3.89.1 | 3.89.1 |
| numba | 0.57.0 | 0.57.0 |
| numexpr | 2.8.4 | 2.8.4 |
| numpy | 1.24.3 | 1.24.3 |
| numpy-base | 1.24.3 | 1.24.3 |
| numpydoc | 1.5.0 | 1.5.0 |
| oniguruma | 6.9.7.1 | 6.9.7.1 |
| openjpeg | 2.3.0 | 2.4.0 |
| openpyxl | 3.0.10 | 3.0.10 |
| openssl | 1.1.1u | 1.1.1u |
| orc | 1.7.4 | 1.7.4 |
| packaging | 23.0 | 23.0 |
| pandas | 1.5.3 | 1.5.3 |
| pandocfilters | 1.5.0 | 1.5.0 |
| panel | 1.2.1 | 1.2.1 |
| param | 1.13.0 | 1.13.0 |
| parsel | 1.6.0 | 1.6.0 |
| parso | 0.8.3 | 0.8.3 |
| partd | 1.2.0 | 1.2.0 |
| patch | 2.7.6 | 2.7.6 |
| pathlib | 1.0.1 | 1.0.1 |
| pathspec | 0.10.3 | 0.10.3 |
| patsy | 0.5.3 | 0.5.3 |
| pcre | 8.45 | 8.45 |
| pcre2 | 10.37 | 10.37 |
| pep8 | 1.7.1 | 1.7.1 |
| pexpect | 4.8.0 | 4.8.0 |
| pickleshare | 0.7.5 | 0.7.5 |
| pillow | 9.4.0 | 9.4.0 |
| pip | 23.2.1 | 23.2.1 |
| pkginfo | 1.9.6 | 1.9.6 |
| platformdirs | 2.5.2 | 2.5.2 |
| plotly | 5.9.0 | 5.9.0 |
| pluggy | 1.0.0 | 1.0.0 |
| ply | 3.11 | 3.11 |
| pooch | 1.4.0 | 1.4.0 |
| poyo | 0.5.0 | 0.5.0 |
| prometheus\_client | 0.14.1 | 0.14.1 |
| prompt-toolkit | 3.0.36 | 3.0.36 |
| prompt\_toolkit | 3.0.36 | 3.0.36 |
| protego | 0.1.16 | 0.1.16 |
| psutil | 5.9.0 | 5.9.0 |
| ptyprocess | 0.7.0 | 0.7.0 |
| pure\_eval | 0.2.2 | 0.2.2 |
| py-cpuinfo | 8.0.0 | 8.0.0 |
| py-lief | 0.12.3 | 0.12.3 |
| pyarrow | 11.0.0 | 11.0.0 |
| pyasn1 | 0.4.8 | 0.4.8 |
| pyasn1-modules | 0.2.8 | 0.2.8 |
| pybind11-abi | 4 | 4 |
| pycodestyle | 2.10.0 | 2.10.0 |
| pycosat | 0.6.4 | 0.6.4 |
| pycparser | 2.21 | 2.21 |
| pyct | 0.5.0 | 0.5.0 |
| pycurl | 7.45.2 | 7.45.2 |
| pydispatcher | 2.0.5 | 2.0.5 |
| pydocstyle | 6.3.0 | 6.3.0 |
| pyerfa | 2.0.0 | 2.0.0 |
| pyflakes | 3.0.1 | 3.0.1 |
| pygments | 2.15.1 | 2.15.1 |
| pyjwt | 2.4.0 | 2.4.0 |
| pylint | 2.16.2 | 2.16.2 |
| pylint-venv | 2.3.0 | 2.3.0 |
| pyls-spyder | 0.4.0 | 0.4.0 |
| pyobjc-core | 9.0 | 9.0 |
| pyobjc-framework-cocoa | 9.0 | 9.0 |
| pyobjc-framework-coreservices | 9.0 | 9.0 |
| pyobjc-framework-fsevents | 9.0 | 9.0 |
| pyodbc | 4.0.34 | 4.0.34 |
| pyopenssl | 23.2.0 | 23.2.0 |
| pyparsing | 3.0.9 | 3.0.9 |
| pyqt | 5.15.7 | 5.15.7 |
| pyqt5-sip | 12.11.0 | 12.11.0 |
| pyqtwebengine | 5.15.7 | 5.15.7 |
| pyrsistent | 0.18.0 | 0.18.0 |
| pysocks | 1.7.1 | 1.7.1 |
| pytables | 3.8.0 | 3.8.0 |
| pytest | 7.4.0 | 7.4.0 |
| python | 3.11.4 | 3.11.4 |
| python-dateutil | 2.8.2 | 2.8.2 |
| python-fastjsonschema | 2.16.2 | 2.16.2 |
| python-json-logger | 2.0.7 | 2.0.7 |
| python-libarchive-c | 2.9 | 2.9 |
| python-lmdb | 1.4.1 | 1.4.1 |
| python-lsp-black | 1.2.1 | 1.2.1 |
| python-lsp-jsonrpc | 1.0.0 | 1.0.0 |
| python-lsp-server | 1.7.2 | 1.7.2 |
| python-slugify | 5.0.2 | 5.0.2 |
| python-snappy | 0.6.1 | 0.6.1 |
| python-xxhash | 2.0.2 | |
| python.app | 3 | 3 |
| pytoolconfig | 1.2.5 | 1.2.5 |
| pytorch | 2.0.1 | |
| pytz | 2022.7 | 2022.7 |
| pyviz\_comms | 2.3.0 | 2.3.0 |
| pywavelets | 1.4.1 | 1.4.1 |
| pyyaml | 6.0 | 6.0 |
| pyzmq | 23.2.0 | 23.2.0 |
| qdarkstyle | 3.0.2 | 3.0.2 |
| qstylizer | 0.2.2 | 0.2.2 |
| qt-main | 5.15.2 | 5.15.2 |
| qt-webengine | 5.15.9 | 5.15.9 |
| qtawesome | 1.2.2 | 1.2.2 |
| qtconsole | 5.4.2 | 5.4.2 |
| qtpy | 2.2.0 | 2.2.0 |
| qtwebkit | 5.212 | 5.212 |
| queuelib | 1.5.0 | 1.5.0 |
| re2 | 2022.04.01 | 2022.04.01 |
| readline | 8.2 | 8.2 |
| regex | 2022.7.9 | 2022.7.9 |
| reproc | 14.2.4 | 14.2.4 |
| reproc-cpp | 14.2.4 | 14.2.4 |
| requests | 2.31.0 | 2.31.0 |
| requests-file | 1.5.1 | 1.5.1 |
| requests-toolbelt | 1.0.0 | 1.0.0 |
| responses | 0.13.3 | |
| rfc3339-validator | 0.1.4 | 0.1.4 |
| rfc3986-validator | 0.1.1 | 0.1.1 |
| rope | 1.7.0 | 1.7.0 |
| rtree | 1.0.1 | 1.0.1 |
| ruamel.yaml | 0.17.21 | 0.17.21 |
| ruamel\_yaml | 0.17.21 | 0.17.21 |
| s3fs | 2023.4.0 | 2023.3.0 |
| s3transfer | 0.6.0 | |
| sacremoses | 0.0.43 | 0.0.43 |
| scikit-image | 0.20.0 | 0.20.0 |
| scikit-learn | 1.3.0 | 1.3.0 |
| scipy | 1.10.1 | 1.10.1 |
| scrapy | 2.8.0 | 2.8.0 |
| seaborn | 0.12.2 | 0.12.2 |
| send2trash | 1.8.0 | 1.8.0 |
| service\_identity | 18.1.0 | 18.1.0 |
| setuptools | 68.0.0 | 68.0.0 |
| sip | 6.6.2 | 6.6.2 |
| six | 1.16.0 | 1.16.0 |
| sleef | 3.5.1 | |
| smart\_open | 5.2.1 | 5.2.1 |
| snappy | 1.1.9 | 1.1.9 |
| sniffio | 1.2.0 | 1.2.0 |
| snowballstemmer | 2.2.0 | 2.2.0 |
| sortedcontainers | 2.4.0 | 2.4.0 |
| soupsieve | 2.4 | 2.4 |
| sphinx | 5.0.2 | 5.0.2 |
| sphinxcontrib-applehelp | 1.0.2 | 1.0.2 |
| sphinxcontrib-devhelp | 1.0.2 | 1.0.2 |
| sphinxcontrib-htmlhelp | 2.0.0 | 2.0.0 |
| sphinxcontrib-jsmath | 1.0.1 | 1.0.1 |
| sphinxcontrib-qthelp | 1.0.3 | 1.0.3 |
| sphinxcontrib-serializinghtml | 1.1.5 | 1.1.5 |
| spyder | 5.4.3 | 5.4.3 |
| spyder-kernels | 2.4.3 | 2.4.3 |
| sqlalchemy | 1.4.39 | 1.4.39 |
| sqlite | 3.41.2 | 3.41.2 |
| stack\_data | 0.2.0 | 0.2.0 |
| statsmodels | 0.14.0 | 0.14.0 |
| sympy | 1.11.1 | 1.11.1 |
| tabulate | 0.8.10 | 0.8.10 |
| tapi | 1100.0.11 | 1000.10.8 |
| tbb | 2021.8.0 | 2021.8.0 |
| tbb4py | 2021.8.0 | 2021.8.0 |
| tblib | 1.7.0 | 1.7.0 |
| tenacity | 8.2.2 | 8.2.2 |
| terminado | 0.17.1 | 0.17.1 |
| text-unidecode | 1.3 | 1.3 |
| textdistance | 4.2.1 | 4.2.1 |
| threadpoolctl | 2.2.0 | 2.2.0 |
| three-merge | 0.1.1 | 0.1.1 |
| tifffile | 2021.7.2 | 2021.7.2 |
| tinycss2 | 1.2.1 | 1.2.1 |
| tk | 8.6.12 | 8.6.12 |
| tldextract | 3.2.0 | 3.2.0 |
| tokenizers | 0.13.2 | |
| toml | 0.10.2 | 0.10.2 |
| tomlkit | 0.11.1 | 0.11.1 |
| toolz | 0.12.0 | 0.12.0 |
| tornado | 6.3.2 | 6.3.2 |
| tqdm | 4.65.0 | 4.65.0 |
| traitlets | 5.7.1 | 5.7.1 |
| transformers | 4.29.2 | 2.1.1 |
| twisted | 22.10.0 | 22.10.0 |
| typing-extensions | 4.7.1 | 4.7.1 |
| typing\_extensions | 4.7.1 | 4.7.1 |
| tzdata | 2023c | 2023c |
| uc-micro-py | 1.0.1 | 1.0.1 |
| ujson | 5.4.0 | 5.4.0 |
| unidecode | 1.2.0 | 1.2.0 |
| unixodbc | 2.3.11 | 2.3.11 |
| urllib3 | 1.26.16 | 1.26.16 |
| utf8proc | 2.6.1 | 2.6.1 |
| w3lib | 1.21.0 | 1.21.0 |
| watchdog | 2.1.6 | 2.1.6 |
| wcwidth | 0.2.5 | 0.2.5 |
| webencodings | 0.5.1 | 0.5.1 |
| websocket-client | 0.58.0 | 0.58.0 |
| werkzeug | 2.2.3 | 2.2.3 |
| whatthepatch | 1.0.2 | 1.0.2 |
| wheel | 0.38.4 | 0.38.4 |
| widgetsnbextension | 4.0.5 | 4.0.5 |
| wrapt | 1.14.1 | 1.14.1 |
| wurlitzer | 3.0.2 | 3.0.2 |
| xarray | 2023.6.0 | 2023.6.0 |
| xlwings | 0.29.1 | 0.29.1 |
| xxhash | 0.8.0 | |
| xyzservices | 2022.9.0 | 2022.9.0 |
| xz | 5.4.2 | 5.4.2 |
| y-py | 0.5.9 | 0.5.9 |
| yaml | 0.2.5 | 0.2.5 |
| yaml-cpp | 0.7.0 | 0.7.0 |
| yapf | 0.31.0 | 0.31.0 |
| yarl | 1.8.1 | 1.8.1 |
| ypy-websocket | 0.8.2 | 0.8.2 |
| zeromq | 4.3.4 | 4.3.4 |
| zfp | 0.5.5 | 0.5.5 |
| zict | 2.2.0 | 2.2.0 |
| zipp | 3.11.0 | 3.11.0 |
| zlib | 1.2.13 | 1.2.13 |
| zlib-ng | 2.0.7 | 2.0.7 |
| zope | 1.0 | 1.0 |
| zope.interface | 5.4.0 | 5.4.0 |
| zstandard | 0.19.0 | 0.19.0 |
| zstd | 1.5.5 | 1.5.5 |
| Package Name | win-64 |
|---|---|
| \_anaconda\_depends | 2023.07 |
| abseil-cpp | 20211102.0 |
| aiobotocore | 2.4.2 |
| aiofiles | 22.1.0 |
| aiohttp | 3.8.3 |
| aioitertools | 0.7.1 |
| aiosignal | 1.2.0 |
| aiosqlite | 0.18.0 |
| alabaster | 0.7.12 |
| anaconda-catalogs | 0.2.0 |
| anaconda-client | 1.12.0 |
| anaconda-navigator | 2.4.2 |
| anaconda-project | 0.11.1 |
| anyio | 3.5.0 |
| appdirs | 1.4.4 |
| argon2-cffi | 21.3.0 |
| argon2-cffi-bindings | 21.2.0 |
| arrow | 1.2.3 |
| arrow-cpp | 11.0.0 |
| astroid | 2.14.2 |
| astropy | 5.1 |
| asttokens | 2.0.5 |
| async-timeout | 4.0.2 |
| atomicwrites | 1.4.0 |
| attrs | 22.1.0 |
| automat | 20.2.0 |
| autopep8 | 1.6.0 |
| aws-c-common | 0.4.57 |
| aws-c-event-stream | 0.1.6 |
| aws-checksums | 0.1.9 |
| aws-sdk-cpp | 1.8.185 |
| babel | 2.11.0 |
| backcall | 0.2.0 |
| backports | 1.1 |
| backports.functools\_lru\_cache | 1.6.4 |
| backports.tempfile | 1.0 |
| backports.weakref | 1.0.post1 |
| bcrypt | 3.2.0 |
| beautifulsoup4 | 4.12.2 |
| binaryornot | 0.4.4 |
| black | 23.3.0 |
| blas | 1.0 |
| bleach | 4.1.0 |
| blosc | 1.21.3 |
| bokeh | 3.2.1 |
| boltons | 23.0.0 |
| boost-cpp | 1.73.0 |
| boto3 | 1.24.28 |
| botocore | 1.27.59 |
| bottleneck | 1.3.5 |
| brotli | 1.0.9 |
| brotli-bin | 1.0.9 |
| brotlipy | 0.7.0 |
| bzip2 | 1.0.8 |
| c-ares | 1.19.0 |
| c-blosc2 | 2.8.0 |
| ca-certificates | 2023.05.30 |
| certifi | 2023.7.22 |
| cffi | 1.15.1 |
| cfitsio | 3.470 |
| chardet | 4.0.0 |
| charls | 2.2.0 |
| charset-normalizer | 2.0.4 |
| click | 8.0.4 |
| cloudpickle | 2.2.1 |
| clyent | 1.2.2 |
| colorama | 0.4.6 |
| colorcet | 3.0.1 |
| comm | 0.1.2 |
| conda | 23.7.2 |
| conda-build | 3.26.0 |
| conda-content-trust | 0.1.1 |
| conda-index | 0.2.3 |
| conda-libmamba-solver | 23.5.0 |
| conda-pack | 0.6.0 |
| conda-package-handling | 2.2.0 |
| conda-package-streaming | 0.9.0 |
| conda-repo-cli | 1.0.41 |
| conda-token | 0.4.0 |
| conda-verify | 3.4.2 |
| console\_shortcut | 0.1.1 |
| constantly | 15.1.0 |
| contourpy | 1.0.5 |
| cookiecutter | 1.7.3 |
| cryptography | 41.0.2 |
| cssselect | 1.1.0 |
| curl | 8.1.1 |
| cycler | 0.11.0 |
| cytoolz | 0.12.0 |
| daal4py | 2023.1.1 |
| dal | 2023.1.1 |
| dask | 2023.6.0 |
| dask-core | 2023.6.0 |
| datashader | 0.15.1 |
| datashape | 0.5.4 |
| debugpy | 1.6.7 |
| decorator | 5.1.1 |
| defusedxml | 0.7.1 |
| diff-match-patch | 20200713 |
| dill | 0.3.6 |
| distributed | 2023.6.0 |
| docstring-to-markdown | 0.11 |
| docutils | 0.18.1 |
| entrypoints | 0.4 |
| et\_xmlfile | 1.1.0 |
| executing | 0.8.3 |
| filelock | 3.9.0 |
| flake8 | 6.0.0 |
| flask | 2.2.2 |
| fmt | 9.1.0 |
| fonttools | 4.25.0 |
| freetype | 2.12.1 |
| frozenlist | 1.3.3 |
| fsspec | 2023.3.0 |
| future | 0.18.3 |
| gensim | 4.3.0 |
| gflags | 2.2.2 |
| giflib | 5.2.1 |
| glib | 2.69.1 |
| glob2 | 0.7 |
| glog | 0.5.0 |
| greenlet | 2.0.1 |
| gst-plugins-base | 1.18.5 |
| gstreamer | 1.18.5 |
| h5py | 3.7.0 |
| hdf5 | 1.10.6 |
| heapdict | 1.0.1 |
| holoviews | 1.17.0 |
| hvplot | 0.8.4 |
| hyperlink | 21.0.0 |
| icc\_rt | 2022.1.0 |
| icu | 58.2 |
| idna | 3.4 |
| imagecodecs | 2021.8.26 |
| imageio | 2.26.0 |
| imagesize | 1.4.1 |
| imbalanced-learn | 0.10.1 |
| importlib-metadata | 6.0.0 |
| importlib\_metadata | 6.0.0 |
| incremental | 21.3.0 |
| inflection | 0.5.1 |
| iniconfig | 1.1.1 |
| intake | 0.6.8 |
| intel-openmp | 2023.1.0 |
| intervaltree | 3.1.0 |
| ipykernel | 6.19.2 |
| ipython | 8.12.0 |
| ipython\_genutils | 0.2.0 |
| ipywidgets | 8.0.4 |
| isort | 5.9.3 |
| itemadapter | 0.3.0 |
| itemloaders | 1.0.4 |
| itsdangerous | 2.0.1 |
| jaraco.classes | 3.2.1 |
| jedi | 0.18.1 |
| jellyfish | 0.9.0 |
| jinja2 | 3.1.2 |
| jinja2-time | 0.2.0 |
| jmespath | 0.10.0 |
| joblib | 1.2.0 |
| jpeg | 9e |
| jq | 1.6 |
| json5 | 0.9.6 |
| jsonpatch | 1.32 |
| jsonpointer | 2.1 |
| jsonschema | 4.17.3 |
| jupyter | 1.0.0 |
| jupyter\_client | 7.4.9 |
| jupyter\_console | 6.6.3 |
| jupyter\_core | 5.3.0 |
| jupyter\_events | 0.6.3 |
| jupyter\_server | 1.23.4 |
| jupyter\_server\_fileid | 0.9.0 |
| jupyter\_server\_ydoc | 0.8.0 |
| jupyter\_ydoc | 0.2.4 |
| jupyterlab | 3.6.3 |
| jupyterlab\_pygments | 0.1.2 |
| jupyterlab\_server | 2.22.0 |
| jupyterlab\_widgets | 3.0.5 |
| jxrlib | 1.1 |
| keyring | 23.13.1 |
| kiwisolver | 1.4.4 |
| krb5 | 1.19.4 |
| lazy-object-proxy | 1.6.0 |
| lazy\_loader | 0.2 |
| lcms2 | 2.12 |
| lerc | 3.0 |
| libaec | 1.0.4 |
| libarchive | 3.6.2 |
| libboost | 1.73.0 |
| libbrotlicommon | 1.0.9 |
| libbrotlidec | 1.0.9 |
| libbrotlienc | 1.0.9 |
| libclang | 14.0.6 |
| libclang13 | 14.0.6 |
| libcurl | 8.1.1 |
| libdeflate | 1.17 |
| libevent | 2.1.12 |
| libffi | 3.4.4 |
| libiconv | 1.16 |
| liblief | 0.12.3 |
| libllvm14 | 14.0.6 |
| libmamba | 1.4.1 |
| libmambapy | 1.4.1 |
| libogg | 1.3.5 |
| libpng | 1.6.39 |
| libprotobuf | 3.20.3 |
| libsodium | 1.0.18 |
| libsolv | 0.7.22 |
| libspatialindex | 1.9.3 |
| libssh2 | 1.10.0 |
| libthrift | 0.15.0 |
| libtiff | 4.5.0 |
| libvorbis | 1.3.7 |
| libwebp | 1.2.4 |
| libwebp-base | 1.2.4 |
| libxml2 | 2.10.3 |
| libxslt | 1.1.37 |
| libzopfli | 1.0.3 |
| linkify-it-py | 2.0.0 |
| llvmlite | 0.40.0 |
| locket | 1.0.0 |
| lxml | 4.9.2 |
| lz4 | 4.3.2 |
| lz4-c | 1.9.4 |
| lzo | 2.10 |
| m2-msys2-runtime | 2.5.0.17080.65c939c |
| m2-patch | 2.7.5 |
| m2w64-libwinpthread-git | 5.0.0.4634.697f757 |
| markdown | 3.4.1 |
| markdown-it-py | 2.2.0 |
| markupsafe | 2.1.1 |
| matplotlib | 3.7.1 |
| matplotlib-base | 3.7.1 |
| matplotlib-inline | 0.1.6 |
| mccabe | 0.7.0 |
| mdit-py-plugins | 0.3.0 |
| mdurl | 0.1.0 |
| menuinst | 1.4.19 |
| mistune | 0.8.4 |
| mkl | 2023.1.0 |
| mkl-service | 2.4.0 |
| mkl\_fft | 1.3.6 |
| mkl\_random | 1.2.2 |
| more-itertools | 8.12.0 |
| mpmath | 1.3.0 |
| msgpack-python | 1.0.3 |
| msys2-conda-epoch | 20160418 |
| multidict | 6.0.2 |
| multipledispatch | 0.6.0 |
| munkres | 1.1.4 |
| mypy\_extensions | 0.4.3 |
| navigator-updater | 0.4.0 |
| nbclassic | 0.5.5 |
| nbclient | 0.5.13 |
| nbconvert | 6.5.4 |
| nbformat | 5.7.0 |
| nest-asyncio | 1.5.6 |
| networkx | 3.1 |
| nltk | 3.8.1 |
| notebook | 6.5.4 |
| notebook-shim | 0.2.2 |
| numba | 0.57.0 |
| numexpr | 2.8.4 |
| numpy | 1.24.3 |
| numpy-base | 1.24.3 |
| numpydoc | 1.5.0 |
| openjpeg | 2.4.0 |
| openpyxl | 3.0.10 |
| openssl | 1.1.1u |
| orc | 1.7.4 |
| packaging | 23.0 |
| pandas | 1.5.3 |
| pandocfilters | 1.5.0 |
| panel | 1.2.1 |
| param | 1.13.0 |
| paramiko | 2.8.1 |
| parsel | 1.6.0 |
| parso | 0.8.3 |
| partd | 1.2.0 |
| pathlib | 1.0.1 |
| pathspec | 0.10.3 |
| patsy | 0.5.3 |
| pcre | 8.45 |
| pcre2 | 10.37 |
| pep8 | 1.7.1 |
| pexpect | 4.8.0 |
| pickleshare | 0.7.5 |
| pillow | 9.4.0 |
| pip | 23.2.1 |
| pkginfo | 1.9.6 |
| platformdirs | 2.5.2 |
| plotly | 5.9.0 |
| pluggy | 1.0.0 |
| ply | 3.11 |
| pooch | 1.4.0 |
| powershell\_shortcut | 0.0.1 |
| poyo | 0.5.0 |
| prometheus\_client | 0.14.1 |
| prompt-toolkit | 3.0.36 |
| prompt\_toolkit | 3.0.36 |
| protego | 0.1.16 |
| psutil | 5.9.0 |
| ptyprocess | 0.7.0 |
| pure\_eval | 0.2.2 |
| py-cpuinfo | 8.0.0 |
| py-lief | 0.12.3 |
| pyarrow | 11.0.0 |
| pyasn1 | 0.4.8 |
| pyasn1-modules | 0.2.8 |
| pybind11-abi | 4 |
| pycodestyle | 2.10.0 |
| pycosat | 0.6.4 |
| pycparser | 2.21 |
| pyct | 0.5.0 |
| pycurl | 7.45.2 |
| pydispatcher | 2.0.5 |
| pydocstyle | 6.3.0 |
| pyerfa | 2.0.0 |
| pyflakes | 3.0.1 |
| pygments | 2.15.1 |
| pyjwt | 2.4.0 |
| pylint | 2.16.2 |
| pylint-venv | 2.3.0 |
| pyls-spyder | 0.4.0 |
| pynacl | 1.5.0 |
| pyodbc | 4.0.34 |
| pyopenssl | 23.2.0 |
| pyparsing | 3.0.9 |
| pyqt | 5.15.7 |
| pyqt5-sip | 12.11.0 |
| pyqtwebengine | 5.15.7 |
| pyrsistent | 0.18.0 |
| pysocks | 1.7.1 |
| pytables | 3.8.0 |
| pytest | 7.4.0 |
| python | 3.11.4 |
| python-dateutil | 2.8.2 |
| python-fastjsonschema | 2.16.2 |
| python-json-logger | 2.0.7 |
| python-libarchive-c | 2.9 |
| python-lmdb | 1.4.1 |
| python-lsp-black | 1.2.1 |
| python-lsp-jsonrpc | 1.0.0 |
| python-lsp-server | 1.7.2 |
| python-slugify | 5.0.2 |
| python-snappy | 0.6.1 |
| pytoolconfig | 1.2.5 |
| pytz | 2022.7 |
| pyviz\_comms | 2.3.0 |
| pywavelets | 1.4.1 |
| pywin32 | 305 |
| pywin32-ctypes | 0.2.0 |
| pywinpty | 2.0.10 |
| pyyaml | 6.0 |
| pyzmq | 23.2.0 |
| qdarkstyle | 3.0.2 |
| qstylizer | 0.2.2 |
| qt-main | 5.15.2 |
| qt-webengine | 5.15.9 |
| qtawesome | 1.2.2 |
| qtconsole | 5.4.2 |
| qtpy | 2.2.0 |
| qtwebkit | 5.212 |
| queuelib | 1.5.0 |
| re2 | 2022.04.01 |
| regex | 2022.7.9 |
| reproc | 14.2.4 |
| reproc-cpp | 14.2.4 |
| requests | 2.31.0 |
| requests-file | 1.5.1 |
| requests-toolbelt | 1.0.0 |
| rfc3339-validator | 0.1.4 |
| rfc3986-validator | 0.1.1 |
| rope | 1.7.0 |
| rtree | 1.0.1 |
| ruamel.yaml | 0.17.21 |
| ruamel\_yaml | 0.17.21 |
| s3fs | 2023.3.0 |
| s3transfer | 0.6.0 |
| sacremoses | 0.0.43 |
| scikit-image | 0.20.0 |
| scikit-learn | 1.3.0 |
| scikit-learn-intelex | 2023.1.1 |
| scipy | 1.10.1 |
| scrapy | 2.8.0 |
| seaborn | 0.12.2 |
| send2trash | 1.8.0 |
| service\_identity | 18.1.0 |
| setuptools | 68.0.0 |
| sip | 6.6.2 |
| six | 1.16.0 |
| smart\_open | 5.2.1 |
| snappy | 1.1.9 |
| sniffio | 1.2.0 |
| snowballstemmer | 2.2.0 |
| sortedcontainers | 2.4.0 |
| soupsieve | 2.4 |
| sphinx | 5.0.2 |
| sphinxcontrib-applehelp | 1.0.2 |
| sphinxcontrib-devhelp | 1.0.2 |
| sphinxcontrib-htmlhelp | 2.0.0 |
| sphinxcontrib-jsmath | 1.0.1 |
| sphinxcontrib-qthelp | 1.0.3 |
| sphinxcontrib-serializinghtml | 1.1.5 |
| spyder | 5.4.3 |
| spyder-kernels | 2.4.3 |
| sqlalchemy | 1.4.39 |
| sqlite | 3.41.2 |
| stack\_data | 0.2.0 |
| statsmodels | 0.14.0 |
| sympy | 1.11.1 |
| tabulate | 0.8.10 |
| tbb | 2021.8.0 |
| tbb4py | 2021.8.0 |
| tblib | 1.7.0 |
| tenacity | 8.2.2 |
| terminado | 0.17.1 |
| text-unidecode | 1.3 |
| textdistance | 4.2.1 |
| threadpoolctl | 2.2.0 |
| three-merge | 0.1.1 |
| tifffile | 2021.7.2 |
| tinycss2 | 1.2.1 |
| tk | 8.6.12 |
| tldextract | 3.2.0 |
| toml | 0.10.2 |
| tomlkit | 0.11.1 |
| toolz | 0.12.0 |
| tornado | 6.3.2 |
| tqdm | 4.65.0 |
| traitlets | 5.7.1 |
| transformers | 2.1.1 |
| twisted | 22.10.0 |
| twisted-iocpsupport | 1.0.2 |
| typing-extensions | 4.7.1 |
| typing\_extensions | 4.7.1 |
| tzdata | 2023c |
| uc-micro-py | 1.0.1 |
| ujson | 5.4.0 |
| unidecode | 1.2.0 |
| urllib3 | 1.26.16 |
| utf8proc | 2.6.1 |
| vc | 14.2 |
| vs2015\_runtime | 14.27.29016 |
| w3lib | 1.21.0 |
| watchdog | 2.1.6 |
| wcwidth | 0.2.5 |
| webencodings | 0.5.1 |
| websocket-client | 0.58.0 |
| werkzeug | 2.2.3 |
| whatthepatch | 1.0.2 |
| wheel | 0.38.4 |
| widgetsnbextension | 4.0.5 |
| win\_inet\_pton | 1.1.0 |
| winpty | 0.4.3 |
| wrapt | 1.14.1 |
| xarray | 2023.6.0 |
| xlwings | 0.29.1 |
| xyzservices | 2022.9.0 |
| xz | 5.4.2 |
| y-py | 0.5.9 |
| yaml | 0.2.5 |
| yaml-cpp | 0.7.0 |
| yapf | 0.31.0 |
| yarl | 1.8.1 |
| ypy-websocket | 0.8.2 |
| zeromq | 4.3.4 |
| zfp | 0.5.5 |
| zict | 2.2.0 |
| zipp | 3.11.0 |
| zlib | 1.2.13 |
| zlib-ng | 2.0.7 |
| zope | 1.0 |
| zope.interface | 5.4.0 |
| zstandard | 0.19.0 |
| zstd | 1.5.5 |
| Package Name | linux-64 | linux-aarch64 | linux-ppc64le | linux-s390x | osx-arm64 | osx-64 | win-64 |
|---|---|---|---|---|---|---|---|
| \_anaconda\_depends | 2023.07 | 2023.07 | 2023.07 | 2023.07 | 2023.07 | 2023.07 | 2023.07 |
| \_libgcc\_mutex | 0.1 | 0.1 | 0.1 | 0.1 | |||
| \_openmp\_mutex | 5.1 | 5.1 | 5.1 | 5.1 | |||
| abseil-cpp | 20211102.0 | 20211102.0 | 20211102.0 | 20211102.0 | 20211102.0 | 20211102.0 | |
| aiobotocore | 2.5.0 | 2.5.0 | 2.4.2 | 2.4.2 | 2.5.0 | 2.4.2 | 2.4.2 |
| aiofiles | 22.1.0 | 22.1.0 | 22.1.0 | 22.1.0 | 22.1.0 | 22.1.0 | |
| aiohttp | 3.8.3 | 3.8.3 | 3.8.3 | 3.8.3 | 3.8.3 | 3.8.3 | 3.8.3 |
| aioitertools | 0.7.1 | 0.7.1 | 0.7.1 | 0.7.1 | 0.7.1 | 0.7.1 | 0.7.1 |
| aiosignal | 1.2.0 | 1.2.0 | 1.2.0 | 1.2.0 | 1.2.0 | 1.2.0 | 1.2.0 |
| aiosqlite | 0.18.0 | 0.18.0 | 0.18.0 | 0.18.0 | 0.18.0 | 0.18.0 | |
| alabaster | 0.7.12 | 0.7.12 | 0.7.12 | 0.7.12 | 0.7.12 | ||
| anaconda-catalogs | 0.2.0 | 0.2.0 | 0.2.0 | 0.2.0 | 0.2.0 | 0.2.0 | 0.2.0 |
| anaconda-client | 1.11.3 | 1.11.3 | 1.11.3 | 1.11.3 | 1.11.3 | 1.11.3 | 1.11.3 |
| anaconda-navigator | 2.4.2 | 2.4.2 | 2.4.2 | 2.4.2 | 2.4.2 | ||
| anaconda-project | 0.11.1 | 0.11.1 | 0.11.1 | 0.11.1 | 0.11.1 | 0.11.1 | 0.11.1 |
| anyio | 3.5.0 | 3.5.0 | 3.5.0 | 3.5.0 | 3.5.0 | 3.5.0 | 3.5.0 |
| appdirs | 1.4.4 | 1.4.4 | 1.4.4 | 1.4.4 | 1.4.4 | 1.4.4 | 1.4.4 |
| applaunchservices | 0.3.0 | 0.3.0 | |||||
| appnope | 0.1.2 | 0.1.2 | |||||
| appscript | 1.1.2 | 1.1.2 | |||||
| argon2-cffi | 21.3.0 | 21.3.0 | 21.3.0 | 21.3.0 | 21.3.0 | 21.3.0 | 21.3.0 |
| argon2-cffi-bindings | 21.2.0 | 21.2.0 | 21.2.0 | 21.2.0 | 21.2.0 | 21.2.0 | 21.2.0 |
| arrow | 1.2.3 | 1.2.3 | 1.2.3 | 1.2.3 | 1.2.3 | ||
| arrow-cpp | 11.0.0 | 11.0.0 | 11.0.0 | 11.0.0 | 11.0.0 | 11.0.0 | |
| astroid | 2.14.2 | 2.14.2 | 2.14.2 | 2.14.2 | 2.14.2 | 2.14.2 | 2.14.2 |
| astropy | 5.1 | 5.1 | 5.1 | 5.1 | 5.1 | 5.1 | 5.1 |
| asttokens | 2.0.5 | 2.0.5 | 2.0.5 | 2.0.5 | 2.0.5 | 2.0.5 | 2.0.5 |
| async-timeout | 4.0.2 | 4.0.2 | 4.0.2 | 4.0.2 | 4.0.2 | 4.0.2 | 4.0.2 |
| atomicwrites | 1.4.0 | 1.4.0 | 1.4.0 | 1.4.0 | 1.4.0 | ||
| attrs | 22.1.0 | 22.1.0 | 22.1.0 | 22.1.0 | 22.1.0 | 22.1.0 | 22.1.0 |
| automat | 20.2.0 | 20.2.0 | 20.2.0 | 20.2.0 | 20.2.0 | 20.2.0 | |
| autopep8 | 1.6.0 | 1.6.0 | 1.6.0 | 1.6.0 | 1.6.0 | ||
| aws-c-common | 0.4.57 | 0.5.11 | 0.4.57 | 0.6.8 | 0.4.57 | 0.4.57 | |
| aws-c-event-stream | 0.1.6 | 0.1.6 | 0.1.6 | 0.1.6 | 0.1.6 | 0.1.6 | |
| aws-checksums | 0.1.9 | 0.1.11 | 0.1.9 | 0.1.11 | 0.1.9 | 0.1.9 | |
| aws-sdk-cpp | 1.8.185 | 1.8.185 | 1.8.185 | 1.8.185 | 1.8.185 | 1.8.185 | |
| babel | 2.11.0 | 2.11.0 | 2.11.0 | 2.11.0 | 2.11.0 | 2.11.0 | 2.11.0 |
| backcall | 0.2.0 | 0.2.0 | 0.2.0 | 0.2.0 | 0.2.0 | 0.2.0 | 0.2.0 |
| backports | 1.1 | 1.1 | 1.1 | 1.1 | 1.1 | 1.1 | 1.1 |
| backports.functools\_lru\_cache | 1.6.4 | 1.6.4 | 1.6.4 | 1.6.4 | 1.6.4 | 1.6.4 | 1.6.4 |
| backports.tempfile | 1.0 | 1.0 | 1.0 | 1.0 | 1.0 | 1.0 | 1.0 |
| backports.weakref | 1.0.post1 | 1.0.post1 | 1.0.post1 | 1.0.post1 | 1.0.post1 | 1.0.post1 | 1.0.post1 |
| bcrypt | 3.2.0 | 3.2.0 | 3.2.0 | 3.2.0 | 3.2.0 | 3.2.0 | |
| beautifulsoup4 | 4.12.2 | 4.12.2 | 4.12.2 | 4.12.2 | 4.12.2 | 4.12.2 | 4.12.2 |
| binaryornot | 0.4.4 | 0.4.4 | 0.4.4 | 0.4.4 | 0.4.4 | ||
| black | 23.3.0 | 23.3.0 | 23.3.0 | 23.3.0 | 23.3.0 | ||
| blas | 1.0 | 1.0 | 1.0 | 1.0 | 1.0 | 1.0 | 1.0 |
| bleach | 4.1.0 | 4.1.0 | 4.1.0 | 4.1.0 | 4.1.0 | 4.1.0 | 4.1.0 |
| blosc | 1.21.3 | 1.21.3 | 1.21.3 | 1.21.3 | 1.21.3 | 1.21.3 | 1.21.3 |
| bokeh | 3.1.1 | 2.4.3 | 3.1.1 | 2.4.3 | 3.1.1 | 3.1.1 | 3.1.1 |
| boltons | 23.0.0 | 23.0.0 | 23.0.0 | 23.0.0 | 23.0.0 | 23.0.0 | 23.0.0 |
| boost-cpp | 1.73.0 | 1.73.0 | 1.73.0 | 1.73.0 | 1.73.0 | 1.73.0 | |
| boto3 | 1.24.28 | 1.24.28 | 1.24.28 | 1.24.28 | |||
| botocore | 1.29.76 | 1.29.76 | 1.27.59 | 1.27.59 | 1.29.76 | 1.27.59 | 1.27.59 |
| bottleneck | 1.3.5 | 1.3.5 | 1.3.5 | 1.3.5 | 1.3.5 | 1.3.5 | 1.3.5 |
| brotli | 1.0.9 | 1.0.9 | 1.0.9 | 1.0.9 | 1.0.9 | 1.0.9 | 1.0.9 |
| brotli-bin | 1.0.9 | 1.0.9 | 1.0.9 | 1.0.9 | 1.0.9 | 1.0.9 | 1.0.9 |
| brotlipy | 0.7.0 | 0.7.0 | 0.7.0 | 0.7.0 | 0.7.0 | 0.7.0 | 0.7.0 |
| brunsli | 0.1 | 0.1 | 0.1 | 0.1 | 0.1 | ||
| bzip2 | 1.0.8 | 1.0.8 | 1.0.8 | 1.0.8 | 1.0.8 | 1.0.8 | 1.0.8 |
| c-ares | 1.19.0 | 1.19.0 | 1.19.0 | 1.19.0 | 1.19.0 | 1.19.0 | 1.19.0 |
| c-blosc2 | 2.8.0 | 2.8.0 | 2.8.0 | 2.8.0 | 2.8.0 | 2.8.0 | |
| ca-certificates | 2023.05.30 | 2023.05.30 | 2023.05.30 | 2023.05.30 | 2023.05.30 | 2023.05.30 | 2023.05.30 |
| cctools | 949.0.1 | 949.0.1 | |||||
| cctools\_osx-64 | 949.0.1 | ||||||
| cctools\_osx-arm64 | 949.0.1 | ||||||
| certifi | 2023.5.7 | 2023.5.7 | 2023.5.7 | 2023.5.7 | 2023.5.7 | 2023.5.7 | 2023.5.7 |
| cffi | 1.15.1 | 1.15.1 | 1.15.1 | 1.15.1 | 1.15.1 | 1.15.1 | 1.15.1 |
| cfitsio | 3.470 | 3.470 | 3.470 | 3.470 | 3.470 | 3.470 | 3.470 |
| chardet | 4.0.0 | 4.0.0 | 4.0.0 | 4.0.0 | 4.0.0 | 4.0.0 | 4.0.0 |
| charls | 2.2.0 | 2.2.0 | 2.2.0 | 2.2.0 | 2.2.0 | 2.2.0 | |
| charset-normalizer | 2.0.4 | 2.0.4 | 2.0.4 | 2.0.4 | 2.0.4 | 2.0.4 | 2.0.4 |
| click | 8.0.4 | 8.0.4 | 8.0.4 | 8.0.4 | 8.0.4 | 8.0.4 | 8.0.4 |
| cloudpickle | 2.2.1 | 2.2.1 | 2.2.1 | 2.2.1 | 2.2.1 | 2.2.1 | 2.2.1 |
| clyent | 1.2.2 | 1.2.2 | 1.2.2 | 1.2.2 | 1.2.2 | 1.2.2 | 1.2.2 |
| colorama | 0.4.6 | 0.4.6 | 0.4.6 | 0.4.6 | 0.4.6 | 0.4.6 | 0.4.6 |
| colorcet | 3.0.1 | 3.0.1 | 3.0.1 | 3.0.1 | 3.0.1 | 3.0.1 | 3.0.1 |
| comm | 0.1.2 | 0.1.2 | 0.1.2 | 0.1.2 | 0.1.2 | 0.1.2 | 0.1.2 |
| conda | 23.5.2 | 23.5.2 | 23.5.2 | 23.5.2 | 23.5.2 | 23.5.2 | 23.5.2 |
| conda-build | 3.25.0 | 3.25.0 | 3.25.0 | 3.25.0 | 3.25.0 | 3.25.0 | 3.25.0 |
| conda-content-trust | 0.1.3 | 0.1.3 | 0.1.3 | 0.1.3 | 0.1.3 | 0.1.3 | 0.1.3 |
| conda-index | 0.2.3 | 0.2.3 | 0.2.3 | 0.2.3 | 0.2.3 | 0.2.3 | 0.2.3 |
| conda-libmamba-solver | 23.5.0 | 23.5.0 | 23.5.0 | 23.5.0 | 23.5.0 | 23.5.0 | 23.5.0 |
| conda-pack | 0.6.0 | 0.6.0 | 0.6.0 | 0.6.0 | 0.6.0 | 0.6.0 | 0.6.0 |
| conda-package-handling | 2.1.0 | 2.1.0 | 2.1.0 | 2.1.0 | 2.1.0 | 2.1.0 | 2.1.0 |
| conda-package-streaming | 0.8.0 | 0.8.0 | 0.8.0 | 0.8.0 | 0.8.0 | 0.8.0 | 0.8.0 |
| conda-repo-cli | 1.0.41 | 1.0.41 | 1.0.41 | 1.0.41 | 1.0.41 | ||
| conda-token | 0.4.0 | 0.4.0 | 0.4.0 | 0.4.0 | 0.4.0 | 0.4.0 | 0.4.0 |
| conda-verify | 3.4.2 | 3.4.2 | 3.4.2 | 3.4.2 | 3.4.2 | 3.4.2 | 3.4.2 |
| console\_shortcut | 0.1.1 | ||||||
| constantly | 15.1.0 | 15.1.0 | 15.1.0 | 15.1.0 | 15.1.0 | 15.1.0 | |
| contourpy | 1.0.5 | 1.0.5 | 1.0.5 | 1.0.5 | 1.0.5 | 1.0.5 | 1.0.5 |
| cookiecutter | 1.7.3 | 1.7.3 | 1.7.3 | 1.7.3 | 1.7.3 | ||
| cryptography | 39.0.1 | 39.0.1 | 39.0.1 | 39.0.1 | 39.0.1 | 39.0.1 | 39.0.1 |
| cssselect | 1.1.0 | 1.1.0 | 1.1.0 | 1.1.0 | 1.1.0 | 1.1.0 | |
| curl | 8.1.1 | 8.1.1 | 8.1.1 | 8.1.1 | 8.1.1 | 8.1.1 | 8.1.1 |
| cycler | 0.11.0 | 0.11.0 | 0.11.0 | 0.11.0 | 0.11.0 | 0.11.0 | 0.11.0 |
| cytoolz | 0.12.0 | 0.12.0 | 0.12.0 | 0.12.0 | 0.12.0 | 0.12.0 | 0.12.0 |
| daal4py | 2023.1.1 | 2023.1.1 | |||||
| dal | 2023.1.1 | 2023.1.1 | |||||
| dask | 2023.6.0 | 2023.4.1 | 2023.6.0 | 2023.6.0 | 2023.6.0 | 2023.6.0 | 2023.6.0 |
| dask-core | 2023.6.0 | 2023.4.1 | 2023.6.0 | 2023.6.0 | 2023.6.0 | 2023.6.0 | 2023.6.0 |
| datasets | 2.12.0 | 2.12.0 | 2.12.0 | ||||
| datashader | 0.15.0 | 0.15.0 | 0.15.0 | 0.15.0 | 0.15.0 | 0.15.0 | |
| datashape | 0.5.4 | 0.5.4 | 0.5.4 | 0.5.4 | 0.5.4 | 0.5.4 | |
| dbus | 1.13.18 | 1.13.18 | |||||
| debugpy | 1.5.1 | 1.5.1 | 1.5.1 | 1.5.1 | 1.5.1 | 1.5.1 | 1.5.1 |
| decorator | 5.1.1 | 5.1.1 | 5.1.1 | 5.1.1 | 5.1.1 | 5.1.1 | 5.1.1 |
| defusedxml | 0.7.1 | 0.7.1 | 0.7.1 | 0.7.1 | 0.7.1 | 0.7.1 | 0.7.1 |
| diff-match-patch | 20200713 | 20200713 | 20200713 | 20200713 | 20200713 | ||
| dill | 0.3.6 | 0.3.6 | 0.3.6 | 0.3.6 | 0.3.6 | 0.3.6 | 0.3.6 |
| distributed | 2023.6.0 | 2023.4.1 | 2023.6.0 | 2023.6.0 | 2023.6.0 | 2023.6.0 | 2023.6.0 |
| docstring-to-markdown | 0.11 | 0.11 | 0.11 | 0.11 | 0.11 | ||
| docutils | 0.18.1 | 0.18.1 | 0.18.1 | 0.18.1 | 0.18.1 | ||
| entrypoints | 0.4 | 0.4 | 0.4 | 0.4 | 0.4 | 0.4 | 0.4 |
| et\_xmlfile | 1.1.0 | 1.1.0 | 1.1.0 | 1.1.0 | 1.1.0 | 1.1.0 | 1.1.0 |
| executing | 0.8.3 | 0.8.3 | 0.8.3 | 0.8.3 | 0.8.3 | 0.8.3 | 0.8.3 |
| expat | 2.4.9 | 2.4.9 | |||||
| filelock | 3.9.0 | 3.9.0 | 3.9.0 | 3.9.0 | 3.9.0 | 3.9.0 | 3.9.0 |
| flake8 | 6.0.0 | 6.0.0 | 6.0.0 | 6.0.0 | 6.0.0 | ||
| flask | 2.2.2 | 2.2.2 | 2.2.2 | 2.2.2 | 2.2.2 | 2.2.2 | 2.2.2 |
| fmt | 9.1.0 | 9.1.0 | 9.1.0 | 9.1.0 | 9.1.0 | 9.1.0 | 9.1.0 |
| fontconfig | 2.14.1 | 2.14.1 | |||||
| fonttools | 4.25.0 | 4.25.0 | 4.25.0 | 4.25.0 | 4.25.0 | 4.25.0 | 4.25.0 |
| freetype | 2.12.1 | 2.12.1 | 2.12.1 | 2.12.1 | 2.12.1 | 2.12.1 | 2.12.1 |
| frozenlist | 1.3.3 | 1.3.3 | 1.3.3 | 1.3.3 | 1.3.3 | 1.3.3 | 1.3.3 |
| fsspec | 2023.4.0 | 2023.4.0 | 2023.3.0 | 2023.3.0 | 2023.4.0 | 2023.3.0 | 2023.3.0 |
| future | 0.18.3 | 0.18.3 | 0.18.3 | 0.18.3 | 0.18.3 | 0.18.3 | 0.18.3 |
| gensim | 4.3.0 | 4.3.0 | 4.3.0 | 4.3.0 | 4.3.0 | 4.3.0 | |
| gettext | 0.21.0 | 0.21.0 | |||||
| gflags | 2.2.2 | 2.2.2 | 2.2.2 | 2.2.2 | 2.2.2 | 2.2.2 | |
| giflib | 5.2.1 | 5.2.1 | 5.2.1 | 5.2.1 | 5.2.1 | 5.2.1 | 5.2.1 |
| glib | 2.69.1 | 2.69.1 | 2.69.1 | 2.69.1 | 2.69.1 | ||
| glob2 | 0.7 | 0.7 | 0.7 | 0.7 | 0.7 | 0.7 | 0.7 |
| glog | 0.5.0 | 0.5.0 | 0.5.0 | 0.5.0 | 0.5.0 | 0.5.0 | |
| gmp | 6.2.1 | 6.2.1 | 6.2.1 | 6.2.1 | 6.2.1 | 6.2.1 | |
| gmpy2 | 2.1.2 | 2.1.2 | 2.1.2 | 2.1.2 | 2.1.2 | 2.1.2 | |
| greenlet | 2.0.1 | 2.0.1 | 2.0.1 | 2.0.1 | 2.0.1 | 2.0.1 | 2.0.1 |
| grpc-cpp | 1.46.1 | 1.46.1 | 1.46.1 | 1.46.1 | 1.46.1 | ||
| gst-plugins-base | 1.14.1 | 1.14.1 | 1.14.1 | 1.14.1 | 1.18.5 | ||
| gstreamer | 1.14.1 | 1.14.1 | 1.14.1 | 1.14.1 | 1.18.5 | ||
| h5py | 3.7.0 | 3.7.0 | 3.7.0 | 3.7.0 | 3.7.0 | 3.7.0 | 3.7.0 |
| hdf5 | 1.10.6 | 1.10.6 | 1.10.6 | 1.10.6 | 1.12.1 | 1.10.6 | 1.10.6 |
| heapdict | 1.0.1 | 1.0.1 | 1.0.1 | 1.0.1 | 1.0.1 | 1.0.1 | 1.0.1 |
| holoviews | 1.16.2 | 1.16.2 | 1.16.2 | 1.14.8 | 1.16.2 | 1.16.2 | 1.16.2 |
| huggingface\_hub | 0.15.1 | 0.15.1 | 0.15.1 | ||||
| hvplot | 0.8.4 | 0.8.4 | 0.8.4 | 0.7.3 | 0.8.4 | 0.8.4 | 0.8.4 |
| hyperlink | 21.0.0 | 21.0.0 | 21.0.0 | 21.0.0 | 21.0.0 | 21.0.0 | |
| icc\_rt | 2022.1.0 | ||||||
| icu | 58.2 | 68.1 | 58.2 | 68.1 | 68.1 | 58.2 | 58.2 |
| idna | 3.4 | 3.4 | 3.4 | 3.3 | 3.4 | 3.4 | 3.4 |
| imagecodecs | 2021.8.26 | 2021.8.26 | 2021.8.26 | 2021.8.26 | 2021.8.26 | 2021.8.26 | 2021.8.26 |
| imageio | 2.31.1 | 2.31.1 | 2.31.1 | 2.26.0 | 2.31.1 | 2.31.1 | 2.26.0 |
| imagesize | 1.4.1 | 1.4.1 | 1.4.1 | 1.4.1 | 1.4.1 | ||
| imbalanced-learn | 0.10.1 | 0.10.1 | 0.10.1 | 0.10.1 | 0.10.1 | 0.10.1 | 0.10.1 |
| importlib-metadata | 6.0.0 | 6.0.0 | 6.0.0 | 6.0.0 | 6.0.0 | 6.0.0 | 6.0.0 |
| importlib\_metadata | 6.0.0 | 6.0.0 | 6.0.0 | 6.0.0 | 6.0.0 | ||
| incremental | 21.3.0 | 21.3.0 | 21.3.0 | 21.3.0 | 21.3.0 | 21.3.0 | |
| inflection | 0.5.1 | 0.5.1 | 0.5.1 | 0.5.1 | 0.5.1 | ||
| iniconfig | 1.1.1 | 1.1.1 | 1.1.1 | 1.1.1 | 1.1.1 | 1.1.1 | 1.1.1 |
| intake | 0.6.8 | 0.6.8 | 0.6.8 | 0.6.8 | 0.6.8 | 0.6.8 | 0.6.8 |
| intel-openmp | 2023.1.0 | 2023.1.0 | |||||
| intervaltree | 3.1.0 | 3.1.0 | 3.1.0 | 3.1.0 | 3.1.0 | ||
| ipykernel | 6.19.2 | 6.19.2 | 6.19.2 | 6.19.2 | 6.19.2 | 6.19.2 | 6.19.2 |
| ipython | 8.12.0 | 8.12.0 | 8.12.0 | 8.12.0 | 8.12.0 | 8.12.0 | 8.12.0 |
| ipython\_genutils | 0.2.0 | 0.2.0 | 0.2.0 | 0.2.0 | 0.2.0 | 0.2.0 | 0.2.0 |
| ipywidgets | 8.0.4 | 8.0.4 | 8.0.4 | 8.0.4 | 8.0.4 | 8.0.4 | 8.0.4 |
| isort | 5.9.3 | 5.9.3 | 5.9.3 | 5.9.3 | 5.9.3 | 5.9.3 | 5.9.3 |
| itemadapter | 0.3.0 | 0.3.0 | 0.3.0 | 0.3.0 | 0.3.0 | 0.3.0 | |
| itemloaders | 1.0.4 | 1.0.4 | 1.0.4 | 1.0.4 | 1.0.4 | 1.0.4 | |
| itsdangerous | 2.0.1 | 2.0.1 | 2.0.1 | 2.0.1 | 2.0.1 | 2.0.1 | 2.0.1 |
| jaraco.classes | 3.2.1 | 3.2.1 | 3.2.1 | 3.2.1 | 3.2.1 | ||
| jedi | 0.18.1 | 0.18.1 | 0.18.1 | 0.18.1 | 0.18.1 | 0.18.1 | 0.18.1 |
| jeepney | 0.7.1 | 0.7.1 | |||||
| jellyfish | 0.9.0 | 0.9.0 | 0.9.0 | 0.9.0 | 0.9.0 | ||
| jinja2 | 3.1.2 | 3.1.2 | 3.1.2 | 3.1.2 | 3.1.2 | 3.1.2 | 3.1.2 |
| jinja2-time | 0.2.0 | 0.2.0 | 0.2.0 | 0.2.0 | 0.2.0 | ||
| jmespath | 0.10.0 | 0.10.0 | 0.10.0 | 0.10.0 | 0.10.0 | 0.10.0 | 0.10.0 |
| joblib | 1.2.0 | 1.2.0 | 1.2.0 | 1.2.0 | 1.2.0 | 1.2.0 | 1.2.0 |
| jpeg | 9e | 9e | 9e | 9e | 9e | 9e | 9e |
| jq | 1.6 | 1.6 | 1.6 | 1.6 | 1.6 | 1.6 | |
| json5 | 0.9.6 | 0.9.6 | 0.9.6 | 0.9.6 | 0.9.6 | 0.9.6 | 0.9.6 |
| jsonpatch | 1.32 | 1.32 | 1.32 | 1.32 | 1.32 | 1.32 | 1.32 |
| jsonpointer | 2.1 | 2.1 | 2.1 | 2.1 | 2.1 | 2.1 | 2.1 |
| jsonschema | 4.17.3 | 4.17.3 | 4.17.3 | 4.17.3 | 4.17.3 | 4.17.3 | 4.17.3 |
| jupyter | 1.0.0 | 1.0.0 | 1.0.0 | 1.0.0 | 1.0.0 | 1.0.0 | 1.0.0 |
| jupyter\_client | 8.1.0 | 8.1.0 | 8.1.0 | 8.1.0 | 8.1.0 | 8.1.0 | 8.1.0 |
| jupyter\_console | 6.6.3 | 6.6.3 | 6.6.3 | 6.6.3 | 6.6.3 | 6.6.3 | 6.6.3 |
| jupyter\_core | 5.3.0 | 5.3.0 | 5.3.0 | 5.3.0 | 5.3.0 | 5.3.0 | 5.3.0 |
| jupyter\_events | 0.6.3 | 0.6.3 | 0.6.3 | 0.6.3 | 0.6.3 | 0.6.3 | |
| jupyter\_server | 2.5.0 | 2.5.0 | 2.5.0 | 1.23.4 | 2.5.0 | 2.5.0 | 2.5.0 |
| jupyter\_server\_fileid | 0.9.0 | 0.9.0 | 0.9.0 | 0.9.0 | 0.9.0 | 0.9.0 | |
| jupyter\_server\_terminals | 0.4.4 | 0.4.4 | 0.4.4 | 0.4.4 | 0.4.4 | 0.4.4 | |
| jupyter\_server\_ydoc | 0.8.0 | 0.8.0 | 0.8.0 | 0.8.0 | 0.8.0 | 0.8.0 | |
| jupyter\_ydoc | 0.2.4 | 0.2.4 | 0.2.4 | 0.2.4 | 0.2.4 | 0.2.4 | |
| jupyterlab | 3.6.3 | 3.6.3 | 3.6.3 | 3.3.2 | 3.6.3 | 3.6.3 | 3.6.3 |
| jupyterlab\_pygments | 0.1.2 | 0.1.2 | 0.1.2 | 0.1.2 | 0.1.2 | 0.1.2 | 0.1.2 |
| jupyterlab\_server | 2.22.0 | 2.22.0 | 2.22.0 | 2.21.0 | 2.22.0 | 2.22.0 | 2.22.0 |
| jupyterlab\_widgets | 3.0.5 | 3.0.5 | 3.0.5 | 3.0.5 | 3.0.5 | 3.0.5 | 3.0.5 |
| jxrlib | 1.1 | 1.1 | 1.1 | 1.1 | 1.1 | 1.1 | 1.1 |
| keyring | 23.13.1 | 23.13.1 | 23.13.1 | 23.13.1 | 23.13.1 | ||
| kiwisolver | 1.4.4 | 1.4.4 | 1.4.4 | 1.4.4 | 1.4.4 | 1.4.4 | 1.4.4 |
| krb5 | 1.20.1 | 1.19.4 | 1.20.1 | 1.19.4 | 1.19.4 | 1.19.4 | 1.19.4 |
| lazy-object-proxy | 1.6.0 | 1.6.0 | 1.6.0 | 1.6.0 | 1.6.0 | 1.6.0 | 1.6.0 |
| lazy\_loader | 0.2 | 0.2 | 0.2 | 0.1 | 0.2 | 0.2 | 0.2 |
| lcms2 | 2.12 | 2.12 | 2.12 | 2.12 | 2.12 | 2.12 | 2.12 |
| ld64 | 530 | 530 | |||||
| ld64\_osx-64 | 530 | ||||||
| ld64\_osx-arm64 | 530 | ||||||
| ld\_impl\_linux-64 | 2.38 | ||||||
| ld\_impl\_linux-aarch64 | 2.38 | ||||||
| ld\_impl\_linux-ppc64le | 2.38 | ||||||
| ld\_impl\_linux-s390x | 2.38 | ||||||
| ldid | 2.1.5 | 2.1.5 | |||||
| lerc | 3.0 | 3.0 | 3.0 | 3.0 | 3.0 | 3.0 | 3.0 |
| libaec | 1.0.4 | 1.0.4 | 1.0.4 | 1.0.4 | 1.0.4 | 1.0.4 | 1.0.4 |
| libarchive | 3.6.2 | 3.6.2 | 3.6.2 | 3.6.2 | 3.6.2 | 3.6.2 | 3.6.2 |
| libboost | 1.73.0 | 1.73.0 | 1.73.0 | 1.73.0 | 1.73.0 | 1.73.0 | |
| libbrotlicommon | 1.0.9 | 1.0.9 | 1.0.9 | 1.0.9 | 1.0.9 | 1.0.9 | 1.0.9 |
| libbrotlidec | 1.0.9 | 1.0.9 | 1.0.9 | 1.0.9 | 1.0.9 | 1.0.9 | 1.0.9 |
| libbrotlienc | 1.0.9 | 1.0.9 | 1.0.9 | 1.0.9 | 1.0.9 | 1.0.9 | 1.0.9 |
| libclang | 10.0.1 | 14.0.6 | 14.0.6 | 14.0.6 | 14.0.6 | ||
| libclang13 | 14.0.6 | 14.0.6 | 14.0.6 | 14.0.6 | |||
| libcurl | 8.1.1 | 8.1.1 | 8.1.1 | 8.1.1 | 8.1.1 | 8.1.1 | 8.1.1 |
| libcxx | 14.0.6 | 14.0.6 | |||||
| libdeflate | 1.17 | 1.17 | 1.17 | 1.17 | 1.17 | 1.17 | 1.17 |
| libedit | 3.1.20221030 | 3.1.20221030 | 3.1.20221030 | 3.1.20221030 | 3.1.20221030 | 3.1.20221030 | |
| libev | 4.33 | 4.33 | 4.33 | 4.33 | 4.33 | 4.33 | |
| libevent | 2.1.12 | 2.1.12 | 2.1.12 | 2.1.12 | 2.1.12 | 2.1.12 | |
| libffi | 3.4.4 | 3.4.4 | 3.4.4 | 3.4.2 | 3.4.4 | 3.4.4 | 3.4.4 |
| libgcc-ng | 11.2.0 | 11.2.0 | 11.2.0 | 11.2.0 | |||
| libgfortran | 5.0.0 | 5.0.0 | |||||
| libgfortran-ng | 11.2.0 | 11.2.0 | 11.2.0 | 11.2.0 | |||
| libgfortran5 | 11.2.0 | 11.2.0 | 11.2.0 | 11.2.0 | 11.3.0 | 11.3.0 | |
| libgomp | 11.2.0 | 11.2.0 | 11.2.0 | 11.2.0 | |||
| libiconv | 1.16 | 1.16 | 1.16 | ||||
| liblief | 0.12.3 | 0.12.3 | 0.12.3 | 0.12.3 | 0.12.3 | 0.12.3 | 0.12.3 |
| libllvm10 | 10.0.1 | ||||||
| libllvm14 | 14.0.6 | 14.0.6 | 14.0.6 | 14.0.6 | 14.0.6 | 14.0.6 | |
| libmamba | 1.4.1 | 1.4.1 | 1.4.1 | 1.4.1 | 1.4.1 | 1.4.1 | 1.4.1 |
| libmambapy | 1.4.1 | 1.4.1 | 1.4.1 | 1.4.1 | 1.4.1 | 1.4.1 | 1.4.1 |
| libnghttp2 | 1.52.0 | 1.52.0 | 1.52.0 | 1.52.0 | 1.52.0 | 1.52.0 | |
| libogg | 1.3.5 | ||||||
| libopenblas | 0.3.21 | 0.3.21 | 0.3.21 | 0.3.21 | 0.3.21 | ||
| libpng | 1.6.39 | 1.6.39 | 1.6.39 | 1.6.39 | 1.6.39 | 1.6.39 | 1.6.39 |
| libpq | 12.15 | 12.9 | 12.9 | 12.9 | |||
| libprotobuf | 3.20.3 | 3.20.3 | 3.20.3 | 3.20.3 | 3.20.3 | 3.20.3 | |
| libsodium | 1.0.18 | 1.0.18 | 1.0.18 | 1.0.18 | 1.0.18 | 1.0.18 | 1.0.18 |
| libsolv | 0.7.22 | 0.7.22 | 0.7.22 | 0.7.22 | 0.7.22 | 0.7.22 | 0.7.22 |
| libspatialindex | 1.9.3 | 1.9.3 | 1.9.3 | 1.9.3 | 1.9.3 | ||
| libssh2 | 1.10.0 | 1.10.0 | 1.10.0 | 1.10.0 | 1.10.0 | 1.10.0 | 1.10.0 |
| libstdcxx-ng | 11.2.0 | 11.2.0 | 11.2.0 | 11.2.0 | |||
| libthrift | 0.15.0 | 0.15.0 | 0.15.0 | 0.13.0 | 0.15.0 | 0.15.0 | |
| libtiff | 4.5.0 | 4.5.0 | 4.5.0 | 4.5.0 | 4.5.0 | 4.5.0 | 4.5.0 |
| libuuid | 1.41.5 | 1.41.5 | 1.41.5 | 1.41.5 | |||
| libuv | 1.44.2 | ||||||
| libvorbis | 1.3.7 | ||||||
| libwebp | 1.2.4 | 1.2.4 | 1.2.4 | 1.2.4 | 1.2.4 | 1.2.4 | 1.2.4 |
| libwebp-base | 1.2.4 | 1.2.4 | 1.2.4 | 1.2.4 | 1.2.4 | 1.2.4 | 1.2.4 |
| libxcb | 1.15 | 1.15 | |||||
| libxkbcommon | 1.0.1 | 1.0.1 | |||||
| libxml2 | 2.9.14 | 2.10.3 | 2.10.3 | 2.10.3 | 2.10.3 | 2.10.3 | 2.10.3 |
| libxslt | 1.1.35 | 1.1.37 | 1.1.37 | 1.1.37 | 1.1.37 | 1.1.37 | 1.1.37 |
| libzopfli | 1.0.3 | 1.0.3 | 1.0.3 | 1.0.3 | 1.0.3 | 1.0.3 | 1.0.3 |
| linkify-it-py | 2.0.0 | 2.0.0 | 2.0.0 | 2.0.0 | 2.0.0 | ||
| llvm-openmp | 14.0.6 | 14.0.6 | |||||
| llvmlite | 0.40.0 | 0.40.0 | 0.40.0 | 0.40.0 | 0.40.0 | 0.40.0 | |
| locket | 1.0.0 | 1.0.0 | 1.0.0 | 1.0.0 | 1.0.0 | 1.0.0 | 1.0.0 |
| lxml | 4.9.1 | 4.9.2 | 4.9.2 | 4.9.2 | 4.9.2 | 4.9.2 | 4.9.2 |
| lz4 | 4.3.2 | 4.3.2 | 4.3.2 | 4.3.2 | 4.3.2 | 4.3.2 | |
| lz4-c | 1.9.4 | 1.9.4 | 1.9.4 | 1.9.4 | 1.9.4 | 1.9.4 | 1.9.4 |
| lzo | 2.10 | 2.10 | 2.10 | 2.10 | 2.10 | 2.10 | 2.10 |
| m2-msys2-runtime | 2.5.0.17080.65c939c | ||||||
| m2-patch | 2.7.5 | ||||||
| m2w64-libwinpthread-git | 5.0.0.4634.697f757 | ||||||
| markdown | 3.4.1 | 3.4.1 | 3.4.1 | 3.4.1 | 3.4.1 | 3.4.1 | 3.4.1 |
| markdown-it-py | 2.2.0 | 2.2.0 | 2.2.0 | 2.2.0 | 2.2.0 | ||
| markupsafe | 2.1.1 | 2.1.1 | 2.1.1 | 2.1.1 | 2.1.1 | 2.1.1 | 2.1.1 |
| matplotlib | 3.7.1 | 3.7.1 | 3.7.1 | 3.7.1 | 3.7.1 | 3.7.1 | 3.7.1 |
| matplotlib-base | 3.7.1 | 3.7.1 | 3.7.1 | 3.7.1 | 3.7.1 | 3.7.1 | 3.7.1 |
| matplotlib-inline | 0.1.6 | 0.1.6 | 0.1.6 | 0.1.6 | 0.1.6 | 0.1.6 | 0.1.6 |
| mccabe | 0.7.0 | 0.7.0 | 0.7.0 | 0.7.0 | 0.7.0 | 0.7.0 | 0.7.0 |
| mdit-py-plugins | 0.3.0 | 0.3.0 | 0.3.0 | 0.3.0 | 0.3.0 | ||
| mdurl | 0.1.0 | 0.1.0 | 0.1.0 | 0.1.0 | 0.1.0 | ||
| menuinst | 1.4.19 | ||||||
| mistune | 0.8.4 | 0.8.4 | 0.8.4 | 0.8.4 | 0.8.4 | 0.8.4 | 0.8.4 |
| mkl | 2023.1.0 | 2023.1.0 | |||||
| mkl-service | 2.4.0 | 2.4.0 | |||||
| mkl\_fft | 1.3.6 | 1.3.6 | |||||
| mkl\_random | 1.2.2 | 1.2.2 | |||||
| mock | 4.0.3 | ||||||
| more-itertools | 8.12.0 | 8.12.0 | 8.12.0 | 8.12.0 | 8.12.0 | 8.12.0 | 8.12.0 |
| mpc | 1.1.0 | 1.1.0 | 1.1.0 | 1.1.0 | 1.1.0 | 1.1.0 | |
| mpfr | 4.0.2 | 4.0.2 | 4.0.2 | 4.0.2 | 4.0.2 | 4.0.2 | |
| mpi | 1.0 | ||||||
| mpich | 4.1.1 | ||||||
| mpmath | 1.2.1 | 1.2.1 | 1.2.1 | 1.2.1 | 1.2.1 | 1.2.1 | 1.2.1 |
| msgpack-python | 1.0.3 | 1.0.3 | 1.0.3 | 1.0.3 | 1.0.3 | 1.0.3 | 1.0.3 |
| msys2-conda-epoch | 20160418 | ||||||
| multidict | 6.0.2 | 6.0.2 | 6.0.2 | 6.0.2 | 6.0.2 | 6.0.2 | 6.0.2 |
| multipledispatch | 0.6.0 | 0.6.0 | 0.6.0 | 0.6.0 | 0.6.0 | 0.6.0 | |
| multiprocess | 0.70.14 | 0.70.14 | 0.70.14 | ||||
| munkres | 1.1.4 | 1.1.4 | 1.1.4 | 1.1.4 | 1.1.4 | 1.1.4 | 1.1.4 |
| mypy\_extensions | 0.4.3 | 0.4.3 | 0.4.3 | 0.4.3 | 0.4.3 | ||
| navigator-updater | 0.4.0 | 0.4.0 | 0.4.0 | 0.4.0 | 0.4.0 | ||
| nbclassic | 0.5.5 | 0.5.5 | 0.5.5 | 0.5.5 | 0.5.5 | 0.5.5 | 0.5.5 |
| nbclient | 0.5.13 | 0.5.13 | 0.5.13 | 0.5.13 | 0.5.13 | 0.5.13 | 0.5.13 |
| nbconvert | 6.5.4 | 6.5.4 | 6.5.4 | 6.5.4 | 6.5.4 | 6.5.4 | 6.5.4 |
| nbformat | 5.7.0 | 5.7.0 | 5.7.0 | 5.7.0 | 5.7.0 | 5.7.0 | 5.7.0 |
| ncurses | 6.4 | 6.4 | 6.4 | 6.4 | 6.4 | 6.4 | |
| nest-asyncio | 1.5.6 | 1.5.6 | 1.5.6 | 1.5.6 | 1.5.6 | 1.5.6 | 1.5.6 |
| networkx | 2.8.4 | 2.8.4 | 2.8.4 | 2.8.4 | 2.8.4 | 2.8.4 | 2.8.4 |
| ninja | 1.10.2 | 1.10.2 | 1.10.2 | ||||
| ninja-base | 1.10.2 | 1.10.2 | 1.10.2 | ||||
| nltk | 3.7 | 3.7 | 3.7 | 3.7 | 3.7 | 3.7 | 3.7 |
| notebook | 6.5.4 | 6.5.4 | 6.5.4 | 6.5.4 | 6.5.4 | 6.5.4 | 6.5.4 |
| notebook-shim | 0.2.2 | 0.2.2 | 0.2.2 | 0.2.2 | 0.2.2 | 0.2.2 | 0.2.2 |
| nspr | 4.35 | 4.35 | 4.35 | 4.35 | |||
| nss | 3.89.1 | 3.89.1 | 3.89.1 | 3.89.1 | |||
| numba | 0.57.0 | 0.57.0 | 0.57.0 | 0.57.0 | 0.57.0 | 0.57.0 | |
| numexpr | 2.8.4 | 2.8.4 | 2.8.4 | 2.8.4 | 2.8.4 | 2.8.4 | 2.8.4 |
| numpy | 1.24.3 | 1.24.3 | 1.24.3 | 1.25.0 | 1.24.3 | 1.24.3 | 1.24.3 |
| numpy-base | 1.24.3 | 1.24.3 | 1.24.3 | 1.25.0 | 1.24.3 | 1.24.3 | 1.24.3 |
| numpydoc | 1.5.0 | 1.5.0 | 1.5.0 | 1.5.0 | 1.5.0 | ||
| oniguruma | 6.9.7.1 | 6.9.7.1 | 6.9.7.1 | 6.9.7.1 | 6.9.7.1 | ||
| openjpeg | 2.4.0 | 2.4.0 | 2.4.0 | 2.4.0 | 2.3.0 | 2.4.0 | 2.4.0 |
| openpyxl | 3.0.10 | 3.0.10 | 3.0.10 | 3.0.10 | 3.0.10 | 3.0.10 | 3.0.10 |
| openssl | 1.1.1u | 1.1.1u | 1.1.1u | 1.1.1u | 1.1.1u | 1.1.1u | 1.1.1u |
| orc | 1.7.4 | 1.7.4 | 1.7.4 | 1.7.4 | 1.7.4 | 1.7.4 | |
| packaging | 23.0 | 23.0 | 23.0 | 23.0 | 23.0 | 23.0 | 23.0 |
| pandas | 1.5.3 | 1.5.3 | 1.5.3 | 1.5.3 | 1.5.3 | 1.5.3 | 1.5.3 |
| pandocfilters | 1.5.0 | 1.5.0 | 1.5.0 | 1.5.0 | 1.5.0 | 1.5.0 | 1.5.0 |
| panel | 1.1.0 | 0.14.3 | 1.1.0 | 0.12.6 | 1.1.0 | 1.1.0 | 1.1.0 |
| param | 1.13.0 | 1.13.0 | 1.13.0 | 1.13.0 | 1.13.0 | 1.13.0 | 1.13.0 |
| paramiko | 2.8.1 | ||||||
| parsel | 1.6.0 | 1.6.0 | 1.6.0 | 1.6.0 | 1.6.0 | 1.6.0 | |
| parso | 0.8.3 | 0.8.3 | 0.8.3 | 0.8.3 | 0.8.3 | 0.8.3 | 0.8.3 |
| partd | 1.2.0 | 1.2.0 | 1.2.0 | 1.2.0 | 1.2.0 | 1.2.0 | 1.2.0 |
| patch | 2.7.6 | 2.7.6 | 2.7.6 | 2.7.6 | 2.7.6 | 2.7.6 | |
| patchelf | 0.17.2 | 0.17.2 | 0.17.2 | 0.17.2 | |||
| pathlib | 1.0.1 | 1.0.1 | 1.0.1 | 1.0.1 | 1.0.1 | ||
| pathspec | 0.10.3 | 0.10.3 | 0.10.3 | 0.10.3 | 0.10.3 | ||
| patsy | 0.5.3 | 0.5.3 | 0.5.3 | 0.5.3 | 0.5.3 | 0.5.3 | 0.5.3 |
| pcre | 8.45 | 8.45 | 8.45 | 8.45 | 8.45 | ||
| pcre2 | 10.37 | 10.37 | 10.37 | 10.37 | 10.37 | 10.37 | 10.37 |
| pep8 | 1.7.1 | 1.7.1 | 1.7.1 | 1.7.1 | 1.7.1 | 1.7.1 | 1.7.1 |
| pexpect | 4.8.0 | 4.8.0 | 4.8.0 | 4.8.0 | 4.8.0 | 4.8.0 | 4.8.0 |
| pickleshare | 0.7.5 | 0.7.5 | 0.7.5 | 0.7.5 | 0.7.5 | 0.7.5 | 0.7.5 |
| pillow | 9.4.0 | 9.4.0 | 9.4.0 | 9.4.0 | 9.4.0 | 9.4.0 | 9.4.0 |
| pip | 23.1.2 | 23.1.2 | 23.1.2 | 23.1.2 | 23.1.2 | 23.1.2 | 23.1.2 |
| pkginfo | 1.9.6 | 1.9.6 | 1.9.6 | 1.9.6 | 1.9.6 | 1.9.6 | 1.9.6 |
| platformdirs | 2.5.2 | 2.5.2 | 2.5.2 | 2.5.2 | 2.5.2 | 2.5.2 | 2.5.2 |
| plotly | 5.9.0 | 5.9.0 | 5.9.0 | 5.9.0 | 5.9.0 | 5.9.0 | 5.9.0 |
| pluggy | 1.0.0 | 1.0.0 | 1.0.0 | 1.0.0 | 1.0.0 | 1.0.0 | 1.0.0 |
| ply | 3.11 | 3.11 | 3.11 | 3.11 | 3.11 | ||
| pooch | 1.4.0 | 1.4.0 | 1.4.0 | 1.4.0 | 1.4.0 | 1.4.0 | 1.4.0 |
| powershell\_shortcut | 0.0.1 | ||||||
| poyo | 0.5.0 | 0.5.0 | 0.5.0 | 0.5.0 | 0.5.0 | ||
| prometheus\_client | 0.14.1 | 0.14.1 | 0.14.1 | 0.14.1 | 0.14.1 | 0.14.1 | 0.14.1 |
| prompt-toolkit | 3.0.36 | 3.0.36 | 3.0.36 | 3.0.36 | 3.0.36 | 3.0.36 | 3.0.36 |
| prompt\_toolkit | 3.0.36 | 3.0.36 | 3.0.36 | 3.0.36 | 3.0.36 | 3.0.36 | 3.0.36 |
| protego | 0.1.16 | 0.1.16 | 0.1.16 | 0.1.16 | 0.1.16 | 0.1.16 | |
| psutil | 5.9.0 | 5.9.0 | 5.9.0 | 5.9.0 | 5.9.0 | 5.9.0 | 5.9.0 |
| ptyprocess | 0.7.0 | 0.7.0 | 0.7.0 | 0.7.0 | 0.7.0 | 0.7.0 | 0.7.0 |
| pure\_eval | 0.2.2 | 0.2.2 | 0.2.2 | 0.2.2 | 0.2.2 | 0.2.2 | 0.2.2 |
| py-cpuinfo | 8.0.0 | 8.0.0 | 8.0.0 | 8.0.0 | 8.0.0 | 8.0.0 | |
| py-lief | 0.12.3 | 0.12.3 | 0.12.3 | 0.12.3 | 0.12.3 | 0.12.3 | 0.12.3 |
| pyarrow | 11.0.0 | 11.0.0 | 11.0.0 | 11.0.0 | 11.0.0 | 11.0.0 | |
| pyasn1 | 0.4.8 | 0.4.8 | 0.4.8 | 0.4.8 | 0.4.8 | 0.4.8 | |
| pyasn1-modules | 0.2.8 | 0.2.8 | 0.2.8 | 0.2.8 | 0.2.8 | 0.2.8 | |
| pybind11-abi | 4 | 4 | 4 | 4 | 4 | 4 | 4 |
| pycodestyle | 2.10.0 | 2.10.0 | 2.10.0 | 2.10.0 | 2.10.0 | ||
| pycosat | 0.6.4 | 0.6.4 | 0.6.4 | 0.6.4 | 0.6.4 | 0.6.4 | 0.6.4 |
| pycparser | 2.21 | 2.21 | 2.21 | 2.21 | 2.21 | 2.21 | 2.21 |
| pyct | 0.5.0 | 0.5.0 | 0.5.0 | 0.5.0 | 0.5.0 | 0.5.0 | 0.5.0 |
| pycurl | 7.45.2 | 7.45.2 | 7.45.2 | 7.45.2 | 7.45.2 | 7.45.2 | 7.45.2 |
| pydispatcher | 2.0.5 | 2.0.5 | 2.0.5 | 2.0.5 | 2.0.5 | 2.0.5 | |
| pydocstyle | 6.3.0 | 6.3.0 | 6.3.0 | 6.3.0 | 6.3.0 | ||
| pyerfa | 2.0.0 | 2.0.0 | 2.0.0 | 2.0.0 | 2.0.0 | 2.0.0 | 2.0.0 |
| pyflakes | 3.0.1 | 3.0.1 | 3.0.1 | 3.0.1 | 3.0.1 | 3.0.1 | 3.0.1 |
| pygments | 2.15.1 | 2.15.1 | 2.15.1 | 2.15.1 | 2.15.1 | 2.15.1 | 2.15.1 |
| pyjwt | 2.4.0 | 2.4.0 | 2.4.0 | 2.4.0 | 2.4.0 | ||
| pylint | 2.16.2 | 2.16.2 | 2.16.2 | 2.16.2 | 2.16.2 | 2.16.2 | 2.16.2 |
| pylint-venv | 2.3.0 | 2.3.0 | 2.3.0 | 2.3.0 | 2.3.0 | ||
| pyls-spyder | 0.4.0 | 0.4.0 | 0.4.0 | 0.4.0 | 0.4.0 | ||
| pynacl | 1.5.0 | ||||||
| pyobjc-core | 9.0 | 9.0 | |||||
| pyobjc-framework-cocoa | 9.0 | 9.0 | |||||
| pyobjc-framework-coreservices | 9.0 | 9.0 | |||||
| pyobjc-framework-fsevents | 9.0 | 9.0 | |||||
| pyodbc | 4.0.34 | 4.0.34 | 4.0.34 | 4.0.34 | 4.0.34 | 4.0.34 | 4.0.34 |
| pyopenssl | 23.0.0 | 23.0.0 | 23.0.0 | 23.0.0 | 23.0.0 | 23.0.0 | 23.0.0 |
| pyparsing | 3.0.9 | 3.0.9 | 3.0.9 | 3.0.9 | 3.0.9 | 3.0.9 | 3.0.9 |
| pyqt | 5.15.7 | 5.15.7 | 5.15.7 | 5.15.7 | 5.15.7 | ||
| pyqt5-sip | 12.11.0 | 12.11.0 | 12.11.0 | 12.11.0 | 12.11.0 | ||
| pyqtwebengine | 5.15.7 | 5.15.7 | 5.15.7 | 5.15.7 | 5.15.7 | ||
| pyrsistent | 0.18.0 | 0.18.0 | 0.18.0 | 0.18.0 | 0.18.0 | 0.18.0 | 0.18.0 |
| pysocks | 1.7.1 | 1.7.1 | 1.7.1 | 1.7.1 | 1.7.1 | 1.7.1 | 1.7.1 |
| pytables | 3.8.0 | 3.8.0 | 3.8.0 | 3.7.0 | 3.8.0 | 3.8.0 | 3.8.0 |
| pytest | 7.3.1 | 7.3.1 | 7.3.1 | 7.3.1 | 7.3.1 | 7.3.1 | 7.3.1 |
| python | 3.11.3 | 3.11.3 | 3.11.3 | 3.11.3 | 3.11.3 | 3.11.3 | 3.11.3 |
| python-dateutil | 2.8.2 | 2.8.2 | 2.8.2 | 2.8.2 | 2.8.2 | 2.8.2 | 2.8.2 |
| python-fastjsonschema | 2.16.2 | 2.16.2 | 2.16.2 | 2.16.2 | 2.16.2 | 2.16.2 | 2.16.2 |
| python-json-logger | 2.0.7 | 2.0.7 | 2.0.7 | 2.0.7 | 2.0.7 | 2.0.7 | |
| python-libarchive-c | 2.9 | 2.9 | 2.9 | 2.9 | 2.9 | 2.9 | 2.9 |
| python-lmdb | 1.4.1 | 1.4.1 | 1.4.1 | 1.4.1 | 1.4.1 | 1.4.1 | 1.4.1 |
| python-lsp-black | 1.2.1 | 1.2.1 | 1.2.1 | 1.2.1 | 1.2.1 | ||
| python-lsp-jsonrpc | 1.0.0 | 1.0.0 | 1.0.0 | 1.0.0 | 1.0.0 | ||
| python-lsp-server | 1.7.2 | 1.7.2 | 1.7.2 | 1.7.2 | 1.7.2 | ||
| python-slugify | 5.0.2 | 5.0.2 | 5.0.2 | 5.0.2 | 5.0.2 | ||
| python-snappy | 0.6.1 | 0.6.1 | 0.6.1 | 0.6.1 | 0.6.1 | 0.6.1 | 0.6.1 |
| python-xxhash | 2.0.2 | 2.0.2 | 2.0.2 | ||||
| python.app | 3 | 3 | |||||
| pytoolconfig | 1.2.5 | 1.2.5 | 1.2.5 | 1.2.5 | 1.2.5 | ||
| pytorch | 2.0.1 | 2.0.1 | 2.0.1 | ||||
| pytz | 2022.7 | 2022.7 | 2022.7 | 2022.7 | 2022.7 | 2022.7 | 2022.7 |
| pyviz\_comms | 2.3.0 | 2.3.0 | 2.3.0 | 2.3.0 | 2.3.0 | 2.3.0 | 2.3.0 |
| pywavelets | 1.4.1 | 1.4.1 | 1.4.1 | 1.4.1 | 1.4.1 | 1.4.1 | 1.4.1 |
| pywin32 | 305 | ||||||
| pywin32-ctypes | 0.2.0 | ||||||
| pywinpty | 2.0.10 | ||||||
| pyxdg | 0.27 | 0.27 | |||||
| pyyaml | 6.0 | 6.0 | 6.0 | 6.0 | 6.0 | 6.0 | 6.0 |
| pyzmq | 25.1.0 | 25.1.0 | 25.1.0 | 25.1.0 | 25.1.0 | 25.1.0 | 25.1.0 |
| qdarkstyle | 3.0.2 | 3.0.2 | 3.0.2 | 3.0.2 | 3.0.2 | ||
| qstylizer | 0.2.2 | 0.2.2 | 0.2.2 | 0.2.2 | 0.2.2 | ||
| qt-main | 5.15.2 | 5.15.2 | 5.15.2 | 5.15.2 | 5.15.2 | ||
| qt-webengine | 5.15.9 | 5.15.9 | 5.15.9 | 5.15.9 | 5.15.9 | ||
| qtawesome | 1.2.2 | 1.2.2 | 1.2.2 | 1.2.2 | 1.2.2 | ||
| qtconsole | 5.4.2 | 5.4.2 | 5.4.2 | 5.4.2 | 5.4.2 | ||
| qtpy | 2.2.0 | 2.2.0 | 2.2.0 | 2.2.0 | 2.2.0 | ||
| qtwebkit | 5.212 | 5.212 | 5.212 | 5.212 | 5.212 | ||
| queuelib | 1.5.0 | 1.5.0 | 1.5.0 | 1.5.0 | 1.5.0 | 1.5.0 | |
| re2 | 2022.04.01 | 2022.04.01 | 2022.04.01 | 2022.04.01 | 2022.04.01 | 2022.04.01 | |
| readline | 8.2 | 8.2 | 8.2 | 8.2 | 8.2 | 8.2 | |
| regex | 2022.7.9 | 2022.7.9 | 2022.7.9 | 2022.7.9 | 2022.7.9 | 2022.7.9 | 2022.7.9 |
| reproc | 14.2.4 | 14.2.4 | 14.2.4 | 14.2.4 | 14.2.4 | 14.2.4 | 14.2.4 |
| reproc-cpp | 14.2.4 | 14.2.4 | 14.2.4 | 14.2.4 | 14.2.4 | 14.2.4 | 14.2.4 |
| requests | 2.29.0 | 2.29.0 | 2.29.0 | 2.29.0 | 2.29.0 | 2.29.0 | 2.29.0 |
| requests-file | 1.5.1 | 1.5.1 | 1.5.1 | 1.5.1 | 1.5.1 | 1.5.1 | |
| requests-toolbelt | 0.9.1 | 0.9.1 | 0.9.1 | 0.9.1 | 0.9.1 | 0.9.1 | 0.9.1 |
| responses | 0.13.3 | 0.13.3 | 0.13.3 | ||||
| rfc3339-validator | 0.1.4 | 0.1.4 | 0.1.4 | 0.1.4 | 0.1.4 | 0.1.4 | |
| rfc3986-validator | 0.1.1 | 0.1.1 | 0.1.1 | 0.1.1 | 0.1.1 | 0.1.1 | |
| rope | 1.7.0 | 1.7.0 | 1.7.0 | 1.7.0 | 1.7.0 | ||
| rtree | 1.0.1 | 1.0.1 | 1.0.1 | 1.0.1 | 1.0.1 | ||
| ruamel.yaml | 0.17.21 | 0.17.21 | 0.17.21 | 0.17.21 | 0.17.21 | 0.17.21 | 0.17.21 |
| ruamel\_yaml | 0.17.21 | 0.17.21 | 0.17.21 | 0.17.21 | 0.17.21 | 0.17.21 | 0.17.21 |
| s3fs | 2023.4.0 | 2023.4.0 | 2023.3.0 | 2023.3.0 | 2023.4.0 | 2023.3.0 | 2023.3.0 |
| s3transfer | 0.6.0 | 0.6.0 | 0.6.0 | 0.6.0 | |||
| sacremoses | 0.0.43 | 0.0.43 | 0.0.43 | 0.0.43 | 0.0.43 | 0.0.43 | 0.0.43 |
| scikit-image | 0.20.0 | 0.20.0 | 0.20.0 | 0.20.0 | 0.20.0 | 0.20.0 | 0.20.0 |
| scikit-learn | 1.2.2 | 1.2.2 | 1.2.2 | 1.2.2 | 1.2.2 | 1.2.2 | 1.2.2 |
| scikit-learn-intelex | 2023.1.1 | 2023.1.1 | |||||
| scipy | 1.10.1 | 1.10.1 | 1.10.1 | 1.10.1 | 1.10.1 | 1.10.1 | 1.10.1 |
| scrapy | 2.8.0 | 2.8.0 | 2.8.0 | 2.8.0 | 2.8.0 | 2.8.0 | |
| seaborn | 0.12.2 | 0.12.2 | 0.12.2 | 0.12.2 | 0.12.2 | 0.12.2 | 0.12.2 |
| secretstorage | 3.3.1 | 3.3.1 | |||||
| send2trash | 1.8.0 | 1.8.0 | 1.8.0 | 1.8.0 | 1.8.0 | 1.8.0 | 1.8.0 |
| service\_identity | 18.1.0 | 18.1.0 | 18.1.0 | 18.1.0 | 18.1.0 | 18.1.0 | |
| setuptools | 67.8.0 | 67.8.0 | 67.8.0 | 67.8.0 | 67.8.0 | 67.8.0 | 67.8.0 |
| sip | 6.6.2 | 6.6.2 | 6.6.2 | 6.6.2 | 6.6.2 | ||
| six | 1.16.0 | 1.16.0 | 1.16.0 | 1.16.0 | 1.16.0 | 1.16.0 | 1.16.0 |
| sleef | 3.5.1 | ||||||
| smart\_open | 5.2.1 | 5.2.1 | 5.2.1 | 5.2.1 | 5.2.1 | 5.2.1 | |
| snappy | 1.1.9 | 1.1.9 | 1.1.9 | 1.1.9 | 1.1.9 | 1.1.9 | 1.1.9 |
| sniffio | 1.2.0 | 1.2.0 | 1.2.0 | 1.2.0 | 1.2.0 | 1.2.0 | 1.2.0 |
| snowballstemmer | 2.2.0 | 2.2.0 | 2.2.0 | 2.2.0 | 2.2.0 | 2.2.0 | 2.2.0 |
| sortedcontainers | 2.4.0 | 2.4.0 | 2.4.0 | 2.4.0 | 2.4.0 | 2.4.0 | 2.4.0 |
| soupsieve | 2.4 | 2.4 | 2.4 | 2.4 | 2.4 | 2.4 | 2.4 |
| sphinx | 5.0.2 | 5.0.2 | 5.0.2 | 5.0.2 | 5.0.2 | ||
| sphinxcontrib-applehelp | 1.0.2 | 1.0.2 | 1.0.2 | 1.0.2 | 1.0.2 | ||
| sphinxcontrib-devhelp | 1.0.2 | 1.0.2 | 1.0.2 | 1.0.2 | 1.0.2 | ||
| sphinxcontrib-htmlhelp | 2.0.0 | 2.0.0 | 2.0.0 | 2.0.0 | 2.0.0 | ||
| sphinxcontrib-jsmath | 1.0.1 | 1.0.1 | 1.0.1 | 1.0.1 | 1.0.1 | ||
| sphinxcontrib-qthelp | 1.0.3 | 1.0.3 | 1.0.3 | 1.0.3 | 1.0.3 | ||
| sphinxcontrib-serializinghtml | 1.1.5 | 1.1.5 | 1.1.5 | 1.1.5 | 1.1.5 | ||
| spyder | 5.4.3 | 5.4.3 | 5.4.3 | 5.4.3 | 5.4.3 | ||
| spyder-kernels | 2.4.3 | 2.4.3 | 2.4.3 | 2.4.3 | 2.4.3 | ||
| sqlalchemy | 1.4.39 | 1.4.39 | 1.4.39 | 1.4.39 | 1.4.39 | 1.4.39 | 1.4.39 |
| sqlite | 3.41.2 | 3.41.2 | 3.41.2 | 3.41.2 | 3.41.2 | 3.41.2 | 3.41.2 |
| stack\_data | 0.2.0 | 0.2.0 | 0.2.0 | 0.2.0 | 0.2.0 | 0.2.0 | 0.2.0 |
| statsmodels | 0.13.5 | 0.13.5 | 0.13.5 | 0.13.5 | 0.13.5 | 0.13.5 | 0.13.5 |
| sympy | 1.11.1 | 1.11.1 | 1.11.1 | 1.11.1 | 1.11.1 | 1.11.1 | 1.11.1 |
| tabulate | 0.8.10 | 0.8.10 | 0.8.10 | 0.8.10 | 0.8.10 | 0.8.10 | 0.8.10 |
| tapi | 1100.0.11 | 1000.10.8 | |||||
| tbb | 2021.8.0 | 2021.8.0 | 2021.8.0 | 2021.8.0 | 2021.8.0 | 2021.8.0 | 2021.8.0 |
| tbb4py | 2021.8.0 | 2021.8.0 | 2021.8.0 | 2021.8.0 | 2021.8.0 | 2021.8.0 | 2021.8.0 |
| tblib | 1.7.0 | 1.7.0 | 1.7.0 | 1.7.0 | 1.7.0 | 1.7.0 | 1.7.0 |
| tenacity | 8.2.2 | 8.2.2 | 8.2.2 | 8.2.2 | 8.2.2 | 8.2.2 | 8.2.2 |
| terminado | 0.17.1 | 0.17.1 | 0.17.1 | 0.17.1 | 0.17.1 | 0.17.1 | 0.17.1 |
| text-unidecode | 1.3 | 1.3 | 1.3 | 1.3 | 1.3 | ||
| textdistance | 4.2.1 | 4.2.1 | 4.2.1 | 4.2.1 | 4.2.1 | ||
| threadpoolctl | 2.2.0 | 2.2.0 | 2.2.0 | 2.2.0 | 2.2.0 | 2.2.0 | 2.2.0 |
| three-merge | 0.1.1 | 0.1.1 | 0.1.1 | 0.1.1 | 0.1.1 | ||
| tifffile | 2021.7.2 | 2021.7.2 | 2021.7.2 | 2021.7.2 | 2021.7.2 | 2021.7.2 | 2021.7.2 |
| tinycss2 | 1.2.1 | 1.2.1 | 1.2.1 | 1.2.1 | 1.2.1 | 1.2.1 | 1.2.1 |
| tk | 8.6.12 | 8.6.12 | 8.6.12 | 8.6.12 | 8.6.12 | 8.6.12 | 8.6.12 |
| tldextract | 3.2.0 | 3.2.0 | 3.2.0 | 3.2.0 | 3.2.0 | 3.2.0 | |
| tokenizers | 0.13.2 | 0.13.2 | 0.13.2 | ||||
| toml | 0.10.2 | 0.10.2 | 0.10.2 | 0.10.2 | 0.10.2 | ||
| tomli | 2.0.1 | 2.0.1 | 2.0.1 | 2.0.1 | 2.0.1 | 2.0.1 | 2.0.1 |
| tomlkit | 0.11.1 | 0.11.1 | 0.11.1 | 0.11.1 | 0.11.1 | 0.11.1 | 0.11.1 |
| toolz | 0.12.0 | 0.12.0 | 0.12.0 | 0.12.0 | 0.12.0 | 0.12.0 | 0.12.0 |
| tornado | 6.2 | 6.2 | 6.2 | 6.2 | 6.2 | 6.2 | 6.2 |
| tqdm | 4.65.0 | 4.65.0 | 4.65.0 | 4.65.0 | 4.65.0 | 4.65.0 | 4.65.0 |
| traitlets | 5.7.1 | 5.7.1 | 5.7.1 | 5.7.1 | 5.7.1 | 5.7.1 | 5.7.1 |
| transformers | 4.29.2 | 4.29.2 | 2.1.1 | 2.1.1 | 4.29.2 | 2.1.1 | 2.1.1 |
| twisted | 22.10.0 | 22.10.0 | 22.10.0 | 22.10.0 | 22.10.0 | 22.10.0 | |
| twisted-iocpsupport | 1.0.2 | ||||||
| typing-extensions | 4.6.3 | 4.6.3 | 4.6.3 | 4.6.3 | 4.6.3 | 4.6.3 | 4.6.3 |
| typing\_extensions | 4.6.3 | 4.6.3 | 4.6.3 | 4.6.3 | 4.6.3 | 4.6.3 | 4.6.3 |
| tzdata | 2023c | 2023c | 2023c | 2023c | 2023c | 2023c | 2023c |
| uc-micro-py | 1.0.1 | 1.0.1 | 1.0.1 | 1.0.1 | 1.0.1 | ||
| ujson | 5.4.0 | 5.4.0 | 5.4.0 | 5.4.0 | 5.4.0 | ||
| unidecode | 1.2.0 | 1.2.0 | 1.2.0 | 1.2.0 | 1.2.0 | ||
| unixodbc | 2.3.11 | 2.3.11 | 2.3.11 | 2.3.11 | 2.3.11 | 2.3.11 | |
| urllib3 | 1.26.16 | 1.26.16 | 1.26.16 | 1.26.16 | 1.26.16 | 1.26.16 | 1.26.16 |
| utf8proc | 2.6.1 | 2.6.1 | 2.6.1 | 2.6.1 | 2.6.1 | 2.6.1 | |
| vc | 14.2 | ||||||
| vs2015\_runtime | 14.27.29016 | ||||||
| w3lib | 1.21.0 | 1.21.0 | 1.21.0 | 1.21.0 | 1.21.0 | 1.21.0 | |
| watchdog | 2.1.6 | 2.1.6 | 2.1.6 | 2.1.6 | 2.1.6 | ||
| wcwidth | 0.2.5 | 0.2.5 | 0.2.5 | 0.2.5 | 0.2.5 | 0.2.5 | 0.2.5 |
| webencodings | 0.5.1 | 0.5.1 | 0.5.1 | 0.5.1 | 0.5.1 | 0.5.1 | 0.5.1 |
| websocket-client | 0.58.0 | 0.58.0 | 0.58.0 | 0.58.0 | 0.58.0 | 0.58.0 | 0.58.0 |
| werkzeug | 2.2.3 | 2.2.3 | 2.2.3 | 2.2.3 | 2.2.3 | 2.2.3 | 2.2.3 |
| whatthepatch | 1.0.2 | 1.0.2 | 1.0.2 | 1.0.2 | 1.0.2 | ||
| wheel | 0.38.4 | 0.38.4 | 0.38.4 | 0.38.4 | 0.38.4 | 0.38.4 | 0.38.4 |
| widgetsnbextension | 4.0.5 | 4.0.5 | 4.0.5 | 4.0.5 | 4.0.5 | 4.0.5 | 4.0.5 |
| win\_inet\_pton | 1.1.0 | ||||||
| winpty | 0.4.3 | ||||||
| wrapt | 1.14.1 | 1.14.1 | 1.14.1 | 1.14.1 | 1.14.1 | 1.14.1 | 1.14.1 |
| wurlitzer | 3.0.2 | 3.0.2 | 3.0.2 | 3.0.2 | |||
| xarray | 2022.11.0 | 2022.11.0 | 2022.11.0 | 2022.11.0 | 2022.11.0 | 2022.11.0 | |
| xlwings | 0.29.1 | 0.29.1 | 0.29.1 | ||||
| xxhash | 0.8.0 | 0.8.0 | 0.8.0 | ||||
| xyzservices | 2022.9.0 | 2022.9.0 | 2022.9.0 | 2022.9.0 | 2022.9.0 | ||
| xz | 5.4.2 | 5.4.2 | 5.4.2 | 5.4.2 | 5.4.2 | 5.4.2 | 5.4.2 |
| y-py | 0.5.9 | 0.5.9 | 0.5.9 | 0.5.9 | 0.5.9 | 0.5.9 | |
| yaml | 0.2.5 | 0.2.5 | 0.2.5 | 0.2.5 | 0.2.5 | 0.2.5 | 0.2.5 |
| yaml-cpp | 0.7.0 | 0.7.0 | 0.7.0 | 0.7.0 | 0.7.0 | 0.7.0 | 0.7.0 |
| yapf | 0.31.0 | 0.31.0 | 0.31.0 | 0.31.0 | 0.31.0 | ||
| yarl | 1.8.1 | 1.8.1 | 1.8.1 | 1.8.1 | 1.8.1 | 1.8.1 | 1.8.1 |
| ypy-websocket | 0.8.2 | 0.8.2 | 0.8.2 | 0.8.2 | 0.8.2 | 0.8.2 | |
| zeromq | 4.3.4 | 4.3.4 | 4.3.4 | 4.3.4 | 4.3.4 | 4.3.4 | 4.3.4 |
| zfp | 0.5.5 | 0.5.5 | 0.5.5 | 0.5.5 | 0.5.5 | ||
| zict | 2.2.0 | 2.2.0 | 2.2.0 | 2.2.0 | 2.2.0 | 2.2.0 | 2.2.0 |
| zipp | 3.11.0 | 3.11.0 | 3.11.0 | 3.11.0 | 3.11.0 | 3.11.0 | 3.11.0 |
| zlib | 1.2.13 | 1.2.13 | 1.2.13 | 1.2.13 | 1.2.13 | 1.2.13 | 1.2.13 |
| zlib-ng | 2.0.7 | 2.0.7 | 2.0.7 | 2.0.7 | 2.0.7 | 2.0.7 | |
| zope | 1.0 | 1.0 | 1.0 | 1.0 | 1.0 | 1.0 | |
| zope.interface | 5.4.0 | 5.4.0 | 5.4.0 | 5.4.0 | 5.4.0 | 5.4.0 | |
| zstandard | 0.19.0 | 0.19.0 | 0.19.0 | 0.19.0 | 0.19.0 | 0.19.0 | 0.19.0 |
| zstd | 1.5.5 | 1.5.5 | 1.5.5 | 1.5.5 | 1.5.5 | 1.5.5 | 1.5.5 |
| Package Name | linux-64 | linux-aarch64 | linux-ppc64le | linux-s390x |
|---|---|---|---|---|
| \_anaconda\_depends | 2023.07 | 2023.07 | 2023.07 | 2023.07 |
| \_libgcc\_mutex | 0.1 | 0.1 | 0.1 | 0.1 |
| \_openmp\_mutex | 5.1 | 5.1 | 5.1 | 5.1 |
| abseil-cpp | 20211102.0 | 20211102.0 | 20211102.0 | |
| aiobotocore | 2.5.0 | 2.5.0 | 2.4.2 | 2.4.2 |
| aiofiles | 22.1.0 | 22.1.0 | 22.1.0 | |
| aiohttp | 3.8.3 | 3.8.3 | 3.8.3 | 3.8.3 |
| aioitertools | 0.7.1 | 0.7.1 | 0.7.1 | 0.7.1 |
| aiosignal | 1.2.0 | 1.2.0 | 1.2.0 | 1.2.0 |
| aiosqlite | 0.18.0 | 0.18.0 | 0.18.0 | |
| alabaster | 0.7.12 | 0.7.12 | ||
| anaconda-catalogs | 0.2.0 | 0.2.0 | 0.2.0 | 0.2.0 |
| anaconda-client | 1.11.3 | 1.11.3 | 1.11.3 | 1.11.3 |
| anaconda-navigator | 2.4.2 | 2.4.2 | ||
| anaconda-project | 0.11.1 | 0.11.1 | 0.11.1 | 0.11.1 |
| anyio | 3.5.0 | 3.5.0 | 3.5.0 | 3.5.0 |
| appdirs | 1.4.4 | 1.4.4 | 1.4.4 | 1.4.4 |
| argon2-cffi | 21.3.0 | 21.3.0 | 21.3.0 | 21.3.0 |
| argon2-cffi-bindings | 21.2.0 | 21.2.0 | 21.2.0 | 21.2.0 |
| arrow | 1.2.3 | 1.2.3 | ||
| arrow-cpp | 11.0.0 | 11.0.0 | 11.0.0 | |
| astroid | 2.14.2 | 2.14.2 | 2.14.2 | 2.14.2 |
| astropy | 5.1 | 5.1 | 5.1 | 5.1 |
| asttokens | 2.0.5 | 2.0.5 | 2.0.5 | 2.0.5 |
| async-timeout | 4.0.2 | 4.0.2 | 4.0.2 | 4.0.2 |
| atomicwrites | 1.4.0 | 1.4.0 | ||
| attrs | 22.1.0 | 22.1.0 | 22.1.0 | 22.1.0 |
| automat | 20.2.0 | 20.2.0 | 20.2.0 | |
| autopep8 | 1.6.0 | 1.6.0 | ||
| aws-c-common | 0.4.57 | 0.5.11 | 0.4.57 | |
| aws-c-event-stream | 0.1.6 | 0.1.6 | 0.1.6 | |
| aws-checksums | 0.1.9 | 0.1.11 | 0.1.9 | |
| aws-sdk-cpp | 1.8.185 | 1.8.185 | 1.8.185 | |
| babel | 2.11.0 | 2.11.0 | 2.11.0 | 2.11.0 |
| backcall | 0.2.0 | 0.2.0 | 0.2.0 | 0.2.0 |
| backports | 1.1 | 1.1 | 1.1 | 1.1 |
| backports.functools\_lru\_cache | 1.6.4 | 1.6.4 | 1.6.4 | 1.6.4 |
| backports.tempfile | 1.0 | 1.0 | 1.0 | 1.0 |
| backports.weakref | 1.0.post1 | 1.0.post1 | 1.0.post1 | 1.0.post1 |
| bcrypt | 3.2.0 | 3.2.0 | 3.2.0 | |
| beautifulsoup4 | 4.12.2 | 4.12.2 | 4.12.2 | 4.12.2 |
| binaryornot | 0.4.4 | 0.4.4 | ||
| black | 23.3.0 | 23.3.0 | ||
| blas | 1.0 | 1.0 | 1.0 | 1.0 |
| bleach | 4.1.0 | 4.1.0 | 4.1.0 | 4.1.0 |
| blosc | 1.21.3 | 1.21.3 | 1.21.3 | 1.21.3 |
| bokeh | 3.1.1 | 2.4.3 | 3.1.1 | 2.4.3 |
| boltons | 23.0.0 | 23.0.0 | 23.0.0 | 23.0.0 |
| boost-cpp | 1.73.0 | 1.73.0 | 1.73.0 | |
| boto3 | 1.24.28 | 1.24.28 | ||
| botocore | 1.29.76 | 1.29.76 | 1.27.59 | 1.27.59 |
| bottleneck | 1.3.5 | 1.3.5 | 1.3.5 | 1.3.5 |
| brotli | 1.0.9 | 1.0.9 | 1.0.9 | 1.0.9 |
| brotli-bin | 1.0.9 | 1.0.9 | 1.0.9 | 1.0.9 |
| brotlipy | 0.7.0 | 0.7.0 | 0.7.0 | 0.7.0 |
| brunsli | 0.1 | 0.1 | 0.1 | |
| bzip2 | 1.0.8 | 1.0.8 | 1.0.8 | 1.0.8 |
| c-ares | 1.19.0 | 1.19.0 | 1.19.0 | 1.19.0 |
| c-blosc2 | 2.8.0 | 2.8.0 | 2.8.0 | |
| ca-certificates | 2023.05.30 | 2023.05.30 | 2023.05.30 | 2023.05.30 |
| certifi | 2023.5.7 | 2023.5.7 | 2023.5.7 | 2023.5.7 |
| cffi | 1.15.1 | 1.15.1 | 1.15.1 | 1.15.1 |
| cfitsio | 3.470 | 3.470 | 3.470 | 3.470 |
| chardet | 4.0.0 | 4.0.0 | 4.0.0 | 4.0.0 |
| charls | 2.2.0 | 2.2.0 | 2.2.0 | |
| charset-normalizer | 2.0.4 | 2.0.4 | 2.0.4 | 2.0.4 |
| click | 8.0.4 | 8.0.4 | 8.0.4 | 8.0.4 |
| cloudpickle | 2.2.1 | 2.2.1 | 2.2.1 | 2.2.1 |
| clyent | 1.2.2 | 1.2.2 | 1.2.2 | 1.2.2 |
| colorama | 0.4.6 | 0.4.6 | 0.4.6 | 0.4.6 |
| colorcet | 3.0.1 | 3.0.1 | 3.0.1 | 3.0.1 |
| comm | 0.1.2 | 0.1.2 | 0.1.2 | 0.1.2 |
| conda | 23.5.2 | 23.5.2 | 23.5.2 | 23.5.2 |
| conda-build | 3.25.0 | 3.25.0 | 3.25.0 | 3.25.0 |
| conda-content-trust | 0.1.3 | 0.1.3 | 0.1.3 | 0.1.3 |
| conda-index | 0.2.3 | 0.2.3 | 0.2.3 | 0.2.3 |
| conda-libmamba-solver | 23.5.0 | 23.5.0 | 23.5.0 | 23.5.0 |
| conda-pack | 0.6.0 | 0.6.0 | 0.6.0 | 0.6.0 |
| conda-package-handling | 2.1.0 | 2.1.0 | 2.1.0 | 2.1.0 |
| conda-package-streaming | 0.8.0 | 0.8.0 | 0.8.0 | 0.8.0 |
| conda-repo-cli | 1.0.41 | 1.0.41 | ||
| conda-token | 0.4.0 | 0.4.0 | 0.4.0 | 0.4.0 |
| conda-verify | 3.4.2 | 3.4.2 | 3.4.2 | 3.4.2 |
| constantly | 15.1.0 | 15.1.0 | 15.1.0 | |
| contourpy | 1.0.5 | 1.0.5 | 1.0.5 | 1.0.5 |
| cookiecutter | 1.7.3 | 1.7.3 | ||
| cryptography | 39.0.1 | 39.0.1 | 39.0.1 | 39.0.1 |
| cssselect | 1.1.0 | 1.1.0 | 1.1.0 | |
| curl | 8.1.1 | 8.1.1 | 8.1.1 | 8.1.1 |
| cycler | 0.11.0 | 0.11.0 | 0.11.0 | 0.11.0 |
| cytoolz | 0.12.0 | 0.12.0 | 0.12.0 | 0.12.0 |
| daal4py | 2023.1.1 | |||
| dal | 2023.1.1 | |||
| dask | 2023.6.0 | 2023.4.1 | 2023.6.0 | 2023.6.0 |
| dask-core | 2023.6.0 | 2023.4.1 | 2023.6.0 | 2023.6.0 |
| datasets | 2.12.0 | 2.12.0 | ||
| datashader | 0.15.0 | 0.15.0 | 0.15.0 | |
| datashape | 0.5.4 | 0.5.4 | 0.5.4 | |
| dbus | 1.13.18 | 1.13.18 | ||
| debugpy | 1.5.1 | 1.5.1 | 1.5.1 | 1.5.1 |
| decorator | 5.1.1 | 5.1.1 | 5.1.1 | 5.1.1 |
| defusedxml | 0.7.1 | 0.7.1 | 0.7.1 | 0.7.1 |
| diff-match-patch | 20200713 | 20200713 | ||
| dill | 0.3.6 | 0.3.6 | 0.3.6 | 0.3.6 |
| distributed | 2023.6.0 | 2023.4.1 | 2023.6.0 | 2023.6.0 |
| docstring-to-markdown | 0.11 | 0.11 | ||
| docutils | 0.18.1 | 0.18.1 | ||
| entrypoints | 0.4 | 0.4 | 0.4 | 0.4 |
| et\_xmlfile | 1.1.0 | 1.1.0 | 1.1.0 | 1.1.0 |
| executing | 0.8.3 | 0.8.3 | 0.8.3 | 0.8.3 |
| expat | 2.4.9 | 2.4.9 | ||
| filelock | 3.9.0 | 3.9.0 | 3.9.0 | 3.9.0 |
| flake8 | 6.0.0 | 6.0.0 | ||
| flask | 2.2.2 | 2.2.2 | 2.2.2 | 2.2.2 |
| fmt | 9.1.0 | 9.1.0 | 9.1.0 | 9.1.0 |
| fontconfig | 2.14.1 | 2.14.1 | ||
| fonttools | 4.25.0 | 4.25.0 | 4.25.0 | 4.25.0 |
| freetype | 2.12.1 | 2.12.1 | 2.12.1 | 2.12.1 |
| frozenlist | 1.3.3 | 1.3.3 | 1.3.3 | 1.3.3 |
| fsspec | 2023.4.0 | 2023.4.0 | 2023.3.0 | 2023.3.0 |
| future | 0.18.3 | 0.18.3 | 0.18.3 | 0.18.3 |
| gensim | 4.3.0 | 4.3.0 | 4.3.0 | |
| gflags | 2.2.2 | 2.2.2 | 2.2.2 | |
| giflib | 5.2.1 | 5.2.1 | 5.2.1 | 5.2.1 |
| glib | 2.69.1 | 2.69.1 | ||
| glob2 | 0.7 | 0.7 | 0.7 | 0.7 |
| glog | 0.5.0 | 0.5.0 | 0.5.0 | |
| gmp | 6.2.1 | 6.2.1 | 6.2.1 | 6.2.1 |
| gmpy2 | 2.1.2 | 2.1.2 | 2.1.2 | 2.1.2 |
| greenlet | 2.0.1 | 2.0.1 | 2.0.1 | 2.0.1 |
| grpc-cpp | 1.46.1 | 1.46.1 | 1.46.1 | |
| gst-plugins-base | 1.14.1 | 1.14.1 | ||
| gstreamer | 1.14.1 | 1.14.1 | ||
| h5py | 3.7.0 | 3.7.0 | 3.7.0 | 3.7.0 |
| hdf5 | 1.10.6 | 1.10.6 | 1.10.6 | 1.10.6 |
| heapdict | 1.0.1 | 1.0.1 | 1.0.1 | 1.0.1 |
| holoviews | 1.16.2 | 1.16.2 | 1.16.2 | 1.14.8 |
| huggingface\_hub | 0.15.1 | 0.15.1 | ||
| hvplot | 0.8.4 | 0.8.4 | 0.8.4 | 0.7.3 |
| hyperlink | 21.0.0 | 21.0.0 | 21.0.0 | |
| icu | 58.2 | 68.1 | 58.2 | 68.1 |
| idna | 3.4 | 3.4 | 3.4 | 3.3 |
| imagecodecs | 2021.8.26 | 2021.8.26 | 2021.8.26 | 2021.8.26 |
| imageio | 2.31.1 | 2.31.1 | 2.31.1 | 2.26.0 |
| imagesize | 1.4.1 | 1.4.1 | ||
| imbalanced-learn | 0.10.1 | 0.10.1 | 0.10.1 | 0.10.1 |
| importlib-metadata | 6.0.0 | 6.0.0 | 6.0.0 | 6.0.0 |
| importlib\_metadata | 6.0.0 | 6.0.0 | ||
| incremental | 21.3.0 | 21.3.0 | 21.3.0 | |
| inflection | 0.5.1 | 0.5.1 | ||
| iniconfig | 1.1.1 | 1.1.1 | 1.1.1 | 1.1.1 |
| intake | 0.6.8 | 0.6.8 | 0.6.8 | 0.6.8 |
| intel-openmp | 2023.1.0 | |||
| intervaltree | 3.1.0 | 3.1.0 | ||
| ipykernel | 6.19.2 | 6.19.2 | 6.19.2 | 6.19.2 |
| ipython | 8.12.0 | 8.12.0 | 8.12.0 | 8.12.0 |
| ipython\_genutils | 0.2.0 | 0.2.0 | 0.2.0 | 0.2.0 |
| ipywidgets | 8.0.4 | 8.0.4 | 8.0.4 | 8.0.4 |
| isort | 5.9.3 | 5.9.3 | 5.9.3 | 5.9.3 |
| itemadapter | 0.3.0 | 0.3.0 | 0.3.0 | |
| itemloaders | 1.0.4 | 1.0.4 | 1.0.4 | |
| itsdangerous | 2.0.1 | 2.0.1 | 2.0.1 | 2.0.1 |
| jaraco.classes | 3.2.1 | 3.2.1 | ||
| jedi | 0.18.1 | 0.18.1 | 0.18.1 | 0.18.1 |
| jeepney | 0.7.1 | 0.7.1 | ||
| jellyfish | 0.9.0 | 0.9.0 | ||
| jinja2 | 3.1.2 | 3.1.2 | 3.1.2 | 3.1.2 |
| jinja2-time | 0.2.0 | 0.2.0 | ||
| jmespath | 0.10.0 | 0.10.0 | 0.10.0 | 0.10.0 |
| joblib | 1.2.0 | 1.2.0 | 1.2.0 | 1.2.0 |
| jpeg | 9e | 9e | 9e | 9e |
| jq | 1.6 | 1.6 | 1.6 | |
| json5 | 0.9.6 | 0.9.6 | 0.9.6 | 0.9.6 |
| jsonpatch | 1.32 | 1.32 | 1.32 | 1.32 |
| jsonpointer | 2.1 | 2.1 | 2.1 | 2.1 |
| jsonschema | 4.17.3 | 4.17.3 | 4.17.3 | 4.17.3 |
| jupyter | 1.0.0 | 1.0.0 | 1.0.0 | 1.0.0 |
| jupyter\_client | 8.1.0 | 8.1.0 | 8.1.0 | 8.1.0 |
| jupyter\_console | 6.6.3 | 6.6.3 | 6.6.3 | 6.6.3 |
| jupyter\_core | 5.3.0 | 5.3.0 | 5.3.0 | 5.3.0 |
| jupyter\_events | 0.6.3 | 0.6.3 | 0.6.3 | |
| jupyter\_server | 2.5.0 | 2.5.0 | 2.5.0 | 1.23.4 |
| jupyter\_server\_fileid | 0.9.0 | 0.9.0 | 0.9.0 | |
| jupyter\_server\_terminals | 0.4.4 | 0.4.4 | 0.4.4 | |
| jupyter\_server\_ydoc | 0.8.0 | 0.8.0 | 0.8.0 | |
| jupyter\_ydoc | 0.2.4 | 0.2.4 | 0.2.4 | |
| jupyterlab | 3.6.3 | 3.6.3 | 3.6.3 | 3.3.2 |
| jupyterlab\_pygments | 0.1.2 | 0.1.2 | 0.1.2 | 0.1.2 |
| jupyterlab\_server | 2.22.0 | 2.22.0 | 2.22.0 | 2.21.0 |
| jupyterlab\_widgets | 3.0.5 | 3.0.5 | 3.0.5 | 3.0.5 |
| jxrlib | 1.1 | 1.1 | 1.1 | 1.1 |
| keyring | 23.13.1 | 23.13.1 | ||
| kiwisolver | 1.4.4 | 1.4.4 | 1.4.4 | 1.4.4 |
| krb5 | 1.20.1 | 1.19.4 | 1.20.1 | 1.19.4 |
| lazy-object-proxy | 1.6.0 | 1.6.0 | 1.6.0 | 1.6.0 |
| lazy\_loader | 0.2 | 0.2 | 0.2 | 0.1 |
| lcms2 | 2.12 | 2.12 | 2.12 | 2.12 |
| ld\_impl\_linux-64 | 2.38 | |||
| ld\_impl\_linux-aarch64 | 2.38 | |||
| ld\_impl\_linux-ppc64le | 2.38 | |||
| ld\_impl\_linux-s390x | 2.38 | |||
| lerc | 3.0 | 3.0 | 3.0 | 3.0 |
| libaec | 1.0.4 | 1.0.4 | 1.0.4 | 1.0.4 |
| libarchive | 3.6.2 | 3.6.2 | 3.6.2 | 3.6.2 |
| libboost | 1.73.0 | 1.73.0 | 1.73.0 | |
| libbrotlicommon | 1.0.9 | 1.0.9 | 1.0.9 | 1.0.9 |
| libbrotlidec | 1.0.9 | 1.0.9 | 1.0.9 | 1.0.9 |
| libbrotlienc | 1.0.9 | 1.0.9 | 1.0.9 | 1.0.9 |
| libclang | 10.0.1 | 14.0.6 | ||
| libclang13 | 14.0.6 | |||
| libcurl | 8.1.1 | 8.1.1 | 8.1.1 | 8.1.1 |
| libdeflate | 1.17 | 1.17 | 1.17 | 1.17 |
| libedit | 3.1.20221030 | 3.1.20221030 | 3.1.20221030 | 3.1.20221030 |
| libev | 4.33 | 4.33 | 4.33 | 4.33 |
| libevent | 2.1.12 | 2.1.12 | 2.1.12 | |
| libffi | 3.4.4 | 3.4.4 | 3.4.4 | 3.4.2 |
| libgcc-ng | 11.2.0 | 11.2.0 | 11.2.0 | 11.2.0 |
| libgfortran-ng | 11.2.0 | 11.2.0 | 11.2.0 | 11.2.0 |
| libgfortran5 | 11.2.0 | 11.2.0 | 11.2.0 | 11.2.0 |
| libgomp | 11.2.0 | 11.2.0 | 11.2.0 | 11.2.0 |
| liblief | 0.12.3 | 0.12.3 | 0.12.3 | 0.12.3 |
| libllvm10 | 10.0.1 | |||
| libllvm14 | 14.0.6 | 14.0.6 | 14.0.6 | |
| libmamba | 1.4.1 | 1.4.1 | 1.4.1 | 1.4.1 |
| libmambapy | 1.4.1 | 1.4.1 | 1.4.1 | 1.4.1 |
| libnghttp2 | 1.52.0 | 1.52.0 | 1.52.0 | 1.52.0 |
| libopenblas | 0.3.21 | 0.3.21 | 0.3.21 | |
| libpng | 1.6.39 | 1.6.39 | 1.6.39 | 1.6.39 |
| libpq | 12.15 | 12.9 | ||
| libprotobuf | 3.20.3 | 3.20.3 | 3.20.3 | |
| libsodium | 1.0.18 | 1.0.18 | 1.0.18 | 1.0.18 |
| libsolv | 0.7.22 | 0.7.22 | 0.7.22 | 0.7.22 |
| libspatialindex | 1.9.3 | 1.9.3 | ||
| libssh2 | 1.10.0 | 1.10.0 | 1.10.0 | 1.10.0 |
| libstdcxx-ng | 11.2.0 | 11.2.0 | 11.2.0 | 11.2.0 |
| libthrift | 0.15.0 | 0.15.0 | 0.15.0 | |
| libtiff | 4.5.0 | 4.5.0 | 4.5.0 | 4.5.0 |
| libuuid | 1.41.5 | 1.41.5 | 1.41.5 | 1.41.5 |
| libwebp | 1.2.4 | 1.2.4 | 1.2.4 | 1.2.4 |
| libwebp-base | 1.2.4 | 1.2.4 | 1.2.4 | 1.2.4 |
| libxcb | 1.15 | 1.15 | ||
| libxkbcommon | 1.0.1 | 1.0.1 | ||
| libxml2 | 2.9.14 | 2.10.3 | 2.10.3 | 2.10.3 |
| libxslt | 1.1.35 | 1.1.37 | 1.1.37 | 1.1.37 |
| libzopfli | 1.0.3 | 1.0.3 | 1.0.3 | 1.0.3 |
| linkify-it-py | 2.0.0 | 2.0.0 | ||
| llvmlite | 0.40.0 | 0.40.0 | 0.40.0 | |
| locket | 1.0.0 | 1.0.0 | 1.0.0 | 1.0.0 |
| lxml | 4.9.1 | 4.9.2 | 4.9.2 | 4.9.2 |
| lz4 | 4.3.2 | 4.3.2 | 4.3.2 | |
| lz4-c | 1.9.4 | 1.9.4 | 1.9.4 | 1.9.4 |
| lzo | 2.10 | 2.10 | 2.10 | 2.10 |
| markdown | 3.4.1 | 3.4.1 | 3.4.1 | 3.4.1 |
| markdown-it-py | 2.2.0 | 2.2.0 | ||
| markupsafe | 2.1.1 | 2.1.1 | 2.1.1 | 2.1.1 |
| matplotlib | 3.7.1 | 3.7.1 | 3.7.1 | 3.7.1 |
| matplotlib-base | 3.7.1 | 3.7.1 | 3.7.1 | 3.7.1 |
| matplotlib-inline | 0.1.6 | 0.1.6 | 0.1.6 | 0.1.6 |
| mccabe | 0.7.0 | 0.7.0 | 0.7.0 | 0.7.0 |
| mdit-py-plugins | 0.3.0 | 0.3.0 | ||
| mdurl | 0.1.0 | 0.1.0 | ||
| mistune | 0.8.4 | 0.8.4 | 0.8.4 | 0.8.4 |
| mkl | 2023.1.0 | |||
| mkl-service | 2.4.0 | |||
| mkl\_fft | 1.3.6 | |||
| mkl\_random | 1.2.2 | |||
| mock | 4.0.3 | |||
| more-itertools | 8.12.0 | 8.12.0 | 8.12.0 | 8.12.0 |
| mpc | 1.1.0 | 1.1.0 | 1.1.0 | 1.1.0 |
| mpfr | 4.0.2 | 4.0.2 | 4.0.2 | 4.0.2 |
| mpi | 1.0 | |||
| mpich | 4.1.1 | |||
| mpmath | 1.2.1 | 1.2.1 | 1.2.1 | 1.2.1 |
| msgpack-python | 1.0.3 | 1.0.3 | 1.0.3 | 1.0.3 |
| multidict | 6.0.2 | 6.0.2 | 6.0.2 | 6.0.2 |
| multipledispatch | 0.6.0 | 0.6.0 | 0.6.0 | |
| multiprocess | 0.70.14 | 0.70.14 | ||
| munkres | 1.1.4 | 1.1.4 | 1.1.4 | 1.1.4 |
| mypy\_extensions | 0.4.3 | 0.4.3 | ||
| navigator-updater | 0.4.0 | 0.4.0 | ||
| nbclassic | 0.5.5 | 0.5.5 | 0.5.5 | 0.5.5 |
| nbclient | 0.5.13 | 0.5.13 | 0.5.13 | 0.5.13 |
| nbconvert | 6.5.4 | 6.5.4 | 6.5.4 | 6.5.4 |
| nbformat | 5.7.0 | 5.7.0 | 5.7.0 | 5.7.0 |
| ncurses | 6.4 | 6.4 | 6.4 | 6.4 |
| nest-asyncio | 1.5.6 | 1.5.6 | 1.5.6 | 1.5.6 |
| networkx | 2.8.4 | 2.8.4 | 2.8.4 | 2.8.4 |
| ninja | 1.10.2 | 1.10.2 | ||
| ninja-base | 1.10.2 | 1.10.2 | ||
| nltk | 3.7 | 3.7 | 3.7 | 3.7 |
| notebook | 6.5.4 | 6.5.4 | 6.5.4 | 6.5.4 |
| notebook-shim | 0.2.2 | 0.2.2 | 0.2.2 | 0.2.2 |
| nspr | 4.35 | 4.35 | ||
| nss | 3.89.1 | 3.89.1 | ||
| numba | 0.57.0 | 0.57.0 | 0.57.0 | |
| numexpr | 2.8.4 | 2.8.4 | 2.8.4 | 2.8.4 |
| numpy | 1.24.3 | 1.24.3 | 1.24.3 | 1.25.0 |
| numpy-base | 1.24.3 | 1.24.3 | 1.24.3 | 1.25.0 |
| numpydoc | 1.5.0 | 1.5.0 | ||
| oniguruma | 6.9.7.1 | 6.9.7.1 | 6.9.7.1 | |
| openjpeg | 2.4.0 | 2.4.0 | 2.4.0 | 2.4.0 |
| openpyxl | 3.0.10 | 3.0.10 | 3.0.10 | 3.0.10 |
| openssl | 1.1.1u | 1.1.1u | 1.1.1u | 1.1.1u |
| orc | 1.7.4 | 1.7.4 | 1.7.4 | |
| packaging | 23.0 | 23.0 | 23.0 | 23.0 |
| pandas | 1.5.3 | 1.5.3 | 1.5.3 | 1.5.3 |
| pandocfilters | 1.5.0 | 1.5.0 | 1.5.0 | 1.5.0 |
| panel | 1.1.0 | 0.14.3 | 1.1.0 | 0.12.6 |
| param | 1.13.0 | 1.13.0 | 1.13.0 | 1.13.0 |
| parsel | 1.6.0 | 1.6.0 | 1.6.0 | |
| parso | 0.8.3 | 0.8.3 | 0.8.3 | 0.8.3 |
| partd | 1.2.0 | 1.2.0 | 1.2.0 | 1.2.0 |
| patch | 2.7.6 | 2.7.6 | 2.7.6 | 2.7.6 |
| patchelf | 0.17.2 | 0.17.2 | 0.17.2 | 0.17.2 |
| pathlib | 1.0.1 | 1.0.1 | ||
| pathspec | 0.10.3 | 0.10.3 | ||
| patsy | 0.5.3 | 0.5.3 | 0.5.3 | 0.5.3 |
| pcre | 8.45 | 8.45 | ||
| pcre2 | 10.37 | 10.37 | 10.37 | 10.37 |
| pep8 | 1.7.1 | 1.7.1 | 1.7.1 | 1.7.1 |
| pexpect | 4.8.0 | 4.8.0 | 4.8.0 | 4.8.0 |
| pickleshare | 0.7.5 | 0.7.5 | 0.7.5 | 0.7.5 |
| pillow | 9.4.0 | 9.4.0 | 9.4.0 | 9.4.0 |
| pip | 23.1.2 | 23.1.2 | 23.1.2 | 23.1.2 |
| pkginfo | 1.9.6 | 1.9.6 | 1.9.6 | 1.9.6 |
| platformdirs | 2.5.2 | 2.5.2 | 2.5.2 | 2.5.2 |
| plotly | 5.9.0 | 5.9.0 | 5.9.0 | 5.9.0 |
| pluggy | 1.0.0 | 1.0.0 | 1.0.0 | 1.0.0 |
| ply | 3.11 | 3.11 | ||
| pooch | 1.4.0 | 1.4.0 | 1.4.0 | 1.4.0 |
| poyo | 0.5.0 | 0.5.0 | ||
| prometheus\_client | 0.14.1 | 0.14.1 | 0.14.1 | 0.14.1 |
| prompt-toolkit | 3.0.36 | 3.0.36 | 3.0.36 | 3.0.36 |
| prompt\_toolkit | 3.0.36 | 3.0.36 | 3.0.36 | 3.0.36 |
| protego | 0.1.16 | 0.1.16 | 0.1.16 | |
| psutil | 5.9.0 | 5.9.0 | 5.9.0 | 5.9.0 |
| ptyprocess | 0.7.0 | 0.7.0 | 0.7.0 | 0.7.0 |
| pure\_eval | 0.2.2 | 0.2.2 | 0.2.2 | 0.2.2 |
| py-cpuinfo | 8.0.0 | 8.0.0 | 8.0.0 | |
| py-lief | 0.12.3 | 0.12.3 | 0.12.3 | 0.12.3 |
| pyarrow | 11.0.0 | 11.0.0 | 11.0.0 | |
| pyasn1 | 0.4.8 | 0.4.8 | 0.4.8 | |
| pyasn1-modules | 0.2.8 | 0.2.8 | 0.2.8 | |
| pybind11-abi | 4 | 4 | 4 | 4 |
| pycodestyle | 2.10.0 | 2.10.0 | ||
| pycosat | 0.6.4 | 0.6.4 | 0.6.4 | 0.6.4 |
| pycparser | 2.21 | 2.21 | 2.21 | 2.21 |
| pyct | 0.5.0 | 0.5.0 | 0.5.0 | 0.5.0 |
| pycurl | 7.45.2 | 7.45.2 | 7.45.2 | 7.45.2 |
| pydispatcher | 2.0.5 | 2.0.5 | 2.0.5 | |
| pydocstyle | 6.3.0 | 6.3.0 | ||
| pyerfa | 2.0.0 | 2.0.0 | 2.0.0 | 2.0.0 |
| pyflakes | 3.0.1 | 3.0.1 | 3.0.1 | 3.0.1 |
| pygments | 2.15.1 | 2.15.1 | 2.15.1 | 2.15.1 |
| pyjwt | 2.4.0 | 2.4.0 | ||
| pylint | 2.16.2 | 2.16.2 | 2.16.2 | 2.16.2 |
| pylint-venv | 2.3.0 | 2.3.0 | ||
| pyls-spyder | 0.4.0 | 0.4.0 | ||
| pyodbc | 4.0.34 | 4.0.34 | 4.0.34 | 4.0.34 |
| pyopenssl | 23.0.0 | 23.0.0 | 23.0.0 | 23.0.0 |
| pyparsing | 3.0.9 | 3.0.9 | 3.0.9 | 3.0.9 |
| pyqt | 5.15.7 | 5.15.7 | ||
| pyqt5-sip | 12.11.0 | 12.11.0 | ||
| pyqtwebengine | 5.15.7 | 5.15.7 | ||
| pyrsistent | 0.18.0 | 0.18.0 | 0.18.0 | 0.18.0 |
| pysocks | 1.7.1 | 1.7.1 | 1.7.1 | 1.7.1 |
| pytables | 3.8.0 | 3.8.0 | 3.8.0 | 3.7.0 |
| pytest | 7.3.1 | 7.3.1 | 7.3.1 | 7.3.1 |
| python | 3.11.3 | 3.11.3 | 3.11.3 | 3.11.3 |
| python-dateutil | 2.8.2 | 2.8.2 | 2.8.2 | 2.8.2 |
| python-fastjsonschema | 2.16.2 | 2.16.2 | 2.16.2 | 2.16.2 |
| python-json-logger | 2.0.7 | 2.0.7 | 2.0.7 | |
| python-libarchive-c | 2.9 | 2.9 | 2.9 | 2.9 |
| python-lmdb | 1.4.1 | 1.4.1 | 1.4.1 | 1.4.1 |
| python-lsp-black | 1.2.1 | 1.2.1 | ||
| python-lsp-jsonrpc | 1.0.0 | 1.0.0 | ||
| python-lsp-server | 1.7.2 | 1.7.2 | ||
| python-slugify | 5.0.2 | 5.0.2 | ||
| python-snappy | 0.6.1 | 0.6.1 | 0.6.1 | 0.6.1 |
| python-xxhash | 2.0.2 | 2.0.2 | ||
| pytoolconfig | 1.2.5 | 1.2.5 | ||
| pytorch | 2.0.1 | 2.0.1 | ||
| pytz | 2022.7 | 2022.7 | 2022.7 | 2022.7 |
| pyviz\_comms | 2.3.0 | 2.3.0 | 2.3.0 | 2.3.0 |
| pywavelets | 1.4.1 | 1.4.1 | 1.4.1 | 1.4.1 |
| pyxdg | 0.27 | 0.27 | ||
| pyyaml | 6.0 | 6.0 | 6.0 | 6.0 |
| pyzmq | 25.1.0 | 25.1.0 | 25.1.0 | 25.1.0 |
| qdarkstyle | 3.0.2 | 3.0.2 | ||
| qstylizer | 0.2.2 | 0.2.2 | ||
| qt-main | 5.15.2 | 5.15.2 | ||
| qt-webengine | 5.15.9 | 5.15.9 | ||
| qtawesome | 1.2.2 | 1.2.2 | ||
| qtconsole | 5.4.2 | 5.4.2 | ||
| qtpy | 2.2.0 | 2.2.0 | ||
| qtwebkit | 5.212 | 5.212 | ||
| queuelib | 1.5.0 | 1.5.0 | 1.5.0 | |
| re2 | 2022.04.01 | 2022.04.01 | 2022.04.01 | |
| readline | 8.2 | 8.2 | 8.2 | 8.2 |
| regex | 2022.7.9 | 2022.7.9 | 2022.7.9 | 2022.7.9 |
| reproc | 14.2.4 | 14.2.4 | 14.2.4 | 14.2.4 |
| reproc-cpp | 14.2.4 | 14.2.4 | 14.2.4 | 14.2.4 |
| requests | 2.29.0 | 2.29.0 | 2.29.0 | 2.29.0 |
| requests-file | 1.5.1 | 1.5.1 | 1.5.1 | |
| requests-toolbelt | 0.9.1 | 0.9.1 | 0.9.1 | 0.9.1 |
| responses | 0.13.3 | 0.13.3 | ||
| rfc3339-validator | 0.1.4 | 0.1.4 | 0.1.4 | |
| rfc3986-validator | 0.1.1 | 0.1.1 | 0.1.1 | |
| rope | 1.7.0 | 1.7.0 | ||
| rtree | 1.0.1 | 1.0.1 | ||
| ruamel.yaml | 0.17.21 | 0.17.21 | 0.17.21 | 0.17.21 |
| ruamel\_yaml | 0.17.21 | 0.17.21 | 0.17.21 | 0.17.21 |
| s3fs | 2023.4.0 | 2023.4.0 | 2023.3.0 | 2023.3.0 |
| s3transfer | 0.6.0 | 0.6.0 | ||
| sacremoses | 0.0.43 | 0.0.43 | 0.0.43 | 0.0.43 |
| scikit-image | 0.20.0 | 0.20.0 | 0.20.0 | 0.20.0 |
| scikit-learn | 1.2.2 | 1.2.2 | 1.2.2 | 1.2.2 |
| scikit-learn-intelex | 2023.1.1 | |||
| scipy | 1.10.1 | 1.10.1 | 1.10.1 | 1.10.1 |
| scrapy | 2.8.0 | 2.8.0 | 2.8.0 | |
| seaborn | 0.12.2 | 0.12.2 | 0.12.2 | 0.12.2 |
| secretstorage | 3.3.1 | 3.3.1 | ||
| send2trash | 1.8.0 | 1.8.0 | 1.8.0 | 1.8.0 |
| service\_identity | 18.1.0 | 18.1.0 | 18.1.0 | |
| setuptools | 67.8.0 | 67.8.0 | 67.8.0 | 67.8.0 |
| sip | 6.6.2 | 6.6.2 | ||
| six | 1.16.0 | 1.16.0 | 1.16.0 | 1.16.0 |
| smart\_open | 5.2.1 | 5.2.1 | 5.2.1 | |
| snappy | 1.1.9 | 1.1.9 | 1.1.9 | 1.1.9 |
| sniffio | 1.2.0 | 1.2.0 | 1.2.0 | 1.2.0 |
| snowballstemmer | 2.2.0 | 2.2.0 | 2.2.0 | 2.2.0 |
| sortedcontainers | 2.4.0 | 2.4.0 | 2.4.0 | 2.4.0 |
| soupsieve | 2.4 | 2.4 | 2.4 | 2.4 |
| sphinx | 5.0.2 | 5.0.2 | ||
| sphinxcontrib-applehelp | 1.0.2 | 1.0.2 | ||
| sphinxcontrib-devhelp | 1.0.2 | 1.0.2 | ||
| sphinxcontrib-htmlhelp | 2.0.0 | 2.0.0 | ||
| sphinxcontrib-jsmath | 1.0.1 | 1.0.1 | ||
| sphinxcontrib-qthelp | 1.0.3 | 1.0.3 | ||
| sphinxcontrib-serializinghtml | 1.1.5 | 1.1.5 | ||
| spyder | 5.4.3 | 5.4.3 | ||
| spyder-kernels | 2.4.3 | 2.4.3 | ||
| sqlalchemy | 1.4.39 | 1.4.39 | 1.4.39 | 1.4.39 |
| sqlite | 3.41.2 | 3.41.2 | 3.41.2 | 3.41.2 |
| stack\_data | 0.2.0 | 0.2.0 | 0.2.0 | 0.2.0 |
| statsmodels | 0.13.5 | 0.13.5 | 0.13.5 | 0.13.5 |
| sympy | 1.11.1 | 1.11.1 | 1.11.1 | 1.11.1 |
| tabulate | 0.8.10 | 0.8.10 | 0.8.10 | 0.8.10 |
| tbb | 2021.8.0 | 2021.8.0 | 2021.8.0 | 2021.8.0 |
| tbb4py | 2021.8.0 | 2021.8.0 | 2021.8.0 | 2021.8.0 |
| tblib | 1.7.0 | 1.7.0 | 1.7.0 | 1.7.0 |
| tenacity | 8.2.2 | 8.2.2 | 8.2.2 | 8.2.2 |
| terminado | 0.17.1 | 0.17.1 | 0.17.1 | 0.17.1 |
| text-unidecode | 1.3 | 1.3 | ||
| textdistance | 4.2.1 | 4.2.1 | ||
| threadpoolctl | 2.2.0 | 2.2.0 | 2.2.0 | 2.2.0 |
| three-merge | 0.1.1 | 0.1.1 | ||
| tifffile | 2021.7.2 | 2021.7.2 | 2021.7.2 | 2021.7.2 |
| tinycss2 | 1.2.1 | 1.2.1 | 1.2.1 | 1.2.1 |
| tk | 8.6.12 | 8.6.12 | 8.6.12 | 8.6.12 |
| tldextract | 3.2.0 | 3.2.0 | 3.2.0 | |
| tokenizers | 0.13.2 | 0.13.2 | ||
| toml | 0.10.2 | 0.10.2 | ||
| tomli | 2.0.1 | 2.0.1 | 2.0.1 | 2.0.1 |
| tomlkit | 0.11.1 | 0.11.1 | 0.11.1 | 0.11.1 |
| toolz | 0.12.0 | 0.12.0 | 0.12.0 | 0.12.0 |
| tornado | 6.2 | 6.2 | 6.2 | 6.2 |
| tqdm | 4.65.0 | 4.65.0 | 4.65.0 | 4.65.0 |
| traitlets | 5.7.1 | 5.7.1 | 5.7.1 | 5.7.1 |
| transformers | 4.29.2 | 4.29.2 | 2.1.1 | 2.1.1 |
| twisted | 22.10.0 | 22.10.0 | 22.10.0 | |
| typing-extensions | 4.6.3 | 4.6.3 | 4.6.3 | 4.6.3 |
| typing\_extensions | 4.6.3 | 4.6.3 | 4.6.3 | 4.6.3 |
| tzdata | 2023c | 2023c | 2023c | 2023c |
| uc-micro-py | 1.0.1 | 1.0.1 | ||
| ujson | 5.4.0 | 5.4.0 | ||
| unidecode | 1.2.0 | 1.2.0 | ||
| unixodbc | 2.3.11 | 2.3.11 | 2.3.11 | 2.3.11 |
| urllib3 | 1.26.16 | 1.26.16 | 1.26.16 | 1.26.16 |
| utf8proc | 2.6.1 | 2.6.1 | 2.6.1 | |
| w3lib | 1.21.0 | 1.21.0 | 1.21.0 | |
| watchdog | 2.1.6 | 2.1.6 | ||
| wcwidth | 0.2.5 | 0.2.5 | 0.2.5 | 0.2.5 |
| webencodings | 0.5.1 | 0.5.1 | 0.5.1 | 0.5.1 |
| websocket-client | 0.58.0 | 0.58.0 | 0.58.0 | 0.58.0 |
| werkzeug | 2.2.3 | 2.2.3 | 2.2.3 | 2.2.3 |
| whatthepatch | 1.0.2 | 1.0.2 | ||
| wheel | 0.38.4 | 0.38.4 | 0.38.4 | 0.38.4 |
| widgetsnbextension | 4.0.5 | 4.0.5 | 4.0.5 | 4.0.5 |
| wrapt | 1.14.1 | 1.14.1 | 1.14.1 | 1.14.1 |
| wurlitzer | 3.0.2 | 3.0.2 | ||
| xarray | 2022.11.0 | 2022.11.0 | 2022.11.0 | |
| xxhash | 0.8.0 | 0.8.0 | ||
| xyzservices | 2022.9.0 | 2022.9.0 | ||
| xz | 5.4.2 | 5.4.2 | 5.4.2 | 5.4.2 |
| y-py | 0.5.9 | 0.5.9 | 0.5.9 | |
| yaml | 0.2.5 | 0.2.5 | 0.2.5 | 0.2.5 |
| yaml-cpp | 0.7.0 | 0.7.0 | 0.7.0 | 0.7.0 |
| yapf | 0.31.0 | 0.31.0 | ||
| yarl | 1.8.1 | 1.8.1 | 1.8.1 | 1.8.1 |
| ypy-websocket | 0.8.2 | 0.8.2 | 0.8.2 | |
| zeromq | 4.3.4 | 4.3.4 | 4.3.4 | 4.3.4 |
| zfp | 0.5.5 | 0.5.5 | ||
| zict | 2.2.0 | 2.2.0 | 2.2.0 | 2.2.0 |
| zipp | 3.11.0 | 3.11.0 | 3.11.0 | 3.11.0 |
| zlib | 1.2.13 | 1.2.13 | 1.2.13 | 1.2.13 |
| zlib-ng | 2.0.7 | 2.0.7 | 2.0.7 | |
| zope | 1.0 | 1.0 | 1.0 | |
| zope.interface | 5.4.0 | 5.4.0 | 5.4.0 | |
| zstandard | 0.19.0 | 0.19.0 | 0.19.0 | 0.19.0 |
| zstd | 1.5.5 | 1.5.5 | 1.5.5 | 1.5.5 |
| Package Name | osx-arm64 | osx-64 |
|---|---|---|
| \_anaconda\_depends | 2023.07 | 2023.07 |
| abseil-cpp | 20211102.0 | 20211102.0 |
| aiobotocore | 2.5.0 | 2.4.2 |
| aiofiles | 22.1.0 | 22.1.0 |
| aiohttp | 3.8.3 | 3.8.3 |
| aioitertools | 0.7.1 | 0.7.1 |
| aiosignal | 1.2.0 | 1.2.0 |
| aiosqlite | 0.18.0 | 0.18.0 |
| alabaster | 0.7.12 | 0.7.12 |
| anaconda-catalogs | 0.2.0 | 0.2.0 |
| anaconda-client | 1.11.3 | 1.11.3 |
| anaconda-navigator | 2.4.2 | 2.4.2 |
| anaconda-project | 0.11.1 | 0.11.1 |
| anyio | 3.5.0 | 3.5.0 |
| appdirs | 1.4.4 | 1.4.4 |
| applaunchservices | 0.3.0 | 0.3.0 |
| appnope | 0.1.2 | 0.1.2 |
| appscript | 1.1.2 | 1.1.2 |
| argon2-cffi | 21.3.0 | 21.3.0 |
| argon2-cffi-bindings | 21.2.0 | 21.2.0 |
| arrow | 1.2.3 | 1.2.3 |
| arrow-cpp | 11.0.0 | 11.0.0 |
| astroid | 2.14.2 | 2.14.2 |
| astropy | 5.1 | 5.1 |
| asttokens | 2.0.5 | 2.0.5 |
| async-timeout | 4.0.2 | 4.0.2 |
| atomicwrites | 1.4.0 | 1.4.0 |
| attrs | 22.1.0 | 22.1.0 |
| automat | 20.2.0 | 20.2.0 |
| autopep8 | 1.6.0 | 1.6.0 |
| aws-c-common | 0.6.8 | 0.4.57 |
| aws-c-event-stream | 0.1.6 | 0.1.6 |
| aws-checksums | 0.1.11 | 0.1.9 |
| aws-sdk-cpp | 1.8.185 | 1.8.185 |
| babel | 2.11.0 | 2.11.0 |
| backcall | 0.2.0 | 0.2.0 |
| backports | 1.1 | 1.1 |
| backports.functools\_lru\_cache | 1.6.4 | 1.6.4 |
| backports.tempfile | 1.0 | 1.0 |
| backports.weakref | 1.0.post1 | 1.0.post1 |
| bcrypt | 3.2.0 | 3.2.0 |
| beautifulsoup4 | 4.12.2 | 4.12.2 |
| binaryornot | 0.4.4 | 0.4.4 |
| black | 23.3.0 | 23.3.0 |
| blas | 1.0 | 1.0 |
| bleach | 4.1.0 | 4.1.0 |
| blosc | 1.21.3 | 1.21.3 |
| bokeh | 3.1.1 | 3.1.1 |
| boltons | 23.0.0 | 23.0.0 |
| boost-cpp | 1.73.0 | 1.73.0 |
| boto3 | 1.24.28 | |
| botocore | 1.29.76 | 1.27.59 |
| bottleneck | 1.3.5 | 1.3.5 |
| brotli | 1.0.9 | 1.0.9 |
| brotli-bin | 1.0.9 | 1.0.9 |
| brotlipy | 0.7.0 | 0.7.0 |
| brunsli | 0.1 | 0.1 |
| bzip2 | 1.0.8 | 1.0.8 |
| c-ares | 1.19.0 | 1.19.0 |
| c-blosc2 | 2.8.0 | 2.8.0 |
| ca-certificates | 2023.05.30 | 2023.05.30 |
| cctools | 949.0.1 | 949.0.1 |
| cctools\_osx-64 | 949.0.1 | |
| cctools\_osx-arm64 | 949.0.1 | |
| certifi | 2023.5.7 | 2023.5.7 |
| cffi | 1.15.1 | 1.15.1 |
| cfitsio | 3.470 | 3.470 |
| chardet | 4.0.0 | 4.0.0 |
| charls | 2.2.0 | 2.2.0 |
| charset-normalizer | 2.0.4 | 2.0.4 |
| click | 8.0.4 | 8.0.4 |
| cloudpickle | 2.2.1 | 2.2.1 |
| clyent | 1.2.2 | 1.2.2 |
| colorama | 0.4.6 | 0.4.6 |
| colorcet | 3.0.1 | 3.0.1 |
| comm | 0.1.2 | 0.1.2 |
| conda | 23.5.2 | 23.5.2 |
| conda-build | 3.25.0 | 3.25.0 |
| conda-content-trust | 0.1.3 | 0.1.3 |
| conda-index | 0.2.3 | 0.2.3 |
| conda-libmamba-solver | 23.5.0 | 23.5.0 |
| conda-pack | 0.6.0 | 0.6.0 |
| conda-package-handling | 2.1.0 | 2.1.0 |
| conda-package-streaming | 0.8.0 | 0.8.0 |
| conda-repo-cli | 1.0.41 | 1.0.41 |
| conda-token | 0.4.0 | 0.4.0 |
| conda-verify | 3.4.2 | 3.4.2 |
| constantly | 15.1.0 | 15.1.0 |
| contourpy | 1.0.5 | 1.0.5 |
| cookiecutter | 1.7.3 | 1.7.3 |
| cryptography | 39.0.1 | 39.0.1 |
| cssselect | 1.1.0 | 1.1.0 |
| curl | 8.1.1 | 8.1.1 |
| cycler | 0.11.0 | 0.11.0 |
| cytoolz | 0.12.0 | 0.12.0 |
| dask | 2023.6.0 | 2023.6.0 |
| dask-core | 2023.6.0 | 2023.6.0 |
| datasets | 2.12.0 | |
| datashader | 0.15.0 | 0.15.0 |
| datashape | 0.5.4 | 0.5.4 |
| debugpy | 1.5.1 | 1.5.1 |
| decorator | 5.1.1 | 5.1.1 |
| defusedxml | 0.7.1 | 0.7.1 |
| diff-match-patch | 20200713 | 20200713 |
| dill | 0.3.6 | 0.3.6 |
| distributed | 2023.6.0 | 2023.6.0 |
| docstring-to-markdown | 0.11 | 0.11 |
| docutils | 0.18.1 | 0.18.1 |
| entrypoints | 0.4 | 0.4 |
| et\_xmlfile | 1.1.0 | 1.1.0 |
| executing | 0.8.3 | 0.8.3 |
| filelock | 3.9.0 | 3.9.0 |
| flake8 | 6.0.0 | 6.0.0 |
| flask | 2.2.2 | 2.2.2 |
| fmt | 9.1.0 | 9.1.0 |
| fonttools | 4.25.0 | 4.25.0 |
| freetype | 2.12.1 | 2.12.1 |
| frozenlist | 1.3.3 | 1.3.3 |
| fsspec | 2023.4.0 | 2023.3.0 |
| future | 0.18.3 | 0.18.3 |
| gensim | 4.3.0 | 4.3.0 |
| gettext | 0.21.0 | 0.21.0 |
| gflags | 2.2.2 | 2.2.2 |
| giflib | 5.2.1 | 5.2.1 |
| glib | 2.69.1 | 2.69.1 |
| glob2 | 0.7 | 0.7 |
| glog | 0.5.0 | 0.5.0 |
| gmp | 6.2.1 | 6.2.1 |
| gmpy2 | 2.1.2 | 2.1.2 |
| greenlet | 2.0.1 | 2.0.1 |
| grpc-cpp | 1.46.1 | 1.46.1 |
| gst-plugins-base | 1.14.1 | 1.14.1 |
| gstreamer | 1.14.1 | 1.14.1 |
| h5py | 3.7.0 | 3.7.0 |
| hdf5 | 1.12.1 | 1.10.6 |
| heapdict | 1.0.1 | 1.0.1 |
| holoviews | 1.16.2 | 1.16.2 |
| huggingface\_hub | 0.15.1 | |
| hvplot | 0.8.4 | 0.8.4 |
| hyperlink | 21.0.0 | 21.0.0 |
| icu | 68.1 | 58.2 |
| idna | 3.4 | 3.4 |
| imagecodecs | 2021.8.26 | 2021.8.26 |
| imageio | 2.31.1 | 2.31.1 |
| imagesize | 1.4.1 | 1.4.1 |
| imbalanced-learn | 0.10.1 | 0.10.1 |
| importlib-metadata | 6.0.0 | 6.0.0 |
| importlib\_metadata | 6.0.0 | 6.0.0 |
| incremental | 21.3.0 | 21.3.0 |
| inflection | 0.5.1 | 0.5.1 |
| iniconfig | 1.1.1 | 1.1.1 |
| intake | 0.6.8 | 0.6.8 |
| intervaltree | 3.1.0 | 3.1.0 |
| ipykernel | 6.19.2 | 6.19.2 |
| ipython | 8.12.0 | 8.12.0 |
| ipython\_genutils | 0.2.0 | 0.2.0 |
| ipywidgets | 8.0.4 | 8.0.4 |
| isort | 5.9.3 | 5.9.3 |
| itemadapter | 0.3.0 | 0.3.0 |
| itemloaders | 1.0.4 | 1.0.4 |
| itsdangerous | 2.0.1 | 2.0.1 |
| jaraco.classes | 3.2.1 | 3.2.1 |
| jedi | 0.18.1 | 0.18.1 |
| jellyfish | 0.9.0 | 0.9.0 |
| jinja2 | 3.1.2 | 3.1.2 |
| jinja2-time | 0.2.0 | 0.2.0 |
| jmespath | 0.10.0 | 0.10.0 |
| joblib | 1.2.0 | 1.2.0 |
| jpeg | 9e | 9e |
| jq | 1.6 | 1.6 |
| json5 | 0.9.6 | 0.9.6 |
| jsonpatch | 1.32 | 1.32 |
| jsonpointer | 2.1 | 2.1 |
| jsonschema | 4.17.3 | 4.17.3 |
| jupyter | 1.0.0 | 1.0.0 |
| jupyter\_client | 8.1.0 | 8.1.0 |
| jupyter\_console | 6.6.3 | 6.6.3 |
| jupyter\_core | 5.3.0 | 5.3.0 |
| jupyter\_events | 0.6.3 | 0.6.3 |
| jupyter\_server | 2.5.0 | 2.5.0 |
| jupyter\_server\_fileid | 0.9.0 | 0.9.0 |
| jupyter\_server\_terminals | 0.4.4 | 0.4.4 |
| jupyter\_server\_ydoc | 0.8.0 | 0.8.0 |
| jupyter\_ydoc | 0.2.4 | 0.2.4 |
| jupyterlab | 3.6.3 | 3.6.3 |
| jupyterlab\_pygments | 0.1.2 | 0.1.2 |
| jupyterlab\_server | 2.22.0 | 2.22.0 |
| jupyterlab\_widgets | 3.0.5 | 3.0.5 |
| jxrlib | 1.1 | 1.1 |
| keyring | 23.13.1 | 23.13.1 |
| kiwisolver | 1.4.4 | 1.4.4 |
| krb5 | 1.19.4 | 1.19.4 |
| lazy-object-proxy | 1.6.0 | 1.6.0 |
| lazy\_loader | 0.2 | 0.2 |
| lcms2 | 2.12 | 2.12 |
| ld64 | 530 | 530 |
| ld64\_osx-64 | 530 | |
| ld64\_osx-arm64 | 530 | |
| ldid | 2.1.5 | 2.1.5 |
| lerc | 3.0 | 3.0 |
| libaec | 1.0.4 | 1.0.4 |
| libarchive | 3.6.2 | 3.6.2 |
| libboost | 1.73.0 | 1.73.0 |
| libbrotlicommon | 1.0.9 | 1.0.9 |
| libbrotlidec | 1.0.9 | 1.0.9 |
| libbrotlienc | 1.0.9 | 1.0.9 |
| libclang | 14.0.6 | 14.0.6 |
| libclang13 | 14.0.6 | 14.0.6 |
| libcurl | 8.1.1 | 8.1.1 |
| libcxx | 14.0.6 | 14.0.6 |
| libdeflate | 1.17 | 1.17 |
| libedit | 3.1.20221030 | 3.1.20221030 |
| libev | 4.33 | 4.33 |
| libevent | 2.1.12 | 2.1.12 |
| libffi | 3.4.4 | 3.4.4 |
| libgfortran | 5.0.0 | 5.0.0 |
| libgfortran5 | 11.3.0 | 11.3.0 |
| libiconv | 1.16 | 1.16 |
| liblief | 0.12.3 | 0.12.3 |
| libllvm14 | 14.0.6 | 14.0.6 |
| libmamba | 1.4.1 | 1.4.1 |
| libmambapy | 1.4.1 | 1.4.1 |
| libnghttp2 | 1.52.0 | 1.52.0 |
| libopenblas | 0.3.21 | 0.3.21 |
| libpng | 1.6.39 | 1.6.39 |
| libpq | 12.9 | 12.9 |
| libprotobuf | 3.20.3 | 3.20.3 |
| libsodium | 1.0.18 | 1.0.18 |
| libsolv | 0.7.22 | 0.7.22 |
| libspatialindex | 1.9.3 | 1.9.3 |
| libssh2 | 1.10.0 | 1.10.0 |
| libthrift | 0.13.0 | 0.15.0 |
| libtiff | 4.5.0 | 4.5.0 |
| libuv | 1.44.2 | |
| libwebp | 1.2.4 | 1.2.4 |
| libwebp-base | 1.2.4 | 1.2.4 |
| libxml2 | 2.10.3 | 2.10.3 |
| libxslt | 1.1.37 | 1.1.37 |
| libzopfli | 1.0.3 | 1.0.3 |
| linkify-it-py | 2.0.0 | 2.0.0 |
| llvm-openmp | 14.0.6 | 14.0.6 |
| llvmlite | 0.40.0 | 0.40.0 |
| locket | 1.0.0 | 1.0.0 |
| lxml | 4.9.2 | 4.9.2 |
| lz4 | 4.3.2 | 4.3.2 |
| lz4-c | 1.9.4 | 1.9.4 |
| lzo | 2.10 | 2.10 |
| markdown | 3.4.1 | 3.4.1 |
| markdown-it-py | 2.2.0 | 2.2.0 |
| markupsafe | 2.1.1 | 2.1.1 |
| matplotlib | 3.7.1 | 3.7.1 |
| matplotlib-base | 3.7.1 | 3.7.1 |
| matplotlib-inline | 0.1.6 | 0.1.6 |
| mccabe | 0.7.0 | 0.7.0 |
| mdit-py-plugins | 0.3.0 | 0.3.0 |
| mdurl | 0.1.0 | 0.1.0 |
| mistune | 0.8.4 | 0.8.4 |
| more-itertools | 8.12.0 | 8.12.0 |
| mpc | 1.1.0 | 1.1.0 |
| mpfr | 4.0.2 | 4.0.2 |
| mpmath | 1.2.1 | 1.2.1 |
| msgpack-python | 1.0.3 | 1.0.3 |
| multidict | 6.0.2 | 6.0.2 |
| multipledispatch | 0.6.0 | 0.6.0 |
| multiprocess | 0.70.14 | |
| munkres | 1.1.4 | 1.1.4 |
| mypy\_extensions | 0.4.3 | 0.4.3 |
| navigator-updater | 0.4.0 | 0.4.0 |
| nbclassic | 0.5.5 | 0.5.5 |
| nbclient | 0.5.13 | 0.5.13 |
| nbconvert | 6.5.4 | 6.5.4 |
| nbformat | 5.7.0 | 5.7.0 |
| ncurses | 6.4 | 6.4 |
| nest-asyncio | 1.5.6 | 1.5.6 |
| networkx | 2.8.4 | 2.8.4 |
| ninja | 1.10.2 | |
| ninja-base | 1.10.2 | |
| nltk | 3.7 | 3.7 |
| notebook | 6.5.4 | 6.5.4 |
| notebook-shim | 0.2.2 | 0.2.2 |
| nspr | 4.35 | 4.35 |
| nss | 3.89.1 | 3.89.1 |
| numba | 0.57.0 | 0.57.0 |
| numexpr | 2.8.4 | 2.8.4 |
| numpy | 1.24.3 | 1.24.3 |
| numpy-base | 1.24.3 | 1.24.3 |
| numpydoc | 1.5.0 | 1.5.0 |
| oniguruma | 6.9.7.1 | 6.9.7.1 |
| openjpeg | 2.3.0 | 2.4.0 |
| openpyxl | 3.0.10 | 3.0.10 |
| openssl | 1.1.1u | 1.1.1u |
| orc | 1.7.4 | 1.7.4 |
| packaging | 23.0 | 23.0 |
| pandas | 1.5.3 | 1.5.3 |
| pandocfilters | 1.5.0 | 1.5.0 |
| panel | 1.1.0 | 1.1.0 |
| param | 1.13.0 | 1.13.0 |
| parsel | 1.6.0 | 1.6.0 |
| parso | 0.8.3 | 0.8.3 |
| partd | 1.2.0 | 1.2.0 |
| patch | 2.7.6 | 2.7.6 |
| pathlib | 1.0.1 | 1.0.1 |
| pathspec | 0.10.3 | 0.10.3 |
| patsy | 0.5.3 | 0.5.3 |
| pcre | 8.45 | 8.45 |
| pcre2 | 10.37 | 10.37 |
| pep8 | 1.7.1 | 1.7.1 |
| pexpect | 4.8.0 | 4.8.0 |
| pickleshare | 0.7.5 | 0.7.5 |
| pillow | 9.4.0 | 9.4.0 |
| pip | 23.1.2 | 23.1.2 |
| pkginfo | 1.9.6 | 1.9.6 |
| platformdirs | 2.5.2 | 2.5.2 |
| plotly | 5.9.0 | 5.9.0 |
| pluggy | 1.0.0 | 1.0.0 |
| ply | 3.11 | 3.11 |
| pooch | 1.4.0 | 1.4.0 |
| poyo | 0.5.0 | 0.5.0 |
| prometheus\_client | 0.14.1 | 0.14.1 |
| prompt-toolkit | 3.0.36 | 3.0.36 |
| prompt\_toolkit | 3.0.36 | 3.0.36 |
| protego | 0.1.16 | 0.1.16 |
| psutil | 5.9.0 | 5.9.0 |
| ptyprocess | 0.7.0 | 0.7.0 |
| pure\_eval | 0.2.2 | 0.2.2 |
| py-cpuinfo | 8.0.0 | 8.0.0 |
| py-lief | 0.12.3 | 0.12.3 |
| pyarrow | 11.0.0 | 11.0.0 |
| pyasn1 | 0.4.8 | 0.4.8 |
| pyasn1-modules | 0.2.8 | 0.2.8 |
| pybind11-abi | 4 | 4 |
| pycodestyle | 2.10.0 | 2.10.0 |
| pycosat | 0.6.4 | 0.6.4 |
| pycparser | 2.21 | 2.21 |
| pyct | 0.5.0 | 0.5.0 |
| pycurl | 7.45.2 | 7.45.2 |
| pydispatcher | 2.0.5 | 2.0.5 |
| pydocstyle | 6.3.0 | 6.3.0 |
| pyerfa | 2.0.0 | 2.0.0 |
| pyflakes | 3.0.1 | 3.0.1 |
| pygments | 2.15.1 | 2.15.1 |
| pyjwt | 2.4.0 | 2.4.0 |
| pylint | 2.16.2 | 2.16.2 |
| pylint-venv | 2.3.0 | 2.3.0 |
| pyls-spyder | 0.4.0 | 0.4.0 |
| pyobjc-core | 9.0 | 9.0 |
| pyobjc-framework-cocoa | 9.0 | 9.0 |
| pyobjc-framework-coreservices | 9.0 | 9.0 |
| pyobjc-framework-fsevents | 9.0 | 9.0 |
| pyodbc | 4.0.34 | 4.0.34 |
| pyopenssl | 23.0.0 | 23.0.0 |
| pyparsing | 3.0.9 | 3.0.9 |
| pyqt | 5.15.7 | 5.15.7 |
| pyqt5-sip | 12.11.0 | 12.11.0 |
| pyqtwebengine | 5.15.7 | 5.15.7 |
| pyrsistent | 0.18.0 | 0.18.0 |
| pysocks | 1.7.1 | 1.7.1 |
| pytables | 3.8.0 | 3.8.0 |
| pytest | 7.3.1 | 7.3.1 |
| python | 3.11.3 | 3.11.3 |
| python-dateutil | 2.8.2 | 2.8.2 |
| python-fastjsonschema | 2.16.2 | 2.16.2 |
| python-json-logger | 2.0.7 | 2.0.7 |
| python-libarchive-c | 2.9 | 2.9 |
| python-lmdb | 1.4.1 | 1.4.1 |
| python-lsp-black | 1.2.1 | 1.2.1 |
| python-lsp-jsonrpc | 1.0.0 | 1.0.0 |
| python-lsp-server | 1.7.2 | 1.7.2 |
| python-slugify | 5.0.2 | 5.0.2 |
| python-snappy | 0.6.1 | 0.6.1 |
| python-xxhash | 2.0.2 | |
| python.app | 3 | 3 |
| pytoolconfig | 1.2.5 | 1.2.5 |
| pytorch | 2.0.1 | |
| pytz | 2022.7 | 2022.7 |
| pyviz\_comms | 2.3.0 | 2.3.0 |
| pywavelets | 1.4.1 | 1.4.1 |
| pyyaml | 6.0 | 6.0 |
| pyzmq | 25.1.0 | 25.1.0 |
| qdarkstyle | 3.0.2 | 3.0.2 |
| qstylizer | 0.2.2 | 0.2.2 |
| qt-main | 5.15.2 | 5.15.2 |
| qt-webengine | 5.15.9 | 5.15.9 |
| qtawesome | 1.2.2 | 1.2.2 |
| qtconsole | 5.4.2 | 5.4.2 |
| qtpy | 2.2.0 | 2.2.0 |
| qtwebkit | 5.212 | 5.212 |
| queuelib | 1.5.0 | 1.5.0 |
| re2 | 2022.04.01 | 2022.04.01 |
| readline | 8.2 | 8.2 |
| regex | 2022.7.9 | 2022.7.9 |
| reproc | 14.2.4 | 14.2.4 |
| reproc-cpp | 14.2.4 | 14.2.4 |
| requests | 2.29.0 | 2.29.0 |
| requests-file | 1.5.1 | 1.5.1 |
| requests-toolbelt | 0.9.1 | 0.9.1 |
| responses | 0.13.3 | |
| rfc3339-validator | 0.1.4 | 0.1.4 |
| rfc3986-validator | 0.1.1 | 0.1.1 |
| rope | 1.7.0 | 1.7.0 |
| rtree | 1.0.1 | 1.0.1 |
| ruamel.yaml | 0.17.21 | 0.17.21 |
| ruamel\_yaml | 0.17.21 | 0.17.21 |
| s3fs | 2023.4.0 | 2023.3.0 |
| s3transfer | 0.6.0 | |
| sacremoses | 0.0.43 | 0.0.43 |
| scikit-image | 0.20.0 | 0.20.0 |
| scikit-learn | 1.2.2 | 1.2.2 |
| scipy | 1.10.1 | 1.10.1 |
| scrapy | 2.8.0 | 2.8.0 |
| seaborn | 0.12.2 | 0.12.2 |
| send2trash | 1.8.0 | 1.8.0 |
| service\_identity | 18.1.0 | 18.1.0 |
| setuptools | 67.8.0 | 67.8.0 |
| sip | 6.6.2 | 6.6.2 |
| six | 1.16.0 | 1.16.0 |
| sleef | 3.5.1 | |
| smart\_open | 5.2.1 | 5.2.1 |
| snappy | 1.1.9 | 1.1.9 |
| sniffio | 1.2.0 | 1.2.0 |
| snowballstemmer | 2.2.0 | 2.2.0 |
| sortedcontainers | 2.4.0 | 2.4.0 |
| soupsieve | 2.4 | 2.4 |
| sphinx | 5.0.2 | 5.0.2 |
| sphinxcontrib-applehelp | 1.0.2 | 1.0.2 |
| sphinxcontrib-devhelp | 1.0.2 | 1.0.2 |
| sphinxcontrib-htmlhelp | 2.0.0 | 2.0.0 |
| sphinxcontrib-jsmath | 1.0.1 | 1.0.1 |
| sphinxcontrib-qthelp | 1.0.3 | 1.0.3 |
| sphinxcontrib-serializinghtml | 1.1.5 | 1.1.5 |
| spyder | 5.4.3 | 5.4.3 |
| spyder-kernels | 2.4.3 | 2.4.3 |
| sqlalchemy | 1.4.39 | 1.4.39 |
| sqlite | 3.41.2 | 3.41.2 |
| stack\_data | 0.2.0 | 0.2.0 |
| statsmodels | 0.13.5 | 0.13.5 |
| sympy | 1.11.1 | 1.11.1 |
| tabulate | 0.8.10 | 0.8.10 |
| tapi | 1100.0.11 | 1000.10.8 |
| tbb | 2021.8.0 | 2021.8.0 |
| tbb4py | 2021.8.0 | 2021.8.0 |
| tblib | 1.7.0 | 1.7.0 |
| tenacity | 8.2.2 | 8.2.2 |
| terminado | 0.17.1 | 0.17.1 |
| text-unidecode | 1.3 | 1.3 |
| textdistance | 4.2.1 | 4.2.1 |
| threadpoolctl | 2.2.0 | 2.2.0 |
| three-merge | 0.1.1 | 0.1.1 |
| tifffile | 2021.7.2 | 2021.7.2 |
| tinycss2 | 1.2.1 | 1.2.1 |
| tk | 8.6.12 | 8.6.12 |
| tldextract | 3.2.0 | 3.2.0 |
| tokenizers | 0.13.2 | |
| toml | 0.10.2 | 0.10.2 |
| tomli | 2.0.1 | 2.0.1 |
| tomlkit | 0.11.1 | 0.11.1 |
| toolz | 0.12.0 | 0.12.0 |
| tornado | 6.2 | 6.2 |
| tqdm | 4.65.0 | 4.65.0 |
| traitlets | 5.7.1 | 5.7.1 |
| transformers | 4.29.2 | 2.1.1 |
| twisted | 22.10.0 | 22.10.0 |
| typing-extensions | 4.6.3 | 4.6.3 |
| typing\_extensions | 4.6.3 | 4.6.3 |
| tzdata | 2023c | 2023c |
| uc-micro-py | 1.0.1 | 1.0.1 |
| ujson | 5.4.0 | 5.4.0 |
| unidecode | 1.2.0 | 1.2.0 |
| unixodbc | 2.3.11 | 2.3.11 |
| urllib3 | 1.26.16 | 1.26.16 |
| utf8proc | 2.6.1 | 2.6.1 |
| w3lib | 1.21.0 | 1.21.0 |
| watchdog | 2.1.6 | 2.1.6 |
| wcwidth | 0.2.5 | 0.2.5 |
| webencodings | 0.5.1 | 0.5.1 |
| websocket-client | 0.58.0 | 0.58.0 |
| werkzeug | 2.2.3 | 2.2.3 |
| whatthepatch | 1.0.2 | 1.0.2 |
| wheel | 0.38.4 | 0.38.4 |
| widgetsnbextension | 4.0.5 | 4.0.5 |
| wrapt | 1.14.1 | 1.14.1 |
| wurlitzer | 3.0.2 | 3.0.2 |
| xarray | 2022.11.0 | 2022.11.0 |
| xlwings | 0.29.1 | 0.29.1 |
| xxhash | 0.8.0 | |
| xyzservices | 2022.9.0 | 2022.9.0 |
| xz | 5.4.2 | 5.4.2 |
| y-py | 0.5.9 | 0.5.9 |
| yaml | 0.2.5 | 0.2.5 |
| yaml-cpp | 0.7.0 | 0.7.0 |
| yapf | 0.31.0 | 0.31.0 |
| yarl | 1.8.1 | 1.8.1 |
| ypy-websocket | 0.8.2 | 0.8.2 |
| zeromq | 4.3.4 | 4.3.4 |
| zfp | 0.5.5 | 0.5.5 |
| zict | 2.2.0 | 2.2.0 |
| zipp | 3.11.0 | 3.11.0 |
| zlib | 1.2.13 | 1.2.13 |
| zlib-ng | 2.0.7 | 2.0.7 |
| zope | 1.0 | 1.0 |
| zope.interface | 5.4.0 | 5.4.0 |
| zstandard | 0.19.0 | 0.19.0 |
| zstd | 1.5.5 | 1.5.5 |
| Package Name | win-64 |
|---|---|
| \_anaconda\_depends | 2023.07 |
| abseil-cpp | 20211102.0 |
| aiobotocore | 2.4.2 |
| aiofiles | 22.1.0 |
| aiohttp | 3.8.3 |
| aioitertools | 0.7.1 |
| aiosignal | 1.2.0 |
| aiosqlite | 0.18.0 |
| alabaster | 0.7.12 |
| anaconda-catalogs | 0.2.0 |
| anaconda-client | 1.11.3 |
| anaconda-navigator | 2.4.2 |
| anaconda-project | 0.11.1 |
| anyio | 3.5.0 |
| appdirs | 1.4.4 |
| argon2-cffi | 21.3.0 |
| argon2-cffi-bindings | 21.2.0 |
| arrow | 1.2.3 |
| arrow-cpp | 11.0.0 |
| astroid | 2.14.2 |
| astropy | 5.1 |
| asttokens | 2.0.5 |
| async-timeout | 4.0.2 |
| atomicwrites | 1.4.0 |
| attrs | 22.1.0 |
| automat | 20.2.0 |
| autopep8 | 1.6.0 |
| aws-c-common | 0.4.57 |
| aws-c-event-stream | 0.1.6 |
| aws-checksums | 0.1.9 |
| aws-sdk-cpp | 1.8.185 |
| babel | 2.11.0 |
| backcall | 0.2.0 |
| backports | 1.1 |
| backports.functools\_lru\_cache | 1.6.4 |
| backports.tempfile | 1.0 |
| backports.weakref | 1.0.post1 |
| bcrypt | 3.2.0 |
| beautifulsoup4 | 4.12.2 |
| binaryornot | 0.4.4 |
| black | 23.3.0 |
| blas | 1.0 |
| bleach | 4.1.0 |
| blosc | 1.21.3 |
| bokeh | 3.1.1 |
| boltons | 23.0.0 |
| boost-cpp | 1.73.0 |
| boto3 | 1.24.28 |
| botocore | 1.27.59 |
| bottleneck | 1.3.5 |
| brotli | 1.0.9 |
| brotli-bin | 1.0.9 |
| brotlipy | 0.7.0 |
| bzip2 | 1.0.8 |
| c-ares | 1.19.0 |
| c-blosc2 | 2.8.0 |
| ca-certificates | 2023.05.30 |
| certifi | 2023.5.7 |
| cffi | 1.15.1 |
| cfitsio | 3.470 |
| chardet | 4.0.0 |
| charls | 2.2.0 |
| charset-normalizer | 2.0.4 |
| click | 8.0.4 |
| cloudpickle | 2.2.1 |
| clyent | 1.2.2 |
| colorama | 0.4.6 |
| colorcet | 3.0.1 |
| comm | 0.1.2 |
| conda | 23.5.2 |
| conda-build | 3.25.0 |
| conda-content-trust | 0.1.3 |
| conda-index | 0.2.3 |
| conda-libmamba-solver | 23.5.0 |
| conda-pack | 0.6.0 |
| conda-package-handling | 2.1.0 |
| conda-package-streaming | 0.8.0 |
| conda-repo-cli | 1.0.41 |
| conda-token | 0.4.0 |
| conda-verify | 3.4.2 |
| console\_shortcut | 0.1.1 |
| constantly | 15.1.0 |
| contourpy | 1.0.5 |
| cookiecutter | 1.7.3 |
| cryptography | 39.0.1 |
| cssselect | 1.1.0 |
| curl | 8.1.1 |
| cycler | 0.11.0 |
| cytoolz | 0.12.0 |
| daal4py | 2023.1.1 |
| dal | 2023.1.1 |
| dask | 2023.6.0 |
| dask-core | 2023.6.0 |
| datashader | 0.15.0 |
| datashape | 0.5.4 |
| debugpy | 1.5.1 |
| decorator | 5.1.1 |
| defusedxml | 0.7.1 |
| diff-match-patch | 20200713 |
| dill | 0.3.6 |
| distributed | 2023.6.0 |
| docstring-to-markdown | 0.11 |
| docutils | 0.18.1 |
| entrypoints | 0.4 |
| et\_xmlfile | 1.1.0 |
| executing | 0.8.3 |
| filelock | 3.9.0 |
| flake8 | 6.0.0 |
| flask | 2.2.2 |
| fmt | 9.1.0 |
| fonttools | 4.25.0 |
| freetype | 2.12.1 |
| frozenlist | 1.3.3 |
| fsspec | 2023.3.0 |
| future | 0.18.3 |
| gensim | 4.3.0 |
| gflags | 2.2.2 |
| giflib | 5.2.1 |
| glib | 2.69.1 |
| glob2 | 0.7 |
| glog | 0.5.0 |
| greenlet | 2.0.1 |
| gst-plugins-base | 1.18.5 |
| gstreamer | 1.18.5 |
| h5py | 3.7.0 |
| hdf5 | 1.10.6 |
| heapdict | 1.0.1 |
| holoviews | 1.16.2 |
| hvplot | 0.8.4 |
| hyperlink | 21.0.0 |
| icc\_rt | 2022.1.0 |
| icu | 58.2 |
| idna | 3.4 |
| imagecodecs | 2021.8.26 |
| imageio | 2.26.0 |
| imagesize | 1.4.1 |
| imbalanced-learn | 0.10.1 |
| importlib-metadata | 6.0.0 |
| importlib\_metadata | 6.0.0 |
| incremental | 21.3.0 |
| inflection | 0.5.1 |
| iniconfig | 1.1.1 |
| intake | 0.6.8 |
| intel-openmp | 2023.1.0 |
| intervaltree | 3.1.0 |
| ipykernel | 6.19.2 |
| ipython | 8.12.0 |
| ipython\_genutils | 0.2.0 |
| ipywidgets | 8.0.4 |
| isort | 5.9.3 |
| itemadapter | 0.3.0 |
| itemloaders | 1.0.4 |
| itsdangerous | 2.0.1 |
| jaraco.classes | 3.2.1 |
| jedi | 0.18.1 |
| jellyfish | 0.9.0 |
| jinja2 | 3.1.2 |
| jinja2-time | 0.2.0 |
| jmespath | 0.10.0 |
| joblib | 1.2.0 |
| jpeg | 9e |
| jq | 1.6 |
| json5 | 0.9.6 |
| jsonpatch | 1.32 |
| jsonpointer | 2.1 |
| jsonschema | 4.17.3 |
| jupyter | 1.0.0 |
| jupyter\_client | 8.1.0 |
| jupyter\_console | 6.6.3 |
| jupyter\_core | 5.3.0 |
| jupyter\_events | 0.6.3 |
| jupyter\_server | 2.5.0 |
| jupyter\_server\_fileid | 0.9.0 |
| jupyter\_server\_terminals | 0.4.4 |
| jupyter\_server\_ydoc | 0.8.0 |
| jupyter\_ydoc | 0.2.4 |
| jupyterlab | 3.6.3 |
| jupyterlab\_pygments | 0.1.2 |
| jupyterlab\_server | 2.22.0 |
| jupyterlab\_widgets | 3.0.5 |
| jxrlib | 1.1 |
| keyring | 23.13.1 |
| kiwisolver | 1.4.4 |
| krb5 | 1.19.4 |
| lazy-object-proxy | 1.6.0 |
| lazy\_loader | 0.2 |
| lcms2 | 2.12 |
| lerc | 3.0 |
| libaec | 1.0.4 |
| libarchive | 3.6.2 |
| libboost | 1.73.0 |
| libbrotlicommon | 1.0.9 |
| libbrotlidec | 1.0.9 |
| libbrotlienc | 1.0.9 |
| libclang | 14.0.6 |
| libclang13 | 14.0.6 |
| libcurl | 8.1.1 |
| libdeflate | 1.17 |
| libevent | 2.1.12 |
| libffi | 3.4.4 |
| libiconv | 1.16 |
| liblief | 0.12.3 |
| libllvm14 | 14.0.6 |
| libmamba | 1.4.1 |
| libmambapy | 1.4.1 |
| libogg | 1.3.5 |
| libpng | 1.6.39 |
| libprotobuf | 3.20.3 |
| libsodium | 1.0.18 |
| libsolv | 0.7.22 |
| libspatialindex | 1.9.3 |
| libssh2 | 1.10.0 |
| libthrift | 0.15.0 |
| libtiff | 4.5.0 |
| libvorbis | 1.3.7 |
| libwebp | 1.2.4 |
| libwebp-base | 1.2.4 |
| libxml2 | 2.10.3 |
| libxslt | 1.1.37 |
| libzopfli | 1.0.3 |
| linkify-it-py | 2.0.0 |
| llvmlite | 0.40.0 |
| locket | 1.0.0 |
| lxml | 4.9.2 |
| lz4 | 4.3.2 |
| lz4-c | 1.9.4 |
| lzo | 2.10 |
| m2-msys2-runtime | 2.5.0.17080.65c939c |
| m2-patch | 2.7.5 |
| m2w64-libwinpthread-git | 5.0.0.4634.697f757 |
| markdown | 3.4.1 |
| markdown-it-py | 2.2.0 |
| markupsafe | 2.1.1 |
| matplotlib | 3.7.1 |
| matplotlib-base | 3.7.1 |
| matplotlib-inline | 0.1.6 |
| mccabe | 0.7.0 |
| mdit-py-plugins | 0.3.0 |
| mdurl | 0.1.0 |
| menuinst | 1.4.19 |
| mistune | 0.8.4 |
| mkl | 2023.1.0 |
| mkl-service | 2.4.0 |
| mkl\_fft | 1.3.6 |
| mkl\_random | 1.2.2 |
| more-itertools | 8.12.0 |
| mpmath | 1.2.1 |
| msgpack-python | 1.0.3 |
| msys2-conda-epoch | 20160418 |
| multidict | 6.0.2 |
| multipledispatch | 0.6.0 |
| munkres | 1.1.4 |
| mypy\_extensions | 0.4.3 |
| navigator-updater | 0.4.0 |
| nbclassic | 0.5.5 |
| nbclient | 0.5.13 |
| nbconvert | 6.5.4 |
| nbformat | 5.7.0 |
| nest-asyncio | 1.5.6 |
| networkx | 2.8.4 |
| nltk | 3.7 |
| notebook | 6.5.4 |
| notebook-shim | 0.2.2 |
| numba | 0.57.0 |
| numexpr | 2.8.4 |
| numpy | 1.24.3 |
| numpy-base | 1.24.3 |
| numpydoc | 1.5.0 |
| openjpeg | 2.4.0 |
| openpyxl | 3.0.10 |
| openssl | 1.1.1u |
| orc | 1.7.4 |
| packaging | 23.0 |
| pandas | 1.5.3 |
| pandocfilters | 1.5.0 |
| panel | 1.1.0 |
| param | 1.13.0 |
| paramiko | 2.8.1 |
| parsel | 1.6.0 |
| parso | 0.8.3 |
| partd | 1.2.0 |
| pathlib | 1.0.1 |
| pathspec | 0.10.3 |
| patsy | 0.5.3 |
| pcre | 8.45 |
| pcre2 | 10.37 |
| pep8 | 1.7.1 |
| pexpect | 4.8.0 |
| pickleshare | 0.7.5 |
| pillow | 9.4.0 |
| pip | 23.1.2 |
| pkginfo | 1.9.6 |
| platformdirs | 2.5.2 |
| plotly | 5.9.0 |
| pluggy | 1.0.0 |
| ply | 3.11 |
| pooch | 1.4.0 |
| powershell\_shortcut | 0.0.1 |
| poyo | 0.5.0 |
| prometheus\_client | 0.14.1 |
| prompt-toolkit | 3.0.36 |
| prompt\_toolkit | 3.0.36 |
| protego | 0.1.16 |
| psutil | 5.9.0 |
| ptyprocess | 0.7.0 |
| pure\_eval | 0.2.2 |
| py-cpuinfo | 8.0.0 |
| py-lief | 0.12.3 |
| pyarrow | 11.0.0 |
| pyasn1 | 0.4.8 |
| pyasn1-modules | 0.2.8 |
| pybind11-abi | 4 |
| pycodestyle | 2.10.0 |
| pycosat | 0.6.4 |
| pycparser | 2.21 |
| pyct | 0.5.0 |
| pycurl | 7.45.2 |
| pydispatcher | 2.0.5 |
| pydocstyle | 6.3.0 |
| pyerfa | 2.0.0 |
| pyflakes | 3.0.1 |
| pygments | 2.15.1 |
| pyjwt | 2.4.0 |
| pylint | 2.16.2 |
| pylint-venv | 2.3.0 |
| pyls-spyder | 0.4.0 |
| pynacl | 1.5.0 |
| pyodbc | 4.0.34 |
| pyopenssl | 23.0.0 |
| pyparsing | 3.0.9 |
| pyqt | 5.15.7 |
| pyqt5-sip | 12.11.0 |
| pyqtwebengine | 5.15.7 |
| pyrsistent | 0.18.0 |
| pysocks | 1.7.1 |
| pytables | 3.8.0 |
| pytest | 7.3.1 |
| python | 3.11.3 |
| python-dateutil | 2.8.2 |
| python-fastjsonschema | 2.16.2 |
| python-json-logger | 2.0.7 |
| python-libarchive-c | 2.9 |
| python-lmdb | 1.4.1 |
| python-lsp-black | 1.2.1 |
| python-lsp-jsonrpc | 1.0.0 |
| python-lsp-server | 1.7.2 |
| python-slugify | 5.0.2 |
| python-snappy | 0.6.1 |
| pytoolconfig | 1.2.5 |
| pytz | 2022.7 |
| pyviz\_comms | 2.3.0 |
| pywavelets | 1.4.1 |
| pywin32 | 305 |
| pywin32-ctypes | 0.2.0 |
| pywinpty | 2.0.10 |
| pyyaml | 6.0 |
| pyzmq | 25.1.0 |
| qdarkstyle | 3.0.2 |
| qstylizer | 0.2.2 |
| qt-main | 5.15.2 |
| qt-webengine | 5.15.9 |
| qtawesome | 1.2.2 |
| qtconsole | 5.4.2 |
| qtpy | 2.2.0 |
| qtwebkit | 5.212 |
| queuelib | 1.5.0 |
| re2 | 2022.04.01 |
| regex | 2022.7.9 |
| reproc | 14.2.4 |
| reproc-cpp | 14.2.4 |
| requests | 2.29.0 |
| requests-file | 1.5.1 |
| requests-toolbelt | 0.9.1 |
| rfc3339-validator | 0.1.4 |
| rfc3986-validator | 0.1.1 |
| rope | 1.7.0 |
| rtree | 1.0.1 |
| ruamel.yaml | 0.17.21 |
| ruamel\_yaml | 0.17.21 |
| s3fs | 2023.3.0 |
| s3transfer | 0.6.0 |
| sacremoses | 0.0.43 |
| scikit-image | 0.20.0 |
| scikit-learn | 1.2.2 |
| scikit-learn-intelex | 2023.1.1 |
| scipy | 1.10.1 |
| scrapy | 2.8.0 |
| seaborn | 0.12.2 |
| send2trash | 1.8.0 |
| service\_identity | 18.1.0 |
| setuptools | 67.8.0 |
| sip | 6.6.2 |
| six | 1.16.0 |
| smart\_open | 5.2.1 |
| snappy | 1.1.9 |
| sniffio | 1.2.0 |
| snowballstemmer | 2.2.0 |
| sortedcontainers | 2.4.0 |
| soupsieve | 2.4 |
| sphinx | 5.0.2 |
| sphinxcontrib-applehelp | 1.0.2 |
| sphinxcontrib-devhelp | 1.0.2 |
| sphinxcontrib-htmlhelp | 2.0.0 |
| sphinxcontrib-jsmath | 1.0.1 |
| sphinxcontrib-qthelp | 1.0.3 |
| sphinxcontrib-serializinghtml | 1.1.5 |
| spyder | 5.4.3 |
| spyder-kernels | 2.4.3 |
| sqlalchemy | 1.4.39 |
| sqlite | 3.41.2 |
| stack\_data | 0.2.0 |
| statsmodels | 0.13.5 |
| sympy | 1.11.1 |
| tabulate | 0.8.10 |
| tbb | 2021.8.0 |
| tbb4py | 2021.8.0 |
| tblib | 1.7.0 |
| tenacity | 8.2.2 |
| terminado | 0.17.1 |
| text-unidecode | 1.3 |
| textdistance | 4.2.1 |
| threadpoolctl | 2.2.0 |
| three-merge | 0.1.1 |
| tifffile | 2021.7.2 |
| tinycss2 | 1.2.1 |
| tk | 8.6.12 |
| tldextract | 3.2.0 |
| toml | 0.10.2 |
| tomli | 2.0.1 |
| tomlkit | 0.11.1 |
| toolz | 0.12.0 |
| tornado | 6.2 |
| tqdm | 4.65.0 |
| traitlets | 5.7.1 |
| transformers | 2.1.1 |
| twisted | 22.10.0 |
| twisted-iocpsupport | 1.0.2 |
| typing-extensions | 4.6.3 |
| typing\_extensions | 4.6.3 |
| tzdata | 2023c |
| uc-micro-py | 1.0.1 |
| ujson | 5.4.0 |
| unidecode | 1.2.0 |
| urllib3 | 1.26.16 |
| utf8proc | 2.6.1 |
| vc | 14.2 |
| vs2015\_runtime | 14.27.29016 |
| w3lib | 1.21.0 |
| watchdog | 2.1.6 |
| wcwidth | 0.2.5 |
| webencodings | 0.5.1 |
| websocket-client | 0.58.0 |
| werkzeug | 2.2.3 |
| whatthepatch | 1.0.2 |
| wheel | 0.38.4 |
| widgetsnbextension | 4.0.5 |
| win\_inet\_pton | 1.1.0 |
| winpty | 0.4.3 |
| wrapt | 1.14.1 |
| xarray | 2022.11.0 |
| xlwings | 0.29.1 |
| xyzservices | 2022.9.0 |
| xz | 5.4.2 |
| y-py | 0.5.9 |
| yaml | 0.2.5 |
| yaml-cpp | 0.7.0 |
| yapf | 0.31.0 |
| yarl | 1.8.1 |
| ypy-websocket | 0.8.2 |
| zeromq | 4.3.4 |
| zfp | 0.5.5 |
| zict | 2.2.0 |
| zipp | 3.11.0 |
| zlib | 1.2.13 |
| zlib-ng | 2.0.7 |
| zope | 1.0 |
| zope.interface | 5.4.0 |
| zstandard | 0.19.0 |
| zstd | 1.5.5 |
| Package Name | linux-64 | linux-aarch64 | linux-ppc64le | linux-s390x | osx-arm64 | osx-64 | win-64 |
|---|---|---|---|---|---|---|---|
| \_anaconda\_depends | 2023.07 | 2023.07 | 2023.07 | 2023.07 | 2023.07 | 2023.07 | 2023.07 |
| \_libgcc\_mutex | 0.1 | 0.1 | 0.1 | 0.1 | |||
| \_openmp\_mutex | 5.1 | 5.1 | 5.1 | 5.1 | |||
| abseil-cpp | 20211102.0 | 20211102.0 | 20211102.0 | 20211102.0 | 20211102.0 | 20211102.0 | |
| aiobotocore | 2.5.0 | 2.5.0 | 2.4.2 | 2.4.2 | 2.5.0 | 2.4.2 | 2.4.2 |
| aiofiles | 22.1.0 | 22.1.0 | 22.1.0 | 22.1.0 | 22.1.0 | 22.1.0 | |
| aiohttp | 3.8.3 | 3.8.3 | 3.8.3 | 3.8.3 | 3.8.3 | 3.8.3 | 3.8.3 |
| aioitertools | 0.7.1 | 0.7.1 | 0.7.1 | 0.7.1 | 0.7.1 | 0.7.1 | 0.7.1 |
| aiosignal | 1.2.0 | 1.2.0 | 1.2.0 | 1.2.0 | 1.2.0 | 1.2.0 | 1.2.0 |
| aiosqlite | 0.18.0 | 0.18.0 | 0.18.0 | 0.18.0 | 0.18.0 | 0.18.0 | |
| alabaster | 0.7.12 | 0.7.12 | 0.7.12 | 0.7.12 | 0.7.12 | ||
| anaconda-catalogs | 0.2.0 | 0.2.0 | 0.2.0 | 0.2.0 | 0.2.0 | 0.2.0 | 0.2.0 |
| anaconda-client | 1.11.3 | 1.11.3 | 1.11.3 | 1.11.3 | 1.11.3 | 1.11.3 | 1.11.3 |
| anaconda-navigator | 2.4.2 | 2.4.2 | 2.4.2 | 2.4.2 | 2.4.2 | ||
| anaconda-project | 0.11.1 | 0.11.1 | 0.11.1 | 0.11.1 | 0.11.1 | 0.11.1 | 0.11.1 |
| anyio | 3.5.0 | 3.5.0 | 3.5.0 | 3.5.0 | 3.5.0 | 3.5.0 | 3.5.0 |
| appdirs | 1.4.4 | 1.4.4 | 1.4.4 | 1.4.4 | 1.4.4 | 1.4.4 | 1.4.4 |
| applaunchservices | 0.3.0 | 0.3.0 | |||||
| appnope | 0.1.2 | 0.1.2 | |||||
| appscript | 1.1.2 | 1.1.2 | |||||
| argon2-cffi | 21.3.0 | 21.3.0 | 21.3.0 | 21.3.0 | 21.3.0 | 21.3.0 | 21.3.0 |
| argon2-cffi-bindings | 21.2.0 | 21.2.0 | 21.2.0 | 21.2.0 | 21.2.0 | 21.2.0 | 21.2.0 |
| arrow | 1.2.3 | 1.2.3 | 1.2.3 | 1.2.3 | 1.2.3 | ||
| arrow-cpp | 11.0.0 | 11.0.0 | 11.0.0 | 11.0.0 | 11.0.0 | 11.0.0 | |
| astroid | 2.14.2 | 2.14.2 | 2.14.2 | 2.14.2 | 2.14.2 | 2.14.2 | 2.14.2 |
| astropy | 5.1 | 5.1 | 5.1 | 5.1 | 5.1 | 5.1 | 5.1 |
| asttokens | 2.0.5 | 2.0.5 | 2.0.5 | 2.0.5 | 2.0.5 | 2.0.5 | 2.0.5 |
| async-timeout | 4.0.2 | 4.0.2 | 4.0.2 | 4.0.2 | 4.0.2 | 4.0.2 | 4.0.2 |
| atomicwrites | 1.4.0 | 1.4.0 | 1.4.0 | 1.4.0 | 1.4.0 | ||
| attrs | 22.1.0 | 22.1.0 | 22.1.0 | 22.1.0 | 22.1.0 | 22.1.0 | 22.1.0 |
| automat | 20.2.0 | 20.2.0 | 20.2.0 | 20.2.0 | 20.2.0 | 20.2.0 | |
| autopep8 | 1.6.0 | 1.6.0 | 1.6.0 | 1.6.0 | 1.6.0 | ||
| aws-c-common | 0.4.57 | 0.5.11 | 0.4.57 | 0.6.8 | 0.4.57 | 0.4.57 | |
| aws-c-event-stream | 0.1.6 | 0.1.6 | 0.1.6 | 0.1.6 | 0.1.6 | 0.1.6 | |
| aws-checksums | 0.1.9 | 0.1.11 | 0.1.9 | 0.1.11 | 0.1.9 | 0.1.9 | |
| aws-sdk-cpp | 1.8.185 | 1.8.185 | 1.8.185 | 1.8.185 | 1.8.185 | 1.8.185 | |
| babel | 2.11.0 | 2.11.0 | 2.11.0 | 2.11.0 | 2.11.0 | 2.11.0 | 2.11.0 |
| backcall | 0.2.0 | 0.2.0 | 0.2.0 | 0.2.0 | 0.2.0 | 0.2.0 | 0.2.0 |
| backports | 1.1 | 1.1 | 1.1 | 1.1 | 1.1 | 1.1 | 1.1 |
| backports.functools\_lru\_cache | 1.6.4 | 1.6.4 | 1.6.4 | 1.6.4 | 1.6.4 | 1.6.4 | 1.6.4 |
| backports.tempfile | 1.0 | 1.0 | 1.0 | 1.0 | 1.0 | 1.0 | 1.0 |
| backports.weakref | 1.0.post1 | 1.0.post1 | 1.0.post1 | 1.0.post1 | 1.0.post1 | 1.0.post1 | 1.0.post1 |
| bcrypt | 3.2.0 | 3.2.0 | 3.2.0 | 3.2.0 | 3.2.0 | 3.2.0 | |
| beautifulsoup4 | 4.12.2 | 4.12.2 | 4.12.2 | 4.12.2 | 4.12.2 | 4.12.2 | 4.12.2 |
| binaryornot | 0.4.4 | 0.4.4 | 0.4.4 | 0.4.4 | 0.4.4 | ||
| black | 23.3.0 | 23.3.0 | 23.3.0 | 23.3.0 | 23.3.0 | ||
| blas | 1.0 | 1.0 | 1.0 | 1.0 | 1.0 | 1.0 | 1.0 |
| bleach | 4.1.0 | 4.1.0 | 4.1.0 | 4.1.0 | 4.1.0 | 4.1.0 | 4.1.0 |
| blosc | 1.21.3 | 1.21.3 | 1.21.3 | 1.21.3 | 1.21.3 | 1.21.3 | 1.21.3 |
| bokeh | 3.1.1 | 2.4.3 | 3.1.1 | 2.4.3 | 3.1.1 | 3.1.1 | 3.1.1 |
| boltons | 23.0.0 | 23.0.0 | 23.0.0 | 23.0.0 | 23.0.0 | 23.0.0 | 23.0.0 |
| boost-cpp | 1.73.0 | 1.73.0 | 1.73.0 | 1.73.0 | 1.73.0 | 1.73.0 | |
| boto3 | 1.24.28 | 1.24.28 | 1.24.28 | 1.24.28 | |||
| botocore | 1.29.76 | 1.29.76 | 1.27.59 | 1.27.59 | 1.29.76 | 1.27.59 | 1.27.59 |
| bottleneck | 1.3.5 | 1.3.5 | 1.3.5 | 1.3.5 | 1.3.5 | 1.3.5 | 1.3.5 |
| brotli | 1.0.9 | 1.0.9 | 1.0.9 | 1.0.9 | 1.0.9 | 1.0.9 | 1.0.9 |
| brotli-bin | 1.0.9 | 1.0.9 | 1.0.9 | 1.0.9 | 1.0.9 | 1.0.9 | 1.0.9 |
| brotlipy | 0.7.0 | 0.7.0 | 0.7.0 | 0.7.0 | 0.7.0 | 0.7.0 | 0.7.0 |
| brunsli | 0.1 | 0.1 | 0.1 | 0.1 | 0.1 | ||
| bzip2 | 1.0.8 | 1.0.8 | 1.0.8 | 1.0.8 | 1.0.8 | 1.0.8 | 1.0.8 |
| c-ares | 1.19.0 | 1.19.0 | 1.19.0 | 1.19.0 | 1.19.0 | 1.19.0 | 1.19.0 |
| c-blosc2 | 2.8.0 | 2.8.0 | 2.8.0 | 2.8.0 | 2.8.0 | 2.8.0 | |
| ca-certificates | 2023.05.30 | 2023.05.30 | 2023.05.30 | 2023.05.30 | 2023.05.30 | 2023.05.30 | 2023.05.30 |
| cctools | 949.0.1 | 949.0.1 | |||||
| cctools\_osx-64 | 949.0.1 | ||||||
| cctools\_osx-arm64 | 949.0.1 | ||||||
| certifi | 2023.5.7 | 2023.5.7 | 2023.5.7 | 2023.5.7 | 2023.5.7 | 2023.5.7 | 2023.5.7 |
| cffi | 1.15.1 | 1.15.1 | 1.15.1 | 1.15.1 | 1.15.1 | 1.15.1 | 1.15.1 |
| cfitsio | 3.470 | 3.470 | 3.470 | 3.470 | 3.470 | 3.470 | 3.470 |
| chardet | 4.0.0 | 4.0.0 | 4.0.0 | 4.0.0 | 4.0.0 | 4.0.0 | 4.0.0 |
| charls | 2.2.0 | 2.2.0 | 2.2.0 | 2.2.0 | 2.2.0 | 2.2.0 | |
| charset-normalizer | 2.0.4 | 2.0.4 | 2.0.4 | 2.0.4 | 2.0.4 | 2.0.4 | 2.0.4 |
| click | 8.0.4 | 8.0.4 | 8.0.4 | 8.0.4 | 8.0.4 | 8.0.4 | 8.0.4 |
| cloudpickle | 2.2.1 | 2.2.1 | 2.2.1 | 2.2.1 | 2.2.1 | 2.2.1 | 2.2.1 |
| clyent | 1.2.2 | 1.2.2 | 1.2.2 | 1.2.2 | 1.2.2 | 1.2.2 | 1.2.2 |
| colorama | 0.4.6 | 0.4.6 | 0.4.6 | 0.4.6 | 0.4.6 | 0.4.6 | 0.4.6 |
| colorcet | 3.0.1 | 3.0.1 | 3.0.1 | 3.0.1 | 3.0.1 | 3.0.1 | 3.0.1 |
| comm | 0.1.2 | 0.1.2 | 0.1.2 | 0.1.2 | 0.1.2 | 0.1.2 | 0.1.2 |
| conda | 23.5.0 | 23.5.0 | 23.5.0 | 23.5.0 | 23.5.0 | 23.5.0 | 23.5.0 |
| conda-build | 3.25.0 | 3.25.0 | 3.25.0 | 3.25.0 | 3.25.0 | 3.25.0 | 3.25.0 |
| conda-content-trust | 0.1.3 | 0.1.3 | 0.1.3 | 0.1.3 | 0.1.3 | 0.1.3 | 0.1.3 |
| conda-index | 0.2.3 | 0.2.3 | 0.2.3 | 0.2.3 | 0.2.3 | 0.2.3 | 0.2.3 |
| conda-libmamba-solver | 23.5.0 | 23.5.0 | 23.5.0 | 23.5.0 | 23.5.0 | 23.5.0 | 23.5.0 |
| conda-pack | 0.6.0 | 0.6.0 | 0.6.0 | 0.6.0 | 0.6.0 | 0.6.0 | 0.6.0 |
| conda-package-handling | 2.1.0 | 2.1.0 | 2.1.0 | 2.1.0 | 2.1.0 | 2.1.0 | 2.1.0 |
| conda-package-streaming | 0.8.0 | 0.8.0 | 0.8.0 | 0.8.0 | 0.8.0 | 0.8.0 | 0.8.0 |
| conda-repo-cli | 1.0.41 | 1.0.41 | 1.0.41 | 1.0.41 | 1.0.41 | ||
| conda-token | 0.4.0 | 0.4.0 | 0.4.0 | 0.4.0 | 0.4.0 | 0.4.0 | 0.4.0 |
| conda-verify | 3.4.2 | 3.4.2 | 3.4.2 | 3.4.2 | 3.4.2 | 3.4.2 | 3.4.2 |
| console\_shortcut | 0.1.1 | ||||||
| constantly | 15.1.0 | 15.1.0 | 15.1.0 | 15.1.0 | 15.1.0 | 15.1.0 | |
| contourpy | 1.0.5 | 1.0.5 | 1.0.5 | 1.0.5 | 1.0.5 | 1.0.5 | 1.0.5 |
| cookiecutter | 1.7.3 | 1.7.3 | 1.7.3 | 1.7.3 | 1.7.3 | ||
| cryptography | 39.0.1 | 39.0.1 | 39.0.1 | 39.0.1 | 39.0.1 | 39.0.1 | 39.0.1 |
| cssselect | 1.1.0 | 1.1.0 | 1.1.0 | 1.1.0 | 1.1.0 | 1.1.0 | |
| curl | 8.1.1 | 8.1.1 | 8.1.1 | 8.1.1 | 8.1.1 | 8.1.1 | 8.1.1 |
| cycler | 0.11.0 | 0.11.0 | 0.11.0 | 0.11.0 | 0.11.0 | 0.11.0 | 0.11.0 |
| cytoolz | 0.12.0 | 0.12.0 | 0.12.0 | 0.12.0 | 0.12.0 | 0.12.0 | 0.12.0 |
| daal4py | 2023.1.1 | 2023.1.1 | |||||
| dal | 2023.1.1 | 2023.1.1 | |||||
| dask | 2023.6.0 | 2023.4.1 | 2023.6.0 | 2023.6.0 | 2023.6.0 | 2023.6.0 | 2023.6.0 |
| dask-core | 2023.6.0 | 2023.4.1 | 2023.6.0 | 2023.6.0 | 2023.6.0 | 2023.6.0 | 2023.6.0 |
| datasets | 2.12.0 | 2.12.0 | 2.12.0 | ||||
| datashader | 0.15.0 | 0.15.0 | 0.15.0 | 0.15.0 | 0.15.0 | 0.15.0 | |
| datashape | 0.5.4 | 0.5.4 | 0.5.4 | 0.5.4 | 0.5.4 | 0.5.4 | |
| dbus | 1.13.18 | 1.13.18 | |||||
| debugpy | 1.5.1 | 1.5.1 | 1.5.1 | 1.5.1 | 1.5.1 | 1.5.1 | 1.5.1 |
| decorator | 5.1.1 | 5.1.1 | 5.1.1 | 5.1.1 | 5.1.1 | 5.1.1 | 5.1.1 |
| defusedxml | 0.7.1 | 0.7.1 | 0.7.1 | 0.7.1 | 0.7.1 | 0.7.1 | 0.7.1 |
| diff-match-patch | 20200713 | 20200713 | 20200713 | 20200713 | 20200713 | ||
| dill | 0.3.6 | 0.3.6 | 0.3.6 | 0.3.6 | 0.3.6 | 0.3.6 | 0.3.6 |
| distributed | 2023.6.0 | 2023.4.1 | 2023.6.0 | 2023.6.0 | 2023.6.0 | 2023.6.0 | 2023.6.0 |
| docstring-to-markdown | 0.11 | 0.11 | 0.11 | 0.11 | 0.11 | ||
| docutils | 0.18.1 | 0.18.1 | 0.18.1 | 0.18.1 | 0.18.1 | ||
| entrypoints | 0.4 | 0.4 | 0.4 | 0.4 | 0.4 | 0.4 | 0.4 |
| et\_xmlfile | 1.1.0 | 1.1.0 | 1.1.0 | 1.1.0 | 1.1.0 | 1.1.0 | 1.1.0 |
| executing | 0.8.3 | 0.8.3 | 0.8.3 | 0.8.3 | 0.8.3 | 0.8.3 | 0.8.3 |
| expat | 2.4.9 | 2.4.9 | |||||
| filelock | 3.9.0 | 3.9.0 | 3.9.0 | 3.9.0 | 3.9.0 | 3.9.0 | 3.9.0 |
| flake8 | 6.0.0 | 6.0.0 | 6.0.0 | 6.0.0 | 6.0.0 | ||
| flask | 2.2.2 | 2.2.2 | 2.2.2 | 2.2.2 | 2.2.2 | 2.2.2 | 2.2.2 |
| fmt | 9.1.0 | 9.1.0 | 9.1.0 | 9.1.0 | 9.1.0 | 9.1.0 | 9.1.0 |
| fontconfig | 2.14.1 | 2.14.1 | |||||
| fonttools | 4.25.0 | 4.25.0 | 4.25.0 | 4.25.0 | 4.25.0 | 4.25.0 | 4.25.0 |
| freetype | 2.12.1 | 2.12.1 | 2.12.1 | 2.12.1 | 2.12.1 | 2.12.1 | 2.12.1 |
| frozenlist | 1.3.3 | 1.3.3 | 1.3.3 | 1.3.3 | 1.3.3 | 1.3.3 | 1.3.3 |
| fsspec | 2023.4.0 | 2023.4.0 | 2023.3.0 | 2023.3.0 | 2023.4.0 | 2023.3.0 | 2023.3.0 |
| future | 0.18.3 | 0.18.3 | 0.18.3 | 0.18.3 | 0.18.3 | 0.18.3 | 0.18.3 |
| gensim | 4.3.0 | 4.3.0 | 4.3.0 | 4.3.0 | 4.3.0 | 4.3.0 | |
| gettext | 0.21.0 | 0.21.0 | |||||
| gflags | 2.2.2 | 2.2.2 | 2.2.2 | 2.2.2 | 2.2.2 | 2.2.2 | |
| giflib | 5.2.1 | 5.2.1 | 5.2.1 | 5.2.1 | 5.2.1 | 5.2.1 | 5.2.1 |
| glib | 2.69.1 | 2.69.1 | 2.69.1 | 2.69.1 | 2.69.1 | ||
| glob2 | 0.7 | 0.7 | 0.7 | 0.7 | 0.7 | 0.7 | 0.7 |
| glog | 0.5.0 | 0.5.0 | 0.5.0 | 0.5.0 | 0.5.0 | 0.5.0 | |
| gmp | 6.2.1 | 6.2.1 | 6.2.1 | 6.2.1 | 6.2.1 | 6.2.1 | |
| gmpy2 | 2.1.2 | 2.1.2 | 2.1.2 | 2.1.2 | 2.1.2 | 2.1.2 | |
| greenlet | 2.0.1 | 2.0.1 | 2.0.1 | 2.0.1 | 2.0.1 | 2.0.1 | 2.0.1 |
| grpc-cpp | 1.46.1 | 1.46.1 | 1.46.1 | 1.46.1 | 1.46.1 | ||
| gst-plugins-base | 1.14.1 | 1.14.1 | 1.14.1 | 1.14.1 | 1.18.5 | ||
| gstreamer | 1.14.1 | 1.14.1 | 1.14.1 | 1.14.1 | 1.18.5 | ||
| h5py | 3.7.0 | 3.7.0 | 3.7.0 | 3.7.0 | 3.7.0 | 3.7.0 | 3.7.0 |
| hdf5 | 1.10.6 | 1.10.6 | 1.10.6 | 1.10.6 | 1.12.1 | 1.10.6 | 1.10.6 |
| heapdict | 1.0.1 | 1.0.1 | 1.0.1 | 1.0.1 | 1.0.1 | 1.0.1 | 1.0.1 |
| holoviews | 1.16.2 | 1.16.2 | 1.16.2 | 1.14.8 | 1.16.2 | 1.16.2 | 1.16.2 |
| huggingface\_hub | 0.15.1 | 0.15.1 | 0.15.1 | ||||
| hvplot | 0.8.4 | 0.8.4 | 0.8.4 | 0.7.3 | 0.8.4 | 0.8.4 | 0.8.4 |
| hyperlink | 21.0.0 | 21.0.0 | 21.0.0 | 21.0.0 | 21.0.0 | 21.0.0 | |
| icc\_rt | 2022.1.0 | ||||||
| icu | 58.2 | 68.1 | 58.2 | 68.1 | 68.1 | 58.2 | 58.2 |
| idna | 3.4 | 3.4 | 3.4 | 3.3 | 3.4 | 3.4 | 3.4 |
| imagecodecs | 2021.8.26 | 2021.8.26 | 2021.8.26 | 2021.8.26 | 2021.8.26 | 2021.8.26 | 2021.8.26 |
| imageio | 2.31.1 | 2.31.1 | 2.31.1 | 2.26.0 | 2.31.1 | 2.31.1 | 2.26.0 |
| imagesize | 1.4.1 | 1.4.1 | 1.4.1 | 1.4.1 | 1.4.1 | ||
| imbalanced-learn | 0.10.1 | 0.10.1 | 0.10.1 | 0.10.1 | 0.10.1 | 0.10.1 | 0.10.1 |
| importlib-metadata | 6.0.0 | 6.0.0 | 6.0.0 | 6.0.0 | 6.0.0 | 6.0.0 | 6.0.0 |
| importlib\_metadata | 6.0.0 | 6.0.0 | 6.0.0 | 6.0.0 | 6.0.0 | ||
| incremental | 21.3.0 | 21.3.0 | 21.3.0 | 21.3.0 | 21.3.0 | 21.3.0 | |
| inflection | 0.5.1 | 0.5.1 | 0.5.1 | 0.5.1 | 0.5.1 | ||
| iniconfig | 1.1.1 | 1.1.1 | 1.1.1 | 1.1.1 | 1.1.1 | 1.1.1 | 1.1.1 |
| intake | 0.6.8 | 0.6.8 | 0.6.8 | 0.6.8 | 0.6.8 | 0.6.8 | 0.6.8 |
| intel-openmp | 2023.1.0 | 2023.1.0 | |||||
| intervaltree | 3.1.0 | 3.1.0 | 3.1.0 | 3.1.0 | 3.1.0 | ||
| ipykernel | 6.19.2 | 6.19.2 | 6.19.2 | 6.19.2 | 6.19.2 | 6.19.2 | 6.19.2 |
| ipython | 8.12.0 | 8.12.0 | 8.12.0 | 8.12.0 | 8.12.0 | 8.12.0 | 8.12.0 |
| ipython\_genutils | 0.2.0 | 0.2.0 | 0.2.0 | 0.2.0 | 0.2.0 | 0.2.0 | 0.2.0 |
| ipywidgets | 8.0.4 | 8.0.4 | 8.0.4 | 8.0.4 | 8.0.4 | 8.0.4 | 8.0.4 |
| isort | 5.9.3 | 5.9.3 | 5.9.3 | 5.9.3 | 5.9.3 | 5.9.3 | 5.9.3 |
| itemadapter | 0.3.0 | 0.3.0 | 0.3.0 | 0.3.0 | 0.3.0 | 0.3.0 | |
| itemloaders | 1.0.4 | 1.0.4 | 1.0.4 | 1.0.4 | 1.0.4 | 1.0.4 | |
| itsdangerous | 2.0.1 | 2.0.1 | 2.0.1 | 2.0.1 | 2.0.1 | 2.0.1 | 2.0.1 |
| jaraco.classes | 3.2.1 | 3.2.1 | 3.2.1 | 3.2.1 | 3.2.1 | ||
| jedi | 0.18.1 | 0.18.1 | 0.18.1 | 0.18.1 | 0.18.1 | 0.18.1 | 0.18.1 |
| jeepney | 0.7.1 | 0.7.1 | |||||
| jellyfish | 0.9.0 | 0.9.0 | 0.9.0 | 0.9.0 | 0.9.0 | ||
| jinja2 | 3.1.2 | 3.1.2 | 3.1.2 | 3.1.2 | 3.1.2 | 3.1.2 | 3.1.2 |
| jinja2-time | 0.2.0 | 0.2.0 | 0.2.0 | 0.2.0 | 0.2.0 | ||
| jmespath | 0.10.0 | 0.10.0 | 0.10.0 | 0.10.0 | 0.10.0 | 0.10.0 | 0.10.0 |
| joblib | 1.2.0 | 1.2.0 | 1.2.0 | 1.2.0 | 1.2.0 | 1.2.0 | 1.2.0 |
| jpeg | 9e | 9e | 9e | 9e | 9e | 9e | 9e |
| jq | 1.6 | 1.6 | 1.6 | 1.6 | 1.6 | 1.6 | |
| json5 | 0.9.6 | 0.9.6 | 0.9.6 | 0.9.6 | 0.9.6 | 0.9.6 | 0.9.6 |
| jsonpatch | 1.32 | 1.32 | 1.32 | 1.32 | 1.32 | 1.32 | 1.32 |
| jsonpointer | 2.1 | 2.1 | 2.1 | 2.1 | 2.1 | 2.1 | 2.1 |
| jsonschema | 4.17.3 | 4.17.3 | 4.17.3 | 4.17.3 | 4.17.3 | 4.17.3 | 4.17.3 |
| jupyter | 1.0.0 | 1.0.0 | 1.0.0 | 1.0.0 | 1.0.0 | 1.0.0 | 1.0.0 |
| jupyter\_client | 8.1.0 | 8.1.0 | 8.1.0 | 8.1.0 | 8.1.0 | 8.1.0 | 8.1.0 |
| jupyter\_console | 6.6.3 | 6.6.3 | 6.6.3 | 6.6.3 | 6.6.3 | 6.6.3 | 6.6.3 |
| jupyter\_core | 5.3.0 | 5.3.0 | 5.3.0 | 5.3.0 | 5.3.0 | 5.3.0 | 5.3.0 |
| jupyter\_events | 0.6.3 | 0.6.3 | 0.6.3 | 0.6.3 | 0.6.3 | 0.6.3 | |
| jupyter\_server | 2.5.0 | 2.5.0 | 2.5.0 | 1.23.4 | 2.5.0 | 2.5.0 | 2.5.0 |
| jupyter\_server\_fileid | 0.9.0 | 0.9.0 | 0.9.0 | 0.9.0 | 0.9.0 | 0.9.0 | |
| jupyter\_server\_terminals | 0.4.4 | 0.4.4 | 0.4.4 | 0.4.4 | 0.4.4 | 0.4.4 | |
| jupyter\_server\_ydoc | 0.8.0 | 0.8.0 | 0.8.0 | 0.8.0 | 0.8.0 | 0.8.0 | |
| jupyter\_ydoc | 0.2.4 | 0.2.4 | 0.2.4 | 0.2.4 | 0.2.4 | 0.2.4 | |
| jupyterlab | 3.6.3 | 3.6.3 | 3.6.3 | 3.3.2 | 3.6.3 | 3.6.3 | 3.6.3 |
| jupyterlab\_pygments | 0.1.2 | 0.1.2 | 0.1.2 | 0.1.2 | 0.1.2 | 0.1.2 | 0.1.2 |
| jupyterlab\_server | 2.22.0 | 2.22.0 | 2.22.0 | 2.21.0 | 2.22.0 | 2.22.0 | 2.22.0 |
| jupyterlab\_widgets | 3.0.5 | 3.0.5 | 3.0.5 | 3.0.5 | 3.0.5 | 3.0.5 | 3.0.5 |
| jxrlib | 1.1 | 1.1 | 1.1 | 1.1 | 1.1 | 1.1 | 1.1 |
| keyring | 23.13.1 | 23.13.1 | 23.13.1 | 23.13.1 | 23.13.1 | ||
| kiwisolver | 1.4.4 | 1.4.4 | 1.4.4 | 1.4.4 | 1.4.4 | 1.4.4 | 1.4.4 |
| krb5 | 1.20.1 | 1.19.4 | 1.20.1 | 1.19.4 | 1.19.4 | 1.19.4 | 1.19.4 |
| lazy-object-proxy | 1.6.0 | 1.6.0 | 1.6.0 | 1.6.0 | 1.6.0 | 1.6.0 | 1.6.0 |
| lazy\_loader | 0.2 | 0.2 | 0.2 | 0.1 | 0.2 | 0.2 | 0.2 |
| lcms2 | 2.12 | 2.12 | 2.12 | 2.12 | 2.12 | 2.12 | 2.12 |
| ld64 | 530 | 530 | |||||
| ld64\_osx-64 | 530 | ||||||
| ld64\_osx-arm64 | 530 | ||||||
| ld\_impl\_linux-64 | 2.38 | ||||||
| ld\_impl\_linux-aarch64 | 2.38 | ||||||
| ld\_impl\_linux-ppc64le | 2.38 | ||||||
| ld\_impl\_linux-s390x | 2.38 | ||||||
| ldid | 2.1.5 | 2.1.5 | |||||
| lerc | 3.0 | 3.0 | 3.0 | 3.0 | 3.0 | 3.0 | 3.0 |
| libaec | 1.0.4 | 1.0.4 | 1.0.4 | 1.0.4 | 1.0.4 | 1.0.4 | 1.0.4 |
| libarchive | 3.6.2 | 3.6.2 | 3.6.2 | 3.6.2 | 3.6.2 | 3.6.2 | 3.6.2 |
| libboost | 1.73.0 | 1.73.0 | 1.73.0 | 1.73.0 | 1.73.0 | 1.73.0 | |
| libbrotlicommon | 1.0.9 | 1.0.9 | 1.0.9 | 1.0.9 | 1.0.9 | 1.0.9 | 1.0.9 |
| libbrotlidec | 1.0.9 | 1.0.9 | 1.0.9 | 1.0.9 | 1.0.9 | 1.0.9 | 1.0.9 |
| libbrotlienc | 1.0.9 | 1.0.9 | 1.0.9 | 1.0.9 | 1.0.9 | 1.0.9 | 1.0.9 |
| libclang | 10.0.1 | 14.0.6 | 14.0.6 | 14.0.6 | 14.0.6 | ||
| libclang13 | 14.0.6 | 14.0.6 | 14.0.6 | 14.0.6 | |||
| libcurl | 8.1.1 | 8.1.1 | 8.1.1 | 8.1.1 | 8.1.1 | 8.1.1 | 8.1.1 |
| libcxx | 14.0.6 | 14.0.6 | |||||
| libdeflate | 1.17 | 1.17 | 1.17 | 1.17 | 1.17 | 1.17 | 1.17 |
| libedit | 3.1.20221030 | 3.1.20221030 | 3.1.20221030 | 3.1.20221030 | 3.1.20221030 | 3.1.20221030 | |
| libev | 4.33 | 4.33 | 4.33 | 4.33 | 4.33 | 4.33 | |
| libevent | 2.1.12 | 2.1.12 | 2.1.12 | 2.1.12 | 2.1.12 | 2.1.12 | |
| libffi | 3.4.4 | 3.4.4 | 3.4.4 | 3.4.2 | 3.4.4 | 3.4.4 | 3.4.4 |
| libgcc-ng | 11.2.0 | 11.2.0 | 11.2.0 | 11.2.0 | |||
| libgfortran | 5.0.0 | 5.0.0 | |||||
| libgfortran-ng | 11.2.0 | 11.2.0 | 11.2.0 | 11.2.0 | |||
| libgfortran5 | 11.2.0 | 11.2.0 | 11.2.0 | 11.2.0 | 11.3.0 | 11.3.0 | |
| libgomp | 11.2.0 | 11.2.0 | 11.2.0 | 11.2.0 | |||
| libiconv | 1.16 | 1.16 | 1.16 | ||||
| liblief | 0.12.3 | 0.12.3 | 0.12.3 | 0.12.3 | 0.12.3 | 0.12.3 | 0.12.3 |
| libllvm10 | 10.0.1 | ||||||
| libllvm14 | 14.0.6 | 14.0.6 | 14.0.6 | 14.0.6 | 14.0.6 | 14.0.6 | |
| libmamba | 1.4.1 | 1.4.1 | 1.4.1 | 1.4.1 | 1.4.1 | 1.4.1 | 1.4.1 |
| libmambapy | 1.4.1 | 1.4.1 | 1.4.1 | 1.4.1 | 1.4.1 | 1.4.1 | 1.4.1 |
| libnghttp2 | 1.52.0 | 1.52.0 | 1.52.0 | 1.52.0 | 1.52.0 | 1.52.0 | |
| libogg | 1.3.5 | ||||||
| libopenblas | 0.3.21 | 0.3.21 | 0.3.21 | 0.3.21 | 0.3.21 | ||
| libpng | 1.6.39 | 1.6.39 | 1.6.39 | 1.6.39 | 1.6.39 | 1.6.39 | 1.6.39 |
| libpq | 12.15 | 12.9 | 12.9 | 12.9 | |||
| libprotobuf | 3.20.3 | 3.20.3 | 3.20.3 | 3.20.3 | 3.20.3 | 3.20.3 | |
| libsodium | 1.0.18 | 1.0.18 | 1.0.18 | 1.0.18 | 1.0.18 | 1.0.18 | 1.0.18 |
| libsolv | 0.7.22 | 0.7.22 | 0.7.22 | 0.7.22 | 0.7.22 | 0.7.22 | 0.7.22 |
| libspatialindex | 1.9.3 | 1.9.3 | 1.9.3 | 1.9.3 | 1.9.3 | ||
| libssh2 | 1.10.0 | 1.10.0 | 1.10.0 | 1.10.0 | 1.10.0 | 1.10.0 | 1.10.0 |
| libstdcxx-ng | 11.2.0 | 11.2.0 | 11.2.0 | 11.2.0 | |||
| libthrift | 0.15.0 | 0.15.0 | 0.15.0 | 0.13.0 | 0.15.0 | 0.15.0 | |
| libtiff | 4.5.0 | 4.5.0 | 4.5.0 | 4.5.0 | 4.5.0 | 4.5.0 | 4.5.0 |
| libuuid | 1.41.5 | 1.41.5 | 1.41.5 | 1.41.5 | |||
| libuv | 1.44.2 | ||||||
| libvorbis | 1.3.7 | ||||||
| libwebp | 1.2.4 | 1.2.4 | 1.2.4 | 1.2.4 | 1.2.4 | 1.2.4 | 1.2.4 |
| libwebp-base | 1.2.4 | 1.2.4 | 1.2.4 | 1.2.4 | 1.2.4 | 1.2.4 | 1.2.4 |
| libxcb | 1.15 | 1.15 | |||||
| libxkbcommon | 1.0.1 | 1.0.1 | |||||
| libxml2 | 2.9.14 | 2.10.3 | 2.10.3 | 2.10.3 | 2.10.3 | 2.10.3 | 2.10.3 |
| libxslt | 1.1.35 | 1.1.37 | 1.1.37 | 1.1.37 | 1.1.37 | 1.1.37 | 1.1.37 |
| libzopfli | 1.0.3 | 1.0.3 | 1.0.3 | 1.0.3 | 1.0.3 | 1.0.3 | 1.0.3 |
| linkify-it-py | 2.0.0 | 2.0.0 | 2.0.0 | 2.0.0 | 2.0.0 | ||
| llvm-openmp | 14.0.6 | 14.0.6 | |||||
| llvmlite | 0.40.0 | 0.40.0 | 0.40.0 | 0.40.0 | 0.40.0 | 0.40.0 | |
| locket | 1.0.0 | 1.0.0 | 1.0.0 | 1.0.0 | 1.0.0 | 1.0.0 | 1.0.0 |
| lxml | 4.9.1 | 4.9.2 | 4.9.2 | 4.9.2 | 4.9.2 | 4.9.2 | 4.9.2 |
| lz4 | 4.3.2 | 4.3.2 | 4.3.2 | 4.3.2 | 4.3.2 | 4.3.2 | |
| lz4-c | 1.9.4 | 1.9.4 | 1.9.4 | 1.9.4 | 1.9.4 | 1.9.4 | 1.9.4 |
| lzo | 2.10 | 2.10 | 2.10 | 2.10 | 2.10 | 2.10 | 2.10 |
| m2-msys2-runtime | 2.5.0.17080.65c939c | ||||||
| m2-patch | 2.7.5 | ||||||
| m2w64-libwinpthread-git | 5.0.0.4634.697f757 | ||||||
| markdown | 3.4.1 | 3.4.1 | 3.4.1 | 3.4.1 | 3.4.1 | 3.4.1 | 3.4.1 |
| markdown-it-py | 2.2.0 | 2.2.0 | 2.2.0 | 2.2.0 | 2.2.0 | ||
| markupsafe | 2.1.1 | 2.1.1 | 2.1.1 | 2.1.1 | 2.1.1 | 2.1.1 | 2.1.1 |
| matplotlib | 3.7.1 | 3.7.1 | 3.7.1 | 3.7.1 | 3.7.1 | 3.7.1 | 3.7.1 |
| matplotlib-base | 3.7.1 | 3.7.1 | 3.7.1 | 3.7.1 | 3.7.1 | 3.7.1 | 3.7.1 |
| matplotlib-inline | 0.1.6 | 0.1.6 | 0.1.6 | 0.1.6 | 0.1.6 | 0.1.6 | 0.1.6 |
| mccabe | 0.7.0 | 0.7.0 | 0.7.0 | 0.7.0 | 0.7.0 | 0.7.0 | 0.7.0 |
| mdit-py-plugins | 0.3.0 | 0.3.0 | 0.3.0 | 0.3.0 | 0.3.0 | ||
| mdurl | 0.1.0 | 0.1.0 | 0.1.0 | 0.1.0 | 0.1.0 | ||
| menuinst | 1.4.19 | ||||||
| mistune | 0.8.4 | 0.8.4 | 0.8.4 | 0.8.4 | 0.8.4 | 0.8.4 | 0.8.4 |
| mkl | 2023.1.0 | 2023.1.0 | |||||
| mkl-service | 2.4.0 | 2.4.0 | |||||
| mkl\_fft | 1.3.6 | 1.3.6 | |||||
| mkl\_random | 1.2.2 | 1.2.2 | |||||
| mock | 4.0.3 | ||||||
| more-itertools | 8.12.0 | 8.12.0 | 8.12.0 | 8.12.0 | 8.12.0 | 8.12.0 | 8.12.0 |
| mpc | 1.1.0 | 1.1.0 | 1.1.0 | 1.1.0 | 1.1.0 | 1.1.0 | |
| mpfr | 4.0.2 | 4.0.2 | 4.0.2 | 4.0.2 | 4.0.2 | 4.0.2 | |
| mpi | 1.0 | ||||||
| mpich | 4.1.1 | ||||||
| mpmath | 1.2.1 | 1.2.1 | 1.2.1 | 1.2.1 | 1.2.1 | 1.2.1 | 1.2.1 |
| msgpack-python | 1.0.3 | 1.0.3 | 1.0.3 | 1.0.3 | 1.0.3 | 1.0.3 | 1.0.3 |
| msys2-conda-epoch | 20160418 | ||||||
| multidict | 6.0.2 | 6.0.2 | 6.0.2 | 6.0.2 | 6.0.2 | 6.0.2 | 6.0.2 |
| multipledispatch | 0.6.0 | 0.6.0 | 0.6.0 | 0.6.0 | 0.6.0 | 0.6.0 | |
| multiprocess | 0.70.14 | 0.70.14 | 0.70.14 | ||||
| munkres | 1.1.4 | 1.1.4 | 1.1.4 | 1.1.4 | 1.1.4 | 1.1.4 | 1.1.4 |
| mypy\_extensions | 0.4.3 | 0.4.3 | 0.4.3 | 0.4.3 | 0.4.3 | ||
| navigator-updater | 0.4.0 | 0.4.0 | 0.4.0 | 0.4.0 | 0.4.0 | ||
| nbclassic | 0.5.5 | 0.5.5 | 0.5.5 | 0.5.5 | 0.5.5 | 0.5.5 | 0.5.5 |
| nbclient | 0.5.13 | 0.5.13 | 0.5.13 | 0.5.13 | 0.5.13 | 0.5.13 | 0.5.13 |
| nbconvert | 6.5.4 | 6.5.4 | 6.5.4 | 6.5.4 | 6.5.4 | 6.5.4 | 6.5.4 |
| nbformat | 5.7.0 | 5.7.0 | 5.7.0 | 5.7.0 | 5.7.0 | 5.7.0 | 5.7.0 |
| ncurses | 6.4 | 6.4 | 6.4 | 6.4 | 6.4 | 6.4 | |
| nest-asyncio | 1.5.6 | 1.5.6 | 1.5.6 | 1.5.6 | 1.5.6 | 1.5.6 | 1.5.6 |
| networkx | 2.8.4 | 2.8.4 | 2.8.4 | 2.8.4 | 2.8.4 | 2.8.4 | 2.8.4 |
| ninja | 1.10.2 | 1.10.2 | 1.10.2 | ||||
| ninja-base | 1.10.2 | 1.10.2 | 1.10.2 | ||||
| nltk | 3.7 | 3.7 | 3.7 | 3.7 | 3.7 | 3.7 | 3.7 |
| notebook | 6.5.4 | 6.5.4 | 6.5.4 | 6.5.4 | 6.5.4 | 6.5.4 | 6.5.4 |
| notebook-shim | 0.2.2 | 0.2.2 | 0.2.2 | 0.2.2 | 0.2.2 | 0.2.2 | 0.2.2 |
| nspr | 4.35 | 4.35 | 4.35 | 4.35 | |||
| nss | 3.89.1 | 3.89.1 | 3.89.1 | 3.89.1 | |||
| numba | 0.57.0 | 0.57.0 | 0.57.0 | 0.57.0 | 0.57.0 | 0.57.0 | |
| numexpr | 2.8.4 | 2.8.4 | 2.8.4 | 2.8.4 | 2.8.4 | 2.8.4 | 2.8.4 |
| numpy | 1.24.3 | 1.24.3 | 1.24.3 | 1.25.0 | 1.24.3 | 1.24.3 | 1.24.3 |
| numpy-base | 1.24.3 | 1.24.3 | 1.24.3 | 1.25.0 | 1.24.3 | 1.24.3 | 1.24.3 |
| numpydoc | 1.5.0 | 1.5.0 | 1.5.0 | 1.5.0 | 1.5.0 | ||
| oniguruma | 6.9.7.1 | 6.9.7.1 | 6.9.7.1 | 6.9.7.1 | 6.9.7.1 | ||
| openjpeg | 2.4.0 | 2.4.0 | 2.4.0 | 2.4.0 | 2.3.0 | 2.4.0 | 2.4.0 |
| openpyxl | 3.0.10 | 3.0.10 | 3.0.10 | 3.0.10 | 3.0.10 | 3.0.10 | 3.0.10 |
| openssl | 1.1.1u | 1.1.1u | 1.1.1u | 1.1.1u | 1.1.1u | 1.1.1u | 1.1.1u |
| orc | 1.7.4 | 1.7.4 | 1.7.4 | 1.7.4 | 1.7.4 | 1.7.4 | |
| packaging | 23.0 | 23.0 | 23.0 | 23.0 | 23.0 | 23.0 | 23.0 |
| pandas | 1.5.3 | 1.5.3 | 1.5.3 | 1.5.3 | 1.5.3 | 1.5.3 | 1.5.3 |
| pandocfilters | 1.5.0 | 1.5.0 | 1.5.0 | 1.5.0 | 1.5.0 | 1.5.0 | 1.5.0 |
| panel | 1.1.0 | 0.14.3 | 1.1.0 | 0.12.6 | 1.1.0 | 1.1.0 | 1.1.0 |
| param | 1.13.0 | 1.13.0 | 1.13.0 | 1.13.0 | 1.13.0 | 1.13.0 | 1.13.0 |
| paramiko | 2.8.1 | ||||||
| parsel | 1.6.0 | 1.6.0 | 1.6.0 | 1.6.0 | 1.6.0 | 1.6.0 | |
| parso | 0.8.3 | 0.8.3 | 0.8.3 | 0.8.3 | 0.8.3 | 0.8.3 | 0.8.3 |
| partd | 1.2.0 | 1.2.0 | 1.2.0 | 1.2.0 | 1.2.0 | 1.2.0 | 1.2.0 |
| patch | 2.7.6 | 2.7.6 | 2.7.6 | 2.7.6 | 2.7.6 | 2.7.6 | |
| patchelf | 0.17.2 | 0.17.2 | 0.17.2 | 0.17.2 | |||
| pathlib | 1.0.1 | 1.0.1 | 1.0.1 | 1.0.1 | 1.0.1 | ||
| pathspec | 0.10.3 | 0.10.3 | 0.10.3 | 0.10.3 | 0.10.3 | ||
| patsy | 0.5.3 | 0.5.3 | 0.5.3 | 0.5.3 | 0.5.3 | 0.5.3 | 0.5.3 |
| pcre | 8.45 | 8.45 | 8.45 | 8.45 | 8.45 | ||
| pcre2 | 10.37 | 10.37 | 10.37 | 10.37 | 10.37 | 10.37 | 10.37 |
| pep8 | 1.7.1 | 1.7.1 | 1.7.1 | 1.7.1 | 1.7.1 | 1.7.1 | 1.7.1 |
| pexpect | 4.8.0 | 4.8.0 | 4.8.0 | 4.8.0 | 4.8.0 | 4.8.0 | 4.8.0 |
| pickleshare | 0.7.5 | 0.7.5 | 0.7.5 | 0.7.5 | 0.7.5 | 0.7.5 | 0.7.5 |
| pillow | 9.4.0 | 9.4.0 | 9.4.0 | 9.4.0 | 9.4.0 | 9.4.0 | 9.4.0 |
| pip | 23.1.2 | 23.1.2 | 23.1.2 | 23.1.2 | 23.1.2 | 23.1.2 | 23.1.2 |
| pkginfo | 1.9.6 | 1.9.6 | 1.9.6 | 1.9.6 | 1.9.6 | 1.9.6 | 1.9.6 |
| platformdirs | 2.5.2 | 2.5.2 | 2.5.2 | 2.5.2 | 2.5.2 | 2.5.2 | 2.5.2 |
| plotly | 5.9.0 | 5.9.0 | 5.9.0 | 5.9.0 | 5.9.0 | 5.9.0 | 5.9.0 |
| pluggy | 1.0.0 | 1.0.0 | 1.0.0 | 1.0.0 | 1.0.0 | 1.0.0 | 1.0.0 |
| ply | 3.11 | 3.11 | 3.11 | 3.11 | 3.11 | ||
| pooch | 1.4.0 | 1.4.0 | 1.4.0 | 1.4.0 | 1.4.0 | 1.4.0 | 1.4.0 |
| powershell\_shortcut | 0.0.1 | ||||||
| poyo | 0.5.0 | 0.5.0 | 0.5.0 | 0.5.0 | 0.5.0 | ||
| prometheus\_client | 0.14.1 | 0.14.1 | 0.14.1 | 0.14.1 | 0.14.1 | 0.14.1 | 0.14.1 |
| prompt-toolkit | 3.0.36 | 3.0.36 | 3.0.36 | 3.0.36 | 3.0.36 | 3.0.36 | 3.0.36 |
| prompt\_toolkit | 3.0.36 | 3.0.36 | 3.0.36 | 3.0.36 | 3.0.36 | 3.0.36 | 3.0.36 |
| protego | 0.1.16 | 0.1.16 | 0.1.16 | 0.1.16 | 0.1.16 | 0.1.16 | |
| psutil | 5.9.0 | 5.9.0 | 5.9.0 | 5.9.0 | 5.9.0 | 5.9.0 | 5.9.0 |
| ptyprocess | 0.7.0 | 0.7.0 | 0.7.0 | 0.7.0 | 0.7.0 | 0.7.0 | 0.7.0 |
| pure\_eval | 0.2.2 | 0.2.2 | 0.2.2 | 0.2.2 | 0.2.2 | 0.2.2 | 0.2.2 |
| py-cpuinfo | 8.0.0 | 8.0.0 | 8.0.0 | 8.0.0 | 8.0.0 | 8.0.0 | |
| py-lief | 0.12.3 | 0.12.3 | 0.12.3 | 0.12.3 | 0.12.3 | 0.12.3 | 0.12.3 |
| pyarrow | 11.0.0 | 11.0.0 | 11.0.0 | 11.0.0 | 11.0.0 | 11.0.0 | |
| pyasn1 | 0.4.8 | 0.4.8 | 0.4.8 | 0.4.8 | 0.4.8 | 0.4.8 | |
| pyasn1-modules | 0.2.8 | 0.2.8 | 0.2.8 | 0.2.8 | 0.2.8 | 0.2.8 | |
| pybind11-abi | 4 | 4 | 4 | 4 | 4 | 4 | 4 |
| pycodestyle | 2.10.0 | 2.10.0 | 2.10.0 | 2.10.0 | 2.10.0 | ||
| pycosat | 0.6.4 | 0.6.4 | 0.6.4 | 0.6.4 | 0.6.4 | 0.6.4 | 0.6.4 |
| pycparser | 2.21 | 2.21 | 2.21 | 2.21 | 2.21 | 2.21 | 2.21 |
| pyct | 0.5.0 | 0.5.0 | 0.5.0 | 0.5.0 | 0.5.0 | 0.5.0 | 0.5.0 |
| pycurl | 7.45.2 | 7.45.2 | 7.45.2 | 7.45.2 | 7.45.2 | 7.45.2 | 7.45.2 |
| pydispatcher | 2.0.5 | 2.0.5 | 2.0.5 | 2.0.5 | 2.0.5 | 2.0.5 | |
| pydocstyle | 6.3.0 | 6.3.0 | 6.3.0 | 6.3.0 | 6.3.0 | ||
| pyerfa | 2.0.0 | 2.0.0 | 2.0.0 | 2.0.0 | 2.0.0 | 2.0.0 | 2.0.0 |
| pyflakes | 3.0.1 | 3.0.1 | 3.0.1 | 3.0.1 | 3.0.1 | 3.0.1 | 3.0.1 |
| pygments | 2.15.1 | 2.15.1 | 2.15.1 | 2.15.1 | 2.15.1 | 2.15.1 | 2.15.1 |
| pyjwt | 2.4.0 | 2.4.0 | 2.4.0 | 2.4.0 | 2.4.0 | ||
| pylint | 2.16.2 | 2.16.2 | 2.16.2 | 2.16.2 | 2.16.2 | 2.16.2 | 2.16.2 |
| pylint-venv | 2.3.0 | 2.3.0 | 2.3.0 | 2.3.0 | 2.3.0 | ||
| pyls-spyder | 0.4.0 | 0.4.0 | 0.4.0 | 0.4.0 | 0.4.0 | ||
| pynacl | 1.5.0 | ||||||
| pyobjc-core | 9.0 | 9.0 | |||||
| pyobjc-framework-cocoa | 9.0 | 9.0 | |||||
| pyobjc-framework-coreservices | 9.0 | 9.0 | |||||
| pyobjc-framework-fsevents | 9.0 | 9.0 | |||||
| pyodbc | 4.0.34 | 4.0.34 | 4.0.34 | 4.0.34 | 4.0.34 | 4.0.34 | 4.0.34 |
| pyopenssl | 23.0.0 | 23.0.0 | 23.0.0 | 23.0.0 | 23.0.0 | 23.0.0 | 23.0.0 |
| pyparsing | 3.0.9 | 3.0.9 | 3.0.9 | 3.0.9 | 3.0.9 | 3.0.9 | 3.0.9 |
| pyqt | 5.15.7 | 5.15.7 | 5.15.7 | 5.15.7 | 5.15.7 | ||
| pyqt5-sip | 12.11.0 | 12.11.0 | 12.11.0 | 12.11.0 | 12.11.0 | ||
| pyqtwebengine | 5.15.7 | 5.15.7 | 5.15.7 | 5.15.7 | 5.15.7 | ||
| pyrsistent | 0.18.0 | 0.18.0 | 0.18.0 | 0.18.0 | 0.18.0 | 0.18.0 | 0.18.0 |
| pysocks | 1.7.1 | 1.7.1 | 1.7.1 | 1.7.1 | 1.7.1 | 1.7.1 | 1.7.1 |
| pytables | 3.8.0 | 3.8.0 | 3.8.0 | 3.7.0 | 3.8.0 | 3.8.0 | 3.8.0 |
| pytest | 7.3.1 | 7.3.1 | 7.3.1 | 7.3.1 | 7.3.1 | 7.3.1 | 7.3.1 |
| python | 3.11.3 | 3.11.3 | 3.11.3 | 3.11.3 | 3.11.3 | 3.11.3 | 3.11.3 |
| python-dateutil | 2.8.2 | 2.8.2 | 2.8.2 | 2.8.2 | 2.8.2 | 2.8.2 | 2.8.2 |
| python-fastjsonschema | 2.16.2 | 2.16.2 | 2.16.2 | 2.16.2 | 2.16.2 | 2.16.2 | 2.16.2 |
| python-json-logger | 2.0.7 | 2.0.7 | 2.0.7 | 2.0.7 | 2.0.7 | 2.0.7 | |
| python-libarchive-c | 2.9 | 2.9 | 2.9 | 2.9 | 2.9 | 2.9 | 2.9 |
| python-lmdb | 1.4.1 | 1.4.1 | 1.4.1 | 1.4.1 | 1.4.1 | 1.4.1 | 1.4.1 |
| python-lsp-black | 1.2.1 | 1.2.1 | 1.2.1 | 1.2.1 | 1.2.1 | ||
| python-lsp-jsonrpc | 1.0.0 | 1.0.0 | 1.0.0 | 1.0.0 | 1.0.0 | ||
| python-lsp-server | 1.7.2 | 1.7.2 | 1.7.2 | 1.7.2 | 1.7.2 | ||
| python-slugify | 5.0.2 | 5.0.2 | 5.0.2 | 5.0.2 | 5.0.2 | ||
| python-snappy | 0.6.1 | 0.6.1 | 0.6.1 | 0.6.1 | 0.6.1 | 0.6.1 | 0.6.1 |
| python-xxhash | 2.0.2 | 2.0.2 | 2.0.2 | ||||
| python.app | 3 | 3 | |||||
| pytoolconfig | 1.2.5 | 1.2.5 | 1.2.5 | 1.2.5 | 1.2.5 | ||
| pytorch | 2.0.1 | 2.0.1 | 2.0.1 | ||||
| pytz | 2022.7 | 2022.7 | 2022.7 | 2022.7 | 2022.7 | 2022.7 | 2022.7 |
| pyviz\_comms | 2.3.0 | 2.3.0 | 2.3.0 | 2.3.0 | 2.3.0 | 2.3.0 | 2.3.0 |
| pywavelets | 1.4.1 | 1.4.1 | 1.4.1 | 1.4.1 | 1.4.1 | 1.4.1 | 1.4.1 |
| pywin32 | 305 | ||||||
| pywin32-ctypes | 0.2.0 | ||||||
| pywinpty | 2.0.10 | ||||||
| pyxdg | 0.27 | 0.27 | |||||
| pyyaml | 6.0 | 6.0 | 6.0 | 6.0 | 6.0 | 6.0 | 6.0 |
| pyzmq | 25.1.0 | 25.1.0 | 25.1.0 | 25.1.0 | 25.1.0 | 25.1.0 | 25.1.0 |
| qdarkstyle | 3.0.2 | 3.0.2 | 3.0.2 | 3.0.2 | 3.0.2 | ||
| qstylizer | 0.2.2 | 0.2.2 | 0.2.2 | 0.2.2 | 0.2.2 | ||
| qt-main | 5.15.2 | 5.15.2 | 5.15.2 | 5.15.2 | 5.15.2 | ||
| qt-webengine | 5.15.9 | 5.15.9 | 5.15.9 | 5.15.9 | 5.15.9 | ||
| qtawesome | 1.2.2 | 1.2.2 | 1.2.2 | 1.2.2 | 1.2.2 | ||
| qtconsole | 5.4.2 | 5.4.2 | 5.4.2 | 5.4.2 | 5.4.2 | ||
| qtpy | 2.2.0 | 2.2.0 | 2.2.0 | 2.2.0 | 2.2.0 | ||
| qtwebkit | 5.212 | 5.212 | 5.212 | 5.212 | 5.212 | ||
| queuelib | 1.5.0 | 1.5.0 | 1.5.0 | 1.5.0 | 1.5.0 | 1.5.0 | |
| re2 | 2022.04.01 | 2022.04.01 | 2022.04.01 | 2022.04.01 | 2022.04.01 | 2022.04.01 | |
| readline | 8.2 | 8.2 | 8.2 | 8.2 | 8.2 | 8.2 | |
| regex | 2022.7.9 | 2022.7.9 | 2022.7.9 | 2022.7.9 | 2022.7.9 | 2022.7.9 | 2022.7.9 |
| reproc | 14.2.4 | 14.2.4 | 14.2.4 | 14.2.4 | 14.2.4 | 14.2.4 | 14.2.4 |
| reproc-cpp | 14.2.4 | 14.2.4 | 14.2.4 | 14.2.4 | 14.2.4 | 14.2.4 | 14.2.4 |
| requests | 2.29.0 | 2.29.0 | 2.29.0 | 2.29.0 | 2.29.0 | 2.29.0 | 2.29.0 |
| requests-file | 1.5.1 | 1.5.1 | 1.5.1 | 1.5.1 | 1.5.1 | 1.5.1 | |
| requests-toolbelt | 0.9.1 | 0.9.1 | 0.9.1 | 0.9.1 | 0.9.1 | 0.9.1 | 0.9.1 |
| responses | 0.13.3 | 0.13.3 | 0.13.3 | ||||
| rfc3339-validator | 0.1.4 | 0.1.4 | 0.1.4 | 0.1.4 | 0.1.4 | 0.1.4 | |
| rfc3986-validator | 0.1.1 | 0.1.1 | 0.1.1 | 0.1.1 | 0.1.1 | 0.1.1 | |
| rope | 1.7.0 | 1.7.0 | 1.7.0 | 1.7.0 | 1.7.0 | ||
| rtree | 1.0.1 | 1.0.1 | 1.0.1 | 1.0.1 | 1.0.1 | ||
| ruamel.yaml | 0.17.21 | 0.17.21 | 0.17.21 | 0.17.21 | 0.17.21 | 0.17.21 | 0.17.21 |
| ruamel\_yaml | 0.17.21 | 0.17.21 | 0.17.21 | 0.17.21 | 0.17.21 | 0.17.21 | 0.17.21 |
| s3fs | 2023.4.0 | 2023.4.0 | 2023.3.0 | 2023.3.0 | 2023.4.0 | 2023.3.0 | 2023.3.0 |
| s3transfer | 0.6.0 | 0.6.0 | 0.6.0 | 0.6.0 | |||
| sacremoses | 0.0.43 | 0.0.43 | 0.0.43 | 0.0.43 | 0.0.43 | 0.0.43 | 0.0.43 |
| scikit-image | 0.20.0 | 0.20.0 | 0.20.0 | 0.20.0 | 0.20.0 | 0.20.0 | 0.20.0 |
| scikit-learn | 1.2.2 | 1.2.2 | 1.2.2 | 1.2.2 | 1.2.2 | 1.2.2 | 1.2.2 |
| scikit-learn-intelex | 2023.1.1 | 2023.1.1 | |||||
| scipy | 1.10.1 | 1.10.1 | 1.10.1 | 1.10.1 | 1.10.1 | 1.10.1 | 1.10.1 |
| scrapy | 2.8.0 | 2.8.0 | 2.8.0 | 2.8.0 | 2.8.0 | 2.8.0 | |
| seaborn | 0.12.2 | 0.12.2 | 0.12.2 | 0.12.2 | 0.12.2 | 0.12.2 | 0.12.2 |
| secretstorage | 3.3.1 | 3.3.1 | |||||
| send2trash | 1.8.0 | 1.8.0 | 1.8.0 | 1.8.0 | 1.8.0 | 1.8.0 | 1.8.0 |
| service\_identity | 18.1.0 | 18.1.0 | 18.1.0 | 18.1.0 | 18.1.0 | 18.1.0 | |
| setuptools | 67.8.0 | 67.8.0 | 67.8.0 | 67.8.0 | 67.8.0 | 67.8.0 | 67.8.0 |
| sip | 6.6.2 | 6.6.2 | 6.6.2 | 6.6.2 | 6.6.2 | ||
| six | 1.16.0 | 1.16.0 | 1.16.0 | 1.16.0 | 1.16.0 | 1.16.0 | 1.16.0 |
| sleef | 3.5.1 | ||||||
| smart\_open | 5.2.1 | 5.2.1 | 5.2.1 | 5.2.1 | 5.2.1 | 5.2.1 | |
| snappy | 1.1.9 | 1.1.9 | 1.1.9 | 1.1.9 | 1.1.9 | 1.1.9 | 1.1.9 |
| sniffio | 1.2.0 | 1.2.0 | 1.2.0 | 1.2.0 | 1.2.0 | 1.2.0 | 1.2.0 |
| snowballstemmer | 2.2.0 | 2.2.0 | 2.2.0 | 2.2.0 | 2.2.0 | 2.2.0 | 2.2.0 |
| sortedcontainers | 2.4.0 | 2.4.0 | 2.4.0 | 2.4.0 | 2.4.0 | 2.4.0 | 2.4.0 |
| soupsieve | 2.4 | 2.4 | 2.4 | 2.4 | 2.4 | 2.4 | 2.4 |
| sphinx | 5.0.2 | 5.0.2 | 5.0.2 | 5.0.2 | 5.0.2 | ||
| sphinxcontrib-applehelp | 1.0.2 | 1.0.2 | 1.0.2 | 1.0.2 | 1.0.2 | ||
| sphinxcontrib-devhelp | 1.0.2 | 1.0.2 | 1.0.2 | 1.0.2 | 1.0.2 | ||
| sphinxcontrib-htmlhelp | 2.0.0 | 2.0.0 | 2.0.0 | 2.0.0 | 2.0.0 | ||
| sphinxcontrib-jsmath | 1.0.1 | 1.0.1 | 1.0.1 | 1.0.1 | 1.0.1 | ||
| sphinxcontrib-qthelp | 1.0.3 | 1.0.3 | 1.0.3 | 1.0.3 | 1.0.3 | ||
| sphinxcontrib-serializinghtml | 1.1.5 | 1.1.5 | 1.1.5 | 1.1.5 | 1.1.5 | ||
| spyder | 5.4.3 | 5.4.3 | 5.4.3 | 5.4.3 | 5.4.3 | ||
| spyder-kernels | 2.4.3 | 2.4.3 | 2.4.3 | 2.4.3 | 2.4.3 | ||
| sqlalchemy | 1.4.39 | 1.4.39 | 1.4.39 | 1.4.39 | 1.4.39 | 1.4.39 | 1.4.39 |
| sqlite | 3.41.2 | 3.41.2 | 3.41.2 | 3.41.2 | 3.41.2 | 3.41.2 | 3.41.2 |
| stack\_data | 0.2.0 | 0.2.0 | 0.2.0 | 0.2.0 | 0.2.0 | 0.2.0 | 0.2.0 |
| statsmodels | 0.13.5 | 0.13.5 | 0.13.5 | 0.13.5 | 0.13.5 | 0.13.5 | 0.13.5 |
| sympy | 1.11.1 | 1.11.1 | 1.11.1 | 1.11.1 | 1.11.1 | 1.11.1 | 1.11.1 |
| tabulate | 0.8.10 | 0.8.10 | 0.8.10 | 0.8.10 | 0.8.10 | 0.8.10 | 0.8.10 |
| tapi | 1100.0.11 | 1000.10.8 | |||||
| tbb | 2021.8.0 | 2021.8.0 | 2021.8.0 | 2021.8.0 | 2021.8.0 | 2021.8.0 | 2021.8.0 |
| tbb4py | 2021.8.0 | 2021.8.0 | 2021.8.0 | 2021.8.0 | 2021.8.0 | 2021.8.0 | 2021.8.0 |
| tblib | 1.7.0 | 1.7.0 | 1.7.0 | 1.7.0 | 1.7.0 | 1.7.0 | 1.7.0 |
| tenacity | 8.2.2 | 8.2.2 | 8.2.2 | 8.2.2 | 8.2.2 | 8.2.2 | 8.2.2 |
| terminado | 0.17.1 | 0.17.1 | 0.17.1 | 0.17.1 | 0.17.1 | 0.17.1 | 0.17.1 |
| text-unidecode | 1.3 | 1.3 | 1.3 | 1.3 | 1.3 | ||
| textdistance | 4.2.1 | 4.2.1 | 4.2.1 | 4.2.1 | 4.2.1 | ||
| threadpoolctl | 2.2.0 | 2.2.0 | 2.2.0 | 2.2.0 | 2.2.0 | 2.2.0 | 2.2.0 |
| three-merge | 0.1.1 | 0.1.1 | 0.1.1 | 0.1.1 | 0.1.1 | ||
| tifffile | 2021.7.2 | 2021.7.2 | 2021.7.2 | 2021.7.2 | 2021.7.2 | 2021.7.2 | 2021.7.2 |
| tinycss2 | 1.2.1 | 1.2.1 | 1.2.1 | 1.2.1 | 1.2.1 | 1.2.1 | 1.2.1 |
| tk | 8.6.12 | 8.6.12 | 8.6.12 | 8.6.12 | 8.6.12 | 8.6.12 | 8.6.12 |
| tldextract | 3.2.0 | 3.2.0 | 3.2.0 | 3.2.0 | 3.2.0 | 3.2.0 | |
| tokenizers | 0.13.2 | 0.13.2 | 0.13.2 | ||||
| toml | 0.10.2 | 0.10.2 | 0.10.2 | 0.10.2 | 0.10.2 | ||
| tomli | 2.0.1 | 2.0.1 | 2.0.1 | 2.0.1 | 2.0.1 | 2.0.1 | 2.0.1 |
| tomlkit | 0.11.1 | 0.11.1 | 0.11.1 | 0.11.1 | 0.11.1 | 0.11.1 | 0.11.1 |
| toolz | 0.12.0 | 0.12.0 | 0.12.0 | 0.12.0 | 0.12.0 | 0.12.0 | 0.12.0 |
| tornado | 6.2 | 6.2 | 6.2 | 6.2 | 6.2 | 6.2 | 6.2 |
| tqdm | 4.65.0 | 4.65.0 | 4.65.0 | 4.65.0 | 4.65.0 | 4.65.0 | 4.65.0 |
| traitlets | 5.7.1 | 5.7.1 | 5.7.1 | 5.7.1 | 5.7.1 | 5.7.1 | 5.7.1 |
| transformers | 4.29.2 | 4.29.2 | 2.1.1 | 2.1.1 | 4.29.2 | 2.1.1 | 2.1.1 |
| twisted | 22.10.0 | 22.10.0 | 22.10.0 | 22.10.0 | 22.10.0 | 22.10.0 | |
| twisted-iocpsupport | 1.0.2 | ||||||
| typing-extensions | 4.6.3 | 4.6.3 | 4.6.3 | 4.6.3 | 4.6.3 | 4.6.3 | 4.6.3 |
| typing\_extensions | 4.6.3 | 4.6.3 | 4.6.3 | 4.6.3 | 4.6.3 | 4.6.3 | 4.6.3 |
| tzdata | 2023c | 2023c | 2023c | 2023c | 2023c | 2023c | 2023c |
| uc-micro-py | 1.0.1 | 1.0.1 | 1.0.1 | 1.0.1 | 1.0.1 | ||
| ujson | 5.4.0 | 5.4.0 | 5.4.0 | 5.4.0 | 5.4.0 | ||
| unidecode | 1.2.0 | 1.2.0 | 1.2.0 | 1.2.0 | 1.2.0 | ||
| unixodbc | 2.3.11 | 2.3.11 | 2.3.11 | 2.3.11 | 2.3.11 | 2.3.11 | |
| urllib3 | 1.26.16 | 1.26.16 | 1.26.16 | 1.26.16 | 1.26.16 | 1.26.16 | 1.26.16 |
| utf8proc | 2.6.1 | 2.6.1 | 2.6.1 | 2.6.1 | 2.6.1 | 2.6.1 | |
| vc | 14.2 | ||||||
| vs2015\_runtime | 14.27.29016 | ||||||
| w3lib | 1.21.0 | 1.21.0 | 1.21.0 | 1.21.0 | 1.21.0 | 1.21.0 | |
| watchdog | 2.1.6 | 2.1.6 | 2.1.6 | 2.1.6 | 2.1.6 | ||
| wcwidth | 0.2.5 | 0.2.5 | 0.2.5 | 0.2.5 | 0.2.5 | 0.2.5 | 0.2.5 |
| webencodings | 0.5.1 | 0.5.1 | 0.5.1 | 0.5.1 | 0.5.1 | 0.5.1 | 0.5.1 |
| websocket-client | 0.58.0 | 0.58.0 | 0.58.0 | 0.58.0 | 0.58.0 | 0.58.0 | 0.58.0 |
| werkzeug | 2.2.3 | 2.2.3 | 2.2.3 | 2.2.3 | 2.2.3 | 2.2.3 | 2.2.3 |
| whatthepatch | 1.0.2 | 1.0.2 | 1.0.2 | 1.0.2 | 1.0.2 | ||
| wheel | 0.38.4 | 0.38.4 | 0.38.4 | 0.38.4 | 0.38.4 | 0.38.4 | 0.38.4 |
| widgetsnbextension | 4.0.5 | 4.0.5 | 4.0.5 | 4.0.5 | 4.0.5 | 4.0.5 | 4.0.5 |
| win\_inet\_pton | 1.1.0 | ||||||
| winpty | 0.4.3 | ||||||
| wrapt | 1.14.1 | 1.14.1 | 1.14.1 | 1.14.1 | 1.14.1 | 1.14.1 | 1.14.1 |
| wurlitzer | 3.0.2 | 3.0.2 | 3.0.2 | 3.0.2 | |||
| xarray | 2022.11.0 | 2022.11.0 | 2022.11.0 | 2022.11.0 | 2022.11.0 | 2022.11.0 | |
| xlwings | 0.29.1 | 0.29.1 | 0.29.1 | ||||
| xxhash | 0.8.0 | 0.8.0 | 0.8.0 | ||||
| xyzservices | 2022.9.0 | 2022.9.0 | 2022.9.0 | 2022.9.0 | 2022.9.0 | ||
| xz | 5.4.2 | 5.4.2 | 5.4.2 | 5.4.2 | 5.4.2 | 5.4.2 | 5.4.2 |
| y-py | 0.5.9 | 0.5.9 | 0.5.9 | 0.5.9 | 0.5.9 | 0.5.9 | |
| yaml | 0.2.5 | 0.2.5 | 0.2.5 | 0.2.5 | 0.2.5 | 0.2.5 | 0.2.5 |
| yaml-cpp | 0.7.0 | 0.7.0 | 0.7.0 | 0.7.0 | 0.7.0 | 0.7.0 | 0.7.0 |
| yapf | 0.31.0 | 0.31.0 | 0.31.0 | 0.31.0 | 0.31.0 | ||
| yarl | 1.8.1 | 1.8.1 | 1.8.1 | 1.8.1 | 1.8.1 | 1.8.1 | 1.8.1 |
| ypy-websocket | 0.8.2 | 0.8.2 | 0.8.2 | 0.8.2 | 0.8.2 | 0.8.2 | |
| zeromq | 4.3.4 | 4.3.4 | 4.3.4 | 4.3.4 | 4.3.4 | 4.3.4 | 4.3.4 |
| zfp | 0.5.5 | 0.5.5 | 0.5.5 | 0.5.5 | 0.5.5 | ||
| zict | 2.2.0 | 2.2.0 | 2.2.0 | 2.2.0 | 2.2.0 | 2.2.0 | 2.2.0 |
| zipp | 3.11.0 | 3.11.0 | 3.11.0 | 3.11.0 | 3.11.0 | 3.11.0 | 3.11.0 |
| zlib | 1.2.13 | 1.2.13 | 1.2.13 | 1.2.13 | 1.2.13 | 1.2.13 | 1.2.13 |
| zlib-ng | 2.0.7 | 2.0.7 | 2.0.7 | 2.0.7 | 2.0.7 | 2.0.7 | |
| zope | 1.0 | 1.0 | 1.0 | 1.0 | 1.0 | 1.0 | |
| zope.interface | 5.4.0 | 5.4.0 | 5.4.0 | 5.4.0 | 5.4.0 | 5.4.0 | |
| zstandard | 0.19.0 | 0.19.0 | 0.19.0 | 0.19.0 | 0.19.0 | 0.19.0 | 0.19.0 |
| zstd | 1.5.5 | 1.5.5 | 1.5.5 | 1.5.5 | 1.5.5 | 1.5.5 | 1.5.5 |
| Package Name | linux-64 | linux-aarch64 | linux-ppc64le | linux-s390x |
|---|---|---|---|---|
| \_anaconda\_depends | 2023.07 | 2023.07 | 2023.07 | 2023.07 |
| \_libgcc\_mutex | 0.1 | 0.1 | 0.1 | 0.1 |
| \_openmp\_mutex | 5.1 | 5.1 | 5.1 | 5.1 |
| abseil-cpp | 20211102.0 | 20211102.0 | 20211102.0 | |
| aiobotocore | 2.5.0 | 2.5.0 | 2.4.2 | 2.4.2 |
| aiofiles | 22.1.0 | 22.1.0 | 22.1.0 | |
| aiohttp | 3.8.3 | 3.8.3 | 3.8.3 | 3.8.3 |
| aioitertools | 0.7.1 | 0.7.1 | 0.7.1 | 0.7.1 |
| aiosignal | 1.2.0 | 1.2.0 | 1.2.0 | 1.2.0 |
| aiosqlite | 0.18.0 | 0.18.0 | 0.18.0 | |
| alabaster | 0.7.12 | 0.7.12 | ||
| anaconda-catalogs | 0.2.0 | 0.2.0 | 0.2.0 | 0.2.0 |
| anaconda-client | 1.11.3 | 1.11.3 | 1.11.3 | 1.11.3 |
| anaconda-navigator | 2.4.2 | 2.4.2 | ||
| anaconda-project | 0.11.1 | 0.11.1 | 0.11.1 | 0.11.1 |
| anyio | 3.5.0 | 3.5.0 | 3.5.0 | 3.5.0 |
| appdirs | 1.4.4 | 1.4.4 | 1.4.4 | 1.4.4 |
| argon2-cffi | 21.3.0 | 21.3.0 | 21.3.0 | 21.3.0 |
| argon2-cffi-bindings | 21.2.0 | 21.2.0 | 21.2.0 | 21.2.0 |
| arrow | 1.2.3 | 1.2.3 | ||
| arrow-cpp | 11.0.0 | 11.0.0 | 11.0.0 | |
| astroid | 2.14.2 | 2.14.2 | 2.14.2 | 2.14.2 |
| astropy | 5.1 | 5.1 | 5.1 | 5.1 |
| asttokens | 2.0.5 | 2.0.5 | 2.0.5 | 2.0.5 |
| async-timeout | 4.0.2 | 4.0.2 | 4.0.2 | 4.0.2 |
| atomicwrites | 1.4.0 | 1.4.0 | ||
| attrs | 22.1.0 | 22.1.0 | 22.1.0 | 22.1.0 |
| automat | 20.2.0 | 20.2.0 | 20.2.0 | |
| autopep8 | 1.6.0 | 1.6.0 | ||
| aws-c-common | 0.4.57 | 0.5.11 | 0.4.57 | |
| aws-c-event-stream | 0.1.6 | 0.1.6 | 0.1.6 | |
| aws-checksums | 0.1.9 | 0.1.11 | 0.1.9 | |
| aws-sdk-cpp | 1.8.185 | 1.8.185 | 1.8.185 | |
| babel | 2.11.0 | 2.11.0 | 2.11.0 | 2.11.0 |
| backcall | 0.2.0 | 0.2.0 | 0.2.0 | 0.2.0 |
| backports | 1.1 | 1.1 | 1.1 | 1.1 |
| backports.functools\_lru\_cache | 1.6.4 | 1.6.4 | 1.6.4 | 1.6.4 |
| backports.tempfile | 1.0 | 1.0 | 1.0 | 1.0 |
| backports.weakref | 1.0.post1 | 1.0.post1 | 1.0.post1 | 1.0.post1 |
| bcrypt | 3.2.0 | 3.2.0 | 3.2.0 | |
| beautifulsoup4 | 4.12.2 | 4.12.2 | 4.12.2 | 4.12.2 |
| binaryornot | 0.4.4 | 0.4.4 | ||
| black | 23.3.0 | 23.3.0 | ||
| blas | 1.0 | 1.0 | 1.0 | 1.0 |
| bleach | 4.1.0 | 4.1.0 | 4.1.0 | 4.1.0 |
| blosc | 1.21.3 | 1.21.3 | 1.21.3 | 1.21.3 |
| bokeh | 3.1.1 | 2.4.3 | 3.1.1 | 2.4.3 |
| boltons | 23.0.0 | 23.0.0 | 23.0.0 | 23.0.0 |
| boost-cpp | 1.73.0 | 1.73.0 | 1.73.0 | |
| boto3 | 1.24.28 | 1.24.28 | ||
| botocore | 1.29.76 | 1.29.76 | 1.27.59 | 1.27.59 |
| bottleneck | 1.3.5 | 1.3.5 | 1.3.5 | 1.3.5 |
| brotli | 1.0.9 | 1.0.9 | 1.0.9 | 1.0.9 |
| brotli-bin | 1.0.9 | 1.0.9 | 1.0.9 | 1.0.9 |
| brotlipy | 0.7.0 | 0.7.0 | 0.7.0 | 0.7.0 |
| brunsli | 0.1 | 0.1 | 0.1 | |
| bzip2 | 1.0.8 | 1.0.8 | 1.0.8 | 1.0.8 |
| c-ares | 1.19.0 | 1.19.0 | 1.19.0 | 1.19.0 |
| c-blosc2 | 2.8.0 | 2.8.0 | 2.8.0 | |
| ca-certificates | 2023.05.30 | 2023.05.30 | 2023.05.30 | 2023.05.30 |
| certifi | 2023.5.7 | 2023.5.7 | 2023.5.7 | 2023.5.7 |
| cffi | 1.15.1 | 1.15.1 | 1.15.1 | 1.15.1 |
| cfitsio | 3.470 | 3.470 | 3.470 | 3.470 |
| chardet | 4.0.0 | 4.0.0 | 4.0.0 | 4.0.0 |
| charls | 2.2.0 | 2.2.0 | 2.2.0 | |
| charset-normalizer | 2.0.4 | 2.0.4 | 2.0.4 | 2.0.4 |
| click | 8.0.4 | 8.0.4 | 8.0.4 | 8.0.4 |
| cloudpickle | 2.2.1 | 2.2.1 | 2.2.1 | 2.2.1 |
| clyent | 1.2.2 | 1.2.2 | 1.2.2 | 1.2.2 |
| colorama | 0.4.6 | 0.4.6 | 0.4.6 | 0.4.6 |
| colorcet | 3.0.1 | 3.0.1 | 3.0.1 | 3.0.1 |
| comm | 0.1.2 | 0.1.2 | 0.1.2 | 0.1.2 |
| conda | 23.5.0 | 23.5.0 | 23.5.0 | 23.5.0 |
| conda-build | 3.25.0 | 3.25.0 | 3.25.0 | 3.25.0 |
| conda-content-trust | 0.1.3 | 0.1.3 | 0.1.3 | 0.1.3 |
| conda-index | 0.2.3 | 0.2.3 | 0.2.3 | 0.2.3 |
| conda-libmamba-solver | 23.5.0 | 23.5.0 | 23.5.0 | 23.5.0 |
| conda-pack | 0.6.0 | 0.6.0 | 0.6.0 | 0.6.0 |
| conda-package-handling | 2.1.0 | 2.1.0 | 2.1.0 | 2.1.0 |
| conda-package-streaming | 0.8.0 | 0.8.0 | 0.8.0 | 0.8.0 |
| conda-repo-cli | 1.0.41 | 1.0.41 | ||
| conda-token | 0.4.0 | 0.4.0 | 0.4.0 | 0.4.0 |
| conda-verify | 3.4.2 | 3.4.2 | 3.4.2 | 3.4.2 |
| constantly | 15.1.0 | 15.1.0 | 15.1.0 | |
| contourpy | 1.0.5 | 1.0.5 | 1.0.5 | 1.0.5 |
| cookiecutter | 1.7.3 | 1.7.3 | ||
| cryptography | 39.0.1 | 39.0.1 | 39.0.1 | 39.0.1 |
| cssselect | 1.1.0 | 1.1.0 | 1.1.0 | |
| curl | 8.1.1 | 8.1.1 | 8.1.1 | 8.1.1 |
| cycler | 0.11.0 | 0.11.0 | 0.11.0 | 0.11.0 |
| cytoolz | 0.12.0 | 0.12.0 | 0.12.0 | 0.12.0 |
| daal4py | 2023.1.1 | |||
| dal | 2023.1.1 | |||
| dask | 2023.6.0 | 2023.4.1 | 2023.6.0 | 2023.6.0 |
| dask-core | 2023.6.0 | 2023.4.1 | 2023.6.0 | 2023.6.0 |
| datasets | 2.12.0 | 2.12.0 | ||
| datashader | 0.15.0 | 0.15.0 | 0.15.0 | |
| datashape | 0.5.4 | 0.5.4 | 0.5.4 | |
| dbus | 1.13.18 | 1.13.18 | ||
| debugpy | 1.5.1 | 1.5.1 | 1.5.1 | 1.5.1 |
| decorator | 5.1.1 | 5.1.1 | 5.1.1 | 5.1.1 |
| defusedxml | 0.7.1 | 0.7.1 | 0.7.1 | 0.7.1 |
| diff-match-patch | 20200713 | 20200713 | ||
| dill | 0.3.6 | 0.3.6 | 0.3.6 | 0.3.6 |
| distributed | 2023.6.0 | 2023.4.1 | 2023.6.0 | 2023.6.0 |
| docstring-to-markdown | 0.11 | 0.11 | ||
| docutils | 0.18.1 | 0.18.1 | ||
| entrypoints | 0.4 | 0.4 | 0.4 | 0.4 |
| et\_xmlfile | 1.1.0 | 1.1.0 | 1.1.0 | 1.1.0 |
| executing | 0.8.3 | 0.8.3 | 0.8.3 | 0.8.3 |
| expat | 2.4.9 | 2.4.9 | ||
| filelock | 3.9.0 | 3.9.0 | 3.9.0 | 3.9.0 |
| flake8 | 6.0.0 | 6.0.0 | ||
| flask | 2.2.2 | 2.2.2 | 2.2.2 | 2.2.2 |
| fmt | 9.1.0 | 9.1.0 | 9.1.0 | 9.1.0 |
| fontconfig | 2.14.1 | 2.14.1 | ||
| fonttools | 4.25.0 | 4.25.0 | 4.25.0 | 4.25.0 |
| freetype | 2.12.1 | 2.12.1 | 2.12.1 | 2.12.1 |
| frozenlist | 1.3.3 | 1.3.3 | 1.3.3 | 1.3.3 |
| fsspec | 2023.4.0 | 2023.4.0 | 2023.3.0 | 2023.3.0 |
| future | 0.18.3 | 0.18.3 | 0.18.3 | 0.18.3 |
| gensim | 4.3.0 | 4.3.0 | 4.3.0 | |
| gflags | 2.2.2 | 2.2.2 | 2.2.2 | |
| giflib | 5.2.1 | 5.2.1 | 5.2.1 | 5.2.1 |
| glib | 2.69.1 | 2.69.1 | ||
| glob2 | 0.7 | 0.7 | 0.7 | 0.7 |
| glog | 0.5.0 | 0.5.0 | 0.5.0 | |
| gmp | 6.2.1 | 6.2.1 | 6.2.1 | 6.2.1 |
| gmpy2 | 2.1.2 | 2.1.2 | 2.1.2 | 2.1.2 |
| greenlet | 2.0.1 | 2.0.1 | 2.0.1 | 2.0.1 |
| grpc-cpp | 1.46.1 | 1.46.1 | 1.46.1 | |
| gst-plugins-base | 1.14.1 | 1.14.1 | ||
| gstreamer | 1.14.1 | 1.14.1 | ||
| h5py | 3.7.0 | 3.7.0 | 3.7.0 | 3.7.0 |
| hdf5 | 1.10.6 | 1.10.6 | 1.10.6 | 1.10.6 |
| heapdict | 1.0.1 | 1.0.1 | 1.0.1 | 1.0.1 |
| holoviews | 1.16.2 | 1.16.2 | 1.16.2 | 1.14.8 |
| huggingface\_hub | 0.15.1 | 0.15.1 | ||
| hvplot | 0.8.4 | 0.8.4 | 0.8.4 | 0.7.3 |
| hyperlink | 21.0.0 | 21.0.0 | 21.0.0 | |
| icu | 58.2 | 68.1 | 58.2 | 68.1 |
| idna | 3.4 | 3.4 | 3.4 | 3.3 |
| imagecodecs | 2021.8.26 | 2021.8.26 | 2021.8.26 | 2021.8.26 |
| imageio | 2.31.1 | 2.31.1 | 2.31.1 | 2.26.0 |
| imagesize | 1.4.1 | 1.4.1 | ||
| imbalanced-learn | 0.10.1 | 0.10.1 | 0.10.1 | 0.10.1 |
| importlib-metadata | 6.0.0 | 6.0.0 | 6.0.0 | 6.0.0 |
| importlib\_metadata | 6.0.0 | 6.0.0 | ||
| incremental | 21.3.0 | 21.3.0 | 21.3.0 | |
| inflection | 0.5.1 | 0.5.1 | ||
| iniconfig | 1.1.1 | 1.1.1 | 1.1.1 | 1.1.1 |
| intake | 0.6.8 | 0.6.8 | 0.6.8 | 0.6.8 |
| intel-openmp | 2023.1.0 | |||
| intervaltree | 3.1.0 | 3.1.0 | ||
| ipykernel | 6.19.2 | 6.19.2 | 6.19.2 | 6.19.2 |
| ipython | 8.12.0 | 8.12.0 | 8.12.0 | 8.12.0 |
| ipython\_genutils | 0.2.0 | 0.2.0 | 0.2.0 | 0.2.0 |
| ipywidgets | 8.0.4 | 8.0.4 | 8.0.4 | 8.0.4 |
| isort | 5.9.3 | 5.9.3 | 5.9.3 | 5.9.3 |
| itemadapter | 0.3.0 | 0.3.0 | 0.3.0 | |
| itemloaders | 1.0.4 | 1.0.4 | 1.0.4 | |
| itsdangerous | 2.0.1 | 2.0.1 | 2.0.1 | 2.0.1 |
| jaraco.classes | 3.2.1 | 3.2.1 | ||
| jedi | 0.18.1 | 0.18.1 | 0.18.1 | 0.18.1 |
| jeepney | 0.7.1 | 0.7.1 | ||
| jellyfish | 0.9.0 | 0.9.0 | ||
| jinja2 | 3.1.2 | 3.1.2 | 3.1.2 | 3.1.2 |
| jinja2-time | 0.2.0 | 0.2.0 | ||
| jmespath | 0.10.0 | 0.10.0 | 0.10.0 | 0.10.0 |
| joblib | 1.2.0 | 1.2.0 | 1.2.0 | 1.2.0 |
| jpeg | 9e | 9e | 9e | 9e |
| jq | 1.6 | 1.6 | 1.6 | |
| json5 | 0.9.6 | 0.9.6 | 0.9.6 | 0.9.6 |
| jsonpatch | 1.32 | 1.32 | 1.32 | 1.32 |
| jsonpointer | 2.1 | 2.1 | 2.1 | 2.1 |
| jsonschema | 4.17.3 | 4.17.3 | 4.17.3 | 4.17.3 |
| jupyter | 1.0.0 | 1.0.0 | 1.0.0 | 1.0.0 |
| jupyter\_client | 8.1.0 | 8.1.0 | 8.1.0 | 8.1.0 |
| jupyter\_console | 6.6.3 | 6.6.3 | 6.6.3 | 6.6.3 |
| jupyter\_core | 5.3.0 | 5.3.0 | 5.3.0 | 5.3.0 |
| jupyter\_events | 0.6.3 | 0.6.3 | 0.6.3 | |
| jupyter\_server | 2.5.0 | 2.5.0 | 2.5.0 | 1.23.4 |
| jupyter\_server\_fileid | 0.9.0 | 0.9.0 | 0.9.0 | |
| jupyter\_server\_terminals | 0.4.4 | 0.4.4 | 0.4.4 | |
| jupyter\_server\_ydoc | 0.8.0 | 0.8.0 | 0.8.0 | |
| jupyter\_ydoc | 0.2.4 | 0.2.4 | 0.2.4 | |
| jupyterlab | 3.6.3 | 3.6.3 | 3.6.3 | 3.3.2 |
| jupyterlab\_pygments | 0.1.2 | 0.1.2 | 0.1.2 | 0.1.2 |
| jupyterlab\_server | 2.22.0 | 2.22.0 | 2.22.0 | 2.21.0 |
| jupyterlab\_widgets | 3.0.5 | 3.0.5 | 3.0.5 | 3.0.5 |
| jxrlib | 1.1 | 1.1 | 1.1 | 1.1 |
| keyring | 23.13.1 | 23.13.1 | ||
| kiwisolver | 1.4.4 | 1.4.4 | 1.4.4 | 1.4.4 |
| krb5 | 1.20.1 | 1.19.4 | 1.20.1 | 1.19.4 |
| lazy-object-proxy | 1.6.0 | 1.6.0 | 1.6.0 | 1.6.0 |
| lazy\_loader | 0.2 | 0.2 | 0.2 | 0.1 |
| lcms2 | 2.12 | 2.12 | 2.12 | 2.12 |
| ld\_impl\_linux-64 | 2.38 | |||
| ld\_impl\_linux-aarch64 | 2.38 | |||
| ld\_impl\_linux-ppc64le | 2.38 | |||
| ld\_impl\_linux-s390x | 2.38 | |||
| lerc | 3.0 | 3.0 | 3.0 | 3.0 |
| libaec | 1.0.4 | 1.0.4 | 1.0.4 | 1.0.4 |
| libarchive | 3.6.2 | 3.6.2 | 3.6.2 | 3.6.2 |
| libboost | 1.73.0 | 1.73.0 | 1.73.0 | |
| libbrotlicommon | 1.0.9 | 1.0.9 | 1.0.9 | 1.0.9 |
| libbrotlidec | 1.0.9 | 1.0.9 | 1.0.9 | 1.0.9 |
| libbrotlienc | 1.0.9 | 1.0.9 | 1.0.9 | 1.0.9 |
| libclang | 10.0.1 | 14.0.6 | ||
| libclang13 | 14.0.6 | |||
| libcurl | 8.1.1 | 8.1.1 | 8.1.1 | 8.1.1 |
| libdeflate | 1.17 | 1.17 | 1.17 | 1.17 |
| libedit | 3.1.20221030 | 3.1.20221030 | 3.1.20221030 | 3.1.20221030 |
| libev | 4.33 | 4.33 | 4.33 | 4.33 |
| libevent | 2.1.12 | 2.1.12 | 2.1.12 | |
| libffi | 3.4.4 | 3.4.4 | 3.4.4 | 3.4.2 |
| libgcc-ng | 11.2.0 | 11.2.0 | 11.2.0 | 11.2.0 |
| libgfortran-ng | 11.2.0 | 11.2.0 | 11.2.0 | 11.2.0 |
| libgfortran5 | 11.2.0 | 11.2.0 | 11.2.0 | 11.2.0 |
| libgomp | 11.2.0 | 11.2.0 | 11.2.0 | 11.2.0 |
| liblief | 0.12.3 | 0.12.3 | 0.12.3 | 0.12.3 |
| libllvm10 | 10.0.1 | |||
| libllvm14 | 14.0.6 | 14.0.6 | 14.0.6 | |
| libmamba | 1.4.1 | 1.4.1 | 1.4.1 | 1.4.1 |
| libmambapy | 1.4.1 | 1.4.1 | 1.4.1 | 1.4.1 |
| libnghttp2 | 1.52.0 | 1.52.0 | 1.52.0 | 1.52.0 |
| libopenblas | 0.3.21 | 0.3.21 | 0.3.21 | |
| libpng | 1.6.39 | 1.6.39 | 1.6.39 | 1.6.39 |
| libpq | 12.15 | 12.9 | ||
| libprotobuf | 3.20.3 | 3.20.3 | 3.20.3 | |
| libsodium | 1.0.18 | 1.0.18 | 1.0.18 | 1.0.18 |
| libsolv | 0.7.22 | 0.7.22 | 0.7.22 | 0.7.22 |
| libspatialindex | 1.9.3 | 1.9.3 | ||
| libssh2 | 1.10.0 | 1.10.0 | 1.10.0 | 1.10.0 |
| libstdcxx-ng | 11.2.0 | 11.2.0 | 11.2.0 | 11.2.0 |
| libthrift | 0.15.0 | 0.15.0 | 0.15.0 | |
| libtiff | 4.5.0 | 4.5.0 | 4.5.0 | 4.5.0 |
| libuuid | 1.41.5 | 1.41.5 | 1.41.5 | 1.41.5 |
| libwebp | 1.2.4 | 1.2.4 | 1.2.4 | 1.2.4 |
| libwebp-base | 1.2.4 | 1.2.4 | 1.2.4 | 1.2.4 |
| libxcb | 1.15 | 1.15 | ||
| libxkbcommon | 1.0.1 | 1.0.1 | ||
| libxml2 | 2.9.14 | 2.10.3 | 2.10.3 | 2.10.3 |
| libxslt | 1.1.35 | 1.1.37 | 1.1.37 | 1.1.37 |
| libzopfli | 1.0.3 | 1.0.3 | 1.0.3 | 1.0.3 |
| linkify-it-py | 2.0.0 | 2.0.0 | ||
| llvmlite | 0.40.0 | 0.40.0 | 0.40.0 | |
| locket | 1.0.0 | 1.0.0 | 1.0.0 | 1.0.0 |
| lxml | 4.9.1 | 4.9.2 | 4.9.2 | 4.9.2 |
| lz4 | 4.3.2 | 4.3.2 | 4.3.2 | |
| lz4-c | 1.9.4 | 1.9.4 | 1.9.4 | 1.9.4 |
| lzo | 2.10 | 2.10 | 2.10 | 2.10 |
| markdown | 3.4.1 | 3.4.1 | 3.4.1 | 3.4.1 |
| markdown-it-py | 2.2.0 | 2.2.0 | ||
| markupsafe | 2.1.1 | 2.1.1 | 2.1.1 | 2.1.1 |
| matplotlib | 3.7.1 | 3.7.1 | 3.7.1 | 3.7.1 |
| matplotlib-base | 3.7.1 | 3.7.1 | 3.7.1 | 3.7.1 |
| matplotlib-inline | 0.1.6 | 0.1.6 | 0.1.6 | 0.1.6 |
| mccabe | 0.7.0 | 0.7.0 | 0.7.0 | 0.7.0 |
| mdit-py-plugins | 0.3.0 | 0.3.0 | ||
| mdurl | 0.1.0 | 0.1.0 | ||
| mistune | 0.8.4 | 0.8.4 | 0.8.4 | 0.8.4 |
| mkl | 2023.1.0 | |||
| mkl-service | 2.4.0 | |||
| mkl\_fft | 1.3.6 | |||
| mkl\_random | 1.2.2 | |||
| mock | 4.0.3 | |||
| more-itertools | 8.12.0 | 8.12.0 | 8.12.0 | 8.12.0 |
| mpc | 1.1.0 | 1.1.0 | 1.1.0 | 1.1.0 |
| mpfr | 4.0.2 | 4.0.2 | 4.0.2 | 4.0.2 |
| mpi | 1.0 | |||
| mpich | 4.1.1 | |||
| mpmath | 1.2.1 | 1.2.1 | 1.2.1 | 1.2.1 |
| msgpack-python | 1.0.3 | 1.0.3 | 1.0.3 | 1.0.3 |
| multidict | 6.0.2 | 6.0.2 | 6.0.2 | 6.0.2 |
| multipledispatch | 0.6.0 | 0.6.0 | 0.6.0 | |
| multiprocess | 0.70.14 | 0.70.14 | ||
| munkres | 1.1.4 | 1.1.4 | 1.1.4 | 1.1.4 |
| mypy\_extensions | 0.4.3 | 0.4.3 | ||
| navigator-updater | 0.4.0 | 0.4.0 | ||
| nbclassic | 0.5.5 | 0.5.5 | 0.5.5 | 0.5.5 |
| nbclient | 0.5.13 | 0.5.13 | 0.5.13 | 0.5.13 |
| nbconvert | 6.5.4 | 6.5.4 | 6.5.4 | 6.5.4 |
| nbformat | 5.7.0 | 5.7.0 | 5.7.0 | 5.7.0 |
| ncurses | 6.4 | 6.4 | 6.4 | 6.4 |
| nest-asyncio | 1.5.6 | 1.5.6 | 1.5.6 | 1.5.6 |
| networkx | 2.8.4 | 2.8.4 | 2.8.4 | 2.8.4 |
| ninja | 1.10.2 | 1.10.2 | ||
| ninja-base | 1.10.2 | 1.10.2 | ||
| nltk | 3.7 | 3.7 | 3.7 | 3.7 |
| notebook | 6.5.4 | 6.5.4 | 6.5.4 | 6.5.4 |
| notebook-shim | 0.2.2 | 0.2.2 | 0.2.2 | 0.2.2 |
| nspr | 4.35 | 4.35 | ||
| nss | 3.89.1 | 3.89.1 | ||
| numba | 0.57.0 | 0.57.0 | 0.57.0 | |
| numexpr | 2.8.4 | 2.8.4 | 2.8.4 | 2.8.4 |
| numpy | 1.24.3 | 1.24.3 | 1.24.3 | 1.25.0 |
| numpy-base | 1.24.3 | 1.24.3 | 1.24.3 | 1.25.0 |
| numpydoc | 1.5.0 | 1.5.0 | ||
| oniguruma | 6.9.7.1 | 6.9.7.1 | 6.9.7.1 | |
| openjpeg | 2.4.0 | 2.4.0 | 2.4.0 | 2.4.0 |
| openpyxl | 3.0.10 | 3.0.10 | 3.0.10 | 3.0.10 |
| openssl | 1.1.1u | 1.1.1u | 1.1.1u | 1.1.1u |
| orc | 1.7.4 | 1.7.4 | 1.7.4 | |
| packaging | 23.0 | 23.0 | 23.0 | 23.0 |
| pandas | 1.5.3 | 1.5.3 | 1.5.3 | 1.5.3 |
| pandocfilters | 1.5.0 | 1.5.0 | 1.5.0 | 1.5.0 |
| panel | 1.1.0 | 0.14.3 | 1.1.0 | 0.12.6 |
| param | 1.13.0 | 1.13.0 | 1.13.0 | 1.13.0 |
| parsel | 1.6.0 | 1.6.0 | 1.6.0 | |
| parso | 0.8.3 | 0.8.3 | 0.8.3 | 0.8.3 |
| partd | 1.2.0 | 1.2.0 | 1.2.0 | 1.2.0 |
| patch | 2.7.6 | 2.7.6 | 2.7.6 | 2.7.6 |
| patchelf | 0.17.2 | 0.17.2 | 0.17.2 | 0.17.2 |
| pathlib | 1.0.1 | 1.0.1 | ||
| pathspec | 0.10.3 | 0.10.3 | ||
| patsy | 0.5.3 | 0.5.3 | 0.5.3 | 0.5.3 |
| pcre | 8.45 | 8.45 | ||
| pcre2 | 10.37 | 10.37 | 10.37 | 10.37 |
| pep8 | 1.7.1 | 1.7.1 | 1.7.1 | 1.7.1 |
| pexpect | 4.8.0 | 4.8.0 | 4.8.0 | 4.8.0 |
| pickleshare | 0.7.5 | 0.7.5 | 0.7.5 | 0.7.5 |
| pillow | 9.4.0 | 9.4.0 | 9.4.0 | 9.4.0 |
| pip | 23.1.2 | 23.1.2 | 23.1.2 | 23.1.2 |
| pkginfo | 1.9.6 | 1.9.6 | 1.9.6 | 1.9.6 |
| platformdirs | 2.5.2 | 2.5.2 | 2.5.2 | 2.5.2 |
| plotly | 5.9.0 | 5.9.0 | 5.9.0 | 5.9.0 |
| pluggy | 1.0.0 | 1.0.0 | 1.0.0 | 1.0.0 |
| ply | 3.11 | 3.11 | ||
| pooch | 1.4.0 | 1.4.0 | 1.4.0 | 1.4.0 |
| poyo | 0.5.0 | 0.5.0 | ||
| prometheus\_client | 0.14.1 | 0.14.1 | 0.14.1 | 0.14.1 |
| prompt-toolkit | 3.0.36 | 3.0.36 | 3.0.36 | 3.0.36 |
| prompt\_toolkit | 3.0.36 | 3.0.36 | 3.0.36 | 3.0.36 |
| protego | 0.1.16 | 0.1.16 | 0.1.16 | |
| psutil | 5.9.0 | 5.9.0 | 5.9.0 | 5.9.0 |
| ptyprocess | 0.7.0 | 0.7.0 | 0.7.0 | 0.7.0 |
| pure\_eval | 0.2.2 | 0.2.2 | 0.2.2 | 0.2.2 |
| py-cpuinfo | 8.0.0 | 8.0.0 | 8.0.0 | |
| py-lief | 0.12.3 | 0.12.3 | 0.12.3 | 0.12.3 |
| pyarrow | 11.0.0 | 11.0.0 | 11.0.0 | |
| pyasn1 | 0.4.8 | 0.4.8 | 0.4.8 | |
| pyasn1-modules | 0.2.8 | 0.2.8 | 0.2.8 | |
| pybind11-abi | 4 | 4 | 4 | 4 |
| pycodestyle | 2.10.0 | 2.10.0 | ||
| pycosat | 0.6.4 | 0.6.4 | 0.6.4 | 0.6.4 |
| pycparser | 2.21 | 2.21 | 2.21 | 2.21 |
| pyct | 0.5.0 | 0.5.0 | 0.5.0 | 0.5.0 |
| pycurl | 7.45.2 | 7.45.2 | 7.45.2 | 7.45.2 |
| pydispatcher | 2.0.5 | 2.0.5 | 2.0.5 | |
| pydocstyle | 6.3.0 | 6.3.0 | ||
| pyerfa | 2.0.0 | 2.0.0 | 2.0.0 | 2.0.0 |
| pyflakes | 3.0.1 | 3.0.1 | 3.0.1 | 3.0.1 |
| pygments | 2.15.1 | 2.15.1 | 2.15.1 | 2.15.1 |
| pyjwt | 2.4.0 | 2.4.0 | ||
| pylint | 2.16.2 | 2.16.2 | 2.16.2 | 2.16.2 |
| pylint-venv | 2.3.0 | 2.3.0 | ||
| pyls-spyder | 0.4.0 | 0.4.0 | ||
| pyodbc | 4.0.34 | 4.0.34 | 4.0.34 | 4.0.34 |
| pyopenssl | 23.0.0 | 23.0.0 | 23.0.0 | 23.0.0 |
| pyparsing | 3.0.9 | 3.0.9 | 3.0.9 | 3.0.9 |
| pyqt | 5.15.7 | 5.15.7 | ||
| pyqt5-sip | 12.11.0 | 12.11.0 | ||
| pyqtwebengine | 5.15.7 | 5.15.7 | ||
| pyrsistent | 0.18.0 | 0.18.0 | 0.18.0 | 0.18.0 |
| pysocks | 1.7.1 | 1.7.1 | 1.7.1 | 1.7.1 |
| pytables | 3.8.0 | 3.8.0 | 3.8.0 | 3.7.0 |
| pytest | 7.3.1 | 7.3.1 | 7.3.1 | 7.3.1 |
| python | 3.11.3 | 3.11.3 | 3.11.3 | 3.11.3 |
| python-dateutil | 2.8.2 | 2.8.2 | 2.8.2 | 2.8.2 |
| python-fastjsonschema | 2.16.2 | 2.16.2 | 2.16.2 | 2.16.2 |
| python-json-logger | 2.0.7 | 2.0.7 | 2.0.7 | |
| python-libarchive-c | 2.9 | 2.9 | 2.9 | 2.9 |
| python-lmdb | 1.4.1 | 1.4.1 | 1.4.1 | 1.4.1 |
| python-lsp-black | 1.2.1 | 1.2.1 | ||
| python-lsp-jsonrpc | 1.0.0 | 1.0.0 | ||
| python-lsp-server | 1.7.2 | 1.7.2 | ||
| python-slugify | 5.0.2 | 5.0.2 | ||
| python-snappy | 0.6.1 | 0.6.1 | 0.6.1 | 0.6.1 |
| python-xxhash | 2.0.2 | 2.0.2 | ||
| pytoolconfig | 1.2.5 | 1.2.5 | ||
| pytorch | 2.0.1 | 2.0.1 | ||
| pytz | 2022.7 | 2022.7 | 2022.7 | 2022.7 |
| pyviz\_comms | 2.3.0 | 2.3.0 | 2.3.0 | 2.3.0 |
| pywavelets | 1.4.1 | 1.4.1 | 1.4.1 | 1.4.1 |
| pyxdg | 0.27 | 0.27 | ||
| pyyaml | 6.0 | 6.0 | 6.0 | 6.0 |
| pyzmq | 25.1.0 | 25.1.0 | 25.1.0 | 25.1.0 |
| qdarkstyle | 3.0.2 | 3.0.2 | ||
| qstylizer | 0.2.2 | 0.2.2 | ||
| qt-main | 5.15.2 | 5.15.2 | ||
| qt-webengine | 5.15.9 | 5.15.9 | ||
| qtawesome | 1.2.2 | 1.2.2 | ||
| qtconsole | 5.4.2 | 5.4.2 | ||
| qtpy | 2.2.0 | 2.2.0 | ||
| qtwebkit | 5.212 | 5.212 | ||
| queuelib | 1.5.0 | 1.5.0 | 1.5.0 | |
| re2 | 2022.04.01 | 2022.04.01 | 2022.04.01 | |
| readline | 8.2 | 8.2 | 8.2 | 8.2 |
| regex | 2022.7.9 | 2022.7.9 | 2022.7.9 | 2022.7.9 |
| reproc | 14.2.4 | 14.2.4 | 14.2.4 | 14.2.4 |
| reproc-cpp | 14.2.4 | 14.2.4 | 14.2.4 | 14.2.4 |
| requests | 2.29.0 | 2.29.0 | 2.29.0 | 2.29.0 |
| requests-file | 1.5.1 | 1.5.1 | 1.5.1 | |
| requests-toolbelt | 0.9.1 | 0.9.1 | 0.9.1 | 0.9.1 |
| responses | 0.13.3 | 0.13.3 | ||
| rfc3339-validator | 0.1.4 | 0.1.4 | 0.1.4 | |
| rfc3986-validator | 0.1.1 | 0.1.1 | 0.1.1 | |
| rope | 1.7.0 | 1.7.0 | ||
| rtree | 1.0.1 | 1.0.1 | ||
| ruamel.yaml | 0.17.21 | 0.17.21 | 0.17.21 | 0.17.21 |
| ruamel\_yaml | 0.17.21 | 0.17.21 | 0.17.21 | 0.17.21 |
| s3fs | 2023.4.0 | 2023.4.0 | 2023.3.0 | 2023.3.0 |
| s3transfer | 0.6.0 | 0.6.0 | ||
| sacremoses | 0.0.43 | 0.0.43 | 0.0.43 | 0.0.43 |
| scikit-image | 0.20.0 | 0.20.0 | 0.20.0 | 0.20.0 |
| scikit-learn | 1.2.2 | 1.2.2 | 1.2.2 | 1.2.2 |
| scikit-learn-intelex | 2023.1.1 | |||
| scipy | 1.10.1 | 1.10.1 | 1.10.1 | 1.10.1 |
| scrapy | 2.8.0 | 2.8.0 | 2.8.0 | |
| seaborn | 0.12.2 | 0.12.2 | 0.12.2 | 0.12.2 |
| secretstorage | 3.3.1 | 3.3.1 | ||
| send2trash | 1.8.0 | 1.8.0 | 1.8.0 | 1.8.0 |
| service\_identity | 18.1.0 | 18.1.0 | 18.1.0 | |
| setuptools | 67.8.0 | 67.8.0 | 67.8.0 | 67.8.0 |
| sip | 6.6.2 | 6.6.2 | ||
| six | 1.16.0 | 1.16.0 | 1.16.0 | 1.16.0 |
| smart\_open | 5.2.1 | 5.2.1 | 5.2.1 | |
| snappy | 1.1.9 | 1.1.9 | 1.1.9 | 1.1.9 |
| sniffio | 1.2.0 | 1.2.0 | 1.2.0 | 1.2.0 |
| snowballstemmer | 2.2.0 | 2.2.0 | 2.2.0 | 2.2.0 |
| sortedcontainers | 2.4.0 | 2.4.0 | 2.4.0 | 2.4.0 |
| soupsieve | 2.4 | 2.4 | 2.4 | 2.4 |
| sphinx | 5.0.2 | 5.0.2 | ||
| sphinxcontrib-applehelp | 1.0.2 | 1.0.2 | ||
| sphinxcontrib-devhelp | 1.0.2 | 1.0.2 | ||
| sphinxcontrib-htmlhelp | 2.0.0 | 2.0.0 | ||
| sphinxcontrib-jsmath | 1.0.1 | 1.0.1 | ||
| sphinxcontrib-qthelp | 1.0.3 | 1.0.3 | ||
| sphinxcontrib-serializinghtml | 1.1.5 | 1.1.5 | ||
| spyder | 5.4.3 | 5.4.3 | ||
| spyder-kernels | 2.4.3 | 2.4.3 | ||
| sqlalchemy | 1.4.39 | 1.4.39 | 1.4.39 | 1.4.39 |
| sqlite | 3.41.2 | 3.41.2 | 3.41.2 | 3.41.2 |
| stack\_data | 0.2.0 | 0.2.0 | 0.2.0 | 0.2.0 |
| statsmodels | 0.13.5 | 0.13.5 | 0.13.5 | 0.13.5 |
| sympy | 1.11.1 | 1.11.1 | 1.11.1 | 1.11.1 |
| tabulate | 0.8.10 | 0.8.10 | 0.8.10 | 0.8.10 |
| tbb | 2021.8.0 | 2021.8.0 | 2021.8.0 | 2021.8.0 |
| tbb4py | 2021.8.0 | 2021.8.0 | 2021.8.0 | 2021.8.0 |
| tblib | 1.7.0 | 1.7.0 | 1.7.0 | 1.7.0 |
| tenacity | 8.2.2 | 8.2.2 | 8.2.2 | 8.2.2 |
| terminado | 0.17.1 | 0.17.1 | 0.17.1 | 0.17.1 |
| text-unidecode | 1.3 | 1.3 | ||
| textdistance | 4.2.1 | 4.2.1 | ||
| threadpoolctl | 2.2.0 | 2.2.0 | 2.2.0 | 2.2.0 |
| three-merge | 0.1.1 | 0.1.1 | ||
| tifffile | 2021.7.2 | 2021.7.2 | 2021.7.2 | 2021.7.2 |
| tinycss2 | 1.2.1 | 1.2.1 | 1.2.1 | 1.2.1 |
| tk | 8.6.12 | 8.6.12 | 8.6.12 | 8.6.12 |
| tldextract | 3.2.0 | 3.2.0 | 3.2.0 | |
| tokenizers | 0.13.2 | 0.13.2 | ||
| toml | 0.10.2 | 0.10.2 | ||
| tomli | 2.0.1 | 2.0.1 | 2.0.1 | 2.0.1 |
| tomlkit | 0.11.1 | 0.11.1 | 0.11.1 | 0.11.1 |
| toolz | 0.12.0 | 0.12.0 | 0.12.0 | 0.12.0 |
| tornado | 6.2 | 6.2 | 6.2 | 6.2 |
| tqdm | 4.65.0 | 4.65.0 | 4.65.0 | 4.65.0 |
| traitlets | 5.7.1 | 5.7.1 | 5.7.1 | 5.7.1 |
| transformers | 4.29.2 | 4.29.2 | 2.1.1 | 2.1.1 |
| twisted | 22.10.0 | 22.10.0 | 22.10.0 | |
| typing-extensions | 4.6.3 | 4.6.3 | 4.6.3 | 4.6.3 |
| typing\_extensions | 4.6.3 | 4.6.3 | 4.6.3 | 4.6.3 |
| tzdata | 2023c | 2023c | 2023c | 2023c |
| uc-micro-py | 1.0.1 | 1.0.1 | ||
| ujson | 5.4.0 | 5.4.0 | ||
| unidecode | 1.2.0 | 1.2.0 | ||
| unixodbc | 2.3.11 | 2.3.11 | 2.3.11 | 2.3.11 |
| urllib3 | 1.26.16 | 1.26.16 | 1.26.16 | 1.26.16 |
| utf8proc | 2.6.1 | 2.6.1 | 2.6.1 | |
| w3lib | 1.21.0 | 1.21.0 | 1.21.0 | |
| watchdog | 2.1.6 | 2.1.6 | ||
| wcwidth | 0.2.5 | 0.2.5 | 0.2.5 | 0.2.5 |
| webencodings | 0.5.1 | 0.5.1 | 0.5.1 | 0.5.1 |
| websocket-client | 0.58.0 | 0.58.0 | 0.58.0 | 0.58.0 |
| werkzeug | 2.2.3 | 2.2.3 | 2.2.3 | 2.2.3 |
| whatthepatch | 1.0.2 | 1.0.2 | ||
| wheel | 0.38.4 | 0.38.4 | 0.38.4 | 0.38.4 |
| widgetsnbextension | 4.0.5 | 4.0.5 | 4.0.5 | 4.0.5 |
| wrapt | 1.14.1 | 1.14.1 | 1.14.1 | 1.14.1 |
| wurlitzer | 3.0.2 | 3.0.2 | ||
| xarray | 2022.11.0 | 2022.11.0 | 2022.11.0 | |
| xxhash | 0.8.0 | 0.8.0 | ||
| xyzservices | 2022.9.0 | 2022.9.0 | ||
| xz | 5.4.2 | 5.4.2 | 5.4.2 | 5.4.2 |
| y-py | 0.5.9 | 0.5.9 | 0.5.9 | |
| yaml | 0.2.5 | 0.2.5 | 0.2.5 | 0.2.5 |
| yaml-cpp | 0.7.0 | 0.7.0 | 0.7.0 | 0.7.0 |
| yapf | 0.31.0 | 0.31.0 | ||
| yarl | 1.8.1 | 1.8.1 | 1.8.1 | 1.8.1 |
| ypy-websocket | 0.8.2 | 0.8.2 | 0.8.2 | |
| zeromq | 4.3.4 | 4.3.4 | 4.3.4 | 4.3.4 |
| zfp | 0.5.5 | 0.5.5 | ||
| zict | 2.2.0 | 2.2.0 | 2.2.0 | 2.2.0 |
| zipp | 3.11.0 | 3.11.0 | 3.11.0 | 3.11.0 |
| zlib | 1.2.13 | 1.2.13 | 1.2.13 | 1.2.13 |
| zlib-ng | 2.0.7 | 2.0.7 | 2.0.7 | |
| zope | 1.0 | 1.0 | 1.0 | |
| zope.interface | 5.4.0 | 5.4.0 | 5.4.0 | |
| zstandard | 0.19.0 | 0.19.0 | 0.19.0 | 0.19.0 |
| zstd | 1.5.5 | 1.5.5 | 1.5.5 | 1.5.5 |
| Package Name | osx-arm64 | osx-64 |
|---|---|---|
| \_anaconda\_depends | 2023.07 | 2023.07 |
| abseil-cpp | 20211102.0 | 20211102.0 |
| aiobotocore | 2.5.0 | 2.4.2 |
| aiofiles | 22.1.0 | 22.1.0 |
| aiohttp | 3.8.3 | 3.8.3 |
| aioitertools | 0.7.1 | 0.7.1 |
| aiosignal | 1.2.0 | 1.2.0 |
| aiosqlite | 0.18.0 | 0.18.0 |
| alabaster | 0.7.12 | 0.7.12 |
| anaconda-catalogs | 0.2.0 | 0.2.0 |
| anaconda-client | 1.11.3 | 1.11.3 |
| anaconda-navigator | 2.4.2 | 2.4.2 |
| anaconda-project | 0.11.1 | 0.11.1 |
| anyio | 3.5.0 | 3.5.0 |
| appdirs | 1.4.4 | 1.4.4 |
| applaunchservices | 0.3.0 | 0.3.0 |
| appnope | 0.1.2 | 0.1.2 |
| appscript | 1.1.2 | 1.1.2 |
| argon2-cffi | 21.3.0 | 21.3.0 |
| argon2-cffi-bindings | 21.2.0 | 21.2.0 |
| arrow | 1.2.3 | 1.2.3 |
| arrow-cpp | 11.0.0 | 11.0.0 |
| astroid | 2.14.2 | 2.14.2 |
| astropy | 5.1 | 5.1 |
| asttokens | 2.0.5 | 2.0.5 |
| async-timeout | 4.0.2 | 4.0.2 |
| atomicwrites | 1.4.0 | 1.4.0 |
| attrs | 22.1.0 | 22.1.0 |
| automat | 20.2.0 | 20.2.0 |
| autopep8 | 1.6.0 | 1.6.0 |
| aws-c-common | 0.6.8 | 0.4.57 |
| aws-c-event-stream | 0.1.6 | 0.1.6 |
| aws-checksums | 0.1.11 | 0.1.9 |
| aws-sdk-cpp | 1.8.185 | 1.8.185 |
| babel | 2.11.0 | 2.11.0 |
| backcall | 0.2.0 | 0.2.0 |
| backports | 1.1 | 1.1 |
| backports.functools\_lru\_cache | 1.6.4 | 1.6.4 |
| backports.tempfile | 1.0 | 1.0 |
| backports.weakref | 1.0.post1 | 1.0.post1 |
| bcrypt | 3.2.0 | 3.2.0 |
| beautifulsoup4 | 4.12.2 | 4.12.2 |
| binaryornot | 0.4.4 | 0.4.4 |
| black | 23.3.0 | 23.3.0 |
| blas | 1.0 | 1.0 |
| bleach | 4.1.0 | 4.1.0 |
| blosc | 1.21.3 | 1.21.3 |
| bokeh | 3.1.1 | 3.1.1 |
| boltons | 23.0.0 | 23.0.0 |
| boost-cpp | 1.73.0 | 1.73.0 |
| boto3 | 1.24.28 | |
| botocore | 1.29.76 | 1.27.59 |
| bottleneck | 1.3.5 | 1.3.5 |
| brotli | 1.0.9 | 1.0.9 |
| brotli-bin | 1.0.9 | 1.0.9 |
| brotlipy | 0.7.0 | 0.7.0 |
| brunsli | 0.1 | 0.1 |
| bzip2 | 1.0.8 | 1.0.8 |
| c-ares | 1.19.0 | 1.19.0 |
| c-blosc2 | 2.8.0 | 2.8.0 |
| ca-certificates | 2023.05.30 | 2023.05.30 |
| cctools | 949.0.1 | 949.0.1 |
| cctools\_osx-64 | 949.0.1 | |
| cctools\_osx-arm64 | 949.0.1 | |
| certifi | 2023.5.7 | 2023.5.7 |
| cffi | 1.15.1 | 1.15.1 |
| cfitsio | 3.470 | 3.470 |
| chardet | 4.0.0 | 4.0.0 |
| charls | 2.2.0 | 2.2.0 |
| charset-normalizer | 2.0.4 | 2.0.4 |
| click | 8.0.4 | 8.0.4 |
| cloudpickle | 2.2.1 | 2.2.1 |
| clyent | 1.2.2 | 1.2.2 |
| colorama | 0.4.6 | 0.4.6 |
| colorcet | 3.0.1 | 3.0.1 |
| comm | 0.1.2 | 0.1.2 |
| conda | 23.5.0 | 23.5.0 |
| conda-build | 3.25.0 | 3.25.0 |
| conda-content-trust | 0.1.3 | 0.1.3 |
| conda-index | 0.2.3 | 0.2.3 |
| conda-libmamba-solver | 23.5.0 | 23.5.0 |
| conda-pack | 0.6.0 | 0.6.0 |
| conda-package-handling | 2.1.0 | 2.1.0 |
| conda-package-streaming | 0.8.0 | 0.8.0 |
| conda-repo-cli | 1.0.41 | 1.0.41 |
| conda-token | 0.4.0 | 0.4.0 |
| conda-verify | 3.4.2 | 3.4.2 |
| constantly | 15.1.0 | 15.1.0 |
| contourpy | 1.0.5 | 1.0.5 |
| cookiecutter | 1.7.3 | 1.7.3 |
| cryptography | 39.0.1 | 39.0.1 |
| cssselect | 1.1.0 | 1.1.0 |
| curl | 8.1.1 | 8.1.1 |
| cycler | 0.11.0 | 0.11.0 |
| cytoolz | 0.12.0 | 0.12.0 |
| dask | 2023.6.0 | 2023.6.0 |
| dask-core | 2023.6.0 | 2023.6.0 |
| datasets | 2.12.0 | |
| datashader | 0.15.0 | 0.15.0 |
| datashape | 0.5.4 | 0.5.4 |
| debugpy | 1.5.1 | 1.5.1 |
| decorator | 5.1.1 | 5.1.1 |
| defusedxml | 0.7.1 | 0.7.1 |
| diff-match-patch | 20200713 | 20200713 |
| dill | 0.3.6 | 0.3.6 |
| distributed | 2023.6.0 | 2023.6.0 |
| docstring-to-markdown | 0.11 | 0.11 |
| docutils | 0.18.1 | 0.18.1 |
| entrypoints | 0.4 | 0.4 |
| et\_xmlfile | 1.1.0 | 1.1.0 |
| executing | 0.8.3 | 0.8.3 |
| filelock | 3.9.0 | 3.9.0 |
| flake8 | 6.0.0 | 6.0.0 |
| flask | 2.2.2 | 2.2.2 |
| fmt | 9.1.0 | 9.1.0 |
| fonttools | 4.25.0 | 4.25.0 |
| freetype | 2.12.1 | 2.12.1 |
| frozenlist | 1.3.3 | 1.3.3 |
| fsspec | 2023.4.0 | 2023.3.0 |
| future | 0.18.3 | 0.18.3 |
| gensim | 4.3.0 | 4.3.0 |
| gettext | 0.21.0 | 0.21.0 |
| gflags | 2.2.2 | 2.2.2 |
| giflib | 5.2.1 | 5.2.1 |
| glib | 2.69.1 | 2.69.1 |
| glob2 | 0.7 | 0.7 |
| glog | 0.5.0 | 0.5.0 |
| gmp | 6.2.1 | 6.2.1 |
| gmpy2 | 2.1.2 | 2.1.2 |
| greenlet | 2.0.1 | 2.0.1 |
| grpc-cpp | 1.46.1 | 1.46.1 |
| gst-plugins-base | 1.14.1 | 1.14.1 |
| gstreamer | 1.14.1 | 1.14.1 |
| h5py | 3.7.0 | 3.7.0 |
| hdf5 | 1.12.1 | 1.10.6 |
| heapdict | 1.0.1 | 1.0.1 |
| holoviews | 1.16.2 | 1.16.2 |
| huggingface\_hub | 0.15.1 | |
| hvplot | 0.8.4 | 0.8.4 |
| hyperlink | 21.0.0 | 21.0.0 |
| icu | 68.1 | 58.2 |
| idna | 3.4 | 3.4 |
| imagecodecs | 2021.8.26 | 2021.8.26 |
| imageio | 2.31.1 | 2.31.1 |
| imagesize | 1.4.1 | 1.4.1 |
| imbalanced-learn | 0.10.1 | 0.10.1 |
| importlib-metadata | 6.0.0 | 6.0.0 |
| importlib\_metadata | 6.0.0 | 6.0.0 |
| incremental | 21.3.0 | 21.3.0 |
| inflection | 0.5.1 | 0.5.1 |
| iniconfig | 1.1.1 | 1.1.1 |
| intake | 0.6.8 | 0.6.8 |
| intervaltree | 3.1.0 | 3.1.0 |
| ipykernel | 6.19.2 | 6.19.2 |
| ipython | 8.12.0 | 8.12.0 |
| ipython\_genutils | 0.2.0 | 0.2.0 |
| ipywidgets | 8.0.4 | 8.0.4 |
| isort | 5.9.3 | 5.9.3 |
| itemadapter | 0.3.0 | 0.3.0 |
| itemloaders | 1.0.4 | 1.0.4 |
| itsdangerous | 2.0.1 | 2.0.1 |
| jaraco.classes | 3.2.1 | 3.2.1 |
| jedi | 0.18.1 | 0.18.1 |
| jellyfish | 0.9.0 | 0.9.0 |
| jinja2 | 3.1.2 | 3.1.2 |
| jinja2-time | 0.2.0 | 0.2.0 |
| jmespath | 0.10.0 | 0.10.0 |
| joblib | 1.2.0 | 1.2.0 |
| jpeg | 9e | 9e |
| jq | 1.6 | 1.6 |
| json5 | 0.9.6 | 0.9.6 |
| jsonpatch | 1.32 | 1.32 |
| jsonpointer | 2.1 | 2.1 |
| jsonschema | 4.17.3 | 4.17.3 |
| jupyter | 1.0.0 | 1.0.0 |
| jupyter\_client | 8.1.0 | 8.1.0 |
| jupyter\_console | 6.6.3 | 6.6.3 |
| jupyter\_core | 5.3.0 | 5.3.0 |
| jupyter\_events | 0.6.3 | 0.6.3 |
| jupyter\_server | 2.5.0 | 2.5.0 |
| jupyter\_server\_fileid | 0.9.0 | 0.9.0 |
| jupyter\_server\_terminals | 0.4.4 | 0.4.4 |
| jupyter\_server\_ydoc | 0.8.0 | 0.8.0 |
| jupyter\_ydoc | 0.2.4 | 0.2.4 |
| jupyterlab | 3.6.3 | 3.6.3 |
| jupyterlab\_pygments | 0.1.2 | 0.1.2 |
| jupyterlab\_server | 2.22.0 | 2.22.0 |
| jupyterlab\_widgets | 3.0.5 | 3.0.5 |
| jxrlib | 1.1 | 1.1 |
| keyring | 23.13.1 | 23.13.1 |
| kiwisolver | 1.4.4 | 1.4.4 |
| krb5 | 1.19.4 | 1.19.4 |
| lazy-object-proxy | 1.6.0 | 1.6.0 |
| lazy\_loader | 0.2 | 0.2 |
| lcms2 | 2.12 | 2.12 |
| ld64 | 530 | 530 |
| ld64\_osx-64 | 530 | |
| ld64\_osx-arm64 | 530 | |
| ldid | 2.1.5 | 2.1.5 |
| lerc | 3.0 | 3.0 |
| libaec | 1.0.4 | 1.0.4 |
| libarchive | 3.6.2 | 3.6.2 |
| libboost | 1.73.0 | 1.73.0 |
| libbrotlicommon | 1.0.9 | 1.0.9 |
| libbrotlidec | 1.0.9 | 1.0.9 |
| libbrotlienc | 1.0.9 | 1.0.9 |
| libclang | 14.0.6 | 14.0.6 |
| libclang13 | 14.0.6 | 14.0.6 |
| libcurl | 8.1.1 | 8.1.1 |
| libcxx | 14.0.6 | 14.0.6 |
| libdeflate | 1.17 | 1.17 |
| libedit | 3.1.20221030 | 3.1.20221030 |
| libev | 4.33 | 4.33 |
| libevent | 2.1.12 | 2.1.12 |
| libffi | 3.4.4 | 3.4.4 |
| libgfortran | 5.0.0 | 5.0.0 |
| libgfortran5 | 11.3.0 | 11.3.0 |
| libiconv | 1.16 | 1.16 |
| liblief | 0.12.3 | 0.12.3 |
| libllvm14 | 14.0.6 | 14.0.6 |
| libmamba | 1.4.1 | 1.4.1 |
| libmambapy | 1.4.1 | 1.4.1 |
| libnghttp2 | 1.52.0 | 1.52.0 |
| libopenblas | 0.3.21 | 0.3.21 |
| libpng | 1.6.39 | 1.6.39 |
| libpq | 12.9 | 12.9 |
| libprotobuf | 3.20.3 | 3.20.3 |
| libsodium | 1.0.18 | 1.0.18 |
| libsolv | 0.7.22 | 0.7.22 |
| libspatialindex | 1.9.3 | 1.9.3 |
| libssh2 | 1.10.0 | 1.10.0 |
| libthrift | 0.13.0 | 0.15.0 |
| libtiff | 4.5.0 | 4.5.0 |
| libuv | 1.44.2 | |
| libwebp | 1.2.4 | 1.2.4 |
| libwebp-base | 1.2.4 | 1.2.4 |
| libxml2 | 2.10.3 | 2.10.3 |
| libxslt | 1.1.37 | 1.1.37 |
| libzopfli | 1.0.3 | 1.0.3 |
| linkify-it-py | 2.0.0 | 2.0.0 |
| llvm-openmp | 14.0.6 | 14.0.6 |
| llvmlite | 0.40.0 | 0.40.0 |
| locket | 1.0.0 | 1.0.0 |
| lxml | 4.9.2 | 4.9.2 |
| lz4 | 4.3.2 | 4.3.2 |
| lz4-c | 1.9.4 | 1.9.4 |
| lzo | 2.10 | 2.10 |
| markdown | 3.4.1 | 3.4.1 |
| markdown-it-py | 2.2.0 | 2.2.0 |
| markupsafe | 2.1.1 | 2.1.1 |
| matplotlib | 3.7.1 | 3.7.1 |
| matplotlib-base | 3.7.1 | 3.7.1 |
| matplotlib-inline | 0.1.6 | 0.1.6 |
| mccabe | 0.7.0 | 0.7.0 |
| mdit-py-plugins | 0.3.0 | 0.3.0 |
| mdurl | 0.1.0 | 0.1.0 |
| mistune | 0.8.4 | 0.8.4 |
| more-itertools | 8.12.0 | 8.12.0 |
| mpc | 1.1.0 | 1.1.0 |
| mpfr | 4.0.2 | 4.0.2 |
| mpmath | 1.2.1 | 1.2.1 |
| msgpack-python | 1.0.3 | 1.0.3 |
| multidict | 6.0.2 | 6.0.2 |
| multipledispatch | 0.6.0 | 0.6.0 |
| multiprocess | 0.70.14 | |
| munkres | 1.1.4 | 1.1.4 |
| mypy\_extensions | 0.4.3 | 0.4.3 |
| navigator-updater | 0.4.0 | 0.4.0 |
| nbclassic | 0.5.5 | 0.5.5 |
| nbclient | 0.5.13 | 0.5.13 |
| nbconvert | 6.5.4 | 6.5.4 |
| nbformat | 5.7.0 | 5.7.0 |
| ncurses | 6.4 | 6.4 |
| nest-asyncio | 1.5.6 | 1.5.6 |
| networkx | 2.8.4 | 2.8.4 |
| ninja | 1.10.2 | |
| ninja-base | 1.10.2 | |
| nltk | 3.7 | 3.7 |
| notebook | 6.5.4 | 6.5.4 |
| notebook-shim | 0.2.2 | 0.2.2 |
| nspr | 4.35 | 4.35 |
| nss | 3.89.1 | 3.89.1 |
| numba | 0.57.0 | 0.57.0 |
| numexpr | 2.8.4 | 2.8.4 |
| numpy | 1.24.3 | 1.24.3 |
| numpy-base | 1.24.3 | 1.24.3 |
| numpydoc | 1.5.0 | 1.5.0 |
| oniguruma | 6.9.7.1 | 6.9.7.1 |
| openjpeg | 2.3.0 | 2.4.0 |
| openpyxl | 3.0.10 | 3.0.10 |
| openssl | 1.1.1u | 1.1.1u |
| orc | 1.7.4 | 1.7.4 |
| packaging | 23.0 | 23.0 |
| pandas | 1.5.3 | 1.5.3 |
| pandocfilters | 1.5.0 | 1.5.0 |
| panel | 1.1.0 | 1.1.0 |
| param | 1.13.0 | 1.13.0 |
| parsel | 1.6.0 | 1.6.0 |
| parso | 0.8.3 | 0.8.3 |
| partd | 1.2.0 | 1.2.0 |
| patch | 2.7.6 | 2.7.6 |
| pathlib | 1.0.1 | 1.0.1 |
| pathspec | 0.10.3 | 0.10.3 |
| patsy | 0.5.3 | 0.5.3 |
| pcre | 8.45 | 8.45 |
| pcre2 | 10.37 | 10.37 |
| pep8 | 1.7.1 | 1.7.1 |
| pexpect | 4.8.0 | 4.8.0 |
| pickleshare | 0.7.5 | 0.7.5 |
| pillow | 9.4.0 | 9.4.0 |
| pip | 23.1.2 | 23.1.2 |
| pkginfo | 1.9.6 | 1.9.6 |
| platformdirs | 2.5.2 | 2.5.2 |
| plotly | 5.9.0 | 5.9.0 |
| pluggy | 1.0.0 | 1.0.0 |
| ply | 3.11 | 3.11 |
| pooch | 1.4.0 | 1.4.0 |
| poyo | 0.5.0 | 0.5.0 |
| prometheus\_client | 0.14.1 | 0.14.1 |
| prompt-toolkit | 3.0.36 | 3.0.36 |
| prompt\_toolkit | 3.0.36 | 3.0.36 |
| protego | 0.1.16 | 0.1.16 |
| psutil | 5.9.0 | 5.9.0 |
| ptyprocess | 0.7.0 | 0.7.0 |
| pure\_eval | 0.2.2 | 0.2.2 |
| py-cpuinfo | 8.0.0 | 8.0.0 |
| py-lief | 0.12.3 | 0.12.3 |
| pyarrow | 11.0.0 | 11.0.0 |
| pyasn1 | 0.4.8 | 0.4.8 |
| pyasn1-modules | 0.2.8 | 0.2.8 |
| pybind11-abi | 4 | 4 |
| pycodestyle | 2.10.0 | 2.10.0 |
| pycosat | 0.6.4 | 0.6.4 |
| pycparser | 2.21 | 2.21 |
| pyct | 0.5.0 | 0.5.0 |
| pycurl | 7.45.2 | 7.45.2 |
| pydispatcher | 2.0.5 | 2.0.5 |
| pydocstyle | 6.3.0 | 6.3.0 |
| pyerfa | 2.0.0 | 2.0.0 |
| pyflakes | 3.0.1 | 3.0.1 |
| pygments | 2.15.1 | 2.15.1 |
| pyjwt | 2.4.0 | 2.4.0 |
| pylint | 2.16.2 | 2.16.2 |
| pylint-venv | 2.3.0 | 2.3.0 |
| pyls-spyder | 0.4.0 | 0.4.0 |
| pyobjc-core | 9.0 | 9.0 |
| pyobjc-framework-cocoa | 9.0 | 9.0 |
| pyobjc-framework-coreservices | 9.0 | 9.0 |
| pyobjc-framework-fsevents | 9.0 | 9.0 |
| pyodbc | 4.0.34 | 4.0.34 |
| pyopenssl | 23.0.0 | 23.0.0 |
| pyparsing | 3.0.9 | 3.0.9 |
| pyqt | 5.15.7 | 5.15.7 |
| pyqt5-sip | 12.11.0 | 12.11.0 |
| pyqtwebengine | 5.15.7 | 5.15.7 |
| pyrsistent | 0.18.0 | 0.18.0 |
| pysocks | 1.7.1 | 1.7.1 |
| pytables | 3.8.0 | 3.8.0 |
| pytest | 7.3.1 | 7.3.1 |
| python | 3.11.3 | 3.11.3 |
| python-dateutil | 2.8.2 | 2.8.2 |
| python-fastjsonschema | 2.16.2 | 2.16.2 |
| python-json-logger | 2.0.7 | 2.0.7 |
| python-libarchive-c | 2.9 | 2.9 |
| python-lmdb | 1.4.1 | 1.4.1 |
| python-lsp-black | 1.2.1 | 1.2.1 |
| python-lsp-jsonrpc | 1.0.0 | 1.0.0 |
| python-lsp-server | 1.7.2 | 1.7.2 |
| python-slugify | 5.0.2 | 5.0.2 |
| python-snappy | 0.6.1 | 0.6.1 |
| python-xxhash | 2.0.2 | |
| python.app | 3 | 3 |
| pytoolconfig | 1.2.5 | 1.2.5 |
| pytorch | 2.0.1 | |
| pytz | 2022.7 | 2022.7 |
| pyviz\_comms | 2.3.0 | 2.3.0 |
| pywavelets | 1.4.1 | 1.4.1 |
| pyyaml | 6.0 | 6.0 |
| pyzmq | 25.1.0 | 25.1.0 |
| qdarkstyle | 3.0.2 | 3.0.2 |
| qstylizer | 0.2.2 | 0.2.2 |
| qt-main | 5.15.2 | 5.15.2 |
| qt-webengine | 5.15.9 | 5.15.9 |
| qtawesome | 1.2.2 | 1.2.2 |
| qtconsole | 5.4.2 | 5.4.2 |
| qtpy | 2.2.0 | 2.2.0 |
| qtwebkit | 5.212 | 5.212 |
| queuelib | 1.5.0 | 1.5.0 |
| re2 | 2022.04.01 | 2022.04.01 |
| readline | 8.2 | 8.2 |
| regex | 2022.7.9 | 2022.7.9 |
| reproc | 14.2.4 | 14.2.4 |
| reproc-cpp | 14.2.4 | 14.2.4 |
| requests | 2.29.0 | 2.29.0 |
| requests-file | 1.5.1 | 1.5.1 |
| requests-toolbelt | 0.9.1 | 0.9.1 |
| responses | 0.13.3 | |
| rfc3339-validator | 0.1.4 | 0.1.4 |
| rfc3986-validator | 0.1.1 | 0.1.1 |
| rope | 1.7.0 | 1.7.0 |
| rtree | 1.0.1 | 1.0.1 |
| ruamel.yaml | 0.17.21 | 0.17.21 |
| ruamel\_yaml | 0.17.21 | 0.17.21 |
| s3fs | 2023.4.0 | 2023.3.0 |
| s3transfer | 0.6.0 | |
| sacremoses | 0.0.43 | 0.0.43 |
| scikit-image | 0.20.0 | 0.20.0 |
| scikit-learn | 1.2.2 | 1.2.2 |
| scipy | 1.10.1 | 1.10.1 |
| scrapy | 2.8.0 | 2.8.0 |
| seaborn | 0.12.2 | 0.12.2 |
| send2trash | 1.8.0 | 1.8.0 |
| service\_identity | 18.1.0 | 18.1.0 |
| setuptools | 67.8.0 | 67.8.0 |
| sip | 6.6.2 | 6.6.2 |
| six | 1.16.0 | 1.16.0 |
| sleef | 3.5.1 | |
| smart\_open | 5.2.1 | 5.2.1 |
| snappy | 1.1.9 | 1.1.9 |
| sniffio | 1.2.0 | 1.2.0 |
| snowballstemmer | 2.2.0 | 2.2.0 |
| sortedcontainers | 2.4.0 | 2.4.0 |
| soupsieve | 2.4 | 2.4 |
| sphinx | 5.0.2 | 5.0.2 |
| sphinxcontrib-applehelp | 1.0.2 | 1.0.2 |
| sphinxcontrib-devhelp | 1.0.2 | 1.0.2 |
| sphinxcontrib-htmlhelp | 2.0.0 | 2.0.0 |
| sphinxcontrib-jsmath | 1.0.1 | 1.0.1 |
| sphinxcontrib-qthelp | 1.0.3 | 1.0.3 |
| sphinxcontrib-serializinghtml | 1.1.5 | 1.1.5 |
| spyder | 5.4.3 | 5.4.3 |
| spyder-kernels | 2.4.3 | 2.4.3 |
| sqlalchemy | 1.4.39 | 1.4.39 |
| sqlite | 3.41.2 | 3.41.2 |
| stack\_data | 0.2.0 | 0.2.0 |
| statsmodels | 0.13.5 | 0.13.5 |
| sympy | 1.11.1 | 1.11.1 |
| tabulate | 0.8.10 | 0.8.10 |
| tapi | 1100.0.11 | 1000.10.8 |
| tbb | 2021.8.0 | 2021.8.0 |
| tbb4py | 2021.8.0 | 2021.8.0 |
| tblib | 1.7.0 | 1.7.0 |
| tenacity | 8.2.2 | 8.2.2 |
| terminado | 0.17.1 | 0.17.1 |
| text-unidecode | 1.3 | 1.3 |
| textdistance | 4.2.1 | 4.2.1 |
| threadpoolctl | 2.2.0 | 2.2.0 |
| three-merge | 0.1.1 | 0.1.1 |
| tifffile | 2021.7.2 | 2021.7.2 |
| tinycss2 | 1.2.1 | 1.2.1 |
| tk | 8.6.12 | 8.6.12 |
| tldextract | 3.2.0 | 3.2.0 |
| tokenizers | 0.13.2 | |
| toml | 0.10.2 | 0.10.2 |
| tomli | 2.0.1 | 2.0.1 |
| tomlkit | 0.11.1 | 0.11.1 |
| toolz | 0.12.0 | 0.12.0 |
| tornado | 6.2 | 6.2 |
| tqdm | 4.65.0 | 4.65.0 |
| traitlets | 5.7.1 | 5.7.1 |
| transformers | 4.29.2 | 2.1.1 |
| twisted | 22.10.0 | 22.10.0 |
| typing-extensions | 4.6.3 | 4.6.3 |
| typing\_extensions | 4.6.3 | 4.6.3 |
| tzdata | 2023c | 2023c |
| uc-micro-py | 1.0.1 | 1.0.1 |
| ujson | 5.4.0 | 5.4.0 |
| unidecode | 1.2.0 | 1.2.0 |
| unixodbc | 2.3.11 | 2.3.11 |
| urllib3 | 1.26.16 | 1.26.16 |
| utf8proc | 2.6.1 | 2.6.1 |
| w3lib | 1.21.0 | 1.21.0 |
| watchdog | 2.1.6 | 2.1.6 |
| wcwidth | 0.2.5 | 0.2.5 |
| webencodings | 0.5.1 | 0.5.1 |
| websocket-client | 0.58.0 | 0.58.0 |
| werkzeug | 2.2.3 | 2.2.3 |
| whatthepatch | 1.0.2 | 1.0.2 |
| wheel | 0.38.4 | 0.38.4 |
| widgetsnbextension | 4.0.5 | 4.0.5 |
| wrapt | 1.14.1 | 1.14.1 |
| wurlitzer | 3.0.2 | 3.0.2 |
| xarray | 2022.11.0 | 2022.11.0 |
| xlwings | 0.29.1 | 0.29.1 |
| xxhash | 0.8.0 | |
| xyzservices | 2022.9.0 | 2022.9.0 |
| xz | 5.4.2 | 5.4.2 |
| y-py | 0.5.9 | 0.5.9 |
| yaml | 0.2.5 | 0.2.5 |
| yaml-cpp | 0.7.0 | 0.7.0 |
| yapf | 0.31.0 | 0.31.0 |
| yarl | 1.8.1 | 1.8.1 |
| ypy-websocket | 0.8.2 | 0.8.2 |
| zeromq | 4.3.4 | 4.3.4 |
| zfp | 0.5.5 | 0.5.5 |
| zict | 2.2.0 | 2.2.0 |
| zipp | 3.11.0 | 3.11.0 |
| zlib | 1.2.13 | 1.2.13 |
| zlib-ng | 2.0.7 | 2.0.7 |
| zope | 1.0 | 1.0 |
| zope.interface | 5.4.0 | 5.4.0 |
| zstandard | 0.19.0 | 0.19.0 |
| zstd | 1.5.5 | 1.5.5 |
| Package Name | win-64 |
|---|---|
| \_anaconda\_depends | 2023.07 |
| abseil-cpp | 20211102.0 |
| aiobotocore | 2.4.2 |
| aiofiles | 22.1.0 |
| aiohttp | 3.8.3 |
| aioitertools | 0.7.1 |
| aiosignal | 1.2.0 |
| aiosqlite | 0.18.0 |
| alabaster | 0.7.12 |
| anaconda-catalogs | 0.2.0 |
| anaconda-client | 1.11.3 |
| anaconda-navigator | 2.4.2 |
| anaconda-project | 0.11.1 |
| anyio | 3.5.0 |
| appdirs | 1.4.4 |
| argon2-cffi | 21.3.0 |
| argon2-cffi-bindings | 21.2.0 |
| arrow | 1.2.3 |
| arrow-cpp | 11.0.0 |
| astroid | 2.14.2 |
| astropy | 5.1 |
| asttokens | 2.0.5 |
| async-timeout | 4.0.2 |
| atomicwrites | 1.4.0 |
| attrs | 22.1.0 |
| automat | 20.2.0 |
| autopep8 | 1.6.0 |
| aws-c-common | 0.4.57 |
| aws-c-event-stream | 0.1.6 |
| aws-checksums | 0.1.9 |
| aws-sdk-cpp | 1.8.185 |
| babel | 2.11.0 |
| backcall | 0.2.0 |
| backports | 1.1 |
| backports.functools\_lru\_cache | 1.6.4 |
| backports.tempfile | 1.0 |
| backports.weakref | 1.0.post1 |
| bcrypt | 3.2.0 |
| beautifulsoup4 | 4.12.2 |
| binaryornot | 0.4.4 |
| black | 23.3.0 |
| blas | 1.0 |
| bleach | 4.1.0 |
| blosc | 1.21.3 |
| bokeh | 3.1.1 |
| boltons | 23.0.0 |
| boost-cpp | 1.73.0 |
| boto3 | 1.24.28 |
| botocore | 1.27.59 |
| bottleneck | 1.3.5 |
| brotli | 1.0.9 |
| brotli-bin | 1.0.9 |
| brotlipy | 0.7.0 |
| bzip2 | 1.0.8 |
| c-ares | 1.19.0 |
| c-blosc2 | 2.8.0 |
| ca-certificates | 2023.05.30 |
| certifi | 2023.5.7 |
| cffi | 1.15.1 |
| cfitsio | 3.470 |
| chardet | 4.0.0 |
| charls | 2.2.0 |
| charset-normalizer | 2.0.4 |
| click | 8.0.4 |
| cloudpickle | 2.2.1 |
| clyent | 1.2.2 |
| colorama | 0.4.6 |
| colorcet | 3.0.1 |
| comm | 0.1.2 |
| conda | 23.5.0 |
| conda-build | 3.25.0 |
| conda-content-trust | 0.1.3 |
| conda-index | 0.2.3 |
| conda-libmamba-solver | 23.5.0 |
| conda-pack | 0.6.0 |
| conda-package-handling | 2.1.0 |
| conda-package-streaming | 0.8.0 |
| conda-repo-cli | 1.0.41 |
| conda-token | 0.4.0 |
| conda-verify | 3.4.2 |
| console\_shortcut | 0.1.1 |
| constantly | 15.1.0 |
| contourpy | 1.0.5 |
| cookiecutter | 1.7.3 |
| cryptography | 39.0.1 |
| cssselect | 1.1.0 |
| curl | 8.1.1 |
| cycler | 0.11.0 |
| cytoolz | 0.12.0 |
| daal4py | 2023.1.1 |
| dal | 2023.1.1 |
| dask | 2023.6.0 |
| dask-core | 2023.6.0 |
| datashader | 0.15.0 |
| datashape | 0.5.4 |
| debugpy | 1.5.1 |
| decorator | 5.1.1 |
| defusedxml | 0.7.1 |
| diff-match-patch | 20200713 |
| dill | 0.3.6 |
| distributed | 2023.6.0 |
| docstring-to-markdown | 0.11 |
| docutils | 0.18.1 |
| entrypoints | 0.4 |
| et\_xmlfile | 1.1.0 |
| executing | 0.8.3 |
| filelock | 3.9.0 |
| flake8 | 6.0.0 |
| flask | 2.2.2 |
| fmt | 9.1.0 |
| fonttools | 4.25.0 |
| freetype | 2.12.1 |
| frozenlist | 1.3.3 |
| fsspec | 2023.3.0 |
| future | 0.18.3 |
| gensim | 4.3.0 |
| gflags | 2.2.2 |
| giflib | 5.2.1 |
| glib | 2.69.1 |
| glob2 | 0.7 |
| glog | 0.5.0 |
| greenlet | 2.0.1 |
| gst-plugins-base | 1.18.5 |
| gstreamer | 1.18.5 |
| h5py | 3.7.0 |
| hdf5 | 1.10.6 |
| heapdict | 1.0.1 |
| holoviews | 1.16.2 |
| hvplot | 0.8.4 |
| hyperlink | 21.0.0 |
| icc\_rt | 2022.1.0 |
| icu | 58.2 |
| idna | 3.4 |
| imagecodecs | 2021.8.26 |
| imageio | 2.26.0 |
| imagesize | 1.4.1 |
| imbalanced-learn | 0.10.1 |
| importlib-metadata | 6.0.0 |
| importlib\_metadata | 6.0.0 |
| incremental | 21.3.0 |
| inflection | 0.5.1 |
| iniconfig | 1.1.1 |
| intake | 0.6.8 |
| intel-openmp | 2023.1.0 |
| intervaltree | 3.1.0 |
| ipykernel | 6.19.2 |
| ipython | 8.12.0 |
| ipython\_genutils | 0.2.0 |
| ipywidgets | 8.0.4 |
| isort | 5.9.3 |
| itemadapter | 0.3.0 |
| itemloaders | 1.0.4 |
| itsdangerous | 2.0.1 |
| jaraco.classes | 3.2.1 |
| jedi | 0.18.1 |
| jellyfish | 0.9.0 |
| jinja2 | 3.1.2 |
| jinja2-time | 0.2.0 |
| jmespath | 0.10.0 |
| joblib | 1.2.0 |
| jpeg | 9e |
| jq | 1.6 |
| json5 | 0.9.6 |
| jsonpatch | 1.32 |
| jsonpointer | 2.1 |
| jsonschema | 4.17.3 |
| jupyter | 1.0.0 |
| jupyter\_client | 8.1.0 |
| jupyter\_console | 6.6.3 |
| jupyter\_core | 5.3.0 |
| jupyter\_events | 0.6.3 |
| jupyter\_server | 2.5.0 |
| jupyter\_server\_fileid | 0.9.0 |
| jupyter\_server\_terminals | 0.4.4 |
| jupyter\_server\_ydoc | 0.8.0 |
| jupyter\_ydoc | 0.2.4 |
| jupyterlab | 3.6.3 |
| jupyterlab\_pygments | 0.1.2 |
| jupyterlab\_server | 2.22.0 |
| jupyterlab\_widgets | 3.0.5 |
| jxrlib | 1.1 |
| keyring | 23.13.1 |
| kiwisolver | 1.4.4 |
| krb5 | 1.19.4 |
| lazy-object-proxy | 1.6.0 |
| lazy\_loader | 0.2 |
| lcms2 | 2.12 |
| lerc | 3.0 |
| libaec | 1.0.4 |
| libarchive | 3.6.2 |
| libboost | 1.73.0 |
| libbrotlicommon | 1.0.9 |
| libbrotlidec | 1.0.9 |
| libbrotlienc | 1.0.9 |
| libclang | 14.0.6 |
| libclang13 | 14.0.6 |
| libcurl | 8.1.1 |
| libdeflate | 1.17 |
| libevent | 2.1.12 |
| libffi | 3.4.4 |
| libiconv | 1.16 |
| liblief | 0.12.3 |
| libllvm14 | 14.0.6 |
| libmamba | 1.4.1 |
| libmambapy | 1.4.1 |
| libogg | 1.3.5 |
| libpng | 1.6.39 |
| libprotobuf | 3.20.3 |
| libsodium | 1.0.18 |
| libsolv | 0.7.22 |
| libspatialindex | 1.9.3 |
| libssh2 | 1.10.0 |
| libthrift | 0.15.0 |
| libtiff | 4.5.0 |
| libvorbis | 1.3.7 |
| libwebp | 1.2.4 |
| libwebp-base | 1.2.4 |
| libxml2 | 2.10.3 |
| libxslt | 1.1.37 |
| libzopfli | 1.0.3 |
| linkify-it-py | 2.0.0 |
| llvmlite | 0.40.0 |
| locket | 1.0.0 |
| lxml | 4.9.2 |
| lz4 | 4.3.2 |
| lz4-c | 1.9.4 |
| lzo | 2.10 |
| m2-msys2-runtime | 2.5.0.17080.65c939c |
| m2-patch | 2.7.5 |
| m2w64-libwinpthread-git | 5.0.0.4634.697f757 |
| markdown | 3.4.1 |
| markdown-it-py | 2.2.0 |
| markupsafe | 2.1.1 |
| matplotlib | 3.7.1 |
| matplotlib-base | 3.7.1 |
| matplotlib-inline | 0.1.6 |
| mccabe | 0.7.0 |
| mdit-py-plugins | 0.3.0 |
| mdurl | 0.1.0 |
| menuinst | 1.4.19 |
| mistune | 0.8.4 |
| mkl | 2023.1.0 |
| mkl-service | 2.4.0 |
| mkl\_fft | 1.3.6 |
| mkl\_random | 1.2.2 |
| more-itertools | 8.12.0 |
| mpmath | 1.2.1 |
| msgpack-python | 1.0.3 |
| msys2-conda-epoch | 20160418 |
| multidict | 6.0.2 |
| multipledispatch | 0.6.0 |
| munkres | 1.1.4 |
| mypy\_extensions | 0.4.3 |
| navigator-updater | 0.4.0 |
| nbclassic | 0.5.5 |
| nbclient | 0.5.13 |
| nbconvert | 6.5.4 |
| nbformat | 5.7.0 |
| nest-asyncio | 1.5.6 |
| networkx | 2.8.4 |
| nltk | 3.7 |
| notebook | 6.5.4 |
| notebook-shim | 0.2.2 |
| numba | 0.57.0 |
| numexpr | 2.8.4 |
| numpy | 1.24.3 |
| numpy-base | 1.24.3 |
| numpydoc | 1.5.0 |
| openjpeg | 2.4.0 |
| openpyxl | 3.0.10 |
| openssl | 1.1.1u |
| orc | 1.7.4 |
| packaging | 23.0 |
| pandas | 1.5.3 |
| pandocfilters | 1.5.0 |
| panel | 1.1.0 |
| param | 1.13.0 |
| paramiko | 2.8.1 |
| parsel | 1.6.0 |
| parso | 0.8.3 |
| partd | 1.2.0 |
| pathlib | 1.0.1 |
| pathspec | 0.10.3 |
| patsy | 0.5.3 |
| pcre | 8.45 |
| pcre2 | 10.37 |
| pep8 | 1.7.1 |
| pexpect | 4.8.0 |
| pickleshare | 0.7.5 |
| pillow | 9.4.0 |
| pip | 23.1.2 |
| pkginfo | 1.9.6 |
| platformdirs | 2.5.2 |
| plotly | 5.9.0 |
| pluggy | 1.0.0 |
| ply | 3.11 |
| pooch | 1.4.0 |
| powershell\_shortcut | 0.0.1 |
| poyo | 0.5.0 |
| prometheus\_client | 0.14.1 |
| prompt-toolkit | 3.0.36 |
| prompt\_toolkit | 3.0.36 |
| protego | 0.1.16 |
| psutil | 5.9.0 |
| ptyprocess | 0.7.0 |
| pure\_eval | 0.2.2 |
| py-cpuinfo | 8.0.0 |
| py-lief | 0.12.3 |
| pyarrow | 11.0.0 |
| pyasn1 | 0.4.8 |
| pyasn1-modules | 0.2.8 |
| pybind11-abi | 4 |
| pycodestyle | 2.10.0 |
| pycosat | 0.6.4 |
| pycparser | 2.21 |
| pyct | 0.5.0 |
| pycurl | 7.45.2 |
| pydispatcher | 2.0.5 |
| pydocstyle | 6.3.0 |
| pyerfa | 2.0.0 |
| pyflakes | 3.0.1 |
| pygments | 2.15.1 |
| pyjwt | 2.4.0 |
| pylint | 2.16.2 |
| pylint-venv | 2.3.0 |
| pyls-spyder | 0.4.0 |
| pynacl | 1.5.0 |
| pyodbc | 4.0.34 |
| pyopenssl | 23.0.0 |
| pyparsing | 3.0.9 |
| pyqt | 5.15.7 |
| pyqt5-sip | 12.11.0 |
| pyqtwebengine | 5.15.7 |
| pyrsistent | 0.18.0 |
| pysocks | 1.7.1 |
| pytables | 3.8.0 |
| pytest | 7.3.1 |
| python | 3.11.3 |
| python-dateutil | 2.8.2 |
| python-fastjsonschema | 2.16.2 |
| python-json-logger | 2.0.7 |
| python-libarchive-c | 2.9 |
| python-lmdb | 1.4.1 |
| python-lsp-black | 1.2.1 |
| python-lsp-jsonrpc | 1.0.0 |
| python-lsp-server | 1.7.2 |
| python-slugify | 5.0.2 |
| python-snappy | 0.6.1 |
| pytoolconfig | 1.2.5 |
| pytz | 2022.7 |
| pyviz\_comms | 2.3.0 |
| pywavelets | 1.4.1 |
| pywin32 | 305 |
| pywin32-ctypes | 0.2.0 |
| pywinpty | 2.0.10 |
| pyyaml | 6.0 |
| pyzmq | 25.1.0 |
| qdarkstyle | 3.0.2 |
| qstylizer | 0.2.2 |
| qt-main | 5.15.2 |
| qt-webengine | 5.15.9 |
| qtawesome | 1.2.2 |
| qtconsole | 5.4.2 |
| qtpy | 2.2.0 |
| qtwebkit | 5.212 |
| queuelib | 1.5.0 |
| re2 | 2022.04.01 |
| regex | 2022.7.9 |
| reproc | 14.2.4 |
| reproc-cpp | 14.2.4 |
| requests | 2.29.0 |
| requests-file | 1.5.1 |
| requests-toolbelt | 0.9.1 |
| rfc3339-validator | 0.1.4 |
| rfc3986-validator | 0.1.1 |
| rope | 1.7.0 |
| rtree | 1.0.1 |
| ruamel.yaml | 0.17.21 |
| ruamel\_yaml | 0.17.21 |
| s3fs | 2023.3.0 |
| s3transfer | 0.6.0 |
| sacremoses | 0.0.43 |
| scikit-image | 0.20.0 |
| scikit-learn | 1.2.2 |
| scikit-learn-intelex | 2023.1.1 |
| scipy | 1.10.1 |
| scrapy | 2.8.0 |
| seaborn | 0.12.2 |
| send2trash | 1.8.0 |
| service\_identity | 18.1.0 |
| setuptools | 67.8.0 |
| sip | 6.6.2 |
| six | 1.16.0 |
| smart\_open | 5.2.1 |
| snappy | 1.1.9 |
| sniffio | 1.2.0 |
| snowballstemmer | 2.2.0 |
| sortedcontainers | 2.4.0 |
| soupsieve | 2.4 |
| sphinx | 5.0.2 |
| sphinxcontrib-applehelp | 1.0.2 |
| sphinxcontrib-devhelp | 1.0.2 |
| sphinxcontrib-htmlhelp | 2.0.0 |
| sphinxcontrib-jsmath | 1.0.1 |
| sphinxcontrib-qthelp | 1.0.3 |
| sphinxcontrib-serializinghtml | 1.1.5 |
| spyder | 5.4.3 |
| spyder-kernels | 2.4.3 |
| sqlalchemy | 1.4.39 |
| sqlite | 3.41.2 |
| stack\_data | 0.2.0 |
| statsmodels | 0.13.5 |
| sympy | 1.11.1 |
| tabulate | 0.8.10 |
| tbb | 2021.8.0 |
| tbb4py | 2021.8.0 |
| tblib | 1.7.0 |
| tenacity | 8.2.2 |
| terminado | 0.17.1 |
| text-unidecode | 1.3 |
| textdistance | 4.2.1 |
| threadpoolctl | 2.2.0 |
| three-merge | 0.1.1 |
| tifffile | 2021.7.2 |
| tinycss2 | 1.2.1 |
| tk | 8.6.12 |
| tldextract | 3.2.0 |
| toml | 0.10.2 |
| tomli | 2.0.1 |
| tomlkit | 0.11.1 |
| toolz | 0.12.0 |
| tornado | 6.2 |
| tqdm | 4.65.0 |
| traitlets | 5.7.1 |
| transformers | 2.1.1 |
| twisted | 22.10.0 |
| twisted-iocpsupport | 1.0.2 |
| typing-extensions | 4.6.3 |
| typing\_extensions | 4.6.3 |
| tzdata | 2023c |
| uc-micro-py | 1.0.1 |
| ujson | 5.4.0 |
| unidecode | 1.2.0 |
| urllib3 | 1.26.16 |
| utf8proc | 2.6.1 |
| vc | 14.2 |
| vs2015\_runtime | 14.27.29016 |
| w3lib | 1.21.0 |
| watchdog | 2.1.6 |
| wcwidth | 0.2.5 |
| webencodings | 0.5.1 |
| websocket-client | 0.58.0 |
| werkzeug | 2.2.3 |
| whatthepatch | 1.0.2 |
| wheel | 0.38.4 |
| widgetsnbextension | 4.0.5 |
| win\_inet\_pton | 1.1.0 |
| winpty | 0.4.3 |
| wrapt | 1.14.1 |
| xarray | 2022.11.0 |
| xlwings | 0.29.1 |
| xyzservices | 2022.9.0 |
| xz | 5.4.2 |
| y-py | 0.5.9 |
| yaml | 0.2.5 |
| yaml-cpp | 0.7.0 |
| yapf | 0.31.0 |
| yarl | 1.8.1 |
| ypy-websocket | 0.8.2 |
| zeromq | 4.3.4 |
| zfp | 0.5.5 |
| zict | 2.2.0 |
| zipp | 3.11.0 |
| zlib | 1.2.13 |
| zlib-ng | 2.0.7 |
| zope | 1.0 |
| zope.interface | 5.4.0 |
| zstandard | 0.19.0 |
| zstd | 1.5.5 |
| Name | Version | Summary / License |
|---|---|---|
| [alabaster](http://www.sphinx-doc.org/en/stable/index.html) | 0.7.12 | Configurable, Python 2+3 compatible Sphinx theme. / BSD 3-Clause |
| [anaconda-navigator](https://github.com/anaconda-distribution/navigator) | 2.4.0 | Anaconda Navigator / proprietary - Continuum Analytics, Inc. |
| [anyio](https://github.com/agronholm/anyio) | 3.5.0 | High level compatibility layer for multiple asynchronous event loop implementations on Python / MIT |
| [appdirs](http://github.com/ActiveState/appdirs) | 1.4.4 | A small Python module for determining appropriate platform-specific dirs. / MIT |
| [argon2-cffi](https://argon2-cffi.readthedocs.org/) | 21.3.0 | The secure Argon2 password hashing algorithm. / MIT |
| [argon2-cffi-bindings](https://github.com/hynek/argon2-cffi-bindings) | 21.2.0 | Low-level Python CFFI Bindings for Argon2 / MIT |
| [arrow](https://github.com/arrow-py/arrow) | 1.2.3 | Better dates & times for Python / Apache-2.0 |
| [astroid](https://github.com/PyCQA/astroid) | 2.14.2 | A abstract syntax tree for Python with inference support. / LGPL-2.1-or-later |
| [astropy](https://www.astropy.org/) | 5.1 | Community-developed Python Library for Astronomy / BSD-3-Clause |
| [asttokens](https://github.com/gristlabs/asttokens) | 2.0.5 | The asttokens module annotates Python abstract syntax trees (ASTs) with the positions of tokens and text in the source code that generated them. / Apache-2.0 |
| [atomicwrites](https://github.com/untitaker/python-atomicwrites) | 1.4.0 | Atomic file writes / MIT |
| [attrs](https://www.attrs.org/) | 22.1.0 | attrs is the Python package that will bring back the joy of writing classes by relieving you from the drudgery of implementing object protocols (aka dunder methods). / MIT |
| [automat](https://github.com/glyph/Automat) | 20.2.0 | self-service finite-state machines for the programmer on the go / MIT |
| [autopep8](https://github.com/hhatto/autopep8) | 1.6.0 | A tool that automatically formats Python code to conform to the PEP 8 style guide / MIT |
| [babel](https://babel.pocoo.org/) | 2.11.0 | Utilities to internationalize and localize Python applications / BSD-3-Clause |
| [backcall](https://github.com/takluyver/backcall/) | 0.2.0 | Specifications for callback functions passed in to an API / BSD-3-Clause |
| [bcrypt](https://github.com/pyca/bcrypt/) | 3.2.0 | Modern password hashing for your software and your servers / Apache-2.0 |
| [beautifulsoup4](https://www.crummy.com/software/BeautifulSoup/) | 4.11.1 | Python library designed for screen-scraping / MIT |
| [binaryornot](https://github.com/audreyr/binaryornot) | 0.4.4 | Ultra-lightweight pure Python package to check if a file is binary or text. / BSD-3-Clause |
| [black](https://github.com/psf/black) | 22.6.0 | The Uncompromising Code Formatter / MIT |
| [blas](http://www.netlib.org/lapack) | 1.0 | Linear Algebra PACKage / BSD-3-Clause |
| [bleach](https://github.com/mozilla/bleach) | 4.1.0 | Easy, whitelist-based HTML-sanitizing tool / Apache-2.0 |
| [blosc](https://www.blosc.org/) | 1.21.3 | A blocking, shuffling and loss-less compression library that can be faster than memcpy() / BSD-3-Clause |
| [bokeh](https://bokeh.org/) | 2.4.3 | Bokeh is an interactive visualization library for modern web browsers. / BSD-3-Clause |
| [bottleneck](https://github.com/pydata/bottleneck) | 1.3.5 | Fast NumPy array functions written in Cython. / BSD-2-Clause |
| [brotli](https://github.com/google/brotli) | 1.0.9 | Brotli compression format / MIT |
| [brotli-bin](https://github.com/google/brotli) | 1.0.9 | Brotli compression format / MIT |
| [brotlipy](https://github.com/python-hyper/brotlipy) | 0.7.0 | Python bindings to the Brotli compression library / MIT |
| [bzip2](http://www.bzip.org/) | 1.0.8 | high-quality data compressor / bzip2 |
| [ca-certificates](https://curl.se/docs/caextract.html) | 2023.01.10 | Certificates for use with other packages. / MPL-2.0 |
| [certifi](https://certifi.io/) | 2022.12.7 | Python package for providing Mozilla’s CA Bundle. / MPL-2.0 |
| [cffi](https://cffi.readthedocs.org/) | 1.15.1 | Foreign Function Interface for Python calling C code. / MIT |
| [cfitsio](https://heasarc.gsfc.nasa.gov/fitsio/fitsio.html) | 3.470 | A library for reading and writing FITS files / Other |
| [chardet](https://github.com/chardet/chardet) | 4.0.0 | Universal character encoding detector / LGPL2 |
| [charls](https://github.com/team-charls/charls) | 2.2.0 | CharLS is a C++ implementation of the JPEG-LS standard for lossless and near-lossless image compression and decompression. JPEG-LS is a low-complexity image compression standard that matches JPEG 2000 compression ratios. / BSD-3-Clause |
| [charset-normalizer](https://github.com/ousret/charset_normalizer) | 2.0.4 | The Real First Universal Charset Detector. Open, modern and actively maintained alternative to Chardet. / MIT |
| [click](https://palletsprojects.com/p/click) | 8.0.4 | Python composable command line interface toolkit / BSD-3-Clause |
| [cloudpickle](https://github.com/cloudpipe/cloudpickle) | 2.0.0 | Extended pickling support for Python objects / BSD-3-Clause |
| [colorama](https://github.com/tartley/colorama) | 0.4.6 | Cross-platform colored terminal text / BSD-3-Clause |
| [colorcet](https://colorcet.holoviz.org/index.html) | 3.0.1 | Collection of perceptually uniform colormaps / CC-BY-4.0 |
| [comm](https://github.com/ipython/comm) | 0.1.2 | Python Comm implementation for the Jupyter kernel protocol / BSD-3-Clause |
| [conda](https://docs.conda.io) | 23.1.0 | OS-agnostic, system-level binary package and environment manager. / BSD-3-Clause |
| [conda-build](https://github.com/conda/conda-build) | 3.23.3 | tools for building conda packages / BSD-3-Clause |
| [conda-env](https://github.com/conda/conda-env) | 2.6.0 | Tools for interacting with conda environments. / BSD 3-Clause |
| [conda-verify](https://github.com/conda/conda-verify) | 3.4.2 | tool for validating conda recipes and conda packages / BSD 3-Clause |
| [constantly](https://github.com/twisted/constantly) | 15.1.0 | Symbolic constants in Python / MIT |
| [contourpy](https://github.com/contourpy/contourpy) | 1.0.5 | Python library for calculating contours of 2D quadrilateral grids. / BSD-3-Clause |
| [cookiecutter](https://github.com/cookiecutter/cookiecutter) | 1.7.3 | A command-line utility that creates projects from cookiecutters (project templates), e.g. creating a Python package project from a Python package project template. / BSD-3-Clause |
| [cryptography](https://github.com/pyca/cryptography) | 39.0.1 | Provides cryptographic recipes and primitives to Python developers / (BSD-3-Clause OR Apache-2.0) AND PSF-2.0 AND MIT |
| [cssselect](https://pythonhosted.org/cssselect/) | 1.1.0 | CSS Selectors for Python / BSD 3-Clause |
| [curl](https://curl.se/) | 7.87.0 | tool and library for transferring data with URL syntax / curl |
| [cycler](http://matplotlib.org/cycler) | 0.11.0 | Composable style cycles. / BSD-3-Clause |
| [cytoolz](https://github.com/pytoolz/cytoolz) | 0.12.0 | Cython implementation of Toolz. High performance functional utilities / BSD-3-Clause |
| [daal4py](https://intelpython.github.io/daal4py/) | 2023.0.2 | A convenient Python API to Intel (R) oneAPI Data Analytics Library / Apache-2.0 |
| [dal](https://software.intel.com/content/www/us/en/develop/tools.html) | 2023.0.1 | Intel® oneDAL runtime libraries / Intel Simplified Software License |
| [dask](https://dask.org/) | 2022.7.0 | Parallel PyData with Task Scheduling / BSD-3-Clause |
| [dask-core](https://github.com/dask/dask/) | 2022.7.0 | Parallel Python with task scheduling / BSD-3-Clause |
| [datashader](https://datashader.org) | 0.14.4 | Data visualization toolchain based on aggregating into a grid / BSD-3-Clause |
| [datashape](http://datashape.pydata.org) | 0.5.4 | A data description language. / BSD 2-Clause |
| [debugpy](https://github.com/Microsoft/debugpy) | 1.5.1 | An implementation of the Debug Adapter Protocol for Python / MIT |
| [decorator](https://github.com/micheles/decorator) | 5.1.1 | Better living through Python with decorators. / BSD-2-Clause |
| [defusedxml](https://bitbucket.org/tiran/defusedxml) | 0.7.1 | XML bomb protection for Python stdlib modules / PSF 2.0 |
| [diff-match-patch](http://code.google.com/p/google-diff-match-patch/) | 20200713 | Diff Match Patch is a high-performance library in multiple languages that manipulates plain text / Apache-2.0 |
| [dill](https://github.com/uqfoundation/dill) | 0.3.6 | Serialize all of python (almost) / BSD-3-Clause |
| [distributed](https://distributed.readthedocs.io/en/latest/) | 2022.7.0 | Distributed computing with Dask / BSD-3-Clause |
| [docstring-to-markdown](https://pypi.org/project/docstring-to-markdown) | 0.11 | On the fly conversion of Python docstrings to markdown / LGPL-2.1-or-later |
| [docutils](https://docutils.sourceforge.io/) | 0.18.1 | Docutils – Python Documentation Utilities / LicenseRef-Public-Domain-Dedictation and BSD-2-Clause and LicenseRef-PSF-2.1.1 and GPL-3.0-or-later |
| [entrypoints](https://github.com/takluyver/entrypoints) | 0.4 | Discover and load entry points from installed packages. / MIT License |
| [et\_xmlfile](https://foss.heptapod.net/openpyxl/et_xmlfile) | 1.1.0 | An implementation of lxml.xmlfile for the standard library / MIT AND PSF-2.0 |
| [executing](https://pypi.org/project/executing) | 0.8.3 | Get the currently executing AST node of a frame, and other information / MIT |
| [filelock](https://github.com/tox-dev/py-filelock) | 3.9.0 | A platform independent file lock. / Unlicense |
| [flake8](https://flake8.pycqa.org/) | 6.0.0 | Your Tool For Style Guide Enforcement / MIT |
| [flask](https://palletsprojects.com/p/flask) | 2.2.2 | A simple framework for building complex web applications. / BSD-3-Clause |
| [flit-core](https://flit.readthedocs.io/) | 3.6.0 | Simplified packaging of Python modules / BSD-3-Clause |
| [fonttools](https://github.com/fonttools/fonttools) | 4.25.0 | fontTools is a library for manipulating fonts, written in Python. / MIT |
| [freetype](https://freetype.org/) | 2.12.1 | A Free, High-Quality, and Portable Font Engine / GPL-2-only and LicenseRef-FreeType |
| [fsspec](https://github.com/fsspec/filesystem_spec) | 2022.11.0 | A specification for pythonic filesystems / BSD-3-Clause |
| [future](https://python-future.org) | 0.18.3 | Clean single-source support for Python 3 and 2 / MIT |
| [gensim](https://github.com/RaRe-Technologies/gensim) | 4.3.0 | Topic Modelling for Humans / LGPL-2.1-only |
| [giflib](https://giflib.sourceforge.net) | 5.2.1 | Library for reading and writing gif images / MIT |
| [glib](https://developer.gnome.org/glib/) | 2.69.1 | Provides core application building blocks for libraries and applications written in C. / LGPL-2.1-or-later |
| [greenlet](https://github.com/python-greenlet/greenlet) | 2.0.1 | Lightweight in-process concurrent programming / MIT |
| [gst-plugins-base](http://gstreamer.freedesktop.org/) | 1.18.5 | GStreamer Base Plug-ins / GPL2 |
| [gstreamer](http://gstreamer.freedesktop.org/) | 1.18.5 | Library for constructing graphs of media-handling components / LGPL 2 |
| [h5py](https://www.h5py.org/) | 3.7.0 | Read and write HDF5 files from Python / BSD-3-Clause |
| [hdf5](http://www.hdfgroup.org/HDF5/) | 1.10.6 | HDF5 is a data model, library, and file format for storing and managing data / HDF5 |
| [heapdict](http://stutzbachenterprises.com/) | 1.0.1 | A heap with decrease-key and increase-key operations / BSD 3-Clause |
| [holoviews](https://holoviews.org) | 1.15.4 | Stop plotting your data - annotate your data and let it visualize itself. / BSD-3-Clause |
| [huggingface\_hub](https://github.com/huggingface/huggingface_hub) | 0.10.1 | Client library to download and publish models, datasets and other repos on the huggingface.co hub / Apache-2.0 |
| [hvplot](https://hvplot.holoviz.org) | 0.8.2 | A high-level plotting API for the PyData ecosystem built on HoloViews / BSD-3-Clause |
| [hyperlink](https://github.com/python-hyper/hyperlink) | 21.0.0 | Immutable, Pythonic, correct URLs. / MIT |
| icc\_rt | 2022.1.0 | Intel runtime libraries for C, C++ and Fortran compilers / Intel proprietary |
| [icu](http://site.icu-project.org/) | 58.2 | International Components for Unicode. / MIT |
| [idna](https://github.com/kjd/idna) | 3.4 | Internationalized Domain Names in Applications (IDNA). / BSD-3-Clause |
| [imagecodecs](https://www.lfd.uci.edu/~gohlke/) | 2021.8.26 | Image transformation, compression, and decompression codecs / BSD-3-Clause |
| [imageio](https://imageio.github.io) | 2.26.0 | A Python library for reading and writing image data / BSD-2-Clause |
| [imagesize](https://github.com/shibukawa/imagesize_py) | 1.4.1 | Getting image size from png/jpeg/jpeg2000/gif file / MIT |
| [imbalanced-learn](https://github.com/scikit-learn-contrib/imbalanced-learn) | 0.10.1 | Python module to balance data set using under- and over-sampling / MIT |
| [importlib-metadata](https://github.com/python/importlib_metadata) | 4.11.3 | A library to access the metadata for a Python package. / Apache-2.0 |
| [importlib\_metadata](https://github.com/python/importlib_metadata) | 4.11.3 | A library to access the metadata for a Python package. / Apache-2.0 |
| [incremental](https://github.com/hawkowl/incremental) | 21.3.0 | Incremental is a small library that versions your Python projects. / MIT |
| [inflection](http://github.com/jpvanhal/inflection) | 0.5.1 | A port of Ruby on Rails inflector to Python / MIT |
| [iniconfig](http://github.com/RonnyPfannschmidt/iniconfig) | 1.1.1 | iniconfig: brain-dead simple config-ini parsing / MIT |
| [intake](https://github.com/intake/intake) | 0.6.7 | Data load and catalog system / BSD-2-Clause |
| [intel-openmp](https://software.intel.com/en-us/node/522690) | 2021.4.0 | Math library for Intel and compatible processors / LicenseRef-ProprietaryIntel |
| [intervaltree](https://github.com/chaimleib/intervaltree) | 3.1.0 | Editable interval tree data structure for Python 2 and 3 / Apache-2.0 |
| [ipykernel](https://ipython.org) | 6.19.2 | IPython Kernel for Jupyter / BSD-3-Clause |
| [ipython](https://ipython.org) | 8.10.0 | IPython: Productive Interactive Computing / BSD-3-Clause |
| [ipython\_genutils](http://ipython.org) | 0.2.0 | vestigial utilities from IPython / BSD 3-Clause |
| [ipywidgets](https://github.com/ipython/ipywidgets) | 7.6.5 | Jupyter Interactive Widgets / BSD-3-Clause |
| [isort](https://github.com/timothycrosley/isort) | 5.9.3 | A Python utility / library to sort Python imports. / MIT |
| [itemadapter](https://github.com/scrapy/itemadapter) | 0.3.0 | Common interface for different data containers / BSD-3-Clause |
| [itemloaders](https://github.com/scrapy/itemloaders) | 1.0.4 | Collect data from HTML and XML sources / BSD-3-Clause |
| [itsdangerous](https://github.com/pallets/itsdangerous) | 2.0.1 | Various helpers to pass trusted data to untrusted environments. / BSD-3-Clause |
| [jedi](https://github.com/davidhalter/jedi/) | 0.18.1 | An autocompletion tool for Python that can be used for text editors. / MIT |
| [jellyfish](https://github.com/jamesturk/jellyfish) | 0.9.0 | a library for doing approximate and phonetic matching of strings. / BSD-2-Clause |
| [jinja2](https://palletsprojects.com/p/jinja/) | 3.1.2 | A very fast and expressive template engine. / BSD-3-Clause |
| [jinja2-time](https://github.com/hackebrot/jinja2-time) | 0.2.0 | Jinja2 Extension for Dates and Times / MIT |
| [jmespath](http://jmespath.org/) | 0.10.0 | Query language for JSON / MIT |
| [joblib](https://joblib.readthedocs.io/en/latest/) | 1.1.1 | Lightweight pipelining: using Python functions as pipeline jobs. / BSD-3-Clause |
| [jpeg](https://www.ijg.org/) | 9e | read/write jpeg COM, EXIF, IPTC medata / IJG |
| [jq](http://stedolan.github.io/jq/) | 1.6 | A command-line JSON processor. / MIT |
| [json5](https://github.com/dpranke/pyjson5) | 0.9.6 | A Python implementation of the JSON5 data format / Apache-2.0 |
| [jsonschema](https://github.com/python-jsonschema/jsonschema) | 4.17.3 | An implementation of JSON Schema validation for Python / MIT |
| [jupyter](https://jupyter.org) | 1.0.0 | Jupyter metapackage. Install all the Jupyter components in one go. / BSD-3-Clause |
| [jupyter\_client](https://jupyter.org) | 7.3.4 | Jupyter protocol implementation and client libraries. / BSD-3-Clause |
| [jupyter\_console](https://jupyter.org) | 6.6.2 | Jupyter terminal console / BSD-3-Clause |
| [jupyter\_core](https://jupyter.org) | 5.2.0 | Core common functionality of Jupyter projects. / BSD-3-Clause |
| [jupyter\_server](https://jupyter.org) | 1.23.4 | Jupyter Server / BSD-3-Clause |
| [jupyterlab](https://github.com/jupyterlab/jupyterlab) | 3.5.3 | JupyterLab PRE-ALPHA / BSD-3-Clause |
| [jupyterlab\_pygments](http://github.com/JupyterLab/jupyterlab_pygments) | 0.1.2 | Pygments syntax coloring scheme making use of the JupyterLab CSS variables / BSD-3-Clause |
| [jupyterlab\_server](https://github.com/jupyterlab/jupyterlab_server) | 2.19.0 | A set of server components for JupyterLab and JupyterLab like applications. / BSD-3-Clause |
| [jupyterlab\_widgets](https://github.com/jupyter-widgets/ipywidgets) | 1.0.0 | JupyterLab extension providing HTML widgets / BSD-3-Clause |
| [jxrlib](https://packages.debian.org/source/sid/jxrlib) | 1.1 | jxrlib - JPEG XR Library by Microsoft, built from Debian hosted sources. / BSD-2-Clause |
| [keyring](https://github.com/jaraco/keyring) | 23.4.0 | Store and access your passwords safely / MIT |
| [kiwisolver](https://github.com/nucleic/kiwi) | 1.4.4 | An efficient C++ implementation of the Cassowary constraint solver / BSD-3-Clause |
| [lazy-object-proxy](https://github.com/ionelmc/python-lazy-object-proxy) | 1.6.0 | A fast and thorough lazy object proxy / BSD-2-Clause |
| [lcms2](http://www.littlecms.com/) | 2.12 | Open Source Color Management Engine / MIT |
| [lerc](https://github.com/Esri/lerc) | 3.0 | LERC - Limited Error Raster Compression / Apache-2.0 |
| [libaec](https://gitlab.dkrz.de/k202009/libaec) | 1.0.4 | Adaptive Entropy Coding library / BSD-2-Clause |
| [libbrotlicommon](https://github.com/google/brotli) | 1.0.9 | Brotli compression format / MIT |
| [libbrotlidec](https://github.com/google/brotli) | 1.0.9 | Brotli compression format / MIT |
| [libbrotlienc](https://github.com/google/brotli) | 1.0.9 | Brotli compression format / MIT |
| [libclang](https://llvm.org/) | 12.0.0 | Development headers and libraries for Clang / Apache-2.0 WITH LLVM-exception |
| [libcurl](https://curl.se/) | 7.87.0 | tool and library for transferring data with URL syntax / curl |
| [libdeflate](https://github.com/ebiggers/libdeflate) | 1.17 | libdeflate is a library for fast, whole-buffer DEFLATE-based compression and decompression. / MIT |
| [libffi](https://sourceware.org/libffi/) | 3.4.2 | A Portable Foreign Function Interface Library / MIT |
| [libiconv](https://www.gnu.org/software/libiconv/) | 1.16 | Provides iconv for systems which don’t have one (or that cannot convert from/to Unicode.) / GPL-3.0-or-later |
| [libogg](https://www.xiph.org/) | 1.3.5 | OGG media container / BSD-3-Clause |
| [libpng](http://www.libpng.org/pub/png/libpng.html) | 1.6.39 | PNG reference library / Zlib |
| [libsodium](http://libsodium.org) | 1.0.18 | A modern and easy-to-use crypto library. / ISC |
| [libspatialindex](http://libspatialindex.github.io) | 1.9.3 | Extensible framework for robust spatial indexing / MIT |
| [libssh2](https://www.libssh2.org/) | 1.10.0 | the SSH library / BSD-3-Clause |
| [libtiff](http://www.simplesystems.org/libtiff/) | 4.5.0 | Support for the Tag Image File Format (TIFF). / HPND |
| [libuv](https://libuv.org/) | 1.44.2 | Cross-platform asynchronous I/O / MIT |
| [libvorbis](https://www.xiph.org/) | 1.3.7 | Vorbis audio format / BSD-3-Clause |
| [libwebp](https://developers.google.com/speed/webp/) | 1.2.4 | WebP image library / BSD-3-Clause |
| [libwebp-base](https://developers.google.com/speed/webp) | 1.2.4 | WebP image library / BSD-3-Clause |
| [libxml2](https://gitlab.gnome.org/GNOME/libxml2/) | 2.9.14 | The XML C parser and toolkit of Gnome / MIT |
| [libxslt](https://gitlab.gnome.org/GNOME/libxslt) | 1.1.35 | The XSLT C library developed for the GNOME project / MIT |
| [libzopfli](https://github.com/google/zopfli) | 1.0.3 | A compression library programmed in C to perform very good, but slow, deflate or zlib compression. / Apache-2.0 |
| [llvmlite](https://llvmlite.pydata.org) | 0.39.1 | A lightweight LLVM python binding for writing JIT compilers. / BSD-2-Clause |
| [locket](https://github.com/mwilliamson/locket.py) | 1.0.0 | File-based locks for Python for Linux and Windows / BSD-2-Clause |
| [lxml](https://lxml.de/) | 4.9.1 | Pythonic binding for the C libraries libxml2 and libxslt. / BSD-3-Clause and GPL-2.0-only and ZPL-2.0 and LicenseRef-ElementTree |
| [lz4](https://github.com/python-lz4/python-lz4) | 3.1.3 | LZ4 Bindings for Python / BSD-3-Clause |
| [lz4-c](https://lz4.github.io/lz4/) | 1.9.4 | Extremely Fast Compression algorithm / BSD-2-Clause |
| [lzo](http://www.oberhumer.com/opensource/lzo/) | 2.10 | LZO is a portable lossless data compression library written in ANSI C. / GPL v2+ |
| [m2w64-libwinpthread-git](http://mingw-w64.sourceforge.net) | 5.0.0.4634.697f757 | MinGW-w64 winpthreads library / MIT, BSD |
| [markdown](https://github.com/Python-Markdown/markdown) | 3.4.1 | Python implementation of Markdown. / BSD-3-Clause |
| [markupsafe](https://www.palletsprojects.com/p/markupsafe) | 2.1.1 | Safely add untrusted strings to HTML/XML markup. / BSD-3-Clause |
| [matplotlib](https://matplotlib.org/) | 3.7.0 | Publication quality figures in Python / LicenseRef-PSF-based |
| [matplotlib-base](https://matplotlib.org/) | 3.7.0 | Publication quality figures in Python / LicenseRef-PSF-based |
| [matplotlib-inline](https://github.com/ipython/matplotlib-inline) | 0.1.6 | Inline Matplotlib backend for Jupyter / BSD-3-Clause |
| [mccabe](https://github.com/PyCQA/mccabe) | 0.7.0 | McCabe complexity checker for Python / MIT |
| [menuinst](https://github.com/conda/menuinst) | 1.4.19 | cross platform install of menu items / BSD-3-Clause |
| [mistune](https://github.com/lepture/mistune) | 0.8.4 | A sane Markdown parser with useful plugins and renderers. / BSD-3-Clause |
| [mkl](https://software.intel.com/en-us/mkl) | 2021.4.0 | Math library for Intel and compatible processors / LicenseRef-ProprietaryIntel |
| [mkl-service](http://github.com/IntelPython/mkl-service) | 2.4.0 | Python hooks for Intel(R) Math Kernel Library runtime control settings. / BSD-3-Clause |
| [mkl\_fft](http://github.com/IntelPython/mkl_fft) | 1.3.1 | NumPy-based implementation of Fast Fourier Transform using Intel (R) Math Kernel Library. / BSD 3-Clause |
| [mkl\_random](http://github.com/IntelPython/mkl_random) | 1.2.2 | Intel (R) MKL-powered package for sampling from common probability distributions into NumPy arrays. / BSD-3-Clause |
| [mock](https://github.com/testing-cabal/mock) | 4.0.3 | A library for testing in Python / BSD-2-Clause |
| [mpmath](http://mpmath.org) | 1.2.1 | Python library for arbitrary-precision floating-point arithmetic / BSD 3-Clause |
| [msgpack-python](https://msgpack.org/) | 1.0.3 | MessagePack (de)serializer / Apache-2.0 |
| msys2-conda-epoch | 20160418 | / |
| [multipledispatch](https://github.com/mrocklin/multipledispatch/) | 0.6.0 | Multiple dispatch in Python / BSD 3-Clause |
| [munkres](https://github.com/bmc/munkres) | 1.1.4 | The Munkres module provides an O(n^3) implementation of the Munkres algorithm (also called the Hungarian algorithm or the Kuhn-Munkres algorithm). / Apache-2.0 |
| [mypy\_extensions](http://www.mypy-lang.org/) | 0.4.3 | Experimental type system extensions for programs checked with the mypy typechecker. / MIT |
| [nbclassic](https://github.com/jupyter/nbclassic) | 0.5.2 | Jupyter Notebook as a Jupyter Server Extension. / BSD-3-Clause |
| [nbclient](https://jupyter.org) | 0.5.13 | A client library for executing notebooks. Formally nbconvert’s ExecutePreprocessor. / BSD-3-Clause |
| [nbconvert](https://nbconvert.readthedocs.io/en/latest/) | 6.5.4 | Converting Jupyter Notebooks / BSD-3-Clause |
| [nbformat](https://jupyter.org) | 5.7.0 | The Jupyter Notebook format / BSD-3-Clause |
| [nest-asyncio](https://github.com/erdewit/nest_asyncio) | 1.5.6 | Patch asyncio to allow nested event loops / BSD-2-Clause |
| [networkx](https://networkx.github.io/) | 2.8.4 | Python package for creating and manipulating complex networks / BSD-3-Clause |
| [ninja](https://ninja-build.org/) | 1.10.2 | A small build system with a focus on speed / Apache-2.0 |
| [ninja-base](https://ninja-build.org/) | 1.10.2 | A small build system with a focus on speed / Apache-2.0 |
| [nltk](https://nltk.org/) | 3.7 | Natural Language Toolkit / Apache-2.0 |
| [notebook](https://jupyter.org) | 6.5.2 | Jupyter Notebook / BSD-3-Clause |
| [notebook-shim](https://github.com/jupyter/notebook_shim) | 0.2.2 | A shim layer for notebook traits and config / BSD-3-Clause |
| [numba](https://numba.pydata.org) | 0.56.4 | NumPy aware dynamic Python compiler using LLVM / BSD-2-Clause |
| [numexpr](https://github.com/pydata/numexpr) | 2.8.4 | Fast numerical expression evaluator for NumPy. / MIT |
| [numpy](https://numpy.org/) | 1.23.5 | Array processing for numbers, strings, records, and objects. / BSD-3-Clause |
| [numpy-base](https://numpy.org/) | 1.23.5 | Array processing for numbers, strings, records, and objects. / BSD-3-Clause |
| [numpydoc](https://github.com/numpy/numpydoc) | 1.5.0 | Sphinx extension to support docstrings in Numpy format / BSD-3-Clause |
| [openjpeg](http://www.openjpeg.org/) | 2.4.0 | An open-source JPEG 2000 codec written in C / BSD 2-Clause |
| [openpyxl](https://openpyxl.readthedocs.io) | 3.0.10 | A Python library to read/write Excel 2010 xlsx/xlsm files / MIT |
| [openssl](https://www.openssl.org/) | 1.1.1t | OpenSSL is an open-source implementation of the SSL and TLS protocols / OpenSSL |
| [packaging](https://github.com/pypa/packaging) | 22.0 | Core utilities for Python packages / Apache-2.0 or BSD-2-Clause |
| [pandas](https://pandas.pydata.org) | 1.5.3 | High-performance, easy-to-use data structures and data analysis tools. / BSD-3-Clause |
| [pandocfilters](https://github.com/jgm/pandocfilters) | 1.5.0 | A python module for writing pandoc filters / BSD-3-Clause |
| [panel](https://panel.holoviz.org) | 0.14.3 | A high-level app and dashboarding solution for Python / BSD-3-Clause |
| [param](https://param.holoviz.org/) | 1.12.3 | Param: Make your Python code clearer and more reliable by declaring Parameters / BSD-3-Clause |
| [paramiko](http://www.paramiko.org/) | 2.8.1 | SSH2 protocol library / LGPL-2.1-or-later |
| [parsel](https://github.com/scrapy/parsel) | 1.6.0 | library to extract data from HTML and XML using XPath and CSS selectors / BSD-3-Clause |
| [parso](https://github.com/davidhalter/parso) | 0.8.3 | A Python Parser / MIT |
| [partd](https://github.com/dask/partd) | 1.2.0 | Appendable key-value storage / BSD-3-Clause |
| [pathspec](https://github.com/cpburnz/python-path-specification) | 0.10.3 | Utility library for gitignore style pattern matching of file paths. / MPL-2.0 |
| [patsy](https://github.com/pydata/patsy) | 0.5.3 | Describing statistical models in Python using symbolic formulas / BSD-2-Clause AND PSF-2.0 |
| [pcre](http://www.pcre.org/) | 8.45 | Regular expression pattern matching using the same syntax and semantics as Perl 5. / BSD 3-Clause |
| [pep8](https://pep8.readthedocs.org/) | 1.7.1 | Python style guide checker / MIT |
| [pexpect](http://pexpect.sourceforge.net/) | 4.8.0 | Pexpect makes Python a better tool for controlling other applications. / ISC |
| [pickleshare](https://github.com/pickleshare/pickleshare/) | 0.7.5 | Tiny ‘shelve’-like database with concurrency support / MIT |
| [pillow](https://pillow.readthedocs.io) | 9.4.0 | Pillow is the friendly PIL fork by Alex Clark and Contributors / LicenseRef-PIL |
| [pip](https://pip.pypa.io/en/stable/) | 22.3.1 | PyPA recommended tool for installing Python packages / MIT |
| [platformdirs](https://github.com/platformdirs/platformdirs) | 2.5.2 | A small Python module for determining appropriate platform-specific dirs, e.g. a “user data dir”. / MIT |
| [plotly](https://plot.ly/python/) | 5.9.0 | An interactive JavaScript-based visualization library for Python / MIT |
| [pluggy](https://github.com/pytest-dev/pluggy) | 1.0.0 | Plugin registration and hook calling for Python / MIT |
| [ply](http://www.dabeaz.com/ply/index.html) | 3.11 | Python Lex-Yacc / BSD 3-clause |
| [pooch](https://github.com/fatiando/pooch) | 1.4.0 | A friend to fetch your data files / BSD-3-Clause |
| [poyo](https://github.com/hackebrot/poyo) | 0.5.0 | A lightweight YAML Parser for Python / MIT |
| [prometheus\_client](https://github.com/prometheus/client_python) | 0.14.1 | Python client for the Prometheus monitoring system / Apache-2.0 |
| [prompt-toolkit](https://github.com/prompt-toolkit/python-prompt-toolkit) | 3.0.36 | Library for building powerful interactive command lines in Python / BSD-3-Clause |
| [prompt\_toolkit](https://github.com/prompt-toolkit/python-prompt-toolkit) | 3.0.36 | Library for building powerful interactive command lines in Python / BSD-3-Clause |
| [protego](https://github.com/scrapy/protego) | 0.1.16 | A pure-Python robots.txt parser with support for modern conventions / BSD 3-Clauses |
| [psutil](https://github.com/giampaolo/psutil) | 5.9.0 | A cross-platform process and system utilities module for Python / BSD-3-Clause |
| [ptyprocess](https://github.com/pexpect/ptyprocess) | 0.7.0 | Run a subprocess in a pseudo terminal / ISC |
| [pure\_eval](https://github.com/alexmojaki/pure_eval) | 0.2.2 | Safely evaluate AST nodes without side effects / MIT |
| [py](https://github.com/pytest-dev/py) | 1.11.0 | library with cross-python path, ini-parsing, io, code, log facilities / MIT |
| [pyasn1](https://github.com/etingof/pyasn1) | 0.4.8 | ASN.1 types and codecs / BSD 2-Clause |
| [pyasn1-modules](http://pyasn1.sourceforge.net/) | 0.2.8 | A collection of ASN.1-based protocols modules. / BSD 2-Clause |
| [pycodestyle](https://pycodestyle.readthedocs.io/) | 2.10.0 | Python style guide checker / MIT |
| [pycparser](https://github.com/eliben/pycparser) | 2.21 | Complete C99 parser in pure Python / BSD-3-clause |
| [pyct](https://github.com/pyviz/pyct) | 0.5.0 | python package common tasks for users (e.g. copy examples, fetch data, …) / BSD-3-Clause |
| [pycurl](http://pycurl.sourceforge.net/) | 7.45.1 | A Python Interface To The cURL library / LGPL-2.1-only, MIT |
| [pydispatcher](http://pydispatcher.sourceforge.net) | 2.0.5 | Multi-producer-multi-consumer signal dispatching mechanism / BSD-3-Clause |
| [pydocstyle](https://github.com/PyCQA/pydocstyle) | 6.3.0 | Python docstring style checker (formerly pep257) / MIT |
| [pyerfa](https://pyerfa.readthedocs.io/) | 2.0.0 | Python bindings for ERFA routines / BSD-3-Clause |
| [pyflakes](https://github.com/PyCQA/pyflakes) | 3.0.1 | Pyflakes analyzes programs and detects various errors. / MIT |
| [pygments](https://pygments.org/) | 2.11.2 | Pygments is a generic syntax highlighter suitable for use in code hosting, forums, wikis or other applications that need to prettify source code. / BSD-2-Clause |
| [pyhamcrest](https://github.com/hamcrest/PyHamcrest) | 2.0.2 | Hamcrest framework for matcher objects / BSD 3-Clause |
| [pylint](https://www.pylint.org) | 2.16.2 | python code static checker / GPL-2.0-or-later |
| [pylint-venv](https://github.com/jgosmann/pylint-venv/) | 2.3.0 | pylint-venv provides a Pylint init-hook to use the same Pylint installation with different virtual environments. / MIT |
| [pyls-spyder](https://github.com/spyder-ide/pyls-spyder) | 0.4.0 | Spyder extensions for the python-lsp-server / MIT |
| [pynacl](https://github.com/pyca/pynacl) | 1.5.0 | PyNaCl is a Python binding to the Networking and Cryptography library, a crypto library with the stated goal of improving usability, security and speed. / Apache-2.0 |
| [pyodbc](https://github.com/mkleehammer/pyodbc) | 4.0.34 | DB API Module for ODBC / MIT-0 |
| [pyopenssl](https://github.com/pyca/pyopenssl) | 23.0.0 | Python wrapper module around the OpenSSL library / Apache-2.0 |
| [pyparsing](https://github.com/pyparsing/pyparsing/) | 3.0.9 | Create and execute simple grammars / MIT |
| [pyqt](https://www.riverbankcomputing.com/software/pyqt/) | 5.15.7 | Python bindings for the Qt cross platform application toolkit / GPL-3.0-only |
| [pyqt5-sip](https://www.riverbankcomputing.com/software/pyqt/) | 12.11.0 | Python bindings for the Qt cross platform application toolkit / GPL-3.0-only |
| [pyqtwebengine](https://www.riverbankcomputing.com/software/pyqt/) | 5.15.7 | Python bindings for the Qt cross platform application toolkit / GPL-3.0-only |
| [pyrsistent](http://github.com/tobgu/pyrsistent/) | 0.18.0 | Persistent/Functional/Immutable data structures / MIT |
| [pysocks](https://github.com/Anorov/PySocks) | 1.7.1 | A Python SOCKS client module. See [Anorov/PySocks](https://github.com/Anorov/PySocks) for more information. / BSD 3-Clause |
| [pytables](https://www.pytables.org) | 3.7.0 | Brings together Python, HDF5 and NumPy to easily handle large amounts of data. / BSD-3-Clause |
| [pytest](https://docs.pytest.org/en/latest/) | 7.1.2 | Simple and powerful testing with Python. / MIT |
| [python](https://www.python.org/) | 3.10.9 | General purpose programming language / PSF-2.0 |
| [python-dateutil](https://dateutil.readthedocs.org/) | 2.8.2 | Extensions to the standard Python datetime module. / BSD-3-Clause and Apache |
| [python-fastjsonschema](https://github.com/horejsek/python-fastjsonschema) | 2.16.2 | Fastest Python implementation of JSON schema / BSD-3-Clause |
| [python-lsp-black](https://github.com/python-lsp/python-lsp-black) | 1.2.1 | Black plugin for the Python LSP Server / MIT |
| [python-lsp-jsonrpc](https://github.com/python-lsp/python-lsp-jsonrpc) | 1.0.0 | A Python 3.6+ server implementation of the JSON RPC 2.0 protocol. / MIT |
| [python-lsp-server](https://github.com/python-lsp/python-lsp-server) | 1.7.1 | An implementation of the Language Server Protocol for Python / MIT |
| [python-slugify](https://github.com/un33k/python-slugify) | 5.0.2 | A Python Slugify application that handles Unicode / MIT |
| [python-snappy](https://github.com/andrix/python-snappy) | 0.6.1 | Python library for the snappy compression library from Google / BSD-3-Clause |
| [pytoolconfig](https://github.com/bagel897/pytoolconfig) | 1.2.5 | Python tool configuration / LGPL-3.0-or-later |
| [pytorch](https://pytorch.org/) | 1.12.1 | PyTorch is an optimized tensor library for deep learning using GPUs and CPUs. / BSD-3-Clause |
| [pytz](https://pythonhosted.org/pytz/) | 2022.7 | World timezone definitions, modern and historical. / MIT |
| [pyviz\_comms](https://www.holoviz.org) | 2.0.2 | Bidirectional communication for PyViz / BSD-3-Clause |
| [pywavelets](https://github.com/PyWavelets/pywt) | 1.4.1 | Discrete Wavelet Transforms in Python / MIT |
| [pywin32](https://github.com/mhammond/pywin32) | 305 | Python extensions for Windows / HPND AND BSD-3-Clause AND LGPL-2.1-or-later AND MIT |
| [pywin32-ctypes](https://github.com/enthought/pywin32-ctypes) | 0.2.0 | A limited subset of pywin32 re-implemented using ctypes (or cffi) / BSD 3 Clause |
| [pywinpty](https://github.com/spyder-ide/pywinpty) | 2.0.10 | Pseudoterminals for Windows in Python / MIT |
| [pyyaml](http://pyyaml.org/wiki/PyYAML) | 6.0 | YAML parser and emitter for Python / MIT |
| [pyzmq](https://github.com/zeromq/pyzmq) | 23.2.0 | Python bindings for zeromq / BSD-3-Clause AND LGPL-3.0-or-later |
| [qdarkstyle](https://github.com/ColinDuquesnoy/QDarkStyleSheet) | 3.0.2 | A dark stylesheet for Qt applications (Qt4, Qt5, PySide, PyQt4, PyQt5, QtPy, PyQtGraph). / MIT |
| [qstylizer](https://github.com/blambright/qstylizer) | 0.2.2 | Qt stylesheet generation utility for PyQt/PySide / MIT |
| [qt-main](http://qt.io) | 5.15.2 | Qt is a cross-platform application and UI framework. / LGPL-3.0-only |
| [qt-webengine](http://qt.io) | 5.15.9 | Qt is a cross-platform application and UI framework. / LGPL-3.0-only |
| [qtawesome](https://github.com/spyder-ide/qtawesome) | 1.2.2 | Iconic fonts in PyQt and PySide applications / MIT |
| [qtconsole](https://jupyter.org) | 5.4.0 | Jupyter Qt Console / BSD-3-Clause |
| [qtpy](https://github.com/spyder-ide/qtpy) | 2.2.0 | Abstraction layer for PyQt5/PyQt4/PySide / MIT |
| [qtwebkit](https://wiki.qt.io/Qt_WebKit) | 5.212 | WebKit is one of the major engine to render webpages and execute JavaScript code / LGPL-2.1-only |
| [queuelib](https://github.com/scrapy/queuelib) | 1.5.0 | Collection of persistent (disk-based) queues / BSD |
| [regex](https://github.com/mrabarnett/mrab-regex) | 2022.7.9 | Alternative regular expression module, to replace re / Apache-2.0 |
| [requests](https://requests.readthedocs.io/en/latest/) | 2.28.1 | Requests is an elegant and simple HTTP library for Python, built with ♥. / Apache-2.0 |
| [requests-file](http://github.com/dashea/requests-file) | 1.5.1 | file transport adapter for Requests / Apache |
| [rope](https://github.com/python-rope/rope) | 1.7.0 | A python refactoring library / LGPL-3.0-or-later |
| [rtree](https://github.com/Toblerity/rtree) | 1.0.1 | R-Tree spatial index for Python GIS / MIT |
| [scikit-image](https://scikit-image.org/) | 0.19.3 | Image processing in Python. / BSD-3-Clause |
| [scikit-learn](https://scikit-learn.org/) | 1.2.1 | A set of python modules for machine learning and data mining / BSD-3-Clause |
| [scikit-learn-intelex](https://intel.github.io/scikit-learn-intelex) | 2023.0.2 | Intel(R) Extension for Scikit-learn is a seamless way to speed up your Scikit-learn application. / Apache-2.0 AND BSD-2-Clause AND BSD-3-Clause AND MIT |
| [scipy](https://scipy.org/) | 1.10.0 | Scientific Library for Python / BSD-3-Clause |
| [scrapy](https://scrapy.org/) | 2.8.0 | A high-level Python Screen Scraping framework / BSD-3-Clause |
| [seaborn](https://seaborn.pydata.org) | 0.12.2 | Statistical data visualization / BSD-3-Clause |
| [send2trash](https://github.com/arsenetar/send2trash) | 1.8.0 | Python library to natively send files to Trash (or Recycle bin) on all platforms. / BSD-3-Clause |
| [service\_identity](https://github.com/pyca/service_identity) | 18.1.0 | Service identity verification for pyOpenSSL. / MIT |
| [setuptools](https://github.com/pypa/setuptools) | 65.6.3 | Download, build, install, upgrade, and uninstall Python packages / MIT |
| [sip](https://www.riverbankcomputing.com/software/sip/) | 6.6.2 | A Python bindings generator for C/C++ libraries / GPL-3.0-only |
| [six](https://six.readthedocs.io/) | 1.16.0 | Python 2 and 3 compatibility utilities / MIT |
| [smart\_open](https://github.com/RaRe-Technologies/smart_open) | 5.2.1 | Python library for efficient streaming of large files / MIT |
| [snappy](https://github.com/google/snappy) | 1.1.9 | A fast compressor/decompressor / BSD-3-clause AND CC-BY-3.0 AND MIT AND CC-BY AND Public Domain |
| [sniffio](https://github.com/python-trio/sniffio) | 1.2.0 | Sniff out which async library your code is running under / Apache-2.0 |
| [snowballstemmer](https://github.com/snowballstem/snowball) | 2.2.0 | Snowball stemming library collection for Python / BSD-3-Clause |
| [sortedcontainers](http://www.grantjenks.com/docs/sortedcontainers/) | 2.4.0 | Python Sorted Container Types: SortedList, SortedDict, and SortedSet / Apache-2.0 |
| [soupsieve](https://facelessuser.github.io/soupsieve) | 2.3.2.post1 | A modern CSS selector implementation for BeautifulSoup / MIT |
| [sphinx](https://www.sphinx-doc.org) | 5.0.2 | Sphinx is a tool that makes it easy to create intelligent and beautiful documentation / BSD-2-Clause |
| [sphinxcontrib-applehelp](https://www.sphinx-doc.org/en/master/) | 1.0.2 | sphinxcontrib-applehelp is a sphinx extension which outputs Apple help books / BSD-2-Clause |
| [sphinxcontrib-devhelp](https://www.sphinx-doc.org/en/master/) | 1.0.2 | sphinxcontrib-devhelp is a sphinx extension which outputs Devhelp document / BSD-2-Clause |
| [sphinxcontrib-htmlhelp](https://www.sphinx-doc.org/en/master/) | 2.0.0 | sphinxcontrib-htmlhelp is a sphinx extension which renders HTML help files. / BSD-2-Clause |
| [sphinxcontrib-jsmath](https://www.sphinx-doc.org/en/master/) | 1.0.1 | A sphinx extension which renders display math in HTML via JavaScript / BSD-2-Clause |
| [sphinxcontrib-qthelp](https://www.sphinx-doc.org/en/master/) | 1.0.3 | sphinxcontrib-qthelp is a sphinx extension which outputs QtHelp document / BSD-2-Clause |
| [sphinxcontrib-serializinghtml](https://www.sphinx-doc.org/en/master/) | 1.1.5 | sphinxcontrib-serializinghtml is a sphinx extension which outputs “serialized” HTML files (json and pickle). / BSD-2-Clause |
| [spyder](https://www.spyder-ide.org/) | 5.4.1 | The Scientific Python Development Environment / MIT |
| [spyder-kernels](https://www.spyder-ide.org/) | 2.4.1 | Jupyter kernels for Spyder’s console / MIT |
| [sqlalchemy](https://www.sqlalchemy.org/) | 1.4.39 | Database Abstraction Library. / MIT |
| [sqlite](https://www.sqlite.org/) | 3.40.1 | Implements a self-contained, zero-configuration, SQL database engine / blessing |
| [stack\_data](https://github.com/alexmojaki/stack_data) | 0.2.0 | Extract data from python stack frames and tracebacks for informative displays / MIT |
| [statsmodels](https://www.statsmodels.org) | 0.13.5 | Statistical computations and models for use with SciPy / BSD-3-Clause |
| [sympy](https://sympy.org) | 1.11.1 | Python library for symbolic mathematics / BSD-3-Clause AND MIT |
| [tabulate](https://github.com/astanin/python-tabulate) | 0.8.10 | Pretty-print tabular data in Python, a library and a command-line utility. / MIT |
| [tbb](https://github.com/oneapi-src/oneTBB) | 2021.7.0 | High level abstract threading library / Apache-2.0 |
| tbb4py | 2021.7.0 | TBB module for Python / Apache-2.0 |
| [tblib](https://github.com/ionelmc/python-tblib) | 1.7.0 | Traceback serialization library. / BSD 2-Clause |
| [tenacity](https://github.com/jd/tenacity) | 8.0.1 | Retry a flaky function whenever an exception occurs until it works / Apache-2.0 |
| [terminado](https://github.com/jupyter/terminado) | 0.17.1 | Terminals served by tornado websockets / BSD-2-Clause |
| [text-unidecode](https://github.com/kmike/text-unidecode/) | 1.3 | The most basic Text::Unidecode port / Artistic |
| [textdistance](https://github.com/orsinium/textdistance) | 4.2.1 | TextDistance – python library for comparing distance between two or more sequences by many algorithms. / MIT |
| [threadpoolctl](https://github.com/joblib/threadpoolctl) | 2.2.0 | Python helpers to control the threadpools of native libraries / BSD 3-Clause |
| [three-merge](https://github.com/spyder-ide/three-merge) | 0.1.1 | Simple Python library to perform a 3-way merge between strings / MIT |
| [tifffile](https://github.com/cgohlke/tifffile) | 2021.7.2 | Read and write image data from and to TIFF files. / BSD-3-Clause |
| [tinycss2](https://www.courtbouillon.org/tinycss2) | 1.2.1 | Low-level CSS parser for Python / BSD-3-Clause |
| [tk](http://www.tcl.tk/) | 8.6.12 | A dynamic programming language with GUI support. Bundles Tcl and Tk. / Tcl/Tk |
| [tldextract](https://github.com/john-kurkowski/tldextract) | 3.2.0 | Accurately separate the TLD from the registered domain andsubdomains of a URL, using the Public Suffix List. / BSD-3-Clause |
| [tokenizers](https://github.com/huggingface/tokenizers) | 0.11.4 | Fast State-of-the-Art Tokenizers optimized for Research and Production / Apache-2.0 |
| [toml](https://github.com/uiri/toml) | 0.10.2 | Python lib for TOML. / MIT |
| [tomli](https://github.com/hukkin/tomli) | 2.0.1 | A simple TOML parser / MIT |
| [tomlkit](https://github.com/sdispater/tomlkit) | 0.11.1 | Style preserving TOML library / MIT |
| [toolz](https://toolz.readthedocs.io/) | 0.12.0 | List processing tools and functional utilities / BSD-3-Clause |
| [tornado](https://www.tornadoweb.org/) | 6.1 | A Python web framework and asynchronous networking library, originally developed at FriendFeed. / Apache-2.0 |
| [tqdm](https://tqdm.github.io/) | 4.64.1 | A Fast, Extensible Progress Meter / MPL-2.0 AND MIT |
| [traitlets](http://traitlets.readthedocs.org/) | 5.7.1 | Configuration system for Python applications / BSD-3-Clause |
| [transformers](https://github.com/huggingface/transformers) | 4.24.0 | State-of-the-art Machine Learning for JAX, PyTorch and TensorFlow / Apache-2.0 |
| [twisted](https://twistedmatrix.com/) | 22.2.0 | An asynchronous networking framework written in Python / MIT |
| [twisted-iocpsupport](https://github.com/twisted/twisted-iocpsupport) | 1.0.2 | An extension for use in the twisted I/O Completion Ports reactor. / MIT |
| [typing-extensions](https://github.com/python/typing_extensions) | 4.4.0 | Backported and Experimental Type Hints for Python / PSF-2.0 |
| [typing\_extensions](https://github.com/python/typing_extensions) | 4.4.0 | Backported and Experimental Type Hints for Python / PSF-2.0 |
| [tzdata](https://www.iana.org/time-zones) | 2022g | The Time Zone Database (called tz, tzdb or zoneinfo) / CC-PDDC OR BSD-3-Clause |
| [ujson](https://github.com/ultrajson/ultrajson) | 5.4.0 | Ultra fast JSON decoder and encoder written in C with Python bindings / BSD-3-Clause |
| [unidecode](https://pypi.python.org/pypi/Unidecode) | 1.2.0 | ASCII transliterations of Unicode text / GPL-2.0-or-later |
| [urllib3](https://urllib3.readthedocs.io/) | 1.26.14 | HTTP library with thread-safe connection pooling, file post, and more. / MIT |
| [vc](https://github.com/conda/conda/wiki/VC-features) | 14.2 | A meta-package to impose mutual exclusivity among software built with different VS versions / Modified BSD License (3-clause) |
| vs2015\_runtime | 14.27.29016 | MSVC runtimes associated with cl.exe version 19.27.29111 (VS 2019 update 5) / |
| [w3lib](https://github.com/scrapy/w3lib) | 1.21.0 | Library of web-related functions / BSD |
| [watchdog](http://github.com/gorakhargosh/watchdog) | 2.1.6 | Filesystem events monitoring / Apache-2.0 |
| [wcwidth](https://github.com/jquast/wcwidth) | 0.2.5 | Measures number of Terminal column cells of wide-character codes. / MIT |
| [webencodings](https://github.com/gsnedders/python-webencodings) | 0.5.1 | Character encoding aliases for legacy web content / BSD 3-Clause |
| [websocket-client](https://github.com/liris/websocket-client) | 0.58.0 | WebSocket client for python. hybi13 is supported. / BSD-3-Clause |
| [werkzeug](https://palletsprojects.com/p/werkzeug/) | 2.2.2 | The comprehensive WSGI web application library. / BSD-3-Clause |
| [whatthepatch](https://github.com/cscorley/whatthepatch) | 1.0.2 | What The Patch!? is a library for both parsing and applying patch files / MIT |
| [wheel](https://github.com/pypa/wheel) | 0.38.4 | A built-package format for Python. / MIT |
| [widgetsnbextension](https://ipython.org) | 3.5.2 | Interactive Widgets for Jupyter / BSD-3-Clause |
| [win\_inet\_pton](https://github.com/hickeroar/win_inet_pton) | 1.1.0 | Native inet\_pton and inet\_ntop implementation for Python on Windows (with ctypes). / PUBLIC-DOMAIN |
| [wincertstore](https://bitbucket.org/tiran/wincertstore) | 0.2 | Python module to extract CA and CRL certs from Windows’ cert store (ctypes based). / PSF 2 |
| [winpty](https://github.com/rprichard/winpty) | 0.4.3 | Winpty provides an interface similar to a Unix pty-master for communicating with Windows console programs. / MIT |
| [wrapt](https://github.com/GrahamDumpleton/wrapt) | 1.14.1 | Module for decorators, wrappers and monkey patching / BSD-2-Clause |
| [xarray](https://github.com/pydata/xarray) | 2022.11.0 | N-D labeled arrays and datasets in Python. / Apache-2.0 |
| [xlwings](https://www.xlwings.org/) | 0.29.1 | Interact with Excel from Python and vice versa / BSD-3-Clause |
| [xz](https://tukaani.org/xz/) | 5.2.10 | Data compression software with high compression ratio / LGPL-2.1-or-later and GPL-2.0-or-later |
| [yaml](http://pyyaml.org/wiki/LibYAML) | 0.2.5 | A C library for parsing and emitting YAML / MIT |
| [yapf](https://github.com/google/yapf) | 0.31.0 | A formatter for Python files / Apache 2.0 |
| [zeromq](http://zeromq.org) | 4.3.4 | A high-performance asynchronous messaging library. / LGPL-3.0-or-later |
| [zfp](https://computation.llnl.gov/projects/floating-point-compression) | 0.5.5 | Library for compressed numerical arrays that support high throughput read and write random access / BSD-3-Clause |
| [zict](https://github.com/mrocklin/zict) | 2.1.0 | Composable Dictionary Classes / BSD-3-Clause |
| [zipp](https://github.com/jaraco/zipp) | 3.11.0 | A pathlib-compatible Zipfile object wrapper / MIT |
| [zlib](https://zlib.net/) | 1.2.13 | Massively spiffy yet delicately unobtrusive compression library / Zlib |
| zope | 1.0 | web application server / BSD |
| [zope.interface](https://github.com/zopefoundation/zope.interface) | 5.4.0 | Interfaces for Python / ZPL-2.1 |
| [zstd](https://www.zstd.net) | 1.5.2 | Zstandard - Fast real-time compression algorithm / BSD-3-Clause AND GPL-2.0-or-later |
| Name | Version | Summary / License |
|---|---|---|
| [alabaster](http://www.sphinx-doc.org/en/stable/index.html) | 0.7.12 | Configurable, Python 2+3 compatible Sphinx theme. / BSD 3-Clause |
| [anaconda-navigator](https://github.com/anaconda-distribution/navigator) | 2.4.0 | Anaconda Navigator / proprietary - Continuum Analytics, Inc. |
| [anyio](https://github.com/agronholm/anyio) | 3.5.0 | High level compatibility layer for multiple asynchronous event loop implementations on Python / MIT |
| [appdirs](http://github.com/ActiveState/appdirs) | 1.4.4 | A small Python module for determining appropriate platform-specific dirs. / MIT |
| [applaunchservices](https://github.com/impact27/applaunchservices) | 0.3.0 | Simple package for registering an app with apple Launch Services to handle UTI and URL / MIT |
| [appnope](http://github.com/minrk/appnope) | 0.1.2 | Disable App Nap on OS X 10.9 / BSD 2-Clause |
| [appscript](http://appscript.sourceforge.net) | 1.1.2 | Control AppleScriptable applications from Python. / Public Domain |
| [argon2-cffi](https://argon2-cffi.readthedocs.org/) | 21.3.0 | The secure Argon2 password hashing algorithm. / MIT |
| [argon2-cffi-bindings](https://github.com/hynek/argon2-cffi-bindings) | 21.2.0 | Low-level Python CFFI Bindings for Argon2 / MIT |
| [arrow](https://github.com/arrow-py/arrow) | 1.2.3 | Better dates & times for Python / Apache-2.0 |
| [astroid](https://github.com/PyCQA/astroid) | 2.14.2 | A abstract syntax tree for Python with inference support. / LGPL-2.1-or-later |
| [astropy](https://www.astropy.org/) | 5.1 | Community-developed Python Library for Astronomy / BSD-3-Clause |
| [asttokens](https://github.com/gristlabs/asttokens) | 2.0.5 | The asttokens module annotates Python abstract syntax trees (ASTs) with the positions of tokens and text in the source code that generated them. / Apache-2.0 |
| [atomicwrites](https://github.com/untitaker/python-atomicwrites) | 1.4.0 | Atomic file writes / MIT |
| [attrs](https://www.attrs.org/) | 22.1.0 | attrs is the Python package that will bring back the joy of writing classes by relieving you from the drudgery of implementing object protocols (aka dunder methods). / MIT |
| [automat](https://github.com/glyph/Automat) | 20.2.0 | self-service finite-state machines for the programmer on the go / MIT |
| [autopep8](https://github.com/hhatto/autopep8) | 1.6.0 | A tool that automatically formats Python code to conform to the PEP 8 style guide / MIT |
| [babel](https://babel.pocoo.org/) | 2.11.0 | Utilities to internationalize and localize Python applications / BSD-3-Clause |
| [backcall](https://github.com/takluyver/backcall/) | 0.2.0 | Specifications for callback functions passed in to an API / BSD-3-Clause |
| [bcrypt](https://github.com/pyca/bcrypt/) | 3.2.0 | Modern password hashing for your software and your servers / Apache-2.0 |
| [beautifulsoup4](https://www.crummy.com/software/BeautifulSoup/) | 4.11.1 | Python library designed for screen-scraping / MIT |
| [binaryornot](https://github.com/audreyr/binaryornot) | 0.4.4 | Ultra-lightweight pure Python package to check if a file is binary or text. / BSD-3-Clause |
| [black](https://github.com/psf/black) | 22.6.0 | The Uncompromising Code Formatter / MIT |
| [blas](http://www.netlib.org/lapack) | 1.0 | Linear Algebra PACKage / BSD-3-Clause |
| [bleach](https://github.com/mozilla/bleach) | 4.1.0 | Easy, whitelist-based HTML-sanitizing tool / Apache-2.0 |
| [blosc](https://www.blosc.org/) | 1.21.3 | A blocking, shuffling and loss-less compression library that can be faster than memcpy() / BSD-3-Clause |
| [bokeh](https://bokeh.org/) | 2.4.3 | Bokeh is an interactive visualization library for modern web browsers. / BSD-3-Clause |
| [bottleneck](https://github.com/pydata/bottleneck) | 1.3.5 | Fast NumPy array functions written in Cython. / BSD-2-Clause |
| [brotli](https://github.com/google/brotli) | 1.0.9 | Brotli compression format / MIT |
| [brotli-bin](https://github.com/google/brotli) | 1.0.9 | Brotli compression format / MIT |
| [brotlipy](https://github.com/python-hyper/brotlipy) | 0.7.0 | Python bindings to the Brotli compression library / MIT |
| [brunsli](https://github.com/google/brunsli) | 0.1 | Practical JPEG Repacker / MIT |
| [bzip2](http://www.bzip.org/) | 1.0.8 | high-quality data compressor / bzip2 |
| [c-ares](https://c-ares.org/) | 1.18.1 | This is c-ares, an asynchronous resolver library / MIT |
| [ca-certificates](https://curl.se/docs/caextract.html) | 2023.01.10 | Certificates for use with other packages. / MPL-2.0 |
| [certifi](https://certifi.io/) | 2022.12.7 | Python package for providing Mozilla’s CA Bundle. / MPL-2.0 |
| [cffi](https://cffi.readthedocs.org/) | 1.15.1 | Foreign Function Interface for Python calling C code. / MIT |
| [cfitsio](https://heasarc.gsfc.nasa.gov/fitsio/fitsio.html) | 3.470 | A library for reading and writing FITS files / Other |
| [chardet](https://github.com/chardet/chardet) | 4.0.0 | Universal character encoding detector / LGPL2 |
| [charls](https://github.com/team-charls/charls) | 2.2.0 | CharLS is a C++ implementation of the JPEG-LS standard for lossless and near-lossless image compression and decompression. JPEG-LS is a low-complexity image compression standard that matches JPEG 2000 compression ratios. / BSD-3-Clause |
| [charset-normalizer](https://github.com/ousret/charset_normalizer) | 2.0.4 | The Real First Universal Charset Detector. Open, modern and actively maintained alternative to Chardet. / MIT |
| [click](https://palletsprojects.com/p/click) | 8.0.4 | Python composable command line interface toolkit / BSD-3-Clause |
| [cloudpickle](https://github.com/cloudpipe/cloudpickle) | 2.0.0 | Extended pickling support for Python objects / BSD-3-Clause |
| [colorama](https://github.com/tartley/colorama) | 0.4.6 | Cross-platform colored terminal text / BSD-3-Clause |
| [colorcet](https://colorcet.holoviz.org/index.html) | 3.0.1 | Collection of perceptually uniform colormaps / CC-BY-4.0 |
| [comm](https://github.com/ipython/comm) | 0.1.2 | Python Comm implementation for the Jupyter kernel protocol / BSD-3-Clause |
| [conda](https://docs.conda.io) | 23.1.0 | OS-agnostic, system-level binary package and environment manager. / BSD-3-Clause |
| [conda-build](https://github.com/conda/conda-build) | 3.23.3 | tools for building conda packages / BSD-3-Clause |
| [conda-env](https://github.com/conda/conda-env) | 2.6.0 | Tools for interacting with conda environments. / BSD 3-Clause |
| [conda-verify](https://github.com/conda/conda-verify) | 3.4.2 | tool for validating conda recipes and conda packages / BSD 3-Clause |
| [constantly](https://github.com/twisted/constantly) | 15.1.0 | Symbolic constants in Python / MIT |
| [contourpy](https://github.com/contourpy/contourpy) | 1.0.5 | Python library for calculating contours of 2D quadrilateral grids. / BSD-3-Clause |
| [cookiecutter](https://github.com/cookiecutter/cookiecutter) | 1.7.3 | A command-line utility that creates projects from cookiecutters (project templates), e.g. creating a Python package project from a Python package project template. / BSD-3-Clause |
| [cryptography](https://github.com/pyca/cryptography) | 39.0.1 | Provides cryptographic recipes and primitives to Python developers / (BSD-3-Clause OR Apache-2.0) AND PSF-2.0 AND MIT |
| [cssselect](https://pythonhosted.org/cssselect/) | 1.1.0 | CSS Selectors for Python / BSD 3-Clause |
| [curl](https://curl.se/) | 7.87.0 | tool and library for transferring data with URL syntax / curl |
| [cycler](http://matplotlib.org/cycler) | 0.11.0 | Composable style cycles. / BSD-3-Clause |
| [cytoolz](https://github.com/pytoolz/cytoolz) | 0.12.0 | Cython implementation of Toolz. High performance functional utilities / BSD-3-Clause |
| [dask](https://dask.org/) | 2022.7.0 | Parallel PyData with Task Scheduling / BSD-3-Clause |
| [dask-core](https://github.com/dask/dask/) | 2022.7.0 | Parallel Python with task scheduling / BSD-3-Clause |
| [datashader](https://datashader.org) | 0.14.4 | Data visualization toolchain based on aggregating into a grid / BSD-3-Clause |
| [datashape](http://datashape.pydata.org) | 0.5.4 | A data description language. / BSD 2-Clause |
| [debugpy](https://github.com/Microsoft/debugpy) | 1.5.1 | An implementation of the Debug Adapter Protocol for Python / MIT |
| [decorator](https://github.com/micheles/decorator) | 5.1.1 | Better living through Python with decorators. / BSD-2-Clause |
| [defusedxml](https://bitbucket.org/tiran/defusedxml) | 0.7.1 | XML bomb protection for Python stdlib modules / PSF 2.0 |
| [diff-match-patch](http://code.google.com/p/google-diff-match-patch/) | 20200713 | Diff Match Patch is a high-performance library in multiple languages that manipulates plain text / Apache-2.0 |
| [dill](https://github.com/uqfoundation/dill) | 0.3.6 | Serialize all of python (almost) / BSD-3-Clause |
| [distributed](https://distributed.readthedocs.io/en/latest/) | 2022.7.0 | Distributed computing with Dask / BSD-3-Clause |
| [docstring-to-markdown](https://pypi.org/project/docstring-to-markdown) | 0.11 | On the fly conversion of Python docstrings to markdown / LGPL-2.1-or-later |
| [docutils](https://docutils.sourceforge.io/) | 0.18.1 | Docutils – Python Documentation Utilities / LicenseRef-Public-Domain-Dedictation and BSD-2-Clause and LicenseRef-PSF-2.1.1 and GPL-3.0-or-later |
| [entrypoints](https://github.com/takluyver/entrypoints) | 0.4 | Discover and load entry points from installed packages. / MIT License |
| [et\_xmlfile](https://foss.heptapod.net/openpyxl/et_xmlfile) | 1.1.0 | An implementation of lxml.xmlfile for the standard library / MIT AND PSF-2.0 |
| [executing](https://pypi.org/project/executing) | 0.8.3 | Get the currently executing AST node of a frame, and other information / MIT |
| [filelock](https://github.com/tox-dev/py-filelock) | 3.9.0 | A platform independent file lock. / Unlicense |
| [flake8](https://flake8.pycqa.org/) | 6.0.0 | Your Tool For Style Guide Enforcement / MIT |
| [flask](https://palletsprojects.com/p/flask) | 2.2.2 | A simple framework for building complex web applications. / BSD-3-Clause |
| [flit-core](https://flit.readthedocs.io/) | 3.6.0 | Simplified packaging of Python modules / BSD-3-Clause |
| [fonttools](https://github.com/fonttools/fonttools) | 4.25.0 | fontTools is a library for manipulating fonts, written in Python. / MIT |
| [freetype](https://freetype.org/) | 2.12.1 | A Free, High-Quality, and Portable Font Engine / GPL-2-only and LicenseRef-FreeType |
| [fsspec](https://github.com/fsspec/filesystem_spec) | 2022.11.0 | A specification for pythonic filesystems / BSD-3-Clause |
| [future](https://python-future.org) | 0.18.3 | Clean single-source support for Python 3 and 2 / MIT |
| [gensim](https://github.com/RaRe-Technologies/gensim) | 4.3.0 | Topic Modelling for Humans / LGPL-2.1-only |
| [gettext](https://www.gnu.org/software/gettext/) | 0.21.0 | Internationalization package / GPL-2.0 |
| [giflib](https://giflib.sourceforge.net) | 5.2.1 | Library for reading and writing gif images / MIT |
| [glib](https://developer.gnome.org/glib/) | 2.69.1 | Provides core application building blocks for libraries and applications written in C. / LGPL-2.1-or-later |
| [gmp](https://gmplib.org/) | 6.2.1 | The GNU multiprecision library. / GPL-2.0-or-later AND LGPL-3.0-or-later |
| [gmpy2](https://pypi.python.org/pypi/gmpy2) | 2.1.2 | GMP/MPIR, MPFR, and MPC interface to Python 2.6+ and 3.x / LGPL-3.0-or-later |
| [greenlet](https://github.com/python-greenlet/greenlet) | 2.0.1 | Lightweight in-process concurrent programming / MIT |
| [gst-plugins-base](http://gstreamer.freedesktop.org/) | 1.14.1 | GStreamer Base Plug-ins / GPL2 |
| [gstreamer](http://gstreamer.freedesktop.org/) | 1.14.1 | Library for constructing graphs of media-handling components / LGPL 2 |
| [h5py](https://www.h5py.org/) | 3.7.0 | Read and write HDF5 files from Python / BSD-3-Clause |
| [hdf5](http://www.hdfgroup.org/HDF5/) | 1.12.1 | HDF5 is a data model, library, and file format for storing and managing data / HDF5 |
| [heapdict](http://stutzbachenterprises.com/) | 1.0.1 | A heap with decrease-key and increase-key operations / BSD 3-Clause |
| [holoviews](https://holoviews.org) | 1.15.4 | Stop plotting your data - annotate your data and let it visualize itself. / BSD-3-Clause |
| [huggingface\_hub](https://github.com/huggingface/huggingface_hub) | 0.10.1 | Client library to download and publish models, datasets and other repos on the huggingface.co hub / Apache-2.0 |
| [hvplot](https://hvplot.holoviz.org) | 0.8.2 | A high-level plotting API for the PyData ecosystem built on HoloViews / BSD-3-Clause |
| [hyperlink](https://github.com/python-hyper/hyperlink) | 21.0.0 | Immutable, Pythonic, correct URLs. / MIT |
| [icu](http://site.icu-project.org/) | 68.1 | International Components for Unicode. / MIT |
| [idna](https://github.com/kjd/idna) | 3.4 | Internationalized Domain Names in Applications (IDNA). / BSD-3-Clause |
| [imagecodecs](https://www.lfd.uci.edu/~gohlke/) | 2021.8.26 | Image transformation, compression, and decompression codecs / BSD-3-Clause |
| [imageio](https://imageio.github.io) | 2.26.0 | A Python library for reading and writing image data / BSD-2-Clause |
| [imagesize](https://github.com/shibukawa/imagesize_py) | 1.4.1 | Getting image size from png/jpeg/jpeg2000/gif file / MIT |
| [imbalanced-learn](https://github.com/scikit-learn-contrib/imbalanced-learn) | 0.10.1 | Python module to balance data set using under- and over-sampling / MIT |
| [importlib-metadata](https://github.com/python/importlib_metadata) | 4.11.3 | A library to access the metadata for a Python package. / Apache-2.0 |
| [importlib\_metadata](https://github.com/python/importlib_metadata) | 4.11.3 | A library to access the metadata for a Python package. / Apache-2.0 |
| [incremental](https://github.com/hawkowl/incremental) | 21.3.0 | Incremental is a small library that versions your Python projects. / MIT |
| [inflection](http://github.com/jpvanhal/inflection) | 0.5.1 | A port of Ruby on Rails inflector to Python / MIT |
| [iniconfig](http://github.com/RonnyPfannschmidt/iniconfig) | 1.1.1 | iniconfig: brain-dead simple config-ini parsing / MIT |
| [intake](https://github.com/intake/intake) | 0.6.7 | Data load and catalog system / BSD-2-Clause |
| [intervaltree](https://github.com/chaimleib/intervaltree) | 3.1.0 | Editable interval tree data structure for Python 2 and 3 / Apache-2.0 |
| [ipykernel](https://ipython.org) | 6.19.2 | IPython Kernel for Jupyter / BSD-3-Clause |
| [ipython](https://ipython.org) | 8.10.0 | IPython: Productive Interactive Computing / BSD-3-Clause |
| [ipython\_genutils](http://ipython.org) | 0.2.0 | vestigial utilities from IPython / BSD 3-Clause |
| [isort](https://github.com/timothycrosley/isort) | 5.9.3 | A Python utility / library to sort Python imports. / MIT |
| [itemadapter](https://github.com/scrapy/itemadapter) | 0.3.0 | Common interface for different data containers / BSD-3-Clause |
| [itemloaders](https://github.com/scrapy/itemloaders) | 1.0.4 | Collect data from HTML and XML sources / BSD-3-Clause |
| [itsdangerous](https://github.com/pallets/itsdangerous) | 2.0.1 | Various helpers to pass trusted data to untrusted environments. / BSD-3-Clause |
| [jedi](https://github.com/davidhalter/jedi/) | 0.18.1 | An autocompletion tool for Python that can be used for text editors. / MIT |
| [jellyfish](https://github.com/jamesturk/jellyfish) | 0.9.0 | a library for doing approximate and phonetic matching of strings. / BSD-2-Clause |
| [jinja2](https://palletsprojects.com/p/jinja/) | 3.1.2 | A very fast and expressive template engine. / BSD-3-Clause |
| [jinja2-time](https://github.com/hackebrot/jinja2-time) | 0.2.0 | Jinja2 Extension for Dates and Times / MIT |
| [jmespath](http://jmespath.org/) | 0.10.0 | Query language for JSON / MIT |
| [joblib](https://joblib.readthedocs.io/en/latest/) | 1.1.1 | Lightweight pipelining: using Python functions as pipeline jobs. / BSD-3-Clause |
| [jpeg](https://www.ijg.org/) | 9e | read/write jpeg COM, EXIF, IPTC medata / IJG |
| [jq](http://stedolan.github.io/jq/) | 1.6 | A command-line JSON processor. / MIT |
| [json5](https://github.com/dpranke/pyjson5) | 0.9.6 | A Python implementation of the JSON5 data format / Apache-2.0 |
| [jsonschema](https://github.com/python-jsonschema/jsonschema) | 4.17.3 | An implementation of JSON Schema validation for Python / MIT |
| [jupyter\_client](https://jupyter.org) | 7.3.4 | Jupyter protocol implementation and client libraries. / BSD-3-Clause |
| [jupyter\_core](https://jupyter.org) | 5.2.0 | Core common functionality of Jupyter projects. / BSD-3-Clause |
| [jupyter\_server](https://jupyter.org) | 1.23.4 | Jupyter Server / BSD-3-Clause |
| [jupyterlab](https://github.com/jupyterlab/jupyterlab) | 3.5.3 | JupyterLab PRE-ALPHA / BSD-3-Clause |
| [jupyterlab\_pygments](http://github.com/JupyterLab/jupyterlab_pygments) | 0.1.2 | Pygments syntax coloring scheme making use of the JupyterLab CSS variables / BSD-3-Clause |
| [jupyterlab\_server](https://github.com/jupyterlab/jupyterlab_server) | 2.19.0 | A set of server components for JupyterLab and JupyterLab like applications. / BSD-3-Clause |
| [jxrlib](https://packages.debian.org/source/sid/jxrlib) | 1.1 | jxrlib - JPEG XR Library by Microsoft, built from Debian hosted sources. / BSD-2-Clause |
| [keyring](https://github.com/jaraco/keyring) | 23.4.0 | Store and access your passwords safely / MIT |
| [kiwisolver](https://github.com/nucleic/kiwi) | 1.4.4 | An efficient C++ implementation of the Cassowary constraint solver / BSD-3-Clause |
| [krb5](https://web.mit.edu/kerberos/) | 1.19.4 | A network authentication protocol. / MIT |
| [lazy-object-proxy](https://github.com/ionelmc/python-lazy-object-proxy) | 1.6.0 | A fast and thorough lazy object proxy / BSD-2-Clause |
| [lcms2](http://www.littlecms.com/) | 2.12 | Open Source Color Management Engine / MIT |
| [lerc](https://github.com/Esri/lerc) | 3.0 | LERC - Limited Error Raster Compression / Apache-2.0 |
| [libaec](https://gitlab.dkrz.de/k202009/libaec) | 1.0.4 | Adaptive Entropy Coding library / BSD-2-Clause |
| [libbrotlicommon](https://github.com/google/brotli) | 1.0.9 | Brotli compression format / MIT |
| [libbrotlidec](https://github.com/google/brotli) | 1.0.9 | Brotli compression format / MIT |
| [libbrotlienc](https://github.com/google/brotli) | 1.0.9 | Brotli compression format / MIT |
| [libclang](https://llvm.org/) | 12.0.0 | Development headers and libraries for Clang / Apache-2.0 WITH LLVM-exception |
| [libcurl](https://curl.se/) | 7.87.0 | tool and library for transferring data with URL syntax / curl |
| [libcxx](https://libcxx.llvm.org/) | 14.0.6 | LLVM C++ standard library / Apache-2.0 WITH LLVM-exception |
| [libdeflate](https://github.com/ebiggers/libdeflate) | 1.17 | libdeflate is a library for fast, whole-buffer DEFLATE-based compression and decompression. / MIT |
| [libedit](https://thrysoee.dk/editline/) | 3.1.20221030 | Editline Library (libedit) / BSD-2-Clause |
| [libev](http://software.schmorp.de/pkg/libev.html) | 4.33 | A full-featured and high-performance event loop that is loosely modeled after libevent, but without its limitations and bugs. / BSD-2-Clause |
| [libffi](https://sourceware.org/libffi/) | 3.4.2 | A Portable Foreign Function Interface Library / MIT |
| [libgfortran](https://gcc.gnu.org/) | 5.0.0 | Fortran compiler and libraries from the GNU Compiler Collection / GPL-3.0-only WITH GCC-exception-3.1 |
| [libgfortran5](https://gcc.gnu.org/) | 11.3.0 | Fortran compiler and libraries from the GNU Compiler Collection / GPL-3.0-only WITH GCC-exception-3.1 |
| [libiconv](https://www.gnu.org/software/libiconv/) | 1.16 | Provides iconv for systems which don’t have one (or that cannot convert from/to Unicode.) / GPL-3.0-or-later |
| [libllvm11](https://llvm.org/) | 11.1.0 | Development headers and libraries for LLVM / Apache-2.0 WITH LLVM-exception |
| [libllvm12](http://llvm.org/) | 12.0.0 | Development headers and libraries for LLVM / Apache-2.0 WITH LLVM-exception |
| [libnghttp2](http://github.com/nghttp2/nghttp2) | 1.46.0 | This is an implementation of Hypertext Transfer Protocol version 2. / MIT |
| [libopenblas](https://www.openblas.net/) | 0.3.21 | An Optimized BLAS library / BSD-3-Clause |
| [libpng](http://www.libpng.org/pub/png/libpng.html) | 1.6.39 | PNG reference library / Zlib |
| [libpq](http://www.postgresql.org/) | 12.9 | The postgres runtime libraries and utilities (not the server itself) / PostgreSQL |
| [libprotobuf](https://developers.google.com/protocol-buffers/) | 3.20.3 | Protocol Buffers - Google’s data interchange format. C++ Libraries and protoc, the protobuf compiler. / BSD-3-Clause |
| [libsodium](http://libsodium.org) | 1.0.18 | A modern and easy-to-use crypto library. / ISC |
| [libspatialindex](http://libspatialindex.github.io) | 1.9.3 | Extensible framework for robust spatial indexing / MIT |
| [libssh2](https://www.libssh2.org/) | 1.10.0 | the SSH library / BSD-3-Clause |
| [libtiff](http://www.simplesystems.org/libtiff/) | 4.5.0 | Support for the Tag Image File Format (TIFF). / HPND |
| [libuv](https://libuv.org/) | 1.44.2 | Cross-platform asynchronous I/O / MIT |
| [libwebp](https://developers.google.com/speed/webp/) | 1.2.4 | WebP image library / BSD-3-Clause |
| [libwebp-base](https://developers.google.com/speed/webp) | 1.2.4 | WebP image library / BSD-3-Clause |
| [libxml2](https://gitlab.gnome.org/GNOME/libxml2/) | 2.9.14 | The XML C parser and toolkit of Gnome / MIT |
| [libxslt](https://gitlab.gnome.org/GNOME/libxslt) | 1.1.35 | The XSLT C library developed for the GNOME project / MIT |
| [libzopfli](https://github.com/google/zopfli) | 1.0.3 | A compression library programmed in C to perform very good, but slow, deflate or zlib compression. / Apache-2.0 |
| [llvm-openmp](https://openmp.llvm.org/) | 14.0.6 | The OpenMP API supports multi-platform shared-memory parallel programming in C/C++ and Fortran. / Apache-2.0 WITH LLVM-exception |
| [llvmlite](https://llvmlite.pydata.org) | 0.39.1 | A lightweight LLVM python binding for writing JIT compilers. / BSD-2-Clause |
| [locket](https://github.com/mwilliamson/locket.py) | 1.0.0 | File-based locks for Python for Linux and Windows / BSD-2-Clause |
| [lxml](https://lxml.de/) | 4.9.1 | Pythonic binding for the C libraries libxml2 and libxslt. / BSD-3-Clause and GPL-2.0-only and ZPL-2.0 and LicenseRef-ElementTree |
| [lz4](https://github.com/python-lz4/python-lz4) | 3.1.3 | LZ4 Bindings for Python / BSD-3-Clause |
| [lz4-c](https://lz4.github.io/lz4/) | 1.9.4 | Extremely Fast Compression algorithm / BSD-2-Clause |
| [lzo](http://www.oberhumer.com/opensource/lzo/) | 2.10 | LZO is a portable lossless data compression library written in ANSI C. / GPL v2+ |
| [markdown](https://github.com/Python-Markdown/markdown) | 3.4.1 | Python implementation of Markdown. / BSD-3-Clause |
| [markupsafe](https://www.palletsprojects.com/p/markupsafe) | 2.1.1 | Safely add untrusted strings to HTML/XML markup. / BSD-3-Clause |
| [matplotlib](https://matplotlib.org/) | 3.7.0 | Publication quality figures in Python / LicenseRef-PSF-based |
| [matplotlib-base](https://matplotlib.org/) | 3.7.0 | Publication quality figures in Python / LicenseRef-PSF-based |
| [matplotlib-inline](https://github.com/ipython/matplotlib-inline) | 0.1.6 | Inline Matplotlib backend for Jupyter / BSD-3-Clause |
| [mccabe](https://github.com/PyCQA/mccabe) | 0.7.0 | McCabe complexity checker for Python / MIT |
| [mistune](https://github.com/lepture/mistune) | 0.8.4 | A sane Markdown parser with useful plugins and renderers. / BSD-3-Clause |
| [mock](https://github.com/testing-cabal/mock) | 4.0.3 | A library for testing in Python / BSD-2-Clause |
| [mpc](http://www.multiprecision.org/) | 1.1.0 | A C library for the arithmetic of complex numbers with arbitrarily high precision. / LGPL-3-or-later |
| [mpfr](http://www.mpfr.org/) | 4.0.2 | The MPFR library is a C library for multiple-precision floating-point computations with correct rounding. / LGPL-3.0-only |
| [mpmath](http://mpmath.org) | 1.2.1 | Python library for arbitrary-precision floating-point arithmetic / BSD 3-Clause |
| [msgpack-python](https://msgpack.org/) | 1.0.3 | MessagePack (de)serializer / Apache-2.0 |
| [multipledispatch](https://github.com/mrocklin/multipledispatch/) | 0.6.0 | Multiple dispatch in Python / BSD 3-Clause |
| [munkres](https://github.com/bmc/munkres) | 1.1.4 | The Munkres module provides an O(n^3) implementation of the Munkres algorithm (also called the Hungarian algorithm or the Kuhn-Munkres algorithm). / Apache-2.0 |
| [mypy\_extensions](http://www.mypy-lang.org/) | 0.4.3 | Experimental type system extensions for programs checked with the mypy typechecker. / MIT |
| [nbclassic](https://github.com/jupyter/nbclassic) | 0.5.2 | Jupyter Notebook as a Jupyter Server Extension. / BSD-3-Clause |
| [nbclient](https://jupyter.org) | 0.5.13 | A client library for executing notebooks. Formally nbconvert’s ExecutePreprocessor. / BSD-3-Clause |
| [nbconvert](https://nbconvert.readthedocs.io/en/latest/) | 6.5.4 | Converting Jupyter Notebooks / BSD-3-Clause |
| [nbformat](https://jupyter.org) | 5.7.0 | The Jupyter Notebook format / BSD-3-Clause |
| [ncurses](https://invisible-island.net/ncurses/) | 6.4 | Library for text-based user interfaces / MIT AND X11 |
| [nest-asyncio](https://github.com/erdewit/nest_asyncio) | 1.5.6 | Patch asyncio to allow nested event loops / BSD-2-Clause |
| [networkx](https://networkx.github.io/) | 2.8.4 | Python package for creating and manipulating complex networks / BSD-3-Clause |
| [ninja](https://ninja-build.org/) | 1.10.2 | A small build system with a focus on speed / Apache-2.0 |
| [ninja-base](https://ninja-build.org/) | 1.10.2 | A small build system with a focus on speed / Apache-2.0 |
| [nltk](https://nltk.org/) | 3.7 | Natural Language Toolkit / Apache-2.0 |
| [notebook](https://jupyter.org) | 6.5.2 | Jupyter Notebook / BSD-3-Clause |
| [notebook-shim](https://github.com/jupyter/notebook_shim) | 0.2.2 | A shim layer for notebook traits and config / BSD-3-Clause |
| [nspr](https://hg.mozilla.org/projects/nspr) | 4.33 | A platform-neutral API for system level and libc-like functions. / MPL-2.0 |
| [nss](https://developer.mozilla.org/en-US/docs/Mozilla/Projects/NSS) | 3.74 | A set of libraries designed to support cross-platform development of security-enabled client and server applications. / MPL-2.0 |
| [numba](https://numba.pydata.org) | 0.56.4 | NumPy aware dynamic Python compiler using LLVM / BSD-2-Clause |
| [numexpr](https://github.com/pydata/numexpr) | 2.8.4 | Fast numerical expression evaluator for NumPy. / MIT |
| [numpy](https://numpy.org/) | 1.23.5 | Array processing for numbers, strings, records, and objects. / BSD-3-Clause |
| [numpy-base](https://numpy.org/) | 1.23.5 | Array processing for numbers, strings, records, and objects. / BSD-3-Clause |
| [numpydoc](https://github.com/numpy/numpydoc) | 1.5.0 | Sphinx extension to support docstrings in Numpy format / BSD-3-Clause |
| [oniguruma](https://github.com/kkos/oniguruma) | 6.9.7.1 | A regular expression library. / BSD-2-Clause |
| [openjpeg](http://www.openjpeg.org/) | 2.3.0 | An open-source JPEG 2000 codec written in C / BSD 2-Clause |
| [openpyxl](https://openpyxl.readthedocs.io) | 3.0.10 | A Python library to read/write Excel 2010 xlsx/xlsm files / MIT |
| [openssl](https://www.openssl.org/) | 1.1.1t | OpenSSL is an open-source implementation of the SSL and TLS protocols / OpenSSL |
| [packaging](https://github.com/pypa/packaging) | 22.0 | Core utilities for Python packages / Apache-2.0 or BSD-2-Clause |
| [pandas](https://pandas.pydata.org) | 1.5.3 | High-performance, easy-to-use data structures and data analysis tools. / BSD-3-Clause |
| [pandocfilters](https://github.com/jgm/pandocfilters) | 1.5.0 | A python module for writing pandoc filters / BSD-3-Clause |
| [panel](https://panel.holoviz.org) | 0.14.3 | A high-level app and dashboarding solution for Python / BSD-3-Clause |
| [param](https://param.holoviz.org/) | 1.12.3 | Param: Make your Python code clearer and more reliable by declaring Parameters / BSD-3-Clause |
| [parsel](https://github.com/scrapy/parsel) | 1.6.0 | library to extract data from HTML and XML using XPath and CSS selectors / BSD-3-Clause |
| [parso](https://github.com/davidhalter/parso) | 0.8.3 | A Python Parser / MIT |
| [partd](https://github.com/dask/partd) | 1.2.0 | Appendable key-value storage / BSD-3-Clause |
| [pathspec](https://github.com/cpburnz/python-path-specification) | 0.10.3 | Utility library for gitignore style pattern matching of file paths. / MPL-2.0 |
| [patsy](https://github.com/pydata/patsy) | 0.5.3 | Describing statistical models in Python using symbolic formulas / BSD-2-Clause AND PSF-2.0 |
| [pcre](http://www.pcre.org/) | 8.45 | Regular expression pattern matching using the same syntax and semantics as Perl 5. / BSD 3-Clause |
| [pep8](https://pep8.readthedocs.org/) | 1.7.1 | Python style guide checker / MIT |
| [pexpect](http://pexpect.sourceforge.net/) | 4.8.0 | Pexpect makes Python a better tool for controlling other applications. / ISC |
| [pickleshare](https://github.com/pickleshare/pickleshare/) | 0.7.5 | Tiny ‘shelve’-like database with concurrency support / MIT |
| [pillow](https://pillow.readthedocs.io) | 9.4.0 | Pillow is the friendly PIL fork by Alex Clark and Contributors / LicenseRef-PIL |
| [pip](https://pip.pypa.io/en/stable/) | 22.3.1 | PyPA recommended tool for installing Python packages / MIT |
| [platformdirs](https://github.com/platformdirs/platformdirs) | 2.5.2 | A small Python module for determining appropriate platform-specific dirs, e.g. a “user data dir”. / MIT |
| [plotly](https://plot.ly/python/) | 5.9.0 | An interactive JavaScript-based visualization library for Python / MIT |
| [pluggy](https://github.com/pytest-dev/pluggy) | 1.0.0 | Plugin registration and hook calling for Python / MIT |
| [ply](http://www.dabeaz.com/ply/index.html) | 3.11 | Python Lex-Yacc / BSD 3-clause |
| [pooch](https://github.com/fatiando/pooch) | 1.4.0 | A friend to fetch your data files / BSD-3-Clause |
| [poyo](https://github.com/hackebrot/poyo) | 0.5.0 | A lightweight YAML Parser for Python / MIT |
| [prometheus\_client](https://github.com/prometheus/client_python) | 0.14.1 | Python client for the Prometheus monitoring system / Apache-2.0 |
| [prompt-toolkit](https://github.com/prompt-toolkit/python-prompt-toolkit) | 3.0.36 | Library for building powerful interactive command lines in Python / BSD-3-Clause |
| [protego](https://github.com/scrapy/protego) | 0.1.16 | A pure-Python robots.txt parser with support for modern conventions / BSD 3-Clauses |
| [psutil](https://github.com/giampaolo/psutil) | 5.9.0 | A cross-platform process and system utilities module for Python / BSD-3-Clause |
| [ptyprocess](https://github.com/pexpect/ptyprocess) | 0.7.0 | Run a subprocess in a pseudo terminal / ISC |
| [pure\_eval](https://github.com/alexmojaki/pure_eval) | 0.2.2 | Safely evaluate AST nodes without side effects / MIT |
| [py](https://github.com/pytest-dev/py) | 1.11.0 | library with cross-python path, ini-parsing, io, code, log facilities / MIT |
| [pyasn1](https://github.com/etingof/pyasn1) | 0.4.8 | ASN.1 types and codecs / BSD 2-Clause |
| [pyasn1-modules](http://pyasn1.sourceforge.net/) | 0.2.8 | A collection of ASN.1-based protocols modules. / BSD 2-Clause |
| [pycodestyle](https://pycodestyle.readthedocs.io/) | 2.10.0 | Python style guide checker / MIT |
| [pycparser](https://github.com/eliben/pycparser) | 2.21 | Complete C99 parser in pure Python / BSD-3-clause |
| [pyct](https://github.com/pyviz/pyct) | 0.5.0 | python package common tasks for users (e.g. copy examples, fetch data, …) / BSD-3-Clause |
| [pycurl](http://pycurl.sourceforge.net/) | 7.45.1 | A Python Interface To The cURL library / LGPL-2.1-only, MIT |
| [pydispatcher](http://pydispatcher.sourceforge.net) | 2.0.5 | Multi-producer-multi-consumer signal dispatching mechanism / BSD-3-Clause |
| [pydocstyle](https://github.com/PyCQA/pydocstyle) | 6.3.0 | Python docstring style checker (formerly pep257) / MIT |
| [pyerfa](https://pyerfa.readthedocs.io/) | 2.0.0 | Python bindings for ERFA routines / BSD-3-Clause |
| [pyflakes](https://github.com/PyCQA/pyflakes) | 3.0.1 | Pyflakes analyzes programs and detects various errors. / MIT |
| [pygments](https://pygments.org/) | 2.11.2 | Pygments is a generic syntax highlighter suitable for use in code hosting, forums, wikis or other applications that need to prettify source code. / BSD-2-Clause |
| [pyhamcrest](https://github.com/hamcrest/PyHamcrest) | 2.0.2 | Hamcrest framework for matcher objects / BSD 3-Clause |
| [pylint](https://www.pylint.org) | 2.16.2 | python code static checker / GPL-2.0-or-later |
| [pylint-venv](https://github.com/jgosmann/pylint-venv/) | 2.3.0 | pylint-venv provides a Pylint init-hook to use the same Pylint installation with different virtual environments. / MIT |
| [pyls-spyder](https://github.com/spyder-ide/pyls-spyder) | 0.4.0 | Spyder extensions for the python-lsp-server / MIT |
| [pyobjc-core](https://github.com/ronaldoussoren/pyobjc) | 9.0 | `Python<->ObjC` Interoperability Module / MIT |
| [pyobjc-framework-cocoa](https://github.com/ronaldoussoren/pyobjc) | 9.0 | Wrappers for the Cocoa frameworks on Mac OS X / MIT |
| [pyobjc-framework-coreservices](https://github.com/ronaldoussoren/pyobjc) | 9.0 | Wrappers for the “CoreServices” framework on macOS. / MIT |
| [pyobjc-framework-fsevents](https://github.com/ronaldoussoren/pyobjc) | 9.0 | Wrappers for the framework FSEvents on macOS / MIT |
| [pyodbc](https://github.com/mkleehammer/pyodbc) | 4.0.34 | DB API Module for ODBC / MIT-0 |
| [pyopenssl](https://github.com/pyca/pyopenssl) | 23.0.0 | Python wrapper module around the OpenSSL library / Apache-2.0 |
| [pyparsing](https://github.com/pyparsing/pyparsing/) | 3.0.9 | Create and execute simple grammars / MIT |
| [pyqt](https://www.riverbankcomputing.com/software/pyqt/) | 5.15.7 | Python bindings for the Qt cross platform application toolkit / GPL-3.0-only |
| [pyqt5-sip](https://www.riverbankcomputing.com/software/pyqt/) | 12.11.0 | Python bindings for the Qt cross platform application toolkit / GPL-3.0-only |
| [pyqtwebengine](https://www.riverbankcomputing.com/software/pyqt/) | 5.15.7 | Python bindings for the Qt cross platform application toolkit / GPL-3.0-only |
| [pyrsistent](http://github.com/tobgu/pyrsistent/) | 0.18.0 | Persistent/Functional/Immutable data structures / MIT |
| [pysocks](https://github.com/Anorov/PySocks) | 1.7.1 | A Python SOCKS client module. See [Anorov/PySocks](https://github.com/Anorov/PySocks) for more information. / BSD 3-Clause |
| [pytables](https://www.pytables.org) | 3.7.0 | Brings together Python, HDF5 and NumPy to easily handle large amounts of data. / BSD-3-Clause |
| [pytest](https://docs.pytest.org/en/latest/) | 7.1.2 | Simple and powerful testing with Python. / MIT |
| [python](https://www.python.org/) | 3.10.9 | General purpose programming language / PSF-2.0 |
| [python-dateutil](https://dateutil.readthedocs.org/) | 2.8.2 | Extensions to the standard Python datetime module. / BSD-3-Clause and Apache |
| [python-fastjsonschema](https://github.com/horejsek/python-fastjsonschema) | 2.16.2 | Fastest Python implementation of JSON schema / BSD-3-Clause |
| [python-lsp-black](https://github.com/python-lsp/python-lsp-black) | 1.2.1 | Black plugin for the Python LSP Server / MIT |
| [python-lsp-jsonrpc](https://github.com/python-lsp/python-lsp-jsonrpc) | 1.0.0 | A Python 3.6+ server implementation of the JSON RPC 2.0 protocol. / MIT |
| [python-lsp-server](https://github.com/python-lsp/python-lsp-server) | 1.7.1 | An implementation of the Language Server Protocol for Python / MIT |
| [python-slugify](https://github.com/un33k/python-slugify) | 5.0.2 | A Python Slugify application that handles Unicode / MIT |
| [python-snappy](https://github.com/andrix/python-snappy) | 0.6.1 | Python library for the snappy compression library from Google / BSD-3-Clause |
| [python.app](https://www.python.org/) | 3 | Proxy on macOS letting Python libraries hook into the GUI event loop / BSD-3-Clause |
| [pytoolconfig](https://github.com/bagel897/pytoolconfig) | 1.2.5 | Python tool configuration / LGPL-3.0-or-later |
| [pytorch](https://pytorch.org/) | 1.12.1 | PyTorch is an optimized tensor library for deep learning using GPUs and CPUs. / BSD-3-Clause |
| [pytz](https://pythonhosted.org/pytz/) | 2022.7 | World timezone definitions, modern and historical. / MIT |
| [pyviz\_comms](https://www.holoviz.org) | 2.0.2 | Bidirectional communication for PyViz / BSD-3-Clause |
| [pywavelets](https://github.com/PyWavelets/pywt) | 1.4.1 | Discrete Wavelet Transforms in Python / MIT |
| [pyyaml](http://pyyaml.org/wiki/PyYAML) | 6.0 | YAML parser and emitter for Python / MIT |
| [pyzmq](https://github.com/zeromq/pyzmq) | 23.2.0 | Python bindings for zeromq / BSD-3-Clause AND LGPL-3.0-or-later |
| [qdarkstyle](https://github.com/ColinDuquesnoy/QDarkStyleSheet) | 3.0.2 | A dark stylesheet for Qt applications (Qt4, Qt5, PySide, PyQt4, PyQt5, QtPy, PyQtGraph). / MIT |
| [qstylizer](https://github.com/blambright/qstylizer) | 0.2.2 | Qt stylesheet generation utility for PyQt/PySide / MIT |
| [qt-main](http://qt.io) | 5.15.2 | Qt is a cross-platform application and UI framework. / LGPL-3.0-only |
| [qt-webengine](http://qt.io) | 5.15.9 | Qt is a cross-platform application and UI framework. / LGPL-3.0-only |
| [qtawesome](https://github.com/spyder-ide/qtawesome) | 1.2.2 | Iconic fonts in PyQt and PySide applications / MIT |
| [qtconsole](https://jupyter.org) | 5.4.0 | Jupyter Qt Console / BSD-3-Clause |
| [qtpy](https://github.com/spyder-ide/qtpy) | 2.2.0 | Abstraction layer for PyQt5/PyQt4/PySide / MIT |
| [qtwebkit](https://wiki.qt.io/Qt_WebKit) | 5.212 | WebKit is one of the major engine to render webpages and execute JavaScript code / LGPL-2.1-only |
| [queuelib](https://github.com/scrapy/queuelib) | 1.5.0 | Collection of persistent (disk-based) queues / BSD |
| [readline](https://tiswww.case.edu/php/chet/readline/rltop.html) | 8.2 | library for editing command lines as they are typed in / GPL-3.0-only |
| [regex](https://github.com/mrabarnett/mrab-regex) | 2022.7.9 | Alternative regular expression module, to replace re / Apache-2.0 |
| [requests](https://requests.readthedocs.io/en/latest/) | 2.28.1 | Requests is an elegant and simple HTTP library for Python, built with ♥. / Apache-2.0 |
| [requests-file](http://github.com/dashea/requests-file) | 1.5.1 | file transport adapter for Requests / Apache |
| [rope](https://github.com/python-rope/rope) | 1.7.0 | A python refactoring library / LGPL-3.0-or-later |
| [rtree](https://github.com/Toblerity/rtree) | 1.0.1 | R-Tree spatial index for Python GIS / MIT |
| [scikit-image](https://scikit-image.org/) | 0.19.3 | Image processing in Python. / BSD-3-Clause |
| [scikit-learn](https://scikit-learn.org/) | 1.2.1 | A set of python modules for machine learning and data mining / BSD-3-Clause |
| [scipy](https://scipy.org/) | 1.10.0 | Scientific Library for Python / BSD-3-Clause |
| [scrapy](https://scrapy.org/) | 2.8.0 | A high-level Python Screen Scraping framework / BSD-3-Clause |
| [seaborn](https://seaborn.pydata.org) | 0.12.2 | Statistical data visualization / BSD-3-Clause |
| [send2trash](https://github.com/arsenetar/send2trash) | 1.8.0 | Python library to natively send files to Trash (or Recycle bin) on all platforms. / BSD-3-Clause |
| [service\_identity](https://github.com/pyca/service_identity) | 18.1.0 | Service identity verification for pyOpenSSL. / MIT |
| [setuptools](https://github.com/pypa/setuptools) | 65.6.3 | Download, build, install, upgrade, and uninstall Python packages / MIT |
| [sip](https://www.riverbankcomputing.com/software/sip/) | 6.6.2 | A Python bindings generator for C/C++ libraries / GPL-3.0-only |
| [six](https://six.readthedocs.io/) | 1.16.0 | Python 2 and 3 compatibility utilities / MIT |
| [sleef](https://sleef.org/) | 3.5.1 | SIMD library for evaluating elementary functions / BSL-1.0 |
| [smart\_open](https://github.com/RaRe-Technologies/smart_open) | 5.2.1 | Python library for efficient streaming of large files / MIT |
| [snappy](https://github.com/google/snappy) | 1.1.9 | A fast compressor/decompressor / BSD-3-clause AND CC-BY-3.0 AND MIT AND CC-BY AND Public Domain |
| [sniffio](https://github.com/python-trio/sniffio) | 1.2.0 | Sniff out which async library your code is running under / Apache-2.0 |
| [snowballstemmer](https://github.com/snowballstem/snowball) | 2.2.0 | Snowball stemming library collection for Python / BSD-3-Clause |
| [sortedcontainers](http://www.grantjenks.com/docs/sortedcontainers/) | 2.4.0 | Python Sorted Container Types: SortedList, SortedDict, and SortedSet / Apache-2.0 |
| [soupsieve](https://facelessuser.github.io/soupsieve) | 2.3.2.post1 | A modern CSS selector implementation for BeautifulSoup / MIT |
| [sphinx](https://www.sphinx-doc.org) | 5.0.2 | Sphinx is a tool that makes it easy to create intelligent and beautiful documentation / BSD-2-Clause |
| [sphinxcontrib-applehelp](https://www.sphinx-doc.org/en/master/) | 1.0.2 | sphinxcontrib-applehelp is a sphinx extension which outputs Apple help books / BSD-2-Clause |
| [sphinxcontrib-devhelp](https://www.sphinx-doc.org/en/master/) | 1.0.2 | sphinxcontrib-devhelp is a sphinx extension which outputs Devhelp document / BSD-2-Clause |
| [sphinxcontrib-htmlhelp](https://www.sphinx-doc.org/en/master/) | 2.0.0 | sphinxcontrib-htmlhelp is a sphinx extension which renders HTML help files. / BSD-2-Clause |
| [sphinxcontrib-jsmath](https://www.sphinx-doc.org/en/master/) | 1.0.1 | A sphinx extension which renders display math in HTML via JavaScript / BSD-2-Clause |
| [sphinxcontrib-qthelp](https://www.sphinx-doc.org/en/master/) | 1.0.3 | sphinxcontrib-qthelp is a sphinx extension which outputs QtHelp document / BSD-2-Clause |
| [sphinxcontrib-serializinghtml](https://www.sphinx-doc.org/en/master/) | 1.1.5 | sphinxcontrib-serializinghtml is a sphinx extension which outputs “serialized” HTML files (json and pickle). / BSD-2-Clause |
| [spyder](https://www.spyder-ide.org/) | 5.4.1 | The Scientific Python Development Environment / MIT |
| [spyder-kernels](https://www.spyder-ide.org/) | 2.4.1 | Jupyter kernels for Spyder’s console / MIT |
| [sqlalchemy](https://www.sqlalchemy.org/) | 1.4.39 | Database Abstraction Library. / MIT |
| [sqlite](https://www.sqlite.org/) | 3.40.1 | Implements a self-contained, zero-configuration, SQL database engine / blessing |
| [stack\_data](https://github.com/alexmojaki/stack_data) | 0.2.0 | Extract data from python stack frames and tracebacks for informative displays / MIT |
| [statsmodels](https://www.statsmodels.org) | 0.13.5 | Statistical computations and models for use with SciPy / BSD-3-Clause |
| [sympy](https://sympy.org) | 1.11.1 | Python library for symbolic mathematics / BSD-3-Clause AND MIT |
| [tabulate](https://github.com/astanin/python-tabulate) | 0.8.10 | Pretty-print tabular data in Python, a library and a command-line utility. / MIT |
| [tbb](https://github.com/oneapi-src/oneTBB) | 2021.7.0 | High level abstract threading library / Apache-2.0 |
| tbb4py | 2021.7.0 | TBB module for Python / Apache-2.0 |
| [tblib](https://github.com/ionelmc/python-tblib) | 1.7.0 | Traceback serialization library. / BSD 2-Clause |
| [tenacity](https://github.com/jd/tenacity) | 8.0.1 | Retry a flaky function whenever an exception occurs until it works / Apache-2.0 |
| [terminado](https://github.com/jupyter/terminado) | 0.17.1 | Terminals served by tornado websockets / BSD-2-Clause |
| [text-unidecode](https://github.com/kmike/text-unidecode/) | 1.3 | The most basic Text::Unidecode port / Artistic |
| [textdistance](https://github.com/orsinium/textdistance) | 4.2.1 | TextDistance – python library for comparing distance between two or more sequences by many algorithms. / MIT |
| [threadpoolctl](https://github.com/joblib/threadpoolctl) | 2.2.0 | Python helpers to control the threadpools of native libraries / BSD 3-Clause |
| [three-merge](https://github.com/spyder-ide/three-merge) | 0.1.1 | Simple Python library to perform a 3-way merge between strings / MIT |
| [tifffile](https://github.com/cgohlke/tifffile) | 2021.7.2 | Read and write image data from and to TIFF files. / BSD-3-Clause |
| [tinycss2](https://www.courtbouillon.org/tinycss2) | 1.2.1 | Low-level CSS parser for Python / BSD-3-Clause |
| [tk](http://www.tcl.tk/) | 8.6.12 | A dynamic programming language with GUI support. Bundles Tcl and Tk. / Tcl/Tk |
| [tldextract](https://github.com/john-kurkowski/tldextract) | 3.2.0 | Accurately separate the TLD from the registered domain andsubdomains of a URL, using the Public Suffix List. / BSD-3-Clause |
| [tokenizers](https://github.com/huggingface/tokenizers) | 0.11.4 | Fast State-of-the-Art Tokenizers optimized for Research and Production / Apache-2.0 |
| [toml](https://github.com/uiri/toml) | 0.10.2 | Python lib for TOML. / MIT |
| [tomli](https://github.com/hukkin/tomli) | 2.0.1 | A simple TOML parser / MIT |
| [tomlkit](https://github.com/sdispater/tomlkit) | 0.11.1 | Style preserving TOML library / MIT |
| [toolz](https://toolz.readthedocs.io/) | 0.12.0 | List processing tools and functional utilities / BSD-3-Clause |
| [tornado](https://www.tornadoweb.org/) | 6.1 | A Python web framework and asynchronous networking library, originally developed at FriendFeed. / Apache-2.0 |
| [tqdm](https://tqdm.github.io/) | 4.64.1 | A Fast, Extensible Progress Meter / MPL-2.0 AND MIT |
| [traitlets](http://traitlets.readthedocs.org/) | 5.7.1 | Configuration system for Python applications / BSD-3-Clause |
| [transformers](https://github.com/huggingface/transformers) | 4.24.0 | State-of-the-art Machine Learning for JAX, PyTorch and TensorFlow / Apache-2.0 |
| [twisted](https://twistedmatrix.com/) | 22.2.0 | An asynchronous networking framework written in Python / MIT |
| [typing-extensions](https://github.com/python/typing_extensions) | 4.4.0 | Backported and Experimental Type Hints for Python / PSF-2.0 |
| [typing\_extensions](https://github.com/python/typing_extensions) | 4.4.0 | Backported and Experimental Type Hints for Python / PSF-2.0 |
| [tzdata](https://www.iana.org/time-zones) | 2022g | The Time Zone Database (called tz, tzdb or zoneinfo) / CC-PDDC OR BSD-3-Clause |
| [ujson](https://github.com/ultrajson/ultrajson) | 5.4.0 | Ultra fast JSON decoder and encoder written in C with Python bindings / BSD-3-Clause |
| [unidecode](https://pypi.python.org/pypi/Unidecode) | 1.2.0 | ASCII transliterations of Unicode text / GPL-2.0-or-later |
| [unixodbc](http://www.unixodbc.org/) | 2.3.11 | ODBC on non MS Windows platforms / LGPL-2.1-or-later |
| [urllib3](https://urllib3.readthedocs.io/) | 1.26.14 | HTTP library with thread-safe connection pooling, file post, and more. / MIT |
| [w3lib](https://github.com/scrapy/w3lib) | 1.21.0 | Library of web-related functions / BSD |
| [watchdog](http://github.com/gorakhargosh/watchdog) | 2.1.6 | Filesystem events monitoring / Apache-2.0 |
| [wcwidth](https://github.com/jquast/wcwidth) | 0.2.5 | Measures number of Terminal column cells of wide-character codes. / MIT |
| [webencodings](https://github.com/gsnedders/python-webencodings) | 0.5.1 | Character encoding aliases for legacy web content / BSD 3-Clause |
| [websocket-client](https://github.com/liris/websocket-client) | 0.58.0 | WebSocket client for python. hybi13 is supported. / BSD-3-Clause |
| [werkzeug](https://palletsprojects.com/p/werkzeug/) | 2.2.2 | The comprehensive WSGI web application library. / BSD-3-Clause |
| [whatthepatch](https://github.com/cscorley/whatthepatch) | 1.0.2 | What The Patch!? is a library for both parsing and applying patch files / MIT |
| [wheel](https://github.com/pypa/wheel) | 0.38.4 | A built-package format for Python. / MIT |
| [wrapt](https://github.com/GrahamDumpleton/wrapt) | 1.14.1 | Module for decorators, wrappers and monkey patching / BSD-2-Clause |
| [wurlitzer](https://github.com/minrk/wurlitzer) | 3.0.2 | Capture C-level stdout/stderr in Python / MIT |
| [xarray](https://github.com/pydata/xarray) | 2022.11.0 | N-D labeled arrays and datasets in Python. / Apache-2.0 |
| [xlwings](https://www.xlwings.org/) | 0.29.1 | Interact with Excel from Python and vice versa / BSD-3-Clause |
| [xz](https://tukaani.org/xz/) | 5.2.10 | Data compression software with high compression ratio / LGPL-2.1-or-later and GPL-2.0-or-later |
| [yaml](http://pyyaml.org/wiki/LibYAML) | 0.2.5 | A C library for parsing and emitting YAML / MIT |
| [yapf](https://github.com/google/yapf) | 0.31.0 | A formatter for Python files / Apache 2.0 |
| [zeromq](http://zeromq.org) | 4.3.4 | A high-performance asynchronous messaging library. / LGPL-3.0-or-later |
| [zfp](https://computation.llnl.gov/projects/floating-point-compression) | 0.5.5 | Library for compressed numerical arrays that support high throughput read and write random access / BSD-3-Clause |
| [zict](https://github.com/mrocklin/zict) | 2.1.0 | Composable Dictionary Classes / BSD-3-Clause |
| [zipp](https://github.com/jaraco/zipp) | 3.11.0 | A pathlib-compatible Zipfile object wrapper / MIT |
| [zlib](https://zlib.net/) | 1.2.13 | Massively spiffy yet delicately unobtrusive compression library / Zlib |
| zope | 1.0 | web application server / BSD |
| [zope.interface](https://github.com/zopefoundation/zope.interface) | 5.4.0 | Interfaces for Python / ZPL-2.1 |
| [zstd](https://www.zstd.net) | 1.5.2 | Zstandard - Fast real-time compression algorithm / BSD-3-Clause AND GPL-2.0-or-later |
| Name | Version | Summary / License |
|---|---|---|
| [alabaster](http://www.sphinx-doc.org/en/stable/index.html) | 0.7.12 | Configurable, Python 2+3 compatible Sphinx theme. / BSD 3-Clause |
| [anaconda-navigator](https://github.com/anaconda-distribution/navigator) | 2.4.0 | Anaconda Navigator / proprietary - Continuum Analytics, Inc. |
| [anyio](https://github.com/agronholm/anyio) | 3.5.0 | High level compatibility layer for multiple asynchronous event loop implementations on Python / MIT |
| [appdirs](http://github.com/ActiveState/appdirs) | 1.4.4 | A small Python module for determining appropriate platform-specific dirs. / MIT |
| [applaunchservices](https://github.com/impact27/applaunchservices) | 0.3.0 | Simple package for registering an app with apple Launch Services to handle UTI and URL / MIT |
| [appnope](http://github.com/minrk/appnope) | 0.1.2 | Disable App Nap on OS X 10.9 / BSD 2-Clause |
| [appscript](http://appscript.sourceforge.net) | 1.1.2 | Control AppleScriptable applications from Python. / Public Domain |
| [argon2-cffi](https://argon2-cffi.readthedocs.org/) | 21.3.0 | The secure Argon2 password hashing algorithm. / MIT |
| [argon2-cffi-bindings](https://github.com/hynek/argon2-cffi-bindings) | 21.2.0 | Low-level Python CFFI Bindings for Argon2 / MIT |
| [arrow](https://github.com/arrow-py/arrow) | 1.2.3 | Better dates & times for Python / Apache-2.0 |
| [astroid](https://github.com/PyCQA/astroid) | 2.14.2 | A abstract syntax tree for Python with inference support. / LGPL-2.1-or-later |
| [astropy](https://www.astropy.org/) | 5.1 | Community-developed Python Library for Astronomy / BSD-3-Clause |
| [asttokens](https://github.com/gristlabs/asttokens) | 2.0.5 | The asttokens module annotates Python abstract syntax trees (ASTs) with the positions of tokens and text in the source code that generated them. / Apache-2.0 |
| [atomicwrites](https://github.com/untitaker/python-atomicwrites) | 1.4.0 | Atomic file writes / MIT |
| [attrs](https://www.attrs.org/) | 22.1.0 | attrs is the Python package that will bring back the joy of writing classes by relieving you from the drudgery of implementing object protocols (aka dunder methods). / MIT |
| [automat](https://github.com/glyph/Automat) | 20.2.0 | self-service finite-state machines for the programmer on the go / MIT |
| [autopep8](https://github.com/hhatto/autopep8) | 1.6.0 | A tool that automatically formats Python code to conform to the PEP 8 style guide / MIT |
| [babel](https://babel.pocoo.org/) | 2.11.0 | Utilities to internationalize and localize Python applications / BSD-3-Clause |
| [backcall](https://github.com/takluyver/backcall/) | 0.2.0 | Specifications for callback functions passed in to an API / BSD-3-Clause |
| [bcrypt](https://github.com/pyca/bcrypt/) | 3.2.0 | Modern password hashing for your software and your servers / Apache-2.0 |
| [beautifulsoup4](https://www.crummy.com/software/BeautifulSoup/) | 4.11.1 | Python library designed for screen-scraping / MIT |
| [binaryornot](https://github.com/audreyr/binaryornot) | 0.4.4 | Ultra-lightweight pure Python package to check if a file is binary or text. / BSD-3-Clause |
| [black](https://github.com/psf/black) | 22.6.0 | The Uncompromising Code Formatter / MIT |
| [blas](http://www.netlib.org/lapack) | 1.0 | Linear Algebra PACKage / BSD-3-Clause |
| [bleach](https://github.com/mozilla/bleach) | 4.1.0 | Easy, whitelist-based HTML-sanitizing tool / Apache-2.0 |
| [blosc](https://www.blosc.org/) | 1.21.3 | A blocking, shuffling and loss-less compression library that can be faster than memcpy() / BSD-3-Clause |
| [bokeh](https://bokeh.org/) | 2.4.3 | Bokeh is an interactive visualization library for modern web browsers. / BSD-3-Clause |
| [bottleneck](https://github.com/pydata/bottleneck) | 1.3.5 | Fast NumPy array functions written in Cython. / BSD-2-Clause |
| [brotli](https://github.com/google/brotli) | 1.0.9 | Brotli compression format / MIT |
| [brotli-bin](https://github.com/google/brotli) | 1.0.9 | Brotli compression format / MIT |
| [brotlipy](https://github.com/python-hyper/brotlipy) | 0.7.0 | Python bindings to the Brotli compression library / MIT |
| [brunsli](https://github.com/google/brunsli) | 0.1 | Practical JPEG Repacker / MIT |
| [bzip2](http://www.bzip.org/) | 1.0.8 | high-quality data compressor / bzip2 |
| [c-ares](https://c-ares.org/) | 1.18.1 | This is c-ares, an asynchronous resolver library / MIT |
| [ca-certificates](https://curl.se/docs/caextract.html) | 2023.01.10 | Certificates for use with other packages. / MPL-2.0 |
| [certifi](https://certifi.io/) | 2022.12.7 | Python package for providing Mozilla’s CA Bundle. / MPL-2.0 |
| [cffi](https://cffi.readthedocs.org/) | 1.15.1 | Foreign Function Interface for Python calling C code. / MIT |
| [cfitsio](https://heasarc.gsfc.nasa.gov/fitsio/fitsio.html) | 3.470 | A library for reading and writing FITS files / Other |
| [chardet](https://github.com/chardet/chardet) | 4.0.0 | Universal character encoding detector / LGPL2 |
| [charls](https://github.com/team-charls/charls) | 2.2.0 | CharLS is a C++ implementation of the JPEG-LS standard for lossless and near-lossless image compression and decompression. JPEG-LS is a low-complexity image compression standard that matches JPEG 2000 compression ratios. / BSD-3-Clause |
| [charset-normalizer](https://github.com/ousret/charset_normalizer) | 2.0.4 | The Real First Universal Charset Detector. Open, modern and actively maintained alternative to Chardet. / MIT |
| [click](https://palletsprojects.com/p/click) | 8.0.4 | Python composable command line interface toolkit / BSD-3-Clause |
| [cloudpickle](https://github.com/cloudpipe/cloudpickle) | 2.0.0 | Extended pickling support for Python objects / BSD-3-Clause |
| [colorama](https://github.com/tartley/colorama) | 0.4.6 | Cross-platform colored terminal text / BSD-3-Clause |
| [colorcet](https://colorcet.holoviz.org/index.html) | 3.0.1 | Collection of perceptually uniform colormaps / CC-BY-4.0 |
| [comm](https://github.com/ipython/comm) | 0.1.2 | Python Comm implementation for the Jupyter kernel protocol / BSD-3-Clause |
| [conda](https://docs.conda.io) | 23.1.0 | OS-agnostic, system-level binary package and environment manager. / BSD-3-Clause |
| [conda-build](https://github.com/conda/conda-build) | 3.23.3 | tools for building conda packages / BSD-3-Clause |
| [conda-env](https://github.com/conda/conda-env) | 2.6.0 | Tools for interacting with conda environments. / BSD 3-Clause |
| [conda-verify](https://github.com/conda/conda-verify) | 3.4.2 | tool for validating conda recipes and conda packages / BSD 3-Clause |
| [constantly](https://github.com/twisted/constantly) | 15.1.0 | Symbolic constants in Python / MIT |
| [contourpy](https://github.com/contourpy/contourpy) | 1.0.5 | Python library for calculating contours of 2D quadrilateral grids. / BSD-3-Clause |
| [cookiecutter](https://github.com/cookiecutter/cookiecutter) | 1.7.3 | A command-line utility that creates projects from cookiecutters (project templates), e.g. creating a Python package project from a Python package project template. / BSD-3-Clause |
| [cryptography](https://github.com/pyca/cryptography) | 39.0.1 | Provides cryptographic recipes and primitives to Python developers / (BSD-3-Clause OR Apache-2.0) AND PSF-2.0 AND MIT |
| [cssselect](https://pythonhosted.org/cssselect/) | 1.1.0 | CSS Selectors for Python / BSD 3-Clause |
| [curl](https://curl.se/) | 7.87.0 | tool and library for transferring data with URL syntax / curl |
| [cycler](http://matplotlib.org/cycler) | 0.11.0 | Composable style cycles. / BSD-3-Clause |
| [cytoolz](https://github.com/pytoolz/cytoolz) | 0.12.0 | Cython implementation of Toolz. High performance functional utilities / BSD-3-Clause |
| [dask](https://dask.org/) | 2022.7.0 | Parallel PyData with Task Scheduling / BSD-3-Clause |
| [dask-core](https://github.com/dask/dask/) | 2022.7.0 | Parallel Python with task scheduling / BSD-3-Clause |
| [datashader](https://datashader.org) | 0.14.4 | Data visualization toolchain based on aggregating into a grid / BSD-3-Clause |
| [datashape](http://datashape.pydata.org) | 0.5.4 | A data description language. / BSD 2-Clause |
| [debugpy](https://github.com/Microsoft/debugpy) | 1.5.1 | An implementation of the Debug Adapter Protocol for Python / MIT |
| [decorator](https://github.com/micheles/decorator) | 5.1.1 | Better living through Python with decorators. / BSD-2-Clause |
| [defusedxml](https://bitbucket.org/tiran/defusedxml) | 0.7.1 | XML bomb protection for Python stdlib modules / PSF 2.0 |
| [diff-match-patch](http://code.google.com/p/google-diff-match-patch/) | 20200713 | Diff Match Patch is a high-performance library in multiple languages that manipulates plain text / Apache-2.0 |
| [dill](https://github.com/uqfoundation/dill) | 0.3.6 | Serialize all of python (almost) / BSD-3-Clause |
| [distributed](https://distributed.readthedocs.io/en/latest/) | 2022.7.0 | Distributed computing with Dask / BSD-3-Clause |
| [docstring-to-markdown](https://pypi.org/project/docstring-to-markdown) | 0.11 | On the fly conversion of Python docstrings to markdown / LGPL-2.1-or-later |
| [docutils](https://docutils.sourceforge.io/) | 0.18.1 | Docutils – Python Documentation Utilities / LicenseRef-Public-Domain-Dedictation and BSD-2-Clause and LicenseRef-PSF-2.1.1 and GPL-3.0-or-later |
| [entrypoints](https://github.com/takluyver/entrypoints) | 0.4 | Discover and load entry points from installed packages. / MIT License |
| [et\_xmlfile](https://foss.heptapod.net/openpyxl/et_xmlfile) | 1.1.0 | An implementation of lxml.xmlfile for the standard library / MIT AND PSF-2.0 |
| [executing](https://pypi.org/project/executing) | 0.8.3 | Get the currently executing AST node of a frame, and other information / MIT |
| [filelock](https://github.com/tox-dev/py-filelock) | 3.9.0 | A platform independent file lock. / Unlicense |
| [flake8](https://flake8.pycqa.org/) | 6.0.0 | Your Tool For Style Guide Enforcement / MIT |
| [flask](https://palletsprojects.com/p/flask) | 2.2.2 | A simple framework for building complex web applications. / BSD-3-Clause |
| [flit-core](https://flit.readthedocs.io/) | 3.6.0 | Simplified packaging of Python modules / BSD-3-Clause |
| [fonttools](https://github.com/fonttools/fonttools) | 4.25.0 | fontTools is a library for manipulating fonts, written in Python. / MIT |
| [freetype](https://freetype.org/) | 2.12.1 | A Free, High-Quality, and Portable Font Engine / GPL-2-only and LicenseRef-FreeType |
| [fsspec](https://github.com/fsspec/filesystem_spec) | 2022.11.0 | A specification for pythonic filesystems / BSD-3-Clause |
| [future](https://python-future.org) | 0.18.3 | Clean single-source support for Python 3 and 2 / MIT |
| [gensim](https://github.com/RaRe-Technologies/gensim) | 4.3.0 | Topic Modelling for Humans / LGPL-2.1-only |
| [gettext](https://www.gnu.org/software/gettext/) | 0.21.0 | Internationalization package / GPL-2.0 |
| [giflib](https://giflib.sourceforge.net) | 5.2.1 | Library for reading and writing gif images / MIT |
| [glib](https://developer.gnome.org/glib/) | 2.69.1 | Provides core application building blocks for libraries and applications written in C. / LGPL-2.1-or-later |
| [gmp](https://gmplib.org/) | 6.2.1 | The GNU multiprecision library. / GPL-2.0-or-later AND LGPL-3.0-or-later |
| [gmpy2](https://pypi.python.org/pypi/gmpy2) | 2.1.2 | GMP/MPIR, MPFR, and MPC interface to Python 2.6+ and 3.x / LGPL-3.0-or-later |
| [greenlet](https://github.com/python-greenlet/greenlet) | 2.0.1 | Lightweight in-process concurrent programming / MIT |
| [gst-plugins-base](http://gstreamer.freedesktop.org/) | 1.14.1 | GStreamer Base Plug-ins / GPL2 |
| [gstreamer](http://gstreamer.freedesktop.org/) | 1.14.1 | Library for constructing graphs of media-handling components / LGPL 2 |
| [h5py](https://www.h5py.org/) | 3.7.0 | Read and write HDF5 files from Python / BSD-3-Clause |
| [hdf5](http://www.hdfgroup.org/HDF5/) | 1.10.6 | HDF5 is a data model, library, and file format for storing and managing data / HDF5 |
| [heapdict](http://stutzbachenterprises.com/) | 1.0.1 | A heap with decrease-key and increase-key operations / BSD 3-Clause |
| [holoviews](https://holoviews.org) | 1.15.4 | Stop plotting your data - annotate your data and let it visualize itself. / BSD-3-Clause |
| [huggingface\_hub](https://github.com/huggingface/huggingface_hub) | 0.10.1 | Client library to download and publish models, datasets and other repos on the huggingface.co hub / Apache-2.0 |
| [hvplot](https://hvplot.holoviz.org) | 0.8.2 | A high-level plotting API for the PyData ecosystem built on HoloViews / BSD-3-Clause |
| [hyperlink](https://github.com/python-hyper/hyperlink) | 21.0.0 | Immutable, Pythonic, correct URLs. / MIT |
| [icu](http://site.icu-project.org/) | 58.2 | International Components for Unicode. / MIT |
| [idna](https://github.com/kjd/idna) | 3.4 | Internationalized Domain Names in Applications (IDNA). / BSD-3-Clause |
| [imagecodecs](https://www.lfd.uci.edu/~gohlke/) | 2021.8.26 | Image transformation, compression, and decompression codecs / BSD-3-Clause |
| [imageio](https://imageio.github.io) | 2.26.0 | A Python library for reading and writing image data / BSD-2-Clause |
| [imagesize](https://github.com/shibukawa/imagesize_py) | 1.4.1 | Getting image size from png/jpeg/jpeg2000/gif file / MIT |
| [imbalanced-learn](https://github.com/scikit-learn-contrib/imbalanced-learn) | 0.10.1 | Python module to balance data set using under- and over-sampling / MIT |
| [importlib-metadata](https://github.com/python/importlib_metadata) | 4.11.3 | A library to access the metadata for a Python package. / Apache-2.0 |
| [importlib\_metadata](https://github.com/python/importlib_metadata) | 4.11.3 | A library to access the metadata for a Python package. / Apache-2.0 |
| [incremental](https://github.com/hawkowl/incremental) | 21.3.0 | Incremental is a small library that versions your Python projects. / MIT |
| [inflection](http://github.com/jpvanhal/inflection) | 0.5.1 | A port of Ruby on Rails inflector to Python / MIT |
| [iniconfig](http://github.com/RonnyPfannschmidt/iniconfig) | 1.1.1 | iniconfig: brain-dead simple config-ini parsing / MIT |
| [intake](https://github.com/intake/intake) | 0.6.7 | Data load and catalog system / BSD-2-Clause |
| [intervaltree](https://github.com/chaimleib/intervaltree) | 3.1.0 | Editable interval tree data structure for Python 2 and 3 / Apache-2.0 |
| [ipykernel](https://ipython.org) | 6.19.2 | IPython Kernel for Jupyter / BSD-3-Clause |
| [ipython](https://ipython.org) | 8.10.0 | IPython: Productive Interactive Computing / BSD-3-Clause |
| [ipython\_genutils](http://ipython.org) | 0.2.0 | vestigial utilities from IPython / BSD 3-Clause |
| [ipywidgets](https://github.com/ipython/ipywidgets) | 7.6.5 | Jupyter Interactive Widgets / BSD-3-Clause |
| [isort](https://github.com/timothycrosley/isort) | 5.9.3 | A Python utility / library to sort Python imports. / MIT |
| [itemadapter](https://github.com/scrapy/itemadapter) | 0.3.0 | Common interface for different data containers / BSD-3-Clause |
| [itemloaders](https://github.com/scrapy/itemloaders) | 1.0.4 | Collect data from HTML and XML sources / BSD-3-Clause |
| [itsdangerous](https://github.com/pallets/itsdangerous) | 2.0.1 | Various helpers to pass trusted data to untrusted environments. / BSD-3-Clause |
| [jedi](https://github.com/davidhalter/jedi/) | 0.18.1 | An autocompletion tool for Python that can be used for text editors. / MIT |
| [jellyfish](https://github.com/jamesturk/jellyfish) | 0.9.0 | a library for doing approximate and phonetic matching of strings. / BSD-2-Clause |
| [jinja2](https://palletsprojects.com/p/jinja/) | 3.1.2 | A very fast and expressive template engine. / BSD-3-Clause |
| [jinja2-time](https://github.com/hackebrot/jinja2-time) | 0.2.0 | Jinja2 Extension for Dates and Times / MIT |
| [jmespath](http://jmespath.org/) | 0.10.0 | Query language for JSON / MIT |
| [joblib](https://joblib.readthedocs.io/en/latest/) | 1.1.1 | Lightweight pipelining: using Python functions as pipeline jobs. / BSD-3-Clause |
| [jpeg](https://www.ijg.org/) | 9e | read/write jpeg COM, EXIF, IPTC medata / IJG |
| [jq](http://stedolan.github.io/jq/) | 1.6 | A command-line JSON processor. / MIT |
| [json5](https://github.com/dpranke/pyjson5) | 0.9.6 | A Python implementation of the JSON5 data format / Apache-2.0 |
| [jsonschema](https://github.com/python-jsonschema/jsonschema) | 4.17.3 | An implementation of JSON Schema validation for Python / MIT |
| [jupyter](https://jupyter.org) | 1.0.0 | Jupyter metapackage. Install all the Jupyter components in one go. / BSD-3-Clause |
| [jupyter\_client](https://jupyter.org) | 7.3.4 | Jupyter protocol implementation and client libraries. / BSD-3-Clause |
| [jupyter\_console](https://jupyter.org) | 6.6.2 | Jupyter terminal console / BSD-3-Clause |
| [jupyter\_core](https://jupyter.org) | 5.2.0 | Core common functionality of Jupyter projects. / BSD-3-Clause |
| [jupyter\_server](https://jupyter.org) | 1.23.4 | Jupyter Server / BSD-3-Clause |
| [jupyterlab](https://github.com/jupyterlab/jupyterlab) | 3.5.3 | JupyterLab PRE-ALPHA / BSD-3-Clause |
| [jupyterlab\_pygments](http://github.com/JupyterLab/jupyterlab_pygments) | 0.1.2 | Pygments syntax coloring scheme making use of the JupyterLab CSS variables / BSD-3-Clause |
| [jupyterlab\_server](https://github.com/jupyterlab/jupyterlab_server) | 2.19.0 | A set of server components for JupyterLab and JupyterLab like applications. / BSD-3-Clause |
| [jupyterlab\_widgets](https://github.com/jupyter-widgets/ipywidgets) | 1.0.0 | JupyterLab extension providing HTML widgets / BSD-3-Clause |
| [jxrlib](https://packages.debian.org/source/sid/jxrlib) | 1.1 | jxrlib - JPEG XR Library by Microsoft, built from Debian hosted sources. / BSD-2-Clause |
| [keyring](https://github.com/jaraco/keyring) | 23.4.0 | Store and access your passwords safely / MIT |
| [kiwisolver](https://github.com/nucleic/kiwi) | 1.4.4 | An efficient C++ implementation of the Cassowary constraint solver / BSD-3-Clause |
| [krb5](https://web.mit.edu/kerberos/) | 1.19.4 | A network authentication protocol. / MIT |
| [lazy-object-proxy](https://github.com/ionelmc/python-lazy-object-proxy) | 1.6.0 | A fast and thorough lazy object proxy / BSD-2-Clause |
| [lcms2](http://www.littlecms.com/) | 2.12 | Open Source Color Management Engine / MIT |
| [lerc](https://github.com/Esri/lerc) | 3.0 | LERC - Limited Error Raster Compression / Apache-2.0 |
| [libaec](https://gitlab.dkrz.de/k202009/libaec) | 1.0.4 | Adaptive Entropy Coding library / BSD-2-Clause |
| [libbrotlicommon](https://github.com/google/brotli) | 1.0.9 | Brotli compression format / MIT |
| [libbrotlidec](https://github.com/google/brotli) | 1.0.9 | Brotli compression format / MIT |
| [libbrotlienc](https://github.com/google/brotli) | 1.0.9 | Brotli compression format / MIT |
| [libclang](https://llvm.org/) | 12.0.0 | Development headers and libraries for Clang / Apache-2.0 WITH LLVM-exception |
| [libcurl](https://curl.se/) | 7.87.0 | tool and library for transferring data with URL syntax / curl |
| [libcxx](https://libcxx.llvm.org/) | 14.0.6 | LLVM C++ standard library / Apache-2.0 WITH LLVM-exception |
| [libdeflate](https://github.com/ebiggers/libdeflate) | 1.17 | libdeflate is a library for fast, whole-buffer DEFLATE-based compression and decompression. / MIT |
| [libedit](https://thrysoee.dk/editline/) | 3.1.20221030 | Editline Library (libedit) / BSD-2-Clause |
| [libev](http://software.schmorp.de/pkg/libev.html) | 4.33 | A full-featured and high-performance event loop that is loosely modeled after libevent, but without its limitations and bugs. / BSD-2-Clause |
| [libffi](https://sourceware.org/libffi/) | 3.4.2 | A Portable Foreign Function Interface Library / MIT |
| [libgfortran](https://gcc.gnu.org/) | 5.0.0 | Fortran compiler and libraries from the GNU Compiler Collection / GPL-3.0-only WITH GCC-exception-3.1 |
| [libgfortran5](https://gcc.gnu.org/) | 11.3.0 | Fortran compiler and libraries from the GNU Compiler Collection / GPL-3.0-only WITH GCC-exception-3.1 |
| [libiconv](https://www.gnu.org/software/libiconv/) | 1.16 | Provides iconv for systems which don’t have one (or that cannot convert from/to Unicode.) / GPL-3.0-or-later |
| [libllvm11](https://llvm.org/) | 11.1.0 | Development headers and libraries for LLVM / Apache-2.0 WITH LLVM-exception |
| [libllvm12](http://llvm.org/) | 12.0.0 | Development headers and libraries for LLVM / Apache-2.0 WITH LLVM-exception |
| [libnghttp2](http://github.com/nghttp2/nghttp2) | 1.46.0 | This is an implementation of Hypertext Transfer Protocol version 2. / MIT |
| [libopenblas](https://www.openblas.net/) | 0.3.21 | An Optimized BLAS library / BSD-3-Clause |
| [libpng](http://www.libpng.org/pub/png/libpng.html) | 1.6.39 | PNG reference library / Zlib |
| [libpq](http://www.postgresql.org/) | 12.9 | The postgres runtime libraries and utilities (not the server itself) / PostgreSQL |
| [libprotobuf](https://developers.google.com/protocol-buffers/) | 3.20.3 | Protocol Buffers - Google’s data interchange format. C++ Libraries and protoc, the protobuf compiler. / BSD-3-Clause |
| [libsodium](http://libsodium.org) | 1.0.18 | A modern and easy-to-use crypto library. / ISC |
| [libspatialindex](http://libspatialindex.github.io) | 1.9.3 | Extensible framework for robust spatial indexing / MIT |
| [libssh2](https://www.libssh2.org/) | 1.10.0 | the SSH library / BSD-3-Clause |
| [libtiff](http://www.simplesystems.org/libtiff/) | 4.5.0 | Support for the Tag Image File Format (TIFF). / HPND |
| [libuv](https://libuv.org/) | 1.44.2 | Cross-platform asynchronous I/O / MIT |
| [libwebp](https://developers.google.com/speed/webp/) | 1.2.4 | WebP image library / BSD-3-Clause |
| [libwebp-base](https://developers.google.com/speed/webp) | 1.2.4 | WebP image library / BSD-3-Clause |
| [libxml2](https://gitlab.gnome.org/GNOME/libxml2/) | 2.9.14 | The XML C parser and toolkit of Gnome / MIT |
| [libxslt](https://gitlab.gnome.org/GNOME/libxslt) | 1.1.35 | The XSLT C library developed for the GNOME project / MIT |
| [libzopfli](https://github.com/google/zopfli) | 1.0.3 | A compression library programmed in C to perform very good, but slow, deflate or zlib compression. / Apache-2.0 |
| [llvm-openmp](https://openmp.llvm.org/) | 14.0.6 | The OpenMP API supports multi-platform shared-memory parallel programming in C/C++ and Fortran. / Apache-2.0 WITH LLVM-exception |
| [llvmlite](https://llvmlite.pydata.org) | 0.39.1 | A lightweight LLVM python binding for writing JIT compilers. / BSD-2-Clause |
| [locket](https://github.com/mwilliamson/locket.py) | 1.0.0 | File-based locks for Python for Linux and Windows / BSD-2-Clause |
| [lxml](https://lxml.de/) | 4.9.1 | Pythonic binding for the C libraries libxml2 and libxslt. / BSD-3-Clause and GPL-2.0-only and ZPL-2.0 and LicenseRef-ElementTree |
| [lz4](https://github.com/python-lz4/python-lz4) | 3.1.3 | LZ4 Bindings for Python / BSD-3-Clause |
| [lz4-c](https://lz4.github.io/lz4/) | 1.9.4 | Extremely Fast Compression algorithm / BSD-2-Clause |
| [lzo](http://www.oberhumer.com/opensource/lzo/) | 2.10 | LZO is a portable lossless data compression library written in ANSI C. / GPL v2+ |
| [markdown](https://github.com/Python-Markdown/markdown) | 3.4.1 | Python implementation of Markdown. / BSD-3-Clause |
| [markupsafe](https://www.palletsprojects.com/p/markupsafe) | 2.1.1 | Safely add untrusted strings to HTML/XML markup. / BSD-3-Clause |
| [matplotlib](https://matplotlib.org/) | 3.7.0 | Publication quality figures in Python / LicenseRef-PSF-based |
| [matplotlib-base](https://matplotlib.org/) | 3.7.0 | Publication quality figures in Python / LicenseRef-PSF-based |
| [matplotlib-inline](https://github.com/ipython/matplotlib-inline) | 0.1.6 | Inline Matplotlib backend for Jupyter / BSD-3-Clause |
| [mccabe](https://github.com/PyCQA/mccabe) | 0.7.0 | McCabe complexity checker for Python / MIT |
| [mistune](https://github.com/lepture/mistune) | 0.8.4 | A sane Markdown parser with useful plugins and renderers. / BSD-3-Clause |
| [mock](https://github.com/testing-cabal/mock) | 4.0.3 | A library for testing in Python / BSD-2-Clause |
| [mpc](http://www.multiprecision.org/) | 1.1.0 | A C library for the arithmetic of complex numbers with arbitrarily high precision. / LGPL-3-or-later |
| [mpfr](http://www.mpfr.org/) | 4.0.2 | The MPFR library is a C library for multiple-precision floating-point computations with correct rounding. / LGPL-3.0-only |
| [mpmath](http://mpmath.org) | 1.2.1 | Python library for arbitrary-precision floating-point arithmetic / BSD 3-Clause |
| [msgpack-python](https://msgpack.org/) | 1.0.3 | MessagePack (de)serializer / Apache-2.0 |
| [multipledispatch](https://github.com/mrocklin/multipledispatch/) | 0.6.0 | Multiple dispatch in Python / BSD 3-Clause |
| [munkres](https://github.com/bmc/munkres) | 1.1.4 | The Munkres module provides an O(n^3) implementation of the Munkres algorithm (also called the Hungarian algorithm or the Kuhn-Munkres algorithm). / Apache-2.0 |
| [mypy\_extensions](http://www.mypy-lang.org/) | 0.4.3 | Experimental type system extensions for programs checked with the mypy typechecker. / MIT |
| [nbclassic](https://github.com/jupyter/nbclassic) | 0.5.2 | Jupyter Notebook as a Jupyter Server Extension. / BSD-3-Clause |
| [nbclient](https://jupyter.org) | 0.5.13 | A client library for executing notebooks. Formally nbconvert’s ExecutePreprocessor. / BSD-3-Clause |
| [nbconvert](https://nbconvert.readthedocs.io/en/latest/) | 6.5.4 | Converting Jupyter Notebooks / BSD-3-Clause |
| [nbformat](https://jupyter.org) | 5.7.0 | The Jupyter Notebook format / BSD-3-Clause |
| [ncurses](https://invisible-island.net/ncurses/) | 6.4 | Library for text-based user interfaces / MIT AND X11 |
| [nest-asyncio](https://github.com/erdewit/nest_asyncio) | 1.5.6 | Patch asyncio to allow nested event loops / BSD-2-Clause |
| [networkx](https://networkx.github.io/) | 2.8.4 | Python package for creating and manipulating complex networks / BSD-3-Clause |
| [ninja](https://ninja-build.org/) | 1.10.2 | A small build system with a focus on speed / Apache-2.0 |
| [ninja-base](https://ninja-build.org/) | 1.10.2 | A small build system with a focus on speed / Apache-2.0 |
| [nltk](https://nltk.org/) | 3.7 | Natural Language Toolkit / Apache-2.0 |
| [notebook](https://jupyter.org) | 6.5.2 | Jupyter Notebook / BSD-3-Clause |
| [notebook-shim](https://github.com/jupyter/notebook_shim) | 0.2.2 | A shim layer for notebook traits and config / BSD-3-Clause |
| [nspr](https://hg.mozilla.org/projects/nspr) | 4.33 | A platform-neutral API for system level and libc-like functions. / MPL-2.0 |
| [nss](https://developer.mozilla.org/en-US/docs/Mozilla/Projects/NSS) | 3.74 | A set of libraries designed to support cross-platform development of security-enabled client and server applications. / MPL-2.0 |
| [numba](https://numba.pydata.org) | 0.56.4 | NumPy aware dynamic Python compiler using LLVM / BSD-2-Clause |
| [numexpr](https://github.com/pydata/numexpr) | 2.8.4 | Fast numerical expression evaluator for NumPy. / MIT |
| [numpy](https://numpy.org/) | 1.23.5 | Array processing for numbers, strings, records, and objects. / BSD-3-Clause |
| [numpy-base](https://numpy.org/) | 1.23.5 | Array processing for numbers, strings, records, and objects. / BSD-3-Clause |
| [numpydoc](https://github.com/numpy/numpydoc) | 1.5.0 | Sphinx extension to support docstrings in Numpy format / BSD-3-Clause |
| [oniguruma](https://github.com/kkos/oniguruma) | 6.9.7.1 | A regular expression library. / BSD-2-Clause |
| [openjpeg](http://www.openjpeg.org/) | 2.4.0 | An open-source JPEG 2000 codec written in C / BSD 2-Clause |
| [openpyxl](https://openpyxl.readthedocs.io) | 3.0.10 | A Python library to read/write Excel 2010 xlsx/xlsm files / MIT |
| [openssl](https://www.openssl.org/) | 1.1.1t | OpenSSL is an open-source implementation of the SSL and TLS protocols / OpenSSL |
| [packaging](https://github.com/pypa/packaging) | 22.0 | Core utilities for Python packages / Apache-2.0 or BSD-2-Clause |
| [pandas](https://pandas.pydata.org) | 1.5.3 | High-performance, easy-to-use data structures and data analysis tools. / BSD-3-Clause |
| [pandocfilters](https://github.com/jgm/pandocfilters) | 1.5.0 | A python module for writing pandoc filters / BSD-3-Clause |
| [panel](https://panel.holoviz.org) | 0.14.3 | A high-level app and dashboarding solution for Python / BSD-3-Clause |
| [param](https://param.holoviz.org/) | 1.12.3 | Param: Make your Python code clearer and more reliable by declaring Parameters / BSD-3-Clause |
| [parsel](https://github.com/scrapy/parsel) | 1.6.0 | library to extract data from HTML and XML using XPath and CSS selectors / BSD-3-Clause |
| [parso](https://github.com/davidhalter/parso) | 0.8.3 | A Python Parser / MIT |
| [partd](https://github.com/dask/partd) | 1.2.0 | Appendable key-value storage / BSD-3-Clause |
| [pathspec](https://github.com/cpburnz/python-path-specification) | 0.10.3 | Utility library for gitignore style pattern matching of file paths. / MPL-2.0 |
| [patsy](https://github.com/pydata/patsy) | 0.5.3 | Describing statistical models in Python using symbolic formulas / BSD-2-Clause AND PSF-2.0 |
| [pcre](http://www.pcre.org/) | 8.45 | Regular expression pattern matching using the same syntax and semantics as Perl 5. / BSD 3-Clause |
| [pep8](https://pep8.readthedocs.org/) | 1.7.1 | Python style guide checker / MIT |
| [pexpect](http://pexpect.sourceforge.net/) | 4.8.0 | Pexpect makes Python a better tool for controlling other applications. / ISC |
| [pickleshare](https://github.com/pickleshare/pickleshare/) | 0.7.5 | Tiny ‘shelve’-like database with concurrency support / MIT |
| [pillow](https://pillow.readthedocs.io) | 9.4.0 | Pillow is the friendly PIL fork by Alex Clark and Contributors / LicenseRef-PIL |
| [pip](https://pip.pypa.io/en/stable/) | 22.3.1 | PyPA recommended tool for installing Python packages / MIT |
| [platformdirs](https://github.com/platformdirs/platformdirs) | 2.5.2 | A small Python module for determining appropriate platform-specific dirs, e.g. a “user data dir”. / MIT |
| [plotly](https://plot.ly/python/) | 5.9.0 | An interactive JavaScript-based visualization library for Python / MIT |
| [pluggy](https://github.com/pytest-dev/pluggy) | 1.0.0 | Plugin registration and hook calling for Python / MIT |
| [ply](http://www.dabeaz.com/ply/index.html) | 3.11 | Python Lex-Yacc / BSD 3-clause |
| [pooch](https://github.com/fatiando/pooch) | 1.4.0 | A friend to fetch your data files / BSD-3-Clause |
| [poyo](https://github.com/hackebrot/poyo) | 0.5.0 | A lightweight YAML Parser for Python / MIT |
| [prometheus\_client](https://github.com/prometheus/client_python) | 0.14.1 | Python client for the Prometheus monitoring system / Apache-2.0 |
| [prompt-toolkit](https://github.com/prompt-toolkit/python-prompt-toolkit) | 3.0.36 | Library for building powerful interactive command lines in Python / BSD-3-Clause |
| [prompt\_toolkit](https://github.com/prompt-toolkit/python-prompt-toolkit) | 3.0.36 | Library for building powerful interactive command lines in Python / BSD-3-Clause |
| [protego](https://github.com/scrapy/protego) | 0.1.16 | A pure-Python robots.txt parser with support for modern conventions / BSD 3-Clauses |
| [psutil](https://github.com/giampaolo/psutil) | 5.9.0 | A cross-platform process and system utilities module for Python / BSD-3-Clause |
| [ptyprocess](https://github.com/pexpect/ptyprocess) | 0.7.0 | Run a subprocess in a pseudo terminal / ISC |
| [pure\_eval](https://github.com/alexmojaki/pure_eval) | 0.2.2 | Safely evaluate AST nodes without side effects / MIT |
| [py](https://github.com/pytest-dev/py) | 1.11.0 | library with cross-python path, ini-parsing, io, code, log facilities / MIT |
| [pyasn1](https://github.com/etingof/pyasn1) | 0.4.8 | ASN.1 types and codecs / BSD 2-Clause |
| [pyasn1-modules](http://pyasn1.sourceforge.net/) | 0.2.8 | A collection of ASN.1-based protocols modules. / BSD 2-Clause |
| [pycodestyle](https://pycodestyle.readthedocs.io/) | 2.10.0 | Python style guide checker / MIT |
| [pycparser](https://github.com/eliben/pycparser) | 2.21 | Complete C99 parser in pure Python / BSD-3-clause |
| [pyct](https://github.com/pyviz/pyct) | 0.5.0 | python package common tasks for users (e.g. copy examples, fetch data, …) / BSD-3-Clause |
| [pycurl](http://pycurl.sourceforge.net/) | 7.45.1 | A Python Interface To The cURL library / LGPL-2.1-only, MIT |
| [pydispatcher](http://pydispatcher.sourceforge.net) | 2.0.5 | Multi-producer-multi-consumer signal dispatching mechanism / BSD-3-Clause |
| [pydocstyle](https://github.com/PyCQA/pydocstyle) | 6.3.0 | Python docstring style checker (formerly pep257) / MIT |
| [pyerfa](https://pyerfa.readthedocs.io/) | 2.0.0 | Python bindings for ERFA routines / BSD-3-Clause |
| [pyflakes](https://github.com/PyCQA/pyflakes) | 3.0.1 | Pyflakes analyzes programs and detects various errors. / MIT |
| [pygments](https://pygments.org/) | 2.11.2 | Pygments is a generic syntax highlighter suitable for use in code hosting, forums, wikis or other applications that need to prettify source code. / BSD-2-Clause |
| [pyhamcrest](https://github.com/hamcrest/PyHamcrest) | 2.0.2 | Hamcrest framework for matcher objects / BSD 3-Clause |
| [pylint](https://www.pylint.org) | 2.16.2 | python code static checker / GPL-2.0-or-later |
| [pylint-venv](https://github.com/jgosmann/pylint-venv/) | 2.3.0 | pylint-venv provides a Pylint init-hook to use the same Pylint installation with different virtual environments. / MIT |
| [pyls-spyder](https://github.com/spyder-ide/pyls-spyder) | 0.4.0 | Spyder extensions for the python-lsp-server / MIT |
| [pyobjc-core](https://github.com/ronaldoussoren/pyobjc) | 9.0 | `Python<->ObjC` Interoperability Module / MIT |
| [pyobjc-framework-cocoa](https://github.com/ronaldoussoren/pyobjc) | 9.0 | Wrappers for the Cocoa frameworks on Mac OS X / MIT |
| [pyobjc-framework-coreservices](https://github.com/ronaldoussoren/pyobjc) | 9.0 | Wrappers for the “CoreServices” framework on macOS. / MIT |
| [pyobjc-framework-fsevents](https://github.com/ronaldoussoren/pyobjc) | 9.0 | Wrappers for the framework FSEvents on macOS / MIT |
| [pyodbc](https://github.com/mkleehammer/pyodbc) | 4.0.34 | DB API Module for ODBC / MIT-0 |
| [pyopenssl](https://github.com/pyca/pyopenssl) | 23.0.0 | Python wrapper module around the OpenSSL library / Apache-2.0 |
| [pyparsing](https://github.com/pyparsing/pyparsing/) | 3.0.9 | Create and execute simple grammars / MIT |
| [pyqt](https://www.riverbankcomputing.com/software/pyqt/) | 5.15.7 | Python bindings for the Qt cross platform application toolkit / GPL-3.0-only |
| [pyqt5-sip](https://www.riverbankcomputing.com/software/pyqt/) | 12.11.0 | Python bindings for the Qt cross platform application toolkit / GPL-3.0-only |
| [pyqtwebengine](https://www.riverbankcomputing.com/software/pyqt/) | 5.15.7 | Python bindings for the Qt cross platform application toolkit / GPL-3.0-only |
| [pyrsistent](http://github.com/tobgu/pyrsistent/) | 0.18.0 | Persistent/Functional/Immutable data structures / MIT |
| [pysocks](https://github.com/Anorov/PySocks) | 1.7.1 | A Python SOCKS client module. See [Anorov/PySocks](https://github.com/Anorov/PySocks) for more information. / BSD 3-Clause |
| [pytables](https://www.pytables.org) | 3.7.0 | Brings together Python, HDF5 and NumPy to easily handle large amounts of data. / BSD-3-Clause |
| [pytest](https://docs.pytest.org/en/latest/) | 7.1.2 | Simple and powerful testing with Python. / MIT |
| [python](https://www.python.org/) | 3.10.9 | General purpose programming language / PSF-2.0 |
| [python-dateutil](https://dateutil.readthedocs.org/) | 2.8.2 | Extensions to the standard Python datetime module. / BSD-3-Clause and Apache |
| [python-fastjsonschema](https://github.com/horejsek/python-fastjsonschema) | 2.16.2 | Fastest Python implementation of JSON schema / BSD-3-Clause |
| [python-lsp-black](https://github.com/python-lsp/python-lsp-black) | 1.2.1 | Black plugin for the Python LSP Server / MIT |
| [python-lsp-jsonrpc](https://github.com/python-lsp/python-lsp-jsonrpc) | 1.0.0 | A Python 3.6+ server implementation of the JSON RPC 2.0 protocol. / MIT |
| [python-lsp-server](https://github.com/python-lsp/python-lsp-server) | 1.7.1 | An implementation of the Language Server Protocol for Python / MIT |
| [python-slugify](https://github.com/un33k/python-slugify) | 5.0.2 | A Python Slugify application that handles Unicode / MIT |
| [python-snappy](https://github.com/andrix/python-snappy) | 0.6.1 | Python library for the snappy compression library from Google / BSD-3-Clause |
| [python.app](https://www.python.org/) | 3 | Proxy on macOS letting Python libraries hook into the GUI event loop / BSD-3-Clause |
| [pytoolconfig](https://github.com/bagel897/pytoolconfig) | 1.2.5 | Python tool configuration / LGPL-3.0-or-later |
| [pytorch](https://pytorch.org/) | 1.12.1 | PyTorch is an optimized tensor library for deep learning using GPUs and CPUs. / BSD-3-Clause |
| [pytz](https://pythonhosted.org/pytz/) | 2022.7 | World timezone definitions, modern and historical. / MIT |
| [pyviz\_comms](https://www.holoviz.org) | 2.0.2 | Bidirectional communication for PyViz / BSD-3-Clause |
| [pywavelets](https://github.com/PyWavelets/pywt) | 1.4.1 | Discrete Wavelet Transforms in Python / MIT |
| [pyyaml](http://pyyaml.org/wiki/PyYAML) | 6.0 | YAML parser and emitter for Python / MIT |
| [pyzmq](https://github.com/zeromq/pyzmq) | 23.2.0 | Python bindings for zeromq / BSD-3-Clause AND LGPL-3.0-or-later |
| [qdarkstyle](https://github.com/ColinDuquesnoy/QDarkStyleSheet) | 3.0.2 | A dark stylesheet for Qt applications (Qt4, Qt5, PySide, PyQt4, PyQt5, QtPy, PyQtGraph). / MIT |
| [qstylizer](https://github.com/blambright/qstylizer) | 0.2.2 | Qt stylesheet generation utility for PyQt/PySide / MIT |
| [qt-main](http://qt.io) | 5.15.2 | Qt is a cross-platform application and UI framework. / LGPL-3.0-only |
| [qt-webengine](http://qt.io) | 5.15.9 | Qt is a cross-platform application and UI framework. / LGPL-3.0-only |
| [qtawesome](https://github.com/spyder-ide/qtawesome) | 1.2.2 | Iconic fonts in PyQt and PySide applications / MIT |
| [qtconsole](https://jupyter.org) | 5.4.0 | Jupyter Qt Console / BSD-3-Clause |
| [qtpy](https://github.com/spyder-ide/qtpy) | 2.2.0 | Abstraction layer for PyQt5/PyQt4/PySide / MIT |
| [qtwebkit](https://wiki.qt.io/Qt_WebKit) | 5.212 | WebKit is one of the major engine to render webpages and execute JavaScript code / LGPL-2.1-only |
| [queuelib](https://github.com/scrapy/queuelib) | 1.5.0 | Collection of persistent (disk-based) queues / BSD |
| [readline](https://tiswww.case.edu/php/chet/readline/rltop.html) | 8.2 | library for editing command lines as they are typed in / GPL-3.0-only |
| [regex](https://github.com/mrabarnett/mrab-regex) | 2022.7.9 | Alternative regular expression module, to replace re / Apache-2.0 |
| [requests](https://requests.readthedocs.io/en/latest/) | 2.28.1 | Requests is an elegant and simple HTTP library for Python, built with ♥. / Apache-2.0 |
| [requests-file](http://github.com/dashea/requests-file) | 1.5.1 | file transport adapter for Requests / Apache |
| [rope](https://github.com/python-rope/rope) | 1.7.0 | A python refactoring library / LGPL-3.0-or-later |
| [rtree](https://github.com/Toblerity/rtree) | 1.0.1 | R-Tree spatial index for Python GIS / MIT |
| [scikit-image](https://scikit-image.org/) | 0.19.3 | Image processing in Python. / BSD-3-Clause |
| [scikit-learn](https://scikit-learn.org/) | 1.2.1 | A set of python modules for machine learning and data mining / BSD-3-Clause |
| [scipy](https://scipy.org/) | 1.10.0 | Scientific Library for Python / BSD-3-Clause |
| [scrapy](https://scrapy.org/) | 2.8.0 | A high-level Python Screen Scraping framework / BSD-3-Clause |
| [seaborn](https://seaborn.pydata.org) | 0.12.2 | Statistical data visualization / BSD-3-Clause |
| [send2trash](https://github.com/arsenetar/send2trash) | 1.8.0 | Python library to natively send files to Trash (or Recycle bin) on all platforms. / BSD-3-Clause |
| [service\_identity](https://github.com/pyca/service_identity) | 18.1.0 | Service identity verification for pyOpenSSL. / MIT |
| [setuptools](https://github.com/pypa/setuptools) | 65.6.3 | Download, build, install, upgrade, and uninstall Python packages / MIT |
| [sip](https://www.riverbankcomputing.com/software/sip/) | 6.6.2 | A Python bindings generator for C/C++ libraries / GPL-3.0-only |
| [six](https://six.readthedocs.io/) | 1.16.0 | Python 2 and 3 compatibility utilities / MIT |
| [smart\_open](https://github.com/RaRe-Technologies/smart_open) | 5.2.1 | Python library for efficient streaming of large files / MIT |
| [snappy](https://github.com/google/snappy) | 1.1.9 | A fast compressor/decompressor / BSD-3-clause AND CC-BY-3.0 AND MIT AND CC-BY AND Public Domain |
| [sniffio](https://github.com/python-trio/sniffio) | 1.2.0 | Sniff out which async library your code is running under / Apache-2.0 |
| [snowballstemmer](https://github.com/snowballstem/snowball) | 2.2.0 | Snowball stemming library collection for Python / BSD-3-Clause |
| [sortedcontainers](http://www.grantjenks.com/docs/sortedcontainers/) | 2.4.0 | Python Sorted Container Types: SortedList, SortedDict, and SortedSet / Apache-2.0 |
| [soupsieve](https://facelessuser.github.io/soupsieve) | 2.3.2.post1 | A modern CSS selector implementation for BeautifulSoup / MIT |
| [sphinx](https://www.sphinx-doc.org) | 5.0.2 | Sphinx is a tool that makes it easy to create intelligent and beautiful documentation / BSD-2-Clause |
| [sphinxcontrib-applehelp](https://www.sphinx-doc.org/en/master/) | 1.0.2 | sphinxcontrib-applehelp is a sphinx extension which outputs Apple help books / BSD-2-Clause |
| [sphinxcontrib-devhelp](https://www.sphinx-doc.org/en/master/) | 1.0.2 | sphinxcontrib-devhelp is a sphinx extension which outputs Devhelp document / BSD-2-Clause |
| [sphinxcontrib-htmlhelp](https://www.sphinx-doc.org/en/master/) | 2.0.0 | sphinxcontrib-htmlhelp is a sphinx extension which renders HTML help files. / BSD-2-Clause |
| [sphinxcontrib-jsmath](https://www.sphinx-doc.org/en/master/) | 1.0.1 | A sphinx extension which renders display math in HTML via JavaScript / BSD-2-Clause |
| [sphinxcontrib-qthelp](https://www.sphinx-doc.org/en/master/) | 1.0.3 | sphinxcontrib-qthelp is a sphinx extension which outputs QtHelp document / BSD-2-Clause |
| [sphinxcontrib-serializinghtml](https://www.sphinx-doc.org/en/master/) | 1.1.5 | sphinxcontrib-serializinghtml is a sphinx extension which outputs “serialized” HTML files (json and pickle). / BSD-2-Clause |
| [spyder](https://www.spyder-ide.org/) | 5.4.1 | The Scientific Python Development Environment / MIT |
| [spyder-kernels](https://www.spyder-ide.org/) | 2.4.1 | Jupyter kernels for Spyder’s console / MIT |
| [sqlalchemy](https://www.sqlalchemy.org/) | 1.4.39 | Database Abstraction Library. / MIT |
| [sqlite](https://www.sqlite.org/) | 3.40.1 | Implements a self-contained, zero-configuration, SQL database engine / blessing |
| [stack\_data](https://github.com/alexmojaki/stack_data) | 0.2.0 | Extract data from python stack frames and tracebacks for informative displays / MIT |
| [statsmodels](https://www.statsmodels.org) | 0.13.5 | Statistical computations and models for use with SciPy / BSD-3-Clause |
| [sympy](https://sympy.org) | 1.11.1 | Python library for symbolic mathematics / BSD-3-Clause AND MIT |
| [tabulate](https://github.com/astanin/python-tabulate) | 0.8.10 | Pretty-print tabular data in Python, a library and a command-line utility. / MIT |
| [tbb](https://github.com/oneapi-src/oneTBB) | 2021.7.0 | High level abstract threading library / Apache-2.0 |
| tbb4py | 2021.7.0 | TBB module for Python / Apache-2.0 |
| [tblib](https://github.com/ionelmc/python-tblib) | 1.7.0 | Traceback serialization library. / BSD 2-Clause |
| [tenacity](https://github.com/jd/tenacity) | 8.0.1 | Retry a flaky function whenever an exception occurs until it works / Apache-2.0 |
| [terminado](https://github.com/jupyter/terminado) | 0.17.1 | Terminals served by tornado websockets / BSD-2-Clause |
| [text-unidecode](https://github.com/kmike/text-unidecode/) | 1.3 | The most basic Text::Unidecode port / Artistic |
| [textdistance](https://github.com/orsinium/textdistance) | 4.2.1 | TextDistance – python library for comparing distance between two or more sequences by many algorithms. / MIT |
| [threadpoolctl](https://github.com/joblib/threadpoolctl) | 2.2.0 | Python helpers to control the threadpools of native libraries / BSD 3-Clause |
| [three-merge](https://github.com/spyder-ide/three-merge) | 0.1.1 | Simple Python library to perform a 3-way merge between strings / MIT |
| [tifffile](https://github.com/cgohlke/tifffile) | 2021.7.2 | Read and write image data from and to TIFF files. / BSD-3-Clause |
| [tinycss2](https://www.courtbouillon.org/tinycss2) | 1.2.1 | Low-level CSS parser for Python / BSD-3-Clause |
| [tk](http://www.tcl.tk/) | 8.6.12 | A dynamic programming language with GUI support. Bundles Tcl and Tk. / Tcl/Tk |
| [tldextract](https://github.com/john-kurkowski/tldextract) | 3.2.0 | Accurately separate the TLD from the registered domain andsubdomains of a URL, using the Public Suffix List. / BSD-3-Clause |
| [tokenizers](https://github.com/huggingface/tokenizers) | 0.11.4 | Fast State-of-the-Art Tokenizers optimized for Research and Production / Apache-2.0 |
| [toml](https://github.com/uiri/toml) | 0.10.2 | Python lib for TOML. / MIT |
| [tomli](https://github.com/hukkin/tomli) | 2.0.1 | A simple TOML parser / MIT |
| [tomlkit](https://github.com/sdispater/tomlkit) | 0.11.1 | Style preserving TOML library / MIT |
| [toolz](https://toolz.readthedocs.io/) | 0.12.0 | List processing tools and functional utilities / BSD-3-Clause |
| [tornado](https://www.tornadoweb.org/) | 6.1 | A Python web framework and asynchronous networking library, originally developed at FriendFeed. / Apache-2.0 |
| [tqdm](https://tqdm.github.io/) | 4.64.1 | A Fast, Extensible Progress Meter / MPL-2.0 AND MIT |
| [traitlets](http://traitlets.readthedocs.org/) | 5.7.1 | Configuration system for Python applications / BSD-3-Clause |
| [transformers](https://github.com/huggingface/transformers) | 4.24.0 | State-of-the-art Machine Learning for JAX, PyTorch and TensorFlow / Apache-2.0 |
| [twisted](https://twistedmatrix.com/) | 22.2.0 | An asynchronous networking framework written in Python / MIT |
| [typing-extensions](https://github.com/python/typing_extensions) | 4.4.0 | Backported and Experimental Type Hints for Python / PSF-2.0 |
| [typing\_extensions](https://github.com/python/typing_extensions) | 4.4.0 | Backported and Experimental Type Hints for Python / PSF-2.0 |
| [tzdata](https://www.iana.org/time-zones) | 2022g | The Time Zone Database (called tz, tzdb or zoneinfo) / CC-PDDC OR BSD-3-Clause |
| [ujson](https://github.com/ultrajson/ultrajson) | 5.4.0 | Ultra fast JSON decoder and encoder written in C with Python bindings / BSD-3-Clause |
| [unidecode](https://pypi.python.org/pypi/Unidecode) | 1.2.0 | ASCII transliterations of Unicode text / GPL-2.0-or-later |
| [unixodbc](http://www.unixodbc.org/) | 2.3.11 | ODBC on non MS Windows platforms / LGPL-2.1-or-later |
| [urllib3](https://urllib3.readthedocs.io/) | 1.26.14 | HTTP library with thread-safe connection pooling, file post, and more. / MIT |
| [w3lib](https://github.com/scrapy/w3lib) | 1.21.0 | Library of web-related functions / BSD |
| [watchdog](http://github.com/gorakhargosh/watchdog) | 2.1.6 | Filesystem events monitoring / Apache-2.0 |
| [wcwidth](https://github.com/jquast/wcwidth) | 0.2.5 | Measures number of Terminal column cells of wide-character codes. / MIT |
| [webencodings](https://github.com/gsnedders/python-webencodings) | 0.5.1 | Character encoding aliases for legacy web content / BSD 3-Clause |
| [websocket-client](https://github.com/liris/websocket-client) | 0.58.0 | WebSocket client for python. hybi13 is supported. / BSD-3-Clause |
| [werkzeug](https://palletsprojects.com/p/werkzeug/) | 2.2.2 | The comprehensive WSGI web application library. / BSD-3-Clause |
| [whatthepatch](https://github.com/cscorley/whatthepatch) | 1.0.2 | What The Patch!? is a library for both parsing and applying patch files / MIT |
| [wheel](https://github.com/pypa/wheel) | 0.38.4 | A built-package format for Python. / MIT |
| [widgetsnbextension](https://ipython.org) | 3.5.2 | Interactive Widgets for Jupyter / BSD-3-Clause |
| [wrapt](https://github.com/GrahamDumpleton/wrapt) | 1.14.1 | Module for decorators, wrappers and monkey patching / BSD-2-Clause |
| [wurlitzer](https://github.com/minrk/wurlitzer) | 3.0.2 | Capture C-level stdout/stderr in Python / MIT |
| [xarray](https://github.com/pydata/xarray) | 2022.11.0 | N-D labeled arrays and datasets in Python. / Apache-2.0 |
| [xlwings](https://www.xlwings.org/) | 0.29.1 | Interact with Excel from Python and vice versa / BSD-3-Clause |
| [xz](https://tukaani.org/xz/) | 5.2.10 | Data compression software with high compression ratio / LGPL-2.1-or-later and GPL-2.0-or-later |
| [yaml](http://pyyaml.org/wiki/LibYAML) | 0.2.5 | A C library for parsing and emitting YAML / MIT |
| [yapf](https://github.com/google/yapf) | 0.31.0 | A formatter for Python files / Apache 2.0 |
| [zeromq](http://zeromq.org) | 4.3.4 | A high-performance asynchronous messaging library. / LGPL-3.0-or-later |
| [zfp](https://computation.llnl.gov/projects/floating-point-compression) | 0.5.5 | Library for compressed numerical arrays that support high throughput read and write random access / BSD-3-Clause |
| [zict](https://github.com/mrocklin/zict) | 2.1.0 | Composable Dictionary Classes / BSD-3-Clause |
| [zipp](https://github.com/jaraco/zipp) | 3.11.0 | A pathlib-compatible Zipfile object wrapper / MIT |
| [zlib](https://zlib.net/) | 1.2.13 | Massively spiffy yet delicately unobtrusive compression library / Zlib |
| zope | 1.0 | web application server / BSD |
| [zope.interface](https://github.com/zopefoundation/zope.interface) | 5.4.0 | Interfaces for Python / ZPL-2.1 |
| [zstd](https://www.zstd.net) | 1.5.2 | Zstandard - Fast real-time compression algorithm / BSD-3-Clause AND GPL-2.0-or-later |
| Name | Version | Summary / License |
|---|---|---|
| [\_libgcc\_mutex](https://github.com/AnacondaRecipes/_libgcc_mutex-feedstock) | 0.1 | Mutex for libgcc and libgcc-ng / None |
| [\_openmp\_mutex](https://github.com/AnacondaRecipes/gcc-compiler-feedstock) | 5.1 | OpenMP Implementation Mutex / BSD-3-Clause |
| [anyio](https://github.com/agronholm/anyio) | 3.5.0 | High level compatibility layer for multiple asynchronous event loop implementations on Python / MIT |
| [appdirs](http://github.com/ActiveState/appdirs) | 1.4.4 | A small Python module for determining appropriate platform-specific dirs. / MIT |
| [argon2-cffi](https://argon2-cffi.readthedocs.org/) | 21.3.0 | The secure Argon2 password hashing algorithm. / MIT |
| [argon2-cffi-bindings](https://github.com/hynek/argon2-cffi-bindings) | 21.2.0 | Low-level Python CFFI Bindings for Argon2 / MIT |
| [astroid](https://github.com/PyCQA/astroid) | 2.14.2 | A abstract syntax tree for Python with inference support. / LGPL-2.1-or-later |
| [astropy](https://www.astropy.org/) | 5.1 | Community-developed Python Library for Astronomy / BSD-3-Clause |
| [asttokens](https://github.com/gristlabs/asttokens) | 2.0.5 | The asttokens module annotates Python abstract syntax trees (ASTs) with the positions of tokens and text in the source code that generated them. / Apache-2.0 |
| [attrs](https://www.attrs.org/) | 22.1.0 | attrs is the Python package that will bring back the joy of writing classes by relieving you from the drudgery of implementing object protocols (aka dunder methods). / MIT |
| [babel](https://babel.pocoo.org/) | 2.11.0 | Utilities to internationalize and localize Python applications / BSD-3-Clause |
| [backcall](https://github.com/takluyver/backcall/) | 0.2.0 | Specifications for callback functions passed in to an API / BSD-3-Clause |
| [beautifulsoup4](https://www.crummy.com/software/BeautifulSoup/) | 4.11.1 | Python library designed for screen-scraping / MIT |
| [blas](http://www.netlib.org/lapack) | 1.0 | Linear Algebra PACKage / BSD-3-Clause |
| [bleach](https://github.com/mozilla/bleach) | 4.1.0 | Easy, whitelist-based HTML-sanitizing tool / Apache-2.0 |
| [blosc](https://www.blosc.org/) | 1.21.3 | A blocking, shuffling and loss-less compression library that can be faster than memcpy() / BSD-3-Clause |
| [bokeh](https://bokeh.org/) | 2.4.3 | Bokeh is an interactive visualization library for modern web browsers. / BSD-3-Clause |
| [bottleneck](https://github.com/pydata/bottleneck) | 1.3.5 | Fast NumPy array functions written in Cython. / BSD-2-Clause |
| [brotli](https://github.com/google/brotli) | 1.0.9 | Brotli compression format / MIT |
| [brotli-bin](https://github.com/google/brotli) | 1.0.9 | Brotli compression format / MIT |
| [brotlipy](https://github.com/python-hyper/brotlipy) | 0.7.0 | Python bindings to the Brotli compression library / MIT |
| [bzip2](http://www.bzip.org/) | 1.0.8 | high-quality data compressor / bzip2 |
| [c-ares](https://c-ares.org/) | 1.18.1 | This is c-ares, an asynchronous resolver library / MIT |
| [ca-certificates](https://curl.se/docs/caextract.html) | 2023.01.10 | Certificates for use with other packages. / MPL-2.0 |
| [certifi](https://certifi.io/) | 2022.12.7 | Python package for providing Mozilla’s CA Bundle. / MPL-2.0 |
| [cffi](https://cffi.readthedocs.org/) | 1.15.1 | Foreign Function Interface for Python calling C code. / MIT |
| [cfitsio](https://heasarc.gsfc.nasa.gov/fitsio/fitsio.html) | 3.470 | A library for reading and writing FITS files / Other |
| [charset-normalizer](https://github.com/ousret/charset_normalizer) | 2.0.4 | The Real First Universal Charset Detector. Open, modern and actively maintained alternative to Chardet. / MIT |
| [click](https://palletsprojects.com/p/click) | 8.0.4 | Python composable command line interface toolkit / BSD-3-Clause |
| [cloudpickle](https://github.com/cloudpipe/cloudpickle) | 2.0.0 | Extended pickling support for Python objects / BSD-3-Clause |
| [colorama](https://github.com/tartley/colorama) | 0.4.6 | Cross-platform colored terminal text / BSD-3-Clause |
| [colorcet](https://colorcet.holoviz.org/index.html) | 3.0.1 | Collection of perceptually uniform colormaps / CC-BY-4.0 |
| [comm](https://github.com/ipython/comm) | 0.1.2 | Python Comm implementation for the Jupyter kernel protocol / BSD-3-Clause |
| [conda](https://docs.conda.io) | 23.1.0 | OS-agnostic, system-level binary package and environment manager. / BSD-3-Clause |
| [conda-build](https://github.com/conda/conda-build) | 3.23.3 | tools for building conda packages / BSD-3-Clause |
| [conda-env](https://github.com/conda/conda-env) | 2.6.0 | Tools for interacting with conda environments. / BSD 3-Clause |
| [conda-verify](https://github.com/conda/conda-verify) | 3.4.2 | tool for validating conda recipes and conda packages / BSD 3-Clause |
| [contourpy](https://github.com/contourpy/contourpy) | 1.0.5 | Python library for calculating contours of 2D quadrilateral grids. / BSD-3-Clause |
| [cryptography](https://github.com/pyca/cryptography) | 39.0.1 | Provides cryptographic recipes and primitives to Python developers / (BSD-3-Clause OR Apache-2.0) AND PSF-2.0 AND MIT |
| [curl](https://curl.se/) | 7.87.0 | tool and library for transferring data with URL syntax / curl |
| [cycler](http://matplotlib.org/cycler) | 0.11.0 | Composable style cycles. / BSD-3-Clause |
| [cytoolz](https://github.com/pytoolz/cytoolz) | 0.12.0 | Cython implementation of Toolz. High performance functional utilities / BSD-3-Clause |
| [dask](https://dask.org/) | 2022.7.0 | Parallel PyData with Task Scheduling / BSD-3-Clause |
| [dask-core](https://github.com/dask/dask/) | 2022.7.0 | Parallel Python with task scheduling / BSD-3-Clause |
| [debugpy](https://github.com/Microsoft/debugpy) | 1.5.1 | An implementation of the Debug Adapter Protocol for Python / MIT |
| [decorator](https://github.com/micheles/decorator) | 5.1.1 | Better living through Python with decorators. / BSD-2-Clause |
| [defusedxml](https://bitbucket.org/tiran/defusedxml) | 0.7.1 | XML bomb protection for Python stdlib modules / PSF 2.0 |
| [dill](https://github.com/uqfoundation/dill) | 0.3.6 | Serialize all of python (almost) / BSD-3-Clause |
| [distributed](https://distributed.readthedocs.io/en/latest/) | 2022.7.0 | Distributed computing with Dask / BSD-3-Clause |
| [entrypoints](https://github.com/takluyver/entrypoints) | 0.4 | Discover and load entry points from installed packages. / MIT License |
| [et\_xmlfile](https://foss.heptapod.net/openpyxl/et_xmlfile) | 1.1.0 | An implementation of lxml.xmlfile for the standard library / MIT AND PSF-2.0 |
| [executing](https://pypi.org/project/executing) | 0.8.3 | Get the currently executing AST node of a frame, and other information / MIT |
| [filelock](https://github.com/tox-dev/py-filelock) | 3.9.0 | A platform independent file lock. / Unlicense |
| [flask](https://palletsprojects.com/p/flask) | 2.2.2 | A simple framework for building complex web applications. / BSD-3-Clause |
| [flit-core](https://flit.readthedocs.io/) | 3.6.0 | Simplified packaging of Python modules / BSD-3-Clause |
| [fonttools](https://github.com/fonttools/fonttools) | 4.25.0 | fontTools is a library for manipulating fonts, written in Python. / MIT |
| [freetype](https://freetype.org/) | 2.12.1 | A Free, High-Quality, and Portable Font Engine / GPL-2-only and LicenseRef-FreeType |
| [fsspec](https://github.com/fsspec/filesystem_spec) | 2022.11.0 | A specification for pythonic filesystems / BSD-3-Clause |
| [future](https://python-future.org) | 0.18.3 | Clean single-source support for Python 3 and 2 / MIT |
| [giflib](https://giflib.sourceforge.net) | 5.2.1 | Library for reading and writing gif images / MIT |
| [gmp](https://gmplib.org/) | 6.2.1 | The GNU multiprecision library. / GPL-2.0-or-later AND LGPL-3.0-or-later |
| [gmpy2](https://pypi.python.org/pypi/gmpy2) | 2.1.2 | GMP/MPIR, MPFR, and MPC interface to Python 2.6+ and 3.x / LGPL-3.0-or-later |
| [greenlet](https://github.com/python-greenlet/greenlet) | 2.0.1 | Lightweight in-process concurrent programming / MIT |
| [h5py](https://www.h5py.org/) | 3.7.0 | Read and write HDF5 files from Python / BSD-3-Clause |
| [hdf5](http://www.hdfgroup.org/HDF5/) | 1.10.6 | HDF5 is a data model, library, and file format for storing and managing data / HDF5 |
| [heapdict](http://stutzbachenterprises.com/) | 1.0.1 | A heap with decrease-key and increase-key operations / BSD 3-Clause |
| [holoviews](https://holoviews.org) | 1.14.8 | Stop plotting your data - annotate your data and let it visualize itself. / BSD-3-Clause |
| [huggingface\_hub](https://github.com/huggingface/huggingface_hub) | 0.10.1 | Client library to download and publish models, datasets and other repos on the huggingface.co hub / Apache-2.0 |
| [hvplot](https://hvplot.holoviz.org) | 0.8.0 | A high-level plotting API for the PyData ecosystem built on HoloViews / BSD-3-Clause |
| [icu](http://site.icu-project.org/) | 68.1 | International Components for Unicode. / MIT |
| [idna](https://github.com/kjd/idna) | 3.3 | Internationalized Domain Names in Applications (IDNA). / BSD-3-Clause |
| [imagecodecs](https://www.lfd.uci.edu/~gohlke/) | 2021.8.26 | Image transformation, compression, and decompression codecs / BSD-3-Clause |
| [imageio](https://imageio.github.io) | 2.26.0 | A Python library for reading and writing image data / BSD-2-Clause |
| [imbalanced-learn](https://github.com/scikit-learn-contrib/imbalanced-learn) | 0.10.1 | Python module to balance data set using under- and over-sampling / MIT |
| [iniconfig](http://github.com/RonnyPfannschmidt/iniconfig) | 1.1.1 | iniconfig: brain-dead simple config-ini parsing / MIT |
| [intake](https://github.com/intake/intake) | 0.6.5 | Data load and catalog system / BSD-2-Clause |
| [ipykernel](https://ipython.org) | 6.19.2 | IPython Kernel for Jupyter / BSD-3-Clause |
| [ipython](https://ipython.org) | 8.10.0 | IPython: Productive Interactive Computing / BSD-3-Clause |
| [ipython\_genutils](http://ipython.org) | 0.2.0 | vestigial utilities from IPython / BSD 3-Clause |
| [ipywidgets](https://github.com/ipython/ipywidgets) | 7.6.5 | Jupyter Interactive Widgets / BSD-3-Clause |
| [isort](https://github.com/timothycrosley/isort) | 5.9.3 | A Python utility / library to sort Python imports. / MIT |
| [itsdangerous](https://github.com/pallets/itsdangerous) | 2.0.1 | Various helpers to pass trusted data to untrusted environments. / BSD-3-Clause |
| [jedi](https://github.com/davidhalter/jedi/) | 0.18.1 | An autocompletion tool for Python that can be used for text editors. / MIT |
| [jinja2](https://palletsprojects.com/p/jinja/) | 3.1.2 | A very fast and expressive template engine. / BSD-3-Clause |
| [joblib](https://joblib.readthedocs.io/en/latest/) | 1.1.1 | Lightweight pipelining: using Python functions as pipeline jobs. / BSD-3-Clause |
| [jpeg](https://www.ijg.org/) | 9e | read/write jpeg COM, EXIF, IPTC medata / IJG |
| [json5](https://github.com/dpranke/pyjson5) | 0.9.6 | A Python implementation of the JSON5 data format / Apache-2.0 |
| [jsonschema](https://github.com/python-jsonschema/jsonschema) | 4.17.3 | An implementation of JSON Schema validation for Python / MIT |
| [jupyter](https://jupyter.org) | 1.0.0 | Jupyter metapackage. Install all the Jupyter components in one go. / BSD-3-Clause |
| [jupyter\_client](https://jupyter.org) | 7.3.4 | Jupyter protocol implementation and client libraries. / BSD-3-Clause |
| [jupyter\_console](https://jupyter.org) | 6.6.2 | Jupyter terminal console / BSD-3-Clause |
| [jupyter\_core](https://jupyter.org) | 5.2.0 | Core common functionality of Jupyter projects. / BSD-3-Clause |
| [jupyter\_server](https://jupyter.org) | 1.23.4 | Jupyter Server / BSD-3-Clause |
| [jupyterlab](https://github.com/jupyterlab/jupyterlab) | 3.3.2 | JupyterLab PRE-ALPHA / BSD-3-Clause |
| [jupyterlab\_pygments](http://github.com/JupyterLab/jupyterlab_pygments) | 0.1.2 | Pygments syntax coloring scheme making use of the JupyterLab CSS variables / BSD-3-Clause |
| [jupyterlab\_server](https://github.com/jupyterlab/jupyterlab_server) | 2.10.3 | A set of server components for JupyterLab and JupyterLab like applications. / BSD-3-Clause |
| [jupyterlab\_widgets](https://github.com/jupyter-widgets/ipywidgets) | 1.0.0 | JupyterLab extension providing HTML widgets / BSD-3-Clause |
| [jxrlib](https://packages.debian.org/source/sid/jxrlib) | 1.1 | jxrlib - JPEG XR Library by Microsoft, built from Debian hosted sources. / BSD-2-Clause |
| [kiwisolver](https://github.com/nucleic/kiwi) | 1.4.4 | An efficient C++ implementation of the Cassowary constraint solver / BSD-3-Clause |
| [krb5](https://web.mit.edu/kerberos/) | 1.19.4 | A network authentication protocol. / MIT |
| [lazy-object-proxy](https://github.com/ionelmc/python-lazy-object-proxy) | 1.6.0 | A fast and thorough lazy object proxy / BSD-2-Clause |
| [lcms2](http://www.littlecms.com/) | 2.12 | Open Source Color Management Engine / MIT |
| [ld\_impl\_linux-s390x](https://www.gnu.org/software/binutils/) | 2.38 | A set of programming tools for creating and managing binary programs, object files, libraries, profile data, and assembly source code. / GPL-3.0-only |
| [lerc](https://github.com/Esri/lerc) | 3.0 | LERC - Limited Error Raster Compression / Apache-2.0 |
| [libaec](https://gitlab.dkrz.de/k202009/libaec) | 1.0.4 | Adaptive Entropy Coding library / BSD-2-Clause |
| [libbrotlicommon](https://github.com/google/brotli) | 1.0.9 | Brotli compression format / MIT |
| [libbrotlidec](https://github.com/google/brotli) | 1.0.9 | Brotli compression format / MIT |
| [libbrotlienc](https://github.com/google/brotli) | 1.0.9 | Brotli compression format / MIT |
| [libcurl](https://curl.se/) | 7.87.0 | tool and library for transferring data with URL syntax / curl |
| [libdeflate](https://github.com/ebiggers/libdeflate) | 1.17 | libdeflate is a library for fast, whole-buffer DEFLATE-based compression and decompression. / MIT |
| [libedit](https://thrysoee.dk/editline/) | 3.1.20221030 | Editline Library (libedit) / BSD-2-Clause |
| [libev](http://software.schmorp.de/pkg/libev.html) | 4.33 | A full-featured and high-performance event loop that is loosely modeled after libevent, but without its limitations and bugs. / BSD-2-Clause |
| [libffi](https://sourceware.org/libffi/) | 3.4.2 | A Portable Foreign Function Interface Library / MIT |
| [libgcc-ng](https://gcc.gnu.org/onlinedocs/gccint/Libgcc.html) | 11.2.0 | The GCC low-level runtime library / GPL-3.0-only WITH GCC-exception-3.1 |
| [libgfortran-ng](https://gcc.gnu.org/) | 11.2.0 | The GNU Fortran Runtime Library / GPL-3.0-only WITH GCC-exception-3.1 |
| [libgfortran5](https://gcc.gnu.org/) | 11.2.0 | Fortran compiler and libraries from the GNU Compiler Collection / GPL-3.0-only WITH GCC-exception-3.1 |
| [libgomp](https://gcc.gnu.org/onlinedocs/gccint/Libgcc.html) | 11.2.0 | The GCC OpenMP implementation. / GPL-3.0-only WITH GCC-exception-3.1 |
| [libnghttp2](http://github.com/nghttp2/nghttp2) | 1.46.0 | This is an implementation of Hypertext Transfer Protocol version 2. / MIT |
| [libopenblas](https://www.openblas.net/) | 0.3.21 | An Optimized BLAS library / BSD-3-Clause |
| [libpng](http://www.libpng.org/pub/png/libpng.html) | 1.6.39 | PNG reference library / Zlib |
| [libprotobuf](https://developers.google.com/protocol-buffers/) | 3.20.3 | Protocol Buffers - Google’s data interchange format. C++ Libraries and protoc, the protobuf compiler. / BSD-3-Clause |
| [libsodium](http://libsodium.org) | 1.0.18 | A modern and easy-to-use crypto library. / ISC |
| [libssh2](https://www.libssh2.org/) | 1.10.0 | the SSH library / BSD-3-Clause |
| [libstdcxx-ng](https://gcc.gnu.org/) | 11.2.0 | The GNU C++ Runtime Library / GPL-3.0-only WITH GCC-exception-3.1 |
| [libtiff](http://www.simplesystems.org/libtiff/) | 4.5.0 | Support for the Tag Image File Format (TIFF). / HPND |
| [libuuid](https://sourceforge.net/projects/libuuid/) | 1.41.5 | Portable uuid C library 2.32.1 as pk-version 1.41.5. / BSD-3-Clause |
| [libwebp](https://developers.google.com/speed/webp/) | 1.2.4 | WebP image library / BSD-3-Clause |
| [libwebp-base](https://developers.google.com/speed/webp) | 1.2.4 | WebP image library / BSD-3-Clause |
| [libxml2](https://gitlab.gnome.org/GNOME/libxml2/) | 2.9.14 | The XML C parser and toolkit of Gnome / MIT |
| [libxslt](https://gitlab.gnome.org/GNOME/libxslt) | 1.1.35 | The XSLT C library developed for the GNOME project / MIT |
| [libzopfli](https://github.com/google/zopfli) | 1.0.3 | A compression library programmed in C to perform very good, but slow, deflate or zlib compression. / Apache-2.0 |
| [locket](https://github.com/mwilliamson/locket.py) | 1.0.0 | File-based locks for Python for Linux and Windows / BSD-2-Clause |
| [lxml](https://lxml.de/) | 4.9.1 | Pythonic binding for the C libraries libxml2 and libxslt. / BSD-3-Clause and GPL-2.0-only and ZPL-2.0 and LicenseRef-ElementTree |
| [lz4](https://github.com/python-lz4/python-lz4) | 3.1.3 | LZ4 Bindings for Python / BSD-3-Clause |
| [lz4-c](https://lz4.github.io/lz4/) | 1.9.4 | Extremely Fast Compression algorithm / BSD-2-Clause |
| [lzo](http://www.oberhumer.com/opensource/lzo/) | 2.10 | LZO is a portable lossless data compression library written in ANSI C. / GPL v2+ |
| [markdown](https://github.com/Python-Markdown/markdown) | 3.4.1 | Python implementation of Markdown. / BSD-3-Clause |
| [markupsafe](https://www.palletsprojects.com/p/markupsafe) | 2.1.1 | Safely add untrusted strings to HTML/XML markup. / BSD-3-Clause |
| [matplotlib](https://matplotlib.org/) | 3.7.0 | Publication quality figures in Python / LicenseRef-PSF-based |
| [matplotlib-base](https://matplotlib.org/) | 3.7.0 | Publication quality figures in Python / LicenseRef-PSF-based |
| [matplotlib-inline](https://github.com/ipython/matplotlib-inline) | 0.1.6 | Inline Matplotlib backend for Jupyter / BSD-3-Clause |
| [mccabe](https://github.com/PyCQA/mccabe) | 0.7.0 | McCabe complexity checker for Python / MIT |
| [mistune](https://github.com/lepture/mistune) | 0.8.4 | A sane Markdown parser with useful plugins and renderers. / BSD-3-Clause |
| [mock](https://github.com/testing-cabal/mock) | 4.0.3 | A library for testing in Python / BSD-2-Clause |
| [mpc](http://www.multiprecision.org/) | 1.1.0 | A C library for the arithmetic of complex numbers with arbitrarily high precision. / LGPL-3-or-later |
| [mpfr](http://www.mpfr.org/) | 4.0.2 | The MPFR library is a C library for multiple-precision floating-point computations with correct rounding. / LGPL-3.0-only |
| [mpmath](http://mpmath.org) | 1.2.1 | Python library for arbitrary-precision floating-point arithmetic / BSD 3-Clause |
| [msgpack-python](https://msgpack.org/) | 1.0.3 | MessagePack (de)serializer / Apache-2.0 |
| [munkres](https://github.com/bmc/munkres) | 1.1.4 | The Munkres module provides an O(n^3) implementation of the Munkres algorithm (also called the Hungarian algorithm or the Kuhn-Munkres algorithm). / Apache-2.0 |
| [nbclassic](https://github.com/jupyter/nbclassic) | 0.5.2 | Jupyter Notebook as a Jupyter Server Extension. / BSD-3-Clause |
| [nbclient](https://jupyter.org) | 0.5.13 | A client library for executing notebooks. Formally nbconvert’s ExecutePreprocessor. / BSD-3-Clause |
| [nbconvert](https://nbconvert.readthedocs.io/en/latest/) | 6.5.4 | Converting Jupyter Notebooks / BSD-3-Clause |
| [nbformat](https://jupyter.org) | 5.7.0 | The Jupyter Notebook format / BSD-3-Clause |
| [ncurses](https://invisible-island.net/ncurses/) | 6.4 | Library for text-based user interfaces / MIT AND X11 |
| [nest-asyncio](https://github.com/erdewit/nest_asyncio) | 1.5.6 | Patch asyncio to allow nested event loops / BSD-2-Clause |
| [networkx](https://networkx.github.io/) | 2.8.4 | Python package for creating and manipulating complex networks / BSD-3-Clause |
| [ninja](https://ninja-build.org/) | 1.10.2 | A small build system with a focus on speed / Apache-2.0 |
| [ninja-base](https://ninja-build.org/) | 1.10.2 | A small build system with a focus on speed / Apache-2.0 |
| [nltk](https://nltk.org/) | 3.7 | Natural Language Toolkit / Apache-2.0 |
| [notebook](https://jupyter.org) | 6.5.2 | Jupyter Notebook / BSD-3-Clause |
| [notebook-shim](https://github.com/jupyter/notebook_shim) | 0.2.2 | A shim layer for notebook traits and config / BSD-3-Clause |
| [numexpr](https://github.com/pydata/numexpr) | 2.8.4 | Fast numerical expression evaluator for NumPy. / MIT |
| [numpy](https://numpy.org/) | 1.23.5 | Array processing for numbers, strings, records, and objects. / BSD-3-Clause |
| [numpy-base](https://numpy.org/) | 1.23.5 | Array processing for numbers, strings, records, and objects. / BSD-3-Clause |
| [openjpeg](http://www.openjpeg.org/) | 2.4.0 | An open-source JPEG 2000 codec written in C / BSD 2-Clause |
| [openpyxl](https://openpyxl.readthedocs.io) | 3.0.10 | A Python library to read/write Excel 2010 xlsx/xlsm files / MIT |
| [openssl](https://www.openssl.org/) | 1.1.1t | OpenSSL is an open-source implementation of the SSL and TLS protocols / OpenSSL |
| [packaging](https://github.com/pypa/packaging) | 22.0 | Core utilities for Python packages / Apache-2.0 or BSD-2-Clause |
| [pandas](https://pandas.pydata.org) | 1.5.3 | High-performance, easy-to-use data structures and data analysis tools. / BSD-3-Clause |
| [pandocfilters](https://github.com/jgm/pandocfilters) | 1.5.0 | A python module for writing pandoc filters / BSD-3-Clause |
| [panel](https://panel.holoviz.org) | 0.12.6 | A high-level app and dashboarding solution for Python / BSD-3-Clause |
| [param](https://param.holoviz.org/) | 1.12.3 | Param: Make your Python code clearer and more reliable by declaring Parameters / BSD-3-Clause |
| [parso](https://github.com/davidhalter/parso) | 0.8.3 | A Python Parser / MIT |
| [partd](https://github.com/dask/partd) | 1.2.0 | Appendable key-value storage / BSD-3-Clause |
| [patsy](https://github.com/pydata/patsy) | 0.5.3 | Describing statistical models in Python using symbolic formulas / BSD-2-Clause AND PSF-2.0 |
| [pep8](https://pep8.readthedocs.org/) | 1.7.1 | Python style guide checker / MIT |
| [pexpect](http://pexpect.sourceforge.net/) | 4.8.0 | Pexpect makes Python a better tool for controlling other applications. / ISC |
| [pickleshare](https://github.com/pickleshare/pickleshare/) | 0.7.5 | Tiny ‘shelve’-like database with concurrency support / MIT |
| [pillow](https://pillow.readthedocs.io) | 9.4.0 | Pillow is the friendly PIL fork by Alex Clark and Contributors / LicenseRef-PIL |
| [pip](https://pip.pypa.io/en/stable/) | 22.3.1 | PyPA recommended tool for installing Python packages / MIT |
| [platformdirs](https://github.com/platformdirs/platformdirs) | 2.5.2 | A small Python module for determining appropriate platform-specific dirs, e.g. a “user data dir”. / MIT |
| [plotly](https://plot.ly/python/) | 5.9.0 | An interactive JavaScript-based visualization library for Python / MIT |
| [pluggy](https://github.com/pytest-dev/pluggy) | 1.0.0 | Plugin registration and hook calling for Python / MIT |
| [pooch](https://github.com/fatiando/pooch) | 1.4.0 | A friend to fetch your data files / BSD-3-Clause |
| [prometheus\_client](https://github.com/prometheus/client_python) | 0.14.1 | Python client for the Prometheus monitoring system / Apache-2.0 |
| [prompt-toolkit](https://github.com/prompt-toolkit/python-prompt-toolkit) | 3.0.36 | Library for building powerful interactive command lines in Python / BSD-3-Clause |
| [prompt\_toolkit](https://github.com/prompt-toolkit/python-prompt-toolkit) | 3.0.36 | Library for building powerful interactive command lines in Python / BSD-3-Clause |
| [psutil](https://github.com/giampaolo/psutil) | 5.9.0 | A cross-platform process and system utilities module for Python / BSD-3-Clause |
| [ptyprocess](https://github.com/pexpect/ptyprocess) | 0.7.0 | Run a subprocess in a pseudo terminal / ISC |
| [pure\_eval](https://github.com/alexmojaki/pure_eval) | 0.2.2 | Safely evaluate AST nodes without side effects / MIT |
| [py](https://github.com/pytest-dev/py) | 1.11.0 | library with cross-python path, ini-parsing, io, code, log facilities / MIT |
| [pycparser](https://github.com/eliben/pycparser) | 2.21 | Complete C99 parser in pure Python / BSD-3-clause |
| [pyct](https://github.com/pyviz/pyct) | 0.5.0 | python package common tasks for users (e.g. copy examples, fetch data, …) / BSD-3-Clause |
| [pycurl](http://pycurl.sourceforge.net/) | 7.45.1 | A Python Interface To The cURL library / LGPL-2.1-only, MIT |
| [pyerfa](https://pyerfa.readthedocs.io/) | 2.0.0 | Python bindings for ERFA routines / BSD-3-Clause |
| [pyflakes](https://github.com/PyCQA/pyflakes) | 3.0.1 | Pyflakes analyzes programs and detects various errors. / MIT |
| [pygments](https://pygments.org/) | 2.11.2 | Pygments is a generic syntax highlighter suitable for use in code hosting, forums, wikis or other applications that need to prettify source code. / BSD-2-Clause |
| [pylint](https://www.pylint.org) | 2.16.2 | python code static checker / GPL-2.0-or-later |
| [pyodbc](https://github.com/mkleehammer/pyodbc) | 4.0.34 | DB API Module for ODBC / MIT-0 |
| [pyopenssl](https://github.com/pyca/pyopenssl) | 23.0.0 | Python wrapper module around the OpenSSL library / Apache-2.0 |
| [pyparsing](https://github.com/pyparsing/pyparsing/) | 3.0.9 | Create and execute simple grammars / MIT |
| [pyrsistent](http://github.com/tobgu/pyrsistent/) | 0.18.0 | Persistent/Functional/Immutable data structures / MIT |
| [pysocks](https://github.com/Anorov/PySocks) | 1.7.1 | A Python SOCKS client module. See [Anorov/PySocks](https://github.com/Anorov/PySocks) for more information. / BSD 3-Clause |
| [pytables](https://www.pytables.org) | 3.7.0 | Brings together Python, HDF5 and NumPy to easily handle large amounts of data. / BSD-3-Clause |
| [pytest](https://docs.pytest.org/en/latest/) | 7.1.2 | Simple and powerful testing with Python. / MIT |
| [python](https://www.python.org/) | 3.10.9 | General purpose programming language / PSF-2.0 |
| [python-dateutil](https://dateutil.readthedocs.org/) | 2.8.2 | Extensions to the standard Python datetime module. / BSD-3-Clause and Apache |
| [python-fastjsonschema](https://github.com/horejsek/python-fastjsonschema) | 2.16.2 | Fastest Python implementation of JSON schema / BSD-3-Clause |
| [python-snappy](https://github.com/andrix/python-snappy) | 0.6.1 | Python library for the snappy compression library from Google / BSD-3-Clause |
| [pytorch](https://pytorch.org/) | 1.12.1 | PyTorch is an optimized tensor library for deep learning using GPUs and CPUs. / BSD-3-Clause |
| [pytz](https://pythonhosted.org/pytz/) | 2022.7 | World timezone definitions, modern and historical. / MIT |
| [pyviz\_comms](https://www.holoviz.org) | 2.0.2 | Bidirectional communication for PyViz / BSD-3-Clause |
| [pywavelets](https://github.com/PyWavelets/pywt) | 1.4.1 | Discrete Wavelet Transforms in Python / MIT |
| [pyyaml](http://pyyaml.org/wiki/PyYAML) | 6.0 | YAML parser and emitter for Python / MIT |
| [pyzmq](https://github.com/zeromq/pyzmq) | 23.2.0 | Python bindings for zeromq / BSD-3-Clause AND LGPL-3.0-or-later |
| [readline](https://tiswww.case.edu/php/chet/readline/rltop.html) | 8.2 | library for editing command lines as they are typed in / GPL-3.0-only |
| [regex](https://github.com/mrabarnett/mrab-regex) | 2022.7.9 | Alternative regular expression module, to replace re / Apache-2.0 |
| [requests](https://requests.readthedocs.io/en/latest/) | 2.28.1 | Requests is an elegant and simple HTTP library for Python, built with ♥. / Apache-2.0 |
| [scikit-image](https://scikit-image.org/) | 0.19.3 | Image processing in Python. / BSD-3-Clause |
| [scikit-learn](https://scikit-learn.org/) | 1.2.1 | A set of python modules for machine learning and data mining / BSD-3-Clause |
| [scipy](https://scipy.org/) | 1.10.0 | Scientific Library for Python / BSD-3-Clause |
| [seaborn](https://seaborn.pydata.org) | 0.12.2 | Statistical data visualization / BSD-3-Clause |
| [send2trash](https://github.com/arsenetar/send2trash) | 1.8.0 | Python library to natively send files to Trash (or Recycle bin) on all platforms. / BSD-3-Clause |
| [setuptools](https://github.com/pypa/setuptools) | 65.6.3 | Download, build, install, upgrade, and uninstall Python packages / MIT |
| [six](https://six.readthedocs.io/) | 1.16.0 | Python 2 and 3 compatibility utilities / MIT |
| [snappy](https://github.com/google/snappy) | 1.1.9 | A fast compressor/decompressor / BSD-3-clause AND CC-BY-3.0 AND MIT AND CC-BY AND Public Domain |
| [sniffio](https://github.com/python-trio/sniffio) | 1.2.0 | Sniff out which async library your code is running under / Apache-2.0 |
| [snowballstemmer](https://github.com/snowballstem/snowball) | 2.2.0 | Snowball stemming library collection for Python / BSD-3-Clause |
| [sortedcontainers](http://www.grantjenks.com/docs/sortedcontainers/) | 2.4.0 | Python Sorted Container Types: SortedList, SortedDict, and SortedSet / Apache-2.0 |
| [soupsieve](https://facelessuser.github.io/soupsieve) | 2.3.2.post1 | A modern CSS selector implementation for BeautifulSoup / MIT |
| [sqlalchemy](https://www.sqlalchemy.org/) | 1.4.39 | Database Abstraction Library. / MIT |
| [sqlite](https://www.sqlite.org/) | 3.40.1 | Implements a self-contained, zero-configuration, SQL database engine / blessing |
| [stack\_data](https://github.com/alexmojaki/stack_data) | 0.2.0 | Extract data from python stack frames and tracebacks for informative displays / MIT |
| [statsmodels](https://www.statsmodels.org) | 0.13.5 | Statistical computations and models for use with SciPy / BSD-3-Clause |
| [sympy](https://sympy.org) | 1.11.1 | Python library for symbolic mathematics / BSD-3-Clause AND MIT |
| [tabulate](https://github.com/astanin/python-tabulate) | 0.8.10 | Pretty-print tabular data in Python, a library and a command-line utility. / MIT |
| [tbb](https://github.com/oneapi-src/oneTBB) | 2021.7.0 | High level abstract threading library / Apache-2.0 |
| tbb4py | 2021.7.0 | TBB module for Python / Apache-2.0 |
| [tblib](https://github.com/ionelmc/python-tblib) | 1.7.0 | Traceback serialization library. / BSD 2-Clause |
| [tenacity](https://github.com/jd/tenacity) | 8.0.1 | Retry a flaky function whenever an exception occurs until it works / Apache-2.0 |
| [terminado](https://github.com/jupyter/terminado) | 0.17.1 | Terminals served by tornado websockets / BSD-2-Clause |
| [threadpoolctl](https://github.com/joblib/threadpoolctl) | 2.2.0 | Python helpers to control the threadpools of native libraries / BSD 3-Clause |
| [tifffile](https://github.com/cgohlke/tifffile) | 2021.7.2 | Read and write image data from and to TIFF files. / BSD-3-Clause |
| [tinycss2](https://www.courtbouillon.org/tinycss2) | 1.2.1 | Low-level CSS parser for Python / BSD-3-Clause |
| [tk](http://www.tcl.tk/) | 8.6.12 | A dynamic programming language with GUI support. Bundles Tcl and Tk. / Tcl/Tk |
| [tokenizers](https://github.com/huggingface/tokenizers) | 0.11.4 | Fast State-of-the-Art Tokenizers optimized for Research and Production / Apache-2.0 |
| [tomli](https://github.com/hukkin/tomli) | 2.0.1 | A simple TOML parser / MIT |
| [tomlkit](https://github.com/sdispater/tomlkit) | 0.11.1 | Style preserving TOML library / MIT |
| [toolz](https://toolz.readthedocs.io/) | 0.12.0 | List processing tools and functional utilities / BSD-3-Clause |
| [tornado](https://www.tornadoweb.org/) | 6.1 | A Python web framework and asynchronous networking library, originally developed at FriendFeed. / Apache-2.0 |
| [tqdm](https://tqdm.github.io/) | 4.64.1 | A Fast, Extensible Progress Meter / MPL-2.0 AND MIT |
| [traitlets](http://traitlets.readthedocs.org/) | 5.7.1 | Configuration system for Python applications / BSD-3-Clause |
| [transformers](https://github.com/huggingface/transformers) | 4.24.0 | State-of-the-art Machine Learning for JAX, PyTorch and TensorFlow / Apache-2.0 |
| [typing-extensions](https://github.com/python/typing_extensions) | 4.4.0 | Backported and Experimental Type Hints for Python / PSF-2.0 |
| [typing\_extensions](https://github.com/python/typing_extensions) | 4.4.0 | Backported and Experimental Type Hints for Python / PSF-2.0 |
| [tzdata](https://www.iana.org/time-zones) | 2022g | The Time Zone Database (called tz, tzdb or zoneinfo) / CC-PDDC OR BSD-3-Clause |
| [unixodbc](http://www.unixodbc.org/) | 2.3.11 | ODBC on non MS Windows platforms / LGPL-2.1-or-later |
| [urllib3](https://urllib3.readthedocs.io/) | 1.26.14 | HTTP library with thread-safe connection pooling, file post, and more. / MIT |
| [wcwidth](https://github.com/jquast/wcwidth) | 0.2.5 | Measures number of Terminal column cells of wide-character codes. / MIT |
| [webencodings](https://github.com/gsnedders/python-webencodings) | 0.5.1 | Character encoding aliases for legacy web content / BSD 3-Clause |
| [websocket-client](https://github.com/liris/websocket-client) | 0.58.0 | WebSocket client for python. hybi13 is supported. / BSD-3-Clause |
| [werkzeug](https://palletsprojects.com/p/werkzeug/) | 2.2.2 | The comprehensive WSGI web application library. / BSD-3-Clause |
| [wheel](https://github.com/pypa/wheel) | 0.38.4 | A built-package format for Python. / MIT |
| [widgetsnbextension](https://ipython.org) | 3.5.2 | Interactive Widgets for Jupyter / BSD-3-Clause |
| [wrapt](https://github.com/GrahamDumpleton/wrapt) | 1.14.1 | Module for decorators, wrappers and monkey patching / BSD-2-Clause |
| [xz](https://tukaani.org/xz/) | 5.2.10 | Data compression software with high compression ratio / LGPL-2.1-or-later and GPL-2.0-or-later |
| [yaml](http://pyyaml.org/wiki/LibYAML) | 0.2.5 | A C library for parsing and emitting YAML / MIT |
| [zeromq](http://zeromq.org) | 4.3.4 | A high-performance asynchronous messaging library. / LGPL-3.0-or-later |
| [zict](https://github.com/mrocklin/zict) | 2.1.0 | Composable Dictionary Classes / BSD-3-Clause |
| [zlib](https://zlib.net/) | 1.2.13 | Massively spiffy yet delicately unobtrusive compression library / Zlib |
| [zstd](https://www.zstd.net) | 1.5.2 | Zstandard - Fast real-time compression algorithm / BSD-3-Clause AND GPL-2.0-or-later |
| Name | Version | Summary / License |
|---|---|---|
| [\_libgcc\_mutex](https://github.com/AnacondaRecipes/_libgcc_mutex-feedstock) | 0.1 | Mutex for libgcc and libgcc-ng / None |
| [\_openmp\_mutex](https://github.com/AnacondaRecipes/gcc-compiler-feedstock) | 5.1 | OpenMP Implementation Mutex / BSD-3-Clause |
| [anyio](https://github.com/agronholm/anyio) | 3.5.0 | High level compatibility layer for multiple asynchronous event loop implementations on Python / MIT |
| [appdirs](http://github.com/ActiveState/appdirs) | 1.4.4 | A small Python module for determining appropriate platform-specific dirs. / MIT |
| [argon2-cffi](https://argon2-cffi.readthedocs.org/) | 21.3.0 | The secure Argon2 password hashing algorithm. / MIT |
| [argon2-cffi-bindings](https://github.com/hynek/argon2-cffi-bindings) | 21.2.0 | Low-level Python CFFI Bindings for Argon2 / MIT |
| [astroid](https://github.com/PyCQA/astroid) | 2.14.2 | A abstract syntax tree for Python with inference support. / LGPL-2.1-or-later |
| [astropy](https://www.astropy.org/) | 5.1 | Community-developed Python Library for Astronomy / BSD-3-Clause |
| [asttokens](https://github.com/gristlabs/asttokens) | 2.0.5 | The asttokens module annotates Python abstract syntax trees (ASTs) with the positions of tokens and text in the source code that generated them. / Apache-2.0 |
| [attrs](https://www.attrs.org/) | 22.1.0 | attrs is the Python package that will bring back the joy of writing classes by relieving you from the drudgery of implementing object protocols (aka dunder methods). / MIT |
| [automat](https://github.com/glyph/Automat) | 20.2.0 | self-service finite-state machines for the programmer on the go / MIT |
| [babel](https://babel.pocoo.org/) | 2.11.0 | Utilities to internationalize and localize Python applications / BSD-3-Clause |
| [backcall](https://github.com/takluyver/backcall/) | 0.2.0 | Specifications for callback functions passed in to an API / BSD-3-Clause |
| [bcrypt](https://github.com/pyca/bcrypt/) | 3.2.0 | Modern password hashing for your software and your servers / Apache-2.0 |
| [beautifulsoup4](https://www.crummy.com/software/BeautifulSoup/) | 4.11.1 | Python library designed for screen-scraping / MIT |
| [blas](http://www.netlib.org/lapack) | 1.0 | Linear Algebra PACKage / BSD-3-Clause |
| [bleach](https://github.com/mozilla/bleach) | 4.1.0 | Easy, whitelist-based HTML-sanitizing tool / Apache-2.0 |
| [blosc](https://www.blosc.org/) | 1.21.3 | A blocking, shuffling and loss-less compression library that can be faster than memcpy() / BSD-3-Clause |
| [bokeh](https://bokeh.org/) | 2.4.3 | Bokeh is an interactive visualization library for modern web browsers. / BSD-3-Clause |
| [bottleneck](https://github.com/pydata/bottleneck) | 1.3.5 | Fast NumPy array functions written in Cython. / BSD-2-Clause |
| [brotli](https://github.com/google/brotli) | 1.0.9 | Brotli compression format / MIT |
| [brotli-bin](https://github.com/google/brotli) | 1.0.9 | Brotli compression format / MIT |
| [brotlipy](https://github.com/python-hyper/brotlipy) | 0.7.0 | Python bindings to the Brotli compression library / MIT |
| [brunsli](https://github.com/google/brunsli) | 0.1 | Practical JPEG Repacker / MIT |
| [bzip2](http://www.bzip.org/) | 1.0.8 | high-quality data compressor / bzip2 |
| [c-ares](https://c-ares.org/) | 1.18.1 | This is c-ares, an asynchronous resolver library / MIT |
| [ca-certificates](https://curl.se/docs/caextract.html) | 2023.01.10 | Certificates for use with other packages. / MPL-2.0 |
| [certifi](https://certifi.io/) | 2022.12.7 | Python package for providing Mozilla’s CA Bundle. / MPL-2.0 |
| [cffi](https://cffi.readthedocs.org/) | 1.15.1 | Foreign Function Interface for Python calling C code. / MIT |
| [cfitsio](https://heasarc.gsfc.nasa.gov/fitsio/fitsio.html) | 3.470 | A library for reading and writing FITS files / Other |
| [charls](https://github.com/team-charls/charls) | 2.2.0 | CharLS is a C++ implementation of the JPEG-LS standard for lossless and near-lossless image compression and decompression. JPEG-LS is a low-complexity image compression standard that matches JPEG 2000 compression ratios. / BSD-3-Clause |
| [charset-normalizer](https://github.com/ousret/charset_normalizer) | 2.0.4 | The Real First Universal Charset Detector. Open, modern and actively maintained alternative to Chardet. / MIT |
| [click](https://palletsprojects.com/p/click) | 8.0.4 | Python composable command line interface toolkit / BSD-3-Clause |
| [cloudpickle](https://github.com/cloudpipe/cloudpickle) | 2.0.0 | Extended pickling support for Python objects / BSD-3-Clause |
| [colorama](https://github.com/tartley/colorama) | 0.4.6 | Cross-platform colored terminal text / BSD-3-Clause |
| [colorcet](https://colorcet.holoviz.org/index.html) | 3.0.1 | Collection of perceptually uniform colormaps / CC-BY-4.0 |
| [comm](https://github.com/ipython/comm) | 0.1.2 | Python Comm implementation for the Jupyter kernel protocol / BSD-3-Clause |
| [conda](https://docs.conda.io) | 23.1.0 | OS-agnostic, system-level binary package and environment manager. / BSD-3-Clause |
| [conda-build](https://github.com/conda/conda-build) | 3.23.3 | tools for building conda packages / BSD-3-Clause |
| [conda-env](https://github.com/conda/conda-env) | 2.6.0 | Tools for interacting with conda environments. / BSD 3-Clause |
| [conda-verify](https://github.com/conda/conda-verify) | 3.4.2 | tool for validating conda recipes and conda packages / BSD 3-Clause |
| [constantly](https://github.com/twisted/constantly) | 15.1.0 | Symbolic constants in Python / MIT |
| [contourpy](https://github.com/contourpy/contourpy) | 1.0.5 | Python library for calculating contours of 2D quadrilateral grids. / BSD-3-Clause |
| [cryptography](https://github.com/pyca/cryptography) | 39.0.1 | Provides cryptographic recipes and primitives to Python developers / (BSD-3-Clause OR Apache-2.0) AND PSF-2.0 AND MIT |
| [cssselect](https://pythonhosted.org/cssselect/) | 1.1.0 | CSS Selectors for Python / BSD 3-Clause |
| [curl](https://curl.se/) | 7.87.0 | tool and library for transferring data with URL syntax / curl |
| [cycler](http://matplotlib.org/cycler) | 0.11.0 | Composable style cycles. / BSD-3-Clause |
| [cytoolz](https://github.com/pytoolz/cytoolz) | 0.12.0 | Cython implementation of Toolz. High performance functional utilities / BSD-3-Clause |
| [dask](https://dask.org/) | 2022.7.0 | Parallel PyData with Task Scheduling / BSD-3-Clause |
| [dask-core](https://github.com/dask/dask/) | 2022.7.0 | Parallel Python with task scheduling / BSD-3-Clause |
| [datashader](https://datashader.org) | 0.14.4 | Data visualization toolchain based on aggregating into a grid / BSD-3-Clause |
| [datashape](http://datashape.pydata.org) | 0.5.4 | A data description language. / BSD 2-Clause |
| [debugpy](https://github.com/Microsoft/debugpy) | 1.5.1 | An implementation of the Debug Adapter Protocol for Python / MIT |
| [decorator](https://github.com/micheles/decorator) | 5.1.1 | Better living through Python with decorators. / BSD-2-Clause |
| [defusedxml](https://bitbucket.org/tiran/defusedxml) | 0.7.1 | XML bomb protection for Python stdlib modules / PSF 2.0 |
| [dill](https://github.com/uqfoundation/dill) | 0.3.6 | Serialize all of python (almost) / BSD-3-Clause |
| [distributed](https://distributed.readthedocs.io/en/latest/) | 2022.7.0 | Distributed computing with Dask / BSD-3-Clause |
| [entrypoints](https://github.com/takluyver/entrypoints) | 0.4 | Discover and load entry points from installed packages. / MIT License |
| [et\_xmlfile](https://foss.heptapod.net/openpyxl/et_xmlfile) | 1.1.0 | An implementation of lxml.xmlfile for the standard library / MIT AND PSF-2.0 |
| [executing](https://pypi.org/project/executing) | 0.8.3 | Get the currently executing AST node of a frame, and other information / MIT |
| [filelock](https://github.com/tox-dev/py-filelock) | 3.9.0 | A platform independent file lock. / Unlicense |
| [flask](https://palletsprojects.com/p/flask) | 2.2.2 | A simple framework for building complex web applications. / BSD-3-Clause |
| [flit-core](https://flit.readthedocs.io/) | 3.6.0 | Simplified packaging of Python modules / BSD-3-Clause |
| [fonttools](https://github.com/fonttools/fonttools) | 4.25.0 | fontTools is a library for manipulating fonts, written in Python. / MIT |
| [freetype](https://freetype.org/) | 2.12.1 | A Free, High-Quality, and Portable Font Engine / GPL-2-only and LicenseRef-FreeType |
| [fsspec](https://github.com/fsspec/filesystem_spec) | 2022.11.0 | A specification for pythonic filesystems / BSD-3-Clause |
| [future](https://python-future.org) | 0.18.3 | Clean single-source support for Python 3 and 2 / MIT |
| [gensim](https://github.com/RaRe-Technologies/gensim) | 4.3.0 | Topic Modelling for Humans / LGPL-2.1-only |
| [giflib](https://giflib.sourceforge.net) | 5.2.1 | Library for reading and writing gif images / MIT |
| [gmp](https://gmplib.org/) | 6.2.1 | The GNU multiprecision library. / GPL-2.0-or-later AND LGPL-3.0-or-later |
| [gmpy2](https://pypi.python.org/pypi/gmpy2) | 2.1.2 | GMP/MPIR, MPFR, and MPC interface to Python 2.6+ and 3.x / LGPL-3.0-or-later |
| [greenlet](https://github.com/python-greenlet/greenlet) | 2.0.1 | Lightweight in-process concurrent programming / MIT |
| [h5py](https://www.h5py.org/) | 3.7.0 | Read and write HDF5 files from Python / BSD-3-Clause |
| [hdf5](http://www.hdfgroup.org/HDF5/) | 1.10.6 | HDF5 is a data model, library, and file format for storing and managing data / HDF5 |
| [heapdict](http://stutzbachenterprises.com/) | 1.0.1 | A heap with decrease-key and increase-key operations / BSD 3-Clause |
| [holoviews](https://holoviews.org) | 1.15.4 | Stop plotting your data - annotate your data and let it visualize itself. / BSD-3-Clause |
| [huggingface\_hub](https://github.com/huggingface/huggingface_hub) | 0.10.1 | Client library to download and publish models, datasets and other repos on the huggingface.co hub / Apache-2.0 |
| [hvplot](https://hvplot.holoviz.org) | 0.8.2 | A high-level plotting API for the PyData ecosystem built on HoloViews / BSD-3-Clause |
| [hyperlink](https://github.com/python-hyper/hyperlink) | 21.0.0 | Immutable, Pythonic, correct URLs. / MIT |
| [icu](http://site.icu-project.org/) | 58.2 | International Components for Unicode. / MIT |
| [idna](https://github.com/kjd/idna) | 3.4 | Internationalized Domain Names in Applications (IDNA). / BSD-3-Clause |
| [imagecodecs](https://www.lfd.uci.edu/~gohlke/) | 2021.8.26 | Image transformation, compression, and decompression codecs / BSD-3-Clause |
| [imageio](https://imageio.github.io) | 2.26.0 | A Python library for reading and writing image data / BSD-2-Clause |
| [imbalanced-learn](https://github.com/scikit-learn-contrib/imbalanced-learn) | 0.10.1 | Python module to balance data set using under- and over-sampling / MIT |
| [incremental](https://github.com/hawkowl/incremental) | 21.3.0 | Incremental is a small library that versions your Python projects. / MIT |
| [iniconfig](http://github.com/RonnyPfannschmidt/iniconfig) | 1.1.1 | iniconfig: brain-dead simple config-ini parsing / MIT |
| [intake](https://github.com/intake/intake) | 0.6.7 | Data load and catalog system / BSD-2-Clause |
| [ipykernel](https://ipython.org) | 6.19.2 | IPython Kernel for Jupyter / BSD-3-Clause |
| [ipython](https://ipython.org) | 8.10.0 | IPython: Productive Interactive Computing / BSD-3-Clause |
| [ipython\_genutils](http://ipython.org) | 0.2.0 | vestigial utilities from IPython / BSD 3-Clause |
| [ipywidgets](https://github.com/ipython/ipywidgets) | 7.6.5 | Jupyter Interactive Widgets / BSD-3-Clause |
| [isort](https://github.com/timothycrosley/isort) | 5.9.3 | A Python utility / library to sort Python imports. / MIT |
| [itemadapter](https://github.com/scrapy/itemadapter) | 0.3.0 | Common interface for different data containers / BSD-3-Clause |
| [itemloaders](https://github.com/scrapy/itemloaders) | 1.0.4 | Collect data from HTML and XML sources / BSD-3-Clause |
| [itsdangerous](https://github.com/pallets/itsdangerous) | 2.0.1 | Various helpers to pass trusted data to untrusted environments. / BSD-3-Clause |
| [jedi](https://github.com/davidhalter/jedi/) | 0.18.1 | An autocompletion tool for Python that can be used for text editors. / MIT |
| [jinja2](https://palletsprojects.com/p/jinja/) | 3.1.2 | A very fast and expressive template engine. / BSD-3-Clause |
| [jmespath](http://jmespath.org/) | 0.10.0 | Query language for JSON / MIT |
| [joblib](https://joblib.readthedocs.io/en/latest/) | 1.1.1 | Lightweight pipelining: using Python functions as pipeline jobs. / BSD-3-Clause |
| [jpeg](https://www.ijg.org/) | 9e | read/write jpeg COM, EXIF, IPTC medata / IJG |
| [jq](http://stedolan.github.io/jq/) | 1.6 | A command-line JSON processor. / MIT |
| [json5](https://github.com/dpranke/pyjson5) | 0.9.6 | A Python implementation of the JSON5 data format / Apache-2.0 |
| [jsonschema](https://github.com/python-jsonschema/jsonschema) | 4.17.3 | An implementation of JSON Schema validation for Python / MIT |
| [jupyter](https://jupyter.org) | 1.0.0 | Jupyter metapackage. Install all the Jupyter components in one go. / BSD-3-Clause |
| [jupyter\_client](https://jupyter.org) | 7.3.4 | Jupyter protocol implementation and client libraries. / BSD-3-Clause |
| [jupyter\_console](https://jupyter.org) | 6.6.2 | Jupyter terminal console / BSD-3-Clause |
| [jupyter\_core](https://jupyter.org) | 5.2.0 | Core common functionality of Jupyter projects. / BSD-3-Clause |
| [jupyter\_server](https://jupyter.org) | 1.23.4 | Jupyter Server / BSD-3-Clause |
| [jupyterlab](https://github.com/jupyterlab/jupyterlab) | 3.5.3 | JupyterLab PRE-ALPHA / BSD-3-Clause |
| [jupyterlab\_pygments](http://github.com/JupyterLab/jupyterlab_pygments) | 0.1.2 | Pygments syntax coloring scheme making use of the JupyterLab CSS variables / BSD-3-Clause |
| [jupyterlab\_server](https://github.com/jupyterlab/jupyterlab_server) | 2.19.0 | A set of server components for JupyterLab and JupyterLab like applications. / BSD-3-Clause |
| [jupyterlab\_widgets](https://github.com/jupyter-widgets/ipywidgets) | 1.0.0 | JupyterLab extension providing HTML widgets / BSD-3-Clause |
| [jxrlib](https://packages.debian.org/source/sid/jxrlib) | 1.1 | jxrlib - JPEG XR Library by Microsoft, built from Debian hosted sources. / BSD-2-Clause |
| [kiwisolver](https://github.com/nucleic/kiwi) | 1.4.4 | An efficient C++ implementation of the Cassowary constraint solver / BSD-3-Clause |
| [krb5](https://web.mit.edu/kerberos/) | 1.19.4 | A network authentication protocol. / MIT |
| [lazy-object-proxy](https://github.com/ionelmc/python-lazy-object-proxy) | 1.6.0 | A fast and thorough lazy object proxy / BSD-2-Clause |
| [lcms2](http://www.littlecms.com/) | 2.12 | Open Source Color Management Engine / MIT |
| [ld\_impl\_linux-ppc64le](https://www.gnu.org/software/binutils/) | 2.38 | A set of programming tools for creating and managing binary programs, object files, libraries, profile data, and assembly source code. / GPL-3.0-only |
| [lerc](https://github.com/Esri/lerc) | 3.0 | LERC - Limited Error Raster Compression / Apache-2.0 |
| [libaec](https://gitlab.dkrz.de/k202009/libaec) | 1.0.4 | Adaptive Entropy Coding library / BSD-2-Clause |
| [libbrotlicommon](https://github.com/google/brotli) | 1.0.9 | Brotli compression format / MIT |
| [libbrotlidec](https://github.com/google/brotli) | 1.0.9 | Brotli compression format / MIT |
| [libbrotlienc](https://github.com/google/brotli) | 1.0.9 | Brotli compression format / MIT |
| [libcurl](https://curl.se/) | 7.87.0 | tool and library for transferring data with URL syntax / curl |
| [libdeflate](https://github.com/ebiggers/libdeflate) | 1.17 | libdeflate is a library for fast, whole-buffer DEFLATE-based compression and decompression. / MIT |
| [libedit](https://thrysoee.dk/editline/) | 3.1.20221030 | Editline Library (libedit) / BSD-2-Clause |
| [libev](http://software.schmorp.de/pkg/libev.html) | 4.33 | A full-featured and high-performance event loop that is loosely modeled after libevent, but without its limitations and bugs. / BSD-2-Clause |
| [libffi](https://sourceware.org/libffi/) | 3.4.2 | A Portable Foreign Function Interface Library / MIT |
| [libgcc-ng](https://gcc.gnu.org/onlinedocs/gccint/Libgcc.html) | 11.2.0 | The GCC low-level runtime library / GPL-3.0-only WITH GCC-exception-3.1 |
| [libgfortran-ng](https://gcc.gnu.org/) | 11.2.0 | The GNU Fortran Runtime Library / GPL-3.0-only WITH GCC-exception-3.1 |
| [libgfortran5](https://gcc.gnu.org/) | 11.2.0 | Fortran compiler and libraries from the GNU Compiler Collection / GPL-3.0-only WITH GCC-exception-3.1 |
| [libgomp](https://gcc.gnu.org/onlinedocs/gccint/Libgcc.html) | 11.2.0 | The GCC OpenMP implementation. / GPL-3.0-only WITH GCC-exception-3.1 |
| [libllvm11](https://llvm.org/) | 11.1.0 | Development headers and libraries for LLVM / Apache-2.0 WITH LLVM-exception |
| [libnghttp2](http://github.com/nghttp2/nghttp2) | 1.46.0 | This is an implementation of Hypertext Transfer Protocol version 2. / MIT |
| [libopenblas](https://www.openblas.net/) | 0.3.21 | An Optimized BLAS library / BSD-3-Clause |
| [libpng](http://www.libpng.org/pub/png/libpng.html) | 1.6.39 | PNG reference library / Zlib |
| [libprotobuf](https://developers.google.com/protocol-buffers/) | 3.20.3 | Protocol Buffers - Google’s data interchange format. C++ Libraries and protoc, the protobuf compiler. / BSD-3-Clause |
| [libsodium](http://libsodium.org) | 1.0.18 | A modern and easy-to-use crypto library. / ISC |
| [libssh2](https://www.libssh2.org/) | 1.10.0 | the SSH library / BSD-3-Clause |
| [libstdcxx-ng](https://gcc.gnu.org/) | 11.2.0 | The GNU C++ Runtime Library / GPL-3.0-only WITH GCC-exception-3.1 |
| [libtiff](http://www.simplesystems.org/libtiff/) | 4.5.0 | Support for the Tag Image File Format (TIFF). / HPND |
| [libuuid](https://sourceforge.net/projects/libuuid/) | 1.41.5 | Portable uuid C library 2.32.1 as pk-version 1.41.5. / BSD-3-Clause |
| [libwebp](https://developers.google.com/speed/webp/) | 1.2.4 | WebP image library / BSD-3-Clause |
| [libwebp-base](https://developers.google.com/speed/webp) | 1.2.4 | WebP image library / BSD-3-Clause |
| [libxml2](https://gitlab.gnome.org/GNOME/libxml2/) | 2.9.14 | The XML C parser and toolkit of Gnome / MIT |
| [libxslt](https://gitlab.gnome.org/GNOME/libxslt) | 1.1.35 | The XSLT C library developed for the GNOME project / MIT |
| [libzopfli](https://github.com/google/zopfli) | 1.0.3 | A compression library programmed in C to perform very good, but slow, deflate or zlib compression. / Apache-2.0 |
| [llvmlite](https://llvmlite.pydata.org) | 0.39.1 | A lightweight LLVM python binding for writing JIT compilers. / BSD-2-Clause |
| [locket](https://github.com/mwilliamson/locket.py) | 1.0.0 | File-based locks for Python for Linux and Windows / BSD-2-Clause |
| [lxml](https://lxml.de/) | 4.9.1 | Pythonic binding for the C libraries libxml2 and libxslt. / BSD-3-Clause and GPL-2.0-only and ZPL-2.0 and LicenseRef-ElementTree |
| [lz4](https://github.com/python-lz4/python-lz4) | 3.1.3 | LZ4 Bindings for Python / BSD-3-Clause |
| [lz4-c](https://lz4.github.io/lz4/) | 1.9.4 | Extremely Fast Compression algorithm / BSD-2-Clause |
| [lzo](http://www.oberhumer.com/opensource/lzo/) | 2.10 | LZO is a portable lossless data compression library written in ANSI C. / GPL v2+ |
| [markdown](https://github.com/Python-Markdown/markdown) | 3.4.1 | Python implementation of Markdown. / BSD-3-Clause |
| [markupsafe](https://www.palletsprojects.com/p/markupsafe) | 2.1.1 | Safely add untrusted strings to HTML/XML markup. / BSD-3-Clause |
| [matplotlib](https://matplotlib.org/) | 3.7.0 | Publication quality figures in Python / LicenseRef-PSF-based |
| [matplotlib-base](https://matplotlib.org/) | 3.7.0 | Publication quality figures in Python / LicenseRef-PSF-based |
| [matplotlib-inline](https://github.com/ipython/matplotlib-inline) | 0.1.6 | Inline Matplotlib backend for Jupyter / BSD-3-Clause |
| [mccabe](https://github.com/PyCQA/mccabe) | 0.7.0 | McCabe complexity checker for Python / MIT |
| [mistune](https://github.com/lepture/mistune) | 0.8.4 | A sane Markdown parser with useful plugins and renderers. / BSD-3-Clause |
| [mock](https://github.com/testing-cabal/mock) | 4.0.3 | A library for testing in Python / BSD-2-Clause |
| [mpc](http://www.multiprecision.org/) | 1.1.0 | A C library for the arithmetic of complex numbers with arbitrarily high precision. / LGPL-3-or-later |
| [mpfr](http://www.mpfr.org/) | 4.0.2 | The MPFR library is a C library for multiple-precision floating-point computations with correct rounding. / LGPL-3.0-only |
| [mpmath](http://mpmath.org) | 1.2.1 | Python library for arbitrary-precision floating-point arithmetic / BSD 3-Clause |
| [msgpack-python](https://msgpack.org/) | 1.0.3 | MessagePack (de)serializer / Apache-2.0 |
| [multipledispatch](https://github.com/mrocklin/multipledispatch/) | 0.6.0 | Multiple dispatch in Python / BSD 3-Clause |
| [munkres](https://github.com/bmc/munkres) | 1.1.4 | The Munkres module provides an O(n^3) implementation of the Munkres algorithm (also called the Hungarian algorithm or the Kuhn-Munkres algorithm). / Apache-2.0 |
| [nbclassic](https://github.com/jupyter/nbclassic) | 0.5.2 | Jupyter Notebook as a Jupyter Server Extension. / BSD-3-Clause |
| [nbclient](https://jupyter.org) | 0.5.13 | A client library for executing notebooks. Formally nbconvert’s ExecutePreprocessor. / BSD-3-Clause |
| [nbconvert](https://nbconvert.readthedocs.io/en/latest/) | 6.5.4 | Converting Jupyter Notebooks / BSD-3-Clause |
| [nbformat](https://jupyter.org) | 5.7.0 | The Jupyter Notebook format / BSD-3-Clause |
| [ncurses](https://invisible-island.net/ncurses/) | 6.4 | Library for text-based user interfaces / MIT AND X11 |
| [nest-asyncio](https://github.com/erdewit/nest_asyncio) | 1.5.6 | Patch asyncio to allow nested event loops / BSD-2-Clause |
| [networkx](https://networkx.github.io/) | 2.8.4 | Python package for creating and manipulating complex networks / BSD-3-Clause |
| [ninja](https://ninja-build.org/) | 1.10.2 | A small build system with a focus on speed / Apache-2.0 |
| [ninja-base](https://ninja-build.org/) | 1.10.2 | A small build system with a focus on speed / Apache-2.0 |
| [nltk](https://nltk.org/) | 3.7 | Natural Language Toolkit / Apache-2.0 |
| [notebook](https://jupyter.org) | 6.5.2 | Jupyter Notebook / BSD-3-Clause |
| [notebook-shim](https://github.com/jupyter/notebook_shim) | 0.2.2 | A shim layer for notebook traits and config / BSD-3-Clause |
| [numba](https://numba.pydata.org) | 0.56.4 | NumPy aware dynamic Python compiler using LLVM / BSD-2-Clause |
| [numexpr](https://github.com/pydata/numexpr) | 2.8.4 | Fast numerical expression evaluator for NumPy. / MIT |
| [numpy](https://numpy.org/) | 1.23.5 | Array processing for numbers, strings, records, and objects. / BSD-3-Clause |
| [numpy-base](https://numpy.org/) | 1.23.5 | Array processing for numbers, strings, records, and objects. / BSD-3-Clause |
| [oniguruma](https://github.com/kkos/oniguruma) | 6.9.7.1 | A regular expression library. / BSD-2-Clause |
| [openjpeg](http://www.openjpeg.org/) | 2.4.0 | An open-source JPEG 2000 codec written in C / BSD 2-Clause |
| [openpyxl](https://openpyxl.readthedocs.io) | 3.0.10 | A Python library to read/write Excel 2010 xlsx/xlsm files / MIT |
| [openssl](https://www.openssl.org/) | 1.1.1t | OpenSSL is an open-source implementation of the SSL and TLS protocols / OpenSSL |
| [packaging](https://github.com/pypa/packaging) | 22.0 | Core utilities for Python packages / Apache-2.0 or BSD-2-Clause |
| [pandas](https://pandas.pydata.org) | 1.5.3 | High-performance, easy-to-use data structures and data analysis tools. / BSD-3-Clause |
| [pandocfilters](https://github.com/jgm/pandocfilters) | 1.5.0 | A python module for writing pandoc filters / BSD-3-Clause |
| [panel](https://panel.holoviz.org) | 0.14.3 | A high-level app and dashboarding solution for Python / BSD-3-Clause |
| [param](https://param.holoviz.org/) | 1.12.3 | Param: Make your Python code clearer and more reliable by declaring Parameters / BSD-3-Clause |
| [parsel](https://github.com/scrapy/parsel) | 1.6.0 | library to extract data from HTML and XML using XPath and CSS selectors / BSD-3-Clause |
| [parso](https://github.com/davidhalter/parso) | 0.8.3 | A Python Parser / MIT |
| [partd](https://github.com/dask/partd) | 1.2.0 | Appendable key-value storage / BSD-3-Clause |
| [patsy](https://github.com/pydata/patsy) | 0.5.3 | Describing statistical models in Python using symbolic formulas / BSD-2-Clause AND PSF-2.0 |
| [pep8](https://pep8.readthedocs.org/) | 1.7.1 | Python style guide checker / MIT |
| [pexpect](http://pexpect.sourceforge.net/) | 4.8.0 | Pexpect makes Python a better tool for controlling other applications. / ISC |
| [pickleshare](https://github.com/pickleshare/pickleshare/) | 0.7.5 | Tiny ‘shelve’-like database with concurrency support / MIT |
| [pillow](https://pillow.readthedocs.io) | 9.4.0 | Pillow is the friendly PIL fork by Alex Clark and Contributors / LicenseRef-PIL |
| [pip](https://pip.pypa.io/en/stable/) | 22.3.1 | PyPA recommended tool for installing Python packages / MIT |
| [platformdirs](https://github.com/platformdirs/platformdirs) | 2.5.2 | A small Python module for determining appropriate platform-specific dirs, e.g. a “user data dir”. / MIT |
| [plotly](https://plot.ly/python/) | 5.9.0 | An interactive JavaScript-based visualization library for Python / MIT |
| [pluggy](https://github.com/pytest-dev/pluggy) | 1.0.0 | Plugin registration and hook calling for Python / MIT |
| [pooch](https://github.com/fatiando/pooch) | 1.4.0 | A friend to fetch your data files / BSD-3-Clause |
| [prometheus\_client](https://github.com/prometheus/client_python) | 0.14.1 | Python client for the Prometheus monitoring system / Apache-2.0 |
| [prompt-toolkit](https://github.com/prompt-toolkit/python-prompt-toolkit) | 3.0.36 | Library for building powerful interactive command lines in Python / BSD-3-Clause |
| [prompt\_toolkit](https://github.com/prompt-toolkit/python-prompt-toolkit) | 3.0.36 | Library for building powerful interactive command lines in Python / BSD-3-Clause |
| [protego](https://github.com/scrapy/protego) | 0.1.16 | A pure-Python robots.txt parser with support for modern conventions / BSD 3-Clauses |
| [psutil](https://github.com/giampaolo/psutil) | 5.9.0 | A cross-platform process and system utilities module for Python / BSD-3-Clause |
| [ptyprocess](https://github.com/pexpect/ptyprocess) | 0.7.0 | Run a subprocess in a pseudo terminal / ISC |
| [pure\_eval](https://github.com/alexmojaki/pure_eval) | 0.2.2 | Safely evaluate AST nodes without side effects / MIT |
| [py](https://github.com/pytest-dev/py) | 1.11.0 | library with cross-python path, ini-parsing, io, code, log facilities / MIT |
| [pyasn1](https://github.com/etingof/pyasn1) | 0.4.8 | ASN.1 types and codecs / BSD 2-Clause |
| [pyasn1-modules](http://pyasn1.sourceforge.net/) | 0.2.8 | A collection of ASN.1-based protocols modules. / BSD 2-Clause |
| [pycparser](https://github.com/eliben/pycparser) | 2.21 | Complete C99 parser in pure Python / BSD-3-clause |
| [pyct](https://github.com/pyviz/pyct) | 0.5.0 | python package common tasks for users (e.g. copy examples, fetch data, …) / BSD-3-Clause |
| [pycurl](http://pycurl.sourceforge.net/) | 7.45.1 | A Python Interface To The cURL library / LGPL-2.1-only, MIT |
| [pydispatcher](http://pydispatcher.sourceforge.net) | 2.0.5 | Multi-producer-multi-consumer signal dispatching mechanism / BSD-3-Clause |
| [pyerfa](https://pyerfa.readthedocs.io/) | 2.0.0 | Python bindings for ERFA routines / BSD-3-Clause |
| [pyflakes](https://github.com/PyCQA/pyflakes) | 3.0.1 | Pyflakes analyzes programs and detects various errors. / MIT |
| [pygments](https://pygments.org/) | 2.11.2 | Pygments is a generic syntax highlighter suitable for use in code hosting, forums, wikis or other applications that need to prettify source code. / BSD-2-Clause |
| [pyhamcrest](https://github.com/hamcrest/PyHamcrest) | 2.0.2 | Hamcrest framework for matcher objects / BSD 3-Clause |
| [pylint](https://www.pylint.org) | 2.16.2 | python code static checker / GPL-2.0-or-later |
| [pyodbc](https://github.com/mkleehammer/pyodbc) | 4.0.34 | DB API Module for ODBC / MIT-0 |
| [pyopenssl](https://github.com/pyca/pyopenssl) | 23.0.0 | Python wrapper module around the OpenSSL library / Apache-2.0 |
| [pyparsing](https://github.com/pyparsing/pyparsing/) | 3.0.9 | Create and execute simple grammars / MIT |
| [pyrsistent](http://github.com/tobgu/pyrsistent/) | 0.18.0 | Persistent/Functional/Immutable data structures / MIT |
| [pysocks](https://github.com/Anorov/PySocks) | 1.7.1 | A Python SOCKS client module. See [Anorov/PySocks](https://github.com/Anorov/PySocks) for more information. / BSD 3-Clause |
| [pytables](https://www.pytables.org) | 3.7.0 | Brings together Python, HDF5 and NumPy to easily handle large amounts of data. / BSD-3-Clause |
| [pytest](https://docs.pytest.org/en/latest/) | 7.1.2 | Simple and powerful testing with Python. / MIT |
| [python](https://www.python.org/) | 3.10.9 | General purpose programming language / PSF-2.0 |
| [python-dateutil](https://dateutil.readthedocs.org/) | 2.8.2 | Extensions to the standard Python datetime module. / BSD-3-Clause and Apache |
| [python-fastjsonschema](https://github.com/horejsek/python-fastjsonschema) | 2.16.2 | Fastest Python implementation of JSON schema / BSD-3-Clause |
| [python-snappy](https://github.com/andrix/python-snappy) | 0.6.1 | Python library for the snappy compression library from Google / BSD-3-Clause |
| [pytorch](https://pytorch.org/) | 1.12.1 | PyTorch is an optimized tensor library for deep learning using GPUs and CPUs. / BSD-3-Clause |
| [pytz](https://pythonhosted.org/pytz/) | 2022.7 | World timezone definitions, modern and historical. / MIT |
| [pyviz\_comms](https://www.holoviz.org) | 2.0.2 | Bidirectional communication for PyViz / BSD-3-Clause |
| [pywavelets](https://github.com/PyWavelets/pywt) | 1.4.1 | Discrete Wavelet Transforms in Python / MIT |
| [pyyaml](http://pyyaml.org/wiki/PyYAML) | 6.0 | YAML parser and emitter for Python / MIT |
| [pyzmq](https://github.com/zeromq/pyzmq) | 23.2.0 | Python bindings for zeromq / BSD-3-Clause AND LGPL-3.0-or-later |
| [queuelib](https://github.com/scrapy/queuelib) | 1.5.0 | Collection of persistent (disk-based) queues / BSD |
| [readline](https://tiswww.case.edu/php/chet/readline/rltop.html) | 8.2 | library for editing command lines as they are typed in / GPL-3.0-only |
| [regex](https://github.com/mrabarnett/mrab-regex) | 2022.7.9 | Alternative regular expression module, to replace re / Apache-2.0 |
| [requests](https://requests.readthedocs.io/en/latest/) | 2.28.1 | Requests is an elegant and simple HTTP library for Python, built with ♥. / Apache-2.0 |
| [requests-file](http://github.com/dashea/requests-file) | 1.5.1 | file transport adapter for Requests / Apache |
| [scikit-image](https://scikit-image.org/) | 0.19.3 | Image processing in Python. / BSD-3-Clause |
| [scikit-learn](https://scikit-learn.org/) | 1.2.1 | A set of python modules for machine learning and data mining / BSD-3-Clause |
| [scipy](https://scipy.org/) | 1.10.0 | Scientific Library for Python / BSD-3-Clause |
| [scrapy](https://scrapy.org/) | 2.8.0 | A high-level Python Screen Scraping framework / BSD-3-Clause |
| [seaborn](https://seaborn.pydata.org) | 0.12.2 | Statistical data visualization / BSD-3-Clause |
| [send2trash](https://github.com/arsenetar/send2trash) | 1.8.0 | Python library to natively send files to Trash (or Recycle bin) on all platforms. / BSD-3-Clause |
| [service\_identity](https://github.com/pyca/service_identity) | 18.1.0 | Service identity verification for pyOpenSSL. / MIT |
| [setuptools](https://github.com/pypa/setuptools) | 65.6.3 | Download, build, install, upgrade, and uninstall Python packages / MIT |
| [six](https://six.readthedocs.io/) | 1.16.0 | Python 2 and 3 compatibility utilities / MIT |
| [smart\_open](https://github.com/RaRe-Technologies/smart_open) | 5.2.1 | Python library for efficient streaming of large files / MIT |
| [snappy](https://github.com/google/snappy) | 1.1.9 | A fast compressor/decompressor / BSD-3-clause AND CC-BY-3.0 AND MIT AND CC-BY AND Public Domain |
| [sniffio](https://github.com/python-trio/sniffio) | 1.2.0 | Sniff out which async library your code is running under / Apache-2.0 |
| [snowballstemmer](https://github.com/snowballstem/snowball) | 2.2.0 | Snowball stemming library collection for Python / BSD-3-Clause |
| [sortedcontainers](http://www.grantjenks.com/docs/sortedcontainers/) | 2.4.0 | Python Sorted Container Types: SortedList, SortedDict, and SortedSet / Apache-2.0 |
| [soupsieve](https://facelessuser.github.io/soupsieve) | 2.3.2.post1 | A modern CSS selector implementation for BeautifulSoup / MIT |
| [sqlalchemy](https://www.sqlalchemy.org/) | 1.4.39 | Database Abstraction Library. / MIT |
| [sqlite](https://www.sqlite.org/) | 3.40.1 | Implements a self-contained, zero-configuration, SQL database engine / blessing |
| [stack\_data](https://github.com/alexmojaki/stack_data) | 0.2.0 | Extract data from python stack frames and tracebacks for informative displays / MIT |
| [statsmodels](https://www.statsmodels.org) | 0.13.5 | Statistical computations and models for use with SciPy / BSD-3-Clause |
| [sympy](https://sympy.org) | 1.11.1 | Python library for symbolic mathematics / BSD-3-Clause AND MIT |
| [tabulate](https://github.com/astanin/python-tabulate) | 0.8.10 | Pretty-print tabular data in Python, a library and a command-line utility. / MIT |
| [tbb](https://github.com/oneapi-src/oneTBB) | 2021.7.0 | High level abstract threading library / Apache-2.0 |
| tbb4py | 2021.7.0 | TBB module for Python / Apache-2.0 |
| [tblib](https://github.com/ionelmc/python-tblib) | 1.7.0 | Traceback serialization library. / BSD 2-Clause |
| [tenacity](https://github.com/jd/tenacity) | 8.0.1 | Retry a flaky function whenever an exception occurs until it works / Apache-2.0 |
| [terminado](https://github.com/jupyter/terminado) | 0.17.1 | Terminals served by tornado websockets / BSD-2-Clause |
| [threadpoolctl](https://github.com/joblib/threadpoolctl) | 2.2.0 | Python helpers to control the threadpools of native libraries / BSD 3-Clause |
| [tifffile](https://github.com/cgohlke/tifffile) | 2021.7.2 | Read and write image data from and to TIFF files. / BSD-3-Clause |
| [tinycss2](https://www.courtbouillon.org/tinycss2) | 1.2.1 | Low-level CSS parser for Python / BSD-3-Clause |
| [tk](http://www.tcl.tk/) | 8.6.12 | A dynamic programming language with GUI support. Bundles Tcl and Tk. / Tcl/Tk |
| [tldextract](https://github.com/john-kurkowski/tldextract) | 3.2.0 | Accurately separate the TLD from the registered domain andsubdomains of a URL, using the Public Suffix List. / BSD-3-Clause |
| [tokenizers](https://github.com/huggingface/tokenizers) | 0.11.4 | Fast State-of-the-Art Tokenizers optimized for Research and Production / Apache-2.0 |
| [tomli](https://github.com/hukkin/tomli) | 2.0.1 | A simple TOML parser / MIT |
| [tomlkit](https://github.com/sdispater/tomlkit) | 0.11.1 | Style preserving TOML library / MIT |
| [toolz](https://toolz.readthedocs.io/) | 0.12.0 | List processing tools and functional utilities / BSD-3-Clause |
| [tornado](https://www.tornadoweb.org/) | 6.1 | A Python web framework and asynchronous networking library, originally developed at FriendFeed. / Apache-2.0 |
| [tqdm](https://tqdm.github.io/) | 4.64.1 | A Fast, Extensible Progress Meter / MPL-2.0 AND MIT |
| [traitlets](http://traitlets.readthedocs.org/) | 5.7.1 | Configuration system for Python applications / BSD-3-Clause |
| [transformers](https://github.com/huggingface/transformers) | 4.24.0 | State-of-the-art Machine Learning for JAX, PyTorch and TensorFlow / Apache-2.0 |
| [twisted](https://twistedmatrix.com/) | 22.2.0 | An asynchronous networking framework written in Python / MIT |
| [typing-extensions](https://github.com/python/typing_extensions) | 4.4.0 | Backported and Experimental Type Hints for Python / PSF-2.0 |
| [typing\_extensions](https://github.com/python/typing_extensions) | 4.4.0 | Backported and Experimental Type Hints for Python / PSF-2.0 |
| [tzdata](https://www.iana.org/time-zones) | 2022g | The Time Zone Database (called tz, tzdb or zoneinfo) / CC-PDDC OR BSD-3-Clause |
| [unixodbc](http://www.unixodbc.org/) | 2.3.11 | ODBC on non MS Windows platforms / LGPL-2.1-or-later |
| [urllib3](https://urllib3.readthedocs.io/) | 1.26.14 | HTTP library with thread-safe connection pooling, file post, and more. / MIT |
| [w3lib](https://github.com/scrapy/w3lib) | 1.21.0 | Library of web-related functions / BSD |
| [wcwidth](https://github.com/jquast/wcwidth) | 0.2.5 | Measures number of Terminal column cells of wide-character codes. / MIT |
| [webencodings](https://github.com/gsnedders/python-webencodings) | 0.5.1 | Character encoding aliases for legacy web content / BSD 3-Clause |
| [websocket-client](https://github.com/liris/websocket-client) | 0.58.0 | WebSocket client for python. hybi13 is supported. / BSD-3-Clause |
| [werkzeug](https://palletsprojects.com/p/werkzeug/) | 2.2.2 | The comprehensive WSGI web application library. / BSD-3-Clause |
| [wheel](https://github.com/pypa/wheel) | 0.38.4 | A built-package format for Python. / MIT |
| [widgetsnbextension](https://ipython.org) | 3.5.2 | Interactive Widgets for Jupyter / BSD-3-Clause |
| [wrapt](https://github.com/GrahamDumpleton/wrapt) | 1.14.1 | Module for decorators, wrappers and monkey patching / BSD-2-Clause |
| [xarray](https://github.com/pydata/xarray) | 2022.11.0 | N-D labeled arrays and datasets in Python. / Apache-2.0 |
| [xz](https://tukaani.org/xz/) | 5.2.10 | Data compression software with high compression ratio / LGPL-2.1-or-later and GPL-2.0-or-later |
| [yaml](http://pyyaml.org/wiki/LibYAML) | 0.2.5 | A C library for parsing and emitting YAML / MIT |
| [zeromq](http://zeromq.org) | 4.3.4 | A high-performance asynchronous messaging library. / LGPL-3.0-or-later |
| [zfp](https://computation.llnl.gov/projects/floating-point-compression) | 0.5.5 | Library for compressed numerical arrays that support high throughput read and write random access / BSD-3-Clause |
| [zict](https://github.com/mrocklin/zict) | 2.1.0 | Composable Dictionary Classes / BSD-3-Clause |
| [zlib](https://zlib.net/) | 1.2.13 | Massively spiffy yet delicately unobtrusive compression library / Zlib |
| zope | 1.0 | web application server / BSD |
| [zope.interface](https://github.com/zopefoundation/zope.interface) | 5.4.0 | Interfaces for Python / ZPL-2.1 |
| [zstd](https://www.zstd.net) | 1.5.2 | Zstandard - Fast real-time compression algorithm / BSD-3-Clause AND GPL-2.0-or-later |
| Name | Version | Summary / License |
|---|---|---|
| [\_libgcc\_mutex](https://github.com/AnacondaRecipes/_libgcc_mutex-feedstock) | 0.1 | Mutex for libgcc and libgcc-ng / None |
| [\_openmp\_mutex](https://github.com/AnacondaRecipes/gcc-compiler-feedstock) | 5.1 | OpenMP Implementation Mutex / BSD-3-Clause |
| [alabaster](http://www.sphinx-doc.org/en/stable/index.html) | 0.7.12 | Configurable, Python 2+3 compatible Sphinx theme. / BSD 3-Clause |
| [anaconda-navigator](https://github.com/anaconda-distribution/navigator) | 2.4.0 | Anaconda Navigator / proprietary - Continuum Analytics, Inc. |
| [anyio](https://github.com/agronholm/anyio) | 3.5.0 | High level compatibility layer for multiple asynchronous event loop implementations on Python / MIT |
| [appdirs](http://github.com/ActiveState/appdirs) | 1.4.4 | A small Python module for determining appropriate platform-specific dirs. / MIT |
| [argon2-cffi](https://argon2-cffi.readthedocs.org/) | 21.3.0 | The secure Argon2 password hashing algorithm. / MIT |
| [argon2-cffi-bindings](https://github.com/hynek/argon2-cffi-bindings) | 21.2.0 | Low-level Python CFFI Bindings for Argon2 / MIT |
| [arrow](https://github.com/arrow-py/arrow) | 1.2.3 | Better dates & times for Python / Apache-2.0 |
| [astroid](https://github.com/PyCQA/astroid) | 2.14.2 | A abstract syntax tree for Python with inference support. / LGPL-2.1-or-later |
| [astropy](https://www.astropy.org/) | 5.1 | Community-developed Python Library for Astronomy / BSD-3-Clause |
| [asttokens](https://github.com/gristlabs/asttokens) | 2.0.5 | The asttokens module annotates Python abstract syntax trees (ASTs) with the positions of tokens and text in the source code that generated them. / Apache-2.0 |
| [atomicwrites](https://github.com/untitaker/python-atomicwrites) | 1.4.0 | Atomic file writes / MIT |
| [attrs](https://www.attrs.org/) | 22.1.0 | attrs is the Python package that will bring back the joy of writing classes by relieving you from the drudgery of implementing object protocols (aka dunder methods). / MIT |
| [automat](https://github.com/glyph/Automat) | 20.2.0 | self-service finite-state machines for the programmer on the go / MIT |
| [autopep8](https://github.com/hhatto/autopep8) | 1.6.0 | A tool that automatically formats Python code to conform to the PEP 8 style guide / MIT |
| [babel](https://babel.pocoo.org/) | 2.11.0 | Utilities to internationalize and localize Python applications / BSD-3-Clause |
| [backcall](https://github.com/takluyver/backcall/) | 0.2.0 | Specifications for callback functions passed in to an API / BSD-3-Clause |
| [bcrypt](https://github.com/pyca/bcrypt/) | 3.2.0 | Modern password hashing for your software and your servers / Apache-2.0 |
| [beautifulsoup4](https://www.crummy.com/software/BeautifulSoup/) | 4.11.1 | Python library designed for screen-scraping / MIT |
| [binaryornot](https://github.com/audreyr/binaryornot) | 0.4.4 | Ultra-lightweight pure Python package to check if a file is binary or text. / BSD-3-Clause |
| [black](https://github.com/psf/black) | 22.6.0 | The Uncompromising Code Formatter / MIT |
| [blas](http://www.netlib.org/lapack) | 1.0 | Linear Algebra PACKage / BSD-3-Clause |
| [bleach](https://github.com/mozilla/bleach) | 4.1.0 | Easy, whitelist-based HTML-sanitizing tool / Apache-2.0 |
| [blosc](https://www.blosc.org/) | 1.21.3 | A blocking, shuffling and loss-less compression library that can be faster than memcpy() / BSD-3-Clause |
| [bokeh](https://bokeh.org/) | 2.4.3 | Bokeh is an interactive visualization library for modern web browsers. / BSD-3-Clause |
| [bottleneck](https://github.com/pydata/bottleneck) | 1.3.5 | Fast NumPy array functions written in Cython. / BSD-2-Clause |
| [brotli](https://github.com/google/brotli) | 1.0.9 | Brotli compression format / MIT |
| [brotli-bin](https://github.com/google/brotli) | 1.0.9 | Brotli compression format / MIT |
| [brotlipy](https://github.com/python-hyper/brotlipy) | 0.7.0 | Python bindings to the Brotli compression library / MIT |
| [brunsli](https://github.com/google/brunsli) | 0.1 | Practical JPEG Repacker / MIT |
| [bzip2](http://www.bzip.org/) | 1.0.8 | high-quality data compressor / bzip2 |
| [c-ares](https://c-ares.org/) | 1.18.1 | This is c-ares, an asynchronous resolver library / MIT |
| [ca-certificates](https://curl.se/docs/caextract.html) | 2023.01.10 | Certificates for use with other packages. / MPL-2.0 |
| [certifi](https://certifi.io/) | 2022.12.7 | Python package for providing Mozilla’s CA Bundle. / MPL-2.0 |
| [cffi](https://cffi.readthedocs.org/) | 1.15.1 | Foreign Function Interface for Python calling C code. / MIT |
| [cfitsio](https://heasarc.gsfc.nasa.gov/fitsio/fitsio.html) | 3.470 | A library for reading and writing FITS files / Other |
| [chardet](https://github.com/chardet/chardet) | 4.0.0 | Universal character encoding detector / LGPL2 |
| [charls](https://github.com/team-charls/charls) | 2.2.0 | CharLS is a C++ implementation of the JPEG-LS standard for lossless and near-lossless image compression and decompression. JPEG-LS is a low-complexity image compression standard that matches JPEG 2000 compression ratios. / BSD-3-Clause |
| [charset-normalizer](https://github.com/ousret/charset_normalizer) | 2.0.4 | The Real First Universal Charset Detector. Open, modern and actively maintained alternative to Chardet. / MIT |
| [click](https://palletsprojects.com/p/click) | 8.0.4 | Python composable command line interface toolkit / BSD-3-Clause |
| [cloudpickle](https://github.com/cloudpipe/cloudpickle) | 2.0.0 | Extended pickling support for Python objects / BSD-3-Clause |
| [colorama](https://github.com/tartley/colorama) | 0.4.6 | Cross-platform colored terminal text / BSD-3-Clause |
| [colorcet](https://colorcet.holoviz.org/index.html) | 3.0.1 | Collection of perceptually uniform colormaps / CC-BY-4.0 |
| [comm](https://github.com/ipython/comm) | 0.1.2 | Python Comm implementation for the Jupyter kernel protocol / BSD-3-Clause |
| [conda](https://docs.conda.io) | 23.1.0 | OS-agnostic, system-level binary package and environment manager. / BSD-3-Clause |
| [conda-build](https://github.com/conda/conda-build) | 3.23.3 | tools for building conda packages / BSD-3-Clause |
| [conda-env](https://github.com/conda/conda-env) | 2.6.0 | Tools for interacting with conda environments. / BSD 3-Clause |
| [conda-verify](https://github.com/conda/conda-verify) | 3.4.2 | tool for validating conda recipes and conda packages / BSD 3-Clause |
| [constantly](https://github.com/twisted/constantly) | 15.1.0 | Symbolic constants in Python / MIT |
| [contourpy](https://github.com/contourpy/contourpy) | 1.0.5 | Python library for calculating contours of 2D quadrilateral grids. / BSD-3-Clause |
| [cookiecutter](https://github.com/cookiecutter/cookiecutter) | 1.7.3 | A command-line utility that creates projects from cookiecutters (project templates), e.g. creating a Python package project from a Python package project template. / BSD-3-Clause |
| [cryptography](https://github.com/pyca/cryptography) | 39.0.1 | Provides cryptographic recipes and primitives to Python developers / (BSD-3-Clause OR Apache-2.0) AND PSF-2.0 AND MIT |
| [cssselect](https://pythonhosted.org/cssselect/) | 1.1.0 | CSS Selectors for Python / BSD 3-Clause |
| [curl](https://curl.se/) | 7.87.0 | tool and library for transferring data with URL syntax / curl |
| [cycler](http://matplotlib.org/cycler) | 0.11.0 | Composable style cycles. / BSD-3-Clause |
| [cytoolz](https://github.com/pytoolz/cytoolz) | 0.12.0 | Cython implementation of Toolz. High performance functional utilities / BSD-3-Clause |
| [dask](https://dask.org/) | 2022.7.0 | Parallel PyData with Task Scheduling / BSD-3-Clause |
| [dask-core](https://github.com/dask/dask/) | 2022.7.0 | Parallel Python with task scheduling / BSD-3-Clause |
| [datashader](https://datashader.org) | 0.14.4 | Data visualization toolchain based on aggregating into a grid / BSD-3-Clause |
| [datashape](http://datashape.pydata.org) | 0.5.4 | A data description language. / BSD 2-Clause |
| [dbus](http://www.freedesktop.org/wiki/Software/dbus/) | 1.13.18 | Simple message bus system for applications to talk to one another / GPL2 |
| [debugpy](https://github.com/Microsoft/debugpy) | 1.5.1 | An implementation of the Debug Adapter Protocol for Python / MIT |
| [decorator](https://github.com/micheles/decorator) | 5.1.1 | Better living through Python with decorators. / BSD-2-Clause |
| [defusedxml](https://bitbucket.org/tiran/defusedxml) | 0.7.1 | XML bomb protection for Python stdlib modules / PSF 2.0 |
| [diff-match-patch](http://code.google.com/p/google-diff-match-patch/) | 20200713 | Diff Match Patch is a high-performance library in multiple languages that manipulates plain text / Apache-2.0 |
| [dill](https://github.com/uqfoundation/dill) | 0.3.6 | Serialize all of python (almost) / BSD-3-Clause |
| [distributed](https://distributed.readthedocs.io/en/latest/) | 2022.7.0 | Distributed computing with Dask / BSD-3-Clause |
| [docstring-to-markdown](https://pypi.org/project/docstring-to-markdown) | 0.11 | On the fly conversion of Python docstrings to markdown / LGPL-2.1-or-later |
| [docutils](https://docutils.sourceforge.io/) | 0.18.1 | Docutils – Python Documentation Utilities / LicenseRef-Public-Domain-Dedictation and BSD-2-Clause and LicenseRef-PSF-2.1.1 and GPL-3.0-or-later |
| [entrypoints](https://github.com/takluyver/entrypoints) | 0.4 | Discover and load entry points from installed packages. / MIT License |
| [et\_xmlfile](https://foss.heptapod.net/openpyxl/et_xmlfile) | 1.1.0 | An implementation of lxml.xmlfile for the standard library / MIT AND PSF-2.0 |
| [executing](https://pypi.org/project/executing) | 0.8.3 | Get the currently executing AST node of a frame, and other information / MIT |
| [expat](https://libexpat.github.io) | 2.4.9 | Expat XML parser library in C / MIT |
| [filelock](https://github.com/tox-dev/py-filelock) | 3.9.0 | A platform independent file lock. / Unlicense |
| [flake8](https://flake8.pycqa.org/) | 6.0.0 | Your Tool For Style Guide Enforcement / MIT |
| [flask](https://palletsprojects.com/p/flask) | 2.2.2 | A simple framework for building complex web applications. / BSD-3-Clause |
| [flit-core](https://flit.readthedocs.io/) | 3.6.0 | Simplified packaging of Python modules / BSD-3-Clause |
| [fontconfig](https://www.freedesktop.org/wiki/Software/fontconfig/) | 2.14.1 | A library for configuring and customizing font access. / MIT |
| [fonttools](https://github.com/fonttools/fonttools) | 4.25.0 | fontTools is a library for manipulating fonts, written in Python. / MIT |
| [freetype](https://freetype.org/) | 2.12.1 | A Free, High-Quality, and Portable Font Engine / GPL-2-only and LicenseRef-FreeType |
| [fsspec](https://github.com/fsspec/filesystem_spec) | 2022.11.0 | A specification for pythonic filesystems / BSD-3-Clause |
| [future](https://python-future.org) | 0.18.3 | Clean single-source support for Python 3 and 2 / MIT |
| [gensim](https://github.com/RaRe-Technologies/gensim) | 4.3.0 | Topic Modelling for Humans / LGPL-2.1-only |
| [giflib](https://giflib.sourceforge.net) | 5.2.1 | Library for reading and writing gif images / MIT |
| [glib](https://developer.gnome.org/glib/) | 2.69.1 | Provides core application building blocks for libraries and applications written in C. / LGPL-2.1-or-later |
| [gmp](https://gmplib.org/) | 6.2.1 | The GNU multiprecision library. / GPL-2.0-or-later AND LGPL-3.0-or-later |
| [gmpy2](https://pypi.python.org/pypi/gmpy2) | 2.1.2 | GMP/MPIR, MPFR, and MPC interface to Python 2.6+ and 3.x / LGPL-3.0-or-later |
| [greenlet](https://github.com/python-greenlet/greenlet) | 2.0.1 | Lightweight in-process concurrent programming / MIT |
| [gst-plugins-base](http://gstreamer.freedesktop.org/) | 1.14.1 | GStreamer Base Plug-ins / GPL2 |
| [gstreamer](http://gstreamer.freedesktop.org/) | 1.14.1 | Library for constructing graphs of media-handling components / LGPL 2 |
| [h5py](https://www.h5py.org/) | 3.7.0 | Read and write HDF5 files from Python / BSD-3-Clause |
| [hdf5](http://www.hdfgroup.org/HDF5/) | 1.10.6 | HDF5 is a data model, library, and file format for storing and managing data / HDF5 |
| [heapdict](http://stutzbachenterprises.com/) | 1.0.1 | A heap with decrease-key and increase-key operations / BSD 3-Clause |
| [holoviews](https://holoviews.org) | 1.15.4 | Stop plotting your data - annotate your data and let it visualize itself. / BSD-3-Clause |
| [huggingface\_hub](https://github.com/huggingface/huggingface_hub) | 0.10.1 | Client library to download and publish models, datasets and other repos on the huggingface.co hub / Apache-2.0 |
| [hvplot](https://hvplot.holoviz.org) | 0.8.2 | A high-level plotting API for the PyData ecosystem built on HoloViews / BSD-3-Clause |
| [hyperlink](https://github.com/python-hyper/hyperlink) | 21.0.0 | Immutable, Pythonic, correct URLs. / MIT |
| [icu](http://site.icu-project.org/) | 68.1 | International Components for Unicode. / MIT |
| [idna](https://github.com/kjd/idna) | 3.4 | Internationalized Domain Names in Applications (IDNA). / BSD-3-Clause |
| [imagecodecs](https://www.lfd.uci.edu/~gohlke/) | 2021.8.26 | Image transformation, compression, and decompression codecs / BSD-3-Clause |
| [imageio](https://imageio.github.io) | 2.26.0 | A Python library for reading and writing image data / BSD-2-Clause |
| [imagesize](https://github.com/shibukawa/imagesize_py) | 1.4.1 | Getting image size from png/jpeg/jpeg2000/gif file / MIT |
| [imbalanced-learn](https://github.com/scikit-learn-contrib/imbalanced-learn) | 0.10.1 | Python module to balance data set using under- and over-sampling / MIT |
| [importlib-metadata](https://github.com/python/importlib_metadata) | 4.11.3 | A library to access the metadata for a Python package. / Apache-2.0 |
| [importlib\_metadata](https://github.com/python/importlib_metadata) | 4.11.3 | A library to access the metadata for a Python package. / Apache-2.0 |
| [incremental](https://github.com/hawkowl/incremental) | 21.3.0 | Incremental is a small library that versions your Python projects. / MIT |
| [inflection](http://github.com/jpvanhal/inflection) | 0.5.1 | A port of Ruby on Rails inflector to Python / MIT |
| [iniconfig](http://github.com/RonnyPfannschmidt/iniconfig) | 1.1.1 | iniconfig: brain-dead simple config-ini parsing / MIT |
| [intake](https://github.com/intake/intake) | 0.6.7 | Data load and catalog system / BSD-2-Clause |
| [intervaltree](https://github.com/chaimleib/intervaltree) | 3.1.0 | Editable interval tree data structure for Python 2 and 3 / Apache-2.0 |
| [ipykernel](https://ipython.org) | 6.19.2 | IPython Kernel for Jupyter / BSD-3-Clause |
| [ipython](https://ipython.org) | 8.10.0 | IPython: Productive Interactive Computing / BSD-3-Clause |
| [ipython\_genutils](http://ipython.org) | 0.2.0 | vestigial utilities from IPython / BSD 3-Clause |
| [ipywidgets](https://github.com/ipython/ipywidgets) | 7.6.5 | Jupyter Interactive Widgets / BSD-3-Clause |
| [isort](https://github.com/timothycrosley/isort) | 5.9.3 | A Python utility / library to sort Python imports. / MIT |
| [itemadapter](https://github.com/scrapy/itemadapter) | 0.3.0 | Common interface for different data containers / BSD-3-Clause |
| [itemloaders](https://github.com/scrapy/itemloaders) | 1.0.4 | Collect data from HTML and XML sources / BSD-3-Clause |
| [itsdangerous](https://github.com/pallets/itsdangerous) | 2.0.1 | Various helpers to pass trusted data to untrusted environments. / BSD-3-Clause |
| [jedi](https://github.com/davidhalter/jedi/) | 0.18.1 | An autocompletion tool for Python that can be used for text editors. / MIT |
| [jeepney](https://gitlab.com/takluyver/jeepney) | 0.7.1 | Pure Python DBus interface / MIT |
| [jellyfish](https://github.com/jamesturk/jellyfish) | 0.9.0 | a library for doing approximate and phonetic matching of strings. / BSD-2-Clause |
| [jinja2](https://palletsprojects.com/p/jinja/) | 3.1.2 | A very fast and expressive template engine. / BSD-3-Clause |
| [jinja2-time](https://github.com/hackebrot/jinja2-time) | 0.2.0 | Jinja2 Extension for Dates and Times / MIT |
| [jmespath](http://jmespath.org/) | 0.10.0 | Query language for JSON / MIT |
| [joblib](https://joblib.readthedocs.io/en/latest/) | 1.1.1 | Lightweight pipelining: using Python functions as pipeline jobs. / BSD-3-Clause |
| [jpeg](https://www.ijg.org/) | 9e | read/write jpeg COM, EXIF, IPTC medata / IJG |
| [jq](http://stedolan.github.io/jq/) | 1.6 | A command-line JSON processor. / MIT |
| [json5](https://github.com/dpranke/pyjson5) | 0.9.6 | A Python implementation of the JSON5 data format / Apache-2.0 |
| [jsonschema](https://github.com/python-jsonschema/jsonschema) | 4.17.3 | An implementation of JSON Schema validation for Python / MIT |
| [jupyter](https://jupyter.org) | 1.0.0 | Jupyter metapackage. Install all the Jupyter components in one go. / BSD-3-Clause |
| [jupyter\_client](https://jupyter.org) | 7.3.4 | Jupyter protocol implementation and client libraries. / BSD-3-Clause |
| [jupyter\_console](https://jupyter.org) | 6.6.2 | Jupyter terminal console / BSD-3-Clause |
| [jupyter\_core](https://jupyter.org) | 5.2.0 | Core common functionality of Jupyter projects. / BSD-3-Clause |
| [jupyter\_server](https://jupyter.org) | 1.23.4 | Jupyter Server / BSD-3-Clause |
| [jupyterlab](https://github.com/jupyterlab/jupyterlab) | 3.5.3 | JupyterLab PRE-ALPHA / BSD-3-Clause |
| [jupyterlab\_pygments](http://github.com/JupyterLab/jupyterlab_pygments) | 0.1.2 | Pygments syntax coloring scheme making use of the JupyterLab CSS variables / BSD-3-Clause |
| [jupyterlab\_server](https://github.com/jupyterlab/jupyterlab_server) | 2.19.0 | A set of server components for JupyterLab and JupyterLab like applications. / BSD-3-Clause |
| [jupyterlab\_widgets](https://github.com/jupyter-widgets/ipywidgets) | 1.0.0 | JupyterLab extension providing HTML widgets / BSD-3-Clause |
| [jxrlib](https://packages.debian.org/source/sid/jxrlib) | 1.1 | jxrlib - JPEG XR Library by Microsoft, built from Debian hosted sources. / BSD-2-Clause |
| [keyring](https://github.com/jaraco/keyring) | 23.4.0 | Store and access your passwords safely / MIT |
| [kiwisolver](https://github.com/nucleic/kiwi) | 1.4.4 | An efficient C++ implementation of the Cassowary constraint solver / BSD-3-Clause |
| [krb5](https://web.mit.edu/kerberos/) | 1.19.4 | A network authentication protocol. / MIT |
| [lazy-object-proxy](https://github.com/ionelmc/python-lazy-object-proxy) | 1.6.0 | A fast and thorough lazy object proxy / BSD-2-Clause |
| [lcms2](http://www.littlecms.com/) | 2.12 | Open Source Color Management Engine / MIT |
| [ld\_impl\_linux-aarch64](https://www.gnu.org/software/binutils/) | 2.38 | A set of programming tools for creating and managing binary programs, object files, libraries, profile data, and assembly source code. / GPL-3.0-only |
| [lerc](https://github.com/Esri/lerc) | 3.0 | LERC - Limited Error Raster Compression / Apache-2.0 |
| [libaec](https://gitlab.dkrz.de/k202009/libaec) | 1.0.4 | Adaptive Entropy Coding library / BSD-2-Clause |
| [libbrotlicommon](https://github.com/google/brotli) | 1.0.9 | Brotli compression format / MIT |
| [libbrotlidec](https://github.com/google/brotli) | 1.0.9 | Brotli compression format / MIT |
| [libbrotlienc](https://github.com/google/brotli) | 1.0.9 | Brotli compression format / MIT |
| [libclang](https://llvm.org/) | 10.0.1 | Development headers and libraries for Clang / Apache-2.0 WITH LLVM-exception |
| [libcurl](https://curl.se/) | 7.87.0 | tool and library for transferring data with URL syntax / curl |
| [libdeflate](https://github.com/ebiggers/libdeflate) | 1.17 | libdeflate is a library for fast, whole-buffer DEFLATE-based compression and decompression. / MIT |
| [libedit](https://thrysoee.dk/editline/) | 3.1.20221030 | Editline Library (libedit) / BSD-2-Clause |
| [libev](http://software.schmorp.de/pkg/libev.html) | 4.33 | A full-featured and high-performance event loop that is loosely modeled after libevent, but without its limitations and bugs. / BSD-2-Clause |
| [libevent](http://libevent.org/) | 2.1.12 | An event notification library. / BSD-3-Clause |
| [libffi](https://sourceware.org/libffi/) | 3.4.2 | A Portable Foreign Function Interface Library / MIT |
| [libgcc-ng](https://gcc.gnu.org/onlinedocs/gccint/Libgcc.html) | 11.2.0 | The GCC low-level runtime library / GPL-3.0-only WITH GCC-exception-3.1 |
| [libgfortran-ng](https://gcc.gnu.org/) | 11.2.0 | The GNU Fortran Runtime Library / GPL-3.0-only WITH GCC-exception-3.1 |
| [libgfortran5](https://gcc.gnu.org/) | 11.2.0 | Fortran compiler and libraries from the GNU Compiler Collection / GPL-3.0-only WITH GCC-exception-3.1 |
| [libgomp](https://gcc.gnu.org/onlinedocs/gccint/Libgcc.html) | 11.2.0 | The GCC OpenMP implementation. / GPL-3.0-only WITH GCC-exception-3.1 |
| [libllvm10](http://llvm.org/) | 10.0.1 | Development headers and libraries for LLVM / Apache-2.0 WITH LLVM-exception |
| [libllvm11](https://llvm.org/) | 11.1.0 | Development headers and libraries for LLVM / Apache-2.0 WITH LLVM-exception |
| [libnghttp2](http://github.com/nghttp2/nghttp2) | 1.46.0 | This is an implementation of Hypertext Transfer Protocol version 2. / MIT |
| [libopenblas](https://www.openblas.net/) | 0.3.21 | An Optimized BLAS library / BSD-3-Clause |
| [libpng](http://www.libpng.org/pub/png/libpng.html) | 1.6.39 | PNG reference library / Zlib |
| [libpq](http://www.postgresql.org/) | 12.9 | The postgres runtime libraries and utilities (not the server itself) / PostgreSQL |
| [libprotobuf](https://developers.google.com/protocol-buffers/) | 3.20.3 | Protocol Buffers - Google’s data interchange format. C++ Libraries and protoc, the protobuf compiler. / BSD-3-Clause |
| [libsodium](http://libsodium.org) | 1.0.18 | A modern and easy-to-use crypto library. / ISC |
| [libspatialindex](http://libspatialindex.github.io) | 1.9.3 | Extensible framework for robust spatial indexing / MIT |
| [libssh2](https://www.libssh2.org/) | 1.10.0 | the SSH library / BSD-3-Clause |
| [libstdcxx-ng](https://gcc.gnu.org/) | 11.2.0 | The GNU C++ Runtime Library / GPL-3.0-only WITH GCC-exception-3.1 |
| [libtiff](http://www.simplesystems.org/libtiff/) | 4.5.0 | Support for the Tag Image File Format (TIFF). / HPND |
| [libuuid](https://sourceforge.net/projects/libuuid/) | 1.41.5 | Portable uuid C library 2.32.1 as pk-version 1.41.5. / BSD-3-Clause |
| [libwebp](https://developers.google.com/speed/webp/) | 1.2.4 | WebP image library / BSD-3-Clause |
| [libwebp-base](https://developers.google.com/speed/webp) | 1.2.4 | WebP image library / BSD-3-Clause |
| [libxcb](http://xcb.freedesktop.org/) | 1.15 | This is the C-language Binding (XCB) package to the X Window System protocol / MIT |
| [libxkbcommon](https://github.com/xkbcommon/libxkbcommon) | 1.0.1 | keymap handling library for toolkits and window systems / MIT/X11 Derivative |
| [libxml2](https://gitlab.gnome.org/GNOME/libxml2/) | 2.9.14 | The XML C parser and toolkit of Gnome / MIT |
| [libxslt](https://gitlab.gnome.org/GNOME/libxslt) | 1.1.35 | The XSLT C library developed for the GNOME project / MIT |
| [libzopfli](https://github.com/google/zopfli) | 1.0.3 | A compression library programmed in C to perform very good, but slow, deflate or zlib compression. / Apache-2.0 |
| [llvmlite](https://llvmlite.pydata.org) | 0.39.1 | A lightweight LLVM python binding for writing JIT compilers. / BSD-2-Clause |
| [locket](https://github.com/mwilliamson/locket.py) | 1.0.0 | File-based locks for Python for Linux and Windows / BSD-2-Clause |
| [lxml](https://lxml.de/) | 4.9.1 | Pythonic binding for the C libraries libxml2 and libxslt. / BSD-3-Clause and GPL-2.0-only and ZPL-2.0 and LicenseRef-ElementTree |
| [lz4](https://github.com/python-lz4/python-lz4) | 3.1.3 | LZ4 Bindings for Python / BSD-3-Clause |
| [lz4-c](https://lz4.github.io/lz4/) | 1.9.4 | Extremely Fast Compression algorithm / BSD-2-Clause |
| [lzo](http://www.oberhumer.com/opensource/lzo/) | 2.10 | LZO is a portable lossless data compression library written in ANSI C. / GPL v2+ |
| [markdown](https://github.com/Python-Markdown/markdown) | 3.4.1 | Python implementation of Markdown. / BSD-3-Clause |
| [markupsafe](https://www.palletsprojects.com/p/markupsafe) | 2.1.1 | Safely add untrusted strings to HTML/XML markup. / BSD-3-Clause |
| [matplotlib](https://matplotlib.org/) | 3.7.0 | Publication quality figures in Python / LicenseRef-PSF-based |
| [matplotlib-base](https://matplotlib.org/) | 3.7.0 | Publication quality figures in Python / LicenseRef-PSF-based |
| [matplotlib-inline](https://github.com/ipython/matplotlib-inline) | 0.1.6 | Inline Matplotlib backend for Jupyter / BSD-3-Clause |
| [mccabe](https://github.com/PyCQA/mccabe) | 0.7.0 | McCabe complexity checker for Python / MIT |
| [mistune](https://github.com/lepture/mistune) | 0.8.4 | A sane Markdown parser with useful plugins and renderers. / BSD-3-Clause |
| [mock](https://github.com/testing-cabal/mock) | 4.0.3 | A library for testing in Python / BSD-2-Clause |
| [mpc](http://www.multiprecision.org/) | 1.1.0 | A C library for the arithmetic of complex numbers with arbitrarily high precision. / LGPL-3-or-later |
| [mpfr](http://www.mpfr.org/) | 4.0.2 | The MPFR library is a C library for multiple-precision floating-point computations with correct rounding. / LGPL-3.0-only |
| [mpmath](http://mpmath.org) | 1.2.1 | Python library for arbitrary-precision floating-point arithmetic / BSD 3-Clause |
| [msgpack-python](https://msgpack.org/) | 1.0.3 | MessagePack (de)serializer / Apache-2.0 |
| [multipledispatch](https://github.com/mrocklin/multipledispatch/) | 0.6.0 | Multiple dispatch in Python / BSD 3-Clause |
| [munkres](https://github.com/bmc/munkres) | 1.1.4 | The Munkres module provides an O(n^3) implementation of the Munkres algorithm (also called the Hungarian algorithm or the Kuhn-Munkres algorithm). / Apache-2.0 |
| [mypy\_extensions](http://www.mypy-lang.org/) | 0.4.3 | Experimental type system extensions for programs checked with the mypy typechecker. / MIT |
| [nbclassic](https://github.com/jupyter/nbclassic) | 0.5.2 | Jupyter Notebook as a Jupyter Server Extension. / BSD-3-Clause |
| [nbclient](https://jupyter.org) | 0.5.13 | A client library for executing notebooks. Formally nbconvert’s ExecutePreprocessor. / BSD-3-Clause |
| [nbconvert](https://nbconvert.readthedocs.io/en/latest/) | 6.5.4 | Converting Jupyter Notebooks / BSD-3-Clause |
| [nbformat](https://jupyter.org) | 5.7.0 | The Jupyter Notebook format / BSD-3-Clause |
| [ncurses](https://invisible-island.net/ncurses/) | 6.4 | Library for text-based user interfaces / MIT AND X11 |
| [nest-asyncio](https://github.com/erdewit/nest_asyncio) | 1.5.6 | Patch asyncio to allow nested event loops / BSD-2-Clause |
| [networkx](https://networkx.github.io/) | 2.8.4 | Python package for creating and manipulating complex networks / BSD-3-Clause |
| [ninja](https://ninja-build.org/) | 1.10.2 | A small build system with a focus on speed / Apache-2.0 |
| [ninja-base](https://ninja-build.org/) | 1.10.2 | A small build system with a focus on speed / Apache-2.0 |
| [nltk](https://nltk.org/) | 3.7 | Natural Language Toolkit / Apache-2.0 |
| [notebook](https://jupyter.org) | 6.5.2 | Jupyter Notebook / BSD-3-Clause |
| [notebook-shim](https://github.com/jupyter/notebook_shim) | 0.2.2 | A shim layer for notebook traits and config / BSD-3-Clause |
| [nspr](https://hg.mozilla.org/projects/nspr) | 4.33 | A platform-neutral API for system level and libc-like functions. / MPL-2.0 |
| [nss](https://developer.mozilla.org/en-US/docs/Mozilla/Projects/NSS) | 3.74 | A set of libraries designed to support cross-platform development of security-enabled client and server applications. / MPL-2.0 |
| [numba](https://numba.pydata.org) | 0.56.4 | NumPy aware dynamic Python compiler using LLVM / BSD-2-Clause |
| [numexpr](https://github.com/pydata/numexpr) | 2.8.4 | Fast numerical expression evaluator for NumPy. / MIT |
| [numpy](https://numpy.org/) | 1.23.5 | Array processing for numbers, strings, records, and objects. / BSD-3-Clause |
| [numpy-base](https://numpy.org/) | 1.23.5 | Array processing for numbers, strings, records, and objects. / BSD-3-Clause |
| [numpydoc](https://github.com/numpy/numpydoc) | 1.5.0 | Sphinx extension to support docstrings in Numpy format / BSD-3-Clause |
| [oniguruma](https://github.com/kkos/oniguruma) | 6.9.7.1 | A regular expression library. / BSD-2-Clause |
| [openjpeg](http://www.openjpeg.org/) | 2.4.0 | An open-source JPEG 2000 codec written in C / BSD 2-Clause |
| [openpyxl](https://openpyxl.readthedocs.io) | 3.0.10 | A Python library to read/write Excel 2010 xlsx/xlsm files / MIT |
| [openssl](https://www.openssl.org/) | 1.1.1t | OpenSSL is an open-source implementation of the SSL and TLS protocols / OpenSSL |
| [packaging](https://github.com/pypa/packaging) | 22.0 | Core utilities for Python packages / Apache-2.0 or BSD-2-Clause |
| [pandas](https://pandas.pydata.org) | 1.5.3 | High-performance, easy-to-use data structures and data analysis tools. / BSD-3-Clause |
| [pandocfilters](https://github.com/jgm/pandocfilters) | 1.5.0 | A python module for writing pandoc filters / BSD-3-Clause |
| [panel](https://panel.holoviz.org) | 0.14.3 | A high-level app and dashboarding solution for Python / BSD-3-Clause |
| [param](https://param.holoviz.org/) | 1.12.3 | Param: Make your Python code clearer and more reliable by declaring Parameters / BSD-3-Clause |
| [parsel](https://github.com/scrapy/parsel) | 1.6.0 | library to extract data from HTML and XML using XPath and CSS selectors / BSD-3-Clause |
| [parso](https://github.com/davidhalter/parso) | 0.8.3 | A Python Parser / MIT |
| [partd](https://github.com/dask/partd) | 1.2.0 | Appendable key-value storage / BSD-3-Clause |
| [pathspec](https://github.com/cpburnz/python-path-specification) | 0.10.3 | Utility library for gitignore style pattern matching of file paths. / MPL-2.0 |
| [patsy](https://github.com/pydata/patsy) | 0.5.3 | Describing statistical models in Python using symbolic formulas / BSD-2-Clause AND PSF-2.0 |
| [pcre](http://www.pcre.org/) | 8.45 | Regular expression pattern matching using the same syntax and semantics as Perl 5. / BSD 3-Clause |
| [pep8](https://pep8.readthedocs.org/) | 1.7.1 | Python style guide checker / MIT |
| [pexpect](http://pexpect.sourceforge.net/) | 4.8.0 | Pexpect makes Python a better tool for controlling other applications. / ISC |
| [pickleshare](https://github.com/pickleshare/pickleshare/) | 0.7.5 | Tiny ‘shelve’-like database with concurrency support / MIT |
| [pillow](https://pillow.readthedocs.io) | 9.4.0 | Pillow is the friendly PIL fork by Alex Clark and Contributors / LicenseRef-PIL |
| [pip](https://pip.pypa.io/en/stable/) | 22.3.1 | PyPA recommended tool for installing Python packages / MIT |
| [platformdirs](https://github.com/platformdirs/platformdirs) | 2.5.2 | A small Python module for determining appropriate platform-specific dirs, e.g. a “user data dir”. / MIT |
| [plotly](https://plot.ly/python/) | 5.9.0 | An interactive JavaScript-based visualization library for Python / MIT |
| [pluggy](https://github.com/pytest-dev/pluggy) | 1.0.0 | Plugin registration and hook calling for Python / MIT |
| [ply](http://www.dabeaz.com/ply/index.html) | 3.11 | Python Lex-Yacc / BSD 3-clause |
| [pooch](https://github.com/fatiando/pooch) | 1.4.0 | A friend to fetch your data files / BSD-3-Clause |
| [poyo](https://github.com/hackebrot/poyo) | 0.5.0 | A lightweight YAML Parser for Python / MIT |
| [prometheus\_client](https://github.com/prometheus/client_python) | 0.14.1 | Python client for the Prometheus monitoring system / Apache-2.0 |
| [prompt-toolkit](https://github.com/prompt-toolkit/python-prompt-toolkit) | 3.0.36 | Library for building powerful interactive command lines in Python / BSD-3-Clause |
| [prompt\_toolkit](https://github.com/prompt-toolkit/python-prompt-toolkit) | 3.0.36 | Library for building powerful interactive command lines in Python / BSD-3-Clause |
| [protego](https://github.com/scrapy/protego) | 0.1.16 | A pure-Python robots.txt parser with support for modern conventions / BSD 3-Clauses |
| [psutil](https://github.com/giampaolo/psutil) | 5.9.0 | A cross-platform process and system utilities module for Python / BSD-3-Clause |
| [ptyprocess](https://github.com/pexpect/ptyprocess) | 0.7.0 | Run a subprocess in a pseudo terminal / ISC |
| [pure\_eval](https://github.com/alexmojaki/pure_eval) | 0.2.2 | Safely evaluate AST nodes without side effects / MIT |
| [py](https://github.com/pytest-dev/py) | 1.11.0 | library with cross-python path, ini-parsing, io, code, log facilities / MIT |
| [pyasn1](https://github.com/etingof/pyasn1) | 0.4.8 | ASN.1 types and codecs / BSD 2-Clause |
| [pyasn1-modules](http://pyasn1.sourceforge.net/) | 0.2.8 | A collection of ASN.1-based protocols modules. / BSD 2-Clause |
| [pycodestyle](https://pycodestyle.readthedocs.io/) | 2.10.0 | Python style guide checker / MIT |
| [pycparser](https://github.com/eliben/pycparser) | 2.21 | Complete C99 parser in pure Python / BSD-3-clause |
| [pyct](https://github.com/pyviz/pyct) | 0.5.0 | python package common tasks for users (e.g. copy examples, fetch data, …) / BSD-3-Clause |
| [pycurl](http://pycurl.sourceforge.net/) | 7.45.1 | A Python Interface To The cURL library / LGPL-2.1-only, MIT |
| [pydispatcher](http://pydispatcher.sourceforge.net) | 2.0.5 | Multi-producer-multi-consumer signal dispatching mechanism / BSD-3-Clause |
| [pydocstyle](https://github.com/PyCQA/pydocstyle) | 6.3.0 | Python docstring style checker (formerly pep257) / MIT |
| [pyerfa](https://pyerfa.readthedocs.io/) | 2.0.0 | Python bindings for ERFA routines / BSD-3-Clause |
| [pyflakes](https://github.com/PyCQA/pyflakes) | 3.0.1 | Pyflakes analyzes programs and detects various errors. / MIT |
| [pygments](https://pygments.org/) | 2.11.2 | Pygments is a generic syntax highlighter suitable for use in code hosting, forums, wikis or other applications that need to prettify source code. / BSD-2-Clause |
| [pyhamcrest](https://github.com/hamcrest/PyHamcrest) | 2.0.2 | Hamcrest framework for matcher objects / BSD 3-Clause |
| [pylint](https://www.pylint.org) | 2.16.2 | python code static checker / GPL-2.0-or-later |
| [pylint-venv](https://github.com/jgosmann/pylint-venv/) | 2.3.0 | pylint-venv provides a Pylint init-hook to use the same Pylint installation with different virtual environments. / MIT |
| [pyls-spyder](https://github.com/spyder-ide/pyls-spyder) | 0.4.0 | Spyder extensions for the python-lsp-server / MIT |
| [pyodbc](https://github.com/mkleehammer/pyodbc) | 4.0.34 | DB API Module for ODBC / MIT-0 |
| [pyopenssl](https://github.com/pyca/pyopenssl) | 23.0.0 | Python wrapper module around the OpenSSL library / Apache-2.0 |
| [pyparsing](https://github.com/pyparsing/pyparsing/) | 3.0.9 | Create and execute simple grammars / MIT |
| [pyqt](https://www.riverbankcomputing.com/software/pyqt/) | 5.15.7 | Python bindings for the Qt cross platform application toolkit / GPL-3.0-only |
| [pyqt5-sip](https://www.riverbankcomputing.com/software/pyqt/) | 12.11.0 | Python bindings for the Qt cross platform application toolkit / GPL-3.0-only |
| [pyqtwebengine](https://www.riverbankcomputing.com/software/pyqt/) | 5.15.7 | Python bindings for the Qt cross platform application toolkit / GPL-3.0-only |
| [pyrsistent](http://github.com/tobgu/pyrsistent/) | 0.18.0 | Persistent/Functional/Immutable data structures / MIT |
| [pysocks](https://github.com/Anorov/PySocks) | 1.7.1 | A Python SOCKS client module. See [Anorov/PySocks](https://github.com/Anorov/PySocks) for more information. / BSD 3-Clause |
| [pytables](https://www.pytables.org) | 3.7.0 | Brings together Python, HDF5 and NumPy to easily handle large amounts of data. / BSD-3-Clause |
| [pytest](https://docs.pytest.org/en/latest/) | 7.1.2 | Simple and powerful testing with Python. / MIT |
| [python](https://www.python.org/) | 3.10.9 | General purpose programming language / PSF-2.0 |
| [python-dateutil](https://dateutil.readthedocs.org/) | 2.8.2 | Extensions to the standard Python datetime module. / BSD-3-Clause and Apache |
| [python-fastjsonschema](https://github.com/horejsek/python-fastjsonschema) | 2.16.2 | Fastest Python implementation of JSON schema / BSD-3-Clause |
| [python-lsp-black](https://github.com/python-lsp/python-lsp-black) | 1.2.1 | Black plugin for the Python LSP Server / MIT |
| [python-lsp-jsonrpc](https://github.com/python-lsp/python-lsp-jsonrpc) | 1.0.0 | A Python 3.6+ server implementation of the JSON RPC 2.0 protocol. / MIT |
| [python-lsp-server](https://github.com/python-lsp/python-lsp-server) | 1.7.1 | An implementation of the Language Server Protocol for Python / MIT |
| [python-slugify](https://github.com/un33k/python-slugify) | 5.0.2 | A Python Slugify application that handles Unicode / MIT |
| [python-snappy](https://github.com/andrix/python-snappy) | 0.6.1 | Python library for the snappy compression library from Google / BSD-3-Clause |
| [pytoolconfig](https://github.com/bagel897/pytoolconfig) | 1.2.5 | Python tool configuration / LGPL-3.0-or-later |
| [pytorch](https://pytorch.org/) | 1.12.1 | PyTorch is an optimized tensor library for deep learning using GPUs and CPUs. / BSD-3-Clause |
| [pytz](https://pythonhosted.org/pytz/) | 2022.7 | World timezone definitions, modern and historical. / MIT |
| [pyviz\_comms](https://www.holoviz.org) | 2.0.2 | Bidirectional communication for PyViz / BSD-3-Clause |
| [pywavelets](https://github.com/PyWavelets/pywt) | 1.4.1 | Discrete Wavelet Transforms in Python / MIT |
| [pyxdg](http://freedesktop.org/wiki/Software/pyxdg) | 0.27 | PyXDG contains implementations of freedesktop.org standards in python. / GNU Lesser General Public v2 (LGPLv2) |
| [pyyaml](http://pyyaml.org/wiki/PyYAML) | 6.0 | YAML parser and emitter for Python / MIT |
| [pyzmq](https://github.com/zeromq/pyzmq) | 23.2.0 | Python bindings for zeromq / BSD-3-Clause AND LGPL-3.0-or-later |
| [qdarkstyle](https://github.com/ColinDuquesnoy/QDarkStyleSheet) | 3.0.2 | A dark stylesheet for Qt applications (Qt4, Qt5, PySide, PyQt4, PyQt5, QtPy, PyQtGraph). / MIT |
| [qstylizer](https://github.com/blambright/qstylizer) | 0.2.2 | Qt stylesheet generation utility for PyQt/PySide / MIT |
| [qt-main](http://qt.io) | 5.15.2 | Qt is a cross-platform application and UI framework. / LGPL-3.0-only |
| [qt-webengine](http://qt.io) | 5.15.9 | Qt is a cross-platform application and UI framework. / LGPL-3.0-only |
| [qtawesome](https://github.com/spyder-ide/qtawesome) | 1.2.2 | Iconic fonts in PyQt and PySide applications / MIT |
| [qtconsole](https://jupyter.org) | 5.4.0 | Jupyter Qt Console / BSD-3-Clause |
| [qtpy](https://github.com/spyder-ide/qtpy) | 2.2.0 | Abstraction layer for PyQt5/PyQt4/PySide / MIT |
| [qtwebkit](https://wiki.qt.io/Qt_WebKit) | 5.212 | WebKit is one of the major engine to render webpages and execute JavaScript code / LGPL-2.1-only |
| [queuelib](https://github.com/scrapy/queuelib) | 1.5.0 | Collection of persistent (disk-based) queues / BSD |
| [readline](https://tiswww.case.edu/php/chet/readline/rltop.html) | 8.2 | library for editing command lines as they are typed in / GPL-3.0-only |
| [regex](https://github.com/mrabarnett/mrab-regex) | 2022.7.9 | Alternative regular expression module, to replace re / Apache-2.0 |
| [requests](https://requests.readthedocs.io/en/latest/) | 2.28.1 | Requests is an elegant and simple HTTP library for Python, built with ♥. / Apache-2.0 |
| [requests-file](http://github.com/dashea/requests-file) | 1.5.1 | file transport adapter for Requests / Apache |
| [rope](https://github.com/python-rope/rope) | 1.7.0 | A python refactoring library / LGPL-3.0-or-later |
| [rtree](https://github.com/Toblerity/rtree) | 1.0.1 | R-Tree spatial index for Python GIS / MIT |
| [scikit-image](https://scikit-image.org/) | 0.19.3 | Image processing in Python. / BSD-3-Clause |
| [scikit-learn](https://scikit-learn.org/) | 1.2.1 | A set of python modules for machine learning and data mining / BSD-3-Clause |
| [scipy](https://scipy.org/) | 1.10.0 | Scientific Library for Python / BSD-3-Clause |
| [scrapy](https://scrapy.org/) | 2.8.0 | A high-level Python Screen Scraping framework / BSD-3-Clause |
| [seaborn](https://seaborn.pydata.org) | 0.12.2 | Statistical data visualization / BSD-3-Clause |
| [secretstorage](https://github.com/mitya57/secretstorage) | 3.3.1 | Provides a way for securely storing passwords and other secrets. / BSD-3-Clause |
| [send2trash](https://github.com/arsenetar/send2trash) | 1.8.0 | Python library to natively send files to Trash (or Recycle bin) on all platforms. / BSD-3-Clause |
| [service\_identity](https://github.com/pyca/service_identity) | 18.1.0 | Service identity verification for pyOpenSSL. / MIT |
| [setuptools](https://github.com/pypa/setuptools) | 65.6.3 | Download, build, install, upgrade, and uninstall Python packages / MIT |
| [sip](https://www.riverbankcomputing.com/software/sip/) | 6.6.2 | A Python bindings generator for C/C++ libraries / GPL-3.0-only |
| [six](https://six.readthedocs.io/) | 1.16.0 | Python 2 and 3 compatibility utilities / MIT |
| [smart\_open](https://github.com/RaRe-Technologies/smart_open) | 5.2.1 | Python library for efficient streaming of large files / MIT |
| [snappy](https://github.com/google/snappy) | 1.1.9 | A fast compressor/decompressor / BSD-3-clause AND CC-BY-3.0 AND MIT AND CC-BY AND Public Domain |
| [sniffio](https://github.com/python-trio/sniffio) | 1.2.0 | Sniff out which async library your code is running under / Apache-2.0 |
| [snowballstemmer](https://github.com/snowballstem/snowball) | 2.2.0 | Snowball stemming library collection for Python / BSD-3-Clause |
| [sortedcontainers](http://www.grantjenks.com/docs/sortedcontainers/) | 2.4.0 | Python Sorted Container Types: SortedList, SortedDict, and SortedSet / Apache-2.0 |
| [soupsieve](https://facelessuser.github.io/soupsieve) | 2.3.2.post1 | A modern CSS selector implementation for BeautifulSoup / MIT |
| [sphinx](https://www.sphinx-doc.org) | 5.0.2 | Sphinx is a tool that makes it easy to create intelligent and beautiful documentation / BSD-2-Clause |
| [sphinxcontrib-applehelp](https://www.sphinx-doc.org/en/master/) | 1.0.2 | sphinxcontrib-applehelp is a sphinx extension which outputs Apple help books / BSD-2-Clause |
| [sphinxcontrib-devhelp](https://www.sphinx-doc.org/en/master/) | 1.0.2 | sphinxcontrib-devhelp is a sphinx extension which outputs Devhelp document / BSD-2-Clause |
| [sphinxcontrib-htmlhelp](https://www.sphinx-doc.org/en/master/) | 2.0.0 | sphinxcontrib-htmlhelp is a sphinx extension which renders HTML help files. / BSD-2-Clause |
| [sphinxcontrib-jsmath](https://www.sphinx-doc.org/en/master/) | 1.0.1 | A sphinx extension which renders display math in HTML via JavaScript / BSD-2-Clause |
| [sphinxcontrib-qthelp](https://www.sphinx-doc.org/en/master/) | 1.0.3 | sphinxcontrib-qthelp is a sphinx extension which outputs QtHelp document / BSD-2-Clause |
| [sphinxcontrib-serializinghtml](https://www.sphinx-doc.org/en/master/) | 1.1.5 | sphinxcontrib-serializinghtml is a sphinx extension which outputs “serialized” HTML files (json and pickle). / BSD-2-Clause |
| [spyder](https://www.spyder-ide.org/) | 5.4.1 | The Scientific Python Development Environment / MIT |
| [spyder-kernels](https://www.spyder-ide.org/) | 2.4.1 | Jupyter kernels for Spyder’s console / MIT |
| [sqlalchemy](https://www.sqlalchemy.org/) | 1.4.39 | Database Abstraction Library. / MIT |
| [sqlite](https://www.sqlite.org/) | 3.40.1 | Implements a self-contained, zero-configuration, SQL database engine / blessing |
| [stack\_data](https://github.com/alexmojaki/stack_data) | 0.2.0 | Extract data from python stack frames and tracebacks for informative displays / MIT |
| [statsmodels](https://www.statsmodels.org) | 0.13.5 | Statistical computations and models for use with SciPy / BSD-3-Clause |
| [sympy](https://sympy.org) | 1.11.1 | Python library for symbolic mathematics / BSD-3-Clause AND MIT |
| [tabulate](https://github.com/astanin/python-tabulate) | 0.8.10 | Pretty-print tabular data in Python, a library and a command-line utility. / MIT |
| [tbb](https://github.com/oneapi-src/oneTBB) | 2021.7.0 | High level abstract threading library / Apache-2.0 |
| tbb4py | 2021.7.0 | TBB module for Python / Apache-2.0 |
| [tblib](https://github.com/ionelmc/python-tblib) | 1.7.0 | Traceback serialization library. / BSD 2-Clause |
| [tenacity](https://github.com/jd/tenacity) | 8.0.1 | Retry a flaky function whenever an exception occurs until it works / Apache-2.0 |
| [terminado](https://github.com/jupyter/terminado) | 0.17.1 | Terminals served by tornado websockets / BSD-2-Clause |
| [text-unidecode](https://github.com/kmike/text-unidecode/) | 1.3 | The most basic Text::Unidecode port / Artistic |
| [textdistance](https://github.com/orsinium/textdistance) | 4.2.1 | TextDistance – python library for comparing distance between two or more sequences by many algorithms. / MIT |
| [threadpoolctl](https://github.com/joblib/threadpoolctl) | 2.2.0 | Python helpers to control the threadpools of native libraries / BSD 3-Clause |
| [three-merge](https://github.com/spyder-ide/three-merge) | 0.1.1 | Simple Python library to perform a 3-way merge between strings / MIT |
| [tifffile](https://github.com/cgohlke/tifffile) | 2021.7.2 | Read and write image data from and to TIFF files. / BSD-3-Clause |
| [tinycss2](https://www.courtbouillon.org/tinycss2) | 1.2.1 | Low-level CSS parser for Python / BSD-3-Clause |
| [tk](http://www.tcl.tk/) | 8.6.12 | A dynamic programming language with GUI support. Bundles Tcl and Tk. / Tcl/Tk |
| [tldextract](https://github.com/john-kurkowski/tldextract) | 3.2.0 | Accurately separate the TLD from the registered domain andsubdomains of a URL, using the Public Suffix List. / BSD-3-Clause |
| [tokenizers](https://github.com/huggingface/tokenizers) | 0.11.4 | Fast State-of-the-Art Tokenizers optimized for Research and Production / Apache-2.0 |
| [toml](https://github.com/uiri/toml) | 0.10.2 | Python lib for TOML. / MIT |
| [tomli](https://github.com/hukkin/tomli) | 2.0.1 | A simple TOML parser / MIT |
| [tomlkit](https://github.com/sdispater/tomlkit) | 0.11.1 | Style preserving TOML library / MIT |
| [toolz](https://toolz.readthedocs.io/) | 0.12.0 | List processing tools and functional utilities / BSD-3-Clause |
| [tornado](https://www.tornadoweb.org/) | 6.1 | A Python web framework and asynchronous networking library, originally developed at FriendFeed. / Apache-2.0 |
| [tqdm](https://tqdm.github.io/) | 4.64.1 | A Fast, Extensible Progress Meter / MPL-2.0 AND MIT |
| [traitlets](http://traitlets.readthedocs.org/) | 5.7.1 | Configuration system for Python applications / BSD-3-Clause |
| [transformers](https://github.com/huggingface/transformers) | 4.24.0 | State-of-the-art Machine Learning for JAX, PyTorch and TensorFlow / Apache-2.0 |
| [twisted](https://twistedmatrix.com/) | 22.2.0 | An asynchronous networking framework written in Python / MIT |
| [typing-extensions](https://github.com/python/typing_extensions) | 4.4.0 | Backported and Experimental Type Hints for Python / PSF-2.0 |
| [typing\_extensions](https://github.com/python/typing_extensions) | 4.4.0 | Backported and Experimental Type Hints for Python / PSF-2.0 |
| [tzdata](https://www.iana.org/time-zones) | 2022g | The Time Zone Database (called tz, tzdb or zoneinfo) / CC-PDDC OR BSD-3-Clause |
| [ujson](https://github.com/ultrajson/ultrajson) | 5.4.0 | Ultra fast JSON decoder and encoder written in C with Python bindings / BSD-3-Clause |
| [unidecode](https://pypi.python.org/pypi/Unidecode) | 1.2.0 | ASCII transliterations of Unicode text / GPL-2.0-or-later |
| [unixodbc](http://www.unixodbc.org/) | 2.3.11 | ODBC on non MS Windows platforms / LGPL-2.1-or-later |
| [urllib3](https://urllib3.readthedocs.io/) | 1.26.14 | HTTP library with thread-safe connection pooling, file post, and more. / MIT |
| [w3lib](https://github.com/scrapy/w3lib) | 1.21.0 | Library of web-related functions / BSD |
| [watchdog](http://github.com/gorakhargosh/watchdog) | 2.1.6 | Filesystem events monitoring / Apache-2.0 |
| [wcwidth](https://github.com/jquast/wcwidth) | 0.2.5 | Measures number of Terminal column cells of wide-character codes. / MIT |
| [webencodings](https://github.com/gsnedders/python-webencodings) | 0.5.1 | Character encoding aliases for legacy web content / BSD 3-Clause |
| [websocket-client](https://github.com/liris/websocket-client) | 0.58.0 | WebSocket client for python. hybi13 is supported. / BSD-3-Clause |
| [werkzeug](https://palletsprojects.com/p/werkzeug/) | 2.2.2 | The comprehensive WSGI web application library. / BSD-3-Clause |
| [whatthepatch](https://github.com/cscorley/whatthepatch) | 1.0.2 | What The Patch!? is a library for both parsing and applying patch files / MIT |
| [wheel](https://github.com/pypa/wheel) | 0.38.4 | A built-package format for Python. / MIT |
| [widgetsnbextension](https://ipython.org) | 3.5.2 | Interactive Widgets for Jupyter / BSD-3-Clause |
| [wrapt](https://github.com/GrahamDumpleton/wrapt) | 1.14.1 | Module for decorators, wrappers and monkey patching / BSD-2-Clause |
| [wurlitzer](https://github.com/minrk/wurlitzer) | 3.0.2 | Capture C-level stdout/stderr in Python / MIT |
| [xarray](https://github.com/pydata/xarray) | 2022.11.0 | N-D labeled arrays and datasets in Python. / Apache-2.0 |
| [xz](https://tukaani.org/xz/) | 5.2.10 | Data compression software with high compression ratio / LGPL-2.1-or-later and GPL-2.0-or-later |
| [yaml](http://pyyaml.org/wiki/LibYAML) | 0.2.5 | A C library for parsing and emitting YAML / MIT |
| [yapf](https://github.com/google/yapf) | 0.31.0 | A formatter for Python files / Apache 2.0 |
| [zeromq](http://zeromq.org) | 4.3.4 | A high-performance asynchronous messaging library. / LGPL-3.0-or-later |
| [zict](https://github.com/mrocklin/zict) | 2.1.0 | Composable Dictionary Classes / BSD-3-Clause |
| [zipp](https://github.com/jaraco/zipp) | 3.11.0 | A pathlib-compatible Zipfile object wrapper / MIT |
| [zlib](https://zlib.net/) | 1.2.13 | Massively spiffy yet delicately unobtrusive compression library / Zlib |
| zope | 1.0 | web application server / BSD |
| [zope.interface](https://github.com/zopefoundation/zope.interface) | 5.4.0 | Interfaces for Python / ZPL-2.1 |
| [zstd](https://www.zstd.net) | 1.5.2 | Zstandard - Fast real-time compression algorithm / BSD-3-Clause AND GPL-2.0-or-later |
| Name | Version | Summary / License |
|---|---|---|
| [\_libgcc\_mutex](https://github.com/AnacondaRecipes/_libgcc_mutex-feedstock) | 0.1 | Mutex for libgcc and libgcc-ng / None |
| [\_openmp\_mutex](https://github.com/AnacondaRecipes/gcc-compiler-feedstock) | 5.1 | OpenMP Implementation Mutex / BSD-3-Clause |
| [alabaster](http://www.sphinx-doc.org/en/stable/index.html) | 0.7.12 | Configurable, Python 2+3 compatible Sphinx theme. / BSD 3-Clause |
| [anaconda-navigator](https://github.com/anaconda-distribution/navigator) | 2.4.0 | Anaconda Navigator / proprietary - Continuum Analytics, Inc. |
| [anyio](https://github.com/agronholm/anyio) | 3.5.0 | High level compatibility layer for multiple asynchronous event loop implementations on Python / MIT |
| [appdirs](http://github.com/ActiveState/appdirs) | 1.4.4 | A small Python module for determining appropriate platform-specific dirs. / MIT |
| [argon2-cffi](https://argon2-cffi.readthedocs.org/) | 21.3.0 | The secure Argon2 password hashing algorithm. / MIT |
| [argon2-cffi-bindings](https://github.com/hynek/argon2-cffi-bindings) | 21.2.0 | Low-level Python CFFI Bindings for Argon2 / MIT |
| [arrow](https://github.com/arrow-py/arrow) | 1.2.3 | Better dates & times for Python / Apache-2.0 |
| [astroid](https://github.com/PyCQA/astroid) | 2.14.2 | A abstract syntax tree for Python with inference support. / LGPL-2.1-or-later |
| [astropy](https://www.astropy.org/) | 5.1 | Community-developed Python Library for Astronomy / BSD-3-Clause |
| [asttokens](https://github.com/gristlabs/asttokens) | 2.0.5 | The asttokens module annotates Python abstract syntax trees (ASTs) with the positions of tokens and text in the source code that generated them. / Apache-2.0 |
| [atomicwrites](https://github.com/untitaker/python-atomicwrites) | 1.4.0 | Atomic file writes / MIT |
| [attrs](https://www.attrs.org/) | 22.1.0 | attrs is the Python package that will bring back the joy of writing classes by relieving you from the drudgery of implementing object protocols (aka dunder methods). / MIT |
| [automat](https://github.com/glyph/Automat) | 20.2.0 | self-service finite-state machines for the programmer on the go / MIT |
| [autopep8](https://github.com/hhatto/autopep8) | 1.6.0 | A tool that automatically formats Python code to conform to the PEP 8 style guide / MIT |
| [babel](https://babel.pocoo.org/) | 2.11.0 | Utilities to internationalize and localize Python applications / BSD-3-Clause |
| [backcall](https://github.com/takluyver/backcall/) | 0.2.0 | Specifications for callback functions passed in to an API / BSD-3-Clause |
| [bcrypt](https://github.com/pyca/bcrypt/) | 3.2.0 | Modern password hashing for your software and your servers / Apache-2.0 |
| [beautifulsoup4](https://www.crummy.com/software/BeautifulSoup/) | 4.11.1 | Python library designed for screen-scraping / MIT |
| [binaryornot](https://github.com/audreyr/binaryornot) | 0.4.4 | Ultra-lightweight pure Python package to check if a file is binary or text. / BSD-3-Clause |
| [black](https://github.com/psf/black) | 22.6.0 | The Uncompromising Code Formatter / MIT |
| [blas](http://www.netlib.org/lapack) | 1.0 | Linear Algebra PACKage / BSD-3-Clause |
| [bleach](https://github.com/mozilla/bleach) | 4.1.0 | Easy, whitelist-based HTML-sanitizing tool / Apache-2.0 |
| [blosc](https://www.blosc.org/) | 1.21.3 | A blocking, shuffling and loss-less compression library that can be faster than memcpy() / BSD-3-Clause |
| [bokeh](https://bokeh.org/) | 2.4.3 | Bokeh is an interactive visualization library for modern web browsers. / BSD-3-Clause |
| [bottleneck](https://github.com/pydata/bottleneck) | 1.3.5 | Fast NumPy array functions written in Cython. / BSD-2-Clause |
| [brotli](https://github.com/google/brotli) | 1.0.9 | Brotli compression format / MIT |
| [brotli-bin](https://github.com/google/brotli) | 1.0.9 | Brotli compression format / MIT |
| [brotlipy](https://github.com/python-hyper/brotlipy) | 0.7.0 | Python bindings to the Brotli compression library / MIT |
| [brunsli](https://github.com/google/brunsli) | 0.1 | Practical JPEG Repacker / MIT |
| [bzip2](http://www.bzip.org/) | 1.0.8 | high-quality data compressor / bzip2 |
| [c-ares](https://c-ares.org/) | 1.18.1 | This is c-ares, an asynchronous resolver library / MIT |
| [ca-certificates](https://curl.se/docs/caextract.html) | 2023.01.10 | Certificates for use with other packages. / MPL-2.0 |
| [certifi](https://certifi.io/) | 2022.12.7 | Python package for providing Mozilla’s CA Bundle. / MPL-2.0 |
| [cffi](https://cffi.readthedocs.org/) | 1.15.1 | Foreign Function Interface for Python calling C code. / MIT |
| [cfitsio](https://heasarc.gsfc.nasa.gov/fitsio/fitsio.html) | 3.470 | A library for reading and writing FITS files / Other |
| [chardet](https://github.com/chardet/chardet) | 4.0.0 | Universal character encoding detector / LGPL2 |
| [charls](https://github.com/team-charls/charls) | 2.2.0 | CharLS is a C++ implementation of the JPEG-LS standard for lossless and near-lossless image compression and decompression. JPEG-LS is a low-complexity image compression standard that matches JPEG 2000 compression ratios. / BSD-3-Clause |
| [charset-normalizer](https://github.com/ousret/charset_normalizer) | 2.0.4 | The Real First Universal Charset Detector. Open, modern and actively maintained alternative to Chardet. / MIT |
| [click](https://palletsprojects.com/p/click) | 8.0.4 | Python composable command line interface toolkit / BSD-3-Clause |
| [cloudpickle](https://github.com/cloudpipe/cloudpickle) | 2.0.0 | Extended pickling support for Python objects / BSD-3-Clause |
| [colorama](https://github.com/tartley/colorama) | 0.4.6 | Cross-platform colored terminal text / BSD-3-Clause |
| [colorcet](https://colorcet.holoviz.org/index.html) | 3.0.1 | Collection of perceptually uniform colormaps / CC-BY-4.0 |
| [comm](https://github.com/ipython/comm) | 0.1.2 | Python Comm implementation for the Jupyter kernel protocol / BSD-3-Clause |
| [conda](https://docs.conda.io) | 23.1.0 | OS-agnostic, system-level binary package and environment manager. / BSD-3-Clause |
| [conda-build](https://github.com/conda/conda-build) | 3.23.3 | tools for building conda packages / BSD-3-Clause |
| [conda-env](https://github.com/conda/conda-env) | 2.6.0 | Tools for interacting with conda environments. / BSD 3-Clause |
| [conda-verify](https://github.com/conda/conda-verify) | 3.4.2 | tool for validating conda recipes and conda packages / BSD 3-Clause |
| [constantly](https://github.com/twisted/constantly) | 15.1.0 | Symbolic constants in Python / MIT |
| [contourpy](https://github.com/contourpy/contourpy) | 1.0.5 | Python library for calculating contours of 2D quadrilateral grids. / BSD-3-Clause |
| [cookiecutter](https://github.com/cookiecutter/cookiecutter) | 1.7.3 | A command-line utility that creates projects from cookiecutters (project templates), e.g. creating a Python package project from a Python package project template. / BSD-3-Clause |
| [cryptography](https://github.com/pyca/cryptography) | 39.0.1 | Provides cryptographic recipes and primitives to Python developers / (BSD-3-Clause OR Apache-2.0) AND PSF-2.0 AND MIT |
| [cssselect](https://pythonhosted.org/cssselect/) | 1.1.0 | CSS Selectors for Python / BSD 3-Clause |
| [curl](https://curl.se/) | 7.87.0 | tool and library for transferring data with URL syntax / curl |
| [cycler](http://matplotlib.org/cycler) | 0.11.0 | Composable style cycles. / BSD-3-Clause |
| [cytoolz](https://github.com/pytoolz/cytoolz) | 0.12.0 | Cython implementation of Toolz. High performance functional utilities / BSD-3-Clause |
| [daal4py](https://intelpython.github.io/daal4py/) | 2023.0.2 | A convenient Python API to Intel (R) oneAPI Data Analytics Library / Apache-2.0 |
| [dal](https://software.intel.com/content/www/us/en/develop/tools.html) | 2023.0.1 | Intel® oneDAL runtime libraries / Intel Simplified Software License |
| [dask](https://dask.org/) | 2022.7.0 | Parallel PyData with Task Scheduling / BSD-3-Clause |
| [dask-core](https://github.com/dask/dask/) | 2022.7.0 | Parallel Python with task scheduling / BSD-3-Clause |
| [datashader](https://datashader.org) | 0.14.4 | Data visualization toolchain based on aggregating into a grid / BSD-3-Clause |
| [datashape](http://datashape.pydata.org) | 0.5.4 | A data description language. / BSD 2-Clause |
| [dbus](http://www.freedesktop.org/wiki/Software/dbus/) | 1.13.18 | Simple message bus system for applications to talk to one another / GPL2 |
| [debugpy](https://github.com/Microsoft/debugpy) | 1.5.1 | An implementation of the Debug Adapter Protocol for Python / MIT |
| [decorator](https://github.com/micheles/decorator) | 5.1.1 | Better living through Python with decorators. / BSD-2-Clause |
| [defusedxml](https://bitbucket.org/tiran/defusedxml) | 0.7.1 | XML bomb protection for Python stdlib modules / PSF 2.0 |
| [diff-match-patch](http://code.google.com/p/google-diff-match-patch/) | 20200713 | Diff Match Patch is a high-performance library in multiple languages that manipulates plain text / Apache-2.0 |
| [dill](https://github.com/uqfoundation/dill) | 0.3.6 | Serialize all of python (almost) / BSD-3-Clause |
| [distributed](https://distributed.readthedocs.io/en/latest/) | 2022.7.0 | Distributed computing with Dask / BSD-3-Clause |
| [docstring-to-markdown](https://pypi.org/project/docstring-to-markdown) | 0.11 | On the fly conversion of Python docstrings to markdown / LGPL-2.1-or-later |
| [docutils](https://docutils.sourceforge.io/) | 0.18.1 | Docutils – Python Documentation Utilities / LicenseRef-Public-Domain-Dedictation and BSD-2-Clause and LicenseRef-PSF-2.1.1 and GPL-3.0-or-later |
| [entrypoints](https://github.com/takluyver/entrypoints) | 0.4 | Discover and load entry points from installed packages. / MIT License |
| [et\_xmlfile](https://foss.heptapod.net/openpyxl/et_xmlfile) | 1.1.0 | An implementation of lxml.xmlfile for the standard library / MIT AND PSF-2.0 |
| [executing](https://pypi.org/project/executing) | 0.8.3 | Get the currently executing AST node of a frame, and other information / MIT |
| [expat](https://libexpat.github.io) | 2.4.9 | Expat XML parser library in C / MIT |
| [filelock](https://github.com/tox-dev/py-filelock) | 3.9.0 | A platform independent file lock. / Unlicense |
| [flake8](https://flake8.pycqa.org/) | 6.0.0 | Your Tool For Style Guide Enforcement / MIT |
| [flask](https://palletsprojects.com/p/flask) | 2.2.2 | A simple framework for building complex web applications. / BSD-3-Clause |
| [flit-core](https://flit.readthedocs.io/) | 3.6.0 | Simplified packaging of Python modules / BSD-3-Clause |
| [fontconfig](https://www.freedesktop.org/wiki/Software/fontconfig/) | 2.14.1 | A library for configuring and customizing font access. / MIT |
| [fonttools](https://github.com/fonttools/fonttools) | 4.25.0 | fontTools is a library for manipulating fonts, written in Python. / MIT |
| [freetype](https://freetype.org/) | 2.12.1 | A Free, High-Quality, and Portable Font Engine / GPL-2-only and LicenseRef-FreeType |
| [fsspec](https://github.com/fsspec/filesystem_spec) | 2022.11.0 | A specification for pythonic filesystems / BSD-3-Clause |
| [future](https://python-future.org) | 0.18.3 | Clean single-source support for Python 3 and 2 / MIT |
| [gensim](https://github.com/RaRe-Technologies/gensim) | 4.3.0 | Topic Modelling for Humans / LGPL-2.1-only |
| [giflib](https://giflib.sourceforge.net) | 5.2.1 | Library for reading and writing gif images / MIT |
| [glib](https://developer.gnome.org/glib/) | 2.69.1 | Provides core application building blocks for libraries and applications written in C. / LGPL-2.1-or-later |
| [gmp](https://gmplib.org/) | 6.2.1 | The GNU multiprecision library. / GPL-2.0-or-later AND LGPL-3.0-or-later |
| [gmpy2](https://pypi.python.org/pypi/gmpy2) | 2.1.2 | GMP/MPIR, MPFR, and MPC interface to Python 2.6+ and 3.x / LGPL-3.0-or-later |
| [greenlet](https://github.com/python-greenlet/greenlet) | 2.0.1 | Lightweight in-process concurrent programming / MIT |
| [gst-plugins-base](http://gstreamer.freedesktop.org/) | 1.14.1 | GStreamer Base Plug-ins / GPL2 |
| [gstreamer](http://gstreamer.freedesktop.org/) | 1.14.1 | Library for constructing graphs of media-handling components / LGPL 2 |
| [h5py](https://www.h5py.org/) | 3.7.0 | Read and write HDF5 files from Python / BSD-3-Clause |
| [hdf5](http://www.hdfgroup.org/HDF5/) | 1.10.6 | HDF5 is a data model, library, and file format for storing and managing data / HDF5 |
| [heapdict](http://stutzbachenterprises.com/) | 1.0.1 | A heap with decrease-key and increase-key operations / BSD 3-Clause |
| [holoviews](https://holoviews.org) | 1.15.4 | Stop plotting your data - annotate your data and let it visualize itself. / BSD-3-Clause |
| [huggingface\_hub](https://github.com/huggingface/huggingface_hub) | 0.10.1 | Client library to download and publish models, datasets and other repos on the huggingface.co hub / Apache-2.0 |
| [hvplot](https://hvplot.holoviz.org) | 0.8.2 | A high-level plotting API for the PyData ecosystem built on HoloViews / BSD-3-Clause |
| [hyperlink](https://github.com/python-hyper/hyperlink) | 21.0.0 | Immutable, Pythonic, correct URLs. / MIT |
| [icu](http://site.icu-project.org/) | 58.2 | International Components for Unicode. / MIT |
| [idna](https://github.com/kjd/idna) | 3.4 | Internationalized Domain Names in Applications (IDNA). / BSD-3-Clause |
| [imagecodecs](https://www.lfd.uci.edu/~gohlke/) | 2021.8.26 | Image transformation, compression, and decompression codecs / BSD-3-Clause |
| [imageio](https://imageio.github.io) | 2.26.0 | A Python library for reading and writing image data / BSD-2-Clause |
| [imagesize](https://github.com/shibukawa/imagesize_py) | 1.4.1 | Getting image size from png/jpeg/jpeg2000/gif file / MIT |
| [imbalanced-learn](https://github.com/scikit-learn-contrib/imbalanced-learn) | 0.10.1 | Python module to balance data set using under- and over-sampling / MIT |
| [importlib-metadata](https://github.com/python/importlib_metadata) | 4.11.3 | A library to access the metadata for a Python package. / Apache-2.0 |
| [importlib\_metadata](https://github.com/python/importlib_metadata) | 4.11.3 | A library to access the metadata for a Python package. / Apache-2.0 |
| [incremental](https://github.com/hawkowl/incremental) | 21.3.0 | Incremental is a small library that versions your Python projects. / MIT |
| [inflection](http://github.com/jpvanhal/inflection) | 0.5.1 | A port of Ruby on Rails inflector to Python / MIT |
| [iniconfig](http://github.com/RonnyPfannschmidt/iniconfig) | 1.1.1 | iniconfig: brain-dead simple config-ini parsing / MIT |
| [intake](https://github.com/intake/intake) | 0.6.7 | Data load and catalog system / BSD-2-Clause |
| [intel-openmp](https://software.intel.com/en-us/node/522690) | 2021.4.0 | Math library for Intel and compatible processors / LicenseRef-ProprietaryIntel |
| [intervaltree](https://github.com/chaimleib/intervaltree) | 3.1.0 | Editable interval tree data structure for Python 2 and 3 / Apache-2.0 |
| [ipykernel](https://ipython.org) | 6.19.2 | IPython Kernel for Jupyter / BSD-3-Clause |
| [ipython](https://ipython.org) | 8.10.0 | IPython: Productive Interactive Computing / BSD-3-Clause |
| [ipython\_genutils](http://ipython.org) | 0.2.0 | vestigial utilities from IPython / BSD 3-Clause |
| [ipywidgets](https://github.com/ipython/ipywidgets) | 7.6.5 | Jupyter Interactive Widgets / BSD-3-Clause |
| [isort](https://github.com/timothycrosley/isort) | 5.9.3 | A Python utility / library to sort Python imports. / MIT |
| [itemadapter](https://github.com/scrapy/itemadapter) | 0.3.0 | Common interface for different data containers / BSD-3-Clause |
| [itemloaders](https://github.com/scrapy/itemloaders) | 1.0.4 | Collect data from HTML and XML sources / BSD-3-Clause |
| [itsdangerous](https://github.com/pallets/itsdangerous) | 2.0.1 | Various helpers to pass trusted data to untrusted environments. / BSD-3-Clause |
| [jedi](https://github.com/davidhalter/jedi/) | 0.18.1 | An autocompletion tool for Python that can be used for text editors. / MIT |
| [jeepney](https://gitlab.com/takluyver/jeepney) | 0.7.1 | Pure Python DBus interface / MIT |
| [jellyfish](https://github.com/jamesturk/jellyfish) | 0.9.0 | a library for doing approximate and phonetic matching of strings. / BSD-2-Clause |
| [jinja2](https://palletsprojects.com/p/jinja/) | 3.1.2 | A very fast and expressive template engine. / BSD-3-Clause |
| [jinja2-time](https://github.com/hackebrot/jinja2-time) | 0.2.0 | Jinja2 Extension for Dates and Times / MIT |
| [jmespath](http://jmespath.org/) | 0.10.0 | Query language for JSON / MIT |
| [joblib](https://joblib.readthedocs.io/en/latest/) | 1.1.1 | Lightweight pipelining: using Python functions as pipeline jobs. / BSD-3-Clause |
| [jpeg](https://www.ijg.org/) | 9e | read/write jpeg COM, EXIF, IPTC medata / IJG |
| [jq](http://stedolan.github.io/jq/) | 1.6 | A command-line JSON processor. / MIT |
| [json5](https://github.com/dpranke/pyjson5) | 0.9.6 | A Python implementation of the JSON5 data format / Apache-2.0 |
| [jsonschema](https://github.com/python-jsonschema/jsonschema) | 4.17.3 | An implementation of JSON Schema validation for Python / MIT |
| [jupyter](https://jupyter.org) | 1.0.0 | Jupyter metapackage. Install all the Jupyter components in one go. / BSD-3-Clause |
| [jupyter\_client](https://jupyter.org) | 7.3.4 | Jupyter protocol implementation and client libraries. / BSD-3-Clause |
| [jupyter\_console](https://jupyter.org) | 6.6.2 | Jupyter terminal console / BSD-3-Clause |
| [jupyter\_core](https://jupyter.org) | 5.2.0 | Core common functionality of Jupyter projects. / BSD-3-Clause |
| [jupyter\_server](https://jupyter.org) | 1.23.4 | Jupyter Server / BSD-3-Clause |
| [jupyterlab](https://github.com/jupyterlab/jupyterlab) | 3.5.3 | JupyterLab PRE-ALPHA / BSD-3-Clause |
| [jupyterlab\_pygments](http://github.com/JupyterLab/jupyterlab_pygments) | 0.1.2 | Pygments syntax coloring scheme making use of the JupyterLab CSS variables / BSD-3-Clause |
| [jupyterlab\_server](https://github.com/jupyterlab/jupyterlab_server) | 2.19.0 | A set of server components for JupyterLab and JupyterLab like applications. / BSD-3-Clause |
| [jupyterlab\_widgets](https://github.com/jupyter-widgets/ipywidgets) | 1.0.0 | JupyterLab extension providing HTML widgets / BSD-3-Clause |
| [jxrlib](https://packages.debian.org/source/sid/jxrlib) | 1.1 | jxrlib - JPEG XR Library by Microsoft, built from Debian hosted sources. / BSD-2-Clause |
| [keyring](https://github.com/jaraco/keyring) | 23.4.0 | Store and access your passwords safely / MIT |
| [kiwisolver](https://github.com/nucleic/kiwi) | 1.4.4 | An efficient C++ implementation of the Cassowary constraint solver / BSD-3-Clause |
| [krb5](https://web.mit.edu/kerberos/) | 1.19.4 | A network authentication protocol. / MIT |
| [lazy-object-proxy](https://github.com/ionelmc/python-lazy-object-proxy) | 1.6.0 | A fast and thorough lazy object proxy / BSD-2-Clause |
| [lcms2](http://www.littlecms.com/) | 2.12 | Open Source Color Management Engine / MIT |
| [ld\_impl\_linux-64](https://www.gnu.org/software/binutils/) | 2.38 | A set of programming tools for creating and managing binary programs, object files, libraries, profile data, and assembly source code. / GPL-3.0-only |
| [lerc](https://github.com/Esri/lerc) | 3.0 | LERC - Limited Error Raster Compression / Apache-2.0 |
| [libaec](https://gitlab.dkrz.de/k202009/libaec) | 1.0.4 | Adaptive Entropy Coding library / BSD-2-Clause |
| [libbrotlicommon](https://github.com/google/brotli) | 1.0.9 | Brotli compression format / MIT |
| [libbrotlidec](https://github.com/google/brotli) | 1.0.9 | Brotli compression format / MIT |
| [libbrotlienc](https://github.com/google/brotli) | 1.0.9 | Brotli compression format / MIT |
| [libclang](https://llvm.org/) | 10.0.1 | Development headers and libraries for Clang / Apache-2.0 WITH LLVM-exception |
| [libcurl](https://curl.se/) | 7.87.0 | tool and library for transferring data with URL syntax / curl |
| [libdeflate](https://github.com/ebiggers/libdeflate) | 1.17 | libdeflate is a library for fast, whole-buffer DEFLATE-based compression and decompression. / MIT |
| [libedit](https://thrysoee.dk/editline/) | 3.1.20221030 | Editline Library (libedit) / BSD-2-Clause |
| [libev](http://software.schmorp.de/pkg/libev.html) | 4.33 | A full-featured and high-performance event loop that is loosely modeled after libevent, but without its limitations and bugs. / BSD-2-Clause |
| [libevent](http://libevent.org/) | 2.1.12 | An event notification library. / BSD-3-Clause |
| [libffi](https://sourceware.org/libffi/) | 3.4.2 | A Portable Foreign Function Interface Library / MIT |
| [libgcc-ng](https://gcc.gnu.org/onlinedocs/gccint/Libgcc.html) | 11.2.0 | The GCC low-level runtime library / GPL-3.0-only WITH GCC-exception-3.1 |
| [libgfortran-ng](https://gcc.gnu.org/) | 11.2.0 | The GNU Fortran Runtime Library / GPL-3.0-only WITH GCC-exception-3.1 |
| [libgfortran5](https://gcc.gnu.org/) | 11.2.0 | Fortran compiler and libraries from the GNU Compiler Collection / GPL-3.0-only WITH GCC-exception-3.1 |
| [libgomp](https://gcc.gnu.org/onlinedocs/gccint/Libgcc.html) | 11.2.0 | The GCC OpenMP implementation. / GPL-3.0-only WITH GCC-exception-3.1 |
| [libllvm10](http://llvm.org/) | 10.0.1 | Development headers and libraries for LLVM / Apache-2.0 WITH LLVM-exception |
| [libllvm11](https://llvm.org/) | 11.1.0 | Development headers and libraries for LLVM / Apache-2.0 WITH LLVM-exception |
| [libnghttp2](http://github.com/nghttp2/nghttp2) | 1.46.0 | This is an implementation of Hypertext Transfer Protocol version 2. / MIT |
| [libpng](http://www.libpng.org/pub/png/libpng.html) | 1.6.39 | PNG reference library / Zlib |
| [libpq](http://www.postgresql.org/) | 12.9 | The postgres runtime libraries and utilities (not the server itself) / PostgreSQL |
| [libprotobuf](https://developers.google.com/protocol-buffers/) | 3.20.3 | Protocol Buffers - Google’s data interchange format. C++ Libraries and protoc, the protobuf compiler. / BSD-3-Clause |
| [libsodium](http://libsodium.org) | 1.0.18 | A modern and easy-to-use crypto library. / ISC |
| [libspatialindex](http://libspatialindex.github.io) | 1.9.3 | Extensible framework for robust spatial indexing / MIT |
| [libssh2](https://www.libssh2.org/) | 1.10.0 | the SSH library / BSD-3-Clause |
| [libstdcxx-ng](https://gcc.gnu.org/) | 11.2.0 | The GNU C++ Runtime Library / GPL-3.0-only WITH GCC-exception-3.1 |
| [libtiff](http://www.simplesystems.org/libtiff/) | 4.5.0 | Support for the Tag Image File Format (TIFF). / HPND |
| [libuuid](https://sourceforge.net/projects/libuuid/) | 1.41.5 | Portable uuid C library 2.32.1 as pk-version 1.41.5. / BSD-3-Clause |
| [libwebp](https://developers.google.com/speed/webp/) | 1.2.4 | WebP image library / BSD-3-Clause |
| [libwebp-base](https://developers.google.com/speed/webp) | 1.2.4 | WebP image library / BSD-3-Clause |
| [libxcb](http://xcb.freedesktop.org/) | 1.15 | This is the C-language Binding (XCB) package to the X Window System protocol / MIT |
| [libxkbcommon](https://github.com/xkbcommon/libxkbcommon) | 1.0.1 | keymap handling library for toolkits and window systems / MIT/X11 Derivative |
| [libxml2](https://gitlab.gnome.org/GNOME/libxml2/) | 2.9.14 | The XML C parser and toolkit of Gnome / MIT |
| [libxslt](https://gitlab.gnome.org/GNOME/libxslt) | 1.1.35 | The XSLT C library developed for the GNOME project / MIT |
| [libzopfli](https://github.com/google/zopfli) | 1.0.3 | A compression library programmed in C to perform very good, but slow, deflate or zlib compression. / Apache-2.0 |
| [llvmlite](https://llvmlite.pydata.org) | 0.39.1 | A lightweight LLVM python binding for writing JIT compilers. / BSD-2-Clause |
| [locket](https://github.com/mwilliamson/locket.py) | 1.0.0 | File-based locks for Python for Linux and Windows / BSD-2-Clause |
| [lxml](https://lxml.de/) | 4.9.1 | Pythonic binding for the C libraries libxml2 and libxslt. / BSD-3-Clause and GPL-2.0-only and ZPL-2.0 and LicenseRef-ElementTree |
| [lz4](https://github.com/python-lz4/python-lz4) | 3.1.3 | LZ4 Bindings for Python / BSD-3-Clause |
| [lz4-c](https://lz4.github.io/lz4/) | 1.9.4 | Extremely Fast Compression algorithm / BSD-2-Clause |
| [lzo](http://www.oberhumer.com/opensource/lzo/) | 2.10 | LZO is a portable lossless data compression library written in ANSI C. / GPL v2+ |
| [markdown](https://github.com/Python-Markdown/markdown) | 3.4.1 | Python implementation of Markdown. / BSD-3-Clause |
| [markupsafe](https://www.palletsprojects.com/p/markupsafe) | 2.1.1 | Safely add untrusted strings to HTML/XML markup. / BSD-3-Clause |
| [matplotlib](https://matplotlib.org/) | 3.7.0 | Publication quality figures in Python / LicenseRef-PSF-based |
| [matplotlib-base](https://matplotlib.org/) | 3.7.0 | Publication quality figures in Python / LicenseRef-PSF-based |
| [matplotlib-inline](https://github.com/ipython/matplotlib-inline) | 0.1.6 | Inline Matplotlib backend for Jupyter / BSD-3-Clause |
| [mccabe](https://github.com/PyCQA/mccabe) | 0.7.0 | McCabe complexity checker for Python / MIT |
| [mistune](https://github.com/lepture/mistune) | 0.8.4 | A sane Markdown parser with useful plugins and renderers. / BSD-3-Clause |
| [mkl](https://software.intel.com/en-us/mkl) | 2021.4.0 | Math library for Intel and compatible processors / LicenseRef-ProprietaryIntel |
| [mkl-service](http://github.com/IntelPython/mkl-service) | 2.4.0 | Python hooks for Intel(R) Math Kernel Library runtime control settings. / BSD-3-Clause |
| [mkl\_fft](http://github.com/IntelPython/mkl_fft) | 1.3.1 | NumPy-based implementation of Fast Fourier Transform using Intel (R) Math Kernel Library. / BSD 3-Clause |
| [mkl\_random](http://github.com/IntelPython/mkl_random) | 1.2.2 | Intel (R) MKL-powered package for sampling from common probability distributions into NumPy arrays. / BSD-3-Clause |
| [mock](https://github.com/testing-cabal/mock) | 4.0.3 | A library for testing in Python / BSD-2-Clause |
| [mpc](http://www.multiprecision.org/) | 1.1.0 | A C library for the arithmetic of complex numbers with arbitrarily high precision. / LGPL-3-or-later |
| [mpfr](http://www.mpfr.org/) | 4.0.2 | The MPFR library is a C library for multiple-precision floating-point computations with correct rounding. / LGPL-3.0-only |
| [mpi](https://github.com/AnacondaRecipes/mpi-feedstock) | 1.0 | Metapackage to select the MPI variant. Use conda’s pinning mechanism in your environment to control which variant you want. / BSD-3-Clause |
| [mpich](http://www.mpich.org/) | 3.3.2 | A high performance widely portable implementation of the MPI standard. / MPICH |
| [mpmath](http://mpmath.org) | 1.2.1 | Python library for arbitrary-precision floating-point arithmetic / BSD 3-Clause |
| [msgpack-python](https://msgpack.org/) | 1.0.3 | MessagePack (de)serializer / Apache-2.0 |
| [multipledispatch](https://github.com/mrocklin/multipledispatch/) | 0.6.0 | Multiple dispatch in Python / BSD 3-Clause |
| [munkres](https://github.com/bmc/munkres) | 1.1.4 | The Munkres module provides an O(n^3) implementation of the Munkres algorithm (also called the Hungarian algorithm or the Kuhn-Munkres algorithm). / Apache-2.0 |
| [mypy\_extensions](http://www.mypy-lang.org/) | 0.4.3 | Experimental type system extensions for programs checked with the mypy typechecker. / MIT |
| [nbclassic](https://github.com/jupyter/nbclassic) | 0.5.2 | Jupyter Notebook as a Jupyter Server Extension. / BSD-3-Clause |
| [nbclient](https://jupyter.org) | 0.5.13 | A client library for executing notebooks. Formally nbconvert’s ExecutePreprocessor. / BSD-3-Clause |
| [nbconvert](https://nbconvert.readthedocs.io/en/latest/) | 6.5.4 | Converting Jupyter Notebooks / BSD-3-Clause |
| [nbformat](https://jupyter.org) | 5.7.0 | The Jupyter Notebook format / BSD-3-Clause |
| [ncurses](https://invisible-island.net/ncurses/) | 6.4 | Library for text-based user interfaces / MIT AND X11 |
| [nest-asyncio](https://github.com/erdewit/nest_asyncio) | 1.5.6 | Patch asyncio to allow nested event loops / BSD-2-Clause |
| [networkx](https://networkx.github.io/) | 2.8.4 | Python package for creating and manipulating complex networks / BSD-3-Clause |
| [ninja](https://ninja-build.org/) | 1.10.2 | A small build system with a focus on speed / Apache-2.0 |
| [ninja-base](https://ninja-build.org/) | 1.10.2 | A small build system with a focus on speed / Apache-2.0 |
| [nltk](https://nltk.org/) | 3.7 | Natural Language Toolkit / Apache-2.0 |
| [notebook](https://jupyter.org) | 6.5.2 | Jupyter Notebook / BSD-3-Clause |
| [notebook-shim](https://github.com/jupyter/notebook_shim) | 0.2.2 | A shim layer for notebook traits and config / BSD-3-Clause |
| [nspr](https://hg.mozilla.org/projects/nspr) | 4.33 | A platform-neutral API for system level and libc-like functions. / MPL-2.0 |
| [nss](https://developer.mozilla.org/en-US/docs/Mozilla/Projects/NSS) | 3.74 | A set of libraries designed to support cross-platform development of security-enabled client and server applications. / MPL-2.0 |
| [numba](https://numba.pydata.org) | 0.56.4 | NumPy aware dynamic Python compiler using LLVM / BSD-2-Clause |
| [numexpr](https://github.com/pydata/numexpr) | 2.8.4 | Fast numerical expression evaluator for NumPy. / MIT |
| [numpy](https://numpy.org/) | 1.23.5 | Array processing for numbers, strings, records, and objects. / BSD-3-Clause |
| [numpy-base](https://numpy.org/) | 1.23.5 | Array processing for numbers, strings, records, and objects. / BSD-3-Clause |
| [numpydoc](https://github.com/numpy/numpydoc) | 1.5.0 | Sphinx extension to support docstrings in Numpy format / BSD-3-Clause |
| [oniguruma](https://github.com/kkos/oniguruma) | 6.9.7.1 | A regular expression library. / BSD-2-Clause |
| [openjpeg](http://www.openjpeg.org/) | 2.4.0 | An open-source JPEG 2000 codec written in C / BSD 2-Clause |
| [openpyxl](https://openpyxl.readthedocs.io) | 3.0.10 | A Python library to read/write Excel 2010 xlsx/xlsm files / MIT |
| [openssl](https://www.openssl.org/) | 1.1.1t | OpenSSL is an open-source implementation of the SSL and TLS protocols / OpenSSL |
| [packaging](https://github.com/pypa/packaging) | 22.0 | Core utilities for Python packages / Apache-2.0 or BSD-2-Clause |
| [pandas](https://pandas.pydata.org) | 1.5.3 | High-performance, easy-to-use data structures and data analysis tools. / BSD-3-Clause |
| [pandocfilters](https://github.com/jgm/pandocfilters) | 1.5.0 | A python module for writing pandoc filters / BSD-3-Clause |
| [panel](https://panel.holoviz.org) | 0.14.3 | A high-level app and dashboarding solution for Python / BSD-3-Clause |
| [param](https://param.holoviz.org/) | 1.12.3 | Param: Make your Python code clearer and more reliable by declaring Parameters / BSD-3-Clause |
| [parsel](https://github.com/scrapy/parsel) | 1.6.0 | library to extract data from HTML and XML using XPath and CSS selectors / BSD-3-Clause |
| [parso](https://github.com/davidhalter/parso) | 0.8.3 | A Python Parser / MIT |
| [partd](https://github.com/dask/partd) | 1.2.0 | Appendable key-value storage / BSD-3-Clause |
| [pathspec](https://github.com/cpburnz/python-path-specification) | 0.10.3 | Utility library for gitignore style pattern matching of file paths. / MPL-2.0 |
| [patsy](https://github.com/pydata/patsy) | 0.5.3 | Describing statistical models in Python using symbolic formulas / BSD-2-Clause AND PSF-2.0 |
| [pcre](http://www.pcre.org/) | 8.45 | Regular expression pattern matching using the same syntax and semantics as Perl 5. / BSD 3-Clause |
| [pep8](https://pep8.readthedocs.org/) | 1.7.1 | Python style guide checker / MIT |
| [pexpect](http://pexpect.sourceforge.net/) | 4.8.0 | Pexpect makes Python a better tool for controlling other applications. / ISC |
| [pickleshare](https://github.com/pickleshare/pickleshare/) | 0.7.5 | Tiny ‘shelve’-like database with concurrency support / MIT |
| [pillow](https://pillow.readthedocs.io) | 9.4.0 | Pillow is the friendly PIL fork by Alex Clark and Contributors / LicenseRef-PIL |
| [pip](https://pip.pypa.io/en/stable/) | 22.3.1 | PyPA recommended tool for installing Python packages / MIT |
| [platformdirs](https://github.com/platformdirs/platformdirs) | 2.5.2 | A small Python module for determining appropriate platform-specific dirs, e.g. a “user data dir”. / MIT |
| [plotly](https://plot.ly/python/) | 5.9.0 | An interactive JavaScript-based visualization library for Python / MIT |
| [pluggy](https://github.com/pytest-dev/pluggy) | 1.0.0 | Plugin registration and hook calling for Python / MIT |
| [ply](http://www.dabeaz.com/ply/index.html) | 3.11 | Python Lex-Yacc / BSD 3-clause |
| [pooch](https://github.com/fatiando/pooch) | 1.4.0 | A friend to fetch your data files / BSD-3-Clause |
| [poyo](https://github.com/hackebrot/poyo) | 0.5.0 | A lightweight YAML Parser for Python / MIT |
| [prometheus\_client](https://github.com/prometheus/client_python) | 0.14.1 | Python client for the Prometheus monitoring system / Apache-2.0 |
| [prompt-toolkit](https://github.com/prompt-toolkit/python-prompt-toolkit) | 3.0.36 | Library for building powerful interactive command lines in Python / BSD-3-Clause |
| [prompt\_toolkit](https://github.com/prompt-toolkit/python-prompt-toolkit) | 3.0.36 | Library for building powerful interactive command lines in Python / BSD-3-Clause |
| [protego](https://github.com/scrapy/protego) | 0.1.16 | A pure-Python robots.txt parser with support for modern conventions / BSD 3-Clauses |
| [psutil](https://github.com/giampaolo/psutil) | 5.9.0 | A cross-platform process and system utilities module for Python / BSD-3-Clause |
| [ptyprocess](https://github.com/pexpect/ptyprocess) | 0.7.0 | Run a subprocess in a pseudo terminal / ISC |
| [pure\_eval](https://github.com/alexmojaki/pure_eval) | 0.2.2 | Safely evaluate AST nodes without side effects / MIT |
| [py](https://github.com/pytest-dev/py) | 1.11.0 | library with cross-python path, ini-parsing, io, code, log facilities / MIT |
| [pyasn1](https://github.com/etingof/pyasn1) | 0.4.8 | ASN.1 types and codecs / BSD 2-Clause |
| [pyasn1-modules](http://pyasn1.sourceforge.net/) | 0.2.8 | A collection of ASN.1-based protocols modules. / BSD 2-Clause |
| [pycodestyle](https://pycodestyle.readthedocs.io/) | 2.10.0 | Python style guide checker / MIT |
| [pycparser](https://github.com/eliben/pycparser) | 2.21 | Complete C99 parser in pure Python / BSD-3-clause |
| [pyct](https://github.com/pyviz/pyct) | 0.5.0 | python package common tasks for users (e.g. copy examples, fetch data, …) / BSD-3-Clause |
| [pycurl](http://pycurl.sourceforge.net/) | 7.45.1 | A Python Interface To The cURL library / LGPL-2.1-only, MIT |
| [pydispatcher](http://pydispatcher.sourceforge.net) | 2.0.5 | Multi-producer-multi-consumer signal dispatching mechanism / BSD-3-Clause |
| [pydocstyle](https://github.com/PyCQA/pydocstyle) | 6.3.0 | Python docstring style checker (formerly pep257) / MIT |
| [pyerfa](https://pyerfa.readthedocs.io/) | 2.0.0 | Python bindings for ERFA routines / BSD-3-Clause |
| [pyflakes](https://github.com/PyCQA/pyflakes) | 3.0.1 | Pyflakes analyzes programs and detects various errors. / MIT |
| [pygments](https://pygments.org/) | 2.11.2 | Pygments is a generic syntax highlighter suitable for use in code hosting, forums, wikis or other applications that need to prettify source code. / BSD-2-Clause |
| [pyhamcrest](https://github.com/hamcrest/PyHamcrest) | 2.0.2 | Hamcrest framework for matcher objects / BSD 3-Clause |
| [pylint](https://www.pylint.org) | 2.16.2 | python code static checker / GPL-2.0-or-later |
| [pylint-venv](https://github.com/jgosmann/pylint-venv/) | 2.3.0 | pylint-venv provides a Pylint init-hook to use the same Pylint installation with different virtual environments. / MIT |
| [pyls-spyder](https://github.com/spyder-ide/pyls-spyder) | 0.4.0 | Spyder extensions for the python-lsp-server / MIT |
| [pyodbc](https://github.com/mkleehammer/pyodbc) | 4.0.34 | DB API Module for ODBC / MIT-0 |
| [pyopenssl](https://github.com/pyca/pyopenssl) | 23.0.0 | Python wrapper module around the OpenSSL library / Apache-2.0 |
| [pyparsing](https://github.com/pyparsing/pyparsing/) | 3.0.9 | Create and execute simple grammars / MIT |
| [pyqt](https://www.riverbankcomputing.com/software/pyqt/) | 5.15.7 | Python bindings for the Qt cross platform application toolkit / GPL-3.0-only |
| [pyqt5-sip](https://www.riverbankcomputing.com/software/pyqt/) | 12.11.0 | Python bindings for the Qt cross platform application toolkit / GPL-3.0-only |
| [pyqtwebengine](https://www.riverbankcomputing.com/software/pyqt/) | 5.15.7 | Python bindings for the Qt cross platform application toolkit / GPL-3.0-only |
| [pyrsistent](http://github.com/tobgu/pyrsistent/) | 0.18.0 | Persistent/Functional/Immutable data structures / MIT |
| [pysocks](https://github.com/Anorov/PySocks) | 1.7.1 | A Python SOCKS client module. See [Anorov/PySocks](https://github.com/Anorov/PySocks) for more information. / BSD 3-Clause |
| [pytables](https://www.pytables.org) | 3.7.0 | Brings together Python, HDF5 and NumPy to easily handle large amounts of data. / BSD-3-Clause |
| [pytest](https://docs.pytest.org/en/latest/) | 7.1.2 | Simple and powerful testing with Python. / MIT |
| [python](https://www.python.org/) | 3.10.9 | General purpose programming language / PSF-2.0 |
| [python-dateutil](https://dateutil.readthedocs.org/) | 2.8.2 | Extensions to the standard Python datetime module. / BSD-3-Clause and Apache |
| [python-fastjsonschema](https://github.com/horejsek/python-fastjsonschema) | 2.16.2 | Fastest Python implementation of JSON schema / BSD-3-Clause |
| [python-lsp-black](https://github.com/python-lsp/python-lsp-black) | 1.2.1 | Black plugin for the Python LSP Server / MIT |
| [python-lsp-jsonrpc](https://github.com/python-lsp/python-lsp-jsonrpc) | 1.0.0 | A Python 3.6+ server implementation of the JSON RPC 2.0 protocol. / MIT |
| [python-lsp-server](https://github.com/python-lsp/python-lsp-server) | 1.7.1 | An implementation of the Language Server Protocol for Python / MIT |
| [python-slugify](https://github.com/un33k/python-slugify) | 5.0.2 | A Python Slugify application that handles Unicode / MIT |
| [python-snappy](https://github.com/andrix/python-snappy) | 0.6.1 | Python library for the snappy compression library from Google / BSD-3-Clause |
| [pytoolconfig](https://github.com/bagel897/pytoolconfig) | 1.2.5 | Python tool configuration / LGPL-3.0-or-later |
| [pytorch](https://pytorch.org/) | 1.12.1 | PyTorch is an optimized tensor library for deep learning using GPUs and CPUs. / BSD-3-Clause |
| [pytz](https://pythonhosted.org/pytz/) | 2022.7 | World timezone definitions, modern and historical. / MIT |
| [pyviz\_comms](https://www.holoviz.org) | 2.0.2 | Bidirectional communication for PyViz / BSD-3-Clause |
| [pywavelets](https://github.com/PyWavelets/pywt) | 1.4.1 | Discrete Wavelet Transforms in Python / MIT |
| [pyxdg](http://freedesktop.org/wiki/Software/pyxdg) | 0.27 | PyXDG contains implementations of freedesktop.org standards in python. / GNU Lesser General Public v2 (LGPLv2) |
| [pyyaml](http://pyyaml.org/wiki/PyYAML) | 6.0 | YAML parser and emitter for Python / MIT |
| [pyzmq](https://github.com/zeromq/pyzmq) | 23.2.0 | Python bindings for zeromq / BSD-3-Clause AND LGPL-3.0-or-later |
| [qdarkstyle](https://github.com/ColinDuquesnoy/QDarkStyleSheet) | 3.0.2 | A dark stylesheet for Qt applications (Qt4, Qt5, PySide, PyQt4, PyQt5, QtPy, PyQtGraph). / MIT |
| [qstylizer](https://github.com/blambright/qstylizer) | 0.2.2 | Qt stylesheet generation utility for PyQt/PySide / MIT |
| [qt-main](http://qt.io) | 5.15.2 | Qt is a cross-platform application and UI framework. / LGPL-3.0-only |
| [qt-webengine](http://qt.io) | 5.15.9 | Qt is a cross-platform application and UI framework. / LGPL-3.0-only |
| [qtawesome](https://github.com/spyder-ide/qtawesome) | 1.2.2 | Iconic fonts in PyQt and PySide applications / MIT |
| [qtconsole](https://jupyter.org) | 5.4.0 | Jupyter Qt Console / BSD-3-Clause |
| [qtpy](https://github.com/spyder-ide/qtpy) | 2.2.0 | Abstraction layer for PyQt5/PyQt4/PySide / MIT |
| [qtwebkit](https://wiki.qt.io/Qt_WebKit) | 5.212 | WebKit is one of the major engine to render webpages and execute JavaScript code / LGPL-2.1-only |
| [queuelib](https://github.com/scrapy/queuelib) | 1.5.0 | Collection of persistent (disk-based) queues / BSD |
| [readline](https://tiswww.case.edu/php/chet/readline/rltop.html) | 8.2 | library for editing command lines as they are typed in / GPL-3.0-only |
| [regex](https://github.com/mrabarnett/mrab-regex) | 2022.7.9 | Alternative regular expression module, to replace re / Apache-2.0 |
| [requests](https://requests.readthedocs.io/en/latest/) | 2.28.1 | Requests is an elegant and simple HTTP library for Python, built with ♥. / Apache-2.0 |
| [requests-file](http://github.com/dashea/requests-file) | 1.5.1 | file transport adapter for Requests / Apache |
| [rope](https://github.com/python-rope/rope) | 1.7.0 | A python refactoring library / LGPL-3.0-or-later |
| [rtree](https://github.com/Toblerity/rtree) | 1.0.1 | R-Tree spatial index for Python GIS / MIT |
| [scikit-image](https://scikit-image.org/) | 0.19.3 | Image processing in Python. / BSD-3-Clause |
| [scikit-learn](https://scikit-learn.org/) | 1.2.1 | A set of python modules for machine learning and data mining / BSD-3-Clause |
| [scikit-learn-intelex](https://intel.github.io/scikit-learn-intelex) | 2023.0.2 | Intel(R) Extension for Scikit-learn is a seamless way to speed up your Scikit-learn application. / Apache-2.0 AND BSD-2-Clause AND BSD-3-Clause AND MIT |
| [scipy](https://scipy.org/) | 1.10.0 | Scientific Library for Python / BSD-3-Clause |
| [scrapy](https://scrapy.org/) | 2.8.0 | A high-level Python Screen Scraping framework / BSD-3-Clause |
| [seaborn](https://seaborn.pydata.org) | 0.12.2 | Statistical data visualization / BSD-3-Clause |
| [secretstorage](https://github.com/mitya57/secretstorage) | 3.3.1 | Provides a way for securely storing passwords and other secrets. / BSD-3-Clause |
| [send2trash](https://github.com/arsenetar/send2trash) | 1.8.0 | Python library to natively send files to Trash (or Recycle bin) on all platforms. / BSD-3-Clause |
| [service\_identity](https://github.com/pyca/service_identity) | 18.1.0 | Service identity verification for pyOpenSSL. / MIT |
| [setuptools](https://github.com/pypa/setuptools) | 65.6.3 | Download, build, install, upgrade, and uninstall Python packages / MIT |
| [sip](https://www.riverbankcomputing.com/software/sip/) | 6.6.2 | A Python bindings generator for C/C++ libraries / GPL-3.0-only |
| [six](https://six.readthedocs.io/) | 1.16.0 | Python 2 and 3 compatibility utilities / MIT |
| [smart\_open](https://github.com/RaRe-Technologies/smart_open) | 5.2.1 | Python library for efficient streaming of large files / MIT |
| [snappy](https://github.com/google/snappy) | 1.1.9 | A fast compressor/decompressor / BSD-3-clause AND CC-BY-3.0 AND MIT AND CC-BY AND Public Domain |
| [sniffio](https://github.com/python-trio/sniffio) | 1.2.0 | Sniff out which async library your code is running under / Apache-2.0 |
| [snowballstemmer](https://github.com/snowballstem/snowball) | 2.2.0 | Snowball stemming library collection for Python / BSD-3-Clause |
| [sortedcontainers](http://www.grantjenks.com/docs/sortedcontainers/) | 2.4.0 | Python Sorted Container Types: SortedList, SortedDict, and SortedSet / Apache-2.0 |
| [soupsieve](https://facelessuser.github.io/soupsieve) | 2.3.2.post1 | A modern CSS selector implementation for BeautifulSoup / MIT |
| [sphinx](https://www.sphinx-doc.org) | 5.0.2 | Sphinx is a tool that makes it easy to create intelligent and beautiful documentation / BSD-2-Clause |
| [sphinxcontrib-applehelp](https://www.sphinx-doc.org/en/master/) | 1.0.2 | sphinxcontrib-applehelp is a sphinx extension which outputs Apple help books / BSD-2-Clause |
| [sphinxcontrib-devhelp](https://www.sphinx-doc.org/en/master/) | 1.0.2 | sphinxcontrib-devhelp is a sphinx extension which outputs Devhelp document / BSD-2-Clause |
| [sphinxcontrib-htmlhelp](https://www.sphinx-doc.org/en/master/) | 2.0.0 | sphinxcontrib-htmlhelp is a sphinx extension which renders HTML help files. / BSD-2-Clause |
| [sphinxcontrib-jsmath](https://www.sphinx-doc.org/en/master/) | 1.0.1 | A sphinx extension which renders display math in HTML via JavaScript / BSD-2-Clause |
| [sphinxcontrib-qthelp](https://www.sphinx-doc.org/en/master/) | 1.0.3 | sphinxcontrib-qthelp is a sphinx extension which outputs QtHelp document / BSD-2-Clause |
| [sphinxcontrib-serializinghtml](https://www.sphinx-doc.org/en/master/) | 1.1.5 | sphinxcontrib-serializinghtml is a sphinx extension which outputs “serialized” HTML files (json and pickle). / BSD-2-Clause |
| [spyder](https://www.spyder-ide.org/) | 5.4.1 | The Scientific Python Development Environment / MIT |
| [spyder-kernels](https://www.spyder-ide.org/) | 2.4.1 | Jupyter kernels for Spyder’s console / MIT |
| [sqlalchemy](https://www.sqlalchemy.org/) | 1.4.39 | Database Abstraction Library. / MIT |
| [sqlite](https://www.sqlite.org/) | 3.40.1 | Implements a self-contained, zero-configuration, SQL database engine / blessing |
| [stack\_data](https://github.com/alexmojaki/stack_data) | 0.2.0 | Extract data from python stack frames and tracebacks for informative displays / MIT |
| [statsmodels](https://www.statsmodels.org) | 0.13.5 | Statistical computations and models for use with SciPy / BSD-3-Clause |
| [sympy](https://sympy.org) | 1.11.1 | Python library for symbolic mathematics / BSD-3-Clause AND MIT |
| [tabulate](https://github.com/astanin/python-tabulate) | 0.8.10 | Pretty-print tabular data in Python, a library and a command-line utility. / MIT |
| [tbb](https://github.com/oneapi-src/oneTBB) | 2021.7.0 | High level abstract threading library / Apache-2.0 |
| tbb4py | 2021.7.0 | TBB module for Python / Apache-2.0 |
| [tblib](https://github.com/ionelmc/python-tblib) | 1.7.0 | Traceback serialization library. / BSD 2-Clause |
| [tenacity](https://github.com/jd/tenacity) | 8.0.1 | Retry a flaky function whenever an exception occurs until it works / Apache-2.0 |
| [terminado](https://github.com/jupyter/terminado) | 0.17.1 | Terminals served by tornado websockets / BSD-2-Clause |
| [text-unidecode](https://github.com/kmike/text-unidecode/) | 1.3 | The most basic Text::Unidecode port / Artistic |
| [textdistance](https://github.com/orsinium/textdistance) | 4.2.1 | TextDistance – python library for comparing distance between two or more sequences by many algorithms. / MIT |
| [threadpoolctl](https://github.com/joblib/threadpoolctl) | 2.2.0 | Python helpers to control the threadpools of native libraries / BSD 3-Clause |
| [three-merge](https://github.com/spyder-ide/three-merge) | 0.1.1 | Simple Python library to perform a 3-way merge between strings / MIT |
| [tifffile](https://github.com/cgohlke/tifffile) | 2021.7.2 | Read and write image data from and to TIFF files. / BSD-3-Clause |
| [tinycss2](https://www.courtbouillon.org/tinycss2) | 1.2.1 | Low-level CSS parser for Python / BSD-3-Clause |
| [tk](http://www.tcl.tk/) | 8.6.12 | A dynamic programming language with GUI support. Bundles Tcl and Tk. / Tcl/Tk |
| [tldextract](https://github.com/john-kurkowski/tldextract) | 3.2.0 | Accurately separate the TLD from the registered domain andsubdomains of a URL, using the Public Suffix List. / BSD-3-Clause |
| [tokenizers](https://github.com/huggingface/tokenizers) | 0.11.4 | Fast State-of-the-Art Tokenizers optimized for Research and Production / Apache-2.0 |
| [toml](https://github.com/uiri/toml) | 0.10.2 | Python lib for TOML. / MIT |
| [tomli](https://github.com/hukkin/tomli) | 2.0.1 | A simple TOML parser / MIT |
| [tomlkit](https://github.com/sdispater/tomlkit) | 0.11.1 | Style preserving TOML library / MIT |
| [toolz](https://toolz.readthedocs.io/) | 0.12.0 | List processing tools and functional utilities / BSD-3-Clause |
| [tornado](https://www.tornadoweb.org/) | 6.1 | A Python web framework and asynchronous networking library, originally developed at FriendFeed. / Apache-2.0 |
| [tqdm](https://tqdm.github.io/) | 4.64.1 | A Fast, Extensible Progress Meter / MPL-2.0 AND MIT |
| [traitlets](http://traitlets.readthedocs.org/) | 5.7.1 | Configuration system for Python applications / BSD-3-Clause |
| [transformers](https://github.com/huggingface/transformers) | 4.24.0 | State-of-the-art Machine Learning for JAX, PyTorch and TensorFlow / Apache-2.0 |
| [twisted](https://twistedmatrix.com/) | 22.2.0 | An asynchronous networking framework written in Python / MIT |
| [typing-extensions](https://github.com/python/typing_extensions) | 4.4.0 | Backported and Experimental Type Hints for Python / PSF-2.0 |
| [typing\_extensions](https://github.com/python/typing_extensions) | 4.4.0 | Backported and Experimental Type Hints for Python / PSF-2.0 |
| [tzdata](https://www.iana.org/time-zones) | 2022g | The Time Zone Database (called tz, tzdb or zoneinfo) / CC-PDDC OR BSD-3-Clause |
| [ujson](https://github.com/ultrajson/ultrajson) | 5.4.0 | Ultra fast JSON decoder and encoder written in C with Python bindings / BSD-3-Clause |
| [unidecode](https://pypi.python.org/pypi/Unidecode) | 1.2.0 | ASCII transliterations of Unicode text / GPL-2.0-or-later |
| [unixodbc](http://www.unixodbc.org/) | 2.3.11 | ODBC on non MS Windows platforms / LGPL-2.1-or-later |
| [urllib3](https://urllib3.readthedocs.io/) | 1.26.14 | HTTP library with thread-safe connection pooling, file post, and more. / MIT |
| [w3lib](https://github.com/scrapy/w3lib) | 1.21.0 | Library of web-related functions / BSD |
| [watchdog](http://github.com/gorakhargosh/watchdog) | 2.1.6 | Filesystem events monitoring / Apache-2.0 |
| [wcwidth](https://github.com/jquast/wcwidth) | 0.2.5 | Measures number of Terminal column cells of wide-character codes. / MIT |
| [webencodings](https://github.com/gsnedders/python-webencodings) | 0.5.1 | Character encoding aliases for legacy web content / BSD 3-Clause |
| [websocket-client](https://github.com/liris/websocket-client) | 0.58.0 | WebSocket client for python. hybi13 is supported. / BSD-3-Clause |
| [werkzeug](https://palletsprojects.com/p/werkzeug/) | 2.2.2 | The comprehensive WSGI web application library. / BSD-3-Clause |
| [whatthepatch](https://github.com/cscorley/whatthepatch) | 1.0.2 | What The Patch!? is a library for both parsing and applying patch files / MIT |
| [wheel](https://github.com/pypa/wheel) | 0.38.4 | A built-package format for Python. / MIT |
| [widgetsnbextension](https://ipython.org) | 3.5.2 | Interactive Widgets for Jupyter / BSD-3-Clause |
| [wrapt](https://github.com/GrahamDumpleton/wrapt) | 1.14.1 | Module for decorators, wrappers and monkey patching / BSD-2-Clause |
| [wurlitzer](https://github.com/minrk/wurlitzer) | 3.0.2 | Capture C-level stdout/stderr in Python / MIT |
| [xarray](https://github.com/pydata/xarray) | 2022.11.0 | N-D labeled arrays and datasets in Python. / Apache-2.0 |
| [xz](https://tukaani.org/xz/) | 5.2.10 | Data compression software with high compression ratio / LGPL-2.1-or-later and GPL-2.0-or-later |
| [yaml](http://pyyaml.org/wiki/LibYAML) | 0.2.5 | A C library for parsing and emitting YAML / MIT |
| [yapf](https://github.com/google/yapf) | 0.31.0 | A formatter for Python files / Apache 2.0 |
| [zeromq](http://zeromq.org) | 4.3.4 | A high-performance asynchronous messaging library. / LGPL-3.0-or-later |
| [zfp](https://computation.llnl.gov/projects/floating-point-compression) | 0.5.5 | Library for compressed numerical arrays that support high throughput read and write random access / BSD-3-Clause |
| [zict](https://github.com/mrocklin/zict) | 2.1.0 | Composable Dictionary Classes / BSD-3-Clause |
| [zipp](https://github.com/jaraco/zipp) | 3.11.0 | A pathlib-compatible Zipfile object wrapper / MIT |
| [zlib](https://zlib.net/) | 1.2.13 | Massively spiffy yet delicately unobtrusive compression library / Zlib |
| zope | 1.0 | web application server / BSD |
| [zope.interface](https://github.com/zopefoundation/zope.interface) | 5.4.0 | Interfaces for Python / ZPL-2.1 |
| [zstd](https://www.zstd.net) | 1.5.2 | Zstandard - Fast real-time compression algorithm / BSD-3-Clause AND GPL-2.0-or-later |
| Package Name | linux-64 | linux-aarch64 | linux-s390x | osx-arm64 | osx-64 | win-64 |
|---|---|---|---|---|---|---|
| \_anaconda\_depends | 2024.10 | 2024.10 | 2024.10 | 2024.10 | 2024.10 | 2024.10 |
| \_libgcc\_mutex | 0.1 | 0.1 | 0.1 | |||
| \_openmp\_mutex | 5.1 | 5.1 | 5.1 | |||
| aiobotocore | 2.12.3 | 2.12.3 | 2.12.3 | 2.12.3 | 2.12.3 | 2.12.3 |
| aiohappyeyeballs | 2.4.0 | 2.4.0 | 2.4.0 | 2.4.0 | 2.4.0 | 2.4.0 |
| aiohttp | 3.10.5 | 3.10.5 | 3.10.5 | 3.10.5 | 3.10.5 | 3.10.5 |
| aioitertools | 0.7.1 | 0.7.1 | 0.7.1 | 0.7.1 | 0.7.1 | 0.7.1 |
| aiosignal | 1.2.0 | 1.2.0 | 1.2.0 | 1.2.0 | 1.2.0 | 1.2.0 |
| alabaster | 0.7.16 | 0.7.16 | 0.7.16 | 0.7.16 | 0.7.16 | |
| altair | 5.0.1 | 5.0.1 | 5.0.1 | 5.0.1 | 5.0.1 | |
| anaconda-anon-usage | 0.4.4 | 0.4.4 | 0.4.4 | 0.4.4 | 0.4.4 | 0.4.4 |
| anaconda-catalogs | 0.2.0 | 0.2.0 | 0.2.0 | 0.2.0 | 0.2.0 | 0.2.0 |
| anaconda-client | 1.12.3 | 1.12.3 | 1.12.3 | 1.12.3 | 1.12.3 | 1.12.3 |
| anaconda-cloud-auth | 0.5.1 | 0.5.1 | 0.5.1 | 0.5.1 | 0.5.1 | |
| anaconda-navigator | 2.6.3 | 2.6.3 | 2.6.3 | 2.6.3 | 2.6.3 | |
| anaconda-project | 0.11.1 | 0.11.1 | 0.11.1 | 0.11.1 | 0.11.1 | 0.11.1 |
| anaconda\_powershell\_prompt | 1.1.0 | |||||
| anaconda\_prompt | 1.1.0 | |||||
| annotated-types | 0.6.0 | 0.6.0 | 0.6.0 | 0.6.0 | 0.6.0 | |
| anyio | 4.2.0 | 4.2.0 | 4.2.0 | 4.2.0 | 4.2.0 | |
| aom | 3.6.0 | 3.6.0 | 3.6.0 | 3.6.0 | 3.6.0 | 3.6.0 |
| appdirs | 1.4.4 | 1.4.4 | 1.4.4 | 1.4.4 | 1.4.4 | |
| applaunchservices | 0.3.0 | 0.3.0 | ||||
| appnope | 0.1.3 | 0.1.3 | ||||
| appscript | 1.2.5 | 1.2.5 | ||||
| archspec | 0.2.3 | 0.2.3 | 0.2.3 | 0.2.3 | 0.2.3 | 0.2.3 |
| argon2-cffi | 21.3.0 | 21.3.0 | 21.3.0 | 21.3.0 | 21.3.0 | |
| argon2-cffi-bindings | 21.2.0 | 21.2.0 | 21.2.0 | 21.2.0 | 21.2.0 | |
| arrow | 1.2.3 | 1.2.3 | 1.2.3 | 1.2.3 | 1.2.3 | |
| arrow-cpp | 16.1.0 | 16.1.0 | 16.1.0 | 16.1.0 | 16.1.0 | 16.1.0 |
| astroid | 2.14.2 | 2.14.2 | 2.14.2 | 2.14.2 | 2.14.2 | 2.14.2 |
| astropy | 6.1.3 | 6.1.3 | 6.1.3 | 6.1.3 | 6.1.3 | 6.1.3 |
| astropy-iers-data | 0.2024.9.2.0.33.23 | 0.2024.9.2.0.33.23 | 0.2024.9.2.0.33.23 | 0.2024.9.2.0.33.23 | 0.2024.9.2.0.33.23 | 0.2024.9.2.0.33.23 |
| asttokens | 2.0.5 | 2.0.5 | 2.0.5 | 2.0.5 | 2.0.5 | 2.0.5 |
| async-lru | 2.0.4 | 2.0.4 | 2.0.4 | 2.0.4 | 2.0.4 | |
| atomicwrites | 1.4.0 | 1.4.0 | 1.4.0 | 1.4.0 | 1.4.0 | |
| attrs | 23.1.0 | 23.1.0 | 23.1.0 | 23.1.0 | 23.1.0 | 23.1.0 |
| automat | 20.2.0 | 20.2.0 | 20.2.0 | 20.2.0 | 20.2.0 | |
| autopep8 | 2.0.4 | 2.0.4 | 2.0.4 | 2.0.4 | 2.0.4 | |
| aws-c-auth | 0.6.19 | 0.6.19 | 0.6.19 | 0.6.19 | 0.6.19 | 0.6.19 |
| aws-c-cal | 0.5.20 | 0.5.20 | 0.5.20 | 0.5.20 | 0.5.20 | 0.5.20 |
| aws-c-common | 0.8.5 | 0.8.5 | 0.8.5 | 0.8.5 | 0.8.5 | 0.8.5 |
| aws-c-compression | 0.2.16 | 0.2.16 | 0.2.16 | 0.2.16 | 0.2.16 | 0.2.16 |
| aws-c-event-stream | 0.2.15 | 0.2.15 | 0.2.15 | 0.2.15 | 0.2.15 | 0.2.15 |
| aws-c-http | 0.6.25 | 0.6.25 | 0.6.25 | 0.6.25 | 0.6.25 | 0.6.25 |
| aws-c-io | 0.13.10 | 0.13.10 | 0.13.10 | 0.13.10 | 0.13.10 | 0.13.10 |
| aws-c-mqtt | 0.7.13 | 0.7.13 | 0.7.13 | 0.7.13 | 0.7.13 | 0.7.13 |
| aws-c-s3 | 0.1.51 | 0.1.51 | 0.1.51 | 0.1.51 | 0.1.51 | 0.1.51 |
| aws-c-sdkutils | 0.1.6 | 0.1.6 | 0.1.6 | 0.1.6 | 0.1.6 | 0.1.6 |
| aws-checksums | 0.1.13 | 0.1.13 | 0.1.13 | 0.1.13 | 0.1.13 | 0.1.13 |
| aws-crt-cpp | 0.18.16 | 0.18.16 | 0.18.16 | 0.18.16 | 0.18.16 | 0.18.16 |
| aws-sdk-cpp | 1.10.55 | 1.10.55 | 1.10.55 | 1.10.55 | 1.10.55 | 1.10.55 |
| babel | 2.11.0 | 2.11.0 | 2.11.0 | 2.11.0 | 2.11.0 | |
| bcrypt | 3.2.0 | 3.2.0 | 3.2.0 | 3.2.0 | 3.2.0 | |
| beautifulsoup4 | 4.12.3 | 4.12.3 | 4.12.3 | 4.12.3 | 4.12.3 | 4.12.3 |
| binaryornot | 0.4.4 | 0.4.4 | 0.4.4 | 0.4.4 | 0.4.4 | |
| black | 24.8.0 | 24.8.0 | 24.8.0 | 24.8.0 | 24.8.0 | 24.8.0 |
| blas | 1.0 | 1.0 | 1.0 | 1.0 | 1.0 | 1.0 |
| bleach | 4.1.0 | 4.1.0 | 4.1.0 | 4.1.0 | 4.1.0 | 4.1.0 |
| blinker | 1.6.2 | 1.6.2 | 1.6.2 | 1.6.2 | 1.6.2 | 1.6.2 |
| blosc | 1.21.3 | 1.21.3 | 1.21.3 | 1.21.3 | 1.21.3 | 1.21.3 |
| bokeh | 3.6.0 | 3.6.0 | 3.6.0 | 3.6.0 | 3.6.0 | 3.6.0 |
| boltons | 23.0.0 | 23.0.0 | 23.0.0 | 23.0.0 | 23.0.0 | 23.0.0 |
| boost-cpp | 1.82.0 | 1.82.0 | 1.82.0 | 1.82.0 | 1.82.0 | 1.82.0 |
| botocore | 1.34.69 | 1.34.69 | 1.34.69 | 1.34.69 | 1.34.69 | 1.34.69 |
| bottleneck | 1.3.7 | 1.3.7 | 1.3.7 | 1.3.7 | 1.3.7 | 1.3.7 |
| brotli | 1.0.9 | 1.0.9 | 1.0.9 | 1.0.9 | 1.0.9 | 1.0.9 |
| brotli-bin | 1.0.9 | 1.0.9 | 1.0.9 | 1.0.9 | 1.0.9 | 1.0.9 |
| brotli-python | 1.0.9 | 1.0.9 | 1.0.9 | 1.0.9 | 1.0.9 | 1.0.9 |
| brunsli | 0.1 | 0.1 | 0.1 | 0.1 | ||
| bzip2 | 1.0.8 | 1.0.8 | 1.0.8 | 1.0.8 | 1.0.8 | 1.0.8 |
| c-ares | 1.19.1 | 1.19.1 | 1.19.1 | 1.19.1 | 1.19.1 | 1.19.1 |
| c-blosc2 | 2.12.0 | 2.12.0 | 2.12.0 | 2.12.0 | 2.12.0 | |
| ca-certificates | 2024.9.24 | 2024.9.24 | 2024.9.24 | 2024.9.24 | 2024.9.24 | 2024.9.24 |
| cachetools | 5.3.3 | 5.3.3 | 5.3.3 | 5.3.3 | 5.3.3 | |
| cctools | 949.0.1 | 949.0.1 | ||||
| cctools\_osx-64 | 949.0.1 | |||||
| cctools\_osx-arm64 | 949.0.1 | |||||
| certifi | 2024.8.30 | 2024.8.30 | 2024.8.30 | 2024.8.30 | 2024.8.30 | 2024.8.30 |
| cffi | 1.17.1 | 1.17.1 | 1.17.1 | 1.17.1 | 1.17.1 | 1.17.1 |
| cfitsio | 3.470 | 3.470 | 3.470 | 3.470 | 3.470 | 3.470 |
| chardet | 4.0.0 | 4.0.0 | 4.0.0 | 4.0.0 | 4.0.0 | 4.0.0 |
| charls | 2.2.0 | 2.2.0 | 2.2.0 | 2.2.0 | 2.2.0 | |
| charset-normalizer | 3.3.2 | 3.3.2 | 3.3.2 | 3.3.2 | 3.3.2 | 3.3.2 |
| click | 8.1.7 | 8.1.7 | 8.1.7 | 8.1.7 | 8.1.7 | 8.1.7 |
| cloudpickle | 3.0.0 | 3.0.0 | 3.0.0 | 3.0.0 | 3.0.0 | 3.0.0 |
| colorama | 0.4.6 | 0.4.6 | 0.4.6 | 0.4.6 | 0.4.6 | 0.4.6 |
| colorcet | 3.1.0 | 3.1.0 | 3.1.0 | 3.1.0 | 3.1.0 | |
| comm | 0.2.1 | 0.2.1 | 0.2.1 | 0.2.1 | 0.2.1 | 0.2.1 |
| conda | 24.9.2 | 24.9.2 | 24.9.2 | 24.9.2 | 24.9.2 | 24.9.2 |
| conda-build | 24.9.0 | 24.9.0 | 24.9.0 | 24.9.0 | 24.9.0 | 24.9.0 |
| conda-content-trust | 0.2.0 | 0.2.0 | 0.2.0 | 0.2.0 | 0.2.0 | 0.2.0 |
| conda-index | 0.5.0 | 0.5.0 | 0.4.0 | 0.5.0 | 0.5.0 | 0.5.0 |
| conda-libmamba-solver | 24.9.0 | 24.9.0 | 24.9.0 | 24.9.0 | 24.9.0 | 24.9.0 |
| conda-pack | 0.7.1 | 0.7.1 | 0.7.1 | 0.7.1 | 0.7.1 | 0.7.1 |
| conda-package-handling | 2.3.0 | 2.3.0 | 2.3.0 | 2.3.0 | 2.3.0 | 2.3.0 |
| conda-package-streaming | 0.10.0 | 0.10.0 | 0.10.0 | 0.10.0 | 0.10.0 | 0.10.0 |
| conda-repo-cli | 1.0.114 | 1.0.114 | 1.0.114 | 1.0.114 | 1.0.114 | |
| conda-token | 0.5.0 | 0.5.0 | 0.5.0 | 0.5.0 | 0.5.0 | 0.5.0 |
| constantly | 23.10.4 | 23.10.4 | 23.10.4 | 23.10.4 | 23.10.4 | |
| contourpy | 1.2.0 | 1.2.0 | 1.2.0 | 1.2.0 | 1.2.0 | 1.2.0 |
| cookiecutter | 2.6.0 | 2.6.0 | 2.6.0 | 2.6.0 | 2.6.0 | |
| cryptography | 43.0.0 | 43.0.0 | 43.0.0 | 43.0.0 | 43.0.0 | 43.0.0 |
| cssselect | 1.2.0 | 1.2.0 | 1.2.0 | 1.2.0 | 1.2.0 | |
| curl | 8.9.1 | 8.9.1 | 8.9.1 | 8.9.1 | 8.9.1 | 8.9.1 |
| cycler | 0.11.0 | 0.11.0 | 0.11.0 | 0.11.0 | 0.11.0 | 0.11.0 |
| cyrus-sasl | 2.1.28 | 2.1.28 | 2.1.28 | 2.1.28 | ||
| cytoolz | 0.12.2 | 0.12.2 | 0.12.2 | 0.12.2 | 0.12.2 | 0.12.2 |
| dask | 2024.8.2 | 2024.8.2 | 2024.8.2 | 2024.8.2 | 2024.8.2 | 2024.8.2 |
| dask-core | 2024.8.2 | 2024.8.2 | 2024.8.2 | 2024.8.2 | 2024.8.2 | 2024.8.2 |
| dask-expr | 1.1.13 | 1.1.13 | 1.1.13 | 1.1.13 | 1.1.13 | 1.1.13 |
| datashader | 0.16.3 | 0.16.3 | 0.16.3 | 0.16.3 | 0.16.3 | |
| dav1d | 1.2.1 | 1.2.1 | 1.2.1 | 1.2.1 | 1.2.1 | 1.2.1 |
| dbus | 1.13.18 | 1.13.18 | ||||
| debugpy | 1.6.7 | 1.6.7 | 1.6.7 | 1.6.7 | 1.6.7 | 1.6.7 |
| decorator | 5.1.1 | 5.1.1 | 5.1.1 | 5.1.1 | 5.1.1 | 5.1.1 |
| defusedxml | 0.7.1 | 0.7.1 | 0.7.1 | 0.7.1 | 0.7.1 | 0.7.1 |
| diff-match-patch | 20200713 | 20200713 | 20200713 | 20200713 | 20200713 | |
| dill | 0.3.8 | 0.3.8 | 0.3.8 | 0.3.8 | 0.3.8 | 0.3.8 |
| distributed | 2024.8.2 | 2024.8.2 | 2024.8.2 | 2024.8.2 | 2024.8.2 | 2024.8.2 |
| distro | 1.9.0 | 1.9.0 | 1.9.0 | 1.9.0 | 1.9.0 | 1.9.0 |
| dmglib | 0.9.5 | 0.9.5 | ||||
| docstring-to-markdown | 0.11 | 0.11 | 0.11 | 0.11 | 0.11 | |
| docutils | 0.18.1 | 0.18.1 | 0.18.1 | 0.18.1 | 0.18.1 | |
| et\_xmlfile | 1.1.0 | 1.1.0 | 1.1.0 | 1.1.0 | 1.1.0 | 1.1.0 |
| executing | 0.8.3 | 0.8.3 | 0.8.3 | 0.8.3 | 0.8.3 | 0.8.3 |
| expat | 2.6.3 | 2.6.3 | 2.6.3 | 2.6.3 | 2.6.3 | 2.6.3 |
| filelock | 3.13.1 | 3.13.1 | 3.13.1 | 3.13.1 | 3.13.1 | 3.13.1 |
| flake8 | 7.0.0 | 7.0.0 | 7.0.0 | 7.0.0 | 7.0.0 | |
| flask | 3.0.3 | 3.0.3 | 3.0.3 | 3.0.3 | 3.0.3 | 3.0.3 |
| fmt | 9.1.0 | 9.1.0 | 9.1.0 | 9.1.0 | 9.1.0 | 9.1.0 |
| fontconfig | 2.14.1 | 2.14.1 | ||||
| fonttools | 4.51.0 | 4.51.0 | 4.51.0 | 4.51.0 | 4.51.0 | 4.51.0 |
| freetype | 2.12.1 | 2.12.1 | 2.12.1 | 2.12.1 | 2.12.1 | 2.12.1 |
| frozendict | 2.4.2 | 2.4.2 | 2.4.2 | 2.4.2 | 2.4.2 | 2.4.2 |
| frozenlist | 1.4.0 | 1.4.0 | 1.4.0 | 1.4.0 | 1.4.0 | 1.4.0 |
| fsspec | 2024.6.1 | 2024.6.1 | 2024.6.1 | 2024.6.1 | 2024.6.1 | 2024.6.1 |
| gensim | 4.3.3 | 4.3.3 | 4.3.3 | 4.3.3 | 4.3.3 | |
| gettext | 0.21.0 | 0.21.0 | ||||
| gflags | 2.2.2 | 2.2.2 | 2.2.2 | 2.2.2 | 2.2.2 | 2.2.2 |
| giflib | 5.2.1 | 5.2.1 | 5.2.1 | 5.2.1 | 5.2.1 | 5.2.1 |
| gitdb | 4.0.7 | 4.0.7 | 4.0.7 | 4.0.7 | 4.0.7 | |
| gitpython | 3.1.43 | 3.1.43 | 3.1.43 | 3.1.43 | 3.1.43 | |
| glib | 2.78.4 | 2.78.4 | 2.78.4 | 2.78.4 | ||
| glib-tools | 2.78.4 | 2.78.4 | 2.78.4 | 2.78.4 | ||
| glog | 0.5.0 | 0.5.0 | 0.5.0 | 0.5.0 | 0.5.0 | 0.5.0 |
| greenlet | 3.0.1 | 3.0.1 | 3.0.1 | 3.0.1 | 3.0.1 | 3.0.1 |
| gst-plugins-base | 1.14.1 | 1.14.1 | 1.14.1 | 1.14.1 | ||
| gstreamer | 1.14.1 | 1.14.1 | 1.14.1 | 1.14.1 | ||
| h11 | 0.14.0 | 0.14.0 | 0.14.0 | 0.14.0 | 0.14.0 | |
| h5py | 3.11.0 | 3.11.0 | 3.11.0 | 3.11.0 | 3.11.0 | 3.11.0 |
| hdf5 | 1.12.1 | 1.12.1 | 1.12.1 | 1.12.1 | 1.12.1 | 1.12.1 |
| heapdict | 1.0.1 | 1.0.1 | 1.0.1 | 1.0.1 | 1.0.1 | 1.0.1 |
| holoviews | 1.19.1 | 1.19.1 | 1.19.1 | 1.19.1 | 1.19.1 | |
| httpcore | 1.0.2 | 1.0.2 | 1.0.2 | 1.0.2 | 1.0.2 | |
| httpx | 0.27.0 | 0.27.0 | 0.27.0 | 0.27.0 | 0.27.0 | |
| hvplot | 0.11.0 | 0.11.0 | 0.11.0 | 0.11.0 | 0.11.0 | |
| hyperlink | 21.0.0 | 21.0.0 | 21.0.0 | 21.0.0 | 21.0.0 | |
| icc\_rt | 2022.1.0 | |||||
| icu | 73.1 | 73.1 | 73.1 | 73.1 | 73.1 | 73.1 |
| idna | 3.7 | 3.7 | 3.7 | 3.7 | 3.7 | 3.7 |
| imagecodecs | 2023.1.23 | 2023.1.23 | 2023.1.23 | 2023.1.23 | 2023.1.23 | 2023.1.23 |
| imageio | 2.33.1 | 2.33.1 | 2.33.1 | 2.33.1 | 2.33.1 | 2.33.1 |
| imagesize | 1.4.1 | 1.4.1 | 1.4.1 | 1.4.1 | 1.4.1 | |
| imbalanced-learn | 0.12.3 | 0.12.3 | 0.12.3 | 0.12.3 | 0.12.3 | 0.12.3 |
| importlib-metadata | 7.0.1 | 7.0.1 | 7.0.1 | 7.0.1 | 7.0.1 | |
| incremental | 22.10.0 | 22.10.0 | 22.10.0 | 22.10.0 | 22.10.0 | |
| inflection | 0.5.1 | 0.5.1 | 0.5.1 | 0.5.1 | 0.5.1 | |
| iniconfig | 1.1.1 | 1.1.1 | 1.1.1 | 1.1.1 | 1.1.1 | 1.1.1 |
| intake | 2.0.7 | 2.0.7 | 2.0.7 | 2.0.7 | 2.0.7 | 2.0.7 |
| intel-openmp | 2023.1.0 | 2023.1.0 | ||||
| intervaltree | 3.1.0 | 3.1.0 | 3.1.0 | 3.1.0 | 3.1.0 | |
| ipykernel | 6.28.0 | 6.28.0 | 6.28.0 | 6.28.0 | 6.28.0 | 6.28.0 |
| ipython | 8.27.0 | 8.27.0 | 8.27.0 | 8.27.0 | 8.27.0 | 8.27.0 |
| ipython\_genutils | 0.2.0 | 0.2.0 | 0.2.0 | 0.2.0 | 0.2.0 | |
| ipywidgets | 7.8.1 | 7.8.1 | 7.8.1 | 7.8.1 | 7.8.1 | |
| isort | 5.13.2 | 5.13.2 | 5.13.2 | 5.13.2 | 5.13.2 | 5.13.2 |
| itemadapter | 0.3.0 | 0.3.0 | 0.3.0 | 0.3.0 | 0.3.0 | |
| itemloaders | 1.1.0 | 1.1.0 | 1.1.0 | 1.1.0 | 1.1.0 | |
| itsdangerous | 2.2.0 | 2.2.0 | 2.2.0 | 2.2.0 | 2.2.0 | 2.2.0 |
| jaraco.classes | 3.2.1 | 3.2.1 | 3.2.1 | 3.2.1 | 3.2.1 | |
| jedi | 0.19.1 | 0.19.1 | 0.19.1 | 0.19.1 | 0.19.1 | 0.19.1 |
| jeepney | 0.7.1 | 0.7.1 | ||||
| jellyfish | 1.0.1 | 1.0.1 | 1.0.1 | 1.0.1 | 1.0.1 | |
| jinja2 | 3.1.4 | 3.1.4 | 3.1.4 | 3.1.4 | 3.1.4 | 3.1.4 |
| jmespath | 1.0.1 | 1.0.1 | 1.0.1 | 1.0.1 | 1.0.1 | 1.0.1 |
| joblib | 1.4.2 | 1.4.2 | 1.4.2 | 1.4.2 | 1.4.2 | 1.4.2 |
| jpeg | 9e | 9e | 9e | 9e | 9e | 9e |
| jq | 1.6 | 1.6 | 1.6 | 1.6 | 1.6 | |
| json5 | 0.9.6 | 0.9.6 | 0.9.6 | 0.9.6 | 0.9.6 | |
| jsonpatch | 1.33 | 1.33 | 1.33 | 1.33 | 1.33 | 1.33 |
| jsonpointer | 2.1 | 2.1 | 2.1 | 2.1 | 2.1 | 2.1 |
| jsonschema | 4.23.0 | 4.23.0 | 4.23.0 | 4.23.0 | 4.23.0 | 4.23.0 |
| jsonschema-specifications | 2023.7.1 | 2023.7.1 | 2023.7.1 | 2023.7.1 | 2023.7.1 | 2023.7.1 |
| jupyter | 1.0.0 | 1.0.0 | 1.0.0 | 1.0.0 | 1.0.0 | 1.0.0 |
| jupyter-lsp | 2.2.0 | 2.2.0 | 2.2.0 | 2.2.0 | 2.2.0 | |
| jupyter\_client | 8.6.0 | 8.6.0 | 8.6.0 | 8.6.0 | 8.6.0 | 8.6.0 |
| jupyter\_console | 6.6.3 | 6.6.3 | 6.6.3 | 6.6.3 | 6.6.3 | 6.6.3 |
| jupyter\_core | 5.7.2 | 5.7.2 | 5.7.2 | 5.7.2 | 5.7.2 | 5.7.2 |
| jupyter\_events | 0.10.0 | 0.10.0 | 0.10.0 | 0.10.0 | 0.10.0 | |
| jupyter\_server | 2.14.1 | 2.14.1 | 2.14.1 | 2.14.1 | 2.14.1 | |
| jupyter\_server\_terminals | 0.4.4 | 0.4.4 | 0.4.4 | 0.4.4 | 0.4.4 | |
| jupyterlab | 4.2.5 | 4.2.5 | 4.2.5 | 4.2.5 | 4.2.5 | |
| jupyterlab-variableinspector | 3.1.0 | 3.1.0 | 3.1.0 | 3.1.0 | 3.1.0 | |
| jupyterlab\_pygments | 0.1.2 | 0.1.2 | 0.2.2 | 0.1.2 | 0.1.2 | 0.1.2 |
| jupyterlab\_server | 2.27.3 | 2.27.3 | 2.27.3 | 2.27.3 | 2.27.3 | |
| jupyterlab\_widgets | 1.0.0 | 1.0.0 | 1.0.0 | 1.0.0 | 1.0.0 | |
| jxrlib | 1.1 | 1.1 | 1.1 | 1.1 | 1.1 | |
| keyring | 24.3.1 | 24.3.1 | 24.3.1 | 24.3.1 | 24.3.1 | |
| kiwisolver | 1.4.4 | 1.4.4 | 1.4.4 | 1.4.4 | 1.4.4 | 1.4.4 |
| krb5 | 1.20.1 | 1.20.1 | 1.20.1 | 1.20.1 | 1.20.1 | 1.20.1 |
| lazy-object-proxy | 1.10.0 | 1.10.0 | 1.10.0 | 1.10.0 | 1.10.0 | 1.10.0 |
| lazy\_loader | 0.4 | 0.4 | 0.4 | 0.4 | 0.4 | 0.4 |
| lcms2 | 2.12 | 2.12 | 2.12 | 2.12 | 2.12 | 2.12 |
| ld64 | 530 | 530 | ||||
| ld64\_osx-64 | 530 | |||||
| ld64\_osx-arm64 | 530 | |||||
| ld\_impl\_linux-64 | 2.40 | |||||
| ld\_impl\_linux-aarch64 | 2.40 | |||||
| ld\_impl\_linux-s390x | 2.40 | |||||
| ldid | 2.1.5 | 2.1.5 | ||||
| lerc | 3.0 | 3.0 | 3.0 | 3.0 | 3.0 | 3.0 |
| libabseil | 20240116.2 | 20240116.2 | 20240116.2 | 20240116.2 | 20240116.2 | 20240116.2 |
| libaec | 1.0.4 | 1.0.4 | 1.0.4 | 1.0.4 | 1.0.4 | 1.0.4 |
| libarchive | 3.6.2 | 3.6.2 | 3.7.4 | 3.7.4 | 3.7.4 | 3.7.4 |
| libavif | 0.11.1 | 0.11.1 | 0.11.1 | 0.11.1 | 0.11.1 | 0.11.1 |
| libboost | 1.82.0 | 1.82.0 | 1.82.0 | 1.82.0 | 1.82.0 | 1.82.0 |
| libbrotlicommon | 1.0.9 | 1.0.9 | 1.0.9 | 1.0.9 | 1.0.9 | 1.0.9 |
| libbrotlidec | 1.0.9 | 1.0.9 | 1.0.9 | 1.0.9 | 1.0.9 | 1.0.9 |
| libbrotlienc | 1.0.9 | 1.0.9 | 1.0.9 | 1.0.9 | 1.0.9 | 1.0.9 |
| libclang | 14.0.6 | 14.0.6 | 14.0.6 | 14.0.6 | 14.0.6 | |
| libclang13 | 14.0.6 | 14.0.6 | 14.0.6 | 14.0.6 | 14.0.6 | |
| libcups | 2.4.2 | 2.4.2 | ||||
| libcurl | 8.9.1 | 8.9.1 | 8.9.1 | 8.9.1 | 8.9.1 | 8.9.1 |
| libcxx | 14.0.6 | 14.0.6 | ||||
| libdeflate | 1.17 | 1.17 | 1.17 | 1.17 | 1.17 | 1.17 |
| libedit | 3.1.20230828 | 3.1.20230828 | 3.1.20230828 | 3.1.20230828 | 3.1.20230828 | |
| libev | 4.33 | 4.33 | 4.33 | 4.33 | 4.33 | |
| libevent | 2.1.12 | 2.1.12 | 2.1.12 | 2.1.12 | 2.1.12 | 2.1.12 |
| libffi | 3.4.4 | 3.4.4 | 3.4.4 | 3.4.4 | 3.4.4 | 3.4.4 |
| libgcc-ng | 11.2.0 | 11.2.0 | 11.2.0 | |||
| libgfortran | 5.0.0 | 5.0.0 | ||||
| libgfortran-ng | 11.2.0 | 11.2.0 | 11.2.0 | |||
| libgfortran5 | 11.2.0 | 11.2.0 | 11.2.0 | 11.3.0 | 11.3.0 | |
| libglib | 2.78.4 | 2.78.4 | 2.78.4 | 2.78.4 | ||
| libgomp | 11.2.0 | 11.2.0 | 11.2.0 | |||
| libgrpc | 1.62.2 | 1.62.2 | 1.62.2 | 1.62.2 | 1.62.2 | 1.62.2 |
| libiconv | 1.16 | 1.16 | 1.16 | 1.16 | 1.16 | |
| liblief | 0.12.3 | 0.12.3 | 0.12.3 | 0.12.3 | 0.12.3 | 0.12.3 |
| libllvm14 | 14.0.6 | 14.0.6 | 14.0.6 | 14.0.6 | ||
| libmamba | 1.5.8 | 1.5.8 | 1.5.8 | 1.5.8 | 1.5.8 | 1.5.8 |
| libmambapy | 1.5.8 | 1.5.8 | 1.5.8 | 1.5.8 | 1.5.8 | 1.5.8 |
| libnghttp2 | 1.57.0 | 1.57.0 | 1.57.0 | 1.57.0 | 1.57.0 | |
| libopenblas | 0.3.21 | 0.3.21 | 0.3.21 | 0.3.21 | ||
| libpng | 1.6.39 | 1.6.39 | 1.6.39 | 1.6.39 | 1.6.39 | 1.6.39 |
| libpq | 12.17 | 12.17 | 12.17 | 12.17 | 12.17 | |
| libprotobuf | 4.25.3 | 4.25.3 | 4.25.3 | 4.25.3 | 4.25.3 | 4.25.3 |
| libsodium | 1.0.18 | 1.0.18 | 1.0.18 | 1.0.18 | 1.0.18 | 1.0.18 |
| libsolv | 0.7.24 | 0.7.24 | 0.7.24 | 0.7.24 | 0.7.24 | 0.7.24 |
| libspatialindex | 1.9.3 | 1.9.3 | 1.9.3 | 1.9.3 | 1.9.3 | |
| libssh2 | 1.11.0 | 1.11.0 | 1.11.0 | 1.11.0 | 1.11.0 | 1.11.0 |
| libstdcxx-ng | 11.2.0 | 11.2.0 | 11.2.0 | |||
| libthrift | 0.15.0 | 0.15.0 | 0.15.0 | 0.15.0 | 0.15.0 | 0.15.0 |
| libtiff | 4.5.1 | 4.5.1 | 4.5.1 | 4.5.1 | 4.5.1 | 4.5.1 |
| libuuid | 1.41.5 | 1.41.5 | 1.41.5 | |||
| libwebp-base | 1.3.2 | 1.3.2 | 1.3.2 | 1.3.2 | 1.3.2 | 1.3.2 |
| libxcb | 1.15 | 1.15 | ||||
| libxkbcommon | 1.0.1 | 1.0.1 | ||||
| libxml2 | 2.10.4 | 2.10.4 | 2.13.1 | 2.13.1 | 2.13.1 | 2.13.1 |
| libxslt | 1.1.37 | 1.1.37 | 1.1.41 | 1.1.41 | 1.1.41 | |
| libzopfli | 1.0.3 | 1.0.3 | 1.0.3 | 1.0.3 | 1.0.3 | 1.0.3 |
| linkify-it-py | 2.0.0 | 2.0.0 | 2.0.0 | 2.0.0 | 2.0.0 | |
| llvm-openmp | 14.0.6 | 14.0.6 | ||||
| llvmlite | 0.43.0 | 0.43.0 | 0.43.0 | 0.43.0 | 0.43.0 | |
| locket | 1.0.0 | 1.0.0 | 1.0.0 | 1.0.0 | 1.0.0 | 1.0.0 |
| lxml | 5.2.1 | 5.2.1 | 5.2.1 | 5.2.1 | 5.2.1 | |
| lz4 | 4.3.2 | 4.3.2 | 4.3.2 | 4.3.2 | 4.3.2 | 4.3.2 |
| lz4-c | 1.9.4 | 1.9.4 | 1.9.4 | 1.9.4 | 1.9.4 | 1.9.4 |
| lzo | 2.10 | 2.10 | 2.10 | 2.10 | 2.10 | |
| m2-msys2-runtime | 2.5.0.17080.65c939c | |||||
| m2-patch | 2.7.5 | |||||
| m2w64-libwinpthread-git | 5.0.0.4634.697f757 | |||||
| markdown | 3.4.1 | 3.4.1 | 3.4.1 | 3.4.1 | 3.4.1 | |
| markdown-it-py | 2.2.0 | 2.2.0 | 2.2.0 | 2.2.0 | 2.2.0 | |
| markupsafe | 2.1.3 | 2.1.3 | 2.1.3 | 2.1.3 | 2.1.3 | 2.1.3 |
| matplotlib | 3.9.2 | 3.9.2 | 3.9.2 | 3.9.2 | 3.9.2 | 3.9.2 |
| matplotlib-base | 3.9.2 | 3.9.2 | 3.9.2 | 3.9.2 | 3.9.2 | 3.9.2 |
| matplotlib-inline | 0.1.6 | 0.1.6 | 0.1.6 | 0.1.6 | 0.1.6 | 0.1.6 |
| mccabe | 0.7.0 | 0.7.0 | 0.7.0 | 0.7.0 | 0.7.0 | 0.7.0 |
| mdit-py-plugins | 0.3.0 | 0.3.0 | 0.3.0 | 0.3.0 | 0.3.0 | |
| mdurl | 0.1.0 | 0.1.0 | 0.1.0 | 0.1.0 | 0.1.0 | |
| menuinst | 2.1.2 | 2.1.2 | 2.1.2 | 2.1.2 | 2.1.2 | 2.1.2 |
| mistune | 2.0.4 | 2.0.4 | 2.0.4 | 2.0.4 | 2.0.4 | 2.0.4 |
| mkl | 2023.1.0 | 2023.1.0 | ||||
| mkl-service | 2.4.0 | 2.4.0 | ||||
| mkl\_fft | 1.3.10 | 1.3.10 | ||||
| mkl\_random | 1.2.7 | 1.2.7 | ||||
| more-itertools | 10.3.0 | 10.3.0 | 10.3.0 | 10.3.0 | 10.3.0 | 10.3.0 |
| mpmath | 1.3.0 | 1.3.0 | 1.3.0 | 1.3.0 | 1.3.0 | 1.3.0 |
| msgpack-python | 1.0.3 | 1.0.3 | 1.0.3 | 1.0.3 | 1.0.3 | 1.0.3 |
| msys2-conda-epoch | 20160418 | |||||
| multidict | 6.0.4 | 6.0.4 | 6.0.4 | 6.0.4 | 6.0.4 | 6.0.4 |
| multipledispatch | 0.6.0 | 0.6.0 | 0.6.0 | 0.6.0 | 0.6.0 | |
| mypy | 1.11.2 | 1.11.2 | 1.11.2 | 1.11.2 | 1.11.2 | 1.11.2 |
| mypy\_extensions | 1.0.0 | 1.0.0 | 1.0.0 | 1.0.0 | 1.0.0 | 1.0.0 |
| mysql | 5.7.24 | 5.7.24 | 5.7.24 | 5.7.24 | ||
| navigator-updater | 0.5.1 | 0.5.1 | 0.5.1 | 0.5.1 | 0.5.1 | |
| nbclient | 0.8.0 | 0.8.0 | 0.8.0 | 0.8.0 | 0.8.0 | 0.8.0 |
| nbconvert | 7.16.4 | 7.16.4 | 7.10.0 | 7.16.4 | 7.16.4 | 7.16.4 |
| nbformat | 5.10.4 | 5.10.4 | 5.10.4 | 5.10.4 | 5.10.4 | 5.10.4 |
| ncurses | 6.4 | 6.4 | 6.4 | 6.4 | 6.4 | |
| nest-asyncio | 1.6.0 | 1.6.0 | 1.6.0 | 1.6.0 | 1.6.0 | 1.6.0 |
| networkx | 3.3 | 3.3 | 3.3 | 3.3 | 3.3 | 3.3 |
| nltk | 3.9.1 | 3.9.1 | 3.9.1 | 3.9.1 | 3.9.1 | 3.9.1 |
| notebook | 7.2.2 | 7.2.2 | 7.2.2 | 7.2.2 | 7.2.2 | |
| notebook-shim | 0.2.3 | 0.2.3 | 0.2.3 | 0.2.3 | 0.2.3 | |
| nspr | 4.35 | 4.35 | ||||
| nss | 3.89.1 | 3.89.1 | ||||
| numba | 0.60.0 | 0.60.0 | 0.60.0 | 0.60.0 | 0.60.0 | |
| numexpr | 2.8.7 | 2.8.7 | 2.8.7 | 2.8.7 | 2.8.7 | 2.8.7 |
| numpy | 1.26.4 | 1.26.4 | 1.26.4 | 1.26.4 | 1.26.4 | 1.26.4 |
| numpy-base | 1.26.4 | 1.26.4 | 1.26.4 | 1.26.4 | 1.26.4 | 1.26.4 |
| numpydoc | 1.7.0 | 1.7.0 | 1.7.0 | 1.7.0 | 1.7.0 | |
| oniguruma | 6.9.7.1 | 6.9.7.1 | 6.9.7.1 | 6.9.7.1 | ||
| openjpeg | 2.5.2 | 2.5.2 | 2.5.2 | 2.5.2 | 2.5.2 | 2.5.2 |
| openpyxl | 3.1.5 | 3.1.5 | 3.1.5 | 3.1.5 | 3.1.5 | 3.1.5 |
| openssl | 3.0.15 | 3.0.15 | 3.0.15 | 3.0.15 | 3.0.15 | 3.0.15 |
| orc | 2.0.1 | 2.0.1 | 2.0.1 | 2.0.1 | 2.0.1 | 2.0.1 |
| overrides | 7.4.0 | 7.4.0 | 7.4.0 | 7.4.0 | 7.4.0 | |
| packaging | 24.1 | 24.1 | 24.1 | 24.1 | 24.1 | 24.1 |
| pandas | 2.2.2 | 2.2.2 | 2.2.2 | 2.2.2 | 2.2.2 | 2.2.2 |
| pandocfilters | 1.5.0 | 1.5.0 | 1.5.0 | 1.5.0 | 1.5.0 | 1.5.0 |
| panel | 1.5.2 | 1.5.2 | 1.5.2 | 1.5.2 | 1.5.2 | |
| param | 2.1.1 | 2.1.1 | 2.1.1 | 2.1.1 | 2.1.1 | |
| paramiko | 2.8.1 | |||||
| parsel | 1.8.1 | 1.8.1 | 1.8.1 | 1.8.1 | 1.8.1 | |
| parso | 0.8.3 | 0.8.3 | 0.8.3 | 0.8.3 | 0.8.3 | 0.8.3 |
| partd | 1.4.1 | 1.4.1 | 1.4.1 | 1.4.1 | 1.4.1 | 1.4.1 |
| patch | 2.7.6 | 2.7.6 | 2.7.6 | 2.7.6 | 2.7.6 | |
| patchelf | 0.17.2 | 0.17.2 | 0.17.2 | |||
| pathspec | 0.10.3 | 0.10.3 | 0.10.3 | 0.10.3 | 0.10.3 | 0.10.3 |
| patsy | 0.5.6 | 0.5.6 | 0.5.6 | 0.5.6 | 0.5.6 | 0.5.6 |
| pcre2 | 10.42 | 10.42 | 10.42 | 10.42 | 10.42 | 10.42 |
| pexpect | 4.8.0 | 4.8.0 | 4.8.0 | 4.8.0 | 4.8.0 | 4.8.0 |
| pickleshare | 0.7.5 | 0.7.5 | 0.7.5 | 0.7.5 | 0.7.5 | |
| pillow | 10.4.0 | 10.4.0 | 10.4.0 | 10.4.0 | 10.4.0 | 10.4.0 |
| pip | 24.2 | 24.2 | 24.2 | 24.2 | 24.2 | 24.2 |
| pkce | 1.0.3 | 1.0.3 | 1.0.3 | 1.0.3 | 1.0.3 | |
| pkginfo | 1.10.0 | 1.10.0 | 1.10.0 | 1.10.0 | 1.10.0 | 1.10.0 |
| platformdirs | 3.10.0 | 3.10.0 | 3.10.0 | 3.10.0 | 3.10.0 | 3.10.0 |
| plotly | 5.24.1 | 5.24.1 | 5.24.1 | 5.24.1 | 5.24.1 | 5.24.1 |
| pluggy | 1.0.0 | 1.0.0 | 1.0.0 | 1.0.0 | 1.0.0 | 1.0.0 |
| ply | 3.11 | 3.11 | 3.11 | 3.11 | 3.11 | |
| prometheus\_client | 0.14.1 | 0.14.1 | 0.14.1 | 0.14.1 | 0.14.1 | |
| prompt-toolkit | 3.0.43 | 3.0.43 | 3.0.43 | 3.0.43 | 3.0.43 | 3.0.43 |
| prompt\_toolkit | 3.0.43 | 3.0.43 | 3.0.43 | 3.0.43 | 3.0.43 | 3.0.43 |
| protego | 0.1.16 | 0.1.16 | 0.1.16 | 0.1.16 | 0.1.16 | |
| protobuf | 4.25.3 | 4.25.3 | 4.25.3 | 4.25.3 | 4.25.3 | |
| psutil | 5.9.0 | 5.9.0 | 5.9.0 | 5.9.0 | 5.9.0 | 5.9.0 |
| ptyprocess | 0.7.0 | 0.7.0 | 0.7.0 | 0.7.0 | 0.7.0 | 0.7.0 |
| pure\_eval | 0.2.2 | 0.2.2 | 0.2.2 | 0.2.2 | 0.2.2 | 0.2.2 |
| py-cpuinfo | 9.0.0 | 9.0.0 | 9.0.0 | 9.0.0 | 9.0.0 | |
| py-lief | 0.12.3 | 0.12.3 | 0.12.3 | 0.12.3 | 0.12.3 | 0.12.3 |
| pyarrow | 16.1.0 | 16.1.0 | 16.1.0 | 16.1.0 | 16.1.0 | 16.1.0 |
| pyasn1 | 0.4.8 | 0.4.8 | 0.4.8 | 0.4.8 | 0.4.8 | |
| pyasn1-modules | 0.2.8 | 0.2.8 | 0.2.8 | 0.2.8 | 0.2.8 | |
| pybind11-abi | 5 | 5 | 5 | 5 | 5 | 5 |
| pycodestyle | 2.11.1 | 2.11.1 | 2.11.1 | 2.11.1 | 2.11.1 | 2.11.1 |
| pycosat | 0.6.6 | 0.6.6 | 0.6.6 | 0.6.6 | 0.6.6 | 0.6.6 |
| pycparser | 2.21 | 2.21 | 2.21 | 2.21 | 2.21 | 2.21 |
| pyct | 0.5.0 | 0.5.0 | 0.5.0 | 0.5.0 | 0.5.0 | |
| pycurl | 7.45.3 | 7.45.3 | 7.45.3 | 7.45.3 | 7.45.3 | 7.45.3 |
| pydantic | 2.8.2 | 2.8.2 | 2.8.2 | 2.8.2 | 2.8.2 | |
| pydantic-core | 2.20.1 | 2.20.1 | 2.20.1 | 2.20.1 | 2.20.1 | |
| pydeck | 0.8.0 | 0.8.0 | 0.8.0 | 0.8.0 | 0.8.0 | |
| pydispatcher | 2.0.5 | 2.0.5 | 2.0.5 | 2.0.5 | 2.0.5 | |
| pydocstyle | 6.3.0 | 6.3.0 | 6.3.0 | 6.3.0 | 6.3.0 | |
| pyerfa | 2.0.1.4 | 2.0.1.4 | 2.0.1.4 | 2.0.1.4 | 2.0.1.4 | 2.0.1.4 |
| pyflakes | 3.2.0 | 3.2.0 | 3.2.0 | 3.2.0 | 3.2.0 | 3.2.0 |
| pygments | 2.15.1 | 2.15.1 | 2.15.1 | 2.15.1 | 2.15.1 | 2.15.1 |
| pyjwt | 2.8.0 | 2.8.0 | 2.8.0 | 2.8.0 | 2.8.0 | |
| pylint | 2.16.2 | 2.16.2 | 2.16.2 | 2.16.2 | 2.16.2 | 2.16.2 |
| pylint-venv | 3.0.3 | 3.0.3 | 3.0.3 | 3.0.3 | 3.0.3 | |
| pyls-spyder | 0.4.0 | 0.4.0 | 0.4.0 | 0.4.0 | 0.4.0 | |
| pynacl | 1.5.0 | |||||
| pyobjc-core | 10.1 | 10.1 | ||||
| pyobjc-framework-cocoa | 10.1 | 10.1 | ||||
| pyobjc-framework-coreservices | 10.1 | 10.1 | ||||
| pyobjc-framework-fsevents | 10.1 | 10.1 | ||||
| pyodbc | 5.1.0 | 5.1.0 | 5.1.0 | 5.1.0 | 5.1.0 | 5.1.0 |
| pyopenssl | 24.2.1 | 24.2.1 | 24.2.1 | 24.2.1 | 24.2.1 | |
| pyparsing | 3.1.2 | 3.1.2 | 3.1.2 | 3.1.2 | 3.1.2 | 3.1.2 |
| pyqt | 5.15.10 | 5.15.10 | 5.15.10 | 5.15.10 | 5.15.10 | |
| pyqt5-sip | 12.13.0 | 12.13.0 | 12.13.0 | 12.13.0 | 12.13.0 | |
| pyqtwebengine | 5.15.10 | 5.15.10 | 5.15.10 | 5.15.10 | 5.15.10 | |
| pysocks | 1.7.1 | 1.7.1 | 1.7.1 | 1.7.1 | 1.7.1 | 1.7.1 |
| pytables | 3.10.1 | 3.10.1 | 3.10.1 | 3.10.1 | 3.10.1 | |
| pytest | 7.4.4 | 7.4.4 | 7.4.4 | 7.4.4 | 7.4.4 | 7.4.4 |
| python | 3.12.7 | 3.12.7 | 3.12.7 | 3.12.7 | 3.12.7 | 3.12.7 |
| python-dateutil | 2.9.0post0 | 2.9.0post0 | 2.9.0post0 | 2.9.0post0 | 2.9.0post0 | 2.9.0post0 |
| python-dotenv | 0.21.0 | 0.21.0 | 0.21.0 | 0.21.0 | 0.21.0 | |
| python-fastjsonschema | 2.16.2 | 2.16.2 | 2.16.2 | 2.16.2 | 2.16.2 | 2.16.2 |
| python-json-logger | 2.0.7 | 2.0.7 | 2.0.7 | 2.0.7 | 2.0.7 | |
| python-libarchive-c | 5.1 | 5.1 | 5.1 | 5.1 | 5.1 | 5.1 |
| python-lmdb | 1.4.1 | 1.4.1 | 1.4.1 | 1.4.1 | 1.4.1 | 1.4.1 |
| python-lsp-black | 2.0.0 | 2.0.0 | 2.0.0 | 2.0.0 | 2.0.0 | |
| python-lsp-jsonrpc | 1.1.2 | 1.1.2 | 1.1.2 | 1.1.2 | 1.1.2 | |
| python-lsp-server | 1.10.0 | 1.10.0 | 1.10.0 | 1.10.0 | 1.10.0 | |
| python-slugify | 5.0.2 | 5.0.2 | 5.0.2 | 5.0.2 | 5.0.2 | |
| python-tzdata | 2023.3 | 2023.3 | 2023.3 | 2023.3 | 2023.3 | 2023.3 |
| python.app | 3 | 3 | ||||
| pytoolconfig | 1.2.6 | 1.2.6 | 1.2.6 | 1.2.6 | 1.2.6 | |
| pytz | 2024.1 | 2024.1 | 2024.1 | 2024.1 | 2024.1 | 2024.1 |
| pyviz\_comms | 3.0.2 | 3.0.2 | 3.0.2 | 3.0.2 | 3.0.2 | |
| pywavelets | 1.7.0 | 1.7.0 | 1.7.0 | 1.7.0 | 1.7.0 | 1.7.0 |
| pywin32 | 305 | |||||
| pywin32-ctypes | 0.2.2 | |||||
| pywinpty | 2.0.10 | |||||
| pyxdg | 0.27 | 0.27 | ||||
| pyyaml | 6.0.1 | 6.0.1 | 6.0.1 | 6.0.1 | 6.0.1 | 6.0.1 |
| pyzmq | 25.1.2 | 25.1.2 | 25.1.2 | 25.1.2 | 25.1.2 | 25.1.2 |
| qdarkstyle | 3.2.3 | 3.2.3 | 3.2.3 | 3.2.3 | 3.2.3 | |
| qstylizer | 0.2.2 | 0.2.2 | 0.2.2 | 0.2.2 | 0.2.2 | |
| qt-main | 5.15.2 | 5.15.2 | 5.15.2 | 5.15.2 | 5.15.2 | |
| qt-webengine | 5.15.9 | 5.15.9 | 5.15.9 | 5.15.9 | 5.15.9 | |
| qtawesome | 1.3.1 | 1.3.1 | 1.3.1 | 1.3.1 | 1.3.1 | |
| qtconsole | 5.5.1 | 5.5.1 | 5.5.1 | 5.5.1 | 5.5.1 | |
| qtpy | 2.4.1 | 2.4.1 | 2.4.1 | 2.4.1 | 2.4.1 | |
| queuelib | 1.6.2 | 1.6.2 | 1.6.2 | 1.6.2 | 1.6.2 | |
| re2 | 2022.04.01 | 2022.04.01 | 2022.04.01 | 2022.04.01 | 2022.04.01 | 2022.04.01 |
| readline | 8.2 | 8.2 | 8.2 | 8.2 | 8.2 | |
| referencing | 0.30.2 | 0.30.2 | 0.30.2 | 0.30.2 | 0.30.2 | 0.30.2 |
| regex | 2024.9.11 | 2024.9.11 | 2024.9.11 | 2024.9.11 | 2024.9.11 | 2024.9.11 |
| reproc | 14.2.4 | 14.2.4 | 14.2.4 | 14.2.4 | 14.2.4 | 14.2.4 |
| reproc-cpp | 14.2.4 | 14.2.4 | 14.2.4 | 14.2.4 | 14.2.4 | 14.2.4 |
| requests | 2.32.3 | 2.32.3 | 2.32.3 | 2.32.3 | 2.32.3 | 2.32.3 |
| requests-file | 1.5.1 | 1.5.1 | 1.5.1 | 1.5.1 | 1.5.1 | |
| requests-toolbelt | 1.0.0 | 1.0.0 | 1.0.0 | 1.0.0 | 1.0.0 | 1.0.0 |
| rfc3339-validator | 0.1.4 | 0.1.4 | 0.1.4 | 0.1.4 | 0.1.4 | |
| rfc3986-validator | 0.1.1 | 0.1.1 | 0.1.1 | 0.1.1 | 0.1.1 | |
| rich | 13.7.1 | 13.7.1 | 13.7.1 | 13.7.1 | 13.7.1 | |
| rope | 1.12.0 | 1.12.0 | 1.12.0 | 1.12.0 | 1.12.0 | |
| rpds-py | 0.10.6 | 0.10.6 | 0.10.6 | 0.10.6 | 0.10.6 | 0.10.6 |
| rtree | 1.0.1 | 1.0.1 | 1.0.1 | 1.0.1 | 1.0.1 | |
| ruamel.yaml | 0.18.6 | 0.18.6 | 0.18.6 | 0.18.6 | 0.18.6 | 0.18.6 |
| ruamel.yaml.clib | 0.2.8 | 0.2.8 | 0.2.8 | 0.2.8 | 0.2.8 | 0.2.8 |
| ruamel\_yaml | 0.17.21 | 0.17.21 | 0.17.21 | 0.17.21 | 0.17.21 | 0.17.21 |
| s2n | 1.3.27 | 1.3.27 | 1.3.27 | |||
| s3fs | 2024.6.1 | 2024.6.1 | 2024.6.1 | 2024.6.1 | 2024.6.1 | 2024.6.1 |
| scikit-image | 0.24.0 | 0.24.0 | 0.24.0 | 0.24.0 | 0.24.0 | 0.24.0 |
| scikit-learn | 1.5.1 | 1.5.1 | 1.5.1 | 1.5.1 | 1.5.1 | 1.5.1 |
| scipy | 1.13.1 | 1.13.1 | 1.13.1 | 1.13.1 | 1.13.1 | 1.13.1 |
| scrapy | 2.11.1 | 2.11.1 | 2.11.1 | 2.11.1 | 2.11.1 | |
| seaborn | 0.13.2 | 0.13.2 | 0.13.2 | 0.13.2 | 0.13.2 | 0.13.2 |
| secretstorage | 3.3.1 | 3.3.1 | ||||
| semver | 3.0.2 | 3.0.2 | 3.0.2 | 3.0.2 | 3.0.2 | |
| send2trash | 1.8.2 | 1.8.2 | 1.8.2 | 1.8.2 | 1.8.2 | |
| service\_identity | 18.1.0 | 18.1.0 | 18.1.0 | 18.1.0 | 18.1.0 | |
| setuptools | 75.1.0 | 75.1.0 | 75.1.0 | 75.1.0 | 75.1.0 | 75.1.0 |
| sip | 6.7.12 | 6.7.12 | 6.7.12 | 6.7.12 | 6.7.12 | |
| six | 1.16.0 | 1.16.0 | 1.16.0 | 1.16.0 | 1.16.0 | 1.16.0 |
| smart\_open | 5.2.1 | 5.2.1 | 5.2.1 | 5.2.1 | 5.2.1 | |
| smmap | 4.0.0 | 4.0.0 | 4.0.0 | 4.0.0 | 4.0.0 | |
| snappy | 1.2.1 | 1.2.1 | 1.2.1 | 1.2.1 | 1.2.1 | 1.2.1 |
| sniffio | 1.3.0 | 1.3.0 | 1.3.0 | 1.3.0 | 1.3.0 | |
| snowballstemmer | 2.2.0 | 2.2.0 | 2.2.0 | 2.2.0 | 2.2.0 | 2.2.0 |
| sortedcontainers | 2.4.0 | 2.4.0 | 2.4.0 | 2.4.0 | 2.4.0 | 2.4.0 |
| soupsieve | 2.5 | 2.5 | 2.5 | 2.5 | 2.5 | 2.5 |
| sphinx | 7.3.7 | 7.3.7 | 7.3.7 | 7.3.7 | 7.3.7 | |
| sphinxcontrib-applehelp | 1.0.2 | 1.0.2 | 1.0.2 | 1.0.2 | 1.0.2 | |
| sphinxcontrib-devhelp | 1.0.2 | 1.0.2 | 1.0.2 | 1.0.2 | 1.0.2 | |
| sphinxcontrib-htmlhelp | 2.0.0 | 2.0.0 | 2.0.0 | 2.0.0 | 2.0.0 | |
| sphinxcontrib-jsmath | 1.0.1 | 1.0.1 | 1.0.1 | 1.0.1 | 1.0.1 | |
| sphinxcontrib-qthelp | 1.0.3 | 1.0.3 | 1.0.3 | 1.0.3 | 1.0.3 | |
| sphinxcontrib-serializinghtml | 1.1.10 | 1.1.10 | 1.1.10 | 1.1.10 | 1.1.10 | |
| spyder | 5.5.1 | 5.5.1 | 5.5.1 | 5.5.1 | 5.5.1 | |
| spyder-kernels | 2.5.0 | 2.5.0 | 2.5.0 | 2.5.0 | 2.5.0 | |
| sqlalchemy | 2.0.34 | 2.0.34 | 2.0.34 | 2.0.34 | 2.0.34 | 2.0.34 |
| sqlite | 3.45.3 | 3.45.3 | 3.45.3 | 3.45.3 | 3.45.3 | 3.45.3 |
| stack\_data | 0.2.0 | 0.2.0 | 0.2.0 | 0.2.0 | 0.2.0 | 0.2.0 |
| statsmodels | 0.14.2 | 0.14.2 | 0.14.2 | 0.14.2 | 0.14.2 | 0.14.2 |
| streamlit | 1.37.1 | 1.37.1 | 1.37.1 | 1.37.1 | 1.37.1 | |
| sympy | 1.13.2 | 1.13.2 | 1.13.2 | 1.13.2 | 1.13.2 | 1.13.2 |
| tabulate | 0.9.0 | 0.9.0 | 0.9.0 | 0.9.0 | 0.9.0 | 0.9.0 |
| tapi | 1100.0.11 | 1000.10.8 | ||||
| tbb | 2021.8.0 | 2021.8.0 | 2021.8.0 | 2021.8.0 | 2021.8.0 | |
| tblib | 1.7.0 | 1.7.0 | 1.7.0 | 1.7.0 | 1.7.0 | 1.7.0 |
| tenacity | 8.2.3 | 8.2.3 | 8.2.3 | 8.2.3 | 8.2.3 | 8.2.3 |
| terminado | 0.17.1 | 0.17.1 | 0.17.1 | 0.17.1 | 0.17.1 | |
| text-unidecode | 1.3 | 1.3 | 1.3 | 1.3 | 1.3 | |
| textdistance | 4.2.1 | 4.2.1 | 4.2.1 | 4.2.1 | 4.2.1 | |
| threadpoolctl | 3.5.0 | 3.5.0 | 3.5.0 | 3.5.0 | 3.5.0 | 3.5.0 |
| three-merge | 0.1.1 | 0.1.1 | 0.1.1 | 0.1.1 | 0.1.1 | |
| tifffile | 2023.4.12 | 2023.4.12 | 2023.4.12 | 2023.4.12 | 2023.4.12 | 2023.4.12 |
| tinycss2 | 1.2.1 | 1.2.1 | 1.2.1 | 1.2.1 | 1.2.1 | 1.2.1 |
| tk | 8.6.14 | 8.6.14 | 8.6.14 | 8.6.14 | 8.6.14 | 8.6.14 |
| tldextract | 5.1.2 | 5.1.2 | 5.1.2 | 5.1.2 | 5.1.2 | |
| toml | 0.10.2 | 0.10.2 | 0.10.2 | 0.10.2 | 0.10.2 | |
| tomli | 2.0.1 | 2.0.1 | 2.0.1 | 2.0.1 | 2.0.1 | |
| tomlkit | 0.11.1 | 0.11.1 | 0.11.1 | 0.11.1 | 0.11.1 | 0.11.1 |
| toolz | 0.12.0 | 0.12.0 | 0.12.0 | 0.12.0 | 0.12.0 | 0.12.0 |
| tornado | 6.4.1 | 6.4.1 | 6.4.1 | 6.4.1 | 6.4.1 | 6.4.1 |
| tqdm | 4.66.5 | 4.66.5 | 4.66.5 | 4.66.5 | 4.66.5 | 4.66.5 |
| traitlets | 5.14.3 | 5.14.3 | 5.14.3 | 5.14.3 | 5.14.3 | 5.14.3 |
| truststore | 0.8.0 | 0.8.0 | 0.8.0 | 0.8.0 | 0.8.0 | 0.8.0 |
| twisted | 23.10.0 | 23.10.0 | 23.10.0 | 23.10.0 | 23.10.0 | |
| twisted-iocpsupport | 1.0.2 | |||||
| typing-extensions | 4.11.0 | 4.11.0 | 4.11.0 | 4.11.0 | 4.11.0 | 4.11.0 |
| typing\_extensions | 4.11.0 | 4.11.0 | 4.11.0 | 4.11.0 | 4.11.0 | 4.11.0 |
| tzdata | 2024b | 2024b | 2024b | 2024b | 2024b | 2024b |
| uc-micro-py | 1.0.1 | 1.0.1 | 1.0.1 | 1.0.1 | 1.0.1 | |
| ujson | 5.10.0 | 5.10.0 | 5.10.0 | 5.10.0 | 5.10.0 | |
| unicodedata2 | 15.1.0 | 15.1.0 | 15.1.0 | 15.1.0 | 15.1.0 | 15.1.0 |
| unidecode | 1.3.8 | 1.3.8 | 1.3.8 | 1.3.8 | 1.3.8 | |
| unixodbc | 2.3.11 | 2.3.11 | 2.3.11 | 2.3.11 | 2.3.11 | |
| urllib3 | 2.2.3 | 2.2.3 | 2.2.3 | 2.2.3 | 2.2.3 | 2.2.3 |
| utf8proc | 2.6.1 | 2.6.1 | 2.6.1 | 2.6.1 | 2.6.1 | 2.6.1 |
| vc | 14.40 | |||||
| vs2015\_runtime | 14.40.33807 | |||||
| w3lib | 1.21.0 | 2.1.2 | 2.1.2 | 2.1.2 | 2.1.2 | |
| watchdog | 4.0.1 | 4.0.1 | 4.0.1 | 4.0.1 | 4.0.1 | |
| wcwidth | 0.2.5 | 0.2.5 | 0.2.5 | 0.2.5 | 0.2.5 | 0.2.5 |
| webencodings | 0.5.1 | 0.5.1 | 0.5.1 | 0.5.1 | 0.5.1 | 0.5.1 |
| websocket-client | 1.8.0 | 1.8.0 | 1.8.0 | 1.8.0 | 1.8.0 | |
| werkzeug | 3.0.3 | 3.0.3 | 3.0.3 | 3.0.3 | 3.0.3 | 3.0.3 |
| whatthepatch | 1.0.2 | 1.0.2 | 1.0.2 | 1.0.2 | 1.0.2 | |
| wheel | 0.44.0 | 0.44.0 | 0.44.0 | 0.44.0 | 0.44.0 | 0.44.0 |
| widgetsnbextension | 3.6.6 | 3.6.6 | 3.6.6 | 3.6.6 | 3.6.6 | |
| win\_inet\_pton | 1.1.0 | |||||
| winpty | 0.4.3 | |||||
| wrapt | 1.14.1 | 1.14.1 | 1.14.1 | 1.14.1 | 1.14.1 | 1.14.1 |
| wurlitzer | 3.0.2 | 3.0.2 | 3.0.2 | 3.0.2 | ||
| xarray | 2023.6.0 | 2023.6.0 | 2023.6.0 | 2023.6.0 | 2023.6.0 | |
| xlwings | 0.32.1 | 0.32.1 | 0.32.1 | |||
| xyzservices | 2022.9.0 | 2022.9.0 | 2022.9.0 | 2022.9.0 | 2022.9.0 | 2022.9.0 |
| xz | 5.4.6 | 5.4.6 | 5.4.6 | 5.4.6 | 5.4.6 | 5.4.6 |
| yaml | 0.2.5 | 0.2.5 | 0.2.5 | 0.2.5 | 0.2.5 | 0.2.5 |
| yaml-cpp | 0.8.0 | 0.8.0 | 0.8.0 | 0.8.0 | 0.8.0 | 0.8.0 |
| yapf | 0.40.2 | 0.40.2 | 0.40.2 | 0.40.2 | 0.40.2 | |
| yarl | 1.11.0 | 1.11.0 | 1.11.0 | 1.11.0 | 1.11.0 | 1.11.0 |
| zeromq | 4.3.5 | 4.3.5 | 4.3.5 | 4.3.5 | 4.3.5 | 4.3.5 |
| zfp | 1.0.0 | 1.0.0 | 1.0.0 | 1.0.0 | ||
| zict | 3.0.0 | 3.0.0 | 3.0.0 | 3.0.0 | 3.0.0 | 3.0.0 |
| zipp | 3.17.0 | 3.17.0 | 3.17.0 | 3.17.0 | 3.17.0 | |
| zlib | 1.2.13 | 1.2.13 | 1.2.13 | 1.2.13 | 1.2.13 | 1.2.13 |
| zlib-ng | 2.0.7 | 2.0.7 | 2.0.7 | 2.0.7 | 2.0.7 | |
| zope | 1.0 | 1.0 | 1.0 | 1.0 | 1.0 | |
| zope.interface | 5.4.0 | 5.4.0 | 5.4.0 | 5.4.0 | 5.4.0 | |
| zstandard | 0.23.0 | 0.23.0 | 0.23.0 | 0.23.0 | 0.23.0 | 0.23.0 |
| zstd | 1.5.6 | 1.5.6 | 1.5.6 | 1.5.6 | 1.5.6 | 1.5.6 |
| Package Name | linux-64 | linux-aarch64 | linux-s390x |
|---|---|---|---|
| \_anaconda\_depends | 2024.10 | 2024.10 | 2024.10 |
| \_libgcc\_mutex | 0.1 | 0.1 | 0.1 |
| \_openmp\_mutex | 5.1 | 5.1 | 5.1 |
| aiobotocore | 2.12.3 | 2.12.3 | 2.12.3 |
| aiohappyeyeballs | 2.4.0 | 2.4.0 | 2.4.0 |
| aiohttp | 3.10.5 | 3.10.5 | 3.10.5 |
| aioitertools | 0.7.1 | 0.7.1 | 0.7.1 |
| aiosignal | 1.2.0 | 1.2.0 | 1.2.0 |
| alabaster | 0.7.16 | 0.7.16 | |
| altair | 5.0.1 | 5.0.1 | |
| anaconda-anon-usage | 0.4.4 | 0.4.4 | 0.4.4 |
| anaconda-catalogs | 0.2.0 | 0.2.0 | 0.2.0 |
| anaconda-client | 1.12.3 | 1.12.3 | 1.12.3 |
| anaconda-cloud-auth | 0.5.1 | 0.5.1 | |
| anaconda-navigator | 2.6.3 | 2.6.3 | |
| anaconda-project | 0.11.1 | 0.11.1 | 0.11.1 |
| annotated-types | 0.6.0 | 0.6.0 | |
| anyio | 4.2.0 | 4.2.0 | |
| aom | 3.6.0 | 3.6.0 | 3.6.0 |
| appdirs | 1.4.4 | 1.4.4 | |
| archspec | 0.2.3 | 0.2.3 | 0.2.3 |
| argon2-cffi | 21.3.0 | 21.3.0 | |
| argon2-cffi-bindings | 21.2.0 | 21.2.0 | |
| arrow | 1.2.3 | 1.2.3 | |
| arrow-cpp | 16.1.0 | 16.1.0 | 16.1.0 |
| astroid | 2.14.2 | 2.14.2 | 2.14.2 |
| astropy | 6.1.3 | 6.1.3 | 6.1.3 |
| astropy-iers-data | 0.2024.9.2.0.33.23 | 0.2024.9.2.0.33.23 | 0.2024.9.2.0.33.23 |
| asttokens | 2.0.5 | 2.0.5 | 2.0.5 |
| async-lru | 2.0.4 | 2.0.4 | |
| atomicwrites | 1.4.0 | 1.4.0 | |
| attrs | 23.1.0 | 23.1.0 | 23.1.0 |
| automat | 20.2.0 | 20.2.0 | |
| autopep8 | 2.0.4 | 2.0.4 | |
| aws-c-auth | 0.6.19 | 0.6.19 | 0.6.19 |
| aws-c-cal | 0.5.20 | 0.5.20 | 0.5.20 |
| aws-c-common | 0.8.5 | 0.8.5 | 0.8.5 |
| aws-c-compression | 0.2.16 | 0.2.16 | 0.2.16 |
| aws-c-event-stream | 0.2.15 | 0.2.15 | 0.2.15 |
| aws-c-http | 0.6.25 | 0.6.25 | 0.6.25 |
| aws-c-io | 0.13.10 | 0.13.10 | 0.13.10 |
| aws-c-mqtt | 0.7.13 | 0.7.13 | 0.7.13 |
| aws-c-s3 | 0.1.51 | 0.1.51 | 0.1.51 |
| aws-c-sdkutils | 0.1.6 | 0.1.6 | 0.1.6 |
| aws-checksums | 0.1.13 | 0.1.13 | 0.1.13 |
| aws-crt-cpp | 0.18.16 | 0.18.16 | 0.18.16 |
| aws-sdk-cpp | 1.10.55 | 1.10.55 | 1.10.55 |
| babel | 2.11.0 | 2.11.0 | |
| bcrypt | 3.2.0 | 3.2.0 | |
| beautifulsoup4 | 4.12.3 | 4.12.3 | 4.12.3 |
| binaryornot | 0.4.4 | 0.4.4 | |
| black | 24.8.0 | 24.8.0 | 24.8.0 |
| blas | 1.0 | 1.0 | 1.0 |
| bleach | 4.1.0 | 4.1.0 | 4.1.0 |
| blinker | 1.6.2 | 1.6.2 | 1.6.2 |
| blosc | 1.21.3 | 1.21.3 | 1.21.3 |
| bokeh | 3.6.0 | 3.6.0 | 3.6.0 |
| boltons | 23.0.0 | 23.0.0 | 23.0.0 |
| boost-cpp | 1.82.0 | 1.82.0 | 1.82.0 |
| botocore | 1.34.69 | 1.34.69 | 1.34.69 |
| bottleneck | 1.3.7 | 1.3.7 | 1.3.7 |
| brotli | 1.0.9 | 1.0.9 | 1.0.9 |
| brotli-bin | 1.0.9 | 1.0.9 | 1.0.9 |
| brotli-python | 1.0.9 | 1.0.9 | 1.0.9 |
| brunsli | 0.1 | 0.1 | |
| bzip2 | 1.0.8 | 1.0.8 | 1.0.8 |
| c-ares | 1.19.1 | 1.19.1 | 1.19.1 |
| c-blosc2 | 2.12.0 | 2.12.0 | |
| ca-certificates | 2024.9.24 | 2024.9.24 | 2024.9.24 |
| cachetools | 5.3.3 | 5.3.3 | |
| certifi | 2024.8.30 | 2024.8.30 | 2024.8.30 |
| cffi | 1.17.1 | 1.17.1 | 1.17.1 |
| cfitsio | 3.470 | 3.470 | 3.470 |
| chardet | 4.0.0 | 4.0.0 | 4.0.0 |
| charls | 2.2.0 | 2.2.0 | |
| charset-normalizer | 3.3.2 | 3.3.2 | 3.3.2 |
| click | 8.1.7 | 8.1.7 | 8.1.7 |
| cloudpickle | 3.0.0 | 3.0.0 | 3.0.0 |
| colorama | 0.4.6 | 0.4.6 | 0.4.6 |
| colorcet | 3.1.0 | 3.1.0 | |
| comm | 0.2.1 | 0.2.1 | 0.2.1 |
| conda | 24.9.2 | 24.9.2 | 24.9.2 |
| conda-build | 24.9.0 | 24.9.0 | 24.9.0 |
| conda-content-trust | 0.2.0 | 0.2.0 | 0.2.0 |
| conda-index | 0.5.0 | 0.5.0 | 0.4.0 |
| conda-libmamba-solver | 24.9.0 | 24.9.0 | 24.9.0 |
| conda-pack | 0.7.1 | 0.7.1 | 0.7.1 |
| conda-package-handling | 2.3.0 | 2.3.0 | 2.3.0 |
| conda-package-streaming | 0.10.0 | 0.10.0 | 0.10.0 |
| conda-repo-cli | 1.0.114 | 1.0.114 | |
| conda-token | 0.5.0 | 0.5.0 | 0.5.0 |
| constantly | 23.10.4 | 23.10.4 | |
| contourpy | 1.2.0 | 1.2.0 | 1.2.0 |
| cookiecutter | 2.6.0 | 2.6.0 | |
| cryptography | 43.0.0 | 43.0.0 | 43.0.0 |
| cssselect | 1.2.0 | 1.2.0 | |
| curl | 8.9.1 | 8.9.1 | 8.9.1 |
| cycler | 0.11.0 | 0.11.0 | 0.11.0 |
| cyrus-sasl | 2.1.28 | 2.1.28 | |
| cytoolz | 0.12.2 | 0.12.2 | 0.12.2 |
| dask | 2024.8.2 | 2024.8.2 | 2024.8.2 |
| dask-core | 2024.8.2 | 2024.8.2 | 2024.8.2 |
| dask-expr | 1.1.13 | 1.1.13 | 1.1.13 |
| datashader | 0.16.3 | 0.16.3 | |
| dav1d | 1.2.1 | 1.2.1 | 1.2.1 |
| dbus | 1.13.18 | 1.13.18 | |
| debugpy | 1.6.7 | 1.6.7 | 1.6.7 |
| decorator | 5.1.1 | 5.1.1 | 5.1.1 |
| defusedxml | 0.7.1 | 0.7.1 | 0.7.1 |
| diff-match-patch | 20200713 | 20200713 | |
| dill | 0.3.8 | 0.3.8 | 0.3.8 |
| distributed | 2024.8.2 | 2024.8.2 | 2024.8.2 |
| distro | 1.9.0 | 1.9.0 | 1.9.0 |
| docstring-to-markdown | 0.11 | 0.11 | |
| docutils | 0.18.1 | 0.18.1 | |
| et\_xmlfile | 1.1.0 | 1.1.0 | 1.1.0 |
| executing | 0.8.3 | 0.8.3 | 0.8.3 |
| expat | 2.6.3 | 2.6.3 | 2.6.3 |
| filelock | 3.13.1 | 3.13.1 | 3.13.1 |
| flake8 | 7.0.0 | 7.0.0 | |
| flask | 3.0.3 | 3.0.3 | 3.0.3 |
| fmt | 9.1.0 | 9.1.0 | 9.1.0 |
| fontconfig | 2.14.1 | 2.14.1 | |
| fonttools | 4.51.0 | 4.51.0 | 4.51.0 |
| freetype | 2.12.1 | 2.12.1 | 2.12.1 |
| frozendict | 2.4.2 | 2.4.2 | 2.4.2 |
| frozenlist | 1.4.0 | 1.4.0 | 1.4.0 |
| fsspec | 2024.6.1 | 2024.6.1 | 2024.6.1 |
| gensim | 4.3.3 | 4.3.3 | |
| gflags | 2.2.2 | 2.2.2 | 2.2.2 |
| giflib | 5.2.1 | 5.2.1 | 5.2.1 |
| gitdb | 4.0.7 | 4.0.7 | |
| gitpython | 3.1.43 | 3.1.43 | |
| glib | 2.78.4 | 2.78.4 | |
| glib-tools | 2.78.4 | 2.78.4 | |
| glog | 0.5.0 | 0.5.0 | 0.5.0 |
| greenlet | 3.0.1 | 3.0.1 | 3.0.1 |
| gst-plugins-base | 1.14.1 | 1.14.1 | |
| gstreamer | 1.14.1 | 1.14.1 | |
| h11 | 0.14.0 | 0.14.0 | |
| h5py | 3.11.0 | 3.11.0 | 3.11.0 |
| hdf5 | 1.12.1 | 1.12.1 | 1.12.1 |
| heapdict | 1.0.1 | 1.0.1 | 1.0.1 |
| holoviews | 1.19.1 | 1.19.1 | |
| httpcore | 1.0.2 | 1.0.2 | |
| httpx | 0.27.0 | 0.27.0 | |
| hvplot | 0.11.0 | 0.11.0 | |
| hyperlink | 21.0.0 | 21.0.0 | |
| icu | 73.1 | 73.1 | 73.1 |
| idna | 3.7 | 3.7 | 3.7 |
| imagecodecs | 2023.1.23 | 2023.1.23 | 2023.1.23 |
| imageio | 2.33.1 | 2.33.1 | 2.33.1 |
| imagesize | 1.4.1 | 1.4.1 | |
| imbalanced-learn | 0.12.3 | 0.12.3 | 0.12.3 |
| importlib-metadata | 7.0.1 | 7.0.1 | |
| incremental | 22.10.0 | 22.10.0 | |
| inflection | 0.5.1 | 0.5.1 | |
| iniconfig | 1.1.1 | 1.1.1 | 1.1.1 |
| intake | 2.0.7 | 2.0.7 | 2.0.7 |
| intel-openmp | 2023.1.0 | ||
| intervaltree | 3.1.0 | 3.1.0 | |
| ipykernel | 6.28.0 | 6.28.0 | 6.28.0 |
| ipython | 8.27.0 | 8.27.0 | 8.27.0 |
| ipython\_genutils | 0.2.0 | 0.2.0 | |
| ipywidgets | 7.8.1 | 7.8.1 | |
| isort | 5.13.2 | 5.13.2 | 5.13.2 |
| itemadapter | 0.3.0 | 0.3.0 | |
| itemloaders | 1.1.0 | 1.1.0 | |
| itsdangerous | 2.2.0 | 2.2.0 | 2.2.0 |
| jaraco.classes | 3.2.1 | 3.2.1 | |
| jedi | 0.19.1 | 0.19.1 | 0.19.1 |
| jeepney | 0.7.1 | 0.7.1 | |
| jellyfish | 1.0.1 | 1.0.1 | |
| jinja2 | 3.1.4 | 3.1.4 | 3.1.4 |
| jmespath | 1.0.1 | 1.0.1 | 1.0.1 |
| joblib | 1.4.2 | 1.4.2 | 1.4.2 |
| jpeg | 9e | 9e | 9e |
| jq | 1.6 | 1.6 | |
| json5 | 0.9.6 | 0.9.6 | |
| jsonpatch | 1.33 | 1.33 | 1.33 |
| jsonpointer | 2.1 | 2.1 | 2.1 |
| jsonschema | 4.23.0 | 4.23.0 | 4.23.0 |
| jsonschema-specifications | 2023.7.1 | 2023.7.1 | 2023.7.1 |
| jupyter | 1.0.0 | 1.0.0 | 1.0.0 |
| jupyter-lsp | 2.2.0 | 2.2.0 | |
| jupyter\_client | 8.6.0 | 8.6.0 | 8.6.0 |
| jupyter\_console | 6.6.3 | 6.6.3 | 6.6.3 |
| jupyter\_core | 5.7.2 | 5.7.2 | 5.7.2 |
| jupyter\_events | 0.10.0 | 0.10.0 | |
| jupyter\_server | 2.14.1 | 2.14.1 | |
| jupyter\_server\_terminals | 0.4.4 | 0.4.4 | |
| jupyterlab | 4.2.5 | 4.2.5 | |
| jupyterlab-variableinspector | 3.1.0 | 3.1.0 | |
| jupyterlab\_pygments | 0.1.2 | 0.1.2 | 0.2.2 |
| jupyterlab\_server | 2.27.3 | 2.27.3 | |
| jupyterlab\_widgets | 1.0.0 | 1.0.0 | |
| jxrlib | 1.1 | 1.1 | 1.1 |
| keyring | 24.3.1 | 24.3.1 | |
| kiwisolver | 1.4.4 | 1.4.4 | 1.4.4 |
| krb5 | 1.20.1 | 1.20.1 | 1.20.1 |
| lazy-object-proxy | 1.10.0 | 1.10.0 | 1.10.0 |
| lazy\_loader | 0.4 | 0.4 | 0.4 |
| lcms2 | 2.12 | 2.12 | 2.12 |
| ld\_impl\_linux-64 | 2.40 | ||
| ld\_impl\_linux-aarch64 | 2.40 | ||
| ld\_impl\_linux-s390x | 2.40 | ||
| lerc | 3.0 | 3.0 | 3.0 |
| libabseil | 20240116.2 | 20240116.2 | 20240116.2 |
| libaec | 1.0.4 | 1.0.4 | 1.0.4 |
| libarchive | 3.6.2 | 3.6.2 | 3.7.4 |
| libavif | 0.11.1 | 0.11.1 | 0.11.1 |
| libboost | 1.82.0 | 1.82.0 | 1.82.0 |
| libbrotlicommon | 1.0.9 | 1.0.9 | 1.0.9 |
| libbrotlidec | 1.0.9 | 1.0.9 | 1.0.9 |
| libbrotlienc | 1.0.9 | 1.0.9 | 1.0.9 |
| libclang | 14.0.6 | 14.0.6 | |
| libclang13 | 14.0.6 | 14.0.6 | |
| libcups | 2.4.2 | 2.4.2 | |
| libcurl | 8.9.1 | 8.9.1 | 8.9.1 |
| libdeflate | 1.17 | 1.17 | 1.17 |
| libedit | 3.1.20230828 | 3.1.20230828 | 3.1.20230828 |
| libev | 4.33 | 4.33 | 4.33 |
| libevent | 2.1.12 | 2.1.12 | 2.1.12 |
| libffi | 3.4.4 | 3.4.4 | 3.4.4 |
| libgcc-ng | 11.2.0 | 11.2.0 | 11.2.0 |
| libgfortran-ng | 11.2.0 | 11.2.0 | 11.2.0 |
| libgfortran5 | 11.2.0 | 11.2.0 | 11.2.0 |
| libglib | 2.78.4 | 2.78.4 | |
| libgomp | 11.2.0 | 11.2.0 | 11.2.0 |
| libgrpc | 1.62.2 | 1.62.2 | 1.62.2 |
| libiconv | 1.16 | 1.16 | |
| liblief | 0.12.3 | 0.12.3 | 0.12.3 |
| libllvm14 | 14.0.6 | 14.0.6 | |
| libmamba | 1.5.8 | 1.5.8 | 1.5.8 |
| libmambapy | 1.5.8 | 1.5.8 | 1.5.8 |
| libnghttp2 | 1.57.0 | 1.57.0 | 1.57.0 |
| libopenblas | 0.3.21 | 0.3.21 | |
| libpng | 1.6.39 | 1.6.39 | 1.6.39 |
| libpq | 12.17 | 12.17 | |
| libprotobuf | 4.25.3 | 4.25.3 | 4.25.3 |
| libsodium | 1.0.18 | 1.0.18 | 1.0.18 |
| libsolv | 0.7.24 | 0.7.24 | 0.7.24 |
| libspatialindex | 1.9.3 | 1.9.3 | |
| libssh2 | 1.11.0 | 1.11.0 | 1.11.0 |
| libstdcxx-ng | 11.2.0 | 11.2.0 | 11.2.0 |
| libthrift | 0.15.0 | 0.15.0 | 0.15.0 |
| libtiff | 4.5.1 | 4.5.1 | 4.5.1 |
| libuuid | 1.41.5 | 1.41.5 | 1.41.5 |
| libwebp-base | 1.3.2 | 1.3.2 | 1.3.2 |
| libxcb | 1.15 | 1.15 | |
| libxkbcommon | 1.0.1 | 1.0.1 | |
| libxml2 | 2.10.4 | 2.10.4 | 2.13.1 |
| libxslt | 1.1.37 | 1.1.37 | |
| libzopfli | 1.0.3 | 1.0.3 | 1.0.3 |
| linkify-it-py | 2.0.0 | 2.0.0 | |
| llvmlite | 0.43.0 | 0.43.0 | |
| locket | 1.0.0 | 1.0.0 | 1.0.0 |
| lxml | 5.2.1 | 5.2.1 | |
| lz4 | 4.3.2 | 4.3.2 | 4.3.2 |
| lz4-c | 1.9.4 | 1.9.4 | 1.9.4 |
| lzo | 2.10 | 2.10 | |
| markdown | 3.4.1 | 3.4.1 | |
| markdown-it-py | 2.2.0 | 2.2.0 | |
| markupsafe | 2.1.3 | 2.1.3 | 2.1.3 |
| matplotlib | 3.9.2 | 3.9.2 | 3.9.2 |
| matplotlib-base | 3.9.2 | 3.9.2 | 3.9.2 |
| matplotlib-inline | 0.1.6 | 0.1.6 | 0.1.6 |
| mccabe | 0.7.0 | 0.7.0 | 0.7.0 |
| mdit-py-plugins | 0.3.0 | 0.3.0 | |
| mdurl | 0.1.0 | 0.1.0 | |
| menuinst | 2.1.2 | 2.1.2 | 2.1.2 |
| mistune | 2.0.4 | 2.0.4 | 2.0.4 |
| mkl | 2023.1.0 | ||
| mkl-service | 2.4.0 | ||
| mkl\_fft | 1.3.10 | ||
| mkl\_random | 1.2.7 | ||
| more-itertools | 10.3.0 | 10.3.0 | 10.3.0 |
| mpmath | 1.3.0 | 1.3.0 | 1.3.0 |
| msgpack-python | 1.0.3 | 1.0.3 | 1.0.3 |
| multidict | 6.0.4 | 6.0.4 | 6.0.4 |
| multipledispatch | 0.6.0 | 0.6.0 | |
| mypy | 1.11.2 | 1.11.2 | 1.11.2 |
| mypy\_extensions | 1.0.0 | 1.0.0 | 1.0.0 |
| mysql | 5.7.24 | 5.7.24 | |
| navigator-updater | 0.5.1 | 0.5.1 | |
| nbclient | 0.8.0 | 0.8.0 | 0.8.0 |
| nbconvert | 7.16.4 | 7.16.4 | 7.10.0 |
| nbformat | 5.10.4 | 5.10.4 | 5.10.4 |
| ncurses | 6.4 | 6.4 | 6.4 |
| nest-asyncio | 1.6.0 | 1.6.0 | 1.6.0 |
| networkx | 3.3 | 3.3 | 3.3 |
| nltk | 3.9.1 | 3.9.1 | 3.9.1 |
| notebook | 7.2.2 | 7.2.2 | |
| notebook-shim | 0.2.3 | 0.2.3 | |
| nspr | 4.35 | 4.35 | |
| nss | 3.89.1 | 3.89.1 | |
| numba | 0.60.0 | 0.60.0 | |
| numexpr | 2.8.7 | 2.8.7 | 2.8.7 |
| numpy | 1.26.4 | 1.26.4 | 1.26.4 |
| numpy-base | 1.26.4 | 1.26.4 | 1.26.4 |
| numpydoc | 1.7.0 | 1.7.0 | |
| oniguruma | 6.9.7.1 | 6.9.7.1 | |
| openjpeg | 2.5.2 | 2.5.2 | 2.5.2 |
| openpyxl | 3.1.5 | 3.1.5 | 3.1.5 |
| openssl | 3.0.15 | 3.0.15 | 3.0.15 |
| orc | 2.0.1 | 2.0.1 | 2.0.1 |
| overrides | 7.4.0 | 7.4.0 | |
| packaging | 24.1 | 24.1 | 24.1 |
| pandas | 2.2.2 | 2.2.2 | 2.2.2 |
| pandocfilters | 1.5.0 | 1.5.0 | 1.5.0 |
| panel | 1.5.2 | 1.5.2 | |
| param | 2.1.1 | 2.1.1 | |
| parsel | 1.8.1 | 1.8.1 | |
| parso | 0.8.3 | 0.8.3 | 0.8.3 |
| partd | 1.4.1 | 1.4.1 | 1.4.1 |
| patch | 2.7.6 | 2.7.6 | 2.7.6 |
| patchelf | 0.17.2 | 0.17.2 | 0.17.2 |
| pathspec | 0.10.3 | 0.10.3 | 0.10.3 |
| patsy | 0.5.6 | 0.5.6 | 0.5.6 |
| pcre2 | 10.42 | 10.42 | 10.42 |
| pexpect | 4.8.0 | 4.8.0 | 4.8.0 |
| pickleshare | 0.7.5 | 0.7.5 | |
| pillow | 10.4.0 | 10.4.0 | 10.4.0 |
| pip | 24.2 | 24.2 | 24.2 |
| pkce | 1.0.3 | 1.0.3 | |
| pkginfo | 1.10.0 | 1.10.0 | 1.10.0 |
| platformdirs | 3.10.0 | 3.10.0 | 3.10.0 |
| plotly | 5.24.1 | 5.24.1 | 5.24.1 |
| pluggy | 1.0.0 | 1.0.0 | 1.0.0 |
| ply | 3.11 | 3.11 | |
| prometheus\_client | 0.14.1 | 0.14.1 | |
| prompt-toolkit | 3.0.43 | 3.0.43 | 3.0.43 |
| prompt\_toolkit | 3.0.43 | 3.0.43 | 3.0.43 |
| protego | 0.1.16 | 0.1.16 | |
| protobuf | 4.25.3 | 4.25.3 | |
| psutil | 5.9.0 | 5.9.0 | 5.9.0 |
| ptyprocess | 0.7.0 | 0.7.0 | 0.7.0 |
| pure\_eval | 0.2.2 | 0.2.2 | 0.2.2 |
| py-cpuinfo | 9.0.0 | 9.0.0 | |
| py-lief | 0.12.3 | 0.12.3 | 0.12.3 |
| pyarrow | 16.1.0 | 16.1.0 | 16.1.0 |
| pyasn1 | 0.4.8 | 0.4.8 | |
| pyasn1-modules | 0.2.8 | 0.2.8 | |
| pybind11-abi | 5 | 5 | 5 |
| pycodestyle | 2.11.1 | 2.11.1 | 2.11.1 |
| pycosat | 0.6.6 | 0.6.6 | 0.6.6 |
| pycparser | 2.21 | 2.21 | 2.21 |
| pyct | 0.5.0 | 0.5.0 | |
| pycurl | 7.45.3 | 7.45.3 | 7.45.3 |
| pydantic | 2.8.2 | 2.8.2 | |
| pydantic-core | 2.20.1 | 2.20.1 | |
| pydeck | 0.8.0 | 0.8.0 | |
| pydispatcher | 2.0.5 | 2.0.5 | |
| pydocstyle | 6.3.0 | 6.3.0 | |
| pyerfa | 2.0.1.4 | 2.0.1.4 | 2.0.1.4 |
| pyflakes | 3.2.0 | 3.2.0 | 3.2.0 |
| pygments | 2.15.1 | 2.15.1 | 2.15.1 |
| pyjwt | 2.8.0 | 2.8.0 | |
| pylint | 2.16.2 | 2.16.2 | 2.16.2 |
| pylint-venv | 3.0.3 | 3.0.3 | |
| pyls-spyder | 0.4.0 | 0.4.0 | |
| pyodbc | 5.1.0 | 5.1.0 | 5.1.0 |
| pyopenssl | 24.2.1 | 24.2.1 | |
| pyparsing | 3.1.2 | 3.1.2 | 3.1.2 |
| pyqt | 5.15.10 | 5.15.10 | |
| pyqt5-sip | 12.13.0 | 12.13.0 | |
| pyqtwebengine | 5.15.10 | 5.15.10 | |
| pysocks | 1.7.1 | 1.7.1 | 1.7.1 |
| pytables | 3.10.1 | 3.10.1 | |
| pytest | 7.4.4 | 7.4.4 | 7.4.4 |
| python | 3.12.7 | 3.12.7 | 3.12.7 |
| python-dateutil | 2.9.0post0 | 2.9.0post0 | 2.9.0post0 |
| python-dotenv | 0.21.0 | 0.21.0 | |
| python-fastjsonschema | 2.16.2 | 2.16.2 | 2.16.2 |
| python-json-logger | 2.0.7 | 2.0.7 | |
| python-libarchive-c | 5.1 | 5.1 | 5.1 |
| python-lmdb | 1.4.1 | 1.4.1 | 1.4.1 |
| python-lsp-black | 2.0.0 | 2.0.0 | |
| python-lsp-jsonrpc | 1.1.2 | 1.1.2 | |
| python-lsp-server | 1.10.0 | 1.10.0 | |
| python-slugify | 5.0.2 | 5.0.2 | |
| python-tzdata | 2023.3 | 2023.3 | 2023.3 |
| pytoolconfig | 1.2.6 | 1.2.6 | |
| pytz | 2024.1 | 2024.1 | 2024.1 |
| pyviz\_comms | 3.0.2 | 3.0.2 | |
| pywavelets | 1.7.0 | 1.7.0 | 1.7.0 |
| pyxdg | 0.27 | 0.27 | |
| pyyaml | 6.0.1 | 6.0.1 | 6.0.1 |
| pyzmq | 25.1.2 | 25.1.2 | 25.1.2 |
| qdarkstyle | 3.2.3 | 3.2.3 | |
| qstylizer | 0.2.2 | 0.2.2 | |
| qt-main | 5.15.2 | 5.15.2 | |
| qt-webengine | 5.15.9 | 5.15.9 | |
| qtawesome | 1.3.1 | 1.3.1 | |
| qtconsole | 5.5.1 | 5.5.1 | |
| qtpy | 2.4.1 | 2.4.1 | |
| queuelib | 1.6.2 | 1.6.2 | |
| re2 | 2022.04.01 | 2022.04.01 | 2022.04.01 |
| readline | 8.2 | 8.2 | 8.2 |
| referencing | 0.30.2 | 0.30.2 | 0.30.2 |
| regex | 2024.9.11 | 2024.9.11 | 2024.9.11 |
| reproc | 14.2.4 | 14.2.4 | 14.2.4 |
| reproc-cpp | 14.2.4 | 14.2.4 | 14.2.4 |
| requests | 2.32.3 | 2.32.3 | 2.32.3 |
| requests-file | 1.5.1 | 1.5.1 | |
| requests-toolbelt | 1.0.0 | 1.0.0 | 1.0.0 |
| rfc3339-validator | 0.1.4 | 0.1.4 | |
| rfc3986-validator | 0.1.1 | 0.1.1 | |
| rich | 13.7.1 | 13.7.1 | |
| rope | 1.12.0 | 1.12.0 | |
| rpds-py | 0.10.6 | 0.10.6 | 0.10.6 |
| rtree | 1.0.1 | 1.0.1 | |
| ruamel.yaml | 0.18.6 | 0.18.6 | 0.18.6 |
| ruamel.yaml.clib | 0.2.8 | 0.2.8 | 0.2.8 |
| ruamel\_yaml | 0.17.21 | 0.17.21 | 0.17.21 |
| s2n | 1.3.27 | 1.3.27 | 1.3.27 |
| s3fs | 2024.6.1 | 2024.6.1 | 2024.6.1 |
| scikit-image | 0.24.0 | 0.24.0 | 0.24.0 |
| scikit-learn | 1.5.1 | 1.5.1 | 1.5.1 |
| scipy | 1.13.1 | 1.13.1 | 1.13.1 |
| scrapy | 2.11.1 | 2.11.1 | |
| seaborn | 0.13.2 | 0.13.2 | 0.13.2 |
| secretstorage | 3.3.1 | 3.3.1 | |
| semver | 3.0.2 | 3.0.2 | |
| send2trash | 1.8.2 | 1.8.2 | |
| service\_identity | 18.1.0 | 18.1.0 | |
| setuptools | 75.1.0 | 75.1.0 | 75.1.0 |
| sip | 6.7.12 | 6.7.12 | |
| six | 1.16.0 | 1.16.0 | 1.16.0 |
| smart\_open | 5.2.1 | 5.2.1 | |
| smmap | 4.0.0 | 4.0.0 | |
| snappy | 1.2.1 | 1.2.1 | 1.2.1 |
| sniffio | 1.3.0 | 1.3.0 | |
| snowballstemmer | 2.2.0 | 2.2.0 | 2.2.0 |
| sortedcontainers | 2.4.0 | 2.4.0 | 2.4.0 |
| soupsieve | 2.5 | 2.5 | 2.5 |
| sphinx | 7.3.7 | 7.3.7 | |
| sphinxcontrib-applehelp | 1.0.2 | 1.0.2 | |
| sphinxcontrib-devhelp | 1.0.2 | 1.0.2 | |
| sphinxcontrib-htmlhelp | 2.0.0 | 2.0.0 | |
| sphinxcontrib-jsmath | 1.0.1 | 1.0.1 | |
| sphinxcontrib-qthelp | 1.0.3 | 1.0.3 | |
| sphinxcontrib-serializinghtml | 1.1.10 | 1.1.10 | |
| spyder | 5.5.1 | 5.5.1 | |
| spyder-kernels | 2.5.0 | 2.5.0 | |
| sqlalchemy | 2.0.34 | 2.0.34 | 2.0.34 |
| sqlite | 3.45.3 | 3.45.3 | 3.45.3 |
| stack\_data | 0.2.0 | 0.2.0 | 0.2.0 |
| statsmodels | 0.14.2 | 0.14.2 | 0.14.2 |
| streamlit | 1.37.1 | 1.37.1 | |
| sympy | 1.13.2 | 1.13.2 | 1.13.2 |
| tabulate | 0.9.0 | 0.9.0 | 0.9.0 |
| tbb | 2021.8.0 | 2021.8.0 | |
| tblib | 1.7.0 | 1.7.0 | 1.7.0 |
| tenacity | 8.2.3 | 8.2.3 | 8.2.3 |
| terminado | 0.17.1 | 0.17.1 | |
| text-unidecode | 1.3 | 1.3 | |
| textdistance | 4.2.1 | 4.2.1 | |
| threadpoolctl | 3.5.0 | 3.5.0 | 3.5.0 |
| three-merge | 0.1.1 | 0.1.1 | |
| tifffile | 2023.4.12 | 2023.4.12 | 2023.4.12 |
| tinycss2 | 1.2.1 | 1.2.1 | 1.2.1 |
| tk | 8.6.14 | 8.6.14 | 8.6.14 |
| tldextract | 5.1.2 | 5.1.2 | |
| toml | 0.10.2 | 0.10.2 | |
| tomli | 2.0.1 | 2.0.1 | |
| tomlkit | 0.11.1 | 0.11.1 | 0.11.1 |
| toolz | 0.12.0 | 0.12.0 | 0.12.0 |
| tornado | 6.4.1 | 6.4.1 | 6.4.1 |
| tqdm | 4.66.5 | 4.66.5 | 4.66.5 |
| traitlets | 5.14.3 | 5.14.3 | 5.14.3 |
| truststore | 0.8.0 | 0.8.0 | 0.8.0 |
| twisted | 23.10.0 | 23.10.0 | |
| typing-extensions | 4.11.0 | 4.11.0 | 4.11.0 |
| typing\_extensions | 4.11.0 | 4.11.0 | 4.11.0 |
| tzdata | 2024b | 2024b | 2024b |
| uc-micro-py | 1.0.1 | 1.0.1 | |
| ujson | 5.10.0 | 5.10.0 | |
| unicodedata2 | 15.1.0 | 15.1.0 | 15.1.0 |
| unidecode | 1.3.8 | 1.3.8 | |
| unixodbc | 2.3.11 | 2.3.11 | 2.3.11 |
| urllib3 | 2.2.3 | 2.2.3 | 2.2.3 |
| utf8proc | 2.6.1 | 2.6.1 | 2.6.1 |
| w3lib | 1.21.0 | 2.1.2 | |
| watchdog | 4.0.1 | 4.0.1 | |
| wcwidth | 0.2.5 | 0.2.5 | 0.2.5 |
| webencodings | 0.5.1 | 0.5.1 | 0.5.1 |
| websocket-client | 1.8.0 | 1.8.0 | |
| werkzeug | 3.0.3 | 3.0.3 | 3.0.3 |
| whatthepatch | 1.0.2 | 1.0.2 | |
| wheel | 0.44.0 | 0.44.0 | 0.44.0 |
| widgetsnbextension | 3.6.6 | 3.6.6 | |
| wrapt | 1.14.1 | 1.14.1 | 1.14.1 |
| wurlitzer | 3.0.2 | 3.0.2 | |
| xarray | 2023.6.0 | 2023.6.0 | |
| xyzservices | 2022.9.0 | 2022.9.0 | 2022.9.0 |
| xz | 5.4.6 | 5.4.6 | 5.4.6 |
| yaml | 0.2.5 | 0.2.5 | 0.2.5 |
| yaml-cpp | 0.8.0 | 0.8.0 | 0.8.0 |
| yapf | 0.40.2 | 0.40.2 | |
| yarl | 1.11.0 | 1.11.0 | 1.11.0 |
| zeromq | 4.3.5 | 4.3.5 | 4.3.5 |
| zfp | 1.0.0 | ||
| zict | 3.0.0 | 3.0.0 | 3.0.0 |
| zipp | 3.17.0 | 3.17.0 | |
| zlib | 1.2.13 | 1.2.13 | 1.2.13 |
| zlib-ng | 2.0.7 | 2.0.7 | |
| zope | 1.0 | 1.0 | |
| zope.interface | 5.4.0 | 5.4.0 | |
| zstandard | 0.23.0 | 0.23.0 | 0.23.0 |
| zstd | 1.5.6 | 1.5.6 | 1.5.6 |
| Package Name | osx-arm64 | osx-64 |
|---|---|---|
| \_anaconda\_depends | 2024.10 | 2024.10 |
| aiobotocore | 2.12.3 | 2.12.3 |
| aiohappyeyeballs | 2.4.0 | 2.4.0 |
| aiohttp | 3.10.5 | 3.10.5 |
| aioitertools | 0.7.1 | 0.7.1 |
| aiosignal | 1.2.0 | 1.2.0 |
| alabaster | 0.7.16 | 0.7.16 |
| altair | 5.0.1 | 5.0.1 |
| anaconda-anon-usage | 0.4.4 | 0.4.4 |
| anaconda-catalogs | 0.2.0 | 0.2.0 |
| anaconda-client | 1.12.3 | 1.12.3 |
| anaconda-cloud-auth | 0.5.1 | 0.5.1 |
| anaconda-navigator | 2.6.3 | 2.6.3 |
| anaconda-project | 0.11.1 | 0.11.1 |
| annotated-types | 0.6.0 | 0.6.0 |
| anyio | 4.2.0 | 4.2.0 |
| aom | 3.6.0 | 3.6.0 |
| appdirs | 1.4.4 | 1.4.4 |
| applaunchservices | 0.3.0 | 0.3.0 |
| appnope | 0.1.3 | 0.1.3 |
| appscript | 1.2.5 | 1.2.5 |
| archspec | 0.2.3 | 0.2.3 |
| argon2-cffi | 21.3.0 | 21.3.0 |
| argon2-cffi-bindings | 21.2.0 | 21.2.0 |
| arrow | 1.2.3 | 1.2.3 |
| arrow-cpp | 16.1.0 | 16.1.0 |
| astroid | 2.14.2 | 2.14.2 |
| astropy | 6.1.3 | 6.1.3 |
| astropy-iers-data | 0.2024.9.2.0.33.23 | 0.2024.9.2.0.33.23 |
| asttokens | 2.0.5 | 2.0.5 |
| async-lru | 2.0.4 | 2.0.4 |
| atomicwrites | 1.4.0 | 1.4.0 |
| attrs | 23.1.0 | 23.1.0 |
| automat | 20.2.0 | 20.2.0 |
| autopep8 | 2.0.4 | 2.0.4 |
| aws-c-auth | 0.6.19 | 0.6.19 |
| aws-c-cal | 0.5.20 | 0.5.20 |
| aws-c-common | 0.8.5 | 0.8.5 |
| aws-c-compression | 0.2.16 | 0.2.16 |
| aws-c-event-stream | 0.2.15 | 0.2.15 |
| aws-c-http | 0.6.25 | 0.6.25 |
| aws-c-io | 0.13.10 | 0.13.10 |
| aws-c-mqtt | 0.7.13 | 0.7.13 |
| aws-c-s3 | 0.1.51 | 0.1.51 |
| aws-c-sdkutils | 0.1.6 | 0.1.6 |
| aws-checksums | 0.1.13 | 0.1.13 |
| aws-crt-cpp | 0.18.16 | 0.18.16 |
| aws-sdk-cpp | 1.10.55 | 1.10.55 |
| babel | 2.11.0 | 2.11.0 |
| bcrypt | 3.2.0 | 3.2.0 |
| beautifulsoup4 | 4.12.3 | 4.12.3 |
| binaryornot | 0.4.4 | 0.4.4 |
| black | 24.8.0 | 24.8.0 |
| blas | 1.0 | 1.0 |
| bleach | 4.1.0 | 4.1.0 |
| blinker | 1.6.2 | 1.6.2 |
| blosc | 1.21.3 | 1.21.3 |
| bokeh | 3.6.0 | 3.6.0 |
| boltons | 23.0.0 | 23.0.0 |
| boost-cpp | 1.82.0 | 1.82.0 |
| botocore | 1.34.69 | 1.34.69 |
| bottleneck | 1.3.7 | 1.3.7 |
| brotli | 1.0.9 | 1.0.9 |
| brotli-bin | 1.0.9 | 1.0.9 |
| brotli-python | 1.0.9 | 1.0.9 |
| brunsli | 0.1 | 0.1 |
| bzip2 | 1.0.8 | 1.0.8 |
| c-ares | 1.19.1 | 1.19.1 |
| c-blosc2 | 2.12.0 | 2.12.0 |
| ca-certificates | 2024.9.24 | 2024.9.24 |
| cachetools | 5.3.3 | 5.3.3 |
| cctools | 949.0.1 | 949.0.1 |
| cctools\_osx-64 | 949.0.1 | |
| cctools\_osx-arm64 | 949.0.1 | |
| certifi | 2024.8.30 | 2024.8.30 |
| cffi | 1.17.1 | 1.17.1 |
| cfitsio | 3.470 | 3.470 |
| chardet | 4.0.0 | 4.0.0 |
| charls | 2.2.0 | 2.2.0 |
| charset-normalizer | 3.3.2 | 3.3.2 |
| click | 8.1.7 | 8.1.7 |
| cloudpickle | 3.0.0 | 3.0.0 |
| colorama | 0.4.6 | 0.4.6 |
| colorcet | 3.1.0 | 3.1.0 |
| comm | 0.2.1 | 0.2.1 |
| conda | 24.9.2 | 24.9.2 |
| conda-build | 24.9.0 | 24.9.0 |
| conda-content-trust | 0.2.0 | 0.2.0 |
| conda-index | 0.5.0 | 0.5.0 |
| conda-libmamba-solver | 24.9.0 | 24.9.0 |
| conda-pack | 0.7.1 | 0.7.1 |
| conda-package-handling | 2.3.0 | 2.3.0 |
| conda-package-streaming | 0.10.0 | 0.10.0 |
| conda-repo-cli | 1.0.114 | 1.0.114 |
| conda-token | 0.5.0 | 0.5.0 |
| constantly | 23.10.4 | 23.10.4 |
| contourpy | 1.2.0 | 1.2.0 |
| cookiecutter | 2.6.0 | 2.6.0 |
| cryptography | 43.0.0 | 43.0.0 |
| cssselect | 1.2.0 | 1.2.0 |
| curl | 8.9.1 | 8.9.1 |
| cycler | 0.11.0 | 0.11.0 |
| cyrus-sasl | 2.1.28 | 2.1.28 |
| cytoolz | 0.12.2 | 0.12.2 |
| dask | 2024.8.2 | 2024.8.2 |
| dask-core | 2024.8.2 | 2024.8.2 |
| dask-expr | 1.1.13 | 1.1.13 |
| datashader | 0.16.3 | 0.16.3 |
| dav1d | 1.2.1 | 1.2.1 |
| debugpy | 1.6.7 | 1.6.7 |
| decorator | 5.1.1 | 5.1.1 |
| defusedxml | 0.7.1 | 0.7.1 |
| diff-match-patch | 20200713 | 20200713 |
| dill | 0.3.8 | 0.3.8 |
| distributed | 2024.8.2 | 2024.8.2 |
| distro | 1.9.0 | 1.9.0 |
| dmglib | 0.9.5 | 0.9.5 |
| docstring-to-markdown | 0.11 | 0.11 |
| docutils | 0.18.1 | 0.18.1 |
| et\_xmlfile | 1.1.0 | 1.1.0 |
| executing | 0.8.3 | 0.8.3 |
| expat | 2.6.3 | 2.6.3 |
| filelock | 3.13.1 | 3.13.1 |
| flake8 | 7.0.0 | 7.0.0 |
| flask | 3.0.3 | 3.0.3 |
| fmt | 9.1.0 | 9.1.0 |
| fonttools | 4.51.0 | 4.51.0 |
| freetype | 2.12.1 | 2.12.1 |
| frozendict | 2.4.2 | 2.4.2 |
| frozenlist | 1.4.0 | 1.4.0 |
| fsspec | 2024.6.1 | 2024.6.1 |
| gensim | 4.3.3 | 4.3.3 |
| gettext | 0.21.0 | 0.21.0 |
| gflags | 2.2.2 | 2.2.2 |
| giflib | 5.2.1 | 5.2.1 |
| gitdb | 4.0.7 | 4.0.7 |
| gitpython | 3.1.43 | 3.1.43 |
| glib | 2.78.4 | 2.78.4 |
| glib-tools | 2.78.4 | 2.78.4 |
| glog | 0.5.0 | 0.5.0 |
| greenlet | 3.0.1 | 3.0.1 |
| gst-plugins-base | 1.14.1 | 1.14.1 |
| gstreamer | 1.14.1 | 1.14.1 |
| h11 | 0.14.0 | 0.14.0 |
| h5py | 3.11.0 | 3.11.0 |
| hdf5 | 1.12.1 | 1.12.1 |
| heapdict | 1.0.1 | 1.0.1 |
| holoviews | 1.19.1 | 1.19.1 |
| httpcore | 1.0.2 | 1.0.2 |
| httpx | 0.27.0 | 0.27.0 |
| hvplot | 0.11.0 | 0.11.0 |
| hyperlink | 21.0.0 | 21.0.0 |
| icu | 73.1 | 73.1 |
| idna | 3.7 | 3.7 |
| imagecodecs | 2023.1.23 | 2023.1.23 |
| imageio | 2.33.1 | 2.33.1 |
| imagesize | 1.4.1 | 1.4.1 |
| imbalanced-learn | 0.12.3 | 0.12.3 |
| importlib-metadata | 7.0.1 | 7.0.1 |
| incremental | 22.10.0 | 22.10.0 |
| inflection | 0.5.1 | 0.5.1 |
| iniconfig | 1.1.1 | 1.1.1 |
| intake | 2.0.7 | 2.0.7 |
| intervaltree | 3.1.0 | 3.1.0 |
| ipykernel | 6.28.0 | 6.28.0 |
| ipython | 8.27.0 | 8.27.0 |
| ipython\_genutils | 0.2.0 | 0.2.0 |
| ipywidgets | 7.8.1 | 7.8.1 |
| isort | 5.13.2 | 5.13.2 |
| itemadapter | 0.3.0 | 0.3.0 |
| itemloaders | 1.1.0 | 1.1.0 |
| itsdangerous | 2.2.0 | 2.2.0 |
| jaraco.classes | 3.2.1 | 3.2.1 |
| jedi | 0.19.1 | 0.19.1 |
| jellyfish | 1.0.1 | 1.0.1 |
| jinja2 | 3.1.4 | 3.1.4 |
| jmespath | 1.0.1 | 1.0.1 |
| joblib | 1.4.2 | 1.4.2 |
| jpeg | 9e | 9e |
| jq | 1.6 | 1.6 |
| json5 | 0.9.6 | 0.9.6 |
| jsonpatch | 1.33 | 1.33 |
| jsonpointer | 2.1 | 2.1 |
| jsonschema | 4.23.0 | 4.23.0 |
| jsonschema-specifications | 2023.7.1 | 2023.7.1 |
| jupyter | 1.0.0 | 1.0.0 |
| jupyter-lsp | 2.2.0 | 2.2.0 |
| jupyter\_client | 8.6.0 | 8.6.0 |
| jupyter\_console | 6.6.3 | 6.6.3 |
| jupyter\_core | 5.7.2 | 5.7.2 |
| jupyter\_events | 0.10.0 | 0.10.0 |
| jupyter\_server | 2.14.1 | 2.14.1 |
| jupyter\_server\_terminals | 0.4.4 | 0.4.4 |
| jupyterlab | 4.2.5 | 4.2.5 |
| jupyterlab-variableinspector | 3.1.0 | 3.1.0 |
| jupyterlab\_pygments | 0.1.2 | 0.1.2 |
| jupyterlab\_server | 2.27.3 | 2.27.3 |
| jupyterlab\_widgets | 1.0.0 | 1.0.0 |
| jxrlib | 1.1 | 1.1 |
| keyring | 24.3.1 | 24.3.1 |
| kiwisolver | 1.4.4 | 1.4.4 |
| krb5 | 1.20.1 | 1.20.1 |
| lazy-object-proxy | 1.10.0 | 1.10.0 |
| lazy\_loader | 0.4 | 0.4 |
| lcms2 | 2.12 | 2.12 |
| ld64 | 530 | 530 |
| ld64\_osx-64 | 530 | |
| ld64\_osx-arm64 | 530 | |
| ldid | 2.1.5 | 2.1.5 |
| lerc | 3.0 | 3.0 |
| libabseil | 20240116.2 | 20240116.2 |
| libaec | 1.0.4 | 1.0.4 |
| libarchive | 3.7.4 | 3.7.4 |
| libavif | 0.11.1 | 0.11.1 |
| libboost | 1.82.0 | 1.82.0 |
| libbrotlicommon | 1.0.9 | 1.0.9 |
| libbrotlidec | 1.0.9 | 1.0.9 |
| libbrotlienc | 1.0.9 | 1.0.9 |
| libclang | 14.0.6 | 14.0.6 |
| libclang13 | 14.0.6 | 14.0.6 |
| libcurl | 8.9.1 | 8.9.1 |
| libcxx | 14.0.6 | 14.0.6 |
| libdeflate | 1.17 | 1.17 |
| libedit | 3.1.20230828 | 3.1.20230828 |
| libev | 4.33 | 4.33 |
| libevent | 2.1.12 | 2.1.12 |
| libffi | 3.4.4 | 3.4.4 |
| libgfortran | 5.0.0 | 5.0.0 |
| libgfortran5 | 11.3.0 | 11.3.0 |
| libglib | 2.78.4 | 2.78.4 |
| libgrpc | 1.62.2 | 1.62.2 |
| libiconv | 1.16 | 1.16 |
| liblief | 0.12.3 | 0.12.3 |
| libllvm14 | 14.0.6 | 14.0.6 |
| libmamba | 1.5.8 | 1.5.8 |
| libmambapy | 1.5.8 | 1.5.8 |
| libnghttp2 | 1.57.0 | 1.57.0 |
| libopenblas | 0.3.21 | 0.3.21 |
| libpng | 1.6.39 | 1.6.39 |
| libpq | 12.17 | 12.17 |
| libprotobuf | 4.25.3 | 4.25.3 |
| libsodium | 1.0.18 | 1.0.18 |
| libsolv | 0.7.24 | 0.7.24 |
| libspatialindex | 1.9.3 | 1.9.3 |
| libssh2 | 1.11.0 | 1.11.0 |
| libthrift | 0.15.0 | 0.15.0 |
| libtiff | 4.5.1 | 4.5.1 |
| libwebp-base | 1.3.2 | 1.3.2 |
| libxml2 | 2.13.1 | 2.13.1 |
| libxslt | 1.1.41 | 1.1.41 |
| libzopfli | 1.0.3 | 1.0.3 |
| linkify-it-py | 2.0.0 | 2.0.0 |
| llvm-openmp | 14.0.6 | 14.0.6 |
| llvmlite | 0.43.0 | 0.43.0 |
| locket | 1.0.0 | 1.0.0 |
| lxml | 5.2.1 | 5.2.1 |
| lz4 | 4.3.2 | 4.3.2 |
| lz4-c | 1.9.4 | 1.9.4 |
| lzo | 2.10 | 2.10 |
| markdown | 3.4.1 | 3.4.1 |
| markdown-it-py | 2.2.0 | 2.2.0 |
| markupsafe | 2.1.3 | 2.1.3 |
| matplotlib | 3.9.2 | 3.9.2 |
| matplotlib-base | 3.9.2 | 3.9.2 |
| matplotlib-inline | 0.1.6 | 0.1.6 |
| mccabe | 0.7.0 | 0.7.0 |
| mdit-py-plugins | 0.3.0 | 0.3.0 |
| mdurl | 0.1.0 | 0.1.0 |
| menuinst | 2.1.2 | 2.1.2 |
| mistune | 2.0.4 | 2.0.4 |
| more-itertools | 10.3.0 | 10.3.0 |
| mpmath | 1.3.0 | 1.3.0 |
| msgpack-python | 1.0.3 | 1.0.3 |
| multidict | 6.0.4 | 6.0.4 |
| multipledispatch | 0.6.0 | 0.6.0 |
| mypy | 1.11.2 | 1.11.2 |
| mypy\_extensions | 1.0.0 | 1.0.0 |
| mysql | 5.7.24 | 5.7.24 |
| navigator-updater | 0.5.1 | 0.5.1 |
| nbclient | 0.8.0 | 0.8.0 |
| nbconvert | 7.16.4 | 7.16.4 |
| nbformat | 5.10.4 | 5.10.4 |
| ncurses | 6.4 | 6.4 |
| nest-asyncio | 1.6.0 | 1.6.0 |
| networkx | 3.3 | 3.3 |
| nltk | 3.9.1 | 3.9.1 |
| notebook | 7.2.2 | 7.2.2 |
| notebook-shim | 0.2.3 | 0.2.3 |
| numba | 0.60.0 | 0.60.0 |
| numexpr | 2.8.7 | 2.8.7 |
| numpy | 1.26.4 | 1.26.4 |
| numpy-base | 1.26.4 | 1.26.4 |
| numpydoc | 1.7.0 | 1.7.0 |
| oniguruma | 6.9.7.1 | 6.9.7.1 |
| openjpeg | 2.5.2 | 2.5.2 |
| openpyxl | 3.1.5 | 3.1.5 |
| openssl | 3.0.15 | 3.0.15 |
| orc | 2.0.1 | 2.0.1 |
| overrides | 7.4.0 | 7.4.0 |
| packaging | 24.1 | 24.1 |
| pandas | 2.2.2 | 2.2.2 |
| pandocfilters | 1.5.0 | 1.5.0 |
| panel | 1.5.2 | 1.5.2 |
| param | 2.1.1 | 2.1.1 |
| parsel | 1.8.1 | 1.8.1 |
| parso | 0.8.3 | 0.8.3 |
| partd | 1.4.1 | 1.4.1 |
| patch | 2.7.6 | 2.7.6 |
| pathspec | 0.10.3 | 0.10.3 |
| patsy | 0.5.6 | 0.5.6 |
| pcre2 | 10.42 | 10.42 |
| pexpect | 4.8.0 | 4.8.0 |
| pickleshare | 0.7.5 | 0.7.5 |
| pillow | 10.4.0 | 10.4.0 |
| pip | 24.2 | 24.2 |
| pkce | 1.0.3 | 1.0.3 |
| pkginfo | 1.10.0 | 1.10.0 |
| platformdirs | 3.10.0 | 3.10.0 |
| plotly | 5.24.1 | 5.24.1 |
| pluggy | 1.0.0 | 1.0.0 |
| ply | 3.11 | 3.11 |
| prometheus\_client | 0.14.1 | 0.14.1 |
| prompt-toolkit | 3.0.43 | 3.0.43 |
| prompt\_toolkit | 3.0.43 | 3.0.43 |
| protego | 0.1.16 | 0.1.16 |
| protobuf | 4.25.3 | 4.25.3 |
| psutil | 5.9.0 | 5.9.0 |
| ptyprocess | 0.7.0 | 0.7.0 |
| pure\_eval | 0.2.2 | 0.2.2 |
| py-cpuinfo | 9.0.0 | 9.0.0 |
| py-lief | 0.12.3 | 0.12.3 |
| pyarrow | 16.1.0 | 16.1.0 |
| pyasn1 | 0.4.8 | 0.4.8 |
| pyasn1-modules | 0.2.8 | 0.2.8 |
| pybind11-abi | 5 | 5 |
| pycodestyle | 2.11.1 | 2.11.1 |
| pycosat | 0.6.6 | 0.6.6 |
| pycparser | 2.21 | 2.21 |
| pyct | 0.5.0 | 0.5.0 |
| pycurl | 7.45.3 | 7.45.3 |
| pydantic | 2.8.2 | 2.8.2 |
| pydantic-core | 2.20.1 | 2.20.1 |
| pydeck | 0.8.0 | 0.8.0 |
| pydispatcher | 2.0.5 | 2.0.5 |
| pydocstyle | 6.3.0 | 6.3.0 |
| pyerfa | 2.0.1.4 | 2.0.1.4 |
| pyflakes | 3.2.0 | 3.2.0 |
| pygments | 2.15.1 | 2.15.1 |
| pyjwt | 2.8.0 | 2.8.0 |
| pylint | 2.16.2 | 2.16.2 |
| pylint-venv | 3.0.3 | 3.0.3 |
| pyls-spyder | 0.4.0 | 0.4.0 |
| pyobjc-core | 10.1 | 10.1 |
| pyobjc-framework-cocoa | 10.1 | 10.1 |
| pyobjc-framework-coreservices | 10.1 | 10.1 |
| pyobjc-framework-fsevents | 10.1 | 10.1 |
| pyodbc | 5.1.0 | 5.1.0 |
| pyopenssl | 24.2.1 | 24.2.1 |
| pyparsing | 3.1.2 | 3.1.2 |
| pyqt | 5.15.10 | 5.15.10 |
| pyqt5-sip | 12.13.0 | 12.13.0 |
| pyqtwebengine | 5.15.10 | 5.15.10 |
| pysocks | 1.7.1 | 1.7.1 |
| pytables | 3.10.1 | 3.10.1 |
| pytest | 7.4.4 | 7.4.4 |
| python | 3.12.7 | 3.12.7 |
| python-dateutil | 2.9.0post0 | 2.9.0post0 |
| python-dotenv | 0.21.0 | 0.21.0 |
| python-fastjsonschema | 2.16.2 | 2.16.2 |
| python-json-logger | 2.0.7 | 2.0.7 |
| python-libarchive-c | 5.1 | 5.1 |
| python-lmdb | 1.4.1 | 1.4.1 |
| python-lsp-black | 2.0.0 | 2.0.0 |
| python-lsp-jsonrpc | 1.1.2 | 1.1.2 |
| python-lsp-server | 1.10.0 | 1.10.0 |
| python-slugify | 5.0.2 | 5.0.2 |
| python-tzdata | 2023.3 | 2023.3 |
| python.app | 3 | 3 |
| pytoolconfig | 1.2.6 | 1.2.6 |
| pytz | 2024.1 | 2024.1 |
| pyviz\_comms | 3.0.2 | 3.0.2 |
| pywavelets | 1.7.0 | 1.7.0 |
| pyyaml | 6.0.1 | 6.0.1 |
| pyzmq | 25.1.2 | 25.1.2 |
| qdarkstyle | 3.2.3 | 3.2.3 |
| qstylizer | 0.2.2 | 0.2.2 |
| qt-main | 5.15.2 | 5.15.2 |
| qt-webengine | 5.15.9 | 5.15.9 |
| qtawesome | 1.3.1 | 1.3.1 |
| qtconsole | 5.5.1 | 5.5.1 |
| qtpy | 2.4.1 | 2.4.1 |
| queuelib | 1.6.2 | 1.6.2 |
| re2 | 2022.04.01 | 2022.04.01 |
| readline | 8.2 | 8.2 |
| referencing | 0.30.2 | 0.30.2 |
| regex | 2024.9.11 | 2024.9.11 |
| reproc | 14.2.4 | 14.2.4 |
| reproc-cpp | 14.2.4 | 14.2.4 |
| requests | 2.32.3 | 2.32.3 |
| requests-file | 1.5.1 | 1.5.1 |
| requests-toolbelt | 1.0.0 | 1.0.0 |
| rfc3339-validator | 0.1.4 | 0.1.4 |
| rfc3986-validator | 0.1.1 | 0.1.1 |
| rich | 13.7.1 | 13.7.1 |
| rope | 1.12.0 | 1.12.0 |
| rpds-py | 0.10.6 | 0.10.6 |
| rtree | 1.0.1 | 1.0.1 |
| ruamel.yaml | 0.18.6 | 0.18.6 |
| ruamel.yaml.clib | 0.2.8 | 0.2.8 |
| ruamel\_yaml | 0.17.21 | 0.17.21 |
| s3fs | 2024.6.1 | 2024.6.1 |
| scikit-image | 0.24.0 | 0.24.0 |
| scikit-learn | 1.5.1 | 1.5.1 |
| scipy | 1.13.1 | 1.13.1 |
| scrapy | 2.11.1 | 2.11.1 |
| seaborn | 0.13.2 | 0.13.2 |
| semver | 3.0.2 | 3.0.2 |
| send2trash | 1.8.2 | 1.8.2 |
| service\_identity | 18.1.0 | 18.1.0 |
| setuptools | 75.1.0 | 75.1.0 |
| sip | 6.7.12 | 6.7.12 |
| six | 1.16.0 | 1.16.0 |
| smart\_open | 5.2.1 | 5.2.1 |
| smmap | 4.0.0 | 4.0.0 |
| snappy | 1.2.1 | 1.2.1 |
| sniffio | 1.3.0 | 1.3.0 |
| snowballstemmer | 2.2.0 | 2.2.0 |
| sortedcontainers | 2.4.0 | 2.4.0 |
| soupsieve | 2.5 | 2.5 |
| sphinx | 7.3.7 | 7.3.7 |
| sphinxcontrib-applehelp | 1.0.2 | 1.0.2 |
| sphinxcontrib-devhelp | 1.0.2 | 1.0.2 |
| sphinxcontrib-htmlhelp | 2.0.0 | 2.0.0 |
| sphinxcontrib-jsmath | 1.0.1 | 1.0.1 |
| sphinxcontrib-qthelp | 1.0.3 | 1.0.3 |
| sphinxcontrib-serializinghtml | 1.1.10 | 1.1.10 |
| spyder | 5.5.1 | 5.5.1 |
| spyder-kernels | 2.5.0 | 2.5.0 |
| sqlalchemy | 2.0.34 | 2.0.34 |
| sqlite | 3.45.3 | 3.45.3 |
| stack\_data | 0.2.0 | 0.2.0 |
| statsmodels | 0.14.2 | 0.14.2 |
| streamlit | 1.37.1 | 1.37.1 |
| sympy | 1.13.2 | 1.13.2 |
| tabulate | 0.9.0 | 0.9.0 |
| tapi | 1100.0.11 | 1000.10.8 |
| tbb | 2021.8.0 | 2021.8.0 |
| tblib | 1.7.0 | 1.7.0 |
| tenacity | 8.2.3 | 8.2.3 |
| terminado | 0.17.1 | 0.17.1 |
| text-unidecode | 1.3 | 1.3 |
| textdistance | 4.2.1 | 4.2.1 |
| threadpoolctl | 3.5.0 | 3.5.0 |
| three-merge | 0.1.1 | 0.1.1 |
| tifffile | 2023.4.12 | 2023.4.12 |
| tinycss2 | 1.2.1 | 1.2.1 |
| tk | 8.6.14 | 8.6.14 |
| tldextract | 5.1.2 | 5.1.2 |
| toml | 0.10.2 | 0.10.2 |
| tomli | 2.0.1 | 2.0.1 |
| tomlkit | 0.11.1 | 0.11.1 |
| toolz | 0.12.0 | 0.12.0 |
| tornado | 6.4.1 | 6.4.1 |
| tqdm | 4.66.5 | 4.66.5 |
| traitlets | 5.14.3 | 5.14.3 |
| truststore | 0.8.0 | 0.8.0 |
| twisted | 23.10.0 | 23.10.0 |
| typing-extensions | 4.11.0 | 4.11.0 |
| typing\_extensions | 4.11.0 | 4.11.0 |
| tzdata | 2024b | 2024b |
| uc-micro-py | 1.0.1 | 1.0.1 |
| ujson | 5.10.0 | 5.10.0 |
| unicodedata2 | 15.1.0 | 15.1.0 |
| unidecode | 1.3.8 | 1.3.8 |
| unixodbc | 2.3.11 | 2.3.11 |
| urllib3 | 2.2.3 | 2.2.3 |
| utf8proc | 2.6.1 | 2.6.1 |
| w3lib | 2.1.2 | 2.1.2 |
| watchdog | 4.0.1 | 4.0.1 |
| wcwidth | 0.2.5 | 0.2.5 |
| webencodings | 0.5.1 | 0.5.1 |
| websocket-client | 1.8.0 | 1.8.0 |
| werkzeug | 3.0.3 | 3.0.3 |
| whatthepatch | 1.0.2 | 1.0.2 |
| wheel | 0.44.0 | 0.44.0 |
| widgetsnbextension | 3.6.6 | 3.6.6 |
| wrapt | 1.14.1 | 1.14.1 |
| wurlitzer | 3.0.2 | 3.0.2 |
| xarray | 2023.6.0 | 2023.6.0 |
| xlwings | 0.32.1 | 0.32.1 |
| xyzservices | 2022.9.0 | 2022.9.0 |
| xz | 5.4.6 | 5.4.6 |
| yaml | 0.2.5 | 0.2.5 |
| yaml-cpp | 0.8.0 | 0.8.0 |
| yapf | 0.40.2 | 0.40.2 |
| yarl | 1.11.0 | 1.11.0 |
| zeromq | 4.3.5 | 4.3.5 |
| zfp | 1.0.0 | 1.0.0 |
| zict | 3.0.0 | 3.0.0 |
| zipp | 3.17.0 | 3.17.0 |
| zlib | 1.2.13 | 1.2.13 |
| zlib-ng | 2.0.7 | 2.0.7 |
| zope | 1.0 | 1.0 |
| zope.interface | 5.4.0 | 5.4.0 |
| zstandard | 0.23.0 | 0.23.0 |
| zstd | 1.5.6 | 1.5.6 |
| Package Name | win-64 |
|---|---|
| \_anaconda\_depends | 2024.10 |
| aiobotocore | 2.12.3 |
| aiohappyeyeballs | 2.4.0 |
| aiohttp | 3.10.5 |
| aioitertools | 0.7.1 |
| aiosignal | 1.2.0 |
| alabaster | 0.7.16 |
| altair | 5.0.1 |
| anaconda-anon-usage | 0.4.4 |
| anaconda-catalogs | 0.2.0 |
| anaconda-client | 1.12.3 |
| anaconda-cloud-auth | 0.5.1 |
| anaconda-navigator | 2.6.3 |
| anaconda-project | 0.11.1 |
| anaconda\_powershell\_prompt | 1.1.0 |
| anaconda\_prompt | 1.1.0 |
| annotated-types | 0.6.0 |
| anyio | 4.2.0 |
| aom | 3.6.0 |
| appdirs | 1.4.4 |
| archspec | 0.2.3 |
| argon2-cffi | 21.3.0 |
| argon2-cffi-bindings | 21.2.0 |
| arrow | 1.2.3 |
| arrow-cpp | 16.1.0 |
| astroid | 2.14.2 |
| astropy | 6.1.3 |
| astropy-iers-data | 0.2024.9.2.0.33.23 |
| asttokens | 2.0.5 |
| async-lru | 2.0.4 |
| atomicwrites | 1.4.0 |
| attrs | 23.1.0 |
| automat | 20.2.0 |
| autopep8 | 2.0.4 |
| aws-c-auth | 0.6.19 |
| aws-c-cal | 0.5.20 |
| aws-c-common | 0.8.5 |
| aws-c-compression | 0.2.16 |
| aws-c-event-stream | 0.2.15 |
| aws-c-http | 0.6.25 |
| aws-c-io | 0.13.10 |
| aws-c-mqtt | 0.7.13 |
| aws-c-s3 | 0.1.51 |
| aws-c-sdkutils | 0.1.6 |
| aws-checksums | 0.1.13 |
| aws-crt-cpp | 0.18.16 |
| aws-sdk-cpp | 1.10.55 |
| babel | 2.11.0 |
| bcrypt | 3.2.0 |
| beautifulsoup4 | 4.12.3 |
| binaryornot | 0.4.4 |
| black | 24.8.0 |
| blas | 1.0 |
| bleach | 4.1.0 |
| blinker | 1.6.2 |
| blosc | 1.21.3 |
| bokeh | 3.6.0 |
| boltons | 23.0.0 |
| boost-cpp | 1.82.0 |
| botocore | 1.34.69 |
| bottleneck | 1.3.7 |
| brotli | 1.0.9 |
| brotli-bin | 1.0.9 |
| brotli-python | 1.0.9 |
| bzip2 | 1.0.8 |
| c-ares | 1.19.1 |
| c-blosc2 | 2.12.0 |
| ca-certificates | 2024.9.24 |
| cachetools | 5.3.3 |
| certifi | 2024.8.30 |
| cffi | 1.17.1 |
| cfitsio | 3.470 |
| chardet | 4.0.0 |
| charls | 2.2.0 |
| charset-normalizer | 3.3.2 |
| click | 8.1.7 |
| cloudpickle | 3.0.0 |
| colorama | 0.4.6 |
| colorcet | 3.1.0 |
| comm | 0.2.1 |
| conda | 24.9.2 |
| conda-build | 24.9.0 |
| conda-content-trust | 0.2.0 |
| conda-index | 0.5.0 |
| conda-libmamba-solver | 24.9.0 |
| conda-pack | 0.7.1 |
| conda-package-handling | 2.3.0 |
| conda-package-streaming | 0.10.0 |
| conda-repo-cli | 1.0.114 |
| conda-token | 0.5.0 |
| constantly | 23.10.4 |
| contourpy | 1.2.0 |
| cookiecutter | 2.6.0 |
| cryptography | 43.0.0 |
| cssselect | 1.2.0 |
| curl | 8.9.1 |
| cycler | 0.11.0 |
| cytoolz | 0.12.2 |
| dask | 2024.8.2 |
| dask-core | 2024.8.2 |
| dask-expr | 1.1.13 |
| datashader | 0.16.3 |
| dav1d | 1.2.1 |
| debugpy | 1.6.7 |
| decorator | 5.1.1 |
| defusedxml | 0.7.1 |
| diff-match-patch | 20200713 |
| dill | 0.3.8 |
| distributed | 2024.8.2 |
| distro | 1.9.0 |
| docstring-to-markdown | 0.11 |
| docutils | 0.18.1 |
| et\_xmlfile | 1.1.0 |
| executing | 0.8.3 |
| expat | 2.6.3 |
| filelock | 3.13.1 |
| flake8 | 7.0.0 |
| flask | 3.0.3 |
| fmt | 9.1.0 |
| fonttools | 4.51.0 |
| freetype | 2.12.1 |
| frozendict | 2.4.2 |
| frozenlist | 1.4.0 |
| fsspec | 2024.6.1 |
| gensim | 4.3.3 |
| gflags | 2.2.2 |
| giflib | 5.2.1 |
| gitdb | 4.0.7 |
| gitpython | 3.1.43 |
| glog | 0.5.0 |
| greenlet | 3.0.1 |
| h11 | 0.14.0 |
| h5py | 3.11.0 |
| hdf5 | 1.12.1 |
| heapdict | 1.0.1 |
| holoviews | 1.19.1 |
| httpcore | 1.0.2 |
| httpx | 0.27.0 |
| hvplot | 0.11.0 |
| hyperlink | 21.0.0 |
| icc\_rt | 2022.1.0 |
| icu | 73.1 |
| idna | 3.7 |
| imagecodecs | 2023.1.23 |
| imageio | 2.33.1 |
| imagesize | 1.4.1 |
| imbalanced-learn | 0.12.3 |
| importlib-metadata | 7.0.1 |
| incremental | 22.10.0 |
| inflection | 0.5.1 |
| iniconfig | 1.1.1 |
| intake | 2.0.7 |
| intel-openmp | 2023.1.0 |
| intervaltree | 3.1.0 |
| ipykernel | 6.28.0 |
| ipython | 8.27.0 |
| ipython\_genutils | 0.2.0 |
| ipywidgets | 7.8.1 |
| isort | 5.13.2 |
| itemadapter | 0.3.0 |
| itemloaders | 1.1.0 |
| itsdangerous | 2.2.0 |
| jaraco.classes | 3.2.1 |
| jedi | 0.19.1 |
| jellyfish | 1.0.1 |
| jinja2 | 3.1.4 |
| jmespath | 1.0.1 |
| joblib | 1.4.2 |
| jpeg | 9e |
| jq | 1.6 |
| json5 | 0.9.6 |
| jsonpatch | 1.33 |
| jsonpointer | 2.1 |
| jsonschema | 4.23.0 |
| jsonschema-specifications | 2023.7.1 |
| jupyter | 1.0.0 |
| jupyter-lsp | 2.2.0 |
| jupyter\_client | 8.6.0 |
| jupyter\_console | 6.6.3 |
| jupyter\_core | 5.7.2 |
| jupyter\_events | 0.10.0 |
| jupyter\_server | 2.14.1 |
| jupyter\_server\_terminals | 0.4.4 |
| jupyterlab | 4.2.5 |
| jupyterlab-variableinspector | 3.1.0 |
| jupyterlab\_pygments | 0.1.2 |
| jupyterlab\_server | 2.27.3 |
| jupyterlab\_widgets | 1.0.0 |
| keyring | 24.3.1 |
| kiwisolver | 1.4.4 |
| krb5 | 1.20.1 |
| lazy-object-proxy | 1.10.0 |
| lazy\_loader | 0.4 |
| lcms2 | 2.12 |
| lerc | 3.0 |
| libabseil | 20240116.2 |
| libaec | 1.0.4 |
| libarchive | 3.7.4 |
| libavif | 0.11.1 |
| libboost | 1.82.0 |
| libbrotlicommon | 1.0.9 |
| libbrotlidec | 1.0.9 |
| libbrotlienc | 1.0.9 |
| libclang | 14.0.6 |
| libclang13 | 14.0.6 |
| libcurl | 8.9.1 |
| libdeflate | 1.17 |
| libevent | 2.1.12 |
| libffi | 3.4.4 |
| libgrpc | 1.62.2 |
| libiconv | 1.16 |
| liblief | 0.12.3 |
| libmamba | 1.5.8 |
| libmambapy | 1.5.8 |
| libpng | 1.6.39 |
| libpq | 12.17 |
| libprotobuf | 4.25.3 |
| libsodium | 1.0.18 |
| libsolv | 0.7.24 |
| libspatialindex | 1.9.3 |
| libssh2 | 1.11.0 |
| libthrift | 0.15.0 |
| libtiff | 4.5.1 |
| libwebp-base | 1.3.2 |
| libxml2 | 2.13.1 |
| libxslt | 1.1.41 |
| libzopfli | 1.0.3 |
| linkify-it-py | 2.0.0 |
| llvmlite | 0.43.0 |
| locket | 1.0.0 |
| lxml | 5.2.1 |
| lz4 | 4.3.2 |
| lz4-c | 1.9.4 |
| lzo | 2.10 |
| m2-msys2-runtime | 2.5.0.17080.65c939c |
| m2-patch | 2.7.5 |
| m2w64-libwinpthread-git | 5.0.0.4634.697f757 |
| markdown | 3.4.1 |
| markdown-it-py | 2.2.0 |
| markupsafe | 2.1.3 |
| matplotlib | 3.9.2 |
| matplotlib-base | 3.9.2 |
| matplotlib-inline | 0.1.6 |
| mccabe | 0.7.0 |
| mdit-py-plugins | 0.3.0 |
| mdurl | 0.1.0 |
| menuinst | 2.1.2 |
| mistune | 2.0.4 |
| mkl | 2023.1.0 |
| mkl-service | 2.4.0 |
| mkl\_fft | 1.3.10 |
| mkl\_random | 1.2.7 |
| more-itertools | 10.3.0 |
| mpmath | 1.3.0 |
| msgpack-python | 1.0.3 |
| msys2-conda-epoch | 20160418 |
| multidict | 6.0.4 |
| multipledispatch | 0.6.0 |
| mypy | 1.11.2 |
| mypy\_extensions | 1.0.0 |
| navigator-updater | 0.5.1 |
| nbclient | 0.8.0 |
| nbconvert | 7.16.4 |
| nbformat | 5.10.4 |
| nest-asyncio | 1.6.0 |
| networkx | 3.3 |
| nltk | 3.9.1 |
| notebook | 7.2.2 |
| notebook-shim | 0.2.3 |
| numba | 0.60.0 |
| numexpr | 2.8.7 |
| numpy | 1.26.4 |
| numpy-base | 1.26.4 |
| numpydoc | 1.7.0 |
| openjpeg | 2.5.2 |
| openpyxl | 3.1.5 |
| openssl | 3.0.15 |
| orc | 2.0.1 |
| overrides | 7.4.0 |
| packaging | 24.1 |
| pandas | 2.2.2 |
| pandocfilters | 1.5.0 |
| panel | 1.5.2 |
| param | 2.1.1 |
| paramiko | 2.8.1 |
| parsel | 1.8.1 |
| parso | 0.8.3 |
| partd | 1.4.1 |
| pathspec | 0.10.3 |
| patsy | 0.5.6 |
| pcre2 | 10.42 |
| pexpect | 4.8.0 |
| pickleshare | 0.7.5 |
| pillow | 10.4.0 |
| pip | 24.2 |
| pkce | 1.0.3 |
| pkginfo | 1.10.0 |
| platformdirs | 3.10.0 |
| plotly | 5.24.1 |
| pluggy | 1.0.0 |
| ply | 3.11 |
| prometheus\_client | 0.14.1 |
| prompt-toolkit | 3.0.43 |
| prompt\_toolkit | 3.0.43 |
| protego | 0.1.16 |
| protobuf | 4.25.3 |
| psutil | 5.9.0 |
| ptyprocess | 0.7.0 |
| pure\_eval | 0.2.2 |
| py-cpuinfo | 9.0.0 |
| py-lief | 0.12.3 |
| pyarrow | 16.1.0 |
| pyasn1 | 0.4.8 |
| pyasn1-modules | 0.2.8 |
| pybind11-abi | 5 |
| pycodestyle | 2.11.1 |
| pycosat | 0.6.6 |
| pycparser | 2.21 |
| pyct | 0.5.0 |
| pycurl | 7.45.3 |
| pydantic | 2.8.2 |
| pydantic-core | 2.20.1 |
| pydeck | 0.8.0 |
| pydispatcher | 2.0.5 |
| pydocstyle | 6.3.0 |
| pyerfa | 2.0.1.4 |
| pyflakes | 3.2.0 |
| pygments | 2.15.1 |
| pyjwt | 2.8.0 |
| pylint | 2.16.2 |
| pylint-venv | 3.0.3 |
| pyls-spyder | 0.4.0 |
| pynacl | 1.5.0 |
| pyodbc | 5.1.0 |
| pyopenssl | 24.2.1 |
| pyparsing | 3.1.2 |
| pyqt | 5.15.10 |
| pyqt5-sip | 12.13.0 |
| pyqtwebengine | 5.15.10 |
| pysocks | 1.7.1 |
| pytables | 3.10.1 |
| pytest | 7.4.4 |
| python | 3.12.7 |
| python-dateutil | 2.9.0post0 |
| python-dotenv | 0.21.0 |
| python-fastjsonschema | 2.16.2 |
| python-json-logger | 2.0.7 |
| python-libarchive-c | 5.1 |
| python-lmdb | 1.4.1 |
| python-lsp-black | 2.0.0 |
| python-lsp-jsonrpc | 1.1.2 |
| python-lsp-server | 1.10.0 |
| python-slugify | 5.0.2 |
| python-tzdata | 2023.3 |
| pytoolconfig | 1.2.6 |
| pytz | 2024.1 |
| pyviz\_comms | 3.0.2 |
| pywavelets | 1.7.0 |
| pywin32 | 305 |
| pywin32-ctypes | 0.2.2 |
| pywinpty | 2.0.10 |
| pyyaml | 6.0.1 |
| pyzmq | 25.1.2 |
| qdarkstyle | 3.2.3 |
| qstylizer | 0.2.2 |
| qt-main | 5.15.2 |
| qt-webengine | 5.15.9 |
| qtawesome | 1.3.1 |
| qtconsole | 5.5.1 |
| qtpy | 2.4.1 |
| queuelib | 1.6.2 |
| re2 | 2022.04.01 |
| referencing | 0.30.2 |
| regex | 2024.9.11 |
| reproc | 14.2.4 |
| reproc-cpp | 14.2.4 |
| requests | 2.32.3 |
| requests-file | 1.5.1 |
| requests-toolbelt | 1.0.0 |
| rfc3339-validator | 0.1.4 |
| rfc3986-validator | 0.1.1 |
| rich | 13.7.1 |
| rope | 1.12.0 |
| rpds-py | 0.10.6 |
| rtree | 1.0.1 |
| ruamel.yaml | 0.18.6 |
| ruamel.yaml.clib | 0.2.8 |
| ruamel\_yaml | 0.17.21 |
| s3fs | 2024.6.1 |
| scikit-image | 0.24.0 |
| scikit-learn | 1.5.1 |
| scipy | 1.13.1 |
| scrapy | 2.11.1 |
| seaborn | 0.13.2 |
| semver | 3.0.2 |
| send2trash | 1.8.2 |
| service\_identity | 18.1.0 |
| setuptools | 75.1.0 |
| sip | 6.7.12 |
| six | 1.16.0 |
| smart\_open | 5.2.1 |
| smmap | 4.0.0 |
| snappy | 1.2.1 |
| sniffio | 1.3.0 |
| snowballstemmer | 2.2.0 |
| sortedcontainers | 2.4.0 |
| soupsieve | 2.5 |
| sphinx | 7.3.7 |
| sphinxcontrib-applehelp | 1.0.2 |
| sphinxcontrib-devhelp | 1.0.2 |
| sphinxcontrib-htmlhelp | 2.0.0 |
| sphinxcontrib-jsmath | 1.0.1 |
| sphinxcontrib-qthelp | 1.0.3 |
| sphinxcontrib-serializinghtml | 1.1.10 |
| spyder | 5.5.1 |
| spyder-kernels | 2.5.0 |
| sqlalchemy | 2.0.34 |
| sqlite | 3.45.3 |
| stack\_data | 0.2.0 |
| statsmodels | 0.14.2 |
| streamlit | 1.37.1 |
| sympy | 1.13.2 |
| tabulate | 0.9.0 |
| tbb | 2021.8.0 |
| tblib | 1.7.0 |
| tenacity | 8.2.3 |
| terminado | 0.17.1 |
| text-unidecode | 1.3 |
| textdistance | 4.2.1 |
| threadpoolctl | 3.5.0 |
| three-merge | 0.1.1 |
| tifffile | 2023.4.12 |
| tinycss2 | 1.2.1 |
| tk | 8.6.14 |
| tldextract | 5.1.2 |
| toml | 0.10.2 |
| tomli | 2.0.1 |
| tomlkit | 0.11.1 |
| toolz | 0.12.0 |
| tornado | 6.4.1 |
| tqdm | 4.66.5 |
| traitlets | 5.14.3 |
| truststore | 0.8.0 |
| twisted | 23.10.0 |
| twisted-iocpsupport | 1.0.2 |
| typing-extensions | 4.11.0 |
| typing\_extensions | 4.11.0 |
| tzdata | 2024b |
| uc-micro-py | 1.0.1 |
| ujson | 5.10.0 |
| unicodedata2 | 15.1.0 |
| unidecode | 1.3.8 |
| urllib3 | 2.2.3 |
| utf8proc | 2.6.1 |
| vc | 14.40 |
| vs2015\_runtime | 14.40.33807 |
| w3lib | 2.1.2 |
| watchdog | 4.0.1 |
| wcwidth | 0.2.5 |
| webencodings | 0.5.1 |
| websocket-client | 1.8.0 |
| werkzeug | 3.0.3 |
| whatthepatch | 1.0.2 |
| wheel | 0.44.0 |
| widgetsnbextension | 3.6.6 |
| win\_inet\_pton | 1.1.0 |
| winpty | 0.4.3 |
| wrapt | 1.14.1 |
| xarray | 2023.6.0 |
| xlwings | 0.32.1 |
| xyzservices | 2022.9.0 |
| xz | 5.4.6 |
| yaml | 0.2.5 |
| yaml-cpp | 0.8.0 |
| yapf | 0.40.2 |
| yarl | 1.11.0 |
| zeromq | 4.3.5 |
| zfp | 1.0.0 |
| zict | 3.0.0 |
| zipp | 3.17.0 |
| zlib | 1.2.13 |
| zlib-ng | 2.0.7 |
| zope | 1.0 |
| zope.interface | 5.4.0 |
| zstandard | 0.23.0 |
| zstd | 1.5.6 |
| Package Name | linux-64 | linux-aarch64 | linux-s390x | osx-arm64 | osx-64 | win-64 |
|---|---|---|---|---|---|---|
| \_anaconda\_depends | 2024.06 | 2024.06 | 2024.06 | 2024.06 | 2024.06 | 2024.06 |
| \_libgcc\_mutex | 0.1 | 0.1 | 0.1 | |||
| \_openmp\_mutex | 5.1 | 5.1 | 5.1 | |||
| abseil-cpp | 20211102.0 | 20211102.0 | 20211102.0 | 20230802.0 | 20230802.0 | 20211102.0 |
| aiobotocore | 2.12.3 | 2.12.3 | 2.12.3 | 2.12.3 | 2.12.3 | 2.12.3 |
| aiohttp | 3.9.5 | 3.9.5 | 3.9.5 | 3.9.5 | 3.9.5 | 3.9.5 |
| aioitertools | 0.7.1 | 0.7.1 | 0.7.1 | 0.7.1 | 0.7.1 | 0.7.1 |
| aiosignal | 1.2.0 | 1.2.0 | 1.2.0 | 1.2.0 | 1.2.0 | 1.2.0 |
| alabaster | 0.7.16 | 0.7.16 | 0.7.16 | 0.7.16 | 0.7.16 | |
| altair | 5.0.1 | 5.0.1 | 5.0.1 | 5.0.1 | 5.0.1 | |
| anaconda-anon-usage | 0.4.4 | 0.4.4 | 0.4.4 | 0.4.4 | 0.4.4 | 0.4.4 |
| anaconda-catalogs | 0.2.0 | 0.2.0 | 0.2.0 | 0.2.0 | 0.2.0 | 0.2.0 |
| anaconda-client | 1.12.3 | 1.12.3 | 1.12.3 | 1.12.3 | 1.12.3 | 1.12.3 |
| anaconda-cloud-auth | 0.5.1 | 0.5.1 | 0.5.1 | 0.5.1 | 0.5.1 | |
| anaconda-navigator | 2.6.0 | 2.6.0 | 2.6.0 | 2.6.0 | 2.6.0 | |
| anaconda-project | 0.11.1 | 0.11.1 | 0.11.1 | 0.11.1 | 0.11.1 | 0.11.1 |
| annotated-types | 0.6.0 | 0.6.0 | 0.6.0 | 0.6.0 | 0.6.0 | |
| anyio | 4.2.0 | 4.2.0 | 4.2.0 | 4.2.0 | 4.2.0 | |
| aom | 3.6.0 | 3.6.0 | 3.6.0 | 3.6.0 | 3.6.0 | 3.6.0 |
| appdirs | 1.4.4 | 1.4.4 | 1.4.4 | 1.4.4 | 1.4.4 | 1.4.4 |
| applaunchservices | 0.3.0 | 0.3.0 | ||||
| appnope | 0.1.3 | 0.1.3 | ||||
| appscript | 1.1.2 | 1.1.2 | ||||
| archspec | 0.2.3 | 0.2.3 | 0.2.3 | 0.2.3 | 0.2.3 | 0.2.3 |
| argon2-cffi | 21.3.0 | 21.3.0 | 21.3.0 | 21.3.0 | 21.3.0 | |
| argon2-cffi-bindings | 21.2.0 | 21.2.0 | 21.2.0 | 21.2.0 | 21.2.0 | |
| arrow | 1.2.3 | 1.2.3 | 1.2.3 | 1.2.3 | 1.2.3 | |
| arrow-cpp | 14.0.2 | 14.0.2 | 14.0.2 | 14.0.2 | 14.0.2 | 14.0.2 |
| astroid | 2.14.2 | 2.14.2 | 2.14.2 | 2.14.2 | 2.14.2 | 2.14.2 |
| astropy | 6.1.0 | 6.1.0 | 6.1.0 | 6.1.0 | 6.1.0 | 6.1.0 |
| astropy-iers-data | 0.2024.6.3.0.31.14 | 0.2024.6.3.0.31.14 | 0.2024.6.3.0.31.14 | 0.2024.6.3.0.31.14 | 0.2024.6.3.0.31.14 | 0.2024.6.3.0.31.14 |
| asttokens | 2.0.5 | 2.0.5 | 2.0.5 | 2.0.5 | 2.0.5 | 2.0.5 |
| async-lru | 2.0.4 | 2.0.4 | 2.0.4 | 2.0.4 | 2.0.4 | |
| atomicwrites | 1.4.0 | 1.4.0 | 1.4.0 | 1.4.0 | 1.4.0 | |
| attrs | 23.1.0 | 23.1.0 | 23.1.0 | 23.1.0 | 23.1.0 | 23.1.0 |
| automat | 20.2.0 | 20.2.0 | 20.2.0 | 20.2.0 | 20.2.0 | |
| autopep8 | 2.0.4 | 2.0.4 | 2.0.4 | 2.0.4 | 2.0.4 | |
| aws-c-auth | 0.6.19 | 0.6.19 | 0.6.19 | 0.6.19 | 0.6.19 | 0.6.19 |
| aws-c-cal | 0.5.20 | 0.5.20 | 0.5.20 | 0.5.20 | 0.5.20 | 0.5.20 |
| aws-c-common | 0.8.5 | 0.8.5 | 0.8.5 | 0.8.5 | 0.8.5 | 0.8.5 |
| aws-c-compression | 0.2.16 | 0.2.16 | 0.2.16 | 0.2.16 | 0.2.16 | 0.2.16 |
| aws-c-event-stream | 0.2.15 | 0.2.15 | 0.2.15 | 0.2.15 | 0.2.15 | 0.2.15 |
| aws-c-http | 0.6.25 | 0.6.25 | 0.6.25 | 0.6.25 | 0.6.25 | 0.6.25 |
| aws-c-io | 0.13.10 | 0.13.10 | 0.13.10 | 0.13.10 | 0.13.10 | 0.13.10 |
| aws-c-mqtt | 0.7.13 | 0.7.13 | 0.7.13 | 0.7.13 | 0.7.13 | 0.7.13 |
| aws-c-s3 | 0.1.51 | 0.1.51 | 0.1.51 | 0.1.51 | 0.1.51 | 0.1.51 |
| aws-c-sdkutils | 0.1.6 | 0.1.6 | 0.1.6 | 0.1.6 | 0.1.6 | 0.1.6 |
| aws-checksums | 0.1.13 | 0.1.13 | 0.1.13 | 0.1.13 | 0.1.13 | 0.1.13 |
| aws-crt-cpp | 0.18.16 | 0.18.16 | 0.18.16 | 0.18.16 | 0.18.16 | 0.18.16 |
| aws-sdk-cpp | 1.10.55 | 1.10.55 | 1.10.55 | 1.10.55 | 1.10.55 | 1.10.55 |
| babel | 2.11.0 | 2.11.0 | 2.11.0 | 2.11.0 | 2.11.0 | |
| bcrypt | 3.2.0 | 3.2.0 | 3.2.0 | 3.2.0 | 3.2.0 | |
| beautifulsoup4 | 4.12.3 | 4.12.3 | 4.12.3 | 4.12.3 | 4.12.3 | 4.12.3 |
| binaryornot | 0.4.4 | 0.4.4 | 0.4.4 | 0.4.4 | 0.4.4 | |
| black | 24.4.2 | 24.4.2 | 24.4.2 | 24.4.2 | 24.4.2 | 24.4.2 |
| blas | 1.0 | 1.0 | 1.0 | 1.0 | 1.0 | 1.0 |
| bleach | 4.1.0 | 4.1.0 | 4.1.0 | 4.1.0 | 4.1.0 | 4.1.0 |
| blinker | 1.6.2 | 1.6.2 | 1.6.2 | 1.6.2 | 1.6.2 | 1.6.2 |
| blosc | 1.21.3 | 1.21.3 | 1.21.3 | 1.21.3 | 1.21.3 | 1.21.3 |
| bokeh | 3.4.1 | 3.4.1 | 3.4.1 | 3.4.1 | 3.4.1 | 3.4.1 |
| boltons | 23.0.0 | 23.0.0 | 23.0.0 | 23.0.0 | 23.0.0 | 23.0.0 |
| boost-cpp | 1.82.0 | 1.82.0 | 1.82.0 | 1.82.0 | 1.82.0 | 1.82.0 |
| botocore | 1.34.69 | 1.34.69 | 1.34.69 | 1.34.69 | 1.34.69 | 1.34.69 |
| bottleneck | 1.3.7 | 1.3.7 | 1.3.7 | 1.3.7 | 1.3.7 | 1.3.7 |
| brotli | 1.0.9 | 1.0.9 | 1.0.9 | 1.0.9 | 1.0.9 | 1.0.9 |
| brotli-bin | 1.0.9 | 1.0.9 | 1.0.9 | 1.0.9 | 1.0.9 | 1.0.9 |
| brotli-python | 1.0.9 | 1.0.9 | 1.0.9 | 1.0.9 | 1.0.9 | 1.0.9 |
| brunsli | 0.1 | 0.1 | 0.1 | 0.1 | ||
| bzip2 | 1.0.8 | 1.0.8 | 1.0.8 | 1.0.8 | 1.0.8 | 1.0.8 |
| c-ares | 1.19.1 | 1.19.1 | 1.19.1 | 1.19.1 | 1.19.1 | 1.19.1 |
| c-blosc2 | 2.12.0 | 2.12.0 | 2.12.0 | 2.12.0 | 2.12.0 | |
| ca-certificates | 2024.3.11 | 2024.3.11 | 2024.3.11 | 2024.3.11 | 2024.3.11 | 2024.3.11 |
| cachetools | 5.3.3 | 5.3.3 | 5.3.3 | 5.3.3 | 5.3.3 | |
| cctools | 949.0.1 | 949.0.1 | ||||
| cctools\_osx-64 | 949.0.1 | |||||
| cctools\_osx-arm64 | 949.0.1 | |||||
| certifi | 2024.6.2 | 2024.6.2 | 2024.6.2 | 2024.6.2 | 2024.6.2 | 2024.6.2 |
| cffi | 1.16.0 | 1.16.0 | 1.16.0 | 1.16.0 | 1.16.0 | 1.16.0 |
| cfitsio | 3.470 | 3.470 | 3.470 | 3.470 | 3.470 | 3.470 |
| chardet | 4.0.0 | 4.0.0 | 4.0.0 | 4.0.0 | 4.0.0 | 4.0.0 |
| charls | 2.2.0 | 2.2.0 | 2.2.0 | 2.2.0 | 2.2.0 | |
| charset-normalizer | 2.0.4 | 2.0.4 | 2.0.4 | 2.0.4 | 2.0.4 | 2.0.4 |
| click | 8.1.7 | 8.1.7 | 8.1.7 | 8.1.7 | 8.1.7 | 8.1.7 |
| cloudpickle | 2.2.1 | 2.2.1 | 2.2.1 | 2.2.1 | 2.2.1 | 2.2.1 |
| colorama | 0.4.6 | 0.4.6 | 0.4.6 | 0.4.6 | 0.4.6 | 0.4.6 |
| colorcet | 3.1.0 | 3.1.0 | 3.1.0 | 3.1.0 | 3.1.0 | |
| comm | 0.2.1 | 0.2.1 | 0.2.1 | 0.2.1 | 0.2.1 | 0.2.1 |
| conda | 24.5.0 | 24.5.0 | 24.5.0 | 24.5.0 | 24.5.0 | 24.5.0 |
| conda-build | 24.5.1 | 24.5.1 | 24.5.1 | 24.5.1 | 24.5.1 | 24.5.1 |
| conda-content-trust | 0.2.0 | 0.2.0 | 0.2.0 | 0.2.0 | 0.2.0 | 0.2.0 |
| conda-index | 0.5.0 | 0.5.0 | 0.4.0 | 0.5.0 | 0.5.0 | 0.5.0 |
| conda-libmamba-solver | 24.1.0 | 24.1.0 | 24.1.0 | 24.1.0 | 24.1.0 | 24.1.0 |
| conda-pack | 0.7.1 | 0.7.1 | 0.7.1 | 0.7.1 | 0.7.1 | 0.7.1 |
| conda-package-handling | 2.3.0 | 2.3.0 | 2.3.0 | 2.3.0 | 2.3.0 | 2.3.0 |
| conda-package-streaming | 0.10.0 | 0.10.0 | 0.10.0 | 0.10.0 | 0.10.0 | 0.10.0 |
| conda-repo-cli | 1.0.88 | 1.0.88 | 1.0.88 | 1.0.88 | 1.0.88 | |
| conda-token | 0.5.0 | 0.5.0 | 0.5.0 | 0.5.0 | 0.5.0 | 0.5.0 |
| console\_shortcut | 0.1.1 | |||||
| constantly | 23.10.4 | 23.10.4 | 23.10.4 | 23.10.4 | 23.10.4 | |
| contourpy | 1.2.0 | 1.2.0 | 1.2.0 | 1.2.0 | 1.2.0 | 1.2.0 |
| cookiecutter | 2.6.0 | 2.6.0 | 2.6.0 | 2.6.0 | 2.6.0 | |
| cryptography | 42.0.5 | 42.0.5 | 42.0.5 | 42.0.5 | 42.0.5 | 42.0.5 |
| cssselect | 1.2.0 | 1.2.0 | 1.2.0 | 1.2.0 | 1.2.0 | |
| curl | 8.7.1 | 8.7.1 | 8.7.1 | 8.7.1 | 8.7.1 | 8.7.1 |
| cycler | 0.11.0 | 0.11.0 | 0.11.0 | 0.11.0 | 0.11.0 | 0.11.0 |
| cyrus-sasl | 2.1.28 | 2.1.28 | 2.1.28 | 2.1.28 | ||
| cytoolz | 0.12.2 | 0.12.2 | 0.12.2 | 0.12.2 | 0.12.2 | 0.12.2 |
| dask | 2024.5.0 | 2024.5.0 | 2024.5.0 | 2024.5.0 | 2024.5.0 | 2024.5.0 |
| dask-core | 2024.5.0 | 2024.5.0 | 2024.5.0 | 2024.5.0 | 2024.5.0 | 2024.5.0 |
| dask-expr | 1.1.0 | 1.1.0 | 1.1.0 | 1.1.0 | 1.1.0 | 1.1.0 |
| datashader | 0.16.2 | 0.16.2 | 0.16.2 | 0.16.2 | 0.16.2 | |
| dav1d | 1.2.1 | 1.2.1 | 1.2.1 | 1.2.1 | 1.2.1 | 1.2.1 |
| dbus | 1.13.18 | 1.13.18 | ||||
| debugpy | 1.6.7 | 1.6.7 | 1.6.7 | 1.6.7 | 1.6.7 | 1.6.7 |
| decorator | 5.1.1 | 5.1.1 | 5.1.1 | 5.1.1 | 5.1.1 | 5.1.1 |
| defusedxml | 0.7.1 | 0.7.1 | 0.7.1 | 0.7.1 | 0.7.1 | 0.7.1 |
| diff-match-patch | 20200713 | 20200713 | 20200713 | 20200713 | 20200713 | |
| dill | 0.3.8 | 0.3.8 | 0.3.8 | 0.3.8 | 0.3.8 | 0.3.8 |
| distributed | 2024.5.0 | 2024.5.0 | 2024.5.0 | 2024.5.0 | 2024.5.0 | 2024.5.0 |
| distro | 1.9.0 | 1.9.0 | 1.9.0 | 1.9.0 | 1.9.0 | 1.9.0 |
| docstring-to-markdown | 0.11 | 0.11 | 0.11 | 0.11 | 0.11 | |
| docutils | 0.18.1 | 0.18.1 | 0.18.1 | 0.18.1 | 0.18.1 | |
| entrypoints | 0.4 | 0.4 | 0.4 | 0.4 | 0.4 | 0.4 |
| et\_xmlfile | 1.1.0 | 1.1.0 | 1.1.0 | 1.1.0 | 1.1.0 | 1.1.0 |
| executing | 0.8.3 | 0.8.3 | 0.8.3 | 0.8.3 | 0.8.3 | 0.8.3 |
| expat | 2.6.2 | 2.6.2 | 2.6.2 | 2.6.2 | 2.6.2 | 2.6.2 |
| filelock | 3.13.1 | 3.13.1 | 3.13.1 | 3.13.1 | 3.13.1 | 3.13.1 |
| flake8 | 7.0.0 | 7.0.0 | 7.0.0 | 7.0.0 | 7.0.0 | |
| flask | 3.0.3 | 3.0.3 | 3.0.3 | 3.0.3 | 3.0.3 | 3.0.3 |
| fmt | 9.1.0 | 9.1.0 | 9.1.0 | 9.1.0 | 9.1.0 | 9.1.0 |
| fontconfig | 2.14.1 | 2.14.1 | ||||
| fonttools | 4.51.0 | 4.51.0 | 4.51.0 | 4.51.0 | 4.51.0 | 4.51.0 |
| freetype | 2.12.1 | 2.12.1 | 2.12.1 | 2.12.1 | 2.12.1 | 2.12.1 |
| frozendict | 2.4.2 | 2.4.2 | 2.4.2 | 2.4.2 | 2.4.2 | 2.4.2 |
| frozenlist | 1.4.0 | 1.4.0 | 1.4.0 | 1.4.0 | 1.4.0 | 1.4.0 |
| fsspec | 2024.3.1 | 2024.3.1 | 2024.3.1 | 2024.3.1 | 2024.3.1 | 2024.3.1 |
| gensim | 4.3.2 | 4.3.2 | 4.3.2 | 4.3.2 | 4.3.2 | |
| gettext | 0.21.0 | 0.21.0 | ||||
| gflags | 2.2.2 | 2.2.2 | 2.2.2 | 2.2.2 | 2.2.2 | 2.2.2 |
| giflib | 5.2.1 | 5.2.1 | 5.2.1 | 5.2.1 | 5.2.1 | 5.2.1 |
| gitdb | 4.0.7 | 4.0.7 | 4.0.7 | 4.0.7 | 4.0.7 | |
| gitpython | 3.1.37 | 3.1.37 | 3.1.37 | 3.1.37 | 3.1.37 | |
| glib | 2.78.4 | 2.78.4 | 2.78.4 | 2.78.4 | ||
| glib-tools | 2.78.4 | 2.78.4 | 2.78.4 | 2.78.4 | ||
| glog | 0.5.0 | 0.5.0 | 0.5.0 | 0.5.0 | 0.5.0 | 0.5.0 |
| greenlet | 3.0.1 | 3.0.1 | 3.0.1 | 3.0.1 | 3.0.1 | 3.0.1 |
| grpc-cpp | 1.48.2 | 1.48.2 | 1.48.2 | 1.48.2 | 1.48.2 | 1.48.2 |
| gst-plugins-base | 1.14.1 | 1.14.1 | 1.14.1 | 1.14.1 | ||
| gstreamer | 1.14.1 | 1.14.1 | 1.14.1 | 1.14.1 | ||
| gtest | 1.14.0 | 1.14.0 | ||||
| h5py | 3.11.0 | 3.11.0 | 3.11.0 | 3.11.0 | 3.11.0 | 3.11.0 |
| hdf5 | 1.12.1 | 1.12.1 | 1.12.1 | 1.12.1 | 1.12.1 | 1.12.1 |
| heapdict | 1.0.1 | 1.0.1 | 1.0.1 | 1.0.1 | 1.0.1 | 1.0.1 |
| holoviews | 1.19.0 | 1.19.0 | 1.19.0 | 1.19.0 | 1.19.0 | |
| hvplot | 0.10.0 | 0.10.0 | 0.10.0 | 0.10.0 | 0.10.0 | |
| hyperlink | 21.0.0 | 21.0.0 | 21.0.0 | 21.0.0 | 21.0.0 | |
| icc\_rt | 2022.1.0 | |||||
| icu | 73.1 | 73.1 | 73.1 | 73.1 | 73.1 | 73.1 |
| idna | 3.7 | 3.7 | 3.7 | 3.7 | 3.7 | 3.7 |
| imagecodecs | 2023.1.23 | 2023.1.23 | 2023.1.23 | 2023.1.23 | 2023.1.23 | 2023.1.23 |
| imageio | 2.33.1 | 2.33.1 | 2.33.1 | 2.33.1 | 2.33.1 | 2.33.1 |
| imagesize | 1.4.1 | 1.4.1 | 1.4.1 | 1.4.1 | 1.4.1 | |
| imbalanced-learn | 0.12.3 | 0.12.3 | 0.12.3 | 0.12.3 | 0.12.3 | 0.12.3 |
| importlib-metadata | 7.0.1 | 7.0.1 | 7.0.1 | 7.0.1 | 7.0.1 | |
| incremental | 22.10.0 | 22.10.0 | 22.10.0 | 22.10.0 | 22.10.0 | |
| inflection | 0.5.1 | 0.5.1 | 0.5.1 | 0.5.1 | 0.5.1 | |
| iniconfig | 1.1.1 | 1.1.1 | 1.1.1 | 1.1.1 | 1.1.1 | 1.1.1 |
| intake | 0.7.0 | 0.7.0 | 0.7.0 | 0.7.0 | 0.7.0 | 0.7.0 |
| intel-openmp | 2023.1.0 | 2023.1.0 | ||||
| intervaltree | 3.1.0 | 3.1.0 | 3.1.0 | 3.1.0 | 3.1.0 | |
| ipykernel | 6.28.0 | 6.28.0 | 6.28.0 | 6.28.0 | 6.28.0 | 6.28.0 |
| ipython | 8.25.0 | 8.25.0 | 8.25.0 | 8.25.0 | 8.25.0 | 8.25.0 |
| ipython\_genutils | 0.2.0 | 0.2.0 | 0.2.0 | 0.2.0 | 0.2.0 | |
| ipywidgets | 7.8.1 | 7.8.1 | 7.8.1 | 7.8.1 | 7.8.1 | |
| isort | 5.13.2 | 5.13.2 | 5.13.2 | 5.13.2 | 5.13.2 | 5.13.2 |
| itemadapter | 0.3.0 | 0.3.0 | 0.3.0 | 0.3.0 | 0.3.0 | |
| itemloaders | 1.1.0 | 1.1.0 | 1.1.0 | 1.1.0 | 1.1.0 | |
| itsdangerous | 2.2.0 | 2.2.0 | 2.2.0 | 2.2.0 | 2.2.0 | 2.2.0 |
| jaraco.classes | 3.2.1 | 3.2.1 | 3.2.1 | 3.2.1 | 3.2.1 | |
| jedi | 0.18.1 | 0.18.1 | 0.18.1 | 0.18.1 | 0.18.1 | 0.18.1 |
| jeepney | 0.7.1 | 0.7.1 | ||||
| jellyfish | 1.0.1 | 1.0.1 | 1.0.1 | 1.0.1 | 1.0.1 | |
| jinja2 | 3.1.4 | 3.1.4 | 3.1.4 | 3.1.4 | 3.1.4 | 3.1.4 |
| jmespath | 1.0.1 | 1.0.1 | 1.0.1 | 1.0.1 | 1.0.1 | 1.0.1 |
| joblib | 1.4.2 | 1.4.2 | 1.4.2 | 1.4.2 | 1.4.2 | 1.4.2 |
| jpeg | 9e | 9e | 9e | 9e | 9e | 9e |
| jq | 1.6 | 1.6 | 1.6 | 1.6 | 1.6 | |
| json5 | 0.9.6 | 0.9.6 | 0.9.6 | 0.9.6 | 0.9.6 | |
| jsonpatch | 1.33 | 1.33 | 1.33 | 1.33 | 1.33 | 1.33 |
| jsonpointer | 2.1 | 2.1 | 2.1 | 2.1 | 2.1 | 2.1 |
| jsonschema | 4.19.2 | 4.19.2 | 4.19.2 | 4.19.2 | 4.19.2 | 4.19.2 |
| jsonschema-specifications | 2023.7.1 | 2023.7.1 | 2023.7.1 | 2023.7.1 | 2023.7.1 | 2023.7.1 |
| jupyter | 1.0.0 | 1.0.0 | 1.0.0 | 1.0.0 | 1.0.0 | 1.0.0 |
| jupyter-lsp | 2.2.0 | 2.2.0 | 2.2.0 | 2.2.0 | 2.2.0 | |
| jupyter\_client | 8.6.0 | 8.6.0 | 8.6.0 | 8.6.0 | 8.6.0 | 8.6.0 |
| jupyter\_console | 6.6.3 | 6.6.3 | 6.6.3 | 6.6.3 | 6.6.3 | 6.6.3 |
| jupyter\_core | 5.7.2 | 5.7.2 | 5.7.2 | 5.7.2 | 5.7.2 | 5.7.2 |
| jupyter\_events | 0.10.0 | 0.10.0 | 0.10.0 | 0.10.0 | 0.10.0 | |
| jupyter\_server | 2.14.1 | 2.14.1 | 2.14.1 | 2.14.1 | 2.14.1 | |
| jupyter\_server\_terminals | 0.4.4 | 0.4.4 | 0.4.4 | 0.4.4 | 0.4.4 | |
| jupyterlab | 4.0.11 | 4.0.11 | 4.0.11 | 4.0.11 | 4.0.11 | |
| jupyterlab-variableinspector | 3.1.0 | 3.1.0 | 3.1.0 | 3.1.0 | 3.1.0 | |
| jupyterlab\_pygments | 0.1.2 | 0.1.2 | 0.2.2 | 0.1.2 | 0.1.2 | 0.1.2 |
| jupyterlab\_server | 2.25.1 | 2.25.1 | 2.25.1 | 2.25.1 | 2.25.1 | |
| jupyterlab\_widgets | 1.0.0 | 1.0.0 | 1.0.0 | 1.0.0 | 1.0.0 | |
| jxrlib | 1.1 | 1.1 | 1.1 | 1.1 | 1.1 | |
| keyring | 24.3.1 | 24.3.1 | 24.3.1 | 24.3.1 | 24.3.1 | |
| kiwisolver | 1.4.4 | 1.4.4 | 1.4.4 | 1.4.4 | 1.4.4 | 1.4.4 |
| krb5 | 1.20.1 | 1.20.1 | 1.20.1 | 1.20.1 | 1.20.1 | 1.20.1 |
| lazy-object-proxy | 1.10.0 | 1.10.0 | 1.10.0 | 1.10.0 | 1.10.0 | 1.10.0 |
| lazy\_loader | 0.4 | 0.4 | 0.4 | 0.4 | 0.4 | 0.4 |
| lcms2 | 2.12 | 2.12 | 2.12 | 2.12 | 2.12 | 2.12 |
| ld64 | 530 | 530 | ||||
| ld64\_osx-64 | 530 | |||||
| ld64\_osx-arm64 | 530 | |||||
| ld\_impl\_linux-64 | 2.38 | |||||
| ld\_impl\_linux-aarch64 | 2.38 | |||||
| ld\_impl\_linux-s390x | 2.38 | |||||
| ldid | 2.1.5 | 2.1.5 | ||||
| lerc | 3.0 | 3.0 | 3.0 | 3.0 | 3.0 | 3.0 |
| libaec | 1.0.4 | 1.0.4 | 1.0.4 | 1.0.4 | 1.0.4 | 1.0.4 |
| libarchive | 3.6.2 | 3.6.2 | 3.6.2 | 3.6.2 | 3.6.2 | 3.6.2 |
| libavif | 0.11.1 | 0.11.1 | 0.11.1 | 0.11.1 | 0.11.1 | 0.11.1 |
| libboost | 1.82.0 | 1.82.0 | 1.82.0 | 1.82.0 | 1.82.0 | 1.82.0 |
| libbrotlicommon | 1.0.9 | 1.0.9 | 1.0.9 | 1.0.9 | 1.0.9 | 1.0.9 |
| libbrotlidec | 1.0.9 | 1.0.9 | 1.0.9 | 1.0.9 | 1.0.9 | 1.0.9 |
| libbrotlienc | 1.0.9 | 1.0.9 | 1.0.9 | 1.0.9 | 1.0.9 | 1.0.9 |
| libclang | 14.0.6 | 14.0.6 | 14.0.6 | 14.0.6 | 14.0.6 | |
| libclang13 | 14.0.6 | 14.0.6 | 14.0.6 | 14.0.6 | 14.0.6 | |
| libcups | 2.4.2 | 2.4.2 | ||||
| libcurl | 8.7.1 | 8.7.1 | 8.7.1 | 8.7.1 | 8.7.1 | 8.7.1 |
| libcxx | 14.0.6 | 14.0.6 | ||||
| libdeflate | 1.17 | 1.17 | 1.17 | 1.17 | 1.17 | 1.17 |
| libedit | 3.1.20230828 | 3.1.20230828 | 3.1.20230828 | 3.1.20230828 | 3.1.20230828 | |
| libev | 4.33 | 4.33 | 4.33 | 4.33 | 4.33 | |
| libevent | 2.1.12 | 2.1.12 | 2.1.12 | 2.1.12 | 2.1.12 | 2.1.12 |
| libffi | 3.4.4 | 3.4.4 | 3.4.4 | 3.4.4 | 3.4.4 | 3.4.4 |
| libgcc-ng | 11.2.0 | 11.2.0 | 11.2.0 | |||
| libgfortran | 5.0.0 | 5.0.0 | ||||
| libgfortran-ng | 11.2.0 | 11.2.0 | 11.2.0 | |||
| libgfortran5 | 11.2.0 | 11.2.0 | 11.2.0 | 11.3.0 | 11.3.0 | |
| libglib | 2.78.4 | 2.78.4 | 2.78.4 | 2.78.4 | ||
| libgomp | 11.2.0 | 11.2.0 | 11.2.0 | |||
| libiconv | 1.16 | 1.16 | 1.16 | 1.16 | 1.16 | |
| liblief | 0.12.3 | 0.12.3 | 0.12.3 | 0.12.3 | 0.12.3 | 0.12.3 |
| libllvm14 | 14.0.6 | 14.0.6 | 14.0.6 | 14.0.6 | ||
| libmamba | 1.5.8 | 1.5.8 | 1.5.8 | 1.5.8 | 1.5.8 | 1.5.8 |
| libmambapy | 1.5.8 | 1.5.8 | 1.5.8 | 1.5.8 | 1.5.8 | 1.5.8 |
| libnghttp2 | 1.57.0 | 1.57.0 | 1.57.0 | 1.57.0 | 1.57.0 | |
| libopenblas | 0.3.21 | 0.3.21 | 0.3.21 | 0.3.21 | ||
| libpng | 1.6.39 | 1.6.39 | 1.6.39 | 1.6.39 | 1.6.39 | 1.6.39 |
| libpq | 12.17 | 12.17 | 12.17 | 12.17 | 12.17 | |
| libprotobuf | 3.20.3 | 3.20.3 | 3.20.3 | 3.20.3 | 3.20.3 | 3.20.3 |
| libsodium | 1.0.18 | 1.0.18 | 1.0.18 | 1.0.18 | 1.0.18 | 1.0.18 |
| libsolv | 0.7.24 | 0.7.24 | 0.7.24 | 0.7.24 | 0.7.24 | 0.7.24 |
| libspatialindex | 1.9.3 | 1.9.3 | 1.9.3 | 1.9.3 | 1.9.3 | |
| libssh2 | 1.11.0 | 1.11.0 | 1.11.0 | 1.11.0 | 1.11.0 | 1.11.0 |
| libstdcxx-ng | 11.2.0 | 11.2.0 | 11.2.0 | |||
| libthrift | 0.15.0 | 0.15.0 | 0.15.0 | 0.15.0 | 0.15.0 | 0.15.0 |
| libtiff | 4.5.1 | 4.5.1 | 4.5.1 | 4.5.1 | 4.5.1 | 4.5.1 |
| libuuid | 1.41.5 | 1.41.5 | 1.41.5 | |||
| libwebp-base | 1.3.2 | 1.3.2 | 1.3.2 | 1.3.2 | 1.3.2 | 1.3.2 |
| libxcb | 1.15 | 1.15 | ||||
| libxkbcommon | 1.0.1 | 1.0.1 | ||||
| libxml2 | 2.10.4 | 2.10.4 | 2.10.4 | 2.10.4 | 2.10.4 | 2.10.4 |
| libxslt | 1.1.37 | 1.1.37 | 1.1.37 | 1.1.37 | 1.1.37 | |
| libzopfli | 1.0.3 | 1.0.3 | 1.0.3 | 1.0.3 | 1.0.3 | 1.0.3 |
| linkify-it-py | 2.0.0 | 2.0.0 | 2.0.0 | 2.0.0 | 2.0.0 | |
| llvm-openmp | 14.0.6 | 14.0.6 | ||||
| llvmlite | 0.42.0 | 0.42.0 | 0.42.0 | 0.42.0 | 0.42.0 | |
| locket | 1.0.0 | 1.0.0 | 1.0.0 | 1.0.0 | 1.0.0 | 1.0.0 |
| lxml | 5.2.1 | 5.2.1 | 5.2.1 | 5.2.1 | 5.2.1 | |
| lz4 | 4.3.2 | 4.3.2 | 4.3.2 | 4.3.2 | 4.3.2 | 4.3.2 |
| lz4-c | 1.9.4 | 1.9.4 | 1.9.4 | 1.9.4 | 1.9.4 | 1.9.4 |
| lzo | 2.10 | 2.10 | 2.10 | 2.10 | 2.10 | |
| m2-msys2-runtime | 2.5.0.17080.65c939c | |||||
| m2-patch | 2.7.5 | |||||
| m2w64-libwinpthread-git | 5.0.0.4634.697f757 | |||||
| markdown | 3.4.1 | 3.4.1 | 3.4.1 | 3.4.1 | 3.4.1 | |
| markdown-it-py | 2.2.0 | 2.2.0 | 2.2.0 | 2.2.0 | 2.2.0 | |
| markupsafe | 2.1.3 | 2.1.3 | 2.1.3 | 2.1.3 | 2.1.3 | 2.1.3 |
| matplotlib | 3.8.4 | 3.8.4 | 3.8.4 | 3.8.4 | 3.8.4 | 3.8.4 |
| matplotlib-base | 3.8.4 | 3.8.4 | 3.8.4 | 3.8.4 | 3.8.4 | 3.8.4 |
| matplotlib-inline | 0.1.6 | 0.1.6 | 0.1.6 | 0.1.6 | 0.1.6 | 0.1.6 |
| mccabe | 0.7.0 | 0.7.0 | 0.7.0 | 0.7.0 | 0.7.0 | 0.7.0 |
| mdit-py-plugins | 0.3.0 | 0.3.0 | 0.3.0 | 0.3.0 | 0.3.0 | |
| mdurl | 0.1.0 | 0.1.0 | 0.1.0 | 0.1.0 | 0.1.0 | |
| menuinst | 2.1.1 | 2.1.1 | 2.1.1 | 2.1.1 | 2.1.1 | 2.1.1 |
| mistune | 2.0.4 | 2.0.4 | 2.0.4 | 2.0.4 | 2.0.4 | 2.0.4 |
| mkl | 2023.1.0 | 2023.1.0 | ||||
| mkl-service | 2.4.0 | 2.4.0 | ||||
| mkl\_fft | 1.3.8 | 1.3.8 | ||||
| mkl\_random | 1.2.4 | 1.2.4 | ||||
| more-itertools | 10.1.0 | 10.1.0 | 10.1.0 | 10.1.0 | 10.1.0 | 10.1.0 |
| mpmath | 1.3.0 | 1.3.0 | 1.3.0 | 1.3.0 | 1.3.0 | 1.3.0 |
| msgpack-python | 1.0.3 | 1.0.3 | 1.0.3 | 1.0.3 | 1.0.3 | 1.0.3 |
| msys2-conda-epoch | 20160418 | |||||
| multidict | 6.0.4 | 6.0.4 | 6.0.4 | 6.0.4 | 6.0.4 | 6.0.4 |
| multipledispatch | 0.6.0 | 0.6.0 | 0.6.0 | 0.6.0 | 0.6.0 | |
| mypy | 1.10.0 | 1.10.0 | 1.10.0 | 1.10.0 | 1.10.0 | 1.10.0 |
| mypy\_extensions | 1.0.0 | 1.0.0 | 1.0.0 | 1.0.0 | 1.0.0 | 1.0.0 |
| mysql | 5.7.24 | 5.7.24 | 5.7.24 | 5.7.24 | ||
| navigator-updater | 0.5.1 | 0.5.1 | 0.5.1 | 0.5.1 | 0.5.1 | |
| nbclient | 0.8.0 | 0.8.0 | 0.8.0 | 0.8.0 | 0.8.0 | 0.8.0 |
| nbconvert | 7.10.0 | 7.10.0 | 7.10.0 | 7.10.0 | 7.10.0 | 7.10.0 |
| nbformat | 5.9.2 | 5.9.2 | 5.9.2 | 5.9.2 | 5.9.2 | 5.9.2 |
| ncurses | 6.4 | 6.4 | 6.4 | 6.4 | 6.4 | |
| nest-asyncio | 1.6.0 | 1.6.0 | 1.6.0 | 1.6.0 | 1.6.0 | 1.6.0 |
| networkx | 3.2.1 | 3.2.1 | 3.2.1 | 3.2.1 | 3.2.1 | 3.2.1 |
| nltk | 3.8.1 | 3.8.1 | 3.8.1 | 3.8.1 | 3.8.1 | 3.8.1 |
| notebook | 7.0.8 | 7.0.8 | 7.0.8 | 7.0.8 | 7.0.8 | |
| notebook-shim | 0.2.3 | 0.2.3 | 0.2.3 | 0.2.3 | 0.2.3 | |
| nspr | 4.35 | 4.35 | ||||
| nss | 3.89.1 | 3.89.1 | ||||
| numba | 0.59.1 | 0.59.1 | 0.59.1 | 0.59.1 | 0.59.1 | |
| numexpr | 2.8.7 | 2.8.7 | 2.8.7 | 2.8.7 | 2.8.7 | 2.8.7 |
| numpy | 1.26.4 | 1.26.4 | 1.26.4 | 1.26.4 | 1.26.4 | 1.26.4 |
| numpy-base | 1.26.4 | 1.26.4 | 1.26.4 | 1.26.4 | 1.26.4 | 1.26.4 |
| numpydoc | 1.7.0 | 1.7.0 | 1.7.0 | 1.7.0 | 1.7.0 | |
| oniguruma | 6.9.7.1 | 6.9.7.1 | 6.9.7.1 | 6.9.7.1 | ||
| openjpeg | 2.4.0 | 2.4.0 | 2.4.0 | 2.3.0 | 2.4.0 | 2.4.0 |
| openpyxl | 3.1.2 | 3.1.2 | 3.1.2 | 3.1.2 | 3.1.2 | 3.1.2 |
| openssl | 3.0.14 | 3.0.14 | 3.0.14 | 3.0.14 | 3.0.14 | 3.0.14 |
| orc | 1.7.4 | 1.7.4 | 1.7.4 | 1.7.4 | 1.7.4 | 1.7.4 |
| overrides | 7.4.0 | 7.4.0 | 7.4.0 | 7.4.0 | 7.4.0 | |
| packaging | 23.2 | 23.2 | 23.2 | 23.2 | 23.2 | 23.2 |
| pandas | 2.2.2 | 2.2.2 | 2.2.2 | 2.2.2 | 2.2.2 | 2.2.2 |
| pandocfilters | 1.5.0 | 1.5.0 | 1.5.0 | 1.5.0 | 1.5.0 | 1.5.0 |
| panel | 1.4.4 | 1.4.4 | 1.4.4 | 1.4.4 | 1.4.4 | |
| param | 2.1.0 | 2.1.0 | 2.1.0 | 2.1.0 | 2.1.0 | |
| paramiko | 2.8.1 | |||||
| parsel | 1.8.1 | 1.8.1 | 1.8.1 | 1.8.1 | 1.8.1 | |
| parso | 0.8.3 | 0.8.3 | 0.8.3 | 0.8.3 | 0.8.3 | 0.8.3 |
| partd | 1.4.1 | 1.4.1 | 1.4.1 | 1.4.1 | 1.4.1 | 1.4.1 |
| patch | 2.7.6 | 2.7.6 | 2.7.6 | 2.7.6 | 2.7.6 | |
| patchelf | 0.17.2 | 0.17.2 | 0.17.2 | |||
| pathspec | 0.10.3 | 0.10.3 | 0.10.3 | 0.10.3 | 0.10.3 | 0.10.3 |
| patsy | 0.5.6 | 0.5.6 | 0.5.6 | 0.5.6 | 0.5.6 | 0.5.6 |
| pcre2 | 10.42 | 10.42 | 10.42 | 10.42 | 10.42 | 10.42 |
| pexpect | 4.8.0 | 4.8.0 | 4.8.0 | 4.8.0 | 4.8.0 | 4.8.0 |
| pickleshare | 0.7.5 | 0.7.5 | 0.7.5 | 0.7.5 | 0.7.5 | |
| pillow | 10.3.0 | 10.3.0 | 10.3.0 | 10.3.0 | 10.3.0 | 10.3.0 |
| pip | 24.0 | 24.0 | 24.0 | 24.0 | 24.0 | 24.0 |
| pkce | 1.0.3 | 1.0.3 | 1.0.3 | 1.0.3 | 1.0.3 | |
| pkginfo | 1.10.0 | 1.10.0 | 1.10.0 | 1.10.0 | 1.10.0 | 1.10.0 |
| platformdirs | 3.10.0 | 3.10.0 | 3.10.0 | 3.10.0 | 3.10.0 | 3.10.0 |
| plotly | 5.22.0 | 5.22.0 | 5.22.0 | 5.22.0 | 5.22.0 | 5.22.0 |
| pluggy | 1.0.0 | 1.0.0 | 1.0.0 | 1.0.0 | 1.0.0 | 1.0.0 |
| ply | 3.11 | 3.11 | 3.11 | 3.11 | 3.11 | |
| powershell\_shortcut | 0.0.1 | |||||
| prometheus\_client | 0.14.1 | 0.14.1 | 0.14.1 | 0.14.1 | 0.14.1 | |
| prompt-toolkit | 3.0.43 | 3.0.43 | 3.0.43 | 3.0.43 | 3.0.43 | 3.0.43 |
| prompt\_toolkit | 3.0.43 | 3.0.43 | 3.0.43 | 3.0.43 | 3.0.43 | 3.0.43 |
| protego | 0.1.16 | 0.1.16 | 0.1.16 | 0.1.16 | 0.1.16 | |
| protobuf | 3.20.3 | 3.20.3 | 3.20.3 | 3.20.3 | 3.20.3 | |
| psutil | 5.9.0 | 5.9.0 | 5.9.0 | 5.9.0 | 5.9.0 | 5.9.0 |
| ptyprocess | 0.7.0 | 0.7.0 | 0.7.0 | 0.7.0 | 0.7.0 | 0.7.0 |
| pure\_eval | 0.2.2 | 0.2.2 | 0.2.2 | 0.2.2 | 0.2.2 | 0.2.2 |
| py-cpuinfo | 9.0.0 | 9.0.0 | 9.0.0 | 9.0.0 | 9.0.0 | |
| py-lief | 0.12.3 | 0.12.3 | 0.12.3 | 0.12.3 | 0.12.3 | 0.12.3 |
| pyarrow | 14.0.2 | 14.0.2 | 14.0.2 | 14.0.2 | 14.0.2 | 14.0.2 |
| pyasn1 | 0.4.8 | 0.4.8 | 0.4.8 | 0.4.8 | 0.4.8 | |
| pyasn1-modules | 0.2.8 | 0.2.8 | 0.2.8 | 0.2.8 | 0.2.8 | |
| pybind11-abi | 5 | 5 | 5 | 5 | 5 | 5 |
| pycodestyle | 2.11.1 | 2.11.1 | 2.11.1 | 2.11.1 | 2.11.1 | 2.11.1 |
| pycosat | 0.6.6 | 0.6.6 | 0.6.6 | 0.6.6 | 0.6.6 | 0.6.6 |
| pycparser | 2.21 | 2.21 | 2.21 | 2.21 | 2.21 | 2.21 |
| pyct | 0.5.0 | 0.5.0 | 0.5.0 | 0.5.0 | 0.5.0 | |
| pycurl | 7.45.2 | 7.45.2 | 7.45.2 | 7.45.2 | 7.45.2 | 7.45.2 |
| pydantic | 2.5.3 | 2.5.3 | 2.5.3 | 2.5.3 | 2.5.3 | |
| pydantic-core | 2.14.6 | 2.14.6 | 2.14.6 | 2.14.6 | 2.14.6 | |
| pydeck | 0.8.0 | 0.8.0 | 0.8.0 | 0.8.0 | 0.8.0 | |
| pydispatcher | 2.0.5 | 2.0.5 | 2.0.5 | 2.0.5 | 2.0.5 | |
| pydocstyle | 6.3.0 | 6.3.0 | 6.3.0 | 6.3.0 | 6.3.0 | |
| pyerfa | 2.0.1.4 | 2.0.1.4 | 2.0.1.4 | 2.0.1.4 | 2.0.1.4 | 2.0.1.4 |
| pyflakes | 3.2.0 | 3.2.0 | 3.2.0 | 3.2.0 | 3.2.0 | 3.2.0 |
| pygments | 2.15.1 | 2.15.1 | 2.15.1 | 2.15.1 | 2.15.1 | 2.15.1 |
| pyjwt | 2.8.0 | 2.8.0 | 2.8.0 | 2.8.0 | 2.8.0 | |
| pylint | 2.16.2 | 2.16.2 | 2.16.2 | 2.16.2 | 2.16.2 | 2.16.2 |
| pylint-venv | 3.0.3 | 3.0.3 | 3.0.3 | 3.0.3 | 3.0.3 | |
| pyls-spyder | 0.4.0 | 0.4.0 | 0.4.0 | 0.4.0 | 0.4.0 | |
| pynacl | 1.5.0 | |||||
| pyobjc-core | 10.1 | 10.1 | ||||
| pyobjc-framework-cocoa | 10.1 | 10.1 | ||||
| pyobjc-framework-coreservices | 10.1 | 10.1 | ||||
| pyobjc-framework-fsevents | 10.1 | 10.1 | ||||
| pyodbc | 5.0.1 | 5.0.1 | 5.0.1 | 5.0.1 | 5.0.1 | 5.0.1 |
| pyopenssl | 24.0.0 | 24.0.0 | 24.0.0 | 24.0.0 | 24.0.0 | |
| pyparsing | 3.0.9 | 3.0.9 | 3.0.9 | 3.0.9 | 3.0.9 | 3.0.9 |
| pyqt | 5.15.10 | 5.15.10 | 5.15.10 | 5.15.10 | 5.15.10 | |
| pyqt5-sip | 12.13.0 | 12.13.0 | 12.13.0 | 12.13.0 | 12.13.0 | |
| pyqtwebengine | 5.15.10 | 5.15.10 | 5.15.10 | 5.15.10 | 5.15.10 | |
| pysocks | 1.7.1 | 1.7.1 | 1.7.1 | 1.7.1 | 1.7.1 | 1.7.1 |
| pytables | 3.9.2 | 3.9.2 | 3.9.2 | 3.9.2 | 3.9.2 | |
| pytest | 7.4.4 | 7.4.4 | 7.4.4 | 7.4.4 | 7.4.4 | 7.4.4 |
| python | 3.12.4 | 3.12.4 | 3.12.4 | 3.12.4 | 3.12.4 | 3.12.4 |
| python-dateutil | 2.9.0post0 | 2.9.0post0 | 2.9.0post0 | 2.9.0post0 | 2.9.0post0 | 2.9.0post0 |
| python-dotenv | 0.21.0 | 0.21.0 | 0.21.0 | 0.21.0 | 0.21.0 | |
| python-fastjsonschema | 2.16.2 | 2.16.2 | 2.16.2 | 2.16.2 | 2.16.2 | 2.16.2 |
| python-json-logger | 2.0.7 | 2.0.7 | 2.0.7 | 2.0.7 | 2.0.7 | |
| python-libarchive-c | 2.9 | 2.9 | 2.9 | 2.9 | 2.9 | 2.9 |
| python-lmdb | 1.4.1 | 1.4.1 | 1.4.1 | 1.4.1 | 1.4.1 | 1.4.1 |
| python-lsp-black | 2.0.0 | 2.0.0 | 2.0.0 | 2.0.0 | 2.0.0 | |
| python-lsp-jsonrpc | 1.1.2 | 1.1.2 | 1.1.2 | 1.1.2 | 1.1.2 | |
| python-lsp-server | 1.10.0 | 1.10.0 | 1.10.0 | 1.10.0 | 1.10.0 | |
| python-slugify | 5.0.2 | 5.0.2 | 5.0.2 | 5.0.2 | 5.0.2 | |
| python-snappy | 0.6.1 | 0.6.1 | 0.6.1 | 0.6.1 | 0.6.1 | 0.6.1 |
| python-tzdata | 2023.3 | 2023.3 | 2023.3 | 2023.3 | 2023.3 | 2023.3 |
| python.app | 3 | 3 | ||||
| pytoolconfig | 1.2.6 | 1.2.6 | 1.2.6 | 1.2.6 | 1.2.6 | |
| pytz | 2024.1 | 2024.1 | 2024.1 | 2024.1 | 2024.1 | 2024.1 |
| pyviz\_comms | 3.0.2 | 3.0.2 | 3.0.2 | 3.0.2 | 3.0.2 | |
| pywavelets | 1.5.0 | 1.5.0 | 1.5.0 | 1.5.0 | 1.5.0 | 1.5.0 |
| pywin32 | 305 | |||||
| pywin32-ctypes | 0.2.2 | |||||
| pywinpty | 2.0.10 | |||||
| pyxdg | 0.27 | 0.27 | ||||
| pyyaml | 6.0.1 | 6.0.1 | 6.0.1 | 6.0.1 | 6.0.1 | 6.0.1 |
| pyzmq | 25.1.2 | 25.1.2 | 25.1.2 | 25.1.2 | 25.1.2 | 25.1.2 |
| qdarkstyle | 3.2.3 | 3.2.3 | 3.2.3 | 3.2.3 | 3.2.3 | |
| qstylizer | 0.2.2 | 0.2.2 | 0.2.2 | 0.2.2 | 0.2.2 | |
| qt-main | 5.15.2 | 5.15.2 | 5.15.2 | 5.15.2 | 5.15.2 | |
| qt-webengine | 5.15.9 | 5.15.9 | 5.15.9 | 5.15.9 | 5.15.9 | |
| qtawesome | 1.2.2 | 1.2.2 | 1.2.2 | 1.2.2 | 1.2.2 | |
| qtconsole | 5.5.1 | 5.5.1 | 5.5.1 | 5.5.1 | 5.5.1 | |
| qtpy | 2.4.1 | 2.4.1 | 2.4.1 | 2.4.1 | 2.4.1 | |
| queuelib | 1.6.2 | 1.6.2 | 1.6.2 | 1.6.2 | 1.6.2 | |
| re2 | 2022.04.01 | 2022.04.01 | 2022.04.01 | 2022.04.01 | 2022.04.01 | 2022.04.01 |
| readline | 8.2 | 8.2 | 8.2 | 8.2 | 8.2 | |
| referencing | 0.30.2 | 0.30.2 | 0.30.2 | 0.30.2 | 0.30.2 | 0.30.2 |
| regex | 2023.10.3 | 2023.10.3 | 2023.10.3 | 2023.10.3 | 2023.10.3 | 2023.10.3 |
| reproc | 14.2.4 | 14.2.4 | 14.2.4 | 14.2.4 | 14.2.4 | 14.2.4 |
| reproc-cpp | 14.2.4 | 14.2.4 | 14.2.4 | 14.2.4 | 14.2.4 | 14.2.4 |
| requests | 2.32.2 | 2.32.2 | 2.32.2 | 2.32.2 | 2.32.2 | 2.32.2 |
| requests-file | 1.5.1 | 1.5.1 | 1.5.1 | 1.5.1 | 1.5.1 | |
| requests-toolbelt | 1.0.0 | 1.0.0 | 1.0.0 | 1.0.0 | 1.0.0 | 1.0.0 |
| rfc3339-validator | 0.1.4 | 0.1.4 | 0.1.4 | 0.1.4 | 0.1.4 | |
| rfc3986-validator | 0.1.1 | 0.1.1 | 0.1.1 | 0.1.1 | 0.1.1 | |
| rich | 13.3.5 | 13.3.5 | 13.3.5 | 13.3.5 | 13.3.5 | |
| rope | 1.12.0 | 1.12.0 | 1.12.0 | 1.12.0 | 1.12.0 | |
| rpds-py | 0.10.6 | 0.10.6 | 0.10.6 | 0.10.6 | 0.10.6 | 0.10.6 |
| rtree | 1.0.1 | 1.0.1 | 1.0.1 | 1.0.1 | 1.0.1 | |
| ruamel.yaml | 0.17.21 | 0.17.21 | 0.17.21 | 0.17.21 | 0.17.21 | 0.17.21 |
| ruamel\_yaml | 0.17.21 | 0.17.21 | 0.17.21 | 0.17.21 | 0.17.21 | 0.17.21 |
| s2n | 1.3.27 | 1.3.27 | 1.3.27 | |||
| s3fs | 2024.3.1 | 2024.3.1 | 2024.3.1 | 2024.3.1 | 2024.3.1 | 2024.3.1 |
| scikit-image | 0.23.2 | 0.23.2 | 0.23.2 | 0.23.2 | 0.23.2 | 0.23.2 |
| scikit-learn | 1.4.2 | 1.4.2 | 1.4.2 | 1.4.2 | 1.4.2 | 1.4.2 |
| scipy | 1.13.1 | 1.13.1 | 1.13.1 | 1.13.1 | 1.13.1 | 1.13.1 |
| scrapy | 2.11.1 | 2.11.1 | 2.11.1 | 2.11.1 | 2.11.1 | |
| seaborn | 0.13.2 | 0.13.2 | 0.13.2 | 0.13.2 | 0.13.2 | 0.13.2 |
| secretstorage | 3.3.1 | 3.3.1 | ||||
| semver | 3.0.2 | 3.0.2 | 3.0.2 | 3.0.2 | 3.0.2 | |
| send2trash | 1.8.2 | 1.8.2 | 1.8.2 | 1.8.2 | 1.8.2 | |
| service\_identity | 18.1.0 | 18.1.0 | 18.1.0 | 18.1.0 | 18.1.0 | |
| setuptools | 69.5.1 | 69.5.1 | 69.5.1 | 69.5.1 | 69.5.1 | 69.5.1 |
| sip | 6.7.12 | 6.7.12 | 6.7.12 | 6.7.12 | 6.7.12 | |
| six | 1.16.0 | 1.16.0 | 1.16.0 | 1.16.0 | 1.16.0 | 1.16.0 |
| smart\_open | 5.2.1 | 5.2.1 | 5.2.1 | 5.2.1 | 5.2.1 | |
| smmap | 4.0.0 | 4.0.0 | 4.0.0 | 4.0.0 | 4.0.0 | |
| snappy | 1.1.10 | 1.1.10 | 1.1.10 | 1.1.10 | 1.1.10 | 1.1.10 |
| sniffio | 1.3.0 | 1.3.0 | 1.3.0 | 1.3.0 | 1.3.0 | |
| snowballstemmer | 2.2.0 | 2.2.0 | 2.2.0 | 2.2.0 | 2.2.0 | 2.2.0 |
| sortedcontainers | 2.4.0 | 2.4.0 | 2.4.0 | 2.4.0 | 2.4.0 | 2.4.0 |
| soupsieve | 2.5 | 2.5 | 2.5 | 2.5 | 2.5 | 2.5 |
| sphinx | 7.3.7 | 7.3.7 | 7.3.7 | 7.3.7 | 7.3.7 | |
| sphinxcontrib-applehelp | 1.0.2 | 1.0.2 | 1.0.2 | 1.0.2 | 1.0.2 | |
| sphinxcontrib-devhelp | 1.0.2 | 1.0.2 | 1.0.2 | 1.0.2 | 1.0.2 | |
| sphinxcontrib-htmlhelp | 2.0.0 | 2.0.0 | 2.0.0 | 2.0.0 | 2.0.0 | |
| sphinxcontrib-jsmath | 1.0.1 | 1.0.1 | 1.0.1 | 1.0.1 | 1.0.1 | |
| sphinxcontrib-qthelp | 1.0.3 | 1.0.3 | 1.0.3 | 1.0.3 | 1.0.3 | |
| sphinxcontrib-serializinghtml | 1.1.10 | 1.1.10 | 1.1.10 | 1.1.10 | 1.1.10 | |
| spyder | 5.5.1 | 5.5.1 | 5.5.1 | 5.5.1 | 5.5.1 | |
| spyder-kernels | 2.5.0 | 2.5.0 | 2.5.0 | 2.5.0 | 2.5.0 | |
| sqlalchemy | 2.0.30 | 2.0.30 | 2.0.30 | 2.0.30 | 2.0.30 | 2.0.30 |
| sqlite | 3.45.3 | 3.45.3 | 3.45.3 | 3.45.3 | 3.45.3 | 3.45.3 |
| stack\_data | 0.2.0 | 0.2.0 | 0.2.0 | 0.2.0 | 0.2.0 | 0.2.0 |
| statsmodels | 0.14.2 | 0.14.2 | 0.14.2 | 0.14.2 | 0.14.2 | 0.14.2 |
| streamlit | 1.32.0 | 1.32.0 | 1.32.0 | 1.32.0 | 1.32.0 | |
| sympy | 1.12 | 1.12 | 1.12 | 1.12 | 1.12 | 1.12 |
| tabulate | 0.9.0 | 0.9.0 | 0.9.0 | 0.9.0 | 0.9.0 | 0.9.0 |
| tapi | 1100.0.11 | 1000.10.8 | ||||
| tbb | 2021.8.0 | 2021.8.0 | 2021.8.0 | 2021.8.0 | 2021.8.0 | |
| tblib | 1.7.0 | 1.7.0 | 1.7.0 | 1.7.0 | 1.7.0 | 1.7.0 |
| tenacity | 8.2.2 | 8.2.2 | 8.2.2 | 8.2.2 | 8.2.2 | 8.2.2 |
| terminado | 0.17.1 | 0.17.1 | 0.17.1 | 0.17.1 | 0.17.1 | |
| text-unidecode | 1.3 | 1.3 | 1.3 | 1.3 | 1.3 | |
| textdistance | 4.2.1 | 4.2.1 | 4.2.1 | 4.2.1 | 4.2.1 | |
| threadpoolctl | 2.2.0 | 2.2.0 | 2.2.0 | 2.2.0 | 2.2.0 | 2.2.0 |
| three-merge | 0.1.1 | 0.1.1 | 0.1.1 | 0.1.1 | 0.1.1 | |
| tifffile | 2023.4.12 | 2023.4.12 | 2023.4.12 | 2023.4.12 | 2023.4.12 | 2023.4.12 |
| tinycss2 | 1.2.1 | 1.2.1 | 1.2.1 | 1.2.1 | 1.2.1 | 1.2.1 |
| tk | 8.6.14 | 8.6.14 | 8.6.14 | 8.6.14 | 8.6.14 | 8.6.14 |
| tldextract | 3.2.0 | 3.2.0 | 3.2.0 | 3.2.0 | 3.2.0 | |
| toml | 0.10.2 | 0.10.2 | 0.10.2 | 0.10.2 | 0.10.2 | |
| tomli | 2.0.1 | 2.0.1 | 2.0.1 | 2.0.1 | 2.0.1 | |
| tomlkit | 0.11.1 | 0.11.1 | 0.11.1 | 0.11.1 | 0.11.1 | 0.11.1 |
| toolz | 0.12.0 | 0.12.0 | 0.12.0 | 0.12.0 | 0.12.0 | 0.12.0 |
| tornado | 6.4.1 | 6.4.1 | 6.4.1 | 6.4.1 | 6.4.1 | 6.4.1 |
| tqdm | 4.66.4 | 4.66.4 | 4.66.4 | 4.66.4 | 4.66.4 | 4.66.4 |
| traitlets | 5.14.3 | 5.14.3 | 5.14.3 | 5.14.3 | 5.14.3 | 5.14.3 |
| truststore | 0.8.0 | 0.8.0 | 0.8.0 | 0.8.0 | 0.8.0 | 0.8.0 |
| twisted | 23.10.0 | 23.10.0 | 23.10.0 | 23.10.0 | 23.10.0 | |
| twisted-iocpsupport | 1.0.2 | |||||
| typing-extensions | 4.11.0 | 4.11.0 | 4.11.0 | 4.11.0 | 4.11.0 | 4.11.0 |
| typing\_extensions | 4.11.0 | 4.11.0 | 4.11.0 | 4.11.0 | 4.11.0 | 4.11.0 |
| tzdata | 2024a | 2024a | 2024a | 2024a | 2024a | 2024a |
| uc-micro-py | 1.0.1 | 1.0.1 | 1.0.1 | 1.0.1 | 1.0.1 | |
| ujson | 5.10.0 | 5.10.0 | 5.10.0 | 5.10.0 | 5.10.0 | |
| unicodedata2 | 15.1.0 | 15.1.0 | 15.1.0 | 15.1.0 | 15.1.0 | 15.1.0 |
| unidecode | 1.2.0 | 1.2.0 | 1.2.0 | 1.2.0 | 1.2.0 | |
| unixodbc | 2.3.11 | 2.3.11 | 2.3.11 | 2.3.11 | 2.3.11 | |
| urllib3 | 2.2.2 | 2.2.2 | 2.2.2 | 2.2.2 | 2.2.2 | 2.2.2 |
| utf8proc | 2.6.1 | 2.6.1 | 2.6.1 | 2.6.1 | 2.6.1 | 2.6.1 |
| vc | 14.2 | |||||
| vs2015\_runtime | 14.29.30133 | |||||
| w3lib | 1.21.0 | 2.1.2 | 2.1.2 | 2.1.2 | 2.1.2 | |
| watchdog | 4.0.1 | 4.0.1 | 4.0.1 | 4.0.1 | 4.0.1 | |
| wcwidth | 0.2.5 | 0.2.5 | 0.2.5 | 0.2.5 | 0.2.5 | 0.2.5 |
| webencodings | 0.5.1 | 0.5.1 | 0.5.1 | 0.5.1 | 0.5.1 | 0.5.1 |
| websocket-client | 1.8.0 | 1.8.0 | 1.8.0 | 1.8.0 | 1.8.0 | |
| werkzeug | 3.0.3 | 3.0.3 | 3.0.3 | 3.0.3 | 3.0.3 | 3.0.3 |
| whatthepatch | 1.0.2 | 1.0.2 | 1.0.2 | 1.0.2 | 1.0.2 | |
| wheel | 0.43.0 | 0.43.0 | 0.43.0 | 0.43.0 | 0.43.0 | 0.43.0 |
| widgetsnbextension | 3.6.6 | 3.6.6 | 3.6.6 | 3.6.6 | 3.6.6 | |
| win\_inet\_pton | 1.1.0 | |||||
| winpty | 0.4.3 | |||||
| wrapt | 1.14.1 | 1.14.1 | 1.14.1 | 1.14.1 | 1.14.1 | 1.14.1 |
| wurlitzer | 3.0.2 | 3.0.2 | 3.0.2 | 3.0.2 | ||
| xarray | 2023.6.0 | 2023.6.0 | 2023.6.0 | 2023.6.0 | 2023.6.0 | |
| xlwings | 0.31.4 | 0.31.4 | 0.31.4 | |||
| xyzservices | 2022.9.0 | 2022.9.0 | 2022.9.0 | 2022.9.0 | 2022.9.0 | 2022.9.0 |
| xz | 5.4.6 | 5.4.6 | 5.4.6 | 5.4.6 | 5.4.6 | 5.4.6 |
| yaml | 0.2.5 | 0.2.5 | 0.2.5 | 0.2.5 | 0.2.5 | 0.2.5 |
| yaml-cpp | 0.8.0 | 0.8.0 | 0.8.0 | 0.8.0 | 0.8.0 | 0.8.0 |
| yapf | 0.40.2 | 0.40.2 | 0.40.2 | 0.40.2 | 0.40.2 | |
| yarl | 1.9.3 | 1.9.3 | 1.9.3 | 1.9.3 | 1.9.3 | 1.9.3 |
| zeromq | 4.3.5 | 4.3.5 | 4.3.5 | 4.3.5 | 4.3.5 | 4.3.5 |
| zfp | 1.0.0 | 1.0.0 | 1.0.0 | 1.0.0 | ||
| zict | 3.0.0 | 3.0.0 | 3.0.0 | 3.0.0 | 3.0.0 | 3.0.0 |
| zipp | 3.17.0 | 3.17.0 | 3.17.0 | 3.17.0 | 3.17.0 | |
| zlib | 1.2.13 | 1.2.13 | 1.2.13 | 1.2.13 | 1.2.13 | 1.2.13 |
| zlib-ng | 2.0.7 | 2.0.7 | 2.0.7 | 2.0.7 | 2.0.7 | |
| zope | 1.0 | 1.0 | 1.0 | 1.0 | 1.0 | |
| zope.interface | 5.4.0 | 5.4.0 | 5.4.0 | 5.4.0 | 5.4.0 | |
| zstandard | 0.22.0 | 0.22.0 | 0.22.0 | 0.22.0 | 0.22.0 | 0.22.0 |
| zstd | 1.5.5 | 1.5.5 | 1.5.5 | 1.5.5 | 1.5.5 | 1.5.5 |
| Package Name | linux-64 | linux-aarch64 | linux-s390x |
|---|---|---|---|
| \_anaconda\_depends | 2024.06 | 2024.06 | 2024.06 |
| \_libgcc\_mutex | 0.1 | 0.1 | 0.1 |
| \_openmp\_mutex | 5.1 | 5.1 | 5.1 |
| abseil-cpp | 20211102.0 | 20211102.0 | 20211102.0 |
| aiobotocore | 2.12.3 | 2.12.3 | 2.12.3 |
| aiohttp | 3.9.5 | 3.9.5 | 3.9.5 |
| aioitertools | 0.7.1 | 0.7.1 | 0.7.1 |
| aiosignal | 1.2.0 | 1.2.0 | 1.2.0 |
| alabaster | 0.7.16 | 0.7.16 | |
| altair | 5.0.1 | 5.0.1 | |
| anaconda-anon-usage | 0.4.4 | 0.4.4 | 0.4.4 |
| anaconda-catalogs | 0.2.0 | 0.2.0 | 0.2.0 |
| anaconda-client | 1.12.3 | 1.12.3 | 1.12.3 |
| anaconda-cloud-auth | 0.5.1 | 0.5.1 | |
| anaconda-navigator | 2.6.0 | 2.6.0 | |
| anaconda-project | 0.11.1 | 0.11.1 | 0.11.1 |
| annotated-types | 0.6.0 | 0.6.0 | |
| anyio | 4.2.0 | 4.2.0 | |
| aom | 3.6.0 | 3.6.0 | 3.6.0 |
| appdirs | 1.4.4 | 1.4.4 | 1.4.4 |
| archspec | 0.2.3 | 0.2.3 | 0.2.3 |
| argon2-cffi | 21.3.0 | 21.3.0 | |
| argon2-cffi-bindings | 21.2.0 | 21.2.0 | |
| arrow | 1.2.3 | 1.2.3 | |
| arrow-cpp | 14.0.2 | 14.0.2 | 14.0.2 |
| astroid | 2.14.2 | 2.14.2 | 2.14.2 |
| astropy | 6.1.0 | 6.1.0 | 6.1.0 |
| astropy-iers-data | 0.2024.6.3.0.31.14 | 0.2024.6.3.0.31.14 | 0.2024.6.3.0.31.14 |
| asttokens | 2.0.5 | 2.0.5 | 2.0.5 |
| async-lru | 2.0.4 | 2.0.4 | |
| atomicwrites | 1.4.0 | 1.4.0 | |
| attrs | 23.1.0 | 23.1.0 | 23.1.0 |
| automat | 20.2.0 | 20.2.0 | |
| autopep8 | 2.0.4 | 2.0.4 | |
| aws-c-auth | 0.6.19 | 0.6.19 | 0.6.19 |
| aws-c-cal | 0.5.20 | 0.5.20 | 0.5.20 |
| aws-c-common | 0.8.5 | 0.8.5 | 0.8.5 |
| aws-c-compression | 0.2.16 | 0.2.16 | 0.2.16 |
| aws-c-event-stream | 0.2.15 | 0.2.15 | 0.2.15 |
| aws-c-http | 0.6.25 | 0.6.25 | 0.6.25 |
| aws-c-io | 0.13.10 | 0.13.10 | 0.13.10 |
| aws-c-mqtt | 0.7.13 | 0.7.13 | 0.7.13 |
| aws-c-s3 | 0.1.51 | 0.1.51 | 0.1.51 |
| aws-c-sdkutils | 0.1.6 | 0.1.6 | 0.1.6 |
| aws-checksums | 0.1.13 | 0.1.13 | 0.1.13 |
| aws-crt-cpp | 0.18.16 | 0.18.16 | 0.18.16 |
| aws-sdk-cpp | 1.10.55 | 1.10.55 | 1.10.55 |
| babel | 2.11.0 | 2.11.0 | |
| bcrypt | 3.2.0 | 3.2.0 | |
| beautifulsoup4 | 4.12.3 | 4.12.3 | 4.12.3 |
| binaryornot | 0.4.4 | 0.4.4 | |
| black | 24.4.2 | 24.4.2 | 24.4.2 |
| blas | 1.0 | 1.0 | 1.0 |
| bleach | 4.1.0 | 4.1.0 | 4.1.0 |
| blinker | 1.6.2 | 1.6.2 | 1.6.2 |
| blosc | 1.21.3 | 1.21.3 | 1.21.3 |
| bokeh | 3.4.1 | 3.4.1 | 3.4.1 |
| boltons | 23.0.0 | 23.0.0 | 23.0.0 |
| boost-cpp | 1.82.0 | 1.82.0 | 1.82.0 |
| botocore | 1.34.69 | 1.34.69 | 1.34.69 |
| bottleneck | 1.3.7 | 1.3.7 | 1.3.7 |
| brotli | 1.0.9 | 1.0.9 | 1.0.9 |
| brotli-bin | 1.0.9 | 1.0.9 | 1.0.9 |
| brotli-python | 1.0.9 | 1.0.9 | 1.0.9 |
| brunsli | 0.1 | 0.1 | |
| bzip2 | 1.0.8 | 1.0.8 | 1.0.8 |
| c-ares | 1.19.1 | 1.19.1 | 1.19.1 |
| c-blosc2 | 2.12.0 | 2.12.0 | |
| ca-certificates | 2024.3.11 | 2024.3.11 | 2024.3.11 |
| cachetools | 5.3.3 | 5.3.3 | |
| certifi | 2024.6.2 | 2024.6.2 | 2024.6.2 |
| cffi | 1.16.0 | 1.16.0 | 1.16.0 |
| cfitsio | 3.470 | 3.470 | 3.470 |
| chardet | 4.0.0 | 4.0.0 | 4.0.0 |
| charls | 2.2.0 | 2.2.0 | |
| charset-normalizer | 2.0.4 | 2.0.4 | 2.0.4 |
| click | 8.1.7 | 8.1.7 | 8.1.7 |
| cloudpickle | 2.2.1 | 2.2.1 | 2.2.1 |
| colorama | 0.4.6 | 0.4.6 | 0.4.6 |
| colorcet | 3.1.0 | 3.1.0 | |
| comm | 0.2.1 | 0.2.1 | 0.2.1 |
| conda | 24.5.0 | 24.5.0 | 24.5.0 |
| conda-build | 24.5.1 | 24.5.1 | 24.5.1 |
| conda-content-trust | 0.2.0 | 0.2.0 | 0.2.0 |
| conda-index | 0.5.0 | 0.5.0 | 0.4.0 |
| conda-libmamba-solver | 24.1.0 | 24.1.0 | 24.1.0 |
| conda-pack | 0.7.1 | 0.7.1 | 0.7.1 |
| conda-package-handling | 2.3.0 | 2.3.0 | 2.3.0 |
| conda-package-streaming | 0.10.0 | 0.10.0 | 0.10.0 |
| conda-repo-cli | 1.0.88 | 1.0.88 | |
| conda-token | 0.5.0 | 0.5.0 | 0.5.0 |
| constantly | 23.10.4 | 23.10.4 | |
| contourpy | 1.2.0 | 1.2.0 | 1.2.0 |
| cookiecutter | 2.6.0 | 2.6.0 | |
| cryptography | 42.0.5 | 42.0.5 | 42.0.5 |
| cssselect | 1.2.0 | 1.2.0 | |
| curl | 8.7.1 | 8.7.1 | 8.7.1 |
| cycler | 0.11.0 | 0.11.0 | 0.11.0 |
| cyrus-sasl | 2.1.28 | 2.1.28 | |
| cytoolz | 0.12.2 | 0.12.2 | 0.12.2 |
| dask | 2024.5.0 | 2024.5.0 | 2024.5.0 |
| dask-core | 2024.5.0 | 2024.5.0 | 2024.5.0 |
| dask-expr | 1.1.0 | 1.1.0 | 1.1.0 |
| datashader | 0.16.2 | 0.16.2 | |
| dav1d | 1.2.1 | 1.2.1 | 1.2.1 |
| dbus | 1.13.18 | 1.13.18 | |
| debugpy | 1.6.7 | 1.6.7 | 1.6.7 |
| decorator | 5.1.1 | 5.1.1 | 5.1.1 |
| defusedxml | 0.7.1 | 0.7.1 | 0.7.1 |
| diff-match-patch | 20200713 | 20200713 | |
| dill | 0.3.8 | 0.3.8 | 0.3.8 |
| distributed | 2024.5.0 | 2024.5.0 | 2024.5.0 |
| distro | 1.9.0 | 1.9.0 | 1.9.0 |
| docstring-to-markdown | 0.11 | 0.11 | |
| docutils | 0.18.1 | 0.18.1 | |
| entrypoints | 0.4 | 0.4 | 0.4 |
| et\_xmlfile | 1.1.0 | 1.1.0 | 1.1.0 |
| executing | 0.8.3 | 0.8.3 | 0.8.3 |
| expat | 2.6.2 | 2.6.2 | 2.6.2 |
| filelock | 3.13.1 | 3.13.1 | 3.13.1 |
| flake8 | 7.0.0 | 7.0.0 | |
| flask | 3.0.3 | 3.0.3 | 3.0.3 |
| fmt | 9.1.0 | 9.1.0 | 9.1.0 |
| fontconfig | 2.14.1 | 2.14.1 | |
| fonttools | 4.51.0 | 4.51.0 | 4.51.0 |
| freetype | 2.12.1 | 2.12.1 | 2.12.1 |
| frozendict | 2.4.2 | 2.4.2 | 2.4.2 |
| frozenlist | 1.4.0 | 1.4.0 | 1.4.0 |
| fsspec | 2024.3.1 | 2024.3.1 | 2024.3.1 |
| gensim | 4.3.2 | 4.3.2 | |
| gflags | 2.2.2 | 2.2.2 | 2.2.2 |
| giflib | 5.2.1 | 5.2.1 | 5.2.1 |
| gitdb | 4.0.7 | 4.0.7 | |
| gitpython | 3.1.37 | 3.1.37 | |
| glib | 2.78.4 | 2.78.4 | |
| glib-tools | 2.78.4 | 2.78.4 | |
| glog | 0.5.0 | 0.5.0 | 0.5.0 |
| greenlet | 3.0.1 | 3.0.1 | 3.0.1 |
| grpc-cpp | 1.48.2 | 1.48.2 | 1.48.2 |
| gst-plugins-base | 1.14.1 | 1.14.1 | |
| gstreamer | 1.14.1 | 1.14.1 | |
| h5py | 3.11.0 | 3.11.0 | 3.11.0 |
| hdf5 | 1.12.1 | 1.12.1 | 1.12.1 |
| heapdict | 1.0.1 | 1.0.1 | 1.0.1 |
| holoviews | 1.19.0 | 1.19.0 | |
| hvplot | 0.10.0 | 0.10.0 | |
| hyperlink | 21.0.0 | 21.0.0 | |
| icu | 73.1 | 73.1 | 73.1 |
| idna | 3.7 | 3.7 | 3.7 |
| imagecodecs | 2023.1.23 | 2023.1.23 | 2023.1.23 |
| imageio | 2.33.1 | 2.33.1 | 2.33.1 |
| imagesize | 1.4.1 | 1.4.1 | |
| imbalanced-learn | 0.12.3 | 0.12.3 | 0.12.3 |
| importlib-metadata | 7.0.1 | 7.0.1 | |
| incremental | 22.10.0 | 22.10.0 | |
| inflection | 0.5.1 | 0.5.1 | |
| iniconfig | 1.1.1 | 1.1.1 | 1.1.1 |
| intake | 0.7.0 | 0.7.0 | 0.7.0 |
| intel-openmp | 2023.1.0 | ||
| intervaltree | 3.1.0 | 3.1.0 | |
| ipykernel | 6.28.0 | 6.28.0 | 6.28.0 |
| ipython | 8.25.0 | 8.25.0 | 8.25.0 |
| ipython\_genutils | 0.2.0 | 0.2.0 | |
| ipywidgets | 7.8.1 | 7.8.1 | |
| isort | 5.13.2 | 5.13.2 | 5.13.2 |
| itemadapter | 0.3.0 | 0.3.0 | |
| itemloaders | 1.1.0 | 1.1.0 | |
| itsdangerous | 2.2.0 | 2.2.0 | 2.2.0 |
| jaraco.classes | 3.2.1 | 3.2.1 | |
| jedi | 0.18.1 | 0.18.1 | 0.18.1 |
| jeepney | 0.7.1 | 0.7.1 | |
| jellyfish | 1.0.1 | 1.0.1 | |
| jinja2 | 3.1.4 | 3.1.4 | 3.1.4 |
| jmespath | 1.0.1 | 1.0.1 | 1.0.1 |
| joblib | 1.4.2 | 1.4.2 | 1.4.2 |
| jpeg | 9e | 9e | 9e |
| jq | 1.6 | 1.6 | |
| json5 | 0.9.6 | 0.9.6 | |
| jsonpatch | 1.33 | 1.33 | 1.33 |
| jsonpointer | 2.1 | 2.1 | 2.1 |
| jsonschema | 4.19.2 | 4.19.2 | 4.19.2 |
| jsonschema-specifications | 2023.7.1 | 2023.7.1 | 2023.7.1 |
| jupyter | 1.0.0 | 1.0.0 | 1.0.0 |
| jupyter-lsp | 2.2.0 | 2.2.0 | |
| jupyter\_client | 8.6.0 | 8.6.0 | 8.6.0 |
| jupyter\_console | 6.6.3 | 6.6.3 | 6.6.3 |
| jupyter\_core | 5.7.2 | 5.7.2 | 5.7.2 |
| jupyter\_events | 0.10.0 | 0.10.0 | |
| jupyter\_server | 2.14.1 | 2.14.1 | |
| jupyter\_server\_terminals | 0.4.4 | 0.4.4 | |
| jupyterlab | 4.0.11 | 4.0.11 | |
| jupyterlab-variableinspector | 3.1.0 | 3.1.0 | |
| jupyterlab\_pygments | 0.1.2 | 0.1.2 | 0.2.2 |
| jupyterlab\_server | 2.25.1 | 2.25.1 | |
| jupyterlab\_widgets | 1.0.0 | 1.0.0 | |
| jxrlib | 1.1 | 1.1 | 1.1 |
| keyring | 24.3.1 | 24.3.1 | |
| kiwisolver | 1.4.4 | 1.4.4 | 1.4.4 |
| krb5 | 1.20.1 | 1.20.1 | 1.20.1 |
| lazy-object-proxy | 1.10.0 | 1.10.0 | 1.10.0 |
| lazy\_loader | 0.4 | 0.4 | 0.4 |
| lcms2 | 2.12 | 2.12 | 2.12 |
| ld\_impl\_linux-64 | 2.38 | ||
| ld\_impl\_linux-aarch64 | 2.38 | ||
| ld\_impl\_linux-s390x | 2.38 | ||
| lerc | 3.0 | 3.0 | 3.0 |
| libaec | 1.0.4 | 1.0.4 | 1.0.4 |
| libarchive | 3.6.2 | 3.6.2 | 3.6.2 |
| libavif | 0.11.1 | 0.11.1 | 0.11.1 |
| libboost | 1.82.0 | 1.82.0 | 1.82.0 |
| libbrotlicommon | 1.0.9 | 1.0.9 | 1.0.9 |
| libbrotlidec | 1.0.9 | 1.0.9 | 1.0.9 |
| libbrotlienc | 1.0.9 | 1.0.9 | 1.0.9 |
| libclang | 14.0.6 | 14.0.6 | |
| libclang13 | 14.0.6 | 14.0.6 | |
| libcups | 2.4.2 | 2.4.2 | |
| libcurl | 8.7.1 | 8.7.1 | 8.7.1 |
| libdeflate | 1.17 | 1.17 | 1.17 |
| libedit | 3.1.20230828 | 3.1.20230828 | 3.1.20230828 |
| libev | 4.33 | 4.33 | 4.33 |
| libevent | 2.1.12 | 2.1.12 | 2.1.12 |
| libffi | 3.4.4 | 3.4.4 | 3.4.4 |
| libgcc-ng | 11.2.0 | 11.2.0 | 11.2.0 |
| libgfortran-ng | 11.2.0 | 11.2.0 | 11.2.0 |
| libgfortran5 | 11.2.0 | 11.2.0 | 11.2.0 |
| libglib | 2.78.4 | 2.78.4 | |
| libgomp | 11.2.0 | 11.2.0 | 11.2.0 |
| libiconv | 1.16 | 1.16 | |
| liblief | 0.12.3 | 0.12.3 | 0.12.3 |
| libllvm14 | 14.0.6 | 14.0.6 | |
| libmamba | 1.5.8 | 1.5.8 | 1.5.8 |
| libmambapy | 1.5.8 | 1.5.8 | 1.5.8 |
| libnghttp2 | 1.57.0 | 1.57.0 | 1.57.0 |
| libopenblas | 0.3.21 | 0.3.21 | |
| libpng | 1.6.39 | 1.6.39 | 1.6.39 |
| libpq | 12.17 | 12.17 | |
| libprotobuf | 3.20.3 | 3.20.3 | 3.20.3 |
| libsodium | 1.0.18 | 1.0.18 | 1.0.18 |
| libsolv | 0.7.24 | 0.7.24 | 0.7.24 |
| libspatialindex | 1.9.3 | 1.9.3 | |
| libssh2 | 1.11.0 | 1.11.0 | 1.11.0 |
| libstdcxx-ng | 11.2.0 | 11.2.0 | 11.2.0 |
| libthrift | 0.15.0 | 0.15.0 | 0.15.0 |
| libtiff | 4.5.1 | 4.5.1 | 4.5.1 |
| libuuid | 1.41.5 | 1.41.5 | 1.41.5 |
| libwebp-base | 1.3.2 | 1.3.2 | 1.3.2 |
| libxcb | 1.15 | 1.15 | |
| libxkbcommon | 1.0.1 | 1.0.1 | |
| libxml2 | 2.10.4 | 2.10.4 | 2.10.4 |
| libxslt | 1.1.37 | 1.1.37 | |
| libzopfli | 1.0.3 | 1.0.3 | 1.0.3 |
| linkify-it-py | 2.0.0 | 2.0.0 | |
| llvmlite | 0.42.0 | 0.42.0 | |
| locket | 1.0.0 | 1.0.0 | 1.0.0 |
| lxml | 5.2.1 | 5.2.1 | |
| lz4 | 4.3.2 | 4.3.2 | 4.3.2 |
| lz4-c | 1.9.4 | 1.9.4 | 1.9.4 |
| lzo | 2.10 | 2.10 | |
| markdown | 3.4.1 | 3.4.1 | |
| markdown-it-py | 2.2.0 | 2.2.0 | |
| markupsafe | 2.1.3 | 2.1.3 | 2.1.3 |
| matplotlib | 3.8.4 | 3.8.4 | 3.8.4 |
| matplotlib-base | 3.8.4 | 3.8.4 | 3.8.4 |
| matplotlib-inline | 0.1.6 | 0.1.6 | 0.1.6 |
| mccabe | 0.7.0 | 0.7.0 | 0.7.0 |
| mdit-py-plugins | 0.3.0 | 0.3.0 | |
| mdurl | 0.1.0 | 0.1.0 | |
| menuinst | 2.1.1 | 2.1.1 | 2.1.1 |
| mistune | 2.0.4 | 2.0.4 | 2.0.4 |
| mkl | 2023.1.0 | ||
| mkl-service | 2.4.0 | ||
| mkl\_fft | 1.3.8 | ||
| mkl\_random | 1.2.4 | ||
| more-itertools | 10.1.0 | 10.1.0 | 10.1.0 |
| mpmath | 1.3.0 | 1.3.0 | 1.3.0 |
| msgpack-python | 1.0.3 | 1.0.3 | 1.0.3 |
| multidict | 6.0.4 | 6.0.4 | 6.0.4 |
| multipledispatch | 0.6.0 | 0.6.0 | |
| mypy | 1.10.0 | 1.10.0 | 1.10.0 |
| mypy\_extensions | 1.0.0 | 1.0.0 | 1.0.0 |
| mysql | 5.7.24 | 5.7.24 | |
| navigator-updater | 0.5.1 | 0.5.1 | |
| nbclient | 0.8.0 | 0.8.0 | 0.8.0 |
| nbconvert | 7.10.0 | 7.10.0 | 7.10.0 |
| nbformat | 5.9.2 | 5.9.2 | 5.9.2 |
| ncurses | 6.4 | 6.4 | 6.4 |
| nest-asyncio | 1.6.0 | 1.6.0 | 1.6.0 |
| networkx | 3.2.1 | 3.2.1 | 3.2.1 |
| nltk | 3.8.1 | 3.8.1 | 3.8.1 |
| notebook | 7.0.8 | 7.0.8 | |
| notebook-shim | 0.2.3 | 0.2.3 | |
| nspr | 4.35 | 4.35 | |
| nss | 3.89.1 | 3.89.1 | |
| numba | 0.59.1 | 0.59.1 | |
| numexpr | 2.8.7 | 2.8.7 | 2.8.7 |
| numpy | 1.26.4 | 1.26.4 | 1.26.4 |
| numpy-base | 1.26.4 | 1.26.4 | 1.26.4 |
| numpydoc | 1.7.0 | 1.7.0 | |
| oniguruma | 6.9.7.1 | 6.9.7.1 | |
| openjpeg | 2.4.0 | 2.4.0 | 2.4.0 |
| openpyxl | 3.1.2 | 3.1.2 | 3.1.2 |
| openssl | 3.0.14 | 3.0.14 | 3.0.14 |
| orc | 1.7.4 | 1.7.4 | 1.7.4 |
| overrides | 7.4.0 | 7.4.0 | |
| packaging | 23.2 | 23.2 | 23.2 |
| pandas | 2.2.2 | 2.2.2 | 2.2.2 |
| pandocfilters | 1.5.0 | 1.5.0 | 1.5.0 |
| panel | 1.4.4 | 1.4.4 | |
| param | 2.1.0 | 2.1.0 | |
| parsel | 1.8.1 | 1.8.1 | |
| parso | 0.8.3 | 0.8.3 | 0.8.3 |
| partd | 1.4.1 | 1.4.1 | 1.4.1 |
| patch | 2.7.6 | 2.7.6 | 2.7.6 |
| patchelf | 0.17.2 | 0.17.2 | 0.17.2 |
| pathspec | 0.10.3 | 0.10.3 | 0.10.3 |
| patsy | 0.5.6 | 0.5.6 | 0.5.6 |
| pcre2 | 10.42 | 10.42 | 10.42 |
| pexpect | 4.8.0 | 4.8.0 | 4.8.0 |
| pickleshare | 0.7.5 | 0.7.5 | |
| pillow | 10.3.0 | 10.3.0 | 10.3.0 |
| pip | 24.0 | 24.0 | 24.0 |
| pkce | 1.0.3 | 1.0.3 | |
| pkginfo | 1.10.0 | 1.10.0 | 1.10.0 |
| platformdirs | 3.10.0 | 3.10.0 | 3.10.0 |
| plotly | 5.22.0 | 5.22.0 | 5.22.0 |
| pluggy | 1.0.0 | 1.0.0 | 1.0.0 |
| ply | 3.11 | 3.11 | |
| prometheus\_client | 0.14.1 | 0.14.1 | |
| prompt-toolkit | 3.0.43 | 3.0.43 | 3.0.43 |
| prompt\_toolkit | 3.0.43 | 3.0.43 | 3.0.43 |
| protego | 0.1.16 | 0.1.16 | |
| protobuf | 3.20.3 | 3.20.3 | |
| psutil | 5.9.0 | 5.9.0 | 5.9.0 |
| ptyprocess | 0.7.0 | 0.7.0 | 0.7.0 |
| pure\_eval | 0.2.2 | 0.2.2 | 0.2.2 |
| py-cpuinfo | 9.0.0 | 9.0.0 | |
| py-lief | 0.12.3 | 0.12.3 | 0.12.3 |
| pyarrow | 14.0.2 | 14.0.2 | 14.0.2 |
| pyasn1 | 0.4.8 | 0.4.8 | |
| pyasn1-modules | 0.2.8 | 0.2.8 | |
| pybind11-abi | 5 | 5 | 5 |
| pycodestyle | 2.11.1 | 2.11.1 | 2.11.1 |
| pycosat | 0.6.6 | 0.6.6 | 0.6.6 |
| pycparser | 2.21 | 2.21 | 2.21 |
| pyct | 0.5.0 | 0.5.0 | |
| pycurl | 7.45.2 | 7.45.2 | 7.45.2 |
| pydantic | 2.5.3 | 2.5.3 | |
| pydantic-core | 2.14.6 | 2.14.6 | |
| pydeck | 0.8.0 | 0.8.0 | |
| pydispatcher | 2.0.5 | 2.0.5 | |
| pydocstyle | 6.3.0 | 6.3.0 | |
| pyerfa | 2.0.1.4 | 2.0.1.4 | 2.0.1.4 |
| pyflakes | 3.2.0 | 3.2.0 | 3.2.0 |
| pygments | 2.15.1 | 2.15.1 | 2.15.1 |
| pyjwt | 2.8.0 | 2.8.0 | |
| pylint | 2.16.2 | 2.16.2 | 2.16.2 |
| pylint-venv | 3.0.3 | 3.0.3 | |
| pyls-spyder | 0.4.0 | 0.4.0 | |
| pyodbc | 5.0.1 | 5.0.1 | 5.0.1 |
| pyopenssl | 24.0.0 | 24.0.0 | |
| pyparsing | 3.0.9 | 3.0.9 | 3.0.9 |
| pyqt | 5.15.10 | 5.15.10 | |
| pyqt5-sip | 12.13.0 | 12.13.0 | |
| pyqtwebengine | 5.15.10 | 5.15.10 | |
| pysocks | 1.7.1 | 1.7.1 | 1.7.1 |
| pytables | 3.9.2 | 3.9.2 | |
| pytest | 7.4.4 | 7.4.4 | 7.4.4 |
| python | 3.12.4 | 3.12.4 | 3.12.4 |
| python-dateutil | 2.9.0post0 | 2.9.0post0 | 2.9.0post0 |
| python-dotenv | 0.21.0 | 0.21.0 | |
| python-fastjsonschema | 2.16.2 | 2.16.2 | 2.16.2 |
| python-json-logger | 2.0.7 | 2.0.7 | |
| python-libarchive-c | 2.9 | 2.9 | 2.9 |
| python-lmdb | 1.4.1 | 1.4.1 | 1.4.1 |
| python-lsp-black | 2.0.0 | 2.0.0 | |
| python-lsp-jsonrpc | 1.1.2 | 1.1.2 | |
| python-lsp-server | 1.10.0 | 1.10.0 | |
| python-slugify | 5.0.2 | 5.0.2 | |
| python-snappy | 0.6.1 | 0.6.1 | 0.6.1 |
| python-tzdata | 2023.3 | 2023.3 | 2023.3 |
| pytoolconfig | 1.2.6 | 1.2.6 | |
| pytz | 2024.1 | 2024.1 | 2024.1 |
| pyviz\_comms | 3.0.2 | 3.0.2 | |
| pywavelets | 1.5.0 | 1.5.0 | 1.5.0 |
| pyxdg | 0.27 | 0.27 | |
| pyyaml | 6.0.1 | 6.0.1 | 6.0.1 |
| pyzmq | 25.1.2 | 25.1.2 | 25.1.2 |
| qdarkstyle | 3.2.3 | 3.2.3 | |
| qstylizer | 0.2.2 | 0.2.2 | |
| qt-main | 5.15.2 | 5.15.2 | |
| qt-webengine | 5.15.9 | 5.15.9 | |
| qtawesome | 1.2.2 | 1.2.2 | |
| qtconsole | 5.5.1 | 5.5.1 | |
| qtpy | 2.4.1 | 2.4.1 | |
| queuelib | 1.6.2 | 1.6.2 | |
| re2 | 2022.04.01 | 2022.04.01 | 2022.04.01 |
| readline | 8.2 | 8.2 | 8.2 |
| referencing | 0.30.2 | 0.30.2 | 0.30.2 |
| regex | 2023.10.3 | 2023.10.3 | 2023.10.3 |
| reproc | 14.2.4 | 14.2.4 | 14.2.4 |
| reproc-cpp | 14.2.4 | 14.2.4 | 14.2.4 |
| requests | 2.32.2 | 2.32.2 | 2.32.2 |
| requests-file | 1.5.1 | 1.5.1 | |
| requests-toolbelt | 1.0.0 | 1.0.0 | 1.0.0 |
| rfc3339-validator | 0.1.4 | 0.1.4 | |
| rfc3986-validator | 0.1.1 | 0.1.1 | |
| rich | 13.3.5 | 13.3.5 | |
| rope | 1.12.0 | 1.12.0 | |
| rpds-py | 0.10.6 | 0.10.6 | 0.10.6 |
| rtree | 1.0.1 | 1.0.1 | |
| ruamel.yaml | 0.17.21 | 0.17.21 | 0.17.21 |
| ruamel\_yaml | 0.17.21 | 0.17.21 | 0.17.21 |
| s2n | 1.3.27 | 1.3.27 | 1.3.27 |
| s3fs | 2024.3.1 | 2024.3.1 | 2024.3.1 |
| scikit-image | 0.23.2 | 0.23.2 | 0.23.2 |
| scikit-learn | 1.4.2 | 1.4.2 | 1.4.2 |
| scipy | 1.13.1 | 1.13.1 | 1.13.1 |
| scrapy | 2.11.1 | 2.11.1 | |
| seaborn | 0.13.2 | 0.13.2 | 0.13.2 |
| secretstorage | 3.3.1 | 3.3.1 | |
| semver | 3.0.2 | 3.0.2 | |
| send2trash | 1.8.2 | 1.8.2 | |
| service\_identity | 18.1.0 | 18.1.0 | |
| setuptools | 69.5.1 | 69.5.1 | 69.5.1 |
| sip | 6.7.12 | 6.7.12 | |
| six | 1.16.0 | 1.16.0 | 1.16.0 |
| smart\_open | 5.2.1 | 5.2.1 | |
| smmap | 4.0.0 | 4.0.0 | |
| snappy | 1.1.10 | 1.1.10 | 1.1.10 |
| sniffio | 1.3.0 | 1.3.0 | |
| snowballstemmer | 2.2.0 | 2.2.0 | 2.2.0 |
| sortedcontainers | 2.4.0 | 2.4.0 | 2.4.0 |
| soupsieve | 2.5 | 2.5 | 2.5 |
| sphinx | 7.3.7 | 7.3.7 | |
| sphinxcontrib-applehelp | 1.0.2 | 1.0.2 | |
| sphinxcontrib-devhelp | 1.0.2 | 1.0.2 | |
| sphinxcontrib-htmlhelp | 2.0.0 | 2.0.0 | |
| sphinxcontrib-jsmath | 1.0.1 | 1.0.1 | |
| sphinxcontrib-qthelp | 1.0.3 | 1.0.3 | |
| sphinxcontrib-serializinghtml | 1.1.10 | 1.1.10 | |
| spyder | 5.5.1 | 5.5.1 | |
| spyder-kernels | 2.5.0 | 2.5.0 | |
| sqlalchemy | 2.0.30 | 2.0.30 | 2.0.30 |
| sqlite | 3.45.3 | 3.45.3 | 3.45.3 |
| stack\_data | 0.2.0 | 0.2.0 | 0.2.0 |
| statsmodels | 0.14.2 | 0.14.2 | 0.14.2 |
| streamlit | 1.32.0 | 1.32.0 | |
| sympy | 1.12 | 1.12 | 1.12 |
| tabulate | 0.9.0 | 0.9.0 | 0.9.0 |
| tbb | 2021.8.0 | 2021.8.0 | |
| tblib | 1.7.0 | 1.7.0 | 1.7.0 |
| tenacity | 8.2.2 | 8.2.2 | 8.2.2 |
| terminado | 0.17.1 | 0.17.1 | |
| text-unidecode | 1.3 | 1.3 | |
| textdistance | 4.2.1 | 4.2.1 | |
| threadpoolctl | 2.2.0 | 2.2.0 | 2.2.0 |
| three-merge | 0.1.1 | 0.1.1 | |
| tifffile | 2023.4.12 | 2023.4.12 | 2023.4.12 |
| tinycss2 | 1.2.1 | 1.2.1 | 1.2.1 |
| tk | 8.6.14 | 8.6.14 | 8.6.14 |
| tldextract | 3.2.0 | 3.2.0 | |
| toml | 0.10.2 | 0.10.2 | |
| tomli | 2.0.1 | 2.0.1 | |
| tomlkit | 0.11.1 | 0.11.1 | 0.11.1 |
| toolz | 0.12.0 | 0.12.0 | 0.12.0 |
| tornado | 6.4.1 | 6.4.1 | 6.4.1 |
| tqdm | 4.66.4 | 4.66.4 | 4.66.4 |
| traitlets | 5.14.3 | 5.14.3 | 5.14.3 |
| truststore | 0.8.0 | 0.8.0 | 0.8.0 |
| twisted | 23.10.0 | 23.10.0 | |
| typing-extensions | 4.11.0 | 4.11.0 | 4.11.0 |
| typing\_extensions | 4.11.0 | 4.11.0 | 4.11.0 |
| tzdata | 2024a | 2024a | 2024a |
| uc-micro-py | 1.0.1 | 1.0.1 | |
| ujson | 5.10.0 | 5.10.0 | |
| unicodedata2 | 15.1.0 | 15.1.0 | 15.1.0 |
| unidecode | 1.2.0 | 1.2.0 | |
| unixodbc | 2.3.11 | 2.3.11 | 2.3.11 |
| urllib3 | 2.2.2 | 2.2.2 | 2.2.2 |
| utf8proc | 2.6.1 | 2.6.1 | 2.6.1 |
| w3lib | 1.21.0 | 2.1.2 | |
| watchdog | 4.0.1 | 4.0.1 | |
| wcwidth | 0.2.5 | 0.2.5 | 0.2.5 |
| webencodings | 0.5.1 | 0.5.1 | 0.5.1 |
| websocket-client | 1.8.0 | 1.8.0 | |
| werkzeug | 3.0.3 | 3.0.3 | 3.0.3 |
| whatthepatch | 1.0.2 | 1.0.2 | |
| wheel | 0.43.0 | 0.43.0 | 0.43.0 |
| widgetsnbextension | 3.6.6 | 3.6.6 | |
| wrapt | 1.14.1 | 1.14.1 | 1.14.1 |
| wurlitzer | 3.0.2 | 3.0.2 | |
| xarray | 2023.6.0 | 2023.6.0 | |
| xyzservices | 2022.9.0 | 2022.9.0 | 2022.9.0 |
| xz | 5.4.6 | 5.4.6 | 5.4.6 |
| yaml | 0.2.5 | 0.2.5 | 0.2.5 |
| yaml-cpp | 0.8.0 | 0.8.0 | 0.8.0 |
| yapf | 0.40.2 | 0.40.2 | |
| yarl | 1.9.3 | 1.9.3 | 1.9.3 |
| zeromq | 4.3.5 | 4.3.5 | 4.3.5 |
| zfp | 1.0.0 | ||
| zict | 3.0.0 | 3.0.0 | 3.0.0 |
| zipp | 3.17.0 | 3.17.0 | |
| zlib | 1.2.13 | 1.2.13 | 1.2.13 |
| zlib-ng | 2.0.7 | 2.0.7 | |
| zope | 1.0 | 1.0 | |
| zope.interface | 5.4.0 | 5.4.0 | |
| zstandard | 0.22.0 | 0.22.0 | 0.22.0 |
| zstd | 1.5.5 | 1.5.5 | 1.5.5 |
| Package Name | osx-arm64 | osx-64 |
|---|---|---|
| \_anaconda\_depends | 2024.06 | 2024.06 |
| abseil-cpp | 20230802.0 | 20230802.0 |
| aiobotocore | 2.12.3 | 2.12.3 |
| aiohttp | 3.9.5 | 3.9.5 |
| aioitertools | 0.7.1 | 0.7.1 |
| aiosignal | 1.2.0 | 1.2.0 |
| alabaster | 0.7.16 | 0.7.16 |
| altair | 5.0.1 | 5.0.1 |
| anaconda-anon-usage | 0.4.4 | 0.4.4 |
| anaconda-catalogs | 0.2.0 | 0.2.0 |
| anaconda-client | 1.12.3 | 1.12.3 |
| anaconda-cloud-auth | 0.5.1 | 0.5.1 |
| anaconda-navigator | 2.6.0 | 2.6.0 |
| anaconda-project | 0.11.1 | 0.11.1 |
| annotated-types | 0.6.0 | 0.6.0 |
| anyio | 4.2.0 | 4.2.0 |
| aom | 3.6.0 | 3.6.0 |
| appdirs | 1.4.4 | 1.4.4 |
| applaunchservices | 0.3.0 | 0.3.0 |
| appnope | 0.1.3 | 0.1.3 |
| appscript | 1.1.2 | 1.1.2 |
| archspec | 0.2.3 | 0.2.3 |
| argon2-cffi | 21.3.0 | 21.3.0 |
| argon2-cffi-bindings | 21.2.0 | 21.2.0 |
| arrow | 1.2.3 | 1.2.3 |
| arrow-cpp | 14.0.2 | 14.0.2 |
| astroid | 2.14.2 | 2.14.2 |
| astropy | 6.1.0 | 6.1.0 |
| astropy-iers-data | 0.2024.6.3.0.31.14 | 0.2024.6.3.0.31.14 |
| asttokens | 2.0.5 | 2.0.5 |
| async-lru | 2.0.4 | 2.0.4 |
| atomicwrites | 1.4.0 | 1.4.0 |
| attrs | 23.1.0 | 23.1.0 |
| automat | 20.2.0 | 20.2.0 |
| autopep8 | 2.0.4 | 2.0.4 |
| aws-c-auth | 0.6.19 | 0.6.19 |
| aws-c-cal | 0.5.20 | 0.5.20 |
| aws-c-common | 0.8.5 | 0.8.5 |
| aws-c-compression | 0.2.16 | 0.2.16 |
| aws-c-event-stream | 0.2.15 | 0.2.15 |
| aws-c-http | 0.6.25 | 0.6.25 |
| aws-c-io | 0.13.10 | 0.13.10 |
| aws-c-mqtt | 0.7.13 | 0.7.13 |
| aws-c-s3 | 0.1.51 | 0.1.51 |
| aws-c-sdkutils | 0.1.6 | 0.1.6 |
| aws-checksums | 0.1.13 | 0.1.13 |
| aws-crt-cpp | 0.18.16 | 0.18.16 |
| aws-sdk-cpp | 1.10.55 | 1.10.55 |
| babel | 2.11.0 | 2.11.0 |
| bcrypt | 3.2.0 | 3.2.0 |
| beautifulsoup4 | 4.12.3 | 4.12.3 |
| binaryornot | 0.4.4 | 0.4.4 |
| black | 24.4.2 | 24.4.2 |
| blas | 1.0 | 1.0 |
| bleach | 4.1.0 | 4.1.0 |
| blinker | 1.6.2 | 1.6.2 |
| blosc | 1.21.3 | 1.21.3 |
| bokeh | 3.4.1 | 3.4.1 |
| boltons | 23.0.0 | 23.0.0 |
| boost-cpp | 1.82.0 | 1.82.0 |
| botocore | 1.34.69 | 1.34.69 |
| bottleneck | 1.3.7 | 1.3.7 |
| brotli | 1.0.9 | 1.0.9 |
| brotli-bin | 1.0.9 | 1.0.9 |
| brotli-python | 1.0.9 | 1.0.9 |
| brunsli | 0.1 | 0.1 |
| bzip2 | 1.0.8 | 1.0.8 |
| c-ares | 1.19.1 | 1.19.1 |
| c-blosc2 | 2.12.0 | 2.12.0 |
| ca-certificates | 2024.3.11 | 2024.3.11 |
| cachetools | 5.3.3 | 5.3.3 |
| cctools | 949.0.1 | 949.0.1 |
| cctools\_osx-64 | 949.0.1 | |
| cctools\_osx-arm64 | 949.0.1 | |
| certifi | 2024.6.2 | 2024.6.2 |
| cffi | 1.16.0 | 1.16.0 |
| cfitsio | 3.470 | 3.470 |
| chardet | 4.0.0 | 4.0.0 |
| charls | 2.2.0 | 2.2.0 |
| charset-normalizer | 2.0.4 | 2.0.4 |
| click | 8.1.7 | 8.1.7 |
| cloudpickle | 2.2.1 | 2.2.1 |
| colorama | 0.4.6 | 0.4.6 |
| colorcet | 3.1.0 | 3.1.0 |
| comm | 0.2.1 | 0.2.1 |
| conda | 24.5.0 | 24.5.0 |
| conda-build | 24.5.1 | 24.5.1 |
| conda-content-trust | 0.2.0 | 0.2.0 |
| conda-index | 0.5.0 | 0.5.0 |
| conda-libmamba-solver | 24.1.0 | 24.1.0 |
| conda-pack | 0.7.1 | 0.7.1 |
| conda-package-handling | 2.3.0 | 2.3.0 |
| conda-package-streaming | 0.10.0 | 0.10.0 |
| conda-repo-cli | 1.0.88 | 1.0.88 |
| conda-token | 0.5.0 | 0.5.0 |
| constantly | 23.10.4 | 23.10.4 |
| contourpy | 1.2.0 | 1.2.0 |
| cookiecutter | 2.6.0 | 2.6.0 |
| cryptography | 42.0.5 | 42.0.5 |
| cssselect | 1.2.0 | 1.2.0 |
| curl | 8.7.1 | 8.7.1 |
| cycler | 0.11.0 | 0.11.0 |
| cyrus-sasl | 2.1.28 | 2.1.28 |
| cytoolz | 0.12.2 | 0.12.2 |
| dask | 2024.5.0 | 2024.5.0 |
| dask-core | 2024.5.0 | 2024.5.0 |
| dask-expr | 1.1.0 | 1.1.0 |
| datashader | 0.16.2 | 0.16.2 |
| dav1d | 1.2.1 | 1.2.1 |
| debugpy | 1.6.7 | 1.6.7 |
| decorator | 5.1.1 | 5.1.1 |
| defusedxml | 0.7.1 | 0.7.1 |
| diff-match-patch | 20200713 | 20200713 |
| dill | 0.3.8 | 0.3.8 |
| distributed | 2024.5.0 | 2024.5.0 |
| distro | 1.9.0 | 1.9.0 |
| docstring-to-markdown | 0.11 | 0.11 |
| docutils | 0.18.1 | 0.18.1 |
| entrypoints | 0.4 | 0.4 |
| et\_xmlfile | 1.1.0 | 1.1.0 |
| executing | 0.8.3 | 0.8.3 |
| expat | 2.6.2 | 2.6.2 |
| filelock | 3.13.1 | 3.13.1 |
| flake8 | 7.0.0 | 7.0.0 |
| flask | 3.0.3 | 3.0.3 |
| fmt | 9.1.0 | 9.1.0 |
| fonttools | 4.51.0 | 4.51.0 |
| freetype | 2.12.1 | 2.12.1 |
| frozendict | 2.4.2 | 2.4.2 |
| frozenlist | 1.4.0 | 1.4.0 |
| fsspec | 2024.3.1 | 2024.3.1 |
| gensim | 4.3.2 | 4.3.2 |
| gettext | 0.21.0 | 0.21.0 |
| gflags | 2.2.2 | 2.2.2 |
| giflib | 5.2.1 | 5.2.1 |
| gitdb | 4.0.7 | 4.0.7 |
| gitpython | 3.1.37 | 3.1.37 |
| glib | 2.78.4 | 2.78.4 |
| glib-tools | 2.78.4 | 2.78.4 |
| glog | 0.5.0 | 0.5.0 |
| greenlet | 3.0.1 | 3.0.1 |
| grpc-cpp | 1.48.2 | 1.48.2 |
| gst-plugins-base | 1.14.1 | 1.14.1 |
| gstreamer | 1.14.1 | 1.14.1 |
| gtest | 1.14.0 | 1.14.0 |
| h5py | 3.11.0 | 3.11.0 |
| hdf5 | 1.12.1 | 1.12.1 |
| heapdict | 1.0.1 | 1.0.1 |
| holoviews | 1.19.0 | 1.19.0 |
| hvplot | 0.10.0 | 0.10.0 |
| hyperlink | 21.0.0 | 21.0.0 |
| icu | 73.1 | 73.1 |
| idna | 3.7 | 3.7 |
| imagecodecs | 2023.1.23 | 2023.1.23 |
| imageio | 2.33.1 | 2.33.1 |
| imagesize | 1.4.1 | 1.4.1 |
| imbalanced-learn | 0.12.3 | 0.12.3 |
| importlib-metadata | 7.0.1 | 7.0.1 |
| incremental | 22.10.0 | 22.10.0 |
| inflection | 0.5.1 | 0.5.1 |
| iniconfig | 1.1.1 | 1.1.1 |
| intake | 0.7.0 | 0.7.0 |
| intervaltree | 3.1.0 | 3.1.0 |
| ipykernel | 6.28.0 | 6.28.0 |
| ipython | 8.25.0 | 8.25.0 |
| ipython\_genutils | 0.2.0 | 0.2.0 |
| ipywidgets | 7.8.1 | 7.8.1 |
| isort | 5.13.2 | 5.13.2 |
| itemadapter | 0.3.0 | 0.3.0 |
| itemloaders | 1.1.0 | 1.1.0 |
| itsdangerous | 2.2.0 | 2.2.0 |
| jaraco.classes | 3.2.1 | 3.2.1 |
| jedi | 0.18.1 | 0.18.1 |
| jellyfish | 1.0.1 | 1.0.1 |
| jinja2 | 3.1.4 | 3.1.4 |
| jmespath | 1.0.1 | 1.0.1 |
| joblib | 1.4.2 | 1.4.2 |
| jpeg | 9e | 9e |
| jq | 1.6 | 1.6 |
| json5 | 0.9.6 | 0.9.6 |
| jsonpatch | 1.33 | 1.33 |
| jsonpointer | 2.1 | 2.1 |
| jsonschema | 4.19.2 | 4.19.2 |
| jsonschema-specifications | 2023.7.1 | 2023.7.1 |
| jupyter | 1.0.0 | 1.0.0 |
| jupyter-lsp | 2.2.0 | 2.2.0 |
| jupyter\_client | 8.6.0 | 8.6.0 |
| jupyter\_console | 6.6.3 | 6.6.3 |
| jupyter\_core | 5.7.2 | 5.7.2 |
| jupyter\_events | 0.10.0 | 0.10.0 |
| jupyter\_server | 2.14.1 | 2.14.1 |
| jupyter\_server\_terminals | 0.4.4 | 0.4.4 |
| jupyterlab | 4.0.11 | 4.0.11 |
| jupyterlab-variableinspector | 3.1.0 | 3.1.0 |
| jupyterlab\_pygments | 0.1.2 | 0.1.2 |
| jupyterlab\_server | 2.25.1 | 2.25.1 |
| jupyterlab\_widgets | 1.0.0 | 1.0.0 |
| jxrlib | 1.1 | 1.1 |
| keyring | 24.3.1 | 24.3.1 |
| kiwisolver | 1.4.4 | 1.4.4 |
| krb5 | 1.20.1 | 1.20.1 |
| lazy-object-proxy | 1.10.0 | 1.10.0 |
| lazy\_loader | 0.4 | 0.4 |
| lcms2 | 2.12 | 2.12 |
| ld64 | 530 | 530 |
| ld64\_osx-64 | 530 | |
| ld64\_osx-arm64 | 530 | |
| ldid | 2.1.5 | 2.1.5 |
| lerc | 3.0 | 3.0 |
| libaec | 1.0.4 | 1.0.4 |
| libarchive | 3.6.2 | 3.6.2 |
| libavif | 0.11.1 | 0.11.1 |
| libboost | 1.82.0 | 1.82.0 |
| libbrotlicommon | 1.0.9 | 1.0.9 |
| libbrotlidec | 1.0.9 | 1.0.9 |
| libbrotlienc | 1.0.9 | 1.0.9 |
| libclang | 14.0.6 | 14.0.6 |
| libclang13 | 14.0.6 | 14.0.6 |
| libcurl | 8.7.1 | 8.7.1 |
| libcxx | 14.0.6 | 14.0.6 |
| libdeflate | 1.17 | 1.17 |
| libedit | 3.1.20230828 | 3.1.20230828 |
| libev | 4.33 | 4.33 |
| libevent | 2.1.12 | 2.1.12 |
| libffi | 3.4.4 | 3.4.4 |
| libgfortran | 5.0.0 | 5.0.0 |
| libgfortran5 | 11.3.0 | 11.3.0 |
| libglib | 2.78.4 | 2.78.4 |
| libiconv | 1.16 | 1.16 |
| liblief | 0.12.3 | 0.12.3 |
| libllvm14 | 14.0.6 | 14.0.6 |
| libmamba | 1.5.8 | 1.5.8 |
| libmambapy | 1.5.8 | 1.5.8 |
| libnghttp2 | 1.57.0 | 1.57.0 |
| libopenblas | 0.3.21 | 0.3.21 |
| libpng | 1.6.39 | 1.6.39 |
| libpq | 12.17 | 12.17 |
| libprotobuf | 3.20.3 | 3.20.3 |
| libsodium | 1.0.18 | 1.0.18 |
| libsolv | 0.7.24 | 0.7.24 |
| libspatialindex | 1.9.3 | 1.9.3 |
| libssh2 | 1.11.0 | 1.11.0 |
| libthrift | 0.15.0 | 0.15.0 |
| libtiff | 4.5.1 | 4.5.1 |
| libwebp-base | 1.3.2 | 1.3.2 |
| libxml2 | 2.10.4 | 2.10.4 |
| libxslt | 1.1.37 | 1.1.37 |
| libzopfli | 1.0.3 | 1.0.3 |
| linkify-it-py | 2.0.0 | 2.0.0 |
| llvm-openmp | 14.0.6 | 14.0.6 |
| llvmlite | 0.42.0 | 0.42.0 |
| locket | 1.0.0 | 1.0.0 |
| lxml | 5.2.1 | 5.2.1 |
| lz4 | 4.3.2 | 4.3.2 |
| lz4-c | 1.9.4 | 1.9.4 |
| lzo | 2.10 | 2.10 |
| markdown | 3.4.1 | 3.4.1 |
| markdown-it-py | 2.2.0 | 2.2.0 |
| markupsafe | 2.1.3 | 2.1.3 |
| matplotlib | 3.8.4 | 3.8.4 |
| matplotlib-base | 3.8.4 | 3.8.4 |
| matplotlib-inline | 0.1.6 | 0.1.6 |
| mccabe | 0.7.0 | 0.7.0 |
| mdit-py-plugins | 0.3.0 | 0.3.0 |
| mdurl | 0.1.0 | 0.1.0 |
| menuinst | 2.1.1 | 2.1.1 |
| mistune | 2.0.4 | 2.0.4 |
| more-itertools | 10.1.0 | 10.1.0 |
| mpmath | 1.3.0 | 1.3.0 |
| msgpack-python | 1.0.3 | 1.0.3 |
| multidict | 6.0.4 | 6.0.4 |
| multipledispatch | 0.6.0 | 0.6.0 |
| mypy | 1.10.0 | 1.10.0 |
| mypy\_extensions | 1.0.0 | 1.0.0 |
| mysql | 5.7.24 | 5.7.24 |
| navigator-updater | 0.5.1 | 0.5.1 |
| nbclient | 0.8.0 | 0.8.0 |
| nbconvert | 7.10.0 | 7.10.0 |
| nbformat | 5.9.2 | 5.9.2 |
| ncurses | 6.4 | 6.4 |
| nest-asyncio | 1.6.0 | 1.6.0 |
| networkx | 3.2.1 | 3.2.1 |
| nltk | 3.8.1 | 3.8.1 |
| notebook | 7.0.8 | 7.0.8 |
| notebook-shim | 0.2.3 | 0.2.3 |
| numba | 0.59.1 | 0.59.1 |
| numexpr | 2.8.7 | 2.8.7 |
| numpy | 1.26.4 | 1.26.4 |
| numpy-base | 1.26.4 | 1.26.4 |
| numpydoc | 1.7.0 | 1.7.0 |
| oniguruma | 6.9.7.1 | 6.9.7.1 |
| openjpeg | 2.3.0 | 2.4.0 |
| openpyxl | 3.1.2 | 3.1.2 |
| openssl | 3.0.14 | 3.0.14 |
| orc | 1.7.4 | 1.7.4 |
| overrides | 7.4.0 | 7.4.0 |
| packaging | 23.2 | 23.2 |
| pandas | 2.2.2 | 2.2.2 |
| pandocfilters | 1.5.0 | 1.5.0 |
| panel | 1.4.4 | 1.4.4 |
| param | 2.1.0 | 2.1.0 |
| parsel | 1.8.1 | 1.8.1 |
| parso | 0.8.3 | 0.8.3 |
| partd | 1.4.1 | 1.4.1 |
| patch | 2.7.6 | 2.7.6 |
| pathspec | 0.10.3 | 0.10.3 |
| patsy | 0.5.6 | 0.5.6 |
| pcre2 | 10.42 | 10.42 |
| pexpect | 4.8.0 | 4.8.0 |
| pickleshare | 0.7.5 | 0.7.5 |
| pillow | 10.3.0 | 10.3.0 |
| pip | 24.0 | 24.0 |
| pkce | 1.0.3 | 1.0.3 |
| pkginfo | 1.10.0 | 1.10.0 |
| platformdirs | 3.10.0 | 3.10.0 |
| plotly | 5.22.0 | 5.22.0 |
| pluggy | 1.0.0 | 1.0.0 |
| ply | 3.11 | 3.11 |
| prometheus\_client | 0.14.1 | 0.14.1 |
| prompt-toolkit | 3.0.43 | 3.0.43 |
| prompt\_toolkit | 3.0.43 | 3.0.43 |
| protego | 0.1.16 | 0.1.16 |
| protobuf | 3.20.3 | 3.20.3 |
| psutil | 5.9.0 | 5.9.0 |
| ptyprocess | 0.7.0 | 0.7.0 |
| pure\_eval | 0.2.2 | 0.2.2 |
| py-cpuinfo | 9.0.0 | 9.0.0 |
| py-lief | 0.12.3 | 0.12.3 |
| pyarrow | 14.0.2 | 14.0.2 |
| pyasn1 | 0.4.8 | 0.4.8 |
| pyasn1-modules | 0.2.8 | 0.2.8 |
| pybind11-abi | 5 | 5 |
| pycodestyle | 2.11.1 | 2.11.1 |
| pycosat | 0.6.6 | 0.6.6 |
| pycparser | 2.21 | 2.21 |
| pyct | 0.5.0 | 0.5.0 |
| pycurl | 7.45.2 | 7.45.2 |
| pydantic | 2.5.3 | 2.5.3 |
| pydantic-core | 2.14.6 | 2.14.6 |
| pydeck | 0.8.0 | 0.8.0 |
| pydispatcher | 2.0.5 | 2.0.5 |
| pydocstyle | 6.3.0 | 6.3.0 |
| pyerfa | 2.0.1.4 | 2.0.1.4 |
| pyflakes | 3.2.0 | 3.2.0 |
| pygments | 2.15.1 | 2.15.1 |
| pyjwt | 2.8.0 | 2.8.0 |
| pylint | 2.16.2 | 2.16.2 |
| pylint-venv | 3.0.3 | 3.0.3 |
| pyls-spyder | 0.4.0 | 0.4.0 |
| pyobjc-core | 10.1 | 10.1 |
| pyobjc-framework-cocoa | 10.1 | 10.1 |
| pyobjc-framework-coreservices | 10.1 | 10.1 |
| pyobjc-framework-fsevents | 10.1 | 10.1 |
| pyodbc | 5.0.1 | 5.0.1 |
| pyopenssl | 24.0.0 | 24.0.0 |
| pyparsing | 3.0.9 | 3.0.9 |
| pyqt | 5.15.10 | 5.15.10 |
| pyqt5-sip | 12.13.0 | 12.13.0 |
| pyqtwebengine | 5.15.10 | 5.15.10 |
| pysocks | 1.7.1 | 1.7.1 |
| pytables | 3.9.2 | 3.9.2 |
| pytest | 7.4.4 | 7.4.4 |
| python | 3.12.4 | 3.12.4 |
| python-dateutil | 2.9.0post0 | 2.9.0post0 |
| python-dotenv | 0.21.0 | 0.21.0 |
| python-fastjsonschema | 2.16.2 | 2.16.2 |
| python-json-logger | 2.0.7 | 2.0.7 |
| python-libarchive-c | 2.9 | 2.9 |
| python-lmdb | 1.4.1 | 1.4.1 |
| python-lsp-black | 2.0.0 | 2.0.0 |
| python-lsp-jsonrpc | 1.1.2 | 1.1.2 |
| python-lsp-server | 1.10.0 | 1.10.0 |
| python-slugify | 5.0.2 | 5.0.2 |
| python-snappy | 0.6.1 | 0.6.1 |
| python-tzdata | 2023.3 | 2023.3 |
| python.app | 3 | 3 |
| pytoolconfig | 1.2.6 | 1.2.6 |
| pytz | 2024.1 | 2024.1 |
| pyviz\_comms | 3.0.2 | 3.0.2 |
| pywavelets | 1.5.0 | 1.5.0 |
| pyyaml | 6.0.1 | 6.0.1 |
| pyzmq | 25.1.2 | 25.1.2 |
| qdarkstyle | 3.2.3 | 3.2.3 |
| qstylizer | 0.2.2 | 0.2.2 |
| qt-main | 5.15.2 | 5.15.2 |
| qt-webengine | 5.15.9 | 5.15.9 |
| qtawesome | 1.2.2 | 1.2.2 |
| qtconsole | 5.5.1 | 5.5.1 |
| qtpy | 2.4.1 | 2.4.1 |
| queuelib | 1.6.2 | 1.6.2 |
| re2 | 2022.04.01 | 2022.04.01 |
| readline | 8.2 | 8.2 |
| referencing | 0.30.2 | 0.30.2 |
| regex | 2023.10.3 | 2023.10.3 |
| reproc | 14.2.4 | 14.2.4 |
| reproc-cpp | 14.2.4 | 14.2.4 |
| requests | 2.32.2 | 2.32.2 |
| requests-file | 1.5.1 | 1.5.1 |
| requests-toolbelt | 1.0.0 | 1.0.0 |
| rfc3339-validator | 0.1.4 | 0.1.4 |
| rfc3986-validator | 0.1.1 | 0.1.1 |
| rich | 13.3.5 | 13.3.5 |
| rope | 1.12.0 | 1.12.0 |
| rpds-py | 0.10.6 | 0.10.6 |
| rtree | 1.0.1 | 1.0.1 |
| ruamel.yaml | 0.17.21 | 0.17.21 |
| ruamel\_yaml | 0.17.21 | 0.17.21 |
| s3fs | 2024.3.1 | 2024.3.1 |
| scikit-image | 0.23.2 | 0.23.2 |
| scikit-learn | 1.4.2 | 1.4.2 |
| scipy | 1.13.1 | 1.13.1 |
| scrapy | 2.11.1 | 2.11.1 |
| seaborn | 0.13.2 | 0.13.2 |
| semver | 3.0.2 | 3.0.2 |
| send2trash | 1.8.2 | 1.8.2 |
| service\_identity | 18.1.0 | 18.1.0 |
| setuptools | 69.5.1 | 69.5.1 |
| sip | 6.7.12 | 6.7.12 |
| six | 1.16.0 | 1.16.0 |
| smart\_open | 5.2.1 | 5.2.1 |
| smmap | 4.0.0 | 4.0.0 |
| snappy | 1.1.10 | 1.1.10 |
| sniffio | 1.3.0 | 1.3.0 |
| snowballstemmer | 2.2.0 | 2.2.0 |
| sortedcontainers | 2.4.0 | 2.4.0 |
| soupsieve | 2.5 | 2.5 |
| sphinx | 7.3.7 | 7.3.7 |
| sphinxcontrib-applehelp | 1.0.2 | 1.0.2 |
| sphinxcontrib-devhelp | 1.0.2 | 1.0.2 |
| sphinxcontrib-htmlhelp | 2.0.0 | 2.0.0 |
| sphinxcontrib-jsmath | 1.0.1 | 1.0.1 |
| sphinxcontrib-qthelp | 1.0.3 | 1.0.3 |
| sphinxcontrib-serializinghtml | 1.1.10 | 1.1.10 |
| spyder | 5.5.1 | 5.5.1 |
| spyder-kernels | 2.5.0 | 2.5.0 |
| sqlalchemy | 2.0.30 | 2.0.30 |
| sqlite | 3.45.3 | 3.45.3 |
| stack\_data | 0.2.0 | 0.2.0 |
| statsmodels | 0.14.2 | 0.14.2 |
| streamlit | 1.32.0 | 1.32.0 |
| sympy | 1.12 | 1.12 |
| tabulate | 0.9.0 | 0.9.0 |
| tapi | 1100.0.11 | 1000.10.8 |
| tbb | 2021.8.0 | 2021.8.0 |
| tblib | 1.7.0 | 1.7.0 |
| tenacity | 8.2.2 | 8.2.2 |
| terminado | 0.17.1 | 0.17.1 |
| text-unidecode | 1.3 | 1.3 |
| textdistance | 4.2.1 | 4.2.1 |
| threadpoolctl | 2.2.0 | 2.2.0 |
| three-merge | 0.1.1 | 0.1.1 |
| tifffile | 2023.4.12 | 2023.4.12 |
| tinycss2 | 1.2.1 | 1.2.1 |
| tk | 8.6.14 | 8.6.14 |
| tldextract | 3.2.0 | 3.2.0 |
| toml | 0.10.2 | 0.10.2 |
| tomli | 2.0.1 | 2.0.1 |
| tomlkit | 0.11.1 | 0.11.1 |
| toolz | 0.12.0 | 0.12.0 |
| tornado | 6.4.1 | 6.4.1 |
| tqdm | 4.66.4 | 4.66.4 |
| traitlets | 5.14.3 | 5.14.3 |
| truststore | 0.8.0 | 0.8.0 |
| twisted | 23.10.0 | 23.10.0 |
| typing-extensions | 4.11.0 | 4.11.0 |
| typing\_extensions | 4.11.0 | 4.11.0 |
| tzdata | 2024a | 2024a |
| uc-micro-py | 1.0.1 | 1.0.1 |
| ujson | 5.10.0 | 5.10.0 |
| unicodedata2 | 15.1.0 | 15.1.0 |
| unidecode | 1.2.0 | 1.2.0 |
| unixodbc | 2.3.11 | 2.3.11 |
| urllib3 | 2.2.2 | 2.2.2 |
| utf8proc | 2.6.1 | 2.6.1 |
| w3lib | 2.1.2 | 2.1.2 |
| watchdog | 4.0.1 | 4.0.1 |
| wcwidth | 0.2.5 | 0.2.5 |
| webencodings | 0.5.1 | 0.5.1 |
| websocket-client | 1.8.0 | 1.8.0 |
| werkzeug | 3.0.3 | 3.0.3 |
| whatthepatch | 1.0.2 | 1.0.2 |
| wheel | 0.43.0 | 0.43.0 |
| widgetsnbextension | 3.6.6 | 3.6.6 |
| wrapt | 1.14.1 | 1.14.1 |
| wurlitzer | 3.0.2 | 3.0.2 |
| xarray | 2023.6.0 | 2023.6.0 |
| xlwings | 0.31.4 | 0.31.4 |
| xyzservices | 2022.9.0 | 2022.9.0 |
| xz | 5.4.6 | 5.4.6 |
| yaml | 0.2.5 | 0.2.5 |
| yaml-cpp | 0.8.0 | 0.8.0 |
| yapf | 0.40.2 | 0.40.2 |
| yarl | 1.9.3 | 1.9.3 |
| zeromq | 4.3.5 | 4.3.5 |
| zfp | 1.0.0 | 1.0.0 |
| zict | 3.0.0 | 3.0.0 |
| zipp | 3.17.0 | 3.17.0 |
| zlib | 1.2.13 | 1.2.13 |
| zlib-ng | 2.0.7 | 2.0.7 |
| zope | 1.0 | 1.0 |
| zope.interface | 5.4.0 | 5.4.0 |
| zstandard | 0.22.0 | 0.22.0 |
| zstd | 1.5.5 | 1.5.5 |
| Package Name | win-64 |
|---|---|
| \_anaconda\_depends | 2024.06 |
| abseil-cpp | 20211102.0 |
| aiobotocore | 2.12.3 |
| aiohttp | 3.9.5 |
| aioitertools | 0.7.1 |
| aiosignal | 1.2.0 |
| alabaster | 0.7.16 |
| altair | 5.0.1 |
| anaconda-anon-usage | 0.4.4 |
| anaconda-catalogs | 0.2.0 |
| anaconda-client | 1.12.3 |
| anaconda-cloud-auth | 0.5.1 |
| anaconda-navigator | 2.6.0 |
| anaconda-project | 0.11.1 |
| annotated-types | 0.6.0 |
| anyio | 4.2.0 |
| aom | 3.6.0 |
| appdirs | 1.4.4 |
| archspec | 0.2.3 |
| argon2-cffi | 21.3.0 |
| argon2-cffi-bindings | 21.2.0 |
| arrow | 1.2.3 |
| arrow-cpp | 14.0.2 |
| astroid | 2.14.2 |
| astropy | 6.1.0 |
| astropy-iers-data | 0.2024.6.3.0.31.14 |
| asttokens | 2.0.5 |
| async-lru | 2.0.4 |
| atomicwrites | 1.4.0 |
| attrs | 23.1.0 |
| automat | 20.2.0 |
| autopep8 | 2.0.4 |
| aws-c-auth | 0.6.19 |
| aws-c-cal | 0.5.20 |
| aws-c-common | 0.8.5 |
| aws-c-compression | 0.2.16 |
| aws-c-event-stream | 0.2.15 |
| aws-c-http | 0.6.25 |
| aws-c-io | 0.13.10 |
| aws-c-mqtt | 0.7.13 |
| aws-c-s3 | 0.1.51 |
| aws-c-sdkutils | 0.1.6 |
| aws-checksums | 0.1.13 |
| aws-crt-cpp | 0.18.16 |
| aws-sdk-cpp | 1.10.55 |
| babel | 2.11.0 |
| bcrypt | 3.2.0 |
| beautifulsoup4 | 4.12.3 |
| binaryornot | 0.4.4 |
| black | 24.4.2 |
| blas | 1.0 |
| bleach | 4.1.0 |
| blinker | 1.6.2 |
| blosc | 1.21.3 |
| bokeh | 3.4.1 |
| boltons | 23.0.0 |
| boost-cpp | 1.82.0 |
| botocore | 1.34.69 |
| bottleneck | 1.3.7 |
| brotli | 1.0.9 |
| brotli-bin | 1.0.9 |
| brotli-python | 1.0.9 |
| bzip2 | 1.0.8 |
| c-ares | 1.19.1 |
| c-blosc2 | 2.12.0 |
| ca-certificates | 2024.3.11 |
| cachetools | 5.3.3 |
| certifi | 2024.6.2 |
| cffi | 1.16.0 |
| cfitsio | 3.470 |
| chardet | 4.0.0 |
| charls | 2.2.0 |
| charset-normalizer | 2.0.4 |
| click | 8.1.7 |
| cloudpickle | 2.2.1 |
| colorama | 0.4.6 |
| colorcet | 3.1.0 |
| comm | 0.2.1 |
| conda | 24.5.0 |
| conda-build | 24.5.1 |
| conda-content-trust | 0.2.0 |
| conda-index | 0.5.0 |
| conda-libmamba-solver | 24.1.0 |
| conda-pack | 0.7.1 |
| conda-package-handling | 2.3.0 |
| conda-package-streaming | 0.10.0 |
| conda-repo-cli | 1.0.88 |
| conda-token | 0.5.0 |
| console\_shortcut | 0.1.1 |
| constantly | 23.10.4 |
| contourpy | 1.2.0 |
| cookiecutter | 2.6.0 |
| cryptography | 42.0.5 |
| cssselect | 1.2.0 |
| curl | 8.7.1 |
| cycler | 0.11.0 |
| cytoolz | 0.12.2 |
| dask | 2024.5.0 |
| dask-core | 2024.5.0 |
| dask-expr | 1.1.0 |
| datashader | 0.16.2 |
| dav1d | 1.2.1 |
| debugpy | 1.6.7 |
| decorator | 5.1.1 |
| defusedxml | 0.7.1 |
| diff-match-patch | 20200713 |
| dill | 0.3.8 |
| distributed | 2024.5.0 |
| distro | 1.9.0 |
| docstring-to-markdown | 0.11 |
| docutils | 0.18.1 |
| entrypoints | 0.4 |
| et\_xmlfile | 1.1.0 |
| executing | 0.8.3 |
| expat | 2.6.2 |
| filelock | 3.13.1 |
| flake8 | 7.0.0 |
| flask | 3.0.3 |
| fmt | 9.1.0 |
| fonttools | 4.51.0 |
| freetype | 2.12.1 |
| frozendict | 2.4.2 |
| frozenlist | 1.4.0 |
| fsspec | 2024.3.1 |
| gensim | 4.3.2 |
| gflags | 2.2.2 |
| giflib | 5.2.1 |
| gitdb | 4.0.7 |
| gitpython | 3.1.37 |
| glog | 0.5.0 |
| greenlet | 3.0.1 |
| grpc-cpp | 1.48.2 |
| h5py | 3.11.0 |
| hdf5 | 1.12.1 |
| heapdict | 1.0.1 |
| holoviews | 1.19.0 |
| hvplot | 0.10.0 |
| hyperlink | 21.0.0 |
| icc\_rt | 2022.1.0 |
| icu | 73.1 |
| idna | 3.7 |
| imagecodecs | 2023.1.23 |
| imageio | 2.33.1 |
| imagesize | 1.4.1 |
| imbalanced-learn | 0.12.3 |
| importlib-metadata | 7.0.1 |
| incremental | 22.10.0 |
| inflection | 0.5.1 |
| iniconfig | 1.1.1 |
| intake | 0.7.0 |
| intel-openmp | 2023.1.0 |
| intervaltree | 3.1.0 |
| ipykernel | 6.28.0 |
| ipython | 8.25.0 |
| ipython\_genutils | 0.2.0 |
| ipywidgets | 7.8.1 |
| isort | 5.13.2 |
| itemadapter | 0.3.0 |
| itemloaders | 1.1.0 |
| itsdangerous | 2.2.0 |
| jaraco.classes | 3.2.1 |
| jedi | 0.18.1 |
| jellyfish | 1.0.1 |
| jinja2 | 3.1.4 |
| jmespath | 1.0.1 |
| joblib | 1.4.2 |
| jpeg | 9e |
| jq | 1.6 |
| json5 | 0.9.6 |
| jsonpatch | 1.33 |
| jsonpointer | 2.1 |
| jsonschema | 4.19.2 |
| jsonschema-specifications | 2023.7.1 |
| jupyter | 1.0.0 |
| jupyter-lsp | 2.2.0 |
| jupyter\_client | 8.6.0 |
| jupyter\_console | 6.6.3 |
| jupyter\_core | 5.7.2 |
| jupyter\_events | 0.10.0 |
| jupyter\_server | 2.14.1 |
| jupyter\_server\_terminals | 0.4.4 |
| jupyterlab | 4.0.11 |
| jupyterlab-variableinspector | 3.1.0 |
| jupyterlab\_pygments | 0.1.2 |
| jupyterlab\_server | 2.25.1 |
| jupyterlab\_widgets | 1.0.0 |
| keyring | 24.3.1 |
| kiwisolver | 1.4.4 |
| krb5 | 1.20.1 |
| lazy-object-proxy | 1.10.0 |
| lazy\_loader | 0.4 |
| lcms2 | 2.12 |
| lerc | 3.0 |
| libaec | 1.0.4 |
| libarchive | 3.6.2 |
| libavif | 0.11.1 |
| libboost | 1.82.0 |
| libbrotlicommon | 1.0.9 |
| libbrotlidec | 1.0.9 |
| libbrotlienc | 1.0.9 |
| libclang | 14.0.6 |
| libclang13 | 14.0.6 |
| libcurl | 8.7.1 |
| libdeflate | 1.17 |
| libevent | 2.1.12 |
| libffi | 3.4.4 |
| libiconv | 1.16 |
| liblief | 0.12.3 |
| libmamba | 1.5.8 |
| libmambapy | 1.5.8 |
| libpng | 1.6.39 |
| libpq | 12.17 |
| libprotobuf | 3.20.3 |
| libsodium | 1.0.18 |
| libsolv | 0.7.24 |
| libspatialindex | 1.9.3 |
| libssh2 | 1.11.0 |
| libthrift | 0.15.0 |
| libtiff | 4.5.1 |
| libwebp-base | 1.3.2 |
| libxml2 | 2.10.4 |
| libxslt | 1.1.37 |
| libzopfli | 1.0.3 |
| linkify-it-py | 2.0.0 |
| llvmlite | 0.42.0 |
| locket | 1.0.0 |
| lxml | 5.2.1 |
| lz4 | 4.3.2 |
| lz4-c | 1.9.4 |
| lzo | 2.10 |
| m2-msys2-runtime | 2.5.0.17080.65c939c |
| m2-patch | 2.7.5 |
| m2w64-libwinpthread-git | 5.0.0.4634.697f757 |
| markdown | 3.4.1 |
| markdown-it-py | 2.2.0 |
| markupsafe | 2.1.3 |
| matplotlib | 3.8.4 |
| matplotlib-base | 3.8.4 |
| matplotlib-inline | 0.1.6 |
| mccabe | 0.7.0 |
| mdit-py-plugins | 0.3.0 |
| mdurl | 0.1.0 |
| menuinst | 2.1.1 |
| mistune | 2.0.4 |
| mkl | 2023.1.0 |
| mkl-service | 2.4.0 |
| mkl\_fft | 1.3.8 |
| mkl\_random | 1.2.4 |
| more-itertools | 10.1.0 |
| mpmath | 1.3.0 |
| msgpack-python | 1.0.3 |
| msys2-conda-epoch | 20160418 |
| multidict | 6.0.4 |
| multipledispatch | 0.6.0 |
| mypy | 1.10.0 |
| mypy\_extensions | 1.0.0 |
| navigator-updater | 0.5.1 |
| nbclient | 0.8.0 |
| nbconvert | 7.10.0 |
| nbformat | 5.9.2 |
| nest-asyncio | 1.6.0 |
| networkx | 3.2.1 |
| nltk | 3.8.1 |
| notebook | 7.0.8 |
| notebook-shim | 0.2.3 |
| numba | 0.59.1 |
| numexpr | 2.8.7 |
| numpy | 1.26.4 |
| numpy-base | 1.26.4 |
| numpydoc | 1.7.0 |
| openjpeg | 2.4.0 |
| openpyxl | 3.1.2 |
| openssl | 3.0.14 |
| orc | 1.7.4 |
| overrides | 7.4.0 |
| packaging | 23.2 |
| pandas | 2.2.2 |
| pandocfilters | 1.5.0 |
| panel | 1.4.4 |
| param | 2.1.0 |
| paramiko | 2.8.1 |
| parsel | 1.8.1 |
| parso | 0.8.3 |
| partd | 1.4.1 |
| pathspec | 0.10.3 |
| patsy | 0.5.6 |
| pcre2 | 10.42 |
| pexpect | 4.8.0 |
| pickleshare | 0.7.5 |
| pillow | 10.3.0 |
| pip | 24.0 |
| pkce | 1.0.3 |
| pkginfo | 1.10.0 |
| platformdirs | 3.10.0 |
| plotly | 5.22.0 |
| pluggy | 1.0.0 |
| ply | 3.11 |
| powershell\_shortcut | 0.0.1 |
| prometheus\_client | 0.14.1 |
| prompt-toolkit | 3.0.43 |
| prompt\_toolkit | 3.0.43 |
| protego | 0.1.16 |
| protobuf | 3.20.3 |
| psutil | 5.9.0 |
| ptyprocess | 0.7.0 |
| pure\_eval | 0.2.2 |
| py-cpuinfo | 9.0.0 |
| py-lief | 0.12.3 |
| pyarrow | 14.0.2 |
| pyasn1 | 0.4.8 |
| pyasn1-modules | 0.2.8 |
| pybind11-abi | 5 |
| pycodestyle | 2.11.1 |
| pycosat | 0.6.6 |
| pycparser | 2.21 |
| pyct | 0.5.0 |
| pycurl | 7.45.2 |
| pydantic | 2.5.3 |
| pydantic-core | 2.14.6 |
| pydeck | 0.8.0 |
| pydispatcher | 2.0.5 |
| pydocstyle | 6.3.0 |
| pyerfa | 2.0.1.4 |
| pyflakes | 3.2.0 |
| pygments | 2.15.1 |
| pyjwt | 2.8.0 |
| pylint | 2.16.2 |
| pylint-venv | 3.0.3 |
| pyls-spyder | 0.4.0 |
| pynacl | 1.5.0 |
| pyodbc | 5.0.1 |
| pyopenssl | 24.0.0 |
| pyparsing | 3.0.9 |
| pyqt | 5.15.10 |
| pyqt5-sip | 12.13.0 |
| pyqtwebengine | 5.15.10 |
| pysocks | 1.7.1 |
| pytables | 3.9.2 |
| pytest | 7.4.4 |
| python | 3.12.4 |
| python-dateutil | 2.9.0post0 |
| python-dotenv | 0.21.0 |
| python-fastjsonschema | 2.16.2 |
| python-json-logger | 2.0.7 |
| python-libarchive-c | 2.9 |
| python-lmdb | 1.4.1 |
| python-lsp-black | 2.0.0 |
| python-lsp-jsonrpc | 1.1.2 |
| python-lsp-server | 1.10.0 |
| python-slugify | 5.0.2 |
| python-snappy | 0.6.1 |
| python-tzdata | 2023.3 |
| pytoolconfig | 1.2.6 |
| pytz | 2024.1 |
| pyviz\_comms | 3.0.2 |
| pywavelets | 1.5.0 |
| pywin32 | 305 |
| pywin32-ctypes | 0.2.2 |
| pywinpty | 2.0.10 |
| pyyaml | 6.0.1 |
| pyzmq | 25.1.2 |
| qdarkstyle | 3.2.3 |
| qstylizer | 0.2.2 |
| qt-main | 5.15.2 |
| qt-webengine | 5.15.9 |
| qtawesome | 1.2.2 |
| qtconsole | 5.5.1 |
| qtpy | 2.4.1 |
| queuelib | 1.6.2 |
| re2 | 2022.04.01 |
| referencing | 0.30.2 |
| regex | 2023.10.3 |
| reproc | 14.2.4 |
| reproc-cpp | 14.2.4 |
| requests | 2.32.2 |
| requests-file | 1.5.1 |
| requests-toolbelt | 1.0.0 |
| rfc3339-validator | 0.1.4 |
| rfc3986-validator | 0.1.1 |
| rich | 13.3.5 |
| rope | 1.12.0 |
| rpds-py | 0.10.6 |
| rtree | 1.0.1 |
| ruamel.yaml | 0.17.21 |
| ruamel\_yaml | 0.17.21 |
| s3fs | 2024.3.1 |
| scikit-image | 0.23.2 |
| scikit-learn | 1.4.2 |
| scipy | 1.13.1 |
| scrapy | 2.11.1 |
| seaborn | 0.13.2 |
| semver | 3.0.2 |
| send2trash | 1.8.2 |
| service\_identity | 18.1.0 |
| setuptools | 69.5.1 |
| sip | 6.7.12 |
| six | 1.16.0 |
| smart\_open | 5.2.1 |
| smmap | 4.0.0 |
| snappy | 1.1.10 |
| sniffio | 1.3.0 |
| snowballstemmer | 2.2.0 |
| sortedcontainers | 2.4.0 |
| soupsieve | 2.5 |
| sphinx | 7.3.7 |
| sphinxcontrib-applehelp | 1.0.2 |
| sphinxcontrib-devhelp | 1.0.2 |
| sphinxcontrib-htmlhelp | 2.0.0 |
| sphinxcontrib-jsmath | 1.0.1 |
| sphinxcontrib-qthelp | 1.0.3 |
| sphinxcontrib-serializinghtml | 1.1.10 |
| spyder | 5.5.1 |
| spyder-kernels | 2.5.0 |
| sqlalchemy | 2.0.30 |
| sqlite | 3.45.3 |
| stack\_data | 0.2.0 |
| statsmodels | 0.14.2 |
| streamlit | 1.32.0 |
| sympy | 1.12 |
| tabulate | 0.9.0 |
| tbb | 2021.8.0 |
| tblib | 1.7.0 |
| tenacity | 8.2.2 |
| terminado | 0.17.1 |
| text-unidecode | 1.3 |
| textdistance | 4.2.1 |
| threadpoolctl | 2.2.0 |
| three-merge | 0.1.1 |
| tifffile | 2023.4.12 |
| tinycss2 | 1.2.1 |
| tk | 8.6.14 |
| tldextract | 3.2.0 |
| toml | 0.10.2 |
| tomli | 2.0.1 |
| tomlkit | 0.11.1 |
| toolz | 0.12.0 |
| tornado | 6.4.1 |
| tqdm | 4.66.4 |
| traitlets | 5.14.3 |
| truststore | 0.8.0 |
| twisted | 23.10.0 |
| twisted-iocpsupport | 1.0.2 |
| typing-extensions | 4.11.0 |
| typing\_extensions | 4.11.0 |
| tzdata | 2024a |
| uc-micro-py | 1.0.1 |
| ujson | 5.10.0 |
| unicodedata2 | 15.1.0 |
| unidecode | 1.2.0 |
| urllib3 | 2.2.2 |
| utf8proc | 2.6.1 |
| vc | 14.2 |
| vs2015\_runtime | 14.29.30133 |
| w3lib | 2.1.2 |
| watchdog | 4.0.1 |
| wcwidth | 0.2.5 |
| webencodings | 0.5.1 |
| websocket-client | 1.8.0 |
| werkzeug | 3.0.3 |
| whatthepatch | 1.0.2 |
| wheel | 0.43.0 |
| widgetsnbextension | 3.6.6 |
| win\_inet\_pton | 1.1.0 |
| winpty | 0.4.3 |
| wrapt | 1.14.1 |
| xarray | 2023.6.0 |
| xlwings | 0.31.4 |
| xyzservices | 2022.9.0 |
| xz | 5.4.6 |
| yaml | 0.2.5 |
| yaml-cpp | 0.8.0 |
| yapf | 0.40.2 |
| yarl | 1.9.3 |
| zeromq | 4.3.5 |
| zfp | 1.0.0 |
| zict | 3.0.0 |
| zipp | 3.17.0 |
| zlib | 1.2.13 |
| zlib-ng | 2.0.7 |
| zope | 1.0 |
| zope.interface | 5.4.0 |
| zstandard | 0.22.0 |
| zstd | 1.5.5 |
| Package Name | linux-64 | linux-aarch64 | linux-s390x | osx-arm64 | osx-64 | win-64 |
|---|---|---|---|---|---|---|
| \_anaconda\_depends | 2024.02 | 2024.02 | 2024.02 | 2024.02 | 2024.02 | 2024.02 |
| \_libgcc\_mutex | 0.1 | 0.1 | 0.1 | |||
| \_openmp\_mutex | 5.1 | 5.1 | 5.1 | |||
| abseil-cpp | 20211102.0 | 20211102.0 | 20230802.0 | 20230802.0 | 20211102.0 | |
| aiobotocore | 2.7.0 | 2.7.0 | 2.7.0 | 2.7.0 | 2.7.0 | 2.7.0 |
| aiohttp | 3.9.3 | 3.9.3 | 3.9.3 | 3.9.3 | 3.9.3 | 3.9.3 |
| aioitertools | 0.7.1 | 0.7.1 | 0.7.1 | 0.7.1 | 0.7.1 | 0.7.1 |
| aiosignal | 1.2.0 | 1.2.0 | 1.2.0 | 1.2.0 | 1.2.0 | 1.2.0 |
| alabaster | 0.7.12 | 0.7.12 | 0.7.12 | 0.7.12 | 0.7.12 | |
| altair | 5.0.1 | 5.0.1 | 5.0.1 | 5.0.1 | 5.0.1 | |
| anaconda-anon-usage | 0.4.3 | 0.4.3 | 0.4.3 | 0.4.3 | 0.4.3 | 0.4.3 |
| anaconda-catalogs | 0.2.0 | 0.2.0 | 0.2.0 | 0.2.0 | 0.2.0 | 0.2.0 |
| anaconda-client | 1.12.3 | 1.12.3 | 1.12.3 | 1.12.3 | 1.12.3 | 1.12.3 |
| anaconda-cloud-auth | 0.1.4 | 0.1.4 | 0.1.4 | 0.1.4 | 0.1.4 | |
| anaconda-navigator | 2.5.2 | 2.5.2 | 2.5.2 | 2.5.2 | 2.5.2 | |
| anaconda-project | 0.11.1 | 0.11.1 | 0.11.1 | 0.11.1 | 0.11.1 | 0.11.1 |
| anyio | 4.2.0 | 4.2.0 | 3.5.0 | 4.2.0 | 4.2.0 | 4.2.0 |
| aom | 3.6.0 | 3.6.0 | 3.6.0 | 3.6.0 | 3.6.0 | 3.6.0 |
| appdirs | 1.4.4 | 1.4.4 | 1.4.4 | 1.4.4 | 1.4.4 | 1.4.4 |
| applaunchservices | 0.3.0 | 0.3.0 | ||||
| appnope | 0.1.2 | 0.1.2 | ||||
| appscript | 1.1.2 | 1.1.2 | ||||
| archspec | 0.2.1 | 0.2.1 | 0.2.1 | 0.2.1 | 0.2.1 | 0.2.1 |
| argon2-cffi | 21.3.0 | 21.3.0 | 21.3.0 | 21.3.0 | 21.3.0 | 21.3.0 |
| argon2-cffi-bindings | 21.2.0 | 21.2.0 | 21.2.0 | 21.2.0 | 21.2.0 | 21.2.0 |
| arrow | 1.2.3 | 1.2.3 | 1.2.3 | 1.2.3 | 1.2.3 | |
| arrow-cpp | 14.0.2 | 14.0.2 | 14.0.2 | 14.0.2 | 14.0.2 | |
| astroid | 2.14.2 | 2.14.2 | 2.14.2 | 2.14.2 | 2.14.2 | 2.14.2 |
| astropy | 5.3.4 | 5.3.4 | 5.3.4 | 5.3.4 | 5.3.4 | 5.3.4 |
| asttokens | 2.0.5 | 2.0.5 | 2.0.5 | 2.0.5 | 2.0.5 | 2.0.5 |
| async-lru | 2.0.4 | 2.0.4 | 2.0.4 | 2.0.4 | 2.0.4 | |
| atomicwrites | 1.4.0 | 1.4.0 | 1.4.0 | 1.4.0 | 1.4.0 | |
| attrs | 23.1.0 | 23.1.0 | 23.1.0 | 23.1.0 | 23.1.0 | 23.1.0 |
| automat | 20.2.0 | 20.2.0 | 20.2.0 | 20.2.0 | 20.2.0 | |
| autopep8 | 1.6.0 | 1.6.0 | 1.6.0 | 1.6.0 | 1.6.0 | |
| aws-c-auth | 0.6.19 | 0.6.19 | 0.6.19 | 0.6.19 | 0.6.19 | |
| aws-c-cal | 0.5.20 | 0.5.20 | 0.5.20 | 0.5.20 | 0.5.20 | |
| aws-c-common | 0.8.5 | 0.8.5 | 0.8.5 | 0.8.5 | 0.8.5 | |
| aws-c-compression | 0.2.16 | 0.2.16 | 0.2.16 | 0.2.16 | 0.2.16 | |
| aws-c-event-stream | 0.2.15 | 0.2.15 | 0.2.15 | 0.2.15 | 0.2.15 | |
| aws-c-http | 0.6.25 | 0.6.25 | 0.6.25 | 0.6.25 | 0.6.25 | |
| aws-c-io | 0.13.10 | 0.13.10 | 0.13.10 | 0.13.10 | 0.13.10 | |
| aws-c-mqtt | 0.7.13 | 0.7.13 | 0.7.13 | 0.7.13 | 0.7.13 | |
| aws-c-s3 | 0.1.51 | 0.1.51 | 0.1.51 | 0.1.51 | 0.1.51 | |
| aws-c-sdkutils | 0.1.6 | 0.1.6 | 0.1.6 | 0.1.6 | 0.1.6 | |
| aws-checksums | 0.1.13 | 0.1.13 | 0.1.13 | 0.1.13 | 0.1.13 | |
| aws-crt-cpp | 0.18.16 | 0.18.16 | 0.18.16 | 0.18.16 | 0.18.16 | |
| aws-sdk-cpp | 1.10.55 | 1.10.55 | 1.10.55 | 1.10.55 | 1.10.55 | |
| babel | 2.11.0 | 2.11.0 | 2.11.0 | 2.11.0 | 2.11.0 | |
| backports | 1.1 | 1.1 | 1.1 | 1.1 | 1.1 | 1.1 |
| backports.functools\_lru\_cache | 1.6.4 | 1.6.4 | 1.6.4 | 1.6.4 | 1.6.4 | 1.6.4 |
| backports.tempfile | 1.0 | 1.0 | 1.0 | 1.0 | 1.0 | 1.0 |
| backports.weakref | 1.0.post1 | 1.0.post1 | 1.0.post1 | 1.0.post1 | 1.0.post1 | 1.0.post1 |
| bcrypt | 3.2.0 | 3.2.0 | 3.2.0 | 3.2.0 | 3.2.0 | |
| beautifulsoup4 | 4.12.2 | 4.12.2 | 4.12.2 | 4.12.2 | 4.12.2 | 4.12.2 |
| binaryornot | 0.4.4 | 0.4.4 | 0.4.4 | 0.4.4 | 0.4.4 | |
| black | 23.11.0 | 23.11.0 | 23.11.0 | 23.11.0 | 23.11.0 | 23.11.0 |
| blas | 1.0 | 1.0 | 1.0 | 1.0 | 1.0 | 1.0 |
| bleach | 4.1.0 | 4.1.0 | 4.1.0 | 4.1.0 | 4.1.0 | 4.1.0 |
| blinker | 1.6.2 | 1.6.2 | 1.6.2 | 1.6.2 | 1.6.2 | |
| blosc | 1.21.3 | 1.21.3 | 1.21.3 | 1.21.3 | 1.21.3 | 1.21.3 |
| bokeh | 3.3.4 | 3.3.4 | 2.4.3 | 3.3.4 | 3.3.4 | 3.3.4 |
| boltons | 23.0.0 | 23.0.0 | 23.0.0 | 23.0.0 | 23.0.0 | 23.0.0 |
| boost-cpp | 1.82.0 | 1.82.0 | 1.82.0 | 1.82.0 | 1.82.0 | |
| botocore | 1.31.64 | 1.31.64 | 1.31.64 | 1.31.64 | 1.31.64 | 1.31.64 |
| bottleneck | 1.3.7 | 1.3.7 | 1.3.7 | 1.3.7 | 1.3.7 | 1.3.7 |
| brotli | 1.0.9 | 1.0.9 | 1.0.9 | 1.0.9 | 1.0.9 | 1.0.9 |
| brotli-bin | 1.0.9 | 1.0.9 | 1.0.9 | 1.0.9 | 1.0.9 | 1.0.9 |
| brotli-python | 1.0.9 | 1.0.9 | 1.0.9 | 1.0.9 | 1.0.9 | 1.0.9 |
| brunsli | 0.1 | 0.1 | 0.1 | 0.1 | ||
| bzip2 | 1.0.8 | 1.0.8 | 1.0.8 | 1.0.8 | 1.0.8 | 1.0.8 |
| c-ares | 1.19.1 | 1.19.1 | 1.19.1 | 1.19.1 | 1.19.1 | 1.19.1 |
| c-blosc2 | 2.12.0 | 2.12.0 | 2.12.0 | 2.12.0 | 2.12.0 | |
| ca-certificates | 2023.12.12 | 2023.12.12 | 2023.12.12 | 2023.12.12 | 2023.12.12 | 2023.12.12 |
| cachetools | 4.2.2 | 4.2.2 | 4.2.2 | 4.2.2 | 4.2.2 | |
| cctools | 949.0.1 | 949.0.1 | ||||
| cctools\_osx-64 | 949.0.1 | |||||
| cctools\_osx-arm64 | 949.0.1 | |||||
| certifi | 2024.2.2 | 2024.2.2 | 2024.2.2 | 2024.2.2 | 2024.2.2 | 2024.2.2 |
| cffi | 1.16.0 | 1.16.0 | 1.16.0 | 1.16.0 | 1.16.0 | 1.16.0 |
| cfitsio | 3.470 | 3.470 | 3.470 | 3.470 | 3.470 | 3.470 |
| chardet | 4.0.0 | 4.0.0 | 4.0.0 | 4.0.0 | 4.0.0 | 4.0.0 |
| charls | 2.2.0 | 2.2.0 | 2.2.0 | 2.2.0 | 2.2.0 | |
| charset-normalizer | 2.0.4 | 2.0.4 | 2.0.4 | 2.0.4 | 2.0.4 | 2.0.4 |
| click | 8.1.7 | 8.1.7 | 8.1.7 | 8.1.7 | 8.1.7 | 8.1.7 |
| cloudpickle | 2.2.1 | 2.2.1 | 2.2.1 | 2.2.1 | 2.2.1 | 2.2.1 |
| clyent | 1.2.2 | 1.2.2 | 1.2.2 | 1.2.2 | 1.2.2 | |
| colorama | 0.4.6 | 0.4.6 | 0.4.6 | 0.4.6 | 0.4.6 | 0.4.6 |
| colorcet | 3.0.1 | 3.0.1 | 3.0.1 | 3.0.1 | 3.0.1 | 3.0.1 |
| comm | 0.1.2 | 0.1.2 | 0.1.2 | 0.1.2 | 0.1.2 | 0.1.2 |
| conda | 24.1.2 | 24.1.2 | 24.1.2 | 24.1.2 | 24.1.2 | 24.1.2 |
| conda-build | 24.1.2 | 24.1.2 | 24.1.2 | 24.1.2 | 24.1.2 | 24.1.2 |
| conda-content-trust | 0.2.0 | 0.2.0 | 0.2.0 | 0.2.0 | 0.2.0 | 0.2.0 |
| conda-index | 0.4.0 | 0.4.0 | 0.4.0 | 0.4.0 | 0.4.0 | 0.4.0 |
| conda-libmamba-solver | 24.1.0 | 24.1.0 | 24.1.0 | 24.1.0 | 24.1.0 | 24.1.0 |
| conda-pack | 0.6.0 | 0.6.0 | 0.6.0 | 0.6.0 | 0.6.0 | 0.6.0 |
| conda-package-handling | 2.2.0 | 2.2.0 | 2.2.0 | 2.2.0 | 2.2.0 | 2.2.0 |
| conda-package-streaming | 0.9.0 | 0.9.0 | 0.9.0 | 0.9.0 | 0.9.0 | 0.9.0 |
| conda-repo-cli | 1.0.75 | 1.0.75 | 1.0.75 | 1.0.75 | 1.0.75 | |
| conda-token | 0.4.0 | 0.4.0 | 0.4.0 | 0.4.0 | 0.4.0 | 0.4.0 |
| conda-verify | 3.4.2 | 3.4.2 | 3.4.2 | 3.4.2 | 3.4.2 | 3.4.2 |
| console\_shortcut | 0.1.1 | |||||
| constantly | 23.10.4 | 23.10.4 | 23.10.4 | 23.10.4 | 23.10.4 | |
| contourpy | 1.2.0 | 1.2.0 | 1.2.0 | 1.2.0 | 1.2.0 | 1.2.0 |
| cookiecutter | 2.5.0 | 2.5.0 | 2.5.0 | 2.5.0 | 2.5.0 | |
| cryptography | 42.0.2 | 42.0.2 | 42.0.2 | 42.0.2 | 42.0.2 | 42.0.2 |
| cssselect | 1.2.0 | 1.2.0 | 1.2.0 | 1.2.0 | 1.2.0 | |
| curl | 8.5.0 | 8.5.0 | 8.5.0 | 8.5.0 | 8.5.0 | 8.5.0 |
| cycler | 0.11.0 | 0.11.0 | 0.11.0 | 0.11.0 | 0.11.0 | 0.11.0 |
| cyrus-sasl | 2.1.28 | 2.1.28 | 2.1.28 | 2.1.28 | ||
| cytoolz | 0.12.2 | 0.12.2 | 0.12.2 | 0.12.2 | 0.12.2 | 0.12.2 |
| dask | 2023.11.0 | 2023.11.0 | 2023.11.0 | 2023.11.0 | 2023.11.0 | 2023.11.0 |
| dask-core | 2023.11.0 | 2023.11.0 | 2023.11.0 | 2023.11.0 | 2023.11.0 | 2023.11.0 |
| datashader | 0.16.0 | 0.16.0 | 0.16.0 | 0.16.0 | 0.16.0 | |
| dav1d | 1.2.1 | 1.2.1 | 1.2.1 | 1.2.1 | 1.2.1 | 1.2.1 |
| dbus | 1.13.18 | 1.13.18 | ||||
| debugpy | 1.6.7 | 1.6.7 | 1.6.7 | 1.6.7 | 1.6.7 | 1.6.7 |
| decorator | 5.1.1 | 5.1.1 | 5.1.1 | 5.1.1 | 5.1.1 | 5.1.1 |
| defusedxml | 0.7.1 | 0.7.1 | 0.7.1 | 0.7.1 | 0.7.1 | 0.7.1 |
| diff-match-patch | 20200713 | 20200713 | 20200713 | 20200713 | 20200713 | |
| dill | 0.3.7 | 0.3.7 | 0.3.7 | 0.3.7 | 0.3.7 | 0.3.7 |
| distributed | 2023.11.0 | 2023.11.0 | 2023.11.0 | 2023.11.0 | 2023.11.0 | 2023.11.0 |
| distro | 1.8.0 | 1.8.0 | 1.8.0 | 1.8.0 | 1.8.0 | 1.8.0 |
| docstring-to-markdown | 0.11 | 0.11 | 0.11 | 0.11 | 0.11 | |
| docutils | 0.18.1 | 0.18.1 | 0.18.1 | 0.18.1 | 0.18.1 | |
| entrypoints | 0.4 | 0.4 | 0.4 | 0.4 | 0.4 | 0.4 |
| et\_xmlfile | 1.1.0 | 1.1.0 | 1.1.0 | 1.1.0 | 1.1.0 | 1.1.0 |
| executing | 0.8.3 | 0.8.3 | 0.8.3 | 0.8.3 | 0.8.3 | 0.8.3 |
| expat | 2.5.0 | 2.5.0 | ||||
| filelock | 3.13.1 | 3.13.1 | 3.13.1 | 3.13.1 | 3.13.1 | 3.13.1 |
| flake8 | 6.0.0 | 6.0.0 | 6.0.0 | 6.0.0 | 6.0.0 | |
| flask | 2.2.5 | 2.2.5 | 2.2.5 | 2.2.5 | 2.2.5 | 2.2.5 |
| fmt | 9.1.0 | 9.1.0 | 9.1.0 | 9.1.0 | 9.1.0 | 9.1.0 |
| fontconfig | 2.14.1 | 2.14.1 | ||||
| fonttools | 4.25.0 | 4.25.0 | 4.25.0 | 4.25.0 | 4.25.0 | 4.25.0 |
| freetype | 2.12.1 | 2.12.1 | 2.12.1 | 2.12.1 | 2.12.1 | 2.12.1 |
| frozenlist | 1.4.0 | 1.4.0 | 1.4.0 | 1.4.0 | 1.4.0 | 1.4.0 |
| fsspec | 2023.10.0 | 2023.10.0 | 2023.10.0 | 2023.10.0 | 2023.10.0 | 2023.10.0 |
| future | 0.18.3 | 0.18.3 | 0.18.3 | 0.18.3 | 0.18.3 | 0.18.3 |
| gensim | 4.3.0 | 4.3.0 | 4.3.0 | 4.3.0 | 4.3.0 | |
| gettext | 0.21.0 | 0.21.0 | ||||
| gflags | 2.2.2 | 2.2.2 | 2.2.2 | 2.2.2 | 2.2.2 | |
| giflib | 5.2.1 | 5.2.1 | 5.2.1 | 5.2.1 | 5.2.1 | 5.2.1 |
| gitdb | 4.0.7 | 4.0.7 | 4.0.7 | 4.0.7 | 4.0.7 | |
| gitpython | 3.1.37 | 3.1.37 | 3.1.37 | 3.1.37 | 3.1.37 | |
| glib | 2.78.4 | 2.78.4 | 2.78.4 | 2.78.4 | ||
| glib-tools | 2.78.4 | 2.78.4 | 2.78.4 | 2.78.4 | ||
| glog | 0.5.0 | 0.5.0 | 0.5.0 | 0.5.0 | 0.5.0 | |
| gmp | 6.2.1 | 6.2.1 | 6.2.1 | 6.2.1 | 6.2.1 | |
| gmpy2 | 2.1.2 | 2.1.2 | 2.1.2 | 2.1.2 | 2.1.2 | 2.1.2 |
| greenlet | 3.0.1 | 3.0.1 | 3.0.1 | 3.0.1 | 3.0.1 | 3.0.1 |
| grpc-cpp | 1.48.2 | 1.48.2 | 1.48.2 | 1.48.2 | 1.48.2 | |
| gst-plugins-base | 1.14.1 | 1.14.1 | 1.14.1 | 1.14.1 | ||
| gstreamer | 1.14.1 | 1.14.1 | 1.14.1 | 1.14.1 | ||
| gtest | 1.14.0 | 1.14.0 | ||||
| h5py | 3.9.0 | 3.9.0 | 3.7.0 | 3.9.0 | 3.9.0 | 3.9.0 |
| hdf5 | 1.12.1 | 1.12.1 | 1.10.6 | 1.12.1 | 1.12.1 | 1.12.1 |
| heapdict | 1.0.1 | 1.0.1 | 1.0.1 | 1.0.1 | 1.0.1 | 1.0.1 |
| holoviews | 1.18.3 | 1.18.3 | 1.14.8 | 1.18.3 | 1.18.3 | 1.18.3 |
| hvplot | 0.9.2 | 0.9.2 | 0.7.3 | 0.9.2 | 0.9.2 | 0.9.2 |
| hyperlink | 21.0.0 | 21.0.0 | 21.0.0 | 21.0.0 | 21.0.0 | |
| icc\_rt | 2022.1.0 | |||||
| icu | 73.1 | 73.1 | 73.1 | 73.1 | 73.1 | 73.1 |
| idna | 3.4 | 3.4 | 3.3 | 3.4 | 3.4 | 3.4 |
| imagecodecs | 2023.1.23 | 2023.1.23 | 2023.1.23 | 2023.1.23 | 2023.1.23 | 2023.1.23 |
| imageio | 2.33.1 | 2.33.1 | 2.33.1 | 2.33.1 | 2.33.1 | 2.33.1 |
| imagesize | 1.4.1 | 1.4.1 | 1.4.1 | 1.4.1 | 1.4.1 | |
| imbalanced-learn | 0.11.0 | 0.11.0 | 0.11.0 | 0.11.0 | 0.11.0 | 0.11.0 |
| importlib-metadata | 7.0.1 | 7.0.1 | 7.0.1 | 7.0.1 | 7.0.1 | 7.0.1 |
| importlib\_metadata | 7.0.1 | 7.0.1 | 7.0.1 | 7.0.1 | 7.0.1 | |
| incremental | 22.10.0 | 22.10.0 | 22.10.0 | 22.10.0 | 22.10.0 | |
| inflection | 0.5.1 | 0.5.1 | 0.5.1 | 0.5.1 | 0.5.1 | |
| iniconfig | 1.1.1 | 1.1.1 | 1.1.1 | 1.1.1 | 1.1.1 | 1.1.1 |
| intake | 0.6.8 | 0.6.8 | 0.6.8 | 0.6.8 | 0.6.8 | 0.6.8 |
| intel-openmp | 2023.1.0 | 2023.1.0 | ||||
| intervaltree | 3.1.0 | 3.1.0 | 3.1.0 | 3.1.0 | 3.1.0 | |
| ipykernel | 6.28.0 | 6.28.0 | 6.25.0 | 6.28.0 | 6.28.0 | 6.28.0 |
| ipython | 8.20.0 | 8.20.0 | 8.20.0 | 8.20.0 | 8.20.0 | 8.20.0 |
| ipython\_genutils | 0.2.0 | 0.2.0 | 0.2.0 | 0.2.0 | 0.2.0 | 0.2.0 |
| ipywidgets | 7.6.5 | 7.6.5 | 7.6.5 | 7.6.5 | 7.6.5 | |
| isort | 5.9.3 | 5.9.3 | 5.9.3 | 5.9.3 | 5.9.3 | 5.9.3 |
| itemadapter | 0.3.0 | 0.3.0 | 0.3.0 | 0.3.0 | 0.3.0 | |
| itemloaders | 1.1.0 | 1.1.0 | 1.1.0 | 1.1.0 | 1.1.0 | |
| itsdangerous | 2.0.1 | 2.0.1 | 2.0.1 | 2.0.1 | 2.0.1 | 2.0.1 |
| jaraco.classes | 3.2.1 | 3.2.1 | 3.2.1 | 3.2.1 | 3.2.1 | |
| jedi | 0.18.1 | 0.18.1 | 0.18.1 | 0.18.1 | 0.18.1 | 0.18.1 |
| jeepney | 0.7.1 | 0.7.1 | ||||
| jellyfish | 1.0.1 | 1.0.1 | 1.0.1 | 1.0.1 | 1.0.1 | |
| jinja2 | 3.1.3 | 3.1.3 | 3.1.3 | 3.1.3 | 3.1.3 | 3.1.3 |
| jmespath | 1.0.1 | 1.0.1 | 1.0.1 | 1.0.1 | 1.0.1 | 1.0.1 |
| joblib | 1.2.0 | 1.2.0 | 1.2.0 | 1.2.0 | 1.2.0 | 1.2.0 |
| jpeg | 9e | 9e | 9e | 9e | 9e | 9e |
| jq | 1.6 | 1.6 | 1.6 | 1.6 | 1.6 | |
| json5 | 0.9.6 | 0.9.6 | 0.9.6 | 0.9.6 | 0.9.6 | |
| jsonpatch | 1.32 | 1.32 | 1.32 | 1.32 | 1.32 | 1.32 |
| jsonpointer | 2.1 | 2.1 | 2.1 | 2.1 | 2.1 | 2.1 |
| jsonschema | 4.19.2 | 4.19.2 | 4.19.2 | 4.19.2 | 4.19.2 | 4.19.2 |
| jsonschema-specifications | 2023.7.1 | 2023.7.1 | 2023.7.1 | 2023.7.1 | 2023.7.1 | 2023.7.1 |
| jupyter | 1.0.0 | 1.0.0 | 1.0.0 | 1.0.0 | 1.0.0 | 1.0.0 |
| jupyter-lsp | 2.2.0 | 2.2.0 | 2.2.0 | 2.2.0 | 2.2.0 | |
| jupyter\_client | 8.6.0 | 8.6.0 | 7.4.9 | 8.6.0 | 8.6.0 | 8.6.0 |
| jupyter\_console | 6.6.3 | 6.6.3 | 6.6.3 | 6.6.3 | 6.6.3 | 6.6.3 |
| jupyter\_core | 5.5.0 | 5.5.0 | 5.5.0 | 5.5.0 | 5.5.0 | 5.5.0 |
| jupyter\_events | 0.8.0 | 0.8.0 | 0.8.0 | 0.8.0 | 0.8.0 | |
| jupyter\_server | 2.10.0 | 2.10.0 | 1.23.4 | 2.10.0 | 2.10.0 | 2.10.0 |
| jupyter\_server\_terminals | 0.4.4 | 0.4.4 | 0.4.4 | 0.4.4 | 0.4.4 | |
| jupyterlab | 4.0.11 | 4.0.11 | 4.0.11 | 4.0.11 | 4.0.11 | |
| jupyterlab-variableinspector | 3.1.0 | 3.1.0 | 3.1.0 | 3.1.0 | 3.1.0 | |
| jupyterlab\_pygments | 0.1.2 | 0.1.2 | 0.2.2 | 0.1.2 | 0.1.2 | 0.1.2 |
| jupyterlab\_server | 2.25.1 | 2.25.1 | 2.25.1 | 2.25.1 | 2.25.1 | |
| jupyterlab\_widgets | 3.0.9 | 3.0.9 | 3.0.9 | 3.0.9 | 3.0.9 | |
| jxrlib | 1.1 | 1.1 | 1.1 | 1.1 | 1.1 | |
| keyring | 23.13.1 | 23.13.1 | 23.13.1 | 23.13.1 | 23.13.1 | |
| kiwisolver | 1.4.4 | 1.4.4 | 1.4.4 | 1.4.4 | 1.4.4 | 1.4.4 |
| krb5 | 1.20.1 | 1.20.1 | 1.20.1 | 1.20.1 | 1.20.1 | 1.20.1 |
| lazy-object-proxy | 1.6.0 | 1.6.0 | 1.6.0 | 1.6.0 | 1.6.0 | 1.6.0 |
| lazy\_loader | 0.3 | 0.3 | 0.3 | 0.3 | 0.3 | 0.3 |
| lcms2 | 2.12 | 2.12 | 2.12 | 2.12 | 2.12 | 2.12 |
| ld64 | 530 | 530 | ||||
| ld64\_osx-64 | 530 | |||||
| ld64\_osx-arm64 | 530 | |||||
| ld\_impl\_linux-64 | 2.38 | |||||
| ld\_impl\_linux-aarch64 | 2.38 | |||||
| ld\_impl\_linux-s390x | 2.38 | |||||
| ldid | 2.1.5 | 2.1.5 | ||||
| lerc | 3.0 | 3.0 | 3.0 | 3.0 | 3.0 | 3.0 |
| libaec | 1.0.4 | 1.0.4 | 1.0.4 | 1.0.4 | 1.0.4 | 1.0.4 |
| libarchive | 3.6.2 | 3.6.2 | 3.6.2 | 3.6.2 | 3.6.2 | 3.6.2 |
| libavif | 0.11.1 | 0.11.1 | 0.11.1 | 0.11.1 | 0.11.1 | 0.11.1 |
| libboost | 1.82.0 | 1.82.0 | 1.82.0 | 1.82.0 | 1.82.0 | |
| libbrotlicommon | 1.0.9 | 1.0.9 | 1.0.9 | 1.0.9 | 1.0.9 | 1.0.9 |
| libbrotlidec | 1.0.9 | 1.0.9 | 1.0.9 | 1.0.9 | 1.0.9 | 1.0.9 |
| libbrotlienc | 1.0.9 | 1.0.9 | 1.0.9 | 1.0.9 | 1.0.9 | 1.0.9 |
| libclang | 14.0.6 | 14.0.6 | 14.0.6 | 14.0.6 | 14.0.6 | |
| libclang13 | 14.0.6 | 14.0.6 | 14.0.6 | 14.0.6 | 14.0.6 | |
| libcups | 2.4.2 | 2.4.2 | ||||
| libcurl | 8.5.0 | 8.5.0 | 8.5.0 | 8.5.0 | 8.5.0 | 8.5.0 |
| libcxx | 14.0.6 | 14.0.6 | ||||
| libdeflate | 1.17 | 1.17 | 1.17 | 1.17 | 1.17 | 1.17 |
| libedit | 3.1.20230828 | 3.1.20230828 | 3.1.20230828 | 3.1.20230828 | 3.1.20230828 | |
| libev | 4.33 | 4.33 | 4.33 | 4.33 | 4.33 | |
| libevent | 2.1.12 | 2.1.12 | 2.1.12 | 2.1.12 | 2.1.12 | |
| libffi | 3.4.4 | 3.4.4 | 3.4.2 | 3.4.4 | 3.4.4 | 3.4.4 |
| libgcc-ng | 11.2.0 | 11.2.0 | 11.2.0 | |||
| libgfortran | 5.0.0 | 5.0.0 | ||||
| libgfortran-ng | 11.2.0 | 11.2.0 | 11.2.0 | |||
| libgfortran5 | 11.2.0 | 11.2.0 | 11.2.0 | 11.3.0 | 11.3.0 | |
| libglib | 2.78.4 | 2.78.4 | 2.78.4 | 2.78.4 | ||
| libgomp | 11.2.0 | 11.2.0 | 11.2.0 | |||
| libiconv | 1.16 | 1.16 | 1.16 | 1.16 | 1.16 | |
| liblief | 0.12.3 | 0.12.3 | 0.12.3 | 0.12.3 | 0.12.3 | 0.12.3 |
| libllvm14 | 14.0.6 | 14.0.6 | 14.0.6 | 14.0.6 | ||
| libmamba | 1.5.6 | 1.5.6 | 1.5.6 | 1.5.6 | 1.5.6 | 1.5.6 |
| libmambapy | 1.5.6 | 1.5.6 | 1.5.6 | 1.5.6 | 1.5.6 | 1.5.6 |
| libnghttp2 | 1.57.0 | 1.57.0 | 1.57.0 | 1.57.0 | 1.57.0 | |
| libopenblas | 0.3.21 | 0.3.21 | 0.3.21 | 0.3.21 | ||
| libpng | 1.6.39 | 1.6.39 | 1.6.39 | 1.6.39 | 1.6.39 | 1.6.39 |
| libpq | 12.17 | 12.17 | 12.17 | 12.17 | 12.17 | |
| libprotobuf | 3.20.3 | 3.20.3 | 3.20.3 | 3.20.3 | 3.20.3 | |
| libsodium | 1.0.18 | 1.0.18 | 1.0.18 | 1.0.18 | 1.0.18 | 1.0.18 |
| libsolv | 0.7.24 | 0.7.24 | 0.7.24 | 0.7.24 | 0.7.24 | 0.7.24 |
| libspatialindex | 1.9.3 | 1.9.3 | 1.9.3 | 1.9.3 | 1.9.3 | |
| libssh2 | 1.10.0 | 1.10.0 | 1.10.0 | 1.10.0 | 1.10.0 | 1.10.0 |
| libstdcxx-ng | 11.2.0 | 11.2.0 | 11.2.0 | |||
| libthrift | 0.15.0 | 0.15.0 | 0.15.0 | 0.15.0 | 0.15.0 | |
| libtiff | 4.5.1 | 4.5.1 | 4.5.1 | 4.5.1 | 4.5.1 | 4.5.1 |
| libuuid | 1.41.5 | 1.41.5 | 1.41.5 | |||
| libwebp-base | 1.3.2 | 1.3.2 | 1.3.2 | 1.3.2 | 1.3.2 | 1.3.2 |
| libxcb | 1.15 | 1.15 | ||||
| libxkbcommon | 1.0.1 | 1.0.1 | ||||
| libxml2 | 2.10.4 | 2.10.4 | 2.10.4 | 2.10.4 | 2.10.4 | 2.10.4 |
| libxslt | 1.1.37 | 1.1.37 | 1.1.37 | 1.1.37 | 1.1.37 | |
| libzopfli | 1.0.3 | 1.0.3 | 1.0.3 | 1.0.3 | 1.0.3 | 1.0.3 |
| linkify-it-py | 2.0.0 | 2.0.0 | 2.0.0 | 2.0.0 | 2.0.0 | |
| llvm-openmp | 14.0.6 | 14.0.6 | ||||
| llvmlite | 0.42.0 | 0.42.0 | 0.42.0 | 0.42.0 | 0.42.0 | |
| locket | 1.0.0 | 1.0.0 | 1.0.0 | 1.0.0 | 1.0.0 | 1.0.0 |
| lxml | 4.9.3 | 4.9.3 | 4.9.3 | 4.9.3 | 4.9.3 | |
| lz4 | 4.3.2 | 4.3.2 | 4.3.2 | 4.3.2 | 4.3.2 | 4.3.2 |
| lz4-c | 1.9.4 | 1.9.4 | 1.9.4 | 1.9.4 | 1.9.4 | 1.9.4 |
| lzo | 2.10 | 2.10 | 2.10 | 2.10 | 2.10 | 2.10 |
| m2-msys2-runtime | 2.5.0.17080.65c939c | |||||
| m2-patch | 2.7.5 | |||||
| m2w64-libwinpthread-git | 5.0.0.4634.697f757 | |||||
| markdown | 3.4.1 | 3.4.1 | 3.4.1 | 3.4.1 | 3.4.1 | 3.4.1 |
| markdown-it-py | 2.2.0 | 2.2.0 | 2.2.0 | 2.2.0 | 2.2.0 | |
| markupsafe | 2.1.3 | 2.1.3 | 2.1.3 | 2.1.3 | 2.1.3 | 2.1.3 |
| matplotlib | 3.8.0 | 3.8.0 | 3.8.0 | 3.8.0 | 3.8.0 | 3.8.0 |
| matplotlib-base | 3.8.0 | 3.8.0 | 3.8.0 | 3.8.0 | 3.8.0 | 3.8.0 |
| matplotlib-inline | 0.1.6 | 0.1.6 | 0.1.6 | 0.1.6 | 0.1.6 | 0.1.6 |
| mccabe | 0.7.0 | 0.7.0 | 0.7.0 | 0.7.0 | 0.7.0 | 0.7.0 |
| mdit-py-plugins | 0.3.0 | 0.3.0 | 0.3.0 | 0.3.0 | 0.3.0 | |
| mdurl | 0.1.0 | 0.1.0 | 0.1.0 | 0.1.0 | 0.1.0 | |
| menuinst | 2.0.2 | 2.0.2 | 2.0.2 | 2.0.2 | 2.0.2 | 2.0.2 |
| mistune | 2.0.4 | 2.0.4 | 2.0.4 | 2.0.4 | 2.0.4 | 2.0.4 |
| mkl | 2023.1.0 | 2023.1.0 | ||||
| mkl-service | 2.4.0 | 2.4.0 | ||||
| mkl\_fft | 1.3.8 | 1.3.8 | ||||
| mkl\_random | 1.2.4 | 1.2.4 | ||||
| mock | 4.0.3 | |||||
| more-itertools | 10.1.0 | 10.1.0 | 10.1.0 | 10.1.0 | 10.1.0 | 10.1.0 |
| mpc | 1.1.0 | 1.1.0 | 1.1.0 | 1.1.0 | 1.1.0 | 1.1.0 |
| mpfr | 4.0.2 | 4.0.2 | 4.0.2 | 4.0.2 | 4.0.2 | 4.0.2 |
| mpir | 3.0.0 | |||||
| mpmath | 1.3.0 | 1.3.0 | 1.3.0 | 1.3.0 | 1.3.0 | 1.3.0 |
| msgpack-python | 1.0.3 | 1.0.3 | 1.0.3 | 1.0.3 | 1.0.3 | 1.0.3 |
| msys2-conda-epoch | 20160418 | |||||
| multidict | 6.0.4 | 6.0.4 | 6.0.4 | 6.0.4 | 6.0.4 | 6.0.4 |
| multipledispatch | 0.6.0 | 0.6.0 | 0.6.0 | 0.6.0 | 0.6.0 | |
| munkres | 1.1.4 | 1.1.4 | 1.1.4 | 1.1.4 | 1.1.4 | 1.1.4 |
| mypy | 1.8.0 | 1.8.0 | 1.8.0 | 1.8.0 | 1.8.0 | 1.8.0 |
| mypy\_extensions | 1.0.0 | 1.0.0 | 1.0.0 | 1.0.0 | 1.0.0 | 1.0.0 |
| mysql | 5.7.24 | 5.7.24 | 5.7.24 | 5.7.24 | ||
| navigator-updater | 0.4.0 | 0.4.0 | 0.4.0 | 0.4.0 | 0.4.0 | |
| nbclassic | 1.0.0 | |||||
| nbclient | 0.8.0 | 0.8.0 | 0.8.0 | 0.8.0 | 0.8.0 | 0.8.0 |
| nbconvert | 7.10.0 | 7.10.0 | 7.10.0 | 7.10.0 | 7.10.0 | 7.10.0 |
| nbformat | 5.9.2 | 5.9.2 | 5.9.2 | 5.9.2 | 5.9.2 | 5.9.2 |
| ncurses | 6.4 | 6.4 | 6.4 | 6.4 | 6.4 | |
| nest-asyncio | 1.6.0 | 1.6.0 | 1.6.0 | 1.6.0 | 1.6.0 | 1.6.0 |
| networkx | 3.1 | 3.1 | 3.1 | 3.1 | 3.1 | 3.1 |
| nltk | 3.8.1 | 3.8.1 | 3.8.1 | 3.8.1 | 3.8.1 | 3.8.1 |
| notebook | 7.0.8 | 7.0.8 | 6.5.4 | 7.0.8 | 7.0.8 | 7.0.8 |
| notebook-shim | 0.2.3 | 0.2.3 | 0.2.3 | 0.2.3 | 0.2.3 | 0.2.3 |
| nspr | 4.35 | 4.35 | ||||
| nss | 3.89.1 | 3.89.1 | ||||
| numba | 0.59.0 | 0.59.0 | 0.59.0 | 0.59.0 | 0.59.0 | |
| numexpr | 2.8.7 | 2.8.7 | 2.8.7 | 2.8.7 | 2.8.7 | 2.8.7 |
| numpy | 1.26.4 | 1.26.4 | 1.26.4 | 1.26.4 | 1.26.4 | 1.26.4 |
| numpy-base | 1.26.4 | 1.26.4 | 1.26.4 | 1.26.4 | 1.26.4 | 1.26.4 |
| numpydoc | 1.5.0 | 1.5.0 | 1.5.0 | 1.5.0 | 1.5.0 | |
| oniguruma | 6.9.7.1 | 6.9.7.1 | 6.9.7.1 | 6.9.7.1 | ||
| openjpeg | 2.4.0 | 2.4.0 | 2.4.0 | 2.3.0 | 2.4.0 | 2.4.0 |
| openpyxl | 3.0.10 | 3.0.10 | 3.0.10 | 3.0.10 | 3.0.10 | 3.0.10 |
| openssl | 3.0.13 | 3.0.13 | 3.0.13 | 3.0.13 | 3.0.13 | 3.0.13 |
| orc | 1.7.4 | 1.7.4 | 1.7.4 | 1.7.4 | 1.7.4 | |
| overrides | 7.4.0 | 7.4.0 | 7.4.0 | 7.4.0 | 7.4.0 | |
| packaging | 23.1 | 23.1 | 23.1 | 23.1 | 23.1 | 23.1 |
| pandas | 2.1.4 | 2.1.4 | 2.1.4 | 2.1.4 | 2.1.4 | 2.1.4 |
| pandocfilters | 1.5.0 | 1.5.0 | 1.5.0 | 1.5.0 | 1.5.0 | 1.5.0 |
| panel | 1.3.8 | 1.3.8 | 0.12.6 | 1.3.8 | 1.3.8 | 1.3.8 |
| param | 2.0.2 | 2.0.2 | 1.13.0 | 2.0.2 | 2.0.2 | 2.0.2 |
| paramiko | 2.8.1 | |||||
| parsel | 1.8.1 | 1.8.1 | 1.8.1 | 1.8.1 | 1.8.1 | |
| parso | 0.8.3 | 0.8.3 | 0.8.3 | 0.8.3 | 0.8.3 | 0.8.3 |
| partd | 1.4.1 | 1.4.1 | 1.4.1 | 1.4.1 | 1.4.1 | 1.4.1 |
| patch | 2.7.6 | 2.7.6 | 2.7.6 | 2.7.6 | 2.7.6 | |
| patchelf | 0.17.2 | 0.17.2 | 0.17.2 | |||
| pathlib | 1.0.1 | 1.0.1 | 1.0.1 | 1.0.1 | 1.0.1 | |
| pathspec | 0.10.3 | 0.10.3 | 0.10.3 | 0.10.3 | 0.10.3 | 0.10.3 |
| patsy | 0.5.3 | 0.5.3 | 0.5.3 | 0.5.3 | 0.5.3 | 0.5.3 |
| pcre2 | 10.42 | 10.42 | 10.42 | 10.42 | 10.42 | 10.42 |
| pexpect | 4.8.0 | 4.8.0 | 4.8.0 | 4.8.0 | 4.8.0 | 4.8.0 |
| pickleshare | 0.7.5 | 0.7.5 | 0.7.5 | 0.7.5 | 0.7.5 | |
| pillow | 10.2.0 | 10.2.0 | 10.2.0 | 10.2.0 | 10.2.0 | 10.2.0 |
| pip | 23.3.1 | 23.3.1 | 23.3.1 | 23.3.1 | 23.3.1 | 23.3.1 |
| pkce | 1.0.3 | 1.0.3 | 1.0.3 | 1.0.3 | 1.0.3 | |
| pkginfo | 1.9.6 | 1.9.6 | 1.9.6 | 1.9.6 | 1.9.6 | 1.9.6 |
| platformdirs | 3.10.0 | 3.10.0 | 3.10.0 | 3.10.0 | 3.10.0 | 3.10.0 |
| plotly | 5.9.0 | 5.9.0 | 5.9.0 | 5.9.0 | 5.9.0 | 5.9.0 |
| pluggy | 1.0.0 | 1.0.0 | 1.0.0 | 1.0.0 | 1.0.0 | 1.0.0 |
| ply | 3.11 | 3.11 | 3.11 | 3.11 | 3.11 | |
| powershell\_shortcut | 0.0.1 | |||||
| prometheus\_client | 0.14.1 | 0.14.1 | 0.14.1 | 0.14.1 | 0.14.1 | 0.14.1 |
| prompt-toolkit | 3.0.43 | 3.0.43 | 3.0.43 | 3.0.43 | 3.0.43 | 3.0.43 |
| prompt\_toolkit | 3.0.43 | 3.0.43 | 3.0.43 | 3.0.43 | 3.0.43 | 3.0.43 |
| protego | 0.1.16 | 0.1.16 | 0.1.16 | 0.1.16 | 0.1.16 | |
| protobuf | 3.20.3 | 3.20.3 | 3.20.3 | 3.20.3 | 3.20.3 | |
| psutil | 5.9.0 | 5.9.0 | 5.9.0 | 5.9.0 | 5.9.0 | 5.9.0 |
| ptyprocess | 0.7.0 | 0.7.0 | 0.7.0 | 0.7.0 | 0.7.0 | 0.7.0 |
| pure\_eval | 0.2.2 | 0.2.2 | 0.2.2 | 0.2.2 | 0.2.2 | 0.2.2 |
| py-cpuinfo | 9.0.0 | 9.0.0 | 9.0.0 | 9.0.0 | 9.0.0 | |
| py-lief | 0.12.3 | 0.12.3 | 0.12.3 | 0.12.3 | 0.12.3 | 0.12.3 |
| pyarrow | 14.0.2 | 14.0.2 | 14.0.2 | 14.0.2 | 14.0.2 | |
| pyasn1 | 0.4.8 | 0.4.8 | 0.4.8 | 0.4.8 | 0.4.8 | |
| pyasn1-modules | 0.2.8 | 0.2.8 | 0.2.8 | 0.2.8 | 0.2.8 | |
| pybind11-abi | 4 | 4 | 4 | 4 | 4 | 4 |
| pycodestyle | 2.10.0 | 2.10.0 | 2.11.1 | 2.10.0 | 2.10.0 | 2.10.0 |
| pycosat | 0.6.6 | 0.6.6 | 0.6.6 | 0.6.6 | 0.6.6 | 0.6.6 |
| pycparser | 2.21 | 2.21 | 2.21 | 2.21 | 2.21 | 2.21 |
| pyct | 0.5.0 | 0.5.0 | 0.5.0 | 0.5.0 | 0.5.0 | 0.5.0 |
| pycurl | 7.45.2 | 7.45.2 | 7.45.2 | 7.45.2 | 7.45.2 | 7.45.2 |
| pydantic | 1.10.12 | 1.10.12 | 1.10.12 | 1.10.12 | 1.10.12 | |
| pydeck | 0.8.0 | 0.8.0 | 0.8.0 | 0.8.0 | 0.8.0 | |
| pydispatcher | 2.0.5 | 2.0.5 | 2.0.5 | 2.0.5 | 2.0.5 | |
| pydocstyle | 6.3.0 | 6.3.0 | 6.3.0 | 6.3.0 | 6.3.0 | |
| pyerfa | 2.0.0 | 2.0.0 | 2.0.0 | 2.0.0 | 2.0.0 | 2.0.0 |
| pyflakes | 3.0.1 | 3.0.1 | 3.1.0 | 3.0.1 | 3.0.1 | 3.0.1 |
| pygments | 2.15.1 | 2.15.1 | 2.15.1 | 2.15.1 | 2.15.1 | 2.15.1 |
| pyjwt | 2.4.0 | 2.4.0 | 2.4.0 | 2.4.0 | 2.4.0 | |
| pylint | 2.16.2 | 2.16.2 | 2.16.2 | 2.16.2 | 2.16.2 | 2.16.2 |
| pylint-venv | 2.3.0 | 2.3.0 | 2.3.0 | 2.3.0 | 2.3.0 | |
| pyls-spyder | 0.4.0 | 0.4.0 | 0.4.0 | 0.4.0 | 0.4.0 | |
| pynacl | 1.5.0 | |||||
| pyobjc-core | 9.0 | 9.0 | ||||
| pyobjc-framework-cocoa | 9.0 | 9.0 | ||||
| pyobjc-framework-coreservices | 9.0 | 9.0 | ||||
| pyobjc-framework-fsevents | 9.0 | 9.0 | ||||
| pyodbc | 5.0.1 | 5.0.1 | 5.0.1 | 5.0.1 | 5.0.1 | 5.0.1 |
| pyopenssl | 24.0.0 | 24.0.0 | 24.0.0 | 24.0.0 | 24.0.0 | |
| pyparsing | 3.0.9 | 3.0.9 | 3.0.9 | 3.0.9 | 3.0.9 | 3.0.9 |
| pyqt | 5.15.10 | 5.15.10 | 5.15.10 | 5.15.10 | 5.15.10 | |
| pyqt5-sip | 12.13.0 | 12.13.0 | 12.13.0 | 12.13.0 | 12.13.0 | |
| pyqtwebengine | 5.15.10 | 5.15.10 | 5.15.10 | 5.15.10 | 5.15.10 | |
| pysocks | 1.7.1 | 1.7.1 | 1.7.1 | 1.7.1 | 1.7.1 | 1.7.1 |
| pytables | 3.9.2 | 3.9.2 | 3.7.0 | 3.9.2 | 3.9.2 | 3.9.2 |
| pytest | 7.4.0 | 7.4.0 | 7.4.0 | 7.4.0 | 7.4.0 | 7.4.0 |
| python | 3.11.7 | 3.11.7 | 3.11.7 | 3.11.7 | 3.11.7 | 3.11.7 |
| python-dateutil | 2.8.2 | 2.8.2 | 2.8.2 | 2.8.2 | 2.8.2 | 2.8.2 |
| python-dotenv | 0.21.0 | 0.21.0 | 0.21.0 | 0.21.0 | 0.21.0 | |
| python-fastjsonschema | 2.16.2 | 2.16.2 | 2.16.2 | 2.16.2 | 2.16.2 | 2.16.2 |
| python-json-logger | 2.0.7 | 2.0.7 | 2.0.7 | 2.0.7 | 2.0.7 | |
| python-libarchive-c | 2.9 | 2.9 | 2.9 | 2.9 | 2.9 | 2.9 |
| python-lmdb | 1.4.1 | 1.4.1 | 1.4.1 | 1.4.1 | 1.4.1 | 1.4.1 |
| python-lsp-black | 1.2.1 | 1.2.1 | 1.2.1 | 1.2.1 | 1.2.1 | |
| python-lsp-jsonrpc | 1.0.0 | 1.0.0 | 1.0.0 | 1.0.0 | 1.0.0 | |
| python-lsp-server | 1.7.2 | 1.7.2 | 1.7.2 | 1.7.2 | 1.7.2 | |
| python-slugify | 5.0.2 | 5.0.2 | 5.0.2 | 5.0.2 | 5.0.2 | |
| python-snappy | 0.6.1 | 0.6.1 | 0.6.1 | 0.6.1 | 0.6.1 | 0.6.1 |
| python-tzdata | 2023.3 | 2023.3 | 2023.3 | 2023.3 | 2023.3 | 2023.3 |
| python.app | 3 | 3 | ||||
| pytoolconfig | 1.2.6 | 1.2.6 | 1.2.6 | 1.2.6 | 1.2.6 | |
| pytz | 2023.3.post1 | 2023.3.post1 | 2023.3.post1 | 2023.3.post1 | 2023.3.post1 | 2023.3.post1 |
| pyviz\_comms | 3.0.0 | 3.0.0 | 2.3.0 | 3.0.0 | 3.0.0 | 3.0.0 |
| pywavelets | 1.5.0 | 1.5.0 | 1.5.0 | 1.5.0 | 1.5.0 | 1.5.0 |
| pywin32 | 305 | |||||
| pywin32-ctypes | 0.2.0 | |||||
| pywinpty | 2.0.10 | |||||
| pyxdg | 0.27 | 0.27 | ||||
| pyyaml | 6.0.1 | 6.0.1 | 6.0.1 | 6.0.1 | 6.0.1 | 6.0.1 |
| pyzmq | 25.1.2 | 25.1.2 | 23.2.0 | 25.1.2 | 25.1.2 | 25.1.2 |
| qdarkstyle | 3.0.2 | 3.0.2 | 3.0.2 | 3.0.2 | 3.0.2 | |
| qstylizer | 0.2.2 | 0.2.2 | 0.2.2 | 0.2.2 | 0.2.2 | |
| qt-main | 5.15.2 | 5.15.2 | 5.15.2 | 5.15.2 | 5.15.2 | |
| qt-webengine | 5.15.9 | 5.15.9 | 5.15.9 | 5.15.9 | 5.15.9 | |
| qtawesome | 1.2.2 | 1.2.2 | 1.2.2 | 1.2.2 | 1.2.2 | |
| qtconsole | 5.4.2 | 5.4.2 | 5.4.2 | 5.4.2 | 5.4.2 | |
| qtpy | 2.4.1 | 2.4.1 | 2.4.1 | 2.4.1 | 2.4.1 | |
| queuelib | 1.6.2 | 1.6.2 | 1.6.2 | 1.6.2 | 1.6.2 | |
| re2 | 2022.04.01 | 2022.04.01 | 2022.04.01 | 2022.04.01 | 2022.04.01 | |
| readline | 8.2 | 8.2 | 8.2 | 8.2 | 8.2 | |
| referencing | 0.30.2 | 0.30.2 | 0.30.2 | 0.30.2 | 0.30.2 | 0.30.2 |
| regex | 2023.10.3 | 2023.10.3 | 2023.10.3 | 2023.10.3 | 2023.10.3 | 2023.10.3 |
| reproc | 14.2.4 | 14.2.4 | 14.2.4 | 14.2.4 | 14.2.4 | 14.2.4 |
| reproc-cpp | 14.2.4 | 14.2.4 | 14.2.4 | 14.2.4 | 14.2.4 | 14.2.4 |
| requests | 2.31.0 | 2.31.0 | 2.31.0 | 2.31.0 | 2.31.0 | 2.31.0 |
| requests-file | 1.5.1 | 1.5.1 | 1.5.1 | 1.5.1 | 1.5.1 | |
| requests-toolbelt | 1.0.0 | 1.0.0 | 1.0.0 | 1.0.0 | 1.0.0 | 1.0.0 |
| rfc3339-validator | 0.1.4 | 0.1.4 | 0.1.4 | 0.1.4 | 0.1.4 | |
| rfc3986-validator | 0.1.1 | 0.1.1 | 0.1.1 | 0.1.1 | 0.1.1 | |
| rich | 13.3.5 | 13.3.5 | 13.3.5 | 13.3.5 | 13.3.5 | |
| rope | 1.7.0 | 1.7.0 | 1.7.0 | 1.7.0 | 1.7.0 | |
| rpds-py | 0.10.6 | 0.10.6 | 0.10.6 | 0.10.6 | 0.10.6 | 0.10.6 |
| rtree | 1.0.1 | 1.0.1 | 1.0.1 | 1.0.1 | 1.0.1 | |
| ruamel.yaml | 0.17.21 | 0.17.21 | 0.17.21 | 0.17.21 | 0.17.21 | 0.17.21 |
| ruamel\_yaml | 0.17.21 | 0.17.21 | 0.17.21 | 0.17.21 | 0.17.21 | 0.17.21 |
| s2n | 1.3.27 | 1.3.27 | ||||
| s3fs | 2023.10.0 | 2023.10.0 | 2023.10.0 | 2023.10.0 | 2023.10.0 | 2023.10.0 |
| scikit-image | 0.22.0 | 0.22.0 | 0.22.0 | 0.22.0 | 0.22.0 | 0.22.0 |
| scikit-learn | 1.2.2 | 1.2.2 | 1.2.2 | 1.2.2 | 1.2.2 | 1.2.2 |
| scipy | 1.11.4 | 1.11.4 | 1.11.4 | 1.11.4 | 1.11.4 | 1.11.4 |
| scrapy | 2.8.0 | 2.8.0 | 2.8.0 | 2.8.0 | 2.8.0 | |
| seaborn | 0.12.2 | 0.12.2 | 0.12.2 | 0.12.2 | 0.12.2 | 0.12.2 |
| secretstorage | 3.3.1 | 3.3.1 | ||||
| semver | 2.13.0 | 2.13.0 | 2.13.0 | 2.13.0 | 2.13.0 | |
| send2trash | 1.8.2 | 1.8.2 | 1.8.2 | 1.8.2 | 1.8.2 | 1.8.2 |
| service\_identity | 18.1.0 | 18.1.0 | 18.1.0 | 18.1.0 | 18.1.0 | |
| setuptools | 68.2.2 | 68.2.2 | 68.2.2 | 68.2.2 | 68.2.2 | 68.2.2 |
| sip | 6.7.12 | 6.7.12 | 6.7.12 | 6.7.12 | 6.7.12 | |
| six | 1.16.0 | 1.16.0 | 1.16.0 | 1.16.0 | 1.16.0 | 1.16.0 |
| smart\_open | 5.2.1 | 5.2.1 | 5.2.1 | 5.2.1 | 5.2.1 | |
| smmap | 4.0.0 | 4.0.0 | 4.0.0 | 4.0.0 | 4.0.0 | |
| snappy | 1.1.10 | 1.1.10 | 1.1.10 | 1.1.10 | 1.1.10 | 1.1.10 |
| sniffio | 1.3.0 | 1.3.0 | 1.3.0 | 1.3.0 | 1.3.0 | 1.3.0 |
| snowballstemmer | 2.2.0 | 2.2.0 | 2.2.0 | 2.2.0 | 2.2.0 | 2.2.0 |
| sortedcontainers | 2.4.0 | 2.4.0 | 2.4.0 | 2.4.0 | 2.4.0 | 2.4.0 |
| soupsieve | 2.5 | 2.5 | 2.5 | 2.5 | 2.5 | 2.5 |
| sphinx | 5.0.2 | 5.0.2 | 5.0.2 | 5.0.2 | 5.0.2 | |
| sphinxcontrib-applehelp | 1.0.2 | 1.0.2 | 1.0.2 | 1.0.2 | 1.0.2 | |
| sphinxcontrib-devhelp | 1.0.2 | 1.0.2 | 1.0.2 | 1.0.2 | 1.0.2 | |
| sphinxcontrib-htmlhelp | 2.0.0 | 2.0.0 | 2.0.0 | 2.0.0 | 2.0.0 | |
| sphinxcontrib-jsmath | 1.0.1 | 1.0.1 | 1.0.1 | 1.0.1 | 1.0.1 | |
| sphinxcontrib-qthelp | 1.0.3 | 1.0.3 | 1.0.3 | 1.0.3 | 1.0.3 | |
| sphinxcontrib-serializinghtml | 1.1.5 | 1.1.5 | 1.1.5 | 1.1.5 | 1.1.5 | |
| spyder | 5.4.3 | 5.4.3 | 5.4.3 | 5.4.3 | 5.4.3 | |
| spyder-kernels | 2.4.4 | 2.4.4 | 2.4.4 | 2.4.4 | 2.4.4 | |
| sqlalchemy | 2.0.25 | 2.0.25 | 2.0.25 | 2.0.25 | 2.0.25 | 2.0.25 |
| sqlite | 3.41.2 | 3.41.2 | 3.41.2 | 3.41.2 | 3.41.2 | 3.41.2 |
| stack\_data | 0.2.0 | 0.2.0 | 0.2.0 | 0.2.0 | 0.2.0 | 0.2.0 |
| statsmodels | 0.14.0 | 0.14.0 | 0.14.0 | 0.14.0 | 0.14.0 | 0.14.0 |
| streamlit | 1.30.0 | 1.30.0 | 1.30.0 | 1.30.0 | 1.30.0 | |
| sympy | 1.12 | 1.12 | 1.12 | 1.12 | 1.12 | 1.12 |
| tabulate | 0.9.0 | 0.9.0 | 0.9.0 | 0.9.0 | 0.9.0 | 0.9.0 |
| tapi | 1100.0.11 | 1000.10.8 | ||||
| tbb | 2021.8.0 | 2021.8.0 | 2021.8.0 | 2021.8.0 | 2021.8.0 | |
| tblib | 1.7.0 | 1.7.0 | 1.7.0 | 1.7.0 | 1.7.0 | 1.7.0 |
| tenacity | 8.2.2 | 8.2.2 | 8.2.2 | 8.2.2 | 8.2.2 | 8.2.2 |
| terminado | 0.17.1 | 0.17.1 | 0.17.1 | 0.17.1 | 0.17.1 | 0.17.1 |
| text-unidecode | 1.3 | 1.3 | 1.3 | 1.3 | 1.3 | |
| textdistance | 4.2.1 | 4.2.1 | 4.2.1 | 4.2.1 | 4.2.1 | |
| threadpoolctl | 2.2.0 | 2.2.0 | 2.2.0 | 2.2.0 | 2.2.0 | 2.2.0 |
| three-merge | 0.1.1 | 0.1.1 | 0.1.1 | 0.1.1 | 0.1.1 | |
| tifffile | 2023.4.12 | 2023.4.12 | 2023.4.12 | 2023.4.12 | 2023.4.12 | 2023.4.12 |
| tinycss2 | 1.2.1 | 1.2.1 | 1.2.1 | 1.2.1 | 1.2.1 | 1.2.1 |
| tk | 8.6.12 | 8.6.12 | 8.6.12 | 8.6.12 | 8.6.12 | 8.6.12 |
| tldextract | 3.2.0 | 3.2.0 | 3.2.0 | 3.2.0 | 3.2.0 | |
| toml | 0.10.2 | 0.10.2 | 0.10.2 | 0.10.2 | 0.10.2 | |
| tomlkit | 0.11.1 | 0.11.1 | 0.11.1 | 0.11.1 | 0.11.1 | 0.11.1 |
| toolz | 0.12.0 | 0.12.0 | 0.12.0 | 0.12.0 | 0.12.0 | 0.12.0 |
| tornado | 6.3.3 | 6.3.3 | 6.3.3 | 6.3.3 | 6.3.3 | 6.3.3 |
| tqdm | 4.65.0 | 4.65.0 | 4.65.0 | 4.65.0 | 4.65.0 | 4.65.0 |
| traitlets | 5.7.1 | 5.7.1 | 5.7.1 | 5.7.1 | 5.7.1 | 5.7.1 |
| truststore | 0.8.0 | 0.8.0 | 0.8.0 | 0.8.0 | 0.8.0 | 0.8.0 |
| twisted | 23.10.0 | 23.10.0 | 23.10.0 | 23.10.0 | 23.10.0 | |
| twisted-iocpsupport | 1.0.2 | |||||
| typing-extensions | 4.9.0 | 4.9.0 | 4.9.0 | 4.9.0 | 4.9.0 | 4.9.0 |
| typing\_extensions | 4.9.0 | 4.9.0 | 4.9.0 | 4.9.0 | 4.9.0 | 4.9.0 |
| tzdata | 2023d | 2023d | 2023d | 2023d | 2023d | 2023d |
| tzlocal | 2.1 | 2.1 | 2.1 | 2.1 | 2.1 | |
| uc-micro-py | 1.0.1 | 1.0.1 | 1.0.1 | 1.0.1 | 1.0.1 | |
| ujson | 5.4.0 | 5.4.0 | 5.4.0 | 5.4.0 | 5.4.0 | |
| unidecode | 1.2.0 | 1.2.0 | 1.2.0 | 1.2.0 | 1.2.0 | |
| unixodbc | 2.3.11 | 2.3.11 | 2.3.11 | 2.3.11 | 2.3.11 | |
| urllib3 | 2.0.7 | 2.0.7 | 2.0.7 | 2.0.7 | 2.0.7 | 2.0.7 |
| utf8proc | 2.6.1 | 2.6.1 | 2.6.1 | 2.6.1 | 2.6.1 | |
| validators | 0.18.2 | 0.18.2 | 0.18.2 | 0.18.2 | 0.18.2 | |
| vc | 14.2 | |||||
| vs2015\_runtime | 14.27.29016 | |||||
| w3lib | 2.1.2 | 2.1.2 | 2.1.2 | 2.1.2 | 2.1.2 | |
| watchdog | 2.1.6 | 2.1.6 | 2.1.6 | 2.1.6 | 2.1.6 | |
| wcwidth | 0.2.5 | 0.2.5 | 0.2.5 | 0.2.5 | 0.2.5 | 0.2.5 |
| webencodings | 0.5.1 | 0.5.1 | 0.5.1 | 0.5.1 | 0.5.1 | 0.5.1 |
| websocket-client | 0.58.0 | 0.58.0 | 0.58.0 | 0.58.0 | 0.58.0 | 0.58.0 |
| werkzeug | 2.2.3 | 2.2.3 | 2.3.8 | 2.2.3 | 2.2.3 | 2.2.3 |
| whatthepatch | 1.0.2 | 1.0.2 | 1.0.2 | 1.0.2 | 1.0.2 | |
| wheel | 0.41.2 | 0.41.2 | 0.41.2 | 0.41.2 | 0.41.2 | 0.41.2 |
| widgetsnbextension | 3.5.2 | 3.5.2 | 3.5.2 | 3.5.2 | 3.5.2 | |
| win\_inet\_pton | 1.1.0 | |||||
| winpty | 0.4.3 | |||||
| wrapt | 1.14.1 | 1.14.1 | 1.14.1 | 1.14.1 | 1.14.1 | 1.14.1 |
| wurlitzer | 3.0.2 | 3.0.2 | 3.0.2 | 3.0.2 | ||
| xarray | 2023.6.0 | 2023.6.0 | 2023.6.0 | 2023.6.0 | 2023.6.0 | |
| xlwings | 0.29.1 | 0.29.1 | 0.29.1 | |||
| xyzservices | 2022.9.0 | 2022.9.0 | 2022.9.0 | 2022.9.0 | 2022.9.0 | |
| xz | 5.4.5 | 5.4.5 | 5.4.5 | 5.4.5 | 5.4.5 | 5.4.5 |
| yaml | 0.2.5 | 0.2.5 | 0.2.5 | 0.2.5 | 0.2.5 | 0.2.5 |
| yaml-cpp | 0.8.0 | 0.8.0 | 0.8.0 | 0.8.0 | 0.8.0 | 0.8.0 |
| yapf | 0.31.0 | 0.31.0 | 0.31.0 | 0.31.0 | 0.31.0 | |
| yarl | 1.9.3 | 1.9.3 | 1.9.3 | 1.9.3 | 1.9.3 | 1.9.3 |
| zeromq | 4.3.5 | 4.3.5 | 4.3.5 | 4.3.5 | 4.3.5 | 4.3.5 |
| zfp | 1.0.0 | 1.0.0 | 1.0.0 | 1.0.0 | ||
| zict | 3.0.0 | 3.0.0 | 3.0.0 | 3.0.0 | 3.0.0 | 3.0.0 |
| zipp | 3.17.0 | 3.17.0 | 3.17.0 | 3.17.0 | 3.17.0 | 3.17.0 |
| zlib | 1.2.13 | 1.2.13 | 1.2.13 | 1.2.13 | 1.2.13 | 1.2.13 |
| zlib-ng | 2.0.7 | 2.0.7 | 2.0.7 | 2.0.7 | 2.0.7 | |
| zope | 1.0 | 1.0 | 1.0 | 1.0 | 1.0 | |
| zope.interface | 5.4.0 | 5.4.0 | 5.4.0 | 5.4.0 | 5.4.0 | |
| zstandard | 0.19.0 | 0.19.0 | 0.19.0 | 0.19.0 | 0.19.0 | 0.19.0 |
| zstd | 1.5.5 | 1.5.5 | 1.5.5 | 1.5.5 | 1.5.5 | 1.5.5 |
| Package Name | linux-64 | linux-aarch64 | linux-s390x |
|---|---|---|---|
| \_anaconda\_depends | 2024.02 | 2024.02 | 2024.02 |
| \_libgcc\_mutex | 0.1 | 0.1 | 0.1 |
| \_openmp\_mutex | 5.1 | 5.1 | 5.1 |
| abseil-cpp | 20211102.0 | 20211102.0 | |
| aiobotocore | 2.7.0 | 2.7.0 | 2.7.0 |
| aiohttp | 3.9.3 | 3.9.3 | 3.9.3 |
| aioitertools | 0.7.1 | 0.7.1 | 0.7.1 |
| aiosignal | 1.2.0 | 1.2.0 | 1.2.0 |
| alabaster | 0.7.12 | 0.7.12 | |
| altair | 5.0.1 | 5.0.1 | |
| anaconda-anon-usage | 0.4.3 | 0.4.3 | 0.4.3 |
| anaconda-catalogs | 0.2.0 | 0.2.0 | 0.2.0 |
| anaconda-client | 1.12.3 | 1.12.3 | 1.12.3 |
| anaconda-cloud-auth | 0.1.4 | 0.1.4 | |
| anaconda-navigator | 2.5.2 | 2.5.2 | |
| anaconda-project | 0.11.1 | 0.11.1 | 0.11.1 |
| anyio | 4.2.0 | 4.2.0 | 3.5.0 |
| aom | 3.6.0 | 3.6.0 | 3.6.0 |
| appdirs | 1.4.4 | 1.4.4 | 1.4.4 |
| archspec | 0.2.1 | 0.2.1 | 0.2.1 |
| argon2-cffi | 21.3.0 | 21.3.0 | 21.3.0 |
| argon2-cffi-bindings | 21.2.0 | 21.2.0 | 21.2.0 |
| arrow | 1.2.3 | 1.2.3 | |
| arrow-cpp | 14.0.2 | 14.0.2 | |
| astroid | 2.14.2 | 2.14.2 | 2.14.2 |
| astropy | 5.3.4 | 5.3.4 | 5.3.4 |
| asttokens | 2.0.5 | 2.0.5 | 2.0.5 |
| async-lru | 2.0.4 | 2.0.4 | |
| atomicwrites | 1.4.0 | 1.4.0 | |
| attrs | 23.1.0 | 23.1.0 | 23.1.0 |
| automat | 20.2.0 | 20.2.0 | |
| autopep8 | 1.6.0 | 1.6.0 | |
| aws-c-auth | 0.6.19 | 0.6.19 | |
| aws-c-cal | 0.5.20 | 0.5.20 | |
| aws-c-common | 0.8.5 | 0.8.5 | |
| aws-c-compression | 0.2.16 | 0.2.16 | |
| aws-c-event-stream | 0.2.15 | 0.2.15 | |
| aws-c-http | 0.6.25 | 0.6.25 | |
| aws-c-io | 0.13.10 | 0.13.10 | |
| aws-c-mqtt | 0.7.13 | 0.7.13 | |
| aws-c-s3 | 0.1.51 | 0.1.51 | |
| aws-c-sdkutils | 0.1.6 | 0.1.6 | |
| aws-checksums | 0.1.13 | 0.1.13 | |
| aws-crt-cpp | 0.18.16 | 0.18.16 | |
| aws-sdk-cpp | 1.10.55 | 1.10.55 | |
| babel | 2.11.0 | 2.11.0 | |
| backports | 1.1 | 1.1 | 1.1 |
| backports.functools\_lru\_cache | 1.6.4 | 1.6.4 | 1.6.4 |
| backports.tempfile | 1.0 | 1.0 | 1.0 |
| backports.weakref | 1.0.post1 | 1.0.post1 | 1.0.post1 |
| bcrypt | 3.2.0 | 3.2.0 | |
| beautifulsoup4 | 4.12.2 | 4.12.2 | 4.12.2 |
| binaryornot | 0.4.4 | 0.4.4 | |
| black | 23.11.0 | 23.11.0 | 23.11.0 |
| blas | 1.0 | 1.0 | 1.0 |
| bleach | 4.1.0 | 4.1.0 | 4.1.0 |
| blinker | 1.6.2 | 1.6.2 | |
| blosc | 1.21.3 | 1.21.3 | 1.21.3 |
| bokeh | 3.3.4 | 3.3.4 | 2.4.3 |
| boltons | 23.0.0 | 23.0.0 | 23.0.0 |
| boost-cpp | 1.82.0 | 1.82.0 | |
| botocore | 1.31.64 | 1.31.64 | 1.31.64 |
| bottleneck | 1.3.7 | 1.3.7 | 1.3.7 |
| brotli | 1.0.9 | 1.0.9 | 1.0.9 |
| brotli-bin | 1.0.9 | 1.0.9 | 1.0.9 |
| brotli-python | 1.0.9 | 1.0.9 | 1.0.9 |
| brunsli | 0.1 | 0.1 | |
| bzip2 | 1.0.8 | 1.0.8 | 1.0.8 |
| c-ares | 1.19.1 | 1.19.1 | 1.19.1 |
| c-blosc2 | 2.12.0 | 2.12.0 | |
| ca-certificates | 2023.12.12 | 2023.12.12 | 2023.12.12 |
| cachetools | 4.2.2 | 4.2.2 | |
| certifi | 2024.2.2 | 2024.2.2 | 2024.2.2 |
| cffi | 1.16.0 | 1.16.0 | 1.16.0 |
| cfitsio | 3.470 | 3.470 | 3.470 |
| chardet | 4.0.0 | 4.0.0 | 4.0.0 |
| charls | 2.2.0 | 2.2.0 | |
| charset-normalizer | 2.0.4 | 2.0.4 | 2.0.4 |
| click | 8.1.7 | 8.1.7 | 8.1.7 |
| cloudpickle | 2.2.1 | 2.2.1 | 2.2.1 |
| clyent | 1.2.2 | 1.2.2 | |
| colorama | 0.4.6 | 0.4.6 | 0.4.6 |
| colorcet | 3.0.1 | 3.0.1 | 3.0.1 |
| comm | 0.1.2 | 0.1.2 | 0.1.2 |
| conda | 24.1.2 | 24.1.2 | 24.1.2 |
| conda-build | 24.1.2 | 24.1.2 | 24.1.2 |
| conda-content-trust | 0.2.0 | 0.2.0 | 0.2.0 |
| conda-index | 0.4.0 | 0.4.0 | 0.4.0 |
| conda-libmamba-solver | 24.1.0 | 24.1.0 | 24.1.0 |
| conda-pack | 0.6.0 | 0.6.0 | 0.6.0 |
| conda-package-handling | 2.2.0 | 2.2.0 | 2.2.0 |
| conda-package-streaming | 0.9.0 | 0.9.0 | 0.9.0 |
| conda-repo-cli | 1.0.75 | 1.0.75 | |
| conda-token | 0.4.0 | 0.4.0 | 0.4.0 |
| conda-verify | 3.4.2 | 3.4.2 | 3.4.2 |
| constantly | 23.10.4 | 23.10.4 | |
| contourpy | 1.2.0 | 1.2.0 | 1.2.0 |
| cookiecutter | 2.5.0 | 2.5.0 | |
| cryptography | 42.0.2 | 42.0.2 | 42.0.2 |
| cssselect | 1.2.0 | 1.2.0 | |
| curl | 8.5.0 | 8.5.0 | 8.5.0 |
| cycler | 0.11.0 | 0.11.0 | 0.11.0 |
| cyrus-sasl | 2.1.28 | 2.1.28 | |
| cytoolz | 0.12.2 | 0.12.2 | 0.12.2 |
| dask | 2023.11.0 | 2023.11.0 | 2023.11.0 |
| dask-core | 2023.11.0 | 2023.11.0 | 2023.11.0 |
| datashader | 0.16.0 | 0.16.0 | |
| dav1d | 1.2.1 | 1.2.1 | 1.2.1 |
| dbus | 1.13.18 | 1.13.18 | |
| debugpy | 1.6.7 | 1.6.7 | 1.6.7 |
| decorator | 5.1.1 | 5.1.1 | 5.1.1 |
| defusedxml | 0.7.1 | 0.7.1 | 0.7.1 |
| diff-match-patch | 20200713 | 20200713 | |
| dill | 0.3.7 | 0.3.7 | 0.3.7 |
| distributed | 2023.11.0 | 2023.11.0 | 2023.11.0 |
| distro | 1.8.0 | 1.8.0 | 1.8.0 |
| docstring-to-markdown | 0.11 | 0.11 | |
| docutils | 0.18.1 | 0.18.1 | |
| entrypoints | 0.4 | 0.4 | 0.4 |
| et\_xmlfile | 1.1.0 | 1.1.0 | 1.1.0 |
| executing | 0.8.3 | 0.8.3 | 0.8.3 |
| expat | 2.5.0 | 2.5.0 | |
| filelock | 3.13.1 | 3.13.1 | 3.13.1 |
| flake8 | 6.0.0 | 6.0.0 | |
| flask | 2.2.5 | 2.2.5 | 2.2.5 |
| fmt | 9.1.0 | 9.1.0 | 9.1.0 |
| fontconfig | 2.14.1 | 2.14.1 | |
| fonttools | 4.25.0 | 4.25.0 | 4.25.0 |
| freetype | 2.12.1 | 2.12.1 | 2.12.1 |
| frozenlist | 1.4.0 | 1.4.0 | 1.4.0 |
| fsspec | 2023.10.0 | 2023.10.0 | 2023.10.0 |
| future | 0.18.3 | 0.18.3 | 0.18.3 |
| gensim | 4.3.0 | 4.3.0 | |
| gflags | 2.2.2 | 2.2.2 | |
| giflib | 5.2.1 | 5.2.1 | 5.2.1 |
| gitdb | 4.0.7 | 4.0.7 | |
| gitpython | 3.1.37 | 3.1.37 | |
| glib | 2.78.4 | 2.78.4 | |
| glib-tools | 2.78.4 | 2.78.4 | |
| glog | 0.5.0 | 0.5.0 | |
| gmp | 6.2.1 | 6.2.1 | 6.2.1 |
| gmpy2 | 2.1.2 | 2.1.2 | 2.1.2 |
| greenlet | 3.0.1 | 3.0.1 | 3.0.1 |
| grpc-cpp | 1.48.2 | 1.48.2 | |
| gst-plugins-base | 1.14.1 | 1.14.1 | |
| gstreamer | 1.14.1 | 1.14.1 | |
| h5py | 3.9.0 | 3.9.0 | 3.7.0 |
| hdf5 | 1.12.1 | 1.12.1 | 1.10.6 |
| heapdict | 1.0.1 | 1.0.1 | 1.0.1 |
| holoviews | 1.18.3 | 1.18.3 | 1.14.8 |
| hvplot | 0.9.2 | 0.9.2 | 0.7.3 |
| hyperlink | 21.0.0 | 21.0.0 | |
| icu | 73.1 | 73.1 | 73.1 |
| idna | 3.4 | 3.4 | 3.3 |
| imagecodecs | 2023.1.23 | 2023.1.23 | 2023.1.23 |
| imageio | 2.33.1 | 2.33.1 | 2.33.1 |
| imagesize | 1.4.1 | 1.4.1 | |
| imbalanced-learn | 0.11.0 | 0.11.0 | 0.11.0 |
| importlib-metadata | 7.0.1 | 7.0.1 | 7.0.1 |
| importlib\_metadata | 7.0.1 | 7.0.1 | |
| incremental | 22.10.0 | 22.10.0 | |
| inflection | 0.5.1 | 0.5.1 | |
| iniconfig | 1.1.1 | 1.1.1 | 1.1.1 |
| intake | 0.6.8 | 0.6.8 | 0.6.8 |
| intel-openmp | 2023.1.0 | ||
| intervaltree | 3.1.0 | 3.1.0 | |
| ipykernel | 6.28.0 | 6.28.0 | 6.25.0 |
| ipython | 8.20.0 | 8.20.0 | 8.20.0 |
| ipython\_genutils | 0.2.0 | 0.2.0 | 0.2.0 |
| ipywidgets | 7.6.5 | 7.6.5 | |
| isort | 5.9.3 | 5.9.3 | 5.9.3 |
| itemadapter | 0.3.0 | 0.3.0 | |
| itemloaders | 1.1.0 | 1.1.0 | |
| itsdangerous | 2.0.1 | 2.0.1 | 2.0.1 |
| jaraco.classes | 3.2.1 | 3.2.1 | |
| jedi | 0.18.1 | 0.18.1 | 0.18.1 |
| jeepney | 0.7.1 | 0.7.1 | |
| jellyfish | 1.0.1 | 1.0.1 | |
| jinja2 | 3.1.3 | 3.1.3 | 3.1.3 |
| jmespath | 1.0.1 | 1.0.1 | 1.0.1 |
| joblib | 1.2.0 | 1.2.0 | 1.2.0 |
| jpeg | 9e | 9e | 9e |
| jq | 1.6 | 1.6 | |
| json5 | 0.9.6 | 0.9.6 | |
| jsonpatch | 1.32 | 1.32 | 1.32 |
| jsonpointer | 2.1 | 2.1 | 2.1 |
| jsonschema | 4.19.2 | 4.19.2 | 4.19.2 |
| jsonschema-specifications | 2023.7.1 | 2023.7.1 | 2023.7.1 |
| jupyter | 1.0.0 | 1.0.0 | 1.0.0 |
| jupyter-lsp | 2.2.0 | 2.2.0 | |
| jupyter\_client | 8.6.0 | 8.6.0 | 7.4.9 |
| jupyter\_console | 6.6.3 | 6.6.3 | 6.6.3 |
| jupyter\_core | 5.5.0 | 5.5.0 | 5.5.0 |
| jupyter\_events | 0.8.0 | 0.8.0 | |
| jupyter\_server | 2.10.0 | 2.10.0 | 1.23.4 |
| jupyter\_server\_terminals | 0.4.4 | 0.4.4 | |
| jupyterlab | 4.0.11 | 4.0.11 | |
| jupyterlab-variableinspector | 3.1.0 | 3.1.0 | |
| jupyterlab\_pygments | 0.1.2 | 0.1.2 | 0.2.2 |
| jupyterlab\_server | 2.25.1 | 2.25.1 | |
| jupyterlab\_widgets | 3.0.9 | 3.0.9 | |
| jxrlib | 1.1 | 1.1 | 1.1 |
| keyring | 23.13.1 | 23.13.1 | |
| kiwisolver | 1.4.4 | 1.4.4 | 1.4.4 |
| krb5 | 1.20.1 | 1.20.1 | 1.20.1 |
| lazy-object-proxy | 1.6.0 | 1.6.0 | 1.6.0 |
| lazy\_loader | 0.3 | 0.3 | 0.3 |
| lcms2 | 2.12 | 2.12 | 2.12 |
| ld\_impl\_linux-64 | 2.38 | ||
| ld\_impl\_linux-aarch64 | 2.38 | ||
| ld\_impl\_linux-s390x | 2.38 | ||
| lerc | 3.0 | 3.0 | 3.0 |
| libaec | 1.0.4 | 1.0.4 | 1.0.4 |
| libarchive | 3.6.2 | 3.6.2 | 3.6.2 |
| libavif | 0.11.1 | 0.11.1 | 0.11.1 |
| libboost | 1.82.0 | 1.82.0 | |
| libbrotlicommon | 1.0.9 | 1.0.9 | 1.0.9 |
| libbrotlidec | 1.0.9 | 1.0.9 | 1.0.9 |
| libbrotlienc | 1.0.9 | 1.0.9 | 1.0.9 |
| libclang | 14.0.6 | 14.0.6 | |
| libclang13 | 14.0.6 | 14.0.6 | |
| libcups | 2.4.2 | 2.4.2 | |
| libcurl | 8.5.0 | 8.5.0 | 8.5.0 |
| libdeflate | 1.17 | 1.17 | 1.17 |
| libedit | 3.1.20230828 | 3.1.20230828 | 3.1.20230828 |
| libev | 4.33 | 4.33 | 4.33 |
| libevent | 2.1.12 | 2.1.12 | |
| libffi | 3.4.4 | 3.4.4 | 3.4.2 |
| libgcc-ng | 11.2.0 | 11.2.0 | 11.2.0 |
| libgfortran-ng | 11.2.0 | 11.2.0 | 11.2.0 |
| libgfortran5 | 11.2.0 | 11.2.0 | 11.2.0 |
| libglib | 2.78.4 | 2.78.4 | |
| libgomp | 11.2.0 | 11.2.0 | 11.2.0 |
| libiconv | 1.16 | 1.16 | |
| liblief | 0.12.3 | 0.12.3 | 0.12.3 |
| libllvm14 | 14.0.6 | 14.0.6 | |
| libmamba | 1.5.6 | 1.5.6 | 1.5.6 |
| libmambapy | 1.5.6 | 1.5.6 | 1.5.6 |
| libnghttp2 | 1.57.0 | 1.57.0 | 1.57.0 |
| libopenblas | 0.3.21 | 0.3.21 | |
| libpng | 1.6.39 | 1.6.39 | 1.6.39 |
| libpq | 12.17 | 12.17 | |
| libprotobuf | 3.20.3 | 3.20.3 | |
| libsodium | 1.0.18 | 1.0.18 | 1.0.18 |
| libsolv | 0.7.24 | 0.7.24 | 0.7.24 |
| libspatialindex | 1.9.3 | 1.9.3 | |
| libssh2 | 1.10.0 | 1.10.0 | 1.10.0 |
| libstdcxx-ng | 11.2.0 | 11.2.0 | 11.2.0 |
| libthrift | 0.15.0 | 0.15.0 | |
| libtiff | 4.5.1 | 4.5.1 | 4.5.1 |
| libuuid | 1.41.5 | 1.41.5 | 1.41.5 |
| libwebp-base | 1.3.2 | 1.3.2 | 1.3.2 |
| libxcb | 1.15 | 1.15 | |
| libxkbcommon | 1.0.1 | 1.0.1 | |
| libxml2 | 2.10.4 | 2.10.4 | 2.10.4 |
| libxslt | 1.1.37 | 1.1.37 | |
| libzopfli | 1.0.3 | 1.0.3 | 1.0.3 |
| linkify-it-py | 2.0.0 | 2.0.0 | |
| llvmlite | 0.42.0 | 0.42.0 | |
| locket | 1.0.0 | 1.0.0 | 1.0.0 |
| lxml | 4.9.3 | 4.9.3 | |
| lz4 | 4.3.2 | 4.3.2 | 4.3.2 |
| lz4-c | 1.9.4 | 1.9.4 | 1.9.4 |
| lzo | 2.10 | 2.10 | 2.10 |
| markdown | 3.4.1 | 3.4.1 | 3.4.1 |
| markdown-it-py | 2.2.0 | 2.2.0 | |
| markupsafe | 2.1.3 | 2.1.3 | 2.1.3 |
| matplotlib | 3.8.0 | 3.8.0 | 3.8.0 |
| matplotlib-base | 3.8.0 | 3.8.0 | 3.8.0 |
| matplotlib-inline | 0.1.6 | 0.1.6 | 0.1.6 |
| mccabe | 0.7.0 | 0.7.0 | 0.7.0 |
| mdit-py-plugins | 0.3.0 | 0.3.0 | |
| mdurl | 0.1.0 | 0.1.0 | |
| menuinst | 2.0.2 | 2.0.2 | 2.0.2 |
| mistune | 2.0.4 | 2.0.4 | 2.0.4 |
| mkl | 2023.1.0 | ||
| mkl-service | 2.4.0 | ||
| mkl\_fft | 1.3.8 | ||
| mkl\_random | 1.2.4 | ||
| mock | 4.0.3 | ||
| more-itertools | 10.1.0 | 10.1.0 | 10.1.0 |
| mpc | 1.1.0 | 1.1.0 | 1.1.0 |
| mpfr | 4.0.2 | 4.0.2 | 4.0.2 |
| mpmath | 1.3.0 | 1.3.0 | 1.3.0 |
| msgpack-python | 1.0.3 | 1.0.3 | 1.0.3 |
| multidict | 6.0.4 | 6.0.4 | 6.0.4 |
| multipledispatch | 0.6.0 | 0.6.0 | |
| munkres | 1.1.4 | 1.1.4 | 1.1.4 |
| mypy | 1.8.0 | 1.8.0 | 1.8.0 |
| mypy\_extensions | 1.0.0 | 1.0.0 | 1.0.0 |
| mysql | 5.7.24 | 5.7.24 | |
| navigator-updater | 0.4.0 | 0.4.0 | |
| nbclassic | 1.0.0 | ||
| nbclient | 0.8.0 | 0.8.0 | 0.8.0 |
| nbconvert | 7.10.0 | 7.10.0 | 7.10.0 |
| nbformat | 5.9.2 | 5.9.2 | 5.9.2 |
| ncurses | 6.4 | 6.4 | 6.4 |
| nest-asyncio | 1.6.0 | 1.6.0 | 1.6.0 |
| networkx | 3.1 | 3.1 | 3.1 |
| nltk | 3.8.1 | 3.8.1 | 3.8.1 |
| notebook | 7.0.8 | 7.0.8 | 6.5.4 |
| notebook-shim | 0.2.3 | 0.2.3 | 0.2.3 |
| nspr | 4.35 | 4.35 | |
| nss | 3.89.1 | 3.89.1 | |
| numba | 0.59.0 | 0.59.0 | |
| numexpr | 2.8.7 | 2.8.7 | 2.8.7 |
| numpy | 1.26.4 | 1.26.4 | 1.26.4 |
| numpy-base | 1.26.4 | 1.26.4 | 1.26.4 |
| numpydoc | 1.5.0 | 1.5.0 | |
| oniguruma | 6.9.7.1 | 6.9.7.1 | |
| openjpeg | 2.4.0 | 2.4.0 | 2.4.0 |
| openpyxl | 3.0.10 | 3.0.10 | 3.0.10 |
| openssl | 3.0.13 | 3.0.13 | 3.0.13 |
| orc | 1.7.4 | 1.7.4 | |
| overrides | 7.4.0 | 7.4.0 | |
| packaging | 23.1 | 23.1 | 23.1 |
| pandas | 2.1.4 | 2.1.4 | 2.1.4 |
| pandocfilters | 1.5.0 | 1.5.0 | 1.5.0 |
| panel | 1.3.8 | 1.3.8 | 0.12.6 |
| param | 2.0.2 | 2.0.2 | 1.13.0 |
| parsel | 1.8.1 | 1.8.1 | |
| parso | 0.8.3 | 0.8.3 | 0.8.3 |
| partd | 1.4.1 | 1.4.1 | 1.4.1 |
| patch | 2.7.6 | 2.7.6 | 2.7.6 |
| patchelf | 0.17.2 | 0.17.2 | 0.17.2 |
| pathlib | 1.0.1 | 1.0.1 | |
| pathspec | 0.10.3 | 0.10.3 | 0.10.3 |
| patsy | 0.5.3 | 0.5.3 | 0.5.3 |
| pcre2 | 10.42 | 10.42 | 10.42 |
| pexpect | 4.8.0 | 4.8.0 | 4.8.0 |
| pickleshare | 0.7.5 | 0.7.5 | |
| pillow | 10.2.0 | 10.2.0 | 10.2.0 |
| pip | 23.3.1 | 23.3.1 | 23.3.1 |
| pkce | 1.0.3 | 1.0.3 | |
| pkginfo | 1.9.6 | 1.9.6 | 1.9.6 |
| platformdirs | 3.10.0 | 3.10.0 | 3.10.0 |
| plotly | 5.9.0 | 5.9.0 | 5.9.0 |
| pluggy | 1.0.0 | 1.0.0 | 1.0.0 |
| ply | 3.11 | 3.11 | |
| prometheus\_client | 0.14.1 | 0.14.1 | 0.14.1 |
| prompt-toolkit | 3.0.43 | 3.0.43 | 3.0.43 |
| prompt\_toolkit | 3.0.43 | 3.0.43 | 3.0.43 |
| protego | 0.1.16 | 0.1.16 | |
| protobuf | 3.20.3 | 3.20.3 | |
| psutil | 5.9.0 | 5.9.0 | 5.9.0 |
| ptyprocess | 0.7.0 | 0.7.0 | 0.7.0 |
| pure\_eval | 0.2.2 | 0.2.2 | 0.2.2 |
| py-cpuinfo | 9.0.0 | 9.0.0 | |
| py-lief | 0.12.3 | 0.12.3 | 0.12.3 |
| pyarrow | 14.0.2 | 14.0.2 | |
| pyasn1 | 0.4.8 | 0.4.8 | |
| pyasn1-modules | 0.2.8 | 0.2.8 | |
| pybind11-abi | 4 | 4 | 4 |
| pycodestyle | 2.10.0 | 2.10.0 | 2.11.1 |
| pycosat | 0.6.6 | 0.6.6 | 0.6.6 |
| pycparser | 2.21 | 2.21 | 2.21 |
| pyct | 0.5.0 | 0.5.0 | 0.5.0 |
| pycurl | 7.45.2 | 7.45.2 | 7.45.2 |
| pydantic | 1.10.12 | 1.10.12 | |
| pydeck | 0.8.0 | 0.8.0 | |
| pydispatcher | 2.0.5 | 2.0.5 | |
| pydocstyle | 6.3.0 | 6.3.0 | |
| pyerfa | 2.0.0 | 2.0.0 | 2.0.0 |
| pyflakes | 3.0.1 | 3.0.1 | 3.1.0 |
| pygments | 2.15.1 | 2.15.1 | 2.15.1 |
| pyjwt | 2.4.0 | 2.4.0 | |
| pylint | 2.16.2 | 2.16.2 | 2.16.2 |
| pylint-venv | 2.3.0 | 2.3.0 | |
| pyls-spyder | 0.4.0 | 0.4.0 | |
| pyodbc | 5.0.1 | 5.0.1 | 5.0.1 |
| pyopenssl | 24.0.0 | 24.0.0 | |
| pyparsing | 3.0.9 | 3.0.9 | 3.0.9 |
| pyqt | 5.15.10 | 5.15.10 | |
| pyqt5-sip | 12.13.0 | 12.13.0 | |
| pyqtwebengine | 5.15.10 | 5.15.10 | |
| pysocks | 1.7.1 | 1.7.1 | 1.7.1 |
| pytables | 3.9.2 | 3.9.2 | 3.7.0 |
| pytest | 7.4.0 | 7.4.0 | 7.4.0 |
| python | 3.11.7 | 3.11.7 | 3.11.7 |
| python-dateutil | 2.8.2 | 2.8.2 | 2.8.2 |
| python-dotenv | 0.21.0 | 0.21.0 | |
| python-fastjsonschema | 2.16.2 | 2.16.2 | 2.16.2 |
| python-json-logger | 2.0.7 | 2.0.7 | |
| python-libarchive-c | 2.9 | 2.9 | 2.9 |
| python-lmdb | 1.4.1 | 1.4.1 | 1.4.1 |
| python-lsp-black | 1.2.1 | 1.2.1 | |
| python-lsp-jsonrpc | 1.0.0 | 1.0.0 | |
| python-lsp-server | 1.7.2 | 1.7.2 | |
| python-slugify | 5.0.2 | 5.0.2 | |
| python-snappy | 0.6.1 | 0.6.1 | 0.6.1 |
| python-tzdata | 2023.3 | 2023.3 | 2023.3 |
| pytoolconfig | 1.2.6 | 1.2.6 | |
| pytz | 2023.3.post1 | 2023.3.post1 | 2023.3.post1 |
| pyviz\_comms | 3.0.0 | 3.0.0 | 2.3.0 |
| pywavelets | 1.5.0 | 1.5.0 | 1.5.0 |
| pyxdg | 0.27 | 0.27 | |
| pyyaml | 6.0.1 | 6.0.1 | 6.0.1 |
| pyzmq | 25.1.2 | 25.1.2 | 23.2.0 |
| qdarkstyle | 3.0.2 | 3.0.2 | |
| qstylizer | 0.2.2 | 0.2.2 | |
| qt-main | 5.15.2 | 5.15.2 | |
| qt-webengine | 5.15.9 | 5.15.9 | |
| qtawesome | 1.2.2 | 1.2.2 | |
| qtconsole | 5.4.2 | 5.4.2 | |
| qtpy | 2.4.1 | 2.4.1 | |
| queuelib | 1.6.2 | 1.6.2 | |
| re2 | 2022.04.01 | 2022.04.01 | |
| readline | 8.2 | 8.2 | 8.2 |
| referencing | 0.30.2 | 0.30.2 | 0.30.2 |
| regex | 2023.10.3 | 2023.10.3 | 2023.10.3 |
| reproc | 14.2.4 | 14.2.4 | 14.2.4 |
| reproc-cpp | 14.2.4 | 14.2.4 | 14.2.4 |
| requests | 2.31.0 | 2.31.0 | 2.31.0 |
| requests-file | 1.5.1 | 1.5.1 | |
| requests-toolbelt | 1.0.0 | 1.0.0 | 1.0.0 |
| rfc3339-validator | 0.1.4 | 0.1.4 | |
| rfc3986-validator | 0.1.1 | 0.1.1 | |
| rich | 13.3.5 | 13.3.5 | |
| rope | 1.7.0 | 1.7.0 | |
| rpds-py | 0.10.6 | 0.10.6 | 0.10.6 |
| rtree | 1.0.1 | 1.0.1 | |
| ruamel.yaml | 0.17.21 | 0.17.21 | 0.17.21 |
| ruamel\_yaml | 0.17.21 | 0.17.21 | 0.17.21 |
| s2n | 1.3.27 | 1.3.27 | |
| s3fs | 2023.10.0 | 2023.10.0 | 2023.10.0 |
| scikit-image | 0.22.0 | 0.22.0 | 0.22.0 |
| scikit-learn | 1.2.2 | 1.2.2 | 1.2.2 |
| scipy | 1.11.4 | 1.11.4 | 1.11.4 |
| scrapy | 2.8.0 | 2.8.0 | |
| seaborn | 0.12.2 | 0.12.2 | 0.12.2 |
| secretstorage | 3.3.1 | 3.3.1 | |
| semver | 2.13.0 | 2.13.0 | |
| send2trash | 1.8.2 | 1.8.2 | 1.8.2 |
| service\_identity | 18.1.0 | 18.1.0 | |
| setuptools | 68.2.2 | 68.2.2 | 68.2.2 |
| sip | 6.7.12 | 6.7.12 | |
| six | 1.16.0 | 1.16.0 | 1.16.0 |
| smart\_open | 5.2.1 | 5.2.1 | |
| smmap | 4.0.0 | 4.0.0 | |
| snappy | 1.1.10 | 1.1.10 | 1.1.10 |
| sniffio | 1.3.0 | 1.3.0 | 1.3.0 |
| snowballstemmer | 2.2.0 | 2.2.0 | 2.2.0 |
| sortedcontainers | 2.4.0 | 2.4.0 | 2.4.0 |
| soupsieve | 2.5 | 2.5 | 2.5 |
| sphinx | 5.0.2 | 5.0.2 | |
| sphinxcontrib-applehelp | 1.0.2 | 1.0.2 | |
| sphinxcontrib-devhelp | 1.0.2 | 1.0.2 | |
| sphinxcontrib-htmlhelp | 2.0.0 | 2.0.0 | |
| sphinxcontrib-jsmath | 1.0.1 | 1.0.1 | |
| sphinxcontrib-qthelp | 1.0.3 | 1.0.3 | |
| sphinxcontrib-serializinghtml | 1.1.5 | 1.1.5 | |
| spyder | 5.4.3 | 5.4.3 | |
| spyder-kernels | 2.4.4 | 2.4.4 | |
| sqlalchemy | 2.0.25 | 2.0.25 | 2.0.25 |
| sqlite | 3.41.2 | 3.41.2 | 3.41.2 |
| stack\_data | 0.2.0 | 0.2.0 | 0.2.0 |
| statsmodels | 0.14.0 | 0.14.0 | 0.14.0 |
| streamlit | 1.30.0 | 1.30.0 | |
| sympy | 1.12 | 1.12 | 1.12 |
| tabulate | 0.9.0 | 0.9.0 | 0.9.0 |
| tbb | 2021.8.0 | 2021.8.0 | |
| tblib | 1.7.0 | 1.7.0 | 1.7.0 |
| tenacity | 8.2.2 | 8.2.2 | 8.2.2 |
| terminado | 0.17.1 | 0.17.1 | 0.17.1 |
| text-unidecode | 1.3 | 1.3 | |
| textdistance | 4.2.1 | 4.2.1 | |
| threadpoolctl | 2.2.0 | 2.2.0 | 2.2.0 |
| three-merge | 0.1.1 | 0.1.1 | |
| tifffile | 2023.4.12 | 2023.4.12 | 2023.4.12 |
| tinycss2 | 1.2.1 | 1.2.1 | 1.2.1 |
| tk | 8.6.12 | 8.6.12 | 8.6.12 |
| tldextract | 3.2.0 | 3.2.0 | |
| toml | 0.10.2 | 0.10.2 | |
| tomlkit | 0.11.1 | 0.11.1 | 0.11.1 |
| toolz | 0.12.0 | 0.12.0 | 0.12.0 |
| tornado | 6.3.3 | 6.3.3 | 6.3.3 |
| tqdm | 4.65.0 | 4.65.0 | 4.65.0 |
| traitlets | 5.7.1 | 5.7.1 | 5.7.1 |
| truststore | 0.8.0 | 0.8.0 | 0.8.0 |
| twisted | 23.10.0 | 23.10.0 | |
| typing-extensions | 4.9.0 | 4.9.0 | 4.9.0 |
| typing\_extensions | 4.9.0 | 4.9.0 | 4.9.0 |
| tzdata | 2023d | 2023d | 2023d |
| tzlocal | 2.1 | 2.1 | |
| uc-micro-py | 1.0.1 | 1.0.1 | |
| ujson | 5.4.0 | 5.4.0 | |
| unidecode | 1.2.0 | 1.2.0 | |
| unixodbc | 2.3.11 | 2.3.11 | 2.3.11 |
| urllib3 | 2.0.7 | 2.0.7 | 2.0.7 |
| utf8proc | 2.6.1 | 2.6.1 | |
| validators | 0.18.2 | 0.18.2 | |
| w3lib | 2.1.2 | 2.1.2 | |
| watchdog | 2.1.6 | 2.1.6 | |
| wcwidth | 0.2.5 | 0.2.5 | 0.2.5 |
| webencodings | 0.5.1 | 0.5.1 | 0.5.1 |
| websocket-client | 0.58.0 | 0.58.0 | 0.58.0 |
| werkzeug | 2.2.3 | 2.2.3 | 2.3.8 |
| whatthepatch | 1.0.2 | 1.0.2 | |
| wheel | 0.41.2 | 0.41.2 | 0.41.2 |
| widgetsnbextension | 3.5.2 | 3.5.2 | |
| wrapt | 1.14.1 | 1.14.1 | 1.14.1 |
| wurlitzer | 3.0.2 | 3.0.2 | |
| xarray | 2023.6.0 | 2023.6.0 | |
| xyzservices | 2022.9.0 | 2022.9.0 | |
| xz | 5.4.5 | 5.4.5 | 5.4.5 |
| yaml | 0.2.5 | 0.2.5 | 0.2.5 |
| yaml-cpp | 0.8.0 | 0.8.0 | 0.8.0 |
| yapf | 0.31.0 | 0.31.0 | |
| yarl | 1.9.3 | 1.9.3 | 1.9.3 |
| zeromq | 4.3.5 | 4.3.5 | 4.3.5 |
| zfp | 1.0.0 | ||
| zict | 3.0.0 | 3.0.0 | 3.0.0 |
| zipp | 3.17.0 | 3.17.0 | 3.17.0 |
| zlib | 1.2.13 | 1.2.13 | 1.2.13 |
| zlib-ng | 2.0.7 | 2.0.7 | |
| zope | 1.0 | 1.0 | |
| zope.interface | 5.4.0 | 5.4.0 | |
| zstandard | 0.19.0 | 0.19.0 | 0.19.0 |
| zstd | 1.5.5 | 1.5.5 | 1.5.5 |
| Package Name | osx-arm64 | osx-64 |
|---|---|---|
| \_anaconda\_depends | 2024.02 | 2024.02 |
| abseil-cpp | 20230802.0 | 20230802.0 |
| aiobotocore | 2.7.0 | 2.7.0 |
| aiohttp | 3.9.3 | 3.9.3 |
| aioitertools | 0.7.1 | 0.7.1 |
| aiosignal | 1.2.0 | 1.2.0 |
| alabaster | 0.7.12 | 0.7.12 |
| altair | 5.0.1 | 5.0.1 |
| anaconda-anon-usage | 0.4.3 | 0.4.3 |
| anaconda-catalogs | 0.2.0 | 0.2.0 |
| anaconda-client | 1.12.3 | 1.12.3 |
| anaconda-cloud-auth | 0.1.4 | 0.1.4 |
| anaconda-navigator | 2.5.2 | 2.5.2 |
| anaconda-project | 0.11.1 | 0.11.1 |
| anyio | 4.2.0 | 4.2.0 |
| aom | 3.6.0 | 3.6.0 |
| appdirs | 1.4.4 | 1.4.4 |
| applaunchservices | 0.3.0 | 0.3.0 |
| appnope | 0.1.2 | 0.1.2 |
| appscript | 1.1.2 | 1.1.2 |
| archspec | 0.2.1 | 0.2.1 |
| argon2-cffi | 21.3.0 | 21.3.0 |
| argon2-cffi-bindings | 21.2.0 | 21.2.0 |
| arrow | 1.2.3 | 1.2.3 |
| arrow-cpp | 14.0.2 | 14.0.2 |
| astroid | 2.14.2 | 2.14.2 |
| astropy | 5.3.4 | 5.3.4 |
| asttokens | 2.0.5 | 2.0.5 |
| async-lru | 2.0.4 | 2.0.4 |
| atomicwrites | 1.4.0 | 1.4.0 |
| attrs | 23.1.0 | 23.1.0 |
| automat | 20.2.0 | 20.2.0 |
| autopep8 | 1.6.0 | 1.6.0 |
| aws-c-auth | 0.6.19 | 0.6.19 |
| aws-c-cal | 0.5.20 | 0.5.20 |
| aws-c-common | 0.8.5 | 0.8.5 |
| aws-c-compression | 0.2.16 | 0.2.16 |
| aws-c-event-stream | 0.2.15 | 0.2.15 |
| aws-c-http | 0.6.25 | 0.6.25 |
| aws-c-io | 0.13.10 | 0.13.10 |
| aws-c-mqtt | 0.7.13 | 0.7.13 |
| aws-c-s3 | 0.1.51 | 0.1.51 |
| aws-c-sdkutils | 0.1.6 | 0.1.6 |
| aws-checksums | 0.1.13 | 0.1.13 |
| aws-crt-cpp | 0.18.16 | 0.18.16 |
| aws-sdk-cpp | 1.10.55 | 1.10.55 |
| babel | 2.11.0 | 2.11.0 |
| backports | 1.1 | 1.1 |
| backports.functools\_lru\_cache | 1.6.4 | 1.6.4 |
| backports.tempfile | 1.0 | 1.0 |
| backports.weakref | 1.0.post1 | 1.0.post1 |
| bcrypt | 3.2.0 | 3.2.0 |
| beautifulsoup4 | 4.12.2 | 4.12.2 |
| binaryornot | 0.4.4 | 0.4.4 |
| black | 23.11.0 | 23.11.0 |
| blas | 1.0 | 1.0 |
| bleach | 4.1.0 | 4.1.0 |
| blinker | 1.6.2 | 1.6.2 |
| blosc | 1.21.3 | 1.21.3 |
| bokeh | 3.3.4 | 3.3.4 |
| boltons | 23.0.0 | 23.0.0 |
| boost-cpp | 1.82.0 | 1.82.0 |
| botocore | 1.31.64 | 1.31.64 |
| bottleneck | 1.3.7 | 1.3.7 |
| brotli | 1.0.9 | 1.0.9 |
| brotli-bin | 1.0.9 | 1.0.9 |
| brotli-python | 1.0.9 | 1.0.9 |
| brunsli | 0.1 | 0.1 |
| bzip2 | 1.0.8 | 1.0.8 |
| c-ares | 1.19.1 | 1.19.1 |
| c-blosc2 | 2.12.0 | 2.12.0 |
| ca-certificates | 2023.12.12 | 2023.12.12 |
| cachetools | 4.2.2 | 4.2.2 |
| cctools | 949.0.1 | 949.0.1 |
| cctools\_osx-64 | 949.0.1 | |
| cctools\_osx-arm64 | 949.0.1 | |
| certifi | 2024.2.2 | 2024.2.2 |
| cffi | 1.16.0 | 1.16.0 |
| cfitsio | 3.470 | 3.470 |
| chardet | 4.0.0 | 4.0.0 |
| charls | 2.2.0 | 2.2.0 |
| charset-normalizer | 2.0.4 | 2.0.4 |
| click | 8.1.7 | 8.1.7 |
| cloudpickle | 2.2.1 | 2.2.1 |
| clyent | 1.2.2 | 1.2.2 |
| colorama | 0.4.6 | 0.4.6 |
| colorcet | 3.0.1 | 3.0.1 |
| comm | 0.1.2 | 0.1.2 |
| conda | 24.1.2 | 24.1.2 |
| conda-build | 24.1.2 | 24.1.2 |
| conda-content-trust | 0.2.0 | 0.2.0 |
| conda-index | 0.4.0 | 0.4.0 |
| conda-libmamba-solver | 24.1.0 | 24.1.0 |
| conda-pack | 0.6.0 | 0.6.0 |
| conda-package-handling | 2.2.0 | 2.2.0 |
| conda-package-streaming | 0.9.0 | 0.9.0 |
| conda-repo-cli | 1.0.75 | 1.0.75 |
| conda-token | 0.4.0 | 0.4.0 |
| conda-verify | 3.4.2 | 3.4.2 |
| constantly | 23.10.4 | 23.10.4 |
| contourpy | 1.2.0 | 1.2.0 |
| cookiecutter | 2.5.0 | 2.5.0 |
| cryptography | 42.0.2 | 42.0.2 |
| cssselect | 1.2.0 | 1.2.0 |
| curl | 8.5.0 | 8.5.0 |
| cycler | 0.11.0 | 0.11.0 |
| cyrus-sasl | 2.1.28 | 2.1.28 |
| cytoolz | 0.12.2 | 0.12.2 |
| dask | 2023.11.0 | 2023.11.0 |
| dask-core | 2023.11.0 | 2023.11.0 |
| datashader | 0.16.0 | 0.16.0 |
| dav1d | 1.2.1 | 1.2.1 |
| debugpy | 1.6.7 | 1.6.7 |
| decorator | 5.1.1 | 5.1.1 |
| defusedxml | 0.7.1 | 0.7.1 |
| diff-match-patch | 20200713 | 20200713 |
| dill | 0.3.7 | 0.3.7 |
| distributed | 2023.11.0 | 2023.11.0 |
| distro | 1.8.0 | 1.8.0 |
| docstring-to-markdown | 0.11 | 0.11 |
| docutils | 0.18.1 | 0.18.1 |
| entrypoints | 0.4 | 0.4 |
| et\_xmlfile | 1.1.0 | 1.1.0 |
| executing | 0.8.3 | 0.8.3 |
| filelock | 3.13.1 | 3.13.1 |
| flake8 | 6.0.0 | 6.0.0 |
| flask | 2.2.5 | 2.2.5 |
| fmt | 9.1.0 | 9.1.0 |
| fonttools | 4.25.0 | 4.25.0 |
| freetype | 2.12.1 | 2.12.1 |
| frozenlist | 1.4.0 | 1.4.0 |
| fsspec | 2023.10.0 | 2023.10.0 |
| future | 0.18.3 | 0.18.3 |
| gensim | 4.3.0 | 4.3.0 |
| gettext | 0.21.0 | 0.21.0 |
| gflags | 2.2.2 | 2.2.2 |
| giflib | 5.2.1 | 5.2.1 |
| gitdb | 4.0.7 | 4.0.7 |
| gitpython | 3.1.37 | 3.1.37 |
| glib | 2.78.4 | 2.78.4 |
| glib-tools | 2.78.4 | 2.78.4 |
| glog | 0.5.0 | 0.5.0 |
| gmp | 6.2.1 | 6.2.1 |
| gmpy2 | 2.1.2 | 2.1.2 |
| greenlet | 3.0.1 | 3.0.1 |
| grpc-cpp | 1.48.2 | 1.48.2 |
| gst-plugins-base | 1.14.1 | 1.14.1 |
| gstreamer | 1.14.1 | 1.14.1 |
| gtest | 1.14.0 | 1.14.0 |
| h5py | 3.9.0 | 3.9.0 |
| hdf5 | 1.12.1 | 1.12.1 |
| heapdict | 1.0.1 | 1.0.1 |
| holoviews | 1.18.3 | 1.18.3 |
| hvplot | 0.9.2 | 0.9.2 |
| hyperlink | 21.0.0 | 21.0.0 |
| icu | 73.1 | 73.1 |
| idna | 3.4 | 3.4 |
| imagecodecs | 2023.1.23 | 2023.1.23 |
| imageio | 2.33.1 | 2.33.1 |
| imagesize | 1.4.1 | 1.4.1 |
| imbalanced-learn | 0.11.0 | 0.11.0 |
| importlib-metadata | 7.0.1 | 7.0.1 |
| importlib\_metadata | 7.0.1 | 7.0.1 |
| incremental | 22.10.0 | 22.10.0 |
| inflection | 0.5.1 | 0.5.1 |
| iniconfig | 1.1.1 | 1.1.1 |
| intake | 0.6.8 | 0.6.8 |
| intervaltree | 3.1.0 | 3.1.0 |
| ipykernel | 6.28.0 | 6.28.0 |
| ipython | 8.20.0 | 8.20.0 |
| ipython\_genutils | 0.2.0 | 0.2.0 |
| ipywidgets | 7.6.5 | 7.6.5 |
| isort | 5.9.3 | 5.9.3 |
| itemadapter | 0.3.0 | 0.3.0 |
| itemloaders | 1.1.0 | 1.1.0 |
| itsdangerous | 2.0.1 | 2.0.1 |
| jaraco.classes | 3.2.1 | 3.2.1 |
| jedi | 0.18.1 | 0.18.1 |
| jellyfish | 1.0.1 | 1.0.1 |
| jinja2 | 3.1.3 | 3.1.3 |
| jmespath | 1.0.1 | 1.0.1 |
| joblib | 1.2.0 | 1.2.0 |
| jpeg | 9e | 9e |
| jq | 1.6 | 1.6 |
| json5 | 0.9.6 | 0.9.6 |
| jsonpatch | 1.32 | 1.32 |
| jsonpointer | 2.1 | 2.1 |
| jsonschema | 4.19.2 | 4.19.2 |
| jsonschema-specifications | 2023.7.1 | 2023.7.1 |
| jupyter | 1.0.0 | 1.0.0 |
| jupyter-lsp | 2.2.0 | 2.2.0 |
| jupyter\_client | 8.6.0 | 8.6.0 |
| jupyter\_console | 6.6.3 | 6.6.3 |
| jupyter\_core | 5.5.0 | 5.5.0 |
| jupyter\_events | 0.8.0 | 0.8.0 |
| jupyter\_server | 2.10.0 | 2.10.0 |
| jupyter\_server\_terminals | 0.4.4 | 0.4.4 |
| jupyterlab | 4.0.11 | 4.0.11 |
| jupyterlab-variableinspector | 3.1.0 | 3.1.0 |
| jupyterlab\_pygments | 0.1.2 | 0.1.2 |
| jupyterlab\_server | 2.25.1 | 2.25.1 |
| jupyterlab\_widgets | 3.0.9 | 3.0.9 |
| jxrlib | 1.1 | 1.1 |
| keyring | 23.13.1 | 23.13.1 |
| kiwisolver | 1.4.4 | 1.4.4 |
| krb5 | 1.20.1 | 1.20.1 |
| lazy-object-proxy | 1.6.0 | 1.6.0 |
| lazy\_loader | 0.3 | 0.3 |
| lcms2 | 2.12 | 2.12 |
| ld64 | 530 | 530 |
| ld64\_osx-64 | 530 | |
| ld64\_osx-arm64 | 530 | |
| ldid | 2.1.5 | 2.1.5 |
| lerc | 3.0 | 3.0 |
| libaec | 1.0.4 | 1.0.4 |
| libarchive | 3.6.2 | 3.6.2 |
| libavif | 0.11.1 | 0.11.1 |
| libboost | 1.82.0 | 1.82.0 |
| libbrotlicommon | 1.0.9 | 1.0.9 |
| libbrotlidec | 1.0.9 | 1.0.9 |
| libbrotlienc | 1.0.9 | 1.0.9 |
| libclang | 14.0.6 | 14.0.6 |
| libclang13 | 14.0.6 | 14.0.6 |
| libcurl | 8.5.0 | 8.5.0 |
| libcxx | 14.0.6 | 14.0.6 |
| libdeflate | 1.17 | 1.17 |
| libedit | 3.1.20230828 | 3.1.20230828 |
| libev | 4.33 | 4.33 |
| libevent | 2.1.12 | 2.1.12 |
| libffi | 3.4.4 | 3.4.4 |
| libgfortran | 5.0.0 | 5.0.0 |
| libgfortran5 | 11.3.0 | 11.3.0 |
| libglib | 2.78.4 | 2.78.4 |
| libiconv | 1.16 | 1.16 |
| liblief | 0.12.3 | 0.12.3 |
| libllvm14 | 14.0.6 | 14.0.6 |
| libmamba | 1.5.6 | 1.5.6 |
| libmambapy | 1.5.6 | 1.5.6 |
| libnghttp2 | 1.57.0 | 1.57.0 |
| libopenblas | 0.3.21 | 0.3.21 |
| libpng | 1.6.39 | 1.6.39 |
| libpq | 12.17 | 12.17 |
| libprotobuf | 3.20.3 | 3.20.3 |
| libsodium | 1.0.18 | 1.0.18 |
| libsolv | 0.7.24 | 0.7.24 |
| libspatialindex | 1.9.3 | 1.9.3 |
| libssh2 | 1.10.0 | 1.10.0 |
| libthrift | 0.15.0 | 0.15.0 |
| libtiff | 4.5.1 | 4.5.1 |
| libwebp-base | 1.3.2 | 1.3.2 |
| libxml2 | 2.10.4 | 2.10.4 |
| libxslt | 1.1.37 | 1.1.37 |
| libzopfli | 1.0.3 | 1.0.3 |
| linkify-it-py | 2.0.0 | 2.0.0 |
| llvm-openmp | 14.0.6 | 14.0.6 |
| llvmlite | 0.42.0 | 0.42.0 |
| locket | 1.0.0 | 1.0.0 |
| lxml | 4.9.3 | 4.9.3 |
| lz4 | 4.3.2 | 4.3.2 |
| lz4-c | 1.9.4 | 1.9.4 |
| lzo | 2.10 | 2.10 |
| markdown | 3.4.1 | 3.4.1 |
| markdown-it-py | 2.2.0 | 2.2.0 |
| markupsafe | 2.1.3 | 2.1.3 |
| matplotlib | 3.8.0 | 3.8.0 |
| matplotlib-base | 3.8.0 | 3.8.0 |
| matplotlib-inline | 0.1.6 | 0.1.6 |
| mccabe | 0.7.0 | 0.7.0 |
| mdit-py-plugins | 0.3.0 | 0.3.0 |
| mdurl | 0.1.0 | 0.1.0 |
| menuinst | 2.0.2 | 2.0.2 |
| mistune | 2.0.4 | 2.0.4 |
| more-itertools | 10.1.0 | 10.1.0 |
| mpc | 1.1.0 | 1.1.0 |
| mpfr | 4.0.2 | 4.0.2 |
| mpmath | 1.3.0 | 1.3.0 |
| msgpack-python | 1.0.3 | 1.0.3 |
| multidict | 6.0.4 | 6.0.4 |
| multipledispatch | 0.6.0 | 0.6.0 |
| munkres | 1.1.4 | 1.1.4 |
| mypy | 1.8.0 | 1.8.0 |
| mypy\_extensions | 1.0.0 | 1.0.0 |
| mysql | 5.7.24 | 5.7.24 |
| navigator-updater | 0.4.0 | 0.4.0 |
| nbclient | 0.8.0 | 0.8.0 |
| nbconvert | 7.10.0 | 7.10.0 |
| nbformat | 5.9.2 | 5.9.2 |
| ncurses | 6.4 | 6.4 |
| nest-asyncio | 1.6.0 | 1.6.0 |
| networkx | 3.1 | 3.1 |
| nltk | 3.8.1 | 3.8.1 |
| notebook | 7.0.8 | 7.0.8 |
| notebook-shim | 0.2.3 | 0.2.3 |
| numba | 0.59.0 | 0.59.0 |
| numexpr | 2.8.7 | 2.8.7 |
| numpy | 1.26.4 | 1.26.4 |
| numpy-base | 1.26.4 | 1.26.4 |
| numpydoc | 1.5.0 | 1.5.0 |
| oniguruma | 6.9.7.1 | 6.9.7.1 |
| openjpeg | 2.3.0 | 2.4.0 |
| openpyxl | 3.0.10 | 3.0.10 |
| openssl | 3.0.13 | 3.0.13 |
| orc | 1.7.4 | 1.7.4 |
| overrides | 7.4.0 | 7.4.0 |
| packaging | 23.1 | 23.1 |
| pandas | 2.1.4 | 2.1.4 |
| pandocfilters | 1.5.0 | 1.5.0 |
| panel | 1.3.8 | 1.3.8 |
| param | 2.0.2 | 2.0.2 |
| parsel | 1.8.1 | 1.8.1 |
| parso | 0.8.3 | 0.8.3 |
| partd | 1.4.1 | 1.4.1 |
| patch | 2.7.6 | 2.7.6 |
| pathlib | 1.0.1 | 1.0.1 |
| pathspec | 0.10.3 | 0.10.3 |
| patsy | 0.5.3 | 0.5.3 |
| pcre2 | 10.42 | 10.42 |
| pexpect | 4.8.0 | 4.8.0 |
| pickleshare | 0.7.5 | 0.7.5 |
| pillow | 10.2.0 | 10.2.0 |
| pip | 23.3.1 | 23.3.1 |
| pkce | 1.0.3 | 1.0.3 |
| pkginfo | 1.9.6 | 1.9.6 |
| platformdirs | 3.10.0 | 3.10.0 |
| plotly | 5.9.0 | 5.9.0 |
| pluggy | 1.0.0 | 1.0.0 |
| ply | 3.11 | 3.11 |
| prometheus\_client | 0.14.1 | 0.14.1 |
| prompt-toolkit | 3.0.43 | 3.0.43 |
| prompt\_toolkit | 3.0.43 | 3.0.43 |
| protego | 0.1.16 | 0.1.16 |
| protobuf | 3.20.3 | 3.20.3 |
| psutil | 5.9.0 | 5.9.0 |
| ptyprocess | 0.7.0 | 0.7.0 |
| pure\_eval | 0.2.2 | 0.2.2 |
| py-cpuinfo | 9.0.0 | 9.0.0 |
| py-lief | 0.12.3 | 0.12.3 |
| pyarrow | 14.0.2 | 14.0.2 |
| pyasn1 | 0.4.8 | 0.4.8 |
| pyasn1-modules | 0.2.8 | 0.2.8 |
| pybind11-abi | 4 | 4 |
| pycodestyle | 2.10.0 | 2.10.0 |
| pycosat | 0.6.6 | 0.6.6 |
| pycparser | 2.21 | 2.21 |
| pyct | 0.5.0 | 0.5.0 |
| pycurl | 7.45.2 | 7.45.2 |
| pydantic | 1.10.12 | 1.10.12 |
| pydeck | 0.8.0 | 0.8.0 |
| pydispatcher | 2.0.5 | 2.0.5 |
| pydocstyle | 6.3.0 | 6.3.0 |
| pyerfa | 2.0.0 | 2.0.0 |
| pyflakes | 3.0.1 | 3.0.1 |
| pygments | 2.15.1 | 2.15.1 |
| pyjwt | 2.4.0 | 2.4.0 |
| pylint | 2.16.2 | 2.16.2 |
| pylint-venv | 2.3.0 | 2.3.0 |
| pyls-spyder | 0.4.0 | 0.4.0 |
| pyobjc-core | 9.0 | 9.0 |
| pyobjc-framework-cocoa | 9.0 | 9.0 |
| pyobjc-framework-coreservices | 9.0 | 9.0 |
| pyobjc-framework-fsevents | 9.0 | 9.0 |
| pyodbc | 5.0.1 | 5.0.1 |
| pyopenssl | 24.0.0 | 24.0.0 |
| pyparsing | 3.0.9 | 3.0.9 |
| pyqt | 5.15.10 | 5.15.10 |
| pyqt5-sip | 12.13.0 | 12.13.0 |
| pyqtwebengine | 5.15.10 | 5.15.10 |
| pysocks | 1.7.1 | 1.7.1 |
| pytables | 3.9.2 | 3.9.2 |
| pytest | 7.4.0 | 7.4.0 |
| python | 3.11.7 | 3.11.7 |
| python-dateutil | 2.8.2 | 2.8.2 |
| python-dotenv | 0.21.0 | 0.21.0 |
| python-fastjsonschema | 2.16.2 | 2.16.2 |
| python-json-logger | 2.0.7 | 2.0.7 |
| python-libarchive-c | 2.9 | 2.9 |
| python-lmdb | 1.4.1 | 1.4.1 |
| python-lsp-black | 1.2.1 | 1.2.1 |
| python-lsp-jsonrpc | 1.0.0 | 1.0.0 |
| python-lsp-server | 1.7.2 | 1.7.2 |
| python-slugify | 5.0.2 | 5.0.2 |
| python-snappy | 0.6.1 | 0.6.1 |
| python-tzdata | 2023.3 | 2023.3 |
| python.app | 3 | 3 |
| pytoolconfig | 1.2.6 | 1.2.6 |
| pytz | 2023.3.post1 | 2023.3.post1 |
| pyviz\_comms | 3.0.0 | 3.0.0 |
| pywavelets | 1.5.0 | 1.5.0 |
| pyyaml | 6.0.1 | 6.0.1 |
| pyzmq | 25.1.2 | 25.1.2 |
| qdarkstyle | 3.0.2 | 3.0.2 |
| qstylizer | 0.2.2 | 0.2.2 |
| qt-main | 5.15.2 | 5.15.2 |
| qt-webengine | 5.15.9 | 5.15.9 |
| qtawesome | 1.2.2 | 1.2.2 |
| qtconsole | 5.4.2 | 5.4.2 |
| qtpy | 2.4.1 | 2.4.1 |
| queuelib | 1.6.2 | 1.6.2 |
| re2 | 2022.04.01 | 2022.04.01 |
| readline | 8.2 | 8.2 |
| referencing | 0.30.2 | 0.30.2 |
| regex | 2023.10.3 | 2023.10.3 |
| reproc | 14.2.4 | 14.2.4 |
| reproc-cpp | 14.2.4 | 14.2.4 |
| requests | 2.31.0 | 2.31.0 |
| requests-file | 1.5.1 | 1.5.1 |
| requests-toolbelt | 1.0.0 | 1.0.0 |
| rfc3339-validator | 0.1.4 | 0.1.4 |
| rfc3986-validator | 0.1.1 | 0.1.1 |
| rich | 13.3.5 | 13.3.5 |
| rope | 1.7.0 | 1.7.0 |
| rpds-py | 0.10.6 | 0.10.6 |
| rtree | 1.0.1 | 1.0.1 |
| ruamel.yaml | 0.17.21 | 0.17.21 |
| ruamel\_yaml | 0.17.21 | 0.17.21 |
| s3fs | 2023.10.0 | 2023.10.0 |
| scikit-image | 0.22.0 | 0.22.0 |
| scikit-learn | 1.2.2 | 1.2.2 |
| scipy | 1.11.4 | 1.11.4 |
| scrapy | 2.8.0 | 2.8.0 |
| seaborn | 0.12.2 | 0.12.2 |
| semver | 2.13.0 | 2.13.0 |
| send2trash | 1.8.2 | 1.8.2 |
| service\_identity | 18.1.0 | 18.1.0 |
| setuptools | 68.2.2 | 68.2.2 |
| sip | 6.7.12 | 6.7.12 |
| six | 1.16.0 | 1.16.0 |
| smart\_open | 5.2.1 | 5.2.1 |
| smmap | 4.0.0 | 4.0.0 |
| snappy | 1.1.10 | 1.1.10 |
| sniffio | 1.3.0 | 1.3.0 |
| snowballstemmer | 2.2.0 | 2.2.0 |
| sortedcontainers | 2.4.0 | 2.4.0 |
| soupsieve | 2.5 | 2.5 |
| sphinx | 5.0.2 | 5.0.2 |
| sphinxcontrib-applehelp | 1.0.2 | 1.0.2 |
| sphinxcontrib-devhelp | 1.0.2 | 1.0.2 |
| sphinxcontrib-htmlhelp | 2.0.0 | 2.0.0 |
| sphinxcontrib-jsmath | 1.0.1 | 1.0.1 |
| sphinxcontrib-qthelp | 1.0.3 | 1.0.3 |
| sphinxcontrib-serializinghtml | 1.1.5 | 1.1.5 |
| spyder | 5.4.3 | 5.4.3 |
| spyder-kernels | 2.4.4 | 2.4.4 |
| sqlalchemy | 2.0.25 | 2.0.25 |
| sqlite | 3.41.2 | 3.41.2 |
| stack\_data | 0.2.0 | 0.2.0 |
| statsmodels | 0.14.0 | 0.14.0 |
| streamlit | 1.30.0 | 1.30.0 |
| sympy | 1.12 | 1.12 |
| tabulate | 0.9.0 | 0.9.0 |
| tapi | 1100.0.11 | 1000.10.8 |
| tbb | 2021.8.0 | 2021.8.0 |
| tblib | 1.7.0 | 1.7.0 |
| tenacity | 8.2.2 | 8.2.2 |
| terminado | 0.17.1 | 0.17.1 |
| text-unidecode | 1.3 | 1.3 |
| textdistance | 4.2.1 | 4.2.1 |
| threadpoolctl | 2.2.0 | 2.2.0 |
| three-merge | 0.1.1 | 0.1.1 |
| tifffile | 2023.4.12 | 2023.4.12 |
| tinycss2 | 1.2.1 | 1.2.1 |
| tk | 8.6.12 | 8.6.12 |
| tldextract | 3.2.0 | 3.2.0 |
| toml | 0.10.2 | 0.10.2 |
| tomlkit | 0.11.1 | 0.11.1 |
| toolz | 0.12.0 | 0.12.0 |
| tornado | 6.3.3 | 6.3.3 |
| tqdm | 4.65.0 | 4.65.0 |
| traitlets | 5.7.1 | 5.7.1 |
| truststore | 0.8.0 | 0.8.0 |
| twisted | 23.10.0 | 23.10.0 |
| typing-extensions | 4.9.0 | 4.9.0 |
| typing\_extensions | 4.9.0 | 4.9.0 |
| tzdata | 2023d | 2023d |
| tzlocal | 2.1 | 2.1 |
| uc-micro-py | 1.0.1 | 1.0.1 |
| ujson | 5.4.0 | 5.4.0 |
| unidecode | 1.2.0 | 1.2.0 |
| unixodbc | 2.3.11 | 2.3.11 |
| urllib3 | 2.0.7 | 2.0.7 |
| utf8proc | 2.6.1 | 2.6.1 |
| validators | 0.18.2 | 0.18.2 |
| w3lib | 2.1.2 | 2.1.2 |
| watchdog | 2.1.6 | 2.1.6 |
| wcwidth | 0.2.5 | 0.2.5 |
| webencodings | 0.5.1 | 0.5.1 |
| websocket-client | 0.58.0 | 0.58.0 |
| werkzeug | 2.2.3 | 2.2.3 |
| whatthepatch | 1.0.2 | 1.0.2 |
| wheel | 0.41.2 | 0.41.2 |
| widgetsnbextension | 3.5.2 | 3.5.2 |
| wrapt | 1.14.1 | 1.14.1 |
| wurlitzer | 3.0.2 | 3.0.2 |
| xarray | 2023.6.0 | 2023.6.0 |
| xlwings | 0.29.1 | 0.29.1 |
| xyzservices | 2022.9.0 | 2022.9.0 |
| xz | 5.4.5 | 5.4.5 |
| yaml | 0.2.5 | 0.2.5 |
| yaml-cpp | 0.8.0 | 0.8.0 |
| yapf | 0.31.0 | 0.31.0 |
| yarl | 1.9.3 | 1.9.3 |
| zeromq | 4.3.5 | 4.3.5 |
| zfp | 1.0.0 | 1.0.0 |
| zict | 3.0.0 | 3.0.0 |
| zipp | 3.17.0 | 3.17.0 |
| zlib | 1.2.13 | 1.2.13 |
| zlib-ng | 2.0.7 | 2.0.7 |
| zope | 1.0 | 1.0 |
| zope.interface | 5.4.0 | 5.4.0 |
| zstandard | 0.19.0 | 0.19.0 |
| zstd | 1.5.5 | 1.5.5 |
| Package Name | win-64 |
|---|---|
| \_anaconda\_depends | 2024.02 |
| abseil-cpp | 20211102.0 |
| aiobotocore | 2.7.0 |
| aiohttp | 3.9.3 |
| aioitertools | 0.7.1 |
| aiosignal | 1.2.0 |
| alabaster | 0.7.12 |
| altair | 5.0.1 |
| anaconda-anon-usage | 0.4.3 |
| anaconda-catalogs | 0.2.0 |
| anaconda-client | 1.12.3 |
| anaconda-cloud-auth | 0.1.4 |
| anaconda-navigator | 2.5.2 |
| anaconda-project | 0.11.1 |
| anyio | 4.2.0 |
| aom | 3.6.0 |
| appdirs | 1.4.4 |
| archspec | 0.2.1 |
| argon2-cffi | 21.3.0 |
| argon2-cffi-bindings | 21.2.0 |
| arrow | 1.2.3 |
| arrow-cpp | 14.0.2 |
| astroid | 2.14.2 |
| astropy | 5.3.4 |
| asttokens | 2.0.5 |
| async-lru | 2.0.4 |
| atomicwrites | 1.4.0 |
| attrs | 23.1.0 |
| automat | 20.2.0 |
| autopep8 | 1.6.0 |
| aws-c-auth | 0.6.19 |
| aws-c-cal | 0.5.20 |
| aws-c-common | 0.8.5 |
| aws-c-compression | 0.2.16 |
| aws-c-event-stream | 0.2.15 |
| aws-c-http | 0.6.25 |
| aws-c-io | 0.13.10 |
| aws-c-mqtt | 0.7.13 |
| aws-c-s3 | 0.1.51 |
| aws-c-sdkutils | 0.1.6 |
| aws-checksums | 0.1.13 |
| aws-crt-cpp | 0.18.16 |
| aws-sdk-cpp | 1.10.55 |
| babel | 2.11.0 |
| backports | 1.1 |
| backports.functools\_lru\_cache | 1.6.4 |
| backports.tempfile | 1.0 |
| backports.weakref | 1.0.post1 |
| bcrypt | 3.2.0 |
| beautifulsoup4 | 4.12.2 |
| binaryornot | 0.4.4 |
| black | 23.11.0 |
| blas | 1.0 |
| bleach | 4.1.0 |
| blinker | 1.6.2 |
| blosc | 1.21.3 |
| bokeh | 3.3.4 |
| boltons | 23.0.0 |
| boost-cpp | 1.82.0 |
| botocore | 1.31.64 |
| bottleneck | 1.3.7 |
| brotli | 1.0.9 |
| brotli-bin | 1.0.9 |
| brotli-python | 1.0.9 |
| bzip2 | 1.0.8 |
| c-ares | 1.19.1 |
| c-blosc2 | 2.12.0 |
| ca-certificates | 2023.12.12 |
| cachetools | 4.2.2 |
| certifi | 2024.2.2 |
| cffi | 1.16.0 |
| cfitsio | 3.470 |
| chardet | 4.0.0 |
| charls | 2.2.0 |
| charset-normalizer | 2.0.4 |
| click | 8.1.7 |
| cloudpickle | 2.2.1 |
| clyent | 1.2.2 |
| colorama | 0.4.6 |
| colorcet | 3.0.1 |
| comm | 0.1.2 |
| conda | 24.1.2 |
| conda-build | 24.1.2 |
| conda-content-trust | 0.2.0 |
| conda-index | 0.4.0 |
| conda-libmamba-solver | 24.1.0 |
| conda-pack | 0.6.0 |
| conda-package-handling | 2.2.0 |
| conda-package-streaming | 0.9.0 |
| conda-repo-cli | 1.0.75 |
| conda-token | 0.4.0 |
| conda-verify | 3.4.2 |
| console\_shortcut | 0.1.1 |
| constantly | 23.10.4 |
| contourpy | 1.2.0 |
| cookiecutter | 2.5.0 |
| cryptography | 42.0.2 |
| cssselect | 1.2.0 |
| curl | 8.5.0 |
| cycler | 0.11.0 |
| cytoolz | 0.12.2 |
| dask | 2023.11.0 |
| dask-core | 2023.11.0 |
| datashader | 0.16.0 |
| dav1d | 1.2.1 |
| debugpy | 1.6.7 |
| decorator | 5.1.1 |
| defusedxml | 0.7.1 |
| diff-match-patch | 20200713 |
| dill | 0.3.7 |
| distributed | 2023.11.0 |
| distro | 1.8.0 |
| docstring-to-markdown | 0.11 |
| docutils | 0.18.1 |
| entrypoints | 0.4 |
| et\_xmlfile | 1.1.0 |
| executing | 0.8.3 |
| filelock | 3.13.1 |
| flake8 | 6.0.0 |
| flask | 2.2.5 |
| fmt | 9.1.0 |
| fonttools | 4.25.0 |
| freetype | 2.12.1 |
| frozenlist | 1.4.0 |
| fsspec | 2023.10.0 |
| future | 0.18.3 |
| gensim | 4.3.0 |
| gflags | 2.2.2 |
| giflib | 5.2.1 |
| gitdb | 4.0.7 |
| gitpython | 3.1.37 |
| glog | 0.5.0 |
| gmpy2 | 2.1.2 |
| greenlet | 3.0.1 |
| grpc-cpp | 1.48.2 |
| h5py | 3.9.0 |
| hdf5 | 1.12.1 |
| heapdict | 1.0.1 |
| holoviews | 1.18.3 |
| hvplot | 0.9.2 |
| hyperlink | 21.0.0 |
| icc\_rt | 2022.1.0 |
| icu | 73.1 |
| idna | 3.4 |
| imagecodecs | 2023.1.23 |
| imageio | 2.33.1 |
| imagesize | 1.4.1 |
| imbalanced-learn | 0.11.0 |
| importlib-metadata | 7.0.1 |
| importlib\_metadata | 7.0.1 |
| incremental | 22.10.0 |
| inflection | 0.5.1 |
| iniconfig | 1.1.1 |
| intake | 0.6.8 |
| intel-openmp | 2023.1.0 |
| intervaltree | 3.1.0 |
| ipykernel | 6.28.0 |
| ipython | 8.20.0 |
| ipython\_genutils | 0.2.0 |
| ipywidgets | 7.6.5 |
| isort | 5.9.3 |
| itemadapter | 0.3.0 |
| itemloaders | 1.1.0 |
| itsdangerous | 2.0.1 |
| jaraco.classes | 3.2.1 |
| jedi | 0.18.1 |
| jellyfish | 1.0.1 |
| jinja2 | 3.1.3 |
| jmespath | 1.0.1 |
| joblib | 1.2.0 |
| jpeg | 9e |
| jq | 1.6 |
| json5 | 0.9.6 |
| jsonpatch | 1.32 |
| jsonpointer | 2.1 |
| jsonschema | 4.19.2 |
| jsonschema-specifications | 2023.7.1 |
| jupyter | 1.0.0 |
| jupyter-lsp | 2.2.0 |
| jupyter\_client | 8.6.0 |
| jupyter\_console | 6.6.3 |
| jupyter\_core | 5.5.0 |
| jupyter\_events | 0.8.0 |
| jupyter\_server | 2.10.0 |
| jupyter\_server\_terminals | 0.4.4 |
| jupyterlab | 4.0.11 |
| jupyterlab-variableinspector | 3.1.0 |
| jupyterlab\_pygments | 0.1.2 |
| jupyterlab\_server | 2.25.1 |
| jupyterlab\_widgets | 3.0.9 |
| keyring | 23.13.1 |
| kiwisolver | 1.4.4 |
| krb5 | 1.20.1 |
| lazy-object-proxy | 1.6.0 |
| lazy\_loader | 0.3 |
| lcms2 | 2.12 |
| lerc | 3.0 |
| libaec | 1.0.4 |
| libarchive | 3.6.2 |
| libavif | 0.11.1 |
| libboost | 1.82.0 |
| libbrotlicommon | 1.0.9 |
| libbrotlidec | 1.0.9 |
| libbrotlienc | 1.0.9 |
| libclang | 14.0.6 |
| libclang13 | 14.0.6 |
| libcurl | 8.5.0 |
| libdeflate | 1.17 |
| libevent | 2.1.12 |
| libffi | 3.4.4 |
| libiconv | 1.16 |
| liblief | 0.12.3 |
| libmamba | 1.5.6 |
| libmambapy | 1.5.6 |
| libpng | 1.6.39 |
| libpq | 12.17 |
| libprotobuf | 3.20.3 |
| libsodium | 1.0.18 |
| libsolv | 0.7.24 |
| libspatialindex | 1.9.3 |
| libssh2 | 1.10.0 |
| libthrift | 0.15.0 |
| libtiff | 4.5.1 |
| libwebp-base | 1.3.2 |
| libxml2 | 2.10.4 |
| libxslt | 1.1.37 |
| libzopfli | 1.0.3 |
| linkify-it-py | 2.0.0 |
| llvmlite | 0.42.0 |
| locket | 1.0.0 |
| lxml | 4.9.3 |
| lz4 | 4.3.2 |
| lz4-c | 1.9.4 |
| lzo | 2.10 |
| m2-msys2-runtime | 2.5.0.17080.65c939c |
| m2-patch | 2.7.5 |
| m2w64-libwinpthread-git | 5.0.0.4634.697f757 |
| markdown | 3.4.1 |
| markdown-it-py | 2.2.0 |
| markupsafe | 2.1.3 |
| matplotlib | 3.8.0 |
| matplotlib-base | 3.8.0 |
| matplotlib-inline | 0.1.6 |
| mccabe | 0.7.0 |
| mdit-py-plugins | 0.3.0 |
| mdurl | 0.1.0 |
| menuinst | 2.0.2 |
| mistune | 2.0.4 |
| mkl | 2023.1.0 |
| mkl-service | 2.4.0 |
| mkl\_fft | 1.3.8 |
| mkl\_random | 1.2.4 |
| more-itertools | 10.1.0 |
| mpc | 1.1.0 |
| mpfr | 4.0.2 |
| mpir | 3.0.0 |
| mpmath | 1.3.0 |
| msgpack-python | 1.0.3 |
| msys2-conda-epoch | 20160418 |
| multidict | 6.0.4 |
| multipledispatch | 0.6.0 |
| munkres | 1.1.4 |
| mypy | 1.8.0 |
| mypy\_extensions | 1.0.0 |
| navigator-updater | 0.4.0 |
| nbclient | 0.8.0 |
| nbconvert | 7.10.0 |
| nbformat | 5.9.2 |
| nest-asyncio | 1.6.0 |
| networkx | 3.1 |
| nltk | 3.8.1 |
| notebook | 7.0.8 |
| notebook-shim | 0.2.3 |
| numba | 0.59.0 |
| numexpr | 2.8.7 |
| numpy | 1.26.4 |
| numpy-base | 1.26.4 |
| numpydoc | 1.5.0 |
| openjpeg | 2.4.0 |
| openpyxl | 3.0.10 |
| openssl | 3.0.13 |
| orc | 1.7.4 |
| overrides | 7.4.0 |
| packaging | 23.1 |
| pandas | 2.1.4 |
| pandocfilters | 1.5.0 |
| panel | 1.3.8 |
| param | 2.0.2 |
| paramiko | 2.8.1 |
| parsel | 1.8.1 |
| parso | 0.8.3 |
| partd | 1.4.1 |
| pathlib | 1.0.1 |
| pathspec | 0.10.3 |
| patsy | 0.5.3 |
| pcre2 | 10.42 |
| pexpect | 4.8.0 |
| pickleshare | 0.7.5 |
| pillow | 10.2.0 |
| pip | 23.3.1 |
| pkce | 1.0.3 |
| pkginfo | 1.9.6 |
| platformdirs | 3.10.0 |
| plotly | 5.9.0 |
| pluggy | 1.0.0 |
| ply | 3.11 |
| powershell\_shortcut | 0.0.1 |
| prometheus\_client | 0.14.1 |
| prompt-toolkit | 3.0.43 |
| prompt\_toolkit | 3.0.43 |
| protego | 0.1.16 |
| protobuf | 3.20.3 |
| psutil | 5.9.0 |
| ptyprocess | 0.7.0 |
| pure\_eval | 0.2.2 |
| py-cpuinfo | 9.0.0 |
| py-lief | 0.12.3 |
| pyarrow | 14.0.2 |
| pyasn1 | 0.4.8 |
| pyasn1-modules | 0.2.8 |
| pybind11-abi | 4 |
| pycodestyle | 2.10.0 |
| pycosat | 0.6.6 |
| pycparser | 2.21 |
| pyct | 0.5.0 |
| pycurl | 7.45.2 |
| pydantic | 1.10.12 |
| pydeck | 0.8.0 |
| pydispatcher | 2.0.5 |
| pydocstyle | 6.3.0 |
| pyerfa | 2.0.0 |
| pyflakes | 3.0.1 |
| pygments | 2.15.1 |
| pyjwt | 2.4.0 |
| pylint | 2.16.2 |
| pylint-venv | 2.3.0 |
| pyls-spyder | 0.4.0 |
| pynacl | 1.5.0 |
| pyodbc | 5.0.1 |
| pyopenssl | 24.0.0 |
| pyparsing | 3.0.9 |
| pyqt | 5.15.10 |
| pyqt5-sip | 12.13.0 |
| pyqtwebengine | 5.15.10 |
| pysocks | 1.7.1 |
| pytables | 3.9.2 |
| pytest | 7.4.0 |
| python | 3.11.7 |
| python-dateutil | 2.8.2 |
| python-dotenv | 0.21.0 |
| python-fastjsonschema | 2.16.2 |
| python-json-logger | 2.0.7 |
| python-libarchive-c | 2.9 |
| python-lmdb | 1.4.1 |
| python-lsp-black | 1.2.1 |
| python-lsp-jsonrpc | 1.0.0 |
| python-lsp-server | 1.7.2 |
| python-slugify | 5.0.2 |
| python-snappy | 0.6.1 |
| python-tzdata | 2023.3 |
| pytoolconfig | 1.2.6 |
| pytz | 2023.3.post1 |
| pyviz\_comms | 3.0.0 |
| pywavelets | 1.5.0 |
| pywin32 | 305 |
| pywin32-ctypes | 0.2.0 |
| pywinpty | 2.0.10 |
| pyyaml | 6.0.1 |
| pyzmq | 25.1.2 |
| qdarkstyle | 3.0.2 |
| qstylizer | 0.2.2 |
| qt-main | 5.15.2 |
| qt-webengine | 5.15.9 |
| qtawesome | 1.2.2 |
| qtconsole | 5.4.2 |
| qtpy | 2.4.1 |
| queuelib | 1.6.2 |
| re2 | 2022.04.01 |
| referencing | 0.30.2 |
| regex | 2023.10.3 |
| reproc | 14.2.4 |
| reproc-cpp | 14.2.4 |
| requests | 2.31.0 |
| requests-file | 1.5.1 |
| requests-toolbelt | 1.0.0 |
| rfc3339-validator | 0.1.4 |
| rfc3986-validator | 0.1.1 |
| rich | 13.3.5 |
| rope | 1.7.0 |
| rpds-py | 0.10.6 |
| rtree | 1.0.1 |
| ruamel.yaml | 0.17.21 |
| ruamel\_yaml | 0.17.21 |
| s3fs | 2023.10.0 |
| scikit-image | 0.22.0 |
| scikit-learn | 1.2.2 |
| scipy | 1.11.4 |
| scrapy | 2.8.0 |
| seaborn | 0.12.2 |
| semver | 2.13.0 |
| send2trash | 1.8.2 |
| service\_identity | 18.1.0 |
| setuptools | 68.2.2 |
| sip | 6.7.12 |
| six | 1.16.0 |
| smart\_open | 5.2.1 |
| smmap | 4.0.0 |
| snappy | 1.1.10 |
| sniffio | 1.3.0 |
| snowballstemmer | 2.2.0 |
| sortedcontainers | 2.4.0 |
| soupsieve | 2.5 |
| sphinx | 5.0.2 |
| sphinxcontrib-applehelp | 1.0.2 |
| sphinxcontrib-devhelp | 1.0.2 |
| sphinxcontrib-htmlhelp | 2.0.0 |
| sphinxcontrib-jsmath | 1.0.1 |
| sphinxcontrib-qthelp | 1.0.3 |
| sphinxcontrib-serializinghtml | 1.1.5 |
| spyder | 5.4.3 |
| spyder-kernels | 2.4.4 |
| sqlalchemy | 2.0.25 |
| sqlite | 3.41.2 |
| stack\_data | 0.2.0 |
| statsmodels | 0.14.0 |
| streamlit | 1.30.0 |
| sympy | 1.12 |
| tabulate | 0.9.0 |
| tbb | 2021.8.0 |
| tblib | 1.7.0 |
| tenacity | 8.2.2 |
| terminado | 0.17.1 |
| text-unidecode | 1.3 |
| textdistance | 4.2.1 |
| threadpoolctl | 2.2.0 |
| three-merge | 0.1.1 |
| tifffile | 2023.4.12 |
| tinycss2 | 1.2.1 |
| tk | 8.6.12 |
| tldextract | 3.2.0 |
| toml | 0.10.2 |
| tomlkit | 0.11.1 |
| toolz | 0.12.0 |
| tornado | 6.3.3 |
| tqdm | 4.65.0 |
| traitlets | 5.7.1 |
| truststore | 0.8.0 |
| twisted | 23.10.0 |
| twisted-iocpsupport | 1.0.2 |
| typing-extensions | 4.9.0 |
| typing\_extensions | 4.9.0 |
| tzdata | 2023d |
| tzlocal | 2.1 |
| uc-micro-py | 1.0.1 |
| ujson | 5.4.0 |
| unidecode | 1.2.0 |
| urllib3 | 2.0.7 |
| utf8proc | 2.6.1 |
| validators | 0.18.2 |
| vc | 14.2 |
| vs2015\_runtime | 14.27.29016 |
| w3lib | 2.1.2 |
| watchdog | 2.1.6 |
| wcwidth | 0.2.5 |
| webencodings | 0.5.1 |
| websocket-client | 0.58.0 |
| werkzeug | 2.2.3 |
| whatthepatch | 1.0.2 |
| wheel | 0.41.2 |
| widgetsnbextension | 3.5.2 |
| win\_inet\_pton | 1.1.0 |
| winpty | 0.4.3 |
| wrapt | 1.14.1 |
| xarray | 2023.6.0 |
| xlwings | 0.29.1 |
| xyzservices | 2022.9.0 |
| xz | 5.4.5 |
| yaml | 0.2.5 |
| yaml-cpp | 0.8.0 |
| yapf | 0.31.0 |
| yarl | 1.9.3 |
| zeromq | 4.3.5 |
| zfp | 1.0.0 |
| zict | 3.0.0 |
| zipp | 3.17.0 |
| zlib | 1.2.13 |
| zlib-ng | 2.0.7 |
| zope | 1.0 |
| zope.interface | 5.4.0 |
| zstandard | 0.19.0 |
| zstd | 1.5.5 |
| Name | Version | Summary / License |
|---|---|---|
| [alabaster](https://github.com/bitprophet/alabaster) | 0.7.10 | Configurable, Python 2+3 compatible Sphinx theme / BSD |
| [anaconda-client](http://anaconda.org) | 1.6.3 | anaconda.org command line client library / BSD 3-clause |
| [anaconda-navigator](https://github.com/ContinuumIO/navigator) | 1.6.2 | Anaconda Navigator / proprietary - Continuum Analytics, Inc. |
| [anaconda-project](https://github.com/Anaconda-Platform/anaconda-project/) | 0.6.0 | reproducible, executable project directories / BSD 3-clause |
| [appnope](http://github.com/minrk/appnope) Mac | 0.1.0 | Disable App Nap on OS X 10.9 / BSD |
| [appscript](http://appscript.sourceforge.net/) Mac | 1.0.1 | Control AppleScriptable applications from Python / Public-Domain |
| [asn1crypto](https://github.com/wbond/asn1crypto) | 0.22.0 | ASN.1 parser and serializer / MIT |
| [astroid](https://www.astroid.org/) | 1.4.9 | abstract syntax tree for Python with inference support / LGPL |
| [astropy](http://www.astropy.org/) | 1.3.2 | Community-developed Python Library for Astronomy / BSD |
| [babel](http://babel.pocoo.org/) | 2.4.0 | Utilities to internationalize and localize Python applications / BSD |
| [backports](https://bitbucket.org/brandon/backports) | 1.0 | / BSD |
| [beautifulsoup4](http://www.crummy.com/software/BeautifulSoup/) | 4.6.0 | Python library designed for screen-scraping / MIT |
| [bitarray](https://github.com/ilanschnell/bitarray) | 0.8.1 | efficient representation of arrays of booleans – C extension / PSF |
| [blaze](http://blaze.pydata.org) | 0.10.1 | NumPy and Pandas interface to big data / BSD |
| [bleach](http://github.com/mozilla/bleach) | 1.5.0 | easy whitelist-based HTML-sanitizing tool / Apache License Version 2.0 |
| [bokeh](http://bokeh.pydata.org/) | 0.12.5 | Python interactive visualization library for modern web browsers / BSD |
| [boto](https://github.com/boto/boto/) | 2.46.1 | Amazon Web Services Library / MIT |
| [bottleneck](http://berkeleyanalytics.com/bottleneck) | 1.2.1 | Fast NumPy array functions written in Cython. / Simplified BSD |
| [bzip2](http://www.bzip.org/) | 1.0.6 | high-quality data compressor / BSD |
| [cairo](http://cairographics.org/) Linux | 1.14.8 | A 2D graphics library with support for multiple output devices / LGPL 2.1, MPL 1.1 |
| [cffi](http://cffi.readthedocs.org) | 1.10.0 | C Foreign Function Interface for Python / MIT |
| [chardet](https://github.com/chardet/chardet) | 3.0.3 | Universal character encoding detector / GNU Lesser General Public License |
| [click](http://click.pocoo.org/) | 6.7 | Command line interface creation kit / BSD |
| [cloudpickle](https://github.com/cloudpipe/cloudpickle) | 0.2.2 | Extended pickling support for Python objects / BSD |
| [clyent](https://github.com/Anaconda-Server/clyent) | 1.2.2 | Command line client library for windows and posix / BSD |
| [colorama](https://github.com/tartley/colorama) | 0.3.9 | Cross-platform colored terminal text in Python / BSD |
| [comtypes](http://starship.python.net/crew/theller/comtypes/) Windows | 1.1.2 | pure Python COM package / MIT |
| [conda](http://conda.pydata.org/) | 4.3.21 | OS-agnostic, system-level binary package and environment manager. / BSD |
| [contextlib2](http://contextlib2.readthedocs.org/) | 0.5.5 | backports and enhancements for the contextlib module / PSF |
| [cryptography](https://cryptography.io) | 1.8.1 | Provides cryptographic recipes and primitives to Python developers / Apache |
| [curl](http://curl.haxx.se/) | 7.52.1 | Tool and library for transferring data with URL syntax / MIT/X derivate |
| [cycler](http://matplotlib.org/cycler/) | 0.10.0 | Composable style cycles / BSD |
| [cython](http://www.cython.org/) | 0.25.2 | The Cython compiler for writing C extensions for the Python language / Apache version 2.0 |
| [cytoolz](https://github.com/pytoolz/cytoolz) | 0.8.2 | Cython implementation of Toolz, high performance functional utilities / BSD |
| [dask](http://dask.pydata.org/en/latest/) | 0.14.3 | Task scheduling and blocked algorithms for parallel processing / BSD |
| [datashape](http://datashape.pydata.org) | 0.5.4 | Language defining a data description protocol / BSD |
| [dbus](http://www.freedesktop.org/wiki/Software/dbus/) Linux | 1.10.10 | message bus system, a simple way for applications to talk to one another / GPL2 |
| [decorator](http://pypi.python.org/pypi/decorator) | 4.0.11 | Better living through Python with decorators / BSD |
| [distributed](http://distributed.readthedocs.org/en/latest/) | 1.16.3 | Lightweight library for distributed computing in Python / BSD 3-Clause |
| [docutils](http://docutils.sourceforge.net) | 0.13.1 | Utilities for general- and special-purpose documentation / Public-Domain, PSF, 2-clause BSD, GPLv3 |
| [entrypoints](https://github.com/takluyver/entrypoints) | 0.2.2 | / MIT |
| [et\_xmlfile](https://bitbucket.org/openpyxl/et_xmlfile) | 1.0.1 | Low memory library for creating large XML files / MIT |
| [expat](http://expat.sourceforge.net) Linux Mac | 2.1.0 | XML parser library written in C / MIT |
| [fastcache](https://github.com/pbrady/fastcache) | 1.0.2 | C implementation of Python 3 functools.lru\_cache / MIT |
| [flask](http://flask.pocoo.org/) | 0.12.2 | A microframework based on Werkzeug, Jinja2 and good intentions / BSD |
| [flask-cors](https://github.com/corydolphin/flask-cors) | 3.0.2 | Flask extension adding a decorator for CORS support / MIT |
| [fontconfig](http://www.freedesktop.org/wiki/Software/fontconfig/) Linux | 2.12.1 | A library for configuring and customizing font access / BSD |
| [freetype](http://freetype.sourceforge.net/index2.html) | 2.5.5 | A Free, High-Quality, and Portable Font Engine / FreeType License |
| [get\_terminal\_size](https://github.com/chrippa/backports.shutil_get_terminal_size) | 1.0.0 | backport of the get\_terminal\_size function from Python 3.3 / MIT |
| [gevent](http://www.gevent.org/) | 1.2.1 | Coroutine-based Python network library / MIT |
| [glib](https://developer.gnome.org/glib/) Linux | 2.50.2 | Core application building blocks for libraries and applications in C / LGPL |
| [greenlet](https://github.com/python-greenlet/greenlet) | 0.4.12 | Lightweight in-process concurrent programming / MIT |
| [gst-plugins-base](http://gstreamer.freedesktop.org/) Linux | 1.8.0 | GStreamer Base Plug-ins / GPL2 |
| [gstreamer](http://gstreamer.freedesktop.org/) Linux | 1.8.0 | library for constructing graphs of media-handling components / LGPL2 |
| [h5py](http://www.h5py.org/) | 2.7.0 | Pythonic interface to the HDF5 binary data format / 3-clause BSD |
| [harfbuzz](http://www.freedesktop.org/wiki/Software/HarfBuzz/) Linux | 0.9.39 | An OpenType text shaping engine / MIT |
| [hdf5](http://www.hdfgroup.org/HDF5/) | 1.8.17 | A data model, library, and file format for storing and managing data / BSD-like |
| [heapdict](http://stutzbachenterprises.com/) | 1.0.0 | A heap with decrease-key and increase-key operations / BSD |
| [html5lib](https://github.com/html5lib/html5lib-python) | 0.999 | HTML parser based on the WHATWG HTML specification / MIT |
| [idna](https://github.com/kjd/idna) | 2.5 | Internationalized Domain Names in Applications / BSD |
| [imagesize](https://github.com/shibukawa/imagesize_py) | 0.7.1 | getting image size from png/jpeg/jpeg2000/gif file / MIT |
| [ipykernel](http://ipython.org) | 4.6.1 | IPython Kernel for Jupyter / BSD |
| [ipython](http://ipython.org/) | 5.3.0 | Productive Interactive Computing / BSD |
| [ipython\_genutils](http://jupyter.org) | 0.2.0 | vestigial utilities from IPython / BSD |
| [ipywidgets](https://github.com/ipython/ipywidgets) | 6.0.0 | Widgets for the Jupyter Notebook / BSD 3-clause |
| [isort](https://github.com/timothycrosley/isort) | 4.2.5 | Python utility / library to sort Python imports / MIT |
| [itsdangerous](https://pythonhosted.org/itsdangerous/) | 0.24 | Various helpers to pass trusted data to untrusted environments / BSD |
| [jbig](https://www.cl.cam.ac.uk/~mgk25/jbigkit) Linux Mac | 2.1 | Implementation of the JBIG1 data compression standard / GPL2 |
| [jdcal](http://github.com/phn/jdcal) | 1.3 | Julian dates from proleptic Gregorian and Julian calendars. / BSD |
| [jedi](http://jedi.jedidjah.ch/) | 0.10.2 | Autocompletion and static analysis library for Python / MIT |
| [jinja2](http://jinja.pocoo.org) | 2.9.6 | An easy to use stand-alone template engine written in pure python. / BSD |
| [jpeg](http://www.ijg.org/) | 9b | Read and write jpeg COM, EXIF, IPTC medata / Custom free software license |
| [jsonschema](https://python-jsonschema.readthedocs.org) | 2.6.0 | An implementation of JSON Schema validation for Python / MIT |
| [jupyter](http://jupyter.org) | 1.0.0 | Open source, interactive data science and scientific computing / BSD |
| [jupyter\_client](http://jupyter.org) | 5.0.1 | Jupyter protocol implementation and client libraries / BSD |
| [jupyter\_console](http://jupyter.org) | 5.1.0 | Jupyter terminal console / BSD |
| [jupyter\_core](http://jupyter.org) | 4.3.0 | core Jupyter functionality / BSD |
| [lazy-object-proxy](https://github.com/ionelmc/python-lazy-object-proxy) | 1.2.2 | Fast and thorough lazy object proxy / BSD |
| [libffi](https://sourceware.org/libffi/) Linux | 3.2.1 | portable foreign-function interface library / MIT |
| [libgcc](http://gcc.gnu.org/) Linux | 4.8.5 | Shared libraries for the GNU Compiler Collection / GPL3 |
| [libgfortran](https://gcc.gnu.org/fortran/) Linux | 3.0.0 | GNU Fortran runtime library / GPL3 |
| [libiconv](https://www.gnu.org/software/libiconv/) Linux Mac | 1.14 | Provides iconv for systems which don’t have one / GPL and LGPL |
| [libpng](http://www.libpng.org/pub/png/libpng.html) | 1.6.27 | official PNG reference library / libpng license |
| [libsodium](http://libsodium.org) Linux | 1.0.10 | A library for encryption, signatures, password hashing, etc. / ISC |
| [libtiff](http://www.libtiff.org/) | 4.0.6 | Support for Tag Image File Format (TIFF) / BSD-like |
| [libtool](http://www.gnu.org/software/libtool/) Linux | 2.4.2 | The GNU Portable Library Tool / GPL3 |
| [libxcb](http://xcb.freedesktop.org/) Linux | 1.12 | This is the C-language Bindings package to the X Window System protocol / MIT |
| [libxml2](http://xmlsoft.org/) Linux Mac | 2.9.4 | The XML C parser and toolkit of Gnome / MIT |
| [libxslt](http://xmlsoft.org/XSLT/) Linux Mac | 1.1.29 | The XSLT C library developed for the GNOME project / MIT |
| [llvmlite](http://llvmlite.pydata.org/) | 0.18.0 | Lightweight wrapper around basic LLVM functionality / BSD |
| [locket](http://github.com/mwilliamson/locket.py) | 0.2.0 | File based locks for Python for Linux and Windows / BSD |
| [lxml](http://lxml.de/) | 3.7.3 | Pythonic binding for the C libraries libxml2 and libxslt / BSD |
| [markupsafe](http://www.pocoo.org/projects/markupsafe/#markupsafe) | 0.23 | Implements a XML/HTML/XHTML Markup safe string for Python / BSD |
| [matplotlib](http://matplotlib.org/) | 2.0.2 | Python 2D plotting library / PSF-based |
| [menuinst](https://github.com/ContinuumIO/menuinst) Windows | 1.4.7 | cross platform menu item installation / BSD |
| [mistune](https://github.com/lepture/mistune) | 0.7.4 | The fastest markdown parser in pure Python with renderer feature / BSD |
| [mkl](http://software.intel.com/en-us/articles/intel-mkl/) | 2017.0.1 | Math library for Intel and compatible processors / proprietary - Intel |
| [mkl-service](https://github.com/ContinuumIO/mkl-service) | 1.1.2 | Python bindings to MKL service functions / 3-clause BSD |
| [mpmath](http://mpmath.org) | 0.19 | Python library for arbitrary-precision floating-point arithmetic / BSD |
| [msgpack-python](http://msgpack.org/) | 0.4.8 | An efficient binary serialization format / Apache |
| [multipledispatch](http://github.com/mrocklin/multipledispatch/) | 0.4.9 | Multiple dispatch in Python / BSD |
| [navigator-updater](https://github.com/ContinuumIO/navigator-updater) | 0.1.0 | Anaconda Navigator Updater / proprietary - Continuum Analytics, Inc. |
| [nbconvert](http://jupyter.org) | 5.1.1 | converts notebooks to various other formats via Jinja templates / BSD |
| [nbformat](http://jupyter.org) | 4.3.0 | The reference implementation of the Jupyter Notebook format / BSD |
| [networkx](http://networkx.lanl.gov/) | 1.11 | Python package for creating and manipulating complex networks / BSD |
| [nltk](http://nltk.org/) | 3.2.3 | Build Python programs to work with human language data / Apache Software License |
| [nose](http://readthedocs.org/docs/nose/) | 1.3.7 | Nose extends unittest to make testing easier / LGPL |
| [notebook](http://jupyter.org) | 5.0.0 | web-based notebook environment for interactive computing / BSD |
| [numba](http://numba.pydata.org/) | 0.33.0 | NumPy aware dynamic Python compiler using LLVM / BSD |
| [numexpr](https://github.com/pydata/numexpr) | 2.6.2 | Fast numerical expression evaluator for NumPy / MIT |
| [numpy](http://numpy.scipy.org/) | 1.11.3 | array processing for numbers, strings, records, and objects / BSD |
| [numpydoc](https://github.com/numpy/numpydoc) | 0.6.0 | Sphinx extension to support docstrings in Numpy format / BSD |
| [odo](http://odo.pydata.org/en/latest/) | 0.5.0 | Shapeshifting for your data / BSD |
| [olefile](https://www.decalage.info/python/olefileio) | 0.44 | parse, read and write Microsoft OLE2 files / BSD License |
| [openpyxl](http://openpyxl.readthedocs.org) | 2.4.7 | A Python library to read/write Excel 2010 xlsx/xlsm files / MIT |
| [openssl](http://www.openssl.org/) | 1.0.2l | OpenSSL is an open-source implementation of the SSL and TLS protocols / Apache-style |
| [packaging](https://github.com/pypa/packaging) | 16.8 | core utilities for Python packages / BSD or Apache 2.0 |
| [pandas](http://pandas.pydata.org/) | 0.20.1 | Powerful data structures and data analysis tools / BSD |
| [pandocfilters](http://github.com/jgm/pandocfilters) | 1.4.1 | utilities for writing pandoc filters in python / BSD License |
| [pango](http://www.pango.org/) Linux | 1.40.3 | Text layout and rendering engine / LGPL |
| [partd](https://github.com/dask/partd) | 0.3.8 | Appendable key-value byte store / BSD |
| [path.py](http://github.com/jaraco/path.py) | 10.3.1 | module wrapper for os.path / MIT |
| [pathlib2](https://pypi.python.org/pypi/pathlib2/) | 2.2.1 | object-oriented filesystem paths / MIT |
| [patsy](https://github.com/pydata/patsy) | 0.4.1 | Describing statistical models in Python using symbolic formulas / BSD |
| [pcre](http://www.pcre.org/) Linux Mac | 8.39 | A set of functions that implement regular expression pattern matching / 3-clause BSD License |
| [pep8](http://pep8.readthedocs.org/) | 1.7.0 | Python style guide checker / MIT |
| [pexpect](http://pexpect.readthedocs.org/) Linux Mac | 4.2.1 | Pexpect allows easy control of interactive console applications / ISC |
| [pickleshare](https://github.com/vivainio/pickleshare) | 0.7.4 | file system based database that uses Python pickles / MIT |
| [pillow](http://python-pillow.github.io/) | 4.1.1 | The friendly Python Imaging Library(PIL) fork / PIL license |
| [pip](https://pip.pypa.io/en/stable/) | 9.0.1 | PyPA recommended tool for installing Python packages / MIT |
| [pixman](http://www.pixman.org/) Linux | 0.34.0 | A low-level software library for pixel manipulation / MIT |
| [ply](http://www.dabeaz.com/ply/) | 3.10 | implementation of Lex and Yacc / BSD |
| [prompt\_toolkit](https://github.com/jonathanslenders/python-prompt-toolkit) | 1.0.14 | library for building powerful interactive command lines in Python / BSD |
| [psutil](https://github.com/giampaolo/psutil) | 5.2.2 | cross-platform process and system utilities module for Python / BSD |
| [ptyprocess](https://github.com/pexpect/ptyprocess) Linux Mac | 0.5.1 | Run a subprocess in a pseudo terminal / ISC |
| [py](http://pylib.readthedocs.org/) | 1.4.33 | Library with cross-python path, ini-parsing, io, code, log facilities / MIT |
| [pycosat](https://github.com/ContinuumIO/pycosat) | 0.6.2 | Python bindings to the picosat SAT solver / MIT |
| [pycparser](https://github.com/eliben/pycparser) | 2.17 | complete C99 parser in pure Python / BSD |
| [pycrypto](http://www.pycrypto.org/) | 2.6.1 | Cryptographic modules for Python / Public-Domain |
| [pycurl](http://pycurl.sourceforge.net/) | 7.43.0 | Python interface to libcurl / LGPL, MIT |
| [pyflakes](https://launchpad.net/pyflakes) | 1.5.0 | Checks Python source files for errors / MIT |
| [pygments](http://pygments.org/) | 2.2.0 | Generic syntax highlighting package / BSD |
| [pylint](http://www.pylint.org/) | 1.6.4 | Python code static checker / GPL |
| [pyodbc](http://mkleehammer.github.io/pyodbc/) | 4.0.16 | DB API Module for ODBC / MIT |
| [pyopenssl](https://github.com/pyca/pyopenssl) | 17.0.0 | Python wrapper module around the OpenSSL library / Apache Software License |
| [pyparsing](http://pyparsing.wikispaces.com/) | 2.1.4 | Create and execute simple grammars / MIT |
| [pyqt](http://www.riverbankcomputing.co.uk/software/pyqt) | 5.6.0 | Python binding of the cross-platform GUI toolkit Qt / Commercial, GPLv2, GPLv3 |
| [pytables](http://www.pytables.org) | 3.3.0 | Manage hierarchical datasets to cope with large amounts of data / BSD |
| [pytest](http://pytest.org/) | 3.0.7 | Simple and powerful testing with Python / MIT |
| [python](http://www.python.org/) | 3.6.1 | general purpose programming language / PSF |
| [python-dateutil](https://dateutil.readthedocs.org/) | 2.6.0 | extensions to the standard Python datetime module / BSD |
| [pytz](http://pytz.sourceforge.net/) | 2017.2 | World timezone definitions, modern and historical / MIT |
| [pywavelets](https://github.com/PyWavelets/pywt) | 0.5.2 | wavelet transform module / MIT |
| [pywin32](http://sourceforge.net/projects/pywin32/) Windows | 220 | Python extensions for Windows / PSF |
| [pyyaml](http://pyyaml.org/wiki/PyYAML) | 3.12 | YAML parser and emitter for Python / MIT |
| [pyzmq](https://github.com/zeromq/pyzmq) | 16.0.2 | zeromq bindings for Python / LGPL and BSD |
| [qt](http://www.qt.io) | 5.6.2 | Qt is a cross-platform application and UI framework / LGPLv3 |
| [qtawesome](https://github.com/spyder-ide/qtawesome) | 0.4.4 | FontAwesome icons in PyQt and PySide applications / MIT |
| [qtconsole](http://jupyter.org) | 4.3.0 | Jupyter Qt Console / Modified BSD License |
| [qtpy](https://github.com/spyder-ide/qtpy) | 1.2.1 | uniform layer to support PyQt4, PyQt5 and PySide with a single codebase / MIT |
| [readline](http://cnswww.cns.cwru.edu/php/chet/readline/rltop.html) Linux Mac | 6.2 | Line-editing for programs with a command-line interface / GPL3 |
| [requests](http://docs.python-requests.org/en/latest/index.html) | 2.14.2 | Python HTTP for Humans / Apache Software License |
| [rope](https://github.com/python-rope/rope) | 0.9.4 | A Python refactoring library / GPL |
| [ruamel\_yaml](https://bitbucket.org/ruamel/yaml) | 0.11.14 | patched copy of ruamel.yaml (a yaml parser) / MIT |
| [scikit-image](http://scikit-image.org/) | 0.13.0 | Image processing routines for SciPy / 3-clause BSD |
| [scikit-learn](http://scikit-learn.org/stable/) | 0.18.1 | set of python modules for machine learning and data mining / 3-clause BSD |
| [scipy](http://www.scipy.org/) | 0.19.0 | Scientific Library for Python / BSD |
| [seaborn](http://stanford.edu/~mwaskom/software/seaborn/) | 0.7.1 | Statistical data visualization / BSD |
| [setuptools](https://pypi.python.org/pypi/setuptools) | 27.2.0 | Download, build, install, upgrade, and uninstall Python packages / MIT |
| [simplegeneric](https://pypi.python.org/pypi/simplegeneric) | 0.8.1 | Define simple single-dispatch generic functions / ZPL 2.1 |
| [singledispatch](http://docs.python.org/3/library/functools.html#functools.singledispatch) | 3.4.0.3 | Transforms a function into a single-dispatch generic function / MIT |
| [sip](http://www.riverbankcomputing.com/software/sip/intro) | 4.18 | Create Python bindings for C and C++ libraries / GPL3 |
| [six](http://pypi.python.org/pypi/six/) | 1.10.0 | Python 2 and 3 compatibility utilities / MIT |
| [snowballstemmer](https://github.com/shibukawa/snowball_py) | 1.2.1 | Snowball stemming library collection for Python / BSD |
| [sortedcollections](http://www.grantjenks.com/docs/sortedcollections/) | 0.5.3 | Python Sorted Collections / Apache Software License |
| [sortedcontainers](http://www.grantjenks.com/docs/sortedcontainers/) | 1.5.7 | sorted Container Types: SortedList, SortedDict, and SortedSet / Apache 2.0 |
| [sphinx](http://sphinx-doc.org) | 1.5.6 | Documentation generator / BSD |
| [spyder](https://github.com/spyder-ide/spyder) | 3.1.4 | Scientific PYthon Development EnviRonment / MIT |
| [sqlalchemy](http://www.sqlalchemy.org/) | 1.1.9 | Database Abstraction Library / MIT |
| [sqlite](http://www.sqlite.org/) | 3.13.0 | Self-contained, zero-configuration, SQL database engine / Public-Domain |
| [statsmodels](http://statsmodels.sourceforge.net/) | 0.8.0 | Statistical computations and models / 3-clause BSD |
| [sympy](http://sympy.org) | 1.0 | Python library for symbolic mathematics / 3-clause BSD |
| [tblib](https://github.com/ionelmc/python-tblib) | 1.3.2 | Traceback fiddling library for Python / BSD |
| [terminado](https://github.com/takluyver/terminado) Linux Mac | 0.6 | Terminals served to term.js using Tornado websockets / BSD |
| [testpath](https://testpath.readthedocs.io) | 0.3 | collection of utilities for Python code working with files and commands / MIT |
| [tk](http://www.tcl.tk/) | 8.5.18 | Dynamic programming language with GUI elements / BSD-like |
| [toolz](http://toolz.readthedocs.org/en/latest/) | 0.8.2 | List processing tools and functional utilities / BSD |
| [tornado](http://www.tornadoweb.org/) | 4.5.1 | A Python web framework and asynchronous networking library / Apache 2.0 |
| [traitlets](https://github.com/ipython/traitlets) | 4.3.2 | Configuration system for Python applications / Modified BSD |
| [unicodecsv](https://github.com/jdunck/python-unicodecsv) | 0.14.1 | Drop-in replacement for csv module which supports unicode strings / BSD |
| [unixodbc](http://www.unixodbc.org/) Linux Mac | 2.3.4 | ODBC (Open Database Connectivity) implementation for Unix / LGPLv2 |
| [vs2015\_runtime](http://www.microsoft.com) Windows | 14.0.25123 | Bundles of the MSVC 14 (VS 2015) runtime / Proprietary |
| [wcwidth](https://github.com/jquast/wcwidth) | 0.1.7 | measures number of Terminal column cells of wide-character codes / MIT |
| [werkzeug](http://werkzeug.pocoo.org/) | 0.12.2 | A WSGI utility library for Python / BSD |
| [wheel](http://bitbucket.org/pypa/wheel/) | 0.29.0 | Built-package format for Python / MIT |
| [widgetsnbextension](http://ipython.org) | 2.0.0 | IPython HTML widgets for Jupyter / BSD 3-clause |
| [win\_unicode\_console](https://github.com/Drekin/win-unicode-console) Windows | 0.5 | enable Unicode input and display when running Python from Windows console / MIT |
| [wrapt](https://github.com/GrahamDumpleton/wrapt) | 1.10.10 | Module for decorators, wrappers and monkey patching / BSD |
| [xlrd](http://www.lexicon.net/sjmachin/xlrd.htm) | 1.0.0 | Extract data from Microsoft Excel spreadsheet files / BSD |
| [xlsxwriter](https://github.com/jmcnamara/XlsxWriter) | 0.9.6 | A Python module for creating Excel XLSX files / BSD |
| [xlwings](http://xlwings.org/) Mac Windows | 0.10.4 | Interact with Excel from Python and vice versa / 3-clause BSD |
| [xlwt](http://www.python-excel.org/) | 1.2.0 | Writing data and formatting information to Excel files / BSD |
| [xz](http://tukaani.org/xz/) Linux Mac | 5.2.2 | Data compression software with high compression ratio / Public-Domain, GPL |
| [yaml](http://www.yaml.org/) Linux Mac | 0.1.6 | A human friendly data serialization standard / MIT |
| [zeromq](http://zeromq.org) Linux | 4.1.5 | Distributed messaging / LGPL |
| [zict](http://github.com/mrocklin/zict/) | 0.1.2 | mutable mapping tools / BSD |
| [zlib](http://zlib.net/) | 1.2.8 | Unobtrusive compression library / zlib |
| Name | Version | Summary / License |
|---|---|---|
| [alabaster](https://github.com/bitprophet/alabaster) | 0.7.10 | Configurable, Python 2+3 compatible Sphinx theme / BSD |
| [anaconda-client](http://anaconda.org) | 1.6.3 | anaconda.org command line client library / BSD 3-clause |
| [anaconda-navigator](https://github.com/ContinuumIO/navigator) | 1.6.2 | Anaconda Navigator / proprietary - Continuum Analytics, Inc. |
| [anaconda-project](https://github.com/Anaconda-Platform/anaconda-project/) | 0.6.0 | reproducible, executable project directories / BSD 3-clause |
| [appnope](http://github.com/minrk/appnope) Mac | 0.1.0 | Disable App Nap on OS X 10.9 / BSD |
| [appscript](http://appscript.sourceforge.net/) Mac | 1.0.1 | Control AppleScriptable applications from Python / Public-Domain |
| [asn1crypto](https://github.com/wbond/asn1crypto) | 0.22.0 | ASN.1 parser and serializer / MIT |
| [astroid](https://www.astroid.org/) | 1.4.9 | abstract syntax tree for Python with inference support / LGPL |
| [astropy](http://www.astropy.org/) | 1.3.2 | Community-developed Python Library for Astronomy / BSD |
| [babel](http://babel.pocoo.org/) | 2.4.0 | Utilities to internationalize and localize Python applications / BSD |
| [backports](https://bitbucket.org/brandon/backports) | 1.0 | / BSD |
| [backports\_abc](https://github.com/cython/backports_abc) | 0.5 | backport of recent additions to the ‘collections.abc’ module / PSF |
| [beautifulsoup4](http://www.crummy.com/software/BeautifulSoup/) | 4.6.0 | Python library designed for screen-scraping / MIT |
| [bitarray](https://github.com/ilanschnell/bitarray) | 0.8.1 | efficient representation of arrays of booleans – C extension / PSF |
| [blaze](http://blaze.pydata.org) | 0.10.1 | NumPy and Pandas interface to big data / BSD |
| [bleach](http://github.com/mozilla/bleach) | 1.5.0 | easy whitelist-based HTML-sanitizing tool / Apache License Version 2.0 |
| [bokeh](http://bokeh.pydata.org/) | 0.12.5 | Python interactive visualization library for modern web browsers / BSD |
| [boto](https://github.com/boto/boto/) | 2.46.1 | Amazon Web Services Library / MIT |
| [bottleneck](http://berkeleyanalytics.com/bottleneck) | 1.2.1 | Fast NumPy array functions written in Cython. / Simplified BSD |
| [bzip2](http://www.bzip.org/) | 1.0.6 | high-quality data compressor / BSD |
| [cairo](http://cairographics.org/) Linux | 1.14.8 | A 2D graphics library with support for multiple output devices / LGPL 2.1, MPL 1.1 |
| [cdecimal](http://www.bytereef.org/mpdecimal/index.html) | 2.3 | Fast drop-in replacement for decimal.py / BSD |
| [cffi](http://cffi.readthedocs.org) | 1.10.0 | C Foreign Function Interface for Python / MIT |
| [chardet](https://github.com/chardet/chardet) | 3.0.3 | Universal character encoding detector / GNU Lesser General Public License |
| [click](http://click.pocoo.org/) | 6.7 | Command line interface creation kit / BSD |
| [cloudpickle](https://github.com/cloudpipe/cloudpickle) | 0.2.2 | Extended pickling support for Python objects / BSD |
| [clyent](https://github.com/Anaconda-Server/clyent) | 1.2.2 | Command line client library for windows and posix / BSD |
| [colorama](https://github.com/tartley/colorama) | 0.3.9 | Cross-platform colored terminal text in Python / BSD |
| [comtypes](http://starship.python.net/crew/theller/comtypes/) Windows | 1.1.2 | pure Python COM package / MIT |
| [conda](http://conda.pydata.org/) | 4.3.21 | OS-agnostic, system-level binary package and environment manager. / BSD |
| [configparser](http://docs.python.org/3/library/configparser.html) | 3.5.0 | brings the updated configparser from Python 3.5 to Python 2.6-3.5 / MIT |
| [contextlib2](http://contextlib2.readthedocs.org/) | 0.5.5 | backports and enhancements for the contextlib module / PSF |
| [cryptography](https://cryptography.io) | 1.8.1 | Provides cryptographic recipes and primitives to Python developers / Apache |
| [curl](http://curl.haxx.se/) | 7.52.1 | Tool and library for transferring data with URL syntax / MIT/X derivate |
| [cycler](http://matplotlib.org/cycler/) | 0.10.0 | Composable style cycles / BSD |
| [cython](http://www.cython.org/) | 0.25.2 | The Cython compiler for writing C extensions for the Python language / Apache version 2.0 |
| [cytoolz](https://github.com/pytoolz/cytoolz) | 0.8.2 | Cython implementation of Toolz, high performance functional utilities / BSD |
| [dask](http://dask.pydata.org/en/latest/) | 0.14.3 | Task scheduling and blocked algorithms for parallel processing / BSD |
| [datashape](http://datashape.pydata.org) | 0.5.4 | Language defining a data description protocol / BSD |
| [dbus](http://www.freedesktop.org/wiki/Software/dbus/) Linux | 1.10.10 | message bus system, a simple way for applications to talk to one another / GPL2 |
| [decorator](http://pypi.python.org/pypi/decorator) | 4.0.11 | Better living through Python with decorators / BSD |
| [distributed](http://distributed.readthedocs.org/en/latest/) | 1.16.3 | Lightweight library for distributed computing in Python / BSD 3-Clause |
| [docutils](http://docutils.sourceforge.net) | 0.13.1 | Utilities for general- and special-purpose documentation / Public-Domain, PSF, 2-clause BSD, GPLv3 |
| [entrypoints](https://github.com/takluyver/entrypoints) | 0.2.2 | / MIT |
| [enum34](https://pypi.python.org/pypi/enum34) | 1.1.6 | Robust enumerated type support in Python / BSD |
| [et\_xmlfile](https://bitbucket.org/openpyxl/et_xmlfile) | 1.0.1 | Low memory library for creating large XML files / MIT |
| [expat](http://expat.sourceforge.net) Linux Mac | 2.1.0 | XML parser library written in C / MIT |
| [fastcache](https://github.com/pbrady/fastcache) | 1.0.2 | C implementation of Python 3 functools.lru\_cache / MIT |
| [flask](http://flask.pocoo.org/) | 0.12.2 | A microframework based on Werkzeug, Jinja2 and good intentions / BSD |
| [flask-cors](https://github.com/corydolphin/flask-cors) | 3.0.2 | Flask extension adding a decorator for CORS support / MIT |
| [fontconfig](http://www.freedesktop.org/wiki/Software/fontconfig/) Linux | 2.12.1 | A library for configuring and customizing font access / BSD |
| [freetype](http://freetype.sourceforge.net/index2.html) | 2.5.5 | A Free, High-Quality, and Portable Font Engine / FreeType License |
| [funcsigs](http://funcsigs.readthedocs.org/) | 1.0.2 | Python function signatures from PEP362 for Python 2.6, 2.7 and 3.2+ / Apache |
| [functools32](https://github.com/MiCHiLU/python-functools32) | 3.2.3.2 | backport of the functools module from Python 3.2.3 for use on 2.7 / PSF |
| [futures](http://code.google.com/p/pythonfutures) | 3.1.1 | A Java-style futures package for Python / PSF |
| [get\_terminal\_size](https://github.com/chrippa/backports.shutil_get_terminal_size) | 1.0.0 | backport of the get\_terminal\_size function from Python 3.3 / MIT |
| [gevent](http://www.gevent.org/) | 1.2.1 | Coroutine-based Python network library / MIT |
| [glib](https://developer.gnome.org/glib/) Linux | 2.50.2 | Core application building blocks for libraries and applications in C / LGPL |
| [greenlet](https://github.com/python-greenlet/greenlet) | 0.4.12 | Lightweight in-process concurrent programming / MIT |
| [grin](http://pypi.python.org/pypi/grin) | 1.2.1 | Enhanced grep-like tool / BSD |
| [gst-plugins-base](http://gstreamer.freedesktop.org/) Linux | 1.8.0 | GStreamer Base Plug-ins / GPL2 |
| [gstreamer](http://gstreamer.freedesktop.org/) Linux | 1.8.0 | library for constructing graphs of media-handling components / LGPL2 |
| [h5py](http://www.h5py.org/) | 2.7.0 | Pythonic interface to the HDF5 binary data format / 3-clause BSD |
| [harfbuzz](http://www.freedesktop.org/wiki/Software/HarfBuzz/) Linux | 0.9.39 | An OpenType text shaping engine / MIT |
| [hdf5](http://www.hdfgroup.org/HDF5/) | 1.8.17 | A data model, library, and file format for storing and managing data / BSD-like |
| [heapdict](http://stutzbachenterprises.com/) | 1.0.0 | A heap with decrease-key and increase-key operations / BSD |
| [html5lib](https://github.com/html5lib/html5lib-python) | 0.999 | HTML parser based on the WHATWG HTML specification / MIT |
| [idna](https://github.com/kjd/idna) | 2.5 | Internationalized Domain Names in Applications / BSD |
| [imagesize](https://github.com/shibukawa/imagesize_py) | 0.7.1 | getting image size from png/jpeg/jpeg2000/gif file / MIT |
| [ipaddress](https://github.com/phihag/ipaddress) | 1.0.18 | IPv4/IPv6 manipulation library / Python Software Foundation License |
| [ipykernel](http://ipython.org) | 4.6.1 | IPython Kernel for Jupyter / BSD |
| [ipython](http://ipython.org/) | 5.3.0 | Productive Interactive Computing / BSD |
| [ipython\_genutils](http://jupyter.org) | 0.2.0 | vestigial utilities from IPython / BSD |
| [ipywidgets](https://github.com/ipython/ipywidgets) | 6.0.0 | Widgets for the Jupyter Notebook / BSD 3-clause |
| [isort](https://github.com/timothycrosley/isort) | 4.2.5 | Python utility / library to sort Python imports / MIT |
| [itsdangerous](https://pythonhosted.org/itsdangerous/) | 0.24 | Various helpers to pass trusted data to untrusted environments / BSD |
| [jbig](https://www.cl.cam.ac.uk/~mgk25/jbigkit) Linux Mac | 2.1 | Implementation of the JBIG1 data compression standard / GPL2 |
| [jdcal](http://github.com/phn/jdcal) | 1.3 | Julian dates from proleptic Gregorian and Julian calendars. / BSD |
| [jedi](http://jedi.jedidjah.ch/) | 0.10.2 | Autocompletion and static analysis library for Python / MIT |
| [jinja2](http://jinja.pocoo.org) | 2.9.6 | An easy to use stand-alone template engine written in pure python. / BSD |
| [jpeg](http://www.ijg.org/) | 9b | Read and write jpeg COM, EXIF, IPTC medata / Custom free software license |
| [jsonschema](https://python-jsonschema.readthedocs.org) | 2.6.0 | An implementation of JSON Schema validation for Python / MIT |
| [jupyter](http://jupyter.org) | 1.0.0 | Open source, interactive data science and scientific computing / BSD |
| [jupyter\_client](http://jupyter.org) | 5.0.1 | Jupyter protocol implementation and client libraries / BSD |
| [jupyter\_console](http://jupyter.org) | 5.1.0 | Jupyter terminal console / BSD |
| [jupyter\_core](http://jupyter.org) | 4.3.0 | core Jupyter functionality / BSD |
| [lazy-object-proxy](https://github.com/ionelmc/python-lazy-object-proxy) | 1.2.2 | Fast and thorough lazy object proxy / BSD |
| [libffi](https://sourceware.org/libffi/) Linux | 3.2.1 | portable foreign-function interface library / MIT |
| [libgcc](http://gcc.gnu.org/) Linux | 4.8.5 | Shared libraries for the GNU Compiler Collection / GPL3 |
| [libgfortran](https://gcc.gnu.org/fortran/) Linux | 3.0.0 | GNU Fortran runtime library / GPL3 |
| [libiconv](https://www.gnu.org/software/libiconv/) Linux Mac | 1.14 | Provides iconv for systems which don’t have one / GPL and LGPL |
| [libpng](http://www.libpng.org/pub/png/libpng.html) | 1.6.27 | official PNG reference library / libpng license |
| [libsodium](http://libsodium.org) Linux | 1.0.10 | A library for encryption, signatures, password hashing, etc. / ISC |
| [libtiff](http://www.libtiff.org/) | 4.0.6 | Support for Tag Image File Format (TIFF) / BSD-like |
| [libtool](http://www.gnu.org/software/libtool/) Linux | 2.4.2 | The GNU Portable Library Tool / GPL3 |
| [libxcb](http://xcb.freedesktop.org/) Linux | 1.12 | This is the C-language Bindings package to the X Window System protocol / MIT |
| [libxml2](http://xmlsoft.org/) Linux Mac | 2.9.4 | The XML C parser and toolkit of Gnome / MIT |
| [libxslt](http://xmlsoft.org/XSLT/) Linux Mac | 1.1.29 | The XSLT C library developed for the GNOME project / MIT |
| [llvmlite](http://llvmlite.pydata.org/) | 0.18.0 | Lightweight wrapper around basic LLVM functionality / BSD |
| [locket](http://github.com/mwilliamson/locket.py) | 0.2.0 | File based locks for Python for Linux and Windows / BSD |
| [lxml](http://lxml.de/) | 3.7.3 | Pythonic binding for the C libraries libxml2 and libxslt / BSD |
| [markupsafe](http://www.pocoo.org/projects/markupsafe/#markupsafe) | 0.23 | Implements a XML/HTML/XHTML Markup safe string for Python / BSD |
| [matplotlib](http://matplotlib.org/) | 2.0.2 | Python 2D plotting library / PSF-based |
| [menuinst](https://github.com/ContinuumIO/menuinst) Windows | 1.4.7 | cross platform menu item installation / BSD |
| [mistune](https://github.com/lepture/mistune) | 0.7.4 | The fastest markdown parser in pure Python with renderer feature / BSD |
| [mkl](http://software.intel.com/en-us/articles/intel-mkl/) | 2017.0.1 | Math library for Intel and compatible processors / proprietary - Intel |
| [mkl-service](https://github.com/ContinuumIO/mkl-service) | 1.1.2 | Python bindings to MKL service functions / 3-clause BSD |
| [mpmath](http://mpmath.org) | 0.19 | Python library for arbitrary-precision floating-point arithmetic / BSD |
| [msgpack-python](http://msgpack.org/) | 0.4.8 | An efficient binary serialization format / Apache |
| [multipledispatch](http://github.com/mrocklin/multipledispatch/) | 0.4.9 | Multiple dispatch in Python / BSD |
| [navigator-updater](https://github.com/ContinuumIO/navigator-updater) | 0.1.0 | Anaconda Navigator Updater / proprietary - Continuum Analytics, Inc. |
| [nbconvert](http://jupyter.org) | 5.1.1 | converts notebooks to various other formats via Jinja templates / BSD |
| [nbformat](http://jupyter.org) | 4.3.0 | The reference implementation of the Jupyter Notebook format / BSD |
| [networkx](http://networkx.lanl.gov/) | 1.11 | Python package for creating and manipulating complex networks / BSD |
| [nltk](http://nltk.org/) | 3.2.3 | Build Python programs to work with human language data / Apache Software License |
| [nose](http://readthedocs.org/docs/nose/) | 1.3.7 | Nose extends unittest to make testing easier / LGPL |
| [notebook](http://jupyter.org) | 5.0.0 | web-based notebook environment for interactive computing / BSD |
| [numba](http://numba.pydata.org/) | 0.33.0 | NumPy aware dynamic Python compiler using LLVM / BSD |
| [numexpr](https://github.com/pydata/numexpr) | 2.6.2 | Fast numerical expression evaluator for NumPy / MIT |
| [numpy](http://numpy.scipy.org/) | 1.11.3 | array processing for numbers, strings, records, and objects / BSD |
| [numpydoc](https://github.com/numpy/numpydoc) | 0.6.0 | Sphinx extension to support docstrings in Numpy format / BSD |
| [odo](http://odo.pydata.org/en/latest/) | 0.5.0 | Shapeshifting for your data / BSD |
| [olefile](https://www.decalage.info/python/olefileio) | 0.44 | parse, read and write Microsoft OLE2 files / BSD License |
| [openpyxl](http://openpyxl.readthedocs.org) | 2.4.7 | A Python library to read/write Excel 2010 xlsx/xlsm files / MIT |
| [openssl](http://www.openssl.org/) | 1.0.2l | OpenSSL is an open-source implementation of the SSL and TLS protocols / Apache-style |
| [packaging](https://github.com/pypa/packaging) | 16.8 | core utilities for Python packages / BSD or Apache 2.0 |
| [pandas](http://pandas.pydata.org/) | 0.20.1 | Powerful data structures and data analysis tools / BSD |
| [pandocfilters](http://github.com/jgm/pandocfilters) | 1.4.1 | utilities for writing pandoc filters in python / BSD License |
| [pango](http://www.pango.org/) Linux | 1.40.3 | Text layout and rendering engine / LGPL |
| [partd](https://github.com/dask/partd) | 0.3.8 | Appendable key-value byte store / BSD |
| [path.py](http://github.com/jaraco/path.py) | 10.3.1 | module wrapper for os.path / MIT |
| [pathlib2](https://pypi.python.org/pypi/pathlib2/) | 2.2.1 | object-oriented filesystem paths / MIT |
| [patsy](https://github.com/pydata/patsy) | 0.4.1 | Describing statistical models in Python using symbolic formulas / BSD |
| [pcre](http://www.pcre.org/) Linux Mac | 8.39 | A set of functions that implement regular expression pattern matching / 3-clause BSD License |
| [pep8](http://pep8.readthedocs.org/) | 1.7.0 | Python style guide checker / MIT |
| [pexpect](http://pexpect.readthedocs.org/) Linux Mac | 4.2.1 | Pexpect allows easy control of interactive console applications / ISC |
| [pickleshare](https://github.com/vivainio/pickleshare) | 0.7.4 | file system based database that uses Python pickles / MIT |
| [pillow](http://python-pillow.github.io/) | 4.1.1 | The friendly Python Imaging Library(PIL) fork / PIL license |
| [pip](https://pip.pypa.io/en/stable/) | 9.0.1 | PyPA recommended tool for installing Python packages / MIT |
| [pixman](http://www.pixman.org/) Linux | 0.34.0 | A low-level software library for pixel manipulation / MIT |
| [ply](http://www.dabeaz.com/ply/) | 3.10 | implementation of Lex and Yacc / BSD |
| [prompt\_toolkit](https://github.com/jonathanslenders/python-prompt-toolkit) | 1.0.14 | library for building powerful interactive command lines in Python / BSD |
| [psutil](https://github.com/giampaolo/psutil) | 5.2.2 | cross-platform process and system utilities module for Python / BSD |
| [ptyprocess](https://github.com/pexpect/ptyprocess) Linux Mac | 0.5.1 | Run a subprocess in a pseudo terminal / ISC |
| [py](http://pylib.readthedocs.org/) | 1.4.33 | Library with cross-python path, ini-parsing, io, code, log facilities / MIT |
| [pyaudio](http://people.csail.mit.edu/hubert/pyaudio/) Mac | 0.2.7 | Bindings for PortAudio v19, the cross-platform audio stream library / MIT |
| [pycairo](http://cairographics.org/pycairo/) Linux | 1.10.0 | A set of Python bindings for the cairo graphics library / LGPL 2.1, MPL 1.1 |
| [pycosat](https://github.com/ContinuumIO/pycosat) | 0.6.2 | Python bindings to the picosat SAT solver / MIT |
| [pycparser](https://github.com/eliben/pycparser) | 2.17 | complete C99 parser in pure Python / BSD |
| [pycrypto](http://www.pycrypto.org/) | 2.6.1 | Cryptographic modules for Python / Public-Domain |
| [pycurl](http://pycurl.sourceforge.net/) | 7.43.0 | Python interface to libcurl / LGPL, MIT |
| [pyflakes](https://launchpad.net/pyflakes) | 1.5.0 | Checks Python source files for errors / MIT |
| [pygments](http://pygments.org/) | 2.2.0 | Generic syntax highlighting package / BSD |
| [pylint](http://www.pylint.org/) | 1.6.4 | Python code static checker / GPL |
| [pyodbc](http://mkleehammer.github.io/pyodbc/) | 4.0.16 | DB API Module for ODBC / MIT |
| [pyopenssl](https://github.com/pyca/pyopenssl) | 17.0.0 | Python wrapper module around the OpenSSL library / Apache Software License |
| [pyparsing](http://pyparsing.wikispaces.com/) | 2.1.4 | Create and execute simple grammars / MIT |
| [pyqt](http://www.riverbankcomputing.co.uk/software/pyqt) | 5.6.0 | Python binding of the cross-platform GUI toolkit Qt / Commercial, GPLv2, GPLv3 |
| [pytables](http://www.pytables.org) | 3.3.0 | Manage hierarchical datasets to cope with large amounts of data / BSD |
| [pytest](http://pytest.org/) | 3.0.7 | Simple and powerful testing with Python / MIT |
| [python](http://www.python.org/) | 2.7.13 | general purpose programming language / PSF |
| [python-dateutil](https://dateutil.readthedocs.org/) | 2.6.0 | extensions to the standard Python datetime module / BSD |
| [pytz](http://pytz.sourceforge.net/) | 2017.2 | World timezone definitions, modern and historical / MIT |
| [pywavelets](https://github.com/PyWavelets/pywt) | 0.5.2 | wavelet transform module / MIT |
| [pywin32](http://sourceforge.net/projects/pywin32/) Windows | 220 | Python extensions for Windows / PSF |
| [pyyaml](http://pyyaml.org/wiki/PyYAML) | 3.12 | YAML parser and emitter for Python / MIT |
| [pyzmq](https://github.com/zeromq/pyzmq) | 16.0.2 | zeromq bindings for Python / LGPL and BSD |
| [qt](http://www.qt.io) | 5.6.2 | Qt is a cross-platform application and UI framework / LGPLv3 |
| [qtawesome](https://github.com/spyder-ide/qtawesome) | 0.4.4 | FontAwesome icons in PyQt and PySide applications / MIT |
| [qtconsole](http://jupyter.org) | 4.3.0 | Jupyter Qt Console / Modified BSD License |
| [qtpy](https://github.com/spyder-ide/qtpy) | 1.2.1 | uniform layer to support PyQt4, PyQt5 and PySide with a single codebase / MIT |
| [readline](http://cnswww.cns.cwru.edu/php/chet/readline/rltop.html) Linux Mac | 6.2 | Line-editing for programs with a command-line interface / GPL3 |
| [requests](http://docs.python-requests.org/en/latest/index.html) | 2.14.2 | Python HTTP for Humans / Apache Software License |
| [rope](https://github.com/python-rope/rope) | 0.9.4 | A Python refactoring library / GPL |
| [ruamel\_yaml](https://bitbucket.org/ruamel/yaml) | 0.11.14 | patched copy of ruamel.yaml (a yaml parser) / MIT |
| [scandir](https://github.com/benhoyt/scandir) | 1.5 | scandir, a better directory iterator and faster os.walk() / BSD License |
| [scikit-image](http://scikit-image.org/) | 0.13.0 | Image processing routines for SciPy / 3-clause BSD |
| [scikit-learn](http://scikit-learn.org/stable/) | 0.18.1 | set of python modules for machine learning and data mining / 3-clause BSD |
| [scipy](http://www.scipy.org/) | 0.19.0 | Scientific Library for Python / BSD |
| [seaborn](http://stanford.edu/~mwaskom/software/seaborn/) | 0.7.1 | Statistical data visualization / BSD |
| [setuptools](https://pypi.python.org/pypi/setuptools) | 27.2.0 | Download, build, install, upgrade, and uninstall Python packages / MIT |
| [simplegeneric](https://pypi.python.org/pypi/simplegeneric) | 0.8.1 | Define simple single-dispatch generic functions / ZPL 2.1 |
| [singledispatch](http://docs.python.org/3/library/functools.html#functools.singledispatch) | 3.4.0.3 | Transforms a function into a single-dispatch generic function / MIT |
| [sip](http://www.riverbankcomputing.com/software/sip/intro) | 4.18 | Create Python bindings for C and C++ libraries / GPL3 |
| [six](http://pypi.python.org/pypi/six/) | 1.10.0 | Python 2 and 3 compatibility utilities / MIT |
| [snowballstemmer](https://github.com/shibukawa/snowball_py) | 1.2.1 | Snowball stemming library collection for Python / BSD |
| [sortedcollections](http://www.grantjenks.com/docs/sortedcollections/) | 0.5.3 | Python Sorted Collections / Apache Software License |
| [sortedcontainers](http://www.grantjenks.com/docs/sortedcontainers/) | 1.5.7 | sorted Container Types: SortedList, SortedDict, and SortedSet / Apache 2.0 |
| [sphinx](http://sphinx-doc.org) | 1.5.6 | Documentation generator / BSD |
| [spyder](https://github.com/spyder-ide/spyder) | 3.1.4 | Scientific PYthon Development EnviRonment / MIT |
| [sqlalchemy](http://www.sqlalchemy.org/) | 1.1.9 | Database Abstraction Library / MIT |
| [sqlite](http://www.sqlite.org/) | 3.13.0 | Self-contained, zero-configuration, SQL database engine / Public-Domain |
| [ssl\_match\_hostname](http://bitbucket.org/brandon/backports.ssl_match_hostname) | 3.4.0.2 | The ssl.match\_hostname() function from Python 3.4 / PSF |
| [statsmodels](http://statsmodels.sourceforge.net/) | 0.8.0 | Statistical computations and models / 3-clause BSD |
| [subprocess32](https://github.com/google/python-subprocess32) | 3.2.7 | backport of the subprocess module from Python 3.2/3.3 for use on 2.x / Python Software Foundation License |
| [sympy](http://sympy.org) | 1.0 | Python library for symbolic mathematics / 3-clause BSD |
| [tblib](https://github.com/ionelmc/python-tblib) | 1.3.2 | Traceback fiddling library for Python / BSD |
| [terminado](https://github.com/takluyver/terminado) Linux Mac | 0.6 | Terminals served to term.js using Tornado websockets / BSD |
| [testpath](https://testpath.readthedocs.io) | 0.3 | collection of utilities for Python code working with files and commands / MIT |
| [tk](http://www.tcl.tk/) | 8.5.18 | Dynamic programming language with GUI elements / BSD-like |
| [toolz](http://toolz.readthedocs.org/en/latest/) | 0.8.2 | List processing tools and functional utilities / BSD |
| [tornado](http://www.tornadoweb.org/) | 4.5.1 | A Python web framework and asynchronous networking library / Apache 2.0 |
| [traitlets](https://github.com/ipython/traitlets) | 4.3.2 | Configuration system for Python applications / Modified BSD |
| [unicodecsv](https://github.com/jdunck/python-unicodecsv) | 0.14.1 | Drop-in replacement for csv module which supports unicode strings / BSD |
| [unixodbc](http://www.unixodbc.org/) Linux Mac | 2.3.4 | ODBC (Open Database Connectivity) implementation for Unix / LGPLv2 |
| [vs2008\_runtime](http://www.microsoft.com) Windows | 9.00.30729.5054 | Bundles of the MSVC 9 (VS 2008) runtime / Proprietary |
| [vs2015\_runtime](http://www.microsoft.com) Windows | 14.0.25123 | Bundles of the MSVC 14 (VS 2015) runtime / Proprietary |
| [wcwidth](https://github.com/jquast/wcwidth) | 0.1.7 | measures number of Terminal column cells of wide-character codes / MIT |
| [werkzeug](http://werkzeug.pocoo.org/) | 0.12.2 | A WSGI utility library for Python / BSD |
| [wheel](http://bitbucket.org/pypa/wheel/) | 0.29.0 | Built-package format for Python / MIT |
| [widgetsnbextension](http://ipython.org) | 2.0.0 | IPython HTML widgets for Jupyter / BSD 3-clause |
| [win\_unicode\_console](https://github.com/Drekin/win-unicode-console) Windows | 0.5 | enable Unicode input and display when running Python from Windows console / MIT |
| [wrapt](https://github.com/GrahamDumpleton/wrapt) | 1.10.10 | Module for decorators, wrappers and monkey patching / BSD |
| [xlrd](http://www.lexicon.net/sjmachin/xlrd.htm) | 1.0.0 | Extract data from Microsoft Excel spreadsheet files / BSD |
| [xlsxwriter](https://github.com/jmcnamara/XlsxWriter) | 0.9.6 | A Python module for creating Excel XLSX files / BSD |
| [xlwings](http://xlwings.org/) Mac Windows | 0.10.4 | Interact with Excel from Python and vice versa / 3-clause BSD |
| [xlwt](http://www.python-excel.org/) | 1.2.0 | Writing data and formatting information to Excel files / BSD |
| [xz](http://tukaani.org/xz/) Linux Mac | 5.2.2 | Data compression software with high compression ratio / Public-Domain, GPL |
| [yaml](http://www.yaml.org/) Linux Mac | 0.1.6 | A human friendly data serialization standard / MIT |
| [zeromq](http://zeromq.org) Linux | 4.1.5 | Distributed messaging / LGPL |
| [zict](http://github.com/mrocklin/zict/) | 0.1.2 | mutable mapping tools / BSD |
| [zlib](http://zlib.net/) | 1.2.8 | Unobtrusive compression library / zlib |
| Name | Version | Summary / License |
|---|---|---|
| [alabaster](http://www.sphinx-doc.org/en/stable/index.html) | 0.7.9 | Configurable, Python 2+3 compatible Sphinx theme / BSD |
| [anaconda-client](http://anaconda.org) | 1.6.0 | anaconda.org command line client library / BSD |
| [anaconda-navigator](https://github.com/ContinuumIO/navigator) | 1.5.0 | Anaconda Navigator / proprietary - Continuum Analytics, Inc. |
| [anaconda-project](https://github.com/Anaconda-Platform/anaconda-project/) | 0.4.1 | reproducible, executable project directories / BSD |
| [appnope](http://github.com/minrk/appnope) Mac | 0.1.0 | Disable App Nap on OS X 10.9 / BSD |
| [appscript](http://appscript.sourceforge.net/) Mac | 1.0.1 | Control AppleScriptable applications from Python / Public-Domain |
| [astroid](https://www.astroid.org/) | 1.4.9 | abstract syntax tree for Python with inference support / LGPL |
| [astropy](http://www.astropy.org/) | 1.3 | Community-developed Python Library for Astronomy / BSD |
| [babel](http://babel.pocoo.org/) | 2.3.4 | Utilities to internationalize and localize Python applications / BSD |
| backports | 1.0 | / BSD |
| [beautifulsoup4](http://www.crummy.com/software/BeautifulSoup/) | 4.5.3 | Python library designed for screen-scraping / MIT |
| [bitarray](https://github.com/ilanschnell/bitarray) | 0.8.1 | efficient representation of arrays of booleans – C extension / PSF |
| [blaze](http://blaze.pydata.org) | 0.10.1 | NumPy and Pandas interface to big data / BSD |
| [bokeh](http://bokeh.pydata.org/) | 0.12.4 | Python interactive visualization library for modern web browsers / BSD |
| [boto](https://github.com/boto/boto/) | 2.45.0 | Amazon Web Services Library / MIT |
| [bottleneck](http://berkeleyanalytics.com/bottleneck) | 1.2.0 | Fast NumPy array functions written in Cython. / Simplified BSD |
| [bzip2](http://www.bzip.org/) | 1.0.6 | high-quality data compressor / BSD |
| [cairo](http://cairographics.org/) Linux | 1.14.8 | A 2D graphics library with support for multiple output devices / LGPL 2.1, MPL 1.1 |
| [cffi](http://cffi.readthedocs.org) | 1.9.1 | C Foreign Function Interface for Python / MIT |
| [chardet](https://github.com/chardet/chardet) | 2.3.0 | Universal character encoding detector / GNU Library or Lesser General Public License |
| [chest](https://github.com/ContinuumIO/chest) | 0.2.3 | A dictionary that writes its contents to disk / BSD |
| [click](http://click.pocoo.org/) | 6.7 | Command line interface creation kit / BSD |
| [cloudpickle](https://github.com/cloudpipe/cloudpickle) | 0.2.2 | Extended pickling support for Python objects / BSD |
| [clyent](https://github.com/Anaconda-Server/clyent) | 1.2.2 | Command line client library for windows and posix / BSD |
| [colorama](https://github.com/tartley/colorama) | 0.3.7 | Cross-platform colored terminal text in Python / BSD |
| [comtypes](http://starship.python.net/crew/theller/comtypes/) Windows | 1.1.2 | pure Python COM package / MIT |
| [conda](http://conda.pydata.org/) | 4.3.14 | OS-agnostic, system-level binary package and environment manager. / BSD |
| [configobj](http://www.voidspace.org.uk/python/configobj.html) | 5.0.6 | Config file reading, writing and validation / BSD |
| [contextlib2](http://contextlib2.readthedocs.org/) | 0.5.4 | backports and enhancements for the contextlib module / PSF |
| [cryptography](https://cryptography.io) | 1.7.1 | Provides cryptographic recipes and primitives to Python developers / Apache |
| [curl](http://curl.haxx.se/) | 7.52.1 | Tool and library for transferring data with URL syntax / MIT/X derivate |
| [cycler](http://matplotlib.org/cycler/) | 0.10.0 | Composable style cycles / BSD |
| [cython](http://www.cython.org/) | 0.25.2 | The Cython compiler for writing C extensions for the Python language / Apache version 2.0 |
| [cytoolz](https://github.com/pytoolz/cytoolz) | 0.8.2 | Cython implementation of Toolz, high performance functional utilities / BSD |
| [dask](http://dask.pydata.org/en/latest/) | 0.13.0 | Task scheduling and blocked algorithms for parallel processing / BSD |
| [datashape](http://datashape.pydata.org) | 0.5.4 | Language defining a data description protocol / BSD |
| [dbus](http://www.freedesktop.org/wiki/Software/dbus/) Linux | 1.10.10 | message bus system, a simple way for applications to talk to one another / GPL2 |
| [decorator](http://pypi.python.org/pypi/decorator) | 4.0.11 | Better living through Python with decorators / BSD |
| [dill](http://www.cacr.caltech.edu/~mmckerns/dill.htm) | 0.2.5 | Serialize all of python (almost) / 3-clause BSD |
| [docutils](http://docutils.sourceforge.net) | 0.13.1 | Utilities for general- and special-purpose documentation / Public-Domain, PSF, 2-clause BSD, GPLv3 |
| [entrypoints](https://github.com/takluyver/entrypoints) | 0.2.2 | / MIT |
| [et\_xmlfile](https://bitbucket.org/openpyxl/et_xmlfile) | 1.0.1 | Low memory library for creating large XML files / MIT |
| [expat](http://expat.sourceforge.net) Linux Mac | 2.1.0 | XML parser library written in C / MIT |
| [fastcache](https://github.com/pbrady/fastcache) | 1.0.2 | C implementation of Python 3 functools.lru\_cache / MIT |
| [flask](http://flask.pocoo.org/) | 0.12 | A microframework based on Werkzeug, Jinja2 and good intentions / BSD |
| [flask-cors](https://github.com/corydolphin/flask-cors) | 3.0.2 | Flask extension adding a decorator for CORS support / MIT |
| [fontconfig](http://www.freedesktop.org/wiki/Software/fontconfig/) Linux | 2.12.1 | A library for configuring and customizing font access / BSD |
| [freetype](http://freetype.sourceforge.net/index2.html) | 2.5.5 | A Free, High-Quality, and Portable Font Engine / FreeType License |
| [get\_terminal\_size](https://github.com/chrippa/backports.shutil_get_terminal_size) | 1.0.0 | backport of the get\_terminal\_size function from Python 3.3 / MIT |
| [gevent](http://www.gevent.org/) | 1.2.1 | Coroutine-based Python network library / MIT |
| [glib](https://developer.gnome.org/glib/) Linux | 2.50.2 | Core application building blocks for libraries and applications in C / LGPL |
| [greenlet](https://github.com/python-greenlet/greenlet) | 0.4.11 | Lightweight in-process concurrent programming / MIT |
| [gst-plugins-base](http://gstreamer.freedesktop.org/) Linux | 1.8.0 | GStreamer Base Plug-ins / GPL2 |
| [gstreamer](http://gstreamer.freedesktop.org/) Linux | 1.8.0 | library for constructing graphs of media-handling components / LGPL2 |
| [h5py](http://www.h5py.org/) | 2.6.0 | Pythonic interface to the HDF5 binary data format / 3-clause BSD |
| [harfbuzz](http://www.freedesktop.org/wiki/Software/HarfBuzz/) Linux | 0.9.39 | An OpenType text shaping engine / MIT |
| [hdf5](http://www.hdfgroup.org/HDF5/) | 1.8.17 | A data model, library, and file format for storing and managing data / BSD-like |
| [heapdict](http://stutzbachenterprises.com/) | 1.0.0 | A heap with decrease-key and increase-key operations / BSD |
| [idna](https://github.com/kjd/idna) | 2.2 | Internationalized Domain Names in Applications / BSD |
| [imagesize](https://github.com/shibukawa/imagesize_py) | 0.7.1 | getting image size from png/jpeg/jpeg2000/gif file / MIT |
| [ipykernel](http://ipython.org) | 4.5.2 | IPython Kernel for Jupyter / BSD |
| [ipython](http://ipython.org/) | 5.1.0 | Productive Interactive Computing / BSD |
| [ipython\_genutils](http://jupyter.org) | 0.1.0 | vestigial utilities from IPython / BSD |
| [ipywidgets](https://github.com/ipython/ipywidgets) | 5.2.2 | Widgets for the Jupyter Notebook / BSD 3-clause |
| [isort](https://github.com/timothycrosley/isort) | 4.2.5 | Python utility / library to sort Python imports / MIT |
| [itsdangerous](https://pythonhosted.org/itsdangerous/) | 0.24 | Various helpers to pass trusted data to untrusted environments / BSD |
| [jbig](https://www.cl.cam.ac.uk/~mgk25/jbigkit) Linux Mac | 2.1 | Implementation of the JBIG1 data compression standard / GPL2 |
| [jdcal](http://github.com/phn/jdcal) | 1.3 | Julian dates from proleptic Gregorian and Julian calendars. / BSD |
| [jedi](http://jedi.jedidjah.ch/) | 0.9.0 | Autocompletion and static analysis library for Python / MIT |
| [jinja2](http://jinja.pocoo.org) | 2.9.4 | An easy to use stand-alone template engine written in pure python. / BSD |
| [jpeg](http://www.ijg.org/) | 9b | Read and write jpeg COM, EXIF, IPTC medata / Custom free software license |
| [jsonschema](https://python-jsonschema.readthedocs.orga) | 2.5.1 | An implementation of JSON Schema validation for Python / MIT |
| [jupyter](http://jupyter.org) | 1.0.0 | Open source, interactive data science and scientific computing / BSD |
| [jupyter\_client](http://jupyter.org) | 4.4.0 | Jupyter protocol implementation and client libraries / BSD |
| [jupyter\_console](http://jupyter.org) | 5.0.0 | Jupyter terminal console / BSD |
| [jupyter\_core](http://jupyter.org) | 4.2.1 | core Jupyter functionality / BSD |
| [lazy-object-proxy](https://github.com/ionelmc/python-lazy-object-proxy) | 1.2.2 | Fast and thorough lazy object proxy / BSD |
| [libffi](https://sourceware.org/libffi/) Linux | 3.2.1 | portable foreign-function interface library / MIT |
| [libgcc](http://gcc.gnu.org/) Linux | 4.8.5 | Shared libraries for the GNU Compiler Collection / GPL3 |
| [libgfortran](https://gcc.gnu.org/fortran/) Linux | 3.0.0 | GNU Fortran runtime library / GPL3 |
| [libiconv](https://www.gnu.org/software/libiconv/) Linux Mac | 1.14 | Provides iconv for systems which don’t have one / GPL and LGPL |
| [libpng](http://www.libpng.org/pub/png/libpng.html) | 1.6.27 | official PNG reference library / libpng license |
| [libsodium](http://libsodium.org) Linux | 1.0.10 | A library for encryption, signatures, password hashing, etc. / ISC |
| [libtiff](http://www.libtiff.org/) | 4.0.6 | Support for Tag Image File Format (TIFF) / BSD-like |
| [libxcb](http://xcb.freedesktop.org/) Linux | 1.12 | This is the C-language Bindings package to the X Window System protocol / MIT |
| [libxml2](http://xmlsoft.org/) Linux Mac | 2.9.4 | The XML C parser and toolkit of Gnome / MIT |
| [libxslt](http://xmlsoft.org/XSLT/) Linux Mac | 1.1.29 | The XSLT C library developed for the GNOME project / MIT |
| [llvmlite](http://llvmlite.pydata.org/) | 0.15.0 | Lightweight wrapper around basic LLVM functionality / BSD |
| [locket](http://github.com/mwilliamson/locket.py) | 0.2.0 | File based locks for Python for Linux and Windows / BSD |
| [lxml](http://lxml.de/) | 3.7.2 | Pythonic binding for the C libraries libxml2 and libxslt / BSD |
| [markupsafe](http://www.pocoo.org/projects/markupsafe/#markupsafe) | 0.23 | Implements a XML/HTML/XHTML Markup safe string for Python / BSD |
| [matplotlib](http://matplotlib.org/) | 2.0.0 | Python 2D plotting library / PSF-based |
| [menuinst](https://github.com/ContinuumIO/menuinst) Windows | 1.4.4 | cross platform menu item installation / BSD |
| [mistune](https://github.com/lepture/mistune) | 0.7.3 | The fastest markdown parser in pure Python with renderer feature / BSD |
| [mkl](http://software.intel.com/en-us/articles/intel-mkl/) | 2017.0.1 | Math library for Intel and compatible processors / proprietary - Intel |
| [mkl-service](https://github.com/ContinuumIO/mkl-service) | 1.1.2 | Python bindings to MKL service functions / 3-clause BSD |
| [mpmath](http://mpmath.org) | 0.19 | Python library for arbitrary-precision floating-point arithmetic / BSD |
| [multipledispatch](http://github.com/mrocklin/multipledispatch/) | 0.4.9 | Multiple dispatch in Python / BSD |
| [nbconvert](http://jupyter.org) | 4.2.0 | converts notebooks to various other formats via Jinja templates / BSD |
| [nbformat](http://jupyter.org) | 4.2.0 | The reference implementation of the Jupyter Notebook format / BSD |
| [networkx](http://networkx.lanl.gov/) | 1.11 | Python package for creating and manipulating complex networks / BSD |
| [nltk](http://nltk.org/) | 3.2.2 | Build Python programs to work with human language data / Apache |
| [nose](http://readthedocs.org/docs/nose/) | 1.3.7 | Nose extends unittest to make testing easier / LGPL |
| [notebook](http://jupyter.org) | 4.3.1 | web-based notebook environment for interactive computing / BSD |
| [numba](http://numba.pydata.org/) | 0.30.1 | NumPy aware dynamic Python compiler using LLVM / BSD |
| [numexpr](https://github.com/pydata/numexpr) | 2.6.1 | Fast numerical expression evaluator for NumPy / MIT |
| [numpy](http://numpy.scipy.org/) | 1.11.3 | array processing for numbers, strings, records, and objects / BSD |
| [numpydoc](https://github.com/numpy/numpydoc) | 0.6.0 | Sphinx extension to support docstrings in Numpy format / BSD |
| [odo](http://odo.pydata.org/en/latest/) | 0.5.0 | Shapeshifting for your data / BSD |
| [openpyxl](http://openpyxl.readthedocs.org) | 2.4.1 | A Python library to read/write Excel 2010 xlsx/xlsm files / MIT |
| [openssl](http://www.openssl.org/) | 1.0.2k | OpenSSL is an open-source implementation of the SSL and TLS protocols / Apache-style |
| [pandas](http://pandas.pydata.org/) | 0.19.2 | Powerful data structures and data analysis tools / BSD |
| [partd](https://github.com/dask/partd) | 0.3.7 | Appendable key-value byte store / BSD |
| [path.py](http://github.com/jaraco/path.py) | 10.0 | Module wrapper for os.path / MIT |
| [pathlib2](https://pypi.python.org/pypi/pathlib2/) | 2.2.0 | object-oriented filesystem paths / MIT |
| [patsy](https://github.com/pydata/patsy) | 0.4.1 | Describing statistical models in Python using symbolic formulas / BSD |
| [pcre](http://www.pcre.org/) Linux Mac | 8.39 | A set of functions that implement regular expression pattern matching / 3-clause BSD License |
| [pep8](http://pep8.readthedocs.org/) | 1.7.0 | Python style guide checker / MIT |
| [pexpect](http://pexpect.readthedocs.org/) Linux Mac | 4.2.1 | Pexpect allows easy control of interactive console applications / ISC |
| [pickleshare](https://github.com/vivainio/pickleshare) | 0.7.4 | file system based database that uses Python pickles / MIT |
| [pillow](http://python-pillow.github.io/) | 4.0.0 | The friendly Python Imaging Library(PIL) fork / PIL license |
| [pip](https://pip.pypa.io/en/stable/) | 9.0.1 | PyPA recommended tool for installing Python packages / MIT |
| [pixman](http://www.pixman.org/) Linux | 0.34.0 | A low-level software library for pixel manipulation / MIT |
| [ply](http://www.dabeaz.com/ply/) | 3.9 | Implementation of Lex and Yacc / BSD |
| [prompt\_toolkit](https://github.com/jonathanslenders/python-prompt-toolkit) | 1.0.9 | library for building powerful interactive command lines in Python / BSD |
| [psutil](https://github.com/giampaolo/psutil) | 5.0.1 | A cross-platform process and system utilities module for Python / BSD |
| [ptyprocess](https://github.com/pexpect/ptyprocess) Linux Mac | 0.5.1 | Run a subprocess in a pseudo terminal / ISC |
| [py](http://pylib.readthedocs.org/) | 1.4.32 | Library with cross-python path, ini-parsing, io, code, log facilities / MIT |
| [pyasn1](http://pyasn1.sourceforge.net/) | 0.1.9 | Offline IP address to Autonomous System Number lookup module / BSD |
| [pycosat](https://github.com/ContinuumIO/pycosat) | 0.6.1 | Python bindings to the picosat SAT solver / MIT |
| [pycparser](https://github.com/eliben/pycparser) | 2.17 | complete C99 parser in pure Python / BSD |
| [pycrypto](http://www.pycrypto.org/) | 2.6.1 | Cryptographic modules for Python / Public-Domain |
| [pycurl](http://pycurl.sourceforge.net/) | 7.43.0 | Python interface to libcurl / LGPL, MIT |
| [pyflakes](https://launchpad.net/pyflakes) | 1.5.0 | Checks Python source files for errors / MIT |
| [pygments](http://pygments.org/) | 2.1.3 | Generic syntax highlighting package / BSD |
| [pylint](http://www.pylint.org/) | 1.6.4 | Python code static checker / GPL |
| [pyopenssl](https://github.com/pyca/pyopenssl) | 16.2.0 | Python wrapper module around the OpenSSL library / Apache Software License |
| [pyparsing](http://pyparsing.wikispaces.com/) | 2.1.4 | Create and execute simple grammars / MIT |
| [pyqt](http://www.riverbankcomputing.co.uk/software/pyqt) | 5.6.0 | Python binding of the cross-platform GUI toolkit Qt / Commercial, GPLv2, GPLv3 |
| [pytables](http://www.pytables.org) | 3.3.0 | Manage hierarchical datasets to cope with large amounts of data / BSD |
| [pytest](http://pytest.org/) | 3.0.5 | Simple and powerful testing with Python / MIT |
| [python](http://www.python.org/) | 3.6.0 | general purpose programming language / PSF |
| [python-dateutil](https://dateutil.readthedocs.org/) | 2.6.0 | extensions to the standard Python datetime module / BSD |
| [pytz](http://pytz.sourceforge.net/) | 2016.10 | World timezone definitions, modern and historical / MIT |
| [pywin32](http://sourceforge.net/projects/pywin32/) Windows | 220 | Python extensions for Windows / PSF |
| [pyyaml](http://pyyaml.org/wiki/PyYAML) | 3.12 | YAML parser and emitter for Python / MIT |
| [pyzmq](https://github.com/zeromq/pyzmq) | 16.0.2 | zeromq bindings for Python / LGPL and BSD |
| [qt](http://www.qt.io) | 5.6.2 | Qt is a cross-platform application and UI framework / LGPLv3 |
| [qtawesome](https://github.com/spyder-ide/qtawesome) | 0.4.3 | FontAwesome icons in PyQt and PySide applications / MIT |
| [qtconsole](http://jupyter.org) | 4.2.1 | Jupyter Qt Console / BSD |
| [qtpy](https://github.com/spyder-ide/qtpy) | 1.2.1 | uniform layer to support PyQt4, PyQt5 and PySide with a single codebase / MIT |
| [readline](http://cnswww.cns.cwru.edu/php/chet/readline/rltop.html) Linux Mac | 6.2 | Line-editing for programs with a command-line interface / GPL3 |
| [redis](http://redis.io/download/) Linux Mac | 3.2.0 | Advanced key-value cache and store / 3-clause BSD |
| [redis-py](https://github.com/andymccurdy/redis-py/) Linux Mac | 2.10.5 | Redis Python Client / MIT |
| [requests](http://docs.python-requests.org/en/latest/index.html) | 2.12.4 | Python HTTP for Humans / Apache Software License |
| [rope](https://github.com/python-rope/rope) | 0.9.4 | A Python refactoring library / GPL |
| [ruamel\_yaml](https://bitbucket.org/ruamel/yaml) | 0.11.14 | patched copy of ruamel.yaml (a yaml parser) / MIT |
| [scikit-image](http://scikit-image.org/) | 0.12.3 | Image processing routines for SciPy / 3-clause BSD |
| [scikit-learn](http://scikit-learn.org/stable/) | 0.18.1 | set of python modules for machine learning and data mining / 3-clause BSD |
| [scipy](http://www.scipy.org/) | 0.18.1 | Scientific Library for Python / BSD |
| [seaborn](http://stanford.edu/~mwaskom/software/seaborn/) | 0.7.1 | Statistical data visualization / BSD |
| [setuptools](https://pypi.python.org/pypi/setuptools) | 27.2.0 | Download, build, install, upgrade, and uninstall Python packages / MIT |
| [simplegeneric](https://pypi.python.org/pypi/simplegeneric) | 0.8.1 | Define simple single-dispatch generic functions / ZPL 2.1 |
| [singledispatch](http://docs.python.org/3/library/functools.html#functools.singledispatch) | 3.4.0.3 | Transforms a function into a single-dispatch generic function / MIT |
| [sip](http://www.riverbankcomputing.com/software/sip/intro) | 4.18 | Create Python bindings for C and C++ libraries / GPL3 |
| [six](http://pypi.python.org/pypi/six/) | 1.10.0 | Python 2 and 3 compatibility utilities / MIT |
| [snowballstemmer](https://github.com/shibukawa/snowball_py) | 1.2.1 | Snowball stemming library collection for Python / BSD |
| [sockjs-tornado](http://github.com/mrjoes/sockjs-tornado/) | 1.0.3 | SockJS python server implementation on top of Tornado framework / MIT |
| [sphinx](http://sphinx-doc.org) | 1.5.1 | Documentation generator / BSD |
| [spyder](https://github.com/spyder-ide/spyder) | 3.1.2 | Scientific PYthon Development EnviRonment / MIT |
| [sqlalchemy](http://www.sqlalchemy.org/) | 1.1.5 | Database Abstraction Library / MIT |
| [sqlite](http://www.sqlite.org/) | 3.13.0 | Self-contained, zero-configuration, SQL database engine / Public-Domain |
| [statsmodels](http://statsmodels.sourceforge.net/) | 0.6.1 | Statistical computations and models / 3-clause BSD |
| [sympy](http://sympy.org) | 1.0 | Python library for symbolic mathematics / 3-clause BSD |
| [terminado](https://github.com/takluyver/terminado) Linux Mac | 0.6 | Terminals served to term.js using Tornado websockets / BSD |
| [tk](http://www.tcl.tk/) | 8.5.18 | Dynamic programming language with GUI elements / BSD-like |
| [toolz](http://toolz.readthedocs.org/en/latest/) | 0.8.2 | List processing tools and functional utilities / BSD |
| [tornado](http://www.tornadoweb.org/) | 4.4.2 | A Python web framework and asynchronous networking library / Apache |
| [traitlets](https://github.com/ipython/traitlets) | 4.3.1 | Configuration system for Python applications / BSD |
| [unicodecsv](https://github.com/jdunck/python-unicodecsv) | 0.14.1 | Drop-in replacement for csv module which supports unicode strings / BSD |
| [vs2015\_runtime](http://www.microsoft.com) Windows | 14.0.25123 | Bundles of the MSVC 14 (VS 2015) runtime / Proprietary |
| [wcwidth](https://github.com/jquast/wcwidth) | 0.1.7 | measures number of Terminal column cells of wide-character codes / MIT |
| [werkzeug](http://werkzeug.pocoo.org/) | 0.11.15 | A WSGI utility library for Python / BSD |
| [wheel](http://bitbucket.org/pypa/wheel/) | 0.29.0 | Built-package format for Python / MIT |
| [widgetsnbextension](http://ipython.org) | 1.2.6 | IPython HTML widgets for Jupyter / BSD 3-clause |
| [win\_unicode\_console](https://github.com/Drekin/win-unicode-console) Windows | 0.5 | enable Unicode input and display when running Python from Windows console / MIT |
| [wrapt](https://github.com/GrahamDumpleton/wrapt) | 1.10.8 | Module for decorators, wrappers and monkey patching / BSD |
| [xlrd](http://www.lexicon.net/sjmachin/xlrd.htm) | 1.0.0 | Extract data from Microsoft Excel spreadsheet files / BSD |
| [xlsxwriter](https://github.com/jmcnamara/XlsxWriter) | 0.9.6 | A Python module for creating Excel XLSX files / BSD |
| [xlwings](http://xlwings.org/) Mac Windows | 0.10.2 | Interact with Excel from Python and vice versa / 3-clause BSD |
| [xlwt](http://www.python-excel.org/) | 1.2.0 | Writing data and formatting information to Excel files / BSD |
| [xz](http://tukaani.org/xz/) Linux Mac | 5.2.2 | Data compression software with high compression ratio / Public-Domain, GPL |
| [yaml](http://www.yaml.org/) Linux Mac | 0.1.6 | A human friendly data serialization standard / MIT |
| [zeromq](http://zeromq.org) Linux | 4.1.5 | Distributed messaging / LGPL |
| [zlib](http://zlib.net/) | 1.2.8 | Unobtrusive compression library / zlib |
| Name | Version | Summary / License |
|---|---|---|
| [alabaster](http://www.sphinx-doc.org/en/stable/index.html) | 0.7.9 | Configurable, Python 2+3 compatible Sphinx theme / BSD |
| [anaconda-client](http://anaconda.org) | 1.6.0 | anaconda.org command line client library / BSD |
| [anaconda-navigator](https://github.com/ContinuumIO/navigator) | 1.5.0 | Anaconda Navigator / proprietary - Continuum Analytics, Inc. |
| [anaconda-project](https://github.com/Anaconda-Platform/anaconda-project/) | 0.4.1 | reproducible, executable project directories / BSD |
| [appnope](http://github.com/minrk/appnope) Mac | 0.1.0 | Disable App Nap on OS X 10.9 / BSD |
| [appscript](http://appscript.sourceforge.net/) Mac | 1.0.1 | Control AppleScriptable applications from Python / Public-Domain |
| [argcomplete](https://argcomplete.readthedocs.org/en/latest/) | 1.0.0 | Bash tab completion of arguments for Python scripts / Apache |
| [astroid](https://www.astroid.org/) | 1.4.9 | abstract syntax tree for Python with inference support / LGPL |
| [astropy](http://www.astropy.org/) | 1.3 | Community-developed Python Library for Astronomy / BSD |
| [babel](http://babel.pocoo.org/) | 2.3.4 | Utilities to internationalize and localize Python applications / BSD |
| backports | 1.0 | / BSD |
| [backports\_abc](https://github.com/cython/backports_abc) | 0.5 | backport of recent additions to the ‘collections.abc’ module / PSF |
| [beautifulsoup4](http://www.crummy.com/software/BeautifulSoup/) | 4.5.3 | Python library designed for screen-scraping / MIT |
| [bitarray](https://github.com/ilanschnell/bitarray) | 0.8.1 | efficient representation of arrays of booleans – C extension / PSF |
| [blaze](http://blaze.pydata.org) | 0.10.1 | NumPy and Pandas interface to big data / BSD |
| [bokeh](http://bokeh.pydata.org/) | 0.12.4 | Python interactive visualization library for modern web browsers / BSD |
| [boto](https://github.com/boto/boto/) | 2.45.0 | Amazon Web Services Library / MIT |
| [bottleneck](http://berkeleyanalytics.com/bottleneck) | 1.2.0 | Fast NumPy array functions written in Cython. / Simplified BSD |
| [bzip2](http://www.bzip.org/) | 1.0.6 | high-quality data compressor / BSD |
| [cairo](http://cairographics.org/) Linux | 1.14.8 | A 2D graphics library with support for multiple output devices / LGPL 2.1, MPL 1.1 |
| [cdecimal](http://www.bytereef.org/mpdecimal/index.html) | 2.3 | Fast drop-in replacement for decimal.py / BSD |
| [cffi](http://cffi.readthedocs.org) | 1.9.1 | C Foreign Function Interface for Python / MIT |
| [chardet](https://github.com/chardet/chardet) | 2.3.0 | Universal character encoding detector / GNU Library or Lesser General Public License |
| [chest](https://github.com/ContinuumIO/chest) | 0.2.3 | A dictionary that writes its contents to disk / BSD |
| [click](http://click.pocoo.org/) | 6.7 | Command line interface creation kit / BSD |
| [cloudpickle](https://github.com/cloudpipe/cloudpickle) | 0.2.2 | Extended pickling support for Python objects / BSD |
| [clyent](https://github.com/Anaconda-Server/clyent) | 1.2.2 | Command line client library for windows and posix / BSD |
| [colorama](https://github.com/tartley/colorama) | 0.3.7 | Cross-platform colored terminal text in Python / BSD |
| [comtypes](http://starship.python.net/crew/theller/comtypes/) Windows | 1.1.2 | pure Python COM package / MIT |
| [conda](http://conda.pydata.org/) | 4.3.14 | OS-agnostic, system-level binary package and environment manager. / BSD |
| [configobj](http://www.voidspace.org.uk/python/configobj.html) | 5.0.6 | Config file reading, writing and validation / BSD |
| [configparser](http://docs.python.org/3/library/configparser.html) | 3.5.0 | brings the updated configparser from Python 3.5 to Python 2.6-3.5 / MIT |
| [contextlib2](http://contextlib2.readthedocs.org/) | 0.5.4 | backports and enhancements for the contextlib module / PSF |
| [cryptography](https://cryptography.io) | 1.7.1 | Provides cryptographic recipes and primitives to Python developers / Apache |
| [curl](http://curl.haxx.se/) | 7.52.1 | Tool and library for transferring data with URL syntax / MIT/X derivate |
| [cycler](http://matplotlib.org/cycler/) | 0.10.0 | Composable style cycles / BSD |
| [cython](http://www.cython.org/) | 0.25.2 | The Cython compiler for writing C extensions for the Python language / Apache version 2.0 |
| [cytoolz](https://github.com/pytoolz/cytoolz) | 0.8.2 | Cython implementation of Toolz, high performance functional utilities / BSD |
| [dask](http://dask.pydata.org/en/latest/) | 0.13.0 | Task scheduling and blocked algorithms for parallel processing / BSD |
| [datashape](http://datashape.pydata.org) | 0.5.4 | Language defining a data description protocol / BSD |
| [dbus](http://www.freedesktop.org/wiki/Software/dbus/) Linux | 1.10.10 | message bus system, a simple way for applications to talk to one another / GPL2 |
| [decorator](http://pypi.python.org/pypi/decorator) | 4.0.11 | Better living through Python with decorators / BSD |
| [dill](http://www.cacr.caltech.edu/~mmckerns/dill.htm) | 0.2.5 | Serialize all of python (almost) / 3-clause BSD |
| [docutils](http://docutils.sourceforge.net) | 0.13.1 | Utilities for general- and special-purpose documentation / Public-Domain, PSF, 2-clause BSD, GPLv3 |
| [entrypoints](https://github.com/takluyver/entrypoints) | 0.2.2 | / MIT |
| [enum34](https://pypi.python.org/pypi/enum34) | 1.1.6 | Robust enumerated type support in Python / BSD |
| [et\_xmlfile](https://bitbucket.org/openpyxl/et_xmlfile) | 1.0.1 | Low memory library for creating large XML files / MIT |
| [expat](http://expat.sourceforge.net) Linux Mac | 2.1.0 | XML parser library written in C / MIT |
| [fastcache](https://github.com/pbrady/fastcache) | 1.0.2 | C implementation of Python 3 functools.lru\_cache / MIT |
| [flask](http://flask.pocoo.org/) | 0.12 | A microframework based on Werkzeug, Jinja2 and good intentions / BSD |
| [flask-cors](https://github.com/corydolphin/flask-cors) | 3.0.2 | Flask extension adding a decorator for CORS support / MIT |
| [fontconfig](http://www.freedesktop.org/wiki/Software/fontconfig/) Linux | 2.12.1 | A library for configuring and customizing font access / BSD |
| [freetype](http://freetype.sourceforge.net/index2.html) | 2.5.5 | A Free, High-Quality, and Portable Font Engine / FreeType License |
| [funcsigs](http://funcsigs.readthedocs.org/) | 1.0.2 | Python function signatures from PEP362 for Python 2.6, 2.7 and 3.2+ / Apache |
| [functools32](https://github.com/MiCHiLU/python-functools32) | 3.2.3.2 | backport of the functools module from Python 3.2.3 for use on 2.7 / PSF |
| [futures](http://code.google.com/p/pythonfutures) | 3.0.5 | A Java-style futures package for Python / BSD |
| [get\_terminal\_size](https://github.com/chrippa/backports.shutil_get_terminal_size) | 1.0.0 | backport of the get\_terminal\_size function from Python 3.3 / MIT |
| [gevent](http://www.gevent.org/) | 1.2.1 | Coroutine-based Python network library / MIT |
| [glib](https://developer.gnome.org/glib/) Linux | 2.50.2 | Core application building blocks for libraries and applications in C / LGPL |
| [greenlet](https://github.com/python-greenlet/greenlet) | 0.4.11 | Lightweight in-process concurrent programming / MIT |
| [grin](http://pypi.python.org/pypi/grin) | 1.2.1 | Enhanced grep-like tool / BSD |
| [gst-plugins-base](http://gstreamer.freedesktop.org/) Linux | 1.8.0 | GStreamer Base Plug-ins / GPL2 |
| [gstreamer](http://gstreamer.freedesktop.org/) Linux | 1.8.0 | library for constructing graphs of media-handling components / LGPL2 |
| [h5py](http://www.h5py.org/) | 2.6.0 | Pythonic interface to the HDF5 binary data format / 3-clause BSD |
| [harfbuzz](http://www.freedesktop.org/wiki/Software/HarfBuzz/) Linux | 0.9.39 | An OpenType text shaping engine / MIT |
| [hdf5](http://www.hdfgroup.org/HDF5/) | 1.8.17 | A data model, library, and file format for storing and managing data / BSD-like |
| [heapdict](http://stutzbachenterprises.com/) | 1.0.0 | A heap with decrease-key and increase-key operations / BSD |
| [idna](https://github.com/kjd/idna) | 2.2 | Internationalized Domain Names in Applications / BSD |
| [imagesize](https://github.com/shibukawa/imagesize_py) | 0.7.1 | getting image size from png/jpeg/jpeg2000/gif file / MIT |
| [ipaddress](https://github.com/phihag/ipaddress) | 1.0.18 | IPv4/IPv6 manipulation library / Python Software Foundation License |
| [ipykernel](http://ipython.org) | 4.5.2 | IPython Kernel for Jupyter / BSD |
| [ipython](http://ipython.org/) | 5.1.0 | Productive Interactive Computing / BSD |
| [ipython\_genutils](http://jupyter.org) | 0.1.0 | vestigial utilities from IPython / BSD |
| [ipywidgets](https://github.com/ipython/ipywidgets) | 5.2.2 | Widgets for the Jupyter Notebook / BSD 3-clause |
| [isort](https://github.com/timothycrosley/isort) | 4.2.5 | Python utility / library to sort Python imports / MIT |
| [itsdangerous](https://pythonhosted.org/itsdangerous/) | 0.24 | Various helpers to pass trusted data to untrusted environments / BSD |
| [jbig](https://www.cl.cam.ac.uk/~mgk25/jbigkit) Linux Mac | 2.1 | Implementation of the JBIG1 data compression standard / GPL2 |
| [jdcal](http://github.com/phn/jdcal) | 1.3 | Julian dates from proleptic Gregorian and Julian calendars. / BSD |
| [jedi](http://jedi.jedidjah.ch/) | 0.9.0 | Autocompletion and static analysis library for Python / MIT |
| [jinja2](http://jinja.pocoo.org) | 2.9.4 | An easy to use stand-alone template engine written in pure python. / BSD |
| [jpeg](http://www.ijg.org/) | 9b | Read and write jpeg COM, EXIF, IPTC medata / Custom free software license |
| [jsonschema](https://python-jsonschema.readthedocs.orga) | 2.5.1 | An implementation of JSON Schema validation for Python / MIT |
| [jupyter](http://jupyter.org) | 1.0.0 | Open source, interactive data science and scientific computing / BSD |
| [jupyter\_client](http://jupyter.org) | 4.4.0 | Jupyter protocol implementation and client libraries / BSD |
| [jupyter\_console](http://jupyter.org) | 5.0.0 | Jupyter terminal console / BSD |
| [jupyter\_core](http://jupyter.org) | 4.2.1 | core Jupyter functionality / BSD |
| [lazy-object-proxy](https://github.com/ionelmc/python-lazy-object-proxy) | 1.2.2 | Fast and thorough lazy object proxy / BSD |
| [libffi](https://sourceware.org/libffi/) Linux | 3.2.1 | portable foreign-function interface library / MIT |
| [libgcc](http://gcc.gnu.org/) Linux | 4.8.5 | Shared libraries for the GNU Compiler Collection / GPL3 |
| [libgfortran](https://gcc.gnu.org/fortran/) Linux | 3.0.0 | GNU Fortran runtime library / GPL3 |
| [libiconv](https://www.gnu.org/software/libiconv/) Linux Mac | 1.14 | Provides iconv for systems which don’t have one / GPL and LGPL |
| [libpng](http://www.libpng.org/pub/png/libpng.html) | 1.6.27 | official PNG reference library / libpng license |
| [libsodium](http://libsodium.org) Linux | 1.0.10 | A library for encryption, signatures, password hashing, etc. / ISC |
| [libtiff](http://www.libtiff.org/) | 4.0.6 | Support for Tag Image File Format (TIFF) / BSD-like |
| [libxcb](http://xcb.freedesktop.org/) Linux | 1.12 | This is the C-language Bindings package to the X Window System protocol / MIT |
| [libxml2](http://xmlsoft.org/) Linux Mac | 2.9.4 | The XML C parser and toolkit of Gnome / MIT |
| [libxslt](http://xmlsoft.org/XSLT/) Linux Mac | 1.1.29 | The XSLT C library developed for the GNOME project / MIT |
| [llvmlite](http://llvmlite.pydata.org/) | 0.15.0 | Lightweight wrapper around basic LLVM functionality / BSD |
| [locket](http://github.com/mwilliamson/locket.py) | 0.2.0 | File based locks for Python for Linux and Windows / BSD |
| [lxml](http://lxml.de/) | 3.7.2 | Pythonic binding for the C libraries libxml2 and libxslt / BSD |
| [markupsafe](http://www.pocoo.org/projects/markupsafe/#markupsafe) | 0.23 | Implements a XML/HTML/XHTML Markup safe string for Python / BSD |
| [matplotlib](http://matplotlib.org/) | 2.0.0 | Python 2D plotting library / PSF-based |
| [menuinst](https://github.com/ContinuumIO/menuinst) Windows | 1.4.4 | cross platform menu item installation / BSD |
| [mistune](https://github.com/lepture/mistune) | 0.7.3 | The fastest markdown parser in pure Python with renderer feature / BSD |
| [mkl](http://software.intel.com/en-us/articles/intel-mkl/) | 2017.0.1 | Math library for Intel and compatible processors / proprietary - Intel |
| [mkl-service](https://github.com/ContinuumIO/mkl-service) | 1.1.2 | Python bindings to MKL service functions / 3-clause BSD |
| [mpmath](http://mpmath.org) | 0.19 | Python library for arbitrary-precision floating-point arithmetic / BSD |
| [multipledispatch](http://github.com/mrocklin/multipledispatch/) | 0.4.9 | Multiple dispatch in Python / BSD |
| [nbconvert](http://jupyter.org) | 4.2.0 | converts notebooks to various other formats via Jinja templates / BSD |
| [nbformat](http://jupyter.org) | 4.2.0 | The reference implementation of the Jupyter Notebook format / BSD |
| [networkx](http://networkx.lanl.gov/) | 1.11 | Python package for creating and manipulating complex networks / BSD |
| [nltk](http://nltk.org/) | 3.2.2 | Build Python programs to work with human language data / Apache |
| [nose](http://readthedocs.org/docs/nose/) | 1.3.7 | Nose extends unittest to make testing easier / LGPL |
| [notebook](http://jupyter.org) | 4.3.1 | web-based notebook environment for interactive computing / BSD |
| [numba](http://numba.pydata.org/) | 0.30.1 | NumPy aware dynamic Python compiler using LLVM / BSD |
| [numexpr](https://github.com/pydata/numexpr) | 2.6.1 | Fast numerical expression evaluator for NumPy / MIT |
| [numpy](http://numpy.scipy.org/) | 1.11.3 | array processing for numbers, strings, records, and objects / BSD |
| [numpydoc](https://github.com/numpy/numpydoc) | 0.6.0 | Sphinx extension to support docstrings in Numpy format / BSD |
| [odo](http://odo.pydata.org/en/latest/) | 0.5.0 | Shapeshifting for your data / BSD |
| [openpyxl](http://openpyxl.readthedocs.org) | 2.4.1 | A Python library to read/write Excel 2010 xlsx/xlsm files / MIT |
| [openssl](http://www.openssl.org/) | 1.0.2k | OpenSSL is an open-source implementation of the SSL and TLS protocols / Apache-style |
| [pandas](http://pandas.pydata.org/) | 0.19.2 | Powerful data structures and data analysis tools / BSD |
| [partd](https://github.com/dask/partd) | 0.3.7 | Appendable key-value byte store / BSD |
| [path.py](http://github.com/jaraco/path.py) | 10.0 | Module wrapper for os.path / MIT |
| [pathlib2](https://pypi.python.org/pypi/pathlib2/) | 2.2.0 | object-oriented filesystem paths / MIT |
| [patsy](https://github.com/pydata/patsy) | 0.4.1 | Describing statistical models in Python using symbolic formulas / BSD |
| [pcre](http://www.pcre.org/) Linux Mac | 8.39 | A set of functions that implement regular expression pattern matching / 3-clause BSD License |
| [pep8](http://pep8.readthedocs.org/) | 1.7.0 | Python style guide checker / MIT |
| [pexpect](http://pexpect.readthedocs.org/) Linux Mac | 4.2.1 | Pexpect allows easy control of interactive console applications / ISC |
| [pickleshare](https://github.com/vivainio/pickleshare) | 0.7.4 | file system based database that uses Python pickles / MIT |
| [pillow](http://python-pillow.github.io/) | 4.0.0 | The friendly Python Imaging Library(PIL) fork / PIL license |
| [pip](https://pip.pypa.io/en/stable/) | 9.0.1 | PyPA recommended tool for installing Python packages / MIT |
| [pixman](http://www.pixman.org/) Linux | 0.34.0 | A low-level software library for pixel manipulation / MIT |
| [ply](http://www.dabeaz.com/ply/) | 3.9 | Implementation of Lex and Yacc / BSD |
| [prompt\_toolkit](https://github.com/jonathanslenders/python-prompt-toolkit) | 1.0.9 | library for building powerful interactive command lines in Python / BSD |
| [psutil](https://github.com/giampaolo/psutil) | 5.0.1 | A cross-platform process and system utilities module for Python / BSD |
| [ptyprocess](https://github.com/pexpect/ptyprocess) Linux Mac | 0.5.1 | Run a subprocess in a pseudo terminal / ISC |
| [py](http://pylib.readthedocs.org/) | 1.4.32 | Library with cross-python path, ini-parsing, io, code, log facilities / MIT |
| [pyasn1](http://pyasn1.sourceforge.net/) | 0.1.9 | Offline IP address to Autonomous System Number lookup module / BSD |
| [pyaudio](http://people.csail.mit.edu/hubert/pyaudio/) Mac | 0.2.7 | Bindings for PortAudio v19, the cross-platform audio stream library / MIT |
| [pycairo](http://cairographics.org/pycairo/) Linux | 1.10.0 | A set of Python bindings for the cairo graphics library / LGPL 2.1, MPL 1.1 |
| [pycosat](https://github.com/ContinuumIO/pycosat) | 0.6.1 | Python bindings to the picosat SAT solver / MIT |
| [pycparser](https://github.com/eliben/pycparser) | 2.17 | complete C99 parser in pure Python / BSD |
| [pycrypto](http://www.pycrypto.org/) | 2.6.1 | Cryptographic modules for Python / Public-Domain |
| [pycurl](http://pycurl.sourceforge.net/) | 7.43.0 | Python interface to libcurl / LGPL, MIT |
| [pyflakes](https://launchpad.net/pyflakes) | 1.5.0 | Checks Python source files for errors / MIT |
| [pygments](http://pygments.org/) | 2.1.3 | Generic syntax highlighting package / BSD |
| [pylint](http://www.pylint.org/) | 1.6.4 | Python code static checker / GPL |
| [pyopenssl](https://github.com/pyca/pyopenssl) | 16.2.0 | Python wrapper module around the OpenSSL library / Apache Software License |
| [pyparsing](http://pyparsing.wikispaces.com/) | 2.1.4 | Create and execute simple grammars / MIT |
| [pyqt](http://www.riverbankcomputing.co.uk/software/pyqt) | 5.6.0 | Python binding of the cross-platform GUI toolkit Qt / Commercial, GPLv2, GPLv3 |
| [pytables](http://www.pytables.org) | 3.3.0 | Manage hierarchical datasets to cope with large amounts of data / BSD |
| [pytest](http://pytest.org/) | 3.0.5 | Simple and powerful testing with Python / MIT |
| [python](http://www.python.org/) | 2.7.13 | general purpose programming language / PSF |
| [python-dateutil](https://dateutil.readthedocs.org/) | 2.6.0 | extensions to the standard Python datetime module / BSD |
| [pytz](http://pytz.sourceforge.net/) | 2016.10 | World timezone definitions, modern and historical / MIT |
| [pywin32](http://sourceforge.net/projects/pywin32/) Windows | 220 | Python extensions for Windows / PSF |
| [pyyaml](http://pyyaml.org/wiki/PyYAML) | 3.12 | YAML parser and emitter for Python / MIT |
| [pyzmq](https://github.com/zeromq/pyzmq) | 16.0.2 | zeromq bindings for Python / LGPL and BSD |
| [qt](http://www.qt.io) | 5.6.2 | Qt is a cross-platform application and UI framework / LGPLv3 |
| [qtawesome](https://github.com/spyder-ide/qtawesome) | 0.4.3 | FontAwesome icons in PyQt and PySide applications / MIT |
| [qtconsole](http://jupyter.org) | 4.2.1 | Jupyter Qt Console / BSD |
| [qtpy](https://github.com/spyder-ide/qtpy) | 1.2.1 | uniform layer to support PyQt4, PyQt5 and PySide with a single codebase / MIT |
| [readline](http://cnswww.cns.cwru.edu/php/chet/readline/rltop.html) Linux Mac | 6.2 | Line-editing for programs with a command-line interface / GPL3 |
| [redis](http://redis.io/download/) Linux Mac | 3.2.0 | Advanced key-value cache and store / 3-clause BSD |
| [redis-py](https://github.com/andymccurdy/redis-py/) Linux Mac | 2.10.5 | Redis Python Client / MIT |
| [requests](http://docs.python-requests.org/en/latest/index.html) | 2.12.4 | Python HTTP for Humans / Apache Software License |
| [rope](https://github.com/python-rope/rope) | 0.9.4 | A Python refactoring library / GPL |
| [ruamel\_yaml](https://bitbucket.org/ruamel/yaml) | 0.11.14 | patched copy of ruamel.yaml (a yaml parser) / MIT |
| [scandir](https://github.com/benhoyt/scandir) | 1.4 | scandir, a better directory iterator and faster os.walk() / BSD License |
| [scikit-image](http://scikit-image.org/) | 0.12.3 | Image processing routines for SciPy / 3-clause BSD |
| [scikit-learn](http://scikit-learn.org/stable/) | 0.18.1 | set of python modules for machine learning and data mining / 3-clause BSD |
| [scipy](http://www.scipy.org/) | 0.18.1 | Scientific Library for Python / BSD |
| [seaborn](http://stanford.edu/~mwaskom/software/seaborn/) | 0.7.1 | Statistical data visualization / BSD |
| [setuptools](https://pypi.python.org/pypi/setuptools) | 27.2.0 | Download, build, install, upgrade, and uninstall Python packages / MIT |
| [simplegeneric](https://pypi.python.org/pypi/simplegeneric) | 0.8.1 | Define simple single-dispatch generic functions / ZPL 2.1 |
| [singledispatch](http://docs.python.org/3/library/functools.html#functools.singledispatch) | 3.4.0.3 | Transforms a function into a single-dispatch generic function / MIT |
| [sip](http://www.riverbankcomputing.com/software/sip/intro) | 4.18 | Create Python bindings for C and C++ libraries / GPL3 |
| [six](http://pypi.python.org/pypi/six/) | 1.10.0 | Python 2 and 3 compatibility utilities / MIT |
| [snowballstemmer](https://github.com/shibukawa/snowball_py) | 1.2.1 | Snowball stemming library collection for Python / BSD |
| [sockjs-tornado](http://github.com/mrjoes/sockjs-tornado/) | 1.0.3 | SockJS python server implementation on top of Tornado framework / MIT |
| [sphinx](http://sphinx-doc.org) | 1.5.1 | Documentation generator / BSD |
| [spyder](https://github.com/spyder-ide/spyder) | 3.1.2 | Scientific PYthon Development EnviRonment / MIT |
| [sqlalchemy](http://www.sqlalchemy.org/) | 1.1.5 | Database Abstraction Library / MIT |
| [sqlite](http://www.sqlite.org/) | 3.13.0 | Self-contained, zero-configuration, SQL database engine / Public-Domain |
| [ssl\_match\_hostname](http://bitbucket.org/brandon/backports.ssl_match_hostname) | 3.4.0.2 | The ssl.match\_hostname() function from Python 3.4 / PSF |
| [statsmodels](http://statsmodels.sourceforge.net/) | 0.6.1 | Statistical computations and models / 3-clause BSD |
| [subprocess32](https://github.com/google/python-subprocess32) | 3.2.7 | backport of the subprocess module from Python 3.2/3.3 for use on 2.x / Python Software Foundation License |
| [sympy](http://sympy.org) | 1.0 | Python library for symbolic mathematics / 3-clause BSD |
| [terminado](https://github.com/takluyver/terminado) Linux Mac | 0.6 | Terminals served to term.js using Tornado websockets / BSD |
| [tk](http://www.tcl.tk/) | 8.5.18 | Dynamic programming language with GUI elements / BSD-like |
| [toolz](http://toolz.readthedocs.org/en/latest/) | 0.8.2 | List processing tools and functional utilities / BSD |
| [tornado](http://www.tornadoweb.org/) | 4.4.2 | A Python web framework and asynchronous networking library / Apache |
| [traitlets](https://github.com/ipython/traitlets) | 4.3.1 | Configuration system for Python applications / BSD |
| [unicodecsv](https://github.com/jdunck/python-unicodecsv) | 0.14.1 | Drop-in replacement for csv module which supports unicode strings / BSD |
| [vs2008\_runtime](http://www.microsoft.com) Windows | 9.00.30729.5054 | Bundles of the MSVC 9 (VS 2008) runtime / Proprietary |
| [wcwidth](https://github.com/jquast/wcwidth) | 0.1.7 | measures number of Terminal column cells of wide-character codes / MIT |
| [werkzeug](http://werkzeug.pocoo.org/) | 0.11.15 | A WSGI utility library for Python / BSD |
| [wheel](http://bitbucket.org/pypa/wheel/) | 0.29.0 | Built-package format for Python / MIT |
| [widgetsnbextension](http://ipython.org) | 1.2.6 | IPython HTML widgets for Jupyter / BSD 3-clause |
| [win\_unicode\_console](https://github.com/Drekin/win-unicode-console) Windows | 0.5 | enable Unicode input and display when running Python from Windows console / MIT |
| [wrapt](https://github.com/GrahamDumpleton/wrapt) | 1.10.8 | Module for decorators, wrappers and monkey patching / BSD |
| [xlrd](http://www.lexicon.net/sjmachin/xlrd.htm) | 1.0.0 | Extract data from Microsoft Excel spreadsheet files / BSD |
| [xlsxwriter](https://github.com/jmcnamara/XlsxWriter) | 0.9.6 | A Python module for creating Excel XLSX files / BSD |
| [xlwings](http://xlwings.org/) Mac Windows | 0.10.2 | Interact with Excel from Python and vice versa / 3-clause BSD |
| [xlwt](http://www.python-excel.org/) | 1.2.0 | Writing data and formatting information to Excel files / BSD |
| [xz](http://tukaani.org/xz/) Linux Mac | 5.2.2 | Data compression software with high compression ratio / Public-Domain, GPL |
| [yaml](http://www.yaml.org/) Linux Mac | 0.1.6 | A human friendly data serialization standard / MIT |
| [zeromq](http://zeromq.org) Linux | 4.1.5 | Distributed messaging / LGPL |
| [zlib](http://zlib.net/) | 1.2.8 | Unobtrusive compression library / zlib |
| Name | Version | Summary / License |
|---|---|---|
| [alabaster](http://www.sphinx-doc.org/en/stable/index.html) | 0.7.9 | Configurable, Python 2+3 compatible Sphinx theme / BSD |
| [anaconda-client](http://anaconda.org) | 1.6.0 | anaconda.org command line client library / BSD |
| [anaconda-navigator](https://github.com/ContinuumIO/navigator) | 1.4.3 | Anaconda Navigator / proprietary - Continuum Analytics, Inc. |
| [appnope](http://github.com/minrk/appnope) Mac | 0.1.0 | Disable App Nap on OS X 10.9 / BSD |
| [appscript](http://appscript.sourceforge.net/) Mac | 1.0.1 | Control AppleScriptable applications from Python / Public-Domain |
| [astroid](https://www.astroid.org/) | 1.4.9 | abstract syntax tree for Python with inference support / LGPL |
| [astropy](http://www.astropy.org/) | 1.3 | Community-developed Python Library for Astronomy / BSD |
| [babel](http://babel.pocoo.org/) | 2.3.4 | Utilities to internationalize and localize Python applications / BSD |
| backports | 1.0 | / BSD |
| [beautifulsoup4](http://www.crummy.com/software/BeautifulSoup/) | 4.5.3 | Python library designed for screen-scraping / MIT |
| [bitarray](https://github.com/ilanschnell/bitarray) | 0.8.1 | efficient representation of arrays of booleans – C extension / PSF |
| [blaze](http://blaze.pydata.org) | 0.10.1 | NumPy and Pandas interface to big data / BSD |
| [bokeh](http://bokeh.pydata.org/) | 0.12.4 | Python interactive visualization library for modern web browsers / BSD |
| [boto](https://github.com/boto/boto/) | 2.45.0 | Amazon Web Services Library / MIT |
| [bottleneck](http://berkeleyanalytics.com/bottleneck) | 1.2.0 | Fast NumPy array functions written in Cython. / Simplified BSD |
| [bzip2](http://www.bzip.org/) | 1.0.6 | high-quality data compressor / BSD |
| [cairo](http://cairographics.org/) Linux | 1.14.8 | A 2D graphics library with support for multiple output devices / LGPL 2.1, MPL 1.1 |
| [cffi](http://cffi.readthedocs.org) | 1.9.1 | C Foreign Function Interface for Python / MIT |
| [chardet](https://github.com/chardet/chardet) | 2.3.0 | Universal character encoding detector / GNU Library or Lesser General Public License |
| [chest](https://github.com/ContinuumIO/chest) | 0.2.3 | A dictionary that writes its contents to disk / BSD |
| [click](http://click.pocoo.org/) | 6.7 | Command line interface creation kit / BSD |
| [cloudpickle](https://github.com/cloudpipe/cloudpickle) | 0.2.2 | Extended pickling support for Python objects / BSD |
| [clyent](https://github.com/Anaconda-Server/clyent) | 1.2.2 | Command line client library for windows and posix / BSD |
| [colorama](https://github.com/tartley/colorama) | 0.3.7 | Cross-platform colored terminal text in Python / BSD |
| [comtypes](http://starship.python.net/crew/theller/comtypes/) Windows | 1.1.2 | pure Python COM package / MIT |
| [conda](http://conda.pydata.org/) | 4.3.8 | OS-agnostic, system-level binary package and environment manager. / BSD |
| [configobj](http://www.voidspace.org.uk/python/configobj.html) | 5.0.6 | Config file reading, writing and validation / BSD |
| [contextlib2](http://contextlib2.readthedocs.org/) | 0.5.4 | backports and enhancements for the contextlib module / PSF |
| [cryptography](https://cryptography.io) | 1.7.1 | Provides cryptographic recipes and primitives to Python developers / Apache |
| [curl](http://curl.haxx.se/) | 7.52.1 | Tool and library for transferring data with URL syntax / MIT/X derivate |
| [cycler](http://matplotlib.org/cycler/) | 0.10.0 | Composable style cycles / BSD |
| [cython](http://www.cython.org/) | 0.25.2 | The Cython compiler for writing C extensions for the Python language / Apache version 2.0 |
| [cytoolz](https://github.com/pytoolz/cytoolz) | 0.8.2 | Cython implementation of Toolz, high performance functional utilities / BSD |
| [dask](http://dask.pydata.org/en/latest/) | 0.13.0 | Task scheduling and blocked algorithms for parallel processing / BSD |
| [datashape](http://datashape.pydata.org) | 0.5.4 | Language defining a data description protocol / BSD |
| [dbus](http://www.freedesktop.org/wiki/Software/dbus/) Linux | 1.10.10 | message bus system, a simple way for applications to talk to one another / GPL2 |
| [decorator](http://pypi.python.org/pypi/decorator) | 4.0.11 | Better living through Python with decorators / BSD |
| [dill](http://www.cacr.caltech.edu/~mmckerns/dill.htm) | 0.2.5 | Serialize all of python (almost) / 3-clause BSD |
| [docutils](http://docutils.sourceforge.net) | 0.13.1 | Utilities for general- and special-purpose documentation / Public-Domain, PSF, 2-clause BSD, GPLv3 |
| [entrypoints](https://github.com/takluyver/entrypoints) | 0.2.2 | / MIT |
| [et\_xmlfile](https://bitbucket.org/openpyxl/et_xmlfile) | 1.0.1 | Low memory library for creating large XML files / MIT |
| [expat](http://expat.sourceforge.net) Linux Mac | 2.1.0 | XML parser library written in C / MIT |
| [fastcache](https://github.com/pbrady/fastcache) | 1.0.2 | C implementation of Python 3 functools.lru\_cache / MIT |
| [flask](http://flask.pocoo.org/) | 0.12 | A microframework based on Werkzeug, Jinja2 and good intentions / BSD |
| [flask-cors](https://github.com/corydolphin/flask-cors) | 3.0.2 | Flask extension adding a decorator for CORS support / MIT |
| [fontconfig](http://www.freedesktop.org/wiki/Software/fontconfig/) Linux | 2.12.1 | A library for configuring and customizing font access / BSD |
| [freetype](http://freetype.sourceforge.net/index2.html) | 2.5.5 | A Free, High-Quality, and Portable Font Engine / FreeType License |
| [get\_terminal\_size](https://github.com/chrippa/backports.shutil_get_terminal_size) | 1.0.0 | backport of the get\_terminal\_size function from Python 3.3 / MIT |
| [gevent](http://www.gevent.org/) | 1.2.1 | Coroutine-based Python network library / MIT |
| [glib](https://developer.gnome.org/glib/) Linux | 2.50.2 | Core application building blocks for libraries and applications in C / LGPL |
| [greenlet](https://github.com/python-greenlet/greenlet) | 0.4.11 | Lightweight in-process concurrent programming / MIT |
| [gst-plugins-base](http://gstreamer.freedesktop.org/) Linux | 1.8.0 | GStreamer Base Plug-ins / GPL2 |
| [gstreamer](http://gstreamer.freedesktop.org/) Linux | 1.8.0 | library for constructing graphs of media-handling components / LGPL2 |
| [h5py](http://www.h5py.org/) | 2.6.0 | Pythonic interface to the HDF5 binary data format / 3-clause BSD |
| [harfbuzz](http://www.freedesktop.org/wiki/Software/HarfBuzz/) Linux | 0.9.39 | An OpenType text shaping engine / MIT |
| [hdf5](http://www.hdfgroup.org/HDF5/) | 1.8.17 | A data model, library, and file format for storing and managing data / BSD-like |
| [heapdict](http://stutzbachenterprises.com/) | 1.0.0 | A heap with decrease-key and increase-key operations / BSD |
| [idna](https://github.com/kjd/idna) | 2.2 | Internationalized Domain Names in Applications / BSD |
| [imagesize](https://github.com/shibukawa/imagesize_py) | 0.7.1 | getting image size from png/jpeg/jpeg2000/gif file / MIT |
| [ipykernel](http://ipython.org) | 4.5.2 | IPython Kernel for Jupyter / BSD |
| [ipython](http://ipython.org/) | 5.1.0 | Productive Interactive Computing / BSD |
| [ipython\_genutils](http://jupyter.org) | 0.1.0 | vestigial utilities from IPython / BSD |
| [ipywidgets](https://github.com/ipython/ipywidgets) | 5.2.2 | Widgets for the Jupyter Notebook / BSD 3-clause |
| [isort](https://github.com/timothycrosley/isort) | 4.2.5 | Python utility / library to sort Python imports / MIT |
| [itsdangerous](https://pythonhosted.org/itsdangerous/) | 0.24 | Various helpers to pass trusted data to untrusted environments / BSD |
| [jbig](https://www.cl.cam.ac.uk/~mgk25/jbigkit) Linux Mac | 2.1 | Implementation of the JBIG1 data compression standard / GPL2 |
| [jdcal](http://github.com/phn/jdcal) | 1.3 | Julian dates from proleptic Gregorian and Julian calendars. / BSD |
| [jedi](http://jedi.jedidjah.ch/) | 0.9.0 | Autocompletion and static analysis library for Python / MIT |
| [jinja2](http://jinja.pocoo.org) | 2.9.4 | An easy to use stand-alone template engine written in pure python. / BSD |
| [jpeg](http://www.ijg.org/) | 9b | Read and write jpeg COM, EXIF, IPTC medata / Custom free software license |
| [jsonschema](https://python-jsonschema.readthedocs.orga) | 2.5.1 | An implementation of JSON Schema validation for Python / MIT |
| [jupyter](http://jupyter.org) | 1.0.0 | Open source, interactive data science and scientific computing / BSD |
| [jupyter\_client](http://jupyter.org) | 4.4.0 | Jupyter protocol implementation and client libraries / BSD |
| [jupyter\_console](http://jupyter.org) | 5.0.0 | Jupyter terminal console / BSD |
| [jupyter\_core](http://jupyter.org) | 4.2.1 | core Jupyter functionality / BSD |
| [lazy-object-proxy](https://github.com/ionelmc/python-lazy-object-proxy) | 1.2.2 | Fast and thorough lazy object proxy / BSD |
| [libffi](https://sourceware.org/libffi/) Linux | 3.2.1 | portable foreign-function interface library / MIT |
| [libgcc](http://gcc.gnu.org/) Linux | 4.8.5 | Shared libraries for the GNU Compiler Collection / GPL3 |
| [libgfortran](https://gcc.gnu.org/fortran/) Linux | 3.0.0 | GNU Fortran runtime library / GPL3 |
| [libiconv](https://www.gnu.org/software/libiconv/) Linux Mac | 1.14 | Provides iconv for systems which don’t have one / GPL and LGPL |
| [libpng](http://www.libpng.org/pub/png/libpng.html) | 1.6.27 | official PNG reference library / libpng license |
| [libsodium](http://libsodium.org) Linux | 1.0.10 | A library for encryption, signatures, password hashing, etc. / ISC |
| [libtiff](http://www.libtiff.org/) | 4.0.6 | Support for Tag Image File Format (TIFF) / BSD-like |
| [libxcb](http://xcb.freedesktop.org/) Linux | 1.12 | This is the C-language Bindings package to the X Window System protocol / MIT |
| [libxml2](http://xmlsoft.org/) Linux Mac | 2.9.4 | The XML C parser and toolkit of Gnome / MIT |
| [libxslt](http://xmlsoft.org/XSLT/) Linux Mac | 1.1.29 | The XSLT C library developed for the GNOME project / MIT |
| [llvmlite](http://llvmlite.pydata.org/) | 0.15.0 | Lightweight wrapper around basic LLVM functionality / BSD |
| [locket](http://github.com/mwilliamson/locket.py) | 0.2.0 | File based locks for Python for Linux and Windows / BSD |
| [lxml](http://lxml.de/) | 3.7.2 | Pythonic binding for the C libraries libxml2 and libxslt / BSD |
| [markupsafe](http://www.pocoo.org/projects/markupsafe/#markupsafe) | 0.23 | Implements a XML/HTML/XHTML Markup safe string for Python / BSD |
| [matplotlib](http://matplotlib.org/) | 2.0.0 | Python 2D plotting library / PSF-based |
| [menuinst](https://github.com/ContinuumIO/menuinst) Windows | 1.4.4 | cross platform menu item installation / BSD |
| [mistune](https://github.com/lepture/mistune) | 0.7.3 | The fastest markdown parser in pure Python with renderer feature / BSD |
| [mkl](http://software.intel.com/en-us/articles/intel-mkl/) | 2017.0.1 | Math library for Intel and compatible processors / proprietary - Intel |
| [mkl-service](https://github.com/ContinuumIO/mkl-service) | 1.1.2 | Python bindings to MKL service functions / 3-clause BSD |
| [mpmath](http://mpmath.org) | 0.19 | Python library for arbitrary-precision floating-point arithmetic / BSD |
| [multipledispatch](http://github.com/mrocklin/multipledispatch/) | 0.4.9 | Multiple dispatch in Python / BSD |
| [nbconvert](http://jupyter.org) | 4.2.0 | converts notebooks to various other formats via Jinja templates / BSD |
| [nbformat](http://jupyter.org) | 4.2.0 | The reference implementation of the Jupyter Notebook format / BSD |
| [networkx](http://networkx.lanl.gov/) | 1.11 | Python package for creating and manipulating complex networks / BSD |
| [nltk](http://nltk.org/) | 3.2.2 | Build Python programs to work with human language data / Apache |
| [nose](http://readthedocs.org/docs/nose/) | 1.3.7 | Nose extends unittest to make testing easier / LGPL |
| [notebook](http://jupyter.org) | 4.3.1 | web-based notebook environment for interactive computing / BSD |
| [numba](http://numba.pydata.org/) | 0.30.1 | NumPy aware dynamic Python compiler using LLVM / BSD |
| [numexpr](https://github.com/pydata/numexpr) | 2.6.1 | Fast numerical expression evaluator for NumPy / MIT |
| [numpy](http://numpy.scipy.org/) | 1.11.3 | array processing for numbers, strings, records, and objects / BSD |
| [numpydoc](https://github.com/numpy/numpydoc) | 0.6.0 | Sphinx extension to support docstrings in Numpy format / BSD |
| [odo](http://odo.pydata.org/en/latest/) | 0.5.0 | Shapeshifting for your data / BSD |
| [openpyxl](http://openpyxl.readthedocs.org) | 2.4.1 | A Python library to read/write Excel 2010 xlsx/xlsm files / MIT |
| [openssl](http://www.openssl.org/) | 1.0.2k | OpenSSL is an open-source implementation of the SSL and TLS protocols / Apache-style |
| [pandas](http://pandas.pydata.org/) | 0.19.2 | Powerful data structures and data analysis tools / BSD |
| [partd](https://github.com/dask/partd) | 0.3.7 | Appendable key-value byte store / BSD |
| [path.py](http://github.com/jaraco/path.py) | 10.0 | Module wrapper for os.path / MIT |
| [pathlib2](https://pypi.python.org/pypi/pathlib2/) | 2.2.0 | object-oriented filesystem paths / MIT |
| [patsy](https://github.com/pydata/patsy) | 0.4.1 | Describing statistical models in Python using symbolic formulas / BSD |
| [pcre](http://www.pcre.org/) Linux Mac | 8.39 | A set of functions that implement regular expression pattern matching / 3-clause BSD License |
| [pep8](http://pep8.readthedocs.org/) | 1.7.0 | Python style guide checker / MIT |
| [pexpect](http://pexpect.readthedocs.org/) Linux Mac | 4.2.1 | Pexpect allows easy control of interactive console applications / ISC |
| [pickleshare](https://github.com/vivainio/pickleshare) | 0.7.4 | file system based database that uses Python pickles / MIT |
| [pillow](http://python-pillow.github.io/) | 4.0.0 | The friendly Python Imaging Library(PIL) fork / PIL license |
| [pip](https://pip.pypa.io/en/stable/) | 9.0.1 | PyPA recommended tool for installing Python packages / MIT |
| [pixman](http://www.pixman.org/) Linux | 0.34.0 | A low-level software library for pixel manipulation / MIT |
| [ply](http://www.dabeaz.com/ply/) | 3.9 | Implementation of Lex and Yacc / BSD |
| [prompt\_toolkit](https://github.com/jonathanslenders/python-prompt-toolkit) | 1.0.9 | library for building powerful interactive command lines in Python / BSD |
| [psutil](https://github.com/giampaolo/psutil) | 5.0.1 | A cross-platform process and system utilities module for Python / BSD |
| [ptyprocess](https://github.com/pexpect/ptyprocess) Linux Mac | 0.5.1 | Run a subprocess in a pseudo terminal / ISC |
| [py](http://pylib.readthedocs.org/) | 1.4.32 | Library with cross-python path, ini-parsing, io, code, log facilities / MIT |
| [pyasn1](http://pyasn1.sourceforge.net/) | 0.1.9 | Offline IP address to Autonomous System Number lookup module / BSD |
| [pycosat](https://github.com/ContinuumIO/pycosat) | 0.6.1 | Python bindings to the picosat SAT solver / MIT |
| [pycparser](https://github.com/eliben/pycparser) | 2.17 | complete C99 parser in pure Python / BSD |
| [pycrypto](http://www.pycrypto.org/) | 2.6.1 | Cryptographic modules for Python / Public-Domain |
| [pycurl](http://pycurl.sourceforge.net/) | 7.43.0 | Python interface to libcurl / LGPL, MIT |
| [pyflakes](https://launchpad.net/pyflakes) | 1.5.0 | Checks Python source files for errors / MIT |
| [pygments](http://pygments.org/) | 2.1.3 | Generic syntax highlighting package / BSD |
| [pylint](http://www.pylint.org/) | 1.6.4 | Python code static checker / GPL |
| [pyopenssl](https://github.com/pyca/pyopenssl) | 16.2.0 | Python wrapper module around the OpenSSL library / Apache Software License |
| [pyparsing](http://pyparsing.wikispaces.com/) | 2.1.4 | Create and execute simple grammars / MIT |
| [pyqt](http://www.riverbankcomputing.co.uk/software/pyqt) | 5.6.0 | Python binding of the cross-platform GUI toolkit Qt / Commercial, GPLv2, GPLv3 |
| [pytables](http://www.pytables.org) | 3.3.0 | Manage hierarchical datasets to cope with large amounts of data / BSD |
| [pytest](http://pytest.org/) | 3.0.5 | Simple and powerful testing with Python / MIT |
| [python](http://www.python.org/) | 3.6.0 | general purpose programming language / PSF |
| [python-dateutil](https://dateutil.readthedocs.org/) | 2.6.0 | extensions to the standard Python datetime module / BSD |
| [pytz](http://pytz.sourceforge.net/) | 2016.10 | World timezone definitions, modern and historical / MIT |
| [pywin32](http://sourceforge.net/projects/pywin32/) Windows | 220 | Python extensions for Windows / PSF |
| [pyyaml](http://pyyaml.org/wiki/PyYAML) | 3.12 | YAML parser and emitter for Python / MIT |
| [pyzmq](https://github.com/zeromq/pyzmq) | 16.0.2 | zeromq bindings for Python / LGPL and BSD |
| [qt](http://www.qt.io) | 5.6.2 | Qt is a cross-platform application and UI framework / LGPLv3 |
| [qtawesome](https://github.com/spyder-ide/qtawesome) | 0.4.3 | FontAwesome icons in PyQt and PySide applications / MIT |
| [qtconsole](http://jupyter.org) | 4.2.1 | Jupyter Qt Console / BSD |
| [qtpy](https://github.com/spyder-ide/qtpy) | 1.2.1 | uniform layer to support PyQt4, PyQt5 and PySide with a single codebase / MIT |
| [readline](http://cnswww.cns.cwru.edu/php/chet/readline/rltop.html) Linux Mac | 6.2 | Line-editing for programs with a command-line interface / GPL3 |
| [redis](http://redis.io/download/) Linux Mac | 3.2.0 | Advanced key-value cache and store / 3-clause BSD |
| [redis-py](https://github.com/andymccurdy/redis-py/) Linux Mac | 2.10.5 | Redis Python Client / MIT |
| [requests](http://docs.python-requests.org/en/latest/index.html) | 2.12.4 | Python HTTP for Humans / Apache Software License |
| [rope](https://github.com/python-rope/rope) | 0.9.4 | A Python refactoring library / GPL |
| [ruamel\_yaml](https://bitbucket.org/ruamel/yaml) | 0.11.14 | patched copy of ruamel.yaml (a yaml parser) / MIT |
| [scikit-image](http://scikit-image.org/) | 0.12.3 | Image processing routines for SciPy / 3-clause BSD |
| [scikit-learn](http://scikit-learn.org/stable/) | 0.18.1 | set of python modules for machine learning and data mining / 3-clause BSD |
| [scipy](http://www.scipy.org/) | 0.18.1 | Scientific Library for Python / BSD |
| [seaborn](http://stanford.edu/~mwaskom/software/seaborn/) | 0.7.1 | Statistical data visualization / BSD |
| [setuptools](https://pypi.python.org/pypi/setuptools) | 27.2.0 | Download, build, install, upgrade, and uninstall Python packages / MIT |
| [simplegeneric](https://pypi.python.org/pypi/simplegeneric) | 0.8.1 | Define simple single-dispatch generic functions / ZPL 2.1 |
| [singledispatch](http://docs.python.org/3/library/functools.html#functools.singledispatch) | 3.4.0.3 | Transforms a function into a single-dispatch generic function / MIT |
| [sip](http://www.riverbankcomputing.com/software/sip/intro) | 4.18 | Create Python bindings for C and C++ libraries / GPL3 |
| [six](http://pypi.python.org/pypi/six/) | 1.10.0 | Python 2 and 3 compatibility utilities / MIT |
| [snowballstemmer](https://github.com/shibukawa/snowball_py) | 1.2.1 | Snowball stemming library collection for Python / BSD |
| [sockjs-tornado](http://github.com/mrjoes/sockjs-tornado/) | 1.0.3 | SockJS python server implementation on top of Tornado framework / MIT |
| [sphinx](http://sphinx-doc.org) | 1.5.1 | Documentation generator / BSD |
| [spyder](https://github.com/spyder-ide/spyder) | 3.1.2 | Scientific PYthon Development EnviRonment / MIT |
| [sqlalchemy](http://www.sqlalchemy.org/) | 1.1.5 | Database Abstraction Library / MIT |
| [sqlite](http://www.sqlite.org/) | 3.13.0 | Self-contained, zero-configuration, SQL database engine / Public-Domain |
| [statsmodels](http://statsmodels.sourceforge.net/) | 0.6.1 | Statistical computations and models / 3-clause BSD |
| [sympy](http://sympy.org) | 1.0 | Python library for symbolic mathematics / 3-clause BSD |
| [terminado](https://github.com/takluyver/terminado) Linux Mac | 0.6 | Terminals served to term.js using Tornado websockets / BSD |
| [tk](http://www.tcl.tk/) | 8.5.18 | Dynamic programming language with GUI elements / BSD-like |
| [toolz](http://toolz.readthedocs.org/en/latest/) | 0.8.2 | List processing tools and functional utilities / BSD |
| [tornado](http://www.tornadoweb.org/) | 4.4.2 | A Python web framework and asynchronous networking library / Apache |
| [traitlets](https://github.com/ipython/traitlets) | 4.3.1 | Configuration system for Python applications / BSD |
| [unicodecsv](https://github.com/jdunck/python-unicodecsv) | 0.14.1 | Drop-in replacement for csv module which supports unicode strings / BSD |
| [vs2015\_runtime](http://www.microsoft.com) Windows | 14.0.25123 | Bundles of the MSVC 14 (VS 2015) runtime / Proprietary |
| [wcwidth](https://github.com/jquast/wcwidth) | 0.1.7 | measures number of Terminal column cells of wide-character codes / MIT |
| [werkzeug](http://werkzeug.pocoo.org/) | 0.11.15 | A WSGI utility library for Python / BSD |
| [wheel](http://bitbucket.org/pypa/wheel/) | 0.29.0 | Built-package format for Python / MIT |
| [widgetsnbextension](http://ipython.org) | 1.2.6 | IPython HTML widgets for Jupyter / BSD 3-clause |
| [win\_unicode\_console](https://github.com/Drekin/win-unicode-console) Windows | 0.5 | enable Unicode input and display when running Python from Windows console / MIT |
| [wrapt](https://github.com/GrahamDumpleton/wrapt) | 1.10.8 | Module for decorators, wrappers and monkey patching / BSD |
| [xlrd](http://www.lexicon.net/sjmachin/xlrd.htm) | 1.0.0 | Extract data from Microsoft Excel spreadsheet files / BSD |
| [xlsxwriter](https://github.com/jmcnamara/XlsxWriter) | 0.9.6 | A Python module for creating Excel XLSX files / BSD |
| [xlwings](http://xlwings.org/) Mac Windows | 0.10.2 | Interact with Excel from Python and vice versa / 3-clause BSD |
| [xlwt](http://www.python-excel.org/) | 1.2.0 | Writing data and formatting information to Excel files / BSD |
| [xz](http://tukaani.org/xz/) Linux Mac | 5.2.2 | Data compression software with high compression ratio / Public-Domain, GPL |
| [yaml](http://www.yaml.org/) Linux Mac | 0.1.6 | A human friendly data serialization standard / MIT |
| [zeromq](http://zeromq.org) Linux | 4.1.5 | Distributed messaging / LGPL |
| [zlib](http://zlib.net/) | 1.2.8 | Unobtrusive compression library / zlib |
| Name | Version | Summary / License |
|---|---|---|
| [alabaster](http://www.sphinx-doc.org/en/stable/index.html) | 0.7.9 | Configurable, Python 2+3 compatible Sphinx theme / BSD |
| [anaconda-client](http://anaconda.org) | 1.6.0 | anaconda.org command line client library / BSD |
| [anaconda-navigator](https://github.com/ContinuumIO/navigator) | 1.4.3 | Anaconda Navigator / proprietary - Continuum Analytics, Inc. |
| [appnope](http://github.com/minrk/appnope) Mac | 0.1.0 | Disable App Nap on OS X 10.9 / BSD |
| [appscript](http://appscript.sourceforge.net/) Mac | 1.0.1 | Control AppleScriptable applications from Python / Public-Domain |
| [argcomplete](https://argcomplete.readthedocs.org/en/latest/) | 1.0.0 | Bash tab completion of arguments for Python scripts / Apache |
| [astroid](https://www.astroid.org/) | 1.4.9 | abstract syntax tree for Python with inference support / LGPL |
| [astropy](http://www.astropy.org/) | 1.3 | Community-developed Python Library for Astronomy / BSD |
| [babel](http://babel.pocoo.org/) | 2.3.4 | Utilities to internationalize and localize Python applications / BSD |
| backports | 1.0 | / BSD |
| [backports\_abc](https://github.com/cython/backports_abc) | 0.5 | backport of recent additions to the ‘collections.abc’ module / PSF |
| [beautifulsoup4](http://www.crummy.com/software/BeautifulSoup/) | 4.5.3 | Python library designed for screen-scraping / MIT |
| [bitarray](https://github.com/ilanschnell/bitarray) | 0.8.1 | efficient representation of arrays of booleans – C extension / PSF |
| [blaze](http://blaze.pydata.org) | 0.10.1 | NumPy and Pandas interface to big data / BSD |
| [bokeh](http://bokeh.pydata.org/) | 0.12.4 | Python interactive visualization library for modern web browsers / BSD |
| [boto](https://github.com/boto/boto/) | 2.45.0 | Amazon Web Services Library / MIT |
| [bottleneck](http://berkeleyanalytics.com/bottleneck) | 1.2.0 | Fast NumPy array functions written in Cython. / Simplified BSD |
| [bzip2](http://www.bzip.org/) | 1.0.6 | high-quality data compressor / BSD |
| [cairo](http://cairographics.org/) Linux | 1.14.8 | A 2D graphics library with support for multiple output devices / LGPL 2.1, MPL 1.1 |
| [cdecimal](http://www.bytereef.org/mpdecimal/index.html) | 2.3 | Fast drop-in replacement for decimal.py / BSD |
| [cffi](http://cffi.readthedocs.org) | 1.9.1 | C Foreign Function Interface for Python / MIT |
| [chardet](https://github.com/chardet/chardet) | 2.3.0 | Universal character encoding detector / GNU Library or Lesser General Public License |
| [chest](https://github.com/ContinuumIO/chest) | 0.2.3 | A dictionary that writes its contents to disk / BSD |
| [click](http://click.pocoo.org/) | 6.7 | Command line interface creation kit / BSD |
| [cloudpickle](https://github.com/cloudpipe/cloudpickle) | 0.2.2 | Extended pickling support for Python objects / BSD |
| [clyent](https://github.com/Anaconda-Server/clyent) | 1.2.2 | Command line client library for windows and posix / BSD |
| [colorama](https://github.com/tartley/colorama) | 0.3.7 | Cross-platform colored terminal text in Python / BSD |
| [comtypes](http://starship.python.net/crew/theller/comtypes/) Windows | 1.1.2 | pure Python COM package / MIT |
| [conda](http://conda.pydata.org/) | 4.3.8 | OS-agnostic, system-level binary package and environment manager. / BSD |
| [configobj](http://www.voidspace.org.uk/python/configobj.html) | 5.0.6 | Config file reading, writing and validation / BSD |
| [configparser](http://docs.python.org/3/library/configparser.html) | 3.5.0 | brings the updated configparser from Python 3.5 to Python 2.6-3.5 / MIT |
| [contextlib2](http://contextlib2.readthedocs.org/) | 0.5.4 | backports and enhancements for the contextlib module / PSF |
| [cryptography](https://cryptography.io) | 1.7.1 | Provides cryptographic recipes and primitives to Python developers / Apache |
| [curl](http://curl.haxx.se/) | 7.52.1 | Tool and library for transferring data with URL syntax / MIT/X derivate |
| [cycler](http://matplotlib.org/cycler/) | 0.10.0 | Composable style cycles / BSD |
| [cython](http://www.cython.org/) | 0.25.2 | The Cython compiler for writing C extensions for the Python language / Apache version 2.0 |
| [cytoolz](https://github.com/pytoolz/cytoolz) | 0.8.2 | Cython implementation of Toolz, high performance functional utilities / BSD |
| [dask](http://dask.pydata.org/en/latest/) | 0.13.0 | Task scheduling and blocked algorithms for parallel processing / BSD |
| [datashape](http://datashape.pydata.org) | 0.5.4 | Language defining a data description protocol / BSD |
| [dbus](http://www.freedesktop.org/wiki/Software/dbus/) Linux | 1.10.10 | message bus system, a simple way for applications to talk to one another / GPL2 |
| [decorator](http://pypi.python.org/pypi/decorator) | 4.0.11 | Better living through Python with decorators / BSD |
| [dill](http://www.cacr.caltech.edu/~mmckerns/dill.htm) | 0.2.5 | Serialize all of python (almost) / 3-clause BSD |
| [docutils](http://docutils.sourceforge.net) | 0.13.1 | Utilities for general- and special-purpose documentation / Public-Domain, PSF, 2-clause BSD, GPLv3 |
| [entrypoints](https://github.com/takluyver/entrypoints) | 0.2.2 | / MIT |
| [enum34](https://pypi.python.org/pypi/enum34) | 1.1.6 | Robust enumerated type support in Python / BSD |
| [et\_xmlfile](https://bitbucket.org/openpyxl/et_xmlfile) | 1.0.1 | Low memory library for creating large XML files / MIT |
| [expat](http://expat.sourceforge.net) Linux Mac | 2.1.0 | XML parser library written in C / MIT |
| [fastcache](https://github.com/pbrady/fastcache) | 1.0.2 | C implementation of Python 3 functools.lru\_cache / MIT |
| [flask](http://flask.pocoo.org/) | 0.12 | A microframework based on Werkzeug, Jinja2 and good intentions / BSD |
| [flask-cors](https://github.com/corydolphin/flask-cors) | 3.0.2 | Flask extension adding a decorator for CORS support / MIT |
| [fontconfig](http://www.freedesktop.org/wiki/Software/fontconfig/) Linux | 2.12.1 | A library for configuring and customizing font access / BSD |
| [freetype](http://freetype.sourceforge.net/index2.html) | 2.5.5 | A Free, High-Quality, and Portable Font Engine / FreeType License |
| [funcsigs](http://funcsigs.readthedocs.org/) | 1.0.2 | Python function signatures from PEP362 for Python 2.6, 2.7 and 3.2+ / Apache |
| [functools32](https://github.com/MiCHiLU/python-functools32) | 3.2.3.2 | backport of the functools module from Python 3.2.3 for use on 2.7 / PSF |
| [futures](http://code.google.com/p/pythonfutures) | 3.0.5 | A Java-style futures package for Python / BSD |
| [get\_terminal\_size](https://github.com/chrippa/backports.shutil_get_terminal_size) | 1.0.0 | backport of the get\_terminal\_size function from Python 3.3 / MIT |
| [gevent](http://www.gevent.org/) | 1.2.1 | Coroutine-based Python network library / MIT |
| [glib](https://developer.gnome.org/glib/) Linux | 2.50.2 | Core application building blocks for libraries and applications in C / LGPL |
| [greenlet](https://github.com/python-greenlet/greenlet) | 0.4.11 | Lightweight in-process concurrent programming / MIT |
| [grin](http://pypi.python.org/pypi/grin) | 1.2.1 | Enhanced grep-like tool / BSD |
| [gst-plugins-base](http://gstreamer.freedesktop.org/) Linux | 1.8.0 | GStreamer Base Plug-ins / GPL2 |
| [gstreamer](http://gstreamer.freedesktop.org/) Linux | 1.8.0 | library for constructing graphs of media-handling components / LGPL2 |
| [h5py](http://www.h5py.org/) | 2.6.0 | Pythonic interface to the HDF5 binary data format / 3-clause BSD |
| [harfbuzz](http://www.freedesktop.org/wiki/Software/HarfBuzz/) Linux | 0.9.39 | An OpenType text shaping engine / MIT |
| [hdf5](http://www.hdfgroup.org/HDF5/) | 1.8.17 | A data model, library, and file format for storing and managing data / BSD-like |
| [heapdict](http://stutzbachenterprises.com/) | 1.0.0 | A heap with decrease-key and increase-key operations / BSD |
| [idna](https://github.com/kjd/idna) | 2.2 | Internationalized Domain Names in Applications / BSD |
| [imagesize](https://github.com/shibukawa/imagesize_py) | 0.7.1 | getting image size from png/jpeg/jpeg2000/gif file / MIT |
| [ipaddress](https://github.com/phihag/ipaddress) | 1.0.18 | IPv4/IPv6 manipulation library / Python Software Foundation License |
| [ipykernel](http://ipython.org) | 4.5.2 | IPython Kernel for Jupyter / BSD |
| [ipython](http://ipython.org/) | 5.1.0 | Productive Interactive Computing / BSD |
| [ipython\_genutils](http://jupyter.org) | 0.1.0 | vestigial utilities from IPython / BSD |
| [ipywidgets](https://github.com/ipython/ipywidgets) | 5.2.2 | Widgets for the Jupyter Notebook / BSD 3-clause |
| [isort](https://github.com/timothycrosley/isort) | 4.2.5 | Python utility / library to sort Python imports / MIT |
| [itsdangerous](https://pythonhosted.org/itsdangerous/) | 0.24 | Various helpers to pass trusted data to untrusted environments / BSD |
| [jbig](https://www.cl.cam.ac.uk/~mgk25/jbigkit) Linux Mac | 2.1 | Implementation of the JBIG1 data compression standard / GPL2 |
| [jdcal](http://github.com/phn/jdcal) | 1.3 | Julian dates from proleptic Gregorian and Julian calendars. / BSD |
| [jedi](http://jedi.jedidjah.ch/) | 0.9.0 | Autocompletion and static analysis library for Python / MIT |
| [jinja2](http://jinja.pocoo.org) | 2.9.4 | An easy to use stand-alone template engine written in pure python. / BSD |
| [jpeg](http://www.ijg.org/) | 9b | Read and write jpeg COM, EXIF, IPTC medata / Custom free software license |
| [jsonschema](https://python-jsonschema.readthedocs.orga) | 2.5.1 | An implementation of JSON Schema validation for Python / MIT |
| [jupyter](http://jupyter.org) | 1.0.0 | Open source, interactive data science and scientific computing / BSD |
| [jupyter\_client](http://jupyter.org) | 4.4.0 | Jupyter protocol implementation and client libraries / BSD |
| [jupyter\_console](http://jupyter.org) | 5.0.0 | Jupyter terminal console / BSD |
| [jupyter\_core](http://jupyter.org) | 4.2.1 | core Jupyter functionality / BSD |
| [lazy-object-proxy](https://github.com/ionelmc/python-lazy-object-proxy) | 1.2.2 | Fast and thorough lazy object proxy / BSD |
| [libffi](https://sourceware.org/libffi/) Linux | 3.2.1 | portable foreign-function interface library / MIT |
| [libgcc](http://gcc.gnu.org/) Linux | 4.8.5 | Shared libraries for the GNU Compiler Collection / GPL3 |
| [libgfortran](https://gcc.gnu.org/fortran/) Linux | 3.0.0 | GNU Fortran runtime library / GPL3 |
| [libiconv](https://www.gnu.org/software/libiconv/) Linux Mac | 1.14 | Provides iconv for systems which don’t have one / GPL and LGPL |
| [libpng](http://www.libpng.org/pub/png/libpng.html) | 1.6.27 | official PNG reference library / libpng license |
| [libsodium](http://libsodium.org) Linux | 1.0.10 | A library for encryption, signatures, password hashing, etc. / ISC |
| [libtiff](http://www.libtiff.org/) | 4.0.6 | Support for Tag Image File Format (TIFF) / BSD-like |
| [libxcb](http://xcb.freedesktop.org/) Linux | 1.12 | This is the C-language Bindings package to the X Window System protocol / MIT |
| [libxml2](http://xmlsoft.org/) Linux Mac | 2.9.4 | The XML C parser and toolkit of Gnome / MIT |
| [libxslt](http://xmlsoft.org/XSLT/) Linux Mac | 1.1.29 | The XSLT C library developed for the GNOME project / MIT |
| [llvmlite](http://llvmlite.pydata.org/) | 0.15.0 | Lightweight wrapper around basic LLVM functionality / BSD |
| [locket](http://github.com/mwilliamson/locket.py) | 0.2.0 | File based locks for Python for Linux and Windows / BSD |
| [lxml](http://lxml.de/) | 3.7.2 | Pythonic binding for the C libraries libxml2 and libxslt / BSD |
| [markupsafe](http://www.pocoo.org/projects/markupsafe/#markupsafe) | 0.23 | Implements a XML/HTML/XHTML Markup safe string for Python / BSD |
| [matplotlib](http://matplotlib.org/) | 2.0.0 | Python 2D plotting library / PSF-based |
| [menuinst](https://github.com/ContinuumIO/menuinst) Windows | 1.4.4 | cross platform menu item installation / BSD |
| [mistune](https://github.com/lepture/mistune) | 0.7.3 | The fastest markdown parser in pure Python with renderer feature / BSD |
| [mkl](http://software.intel.com/en-us/articles/intel-mkl/) | 2017.0.1 | Math library for Intel and compatible processors / proprietary - Intel |
| [mkl-service](https://github.com/ContinuumIO/mkl-service) | 1.1.2 | Python bindings to MKL service functions / 3-clause BSD |
| [mpmath](http://mpmath.org) | 0.19 | Python library for arbitrary-precision floating-point arithmetic / BSD |
| [multipledispatch](http://github.com/mrocklin/multipledispatch/) | 0.4.9 | Multiple dispatch in Python / BSD |
| [nbconvert](http://jupyter.org) | 4.2.0 | converts notebooks to various other formats via Jinja templates / BSD |
| [nbformat](http://jupyter.org) | 4.2.0 | The reference implementation of the Jupyter Notebook format / BSD |
| [networkx](http://networkx.lanl.gov/) | 1.11 | Python package for creating and manipulating complex networks / BSD |
| [nltk](http://nltk.org/) | 3.2.2 | Build Python programs to work with human language data / Apache |
| [nose](http://readthedocs.org/docs/nose/) | 1.3.7 | Nose extends unittest to make testing easier / LGPL |
| [notebook](http://jupyter.org) | 4.3.1 | web-based notebook environment for interactive computing / BSD |
| [numba](http://numba.pydata.org/) | 0.30.1 | NumPy aware dynamic Python compiler using LLVM / BSD |
| [numexpr](https://github.com/pydata/numexpr) | 2.6.1 | Fast numerical expression evaluator for NumPy / MIT |
| [numpy](http://numpy.scipy.org/) | 1.11.3 | array processing for numbers, strings, records, and objects / BSD |
| [numpydoc](https://github.com/numpy/numpydoc) | 0.6.0 | Sphinx extension to support docstrings in Numpy format / BSD |
| [odo](http://odo.pydata.org/en/latest/) | 0.5.0 | Shapeshifting for your data / BSD |
| [openpyxl](http://openpyxl.readthedocs.org) | 2.4.1 | A Python library to read/write Excel 2010 xlsx/xlsm files / MIT |
| [openssl](http://www.openssl.org/) | 1.0.2k | OpenSSL is an open-source implementation of the SSL and TLS protocols / Apache-style |
| [pandas](http://pandas.pydata.org/) | 0.19.2 | Powerful data structures and data analysis tools / BSD |
| [partd](https://github.com/dask/partd) | 0.3.7 | Appendable key-value byte store / BSD |
| [path.py](http://github.com/jaraco/path.py) | 10.0 | Module wrapper for os.path / MIT |
| [pathlib2](https://pypi.python.org/pypi/pathlib2/) | 2.2.0 | object-oriented filesystem paths / MIT |
| [patsy](https://github.com/pydata/patsy) | 0.4.1 | Describing statistical models in Python using symbolic formulas / BSD |
| [pcre](http://www.pcre.org/) Linux Mac | 8.39 | A set of functions that implement regular expression pattern matching / 3-clause BSD License |
| [pep8](http://pep8.readthedocs.org/) | 1.7.0 | Python style guide checker / MIT |
| [pexpect](http://pexpect.readthedocs.org/) Linux Mac | 4.2.1 | Pexpect allows easy control of interactive console applications / ISC |
| [pickleshare](https://github.com/vivainio/pickleshare) | 0.7.4 | file system based database that uses Python pickles / MIT |
| [pillow](http://python-pillow.github.io/) | 4.0.0 | The friendly Python Imaging Library(PIL) fork / PIL license |
| [pip](https://pip.pypa.io/en/stable/) | 9.0.1 | PyPA recommended tool for installing Python packages / MIT |
| [pixman](http://www.pixman.org/) Linux | 0.34.0 | A low-level software library for pixel manipulation / MIT |
| [ply](http://www.dabeaz.com/ply/) | 3.9 | Implementation of Lex and Yacc / BSD |
| [prompt\_toolkit](https://github.com/jonathanslenders/python-prompt-toolkit) | 1.0.9 | library for building powerful interactive command lines in Python / BSD |
| [psutil](https://github.com/giampaolo/psutil) | 5.0.1 | A cross-platform process and system utilities module for Python / BSD |
| [ptyprocess](https://github.com/pexpect/ptyprocess) Linux Mac | 0.5.1 | Run a subprocess in a pseudo terminal / ISC |
| [py](http://pylib.readthedocs.org/) | 1.4.32 | Library with cross-python path, ini-parsing, io, code, log facilities / MIT |
| [pyasn1](http://pyasn1.sourceforge.net/) | 0.1.9 | Offline IP address to Autonomous System Number lookup module / BSD |
| [pyaudio](http://people.csail.mit.edu/hubert/pyaudio/) Mac | 0.2.7 | Bindings for PortAudio v19, the cross-platform audio stream library / MIT |
| [pycairo](http://cairographics.org/pycairo/) Linux | 1.10.0 | A set of Python bindings for the cairo graphics library / LGPL 2.1, MPL 1.1 |
| [pycosat](https://github.com/ContinuumIO/pycosat) | 0.6.1 | Python bindings to the picosat SAT solver / MIT |
| [pycparser](https://github.com/eliben/pycparser) | 2.17 | complete C99 parser in pure Python / BSD |
| [pycrypto](http://www.pycrypto.org/) | 2.6.1 | Cryptographic modules for Python / Public-Domain |
| [pycurl](http://pycurl.sourceforge.net/) | 7.43.0 | Python interface to libcurl / LGPL, MIT |
| [pyflakes](https://launchpad.net/pyflakes) | 1.5.0 | Checks Python source files for errors / MIT |
| [pygments](http://pygments.org/) | 2.1.3 | Generic syntax highlighting package / BSD |
| [pylint](http://www.pylint.org/) | 1.6.4 | Python code static checker / GPL |
| [pyopenssl](https://github.com/pyca/pyopenssl) | 16.2.0 | Python wrapper module around the OpenSSL library / Apache Software License |
| [pyparsing](http://pyparsing.wikispaces.com/) | 2.1.4 | Create and execute simple grammars / MIT |
| [pyqt](http://www.riverbankcomputing.co.uk/software/pyqt) | 5.6.0 | Python binding of the cross-platform GUI toolkit Qt / Commercial, GPLv2, GPLv3 |
| [pytables](http://www.pytables.org) | 3.3.0 | Manage hierarchical datasets to cope with large amounts of data / BSD |
| [pytest](http://pytest.org/) | 3.0.5 | Simple and powerful testing with Python / MIT |
| [python](http://www.python.org/) | 2.7.13 | general purpose programming language / PSF |
| [python-dateutil](https://dateutil.readthedocs.org/) | 2.6.0 | extensions to the standard Python datetime module / BSD |
| [pytz](http://pytz.sourceforge.net/) | 2016.10 | World timezone definitions, modern and historical / MIT |
| [pywin32](http://sourceforge.net/projects/pywin32/) Windows | 220 | Python extensions for Windows / PSF |
| [pyyaml](http://pyyaml.org/wiki/PyYAML) | 3.12 | YAML parser and emitter for Python / MIT |
| [pyzmq](https://github.com/zeromq/pyzmq) | 16.0.2 | zeromq bindings for Python / LGPL and BSD |
| [qt](http://www.qt.io) | 5.6.2 | Qt is a cross-platform application and UI framework / LGPLv3 |
| [qtawesome](https://github.com/spyder-ide/qtawesome) | 0.4.3 | FontAwesome icons in PyQt and PySide applications / MIT |
| [qtconsole](http://jupyter.org) | 4.2.1 | Jupyter Qt Console / BSD |
| [qtpy](https://github.com/spyder-ide/qtpy) | 1.2.1 | uniform layer to support PyQt4, PyQt5 and PySide with a single codebase / MIT |
| [readline](http://cnswww.cns.cwru.edu/php/chet/readline/rltop.html) Linux Mac | 6.2 | Line-editing for programs with a command-line interface / GPL3 |
| [redis](http://redis.io/download/) Linux Mac | 3.2.0 | Advanced key-value cache and store / 3-clause BSD |
| [redis-py](https://github.com/andymccurdy/redis-py/) Linux Mac | 2.10.5 | Redis Python Client / MIT |
| [requests](http://docs.python-requests.org/en/latest/index.html) | 2.12.4 | Python HTTP for Humans / Apache Software License |
| [rope](https://github.com/python-rope/rope) | 0.9.4 | A Python refactoring library / GPL |
| [ruamel\_yaml](https://bitbucket.org/ruamel/yaml) | 0.11.14 | patched copy of ruamel.yaml (a yaml parser) / MIT |
| [scandir](https://github.com/benhoyt/scandir) | 1.4 | scandir, a better directory iterator and faster os.walk() / BSD License |
| [scikit-image](http://scikit-image.org/) | 0.12.3 | Image processing routines for SciPy / 3-clause BSD |
| [scikit-learn](http://scikit-learn.org/stable/) | 0.18.1 | set of python modules for machine learning and data mining / 3-clause BSD |
| [scipy](http://www.scipy.org/) | 0.18.1 | Scientific Library for Python / BSD |
| [seaborn](http://stanford.edu/~mwaskom/software/seaborn/) | 0.7.1 | Statistical data visualization / BSD |
| [setuptools](https://pypi.python.org/pypi/setuptools) | 27.2.0 | Download, build, install, upgrade, and uninstall Python packages / MIT |
| [simplegeneric](https://pypi.python.org/pypi/simplegeneric) | 0.8.1 | Define simple single-dispatch generic functions / ZPL 2.1 |
| [singledispatch](http://docs.python.org/3/library/functools.html#functools.singledispatch) | 3.4.0.3 | Transforms a function into a single-dispatch generic function / MIT |
| [sip](http://www.riverbankcomputing.com/software/sip/intro) | 4.18 | Create Python bindings for C and C++ libraries / GPL3 |
| [six](http://pypi.python.org/pypi/six/) | 1.10.0 | Python 2 and 3 compatibility utilities / MIT |
| [snowballstemmer](https://github.com/shibukawa/snowball_py) | 1.2.1 | Snowball stemming library collection for Python / BSD |
| [sockjs-tornado](http://github.com/mrjoes/sockjs-tornado/) | 1.0.3 | SockJS python server implementation on top of Tornado framework / MIT |
| [sphinx](http://sphinx-doc.org) | 1.5.1 | Documentation generator / BSD |
| [spyder](https://github.com/spyder-ide/spyder) | 3.1.2 | Scientific PYthon Development EnviRonment / MIT |
| [sqlalchemy](http://www.sqlalchemy.org/) | 1.1.5 | Database Abstraction Library / MIT |
| [sqlite](http://www.sqlite.org/) | 3.13.0 | Self-contained, zero-configuration, SQL database engine / Public-Domain |
| [ssl\_match\_hostname](http://bitbucket.org/brandon/backports.ssl_match_hostname) | 3.4.0.2 | The ssl.match\_hostname() function from Python 3.4 / PSF |
| [statsmodels](http://statsmodels.sourceforge.net/) | 0.6.1 | Statistical computations and models / 3-clause BSD |
| [subprocess32](https://github.com/google/python-subprocess32) | 3.2.7 | backport of the subprocess module from Python 3.2/3.3 for use on 2.x / Python Software Foundation License |
| [sympy](http://sympy.org) | 1.0 | Python library for symbolic mathematics / 3-clause BSD |
| [terminado](https://github.com/takluyver/terminado) Linux Mac | 0.6 | Terminals served to term.js using Tornado websockets / BSD |
| [tk](http://www.tcl.tk/) | 8.5.18 | Dynamic programming language with GUI elements / BSD-like |
| [toolz](http://toolz.readthedocs.org/en/latest/) | 0.8.2 | List processing tools and functional utilities / BSD |
| [tornado](http://www.tornadoweb.org/) | 4.4.2 | A Python web framework and asynchronous networking library / Apache |
| [traitlets](https://github.com/ipython/traitlets) | 4.3.1 | Configuration system for Python applications / BSD |
| [unicodecsv](https://github.com/jdunck/python-unicodecsv) | 0.14.1 | Drop-in replacement for csv module which supports unicode strings / BSD |
| [vs2008\_runtime](http://www.microsoft.com) Windows | 9.00.30729.5054 | Bundles of the MSVC 9 (VS 2008) runtime / Proprietary |
| [wcwidth](https://github.com/jquast/wcwidth) | 0.1.7 | measures number of Terminal column cells of wide-character codes / MIT |
| [werkzeug](http://werkzeug.pocoo.org/) | 0.11.15 | A WSGI utility library for Python / BSD |
| [wheel](http://bitbucket.org/pypa/wheel/) | 0.29.0 | Built-package format for Python / MIT |
| [widgetsnbextension](http://ipython.org) | 1.2.6 | IPython HTML widgets for Jupyter / BSD 3-clause |
| [win\_unicode\_console](https://github.com/Drekin/win-unicode-console) Windows | 0.5 | enable Unicode input and display when running Python from Windows console / MIT |
| [wrapt](https://github.com/GrahamDumpleton/wrapt) | 1.10.8 | Module for decorators, wrappers and monkey patching / BSD |
| [xlrd](http://www.lexicon.net/sjmachin/xlrd.htm) | 1.0.0 | Extract data from Microsoft Excel spreadsheet files / BSD |
| [xlsxwriter](https://github.com/jmcnamara/XlsxWriter) | 0.9.6 | A Python module for creating Excel XLSX files / BSD |
| [xlwings](http://xlwings.org/) Mac Windows | 0.10.2 | Interact with Excel from Python and vice versa / 3-clause BSD |
| [xlwt](http://www.python-excel.org/) | 1.2.0 | Writing data and formatting information to Excel files / BSD |
| [xz](http://tukaani.org/xz/) Linux Mac | 5.2.2 | Data compression software with high compression ratio / Public-Domain, GPL |
| [yaml](http://www.yaml.org/) Linux Mac | 0.1.6 | A human friendly data serialization standard / MIT |
| [zeromq](http://zeromq.org) Linux | 4.1.5 | Distributed messaging / LGPL |
| [zlib](http://zlib.net/) | 1.2.8 | Unobtrusive compression library / zlib |
| Name | Version | Summary / License |
|---|---|---|
| [alabaster](http://www.sphinx-doc.org/en/stable/index.html) | 0.7.9 | Configurable, Python 2+3 compatible Sphinx theme / BSD |
| [anaconda-clean](https://github.com/ContinuumIO/anaconda-clean) | 1.0.0 | Delete Anaconda configuration files / BSD |
| [anaconda-client](http://anaconda.org) | 1.5.1 | anaconda.org command line client library / BSD |
| [anaconda-navigator](https://github.com/ContinuumIO/navigator) | 1.3.1 | Anaconda Navigator / proprietary - Continuum Analytics, Inc. |
| [appnope](http://github.com/minrk/appnope) Mac | 0.1.0 | Disable App Nap on OS X 10.9 / BSD |
| [appscript](http://appscript.sourceforge.net/) Mac | 1.0.1 | Control AppleScriptable applications from Python / Public-Domain |
| [argcomplete](https://argcomplete.readthedocs.org/en/latest/) | 1.0.0 | Bash tab completion of arguments for Python scripts / Apache |
| [astroid](https://www.astroid.org/) | 1.4.7 | abstract syntax tree for Python with inference support / LGPL |
| [astropy](http://www.astropy.org/) | 1.2.1 | Community-developed Python Library for Astronomy / BSD |
| [babel](http://babel.pocoo.org/) | 2.3.4 | Utilities to internationalize and localize Python applications / BSD |
| backports | 1.0 | / BSD |
| [beautifulsoup4](http://www.crummy.com/software/BeautifulSoup/) | 4.5.1 | Python library designed for screen-scraping / MIT |
| [bitarray](https://github.com/ilanschnell/bitarray) | 0.8.1 | efficient representation of arrays of booleans – C extension / PSF |
| [blaze](http://blaze.pydata.org) | 0.10.1 | NumPy and Pandas interface to big data / BSD |
| [bokeh](http://bokeh.pydata.org/) | 0.12.2 | Python interactive visualization library for modern web browsers / BSD |
| [boto](https://github.com/boto/boto/) | 2.42.0 | Amazon Web Services Library / MIT |
| [bottleneck](http://berkeleyanalytics.com/bottleneck) | 1.1.0 | Fast NumPy array functions written in Cython. / Simplified BSD |
| [bzip2](http://www.bzip.org/) Windows | 1.0.6 | high-quality data compressor / BSD |
| [cairo](http://cairographics.org/) Linux | 1.12.18 | A 2D graphics library with support for multiple output devices / LGPL 2.1, MPL 1.1 |
| [cffi](http://cffi.readthedocs.org) | 1.7.0 | C Foreign Function Interface for Python / MIT |
| [chest](https://github.com/ContinuumIO/chest) | 0.2.3 | A dictionary that writes its contents to disk / BSD |
| [click](http://click.pocoo.org/) | 6.6 | Command line interface creation kit / BSD |
| [cloudpickle](https://github.com/cloudpipe/cloudpickle) | 0.2.1 | Extended pickling support for Python objects / BSD |
| [clyent](https://github.com/Anaconda-Server/clyent) | 1.2.2 | Command line client library for windows and posix / BSD |
| [colorama](https://github.com/tartley/colorama) | 0.3.7 | Cross-platform colored terminal text in Python / BSD |
| [comtypes](http://starship.python.net/crew/theller/comtypes/) Windows | 1.1.2 | pure Python COM package / MIT |
| [conda](http://conda.pydata.org/) | 4.2.9 | OS-agnostic, system-level binary package and environment manager. / BSD |
| [conda-build](https://github.com/conda/conda-build) | 2.0.2 | Commands and tools for building conda packages / BSD 3-clause |
| [configobj](http://www.voidspace.org.uk/python/configobj.html) | 5.0.6 | Config file reading, writing and validation / BSD |
| [contextlib2](http://contextlib2.readthedocs.org/) | 0.5.3 | backports and enhancements for the contextlib module / PSF |
| [cryptography](https://cryptography.io) | 1.5 | Provides cryptographic recipes and primitives to Python developers / Apache |
| [curl](http://curl.haxx.se/) | 7.49.0 | Tool and library for transferring data with URL syntax / MIT/X derivate |
| [cycler](http://matplotlib.org/cycler/) | 0.10.0 | Composable style cycles / BSD |
| [cython](http://www.cython.org/) | 0.24.1 | The Cython compiler for writing C extensions for the Python language / Apache |
| [cytoolz](https://github.com/pytoolz/cytoolz) | 0.8.0 | Cython implementation of Toolz, high performance functional utilities / BSD |
| [dask](http://dask.pydata.org/en/latest/) | 0.11.0 | Task scheduling and blocked algorithms for parallel processing / BSD |
| [datashape](http://datashape.pydata.org) | 0.5.2 | Language defining a data description protocol / BSD |
| [dbus](http://www.freedesktop.org/wiki/Software/dbus/) Linux | 1.10.10 | message bus system, a simple way for applications to talk to one another / GPL2 |
| [decorator](http://pypi.python.org/pypi/decorator) | 4.0.10 | Better living through Python with decorators / BSD |
| [dill](http://www.cacr.caltech.edu/~mmckerns/dill.htm) | 0.2.5 | Serialize all of python (almost) / 3-clause BSD |
| [docutils](http://docutils.sourceforge.net) | 0.12 | Utilities for general- and special-purpose documentation / Public-Domain, PSF, 2-clause BSD, GPLv3 |
| [dynd-python](http://libdynd.org/) | 0.7.2 | Python exposure of DyND, a library for dynamic arrays / BSD |
| [entrypoints](https://github.com/takluyver/entrypoints) | 0.2.2 | / MIT |
| [et\_xmlfile](https://bitbucket.org/openpyxl/et_xmlfile) | 1.0.1 | Low memory library for creating large XML files / MIT |
| [expat](http://expat.sourceforge.net) Linux Mac | 2.1.0 | XML parser library written in C / MIT |
| [fastcache](https://github.com/pbrady/fastcache) | 1.0.2 | C implementation of Python 3 functools.lru\_cache / MIT |
| [filelock](http://s3fs.readthedocs.org/en/latest/) | 2.0.6 | / Public-Domain |
| [flask](http://flask.pocoo.org/) | 0.11.1 | A microframework based on Werkzeug, Jinja2 and good intentions / BSD |
| [flask-cors](https://github.com/corydolphin/flask-cors) | 2.1.2 | Flask extension adding a decorator for CORS support / MIT |
| [fontconfig](http://www.freedesktop.org/wiki/Software/fontconfig/) Linux | 2.11.1 | A library for configuring and customizing font access / BSD |
| [freetype](http://freetype.sourceforge.net/index2.html) | 2.5.5 | A Free, High-Quality, and Portable Font Engine / FreeType License |
| [get\_terminal\_size](https://github.com/chrippa/backports.shutil_get_terminal_size) | 1.0.0 | backport of the get\_terminal\_size function from Python 3.3 / MIT |
| [gevent](http://www.gevent.org/) | 1.1.2 | Coroutine-based Python network library / MIT |
| [glib](https://developer.gnome.org/glib/) Linux | 2.43.0 | Core application building blocks for libraries and applications in C / LGPL |
| [greenlet](https://github.com/python-greenlet/greenlet) | 0.4.10 | Lightweight in-process concurrent programming / MIT |
| [gst-plugins-base](http://gstreamer.freedesktop.org/) Linux | 1.8.0 | GStreamer Base Plug-ins / GPL2 |
| [gstreamer](http://gstreamer.freedesktop.org/) Linux | 1.8.0 | library for constructing graphs of media-handling components / LGPL2 |
| [h5py](http://www.h5py.org/) | 2.6.0 | Pythonic interface to the HDF5 binary data format / 3-clause BSD |
| [harfbuzz](http://www.freedesktop.org/wiki/Software/HarfBuzz/) Linux | 0.9.39 | An OpenType text shaping engine / MIT |
| [hdf5](http://www.hdfgroup.org/HDF5/) | 1.8.17 | A data model, library, and file format for storing and managing data / BSD-like |
| [heapdict](http://stutzbachenterprises.com/) | 1.0.0 | A heap with decrease-key and increase-key operations / BSD |
| [idna](https://github.com/kjd/idna) | 2.1 | Internationalized Domain Names in Applications / BSD |
| [imagesize](https://github.com/shibukawa/imagesize_py) | 0.7.1 | getting image size from png/jpeg/jpeg2000/gif file / MIT |
| [ipykernel](http://ipython.org) | 4.5.0 | IPython Kernel for Jupyter / BSD |
| [ipython](http://ipython.org/) | 5.1.0 | Productive Interactive Computing / BSD |
| [ipython\_genutils](http://jupyter.org) | 0.1.0 | vestigial utilities from IPython / BSD |
| [ipywidgets](https://github.com/ipython/ipywidgets) | 5.2.2 | Widgets for the Jupyter Notebook / BSD 3-clause |
| [itsdangerous](https://pythonhosted.org/itsdangerous/) | 0.24 | Various helpers to pass trusted data to untrusted environments / BSD |
| [jbig](https://www.cl.cam.ac.uk/~mgk25/jbigkit) Linux Mac | 2.1 | Implementation of the JBIG1 data compression standard / GPL2 |
| [jdcal](http://github.com/phn/jdcal) | 1.2 | Julian dates from proleptic Gregorian and Julian calendars. / BSD |
| [jedi](http://jedi.jedidjah.ch/) | 0.9.0 | Autocompletion and static analysis library for Python / MIT |
| [jinja2](http://jinja.pocoo.org) | 2.8 | An easy to use stand-alone template engine written in pure python. / BSD |
| [jpeg](http://www.ijg.org/) | 8d | Read and write jpeg COM, EXIF, IPTC medata / Custom free software license |
| [jsonschema](https://python-jsonschema.readthedocs.orga) | 2.5.1 | An implementation of JSON Schema validation for Python / MIT |
| [jupyter](http://jupyter.org) | 1.0.0 | Open source, interactive data science and scientific computing / BSD |
| [jupyter\_client](http://jupyter.org) | 4.4.0 | Jupyter protocol implementation and client libraries / BSD |
| [jupyter\_console](http://jupyter.org) | 5.0.0 | Jupyter terminal console / BSD |
| [jupyter\_core](http://jupyter.org) | 4.2.0 | core Jupyter functionality / BSD |
| [lazy-object-proxy](https://github.com/ionelmc/python-lazy-object-proxy) | 1.2.1 | Fast and thorough lazy object proxy / BSD |
| [libdynd](http://libdynd.org/) | 0.7.2 | C++ dynamic ndarray library / BSD |
| [libffi](http://sourceware.org/libffi/) Linux | 3.2.1 | portable foreign-function interface library / MIT |
| [libgcc](http://gcc.gnu.org/) Linux | 4.8.5 | Shared libraries for the GNU Compiler Collection / GPL3 |
| [libgfortran](https://gcc.gnu.org/fortran/) Linux | 3.0.0 | GNU Fortran runtime library / GPL3 |
| [libpng](http://www.libpng.org/pub/png/libpng.html) | 1.6.22 | The official PNG reference library / libpng license |
| [libsodium](http://libsodium.org) Linux | 1.0.10 | A library for encryption, signatures, password hashing, etc. / ISC |
| [libtiff](http://www.libtiff.org/) | 4.0.6 | Support for Tag Image File Format (TIFF) / BSD-like |
| [libxcb](http://xcb.freedesktop.org/) Linux | 1.12 | This is the C-language Bindings package to the X Window System protocol / MIT |
| [libxml2](http://xmlsoft.org/) Linux Mac | 2.9.2 | The XML C parser and toolkit for Gnome / MIT |
| [libxslt](http://xmlsoft.org/XSLT/) Linux Mac | 1.1.28 | The XSLT C library developed for the GNOME project / MIT |
| [llvmlite](http://llvmlite.pydata.org/) | 0.13.0 | Lightweight wrapper around basic LLVM functionality / BSD |
| [locket](http://github.com/mwilliamson/locket.py) | 0.2.0 | File based locks for Python for Linux and Windows / BSD |
| [lxml](http://lxml.de/) | 3.6.4 | Pythonic binding for the C libraries libxml2 and libxslt / BSD |
| [markupsafe](http://www.pocoo.org/projects/markupsafe/#markupsafe) | 0.23 | Implements a XML/HTML/XHTML Markup safe string for Python / BSD |
| [matplotlib](http://matplotlib.org/) | 1.5.3 | Python 2D plotting library / PSF-based |
| [menuinst](https://github.com/ContinuumIO/menuinst) Windows | 1.4.1 | cross platform menu item installation / BSD |
| [mistune](https://github.com/lepture/mistune) | 0.7.3 | The fastest markdown parser in pure Python with renderer feature / BSD |
| [mkl](http://software.intel.com/en-us/articles/intel-mkl/) | 11.3.3 | Math library for Intel and compatible processors / proprietary - Intel |
| [mkl-service](https://github.com/ContinuumIO/mkl-service) | 1.1.2 | Python bindings to MKL service functions / 3-clause BSD |
| [mpmath](http://mpmath.org) | 0.19 | Python library for arbitrary-precision floating-point arithmetic / BSD |
| [multipledispatch](http://github.com/mrocklin/multipledispatch/) | 0.4.8 | Multiple dispatch in Python / BSD |
| [nb\_anacondacloud](https://github.com/Anaconda-Platform/nb_anacondacloud) | 1.2.0 | / BSD |
| [nb\_conda](https://github.com/Anaconda-Platform/nb_conda) | 2.0.0 | Launch Jupyter kernels for any installed conda environment / BSD |
| [nb\_conda\_kernels](https://github.com/Anaconda-Platform/nb_conda_kernels) | 2.0.0 | Launch Jupyter kernels for any installed conda environment / BSD |
| [nbconvert](http://jupyter.org) | 4.2.0 | converts notebooks to various other formats via Jinja templates / BSD |
| [nbformat](http://jupyter.org) | 4.1.0 | The reference implementation of the Jupyter Notebook format / BSD |
| [nbpresent](https://github.com/Anaconda-Platform/nbpresent) | 3.0.2 | Next generation slides for Jupyter Notebooks / BSD |
| [networkx](http://networkx.lanl.gov/) | 1.11 | Python package for creating and manipulating complex networks / BSD |
| [nltk](http://nltk.org/) | 3.2.1 | Build Python programs to work with human language data / Apache |
| [nose](http://readthedocs.org/docs/nose/) | 1.3.7 | Nose extends unittest to make testing easier / LGPL |
| [notebook](http://jupyter.org) | 4.2.3 | web-based notebook environment for interactive computing / BSD |
| [numba](http://numba.pydata.org/) | 0.28.1 | NumPy aware dynamic Python compiler using LLVM / BSD |
| [numexpr](https://github.com/pydata/numexpr) | 2.6.1 | Fast numerical expression evaluator for NumPy / MIT |
| [numpy](http://numpy.scipy.org/) | 1.11.1 | array processing for numbers, strings, records, and objects / BSD |
| [odo](http://odo.pydata.org/en/latest/) | 0.5.0 | Shapeshifting for your data / BSD |
| [openpyxl](http://openpyxl.readthedocs.org) | 2.3.2 | A Python library to read/write Excel 2010 xlsx/xlsm files / MIT |
| [openssl](http://www.openssl.org/) | 1.0.2j | OpenSSL is an open-source implementation of the SSL and TLS protocols / Apache-style |
| [pandas](http://pandas.pydata.org/) | 0.18.1 | Powerful data structures and data analysis tools / BSD |
| [partd](https://github.com/dask/partd) | 0.3.6 | Appendable key-value byte store / BSD |
| [patchelf](http://nixos.org/patchelf.html) Linux | 0.9 | Modify the dynamic linker and RPATH of ELF executables / GPL3 |
| [path.py](http://github.com/jaraco/path.py) | 8.2.1 | Module wrapper for os.path / MIT |
| [pathlib2](https://pypi.python.org/pypi/pathlib2/) | 2.1.0 | object-oriented filesystem paths / MIT |
| [patsy](https://github.com/pydata/patsy) | 0.4.1 | Describing statistical models in Python using symbolic formulas / BSD |
| [pep8](http://pep8.readthedocs.org/) | 1.7.0 | Python style guide checker / MIT |
| [pexpect](http://pexpect.readthedocs.org/) Linux Mac | 4.0.1 | Pexpect allows easy control of interactive console applications / ISC |
| [pickleshare](https://github.com/vivainio/pickleshare) | 0.7.4 | file system based database that uses Python pickles / MIT |
| [pillow](http://python-pillow.github.io/) | 3.3.1 | The friendly Python Imaging Library(PIL) fork / PIL license |
| [pip](https://pip.pypa.io/en/stable/) | 8.1.2 | PyPA recommended tool for installing Python packages / MIT |
| [pixman](http://www.pixman.org/) Linux | 0.32.6 | A low-level software library for pixel manipulation / MIT |
| [pkginfo](https://pypi.python.org/pypi/pkginfo/) | 1.3.2 | query metadatdata from sdists or bdists installed packages / PSF |
| [ply](http://www.dabeaz.com/ply/) | 3.9 | Implementation of Lex and Yacc / BSD |
| [prompt\_toolkit](https://github.com/jonathanslenders/python-prompt-toolkit) | 1.0.3 | library for building powerful interactive command lines in Python / BSD |
| [psutil](https://github.com/giampaolo/psutil) | 4.3.1 | A cross-platform process and system utilities module for Python / BSD |
| [ptyprocess](https://github.com/pexpect/ptyprocess) Linux Mac | 0.5.1 | Run a subprocess in a pseudo terminal / ISC |
| [py](http://pylib.readthedocs.org/) | 1.4.31 | Library with cross-python path, ini-parsing, io, code, log facilities / MIT |
| [pyasn1](http://pyasn1.sourceforge.net/) | 0.1.9 | Offline IP address to Autonomous System Number lookup module / BSD |
| [pycosat](https://github.com/ContinuumIO/pycosat) | 0.6.1 | Python bindings to the picosat SAT solver / MIT |
| [pycparser](https://github.com/eliben/pycparser) | 2.14 | Complete C99 parser in pure Python / BSD |
| [pycrypto](http://www.pycrypto.org/) | 2.6.1 | Cryptographic modules for Python / Public-Domain |
| [pycurl](http://pycurl.sourceforge.net/) | 7.43.0 | Python interface to libcurl / LGPL, MIT |
| [pyflakes](https://launchpad.net/pyflakes) | 1.3.0 | Checks Python source files for errors / MIT |
| [pygments](http://pygments.org/) | 2.1.3 | Generic syntax highlighting package / BSD |
| [pylint](http://www.pylint.org/) | 1.5.4 | Python code static checker / GPL |
| [pyopenssl](https://github.com/pyca/pyopenssl) | 16.0.0 | Python wrapper module around the OpenSSL library / Apache License, Version 2.0 |
| [pyparsing](http://pyparsing.wikispaces.com/) | 2.1.4 | Create and execute simple grammars / MIT |
| [pyqt](http://www.riverbankcomputing.co.uk/software/pyqt) | 5.6.0 | Python binding of the cross-platform GUI toolkit Qt / Commercial, GPLv2, GPLv3 |
| [pytables](http://www.pytables.org) | 3.2.3.1 | Manage hierarchical datasets to cope with large amounts of data / BSD |
| [pytest](http://pytest.org/) | 2.9.2 | Simple and powerful testing with Python / MIT |
| [python](http://www.python.org/) | 3.5.2 | general purpose programming language / PSF |
| [python-dateutil](https://dateutil.readthedocs.org/) | 2.5.3 | Extensions to the standard Python datetime module / BSD |
| [pytz](http://pytz.sourceforge.net/) | 2016.6.1 | World timezone definitions, modern and historical / MIT |
| [pywin32](http://sourceforge.net/projects/pywin32/) Windows | 220 | Python extensions for Windows / PSF |
| [pyyaml](http://pyyaml.org/wiki/PyYAML) | 3.12 | YAML parser and emitter for Python / MIT |
| [pyzmq](https://github.com/zeromq/pyzmq) | 15.4.0 | zeromq bindings for Python / LGPL and BSD |
| [qt](http://www.qt.io) | 5.6.0 | Qt is a cross-platform application and UI framework / LGPLv3 |
| [qtawesome](https://github.com/spyder-ide/qtawesome) | 0.3.3 | FontAwesome icons in PyQt and PySide applications / MIT |
| [qtconsole](http://jupyter.org) | 4.2.1 | Jupyter Qt Console / BSD |
| [qtpy](https://github.com/spyder-ide/qtpy) | 1.1.2 | uniform layer to support PyQt4, PyQt5 and PySide with a single codebase / MIT |
| [readline](http://cnswww.cns.cwru.edu/php/chet/readline/rltop.html) Linux Mac | 6.2 | Line-editing for programs with a command-line interface / GPL3 |
| [redis](http://redis.io/download/) Linux Mac | 3.2.0 | Advanced key-value cache and store / 3-clause BSD |
| [redis-py](https://github.com/andymccurdy/redis-py/) Linux Mac | 2.10.5 | Redis Python Client / MIT |
| [requests](http://docs.python-requests.org/en/latest/index.html) | 2.11.1 | Python HTTP for Humans / Apache |
| [rope](https://github.com/python-rope/rope) | 0.9.4 | A Python refactoring library / GPL |
| [ruamel\_yaml](https://bitbucket.org/ruamel/yaml) | 0.11.14 | / MIT |
| [scikit-image](http://scikit-image.org/) | 0.12.3 | Image processing routines for SciPy / 3-clause BSD |
| [scikit-learn](http://scikit-learn.org/stable/) | 0.17.1 | A set of python modules for machine learning and data mining / 3-clause BSD |
| [scipy](http://www.scipy.org/) | 0.18.1 | Scientific Library for Python / BSD |
| [setuptools](https://pypi.python.org/pypi/setuptools) | 27.2.0 | Download, build, install, upgrade, and uninstall Python packages / MIT |
| [simplegeneric](https://pypi.python.org/pypi/simplegeneric) | 0.8.1 | Define simple single-dispatch generic functions / ZPL 2.1 |
| [singledispatch](http://docs.python.org/3/library/functools.html#functools.singledispatch) | 3.4.0.3 | Transforms a function into a single-dispatch generic function / MIT |
| [sip](http://www.riverbankcomputing.com/software/sip/intro) | 4.18 | Create Python bindings for C and C++ libraries / GPL3 |
| [six](http://pypi.python.org/pypi/six/) | 1.10.0 | Python 2 and 3 compatibility utilities / MIT |
| [snowballstemmer](https://github.com/shibukawa/snowball_py) | 1.2.1 | Snowball stemming library collection for Python / BSD |
| [sockjs-tornado](http://github.com/mrjoes/sockjs-tornado/) | 1.0.3 | SockJS python server implementation on top of Tornado framework / MIT |
| [sphinx](http://sphinx-doc.org) | 1.4.6 | Documentation generator / BSD |
| [spyder](https://github.com/spyder-ide/spyder) | 3.0.0 | Scientific PYthon Development EnviRonment / MIT |
| [sqlalchemy](http://www.sqlalchemy.org/) | 1.0.13 | Database Abstraction Library / MIT |
| [sqlite](http://www.sqlite.org/) | 3.13.0 | Self-contained, zero-configuration, SQL database engine / Public-Domain |
| [statsmodels](http://statsmodels.sourceforge.net/) | 0.6.1 | Statistical computations and models / 3-clause BSD |
| [sympy](http://sympy.org) | 1.0 | Python library for symbolic mathematics / 3-clause BSD |
| [terminado](https://github.com/takluyver/terminado) Linux Mac | 0.6 | Terminals served to term.js using Tornado websockets / BSD |
| [tk](http://www.tcl.tk/) | 8.5.18 | Dynamic programming language with GUI elements / BSD-like |
| [toolz](http://toolz.readthedocs.org/en/latest/) | 0.8.0 | List processing tools and functional utilities / BSD |
| [tornado](http://www.tornadoweb.org/) | 4.4.1 | A Python web framework and asynchronous networking library / Apache |
| [traitlets](https://github.com/ipython/traitlets) | 4.3.0 | Configuration system for Python applications / BSD |
| [unicodecsv](https://github.com/jdunck/python-unicodecsv) | 0.14.1 | Drop-in replacement for csv module which supports unicode strings / BSD |
| [vs2015\_runtime](http://www.microsoft.com) Windows | 14.0.25123 | Bundles of the MSVC 14 (VS 2015) runtime / Proprietary |
| [wcwidth](https://github.com/jquast/wcwidth) | 0.1.7 | measures number of Terminal column cells of wide-character codes / MIT |
| [werkzeug](http://werkzeug.pocoo.org/) | 0.11.11 | A WSGI utility library for Python / BSD |
| [wheel](http://bitbucket.org/pypa/wheel/) | 0.29.0 | Built-package format for Python / MIT |
| [widgetsnbextension](http://ipython.org) | 1.2.6 | IPython HTML widgets for Jupyter / BSD 3-clause |
| [win\_unicode\_console](https://github.com/Drekin/win-unicode-console) Windows | 0.5 | enable Unicode input and display when running Python from Windows console / MIT |
| [wrapt](https://github.com/GrahamDumpleton/wrapt) | 1.10.6 | Module for decorators, wrappers and monkey patching / BSD |
| [xlrd](http://www.lexicon.net/sjmachin/xlrd.htm) | 1.0.0 | Extract data from Microsoft Excel spreadsheet files / BSD |
| [xlsxwriter](https://github.com/jmcnamara/XlsxWriter) | 0.9.3 | A Python module for creating Excel XLSX files / BSD |
| [xlwings](http://xlwings.org/) Mac Windows | 0.10.0 | Interact with Excel from Python and vice versa / 3-clause BSD |
| [xlwt](http://www.python-excel.org/) | 1.1.2 | Writing data and formatting information to Excel files / BSD |
| [xz](http://tukaani.org/xz/) Linux Mac | 5.2.2 | Data compression software with high compression ratio / Public-Domain, GPL |
| [yaml](http://www.yaml.org/) Linux Mac | 0.1.6 | A human friendly data serialization standard / MIT |
| [zeromq](http://zeromq.org) Linux | 4.1.4 | Distributed messaging / LGPL |
| [zlib](http://zlib.net/) | 1.2.8 | Unobtrusive compression library / zlib |
| Name | Version | Summary / License |
|---|---|---|
| [alabaster](http://www.sphinx-doc.org/en/stable/index.html) | 0.7.9 | Configurable, Python 2+3 compatible Sphinx theme / BSD |
| [anaconda-clean](https://github.com/ContinuumIO/anaconda-clean) | 1.0.0 | Delete Anaconda configuration files / BSD |
| [anaconda-client](http://anaconda.org) | 1.5.1 | anaconda.org command line client library / BSD |
| [anaconda-navigator](https://github.com/ContinuumIO/navigator) | 1.3.1 | Anaconda Navigator / proprietary - Continuum Analytics, Inc. |
| [appnope](http://github.com/minrk/appnope) Mac | 0.1.0 | Disable App Nap on OS X 10.9 / BSD |
| [appscript](http://appscript.sourceforge.net/) Mac | 1.0.1 | Control AppleScriptable applications from Python / Public-Domain |
| [argcomplete](https://argcomplete.readthedocs.org/en/latest/) | 1.0.0 | Bash tab completion of arguments for Python scripts / Apache |
| [astroid](https://www.astroid.org/) | 1.4.7 | abstract syntax tree for Python with inference support / LGPL |
| [astropy](http://www.astropy.org/) | 1.2.1 | Community-developed Python Library for Astronomy / BSD |
| [babel](http://babel.pocoo.org/) | 2.3.4 | Utilities to internationalize and localize Python applications / BSD |
| backports | 1.0 | / BSD |
| [backports\_abc](https://github.com/cython/backports_abc) | 0.4 | backport of recent additions to the ‘collections.abc’ module / PSF |
| [beautifulsoup4](http://www.crummy.com/software/BeautifulSoup/) | 4.5.1 | Python library designed for screen-scraping / MIT |
| [bitarray](https://github.com/ilanschnell/bitarray) | 0.8.1 | efficient representation of arrays of booleans – C extension / PSF |
| [blaze](http://blaze.pydata.org) | 0.10.1 | NumPy and Pandas interface to big data / BSD |
| [bokeh](http://bokeh.pydata.org/) | 0.12.2 | Python interactive visualization library for modern web browsers / BSD |
| [boto](https://github.com/boto/boto/) | 2.42.0 | Amazon Web Services Library / MIT |
| [bottleneck](http://berkeleyanalytics.com/bottleneck) | 1.1.0 | Fast NumPy array functions written in Cython. / Simplified BSD |
| [bzip2](http://www.bzip.org/) Windows | 1.0.6 | high-quality data compressor / BSD |
| [cairo](http://cairographics.org/) Linux | 1.12.18 | A 2D graphics library with support for multiple output devices / LGPL 2.1, MPL 1.1 |
| [cdecimal](http://www.bytereef.org/mpdecimal/index.html) | 2.3 | Fast drop-in replacement for decimal.py / BSD |
| [cffi](http://cffi.readthedocs.org) | 1.7.0 | C Foreign Function Interface for Python / MIT |
| [chest](https://github.com/ContinuumIO/chest) | 0.2.3 | A dictionary that writes its contents to disk / BSD |
| [click](http://click.pocoo.org/) | 6.6 | Command line interface creation kit / BSD |
| [cloudpickle](https://github.com/cloudpipe/cloudpickle) | 0.2.1 | Extended pickling support for Python objects / BSD |
| [clyent](https://github.com/Anaconda-Server/clyent) | 1.2.2 | Command line client library for windows and posix / BSD |
| [colorama](https://github.com/tartley/colorama) | 0.3.7 | Cross-platform colored terminal text in Python / BSD |
| [comtypes](http://starship.python.net/crew/theller/comtypes/) Windows | 1.1.2 | pure Python COM package / MIT |
| [conda](http://conda.pydata.org/) | 4.2.9 | OS-agnostic, system-level binary package and environment manager. / BSD |
| [conda-build](https://github.com/conda/conda-build) | 2.0.2 | Commands and tools for building conda packages / BSD 3-clause |
| [configobj](http://www.voidspace.org.uk/python/configobj.html) | 5.0.6 | Config file reading, writing and validation / BSD |
| [configparser](http://docs.python.org/3/library/configparser.html) | 3.5.0 | brings the updated configparser from Python 3.5 to Python 2.6-3.5 / MIT |
| [contextlib2](http://contextlib2.readthedocs.org/) | 0.5.3 | backports and enhancements for the contextlib module / PSF |
| [cryptography](https://cryptography.io) | 1.5 | Provides cryptographic recipes and primitives to Python developers / Apache |
| [curl](http://curl.haxx.se/) | 7.49.0 | Tool and library for transferring data with URL syntax / MIT/X derivate |
| [cycler](http://matplotlib.org/cycler/) | 0.10.0 | Composable style cycles / BSD |
| [cython](http://www.cython.org/) | 0.24.1 | The Cython compiler for writing C extensions for the Python language / Apache |
| [cytoolz](https://github.com/pytoolz/cytoolz) | 0.8.0 | Cython implementation of Toolz, high performance functional utilities / BSD |
| [dask](http://dask.pydata.org/en/latest/) | 0.11.0 | Task scheduling and blocked algorithms for parallel processing / BSD |
| [datashape](http://datashape.pydata.org) | 0.5.2 | Language defining a data description protocol / BSD |
| [dbus](http://www.freedesktop.org/wiki/Software/dbus/) Linux | 1.10.10 | message bus system, a simple way for applications to talk to one another / GPL2 |
| [decorator](http://pypi.python.org/pypi/decorator) | 4.0.10 | Better living through Python with decorators / BSD |
| [dill](http://www.cacr.caltech.edu/~mmckerns/dill.htm) | 0.2.5 | Serialize all of python (almost) / 3-clause BSD |
| [docutils](http://docutils.sourceforge.net) | 0.12 | Utilities for general- and special-purpose documentation / Public-Domain, PSF, 2-clause BSD, GPLv3 |
| [dynd-python](http://libdynd.org/) Linux Mac | 0.7.2 | Python exposure of DyND, a library for dynamic arrays / BSD |
| [entrypoints](https://github.com/takluyver/entrypoints) | 0.2.2 | / MIT |
| [enum34](https://pypi.python.org/pypi/enum34) | 1.1.6 | Robust enumerated type support in Python / BSD |
| [et\_xmlfile](https://bitbucket.org/openpyxl/et_xmlfile) | 1.0.1 | Low memory library for creating large XML files / MIT |
| [expat](http://expat.sourceforge.net) Linux Mac | 2.1.0 | XML parser library written in C / MIT |
| [fastcache](https://github.com/pbrady/fastcache) | 1.0.2 | C implementation of Python 3 functools.lru\_cache / MIT |
| [filelock](http://s3fs.readthedocs.org/en/latest/) | 2.0.6 | / Public-Domain |
| [flask](http://flask.pocoo.org/) | 0.11.1 | A microframework based on Werkzeug, Jinja2 and good intentions / BSD |
| [flask-cors](https://github.com/corydolphin/flask-cors) | 2.1.2 | Flask extension adding a decorator for CORS support / MIT |
| [fontconfig](http://www.freedesktop.org/wiki/Software/fontconfig/) Linux | 2.11.1 | A library for configuring and customizing font access / BSD |
| [freetype](http://freetype.sourceforge.net/index2.html) | 2.5.5 | A Free, High-Quality, and Portable Font Engine / FreeType License |
| [funcsigs](http://funcsigs.readthedocs.org/) | 1.0.2 | Python function signatures from PEP362 for Python 2.6, 2.7 and 3.2+ / Apache |
| [functools32](https://github.com/MiCHiLU/python-functools32) | 3.2.3.2 | backport of the functools module from Python 3.2.3 for use on 2.7 / PSF |
| [futures](http://code.google.com/p/pythonfutures) | 3.0.5 | A Java-style futures package for Python / BSD |
| [get\_terminal\_size](https://github.com/chrippa/backports.shutil_get_terminal_size) | 1.0.0 | backport of the get\_terminal\_size function from Python 3.3 / MIT |
| [gevent](http://www.gevent.org/) | 1.1.2 | Coroutine-based Python network library / MIT |
| [glib](https://developer.gnome.org/glib/) Linux | 2.43.0 | Core application building blocks for libraries and applications in C / LGPL |
| [greenlet](https://github.com/python-greenlet/greenlet) | 0.4.10 | Lightweight in-process concurrent programming / MIT |
| [grin](http://pypi.python.org/pypi/grin) | 1.2.1 | Enhanced grep-like tool / BSD |
| [gst-plugins-base](http://gstreamer.freedesktop.org/) Linux | 1.8.0 | GStreamer Base Plug-ins / GPL2 |
| [gstreamer](http://gstreamer.freedesktop.org/) Linux | 1.8.0 | library for constructing graphs of media-handling components / LGPL2 |
| [h5py](http://www.h5py.org/) | 2.6.0 | Pythonic interface to the HDF5 binary data format / 3-clause BSD |
| [harfbuzz](http://www.freedesktop.org/wiki/Software/HarfBuzz/) Linux | 0.9.39 | An OpenType text shaping engine / MIT |
| [hdf5](http://www.hdfgroup.org/HDF5/) | 1.8.17 | A data model, library, and file format for storing and managing data / BSD-like |
| [heapdict](http://stutzbachenterprises.com/) | 1.0.0 | A heap with decrease-key and increase-key operations / BSD |
| [idna](https://github.com/kjd/idna) | 2.1 | Internationalized Domain Names in Applications / BSD |
| [imagesize](https://github.com/shibukawa/imagesize_py) | 0.7.1 | getting image size from png/jpeg/jpeg2000/gif file / MIT |
| [ipaddress](https://github.com/phihag/ipaddress) | 1.0.16 | IPv4/IPv6 manipulation library / PSF |
| [ipykernel](http://ipython.org) | 4.5.0 | IPython Kernel for Jupyter / BSD |
| [ipython](http://ipython.org/) | 5.1.0 | Productive Interactive Computing / BSD |
| [ipython\_genutils](http://jupyter.org) | 0.1.0 | vestigial utilities from IPython / BSD |
| [ipywidgets](https://github.com/ipython/ipywidgets) | 5.2.2 | Widgets for the Jupyter Notebook / BSD 3-clause |
| [itsdangerous](https://pythonhosted.org/itsdangerous/) | 0.24 | Various helpers to pass trusted data to untrusted environments / BSD |
| [jbig](https://www.cl.cam.ac.uk/~mgk25/jbigkit) Linux Mac | 2.1 | Implementation of the JBIG1 data compression standard / GPL2 |
| [jdcal](http://github.com/phn/jdcal) | 1.2 | Julian dates from proleptic Gregorian and Julian calendars. / BSD |
| [jedi](http://jedi.jedidjah.ch/) | 0.9.0 | Autocompletion and static analysis library for Python / MIT |
| [jinja2](http://jinja.pocoo.org) | 2.8 | An easy to use stand-alone template engine written in pure python. / BSD |
| [jpeg](http://www.ijg.org/) | 8d | Read and write jpeg COM, EXIF, IPTC medata / Custom free software license |
| [jsonschema](https://python-jsonschema.readthedocs.orga) | 2.5.1 | An implementation of JSON Schema validation for Python / MIT |
| [jupyter](http://jupyter.org) | 1.0.0 | Open source, interactive data science and scientific computing / BSD |
| [jupyter\_client](http://jupyter.org) | 4.4.0 | Jupyter protocol implementation and client libraries / BSD |
| [jupyter\_console](http://jupyter.org) | 5.0.0 | Jupyter terminal console / BSD |
| [jupyter\_core](http://jupyter.org) | 4.2.0 | core Jupyter functionality / BSD |
| [lazy-object-proxy](https://github.com/ionelmc/python-lazy-object-proxy) | 1.2.1 | Fast and thorough lazy object proxy / BSD |
| [libdynd](http://libdynd.org/) Linux Mac | 0.7.2 | C++ dynamic ndarray library / BSD |
| [libffi](http://sourceware.org/libffi/) Linux | 3.2.1 | portable foreign-function interface library / MIT |
| [libgcc](http://gcc.gnu.org/) Linux | 4.8.5 | Shared libraries for the GNU Compiler Collection / GPL3 |
| [libgfortran](https://gcc.gnu.org/fortran/) Linux | 3.0.0 | GNU Fortran runtime library / GPL3 |
| [libpng](http://www.libpng.org/pub/png/libpng.html) | 1.6.22 | The official PNG reference library / libpng license |
| [libsodium](http://libsodium.org) Linux | 1.0.10 | A library for encryption, signatures, password hashing, etc. / ISC |
| [libtiff](http://www.libtiff.org/) | 4.0.6 | Support for Tag Image File Format (TIFF) / BSD-like |
| [libxcb](http://xcb.freedesktop.org/) Linux | 1.12 | This is the C-language Bindings package to the X Window System protocol / MIT |
| [libxml2](http://xmlsoft.org/) Linux Mac | 2.9.2 | The XML C parser and toolkit for Gnome / MIT |
| [libxslt](http://xmlsoft.org/XSLT/) Linux Mac | 1.1.28 | The XSLT C library developed for the GNOME project / MIT |
| [llvmlite](http://llvmlite.pydata.org/) | 0.13.0 | Lightweight wrapper around basic LLVM functionality / BSD |
| [locket](http://github.com/mwilliamson/locket.py) | 0.2.0 | File based locks for Python for Linux and Windows / BSD |
| [lxml](http://lxml.de/) | 3.6.4 | Pythonic binding for the C libraries libxml2 and libxslt / BSD |
| [markupsafe](http://www.pocoo.org/projects/markupsafe/#markupsafe) | 0.23 | Implements a XML/HTML/XHTML Markup safe string for Python / BSD |
| [matplotlib](http://matplotlib.org/) | 1.5.3 | Python 2D plotting library / PSF-based |
| [menuinst](https://github.com/ContinuumIO/menuinst) Windows | 1.4.1 | cross platform menu item installation / BSD |
| [mistune](https://github.com/lepture/mistune) | 0.7.3 | The fastest markdown parser in pure Python with renderer feature / BSD |
| [mkl](http://software.intel.com/en-us/articles/intel-mkl/) | 11.3.3 | Math library for Intel and compatible processors / proprietary - Intel |
| [mkl-service](https://github.com/ContinuumIO/mkl-service) | 1.1.2 | Python bindings to MKL service functions / 3-clause BSD |
| [mpmath](http://mpmath.org) | 0.19 | Python library for arbitrary-precision floating-point arithmetic / BSD |
| [multipledispatch](http://github.com/mrocklin/multipledispatch/) | 0.4.8 | Multiple dispatch in Python / BSD |
| [nb\_anacondacloud](https://github.com/Anaconda-Platform/nb_anacondacloud) | 1.2.0 | / BSD |
| [nb\_conda](https://github.com/Anaconda-Platform/nb_conda) | 2.0.0 | Launch Jupyter kernels for any installed conda environment / BSD |
| [nb\_conda\_kernels](https://github.com/Anaconda-Platform/nb_conda_kernels) | 2.0.0 | Launch Jupyter kernels for any installed conda environment / BSD |
| [nbconvert](http://jupyter.org) | 4.2.0 | converts notebooks to various other formats via Jinja templates / BSD |
| [nbformat](http://jupyter.org) | 4.1.0 | The reference implementation of the Jupyter Notebook format / BSD |
| [nbpresent](https://github.com/Anaconda-Platform/nbpresent) | 3.0.2 | Next generation slides for Jupyter Notebooks / BSD |
| [networkx](http://networkx.lanl.gov/) | 1.11 | Python package for creating and manipulating complex networks / BSD |
| [nltk](http://nltk.org/) | 3.2.1 | Build Python programs to work with human language data / Apache |
| [nose](http://readthedocs.org/docs/nose/) | 1.3.7 | Nose extends unittest to make testing easier / LGPL |
| [notebook](http://jupyter.org) | 4.2.3 | web-based notebook environment for interactive computing / BSD |
| [numba](http://numba.pydata.org/) | 0.28.1 | NumPy aware dynamic Python compiler using LLVM / BSD |
| [numexpr](https://github.com/pydata/numexpr) | 2.6.1 | Fast numerical expression evaluator for NumPy / MIT |
| [numpy](http://numpy.scipy.org/) | 1.11.1 | array processing for numbers, strings, records, and objects / BSD |
| [odo](http://odo.pydata.org/en/latest/) | 0.5.0 | Shapeshifting for your data / BSD |
| [openpyxl](http://openpyxl.readthedocs.org) | 2.3.2 | A Python library to read/write Excel 2010 xlsx/xlsm files / MIT |
| [openssl](http://www.openssl.org/) | 1.0.2j | OpenSSL is an open-source implementation of the SSL and TLS protocols / Apache-style |
| [pandas](http://pandas.pydata.org/) | 0.18.1 | Powerful data structures and data analysis tools / BSD |
| [partd](https://github.com/dask/partd) | 0.3.6 | Appendable key-value byte store / BSD |
| [patchelf](http://nixos.org/patchelf.html) Linux | 0.9 | Modify the dynamic linker and RPATH of ELF executables / GPL3 |
| [path.py](http://github.com/jaraco/path.py) | 8.2.1 | Module wrapper for os.path / MIT |
| [pathlib2](https://pypi.python.org/pypi/pathlib2/) | 2.1.0 | object-oriented filesystem paths / MIT |
| [patsy](https://github.com/pydata/patsy) | 0.4.1 | Describing statistical models in Python using symbolic formulas / BSD |
| [pep8](http://pep8.readthedocs.org/) | 1.7.0 | Python style guide checker / MIT |
| [pexpect](http://pexpect.readthedocs.org/) Linux Mac | 4.0.1 | Pexpect allows easy control of interactive console applications / ISC |
| [pickleshare](https://github.com/vivainio/pickleshare) | 0.7.4 | file system based database that uses Python pickles / MIT |
| [pillow](http://python-pillow.github.io/) | 3.3.1 | The friendly Python Imaging Library(PIL) fork / PIL license |
| [pip](https://pip.pypa.io/en/stable/) | 8.1.2 | PyPA recommended tool for installing Python packages / MIT |
| [pixman](http://www.pixman.org/) Linux | 0.32.6 | A low-level software library for pixel manipulation / MIT |
| [pkginfo](https://pypi.python.org/pypi/pkginfo/) | 1.3.2 | query metadatdata from sdists or bdists installed packages / PSF |
| [ply](http://www.dabeaz.com/ply/) | 3.9 | Implementation of Lex and Yacc / BSD |
| [prompt\_toolkit](https://github.com/jonathanslenders/python-prompt-toolkit) | 1.0.3 | library for building powerful interactive command lines in Python / BSD |
| [psutil](https://github.com/giampaolo/psutil) | 4.3.1 | A cross-platform process and system utilities module for Python / BSD |
| [ptyprocess](https://github.com/pexpect/ptyprocess) Linux Mac | 0.5.1 | Run a subprocess in a pseudo terminal / ISC |
| [py](http://pylib.readthedocs.org/) | 1.4.31 | Library with cross-python path, ini-parsing, io, code, log facilities / MIT |
| [pyasn1](http://pyasn1.sourceforge.net/) | 0.1.9 | Offline IP address to Autonomous System Number lookup module / BSD |
| [pyaudio](http://people.csail.mit.edu/hubert/pyaudio/) Mac | 0.2.7 | Bindings for PortAudio v19, the cross-platform audio stream library / MIT |
| [pycairo](http://cairographics.org/pycairo/) Linux | 1.10.0 | A set of Python bindings for the cairo graphics library / LGPL 2.1, MPL 1.1 |
| [pycosat](https://github.com/ContinuumIO/pycosat) | 0.6.1 | Python bindings to the picosat SAT solver / MIT |
| [pycparser](https://github.com/eliben/pycparser) | 2.14 | Complete C99 parser in pure Python / BSD |
| [pycrypto](http://www.pycrypto.org/) | 2.6.1 | Cryptographic modules for Python / Public-Domain |
| [pycurl](http://pycurl.sourceforge.net/) | 7.43.0 | Python interface to libcurl / LGPL, MIT |
| [pyflakes](https://launchpad.net/pyflakes) | 1.3.0 | Checks Python source files for errors / MIT |
| [pygments](http://pygments.org/) | 2.1.3 | Generic syntax highlighting package / BSD |
| [pylint](http://www.pylint.org/) | 1.5.4 | Python code static checker / GPL |
| [pyopenssl](https://github.com/pyca/pyopenssl) | 16.0.0 | Python wrapper module around the OpenSSL library / Apache License, Version 2.0 |
| [pyparsing](http://pyparsing.wikispaces.com/) | 2.1.4 | Create and execute simple grammars / MIT |
| [pyqt](http://www.riverbankcomputing.co.uk/software/pyqt) | 5.6.0 | Python binding of the cross-platform GUI toolkit Qt / Commercial, GPLv2, GPLv3 |
| [pytables](http://www.pytables.org) | 3.2.3.1 | Manage hierarchical datasets to cope with large amounts of data / BSD |
| [pytest](http://pytest.org/) | 2.9.2 | Simple and powerful testing with Python / MIT |
| [python](http://www.python.org/) | 2.7.12 | general purpose programming language / PSF |
| [python-dateutil](https://dateutil.readthedocs.org/) | 2.5.3 | Extensions to the standard Python datetime module / BSD |
| [pytz](http://pytz.sourceforge.net/) | 2016.6.1 | World timezone definitions, modern and historical / MIT |
| [pywin32](http://sourceforge.net/projects/pywin32/) Windows | 220 | Python extensions for Windows / PSF |
| [pyyaml](http://pyyaml.org/wiki/PyYAML) | 3.12 | YAML parser and emitter for Python / MIT |
| [pyzmq](https://github.com/zeromq/pyzmq) | 15.4.0 | zeromq bindings for Python / LGPL and BSD |
| [qt](http://www.qt.io) | 5.6.0 | Qt is a cross-platform application and UI framework / LGPLv3 |
| [qtawesome](https://github.com/spyder-ide/qtawesome) | 0.3.3 | FontAwesome icons in PyQt and PySide applications / MIT |
| [qtconsole](http://jupyter.org) | 4.2.1 | Jupyter Qt Console / BSD |
| [qtpy](https://github.com/spyder-ide/qtpy) | 1.1.2 | uniform layer to support PyQt4, PyQt5 and PySide with a single codebase / MIT |
| [readline](http://cnswww.cns.cwru.edu/php/chet/readline/rltop.html) Linux Mac | 6.2 | Line-editing for programs with a command-line interface / GPL3 |
| [redis](http://redis.io/download/) Linux Mac | 3.2.0 | Advanced key-value cache and store / 3-clause BSD |
| [redis-py](https://github.com/andymccurdy/redis-py/) Linux Mac | 2.10.5 | Redis Python Client / MIT |
| [requests](http://docs.python-requests.org/en/latest/index.html) | 2.11.1 | Python HTTP for Humans / Apache |
| [rope](https://github.com/python-rope/rope) | 0.9.4 | A Python refactoring library / GPL |
| [ruamel\_yaml](https://bitbucket.org/ruamel/yaml) | 0.11.14 | / MIT |
| [scikit-image](http://scikit-image.org/) | 0.12.3 | Image processing routines for SciPy / 3-clause BSD |
| [scikit-learn](http://scikit-learn.org/stable/) | 0.17.1 | A set of python modules for machine learning and data mining / 3-clause BSD |
| [scipy](http://www.scipy.org/) | 0.18.1 | Scientific Library for Python / BSD |
| [setuptools](https://pypi.python.org/pypi/setuptools) | 27.2.0 | Download, build, install, upgrade, and uninstall Python packages / MIT |
| [simplegeneric](https://pypi.python.org/pypi/simplegeneric) | 0.8.1 | Define simple single-dispatch generic functions / ZPL 2.1 |
| [singledispatch](http://docs.python.org/3/library/functools.html#functools.singledispatch) | 3.4.0.3 | Transforms a function into a single-dispatch generic function / MIT |
| [sip](http://www.riverbankcomputing.com/software/sip/intro) | 4.18 | Create Python bindings for C and C++ libraries / GPL3 |
| [six](http://pypi.python.org/pypi/six/) | 1.10.0 | Python 2 and 3 compatibility utilities / MIT |
| [snowballstemmer](https://github.com/shibukawa/snowball_py) | 1.2.1 | Snowball stemming library collection for Python / BSD |
| [sockjs-tornado](http://github.com/mrjoes/sockjs-tornado/) | 1.0.3 | SockJS python server implementation on top of Tornado framework / MIT |
| [sphinx](http://sphinx-doc.org) | 1.4.6 | Documentation generator / BSD |
| [spyder](https://github.com/spyder-ide/spyder) | 3.0.0 | Scientific PYthon Development EnviRonment / MIT |
| [sqlalchemy](http://www.sqlalchemy.org/) | 1.0.13 | Database Abstraction Library / MIT |
| [sqlite](http://www.sqlite.org/) | 3.13.0 | Self-contained, zero-configuration, SQL database engine / Public-Domain |
| [ssl\_match\_hostname](http://bitbucket.org/brandon/backports.ssl_match_hostname) | 3.4.0.2 | The ssl.match\_hostname() function from Python 3.4 / PSF |
| [statsmodels](http://statsmodels.sourceforge.net/) | 0.6.1 | Statistical computations and models / 3-clause BSD |
| [sympy](http://sympy.org) | 1.0 | Python library for symbolic mathematics / 3-clause BSD |
| [terminado](https://github.com/takluyver/terminado) Linux Mac | 0.6 | Terminals served to term.js using Tornado websockets / BSD |
| [tk](http://www.tcl.tk/) | 8.5.18 | Dynamic programming language with GUI elements / BSD-like |
| [toolz](http://toolz.readthedocs.org/en/latest/) | 0.8.0 | List processing tools and functional utilities / BSD |
| [tornado](http://www.tornadoweb.org/) | 4.4.1 | A Python web framework and asynchronous networking library / Apache |
| [traitlets](https://github.com/ipython/traitlets) | 4.3.0 | Configuration system for Python applications / BSD |
| [unicodecsv](https://github.com/jdunck/python-unicodecsv) | 0.14.1 | Drop-in replacement for csv module which supports unicode strings / BSD |
| [vs2008\_runtime](http://www.microsoft.com) Windows | 9.00.30729.1 | Bundles of the MSVC 9 (VS 2008) runtime / Proprietary |
| [wcwidth](https://github.com/jquast/wcwidth) | 0.1.7 | measures number of Terminal column cells of wide-character codes / MIT |
| [werkzeug](http://werkzeug.pocoo.org/) | 0.11.11 | A WSGI utility library for Python / BSD |
| [wheel](http://bitbucket.org/pypa/wheel/) | 0.29.0 | Built-package format for Python / MIT |
| [widgetsnbextension](http://ipython.org) | 1.2.6 | IPython HTML widgets for Jupyter / BSD 3-clause |
| [win\_unicode\_console](https://github.com/Drekin/win-unicode-console) Windows | 0.5 | enable Unicode input and display when running Python from Windows console / MIT |
| [wrapt](https://github.com/GrahamDumpleton/wrapt) | 1.10.6 | Module for decorators, wrappers and monkey patching / BSD |
| [xlrd](http://www.lexicon.net/sjmachin/xlrd.htm) | 1.0.0 | Extract data from Microsoft Excel spreadsheet files / BSD |
| [xlsxwriter](https://github.com/jmcnamara/XlsxWriter) | 0.9.3 | A Python module for creating Excel XLSX files / BSD |
| [xlwings](http://xlwings.org/) Mac Windows | 0.10.0 | Interact with Excel from Python and vice versa / 3-clause BSD |
| [xlwt](http://www.python-excel.org/) | 1.1.2 | Writing data and formatting information to Excel files / BSD |
| [xz](http://tukaani.org/xz/) Linux Mac | 5.2.2 | Data compression software with high compression ratio / Public-Domain, GPL |
| [yaml](http://www.yaml.org/) Linux Mac | 0.1.6 | A human friendly data serialization standard / MIT |
| [zeromq](http://zeromq.org) Linux | 4.1.4 | Distributed messaging / LGPL |
| [zlib](http://zlib.net/) | 1.2.8 | Unobtrusive compression library / zlib |
| Name | Version | Summary / License |
|---|---|---|
| [alabaster](http://www.sphinx-doc.org/en/stable/index.html) | 0.7.8 | Configurable, Python 2+3 compatible Sphinx theme / BSD |
| [anaconda-client](http://anaconda.org) | 1.4.0 | anaconda.org command line client library / BSD |
| [anaconda-navigator](https://github.com/ContinuumIO/navigator) | 1.2.1 | Anaconda Navigator / proprietary - Continuum Analytics, Inc. |
| [appnope](http://github.com/minrk/appnope) Mac | 0.1.0 | Disable App Nap on OS X 10.9 / BSD |
| [appscript](http://appscript.sourceforge.net/) Mac | 1.0.1 | Control AppleScriptable applications from Python / Public-Domain |
| [argcomplete](https://argcomplete.readthedocs.org/en/latest/) | 1.0.0 | Bash tab completion of arguments for Python scripts / Apache |
| [astropy](http://www.astropy.org/) | 1.2.1 | Community-developed Python Library for Astronomy / BSD |
| [babel](http://babel.pocoo.org/) | 2.3.3 | Utilities to internationalize and localize Python applications / BSD |
| backports | 1.0 | / BSD |
| [beautifulsoup4](http://www.crummy.com/software/BeautifulSoup/) | 4.4.1 | Python library designed for screen-scraping / MIT |
| [bitarray](https://github.com/ilanschnell/bitarray) | 0.8.1 | efficient representation of arrays of booleans – C extension / PSF |
| [blaze](http://blaze.pydata.org) | 0.10.1 | NumPy and Pandas interface to big data / BSD |
| [bokeh](http://bokeh.pydata.org/) | 0.12.0 | Python interactive visualization library for modern web browsers / BSD |
| [boto](https://github.com/boto/boto/) | 2.40.0 | Amazon Web Services Library / MIT |
| [bottleneck](http://berkeleyanalytics.com/bottleneck) | 1.1.0 | Fast NumPy array functions written in Cython. / Simplified BSD |
| [bzip2](http://www.bzip.org/) Windows | 1.0.6 | high-quality data compressor / BSD |
| [cffi](http://cffi.readthedocs.org) | 1.6.0 | C Foreign Function Interface for Python / MIT |
| [chest](https://github.com/ContinuumIO/chest) | 0.2.3 | A dictionary that writes its contents to disk / BSD |
| [click](http://click.pocoo.org/) | 6.6 | Command line interface creation kit / BSD |
| [cloudpickle](https://github.com/cloudpipe/cloudpickle) | 0.2.1 | Extended pickling support for Python objects / as-is |
| [clyent](https://github.com/Anaconda-Server/clyent) | 1.2.2 | Command line client library for windows and posix / BSD |
| [colorama](https://github.com/tartley/colorama) | 0.3.7 | Cross-platform colored terminal text in Python / BSD |
| [comtypes](http://starship.python.net/crew/theller/comtypes/) Windows | 1.1.2 | pure Python COM package / MIT |
| [conda](http://conda.pydata.org/) | 4.1.6 | Package management system and Environment management system / BSD |
| [conda-build](https://github.com/conda/conda-build) | 1.21.3 | Commands and tools for building conda packages / BSD |
| [conda-env](https://github.com/conda/conda-env/) | 2.5.1 | Provides a unified interface to dealing with Conda environments / BSD |
| [configobj](http://www.voidspace.org.uk/python/configobj.html) | 5.0.6 | Config file reading, writing and validation / BSD |
| [contextlib2](http://contextlib2.readthedocs.org/) | 0.5.3 | backports and enhancements for the contextlib module / PSF |
| [cryptography](https://cryptography.io) | 1.4 | Provides cryptographic recipes and primitives to Python developers / Apache |
| [curl](http://curl.haxx.se/) | 7.49.0 | Tool and library for transferring data with URL syntax / MIT/X derivate |
| [cycler](http://matplotlib.org/cycler/) | 0.10.0 | Composable style cycles / BSD |
| [cython](http://www.cython.org/) | 0.24 | The Cython compiler for writing C extensions for the Python language / Apache |
| [cytoolz](https://github.com/pytoolz/cytoolz) | 0.8.0 | Cython implementation of Toolz, high performance functional utilities / BSD |
| [dask](http://dask.pydata.org/en/latest/) | 0.10.0 | Task scheduling and blocked algorithms for parallel processing / BSD |
| [datashape](http://datashape.pydata.org) | 0.5.2 | Language defining a data description protocol / BSD |
| [decorator](http://pypi.python.org/pypi/decorator) | 4.0.10 | Better living through Python with decorators / BSD |
| [dill](http://www.cacr.caltech.edu/~mmckerns/dill.htm) | 0.2.5 | Serialize all of python (almost) / 3-clause BSD |
| [docutils](http://docutils.sourceforge.net) | 0.12 | Utilities for general- and special-purpose documentation / Public-Domain, PSF, 2-clause BSD, GPLv3 |
| [dynd-python](http://libdynd.org/) | 0.7.2 | Python exposure of DyND, a library for dynamic arrays / BSD |
| [entrypoints](https://github.com/takluyver/entrypoints) | 0.2.2 | / MIT |
| [et\_xmlfile](https://bitbucket.org/openpyxl/et_xmlfile) | 1.0.1 | Low memory library for creating large XML files / MIT |
| [fastcache](https://github.com/pbrady/fastcache) | 1.0.2 | C implementation of Python 3 functools.lru\_cache / MIT |
| [flask](http://flask.pocoo.org/) | 0.11.1 | A microframework based on Werkzeug, Jinja2 and good intentions / BSD |
| [flask-cors](https://github.com/corydolphin/flask-cors) | 2.1.2 | Flask extension adding a decorator for CORS support / MIT |
| [fontconfig](http://www.freedesktop.org/wiki/Software/fontconfig/) Linux | 2.11.1 | A library for configuring and customizing font access / BSD |
| [freetype](http://freetype.sourceforge.net/index2.html) | 2.5.5 | A Free, High-Quality, and Portable Font Engine / FreeType License |
| [get\_terminal\_size](https://github.com/chrippa/backports.shutil_get_terminal_size) | 1.0.0 | backport of the get\_terminal\_size function from Python 3.3 / MIT |
| [gevent](http://www.gevent.org/) | 1.1.1 | Coroutine-based Python network library / MIT |
| [greenlet](https://github.com/python-greenlet/greenlet) | 0.4.10 | Lightweight in-process concurrent programming / MIT |
| [h5py](http://www.h5py.org/) | 2.6.0 | Pythonic interface to the HDF5 binary data format / 3-clause BSD |
| [hdf5](http://www.hdfgroup.org/HDF5/) | 1.8.16 | A data model, library, and file format for storing and managing data / BSD-like |
| [heapdict](http://stutzbachenterprises.com/) | 1.0.0 | A heap with decrease-key and increase-key operations / BSD |
| [idna](https://github.com/kjd/idna) | 2.1 | Internationalized Domain Names in Applications / BSD |
| [imagesize](https://github.com/shibukawa/imagesize_py) | 0.7.1 | getting image size from png/jpeg/jpeg2000/gif file / MIT |
| [ipykernel](http://ipython.org) | 4.3.1 | IPython Kernel for Jupyter / BSD |
| [ipython](http://ipython.org/) | 4.2.0 | Productive Interactive Computing / BSD |
| [ipython\_genutils](http://jupyter.org) | 0.1.0 | vestigial utilities from IPython / BSD |
| [ipywidgets](http://github.com/jakevdp/ipywidgets) | 4.1.1 | IPython Static Widgets / BSD |
| [itsdangerous](https://pythonhosted.org/itsdangerous/) | 0.24 | Various helpers to pass trusted data to untrusted environments / BSD |
| [jbig](https://www.cl.cam.ac.uk/~mgk25/jbigkit) Linux Mac | 2.1 | Implementation of the JBIG1 data compression standard / GPL2 |
| [jdcal](http://github.com/phn/jdcal) | 1.2 | Julian dates from proleptic Gregorian and Julian calendars. / BSD |
| [jedi](http://jedi.jedidjah.ch/) | 0.9.0 | Autocompletion and static analysis library for Python / MIT |
| [jinja2](http://jinja.pocoo.org) | 2.8 | An easy to use stand-alone template engine written in pure python. / BSD |
| [jpeg](http://www.ijg.org/) | 8d | Read and write jpeg COM, EXIF, IPTC medata / Custom free software license |
| [jsonschema](https://python-jsonschema.readthedocs.orga) | 2.5.1 | An implementation of JSON Schema validation for Python / MIT |
| [jupyter](http://jupyter.org) | 1.0.0 | Open source, interactive data science and scientific computing / BSD |
| [jupyter\_client](http://jupyter.org) | 4.3.0 | Jupyter protocol implementation and client libraries / BSD |
| [jupyter\_console](http://jupyter.org) | 4.1.1 | Jupyter terminal console / BSD |
| [jupyter\_core](http://jupyter.org) | 4.1.0 | Core Jupyter functionality / BSD |
| [libdynd](http://libdynd.org/) | 0.7.2 | C++ dynamic ndarray library / BSD |
| [libffi](http://sourceware.org/libffi/) Linux | 3.2.1 | portable foreign-function interface library / MIT |
| [libgfortran](https://gcc.gnu.org/fortran/) Linux | 3.0.0 | GNU Fortran runtime library / GPL3 |
| [libpng](http://www.libpng.org/pub/png/libpng.html) | 1.6.22 | The official PNG reference library / libpng license |
| [libsodium](http://libsodium.org) Linux | 1.0.10 | A library for encryption, signatures, password hashing, etc. / MIT |
| [libtiff](http://www.libtiff.org/) | 4.0.6 | Support for Tag Image File Format (TIFF) / BSD-like |
| [libxml2](http://xmlsoft.org/) Linux Mac | 2.9.2 | The XML C parser and toolkit for Gnome / MIT |
| [libxslt](http://xmlsoft.org/XSLT/) Linux Mac | 1.1.28 | The XSLT C library developed for the GNOME project / MIT |
| [llvmlite](http://llvmlite.pydata.org/) | 0.11.0 | Lightweight wrapper around basic LLVM functionality / BSD |
| [locket](http://github.com/mwilliamson/locket.py) | 0.2.0 | File based locks for Python for Linux and Windows / BSD |
| [lxml](http://lxml.de/) | 3.6.0 | Pythonic binding for the C libraries libxml2 and libxslt / BSD |
| [markupsafe](http://www.pocoo.org/projects/markupsafe/#markupsafe) | 0.23 | Implements a XML/HTML/XHTML Markup safe string for Python / BSD |
| [matplotlib](http://matplotlib.org/) | 1.5.1 | Python 2D plotting library / PSF-based |
| [menuinst](https://github.com/ContinuumIO/menuinst) Windows | 1.4.1 | cross platform menu item installation / BSD |
| [mistune](https://github.com/lepture/mistune) | 0.7.2 | The fastest markdown parser in pure Python with renderer feature / BSD |
| [mkl](http://software.intel.com/en-us/articles/intel-mkl/) | 11.3.3 | Math library for Intel and compatible processors / proprietary - Intel |
| [mkl-service](https://github.com/ContinuumIO/mkl-service) | 1.1.2 | Python bindings to MKL service functions / 3-clause BSD |
| [mpmath](http://mpmath.org) | 0.19 | Python library for arbitrary-precision floating-point arithmetic / BSD |
| [multipledispatch](http://github.com/mrocklin/multipledispatch/) | 0.4.8 | Multiple dispatch in Python / BSD |
| [nb\_anacondacloud](https://github.com/Anaconda-Platform/nb_anacondacloud) | 1.1.0 | / BSD |
| [nb\_conda](https://github.com/Anaconda-Platform/nb_conda) | 1.1.0 | Launch Jupyter kernels for any installed conda environment / BSD |
| [nb\_conda\_kernels](https://github.com/Anaconda-Platform/nb_conda_kernels) | 1.0.3 | Launch Jupyter kernels for any installed conda environment / BSD |
| [nbconvert](http://jupyter.org) | 4.2.0 | converts notebooks to various other formats via Jinja templates / BSD |
| [nbformat](http://jupyter.org) | 4.0.1 | The reference implementation of the Jupyter Notebook format / BSD |
| [nbpresent](https://github.com/Anaconda-Platform/nbpresent) | 3.0.2 | Next generation slides for Jupyter Notebooks / BSD |
| [networkx](http://networkx.lanl.gov/) | 1.11 | Python package for creating and manipulating complex networks / BSD |
| [nltk](http://nltk.org/) | 3.2.1 | Build Python programs to work with human language data / Apache |
| [nose](http://readthedocs.org/docs/nose/) | 1.3.7 | Nose extends unittest to make testing easier / LGPL |
| [notebook](http://jupyter.org) | 4.2.1 | A web-based notebook environment for interactive computing / BSD |
| [numba](http://numba.pydata.org/) | 0.26.0 | NumPy aware dynamic Python compiler using LLVM / BSD |
| [numexpr](https://github.com/pydata/numexpr) | 2.6.0 | Fast numerical expression evaluator for NumPy / MIT |
| [numpy](http://numpy.scipy.org/) | 1.11.1 | array processing for numbers, strings, records, and objects / BSD |
| [odo](http://odo.pydata.org/en/latest/) | 0.5.0 | Shapeshifting for your data / BSD |
| [openpyxl](http://openpyxl.readthedocs.org) | 2.3.2 | A Python library to read/write Excel 2010 xlsx/xlsm files / MIT |
| [openssl](http://www.openssl.org/) | 1.0.2h | OpenSSL is an open-source implementation of the SSL and TLS protocols / Apache-style |
| [pandas](http://pandas.pydata.org/) | 0.18.1 | Powerful data structures and data analysis tools / BSD |
| [partd](https://github.com/dask/partd) | 0.3.4 | Appendable key-value byte store / BSD |
| [patchelf](http://nixos.org/patchelf.html) Linux | 0.9 | Modify the dynamic linker and RPATH of ELF executables / GPL3 |
| [path.py](http://github.com/jaraco/path.py) | 8.2.1 | Module wrapper for os.path / MIT |
| [pathlib2](https://pypi.python.org/pypi/pathlib2/) | 2.1.0 | object-oriented filesystem paths / MIT |
| [patsy](https://github.com/pydata/patsy) | 0.4.1 | Describing statistical models in Python using symbolic formulas / BSD |
| [pep8](http://pep8.readthedocs.org/) | 1.7.0 | Python style guide checker / MIT |
| [pexpect](http://pexpect.readthedocs.org/) Linux Mac | 4.0.1 | Pexpect allows easy control of interactive console applications / ISC |
| [pickleshare](https://github.com/vivainio/pickleshare) | 0.7.2 | File system based database that uses Python pickles / MIT |
| [pillow](http://python-pillow.github.io/) | 3.2.0 | The friendly Python Imaging Library(PIL) fork / PIL license |
| [pip](https://pip.pypa.io/en/stable/) | 8.1.2 | PyPA recommended tool for installing Python packages / MIT |
| [ply](http://www.dabeaz.com/ply/) | 3.8 | Implementation of Lex and Yacc / BSD |
| [psutil](https://github.com/giampaolo/psutil) | 4.3.0 | A cross-platform process and system utilities module for Python / BSD |
| [ptyprocess](https://github.com/pexpect/ptyprocess) Linux Mac | 0.5.1 | Run a subprocess in a pseudo terminal / ISC |
| [py](http://pylib.readthedocs.org/) | 1.4.31 | Library with cross-python path, ini-parsing, io, code, log facilities / MIT |
| [pyasn1](http://pyasn1.sourceforge.net/) | 0.1.9 | Offline IP address to Autonomous System Number lookup module / BSD |
| [pycosat](https://github.com/ContinuumIO/pycosat) | 0.6.1 | Python bindings to the picosat SAT solver / MIT |
| [pycparser](https://github.com/eliben/pycparser) | 2.14 | Complete C99 parser in pure Python / BSD |
| [pycrypto](http://www.pycrypto.org/) | 2.6.1 | Cryptographic modules for Python / Public-Domain |
| [pycurl](http://pycurl.sourceforge.net/) | 7.43.0 | Python interface to libcurl / LGPL, MIT |
| [pyflakes](https://launchpad.net/pyflakes) | 1.2.3 | Checks Python source files for errors / MIT |
| [pygments](http://pygments.org/) | 2.1.3 | Generic syntax highlighting package / BSD |
| [pyopenssl](https://github.com/pyca/pyopenssl) | 0.16.0 | Python wrapper module around the OpenSSL library / Apache License, Version 2.0 |
| [pyparsing](http://pyparsing.wikispaces.com/) | 2.1.4 | Create and execute simple grammars / MIT |
| [pyqt](http://www.riverbankcomputing.co.uk/software/pyqt) | 4.11.4 | Python binding of the cross-platform GUI toolkit Qt / Commercial, GPLv2, GPLv3 |
| [pyreadline](http://ipython.org/pyreadline.html) Windows | 2.1 | A ctypes-based readline for Windows / BSD |
| [pytables](http://www.pytables.org) | 3.2.2 | Manage hierarchical datasets to cope with large amounts of data / BSD |
| [pytest](http://pytest.org/) | 2.9.2 | Simple and powerful testing with Python / MIT |
| [python](http://www.python.org/) | 3.5.2 | general purpose programming language / PSF |
| [python-dateutil](https://dateutil.readthedocs.org/) | 2.5.3 | Extensions to the standard Python datetime module / BSD |
| [pytz](http://pytz.sourceforge.net/) | 2016.4 | World timezone definitions, modern and historical / MIT |
| [pywin32](http://sourceforge.net/projects/pywin32/) Windows | 220 | Python extensions for Windows / PSF |
| [pyyaml](http://pyyaml.org/wiki/PyYAML) | 3.11 | YAML parser and emitter for Python / MIT |
| [pyzmq](https://github.com/zeromq/pyzmq) | 15.2.0 | zeromq bindings for Python / LGPL and BSD |
| [qt](http://qt-project.org) | 4.8.7 | Qt is a cross-platform application and UI framework / LGPL |
| [qtconsole](http://jupyter.org) | 4.2.1 | Jupyter Qt Console / BSD |
| [qtpy](https://github.com/spyder-ide/qtpy) | 1.0.2 | uniform layer to support PyQt4, PyQt5 and PySide with a single codebase / MIT |
| [readline](http://cnswww.cns.cwru.edu/php/chet/readline/rltop.html) Linux Mac | 6.2 | Line-editing for programs with a command-line interface / GPL3 |
| [redis](http://redis.io/download/) Linux Mac | 3.2.0 | Advanced key-value cache and store / 3-clause BSD |
| [redis-py](https://github.com/andymccurdy/redis-py/) Linux Mac | 2.10.5 | Redis Python Client / MIT |
| [requests](http://docs.python-requests.org/en/latest/index.html) | 2.10.0 | Python HTTP for Humans / Apache |
| [rope](https://github.com/python-rope/rope) | 0.9.4 | A Python refactoring library / GPL |
| [ruamel\_yaml](https://bitbucket.org/ruamel/yaml) | 0.11.7 | / MIT |
| [scikit-image](http://scikit-image.org/) | 0.12.3 | Image processing routines for SciPy / 3-clause BSD |
| [scikit-learn](http://scikit-learn.org/stable/) | 0.17.1 | A set of python modules for machine learning and data mining / 3-clause BSD |
| [scipy](http://www.scipy.org/) | 0.17.1 | Scientific Library for Python / BSD |
| [setuptools](https://pypi.python.org/pypi/setuptools) | 23.0.0 | Download, build, install, upgrade, and uninstall Python packages / PSF or ZPL |
| [simplegeneric](https://pypi.python.org/pypi/simplegeneric) | 0.8.1 | Define simple single-dispatch generic functions / ZPL 2.1 |
| [singledispatch](http://docs.python.org/3/library/functools.html#functools.singledispatch) | 3.4.0.3 | Transforms a function into a single-dispatch generic function / MIT |
| [sip](http://www.riverbankcomputing.com/software/sip/intro) | 4.16.9 | Create Python bindings for C and C++ libraries / GPL3 |
| [six](http://pypi.python.org/pypi/six/) | 1.10.0 | Python 2 and 3 compatibility utilities / MIT |
| [snowballstemmer](https://github.com/shibukawa/snowball_py) | 1.2.1 | Snowball stemming library collection for Python / BSD |
| [sockjs-tornado](http://github.com/mrjoes/sockjs-tornado/) | 1.0.3 | SockJS python server implementation on top of Tornado framework / MIT |
| [sphinx](http://sphinx-doc.org) | 1.4.1 | Documentation generator / BSD |
| [sphinx\_rtd\_theme](https://github.com/snide/sphinx_rtd_theme/) | 0.1.9 | ReadTheDocs.org theme for Sphinx / BSD |
| [spyder](https://github.com/spyder-ide/spyder) | 2.3.9 | Scientific PYthon Development EnviRonment / MIT |
| [sqlalchemy](http://www.sqlalchemy.org/) | 1.0.13 | Database Abstraction Library / MIT |
| [sqlite](http://www.sqlite.org/) | 3.13.0 | Self-contained, zero-configuration, SQL database engine / Public-Domain |
| [statsmodels](http://statsmodels.sourceforge.net/) | 0.6.1 | Statistical computations and models / 3-clause BSD |
| [sympy](http://sympy.org) | 1.0 | Python library for symbolic mathematics / 3-clause BSD |
| [terminado](https://github.com/takluyver/terminado) Linux Mac | 0.6 | Terminals served to term.js using Tornado websockets / BSD |
| [tk](http://www.tcl.tk/) | 8.5.18 | Dynamic programming language with GUI elements / BSD-like |
| [toolz](http://toolz.readthedocs.org/en/latest/) | 0.8.0 | List processing tools and functional utilities / BSD |
| [tornado](http://www.tornadoweb.org/) | 4.3 | A Python web framework and asynchronous networking library / Apache |
| [traitlets](https://github.com/ipython/traitlets) | 4.2.1 | Configuration system for Python applications / BSD |
| [unicodecsv](https://github.com/jdunck/python-unicodecsv) | 0.14.1 | Drop-in replacement for csv module which supports unicode strings / BSD |
| [vs2015\_runtime](http://www.microsoft.com) Windows | 14.0.25123 | Bundles of the MSVC 14 (VS 2015) runtime / Proprietary |
| [werkzeug](http://werkzeug.pocoo.org/) | 0.11.10 | A WSGI utility library for Python / BSD |
| [wheel](http://bitbucket.org/pypa/wheel/) | 0.29.0 | Built-package format for Python / MIT |
| [xlrd](http://www.lexicon.net/sjmachin/xlrd.htm) | 1.0.0 | Extract data from Microsoft Excel spreadsheet files / BSD |
| [xlsxwriter](https://github.com/jmcnamara/XlsxWriter) | 0.9.2 | A Python module for creating Excel XLSX files / BSD |
| [xlwings](http://xlwings.org/) Mac Windows | 0.7.2 | Interact with Excel from Python and vice versa / 3-clause BSD |
| [xlwt](http://www.python-excel.org/) | 1.1.2 | Writing data and formatting information to Excel files / BSD |
| [xz](http://tukaani.org/xz/) Linux Mac | 5.2.2 | Data compression software with high compression ratio / Public-Domain, GPL |
| [yaml](http://www.yaml.org/) Linux Mac | 0.1.6 | A human friendly data serialization standard / MIT |
| [zeromq](http://zeromq.org) Linux | 4.1.4 | Distributed messaging / LGPL |
| [zlib](http://zlib.net/) | 1.2.8 | Unobtrusive compression library / zlib |
| Name | Version | Summary / License |
|---|---|---|
| [alabaster](http://www.sphinx-doc.org/en/stable/index.html) | 0.7.8 | Configurable, Python 2+3 compatible Sphinx theme / BSD |
| [anaconda-client](http://anaconda.org) | 1.4.0 | anaconda.org command line client library / BSD |
| [anaconda-navigator](https://github.com/ContinuumIO/navigator) | 1.2.1 | Anaconda Navigator / proprietary - Continuum Analytics, Inc. |
| [appnope](http://github.com/minrk/appnope) Mac | 0.1.0 | Disable App Nap on OS X 10.9 / BSD |
| [appscript](http://appscript.sourceforge.net/) Mac | 1.0.1 | Control AppleScriptable applications from Python / Public-Domain |
| [argcomplete](https://argcomplete.readthedocs.org/en/latest/) | 1.0.0 | Bash tab completion of arguments for Python scripts / Apache |
| [astropy](http://www.astropy.org/) | 1.2.1 | Community-developed Python Library for Astronomy / BSD |
| [babel](http://babel.pocoo.org/) | 2.3.3 | Utilities to internationalize and localize Python applications / BSD |
| backports | 1.0 | / BSD |
| [backports\_abc](https://github.com/cython/backports_abc) | 0.4 | backport of recent additions to the ‘collections.abc’ module / PSF |
| [beautifulsoup4](http://www.crummy.com/software/BeautifulSoup/) | 4.4.1 | Python library designed for screen-scraping / MIT |
| [bitarray](https://github.com/ilanschnell/bitarray) | 0.8.1 | efficient representation of arrays of booleans – C extension / PSF |
| [blaze](http://blaze.pydata.org) | 0.10.1 | NumPy and Pandas interface to big data / BSD |
| [bokeh](http://bokeh.pydata.org/) | 0.12.0 | Python interactive visualization library for modern web browsers / BSD |
| [boto](https://github.com/boto/boto/) | 2.40.0 | Amazon Web Services Library / MIT |
| [bottleneck](http://berkeleyanalytics.com/bottleneck) | 1.1.0 | Fast NumPy array functions written in Cython. / Simplified BSD |
| [bzip2](http://www.bzip.org/) Windows | 1.0.6 | high-quality data compressor / BSD |
| [cairo](http://cairographics.org/) Linux | 1.12.18 | A 2D graphics library with support for multiple output devices / LGPL 2.1, MPL 1.1 |
| [cdecimal](http://www.bytereef.org/mpdecimal/index.html) | 2.3 | Fast drop-in replacement for decimal.py / BSD |
| [cffi](http://cffi.readthedocs.org) | 1.6.0 | C Foreign Function Interface for Python / MIT |
| [chest](https://github.com/ContinuumIO/chest) | 0.2.3 | A dictionary that writes its contents to disk / BSD |
| [click](http://click.pocoo.org/) | 6.6 | Command line interface creation kit / BSD |
| [cloudpickle](https://github.com/cloudpipe/cloudpickle) | 0.2.1 | Extended pickling support for Python objects / as-is |
| [clyent](https://github.com/Anaconda-Server/clyent) | 1.2.2 | Command line client library for windows and posix / BSD |
| [colorama](https://github.com/tartley/colorama) | 0.3.7 | Cross-platform colored terminal text in Python / BSD |
| [comtypes](http://starship.python.net/crew/theller/comtypes/) Windows | 1.1.2 | pure Python COM package / MIT |
| [conda](http://conda.pydata.org/) | 4.1.6 | Package management system and Environment management system / BSD |
| [conda-build](https://github.com/conda/conda-build) | 1.21.3 | Commands and tools for building conda packages / BSD |
| [conda-env](https://github.com/conda/conda-env/) | 2.5.1 | Provides a unified interface to dealing with Conda environments / BSD |
| [configobj](http://www.voidspace.org.uk/python/configobj.html) | 5.0.6 | Config file reading, writing and validation / BSD |
| [configparser](http://docs.python.org/3/library/configparser.html) | 3.5.0b2 | brings the updated configparser from Python 3.5 to Python 2.6-3.5 / MIT |
| [contextlib2](http://contextlib2.readthedocs.org/) | 0.5.3 | backports and enhancements for the contextlib module / PSF |
| [cryptography](https://cryptography.io) | 1.4 | Provides cryptographic recipes and primitives to Python developers / Apache |
| [curl](http://curl.haxx.se/) | 7.49.0 | Tool and library for transferring data with URL syntax / MIT/X derivate |
| [cycler](http://matplotlib.org/cycler/) | 0.10.0 | Composable style cycles / BSD |
| [cython](http://www.cython.org/) | 0.24 | The Cython compiler for writing C extensions for the Python language / Apache |
| [cytoolz](https://github.com/pytoolz/cytoolz) | 0.8.0 | Cython implementation of Toolz, high performance functional utilities / BSD |
| [dask](http://dask.pydata.org/en/latest/) | 0.10.0 | Task scheduling and blocked algorithms for parallel processing / BSD |
| [datashape](http://datashape.pydata.org) | 0.5.2 | Language defining a data description protocol / BSD |
| [decorator](http://pypi.python.org/pypi/decorator) | 4.0.10 | Better living through Python with decorators / BSD |
| [dill](http://www.cacr.caltech.edu/~mmckerns/dill.htm) | 0.2.5 | Serialize all of python (almost) / 3-clause BSD |
| [docutils](http://docutils.sourceforge.net) | 0.12 | Utilities for general- and special-purpose documentation / Public-Domain, PSF, 2-clause BSD, GPLv3 |
| [dynd-python](http://libdynd.org/) Linux Mac | 0.7.2 | Python exposure of DyND, a library for dynamic arrays / BSD |
| [entrypoints](https://github.com/takluyver/entrypoints) | 0.2.2 | / MIT |
| [enum34](https://pypi.python.org/pypi/enum34) | 1.1.6 | Robust enumerated type support in Python / BSD |
| [et\_xmlfile](https://bitbucket.org/openpyxl/et_xmlfile) | 1.0.1 | Low memory library for creating large XML files / MIT |
| [fastcache](https://github.com/pbrady/fastcache) | 1.0.2 | C implementation of Python 3 functools.lru\_cache / MIT |
| [flask](http://flask.pocoo.org/) | 0.11.1 | A microframework based on Werkzeug, Jinja2 and good intentions / BSD |
| [flask-cors](https://github.com/corydolphin/flask-cors) | 2.1.2 | Flask extension adding a decorator for CORS support / MIT |
| [fontconfig](http://www.freedesktop.org/wiki/Software/fontconfig/) Linux | 2.11.1 | A library for configuring and customizing font access / BSD |
| [freetype](http://freetype.sourceforge.net/index2.html) | 2.5.5 | A Free, High-Quality, and Portable Font Engine / FreeType License |
| [funcsigs](http://funcsigs.readthedocs.org/) | 1.0.2 | Python function signatures from PEP362 for Python 2.6, 2.7 and 3.2+ / Apache |
| [functools32](https://github.com/MiCHiLU/python-functools32) | 3.2.3.2 | backport of the functools module from Python 3.2.3 for use on 2.7 / PSF |
| [futures](http://code.google.com/p/pythonfutures) | 3.0.5 | A Java-style futures package for Python / BSD |
| [get\_terminal\_size](https://github.com/chrippa/backports.shutil_get_terminal_size) | 1.0.0 | backport of the get\_terminal\_size function from Python 3.3 / MIT |
| [gevent](http://www.gevent.org/) | 1.1.1 | Coroutine-based Python network library / MIT |
| [greenlet](https://github.com/python-greenlet/greenlet) | 0.4.10 | Lightweight in-process concurrent programming / MIT |
| [grin](http://pypi.python.org/pypi/grin) | 1.2.1 | Enhanced grep-like tool / BSD |
| [h5py](http://www.h5py.org/) | 2.6.0 | Pythonic interface to the HDF5 binary data format / 3-clause BSD |
| [hdf5](http://www.hdfgroup.org/HDF5/) | 1.8.16 | A data model, library, and file format for storing and managing data / BSD-like |
| [heapdict](http://stutzbachenterprises.com/) | 1.0.0 | A heap with decrease-key and increase-key operations / BSD |
| [idna](https://github.com/kjd/idna) | 2.1 | Internationalized Domain Names in Applications / BSD |
| [imagesize](https://github.com/shibukawa/imagesize_py) | 0.7.1 | getting image size from png/jpeg/jpeg2000/gif file / MIT |
| [ipaddress](https://github.com/phihag/ipaddress) | 1.0.16 | IPv4/IPv6 manipulation library / PSF |
| [ipykernel](http://ipython.org) | 4.3.1 | IPython Kernel for Jupyter / BSD |
| [ipython](http://ipython.org/) | 4.2.0 | Productive Interactive Computing / BSD |
| [ipython\_genutils](http://jupyter.org) | 0.1.0 | vestigial utilities from IPython / BSD |
| [ipywidgets](http://github.com/jakevdp/ipywidgets) | 4.1.1 | IPython Static Widgets / BSD |
| [itsdangerous](https://pythonhosted.org/itsdangerous/) | 0.24 | Various helpers to pass trusted data to untrusted environments / BSD |
| [jbig](https://www.cl.cam.ac.uk/~mgk25/jbigkit) Linux Mac | 2.1 | Implementation of the JBIG1 data compression standard / GPL2 |
| [jdcal](http://github.com/phn/jdcal) | 1.2 | Julian dates from proleptic Gregorian and Julian calendars. / BSD |
| [jedi](http://jedi.jedidjah.ch/) | 0.9.0 | Autocompletion and static analysis library for Python / MIT |
| [jinja2](http://jinja.pocoo.org) | 2.8 | An easy to use stand-alone template engine written in pure python. / BSD |
| [jpeg](http://www.ijg.org/) | 8d | Read and write jpeg COM, EXIF, IPTC medata / Custom free software license |
| [jsonschema](https://python-jsonschema.readthedocs.orga) | 2.5.1 | An implementation of JSON Schema validation for Python / MIT |
| [jupyter](http://jupyter.org) | 1.0.0 | Open source, interactive data science and scientific computing / BSD |
| [jupyter\_client](http://jupyter.org) | 4.3.0 | Jupyter protocol implementation and client libraries / BSD |
| [jupyter\_console](http://jupyter.org) | 4.1.1 | Jupyter terminal console / BSD |
| [jupyter\_core](http://jupyter.org) | 4.1.0 | Core Jupyter functionality / BSD |
| [libdynd](http://libdynd.org/) Linux Mac | 0.7.2 | C++ dynamic ndarray library / BSD |
| [libffi](http://sourceware.org/libffi/) Linux | 3.2.1 | portable foreign-function interface library / MIT |
| [libgfortran](https://gcc.gnu.org/fortran/) Linux | 3.0.0 | GNU Fortran runtime library / GPL3 |
| [libpng](http://www.libpng.org/pub/png/libpng.html) | 1.6.22 | The official PNG reference library / libpng license |
| [libsodium](http://libsodium.org) Linux | 1.0.10 | A library for encryption, signatures, password hashing, etc. / MIT |
| [libtiff](http://www.libtiff.org/) | 4.0.6 | Support for Tag Image File Format (TIFF) / BSD-like |
| [libxml2](http://xmlsoft.org/) Linux Mac | 2.9.2 | The XML C parser and toolkit for Gnome / MIT |
| [libxslt](http://xmlsoft.org/XSLT/) Linux Mac | 1.1.28 | The XSLT C library developed for the GNOME project / MIT |
| [llvmlite](http://llvmlite.pydata.org/) | 0.11.0 | Lightweight wrapper around basic LLVM functionality / BSD |
| [locket](http://github.com/mwilliamson/locket.py) | 0.2.0 | File based locks for Python for Linux and Windows / BSD |
| [lxml](http://lxml.de/) | 3.6.0 | Pythonic binding for the C libraries libxml2 and libxslt / BSD |
| [markupsafe](http://www.pocoo.org/projects/markupsafe/#markupsafe) | 0.23 | Implements a XML/HTML/XHTML Markup safe string for Python / BSD |
| [matplotlib](http://matplotlib.org/) | 1.5.1 | Python 2D plotting library / PSF-based |
| [menuinst](https://github.com/ContinuumIO/menuinst) Windows | 1.4.1 | cross platform menu item installation / BSD |
| [mistune](https://github.com/lepture/mistune) | 0.7.2 | The fastest markdown parser in pure Python with renderer feature / BSD |
| [mkl](http://software.intel.com/en-us/articles/intel-mkl/) | 11.3.3 | Math library for Intel and compatible processors / proprietary - Intel |
| [mkl-service](https://github.com/ContinuumIO/mkl-service) | 1.1.2 | Python bindings to MKL service functions / 3-clause BSD |
| [mpmath](http://mpmath.org) | 0.19 | Python library for arbitrary-precision floating-point arithmetic / BSD |
| [multipledispatch](http://github.com/mrocklin/multipledispatch/) | 0.4.8 | Multiple dispatch in Python / BSD |
| [nb\_anacondacloud](https://github.com/Anaconda-Platform/nb_anacondacloud) | 1.1.0 | / BSD |
| [nb\_conda](https://github.com/Anaconda-Platform/nb_conda) | 1.1.0 | Launch Jupyter kernels for any installed conda environment / BSD |
| [nb\_conda\_kernels](https://github.com/Anaconda-Platform/nb_conda_kernels) | 1.0.3 | Launch Jupyter kernels for any installed conda environment / BSD |
| [nbconvert](http://jupyter.org) | 4.2.0 | converts notebooks to various other formats via Jinja templates / BSD |
| [nbformat](http://jupyter.org) | 4.0.1 | The reference implementation of the Jupyter Notebook format / BSD |
| [nbpresent](https://github.com/Anaconda-Platform/nbpresent) | 3.0.2 | Next generation slides for Jupyter Notebooks / BSD |
| [networkx](http://networkx.lanl.gov/) | 1.11 | Python package for creating and manipulating complex networks / BSD |
| [nltk](http://nltk.org/) | 3.2.1 | Build Python programs to work with human language data / Apache |
| [nose](http://readthedocs.org/docs/nose/) | 1.3.7 | Nose extends unittest to make testing easier / LGPL |
| [notebook](http://jupyter.org) | 4.2.1 | A web-based notebook environment for interactive computing / BSD |
| [numba](http://numba.pydata.org/) | 0.26.0 | NumPy aware dynamic Python compiler using LLVM / BSD |
| [numexpr](https://github.com/pydata/numexpr) | 2.6.0 | Fast numerical expression evaluator for NumPy / MIT |
| [numpy](http://numpy.scipy.org/) | 1.11.1 | array processing for numbers, strings, records, and objects / BSD |
| [odo](http://odo.pydata.org/en/latest/) | 0.5.0 | Shapeshifting for your data / BSD |
| [openpyxl](http://openpyxl.readthedocs.org) | 2.3.2 | A Python library to read/write Excel 2010 xlsx/xlsm files / MIT |
| [openssl](http://www.openssl.org/) | 1.0.2h | OpenSSL is an open-source implementation of the SSL and TLS protocols / Apache-style |
| [pandas](http://pandas.pydata.org/) | 0.18.1 | Powerful data structures and data analysis tools / BSD |
| [partd](https://github.com/dask/partd) | 0.3.4 | Appendable key-value byte store / BSD |
| [patchelf](http://nixos.org/patchelf.html) Linux | 0.9 | Modify the dynamic linker and RPATH of ELF executables / GPL3 |
| [path.py](http://github.com/jaraco/path.py) | 8.2.1 | Module wrapper for os.path / MIT |
| [pathlib2](https://pypi.python.org/pypi/pathlib2/) | 2.1.0 | object-oriented filesystem paths / MIT |
| [patsy](https://github.com/pydata/patsy) | 0.4.1 | Describing statistical models in Python using symbolic formulas / BSD |
| [pep8](http://pep8.readthedocs.org/) | 1.7.0 | Python style guide checker / MIT |
| [pexpect](http://pexpect.readthedocs.org/) Linux Mac | 4.0.1 | Pexpect allows easy control of interactive console applications / ISC |
| [pickleshare](https://github.com/vivainio/pickleshare) | 0.7.2 | File system based database that uses Python pickles / MIT |
| [pillow](http://python-pillow.github.io/) | 3.2.0 | The friendly Python Imaging Library(PIL) fork / PIL license |
| [pip](https://pip.pypa.io/en/stable/) | 8.1.2 | PyPA recommended tool for installing Python packages / MIT |
| [pixman](http://www.pixman.org/) Linux | 0.32.6 | A low-level software library for pixel manipulation / MIT |
| [ply](http://www.dabeaz.com/ply/) | 3.8 | Implementation of Lex and Yacc / BSD |
| [psutil](https://github.com/giampaolo/psutil) | 4.3.0 | A cross-platform process and system utilities module for Python / BSD |
| [ptyprocess](https://github.com/pexpect/ptyprocess) Linux Mac | 0.5.1 | Run a subprocess in a pseudo terminal / ISC |
| [py](http://pylib.readthedocs.org/) | 1.4.31 | Library with cross-python path, ini-parsing, io, code, log facilities / MIT |
| [pyasn1](http://pyasn1.sourceforge.net/) | 0.1.9 | Offline IP address to Autonomous System Number lookup module / BSD |
| [pyaudio](http://people.csail.mit.edu/hubert/pyaudio/) Mac | 0.2.7 | Bindings for PortAudio v19, the cross-platform audio stream library / MIT |
| [pycairo](http://cairographics.org/pycairo/) Linux | 1.10.0 | A set of Python bindings for the cairo graphics library / LGPL 2.1, MPL 1.1 |
| [pycosat](https://github.com/ContinuumIO/pycosat) | 0.6.1 | Python bindings to the picosat SAT solver / MIT |
| [pycparser](https://github.com/eliben/pycparser) | 2.14 | Complete C99 parser in pure Python / BSD |
| [pycrypto](http://www.pycrypto.org/) | 2.6.1 | Cryptographic modules for Python / Public-Domain |
| [pycurl](http://pycurl.sourceforge.net/) | 7.43.0 | Python interface to libcurl / LGPL, MIT |
| [pyflakes](https://launchpad.net/pyflakes) | 1.2.3 | Checks Python source files for errors / MIT |
| [pygments](http://pygments.org/) | 2.1.3 | Generic syntax highlighting package / BSD |
| [pyopenssl](https://github.com/pyca/pyopenssl) | 0.16.0 | Python wrapper module around the OpenSSL library / Apache License, Version 2.0 |
| [pyparsing](http://pyparsing.wikispaces.com/) | 2.1.4 | Create and execute simple grammars / MIT |
| [pyqt](http://www.riverbankcomputing.co.uk/software/pyqt) | 4.11.4 | Python binding of the cross-platform GUI toolkit Qt / Commercial, GPLv2, GPLv3 |
| [pyreadline](http://ipython.org/pyreadline.html) Windows | 2.1 | A ctypes-based readline for Windows / BSD |
| [pytables](http://www.pytables.org) | 3.2.2 | Manage hierarchical datasets to cope with large amounts of data / BSD |
| [pytest](http://pytest.org/) | 2.9.2 | Simple and powerful testing with Python / MIT |
| [python](http://www.python.org/) | 2.7.12 | general purpose programming language / PSF |
| [python-dateutil](https://dateutil.readthedocs.org/) | 2.5.3 | Extensions to the standard Python datetime module / BSD |
| [pytz](http://pytz.sourceforge.net/) | 2016.4 | World timezone definitions, modern and historical / MIT |
| [pywin32](http://sourceforge.net/projects/pywin32/) Windows | 220 | Python extensions for Windows / PSF |
| [pyyaml](http://pyyaml.org/wiki/PyYAML) | 3.11 | YAML parser and emitter for Python / MIT |
| [pyzmq](https://github.com/zeromq/pyzmq) | 15.2.0 | zeromq bindings for Python / LGPL and BSD |
| [qt](http://qt-project.org) | 4.8.7 | Qt is a cross-platform application and UI framework / LGPL |
| [qtconsole](http://jupyter.org) | 4.2.1 | Jupyter Qt Console / BSD |
| [qtpy](https://github.com/spyder-ide/qtpy) | 1.0.2 | uniform layer to support PyQt4, PyQt5 and PySide with a single codebase / MIT |
| [readline](http://cnswww.cns.cwru.edu/php/chet/readline/rltop.html) Linux Mac | 6.2 | Line-editing for programs with a command-line interface / GPL3 |
| [redis](http://redis.io/download/) Linux Mac | 3.2.0 | Advanced key-value cache and store / 3-clause BSD |
| [redis-py](https://github.com/andymccurdy/redis-py/) Linux Mac | 2.10.5 | Redis Python Client / MIT |
| [requests](http://docs.python-requests.org/en/latest/index.html) | 2.10.0 | Python HTTP for Humans / Apache |
| [rope](https://github.com/python-rope/rope) | 0.9.4 | A Python refactoring library / GPL |
| [ruamel\_yaml](https://bitbucket.org/ruamel/yaml) | 0.11.7 | / MIT |
| [scikit-image](http://scikit-image.org/) | 0.12.3 | Image processing routines for SciPy / 3-clause BSD |
| [scikit-learn](http://scikit-learn.org/stable/) | 0.17.1 | A set of python modules for machine learning and data mining / 3-clause BSD |
| [scipy](http://www.scipy.org/) | 0.17.1 | Scientific Library for Python / BSD |
| [setuptools](https://pypi.python.org/pypi/setuptools) | 23.0.0 | Download, build, install, upgrade, and uninstall Python packages / PSF or ZPL |
| [simplegeneric](https://pypi.python.org/pypi/simplegeneric) | 0.8.1 | Define simple single-dispatch generic functions / ZPL 2.1 |
| [singledispatch](http://docs.python.org/3/library/functools.html#functools.singledispatch) | 3.4.0.3 | Transforms a function into a single-dispatch generic function / MIT |
| [sip](http://www.riverbankcomputing.com/software/sip/intro) | 4.16.9 | Create Python bindings for C and C++ libraries / GPL3 |
| [six](http://pypi.python.org/pypi/six/) | 1.10.0 | Python 2 and 3 compatibility utilities / MIT |
| [snowballstemmer](https://github.com/shibukawa/snowball_py) | 1.2.1 | Snowball stemming library collection for Python / BSD |
| [sockjs-tornado](http://github.com/mrjoes/sockjs-tornado/) | 1.0.3 | SockJS python server implementation on top of Tornado framework / MIT |
| [sphinx](http://sphinx-doc.org) | 1.4.1 | Documentation generator / BSD |
| [sphinx\_rtd\_theme](https://github.com/snide/sphinx_rtd_theme/) | 0.1.9 | ReadTheDocs.org theme for Sphinx / BSD |
| [spyder](https://github.com/spyder-ide/spyder) | 2.3.9 | Scientific PYthon Development EnviRonment / MIT |
| [sqlalchemy](http://www.sqlalchemy.org/) | 1.0.13 | Database Abstraction Library / MIT |
| [sqlite](http://www.sqlite.org/) | 3.13.0 | Self-contained, zero-configuration, SQL database engine / Public-Domain |
| [ssl\_match\_hostname](http://bitbucket.org/brandon/backports.ssl_match_hostname) | 3.4.0.2 | The ssl.match\_hostname() function from Python 3.4 / PSF |
| [statsmodels](http://statsmodels.sourceforge.net/) | 0.6.1 | Statistical computations and models / 3-clause BSD |
| [sympy](http://sympy.org) | 1.0 | Python library for symbolic mathematics / 3-clause BSD |
| [terminado](https://github.com/takluyver/terminado) Linux Mac | 0.6 | Terminals served to term.js using Tornado websockets / BSD |
| [tk](http://www.tcl.tk/) | 8.5.18 | Dynamic programming language with GUI elements / BSD-like |
| [toolz](http://toolz.readthedocs.org/en/latest/) | 0.8.0 | List processing tools and functional utilities / BSD |
| [tornado](http://www.tornadoweb.org/) | 4.3 | A Python web framework and asynchronous networking library / Apache |
| [traitlets](https://github.com/ipython/traitlets) | 4.2.1 | Configuration system for Python applications / BSD |
| [unicodecsv](https://github.com/jdunck/python-unicodecsv) | 0.14.1 | Drop-in replacement for csv module which supports unicode strings / BSD |
| [vs2008\_runtime](http://www.microsoft.com) Windows | 9.00.30729.1 | Bundles of the MSVC 9 (VS 2008) runtime / Proprietary |
| [werkzeug](http://werkzeug.pocoo.org/) | 0.11.10 | A WSGI utility library for Python / BSD |
| [wheel](http://bitbucket.org/pypa/wheel/) | 0.29.0 | Built-package format for Python / MIT |
| [xlrd](http://www.lexicon.net/sjmachin/xlrd.htm) | 1.0.0 | Extract data from Microsoft Excel spreadsheet files / BSD |
| [xlsxwriter](https://github.com/jmcnamara/XlsxWriter) | 0.9.2 | A Python module for creating Excel XLSX files / BSD |
| [xlwings](http://xlwings.org/) Mac Windows | 0.7.2 | Interact with Excel from Python and vice versa / 3-clause BSD |
| [xlwt](http://www.python-excel.org/) | 1.1.2 | Writing data and formatting information to Excel files / BSD |
| [xz](http://tukaani.org/xz/) Linux Mac | 5.2.2 | Data compression software with high compression ratio / Public-Domain, GPL |
| [yaml](http://www.yaml.org/) Linux Mac | 0.1.6 | A human friendly data serialization standard / MIT |
| [zeromq](http://zeromq.org) Linux | 4.1.4 | Distributed messaging / LGPL |
| [zlib](http://zlib.net/) | 1.2.8 | Unobtrusive compression library / zlib |
| Name | Version | Summary / License |
|---|---|---|
| [alabaster](http://www.sphinx-doc.org/en/stable/index.html) | 0.7.8 | Configurable, Python 2+3 compatible Sphinx theme / BSD |
| [anaconda-client](http://anaconda.org) | 1.4.0 | anaconda.org command line client library / BSD |
| [anaconda-navigator](https://github.com/ContinuumIO/navigator) | 1.2.1 | Anaconda Navigator / proprietary - Continuum Analytics, Inc. |
| [appnope](http://github.com/minrk/appnope) Mac | 0.1.0 | Disable App Nap on OS X 10.9 / BSD |
| [appscript](http://appscript.sourceforge.net/) Mac | 1.0.1 | Control AppleScriptable applications from Python / Public-Domain |
| [argcomplete](https://argcomplete.readthedocs.org/en/latest/) | 1.0.0 | Bash tab completion of arguments for Python scripts / Apache |
| [astropy](http://www.astropy.org/) | 1.2.1 | Community-developed Python Library for Astronomy / BSD |
| [babel](http://babel.pocoo.org/) | 2.3.3 | Utilities to internationalize and localize Python applications / BSD |
| backports | 1.0 | / BSD |
| [beautifulsoup4](http://www.crummy.com/software/BeautifulSoup/) | 4.4.1 | Python library designed for screen-scraping / MIT |
| [bitarray](https://github.com/ilanschnell/bitarray) | 0.8.1 | efficient representation of arrays of booleans – C extension / PSF |
| [blaze](http://blaze.pydata.org) | 0.10.1 | NumPy and Pandas interface to big data / BSD |
| [bokeh](http://bokeh.pydata.org/) | 0.11.1 | Python interactive visualization library for modern web browsers / BSD |
| [boto](https://github.com/boto/boto/) | 2.40.0 | Amazon Web Services Library / MIT |
| [bottleneck](http://berkeleyanalytics.com/bottleneck) | 1.0.0 | Fast NumPy array functions written in Cython. / Simplified BSD |
| [bzip2](http://www.bzip.org/) Windows | 1.0.6 | high-quality data compressor / BSD |
| [cffi](http://cffi.readthedocs.org) | 1.6.0 | C Foreign Function Interface for Python / MIT |
| [chest](https://github.com/ContinuumIO/chest) | 0.2.3 | A dictionary that writes its contents to disk / BSD |
| [click](http://click.pocoo.org/) | 6.6 | Command line interface creation kit / BSD |
| [cloudpickle](https://github.com/cloudpipe/cloudpickle) | 0.2.1 | Extended pickling support for Python objects / as-is |
| [clyent](https://github.com/Anaconda-Server/clyent) | 1.2.2 | Command line client library for windows and posix / BSD |
| [colorama](https://github.com/tartley/colorama) | 0.3.7 | Cross-platform colored terminal text in Python / BSD |
| [comtypes](http://starship.python.net/crew/theller/comtypes/) Windows | 1.1.2 | pure Python COM package / MIT |
| [conda](http://conda.pydata.org/) | 4.1.4 | Package management system and Environment management system / BSD |
| [conda-build](https://github.com/conda/conda-build) | 1.21.2 | Commands and tools for building conda packages / BSD |
| [conda-env](https://github.com/conda/conda-env/) | 2.5.1 | Provides a unified interface to dealing with Conda environments / BSD |
| [configobj](http://www.voidspace.org.uk/python/configobj.html) | 5.0.6 | Config file reading, writing and validation / BSD |
| [contextlib2](http://contextlib2.readthedocs.org/) | 0.5.3 | backports and enhancements for the contextlib module / PSF |
| [cryptography](https://cryptography.io) | 1.4 | Provides cryptographic recipes and primitives to Python developers / Apache |
| [curl](http://curl.haxx.se/) | 7.49.0 | Tool and library for transferring data with URL syntax / MIT/X derivate |
| [cycler](http://matplotlib.org/cycler/) | 0.10.0 | Composable style cycles / BSD |
| [cython](http://www.cython.org/) | 0.24 | The Cython compiler for writing C extensions for the Python language / Apache |
| [cytoolz](https://github.com/pytoolz/cytoolz) | 0.8.0 | Cython implementation of Toolz, high performance functional utilities / BSD |
| [dask](http://dask.pydata.org/en/latest/) | 0.10.0 | Task scheduling and blocked algorithms for parallel processing / BSD |
| [datashape](http://datashape.pydata.org) | 0.5.2 | Language defining a data description protocol / BSD |
| [decorator](http://pypi.python.org/pypi/decorator) | 4.0.10 | Better living through Python with decorators / BSD |
| [dill](http://www.cacr.caltech.edu/~mmckerns/dill.htm) | 0.2.5 | Serialize all of python (almost) / 3-clause BSD |
| [docutils](http://docutils.sourceforge.net) | 0.12 | Utilities for general- and special-purpose documentation / Public-Domain, PSF, 2-clause BSD, GPLv3 |
| [dynd-python](http://libdynd.org/) | 0.7.2 | Python exposure of DyND, a library for dynamic arrays / BSD |
| [entrypoints](https://github.com/takluyver/entrypoints) | 0.2.2 | / MIT |
| [et\_xmlfile](https://bitbucket.org/openpyxl/et_xmlfile) | 1.0.1 | Low memory library for creating large XML files / MIT |
| [fastcache](https://github.com/pbrady/fastcache) | 1.0.2 | C implementation of Python 3 functools.lru\_cache / MIT |
| [flask](http://flask.pocoo.org/) | 0.11.1 | A microframework based on Werkzeug, Jinja2 and good intentions / BSD |
| [flask-cors](https://github.com/corydolphin/flask-cors) | 2.1.2 | Flask extension adding a decorator for CORS support / MIT |
| [fontconfig](http://www.freedesktop.org/wiki/Software/fontconfig/) Linux | 2.11.1 | A library for configuring and customizing font access / BSD |
| [freetype](http://freetype.sourceforge.net/index2.html) | 2.5.5 | A Free, High-Quality, and Portable Font Engine / FreeType License |
| [get\_terminal\_size](https://github.com/chrippa/backports.shutil_get_terminal_size) | 1.0.0 | backport of the get\_terminal\_size function from Python 3.3 / MIT |
| [gevent](http://www.gevent.org/) | 1.1.1 | Coroutine-based Python network library / MIT |
| [greenlet](https://github.com/python-greenlet/greenlet) | 0.4.10 | Lightweight in-process concurrent programming / MIT |
| [h5py](http://www.h5py.org/) | 2.6.0 | Pythonic interface to the HDF5 binary data format / 3-clause BSD |
| [hdf5](http://www.hdfgroup.org/HDF5/) | 1.8.16 | A data model, library, and file format for storing and managing data / BSD-like |
| [heapdict](http://stutzbachenterprises.com/) | 1.0.0 | A heap with decrease-key and increase-key operations / BSD |
| [idna](https://github.com/kjd/idna) | 2.1 | Internationalized Domain Names in Applications / BSD |
| [imagesize](https://github.com/shibukawa/imagesize_py) | 0.7.1 | getting image size from png/jpeg/jpeg2000/gif file / MIT |
| [ipykernel](http://ipython.org) | 4.3.1 | IPython Kernel for Jupyter / BSD |
| [ipython](http://ipython.org/) | 4.2.0 | Productive Interactive Computing / BSD |
| [ipython\_genutils](http://jupyter.org) | 0.1.0 | vestigial utilities from IPython / BSD |
| [ipywidgets](http://github.com/jakevdp/ipywidgets) | 4.1.1 | IPython Static Widgets / BSD |
| [itsdangerous](https://pythonhosted.org/itsdangerous/) | 0.24 | Various helpers to pass trusted data to untrusted environments / BSD |
| [jbig](https://www.cl.cam.ac.uk/~mgk25/jbigkit) Linux Mac | 2.1 | Implementation of the JBIG1 data compression standard / GPL2 |
| [jdcal](http://github.com/phn/jdcal) | 1.2 | Julian dates from proleptic Gregorian and Julian calendars. / BSD |
| [jedi](http://jedi.jedidjah.ch/) | 0.9.0 | Autocompletion and static analysis library for Python / MIT |
| [jinja2](http://jinja.pocoo.org) | 2.8 | An easy to use stand-alone template engine written in pure python. / BSD |
| [jpeg](http://www.ijg.org/) | 8d | Read and write jpeg COM, EXIF, IPTC medata / Custom free software license |
| [jsonschema](https://python-jsonschema.readthedocs.orga) | 2.5.1 | An implementation of JSON Schema validation for Python / MIT |
| [jupyter](http://jupyter.org) | 1.0.0 | Open source, interactive data science and scientific computing / BSD |
| [jupyter\_client](http://jupyter.org) | 4.3.0 | Jupyter protocol implementation and client libraries / BSD |
| [jupyter\_console](http://jupyter.org) | 4.1.1 | Jupyter terminal console / BSD |
| [jupyter\_core](http://jupyter.org) | 4.1.0 | Core Jupyter functionality / BSD |
| [libdynd](http://libdynd.org/) | 0.7.2 | C++ dynamic ndarray library / BSD |
| [libffi](http://sourceware.org/libffi/) Linux | 3.2.1 | portable foreign-function interface library / MIT |
| [libgfortran](https://gcc.gnu.org/fortran/) Linux | 3.0.0 | GNU Fortran runtime library / GPL3 |
| [libpng](http://www.libpng.org/pub/png/libpng.html) | 1.6.22 | The official PNG reference library / libpng license |
| [libsodium](http://libsodium.org) Linux | 1.0.10 | A library for encryption, signatures, password hashing, etc. / MIT |
| [libtiff](http://www.libtiff.org/) | 4.0.6 | Support for Tag Image File Format (TIFF) / BSD-like |
| [libxml2](http://xmlsoft.org/) Linux Mac | 2.9.2 | The XML C parser and toolkit for Gnome / MIT |
| [libxslt](http://xmlsoft.org/XSLT/) Linux Mac | 1.1.28 | The XSLT C library developed for the GNOME project / MIT |
| [llvmlite](http://llvmlite.pydata.org/) | 0.11.0 | Lightweight wrapper around basic LLVM functionality / BSD |
| [locket](http://github.com/mwilliamson/locket.py) | 0.2.0 | File based locks for Python for Linux and Windows / BSD |
| [lxml](http://lxml.de/) | 3.6.0 | Pythonic binding for the C libraries libxml2 and libxslt / BSD |
| [markupsafe](http://www.pocoo.org/projects/markupsafe/#markupsafe) | 0.23 | Implements a XML/HTML/XHTML Markup safe string for Python / BSD |
| [matplotlib](http://matplotlib.org/) | 1.5.1 | Python 2D plotting library / PSF-based |
| [menuinst](https://github.com/ContinuumIO/menuinst) Windows | 1.4.1 | cross platform menu item installation / BSD |
| [mistune](https://github.com/lepture/mistune) | 0.7.2 | The fastest markdown parser in pure Python with renderer feature / BSD |
| [mkl](http://software.intel.com/en-us/articles/intel-mkl/) | 11.3.3 | Math library for Intel and compatible processors / proprietary - Intel |
| [mkl-service](https://github.com/ContinuumIO/mkl-service) | 1.1.2 | Python bindings to MKL service functions / 3-clause BSD |
| [mpmath](http://mpmath.org) | 0.19 | Python library for arbitrary-precision floating-point arithmetic / BSD |
| [multipledispatch](http://github.com/mrocklin/multipledispatch/) | 0.4.8 | Multiple dispatch in Python / BSD |
| [nb\_anacondacloud](https://github.com/Anaconda-Platform/nb_anacondacloud) | 1.1.0 | / BSD |
| [nb\_conda](https://github.com/Anaconda-Platform/nb_conda) | 1.1.0 | Launch Jupyter kernels for any installed conda environment / BSD |
| [nb\_conda\_kernels](https://github.com/Anaconda-Platform/nb_conda_kernels) | 1.0.3 | Launch Jupyter kernels for any installed conda environment / BSD |
| [nbconvert](http://jupyter.org) | 4.2.0 | converts notebooks to various other formats via Jinja templates / BSD |
| [nbformat](http://jupyter.org) | 4.0.1 | The reference implementation of the Jupyter Notebook format / BSD |
| [nbpresent](https://github.com/Anaconda-Platform/nbpresent) | 3.0.2 | Next generation slides for Jupyter Notebooks / BSD |
| [networkx](http://networkx.lanl.gov/) | 1.11 | Python package for creating and manipulating complex networks / BSD |
| [nltk](http://nltk.org/) | 3.2.1 | Build Python programs to work with human language data / Apache |
| [nose](http://readthedocs.org/docs/nose/) | 1.3.7 | Nose extends unittest to make testing easier / LGPL |
| [notebook](http://jupyter.org) | 4.2.1 | A web-based notebook environment for interactive computing / BSD |
| [numba](http://numba.pydata.org/) | 0.26.0 | NumPy aware dynamic Python compiler using LLVM / BSD |
| [numexpr](https://github.com/pydata/numexpr) | 2.6.0 | Fast numerical expression evaluator for NumPy / MIT |
| [numpy](http://numpy.scipy.org/) | 1.10.4 | Array processing for numbers, strings, records, and objects / BSD |
| [odo](http://odo.pydata.org/en/latest/) | 0.5.0 | Shapeshifting for your data / BSD |
| [openpyxl](http://openpyxl.readthedocs.org) | 2.3.2 | A Python library to read/write Excel 2010 xlsx/xlsm files / MIT |
| [openssl](http://www.openssl.org/) | 1.0.2h | OpenSSL is an open-source implementation of the SSL and TLS protocols / Apache-style |
| [pandas](http://pandas.pydata.org/) | 0.18.1 | Powerful data structures and data analysis tools / BSD |
| [partd](https://github.com/dask/partd) | 0.3.4 | Appendable key-value byte store / BSD |
| [patchelf](http://nixos.org/patchelf.html) Linux | 0.9 | Modify the dynamic linker and RPATH of ELF executables / GPL3 |
| [path.py](http://github.com/jaraco/path.py) | 8.2.1 | Module wrapper for os.path / MIT |
| [pathlib2](https://pypi.python.org/pypi/pathlib2/) | 2.1.0 | object-oriented filesystem paths / MIT |
| [patsy](https://github.com/pydata/patsy) | 0.4.1 | Describing statistical models in Python using symbolic formulas / BSD |
| [pep8](http://pep8.readthedocs.org/) | 1.7.0 | Python style guide checker / MIT |
| [pexpect](http://pexpect.readthedocs.org/) Linux Mac | 4.0.1 | Pexpect allows easy control of interactive console applications / ISC |
| [pickleshare](https://github.com/vivainio/pickleshare) | 0.7.2 | File system based database that uses Python pickles / MIT |
| [pillow](http://python-pillow.github.io/) | 3.2.0 | The friendly Python Imaging Library(PIL) fork / PIL license |
| [pip](https://pip.pypa.io/en/stable/) | 8.1.2 | PyPA recommended tool for installing Python packages / MIT |
| [ply](http://www.dabeaz.com/ply/) | 3.8 | Implementation of Lex and Yacc / BSD |
| [psutil](https://github.com/giampaolo/psutil) | 4.3.0 | A cross-platform process and system utilities module for Python / BSD |
| [ptyprocess](https://github.com/pexpect/ptyprocess) Linux Mac | 0.5.1 | Run a subprocess in a pseudo terminal / ISC |
| [py](http://pylib.readthedocs.org/) | 1.4.31 | Library with cross-python path, ini-parsing, io, code, log facilities / MIT |
| [pyasn1](http://pyasn1.sourceforge.net/) | 0.1.9 | Offline IP address to Autonomous System Number lookup module / BSD |
| [pycosat](https://github.com/ContinuumIO/pycosat) | 0.6.1 | Python bindings to the picosat SAT solver / MIT |
| [pycparser](https://github.com/eliben/pycparser) | 2.14 | Complete C99 parser in pure Python / BSD |
| [pycrypto](http://www.pycrypto.org/) | 2.6.1 | Cryptographic modules for Python / Public-Domain |
| [pycurl](http://pycurl.sourceforge.net/) | 7.43.0 | Python interface to libcurl / LGPL, MIT |
| [pyflakes](https://launchpad.net/pyflakes) | 1.2.3 | Checks Python source files for errors / MIT |
| [pygments](http://pygments.org/) | 2.1.3 | Generic syntax highlighting package / BSD |
| [pyopenssl](https://github.com/pyca/pyopenssl) | 0.16.0 | Python wrapper module around the OpenSSL library / Apache License, Version 2.0 |
| [pyparsing](http://pyparsing.wikispaces.com/) | 2.1.4 | Create and execute simple grammars / MIT |
| [pyqt](http://www.riverbankcomputing.co.uk/software/pyqt) | 4.11.4 | Python binding of the cross-platform GUI toolkit Qt / Commercial, GPLv2, GPLv3 |
| [pyreadline](http://ipython.org/pyreadline.html) Windows | 2.1 | A ctypes-based readline for Windows / BSD |
| [pytables](http://www.pytables.org) | 3.2.2 | Manage hierarchical datasets to cope with large amounts of data / BSD |
| [pytest](http://pytest.org/) | 2.9.2 | Simple and powerful testing with Python / MIT |
| [python](http://www.python.org/) | 3.5.1 | general purpose programming language / PSF |
| [python-dateutil](https://dateutil.readthedocs.org/) | 2.5.3 | Extensions to the standard Python datetime module / BSD |
| [pytz](http://pytz.sourceforge.net/) | 2016.4 | World timezone definitions, modern and historical / MIT |
| [pywin32](http://sourceforge.net/projects/pywin32/) Windows | 220 | Python extensions for Windows / PSF |
| [pyyaml](http://pyyaml.org/wiki/PyYAML) | 3.11 | YAML parser and emitter for Python / MIT |
| [pyzmq](https://github.com/zeromq/pyzmq) | 15.2.0 | zeromq bindings for Python / LGPL and BSD |
| [qt](http://qt-project.org) | 4.8.7 | Qt is a cross-platform application and UI framework / LGPL |
| [qtconsole](http://jupyter.org) | 4.2.1 | Jupyter Qt Console / BSD |
| [qtpy](https://github.com/spyder-ide/qtpy) | 1.0.2 | uniform layer to support PyQt4, PyQt5 and PySide with a single codebase / MIT |
| [readline](http://cnswww.cns.cwru.edu/php/chet/readline/rltop.html) Linux Mac | 6.2 | Line-editing for programs with a command-line interface / GPL3 |
| [redis](http://redis.io/download/) Linux Mac | 3.2.0 | Advanced key-value cache and store / 3-clause BSD |
| [redis-py](https://github.com/andymccurdy/redis-py/) Linux Mac | 2.10.5 | Redis Python Client / MIT |
| [requests](http://docs.python-requests.org/en/latest/index.html) | 2.10.0 | Python HTTP for Humans / Apache |
| [rope](https://github.com/python-rope/rope) | 0.9.4 | A Python refactoring library / GPL |
| [ruamel\_yaml](https://bitbucket.org/ruamel/yaml) | 0.11.7 | / MIT |
| [scikit-image](http://scikit-image.org/) | 0.12.3 | Image processing routines for SciPy / 3-clause BSD |
| [scikit-learn](http://scikit-learn.org/stable/) | 0.17.1 | A set of python modules for machine learning and data mining / 3-clause BSD |
| [scipy](http://www.scipy.org/) | 0.17.1 | Scientific Library for Python / BSD |
| [setuptools](https://pypi.python.org/pypi/setuptools) | 23.0.0 | Download, build, install, upgrade, and uninstall Python packages / PSF or ZPL |
| [simplegeneric](https://pypi.python.org/pypi/simplegeneric) | 0.8.1 | Define simple single-dispatch generic functions / ZPL 2.1 |
| [singledispatch](http://docs.python.org/3/library/functools.html#functools.singledispatch) | 3.4.0.3 | Transforms a function into a single-dispatch generic function / MIT |
| [sip](http://www.riverbankcomputing.com/software/sip/intro) | 4.16.9 | Create Python bindings for C and C++ libraries / GPL3 |
| [six](http://pypi.python.org/pypi/six/) | 1.10.0 | Python 2 and 3 compatibility utilities / MIT |
| [snowballstemmer](https://github.com/shibukawa/snowball_py) | 1.2.1 | Snowball stemming library collection for Python / BSD |
| [sockjs-tornado](http://github.com/mrjoes/sockjs-tornado/) | 1.0.3 | SockJS python server implementation on top of Tornado framework / MIT |
| [sphinx](http://sphinx-doc.org) | 1.4.1 | Documentation generator / BSD |
| [sphinx\_rtd\_theme](https://github.com/snide/sphinx_rtd_theme/) | 0.1.9 | ReadTheDocs.org theme for Sphinx / BSD |
| [spyder](https://github.com/spyder-ide/spyder) | 2.3.9 | Scientific PYthon Development EnviRonment / MIT |
| [sqlalchemy](http://www.sqlalchemy.org/) | 1.0.13 | Database Abstraction Library / MIT |
| [sqlite](http://www.sqlite.org/) | 3.13.0 | Self-contained, zero-configuration, SQL database engine / Public-Domain |
| [statsmodels](http://statsmodels.sourceforge.net/) | 0.6.1 | Statistical computations and models / 3-clause BSD |
| [sympy](http://sympy.org) | 1.0 | Python library for symbolic mathematics / 3-clause BSD |
| [terminado](https://github.com/takluyver/terminado) Linux Mac | 0.6 | Terminals served to term.js using Tornado websockets / BSD |
| [tk](http://www.tcl.tk/) | 8.5.18 | Dynamic programming language with GUI elements / BSD-like |
| [toolz](http://toolz.readthedocs.org/en/latest/) | 0.8.0 | List processing tools and functional utilities / BSD |
| [tornado](http://www.tornadoweb.org/) | 4.3 | A Python web framework and asynchronous networking library / Apache |
| [traitlets](https://github.com/ipython/traitlets) | 4.2.1 | Configuration system for Python applications / BSD |
| [unicodecsv](https://github.com/jdunck/python-unicodecsv) | 0.14.1 | Drop-in replacement for csv module which supports unicode strings / BSD |
| [vs2015\_runtime](http://www.microsoft.com) Windows | 14.0.25123 | Bundles of the MSVC 14 (VS 2015) runtime / Proprietary |
| [werkzeug](http://werkzeug.pocoo.org/) | 0.11.10 | A WSGI utility library for Python / BSD |
| [wheel](http://bitbucket.org/pypa/wheel/) | 0.29.0 | Built-package format for Python / MIT |
| [xlrd](http://www.lexicon.net/sjmachin/xlrd.htm) | 1.0.0 | Extract data from Microsoft Excel spreadsheet files / BSD |
| [xlsxwriter](https://github.com/jmcnamara/XlsxWriter) | 0.9.2 | A Python module for creating Excel XLSX files / BSD |
| [xlwings](http://xlwings.org/) Mac Windows | 0.7.2 | Interact with Excel from Python and vice versa / 3-clause BSD |
| [xlwt](http://www.python-excel.org/) | 1.1.2 | Writing data and formatting information to Excel files / BSD |
| [xz](http://tukaani.org/xz/) Linux Mac | 5.2.2 | Data compression software with high compression ratio / Public-Domain, GPL |
| [yaml](http://www.yaml.org/) Linux Mac | 0.1.6 | A human friendly data serialization standard / MIT |
| [zeromq](http://zeromq.org) Linux | 4.1.4 | Distributed messaging / LGPL |
| [zlib](http://zlib.net/) | 1.2.8 | Unobtrusive compression library / zlib |
| Name | Version | Summary / License |
|---|---|---|
| [alabaster](http://www.sphinx-doc.org/en/stable/index.html) | 0.7.8 | Configurable, Python 2+3 compatible Sphinx theme / BSD |
| [anaconda-client](http://anaconda.org) | 1.4.0 | anaconda.org command line client library / BSD |
| [anaconda-navigator](https://github.com/ContinuumIO/navigator) | 1.2.1 | Anaconda Navigator / proprietary - Continuum Analytics, Inc. |
| [appnope](http://github.com/minrk/appnope) Mac | 0.1.0 | Disable App Nap on OS X 10.9 / BSD |
| [appscript](http://appscript.sourceforge.net/) Mac | 1.0.1 | Control AppleScriptable applications from Python / Public-Domain |
| [argcomplete](https://argcomplete.readthedocs.org/en/latest/) | 1.0.0 | Bash tab completion of arguments for Python scripts / Apache |
| [astropy](http://www.astropy.org/) | 1.2.1 | Community-developed Python Library for Astronomy / BSD |
| [babel](http://babel.pocoo.org/) | 2.3.3 | Utilities to internationalize and localize Python applications / BSD |
| backports | 1.0 | / BSD |
| [backports\_abc](https://github.com/cython/backports_abc) | 0.4 | backport of recent additions to the ‘collections.abc’ module / PSF |
| [beautifulsoup4](http://www.crummy.com/software/BeautifulSoup/) | 4.4.1 | Python library designed for screen-scraping / MIT |
| [bitarray](https://github.com/ilanschnell/bitarray) | 0.8.1 | efficient representation of arrays of booleans – C extension / PSF |
| [blaze](http://blaze.pydata.org) | 0.10.1 | NumPy and Pandas interface to big data / BSD |
| [bokeh](http://bokeh.pydata.org/) | 0.11.1 | Python interactive visualization library for modern web browsers / BSD |
| [boto](https://github.com/boto/boto/) | 2.40.0 | Amazon Web Services Library / MIT |
| [bottleneck](http://berkeleyanalytics.com/bottleneck) | 1.0.0 | Fast NumPy array functions written in Cython. / Simplified BSD |
| [bzip2](http://www.bzip.org/) Windows | 1.0.6 | high-quality data compressor / BSD |
| [cairo](http://cairographics.org/) Linux | 1.12.18 | A 2D graphics library with support for multiple output devices / LGPL 2.1, MPL 1.1 |
| [cdecimal](http://www.bytereef.org/mpdecimal/index.html) | 2.3 | Fast drop-in replacement for decimal.py / BSD |
| [cffi](http://cffi.readthedocs.org) | 1.6.0 | C Foreign Function Interface for Python / MIT |
| [chest](https://github.com/ContinuumIO/chest) | 0.2.3 | A dictionary that writes its contents to disk / BSD |
| [click](http://click.pocoo.org/) | 6.6 | Command line interface creation kit / BSD |
| [cloudpickle](https://github.com/cloudpipe/cloudpickle) | 0.2.1 | Extended pickling support for Python objects / as-is |
| [clyent](https://github.com/Anaconda-Server/clyent) | 1.2.2 | Command line client library for windows and posix / BSD |
| [colorama](https://github.com/tartley/colorama) | 0.3.7 | Cross-platform colored terminal text in Python / BSD |
| [comtypes](http://starship.python.net/crew/theller/comtypes/) Windows | 1.1.2 | pure Python COM package / MIT |
| [conda](http://conda.pydata.org/) | 4.1.4 | Package management system and Environment management system / BSD |
| [conda-build](https://github.com/conda/conda-build) | 1.21.2 | Commands and tools for building conda packages / BSD |
| [conda-env](https://github.com/conda/conda-env/) | 2.5.1 | Provides a unified interface to dealing with Conda environments / BSD |
| [configobj](http://www.voidspace.org.uk/python/configobj.html) | 5.0.6 | Config file reading, writing and validation / BSD |
| [configparser](http://docs.python.org/3/library/configparser.html) | 3.5.0b2 | brings the updated configparser from Python 3.5 to Python 2.6-3.5 / MIT |
| [contextlib2](http://contextlib2.readthedocs.org/) | 0.5.3 | backports and enhancements for the contextlib module / PSF |
| [cryptography](https://cryptography.io) | 1.4 | Provides cryptographic recipes and primitives to Python developers / Apache |
| [curl](http://curl.haxx.se/) | 7.49.0 | Tool and library for transferring data with URL syntax / MIT/X derivate |
| [cycler](http://matplotlib.org/cycler/) | 0.10.0 | Composable style cycles / BSD |
| [cython](http://www.cython.org/) | 0.24 | The Cython compiler for writing C extensions for the Python language / Apache |
| [cytoolz](https://github.com/pytoolz/cytoolz) | 0.8.0 | Cython implementation of Toolz, high performance functional utilities / BSD |
| [dask](http://dask.pydata.org/en/latest/) | 0.10.0 | Task scheduling and blocked algorithms for parallel processing / BSD |
| [datashape](http://datashape.pydata.org) | 0.5.2 | Language defining a data description protocol / BSD |
| [decorator](http://pypi.python.org/pypi/decorator) | 4.0.10 | Better living through Python with decorators / BSD |
| [dill](http://www.cacr.caltech.edu/~mmckerns/dill.htm) | 0.2.5 | Serialize all of python (almost) / 3-clause BSD |
| [docutils](http://docutils.sourceforge.net) | 0.12 | Utilities for general- and special-purpose documentation / Public-Domain, PSF, 2-clause BSD, GPLv3 |
| [dynd-python](http://libdynd.org/) Linux Mac | 0.7.2 | Python exposure of DyND, a library for dynamic arrays / BSD |
| [entrypoints](https://github.com/takluyver/entrypoints) | 0.2.2 | / MIT |
| [enum34](https://pypi.python.org/pypi/enum34) | 1.1.6 | Robust enumerated type support in Python / BSD |
| [et\_xmlfile](https://bitbucket.org/openpyxl/et_xmlfile) | 1.0.1 | Low memory library for creating large XML files / MIT |
| [fastcache](https://github.com/pbrady/fastcache) | 1.0.2 | C implementation of Python 3 functools.lru\_cache / MIT |
| [flask](http://flask.pocoo.org/) | 0.11.1 | A microframework based on Werkzeug, Jinja2 and good intentions / BSD |
| [flask-cors](https://github.com/corydolphin/flask-cors) | 2.1.2 | Flask extension adding a decorator for CORS support / MIT |
| [fontconfig](http://www.freedesktop.org/wiki/Software/fontconfig/) Linux | 2.11.1 | A library for configuring and customizing font access / BSD |
| [freetype](http://freetype.sourceforge.net/index2.html) | 2.5.5 | A Free, High-Quality, and Portable Font Engine / FreeType License |
| [funcsigs](http://funcsigs.readthedocs.org/) | 1.0.2 | Python function signatures from PEP362 for Python 2.6, 2.7 and 3.2+ / Apache |
| [functools32](https://github.com/MiCHiLU/python-functools32) | 3.2.3.2 | backport of the functools module from Python 3.2.3 for use on 2.7 / PSF |
| [futures](http://code.google.com/p/pythonfutures) | 3.0.5 | A Java-style futures package for Python / BSD |
| [get\_terminal\_size](https://github.com/chrippa/backports.shutil_get_terminal_size) | 1.0.0 | backport of the get\_terminal\_size function from Python 3.3 / MIT |
| [gevent](http://www.gevent.org/) | 1.1.1 | Coroutine-based Python network library / MIT |
| [greenlet](https://github.com/python-greenlet/greenlet) | 0.4.10 | Lightweight in-process concurrent programming / MIT |
| [grin](http://pypi.python.org/pypi/grin) | 1.2.1 | Enhanced grep-like tool / BSD |
| [h5py](http://www.h5py.org/) | 2.6.0 | Pythonic interface to the HDF5 binary data format / 3-clause BSD |
| [hdf5](http://www.hdfgroup.org/HDF5/) | 1.8.16 | A data model, library, and file format for storing and managing data / BSD-like |
| [heapdict](http://stutzbachenterprises.com/) | 1.0.0 | A heap with decrease-key and increase-key operations / BSD |
| [idna](https://github.com/kjd/idna) | 2.1 | Internationalized Domain Names in Applications / BSD |
| [imagesize](https://github.com/shibukawa/imagesize_py) | 0.7.1 | getting image size from png/jpeg/jpeg2000/gif file / MIT |
| [ipaddress](https://github.com/phihag/ipaddress) | 1.0.16 | IPv4/IPv6 manipulation library / PSF |
| [ipykernel](http://ipython.org) | 4.3.1 | IPython Kernel for Jupyter / BSD |
| [ipython](http://ipython.org/) | 4.2.0 | Productive Interactive Computing / BSD |
| [ipython\_genutils](http://jupyter.org) | 0.1.0 | vestigial utilities from IPython / BSD |
| [ipywidgets](http://github.com/jakevdp/ipywidgets) | 4.1.1 | IPython Static Widgets / BSD |
| [itsdangerous](https://pythonhosted.org/itsdangerous/) | 0.24 | Various helpers to pass trusted data to untrusted environments / BSD |
| [jbig](https://www.cl.cam.ac.uk/~mgk25/jbigkit) Linux Mac | 2.1 | Implementation of the JBIG1 data compression standard / GPL2 |
| [jdcal](http://github.com/phn/jdcal) | 1.2 | Julian dates from proleptic Gregorian and Julian calendars. / BSD |
| [jedi](http://jedi.jedidjah.ch/) | 0.9.0 | Autocompletion and static analysis library for Python / MIT |
| [jinja2](http://jinja.pocoo.org) | 2.8 | An easy to use stand-alone template engine written in pure python. / BSD |
| [jpeg](http://www.ijg.org/) | 8d | Read and write jpeg COM, EXIF, IPTC medata / Custom free software license |
| [jsonschema](https://python-jsonschema.readthedocs.orga) | 2.5.1 | An implementation of JSON Schema validation for Python / MIT |
| [jupyter](http://jupyter.org) | 1.0.0 | Open source, interactive data science and scientific computing / BSD |
| [jupyter\_client](http://jupyter.org) | 4.3.0 | Jupyter protocol implementation and client libraries / BSD |
| [jupyter\_console](http://jupyter.org) | 4.1.1 | Jupyter terminal console / BSD |
| [jupyter\_core](http://jupyter.org) | 4.1.0 | Core Jupyter functionality / BSD |
| [libdynd](http://libdynd.org/) Linux Mac | 0.7.2 | C++ dynamic ndarray library / BSD |
| [libffi](http://sourceware.org/libffi/) Linux | 3.2.1 | portable foreign-function interface library / MIT |
| [libgfortran](https://gcc.gnu.org/fortran/) Linux | 3.0.0 | GNU Fortran runtime library / GPL3 |
| [libpng](http://www.libpng.org/pub/png/libpng.html) | 1.6.22 | The official PNG reference library / libpng license |
| [libsodium](http://libsodium.org) Linux | 1.0.10 | A library for encryption, signatures, password hashing, etc. / MIT |
| [libtiff](http://www.libtiff.org/) | 4.0.6 | Support for Tag Image File Format (TIFF) / BSD-like |
| [libxml2](http://xmlsoft.org/) Linux Mac | 2.9.2 | The XML C parser and toolkit for Gnome / MIT |
| [libxslt](http://xmlsoft.org/XSLT/) Linux Mac | 1.1.28 | The XSLT C library developed for the GNOME project / MIT |
| [llvmlite](http://llvmlite.pydata.org/) | 0.11.0 | Lightweight wrapper around basic LLVM functionality / BSD |
| [locket](http://github.com/mwilliamson/locket.py) | 0.2.0 | File based locks for Python for Linux and Windows / BSD |
| [lxml](http://lxml.de/) | 3.6.0 | Pythonic binding for the C libraries libxml2 and libxslt / BSD |
| [markupsafe](http://www.pocoo.org/projects/markupsafe/#markupsafe) | 0.23 | Implements a XML/HTML/XHTML Markup safe string for Python / BSD |
| [matplotlib](http://matplotlib.org/) | 1.5.1 | Python 2D plotting library / PSF-based |
| [menuinst](https://github.com/ContinuumIO/menuinst) Windows | 1.4.1 | cross platform menu item installation / BSD |
| [mistune](https://github.com/lepture/mistune) | 0.7.2 | The fastest markdown parser in pure Python with renderer feature / BSD |
| [mkl](http://software.intel.com/en-us/articles/intel-mkl/) | 11.3.3 | Math library for Intel and compatible processors / proprietary - Intel |
| [mkl-service](https://github.com/ContinuumIO/mkl-service) | 1.1.2 | Python bindings to MKL service functions / 3-clause BSD |
| [mpmath](http://mpmath.org) | 0.19 | Python library for arbitrary-precision floating-point arithmetic / BSD |
| [multipledispatch](http://github.com/mrocklin/multipledispatch/) | 0.4.8 | Multiple dispatch in Python / BSD |
| [nb\_anacondacloud](https://github.com/Anaconda-Platform/nb_anacondacloud) | 1.1.0 | / BSD |
| [nb\_conda](https://github.com/Anaconda-Platform/nb_conda) | 1.1.0 | Launch Jupyter kernels for any installed conda environment / BSD |
| [nb\_conda\_kernels](https://github.com/Anaconda-Platform/nb_conda_kernels) | 1.0.3 | Launch Jupyter kernels for any installed conda environment / BSD |
| [nbconvert](http://jupyter.org) | 4.2.0 | converts notebooks to various other formats via Jinja templates / BSD |
| [nbformat](http://jupyter.org) | 4.0.1 | The reference implementation of the Jupyter Notebook format / BSD |
| [nbpresent](https://github.com/Anaconda-Platform/nbpresent) | 3.0.2 | Next generation slides for Jupyter Notebooks / BSD |
| [networkx](http://networkx.lanl.gov/) | 1.11 | Python package for creating and manipulating complex networks / BSD |
| [nltk](http://nltk.org/) | 3.2.1 | Build Python programs to work with human language data / Apache |
| [nose](http://readthedocs.org/docs/nose/) | 1.3.7 | Nose extends unittest to make testing easier / LGPL |
| [notebook](http://jupyter.org) | 4.2.1 | A web-based notebook environment for interactive computing / BSD |
| [numba](http://numba.pydata.org/) | 0.26.0 | NumPy aware dynamic Python compiler using LLVM / BSD |
| [numexpr](https://github.com/pydata/numexpr) | 2.6.0 | Fast numerical expression evaluator for NumPy / MIT |
| [numpy](http://numpy.scipy.org/) | 1.10.4 | Array processing for numbers, strings, records, and objects / BSD |
| [odo](http://odo.pydata.org/en/latest/) | 0.5.0 | Shapeshifting for your data / BSD |
| [openpyxl](http://openpyxl.readthedocs.org) | 2.3.2 | A Python library to read/write Excel 2010 xlsx/xlsm files / MIT |
| [openssl](http://www.openssl.org/) | 1.0.2h | OpenSSL is an open-source implementation of the SSL and TLS protocols / Apache-style |
| [pandas](http://pandas.pydata.org/) | 0.18.1 | Powerful data structures and data analysis tools / BSD |
| [partd](https://github.com/dask/partd) | 0.3.4 | Appendable key-value byte store / BSD |
| [patchelf](http://nixos.org/patchelf.html) Linux | 0.9 | Modify the dynamic linker and RPATH of ELF executables / GPL3 |
| [path.py](http://github.com/jaraco/path.py) | 8.2.1 | Module wrapper for os.path / MIT |
| [pathlib2](https://pypi.python.org/pypi/pathlib2/) | 2.1.0 | object-oriented filesystem paths / MIT |
| [patsy](https://github.com/pydata/patsy) | 0.4.1 | Describing statistical models in Python using symbolic formulas / BSD |
| [pep8](http://pep8.readthedocs.org/) | 1.7.0 | Python style guide checker / MIT |
| [pexpect](http://pexpect.readthedocs.org/) Linux Mac | 4.0.1 | Pexpect allows easy control of interactive console applications / ISC |
| [pickleshare](https://github.com/vivainio/pickleshare) | 0.7.2 | File system based database that uses Python pickles / MIT |
| [pillow](http://python-pillow.github.io/) | 3.2.0 | The friendly Python Imaging Library(PIL) fork / PIL license |
| [pip](https://pip.pypa.io/en/stable/) | 8.1.2 | PyPA recommended tool for installing Python packages / MIT |
| [pixman](http://www.pixman.org/) Linux | 0.32.6 | A low-level software library for pixel manipulation / MIT |
| [ply](http://www.dabeaz.com/ply/) | 3.8 | Implementation of Lex and Yacc / BSD |
| [psutil](https://github.com/giampaolo/psutil) | 4.3.0 | A cross-platform process and system utilities module for Python / BSD |
| [ptyprocess](https://github.com/pexpect/ptyprocess) Linux Mac | 0.5.1 | Run a subprocess in a pseudo terminal / ISC |
| [py](http://pylib.readthedocs.org/) | 1.4.31 | Library with cross-python path, ini-parsing, io, code, log facilities / MIT |
| [pyasn1](http://pyasn1.sourceforge.net/) | 0.1.9 | Offline IP address to Autonomous System Number lookup module / BSD |
| [pyaudio](http://people.csail.mit.edu/hubert/pyaudio/) Mac | 0.2.7 | Bindings for PortAudio v19, the cross-platform audio stream library / MIT |
| [pycairo](http://cairographics.org/pycairo/) Linux | 1.10.0 | A set of Python bindings for the cairo graphics library / LGPL 2.1, MPL 1.1 |
| [pycosat](https://github.com/ContinuumIO/pycosat) | 0.6.1 | Python bindings to the picosat SAT solver / MIT |
| [pycparser](https://github.com/eliben/pycparser) | 2.14 | Complete C99 parser in pure Python / BSD |
| [pycrypto](http://www.pycrypto.org/) | 2.6.1 | Cryptographic modules for Python / Public-Domain |
| [pycurl](http://pycurl.sourceforge.net/) | 7.43.0 | Python interface to libcurl / LGPL, MIT |
| [pyflakes](https://launchpad.net/pyflakes) | 1.2.3 | Checks Python source files for errors / MIT |
| [pygments](http://pygments.org/) | 2.1.3 | Generic syntax highlighting package / BSD |
| [pyopenssl](https://github.com/pyca/pyopenssl) | 0.16.0 | Python wrapper module around the OpenSSL library / Apache License, Version 2.0 |
| [pyparsing](http://pyparsing.wikispaces.com/) | 2.1.4 | Create and execute simple grammars / MIT |
| [pyqt](http://www.riverbankcomputing.co.uk/software/pyqt) | 4.11.4 | Python binding of the cross-platform GUI toolkit Qt / Commercial, GPLv2, GPLv3 |
| [pyreadline](http://ipython.org/pyreadline.html) Windows | 2.1 | A ctypes-based readline for Windows / BSD |
| [pytables](http://www.pytables.org) | 3.2.2 | Manage hierarchical datasets to cope with large amounts of data / BSD |
| [pytest](http://pytest.org/) | 2.9.2 | Simple and powerful testing with Python / MIT |
| [python](http://www.python.org/) | 2.7.11 | general purpose programming language / PSF |
| [python-dateutil](https://dateutil.readthedocs.org/) | 2.5.3 | Extensions to the standard Python datetime module / BSD |
| [pytz](http://pytz.sourceforge.net/) | 2016.4 | World timezone definitions, modern and historical / MIT |
| [pywin32](http://sourceforge.net/projects/pywin32/) Windows | 220 | Python extensions for Windows / PSF |
| [pyyaml](http://pyyaml.org/wiki/PyYAML) | 3.11 | YAML parser and emitter for Python / MIT |
| [pyzmq](https://github.com/zeromq/pyzmq) | 15.2.0 | zeromq bindings for Python / LGPL and BSD |
| [qt](http://qt-project.org) | 4.8.7 | Qt is a cross-platform application and UI framework / LGPL |
| [qtconsole](http://jupyter.org) | 4.2.1 | Jupyter Qt Console / BSD |
| [qtpy](https://github.com/spyder-ide/qtpy) | 1.0.2 | uniform layer to support PyQt4, PyQt5 and PySide with a single codebase / MIT |
| [readline](http://cnswww.cns.cwru.edu/php/chet/readline/rltop.html) Linux Mac | 6.2 | Line-editing for programs with a command-line interface / GPL3 |
| [redis](http://redis.io/download/) Linux Mac | 3.2.0 | Advanced key-value cache and store / 3-clause BSD |
| [redis-py](https://github.com/andymccurdy/redis-py/) Linux Mac | 2.10.5 | Redis Python Client / MIT |
| [requests](http://docs.python-requests.org/en/latest/index.html) | 2.10.0 | Python HTTP for Humans / Apache |
| [rope](https://github.com/python-rope/rope) | 0.9.4 | A Python refactoring library / GPL |
| [ruamel\_yaml](https://bitbucket.org/ruamel/yaml) | 0.11.7 | / MIT |
| [scikit-image](http://scikit-image.org/) | 0.12.3 | Image processing routines for SciPy / 3-clause BSD |
| [scikit-learn](http://scikit-learn.org/stable/) | 0.17.1 | A set of python modules for machine learning and data mining / 3-clause BSD |
| [scipy](http://www.scipy.org/) | 0.17.1 | Scientific Library for Python / BSD |
| [setuptools](https://pypi.python.org/pypi/setuptools) | 23.0.0 | Download, build, install, upgrade, and uninstall Python packages / PSF or ZPL |
| [simplegeneric](https://pypi.python.org/pypi/simplegeneric) | 0.8.1 | Define simple single-dispatch generic functions / ZPL 2.1 |
| [singledispatch](http://docs.python.org/3/library/functools.html#functools.singledispatch) | 3.4.0.3 | Transforms a function into a single-dispatch generic function / MIT |
| [sip](http://www.riverbankcomputing.com/software/sip/intro) | 4.16.9 | Create Python bindings for C and C++ libraries / GPL3 |
| [six](http://pypi.python.org/pypi/six/) | 1.10.0 | Python 2 and 3 compatibility utilities / MIT |
| [snowballstemmer](https://github.com/shibukawa/snowball_py) | 1.2.1 | Snowball stemming library collection for Python / BSD |
| [sockjs-tornado](http://github.com/mrjoes/sockjs-tornado/) | 1.0.3 | SockJS python server implementation on top of Tornado framework / MIT |
| [sphinx](http://sphinx-doc.org) | 1.4.1 | Documentation generator / BSD |
| [sphinx\_rtd\_theme](https://github.com/snide/sphinx_rtd_theme/) | 0.1.9 | ReadTheDocs.org theme for Sphinx / BSD |
| [spyder](https://github.com/spyder-ide/spyder) | 2.3.9 | Scientific PYthon Development EnviRonment / MIT |
| [sqlalchemy](http://www.sqlalchemy.org/) | 1.0.13 | Database Abstraction Library / MIT |
| [sqlite](http://www.sqlite.org/) | 3.13.0 | Self-contained, zero-configuration, SQL database engine / Public-Domain |
| [ssl\_match\_hostname](http://bitbucket.org/brandon/backports.ssl_match_hostname) | 3.4.0.2 | The ssl.match\_hostname() function from Python 3.4 / PSF |
| [statsmodels](http://statsmodels.sourceforge.net/) | 0.6.1 | Statistical computations and models / 3-clause BSD |
| [sympy](http://sympy.org) | 1.0 | Python library for symbolic mathematics / 3-clause BSD |
| [terminado](https://github.com/takluyver/terminado) Linux Mac | 0.6 | Terminals served to term.js using Tornado websockets / BSD |
| [tk](http://www.tcl.tk/) | 8.5.18 | Dynamic programming language with GUI elements / BSD-like |
| [toolz](http://toolz.readthedocs.org/en/latest/) | 0.8.0 | List processing tools and functional utilities / BSD |
| [tornado](http://www.tornadoweb.org/) | 4.3 | A Python web framework and asynchronous networking library / Apache |
| [traitlets](https://github.com/ipython/traitlets) | 4.2.1 | Configuration system for Python applications / BSD |
| [unicodecsv](https://github.com/jdunck/python-unicodecsv) | 0.14.1 | Drop-in replacement for csv module which supports unicode strings / BSD |
| [vs2008\_runtime](http://www.microsoft.com) Windows | 9.00.30729.1 | Bundles of the MSVC 9 (VS 2008) runtime / Proprietary |
| [werkzeug](http://werkzeug.pocoo.org/) | 0.11.10 | A WSGI utility library for Python / BSD |
| [wheel](http://bitbucket.org/pypa/wheel/) | 0.29.0 | Built-package format for Python / MIT |
| [xlrd](http://www.lexicon.net/sjmachin/xlrd.htm) | 1.0.0 | Extract data from Microsoft Excel spreadsheet files / BSD |
| [xlsxwriter](https://github.com/jmcnamara/XlsxWriter) | 0.9.2 | A Python module for creating Excel XLSX files / BSD |
| [xlwings](http://xlwings.org/) Mac Windows | 0.7.2 | Interact with Excel from Python and vice versa / 3-clause BSD |
| [xlwt](http://www.python-excel.org/) | 1.1.2 | Writing data and formatting information to Excel files / BSD |
| [xz](http://tukaani.org/xz/) Linux Mac | 5.2.2 | Data compression software with high compression ratio / Public-Domain, GPL |
| [yaml](http://www.yaml.org/) Linux Mac | 0.1.6 | A human friendly data serialization standard / MIT |
| [zeromq](http://zeromq.org) Linux | 4.1.4 | Distributed messaging / LGPL |
| [zlib](http://zlib.net/) | 1.2.8 | Unobtrusive compression library / zlib |
| Name | Version | Summary / License |
|---|---|---|
| [alabaster](https://github.com/bitprophet/alabaster) | 0.7.7 | configurable sidebar-enabled Sphinx theme / BSD |
| [anaconda-client](http://anaconda.org) | 1.4.0 | anaconda.org command line client library / BSD |
| [anaconda-navigator](https://github.com/ContinuumIO/navigator) | 1.1.0 | Anaconda Navigator / proprietary - Continuum Analytics, Inc. |
| [appnope](http://github.com/minrk/appnope) Mac | 0.1.0 | Disable App Nap on OS X 10.9 / BSD |
| [appscript](http://appscript.sourceforge.net/) Mac | 1.0.1 | Control AppleScriptable applications from Python / Public-Domain |
| [argcomplete](https://github.com/kislyuk/argcomplete) | 1.0.0 | Bash tab completion for argparse. Tab complete all the things! / Apache |
| [astropy](http://www.astropy.org/) | 1.1.2 | Community-developed python astronomy tools / BSD |
| [babel](http://babel.pocoo.org/) | 2.2.0 | Internationalization utilities / BSD |
| [beautifulsoup4](http://www.crummy.com/software/BeautifulSoup/) | 4.4.1 | screen-scraping library / MIT |
| [bitarray](https://github.com/ilanschnell/bitarray) | 0.8.1 | efficient arrays of booleans – C extension / PSF |
| [blaze](http://blaze.pydata.org) | 0.9.1 | Blaze is the next generation of NumPy / BSD |
| [bokeh](http://github.com/bokeh/bokeh) | 0.11.1 | statistical and novel interactive HTML plots for Python / BSD |
| [boto](https://github.com/boto/boto/) | 2.39.0 | Amazon Web Services Library / MIT |
| [bottleneck](http://berkeleyanalytics.com/bottleneck) | 1.0.0 | Fast NumPy array functions written in Cython. / Simplified BSD |
| [bzip2](http://www.bzip.org/) Windows | 1.0.6 | high-quality data compressor / BSD |
| [cffi](http://cffi.readthedocs.org) | 1.5.2 | Foreign Function Interface for Python calling C code / MIT |
| [chest](https://github.com/ContinuumIO/chest) | 0.2.3 | a dictionary that spills to disk / BSD |
| [cloudpickle](https://github.com/cloudpipe/cloudpickle) | 0.1.1 | Extended pickling support for Python objects / as-is |
| [clyent](https://github.com/binstar/clyent) | 1.2.1 | Command line client Library for windows and posix / BSD |
| [colorama](http://code.google.com/p/colorama/) | 0.3.7 | Cross-platform colored terminal text. / BSD |
| [comtypes](http://starship.python.net/crew/theller/comtypes/) Windows | 1.1.2 | pure Python COM package / MIT |
| [conda](http://conda.pydata.org/) | 4.0.5 | cross-platform, Python-agnostic binary package manager / BSD |
| [conda-build](https://github.com/conda/conda-build) | 1.20.0 | Commands and tools for building conda packages / BSD |
| [conda-env](https://github.com/conda/conda-env/) | 2.4.5 | provides a unified interface to dealing with Conda environments / BSD |
| [conda-manager](https://github.com/spyder-ide/conda-manager) | 0.3.1 | Graphical conda package manager / MIT |
| [configobj](http://www.voidspace.org.uk/python/configobj.html) | 5.0.6 | Config file reading, writing and validation / BSD |
| [cryptography](https://github.com/pyca/cryptography) | 1.3 | provides cryptographic recipes and primitives to Python developers / Apache |
| [curl](http://curl.haxx.se/) | 7.45.0 | tool and library for transferring data with URL syntax / MIT/X derivate |
| [cycler](http://matplotlib.org/cycler/) | 0.10.0 | Composable style cycles / BSD |
| [cython](http://www.cython.org/) | 0.23.4 | The Cython compiler for writing C extensions for the Python language / Apache |
| [cytoolz](https://github.com/pytoolz/cytoolz) | 0.7.5 | Cython implementation of Toolz, high performance functional utilities / BSD |
| [dask](http://dask.pydata.org/en/latest/) | 0.8.1 | Task scheduling and blocked algorithms for parallel processing / BSD |
| [datashape](http://datashape.pydata.org) | 0.5.1 | A data description language / BSD |
| [decorator](http://pypi.python.org/pypi/decorator) | 4.0.9 | Better living through Python with decorators / BSD |
| [dill](http://www.cacr.caltech.edu/~mmckerns/dill.htm) | 0.2.4 | Serialize all of python (almost) / 3-clause BSD |
| [docutils](http://docutils.sourceforge.net) | 0.12 | Utilities for general- and special-purpose documentation / Public-Domain, PSF, 2-clause BSD, GPLv3 |
| [dynd-python](https://github.com/libdynd/dynd-python) | 0.7.2 | Python exposure of DyND / BSD |
| [et\_xmlfile](https://bitbucket.org/openpyxl/et_xmlfile) | 1.0.1 | implementation of lxml.xmlfile for the standard library / MIT |
| [fastcache](https://github.com/pbrady/fastcache) | 1.0.2 | C implementation of Python 3 functools.lru\_cache / MIT |
| [flask](http://flask.pocoo.org/) | 0.10.1 | A microframework based on Werkzeug, Jinja2 and good intentions / BSD |
| [flask-cors](https://github.com/corydolphin/flask-cors) | 2.1.2 | flask extension adding a decorator for CORS support / MIT |
| [fontconfig](http://www.freedesktop.org/wiki/Software/fontconfig/) Linux | 2.11.1 | Fontconfig is a library for configuring and customizing font access / BSD |
| [freetype](http://freetype.sourceforge.net/index2.html) | 2.5.5 | A Free, High-Quality, and Portable Font Engine / FreeType License |
| [gevent](http://www.gevent.org/) | 1.1.0 | Coroutine-based network library / MIT |
| [greenlet](http://pypi.python.org/pypi/greenlet/) | 0.4.9 | lightweight in-process concurrent programming / MIT |
| [h5py](http://code.google.com/p/h5py/) | 2.5.0 | read and write HDF5 files from Python / 3-clause BSD |
| [hdf5](http://www.hdfgroup.org/HDF5/) | 1.8.15.1 | HDF5 is a data model, library, and file format for storing and managing data / BSD-like |
| [heapdict](http://stutzbachenterprises.com/) | 1.0.0 | a heap with decrease-key and increase-key operations / BSD |
| [idna](https://github.com/kjd/idna) | 2.0 | Internationalized Domain Names in Applications / BSD |
| [ipykernel](http://ipython.org) | 4.3.1 | IPython Kernel for Jupyter / BSD |
| [ipython](http://ipython.org/) | 4.1.2 | Productive Interactive Computing / BSD |
| [ipython\_genutils](http://jupyter.org) | 0.1.0 | vestigial utilities from IPython / BSD |
| [ipywidgets](http://github.com/jakevdp/ipywidgets) | 4.1.1 | IPython Static Widgets / BSD |
| [itsdangerous](http://github.com/mitsuhiko/itsdangerous) | 0.24 | Various helpers to pass trusted data to untrusted environments and back. / BSD |
| [jbig](https://www.cl.cam.ac.uk/~mgk25/jbigkit) Linux Mac | 2.1 | implementation of the JBIG1 data compression standard / GPL2 |
| [jdcal](http://github.com/phn/jdcal) | 1.2 | Julian dates from proleptic Gregorian and Julian calendars. / BSD |
| [jedi](https://github.com/davidhalter/jedi) | 0.9.0 | / MIT |
| [jinja2](http://jinja.pocoo.org/docs/) | 2.8 | An easy to use stand-alone template engine written in pure python. / BSD |
| [jpeg](http://www.ijg.org/) | 8d | read/write jpeg COM, EXIF, IPTC medata / Custom free software license |
| [jsonschema](http://github.com/Julian/jsonschema) | 2.4.0 | An implementation of JSON Schema validation for Python / MIT |
| [jupyter](http://jupyter.org) | 1.0.0 | Jupyter metapackage / BSD |
| [jupyter\_client](http://jupyter.org) | 4.2.2 | Jupyter protocol implementation and client libraries / BSD |
| [jupyter\_console](http://jupyter.org) | 4.1.1 | Jupyter terminal console / BSD |
| [jupyter\_core](http://jupyter.org) | 4.1.0 | base package on which Jupyter projects rely / BSD |
| [libdynd](https://github.com/libdynd/libdynd) | 0.7.2 | C++ dynamic ndarray library / BSD |
| [libffi](https://github.com/atgreen/libffi) Linux | 3.0.13 | A portable foreign-function interface library / MIT |
| libgfortran Linux | 3.0 | GNU Fortran runtime library / GPL3 |
| [libpng](http://www.libpng.org/pub/png/libpng.html) | 1.6.17 | libpng is the official PNG reference library / libpng license |
| [libsodium](http://libsodium.org) Linux Windows | 1.0.3 | a modern software library for encryption, signatures, password hashing, etc. / MIT |
| [libtiff](http://www.libtiff.org/) | 4.0.6 | tiff image library / BSD-like |
| [libxml2](http://xmlsoft.org/) Linux Mac | 2.9.2 | The XML C parser and toolkit of Gnome / MIT |
| [libxslt](http://xmlsoft.org/) Linux Mac | 1.1.28 | Libxslt is the XSLT C library developed for the GNOME project / MIT |
| [llvmlite](https://github.com/numba/llvmlite) | 0.9.0 | lightweight wrapper around basic LLVM functionality / BSD |
| [locket](http://github.com/mwilliamson/locket.py) | 0.2.0 | File based locks / BSD |
| [lxml](http://lxml.de/) | 3.6.0 | XML processing library combining libxml2/libxslt with the ElementTree API / BSD |
| [markupsafe](http://github.com/mitsuhiko/markupsafe) | 0.23 | Implements a XML/HTML/XHTML Markup safe string for Python / BSD |
| [matplotlib](http://matplotlib.sourceforge.net/) | 1.5.1 | Python plotting package / PSF-based |
| [menuinst](https://github.com/ContinuumIO/menuinst) Windows | 1.3.2 | cross platform install of menu items / BSD |
| [mistune](https://github.com/lepture/mistune) | 0.7.2 | The fastest markdown parser in pure Python with renderer feature / BSD |
| [mkl](http://software.intel.com/en-us/articles/intel-mkl/) | 11.3.1 | math library for Intel and compatible processors / proprietary - Intel |
| [mkl-service](https://github.com/ContinuumIO/mkl-service) | 1.1.2 | Python bindings to MKL service functions / 3-clause BSD |
| [mpmath](http://mpmath.org) | 0.19 | Python library for arbitrary-precision floating-point arithmetic / BSD |
| [multipledispatch](http://github.com/mrocklin/multipledispatch/) | 0.4.8 | Multiple dispatch / BSD |
| [nbconvert](http://jupyter.org) | 4.1.0 | converts notebooks to various other formats via Jinja templates / BSD |
| [nbformat](http://jupyter.org) | 4.0.1 | the base implementation of the Jupyter Notebook format / BSD |
| [networkx](http://networkx.lanl.gov/) | 1.11 | Python package for creating and manipulating graphs and networks / BSD |
| [nltk](http://nltk.org/) | 3.2 | Natural Language Toolkit / Apache |
| [nose](http://readthedocs.org/docs/nose/) | 1.3.7 | nose extends unittest to make testing easier / LGPL |
| [notebook](http://jupyter.org) | 4.1.0 | a web-based notebook environment for interactive computing / BSD |
| [numba](http://continuum.io/developer-resources.html) | 0.24.0 | compiling Python code using LLVM / BSD |
| [numexpr](https://github.com/pydata/numexpr) | 2.5 | fast numerical expression evaluator for NumPy / MIT |
| [numpy](http://numpy.scipy.org/) | 1.10.4 | array processing for numbers, strings, records, and objects. / BSD |
| [odo](http://odo.pydata.org/en/latest/) | 0.4.2 | Data Migration for Blaze Project / BSD |
| [openpyxl](http://openpyxl.readthedocs.org) | 2.3.2 | A Python library to read/write Excel 2007 xlsx/xlsm files / MIT |
| [openssl](http://www.openssl.org/) | 1.0.2g | OpenSSL is an open-source implementation of the SSL and TLS protocols / Apache-style |
| [pandas](http://pandas.pydata.org/) | 0.18.0 | Powerful data structures for data analysis, time series,and statistics / BSD |
| [partd](https://github.com/mrocklin/partd) | 0.3.2 | Appendable key-value byte store / BSD |
| [patchelf](http://nixos.org/patchelf.html) Linux | 0.8 | a small utility to modify the dynamic linker and RPATH of ELF executables / GPL3 |
| [path.py](http://github.com/jaraco/path.py) | 8.1.2 | module wrapper for os.path / MIT |
| [patsy](https://github.com/pydata/patsy) | 0.4.0 | a library for describing statistical models and building design matrices. / BSD |
| [pep8](http://pep8.readthedocs.org/) | 1.7.0 | Python style guide checker / MIT |
| [pexpect](http://pexpect.readthedocs.org/) Linux Mac | 4.0.1 | Pexpect allows easy control of interactive console applications / ISC |
| [pickleshare](https://github.com/vivainio/pickleshare) | 0.5 | tiny shelve-like database with concurrency support / MIT |
| [pillow](http://python-pillow.github.io/) | 3.1.1 | Python Imaging Library (Fork) / PIL license |
| [pip](http://www.pip-installer.org/) | 8.1.1 | PyPA recommended tool for installing Python packages / MIT |
| [ply](http://www.dabeaz.com/ply/) | 3.8 | Python Lex & Yacc / BSD |
| [psutil](https://github.com/giampaolo/psutil) | 4.1.0 | cross-platform process and system utilities module for Python / BSD |
| [ptyprocess](https://github.com/pexpect/ptyprocess) Linux Mac | 0.5 | Run a subprocess in a pseudo terminal / ISC |
| [py](http://pylib.readthedocs.org/) | 1.4.31 | library with cross-python path, ini-parsing, io, code, log facilities / MIT |
| [pyasn1](http://sourceforge.net/projects/pyasn1/) | 0.1.9 | Offline IP address to Autonomous System Number lookup module / BSD |
| [pycosat](https://github.com/ilanschnell/pycosat) | 0.6.1 | bindings to picosat (a SAT solver) / MIT |
| [pycparser](https://github.com/eliben/pycparser) | 2.14 | C parser in Python / BSD |
| [pycrypto](http://www.pycrypto.org/) | 2.6.1 | Cryptographic modules for Python. / Public-Domain |
| [pycurl](http://pycurl.sourceforge.net/) Linux Mac | 7.19.5.3 | PycURL – cURL library module for Python / LGPL, MIT |
| [pyflakes](https://launchpad.net/pyflakes) | 1.1.0 | passive checker of Python programs / MIT |
| [pygments](http://pygments.org/) | 2.1.1 | Pygments is a syntax highlighting package written in Python / BSD |
| [pyopenssl](https://github.com/pyca/pyopenssl) | 0.15.1 | Python wrapper module around the OpenSSL library / Apache |
| [pyparsing](http://pyparsing.wikispaces.com/) | 2.0.3 | Python parsing module / MIT |
| [pyqt](http://www.riverbankcomputing.co.uk/software/pyqt) | 4.11.4 | PyQt is a Python binding of the cross-platform GUI toolkit Qt / Commercial, GPLv2, GPLv3 |
| [pyreadline](http://ipython.org/pyreadline.html) Windows | 2.1 | A python implmementation of GNU readline. / BSD |
| [pytables](http://www.pytables.org) | 3.2.2 | brings together Python, HDF5 and NumPy to easily handle large amounts of data / BSD |
| [pytest](http://pytest.org/) | 2.8.5 | simple powerful testing with Python / MIT |
| [python](http://www.python.org/) | 3.5.1 | general purpose programming language / PSF |
| [python-dateutil](https://dateutil.readthedocs.org/) | 2.5.1 | Extensions to the standard Python datetime module / BSD |
| [pytz](http://pytz.sourceforge.net/) | 2016.2 | World timezone definitions, modern and historical / MIT |
| [pywin32](http://sourceforge.net/projects/pywin32/) Windows | 220 | Python extensions for Windows / PSF |
| [pyyaml](http://pyyaml.org/wiki/PyYAML) | 3.11 | YAML parser and emitter for Python / MIT |
| [pyzmq](https://github.com/zeromq/pyzmq) | 15.2.0 | zeromq bindings for Python / LGPL and BSD |
| [qt](http://qt-project.org) | 4.8.7 | Qt is a cross-platform application and UI framework / LGPL |
| [qtawesome](https://github.com/spyder-ide/qtawesome) | 0.3.2 | FontAwesome icons in PyQt and PySide applications / MIT |
| [qtconsole](http://jupyter.org) | 4.2.0 | Jupyter Qt Console / BSD |
| [qtpy](https://github.com/spyder-ide/qtpy) | 1.0 | Provides an uniform layer to support PyQt4, PyQt5 and PySide with a single codebase / MIT |
| [readline](http://cnswww.cns.cwru.edu/php/chet/readline/rltop.html) Linux Mac | 6.2 | line-editing for programs with a command-line interface / GPL3 |
| [redis](http://redis.io/download/) Linux Mac | 2.6.9 | Redis is an open source, BSD licensed, advanced key-value cache and store / 3-clause BSD |
| [redis-py](https://github.com/andymccurdy/redis-py/) Linux Mac | 2.10.3 | Redis Python Client / MIT |
| [requests](http://docs.python-requests.org/en/latest/index.html) | 2.9.1 | Python HTTP for Humans / Apache |
| [rope](http://rope.sourceforge.net/) | 0.9.4 | a python refactoring library / GPL |
| [scikit-image](http://scikit-image.org/) | 0.12.3 | Image processing routines for SciPy / 3-clause BSD |
| [scikit-learn](http://scikit-learn.org/stable/) | 0.17.1 | A set of python modules for machine learning and data mining / 3-clause BSD |
| [scipy](http://www.scipy.org/) | 0.17.0 | Scientific Library for Python / BSD |
| [setuptools](https://pypi.python.org/pypi/setuptools) | 20.3 | Easily download, build, install, upgrade, and uninstall Python packages / PSF or ZPL |
| [simplegeneric](http://cheeseshop.python.org/pypi/simplegeneric) | 0.8.1 | lets you define simple single-dispatch generic functions / ZPL 2.1 |
| [singledispatch](http://docs.python.org/3/library/functools.html#functools.singledispatch) | 3.4.0.3 | brings functools.singledispatch from Python 3.4 to Python 2.6-3.3 / MIT |
| [sip](http://www.riverbankcomputing.com/software/sip/intro) | 4.16.9 | / GPL3 |
| [six](http://pypi.python.org/pypi/six/) | 1.10.0 | Python 2 and 3 compatibility utilities / MIT |
| [snowballstemmer](https://github.com/shibukawa/snowball_py) | 1.2.1 | provides 16 stemmer algorithms generated from Snowball algorithms / BSD |
| [sockjs-tornado](http://github.com/mrjoes/sockjs-tornado/) | 1.0.1 | SockJS python server implementation on top of Tornado framework / MIT |
| [sphinx](http://sphinx-doc.org) | 1.3.5 | Python documentation generator / BSD |
| [sphinx\_rtd\_theme](https://github.com/snide/sphinx_rtd_theme/) | 0.1.9 | ReadTheDocs.org theme for Sphinx / BSD |
| [spyder](https://github.com/spyder-ide/spyder) | 2.3.8 | Scientific PYthon Development EnviRonment / MIT |
| [sqlalchemy](http://www.sqlalchemy.org/) | 1.0.12 | Database Abstraction Library / MIT |
| [sqlite](http://www.sqlite.org/) Linux Mac | 3.9.2 | self-contained, zero-configuration, SQL database engine / Public-Domain |
| [statsmodels](http://statsmodels.sourceforge.net/) | 0.6.1 | Statistical computations and models for use with SciPy / 3-clause BSD |
| [sympy](http://sympy.org) | 1.0 | SymPy is a Python library for symbolic mathematics / 3-clause BSD |
| [terminado](https://github.com/takluyver/terminado) Linux Mac | 0.5 | Terminals served to term.js using Tornado websockets / BSD |
| [tk](http://www.tcl.tk/) | 8.5.18 | dynamic programming language with GUI elements / BSD-like |
| [toolz](http://toolz.readthedocs.org/en/latest/) | 0.7.4 | List processing tools and functional utilities / BSD |
| [tornado](http://www.tornadoweb.org/) | 4.3 | a Python web framework and asynchronous networking library / Apache |
| [traitlets](http://ipython.org/) | 4.2.1 | configuration system for Python applications / BSD |
| [unicodecsv](https://github.com/jdunck/python-unicodecsv) | 0.14.1 | The unicodecsv file reads and decodes byte strings for you / BSD |
| [util-linux](http://freecode.com/projects/util-linux) Linux | 2.21 | Util-linux is a suite of essential utilities for any Linux system / GPL2 |
| [vs2015\_runtime](http://www.microsoft.com) Windows | 14.00.23026.0 | Bundles of the MSVC 14 (VS 2015) runtime / Proprietary |
| [werkzeug](http://werkzeug.pocoo.org/) | 0.11.4 | The Swiss Army knife of Python web development / BSD |
| [wheel](http://bitbucket.org/pypa/wheel/) | 0.29.0 | built-package format for Python / MIT |
| [xlrd](http://www.lexicon.net/sjmachin/xlrd.htm) | 0.9.4 | extract data from Microsoft Excel spreadsheet files / BSD |
| [xlsxwriter](https://github.com/jmcnamara/XlsxWriter) | 0.8.4 | A Python module for creating Excel XLSX files / BSD |
| [xlwings](http://xlwings.org/) Mac Windows | 0.7.0 | Make Excel fly. Interact with Excel from Python and vice versa / 3-clause BSD |
| [xlwt](http://www.python-excel.org/) | 1.0.0 | writing data and formatting information to Excel files / BSD |
| [xz](http://tukaani.org/xz/) Linux Mac | 5.0.5 | data compression software with high compression ratio / Public-Domain, GPLv2 |
| [yaml](http://www.yaml.org/) Linux Mac | 0.1.6 | a human friendly data serialization standard for all programming languages / MIT |
| [zeromq](http://zeromq.org) Linux Mac | 4.1.3 | a messaging system, or “message-oriented middleware” / LGPL |
| [zlib](http://zlib.net/) | 1.2.8 | massively spiffy yet delicately unobtrusive compression library / zlib |
| Name | Version | Summary / License |
|---|---|---|
| [alabaster](https://github.com/bitprophet/alabaster) | 0.7.7 | configurable sidebar-enabled Sphinx theme / BSD |
| [anaconda-client](http://anaconda.org) | 1.4.0 | anaconda.org command line client library / BSD |
| [anaconda-navigator](https://github.com/ContinuumIO/navigator) | 1.1.0 | Anaconda Navigator / proprietary - Continuum Analytics, Inc. |
| [appnope](http://github.com/minrk/appnope) Mac | 0.1.0 | Disable App Nap on OS X 10.9 / BSD |
| [appscript](http://appscript.sourceforge.net/) Mac | 1.0.1 | Control AppleScriptable applications from Python / Public-Domain |
| [argcomplete](https://github.com/kislyuk/argcomplete) | 1.0.0 | Bash tab completion for argparse. Tab complete all the things! / Apache |
| [astropy](http://www.astropy.org/) | 1.1.2 | Community-developed python astronomy tools / BSD |
| [babel](http://babel.pocoo.org/) | 2.2.0 | Internationalization utilities / BSD |
| [backports\_abc](https://github.com/cython/backports_abc) | 0.4 | backport of recent additions to the ‘collections.abc’ module / PSF |
| [beautifulsoup4](http://www.crummy.com/software/BeautifulSoup/) | 4.4.1 | screen-scraping library / MIT |
| [bitarray](https://github.com/ilanschnell/bitarray) | 0.8.1 | efficient arrays of booleans – C extension / PSF |
| [blaze](http://blaze.pydata.org) | 0.9.1 | Blaze is the next generation of NumPy / BSD |
| [bokeh](http://github.com/bokeh/bokeh) | 0.11.1 | statistical and novel interactive HTML plots for Python / BSD |
| [boto](https://github.com/boto/boto/) | 2.39.0 | Amazon Web Services Library / MIT |
| [bottleneck](http://berkeleyanalytics.com/bottleneck) | 1.0.0 | Fast NumPy array functions written in Cython. / Simplified BSD |
| [bzip2](http://www.bzip.org/) Windows | 1.0.6 | high-quality data compressor / BSD |
| [cairo](http://cairographics.org/) Linux | 1.12.18 | Cairo is a 2D graphics library with support for multiple output devices. / LGPL 2.1, MPL 1.1 |
| [cdecimal](http://www.bytereef.org/mpdecimal/index.html) | 2.3 | Fast drop-in replacement for decimal.py / BSD |
| [cffi](http://cffi.readthedocs.org) | 1.5.2 | Foreign Function Interface for Python calling C code / MIT |
| [chest](https://github.com/ContinuumIO/chest) | 0.2.3 | a dictionary that spills to disk / BSD |
| [cloudpickle](https://github.com/cloudpipe/cloudpickle) | 0.1.1 | Extended pickling support for Python objects / as-is |
| [clyent](https://github.com/binstar/clyent) | 1.2.1 | Command line client Library for windows and posix / BSD |
| [colorama](http://code.google.com/p/colorama/) | 0.3.7 | Cross-platform colored terminal text. / BSD |
| [comtypes](http://starship.python.net/crew/theller/comtypes/) Windows | 1.1.2 | pure Python COM package / MIT |
| [conda](http://conda.pydata.org/) | 4.0.5 | cross-platform, Python-agnostic binary package manager / BSD |
| [conda-build](https://github.com/conda/conda-build) | 1.20.0 | Commands and tools for building conda packages / BSD |
| [conda-env](https://github.com/conda/conda-env/) | 2.4.5 | provides a unified interface to dealing with Conda environments / BSD |
| [conda-manager](https://github.com/spyder-ide/conda-manager) | 0.3.1 | Graphical conda package manager / MIT |
| [configobj](http://www.voidspace.org.uk/python/configobj.html) | 5.0.6 | Config file reading, writing and validation / BSD |
| [cryptography](https://github.com/pyca/cryptography) | 1.3 | provides cryptographic recipes and primitives to Python developers / Apache |
| [curl](http://curl.haxx.se/) | 7.45.0 | tool and library for transferring data with URL syntax / MIT/X derivate |
| [cycler](http://matplotlib.org/cycler/) | 0.10.0 | Composable style cycles / BSD |
| [cython](http://www.cython.org/) | 0.23.4 | The Cython compiler for writing C extensions for the Python language / Apache |
| [cytoolz](https://github.com/pytoolz/cytoolz) | 0.7.5 | Cython implementation of Toolz, high performance functional utilities / BSD |
| [dask](http://dask.pydata.org/en/latest/) | 0.8.1 | Task scheduling and blocked algorithms for parallel processing / BSD |
| [datashape](http://datashape.pydata.org) | 0.5.1 | A data description language / BSD |
| [decorator](http://pypi.python.org/pypi/decorator) | 4.0.9 | Better living through Python with decorators / BSD |
| [dill](http://www.cacr.caltech.edu/~mmckerns/dill.htm) | 0.2.4 | Serialize all of python (almost) / 3-clause BSD |
| [docutils](http://docutils.sourceforge.net) | 0.12 | Utilities for general- and special-purpose documentation / Public-Domain, PSF, 2-clause BSD, GPLv3 |
| [dynd-python](https://github.com/libdynd/dynd-python) Linux Mac | 0.7.2 | Python exposure of DyND / BSD |
| [enum34](https://pypi.python.org/pypi/enum34) | 1.1.2 | Robust enumerated type support in Python / BSD |
| [et\_xmlfile](https://bitbucket.org/openpyxl/et_xmlfile) | 1.0.1 | implementation of lxml.xmlfile for the standard library / MIT |
| [fastcache](https://github.com/pbrady/fastcache) | 1.0.2 | C implementation of Python 3 functools.lru\_cache / MIT |
| [flask](http://flask.pocoo.org/) | 0.10.1 | A microframework based on Werkzeug, Jinja2 and good intentions / BSD |
| [flask-cors](https://github.com/corydolphin/flask-cors) | 2.1.2 | flask extension adding a decorator for CORS support / MIT |
| [fontconfig](http://www.freedesktop.org/wiki/Software/fontconfig/) Linux | 2.11.1 | Fontconfig is a library for configuring and customizing font access / BSD |
| [freetype](http://freetype.sourceforge.net/index2.html) | 2.5.5 | A Free, High-Quality, and Portable Font Engine / FreeType License |
| [funcsigs](http://funcsigs.readthedocs.org/) | 0.4 | Python function signatures from PEP362 for Python 2.6, 2.7 and 3.2+ / Apache |
| [futures](http://code.google.com/p/pythonfutures) | 3.0.3 | Backport of the concurrent.futures package from Python 3.2 / BSD |
| [gevent](http://www.gevent.org/) | 1.1.0 | Coroutine-based network library / MIT |
| [greenlet](http://pypi.python.org/pypi/greenlet/) | 0.4.9 | lightweight in-process concurrent programming / MIT |
| [grin](http://pypi.python.org/pypi/grin) | 1.2.1 | grep program configured the way Robert Kern likes it / BSD |
| [h5py](http://code.google.com/p/h5py/) | 2.5.0 | read and write HDF5 files from Python / 3-clause BSD |
| [hdf5](http://www.hdfgroup.org/HDF5/) | 1.8.15.1 | HDF5 is a data model, library, and file format for storing and managing data / BSD-like |
| [heapdict](http://stutzbachenterprises.com/) | 1.0.0 | a heap with decrease-key and increase-key operations / BSD |
| [idna](https://github.com/kjd/idna) | 2.0 | Internationalized Domain Names in Applications / BSD |
| [ipaddress](https://github.com/phihag/ipaddress) | 1.0.14 | IPv4/IPv6 manipulation library / PSF |
| [ipykernel](http://ipython.org) | 4.3.1 | IPython Kernel for Jupyter / BSD |
| [ipython](http://ipython.org/) | 4.1.2 | Productive Interactive Computing / BSD |
| [ipython\_genutils](http://jupyter.org) | 0.1.0 | vestigial utilities from IPython / BSD |
| [ipywidgets](http://github.com/jakevdp/ipywidgets) | 4.1.1 | IPython Static Widgets / BSD |
| [itsdangerous](http://github.com/mitsuhiko/itsdangerous) | 0.24 | Various helpers to pass trusted data to untrusted environments and back. / BSD |
| [jbig](https://www.cl.cam.ac.uk/~mgk25/jbigkit) Linux Mac | 2.1 | implementation of the JBIG1 data compression standard / GPL2 |
| [jdcal](http://github.com/phn/jdcal) | 1.2 | Julian dates from proleptic Gregorian and Julian calendars. / BSD |
| [jedi](https://github.com/davidhalter/jedi) | 0.9.0 | / MIT |
| [jinja2](http://jinja.pocoo.org/docs/) | 2.8 | An easy to use stand-alone template engine written in pure python. / BSD |
| [jpeg](http://www.ijg.org/) | 8d | read/write jpeg COM, EXIF, IPTC medata / Custom free software license |
| [jsonschema](http://github.com/Julian/jsonschema) | 2.4.0 | An implementation of JSON Schema validation for Python / MIT |
| [jupyter](http://jupyter.org) | 1.0.0 | Jupyter metapackage / BSD |
| [jupyter\_client](http://jupyter.org) | 4.2.2 | Jupyter protocol implementation and client libraries / BSD |
| [jupyter\_console](http://jupyter.org) | 4.1.1 | Jupyter terminal console / BSD |
| [jupyter\_core](http://jupyter.org) | 4.1.0 | base package on which Jupyter projects rely / BSD |
| [libdynd](https://github.com/libdynd/libdynd) Linux Mac | 0.7.2 | C++ dynamic ndarray library / BSD |
| [libffi](https://github.com/atgreen/libffi) Linux | 3.0.13 | A portable foreign-function interface library / MIT |
| libgfortran Linux | 3.0 | GNU Fortran runtime library / GPL3 |
| [libpng](http://www.libpng.org/pub/png/libpng.html) | 1.6.17 | libpng is the official PNG reference library / libpng license |
| [libsodium](http://libsodium.org) Linux Windows | 1.0.3 | a modern software library for encryption, signatures, password hashing, etc. / MIT |
| [libtiff](http://www.libtiff.org/) | 4.0.6 | tiff image library / BSD-like |
| [libxml2](http://xmlsoft.org/) Linux Mac | 2.9.2 | The XML C parser and toolkit of Gnome / MIT |
| [libxslt](http://xmlsoft.org/) Linux Mac | 1.1.28 | Libxslt is the XSLT C library developed for the GNOME project / MIT |
| [llvmlite](https://github.com/numba/llvmlite) | 0.9.0 | lightweight wrapper around basic LLVM functionality / BSD |
| [locket](http://github.com/mwilliamson/locket.py) | 0.2.0 | File based locks / BSD |
| [lxml](http://lxml.de/) | 3.6.0 | XML processing library combining libxml2/libxslt with the ElementTree API / BSD |
| [markupsafe](http://github.com/mitsuhiko/markupsafe) | 0.23 | Implements a XML/HTML/XHTML Markup safe string for Python / BSD |
| [matplotlib](http://matplotlib.sourceforge.net/) | 1.5.1 | Python plotting package / PSF-based |
| [menuinst](https://github.com/ContinuumIO/menuinst) Windows | 1.3.2 | cross platform install of menu items / BSD |
| [mistune](https://github.com/lepture/mistune) | 0.7.2 | The fastest markdown parser in pure Python with renderer feature / BSD |
| [mkl](http://software.intel.com/en-us/articles/intel-mkl/) | 11.3.1 | math library for Intel and compatible processors / proprietary - Intel |
| [mkl-service](https://github.com/ContinuumIO/mkl-service) | 1.1.2 | Python bindings to MKL service functions / 3-clause BSD |
| [mpmath](http://mpmath.org) | 0.19 | Python library for arbitrary-precision floating-point arithmetic / BSD |
| [multipledispatch](http://github.com/mrocklin/multipledispatch/) | 0.4.8 | Multiple dispatch / BSD |
| [nbconvert](http://jupyter.org) | 4.1.0 | converts notebooks to various other formats via Jinja templates / BSD |
| [nbformat](http://jupyter.org) | 4.0.1 | the base implementation of the Jupyter Notebook format / BSD |
| [networkx](http://networkx.lanl.gov/) | 1.11 | Python package for creating and manipulating graphs and networks / BSD |
| [nltk](http://nltk.org/) | 3.2 | Natural Language Toolkit / Apache |
| [nose](http://readthedocs.org/docs/nose/) | 1.3.7 | nose extends unittest to make testing easier / LGPL |
| [notebook](http://jupyter.org) | 4.1.0 | a web-based notebook environment for interactive computing / BSD |
| [numba](http://continuum.io/developer-resources.html) | 0.24.0 | compiling Python code using LLVM / BSD |
| [numexpr](https://github.com/pydata/numexpr) | 2.5 | fast numerical expression evaluator for NumPy / MIT |
| [numpy](http://numpy.scipy.org/) | 1.10.4 | array processing for numbers, strings, records, and objects. / BSD |
| [odo](http://odo.pydata.org/en/latest/) | 0.4.2 | Data Migration for Blaze Project / BSD |
| [openpyxl](http://openpyxl.readthedocs.org) | 2.3.2 | A Python library to read/write Excel 2007 xlsx/xlsm files / MIT |
| [openssl](http://www.openssl.org/) | 1.0.2g | OpenSSL is an open-source implementation of the SSL and TLS protocols / Apache-style |
| [pandas](http://pandas.pydata.org/) | 0.18.0 | Powerful data structures for data analysis, time series,and statistics / BSD |
| [partd](https://github.com/mrocklin/partd) | 0.3.2 | Appendable key-value byte store / BSD |
| [patchelf](http://nixos.org/patchelf.html) Linux | 0.8 | a small utility to modify the dynamic linker and RPATH of ELF executables / GPL3 |
| [path.py](http://github.com/jaraco/path.py) | 8.1.2 | module wrapper for os.path / MIT |
| [patsy](https://github.com/pydata/patsy) | 0.4.0 | a library for describing statistical models and building design matrices. / BSD |
| [pep8](http://pep8.readthedocs.org/) | 1.7.0 | Python style guide checker / MIT |
| [pexpect](http://pexpect.readthedocs.org/) Linux Mac | 4.0.1 | Pexpect allows easy control of interactive console applications / ISC |
| [pickleshare](https://github.com/vivainio/pickleshare) | 0.5 | tiny shelve-like database with concurrency support / MIT |
| [pillow](http://python-pillow.github.io/) | 3.1.1 | Python Imaging Library (Fork) / PIL license |
| [pip](http://www.pip-installer.org/) | 8.1.1 | PyPA recommended tool for installing Python packages / MIT |
| [pixman](http://cgit.freedesktop.org/pixman/) Linux | 0.32.6 | A low-level software library for pixel manipulation / MIT |
| [ply](http://www.dabeaz.com/ply/) | 3.8 | Python Lex & Yacc / BSD |
| [psutil](https://github.com/giampaolo/psutil) | 4.1.0 | cross-platform process and system utilities module for Python / BSD |
| [ptyprocess](https://github.com/pexpect/ptyprocess) Linux Mac | 0.5 | Run a subprocess in a pseudo terminal / ISC |
| [py](http://pylib.readthedocs.org/) | 1.4.31 | library with cross-python path, ini-parsing, io, code, log facilities / MIT |
| [pyasn1](http://sourceforge.net/projects/pyasn1/) | 0.1.9 | Offline IP address to Autonomous System Number lookup module / BSD |
| [pyaudio](http://people.csail.mit.edu/hubert/pyaudio/) Mac | 0.2.7 | Bindings for PortAudio v19, the cross-platform audio stream library / MIT |
| [pycairo](http://cairographics.org/pycairo/) Linux | 1.10.0 | Pycairo is a set of Python bindings for the cairo graphics library / LGPL 2.1, MPL 1.1 |
| [pycosat](https://github.com/ilanschnell/pycosat) | 0.6.1 | bindings to picosat (a SAT solver) / MIT |
| [pycparser](https://github.com/eliben/pycparser) | 2.14 | C parser in Python / BSD |
| [pycrypto](http://www.pycrypto.org/) | 2.6.1 | Cryptographic modules for Python. / Public-Domain |
| [pycurl](http://pycurl.sourceforge.net/) Linux Mac | 7.19.5.3 | PycURL – cURL library module for Python / LGPL, MIT |
| [pyflakes](https://launchpad.net/pyflakes) | 1.1.0 | passive checker of Python programs / MIT |
| [pygments](http://pygments.org/) | 2.1.1 | Pygments is a syntax highlighting package written in Python / BSD |
| [pyopenssl](https://github.com/pyca/pyopenssl) | 0.15.1 | Python wrapper module around the OpenSSL library / Apache |
| [pyparsing](http://pyparsing.wikispaces.com/) | 2.0.3 | Python parsing module / MIT |
| [pyqt](http://www.riverbankcomputing.co.uk/software/pyqt) | 4.11.4 | PyQt is a Python binding of the cross-platform GUI toolkit Qt / Commercial, GPLv2, GPLv3 |
| [pyreadline](http://ipython.org/pyreadline.html) Windows | 2.1 | A python implmementation of GNU readline. / BSD |
| [pytables](http://www.pytables.org) | 3.2.2 | brings together Python, HDF5 and NumPy to easily handle large amounts of data / BSD |
| [pytest](http://pytest.org/) | 2.8.5 | simple powerful testing with Python / MIT |
| [python](http://www.python.org/) | 2.7.11 | general purpose programming language / PSF |
| [python-dateutil](https://dateutil.readthedocs.org/) | 2.5.1 | Extensions to the standard Python datetime module / BSD |
| [pytz](http://pytz.sourceforge.net/) | 2016.2 | World timezone definitions, modern and historical / MIT |
| [pywin32](http://sourceforge.net/projects/pywin32/) Windows | 220 | Python extensions for Windows / PSF |
| [pyyaml](http://pyyaml.org/wiki/PyYAML) | 3.11 | YAML parser and emitter for Python / MIT |
| [pyzmq](https://github.com/zeromq/pyzmq) | 15.2.0 | zeromq bindings for Python / LGPL and BSD |
| [qt](http://qt-project.org) | 4.8.7 | Qt is a cross-platform application and UI framework / LGPL |
| [qtawesome](https://github.com/spyder-ide/qtawesome) | 0.3.2 | FontAwesome icons in PyQt and PySide applications / MIT |
| [qtconsole](http://jupyter.org) | 4.2.0 | Jupyter Qt Console / BSD |
| [qtpy](https://github.com/spyder-ide/qtpy) | 1.0 | Provides an uniform layer to support PyQt4, PyQt5 and PySide with a single codebase / MIT |
| [readline](http://cnswww.cns.cwru.edu/php/chet/readline/rltop.html) Linux Mac | 6.2 | line-editing for programs with a command-line interface / GPL3 |
| [redis](http://redis.io/download/) Linux Mac | 2.6.9 | Redis is an open source, BSD licensed, advanced key-value cache and store / 3-clause BSD |
| [redis-py](https://github.com/andymccurdy/redis-py/) Linux Mac | 2.10.3 | Redis Python Client / MIT |
| [requests](http://docs.python-requests.org/en/latest/index.html) | 2.9.1 | Python HTTP for Humans / Apache |
| [rope](http://rope.sourceforge.net/) | 0.9.4 | a python refactoring library / GPL |
| [scikit-image](http://scikit-image.org/) | 0.12.3 | Image processing routines for SciPy / 3-clause BSD |
| [scikit-learn](http://scikit-learn.org/stable/) | 0.17.1 | A set of python modules for machine learning and data mining / 3-clause BSD |
| [scipy](http://www.scipy.org/) | 0.17.0 | Scientific Library for Python / BSD |
| [setuptools](https://pypi.python.org/pypi/setuptools) | 20.3 | Easily download, build, install, upgrade, and uninstall Python packages / PSF or ZPL |
| [simplegeneric](http://cheeseshop.python.org/pypi/simplegeneric) | 0.8.1 | lets you define simple single-dispatch generic functions / ZPL 2.1 |
| [singledispatch](http://docs.python.org/3/library/functools.html#functools.singledispatch) | 3.4.0.3 | brings functools.singledispatch from Python 3.4 to Python 2.6-3.3 / MIT |
| [sip](http://www.riverbankcomputing.com/software/sip/intro) | 4.16.9 | / GPL3 |
| [six](http://pypi.python.org/pypi/six/) | 1.10.0 | Python 2 and 3 compatibility utilities / MIT |
| [snowballstemmer](https://github.com/shibukawa/snowball_py) | 1.2.1 | provides 16 stemmer algorithms generated from Snowball algorithms / BSD |
| [sockjs-tornado](http://github.com/mrjoes/sockjs-tornado/) | 1.0.1 | SockJS python server implementation on top of Tornado framework / MIT |
| [sphinx](http://sphinx-doc.org) | 1.3.5 | Python documentation generator / BSD |
| [sphinx\_rtd\_theme](https://github.com/snide/sphinx_rtd_theme/) | 0.1.9 | ReadTheDocs.org theme for Sphinx / BSD |
| [spyder](https://github.com/spyder-ide/spyder) | 2.3.8 | Scientific PYthon Development EnviRonment / MIT |
| [sqlalchemy](http://www.sqlalchemy.org/) | 1.0.12 | Database Abstraction Library / MIT |
| [sqlite](http://www.sqlite.org/) Linux Mac | 3.9.2 | self-contained, zero-configuration, SQL database engine / Public-Domain |
| [ssl\_match\_hostname](http://bitbucket.org/brandon/backports.ssl_match_hostname) | 3.4.0.2 | The ssl.match\_hostname() function from Python 3.4 / PSF |
| [statsmodels](http://statsmodels.sourceforge.net/) | 0.6.1 | Statistical computations and models for use with SciPy / 3-clause BSD |
| [sympy](http://sympy.org) | 1.0 | SymPy is a Python library for symbolic mathematics / 3-clause BSD |
| [terminado](https://github.com/takluyver/terminado) Linux Mac | 0.5 | Terminals served to term.js using Tornado websockets / BSD |
| [tk](http://www.tcl.tk/) | 8.5.18 | dynamic programming language with GUI elements / BSD-like |
| [toolz](http://toolz.readthedocs.org/en/latest/) | 0.7.4 | List processing tools and functional utilities / BSD |
| [tornado](http://www.tornadoweb.org/) | 4.3 | a Python web framework and asynchronous networking library / Apache |
| [traitlets](http://ipython.org/) | 4.2.1 | configuration system for Python applications / BSD |
| [unicodecsv](https://github.com/jdunck/python-unicodecsv) | 0.14.1 | The unicodecsv file reads and decodes byte strings for you / BSD |
| [util-linux](http://freecode.com/projects/util-linux) Linux | 2.21 | Util-linux is a suite of essential utilities for any Linux system / GPL2 |
| [vs2008\_runtime](http://www.microsoft.com) Windows | 9.00.30729.1 | Bundles of the MSVC 9 (VS 2008) runtime / Proprietary |
| [werkzeug](http://werkzeug.pocoo.org/) | 0.11.4 | The Swiss Army knife of Python web development / BSD |
| [wheel](http://bitbucket.org/pypa/wheel/) | 0.29.0 | built-package format for Python / MIT |
| [xlrd](http://www.lexicon.net/sjmachin/xlrd.htm) | 0.9.4 | extract data from Microsoft Excel spreadsheet files / BSD |
| [xlsxwriter](https://github.com/jmcnamara/XlsxWriter) | 0.8.4 | A Python module for creating Excel XLSX files / BSD |
| [xlwings](http://xlwings.org/) Mac Windows | 0.7.0 | Make Excel fly. Interact with Excel from Python and vice versa / 3-clause BSD |
| [xlwt](http://www.python-excel.org/) | 1.0.0 | writing data and formatting information to Excel files / BSD |
| [xz](http://tukaani.org/xz/) Linux Mac | 5.0.5 | data compression software with high compression ratio / Public-Domain, GPLv2 |
| [yaml](http://www.yaml.org/) Linux Mac | 0.1.6 | a human friendly data serialization standard for all programming languages / MIT |
| [zeromq](http://zeromq.org) Linux Mac | 4.1.3 | a messaging system, or “message-oriented middleware” / LGPL |
| [zlib](http://zlib.net/) | 1.2.8 | massively spiffy yet delicately unobtrusive compression library / zlib |
| Name | Version | Summary / License |
|---|---|---|
| [\_ipyw\_jlab\_nb\_ext\_conf](https://github.com/ContinuumIO/anaconda-nb-extensions-meta-config) | 0.1.0 | A configuration metapackage for enabling Anaconda-bundled jupyter extensions / BSD |
| [alabaster](http://www.sphinx-doc.org/en/stable/index.html) | 0.7.11 | Configurable, Python 2+3 compatible Sphinx theme. / BSD 3-Clause |
| [anaconda-client](http://anaconda.org) | 1.7.2 | anaconda.org command line client library / BSD 3-clause |
| [anaconda-navigator](https://github.com/ContinuumIO/navigator) | 1.9.2 | Anaconda Navigator / proprietary - Continuum Analytics, Inc. |
| [anaconda-project](https://github.com/Anaconda-Platform/anaconda-project) | 0.8.2 | Tool for encapsulating, running, and reproducing data science projects / BSD 3-Clause |
| [appdirs](http://github.com/ActiveState/appdirs) | 1.4.3 | A small Python module for determining appropriate platform-specific dirs. / MIT |
| [asn1crypto](https://github.com/wbond/asn1crypto) | 0.24.0 | Python ASN.1 library with a focus on performance and a pythonic API / MIT |
| [astroid](https://www.astroid.org/) | 2.0.4 | A abstract syntax tree for Python with inference support. / LGPL 2.1 |
| [astropy](http://www.astropy.org/) | 3.0.4 | Community-developed Python Library for Astronomy / BSD |
| [atomicwrites](https://github.com/untitaker/python-atomicwrites) | 1.2.1 | Atomic file writes. / MIT |
| [attrs](https://attrs.readthedocs.io/en/stable/) | 18.2.0 | attrs is the Python package that will bring back the joy of writing classes by relieving you from the drudgery of implementing object protocols (aka dunder methods). / MIT |
| [automat](https://github.com/glyph/Automat) | 0.7.0 | self-service finite-state machines for the programmer on the go / MIT |
| [babel](http://babel.pocoo.org/) | 2.6.0 | Utilities to internationalize and localize Python applications / BSD 3-clause |
| [backcall](https://github.com/takluyver/backcall/) | 0.1.0 | Specifications for callback functions passed in to an API / BSD-3-Clause |
| [backports](https://bitbucket.org/brandon/backports) | 1.0 | / BSD |
| [backports.shutil\_get\_terminal\_size](https://github.com/chrippa/backports.shutil_get_terminal_size) | 1.0.0 | A backport of the get\_terminal\_size function from Python 3.3’s shutil. / MIT |
| [beautifulsoup4](http://www.crummy.com/software/BeautifulSoup/) | 4.6.3 | Python library designed for screen-scraping / MIT |
| [bitarray](https://github.com/ilanschnell/bitarray) | 0.8.3 | efficient arrays of booleans – C extension / PSF |
| [bkcharts](http://github.com/bokeh/bkcharts) | 0.2 | High level chart types built on top of Bokeh / BSD 3-Clause |
| blas | 1.0 | |
| [blaze](http://blaze.pydata.org) | 0.11.3 | NumPy and Pandas interface to big data / BSD 3-Clause |
| [bleach](https://github.com/mozilla/bleach) | 2.1.4 | Easy, whitelist-based HTML-sanitizing tool / Apache-2.0 |
| [blosc](https://github.com/Blosc/c-blosc) | 1.14.4 | A blocking, shuffling and loss-less compression library that can be faster than memcpy() / BSD 3-Clause |
| [bokeh](http://bokeh.pydata.org/) | 0.13.0 | Statistical and novel interactive HTML plots for Python / BSD 3-Clause |
| [boto](https://github.com/boto/boto/) | 2.49.0 | Amazon Web Services Library / MIT |
| [bottleneck](http://berkeleyanalytics.com/bottleneck) | 1.2.1 | Fast NumPy array functions written in Cython. / BSD 2-Clause |
| [bzip2](http://www.bzip.org/) | 1.0.6 | high-quality data compressor / bzip2 |
| [ca-certificates](https://github.com/conda-forge/ca-certificates-feedstock) | 2018.03.07 | Certificates for use with other packages. / ISC |
| [certifi](http://certifi.io/) | 2018.8.24 | Python package for providing Mozilla’s CA Bundle. / ISC |
| [cffi](https://bitbucket.org/cffi/cffi) | 1.11.5 | Foreign Function Interface for Python calling C code. / MIT |
| [chardet](https://github.com/chardet/chardet) | 3.0.4 | Universal character encoding detector / LGPL2 |
| [click](http://click.pocoo.org/) | 6.7 | A simple wrapper around optparse for powerful command line utilities. / BSD 3-Clause |
| [cloudpickle](https://github.com/cloudpipe/cloudpickle) | 0.5.5 | Extended pickling support for Python objects / BSD 3-Clause |
| [clyent](https://github.com/Anaconda-Platform/clyent) | 1.2.2 | Command line client library for windows and posix / BSD 3-Clause |
| [colorama](https://github.com/tartley/colorama) | 0.3.9 | Cross-platform colored terminal text. / BSD 3-Clause |
| [comtypes](http://starship.python.net/crew/theller/comtypes/) | 1.1.7 | pure Python COM package / MIT |
| [conda](https://conda.io) | 4.5.11 | OS-agnostic, system-level binary package and environment manager. / BSD 3-Clause |
| [conda-build](https://github.com/conda/conda-build) | 3.15.1 | tools for building conda packages / BSD 3-Clause |
| [conda-env](https://github.com/conda/conda-env) | 2.6.0 | Tools for interacting with conda environments. / BSD 3-Clause |
| console\_shortcut | 0.1.1 | Console shortcut creator for Windows (using menuinst) / BSD |
| [constantly](https://github.com/twisted/constantly) | 15.1.0 | Symbolic constants in Python / MIT |
| [contextlib2](http://contextlib2.readthedocs.org) | 0.5.5 | Backports and enhancements for the contextlib module / PSF |
| [cryptography](https://github.com/pyca/cryptography) | 2.3.1 | Provides cryptographic recipes and primitives to Python developers / Apache 2.0 or BSD 3-Clause, PSF 2 |
| [curl](http://curl.haxx.se/) | 7.61.0 | tool and library for transferring data with URL syntax / MIT/X derivate (`<http://curl.haxx.se/docs/copyright.html>`) |
| [cycler](http://matplotlib.org/cycler) | 0.10.0 | Composable style cycles. / BSD 3-Clause |
| [cython](http://www.cython.org/) | 0.28.5 | The Cython compiler for writing C extensions for the Python language / Apache-2.0 |
| [cytoolz](https://github.com/pytoolz/cytoolz) | 0.9.0.1 | Cython implementation of Toolz. High performance functional utilities. / BSD 3-Clause |
| [dask](http://github.com/dask/dask/) | 0.19.1 | Parallel Python with task scheduling / BSD 3-Clause |
| [dask-core](http://github.com/dask/dask/) | 0.19.1 | Parallel Python with task scheduling / BSD 3-Clause |
| [datashape](http://datashape.pydata.org) | 0.5.4 | A data description language. / BSD 2-Clause |
| [decorator](https://github.com/micheles/decorator) | 4.3.0 | Better living through Python with decorators. / BSD 3-Clause |
| [defusedxml](https://bitbucket.org/tiran/defusedxml) | 0.5.0 | XML bomb protection for Python stdlib modules / PSF 2.0 |
| [distributed](http://distributed.readthedocs.io/en/latest/) | 1.23.1 | Distributed computing with Dask / BSD 3-Clause |
| [docutils](http://docutils.sourceforge.net/) | 0.14 | Docutils – Python Documentation Utilities / Public Domain Dedictation and BSD 2-Clause and PSF 2.1.1 and GPL 3.0 |
| [entrypoints](https://github.com/takluyver/entrypoints) | 0.2.3 | Discover and load entry points from installed packages. / MIT License |
| [et\_xmlfile](https://bitbucket.org/openpyxl/et_xmlfile) | 1.0.1 | An implementation of lxml.xmlfile for the standard library / MIT |
| [fastcache](https://github.com/pbrady/fastcache) | 1.0.2 | C implementation of Python 3 lru\_cache / MIT |
| [filelock](https://github.com/benediktschmitt/py-filelock) | 3.0.8 | A platform independent file lock. / Public Domain |
| [flask](http://flask.pocoo.org) | 1.0.2 | A microframework based on Werkzeug, Jinja2 and good intentions. / BSD 3-Clause |
| [flask-cors](https://github.com/corydolphin/flask-cors) | 3.0.6 | A Flask extension adding a decorator for CORS support / MIT |
| [freetype](https://www.freetype.org/) | 2.9.1 | A Free, High-Quality, and Portable Font Engine / GPL-2.0 and FreeType |
| [get\_terminal\_size](https://github.com/chrippa/backports.shutil_get_terminal_size) | 1.0.0 | Get the size of the terminal window. / MIT |
| [gevent](http://www.gevent.org/) | 1.3.6 | Coroutine-based network library / MIT |
| [glob2](https://github.com/miracle2k/python-glob2) | 0.6 | Version of the glob module that supports recursion via \*\*, and can capture patterns. / BSD-2-Clause |
| [greenlet](https://github.com/python-greenlet/greenlet) | 0.4.15 | Lightweight in-process concurrent programming / MIT |
| [h5py](http://www.h5py.org/) | 2.8.0 | Read and write HDF5 files from Python. / BSD 3-Clause |
| [hdf5](http://www.hdfgroup.org/HDF5/) | 1.10.2 | HDF5 is a data model, library, and file format for storing and managing data / HDF5 |
| [heapdict](http://stutzbachenterprises.com/) | 1.0.0 | A heap with decrease-key and increase-key operations / BSD 3-Clause |
| [html5lib](https://github.com/html5lib/html5lib-python) | 1.0.1 | HTML parser based on the WHATWG HTML specification / MIT |
| [hyperlink](https://github.com/python-hyper/hyperlink) | 18.0.0 | Immutable, Pythonic, correct URLs. / MIT |
| [icc\_rt](https://software.intel.com/en-us/node/522690) | 2017.0.4 | Intel runtime libraries for C, C++ and Fortran compilers / Intel proprietary |
| [icu](http://site.icu-project.org/) | 58.2 | International Components for Unicode. / MIT |
| [idna](https://github.com/kjd/idna) | 2.7 | Internationalized Domain Names in Applications (IDNA). / BSD Like |
| [imageio](http://imageio.github.io) | 2.4.1 | a Python library for reading and writing image data / BSD 2-Clause |
| [imagesize](https://github.com/shibukawa/imagesize_py) | 1.1.0 | Getting image size from png/jpeg/jpeg2000/gif file / MIT |
| [incremental](https://twistedmatrix.com) | 17.5.0 | A library that versions your Python projects / MIT License |
| [intel-openmp](https://software.intel.com/en-us/node/522690) | 2019.0 | Math library for Intel and compatible processors / proprietary - Intel |
| [ipykernel](http://ipython.org) | 4.10.0 | IPython Kernel for Jupyter / BSD 3-clause |
| [ipython](http://ipython.org/) | 6.5.0 | IPython: Productive Interactive Computing / BSD 3-clause |
| [ipython\_genutils](http://ipython.org) | 0.2.0 | vestigial utilities from IPython / BSD 3-Clause |
| [ipywidgets](https://github.com/ipython/ipywidgets) | 7.4.1 | Jupyter Interactive Widgets / BSD 3-clause |
| [isort](https://github.com/timothycrosley/isort) | 4.3.4 | A Python utility / library to sort Python imports. / MIT |
| [itsdangerous](https://github.com/pallets/itsdangerous) | 0.24 | Various helpers to pass trusted data to untrusted environments. / BSD 3-Clause |
| [jdcal](https://github.com/phn/jdcal) | 1.4 | Julian dates from proleptic Gregorian and Julian calendars. / BSD 2-Clause |
| [jedi](https://github.com/davidhalter/jedi/) | 0.12.1 | An autocompletion tool for Python that can be used for text editors. / MIT |
| [jinja2](http://jinja.pocoo.org) | 2.10 | An easy to use stand-alone template engine written in pure python. / 3-Clause BSD |
| [jpeg](http://www.ijg.org/) | 9b | read/write jpeg COM, EXIF, IPTC medata / Custom free software license |
| [jsonschema](https://github.com/Julian/jsonschema) | 2.6.0 | An implementation of JSON Schema validation for Python / MIT |
| [jupyter](http://jupyter.org) | 1.0.0 | Jupyter metapackage. Install all the Jupyter components in one go. / BSD 3-Clause |
| [jupyter\_client](http://jupyter.org) | 5.2.3 | Jupyter protocol implementation and client libraries / BSD 3-clause |
| [jupyter\_console](http://jupyter.org) | 5.2.0 | Jupyter terminal console / BSD 3-Clause |
| [jupyter\_core](http://jupyter.org) | 4.4.0 | Core common functionality of Jupyter projects. / BSD 3-clause |
| [jupyterlab](https://github.com/jupyterlab/jupyterlab) | 0.34.9 | JupyterLab PRE-ALPHA / BSD-3-Clause |
| [jupyterlab\_launcher](http://github.com/jupyterlab/jupyterlab_launcher) | 0.13.1 | A Launcher for JupyterLab based applications. / BSD 3-Clause |
| [keyring](https://github.com/jaraco/keyring) | 13.2.1 | Store and access your passwords safely. / Python Software Foundation or MIT |
| [kiwisolver](https://github.com/nucleic/kiwi) | 1.0.1 | A fast implementation of the Cassowary constraint solver / BSD 3-Clause |
| [lazy-object-proxy](https://github.com/ionelmc/python-lazy-object-proxy) | 1.3.1 | A fast and thorough lazy object proxy. / BSD 2-Clause |
| [libcurl](http://curl.haxx.se/) | 7.61.0 | tool and library for transferring data with URL syntax / MIT/X derivate (`<http://curl.haxx.se/docs/copyright.html>`) |
| [libiconv](https://www.gnu.org/software/libiconv/) | 1.15 | Provides iconv for systems which don’t have one (or that cannot convert from/to Unicode.) / GPL and LGPL |
| [libpng](http://www.libpng.org/pub/png/libpng.html) | 1.6.34 | PNG reference library. / zlib/libpng |
| [libsodium](http://libsodium.org) | 1.0.16 | A modern and easy-to-use crypto library. / ISC |
| [libssh2](https://www.libssh2.org/) | 1.8.0 | the SSH library / BSD 3-Clause |
| [libtiff](http://www.libtiff.org/) | 4.0.9 | Support for the Tag Image File Format (TIFF). / HPND |
| [libxml2](http://xmlsoft.org/) | 2.9.8 | The XML C parser and toolkit of Gnome / MIT |
| [libxslt](http://xmlsoft.org/XSLT/) | 1.1.32 | The XSLT C library developed for the GNOME project / MIT |
| [llvmlite](https://github.com/numba/llvmlite) | 0.24.0 | A lightweight LLVM python binding for writing JIT compilers / New BSD License |
| [locket](https://github.com/mwilliamson/locket.py) | 0.2.0 | File-based locks for Python for Linux and Windows / BSD 2-Clause |
| [lxml](http://lxml.de/) | 4.2.5 | Pythonic binding for the C libraries libxml2 and libxslt. / BSD 3-Clause, GPL-2.0, ZPL-2.0, and ElementTree |
| [lzo](http://www.oberhumer.com/opensource/lzo/) | 2.10 | LZO is a portable lossless data compression library written in ANSI C. / GPL v2+ |
| m2w64-gcc-libgfortran | 5.3.0 | |
| m2w64-gcc-libs | 5.3.0 | |
| m2w64-gcc-libs-core | 5.3.0 | |
| m2w64-gmp | 6.1.0 | |
| m2w64-libwinpthread-git | 5.0.0.4634.697f757 | |
| [markupsafe](https://www.palletsprojects.com/p/markupsafe/) | 1.0 | A Python module that implements the jinja2.Markup string / BSD 3-Clause |
| [matplotlib](http://matplotlib.org/) | 2.2.3 | Publication quality figures in Python / PSF-based |
| [mccabe](https://github.com/PyCQA/mccabe) | 0.6.1 | McCabe complexity checker for Python / MIT |
| [menuinst](https://github.com/ContinuumIO/menuinst) | 1.4.14 | cross platform menu item installation / BSD |
| [mistune](https://github.com/lepture/mistune) | 0.8.3 | The fastest markdown parser in pure Python. / BSD 3-Clause |
| [mkl](https://software.intel.com/en-us/mkl) | 2019.0 | Math library for Intel and compatible processors / proprietary - Intel |
| [mkl-service](https://github.com/ContinuumIO/mkl-service) | 1.1.2 | Python bindings to MKL service functions / 3-clause BSD |
| [mkl\_fft](http://github.com/IntelPython/mkl_fft) | 1.0.4 | NumPy-based implementation of Fast Fourier Transform using Intel (R) Math Kernel Library. / BSD 3-Clause |
| [mkl\_random](http://github.com/IntelPython/mkl_random) | 1.0.1 | Intel (R) MKL-powered package for sampling from common probability distributions into NumPy arrays. / BSD 3-Clause |
| [more-itertools](https://github.com/erikrose/more-itertools) | 4.3.0 | More routines for operating on iterables, beyond itertools / MIT |
| [mpmath](http://mpmath.org) | 1.0.0 | Python library for arbitrary-precision floating-point arithmetic / BSD 3-Clause |
| [msgpack-python](http://msgpack.org/) | 0.5.6 | MessagePack (de)serializer. / Apache 2.0 |
| msys2-conda-epoch | 20160418 | |
| [multipledispatch](https://github.com/mrocklin/multipledispatch/) | 0.6.0 | Multiple dispatch in Python / BSD 3-Clause |
| [navigator-updater](https://github.com/ContinuumIO/navigator-updater) | 0.2.1 | Anaconda Navigator Updater / proprietary - Continuum Analytics, Inc. |
| [nbconvert](http://jupyter.org) | 5.4.0 | Converting Jupyter Notebooks / BSD-3-Clause |
| [nbformat](http://jupyter.org) | 4.4.0 | The reference implementation of the Jupyter Notebook format / BSD 3-clause |
| [networkx](https://networkx.github.io/) | 2.1 | Python package for creating and manipulating complex networks / BSD 3-Clause |
| [nltk](http://nltk.org/) | 3.3.0 | Build Python programs to work with human language data / Apache 2.0 |
| [nose](http://readthedocs.org/docs/nose/) | 1.3.7 | Nose extends unittest to make testing easier / LGPL-2.1 |
| [notebook](http://jupyter.org) | 5.6.0 | Jupyter Notebook / BSD 3-clause |
| [numba](http://numba.github.com) | 0.39.0 | NumPy aware dynamic Python compiler using LLVM / BSD 2-clause |
| [numexpr](https://github.com/pydata/numexpr) | 2.6.8 | Fast numerical expression evaluator for NumPy. / MIT |
| [numpy](http://numpy.scipy.org/) | 1.15.1 | Array processing for numbers, strings, records, and objects. / BSD 3-Clause |
| numpy-base | 1.15.1 | |
| [numpydoc](https://github.com/numpy/numpydoc) | 0.8.0 | Sphinx extension to support docstrings in Numpy format / BSD 3-Clause |
| [odo](http://odo.pydata.org) | 0.5.1 | Data migration in Python / BSD-3-Clause |
| [olefile](http://www.decalage.info/python/olefileio) | 0.46 | parse, read and write Microsoft OLE2 files / BSD 2-Clause |
| [openpyxl](https://openpyxl.readthedocs.io) | 2.5.6 | A Python library to read/write Excel 2010 xlsx/xlsm files / MIT |
| [openssl](http://www.openssl.org/) | 1.0.2p | OpenSSL is an open-source implementation of the SSL and TLS protocols / OpenSSL |
| [packaging](https://github.com/pypa/packaging) | 17.1 | Core utilities for Python packages / Apache 2.0 or BSD 2-Clause |
| [pandas](http://pandas.pydata.org) | 0.23.4 | High-performance, easy-to-use data structures and data analysis tools. / BSD 3-clause |
| [pandoc](http://pandoc.org/) | 1.19.2.1 | Universal markup converter (repackaged binaries). / GPL-2.0 |
| [pandocfilters](https://github.com/jgm/pandocfilters) | 1.4.2 | A python module for writing pandoc filters / BSD-3-Clause |
| [parso](https://github.com/davidhalter/parso) | 0.3.1 | A Python Parser / MIT |
| [partd](https://github.com/dask/partd) | 0.3.8 | Data structure for on-disk shuffle operations / BSD 3-Clause |
| [path.py](https://github.com/jaraco/path.py) | 11.1.0 | A module wrapper for os.path / MIT |
| [pathlib2](https://github.com/mcmtroffaes/pathlib2) | 2.3.2 | Fork of pathlib aiming to support the full stdlib Python API. / MIT |
| [patsy](https://github.com/pydata/patsy) | 0.5.0 | Describing statistical models in Python using symbolic formulas / BSD-2-Clause, PSF2 |
| [pep8](http://pep8.readthedocs.org/) | 1.7.1 | Python style guide checker / MIT |
| [pickleshare](https://github.com/vivainio/pickleshare) | 0.7.4 | Tiny ‘shelve’-like database with concurrency support / MIT |
| [pillow](https://pillow.readthedocs.io) | 5.2.0 | Pillow is the friendly PIL fork by Alex Clark and Contributors. / PIL |
| [pip](https://pip.pypa.io/en/stable/) | 10.0.1 | PyPA recommended tool for installing Python packages / MIT |
| [pkginfo](https://code.launchpad.net/~tseaver/pkginfo/trunk) | 1.4.2 | Query metadatdata from sdists / bdists / installed packages. / MIT |
| [pluggy](https://github.com/pytest-dev/pluggy) | 0.7.1 | Plugin registration and hook calling for Python / MIT |
| [ply](http://www.dabeaz.com/ply/index.html) | 3.11 | Python Lex-Yacc / BSD 3-clause |
| [progress](https://github.com/verigak/progress) | 1.3 | Easy progress reporting for Python / ISC |
| [prometheus\_client](https://github.com/prometheus/client_python) | 0.3.1 | Python client for the Prometheus monitoring system. / Apache 2.0 |
| [prompt\_toolkit](https://github.com/jonathanslenders/python-prompt-toolkit) | 1.0.15 | Library for building powerful interactive command lines in Python / BSD 3-clause |
| [psutil](https://github.com/giampaolo/psutil) | 5.4.7 | A cross-platform process and system utilities module for Python / BSD 3-Clause |
| [py](https://github.com/pytest-dev/py) | 1.6.0 | library with cross-python path, ini-parsing, io, code, log facilities / MIT |
| [pyasn1](https://github.com/etingof/pyasn1) | 0.4.4 | ASN.1 types and codecs / BSD 2-Clause |
| [pyasn1-modules](http://pyasn1.sourceforge.net/) | 0.2.2 | A collection of ASN.1-based protocols modules. / BSD 2-Clause |
| [pycodestyle](https://pycodestyle.readthedocs.io/) | 2.4.0 | Python style guide checker / MIT |
| [pycosat](https://github.com/ContinuumIO/pycosat) | 0.6.3 | Bindings to picosat (a SAT solver) / MIT |
| [pycparser](https://github.com/eliben/pycparser) | 2.18 | Complete C99 parser in pure Python / BSD 3-clause |
| [pycrypto](http://www.pycrypto.org/) | 2.6.1 | Cryptographic modules for Python. / Public Domain |
| [pycurl](http://pycurl.sourceforge.net/) | 7.43.0.2 | A Python Interface To The cURL library / LGPL, MIT |
| [pyflakes](https://github.com/PyCQA/pyflakes) | 2.0.0 | Pyflakes analyzes programs and detects various errors. / MIT |
| [pygments](http://pygments.org/) | 2.2.0 | Generic syntax highlighting package / BSD 2-clause |
| [pylint](http://www.pylint.org/) | 2.1.1 | python code static checker / GPL |
| [pyodbc](https://github.com/mkleehammer/pyodbc) | 4.0.24 | DB API Module for ODBC / MIT |
| [pyopenssl](https://github.com/pyca/pyopenssl) | 18.0.0 | Python wrapper module around the OpenSSL library / Apache 2.0 |
| [pyparsing](http://pyparsing.wikispaces.com/) | 2.2.0 | Create and execute simple grammars / MIT |
| [pyqt](http://www.riverbankcomputing.co.uk/software/pyqt) | 5.9.2 | Python binding of the cross-platform GUI toolkit Qt. / Commercial, GPL-2.0, GPL-3.0 |
| [pysocks](https://github.com/Anorov/PySocks) | 1.6.8 | A Python SOCKS client module. See [Anorov/PySocks](https://github.com/Anorov/PySocks) for more information. / BSD 3-Clause |
| [pytables](http://www.pytables.org) | 3.4.4 | Brings together Python, HDF5 and NumPy to easily handle large amounts of data. / BSD 3-Clause |
| [pytest](https://docs.pytest.org/en/latest/) | 3.8.0 | Simple and powerful testing with Python. / MIT |
| [pytest-arraydiff](https://github.com/astrofrog/pytest-arraydiff) | 0.2 | pytest plugin to help with comparing array output from tests / BSD |
| [pytest-astropy](https://github.com/astropy/pytest-astropy) | 0.4.0 | Meta-package containing dependencies for testing Astropy / BSD |
| [pytest-doctestplus](https://github.com/astropy/pytest-doctestplus) | 0.1.3 | Pytest plugin with advanced doctest features / BSD |
| [pytest-openfiles](https://github.com/astropy/pytest-openfiles) | 0.3.0 | Pytest plugin for detecting inadvertent open file handles / BSD |
| [pytest-remotedata](https://github.com/astropy/pytest-remotedata) | 0.3.0 | Pytest plugin for controlling remote data access / BSD |
| [python](http://www.python.org/) | 3.7.0 | General purpose programming language / PSF |
| [python-dateutil](https://dateutil.readthedocs.org/) | 2.7.3 | Extensions to the standard Python datetime module. / BSD 3 Clause |
| [pytz](http://pythonhosted.org/pytz/) | 2018.5 | World timezone definitions, modern and historical. / MIT |
| [pywavelets](https://github.com/PyWavelets/pywt) | 1.0.0 | Discrete Wavelet Transforms in Python. / MIT |
| [pywin32](https://sourceforge.net/projects/pywin32) | 223 | Python extensions for Windows / PSF |
| [pywinpty](https://github.com/spyder-ide/pywinpty) | 0.5.4 | Python bindings for the winpty library / MIT |
| [pyyaml](http://pyyaml.org/wiki/PyYAML) | 3.13 | YAML parser and emitter for Python / MIT |
| [pyzmq](https://github.com/zeromq/pyzmq) | 17.1.2 | Python bindings for zeromq / BSD 3-clause |
| [qt](http://qt-project.org) | 5.9.6 | Qt is a cross-platform application and UI framework. / LGPL-3.0 |
| [qtawesome](https://github.com/spyder-ide/qtawesome) | 0.4.4 | Iconic fonts in PyQt and PySide applications / MIT |
| [qtconsole](http://jupyter.org) | 4.4.1 | Jupyter Qt console / BSD 3-Clause |
| [qtpy](https://github.com/spyder-ide/qtpy) | 1.5.0 | Abstraction layer for PyQt5/PyQt4/PySide / MIT |
| [requests](http://python-requests.org) | 2.19.1 | Python HTTP for Humans. / Apache 2.0 |
| [rope](https://github.com/python-rope/rope) | 0.11.0 | A python refactoring library… / GPL 2.0 |
| [ruamel\_yaml](https://bitbucket.org/ruamel/yaml) | 0.15.46 | A patched copy of ruamel.yaml. / MIT |
| [scikit-image](http://scikit-image.org/) | 0.14.0 | Image processing routines for SciPy. / BSD 3-Clause |
| [scikit-learn](http://scikit-learn.org/) | 0.19.2 | A set of python modules for machine learning and data mining / BSD 3-Clause |
| [scipy](http://www.scipy.org/) | 1.1.0 | Scientific Library for Python / BSD 3-Clause |
| [seaborn](https://seaborn.pydata.org) | 0.9.0 | Statistical data visualization / BSD 3-Clause |
| [send2trash](https://github.com/hsoft/send2trash) | 1.5.0 | Python library to natively send files to Trash (or Recycle bin) on all platforms. / BSD-3-Clause |
| [service\_identity](https://github.com/pyca/service_identity) | 17.0.0 | Service identity verification for pyOpenSSL. / MIT |
| [setuptools](https://github.com/pypa/setuptools) | 40.2.0 | Download, build, install, upgrade, and uninstall Python packages / MIT |
| [simplegeneric](http://cheeseshop.python.org/pypi/simplegeneric) | 0.8.1 | Simple generic functions (similar to Python’s own len(), pickle.dump(), etc.) / Zope Public |
| [singledispatch](http://docs.python.org/3/library/functools.html#functools.singledispatch) | 3.4.0.3 | Transforms a function into a single-dispatch generic function / MIT |
| [sip](http://www.riverbankcomputing.com/software/sip/intro) | 4.19.8 | Create Python bindings for C and C++ libraries / GPL-3.0 |
| [six](http://pypi.python.org/pypi/six/) | 1.11.0 | Python 2 and 3 compatibility utilities / MIT |
| [snappy](https://github.com/google/snappy) | 1.1.7 | A fast compressor/decompressor / BSD 3-clause |
| [snowballstemmer](https://github.com/shibukawa/snowball_py) | 1.2.1 | Snowball stemming library collection for Python / BSD-2-Clause |
| [sortedcollections](http://www.grantjenks.com/docs/sortedcollections/) | 1.0.1 | Python Sorted Collections / Apache-2.0 |
| [sortedcontainers](http://www.grantjenks.com/docs/sortedcontainers/) | 2.0.5 | Python Sorted Container Types: SortedList, SortedDict, and SortedSet / Apache 2.0 |
| [sphinx](http://www.sphinx-doc.org) | 1.7.9 | Sphinx is a tool that makes it easy to create intelligent and beautiful documentation / BSD 2-clause |
| sphinxcontrib | 1.0 | Python namespace for sphinxcontrib / BSD |
| [sphinxcontrib-websupport](https://pypi.python.org/pypi/sphinxcontrib-websupport) | 1.1.0 | Sphinx API for Web Apps / BSD-2-Clause |
| [spyder](https://www.spyder-ide.org/) | 3.3.1 | The Scientific Python Development Environment / MIT |
| [spyder-kernels](https://github.com/spyder-ide/spyder-kernels) | 0.2.6 | Jupyter kernels for the Spyder console / MIT |
| [sqlalchemy](http://www.sqlalchemy.org/) | 1.2.11 | Database Abstraction Library. / MIT |
| [sqlite](http://www.sqlite.org/) | 3.24.0 | Implements a self-contained, zero-configuration, SQL database engine. / Public-Domain (`<http://www.sqlite.org/copyright.html>`) |
| [statsmodels](https://www.statsmodels.org) | 0.9.0 | Statistical computations and models for use with SciPy / BSD 3-Clause |
| [sympy](http://sympy.org) | 1.1.1 | Python library for symbolic mathematics / 3-clause BSD |
| [tblib](https://github.com/ionelmc/python-tblib) | 1.3.2 | Traceback serialization library. / BSD 2-Clause |
| [terminado](https://github.com/jupyter/terminado) | 0.8.1 | Terminals served by tornado websockets / BSD 2-clause |
| [testpath](https://testpath.readthedocs.io) | 0.3.1 | Testpath is a collection of utilities for Python code working with files and commands. / MIT |
| [tk](http://www.tcl.tk/) | 8.6.8 | A dynamic programming language with GUI support. Bundles Tcl and Tk. / Tcl/Tk |
| [toolz](http://toolz.readthedocs.org/) | 0.9.0 | A functional standard library for Python. / BSD 3-Clause |
| [tornado](http://www.tornadoweb.org/) | 5.1 | A Python web framework and asynchronous networking library, originally developed at FriendFeed. / Apache 2.0 |
| [tqdm](https://pypi.python.org/pypi/tqdm) | 4.26.0 | A Fast, Extensible Progress Meter / MPLv2.0, MIT |
| [traitlets](http://ipython.org/) | 4.3.2 | Configuration system for Python applications / BSD 3-clause |
| [twisted](http://twistedmatrix.com/) | 18.7.0 | event-driven networking engine / MIT |
| [unicodecsv](https://github.com/jdunck/python-unicodecsv) | 0.14.1 | Drop-in replacement for csv module which supports unicode strings / BSD |
| [urllib3](https://urllib3.readthedocs.io/) | 1.23 | HTTP library with thread-safe connection pooling, file post, and more. / MIT |
| [vc](https://github.com/conda/conda/wiki/VC-features) | 14.1 | A meta-package to impose mutual exclusivity among software built with different VS versions / Modified BSD License (3-clause) |
| [vs2015\_runtime](http://www.microsoft.com) | 14.15.26706 | Bundles of the MSVC 14 (VS 2015) runtime / Proprietary |
| [wcwidth](https://github.com/jquast/wcwidth) | 0.1.7 | Measures number of Terminal column cells of wide-character codes. / MIT |
| [webencodings](https://github.com/gsnedders/python-webencodings) | 0.5.1 | Character encoding aliases for legacy web content / BSD 3-Clause |
| [werkzeug](http://werkzeug.pocoo.org/) | 0.14.1 | The Python WSGI Utility Library. / BSD 3-Clause |
| [wheel](https://bitbucket.org/pypa/wheel/) | 0.31.1 | A built-package format for Python. / MIT |
| [widgetsnbextension](http://ipython.org) | 3.4.1 | Interactive Widgets for Jupyter / BSD 3-clause |
| [win\_inet\_pton](https://github.com/hickeroar/win_inet_pton) | 1.0.1 | Native inet\_pton and inet\_ntop implementation for Python on Windows (with ctypes). / PUBLIC-DOMAIN |
| [win\_unicode\_console](https://github.com/Drekin/win-unicode-console) | 0.5 | A Python package to enable Unicode input and display when running Python from Windows console. / MIT |
| [wincertstore](https://bitbucket.org/tiran/wincertstore) | 0.2 | Python module to extract CA and CRL certs from Windows’ cert store (ctypes based). / PSF 2 |
| [winpty](https://github.com/rprichard/winpty) | 0.4.3 | Winpty provides an interface similar to a Unix pty-master for communicating with Windows console programs. / MIT |
| [wrapt](https://github.com/GrahamDumpleton/wrapt) | 1.10.11 | Module for decorators, wrappers and monkey patching. / BSD 2-Clause |
| [xlrd](http://www.python-excel.org/) | 1.1.0 | Library for developers to extract data from Microsoft Excel (tm) spreadsheet files / BSD 3-Clause and BSD with advertising |
| [xlsxwriter](https://xlsxwriter.readthedocs.io/) | 1.1.0 | A Python module for creating Excel XLSX files / BSD 2-Clause |
| [xlwings](http://xlwings.org/) | 0.11.8 | Interact with Excel from Python and vice versa / 3-clause BSD |
| [xlwt](http://www.python-excel.org/) | 1.3.0 | Writing data and formatting information to Excel files / BSD |
| [yaml](http://pyyaml.org/wiki/LibYAML) | 0.1.7 | A C library for parsing and emitting YAML. / MIT |
| [zeromq](http://zeromq.org) | 4.2.5 | A high-performance asynchronous messaging library. / LGPL 3 |
| [zict](http://github.com/mrocklin/zict) | 0.1.3 | Composable Dictionary Classes / BSD 3-Clause |
| [zlib](http://zlib.net/) | 1.2.11 | Massively spiffy yet delicately unobtrusive compression library / zlib |
| zope | 1.0 | web application server / BSD |
| [zope.interface](http://docs.zope.org/zope.interface/) | 4.5.0 | Interfaces for Python / ZPL 2.1 |
| Name | Version | Summary / License |
|---|---|---|
| [\_ipyw\_jlab\_nb\_ext\_conf](https://github.com/ContinuumIO/anaconda-nb-extensions-meta-config) | 0.1.0 | A configuration metapackage for enabling Anaconda-bundled jupyter extensions / BSD |
| [alabaster](http://www.sphinx-doc.org/en/stable/index.html) | 0.7.11 | Configurable, Python 2+3 compatible Sphinx theme. / BSD 3-Clause |
| [anaconda-client](http://anaconda.org) | 1.7.2 | anaconda.org command line client library / BSD 3-clause |
| [anaconda-navigator](https://github.com/ContinuumIO/navigator) | 1.9.2 | Anaconda Navigator / proprietary - Continuum Analytics, Inc. |
| [anaconda-project](https://github.com/Anaconda-Platform/anaconda-project) | 0.8.2 | Tool for encapsulating, running, and reproducing data science projects / BSD 3-Clause |
| [appdirs](http://github.com/ActiveState/appdirs) | 1.4.3 | A small Python module for determining appropriate platform-specific dirs. / MIT |
| [asn1crypto](https://github.com/wbond/asn1crypto) | 0.24.0 | Python ASN.1 library with a focus on performance and a pythonic API / MIT |
| [astroid](https://www.astroid.org/) | 2.0.2 | A abstract syntax tree for Python with inference support. / LGPL 2.1 |
| [astropy](http://www.astropy.org/) | 3.0.4 | Community-developed Python Library for Astronomy / BSD |
| [atomicwrites](https://github.com/untitaker/python-atomicwrites) | 1.2.1 | Atomic file writes. / MIT |
| [attrs](https://attrs.readthedocs.io/en/stable/) | 18.2.0 | attrs is the Python package that will bring back the joy of writing classes by relieving you from the drudgery of implementing object protocols (aka dunder methods). / MIT |
| [automat](https://github.com/glyph/Automat) | 0.7.0 | self-service finite-state machines for the programmer on the go / MIT |
| [babel](http://babel.pocoo.org/) | 2.6.0 | Utilities to internationalize and localize Python applications / BSD 3-clause |
| [backcall](https://github.com/takluyver/backcall/) | 0.1.0 | Specifications for callback functions passed in to an API / BSD-3-Clause |
| [backports](https://bitbucket.org/brandon/backports) | 1.0 | / BSD |
| [backports.shutil\_get\_terminal\_size](https://github.com/chrippa/backports.shutil_get_terminal_size) | 1.0.0 | A backport of the get\_terminal\_size function from Python 3.3’s shutil. / MIT |
| [beautifulsoup4](http://www.crummy.com/software/BeautifulSoup/) | 4.6.3 | Python library designed for screen-scraping / MIT |
| [bitarray](https://github.com/ilanschnell/bitarray) | 0.8.3 | efficient arrays of booleans – C extension / PSF |
| [bkcharts](http://github.com/bokeh/bkcharts) | 0.2 | High level chart types built on top of Bokeh / BSD 3-Clause |
| blas | 1.0 | |
| [blaze](http://blaze.pydata.org) | 0.11.3 | NumPy and Pandas interface to big data / BSD 3-Clause |
| [bleach](https://github.com/mozilla/bleach) | 2.1.4 | Easy, whitelist-based HTML-sanitizing tool / Apache-2.0 |
| [blosc](https://github.com/Blosc/c-blosc) | 1.14.4 | A blocking, shuffling and loss-less compression library that can be faster than memcpy() / BSD 3-Clause |
| [bokeh](http://bokeh.pydata.org/) | 0.13.0 | Statistical and novel interactive HTML plots for Python / BSD 3-Clause |
| [boto](https://github.com/boto/boto/) | 2.49.0 | Amazon Web Services Library / MIT |
| [bottleneck](http://berkeleyanalytics.com/bottleneck) | 1.2.1 | Fast NumPy array functions written in Cython. / BSD 2-Clause |
| [bzip2](http://www.bzip.org/) | 1.0.6 | high-quality data compressor / bzip2 |
| [ca-certificates](https://github.com/conda-forge/ca-certificates-feedstock) | 2018.03.07 | Certificates for use with other packages. / ISC |
| [certifi](http://certifi.io/) | 2018.8.24 | Python package for providing Mozilla’s CA Bundle. / ISC |
| [cffi](https://bitbucket.org/cffi/cffi) | 1.11.5 | Foreign Function Interface for Python calling C code. / MIT |
| [chardet](https://github.com/chardet/chardet) | 3.0.4 | Universal character encoding detector / LGPL2 |
| [click](http://click.pocoo.org/) | 6.7 | A simple wrapper around optparse for powerful command line utilities. / BSD 3-Clause |
| [cloudpickle](https://github.com/cloudpipe/cloudpickle) | 0.5.5 | Extended pickling support for Python objects / BSD 3-Clause |
| [clyent](https://github.com/Anaconda-Platform/clyent) | 1.2.2 | Command line client library for windows and posix / BSD 3-Clause |
| [colorama](https://github.com/tartley/colorama) | 0.3.9 | Cross-platform colored terminal text. / BSD 3-Clause |
| [comtypes](http://starship.python.net/crew/theller/comtypes/) | 1.1.7 | pure Python COM package / MIT |
| [conda](https://conda.io) | 4.5.11 | OS-agnostic, system-level binary package and environment manager. / BSD 3-Clause |
| [conda-build](https://github.com/conda/conda-build) | 3.15.1 | tools for building conda packages / BSD 3-Clause |
| [conda-env](https://github.com/conda/conda-env) | 2.6.0 | Tools for interacting with conda environments. / BSD 3-Clause |
| console\_shortcut | 0.1.1 | Console shortcut creator for Windows (using menuinst) / BSD |
| [constantly](https://github.com/twisted/constantly) | 15.1.0 | Symbolic constants in Python / MIT |
| [contextlib2](http://contextlib2.readthedocs.org) | 0.5.5 | Backports and enhancements for the contextlib module / PSF |
| [cryptography](https://github.com/pyca/cryptography) | 2.3.1 | Provides cryptographic recipes and primitives to Python developers / Apache 2.0 or BSD 3-Clause, PSF 2 |
| [curl](http://curl.haxx.se/) | 7.61.0 | tool and library for transferring data with URL syntax / MIT/X derivate (`<http://curl.haxx.se/docs/copyright.html>`) |
| [cycler](http://matplotlib.org/cycler) | 0.10.0 | Composable style cycles. / BSD 3-Clause |
| [cython](http://www.cython.org/) | 0.28.5 | The Cython compiler for writing C extensions for the Python language / Apache-2.0 |
| [cytoolz](https://github.com/pytoolz/cytoolz) | 0.9.0.1 | Cython implementation of Toolz. High performance functional utilities. / BSD 3-Clause |
| [dask](http://github.com/dask/dask/) | 0.19.1 | Parallel Python with task scheduling / BSD 3-Clause |
| [dask-core](http://github.com/dask/dask/) | 0.19.1 | Parallel Python with task scheduling / BSD 3-Clause |
| [datashape](http://datashape.pydata.org) | 0.5.4 | A data description language. / BSD 2-Clause |
| [decorator](https://github.com/micheles/decorator) | 4.3.0 | Better living through Python with decorators. / BSD 3-Clause |
| [defusedxml](https://bitbucket.org/tiran/defusedxml) | 0.5.0 | XML bomb protection for Python stdlib modules / PSF 2.0 |
| [distributed](http://distributed.readthedocs.io/en/latest/) | 1.23.1 | Distributed computing with Dask / BSD 3-Clause |
| [docutils](http://docutils.sourceforge.net/) | 0.14 | Docutils – Python Documentation Utilities / Public Domain Dedictation and BSD 2-Clause and PSF 2.1.1 and GPL 3.0 |
| [entrypoints](https://github.com/takluyver/entrypoints) | 0.2.3 | Discover and load entry points from installed packages. / MIT License |
| [et\_xmlfile](https://bitbucket.org/openpyxl/et_xmlfile) | 1.0.1 | An implementation of lxml.xmlfile for the standard library / MIT |
| [fastcache](https://github.com/pbrady/fastcache) | 1.0.2 | C implementation of Python 3 lru\_cache / MIT |
| [filelock](https://github.com/benediktschmitt/py-filelock) | 3.0.8 | A platform independent file lock. / Public Domain |
| [flask](http://flask.pocoo.org) | 1.0.2 | A microframework based on Werkzeug, Jinja2 and good intentions. / BSD 3-Clause |
| [flask-cors](https://github.com/corydolphin/flask-cors) | 3.0.6 | A Flask extension adding a decorator for CORS support / MIT |
| [freetype](https://www.freetype.org/) | 2.9.1 | A Free, High-Quality, and Portable Font Engine / GPL-2.0 and FreeType |
| [get\_terminal\_size](https://github.com/chrippa/backports.shutil_get_terminal_size) | 1.0.0 | Get the size of the terminal window. / MIT |
| [gevent](http://www.gevent.org/) | 1.3.6 | Coroutine-based network library / MIT |
| [glob2](https://github.com/miracle2k/python-glob2) | 0.6 | Version of the glob module that supports recursion via \*\*, and can capture patterns. / BSD-2-Clause |
| [greenlet](https://github.com/python-greenlet/greenlet) | 0.4.15 | Lightweight in-process concurrent programming / MIT |
| [h5py](http://www.h5py.org/) | 2.8.0 | Read and write HDF5 files from Python. / BSD 3-Clause |
| [hdf5](http://www.hdfgroup.org/HDF5/) | 1.10.2 | HDF5 is a data model, library, and file format for storing and managing data / HDF5 |
| [heapdict](http://stutzbachenterprises.com/) | 1.0.0 | A heap with decrease-key and increase-key operations / BSD 3-Clause |
| [html5lib](https://github.com/html5lib/html5lib-python) | 1.0.1 | HTML parser based on the WHATWG HTML specification / MIT |
| [hyperlink](https://github.com/python-hyper/hyperlink) | 18.0.0 | Immutable, Pythonic, correct URLs. / MIT |
| [icc\_rt](https://software.intel.com/en-us/node/522690) | 2017.0.4 | Intel runtime libraries for C, C++ and Fortran compilers / Intel proprietary |
| [icu](http://site.icu-project.org/) | 58.2 | International Components for Unicode. / MIT |
| [idna](https://github.com/kjd/idna) | 2.7 | Internationalized Domain Names in Applications (IDNA). / BSD Like |
| [imageio](http://imageio.github.io) | 2.4.1 | a Python library for reading and writing image data / BSD 2-Clause |
| [imagesize](https://github.com/shibukawa/imagesize_py) | 1.1.0 | Getting image size from png/jpeg/jpeg2000/gif file / MIT |
| [incremental](https://twistedmatrix.com) | 17.5.0 | A library that versions your Python projects / MIT License |
| [intel-openmp](https://software.intel.com/en-us/node/522690) | 2019.0 | Math library for Intel and compatible processors / proprietary - Intel |
| [ipykernel](http://ipython.org) | 4.10.0 | IPython Kernel for Jupyter / BSD 3-clause |
| [ipython](http://ipython.org/) | 6.5.0 | IPython: Productive Interactive Computing / BSD 3-clause |
| [ipython\_genutils](http://ipython.org) | 0.2.0 | vestigial utilities from IPython / BSD 3-Clause |
| [ipywidgets](https://github.com/ipython/ipywidgets) | 7.4.1 | Jupyter Interactive Widgets / BSD 3-clause |
| [isort](https://github.com/timothycrosley/isort) | 4.3.4 | A Python utility / library to sort Python imports. / MIT |
| [itsdangerous](https://github.com/pallets/itsdangerous) | 0.24 | Various helpers to pass trusted data to untrusted environments. / BSD 3-Clause |
| [jdcal](https://github.com/phn/jdcal) | 1.4 | Julian dates from proleptic Gregorian and Julian calendars. / BSD 2-Clause |
| [jedi](https://github.com/davidhalter/jedi/) | 0.12.1 | An autocompletion tool for Python that can be used for text editors. / MIT |
| [jinja2](http://jinja.pocoo.org) | 2.10 | An easy to use stand-alone template engine written in pure python. / 3-Clause BSD |
| [jpeg](http://www.ijg.org/) | 9b | read/write jpeg COM, EXIF, IPTC medata / Custom free software license |
| [jsonschema](https://github.com/Julian/jsonschema) | 2.6.0 | An implementation of JSON Schema validation for Python / MIT |
| [jupyter](http://jupyter.org) | 1.0.0 | Jupyter metapackage. Install all the Jupyter components in one go. / BSD 3-Clause |
| [jupyter\_client](http://jupyter.org) | 5.2.3 | Jupyter protocol implementation and client libraries / BSD 3-clause |
| [jupyter\_console](http://jupyter.org) | 5.2.0 | Jupyter terminal console / BSD 3-Clause |
| [jupyter\_core](http://jupyter.org) | 4.4.0 | Core common functionality of Jupyter projects. / BSD 3-clause |
| [jupyterlab](https://github.com/jupyterlab/jupyterlab) | 0.34.9 | JupyterLab PRE-ALPHA / BSD-3-Clause |
| [jupyterlab\_launcher](http://github.com/jupyterlab/jupyterlab_launcher) | 0.13.1 | A Launcher for JupyterLab based applications. / BSD 3-Clause |
| [keyring](https://github.com/jaraco/keyring) | 13.2.1 | Store and access your passwords safely. / Python Software Foundation or MIT |
| [kiwisolver](https://github.com/nucleic/kiwi) | 1.0.1 | A fast implementation of the Cassowary constraint solver / BSD 3-Clause |
| [lazy-object-proxy](https://github.com/ionelmc/python-lazy-object-proxy) | 1.3.1 | A fast and thorough lazy object proxy. / BSD 2-Clause |
| [libcurl](http://curl.haxx.se/) | 7.61.0 | tool and library for transferring data with URL syntax / MIT/X derivate (`<http://curl.haxx.se/docs/copyright.html>`) |
| [libiconv](https://www.gnu.org/software/libiconv/) | 1.15 | Provides iconv for systems which don’t have one (or that cannot convert from/to Unicode.) / GPL and LGPL |
| [libpng](http://www.libpng.org/pub/png/libpng.html) | 1.6.34 | PNG reference library. / zlib/libpng |
| [libsodium](http://libsodium.org) | 1.0.16 | A modern and easy-to-use crypto library. / ISC |
| [libssh2](https://www.libssh2.org/) | 1.8.0 | the SSH library / BSD 3-Clause |
| [libtiff](http://www.libtiff.org/) | 4.0.9 | Support for the Tag Image File Format (TIFF). / HPND |
| [libxml2](http://xmlsoft.org/) | 2.9.8 | The XML C parser and toolkit of Gnome / MIT |
| [libxslt](http://xmlsoft.org/XSLT/) | 1.1.32 | The XSLT C library developed for the GNOME project / MIT |
| [llvmlite](https://github.com/numba/llvmlite) | 0.24.0 | A lightweight LLVM python binding for writing JIT compilers / New BSD License |
| [locket](https://github.com/mwilliamson/locket.py) | 0.2.0 | File-based locks for Python for Linux and Windows / BSD 2-Clause |
| [lxml](http://lxml.de/) | 4.2.5 | Pythonic binding for the C libraries libxml2 and libxslt. / BSD 3-Clause, GPL-2.0, ZPL-2.0, and ElementTree |
| [lzo](http://www.oberhumer.com/opensource/lzo/) | 2.10 | LZO is a portable lossless data compression library written in ANSI C. / GPL v2+ |
| m2w64-gcc-libgfortran | 5.3.0 | |
| m2w64-gcc-libs | 5.3.0 | |
| m2w64-gcc-libs-core | 5.3.0 | |
| m2w64-gmp | 6.1.0 | |
| m2w64-libwinpthread-git | 5.0.0.4634.697f757 | |
| [markupsafe](https://www.palletsprojects.com/p/markupsafe/) | 1.0 | A Python module that implements the jinja2.Markup string / BSD 3-Clause |
| [matplotlib](http://matplotlib.org/) | 2.2.3 | Publication quality figures in Python / PSF-based |
| [mccabe](https://github.com/PyCQA/mccabe) | 0.6.1 | McCabe complexity checker for Python / MIT |
| [menuinst](https://github.com/ContinuumIO/menuinst) | 1.4.14 | cross platform menu item installation / BSD |
| [mistune](https://github.com/lepture/mistune) | 0.8.3 | The fastest markdown parser in pure Python. / BSD 3-Clause |
| [mkl](https://software.intel.com/en-us/mkl) | 2019.0 | Math library for Intel and compatible processors / proprietary - Intel |
| [mkl-service](https://github.com/ContinuumIO/mkl-service) | 1.1.2 | Python bindings to MKL service functions / 3-clause BSD |
| [mkl\_fft](http://github.com/IntelPython/mkl_fft) | 1.0.4 | NumPy-based implementation of Fast Fourier Transform using Intel (R) Math Kernel Library. / BSD 3-Clause |
| [mkl\_random](http://github.com/IntelPython/mkl_random) | 1.0.1 | Intel (R) MKL-powered package for sampling from common probability distributions into NumPy arrays. / BSD 3-Clause |
| [more-itertools](https://github.com/erikrose/more-itertools) | 4.3.0 | More routines for operating on iterables, beyond itertools / MIT |
| [mpmath](http://mpmath.org) | 1.0.0 | Python library for arbitrary-precision floating-point arithmetic / BSD 3-Clause |
| [msgpack-python](http://msgpack.org/) | 0.5.6 | MessagePack (de)serializer. / Apache 2.0 |
| msys2-conda-epoch | 20160418 | |
| [multipledispatch](https://github.com/mrocklin/multipledispatch/) | 0.6.0 | Multiple dispatch in Python / BSD 3-Clause |
| [navigator-updater](https://github.com/ContinuumIO/navigator-updater) | 0.2.1 | Anaconda Navigator Updater / proprietary - Continuum Analytics, Inc. |
| [nbconvert](http://jupyter.org) | 5.4.0 | Converting Jupyter Notebooks / BSD-3-Clause |
| [nbformat](http://jupyter.org) | 4.4.0 | The reference implementation of the Jupyter Notebook format / BSD 3-clause |
| [networkx](https://networkx.github.io/) | 2.1 | Python package for creating and manipulating complex networks / BSD 3-Clause |
| [nltk](http://nltk.org/) | 3.3.0 | Build Python programs to work with human language data / Apache 2.0 |
| [nose](http://readthedocs.org/docs/nose/) | 1.3.7 | Nose extends unittest to make testing easier / LGPL-2.1 |
| [notebook](http://jupyter.org) | 5.6.0 | Jupyter Notebook / BSD 3-clause |
| [numba](http://numba.github.com) | 0.39.0 | NumPy aware dynamic Python compiler using LLVM / BSD 2-clause |
| [numexpr](https://github.com/pydata/numexpr) | 2.6.8 | Fast numerical expression evaluator for NumPy. / MIT |
| [numpy](http://numpy.scipy.org/) | 1.15.1 | Array processing for numbers, strings, records, and objects. / BSD 3-Clause |
| numpy-base | 1.15.1 | |
| [numpydoc](https://github.com/numpy/numpydoc) | 0.8.0 | Sphinx extension to support docstrings in Numpy format / BSD 3-Clause |
| [odo](http://odo.pydata.org) | 0.5.1 | Data migration in Python / BSD-3-Clause |
| [olefile](http://www.decalage.info/python/olefileio) | 0.46 | parse, read and write Microsoft OLE2 files / BSD 2-Clause |
| [openpyxl](https://openpyxl.readthedocs.io) | 2.5.6 | A Python library to read/write Excel 2010 xlsx/xlsm files / MIT |
| [openssl](http://www.openssl.org/) | 1.0.2p | OpenSSL is an open-source implementation of the SSL and TLS protocols / OpenSSL |
| [packaging](https://github.com/pypa/packaging) | 17.1 | Core utilities for Python packages / Apache 2.0 or BSD 2-Clause |
| [pandas](http://pandas.pydata.org) | 0.23.4 | High-performance, easy-to-use data structures and data analysis tools. / BSD 3-clause |
| [pandoc](http://pandoc.org/) | 1.19.2.1 | Universal markup converter (repackaged binaries). / GPL-2.0 |
| [pandocfilters](https://github.com/jgm/pandocfilters) | 1.4.2 | A python module for writing pandoc filters / BSD-3-Clause |
| [parso](https://github.com/davidhalter/parso) | 0.3.1 | A Python Parser / MIT |
| [partd](https://github.com/dask/partd) | 0.3.8 | Data structure for on-disk shuffle operations / BSD 3-Clause |
| [path.py](https://github.com/jaraco/path.py) | 11.1.0 | A module wrapper for os.path / MIT |
| [pathlib2](https://github.com/mcmtroffaes/pathlib2) | 2.3.2 | Fork of pathlib aiming to support the full stdlib Python API. / MIT |
| [patsy](https://github.com/pydata/patsy) | 0.5.0 | Describing statistical models in Python using symbolic formulas / BSD-2-Clause, PSF2 |
| [pep8](http://pep8.readthedocs.org/) | 1.7.1 | Python style guide checker / MIT |
| [pickleshare](https://github.com/vivainio/pickleshare) | 0.7.4 | Tiny ‘shelve’-like database with concurrency support / MIT |
| [pillow](https://pillow.readthedocs.io) | 5.2.0 | Pillow is the friendly PIL fork by Alex Clark and Contributors. / PIL |
| [pip](https://pip.pypa.io/en/stable/) | 10.0.1 | PyPA recommended tool for installing Python packages / MIT |
| [pkginfo](https://code.launchpad.net/~tseaver/pkginfo/trunk) | 1.4.2 | Query metadatdata from sdists / bdists / installed packages. / MIT |
| [pluggy](https://github.com/pytest-dev/pluggy) | 0.7.1 | Plugin registration and hook calling for Python / MIT |
| [ply](http://www.dabeaz.com/ply/index.html) | 3.11 | Python Lex-Yacc / BSD 3-clause |
| [progress](https://github.com/verigak/progress) | 1.3 | Easy progress reporting for Python / ISC |
| [prometheus\_client](https://github.com/prometheus/client_python) | 0.3.1 | Python client for the Prometheus monitoring system. / Apache 2.0 |
| [prompt\_toolkit](https://github.com/jonathanslenders/python-prompt-toolkit) | 1.0.15 | Library for building powerful interactive command lines in Python / BSD 3-clause |
| [psutil](https://github.com/giampaolo/psutil) | 5.4.7 | A cross-platform process and system utilities module for Python / BSD 3-Clause |
| [py](https://github.com/pytest-dev/py) | 1.6.0 | library with cross-python path, ini-parsing, io, code, log facilities / MIT |
| [pyasn1](https://github.com/etingof/pyasn1) | 0.4.4 | ASN.1 types and codecs / BSD 2-Clause |
| [pyasn1-modules](http://pyasn1.sourceforge.net/) | 0.2.2 | A collection of ASN.1-based protocols modules. / BSD 2-Clause |
| [pycodestyle](https://pycodestyle.readthedocs.io/) | 2.4.0 | Python style guide checker / MIT |
| [pycosat](https://github.com/ContinuumIO/pycosat) | 0.6.3 | Bindings to picosat (a SAT solver) / MIT |
| [pycparser](https://github.com/eliben/pycparser) | 2.18 | Complete C99 parser in pure Python / BSD 3-clause |
| [pycrypto](http://www.pycrypto.org/) | 2.6.1 | Cryptographic modules for Python. / Public Domain |
| [pycurl](http://pycurl.sourceforge.net/) | 7.43.0.2 | A Python Interface To The cURL library / LGPL, MIT |
| [pyflakes](https://github.com/PyCQA/pyflakes) | 2.0.0 | Pyflakes analyzes programs and detects various errors. / MIT |
| [pygments](http://pygments.org/) | 2.2.0 | Generic syntax highlighting package / BSD 2-clause |
| [pylint](http://www.pylint.org/) | 2.1.1 | python code static checker / GPL |
| [pyodbc](https://github.com/mkleehammer/pyodbc) | 4.0.24 | DB API Module for ODBC / MIT |
| [pyopenssl](https://github.com/pyca/pyopenssl) | 18.0.0 | Python wrapper module around the OpenSSL library / Apache 2.0 |
| [pyparsing](http://pyparsing.wikispaces.com/) | 2.2.0 | Create and execute simple grammars / MIT |
| [pyqt](http://www.riverbankcomputing.co.uk/software/pyqt) | 5.9.2 | Python binding of the cross-platform GUI toolkit Qt. / Commercial, GPL-2.0, GPL-3.0 |
| [pysocks](https://github.com/Anorov/PySocks) | 1.6.8 | A Python SOCKS client module. See [Anorov/PySocks](https://github.com/Anorov/PySocks) for more information. / BSD 3-Clause |
| [pytables](http://www.pytables.org) | 3.4.4 | Brings together Python, HDF5 and NumPy to easily handle large amounts of data. / BSD 3-Clause |
| [pytest](https://docs.pytest.org/en/latest/) | 3.8.0 | Simple and powerful testing with Python. / MIT |
| [pytest-arraydiff](https://github.com/astrofrog/pytest-arraydiff) | 0.2 | pytest plugin to help with comparing array output from tests / BSD |
| [pytest-astropy](https://github.com/astropy/pytest-astropy) | 0.4.0 | Meta-package containing dependencies for testing Astropy / BSD |
| [pytest-doctestplus](https://github.com/astropy/pytest-doctestplus) | 0.1.3 | Pytest plugin with advanced doctest features / BSD |
| [pytest-openfiles](https://github.com/astropy/pytest-openfiles) | 0.3.0 | Pytest plugin for detecting inadvertent open file handles / BSD |
| [pytest-remotedata](https://github.com/astropy/pytest-remotedata) | 0.3.0 | Pytest plugin for controlling remote data access / BSD |
| [python](http://www.python.org/) | 3.7.0 | General purpose programming language / PSF |
| [python-dateutil](https://dateutil.readthedocs.org/) | 2.7.3 | Extensions to the standard Python datetime module. / BSD 3 Clause |
| [pytz](http://pythonhosted.org/pytz/) | 2018.5 | World timezone definitions, modern and historical. / MIT |
| [pywavelets](https://github.com/PyWavelets/pywt) | 1.0.0 | Discrete Wavelet Transforms in Python. / MIT |
| [pywin32](https://sourceforge.net/projects/pywin32) | 223 | Python extensions for Windows / PSF |
| [pywinpty](https://github.com/spyder-ide/pywinpty) | 0.5.4 | Python bindings for the winpty library / MIT |
| [pyyaml](http://pyyaml.org/wiki/PyYAML) | 3.13 | YAML parser and emitter for Python / MIT |
| [pyzmq](https://github.com/zeromq/pyzmq) | 17.1.2 | Python bindings for zeromq / BSD 3-clause |
| [qt](http://qt-project.org) | 5.9.6 | Qt is a cross-platform application and UI framework. / LGPL-3.0 |
| [qtawesome](https://github.com/spyder-ide/qtawesome) | 0.4.4 | Iconic fonts in PyQt and PySide applications / MIT |
| [qtconsole](http://jupyter.org) | 4.4.1 | Jupyter Qt console / BSD 3-Clause |
| [qtpy](https://github.com/spyder-ide/qtpy) | 1.5.0 | Abstraction layer for PyQt5/PyQt4/PySide / MIT |
| [requests](http://python-requests.org) | 2.19.1 | Python HTTP for Humans. / Apache 2.0 |
| [rope](https://github.com/python-rope/rope) | 0.11.0 | A python refactoring library… / GPL 2.0 |
| [ruamel\_yaml](https://bitbucket.org/ruamel/yaml) | 0.15.46 | A patched copy of ruamel.yaml. / MIT |
| [scikit-image](http://scikit-image.org/) | 0.14.0 | Image processing routines for SciPy. / BSD 3-Clause |
| [scikit-learn](http://scikit-learn.org/) | 0.19.2 | A set of python modules for machine learning and data mining / BSD 3-Clause |
| [scipy](http://www.scipy.org/) | 1.1.0 | Scientific Library for Python / BSD 3-Clause |
| [seaborn](https://seaborn.pydata.org) | 0.9.0 | Statistical data visualization / BSD 3-Clause |
| [send2trash](https://github.com/hsoft/send2trash) | 1.5.0 | Python library to natively send files to Trash (or Recycle bin) on all platforms. / BSD-3-Clause |
| [service\_identity](https://github.com/pyca/service_identity) | 17.0.0 | Service identity verification for pyOpenSSL. / MIT |
| [setuptools](https://github.com/pypa/setuptools) | 40.2.0 | Download, build, install, upgrade, and uninstall Python packages / MIT |
| [simplegeneric](http://cheeseshop.python.org/pypi/simplegeneric) | 0.8.1 | Simple generic functions (similar to Python’s own len(), pickle.dump(), etc.) / Zope Public |
| [singledispatch](http://docs.python.org/3/library/functools.html#functools.singledispatch) | 3.4.0.3 | Transforms a function into a single-dispatch generic function / MIT |
| [sip](http://www.riverbankcomputing.com/software/sip/intro) | 4.19.8 | Create Python bindings for C and C++ libraries / GPL-3.0 |
| [six](http://pypi.python.org/pypi/six/) | 1.11.0 | Python 2 and 3 compatibility utilities / MIT |
| [snappy](https://github.com/google/snappy) | 1.1.7 | A fast compressor/decompressor / BSD 3-clause |
| [snowballstemmer](https://github.com/shibukawa/snowball_py) | 1.2.1 | Snowball stemming library collection for Python / BSD-2-Clause |
| [sortedcollections](http://www.grantjenks.com/docs/sortedcollections/) | 1.0.1 | Python Sorted Collections / Apache-2.0 |
| [sortedcontainers](http://www.grantjenks.com/docs/sortedcontainers/) | 2.0.5 | Python Sorted Container Types: SortedList, SortedDict, and SortedSet / Apache 2.0 |
| [sphinx](http://www.sphinx-doc.org) | 1.7.9 | Sphinx is a tool that makes it easy to create intelligent and beautiful documentation / BSD 2-clause |
| sphinxcontrib | 1.0 | Python namespace for sphinxcontrib / BSD |
| [sphinxcontrib-websupport](https://pypi.python.org/pypi/sphinxcontrib-websupport) | 1.1.0 | Sphinx API for Web Apps / BSD-2-Clause |
| [spyder](https://www.spyder-ide.org/) | 3.3.1 | The Scientific Python Development Environment / MIT |
| [spyder-kernels](https://github.com/spyder-ide/spyder-kernels) | 0.2.6 | Jupyter kernels for the Spyder console / MIT |
| [sqlalchemy](http://www.sqlalchemy.org/) | 1.2.11 | Database Abstraction Library. / MIT |
| [sqlite](http://www.sqlite.org/) | 3.24.0 | Implements a self-contained, zero-configuration, SQL database engine. / Public-Domain (`<http://www.sqlite.org/copyright.html>`) |
| [statsmodels](https://www.statsmodels.org) | 0.9.0 | Statistical computations and models for use with SciPy / BSD 3-Clause |
| [sympy](http://sympy.org) | 1.2 | Python library for symbolic mathematics / 3-clause BSD |
| [tblib](https://github.com/ionelmc/python-tblib) | 1.3.2 | Traceback serialization library. / BSD 2-Clause |
| [terminado](https://github.com/jupyter/terminado) | 0.8.1 | Terminals served by tornado websockets / BSD 2-clause |
| [testpath](https://testpath.readthedocs.io) | 0.3.1 | Testpath is a collection of utilities for Python code working with files and commands. / MIT |
| [tk](http://www.tcl.tk/) | 8.6.8 | A dynamic programming language with GUI support. Bundles Tcl and Tk. / Tcl/Tk |
| [toolz](http://toolz.readthedocs.org/) | 0.9.0 | A functional standard library for Python. / BSD 3-Clause |
| [tornado](http://www.tornadoweb.org/) | 5.1 | A Python web framework and asynchronous networking library, originally developed at FriendFeed. / Apache 2.0 |
| [tqdm](https://pypi.python.org/pypi/tqdm) | 4.26.0 | A Fast, Extensible Progress Meter / MPLv2.0, MIT |
| [traitlets](http://ipython.org/) | 4.3.2 | Configuration system for Python applications / BSD 3-clause |
| [twisted](http://twistedmatrix.com/) | 18.7.0 | event-driven networking engine / MIT |
| [unicodecsv](https://github.com/jdunck/python-unicodecsv) | 0.14.1 | Drop-in replacement for csv module which supports unicode strings / BSD |
| [urllib3](https://urllib3.readthedocs.io/) | 1.23 | HTTP library with thread-safe connection pooling, file post, and more. / MIT |
| [vc](https://github.com/conda/conda/wiki/VC-features) | 14.1 | A meta-package to impose mutual exclusivity among software built with different VS versions / Modified BSD License (3-clause) |
| [vs2015\_runtime](http://www.microsoft.com) | 14.15.26706 | Bundles of the MSVC 14 (VS 2015) runtime / Proprietary |
| [wcwidth](https://github.com/jquast/wcwidth) | 0.1.7 | Measures number of Terminal column cells of wide-character codes. / MIT |
| [webencodings](https://github.com/gsnedders/python-webencodings) | 0.5.1 | Character encoding aliases for legacy web content / BSD 3-Clause |
| [werkzeug](http://werkzeug.pocoo.org/) | 0.14.1 | The Python WSGI Utility Library. / BSD 3-Clause |
| [wheel](https://bitbucket.org/pypa/wheel/) | 0.31.1 | A built-package format for Python. / MIT |
| [widgetsnbextension](http://ipython.org) | 3.4.1 | Interactive Widgets for Jupyter / BSD 3-clause |
| [win\_inet\_pton](https://github.com/hickeroar/win_inet_pton) | 1.0.1 | Native inet\_pton and inet\_ntop implementation for Python on Windows (with ctypes). / PUBLIC-DOMAIN |
| [win\_unicode\_console](https://github.com/Drekin/win-unicode-console) | 0.5 | A Python package to enable Unicode input and display when running Python from Windows console. / MIT |
| [wincertstore](https://bitbucket.org/tiran/wincertstore) | 0.2 | Python module to extract CA and CRL certs from Windows’ cert store (ctypes based). / PSF 2 |
| [winpty](https://github.com/rprichard/winpty) | 0.4.3 | Winpty provides an interface similar to a Unix pty-master for communicating with Windows console programs. / MIT |
| [wrapt](https://github.com/GrahamDumpleton/wrapt) | 1.10.11 | Module for decorators, wrappers and monkey patching. / BSD 2-Clause |
| [xlrd](http://www.python-excel.org/) | 1.1.0 | Library for developers to extract data from Microsoft Excel (tm) spreadsheet files / BSD 3-Clause and BSD with advertising |
| [xlsxwriter](https://xlsxwriter.readthedocs.io/) | 1.1.0 | A Python module for creating Excel XLSX files / BSD 2-Clause |
| [xlwings](http://xlwings.org/) | 0.11.8 | Interact with Excel from Python and vice versa / 3-clause BSD |
| [xlwt](http://www.python-excel.org/) | 1.3.0 | Writing data and formatting information to Excel files / BSD |
| [yaml](http://pyyaml.org/wiki/LibYAML) | 0.1.7 | A C library for parsing and emitting YAML. / MIT |
| [zeromq](http://zeromq.org) | 4.2.5 | A high-performance asynchronous messaging library. / LGPL 3 |
| [zict](http://github.com/mrocklin/zict) | 0.1.3 | Composable Dictionary Classes / BSD 3-Clause |
| [zlib](http://zlib.net/) | 1.2.11 | Massively spiffy yet delicately unobtrusive compression library / zlib |
| zope | 1.0 | web application server / BSD |
| [zope.interface](http://docs.zope.org/zope.interface/) | 4.5.0 | Interfaces for Python / ZPL 2.1 |
| Name | Version | Summary / License |
|---|---|---|
| [\_ipyw\_jlab\_nb\_ext\_conf](https://github.com/ContinuumIO/anaconda-nb-extensions-meta-config) | 0.1.0 | A configuration metapackage for enabling Anaconda-bundled jupyter extensions / BSD |
| [alabaster](http://www.sphinx-doc.org/en/stable/index.html) | 0.7.10 | Configurable, Python 2+3 compatible Sphinx theme. / BSD 3-Clause |
| [anaconda-client](http://anaconda.org) | 1.6.3 | anaconda.org command line client library / BSD 3-clause |
| [anaconda-navigator](https://github.com/ContinuumIO/navigator) | 1.8.7 | Anaconda Navigator / proprietary - Continuum Analytics, Inc. |
| [anaconda-project](https://github.com/Anaconda-Platform/anaconda-project) | 0.8.2 | Tool for encapsulating, running, and reproducing data science projects / BSD 3-Clause |
| [appnope](http://github.com/minrk/appnope) | 0.1.0 | Disable App Nap on OS X 10.9 / BSD 2-Clause |
| [appscript](http://appscript.sourceforge.net/) | 1.0.1 | Control AppleScriptable applications from Python / Public-Domain |
| [asn1crypto](https://github.com/wbond/asn1crypto) | 0.24.0 | Python ASN.1 library with a focus on performance and a pythonic API / MIT |
| [astroid](https://www.astroid.org/) | 1.6.3 | A abstract syntax tree for Python with inference support. / LGPL 2.1 |
| [astropy](http://www.astropy.org/) | 3.0.2 | Community-developed Python Library for Astronomy / BSD |
| [babel](http://babel.pocoo.org/) | 2.5.3 | Utilities to internationalize and localize Python applications / BSD 3-clause |
| [backcall](https://github.com/takluyver/backcall/) | 0.1.0 | Specifications for callback functions passed in to an API / BSD-3-Clause |
| [backports](https://bitbucket.org/brandon/backports) | 1.0 | / BSD |
| [backports.shutil\_get\_terminal\_size](https://github.com/chrippa/backports.shutil_get_terminal_size) | 1.0.0 | A backport of the get\_terminal\_size function from Python 3.3’s shutil. / MIT |
| [beautifulsoup4](http://www.crummy.com/software/BeautifulSoup/) | 4.6.0 | Python library designed for screen-scraping / MIT |
| [bitarray](https://github.com/ilanschnell/bitarray) | 0.8.1 | efficient arrays of booleans – C extension / PSF |
| blas | 1.0 | |
| [blaze](http://blaze.pydata.org) | 0.11.3 | NumPy and Pandas interface to big data / BSD 3-Clause |
| [bleach](https://github.com/mozilla/bleach) | 2.1.3 | Easy, whitelist-based HTML-sanitizing tool / Apache-2.0 |
| [bokeh](http://bokeh.pydata.org/) | 0.12.16 | Statistical and novel interactive HTML plots for Python / BSD 3-Clause |
| [boto](https://github.com/boto/boto/) | 2.48.0 | Amazon Web Services Library / MIT |
| [bottleneck](http://berkeleyanalytics.com/bottleneck) | 1.2.1 | Fast NumPy array functions written in Cython. / BSD 2-Clause |
| [bzip2](http://www.bzip.org/) | 1.0.6 | high-quality data compressor / bzip2 |
| [ca-certificates](https://github.com/conda-forge/ca-certificates-feedstock) | 2018.03.07 | Certificates for use with other packages. / ISC |
| [certifi](http://certifi.io/) | 2018.4.16 | Python package for providing Mozilla’s CA Bundle. / ISC |
| [cffi](https://bitbucket.org/cffi/cffi) | 1.9.1 | Foreign Function Interface for Python calling C code. / MIT |
| [chardet](https://github.com/chardet/chardet) | 3.0.3 | Universal character encoding detector / LGPL2 |
| [click](http://click.pocoo.org/) | 6.7 | A simple wrapper around optparse for powerful command line utilities. / BSD 3-Clause |
| [cloudpickle](https://github.com/cloudpipe/cloudpickle) | 0.5.3 | Extended pickling support for Python objects / BSD 3-Clause |
| [clyent](https://github.com/Anaconda-Platform/clyent) | 1.2.2 | Command line client library for windows and posix / BSD 3-Clause |
| [colorama](https://github.com/tartley/colorama) | 0.3.9 | Cross-platform colored terminal text. / BSD 3-Clause |
| [conda](https://conda.io) | 4.5.2 | OS-agnostic, system-level binary package and environment manager. / BSD 3-Clause |
| [conda-build](https://github.com/conda/conda-build) | 3.10.1 | tools for building conda packages / BSD 3-Clause |
| [conda-env](https://github.com/conda/conda-env) | 2.6.0 | Tools for interacting with conda environments. / BSD 3-Clause |
| [conda-verify](https://github.com/conda/conda-verify) | 2.0.0 | tool for validating conda recipes and conda packages / BSD 3-Clause |
| [cryptography](https://github.com/pyca/cryptography) | 1.7.1 | Provides cryptographic recipes and primitives to Python developers / Apache 2.0 or BSD 3-Clause, PSF 2 |
| [curl](http://curl.haxx.se/) | 7.60.0 | tool and library for transferring data with URL syntax / MIT/X derivate (`<http://curl.haxx.se/docs/copyright.html>`) |
| [cycler](http://matplotlib.org/cycler) | 0.10.0 | Composable style cycles. / BSD 3-Clause |
| [cython](http://www.cython.org/) | 0.28.2 | The Cython compiler for writing C extensions for the Python language / Apache-2.0 |
| [dask](http://github.com/dask/dask/) | 0.17.5 | Parallel Python with task scheduling / BSD 3-Clause |
| [datashape](http://datashape.pydata.org) | 0.5.4 | A data description language. / BSD 2-Clause |
| [dbus](http://www.freedesktop.org/wiki/Software/dbus/) | 1.13.2 | Simple message bus system for applications to talk to one another / GPL2 |
| [decorator](https://github.com/micheles/decorator) | 4.3.0 | Better living through Python with decorators. / BSD 3-Clause |
| [distributed](http://distributed.readthedocs.io/en/latest/) | 1.21.8 | Distributed computing with Dask / BSD 3-Clause |
| [docutils](http://docutils.sourceforge.net/) | 0.14 | Docutils – Python Documentation Utilities / Public Domain Dedictation and BSD 2-Clause and PSF 2.1.1 and GPL 3.0 |
| [entrypoints](https://github.com/takluyver/entrypoints) | 0.2.3 | Discover and load entry points from installed packages. / MIT License |
| [et\_xmlfile](https://bitbucket.org/openpyxl/et_xmlfile) | 1.0.1 | An implementation of lxml.xmlfile for the standard library / MIT |
| [expat](http://expat.sourceforge.net/) | 2.2.5 | Expat XML parser library in C. / MIT |
| [fastcache](https://github.com/pbrady/fastcache) | 1.0.2 | C implementation of Python 3 lru\_cache / MIT |
| [filelock](https://github.com/benediktschmitt/py-filelock) | 2.0.7 | A platform independent file lock. / Public Domain |
| [flask](http://flask.pocoo.org) | 1.0.2 | A microframework based on Werkzeug, Jinja2 and good intentions. / BSD 3-Clause |
| [flask-cors](https://github.com/corydolphin/flask-cors) | 3.0.4 | A Flask extension adding a decorator for CORS support / MIT |
| [freetype](https://www.freetype.org/) | 2.8 | A Free, High-Quality, and Portable Font Engine / GPL-2.0 and FreeType |
| [get\_terminal\_size](https://github.com/chrippa/backports.shutil_get_terminal_size) | 1.0.0 | Get the size of the terminal window. / MIT |
| [gettext](https://www.gnu.org/software/gettext/) | 0.19.8.1 | Internationalization package. / GPLv2 |
| [gevent](http://www.gevent.org/) | 1.3.0 | Coroutine-based network library / MIT |
| [glib](https://developer.gnome.org/glib/) | 2.56.1 | Provides core application building blocks for libraries and applications written in C. / LGPL-2.1 |
| [glob2](https://github.com/miracle2k/python-glob2) | 0.5 | Version of the glob module that supports recursion via \*\*, and can capture patterns. / BSD-2-Clause |
| [gmp](http://gmplib.org/) | 6.1.2 | The GNU multiprecision library. / GPL 2 and LGPL 3 |
| [gmpy2](https://pypi.python.org/pypi/gmpy2) | 2.0.8 | GMP/MPIR, MPFR, and MPC interface to Python 2.6+ and 3.x / LGPL 3 |
| [greenlet](https://github.com/python-greenlet/greenlet) | 0.4.13 | Lightweight in-process concurrent programming / MIT |
| [h5py](http://www.h5py.org/) | 2.7.1 | Read and write HDF5 files from Python. / BSD 3-Clause |
| [hdf5](http://www.hdfgroup.org/HDF5/) | 1.10.2 | HDF5 is a data model, library, and file format for storing and managing data / HDF5 |
| [heapdict](http://stutzbachenterprises.com/) | 1.0.0 | A heap with decrease-key and increase-key operations / BSD 3-Clause |
| [icu](http://site.icu-project.org/) | 58.2 | International Components for Unicode. / MIT |
| [idna](https://github.com/kjd/idna) | 2.2 | Internationalized Domain Names in Applications (IDNA). / BSD Like |
| [imagesize](https://github.com/shibukawa/imagesize_py) | 1.0.0 | Getting image size from png/jpeg/jpeg2000/gif file / MIT |
| [ipykernel](http://ipython.org) | 4.8.2 | IPython Kernel for Jupyter / BSD 3-clause |
| [ipython](http://ipython.org/) | 6.4.0 | IPython: Productive Interactive Computing / BSD 3-clause |
| [ipython\_genutils](http://ipython.org) | 0.2.0 | vestigial utilities from IPython / BSD 3-Clause |
| [ipywidgets](https://github.com/ipython/ipywidgets) | 7.2.1 | Jupyter Interactive Widgets / BSD 3-clause |
| [isort](https://github.com/timothycrosley/isort) | 4.3.4 | A Python utility / library to sort Python imports. / MIT |
| [itsdangerous](https://github.com/pallets/itsdangerous) | 0.24 | Various helpers to pass trusted data to untrusted environments. / BSD 3-Clause |
| [jbig](https://www.cl.cam.ac.uk/~mgk25/jbigkit) | 2.1 | Implementation of the JBIG1 data compression standard / GPL-2.0 |
| [jdcal](https://github.com/phn/jdcal) | 1.4 | Julian dates from proleptic Gregorian and Julian calendars. / BSD 2-Clause |
| [jedi](https://github.com/davidhalter/jedi/) | 0.12.0 | An autocompletion tool for Python that can be used for text editors. / MIT |
| [jinja2](http://jinja.pocoo.org) | 2.9.6 | An easy to use stand-alone template engine written in pure python. / 3-Clause BSD |
| [jpeg](http://www.ijg.org/) | 9b | read/write jpeg COM, EXIF, IPTC medata / Custom free software license |
| [jupyter](http://jupyter.org) | 1.0.0 | Jupyter metapackage. Install all the Jupyter components in one go. / BSD 3-Clause |
| [jupyter\_client](http://jupyter.org) | 5.2.3 | Jupyter protocol implementation and client libraries / BSD 3-clause |
| [jupyter\_console](http://jupyter.org) | 5.2.0 | Jupyter terminal console / BSD 3-Clause |
| [jupyter\_core](http://jupyter.org) | 4.4.0 | Core common functionality of Jupyter projects. / BSD 3-clause |
| [jupyterlab](https://github.com/jupyterlab/jupyterlab) | 0.32.1 | JupyterLab PRE-ALPHA / BSD-3-Clause |
| [kiwisolver](https://github.com/nucleic/kiwi) | 1.0.1 | A fast implementation of the Cassowary constraint solver / BSD 3-Clause |
| [lazy-object-proxy](https://github.com/ionelmc/python-lazy-object-proxy) | 1.3.1 | A fast and thorough lazy object proxy. / BSD 2-Clause |
| [libcurl](http://curl.haxx.se/) | 7.60.0 | tool and library for transferring data with URL syntax / MIT/X derivate (`<http://curl.haxx.se/docs/copyright.html>`) |
| [libcxx](http://libcxx.llvm.org/) | 4.0.1 | C++ Standard Library / MIT license or UIUC License |
| [libcxxabi](http://libcxxabi.llvm.org/) | 4.0.1 | C++ Standard Library Support / MIT license or UIUC License |
| [libedit](http://thrysoee.dk/editline/) | 3.1 | Editline Library (libedit) / NetBSD |
| [libffi](https://sourceware.org/libffi/) | 3.2.1 | A Portable Foreign Function Interface Library. / Custom |
| [libgfortran](http://gcc.gnu.org/) | 3.0.1 | Fortran libraries from the GNU Compiler Collection / GPL 3 (with GCC Runtime Library Exception 3.1) |
| [libiconv](https://www.gnu.org/software/libiconv/) | 1.15 | Provides iconv for systems which don’t have one (or that cannot convert from/to Unicode.) / GPL and LGPL |
| [libpng](http://www.libpng.org/pub/png/libpng.html) | 1.6.34 | PNG reference library. / zlib/libpng |
| [libsodium](http://libsodium.org) | 1.0.16 | A modern and easy-to-use crypto library. / ISC |
| [libssh2](https://www.libssh2.org/) | 1.8.0 | the SSH library / BSD 3-Clause |
| [libtiff](http://www.libtiff.org/) | 4.0.9 | Support for the Tag Image File Format (TIFF). / HPND |
| [libxml2](http://xmlsoft.org/) | 2.9.8 | The XML C parser and toolkit of Gnome / MIT |
| [libxslt](http://xmlsoft.org/XSLT/) | 1.1.32 | The XSLT C library developed for the GNOME project / MIT |
| [llvmlite](https://github.com/numba/llvmlite) | 0.23.1 | A lightweight LLVM python binding for writing JIT compilers / New BSD License |
| [locket](https://github.com/mwilliamson/locket.py) | 0.2.0 | File-based locks for Python for Linux and Windows / BSD 2-Clause |
| [lxml](http://lxml.de/) | 4.2.1 | Pythonic binding for the C libraries libxml2 and libxslt. / BSD 3-Clause, GPL-2.0, ZPL-2.0, and ElementTree |
| [lzo](http://www.oberhumer.com/opensource/lzo/) | 2.10 | LZO is a portable lossless data compression library written in ANSI C. / GPL v2+ |
| [markupsafe](https://www.palletsprojects.com/p/markupsafe/) | 0.23 | A Python module that implements the jinja2.Markup string / BSD 3-Clause |
| [matplotlib](http://matplotlib.org/) | 2.2.2 | Publication quality figures in Python / PSF-based |
| [mccabe](https://github.com/PyCQA/mccabe) | 0.6.1 | McCabe complexity checker for Python / MIT |
| [mistune](https://github.com/lepture/mistune) | 0.8.3 | The fastest markdown parser in pure Python. / BSD 3-Clause |
| [mkl](https://software.intel.com/en-us/mkl) | 2018.0.2 | Math library for Intel and compatible processors / proprietary - Intel |
| [mkl-service](https://github.com/ContinuumIO/mkl-service) | 1.1.2 | Python bindings to MKL service functions / 3-clause BSD |
| [mkl\_fft](http://github.com/IntelPython/mkl_fft) | 1.0.1 | NumPy-based implementation of Fast Fourier Transform using Intel (R) Math Kernel Library. / BSD 3-Clause |
| [mkl\_random](http://github.com/IntelPython/mkl_random) | 1.0.1 | Intel (R) MKL-powered package for sampling from common probability distributions into NumPy arrays. / BSD 3-Clause |
| [more-itertools](https://github.com/erikrose/more-itertools) | 4.1.0 | More routines for operating on iterables, beyond itertools / MIT |
| [mpc](http://www.multiprecision.org/) | 1.0.3 | A C library for the arithmetic of complex numbers with arbitrarily high precision. / LGPL 3 |
| [mpfr](http://www.mpfr.org/) | 3.1.5 | The MPFR library is a C library for multiple-precision floating-point computations with correct rounding. / LGPL 3 |
| [mpmath](http://mpmath.org) | 1.0.0 | Python library for arbitrary-precision floating-point arithmetic / BSD 3-Clause |
| [multipledispatch](https://github.com/mrocklin/multipledispatch/) | 0.5.0 | Multiple dispatch in Python / BSD 3-Clause |
| [navigator-updater](https://github.com/ContinuumIO/navigator-updater) | 0.2.1 | Anaconda Navigator Updater / proprietary - Continuum Analytics, Inc. |
| [nbconvert](http://jupyter.org) | 5.3.1 | Converting Jupyter Notebooks / BSD-3-Clause |
| [nbformat](http://jupyter.org) | 4.4.0 | The reference implementation of the Jupyter Notebook format / BSD 3-clause |
| [ncurses](http://www.gnu.org/software/ncurses/) | 6.0 | Library for text-based user interfaces / Free software (MIT-like) |
| [networkx](https://networkx.github.io/) | 2.1 | Python package for creating and manipulating complex networks / BSD 3-Clause |
| [nltk](http://nltk.org/) | 3.3.0 | Build Python programs to work with human language data / Apache 2.0 |
| [nose](http://readthedocs.org/docs/nose/) | 1.3.7 | Nose extends unittest to make testing easier / LGPL-2.1 |
| [notebook](http://jupyter.org) | 5.5.0 | Jupyter Notebook / BSD 3-clause |
| [numba](http://numba.github.com) | 0.38.0 | NumPy aware dynamic Python compiler using LLVM / BSD 2-clause |
| [numexpr](https://github.com/pydata/numexpr) | 2.6.5 | Fast numerical expression evaluator for NumPy. / MIT |
| [numpy](http://numpy.scipy.org/) | 1.14.3 | Array processing for numbers, strings, records, and objects. / BSD 3-Clause |
| numpy-base | 1.14.3 | |
| [numpydoc](https://github.com/numpy/numpydoc) | 0.8.0 | Sphinx extension to support docstrings in Numpy format / BSD 3-Clause |
| [odo](http://odo.pydata.org) | 0.5.1 | Data migration in Python / BSD-3-Clause |
| [openpyxl](https://openpyxl.readthedocs.io) | 2.5.3 | A Python library to read/write Excel 2010 xlsx/xlsm files / MIT |
| [openssl](http://www.openssl.org/) | 1.0.2o | OpenSSL is an open-source implementation of the SSL and TLS protocols / OpenSSL |
| [packaging](https://github.com/pypa/packaging) | 17.1 | Core utilities for Python packages / Apache 2.0 or BSD 2-Clause |
| [pandas](http://pandas.pydata.org) | 0.23.0 | High-performance, easy-to-use data structures and data analysis tools. / BSD 3-clause |
| [pandoc](http://pandoc.org/) | 1.19.2.1 | Universal markup converter (repackaged binaries). / GPL-2.0 |
| [pandocfilters](https://github.com/jgm/pandocfilters) | 1.4.2 | A python module for writing pandoc filters / BSD-3-Clause |
| [parso](https://github.com/davidhalter/parso) | 0.2.0 | A Python Parser / MIT |
| [partd](https://github.com/dask/partd) | 0.3.8 | Data structure for on-disk shuffle operations / BSD 3-Clause |
| [path.py](https://github.com/jaraco/path.py) | 11.0.1 | A module wrapper for os.path / MIT |
| [pathlib2](https://github.com/mcmtroffaes/pathlib2) | 2.3.2 | Fork of pathlib aiming to support the full stdlib Python API. / MIT |
| [patsy](https://github.com/pydata/patsy) | 0.5.0 | Describing statistical models in Python using symbolic formulas / BSD-2-Clause, PSF2 |
| [pcre](http://www.pcre.org/) | 8.42 | Regular expression pattern matching using the same syntax and semantics as Perl 5. / BSD 3-Clause |
| [pep8](http://pep8.readthedocs.org/) | 1.7.1 | Python style guide checker / MIT |
| [pexpect](http://pexpect.sourceforge.net/) | 4.5.0 | Pexpect makes Python a better tool for controlling other applications. / ISC |
| [pickleshare](https://github.com/vivainio/pickleshare) | 0.7.4 | Tiny ‘shelve’-like database with concurrency support / MIT |
| [pillow](https://pillow.readthedocs.io) | 5.1.0 | Pillow is the friendly PIL fork by Alex Clark and Contributors. / PIL |
| [pip](https://pip.pypa.io/en/stable/) | 9.0.1 | PyPA recommended tool for installing Python packages / MIT |
| [pkginfo](https://code.launchpad.net/~tseaver/pkginfo/trunk) | 1.4.1 | Query metadatdata from sdists / bdists / installed packages. / MIT |
| [pluggy](https://github.com/pytest-dev/pluggy) | 0.6.0 | Plugin registration and hook calling for Python / MIT |
| [ply](http://www.dabeaz.com/ply/index.html) | 3.11 | Python Lex-Yacc / BSD 3-clause |
| [prompt\_toolkit](https://github.com/jonathanslenders/python-prompt-toolkit) | 1.0.15 | Library for building powerful interactive command lines in Python / BSD 3-clause |
| [psutil](https://github.com/giampaolo/psutil) | 5.4.3 | A cross-platform process and system utilities module for Python / BSD 3-Clause |
| [ptyprocess](https://github.com/pexpect/ptyprocess) | 0.5.2 | Run a subprocess in a pseudo terminal / ISC |
| [py](https://github.com/pytest-dev/py) | 1.5.3 | library with cross-python path, ini-parsing, io, code, log facilities / MIT |
| [pyasn1](https://github.com/etingof/pyasn1) | 0.1.9 | ASN.1 types and codecs / BSD 2-Clause |
| [pycodestyle](https://pycodestyle.readthedocs.io/) | 2.4.0 | Python style guide checker / MIT |
| [pycosat](https://github.com/ContinuumIO/pycosat) | 0.6.3 | Bindings to picosat (a SAT solver) / MIT |
| [pycparser](https://github.com/eliben/pycparser) | 2.17 | Complete C99 parser in pure Python / BSD 3-clause |
| [pycrypto](http://www.pycrypto.org/) | 2.6.1 | Cryptographic modules for Python. / Public Domain |
| [pycurl](http://pycurl.sourceforge.net/) | 7.43.0.1 | A Python Interface To The cURL library / LGPL, MIT |
| [pyflakes](https://github.com/PyCQA/pyflakes) | 1.6.0 | Pyflakes analyzes programs and detects various errors. / MIT |
| [pygments](http://pygments.org/) | 2.2.0 | Generic syntax highlighting package / BSD 2-clause |
| [pyodbc](https://github.com/mkleehammer/pyodbc) | 4.0.23 | DB API Module for ODBC / MIT |
| [pyopenssl](https://github.com/pyca/pyopenssl) | 16.2.0 | Python wrapper module around the OpenSSL library / Apache 2.0 |
| [pyparsing](http://pyparsing.wikispaces.com/) | 2.2.0 | Create and execute simple grammars / MIT |
| [pyqt](http://www.riverbankcomputing.co.uk/software/pyqt) | 5.9.2 | Python binding of the cross-platform GUI toolkit Qt. / Commercial, GPL-2.0, GPL-3.0 |
| [pytables](http://www.pytables.org) | 3.4.3 | Brings together Python, HDF5 and NumPy to easily handle large amounts of data. / BSD 3-Clause |
| [pytest](https://docs.pytest.org/en/latest/) | 3.5.1 | Simple and powerful testing with Python. / MIT |
| [pytest-arraydiff](https://github.com/astrofrog/pytest-arraydiff) | 0.2 | pytest plugin to help with comparing array output from tests / BSD |
| [pytest-astropy](https://github.com/astropy/pytest-astropy) | 0.3.0 | Meta-package containing dependencies for testing Astropy / BSD |
| [pytest-doctestplus](https://github.com/astropy/pytest-doctestplus) | 0.1.3 | Pytest plugin with advanced doctest features / BSD |
| [pytest-openfiles](https://github.com/astropy/pytest-openfiles) | 0.3.0 | Pytest plugin for detecting inadvertent open file handles / BSD |
| [pytest-remotedata](https://github.com/astropy/pytest-remotedata) | 0.2.1 | Pytest plugin for controlling remote data access / BSD |
| [python](http://www.python.org/) | 3.6.4 | General purpose programming language / PSF |
| [python-dateutil](https://dateutil.readthedocs.org/) | 2.6.0 | Extensions to the standard Python datetime module. / BSD 3 Clause |
| python.app | 2 | Proxy on OS X letting Python libraries hook into the gui event loop / BSD |
| [pytz](http://pythonhosted.org/pytz/) | 2017.2 | World timezone definitions, modern and historical. / MIT |
| [pywavelets](https://github.com/PyWavelets/pywt) | 0.5.2 | Discrete Wavelet Transforms in Python. / MIT |
| [pyyaml](http://pyyaml.org/wiki/PyYAML) | 3.12 | YAML parser and emitter for Python / MIT |
| [pyzmq](https://github.com/zeromq/pyzmq) | 17.0.0 | Python bindings for zeromq / BSD 3-clause |
| [qt](http://qt-project.org) | 5.9.5 | Qt is a cross-platform application and UI framework. / LGPL-3.0 |
| [qtawesome](https://github.com/spyder-ide/qtawesome) | 0.4.4 | Iconic fonts in PyQt and PySide applications / MIT |
| [qtconsole](http://jupyter.org) | 4.3.1 | Jupyter Qt console / BSD 3-Clause |
| [qtpy](https://github.com/spyder-ide/qtpy) | 1.4.1 | Abstraction layer for PyQt5/PyQt4/PySide / MIT |
| [readline](https://cnswww.cns.cwru.edu/php/chet/readline/rltop.html) | 7.0 | library for editing command lines as they are typed in / GPL-3.0 |
| [requests](http://python-requests.org) | 2.12.4 | Python HTTP for Humans. / Apache 2.0 |
| [rope](https://github.com/python-rope/rope) | 0.10.7 | A python refactoring library… / GPL 2.0 |
| [ruamel\_yaml](https://bitbucket.org/ruamel/yaml) | 0.15.35 | A patched copy of ruamel.yaml. / MIT |
| [scikit-image](http://scikit-image.org/) | 0.13.1 | Image processing routines for SciPy. / BSD 3-Clause |
| [scikit-learn](http://scikit-learn.org/) | 0.19.1 | A set of python modules for machine learning and data mining / BSD 3-Clause |
| [scipy](http://www.scipy.org/) | 1.1.0 | Scientific Library for Python / BSD 3-Clause |
| [seaborn](https://seaborn.pydata.org) | 0.8.1 | Statistical data visualization / BSD 3-Clause |
| [send2trash](https://github.com/hsoft/send2trash) | 1.5.0 | Python library to natively send files to Trash (or Recycle bin) on all platforms. / BSD-3-Clause |
| [setuptools](https://github.com/pypa/setuptools) | 38.5.1 | Download, build, install, upgrade, and uninstall Python packages / MIT |
| [simplegeneric](http://cheeseshop.python.org/pypi/simplegeneric) | 0.8.1 | Simple generic functions (similar to Python’s own len(), pickle.dump(), etc.) / Zope Public |
| [singledispatch](http://docs.python.org/3/library/functools.html#functools.singledispatch) | 3.4.0.3 | Transforms a function into a single-dispatch generic function / MIT |
| [sip](http://www.riverbankcomputing.com/software/sip/intro) | 4.19.8 | Create Python bindings for C and C++ libraries / GPL-3.0 |
| [six](http://pypi.python.org/pypi/six/) | 1.10.0 | Python 2 and 3 compatibility utilities / MIT |
| [snowballstemmer](https://github.com/shibukawa/snowball_py) | 1.2.1 | Snowball stemming library collection for Python / BSD-2-Clause |
| [sortedcollections](http://www.grantjenks.com/docs/sortedcollections/) | 0.6.1 | Python Sorted Collections / Apache-2.0 |
| [sortedcontainers](http://www.grantjenks.com/docs/sortedcontainers/) | 1.5.10 | Python Sorted Container Types: SortedList, SortedDict, and SortedSet / Apache 2.0 |
| [sphinx](http://www.sphinx-doc.org) | 1.7.4 | Sphinx is a tool that makes it easy to create intelligent and beautiful documentation / BSD 2-clause |
| sphinxcontrib | 1.0 | Python namespace for sphinxcontrib / BSD |
| [sphinxcontrib-websupport](https://pypi.python.org/pypi/sphinxcontrib-websupport) | 1.0.1 | Sphinx API for Web Apps / BSD-2-Clause |
| [spyder](https://www.spyder-ide.org/) | 3.2.8 | The Scientific Python Development Environment / MIT |
| [sqlalchemy](http://www.sqlalchemy.org/) | 1.2.7 | Database Abstraction Library. / MIT |
| [sqlite](http://www.sqlite.org/) | 3.22.0 | Implements a self-contained, zero-configuration, SQL database engine. / Public-Domain (`<http://www.sqlite.org/copyright.html>`) |
| [statsmodels](https://www.statsmodels.org) | 0.9.0 | Statistical computations and models for use with SciPy / BSD 3-Clause |
| [sympy](http://sympy.org) | 1.1.1 | Python library for symbolic mathematics / 3-clause BSD |
| [tblib](https://github.com/ionelmc/python-tblib) | 1.3.2 | Traceback serialization library. / BSD 2-Clause |
| [terminado](https://github.com/jupyter/terminado) | 0.8.1 | Terminals served by tornado websockets / BSD 2-clause |
| [testpath](https://testpath.readthedocs.io) | 0.3.1 | Testpath is a collection of utilities for Python code working with files and commands. / MIT |
| [tk](http://www.tcl.tk/) | 8.6.7 | A dynamic programming language with GUI support. Bundles Tcl and Tk. / Tcl/Tk |
| [tornado](http://www.tornadoweb.org/) | 5.0.2 | A Python web framework and asynchronous networking library, originally developed at FriendFeed. / Apache 2.0 |
| [traitlets](http://ipython.org/) | 4.3.2 | Configuration system for Python applications / BSD 3-clause |
| [unicodecsv](https://github.com/jdunck/python-unicodecsv) | 0.14.1 | Drop-in replacement for csv module which supports unicode strings / BSD |
| [unixodbc](http://www.unixodbc.org/) | 2.3.6 | ODBC on non MS Windows platforms / LGPL-2.1 |
| [wcwidth](https://github.com/jquast/wcwidth) | 0.1.7 | Measures number of Terminal column cells of wide-character codes. / MIT |
| [webencodings](https://github.com/gsnedders/python-webencodings) | 0.5.1 | Character encoding aliases for legacy web content / BSD 3-Clause |
| [werkzeug](http://werkzeug.pocoo.org/) | 0.14.1 | The Python WSGI Utility Library. / BSD 3-Clause |
| [wheel](https://bitbucket.org/pypa/wheel/) | 0.29.0 | A built-package format for Python. / MIT |
| [widgetsnbextension](http://ipython.org) | 3.2.1 | Interactive Widgets for Jupyter / BSD 3-clause |
| [wrapt](https://github.com/GrahamDumpleton/wrapt) | 1.10.11 | Module for decorators, wrappers and monkey patching. / BSD 2-Clause |
| [xlrd](http://www.python-excel.org/) | 1.1.0 | Library for developers to extract data from Microsoft Excel (tm) spreadsheet files / BSD 3-Clause and BSD with advertising |
| [xlsxwriter](https://xlsxwriter.readthedocs.io/) | 1.0.4 | A Python module for creating Excel XLSX files / BSD 2-Clause |
| [xlwings](http://xlwings.org/) | 0.11.8 | Interact with Excel from Python and vice versa / 3-clause BSD |
| [xlwt](http://www.python-excel.org/) | 1.2.0 | Writing data and formatting information to Excel files / BSD |
| [xz](http://tukaani.org/xz/) | 5.2.3 | Data compression software with high compression ratio / LGPL-2.1 and GPL-2.0 |
| [yaml](http://pyyaml.org/wiki/LibYAML) | 0.1.7 | A C library for parsing and emitting YAML. / MIT |
| [zeromq](http://zeromq.org) | 4.2.5 | A high-performance asynchronous messaging library. / LGPL 3 |
| [zict](http://github.com/mrocklin/zict) | 0.1.3 | Composable Dictionary Classes / BSD 3-Clause |
| [zlib](http://zlib.net/) | 1.2.11 | Massively spiffy yet delicately unobtrusive compression library / zlib |
| Name | Version | Summary / License |
|---|---|---|
| [\_ipyw\_jlab\_nb\_ext\_conf](https://github.com/ContinuumIO/anaconda-nb-extensions-meta-config) | 0.1.0 | A configuration metapackage for enabling Anaconda-bundled jupyter extensions / BSD |
| [alabaster](http://www.sphinx-doc.org/en/stable/index.html) | 0.7.11 | Configurable, Python 2+3 compatible Sphinx theme. / BSD 3-Clause |
| [anaconda-client](http://anaconda.org) | 1.7.2 | anaconda.org command line client library / BSD 3-clause |
| [anaconda-project](https://github.com/Anaconda-Platform/anaconda-project) | 0.8.2 | Tool for encapsulating, running, and reproducing data science projects / BSD 3-Clause |
| [appdirs](http://github.com/ActiveState/appdirs) | 1.4.3 | A small Python module for determining appropriate platform-specific dirs. / MIT |
| [asn1crypto](https://github.com/wbond/asn1crypto) | 0.24.0 | Python ASN.1 library with a focus on performance and a pythonic API / MIT |
| [astroid](https://www.astroid.org/) | 2.0.4 | A abstract syntax tree for Python with inference support. / LGPL 2.1 |
| [astropy](http://www.astropy.org/) | 3.0.4 | Community-developed Python Library for Astronomy / BSD |
| [atomicwrites](https://github.com/untitaker/python-atomicwrites) | 1.2.1 | Atomic file writes. / MIT |
| [attrs](https://attrs.readthedocs.io/en/stable/) | 18.2.0 | attrs is the Python package that will bring back the joy of writing classes by relieving you from the drudgery of implementing object protocols (aka dunder methods). / MIT |
| [automat](https://github.com/glyph/Automat) | 0.7.0 | self-service finite-state machines for the programmer on the go / MIT |
| [babel](http://babel.pocoo.org/) | 2.6.0 | Utilities to internationalize and localize Python applications / BSD 3-clause |
| [backcall](https://github.com/takluyver/backcall/) | 0.1.0 | Specifications for callback functions passed in to an API / BSD-3-Clause |
| [backports](https://bitbucket.org/brandon/backports) | 1.0 | / BSD |
| [backports.shutil\_get\_terminal\_size](https://github.com/chrippa/backports.shutil_get_terminal_size) | 1.0.0 | A backport of the get\_terminal\_size function from Python 3.3’s shutil. / MIT |
| [beautifulsoup4](http://www.crummy.com/software/BeautifulSoup/) | 4.6.3 | Python library designed for screen-scraping / MIT |
| [bitarray](https://github.com/ilanschnell/bitarray) | 0.8.3 | efficient arrays of booleans – C extension / PSF |
| [bkcharts](http://github.com/bokeh/bkcharts) | 0.2 | High level chart types built on top of Bokeh / BSD 3-Clause |
| blas | 1.0 | |
| [bleach](https://github.com/mozilla/bleach) | 2.1.4 | Easy, whitelist-based HTML-sanitizing tool / Apache-2.0 |
| [blosc](https://github.com/Blosc/c-blosc) | 1.14.4 | A blocking, shuffling and loss-less compression library that can be faster than memcpy() / BSD 3-Clause |
| [bokeh](http://bokeh.pydata.org/) | 0.13.0 | Statistical and novel interactive HTML plots for Python / BSD 3-Clause |
| [boto](https://github.com/boto/boto/) | 2.49.0 | Amazon Web Services Library / MIT |
| [bottleneck](http://berkeleyanalytics.com/bottleneck) | 1.2.1 | Fast NumPy array functions written in Cython. / BSD 2-Clause |
| [bzip2](http://www.bzip.org/) | 1.0.6 | high-quality data compressor / bzip2 |
| [ca-certificates](https://github.com/conda-forge/ca-certificates-feedstock) | 2018.03.07 | Certificates for use with other packages. / ISC |
| [cairo](http://cairographics.org/) | 1.14.12 | Cairo is a 2D graphics library with support for multiple output devices. / LGPL 2.1 or MPL 1.1 |
| [certifi](http://certifi.io/) | 2018.8.24 | Python package for providing Mozilla’s CA Bundle. / ISC |
| [cffi](https://bitbucket.org/cffi/cffi) | 1.11.5 | Foreign Function Interface for Python calling C code. / MIT |
| [chardet](https://github.com/chardet/chardet) | 3.0.4 | Universal character encoding detector / LGPL2 |
| [click](http://click.pocoo.org/) | 6.7 | A simple wrapper around optparse for powerful command line utilities. / BSD 3-Clause |
| [cloudpickle](https://github.com/cloudpipe/cloudpickle) | 0.5.5 | Extended pickling support for Python objects / BSD 3-Clause |
| [clyent](https://github.com/Anaconda-Platform/clyent) | 1.2.2 | Command line client library for windows and posix / BSD 3-Clause |
| [colorama](https://github.com/tartley/colorama) | 0.3.9 | Cross-platform colored terminal text. / BSD 3-Clause |
| [conda](https://conda.io) | 4.5.11 | OS-agnostic, system-level binary package and environment manager. / BSD 3-Clause |
| [conda-build](https://github.com/conda/conda-build) | 3.15.1 | tools for building conda packages / BSD 3-Clause |
| [conda-env](https://github.com/conda/conda-env) | 2.6.0 | Tools for interacting with conda environments. / BSD 3-Clause |
| [constantly](https://github.com/twisted/constantly) | 15.1.0 | Symbolic constants in Python / MIT |
| [contextlib2](http://contextlib2.readthedocs.org) | 0.5.5 | Backports and enhancements for the contextlib module / PSF |
| [cryptography](https://github.com/pyca/cryptography) | 2.3.1 | Provides cryptographic recipes and primitives to Python developers / Apache 2.0 or BSD 3-Clause, PSF 2 |
| [curl](http://curl.haxx.se/) | 7.61.0 | tool and library for transferring data with URL syntax / MIT/X derivate (`<http://curl.haxx.se/docs/copyright.html>`) |
| [cycler](http://matplotlib.org/cycler) | 0.10.0 | Composable style cycles. / BSD 3-Clause |
| [cython](http://www.cython.org/) | 0.28.5 | The Cython compiler for writing C extensions for the Python language / Apache-2.0 |
| [cytoolz](https://github.com/pytoolz/cytoolz) | 0.9.0.1 | Cython implementation of Toolz. High performance functional utilities. / BSD 3-Clause |
| [dask](http://github.com/dask/dask/) | 0.19.1 | Parallel Python with task scheduling / BSD 3-Clause |
| [dask-core](http://github.com/dask/dask/) | 0.19.1 | Parallel Python with task scheduling / BSD 3-Clause |
| [datashape](http://datashape.pydata.org) | 0.5.4 | A data description language. / BSD 2-Clause |
| [decorator](https://github.com/micheles/decorator) | 4.3.0 | Better living through Python with decorators. / BSD 3-Clause |
| [distributed](http://distributed.readthedocs.io/en/latest/) | 1.23.1 | Distributed computing with Dask / BSD 3-Clause |
| [docutils](http://docutils.sourceforge.net/) | 0.14 | Docutils – Python Documentation Utilities / Public Domain Dedictation and BSD 2-Clause and PSF 2.1.1 and GPL 3.0 |
| [entrypoints](https://github.com/takluyver/entrypoints) | 0.2.3 | Discover and load entry points from installed packages. / MIT License |
| [et\_xmlfile](https://bitbucket.org/openpyxl/et_xmlfile) | 1.0.1 | An implementation of lxml.xmlfile for the standard library / MIT |
| [expat](http://expat.sourceforge.net/) | 2.2.6 | Expat XML parser library in C. / MIT |
| [fastcache](https://github.com/pbrady/fastcache) | 1.0.2 | C implementation of Python 3 lru\_cache / MIT |
| [filelock](https://github.com/benediktschmitt/py-filelock) | 3.0.8 | A platform independent file lock. / Public Domain |
| [flask](http://flask.pocoo.org) | 1.0.2 | A microframework based on Werkzeug, Jinja2 and good intentions. / BSD 3-Clause |
| [flask-cors](https://github.com/corydolphin/flask-cors) | 3.0.6 | A Flask extension adding a decorator for CORS support / MIT |
| [fontconfig](http://www.freedesktop.org/wiki/Software/fontconfig/) | 2.13.0 | A library for configuring and customizing font access. / MIT |
| [freetype](https://www.freetype.org/) | 2.9.1 | A Free, High-Quality, and Portable Font Engine / GPL-2.0 and FreeType |
| [get\_terminal\_size](https://github.com/chrippa/backports.shutil_get_terminal_size) | 1.0.0 | Get the size of the terminal window. / MIT |
| [gevent](http://www.gevent.org/) | 1.3.6 | Coroutine-based network library / MIT |
| [glib](https://developer.gnome.org/glib/) | 2.56.2 | Provides core application building blocks for libraries and applications written in C. / LGPL-2.1 |
| [glob2](https://github.com/miracle2k/python-glob2) | 0.6 | Version of the glob module that supports recursion via \*\*, and can capture patterns. / BSD-2-Clause |
| [gmp](http://gmplib.org/) | 6.1.2 | The GNU multiprecision library. / GPL 2 and LGPL 3 |
| [gmpy2](https://pypi.python.org/pypi/gmpy2) | 2.0.8 | GMP/MPIR, MPFR, and MPC interface to Python 2.6+ and 3.x / LGPL 3 |
| [greenlet](https://github.com/python-greenlet/greenlet) | 0.4.15 | Lightweight in-process concurrent programming / MIT |
| [h5py](http://www.h5py.org/) | 2.8.0 | Read and write HDF5 files from Python. / BSD 3-Clause |
| [hdf5](http://www.hdfgroup.org/HDF5/) | 1.10.2 | HDF5 is a data model, library, and file format for storing and managing data / HDF5 |
| [heapdict](http://stutzbachenterprises.com/) | 1.0.0 | A heap with decrease-key and increase-key operations / BSD 3-Clause |
| [html5lib](https://github.com/html5lib/html5lib-python) | 1.0.1 | HTML parser based on the WHATWG HTML specification / MIT |
| [hyperlink](https://github.com/python-hyper/hyperlink) | 18.0.0 | Immutable, Pythonic, correct URLs. / MIT |
| [icu](http://site.icu-project.org/) | 58.2 | International Components for Unicode. / MIT |
| [idna](https://github.com/kjd/idna) | 2.7 | Internationalized Domain Names in Applications (IDNA). / BSD Like |
| [imageio](http://imageio.github.io) | 2.4.1 | a Python library for reading and writing image data / BSD 2-Clause |
| [imagesize](https://github.com/shibukawa/imagesize_py) | 1.1.0 | Getting image size from png/jpeg/jpeg2000/gif file / MIT |
| [incremental](https://twistedmatrix.com) | 17.5.0 | A library that versions your Python projects / MIT License |
| [ipykernel](http://ipython.org) | 4.9.0 | IPython Kernel for Jupyter / BSD 3-clause |
| [ipython](http://ipython.org/) | 6.5.0 | IPython: Productive Interactive Computing / BSD 3-clause |
| [ipython\_genutils](http://ipython.org) | 0.2.0 | vestigial utilities from IPython / BSD 3-Clause |
| [ipywidgets](https://github.com/ipython/ipywidgets) | 7.4.1 | Jupyter Interactive Widgets / BSD 3-clause |
| [isort](https://github.com/timothycrosley/isort) | 4.3.4 | A Python utility / library to sort Python imports. / MIT |
| [itsdangerous](https://github.com/pallets/itsdangerous) | 0.24 | Various helpers to pass trusted data to untrusted environments. / BSD 3-Clause |
| [jbig](https://www.cl.cam.ac.uk/~mgk25/jbigkit) | 2.1 | Implementation of the JBIG1 data compression standard / GPL-2.0 |
| [jdcal](https://github.com/phn/jdcal) | 1.4 | Julian dates from proleptic Gregorian and Julian calendars. / BSD 2-Clause |
| [jedi](https://github.com/davidhalter/jedi/) | 0.12.1 | An autocompletion tool for Python that can be used for text editors. / MIT |
| [jinja2](http://jinja.pocoo.org) | 2.10 | An easy to use stand-alone template engine written in pure python. / 3-Clause BSD |
| [jpeg](http://www.ijg.org/) | 9b | read/write jpeg COM, EXIF, IPTC medata / Custom free software license |
| [jsonschema](https://github.com/Julian/jsonschema) | 2.6.0 | An implementation of JSON Schema validation for Python / MIT |
| [jupyter](http://jupyter.org) | 1.0.0 | Jupyter metapackage. Install all the Jupyter components in one go. / BSD 3-Clause |
| [jupyter\_client](http://jupyter.org) | 5.2.3 | Jupyter protocol implementation and client libraries / BSD 3-clause |
| [jupyter\_console](http://jupyter.org) | 5.2.0 | Jupyter terminal console / BSD 3-Clause |
| [jupyter\_core](http://jupyter.org) | 4.4.0 | Core common functionality of Jupyter projects. / BSD 3-clause |
| [jupyterlab](https://github.com/jupyterlab/jupyterlab) | 0.34.9 | JupyterLab PRE-ALPHA / BSD-3-Clause |
| [jupyterlab\_launcher](http://github.com/jupyterlab/jupyterlab_launcher) | 0.13.1 | A Launcher for JupyterLab based applications. / BSD 3-Clause |
| [kiwisolver](https://github.com/nucleic/kiwi) | 1.0.1 | A fast implementation of the Cassowary constraint solver / BSD 3-Clause |
| [lazy-object-proxy](https://github.com/ionelmc/python-lazy-object-proxy) | 1.3.1 | A fast and thorough lazy object proxy. / BSD 2-Clause |
| [libcurl](http://curl.haxx.se/) | 7.61.0 | tool and library for transferring data with URL syntax / MIT/X derivate (`<http://curl.haxx.se/docs/copyright.html>`) |
| [libedit](http://thrysoee.dk/editline/) | 3.1.20170329 | Editline Library (libedit) / NetBSD |
| [libffi](https://sourceware.org/libffi/) | 3.2.1 | A Portable Foreign Function Interface Library. / Custom |
| [libgcc-ng](https://gcc.gnu.org/onlinedocs/gccint/Libgcc.html) | 8.2.0 | The GCC low-level runtime library / GPL |
| [libgfortran](http://gcc.gnu.org/) | 3.0.0 | Fortran libraries from the GNU Compiler Collection / GPL 3 (with GCC Runtime Library Exception 3.1) |
| [libgfortran-ng](https://gcc.gnu.org/) | 7.3.0 | The GNU Fortran Runtime Library / GPL |
| [libiconv](https://www.gnu.org/software/libiconv/) | 1.14 | Provides iconv for systems which don’t have one (or that cannot convert from/to Unicode.) / GPL and LGPL |
| [libopenblas](http://www.openblas.net/) | 0.2.20 | An Optimized BLAS library / BSD |
| [libpng](http://www.libpng.org/pub/png/libpng.html) | 1.6.32 | PNG reference library. / zlib/libpng |
| [libsodium](http://libsodium.org) | 1.0.16 | A modern and easy-to-use crypto library. / ISC |
| [libssh2](https://www.libssh2.org/) | 1.8.0 | the SSH library / BSD 3-Clause |
| [libstdcxx-ng](https://gcc.gnu.org/) | 8.2.0 | The GNU C++ Runtime Library / GPL3 with runtime exception |
| [libtiff](http://www.libtiff.org/) | 4.0.9 | Support for the Tag Image File Format (TIFF). / HPND |
| [libuuid](http://sourceforge.net/projects/libuuid/) | 1.0.3 | Portable uuid C library. / BSD 3-Clause |
| [libxcb](http://xcb.freedesktop.org/) | 1.13 | This is the C-language Binding (XCB) package to the X Window System protocol / MIT |
| [libxml2](http://xmlsoft.org/) | 2.9.8 | The XML C parser and toolkit of Gnome / MIT |
| [libxslt](http://xmlsoft.org/XSLT/) | 1.1.32 | The XSLT C library developed for the GNOME project / MIT |
| [locket](https://github.com/mwilliamson/locket.py) | 0.2.0 | File-based locks for Python for Linux and Windows / BSD 2-Clause |
| [lxml](http://lxml.de/) | 4.2.5 | Pythonic binding for the C libraries libxml2 and libxslt. / BSD 3-Clause, GPL-2.0, ZPL-2.0, and ElementTree |
| [lzo](http://www.oberhumer.com/opensource/lzo/) | 2.10 | LZO is a portable lossless data compression library written in ANSI C. / GPL v2+ |
| [markupsafe](https://www.palletsprojects.com/p/markupsafe/) | 1.0 | A Python module that implements the jinja2.Markup string / BSD 3-Clause |
| [matplotlib](http://matplotlib.org/) | 2.2.3 | Publication quality figures in Python / PSF-based |
| [mccabe](https://github.com/PyCQA/mccabe) | 0.6.1 | McCabe complexity checker for Python / MIT |
| [mistune](https://github.com/lepture/mistune) | 0.8.3 | The fastest markdown parser in pure Python. / BSD 3-Clause |
| [more-itertools](https://github.com/erikrose/more-itertools) | 4.3.0 | More routines for operating on iterables, beyond itertools / MIT |
| [mpc](http://www.multiprecision.org/) | 1.1.0 | A C library for the arithmetic of complex numbers with arbitrarily high precision. / LGPL 3 |
| [mpfr](http://www.mpfr.org/) | 4.0.1 | The MPFR library is a C library for multiple-precision floating-point computations with correct rounding. / LGPL 3 |
| [mpmath](http://mpmath.org) | 1.0.0 | Python library for arbitrary-precision floating-point arithmetic / BSD 3-Clause |
| [msgpack-python](http://msgpack.org/) | 0.5.6 | MessagePack (de)serializer. / Apache 2.0 |
| [multipledispatch](https://github.com/mrocklin/multipledispatch/) | 0.6.0 | Multiple dispatch in Python / BSD 3-Clause |
| [nbconvert](http://jupyter.org) | 5.3.1 | Converting Jupyter Notebooks / BSD-3-Clause |
| [nbformat](http://jupyter.org) | 4.4.0 | The reference implementation of the Jupyter Notebook format / BSD 3-clause |
| [ncurses](http://www.gnu.org/software/ncurses/) | 6.1 | Library for text-based user interfaces / Free software (MIT-like) |
| [networkx](https://networkx.github.io/) | 2.1 | Python package for creating and manipulating complex networks / BSD 3-Clause |
| [nltk](http://nltk.org/) | 3.3.0 | Build Python programs to work with human language data / Apache 2.0 |
| [nose](http://readthedocs.org/docs/nose/) | 1.3.7 | Nose extends unittest to make testing easier / LGPL-2.1 |
| [notebook](http://jupyter.org) | 5.6.0 | Jupyter Notebook / BSD 3-clause |
| [numexpr](https://github.com/pydata/numexpr) | 2.6.7 | Fast numerical expression evaluator for NumPy. / MIT |
| [numpy](http://numpy.scipy.org/) | 1.14.5 | Array processing for numbers, strings, records, and objects. / BSD 3-Clause |
| numpy-base | 1.14.5 | |
| [numpydoc](https://github.com/numpy/numpydoc) | 0.8.0 | Sphinx extension to support docstrings in Numpy format / BSD 3-Clause |
| [odo](http://odo.pydata.org) | 0.5.1 | Data migration in Python / BSD-3-Clause |
| [olefile](http://www.decalage.info/python/olefileio) | 0.46 | parse, read and write Microsoft OLE2 files / BSD 2-Clause |
| [openblas](http://www.openblas.net/) | 0.2.20 | An Optimized BLAS library / BSD |
| openblas-devel | 0.2.20 | |
| [openpyxl](https://openpyxl.readthedocs.io) | 2.5.6 | A Python library to read/write Excel 2010 xlsx/xlsm files / MIT |
| [openssl](http://www.openssl.org/) | 1.0.2p | OpenSSL is an open-source implementation of the SSL and TLS protocols / OpenSSL |
| [packaging](https://github.com/pypa/packaging) | 17.1 | Core utilities for Python packages / Apache 2.0 or BSD 2-Clause |
| [pandas](http://pandas.pydata.org) | 0.23.4 | High-performance, easy-to-use data structures and data analysis tools. / BSD 3-clause |
| [pandoc](http://pandoc.org/) | 2.0.0.1 | Universal markup converter (repackaged binaries). / GPL-2.0 |
| [pandocfilters](https://github.com/jgm/pandocfilters) | 1.4.2 | A python module for writing pandoc filters / BSD-3-Clause |
| [parso](https://github.com/davidhalter/parso) | 0.3.1 | A Python Parser / MIT |
| [partd](https://github.com/dask/partd) | 0.3.8 | Data structure for on-disk shuffle operations / BSD 3-Clause |
| [patchelf](http://nixos.org/patchelf.html) | 0.9 | A small utility to modify the dynamic linker and RPATH of ELF executables. / GPL 3 |
| [path.py](https://github.com/jaraco/path.py) | 11.1.0 | A module wrapper for os.path / MIT |
| [pathlib2](https://github.com/mcmtroffaes/pathlib2) | 2.3.2 | Fork of pathlib aiming to support the full stdlib Python API. / MIT |
| [patsy](https://github.com/pydata/patsy) | 0.5.0 | Describing statistical models in Python using symbolic formulas / BSD-2-Clause, PSF2 |
| [pcre](http://www.pcre.org/) | 8.42 | Regular expression pattern matching using the same syntax and semantics as Perl 5. / BSD 3-Clause |
| [pep8](http://pep8.readthedocs.org/) | 1.7.1 | Python style guide checker / MIT |
| [pexpect](http://pexpect.sourceforge.net/) | 4.6.0 | Pexpect makes Python a better tool for controlling other applications. / ISC |
| [pickleshare](https://github.com/vivainio/pickleshare) | 0.7.4 | Tiny ‘shelve’-like database with concurrency support / MIT |
| [pillow](https://pillow.readthedocs.io) | 5.2.0 | Pillow is the friendly PIL fork by Alex Clark and Contributors. / PIL |
| [pip](https://pip.pypa.io/en/stable/) | 10.0.1 | PyPA recommended tool for installing Python packages / MIT |
| [pixman](http://www.pixman.org/) | 0.34.0 | A low-level software library for pixel manipulation. / MIT |
| [pkginfo](https://code.launchpad.net/~tseaver/pkginfo/trunk) | 1.4.2 | Query metadatdata from sdists / bdists / installed packages. / MIT |
| [pluggy](https://github.com/pytest-dev/pluggy) | 0.7.1 | Plugin registration and hook calling for Python / MIT |
| [ply](http://www.dabeaz.com/ply/index.html) | 3.11 | Python Lex-Yacc / BSD 3-clause |
| [prometheus\_client](https://github.com/prometheus/client_python) | 0.3.1 | Python client for the Prometheus monitoring system. / Apache 2.0 |
| [prompt\_toolkit](https://github.com/jonathanslenders/python-prompt-toolkit) | 1.0.15 | Library for building powerful interactive command lines in Python / BSD 3-clause |
| [psutil](https://github.com/giampaolo/psutil) | 5.4.7 | A cross-platform process and system utilities module for Python / BSD 3-Clause |
| [ptyprocess](https://github.com/pexpect/ptyprocess) | 0.6.0 | Run a subprocess in a pseudo terminal / ISC |
| [py](https://github.com/pytest-dev/py) | 1.6.0 | library with cross-python path, ini-parsing, io, code, log facilities / MIT |
| [pyasn1](https://github.com/etingof/pyasn1) | 0.4.4 | ASN.1 types and codecs / BSD 2-Clause |
| [pyasn1-modules](http://pyasn1.sourceforge.net/) | 0.2.2 | A collection of ASN.1-based protocols modules. / BSD 2-Clause |
| [pycodestyle](https://pycodestyle.readthedocs.io/) | 2.4.0 | Python style guide checker / MIT |
| [pycosat](https://github.com/ContinuumIO/pycosat) | 0.6.3 | Bindings to picosat (a SAT solver) / MIT |
| [pycparser](https://github.com/eliben/pycparser) | 2.18 | Complete C99 parser in pure Python / BSD 3-clause |
| [pycrypto](http://www.pycrypto.org/) | 2.6.1 | Cryptographic modules for Python. / Public Domain |
| [pycurl](http://pycurl.sourceforge.net/) | 7.43.0.2 | A Python Interface To The cURL library / LGPL, MIT |
| [pyflakes](https://github.com/PyCQA/pyflakes) | 2.0.0 | Pyflakes analyzes programs and detects various errors. / MIT |
| [pygments](http://pygments.org/) | 2.2.0 | Generic syntax highlighting package / BSD 2-clause |
| [pylint](http://www.pylint.org/) | 2.1.1 | python code static checker / GPL |
| [pyodbc](https://github.com/mkleehammer/pyodbc) | 4.0.24 | DB API Module for ODBC / MIT |
| [pyopenssl](https://github.com/pyca/pyopenssl) | 18.0.0 | Python wrapper module around the OpenSSL library / Apache 2.0 |
| [pyparsing](http://pyparsing.wikispaces.com/) | 2.2.0 | Create and execute simple grammars / MIT |
| [pysocks](https://github.com/Anorov/PySocks) | 1.6.8 | A Python SOCKS client module. See [Anorov/PySocks](https://github.com/Anorov/PySocks) for more information. / BSD 3-Clause |
| [pytables](http://www.pytables.org) | 3.4.4 | Brings together Python, HDF5 and NumPy to easily handle large amounts of data. / BSD 3-Clause |
| [pytest](https://docs.pytest.org/en/latest/) | 3.8.0 | Simple and powerful testing with Python. / MIT |
| [pytest-arraydiff](https://github.com/astrofrog/pytest-arraydiff) | 0.2 | pytest plugin to help with comparing array output from tests / BSD |
| [pytest-astropy](https://github.com/astropy/pytest-astropy) | 0.4.0 | Meta-package containing dependencies for testing Astropy / BSD |
| [pytest-doctestplus](https://github.com/astropy/pytest-doctestplus) | 0.1.3 | Pytest plugin with advanced doctest features / BSD |
| [pytest-openfiles](https://github.com/astropy/pytest-openfiles) | 0.3.0 | Pytest plugin for detecting inadvertent open file handles / BSD |
| [pytest-remotedata](https://github.com/astropy/pytest-remotedata) | 0.3.0 | Pytest plugin for controlling remote data access / BSD |
| [python](http://www.python.org/) | 3.7.0 | General purpose programming language / PSF |
| [python-dateutil](https://dateutil.readthedocs.org/) | 2.7.3 | Extensions to the standard Python datetime module. / BSD 3 Clause |
| [pytz](http://pythonhosted.org/pytz/) | 2018.5 | World timezone definitions, modern and historical. / MIT |
| [pywavelets](https://github.com/PyWavelets/pywt) | 1.0.0 | Discrete Wavelet Transforms in Python. / MIT |
| [pyyaml](http://pyyaml.org/wiki/PyYAML) | 3.13 | YAML parser and emitter for Python / MIT |
| [pyzmq](https://github.com/zeromq/pyzmq) | 17.1.2 | Python bindings for zeromq / BSD 3-clause |
| [readline](https://cnswww.cns.cwru.edu/php/chet/readline/rltop.html) | 7.0 | library for editing command lines as they are typed in / GPL-3.0 |
| [requests](http://python-requests.org) | 2.19.1 | Python HTTP for Humans. / Apache 2.0 |
| [ruamel\_yaml](https://bitbucket.org/ruamel/yaml) | 0.15.46 | A patched copy of ruamel.yaml. / MIT |
| [scikit-image](http://scikit-image.org/) | 0.14.0 | Image processing routines for SciPy. / BSD 3-Clause |
| [scikit-learn](http://scikit-learn.org/) | 0.19.1 | A set of python modules for machine learning and data mining / BSD 3-Clause |
| [scipy](http://www.scipy.org/) | 1.1.0 | Scientific Library for Python / BSD 3-Clause |
| [seaborn](https://seaborn.pydata.org) | 0.9.0 | Statistical data visualization / BSD 3-Clause |
| [send2trash](https://github.com/hsoft/send2trash) | 1.5.0 | Python library to natively send files to Trash (or Recycle bin) on all platforms. / BSD-3-Clause |
| [service\_identity](https://github.com/pyca/service_identity) | 17.0.0 | Service identity verification for pyOpenSSL. / MIT |
| [setuptools](https://github.com/pypa/setuptools) | 40.2.0 | Download, build, install, upgrade, and uninstall Python packages / MIT |
| [simplegeneric](http://cheeseshop.python.org/pypi/simplegeneric) | 0.8.1 | Simple generic functions (similar to Python’s own len(), pickle.dump(), etc.) / Zope Public |
| [singledispatch](http://docs.python.org/3/library/functools.html#functools.singledispatch) | 3.4.0.3 | Transforms a function into a single-dispatch generic function / MIT |
| [six](http://pypi.python.org/pypi/six/) | 1.11.0 | Python 2 and 3 compatibility utilities / MIT |
| [snappy](https://github.com/google/snappy) | 1.1.7 | A fast compressor/decompressor / BSD 3-clause |
| [snowballstemmer](https://github.com/shibukawa/snowball_py) | 1.2.1 | Snowball stemming library collection for Python / BSD-2-Clause |
| [sortedcollections](http://www.grantjenks.com/docs/sortedcollections/) | 1.0.1 | Python Sorted Collections / Apache-2.0 |
| [sortedcontainers](http://www.grantjenks.com/docs/sortedcontainers/) | 2.0.5 | Python Sorted Container Types: SortedList, SortedDict, and SortedSet / Apache 2.0 |
| [sphinx](http://www.sphinx-doc.org) | 1.7.9 | Sphinx is a tool that makes it easy to create intelligent and beautiful documentation / BSD 2-clause |
| sphinxcontrib | 1.0 | Python namespace for sphinxcontrib / BSD |
| [sphinxcontrib-websupport](https://pypi.python.org/pypi/sphinxcontrib-websupport) | 1.1.0 | Sphinx API for Web Apps / BSD-2-Clause |
| [sqlalchemy](http://www.sqlalchemy.org/) | 1.2.11 | Database Abstraction Library. / MIT |
| [sqlite](http://www.sqlite.org/) | 3.24.0 | Implements a self-contained, zero-configuration, SQL database engine. / Public-Domain (`<http://www.sqlite.org/copyright.html>`) |
| [statsmodels](https://www.statsmodels.org) | 0.9.0 | Statistical computations and models for use with SciPy / BSD 3-Clause |
| [sympy](http://sympy.org) | 1.2 | Python library for symbolic mathematics / 3-clause BSD |
| [tblib](https://github.com/ionelmc/python-tblib) | 1.3.2 | Traceback serialization library. / BSD 2-Clause |
| [terminado](https://github.com/jupyter/terminado) | 0.8.1 | Terminals served by tornado websockets / BSD 2-clause |
| [testpath](https://testpath.readthedocs.io) | 0.3.1 | Testpath is a collection of utilities for Python code working with files and commands. / MIT |
| [tk](http://www.tcl.tk/) | 8.6.8 | A dynamic programming language with GUI support. Bundles Tcl and Tk. / Tcl/Tk |
| [toolz](http://toolz.readthedocs.org/) | 0.9.0 | A functional standard library for Python. / BSD 3-Clause |
| [tornado](http://www.tornadoweb.org/) | 5.1 | A Python web framework and asynchronous networking library, originally developed at FriendFeed. / Apache 2.0 |
| [tqdm](https://pypi.python.org/pypi/tqdm) | 4.26.0 | A Fast, Extensible Progress Meter / MPLv2.0, MIT |
| [traitlets](http://ipython.org/) | 4.3.2 | Configuration system for Python applications / BSD 3-clause |
| [twisted](http://twistedmatrix.com/) | 18.4.0 | event-driven networking engine / MIT |
| [unicodecsv](https://github.com/jdunck/python-unicodecsv) | 0.14.1 | Drop-in replacement for csv module which supports unicode strings / BSD |
| [unixodbc](http://www.unixodbc.org/) | 2.3.7 | ODBC on non MS Windows platforms / LGPL-2.1 |
| [urllib3](https://urllib3.readthedocs.io/) | 1.23 | HTTP library with thread-safe connection pooling, file post, and more. / MIT |
| [wcwidth](https://github.com/jquast/wcwidth) | 0.1.7 | Measures number of Terminal column cells of wide-character codes. / MIT |
| [webencodings](https://github.com/gsnedders/python-webencodings) | 0.5.1 | Character encoding aliases for legacy web content / BSD 3-Clause |
| [werkzeug](http://werkzeug.pocoo.org/) | 0.14.1 | The Python WSGI Utility Library. / BSD 3-Clause |
| [wheel](https://bitbucket.org/pypa/wheel/) | 0.31.1 | A built-package format for Python. / MIT |
| [widgetsnbextension](http://ipython.org) | 3.4.1 | Interactive Widgets for Jupyter / BSD 3-clause |
| [wrapt](https://github.com/GrahamDumpleton/wrapt) | 1.10.11 | Module for decorators, wrappers and monkey patching. / BSD 2-Clause |
| [xlrd](http://www.python-excel.org/) | 1.1.0 | Library for developers to extract data from Microsoft Excel (tm) spreadsheet files / BSD 3-Clause and BSD with advertising |
| [xlsxwriter](https://xlsxwriter.readthedocs.io/) | 1.1.0 | A Python module for creating Excel XLSX files / BSD 2-Clause |
| [xlwt](http://www.python-excel.org/) | 1.3.0 | Writing data and formatting information to Excel files / BSD |
| [xz](http://tukaani.org/xz/) | 5.2.4 | Data compression software with high compression ratio / LGPL-2.1 and GPL-2.0 |
| [yaml](http://pyyaml.org/wiki/LibYAML) | 0.1.7 | A C library for parsing and emitting YAML. / MIT |
| [zeromq](http://zeromq.org) | 4.2.5 | A high-performance asynchronous messaging library. / LGPL 3 |
| [zict](http://github.com/mrocklin/zict) | 0.1.3 | Composable Dictionary Classes / BSD 3-Clause |
| [zlib](http://zlib.net/) | 1.2.11 | Massively spiffy yet delicately unobtrusive compression library / zlib |
| zope | 1.0 | web application server / BSD |
| [zope.interface](http://docs.zope.org/zope.interface/) | 4.5.0 | Interfaces for Python / ZPL 2.1 |
| Name | Version | Summary / License |
|---|---|---|
| [\_ipyw\_jlab\_nb\_ext\_conf](https://github.com/ContinuumIO/anaconda-nb-extensions-meta-config) | 0.1.0 | A configuration metapackage for enabling Anaconda-bundled jupyter extensions / BSD |
| [alabaster](http://www.sphinx-doc.org/en/stable/index.html) | 0.7.11 | Configurable, Python 2+3 compatible Sphinx theme. / BSD 3-Clause |
| [anaconda-client](http://anaconda.org) | 1.7.2 | anaconda.org command line client library / BSD 3-clause |
| [anaconda-navigator](https://github.com/ContinuumIO/navigator) | 1.9.2 | Anaconda Navigator / proprietary - Continuum Analytics, Inc. |
| [anaconda-project](https://github.com/Anaconda-Platform/anaconda-project) | 0.8.2 | Tool for encapsulating, running, and reproducing data science projects / BSD 3-Clause |
| [appdirs](http://github.com/ActiveState/appdirs) | 1.4.3 | A small Python module for determining appropriate platform-specific dirs. / MIT |
| [asn1crypto](https://github.com/wbond/asn1crypto) | 0.24.0 | Python ASN.1 library with a focus on performance and a pythonic API / MIT |
| [astroid](https://www.astroid.org/) | 2.0.4 | A abstract syntax tree for Python with inference support. / LGPL 2.1 |
| [astropy](http://www.astropy.org/) | 3.0.4 | Community-developed Python Library for Astronomy / BSD |
| [atomicwrites](https://github.com/untitaker/python-atomicwrites) | 1.2.1 | Atomic file writes. / MIT |
| [attrs](https://attrs.readthedocs.io/en/stable/) | 18.2.0 | attrs is the Python package that will bring back the joy of writing classes by relieving you from the drudgery of implementing object protocols (aka dunder methods). / MIT |
| [automat](https://github.com/glyph/Automat) | 0.7.0 | self-service finite-state machines for the programmer on the go / MIT |
| [babel](http://babel.pocoo.org/) | 2.6.0 | Utilities to internationalize and localize Python applications / BSD 3-clause |
| [backcall](https://github.com/takluyver/backcall/) | 0.1.0 | Specifications for callback functions passed in to an API / BSD-3-Clause |
| [backports](https://bitbucket.org/brandon/backports) | 1.0 | / BSD |
| [backports.shutil\_get\_terminal\_size](https://github.com/chrippa/backports.shutil_get_terminal_size) | 1.0.0 | A backport of the get\_terminal\_size function from Python 3.3’s shutil. / MIT |
| [beautifulsoup4](http://www.crummy.com/software/BeautifulSoup/) | 4.6.3 | Python library designed for screen-scraping / MIT |
| [bitarray](https://github.com/ilanschnell/bitarray) | 0.8.3 | efficient arrays of booleans – C extension / PSF |
| [bkcharts](http://github.com/bokeh/bkcharts) | 0.2 | High level chart types built on top of Bokeh / BSD 3-Clause |
| blas | 1.0 | |
| [blaze](http://blaze.pydata.org) | 0.11.3 | NumPy and Pandas interface to big data / BSD 3-Clause |
| [bleach](https://github.com/mozilla/bleach) | 2.1.4 | Easy, whitelist-based HTML-sanitizing tool / Apache-2.0 |
| [blosc](https://github.com/Blosc/c-blosc) | 1.14.4 | A blocking, shuffling and loss-less compression library that can be faster than memcpy() / BSD 3-Clause |
| [bokeh](http://bokeh.pydata.org/) | 0.13.0 | Statistical and novel interactive HTML plots for Python / BSD 3-Clause |
| [boto](https://github.com/boto/boto/) | 2.49.0 | Amazon Web Services Library / MIT |
| [bottleneck](http://berkeleyanalytics.com/bottleneck) | 1.2.1 | Fast NumPy array functions written in Cython. / BSD 2-Clause |
| [bzip2](http://www.bzip.org/) | 1.0.6 | high-quality data compressor / bzip2 |
| [ca-certificates](https://github.com/conda-forge/ca-certificates-feedstock) | 2018.03.07 | Certificates for use with other packages. / ISC |
| [cairo](http://cairographics.org/) | 1.14.12 | Cairo is a 2D graphics library with support for multiple output devices. / LGPL 2.1 or MPL 1.1 |
| [certifi](http://certifi.io/) | 2018.8.24 | Python package for providing Mozilla’s CA Bundle. / ISC |
| [cffi](https://bitbucket.org/cffi/cffi) | 1.11.5 | Foreign Function Interface for Python calling C code. / MIT |
| [chardet](https://github.com/chardet/chardet) | 3.0.4 | Universal character encoding detector / LGPL2 |
| [click](http://click.pocoo.org/) | 6.7 | A simple wrapper around optparse for powerful command line utilities. / BSD 3-Clause |
| [cloudpickle](https://github.com/cloudpipe/cloudpickle) | 0.5.5 | Extended pickling support for Python objects / BSD 3-Clause |
| [clyent](https://github.com/Anaconda-Platform/clyent) | 1.2.2 | Command line client library for windows and posix / BSD 3-Clause |
| [colorama](https://github.com/tartley/colorama) | 0.3.9 | Cross-platform colored terminal text. / BSD 3-Clause |
| [conda](https://conda.io) | 4.5.11 | OS-agnostic, system-level binary package and environment manager. / BSD 3-Clause |
| [conda-build](https://github.com/conda/conda-build) | 3.15.1 | tools for building conda packages / BSD 3-Clause |
| [conda-env](https://github.com/conda/conda-env) | 2.6.0 | Tools for interacting with conda environments. / BSD 3-Clause |
| [constantly](https://github.com/twisted/constantly) | 15.1.0 | Symbolic constants in Python / MIT |
| [contextlib2](http://contextlib2.readthedocs.org) | 0.5.5 | Backports and enhancements for the contextlib module / PSF |
| [cryptography](https://github.com/pyca/cryptography) | 2.3.1 | Provides cryptographic recipes and primitives to Python developers / Apache 2.0 or BSD 3-Clause, PSF 2 |
| [curl](http://curl.haxx.se/) | 7.61.0 | tool and library for transferring data with URL syntax / MIT/X derivate (`<http://curl.haxx.se/docs/copyright.html>`) |
| [cycler](http://matplotlib.org/cycler) | 0.10.0 | Composable style cycles. / BSD 3-Clause |
| [cython](http://www.cython.org/) | 0.28.5 | The Cython compiler for writing C extensions for the Python language / Apache-2.0 |
| [cytoolz](https://github.com/pytoolz/cytoolz) | 0.9.0.1 | Cython implementation of Toolz. High performance functional utilities. / BSD 3-Clause |
| [dask](http://github.com/dask/dask/) | 0.19.1 | Parallel Python with task scheduling / BSD 3-Clause |
| [dask-core](http://github.com/dask/dask/) | 0.19.1 | Parallel Python with task scheduling / BSD 3-Clause |
| [datashape](http://datashape.pydata.org) | 0.5.4 | A data description language. / BSD 2-Clause |
| [dbus](http://www.freedesktop.org/wiki/Software/dbus/) | 1.13.2 | Simple message bus system for applications to talk to one another / GPL2 |
| [decorator](https://github.com/micheles/decorator) | 4.3.0 | Better living through Python with decorators. / BSD 3-Clause |
| [defusedxml](https://bitbucket.org/tiran/defusedxml) | 0.5.0 | XML bomb protection for Python stdlib modules / PSF 2.0 |
| [distributed](http://distributed.readthedocs.io/en/latest/) | 1.23.1 | Distributed computing with Dask / BSD 3-Clause |
| [docutils](http://docutils.sourceforge.net/) | 0.14 | Docutils – Python Documentation Utilities / Public Domain Dedictation and BSD 2-Clause and PSF 2.1.1 and GPL 3.0 |
| [entrypoints](https://github.com/takluyver/entrypoints) | 0.2.3 | Discover and load entry points from installed packages. / MIT License |
| [et\_xmlfile](https://bitbucket.org/openpyxl/et_xmlfile) | 1.0.1 | An implementation of lxml.xmlfile for the standard library / MIT |
| [expat](http://expat.sourceforge.net/) | 2.2.6 | Expat XML parser library in C. / MIT |
| [fastcache](https://github.com/pbrady/fastcache) | 1.0.2 | C implementation of Python 3 lru\_cache / MIT |
| [filelock](https://github.com/benediktschmitt/py-filelock) | 3.0.8 | A platform independent file lock. / Public Domain |
| [flask](http://flask.pocoo.org) | 1.0.2 | A microframework based on Werkzeug, Jinja2 and good intentions. / BSD 3-Clause |
| [flask-cors](https://github.com/corydolphin/flask-cors) | 3.0.6 | A Flask extension adding a decorator for CORS support / MIT |
| [fontconfig](http://www.freedesktop.org/wiki/Software/fontconfig/) | 2.13.0 | A library for configuring and customizing font access. / MIT |
| [freetype](https://www.freetype.org/) | 2.9.1 | A Free, High-Quality, and Portable Font Engine / GPL-2.0 and FreeType |
| [fribidi](https://github.com/fribidi/fribidi) | 1.0.5 | The Free Implementation of the Unicode Bidirectional Algorithm. / LGPL-2.1 |
| [get\_terminal\_size](https://github.com/chrippa/backports.shutil_get_terminal_size) | 1.0.0 | Get the size of the terminal window. / MIT |
| [gevent](http://www.gevent.org/) | 1.3.6 | Coroutine-based network library / MIT |
| [glib](https://developer.gnome.org/glib/) | 2.56.2 | Provides core application building blocks for libraries and applications written in C. / LGPL-2.1 |
| [glob2](https://github.com/miracle2k/python-glob2) | 0.6 | Version of the glob module that supports recursion via \*\*, and can capture patterns. / BSD-2-Clause |
| [gmp](http://gmplib.org/) | 6.1.2 | The GNU multiprecision library. / GPL 2 and LGPL 3 |
| [gmpy2](https://pypi.python.org/pypi/gmpy2) | 2.0.8 | GMP/MPIR, MPFR, and MPC interface to Python 2.6+ and 3.x / LGPL 3 |
| [graphite2](http://graphite.sil.org/) | 1.3.12 | A “smart font” system that handles the complexities of lesser-known languages of the world. / LGPLv2 |
| [greenlet](https://github.com/python-greenlet/greenlet) | 0.4.15 | Lightweight in-process concurrent programming / MIT |
| [gst-plugins-base](http://gstreamer.freedesktop.org/) | 1.14.0 | GStreamer Base Plug-ins / GPL2 |
| [gstreamer](http://gstreamer.freedesktop.org/) | 1.14.0 | Library for constructing graphs of media-handling components / LGPL 2 |
| [h5py](http://www.h5py.org/) | 2.8.0 | Read and write HDF5 files from Python. / BSD 3-Clause |
| [harfbuzz](http://www.freedesktop.org/wiki/Software/HarfBuzz/) | 1.8.8 | An OpenType text shaping engine. / MIT |
| [hdf5](http://www.hdfgroup.org/HDF5/) | 1.10.2 | HDF5 is a data model, library, and file format for storing and managing data / HDF5 |
| [heapdict](http://stutzbachenterprises.com/) | 1.0.0 | A heap with decrease-key and increase-key operations / BSD 3-Clause |
| [html5lib](https://github.com/html5lib/html5lib-python) | 1.0.1 | HTML parser based on the WHATWG HTML specification / MIT |
| [hyperlink](https://github.com/python-hyper/hyperlink) | 18.0.0 | Immutable, Pythonic, correct URLs. / MIT |
| [icu](http://site.icu-project.org/) | 58.2 | International Components for Unicode. / MIT |
| [idna](https://github.com/kjd/idna) | 2.7 | Internationalized Domain Names in Applications (IDNA). / BSD Like |
| [imageio](http://imageio.github.io) | 2.4.1 | a Python library for reading and writing image data / BSD 2-Clause |
| [imagesize](https://github.com/shibukawa/imagesize_py) | 1.1.0 | Getting image size from png/jpeg/jpeg2000/gif file / MIT |
| [incremental](https://twistedmatrix.com) | 17.5.0 | A library that versions your Python projects / MIT License |
| [intel-openmp](https://software.intel.com/en-us/node/522690) | 2019.0 | Math library for Intel and compatible processors / proprietary - Intel |
| [ipykernel](http://ipython.org) | 4.9.0 | IPython Kernel for Jupyter / BSD 3-clause |
| [ipython](http://ipython.org/) | 6.5.0 | IPython: Productive Interactive Computing / BSD 3-clause |
| [ipython\_genutils](http://ipython.org) | 0.2.0 | vestigial utilities from IPython / BSD 3-Clause |
| [ipywidgets](https://github.com/ipython/ipywidgets) | 7.4.1 | Jupyter Interactive Widgets / BSD 3-clause |
| [isort](https://github.com/timothycrosley/isort) | 4.3.4 | A Python utility / library to sort Python imports. / MIT |
| [itsdangerous](https://github.com/pallets/itsdangerous) | 0.24 | Various helpers to pass trusted data to untrusted environments. / BSD 3-Clause |
| [jbig](https://www.cl.cam.ac.uk/~mgk25/jbigkit) | 2.1 | Implementation of the JBIG1 data compression standard / GPL-2.0 |
| [jdcal](https://github.com/phn/jdcal) | 1.4 | Julian dates from proleptic Gregorian and Julian calendars. / BSD 2-Clause |
| [jedi](https://github.com/davidhalter/jedi/) | 0.12.1 | An autocompletion tool for Python that can be used for text editors. / MIT |
| [jeepney](https://gitlab.com/takluyver/jeepney) | 0.3.1 | Pure Python DBus interface / MIT |
| [jinja2](http://jinja.pocoo.org) | 2.10 | An easy to use stand-alone template engine written in pure python. / 3-Clause BSD |
| [jpeg](http://www.ijg.org/) | 9b | read/write jpeg COM, EXIF, IPTC medata / Custom free software license |
| [jsonschema](https://github.com/Julian/jsonschema) | 2.6.0 | An implementation of JSON Schema validation for Python / MIT |
| [jupyter](http://jupyter.org) | 1.0.0 | Jupyter metapackage. Install all the Jupyter components in one go. / BSD 3-Clause |
| [jupyter\_client](http://jupyter.org) | 5.2.3 | Jupyter protocol implementation and client libraries / BSD 3-clause |
| [jupyter\_console](http://jupyter.org) | 5.2.0 | Jupyter terminal console / BSD 3-Clause |
| [jupyter\_core](http://jupyter.org) | 4.4.0 | Core common functionality of Jupyter projects. / BSD 3-clause |
| [jupyterlab](https://github.com/jupyterlab/jupyterlab) | 0.34.9 | JupyterLab PRE-ALPHA / BSD-3-Clause |
| [jupyterlab\_launcher](http://github.com/jupyterlab/jupyterlab_launcher) | 0.13.1 | A Launcher for JupyterLab based applications. / BSD 3-Clause |
| [keyring](https://github.com/jaraco/keyring) | 13.2.1 | Store and access your passwords safely. / Python Software Foundation or MIT |
| [kiwisolver](https://github.com/nucleic/kiwi) | 1.0.1 | A fast implementation of the Cassowary constraint solver / BSD 3-Clause |
| [lazy-object-proxy](https://github.com/ionelmc/python-lazy-object-proxy) | 1.3.1 | A fast and thorough lazy object proxy. / BSD 2-Clause |
| [libcurl](http://curl.haxx.se/) | 7.61.0 | tool and library for transferring data with URL syntax / MIT/X derivate (`<http://curl.haxx.se/docs/copyright.html>`) |
| [libedit](http://thrysoee.dk/editline/) | 3.1.20170329 | Editline Library (libedit) / NetBSD |
| [libffi](https://sourceware.org/libffi/) | 3.2.1 | A Portable Foreign Function Interface Library. / Custom |
| [libgcc-ng](https://gcc.gnu.org/onlinedocs/gccint/Libgcc.html) | 8.2.0 | The GCC low-level runtime library / GPL |
| [libgfortran-ng](https://gcc.gnu.org/) | 7.3.0 | The GNU Fortran Runtime Library / GPL |
| [libpng](http://www.libpng.org/pub/png/libpng.html) | 1.6.34 | PNG reference library. / zlib/libpng |
| [libsodium](http://libsodium.org) | 1.0.16 | A modern and easy-to-use crypto library. / ISC |
| [libssh2](https://www.libssh2.org/) | 1.8.0 | the SSH library / BSD 3-Clause |
| [libstdcxx-ng](https://gcc.gnu.org/) | 8.2.0 | The GNU C++ Runtime Library / GPL3 with runtime exception |
| [libtiff](http://www.libtiff.org/) | 4.0.9 | Support for the Tag Image File Format (TIFF). / HPND |
| [libtool](http://www.gnu.org/software/libtool/) | 2.4.6 | The GNU Portable Library Tool / GPL 3 |
| [libuuid](http://sourceforge.net/projects/libuuid/) | 1.0.3 | Portable uuid C library. / BSD 3-Clause |
| [libxcb](http://xcb.freedesktop.org/) | 1.13 | This is the C-language Binding (XCB) package to the X Window System protocol / MIT |
| [libxml2](http://xmlsoft.org/) | 2.9.8 | The XML C parser and toolkit of Gnome / MIT |
| [libxslt](http://xmlsoft.org/XSLT/) | 1.1.32 | The XSLT C library developed for the GNOME project / MIT |
| [llvmlite](https://github.com/numba/llvmlite) | 0.24.0 | A lightweight LLVM python binding for writing JIT compilers / New BSD License |
| [locket](https://github.com/mwilliamson/locket.py) | 0.2.0 | File-based locks for Python for Linux and Windows / BSD 2-Clause |
| [lxml](http://lxml.de/) | 4.2.5 | Pythonic binding for the C libraries libxml2 and libxslt. / BSD 3-Clause, GPL-2.0, ZPL-2.0, and ElementTree |
| [lzo](http://www.oberhumer.com/opensource/lzo/) | 2.10 | LZO is a portable lossless data compression library written in ANSI C. / GPL v2+ |
| [markupsafe](https://www.palletsprojects.com/p/markupsafe/) | 1.0 | A Python module that implements the jinja2.Markup string / BSD 3-Clause |
| [matplotlib](http://matplotlib.org/) | 2.2.3 | Publication quality figures in Python / PSF-based |
| [mccabe](https://github.com/PyCQA/mccabe) | 0.6.1 | McCabe complexity checker for Python / MIT |
| [mistune](https://github.com/lepture/mistune) | 0.8.3 | The fastest markdown parser in pure Python. / BSD 3-Clause |
| [mkl](https://software.intel.com/en-us/mkl) | 2019.0 | Math library for Intel and compatible processors / proprietary - Intel |
| [mkl-service](https://github.com/ContinuumIO/mkl-service) | 1.1.2 | Python bindings to MKL service functions / 3-clause BSD |
| [mkl\_fft](http://github.com/IntelPython/mkl_fft) | 1.0.4 | NumPy-based implementation of Fast Fourier Transform using Intel (R) Math Kernel Library. / BSD 3-Clause |
| [mkl\_random](http://github.com/IntelPython/mkl_random) | 1.0.1 | Intel (R) MKL-powered package for sampling from common probability distributions into NumPy arrays. / BSD 3-Clause |
| [more-itertools](https://github.com/erikrose/more-itertools) | 4.3.0 | More routines for operating on iterables, beyond itertools / MIT |
| [mpc](http://www.multiprecision.org/) | 1.1.0 | A C library for the arithmetic of complex numbers with arbitrarily high precision. / LGPL 3 |
| [mpfr](http://www.mpfr.org/) | 4.0.1 | The MPFR library is a C library for multiple-precision floating-point computations with correct rounding. / LGPL 3 |
| [mpmath](http://mpmath.org) | 1.0.0 | Python library for arbitrary-precision floating-point arithmetic / BSD 3-Clause |
| [msgpack-python](http://msgpack.org/) | 0.5.6 | MessagePack (de)serializer. / Apache 2.0 |
| [multipledispatch](https://github.com/mrocklin/multipledispatch/) | 0.6.0 | Multiple dispatch in Python / BSD 3-Clause |
| [navigator-updater](https://github.com/ContinuumIO/navigator-updater) | 0.2.1 | Anaconda Navigator Updater / proprietary - Continuum Analytics, Inc. |
| [nbconvert](http://jupyter.org) | 5.4.0 | Converting Jupyter Notebooks / BSD-3-Clause |
| [nbformat](http://jupyter.org) | 4.4.0 | The reference implementation of the Jupyter Notebook format / BSD 3-clause |
| [ncurses](http://www.gnu.org/software/ncurses/) | 6.1 | Library for text-based user interfaces / Free software (MIT-like) |
| [networkx](https://networkx.github.io/) | 2.1 | Python package for creating and manipulating complex networks / BSD 3-Clause |
| [nltk](http://nltk.org/) | 3.3.0 | Build Python programs to work with human language data / Apache 2.0 |
| [nose](http://readthedocs.org/docs/nose/) | 1.3.7 | Nose extends unittest to make testing easier / LGPL-2.1 |
| [notebook](http://jupyter.org) | 5.6.0 | Jupyter Notebook / BSD 3-clause |
| [numba](http://numba.github.com) | 0.39.0 | NumPy aware dynamic Python compiler using LLVM / BSD 2-clause |
| [numexpr](https://github.com/pydata/numexpr) | 2.6.8 | Fast numerical expression evaluator for NumPy. / MIT |
| [numpy](http://numpy.scipy.org/) | 1.15.1 | Array processing for numbers, strings, records, and objects. / BSD 3-Clause |
| numpy-base | 1.15.1 | |
| [numpydoc](https://github.com/numpy/numpydoc) | 0.8.0 | Sphinx extension to support docstrings in Numpy format / BSD 3-Clause |
| [odo](http://odo.pydata.org) | 0.5.1 | Data migration in Python / BSD-3-Clause |
| [olefile](http://www.decalage.info/python/olefileio) | 0.46 | parse, read and write Microsoft OLE2 files / BSD 2-Clause |
| [openpyxl](https://openpyxl.readthedocs.io) | 2.5.6 | A Python library to read/write Excel 2010 xlsx/xlsm files / MIT |
| [openssl](http://www.openssl.org/) | 1.0.2p | OpenSSL is an open-source implementation of the SSL and TLS protocols / OpenSSL |
| [packaging](https://github.com/pypa/packaging) | 17.1 | Core utilities for Python packages / Apache 2.0 or BSD 2-Clause |
| [pandas](http://pandas.pydata.org) | 0.23.4 | High-performance, easy-to-use data structures and data analysis tools. / BSD 3-clause |
| [pandoc](http://pandoc.org/) | 1.19.2.1 | Universal markup converter (repackaged binaries). / GPL-2.0 |
| [pandocfilters](https://github.com/jgm/pandocfilters) | 1.4.2 | A python module for writing pandoc filters / BSD-3-Clause |
| [pango](http://www.pango.org/) | 1.42.4 | Text layout and rendering engine. / LGPL-2.1 |
| [parso](https://github.com/davidhalter/parso) | 0.3.1 | A Python Parser / MIT |
| [partd](https://github.com/dask/partd) | 0.3.8 | Data structure for on-disk shuffle operations / BSD 3-Clause |
| [patchelf](http://nixos.org/patchelf.html) | 0.9 | A small utility to modify the dynamic linker and RPATH of ELF executables. / GPL 3 |
| [path.py](https://github.com/jaraco/path.py) | 11.1.0 | A module wrapper for os.path / MIT |
| [pathlib2](https://github.com/mcmtroffaes/pathlib2) | 2.3.2 | Fork of pathlib aiming to support the full stdlib Python API. / MIT |
| [patsy](https://github.com/pydata/patsy) | 0.5.0 | Describing statistical models in Python using symbolic formulas / BSD-2-Clause, PSF2 |
| [pcre](http://www.pcre.org/) | 8.42 | Regular expression pattern matching using the same syntax and semantics as Perl 5. / BSD 3-Clause |
| [pep8](http://pep8.readthedocs.org/) | 1.7.1 | Python style guide checker / MIT |
| [pexpect](http://pexpect.sourceforge.net/) | 4.6.0 | Pexpect makes Python a better tool for controlling other applications. / ISC |
| [pickleshare](https://github.com/vivainio/pickleshare) | 0.7.4 | Tiny ‘shelve’-like database with concurrency support / MIT |
| [pillow](https://pillow.readthedocs.io) | 5.2.0 | Pillow is the friendly PIL fork by Alex Clark and Contributors. / PIL |
| [pip](https://pip.pypa.io/en/stable/) | 10.0.1 | PyPA recommended tool for installing Python packages / MIT |
| [pixman](http://www.pixman.org/) | 0.34.0 | A low-level software library for pixel manipulation. / MIT |
| [pkginfo](https://code.launchpad.net/~tseaver/pkginfo/trunk) | 1.4.2 | Query metadatdata from sdists / bdists / installed packages. / MIT |
| [pluggy](https://github.com/pytest-dev/pluggy) | 0.7.1 | Plugin registration and hook calling for Python / MIT |
| [ply](http://www.dabeaz.com/ply/index.html) | 3.11 | Python Lex-Yacc / BSD 3-clause |
| [prometheus\_client](https://github.com/prometheus/client_python) | 0.3.1 | Python client for the Prometheus monitoring system. / Apache 2.0 |
| [prompt\_toolkit](https://github.com/jonathanslenders/python-prompt-toolkit) | 1.0.15 | Library for building powerful interactive command lines in Python / BSD 3-clause |
| [psutil](https://github.com/giampaolo/psutil) | 5.4.7 | A cross-platform process and system utilities module for Python / BSD 3-Clause |
| [ptyprocess](https://github.com/pexpect/ptyprocess) | 0.6.0 | Run a subprocess in a pseudo terminal / ISC |
| [py](https://github.com/pytest-dev/py) | 1.6.0 | library with cross-python path, ini-parsing, io, code, log facilities / MIT |
| [pyasn1](https://github.com/etingof/pyasn1) | 0.4.4 | ASN.1 types and codecs / BSD 2-Clause |
| [pyasn1-modules](http://pyasn1.sourceforge.net/) | 0.2.2 | A collection of ASN.1-based protocols modules. / BSD 2-Clause |
| [pycodestyle](https://pycodestyle.readthedocs.io/) | 2.4.0 | Python style guide checker / MIT |
| [pycosat](https://github.com/ContinuumIO/pycosat) | 0.6.3 | Bindings to picosat (a SAT solver) / MIT |
| [pycparser](https://github.com/eliben/pycparser) | 2.18 | Complete C99 parser in pure Python / BSD 3-clause |
| [pycrypto](http://www.pycrypto.org/) | 2.6.1 | Cryptographic modules for Python. / Public Domain |
| [pycurl](http://pycurl.sourceforge.net/) | 7.43.0.2 | A Python Interface To The cURL library / LGPL, MIT |
| [pyflakes](https://github.com/PyCQA/pyflakes) | 2.0.0 | Pyflakes analyzes programs and detects various errors. / MIT |
| [pygments](http://pygments.org/) | 2.2.0 | Generic syntax highlighting package / BSD 2-clause |
| [pylint](http://www.pylint.org/) | 2.1.1 | python code static checker / GPL |
| [pyodbc](https://github.com/mkleehammer/pyodbc) | 4.0.24 | DB API Module for ODBC / MIT |
| [pyopenssl](https://github.com/pyca/pyopenssl) | 18.0.0 | Python wrapper module around the OpenSSL library / Apache 2.0 |
| [pyparsing](http://pyparsing.wikispaces.com/) | 2.2.0 | Create and execute simple grammars / MIT |
| [pyqt](http://www.riverbankcomputing.co.uk/software/pyqt) | 5.9.2 | Python binding of the cross-platform GUI toolkit Qt. / Commercial, GPL-2.0, GPL-3.0 |
| [pysocks](https://github.com/Anorov/PySocks) | 1.6.8 | A Python SOCKS client module. See [Anorov/PySocks](https://github.com/Anorov/PySocks) for more information. / BSD 3-Clause |
| [pytables](http://www.pytables.org) | 3.4.4 | Brings together Python, HDF5 and NumPy to easily handle large amounts of data. / BSD 3-Clause |
| [pytest](https://docs.pytest.org/en/latest/) | 3.8.0 | Simple and powerful testing with Python. / MIT |
| [pytest-arraydiff](https://github.com/astrofrog/pytest-arraydiff) | 0.2 | pytest plugin to help with comparing array output from tests / BSD |
| [pytest-astropy](https://github.com/astropy/pytest-astropy) | 0.4.0 | Meta-package containing dependencies for testing Astropy / BSD |
| [pytest-doctestplus](https://github.com/astropy/pytest-doctestplus) | 0.1.3 | Pytest plugin with advanced doctest features / BSD |
| [pytest-openfiles](https://github.com/astropy/pytest-openfiles) | 0.3.0 | Pytest plugin for detecting inadvertent open file handles / BSD |
| [pytest-remotedata](https://github.com/astropy/pytest-remotedata) | 0.3.0 | Pytest plugin for controlling remote data access / BSD |
| [python](http://www.python.org/) | 3.7.0 | General purpose programming language / PSF |
| [python-dateutil](https://dateutil.readthedocs.org/) | 2.7.3 | Extensions to the standard Python datetime module. / BSD 3 Clause |
| [pytz](http://pythonhosted.org/pytz/) | 2018.5 | World timezone definitions, modern and historical. / MIT |
| [pywavelets](https://github.com/PyWavelets/pywt) | 1.0.0 | Discrete Wavelet Transforms in Python. / MIT |
| [pyyaml](http://pyyaml.org/wiki/PyYAML) | 3.13 | YAML parser and emitter for Python / MIT |
| [pyzmq](https://github.com/zeromq/pyzmq) | 17.1.2 | Python bindings for zeromq / BSD 3-clause |
| [qt](http://qt-project.org) | 5.9.6 | Qt is a cross-platform application and UI framework. / LGPL-3.0 |
| [qtawesome](https://github.com/spyder-ide/qtawesome) | 0.4.4 | Iconic fonts in PyQt and PySide applications / MIT |
| [qtconsole](http://jupyter.org) | 4.4.1 | Jupyter Qt console / BSD 3-Clause |
| [qtpy](https://github.com/spyder-ide/qtpy) | 1.5.0 | Abstraction layer for PyQt5/PyQt4/PySide / MIT |
| [readline](https://cnswww.cns.cwru.edu/php/chet/readline/rltop.html) | 7.0 | library for editing command lines as they are typed in / GPL-3.0 |
| [requests](http://python-requests.org) | 2.19.1 | Python HTTP for Humans. / Apache 2.0 |
| [rope](https://github.com/python-rope/rope) | 0.11.0 | A python refactoring library… / GPL 2.0 |
| [ruamel\_yaml](https://bitbucket.org/ruamel/yaml) | 0.15.46 | A patched copy of ruamel.yaml. / MIT |
| [scikit-image](http://scikit-image.org/) | 0.14.0 | Image processing routines for SciPy. / BSD 3-Clause |
| [scikit-learn](http://scikit-learn.org/) | 0.19.2 | A set of python modules for machine learning and data mining / BSD 3-Clause |
| [scipy](http://www.scipy.org/) | 1.1.0 | Scientific Library for Python / BSD 3-Clause |
| [seaborn](https://seaborn.pydata.org) | 0.9.0 | Statistical data visualization / BSD 3-Clause |
| [secretstorage](https://github.com/mitya57/secretstorage) | 3.1.0 | Provides a way for securely storing passwords and other secrets. / BSD-3-Clause |
| [send2trash](https://github.com/hsoft/send2trash) | 1.5.0 | Python library to natively send files to Trash (or Recycle bin) on all platforms. / BSD-3-Clause |
| [service\_identity](https://github.com/pyca/service_identity) | 17.0.0 | Service identity verification for pyOpenSSL. / MIT |
| [setuptools](https://github.com/pypa/setuptools) | 40.2.0 | Download, build, install, upgrade, and uninstall Python packages / MIT |
| [simplegeneric](http://cheeseshop.python.org/pypi/simplegeneric) | 0.8.1 | Simple generic functions (similar to Python’s own len(), pickle.dump(), etc.) / Zope Public |
| [singledispatch](http://docs.python.org/3/library/functools.html#functools.singledispatch) | 3.4.0.3 | Transforms a function into a single-dispatch generic function / MIT |
| [sip](http://www.riverbankcomputing.com/software/sip/intro) | 4.19.8 | Create Python bindings for C and C++ libraries / GPL-3.0 |
| [six](http://pypi.python.org/pypi/six/) | 1.11.0 | Python 2 and 3 compatibility utilities / MIT |
| [snappy](https://github.com/google/snappy) | 1.1.7 | A fast compressor/decompressor / BSD 3-clause |
| [snowballstemmer](https://github.com/shibukawa/snowball_py) | 1.2.1 | Snowball stemming library collection for Python / BSD-2-Clause |
| [sortedcollections](http://www.grantjenks.com/docs/sortedcollections/) | 1.0.1 | Python Sorted Collections / Apache-2.0 |
| [sortedcontainers](http://www.grantjenks.com/docs/sortedcontainers/) | 2.0.5 | Python Sorted Container Types: SortedList, SortedDict, and SortedSet / Apache 2.0 |
| [sphinx](http://www.sphinx-doc.org) | 1.7.9 | Sphinx is a tool that makes it easy to create intelligent and beautiful documentation / BSD 2-clause |
| sphinxcontrib | 1.0 | Python namespace for sphinxcontrib / BSD |
| [sphinxcontrib-websupport](https://pypi.python.org/pypi/sphinxcontrib-websupport) | 1.1.0 | Sphinx API for Web Apps / BSD-2-Clause |
| [spyder](https://www.spyder-ide.org/) | 3.3.1 | The Scientific Python Development Environment / MIT |
| [spyder-kernels](https://github.com/spyder-ide/spyder-kernels) | 0.2.6 | Jupyter kernels for the Spyder console / MIT |
| [sqlalchemy](http://www.sqlalchemy.org/) | 1.2.11 | Database Abstraction Library. / MIT |
| [sqlite](http://www.sqlite.org/) | 3.24.0 | Implements a self-contained, zero-configuration, SQL database engine. / Public-Domain (`<http://www.sqlite.org/copyright.html>`) |
| [statsmodels](https://www.statsmodels.org) | 0.9.0 | Statistical computations and models for use with SciPy / BSD 3-Clause |
| [sympy](http://sympy.org) | 1.2 | Python library for symbolic mathematics / 3-clause BSD |
| [tblib](https://github.com/ionelmc/python-tblib) | 1.3.2 | Traceback serialization library. / BSD 2-Clause |
| [terminado](https://github.com/jupyter/terminado) | 0.8.1 | Terminals served by tornado websockets / BSD 2-clause |
| [testpath](https://testpath.readthedocs.io) | 0.3.1 | Testpath is a collection of utilities for Python code working with files and commands. / MIT |
| [tk](http://www.tcl.tk/) | 8.6.8 | A dynamic programming language with GUI support. Bundles Tcl and Tk. / Tcl/Tk |
| [toolz](http://toolz.readthedocs.org/) | 0.9.0 | A functional standard library for Python. / BSD 3-Clause |
| [tornado](http://www.tornadoweb.org/) | 5.1 | A Python web framework and asynchronous networking library, originally developed at FriendFeed. / Apache 2.0 |
| [tqdm](https://pypi.python.org/pypi/tqdm) | 4.26.0 | A Fast, Extensible Progress Meter / MPLv2.0, MIT |
| [traitlets](http://ipython.org/) | 4.3.2 | Configuration system for Python applications / BSD 3-clause |
| [twisted](http://twistedmatrix.com/) | 18.7.0 | event-driven networking engine / MIT |
| [unicodecsv](https://github.com/jdunck/python-unicodecsv) | 0.14.1 | Drop-in replacement for csv module which supports unicode strings / BSD |
| [unixodbc](http://www.unixodbc.org/) | 2.3.7 | ODBC on non MS Windows platforms / LGPL-2.1 |
| [urllib3](https://urllib3.readthedocs.io/) | 1.23 | HTTP library with thread-safe connection pooling, file post, and more. / MIT |
| [wcwidth](https://github.com/jquast/wcwidth) | 0.1.7 | Measures number of Terminal column cells of wide-character codes. / MIT |
| [webencodings](https://github.com/gsnedders/python-webencodings) | 0.5.1 | Character encoding aliases for legacy web content / BSD 3-Clause |
| [werkzeug](http://werkzeug.pocoo.org/) | 0.14.1 | The Python WSGI Utility Library. / BSD 3-Clause |
| [wheel](https://bitbucket.org/pypa/wheel/) | 0.31.1 | A built-package format for Python. / MIT |
| [widgetsnbextension](http://ipython.org) | 3.4.1 | Interactive Widgets for Jupyter / BSD 3-clause |
| [wrapt](https://github.com/GrahamDumpleton/wrapt) | 1.10.11 | Module for decorators, wrappers and monkey patching. / BSD 2-Clause |
| [xlrd](http://www.python-excel.org/) | 1.1.0 | Library for developers to extract data from Microsoft Excel (tm) spreadsheet files / BSD 3-Clause and BSD with advertising |
| [xlsxwriter](https://xlsxwriter.readthedocs.io/) | 1.1.0 | A Python module for creating Excel XLSX files / BSD 2-Clause |
| [xlwt](http://www.python-excel.org/) | 1.3.0 | Writing data and formatting information to Excel files / BSD |
| [xz](http://tukaani.org/xz/) | 5.2.4 | Data compression software with high compression ratio / LGPL-2.1 and GPL-2.0 |
| [yaml](http://pyyaml.org/wiki/LibYAML) | 0.1.7 | A C library for parsing and emitting YAML. / MIT |
| [zeromq](http://zeromq.org) | 4.2.5 | A high-performance asynchronous messaging library. / LGPL 3 |
| [zict](http://github.com/mrocklin/zict) | 0.1.3 | Composable Dictionary Classes / BSD 3-Clause |
| [zlib](http://zlib.net/) | 1.2.11 | Massively spiffy yet delicately unobtrusive compression library / zlib |
| zope | 1.0 | web application server / BSD |
| [zope.interface](http://docs.zope.org/zope.interface/) | 4.5.0 | Interfaces for Python / ZPL 2.1 |
| Name | Version | Summary / License |
|---|---|---|
| [\_ipyw\_jlab\_nb\_ext\_conf](https://github.com/ContinuumIO/anaconda-nb-extensions-meta-config) | 0.1.0 | A configuration metapackage for enabling Anaconda-bundled jupyter extensions / BSD |
| [alabaster](http://www.sphinx-doc.org/en/stable/index.html) | 0.7.11 | Configurable, Python 2+3 compatible Sphinx theme. / BSD 3-Clause |
| [anaconda-client](http://anaconda.org) | 1.7.2 | anaconda.org command line client library / BSD 3-clause |
| [anaconda-navigator](https://github.com/ContinuumIO/navigator) | 1.9.2 | Anaconda Navigator / proprietary - Continuum Analytics, Inc. |
| [anaconda-project](https://github.com/Anaconda-Platform/anaconda-project) | 0.8.2 | Tool for encapsulating, running, and reproducing data science projects / BSD 3-Clause |
| [appdirs](http://github.com/ActiveState/appdirs) | 1.4.3 | A small Python module for determining appropriate platform-specific dirs. / MIT |
| [asn1crypto](https://github.com/wbond/asn1crypto) | 0.24.0 | Python ASN.1 library with a focus on performance and a pythonic API / MIT |
| [astroid](https://www.astroid.org/) | 2.0.4 | A abstract syntax tree for Python with inference support. / LGPL 2.1 |
| [astropy](http://www.astropy.org/) | 3.0.4 | Community-developed Python Library for Astronomy / BSD |
| [atomicwrites](https://github.com/untitaker/python-atomicwrites) | 1.2.1 | Atomic file writes. / MIT |
| [attrs](https://attrs.readthedocs.io/en/stable/) | 18.2.0 | attrs is the Python package that will bring back the joy of writing classes by relieving you from the drudgery of implementing object protocols (aka dunder methods). / MIT |
| [automat](https://github.com/glyph/Automat) | 0.7.0 | self-service finite-state machines for the programmer on the go / MIT |
| [babel](http://babel.pocoo.org/) | 2.6.0 | Utilities to internationalize and localize Python applications / BSD 3-clause |
| [backcall](https://github.com/takluyver/backcall/) | 0.1.0 | Specifications for callback functions passed in to an API / BSD-3-Clause |
| [backports](https://bitbucket.org/brandon/backports) | 1.0 | / BSD |
| [backports.shutil\_get\_terminal\_size](https://github.com/chrippa/backports.shutil_get_terminal_size) | 1.0.0 | A backport of the get\_terminal\_size function from Python 3.3’s shutil. / MIT |
| [beautifulsoup4](http://www.crummy.com/software/BeautifulSoup/) | 4.6.3 | Python library designed for screen-scraping / MIT |
| [bitarray](https://github.com/ilanschnell/bitarray) | 0.8.3 | efficient arrays of booleans – C extension / PSF |
| [bkcharts](http://github.com/bokeh/bkcharts) | 0.2 | High level chart types built on top of Bokeh / BSD 3-Clause |
| blas | 1.0 | |
| [blaze](http://blaze.pydata.org) | 0.11.3 | NumPy and Pandas interface to big data / BSD 3-Clause |
| [bleach](https://github.com/mozilla/bleach) | 2.1.4 | Easy, whitelist-based HTML-sanitizing tool / Apache-2.0 |
| [blosc](https://github.com/Blosc/c-blosc) | 1.14.4 | A blocking, shuffling and loss-less compression library that can be faster than memcpy() / BSD 3-Clause |
| [bokeh](http://bokeh.pydata.org/) | 0.13.0 | Statistical and novel interactive HTML plots for Python / BSD 3-Clause |
| [boto](https://github.com/boto/boto/) | 2.49.0 | Amazon Web Services Library / MIT |
| [bottleneck](http://berkeleyanalytics.com/bottleneck) | 1.2.1 | Fast NumPy array functions written in Cython. / BSD 2-Clause |
| [bzip2](http://www.bzip.org/) | 1.0.6 | high-quality data compressor / bzip2 |
| [ca-certificates](https://github.com/conda-forge/ca-certificates-feedstock) | 2018.03.07 | Certificates for use with other packages. / ISC |
| [cairo](http://cairographics.org/) | 1.14.12 | Cairo is a 2D graphics library with support for multiple output devices. / LGPL 2.1 or MPL 1.1 |
| [certifi](http://certifi.io/) | 2018.8.24 | Python package for providing Mozilla’s CA Bundle. / ISC |
| [cffi](https://bitbucket.org/cffi/cffi) | 1.11.5 | Foreign Function Interface for Python calling C code. / MIT |
| [chardet](https://github.com/chardet/chardet) | 3.0.4 | Universal character encoding detector / LGPL2 |
| [click](http://click.pocoo.org/) | 6.7 | A simple wrapper around optparse for powerful command line utilities. / BSD 3-Clause |
| [cloudpickle](https://github.com/cloudpipe/cloudpickle) | 0.5.5 | Extended pickling support for Python objects / BSD 3-Clause |
| [clyent](https://github.com/Anaconda-Platform/clyent) | 1.2.2 | Command line client library for windows and posix / BSD 3-Clause |
| [colorama](https://github.com/tartley/colorama) | 0.3.9 | Cross-platform colored terminal text. / BSD 3-Clause |
| [conda](https://conda.io) | 4.5.11 | OS-agnostic, system-level binary package and environment manager. / BSD 3-Clause |
| [conda-build](https://github.com/conda/conda-build) | 3.15.1 | tools for building conda packages / BSD 3-Clause |
| [conda-env](https://github.com/conda/conda-env) | 2.6.0 | Tools for interacting with conda environments. / BSD 3-Clause |
| [constantly](https://github.com/twisted/constantly) | 15.1.0 | Symbolic constants in Python / MIT |
| [contextlib2](http://contextlib2.readthedocs.org) | 0.5.5 | Backports and enhancements for the contextlib module / PSF |
| [cryptography](https://github.com/pyca/cryptography) | 2.3.1 | Provides cryptographic recipes and primitives to Python developers / Apache 2.0 or BSD 3-Clause, PSF 2 |
| [curl](http://curl.haxx.se/) | 7.61.0 | tool and library for transferring data with URL syntax / MIT/X derivate (`<http://curl.haxx.se/docs/copyright.html>`) |
| [cycler](http://matplotlib.org/cycler) | 0.10.0 | Composable style cycles. / BSD 3-Clause |
| [cython](http://www.cython.org/) | 0.28.5 | The Cython compiler for writing C extensions for the Python language / Apache-2.0 |
| [cytoolz](https://github.com/pytoolz/cytoolz) | 0.9.0.1 | Cython implementation of Toolz. High performance functional utilities. / BSD 3-Clause |
| [dask](http://github.com/dask/dask/) | 0.19.1 | Parallel Python with task scheduling / BSD 3-Clause |
| [dask-core](http://github.com/dask/dask/) | 0.19.1 | Parallel Python with task scheduling / BSD 3-Clause |
| [datashape](http://datashape.pydata.org) | 0.5.4 | A data description language. / BSD 2-Clause |
| [dbus](http://www.freedesktop.org/wiki/Software/dbus/) | 1.13.2 | Simple message bus system for applications to talk to one another / GPL2 |
| [decorator](https://github.com/micheles/decorator) | 4.3.0 | Better living through Python with decorators. / BSD 3-Clause |
| [defusedxml](https://bitbucket.org/tiran/defusedxml) | 0.5.0 | XML bomb protection for Python stdlib modules / PSF 2.0 |
| [distributed](http://distributed.readthedocs.io/en/latest/) | 1.23.1 | Distributed computing with Dask / BSD 3-Clause |
| [docutils](http://docutils.sourceforge.net/) | 0.14 | Docutils – Python Documentation Utilities / Public Domain Dedictation and BSD 2-Clause and PSF 2.1.1 and GPL 3.0 |
| [entrypoints](https://github.com/takluyver/entrypoints) | 0.2.3 | Discover and load entry points from installed packages. / MIT License |
| [et\_xmlfile](https://bitbucket.org/openpyxl/et_xmlfile) | 1.0.1 | An implementation of lxml.xmlfile for the standard library / MIT |
| [expat](http://expat.sourceforge.net/) | 2.2.6 | Expat XML parser library in C. / MIT |
| [fastcache](https://github.com/pbrady/fastcache) | 1.0.2 | C implementation of Python 3 lru\_cache / MIT |
| [filelock](https://github.com/benediktschmitt/py-filelock) | 3.0.8 | A platform independent file lock. / Public Domain |
| [flask](http://flask.pocoo.org) | 1.0.2 | A microframework based on Werkzeug, Jinja2 and good intentions. / BSD 3-Clause |
| [flask-cors](https://github.com/corydolphin/flask-cors) | 3.0.6 | A Flask extension adding a decorator for CORS support / MIT |
| [fontconfig](http://www.freedesktop.org/wiki/Software/fontconfig/) | 2.13.0 | A library for configuring and customizing font access. / MIT |
| [freetype](https://www.freetype.org/) | 2.9.1 | A Free, High-Quality, and Portable Font Engine / GPL-2.0 and FreeType |
| [fribidi](https://github.com/fribidi/fribidi) | 1.0.5 | The Free Implementation of the Unicode Bidirectional Algorithm. / LGPL-2.1 |
| [get\_terminal\_size](https://github.com/chrippa/backports.shutil_get_terminal_size) | 1.0.0 | Get the size of the terminal window. / MIT |
| [gevent](http://www.gevent.org/) | 1.3.6 | Coroutine-based network library / MIT |
| [glib](https://developer.gnome.org/glib/) | 2.56.2 | Provides core application building blocks for libraries and applications written in C. / LGPL-2.1 |
| [glob2](https://github.com/miracle2k/python-glob2) | 0.6 | Version of the glob module that supports recursion via \*\*, and can capture patterns. / BSD-2-Clause |
| [gmp](http://gmplib.org/) | 6.1.2 | The GNU multiprecision library. / GPL 2 and LGPL 3 |
| [gmpy2](https://pypi.python.org/pypi/gmpy2) | 2.0.8 | GMP/MPIR, MPFR, and MPC interface to Python 2.6+ and 3.x / LGPL 3 |
| [graphite2](http://graphite.sil.org/) | 1.3.12 | A “smart font” system that handles the complexities of lesser-known languages of the world. / LGPLv2 |
| [greenlet](https://github.com/python-greenlet/greenlet) | 0.4.15 | Lightweight in-process concurrent programming / MIT |
| [gst-plugins-base](http://gstreamer.freedesktop.org/) | 1.14.0 | GStreamer Base Plug-ins / GPL2 |
| [gstreamer](http://gstreamer.freedesktop.org/) | 1.14.0 | Library for constructing graphs of media-handling components / LGPL 2 |
| [h5py](http://www.h5py.org/) | 2.8.0 | Read and write HDF5 files from Python. / BSD 3-Clause |
| [harfbuzz](http://www.freedesktop.org/wiki/Software/HarfBuzz/) | 1.8.8 | An OpenType text shaping engine. / MIT |
| [hdf5](http://www.hdfgroup.org/HDF5/) | 1.10.2 | HDF5 is a data model, library, and file format for storing and managing data / HDF5 |
| [heapdict](http://stutzbachenterprises.com/) | 1.0.0 | A heap with decrease-key and increase-key operations / BSD 3-Clause |
| [html5lib](https://github.com/html5lib/html5lib-python) | 1.0.1 | HTML parser based on the WHATWG HTML specification / MIT |
| [hyperlink](https://github.com/python-hyper/hyperlink) | 18.0.0 | Immutable, Pythonic, correct URLs. / MIT |
| [icu](http://site.icu-project.org/) | 58.2 | International Components for Unicode. / MIT |
| [idna](https://github.com/kjd/idna) | 2.7 | Internationalized Domain Names in Applications (IDNA). / BSD Like |
| [imageio](http://imageio.github.io) | 2.4.1 | a Python library for reading and writing image data / BSD 2-Clause |
| [imagesize](https://github.com/shibukawa/imagesize_py) | 1.1.0 | Getting image size from png/jpeg/jpeg2000/gif file / MIT |
| [incremental](https://twistedmatrix.com) | 17.5.0 | A library that versions your Python projects / MIT License |
| [intel-openmp](https://software.intel.com/en-us/node/522690) | 2019.0 | Math library for Intel and compatible processors / proprietary - Intel |
| [ipykernel](http://ipython.org) | 4.9.0 | IPython Kernel for Jupyter / BSD 3-clause |
| [ipython](http://ipython.org/) | 6.5.0 | IPython: Productive Interactive Computing / BSD 3-clause |
| [ipython\_genutils](http://ipython.org) | 0.2.0 | vestigial utilities from IPython / BSD 3-Clause |
| [ipywidgets](https://github.com/ipython/ipywidgets) | 7.4.1 | Jupyter Interactive Widgets / BSD 3-clause |
| [isort](https://github.com/timothycrosley/isort) | 4.3.4 | A Python utility / library to sort Python imports. / MIT |
| [itsdangerous](https://github.com/pallets/itsdangerous) | 0.24 | Various helpers to pass trusted data to untrusted environments. / BSD 3-Clause |
| [jbig](https://www.cl.cam.ac.uk/~mgk25/jbigkit) | 2.1 | Implementation of the JBIG1 data compression standard / GPL-2.0 |
| [jdcal](https://github.com/phn/jdcal) | 1.4 | Julian dates from proleptic Gregorian and Julian calendars. / BSD 2-Clause |
| [jedi](https://github.com/davidhalter/jedi/) | 0.12.1 | An autocompletion tool for Python that can be used for text editors. / MIT |
| [jeepney](https://gitlab.com/takluyver/jeepney) | 0.3.1 | Pure Python DBus interface / MIT |
| [jinja2](http://jinja.pocoo.org) | 2.10 | An easy to use stand-alone template engine written in pure python. / 3-Clause BSD |
| [jpeg](http://www.ijg.org/) | 9b | read/write jpeg COM, EXIF, IPTC medata / Custom free software license |
| [jsonschema](https://github.com/Julian/jsonschema) | 2.6.0 | An implementation of JSON Schema validation for Python / MIT |
| [jupyter](http://jupyter.org) | 1.0.0 | Jupyter metapackage. Install all the Jupyter components in one go. / BSD 3-Clause |
| [jupyter\_client](http://jupyter.org) | 5.2.3 | Jupyter protocol implementation and client libraries / BSD 3-clause |
| [jupyter\_console](http://jupyter.org) | 5.2.0 | Jupyter terminal console / BSD 3-Clause |
| [jupyter\_core](http://jupyter.org) | 4.4.0 | Core common functionality of Jupyter projects. / BSD 3-clause |
| [jupyterlab](https://github.com/jupyterlab/jupyterlab) | 0.34.9 | JupyterLab PRE-ALPHA / BSD-3-Clause |
| [jupyterlab\_launcher](http://github.com/jupyterlab/jupyterlab_launcher) | 0.13.1 | A Launcher for JupyterLab based applications. / BSD 3-Clause |
| [keyring](https://github.com/jaraco/keyring) | 13.2.1 | Store and access your passwords safely. / Python Software Foundation or MIT |
| [kiwisolver](https://github.com/nucleic/kiwi) | 1.0.1 | A fast implementation of the Cassowary constraint solver / BSD 3-Clause |
| [lazy-object-proxy](https://github.com/ionelmc/python-lazy-object-proxy) | 1.3.1 | A fast and thorough lazy object proxy. / BSD 2-Clause |
| [libcurl](http://curl.haxx.se/) | 7.61.0 | tool and library for transferring data with URL syntax / MIT/X derivate (`<http://curl.haxx.se/docs/copyright.html>`) |
| [libedit](http://thrysoee.dk/editline/) | 3.1.20170329 | Editline Library (libedit) / NetBSD |
| [libffi](https://sourceware.org/libffi/) | 3.2.1 | A Portable Foreign Function Interface Library. / Custom |
| [libgcc-ng](https://gcc.gnu.org/onlinedocs/gccint/Libgcc.html) | 8.2.0 | The GCC low-level runtime library / GPL |
| [libgfortran-ng](https://gcc.gnu.org/) | 7.3.0 | The GNU Fortran Runtime Library / GPL |
| [libpng](http://www.libpng.org/pub/png/libpng.html) | 1.6.34 | PNG reference library. / zlib/libpng |
| [libsodium](http://libsodium.org) | 1.0.16 | A modern and easy-to-use crypto library. / ISC |
| [libssh2](https://www.libssh2.org/) | 1.8.0 | the SSH library / BSD 3-Clause |
| [libstdcxx-ng](https://gcc.gnu.org/) | 8.2.0 | The GNU C++ Runtime Library / GPL3 with runtime exception |
| [libtiff](http://www.libtiff.org/) | 4.0.9 | Support for the Tag Image File Format (TIFF). / HPND |
| [libtool](http://www.gnu.org/software/libtool/) | 2.4.6 | The GNU Portable Library Tool / GPL 3 |
| [libuuid](http://sourceforge.net/projects/libuuid/) | 1.0.3 | Portable uuid C library. / BSD 3-Clause |
| [libxcb](http://xcb.freedesktop.org/) | 1.13 | This is the C-language Binding (XCB) package to the X Window System protocol / MIT |
| [libxml2](http://xmlsoft.org/) | 2.9.8 | The XML C parser and toolkit of Gnome / MIT |
| [libxslt](http://xmlsoft.org/XSLT/) | 1.1.32 | The XSLT C library developed for the GNOME project / MIT |
| [llvmlite](https://github.com/numba/llvmlite) | 0.24.0 | A lightweight LLVM python binding for writing JIT compilers / New BSD License |
| [locket](https://github.com/mwilliamson/locket.py) | 0.2.0 | File-based locks for Python for Linux and Windows / BSD 2-Clause |
| [lxml](http://lxml.de/) | 4.2.5 | Pythonic binding for the C libraries libxml2 and libxslt. / BSD 3-Clause, GPL-2.0, ZPL-2.0, and ElementTree |
| [lzo](http://www.oberhumer.com/opensource/lzo/) | 2.10 | LZO is a portable lossless data compression library written in ANSI C. / GPL v2+ |
| [markupsafe](https://www.palletsprojects.com/p/markupsafe/) | 1.0 | A Python module that implements the jinja2.Markup string / BSD 3-Clause |
| [matplotlib](http://matplotlib.org/) | 2.2.3 | Publication quality figures in Python / PSF-based |
| [mccabe](https://github.com/PyCQA/mccabe) | 0.6.1 | McCabe complexity checker for Python / MIT |
| [mistune](https://github.com/lepture/mistune) | 0.8.3 | The fastest markdown parser in pure Python. / BSD 3-Clause |
| [mkl](https://software.intel.com/en-us/mkl) | 2019.0 | Math library for Intel and compatible processors / proprietary - Intel |
| [mkl-service](https://github.com/ContinuumIO/mkl-service) | 1.1.2 | Python bindings to MKL service functions / 3-clause BSD |
| [mkl\_fft](http://github.com/IntelPython/mkl_fft) | 1.0.4 | NumPy-based implementation of Fast Fourier Transform using Intel (R) Math Kernel Library. / BSD 3-Clause |
| [mkl\_random](http://github.com/IntelPython/mkl_random) | 1.0.1 | Intel (R) MKL-powered package for sampling from common probability distributions into NumPy arrays. / BSD 3-Clause |
| [more-itertools](https://github.com/erikrose/more-itertools) | 4.3.0 | More routines for operating on iterables, beyond itertools / MIT |
| [mpc](http://www.multiprecision.org/) | 1.1.0 | A C library for the arithmetic of complex numbers with arbitrarily high precision. / LGPL 3 |
| [mpfr](http://www.mpfr.org/) | 4.0.1 | The MPFR library is a C library for multiple-precision floating-point computations with correct rounding. / LGPL 3 |
| [mpmath](http://mpmath.org) | 1.0.0 | Python library for arbitrary-precision floating-point arithmetic / BSD 3-Clause |
| [msgpack-python](http://msgpack.org/) | 0.5.6 | MessagePack (de)serializer. / Apache 2.0 |
| [multipledispatch](https://github.com/mrocklin/multipledispatch/) | 0.6.0 | Multiple dispatch in Python / BSD 3-Clause |
| [navigator-updater](https://github.com/ContinuumIO/navigator-updater) | 0.2.1 | Anaconda Navigator Updater / proprietary - Continuum Analytics, Inc. |
| [nbconvert](http://jupyter.org) | 5.4.0 | Converting Jupyter Notebooks / BSD-3-Clause |
| [nbformat](http://jupyter.org) | 4.4.0 | The reference implementation of the Jupyter Notebook format / BSD 3-clause |
| [ncurses](http://www.gnu.org/software/ncurses/) | 6.1 | Library for text-based user interfaces / Free software (MIT-like) |
| [networkx](https://networkx.github.io/) | 2.1 | Python package for creating and manipulating complex networks / BSD 3-Clause |
| [nltk](http://nltk.org/) | 3.3.0 | Build Python programs to work with human language data / Apache 2.0 |
| [nose](http://readthedocs.org/docs/nose/) | 1.3.7 | Nose extends unittest to make testing easier / LGPL-2.1 |
| [notebook](http://jupyter.org) | 5.6.0 | Jupyter Notebook / BSD 3-clause |
| [numba](http://numba.github.com) | 0.39.0 | NumPy aware dynamic Python compiler using LLVM / BSD 2-clause |
| [numexpr](https://github.com/pydata/numexpr) | 2.6.8 | Fast numerical expression evaluator for NumPy. / MIT |
| [numpy](http://numpy.scipy.org/) | 1.15.1 | Array processing for numbers, strings, records, and objects. / BSD 3-Clause |
| numpy-base | 1.15.1 | |
| [numpydoc](https://github.com/numpy/numpydoc) | 0.8.0 | Sphinx extension to support docstrings in Numpy format / BSD 3-Clause |
| [odo](http://odo.pydata.org) | 0.5.1 | Data migration in Python / BSD-3-Clause |
| [olefile](http://www.decalage.info/python/olefileio) | 0.46 | parse, read and write Microsoft OLE2 files / BSD 2-Clause |
| [openpyxl](https://openpyxl.readthedocs.io) | 2.5.6 | A Python library to read/write Excel 2010 xlsx/xlsm files / MIT |
| [openssl](http://www.openssl.org/) | 1.0.2p | OpenSSL is an open-source implementation of the SSL and TLS protocols / OpenSSL |
| [packaging](https://github.com/pypa/packaging) | 17.1 | Core utilities for Python packages / Apache 2.0 or BSD 2-Clause |
| [pandas](http://pandas.pydata.org) | 0.23.4 | High-performance, easy-to-use data structures and data analysis tools. / BSD 3-clause |
| [pandoc](http://pandoc.org/) | 1.15.0.6 | Universal markup converter (repackaged binaries). / GPL-2.0 |
| [pandocfilters](https://github.com/jgm/pandocfilters) | 1.4.2 | A python module for writing pandoc filters / BSD-3-Clause |
| [pango](http://www.pango.org/) | 1.42.4 | Text layout and rendering engine. / LGPL-2.1 |
| [parso](https://github.com/davidhalter/parso) | 0.3.1 | A Python Parser / MIT |
| [partd](https://github.com/dask/partd) | 0.3.8 | Data structure for on-disk shuffle operations / BSD 3-Clause |
| [patchelf](http://nixos.org/patchelf.html) | 0.9 | A small utility to modify the dynamic linker and RPATH of ELF executables. / GPL 3 |
| [path.py](https://github.com/jaraco/path.py) | 11.1.0 | A module wrapper for os.path / MIT |
| [pathlib2](https://github.com/mcmtroffaes/pathlib2) | 2.3.2 | Fork of pathlib aiming to support the full stdlib Python API. / MIT |
| [patsy](https://github.com/pydata/patsy) | 0.5.0 | Describing statistical models in Python using symbolic formulas / BSD-2-Clause, PSF2 |
| [pcre](http://www.pcre.org/) | 8.42 | Regular expression pattern matching using the same syntax and semantics as Perl 5. / BSD 3-Clause |
| [pep8](http://pep8.readthedocs.org/) | 1.7.1 | Python style guide checker / MIT |
| [pexpect](http://pexpect.sourceforge.net/) | 4.6.0 | Pexpect makes Python a better tool for controlling other applications. / ISC |
| [pickleshare](https://github.com/vivainio/pickleshare) | 0.7.4 | Tiny ‘shelve’-like database with concurrency support / MIT |
| [pillow](https://pillow.readthedocs.io) | 5.2.0 | Pillow is the friendly PIL fork by Alex Clark and Contributors. / PIL |
| [pip](https://pip.pypa.io/en/stable/) | 10.0.1 | PyPA recommended tool for installing Python packages / MIT |
| [pixman](http://www.pixman.org/) | 0.34.0 | A low-level software library for pixel manipulation. / MIT |
| [pkginfo](https://code.launchpad.net/~tseaver/pkginfo/trunk) | 1.4.2 | Query metadatdata from sdists / bdists / installed packages. / MIT |
| [pluggy](https://github.com/pytest-dev/pluggy) | 0.7.1 | Plugin registration and hook calling for Python / MIT |
| [ply](http://www.dabeaz.com/ply/index.html) | 3.11 | Python Lex-Yacc / BSD 3-clause |
| [prometheus\_client](https://github.com/prometheus/client_python) | 0.3.1 | Python client for the Prometheus monitoring system. / Apache 2.0 |
| [prompt\_toolkit](https://github.com/jonathanslenders/python-prompt-toolkit) | 1.0.15 | Library for building powerful interactive command lines in Python / BSD 3-clause |
| [psutil](https://github.com/giampaolo/psutil) | 5.4.7 | A cross-platform process and system utilities module for Python / BSD 3-Clause |
| [ptyprocess](https://github.com/pexpect/ptyprocess) | 0.6.0 | Run a subprocess in a pseudo terminal / ISC |
| [py](https://github.com/pytest-dev/py) | 1.6.0 | library with cross-python path, ini-parsing, io, code, log facilities / MIT |
| [pyasn1](https://github.com/etingof/pyasn1) | 0.4.4 | ASN.1 types and codecs / BSD 2-Clause |
| [pyasn1-modules](http://pyasn1.sourceforge.net/) | 0.2.2 | A collection of ASN.1-based protocols modules. / BSD 2-Clause |
| [pycodestyle](https://pycodestyle.readthedocs.io/) | 2.4.0 | Python style guide checker / MIT |
| [pycosat](https://github.com/ContinuumIO/pycosat) | 0.6.3 | Bindings to picosat (a SAT solver) / MIT |
| [pycparser](https://github.com/eliben/pycparser) | 2.18 | Complete C99 parser in pure Python / BSD 3-clause |
| [pycrypto](http://www.pycrypto.org/) | 2.6.1 | Cryptographic modules for Python. / Public Domain |
| [pycurl](http://pycurl.sourceforge.net/) | 7.43.0.2 | A Python Interface To The cURL library / LGPL, MIT |
| [pyflakes](https://github.com/PyCQA/pyflakes) | 2.0.0 | Pyflakes analyzes programs and detects various errors. / MIT |
| [pygments](http://pygments.org/) | 2.2.0 | Generic syntax highlighting package / BSD 2-clause |
| [pylint](http://www.pylint.org/) | 2.1.1 | python code static checker / GPL |
| [pyodbc](https://github.com/mkleehammer/pyodbc) | 4.0.24 | DB API Module for ODBC / MIT |
| [pyopenssl](https://github.com/pyca/pyopenssl) | 18.0.0 | Python wrapper module around the OpenSSL library / Apache 2.0 |
| [pyparsing](http://pyparsing.wikispaces.com/) | 2.2.0 | Create and execute simple grammars / MIT |
| [pyqt](http://www.riverbankcomputing.co.uk/software/pyqt) | 5.9.2 | Python binding of the cross-platform GUI toolkit Qt. / Commercial, GPL-2.0, GPL-3.0 |
| [pysocks](https://github.com/Anorov/PySocks) | 1.6.8 | A Python SOCKS client module. See [Anorov/PySocks](https://github.com/Anorov/PySocks) for more information. / BSD 3-Clause |
| [pytables](http://www.pytables.org) | 3.4.4 | Brings together Python, HDF5 and NumPy to easily handle large amounts of data. / BSD 3-Clause |
| [pytest](https://docs.pytest.org/en/latest/) | 3.8.0 | Simple and powerful testing with Python. / MIT |
| [pytest-arraydiff](https://github.com/astrofrog/pytest-arraydiff) | 0.2 | pytest plugin to help with comparing array output from tests / BSD |
| [pytest-astropy](https://github.com/astropy/pytest-astropy) | 0.4.0 | Meta-package containing dependencies for testing Astropy / BSD |
| [pytest-doctestplus](https://github.com/astropy/pytest-doctestplus) | 0.1.3 | Pytest plugin with advanced doctest features / BSD |
| [pytest-openfiles](https://github.com/astropy/pytest-openfiles) | 0.3.0 | Pytest plugin for detecting inadvertent open file handles / BSD |
| [pytest-remotedata](https://github.com/astropy/pytest-remotedata) | 0.3.0 | Pytest plugin for controlling remote data access / BSD |
| [python](http://www.python.org/) | 3.7.0 | General purpose programming language / PSF |
| [python-dateutil](https://dateutil.readthedocs.org/) | 2.7.3 | Extensions to the standard Python datetime module. / BSD 3 Clause |
| [pytz](http://pythonhosted.org/pytz/) | 2018.5 | World timezone definitions, modern and historical. / MIT |
| [pywavelets](https://github.com/PyWavelets/pywt) | 1.0.0 | Discrete Wavelet Transforms in Python. / MIT |
| [pyyaml](http://pyyaml.org/wiki/PyYAML) | 3.13 | YAML parser and emitter for Python / MIT |
| [pyzmq](https://github.com/zeromq/pyzmq) | 17.1.2 | Python bindings for zeromq / BSD 3-clause |
| [qt](http://qt-project.org) | 5.9.6 | Qt is a cross-platform application and UI framework. / LGPL-3.0 |
| [qtawesome](https://github.com/spyder-ide/qtawesome) | 0.4.4 | Iconic fonts in PyQt and PySide applications / MIT |
| [qtconsole](http://jupyter.org) | 4.4.1 | Jupyter Qt console / BSD 3-Clause |
| [qtpy](https://github.com/spyder-ide/qtpy) | 1.5.0 | Abstraction layer for PyQt5/PyQt4/PySide / MIT |
| [readline](https://cnswww.cns.cwru.edu/php/chet/readline/rltop.html) | 7.0 | library for editing command lines as they are typed in / GPL-3.0 |
| [requests](http://python-requests.org) | 2.19.1 | Python HTTP for Humans. / Apache 2.0 |
| [rope](https://github.com/python-rope/rope) | 0.11.0 | A python refactoring library… / GPL 2.0 |
| [ruamel\_yaml](https://bitbucket.org/ruamel/yaml) | 0.15.46 | A patched copy of ruamel.yaml. / MIT |
| [scikit-image](http://scikit-image.org/) | 0.14.0 | Image processing routines for SciPy. / BSD 3-Clause |
| [scikit-learn](http://scikit-learn.org/) | 0.19.2 | A set of python modules for machine learning and data mining / BSD 3-Clause |
| [scipy](http://www.scipy.org/) | 1.1.0 | Scientific Library for Python / BSD 3-Clause |
| [seaborn](https://seaborn.pydata.org) | 0.9.0 | Statistical data visualization / BSD 3-Clause |
| [secretstorage](https://github.com/mitya57/secretstorage) | 3.1.0 | Provides a way for securely storing passwords and other secrets. / BSD-3-Clause |
| [send2trash](https://github.com/hsoft/send2trash) | 1.5.0 | Python library to natively send files to Trash (or Recycle bin) on all platforms. / BSD-3-Clause |
| [service\_identity](https://github.com/pyca/service_identity) | 17.0.0 | Service identity verification for pyOpenSSL. / MIT |
| [setuptools](https://github.com/pypa/setuptools) | 40.2.0 | Download, build, install, upgrade, and uninstall Python packages / MIT |
| [simplegeneric](http://cheeseshop.python.org/pypi/simplegeneric) | 0.8.1 | Simple generic functions (similar to Python’s own len(), pickle.dump(), etc.) / Zope Public |
| [singledispatch](http://docs.python.org/3/library/functools.html#functools.singledispatch) | 3.4.0.3 | Transforms a function into a single-dispatch generic function / MIT |
| [sip](http://www.riverbankcomputing.com/software/sip/intro) | 4.19.8 | Create Python bindings for C and C++ libraries / GPL-3.0 |
| [six](http://pypi.python.org/pypi/six/) | 1.11.0 | Python 2 and 3 compatibility utilities / MIT |
| [snappy](https://github.com/google/snappy) | 1.1.7 | A fast compressor/decompressor / BSD 3-clause |
| [snowballstemmer](https://github.com/shibukawa/snowball_py) | 1.2.1 | Snowball stemming library collection for Python / BSD-2-Clause |
| [sortedcollections](http://www.grantjenks.com/docs/sortedcollections/) | 1.0.1 | Python Sorted Collections / Apache-2.0 |
| [sortedcontainers](http://www.grantjenks.com/docs/sortedcontainers/) | 2.0.5 | Python Sorted Container Types: SortedList, SortedDict, and SortedSet / Apache 2.0 |
| [sphinx](http://www.sphinx-doc.org) | 1.7.9 | Sphinx is a tool that makes it easy to create intelligent and beautiful documentation / BSD 2-clause |
| sphinxcontrib | 1.0 | Python namespace for sphinxcontrib / BSD |
| [sphinxcontrib-websupport](https://pypi.python.org/pypi/sphinxcontrib-websupport) | 1.1.0 | Sphinx API for Web Apps / BSD-2-Clause |
| [spyder](https://www.spyder-ide.org/) | 3.3.1 | The Scientific Python Development Environment / MIT |
| [spyder-kernels](https://github.com/spyder-ide/spyder-kernels) | 0.2.6 | Jupyter kernels for the Spyder console / MIT |
| [sqlalchemy](http://www.sqlalchemy.org/) | 1.2.11 | Database Abstraction Library. / MIT |
| [sqlite](http://www.sqlite.org/) | 3.24.0 | Implements a self-contained, zero-configuration, SQL database engine. / Public-Domain (`<http://www.sqlite.org/copyright.html>`) |
| [statsmodels](https://www.statsmodels.org) | 0.9.0 | Statistical computations and models for use with SciPy / BSD 3-Clause |
| [sympy](http://sympy.org) | 1.2 | Python library for symbolic mathematics / 3-clause BSD |
| [tblib](https://github.com/ionelmc/python-tblib) | 1.3.2 | Traceback serialization library. / BSD 2-Clause |
| [terminado](https://github.com/jupyter/terminado) | 0.8.1 | Terminals served by tornado websockets / BSD 2-clause |
| [testpath](https://testpath.readthedocs.io) | 0.3.1 | Testpath is a collection of utilities for Python code working with files and commands. / MIT |
| [tk](http://www.tcl.tk/) | 8.6.8 | A dynamic programming language with GUI support. Bundles Tcl and Tk. / Tcl/Tk |
| [toolz](http://toolz.readthedocs.org/) | 0.9.0 | A functional standard library for Python. / BSD 3-Clause |
| [tornado](http://www.tornadoweb.org/) | 5.1 | A Python web framework and asynchronous networking library, originally developed at FriendFeed. / Apache 2.0 |
| [tqdm](https://pypi.python.org/pypi/tqdm) | 4.26.0 | A Fast, Extensible Progress Meter / MPLv2.0, MIT |
| [traitlets](http://ipython.org/) | 4.3.2 | Configuration system for Python applications / BSD 3-clause |
| [twisted](http://twistedmatrix.com/) | 18.7.0 | event-driven networking engine / MIT |
| [unicodecsv](https://github.com/jdunck/python-unicodecsv) | 0.14.1 | Drop-in replacement for csv module which supports unicode strings / BSD |
| [unixodbc](http://www.unixodbc.org/) | 2.3.7 | ODBC on non MS Windows platforms / LGPL-2.1 |
| [urllib3](https://urllib3.readthedocs.io/) | 1.23 | HTTP library with thread-safe connection pooling, file post, and more. / MIT |
| [wcwidth](https://github.com/jquast/wcwidth) | 0.1.7 | Measures number of Terminal column cells of wide-character codes. / MIT |
| [webencodings](https://github.com/gsnedders/python-webencodings) | 0.5.1 | Character encoding aliases for legacy web content / BSD 3-Clause |
| [werkzeug](http://werkzeug.pocoo.org/) | 0.14.1 | The Python WSGI Utility Library. / BSD 3-Clause |
| [wheel](https://bitbucket.org/pypa/wheel/) | 0.31.1 | A built-package format for Python. / MIT |
| [widgetsnbextension](http://ipython.org) | 3.4.1 | Interactive Widgets for Jupyter / BSD 3-clause |
| [wrapt](https://github.com/GrahamDumpleton/wrapt) | 1.10.11 | Module for decorators, wrappers and monkey patching. / BSD 2-Clause |
| [xlrd](http://www.python-excel.org/) | 1.1.0 | Library for developers to extract data from Microsoft Excel (tm) spreadsheet files / BSD 3-Clause and BSD with advertising |
| [xlsxwriter](https://xlsxwriter.readthedocs.io/) | 1.1.0 | A Python module for creating Excel XLSX files / BSD 2-Clause |
| [xlwt](http://www.python-excel.org/) | 1.3.0 | Writing data and formatting information to Excel files / BSD |
| [xz](http://tukaani.org/xz/) | 5.2.4 | Data compression software with high compression ratio / LGPL-2.1 and GPL-2.0 |
| [yaml](http://pyyaml.org/wiki/LibYAML) | 0.1.7 | A C library for parsing and emitting YAML. / MIT |
| [zeromq](http://zeromq.org) | 4.2.5 | A high-performance asynchronous messaging library. / LGPL 3 |
| [zict](http://github.com/mrocklin/zict) | 0.1.3 | Composable Dictionary Classes / BSD 3-Clause |
| [zlib](http://zlib.net/) | 1.2.11 | Massively spiffy yet delicately unobtrusive compression library / zlib |
| zope | 1.0 | web application server / BSD |
| [zope.interface](http://docs.zope.org/zope.interface/) | 4.5.0 | Interfaces for Python / ZPL 2.1 |
| Name | Version | Summary / License |
|---|---|---|
| [\_ipyw\_jlab\_nb\_ext\_conf](https://github.com/ContinuumIO/anaconda-nb-extensions-meta-config) | 0.1.0 | A configuration metapackage for enabling Anaconda-bundled jupyter extensions / BSD |
| [alabaster](http://www.sphinx-doc.org/en/stable/index.html) | 0.7.11 | Configurable, Python 2+3 compatible Sphinx theme. / BSD 3-Clause |
| [anaconda-client](http://anaconda.org) | 1.7.2 | anaconda.org command line client library / BSD 3-clause |
| [anaconda-navigator](https://github.com/ContinuumIO/navigator) | 1.9.2 | Anaconda Navigator / proprietary - Continuum Analytics, Inc. |
| [anaconda-project](https://github.com/Anaconda-Platform/anaconda-project) | 0.8.2 | Tool for encapsulating, running, and reproducing data science projects / BSD 3-Clause |
| [appdirs](http://github.com/ActiveState/appdirs) | 1.4.3 | A small Python module for determining appropriate platform-specific dirs. / MIT |
| [asn1crypto](https://github.com/wbond/asn1crypto) | 0.24.0 | Python ASN.1 library with a focus on performance and a pythonic API / MIT |
| [astroid](https://www.astroid.org/) | 1.6.5 | A abstract syntax tree for Python with inference support. / LGPL 2.1 |
| [astropy](http://www.astropy.org/) | 2.0.8 | Community-developed Python Library for Astronomy / BSD |
| [atomicwrites](https://github.com/untitaker/python-atomicwrites) | 1.2.1 | Atomic file writes. / MIT |
| [attrs](https://attrs.readthedocs.io/en/stable/) | 18.2.0 | attrs is the Python package that will bring back the joy of writing classes by relieving you from the drudgery of implementing object protocols (aka dunder methods). / MIT |
| [automat](https://github.com/glyph/Automat) | 0.7.0 | self-service finite-state machines for the programmer on the go / MIT |
| [babel](http://babel.pocoo.org/) | 2.6.0 | Utilities to internationalize and localize Python applications / BSD 3-clause |
| [backports](https://bitbucket.org/brandon/backports) | 1.0 | / BSD |
| [backports.functools\_lru\_cache](https://github.com/jaraco/backports.functools_lru_cache) | 1.5 | Backport of functools.lru\_cache from Python 3.3 as published at ActiveState. / MIT |
| [backports.shutil\_get\_terminal\_size](https://github.com/chrippa/backports.shutil_get_terminal_size) | 1.0.0 | A backport of the get\_terminal\_size function from Python 3.3’s shutil. / MIT |
| [backports.shutil\_which](https://github.com/minrk/backports.shutil_which) | 3.5.1 | Backport of shutil.which from Python 3.3 / PSF2 & MIT |
| [backports\_abc](https://github.com/cython/backports_abc) | 0.5 | A backport of recent additions to the collections.abc module. / PSF 2 |
| [beautifulsoup4](http://www.crummy.com/software/BeautifulSoup/) | 4.6.3 | Python library designed for screen-scraping / MIT |
| [bitarray](https://github.com/ilanschnell/bitarray) | 0.8.3 | efficient arrays of booleans – C extension / PSF |
| [bkcharts](http://github.com/bokeh/bkcharts) | 0.2 | High level chart types built on top of Bokeh / BSD 3-Clause |
| blas | 1.0 | |
| [blaze](http://blaze.pydata.org) | 0.11.3 | NumPy and Pandas interface to big data / BSD 3-Clause |
| [bleach](https://github.com/mozilla/bleach) | 2.1.4 | Easy, whitelist-based HTML-sanitizing tool / Apache-2.0 |
| [blosc](https://github.com/Blosc/c-blosc) | 1.14.4 | A blocking, shuffling and loss-less compression library that can be faster than memcpy() / BSD 3-Clause |
| [bokeh](http://bokeh.pydata.org/) | 0.13.0 | Statistical and novel interactive HTML plots for Python / BSD 3-Clause |
| [boto](https://github.com/boto/boto/) | 2.49.0 | Amazon Web Services Library / MIT |
| [bottleneck](http://berkeleyanalytics.com/bottleneck) | 1.2.1 | Fast NumPy array functions written in Cython. / BSD 2-Clause |
| [bzip2](http://www.bzip.org/) | 1.0.6 | high-quality data compressor / bzip2 |
| [ca-certificates](https://github.com/conda-forge/ca-certificates-feedstock) | 2018.03.07 | Certificates for use with other packages. / ISC |
| [cdecimal](http://www.bytereef.org/mpdecimal/index.html) | 2.3 | Fast drop-in replacement for decimal.py / BSD 2-Clause |
| [certifi](http://certifi.io/) | 2018.8.24 | Python package for providing Mozilla’s CA Bundle. / ISC |
| [cffi](https://bitbucket.org/cffi/cffi) | 1.11.5 | Foreign Function Interface for Python calling C code. / MIT |
| [chardet](https://github.com/chardet/chardet) | 3.0.4 | Universal character encoding detector / LGPL2 |
| [click](http://click.pocoo.org/) | 6.7 | A simple wrapper around optparse for powerful command line utilities. / BSD 3-Clause |
| [cloudpickle](https://github.com/cloudpipe/cloudpickle) | 0.5.5 | Extended pickling support for Python objects / BSD 3-Clause |
| [clyent](https://github.com/Anaconda-Platform/clyent) | 1.2.2 | Command line client library for windows and posix / BSD 3-Clause |
| [colorama](https://github.com/tartley/colorama) | 0.3.9 | Cross-platform colored terminal text. / BSD 3-Clause |
| [comtypes](http://starship.python.net/crew/theller/comtypes/) | 1.1.7 | pure Python COM package / MIT |
| [conda](https://conda.io) | 4.5.11 | OS-agnostic, system-level binary package and environment manager. / BSD 3-Clause |
| [conda-build](https://github.com/conda/conda-build) | 3.15.1 | tools for building conda packages / BSD 3-Clause |
| [conda-env](https://github.com/conda/conda-env) | 2.6.0 | Tools for interacting with conda environments. / BSD 3-Clause |
| [configparser](http://docs.python.org/3/library/configparser.html) | 3.5.0 | This library brings the updated configparser from Python 3.5 to Python 2.6-3.5 / MIT |
| console\_shortcut | 0.1.1 | Console shortcut creator for Windows (using menuinst) / BSD |
| [constantly](https://github.com/twisted/constantly) | 15.1.0 | Symbolic constants in Python / MIT |
| [contextlib2](http://contextlib2.readthedocs.org) | 0.5.5 | Backports and enhancements for the contextlib module / PSF |
| [cryptography](https://github.com/pyca/cryptography) | 2.3.1 | Provides cryptographic recipes and primitives to Python developers / Apache 2.0 or BSD 3-Clause, PSF 2 |
| [curl](http://curl.haxx.se/) | 7.61.0 | tool and library for transferring data with URL syntax / MIT/X derivate (`<http://curl.haxx.se/docs/copyright.html>`) |
| [cycler](http://matplotlib.org/cycler) | 0.10.0 | Composable style cycles. / BSD 3-Clause |
| [cython](http://www.cython.org/) | 0.28.5 | The Cython compiler for writing C extensions for the Python language / Apache-2.0 |
| [cytoolz](https://github.com/pytoolz/cytoolz) | 0.9.0.1 | Cython implementation of Toolz. High performance functional utilities. / BSD 3-Clause |
| [dask](http://github.com/dask/dask/) | 0.19.1 | Parallel Python with task scheduling / BSD 3-Clause |
| [dask-core](http://github.com/dask/dask/) | 0.19.1 | Parallel Python with task scheduling / BSD 3-Clause |
| [datashape](http://datashape.pydata.org) | 0.5.4 | A data description language. / BSD 2-Clause |
| [decorator](https://github.com/micheles/decorator) | 4.3.0 | Better living through Python with decorators. / BSD 3-Clause |
| [defusedxml](https://bitbucket.org/tiran/defusedxml) | 0.5.0 | XML bomb protection for Python stdlib modules / PSF 2.0 |
| [distributed](http://distributed.readthedocs.io/en/latest/) | 1.23.1 | Distributed computing with Dask / BSD 3-Clause |
| [docutils](http://docutils.sourceforge.net/) | 0.14 | Docutils – Python Documentation Utilities / Public Domain Dedictation and BSD 2-Clause and PSF 2.1.1 and GPL 3.0 |
| [entrypoints](https://github.com/takluyver/entrypoints) | 0.2.3 | Discover and load entry points from installed packages. / MIT License |
| [enum34](https://bitbucket.org/stoneleaf/enum34) | 1.1.6 | Python 3.4 Enum backported to 3.3, 3.2, 3.1, 2.7, 2.6, 2.5, and 2.4 / BSD 3-Clause |
| [et\_xmlfile](https://bitbucket.org/openpyxl/et_xmlfile) | 1.0.1 | An implementation of lxml.xmlfile for the standard library / MIT |
| [fastcache](https://github.com/pbrady/fastcache) | 1.0.2 | C implementation of Python 3 lru\_cache / MIT |
| [filelock](https://github.com/benediktschmitt/py-filelock) | 3.0.8 | A platform independent file lock. / Public Domain |
| [flask](http://flask.pocoo.org) | 1.0.2 | A microframework based on Werkzeug, Jinja2 and good intentions. / BSD 3-Clause |
| [flask-cors](https://github.com/corydolphin/flask-cors) | 3.0.6 | A Flask extension adding a decorator for CORS support / MIT |
| [freetype](https://www.freetype.org/) | 2.9.1 | A Free, High-Quality, and Portable Font Engine / GPL-2.0 and FreeType |
| [funcsigs](http://funcsigs.readthedocs.org) | 1.0.2 | Python function signatures from PEP362 for Python 2.6, 2.7 and 3.2+. / Apache 2.0 |
| [functools32](https://github.com/MiCHiLU/python-functools32) | 3.2.3.2 | Backport of the functools module from Python 3.2.3 for use on 2.7 and PyPy. / PSF license |
| [futures](https://github.com/agronholm/pythonfutures) | 3.2.0 | Backport of the concurrent.futures package from Python 3.2 / PSF |
| [get\_terminal\_size](https://github.com/chrippa/backports.shutil_get_terminal_size) | 1.0.0 | Get the size of the terminal window. / MIT |
| [gevent](http://www.gevent.org/) | 1.3.6 | Coroutine-based network library / MIT |
| [glob2](https://github.com/miracle2k/python-glob2) | 0.6 | Version of the glob module that supports recursion via \*\*, and can capture patterns. / BSD-2-Clause |
| [greenlet](https://github.com/python-greenlet/greenlet) | 0.4.15 | Lightweight in-process concurrent programming / MIT |
| [grin](http://pypi.python.org/pypi/grin) | 1.2.1 | Enhanced grep-like tool / BSD 3-Clause |
| [h5py](http://www.h5py.org/) | 2.8.0 | Read and write HDF5 files from Python. / BSD 3-Clause |
| [hdf5](http://www.hdfgroup.org/HDF5/) | 1.10.2 | HDF5 is a data model, library, and file format for storing and managing data / HDF5 |
| [heapdict](http://stutzbachenterprises.com/) | 1.0.0 | A heap with decrease-key and increase-key operations / BSD 3-Clause |
| [html5lib](https://github.com/html5lib/html5lib-python) | 1.0.1 | HTML parser based on the WHATWG HTML specification / MIT |
| [hyperlink](https://github.com/python-hyper/hyperlink) | 18.0.0 | Immutable, Pythonic, correct URLs. / MIT |
| [icc\_rt](https://software.intel.com/en-us/node/522690) | 2017.0.4 | Intel runtime libraries for C, C++ and Fortran compilers / Intel proprietary |
| [icu](http://site.icu-project.org/) | 58.2 | International Components for Unicode. / MIT |
| [idna](https://github.com/kjd/idna) | 2.7 | Internationalized Domain Names in Applications (IDNA). / BSD Like |
| [imageio](http://imageio.github.io) | 2.4.1 | a Python library for reading and writing image data / BSD 2-Clause |
| [imagesize](https://github.com/shibukawa/imagesize_py) | 1.1.0 | Getting image size from png/jpeg/jpeg2000/gif file / MIT |
| [incremental](https://twistedmatrix.com) | 17.5.0 | A library that versions your Python projects / MIT License |
| [intel-openmp](https://software.intel.com/en-us/node/522690) | 2019.0 | Math library for Intel and compatible processors / proprietary - Intel |
| [ipaddress](https://github.com/phihag/ipaddress) | 1.0.22 | IPv4/IPv6 manipulation library / PSF 2 |
| [ipykernel](http://ipython.org) | 4.10.0 | IPython Kernel for Jupyter / BSD 3-clause |
| [ipython](http://ipython.org/) | 5.8.0 | IPython: Productive Interactive Computing / BSD 3-clause |
| [ipython\_genutils](http://ipython.org) | 0.2.0 | vestigial utilities from IPython / BSD 3-Clause |
| [ipywidgets](https://github.com/ipython/ipywidgets) | 7.4.1 | Jupyter Interactive Widgets / BSD 3-clause |
| [isort](https://github.com/timothycrosley/isort) | 4.3.4 | A Python utility / library to sort Python imports. / MIT |
| [itsdangerous](https://github.com/pallets/itsdangerous) | 0.24 | Various helpers to pass trusted data to untrusted environments. / BSD 3-Clause |
| [jdcal](https://github.com/phn/jdcal) | 1.4 | Julian dates from proleptic Gregorian and Julian calendars. / BSD 2-Clause |
| [jedi](https://github.com/davidhalter/jedi/) | 0.12.1 | An autocompletion tool for Python that can be used for text editors. / MIT |
| [jinja2](http://jinja.pocoo.org) | 2.10 | An easy to use stand-alone template engine written in pure python. / 3-Clause BSD |
| [jpeg](http://www.ijg.org/) | 9b | read/write jpeg COM, EXIF, IPTC medata / Custom free software license |
| [jsonschema](https://github.com/Julian/jsonschema) | 2.6.0 | An implementation of JSON Schema validation for Python / MIT |
| [jupyter](http://jupyter.org) | 1.0.0 | Jupyter metapackage. Install all the Jupyter components in one go. / BSD 3-Clause |
| [jupyter\_client](http://jupyter.org) | 5.2.3 | Jupyter protocol implementation and client libraries / BSD 3-clause |
| [jupyter\_console](http://jupyter.org) | 5.2.0 | Jupyter terminal console / BSD 3-Clause |
| [jupyter\_core](http://jupyter.org) | 4.4.0 | Core common functionality of Jupyter projects. / BSD 3-clause |
| [jupyterlab](https://github.com/jupyterlab/jupyterlab) | 0.33.11 | JupyterLab PRE-ALPHA / BSD-3-Clause |
| [jupyterlab\_launcher](http://github.com/jupyterlab/jupyterlab_launcher) | 0.11.2 | A Launcher for JupyterLab based applications. / BSD 3-Clause |
| [keyring](https://github.com/jaraco/keyring) | 13.2.1 | Store and access your passwords safely. / Python Software Foundation or MIT |
| [kiwisolver](https://github.com/nucleic/kiwi) | 1.0.1 | A fast implementation of the Cassowary constraint solver / BSD 3-Clause |
| [lazy-object-proxy](https://github.com/ionelmc/python-lazy-object-proxy) | 1.3.1 | A fast and thorough lazy object proxy. / BSD 2-Clause |
| [libcurl](http://curl.haxx.se/) | 7.61.0 | tool and library for transferring data with URL syntax / MIT/X derivate (`<http://curl.haxx.se/docs/copyright.html>`) |
| [libiconv](https://www.gnu.org/software/libiconv/) | 1.15 | Provides iconv for systems which don’t have one (or that cannot convert from/to Unicode.) / GPL and LGPL |
| [libpng](http://www.libpng.org/pub/png/libpng.html) | 1.6.34 | PNG reference library. / zlib/libpng |
| [libsodium](http://libsodium.org) | 1.0.16 | A modern and easy-to-use crypto library. / ISC |
| [libssh2](https://www.libssh2.org/) | 1.8.0 | the SSH library / BSD 3-Clause |
| [libtiff](http://www.libtiff.org/) | 4.0.9 | Support for the Tag Image File Format (TIFF). / HPND |
| [libxml2](http://xmlsoft.org/) | 2.9.8 | The XML C parser and toolkit of Gnome / MIT |
| [libxslt](http://xmlsoft.org/XSLT/) | 1.1.32 | The XSLT C library developed for the GNOME project / MIT |
| [linecache2](https://github.com/testing-cabal/linecache2) | 1.0.0 | Backport of the linecache module / PSF 1.0 |
| [llvmlite](https://github.com/numba/llvmlite) | 0.24.0 | A lightweight LLVM python binding for writing JIT compilers / New BSD License |
| [locket](https://github.com/mwilliamson/locket.py) | 0.2.0 | File-based locks for Python for Linux and Windows / BSD 2-Clause |
| [lxml](http://lxml.de/) | 4.2.5 | Pythonic binding for the C libraries libxml2 and libxslt. / BSD 3-Clause, GPL-2.0, ZPL-2.0, and ElementTree |
| [lzo](http://www.oberhumer.com/opensource/lzo/) | 2.10 | LZO is a portable lossless data compression library written in ANSI C. / GPL v2+ |
| m2w64-gcc-libgfortran | 5.3.0 | |
| m2w64-gcc-libs | 5.3.0 | |
| m2w64-gcc-libs-core | 5.3.0 | |
| m2w64-gmp | 6.1.0 | |
| m2w64-libwinpthread-git | 5.0.0.4634.697f757 | |
| [markupsafe](https://www.palletsprojects.com/p/markupsafe/) | 1.0 | A Python module that implements the jinja2.Markup string / BSD 3-Clause |
| [matplotlib](http://matplotlib.org/) | 2.2.3 | Publication quality figures in Python / PSF-based |
| [mccabe](https://github.com/PyCQA/mccabe) | 0.6.1 | McCabe complexity checker for Python / MIT |
| [menuinst](https://github.com/ContinuumIO/menuinst) | 1.4.14 | cross platform menu item installation / BSD |
| [mistune](https://github.com/lepture/mistune) | 0.8.3 | The fastest markdown parser in pure Python. / BSD 3-Clause |
| [mkl](https://software.intel.com/en-us/mkl) | 2019.0 | Math library for Intel and compatible processors / proprietary - Intel |
| [mkl-service](https://github.com/ContinuumIO/mkl-service) | 1.1.2 | Python bindings to MKL service functions / 3-clause BSD |
| [mkl\_fft](http://github.com/IntelPython/mkl_fft) | 1.0.4 | NumPy-based implementation of Fast Fourier Transform using Intel (R) Math Kernel Library. / BSD 3-Clause |
| [more-itertools](https://github.com/erikrose/more-itertools) | 4.3.0 | More routines for operating on iterables, beyond itertools / MIT |
| [mpmath](http://mpmath.org) | 1.0.0 | Python library for arbitrary-precision floating-point arithmetic / BSD 3-Clause |
| [msgpack-python](http://msgpack.org/) | 0.5.6 | MessagePack (de)serializer. / Apache 2.0 |
| msys2-conda-epoch | 20160418 | |
| [multipledispatch](https://github.com/mrocklin/multipledispatch/) | 0.6.0 | Multiple dispatch in Python / BSD 3-Clause |
| [navigator-updater](https://github.com/ContinuumIO/navigator-updater) | 0.2.1 | Anaconda Navigator Updater / proprietary - Continuum Analytics, Inc. |
| [nbconvert](http://jupyter.org) | 5.4.0 | Converting Jupyter Notebooks / BSD-3-Clause |
| [nbformat](http://jupyter.org) | 4.4.0 | The reference implementation of the Jupyter Notebook format / BSD 3-clause |
| [networkx](https://networkx.github.io/) | 2.1 | Python package for creating and manipulating complex networks / BSD 3-Clause |
| [nltk](http://nltk.org/) | 3.3.0 | Build Python programs to work with human language data / Apache 2.0 |
| [nose](http://readthedocs.org/docs/nose/) | 1.3.7 | Nose extends unittest to make testing easier / LGPL-2.1 |
| [notebook](http://jupyter.org) | 5.6.0 | Jupyter Notebook / BSD 3-clause |
| [numba](http://numba.github.com) | 0.39.0 | NumPy aware dynamic Python compiler using LLVM / BSD 2-clause |
| [numexpr](https://github.com/pydata/numexpr) | 2.6.8 | Fast numerical expression evaluator for NumPy. / MIT |
| [numpy](http://numpy.scipy.org/) | 1.15.1 | Array processing for numbers, strings, records, and objects. / BSD 3-Clause |
| numpy-base | 1.15.1 | |
| [numpydoc](https://github.com/numpy/numpydoc) | 0.8.0 | Sphinx extension to support docstrings in Numpy format / BSD 3-Clause |
| [odo](http://odo.pydata.org) | 0.5.1 | Data migration in Python / BSD-3-Clause |
| [olefile](http://www.decalage.info/python/olefileio) | 0.46 | parse, read and write Microsoft OLE2 files / BSD 2-Clause |
| [openpyxl](https://openpyxl.readthedocs.io) | 2.5.6 | A Python library to read/write Excel 2010 xlsx/xlsm files / MIT |
| [openssl](http://www.openssl.org/) | 1.0.2p | OpenSSL is an open-source implementation of the SSL and TLS protocols / OpenSSL |
| [packaging](https://github.com/pypa/packaging) | 17.1 | Core utilities for Python packages / Apache 2.0 or BSD 2-Clause |
| [pandas](http://pandas.pydata.org) | 0.23.4 | High-performance, easy-to-use data structures and data analysis tools. / BSD 3-clause |
| [pandoc](http://pandoc.org/) | 1.19.2.1 | Universal markup converter (repackaged binaries). / GPL-2.0 |
| [pandocfilters](https://github.com/jgm/pandocfilters) | 1.4.2 | A python module for writing pandoc filters / BSD-3-Clause |
| [parso](https://github.com/davidhalter/parso) | 0.3.1 | A Python Parser / MIT |
| [partd](https://github.com/dask/partd) | 0.3.8 | Data structure for on-disk shuffle operations / BSD 3-Clause |
| [path.py](https://github.com/jaraco/path.py) | 11.1.0 | A module wrapper for os.path / MIT |
| [pathlib2](https://github.com/mcmtroffaes/pathlib2) | 2.3.2 | Fork of pathlib aiming to support the full stdlib Python API. / MIT |
| [patsy](https://github.com/pydata/patsy) | 0.5.0 | Describing statistical models in Python using symbolic formulas / BSD-2-Clause, PSF2 |
| [pep8](http://pep8.readthedocs.org/) | 1.7.1 | Python style guide checker / MIT |
| [pickleshare](https://github.com/vivainio/pickleshare) | 0.7.4 | Tiny ‘shelve’-like database with concurrency support / MIT |
| [pillow](https://pillow.readthedocs.io) | 5.2.0 | Pillow is the friendly PIL fork by Alex Clark and Contributors. / PIL |
| [pip](https://pip.pypa.io/en/stable/) | 10.0.1 | PyPA recommended tool for installing Python packages / MIT |
| [pkginfo](https://code.launchpad.net/~tseaver/pkginfo/trunk) | 1.4.2 | Query metadatdata from sdists / bdists / installed packages. / MIT |
| [pluggy](https://github.com/pytest-dev/pluggy) | 0.7.1 | Plugin registration and hook calling for Python / MIT |
| [ply](http://www.dabeaz.com/ply/index.html) | 3.11 | Python Lex-Yacc / BSD 3-clause |
| [progress](https://github.com/verigak/progress) | 1.3 | Easy progress reporting for Python / ISC |
| [prometheus\_client](https://github.com/prometheus/client_python) | 0.3.1 | Python client for the Prometheus monitoring system. / Apache 2.0 |
| [prompt\_toolkit](https://github.com/jonathanslenders/python-prompt-toolkit) | 1.0.15 | Library for building powerful interactive command lines in Python / BSD 3-clause |
| [psutil](https://github.com/giampaolo/psutil) | 5.4.7 | A cross-platform process and system utilities module for Python / BSD 3-Clause |
| [py](https://github.com/pytest-dev/py) | 1.6.0 | library with cross-python path, ini-parsing, io, code, log facilities / MIT |
| [pyasn1](https://github.com/etingof/pyasn1) | 0.4.4 | ASN.1 types and codecs / BSD 2-Clause |
| [pyasn1-modules](http://pyasn1.sourceforge.net/) | 0.2.2 | A collection of ASN.1-based protocols modules. / BSD 2-Clause |
| [pycodestyle](https://pycodestyle.readthedocs.io/) | 2.4.0 | Python style guide checker / MIT |
| [pycosat](https://github.com/ContinuumIO/pycosat) | 0.6.3 | Bindings to picosat (a SAT solver) / MIT |
| [pycparser](https://github.com/eliben/pycparser) | 2.18 | Complete C99 parser in pure Python / BSD 3-clause |
| [pycrypto](http://www.pycrypto.org/) | 2.6.1 | Cryptographic modules for Python. / Public Domain |
| [pycurl](http://pycurl.sourceforge.net/) | 7.43.0.2 | A Python Interface To The cURL library / LGPL, MIT |
| [pyflakes](https://github.com/PyCQA/pyflakes) | 2.0.0 | Pyflakes analyzes programs and detects various errors. / MIT |
| [pygments](http://pygments.org/) | 2.2.0 | Generic syntax highlighting package / BSD 2-clause |
| [pylint](http://www.pylint.org/) | 1.9.2 | python code static checker / GPL |
| [pyodbc](https://github.com/mkleehammer/pyodbc) | 4.0.24 | DB API Module for ODBC / MIT |
| [pyopenssl](https://github.com/pyca/pyopenssl) | 18.0.0 | Python wrapper module around the OpenSSL library / Apache 2.0 |
| [pyparsing](http://pyparsing.wikispaces.com/) | 2.2.0 | Create and execute simple grammars / MIT |
| [pyqt](http://www.riverbankcomputing.co.uk/software/pyqt) | 5.6.0 | Python binding of the cross-platform GUI toolkit Qt. / Commercial, GPL-2.0, GPL-3.0 |
| [pysocks](https://github.com/Anorov/PySocks) | 1.6.8 | A Python SOCKS client module. See [Anorov/PySocks](https://github.com/Anorov/PySocks) for more information. / BSD 3-Clause |
| [pytables](http://www.pytables.org) | 3.4.4 | Brings together Python, HDF5 and NumPy to easily handle large amounts of data. / BSD 3-Clause |
| [pytest](https://docs.pytest.org/en/latest/) | 3.8.0 | Simple and powerful testing with Python. / MIT |
| [python](http://www.python.org/) | 2.7.15 | General purpose programming language / PSF |
| [python-dateutil](https://dateutil.readthedocs.org/) | 2.7.3 | Extensions to the standard Python datetime module. / BSD 3 Clause |
| [pytz](http://pythonhosted.org/pytz/) | 2018.5 | World timezone definitions, modern and historical. / MIT |
| [pywavelets](https://github.com/PyWavelets/pywt) | 1.0.0 | Discrete Wavelet Transforms in Python. / MIT |
| [pywin32](https://sourceforge.net/projects/pywin32) | 223 | Python extensions for Windows / PSF |
| [pywinpty](https://github.com/spyder-ide/pywinpty) | 0.5.4 | Python bindings for the winpty library / MIT |
| [pyyaml](http://pyyaml.org/wiki/PyYAML) | 3.13 | YAML parser and emitter for Python / MIT |
| [pyzmq](https://github.com/zeromq/pyzmq) | 17.1.2 | Python bindings for zeromq / BSD 3-clause |
| [qt](http://qt-project.org) | 5.6.2 | Qt is a cross-platform application and UI framework. / LGPL-3.0 |
| [qtawesome](https://github.com/spyder-ide/qtawesome) | 0.4.4 | Iconic fonts in PyQt and PySide applications / MIT |
| [qtconsole](http://jupyter.org) | 4.4.1 | Jupyter Qt console / BSD 3-Clause |
| [qtpy](https://github.com/spyder-ide/qtpy) | 1.5.0 | Abstraction layer for PyQt5/PyQt4/PySide / MIT |
| [requests](http://python-requests.org) | 2.19.1 | Python HTTP for Humans. / Apache 2.0 |
| [rope](https://github.com/python-rope/rope) | 0.11.0 | A python refactoring library… / GPL 2.0 |
| [ruamel\_yaml](https://bitbucket.org/ruamel/yaml) | 0.15.46 | A patched copy of ruamel.yaml. / MIT |
| [scandir](https://github.com/benhoyt/scandir) | 1.9.0 | scandir, a better directory iterator and faster os.walk() / BSD 3-Clause |
| [scikit-image](http://scikit-image.org/) | 0.14.0 | Image processing routines for SciPy. / BSD 3-Clause |
| [scikit-learn](http://scikit-learn.org/) | 0.19.2 | A set of python modules for machine learning and data mining / BSD 3-Clause |
| [scipy](http://www.scipy.org/) | 1.1.0 | Scientific Library for Python / BSD 3-Clause |
| [seaborn](https://seaborn.pydata.org) | 0.9.0 | Statistical data visualization / BSD 3-Clause |
| [send2trash](https://github.com/hsoft/send2trash) | 1.5.0 | Python library to natively send files to Trash (or Recycle bin) on all platforms. / BSD-3-Clause |
| [service\_identity](https://github.com/pyca/service_identity) | 17.0.0 | Service identity verification for pyOpenSSL. / MIT |
| [setuptools](https://github.com/pypa/setuptools) | 40.2.0 | Download, build, install, upgrade, and uninstall Python packages / MIT |
| [simplegeneric](http://cheeseshop.python.org/pypi/simplegeneric) | 0.8.1 | Simple generic functions (similar to Python’s own len(), pickle.dump(), etc.) / Zope Public |
| [singledispatch](http://docs.python.org/3/library/functools.html#functools.singledispatch) | 3.4.0.3 | Transforms a function into a single-dispatch generic function / MIT |
| [sip](http://www.riverbankcomputing.com/software/sip/intro) | 4.18.1 | Create Python bindings for C and C++ libraries / GPL-3.0 |
| [six](http://pypi.python.org/pypi/six/) | 1.11.0 | Python 2 and 3 compatibility utilities / MIT |
| [snappy](https://github.com/google/snappy) | 1.1.7 | A fast compressor/decompressor / BSD 3-clause |
| [snowballstemmer](https://github.com/shibukawa/snowball_py) | 1.2.1 | Snowball stemming library collection for Python / BSD-2-Clause |
| [sortedcollections](http://www.grantjenks.com/docs/sortedcollections/) | 1.0.1 | Python Sorted Collections / Apache-2.0 |
| [sortedcontainers](http://www.grantjenks.com/docs/sortedcontainers/) | 2.0.5 | Python Sorted Container Types: SortedList, SortedDict, and SortedSet / Apache 2.0 |
| [sphinx](http://www.sphinx-doc.org) | 1.7.9 | Sphinx is a tool that makes it easy to create intelligent and beautiful documentation / BSD 2-clause |
| sphinxcontrib | 1.0 | Python namespace for sphinxcontrib / BSD |
| [sphinxcontrib-websupport](https://pypi.python.org/pypi/sphinxcontrib-websupport) | 1.1.0 | Sphinx API for Web Apps / BSD-2-Clause |
| [spyder](https://www.spyder-ide.org/) | 3.3.1 | The Scientific Python Development Environment / MIT |
| [spyder-kernels](https://github.com/spyder-ide/spyder-kernels) | 0.2.6 | Jupyter kernels for the Spyder console / MIT |
| [sqlalchemy](http://www.sqlalchemy.org/) | 1.2.11 | Database Abstraction Library. / MIT |
| [sqlite](http://www.sqlite.org/) | 3.24.0 | Implements a self-contained, zero-configuration, SQL database engine. / Public-Domain (`<http://www.sqlite.org/copyright.html>`) |
| [ssl\_match\_hostname](http://bitbucket.org/brandon/backports.ssl_match_hostname) | 3.5.0.1 | The ssl.match\_hostname() function from Python 3.5 / PSF 2 |
| [statsmodels](https://www.statsmodels.org) | 0.9.0 | Statistical computations and models for use with SciPy / BSD 3-Clause |
| [subprocess32](https://github.com/google/python-subprocess32) | 3.5.2 | A backport of the subprocess module from Python 3.2/3.3 for use on 2.x. / PSF 2 |
| [sympy](http://sympy.org) | 1.2 | Python library for symbolic mathematics / 3-clause BSD |
| [tblib](https://github.com/ionelmc/python-tblib) | 1.3.2 | Traceback serialization library. / BSD 2-Clause |
| [terminado](https://github.com/jupyter/terminado) | 0.8.1 | Terminals served by tornado websockets / BSD 2-clause |
| [testpath](https://testpath.readthedocs.io) | 0.3.1 | Testpath is a collection of utilities for Python code working with files and commands. / MIT |
| [tk](http://www.tcl.tk/) | 8.6.8 | A dynamic programming language with GUI support. Bundles Tcl and Tk. / Tcl/Tk |
| [toolz](http://toolz.readthedocs.org/) | 0.9.0 | A functional standard library for Python. / BSD 3-Clause |
| [tornado](http://www.tornadoweb.org/) | 5.1 | A Python web framework and asynchronous networking library, originally developed at FriendFeed. / Apache 2.0 |
| [tqdm](https://pypi.python.org/pypi/tqdm) | 4.26.0 | A Fast, Extensible Progress Meter / MPLv2.0, MIT |
| [traceback2](https://github.com/testing-cabal/traceback2) | 1.4.0 | Backports of the traceback module / PSF 2.0 |
| [traitlets](http://ipython.org/) | 4.3.2 | Configuration system for Python applications / BSD 3-clause |
| [twisted](http://twistedmatrix.com/) | 18.7.0 | event-driven networking engine / MIT |
| [typing](https://docs.python.org/3.5/library/typing.html) | 3.6.6 | Type Hints for Python - backport for `Python<3.5` / PSF |
| [unicodecsv](https://github.com/jdunck/python-unicodecsv) | 0.14.1 | Drop-in replacement for csv module which supports unicode strings / BSD |
| [unittest2](http://pypi.python.org/pypi/unittest2) | 1.1.0 | The new features in unittest backported to Python 2.4+ / BSD |
| [urllib3](https://urllib3.readthedocs.io/) | 1.23 | HTTP library with thread-safe connection pooling, file post, and more. / MIT |
| [vc](https://github.com/conda/conda/wiki/VC-features) | 9 | A meta-package to impose mutual exclusivity among software built with different VS versions / Modified BSD License (3-clause) |
| [vs2008\_runtime](http://www.microsoft.com) | 9.00.30729.1 | Bundles of the MSVC 9 (VS 2008) runtime / Proprietary |
| [vs2015\_runtime](http://www.microsoft.com) | 14.15.26706 | Bundles of the MSVC 14 (VS 2015) runtime / Proprietary |
| [wcwidth](https://github.com/jquast/wcwidth) | 0.1.7 | Measures number of Terminal column cells of wide-character codes. / MIT |
| [webencodings](https://github.com/gsnedders/python-webencodings) | 0.5.1 | Character encoding aliases for legacy web content / BSD 3-Clause |
| [werkzeug](http://werkzeug.pocoo.org/) | 0.14.1 | The Python WSGI Utility Library. / BSD 3-Clause |
| [wheel](https://bitbucket.org/pypa/wheel/) | 0.31.1 | A built-package format for Python. / MIT |
| [widgetsnbextension](http://ipython.org) | 3.4.1 | Interactive Widgets for Jupyter / BSD 3-clause |
| [win\_inet\_pton](https://github.com/hickeroar/win_inet_pton) | 1.0.1 | Native inet\_pton and inet\_ntop implementation for Python on Windows (with ctypes). / PUBLIC-DOMAIN |
| [win\_unicode\_console](https://github.com/Drekin/win-unicode-console) | 0.5 | A Python package to enable Unicode input and display when running Python from Windows console. / MIT |
| [wincertstore](https://bitbucket.org/tiran/wincertstore) | 0.2 | Python module to extract CA and CRL certs from Windows’ cert store (ctypes based). / PSF 2 |
| [winpty](https://github.com/rprichard/winpty) | 0.4.3 | Winpty provides an interface similar to a Unix pty-master for communicating with Windows console programs. / MIT |
| [wrapt](https://github.com/GrahamDumpleton/wrapt) | 1.10.11 | Module for decorators, wrappers and monkey patching. / BSD 2-Clause |
| [xlrd](http://www.python-excel.org/) | 1.1.0 | Library for developers to extract data from Microsoft Excel (tm) spreadsheet files / BSD 3-Clause and BSD with advertising |
| [xlsxwriter](https://xlsxwriter.readthedocs.io/) | 1.1.0 | A Python module for creating Excel XLSX files / BSD 2-Clause |
| [xlwings](http://xlwings.org/) | 0.11.8 | Interact with Excel from Python and vice versa / 3-clause BSD |
| [xlwt](http://www.python-excel.org/) | 1.3.0 | Writing data and formatting information to Excel files / BSD |
| [yaml](http://pyyaml.org/wiki/LibYAML) | 0.1.7 | A C library for parsing and emitting YAML. / MIT |
| [zeromq](http://zeromq.org) | 4.2.5 | A high-performance asynchronous messaging library. / LGPL 3 |
| [zict](http://github.com/mrocklin/zict) | 0.1.3 | Composable Dictionary Classes / BSD 3-Clause |
| [zlib](http://zlib.net/) | 1.2.11 | Massively spiffy yet delicately unobtrusive compression library / zlib |
| zope | 1.0 | web application server / BSD |
| [zope.interface](http://docs.zope.org/zope.interface/) | 4.5.0 | Interfaces for Python / ZPL 2.1 |
| Name | Version | Summary / License |
|---|---|---|
| [\_ipyw\_jlab\_nb\_ext\_conf](https://github.com/ContinuumIO/anaconda-nb-extensions-meta-config) | 0.1.0 | A configuration metapackage for enabling Anaconda-bundled jupyter extensions / BSD |
| [alabaster](http://www.sphinx-doc.org/en/stable/index.html) | 0.7.11 | Configurable, Python 2+3 compatible Sphinx theme. / BSD 3-Clause |
| [anaconda-client](http://anaconda.org) | 1.7.2 | anaconda.org command line client library / BSD 3-clause |
| [anaconda-navigator](https://github.com/ContinuumIO/navigator) | 1.9.2 | Anaconda Navigator / proprietary - Continuum Analytics, Inc. |
| [anaconda-project](https://github.com/Anaconda-Platform/anaconda-project) | 0.8.2 | Tool for encapsulating, running, and reproducing data science projects / BSD 3-Clause |
| [appdirs](http://github.com/ActiveState/appdirs) | 1.4.3 | A small Python module for determining appropriate platform-specific dirs. / MIT |
| [asn1crypto](https://github.com/wbond/asn1crypto) | 0.24.0 | Python ASN.1 library with a focus on performance and a pythonic API / MIT |
| [astroid](https://www.astroid.org/) | 1.6.5 | A abstract syntax tree for Python with inference support. / LGPL 2.1 |
| [astropy](http://www.astropy.org/) | 2.0.8 | Community-developed Python Library for Astronomy / BSD |
| [atomicwrites](https://github.com/untitaker/python-atomicwrites) | 1.2.1 | Atomic file writes. / MIT |
| [attrs](https://attrs.readthedocs.io/en/stable/) | 18.2.0 | attrs is the Python package that will bring back the joy of writing classes by relieving you from the drudgery of implementing object protocols (aka dunder methods). / MIT |
| [automat](https://github.com/glyph/Automat) | 0.7.0 | self-service finite-state machines for the programmer on the go / MIT |
| [babel](http://babel.pocoo.org/) | 2.6.0 | Utilities to internationalize and localize Python applications / BSD 3-clause |
| [backports](https://bitbucket.org/brandon/backports) | 1.0 | / BSD |
| [backports.functools\_lru\_cache](https://github.com/jaraco/backports.functools_lru_cache) | 1.5 | Backport of functools.lru\_cache from Python 3.3 as published at ActiveState. / MIT |
| [backports.shutil\_get\_terminal\_size](https://github.com/chrippa/backports.shutil_get_terminal_size) | 1.0.0 | A backport of the get\_terminal\_size function from Python 3.3’s shutil. / MIT |
| [backports.shutil\_which](https://github.com/minrk/backports.shutil_which) | 3.5.1 | Backport of shutil.which from Python 3.3 / PSF2 & MIT |
| [backports\_abc](https://github.com/cython/backports_abc) | 0.5 | A backport of recent additions to the collections.abc module. / PSF 2 |
| [beautifulsoup4](http://www.crummy.com/software/BeautifulSoup/) | 4.6.3 | Python library designed for screen-scraping / MIT |
| [bitarray](https://github.com/ilanschnell/bitarray) | 0.8.3 | efficient arrays of booleans – C extension / PSF |
| [bkcharts](http://github.com/bokeh/bkcharts) | 0.2 | High level chart types built on top of Bokeh / BSD 3-Clause |
| blas | 1.0 | |
| [blaze](http://blaze.pydata.org) | 0.11.3 | NumPy and Pandas interface to big data / BSD 3-Clause |
| [bleach](https://github.com/mozilla/bleach) | 2.1.4 | Easy, whitelist-based HTML-sanitizing tool / Apache-2.0 |
| [blosc](https://github.com/Blosc/c-blosc) | 1.14.4 | A blocking, shuffling and loss-less compression library that can be faster than memcpy() / BSD 3-Clause |
| [bokeh](http://bokeh.pydata.org/) | 0.13.0 | Statistical and novel interactive HTML plots for Python / BSD 3-Clause |
| [boto](https://github.com/boto/boto/) | 2.49.0 | Amazon Web Services Library / MIT |
| [bottleneck](http://berkeleyanalytics.com/bottleneck) | 1.2.1 | Fast NumPy array functions written in Cython. / BSD 2-Clause |
| [bzip2](http://www.bzip.org/) | 1.0.6 | high-quality data compressor / bzip2 |
| [ca-certificates](https://github.com/conda-forge/ca-certificates-feedstock) | 2018.03.07 | Certificates for use with other packages. / ISC |
| [cdecimal](http://www.bytereef.org/mpdecimal/index.html) | 2.3 | Fast drop-in replacement for decimal.py / BSD 2-Clause |
| [certifi](http://certifi.io/) | 2018.8.24 | Python package for providing Mozilla’s CA Bundle. / ISC |
| [cffi](https://bitbucket.org/cffi/cffi) | 1.11.5 | Foreign Function Interface for Python calling C code. / MIT |
| [chardet](https://github.com/chardet/chardet) | 3.0.4 | Universal character encoding detector / LGPL2 |
| [click](http://click.pocoo.org/) | 6.7 | A simple wrapper around optparse for powerful command line utilities. / BSD 3-Clause |
| [cloudpickle](https://github.com/cloudpipe/cloudpickle) | 0.5.5 | Extended pickling support for Python objects / BSD 3-Clause |
| [clyent](https://github.com/Anaconda-Platform/clyent) | 1.2.2 | Command line client library for windows and posix / BSD 3-Clause |
| [colorama](https://github.com/tartley/colorama) | 0.3.9 | Cross-platform colored terminal text. / BSD 3-Clause |
| [comtypes](http://starship.python.net/crew/theller/comtypes/) | 1.1.7 | pure Python COM package / MIT |
| [conda](https://conda.io) | 4.5.11 | OS-agnostic, system-level binary package and environment manager. / BSD 3-Clause |
| [conda-build](https://github.com/conda/conda-build) | 3.15.1 | tools for building conda packages / BSD 3-Clause |
| [conda-env](https://github.com/conda/conda-env) | 2.6.0 | Tools for interacting with conda environments. / BSD 3-Clause |
| [configparser](http://docs.python.org/3/library/configparser.html) | 3.5.0 | This library brings the updated configparser from Python 3.5 to Python 2.6-3.5 / MIT |
| console\_shortcut | 0.1.1 | Console shortcut creator for Windows (using menuinst) / BSD |
| [constantly](https://github.com/twisted/constantly) | 15.1.0 | Symbolic constants in Python / MIT |
| [contextlib2](http://contextlib2.readthedocs.org) | 0.5.5 | Backports and enhancements for the contextlib module / PSF |
| [cryptography](https://github.com/pyca/cryptography) | 2.3.1 | Provides cryptographic recipes and primitives to Python developers / Apache 2.0 or BSD 3-Clause, PSF 2 |
| [curl](http://curl.haxx.se/) | 7.61.0 | tool and library for transferring data with URL syntax / MIT/X derivate (`<http://curl.haxx.se/docs/copyright.html>`) |
| [cycler](http://matplotlib.org/cycler) | 0.10.0 | Composable style cycles. / BSD 3-Clause |
| [cython](http://www.cython.org/) | 0.28.5 | The Cython compiler for writing C extensions for the Python language / Apache-2.0 |
| [cytoolz](https://github.com/pytoolz/cytoolz) | 0.9.0.1 | Cython implementation of Toolz. High performance functional utilities. / BSD 3-Clause |
| [dask](http://github.com/dask/dask/) | 0.19.1 | Parallel Python with task scheduling / BSD 3-Clause |
| [dask-core](http://github.com/dask/dask/) | 0.19.1 | Parallel Python with task scheduling / BSD 3-Clause |
| [datashape](http://datashape.pydata.org) | 0.5.4 | A data description language. / BSD 2-Clause |
| [decorator](https://github.com/micheles/decorator) | 4.3.0 | Better living through Python with decorators. / BSD 3-Clause |
| [defusedxml](https://bitbucket.org/tiran/defusedxml) | 0.5.0 | XML bomb protection for Python stdlib modules / PSF 2.0 |
| [distributed](http://distributed.readthedocs.io/en/latest/) | 1.23.1 | Distributed computing with Dask / BSD 3-Clause |
| [docutils](http://docutils.sourceforge.net/) | 0.14 | Docutils – Python Documentation Utilities / Public Domain Dedictation and BSD 2-Clause and PSF 2.1.1 and GPL 3.0 |
| [entrypoints](https://github.com/takluyver/entrypoints) | 0.2.3 | Discover and load entry points from installed packages. / MIT License |
| [enum34](https://bitbucket.org/stoneleaf/enum34) | 1.1.6 | Python 3.4 Enum backported to 3.3, 3.2, 3.1, 2.7, 2.6, 2.5, and 2.4 / BSD 3-Clause |
| [et\_xmlfile](https://bitbucket.org/openpyxl/et_xmlfile) | 1.0.1 | An implementation of lxml.xmlfile for the standard library / MIT |
| [fastcache](https://github.com/pbrady/fastcache) | 1.0.2 | C implementation of Python 3 lru\_cache / MIT |
| [filelock](https://github.com/benediktschmitt/py-filelock) | 3.0.8 | A platform independent file lock. / Public Domain |
| [flask](http://flask.pocoo.org) | 1.0.2 | A microframework based on Werkzeug, Jinja2 and good intentions. / BSD 3-Clause |
| [flask-cors](https://github.com/corydolphin/flask-cors) | 3.0.6 | A Flask extension adding a decorator for CORS support / MIT |
| [freetype](https://www.freetype.org/) | 2.9.1 | A Free, High-Quality, and Portable Font Engine / GPL-2.0 and FreeType |
| [funcsigs](http://funcsigs.readthedocs.org) | 1.0.2 | Python function signatures from PEP362 for Python 2.6, 2.7 and 3.2+. / Apache 2.0 |
| [functools32](https://github.com/MiCHiLU/python-functools32) | 3.2.3.2 | Backport of the functools module from Python 3.2.3 for use on 2.7 and PyPy. / PSF license |
| [futures](https://github.com/agronholm/pythonfutures) | 3.2.0 | Backport of the concurrent.futures package from Python 3.2 / PSF |
| [get\_terminal\_size](https://github.com/chrippa/backports.shutil_get_terminal_size) | 1.0.0 | Get the size of the terminal window. / MIT |
| [gevent](http://www.gevent.org/) | 1.3.6 | Coroutine-based network library / MIT |
| [glob2](https://github.com/miracle2k/python-glob2) | 0.6 | Version of the glob module that supports recursion via \*\*, and can capture patterns. / BSD-2-Clause |
| [greenlet](https://github.com/python-greenlet/greenlet) | 0.4.15 | Lightweight in-process concurrent programming / MIT |
| [grin](http://pypi.python.org/pypi/grin) | 1.2.1 | Enhanced grep-like tool / BSD 3-Clause |
| [h5py](http://www.h5py.org/) | 2.8.0 | Read and write HDF5 files from Python. / BSD 3-Clause |
| [hdf5](http://www.hdfgroup.org/HDF5/) | 1.10.2 | HDF5 is a data model, library, and file format for storing and managing data / HDF5 |
| [heapdict](http://stutzbachenterprises.com/) | 1.0.0 | A heap with decrease-key and increase-key operations / BSD 3-Clause |
| [html5lib](https://github.com/html5lib/html5lib-python) | 1.0.1 | HTML parser based on the WHATWG HTML specification / MIT |
| [hyperlink](https://github.com/python-hyper/hyperlink) | 18.0.0 | Immutable, Pythonic, correct URLs. / MIT |
| [icc\_rt](https://software.intel.com/en-us/node/522690) | 2017.0.4 | Intel runtime libraries for C, C++ and Fortran compilers / Intel proprietary |
| [icu](http://site.icu-project.org/) | 58.2 | International Components for Unicode. / MIT |
| [idna](https://github.com/kjd/idna) | 2.7 | Internationalized Domain Names in Applications (IDNA). / BSD Like |
| [imageio](http://imageio.github.io) | 2.4.1 | a Python library for reading and writing image data / BSD 2-Clause |
| [imagesize](https://github.com/shibukawa/imagesize_py) | 1.1.0 | Getting image size from png/jpeg/jpeg2000/gif file / MIT |
| [incremental](https://twistedmatrix.com) | 17.5.0 | A library that versions your Python projects / MIT License |
| [intel-openmp](https://software.intel.com/en-us/node/522690) | 2019.0 | Math library for Intel and compatible processors / proprietary - Intel |
| [ipaddress](https://github.com/phihag/ipaddress) | 1.0.22 | IPv4/IPv6 manipulation library / PSF 2 |
| [ipykernel](http://ipython.org) | 4.8.2 | IPython Kernel for Jupyter / BSD 3-clause |
| [ipython](http://ipython.org/) | 5.8.0 | IPython: Productive Interactive Computing / BSD 3-clause |
| [ipython\_genutils](http://ipython.org) | 0.2.0 | vestigial utilities from IPython / BSD 3-Clause |
| [ipywidgets](https://github.com/ipython/ipywidgets) | 7.4.1 | Jupyter Interactive Widgets / BSD 3-clause |
| [isort](https://github.com/timothycrosley/isort) | 4.3.4 | A Python utility / library to sort Python imports. / MIT |
| [itsdangerous](https://github.com/pallets/itsdangerous) | 0.24 | Various helpers to pass trusted data to untrusted environments. / BSD 3-Clause |
| [jdcal](https://github.com/phn/jdcal) | 1.4 | Julian dates from proleptic Gregorian and Julian calendars. / BSD 2-Clause |
| [jedi](https://github.com/davidhalter/jedi/) | 0.12.1 | An autocompletion tool for Python that can be used for text editors. / MIT |
| [jinja2](http://jinja.pocoo.org) | 2.10 | An easy to use stand-alone template engine written in pure python. / 3-Clause BSD |
| [jpeg](http://www.ijg.org/) | 9b | read/write jpeg COM, EXIF, IPTC medata / Custom free software license |
| [jsonschema](https://github.com/Julian/jsonschema) | 2.6.0 | An implementation of JSON Schema validation for Python / MIT |
| [jupyter](http://jupyter.org) | 1.0.0 | Jupyter metapackage. Install all the Jupyter components in one go. / BSD 3-Clause |
| [jupyter\_client](http://jupyter.org) | 5.2.3 | Jupyter protocol implementation and client libraries / BSD 3-clause |
| [jupyter\_console](http://jupyter.org) | 5.2.0 | Jupyter terminal console / BSD 3-Clause |
| [jupyter\_core](http://jupyter.org) | 4.4.0 | Core common functionality of Jupyter projects. / BSD 3-clause |
| [jupyterlab](https://github.com/jupyterlab/jupyterlab) | 0.33.11 | JupyterLab PRE-ALPHA / BSD-3-Clause |
| [jupyterlab\_launcher](http://github.com/jupyterlab/jupyterlab_launcher) | 0.11.2 | A Launcher for JupyterLab based applications. / BSD 3-Clause |
| [keyring](https://github.com/jaraco/keyring) | 13.2.1 | Store and access your passwords safely. / Python Software Foundation or MIT |
| [kiwisolver](https://github.com/nucleic/kiwi) | 1.0.1 | A fast implementation of the Cassowary constraint solver / BSD 3-Clause |
| [lazy-object-proxy](https://github.com/ionelmc/python-lazy-object-proxy) | 1.3.1 | A fast and thorough lazy object proxy. / BSD 2-Clause |
| [libcurl](http://curl.haxx.se/) | 7.61.0 | tool and library for transferring data with URL syntax / MIT/X derivate (`<http://curl.haxx.se/docs/copyright.html>`) |
| [libiconv](https://www.gnu.org/software/libiconv/) | 1.15 | Provides iconv for systems which don’t have one (or that cannot convert from/to Unicode.) / GPL and LGPL |
| [libpng](http://www.libpng.org/pub/png/libpng.html) | 1.6.34 | PNG reference library. / zlib/libpng |
| [libsodium](http://libsodium.org) | 1.0.16 | A modern and easy-to-use crypto library. / ISC |
| [libssh2](https://www.libssh2.org/) | 1.8.0 | the SSH library / BSD 3-Clause |
| [libtiff](http://www.libtiff.org/) | 4.0.9 | Support for the Tag Image File Format (TIFF). / HPND |
| [libxml2](http://xmlsoft.org/) | 2.9.8 | The XML C parser and toolkit of Gnome / MIT |
| [libxslt](http://xmlsoft.org/XSLT/) | 1.1.32 | The XSLT C library developed for the GNOME project / MIT |
| [linecache2](https://github.com/testing-cabal/linecache2) | 1.0.0 | Backport of the linecache module / PSF 1.0 |
| [llvmlite](https://github.com/numba/llvmlite) | 0.24.0 | A lightweight LLVM python binding for writing JIT compilers / New BSD License |
| [locket](https://github.com/mwilliamson/locket.py) | 0.2.0 | File-based locks for Python for Linux and Windows / BSD 2-Clause |
| [lxml](http://lxml.de/) | 4.2.5 | Pythonic binding for the C libraries libxml2 and libxslt. / BSD 3-Clause, GPL-2.0, ZPL-2.0, and ElementTree |
| [lzo](http://www.oberhumer.com/opensource/lzo/) | 2.10 | LZO is a portable lossless data compression library written in ANSI C. / GPL v2+ |
| m2w64-gcc-libgfortran | 5.3.0 | |
| m2w64-gcc-libs | 5.3.0 | |
| m2w64-gcc-libs-core | 5.3.0 | |
| m2w64-gmp | 6.1.0 | |
| m2w64-libwinpthread-git | 5.0.0.4634.697f757 | |
| [markupsafe](https://www.palletsprojects.com/p/markupsafe/) | 1.0 | A Python module that implements the jinja2.Markup string / BSD 3-Clause |
| [matplotlib](http://matplotlib.org/) | 2.2.3 | Publication quality figures in Python / PSF-based |
| [mccabe](https://github.com/PyCQA/mccabe) | 0.6.1 | McCabe complexity checker for Python / MIT |
| [menuinst](https://github.com/ContinuumIO/menuinst) | 1.4.14 | cross platform menu item installation / BSD |
| [mistune](https://github.com/lepture/mistune) | 0.8.3 | The fastest markdown parser in pure Python. / BSD 3-Clause |
| [mkl](https://software.intel.com/en-us/mkl) | 2019.0 | Math library for Intel and compatible processors / proprietary - Intel |
| [mkl-service](https://github.com/ContinuumIO/mkl-service) | 1.1.2 | Python bindings to MKL service functions / 3-clause BSD |
| [mkl\_fft](http://github.com/IntelPython/mkl_fft) | 1.0.4 | NumPy-based implementation of Fast Fourier Transform using Intel (R) Math Kernel Library. / BSD 3-Clause |
| [more-itertools](https://github.com/erikrose/more-itertools) | 4.3.0 | More routines for operating on iterables, beyond itertools / MIT |
| [mpmath](http://mpmath.org) | 1.0.0 | Python library for arbitrary-precision floating-point arithmetic / BSD 3-Clause |
| [msgpack-python](http://msgpack.org/) | 0.5.6 | MessagePack (de)serializer. / Apache 2.0 |
| msys2-conda-epoch | 20160418 | |
| [multipledispatch](https://github.com/mrocklin/multipledispatch/) | 0.6.0 | Multiple dispatch in Python / BSD 3-Clause |
| [navigator-updater](https://github.com/ContinuumIO/navigator-updater) | 0.2.1 | Anaconda Navigator Updater / proprietary - Continuum Analytics, Inc. |
| [nbconvert](http://jupyter.org) | 5.4.0 | Converting Jupyter Notebooks / BSD-3-Clause |
| [nbformat](http://jupyter.org) | 4.4.0 | The reference implementation of the Jupyter Notebook format / BSD 3-clause |
| [networkx](https://networkx.github.io/) | 2.1 | Python package for creating and manipulating complex networks / BSD 3-Clause |
| [nltk](http://nltk.org/) | 3.3.0 | Build Python programs to work with human language data / Apache 2.0 |
| [nose](http://readthedocs.org/docs/nose/) | 1.3.7 | Nose extends unittest to make testing easier / LGPL-2.1 |
| [notebook](http://jupyter.org) | 5.6.0 | Jupyter Notebook / BSD 3-clause |
| [numba](http://numba.github.com) | 0.39.0 | NumPy aware dynamic Python compiler using LLVM / BSD 2-clause |
| [numexpr](https://github.com/pydata/numexpr) | 2.6.8 | Fast numerical expression evaluator for NumPy. / MIT |
| [numpy](http://numpy.scipy.org/) | 1.15.1 | Array processing for numbers, strings, records, and objects. / BSD 3-Clause |
| numpy-base | 1.15.1 | |
| [numpydoc](https://github.com/numpy/numpydoc) | 0.8.0 | Sphinx extension to support docstrings in Numpy format / BSD 3-Clause |
| [odo](http://odo.pydata.org) | 0.5.1 | Data migration in Python / BSD-3-Clause |
| [olefile](http://www.decalage.info/python/olefileio) | 0.46 | parse, read and write Microsoft OLE2 files / BSD 2-Clause |
| [openpyxl](https://openpyxl.readthedocs.io) | 2.5.6 | A Python library to read/write Excel 2010 xlsx/xlsm files / MIT |
| [openssl](http://www.openssl.org/) | 1.0.2p | OpenSSL is an open-source implementation of the SSL and TLS protocols / OpenSSL |
| [packaging](https://github.com/pypa/packaging) | 17.1 | Core utilities for Python packages / Apache 2.0 or BSD 2-Clause |
| [pandas](http://pandas.pydata.org) | 0.23.4 | High-performance, easy-to-use data structures and data analysis tools. / BSD 3-clause |
| [pandoc](http://pandoc.org/) | 1.19.2.1 | Universal markup converter (repackaged binaries). / GPL-2.0 |
| [pandocfilters](https://github.com/jgm/pandocfilters) | 1.4.2 | A python module for writing pandoc filters / BSD-3-Clause |
| [parso](https://github.com/davidhalter/parso) | 0.3.1 | A Python Parser / MIT |
| [partd](https://github.com/dask/partd) | 0.3.8 | Data structure for on-disk shuffle operations / BSD 3-Clause |
| [path.py](https://github.com/jaraco/path.py) | 11.1.0 | A module wrapper for os.path / MIT |
| [pathlib2](https://github.com/mcmtroffaes/pathlib2) | 2.3.2 | Fork of pathlib aiming to support the full stdlib Python API. / MIT |
| [patsy](https://github.com/pydata/patsy) | 0.5.0 | Describing statistical models in Python using symbolic formulas / BSD-2-Clause, PSF2 |
| [pep8](http://pep8.readthedocs.org/) | 1.7.1 | Python style guide checker / MIT |
| [pickleshare](https://github.com/vivainio/pickleshare) | 0.7.4 | Tiny ‘shelve’-like database with concurrency support / MIT |
| [pillow](https://pillow.readthedocs.io) | 5.2.0 | Pillow is the friendly PIL fork by Alex Clark and Contributors. / PIL |
| [pip](https://pip.pypa.io/en/stable/) | 10.0.1 | PyPA recommended tool for installing Python packages / MIT |
| [pkginfo](https://code.launchpad.net/~tseaver/pkginfo/trunk) | 1.4.2 | Query metadatdata from sdists / bdists / installed packages. / MIT |
| [pluggy](https://github.com/pytest-dev/pluggy) | 0.7.1 | Plugin registration and hook calling for Python / MIT |
| [ply](http://www.dabeaz.com/ply/index.html) | 3.11 | Python Lex-Yacc / BSD 3-clause |
| [progress](https://github.com/verigak/progress) | 1.3 | Easy progress reporting for Python / ISC |
| [prometheus\_client](https://github.com/prometheus/client_python) | 0.3.1 | Python client for the Prometheus monitoring system. / Apache 2.0 |
| [prompt\_toolkit](https://github.com/jonathanslenders/python-prompt-toolkit) | 1.0.15 | Library for building powerful interactive command lines in Python / BSD 3-clause |
| [psutil](https://github.com/giampaolo/psutil) | 5.4.7 | A cross-platform process and system utilities module for Python / BSD 3-Clause |
| [py](https://github.com/pytest-dev/py) | 1.6.0 | library with cross-python path, ini-parsing, io, code, log facilities / MIT |
| [pyasn1](https://github.com/etingof/pyasn1) | 0.4.4 | ASN.1 types and codecs / BSD 2-Clause |
| [pyasn1-modules](http://pyasn1.sourceforge.net/) | 0.2.2 | A collection of ASN.1-based protocols modules. / BSD 2-Clause |
| [pycodestyle](https://pycodestyle.readthedocs.io/) | 2.4.0 | Python style guide checker / MIT |
| [pycosat](https://github.com/ContinuumIO/pycosat) | 0.6.3 | Bindings to picosat (a SAT solver) / MIT |
| [pycparser](https://github.com/eliben/pycparser) | 2.18 | Complete C99 parser in pure Python / BSD 3-clause |
| [pycrypto](http://www.pycrypto.org/) | 2.6.1 | Cryptographic modules for Python. / Public Domain |
| [pycurl](http://pycurl.sourceforge.net/) | 7.43.0.2 | A Python Interface To The cURL library / LGPL, MIT |
| [pyflakes](https://github.com/PyCQA/pyflakes) | 2.0.0 | Pyflakes analyzes programs and detects various errors. / MIT |
| [pygments](http://pygments.org/) | 2.2.0 | Generic syntax highlighting package / BSD 2-clause |
| [pylint](http://www.pylint.org/) | 1.9.2 | python code static checker / GPL |
| [pyodbc](https://github.com/mkleehammer/pyodbc) | 4.0.24 | DB API Module for ODBC / MIT |
| [pyopenssl](https://github.com/pyca/pyopenssl) | 18.0.0 | Python wrapper module around the OpenSSL library / Apache 2.0 |
| [pyparsing](http://pyparsing.wikispaces.com/) | 2.2.0 | Create and execute simple grammars / MIT |
| [pyqt](http://www.riverbankcomputing.co.uk/software/pyqt) | 5.6.0 | Python binding of the cross-platform GUI toolkit Qt. / Commercial, GPL-2.0, GPL-3.0 |
| [pysocks](https://github.com/Anorov/PySocks) | 1.6.8 | A Python SOCKS client module. See [Anorov/PySocks](https://github.com/Anorov/PySocks) for more information. / BSD 3-Clause |
| [pytables](http://www.pytables.org) | 3.4.4 | Brings together Python, HDF5 and NumPy to easily handle large amounts of data. / BSD 3-Clause |
| [pytest](https://docs.pytest.org/en/latest/) | 3.8.0 | Simple and powerful testing with Python. / MIT |
| [python](http://www.python.org/) | 2.7.15 | General purpose programming language / PSF |
| [python-dateutil](https://dateutil.readthedocs.org/) | 2.7.3 | Extensions to the standard Python datetime module. / BSD 3 Clause |
| [pytz](http://pythonhosted.org/pytz/) | 2018.5 | World timezone definitions, modern and historical. / MIT |
| [pywavelets](https://github.com/PyWavelets/pywt) | 1.0.0 | Discrete Wavelet Transforms in Python. / MIT |
| [pywin32](https://sourceforge.net/projects/pywin32) | 223 | Python extensions for Windows / PSF |
| [pywinpty](https://github.com/spyder-ide/pywinpty) | 0.5.4 | Python bindings for the winpty library / MIT |
| [pyyaml](http://pyyaml.org/wiki/PyYAML) | 3.13 | YAML parser and emitter for Python / MIT |
| [pyzmq](https://github.com/zeromq/pyzmq) | 17.1.2 | Python bindings for zeromq / BSD 3-clause |
| [qt](http://qt-project.org) | 5.6.2 | Qt is a cross-platform application and UI framework. / LGPL-3.0 |
| [qtawesome](https://github.com/spyder-ide/qtawesome) | 0.4.4 | Iconic fonts in PyQt and PySide applications / MIT |
| [qtconsole](http://jupyter.org) | 4.4.1 | Jupyter Qt console / BSD 3-Clause |
| [qtpy](https://github.com/spyder-ide/qtpy) | 1.5.0 | Abstraction layer for PyQt5/PyQt4/PySide / MIT |
| [requests](http://python-requests.org) | 2.19.1 | Python HTTP for Humans. / Apache 2.0 |
| [rope](https://github.com/python-rope/rope) | 0.11.0 | A python refactoring library… / GPL 2.0 |
| [ruamel\_yaml](https://bitbucket.org/ruamel/yaml) | 0.15.46 | A patched copy of ruamel.yaml. / MIT |
| [scandir](https://github.com/benhoyt/scandir) | 1.9.0 | scandir, a better directory iterator and faster os.walk() / BSD 3-Clause |
| [scikit-image](http://scikit-image.org/) | 0.14.0 | Image processing routines for SciPy. / BSD 3-Clause |
| [scikit-learn](http://scikit-learn.org/) | 0.19.2 | A set of python modules for machine learning and data mining / BSD 3-Clause |
| [scipy](http://www.scipy.org/) | 1.1.0 | Scientific Library for Python / BSD 3-Clause |
| [seaborn](https://seaborn.pydata.org) | 0.9.0 | Statistical data visualization / BSD 3-Clause |
| [send2trash](https://github.com/hsoft/send2trash) | 1.5.0 | Python library to natively send files to Trash (or Recycle bin) on all platforms. / BSD-3-Clause |
| [service\_identity](https://github.com/pyca/service_identity) | 17.0.0 | Service identity verification for pyOpenSSL. / MIT |
| [setuptools](https://github.com/pypa/setuptools) | 40.2.0 | Download, build, install, upgrade, and uninstall Python packages / MIT |
| [simplegeneric](http://cheeseshop.python.org/pypi/simplegeneric) | 0.8.1 | Simple generic functions (similar to Python’s own len(), pickle.dump(), etc.) / Zope Public |
| [singledispatch](http://docs.python.org/3/library/functools.html#functools.singledispatch) | 3.4.0.3 | Transforms a function into a single-dispatch generic function / MIT |
| [sip](http://www.riverbankcomputing.com/software/sip/intro) | 4.18.1 | Create Python bindings for C and C++ libraries / GPL-3.0 |
| [six](http://pypi.python.org/pypi/six/) | 1.11.0 | Python 2 and 3 compatibility utilities / MIT |
| [snappy](https://github.com/google/snappy) | 1.1.7 | A fast compressor/decompressor / BSD 3-clause |
| [snowballstemmer](https://github.com/shibukawa/snowball_py) | 1.2.1 | Snowball stemming library collection for Python / BSD-2-Clause |
| [sortedcollections](http://www.grantjenks.com/docs/sortedcollections/) | 1.0.1 | Python Sorted Collections / Apache-2.0 |
| [sortedcontainers](http://www.grantjenks.com/docs/sortedcontainers/) | 2.0.5 | Python Sorted Container Types: SortedList, SortedDict, and SortedSet / Apache 2.0 |
| [sphinx](http://www.sphinx-doc.org) | 1.7.9 | Sphinx is a tool that makes it easy to create intelligent and beautiful documentation / BSD 2-clause |
| sphinxcontrib | 1.0 | Python namespace for sphinxcontrib / BSD |
| [sphinxcontrib-websupport](https://pypi.python.org/pypi/sphinxcontrib-websupport) | 1.1.0 | Sphinx API for Web Apps / BSD-2-Clause |
| [spyder](https://www.spyder-ide.org/) | 3.3.1 | The Scientific Python Development Environment / MIT |
| [spyder-kernels](https://github.com/spyder-ide/spyder-kernels) | 0.2.6 | Jupyter kernels for the Spyder console / MIT |
| [sqlalchemy](http://www.sqlalchemy.org/) | 1.2.11 | Database Abstraction Library. / MIT |
| [sqlite](http://www.sqlite.org/) | 3.24.0 | Implements a self-contained, zero-configuration, SQL database engine. / Public-Domain (`<http://www.sqlite.org/copyright.html>`) |
| [ssl\_match\_hostname](http://bitbucket.org/brandon/backports.ssl_match_hostname) | 3.5.0.1 | The ssl.match\_hostname() function from Python 3.5 / PSF 2 |
| [statsmodels](https://www.statsmodels.org) | 0.9.0 | Statistical computations and models for use with SciPy / BSD 3-Clause |
| [subprocess32](https://github.com/google/python-subprocess32) | 3.5.2 | A backport of the subprocess module from Python 3.2/3.3 for use on 2.x. / PSF 2 |
| [sympy](http://sympy.org) | 1.2 | Python library for symbolic mathematics / 3-clause BSD |
| [tblib](https://github.com/ionelmc/python-tblib) | 1.3.2 | Traceback serialization library. / BSD 2-Clause |
| [terminado](https://github.com/jupyter/terminado) | 0.8.1 | Terminals served by tornado websockets / BSD 2-clause |
| [testpath](https://testpath.readthedocs.io) | 0.3.1 | Testpath is a collection of utilities for Python code working with files and commands. / MIT |
| [tk](http://www.tcl.tk/) | 8.6.8 | A dynamic programming language with GUI support. Bundles Tcl and Tk. / Tcl/Tk |
| [toolz](http://toolz.readthedocs.org/) | 0.9.0 | A functional standard library for Python. / BSD 3-Clause |
| [tornado](http://www.tornadoweb.org/) | 5.1 | A Python web framework and asynchronous networking library, originally developed at FriendFeed. / Apache 2.0 |
| [tqdm](https://pypi.python.org/pypi/tqdm) | 4.26.0 | A Fast, Extensible Progress Meter / MPLv2.0, MIT |
| [traceback2](https://github.com/testing-cabal/traceback2) | 1.4.0 | Backports of the traceback module / PSF 2.0 |
| [traitlets](http://ipython.org/) | 4.3.2 | Configuration system for Python applications / BSD 3-clause |
| [twisted](http://twistedmatrix.com/) | 18.7.0 | event-driven networking engine / MIT |
| [typing](https://docs.python.org/3.5/library/typing.html) | 3.6.6 | Type Hints for Python - backport for `Python<3.5` / PSF |
| [unicodecsv](https://github.com/jdunck/python-unicodecsv) | 0.14.1 | Drop-in replacement for csv module which supports unicode strings / BSD |
| [unittest2](http://pypi.python.org/pypi/unittest2) | 1.1.0 | The new features in unittest backported to Python 2.4+ / BSD |
| [urllib3](https://urllib3.readthedocs.io/) | 1.23 | HTTP library with thread-safe connection pooling, file post, and more. / MIT |
| [vc](https://github.com/conda/conda/wiki/VC-features) | 9 | A meta-package to impose mutual exclusivity among software built with different VS versions / Modified BSD License (3-clause) |
| [vs2008\_runtime](http://www.microsoft.com) | 9.00.30729.1 | Bundles of the MSVC 9 (VS 2008) runtime / Proprietary |
| [vs2015\_runtime](http://www.microsoft.com) | 14.15.26706 | Bundles of the MSVC 14 (VS 2015) runtime / Proprietary |
| [wcwidth](https://github.com/jquast/wcwidth) | 0.1.7 | Measures number of Terminal column cells of wide-character codes. / MIT |
| [webencodings](https://github.com/gsnedders/python-webencodings) | 0.5.1 | Character encoding aliases for legacy web content / BSD 3-Clause |
| [werkzeug](http://werkzeug.pocoo.org/) | 0.14.1 | The Python WSGI Utility Library. / BSD 3-Clause |
| [wheel](https://bitbucket.org/pypa/wheel/) | 0.31.1 | A built-package format for Python. / MIT |
| [widgetsnbextension](http://ipython.org) | 3.4.1 | Interactive Widgets for Jupyter / BSD 3-clause |
| [win\_inet\_pton](https://github.com/hickeroar/win_inet_pton) | 1.0.1 | Native inet\_pton and inet\_ntop implementation for Python on Windows (with ctypes). / PUBLIC-DOMAIN |
| [win\_unicode\_console](https://github.com/Drekin/win-unicode-console) | 0.5 | A Python package to enable Unicode input and display when running Python from Windows console. / MIT |
| [wincertstore](https://bitbucket.org/tiran/wincertstore) | 0.2 | Python module to extract CA and CRL certs from Windows’ cert store (ctypes based). / PSF 2 |
| [winpty](https://github.com/rprichard/winpty) | 0.4.3 | Winpty provides an interface similar to a Unix pty-master for communicating with Windows console programs. / MIT |
| [wrapt](https://github.com/GrahamDumpleton/wrapt) | 1.10.11 | Module for decorators, wrappers and monkey patching. / BSD 2-Clause |
| [xlrd](http://www.python-excel.org/) | 1.1.0 | Library for developers to extract data from Microsoft Excel (tm) spreadsheet files / BSD 3-Clause and BSD with advertising |
| [xlsxwriter](https://xlsxwriter.readthedocs.io/) | 1.1.0 | A Python module for creating Excel XLSX files / BSD 2-Clause |
| [xlwings](http://xlwings.org/) | 0.11.8 | Interact with Excel from Python and vice versa / 3-clause BSD |
| [xlwt](http://www.python-excel.org/) | 1.3.0 | Writing data and formatting information to Excel files / BSD |
| [yaml](http://pyyaml.org/wiki/LibYAML) | 0.1.7 | A C library for parsing and emitting YAML. / MIT |
| [zeromq](http://zeromq.org) | 4.2.5 | A high-performance asynchronous messaging library. / LGPL 3 |
| [zict](http://github.com/mrocklin/zict) | 0.1.3 | Composable Dictionary Classes / BSD 3-Clause |
| [zlib](http://zlib.net/) | 1.2.11 | Massively spiffy yet delicately unobtrusive compression library / zlib |
| zope | 1.0 | web application server / BSD |
| [zope.interface](http://docs.zope.org/zope.interface/) | 4.5.0 | Interfaces for Python / ZPL 2.1 |
| Name | Version | Summary / License |
|---|---|---|
| [\_ipyw\_jlab\_nb\_ext\_conf](https://github.com/ContinuumIO/anaconda-nb-extensions-meta-config) | 0.1.0 | A configuration metapackage for enabling Anaconda-bundled jupyter extensions / BSD |
| [alabaster](http://www.sphinx-doc.org/en/stable/index.html) | 0.7.10 | Configurable, Python 2+3 compatible Sphinx theme. / BSD 3-Clause |
| [anaconda-client](http://anaconda.org) | 1.6.3 | anaconda.org command line client library / BSD 3-clause |
| [anaconda-navigator](https://github.com/ContinuumIO/navigator) | 1.8.7 | Anaconda Navigator / proprietary - Continuum Analytics, Inc. |
| [anaconda-project](https://github.com/Anaconda-Platform/anaconda-project) | 0.8.2 | Tool for encapsulating, running, and reproducing data science projects / BSD 3-Clause |
| [appnope](http://github.com/minrk/appnope) | 0.1.0 | Disable App Nap on OS X 10.9 / BSD 2-Clause |
| [appscript](http://appscript.sourceforge.net/) | 1.0.1 | Control AppleScriptable applications from Python / Public-Domain |
| [asn1crypto](https://github.com/wbond/asn1crypto) | 0.24.0 | Python ASN.1 library with a focus on performance and a pythonic API / MIT |
| [astroid](https://www.astroid.org/) | 1.6.3 | A abstract syntax tree for Python with inference support. / LGPL 2.1 |
| [astropy](http://www.astropy.org/) | 2.0.6 | Community-developed Python Library for Astronomy / BSD |
| [babel](http://babel.pocoo.org/) | 2.5.3 | Utilities to internationalize and localize Python applications / BSD 3-clause |
| [backports](https://bitbucket.org/brandon/backports) | 1.0 | / BSD |
| [backports.functools\_lru\_cache](https://github.com/jaraco/backports.functools_lru_cache) | 1.5 | Backport of functools.lru\_cache from Python 3.3 as published at ActiveState. / MIT |
| [backports.shutil\_get\_terminal\_size](https://github.com/chrippa/backports.shutil_get_terminal_size) | 1.0.0 | A backport of the get\_terminal\_size function from Python 3.3’s shutil. / MIT |
| [backports\_abc](https://github.com/cython/backports_abc) | 0.5 | A backport of recent additions to the collections.abc module. / PSF 2 |
| [beautifulsoup4](http://www.crummy.com/software/BeautifulSoup/) | 4.6.0 | Python library designed for screen-scraping / MIT |
| [bitarray](https://github.com/ilanschnell/bitarray) | 0.8.1 | efficient arrays of booleans – C extension / PSF |
| [blaze](http://blaze.pydata.org) | 0.11.3 | NumPy and Pandas interface to big data / BSD 3-Clause |
| [bleach](https://github.com/mozilla/bleach) | 2.1.3 | Easy, whitelist-based HTML-sanitizing tool / Apache-2.0 |
| [bokeh](http://bokeh.pydata.org/) | 0.12.16 | Statistical and novel interactive HTML plots for Python / BSD 3-Clause |
| [boto](https://github.com/boto/boto/) | 2.48.0 | Amazon Web Services Library / MIT |
| [bottleneck](http://berkeleyanalytics.com/bottleneck) | 1.2.1 | Fast NumPy array functions written in Cython. / BSD 2-Clause |
| [bzip2](http://www.bzip.org/) | 1.0.6 | high-quality data compressor / bzip2 |
| [ca-certificates](https://github.com/conda-forge/ca-certificates-feedstock) | 2018.03.07 | Certificates for use with other packages. / ISC |
| [cdecimal](http://www.bytereef.org/mpdecimal/index.html) | 2.3 | Fast drop-in replacement for decimal.py / BSD 2-Clause |
| [certifi](http://certifi.io/) | 2018.4.16 | Python package for providing Mozilla’s CA Bundle. / ISC |
| [cffi](https://bitbucket.org/cffi/cffi) | 1.9.1 | Foreign Function Interface for Python calling C code. / MIT |
| [chardet](https://github.com/chardet/chardet) | 3.0.3 | Universal character encoding detector / LGPL2 |
| [click](http://click.pocoo.org/) | 6.7 | A simple wrapper around optparse for powerful command line utilities. / BSD 3-Clause |
| [cloudpickle](https://github.com/cloudpipe/cloudpickle) | 0.5.3 | Extended pickling support for Python objects / BSD 3-Clause |
| [clyent](https://github.com/Anaconda-Platform/clyent) | 1.2.2 | Command line client library for windows and posix / BSD 3-Clause |
| [colorama](https://github.com/tartley/colorama) | 0.3.9 | Cross-platform colored terminal text. / BSD 3-Clause |
| [conda](https://conda.io) | 4.5.2 | OS-agnostic, system-level binary package and environment manager. / BSD 3-Clause |
| [conda-build](https://github.com/conda/conda-build) | 3.10.1 | tools for building conda packages / BSD 3-Clause |
| [conda-env](https://github.com/conda/conda-env) | 2.6.0 | Tools for interacting with conda environments. / BSD 3-Clause |
| [conda-verify](https://github.com/conda/conda-verify) | 2.0.0 | tool for validating conda recipes and conda packages / BSD 3-Clause |
| [configparser](http://docs.python.org/3/library/configparser.html) | 3.5.0 | This library brings the updated configparser from Python 3.5 to Python 2.6-3.5 / MIT |
| [cryptography](https://github.com/pyca/cryptography) | 1.7.1 | Provides cryptographic recipes and primitives to Python developers / Apache 2.0 or BSD 3-Clause, PSF 2 |
| [curl](http://curl.haxx.se/) | 7.60.0 | tool and library for transferring data with URL syntax / MIT/X derivate (`<http://curl.haxx.se/docs/copyright.html>`) |
| [cycler](http://matplotlib.org/cycler) | 0.10.0 | Composable style cycles. / BSD 3-Clause |
| [cython](http://www.cython.org/) | 0.28.2 | The Cython compiler for writing C extensions for the Python language / Apache-2.0 |
| [dask](http://github.com/dask/dask/) | 0.17.5 | Parallel Python with task scheduling / BSD 3-Clause |
| [datashape](http://datashape.pydata.org) | 0.5.4 | A data description language. / BSD 2-Clause |
| [dbus](http://www.freedesktop.org/wiki/Software/dbus/) | 1.13.2 | Simple message bus system for applications to talk to one another / GPL2 |
| [decorator](https://github.com/micheles/decorator) | 4.3.0 | Better living through Python with decorators. / BSD 3-Clause |
| [distributed](http://distributed.readthedocs.io/en/latest/) | 1.21.8 | Distributed computing with Dask / BSD 3-Clause |
| [docutils](http://docutils.sourceforge.net/) | 0.14 | Docutils – Python Documentation Utilities / Public Domain Dedictation and BSD 2-Clause and PSF 2.1.1 and GPL 3.0 |
| [entrypoints](https://github.com/takluyver/entrypoints) | 0.2.3 | Discover and load entry points from installed packages. / MIT License |
| [enum34](https://bitbucket.org/stoneleaf/enum34) | 1.1.6 | Python 3.4 Enum backported to 3.3, 3.2, 3.1, 2.7, 2.6, 2.5, and 2.4 / BSD 3-Clause |
| [et\_xmlfile](https://bitbucket.org/openpyxl/et_xmlfile) | 1.0.1 | An implementation of lxml.xmlfile for the standard library / MIT |
| [expat](http://expat.sourceforge.net/) | 2.2.5 | Expat XML parser library in C. / MIT |
| [fastcache](https://github.com/pbrady/fastcache) | 1.0.2 | C implementation of Python 3 lru\_cache / MIT |
| [filelock](https://github.com/benediktschmitt/py-filelock) | 2.0.7 | A platform independent file lock. / Public Domain |
| [flask](http://flask.pocoo.org) | 1.0.2 | A microframework based on Werkzeug, Jinja2 and good intentions. / BSD 3-Clause |
| [flask-cors](https://github.com/corydolphin/flask-cors) | 3.0.4 | A Flask extension adding a decorator for CORS support / MIT |
| [freetype](https://www.freetype.org/) | 2.8 | A Free, High-Quality, and Portable Font Engine / GPL-2.0 and FreeType |
| [funcsigs](http://funcsigs.readthedocs.org) | 1.0.2 | Python function signatures from PEP362 for Python 2.6, 2.7 and 3.2+. / Apache 2.0 |
| [functools32](https://github.com/MiCHiLU/python-functools32) | 3.2.3.2 | Backport of the functools module from Python 3.2.3 for use on 2.7 and PyPy. / PSF license |
| [futures](https://github.com/agronholm/pythonfutures) | 3.2.0 | Backport of the concurrent.futures package from Python 3.2 / PSF |
| [get\_terminal\_size](https://github.com/chrippa/backports.shutil_get_terminal_size) | 1.0.0 | Get the size of the terminal window. / MIT |
| [gettext](https://www.gnu.org/software/gettext/) | 0.19.8.1 | Internationalization package. / GPLv2 |
| [gevent](http://www.gevent.org/) | 1.3.0 | Coroutine-based network library / MIT |
| [glib](https://developer.gnome.org/glib/) | 2.56.1 | Provides core application building blocks for libraries and applications written in C. / LGPL-2.1 |
| [glob2](https://github.com/miracle2k/python-glob2) | 0.5 | Version of the glob module that supports recursion via \*\*, and can capture patterns. / BSD-2-Clause |
| [gmp](http://gmplib.org/) | 6.1.2 | The GNU multiprecision library. / GPL 2 and LGPL 3 |
| [gmpy2](https://pypi.python.org/pypi/gmpy2) | 2.0.8 | GMP/MPIR, MPFR, and MPC interface to Python 2.6+ and 3.x / LGPL 3 |
| [greenlet](https://github.com/python-greenlet/greenlet) | 0.4.13 | Lightweight in-process concurrent programming / MIT |
| [grin](http://pypi.python.org/pypi/grin) | 1.2.1 | Enhanced grep-like tool / BSD 3-Clause |
| [h5py](http://www.h5py.org/) | 2.7.1 | Read and write HDF5 files from Python. / BSD 3-Clause |
| [hdf5](http://www.hdfgroup.org/HDF5/) | 1.10.2 | HDF5 is a data model, library, and file format for storing and managing data / HDF5 |
| [heapdict](http://stutzbachenterprises.com/) | 1.0.0 | A heap with decrease-key and increase-key operations / BSD 3-Clause |
| [icu](http://site.icu-project.org/) | 58.2 | International Components for Unicode. / MIT |
| [idna](https://github.com/kjd/idna) | 2.2 | Internationalized Domain Names in Applications (IDNA). / BSD Like |
| [imagesize](https://github.com/shibukawa/imagesize_py) | 1.0.0 | Getting image size from png/jpeg/jpeg2000/gif file / MIT |
| [ipaddress](https://github.com/phihag/ipaddress) | 1.0.22 | IPv4/IPv6 manipulation library / PSF 2 |
| [ipykernel](http://ipython.org) | 4.8.2 | IPython Kernel for Jupyter / BSD 3-clause |
| [ipython](http://ipython.org/) | 5.7.0 | IPython: Productive Interactive Computing / BSD 3-clause |
| [ipython\_genutils](http://ipython.org) | 0.2.0 | vestigial utilities from IPython / BSD 3-Clause |
| [ipywidgets](https://github.com/ipython/ipywidgets) | 7.2.1 | Jupyter Interactive Widgets / BSD 3-clause |
| [isort](https://github.com/timothycrosley/isort) | 4.3.4 | A Python utility / library to sort Python imports. / MIT |
| [itsdangerous](https://github.com/pallets/itsdangerous) | 0.24 | Various helpers to pass trusted data to untrusted environments. / BSD 3-Clause |
| [jbig](https://www.cl.cam.ac.uk/~mgk25/jbigkit) | 2.1 | Implementation of the JBIG1 data compression standard / GPL-2.0 |
| [jdcal](https://github.com/phn/jdcal) | 1.4 | Julian dates from proleptic Gregorian and Julian calendars. / BSD 2-Clause |
| [jedi](https://github.com/davidhalter/jedi/) | 0.12.0 | An autocompletion tool for Python that can be used for text editors. / MIT |
| [jinja2](http://jinja.pocoo.org) | 2.9.6 | An easy to use stand-alone template engine written in pure python. / 3-Clause BSD |
| [jpeg](http://www.ijg.org/) | 9b | read/write jpeg COM, EXIF, IPTC medata / Custom free software license |
| [jupyter](http://jupyter.org) | 1.0.0 | Jupyter metapackage. Install all the Jupyter components in one go. / BSD 3-Clause |
| [jupyter\_client](http://jupyter.org) | 5.2.3 | Jupyter protocol implementation and client libraries / BSD 3-clause |
| [jupyter\_console](http://jupyter.org) | 5.2.0 | Jupyter terminal console / BSD 3-Clause |
| [jupyter\_core](http://jupyter.org) | 4.4.0 | Core common functionality of Jupyter projects. / BSD 3-clause |
| [jupyterlab](https://github.com/jupyterlab/jupyterlab) | 0.32.1 | JupyterLab PRE-ALPHA / BSD-3-Clause |
| [lazy-object-proxy](https://github.com/ionelmc/python-lazy-object-proxy) | 1.3.1 | A fast and thorough lazy object proxy. / BSD 2-Clause |
| [libcurl](http://curl.haxx.se/) | 7.60.0 | tool and library for transferring data with URL syntax / MIT/X derivate (`<http://curl.haxx.se/docs/copyright.html>`) |
| [libcxx](http://libcxx.llvm.org/) | 4.0.1 | C++ Standard Library / MIT license or UIUC License |
| [libcxxabi](http://libcxxabi.llvm.org/) | 4.0.1 | C++ Standard Library Support / MIT license or UIUC License |
| [libedit](http://thrysoee.dk/editline/) | 3.1 | Editline Library (libedit) / NetBSD |
| [libffi](https://sourceware.org/libffi/) | 3.2.1 | A Portable Foreign Function Interface Library. / Custom |
| [libgfortran](http://gcc.gnu.org/) | 3.0.1 | Fortran libraries from the GNU Compiler Collection / GPL 3 (with GCC Runtime Library Exception 3.1) |
| [libiconv](https://www.gnu.org/software/libiconv/) | 1.15 | Provides iconv for systems which don’t have one (or that cannot convert from/to Unicode.) / GPL and LGPL |
| [libpng](http://www.libpng.org/pub/png/libpng.html) | 1.6.34 | PNG reference library. / zlib/libpng |
| [libsodium](http://libsodium.org) | 1.0.16 | A modern and easy-to-use crypto library. / ISC |
| [libssh2](https://www.libssh2.org/) | 1.8.0 | the SSH library / BSD 3-Clause |
| [libtiff](http://www.libtiff.org/) | 4.0.9 | Support for the Tag Image File Format (TIFF). / HPND |
| [libxml2](http://xmlsoft.org/) | 2.9.8 | The XML C parser and toolkit of Gnome / MIT |
| [libxslt](http://xmlsoft.org/XSLT/) | 1.1.32 | The XSLT C library developed for the GNOME project / MIT |
| [llvmlite](https://github.com/numba/llvmlite) | 0.23.1 | A lightweight LLVM python binding for writing JIT compilers / New BSD License |
| [locket](https://github.com/mwilliamson/locket.py) | 0.2.0 | File-based locks for Python for Linux and Windows / BSD 2-Clause |
| [lxml](http://lxml.de/) | 4.2.1 | Pythonic binding for the C libraries libxml2 and libxslt. / BSD 3-Clause, GPL-2.0, ZPL-2.0, and ElementTree |
| [lzo](http://www.oberhumer.com/opensource/lzo/) | 2.10 | LZO is a portable lossless data compression library written in ANSI C. / GPL v2+ |
| [markupsafe](https://www.palletsprojects.com/p/markupsafe/) | 0.23 | A Python module that implements the jinja2.Markup string / BSD 3-Clause |
| [matplotlib](http://matplotlib.org/) | 2.2.2 | Publication quality figures in Python / PSF-based |
| [mccabe](https://github.com/PyCQA/mccabe) | 0.6.1 | McCabe complexity checker for Python / MIT |
| [mistune](https://github.com/lepture/mistune) | 0.8.3 | The fastest markdown parser in pure Python. / BSD 3-Clause |
| [mkl](https://software.intel.com/en-us/mkl) | 2018.0.2 | Math library for Intel and compatible processors / proprietary - Intel |
| [mkl-service](https://github.com/ContinuumIO/mkl-service) | 1.1.2 | Python bindings to MKL service functions / 3-clause BSD |
| [more-itertools](https://github.com/erikrose/more-itertools) | 4.1.0 | More routines for operating on iterables, beyond itertools / MIT |
| [mpc](http://www.multiprecision.org/) | 1.0.3 | A C library for the arithmetic of complex numbers with arbitrarily high precision. / LGPL 3 |
| [mpfr](http://www.mpfr.org/) | 3.1.5 | The MPFR library is a C library for multiple-precision floating-point computations with correct rounding. / LGPL 3 |
| [mpmath](http://mpmath.org) | 1.0.0 | Python library for arbitrary-precision floating-point arithmetic / BSD 3-Clause |
| [multipledispatch](https://github.com/mrocklin/multipledispatch/) | 0.5.0 | Multiple dispatch in Python / BSD 3-Clause |
| [navigator-updater](https://github.com/ContinuumIO/navigator-updater) | 0.2.1 | Anaconda Navigator Updater / proprietary - Continuum Analytics, Inc. |
| [nbconvert](http://jupyter.org) | 5.3.1 | Converting Jupyter Notebooks / BSD-3-Clause |
| [nbformat](http://jupyter.org) | 4.4.0 | The reference implementation of the Jupyter Notebook format / BSD 3-clause |
| [ncurses](http://www.gnu.org/software/ncurses/) | 6.0 | Library for text-based user interfaces / Free software (MIT-like) |
| [networkx](https://networkx.github.io/) | 2.1 | Python package for creating and manipulating complex networks / BSD 3-Clause |
| [nltk](http://nltk.org/) | 3.3.0 | Build Python programs to work with human language data / Apache 2.0 |
| [nose](http://readthedocs.org/docs/nose/) | 1.3.7 | Nose extends unittest to make testing easier / LGPL-2.1 |
| [notebook](http://jupyter.org) | 5.5.0 | Jupyter Notebook / BSD 3-clause |
| [numba](http://numba.github.com) | 0.38.0 | NumPy aware dynamic Python compiler using LLVM / BSD 2-clause |
| [numexpr](https://github.com/pydata/numexpr) | 2.6.5 | Fast numerical expression evaluator for NumPy. / MIT |
| [numpy](http://numpy.scipy.org/) | 1.14.3 | Array processing for numbers, strings, records, and objects. / BSD 3-Clause |
| numpy-base | 1.14.3 | |
| [numpydoc](https://github.com/numpy/numpydoc) | 0.8.0 | Sphinx extension to support docstrings in Numpy format / BSD 3-Clause |
| [odo](http://odo.pydata.org) | 0.5.1 | Data migration in Python / BSD-3-Clause |
| [openpyxl](https://openpyxl.readthedocs.io) | 2.5.3 | A Python library to read/write Excel 2010 xlsx/xlsm files / MIT |
| [openssl](http://www.openssl.org/) | 1.0.2o | OpenSSL is an open-source implementation of the SSL and TLS protocols / OpenSSL |
| [packaging](https://github.com/pypa/packaging) | 17.1 | Core utilities for Python packages / Apache 2.0 or BSD 2-Clause |
| [pandas](http://pandas.pydata.org) | 0.23.0 | High-performance, easy-to-use data structures and data analysis tools. / BSD 3-clause |
| [pandoc](http://pandoc.org/) | 1.19.2.1 | Universal markup converter (repackaged binaries). / GPL-2.0 |
| [pandocfilters](https://github.com/jgm/pandocfilters) | 1.4.2 | A python module for writing pandoc filters / BSD-3-Clause |
| [parso](https://github.com/davidhalter/parso) | 0.2.0 | A Python Parser / MIT |
| [partd](https://github.com/dask/partd) | 0.3.8 | Data structure for on-disk shuffle operations / BSD 3-Clause |
| [path.py](https://github.com/jaraco/path.py) | 11.0.1 | A module wrapper for os.path / MIT |
| [pathlib2](https://github.com/mcmtroffaes/pathlib2) | 2.3.2 | Fork of pathlib aiming to support the full stdlib Python API. / MIT |
| [patsy](https://github.com/pydata/patsy) | 0.5.0 | Describing statistical models in Python using symbolic formulas / BSD-2-Clause, PSF2 |
| [pcre](http://www.pcre.org/) | 8.42 | Regular expression pattern matching using the same syntax and semantics as Perl 5. / BSD 3-Clause |
| [pep8](http://pep8.readthedocs.org/) | 1.7.1 | Python style guide checker / MIT |
| [pexpect](http://pexpect.sourceforge.net/) | 4.5.0 | Pexpect makes Python a better tool for controlling other applications. / ISC |
| [pickleshare](https://github.com/vivainio/pickleshare) | 0.7.4 | Tiny ‘shelve’-like database with concurrency support / MIT |
| [pillow](https://pillow.readthedocs.io) | 5.1.0 | Pillow is the friendly PIL fork by Alex Clark and Contributors. / PIL |
| [pip](https://pip.pypa.io/en/stable/) | 9.0.1 | PyPA recommended tool for installing Python packages / MIT |
| [pkginfo](https://code.launchpad.net/~tseaver/pkginfo/trunk) | 1.4.1 | Query metadatdata from sdists / bdists / installed packages. / MIT |
| [pluggy](https://github.com/pytest-dev/pluggy) | 0.6.0 | Plugin registration and hook calling for Python / MIT |
| [ply](http://www.dabeaz.com/ply/index.html) | 3.11 | Python Lex-Yacc / BSD 3-clause |
| [prompt\_toolkit](https://github.com/jonathanslenders/python-prompt-toolkit) | 1.0.15 | Library for building powerful interactive command lines in Python / BSD 3-clause |
| [psutil](https://github.com/giampaolo/psutil) | 5.4.3 | A cross-platform process and system utilities module for Python / BSD 3-Clause |
| [ptyprocess](https://github.com/pexpect/ptyprocess) | 0.5.2 | Run a subprocess in a pseudo terminal / ISC |
| [py](https://github.com/pytest-dev/py) | 1.5.3 | library with cross-python path, ini-parsing, io, code, log facilities / MIT |
| [pyasn1](https://github.com/etingof/pyasn1) | 0.1.9 | ASN.1 types and codecs / BSD 2-Clause |
| [pyaudio](http://people.csail.mit.edu/hubert/pyaudio/) | 0.2.7 | Bindings for PortAudio v19, the cross-platform audio stream library / MIT |
| [pycodestyle](https://pycodestyle.readthedocs.io/) | 2.4.0 | Python style guide checker / MIT |
| [pycosat](https://github.com/ContinuumIO/pycosat) | 0.6.3 | Bindings to picosat (a SAT solver) / MIT |
| [pycparser](https://github.com/eliben/pycparser) | 2.17 | Complete C99 parser in pure Python / BSD 3-clause |
| [pycrypto](http://www.pycrypto.org/) | 2.6.1 | Cryptographic modules for Python. / Public Domain |
| [pycurl](http://pycurl.sourceforge.net/) | 7.43.0.1 | A Python Interface To The cURL library / LGPL, MIT |
| [pyflakes](https://github.com/PyCQA/pyflakes) | 1.6.0 | Pyflakes analyzes programs and detects various errors. / MIT |
| [pygments](http://pygments.org/) | 2.2.0 | Generic syntax highlighting package / BSD 2-clause |
| [pyodbc](https://github.com/mkleehammer/pyodbc) | 4.0.23 | DB API Module for ODBC / MIT |
| [pyopenssl](https://github.com/pyca/pyopenssl) | 16.2.0 | Python wrapper module around the OpenSSL library / Apache 2.0 |
| [pyparsing](http://pyparsing.wikispaces.com/) | 2.2.0 | Create and execute simple grammars / MIT |
| [pyqt](http://www.riverbankcomputing.co.uk/software/pyqt) | 5.9.2 | Python binding of the cross-platform GUI toolkit Qt. / Commercial, GPL-2.0, GPL-3.0 |
| [pytables](http://www.pytables.org) | 3.4.3 | Brings together Python, HDF5 and NumPy to easily handle large amounts of data. / BSD 3-Clause |
| [pytest](https://docs.pytest.org/en/latest/) | 3.5.1 | Simple and powerful testing with Python. / MIT |
| [python](http://www.python.org/) | 3.6.4 | General purpose programming language / PSF |
| [python-dateutil](https://dateutil.readthedocs.org/) | 2.6.0 | Extensions to the standard Python datetime module. / BSD 3 Clause |
| python.app | 2 | Proxy on OS X letting Python libraries hook into the gui event loop / BSD |
| [pytz](http://pythonhosted.org/pytz/) | 2017.2 | World timezone definitions, modern and historical. / MIT |
| [pywavelets](https://github.com/PyWavelets/pywt) | 0.5.2 | Discrete Wavelet Transforms in Python. / MIT |
| [pyyaml](http://pyyaml.org/wiki/PyYAML) | 3.12 | YAML parser and emitter for Python / MIT |
| [pyzmq](https://github.com/zeromq/pyzmq) | 17.0.0 | Python bindings for zeromq / BSD 3-clause |
| [qt](http://qt-project.org) | 5.9.5 | Qt is a cross-platform application and UI framework. / LGPL-3.0 |
| [qtawesome](https://github.com/spyder-ide/qtawesome) | 0.4.4 | Iconic fonts in PyQt and PySide applications / MIT |
| [qtconsole](http://jupyter.org) | 4.3.1 | Jupyter Qt console / BSD 3-Clause |
| [qtpy](https://github.com/spyder-ide/qtpy) | 1.4.1 | Abstraction layer for PyQt5/PyQt4/PySide / MIT |
| [readline](https://cnswww.cns.cwru.edu/php/chet/readline/rltop.html) | 7.0 | library for editing command lines as they are typed in / GPL-3.0 |
| [requests](http://python-requests.org) | 2.12.4 | Python HTTP for Humans. / Apache 2.0 |
| [rope](https://github.com/python-rope/rope) | 0.10.7 | A python refactoring library… / GPL 2.0 |
| [ruamel\_yaml](https://bitbucket.org/ruamel/yaml) | 0.15.35 | A patched copy of ruamel.yaml. / MIT |
| [scikit-image](http://scikit-image.org/) | 0.13.1 | Image processing routines for SciPy. / BSD 3-Clause |
| [scikit-learn](http://scikit-learn.org/) | 0.19.1 | A set of python modules for machine learning and data mining / BSD 3-Clause |
| [scipy](http://www.scipy.org/) | 1.1.0 | Scientific Library for Python / BSD 3-Clause |
| [seaborn](https://seaborn.pydata.org) | 0.8.1 | Statistical data visualization / BSD 3-Clause |
| [send2trash](https://github.com/hsoft/send2trash) | 1.5.0 | Python library to natively send files to Trash (or Recycle bin) on all platforms. / BSD-3-Clause |
| [setuptools](https://github.com/pypa/setuptools) | 38.5.1 | Download, build, install, upgrade, and uninstall Python packages / MIT |
| [simplegeneric](http://cheeseshop.python.org/pypi/simplegeneric) | 0.8.1 | Simple generic functions (similar to Python’s own len(), pickle.dump(), etc.) / Zope Public |
| [singledispatch](http://docs.python.org/3/library/functools.html#functools.singledispatch) | 3.4.0.3 | Transforms a function into a single-dispatch generic function / MIT |
| [sip](http://www.riverbankcomputing.com/software/sip/intro) | 4.19.8 | Create Python bindings for C and C++ libraries / GPL-3.0 |
| [six](http://pypi.python.org/pypi/six/) | 1.10.0 | Python 2 and 3 compatibility utilities / MIT |
| [snowballstemmer](https://github.com/shibukawa/snowball_py) | 1.2.1 | Snowball stemming library collection for Python / BSD-2-Clause |
| [sortedcollections](http://www.grantjenks.com/docs/sortedcollections/) | 0.6.1 | Python Sorted Collections / Apache-2.0 |
| [sortedcontainers](http://www.grantjenks.com/docs/sortedcontainers/) | 1.5.10 | Python Sorted Container Types: SortedList, SortedDict, and SortedSet / Apache 2.0 |
| [sphinx](http://www.sphinx-doc.org) | 1.7.4 | Sphinx is a tool that makes it easy to create intelligent and beautiful documentation / BSD 2-clause |
| sphinxcontrib | 1.0 | Python namespace for sphinxcontrib / BSD |
| [sphinxcontrib-websupport](https://pypi.python.org/pypi/sphinxcontrib-websupport) | 1.0.1 | Sphinx API for Web Apps / BSD-2-Clause |
| [spyder](https://www.spyder-ide.org/) | 3.2.8 | The Scientific Python Development Environment / MIT |
| [sqlalchemy](http://www.sqlalchemy.org/) | 1.2.7 | Database Abstraction Library. / MIT |
| [sqlite](http://www.sqlite.org/) | 3.22.0 | Implements a self-contained, zero-configuration, SQL database engine. / Public-Domain (`<http://www.sqlite.org/copyright.html>`) |
| [ssl\_match\_hostname](http://bitbucket.org/brandon/backports.ssl_match_hostname) | 3.5.0.1 | The ssl.match\_hostname() function from Python 3.5 / PSF 2 |
| [statsmodels](https://www.statsmodels.org) | 0.9.0 | Statistical computations and models for use with SciPy / BSD 3-Clause |
| [subprocess32](https://github.com/google/python-subprocess32) | 3.5.0 | A backport of the subprocess module from Python 3.2/3.3 for use on 2.x. / PSF 2 |
| [sympy](http://sympy.org) | 1.1.1 | Python library for symbolic mathematics / 3-clause BSD |
| [tblib](https://github.com/ionelmc/python-tblib) | 1.3.2 | Traceback serialization library. / BSD 2-Clause |
| [terminado](https://github.com/jupyter/terminado) | 0.8.1 | Terminals served by tornado websockets / BSD 2-clause |
| [testpath](https://testpath.readthedocs.io) | 0.3.1 | Testpath is a collection of utilities for Python code working with files and commands. / MIT |
| [tk](http://www.tcl.tk/) | 8.6.7 | A dynamic programming language with GUI support. Bundles Tcl and Tk. / Tcl/Tk |
| [tornado](http://www.tornadoweb.org/) | 5.0.2 | A Python web framework and asynchronous networking library, originally developed at FriendFeed. / Apache 2.0 |
| [traitlets](http://ipython.org/) | 4.3.2 | Configuration system for Python applications / BSD 3-clause |
| [unicodecsv](https://github.com/jdunck/python-unicodecsv) | 0.14.1 | Drop-in replacement for csv module which supports unicode strings / BSD |
| [unixodbc](http://www.unixodbc.org/) | 2.3.6 | ODBC on non MS Windows platforms / LGPL-2.1 |
| [wcwidth](https://github.com/jquast/wcwidth) | 0.1.7 | Measures number of Terminal column cells of wide-character codes. / MIT |
| [webencodings](https://github.com/gsnedders/python-webencodings) | 0.5.1 | Character encoding aliases for legacy web content / BSD 3-Clause |
| [werkzeug](http://werkzeug.pocoo.org/) | 0.14.1 | The Python WSGI Utility Library. / BSD 3-Clause |
| [wheel](https://bitbucket.org/pypa/wheel/) | 0.29.0 | A built-package format for Python. / MIT |
| [widgetsnbextension](http://ipython.org) | 3.2.1 | Interactive Widgets for Jupyter / BSD 3-clause |
| [wrapt](https://github.com/GrahamDumpleton/wrapt) | 1.10.11 | Module for decorators, wrappers and monkey patching. / BSD 2-Clause |
| [xlrd](http://www.python-excel.org/) | 1.1.0 | Library for developers to extract data from Microsoft Excel (tm) spreadsheet files / BSD 3-Clause and BSD with advertising |
| [xlsxwriter](https://xlsxwriter.readthedocs.io/) | 1.0.4 | A Python module for creating Excel XLSX files / BSD 2-Clause |
| [xlwings](http://xlwings.org/) | 0.11.8 | Interact with Excel from Python and vice versa / 3-clause BSD |
| [xlwt](http://www.python-excel.org/) | 1.2.0 | Writing data and formatting information to Excel files / BSD |
| [xz](http://tukaani.org/xz/) | 5.2.3 | Data compression software with high compression ratio / LGPL-2.1 and GPL-2.0 |
| [yaml](http://pyyaml.org/wiki/LibYAML) | 0.1.7 | A C library for parsing and emitting YAML. / MIT |
| [zeromq](http://zeromq.org) | 4.2.5 | A high-performance asynchronous messaging library. / LGPL 3 |
| [zict](http://github.com/mrocklin/zict) | 0.1.3 | Composable Dictionary Classes / BSD 3-Clause |
| [zlib](http://zlib.net/) | 1.2.11 | Massively spiffy yet delicately unobtrusive compression library / zlib |
| Name | Version | Summary / License |
|---|---|---|
| [\_ipyw\_jlab\_nb\_ext\_conf](https://github.com/ContinuumIO/anaconda-nb-extensions-meta-config) | 0.1.0 | A configuration metapackage for enabling Anaconda-bundled jupyter extensions / BSD |
| [alabaster](http://www.sphinx-doc.org/en/stable/index.html) | 0.7.11 | Configurable, Python 2+3 compatible Sphinx theme. / BSD 3-Clause |
| [anaconda-client](http://anaconda.org) | 1.7.2 | anaconda.org command line client library / BSD 3-clause |
| [anaconda-project](https://github.com/Anaconda-Platform/anaconda-project) | 0.8.2 | Tool for encapsulating, running, and reproducing data science projects / BSD 3-Clause |
| [appdirs](http://github.com/ActiveState/appdirs) | 1.4.3 | A small Python module for determining appropriate platform-specific dirs. / MIT |
| [asn1crypto](https://github.com/wbond/asn1crypto) | 0.24.0 | Python ASN.1 library with a focus on performance and a pythonic API / MIT |
| [astroid](https://www.astroid.org/) | 1.6.5 | A abstract syntax tree for Python with inference support. / LGPL 2.1 |
| [astropy](http://www.astropy.org/) | 2.0.8 | Community-developed Python Library for Astronomy / BSD |
| [atomicwrites](https://github.com/untitaker/python-atomicwrites) | 1.2.1 | Atomic file writes. / MIT |
| [attrs](https://attrs.readthedocs.io/en/stable/) | 18.2.0 | attrs is the Python package that will bring back the joy of writing classes by relieving you from the drudgery of implementing object protocols (aka dunder methods). / MIT |
| [automat](https://github.com/glyph/Automat) | 0.7.0 | self-service finite-state machines for the programmer on the go / MIT |
| [babel](http://babel.pocoo.org/) | 2.6.0 | Utilities to internationalize and localize Python applications / BSD 3-clause |
| [backports](https://bitbucket.org/brandon/backports) | 1.0 | / BSD |
| [backports.functools\_lru\_cache](https://github.com/jaraco/backports.functools_lru_cache) | 1.5 | Backport of functools.lru\_cache from Python 3.3 as published at ActiveState. / MIT |
| [backports.shutil\_get\_terminal\_size](https://github.com/chrippa/backports.shutil_get_terminal_size) | 1.0.0 | A backport of the get\_terminal\_size function from Python 3.3’s shutil. / MIT |
| [backports\_abc](https://github.com/cython/backports_abc) | 0.5 | A backport of recent additions to the collections.abc module. / PSF 2 |
| [beautifulsoup4](http://www.crummy.com/software/BeautifulSoup/) | 4.6.3 | Python library designed for screen-scraping / MIT |
| [bitarray](https://github.com/ilanschnell/bitarray) | 0.8.3 | efficient arrays of booleans – C extension / PSF |
| [bkcharts](http://github.com/bokeh/bkcharts) | 0.2 | High level chart types built on top of Bokeh / BSD 3-Clause |
| blas | 1.0 | |
| [bleach](https://github.com/mozilla/bleach) | 2.1.4 | Easy, whitelist-based HTML-sanitizing tool / Apache-2.0 |
| [blosc](https://github.com/Blosc/c-blosc) | 1.14.4 | A blocking, shuffling and loss-less compression library that can be faster than memcpy() / BSD 3-Clause |
| [bokeh](http://bokeh.pydata.org/) | 0.13.0 | Statistical and novel interactive HTML plots for Python / BSD 3-Clause |
| [boto](https://github.com/boto/boto/) | 2.49.0 | Amazon Web Services Library / MIT |
| [bottleneck](http://berkeleyanalytics.com/bottleneck) | 1.2.1 | Fast NumPy array functions written in Cython. / BSD 2-Clause |
| [bzip2](http://www.bzip.org/) | 1.0.6 | high-quality data compressor / bzip2 |
| [ca-certificates](https://github.com/conda-forge/ca-certificates-feedstock) | 2018.03.07 | Certificates for use with other packages. / ISC |
| [cairo](http://cairographics.org/) | 1.14.12 | Cairo is a 2D graphics library with support for multiple output devices. / LGPL 2.1 or MPL 1.1 |
| [cdecimal](http://www.bytereef.org/mpdecimal/index.html) | 2.3 | Fast drop-in replacement for decimal.py / BSD 2-Clause |
| [certifi](http://certifi.io/) | 2018.8.24 | Python package for providing Mozilla’s CA Bundle. / ISC |
| [cffi](https://bitbucket.org/cffi/cffi) | 1.11.5 | Foreign Function Interface for Python calling C code. / MIT |
| [chardet](https://github.com/chardet/chardet) | 3.0.4 | Universal character encoding detector / LGPL2 |
| [click](http://click.pocoo.org/) | 6.7 | A simple wrapper around optparse for powerful command line utilities. / BSD 3-Clause |
| [cloudpickle](https://github.com/cloudpipe/cloudpickle) | 0.5.5 | Extended pickling support for Python objects / BSD 3-Clause |
| [clyent](https://github.com/Anaconda-Platform/clyent) | 1.2.2 | Command line client library for windows and posix / BSD 3-Clause |
| [colorama](https://github.com/tartley/colorama) | 0.3.9 | Cross-platform colored terminal text. / BSD 3-Clause |
| [conda](https://conda.io) | 4.5.11 | OS-agnostic, system-level binary package and environment manager. / BSD 3-Clause |
| [conda-build](https://github.com/conda/conda-build) | 3.15.1 | tools for building conda packages / BSD 3-Clause |
| [conda-env](https://github.com/conda/conda-env) | 2.6.0 | Tools for interacting with conda environments. / BSD 3-Clause |
| [configparser](http://docs.python.org/3/library/configparser.html) | 3.5.0 | This library brings the updated configparser from Python 3.5 to Python 2.6-3.5 / MIT |
| [constantly](https://github.com/twisted/constantly) | 15.1.0 | Symbolic constants in Python / MIT |
| [contextlib2](http://contextlib2.readthedocs.org) | 0.5.5 | Backports and enhancements for the contextlib module / PSF |
| [cryptography](https://github.com/pyca/cryptography) | 2.3.1 | Provides cryptographic recipes and primitives to Python developers / Apache 2.0 or BSD 3-Clause, PSF 2 |
| [curl](http://curl.haxx.se/) | 7.61.0 | tool and library for transferring data with URL syntax / MIT/X derivate (`<http://curl.haxx.se/docs/copyright.html>`) |
| [cycler](http://matplotlib.org/cycler) | 0.10.0 | Composable style cycles. / BSD 3-Clause |
| [cython](http://www.cython.org/) | 0.28.5 | The Cython compiler for writing C extensions for the Python language / Apache-2.0 |
| [cytoolz](https://github.com/pytoolz/cytoolz) | 0.9.0.1 | Cython implementation of Toolz. High performance functional utilities. / BSD 3-Clause |
| [dask](http://github.com/dask/dask/) | 0.19.1 | Parallel Python with task scheduling / BSD 3-Clause |
| [dask-core](http://github.com/dask/dask/) | 0.19.1 | Parallel Python with task scheduling / BSD 3-Clause |
| [datashape](http://datashape.pydata.org) | 0.5.4 | A data description language. / BSD 2-Clause |
| [decorator](https://github.com/micheles/decorator) | 4.3.0 | Better living through Python with decorators. / BSD 3-Clause |
| [distributed](http://distributed.readthedocs.io/en/latest/) | 1.23.1 | Distributed computing with Dask / BSD 3-Clause |
| [docutils](http://docutils.sourceforge.net/) | 0.14 | Docutils – Python Documentation Utilities / Public Domain Dedictation and BSD 2-Clause and PSF 2.1.1 and GPL 3.0 |
| [entrypoints](https://github.com/takluyver/entrypoints) | 0.2.3 | Discover and load entry points from installed packages. / MIT License |
| [enum34](https://bitbucket.org/stoneleaf/enum34) | 1.1.6 | Python 3.4 Enum backported to 3.3, 3.2, 3.1, 2.7, 2.6, 2.5, and 2.4 / BSD 3-Clause |
| [et\_xmlfile](https://bitbucket.org/openpyxl/et_xmlfile) | 1.0.1 | An implementation of lxml.xmlfile for the standard library / MIT |
| [expat](http://expat.sourceforge.net/) | 2.2.6 | Expat XML parser library in C. / MIT |
| [fastcache](https://github.com/pbrady/fastcache) | 1.0.2 | C implementation of Python 3 lru\_cache / MIT |
| [filelock](https://github.com/benediktschmitt/py-filelock) | 3.0.8 | A platform independent file lock. / Public Domain |
| [flask](http://flask.pocoo.org) | 1.0.2 | A microframework based on Werkzeug, Jinja2 and good intentions. / BSD 3-Clause |
| [flask-cors](https://github.com/corydolphin/flask-cors) | 3.0.6 | A Flask extension adding a decorator for CORS support / MIT |
| [fontconfig](http://www.freedesktop.org/wiki/Software/fontconfig/) | 2.13.0 | A library for configuring and customizing font access. / MIT |
| [freetype](https://www.freetype.org/) | 2.9.1 | A Free, High-Quality, and Portable Font Engine / GPL-2.0 and FreeType |
| [funcsigs](http://funcsigs.readthedocs.org) | 1.0.2 | Python function signatures from PEP362 for Python 2.6, 2.7 and 3.2+. / Apache 2.0 |
| [functools32](https://github.com/MiCHiLU/python-functools32) | 3.2.3.2 | Backport of the functools module from Python 3.2.3 for use on 2.7 and PyPy. / PSF license |
| [functools\_lru\_cache](https://github.com/jaraco/backports.functools_lru_cache) | 1.4 | Backport of functools.lru\_cache from Python 3.3 as published at ActiveState. / MIT |
| [futures](https://github.com/agronholm/pythonfutures) | 3.2.0 | Backport of the concurrent.futures package from Python 3.2 / PSF |
| [get\_terminal\_size](https://github.com/chrippa/backports.shutil_get_terminal_size) | 1.0.0 | Get the size of the terminal window. / MIT |
| [gevent](http://www.gevent.org/) | 1.3.6 | Coroutine-based network library / MIT |
| [glib](https://developer.gnome.org/glib/) | 2.56.2 | Provides core application building blocks for libraries and applications written in C. / LGPL-2.1 |
| [glob2](https://github.com/miracle2k/python-glob2) | 0.6 | Version of the glob module that supports recursion via \*\*, and can capture patterns. / BSD-2-Clause |
| [gmp](http://gmplib.org/) | 6.1.2 | The GNU multiprecision library. / GPL 2 and LGPL 3 |
| [gmpy2](https://pypi.python.org/pypi/gmpy2) | 2.0.8 | GMP/MPIR, MPFR, and MPC interface to Python 2.6+ and 3.x / LGPL 3 |
| [greenlet](https://github.com/python-greenlet/greenlet) | 0.4.15 | Lightweight in-process concurrent programming / MIT |
| [grin](http://pypi.python.org/pypi/grin) | 1.2.1 | Enhanced grep-like tool / BSD 3-Clause |
| [h5py](http://www.h5py.org/) | 2.8.0 | Read and write HDF5 files from Python. / BSD 3-Clause |
| [hdf5](http://www.hdfgroup.org/HDF5/) | 1.10.2 | HDF5 is a data model, library, and file format for storing and managing data / HDF5 |
| [heapdict](http://stutzbachenterprises.com/) | 1.0.0 | A heap with decrease-key and increase-key operations / BSD 3-Clause |
| [html5lib](https://github.com/html5lib/html5lib-python) | 1.0.1 | HTML parser based on the WHATWG HTML specification / MIT |
| [hyperlink](https://github.com/python-hyper/hyperlink) | 18.0.0 | Immutable, Pythonic, correct URLs. / MIT |
| [icu](http://site.icu-project.org/) | 58.2 | International Components for Unicode. / MIT |
| [idna](https://github.com/kjd/idna) | 2.7 | Internationalized Domain Names in Applications (IDNA). / BSD Like |
| [imageio](http://imageio.github.io) | 2.4.1 | a Python library for reading and writing image data / BSD 2-Clause |
| [imagesize](https://github.com/shibukawa/imagesize_py) | 1.1.0 | Getting image size from png/jpeg/jpeg2000/gif file / MIT |
| [incremental](https://twistedmatrix.com) | 17.5.0 | A library that versions your Python projects / MIT License |
| [ipaddress](https://github.com/phihag/ipaddress) | 1.0.22 | IPv4/IPv6 manipulation library / PSF 2 |
| [ipykernel](http://ipython.org) | 4.9.0 | IPython Kernel for Jupyter / BSD 3-clause |
| [ipython](http://ipython.org/) | 5.8.0 | IPython: Productive Interactive Computing / BSD 3-clause |
| [ipython\_genutils](http://ipython.org) | 0.2.0 | vestigial utilities from IPython / BSD 3-Clause |
| [ipywidgets](https://github.com/ipython/ipywidgets) | 7.4.1 | Jupyter Interactive Widgets / BSD 3-clause |
| [isort](https://github.com/timothycrosley/isort) | 4.3.4 | A Python utility / library to sort Python imports. / MIT |
| [itsdangerous](https://github.com/pallets/itsdangerous) | 0.24 | Various helpers to pass trusted data to untrusted environments. / BSD 3-Clause |
| [jbig](https://www.cl.cam.ac.uk/~mgk25/jbigkit) | 2.1 | Implementation of the JBIG1 data compression standard / GPL-2.0 |
| [jdcal](https://github.com/phn/jdcal) | 1.4 | Julian dates from proleptic Gregorian and Julian calendars. / BSD 2-Clause |
| [jedi](https://github.com/davidhalter/jedi/) | 0.12.1 | An autocompletion tool for Python that can be used for text editors. / MIT |
| [jinja2](http://jinja.pocoo.org) | 2.10 | An easy to use stand-alone template engine written in pure python. / 3-Clause BSD |
| [jpeg](http://www.ijg.org/) | 9b | read/write jpeg COM, EXIF, IPTC medata / Custom free software license |
| [jsonschema](https://github.com/Julian/jsonschema) | 2.6.0 | An implementation of JSON Schema validation for Python / MIT |
| [jupyter](http://jupyter.org) | 1.0.0 | Jupyter metapackage. Install all the Jupyter components in one go. / BSD 3-Clause |
| [jupyter\_client](http://jupyter.org) | 5.2.3 | Jupyter protocol implementation and client libraries / BSD 3-clause |
| [jupyter\_console](http://jupyter.org) | 5.2.0 | Jupyter terminal console / BSD 3-Clause |
| [jupyter\_core](http://jupyter.org) | 4.4.0 | Core common functionality of Jupyter projects. / BSD 3-clause |
| [jupyterlab](https://github.com/jupyterlab/jupyterlab) | 0.33.11 | JupyterLab PRE-ALPHA / BSD-3-Clause |
| [jupyterlab\_launcher](http://github.com/jupyterlab/jupyterlab_launcher) | 0.11.2 | A Launcher for JupyterLab based applications. / BSD 3-Clause |
| [kiwisolver](https://github.com/nucleic/kiwi) | 1.0.1 | A fast implementation of the Cassowary constraint solver / BSD 3-Clause |
| [lazy-object-proxy](https://github.com/ionelmc/python-lazy-object-proxy) | 1.3.1 | A fast and thorough lazy object proxy. / BSD 2-Clause |
| [libcurl](http://curl.haxx.se/) | 7.61.0 | tool and library for transferring data with URL syntax / MIT/X derivate (`<http://curl.haxx.se/docs/copyright.html>`) |
| [libedit](http://thrysoee.dk/editline/) | 3.1.20170329 | Editline Library (libedit) / NetBSD |
| [libffi](https://sourceware.org/libffi/) | 3.2.1 | A Portable Foreign Function Interface Library. / Custom |
| [libgcc-ng](https://gcc.gnu.org/onlinedocs/gccint/Libgcc.html) | 8.2.0 | The GCC low-level runtime library / GPL |
| [libgfortran](http://gcc.gnu.org/) | 3.0.0 | Fortran libraries from the GNU Compiler Collection / GPL 3 (with GCC Runtime Library Exception 3.1) |
| [libgfortran-ng](https://gcc.gnu.org/) | 7.3.0 | The GNU Fortran Runtime Library / GPL |
| [libiconv](https://www.gnu.org/software/libiconv/) | 1.14 | Provides iconv for systems which don’t have one (or that cannot convert from/to Unicode.) / GPL and LGPL |
| [libopenblas](http://www.openblas.net/) | 0.2.20 | An Optimized BLAS library / BSD |
| [libpng](http://www.libpng.org/pub/png/libpng.html) | 1.6.32 | PNG reference library. / zlib/libpng |
| [libsodium](http://libsodium.org) | 1.0.16 | A modern and easy-to-use crypto library. / ISC |
| [libssh2](https://www.libssh2.org/) | 1.8.0 | the SSH library / BSD 3-Clause |
| [libstdcxx-ng](https://gcc.gnu.org/) | 8.2.0 | The GNU C++ Runtime Library / GPL3 with runtime exception |
| [libtiff](http://www.libtiff.org/) | 4.0.9 | Support for the Tag Image File Format (TIFF). / HPND |
| [libuuid](http://sourceforge.net/projects/libuuid/) | 1.0.3 | Portable uuid C library. / BSD 3-Clause |
| [libxcb](http://xcb.freedesktop.org/) | 1.13 | This is the C-language Binding (XCB) package to the X Window System protocol / MIT |
| [libxml2](http://xmlsoft.org/) | 2.9.8 | The XML C parser and toolkit of Gnome / MIT |
| [libxslt](http://xmlsoft.org/XSLT/) | 1.1.32 | The XSLT C library developed for the GNOME project / MIT |
| [linecache2](https://github.com/testing-cabal/linecache2) | 1.0.0 | Backport of the linecache module / PSF 1.0 |
| [locket](https://github.com/mwilliamson/locket.py) | 0.2.0 | File-based locks for Python for Linux and Windows / BSD 2-Clause |
| [lxml](http://lxml.de/) | 4.2.5 | Pythonic binding for the C libraries libxml2 and libxslt. / BSD 3-Clause, GPL-2.0, ZPL-2.0, and ElementTree |
| [lzo](http://www.oberhumer.com/opensource/lzo/) | 2.10 | LZO is a portable lossless data compression library written in ANSI C. / GPL v2+ |
| [markupsafe](https://www.palletsprojects.com/p/markupsafe/) | 1.0 | A Python module that implements the jinja2.Markup string / BSD 3-Clause |
| [matplotlib](http://matplotlib.org/) | 2.2.3 | Publication quality figures in Python / PSF-based |
| [mccabe](https://github.com/PyCQA/mccabe) | 0.6.1 | McCabe complexity checker for Python / MIT |
| [mistune](https://github.com/lepture/mistune) | 0.8.3 | The fastest markdown parser in pure Python. / BSD 3-Clause |
| [more-itertools](https://github.com/erikrose/more-itertools) | 4.3.0 | More routines for operating on iterables, beyond itertools / MIT |
| [mpc](http://www.multiprecision.org/) | 1.1.0 | A C library for the arithmetic of complex numbers with arbitrarily high precision. / LGPL 3 |
| [mpfr](http://www.mpfr.org/) | 4.0.1 | The MPFR library is a C library for multiple-precision floating-point computations with correct rounding. / LGPL 3 |
| [mpmath](http://mpmath.org) | 1.0.0 | Python library for arbitrary-precision floating-point arithmetic / BSD 3-Clause |
| [msgpack-python](http://msgpack.org/) | 0.5.6 | MessagePack (de)serializer. / Apache 2.0 |
| [multipledispatch](https://github.com/mrocklin/multipledispatch/) | 0.6.0 | Multiple dispatch in Python / BSD 3-Clause |
| [nbconvert](http://jupyter.org) | 5.3.1 | Converting Jupyter Notebooks / BSD-3-Clause |
| [nbformat](http://jupyter.org) | 4.4.0 | The reference implementation of the Jupyter Notebook format / BSD 3-clause |
| [ncurses](http://www.gnu.org/software/ncurses/) | 6.1 | Library for text-based user interfaces / Free software (MIT-like) |
| [networkx](https://networkx.github.io/) | 2.1 | Python package for creating and manipulating complex networks / BSD 3-Clause |
| [nltk](http://nltk.org/) | 3.3.0 | Build Python programs to work with human language data / Apache 2.0 |
| [nose](http://readthedocs.org/docs/nose/) | 1.3.7 | Nose extends unittest to make testing easier / LGPL-2.1 |
| [notebook](http://jupyter.org) | 5.6.0 | Jupyter Notebook / BSD 3-clause |
| [numexpr](https://github.com/pydata/numexpr) | 2.6.7 | Fast numerical expression evaluator for NumPy. / MIT |
| [numpy](http://numpy.scipy.org/) | 1.14.5 | Array processing for numbers, strings, records, and objects. / BSD 3-Clause |
| numpy-base | 1.14.5 | |
| [numpydoc](https://github.com/numpy/numpydoc) | 0.8.0 | Sphinx extension to support docstrings in Numpy format / BSD 3-Clause |
| [odo](http://odo.pydata.org) | 0.5.1 | Data migration in Python / BSD-3-Clause |
| [olefile](http://www.decalage.info/python/olefileio) | 0.46 | parse, read and write Microsoft OLE2 files / BSD 2-Clause |
| [openblas](http://www.openblas.net/) | 0.2.20 | An Optimized BLAS library / BSD |
| openblas-devel | 0.2.20 | |
| [openpyxl](https://openpyxl.readthedocs.io) | 2.5.6 | A Python library to read/write Excel 2010 xlsx/xlsm files / MIT |
| [openssl](http://www.openssl.org/) | 1.0.2p | OpenSSL is an open-source implementation of the SSL and TLS protocols / OpenSSL |
| [packaging](https://github.com/pypa/packaging) | 17.1 | Core utilities for Python packages / Apache 2.0 or BSD 2-Clause |
| [pandas](http://pandas.pydata.org) | 0.23.4 | High-performance, easy-to-use data structures and data analysis tools. / BSD 3-clause |
| [pandoc](http://pandoc.org/) | 2.0.0.1 | Universal markup converter (repackaged binaries). / GPL-2.0 |
| [pandocfilters](https://github.com/jgm/pandocfilters) | 1.4.2 | A python module for writing pandoc filters / BSD-3-Clause |
| [parso](https://github.com/davidhalter/parso) | 0.3.1 | A Python Parser / MIT |
| [partd](https://github.com/dask/partd) | 0.3.8 | Data structure for on-disk shuffle operations / BSD 3-Clause |
| [patchelf](http://nixos.org/patchelf.html) | 0.9 | A small utility to modify the dynamic linker and RPATH of ELF executables. / GPL 3 |
| [path.py](https://github.com/jaraco/path.py) | 11.1.0 | A module wrapper for os.path / MIT |
| [pathlib2](https://github.com/mcmtroffaes/pathlib2) | 2.3.2 | Fork of pathlib aiming to support the full stdlib Python API. / MIT |
| [patsy](https://github.com/pydata/patsy) | 0.5.0 | Describing statistical models in Python using symbolic formulas / BSD-2-Clause, PSF2 |
| [pcre](http://www.pcre.org/) | 8.42 | Regular expression pattern matching using the same syntax and semantics as Perl 5. / BSD 3-Clause |
| [pep8](http://pep8.readthedocs.org/) | 1.7.1 | Python style guide checker / MIT |
| [pexpect](http://pexpect.sourceforge.net/) | 4.6.0 | Pexpect makes Python a better tool for controlling other applications. / ISC |
| [pickleshare](https://github.com/vivainio/pickleshare) | 0.7.4 | Tiny ‘shelve’-like database with concurrency support / MIT |
| [pillow](https://pillow.readthedocs.io) | 5.2.0 | Pillow is the friendly PIL fork by Alex Clark and Contributors. / PIL |
| [pip](https://pip.pypa.io/en/stable/) | 10.0.1 | PyPA recommended tool for installing Python packages / MIT |
| [pixman](http://www.pixman.org/) | 0.34.0 | A low-level software library for pixel manipulation. / MIT |
| [pkginfo](https://code.launchpad.net/~tseaver/pkginfo/trunk) | 1.4.2 | Query metadatdata from sdists / bdists / installed packages. / MIT |
| [pluggy](https://github.com/pytest-dev/pluggy) | 0.7.1 | Plugin registration and hook calling for Python / MIT |
| [ply](http://www.dabeaz.com/ply/index.html) | 3.11 | Python Lex-Yacc / BSD 3-clause |
| [prometheus\_client](https://github.com/prometheus/client_python) | 0.3.1 | Python client for the Prometheus monitoring system. / Apache 2.0 |
| [prompt\_toolkit](https://github.com/jonathanslenders/python-prompt-toolkit) | 1.0.15 | Library for building powerful interactive command lines in Python / BSD 3-clause |
| [psutil](https://github.com/giampaolo/psutil) | 5.4.7 | A cross-platform process and system utilities module for Python / BSD 3-Clause |
| [ptyprocess](https://github.com/pexpect/ptyprocess) | 0.6.0 | Run a subprocess in a pseudo terminal / ISC |
| [py](https://github.com/pytest-dev/py) | 1.6.0 | library with cross-python path, ini-parsing, io, code, log facilities / MIT |
| [pyasn1](https://github.com/etingof/pyasn1) | 0.4.4 | ASN.1 types and codecs / BSD 2-Clause |
| [pyasn1-modules](http://pyasn1.sourceforge.net/) | 0.2.2 | A collection of ASN.1-based protocols modules. / BSD 2-Clause |
| [pycairo](http://cairographics.org/pycairo/) | 1.17.1 | Python bindings for the Cairo graphics library. / LGPL 2.1, MPL 1.1 |
| [pycodestyle](https://pycodestyle.readthedocs.io/) | 2.4.0 | Python style guide checker / MIT |
| [pycosat](https://github.com/ContinuumIO/pycosat) | 0.6.3 | Bindings to picosat (a SAT solver) / MIT |
| [pycparser](https://github.com/eliben/pycparser) | 2.18 | Complete C99 parser in pure Python / BSD 3-clause |
| [pycrypto](http://www.pycrypto.org/) | 2.6.1 | Cryptographic modules for Python. / Public Domain |
| [pycurl](http://pycurl.sourceforge.net/) | 7.43.0.2 | A Python Interface To The cURL library / LGPL, MIT |
| [pyflakes](https://github.com/PyCQA/pyflakes) | 2.0.0 | Pyflakes analyzes programs and detects various errors. / MIT |
| [pygments](http://pygments.org/) | 2.2.0 | Generic syntax highlighting package / BSD 2-clause |
| [pylint](http://www.pylint.org/) | 1.9.2 | python code static checker / GPL |
| [pyodbc](https://github.com/mkleehammer/pyodbc) | 4.0.24 | DB API Module for ODBC / MIT |
| [pyopenssl](https://github.com/pyca/pyopenssl) | 18.0.0 | Python wrapper module around the OpenSSL library / Apache 2.0 |
| [pyparsing](http://pyparsing.wikispaces.com/) | 2.2.0 | Create and execute simple grammars / MIT |
| [pysocks](https://github.com/Anorov/PySocks) | 1.6.8 | A Python SOCKS client module. See [Anorov/PySocks](https://github.com/Anorov/PySocks) for more information. / BSD 3-Clause |
| [pytables](http://www.pytables.org) | 3.4.4 | Brings together Python, HDF5 and NumPy to easily handle large amounts of data. / BSD 3-Clause |
| [pytest](https://docs.pytest.org/en/latest/) | 3.8.0 | Simple and powerful testing with Python. / MIT |
| [python](http://www.python.org/) | 2.7.15 | General purpose programming language / PSF |
| [python-dateutil](https://dateutil.readthedocs.org/) | 2.7.3 | Extensions to the standard Python datetime module. / BSD 3 Clause |
| [pytz](http://pythonhosted.org/pytz/) | 2018.5 | World timezone definitions, modern and historical. / MIT |
| [pywavelets](https://github.com/PyWavelets/pywt) | 1.0.0 | Discrete Wavelet Transforms in Python. / MIT |
| [pyyaml](http://pyyaml.org/wiki/PyYAML) | 3.13 | YAML parser and emitter for Python / MIT |
| [pyzmq](https://github.com/zeromq/pyzmq) | 17.1.2 | Python bindings for zeromq / BSD 3-clause |
| [readline](https://cnswww.cns.cwru.edu/php/chet/readline/rltop.html) | 7.0 | library for editing command lines as they are typed in / GPL-3.0 |
| [requests](http://python-requests.org) | 2.19.1 | Python HTTP for Humans. / Apache 2.0 |
| [ruamel\_yaml](https://bitbucket.org/ruamel/yaml) | 0.15.46 | A patched copy of ruamel.yaml. / MIT |
| [scandir](https://github.com/benhoyt/scandir) | 1.9.0 | scandir, a better directory iterator and faster os.walk() / BSD 3-Clause |
| [scikit-image](http://scikit-image.org/) | 0.14.0 | Image processing routines for SciPy. / BSD 3-Clause |
| [scikit-learn](http://scikit-learn.org/) | 0.19.1 | A set of python modules for machine learning and data mining / BSD 3-Clause |
| [scipy](http://www.scipy.org/) | 1.1.0 | Scientific Library for Python / BSD 3-Clause |
| [seaborn](https://seaborn.pydata.org) | 0.9.0 | Statistical data visualization / BSD 3-Clause |
| [send2trash](https://github.com/hsoft/send2trash) | 1.5.0 | Python library to natively send files to Trash (or Recycle bin) on all platforms. / BSD-3-Clause |
| [service\_identity](https://github.com/pyca/service_identity) | 17.0.0 | Service identity verification for pyOpenSSL. / MIT |
| [setuptools](https://github.com/pypa/setuptools) | 40.2.0 | Download, build, install, upgrade, and uninstall Python packages / MIT |
| [simplegeneric](http://cheeseshop.python.org/pypi/simplegeneric) | 0.8.1 | Simple generic functions (similar to Python’s own len(), pickle.dump(), etc.) / Zope Public |
| [singledispatch](http://docs.python.org/3/library/functools.html#functools.singledispatch) | 3.4.0.3 | Transforms a function into a single-dispatch generic function / MIT |
| [six](http://pypi.python.org/pypi/six/) | 1.11.0 | Python 2 and 3 compatibility utilities / MIT |
| [snappy](https://github.com/google/snappy) | 1.1.7 | A fast compressor/decompressor / BSD 3-clause |
| [snowballstemmer](https://github.com/shibukawa/snowball_py) | 1.2.1 | Snowball stemming library collection for Python / BSD-2-Clause |
| [sortedcollections](http://www.grantjenks.com/docs/sortedcollections/) | 1.0.1 | Python Sorted Collections / Apache-2.0 |
| [sortedcontainers](http://www.grantjenks.com/docs/sortedcontainers/) | 2.0.5 | Python Sorted Container Types: SortedList, SortedDict, and SortedSet / Apache 2.0 |
| [sphinx](http://www.sphinx-doc.org) | 1.7.9 | Sphinx is a tool that makes it easy to create intelligent and beautiful documentation / BSD 2-clause |
| sphinxcontrib | 1.0 | Python namespace for sphinxcontrib / BSD |
| [sphinxcontrib-websupport](https://pypi.python.org/pypi/sphinxcontrib-websupport) | 1.1.0 | Sphinx API for Web Apps / BSD-2-Clause |
| [sqlalchemy](http://www.sqlalchemy.org/) | 1.2.11 | Database Abstraction Library. / MIT |
| [sqlite](http://www.sqlite.org/) | 3.24.0 | Implements a self-contained, zero-configuration, SQL database engine. / Public-Domain (`<http://www.sqlite.org/copyright.html>`) |
| [ssl\_match\_hostname](http://bitbucket.org/brandon/backports.ssl_match_hostname) | 3.5.0.1 | The ssl.match\_hostname() function from Python 3.5 / PSF 2 |
| [statsmodels](https://www.statsmodels.org) | 0.9.0 | Statistical computations and models for use with SciPy / BSD 3-Clause |
| [subprocess32](https://github.com/google/python-subprocess32) | 3.5.2 | A backport of the subprocess module from Python 3.2/3.3 for use on 2.x. / PSF 2 |
| [sympy](http://sympy.org) | 1.2 | Python library for symbolic mathematics / 3-clause BSD |
| [tblib](https://github.com/ionelmc/python-tblib) | 1.3.2 | Traceback serialization library. / BSD 2-Clause |
| [terminado](https://github.com/jupyter/terminado) | 0.8.1 | Terminals served by tornado websockets / BSD 2-clause |
| [testpath](https://testpath.readthedocs.io) | 0.3.1 | Testpath is a collection of utilities for Python code working with files and commands. / MIT |
| [tk](http://www.tcl.tk/) | 8.6.8 | A dynamic programming language with GUI support. Bundles Tcl and Tk. / Tcl/Tk |
| [toolz](http://toolz.readthedocs.org/) | 0.9.0 | A functional standard library for Python. / BSD 3-Clause |
| [tornado](http://www.tornadoweb.org/) | 5.1 | A Python web framework and asynchronous networking library, originally developed at FriendFeed. / Apache 2.0 |
| [tqdm](https://pypi.python.org/pypi/tqdm) | 4.26.0 | A Fast, Extensible Progress Meter / MPLv2.0, MIT |
| [traceback2](https://github.com/testing-cabal/traceback2) | 1.4.0 | Backports of the traceback module / PSF 2.0 |
| [traitlets](http://ipython.org/) | 4.3.2 | Configuration system for Python applications / BSD 3-clause |
| [twisted](http://twistedmatrix.com/) | 18.4.0 | event-driven networking engine / MIT |
| [typing](https://docs.python.org/3.5/library/typing.html) | 3.6.6 | Type Hints for Python - backport for `Python<3.5` / PSF |
| [unicodecsv](https://github.com/jdunck/python-unicodecsv) | 0.14.1 | Drop-in replacement for csv module which supports unicode strings / BSD |
| [unittest2](http://pypi.python.org/pypi/unittest2) | 1.1.0 | The new features in unittest backported to Python 2.4+ / BSD |
| [unixodbc](http://www.unixodbc.org/) | 2.3.7 | ODBC on non MS Windows platforms / LGPL-2.1 |
| [urllib3](https://urllib3.readthedocs.io/) | 1.23 | HTTP library with thread-safe connection pooling, file post, and more. / MIT |
| [wcwidth](https://github.com/jquast/wcwidth) | 0.1.7 | Measures number of Terminal column cells of wide-character codes. / MIT |
| [webencodings](https://github.com/gsnedders/python-webencodings) | 0.5.1 | Character encoding aliases for legacy web content / BSD 3-Clause |
| [werkzeug](http://werkzeug.pocoo.org/) | 0.14.1 | The Python WSGI Utility Library. / BSD 3-Clause |
| [wheel](https://bitbucket.org/pypa/wheel/) | 0.31.1 | A built-package format for Python. / MIT |
| [widgetsnbextension](http://ipython.org) | 3.4.1 | Interactive Widgets for Jupyter / BSD 3-clause |
| [wrapt](https://github.com/GrahamDumpleton/wrapt) | 1.10.11 | Module for decorators, wrappers and monkey patching. / BSD 2-Clause |
| [xlrd](http://www.python-excel.org/) | 1.1.0 | Library for developers to extract data from Microsoft Excel (tm) spreadsheet files / BSD 3-Clause and BSD with advertising |
| [xlsxwriter](https://xlsxwriter.readthedocs.io/) | 1.1.0 | A Python module for creating Excel XLSX files / BSD 2-Clause |
| [xlwt](http://www.python-excel.org/) | 1.3.0 | Writing data and formatting information to Excel files / BSD |
| [xz](http://tukaani.org/xz/) | 5.2.4 | Data compression software with high compression ratio / LGPL-2.1 and GPL-2.0 |
| [yaml](http://pyyaml.org/wiki/LibYAML) | 0.1.7 | A C library for parsing and emitting YAML. / MIT |
| [zeromq](http://zeromq.org) | 4.2.5 | A high-performance asynchronous messaging library. / LGPL 3 |
| [zict](http://github.com/mrocklin/zict) | 0.1.3 | Composable Dictionary Classes / BSD 3-Clause |
| [zlib](http://zlib.net/) | 1.2.11 | Massively spiffy yet delicately unobtrusive compression library / zlib |
| zope | 1.0 | web application server / BSD |
| [zope.interface](http://docs.zope.org/zope.interface/) | 4.5.0 | Interfaces for Python / ZPL 2.1 |
| Name | Version | Summary / License |
|---|---|---|
| [\_ipyw\_jlab\_nb\_ext\_conf](https://github.com/ContinuumIO/anaconda-nb-extensions-meta-config) | 0.1.0 | A configuration metapackage for enabling Anaconda-bundled jupyter extensions / BSD |
| [alabaster](http://www.sphinx-doc.org/en/stable/index.html) | 0.7.11 | Configurable, Python 2+3 compatible Sphinx theme. / BSD 3-Clause |
| [anaconda-client](http://anaconda.org) | 1.7.2 | anaconda.org command line client library / BSD 3-clause |
| [anaconda-navigator](https://github.com/ContinuumIO/navigator) | 1.9.2 | Anaconda Navigator / proprietary - Continuum Analytics, Inc. |
| [anaconda-project](https://github.com/Anaconda-Platform/anaconda-project) | 0.8.2 | Tool for encapsulating, running, and reproducing data science projects / BSD 3-Clause |
| [appdirs](http://github.com/ActiveState/appdirs) | 1.4.3 | A small Python module for determining appropriate platform-specific dirs. / MIT |
| [asn1crypto](https://github.com/wbond/asn1crypto) | 0.24.0 | Python ASN.1 library with a focus on performance and a pythonic API / MIT |
| [astroid](https://www.astroid.org/) | 1.6.5 | A abstract syntax tree for Python with inference support. / LGPL 2.1 |
| [astropy](http://www.astropy.org/) | 2.0.8 | Community-developed Python Library for Astronomy / BSD |
| [atomicwrites](https://github.com/untitaker/python-atomicwrites) | 1.2.1 | Atomic file writes. / MIT |
| [attrs](https://attrs.readthedocs.io/en/stable/) | 18.2.0 | attrs is the Python package that will bring back the joy of writing classes by relieving you from the drudgery of implementing object protocols (aka dunder methods). / MIT |
| [automat](https://github.com/glyph/Automat) | 0.7.0 | self-service finite-state machines for the programmer on the go / MIT |
| [babel](http://babel.pocoo.org/) | 2.6.0 | Utilities to internationalize and localize Python applications / BSD 3-clause |
| [backports](https://bitbucket.org/brandon/backports) | 1.0 | / BSD |
| [backports.functools\_lru\_cache](https://github.com/jaraco/backports.functools_lru_cache) | 1.5 | Backport of functools.lru\_cache from Python 3.3 as published at ActiveState. / MIT |
| [backports.shutil\_get\_terminal\_size](https://github.com/chrippa/backports.shutil_get_terminal_size) | 1.0.0 | A backport of the get\_terminal\_size function from Python 3.3’s shutil. / MIT |
| [backports\_abc](https://github.com/cython/backports_abc) | 0.5 | A backport of recent additions to the collections.abc module. / PSF 2 |
| [beautifulsoup4](http://www.crummy.com/software/BeautifulSoup/) | 4.6.3 | Python library designed for screen-scraping / MIT |
| [bitarray](https://github.com/ilanschnell/bitarray) | 0.8.3 | efficient arrays of booleans – C extension / PSF |
| [bkcharts](http://github.com/bokeh/bkcharts) | 0.2 | High level chart types built on top of Bokeh / BSD 3-Clause |
| blas | 1.0 | |
| [blaze](http://blaze.pydata.org) | 0.11.3 | NumPy and Pandas interface to big data / BSD 3-Clause |
| [bleach](https://github.com/mozilla/bleach) | 2.1.4 | Easy, whitelist-based HTML-sanitizing tool / Apache-2.0 |
| [blosc](https://github.com/Blosc/c-blosc) | 1.14.4 | A blocking, shuffling and loss-less compression library that can be faster than memcpy() / BSD 3-Clause |
| [bokeh](http://bokeh.pydata.org/) | 0.13.0 | Statistical and novel interactive HTML plots for Python / BSD 3-Clause |
| [boto](https://github.com/boto/boto/) | 2.49.0 | Amazon Web Services Library / MIT |
| [bottleneck](http://berkeleyanalytics.com/bottleneck) | 1.2.1 | Fast NumPy array functions written in Cython. / BSD 2-Clause |
| [bzip2](http://www.bzip.org/) | 1.0.6 | high-quality data compressor / bzip2 |
| [ca-certificates](https://github.com/conda-forge/ca-certificates-feedstock) | 2018.03.07 | Certificates for use with other packages. / ISC |
| [cairo](http://cairographics.org/) | 1.14.12 | Cairo is a 2D graphics library with support for multiple output devices. / LGPL 2.1 or MPL 1.1 |
| [cdecimal](http://www.bytereef.org/mpdecimal/index.html) | 2.3 | Fast drop-in replacement for decimal.py / BSD 2-Clause |
| [certifi](http://certifi.io/) | 2018.8.24 | Python package for providing Mozilla’s CA Bundle. / ISC |
| [cffi](https://bitbucket.org/cffi/cffi) | 1.11.5 | Foreign Function Interface for Python calling C code. / MIT |
| [chardet](https://github.com/chardet/chardet) | 3.0.4 | Universal character encoding detector / LGPL2 |
| [click](http://click.pocoo.org/) | 6.7 | A simple wrapper around optparse for powerful command line utilities. / BSD 3-Clause |
| [cloudpickle](https://github.com/cloudpipe/cloudpickle) | 0.5.5 | Extended pickling support for Python objects / BSD 3-Clause |
| [clyent](https://github.com/Anaconda-Platform/clyent) | 1.2.2 | Command line client library for windows and posix / BSD 3-Clause |
| [colorama](https://github.com/tartley/colorama) | 0.3.9 | Cross-platform colored terminal text. / BSD 3-Clause |
| [conda](https://conda.io) | 4.5.11 | OS-agnostic, system-level binary package and environment manager. / BSD 3-Clause |
| [conda-build](https://github.com/conda/conda-build) | 3.15.1 | tools for building conda packages / BSD 3-Clause |
| [conda-env](https://github.com/conda/conda-env) | 2.6.0 | Tools for interacting with conda environments. / BSD 3-Clause |
| [configparser](http://docs.python.org/3/library/configparser.html) | 3.5.0 | This library brings the updated configparser from Python 3.5 to Python 2.6-3.5 / MIT |
| [constantly](https://github.com/twisted/constantly) | 15.1.0 | Symbolic constants in Python / MIT |
| [contextlib2](http://contextlib2.readthedocs.org) | 0.5.5 | Backports and enhancements for the contextlib module / PSF |
| [cryptography](https://github.com/pyca/cryptography) | 2.3.1 | Provides cryptographic recipes and primitives to Python developers / Apache 2.0 or BSD 3-Clause, PSF 2 |
| [curl](http://curl.haxx.se/) | 7.61.0 | tool and library for transferring data with URL syntax / MIT/X derivate (`<http://curl.haxx.se/docs/copyright.html>`) |
| [cycler](http://matplotlib.org/cycler) | 0.10.0 | Composable style cycles. / BSD 3-Clause |
| [cython](http://www.cython.org/) | 0.28.5 | The Cython compiler for writing C extensions for the Python language / Apache-2.0 |
| [cytoolz](https://github.com/pytoolz/cytoolz) | 0.9.0.1 | Cython implementation of Toolz. High performance functional utilities. / BSD 3-Clause |
| [dask](http://github.com/dask/dask/) | 0.19.1 | Parallel Python with task scheduling / BSD 3-Clause |
| [dask-core](http://github.com/dask/dask/) | 0.19.1 | Parallel Python with task scheduling / BSD 3-Clause |
| [datashape](http://datashape.pydata.org) | 0.5.4 | A data description language. / BSD 2-Clause |
| [dbus](http://www.freedesktop.org/wiki/Software/dbus/) | 1.13.2 | Simple message bus system for applications to talk to one another / GPL2 |
| [decorator](https://github.com/micheles/decorator) | 4.3.0 | Better living through Python with decorators. / BSD 3-Clause |
| [defusedxml](https://bitbucket.org/tiran/defusedxml) | 0.5.0 | XML bomb protection for Python stdlib modules / PSF 2.0 |
| [distributed](http://distributed.readthedocs.io/en/latest/) | 1.23.1 | Distributed computing with Dask / BSD 3-Clause |
| [docutils](http://docutils.sourceforge.net/) | 0.14 | Docutils – Python Documentation Utilities / Public Domain Dedictation and BSD 2-Clause and PSF 2.1.1 and GPL 3.0 |
| [entrypoints](https://github.com/takluyver/entrypoints) | 0.2.3 | Discover and load entry points from installed packages. / MIT License |
| [enum34](https://bitbucket.org/stoneleaf/enum34) | 1.1.6 | Python 3.4 Enum backported to 3.3, 3.2, 3.1, 2.7, 2.6, 2.5, and 2.4 / BSD 3-Clause |
| [et\_xmlfile](https://bitbucket.org/openpyxl/et_xmlfile) | 1.0.1 | An implementation of lxml.xmlfile for the standard library / MIT |
| [expat](http://expat.sourceforge.net/) | 2.2.6 | Expat XML parser library in C. / MIT |
| [fastcache](https://github.com/pbrady/fastcache) | 1.0.2 | C implementation of Python 3 lru\_cache / MIT |
| [filelock](https://github.com/benediktschmitt/py-filelock) | 3.0.8 | A platform independent file lock. / Public Domain |
| [flask](http://flask.pocoo.org) | 1.0.2 | A microframework based on Werkzeug, Jinja2 and good intentions. / BSD 3-Clause |
| [flask-cors](https://github.com/corydolphin/flask-cors) | 3.0.6 | A Flask extension adding a decorator for CORS support / MIT |
| [fontconfig](http://www.freedesktop.org/wiki/Software/fontconfig/) | 2.13.0 | A library for configuring and customizing font access. / MIT |
| [freetype](https://www.freetype.org/) | 2.9.1 | A Free, High-Quality, and Portable Font Engine / GPL-2.0 and FreeType |
| [fribidi](https://github.com/fribidi/fribidi) | 1.0.5 | The Free Implementation of the Unicode Bidirectional Algorithm. / LGPL-2.1 |
| [funcsigs](http://funcsigs.readthedocs.org) | 1.0.2 | Python function signatures from PEP362 for Python 2.6, 2.7 and 3.2+. / Apache 2.0 |
| [functools32](https://github.com/MiCHiLU/python-functools32) | 3.2.3.2 | Backport of the functools module from Python 3.2.3 for use on 2.7 and PyPy. / PSF license |
| [futures](https://github.com/agronholm/pythonfutures) | 3.2.0 | Backport of the concurrent.futures package from Python 3.2 / PSF |
| [get\_terminal\_size](https://github.com/chrippa/backports.shutil_get_terminal_size) | 1.0.0 | Get the size of the terminal window. / MIT |
| [gevent](http://www.gevent.org/) | 1.3.6 | Coroutine-based network library / MIT |
| [glib](https://developer.gnome.org/glib/) | 2.56.2 | Provides core application building blocks for libraries and applications written in C. / LGPL-2.1 |
| [glob2](https://github.com/miracle2k/python-glob2) | 0.6 | Version of the glob module that supports recursion via \*\*, and can capture patterns. / BSD-2-Clause |
| [gmp](http://gmplib.org/) | 6.1.2 | The GNU multiprecision library. / GPL 2 and LGPL 3 |
| [gmpy2](https://pypi.python.org/pypi/gmpy2) | 2.0.8 | GMP/MPIR, MPFR, and MPC interface to Python 2.6+ and 3.x / LGPL 3 |
| [graphite2](http://graphite.sil.org/) | 1.3.12 | A “smart font” system that handles the complexities of lesser-known languages of the world. / LGPLv2 |
| [greenlet](https://github.com/python-greenlet/greenlet) | 0.4.15 | Lightweight in-process concurrent programming / MIT |
| [grin](http://pypi.python.org/pypi/grin) | 1.2.1 | Enhanced grep-like tool / BSD 3-Clause |
| [gst-plugins-base](http://gstreamer.freedesktop.org/) | 1.14.0 | GStreamer Base Plug-ins / GPL2 |
| [gstreamer](http://gstreamer.freedesktop.org/) | 1.14.0 | Library for constructing graphs of media-handling components / LGPL 2 |
| [h5py](http://www.h5py.org/) | 2.8.0 | Read and write HDF5 files from Python. / BSD 3-Clause |
| [harfbuzz](http://www.freedesktop.org/wiki/Software/HarfBuzz/) | 1.8.8 | An OpenType text shaping engine. / MIT |
| [hdf5](http://www.hdfgroup.org/HDF5/) | 1.10.2 | HDF5 is a data model, library, and file format for storing and managing data / HDF5 |
| [heapdict](http://stutzbachenterprises.com/) | 1.0.0 | A heap with decrease-key and increase-key operations / BSD 3-Clause |
| [html5lib](https://github.com/html5lib/html5lib-python) | 1.0.1 | HTML parser based on the WHATWG HTML specification / MIT |
| [hyperlink](https://github.com/python-hyper/hyperlink) | 18.0.0 | Immutable, Pythonic, correct URLs. / MIT |
| [icu](http://site.icu-project.org/) | 58.2 | International Components for Unicode. / MIT |
| [idna](https://github.com/kjd/idna) | 2.7 | Internationalized Domain Names in Applications (IDNA). / BSD Like |
| [imageio](http://imageio.github.io) | 2.4.1 | a Python library for reading and writing image data / BSD 2-Clause |
| [imagesize](https://github.com/shibukawa/imagesize_py) | 1.1.0 | Getting image size from png/jpeg/jpeg2000/gif file / MIT |
| [incremental](https://twistedmatrix.com) | 17.5.0 | A library that versions your Python projects / MIT License |
| [intel-openmp](https://software.intel.com/en-us/node/522690) | 2019.0 | Math library for Intel and compatible processors / proprietary - Intel |
| [ipaddress](https://github.com/phihag/ipaddress) | 1.0.22 | IPv4/IPv6 manipulation library / PSF 2 |
| [ipykernel](http://ipython.org) | 4.9.0 | IPython Kernel for Jupyter / BSD 3-clause |
| [ipython](http://ipython.org/) | 5.8.0 | IPython: Productive Interactive Computing / BSD 3-clause |
| [ipython\_genutils](http://ipython.org) | 0.2.0 | vestigial utilities from IPython / BSD 3-Clause |
| [ipywidgets](https://github.com/ipython/ipywidgets) | 7.4.1 | Jupyter Interactive Widgets / BSD 3-clause |
| [isort](https://github.com/timothycrosley/isort) | 4.3.4 | A Python utility / library to sort Python imports. / MIT |
| [itsdangerous](https://github.com/pallets/itsdangerous) | 0.24 | Various helpers to pass trusted data to untrusted environments. / BSD 3-Clause |
| [jbig](https://www.cl.cam.ac.uk/~mgk25/jbigkit) | 2.1 | Implementation of the JBIG1 data compression standard / GPL-2.0 |
| [jdcal](https://github.com/phn/jdcal) | 1.4 | Julian dates from proleptic Gregorian and Julian calendars. / BSD 2-Clause |
| [jedi](https://github.com/davidhalter/jedi/) | 0.12.1 | An autocompletion tool for Python that can be used for text editors. / MIT |
| [jinja2](http://jinja.pocoo.org) | 2.10 | An easy to use stand-alone template engine written in pure python. / 3-Clause BSD |
| [jpeg](http://www.ijg.org/) | 9b | read/write jpeg COM, EXIF, IPTC medata / Custom free software license |
| [jsonschema](https://github.com/Julian/jsonschema) | 2.6.0 | An implementation of JSON Schema validation for Python / MIT |
| [jupyter](http://jupyter.org) | 1.0.0 | Jupyter metapackage. Install all the Jupyter components in one go. / BSD 3-Clause |
| [jupyter\_client](http://jupyter.org) | 5.2.3 | Jupyter protocol implementation and client libraries / BSD 3-clause |
| [jupyter\_console](http://jupyter.org) | 5.2.0 | Jupyter terminal console / BSD 3-Clause |
| [jupyter\_core](http://jupyter.org) | 4.4.0 | Core common functionality of Jupyter projects. / BSD 3-clause |
| [jupyterlab](https://github.com/jupyterlab/jupyterlab) | 0.33.11 | JupyterLab PRE-ALPHA / BSD-3-Clause |
| [jupyterlab\_launcher](http://github.com/jupyterlab/jupyterlab_launcher) | 0.11.2 | A Launcher for JupyterLab based applications. / BSD 3-Clause |
| [kiwisolver](https://github.com/nucleic/kiwi) | 1.0.1 | A fast implementation of the Cassowary constraint solver / BSD 3-Clause |
| [lazy-object-proxy](https://github.com/ionelmc/python-lazy-object-proxy) | 1.3.1 | A fast and thorough lazy object proxy. / BSD 2-Clause |
| [libcurl](http://curl.haxx.se/) | 7.61.0 | tool and library for transferring data with URL syntax / MIT/X derivate (`<http://curl.haxx.se/docs/copyright.html>`) |
| [libedit](http://thrysoee.dk/editline/) | 3.1.20170329 | Editline Library (libedit) / NetBSD |
| [libffi](https://sourceware.org/libffi/) | 3.2.1 | A Portable Foreign Function Interface Library. / Custom |
| [libgcc-ng](https://gcc.gnu.org/onlinedocs/gccint/Libgcc.html) | 8.2.0 | The GCC low-level runtime library / GPL |
| [libgfortran-ng](https://gcc.gnu.org/) | 7.3.0 | The GNU Fortran Runtime Library / GPL |
| [libpng](http://www.libpng.org/pub/png/libpng.html) | 1.6.34 | PNG reference library. / zlib/libpng |
| [libsodium](http://libsodium.org) | 1.0.16 | A modern and easy-to-use crypto library. / ISC |
| [libssh2](https://www.libssh2.org/) | 1.8.0 | the SSH library / BSD 3-Clause |
| [libstdcxx-ng](https://gcc.gnu.org/) | 8.2.0 | The GNU C++ Runtime Library / GPL3 with runtime exception |
| [libtiff](http://www.libtiff.org/) | 4.0.9 | Support for the Tag Image File Format (TIFF). / HPND |
| [libtool](http://www.gnu.org/software/libtool/) | 2.4.6 | The GNU Portable Library Tool / GPL 3 |
| [libuuid](http://sourceforge.net/projects/libuuid/) | 1.0.3 | Portable uuid C library. / BSD 3-Clause |
| [libxcb](http://xcb.freedesktop.org/) | 1.13 | This is the C-language Binding (XCB) package to the X Window System protocol / MIT |
| [libxml2](http://xmlsoft.org/) | 2.9.8 | The XML C parser and toolkit of Gnome / MIT |
| [libxslt](http://xmlsoft.org/XSLT/) | 1.1.32 | The XSLT C library developed for the GNOME project / MIT |
| [linecache2](https://github.com/testing-cabal/linecache2) | 1.0.0 | Backport of the linecache module / PSF 1.0 |
| [llvmlite](https://github.com/numba/llvmlite) | 0.24.0 | A lightweight LLVM python binding for writing JIT compilers / New BSD License |
| [locket](https://github.com/mwilliamson/locket.py) | 0.2.0 | File-based locks for Python for Linux and Windows / BSD 2-Clause |
| [lxml](http://lxml.de/) | 4.2.5 | Pythonic binding for the C libraries libxml2 and libxslt. / BSD 3-Clause, GPL-2.0, ZPL-2.0, and ElementTree |
| [lzo](http://www.oberhumer.com/opensource/lzo/) | 2.10 | LZO is a portable lossless data compression library written in ANSI C. / GPL v2+ |
| [markupsafe](https://www.palletsprojects.com/p/markupsafe/) | 1.0 | A Python module that implements the jinja2.Markup string / BSD 3-Clause |
| [matplotlib](http://matplotlib.org/) | 2.2.3 | Publication quality figures in Python / PSF-based |
| [mccabe](https://github.com/PyCQA/mccabe) | 0.6.1 | McCabe complexity checker for Python / MIT |
| [mistune](https://github.com/lepture/mistune) | 0.8.3 | The fastest markdown parser in pure Python. / BSD 3-Clause |
| [mkl](https://software.intel.com/en-us/mkl) | 2019.0 | Math library for Intel and compatible processors / proprietary - Intel |
| [mkl-service](https://github.com/ContinuumIO/mkl-service) | 1.1.2 | Python bindings to MKL service functions / 3-clause BSD |
| [mkl\_fft](http://github.com/IntelPython/mkl_fft) | 1.0.4 | NumPy-based implementation of Fast Fourier Transform using Intel (R) Math Kernel Library. / BSD 3-Clause |
| [mkl\_random](http://github.com/IntelPython/mkl_random) | 1.0.1 | Intel (R) MKL-powered package for sampling from common probability distributions into NumPy arrays. / BSD 3-Clause |
| [more-itertools](https://github.com/erikrose/more-itertools) | 4.3.0 | More routines for operating on iterables, beyond itertools / MIT |
| [mpc](http://www.multiprecision.org/) | 1.1.0 | A C library for the arithmetic of complex numbers with arbitrarily high precision. / LGPL 3 |
| [mpfr](http://www.mpfr.org/) | 4.0.1 | The MPFR library is a C library for multiple-precision floating-point computations with correct rounding. / LGPL 3 |
| [mpmath](http://mpmath.org) | 1.0.0 | Python library for arbitrary-precision floating-point arithmetic / BSD 3-Clause |
| [msgpack-python](http://msgpack.org/) | 0.5.6 | MessagePack (de)serializer. / Apache 2.0 |
| [multipledispatch](https://github.com/mrocklin/multipledispatch/) | 0.6.0 | Multiple dispatch in Python / BSD 3-Clause |
| [navigator-updater](https://github.com/ContinuumIO/navigator-updater) | 0.2.1 | Anaconda Navigator Updater / proprietary - Continuum Analytics, Inc. |
| [nbconvert](http://jupyter.org) | 5.4.0 | Converting Jupyter Notebooks / BSD-3-Clause |
| [nbformat](http://jupyter.org) | 4.4.0 | The reference implementation of the Jupyter Notebook format / BSD 3-clause |
| [ncurses](http://www.gnu.org/software/ncurses/) | 6.1 | Library for text-based user interfaces / Free software (MIT-like) |
| [networkx](https://networkx.github.io/) | 2.1 | Python package for creating and manipulating complex networks / BSD 3-Clause |
| [nltk](http://nltk.org/) | 3.3.0 | Build Python programs to work with human language data / Apache 2.0 |
| [nose](http://readthedocs.org/docs/nose/) | 1.3.7 | Nose extends unittest to make testing easier / LGPL-2.1 |
| [notebook](http://jupyter.org) | 5.6.0 | Jupyter Notebook / BSD 3-clause |
| [numba](http://numba.github.com) | 0.39.0 | NumPy aware dynamic Python compiler using LLVM / BSD 2-clause |
| [numexpr](https://github.com/pydata/numexpr) | 2.6.8 | Fast numerical expression evaluator for NumPy. / MIT |
| [numpy](http://numpy.scipy.org/) | 1.15.1 | Array processing for numbers, strings, records, and objects. / BSD 3-Clause |
| numpy-base | 1.15.1 | |
| [numpydoc](https://github.com/numpy/numpydoc) | 0.8.0 | Sphinx extension to support docstrings in Numpy format / BSD 3-Clause |
| [odo](http://odo.pydata.org) | 0.5.1 | Data migration in Python / BSD-3-Clause |
| [olefile](http://www.decalage.info/python/olefileio) | 0.46 | parse, read and write Microsoft OLE2 files / BSD 2-Clause |
| [openpyxl](https://openpyxl.readthedocs.io) | 2.5.6 | A Python library to read/write Excel 2010 xlsx/xlsm files / MIT |
| [openssl](http://www.openssl.org/) | 1.0.2p | OpenSSL is an open-source implementation of the SSL and TLS protocols / OpenSSL |
| [packaging](https://github.com/pypa/packaging) | 17.1 | Core utilities for Python packages / Apache 2.0 or BSD 2-Clause |
| [pandas](http://pandas.pydata.org) | 0.23.4 | High-performance, easy-to-use data structures and data analysis tools. / BSD 3-clause |
| [pandoc](http://pandoc.org/) | 1.19.2.1 | Universal markup converter (repackaged binaries). / GPL-2.0 |
| [pandocfilters](https://github.com/jgm/pandocfilters) | 1.4.2 | A python module for writing pandoc filters / BSD-3-Clause |
| [pango](http://www.pango.org/) | 1.42.4 | Text layout and rendering engine. / LGPL-2.1 |
| [parso](https://github.com/davidhalter/parso) | 0.3.1 | A Python Parser / MIT |
| [partd](https://github.com/dask/partd) | 0.3.8 | Data structure for on-disk shuffle operations / BSD 3-Clause |
| [patchelf](http://nixos.org/patchelf.html) | 0.9 | A small utility to modify the dynamic linker and RPATH of ELF executables. / GPL 3 |
| [path.py](https://github.com/jaraco/path.py) | 11.1.0 | A module wrapper for os.path / MIT |
| [pathlib2](https://github.com/mcmtroffaes/pathlib2) | 2.3.2 | Fork of pathlib aiming to support the full stdlib Python API. / MIT |
| [patsy](https://github.com/pydata/patsy) | 0.5.0 | Describing statistical models in Python using symbolic formulas / BSD-2-Clause, PSF2 |
| [pcre](http://www.pcre.org/) | 8.42 | Regular expression pattern matching using the same syntax and semantics as Perl 5. / BSD 3-Clause |
| [pep8](http://pep8.readthedocs.org/) | 1.7.1 | Python style guide checker / MIT |
| [pexpect](http://pexpect.sourceforge.net/) | 4.6.0 | Pexpect makes Python a better tool for controlling other applications. / ISC |
| [pickleshare](https://github.com/vivainio/pickleshare) | 0.7.4 | Tiny ‘shelve’-like database with concurrency support / MIT |
| [pillow](https://pillow.readthedocs.io) | 5.2.0 | Pillow is the friendly PIL fork by Alex Clark and Contributors. / PIL |
| [pip](https://pip.pypa.io/en/stable/) | 10.0.1 | PyPA recommended tool for installing Python packages / MIT |
| [pixman](http://www.pixman.org/) | 0.34.0 | A low-level software library for pixel manipulation. / MIT |
| [pkginfo](https://code.launchpad.net/~tseaver/pkginfo/trunk) | 1.4.2 | Query metadatdata from sdists / bdists / installed packages. / MIT |
| [pluggy](https://github.com/pytest-dev/pluggy) | 0.7.1 | Plugin registration and hook calling for Python / MIT |
| [ply](http://www.dabeaz.com/ply/index.html) | 3.11 | Python Lex-Yacc / BSD 3-clause |
| [prometheus\_client](https://github.com/prometheus/client_python) | 0.3.1 | Python client for the Prometheus monitoring system. / Apache 2.0 |
| [prompt\_toolkit](https://github.com/jonathanslenders/python-prompt-toolkit) | 1.0.15 | Library for building powerful interactive command lines in Python / BSD 3-clause |
| [psutil](https://github.com/giampaolo/psutil) | 5.4.7 | A cross-platform process and system utilities module for Python / BSD 3-Clause |
| [ptyprocess](https://github.com/pexpect/ptyprocess) | 0.6.0 | Run a subprocess in a pseudo terminal / ISC |
| [py](https://github.com/pytest-dev/py) | 1.6.0 | library with cross-python path, ini-parsing, io, code, log facilities / MIT |
| [pyasn1](https://github.com/etingof/pyasn1) | 0.4.4 | ASN.1 types and codecs / BSD 2-Clause |
| [pyasn1-modules](http://pyasn1.sourceforge.net/) | 0.2.2 | A collection of ASN.1-based protocols modules. / BSD 2-Clause |
| [pycairo](http://cairographics.org/pycairo/) | 1.17.1 | Python bindings for the Cairo graphics library. / LGPL 2.1, MPL 1.1 |
| [pycodestyle](https://pycodestyle.readthedocs.io/) | 2.4.0 | Python style guide checker / MIT |
| [pycosat](https://github.com/ContinuumIO/pycosat) | 0.6.3 | Bindings to picosat (a SAT solver) / MIT |
| [pycparser](https://github.com/eliben/pycparser) | 2.18 | Complete C99 parser in pure Python / BSD 3-clause |
| [pycrypto](http://www.pycrypto.org/) | 2.6.1 | Cryptographic modules for Python. / Public Domain |
| [pycurl](http://pycurl.sourceforge.net/) | 7.43.0.2 | A Python Interface To The cURL library / LGPL, MIT |
| [pyflakes](https://github.com/PyCQA/pyflakes) | 2.0.0 | Pyflakes analyzes programs and detects various errors. / MIT |
| [pygments](http://pygments.org/) | 2.2.0 | Generic syntax highlighting package / BSD 2-clause |
| [pylint](http://www.pylint.org/) | 1.9.2 | python code static checker / GPL |
| [pyodbc](https://github.com/mkleehammer/pyodbc) | 4.0.24 | DB API Module for ODBC / MIT |
| [pyopenssl](https://github.com/pyca/pyopenssl) | 18.0.0 | Python wrapper module around the OpenSSL library / Apache 2.0 |
| [pyparsing](http://pyparsing.wikispaces.com/) | 2.2.0 | Create and execute simple grammars / MIT |
| [pyqt](http://www.riverbankcomputing.co.uk/software/pyqt) | 5.9.2 | Python binding of the cross-platform GUI toolkit Qt. / Commercial, GPL-2.0, GPL-3.0 |
| [pysocks](https://github.com/Anorov/PySocks) | 1.6.8 | A Python SOCKS client module. See [Anorov/PySocks](https://github.com/Anorov/PySocks) for more information. / BSD 3-Clause |
| [pytables](http://www.pytables.org) | 3.4.4 | Brings together Python, HDF5 and NumPy to easily handle large amounts of data. / BSD 3-Clause |
| [pytest](https://docs.pytest.org/en/latest/) | 3.8.0 | Simple and powerful testing with Python. / MIT |
| [python](http://www.python.org/) | 2.7.15 | General purpose programming language / PSF |
| [python-dateutil](https://dateutil.readthedocs.org/) | 2.7.3 | Extensions to the standard Python datetime module. / BSD 3 Clause |
| [pytz](http://pythonhosted.org/pytz/) | 2018.5 | World timezone definitions, modern and historical. / MIT |
| [pywavelets](https://github.com/PyWavelets/pywt) | 1.0.0 | Discrete Wavelet Transforms in Python. / MIT |
| [pyyaml](http://pyyaml.org/wiki/PyYAML) | 3.13 | YAML parser and emitter for Python / MIT |
| [pyzmq](https://github.com/zeromq/pyzmq) | 17.1.2 | Python bindings for zeromq / BSD 3-clause |
| [qt](http://qt-project.org) | 5.9.6 | Qt is a cross-platform application and UI framework. / LGPL-3.0 |
| [qtawesome](https://github.com/spyder-ide/qtawesome) | 0.4.4 | Iconic fonts in PyQt and PySide applications / MIT |
| [qtconsole](http://jupyter.org) | 4.4.1 | Jupyter Qt console / BSD 3-Clause |
| [qtpy](https://github.com/spyder-ide/qtpy) | 1.5.0 | Abstraction layer for PyQt5/PyQt4/PySide / MIT |
| [readline](https://cnswww.cns.cwru.edu/php/chet/readline/rltop.html) | 7.0 | library for editing command lines as they are typed in / GPL-3.0 |
| [requests](http://python-requests.org) | 2.19.1 | Python HTTP for Humans. / Apache 2.0 |
| [rope](https://github.com/python-rope/rope) | 0.11.0 | A python refactoring library… / GPL 2.0 |
| [ruamel\_yaml](https://bitbucket.org/ruamel/yaml) | 0.15.46 | A patched copy of ruamel.yaml. / MIT |
| [scandir](https://github.com/benhoyt/scandir) | 1.9.0 | scandir, a better directory iterator and faster os.walk() / BSD 3-Clause |
| [scikit-image](http://scikit-image.org/) | 0.14.0 | Image processing routines for SciPy. / BSD 3-Clause |
| [scikit-learn](http://scikit-learn.org/) | 0.19.2 | A set of python modules for machine learning and data mining / BSD 3-Clause |
| [scipy](http://www.scipy.org/) | 1.1.0 | Scientific Library for Python / BSD 3-Clause |
| [seaborn](https://seaborn.pydata.org) | 0.9.0 | Statistical data visualization / BSD 3-Clause |
| [send2trash](https://github.com/hsoft/send2trash) | 1.5.0 | Python library to natively send files to Trash (or Recycle bin) on all platforms. / BSD-3-Clause |
| [service\_identity](https://github.com/pyca/service_identity) | 17.0.0 | Service identity verification for pyOpenSSL. / MIT |
| [setuptools](https://github.com/pypa/setuptools) | 40.2.0 | Download, build, install, upgrade, and uninstall Python packages / MIT |
| [simplegeneric](http://cheeseshop.python.org/pypi/simplegeneric) | 0.8.1 | Simple generic functions (similar to Python’s own len(), pickle.dump(), etc.) / Zope Public |
| [singledispatch](http://docs.python.org/3/library/functools.html#functools.singledispatch) | 3.4.0.3 | Transforms a function into a single-dispatch generic function / MIT |
| [sip](http://www.riverbankcomputing.com/software/sip/intro) | 4.19.8 | Create Python bindings for C and C++ libraries / GPL-3.0 |
| [six](http://pypi.python.org/pypi/six/) | 1.11.0 | Python 2 and 3 compatibility utilities / MIT |
| [snappy](https://github.com/google/snappy) | 1.1.7 | A fast compressor/decompressor / BSD 3-clause |
| [snowballstemmer](https://github.com/shibukawa/snowball_py) | 1.2.1 | Snowball stemming library collection for Python / BSD-2-Clause |
| [sortedcollections](http://www.grantjenks.com/docs/sortedcollections/) | 1.0.1 | Python Sorted Collections / Apache-2.0 |
| [sortedcontainers](http://www.grantjenks.com/docs/sortedcontainers/) | 2.0.5 | Python Sorted Container Types: SortedList, SortedDict, and SortedSet / Apache 2.0 |
| [sphinx](http://www.sphinx-doc.org) | 1.7.9 | Sphinx is a tool that makes it easy to create intelligent and beautiful documentation / BSD 2-clause |
| sphinxcontrib | 1.0 | Python namespace for sphinxcontrib / BSD |
| [sphinxcontrib-websupport](https://pypi.python.org/pypi/sphinxcontrib-websupport) | 1.1.0 | Sphinx API for Web Apps / BSD-2-Clause |
| [spyder](https://www.spyder-ide.org/) | 3.3.1 | The Scientific Python Development Environment / MIT |
| [spyder-kernels](https://github.com/spyder-ide/spyder-kernels) | 0.2.6 | Jupyter kernels for the Spyder console / MIT |
| [sqlalchemy](http://www.sqlalchemy.org/) | 1.2.11 | Database Abstraction Library. / MIT |
| [sqlite](http://www.sqlite.org/) | 3.24.0 | Implements a self-contained, zero-configuration, SQL database engine. / Public-Domain (`<http://www.sqlite.org/copyright.html>`) |
| [ssl\_match\_hostname](http://bitbucket.org/brandon/backports.ssl_match_hostname) | 3.5.0.1 | The ssl.match\_hostname() function from Python 3.5 / PSF 2 |
| [statsmodels](https://www.statsmodels.org) | 0.9.0 | Statistical computations and models for use with SciPy / BSD 3-Clause |
| [subprocess32](https://github.com/google/python-subprocess32) | 3.5.2 | A backport of the subprocess module from Python 3.2/3.3 for use on 2.x. / PSF 2 |
| [sympy](http://sympy.org) | 1.2 | Python library for symbolic mathematics / 3-clause BSD |
| [tblib](https://github.com/ionelmc/python-tblib) | 1.3.2 | Traceback serialization library. / BSD 2-Clause |
| [terminado](https://github.com/jupyter/terminado) | 0.8.1 | Terminals served by tornado websockets / BSD 2-clause |
| [testpath](https://testpath.readthedocs.io) | 0.3.1 | Testpath is a collection of utilities for Python code working with files and commands. / MIT |
| [tk](http://www.tcl.tk/) | 8.6.8 | A dynamic programming language with GUI support. Bundles Tcl and Tk. / Tcl/Tk |
| [toolz](http://toolz.readthedocs.org/) | 0.9.0 | A functional standard library for Python. / BSD 3-Clause |
| [tornado](http://www.tornadoweb.org/) | 5.1 | A Python web framework and asynchronous networking library, originally developed at FriendFeed. / Apache 2.0 |
| [tqdm](https://pypi.python.org/pypi/tqdm) | 4.26.0 | A Fast, Extensible Progress Meter / MPLv2.0, MIT |
| [traceback2](https://github.com/testing-cabal/traceback2) | 1.4.0 | Backports of the traceback module / PSF 2.0 |
| [traitlets](http://ipython.org/) | 4.3.2 | Configuration system for Python applications / BSD 3-clause |
| [twisted](http://twistedmatrix.com/) | 18.7.0 | event-driven networking engine / MIT |
| [typing](https://docs.python.org/3.5/library/typing.html) | 3.6.6 | Type Hints for Python - backport for `Python<3.5` / PSF |
| [unicodecsv](https://github.com/jdunck/python-unicodecsv) | 0.14.1 | Drop-in replacement for csv module which supports unicode strings / BSD |
| [unittest2](http://pypi.python.org/pypi/unittest2) | 1.1.0 | The new features in unittest backported to Python 2.4+ / BSD |
| [unixodbc](http://www.unixodbc.org/) | 2.3.7 | ODBC on non MS Windows platforms / LGPL-2.1 |
| [urllib3](https://urllib3.readthedocs.io/) | 1.23 | HTTP library with thread-safe connection pooling, file post, and more. / MIT |
| [wcwidth](https://github.com/jquast/wcwidth) | 0.1.7 | Measures number of Terminal column cells of wide-character codes. / MIT |
| [webencodings](https://github.com/gsnedders/python-webencodings) | 0.5.1 | Character encoding aliases for legacy web content / BSD 3-Clause |
| [werkzeug](http://werkzeug.pocoo.org/) | 0.14.1 | The Python WSGI Utility Library. / BSD 3-Clause |
| [wheel](https://bitbucket.org/pypa/wheel/) | 0.31.1 | A built-package format for Python. / MIT |
| [widgetsnbextension](http://ipython.org) | 3.4.1 | Interactive Widgets for Jupyter / BSD 3-clause |
| [wrapt](https://github.com/GrahamDumpleton/wrapt) | 1.10.11 | Module for decorators, wrappers and monkey patching. / BSD 2-Clause |
| [xlrd](http://www.python-excel.org/) | 1.1.0 | Library for developers to extract data from Microsoft Excel (tm) spreadsheet files / BSD 3-Clause and BSD with advertising |
| [xlsxwriter](https://xlsxwriter.readthedocs.io/) | 1.1.0 | A Python module for creating Excel XLSX files / BSD 2-Clause |
| [xlwt](http://www.python-excel.org/) | 1.3.0 | Writing data and formatting information to Excel files / BSD |
| [xz](http://tukaani.org/xz/) | 5.2.4 | Data compression software with high compression ratio / LGPL-2.1 and GPL-2.0 |
| [yaml](http://pyyaml.org/wiki/LibYAML) | 0.1.7 | A C library for parsing and emitting YAML. / MIT |
| [zeromq](http://zeromq.org) | 4.2.5 | A high-performance asynchronous messaging library. / LGPL 3 |
| [zict](http://github.com/mrocklin/zict) | 0.1.3 | Composable Dictionary Classes / BSD 3-Clause |
| [zlib](http://zlib.net/) | 1.2.11 | Massively spiffy yet delicately unobtrusive compression library / zlib |
| zope | 1.0 | web application server / BSD |
| [zope.interface](http://docs.zope.org/zope.interface/) | 4.5.0 | Interfaces for Python / ZPL 2.1 |
| Name | Version | Summary / License |
|---|---|---|
| [\_ipyw\_jlab\_nb\_ext\_conf](https://github.com/ContinuumIO/anaconda-nb-extensions-meta-config) | 0.1.0 | A configuration metapackage for enabling Anaconda-bundled jupyter extensions / BSD |
| [alabaster](http://www.sphinx-doc.org/en/stable/index.html) | 0.7.11 | Configurable, Python 2+3 compatible Sphinx theme. / BSD 3-Clause |
| [anaconda-client](http://anaconda.org) | 1.7.2 | anaconda.org command line client library / BSD 3-clause |
| [anaconda-navigator](https://github.com/ContinuumIO/navigator) | 1.9.2 | Anaconda Navigator / proprietary - Continuum Analytics, Inc. |
| [anaconda-project](https://github.com/Anaconda-Platform/anaconda-project) | 0.8.2 | Tool for encapsulating, running, and reproducing data science projects / BSD 3-Clause |
| [appdirs](http://github.com/ActiveState/appdirs) | 1.4.3 | A small Python module for determining appropriate platform-specific dirs. / MIT |
| [asn1crypto](https://github.com/wbond/asn1crypto) | 0.24.0 | Python ASN.1 library with a focus on performance and a pythonic API / MIT |
| [astroid](https://www.astroid.org/) | 1.6.5 | A abstract syntax tree for Python with inference support. / LGPL 2.1 |
| [astropy](http://www.astropy.org/) | 2.0.8 | Community-developed Python Library for Astronomy / BSD |
| [atomicwrites](https://github.com/untitaker/python-atomicwrites) | 1.2.1 | Atomic file writes. / MIT |
| [attrs](https://attrs.readthedocs.io/en/stable/) | 18.2.0 | attrs is the Python package that will bring back the joy of writing classes by relieving you from the drudgery of implementing object protocols (aka dunder methods). / MIT |
| [automat](https://github.com/glyph/Automat) | 0.7.0 | self-service finite-state machines for the programmer on the go / MIT |
| [babel](http://babel.pocoo.org/) | 2.6.0 | Utilities to internationalize and localize Python applications / BSD 3-clause |
| [backports](https://bitbucket.org/brandon/backports) | 1.0 | / BSD |
| [backports.functools\_lru\_cache](https://github.com/jaraco/backports.functools_lru_cache) | 1.5 | Backport of functools.lru\_cache from Python 3.3 as published at ActiveState. / MIT |
| [backports.shutil\_get\_terminal\_size](https://github.com/chrippa/backports.shutil_get_terminal_size) | 1.0.0 | A backport of the get\_terminal\_size function from Python 3.3’s shutil. / MIT |
| [backports\_abc](https://github.com/cython/backports_abc) | 0.5 | A backport of recent additions to the collections.abc module. / PSF 2 |
| [beautifulsoup4](http://www.crummy.com/software/BeautifulSoup/) | 4.6.3 | Python library designed for screen-scraping / MIT |
| [bitarray](https://github.com/ilanschnell/bitarray) | 0.8.3 | efficient arrays of booleans – C extension / PSF |
| [bkcharts](http://github.com/bokeh/bkcharts) | 0.2 | High level chart types built on top of Bokeh / BSD 3-Clause |
| blas | 1.0 | |
| [blaze](http://blaze.pydata.org) | 0.11.3 | NumPy and Pandas interface to big data / BSD 3-Clause |
| [bleach](https://github.com/mozilla/bleach) | 2.1.4 | Easy, whitelist-based HTML-sanitizing tool / Apache-2.0 |
| [blosc](https://github.com/Blosc/c-blosc) | 1.14.4 | A blocking, shuffling and loss-less compression library that can be faster than memcpy() / BSD 3-Clause |
| [bokeh](http://bokeh.pydata.org/) | 0.13.0 | Statistical and novel interactive HTML plots for Python / BSD 3-Clause |
| [boto](https://github.com/boto/boto/) | 2.49.0 | Amazon Web Services Library / MIT |
| [bottleneck](http://berkeleyanalytics.com/bottleneck) | 1.2.1 | Fast NumPy array functions written in Cython. / BSD 2-Clause |
| [bzip2](http://www.bzip.org/) | 1.0.6 | high-quality data compressor / bzip2 |
| [ca-certificates](https://github.com/conda-forge/ca-certificates-feedstock) | 2018.03.07 | Certificates for use with other packages. / ISC |
| [cairo](http://cairographics.org/) | 1.14.12 | Cairo is a 2D graphics library with support for multiple output devices. / LGPL 2.1 or MPL 1.1 |
| [cdecimal](http://www.bytereef.org/mpdecimal/index.html) | 2.3 | Fast drop-in replacement for decimal.py / BSD 2-Clause |
| [certifi](http://certifi.io/) | 2018.8.24 | Python package for providing Mozilla’s CA Bundle. / ISC |
| [cffi](https://bitbucket.org/cffi/cffi) | 1.11.5 | Foreign Function Interface for Python calling C code. / MIT |
| [chardet](https://github.com/chardet/chardet) | 3.0.4 | Universal character encoding detector / LGPL2 |
| [click](http://click.pocoo.org/) | 6.7 | A simple wrapper around optparse for powerful command line utilities. / BSD 3-Clause |
| [cloudpickle](https://github.com/cloudpipe/cloudpickle) | 0.5.5 | Extended pickling support for Python objects / BSD 3-Clause |
| [clyent](https://github.com/Anaconda-Platform/clyent) | 1.2.2 | Command line client library for windows and posix / BSD 3-Clause |
| [colorama](https://github.com/tartley/colorama) | 0.3.9 | Cross-platform colored terminal text. / BSD 3-Clause |
| [conda](https://conda.io) | 4.5.11 | OS-agnostic, system-level binary package and environment manager. / BSD 3-Clause |
| [conda-build](https://github.com/conda/conda-build) | 3.15.1 | tools for building conda packages / BSD 3-Clause |
| [conda-env](https://github.com/conda/conda-env) | 2.6.0 | Tools for interacting with conda environments. / BSD 3-Clause |
| [configparser](http://docs.python.org/3/library/configparser.html) | 3.5.0 | This library brings the updated configparser from Python 3.5 to Python 2.6-3.5 / MIT |
| [constantly](https://github.com/twisted/constantly) | 15.1.0 | Symbolic constants in Python / MIT |
| [contextlib2](http://contextlib2.readthedocs.org) | 0.5.5 | Backports and enhancements for the contextlib module / PSF |
| [cryptography](https://github.com/pyca/cryptography) | 2.3.1 | Provides cryptographic recipes and primitives to Python developers / Apache 2.0 or BSD 3-Clause, PSF 2 |
| [curl](http://curl.haxx.se/) | 7.61.0 | tool and library for transferring data with URL syntax / MIT/X derivate (`<http://curl.haxx.se/docs/copyright.html>`) |
| [cycler](http://matplotlib.org/cycler) | 0.10.0 | Composable style cycles. / BSD 3-Clause |
| [cython](http://www.cython.org/) | 0.28.5 | The Cython compiler for writing C extensions for the Python language / Apache-2.0 |
| [cytoolz](https://github.com/pytoolz/cytoolz) | 0.9.0.1 | Cython implementation of Toolz. High performance functional utilities. / BSD 3-Clause |
| [dask](http://github.com/dask/dask/) | 0.19.1 | Parallel Python with task scheduling / BSD 3-Clause |
| [dask-core](http://github.com/dask/dask/) | 0.19.1 | Parallel Python with task scheduling / BSD 3-Clause |
| [datashape](http://datashape.pydata.org) | 0.5.4 | A data description language. / BSD 2-Clause |
| [dbus](http://www.freedesktop.org/wiki/Software/dbus/) | 1.13.2 | Simple message bus system for applications to talk to one another / GPL2 |
| [decorator](https://github.com/micheles/decorator) | 4.3.0 | Better living through Python with decorators. / BSD 3-Clause |
| [defusedxml](https://bitbucket.org/tiran/defusedxml) | 0.5.0 | XML bomb protection for Python stdlib modules / PSF 2.0 |
| [distributed](http://distributed.readthedocs.io/en/latest/) | 1.23.1 | Distributed computing with Dask / BSD 3-Clause |
| [docutils](http://docutils.sourceforge.net/) | 0.14 | Docutils – Python Documentation Utilities / Public Domain Dedictation and BSD 2-Clause and PSF 2.1.1 and GPL 3.0 |
| [entrypoints](https://github.com/takluyver/entrypoints) | 0.2.3 | Discover and load entry points from installed packages. / MIT License |
| [enum34](https://bitbucket.org/stoneleaf/enum34) | 1.1.6 | Python 3.4 Enum backported to 3.3, 3.2, 3.1, 2.7, 2.6, 2.5, and 2.4 / BSD 3-Clause |
| [et\_xmlfile](https://bitbucket.org/openpyxl/et_xmlfile) | 1.0.1 | An implementation of lxml.xmlfile for the standard library / MIT |
| [expat](http://expat.sourceforge.net/) | 2.2.6 | Expat XML parser library in C. / MIT |
| [fastcache](https://github.com/pbrady/fastcache) | 1.0.2 | C implementation of Python 3 lru\_cache / MIT |
| [filelock](https://github.com/benediktschmitt/py-filelock) | 3.0.8 | A platform independent file lock. / Public Domain |
| [flask](http://flask.pocoo.org) | 1.0.2 | A microframework based on Werkzeug, Jinja2 and good intentions. / BSD 3-Clause |
| [flask-cors](https://github.com/corydolphin/flask-cors) | 3.0.6 | A Flask extension adding a decorator for CORS support / MIT |
| [fontconfig](http://www.freedesktop.org/wiki/Software/fontconfig/) | 2.13.0 | A library for configuring and customizing font access. / MIT |
| [freetype](https://www.freetype.org/) | 2.9.1 | A Free, High-Quality, and Portable Font Engine / GPL-2.0 and FreeType |
| [fribidi](https://github.com/fribidi/fribidi) | 1.0.5 | The Free Implementation of the Unicode Bidirectional Algorithm. / LGPL-2.1 |
| [funcsigs](http://funcsigs.readthedocs.org) | 1.0.2 | Python function signatures from PEP362 for Python 2.6, 2.7 and 3.2+. / Apache 2.0 |
| [functools32](https://github.com/MiCHiLU/python-functools32) | 3.2.3.2 | Backport of the functools module from Python 3.2.3 for use on 2.7 and PyPy. / PSF license |
| [futures](https://github.com/agronholm/pythonfutures) | 3.2.0 | Backport of the concurrent.futures package from Python 3.2 / PSF |
| [get\_terminal\_size](https://github.com/chrippa/backports.shutil_get_terminal_size) | 1.0.0 | Get the size of the terminal window. / MIT |
| [gevent](http://www.gevent.org/) | 1.3.6 | Coroutine-based network library / MIT |
| [glib](https://developer.gnome.org/glib/) | 2.56.2 | Provides core application building blocks for libraries and applications written in C. / LGPL-2.1 |
| [glob2](https://github.com/miracle2k/python-glob2) | 0.6 | Version of the glob module that supports recursion via \*\*, and can capture patterns. / BSD-2-Clause |
| [gmp](http://gmplib.org/) | 6.1.2 | The GNU multiprecision library. / GPL 2 and LGPL 3 |
| [gmpy2](https://pypi.python.org/pypi/gmpy2) | 2.0.8 | GMP/MPIR, MPFR, and MPC interface to Python 2.6+ and 3.x / LGPL 3 |
| [graphite2](http://graphite.sil.org/) | 1.3.12 | A “smart font” system that handles the complexities of lesser-known languages of the world. / LGPLv2 |
| [greenlet](https://github.com/python-greenlet/greenlet) | 0.4.15 | Lightweight in-process concurrent programming / MIT |
| [grin](http://pypi.python.org/pypi/grin) | 1.2.1 | Enhanced grep-like tool / BSD 3-Clause |
| [gst-plugins-base](http://gstreamer.freedesktop.org/) | 1.14.0 | GStreamer Base Plug-ins / GPL2 |
| [gstreamer](http://gstreamer.freedesktop.org/) | 1.14.0 | Library for constructing graphs of media-handling components / LGPL 2 |
| [h5py](http://www.h5py.org/) | 2.8.0 | Read and write HDF5 files from Python. / BSD 3-Clause |
| [harfbuzz](http://www.freedesktop.org/wiki/Software/HarfBuzz/) | 1.8.8 | An OpenType text shaping engine. / MIT |
| [hdf5](http://www.hdfgroup.org/HDF5/) | 1.10.2 | HDF5 is a data model, library, and file format for storing and managing data / HDF5 |
| [heapdict](http://stutzbachenterprises.com/) | 1.0.0 | A heap with decrease-key and increase-key operations / BSD 3-Clause |
| [html5lib](https://github.com/html5lib/html5lib-python) | 1.0.1 | HTML parser based on the WHATWG HTML specification / MIT |
| [hyperlink](https://github.com/python-hyper/hyperlink) | 18.0.0 | Immutable, Pythonic, correct URLs. / MIT |
| [icu](http://site.icu-project.org/) | 58.2 | International Components for Unicode. / MIT |
| [idna](https://github.com/kjd/idna) | 2.7 | Internationalized Domain Names in Applications (IDNA). / BSD Like |
| [imageio](http://imageio.github.io) | 2.4.1 | a Python library for reading and writing image data / BSD 2-Clause |
| [imagesize](https://github.com/shibukawa/imagesize_py) | 1.1.0 | Getting image size from png/jpeg/jpeg2000/gif file / MIT |
| [incremental](https://twistedmatrix.com) | 17.5.0 | A library that versions your Python projects / MIT License |
| [intel-openmp](https://software.intel.com/en-us/node/522690) | 2019.0 | Math library for Intel and compatible processors / proprietary - Intel |
| [ipaddress](https://github.com/phihag/ipaddress) | 1.0.22 | IPv4/IPv6 manipulation library / PSF 2 |
| [ipykernel](http://ipython.org) | 4.9.0 | IPython Kernel for Jupyter / BSD 3-clause |
| [ipython](http://ipython.org/) | 5.8.0 | IPython: Productive Interactive Computing / BSD 3-clause |
| [ipython\_genutils](http://ipython.org) | 0.2.0 | vestigial utilities from IPython / BSD 3-Clause |
| [ipywidgets](https://github.com/ipython/ipywidgets) | 7.4.1 | Jupyter Interactive Widgets / BSD 3-clause |
| [isort](https://github.com/timothycrosley/isort) | 4.3.4 | A Python utility / library to sort Python imports. / MIT |
| [itsdangerous](https://github.com/pallets/itsdangerous) | 0.24 | Various helpers to pass trusted data to untrusted environments. / BSD 3-Clause |
| [jbig](https://www.cl.cam.ac.uk/~mgk25/jbigkit) | 2.1 | Implementation of the JBIG1 data compression standard / GPL-2.0 |
| [jdcal](https://github.com/phn/jdcal) | 1.4 | Julian dates from proleptic Gregorian and Julian calendars. / BSD 2-Clause |
| [jedi](https://github.com/davidhalter/jedi/) | 0.12.1 | An autocompletion tool for Python that can be used for text editors. / MIT |
| [jinja2](http://jinja.pocoo.org) | 2.10 | An easy to use stand-alone template engine written in pure python. / 3-Clause BSD |
| [jpeg](http://www.ijg.org/) | 9b | read/write jpeg COM, EXIF, IPTC medata / Custom free software license |
| [jsonschema](https://github.com/Julian/jsonschema) | 2.6.0 | An implementation of JSON Schema validation for Python / MIT |
| [jupyter](http://jupyter.org) | 1.0.0 | Jupyter metapackage. Install all the Jupyter components in one go. / BSD 3-Clause |
| [jupyter\_client](http://jupyter.org) | 5.2.3 | Jupyter protocol implementation and client libraries / BSD 3-clause |
| [jupyter\_console](http://jupyter.org) | 5.2.0 | Jupyter terminal console / BSD 3-Clause |
| [jupyter\_core](http://jupyter.org) | 4.4.0 | Core common functionality of Jupyter projects. / BSD 3-clause |
| [jupyterlab](https://github.com/jupyterlab/jupyterlab) | 0.33.11 | JupyterLab PRE-ALPHA / BSD-3-Clause |
| [jupyterlab\_launcher](http://github.com/jupyterlab/jupyterlab_launcher) | 0.11.2 | A Launcher for JupyterLab based applications. / BSD 3-Clause |
| [kiwisolver](https://github.com/nucleic/kiwi) | 1.0.1 | A fast implementation of the Cassowary constraint solver / BSD 3-Clause |
| [lazy-object-proxy](https://github.com/ionelmc/python-lazy-object-proxy) | 1.3.1 | A fast and thorough lazy object proxy. / BSD 2-Clause |
| [libcurl](http://curl.haxx.se/) | 7.61.0 | tool and library for transferring data with URL syntax / MIT/X derivate (`<http://curl.haxx.se/docs/copyright.html>`) |
| [libedit](http://thrysoee.dk/editline/) | 3.1.20170329 | Editline Library (libedit) / NetBSD |
| [libffi](https://sourceware.org/libffi/) | 3.2.1 | A Portable Foreign Function Interface Library. / Custom |
| [libgcc-ng](https://gcc.gnu.org/onlinedocs/gccint/Libgcc.html) | 8.2.0 | The GCC low-level runtime library / GPL |
| [libgfortran-ng](https://gcc.gnu.org/) | 7.3.0 | The GNU Fortran Runtime Library / GPL |
| [libpng](http://www.libpng.org/pub/png/libpng.html) | 1.6.34 | PNG reference library. / zlib/libpng |
| [libsodium](http://libsodium.org) | 1.0.16 | A modern and easy-to-use crypto library. / ISC |
| [libssh2](https://www.libssh2.org/) | 1.8.0 | the SSH library / BSD 3-Clause |
| [libstdcxx-ng](https://gcc.gnu.org/) | 8.2.0 | The GNU C++ Runtime Library / GPL3 with runtime exception |
| [libtiff](http://www.libtiff.org/) | 4.0.9 | Support for the Tag Image File Format (TIFF). / HPND |
| [libtool](http://www.gnu.org/software/libtool/) | 2.4.6 | The GNU Portable Library Tool / GPL 3 |
| [libuuid](http://sourceforge.net/projects/libuuid/) | 1.0.3 | Portable uuid C library. / BSD 3-Clause |
| [libxcb](http://xcb.freedesktop.org/) | 1.13 | This is the C-language Binding (XCB) package to the X Window System protocol / MIT |
| [libxml2](http://xmlsoft.org/) | 2.9.8 | The XML C parser and toolkit of Gnome / MIT |
| [libxslt](http://xmlsoft.org/XSLT/) | 1.1.32 | The XSLT C library developed for the GNOME project / MIT |
| [linecache2](https://github.com/testing-cabal/linecache2) | 1.0.0 | Backport of the linecache module / PSF 1.0 |
| [llvmlite](https://github.com/numba/llvmlite) | 0.24.0 | A lightweight LLVM python binding for writing JIT compilers / New BSD License |
| [locket](https://github.com/mwilliamson/locket.py) | 0.2.0 | File-based locks for Python for Linux and Windows / BSD 2-Clause |
| [lxml](http://lxml.de/) | 4.2.5 | Pythonic binding for the C libraries libxml2 and libxslt. / BSD 3-Clause, GPL-2.0, ZPL-2.0, and ElementTree |
| [lzo](http://www.oberhumer.com/opensource/lzo/) | 2.10 | LZO is a portable lossless data compression library written in ANSI C. / GPL v2+ |
| [markupsafe](https://www.palletsprojects.com/p/markupsafe/) | 1.0 | A Python module that implements the jinja2.Markup string / BSD 3-Clause |
| [matplotlib](http://matplotlib.org/) | 2.2.3 | Publication quality figures in Python / PSF-based |
| [mccabe](https://github.com/PyCQA/mccabe) | 0.6.1 | McCabe complexity checker for Python / MIT |
| [mistune](https://github.com/lepture/mistune) | 0.8.3 | The fastest markdown parser in pure Python. / BSD 3-Clause |
| [mkl](https://software.intel.com/en-us/mkl) | 2019.0 | Math library for Intel and compatible processors / proprietary - Intel |
| [mkl-service](https://github.com/ContinuumIO/mkl-service) | 1.1.2 | Python bindings to MKL service functions / 3-clause BSD |
| [mkl\_fft](http://github.com/IntelPython/mkl_fft) | 1.0.4 | NumPy-based implementation of Fast Fourier Transform using Intel (R) Math Kernel Library. / BSD 3-Clause |
| [mkl\_random](http://github.com/IntelPython/mkl_random) | 1.0.1 | Intel (R) MKL-powered package for sampling from common probability distributions into NumPy arrays. / BSD 3-Clause |
| [more-itertools](https://github.com/erikrose/more-itertools) | 4.3.0 | More routines for operating on iterables, beyond itertools / MIT |
| [mpc](http://www.multiprecision.org/) | 1.1.0 | A C library for the arithmetic of complex numbers with arbitrarily high precision. / LGPL 3 |
| [mpfr](http://www.mpfr.org/) | 4.0.1 | The MPFR library is a C library for multiple-precision floating-point computations with correct rounding. / LGPL 3 |
| [mpmath](http://mpmath.org) | 1.0.0 | Python library for arbitrary-precision floating-point arithmetic / BSD 3-Clause |
| [msgpack-python](http://msgpack.org/) | 0.5.6 | MessagePack (de)serializer. / Apache 2.0 |
| [multipledispatch](https://github.com/mrocklin/multipledispatch/) | 0.6.0 | Multiple dispatch in Python / BSD 3-Clause |
| [navigator-updater](https://github.com/ContinuumIO/navigator-updater) | 0.2.1 | Anaconda Navigator Updater / proprietary - Continuum Analytics, Inc. |
| [nbconvert](http://jupyter.org) | 5.4.0 | Converting Jupyter Notebooks / BSD-3-Clause |
| [nbformat](http://jupyter.org) | 4.4.0 | The reference implementation of the Jupyter Notebook format / BSD 3-clause |
| [ncurses](http://www.gnu.org/software/ncurses/) | 6.1 | Library for text-based user interfaces / Free software (MIT-like) |
| [networkx](https://networkx.github.io/) | 2.1 | Python package for creating and manipulating complex networks / BSD 3-Clause |
| [nltk](http://nltk.org/) | 3.3.0 | Build Python programs to work with human language data / Apache 2.0 |
| [nose](http://readthedocs.org/docs/nose/) | 1.3.7 | Nose extends unittest to make testing easier / LGPL-2.1 |
| [notebook](http://jupyter.org) | 5.6.0 | Jupyter Notebook / BSD 3-clause |
| [numba](http://numba.github.com) | 0.39.0 | NumPy aware dynamic Python compiler using LLVM / BSD 2-clause |
| [numexpr](https://github.com/pydata/numexpr) | 2.6.8 | Fast numerical expression evaluator for NumPy. / MIT |
| [numpy](http://numpy.scipy.org/) | 1.15.1 | Array processing for numbers, strings, records, and objects. / BSD 3-Clause |
| numpy-base | 1.15.1 | |
| [numpydoc](https://github.com/numpy/numpydoc) | 0.8.0 | Sphinx extension to support docstrings in Numpy format / BSD 3-Clause |
| [odo](http://odo.pydata.org) | 0.5.1 | Data migration in Python / BSD-3-Clause |
| [olefile](http://www.decalage.info/python/olefileio) | 0.46 | parse, read and write Microsoft OLE2 files / BSD 2-Clause |
| [openpyxl](https://openpyxl.readthedocs.io) | 2.5.6 | A Python library to read/write Excel 2010 xlsx/xlsm files / MIT |
| [openssl](http://www.openssl.org/) | 1.0.2p | OpenSSL is an open-source implementation of the SSL and TLS protocols / OpenSSL |
| [packaging](https://github.com/pypa/packaging) | 17.1 | Core utilities for Python packages / Apache 2.0 or BSD 2-Clause |
| [pandas](http://pandas.pydata.org) | 0.23.4 | High-performance, easy-to-use data structures and data analysis tools. / BSD 3-clause |
| [pandoc](http://pandoc.org/) | 1.15.0.6 | Universal markup converter (repackaged binaries). / GPL-2.0 |
| [pandocfilters](https://github.com/jgm/pandocfilters) | 1.4.2 | A python module for writing pandoc filters / BSD-3-Clause |
| [pango](http://www.pango.org/) | 1.42.4 | Text layout and rendering engine. / LGPL-2.1 |
| [parso](https://github.com/davidhalter/parso) | 0.3.1 | A Python Parser / MIT |
| [partd](https://github.com/dask/partd) | 0.3.8 | Data structure for on-disk shuffle operations / BSD 3-Clause |
| [patchelf](http://nixos.org/patchelf.html) | 0.9 | A small utility to modify the dynamic linker and RPATH of ELF executables. / GPL 3 |
| [path.py](https://github.com/jaraco/path.py) | 11.1.0 | A module wrapper for os.path / MIT |
| [pathlib2](https://github.com/mcmtroffaes/pathlib2) | 2.3.2 | Fork of pathlib aiming to support the full stdlib Python API. / MIT |
| [patsy](https://github.com/pydata/patsy) | 0.5.0 | Describing statistical models in Python using symbolic formulas / BSD-2-Clause, PSF2 |
| [pcre](http://www.pcre.org/) | 8.42 | Regular expression pattern matching using the same syntax and semantics as Perl 5. / BSD 3-Clause |
| [pep8](http://pep8.readthedocs.org/) | 1.7.1 | Python style guide checker / MIT |
| [pexpect](http://pexpect.sourceforge.net/) | 4.6.0 | Pexpect makes Python a better tool for controlling other applications. / ISC |
| [pickleshare](https://github.com/vivainio/pickleshare) | 0.7.4 | Tiny ‘shelve’-like database with concurrency support / MIT |
| [pillow](https://pillow.readthedocs.io) | 5.2.0 | Pillow is the friendly PIL fork by Alex Clark and Contributors. / PIL |
| [pip](https://pip.pypa.io/en/stable/) | 10.0.1 | PyPA recommended tool for installing Python packages / MIT |
| [pixman](http://www.pixman.org/) | 0.34.0 | A low-level software library for pixel manipulation. / MIT |
| [pkginfo](https://code.launchpad.net/~tseaver/pkginfo/trunk) | 1.4.2 | Query metadatdata from sdists / bdists / installed packages. / MIT |
| [pluggy](https://github.com/pytest-dev/pluggy) | 0.7.1 | Plugin registration and hook calling for Python / MIT |
| [ply](http://www.dabeaz.com/ply/index.html) | 3.11 | Python Lex-Yacc / BSD 3-clause |
| [prometheus\_client](https://github.com/prometheus/client_python) | 0.3.1 | Python client for the Prometheus monitoring system. / Apache 2.0 |
| [prompt\_toolkit](https://github.com/jonathanslenders/python-prompt-toolkit) | 1.0.15 | Library for building powerful interactive command lines in Python / BSD 3-clause |
| [psutil](https://github.com/giampaolo/psutil) | 5.4.7 | A cross-platform process and system utilities module for Python / BSD 3-Clause |
| [ptyprocess](https://github.com/pexpect/ptyprocess) | 0.6.0 | Run a subprocess in a pseudo terminal / ISC |
| [py](https://github.com/pytest-dev/py) | 1.6.0 | library with cross-python path, ini-parsing, io, code, log facilities / MIT |
| [pyasn1](https://github.com/etingof/pyasn1) | 0.4.4 | ASN.1 types and codecs / BSD 2-Clause |
| [pyasn1-modules](http://pyasn1.sourceforge.net/) | 0.2.2 | A collection of ASN.1-based protocols modules. / BSD 2-Clause |
| [pycairo](http://cairographics.org/pycairo/) | 1.17.1 | Python bindings for the Cairo graphics library. / LGPL 2.1, MPL 1.1 |
| [pycodestyle](https://pycodestyle.readthedocs.io/) | 2.4.0 | Python style guide checker / MIT |
| [pycosat](https://github.com/ContinuumIO/pycosat) | 0.6.3 | Bindings to picosat (a SAT solver) / MIT |
| [pycparser](https://github.com/eliben/pycparser) | 2.18 | Complete C99 parser in pure Python / BSD 3-clause |
| [pycrypto](http://www.pycrypto.org/) | 2.6.1 | Cryptographic modules for Python. / Public Domain |
| [pycurl](http://pycurl.sourceforge.net/) | 7.43.0.2 | A Python Interface To The cURL library / LGPL, MIT |
| [pyflakes](https://github.com/PyCQA/pyflakes) | 2.0.0 | Pyflakes analyzes programs and detects various errors. / MIT |
| [pygments](http://pygments.org/) | 2.2.0 | Generic syntax highlighting package / BSD 2-clause |
| [pylint](http://www.pylint.org/) | 1.9.2 | python code static checker / GPL |
| [pyodbc](https://github.com/mkleehammer/pyodbc) | 4.0.24 | DB API Module for ODBC / MIT |
| [pyopenssl](https://github.com/pyca/pyopenssl) | 18.0.0 | Python wrapper module around the OpenSSL library / Apache 2.0 |
| [pyparsing](http://pyparsing.wikispaces.com/) | 2.2.0 | Create and execute simple grammars / MIT |
| [pyqt](http://www.riverbankcomputing.co.uk/software/pyqt) | 5.9.2 | Python binding of the cross-platform GUI toolkit Qt. / Commercial, GPL-2.0, GPL-3.0 |
| [pysocks](https://github.com/Anorov/PySocks) | 1.6.8 | A Python SOCKS client module. See [Anorov/PySocks](https://github.com/Anorov/PySocks) for more information. / BSD 3-Clause |
| [pytables](http://www.pytables.org) | 3.4.4 | Brings together Python, HDF5 and NumPy to easily handle large amounts of data. / BSD 3-Clause |
| [pytest](https://docs.pytest.org/en/latest/) | 3.8.0 | Simple and powerful testing with Python. / MIT |
| [python](http://www.python.org/) | 2.7.15 | General purpose programming language / PSF |
| [python-dateutil](https://dateutil.readthedocs.org/) | 2.7.3 | Extensions to the standard Python datetime module. / BSD 3 Clause |
| [pytz](http://pythonhosted.org/pytz/) | 2018.5 | World timezone definitions, modern and historical. / MIT |
| [pywavelets](https://github.com/PyWavelets/pywt) | 1.0.0 | Discrete Wavelet Transforms in Python. / MIT |
| [pyyaml](http://pyyaml.org/wiki/PyYAML) | 3.13 | YAML parser and emitter for Python / MIT |
| [pyzmq](https://github.com/zeromq/pyzmq) | 17.1.2 | Python bindings for zeromq / BSD 3-clause |
| [qt](http://qt-project.org) | 5.9.6 | Qt is a cross-platform application and UI framework. / LGPL-3.0 |
| [qtawesome](https://github.com/spyder-ide/qtawesome) | 0.4.4 | Iconic fonts in PyQt and PySide applications / MIT |
| [qtconsole](http://jupyter.org) | 4.4.1 | Jupyter Qt console / BSD 3-Clause |
| [qtpy](https://github.com/spyder-ide/qtpy) | 1.5.0 | Abstraction layer for PyQt5/PyQt4/PySide / MIT |
| [readline](https://cnswww.cns.cwru.edu/php/chet/readline/rltop.html) | 7.0 | library for editing command lines as they are typed in / GPL-3.0 |
| [requests](http://python-requests.org) | 2.19.1 | Python HTTP for Humans. / Apache 2.0 |
| [rope](https://github.com/python-rope/rope) | 0.11.0 | A python refactoring library… / GPL 2.0 |
| [ruamel\_yaml](https://bitbucket.org/ruamel/yaml) | 0.15.46 | A patched copy of ruamel.yaml. / MIT |
| [scandir](https://github.com/benhoyt/scandir) | 1.9.0 | scandir, a better directory iterator and faster os.walk() / BSD 3-Clause |
| [scikit-image](http://scikit-image.org/) | 0.14.0 | Image processing routines for SciPy. / BSD 3-Clause |
| [scikit-learn](http://scikit-learn.org/) | 0.19.2 | A set of python modules for machine learning and data mining / BSD 3-Clause |
| [scipy](http://www.scipy.org/) | 1.1.0 | Scientific Library for Python / BSD 3-Clause |
| [seaborn](https://seaborn.pydata.org) | 0.9.0 | Statistical data visualization / BSD 3-Clause |
| [send2trash](https://github.com/hsoft/send2trash) | 1.5.0 | Python library to natively send files to Trash (or Recycle bin) on all platforms. / BSD-3-Clause |
| [service\_identity](https://github.com/pyca/service_identity) | 17.0.0 | Service identity verification for pyOpenSSL. / MIT |
| [setuptools](https://github.com/pypa/setuptools) | 40.2.0 | Download, build, install, upgrade, and uninstall Python packages / MIT |
| [simplegeneric](http://cheeseshop.python.org/pypi/simplegeneric) | 0.8.1 | Simple generic functions (similar to Python’s own len(), pickle.dump(), etc.) / Zope Public |
| [singledispatch](http://docs.python.org/3/library/functools.html#functools.singledispatch) | 3.4.0.3 | Transforms a function into a single-dispatch generic function / MIT |
| [sip](http://www.riverbankcomputing.com/software/sip/intro) | 4.19.8 | Create Python bindings for C and C++ libraries / GPL-3.0 |
| [six](http://pypi.python.org/pypi/six/) | 1.11.0 | Python 2 and 3 compatibility utilities / MIT |
| [snappy](https://github.com/google/snappy) | 1.1.7 | A fast compressor/decompressor / BSD 3-clause |
| [snowballstemmer](https://github.com/shibukawa/snowball_py) | 1.2.1 | Snowball stemming library collection for Python / BSD-2-Clause |
| [sortedcollections](http://www.grantjenks.com/docs/sortedcollections/) | 1.0.1 | Python Sorted Collections / Apache-2.0 |
| [sortedcontainers](http://www.grantjenks.com/docs/sortedcontainers/) | 2.0.5 | Python Sorted Container Types: SortedList, SortedDict, and SortedSet / Apache 2.0 |
| [sphinx](http://www.sphinx-doc.org) | 1.7.9 | Sphinx is a tool that makes it easy to create intelligent and beautiful documentation / BSD 2-clause |
| sphinxcontrib | 1.0 | Python namespace for sphinxcontrib / BSD |
| [sphinxcontrib-websupport](https://pypi.python.org/pypi/sphinxcontrib-websupport) | 1.1.0 | Sphinx API for Web Apps / BSD-2-Clause |
| [spyder](https://www.spyder-ide.org/) | 3.3.1 | The Scientific Python Development Environment / MIT |
| [spyder-kernels](https://github.com/spyder-ide/spyder-kernels) | 0.2.6 | Jupyter kernels for the Spyder console / MIT |
| [sqlalchemy](http://www.sqlalchemy.org/) | 1.2.11 | Database Abstraction Library. / MIT |
| [sqlite](http://www.sqlite.org/) | 3.24.0 | Implements a self-contained, zero-configuration, SQL database engine. / Public-Domain (`<http://www.sqlite.org/copyright.html>`) |
| [ssl\_match\_hostname](http://bitbucket.org/brandon/backports.ssl_match_hostname) | 3.5.0.1 | The ssl.match\_hostname() function from Python 3.5 / PSF 2 |
| [statsmodels](https://www.statsmodels.org) | 0.9.0 | Statistical computations and models for use with SciPy / BSD 3-Clause |
| [subprocess32](https://github.com/google/python-subprocess32) | 3.5.2 | A backport of the subprocess module from Python 3.2/3.3 for use on 2.x. / PSF 2 |
| [sympy](http://sympy.org) | 1.2 | Python library for symbolic mathematics / 3-clause BSD |
| [tblib](https://github.com/ionelmc/python-tblib) | 1.3.2 | Traceback serialization library. / BSD 2-Clause |
| [terminado](https://github.com/jupyter/terminado) | 0.8.1 | Terminals served by tornado websockets / BSD 2-clause |
| [testpath](https://testpath.readthedocs.io) | 0.3.1 | Testpath is a collection of utilities for Python code working with files and commands. / MIT |
| [tk](http://www.tcl.tk/) | 8.6.8 | A dynamic programming language with GUI support. Bundles Tcl and Tk. / Tcl/Tk |
| [toolz](http://toolz.readthedocs.org/) | 0.9.0 | A functional standard library for Python. / BSD 3-Clause |
| [tornado](http://www.tornadoweb.org/) | 5.1 | A Python web framework and asynchronous networking library, originally developed at FriendFeed. / Apache 2.0 |
| [tqdm](https://pypi.python.org/pypi/tqdm) | 4.26.0 | A Fast, Extensible Progress Meter / MPLv2.0, MIT |
| [traceback2](https://github.com/testing-cabal/traceback2) | 1.4.0 | Backports of the traceback module / PSF 2.0 |
| [traitlets](http://ipython.org/) | 4.3.2 | Configuration system for Python applications / BSD 3-clause |
| [twisted](http://twistedmatrix.com/) | 18.7.0 | event-driven networking engine / MIT |
| [typing](https://docs.python.org/3.5/library/typing.html) | 3.6.6 | Type Hints for Python - backport for `Python<3.5` / PSF |
| [unicodecsv](https://github.com/jdunck/python-unicodecsv) | 0.14.1 | Drop-in replacement for csv module which supports unicode strings / BSD |
| [unittest2](http://pypi.python.org/pypi/unittest2) | 1.1.0 | The new features in unittest backported to Python 2.4+ / BSD |
| [unixodbc](http://www.unixodbc.org/) | 2.3.7 | ODBC on non MS Windows platforms / LGPL-2.1 |
| [urllib3](https://urllib3.readthedocs.io/) | 1.23 | HTTP library with thread-safe connection pooling, file post, and more. / MIT |
| [wcwidth](https://github.com/jquast/wcwidth) | 0.1.7 | Measures number of Terminal column cells of wide-character codes. / MIT |
| [webencodings](https://github.com/gsnedders/python-webencodings) | 0.5.1 | Character encoding aliases for legacy web content / BSD 3-Clause |
| [werkzeug](http://werkzeug.pocoo.org/) | 0.14.1 | The Python WSGI Utility Library. / BSD 3-Clause |
| [wheel](https://bitbucket.org/pypa/wheel/) | 0.31.1 | A built-package format for Python. / MIT |
| [widgetsnbextension](http://ipython.org) | 3.4.1 | Interactive Widgets for Jupyter / BSD 3-clause |
| [wrapt](https://github.com/GrahamDumpleton/wrapt) | 1.10.11 | Module for decorators, wrappers and monkey patching. / BSD 2-Clause |
| [xlrd](http://www.python-excel.org/) | 1.1.0 | Library for developers to extract data from Microsoft Excel (tm) spreadsheet files / BSD 3-Clause and BSD with advertising |
| [xlsxwriter](https://xlsxwriter.readthedocs.io/) | 1.1.0 | A Python module for creating Excel XLSX files / BSD 2-Clause |
| [xlwt](http://www.python-excel.org/) | 1.3.0 | Writing data and formatting information to Excel files / BSD |
| [xz](http://tukaani.org/xz/) | 5.2.4 | Data compression software with high compression ratio / LGPL-2.1 and GPL-2.0 |
| [yaml](http://pyyaml.org/wiki/LibYAML) | 0.1.7 | A C library for parsing and emitting YAML. / MIT |
| [zeromq](http://zeromq.org) | 4.2.5 | A high-performance asynchronous messaging library. / LGPL 3 |
| [zict](http://github.com/mrocklin/zict) | 0.1.3 | Composable Dictionary Classes / BSD 3-Clause |
| [zlib](http://zlib.net/) | 1.2.11 | Massively spiffy yet delicately unobtrusive compression library / zlib |
| zope | 1.0 | web application server / BSD |
| [zope.interface](http://docs.zope.org/zope.interface/) | 4.5.0 | Interfaces for Python / ZPL 2.1 |
| Name | Version | Summary / License |
|---|---|---|
| [\_ipyw\_jlab\_nb\_ext\_conf](https://github.com/ContinuumIO/anaconda-nb-extensions-meta-config) | 0.1.0 | A configuration metapackage for enabling Anaconda-bundled jupyter extensions / BSD |
| [alabaster](http://www.sphinx-doc.org/en/stable/index.html) | 0.7.10 | Configurable, Python 2+3 compatible Sphinx theme. / BSD 3-Clause |
| [anaconda-client](https://github.com/Anaconda-Platform/anaconda-client) | 1.6.14 | Anaconda Cloud command line client library / BSD 3-Clause |
| [anaconda-navigator](https://github.com/ContinuumIO/navigator) | 1.8.7 | Anaconda Navigator / proprietary - Continuum Analytics, Inc. |
| [anaconda-project](https://github.com/Anaconda-Platform/anaconda-project) | 0.8.2 | Tool for encapsulating, running, and reproducing data science projects / BSD 3-Clause |
| [asn1crypto](https://github.com/wbond/asn1crypto) | 0.24.0 | Python ASN.1 library with a focus on performance and a pythonic API / MIT |
| [astroid](https://www.astroid.org/) | 1.6.3 | A abstract syntax tree for Python with inference support. / LGPL 2.1 |
| [astropy](http://www.astropy.org/) | 3.0.2 | Community-developed Python Library for Astronomy / BSD |
| [attrs](https://attrs.readthedocs.io/en/stable/) | 18.1.0 | attrs is the Python package that will bring back the joy of writing classes by relieving you from the drudgery of implementing object protocols (aka dunder methods). / MIT |
| [babel](http://babel.pocoo.org/) | 2.5.3 | Utilities to internationalize and localize Python applications / BSD 3-clause |
| [backcall](https://github.com/takluyver/backcall/) | 0.1.0 | Specifications for callback functions passed in to an API / BSD-3-Clause |
| [backports](https://bitbucket.org/brandon/backports) | 1.0 | / BSD |
| [backports.shutil\_get\_terminal\_size](https://github.com/chrippa/backports.shutil_get_terminal_size) | 1.0.0 | A backport of the get\_terminal\_size function from Python 3.3’s shutil. / MIT |
| [beautifulsoup4](http://www.crummy.com/software/BeautifulSoup/) | 4.6.0 | Python library designed for screen-scraping / MIT |
| [bitarray](https://github.com/ilanschnell/bitarray) | 0.8.1 | efficient arrays of booleans – C extension / PSF |
| [bkcharts](http://github.com/bokeh/bkcharts) | 0.2 | High level chart types built on top of Bokeh / BSD 3-Clause |
| blas | 1.0 | |
| [blaze](http://blaze.pydata.org) | 0.11.3 | NumPy and Pandas interface to big data / BSD 3-Clause |
| [bleach](https://github.com/mozilla/bleach) | 2.1.3 | Easy, whitelist-based HTML-sanitizing tool / Apache-2.0 |
| [blosc](https://github.com/Blosc/c-blosc) | 1.14.3 | A blocking, shuffling and loss-less compression library that can be faster than memcpy() / BSD 3-Clause |
| [bokeh](http://bokeh.pydata.org/) | 0.12.16 | Statistical and novel interactive HTML plots for Python / BSD 3-Clause |
| [boto](https://github.com/boto/boto/) | 2.48.0 | Amazon Web Services Library / MIT |
| [bottleneck](http://berkeleyanalytics.com/bottleneck) | 1.2.1 | Fast NumPy array functions written in Cython. / BSD 2-Clause |
| [bzip2](http://www.bzip.org/) | 1.0.6 | high-quality data compressor / bzip2 |
| [ca-certificates](https://github.com/conda-forge/ca-certificates-feedstock) | 2018.03.07 | Certificates for use with other packages. / ISC |
| [certifi](http://certifi.io/) | 2018.4.16 | Python package for providing Mozilla’s CA Bundle. / ISC |
| [cffi](https://bitbucket.org/cffi/cffi) | 1.11.5 | Foreign Function Interface for Python calling C code. / MIT |
| [chardet](https://github.com/chardet/chardet) | 3.0.4 | Universal character encoding detector / LGPL2 |
| [click](http://click.pocoo.org/) | 6.7 | A simple wrapper around optparse for powerful command line utilities. / BSD 3-Clause |
| [cloudpickle](https://github.com/cloudpipe/cloudpickle) | 0.5.3 | Extended pickling support for Python objects / BSD 3-Clause |
| [clyent](https://github.com/Anaconda-Platform/clyent) | 1.2.2 | Command line client library for windows and posix / BSD 3-Clause |
| [colorama](https://github.com/tartley/colorama) | 0.3.9 | Cross-platform colored terminal text. / BSD 3-Clause |
| [comtypes](http://starship.python.net/crew/theller/comtypes/) | 1.1.4 | pure Python COM package / MIT |
| [conda](https://conda.io) | 4.5.4 | OS-agnostic, system-level binary package and environment manager. / BSD 3-Clause |
| [conda-build](https://github.com/conda/conda-build) | 3.10.5 | tools for building conda packages / BSD 3-Clause |
| [conda-env](https://github.com/conda/conda-env) | 2.6.0 | Tools for interacting with conda environments. / BSD 3-Clause |
| [conda-verify](https://github.com/conda/conda-verify) | 2.0.0 | tool for validating conda recipes and conda packages / BSD 3-Clause |
| console\_shortcut | 0.1.1 | Console shortcut creator for Windows (using menuinst) / BSD |
| [contextlib2](http://contextlib2.readthedocs.org) | 0.5.5 | Backports and enhancements for the contextlib module / PSF |
| [cryptography](https://github.com/pyca/cryptography) | 2.2.2 | Provides cryptographic recipes and primitives to Python developers / Apache 2.0 or BSD 3-Clause, PSF 2 |
| [curl](http://curl.haxx.se/) | 7.60.0 | tool and library for transferring data with URL syntax / MIT/X derivate (`<http://curl.haxx.se/docs/copyright.html>`) |
| [cycler](http://matplotlib.org/cycler) | 0.10.0 | Composable style cycles. / BSD 3-Clause |
| [cython](http://www.cython.org/) | 0.28.2 | The Cython compiler for writing C extensions for the Python language / Apache-2.0 |
| [cytoolz](https://github.com/pytoolz/cytoolz) | 0.9.0.1 | Cython implementation of Toolz. High performance functional utilities. / BSD 3-Clause |
| [dask](http://github.com/dask/dask/) | 0.17.5 | Parallel Python with task scheduling / BSD 3-Clause |
| [dask-core](http://github.com/dask/dask/) | 0.17.5 | Parallel Python with task scheduling / BSD 3-Clause |
| [datashape](http://datashape.pydata.org) | 0.5.4 | A data description language. / BSD 2-Clause |
| [decorator](https://github.com/micheles/decorator) | 4.3.0 | Better living through Python with decorators. / BSD 3-Clause |
| [distributed](http://distributed.readthedocs.io/en/latest/) | 1.21.8 | Distributed computing with Dask / BSD 3-Clause |
| [docutils](http://docutils.sourceforge.net/) | 0.14 | Docutils – Python Documentation Utilities / Public Domain Dedictation and BSD 2-Clause and PSF 2.1.1 and GPL 3.0 |
| [entrypoints](https://github.com/takluyver/entrypoints) | 0.2.3 | Discover and load entry points from installed packages. / MIT License |
| [et\_xmlfile](https://bitbucket.org/openpyxl/et_xmlfile) | 1.0.1 | An implementation of lxml.xmlfile for the standard library / MIT |
| [fastcache](https://github.com/pbrady/fastcache) | 1.0.2 | C implementation of Python 3 lru\_cache / MIT |
| [filelock](https://github.com/benediktschmitt/py-filelock) | 3.0.4 | A platform independent file lock. / Public Domain |
| [flask](http://flask.pocoo.org) | 1.0.2 | A microframework based on Werkzeug, Jinja2 and good intentions. / BSD 3-Clause |
| [flask-cors](https://github.com/corydolphin/flask-cors) | 3.0.4 | A Flask extension adding a decorator for CORS support / MIT |
| [freetype](https://www.freetype.org/) | 2.8 | A Free, High-Quality, and Portable Font Engine / GPL-2.0 and FreeType |
| [get\_terminal\_size](https://github.com/chrippa/backports.shutil_get_terminal_size) | 1.0.0 | Get the size of the terminal window. / MIT |
| [gevent](http://www.gevent.org/) | 1.3.0 | Coroutine-based network library / MIT |
| [glob2](https://github.com/miracle2k/python-glob2) | 0.6 | Version of the glob module that supports recursion via \*\*, and can capture patterns. / BSD-2-Clause |
| [greenlet](https://github.com/python-greenlet/greenlet) | 0.4.13 | Lightweight in-process concurrent programming / MIT |
| [h5py](http://www.h5py.org/) | 2.7.1 | Read and write HDF5 files from Python. / BSD 3-Clause |
| [hdf5](http://www.hdfgroup.org/HDF5/) | 1.10.2 | HDF5 is a data model, library, and file format for storing and managing data / HDF5 |
| [heapdict](http://stutzbachenterprises.com/) | 1.0.0 | A heap with decrease-key and increase-key operations / BSD 3-Clause |
| [html5lib](https://github.com/html5lib/html5lib-python) | 1.0.1 | HTML parser based on the WHATWG HTML specification / MIT |
| [icc\_rt](https://software.intel.com/en-us/node/522690) | 2017.0.4 | Intel runtime libraries for C, C++ and Fortran compilers / Intel proprietary |
| [icu](http://site.icu-project.org/) | 58.2 | International Components for Unicode. / MIT |
| [idna](https://github.com/kjd/idna) | 2.6 | Internationalized Domain Names in Applications (IDNA). / BSD Like |
| [imageio](http://imageio.github.io) | 2.3.0 | a Python library for reading and writing image data / BSD 2-Clause |
| [imagesize](https://github.com/shibukawa/imagesize_py) | 1.0.0 | Getting image size from png/jpeg/jpeg2000/gif file / MIT |
| [intel-openmp](https://software.intel.com/en-us/node/522690) | 2018.0.0 | Math library for Intel and compatible processors / proprietary - Intel |
| [ipykernel](http://ipython.org) | 4.8.2 | IPython Kernel for Jupyter / BSD 3-clause |
| [ipython](http://ipython.org/) | 6.4.0 | IPython: Productive Interactive Computing / BSD 3-clause |
| [ipython\_genutils](http://ipython.org) | 0.2.0 | vestigial utilities from IPython / BSD 3-Clause |
| [ipywidgets](https://github.com/ipython/ipywidgets) | 7.2.1 | Jupyter Interactive Widgets / BSD 3-clause |
| [isort](https://github.com/timothycrosley/isort) | 4.3.4 | A Python utility / library to sort Python imports. / MIT |
| [itsdangerous](https://github.com/pallets/itsdangerous) | 0.24 | Various helpers to pass trusted data to untrusted environments. / BSD 3-Clause |
| [jdcal](https://github.com/phn/jdcal) | 1.4 | Julian dates from proleptic Gregorian and Julian calendars. / BSD 2-Clause |
| [jedi](https://github.com/davidhalter/jedi/) | 0.12.0 | An autocompletion tool for Python that can be used for text editors. / MIT |
| [jinja2](http://jinja.pocoo.org) | 2.10 | An easy to use stand-alone template engine written in pure python. / 3-Clause BSD |
| [jpeg](http://www.ijg.org/) | 9b | read/write jpeg COM, EXIF, IPTC medata / Custom free software license |
| [jsonschema](https://github.com/Julian/jsonschema) | 2.6.0 | An implementation of JSON Schema validation for Python / MIT |
| [jupyter](http://jupyter.org) | 1.0.0 | Jupyter metapackage. Install all the Jupyter components in one go. / BSD 3-Clause |
| [jupyter\_client](http://jupyter.org) | 5.2.3 | Jupyter protocol implementation and client libraries / BSD 3-clause |
| [jupyter\_console](http://jupyter.org) | 5.2.0 | Jupyter terminal console / BSD 3-Clause |
| [jupyter\_core](http://jupyter.org) | 4.4.0 | Core common functionality of Jupyter projects. / BSD 3-clause |
| [jupyterlab](https://github.com/jupyterlab/jupyterlab) | 0.32.1 | An extensible environment for interactive and reproducible computing, based on the Jupyter Notebook and Architecture. Currently in beta. / BSD 3-Clause |
| [jupyterlab\_launcher](http://github.com/jupyterlab/jupyterlab_launcher) | 0.10.5 | A Launcher for JupyterLab based applications. / BSD 3-Clause |
| [kiwisolver](https://github.com/nucleic/kiwi) | 1.0.1 | A fast implementation of the Cassowary constraint solver / BSD 3-Clause |
| [lazy-object-proxy](https://github.com/ionelmc/python-lazy-object-proxy) | 1.3.1 | A fast and thorough lazy object proxy. / BSD 2-Clause |
| [libcurl](http://curl.haxx.se/) | 7.60.0 | tool and library for transferring data with URL syntax / MIT/X derivate (`<http://curl.haxx.se/docs/copyright.html>`) |
| [libiconv](https://www.gnu.org/software/libiconv/) | 1.15 | Provides iconv for systems which don’t have one (or that cannot convert from/to Unicode.) / GPL and LGPL |
| [libpng](http://www.libpng.org/pub/png/libpng.html) | 1.6.34 | PNG reference library. / zlib/libpng |
| [libsodium](http://libsodium.org) | 1.0.16 | A modern and easy-to-use crypto library. / ISC |
| [libssh2](https://www.libssh2.org/) | 1.8.0 | the SSH library / BSD 3-Clause |
| [libtiff](http://www.libtiff.org/) | 4.0.9 | Support for the Tag Image File Format (TIFF). / HPND |
| [libxml2](http://xmlsoft.org/) | 2.9.8 | The XML C parser and toolkit of Gnome / MIT |
| [libxslt](http://xmlsoft.org/XSLT/) | 1.1.32 | The XSLT C library developed for the GNOME project / MIT |
| [llvmlite](https://github.com/numba/llvmlite) | 0.23.1 | A lightweight LLVM python binding for writing JIT compilers / New BSD License |
| [locket](https://github.com/mwilliamson/locket.py) | 0.2.0 | File-based locks for Python for Linux and Windows / BSD 2-Clause |
| [lxml](http://lxml.de/) | 4.2.1 | Pythonic binding for the C libraries libxml2 and libxslt. / BSD 3-Clause, GPL-2.0, ZPL-2.0, and ElementTree |
| [lzo](http://www.oberhumer.com/opensource/lzo/) | 2.10 | LZO is a portable lossless data compression library written in ANSI C. / GPL v2+ |
| m2w64-gcc-libgfortran | 5.3.0 | |
| m2w64-gcc-libs | 5.3.0 | |
| m2w64-gcc-libs-core | 5.3.0 | |
| m2w64-gmp | 6.1.0 | |
| m2w64-libwinpthread-git | 5.0.0.4634.697f757 | |
| [markupsafe](https://www.palletsprojects.com/p/markupsafe/) | 1.0 | A Python module that implements the jinja2.Markup string / BSD 3-Clause |
| [matplotlib](http://matplotlib.org/) | 2.2.2 | Publication quality figures in Python / PSF-based |
| [mccabe](https://github.com/PyCQA/mccabe) | 0.6.1 | McCabe complexity checker for Python / MIT |
| [menuinst](https://github.com/ContinuumIO/menuinst) | 1.4.14 | cross platform menu item installation / BSD |
| [mistune](https://github.com/lepture/mistune) | 0.8.3 | The fastest markdown parser in pure Python. / BSD 3-Clause |
| [mkl](https://software.intel.com/en-us/mkl) | 2018.0.2 | Math library for Intel and compatible processors / proprietary - Intel |
| [mkl-service](https://github.com/ContinuumIO/mkl-service) | 1.1.2 | Python bindings to MKL service functions / 3-clause BSD |
| [mkl\_fft](http://github.com/IntelPython/mkl_fft) | 1.0.1 | NumPy-based implementation of Fast Fourier Transform using Intel (R) Math Kernel Library / BSD |
| [mkl\_random](http://github.com/IntelPython/mkl_random) | 1.0.1 | Intel (R) MKL-powered package for sampling from common probability distributions into NumPy arrays. / BSD 3-Clause |
| [more-itertools](https://github.com/erikrose/more-itertools) | 4.1.0 | More routines for operating on iterables, beyond itertools / MIT |
| [mpmath](http://mpmath.org) | 1.0.0 | Python library for arbitrary-precision floating-point arithmetic / BSD 3-Clause |
| [msgpack-python](http://msgpack.org/) | 0.5.6 | MessagePack (de)serializer. / Apache 2.0 |
| msys2-conda-epoch | 20160418 | |
| [multipledispatch](https://github.com/mrocklin/multipledispatch/) | 0.5.0 | Multiple dispatch in Python / BSD 3-Clause |
| [navigator-updater](https://github.com/ContinuumIO/navigator-updater) | 0.2.1 | Anaconda Navigator Updater / proprietary - Continuum Analytics, Inc. |
| [nbconvert](http://jupyter.org) | 5.3.1 | Converting Jupyter Notebooks / BSD 3-Clause |
| [nbformat](http://jupyter.org) | 4.4.0 | The reference implementation of the Jupyter Notebook format / BSD 3-clause |
| [networkx](https://networkx.github.io/) | 2.1 | Python package for creating and manipulating complex networks / BSD 3-Clause |
| [nltk](http://nltk.org/) | 3.3.0 | Build Python programs to work with human language data / Apache 2.0 |
| [nose](http://readthedocs.org/docs/nose/) | 1.3.7 | Nose extends unittest to make testing easier / LGPL-2.1 |
| [notebook](http://jupyter.org) | 5.5.0 | A web-based notebook environment for interactive computing / BSD 3-clause |
| [numba](http://numba.github.com) | 0.38.0 | NumPy aware dynamic Python compiler using LLVM / BSD 2-clause |
| [numexpr](https://github.com/pydata/numexpr) | 2.6.5 | Fast numerical expression evaluator for NumPy. / MIT |
| [numpy](http://numpy.scipy.org/) | 1.14.3 | Array processing for numbers, strings, records, and objects. / BSD 3-Clause |
| numpy-base | 1.14.3 | |
| [numpydoc](https://github.com/numpy/numpydoc) | 0.8.0 | Sphinx extension to support docstrings in Numpy format / BSD 3-Clause |
| [odo](http://odo.pydata.org) | 0.5.1 | Data migration in Python / BSD-3-Clause |
| [olefile](http://www.decalage.info/python/olefileio) | 0.45.1 | parse, read and write Microsoft OLE2 files / BSD License 2-Clause |
| [openpyxl](https://openpyxl.readthedocs.io) | 2.5.3 | A Python library to read/write Excel 2010 xlsx/xlsm files / MIT |
| [openssl](http://www.openssl.org/) | 1.0.2o | OpenSSL is an open-source implementation of the SSL and TLS protocols / OpenSSL |
| [packaging](https://github.com/pypa/packaging) | 17.1 | Core utilities for Python packages / Apache 2.0 or BSD 2-Clause |
| [pandas](http://pandas.pydata.org) | 0.23.0 | High-performance, easy-to-use data structures and data analysis tools. / BSD 3-clause |
| [pandoc](http://johnmacfarlane.net/pandoc/) | 1.19.2.1 | Universal markup converter (repackaged binaries). / GPL-2.0 |
| [pandocfilters](https://github.com/jgm/pandocfilters) | 1.4.2 | A python module for writing pandoc filters / BSD-3-Clause |
| [parso](https://github.com/davidhalter/parso) | 0.2.0 | A Python Parser / MIT |
| [partd](https://github.com/dask/partd) | 0.3.8 | Data structure for on-disk shuffle operations / BSD 3-Clause |
| [path.py](https://github.com/jaraco/path.py) | 11.0.1 | A module wrapper for os.path / MIT |
| [pathlib2](https://github.com/mcmtroffaes/pathlib2) | 2.3.2 | Fork of pathlib aiming to support the full stdlib Python API. / MIT |
| [patsy](https://github.com/pydata/patsy) | 0.5.0 | Describing statistical models in Python using symbolic formulas / BSD-2-Clause, PSF2 |
| [pep8](http://pep8.readthedocs.org/) | 1.7.1 | Python style guide checker / MIT |
| [pickleshare](https://github.com/vivainio/pickleshare) | 0.7.4 | Tiny ‘shelve’-like database with concurrency support / MIT |
| [pillow](https://pillow.readthedocs.io) | 5.1.0 | Pillow is the friendly PIL fork by Alex Clark and Contributors. / PIL |
| [pip](https://pip.pypa.io/en/stable/) | 10.0.1 | PyPA recommended tool for installing Python packages / MIT |
| [pkginfo](https://code.launchpad.net/~tseaver/pkginfo/trunk) | 1.4.2 | Query metadatdata from sdists / bdists / installed packages. / MIT |
| [pluggy](https://github.com/pytest-dev/pluggy) | 0.6.0 | Plugin registration and hook calling for Python / MIT |
| [ply](http://www.dabeaz.com/ply/index.html) | 3.11 | Python Lex-Yacc / BSD 3-clause |
| [progress](https://github.com/verigak/progress) | 1.3 | Easy progress reporting for Python / ISC |
| [prompt\_toolkit](https://github.com/jonathanslenders/python-prompt-toolkit) | 1.0.15 | Library for building powerful interactive command lines in Python / BSD 3-clause |
| [psutil](https://github.com/giampaolo/psutil) | 5.4.5 | A cross-platform process and system utilities module for Python / BSD 3-Clause |
| [py](https://github.com/pytest-dev/py) | 1.5.3 | library with cross-python path, ini-parsing, io, code, log facilities / MIT |
| [pycodestyle](https://pycodestyle.readthedocs.io/) | 2.4.0 | Python style guide checker / MIT |
| [pycosat](https://github.com/ContinuumIO/pycosat) | 0.6.3 | Bindings to picosat (a SAT solver) / MIT |
| [pycparser](https://github.com/eliben/pycparser) | 2.18 | Complete C99 parser in pure Python / BSD 3-clause |
| [pycrypto](http://www.pycrypto.org/) | 2.6.1 | Cryptographic modules for Python. / Public Domain |
| [pycurl](http://pycurl.sourceforge.net/) | 7.43.0.1 | A Python Interface To The cURL library / LGPL, MIT |
| [pyflakes](https://github.com/PyCQA/pyflakes) | 1.6.0 | Pyflakes analyzes programs and detects various errors. / MIT |
| [pygments](http://pygments.org/) | 2.2.0 | Generic syntax highlighting package / BSD 2-clause |
| [pylint](http://www.pylint.org/) | 1.8.4 | python code static checker / GPL |
| [pyodbc](https://github.com/mkleehammer/pyodbc) | 4.0.23 | DB API Module for ODBC / MIT |
| [pyopenssl](https://github.com/pyca/pyopenssl) | 18.0.0 | Python wrapper module around the OpenSSL library / Apache 2.0 |
| [pyparsing](http://pyparsing.wikispaces.com/) | 2.2.0 | Create and execute simple grammars / MIT |
| [pyqt](http://www.riverbankcomputing.co.uk/software/pyqt) | 5.9.2 | Python binding of the cross-platform GUI toolkit Qt. / Commercial, GPL-2.0, GPL-3.0 |
| [pysocks](https://github.com/Anorov/PySocks) | 1.6.8 | A Python SOCKS client module. See [Anorov/PySocks](https://github.com/Anorov/PySocks) for more information. / BSD 3-Clause |
| [pytables](http://www.pytables.org) | 3.4.3 | Brings together Python, HDF5 and NumPy to easily handle large amounts of data. / BSD 3-Clause |
| [pytest](https://docs.pytest.org/en/latest/) | 3.5.1 | Simple and powerful testing with Python. / MIT |
| [pytest-arraydiff](https://github.com/astrofrog/pytest-arraydiff) | 0.2 | pytest plugin to help with comparing array output from tests / BSD |
| [pytest-astropy](https://github.com/astropy/pytest-astropy) | 0.3.0 | Meta-package containing dependencies for testing Astropy / BSD |
| [pytest-doctestplus](https://github.com/astropy/pytest-doctestplus) | 0.1.3 | Pytest plugin with advanced doctest features / BSD |
| [pytest-openfiles](https://github.com/astropy/pytest-openfiles) | 0.3.0 | Pytest plugin for detecting inadvertent open file handles / BSD |
| [pytest-remotedata](https://github.com/astropy/pytest-remotedata) | 0.2.1 | Pytest plugin for controlling remote data access / BSD |
| [python](http://www.python.org/) | 3.6.5 | General purpose programming language / PSF |
| [python-dateutil](https://dateutil.readthedocs.org/) | 2.7.3 | Extensions to the standard Python datetime module. / BSD 3 Clause |
| [pytz](http://pythonhosted.org/pytz/) | 2018.4 | World timezone definitions, modern and historical. / MIT |
| [pywavelets](https://github.com/PyWavelets/pywt) | 0.5.2 | Discrete Wavelet Transforms in Python. / MIT |
| [pywin32](https://sourceforge.net/projects/pywin32) | 223 | Python extensions for Windows / PSF |
| [pywinpty](https://github.com/spyder-ide/pywinpty) | 0.5.1 | Python bindings for the winpty library / MIT |
| [pyyaml](http://pyyaml.org/wiki/PyYAML) | 3.12 | YAML parser and emitter for Python / MIT |
| [pyzmq](https://github.com/zeromq/pyzmq) | 17.0.0 | Python bindings for zeromq / BSD 3-clause |
| [qt](http://qt-project.org) | 5.9.5 | Qt is a cross-platform application and UI framework. / LGPL-3.0 |
| [qtawesome](https://github.com/spyder-ide/qtawesome) | 0.4.4 | Iconic fonts in PyQt and PySide applications / MIT |
| [qtconsole](http://jupyter.org) | 4.3.1 | Jupyter Qt console / BSD 3-Clause |
| [qtpy](https://github.com/spyder-ide/qtpy) | 1.4.1 | Abstraction layer for PyQt5/PyQt4/PySide / MIT |
| [requests](http://python-requests.org) | 2.18.4 | Python HTTP for Humans. / Apache 2.0 |
| [rope](https://github.com/python-rope/rope) | 0.10.7 | A python refactoring library… / GPL 2.0 |
| [ruamel\_yaml](https://bitbucket.org/ruamel/yaml) | 0.15.35 | A patched copy of ruamel.yaml. / MIT |
| [scikit-image](http://scikit-image.org/) | 0.13.1 | Image processing routines for SciPy. / BSD 3-Clause |
| [scikit-learn](http://scikit-learn.org/) | 0.19.1 | A set of python modules for machine learning and data mining / BSD 3-Clause |
| [scipy](http://www.scipy.org/) | 1.1.0 | Scientific Library for Python / BSD 3-Clause |
| [seaborn](http://stanford.edu/~mwaskom/software/seaborn/) | 0.8.1 | Statistical data visualization / BSD 3-Clause |
| [send2trash](https://github.com/hsoft/send2trash) | 1.5.0 | Python library to natively send files to Trash (or Recycle bin) on all platforms. / BSD-3-Clause |
| [setuptools](https://github.com/pypa/setuptools) | 39.1.0 | Download, build, install, upgrade, and uninstall Python packages / MIT |
| [simplegeneric](http://cheeseshop.python.org/pypi/simplegeneric) | 0.8.1 | Simple generic functions (similar to Python’s own len(), pickle.dump(), etc.) / Zope Public |
| [singledispatch](http://docs.python.org/3/library/functools.html#functools.singledispatch) | 3.4.0.3 | Transforms a function into a single-dispatch generic function / MIT |
| [sip](http://www.riverbankcomputing.com/software/sip/intro) | 4.19.8 | Create Python bindings for C and C++ libraries / GPL-3.0 |
| [six](http://pypi.python.org/pypi/six/) | 1.11.0 | Python 2 and 3 compatibility utilities / MIT |
| [snappy](https://github.com/google/snappy) | 1.1.7 | A fast compressor/decompressor / BSD 3-clause |
| [snowballstemmer](https://github.com/shibukawa/snowball_py) | 1.2.1 | Snowball stemming library collection for Python / BSD-2-Clause |
| [sortedcollections](http://www.grantjenks.com/docs/sortedcollections/) | 0.6.1 | Python Sorted Collections / Apache-2.0 |
| [sortedcontainers](http://www.grantjenks.com/docs/sortedcontainers/) | 1.5.10 | Python Sorted Container Types: SortedList, SortedDict, and SortedSet / Apache 2.0 |
| [sphinx](http://www.sphinx-doc.org) | 1.7.4 | Sphinx is a tool that makes it easy to create intelligent and beautiful documentation / BSD 2-clause |
| sphinxcontrib | 1.0 | Python namespace for sphinxcontrib / BSD |
| [sphinxcontrib-websupport](https://pypi.python.org/pypi/sphinxcontrib-websupport) | 1.0.1 | Sphinx API for Web Apps / BSD-2-Clause |
| [spyder](https://github.com/spyder-ide/spyder) | 3.2.8 | Scientific PYthon Development EnviRonment / MIT |
| [sqlalchemy](http://www.sqlalchemy.org/) | 1.2.7 | Database Abstraction Library. / MIT |
| [sqlite](http://www.sqlite.org/) | 3.23.1 | Implements a self-contained, zero-configuration, SQL database engine. / Public-Domain (`<http://www.sqlite.org/copyright.html>`) |
| [statsmodels](https://www.statsmodels.org) | 0.9.0 | Statistical computations and models for use with SciPy / BSD 3-Clause |
| [sympy](http://sympy.org) | 1.1.1 | Python library for symbolic mathematics / 3-clause BSD |
| [tblib](https://github.com/ionelmc/python-tblib) | 1.3.2 | Traceback serialization library. / BSD 2-Clause |
| [terminado](http://github.com/mitsuhiko/markupsafe) | 0.8.1 | Terminals served by tornado websockets / BSD 3-clause |
| [testpath](https://testpath.readthedocs.io) | 0.3.1 | Testpath is a collection of utilities for Python code working with files and commands. / MIT |
| [tk](http://www.tcl.tk/) | 8.6.7 | A dynamic programming language with GUI support. Bundles Tcl and Tk. / Tcl/Tk |
| [toolz](http://toolz.readthedocs.org/) | 0.9.0 | A functional standard library for Python. / BSD 3-Clause |
| [tornado](http://www.tornadoweb.org/) | 5.0.2 | A Python web framework and asynchronous networking library, originally developed at FriendFeed. / Apache 2.0 |
| [traitlets](http://ipython.org/) | 4.3.2 | Configuration system for Python applications / BSD 3-clause |
| [typing](https://docs.python.org/3.5/library/typing.html) | 3.6.4 | Type Hints for Python - backport for `Python<3.5` / PSF |
| [unicodecsv](https://github.com/jdunck/python-unicodecsv) | 0.14.1 | Drop-in replacement for csv module which supports unicode strings / BSD |
| [urllib3](https://urllib3.readthedocs.io/) | 1.22 | HTTP library with thread-safe connection pooling, file post, and more. / MIT |
| [vc](https://github.com/conda/conda/wiki/VC-features) | 14 | A meta-package to track VC features. / Modified BSD License (3-clause) |
| [vs2015\_runtime](http://www.microsoft.com) | 14.0.25123 | Bundles of the MSVC 14 (VS 2015) runtime / Proprietary |
| [wcwidth](https://github.com/jquast/wcwidth) | 0.1.7 | Measures number of Terminal column cells of wide-character codes. / MIT |
| [webencodings](https://github.com/gsnedders/python-webencodings) | 0.5.1 | Character encoding aliases for legacy web content / BSD 3-Clause |
| [werkzeug](http://werkzeug.pocoo.org/) | 0.14.1 | The Python WSGI Utility Library. / BSD 3-Clause |
| [wheel](https://bitbucket.org/pypa/wheel/) | 0.31.1 | A built-package format for Python. / MIT |
| [widgetsnbextension](http://ipython.org) | 3.2.1 | IPython HTML widgets for Jupyter / BSD 3-clause |
| [win\_inet\_pton](https://github.com/hickeroar/win_inet_pton) | 1.0.1 | Native inet\_pton and inet\_ntop implementation for Python on Windows (with ctypes). / PUBLIC-DOMAIN |
| [win\_unicode\_console](https://github.com/Drekin/win-unicode-console) | 0.5 | A Python package to enable Unicode input and display when running Python from Windows console. / MIT |
| [wincertstore](https://bitbucket.org/tiran/wincertstore) | 0.2 | Python module to extract CA and CRL certs from Windows’ cert store (ctypes based). / PSF 2 |
| [winpty](https://github.com/rprichard/winpty) | 0.4.3 | Winpty provides an interface similar to a Unix pty-master for communicating with Windows console programs. / MIT |
| [wrapt](https://github.com/GrahamDumpleton/wrapt) | 1.10.11 | Module for decorators, wrappers and monkey patching. / BSD 2-Clause |
| [xlrd](http://www.python-excel.org/) | 1.1.0 | Library for developers to extract data from Microsoft Excel (tm) spreadsheet files / BSD 3-Clause and BSD with advertising |
| [xlsxwriter](https://xlsxwriter.readthedocs.io/) | 1.0.4 | A Python module for creating Excel XLSX files / BSD 2-Clause |
| [xlwings](http://xlwings.org/) | 0.11.8 | Interact with Excel from Python and vice versa / 3-clause BSD |
| [xlwt](http://www.python-excel.org/) | 1.3.0 | Writing data and formatting information to Excel files / BSD |
| [yaml](http://pyyaml.org/wiki/LibYAML) | 0.1.7 | A C library for parsing and emitting YAML. / MIT |
| [zeromq](http://zeromq.org) | 4.2.5 | A high-performance asynchronous messaging library. / LGPL 3 |
| [zict](http://github.com/mrocklin/zict) | 0.1.3 | Composable Dictionary Classes / BSD 3-Clause |
| [zlib](http://zlib.net/) | 1.2.11 | Massively spiffy yet delicately unobtrusive compression library / zlib |
| Name | Version | Summary / License |
|---|---|---|
| [\_ipyw\_jlab\_nb\_ext\_conf](https://github.com/ContinuumIO/anaconda-nb-extensions-meta-config) | 0.1.0 | A configuration metapackage for enabling Anaconda-bundled jupyter extensions / BSD |
| [alabaster](http://www.sphinx-doc.org/en/stable/index.html) | 0.7.10 | Configurable, Python 2+3 compatible Sphinx theme. / BSD 3-Clause |
| [anaconda-client](https://github.com/Anaconda-Platform/anaconda-client) | 1.6.14 | Anaconda Cloud command line client library / BSD 3-Clause |
| [anaconda-navigator](https://github.com/ContinuumIO/navigator) | 1.8.7 | Anaconda Navigator / proprietary - Continuum Analytics, Inc. |
| [anaconda-project](https://github.com/Anaconda-Platform/anaconda-project) | 0.8.2 | Tool for encapsulating, running, and reproducing data science projects / BSD 3-Clause |
| [appnope](http://github.com/minrk/appnope) | 0.1.0 | Disable App Nap on OS X 10.9 / BSD 2-Clause |
| [appscript](http://appscript.sourceforge.net/) | 1.0.1 | Control AppleScriptable applications from Python / Public-Domain |
| [asn1crypto](https://github.com/wbond/asn1crypto) | 0.24.0 | Python ASN.1 library with a focus on performance and a pythonic API / MIT |
| [astroid](https://www.astroid.org/) | 1.6.3 | A abstract syntax tree for Python with inference support. / LGPL 2.1 |
| [astropy](http://www.astropy.org/) | 3.0.2 | Community-developed Python Library for Astronomy / BSD |
| [attrs](https://attrs.readthedocs.io/en/stable/) | 18.1.0 | attrs is the Python package that will bring back the joy of writing classes by relieving you from the drudgery of implementing object protocols (aka dunder methods). / MIT |
| [babel](http://babel.pocoo.org/) | 2.5.3 | Utilities to internationalize and localize Python applications / BSD 3-clause |
| [backcall](https://github.com/takluyver/backcall/) | 0.1.0 | Specifications for callback functions passed in to an API / BSD-3-Clause |
| [backports](https://bitbucket.org/brandon/backports) | 1.0 | / BSD |
| [backports.shutil\_get\_terminal\_size](https://github.com/chrippa/backports.shutil_get_terminal_size) | 1.0.0 | A backport of the get\_terminal\_size function from Python 3.3’s shutil. / MIT |
| [beautifulsoup4](http://www.crummy.com/software/BeautifulSoup/) | 4.6.0 | Python library designed for screen-scraping / MIT |
| [bitarray](https://github.com/ilanschnell/bitarray) | 0.8.1 | efficient arrays of booleans – C extension / PSF |
| [bkcharts](http://github.com/bokeh/bkcharts) | 0.2 | High level chart types built on top of Bokeh / BSD 3-Clause |
| blas | 1.0 | |
| [blaze](http://blaze.pydata.org) | 0.11.3 | NumPy and Pandas interface to big data / BSD 3-Clause |
| [bleach](https://github.com/mozilla/bleach) | 2.1.3 | Easy, whitelist-based HTML-sanitizing tool / Apache-2.0 |
| [blosc](https://github.com/Blosc/c-blosc) | 1.14.3 | A blocking, shuffling and loss-less compression library that can be faster than memcpy() / BSD 3-Clause |
| [bokeh](http://bokeh.pydata.org/) | 0.12.16 | Statistical and novel interactive HTML plots for Python / BSD 3-Clause |
| [boto](https://github.com/boto/boto/) | 2.48.0 | Amazon Web Services Library / MIT |
| [bottleneck](http://berkeleyanalytics.com/bottleneck) | 1.2.1 | Fast NumPy array functions written in Cython. / BSD 2-Clause |
| [bzip2](http://www.bzip.org/) | 1.0.6 | high-quality data compressor / bzip2 |
| [ca-certificates](https://github.com/conda-forge/ca-certificates-feedstock) | 2018.03.07 | Certificates for use with other packages. / ISC |
| [certifi](http://certifi.io/) | 2018.4.16 | Python package for providing Mozilla’s CA Bundle. / ISC |
| [cffi](https://bitbucket.org/cffi/cffi) | 1.11.5 | Foreign Function Interface for Python calling C code. / MIT |
| [chardet](https://github.com/chardet/chardet) | 3.0.4 | Universal character encoding detector / LGPL2 |
| [click](http://click.pocoo.org/) | 6.7 | A simple wrapper around optparse for powerful command line utilities. / BSD 3-Clause |
| [cloudpickle](https://github.com/cloudpipe/cloudpickle) | 0.5.3 | Extended pickling support for Python objects / BSD 3-Clause |
| [clyent](https://github.com/Anaconda-Platform/clyent) | 1.2.2 | Command line client library for windows and posix / BSD 3-Clause |
| [colorama](https://github.com/tartley/colorama) | 0.3.9 | Cross-platform colored terminal text. / BSD 3-Clause |
| [conda](https://conda.io) | 4.5.4 | OS-agnostic, system-level binary package and environment manager. / BSD 3-Clause |
| [conda-build](https://github.com/conda/conda-build) | 3.10.5 | tools for building conda packages / BSD 3-Clause |
| [conda-env](https://github.com/conda/conda-env) | 2.6.0 | Tools for interacting with conda environments. / BSD 3-Clause |
| [conda-verify](https://github.com/conda/conda-verify) | 2.0.0 | tool for validating conda recipes and conda packages / BSD 3-Clause |
| [contextlib2](http://contextlib2.readthedocs.org) | 0.5.5 | Backports and enhancements for the contextlib module / PSF |
| [cryptography](https://github.com/pyca/cryptography) | 2.2.2 | Provides cryptographic recipes and primitives to Python developers / Apache 2.0 or BSD 3-Clause, PSF 2 |
| [curl](http://curl.haxx.se/) | 7.60.0 | tool and library for transferring data with URL syntax / MIT/X derivate (`<http://curl.haxx.se/docs/copyright.html>`) |
| [cycler](http://matplotlib.org/cycler) | 0.10.0 | Composable style cycles. / BSD 3-Clause |
| [cython](http://www.cython.org/) | 0.28.2 | The Cython compiler for writing C extensions for the Python language / Apache-2.0 |
| [cytoolz](https://github.com/pytoolz/cytoolz) | 0.9.0.1 | Cython implementation of Toolz. High performance functional utilities. / BSD 3-Clause |
| [dask](http://github.com/dask/dask/) | 0.17.5 | Parallel Python with task scheduling / BSD 3-Clause |
| [dask-core](http://github.com/dask/dask/) | 0.17.5 | Parallel Python with task scheduling / BSD 3-Clause |
| [datashape](http://datashape.pydata.org) | 0.5.4 | A data description language. / BSD 2-Clause |
| [dbus](http://www.freedesktop.org/wiki/Software/dbus/) | 1.13.2 | Simple message bus system for applications to talk to one another / GPL2 |
| [decorator](https://github.com/micheles/decorator) | 4.3.0 | Better living through Python with decorators. / BSD 3-Clause |
| [distributed](http://distributed.readthedocs.io/en/latest/) | 1.21.8 | Distributed computing with Dask / BSD 3-Clause |
| [docutils](http://docutils.sourceforge.net/) | 0.14 | Docutils – Python Documentation Utilities / Public Domain Dedictation and BSD 2-Clause and PSF 2.1.1 and GPL 3.0 |
| [entrypoints](https://github.com/takluyver/entrypoints) | 0.2.3 | Discover and load entry points from installed packages. / MIT License |
| [et\_xmlfile](https://bitbucket.org/openpyxl/et_xmlfile) | 1.0.1 | An implementation of lxml.xmlfile for the standard library / MIT |
| [expat](http://expat.sourceforge.net/) | 2.2.5 | Expat XML parser library in C. / MIT |
| [fastcache](https://github.com/pbrady/fastcache) | 1.0.2 | C implementation of Python 3 lru\_cache / MIT |
| [filelock](https://github.com/benediktschmitt/py-filelock) | 3.0.4 | A platform independent file lock. / Public Domain |
| [flask](http://flask.pocoo.org) | 1.0.2 | A microframework based on Werkzeug, Jinja2 and good intentions. / BSD 3-Clause |
| [flask-cors](https://github.com/corydolphin/flask-cors) | 3.0.4 | A Flask extension adding a decorator for CORS support / MIT |
| [freetype](https://www.freetype.org/) | 2.8 | A Free, High-Quality, and Portable Font Engine / GPL-2.0 and FreeType |
| [get\_terminal\_size](https://github.com/chrippa/backports.shutil_get_terminal_size) | 1.0.0 | Get the size of the terminal window. / MIT |
| [gettext](https://www.gnu.org/software/gettext/) | 0.19.8.1 | Internationalization package. / GPLv2 |
| [gevent](http://www.gevent.org/) | 1.3.0 | Coroutine-based network library / MIT |
| [glib](https://developer.gnome.org/glib/) | 2.56.1 | Provides core application building blocks for libraries and applications written in C. / LGPL-2.1 |
| [glob2](https://github.com/miracle2k/python-glob2) | 0.6 | Version of the glob module that supports recursion via \*\*, and can capture patterns. / BSD-2-Clause |
| [gmp](http://gmplib.org/) | 6.1.2 | The GNU multiprecision library. / GPL 2 and LGPL 3 |
| [gmpy2](https://pypi.python.org/pypi/gmpy2) | 2.0.8 | GMP/MPIR, MPFR, and MPC interface to Python 2.6+ and 3.x / LGPL 3 |
| [greenlet](https://github.com/python-greenlet/greenlet) | 0.4.13 | Lightweight in-process concurrent programming / MIT |
| [h5py](http://www.h5py.org/) | 2.7.1 | Read and write HDF5 files from Python. / BSD 3-Clause |
| [hdf5](http://www.hdfgroup.org/HDF5/) | 1.10.2 | HDF5 is a data model, library, and file format for storing and managing data / HDF5 |
| [heapdict](http://stutzbachenterprises.com/) | 1.0.0 | A heap with decrease-key and increase-key operations / BSD 3-Clause |
| [html5lib](https://github.com/html5lib/html5lib-python) | 1.0.1 | HTML parser based on the WHATWG HTML specification / MIT |
| [icu](http://site.icu-project.org/) | 58.2 | International Components for Unicode. / MIT |
| [idna](https://github.com/kjd/idna) | 2.6 | Internationalized Domain Names in Applications (IDNA). / BSD Like |
| [imageio](http://imageio.github.io) | 2.3.0 | a Python library for reading and writing image data / BSD 2-Clause |
| [imagesize](https://github.com/shibukawa/imagesize_py) | 1.0.0 | Getting image size from png/jpeg/jpeg2000/gif file / MIT |
| [intel-openmp](https://software.intel.com/en-us/node/522690) | 2018.0.0 | Math library for Intel and compatible processors / proprietary - Intel |
| [ipykernel](http://ipython.org) | 4.8.2 | IPython Kernel for Jupyter / BSD 3-clause |
| [ipython](http://ipython.org/) | 6.4.0 | IPython: Productive Interactive Computing / BSD 3-clause |
| [ipython\_genutils](http://ipython.org) | 0.2.0 | vestigial utilities from IPython / BSD 3-Clause |
| [ipywidgets](https://github.com/ipython/ipywidgets) | 7.2.1 | Jupyter Interactive Widgets / BSD 3-clause |
| [isort](https://github.com/timothycrosley/isort) | 4.3.4 | A Python utility / library to sort Python imports. / MIT |
| [itsdangerous](https://github.com/pallets/itsdangerous) | 0.24 | Various helpers to pass trusted data to untrusted environments. / BSD 3-Clause |
| [jbig](https://www.cl.cam.ac.uk/~mgk25/jbigkit) | 2.1 | Implementation of the JBIG1 data compression standard / GPL-2.0 |
| [jdcal](https://github.com/phn/jdcal) | 1.4 | Julian dates from proleptic Gregorian and Julian calendars. / BSD 2-Clause |
| [jedi](https://github.com/davidhalter/jedi/) | 0.12.0 | An autocompletion tool for Python that can be used for text editors. / MIT |
| [jinja2](http://jinja.pocoo.org) | 2.10 | An easy to use stand-alone template engine written in pure python. / 3-Clause BSD |
| [jpeg](http://www.ijg.org/) | 9b | read/write jpeg COM, EXIF, IPTC medata / Custom free software license |
| [jsonschema](https://github.com/Julian/jsonschema) | 2.6.0 | An implementation of JSON Schema validation for Python / MIT |
| [jupyter](http://jupyter.org) | 1.0.0 | Jupyter metapackage. Install all the Jupyter components in one go. / BSD 3-Clause |
| [jupyter\_client](http://jupyter.org) | 5.2.3 | Jupyter protocol implementation and client libraries / BSD 3-clause |
| [jupyter\_console](http://jupyter.org) | 5.2.0 | Jupyter terminal console / BSD 3-Clause |
| [jupyter\_core](http://jupyter.org) | 4.4.0 | Core common functionality of Jupyter projects. / BSD 3-clause |
| [jupyterlab](https://github.com/jupyterlab/jupyterlab) | 0.32.1 | An extensible environment for interactive and reproducible computing, based on the Jupyter Notebook and Architecture. Currently in beta. / BSD 3-Clause |
| [jupyterlab\_launcher](http://github.com/jupyterlab/jupyterlab_launcher) | 0.10.5 | A Launcher for JupyterLab based applications. / BSD 3-Clause |
| [kiwisolver](https://github.com/nucleic/kiwi) | 1.0.1 | A fast implementation of the Cassowary constraint solver / BSD 3-Clause |
| [lazy-object-proxy](https://github.com/ionelmc/python-lazy-object-proxy) | 1.3.1 | A fast and thorough lazy object proxy. / BSD 2-Clause |
| [libcurl](http://curl.haxx.se/) | 7.60.0 | tool and library for transferring data with URL syntax / MIT/X derivate (`<http://curl.haxx.se/docs/copyright.html>`) |
| [libcxx](http://libcxx.llvm.org/) | 4.0.1 | C++ Standard Library / MIT license or UIUC License |
| [libcxxabi](http://libcxxabi.llvm.org/) | 4.0.1 | C++ Standard Library Support / MIT license or UIUC License |
| [libedit](http://thrysoee.dk/editline/) | 3.1.20170329 | Editline Library (libedit) / NetBSD |
| [libffi](https://sourceware.org/libffi/) | 3.2.1 | A Portable Foreign Function Interface Library. / Custom |
| [libgfortran](http://gcc.gnu.org/) | 3.0.1 | Fortran libraries from the GNU Compiler Collection / GPL 3 (with GCC Runtime Library Exception 3.1) |
| [libiconv](https://www.gnu.org/software/libiconv/) | 1.15 | Provides iconv for systems which don’t have one (or that cannot convert from/to Unicode.) / GPL and LGPL |
| [libpng](http://www.libpng.org/pub/png/libpng.html) | 1.6.34 | PNG reference library. / zlib/libpng |
| [libsodium](http://libsodium.org) | 1.0.16 | A modern and easy-to-use crypto library. / ISC |
| [libssh2](https://www.libssh2.org/) | 1.8.0 | the SSH library / BSD 3-Clause |
| [libtiff](http://www.libtiff.org/) | 4.0.9 | Support for the Tag Image File Format (TIFF). / HPND |
| [libxml2](http://xmlsoft.org/) | 2.9.8 | The XML C parser and toolkit of Gnome / MIT |
| [libxslt](http://xmlsoft.org/XSLT/) | 1.1.32 | The XSLT C library developed for the GNOME project / MIT |
| [llvmlite](https://github.com/numba/llvmlite) | 0.23.1 | A lightweight LLVM python binding for writing JIT compilers / New BSD License |
| [locket](https://github.com/mwilliamson/locket.py) | 0.2.0 | File-based locks for Python for Linux and Windows / BSD 2-Clause |
| [lxml](http://lxml.de/) | 4.2.1 | Pythonic binding for the C libraries libxml2 and libxslt. / BSD 3-Clause, GPL-2.0, ZPL-2.0, and ElementTree |
| [lzo](http://www.oberhumer.com/opensource/lzo/) | 2.10 | LZO is a portable lossless data compression library written in ANSI C. / GPL v2+ |
| [markupsafe](https://www.palletsprojects.com/p/markupsafe/) | 1.0 | A Python module that implements the jinja2.Markup string / BSD 3-Clause |
| [matplotlib](http://matplotlib.org/) | 2.2.2 | Publication quality figures in Python / PSF-based |
| [mccabe](https://github.com/PyCQA/mccabe) | 0.6.1 | McCabe complexity checker for Python / MIT |
| [mistune](https://github.com/lepture/mistune) | 0.8.3 | The fastest markdown parser in pure Python. / BSD 3-Clause |
| [mkl](https://software.intel.com/en-us/mkl) | 2018.0.2 | Math library for Intel and compatible processors / proprietary - Intel |
| [mkl-service](https://github.com/ContinuumIO/mkl-service) | 1.1.2 | Python bindings to MKL service functions / 3-clause BSD |
| [mkl\_fft](http://github.com/IntelPython/mkl_fft) | 1.0.1 | NumPy-based implementation of Fast Fourier Transform using Intel (R) Math Kernel Library / BSD |
| [mkl\_random](http://github.com/IntelPython/mkl_random) | 1.0.1 | Intel (R) MKL-powered package for sampling from common probability distributions into NumPy arrays. / BSD 3-Clause |
| [more-itertools](https://github.com/erikrose/more-itertools) | 4.1.0 | More routines for operating on iterables, beyond itertools / MIT |
| [mpc](http://www.multiprecision.org/) | 1.0.3 | A C library for the arithmetic of complex numbers with arbitrarily high precision. / LGPL 3 |
| [mpfr](http://www.mpfr.org/) | 3.1.5 | The MPFR library is a C library for multiple-precision floating-point computations with correct rounding. / LGPL 3 |
| [mpmath](http://mpmath.org) | 1.0.0 | Python library for arbitrary-precision floating-point arithmetic / BSD 3-Clause |
| [msgpack-python](http://msgpack.org/) | 0.5.6 | MessagePack (de)serializer. / Apache 2.0 |
| [multipledispatch](https://github.com/mrocklin/multipledispatch/) | 0.5.0 | Multiple dispatch in Python / BSD 3-Clause |
| [navigator-updater](https://github.com/ContinuumIO/navigator-updater) | 0.2.1 | Anaconda Navigator Updater / proprietary - Continuum Analytics, Inc. |
| [nbconvert](http://jupyter.org) | 5.3.1 | Converting Jupyter Notebooks / BSD 3-Clause |
| [nbformat](http://jupyter.org) | 4.4.0 | The reference implementation of the Jupyter Notebook format / BSD 3-clause |
| [ncurses](http://www.gnu.org/software/ncurses/) | 6.1 | Library for text-based user interfaces / Free software (MIT-like) |
| [networkx](https://networkx.github.io/) | 2.1 | Python package for creating and manipulating complex networks / BSD 3-Clause |
| [nltk](http://nltk.org/) | 3.3.0 | Build Python programs to work with human language data / Apache 2.0 |
| [nose](http://readthedocs.org/docs/nose/) | 1.3.7 | Nose extends unittest to make testing easier / LGPL-2.1 |
| [notebook](http://jupyter.org) | 5.5.0 | A web-based notebook environment for interactive computing / BSD 3-clause |
| [numba](http://numba.github.com) | 0.38.0 | NumPy aware dynamic Python compiler using LLVM / BSD 2-clause |
| [numexpr](https://github.com/pydata/numexpr) | 2.6.5 | Fast numerical expression evaluator for NumPy. / MIT |
| [numpy](http://numpy.scipy.org/) | 1.14.3 | Array processing for numbers, strings, records, and objects. / BSD 3-Clause |
| numpy-base | 1.14.3 | |
| [numpydoc](https://github.com/numpy/numpydoc) | 0.8.0 | Sphinx extension to support docstrings in Numpy format / BSD 3-Clause |
| [odo](http://odo.pydata.org) | 0.5.1 | Data migration in Python / BSD-3-Clause |
| [olefile](http://www.decalage.info/python/olefileio) | 0.45.1 | parse, read and write Microsoft OLE2 files / BSD License 2-Clause |
| [openpyxl](https://openpyxl.readthedocs.io) | 2.5.3 | A Python library to read/write Excel 2010 xlsx/xlsm files / MIT |
| [openssl](http://www.openssl.org/) | 1.0.2o | OpenSSL is an open-source implementation of the SSL and TLS protocols / OpenSSL |
| [packaging](https://github.com/pypa/packaging) | 17.1 | Core utilities for Python packages / Apache 2.0 or BSD 2-Clause |
| [pandas](http://pandas.pydata.org) | 0.23.0 | High-performance, easy-to-use data structures and data analysis tools. / BSD 3-clause |
| [pandoc](http://johnmacfarlane.net/pandoc/) | 1.19.2.1 | Universal markup converter (repackaged binaries). / GPL-2.0 |
| [pandocfilters](https://github.com/jgm/pandocfilters) | 1.4.2 | A python module for writing pandoc filters / BSD-3-Clause |
| [parso](https://github.com/davidhalter/parso) | 0.2.0 | A Python Parser / MIT |
| [partd](https://github.com/dask/partd) | 0.3.8 | Data structure for on-disk shuffle operations / BSD 3-Clause |
| [path.py](https://github.com/jaraco/path.py) | 11.0.1 | A module wrapper for os.path / MIT |
| [pathlib2](https://github.com/mcmtroffaes/pathlib2) | 2.3.2 | Fork of pathlib aiming to support the full stdlib Python API. / MIT |
| [patsy](https://github.com/pydata/patsy) | 0.5.0 | Describing statistical models in Python using symbolic formulas / BSD-2-Clause, PSF2 |
| [pcre](http://www.pcre.org/) | 8.42 | Regular expression pattern matching using the same syntax and semantics as Perl 5. / BSD 3-Clause |
| [pep8](http://pep8.readthedocs.org/) | 1.7.1 | Python style guide checker / MIT |
| [pexpect](http://pexpect.sourceforge.net/) | 4.5.0 | Pexpect makes Python a better tool for controlling other applications. / ISC |
| [pickleshare](https://github.com/vivainio/pickleshare) | 0.7.4 | Tiny ‘shelve’-like database with concurrency support / MIT |
| [pillow](https://pillow.readthedocs.io) | 5.1.0 | Pillow is the friendly PIL fork by Alex Clark and Contributors. / PIL |
| [pip](https://pip.pypa.io/en/stable/) | 10.0.1 | PyPA recommended tool for installing Python packages / MIT |
| [pkginfo](https://code.launchpad.net/~tseaver/pkginfo/trunk) | 1.4.2 | Query metadatdata from sdists / bdists / installed packages. / MIT |
| [pluggy](https://github.com/pytest-dev/pluggy) | 0.6.0 | Plugin registration and hook calling for Python / MIT |
| [ply](http://www.dabeaz.com/ply/index.html) | 3.11 | Python Lex-Yacc / BSD 3-clause |
| [prompt\_toolkit](https://github.com/jonathanslenders/python-prompt-toolkit) | 1.0.15 | Library for building powerful interactive command lines in Python / BSD 3-clause |
| [psutil](https://github.com/giampaolo/psutil) | 5.4.5 | A cross-platform process and system utilities module for Python / BSD 3-Clause |
| [ptyprocess](https://github.com/pexpect/ptyprocess) | 0.5.2 | Run a subprocess in a pseudo terminal / ISC |
| [py](https://github.com/pytest-dev/py) | 1.5.3 | library with cross-python path, ini-parsing, io, code, log facilities / MIT |
| [pycodestyle](https://pycodestyle.readthedocs.io/) | 2.4.0 | Python style guide checker / MIT |
| [pycosat](https://github.com/ContinuumIO/pycosat) | 0.6.3 | Bindings to picosat (a SAT solver) / MIT |
| [pycparser](https://github.com/eliben/pycparser) | 2.18 | Complete C99 parser in pure Python / BSD 3-clause |
| [pycrypto](http://www.pycrypto.org/) | 2.6.1 | Cryptographic modules for Python. / Public Domain |
| [pycurl](http://pycurl.sourceforge.net/) | 7.43.0.1 | A Python Interface To The cURL library / LGPL, MIT |
| [pyflakes](https://github.com/PyCQA/pyflakes) | 1.6.0 | Pyflakes analyzes programs and detects various errors. / MIT |
| [pygments](http://pygments.org/) | 2.2.0 | Generic syntax highlighting package / BSD 2-clause |
| [pylint](http://www.pylint.org/) | 1.8.4 | python code static checker / GPL |
| [pyodbc](https://github.com/mkleehammer/pyodbc) | 4.0.23 | DB API Module for ODBC / MIT |
| [pyopenssl](https://github.com/pyca/pyopenssl) | 18.0.0 | Python wrapper module around the OpenSSL library / Apache 2.0 |
| [pyparsing](http://pyparsing.wikispaces.com/) | 2.2.0 | Create and execute simple grammars / MIT |
| [pyqt](http://www.riverbankcomputing.co.uk/software/pyqt) | 5.9.2 | Python binding of the cross-platform GUI toolkit Qt. / Commercial, GPL-2.0, GPL-3.0 |
| [pysocks](https://github.com/Anorov/PySocks) | 1.6.8 | A Python SOCKS client module. See [Anorov/PySocks](https://github.com/Anorov/PySocks) for more information. / BSD 3-Clause |
| [pytables](http://www.pytables.org) | 3.4.3 | Brings together Python, HDF5 and NumPy to easily handle large amounts of data. / BSD 3-Clause |
| [pytest](https://docs.pytest.org/en/latest/) | 3.5.1 | Simple and powerful testing with Python. / MIT |
| [pytest-arraydiff](https://github.com/astrofrog/pytest-arraydiff) | 0.2 | pytest plugin to help with comparing array output from tests / BSD |
| [pytest-astropy](https://github.com/astropy/pytest-astropy) | 0.3.0 | Meta-package containing dependencies for testing Astropy / BSD |
| [pytest-doctestplus](https://github.com/astropy/pytest-doctestplus) | 0.1.3 | Pytest plugin with advanced doctest features / BSD |
| [pytest-openfiles](https://github.com/astropy/pytest-openfiles) | 0.3.0 | Pytest plugin for detecting inadvertent open file handles / BSD |
| [pytest-remotedata](https://github.com/astropy/pytest-remotedata) | 0.2.1 | Pytest plugin for controlling remote data access / BSD |
| [python](http://www.python.org/) | 3.6.5 | General purpose programming language / PSF |
| [python-dateutil](https://dateutil.readthedocs.org/) | 2.7.3 | Extensions to the standard Python datetime module. / BSD 3 Clause |
| python.app | 2 | Proxy on OS X letting Python libraries hook into the gui event loop / BSD |
| [pytz](http://pythonhosted.org/pytz/) | 2018.4 | World timezone definitions, modern and historical. / MIT |
| [pywavelets](https://github.com/PyWavelets/pywt) | 0.5.2 | Discrete Wavelet Transforms in Python. / MIT |
| [pyyaml](http://pyyaml.org/wiki/PyYAML) | 3.12 | YAML parser and emitter for Python / MIT |
| [pyzmq](https://github.com/zeromq/pyzmq) | 17.0.0 | Python bindings for zeromq / BSD 3-clause |
| [qt](http://qt-project.org) | 5.9.5 | Qt is a cross-platform application and UI framework. / LGPL-3.0 |
| [qtawesome](https://github.com/spyder-ide/qtawesome) | 0.4.4 | Iconic fonts in PyQt and PySide applications / MIT |
| [qtconsole](http://jupyter.org) | 4.3.1 | Jupyter Qt console / BSD 3-Clause |
| [qtpy](https://github.com/spyder-ide/qtpy) | 1.4.1 | Abstraction layer for PyQt5/PyQt4/PySide / MIT |
| [readline](https://cnswww.cns.cwru.edu/php/chet/readline/rltop.html) | 7.0 | library for editing command lines as they are typed in / GPL3 |
| [requests](http://python-requests.org) | 2.18.4 | Python HTTP for Humans. / Apache 2.0 |
| [rope](https://github.com/python-rope/rope) | 0.10.7 | A python refactoring library… / GPL 2.0 |
| [ruamel\_yaml](https://bitbucket.org/ruamel/yaml) | 0.15.35 | A patched copy of ruamel.yaml. / MIT |
| [scikit-image](http://scikit-image.org/) | 0.13.1 | Image processing routines for SciPy. / BSD 3-Clause |
| [scikit-learn](http://scikit-learn.org/) | 0.19.1 | A set of python modules for machine learning and data mining / BSD 3-Clause |
| [scipy](http://www.scipy.org/) | 1.1.0 | Scientific Library for Python / BSD 3-Clause |
| [seaborn](http://stanford.edu/~mwaskom/software/seaborn/) | 0.8.1 | Statistical data visualization / BSD 3-Clause |
| [send2trash](https://github.com/hsoft/send2trash) | 1.5.0 | Python library to natively send files to Trash (or Recycle bin) on all platforms. / BSD-3-Clause |
| [setuptools](https://github.com/pypa/setuptools) | 39.1.0 | Download, build, install, upgrade, and uninstall Python packages / MIT |
| [simplegeneric](http://cheeseshop.python.org/pypi/simplegeneric) | 0.8.1 | Simple generic functions (similar to Python’s own len(), pickle.dump(), etc.) / Zope Public |
| [singledispatch](http://docs.python.org/3/library/functools.html#functools.singledispatch) | 3.4.0.3 | Transforms a function into a single-dispatch generic function / MIT |
| [sip](http://www.riverbankcomputing.com/software/sip/intro) | 4.19.8 | Create Python bindings for C and C++ libraries / GPL-3.0 |
| [six](http://pypi.python.org/pypi/six/) | 1.11.0 | Python 2 and 3 compatibility utilities / MIT |
| [snappy](https://github.com/google/snappy) | 1.1.7 | A fast compressor/decompressor / BSD 3-clause |
| [snowballstemmer](https://github.com/shibukawa/snowball_py) | 1.2.1 | Snowball stemming library collection for Python / BSD-2-Clause |
| [sortedcollections](http://www.grantjenks.com/docs/sortedcollections/) | 0.6.1 | Python Sorted Collections / Apache-2.0 |
| [sortedcontainers](http://www.grantjenks.com/docs/sortedcontainers/) | 1.5.10 | Python Sorted Container Types: SortedList, SortedDict, and SortedSet / Apache 2.0 |
| [sphinx](http://www.sphinx-doc.org) | 1.7.4 | Sphinx is a tool that makes it easy to create intelligent and beautiful documentation / BSD 2-clause |
| sphinxcontrib | 1.0 | Python namespace for sphinxcontrib / BSD |
| [sphinxcontrib-websupport](https://pypi.python.org/pypi/sphinxcontrib-websupport) | 1.0.1 | Sphinx API for Web Apps / BSD-2-Clause |
| [spyder](https://github.com/spyder-ide/spyder) | 3.2.8 | Scientific PYthon Development EnviRonment / MIT |
| [sqlalchemy](http://www.sqlalchemy.org/) | 1.2.7 | Database Abstraction Library. / MIT |
| [sqlite](http://www.sqlite.org/) | 3.23.1 | Implements a self-contained, zero-configuration, SQL database engine. / Public-Domain (`<http://www.sqlite.org/copyright.html>`) |
| [statsmodels](https://www.statsmodels.org) | 0.9.0 | Statistical computations and models for use with SciPy / BSD 3-Clause |
| [sympy](http://sympy.org) | 1.1.1 | Python library for symbolic mathematics / 3-clause BSD |
| [tblib](https://github.com/ionelmc/python-tblib) | 1.3.2 | Traceback serialization library. / BSD 2-Clause |
| [terminado](http://github.com/mitsuhiko/markupsafe) | 0.8.1 | Terminals served by tornado websockets / BSD 3-clause |
| [testpath](https://testpath.readthedocs.io) | 0.3.1 | Testpath is a collection of utilities for Python code working with files and commands. / MIT |
| [tk](http://www.tcl.tk/) | 8.6.7 | A dynamic programming language with GUI support. Bundles Tcl and Tk. / Tcl/Tk |
| [toolz](http://toolz.readthedocs.org/) | 0.9.0 | A functional standard library for Python. / BSD 3-Clause |
| [tornado](http://www.tornadoweb.org/) | 5.0.2 | A Python web framework and asynchronous networking library, originally developed at FriendFeed. / Apache 2.0 |
| [traitlets](http://ipython.org/) | 4.3.2 | Configuration system for Python applications / BSD 3-clause |
| [typing](https://docs.python.org/3.5/library/typing.html) | 3.6.4 | Type Hints for Python - backport for `Python<3.5` / PSF |
| [unicodecsv](https://github.com/jdunck/python-unicodecsv) | 0.14.1 | Drop-in replacement for csv module which supports unicode strings / BSD |
| [unixodbc](http://www.unixodbc.org/) | 2.3.6 | ODBC on non MS Windows platforms / LGPL-2.1 |
| [urllib3](https://urllib3.readthedocs.io/) | 1.22 | HTTP library with thread-safe connection pooling, file post, and more. / MIT |
| [wcwidth](https://github.com/jquast/wcwidth) | 0.1.7 | Measures number of Terminal column cells of wide-character codes. / MIT |
| [webencodings](https://github.com/gsnedders/python-webencodings) | 0.5.1 | Character encoding aliases for legacy web content / BSD 3-Clause |
| [werkzeug](http://werkzeug.pocoo.org/) | 0.14.1 | The Python WSGI Utility Library. / BSD 3-Clause |
| [wheel](https://bitbucket.org/pypa/wheel/) | 0.31.1 | A built-package format for Python. / MIT |
| [widgetsnbextension](http://ipython.org) | 3.2.1 | IPython HTML widgets for Jupyter / BSD 3-clause |
| [wrapt](https://github.com/GrahamDumpleton/wrapt) | 1.10.11 | Module for decorators, wrappers and monkey patching. / BSD 2-Clause |
| [xlrd](http://www.python-excel.org/) | 1.1.0 | Library for developers to extract data from Microsoft Excel (tm) spreadsheet files / BSD 3-Clause and BSD with advertising |
| [xlsxwriter](https://xlsxwriter.readthedocs.io/) | 1.0.4 | A Python module for creating Excel XLSX files / BSD 2-Clause |
| [xlwings](http://xlwings.org/) | 0.11.8 | Interact with Excel from Python and vice versa / 3-clause BSD |
| [xlwt](http://www.python-excel.org/) | 1.2.0 | Writing data and formatting information to Excel files / BSD |
| [xz](http://tukaani.org/xz/) | 5.2.4 | Data compression software with high compression ratio / LGPL-2.1 and GPL-2.0 |
| [yaml](http://pyyaml.org/wiki/LibYAML) | 0.1.7 | A C library for parsing and emitting YAML. / MIT |
| [zeromq](http://zeromq.org) | 4.2.5 | A high-performance asynchronous messaging library. / LGPL 3 |
| [zict](http://github.com/mrocklin/zict) | 0.1.3 | Composable Dictionary Classes / BSD 3-Clause |
| [zlib](http://zlib.net/) | 1.2.11 | Massively spiffy yet delicately unobtrusive compression library / zlib |
| Name | Version | Summary / License |
|---|---|---|
| [\_ipyw\_jlab\_nb\_ext\_conf](https://github.com/ContinuumIO/anaconda-nb-extensions-meta-config) | 0.1.0 | A configuration metapackage for enabling Anaconda-bundled jupyter extensions / BSD |
| [alabaster](http://www.sphinx-doc.org/en/stable/index.html) | 0.7.10 | Configurable, Python 2+3 compatible Sphinx theme. / BSD 3-Clause |
| [anaconda-client](https://github.com/Anaconda-Platform/anaconda-client) | 1.6.14 | Anaconda Cloud command line client library / BSD 3-Clause |
| [anaconda-project](https://github.com/Anaconda-Platform/anaconda-project) | 0.8.2 | Tool for encapsulating, running, and reproducing data science projects / BSD 3-Clause |
| [asn1crypto](https://github.com/wbond/asn1crypto) | 0.23.0 | Python ASN.1 library with a focus on performance and a pythonic API / MIT |
| [astroid](https://www.astroid.org/) | 1.6.2 | A abstract syntax tree for Python with inference support. / LGPL 2.1 |
| [astropy](http://www.astropy.org/) | 3.0.2 | Community-developed Python Library for Astronomy / BSD |
| [attrs](https://attrs.readthedocs.io/en/stable/) | 18.1.0 | attrs is the Python package that will bring back the joy of writing classes by relieving you from the drudgery of implementing object protocols (aka dunder methods). / MIT |
| [babel](http://babel.pocoo.org/) | 2.5.0 | Utilities to internationalize and localize Python applications / BSD 3-clause |
| [backcall](https://github.com/takluyver/backcall/) | 0.1.0 | Specifications for callback functions passed in to an API / BSD-3-Clause |
| [backports](https://bitbucket.org/brandon/backports) | 1.0 | / BSD |
| [backports.shutil\_get\_terminal\_size](https://github.com/chrippa/backports.shutil_get_terminal_size) | 1.0.0 | A backport of the get\_terminal\_size function from Python 3.3’s shutil. / MIT |
| [beautifulsoup4](http://www.crummy.com/software/BeautifulSoup/) | 4.6.0 | Python library designed for screen-scraping / MIT |
| [bitarray](https://github.com/ilanschnell/bitarray) | 0.8.1 | efficient arrays of booleans – C extension / PSF |
| [bkcharts](http://github.com/bokeh/bkcharts) | 0.2 | High level chart types built on top of Bokeh / BSD 3-Clause |
| [bleach](https://github.com/mozilla/bleach) | 2.1.3 | Easy, whitelist-based HTML-sanitizing tool / Apache-2.0 |
| [blosc](https://github.com/Blosc/c-blosc) | 1.14.3 | A blocking, shuffling and loss-less compression library that can be faster than memcpy() / BSD 3-Clause |
| [bokeh](http://bokeh.pydata.org/) | 0.12.15 | Statistical and novel interactive HTML plots for Python / BSD 3-Clause |
| [boto](https://github.com/boto/boto/) | 2.48.0 | Amazon Web Services Library / MIT |
| [bottleneck](http://berkeleyanalytics.com/bottleneck) | 1.2.1 | Fast NumPy array functions written in Cython. / BSD 2-Clause |
| [bzip2](http://www.bzip.org/) | 1.0.6 | high-quality data compressor / bzip2 |
| [ca-certificates](https://github.com/conda-forge/ca-certificates-feedstock) | 2018.03.07 | Certificates for use with other packages. / ISC |
| [cairo](http://cairographics.org/) | 1.14.12 | Cairo is a 2D graphics library with support for multiple output devices. / LGPL 2.1 or MPL 1.1 |
| [certifi](http://certifi.io/) | 2018.4.16 | Python package for providing Mozilla’s CA Bundle. / ISC |
| [cffi](https://bitbucket.org/cffi/cffi) | 1.11.5 | Foreign Function Interface for Python calling C code. / MIT |
| [chardet](https://github.com/chardet/chardet) | 3.0.4 | Universal character encoding detector / LGPL2 |
| [click](http://click.pocoo.org/) | 6.7 | A simple wrapper around optparse for powerful command line utilities. / BSD 3-Clause |
| [cloudpickle](https://github.com/cloudpipe/cloudpickle) | 0.5.3 | Extended pickling support for Python objects / BSD 3-Clause |
| [clyent](https://github.com/Anaconda-Platform/clyent) | 1.2.2 | Command line client library for windows and posix / BSD 3-Clause |
| [colorama](https://github.com/tartley/colorama) | 0.3.9 | Cross-platform colored terminal text. / BSD 3-Clause |
| [conda](https://conda.io) | 4.5.4 | OS-agnostic, system-level binary package and environment manager. / BSD 3-Clause |
| [conda-build](https://github.com/conda/conda-build) | 3.10.5 | tools for building conda packages / BSD 3-Clause |
| [conda-env](https://github.com/conda/conda-env) | 2.6.0 | Tools for interacting with conda environments. / BSD 3-Clause |
| [conda-verify](https://github.com/conda/conda-verify) | 3.0.0 | tool for validating conda recipes and conda packages / BSD 3-Clause |
| [contextlib2](http://contextlib2.readthedocs.org) | 0.5.5 | Backports and enhancements for the contextlib module / PSF |
| [cryptography](https://github.com/pyca/cryptography) | 2.2.2 | Provides cryptographic recipes and primitives to Python developers / Apache 2.0 or BSD 3-Clause, PSF 2 |
| [curl](http://curl.haxx.se/) | 7.55.1 | tool and library for transferring data with URL syntax / MIT/X derivate (`<http://curl.haxx.se/docs/copyright.html>`) |
| [cycler](http://matplotlib.org/cycler) | 0.10.0 | Composable style cycles. / BSD 3-Clause |
| [cython](http://www.cython.org/) | 0.28.1 | The Cython compiler for writing C extensions for the Python language / Apache-2.0 |
| [cytoolz](https://github.com/pytoolz/cytoolz) | 0.9.0.1 | Cython implementation of Toolz. High performance functional utilities. / BSD 3-Clause |
| [dask](http://github.com/dask/dask/) | 0.17.5 | Parallel Python with task scheduling / BSD 3-Clause |
| [dask-core](http://github.com/dask/dask/) | 0.17.5 | Parallel Python with task scheduling / BSD 3-Clause |
| [datashape](http://datashape.pydata.org) | 0.5.4 | A data description language. / BSD 2-Clause |
| [decorator](https://github.com/micheles/decorator) | 4.1.2 | Better living through Python with decorators. / BSD 3-Clause |
| [distributed](http://distributed.readthedocs.io/en/latest/) | 1.21.8 | Distributed computing with Dask / BSD 3-Clause |
| [docutils](http://docutils.sourceforge.net/) | 0.14 | Docutils – Python Documentation Utilities / Public Domain Dedictation and BSD 2-Clause and PSF 2.1.1 and GPL 3.0 |
| [entrypoints](https://github.com/takluyver/entrypoints) | 0.2.3 | Discover and load entry points from installed packages. / MIT License |
| [et\_xmlfile](https://bitbucket.org/openpyxl/et_xmlfile) | 1.0.1 | An implementation of lxml.xmlfile for the standard library / MIT |
| [expat](http://expat.sourceforge.net/) | 2.2.5 | Expat XML parser library in C. / MIT |
| [fastcache](https://github.com/pbrady/fastcache) | 1.0.2 | C implementation of Python 3 lru\_cache / MIT |
| [filelock](https://github.com/benediktschmitt/py-filelock) | 2.0.13 | A platform independent file lock. / Public Domain |
| [flask](http://flask.pocoo.org) | 0.12.2 | A microframework based on Werkzeug, Jinja2 and good intentions. / BSD 3-Clause |
| [flask-cors](https://github.com/corydolphin/flask-cors) | 3.0.4 | A Flask extension adding a decorator for CORS support / MIT |
| [fontconfig](http://www.freedesktop.org/wiki/Software/fontconfig/) | 2.12.6 | A library for configuring and customizing font access. / MIT |
| [freetype](https://www.freetype.org/) | 2.8 | A Free, High-Quality, and Portable Font Engine / GPL-2.0 and FreeType |
| [get\_terminal\_size](https://github.com/chrippa/backports.shutil_get_terminal_size) | 1.0.0 | Get the size of the terminal window. / MIT |
| [gevent](http://www.gevent.org/) | 1.3.0 | Coroutine-based network library / MIT |
| [glib](https://developer.gnome.org/glib/) | 2.56.1 | Provides core application building blocks for libraries and applications written in C. / LGPL-2.1 |
| [glob2](https://github.com/miracle2k/python-glob2) | 0.6 | Version of the glob module that supports recursion via \*\*, and can capture patterns. / BSD-2-Clause |
| [gmp](http://gmplib.org/) | 6.1.2 | The GNU multiprecision library. / GPL 2 and LGPL 3 |
| [gmpy2](https://pypi.python.org/pypi/gmpy2) | 2.0.8 | GMP/MPIR, MPFR, and MPC interface to Python 2.6+ and 3.x / LGPL 3 |
| [greenlet](https://github.com/python-greenlet/greenlet) | 0.4.12 | Lightweight in-process concurrent programming / MIT |
| [h5py](http://www.h5py.org/) | 2.7.1 | Read and write HDF5 files from Python. / BSD 3-Clause |
| [hdf5](http://www.hdfgroup.org/HDF5/) | 1.10.2 | HDF5 is a data model, library, and file format for storing and managing data / HDF5 |
| [heapdict](http://stutzbachenterprises.com/) | 1.0.0 | A heap with decrease-key and increase-key operations / BSD 3-Clause |
| [html5lib](https://github.com/html5lib/html5lib-python) | 1.0.1 | HTML parser based on the WHATWG HTML specification / MIT |
| [icu](http://site.icu-project.org/) | 58.2 | International Components for Unicode. / MIT |
| [idna](https://github.com/kjd/idna) | 2.6 | Internationalized Domain Names in Applications (IDNA). / BSD Like |
| [imageio](http://imageio.github.io) | 2.2.0 | a Python library for reading and writing image data / BSD 2-Clause |
| [imagesize](https://github.com/shibukawa/imagesize_py) | 0.7.1 | Getting image size from png/jpeg/jpeg2000/gif file / MIT |
| [ipykernel](http://ipython.org) | 4.8.0 | IPython Kernel for Jupyter / BSD 3-clause |
| [ipython](http://ipython.org/) | 6.4.0 | IPython: Productive Interactive Computing / BSD 3-clause |
| [ipython\_genutils](http://ipython.org) | 0.2.0 | vestigial utilities from IPython / BSD 3-Clause |
| [ipywidgets](https://github.com/ipython/ipywidgets) | 7.2.0 | Jupyter Interactive Widgets / BSD 3-clause |
| [isort](https://github.com/timothycrosley/isort) | 4.2.15 | A Python utility / library to sort Python imports. / MIT |
| [itsdangerous](https://github.com/pallets/itsdangerous) | 0.24 | Various helpers to pass trusted data to untrusted environments. / BSD 3-Clause |
| [jbig](https://www.cl.cam.ac.uk/~mgk25/jbigkit) | 2.1 | Implementation of the JBIG1 data compression standard / GPL-2.0 |
| [jdcal](https://github.com/phn/jdcal) | 1.4 | Julian dates from proleptic Gregorian and Julian calendars. / BSD 2-Clause |
| [jedi](https://github.com/davidhalter/jedi/) | 0.11.0 | An autocompletion tool for Python that can be used for text editors. / MIT |
| [jinja2](http://jinja.pocoo.org) | 2.10 | An easy to use stand-alone template engine written in pure python. / 3-Clause BSD |
| [jpeg](http://www.ijg.org/) | 9b | read/write jpeg COM, EXIF, IPTC medata / Custom free software license |
| [jsonschema](https://github.com/Julian/jsonschema) | 2.6.0 | An implementation of JSON Schema validation for Python / MIT |
| [jupyter](http://jupyter.org) | 1.0.0 | Jupyter metapackage. Install all the Jupyter components in one go. / BSD 3-Clause |
| [jupyter\_client](http://jupyter.org) | 5.2.3 | Jupyter protocol implementation and client libraries / BSD 3-clause |
| [jupyter\_console](http://jupyter.org) | 5.2.0 | Jupyter terminal console / BSD 3-Clause |
| [jupyter\_core](http://jupyter.org) | 4.4.0 | Core common functionality of Jupyter projects. / BSD 3-clause |
| [jupyterlab](https://github.com/jupyterlab/jupyterlab) | 0.32.1 | An extensible environment for interactive and reproducible computing, based on the Jupyter Notebook and Architecture. Currently in beta. / BSD 3-Clause |
| [jupyterlab\_launcher](http://github.com/jupyterlab/jupyterlab_launcher) | 0.10.2 | A Launcher for JupyterLab based applications. / BSD 3-Clause |
| [kiwisolver](https://github.com/nucleic/kiwi) | 1.0.1 | A fast implementation of the Cassowary constraint solver / BSD 3-Clause |
| [lazy-object-proxy](https://github.com/ionelmc/python-lazy-object-proxy) | 1.3.1 | A fast and thorough lazy object proxy. / BSD 2-Clause |
| [libedit](http://thrysoee.dk/editline/) | 3.1.20170329 | Editline Library (libedit) / NetBSD |
| [libffi](https://sourceware.org/libffi/) | 3.2.1 | A Portable Foreign Function Interface Library. / Custom |
| [libgcc-ng](https://gcc.gnu.org/onlinedocs/gccint/Libgcc.html) | 7.2.0 | The GCC low-level runtime library / GPL |
| [libgfortran](http://gcc.gnu.org/) | 3.0.0 | Fortran libraries from the GNU Compiler Collection / GPL 3 (with GCC Runtime Library Exception 3.1) |
| [libgfortran-ng](https://gcc.gnu.org/) | 7.2.0 | The GNU Fortran Runtime Library / GPL |
| [libiconv](https://www.gnu.org/software/libiconv/) | 1.14 | Provides iconv for systems which don’t have one (or that cannot convert from/to Unicode.) / GPL and LGPL |
| [libopenblas](http://www.openblas.net/) | 0.2.20 | An Optimized BLAS library / BSD |
| [libpng](http://www.libpng.org/pub/png/libpng.html) | 1.6.32 | PNG reference library. / zlib/libpng |
| [libsodium](http://libsodium.org) | 1.0.16 | A modern and easy-to-use crypto library. / ISC |
| [libssh2](https://www.libssh2.org/) | 1.8.0 | the SSH library / BSD 3-Clause |
| [libstdcxx-ng](https://gcc.gnu.org/) | 7.2.0 | The GNU C++ Runtime Library / GPL3 with runtime exception |
| [libtiff](http://www.libtiff.org/) | 4.0.9 | Support for the Tag Image File Format (TIFF). / HPND |
| [libxcb](http://xcb.freedesktop.org/) | 1.13 | This is the C-language Binding (XCB) package to the X Window System protocol / MIT |
| [libxml2](http://xmlsoft.org/) | 2.9.8 | The XML C parser and toolkit of Gnome / MIT |
| [libxslt](http://xmlsoft.org/XSLT/) | 1.1.32 | The XSLT C library developed for the GNOME project / MIT |
| [locket](https://github.com/mwilliamson/locket.py) | 0.2.0 | File-based locks for Python for Linux and Windows / BSD 2-Clause |
| [lxml](http://lxml.de/) | 4.2.1 | Pythonic binding for the C libraries libxml2 and libxslt. / BSD 3-Clause, GPL-2.0, ZPL-2.0, and ElementTree |
| [lzo](http://www.oberhumer.com/opensource/lzo/) | 2.10 | LZO is a portable lossless data compression library written in ANSI C. / GPL v2+ |
| [markupsafe](https://www.palletsprojects.com/p/markupsafe/) | 1.0 | A Python module that implements the jinja2.Markup string / BSD 3-Clause |
| [matplotlib](http://matplotlib.org/) | 2.2.2 | Publication quality figures in Python / PSF-based |
| [mccabe](https://github.com/PyCQA/mccabe) | 0.6.1 | McCabe complexity checker for Python / MIT |
| [mistune](https://github.com/lepture/mistune) | 0.8.3 | The fastest markdown parser in pure Python. / BSD 3-Clause |
| [more-itertools](https://github.com/erikrose/more-itertools) | 4.1.0 | More routines for operating on iterables, beyond itertools / MIT |
| [mpc](http://www.multiprecision.org/) | 1.0.3 | A C library for the arithmetic of complex numbers with arbitrarily high precision. / LGPL 3 |
| [mpfr](http://www.mpfr.org/) | 3.1.5 | The MPFR library is a C library for multiple-precision floating-point computations with correct rounding. / LGPL 3 |
| [mpmath](http://mpmath.org) | 1.0.0 | Python library for arbitrary-precision floating-point arithmetic / BSD 3-Clause |
| [msgpack-python](http://msgpack.org/) | 0.5.6 | MessagePack (de)serializer. / Apache 2.0 |
| [multipledispatch](https://github.com/mrocklin/multipledispatch/) | 0.5.0 | Multiple dispatch in Python / BSD 3-Clause |
| [nbconvert](http://jupyter.org) | 5.3.1 | Converting Jupyter Notebooks / BSD 3-Clause |
| [nbformat](http://jupyter.org) | 4.4.0 | The reference implementation of the Jupyter Notebook format / BSD 3-clause |
| [ncurses](http://www.gnu.org/software/ncurses/) | 6.1 | Library for text-based user interfaces / Free software (MIT-like) |
| [networkx](https://networkx.github.io/) | 2.1 | Python package for creating and manipulating complex networks / BSD 3-Clause |
| [nltk](http://nltk.org/) | 3.3.0 | Build Python programs to work with human language data / Apache 2.0 |
| [nose](http://readthedocs.org/docs/nose/) | 1.3.7 | Nose extends unittest to make testing easier / LGPL-2.1 |
| [notebook](http://jupyter.org) | 5.5.0 | A web-based notebook environment for interactive computing / BSD 3-clause |
| [numexpr](https://github.com/pydata/numexpr) | 2.6.5 | Fast numerical expression evaluator for NumPy. / MIT |
| [numpy](http://numpy.scipy.org/) | 1.13.3 | Array processing for numbers, strings, records, and objects. / BSD 3-Clause |
| [numpydoc](https://github.com/numpy/numpydoc) | 0.8.0 | Sphinx extension to support docstrings in Numpy format / BSD 3-Clause |
| [odo](http://odo.pydata.org) | 0.5.1 | Data migration in Python / BSD-3-Clause |
| [olefile](http://www.decalage.info/python/olefileio) | 0.45.1 | parse, read and write Microsoft OLE2 files / BSD License 2-Clause |
| [openblas](http://www.openblas.net/) | 0.2.20 | An Optimized BLAS library / BSD |
| openblas-devel | 0.2.20 | |
| [openpyxl](https://openpyxl.readthedocs.io) | 2.5.3 | A Python library to read/write Excel 2010 xlsx/xlsm files / MIT |
| [openssl](http://www.openssl.org/) | 1.0.2o | OpenSSL is an open-source implementation of the SSL and TLS protocols / OpenSSL |
| [packaging](https://github.com/pypa/packaging) | 17.1 | Core utilities for Python packages / Apache 2.0 or BSD 2-Clause |
| [pandas](http://pandas.pydata.org) | 0.23.0 | High-performance, easy-to-use data structures and data analysis tools. / BSD 3-clause |
| [pandoc](http://johnmacfarlane.net/pandoc/) | 2.0.0.1 | Universal markup converter (repackaged binaries). / GPL-2.0 |
| [pandocfilters](https://github.com/jgm/pandocfilters) | 1.4.2 | A python module for writing pandoc filters / BSD-3-Clause |
| [parso](https://github.com/davidhalter/parso) | 0.1.1 | A Python Parser / MIT |
| [partd](https://github.com/dask/partd) | 0.3.8 | Data structure for on-disk shuffle operations / BSD 3-Clause |
| [patchelf](http://nixos.org/patchelf.html) | 0.9 | A small utility to modify the dynamic linker and RPATH of ELF executables. / GPL 3 |
| [path.py](https://github.com/jaraco/path.py) | 11.0.1 | A module wrapper for os.path / MIT |
| [pathlib2](https://github.com/mcmtroffaes/pathlib2) | 2.3.2 | Fork of pathlib aiming to support the full stdlib Python API. / MIT |
| [patsy](https://github.com/pydata/patsy) | 0.4.1 | Describing statistical models in Python using symbolic formulas / BSD-2-Clause, PSF2 |
| [pcre](http://www.pcre.org/) | 8.42 | Regular expression pattern matching using the same syntax and semantics as Perl 5. / BSD 3-Clause |
| [pep8](http://pep8.readthedocs.org/) | 1.7.0 | Python style guide checker / MIT |
| [pexpect](http://pexpect.sourceforge.net/) | 4.3.0 | Pexpect makes Python a better tool for controlling other applications. / ISC |
| [pickleshare](https://github.com/vivainio/pickleshare) | 0.7.4 | Tiny ‘shelve’-like database with concurrency support / MIT |
| [pillow](https://pillow.readthedocs.io) | 5.0.0 | Pillow is the friendly PIL fork by Alex Clark and Contributors. / PIL |
| [pip](https://pip.pypa.io/en/stable/) | 10.0.1 | PyPA recommended tool for installing Python packages / MIT |
| [pixman](http://www.pixman.org/) | 0.34.0 | A low-level software library for pixel manipulation. / MIT |
| [pkginfo](https://code.launchpad.net/~tseaver/pkginfo/trunk) | 1.4.1 | Query metadatdata from sdists / bdists / installed packages. / MIT |
| [pluggy](https://github.com/pytest-dev/pluggy) | 0.6.0 | Plugin registration and hook calling for Python / MIT |
| [ply](http://www.dabeaz.com/ply/index.html) | 3.10 | Python Lex-Yacc / BSD 3-clause |
| [prompt\_toolkit](https://github.com/jonathanslenders/python-prompt-toolkit) | 1.0.15 | Library for building powerful interactive command lines in Python / BSD 3-clause |
| [psutil](https://github.com/giampaolo/psutil) | 5.4.1 | A cross-platform process and system utilities module for Python / BSD 3-Clause |
| [ptyprocess](https://github.com/pexpect/ptyprocess) | 0.5.2 | Run a subprocess in a pseudo terminal / ISC |
| [py](https://github.com/pytest-dev/py) | 1.5.3 | library with cross-python path, ini-parsing, io, code, log facilities / MIT |
| [pycodestyle](https://pycodestyle.readthedocs.io/) | 2.4.0 | Python style guide checker / MIT |
| [pycosat](https://github.com/ContinuumIO/pycosat) | 0.6.3 | Bindings to picosat (a SAT solver) / MIT |
| [pycparser](https://github.com/eliben/pycparser) | 2.18 | Complete C99 parser in pure Python / BSD 3-clause |
| [pycrypto](http://www.pycrypto.org/) | 2.6.1 | Cryptographic modules for Python. / Public Domain |
| [pycurl](http://pycurl.sourceforge.net/) | 7.43.0 | A Python Interface To The cURL library / LGPL, MIT |
| [pyflakes](https://github.com/PyCQA/pyflakes) | 1.6.0 | Pyflakes analyzes programs and detects various errors. / MIT |
| [pygments](http://pygments.org/) | 2.2.0 | Generic syntax highlighting package / BSD 2-clause |
| [pylint](http://www.pylint.org/) | 1.8.4 | python code static checker / GPL |
| [pyodbc](https://github.com/mkleehammer/pyodbc) | 4.0.23 | DB API Module for ODBC / MIT |
| [pyopenssl](https://github.com/pyca/pyopenssl) | 18.0.0 | Python wrapper module around the OpenSSL library / Apache 2.0 |
| [pyparsing](http://pyparsing.wikispaces.com/) | 2.2.0 | Create and execute simple grammars / MIT |
| [pysocks](https://github.com/Anorov/PySocks) | 1.6.7 | A Python SOCKS client module. See [Anorov/PySocks](https://github.com/Anorov/PySocks) for more information. / BSD 3-Clause |
| [pytables](http://www.pytables.org) | 3.4.3 | Brings together Python, HDF5 and NumPy to easily handle large amounts of data. / BSD 3-Clause |
| [pytest](https://docs.pytest.org/en/latest/) | 3.5.1 | Simple and powerful testing with Python. / MIT |
| [pytest-arraydiff](https://github.com/astrofrog/pytest-arraydiff) | 0.2 | pytest plugin to help with comparing array output from tests / BSD |
| [pytest-astropy](https://github.com/astropy/pytest-astropy) | 0.3.0 | Meta-package containing dependencies for testing Astropy / BSD |
| [pytest-doctestplus](https://github.com/astropy/pytest-doctestplus) | 0.1.3 | Pytest plugin with advanced doctest features / BSD |
| [pytest-openfiles](https://github.com/astropy/pytest-openfiles) | 0.3.0 | Pytest plugin for detecting inadvertent open file handles / BSD |
| [pytest-remotedata](https://github.com/astropy/pytest-remotedata) | 0.2.1 | Pytest plugin for controlling remote data access / BSD |
| [python](http://www.python.org/) | 3.6.5 | General purpose programming language / PSF |
| [python-dateutil](https://dateutil.readthedocs.org/) | 2.7.3 | Extensions to the standard Python datetime module. / BSD 3 Clause |
| [pytz](http://pythonhosted.org/pytz/) | 2017.3 | World timezone definitions, modern and historical. / MIT |
| [pywavelets](https://github.com/PyWavelets/pywt) | 0.5.2 | Discrete Wavelet Transforms in Python. / MIT |
| [pyyaml](http://pyyaml.org/wiki/PyYAML) | 3.12 | YAML parser and emitter for Python / MIT |
| [pyzmq](https://github.com/zeromq/pyzmq) | 17.0.0 | Python bindings for zeromq / BSD 3-clause |
| [readline](https://cnswww.cns.cwru.edu/php/chet/readline/rltop.html) | 7.0 | library for editing command lines as they are typed in / GPL3 |
| [requests](http://python-requests.org) | 2.18.4 | Python HTTP for Humans. / Apache 2.0 |
| [ruamel\_yaml](https://bitbucket.org/ruamel/yaml) | 0.15.35 | A patched copy of ruamel.yaml. / MIT |
| [scikit-image](http://scikit-image.org/) | 0.13.1 | Image processing routines for SciPy. / BSD 3-Clause |
| [scikit-learn](http://scikit-learn.org/) | 0.19.1 | A set of python modules for machine learning and data mining / BSD 3-Clause |
| [scipy](http://www.scipy.org/) | 1.1.0 | Scientific Library for Python / BSD 3-Clause |
| [seaborn](http://stanford.edu/~mwaskom/software/seaborn/) | 0.8.1 | Statistical data visualization / BSD 3-Clause |
| [send2trash](https://github.com/hsoft/send2trash) | 1.4.2 | Python library to natively send files to Trash (or Recycle bin) on all platforms. / BSD-3-Clause |
| [setuptools](https://github.com/pypa/setuptools) | 39.1.0 | Download, build, install, upgrade, and uninstall Python packages / MIT |
| [simplegeneric](http://cheeseshop.python.org/pypi/simplegeneric) | 0.8.1 | Simple generic functions (similar to Python’s own len(), pickle.dump(), etc.) / Zope Public |
| [singledispatch](http://docs.python.org/3/library/functools.html#functools.singledispatch) | 3.4.0.3 | Transforms a function into a single-dispatch generic function / MIT |
| [six](http://pypi.python.org/pypi/six/) | 1.11.0 | Python 2 and 3 compatibility utilities / MIT |
| [snappy](https://github.com/google/snappy) | 1.1.7 | A fast compressor/decompressor / BSD 3-clause |
| [snowballstemmer](https://github.com/shibukawa/snowball_py) | 1.2.1 | Snowball stemming library collection for Python / BSD-2-Clause |
| [sortedcollections](http://www.grantjenks.com/docs/sortedcollections/) | 0.6.1 | Python Sorted Collections / Apache-2.0 |
| [sortedcontainers](http://www.grantjenks.com/docs/sortedcontainers/) | 1.5.10 | Python Sorted Container Types: SortedList, SortedDict, and SortedSet / Apache 2.0 |
| [sphinx](http://www.sphinx-doc.org) | 1.7.4 | Sphinx is a tool that makes it easy to create intelligent and beautiful documentation / BSD 2-clause |
| sphinxcontrib | 1.0 | Python namespace for sphinxcontrib / BSD |
| [sphinxcontrib-websupport](https://pypi.python.org/pypi/sphinxcontrib-websupport) | 1.0.1 | Sphinx API for Web Apps / BSD-2-Clause |
| [sqlalchemy](http://www.sqlalchemy.org/) | 1.2.7 | Database Abstraction Library. / MIT |
| [sqlite](http://www.sqlite.org/) | 3.23.1 | Implements a self-contained, zero-configuration, SQL database engine. / Public-Domain (`<http://www.sqlite.org/copyright.html>`) |
| [statsmodels](https://www.statsmodels.org) | 0.9.0 | Statistical computations and models for use with SciPy / BSD 3-Clause |
| [sympy](http://sympy.org) | 1.1.1 | Python library for symbolic mathematics / 3-clause BSD |
| [tblib](https://github.com/ionelmc/python-tblib) | 1.3.2 | Traceback serialization library. / BSD 2-Clause |
| [terminado](http://github.com/mitsuhiko/markupsafe) | 0.8.1 | Terminals served by tornado websockets / BSD 3-clause |
| [testpath](https://testpath.readthedocs.io) | 0.3.1 | Testpath is a collection of utilities for Python code working with files and commands. / MIT |
| [tk](http://www.tcl.tk/) | 8.6.7 | A dynamic programming language with GUI support. Bundles Tcl and Tk. / Tcl/Tk |
| [toolz](http://toolz.readthedocs.org/) | 0.8.2 | A functional standard library for Python. / BSD 3-Clause |
| [tornado](http://www.tornadoweb.org/) | 5.0.2 | A Python web framework and asynchronous networking library, originally developed at FriendFeed. / Apache 2.0 |
| [traitlets](http://ipython.org/) | 4.3.2 | Configuration system for Python applications / BSD 3-clause |
| [typing](https://docs.python.org/3.5/library/typing.html) | 3.6.2 | Type Hints for Python - backport for `Python<3.5` / PSF |
| [unicodecsv](https://github.com/jdunck/python-unicodecsv) | 0.14.1 | Drop-in replacement for csv module which supports unicode strings / BSD |
| [unixodbc](http://www.unixodbc.org/) | 2.3.6 | ODBC on non MS Windows platforms / LGPL-2.1 |
| [urllib3](https://urllib3.readthedocs.io/) | 1.22 | HTTP library with thread-safe connection pooling, file post, and more. / MIT |
| [wcwidth](https://github.com/jquast/wcwidth) | 0.1.7 | Measures number of Terminal column cells of wide-character codes. / MIT |
| [webencodings](https://github.com/gsnedders/python-webencodings) | 0.5.1 | Character encoding aliases for legacy web content / BSD 3-Clause |
| [werkzeug](http://werkzeug.pocoo.org/) | 0.12.2 | The Python WSGI Utility Library. / BSD 3-Clause |
| [wheel](https://bitbucket.org/pypa/wheel/) | 0.31.1 | A built-package format for Python. / MIT |
| [widgetsnbextension](http://ipython.org) | 3.2.1 | IPython HTML widgets for Jupyter / BSD 3-clause |
| [wrapt](https://github.com/GrahamDumpleton/wrapt) | 1.10.11 | Module for decorators, wrappers and monkey patching. / BSD 2-Clause |
| [xlrd](http://www.python-excel.org/) | 1.1.0 | Library for developers to extract data from Microsoft Excel (tm) spreadsheet files / BSD 3-Clause and BSD with advertising |
| [xlsxwriter](https://xlsxwriter.readthedocs.io/) | 1.0.4 | A Python module for creating Excel XLSX files / BSD 2-Clause |
| [xlwt](http://www.python-excel.org/) | 1.3.0 | Writing data and formatting information to Excel files / BSD |
| [xz](http://tukaani.org/xz/) | 5.2.4 | Data compression software with high compression ratio / LGPL-2.1 and GPL-2.0 |
| [yaml](http://pyyaml.org/wiki/LibYAML) | 0.1.7 | A C library for parsing and emitting YAML. / MIT |
| [zeromq](http://zeromq.org) | 4.2.3 | A high-performance asynchronous messaging library. / LGPL 3 |
| [zict](http://github.com/mrocklin/zict) | 0.1.3 | Composable Dictionary Classes / BSD 3-Clause |
| [zlib](http://zlib.net/) | 1.2.11 | Massively spiffy yet delicately unobtrusive compression library / zlib |
| Name | Version | Summary / License |
|---|---|---|
| [\_ipyw\_jlab\_nb\_ext\_conf](https://github.com/ContinuumIO/anaconda-nb-extensions-meta-config) | 0.1.0 | A configuration metapackage for enabling Anaconda-bundled jupyter extensions / BSD |
| [alabaster](http://www.sphinx-doc.org/en/stable/index.html) | 0.7.10 | Configurable, Python 2+3 compatible Sphinx theme. / BSD 3-Clause |
| [anaconda-client](https://github.com/Anaconda-Platform/anaconda-client) | 1.6.14 | Anaconda Cloud command line client library / BSD 3-Clause |
| [anaconda-navigator](https://github.com/ContinuumIO/navigator) | 1.8.7 | Anaconda Navigator / proprietary - Continuum Analytics, Inc. |
| [anaconda-project](https://github.com/Anaconda-Platform/anaconda-project) | 0.8.2 | Tool for encapsulating, running, and reproducing data science projects / BSD 3-Clause |
| [asn1crypto](https://github.com/wbond/asn1crypto) | 0.24.0 | Python ASN.1 library with a focus on performance and a pythonic API / MIT |
| [astroid](https://www.astroid.org/) | 1.6.3 | A abstract syntax tree for Python with inference support. / LGPL 2.1 |
| [astropy](http://www.astropy.org/) | 3.0.2 | Community-developed Python Library for Astronomy / BSD |
| [attrs](https://attrs.readthedocs.io/en/stable/) | 18.1.0 | attrs is the Python package that will bring back the joy of writing classes by relieving you from the drudgery of implementing object protocols (aka dunder methods). / MIT |
| [babel](http://babel.pocoo.org/) | 2.5.3 | Utilities to internationalize and localize Python applications / BSD 3-clause |
| [backcall](https://github.com/takluyver/backcall/) | 0.1.0 | Specifications for callback functions passed in to an API / BSD-3-Clause |
| [backports](https://bitbucket.org/brandon/backports) | 1.0 | / BSD |
| [backports.shutil\_get\_terminal\_size](https://github.com/chrippa/backports.shutil_get_terminal_size) | 1.0.0 | A backport of the get\_terminal\_size function from Python 3.3’s shutil. / MIT |
| [beautifulsoup4](http://www.crummy.com/software/BeautifulSoup/) | 4.6.0 | Python library designed for screen-scraping / MIT |
| [bitarray](https://github.com/ilanschnell/bitarray) | 0.8.1 | efficient arrays of booleans – C extension / PSF |
| [bkcharts](http://github.com/bokeh/bkcharts) | 0.2 | High level chart types built on top of Bokeh / BSD 3-Clause |
| blas | 1.0 | |
| [blaze](http://blaze.pydata.org) | 0.11.3 | NumPy and Pandas interface to big data / BSD 3-Clause |
| [bleach](https://github.com/mozilla/bleach) | 2.1.3 | Easy, whitelist-based HTML-sanitizing tool / Apache-2.0 |
| [blosc](https://github.com/Blosc/c-blosc) | 1.14.3 | A blocking, shuffling and loss-less compression library that can be faster than memcpy() / BSD 3-Clause |
| [bokeh](http://bokeh.pydata.org/) | 0.12.16 | Statistical and novel interactive HTML plots for Python / BSD 3-Clause |
| [boto](https://github.com/boto/boto/) | 2.48.0 | Amazon Web Services Library / MIT |
| [bottleneck](http://berkeleyanalytics.com/bottleneck) | 1.2.1 | Fast NumPy array functions written in Cython. / BSD 2-Clause |
| [bzip2](http://www.bzip.org/) | 1.0.6 | high-quality data compressor / bzip2 |
| [ca-certificates](https://github.com/conda-forge/ca-certificates-feedstock) | 2018.03.07 | Certificates for use with other packages. / ISC |
| [cairo](http://cairographics.org/) | 1.14.12 | Cairo is a 2D graphics library with support for multiple output devices. / LGPL 2.1 or MPL 1.1 |
| [certifi](http://certifi.io/) | 2018.4.16 | Python package for providing Mozilla’s CA Bundle. / ISC |
| [cffi](https://bitbucket.org/cffi/cffi) | 1.11.5 | Foreign Function Interface for Python calling C code. / MIT |
| [chardet](https://github.com/chardet/chardet) | 3.0.4 | Universal character encoding detector / LGPL2 |
| [click](http://click.pocoo.org/) | 6.7 | A simple wrapper around optparse for powerful command line utilities. / BSD 3-Clause |
| [cloudpickle](https://github.com/cloudpipe/cloudpickle) | 0.5.3 | Extended pickling support for Python objects / BSD 3-Clause |
| [clyent](https://github.com/Anaconda-Platform/clyent) | 1.2.2 | Command line client library for windows and posix / BSD 3-Clause |
| [colorama](https://github.com/tartley/colorama) | 0.3.9 | Cross-platform colored terminal text. / BSD 3-Clause |
| [conda](https://conda.io) | 4.5.4 | OS-agnostic, system-level binary package and environment manager. / BSD 3-Clause |
| [conda-build](https://github.com/conda/conda-build) | 3.10.5 | tools for building conda packages / BSD 3-Clause |
| [conda-env](https://github.com/conda/conda-env) | 2.6.0 | Tools for interacting with conda environments. / BSD 3-Clause |
| [conda-verify](https://github.com/conda/conda-verify) | 2.0.0 | tool for validating conda recipes and conda packages / BSD 3-Clause |
| [contextlib2](http://contextlib2.readthedocs.org) | 0.5.5 | Backports and enhancements for the contextlib module / PSF |
| [cryptography](https://github.com/pyca/cryptography) | 2.2.2 | Provides cryptographic recipes and primitives to Python developers / Apache 2.0 or BSD 3-Clause, PSF 2 |
| [curl](http://curl.haxx.se/) | 7.60.0 | tool and library for transferring data with URL syntax / MIT/X derivate (`<http://curl.haxx.se/docs/copyright.html>`) |
| [cycler](http://matplotlib.org/cycler) | 0.10.0 | Composable style cycles. / BSD 3-Clause |
| [cython](http://www.cython.org/) | 0.28.2 | The Cython compiler for writing C extensions for the Python language / Apache-2.0 |
| [cytoolz](https://github.com/pytoolz/cytoolz) | 0.9.0.1 | Cython implementation of Toolz. High performance functional utilities. / BSD 3-Clause |
| [dask](http://github.com/dask/dask/) | 0.17.5 | Parallel Python with task scheduling / BSD 3-Clause |
| [dask-core](http://github.com/dask/dask/) | 0.17.5 | Parallel Python with task scheduling / BSD 3-Clause |
| [datashape](http://datashape.pydata.org) | 0.5.4 | A data description language. / BSD 2-Clause |
| [dbus](http://www.freedesktop.org/wiki/Software/dbus/) | 1.13.2 | Simple message bus system for applications to talk to one another / GPL2 |
| [decorator](https://github.com/micheles/decorator) | 4.3.0 | Better living through Python with decorators. / BSD 3-Clause |
| [distributed](http://distributed.readthedocs.io/en/latest/) | 1.21.8 | Distributed computing with Dask / BSD 3-Clause |
| [docutils](http://docutils.sourceforge.net/) | 0.14 | Docutils – Python Documentation Utilities / Public Domain Dedictation and BSD 2-Clause and PSF 2.1.1 and GPL 3.0 |
| [entrypoints](https://github.com/takluyver/entrypoints) | 0.2.3 | Discover and load entry points from installed packages. / MIT License |
| [et\_xmlfile](https://bitbucket.org/openpyxl/et_xmlfile) | 1.0.1 | An implementation of lxml.xmlfile for the standard library / MIT |
| [expat](http://expat.sourceforge.net/) | 2.2.5 | Expat XML parser library in C. / MIT |
| [fastcache](https://github.com/pbrady/fastcache) | 1.0.2 | C implementation of Python 3 lru\_cache / MIT |
| [filelock](https://github.com/benediktschmitt/py-filelock) | 3.0.4 | A platform independent file lock. / Public Domain |
| [flask](http://flask.pocoo.org) | 1.0.2 | A microframework based on Werkzeug, Jinja2 and good intentions. / BSD 3-Clause |
| [flask-cors](https://github.com/corydolphin/flask-cors) | 3.0.4 | A Flask extension adding a decorator for CORS support / MIT |
| [fontconfig](http://www.freedesktop.org/wiki/Software/fontconfig/) | 2.12.6 | A library for configuring and customizing font access. / MIT |
| [freetype](https://www.freetype.org/) | 2.8 | A Free, High-Quality, and Portable Font Engine / GPL-2.0 and FreeType |
| [get\_terminal\_size](https://github.com/chrippa/backports.shutil_get_terminal_size) | 1.0.0 | Get the size of the terminal window. / MIT |
| [gevent](http://www.gevent.org/) | 1.3.0 | Coroutine-based network library / MIT |
| [glib](https://developer.gnome.org/glib/) | 2.56.1 | Provides core application building blocks for libraries and applications written in C. / LGPL-2.1 |
| [glob2](https://github.com/miracle2k/python-glob2) | 0.6 | Version of the glob module that supports recursion via \*\*, and can capture patterns. / BSD-2-Clause |
| [gmp](http://gmplib.org/) | 6.1.2 | The GNU multiprecision library. / GPL 2 and LGPL 3 |
| [gmpy2](https://pypi.python.org/pypi/gmpy2) | 2.0.8 | GMP/MPIR, MPFR, and MPC interface to Python 2.6+ and 3.x / LGPL 3 |
| [graphite2](http://graphite.sil.org/) | 1.3.11 | A “smart font” system that handles the complexities of lesser-known languages of the world. / LGPLv2 |
| [greenlet](https://github.com/python-greenlet/greenlet) | 0.4.13 | Lightweight in-process concurrent programming / MIT |
| [gst-plugins-base](http://gstreamer.freedesktop.org/) | 1.14.0 | GStreamer Base Plug-ins / GPL2 |
| [gstreamer](http://gstreamer.freedesktop.org/) | 1.14.0 | Library for constructing graphs of media-handling components / LGPL 2 |
| [h5py](http://www.h5py.org/) | 2.7.1 | Read and write HDF5 files from Python. / BSD 3-Clause |
| [harfbuzz](http://www.freedesktop.org/wiki/Software/HarfBuzz/) | 1.7.6 | An OpenType text shaping engine. / MIT |
| [hdf5](http://www.hdfgroup.org/HDF5/) | 1.10.2 | HDF5 is a data model, library, and file format for storing and managing data / HDF5 |
| [heapdict](http://stutzbachenterprises.com/) | 1.0.0 | A heap with decrease-key and increase-key operations / BSD 3-Clause |
| [html5lib](https://github.com/html5lib/html5lib-python) | 1.0.1 | HTML parser based on the WHATWG HTML specification / MIT |
| [icu](http://site.icu-project.org/) | 58.2 | International Components for Unicode. / MIT |
| [idna](https://github.com/kjd/idna) | 2.6 | Internationalized Domain Names in Applications (IDNA). / BSD Like |
| [imageio](http://imageio.github.io) | 2.3.0 | a Python library for reading and writing image data / BSD 2-Clause |
| [imagesize](https://github.com/shibukawa/imagesize_py) | 1.0.0 | Getting image size from png/jpeg/jpeg2000/gif file / MIT |
| [intel-openmp](https://software.intel.com/en-us/node/522690) | 2018.0.0 | Math library for Intel and compatible processors / proprietary - Intel |
| [ipykernel](http://ipython.org) | 4.8.2 | IPython Kernel for Jupyter / BSD 3-clause |
| [ipython](http://ipython.org/) | 6.4.0 | IPython: Productive Interactive Computing / BSD 3-clause |
| [ipython\_genutils](http://ipython.org) | 0.2.0 | vestigial utilities from IPython / BSD 3-Clause |
| [ipywidgets](https://github.com/ipython/ipywidgets) | 7.2.1 | Jupyter Interactive Widgets / BSD 3-clause |
| [isort](https://github.com/timothycrosley/isort) | 4.3.4 | A Python utility / library to sort Python imports. / MIT |
| [itsdangerous](https://github.com/pallets/itsdangerous) | 0.24 | Various helpers to pass trusted data to untrusted environments. / BSD 3-Clause |
| [jbig](https://www.cl.cam.ac.uk/~mgk25/jbigkit) | 2.1 | Implementation of the JBIG1 data compression standard / GPL-2.0 |
| [jdcal](https://github.com/phn/jdcal) | 1.4 | Julian dates from proleptic Gregorian and Julian calendars. / BSD 2-Clause |
| [jedi](https://github.com/davidhalter/jedi/) | 0.12.0 | An autocompletion tool for Python that can be used for text editors. / MIT |
| [jinja2](http://jinja.pocoo.org) | 2.10 | An easy to use stand-alone template engine written in pure python. / 3-Clause BSD |
| [jpeg](http://www.ijg.org/) | 9b | read/write jpeg COM, EXIF, IPTC medata / Custom free software license |
| [jsonschema](https://github.com/Julian/jsonschema) | 2.6.0 | An implementation of JSON Schema validation for Python / MIT |
| [jupyter](http://jupyter.org) | 1.0.0 | Jupyter metapackage. Install all the Jupyter components in one go. / BSD 3-Clause |
| [jupyter\_client](http://jupyter.org) | 5.2.3 | Jupyter protocol implementation and client libraries / BSD 3-clause |
| [jupyter\_console](http://jupyter.org) | 5.2.0 | Jupyter terminal console / BSD 3-Clause |
| [jupyter\_core](http://jupyter.org) | 4.4.0 | Core common functionality of Jupyter projects. / BSD 3-clause |
| [jupyterlab](https://github.com/jupyterlab/jupyterlab) | 0.32.1 | An extensible environment for interactive and reproducible computing, based on the Jupyter Notebook and Architecture. Currently in beta. / BSD 3-Clause |
| [jupyterlab\_launcher](http://github.com/jupyterlab/jupyterlab_launcher) | 0.10.5 | A Launcher for JupyterLab based applications. / BSD 3-Clause |
| [kiwisolver](https://github.com/nucleic/kiwi) | 1.0.1 | A fast implementation of the Cassowary constraint solver / BSD 3-Clause |
| [lazy-object-proxy](https://github.com/ionelmc/python-lazy-object-proxy) | 1.3.1 | A fast and thorough lazy object proxy. / BSD 2-Clause |
| [libcurl](http://curl.haxx.se/) | 7.60.0 | tool and library for transferring data with URL syntax / MIT/X derivate (`<http://curl.haxx.se/docs/copyright.html>`) |
| [libedit](http://thrysoee.dk/editline/) | 3.1.20170329 | Editline Library (libedit) / NetBSD |
| [libffi](https://sourceware.org/libffi/) | 3.2.1 | A Portable Foreign Function Interface Library. / Custom |
| [libgcc-ng](https://gcc.gnu.org/onlinedocs/gccint/Libgcc.html) | 7.2.0 | The GCC low-level runtime library / GPL |
| [libgfortran-ng](https://gcc.gnu.org/) | 7.2.0 | The GNU Fortran Runtime Library / GPL |
| [libpng](http://www.libpng.org/pub/png/libpng.html) | 1.6.34 | PNG reference library. / zlib/libpng |
| [libsodium](http://libsodium.org) | 1.0.16 | A modern and easy-to-use crypto library. / ISC |
| [libssh2](https://www.libssh2.org/) | 1.8.0 | the SSH library / BSD 3-Clause |
| [libstdcxx-ng](https://gcc.gnu.org/) | 7.2.0 | The GNU C++ Runtime Library / GPL3 with runtime exception |
| [libtiff](http://www.libtiff.org/) | 4.0.9 | Support for the Tag Image File Format (TIFF). / HPND |
| [libtool](http://www.gnu.org/software/libtool/) | 2.4.6 | The GNU Portable Library Tool / GPL 3 |
| [libxcb](http://xcb.freedesktop.org/) | 1.13 | This is the C-language Binding (XCB) package to the X Window System protocol / MIT |
| [libxml2](http://xmlsoft.org/) | 2.9.8 | The XML C parser and toolkit of Gnome / MIT |
| [libxslt](http://xmlsoft.org/XSLT/) | 1.1.32 | The XSLT C library developed for the GNOME project / MIT |
| [llvmlite](https://github.com/numba/llvmlite) | 0.23.1 | A lightweight LLVM python binding for writing JIT compilers / New BSD License |
| [locket](https://github.com/mwilliamson/locket.py) | 0.2.0 | File-based locks for Python for Linux and Windows / BSD 2-Clause |
| [lxml](http://lxml.de/) | 4.2.1 | Pythonic binding for the C libraries libxml2 and libxslt. / BSD 3-Clause, GPL-2.0, ZPL-2.0, and ElementTree |
| [lzo](http://www.oberhumer.com/opensource/lzo/) | 2.10 | LZO is a portable lossless data compression library written in ANSI C. / GPL v2+ |
| [markupsafe](https://www.palletsprojects.com/p/markupsafe/) | 1.0 | A Python module that implements the jinja2.Markup string / BSD 3-Clause |
| [matplotlib](http://matplotlib.org/) | 2.2.2 | Publication quality figures in Python / PSF-based |
| [mccabe](https://github.com/PyCQA/mccabe) | 0.6.1 | McCabe complexity checker for Python / MIT |
| [mistune](https://github.com/lepture/mistune) | 0.8.3 | The fastest markdown parser in pure Python. / BSD 3-Clause |
| [mkl](https://software.intel.com/en-us/mkl) | 2018.0.2 | Math library for Intel and compatible processors / proprietary - Intel |
| [mkl-service](https://github.com/ContinuumIO/mkl-service) | 1.1.2 | Python bindings to MKL service functions / 3-clause BSD |
| [mkl\_fft](http://github.com/IntelPython/mkl_fft) | 1.0.1 | NumPy-based implementation of Fast Fourier Transform using Intel (R) Math Kernel Library / BSD |
| [mkl\_random](http://github.com/IntelPython/mkl_random) | 1.0.1 | Intel (R) MKL-powered package for sampling from common probability distributions into NumPy arrays. / BSD 3-Clause |
| [more-itertools](https://github.com/erikrose/more-itertools) | 4.1.0 | More routines for operating on iterables, beyond itertools / MIT |
| [mpc](http://www.multiprecision.org/) | 1.0.3 | A C library for the arithmetic of complex numbers with arbitrarily high precision. / LGPL 3 |
| [mpfr](http://www.mpfr.org/) | 3.1.5 | The MPFR library is a C library for multiple-precision floating-point computations with correct rounding. / LGPL 3 |
| [mpmath](http://mpmath.org) | 1.0.0 | Python library for arbitrary-precision floating-point arithmetic / BSD 3-Clause |
| [msgpack-python](http://msgpack.org/) | 0.5.6 | MessagePack (de)serializer. / Apache 2.0 |
| [multipledispatch](https://github.com/mrocklin/multipledispatch/) | 0.5.0 | Multiple dispatch in Python / BSD 3-Clause |
| [navigator-updater](https://github.com/ContinuumIO/navigator-updater) | 0.2.1 | Anaconda Navigator Updater / proprietary - Continuum Analytics, Inc. |
| [nbconvert](http://jupyter.org) | 5.3.1 | Converting Jupyter Notebooks / BSD 3-Clause |
| [nbformat](http://jupyter.org) | 4.4.0 | The reference implementation of the Jupyter Notebook format / BSD 3-clause |
| [ncurses](http://www.gnu.org/software/ncurses/) | 6.1 | Library for text-based user interfaces / Free software (MIT-like) |
| [networkx](https://networkx.github.io/) | 2.1 | Python package for creating and manipulating complex networks / BSD 3-Clause |
| [nltk](http://nltk.org/) | 3.3.0 | Build Python programs to work with human language data / Apache 2.0 |
| [nose](http://readthedocs.org/docs/nose/) | 1.3.7 | Nose extends unittest to make testing easier / LGPL-2.1 |
| [notebook](http://jupyter.org) | 5.5.0 | A web-based notebook environment for interactive computing / BSD 3-clause |
| [numba](http://numba.github.com) | 0.38.0 | NumPy aware dynamic Python compiler using LLVM / BSD 2-clause |
| [numexpr](https://github.com/pydata/numexpr) | 2.6.5 | Fast numerical expression evaluator for NumPy. / MIT |
| [numpy](http://numpy.scipy.org/) | 1.14.3 | Array processing for numbers, strings, records, and objects. / BSD 3-Clause |
| numpy-base | 1.14.3 | |
| [numpydoc](https://github.com/numpy/numpydoc) | 0.8.0 | Sphinx extension to support docstrings in Numpy format / BSD 3-Clause |
| [odo](http://odo.pydata.org) | 0.5.1 | Data migration in Python / BSD-3-Clause |
| [olefile](http://www.decalage.info/python/olefileio) | 0.45.1 | parse, read and write Microsoft OLE2 files / BSD License 2-Clause |
| [openpyxl](https://openpyxl.readthedocs.io) | 2.5.3 | A Python library to read/write Excel 2010 xlsx/xlsm files / MIT |
| [openssl](http://www.openssl.org/) | 1.0.2o | OpenSSL is an open-source implementation of the SSL and TLS protocols / OpenSSL |
| [packaging](https://github.com/pypa/packaging) | 17.1 | Core utilities for Python packages / Apache 2.0 or BSD 2-Clause |
| [pandas](http://pandas.pydata.org) | 0.23.0 | High-performance, easy-to-use data structures and data analysis tools. / BSD 3-clause |
| [pandoc](http://johnmacfarlane.net/pandoc/) | 1.19.2.1 | Universal markup converter (repackaged binaries). / GPL-2.0 |
| [pandocfilters](https://github.com/jgm/pandocfilters) | 1.4.2 | A python module for writing pandoc filters / BSD-3-Clause |
| [pango](http://www.pango.org/) | 1.41.0 | Text layout and rendering engine. / LGPL-2.1 |
| [parso](https://github.com/davidhalter/parso) | 0.2.0 | A Python Parser / MIT |
| [partd](https://github.com/dask/partd) | 0.3.8 | Data structure for on-disk shuffle operations / BSD 3-Clause |
| [patchelf](http://nixos.org/patchelf.html) | 0.9 | A small utility to modify the dynamic linker and RPATH of ELF executables. / GPL 3 |
| [path.py](https://github.com/jaraco/path.py) | 11.0.1 | A module wrapper for os.path / MIT |
| [pathlib2](https://github.com/mcmtroffaes/pathlib2) | 2.3.2 | Fork of pathlib aiming to support the full stdlib Python API. / MIT |
| [patsy](https://github.com/pydata/patsy) | 0.5.0 | Describing statistical models in Python using symbolic formulas / BSD-2-Clause, PSF2 |
| [pcre](http://www.pcre.org/) | 8.42 | Regular expression pattern matching using the same syntax and semantics as Perl 5. / BSD 3-Clause |
| [pep8](http://pep8.readthedocs.org/) | 1.7.1 | Python style guide checker / MIT |
| [pexpect](http://pexpect.sourceforge.net/) | 4.5.0 | Pexpect makes Python a better tool for controlling other applications. / ISC |
| [pickleshare](https://github.com/vivainio/pickleshare) | 0.7.4 | Tiny ‘shelve’-like database with concurrency support / MIT |
| [pillow](https://pillow.readthedocs.io) | 5.1.0 | Pillow is the friendly PIL fork by Alex Clark and Contributors. / PIL |
| [pip](https://pip.pypa.io/en/stable/) | 10.0.1 | PyPA recommended tool for installing Python packages / MIT |
| [pixman](http://www.pixman.org/) | 0.34.0 | A low-level software library for pixel manipulation. / MIT |
| [pkginfo](https://code.launchpad.net/~tseaver/pkginfo/trunk) | 1.4.2 | Query metadatdata from sdists / bdists / installed packages. / MIT |
| [pluggy](https://github.com/pytest-dev/pluggy) | 0.6.0 | Plugin registration and hook calling for Python / MIT |
| [ply](http://www.dabeaz.com/ply/index.html) | 3.11 | Python Lex-Yacc / BSD 3-clause |
| [prompt\_toolkit](https://github.com/jonathanslenders/python-prompt-toolkit) | 1.0.15 | Library for building powerful interactive command lines in Python / BSD 3-clause |
| [psutil](https://github.com/giampaolo/psutil) | 5.4.5 | A cross-platform process and system utilities module for Python / BSD 3-Clause |
| [ptyprocess](https://github.com/pexpect/ptyprocess) | 0.5.2 | Run a subprocess in a pseudo terminal / ISC |
| [py](https://github.com/pytest-dev/py) | 1.5.3 | library with cross-python path, ini-parsing, io, code, log facilities / MIT |
| [pycodestyle](https://pycodestyle.readthedocs.io/) | 2.4.0 | Python style guide checker / MIT |
| [pycosat](https://github.com/ContinuumIO/pycosat) | 0.6.3 | Bindings to picosat (a SAT solver) / MIT |
| [pycparser](https://github.com/eliben/pycparser) | 2.18 | Complete C99 parser in pure Python / BSD 3-clause |
| [pycrypto](http://www.pycrypto.org/) | 2.6.1 | Cryptographic modules for Python. / Public Domain |
| [pycurl](http://pycurl.sourceforge.net/) | 7.43.0.1 | A Python Interface To The cURL library / LGPL, MIT |
| [pyflakes](https://github.com/PyCQA/pyflakes) | 1.6.0 | Pyflakes analyzes programs and detects various errors. / MIT |
| [pygments](http://pygments.org/) | 2.2.0 | Generic syntax highlighting package / BSD 2-clause |
| [pylint](http://www.pylint.org/) | 1.8.4 | python code static checker / GPL |
| [pyodbc](https://github.com/mkleehammer/pyodbc) | 4.0.23 | DB API Module for ODBC / MIT |
| [pyopenssl](https://github.com/pyca/pyopenssl) | 18.0.0 | Python wrapper module around the OpenSSL library / Apache 2.0 |
| [pyparsing](http://pyparsing.wikispaces.com/) | 2.2.0 | Create and execute simple grammars / MIT |
| [pyqt](http://www.riverbankcomputing.co.uk/software/pyqt) | 5.9.2 | Python binding of the cross-platform GUI toolkit Qt. / Commercial, GPL-2.0, GPL-3.0 |
| [pysocks](https://github.com/Anorov/PySocks) | 1.6.8 | A Python SOCKS client module. See [Anorov/PySocks](https://github.com/Anorov/PySocks) for more information. / BSD 3-Clause |
| [pytables](http://www.pytables.org) | 3.4.3 | Brings together Python, HDF5 and NumPy to easily handle large amounts of data. / BSD 3-Clause |
| [pytest](https://docs.pytest.org/en/latest/) | 3.5.1 | Simple and powerful testing with Python. / MIT |
| [pytest-arraydiff](https://github.com/astrofrog/pytest-arraydiff) | 0.2 | pytest plugin to help with comparing array output from tests / BSD |
| [pytest-astropy](https://github.com/astropy/pytest-astropy) | 0.3.0 | Meta-package containing dependencies for testing Astropy / BSD |
| [pytest-doctestplus](https://github.com/astropy/pytest-doctestplus) | 0.1.3 | Pytest plugin with advanced doctest features / BSD |
| [pytest-openfiles](https://github.com/astropy/pytest-openfiles) | 0.3.0 | Pytest plugin for detecting inadvertent open file handles / BSD |
| [pytest-remotedata](https://github.com/astropy/pytest-remotedata) | 0.2.1 | Pytest plugin for controlling remote data access / BSD |
| [python](http://www.python.org/) | 3.6.5 | General purpose programming language / PSF |
| [python-dateutil](https://dateutil.readthedocs.org/) | 2.7.3 | Extensions to the standard Python datetime module. / BSD 3 Clause |
| [pytz](http://pythonhosted.org/pytz/) | 2018.4 | World timezone definitions, modern and historical. / MIT |
| [pywavelets](https://github.com/PyWavelets/pywt) | 0.5.2 | Discrete Wavelet Transforms in Python. / MIT |
| [pyyaml](http://pyyaml.org/wiki/PyYAML) | 3.12 | YAML parser and emitter for Python / MIT |
| [pyzmq](https://github.com/zeromq/pyzmq) | 17.0.0 | Python bindings for zeromq / BSD 3-clause |
| [qt](http://qt-project.org) | 5.9.5 | Qt is a cross-platform application and UI framework. / LGPL-3.0 |
| [qtawesome](https://github.com/spyder-ide/qtawesome) | 0.4.4 | Iconic fonts in PyQt and PySide applications / MIT |
| [qtconsole](http://jupyter.org) | 4.3.1 | Jupyter Qt console / BSD 3-Clause |
| [qtpy](https://github.com/spyder-ide/qtpy) | 1.4.1 | Abstraction layer for PyQt5/PyQt4/PySide / MIT |
| [readline](https://cnswww.cns.cwru.edu/php/chet/readline/rltop.html) | 7.0 | library for editing command lines as they are typed in / GPL3 |
| [requests](http://python-requests.org) | 2.18.4 | Python HTTP for Humans. / Apache 2.0 |
| [rope](https://github.com/python-rope/rope) | 0.10.7 | A python refactoring library… / GPL 2.0 |
| [ruamel\_yaml](https://bitbucket.org/ruamel/yaml) | 0.15.35 | A patched copy of ruamel.yaml. / MIT |
| [scikit-image](http://scikit-image.org/) | 0.13.1 | Image processing routines for SciPy. / BSD 3-Clause |
| [scikit-learn](http://scikit-learn.org/) | 0.19.1 | A set of python modules for machine learning and data mining / BSD 3-Clause |
| [scipy](http://www.scipy.org/) | 1.1.0 | Scientific Library for Python / BSD 3-Clause |
| [seaborn](http://stanford.edu/~mwaskom/software/seaborn/) | 0.8.1 | Statistical data visualization / BSD 3-Clause |
| [send2trash](https://github.com/hsoft/send2trash) | 1.5.0 | Python library to natively send files to Trash (or Recycle bin) on all platforms. / BSD-3-Clause |
| [setuptools](https://github.com/pypa/setuptools) | 39.1.0 | Download, build, install, upgrade, and uninstall Python packages / MIT |
| [simplegeneric](http://cheeseshop.python.org/pypi/simplegeneric) | 0.8.1 | Simple generic functions (similar to Python’s own len(), pickle.dump(), etc.) / Zope Public |
| [singledispatch](http://docs.python.org/3/library/functools.html#functools.singledispatch) | 3.4.0.3 | Transforms a function into a single-dispatch generic function / MIT |
| [sip](http://www.riverbankcomputing.com/software/sip/intro) | 4.19.8 | Create Python bindings for C and C++ libraries / GPL-3.0 |
| [six](http://pypi.python.org/pypi/six/) | 1.11.0 | Python 2 and 3 compatibility utilities / MIT |
| [snappy](https://github.com/google/snappy) | 1.1.7 | A fast compressor/decompressor / BSD 3-clause |
| [snowballstemmer](https://github.com/shibukawa/snowball_py) | 1.2.1 | Snowball stemming library collection for Python / BSD-2-Clause |
| [sortedcollections](http://www.grantjenks.com/docs/sortedcollections/) | 0.6.1 | Python Sorted Collections / Apache-2.0 |
| [sortedcontainers](http://www.grantjenks.com/docs/sortedcontainers/) | 1.5.10 | Python Sorted Container Types: SortedList, SortedDict, and SortedSet / Apache 2.0 |
| [sphinx](http://www.sphinx-doc.org) | 1.7.4 | Sphinx is a tool that makes it easy to create intelligent and beautiful documentation / BSD 2-clause |
| sphinxcontrib | 1.0 | Python namespace for sphinxcontrib / BSD |
| [sphinxcontrib-websupport](https://pypi.python.org/pypi/sphinxcontrib-websupport) | 1.0.1 | Sphinx API for Web Apps / BSD-2-Clause |
| [spyder](https://github.com/spyder-ide/spyder) | 3.2.8 | Scientific PYthon Development EnviRonment / MIT |
| [sqlalchemy](http://www.sqlalchemy.org/) | 1.2.7 | Database Abstraction Library. / MIT |
| [sqlite](http://www.sqlite.org/) | 3.23.1 | Implements a self-contained, zero-configuration, SQL database engine. / Public-Domain (`<http://www.sqlite.org/copyright.html>`) |
| [statsmodels](https://www.statsmodels.org) | 0.9.0 | Statistical computations and models for use with SciPy / BSD 3-Clause |
| [sympy](http://sympy.org) | 1.1.1 | Python library for symbolic mathematics / 3-clause BSD |
| [tblib](https://github.com/ionelmc/python-tblib) | 1.3.2 | Traceback serialization library. / BSD 2-Clause |
| [terminado](http://github.com/mitsuhiko/markupsafe) | 0.8.1 | Terminals served by tornado websockets / BSD 3-clause |
| [testpath](https://testpath.readthedocs.io) | 0.3.1 | Testpath is a collection of utilities for Python code working with files and commands. / MIT |
| [tk](http://www.tcl.tk/) | 8.6.7 | A dynamic programming language with GUI support. Bundles Tcl and Tk. / Tcl/Tk |
| [toolz](http://toolz.readthedocs.org/) | 0.9.0 | A functional standard library for Python. / BSD 3-Clause |
| [tornado](http://www.tornadoweb.org/) | 5.0.2 | A Python web framework and asynchronous networking library, originally developed at FriendFeed. / Apache 2.0 |
| [traitlets](http://ipython.org/) | 4.3.2 | Configuration system for Python applications / BSD 3-clause |
| [typing](https://docs.python.org/3.5/library/typing.html) | 3.6.4 | Type Hints for Python - backport for `Python<3.5` / PSF |
| [unicodecsv](https://github.com/jdunck/python-unicodecsv) | 0.14.1 | Drop-in replacement for csv module which supports unicode strings / BSD |
| [unixodbc](http://www.unixodbc.org/) | 2.3.6 | ODBC on non MS Windows platforms / LGPL-2.1 |
| [urllib3](https://urllib3.readthedocs.io/) | 1.22 | HTTP library with thread-safe connection pooling, file post, and more. / MIT |
| [wcwidth](https://github.com/jquast/wcwidth) | 0.1.7 | Measures number of Terminal column cells of wide-character codes. / MIT |
| [webencodings](https://github.com/gsnedders/python-webencodings) | 0.5.1 | Character encoding aliases for legacy web content / BSD 3-Clause |
| [werkzeug](http://werkzeug.pocoo.org/) | 0.14.1 | The Python WSGI Utility Library. / BSD 3-Clause |
| [wheel](https://bitbucket.org/pypa/wheel/) | 0.31.1 | A built-package format for Python. / MIT |
| [widgetsnbextension](http://ipython.org) | 3.2.1 | IPython HTML widgets for Jupyter / BSD 3-clause |
| [wrapt](https://github.com/GrahamDumpleton/wrapt) | 1.10.11 | Module for decorators, wrappers and monkey patching. / BSD 2-Clause |
| [xlrd](http://www.python-excel.org/) | 1.1.0 | Library for developers to extract data from Microsoft Excel (tm) spreadsheet files / BSD 3-Clause and BSD with advertising |
| [xlsxwriter](https://xlsxwriter.readthedocs.io/) | 1.0.4 | A Python module for creating Excel XLSX files / BSD 2-Clause |
| [xlwt](http://www.python-excel.org/) | 1.3.0 | Writing data and formatting information to Excel files / BSD |
| [xz](http://tukaani.org/xz/) | 5.2.4 | Data compression software with high compression ratio / LGPL-2.1 and GPL-2.0 |
| [yaml](http://pyyaml.org/wiki/LibYAML) | 0.1.7 | A C library for parsing and emitting YAML. / MIT |
| [zeromq](http://zeromq.org) | 4.2.5 | A high-performance asynchronous messaging library. / LGPL 3 |
| [zict](http://github.com/mrocklin/zict) | 0.1.3 | Composable Dictionary Classes / BSD 3-Clause |
| [zlib](http://zlib.net/) | 1.2.11 | Massively spiffy yet delicately unobtrusive compression library / zlib |
| Name | Version | Summary / License |
|---|---|---|
| [\_ipyw\_jlab\_nb\_ext\_conf](https://github.com/ContinuumIO/anaconda-nb-extensions-meta-config) | 0.1.0 | A configuration metapackage for enabling Anaconda-bundled jupyter extensions / BSD |
| [alabaster](http://www.sphinx-doc.org/en/stable/index.html) | 0.7.10 | Configurable, Python 2+3 compatible Sphinx theme. / BSD 3-Clause |
| [anaconda-client](https://github.com/Anaconda-Platform/anaconda-client) | 1.6.14 | Anaconda Cloud command line client library / BSD 3-Clause |
| [anaconda-navigator](https://github.com/ContinuumIO/navigator) | 1.8.7 | Anaconda Navigator / proprietary - Continuum Analytics, Inc. |
| [anaconda-project](https://github.com/Anaconda-Platform/anaconda-project) | 0.8.2 | Tool for encapsulating, running, and reproducing data science projects / BSD 3-Clause |
| [asn1crypto](https://github.com/wbond/asn1crypto) | 0.24.0 | Python ASN.1 library with a focus on performance and a pythonic API / MIT |
| [astroid](https://www.astroid.org/) | 1.6.3 | A abstract syntax tree for Python with inference support. / LGPL 2.1 |
| [astropy](http://www.astropy.org/) | 3.0.2 | Community-developed Python Library for Astronomy / BSD |
| [attrs](https://attrs.readthedocs.io/en/stable/) | 18.1.0 | attrs is the Python package that will bring back the joy of writing classes by relieving you from the drudgery of implementing object protocols (aka dunder methods). / MIT |
| [babel](http://babel.pocoo.org/) | 2.5.3 | Utilities to internationalize and localize Python applications / BSD 3-clause |
| [backcall](https://github.com/takluyver/backcall/) | 0.1.0 | Specifications for callback functions passed in to an API / BSD-3-Clause |
| [backports](https://bitbucket.org/brandon/backports) | 1.0 | / BSD |
| [backports.shutil\_get\_terminal\_size](https://github.com/chrippa/backports.shutil_get_terminal_size) | 1.0.0 | A backport of the get\_terminal\_size function from Python 3.3’s shutil. / MIT |
| [beautifulsoup4](http://www.crummy.com/software/BeautifulSoup/) | 4.6.0 | Python library designed for screen-scraping / MIT |
| [bitarray](https://github.com/ilanschnell/bitarray) | 0.8.1 | efficient arrays of booleans – C extension / PSF |
| [bkcharts](http://github.com/bokeh/bkcharts) | 0.2 | High level chart types built on top of Bokeh / BSD 3-Clause |
| blas | 1.0 | |
| [blaze](http://blaze.pydata.org) | 0.11.3 | NumPy and Pandas interface to big data / BSD 3-Clause |
| [bleach](https://github.com/mozilla/bleach) | 2.1.3 | Easy, whitelist-based HTML-sanitizing tool / Apache-2.0 |
| [blosc](https://github.com/Blosc/c-blosc) | 1.14.3 | A blocking, shuffling and loss-less compression library that can be faster than memcpy() / BSD 3-Clause |
| [bokeh](http://bokeh.pydata.org/) | 0.12.16 | Statistical and novel interactive HTML plots for Python / BSD 3-Clause |
| [boto](https://github.com/boto/boto/) | 2.48.0 | Amazon Web Services Library / MIT |
| [bottleneck](http://berkeleyanalytics.com/bottleneck) | 1.2.1 | Fast NumPy array functions written in Cython. / BSD 2-Clause |
| [bzip2](http://www.bzip.org/) | 1.0.6 | high-quality data compressor / bzip2 |
| [ca-certificates](https://github.com/conda-forge/ca-certificates-feedstock) | 2018.03.07 | Certificates for use with other packages. / ISC |
| [cairo](http://cairographics.org/) | 1.14.12 | Cairo is a 2D graphics library with support for multiple output devices. / LGPL 2.1 or MPL 1.1 |
| [certifi](http://certifi.io/) | 2018.4.16 | Python package for providing Mozilla’s CA Bundle. / ISC |
| [cffi](https://bitbucket.org/cffi/cffi) | 1.11.5 | Foreign Function Interface for Python calling C code. / MIT |
| [chardet](https://github.com/chardet/chardet) | 3.0.4 | Universal character encoding detector / LGPL2 |
| [click](http://click.pocoo.org/) | 6.7 | A simple wrapper around optparse for powerful command line utilities. / BSD 3-Clause |
| [cloudpickle](https://github.com/cloudpipe/cloudpickle) | 0.5.3 | Extended pickling support for Python objects / BSD 3-Clause |
| [clyent](https://github.com/Anaconda-Platform/clyent) | 1.2.2 | Command line client library for windows and posix / BSD 3-Clause |
| [colorama](https://github.com/tartley/colorama) | 0.3.9 | Cross-platform colored terminal text. / BSD 3-Clause |
| [conda](https://conda.io) | 4.5.4 | OS-agnostic, system-level binary package and environment manager. / BSD 3-Clause |
| [conda-build](https://github.com/conda/conda-build) | 3.10.5 | tools for building conda packages / BSD 3-Clause |
| [conda-env](https://github.com/conda/conda-env) | 2.6.0 | Tools for interacting with conda environments. / BSD 3-Clause |
| [conda-verify](https://github.com/conda/conda-verify) | 2.0.0 | tool for validating conda recipes and conda packages / BSD 3-Clause |
| [contextlib2](http://contextlib2.readthedocs.org) | 0.5.5 | Backports and enhancements for the contextlib module / PSF |
| [cryptography](https://github.com/pyca/cryptography) | 2.2.2 | Provides cryptographic recipes and primitives to Python developers / Apache 2.0 or BSD 3-Clause, PSF 2 |
| [curl](http://curl.haxx.se/) | 7.60.0 | tool and library for transferring data with URL syntax / MIT/X derivate (`<http://curl.haxx.se/docs/copyright.html>`) |
| [cycler](http://matplotlib.org/cycler) | 0.10.0 | Composable style cycles. / BSD 3-Clause |
| [cython](http://www.cython.org/) | 0.28.2 | The Cython compiler for writing C extensions for the Python language / Apache-2.0 |
| [cytoolz](https://github.com/pytoolz/cytoolz) | 0.9.0.1 | Cython implementation of Toolz. High performance functional utilities. / BSD 3-Clause |
| [dask](http://github.com/dask/dask/) | 0.17.5 | Parallel Python with task scheduling / BSD 3-Clause |
| [dask-core](http://github.com/dask/dask/) | 0.17.5 | Parallel Python with task scheduling / BSD 3-Clause |
| [datashape](http://datashape.pydata.org) | 0.5.4 | A data description language. / BSD 2-Clause |
| [dbus](http://www.freedesktop.org/wiki/Software/dbus/) | 1.13.2 | Simple message bus system for applications to talk to one another / GPL2 |
| [decorator](https://github.com/micheles/decorator) | 4.3.0 | Better living through Python with decorators. / BSD 3-Clause |
| [distributed](http://distributed.readthedocs.io/en/latest/) | 1.21.8 | Distributed computing with Dask / BSD 3-Clause |
| [docutils](http://docutils.sourceforge.net/) | 0.14 | Docutils – Python Documentation Utilities / Public Domain Dedictation and BSD 2-Clause and PSF 2.1.1 and GPL 3.0 |
| [entrypoints](https://github.com/takluyver/entrypoints) | 0.2.3 | Discover and load entry points from installed packages. / MIT License |
| [et\_xmlfile](https://bitbucket.org/openpyxl/et_xmlfile) | 1.0.1 | An implementation of lxml.xmlfile for the standard library / MIT |
| [expat](http://expat.sourceforge.net/) | 2.2.5 | Expat XML parser library in C. / MIT |
| [fastcache](https://github.com/pbrady/fastcache) | 1.0.2 | C implementation of Python 3 lru\_cache / MIT |
| [filelock](https://github.com/benediktschmitt/py-filelock) | 3.0.4 | A platform independent file lock. / Public Domain |
| [flask](http://flask.pocoo.org) | 1.0.2 | A microframework based on Werkzeug, Jinja2 and good intentions. / BSD 3-Clause |
| [flask-cors](https://github.com/corydolphin/flask-cors) | 3.0.4 | A Flask extension adding a decorator for CORS support / MIT |
| [fontconfig](http://www.freedesktop.org/wiki/Software/fontconfig/) | 2.12.6 | A library for configuring and customizing font access. / MIT |
| [freetype](https://www.freetype.org/) | 2.8 | A Free, High-Quality, and Portable Font Engine / GPL-2.0 and FreeType |
| [get\_terminal\_size](https://github.com/chrippa/backports.shutil_get_terminal_size) | 1.0.0 | Get the size of the terminal window. / MIT |
| [gevent](http://www.gevent.org/) | 1.3.0 | Coroutine-based network library / MIT |
| [glib](https://developer.gnome.org/glib/) | 2.56.1 | Provides core application building blocks for libraries and applications written in C. / LGPL-2.1 |
| [glob2](https://github.com/miracle2k/python-glob2) | 0.6 | Version of the glob module that supports recursion via \*\*, and can capture patterns. / BSD-2-Clause |
| [gmp](http://gmplib.org/) | 6.1.2 | The GNU multiprecision library. / GPL 2 and LGPL 3 |
| [gmpy2](https://pypi.python.org/pypi/gmpy2) | 2.0.8 | GMP/MPIR, MPFR, and MPC interface to Python 2.6+ and 3.x / LGPL 3 |
| [graphite2](http://graphite.sil.org/) | 1.3.11 | A “smart font” system that handles the complexities of lesser-known languages of the world. / LGPLv2 |
| [greenlet](https://github.com/python-greenlet/greenlet) | 0.4.13 | Lightweight in-process concurrent programming / MIT |
| [gst-plugins-base](http://gstreamer.freedesktop.org/) | 1.14.0 | GStreamer Base Plug-ins / GPL2 |
| [gstreamer](http://gstreamer.freedesktop.org/) | 1.14.0 | Library for constructing graphs of media-handling components / LGPL 2 |
| [h5py](http://www.h5py.org/) | 2.7.1 | Read and write HDF5 files from Python. / BSD 3-Clause |
| [harfbuzz](http://www.freedesktop.org/wiki/Software/HarfBuzz/) | 1.7.6 | An OpenType text shaping engine. / MIT |
| [hdf5](http://www.hdfgroup.org/HDF5/) | 1.10.2 | HDF5 is a data model, library, and file format for storing and managing data / HDF5 |
| [heapdict](http://stutzbachenterprises.com/) | 1.0.0 | A heap with decrease-key and increase-key operations / BSD 3-Clause |
| [html5lib](https://github.com/html5lib/html5lib-python) | 1.0.1 | HTML parser based on the WHATWG HTML specification / MIT |
| [icu](http://site.icu-project.org/) | 58.2 | International Components for Unicode. / MIT |
| [idna](https://github.com/kjd/idna) | 2.6 | Internationalized Domain Names in Applications (IDNA). / BSD Like |
| [imageio](http://imageio.github.io) | 2.3.0 | a Python library for reading and writing image data / BSD 2-Clause |
| [imagesize](https://github.com/shibukawa/imagesize_py) | 1.0.0 | Getting image size from png/jpeg/jpeg2000/gif file / MIT |
| [intel-openmp](https://software.intel.com/en-us/node/522690) | 2018.0.0 | Math library for Intel and compatible processors / proprietary - Intel |
| [ipykernel](http://ipython.org) | 4.8.2 | IPython Kernel for Jupyter / BSD 3-clause |
| [ipython](http://ipython.org/) | 6.4.0 | IPython: Productive Interactive Computing / BSD 3-clause |
| [ipython\_genutils](http://ipython.org) | 0.2.0 | vestigial utilities from IPython / BSD 3-Clause |
| [ipywidgets](https://github.com/ipython/ipywidgets) | 7.2.1 | Jupyter Interactive Widgets / BSD 3-clause |
| [isort](https://github.com/timothycrosley/isort) | 4.3.4 | A Python utility / library to sort Python imports. / MIT |
| [itsdangerous](https://github.com/pallets/itsdangerous) | 0.24 | Various helpers to pass trusted data to untrusted environments. / BSD 3-Clause |
| [jbig](https://www.cl.cam.ac.uk/~mgk25/jbigkit) | 2.1 | Implementation of the JBIG1 data compression standard / GPL-2.0 |
| [jdcal](https://github.com/phn/jdcal) | 1.4 | Julian dates from proleptic Gregorian and Julian calendars. / BSD 2-Clause |
| [jedi](https://github.com/davidhalter/jedi/) | 0.12.0 | An autocompletion tool for Python that can be used for text editors. / MIT |
| [jinja2](http://jinja.pocoo.org) | 2.10 | An easy to use stand-alone template engine written in pure python. / 3-Clause BSD |
| [jpeg](http://www.ijg.org/) | 9b | read/write jpeg COM, EXIF, IPTC medata / Custom free software license |
| [jsonschema](https://github.com/Julian/jsonschema) | 2.6.0 | An implementation of JSON Schema validation for Python / MIT |
| [jupyter](http://jupyter.org) | 1.0.0 | Jupyter metapackage. Install all the Jupyter components in one go. / BSD 3-Clause |
| [jupyter\_client](http://jupyter.org) | 5.2.3 | Jupyter protocol implementation and client libraries / BSD 3-clause |
| [jupyter\_console](http://jupyter.org) | 5.2.0 | Jupyter terminal console / BSD 3-Clause |
| [jupyter\_core](http://jupyter.org) | 4.4.0 | Core common functionality of Jupyter projects. / BSD 3-clause |
| [jupyterlab](https://github.com/jupyterlab/jupyterlab) | 0.32.1 | An extensible environment for interactive and reproducible computing, based on the Jupyter Notebook and Architecture. Currently in beta. / BSD 3-Clause |
| [jupyterlab\_launcher](http://github.com/jupyterlab/jupyterlab_launcher) | 0.10.5 | A Launcher for JupyterLab based applications. / BSD 3-Clause |
| [kiwisolver](https://github.com/nucleic/kiwi) | 1.0.1 | A fast implementation of the Cassowary constraint solver / BSD 3-Clause |
| [lazy-object-proxy](https://github.com/ionelmc/python-lazy-object-proxy) | 1.3.1 | A fast and thorough lazy object proxy. / BSD 2-Clause |
| [libcurl](http://curl.haxx.se/) | 7.60.0 | tool and library for transferring data with URL syntax / MIT/X derivate (`<http://curl.haxx.se/docs/copyright.html>`) |
| [libedit](http://thrysoee.dk/editline/) | 3.1.20170329 | Editline Library (libedit) / NetBSD |
| [libffi](https://sourceware.org/libffi/) | 3.2.1 | A Portable Foreign Function Interface Library. / Custom |
| [libgcc-ng](https://gcc.gnu.org/onlinedocs/gccint/Libgcc.html) | 7.2.0 | The GCC low-level runtime library / GPL |
| [libgfortran-ng](https://gcc.gnu.org/) | 7.2.0 | The GNU Fortran Runtime Library / GPL |
| [libpng](http://www.libpng.org/pub/png/libpng.html) | 1.6.34 | PNG reference library. / zlib/libpng |
| [libsodium](http://libsodium.org) | 1.0.16 | A modern and easy-to-use crypto library. / ISC |
| [libssh2](https://www.libssh2.org/) | 1.8.0 | the SSH library / BSD 3-Clause |
| [libstdcxx-ng](https://gcc.gnu.org/) | 7.2.0 | The GNU C++ Runtime Library / GPL3 with runtime exception |
| [libtiff](http://www.libtiff.org/) | 4.0.9 | Support for the Tag Image File Format (TIFF). / HPND |
| [libtool](http://www.gnu.org/software/libtool/) | 2.4.6 | The GNU Portable Library Tool / GPL 3 |
| [libxcb](http://xcb.freedesktop.org/) | 1.13 | This is the C-language Binding (XCB) package to the X Window System protocol / MIT |
| [libxml2](http://xmlsoft.org/) | 2.9.8 | The XML C parser and toolkit of Gnome / MIT |
| [libxslt](http://xmlsoft.org/XSLT/) | 1.1.32 | The XSLT C library developed for the GNOME project / MIT |
| [llvmlite](https://github.com/numba/llvmlite) | 0.23.1 | A lightweight LLVM python binding for writing JIT compilers / New BSD License |
| [locket](https://github.com/mwilliamson/locket.py) | 0.2.0 | File-based locks for Python for Linux and Windows / BSD 2-Clause |
| [lxml](http://lxml.de/) | 4.2.1 | Pythonic binding for the C libraries libxml2 and libxslt. / BSD 3-Clause, GPL-2.0, ZPL-2.0, and ElementTree |
| [lzo](http://www.oberhumer.com/opensource/lzo/) | 2.10 | LZO is a portable lossless data compression library written in ANSI C. / GPL v2+ |
| [markupsafe](https://www.palletsprojects.com/p/markupsafe/) | 1.0 | A Python module that implements the jinja2.Markup string / BSD 3-Clause |
| [matplotlib](http://matplotlib.org/) | 2.2.2 | Publication quality figures in Python / PSF-based |
| [mccabe](https://github.com/PyCQA/mccabe) | 0.6.1 | McCabe complexity checker for Python / MIT |
| [mistune](https://github.com/lepture/mistune) | 0.8.3 | The fastest markdown parser in pure Python. / BSD 3-Clause |
| [mkl](https://software.intel.com/en-us/mkl) | 2018.0.2 | Math library for Intel and compatible processors / proprietary - Intel |
| [mkl-service](https://github.com/ContinuumIO/mkl-service) | 1.1.2 | Python bindings to MKL service functions / 3-clause BSD |
| [mkl\_fft](http://github.com/IntelPython/mkl_fft) | 1.0.1 | NumPy-based implementation of Fast Fourier Transform using Intel (R) Math Kernel Library / BSD |
| [mkl\_random](http://github.com/IntelPython/mkl_random) | 1.0.1 | Intel (R) MKL-powered package for sampling from common probability distributions into NumPy arrays. / BSD 3-Clause |
| [more-itertools](https://github.com/erikrose/more-itertools) | 4.1.0 | More routines for operating on iterables, beyond itertools / MIT |
| [mpc](http://www.multiprecision.org/) | 1.0.3 | A C library for the arithmetic of complex numbers with arbitrarily high precision. / LGPL 3 |
| [mpfr](http://www.mpfr.org/) | 3.1.5 | The MPFR library is a C library for multiple-precision floating-point computations with correct rounding. / LGPL 3 |
| [mpmath](http://mpmath.org) | 1.0.0 | Python library for arbitrary-precision floating-point arithmetic / BSD 3-Clause |
| [msgpack-python](http://msgpack.org/) | 0.5.6 | MessagePack (de)serializer. / Apache 2.0 |
| [multipledispatch](https://github.com/mrocklin/multipledispatch/) | 0.5.0 | Multiple dispatch in Python / BSD 3-Clause |
| [navigator-updater](https://github.com/ContinuumIO/navigator-updater) | 0.2.1 | Anaconda Navigator Updater / proprietary - Continuum Analytics, Inc. |
| [nbconvert](http://jupyter.org) | 5.3.1 | Converting Jupyter Notebooks / BSD 3-Clause |
| [nbformat](http://jupyter.org) | 4.4.0 | The reference implementation of the Jupyter Notebook format / BSD 3-clause |
| [ncurses](http://www.gnu.org/software/ncurses/) | 6.1 | Library for text-based user interfaces / Free software (MIT-like) |
| [networkx](https://networkx.github.io/) | 2.1 | Python package for creating and manipulating complex networks / BSD 3-Clause |
| [nltk](http://nltk.org/) | 3.3.0 | Build Python programs to work with human language data / Apache 2.0 |
| [nose](http://readthedocs.org/docs/nose/) | 1.3.7 | Nose extends unittest to make testing easier / LGPL-2.1 |
| [notebook](http://jupyter.org) | 5.5.0 | A web-based notebook environment for interactive computing / BSD 3-clause |
| [numba](http://numba.github.com) | 0.38.0 | NumPy aware dynamic Python compiler using LLVM / BSD 2-clause |
| [numexpr](https://github.com/pydata/numexpr) | 2.6.5 | Fast numerical expression evaluator for NumPy. / MIT |
| [numpy](http://numpy.scipy.org/) | 1.14.3 | Array processing for numbers, strings, records, and objects. / BSD 3-Clause |
| numpy-base | 1.14.3 | |
| [numpydoc](https://github.com/numpy/numpydoc) | 0.8.0 | Sphinx extension to support docstrings in Numpy format / BSD 3-Clause |
| [odo](http://odo.pydata.org) | 0.5.1 | Data migration in Python / BSD-3-Clause |
| [olefile](http://www.decalage.info/python/olefileio) | 0.45.1 | parse, read and write Microsoft OLE2 files / BSD License 2-Clause |
| [openpyxl](https://openpyxl.readthedocs.io) | 2.5.3 | A Python library to read/write Excel 2010 xlsx/xlsm files / MIT |
| [openssl](http://www.openssl.org/) | 1.0.2o | OpenSSL is an open-source implementation of the SSL and TLS protocols / OpenSSL |
| [packaging](https://github.com/pypa/packaging) | 17.1 | Core utilities for Python packages / Apache 2.0 or BSD 2-Clause |
| [pandas](http://pandas.pydata.org) | 0.23.0 | High-performance, easy-to-use data structures and data analysis tools. / BSD 3-clause |
| [pandoc](http://johnmacfarlane.net/pandoc/) | 1.15.0.6 | Universal markup converter (repackaged binaries). / GPL-2.0 |
| [pandocfilters](https://github.com/jgm/pandocfilters) | 1.4.2 | A python module for writing pandoc filters / BSD-3-Clause |
| [pango](http://www.pango.org/) | 1.41.0 | Text layout and rendering engine. / LGPL-2.1 |
| [parso](https://github.com/davidhalter/parso) | 0.2.0 | A Python Parser / MIT |
| [partd](https://github.com/dask/partd) | 0.3.8 | Data structure for on-disk shuffle operations / BSD 3-Clause |
| [patchelf](http://nixos.org/patchelf.html) | 0.9 | A small utility to modify the dynamic linker and RPATH of ELF executables. / GPL 3 |
| [path.py](https://github.com/jaraco/path.py) | 11.0.1 | A module wrapper for os.path / MIT |
| [pathlib2](https://github.com/mcmtroffaes/pathlib2) | 2.3.2 | Fork of pathlib aiming to support the full stdlib Python API. / MIT |
| [patsy](https://github.com/pydata/patsy) | 0.5.0 | Describing statistical models in Python using symbolic formulas / BSD-2-Clause, PSF2 |
| [pcre](http://www.pcre.org/) | 8.42 | Regular expression pattern matching using the same syntax and semantics as Perl 5. / BSD 3-Clause |
| [pep8](http://pep8.readthedocs.org/) | 1.7.1 | Python style guide checker / MIT |
| [pexpect](http://pexpect.sourceforge.net/) | 4.5.0 | Pexpect makes Python a better tool for controlling other applications. / ISC |
| [pickleshare](https://github.com/vivainio/pickleshare) | 0.7.4 | Tiny ‘shelve’-like database with concurrency support / MIT |
| [pillow](https://pillow.readthedocs.io) | 5.1.0 | Pillow is the friendly PIL fork by Alex Clark and Contributors. / PIL |
| [pip](https://pip.pypa.io/en/stable/) | 10.0.1 | PyPA recommended tool for installing Python packages / MIT |
| [pixman](http://www.pixman.org/) | 0.34.0 | A low-level software library for pixel manipulation. / MIT |
| [pkginfo](https://code.launchpad.net/~tseaver/pkginfo/trunk) | 1.4.2 | Query metadatdata from sdists / bdists / installed packages. / MIT |
| [pluggy](https://github.com/pytest-dev/pluggy) | 0.6.0 | Plugin registration and hook calling for Python / MIT |
| [ply](http://www.dabeaz.com/ply/index.html) | 3.11 | Python Lex-Yacc / BSD 3-clause |
| [prompt\_toolkit](https://github.com/jonathanslenders/python-prompt-toolkit) | 1.0.15 | Library for building powerful interactive command lines in Python / BSD 3-clause |
| [psutil](https://github.com/giampaolo/psutil) | 5.4.5 | A cross-platform process and system utilities module for Python / BSD 3-Clause |
| [ptyprocess](https://github.com/pexpect/ptyprocess) | 0.5.2 | Run a subprocess in a pseudo terminal / ISC |
| [py](https://github.com/pytest-dev/py) | 1.5.3 | library with cross-python path, ini-parsing, io, code, log facilities / MIT |
| [pycodestyle](https://pycodestyle.readthedocs.io/) | 2.4.0 | Python style guide checker / MIT |
| [pycosat](https://github.com/ContinuumIO/pycosat) | 0.6.3 | Bindings to picosat (a SAT solver) / MIT |
| [pycparser](https://github.com/eliben/pycparser) | 2.18 | Complete C99 parser in pure Python / BSD 3-clause |
| [pycrypto](http://www.pycrypto.org/) | 2.6.1 | Cryptographic modules for Python. / Public Domain |
| [pycurl](http://pycurl.sourceforge.net/) | 7.43.0.1 | A Python Interface To The cURL library / LGPL, MIT |
| [pyflakes](https://github.com/PyCQA/pyflakes) | 1.6.0 | Pyflakes analyzes programs and detects various errors. / MIT |
| [pygments](http://pygments.org/) | 2.2.0 | Generic syntax highlighting package / BSD 2-clause |
| [pylint](http://www.pylint.org/) | 1.8.4 | python code static checker / GPL |
| [pyodbc](https://github.com/mkleehammer/pyodbc) | 4.0.23 | DB API Module for ODBC / MIT |
| [pyopenssl](https://github.com/pyca/pyopenssl) | 18.0.0 | Python wrapper module around the OpenSSL library / Apache 2.0 |
| [pyparsing](http://pyparsing.wikispaces.com/) | 2.2.0 | Create and execute simple grammars / MIT |
| [pyqt](http://www.riverbankcomputing.co.uk/software/pyqt) | 5.9.2 | Python binding of the cross-platform GUI toolkit Qt. / Commercial, GPL-2.0, GPL-3.0 |
| [pysocks](https://github.com/Anorov/PySocks) | 1.6.8 | A Python SOCKS client module. See [Anorov/PySocks](https://github.com/Anorov/PySocks) for more information. / BSD 3-Clause |
| [pytables](http://www.pytables.org) | 3.4.3 | Brings together Python, HDF5 and NumPy to easily handle large amounts of data. / BSD 3-Clause |
| [pytest](https://docs.pytest.org/en/latest/) | 3.5.1 | Simple and powerful testing with Python. / MIT |
| [pytest-arraydiff](https://github.com/astrofrog/pytest-arraydiff) | 0.2 | pytest plugin to help with comparing array output from tests / BSD |
| [pytest-astropy](https://github.com/astropy/pytest-astropy) | 0.3.0 | Meta-package containing dependencies for testing Astropy / BSD |
| [pytest-doctestplus](https://github.com/astropy/pytest-doctestplus) | 0.1.3 | Pytest plugin with advanced doctest features / BSD |
| [pytest-openfiles](https://github.com/astropy/pytest-openfiles) | 0.3.0 | Pytest plugin for detecting inadvertent open file handles / BSD |
| [pytest-remotedata](https://github.com/astropy/pytest-remotedata) | 0.2.1 | Pytest plugin for controlling remote data access / BSD |
| [python](http://www.python.org/) | 3.6.5 | General purpose programming language / PSF |
| [python-dateutil](https://dateutil.readthedocs.org/) | 2.7.3 | Extensions to the standard Python datetime module. / BSD 3 Clause |
| [pytz](http://pythonhosted.org/pytz/) | 2018.4 | World timezone definitions, modern and historical. / MIT |
| [pywavelets](https://github.com/PyWavelets/pywt) | 0.5.2 | Discrete Wavelet Transforms in Python. / MIT |
| [pyyaml](http://pyyaml.org/wiki/PyYAML) | 3.12 | YAML parser and emitter for Python / MIT |
| [pyzmq](https://github.com/zeromq/pyzmq) | 17.0.0 | Python bindings for zeromq / BSD 3-clause |
| [qt](http://qt-project.org) | 5.9.5 | Qt is a cross-platform application and UI framework. / LGPL-3.0 |
| [qtawesome](https://github.com/spyder-ide/qtawesome) | 0.4.4 | Iconic fonts in PyQt and PySide applications / MIT |
| [qtconsole](http://jupyter.org) | 4.3.1 | Jupyter Qt console / BSD 3-Clause |
| [qtpy](https://github.com/spyder-ide/qtpy) | 1.4.1 | Abstraction layer for PyQt5/PyQt4/PySide / MIT |
| [readline](https://cnswww.cns.cwru.edu/php/chet/readline/rltop.html) | 7.0 | library for editing command lines as they are typed in / GPL3 |
| [requests](http://python-requests.org) | 2.18.4 | Python HTTP for Humans. / Apache 2.0 |
| [rope](https://github.com/python-rope/rope) | 0.10.7 | A python refactoring library… / GPL 2.0 |
| [ruamel\_yaml](https://bitbucket.org/ruamel/yaml) | 0.15.35 | A patched copy of ruamel.yaml. / MIT |
| [scikit-image](http://scikit-image.org/) | 0.13.1 | Image processing routines for SciPy. / BSD 3-Clause |
| [scikit-learn](http://scikit-learn.org/) | 0.19.1 | A set of python modules for machine learning and data mining / BSD 3-Clause |
| [scipy](http://www.scipy.org/) | 1.1.0 | Scientific Library for Python / BSD 3-Clause |
| [seaborn](http://stanford.edu/~mwaskom/software/seaborn/) | 0.8.1 | Statistical data visualization / BSD 3-Clause |
| [send2trash](https://github.com/hsoft/send2trash) | 1.5.0 | Python library to natively send files to Trash (or Recycle bin) on all platforms. / BSD-3-Clause |
| [setuptools](https://github.com/pypa/setuptools) | 39.1.0 | Download, build, install, upgrade, and uninstall Python packages / MIT |
| [simplegeneric](http://cheeseshop.python.org/pypi/simplegeneric) | 0.8.1 | Simple generic functions (similar to Python’s own len(), pickle.dump(), etc.) / Zope Public |
| [singledispatch](http://docs.python.org/3/library/functools.html#functools.singledispatch) | 3.4.0.3 | Transforms a function into a single-dispatch generic function / MIT |
| [sip](http://www.riverbankcomputing.com/software/sip/intro) | 4.19.8 | Create Python bindings for C and C++ libraries / GPL-3.0 |
| [six](http://pypi.python.org/pypi/six/) | 1.11.0 | Python 2 and 3 compatibility utilities / MIT |
| [snappy](https://github.com/google/snappy) | 1.1.7 | A fast compressor/decompressor / BSD 3-clause |
| [snowballstemmer](https://github.com/shibukawa/snowball_py) | 1.2.1 | Snowball stemming library collection for Python / BSD-2-Clause |
| [sortedcollections](http://www.grantjenks.com/docs/sortedcollections/) | 0.6.1 | Python Sorted Collections / Apache-2.0 |
| [sortedcontainers](http://www.grantjenks.com/docs/sortedcontainers/) | 1.5.10 | Python Sorted Container Types: SortedList, SortedDict, and SortedSet / Apache 2.0 |
| [sphinx](http://www.sphinx-doc.org) | 1.7.4 | Sphinx is a tool that makes it easy to create intelligent and beautiful documentation / BSD 2-clause |
| sphinxcontrib | 1.0 | Python namespace for sphinxcontrib / BSD |
| [sphinxcontrib-websupport](https://pypi.python.org/pypi/sphinxcontrib-websupport) | 1.0.1 | Sphinx API for Web Apps / BSD-2-Clause |
| [spyder](https://github.com/spyder-ide/spyder) | 3.2.8 | Scientific PYthon Development EnviRonment / MIT |
| [sqlalchemy](http://www.sqlalchemy.org/) | 1.2.7 | Database Abstraction Library. / MIT |
| [sqlite](http://www.sqlite.org/) | 3.23.1 | Implements a self-contained, zero-configuration, SQL database engine. / Public-Domain (`<http://www.sqlite.org/copyright.html>`) |
| [statsmodels](https://www.statsmodels.org) | 0.9.0 | Statistical computations and models for use with SciPy / BSD 3-Clause |
| [sympy](http://sympy.org) | 1.1.1 | Python library for symbolic mathematics / 3-clause BSD |
| [tblib](https://github.com/ionelmc/python-tblib) | 1.3.2 | Traceback serialization library. / BSD 2-Clause |
| [terminado](http://github.com/mitsuhiko/markupsafe) | 0.8.1 | Terminals served by tornado websockets / BSD 3-clause |
| [testpath](https://testpath.readthedocs.io) | 0.3.1 | Testpath is a collection of utilities for Python code working with files and commands. / MIT |
| [tk](http://www.tcl.tk/) | 8.6.7 | A dynamic programming language with GUI support. Bundles Tcl and Tk. / Tcl/Tk |
| [toolz](http://toolz.readthedocs.org/) | 0.9.0 | A functional standard library for Python. / BSD 3-Clause |
| [tornado](http://www.tornadoweb.org/) | 5.0.2 | A Python web framework and asynchronous networking library, originally developed at FriendFeed. / Apache 2.0 |
| [traitlets](http://ipython.org/) | 4.3.2 | Configuration system for Python applications / BSD 3-clause |
| [typing](https://docs.python.org/3.5/library/typing.html) | 3.6.4 | Type Hints for Python - backport for `Python<3.5` / PSF |
| [unicodecsv](https://github.com/jdunck/python-unicodecsv) | 0.14.1 | Drop-in replacement for csv module which supports unicode strings / BSD |
| [unixodbc](http://www.unixodbc.org/) | 2.3.6 | ODBC on non MS Windows platforms / LGPL-2.1 |
| [urllib3](https://urllib3.readthedocs.io/) | 1.22 | HTTP library with thread-safe connection pooling, file post, and more. / MIT |
| [wcwidth](https://github.com/jquast/wcwidth) | 0.1.7 | Measures number of Terminal column cells of wide-character codes. / MIT |
| [webencodings](https://github.com/gsnedders/python-webencodings) | 0.5.1 | Character encoding aliases for legacy web content / BSD 3-Clause |
| [werkzeug](http://werkzeug.pocoo.org/) | 0.14.1 | The Python WSGI Utility Library. / BSD 3-Clause |
| [wheel](https://bitbucket.org/pypa/wheel/) | 0.31.1 | A built-package format for Python. / MIT |
| [widgetsnbextension](http://ipython.org) | 3.2.1 | IPython HTML widgets for Jupyter / BSD 3-clause |
| [wrapt](https://github.com/GrahamDumpleton/wrapt) | 1.10.11 | Module for decorators, wrappers and monkey patching. / BSD 2-Clause |
| [xlrd](http://www.python-excel.org/) | 1.1.0 | Library for developers to extract data from Microsoft Excel (tm) spreadsheet files / BSD 3-Clause and BSD with advertising |
| [xlsxwriter](https://xlsxwriter.readthedocs.io/) | 1.0.4 | A Python module for creating Excel XLSX files / BSD 2-Clause |
| [xlwt](http://www.python-excel.org/) | 1.3.0 | Writing data and formatting information to Excel files / BSD |
| [xz](http://tukaani.org/xz/) | 5.2.4 | Data compression software with high compression ratio / LGPL-2.1 and GPL-2.0 |
| [yaml](http://pyyaml.org/wiki/LibYAML) | 0.1.7 | A C library for parsing and emitting YAML. / MIT |
| [zeromq](http://zeromq.org) | 4.2.5 | A high-performance asynchronous messaging library. / LGPL 3 |
| [zict](http://github.com/mrocklin/zict) | 0.1.3 | Composable Dictionary Classes / BSD 3-Clause |
| [zlib](http://zlib.net/) | 1.2.11 | Massively spiffy yet delicately unobtrusive compression library / zlib |
| Name | Version | Summary / License |
|---|---|---|
| [\_ipyw\_jlab\_nb\_ext\_conf](https://github.com/ContinuumIO/anaconda-nb-extensions-meta-config) | 0.1.0 | A configuration metapackage for enabling Anaconda-bundled jupyter extensions / BSD |
| [alabaster](http://www.sphinx-doc.org/en/stable/index.html) | 0.7.10 | Configurable, Python 2+3 compatible Sphinx theme. / BSD 3-Clause |
| [anaconda-client](https://github.com/Anaconda-Platform/anaconda-client) | 1.6.14 | Anaconda Cloud command line client library / BSD 3-Clause |
| [anaconda-navigator](https://github.com/ContinuumIO/navigator) | 1.8.7 | Anaconda Navigator / proprietary - Continuum Analytics, Inc. |
| [anaconda-project](https://github.com/Anaconda-Platform/anaconda-project) | 0.8.2 | Tool for encapsulating, running, and reproducing data science projects / BSD 3-Clause |
| [asn1crypto](https://github.com/wbond/asn1crypto) | 0.24.0 | Python ASN.1 library with a focus on performance and a pythonic API / MIT |
| [astroid](https://www.astroid.org/) | 1.6.3 | A abstract syntax tree for Python with inference support. / LGPL 2.1 |
| [astropy](http://www.astropy.org/) | 2.0.6 | Community-developed Python Library for Astronomy / BSD |
| [attrs](https://attrs.readthedocs.io/en/stable/) | 18.1.0 | attrs is the Python package that will bring back the joy of writing classes by relieving you from the drudgery of implementing object protocols (aka dunder methods). / MIT |
| [babel](http://babel.pocoo.org/) | 2.5.3 | Utilities to internationalize and localize Python applications / BSD 3-clause |
| [backports](https://bitbucket.org/brandon/backports) | 1.0 | / BSD |
| [backports.functools\_lru\_cache](https://github.com/jaraco/backports.functools_lru_cache) | 1.5 | Backport of functools.lru\_cache from Python 3.3 as published at ActiveState. / MIT |
| [backports.shutil\_get\_terminal\_size](https://github.com/chrippa/backports.shutil_get_terminal_size) | 1.0.0 | A backport of the get\_terminal\_size function from Python 3.3’s shutil. / MIT |
| [backports.shutil\_which](https://github.com/minrk/backports.shutil_which) | 3.5.1 | Backport of shutil.which from Python 3.3 / PSF2 & MIT |
| [backports\_abc](https://github.com/cython/backports_abc) | 0.5 | A backport of recent additions to the collections.abc module. / PSF 2 |
| [beautifulsoup4](http://www.crummy.com/software/BeautifulSoup/) | 4.6.0 | Python library designed for screen-scraping / MIT |
| [bitarray](https://github.com/ilanschnell/bitarray) | 0.8.1 | efficient arrays of booleans – C extension / PSF |
| [bkcharts](http://github.com/bokeh/bkcharts) | 0.2 | High level chart types built on top of Bokeh / BSD 3-Clause |
| blas | 1.0 | |
| [blaze](http://blaze.pydata.org) | 0.11.3 | NumPy and Pandas interface to big data / BSD 3-Clause |
| [bleach](https://github.com/mozilla/bleach) | 2.1.3 | Easy, whitelist-based HTML-sanitizing tool / Apache-2.0 |
| [blosc](https://github.com/Blosc/c-blosc) | 1.14.3 | A blocking, shuffling and loss-less compression library that can be faster than memcpy() / BSD 3-Clause |
| [bokeh](http://bokeh.pydata.org/) | 0.12.16 | Statistical and novel interactive HTML plots for Python / BSD 3-Clause |
| [boto](https://github.com/boto/boto/) | 2.48.0 | Amazon Web Services Library / MIT |
| [bottleneck](http://berkeleyanalytics.com/bottleneck) | 1.2.1 | Fast NumPy array functions written in Cython. / BSD 2-Clause |
| [bzip2](http://www.bzip.org/) | 1.0.6 | high-quality data compressor / bzip2 |
| [ca-certificates](https://github.com/conda-forge/ca-certificates-feedstock) | 2018.03.07 | Certificates for use with other packages. / ISC |
| [cdecimal](http://www.bytereef.org/mpdecimal/index.html) | 2.3 | Fast drop-in replacement for decimal.py / BSD 2-Clause |
| [certifi](http://certifi.io/) | 2018.4.16 | Python package for providing Mozilla’s CA Bundle. / ISC |
| [cffi](https://bitbucket.org/cffi/cffi) | 1.11.5 | Foreign Function Interface for Python calling C code. / MIT |
| [chardet](https://github.com/chardet/chardet) | 3.0.4 | Universal character encoding detector / LGPL2 |
| [click](http://click.pocoo.org/) | 6.7 | A simple wrapper around optparse for powerful command line utilities. / BSD 3-Clause |
| [cloudpickle](https://github.com/cloudpipe/cloudpickle) | 0.5.3 | Extended pickling support for Python objects / BSD 3-Clause |
| [clyent](https://github.com/Anaconda-Platform/clyent) | 1.2.2 | Command line client library for windows and posix / BSD 3-Clause |
| [colorama](https://github.com/tartley/colorama) | 0.3.9 | Cross-platform colored terminal text. / BSD 3-Clause |
| [comtypes](http://starship.python.net/crew/theller/comtypes/) | 1.1.4 | pure Python COM package / MIT |
| [conda](https://conda.io) | 4.5.4 | OS-agnostic, system-level binary package and environment manager. / BSD 3-Clause |
| [conda-build](https://github.com/conda/conda-build) | 3.10.5 | tools for building conda packages / BSD 3-Clause |
| [conda-env](https://github.com/conda/conda-env) | 2.6.0 | Tools for interacting with conda environments. / BSD 3-Clause |
| [conda-verify](https://github.com/conda/conda-verify) | 2.0.0 | tool for validating conda recipes and conda packages / BSD 3-Clause |
| [configparser](http://docs.python.org/3/library/configparser.html) | 3.5.0 | This library brings the updated configparser from Python 3.5 to Python 2.6-3.5 / MIT |
| console\_shortcut | 0.1.1 | Console shortcut creator for Windows (using menuinst) / BSD |
| [contextlib2](http://contextlib2.readthedocs.org) | 0.5.5 | Backports and enhancements for the contextlib module / PSF |
| [cryptography](https://github.com/pyca/cryptography) | 2.2.2 | Provides cryptographic recipes and primitives to Python developers / Apache 2.0 or BSD 3-Clause, PSF 2 |
| [curl](http://curl.haxx.se/) | 7.60.0 | tool and library for transferring data with URL syntax / MIT/X derivate (`<http://curl.haxx.se/docs/copyright.html>`) |
| [cycler](http://matplotlib.org/cycler) | 0.10.0 | Composable style cycles. / BSD 3-Clause |
| [cython](http://www.cython.org/) | 0.28.2 | The Cython compiler for writing C extensions for the Python language / Apache-2.0 |
| [cytoolz](https://github.com/pytoolz/cytoolz) | 0.9.0.1 | Cython implementation of Toolz. High performance functional utilities. / BSD 3-Clause |
| [dask](http://github.com/dask/dask/) | 0.17.5 | Parallel Python with task scheduling / BSD 3-Clause |
| [dask-core](http://github.com/dask/dask/) | 0.17.5 | Parallel Python with task scheduling / BSD 3-Clause |
| [datashape](http://datashape.pydata.org) | 0.5.4 | A data description language. / BSD 2-Clause |
| [decorator](https://github.com/micheles/decorator) | 4.3.0 | Better living through Python with decorators. / BSD 3-Clause |
| [distributed](http://distributed.readthedocs.io/en/latest/) | 1.21.8 | Distributed computing with Dask / BSD 3-Clause |
| [docutils](http://docutils.sourceforge.net/) | 0.14 | Docutils – Python Documentation Utilities / Public Domain Dedictation and BSD 2-Clause and PSF 2.1.1 and GPL 3.0 |
| [entrypoints](https://github.com/takluyver/entrypoints) | 0.2.3 | Discover and load entry points from installed packages. / MIT License |
| [enum34](https://bitbucket.org/stoneleaf/enum34) | 1.1.6 | Python 3.4 Enum backported to 3.3, 3.2, 3.1, 2.7, 2.6, 2.5, and 2.4 / BSD 3-Clause |
| [et\_xmlfile](https://bitbucket.org/openpyxl/et_xmlfile) | 1.0.1 | An implementation of lxml.xmlfile for the standard library / MIT |
| [fastcache](https://github.com/pbrady/fastcache) | 1.0.2 | C implementation of Python 3 lru\_cache / MIT |
| [filelock](https://github.com/benediktschmitt/py-filelock) | 3.0.4 | A platform independent file lock. / Public Domain |
| [flask](http://flask.pocoo.org) | 1.0.2 | A microframework based on Werkzeug, Jinja2 and good intentions. / BSD 3-Clause |
| [flask-cors](https://github.com/corydolphin/flask-cors) | 3.0.4 | A Flask extension adding a decorator for CORS support / MIT |
| [freetype](https://www.freetype.org/) | 2.8 | A Free, High-Quality, and Portable Font Engine / GPL-2.0 and FreeType |
| [funcsigs](http://funcsigs.readthedocs.org) | 1.0.2 | Python function signatures from PEP362 for Python 2.6, 2.7 and 3.2+. / Apache 2.0 |
| [functools32](https://github.com/MiCHiLU/python-functools32) | 3.2.3.2 | Backport of the functools module from Python 3.2.3 for use on 2.7 and PyPy. / PSF license |
| [futures](https://github.com/agronholm/pythonfutures) | 3.2.0 | Backport of the concurrent.futures package from Python 3.2 / PSF |
| [get\_terminal\_size](https://github.com/chrippa/backports.shutil_get_terminal_size) | 1.0.0 | Get the size of the terminal window. / MIT |
| [gevent](http://www.gevent.org/) | 1.3.0 | Coroutine-based network library / MIT |
| [glob2](https://github.com/miracle2k/python-glob2) | 0.6 | Version of the glob module that supports recursion via \*\*, and can capture patterns. / BSD-2-Clause |
| [greenlet](https://github.com/python-greenlet/greenlet) | 0.4.13 | Lightweight in-process concurrent programming / MIT |
| [grin](http://pypi.python.org/pypi/grin) | 1.2.1 | Enhanced grep-like tool / BSD 3-Clause |
| [h5py](http://www.h5py.org/) | 2.7.1 | Read and write HDF5 files from Python. / BSD 3-Clause |
| [hdf5](http://www.hdfgroup.org/HDF5/) | 1.10.2 | HDF5 is a data model, library, and file format for storing and managing data / HDF5 |
| [heapdict](http://stutzbachenterprises.com/) | 1.0.0 | A heap with decrease-key and increase-key operations / BSD 3-Clause |
| [html5lib](https://github.com/html5lib/html5lib-python) | 1.0.1 | HTML parser based on the WHATWG HTML specification / MIT |
| [icc\_rt](https://software.intel.com/en-us/node/522690) | 2017.0.4 | Intel runtime libraries for C, C++ and Fortran compilers / Intel proprietary |
| [icu](http://site.icu-project.org/) | 58.2 | International Components for Unicode. / MIT |
| [idna](https://github.com/kjd/idna) | 2.6 | Internationalized Domain Names in Applications (IDNA). / BSD Like |
| [imageio](http://imageio.github.io) | 2.3.0 | a Python library for reading and writing image data / BSD 2-Clause |
| [imagesize](https://github.com/shibukawa/imagesize_py) | 1.0.0 | Getting image size from png/jpeg/jpeg2000/gif file / MIT |
| [intel-openmp](https://software.intel.com/en-us/node/522690) | 2018.0.0 | Math library for Intel and compatible processors / proprietary - Intel |
| [ipaddress](https://github.com/phihag/ipaddress) | 1.0.22 | IPv4/IPv6 manipulation library / PSF 2 |
| [ipykernel](http://ipython.org) | 4.8.2 | IPython Kernel for Jupyter / BSD 3-clause |
| [ipython](http://ipython.org/) | 5.7.0 | IPython: Productive Interactive Computing / BSD 3-clause |
| [ipython\_genutils](http://ipython.org) | 0.2.0 | vestigial utilities from IPython / BSD 3-Clause |
| [ipywidgets](https://github.com/ipython/ipywidgets) | 7.2.1 | Jupyter Interactive Widgets / BSD 3-clause |
| [isort](https://github.com/timothycrosley/isort) | 4.3.4 | A Python utility / library to sort Python imports. / MIT |
| [itsdangerous](https://github.com/pallets/itsdangerous) | 0.24 | Various helpers to pass trusted data to untrusted environments. / BSD 3-Clause |
| [jdcal](https://github.com/phn/jdcal) | 1.4 | Julian dates from proleptic Gregorian and Julian calendars. / BSD 2-Clause |
| [jedi](https://github.com/davidhalter/jedi/) | 0.12.0 | An autocompletion tool for Python that can be used for text editors. / MIT |
| [jinja2](http://jinja.pocoo.org) | 2.10 | An easy to use stand-alone template engine written in pure python. / 3-Clause BSD |
| [jpeg](http://www.ijg.org/) | 9b | read/write jpeg COM, EXIF, IPTC medata / Custom free software license |
| [jsonschema](https://github.com/Julian/jsonschema) | 2.6.0 | An implementation of JSON Schema validation for Python / MIT |
| [jupyter](http://jupyter.org) | 1.0.0 | Jupyter metapackage. Install all the Jupyter components in one go. / BSD 3-Clause |
| [jupyter\_client](http://jupyter.org) | 5.2.3 | Jupyter protocol implementation and client libraries / BSD 3-clause |
| [jupyter\_console](http://jupyter.org) | 5.2.0 | Jupyter terminal console / BSD 3-Clause |
| [jupyter\_core](http://jupyter.org) | 4.4.0 | Core common functionality of Jupyter projects. / BSD 3-clause |
| [jupyterlab](https://github.com/jupyterlab/jupyterlab) | 0.32.1 | An extensible environment for interactive and reproducible computing, based on the Jupyter Notebook and Architecture. Currently in beta. / BSD 3-Clause |
| [jupyterlab\_launcher](http://github.com/jupyterlab/jupyterlab_launcher) | 0.10.5 | A Launcher for JupyterLab based applications. / BSD 3-Clause |
| [kiwisolver](https://github.com/nucleic/kiwi) | 1.0.1 | A fast implementation of the Cassowary constraint solver / BSD 3-Clause |
| [lazy-object-proxy](https://github.com/ionelmc/python-lazy-object-proxy) | 1.3.1 | A fast and thorough lazy object proxy. / BSD 2-Clause |
| [libcurl](http://curl.haxx.se/) | 7.60.0 | tool and library for transferring data with URL syntax / MIT/X derivate (`<http://curl.haxx.se/docs/copyright.html>`) |
| [libiconv](https://www.gnu.org/software/libiconv/) | 1.15 | Provides iconv for systems which don’t have one (or that cannot convert from/to Unicode.) / GPL and LGPL |
| [libpng](http://www.libpng.org/pub/png/libpng.html) | 1.6.34 | PNG reference library. / zlib/libpng |
| [libsodium](http://libsodium.org) | 1.0.16 | A modern and easy-to-use crypto library. / ISC |
| [libssh2](https://www.libssh2.org/) | 1.8.0 | the SSH library / BSD 3-Clause |
| [libtiff](http://www.libtiff.org/) | 4.0.9 | Support for the Tag Image File Format (TIFF). / HPND |
| [libxml2](http://xmlsoft.org/) | 2.9.8 | The XML C parser and toolkit of Gnome / MIT |
| [libxslt](http://xmlsoft.org/XSLT/) | 1.1.32 | The XSLT C library developed for the GNOME project / MIT |
| [llvmlite](https://github.com/numba/llvmlite) | 0.23.1 | A lightweight LLVM python binding for writing JIT compilers / New BSD License |
| [locket](https://github.com/mwilliamson/locket.py) | 0.2.0 | File-based locks for Python for Linux and Windows / BSD 2-Clause |
| [lxml](http://lxml.de/) | 4.2.1 | Pythonic binding for the C libraries libxml2 and libxslt. / BSD 3-Clause, GPL-2.0, ZPL-2.0, and ElementTree |
| [lzo](http://www.oberhumer.com/opensource/lzo/) | 2.10 | LZO is a portable lossless data compression library written in ANSI C. / GPL v2+ |
| m2w64-gcc-libgfortran | 5.3.0 | |
| m2w64-gcc-libs | 5.3.0 | |
| m2w64-gcc-libs-core | 5.3.0 | |
| m2w64-gmp | 6.1.0 | |
| m2w64-libwinpthread-git | 5.0.0.4634.697f757 | |
| [markupsafe](https://www.palletsprojects.com/p/markupsafe/) | 1.0 | A Python module that implements the jinja2.Markup string / BSD 3-Clause |
| [matplotlib](http://matplotlib.org/) | 2.2.2 | Publication quality figures in Python / PSF-based |
| [mccabe](https://github.com/PyCQA/mccabe) | 0.6.1 | McCabe complexity checker for Python / MIT |
| [menuinst](https://github.com/ContinuumIO/menuinst) | 1.4.14 | cross platform menu item installation / BSD |
| [mistune](https://github.com/lepture/mistune) | 0.8.3 | The fastest markdown parser in pure Python. / BSD 3-Clause |
| [mkl](https://software.intel.com/en-us/mkl) | 2018.0.2 | Math library for Intel and compatible processors / proprietary - Intel |
| [mkl-service](https://github.com/ContinuumIO/mkl-service) | 1.1.2 | Python bindings to MKL service functions / 3-clause BSD |
| [mkl\_fft](http://github.com/IntelPython/mkl_fft) | 1.0.1 | NumPy-based implementation of Fast Fourier Transform using Intel (R) Math Kernel Library / BSD |
| [more-itertools](https://github.com/erikrose/more-itertools) | 4.1.0 | More routines for operating on iterables, beyond itertools / MIT |
| [mpmath](http://mpmath.org) | 1.0.0 | Python library for arbitrary-precision floating-point arithmetic / BSD 3-Clause |
| [msgpack-python](http://msgpack.org/) | 0.5.6 | MessagePack (de)serializer. / Apache 2.0 |
| msys2-conda-epoch | 20160418 | |
| [multipledispatch](https://github.com/mrocklin/multipledispatch/) | 0.5.0 | Multiple dispatch in Python / BSD 3-Clause |
| [navigator-updater](https://github.com/ContinuumIO/navigator-updater) | 0.2.1 | Anaconda Navigator Updater / proprietary - Continuum Analytics, Inc. |
| [nbconvert](http://jupyter.org) | 5.3.1 | Converting Jupyter Notebooks / BSD 3-Clause |
| [nbformat](http://jupyter.org) | 4.4.0 | The reference implementation of the Jupyter Notebook format / BSD 3-clause |
| [networkx](https://networkx.github.io/) | 2.1 | Python package for creating and manipulating complex networks / BSD 3-Clause |
| [nltk](http://nltk.org/) | 3.3.0 | Build Python programs to work with human language data / Apache 2.0 |
| [nose](http://readthedocs.org/docs/nose/) | 1.3.7 | Nose extends unittest to make testing easier / LGPL-2.1 |
| [notebook](http://jupyter.org) | 5.5.0 | A web-based notebook environment for interactive computing / BSD 3-clause |
| [numba](http://numba.github.com) | 0.38.0 | NumPy aware dynamic Python compiler using LLVM / BSD 2-clause |
| [numexpr](https://github.com/pydata/numexpr) | 2.6.5 | Fast numerical expression evaluator for NumPy. / MIT |
| [numpy](http://numpy.scipy.org/) | 1.14.3 | Array processing for numbers, strings, records, and objects. / BSD 3-Clause |
| numpy-base | 1.14.3 | |
| [numpydoc](https://github.com/numpy/numpydoc) | 0.8.0 | Sphinx extension to support docstrings in Numpy format / BSD 3-Clause |
| [odo](http://odo.pydata.org) | 0.5.1 | Data migration in Python / BSD-3-Clause |
| [olefile](http://www.decalage.info/python/olefileio) | 0.45.1 | parse, read and write Microsoft OLE2 files / BSD License 2-Clause |
| [openpyxl](https://openpyxl.readthedocs.io) | 2.5.3 | A Python library to read/write Excel 2010 xlsx/xlsm files / MIT |
| [openssl](http://www.openssl.org/) | 1.0.2o | OpenSSL is an open-source implementation of the SSL and TLS protocols / OpenSSL |
| [packaging](https://github.com/pypa/packaging) | 17.1 | Core utilities for Python packages / Apache 2.0 or BSD 2-Clause |
| [pandas](http://pandas.pydata.org) | 0.23.0 | High-performance, easy-to-use data structures and data analysis tools. / BSD 3-clause |
| [pandoc](http://johnmacfarlane.net/pandoc/) | 1.19.2.1 | Universal markup converter (repackaged binaries). / GPL-2.0 |
| [pandocfilters](https://github.com/jgm/pandocfilters) | 1.4.2 | A python module for writing pandoc filters / BSD-3-Clause |
| [parso](https://github.com/davidhalter/parso) | 0.2.0 | A Python Parser / MIT |
| [partd](https://github.com/dask/partd) | 0.3.8 | Data structure for on-disk shuffle operations / BSD 3-Clause |
| [path.py](https://github.com/jaraco/path.py) | 11.0.1 | A module wrapper for os.path / MIT |
| [pathlib2](https://github.com/mcmtroffaes/pathlib2) | 2.3.2 | Fork of pathlib aiming to support the full stdlib Python API. / MIT |
| [patsy](https://github.com/pydata/patsy) | 0.5.0 | Describing statistical models in Python using symbolic formulas / BSD-2-Clause, PSF2 |
| [pep8](http://pep8.readthedocs.org/) | 1.7.1 | Python style guide checker / MIT |
| [pickleshare](https://github.com/vivainio/pickleshare) | 0.7.4 | Tiny ‘shelve’-like database with concurrency support / MIT |
| [pillow](https://pillow.readthedocs.io) | 5.1.0 | Pillow is the friendly PIL fork by Alex Clark and Contributors. / PIL |
| [pip](https://pip.pypa.io/en/stable/) | 10.0.1 | PyPA recommended tool for installing Python packages / MIT |
| [pkginfo](https://code.launchpad.net/~tseaver/pkginfo/trunk) | 1.4.2 | Query metadatdata from sdists / bdists / installed packages. / MIT |
| [pluggy](https://github.com/pytest-dev/pluggy) | 0.6.0 | Plugin registration and hook calling for Python / MIT |
| [ply](http://www.dabeaz.com/ply/index.html) | 3.11 | Python Lex-Yacc / BSD 3-clause |
| [progress](https://github.com/verigak/progress) | 1.3 | Easy progress reporting for Python / ISC |
| [prompt\_toolkit](https://github.com/jonathanslenders/python-prompt-toolkit) | 1.0.15 | Library for building powerful interactive command lines in Python / BSD 3-clause |
| [psutil](https://github.com/giampaolo/psutil) | 5.4.5 | A cross-platform process and system utilities module for Python / BSD 3-Clause |
| [py](https://github.com/pytest-dev/py) | 1.5.3 | library with cross-python path, ini-parsing, io, code, log facilities / MIT |
| [pycodestyle](https://pycodestyle.readthedocs.io/) | 2.4.0 | Python style guide checker / MIT |
| [pycosat](https://github.com/ContinuumIO/pycosat) | 0.6.3 | Bindings to picosat (a SAT solver) / MIT |
| [pycparser](https://github.com/eliben/pycparser) | 2.18 | Complete C99 parser in pure Python / BSD 3-clause |
| [pycrypto](http://www.pycrypto.org/) | 2.6.1 | Cryptographic modules for Python. / Public Domain |
| [pycurl](http://pycurl.sourceforge.net/) | 7.43.0.1 | A Python Interface To The cURL library / LGPL, MIT |
| [pyflakes](https://github.com/PyCQA/pyflakes) | 1.6.0 | Pyflakes analyzes programs and detects various errors. / MIT |
| [pygments](http://pygments.org/) | 2.2.0 | Generic syntax highlighting package / BSD 2-clause |
| [pylint](http://www.pylint.org/) | 1.8.4 | python code static checker / GPL |
| [pyodbc](https://github.com/mkleehammer/pyodbc) | 4.0.23 | DB API Module for ODBC / MIT |
| [pyopenssl](https://github.com/pyca/pyopenssl) | 18.0.0 | Python wrapper module around the OpenSSL library / Apache 2.0 |
| [pyparsing](http://pyparsing.wikispaces.com/) | 2.2.0 | Create and execute simple grammars / MIT |
| [pyqt](http://www.riverbankcomputing.co.uk/software/pyqt) | 5.6.0 | Python binding of the cross-platform GUI toolkit Qt. / Commercial, GPL-2.0, GPL-3.0 |
| [pysocks](https://github.com/Anorov/PySocks) | 1.6.8 | A Python SOCKS client module. See [Anorov/PySocks](https://github.com/Anorov/PySocks) for more information. / BSD 3-Clause |
| [pytables](http://www.pytables.org) | 3.4.3 | Brings together Python, HDF5 and NumPy to easily handle large amounts of data. / BSD 3-Clause |
| [pytest](https://docs.pytest.org/en/latest/) | 3.5.1 | Simple and powerful testing with Python. / MIT |
| [python](http://www.python.org/) | 2.7.15 | General purpose programming language / PSF |
| [python-dateutil](https://dateutil.readthedocs.org/) | 2.7.3 | Extensions to the standard Python datetime module. / BSD 3 Clause |
| [pytz](http://pythonhosted.org/pytz/) | 2018.4 | World timezone definitions, modern and historical. / MIT |
| [pywavelets](https://github.com/PyWavelets/pywt) | 0.5.2 | Discrete Wavelet Transforms in Python. / MIT |
| [pywin32](https://sourceforge.net/projects/pywin32) | 223 | Python extensions for Windows / PSF |
| [pywinpty](https://github.com/spyder-ide/pywinpty) | 0.5.1 | Python bindings for the winpty library / MIT |
| [pyyaml](http://pyyaml.org/wiki/PyYAML) | 3.12 | YAML parser and emitter for Python / MIT |
| [pyzmq](https://github.com/zeromq/pyzmq) | 17.0.0 | Python bindings for zeromq / BSD 3-clause |
| [qt](http://qt-project.org) | 5.6.2 | Qt is a cross-platform application and UI framework. / LGPL-3.0 |
| [qtawesome](https://github.com/spyder-ide/qtawesome) | 0.4.4 | Iconic fonts in PyQt and PySide applications / MIT |
| [qtconsole](http://jupyter.org) | 4.3.1 | Jupyter Qt console / BSD 3-Clause |
| [qtpy](https://github.com/spyder-ide/qtpy) | 1.4.1 | Abstraction layer for PyQt5/PyQt4/PySide / MIT |
| [requests](http://python-requests.org) | 2.18.4 | Python HTTP for Humans. / Apache 2.0 |
| [rope](https://github.com/python-rope/rope) | 0.10.7 | A python refactoring library… / GPL 2.0 |
| [ruamel\_yaml](https://bitbucket.org/ruamel/yaml) | 0.15.35 | A patched copy of ruamel.yaml. / MIT |
| [scandir](https://github.com/benhoyt/scandir) | 1.7 | scandir, a better directory iterator and faster os.walk() / BSD 3-Clause |
| [scikit-image](http://scikit-image.org/) | 0.13.1 | Image processing routines for SciPy. / BSD 3-Clause |
| [scikit-learn](http://scikit-learn.org/) | 0.19.1 | A set of python modules for machine learning and data mining / BSD 3-Clause |
| [scipy](http://www.scipy.org/) | 1.1.0 | Scientific Library for Python / BSD 3-Clause |
| [seaborn](http://stanford.edu/~mwaskom/software/seaborn/) | 0.8.1 | Statistical data visualization / BSD 3-Clause |
| [send2trash](https://github.com/hsoft/send2trash) | 1.5.0 | Python library to natively send files to Trash (or Recycle bin) on all platforms. / BSD-3-Clause |
| [setuptools](https://github.com/pypa/setuptools) | 39.1.0 | Download, build, install, upgrade, and uninstall Python packages / MIT |
| [simplegeneric](http://cheeseshop.python.org/pypi/simplegeneric) | 0.8.1 | Simple generic functions (similar to Python’s own len(), pickle.dump(), etc.) / Zope Public |
| [singledispatch](http://docs.python.org/3/library/functools.html#functools.singledispatch) | 3.4.0.3 | Transforms a function into a single-dispatch generic function / MIT |
| [sip](http://www.riverbankcomputing.com/software/sip/intro) | 4.18.1 | Create Python bindings for C and C++ libraries / GPL-3.0 |
| [six](http://pypi.python.org/pypi/six/) | 1.11.0 | Python 2 and 3 compatibility utilities / MIT |
| [snappy](https://github.com/google/snappy) | 1.1.7 | A fast compressor/decompressor / BSD 3-clause |
| [snowballstemmer](https://github.com/shibukawa/snowball_py) | 1.2.1 | Snowball stemming library collection for Python / BSD-2-Clause |
| [sortedcollections](http://www.grantjenks.com/docs/sortedcollections/) | 0.6.1 | Python Sorted Collections / Apache-2.0 |
| [sortedcontainers](http://www.grantjenks.com/docs/sortedcontainers/) | 1.5.10 | Python Sorted Container Types: SortedList, SortedDict, and SortedSet / Apache 2.0 |
| [sphinx](http://www.sphinx-doc.org) | 1.7.4 | Sphinx is a tool that makes it easy to create intelligent and beautiful documentation / BSD 2-clause |
| sphinxcontrib | 1.0 | Python namespace for sphinxcontrib / BSD |
| [sphinxcontrib-websupport](https://pypi.python.org/pypi/sphinxcontrib-websupport) | 1.0.1 | Sphinx API for Web Apps / BSD-2-Clause |
| [spyder](https://github.com/spyder-ide/spyder) | 3.2.8 | Scientific PYthon Development EnviRonment / MIT |
| [sqlalchemy](http://www.sqlalchemy.org/) | 1.2.7 | Database Abstraction Library. / MIT |
| [sqlite](http://www.sqlite.org/) | 3.23.1 | Implements a self-contained, zero-configuration, SQL database engine. / Public-Domain (`<http://www.sqlite.org/copyright.html>`) |
| [ssl\_match\_hostname](http://bitbucket.org/brandon/backports.ssl_match_hostname) | 3.5.0.1 | The ssl.match\_hostname() function from Python 3.5 / PSF 2 |
| [statsmodels](https://www.statsmodels.org) | 0.9.0 | Statistical computations and models for use with SciPy / BSD 3-Clause |
| [subprocess32](https://github.com/google/python-subprocess32) | 3.5.0 | A backport of the subprocess module from Python 3.2/3.3 for use on 2.x. / PSF 2 |
| [sympy](http://sympy.org) | 1.1.1 | Python library for symbolic mathematics / 3-clause BSD |
| [tblib](https://github.com/ionelmc/python-tblib) | 1.3.2 | Traceback serialization library. / BSD 2-Clause |
| [terminado](http://github.com/mitsuhiko/markupsafe) | 0.8.1 | Terminals served by tornado websockets / BSD 3-clause |
| [testpath](https://testpath.readthedocs.io) | 0.3.1 | Testpath is a collection of utilities for Python code working with files and commands. / MIT |
| [tk](http://www.tcl.tk/) | 8.6.7 | A dynamic programming language with GUI support. Bundles Tcl and Tk. / Tcl/Tk |
| [toolz](http://toolz.readthedocs.org/) | 0.9.0 | A functional standard library for Python. / BSD 3-Clause |
| [tornado](http://www.tornadoweb.org/) | 5.0.2 | A Python web framework and asynchronous networking library, originally developed at FriendFeed. / Apache 2.0 |
| [traitlets](http://ipython.org/) | 4.3.2 | Configuration system for Python applications / BSD 3-clause |
| [typing](https://docs.python.org/3.5/library/typing.html) | 3.6.4 | Type Hints for Python - backport for `Python<3.5` / PSF |
| [unicodecsv](https://github.com/jdunck/python-unicodecsv) | 0.14.1 | Drop-in replacement for csv module which supports unicode strings / BSD |
| [urllib3](https://urllib3.readthedocs.io/) | 1.22 | HTTP library with thread-safe connection pooling, file post, and more. / MIT |
| [vc](https://github.com/conda/conda/wiki/VC-features) | 9 | A meta-package to track VC features. / Modified BSD License (3-clause) |
| [vs2008\_runtime](http://www.microsoft.com) | 9.00.30729.1 | Bundles of the MSVC 9 (VS 2008) runtime / Proprietary |
| [vs2015\_runtime](http://www.microsoft.com) | 14.0.25123 | Bundles of the MSVC 14 (VS 2015) runtime / Proprietary |
| [wcwidth](https://github.com/jquast/wcwidth) | 0.1.7 | Measures number of Terminal column cells of wide-character codes. / MIT |
| [webencodings](https://github.com/gsnedders/python-webencodings) | 0.5.1 | Character encoding aliases for legacy web content / BSD 3-Clause |
| [werkzeug](http://werkzeug.pocoo.org/) | 0.14.1 | The Python WSGI Utility Library. / BSD 3-Clause |
| [wheel](https://bitbucket.org/pypa/wheel/) | 0.31.1 | A built-package format for Python. / MIT |
| [widgetsnbextension](http://ipython.org) | 3.2.1 | IPython HTML widgets for Jupyter / BSD 3-clause |
| [win\_inet\_pton](https://github.com/hickeroar/win_inet_pton) | 1.0.1 | Native inet\_pton and inet\_ntop implementation for Python on Windows (with ctypes). / PUBLIC-DOMAIN |
| [win\_unicode\_console](https://github.com/Drekin/win-unicode-console) | 0.5 | A Python package to enable Unicode input and display when running Python from Windows console. / MIT |
| [wincertstore](https://bitbucket.org/tiran/wincertstore) | 0.2 | Python module to extract CA and CRL certs from Windows’ cert store (ctypes based). / PSF 2 |
| [winpty](https://github.com/rprichard/winpty) | 0.4.3 | Winpty provides an interface similar to a Unix pty-master for communicating with Windows console programs. / MIT |
| [wrapt](https://github.com/GrahamDumpleton/wrapt) | 1.10.11 | Module for decorators, wrappers and monkey patching. / BSD 2-Clause |
| [xlrd](http://www.python-excel.org/) | 1.1.0 | Library for developers to extract data from Microsoft Excel (tm) spreadsheet files / BSD 3-Clause and BSD with advertising |
| [xlsxwriter](https://xlsxwriter.readthedocs.io/) | 1.0.4 | A Python module for creating Excel XLSX files / BSD 2-Clause |
| [xlwings](http://xlwings.org/) | 0.11.8 | Interact with Excel from Python and vice versa / 3-clause BSD |
| [xlwt](http://www.python-excel.org/) | 1.3.0 | Writing data and formatting information to Excel files / BSD |
| [yaml](http://pyyaml.org/wiki/LibYAML) | 0.1.7 | A C library for parsing and emitting YAML. / MIT |
| [zeromq](http://zeromq.org) | 4.2.5 | A high-performance asynchronous messaging library. / LGPL 3 |
| [zict](http://github.com/mrocklin/zict) | 0.1.3 | Composable Dictionary Classes / BSD 3-Clause |
| [zlib](http://zlib.net/) | 1.2.11 | Massively spiffy yet delicately unobtrusive compression library / zlib |
| Name | Version | Summary / License |
|---|---|---|
| [\_ipyw\_jlab\_nb\_ext\_conf](https://github.com/ContinuumIO/anaconda-nb-extensions-meta-config) | 0.1.0 | A configuration metapackage for enabling Anaconda-bundled jupyter extensions / BSD |
| [alabaster](http://www.sphinx-doc.org/en/stable/index.html) | 0.7.10 | Configurable, Python 2+3 compatible Sphinx theme. / BSD 3-Clause |
| [anaconda-client](https://github.com/Anaconda-Platform/anaconda-client) | 1.6.14 | Anaconda Cloud command line client library / BSD 3-Clause |
| [anaconda-navigator](https://github.com/ContinuumIO/navigator) | 1.8.7 | Anaconda Navigator / proprietary - Continuum Analytics, Inc. |
| [anaconda-project](https://github.com/Anaconda-Platform/anaconda-project) | 0.8.2 | Tool for encapsulating, running, and reproducing data science projects / BSD 3-Clause |
| [appnope](http://github.com/minrk/appnope) | 0.1.0 | Disable App Nap on OS X 10.9 / BSD 2-Clause |
| [appscript](http://appscript.sourceforge.net/) | 1.0.1 | Control AppleScriptable applications from Python / Public-Domain |
| [asn1crypto](https://github.com/wbond/asn1crypto) | 0.24.0 | Python ASN.1 library with a focus on performance and a pythonic API / MIT |
| [astroid](https://www.astroid.org/) | 1.6.3 | A abstract syntax tree for Python with inference support. / LGPL 2.1 |
| [astropy](http://www.astropy.org/) | 2.0.6 | Community-developed Python Library for Astronomy / BSD |
| [attrs](https://attrs.readthedocs.io/en/stable/) | 18.1.0 | attrs is the Python package that will bring back the joy of writing classes by relieving you from the drudgery of implementing object protocols (aka dunder methods). / MIT |
| [babel](http://babel.pocoo.org/) | 2.5.3 | Utilities to internationalize and localize Python applications / BSD 3-clause |
| [backports](https://bitbucket.org/brandon/backports) | 1.0 | / BSD |
| [backports.functools\_lru\_cache](https://github.com/jaraco/backports.functools_lru_cache) | 1.5 | Backport of functools.lru\_cache from Python 3.3 as published at ActiveState. / MIT |
| [backports.shutil\_get\_terminal\_size](https://github.com/chrippa/backports.shutil_get_terminal_size) | 1.0.0 | A backport of the get\_terminal\_size function from Python 3.3’s shutil. / MIT |
| [backports\_abc](https://github.com/cython/backports_abc) | 0.5 | A backport of recent additions to the collections.abc module. / PSF 2 |
| [beautifulsoup4](http://www.crummy.com/software/BeautifulSoup/) | 4.6.0 | Python library designed for screen-scraping / MIT |
| [bitarray](https://github.com/ilanschnell/bitarray) | 0.8.1 | efficient arrays of booleans – C extension / PSF |
| [bkcharts](http://github.com/bokeh/bkcharts) | 0.2 | High level chart types built on top of Bokeh / BSD 3-Clause |
| [blaze](http://blaze.pydata.org) | 0.11.3 | NumPy and Pandas interface to big data / BSD 3-Clause |
| [bleach](https://github.com/mozilla/bleach) | 2.1.3 | Easy, whitelist-based HTML-sanitizing tool / Apache-2.0 |
| [blosc](https://github.com/Blosc/c-blosc) | 1.14.3 | A blocking, shuffling and loss-less compression library that can be faster than memcpy() / BSD 3-Clause |
| [bokeh](http://bokeh.pydata.org/) | 0.12.16 | Statistical and novel interactive HTML plots for Python / BSD 3-Clause |
| [boto](https://github.com/boto/boto/) | 2.48.0 | Amazon Web Services Library / MIT |
| [bottleneck](http://berkeleyanalytics.com/bottleneck) | 1.2.1 | Fast NumPy array functions written in Cython. / BSD 2-Clause |
| [bzip2](http://www.bzip.org/) | 1.0.6 | high-quality data compressor / bzip2 |
| [ca-certificates](https://github.com/conda-forge/ca-certificates-feedstock) | 2018.03.07 | Certificates for use with other packages. / ISC |
| [cdecimal](http://www.bytereef.org/mpdecimal/index.html) | 2.3 | Fast drop-in replacement for decimal.py / BSD 2-Clause |
| [certifi](http://certifi.io/) | 2018.4.16 | Python package for providing Mozilla’s CA Bundle. / ISC |
| [cffi](https://bitbucket.org/cffi/cffi) | 1.11.5 | Foreign Function Interface for Python calling C code. / MIT |
| [chardet](https://github.com/chardet/chardet) | 3.0.4 | Universal character encoding detector / LGPL2 |
| [click](http://click.pocoo.org/) | 6.7 | A simple wrapper around optparse for powerful command line utilities. / BSD 3-Clause |
| [cloudpickle](https://github.com/cloudpipe/cloudpickle) | 0.5.3 | Extended pickling support for Python objects / BSD 3-Clause |
| [clyent](https://github.com/Anaconda-Platform/clyent) | 1.2.2 | Command line client library for windows and posix / BSD 3-Clause |
| [colorama](https://github.com/tartley/colorama) | 0.3.9 | Cross-platform colored terminal text. / BSD 3-Clause |
| [conda](https://conda.io) | 4.5.4 | OS-agnostic, system-level binary package and environment manager. / BSD 3-Clause |
| [conda-build](https://github.com/conda/conda-build) | 3.10.5 | tools for building conda packages / BSD 3-Clause |
| [conda-env](https://github.com/conda/conda-env) | 2.6.0 | Tools for interacting with conda environments. / BSD 3-Clause |
| [conda-verify](https://github.com/conda/conda-verify) | 2.0.0 | tool for validating conda recipes and conda packages / BSD 3-Clause |
| [configparser](http://docs.python.org/3/library/configparser.html) | 3.5.0 | This library brings the updated configparser from Python 3.5 to Python 2.6-3.5 / MIT |
| [contextlib2](http://contextlib2.readthedocs.org) | 0.5.5 | Backports and enhancements for the contextlib module / PSF |
| [cryptography](https://github.com/pyca/cryptography) | 2.2.2 | Provides cryptographic recipes and primitives to Python developers / Apache 2.0 or BSD 3-Clause, PSF 2 |
| [curl](http://curl.haxx.se/) | 7.60.0 | tool and library for transferring data with URL syntax / MIT/X derivate (`<http://curl.haxx.se/docs/copyright.html>`) |
| [cycler](http://matplotlib.org/cycler) | 0.10.0 | Composable style cycles. / BSD 3-Clause |
| [cython](http://www.cython.org/) | 0.28.2 | The Cython compiler for writing C extensions for the Python language / Apache-2.0 |
| [cytoolz](https://github.com/pytoolz/cytoolz) | 0.9.0.1 | Cython implementation of Toolz. High performance functional utilities. / BSD 3-Clause |
| [dask](http://github.com/dask/dask/) | 0.17.5 | Parallel Python with task scheduling / BSD 3-Clause |
| [dask-core](http://github.com/dask/dask/) | 0.17.5 | Parallel Python with task scheduling / BSD 3-Clause |
| [datashape](http://datashape.pydata.org) | 0.5.4 | A data description language. / BSD 2-Clause |
| [dbus](http://www.freedesktop.org/wiki/Software/dbus/) | 1.13.2 | Simple message bus system for applications to talk to one another / GPL2 |
| [decorator](https://github.com/micheles/decorator) | 4.3.0 | Better living through Python with decorators. / BSD 3-Clause |
| [distributed](http://distributed.readthedocs.io/en/latest/) | 1.21.8 | Distributed computing with Dask / BSD 3-Clause |
| [docutils](http://docutils.sourceforge.net/) | 0.14 | Docutils – Python Documentation Utilities / Public Domain Dedictation and BSD 2-Clause and PSF 2.1.1 and GPL 3.0 |
| [entrypoints](https://github.com/takluyver/entrypoints) | 0.2.3 | Discover and load entry points from installed packages. / MIT License |
| [enum34](https://bitbucket.org/stoneleaf/enum34) | 1.1.6 | Python 3.4 Enum backported to 3.3, 3.2, 3.1, 2.7, 2.6, 2.5, and 2.4 / BSD 3-Clause |
| [et\_xmlfile](https://bitbucket.org/openpyxl/et_xmlfile) | 1.0.1 | An implementation of lxml.xmlfile for the standard library / MIT |
| [expat](http://expat.sourceforge.net/) | 2.2.5 | Expat XML parser library in C. / MIT |
| [fastcache](https://github.com/pbrady/fastcache) | 1.0.2 | C implementation of Python 3 lru\_cache / MIT |
| [filelock](https://github.com/benediktschmitt/py-filelock) | 3.0.4 | A platform independent file lock. / Public Domain |
| [flask](http://flask.pocoo.org) | 1.0.2 | A microframework based on Werkzeug, Jinja2 and good intentions. / BSD 3-Clause |
| [flask-cors](https://github.com/corydolphin/flask-cors) | 3.0.4 | A Flask extension adding a decorator for CORS support / MIT |
| [freetype](https://www.freetype.org/) | 2.8 | A Free, High-Quality, and Portable Font Engine / GPL-2.0 and FreeType |
| [funcsigs](http://funcsigs.readthedocs.org) | 1.0.2 | Python function signatures from PEP362 for Python 2.6, 2.7 and 3.2+. / Apache 2.0 |
| [functools32](https://github.com/MiCHiLU/python-functools32) | 3.2.3.2 | Backport of the functools module from Python 3.2.3 for use on 2.7 and PyPy. / PSF license |
| [futures](https://github.com/agronholm/pythonfutures) | 3.2.0 | Backport of the concurrent.futures package from Python 3.2 / PSF |
| [get\_terminal\_size](https://github.com/chrippa/backports.shutil_get_terminal_size) | 1.0.0 | Get the size of the terminal window. / MIT |
| [gettext](https://www.gnu.org/software/gettext/) | 0.19.8.1 | Internationalization package. / GPLv2 |
| [gevent](http://www.gevent.org/) | 1.3.0 | Coroutine-based network library / MIT |
| [glib](https://developer.gnome.org/glib/) | 2.56.1 | Provides core application building blocks for libraries and applications written in C. / LGPL-2.1 |
| [glob2](https://github.com/miracle2k/python-glob2) | 0.6 | Version of the glob module that supports recursion via \*\*, and can capture patterns. / BSD-2-Clause |
| [gmp](http://gmplib.org/) | 6.1.2 | The GNU multiprecision library. / GPL 2 and LGPL 3 |
| [gmpy2](https://pypi.python.org/pypi/gmpy2) | 2.0.8 | GMP/MPIR, MPFR, and MPC interface to Python 2.6+ and 3.x / LGPL 3 |
| [greenlet](https://github.com/python-greenlet/greenlet) | 0.4.13 | Lightweight in-process concurrent programming / MIT |
| [grin](http://pypi.python.org/pypi/grin) | 1.2.1 | Enhanced grep-like tool / BSD 3-Clause |
| [h5py](http://www.h5py.org/) | 2.7.1 | Read and write HDF5 files from Python. / BSD 3-Clause |
| [hdf5](http://www.hdfgroup.org/HDF5/) | 1.10.2 | HDF5 is a data model, library, and file format for storing and managing data / HDF5 |
| [heapdict](http://stutzbachenterprises.com/) | 1.0.0 | A heap with decrease-key and increase-key operations / BSD 3-Clause |
| [html5lib](https://github.com/html5lib/html5lib-python) | 1.0.1 | HTML parser based on the WHATWG HTML specification / MIT |
| [icu](http://site.icu-project.org/) | 58.2 | International Components for Unicode. / MIT |
| [idna](https://github.com/kjd/idna) | 2.6 | Internationalized Domain Names in Applications (IDNA). / BSD Like |
| [imageio](http://imageio.github.io) | 2.3.0 | a Python library for reading and writing image data / BSD 2-Clause |
| [imagesize](https://github.com/shibukawa/imagesize_py) | 1.0.0 | Getting image size from png/jpeg/jpeg2000/gif file / MIT |
| [intel-openmp](https://software.intel.com/en-us/node/522690) | 2018.0.0 | Math library for Intel and compatible processors / proprietary - Intel |
| [ipaddress](https://github.com/phihag/ipaddress) | 1.0.22 | IPv4/IPv6 manipulation library / PSF 2 |
| [ipykernel](http://ipython.org) | 4.8.2 | IPython Kernel for Jupyter / BSD 3-clause |
| [ipython](http://ipython.org/) | 5.7.0 | IPython: Productive Interactive Computing / BSD 3-clause |
| [ipython\_genutils](http://ipython.org) | 0.2.0 | vestigial utilities from IPython / BSD 3-Clause |
| [ipywidgets](https://github.com/ipython/ipywidgets) | 7.2.1 | Jupyter Interactive Widgets / BSD 3-clause |
| [isort](https://github.com/timothycrosley/isort) | 4.3.4 | A Python utility / library to sort Python imports. / MIT |
| [itsdangerous](https://github.com/pallets/itsdangerous) | 0.24 | Various helpers to pass trusted data to untrusted environments. / BSD 3-Clause |
| [jbig](https://www.cl.cam.ac.uk/~mgk25/jbigkit) | 2.1 | Implementation of the JBIG1 data compression standard / GPL-2.0 |
| [jdcal](https://github.com/phn/jdcal) | 1.4 | Julian dates from proleptic Gregorian and Julian calendars. / BSD 2-Clause |
| [jedi](https://github.com/davidhalter/jedi/) | 0.12.0 | An autocompletion tool for Python that can be used for text editors. / MIT |
| [jinja2](http://jinja.pocoo.org) | 2.10 | An easy to use stand-alone template engine written in pure python. / 3-Clause BSD |
| [jpeg](http://www.ijg.org/) | 9b | read/write jpeg COM, EXIF, IPTC medata / Custom free software license |
| [jsonschema](https://github.com/Julian/jsonschema) | 2.6.0 | An implementation of JSON Schema validation for Python / MIT |
| [jupyter](http://jupyter.org) | 1.0.0 | Jupyter metapackage. Install all the Jupyter components in one go. / BSD 3-Clause |
| [jupyter\_client](http://jupyter.org) | 5.2.3 | Jupyter protocol implementation and client libraries / BSD 3-clause |
| [jupyter\_console](http://jupyter.org) | 5.2.0 | Jupyter terminal console / BSD 3-Clause |
| [jupyter\_core](http://jupyter.org) | 4.4.0 | Core common functionality of Jupyter projects. / BSD 3-clause |
| [jupyterlab](https://github.com/jupyterlab/jupyterlab) | 0.32.1 | An extensible environment for interactive and reproducible computing, based on the Jupyter Notebook and Architecture. Currently in beta. / BSD 3-Clause |
| [jupyterlab\_launcher](http://github.com/jupyterlab/jupyterlab_launcher) | 0.10.5 | A Launcher for JupyterLab based applications. / BSD 3-Clause |
| [kiwisolver](https://github.com/nucleic/kiwi) | 1.0.1 | A fast implementation of the Cassowary constraint solver / BSD 3-Clause |
| [lazy-object-proxy](https://github.com/ionelmc/python-lazy-object-proxy) | 1.3.1 | A fast and thorough lazy object proxy. / BSD 2-Clause |
| [libcurl](http://curl.haxx.se/) | 7.60.0 | tool and library for transferring data with URL syntax / MIT/X derivate (`<http://curl.haxx.se/docs/copyright.html>`) |
| [libcxx](http://libcxx.llvm.org/) | 4.0.1 | C++ Standard Library / MIT license or UIUC License |
| [libcxxabi](http://libcxxabi.llvm.org/) | 4.0.1 | C++ Standard Library Support / MIT license or UIUC License |
| [libedit](http://thrysoee.dk/editline/) | 3.1.20170329 | Editline Library (libedit) / NetBSD |
| [libffi](https://sourceware.org/libffi/) | 3.2.1 | A Portable Foreign Function Interface Library. / Custom |
| [libgfortran](http://gcc.gnu.org/) | 3.0.1 | Fortran libraries from the GNU Compiler Collection / GPL 3 (with GCC Runtime Library Exception 3.1) |
| [libiconv](https://www.gnu.org/software/libiconv/) | 1.15 | Provides iconv for systems which don’t have one (or that cannot convert from/to Unicode.) / GPL and LGPL |
| [libopenblas](http://www.openblas.net/) | 0.2.20 | An Optimized BLAS library / BSD |
| [libpng](http://www.libpng.org/pub/png/libpng.html) | 1.6.34 | PNG reference library. / zlib/libpng |
| [libsodium](http://libsodium.org) | 1.0.16 | A modern and easy-to-use crypto library. / ISC |
| [libssh2](https://www.libssh2.org/) | 1.8.0 | the SSH library / BSD 3-Clause |
| [libtiff](http://www.libtiff.org/) | 4.0.9 | Support for the Tag Image File Format (TIFF). / HPND |
| [libxml2](http://xmlsoft.org/) | 2.9.8 | The XML C parser and toolkit of Gnome / MIT |
| [libxslt](http://xmlsoft.org/XSLT/) | 1.1.32 | The XSLT C library developed for the GNOME project / MIT |
| [llvmlite](https://github.com/numba/llvmlite) | 0.23.1 | A lightweight LLVM python binding for writing JIT compilers / New BSD License |
| [locket](https://github.com/mwilliamson/locket.py) | 0.2.0 | File-based locks for Python for Linux and Windows / BSD 2-Clause |
| [lxml](http://lxml.de/) | 4.2.1 | Pythonic binding for the C libraries libxml2 and libxslt. / BSD 3-Clause, GPL-2.0, ZPL-2.0, and ElementTree |
| [lzo](http://www.oberhumer.com/opensource/lzo/) | 2.10 | LZO is a portable lossless data compression library written in ANSI C. / GPL v2+ |
| [markupsafe](https://www.palletsprojects.com/p/markupsafe/) | 1.0 | A Python module that implements the jinja2.Markup string / BSD 3-Clause |
| [matplotlib](http://matplotlib.org/) | 2.2.2 | Publication quality figures in Python / PSF-based |
| [mccabe](https://github.com/PyCQA/mccabe) | 0.6.1 | McCabe complexity checker for Python / MIT |
| [mistune](https://github.com/lepture/mistune) | 0.8.3 | The fastest markdown parser in pure Python. / BSD 3-Clause |
| [mkl](https://software.intel.com/en-us/mkl) | 2018.0.2 | Math library for Intel and compatible processors / proprietary - Intel |
| [mkl-service](https://github.com/ContinuumIO/mkl-service) | 1.1.2 | Python bindings to MKL service functions / 3-clause BSD |
| [more-itertools](https://github.com/erikrose/more-itertools) | 4.1.0 | More routines for operating on iterables, beyond itertools / MIT |
| [mpc](http://www.multiprecision.org/) | 1.0.3 | A C library for the arithmetic of complex numbers with arbitrarily high precision. / LGPL 3 |
| [mpfr](http://www.mpfr.org/) | 3.1.5 | The MPFR library is a C library for multiple-precision floating-point computations with correct rounding. / LGPL 3 |
| [mpmath](http://mpmath.org) | 1.0.0 | Python library for arbitrary-precision floating-point arithmetic / BSD 3-Clause |
| [msgpack-python](http://msgpack.org/) | 0.5.6 | MessagePack (de)serializer. / Apache 2.0 |
| [multipledispatch](https://github.com/mrocklin/multipledispatch/) | 0.5.0 | Multiple dispatch in Python / BSD 3-Clause |
| [navigator-updater](https://github.com/ContinuumIO/navigator-updater) | 0.2.1 | Anaconda Navigator Updater / proprietary - Continuum Analytics, Inc. |
| [nbconvert](http://jupyter.org) | 5.3.1 | Converting Jupyter Notebooks / BSD 3-Clause |
| [nbformat](http://jupyter.org) | 4.4.0 | The reference implementation of the Jupyter Notebook format / BSD 3-clause |
| [ncurses](http://www.gnu.org/software/ncurses/) | 6.1 | Library for text-based user interfaces / Free software (MIT-like) |
| [networkx](https://networkx.github.io/) | 2.1 | Python package for creating and manipulating complex networks / BSD 3-Clause |
| [nltk](http://nltk.org/) | 3.3.0 | Build Python programs to work with human language data / Apache 2.0 |
| [nose](http://readthedocs.org/docs/nose/) | 1.3.7 | Nose extends unittest to make testing easier / LGPL-2.1 |
| [notebook](http://jupyter.org) | 5.5.0 | A web-based notebook environment for interactive computing / BSD 3-clause |
| [numba](http://numba.github.com) | 0.38.0 | NumPy aware dynamic Python compiler using LLVM / BSD 2-clause |
| [numexpr](https://github.com/pydata/numexpr) | 2.6.5 | Fast numerical expression evaluator for NumPy. / MIT |
| [numpy](http://numpy.scipy.org/) | 1.14.3 | Array processing for numbers, strings, records, and objects. / BSD 3-Clause |
| numpy-base | 1.14.3 | |
| [numpydoc](https://github.com/numpy/numpydoc) | 0.8.0 | Sphinx extension to support docstrings in Numpy format / BSD 3-Clause |
| [odo](http://odo.pydata.org) | 0.5.1 | Data migration in Python / BSD-3-Clause |
| [olefile](http://www.decalage.info/python/olefileio) | 0.45.1 | parse, read and write Microsoft OLE2 files / BSD License 2-Clause |
| [openpyxl](https://openpyxl.readthedocs.io) | 2.5.3 | A Python library to read/write Excel 2010 xlsx/xlsm files / MIT |
| [openssl](http://www.openssl.org/) | 1.0.2o | OpenSSL is an open-source implementation of the SSL and TLS protocols / OpenSSL |
| [packaging](https://github.com/pypa/packaging) | 17.1 | Core utilities for Python packages / Apache 2.0 or BSD 2-Clause |
| [pandas](http://pandas.pydata.org) | 0.23.0 | High-performance, easy-to-use data structures and data analysis tools. / BSD 3-clause |
| [pandoc](http://johnmacfarlane.net/pandoc/) | 1.19.2.1 | Universal markup converter (repackaged binaries). / GPL-2.0 |
| [pandocfilters](https://github.com/jgm/pandocfilters) | 1.4.2 | A python module for writing pandoc filters / BSD-3-Clause |
| [parso](https://github.com/davidhalter/parso) | 0.2.0 | A Python Parser / MIT |
| [partd](https://github.com/dask/partd) | 0.3.8 | Data structure for on-disk shuffle operations / BSD 3-Clause |
| [path.py](https://github.com/jaraco/path.py) | 11.0.1 | A module wrapper for os.path / MIT |
| [pathlib2](https://github.com/mcmtroffaes/pathlib2) | 2.3.2 | Fork of pathlib aiming to support the full stdlib Python API. / MIT |
| [patsy](https://github.com/pydata/patsy) | 0.5.0 | Describing statistical models in Python using symbolic formulas / BSD-2-Clause, PSF2 |
| [pcre](http://www.pcre.org/) | 8.42 | Regular expression pattern matching using the same syntax and semantics as Perl 5. / BSD 3-Clause |
| [pep8](http://pep8.readthedocs.org/) | 1.7.1 | Python style guide checker / MIT |
| [pexpect](http://pexpect.sourceforge.net/) | 4.5.0 | Pexpect makes Python a better tool for controlling other applications. / ISC |
| [pickleshare](https://github.com/vivainio/pickleshare) | 0.7.4 | Tiny ‘shelve’-like database with concurrency support / MIT |
| [pillow](https://pillow.readthedocs.io) | 5.1.0 | Pillow is the friendly PIL fork by Alex Clark and Contributors. / PIL |
| [pip](https://pip.pypa.io/en/stable/) | 10.0.1 | PyPA recommended tool for installing Python packages / MIT |
| [pkginfo](https://code.launchpad.net/~tseaver/pkginfo/trunk) | 1.4.2 | Query metadatdata from sdists / bdists / installed packages. / MIT |
| [pluggy](https://github.com/pytest-dev/pluggy) | 0.6.0 | Plugin registration and hook calling for Python / MIT |
| [ply](http://www.dabeaz.com/ply/index.html) | 3.11 | Python Lex-Yacc / BSD 3-clause |
| [prompt\_toolkit](https://github.com/jonathanslenders/python-prompt-toolkit) | 1.0.15 | Library for building powerful interactive command lines in Python / BSD 3-clause |
| [psutil](https://github.com/giampaolo/psutil) | 5.4.5 | A cross-platform process and system utilities module for Python / BSD 3-Clause |
| [ptyprocess](https://github.com/pexpect/ptyprocess) | 0.5.2 | Run a subprocess in a pseudo terminal / ISC |
| [py](https://github.com/pytest-dev/py) | 1.5.3 | library with cross-python path, ini-parsing, io, code, log facilities / MIT |
| [pyaudio](http://people.csail.mit.edu/hubert/pyaudio/) | 0.2.7 | Bindings for PortAudio v19, the cross-platform audio stream library / MIT |
| [pycodestyle](https://pycodestyle.readthedocs.io/) | 2.4.0 | Python style guide checker / MIT |
| [pycosat](https://github.com/ContinuumIO/pycosat) | 0.6.3 | Bindings to picosat (a SAT solver) / MIT |
| [pycparser](https://github.com/eliben/pycparser) | 2.18 | Complete C99 parser in pure Python / BSD 3-clause |
| [pycrypto](http://www.pycrypto.org/) | 2.6.1 | Cryptographic modules for Python. / Public Domain |
| [pycurl](http://pycurl.sourceforge.net/) | 7.43.0.1 | A Python Interface To The cURL library / LGPL, MIT |
| [pyflakes](https://github.com/PyCQA/pyflakes) | 1.6.0 | Pyflakes analyzes programs and detects various errors. / MIT |
| [pygments](http://pygments.org/) | 2.2.0 | Generic syntax highlighting package / BSD 2-clause |
| [pylint](http://www.pylint.org/) | 1.8.4 | python code static checker / GPL |
| [pyodbc](https://github.com/mkleehammer/pyodbc) | 4.0.23 | DB API Module for ODBC / MIT |
| [pyopenssl](https://github.com/pyca/pyopenssl) | 18.0.0 | Python wrapper module around the OpenSSL library / Apache 2.0 |
| [pyparsing](http://pyparsing.wikispaces.com/) | 2.2.0 | Create and execute simple grammars / MIT |
| [pyqt](http://www.riverbankcomputing.co.uk/software/pyqt) | 5.9.2 | Python binding of the cross-platform GUI toolkit Qt. / Commercial, GPL-2.0, GPL-3.0 |
| [pysocks](https://github.com/Anorov/PySocks) | 1.6.8 | A Python SOCKS client module. See [Anorov/PySocks](https://github.com/Anorov/PySocks) for more information. / BSD 3-Clause |
| [pytables](http://www.pytables.org) | 3.4.3 | Brings together Python, HDF5 and NumPy to easily handle large amounts of data. / BSD 3-Clause |
| [pytest](https://docs.pytest.org/en/latest/) | 3.5.1 | Simple and powerful testing with Python. / MIT |
| [python](http://www.python.org/) | 2.7.15 | General purpose programming language / PSF |
| [python-dateutil](https://dateutil.readthedocs.org/) | 2.7.3 | Extensions to the standard Python datetime module. / BSD 3 Clause |
| python.app | 2 | Proxy on OS X letting Python libraries hook into the gui event loop / BSD |
| [pytz](http://pythonhosted.org/pytz/) | 2018.4 | World timezone definitions, modern and historical. / MIT |
| [pywavelets](https://github.com/PyWavelets/pywt) | 0.5.2 | Discrete Wavelet Transforms in Python. / MIT |
| [pyyaml](http://pyyaml.org/wiki/PyYAML) | 3.12 | YAML parser and emitter for Python / MIT |
| [pyzmq](https://github.com/zeromq/pyzmq) | 17.0.0 | Python bindings for zeromq / BSD 3-clause |
| [qt](http://qt-project.org) | 5.9.5 | Qt is a cross-platform application and UI framework. / LGPL-3.0 |
| [qtawesome](https://github.com/spyder-ide/qtawesome) | 0.4.4 | Iconic fonts in PyQt and PySide applications / MIT |
| [qtconsole](http://jupyter.org) | 4.3.1 | Jupyter Qt console / BSD 3-Clause |
| [qtpy](https://github.com/spyder-ide/qtpy) | 1.4.1 | Abstraction layer for PyQt5/PyQt4/PySide / MIT |
| [readline](https://cnswww.cns.cwru.edu/php/chet/readline/rltop.html) | 7.0 | library for editing command lines as they are typed in / GPL3 |
| [requests](http://python-requests.org) | 2.18.4 | Python HTTP for Humans. / Apache 2.0 |
| [rope](https://github.com/python-rope/rope) | 0.10.7 | A python refactoring library… / GPL 2.0 |
| [ruamel\_yaml](https://bitbucket.org/ruamel/yaml) | 0.15.35 | A patched copy of ruamel.yaml. / MIT |
| [scandir](https://github.com/benhoyt/scandir) | 1.7 | scandir, a better directory iterator and faster os.walk() / BSD 3-Clause |
| [scikit-image](http://scikit-image.org/) | 0.13.1 | Image processing routines for SciPy. / BSD 3-Clause |
| [scikit-learn](http://scikit-learn.org/) | 0.19.1 | A set of python modules for machine learning and data mining / BSD 3-Clause |
| [scipy](http://www.scipy.org/) | 1.1.0 | Scientific Library for Python / BSD 3-Clause |
| [seaborn](http://stanford.edu/~mwaskom/software/seaborn/) | 0.8.1 | Statistical data visualization / BSD 3-Clause |
| [send2trash](https://github.com/hsoft/send2trash) | 1.5.0 | Python library to natively send files to Trash (or Recycle bin) on all platforms. / BSD-3-Clause |
| [setuptools](https://github.com/pypa/setuptools) | 39.1.0 | Download, build, install, upgrade, and uninstall Python packages / MIT |
| [simplegeneric](http://cheeseshop.python.org/pypi/simplegeneric) | 0.8.1 | Simple generic functions (similar to Python’s own len(), pickle.dump(), etc.) / Zope Public |
| [singledispatch](http://docs.python.org/3/library/functools.html#functools.singledispatch) | 3.4.0.3 | Transforms a function into a single-dispatch generic function / MIT |
| [sip](http://www.riverbankcomputing.com/software/sip/intro) | 4.19.8 | Create Python bindings for C and C++ libraries / GPL-3.0 |
| [six](http://pypi.python.org/pypi/six/) | 1.11.0 | Python 2 and 3 compatibility utilities / MIT |
| [snappy](https://github.com/google/snappy) | 1.1.7 | A fast compressor/decompressor / BSD 3-clause |
| [snowballstemmer](https://github.com/shibukawa/snowball_py) | 1.2.1 | Snowball stemming library collection for Python / BSD-2-Clause |
| [sortedcollections](http://www.grantjenks.com/docs/sortedcollections/) | 0.6.1 | Python Sorted Collections / Apache-2.0 |
| [sortedcontainers](http://www.grantjenks.com/docs/sortedcontainers/) | 1.5.10 | Python Sorted Container Types: SortedList, SortedDict, and SortedSet / Apache 2.0 |
| [sphinx](http://www.sphinx-doc.org) | 1.7.4 | Sphinx is a tool that makes it easy to create intelligent and beautiful documentation / BSD 2-clause |
| sphinxcontrib | 1.0 | Python namespace for sphinxcontrib / BSD |
| [sphinxcontrib-websupport](https://pypi.python.org/pypi/sphinxcontrib-websupport) | 1.0.1 | Sphinx API for Web Apps / BSD-2-Clause |
| [spyder](https://github.com/spyder-ide/spyder) | 3.2.8 | Scientific PYthon Development EnviRonment / MIT |
| [sqlalchemy](http://www.sqlalchemy.org/) | 1.2.7 | Database Abstraction Library. / MIT |
| [sqlite](http://www.sqlite.org/) | 3.23.1 | Implements a self-contained, zero-configuration, SQL database engine. / Public-Domain (`<http://www.sqlite.org/copyright.html>`) |
| [ssl\_match\_hostname](http://bitbucket.org/brandon/backports.ssl_match_hostname) | 3.5.0.1 | The ssl.match\_hostname() function from Python 3.5 / PSF 2 |
| [statsmodels](https://www.statsmodels.org) | 0.9.0 | Statistical computations and models for use with SciPy / BSD 3-Clause |
| [subprocess32](https://github.com/google/python-subprocess32) | 3.5.0 | A backport of the subprocess module from Python 3.2/3.3 for use on 2.x. / PSF 2 |
| [sympy](http://sympy.org) | 1.1.1 | Python library for symbolic mathematics / 3-clause BSD |
| [tblib](https://github.com/ionelmc/python-tblib) | 1.3.2 | Traceback serialization library. / BSD 2-Clause |
| [terminado](http://github.com/mitsuhiko/markupsafe) | 0.8.1 | Terminals served by tornado websockets / BSD 3-clause |
| [testpath](https://testpath.readthedocs.io) | 0.3.1 | Testpath is a collection of utilities for Python code working with files and commands. / MIT |
| [tk](http://www.tcl.tk/) | 8.6.7 | A dynamic programming language with GUI support. Bundles Tcl and Tk. / Tcl/Tk |
| [toolz](http://toolz.readthedocs.org/) | 0.9.0 | A functional standard library for Python. / BSD 3-Clause |
| [tornado](http://www.tornadoweb.org/) | 5.0.2 | A Python web framework and asynchronous networking library, originally developed at FriendFeed. / Apache 2.0 |
| [traitlets](http://ipython.org/) | 4.3.2 | Configuration system for Python applications / BSD 3-clause |
| [typing](https://docs.python.org/3.5/library/typing.html) | 3.6.4 | Type Hints for Python - backport for `Python<3.5` / PSF |
| [unicodecsv](https://github.com/jdunck/python-unicodecsv) | 0.14.1 | Drop-in replacement for csv module which supports unicode strings / BSD |
| [unixodbc](http://www.unixodbc.org/) | 2.3.6 | ODBC on non MS Windows platforms / LGPL-2.1 |
| [urllib3](https://urllib3.readthedocs.io/) | 1.22 | HTTP library with thread-safe connection pooling, file post, and more. / MIT |
| [wcwidth](https://github.com/jquast/wcwidth) | 0.1.7 | Measures number of Terminal column cells of wide-character codes. / MIT |
| [webencodings](https://github.com/gsnedders/python-webencodings) | 0.5.1 | Character encoding aliases for legacy web content / BSD 3-Clause |
| [werkzeug](http://werkzeug.pocoo.org/) | 0.14.1 | The Python WSGI Utility Library. / BSD 3-Clause |
| [wheel](https://bitbucket.org/pypa/wheel/) | 0.31.1 | A built-package format for Python. / MIT |
| [widgetsnbextension](http://ipython.org) | 3.2.1 | IPython HTML widgets for Jupyter / BSD 3-clause |
| [wrapt](https://github.com/GrahamDumpleton/wrapt) | 1.10.11 | Module for decorators, wrappers and monkey patching. / BSD 2-Clause |
| [xlrd](http://www.python-excel.org/) | 1.1.0 | Library for developers to extract data from Microsoft Excel (tm) spreadsheet files / BSD 3-Clause and BSD with advertising |
| [xlsxwriter](https://xlsxwriter.readthedocs.io/) | 1.0.4 | A Python module for creating Excel XLSX files / BSD 2-Clause |
| [xlwings](http://xlwings.org/) | 0.11.8 | Interact with Excel from Python and vice versa / 3-clause BSD |
| [xlwt](http://www.python-excel.org/) | 1.2.0 | Writing data and formatting information to Excel files / BSD |
| [xz](http://tukaani.org/xz/) | 5.2.4 | Data compression software with high compression ratio / LGPL-2.1 and GPL-2.0 |
| [yaml](http://pyyaml.org/wiki/LibYAML) | 0.1.7 | A C library for parsing and emitting YAML. / MIT |
| [zeromq](http://zeromq.org) | 4.2.5 | A high-performance asynchronous messaging library. / LGPL 3 |
| [zict](http://github.com/mrocklin/zict) | 0.1.3 | Composable Dictionary Classes / BSD 3-Clause |
| [zlib](http://zlib.net/) | 1.2.11 | Massively spiffy yet delicately unobtrusive compression library / zlib |
| Name | Version | Summary / License |
|---|---|---|
| [\_ipyw\_jlab\_nb\_ext\_conf](https://github.com/ContinuumIO/anaconda-nb-extensions-meta-config) | 0.1.0 | A configuration metapackage for enabling Anaconda-bundled jupyter extensions / BSD |
| [alabaster](http://www.sphinx-doc.org/en/stable/index.html) | 0.7.10 | Configurable, Python 2+3 compatible Sphinx theme. / BSD 3-Clause |
| [anaconda-client](https://github.com/Anaconda-Platform/anaconda-client) | 1.6.14 | Anaconda Cloud command line client library / BSD 3-Clause |
| [anaconda-project](https://github.com/Anaconda-Platform/anaconda-project) | 0.8.2 | Tool for encapsulating, running, and reproducing data science projects / BSD 3-Clause |
| [asn1crypto](https://github.com/wbond/asn1crypto) | 0.23.0 | Python ASN.1 library with a focus on performance and a pythonic API / MIT |
| [astroid](https://www.astroid.org/) | 1.6.2 | A abstract syntax tree for Python with inference support. / LGPL 2.1 |
| [astropy](http://www.astropy.org/) | 2.0.6 | Community-developed Python Library for Astronomy / BSD |
| [attrs](https://attrs.readthedocs.io/en/stable/) | 18.1.0 | attrs is the Python package that will bring back the joy of writing classes by relieving you from the drudgery of implementing object protocols (aka dunder methods). / MIT |
| [babel](http://babel.pocoo.org/) | 2.5.0 | Utilities to internationalize and localize Python applications / BSD 3-clause |
| [backports](https://bitbucket.org/brandon/backports) | 1.0 | / BSD |
| [backports.functools\_lru\_cache](https://github.com/jaraco/backports.functools_lru_cache) | 1.4 | Backport of functools.lru\_cache from Python 3.3 as published at ActiveState. / MIT |
| [backports.shutil\_get\_terminal\_size](https://github.com/chrippa/backports.shutil_get_terminal_size) | 1.0.0 | A backport of the get\_terminal\_size function from Python 3.3’s shutil. / MIT |
| [backports\_abc](https://github.com/cython/backports_abc) | 0.5 | A backport of recent additions to the collections.abc module. / PSF 2 |
| [beautifulsoup4](http://www.crummy.com/software/BeautifulSoup/) | 4.6.0 | Python library designed for screen-scraping / MIT |
| [bitarray](https://github.com/ilanschnell/bitarray) | 0.8.1 | efficient arrays of booleans – C extension / PSF |
| [bkcharts](http://github.com/bokeh/bkcharts) | 0.2 | High level chart types built on top of Bokeh / BSD 3-Clause |
| [bleach](https://github.com/mozilla/bleach) | 2.1.3 | Easy, whitelist-based HTML-sanitizing tool / Apache-2.0 |
| [blosc](https://github.com/Blosc/c-blosc) | 1.14.3 | A blocking, shuffling and loss-less compression library that can be faster than memcpy() / BSD 3-Clause |
| [bokeh](http://bokeh.pydata.org/) | 0.12.15 | Statistical and novel interactive HTML plots for Python / BSD 3-Clause |
| [boto](https://github.com/boto/boto/) | 2.48.0 | Amazon Web Services Library / MIT |
| [bottleneck](http://berkeleyanalytics.com/bottleneck) | 1.2.1 | Fast NumPy array functions written in Cython. / BSD 2-Clause |
| [bzip2](http://www.bzip.org/) | 1.0.6 | high-quality data compressor / bzip2 |
| [ca-certificates](https://github.com/conda-forge/ca-certificates-feedstock) | 2018.03.07 | Certificates for use with other packages. / ISC |
| [cairo](http://cairographics.org/) | 1.14.12 | Cairo is a 2D graphics library with support for multiple output devices. / LGPL 2.1 or MPL 1.1 |
| [cdecimal](http://www.bytereef.org/mpdecimal/index.html) | 2.3 | Fast drop-in replacement for decimal.py / BSD 2-Clause |
| [certifi](http://certifi.io/) | 2018.4.16 | Python package for providing Mozilla’s CA Bundle. / ISC |
| [cffi](https://bitbucket.org/cffi/cffi) | 1.11.5 | Foreign Function Interface for Python calling C code. / MIT |
| [chardet](https://github.com/chardet/chardet) | 3.0.4 | Universal character encoding detector / LGPL2 |
| [click](http://click.pocoo.org/) | 6.7 | A simple wrapper around optparse for powerful command line utilities. / BSD 3-Clause |
| [cloudpickle](https://github.com/cloudpipe/cloudpickle) | 0.5.3 | Extended pickling support for Python objects / BSD 3-Clause |
| [clyent](https://github.com/Anaconda-Platform/clyent) | 1.2.2 | Command line client library for windows and posix / BSD 3-Clause |
| [colorama](https://github.com/tartley/colorama) | 0.3.9 | Cross-platform colored terminal text. / BSD 3-Clause |
| [conda](https://conda.io) | 4.5.4 | OS-agnostic, system-level binary package and environment manager. / BSD 3-Clause |
| [conda-build](https://github.com/conda/conda-build) | 3.10.5 | tools for building conda packages / BSD 3-Clause |
| [conda-env](https://github.com/conda/conda-env) | 2.6.0 | Tools for interacting with conda environments. / BSD 3-Clause |
| [conda-verify](https://github.com/conda/conda-verify) | 3.0.0 | tool for validating conda recipes and conda packages / BSD 3-Clause |
| [configparser](http://docs.python.org/3/library/configparser.html) | 3.5.0 | This library brings the updated configparser from Python 3.5 to Python 2.6-3.5 / MIT |
| [contextlib2](http://contextlib2.readthedocs.org) | 0.5.5 | Backports and enhancements for the contextlib module / PSF |
| [cryptography](https://github.com/pyca/cryptography) | 2.2.2 | Provides cryptographic recipes and primitives to Python developers / Apache 2.0 or BSD 3-Clause, PSF 2 |
| [curl](http://curl.haxx.se/) | 7.55.1 | tool and library for transferring data with URL syntax / MIT/X derivate (`<http://curl.haxx.se/docs/copyright.html>`) |
| [cycler](http://matplotlib.org/cycler) | 0.10.0 | Composable style cycles. / BSD 3-Clause |
| [cython](http://www.cython.org/) | 0.28.1 | The Cython compiler for writing C extensions for the Python language / Apache-2.0 |
| [cytoolz](https://github.com/pytoolz/cytoolz) | 0.9.0.1 | Cython implementation of Toolz. High performance functional utilities. / BSD 3-Clause |
| [dask](http://github.com/dask/dask/) | 0.17.5 | Parallel Python with task scheduling / BSD 3-Clause |
| [dask-core](http://github.com/dask/dask/) | 0.17.5 | Parallel Python with task scheduling / BSD 3-Clause |
| [datashape](http://datashape.pydata.org) | 0.5.4 | A data description language. / BSD 2-Clause |
| [decorator](https://github.com/micheles/decorator) | 4.1.2 | Better living through Python with decorators. / BSD 3-Clause |
| [distributed](http://distributed.readthedocs.io/en/latest/) | 1.21.8 | Distributed computing with Dask / BSD 3-Clause |
| [docutils](http://docutils.sourceforge.net/) | 0.14 | Docutils – Python Documentation Utilities / Public Domain Dedictation and BSD 2-Clause and PSF 2.1.1 and GPL 3.0 |
| [entrypoints](https://github.com/takluyver/entrypoints) | 0.2.3 | Discover and load entry points from installed packages. / MIT License |
| [enum34](https://bitbucket.org/stoneleaf/enum34) | 1.1.6 | Python 3.4 Enum backported to 3.3, 3.2, 3.1, 2.7, 2.6, 2.5, and 2.4 / BSD 3-Clause |
| [et\_xmlfile](https://bitbucket.org/openpyxl/et_xmlfile) | 1.0.1 | An implementation of lxml.xmlfile for the standard library / MIT |
| [expat](http://expat.sourceforge.net/) | 2.2.5 | Expat XML parser library in C. / MIT |
| [fastcache](https://github.com/pbrady/fastcache) | 1.0.2 | C implementation of Python 3 lru\_cache / MIT |
| [filelock](https://github.com/benediktschmitt/py-filelock) | 2.0.13 | A platform independent file lock. / Public Domain |
| [flask](http://flask.pocoo.org) | 0.12.2 | A microframework based on Werkzeug, Jinja2 and good intentions. / BSD 3-Clause |
| [flask-cors](https://github.com/corydolphin/flask-cors) | 3.0.4 | A Flask extension adding a decorator for CORS support / MIT |
| [fontconfig](http://www.freedesktop.org/wiki/Software/fontconfig/) | 2.12.6 | A library for configuring and customizing font access. / MIT |
| [freetype](https://www.freetype.org/) | 2.8 | A Free, High-Quality, and Portable Font Engine / GPL-2.0 and FreeType |
| [funcsigs](http://funcsigs.readthedocs.org) | 1.0.2 | Python function signatures from PEP362 for Python 2.6, 2.7 and 3.2+. / Apache 2.0 |
| [functools32](https://github.com/MiCHiLU/python-functools32) | 3.2.3.2 | Backport of the functools module from Python 3.2.3 for use on 2.7 and PyPy. / PSF license |
| [functools\_lru\_cache](https://github.com/jaraco/backports.functools_lru_cache) | 1.4 | Backport of functools.lru\_cache from Python 3.3 as published at ActiveState. / MIT |
| [futures](https://github.com/agronholm/pythonfutures) | 3.2.0 | Backport of the concurrent.futures package from Python 3.2 / PSF |
| [get\_terminal\_size](https://github.com/chrippa/backports.shutil_get_terminal_size) | 1.0.0 | Get the size of the terminal window. / MIT |
| [gevent](http://www.gevent.org/) | 1.3.0 | Coroutine-based network library / MIT |
| [glib](https://developer.gnome.org/glib/) | 2.56.1 | Provides core application building blocks for libraries and applications written in C. / LGPL-2.1 |
| [glob2](https://github.com/miracle2k/python-glob2) | 0.6 | Version of the glob module that supports recursion via \*\*, and can capture patterns. / BSD-2-Clause |
| [gmp](http://gmplib.org/) | 6.1.2 | The GNU multiprecision library. / GPL 2 and LGPL 3 |
| [gmpy2](https://pypi.python.org/pypi/gmpy2) | 2.0.8 | GMP/MPIR, MPFR, and MPC interface to Python 2.6+ and 3.x / LGPL 3 |
| [greenlet](https://github.com/python-greenlet/greenlet) | 0.4.12 | Lightweight in-process concurrent programming / MIT |
| [grin](http://pypi.python.org/pypi/grin) | 1.2.1 | Enhanced grep-like tool / BSD 3-Clause |
| [h5py](http://www.h5py.org/) | 2.7.1 | Read and write HDF5 files from Python. / BSD 3-Clause |
| [hdf5](http://www.hdfgroup.org/HDF5/) | 1.10.2 | HDF5 is a data model, library, and file format for storing and managing data / HDF5 |
| [heapdict](http://stutzbachenterprises.com/) | 1.0.0 | A heap with decrease-key and increase-key operations / BSD 3-Clause |
| [html5lib](https://github.com/html5lib/html5lib-python) | 1.0.1 | HTML parser based on the WHATWG HTML specification / MIT |
| [icu](http://site.icu-project.org/) | 58.2 | International Components for Unicode. / MIT |
| [idna](https://github.com/kjd/idna) | 2.6 | Internationalized Domain Names in Applications (IDNA). / BSD Like |
| [imageio](http://imageio.github.io) | 2.2.0 | a Python library for reading and writing image data / BSD 2-Clause |
| [imagesize](https://github.com/shibukawa/imagesize_py) | 0.7.1 | Getting image size from png/jpeg/jpeg2000/gif file / MIT |
| [ipaddress](https://github.com/phihag/ipaddress) | 1.0.22 | IPv4/IPv6 manipulation library / PSF 2 |
| [ipykernel](http://ipython.org) | 4.8.0 | IPython Kernel for Jupyter / BSD 3-clause |
| [ipython](http://ipython.org/) | 5.7.0 | IPython: Productive Interactive Computing / BSD 3-clause |
| [ipython\_genutils](http://ipython.org) | 0.2.0 | vestigial utilities from IPython / BSD 3-Clause |
| [ipywidgets](https://github.com/ipython/ipywidgets) | 7.2.0 | Jupyter Interactive Widgets / BSD 3-clause |
| [isort](https://github.com/timothycrosley/isort) | 4.2.15 | A Python utility / library to sort Python imports. / MIT |
| [itsdangerous](https://github.com/pallets/itsdangerous) | 0.24 | Various helpers to pass trusted data to untrusted environments. / BSD 3-Clause |
| [jbig](https://www.cl.cam.ac.uk/~mgk25/jbigkit) | 2.1 | Implementation of the JBIG1 data compression standard / GPL-2.0 |
| [jdcal](https://github.com/phn/jdcal) | 1.4 | Julian dates from proleptic Gregorian and Julian calendars. / BSD 2-Clause |
| [jedi](https://github.com/davidhalter/jedi/) | 0.11.0 | An autocompletion tool for Python that can be used for text editors. / MIT |
| [jinja2](http://jinja.pocoo.org) | 2.10 | An easy to use stand-alone template engine written in pure python. / 3-Clause BSD |
| [jpeg](http://www.ijg.org/) | 9b | read/write jpeg COM, EXIF, IPTC medata / Custom free software license |
| [jsonschema](https://github.com/Julian/jsonschema) | 2.6.0 | An implementation of JSON Schema validation for Python / MIT |
| [jupyter](http://jupyter.org) | 1.0.0 | Jupyter metapackage. Install all the Jupyter components in one go. / BSD 3-Clause |
| [jupyter\_client](http://jupyter.org) | 5.2.3 | Jupyter protocol implementation and client libraries / BSD 3-clause |
| [jupyter\_console](http://jupyter.org) | 5.2.0 | Jupyter terminal console / BSD 3-Clause |
| [jupyter\_core](http://jupyter.org) | 4.4.0 | Core common functionality of Jupyter projects. / BSD 3-clause |
| [jupyterlab](https://github.com/jupyterlab/jupyterlab) | 0.32.1 | An extensible environment for interactive and reproducible computing, based on the Jupyter Notebook and Architecture. Currently in beta. / BSD 3-Clause |
| [jupyterlab\_launcher](http://github.com/jupyterlab/jupyterlab_launcher) | 0.10.2 | A Launcher for JupyterLab based applications. / BSD 3-Clause |
| [kiwisolver](https://github.com/nucleic/kiwi) | 1.0.1 | A fast implementation of the Cassowary constraint solver / BSD 3-Clause |
| [lazy-object-proxy](https://github.com/ionelmc/python-lazy-object-proxy) | 1.3.1 | A fast and thorough lazy object proxy. / BSD 2-Clause |
| [libedit](http://thrysoee.dk/editline/) | 3.1.20170329 | Editline Library (libedit) / NetBSD |
| [libffi](https://sourceware.org/libffi/) | 3.2.1 | A Portable Foreign Function Interface Library. / Custom |
| [libgcc-ng](https://gcc.gnu.org/onlinedocs/gccint/Libgcc.html) | 7.2.0 | The GCC low-level runtime library / GPL |
| [libgfortran](http://gcc.gnu.org/) | 3.0.0 | Fortran libraries from the GNU Compiler Collection / GPL 3 (with GCC Runtime Library Exception 3.1) |
| [libgfortran-ng](https://gcc.gnu.org/) | 7.2.0 | The GNU Fortran Runtime Library / GPL |
| [libiconv](https://www.gnu.org/software/libiconv/) | 1.14 | Provides iconv for systems which don’t have one (or that cannot convert from/to Unicode.) / GPL and LGPL |
| [libopenblas](http://www.openblas.net/) | 0.2.20 | An Optimized BLAS library / BSD |
| [libpng](http://www.libpng.org/pub/png/libpng.html) | 1.6.32 | PNG reference library. / zlib/libpng |
| [libsodium](http://libsodium.org) | 1.0.16 | A modern and easy-to-use crypto library. / ISC |
| [libssh2](https://www.libssh2.org/) | 1.8.0 | the SSH library / BSD 3-Clause |
| [libstdcxx-ng](https://gcc.gnu.org/) | 7.2.0 | The GNU C++ Runtime Library / GPL3 with runtime exception |
| [libtiff](http://www.libtiff.org/) | 4.0.9 | Support for the Tag Image File Format (TIFF). / HPND |
| [libxcb](http://xcb.freedesktop.org/) | 1.13 | This is the C-language Binding (XCB) package to the X Window System protocol / MIT |
| [libxml2](http://xmlsoft.org/) | 2.9.8 | The XML C parser and toolkit of Gnome / MIT |
| [libxslt](http://xmlsoft.org/XSLT/) | 1.1.32 | The XSLT C library developed for the GNOME project / MIT |
| [locket](https://github.com/mwilliamson/locket.py) | 0.2.0 | File-based locks for Python for Linux and Windows / BSD 2-Clause |
| [lxml](http://lxml.de/) | 4.2.1 | Pythonic binding for the C libraries libxml2 and libxslt. / BSD 3-Clause, GPL-2.0, ZPL-2.0, and ElementTree |
| [lzo](http://www.oberhumer.com/opensource/lzo/) | 2.10 | LZO is a portable lossless data compression library written in ANSI C. / GPL v2+ |
| [markupsafe](https://www.palletsprojects.com/p/markupsafe/) | 1.0 | A Python module that implements the jinja2.Markup string / BSD 3-Clause |
| [matplotlib](http://matplotlib.org/) | 2.2.2 | Publication quality figures in Python / PSF-based |
| [mccabe](https://github.com/PyCQA/mccabe) | 0.6.1 | McCabe complexity checker for Python / MIT |
| [mistune](https://github.com/lepture/mistune) | 0.8.3 | The fastest markdown parser in pure Python. / BSD 3-Clause |
| [more-itertools](https://github.com/erikrose/more-itertools) | 4.1.0 | More routines for operating on iterables, beyond itertools / MIT |
| [mpc](http://www.multiprecision.org/) | 1.0.3 | A C library for the arithmetic of complex numbers with arbitrarily high precision. / LGPL 3 |
| [mpfr](http://www.mpfr.org/) | 3.1.5 | The MPFR library is a C library for multiple-precision floating-point computations with correct rounding. / LGPL 3 |
| [mpmath](http://mpmath.org) | 1.0.0 | Python library for arbitrary-precision floating-point arithmetic / BSD 3-Clause |
| [msgpack-python](http://msgpack.org/) | 0.5.6 | MessagePack (de)serializer. / Apache 2.0 |
| [multipledispatch](https://github.com/mrocklin/multipledispatch/) | 0.5.0 | Multiple dispatch in Python / BSD 3-Clause |
| [nbconvert](http://jupyter.org) | 5.3.1 | Converting Jupyter Notebooks / BSD 3-Clause |
| [nbformat](http://jupyter.org) | 4.4.0 | The reference implementation of the Jupyter Notebook format / BSD 3-clause |
| [ncurses](http://www.gnu.org/software/ncurses/) | 6.1 | Library for text-based user interfaces / Free software (MIT-like) |
| [networkx](https://networkx.github.io/) | 2.1 | Python package for creating and manipulating complex networks / BSD 3-Clause |
| [nltk](http://nltk.org/) | 3.3.0 | Build Python programs to work with human language data / Apache 2.0 |
| [nose](http://readthedocs.org/docs/nose/) | 1.3.7 | Nose extends unittest to make testing easier / LGPL-2.1 |
| [notebook](http://jupyter.org) | 5.5.0 | A web-based notebook environment for interactive computing / BSD 3-clause |
| [numexpr](https://github.com/pydata/numexpr) | 2.6.5 | Fast numerical expression evaluator for NumPy. / MIT |
| [numpy](http://numpy.scipy.org/) | 1.13.3 | Array processing for numbers, strings, records, and objects. / BSD 3-Clause |
| [numpydoc](https://github.com/numpy/numpydoc) | 0.8.0 | Sphinx extension to support docstrings in Numpy format / BSD 3-Clause |
| [odo](http://odo.pydata.org) | 0.5.1 | Data migration in Python / BSD-3-Clause |
| [olefile](http://www.decalage.info/python/olefileio) | 0.45.1 | parse, read and write Microsoft OLE2 files / BSD License 2-Clause |
| [openblas](http://www.openblas.net/) | 0.2.20 | An Optimized BLAS library / BSD |
| openblas-devel | 0.2.20 | |
| [openpyxl](https://openpyxl.readthedocs.io) | 2.5.3 | A Python library to read/write Excel 2010 xlsx/xlsm files / MIT |
| [openssl](http://www.openssl.org/) | 1.0.2o | OpenSSL is an open-source implementation of the SSL and TLS protocols / OpenSSL |
| [packaging](https://github.com/pypa/packaging) | 17.1 | Core utilities for Python packages / Apache 2.0 or BSD 2-Clause |
| [pandas](http://pandas.pydata.org) | 0.23.0 | High-performance, easy-to-use data structures and data analysis tools. / BSD 3-clause |
| [pandoc](http://johnmacfarlane.net/pandoc/) | 2.0.0.1 | Universal markup converter (repackaged binaries). / GPL-2.0 |
| [pandocfilters](https://github.com/jgm/pandocfilters) | 1.4.2 | A python module for writing pandoc filters / BSD-3-Clause |
| [parso](https://github.com/davidhalter/parso) | 0.1.1 | A Python Parser / MIT |
| [partd](https://github.com/dask/partd) | 0.3.8 | Data structure for on-disk shuffle operations / BSD 3-Clause |
| [patchelf](http://nixos.org/patchelf.html) | 0.9 | A small utility to modify the dynamic linker and RPATH of ELF executables. / GPL 3 |
| [path.py](https://github.com/jaraco/path.py) | 11.0.1 | A module wrapper for os.path / MIT |
| [pathlib2](https://github.com/mcmtroffaes/pathlib2) | 2.3.2 | Fork of pathlib aiming to support the full stdlib Python API. / MIT |
| [patsy](https://github.com/pydata/patsy) | 0.4.1 | Describing statistical models in Python using symbolic formulas / BSD-2-Clause, PSF2 |
| [pcre](http://www.pcre.org/) | 8.42 | Regular expression pattern matching using the same syntax and semantics as Perl 5. / BSD 3-Clause |
| [pep8](http://pep8.readthedocs.org/) | 1.7.0 | Python style guide checker / MIT |
| [pexpect](http://pexpect.sourceforge.net/) | 4.3.0 | Pexpect makes Python a better tool for controlling other applications. / ISC |
| [pickleshare](https://github.com/vivainio/pickleshare) | 0.7.4 | Tiny ‘shelve’-like database with concurrency support / MIT |
| [pillow](https://pillow.readthedocs.io) | 5.0.0 | Pillow is the friendly PIL fork by Alex Clark and Contributors. / PIL |
| [pip](https://pip.pypa.io/en/stable/) | 10.0.1 | PyPA recommended tool for installing Python packages / MIT |
| [pixman](http://www.pixman.org/) | 0.34.0 | A low-level software library for pixel manipulation. / MIT |
| [pkginfo](https://code.launchpad.net/~tseaver/pkginfo/trunk) | 1.4.1 | Query metadatdata from sdists / bdists / installed packages. / MIT |
| [pluggy](https://github.com/pytest-dev/pluggy) | 0.6.0 | Plugin registration and hook calling for Python / MIT |
| [ply](http://www.dabeaz.com/ply/index.html) | 3.10 | Python Lex-Yacc / BSD 3-clause |
| [prompt\_toolkit](https://github.com/jonathanslenders/python-prompt-toolkit) | 1.0.15 | Library for building powerful interactive command lines in Python / BSD 3-clause |
| [psutil](https://github.com/giampaolo/psutil) | 5.4.1 | A cross-platform process and system utilities module for Python / BSD 3-Clause |
| [ptyprocess](https://github.com/pexpect/ptyprocess) | 0.5.2 | Run a subprocess in a pseudo terminal / ISC |
| [py](https://github.com/pytest-dev/py) | 1.5.3 | library with cross-python path, ini-parsing, io, code, log facilities / MIT |
| [pycairo](http://cairographics.org/pycairo/) | 1.13.3 | Python bindings for the Cairo graphics library. / LGPL 2.1, MPL 1.1 |
| [pycodestyle](https://pycodestyle.readthedocs.io/) | 2.4.0 | Python style guide checker / MIT |
| [pycosat](https://github.com/ContinuumIO/pycosat) | 0.6.3 | Bindings to picosat (a SAT solver) / MIT |
| [pycparser](https://github.com/eliben/pycparser) | 2.18 | Complete C99 parser in pure Python / BSD 3-clause |
| [pycrypto](http://www.pycrypto.org/) | 2.6.1 | Cryptographic modules for Python. / Public Domain |
| [pycurl](http://pycurl.sourceforge.net/) | 7.43.0 | A Python Interface To The cURL library / LGPL, MIT |
| [pyflakes](https://github.com/PyCQA/pyflakes) | 1.6.0 | Pyflakes analyzes programs and detects various errors. / MIT |
| [pygments](http://pygments.org/) | 2.2.0 | Generic syntax highlighting package / BSD 2-clause |
| [pylint](http://www.pylint.org/) | 1.8.4 | python code static checker / GPL |
| [pyodbc](https://github.com/mkleehammer/pyodbc) | 4.0.23 | DB API Module for ODBC / MIT |
| [pyopenssl](https://github.com/pyca/pyopenssl) | 18.0.0 | Python wrapper module around the OpenSSL library / Apache 2.0 |
| [pyparsing](http://pyparsing.wikispaces.com/) | 2.2.0 | Create and execute simple grammars / MIT |
| [pysocks](https://github.com/Anorov/PySocks) | 1.6.7 | A Python SOCKS client module. See [Anorov/PySocks](https://github.com/Anorov/PySocks) for more information. / BSD 3-Clause |
| [pytables](http://www.pytables.org) | 3.4.3 | Brings together Python, HDF5 and NumPy to easily handle large amounts of data. / BSD 3-Clause |
| [pytest](https://docs.pytest.org/en/latest/) | 3.5.1 | Simple and powerful testing with Python. / MIT |
| [python](http://www.python.org/) | 2.7.15 | General purpose programming language / PSF |
| [python-dateutil](https://dateutil.readthedocs.org/) | 2.7.3 | Extensions to the standard Python datetime module. / BSD 3 Clause |
| [pytz](http://pythonhosted.org/pytz/) | 2017.3 | World timezone definitions, modern and historical. / MIT |
| [pywavelets](https://github.com/PyWavelets/pywt) | 0.5.2 | Discrete Wavelet Transforms in Python. / MIT |
| [pyyaml](http://pyyaml.org/wiki/PyYAML) | 3.12 | YAML parser and emitter for Python / MIT |
| [pyzmq](https://github.com/zeromq/pyzmq) | 17.0.0 | Python bindings for zeromq / BSD 3-clause |
| [readline](https://cnswww.cns.cwru.edu/php/chet/readline/rltop.html) | 7.0 | library for editing command lines as they are typed in / GPL3 |
| [requests](http://python-requests.org) | 2.18.4 | Python HTTP for Humans. / Apache 2.0 |
| [ruamel\_yaml](https://bitbucket.org/ruamel/yaml) | 0.15.35 | A patched copy of ruamel.yaml. / MIT |
| [scandir](https://github.com/benhoyt/scandir) | 1.6 | scandir, a better directory iterator and faster os.walk() / BSD 3-Clause |
| [scikit-image](http://scikit-image.org/) | 0.13.1 | Image processing routines for SciPy. / BSD 3-Clause |
| [scikit-learn](http://scikit-learn.org/) | 0.19.1 | A set of python modules for machine learning and data mining / BSD 3-Clause |
| [scipy](http://www.scipy.org/) | 1.1.0 | Scientific Library for Python / BSD 3-Clause |
| [seaborn](http://stanford.edu/~mwaskom/software/seaborn/) | 0.8.1 | Statistical data visualization / BSD 3-Clause |
| [send2trash](https://github.com/hsoft/send2trash) | 1.4.2 | Python library to natively send files to Trash (or Recycle bin) on all platforms. / BSD-3-Clause |
| [setuptools](https://github.com/pypa/setuptools) | 39.1.0 | Download, build, install, upgrade, and uninstall Python packages / MIT |
| [simplegeneric](http://cheeseshop.python.org/pypi/simplegeneric) | 0.8.1 | Simple generic functions (similar to Python’s own len(), pickle.dump(), etc.) / Zope Public |
| [singledispatch](http://docs.python.org/3/library/functools.html#functools.singledispatch) | 3.4.0.3 | Transforms a function into a single-dispatch generic function / MIT |
| [six](http://pypi.python.org/pypi/six/) | 1.11.0 | Python 2 and 3 compatibility utilities / MIT |
| [snappy](https://github.com/google/snappy) | 1.1.7 | A fast compressor/decompressor / BSD 3-clause |
| [snowballstemmer](https://github.com/shibukawa/snowball_py) | 1.2.1 | Snowball stemming library collection for Python / BSD-2-Clause |
| [sortedcollections](http://www.grantjenks.com/docs/sortedcollections/) | 0.6.1 | Python Sorted Collections / Apache-2.0 |
| [sortedcontainers](http://www.grantjenks.com/docs/sortedcontainers/) | 1.5.10 | Python Sorted Container Types: SortedList, SortedDict, and SortedSet / Apache 2.0 |
| [sphinx](http://www.sphinx-doc.org) | 1.7.4 | Sphinx is a tool that makes it easy to create intelligent and beautiful documentation / BSD 2-clause |
| sphinxcontrib | 1.0 | Python namespace for sphinxcontrib / BSD |
| [sphinxcontrib-websupport](https://pypi.python.org/pypi/sphinxcontrib-websupport) | 1.0.1 | Sphinx API for Web Apps / BSD-2-Clause |
| [sqlalchemy](http://www.sqlalchemy.org/) | 1.2.7 | Database Abstraction Library. / MIT |
| [sqlite](http://www.sqlite.org/) | 3.23.1 | Implements a self-contained, zero-configuration, SQL database engine. / Public-Domain (`<http://www.sqlite.org/copyright.html>`) |
| [ssl\_match\_hostname](http://bitbucket.org/brandon/backports.ssl_match_hostname) | 3.5.0.1 | The ssl.match\_hostname() function from Python 3.5 / PSF 2 |
| [statsmodels](https://www.statsmodels.org) | 0.9.0 | Statistical computations and models for use with SciPy / BSD 3-Clause |
| [subprocess32](https://github.com/google/python-subprocess32) | 3.5.0 | A backport of the subprocess module from Python 3.2/3.3 for use on 2.x. / PSF 2 |
| [sympy](http://sympy.org) | 1.1.1 | Python library for symbolic mathematics / 3-clause BSD |
| [tblib](https://github.com/ionelmc/python-tblib) | 1.3.2 | Traceback serialization library. / BSD 2-Clause |
| [terminado](http://github.com/mitsuhiko/markupsafe) | 0.8.1 | Terminals served by tornado websockets / BSD 3-clause |
| [testpath](https://testpath.readthedocs.io) | 0.3.1 | Testpath is a collection of utilities for Python code working with files and commands. / MIT |
| [tk](http://www.tcl.tk/) | 8.6.7 | A dynamic programming language with GUI support. Bundles Tcl and Tk. / Tcl/Tk |
| [toolz](http://toolz.readthedocs.org/) | 0.8.2 | A functional standard library for Python. / BSD 3-Clause |
| [tornado](http://www.tornadoweb.org/) | 5.0.2 | A Python web framework and asynchronous networking library, originally developed at FriendFeed. / Apache 2.0 |
| [traitlets](http://ipython.org/) | 4.3.2 | Configuration system for Python applications / BSD 3-clause |
| [typing](https://docs.python.org/3.5/library/typing.html) | 3.6.2 | Type Hints for Python - backport for `Python<3.5` / PSF |
| [unicodecsv](https://github.com/jdunck/python-unicodecsv) | 0.14.1 | Drop-in replacement for csv module which supports unicode strings / BSD |
| [unixodbc](http://www.unixodbc.org/) | 2.3.6 | ODBC on non MS Windows platforms / LGPL-2.1 |
| [urllib3](https://urllib3.readthedocs.io/) | 1.22 | HTTP library with thread-safe connection pooling, file post, and more. / MIT |
| [wcwidth](https://github.com/jquast/wcwidth) | 0.1.7 | Measures number of Terminal column cells of wide-character codes. / MIT |
| [webencodings](https://github.com/gsnedders/python-webencodings) | 0.5.1 | Character encoding aliases for legacy web content / BSD 3-Clause |
| [werkzeug](http://werkzeug.pocoo.org/) | 0.12.2 | The Python WSGI Utility Library. / BSD 3-Clause |
| [wheel](https://bitbucket.org/pypa/wheel/) | 0.31.1 | A built-package format for Python. / MIT |
| [widgetsnbextension](http://ipython.org) | 3.2.1 | IPython HTML widgets for Jupyter / BSD 3-clause |
| [wrapt](https://github.com/GrahamDumpleton/wrapt) | 1.10.11 | Module for decorators, wrappers and monkey patching. / BSD 2-Clause |
| [xlrd](http://www.python-excel.org/) | 1.1.0 | Library for developers to extract data from Microsoft Excel (tm) spreadsheet files / BSD 3-Clause and BSD with advertising |
| [xlsxwriter](https://xlsxwriter.readthedocs.io/) | 1.0.4 | A Python module for creating Excel XLSX files / BSD 2-Clause |
| [xlwt](http://www.python-excel.org/) | 1.3.0 | Writing data and formatting information to Excel files / BSD |
| [xz](http://tukaani.org/xz/) | 5.2.4 | Data compression software with high compression ratio / LGPL-2.1 and GPL-2.0 |
| [yaml](http://pyyaml.org/wiki/LibYAML) | 0.1.7 | A C library for parsing and emitting YAML. / MIT |
| [zeromq](http://zeromq.org) | 4.2.3 | A high-performance asynchronous messaging library. / LGPL 3 |
| [zict](http://github.com/mrocklin/zict) | 0.1.3 | Composable Dictionary Classes / BSD 3-Clause |
| [zlib](http://zlib.net/) | 1.2.11 | Massively spiffy yet delicately unobtrusive compression library / zlib |
| Name | Version | Summary / License |
|---|---|---|
| [\_ipyw\_jlab\_nb\_ext\_conf](https://github.com/ContinuumIO/anaconda-nb-extensions-meta-config) | 0.1.0 | A configuration metapackage for enabling Anaconda-bundled jupyter extensions / BSD |
| [alabaster](http://www.sphinx-doc.org/en/stable/index.html) | 0.7.10 | Configurable, Python 2+3 compatible Sphinx theme. / BSD 3-Clause |
| [anaconda-client](https://github.com/Anaconda-Platform/anaconda-client) | 1.6.14 | Anaconda Cloud command line client library / BSD 3-Clause |
| [anaconda-navigator](https://github.com/ContinuumIO/navigator) | 1.8.7 | Anaconda Navigator / proprietary - Continuum Analytics, Inc. |
| [anaconda-project](https://github.com/Anaconda-Platform/anaconda-project) | 0.8.2 | Tool for encapsulating, running, and reproducing data science projects / BSD 3-Clause |
| [asn1crypto](https://github.com/wbond/asn1crypto) | 0.24.0 | Python ASN.1 library with a focus on performance and a pythonic API / MIT |
| [astroid](https://www.astroid.org/) | 1.6.3 | A abstract syntax tree for Python with inference support. / LGPL 2.1 |
| [astropy](http://www.astropy.org/) | 2.0.6 | Community-developed Python Library for Astronomy / BSD |
| [attrs](https://attrs.readthedocs.io/en/stable/) | 18.1.0 | attrs is the Python package that will bring back the joy of writing classes by relieving you from the drudgery of implementing object protocols (aka dunder methods). / MIT |
| [babel](http://babel.pocoo.org/) | 2.5.3 | Utilities to internationalize and localize Python applications / BSD 3-clause |
| [backports](https://bitbucket.org/brandon/backports) | 1.0 | / BSD |
| [backports.functools\_lru\_cache](https://github.com/jaraco/backports.functools_lru_cache) | 1.5 | Backport of functools.lru\_cache from Python 3.3 as published at ActiveState. / MIT |
| [backports.shutil\_get\_terminal\_size](https://github.com/chrippa/backports.shutil_get_terminal_size) | 1.0.0 | A backport of the get\_terminal\_size function from Python 3.3’s shutil. / MIT |
| [backports\_abc](https://github.com/cython/backports_abc) | 0.5 | A backport of recent additions to the collections.abc module. / PSF 2 |
| [beautifulsoup4](http://www.crummy.com/software/BeautifulSoup/) | 4.6.0 | Python library designed for screen-scraping / MIT |
| [bitarray](https://github.com/ilanschnell/bitarray) | 0.8.1 | efficient arrays of booleans – C extension / PSF |
| [bkcharts](http://github.com/bokeh/bkcharts) | 0.2 | High level chart types built on top of Bokeh / BSD 3-Clause |
| blas | 1.0 | |
| [blaze](http://blaze.pydata.org) | 0.11.3 | NumPy and Pandas interface to big data / BSD 3-Clause |
| [bleach](https://github.com/mozilla/bleach) | 2.1.3 | Easy, whitelist-based HTML-sanitizing tool / Apache-2.0 |
| [blosc](https://github.com/Blosc/c-blosc) | 1.14.3 | A blocking, shuffling and loss-less compression library that can be faster than memcpy() / BSD 3-Clause |
| [bokeh](http://bokeh.pydata.org/) | 0.12.16 | Statistical and novel interactive HTML plots for Python / BSD 3-Clause |
| [boto](https://github.com/boto/boto/) | 2.48.0 | Amazon Web Services Library / MIT |
| [bottleneck](http://berkeleyanalytics.com/bottleneck) | 1.2.1 | Fast NumPy array functions written in Cython. / BSD 2-Clause |
| [bzip2](http://www.bzip.org/) | 1.0.6 | high-quality data compressor / bzip2 |
| [ca-certificates](https://github.com/conda-forge/ca-certificates-feedstock) | 2018.03.07 | Certificates for use with other packages. / ISC |
| [cairo](http://cairographics.org/) | 1.14.12 | Cairo is a 2D graphics library with support for multiple output devices. / LGPL 2.1 or MPL 1.1 |
| [cdecimal](http://www.bytereef.org/mpdecimal/index.html) | 2.3 | Fast drop-in replacement for decimal.py / BSD 2-Clause |
| [certifi](http://certifi.io/) | 2018.4.16 | Python package for providing Mozilla’s CA Bundle. / ISC |
| [cffi](https://bitbucket.org/cffi/cffi) | 1.11.5 | Foreign Function Interface for Python calling C code. / MIT |
| [chardet](https://github.com/chardet/chardet) | 3.0.4 | Universal character encoding detector / LGPL2 |
| [click](http://click.pocoo.org/) | 6.7 | A simple wrapper around optparse for powerful command line utilities. / BSD 3-Clause |
| [cloudpickle](https://github.com/cloudpipe/cloudpickle) | 0.5.3 | Extended pickling support for Python objects / BSD 3-Clause |
| [clyent](https://github.com/Anaconda-Platform/clyent) | 1.2.2 | Command line client library for windows and posix / BSD 3-Clause |
| [colorama](https://github.com/tartley/colorama) | 0.3.9 | Cross-platform colored terminal text. / BSD 3-Clause |
| [conda](https://conda.io) | 4.5.4 | OS-agnostic, system-level binary package and environment manager. / BSD 3-Clause |
| [conda-build](https://github.com/conda/conda-build) | 3.10.5 | tools for building conda packages / BSD 3-Clause |
| [conda-env](https://github.com/conda/conda-env) | 2.6.0 | Tools for interacting with conda environments. / BSD 3-Clause |
| [conda-verify](https://github.com/conda/conda-verify) | 2.0.0 | tool for validating conda recipes and conda packages / BSD 3-Clause |
| [configparser](http://docs.python.org/3/library/configparser.html) | 3.5.0 | This library brings the updated configparser from Python 3.5 to Python 2.6-3.5 / MIT |
| [contextlib2](http://contextlib2.readthedocs.org) | 0.5.5 | Backports and enhancements for the contextlib module / PSF |
| [cryptography](https://github.com/pyca/cryptography) | 2.2.2 | Provides cryptographic recipes and primitives to Python developers / Apache 2.0 or BSD 3-Clause, PSF 2 |
| [curl](http://curl.haxx.se/) | 7.60.0 | tool and library for transferring data with URL syntax / MIT/X derivate (`<http://curl.haxx.se/docs/copyright.html>`) |
| [cycler](http://matplotlib.org/cycler) | 0.10.0 | Composable style cycles. / BSD 3-Clause |
| [cython](http://www.cython.org/) | 0.28.2 | The Cython compiler for writing C extensions for the Python language / Apache-2.0 |
| [cytoolz](https://github.com/pytoolz/cytoolz) | 0.9.0.1 | Cython implementation of Toolz. High performance functional utilities. / BSD 3-Clause |
| [dask](http://github.com/dask/dask/) | 0.17.5 | Parallel Python with task scheduling / BSD 3-Clause |
| [dask-core](http://github.com/dask/dask/) | 0.17.5 | Parallel Python with task scheduling / BSD 3-Clause |
| [datashape](http://datashape.pydata.org) | 0.5.4 | A data description language. / BSD 2-Clause |
| [dbus](http://www.freedesktop.org/wiki/Software/dbus/) | 1.13.2 | Simple message bus system for applications to talk to one another / GPL2 |
| [decorator](https://github.com/micheles/decorator) | 4.3.0 | Better living through Python with decorators. / BSD 3-Clause |
| [distributed](http://distributed.readthedocs.io/en/latest/) | 1.21.8 | Distributed computing with Dask / BSD 3-Clause |
| [docutils](http://docutils.sourceforge.net/) | 0.14 | Docutils – Python Documentation Utilities / Public Domain Dedictation and BSD 2-Clause and PSF 2.1.1 and GPL 3.0 |
| [entrypoints](https://github.com/takluyver/entrypoints) | 0.2.3 | Discover and load entry points from installed packages. / MIT License |
| [enum34](https://bitbucket.org/stoneleaf/enum34) | 1.1.6 | Python 3.4 Enum backported to 3.3, 3.2, 3.1, 2.7, 2.6, 2.5, and 2.4 / BSD 3-Clause |
| [et\_xmlfile](https://bitbucket.org/openpyxl/et_xmlfile) | 1.0.1 | An implementation of lxml.xmlfile for the standard library / MIT |
| [expat](http://expat.sourceforge.net/) | 2.2.5 | Expat XML parser library in C. / MIT |
| [fastcache](https://github.com/pbrady/fastcache) | 1.0.2 | C implementation of Python 3 lru\_cache / MIT |
| [filelock](https://github.com/benediktschmitt/py-filelock) | 3.0.4 | A platform independent file lock. / Public Domain |
| [flask](http://flask.pocoo.org) | 1.0.2 | A microframework based on Werkzeug, Jinja2 and good intentions. / BSD 3-Clause |
| [flask-cors](https://github.com/corydolphin/flask-cors) | 3.0.4 | A Flask extension adding a decorator for CORS support / MIT |
| [fontconfig](http://www.freedesktop.org/wiki/Software/fontconfig/) | 2.12.6 | A library for configuring and customizing font access. / MIT |
| [freetype](https://www.freetype.org/) | 2.8 | A Free, High-Quality, and Portable Font Engine / GPL-2.0 and FreeType |
| [funcsigs](http://funcsigs.readthedocs.org) | 1.0.2 | Python function signatures from PEP362 for Python 2.6, 2.7 and 3.2+. / Apache 2.0 |
| [functools32](https://github.com/MiCHiLU/python-functools32) | 3.2.3.2 | Backport of the functools module from Python 3.2.3 for use on 2.7 and PyPy. / PSF license |
| [futures](https://github.com/agronholm/pythonfutures) | 3.2.0 | Backport of the concurrent.futures package from Python 3.2 / PSF |
| [get\_terminal\_size](https://github.com/chrippa/backports.shutil_get_terminal_size) | 1.0.0 | Get the size of the terminal window. / MIT |
| [gevent](http://www.gevent.org/) | 1.3.0 | Coroutine-based network library / MIT |
| [glib](https://developer.gnome.org/glib/) | 2.56.1 | Provides core application building blocks for libraries and applications written in C. / LGPL-2.1 |
| [glob2](https://github.com/miracle2k/python-glob2) | 0.6 | Version of the glob module that supports recursion via \*\*, and can capture patterns. / BSD-2-Clause |
| [gmp](http://gmplib.org/) | 6.1.2 | The GNU multiprecision library. / GPL 2 and LGPL 3 |
| [gmpy2](https://pypi.python.org/pypi/gmpy2) | 2.0.8 | GMP/MPIR, MPFR, and MPC interface to Python 2.6+ and 3.x / LGPL 3 |
| [graphite2](http://graphite.sil.org/) | 1.3.11 | A “smart font” system that handles the complexities of lesser-known languages of the world. / LGPLv2 |
| [greenlet](https://github.com/python-greenlet/greenlet) | 0.4.13 | Lightweight in-process concurrent programming / MIT |
| [grin](http://pypi.python.org/pypi/grin) | 1.2.1 | Enhanced grep-like tool / BSD 3-Clause |
| [gst-plugins-base](http://gstreamer.freedesktop.org/) | 1.14.0 | GStreamer Base Plug-ins / GPL2 |
| [gstreamer](http://gstreamer.freedesktop.org/) | 1.14.0 | Library for constructing graphs of media-handling components / LGPL 2 |
| [h5py](http://www.h5py.org/) | 2.7.1 | Read and write HDF5 files from Python. / BSD 3-Clause |
| [harfbuzz](http://www.freedesktop.org/wiki/Software/HarfBuzz/) | 1.7.6 | An OpenType text shaping engine. / MIT |
| [hdf5](http://www.hdfgroup.org/HDF5/) | 1.10.2 | HDF5 is a data model, library, and file format for storing and managing data / HDF5 |
| [heapdict](http://stutzbachenterprises.com/) | 1.0.0 | A heap with decrease-key and increase-key operations / BSD 3-Clause |
| [html5lib](https://github.com/html5lib/html5lib-python) | 1.0.1 | HTML parser based on the WHATWG HTML specification / MIT |
| [icu](http://site.icu-project.org/) | 58.2 | International Components for Unicode. / MIT |
| [idna](https://github.com/kjd/idna) | 2.6 | Internationalized Domain Names in Applications (IDNA). / BSD Like |
| [imageio](http://imageio.github.io) | 2.3.0 | a Python library for reading and writing image data / BSD 2-Clause |
| [imagesize](https://github.com/shibukawa/imagesize_py) | 1.0.0 | Getting image size from png/jpeg/jpeg2000/gif file / MIT |
| [intel-openmp](https://software.intel.com/en-us/node/522690) | 2018.0.0 | Math library for Intel and compatible processors / proprietary - Intel |
| [ipaddress](https://github.com/phihag/ipaddress) | 1.0.22 | IPv4/IPv6 manipulation library / PSF 2 |
| [ipykernel](http://ipython.org) | 4.8.2 | IPython Kernel for Jupyter / BSD 3-clause |
| [ipython](http://ipython.org/) | 5.7.0 | IPython: Productive Interactive Computing / BSD 3-clause |
| [ipython\_genutils](http://ipython.org) | 0.2.0 | vestigial utilities from IPython / BSD 3-Clause |
| [ipywidgets](https://github.com/ipython/ipywidgets) | 7.2.1 | Jupyter Interactive Widgets / BSD 3-clause |
| [isort](https://github.com/timothycrosley/isort) | 4.3.4 | A Python utility / library to sort Python imports. / MIT |
| [itsdangerous](https://github.com/pallets/itsdangerous) | 0.24 | Various helpers to pass trusted data to untrusted environments. / BSD 3-Clause |
| [jbig](https://www.cl.cam.ac.uk/~mgk25/jbigkit) | 2.1 | Implementation of the JBIG1 data compression standard / GPL-2.0 |
| [jdcal](https://github.com/phn/jdcal) | 1.4 | Julian dates from proleptic Gregorian and Julian calendars. / BSD 2-Clause |
| [jedi](https://github.com/davidhalter/jedi/) | 0.12.0 | An autocompletion tool for Python that can be used for text editors. / MIT |
| [jinja2](http://jinja.pocoo.org) | 2.10 | An easy to use stand-alone template engine written in pure python. / 3-Clause BSD |
| [jpeg](http://www.ijg.org/) | 9b | read/write jpeg COM, EXIF, IPTC medata / Custom free software license |
| [jsonschema](https://github.com/Julian/jsonschema) | 2.6.0 | An implementation of JSON Schema validation for Python / MIT |
| [jupyter](http://jupyter.org) | 1.0.0 | Jupyter metapackage. Install all the Jupyter components in one go. / BSD 3-Clause |
| [jupyter\_client](http://jupyter.org) | 5.2.3 | Jupyter protocol implementation and client libraries / BSD 3-clause |
| [jupyter\_console](http://jupyter.org) | 5.2.0 | Jupyter terminal console / BSD 3-Clause |
| [jupyter\_core](http://jupyter.org) | 4.4.0 | Core common functionality of Jupyter projects. / BSD 3-clause |
| [jupyterlab](https://github.com/jupyterlab/jupyterlab) | 0.32.1 | An extensible environment for interactive and reproducible computing, based on the Jupyter Notebook and Architecture. Currently in beta. / BSD 3-Clause |
| [jupyterlab\_launcher](http://github.com/jupyterlab/jupyterlab_launcher) | 0.10.5 | A Launcher for JupyterLab based applications. / BSD 3-Clause |
| [kiwisolver](https://github.com/nucleic/kiwi) | 1.0.1 | A fast implementation of the Cassowary constraint solver / BSD 3-Clause |
| [lazy-object-proxy](https://github.com/ionelmc/python-lazy-object-proxy) | 1.3.1 | A fast and thorough lazy object proxy. / BSD 2-Clause |
| [libcurl](http://curl.haxx.se/) | 7.60.0 | tool and library for transferring data with URL syntax / MIT/X derivate (`<http://curl.haxx.se/docs/copyright.html>`) |
| [libedit](http://thrysoee.dk/editline/) | 3.1.20170329 | Editline Library (libedit) / NetBSD |
| [libffi](https://sourceware.org/libffi/) | 3.2.1 | A Portable Foreign Function Interface Library. / Custom |
| [libgcc-ng](https://gcc.gnu.org/onlinedocs/gccint/Libgcc.html) | 7.2.0 | The GCC low-level runtime library / GPL |
| [libgfortran-ng](https://gcc.gnu.org/) | 7.2.0 | The GNU Fortran Runtime Library / GPL |
| [libpng](http://www.libpng.org/pub/png/libpng.html) | 1.6.34 | PNG reference library. / zlib/libpng |
| [libsodium](http://libsodium.org) | 1.0.16 | A modern and easy-to-use crypto library. / ISC |
| [libssh2](https://www.libssh2.org/) | 1.8.0 | the SSH library / BSD 3-Clause |
| [libstdcxx-ng](https://gcc.gnu.org/) | 7.2.0 | The GNU C++ Runtime Library / GPL3 with runtime exception |
| [libtiff](http://www.libtiff.org/) | 4.0.9 | Support for the Tag Image File Format (TIFF). / HPND |
| [libtool](http://www.gnu.org/software/libtool/) | 2.4.6 | The GNU Portable Library Tool / GPL 3 |
| [libxcb](http://xcb.freedesktop.org/) | 1.13 | This is the C-language Binding (XCB) package to the X Window System protocol / MIT |
| [libxml2](http://xmlsoft.org/) | 2.9.8 | The XML C parser and toolkit of Gnome / MIT |
| [libxslt](http://xmlsoft.org/XSLT/) | 1.1.32 | The XSLT C library developed for the GNOME project / MIT |
| [llvmlite](https://github.com/numba/llvmlite) | 0.23.1 | A lightweight LLVM python binding for writing JIT compilers / New BSD License |
| [locket](https://github.com/mwilliamson/locket.py) | 0.2.0 | File-based locks for Python for Linux and Windows / BSD 2-Clause |
| [lxml](http://lxml.de/) | 4.2.1 | Pythonic binding for the C libraries libxml2 and libxslt. / BSD 3-Clause, GPL-2.0, ZPL-2.0, and ElementTree |
| [lzo](http://www.oberhumer.com/opensource/lzo/) | 2.10 | LZO is a portable lossless data compression library written in ANSI C. / GPL v2+ |
| [markupsafe](https://www.palletsprojects.com/p/markupsafe/) | 1.0 | A Python module that implements the jinja2.Markup string / BSD 3-Clause |
| [matplotlib](http://matplotlib.org/) | 2.2.2 | Publication quality figures in Python / PSF-based |
| [mccabe](https://github.com/PyCQA/mccabe) | 0.6.1 | McCabe complexity checker for Python / MIT |
| [mistune](https://github.com/lepture/mistune) | 0.8.3 | The fastest markdown parser in pure Python. / BSD 3-Clause |
| [mkl](https://software.intel.com/en-us/mkl) | 2018.0.2 | Math library for Intel and compatible processors / proprietary - Intel |
| [mkl-service](https://github.com/ContinuumIO/mkl-service) | 1.1.2 | Python bindings to MKL service functions / 3-clause BSD |
| [mkl\_fft](http://github.com/IntelPython/mkl_fft) | 1.0.1 | NumPy-based implementation of Fast Fourier Transform using Intel (R) Math Kernel Library / BSD |
| [mkl\_random](http://github.com/IntelPython/mkl_random) | 1.0.1 | Intel (R) MKL-powered package for sampling from common probability distributions into NumPy arrays. / BSD 3-Clause |
| [more-itertools](https://github.com/erikrose/more-itertools) | 4.1.0 | More routines for operating on iterables, beyond itertools / MIT |
| [mpc](http://www.multiprecision.org/) | 1.0.3 | A C library for the arithmetic of complex numbers with arbitrarily high precision. / LGPL 3 |
| [mpfr](http://www.mpfr.org/) | 3.1.5 | The MPFR library is a C library for multiple-precision floating-point computations with correct rounding. / LGPL 3 |
| [mpmath](http://mpmath.org) | 1.0.0 | Python library for arbitrary-precision floating-point arithmetic / BSD 3-Clause |
| [msgpack-python](http://msgpack.org/) | 0.5.6 | MessagePack (de)serializer. / Apache 2.0 |
| [multipledispatch](https://github.com/mrocklin/multipledispatch/) | 0.5.0 | Multiple dispatch in Python / BSD 3-Clause |
| [navigator-updater](https://github.com/ContinuumIO/navigator-updater) | 0.2.1 | Anaconda Navigator Updater / proprietary - Continuum Analytics, Inc. |
| [nbconvert](http://jupyter.org) | 5.3.1 | Converting Jupyter Notebooks / BSD 3-Clause |
| [nbformat](http://jupyter.org) | 4.4.0 | The reference implementation of the Jupyter Notebook format / BSD 3-clause |
| [ncurses](http://www.gnu.org/software/ncurses/) | 6.1 | Library for text-based user interfaces / Free software (MIT-like) |
| [networkx](https://networkx.github.io/) | 2.1 | Python package for creating and manipulating complex networks / BSD 3-Clause |
| [nltk](http://nltk.org/) | 3.3.0 | Build Python programs to work with human language data / Apache 2.0 |
| [nose](http://readthedocs.org/docs/nose/) | 1.3.7 | Nose extends unittest to make testing easier / LGPL-2.1 |
| [notebook](http://jupyter.org) | 5.5.0 | A web-based notebook environment for interactive computing / BSD 3-clause |
| [numba](http://numba.github.com) | 0.38.0 | NumPy aware dynamic Python compiler using LLVM / BSD 2-clause |
| [numexpr](https://github.com/pydata/numexpr) | 2.6.5 | Fast numerical expression evaluator for NumPy. / MIT |
| [numpy](http://numpy.scipy.org/) | 1.14.3 | Array processing for numbers, strings, records, and objects. / BSD 3-Clause |
| numpy-base | 1.14.3 | |
| [numpydoc](https://github.com/numpy/numpydoc) | 0.8.0 | Sphinx extension to support docstrings in Numpy format / BSD 3-Clause |
| [odo](http://odo.pydata.org) | 0.5.1 | Data migration in Python / BSD-3-Clause |
| [olefile](http://www.decalage.info/python/olefileio) | 0.45.1 | parse, read and write Microsoft OLE2 files / BSD License 2-Clause |
| [openpyxl](https://openpyxl.readthedocs.io) | 2.5.3 | A Python library to read/write Excel 2010 xlsx/xlsm files / MIT |
| [openssl](http://www.openssl.org/) | 1.0.2o | OpenSSL is an open-source implementation of the SSL and TLS protocols / OpenSSL |
| [packaging](https://github.com/pypa/packaging) | 17.1 | Core utilities for Python packages / Apache 2.0 or BSD 2-Clause |
| [pandas](http://pandas.pydata.org) | 0.23.0 | High-performance, easy-to-use data structures and data analysis tools. / BSD 3-clause |
| [pandoc](http://johnmacfarlane.net/pandoc/) | 1.19.2.1 | Universal markup converter (repackaged binaries). / GPL-2.0 |
| [pandocfilters](https://github.com/jgm/pandocfilters) | 1.4.2 | A python module for writing pandoc filters / BSD-3-Clause |
| [pango](http://www.pango.org/) | 1.41.0 | Text layout and rendering engine. / LGPL-2.1 |
| [parso](https://github.com/davidhalter/parso) | 0.2.0 | A Python Parser / MIT |
| [partd](https://github.com/dask/partd) | 0.3.8 | Data structure for on-disk shuffle operations / BSD 3-Clause |
| [patchelf](http://nixos.org/patchelf.html) | 0.9 | A small utility to modify the dynamic linker and RPATH of ELF executables. / GPL 3 |
| [path.py](https://github.com/jaraco/path.py) | 11.0.1 | A module wrapper for os.path / MIT |
| [pathlib2](https://github.com/mcmtroffaes/pathlib2) | 2.3.2 | Fork of pathlib aiming to support the full stdlib Python API. / MIT |
| [patsy](https://github.com/pydata/patsy) | 0.5.0 | Describing statistical models in Python using symbolic formulas / BSD-2-Clause, PSF2 |
| [pcre](http://www.pcre.org/) | 8.42 | Regular expression pattern matching using the same syntax and semantics as Perl 5. / BSD 3-Clause |
| [pep8](http://pep8.readthedocs.org/) | 1.7.1 | Python style guide checker / MIT |
| [pexpect](http://pexpect.sourceforge.net/) | 4.5.0 | Pexpect makes Python a better tool for controlling other applications. / ISC |
| [pickleshare](https://github.com/vivainio/pickleshare) | 0.7.4 | Tiny ‘shelve’-like database with concurrency support / MIT |
| [pillow](https://pillow.readthedocs.io) | 5.1.0 | Pillow is the friendly PIL fork by Alex Clark and Contributors. / PIL |
| [pip](https://pip.pypa.io/en/stable/) | 10.0.1 | PyPA recommended tool for installing Python packages / MIT |
| [pixman](http://www.pixman.org/) | 0.34.0 | A low-level software library for pixel manipulation. / MIT |
| [pkginfo](https://code.launchpad.net/~tseaver/pkginfo/trunk) | 1.4.2 | Query metadatdata from sdists / bdists / installed packages. / MIT |
| [pluggy](https://github.com/pytest-dev/pluggy) | 0.6.0 | Plugin registration and hook calling for Python / MIT |
| [ply](http://www.dabeaz.com/ply/index.html) | 3.11 | Python Lex-Yacc / BSD 3-clause |
| [prompt\_toolkit](https://github.com/jonathanslenders/python-prompt-toolkit) | 1.0.15 | Library for building powerful interactive command lines in Python / BSD 3-clause |
| [psutil](https://github.com/giampaolo/psutil) | 5.4.5 | A cross-platform process and system utilities module for Python / BSD 3-Clause |
| [ptyprocess](https://github.com/pexpect/ptyprocess) | 0.5.2 | Run a subprocess in a pseudo terminal / ISC |
| [py](https://github.com/pytest-dev/py) | 1.5.3 | library with cross-python path, ini-parsing, io, code, log facilities / MIT |
| [pycairo](http://cairographics.org/pycairo/) | 1.15.4 | Python bindings for the Cairo graphics library. / LGPL 2.1, MPL 1.1 |
| [pycodestyle](https://pycodestyle.readthedocs.io/) | 2.4.0 | Python style guide checker / MIT |
| [pycosat](https://github.com/ContinuumIO/pycosat) | 0.6.3 | Bindings to picosat (a SAT solver) / MIT |
| [pycparser](https://github.com/eliben/pycparser) | 2.18 | Complete C99 parser in pure Python / BSD 3-clause |
| [pycrypto](http://www.pycrypto.org/) | 2.6.1 | Cryptographic modules for Python. / Public Domain |
| [pycurl](http://pycurl.sourceforge.net/) | 7.43.0.1 | A Python Interface To The cURL library / LGPL, MIT |
| [pyflakes](https://github.com/PyCQA/pyflakes) | 1.6.0 | Pyflakes analyzes programs and detects various errors. / MIT |
| [pygments](http://pygments.org/) | 2.2.0 | Generic syntax highlighting package / BSD 2-clause |
| [pylint](http://www.pylint.org/) | 1.8.4 | python code static checker / GPL |
| [pyodbc](https://github.com/mkleehammer/pyodbc) | 4.0.23 | DB API Module for ODBC / MIT |
| [pyopenssl](https://github.com/pyca/pyopenssl) | 18.0.0 | Python wrapper module around the OpenSSL library / Apache 2.0 |
| [pyparsing](http://pyparsing.wikispaces.com/) | 2.2.0 | Create and execute simple grammars / MIT |
| [pyqt](http://www.riverbankcomputing.co.uk/software/pyqt) | 5.9.2 | Python binding of the cross-platform GUI toolkit Qt. / Commercial, GPL-2.0, GPL-3.0 |
| [pysocks](https://github.com/Anorov/PySocks) | 1.6.8 | A Python SOCKS client module. See [Anorov/PySocks](https://github.com/Anorov/PySocks) for more information. / BSD 3-Clause |
| [pytables](http://www.pytables.org) | 3.4.3 | Brings together Python, HDF5 and NumPy to easily handle large amounts of data. / BSD 3-Clause |
| [pytest](https://docs.pytest.org/en/latest/) | 3.5.1 | Simple and powerful testing with Python. / MIT |
| [python](http://www.python.org/) | 2.7.15 | General purpose programming language / PSF |
| [python-dateutil](https://dateutil.readthedocs.org/) | 2.7.3 | Extensions to the standard Python datetime module. / BSD 3 Clause |
| [pytz](http://pythonhosted.org/pytz/) | 2018.4 | World timezone definitions, modern and historical. / MIT |
| [pywavelets](https://github.com/PyWavelets/pywt) | 0.5.2 | Discrete Wavelet Transforms in Python. / MIT |
| [pyyaml](http://pyyaml.org/wiki/PyYAML) | 3.12 | YAML parser and emitter for Python / MIT |
| [pyzmq](https://github.com/zeromq/pyzmq) | 17.0.0 | Python bindings for zeromq / BSD 3-clause |
| [qt](http://qt-project.org) | 5.9.5 | Qt is a cross-platform application and UI framework. / LGPL-3.0 |
| [qtawesome](https://github.com/spyder-ide/qtawesome) | 0.4.4 | Iconic fonts in PyQt and PySide applications / MIT |
| [qtconsole](http://jupyter.org) | 4.3.1 | Jupyter Qt console / BSD 3-Clause |
| [qtpy](https://github.com/spyder-ide/qtpy) | 1.4.1 | Abstraction layer for PyQt5/PyQt4/PySide / MIT |
| [readline](https://cnswww.cns.cwru.edu/php/chet/readline/rltop.html) | 7.0 | library for editing command lines as they are typed in / GPL3 |
| [requests](http://python-requests.org) | 2.18.4 | Python HTTP for Humans. / Apache 2.0 |
| [rope](https://github.com/python-rope/rope) | 0.10.7 | A python refactoring library… / GPL 2.0 |
| [ruamel\_yaml](https://bitbucket.org/ruamel/yaml) | 0.15.35 | A patched copy of ruamel.yaml. / MIT |
| [scandir](https://github.com/benhoyt/scandir) | 1.7 | scandir, a better directory iterator and faster os.walk() / BSD 3-Clause |
| [scikit-image](http://scikit-image.org/) | 0.13.1 | Image processing routines for SciPy. / BSD 3-Clause |
| [scikit-learn](http://scikit-learn.org/) | 0.19.1 | A set of python modules for machine learning and data mining / BSD 3-Clause |
| [scipy](http://www.scipy.org/) | 1.1.0 | Scientific Library for Python / BSD 3-Clause |
| [seaborn](http://stanford.edu/~mwaskom/software/seaborn/) | 0.8.1 | Statistical data visualization / BSD 3-Clause |
| [send2trash](https://github.com/hsoft/send2trash) | 1.5.0 | Python library to natively send files to Trash (or Recycle bin) on all platforms. / BSD-3-Clause |
| [setuptools](https://github.com/pypa/setuptools) | 39.1.0 | Download, build, install, upgrade, and uninstall Python packages / MIT |
| [simplegeneric](http://cheeseshop.python.org/pypi/simplegeneric) | 0.8.1 | Simple generic functions (similar to Python’s own len(), pickle.dump(), etc.) / Zope Public |
| [singledispatch](http://docs.python.org/3/library/functools.html#functools.singledispatch) | 3.4.0.3 | Transforms a function into a single-dispatch generic function / MIT |
| [sip](http://www.riverbankcomputing.com/software/sip/intro) | 4.19.8 | Create Python bindings for C and C++ libraries / GPL-3.0 |
| [six](http://pypi.python.org/pypi/six/) | 1.11.0 | Python 2 and 3 compatibility utilities / MIT |
| [snappy](https://github.com/google/snappy) | 1.1.7 | A fast compressor/decompressor / BSD 3-clause |
| [snowballstemmer](https://github.com/shibukawa/snowball_py) | 1.2.1 | Snowball stemming library collection for Python / BSD-2-Clause |
| [sortedcollections](http://www.grantjenks.com/docs/sortedcollections/) | 0.6.1 | Python Sorted Collections / Apache-2.0 |
| [sortedcontainers](http://www.grantjenks.com/docs/sortedcontainers/) | 1.5.10 | Python Sorted Container Types: SortedList, SortedDict, and SortedSet / Apache 2.0 |
| [sphinx](http://www.sphinx-doc.org) | 1.7.4 | Sphinx is a tool that makes it easy to create intelligent and beautiful documentation / BSD 2-clause |
| sphinxcontrib | 1.0 | Python namespace for sphinxcontrib / BSD |
| [sphinxcontrib-websupport](https://pypi.python.org/pypi/sphinxcontrib-websupport) | 1.0.1 | Sphinx API for Web Apps / BSD-2-Clause |
| [spyder](https://github.com/spyder-ide/spyder) | 3.2.8 | Scientific PYthon Development EnviRonment / MIT |
| [sqlalchemy](http://www.sqlalchemy.org/) | 1.2.7 | Database Abstraction Library. / MIT |
| [sqlite](http://www.sqlite.org/) | 3.23.1 | Implements a self-contained, zero-configuration, SQL database engine. / Public-Domain (`<http://www.sqlite.org/copyright.html>`) |
| [ssl\_match\_hostname](http://bitbucket.org/brandon/backports.ssl_match_hostname) | 3.5.0.1 | The ssl.match\_hostname() function from Python 3.5 / PSF 2 |
| [statsmodels](https://www.statsmodels.org) | 0.9.0 | Statistical computations and models for use with SciPy / BSD 3-Clause |
| [subprocess32](https://github.com/google/python-subprocess32) | 3.5.0 | A backport of the subprocess module from Python 3.2/3.3 for use on 2.x. / PSF 2 |
| [sympy](http://sympy.org) | 1.1.1 | Python library for symbolic mathematics / 3-clause BSD |
| [tblib](https://github.com/ionelmc/python-tblib) | 1.3.2 | Traceback serialization library. / BSD 2-Clause |
| [terminado](http://github.com/mitsuhiko/markupsafe) | 0.8.1 | Terminals served by tornado websockets / BSD 3-clause |
| [testpath](https://testpath.readthedocs.io) | 0.3.1 | Testpath is a collection of utilities for Python code working with files and commands. / MIT |
| [tk](http://www.tcl.tk/) | 8.6.7 | A dynamic programming language with GUI support. Bundles Tcl and Tk. / Tcl/Tk |
| [toolz](http://toolz.readthedocs.org/) | 0.9.0 | A functional standard library for Python. / BSD 3-Clause |
| [tornado](http://www.tornadoweb.org/) | 5.0.2 | A Python web framework and asynchronous networking library, originally developed at FriendFeed. / Apache 2.0 |
| [traitlets](http://ipython.org/) | 4.3.2 | Configuration system for Python applications / BSD 3-clause |
| [typing](https://docs.python.org/3.5/library/typing.html) | 3.6.4 | Type Hints for Python - backport for `Python<3.5` / PSF |
| [unicodecsv](https://github.com/jdunck/python-unicodecsv) | 0.14.1 | Drop-in replacement for csv module which supports unicode strings / BSD |
| [unixodbc](http://www.unixodbc.org/) | 2.3.6 | ODBC on non MS Windows platforms / LGPL-2.1 |
| [urllib3](https://urllib3.readthedocs.io/) | 1.22 | HTTP library with thread-safe connection pooling, file post, and more. / MIT |
| [wcwidth](https://github.com/jquast/wcwidth) | 0.1.7 | Measures number of Terminal column cells of wide-character codes. / MIT |
| [webencodings](https://github.com/gsnedders/python-webencodings) | 0.5.1 | Character encoding aliases for legacy web content / BSD 3-Clause |
| [werkzeug](http://werkzeug.pocoo.org/) | 0.14.1 | The Python WSGI Utility Library. / BSD 3-Clause |
| [wheel](https://bitbucket.org/pypa/wheel/) | 0.31.1 | A built-package format for Python. / MIT |
| [widgetsnbextension](http://ipython.org) | 3.2.1 | IPython HTML widgets for Jupyter / BSD 3-clause |
| [wrapt](https://github.com/GrahamDumpleton/wrapt) | 1.10.11 | Module for decorators, wrappers and monkey patching. / BSD 2-Clause |
| [xlrd](http://www.python-excel.org/) | 1.1.0 | Library for developers to extract data from Microsoft Excel (tm) spreadsheet files / BSD 3-Clause and BSD with advertising |
| [xlsxwriter](https://xlsxwriter.readthedocs.io/) | 1.0.4 | A Python module for creating Excel XLSX files / BSD 2-Clause |
| [xlwt](http://www.python-excel.org/) | 1.3.0 | Writing data and formatting information to Excel files / BSD |
| [xz](http://tukaani.org/xz/) | 5.2.4 | Data compression software with high compression ratio / LGPL-2.1 and GPL-2.0 |
| [yaml](http://pyyaml.org/wiki/LibYAML) | 0.1.7 | A C library for parsing and emitting YAML. / MIT |
| [zeromq](http://zeromq.org) | 4.2.5 | A high-performance asynchronous messaging library. / LGPL 3 |
| [zict](http://github.com/mrocklin/zict) | 0.1.3 | Composable Dictionary Classes / BSD 3-Clause |
| [zlib](http://zlib.net/) | 1.2.11 | Massively spiffy yet delicately unobtrusive compression library / zlib |
| Name | Version | Summary / License |
|---|---|---|
| [\_ipyw\_jlab\_nb\_ext\_conf](https://github.com/ContinuumIO/anaconda-nb-extensions-meta-config) | 0.1.0 | A configuration metapackage for enabling Anaconda-bundled jupyter extensions / BSD |
| [alabaster](http://www.sphinx-doc.org/en/stable/index.html) | 0.7.10 | Configurable, Python 2+3 compatible Sphinx theme. / BSD 3-Clause |
| [anaconda-client](https://github.com/Anaconda-Platform/anaconda-client) | 1.6.14 | Anaconda Cloud command line client library / BSD 3-Clause |
| [anaconda-navigator](https://github.com/ContinuumIO/navigator) | 1.8.7 | Anaconda Navigator / proprietary - Continuum Analytics, Inc. |
| [anaconda-project](https://github.com/Anaconda-Platform/anaconda-project) | 0.8.2 | Tool for encapsulating, running, and reproducing data science projects / BSD 3-Clause |
| [asn1crypto](https://github.com/wbond/asn1crypto) | 0.24.0 | Python ASN.1 library with a focus on performance and a pythonic API / MIT |
| [astroid](https://www.astroid.org/) | 1.6.3 | A abstract syntax tree for Python with inference support. / LGPL 2.1 |
| [astropy](http://www.astropy.org/) | 2.0.6 | Community-developed Python Library for Astronomy / BSD |
| [attrs](https://attrs.readthedocs.io/en/stable/) | 18.1.0 | attrs is the Python package that will bring back the joy of writing classes by relieving you from the drudgery of implementing object protocols (aka dunder methods). / MIT |
| [babel](http://babel.pocoo.org/) | 2.5.3 | Utilities to internationalize and localize Python applications / BSD 3-clause |
| [backports](https://bitbucket.org/brandon/backports) | 1.0 | / BSD |
| [backports.functools\_lru\_cache](https://github.com/jaraco/backports.functools_lru_cache) | 1.5 | Backport of functools.lru\_cache from Python 3.3 as published at ActiveState. / MIT |
| [backports.shutil\_get\_terminal\_size](https://github.com/chrippa/backports.shutil_get_terminal_size) | 1.0.0 | A backport of the get\_terminal\_size function from Python 3.3’s shutil. / MIT |
| [backports\_abc](https://github.com/cython/backports_abc) | 0.5 | A backport of recent additions to the collections.abc module. / PSF 2 |
| [beautifulsoup4](http://www.crummy.com/software/BeautifulSoup/) | 4.6.0 | Python library designed for screen-scraping / MIT |
| [bitarray](https://github.com/ilanschnell/bitarray) | 0.8.1 | efficient arrays of booleans – C extension / PSF |
| [bkcharts](http://github.com/bokeh/bkcharts) | 0.2 | High level chart types built on top of Bokeh / BSD 3-Clause |
| blas | 1.0 | |
| [blaze](http://blaze.pydata.org) | 0.11.3 | NumPy and Pandas interface to big data / BSD 3-Clause |
| [bleach](https://github.com/mozilla/bleach) | 2.1.3 | Easy, whitelist-based HTML-sanitizing tool / Apache-2.0 |
| [blosc](https://github.com/Blosc/c-blosc) | 1.14.3 | A blocking, shuffling and loss-less compression library that can be faster than memcpy() / BSD 3-Clause |
| [bokeh](http://bokeh.pydata.org/) | 0.12.16 | Statistical and novel interactive HTML plots for Python / BSD 3-Clause |
| [boto](https://github.com/boto/boto/) | 2.48.0 | Amazon Web Services Library / MIT |
| [bottleneck](http://berkeleyanalytics.com/bottleneck) | 1.2.1 | Fast NumPy array functions written in Cython. / BSD 2-Clause |
| [bzip2](http://www.bzip.org/) | 1.0.6 | high-quality data compressor / bzip2 |
| [ca-certificates](https://github.com/conda-forge/ca-certificates-feedstock) | 2018.03.07 | Certificates for use with other packages. / ISC |
| [cairo](http://cairographics.org/) | 1.14.12 | Cairo is a 2D graphics library with support for multiple output devices. / LGPL 2.1 or MPL 1.1 |
| [cdecimal](http://www.bytereef.org/mpdecimal/index.html) | 2.3 | Fast drop-in replacement for decimal.py / BSD 2-Clause |
| [certifi](http://certifi.io/) | 2018.4.16 | Python package for providing Mozilla’s CA Bundle. / ISC |
| [cffi](https://bitbucket.org/cffi/cffi) | 1.11.5 | Foreign Function Interface for Python calling C code. / MIT |
| [chardet](https://github.com/chardet/chardet) | 3.0.4 | Universal character encoding detector / LGPL2 |
| [click](http://click.pocoo.org/) | 6.7 | A simple wrapper around optparse for powerful command line utilities. / BSD 3-Clause |
| [cloudpickle](https://github.com/cloudpipe/cloudpickle) | 0.5.3 | Extended pickling support for Python objects / BSD 3-Clause |
| [clyent](https://github.com/Anaconda-Platform/clyent) | 1.2.2 | Command line client library for windows and posix / BSD 3-Clause |
| [colorama](https://github.com/tartley/colorama) | 0.3.9 | Cross-platform colored terminal text. / BSD 3-Clause |
| [conda](https://conda.io) | 4.5.4 | OS-agnostic, system-level binary package and environment manager. / BSD 3-Clause |
| [conda-build](https://github.com/conda/conda-build) | 3.10.5 | tools for building conda packages / BSD 3-Clause |
| [conda-env](https://github.com/conda/conda-env) | 2.6.0 | Tools for interacting with conda environments. / BSD 3-Clause |
| [conda-verify](https://github.com/conda/conda-verify) | 2.0.0 | tool for validating conda recipes and conda packages / BSD 3-Clause |
| [configparser](http://docs.python.org/3/library/configparser.html) | 3.5.0 | This library brings the updated configparser from Python 3.5 to Python 2.6-3.5 / MIT |
| [contextlib2](http://contextlib2.readthedocs.org) | 0.5.5 | Backports and enhancements for the contextlib module / PSF |
| [cryptography](https://github.com/pyca/cryptography) | 2.2.2 | Provides cryptographic recipes and primitives to Python developers / Apache 2.0 or BSD 3-Clause, PSF 2 |
| [curl](http://curl.haxx.se/) | 7.60.0 | tool and library for transferring data with URL syntax / MIT/X derivate (`<http://curl.haxx.se/docs/copyright.html>`) |
| [cycler](http://matplotlib.org/cycler) | 0.10.0 | Composable style cycles. / BSD 3-Clause |
| [cython](http://www.cython.org/) | 0.28.2 | The Cython compiler for writing C extensions for the Python language / Apache-2.0 |
| [cytoolz](https://github.com/pytoolz/cytoolz) | 0.9.0.1 | Cython implementation of Toolz. High performance functional utilities. / BSD 3-Clause |
| [dask](http://github.com/dask/dask/) | 0.17.5 | Parallel Python with task scheduling / BSD 3-Clause |
| [dask-core](http://github.com/dask/dask/) | 0.17.5 | Parallel Python with task scheduling / BSD 3-Clause |
| [datashape](http://datashape.pydata.org) | 0.5.4 | A data description language. / BSD 2-Clause |
| [dbus](http://www.freedesktop.org/wiki/Software/dbus/) | 1.13.2 | Simple message bus system for applications to talk to one another / GPL2 |
| [decorator](https://github.com/micheles/decorator) | 4.3.0 | Better living through Python with decorators. / BSD 3-Clause |
| [distributed](http://distributed.readthedocs.io/en/latest/) | 1.21.8 | Distributed computing with Dask / BSD 3-Clause |
| [docutils](http://docutils.sourceforge.net/) | 0.14 | Docutils – Python Documentation Utilities / Public Domain Dedictation and BSD 2-Clause and PSF 2.1.1 and GPL 3.0 |
| [entrypoints](https://github.com/takluyver/entrypoints) | 0.2.3 | Discover and load entry points from installed packages. / MIT License |
| [enum34](https://bitbucket.org/stoneleaf/enum34) | 1.1.6 | Python 3.4 Enum backported to 3.3, 3.2, 3.1, 2.7, 2.6, 2.5, and 2.4 / BSD 3-Clause |
| [et\_xmlfile](https://bitbucket.org/openpyxl/et_xmlfile) | 1.0.1 | An implementation of lxml.xmlfile for the standard library / MIT |
| [expat](http://expat.sourceforge.net/) | 2.2.5 | Expat XML parser library in C. / MIT |
| [fastcache](https://github.com/pbrady/fastcache) | 1.0.2 | C implementation of Python 3 lru\_cache / MIT |
| [filelock](https://github.com/benediktschmitt/py-filelock) | 3.0.4 | A platform independent file lock. / Public Domain |
| [flask](http://flask.pocoo.org) | 1.0.2 | A microframework based on Werkzeug, Jinja2 and good intentions. / BSD 3-Clause |
| [flask-cors](https://github.com/corydolphin/flask-cors) | 3.0.4 | A Flask extension adding a decorator for CORS support / MIT |
| [fontconfig](http://www.freedesktop.org/wiki/Software/fontconfig/) | 2.12.6 | A library for configuring and customizing font access. / MIT |
| [freetype](https://www.freetype.org/) | 2.8 | A Free, High-Quality, and Portable Font Engine / GPL-2.0 and FreeType |
| [funcsigs](http://funcsigs.readthedocs.org) | 1.0.2 | Python function signatures from PEP362 for Python 2.6, 2.7 and 3.2+. / Apache 2.0 |
| [functools32](https://github.com/MiCHiLU/python-functools32) | 3.2.3.2 | Backport of the functools module from Python 3.2.3 for use on 2.7 and PyPy. / PSF license |
| [futures](https://github.com/agronholm/pythonfutures) | 3.2.0 | Backport of the concurrent.futures package from Python 3.2 / PSF |
| [get\_terminal\_size](https://github.com/chrippa/backports.shutil_get_terminal_size) | 1.0.0 | Get the size of the terminal window. / MIT |
| [gevent](http://www.gevent.org/) | 1.3.0 | Coroutine-based network library / MIT |
| [glib](https://developer.gnome.org/glib/) | 2.56.1 | Provides core application building blocks for libraries and applications written in C. / LGPL-2.1 |
| [glob2](https://github.com/miracle2k/python-glob2) | 0.6 | Version of the glob module that supports recursion via \*\*, and can capture patterns. / BSD-2-Clause |
| [gmp](http://gmplib.org/) | 6.1.2 | The GNU multiprecision library. / GPL 2 and LGPL 3 |
| [gmpy2](https://pypi.python.org/pypi/gmpy2) | 2.0.8 | GMP/MPIR, MPFR, and MPC interface to Python 2.6+ and 3.x / LGPL 3 |
| [graphite2](http://graphite.sil.org/) | 1.3.11 | A “smart font” system that handles the complexities of lesser-known languages of the world. / LGPLv2 |
| [greenlet](https://github.com/python-greenlet/greenlet) | 0.4.13 | Lightweight in-process concurrent programming / MIT |
| [grin](http://pypi.python.org/pypi/grin) | 1.2.1 | Enhanced grep-like tool / BSD 3-Clause |
| [gst-plugins-base](http://gstreamer.freedesktop.org/) | 1.14.0 | GStreamer Base Plug-ins / GPL2 |
| [gstreamer](http://gstreamer.freedesktop.org/) | 1.14.0 | Library for constructing graphs of media-handling components / LGPL 2 |
| [h5py](http://www.h5py.org/) | 2.7.1 | Read and write HDF5 files from Python. / BSD 3-Clause |
| [harfbuzz](http://www.freedesktop.org/wiki/Software/HarfBuzz/) | 1.7.6 | An OpenType text shaping engine. / MIT |
| [hdf5](http://www.hdfgroup.org/HDF5/) | 1.10.2 | HDF5 is a data model, library, and file format for storing and managing data / HDF5 |
| [heapdict](http://stutzbachenterprises.com/) | 1.0.0 | A heap with decrease-key and increase-key operations / BSD 3-Clause |
| [html5lib](https://github.com/html5lib/html5lib-python) | 1.0.1 | HTML parser based on the WHATWG HTML specification / MIT |
| [icu](http://site.icu-project.org/) | 58.2 | International Components for Unicode. / MIT |
| [idna](https://github.com/kjd/idna) | 2.6 | Internationalized Domain Names in Applications (IDNA). / BSD Like |
| [imageio](http://imageio.github.io) | 2.3.0 | a Python library for reading and writing image data / BSD 2-Clause |
| [imagesize](https://github.com/shibukawa/imagesize_py) | 1.0.0 | Getting image size from png/jpeg/jpeg2000/gif file / MIT |
| [intel-openmp](https://software.intel.com/en-us/node/522690) | 2018.0.0 | Math library for Intel and compatible processors / proprietary - Intel |
| [ipaddress](https://github.com/phihag/ipaddress) | 1.0.22 | IPv4/IPv6 manipulation library / PSF 2 |
| [ipykernel](http://ipython.org) | 4.8.2 | IPython Kernel for Jupyter / BSD 3-clause |
| [ipython](http://ipython.org/) | 5.7.0 | IPython: Productive Interactive Computing / BSD 3-clause |
| [ipython\_genutils](http://ipython.org) | 0.2.0 | vestigial utilities from IPython / BSD 3-Clause |
| [ipywidgets](https://github.com/ipython/ipywidgets) | 7.2.1 | Jupyter Interactive Widgets / BSD 3-clause |
| [isort](https://github.com/timothycrosley/isort) | 4.3.4 | A Python utility / library to sort Python imports. / MIT |
| [itsdangerous](https://github.com/pallets/itsdangerous) | 0.24 | Various helpers to pass trusted data to untrusted environments. / BSD 3-Clause |
| [jbig](https://www.cl.cam.ac.uk/~mgk25/jbigkit) | 2.1 | Implementation of the JBIG1 data compression standard / GPL-2.0 |
| [jdcal](https://github.com/phn/jdcal) | 1.4 | Julian dates from proleptic Gregorian and Julian calendars. / BSD 2-Clause |
| [jedi](https://github.com/davidhalter/jedi/) | 0.12.0 | An autocompletion tool for Python that can be used for text editors. / MIT |
| [jinja2](http://jinja.pocoo.org) | 2.10 | An easy to use stand-alone template engine written in pure python. / 3-Clause BSD |
| [jpeg](http://www.ijg.org/) | 9b | read/write jpeg COM, EXIF, IPTC medata / Custom free software license |
| [jsonschema](https://github.com/Julian/jsonschema) | 2.6.0 | An implementation of JSON Schema validation for Python / MIT |
| [jupyter](http://jupyter.org) | 1.0.0 | Jupyter metapackage. Install all the Jupyter components in one go. / BSD 3-Clause |
| [jupyter\_client](http://jupyter.org) | 5.2.3 | Jupyter protocol implementation and client libraries / BSD 3-clause |
| [jupyter\_console](http://jupyter.org) | 5.2.0 | Jupyter terminal console / BSD 3-Clause |
| [jupyter\_core](http://jupyter.org) | 4.4.0 | Core common functionality of Jupyter projects. / BSD 3-clause |
| [jupyterlab](https://github.com/jupyterlab/jupyterlab) | 0.32.1 | An extensible environment for interactive and reproducible computing, based on the Jupyter Notebook and Architecture. Currently in beta. / BSD 3-Clause |
| [jupyterlab\_launcher](http://github.com/jupyterlab/jupyterlab_launcher) | 0.10.5 | A Launcher for JupyterLab based applications. / BSD 3-Clause |
| [kiwisolver](https://github.com/nucleic/kiwi) | 1.0.1 | A fast implementation of the Cassowary constraint solver / BSD 3-Clause |
| [lazy-object-proxy](https://github.com/ionelmc/python-lazy-object-proxy) | 1.3.1 | A fast and thorough lazy object proxy. / BSD 2-Clause |
| [libcurl](http://curl.haxx.se/) | 7.60.0 | tool and library for transferring data with URL syntax / MIT/X derivate (`<http://curl.haxx.se/docs/copyright.html>`) |
| [libedit](http://thrysoee.dk/editline/) | 3.1.20170329 | Editline Library (libedit) / NetBSD |
| [libffi](https://sourceware.org/libffi/) | 3.2.1 | A Portable Foreign Function Interface Library. / Custom |
| [libgcc-ng](https://gcc.gnu.org/onlinedocs/gccint/Libgcc.html) | 7.2.0 | The GCC low-level runtime library / GPL |
| [libgfortran-ng](https://gcc.gnu.org/) | 7.2.0 | The GNU Fortran Runtime Library / GPL |
| [libpng](http://www.libpng.org/pub/png/libpng.html) | 1.6.34 | PNG reference library. / zlib/libpng |
| [libsodium](http://libsodium.org) | 1.0.16 | A modern and easy-to-use crypto library. / ISC |
| [libssh2](https://www.libssh2.org/) | 1.8.0 | the SSH library / BSD 3-Clause |
| [libstdcxx-ng](https://gcc.gnu.org/) | 7.2.0 | The GNU C++ Runtime Library / GPL3 with runtime exception |
| [libtiff](http://www.libtiff.org/) | 4.0.9 | Support for the Tag Image File Format (TIFF). / HPND |
| [libtool](http://www.gnu.org/software/libtool/) | 2.4.6 | The GNU Portable Library Tool / GPL 3 |
| [libxcb](http://xcb.freedesktop.org/) | 1.13 | This is the C-language Binding (XCB) package to the X Window System protocol / MIT |
| [libxml2](http://xmlsoft.org/) | 2.9.8 | The XML C parser and toolkit of Gnome / MIT |
| [libxslt](http://xmlsoft.org/XSLT/) | 1.1.32 | The XSLT C library developed for the GNOME project / MIT |
| [llvmlite](https://github.com/numba/llvmlite) | 0.23.1 | A lightweight LLVM python binding for writing JIT compilers / New BSD License |
| [locket](https://github.com/mwilliamson/locket.py) | 0.2.0 | File-based locks for Python for Linux and Windows / BSD 2-Clause |
| [lxml](http://lxml.de/) | 4.2.1 | Pythonic binding for the C libraries libxml2 and libxslt. / BSD 3-Clause, GPL-2.0, ZPL-2.0, and ElementTree |
| [lzo](http://www.oberhumer.com/opensource/lzo/) | 2.10 | LZO is a portable lossless data compression library written in ANSI C. / GPL v2+ |
| [markupsafe](https://www.palletsprojects.com/p/markupsafe/) | 1.0 | A Python module that implements the jinja2.Markup string / BSD 3-Clause |
| [matplotlib](http://matplotlib.org/) | 2.2.2 | Publication quality figures in Python / PSF-based |
| [mccabe](https://github.com/PyCQA/mccabe) | 0.6.1 | McCabe complexity checker for Python / MIT |
| [mistune](https://github.com/lepture/mistune) | 0.8.3 | The fastest markdown parser in pure Python. / BSD 3-Clause |
| [mkl](https://software.intel.com/en-us/mkl) | 2018.0.2 | Math library for Intel and compatible processors / proprietary - Intel |
| [mkl-service](https://github.com/ContinuumIO/mkl-service) | 1.1.2 | Python bindings to MKL service functions / 3-clause BSD |
| [mkl\_fft](http://github.com/IntelPython/mkl_fft) | 1.0.1 | NumPy-based implementation of Fast Fourier Transform using Intel (R) Math Kernel Library / BSD |
| [mkl\_random](http://github.com/IntelPython/mkl_random) | 1.0.1 | Intel (R) MKL-powered package for sampling from common probability distributions into NumPy arrays. / BSD 3-Clause |
| [more-itertools](https://github.com/erikrose/more-itertools) | 4.1.0 | More routines for operating on iterables, beyond itertools / MIT |
| [mpc](http://www.multiprecision.org/) | 1.0.3 | A C library for the arithmetic of complex numbers with arbitrarily high precision. / LGPL 3 |
| [mpfr](http://www.mpfr.org/) | 3.1.5 | The MPFR library is a C library for multiple-precision floating-point computations with correct rounding. / LGPL 3 |
| [mpmath](http://mpmath.org) | 1.0.0 | Python library for arbitrary-precision floating-point arithmetic / BSD 3-Clause |
| [msgpack-python](http://msgpack.org/) | 0.5.6 | MessagePack (de)serializer. / Apache 2.0 |
| [multipledispatch](https://github.com/mrocklin/multipledispatch/) | 0.5.0 | Multiple dispatch in Python / BSD 3-Clause |
| [navigator-updater](https://github.com/ContinuumIO/navigator-updater) | 0.2.1 | Anaconda Navigator Updater / proprietary - Continuum Analytics, Inc. |
| [nbconvert](http://jupyter.org) | 5.3.1 | Converting Jupyter Notebooks / BSD 3-Clause |
| [nbformat](http://jupyter.org) | 4.4.0 | The reference implementation of the Jupyter Notebook format / BSD 3-clause |
| [ncurses](http://www.gnu.org/software/ncurses/) | 6.1 | Library for text-based user interfaces / Free software (MIT-like) |
| [networkx](https://networkx.github.io/) | 2.1 | Python package for creating and manipulating complex networks / BSD 3-Clause |
| [nltk](http://nltk.org/) | 3.3.0 | Build Python programs to work with human language data / Apache 2.0 |
| [nose](http://readthedocs.org/docs/nose/) | 1.3.7 | Nose extends unittest to make testing easier / LGPL-2.1 |
| [notebook](http://jupyter.org) | 5.5.0 | A web-based notebook environment for interactive computing / BSD 3-clause |
| [numba](http://numba.github.com) | 0.38.0 | NumPy aware dynamic Python compiler using LLVM / BSD 2-clause |
| [numexpr](https://github.com/pydata/numexpr) | 2.6.5 | Fast numerical expression evaluator for NumPy. / MIT |
| [numpy](http://numpy.scipy.org/) | 1.14.3 | Array processing for numbers, strings, records, and objects. / BSD 3-Clause |
| numpy-base | 1.14.3 | |
| [numpydoc](https://github.com/numpy/numpydoc) | 0.8.0 | Sphinx extension to support docstrings in Numpy format / BSD 3-Clause |
| [odo](http://odo.pydata.org) | 0.5.1 | Data migration in Python / BSD-3-Clause |
| [olefile](http://www.decalage.info/python/olefileio) | 0.45.1 | parse, read and write Microsoft OLE2 files / BSD License 2-Clause |
| [openpyxl](https://openpyxl.readthedocs.io) | 2.5.3 | A Python library to read/write Excel 2010 xlsx/xlsm files / MIT |
| [openssl](http://www.openssl.org/) | 1.0.2o | OpenSSL is an open-source implementation of the SSL and TLS protocols / OpenSSL |
| [packaging](https://github.com/pypa/packaging) | 17.1 | Core utilities for Python packages / Apache 2.0 or BSD 2-Clause |
| [pandas](http://pandas.pydata.org) | 0.23.0 | High-performance, easy-to-use data structures and data analysis tools. / BSD 3-clause |
| [pandoc](http://johnmacfarlane.net/pandoc/) | 1.15.0.6 | Universal markup converter (repackaged binaries). / GPL-2.0 |
| [pandocfilters](https://github.com/jgm/pandocfilters) | 1.4.2 | A python module for writing pandoc filters / BSD-3-Clause |
| [pango](http://www.pango.org/) | 1.41.0 | Text layout and rendering engine. / LGPL-2.1 |
| [parso](https://github.com/davidhalter/parso) | 0.2.0 | A Python Parser / MIT |
| [partd](https://github.com/dask/partd) | 0.3.8 | Data structure for on-disk shuffle operations / BSD 3-Clause |
| [patchelf](http://nixos.org/patchelf.html) | 0.9 | A small utility to modify the dynamic linker and RPATH of ELF executables. / GPL 3 |
| [path.py](https://github.com/jaraco/path.py) | 11.0.1 | A module wrapper for os.path / MIT |
| [pathlib2](https://github.com/mcmtroffaes/pathlib2) | 2.3.2 | Fork of pathlib aiming to support the full stdlib Python API. / MIT |
| [patsy](https://github.com/pydata/patsy) | 0.5.0 | Describing statistical models in Python using symbolic formulas / BSD-2-Clause, PSF2 |
| [pcre](http://www.pcre.org/) | 8.42 | Regular expression pattern matching using the same syntax and semantics as Perl 5. / BSD 3-Clause |
| [pep8](http://pep8.readthedocs.org/) | 1.7.1 | Python style guide checker / MIT |
| [pexpect](http://pexpect.sourceforge.net/) | 4.5.0 | Pexpect makes Python a better tool for controlling other applications. / ISC |
| [pickleshare](https://github.com/vivainio/pickleshare) | 0.7.4 | Tiny ‘shelve’-like database with concurrency support / MIT |
| [pillow](https://pillow.readthedocs.io) | 5.1.0 | Pillow is the friendly PIL fork by Alex Clark and Contributors. / PIL |
| [pip](https://pip.pypa.io/en/stable/) | 10.0.1 | PyPA recommended tool for installing Python packages / MIT |
| [pixman](http://www.pixman.org/) | 0.34.0 | A low-level software library for pixel manipulation. / MIT |
| [pkginfo](https://code.launchpad.net/~tseaver/pkginfo/trunk) | 1.4.2 | Query metadatdata from sdists / bdists / installed packages. / MIT |
| [pluggy](https://github.com/pytest-dev/pluggy) | 0.6.0 | Plugin registration and hook calling for Python / MIT |
| [ply](http://www.dabeaz.com/ply/index.html) | 3.11 | Python Lex-Yacc / BSD 3-clause |
| [prompt\_toolkit](https://github.com/jonathanslenders/python-prompt-toolkit) | 1.0.15 | Library for building powerful interactive command lines in Python / BSD 3-clause |
| [psutil](https://github.com/giampaolo/psutil) | 5.4.5 | A cross-platform process and system utilities module for Python / BSD 3-Clause |
| [ptyprocess](https://github.com/pexpect/ptyprocess) | 0.5.2 | Run a subprocess in a pseudo terminal / ISC |
| [py](https://github.com/pytest-dev/py) | 1.5.3 | library with cross-python path, ini-parsing, io, code, log facilities / MIT |
| [pycairo](http://cairographics.org/pycairo/) | 1.15.4 | Python bindings for the Cairo graphics library. / LGPL 2.1, MPL 1.1 |
| [pycodestyle](https://pycodestyle.readthedocs.io/) | 2.4.0 | Python style guide checker / MIT |
| [pycosat](https://github.com/ContinuumIO/pycosat) | 0.6.3 | Bindings to picosat (a SAT solver) / MIT |
| [pycparser](https://github.com/eliben/pycparser) | 2.18 | Complete C99 parser in pure Python / BSD 3-clause |
| [pycrypto](http://www.pycrypto.org/) | 2.6.1 | Cryptographic modules for Python. / Public Domain |
| [pycurl](http://pycurl.sourceforge.net/) | 7.43.0.1 | A Python Interface To The cURL library / LGPL, MIT |
| [pyflakes](https://github.com/PyCQA/pyflakes) | 1.6.0 | Pyflakes analyzes programs and detects various errors. / MIT |
| [pygments](http://pygments.org/) | 2.2.0 | Generic syntax highlighting package / BSD 2-clause |
| [pylint](http://www.pylint.org/) | 1.8.4 | python code static checker / GPL |
| [pyodbc](https://github.com/mkleehammer/pyodbc) | 4.0.23 | DB API Module for ODBC / MIT |
| [pyopenssl](https://github.com/pyca/pyopenssl) | 18.0.0 | Python wrapper module around the OpenSSL library / Apache 2.0 |
| [pyparsing](http://pyparsing.wikispaces.com/) | 2.2.0 | Create and execute simple grammars / MIT |
| [pyqt](http://www.riverbankcomputing.co.uk/software/pyqt) | 5.9.2 | Python binding of the cross-platform GUI toolkit Qt. / Commercial, GPL-2.0, GPL-3.0 |
| [pysocks](https://github.com/Anorov/PySocks) | 1.6.8 | A Python SOCKS client module. See [Anorov/PySocks](https://github.com/Anorov/PySocks) for more information. / BSD 3-Clause |
| [pytables](http://www.pytables.org) | 3.4.3 | Brings together Python, HDF5 and NumPy to easily handle large amounts of data. / BSD 3-Clause |
| [pytest](https://docs.pytest.org/en/latest/) | 3.5.1 | Simple and powerful testing with Python. / MIT |
| [python](http://www.python.org/) | 2.7.15 | General purpose programming language / PSF |
| [python-dateutil](https://dateutil.readthedocs.org/) | 2.7.3 | Extensions to the standard Python datetime module. / BSD 3 Clause |
| [pytz](http://pythonhosted.org/pytz/) | 2018.4 | World timezone definitions, modern and historical. / MIT |
| [pywavelets](https://github.com/PyWavelets/pywt) | 0.5.2 | Discrete Wavelet Transforms in Python. / MIT |
| [pyyaml](http://pyyaml.org/wiki/PyYAML) | 3.12 | YAML parser and emitter for Python / MIT |
| [pyzmq](https://github.com/zeromq/pyzmq) | 17.0.0 | Python bindings for zeromq / BSD 3-clause |
| [qt](http://qt-project.org) | 5.9.5 | Qt is a cross-platform application and UI framework. / LGPL-3.0 |
| [qtawesome](https://github.com/spyder-ide/qtawesome) | 0.4.4 | Iconic fonts in PyQt and PySide applications / MIT |
| [qtconsole](http://jupyter.org) | 4.3.1 | Jupyter Qt console / BSD 3-Clause |
| [qtpy](https://github.com/spyder-ide/qtpy) | 1.4.1 | Abstraction layer for PyQt5/PyQt4/PySide / MIT |
| [readline](https://cnswww.cns.cwru.edu/php/chet/readline/rltop.html) | 7.0 | library for editing command lines as they are typed in / GPL3 |
| [requests](http://python-requests.org) | 2.18.4 | Python HTTP for Humans. / Apache 2.0 |
| [rope](https://github.com/python-rope/rope) | 0.10.7 | A python refactoring library… / GPL 2.0 |
| [ruamel\_yaml](https://bitbucket.org/ruamel/yaml) | 0.15.35 | A patched copy of ruamel.yaml. / MIT |
| [scandir](https://github.com/benhoyt/scandir) | 1.7 | scandir, a better directory iterator and faster os.walk() / BSD 3-Clause |
| [scikit-image](http://scikit-image.org/) | 0.13.1 | Image processing routines for SciPy. / BSD 3-Clause |
| [scikit-learn](http://scikit-learn.org/) | 0.19.1 | A set of python modules for machine learning and data mining / BSD 3-Clause |
| [scipy](http://www.scipy.org/) | 1.1.0 | Scientific Library for Python / BSD 3-Clause |
| [seaborn](http://stanford.edu/~mwaskom/software/seaborn/) | 0.8.1 | Statistical data visualization / BSD 3-Clause |
| [send2trash](https://github.com/hsoft/send2trash) | 1.5.0 | Python library to natively send files to Trash (or Recycle bin) on all platforms. / BSD-3-Clause |
| [setuptools](https://github.com/pypa/setuptools) | 39.1.0 | Download, build, install, upgrade, and uninstall Python packages / MIT |
| [simplegeneric](http://cheeseshop.python.org/pypi/simplegeneric) | 0.8.1 | Simple generic functions (similar to Python’s own len(), pickle.dump(), etc.) / Zope Public |
| [singledispatch](http://docs.python.org/3/library/functools.html#functools.singledispatch) | 3.4.0.3 | Transforms a function into a single-dispatch generic function / MIT |
| [sip](http://www.riverbankcomputing.com/software/sip/intro) | 4.19.8 | Create Python bindings for C and C++ libraries / GPL-3.0 |
| [six](http://pypi.python.org/pypi/six/) | 1.11.0 | Python 2 and 3 compatibility utilities / MIT |
| [snappy](https://github.com/google/snappy) | 1.1.7 | A fast compressor/decompressor / BSD 3-clause |
| [snowballstemmer](https://github.com/shibukawa/snowball_py) | 1.2.1 | Snowball stemming library collection for Python / BSD-2-Clause |
| [sortedcollections](http://www.grantjenks.com/docs/sortedcollections/) | 0.6.1 | Python Sorted Collections / Apache-2.0 |
| [sortedcontainers](http://www.grantjenks.com/docs/sortedcontainers/) | 1.5.10 | Python Sorted Container Types: SortedList, SortedDict, and SortedSet / Apache 2.0 |
| [sphinx](http://www.sphinx-doc.org) | 1.7.4 | Sphinx is a tool that makes it easy to create intelligent and beautiful documentation / BSD 2-clause |
| sphinxcontrib | 1.0 | Python namespace for sphinxcontrib / BSD |
| [sphinxcontrib-websupport](https://pypi.python.org/pypi/sphinxcontrib-websupport) | 1.0.1 | Sphinx API for Web Apps / BSD-2-Clause |
| [spyder](https://github.com/spyder-ide/spyder) | 3.2.8 | Scientific PYthon Development EnviRonment / MIT |
| [sqlalchemy](http://www.sqlalchemy.org/) | 1.2.7 | Database Abstraction Library. / MIT |
| [sqlite](http://www.sqlite.org/) | 3.23.1 | Implements a self-contained, zero-configuration, SQL database engine. / Public-Domain (`<http://www.sqlite.org/copyright.html>`) |
| [ssl\_match\_hostname](http://bitbucket.org/brandon/backports.ssl_match_hostname) | 3.5.0.1 | The ssl.match\_hostname() function from Python 3.5 / PSF 2 |
| [statsmodels](https://www.statsmodels.org) | 0.9.0 | Statistical computations and models for use with SciPy / BSD 3-Clause |
| [subprocess32](https://github.com/google/python-subprocess32) | 3.5.0 | A backport of the subprocess module from Python 3.2/3.3 for use on 2.x. / PSF 2 |
| [sympy](http://sympy.org) | 1.1.1 | Python library for symbolic mathematics / 3-clause BSD |
| [tblib](https://github.com/ionelmc/python-tblib) | 1.3.2 | Traceback serialization library. / BSD 2-Clause |
| [terminado](http://github.com/mitsuhiko/markupsafe) | 0.8.1 | Terminals served by tornado websockets / BSD 3-clause |
| [testpath](https://testpath.readthedocs.io) | 0.3.1 | Testpath is a collection of utilities for Python code working with files and commands. / MIT |
| [tk](http://www.tcl.tk/) | 8.6.7 | A dynamic programming language with GUI support. Bundles Tcl and Tk. / Tcl/Tk |
| [toolz](http://toolz.readthedocs.org/) | 0.9.0 | A functional standard library for Python. / BSD 3-Clause |
| [tornado](http://www.tornadoweb.org/) | 5.0.2 | A Python web framework and asynchronous networking library, originally developed at FriendFeed. / Apache 2.0 |
| [traitlets](http://ipython.org/) | 4.3.2 | Configuration system for Python applications / BSD 3-clause |
| [typing](https://docs.python.org/3.5/library/typing.html) | 3.6.4 | Type Hints for Python - backport for `Python<3.5` / PSF |
| [unicodecsv](https://github.com/jdunck/python-unicodecsv) | 0.14.1 | Drop-in replacement for csv module which supports unicode strings / BSD |
| [unixodbc](http://www.unixodbc.org/) | 2.3.6 | ODBC on non MS Windows platforms / LGPL-2.1 |
| [urllib3](https://urllib3.readthedocs.io/) | 1.22 | HTTP library with thread-safe connection pooling, file post, and more. / MIT |
| [wcwidth](https://github.com/jquast/wcwidth) | 0.1.7 | Measures number of Terminal column cells of wide-character codes. / MIT |
| [webencodings](https://github.com/gsnedders/python-webencodings) | 0.5.1 | Character encoding aliases for legacy web content / BSD 3-Clause |
| [werkzeug](http://werkzeug.pocoo.org/) | 0.14.1 | The Python WSGI Utility Library. / BSD 3-Clause |
| [wheel](https://bitbucket.org/pypa/wheel/) | 0.31.1 | A built-package format for Python. / MIT |
| [widgetsnbextension](http://ipython.org) | 3.2.1 | IPython HTML widgets for Jupyter / BSD 3-clause |
| [wrapt](https://github.com/GrahamDumpleton/wrapt) | 1.10.11 | Module for decorators, wrappers and monkey patching. / BSD 2-Clause |
| [xlrd](http://www.python-excel.org/) | 1.1.0 | Library for developers to extract data from Microsoft Excel (tm) spreadsheet files / BSD 3-Clause and BSD with advertising |
| [xlsxwriter](https://xlsxwriter.readthedocs.io/) | 1.0.4 | A Python module for creating Excel XLSX files / BSD 2-Clause |
| [xlwt](http://www.python-excel.org/) | 1.3.0 | Writing data and formatting information to Excel files / BSD |
| [xz](http://tukaani.org/xz/) | 5.2.4 | Data compression software with high compression ratio / LGPL-2.1 and GPL-2.0 |
| [yaml](http://pyyaml.org/wiki/LibYAML) | 0.1.7 | A C library for parsing and emitting YAML. / MIT |
| [zeromq](http://zeromq.org) | 4.2.5 | A high-performance asynchronous messaging library. / LGPL 3 |
| [zict](http://github.com/mrocklin/zict) | 0.1.3 | Composable Dictionary Classes / BSD 3-Clause |
| [zlib](http://zlib.net/) | 1.2.11 | Massively spiffy yet delicately unobtrusive compression library / zlib |
| Name | Version | Summary / License |
|---|---|---|
| [\_ipyw\_jlab\_nb\_ext\_conf](https://github.com/ContinuumIO/anaconda-nb-extensions-meta-config) | 0.1.0 | A configuration metapackage for enabling Anaconda-bundled jupyter extensions / BSD |
| [alabaster](http://www.sphinx-doc.org/en/stable/index.html) | 0.7.10 | Configurable, Python 2+3 compatible Sphinx theme. / BSD 3-Clause |
| [anaconda-client](https://github.com/Anaconda-Platform/anaconda-client) | 1.6.9 | Anaconda Cloud command line client library / BSD 3-Clause |
| [anaconda-navigator](https://github.com/ContinuumIO/navigator) | 1.7.0 | Anaconda Navigator / proprietary - Continuum Analytics, Inc. |
| [anaconda-project](https://github.com/Anaconda-Platform/anaconda-project) | 0.8.2 | Tool for encapsulating, running, and reproducing data science projects / BSD 3-Clause |
| [asn1crypto](https://github.com/wbond/asn1crypto) | 0.24.0 | Python ASN.1 library with a focus on performance and a pythonic API / MIT |
| [astroid](https://www.astroid.org/) | 1.6.1 | A abstract syntax tree for Python with inference support. / LGPL 2.1 |
| [astropy](http://www.astropy.org/) | 2.0.3 | Community-developed Python Library for Astronomy / BSD |
| [attrs](https://attrs.readthedocs.io/en/stable/) | 17.4.0 | attrs is the Python package that will bring back the joy of writing classes by relieving you from the drudgery of implementing object protocols (aka dunder methods). / MIT |
| [babel](http://babel.pocoo.org/) | 2.5.3 | Utilities to internationalize and localize Python applications / BSD 3-clause |
| [backports](https://bitbucket.org/brandon/backports) | 1.0 | / BSD |
| [backports.shutil\_get\_terminal\_size](https://github.com/chrippa/backports.shutil_get_terminal_size) | 1.0.0 | A backport of the get\_terminal\_size function from Python 3.3’s shutil. / MIT |
| [beautifulsoup4](http://www.crummy.com/software/BeautifulSoup/) | 4.6.0 | Python library designed for screen-scraping / MIT |
| [bitarray](https://github.com/ilanschnell/bitarray) | 0.8.1 | efficient arrays of booleans – C extension / PSF |
| [bkcharts](http://github.com/bokeh/bkcharts) | 0.2 | High level chart types built on top of Bokeh / BSD 3-Clause |
| [blaze](http://blaze.pydata.org) | 0.11.3 | NumPy and Pandas interface to big data / BSD 3-Clause |
| [bleach](https://github.com/mozilla/bleach) | 2.1.2 | Easy, whitelist-based HTML-sanitizing tool / Apache-2.0 |
| [bokeh](http://bokeh.pydata.org/) | 0.12.13 | Statistical and novel interactive HTML plots for Python / BSD 3-Clause |
| [boto](https://github.com/boto/boto/) | 2.48.0 | Amazon Web Services Library / MIT |
| [bottleneck](http://berkeleyanalytics.com/bottleneck) | 1.2.1 | Fast NumPy array functions written in Cython. / BSD 2-Clause |
| [bzip2](http://www.bzip.org/) | 1.0.6 | high-quality data compressor / bzip2 |
| [ca-certificates](https://github.com/conda-forge/ca-certificates-feedstock) | 2017.08.26 | Certificates for use with other packages. / ISC |
| [certifi](http://certifi.io/) | 2018.1.18 | Python package for providing Mozilla’s CA Bundle. / ISC |
| [cffi](https://bitbucket.org/cffi/cffi) | 1.11.4 | Foreign Function Interface for Python calling C code. / MIT |
| [chardet](https://github.com/chardet/chardet) | 3.0.4 | Universal character encoding detector / LGPL2 |
| [click](http://click.pocoo.org/) | 6.7 | A simple wrapper around optparse for powerful command line utilities. / BSD 3-Clause |
| [cloudpickle](https://github.com/cloudpipe/cloudpickle) | 0.5.2 | Extended pickling support for Python objects / BSD 3-Clause |
| [clyent](https://github.com/Anaconda-Platform/clyent) | 1.2.2 | Command line client library for windows and posix / BSD 3-Clause |
| [colorama](https://github.com/tartley/colorama) | 0.3.9 | Cross-platform colored terminal text. / BSD 3-Clause |
| [comtypes](http://starship.python.net/crew/theller/comtypes/) | 1.1.4 | pure Python COM package / MIT |
| [conda](https://conda.io) | 4.4.10 | OS-agnostic, system-level binary package and environment manager. / BSD 3-Clause |
| [conda-build](https://github.com/conda/conda-build) | 3.4.1 | tools for building conda packages / BSD 3-Clause |
| [conda-env](https://github.com/conda/conda-env) | 2.6.0 | Tools for interacting with conda environments. / BSD 3-Clause |
| [conda-verify](https://github.com/conda/conda-verify) | 2.0.0 | tool for validating conda recipes and conda packages / BSD 3-Clause |
| console\_shortcut | 0.1.1 | Console shortcut creator for Windows (using menuinst) / BSD |
| [contextlib2](http://contextlib2.readthedocs.org) | 0.5.5 | Backports and enhancements for the contextlib module / PSF |
| [cryptography](https://github.com/pyca/cryptography) | 2.1.4 | Provides cryptographic recipes and primitives to Python developers / Apache 2.0 or BSD 3-Clause, PSF 2 |
| [curl](http://curl.haxx.se/) | 7.58.0 | tool and library for transferring data with URL syntax / MIT/X derivate (`<http://curl.haxx.se/docs/copyright.html>`) |
| [cycler](http://matplotlib.org/cycler) | 0.10.0 | Composable style cycles. / BSD 3-Clause |
| [cython](http://www.cython.org/) | 0.27.3 | The Cython compiler for writing C extensions for the Python language / Apache-2.0 |
| [cytoolz](https://github.com/pytoolz/cytoolz) | 0.9.0 | Cython implementation of Toolz. High performance functional utilities. / BSD 3-Clause |
| [dask](http://github.com/dask/dask/) | 0.16.1 | Parallel Python with task scheduling / BSD 3-Clause |
| [dask-core](http://github.com/dask/dask/) | 0.16.1 | Parallel Python with task scheduling / BSD 3-Clause |
| [datashape](http://datashape.pydata.org) | 0.5.4 | A data description language. / BSD 2-Clause |
| [decorator](https://github.com/micheles/decorator) | 4.2.1 | Better living through Python with decorators. / BSD 3-Clause |
| [distlib](https://bitbucket.org/pypa/distlib) | 0.2.5 | Distribution utilities / Python Software Foundation License |
| [distributed](http://distributed.readthedocs.io/en/latest/) | 1.20.2 | Distributed computing with Dask / BSD 3-Clause |
| [docutils](http://docutils.sourceforge.net/) | 0.14 | Docutils – Python Documentation Utilities / Public Domain Dedictation and BSD 2-Clause and PSF 2.1.1 and GPL 3.0 |
| [entrypoints](https://github.com/takluyver/entrypoints) | 0.2.3 | Discover and load entry points from installed packages. / MIT License |
| [et\_xmlfile](https://bitbucket.org/openpyxl/et_xmlfile) | 1.0.1 | An implementation of lxml.xmlfile for the standard library / MIT |
| [fastcache](https://github.com/pbrady/fastcache) | 1.0.2 | C implementation of Python 3 lru\_cache / MIT |
| [filelock](https://github.com/benediktschmitt/py-filelock) | 2.0.13 | A platform independent file lock. / Public Domain |
| [flask](http://flask.pocoo.org) | 0.12.2 | A microframework based on Werkzeug, Jinja2 and good intentions. / BSD 3-Clause |
| [flask-cors](https://github.com/corydolphin/flask-cors) | 3.0.3 | A Flask extension adding a decorator for CORS support / MIT |
| [freetype](https://www.freetype.org/) | 2.8 | A Free, High-Quality, and Portable Font Engine / GPL-2.0 and FreeType |
| [get\_terminal\_size](https://github.com/chrippa/backports.shutil_get_terminal_size) | 1.0.0 | Get the size of the terminal window. / MIT |
| [gevent](http://www.gevent.org/) | 1.2.2 | Coroutine-based network library / MIT |
| [glob2](https://github.com/miracle2k/python-glob2) | 0.6 | Version of the glob module that supports recursion via \*\*, and can capture patterns. / BSD-2-Clause |
| [greenlet](https://github.com/python-greenlet/greenlet) | 0.4.12 | Lightweight in-process concurrent programming / MIT |
| [h5py](http://www.h5py.org/) | 2.7.1 | Read and write HDF5 files from Python. / BSD 3-Clause |
| [hdf5](http://www.hdfgroup.org/HDF5/) | 1.10.1 | HDF5 is a data model, library, and file format for storing and managing data / HDF5 |
| [heapdict](http://stutzbachenterprises.com/) | 1.0.0 | A heap with decrease-key and increase-key operations / BSD 3-Clause |
| [html5lib](https://github.com/html5lib/html5lib-python) | 1.0.1 | HTML parser based on the WHATWG HTML specification / MIT |
| [icc\_rt](https://software.intel.com/en-us/node/522690) | 2017.0.4 | Intel runtime libraries for C, C++ and Fortran compilers / Intel proprietary |
| [icu](http://site.icu-project.org/) | 58.2 | International Components for Unicode. / MIT |
| [idna](https://github.com/kjd/idna) | 2.6 | Internationalized Domain Names in Applications (IDNA). / BSD Like |
| [imageio](http://imageio.github.io) | 2.2.0 | a Python library for reading and writing image data / BSD 2-Clause |
| [imagesize](https://github.com/shibukawa/imagesize_py) | 0.7.1 | Getting image size from png/jpeg/jpeg2000/gif file / MIT |
| [intel-openmp](https://software.intel.com/en-us/node/522690) | 2018.0.0 | Math library for Intel and compatible processors / proprietary - Intel |
| [ipykernel](http://ipython.org) | 4.8.0 | IPython Kernel for Jupyter / BSD 3-clause |
| [ipython](http://ipython.org/) | 6.2.1 | IPython: Productive Interactive Computing / BSD 3-clause |
| [ipython\_genutils](http://ipython.org) | 0.2.0 | vestigial utilities from IPython / BSD 3-Clause |
| [ipywidgets](https://github.com/ipython/ipywidgets) | 7.1.1 | Jupyter Interactive Widgets / BSD 3-clause |
| [isort](https://github.com/timothycrosley/isort) | 4.2.15 | A Python utility / library to sort Python imports. / MIT |
| [itsdangerous](https://github.com/pallets/itsdangerous) | 0.24 | Various helpers to pass trusted data to untrusted environments. / BSD 3-Clause |
| [jdcal](https://github.com/phn/jdcal) | 1.3 | Julian dates from proleptic Gregorian and Julian calendars. / BSD 2-Clause |
| [jedi](https://github.com/davidhalter/jedi/) | 0.11.1 | An autocompletion tool for Python that can be used for text editors. / MIT |
| [jinja2](http://jinja.pocoo.org) | 2.10 | An easy to use stand-alone template engine written in pure python. / 3-Clause BSD |
| [jpeg](http://www.ijg.org/) | 9b | read/write jpeg COM, EXIF, IPTC medata / Custom free software license |
| [jsonschema](https://github.com/Julian/jsonschema) | 2.6.0 | An implementation of JSON Schema validation for Python / MIT |
| [jupyter](http://jupyter.org) | 1.0.0 | Jupyter metapackage. Install all the Jupyter components in one go. / BSD 3-Clause |
| [jupyter\_client](http://jupyter.org) | 5.2.2 | Jupyter protocol implementation and client libraries / BSD 3-clause |
| [jupyter\_console](http://jupyter.org) | 5.2.0 | Jupyter terminal console / BSD 3-Clause |
| [jupyter\_core](http://jupyter.org) | 4.4.0 | Core common functionality of Jupyter projects. / BSD 3-clause |
| [jupyterlab](https://github.com/jupyterlab/jupyterlab) | 0.31.4 | A pre-alpha version of a computational environment for Jupyter. / BSD 3-Clause |
| [jupyterlab\_launcher](http://github.com/jupyterlab/jupyterlab_launcher) | 0.10.2 | A Launcher for JupyterLab based applications. / BSD 3-Clause |
| [lazy-object-proxy](https://github.com/ionelmc/python-lazy-object-proxy) | 1.3.1 | A fast and thorough lazy object proxy. / BSD 2-Clause |
| [libcurl](http://curl.haxx.se/) | 7.58.0 | tool and library for transferring data with URL syntax / MIT/X derivate (`<http://curl.haxx.se/docs/copyright.html>`) |
| [libiconv](https://www.gnu.org/software/libiconv/) | 1.15 | Provides iconv for systems which don’t have one (or that cannot convert from/to Unicode.) / GPL and LGPL |
| [libpng](http://www.libpng.org/pub/png/libpng.html) | 1.6.34 | PNG reference library. / zlib/libpng |
| [libssh2](https://www.libssh2.org/) | 1.8.0 | the SSH library / BSD 3-Clause |
| [libtiff](http://www.libtiff.org/) | 4.0.9 | Support for the Tag Image File Format (TIFF). / HPND |
| [libxml2](http://xmlsoft.org/) | 2.9.7 | The XML C parser and toolkit of Gnome / MIT |
| [libxslt](http://xmlsoft.org/XSLT/) | 1.1.32 | The XSLT C library developed for the GNOME project / MIT |
| [llvmlite](https://github.com/numba/llvmlite) | 0.21.0 | A lightweight LLVM python binding for writing JIT compilers / New BSD License |
| [locket](https://github.com/mwilliamson/locket.py) | 0.2.0 | File-based locks for Python for Linux and Windows / BSD 2-Clause |
| [lxml](http://lxml.de/) | 4.1.1 | Pythonic binding for the C libraries libxml2 and libxslt. / BSD 3-Clause, GPL-2.0, ZPL-2.0, and ElementTree |
| [lzo](http://www.oberhumer.com/opensource/lzo/) | 2.10 | LZO is a portable lossless data compression library written in ANSI C. / GPL v2+ |
| [markupsafe](https://www.palletsprojects.com/p/markupsafe/) | 1.0 | A Python module that implements the jinja2.Markup string / BSD 3-Clause |
| [matplotlib](http://matplotlib.org/) | 2.1.2 | Publication quality figures in Python / PSF-based |
| [mccabe](https://github.com/PyCQA/mccabe) | 0.6.1 | McCabe complexity checker for Python / MIT |
| [menuinst](https://github.com/ContinuumIO/menuinst) | 1.4.11 | cross platform menu item installation / BSD |
| [mistune](https://github.com/lepture/mistune) | 0.8.3 | The fastest markdown parser in pure Python. / BSD 3-Clause |
| [mkl](https://software.intel.com/en-us/mkl) | 2018.0.1 | Math library for Intel and compatible processors / proprietary - Intel |
| [mkl-service](https://github.com/ContinuumIO/mkl-service) | 1.1.2 | Python bindings to MKL service functions / 3-clause BSD |
| [mpmath](http://mpmath.org) | 1.0.0 | Python library for arbitrary-precision floating-point arithmetic / BSD 3-Clause |
| [msgpack-python](http://msgpack.org/) | 0.5.1 | MessagePack (de)serializer. / Apache 2.0 |
| [multipledispatch](https://github.com/mrocklin/multipledispatch/) | 0.4.9 | Multiple dispatch in Python / BSD 3-Clause |
| [navigator-updater](https://github.com/ContinuumIO/navigator-updater) | 0.1.0 | Anaconda Navigator Updater / proprietary - Continuum Analytics, Inc. |
| [nbconvert](http://jupyter.org) | 5.3.1 | Converting Jupyter Notebooks / BSD 3-Clause |
| [nbformat](http://jupyter.org) | 4.4.0 | The reference implementation of the Jupyter Notebook format / BSD 3-clause |
| [networkx](https://networkx.github.io/) | 2.1 | Python package for creating and manipulating complex networks / BSD 3-Clause |
| [nltk](http://nltk.org/) | 3.2.5 | Build Python programs to work with human language data / Apache 2.0 |
| [nose](http://readthedocs.org/docs/nose/) | 1.3.7 | Nose extends unittest to make testing easier / LGPL-2.1 |
| [notebook](http://jupyter.org) | 5.4.0 | A web-based notebook environment for interactive computing / BSD 3-clause |
| [numba](http://numba.pydata.org/) | 0.36.2 | a just-in-time Python function compiler based on LLVM / BSD |
| [numexpr](https://github.com/pydata/numexpr) | 2.6.4 | Fast numerical expression evaluator for NumPy. / MIT |
| [numpy](http://numpy.scipy.org/) | 1.14.0 | Array processing for numbers, strings, records, and objects. / BSD 3-Clause |
| [numpydoc](https://github.com/numpy/numpydoc) | 0.7.0 | Sphinx extension to support docstrings in Numpy format / BSD 3-Clause |
| [odo](http://odo.pydata.org) | 0.5.1 | Data migration in Python / BSD-3-Clause |
| [olefile](http://www.decalage.info/python/olefileio) | 0.45.1 | parse, read and write Microsoft OLE2 files / BSD License 2-Clause |
| [openpyxl](https://openpyxl.readthedocs.io) | 2.4.10 | A Python library to read/write Excel 2010 xlsx/xlsm files / MIT |
| [openssl](http://www.openssl.org/) | 1.0.2n | OpenSSL is an open-source implementation of the SSL and TLS protocols / OpenSSL |
| [packaging](https://github.com/pypa/packaging) | 16.8 | Core utilities for Python packages / Apache 2.0 or BSD 2-Clause |
| [pandas](http://pandas.pydata.org) | 0.22.0 | High-performance, easy-to-use data structures and data analysis tools. / BSD 3-clause |
| [pandoc](http://johnmacfarlane.net/pandoc/) | 1.19.2.1 | Universal markup converter (repackaged binaries). / GPL-2.0 |
| [pandocfilters](https://github.com/jgm/pandocfilters) | 1.4.2 | A python module for writing pandoc filters / BSD-3-Clause |
| [parso](https://github.com/davidhalter/parso) | 0.1.1 | A Python Parser / MIT License |
| [partd](https://github.com/dask/partd) | 0.3.8 | Data structure for on-disk shuffle operations / BSD 3-Clause |
| [path.py](https://github.com/jaraco/path.py) | 10.5 | A module wrapper for os.path / MIT |
| [pathlib2](https://github.com/mcmtroffaes/pathlib2) | 2.3.0 | Fork of pathlib aiming to support the full stdlib Python API. / MIT |
| [patsy](https://github.com/pydata/patsy) | 0.5.0 | Describing statistical models in Python using symbolic formulas / BSD-2-Clause, PSF2 |
| [pep8](http://pep8.readthedocs.org/) | 1.7.1 | Python style guide checker / MIT |
| [pickleshare](https://github.com/vivainio/pickleshare) | 0.7.4 | Tiny ‘shelve’-like database with concurrency support / MIT |
| [pillow](http://python-imaging.github.io/) | 5.0.0 | Pillow is the friendly PIL fork by Alex Clark and Contributors. / PIL |
| [pip](https://pip.pypa.io/en/stable/) | 9.0.1 | PyPA recommended tool for installing Python packages / MIT |
| [pkginfo](https://code.launchpad.net/~tseaver/pkginfo/trunk) | 1.4.1 | Query metadatdata from sdists / bdists / installed packages. / MIT |
| [pluggy](https://github.com/pytest-dev/pluggy) | 0.6.0 | Plugin registration and hook calling for Python / MIT |
| [ply](http://www.dabeaz.com/ply/index.html) | 3.10 | Python Lex-Yacc / BSD 3-clause |
| [progress](https://github.com/verigak/progress) | 1.3 | Easy progress reporting for Python / ISC |
| [prompt\_toolkit](https://github.com/jonathanslenders/python-prompt-toolkit) | 1.0.15 | Library for building powerful interactive command lines in Python / BSD 3-clause |
| [psutil](https://github.com/giampaolo/psutil) | 5.4.3 | A cross-platform process and system utilities module for Python / BSD 3-Clause |
| [py](https://github.com/pytest-dev/py) | 1.5.2 | library with cross-python path, ini-parsing, io, code, log facilities / MIT |
| [pycodestyle](https://pycodestyle.readthedocs.io/) | 2.3.1 | Python style guide checker / MIT |
| [pycosat](https://github.com/ContinuumIO/pycosat) | 0.6.3 | Bindings to picosat (a SAT solver) / MIT |
| [pycparser](https://github.com/eliben/pycparser) | 2.18 | Complete C99 parser in pure Python / BSD 3-clause |
| [pycrypto](http://www.pycrypto.org/) | 2.6.1 | Cryptographic modules for Python. / Public Domain |
| [pycurl](http://pycurl.sourceforge.net/) | 7.43.0.1 | A Python Interface To The cURL library / LGPL, MIT |
| [pyflakes](https://github.com/PyCQA/pyflakes) | 1.6.0 | Pyflakes analyzes programs and detects various errors. / MIT |
| [pygments](http://pygments.org/) | 2.2.0 | Generic syntax highlighting package / BSD 2-clause |
| [pylint](http://www.pylint.org/) | 1.8.2 | python code static checker / GPL |
| [pyodbc](https://github.com/mkleehammer/pyodbc) | 4.0.22 | DB API Module for ODBC / MIT |
| [pyopenssl](https://github.com/pyca/pyopenssl) | 17.5.0 | Python wrapper module around the OpenSSL library / Apache 2.0 |
| [pyparsing](http://pyparsing.wikispaces.com/) | 2.2.0 | Create and execute simple grammars / MIT |
| [pyqt](http://www.riverbankcomputing.co.uk/software/pyqt) | 5.6.0 | Python binding of the cross-platform GUI toolkit Qt. / Commercial, GPL-2.0, GPL-3.0 |
| [pysocks](https://github.com/Anorov/PySocks) | 1.6.7 | A Python SOCKS client module. See [Anorov/PySocks](https://github.com/Anorov/PySocks) for more information. / BSD 3-Clause |
| [pytables](http://www.pytables.org) | 3.4.2 | Brings together Python, HDF5 and NumPy to easily handle large amounts of data. / BSD 3-Clause |
| [pytest](https://docs.pytest.org/en/latest/) | 3.3.2 | Simple and powerful testing with Python. / MIT |
| [python](http://www.python.org/) | 3.6.4 | General purpose programming language / PSF |
| [python-dateutil](https://dateutil.readthedocs.org/) | 2.6.1 | Extensions to the standard Python datetime module. / BSD 3-clause |
| [pytz](http://pythonhosted.org/pytz/) | 2017.3 | World timezone definitions, modern and historical. / MIT |
| [pywavelets](https://github.com/PyWavelets/pywt) | 0.5.2 | Discrete Wavelet Transforms in Python. / MIT |
| [pywin32](https://sourceforge.net/projects/pywin32) | 222 | Python extensions for Windows / PSF |
| [pywinpty](https://github.com/spyder-ide/pywinpty) | 0.5 | Python bindings for the winpty library / MIT |
| [pyyaml](http://pyyaml.org/wiki/PyYAML) | 3.12 | YAML parser and emitter for Python / MIT |
| [pyzmq](https://github.com/zeromq/pyzmq) | 16.0.3 | Python bindings for zeromq / BSD 3-clause |
| [qt](http://qt-project.org) | 5.6.2 | Qt is a cross-platform application and UI framework. / LGPL-3.0 |
| [qtawesome](https://github.com/spyder-ide/qtawesome) | 0.4.4 | Iconic fonts in PyQt and PySide applications / MIT |
| [qtconsole](http://jupyter.org) | 4.3.1 | Jupyter Qt console / BSD 3-Clause |
| [qtpy](https://github.com/spyder-ide/qtpy) | 1.3.1 | Abstraction layer for PyQt5/PyQt4/PySide / MIT |
| [requests](http://python-requests.org) | 2.18.4 | Python HTTP for Humans. / Apache 2.0 |
| [rope](https://github.com/python-rope/rope) | 0.10.7 | A python refactoring library… / GPL 2.0 |
| [ruamel\_yaml](https://bitbucket.org/ruamel/yaml) | 0.15.35 | A patched copy of ruamel.yaml. / MIT |
| [scikit-image](http://scikit-image.org/) | 0.13.1 | Image processing routines for SciPy. / BSD 3-Clause |
| [scikit-learn](http://scikit-learn.org/) | 0.19.1 | A set of python modules for machine learning and data mining / BSD 3-Clause |
| [scipy](http://www.scipy.org/) | 1.0.0 | Scientific Library for Python / BSD 3-Clause |
| [seaborn](http://stanford.edu/~mwaskom/software/seaborn/) | 0.8.1 | Statistical data visualization / BSD 3-Clause |
| [send2trash](https://github.com/hsoft/send2trash) | 1.4.2 | Python library to natively send files to Trash (or Recycle bin) on all platforms. / BSD-3-Clause |
| [setuptools](https://github.com/pypa/setuptools) | 38.4.0 | Download, build, install, upgrade, and uninstall Python packages / MIT |
| [simplegeneric](http://cheeseshop.python.org/pypi/simplegeneric) | 0.8.1 | Simple generic functions (similar to Python’s own len(), pickle.dump(), etc.) / Zope Public |
| [singledispatch](http://docs.python.org/3/library/functools.html#functools.singledispatch) | 3.4.0.3 | Transforms a function into a single-dispatch generic function / MIT |
| [sip](http://www.riverbankcomputing.com/software/sip/intro) | 4.18.1 | Create Python bindings for C and C++ libraries / GPL-3.0 |
| [six](http://pypi.python.org/pypi/six/) | 1.11.0 | Python 2 and 3 compatibility utilities / MIT |
| [snowballstemmer](https://github.com/shibukawa/snowball_py) | 1.2.1 | Snowball stemming library collection for Python / BSD-2-Clause |
| [sortedcollections](http://www.grantjenks.com/docs/sortedcollections/) | 0.5.3 | Python Sorted Collections / Apache-2.0 |
| [sortedcontainers](http://www.grantjenks.com/docs/sortedcontainers/) | 1.5.9 | Python Sorted Container Types: SortedList, SortedDict, and SortedSet / Apache 2.0 |
| [sphinx](http://www.sphinx-doc.org) | 1.6.6 | Sphinx is a tool that makes it easy to create intelligent and beautiful documentation / BSD 2-clause |
| sphinxcontrib | 1.0 | Python namespace for sphinxcontrib / BSD |
| [sphinxcontrib-websupport](https://pypi.python.org/pypi/sphinxcontrib-websupport) | 1.0.1 | Sphinx API for Web Apps / BSD-2-Clause |
| [spyder](https://github.com/spyder-ide/spyder) | 3.2.6 | Scientific PYthon Development EnviRonment / MIT |
| [sqlalchemy](http://www.sqlalchemy.org/) | 1.2.1 | Database Abstraction Library. / MIT |
| [sqlite](http://www.sqlite.org/) | 3.22.0 | Implements a self-contained, zero-configuration, SQL database engine. / Public-Domain (`<http://www.sqlite.org/copyright.html>`) |
| [statsmodels](https://www.statsmodels.org) | 0.8.0 | Statistical computations and models for use with SciPy / BSD 3-Clause |
| [sympy](http://sympy.org) | 1.1.1 | Python library for symbolic mathematics / 3-clause BSD |
| [tblib](https://github.com/ionelmc/python-tblib) | 1.3.2 | Traceback serialization library. / BSD 2-Clause |
| [terminado](http://github.com/mitsuhiko/markupsafe) | 0.8.1 | Terminals served by tornado websockets / BSD 3-clause |
| [testpath](https://testpath.readthedocs.io) | 0.3.1 | Testpath is a collection of utilities for Python code working with files and commands. / MIT |
| [tk](http://www.tcl.tk/) | 8.6.7 | A dynamic programming language with GUI support. Bundles Tcl and Tk. / Tcl/Tk |
| [toolz](http://toolz.readthedocs.org/) | 0.9.0 | A functional standard library for Python. / BSD 3-Clause |
| [tornado](http://www.tornadoweb.org/) | 4.5.3 | A Python web framework and asynchronous networking library, originally developed at FriendFeed. / Apache 2.0 |
| [traitlets](http://ipython.org/) | 4.3.2 | Configuration system for Python applications / BSD 3-clause |
| [typing](https://docs.python.org/3.5/library/typing.html) | 3.6.2 | Type Hints for Python - backport for `Python<3.5` / PSF |
| [unicodecsv](https://github.com/jdunck/python-unicodecsv) | 0.14.1 | Drop-in replacement for csv module which supports unicode strings / BSD |
| [urllib3](https://urllib3.readthedocs.io/) | 1.22 | HTTP library with thread-safe connection pooling, file post, and more. / MIT |
| [vc](https://github.com/conda/conda/wiki/VC-features) | 14 | A meta-package to track VC features. / Modified BSD License (3-clause) |
| [vs2015\_runtime](http://www.microsoft.com) | 14.0.25123 | Bundles of the MSVC 14 (VS 2015) runtime / Proprietary |
| [wcwidth](https://github.com/jquast/wcwidth) | 0.1.7 | Measures number of Terminal column cells of wide-character codes. / MIT |
| [webencodings](https://github.com/gsnedders/python-webencodings) | 0.5.1 | Character encoding aliases for legacy web content / BSD 3-Clause |
| [werkzeug](http://werkzeug.pocoo.org/) | 0.14.1 | The Python WSGI Utility Library. / BSD 3-Clause |
| [wheel](https://bitbucket.org/pypa/wheel/) | 0.30.0 | A built-package format for Python. / MIT |
| [widgetsnbextension](http://ipython.org) | 3.1.0 | IPython HTML widgets for Jupyter / BSD 3-clause |
| [win\_inet\_pton](https://github.com/hickeroar/win_inet_pton) | 1.0.1 | Native inet\_pton and inet\_ntop implementation for Python on Windows (with ctypes). / PUBLIC-DOMAIN |
| [win\_unicode\_console](https://github.com/Drekin/win-unicode-console) | 0.5 | A Python package to enable Unicode input and display when running Python from Windows console. / MIT |
| [wincertstore](https://bitbucket.org/tiran/wincertstore) | 0.2 | Python module to extract CA and CRL certs from Windows’ cert store (ctypes based). / PSF 2 |
| [winpty](https://github.com/rprichard/winpty) | 0.4.3 | Winpty provides an interface similar to a Unix pty-master for communicating with Windows console programs. / MIT |
| [wrapt](https://github.com/GrahamDumpleton/wrapt) | 1.10.11 | Module for decorators, wrappers and monkey patching. / BSD 2-Clause |
| [xlrd](http://www.python-excel.org/) | 1.1.0 | Library for developers to extract data from Microsoft Excel (tm) spreadsheet files / BSD 3-Clause and BSD with advertising |
| [xlsxwriter](https://xlsxwriter.readthedocs.io/) | 1.0.2 | A Python module for creating Excel XLSX files / BSD 2-Clause |
| [xlwings](http://xlwings.org/) | 0.11.5 | Interact with Excel from Python and vice versa / 3-clause BSD |
| [xlwt](http://www.python-excel.org/) | 1.3.0 | Writing data and formatting information to Excel files / BSD |
| [yaml](http://pyyaml.org/wiki/LibYAML) | 0.1.7 | A C library for parsing and emitting YAML. / MIT |
| [zict](http://github.com/mrocklin/zict) | 0.1.3 | Composable Dictionary Classes / BSD 3-Clause |
| [zlib](http://zlib.net/) | 1.2.11 | Massively spiffy yet delicately unobtrusive compression library / zlib |
| Name | Version | Summary / License |
|---|---|---|
| [\_ipyw\_jlab\_nb\_ext\_conf](https://github.com/ContinuumIO/anaconda-nb-extensions-meta-config) | 0.1.0 | A configuration metapackage for enabling Anaconda-bundled jupyter extensions / BSD |
| [alabaster](http://www.sphinx-doc.org/en/stable/index.html) | 0.7.10 | Configurable, Python 2+3 compatible Sphinx theme. / BSD 3-Clause |
| [anaconda-client](https://github.com/Anaconda-Platform/anaconda-client) | 1.6.9 | Anaconda Cloud command line client library / BSD 3-Clause |
| [anaconda-navigator](https://github.com/ContinuumIO/navigator) | 1.7.0 | Anaconda Navigator / proprietary - Continuum Analytics, Inc. |
| [anaconda-project](https://github.com/Anaconda-Platform/anaconda-project) | 0.8.2 | Tool for encapsulating, running, and reproducing data science projects / BSD 3-Clause |
| [asn1crypto](https://github.com/wbond/asn1crypto) | 0.24.0 | Python ASN.1 library with a focus on performance and a pythonic API / MIT |
| [astroid](https://www.astroid.org/) | 1.6.1 | A abstract syntax tree for Python with inference support. / LGPL 2.1 |
| [astropy](http://www.astropy.org/) | 2.0.3 | Community-developed Python Library for Astronomy / BSD |
| [attrs](https://attrs.readthedocs.io/en/stable/) | 17.4.0 | attrs is the Python package that will bring back the joy of writing classes by relieving you from the drudgery of implementing object protocols (aka dunder methods). / MIT |
| [babel](http://babel.pocoo.org/) | 2.5.3 | Utilities to internationalize and localize Python applications / BSD 3-clause |
| [backports](https://bitbucket.org/brandon/backports) | 1.0 | / BSD |
| [backports.shutil\_get\_terminal\_size](https://github.com/chrippa/backports.shutil_get_terminal_size) | 1.0.0 | A backport of the get\_terminal\_size function from Python 3.3’s shutil. / MIT |
| [beautifulsoup4](http://www.crummy.com/software/BeautifulSoup/) | 4.6.0 | Python library designed for screen-scraping / MIT |
| [bitarray](https://github.com/ilanschnell/bitarray) | 0.8.1 | efficient arrays of booleans – C extension / PSF |
| [bkcharts](http://github.com/bokeh/bkcharts) | 0.2 | High level chart types built on top of Bokeh / BSD 3-Clause |
| [blaze](http://blaze.pydata.org) | 0.11.3 | NumPy and Pandas interface to big data / BSD 3-Clause |
| [bleach](https://github.com/mozilla/bleach) | 2.1.2 | Easy, whitelist-based HTML-sanitizing tool / Apache-2.0 |
| [bokeh](http://bokeh.pydata.org/) | 0.12.13 | Statistical and novel interactive HTML plots for Python / BSD 3-Clause |
| [boto](https://github.com/boto/boto/) | 2.48.0 | Amazon Web Services Library / MIT |
| [bottleneck](http://berkeleyanalytics.com/bottleneck) | 1.2.1 | Fast NumPy array functions written in Cython. / BSD 2-Clause |
| [bzip2](http://www.bzip.org/) | 1.0.6 | high-quality data compressor / bzip2 |
| [ca-certificates](https://github.com/conda-forge/ca-certificates-feedstock) | 2017.08.26 | Certificates for use with other packages. / ISC |
| [certifi](http://certifi.io/) | 2018.1.18 | Python package for providing Mozilla’s CA Bundle. / ISC |
| [cffi](https://bitbucket.org/cffi/cffi) | 1.11.4 | Foreign Function Interface for Python calling C code. / MIT |
| [chardet](https://github.com/chardet/chardet) | 3.0.4 | Universal character encoding detector / LGPL2 |
| [click](http://click.pocoo.org/) | 6.7 | A simple wrapper around optparse for powerful command line utilities. / BSD 3-Clause |
| [cloudpickle](https://github.com/cloudpipe/cloudpickle) | 0.5.2 | Extended pickling support for Python objects / BSD 3-Clause |
| [clyent](https://github.com/Anaconda-Platform/clyent) | 1.2.2 | Command line client library for windows and posix / BSD 3-Clause |
| [colorama](https://github.com/tartley/colorama) | 0.3.9 | Cross-platform colored terminal text. / BSD 3-Clause |
| [comtypes](http://starship.python.net/crew/theller/comtypes/) | 1.1.4 | pure Python COM package / MIT |
| [conda](https://conda.io) | 4.4.10 | OS-agnostic, system-level binary package and environment manager. / BSD 3-Clause |
| [conda-build](https://github.com/conda/conda-build) | 3.4.1 | tools for building conda packages / BSD 3-Clause |
| [conda-env](https://github.com/conda/conda-env) | 2.6.0 | Tools for interacting with conda environments. / BSD 3-Clause |
| [conda-verify](https://github.com/conda/conda-verify) | 2.0.0 | tool for validating conda recipes and conda packages / BSD 3-Clause |
| console\_shortcut | 0.1.1 | Console shortcut creator for Windows (using menuinst) / BSD |
| [contextlib2](http://contextlib2.readthedocs.org) | 0.5.5 | Backports and enhancements for the contextlib module / PSF |
| [cryptography](https://github.com/pyca/cryptography) | 2.1.4 | Provides cryptographic recipes and primitives to Python developers / Apache 2.0 or BSD 3-Clause, PSF 2 |
| [curl](http://curl.haxx.se/) | 7.58.0 | tool and library for transferring data with URL syntax / MIT/X derivate (`<http://curl.haxx.se/docs/copyright.html>`) |
| [cycler](http://matplotlib.org/cycler) | 0.10.0 | Composable style cycles. / BSD 3-Clause |
| [cython](http://www.cython.org/) | 0.27.3 | The Cython compiler for writing C extensions for the Python language / Apache-2.0 |
| [cytoolz](https://github.com/pytoolz/cytoolz) | 0.9.0 | Cython implementation of Toolz. High performance functional utilities. / BSD 3-Clause |
| [dask](http://github.com/dask/dask/) | 0.16.1 | Parallel Python with task scheduling / BSD 3-Clause |
| [dask-core](http://github.com/dask/dask/) | 0.16.1 | Parallel Python with task scheduling / BSD 3-Clause |
| [datashape](http://datashape.pydata.org) | 0.5.4 | A data description language. / BSD 2-Clause |
| [decorator](https://github.com/micheles/decorator) | 4.2.1 | Better living through Python with decorators. / BSD 3-Clause |
| [distlib](https://bitbucket.org/pypa/distlib) | 0.2.5 | Distribution utilities / Python Software Foundation License |
| [distributed](http://distributed.readthedocs.io/en/latest/) | 1.20.2 | Distributed computing with Dask / BSD 3-Clause |
| [docutils](http://docutils.sourceforge.net/) | 0.14 | Docutils – Python Documentation Utilities / Public Domain Dedictation and BSD 2-Clause and PSF 2.1.1 and GPL 3.0 |
| [entrypoints](https://github.com/takluyver/entrypoints) | 0.2.3 | Discover and load entry points from installed packages. / MIT License |
| [et\_xmlfile](https://bitbucket.org/openpyxl/et_xmlfile) | 1.0.1 | An implementation of lxml.xmlfile for the standard library / MIT |
| [fastcache](https://github.com/pbrady/fastcache) | 1.0.2 | C implementation of Python 3 lru\_cache / MIT |
| [filelock](https://github.com/benediktschmitt/py-filelock) | 2.0.13 | A platform independent file lock. / Public Domain |
| [flask](http://flask.pocoo.org) | 0.12.2 | A microframework based on Werkzeug, Jinja2 and good intentions. / BSD 3-Clause |
| [flask-cors](https://github.com/corydolphin/flask-cors) | 3.0.3 | A Flask extension adding a decorator for CORS support / MIT |
| [freetype](https://www.freetype.org/) | 2.8 | A Free, High-Quality, and Portable Font Engine / GPL-2.0 and FreeType |
| [get\_terminal\_size](https://github.com/chrippa/backports.shutil_get_terminal_size) | 1.0.0 | Get the size of the terminal window. / MIT |
| [gevent](http://www.gevent.org/) | 1.2.2 | Coroutine-based network library / MIT |
| [glob2](https://github.com/miracle2k/python-glob2) | 0.6 | Version of the glob module that supports recursion via \*\*, and can capture patterns. / BSD-2-Clause |
| [greenlet](https://github.com/python-greenlet/greenlet) | 0.4.12 | Lightweight in-process concurrent programming / MIT |
| [h5py](http://www.h5py.org/) | 2.7.1 | Read and write HDF5 files from Python. / BSD 3-Clause |
| [hdf5](http://www.hdfgroup.org/HDF5/) | 1.10.1 | HDF5 is a data model, library, and file format for storing and managing data / HDF5 |
| [heapdict](http://stutzbachenterprises.com/) | 1.0.0 | A heap with decrease-key and increase-key operations / BSD 3-Clause |
| [html5lib](https://github.com/html5lib/html5lib-python) | 1.0.1 | HTML parser based on the WHATWG HTML specification / MIT |
| [icc\_rt](https://software.intel.com/en-us/node/522690) | 2017.0.4 | Intel runtime libraries for C, C++ and Fortran compilers / Intel proprietary |
| [icu](http://site.icu-project.org/) | 58.2 | International Components for Unicode. / MIT |
| [idna](https://github.com/kjd/idna) | 2.6 | Internationalized Domain Names in Applications (IDNA). / BSD Like |
| [imageio](http://imageio.github.io) | 2.2.0 | a Python library for reading and writing image data / BSD 2-Clause |
| [imagesize](https://github.com/shibukawa/imagesize_py) | 0.7.1 | Getting image size from png/jpeg/jpeg2000/gif file / MIT |
| [intel-openmp](https://software.intel.com/en-us/node/522690) | 2018.0.0 | Math library for Intel and compatible processors / proprietary - Intel |
| [ipykernel](http://ipython.org) | 4.8.0 | IPython Kernel for Jupyter / BSD 3-clause |
| [ipython](http://ipython.org/) | 6.2.1 | IPython: Productive Interactive Computing / BSD 3-clause |
| [ipython\_genutils](http://ipython.org) | 0.2.0 | vestigial utilities from IPython / BSD 3-Clause |
| [ipywidgets](https://github.com/ipython/ipywidgets) | 7.1.1 | Jupyter Interactive Widgets / BSD 3-clause |
| [isort](https://github.com/timothycrosley/isort) | 4.2.15 | A Python utility / library to sort Python imports. / MIT |
| [itsdangerous](https://github.com/pallets/itsdangerous) | 0.24 | Various helpers to pass trusted data to untrusted environments. / BSD 3-Clause |
| [jdcal](https://github.com/phn/jdcal) | 1.3 | Julian dates from proleptic Gregorian and Julian calendars. / BSD 2-Clause |
| [jedi](https://github.com/davidhalter/jedi/) | 0.11.1 | An autocompletion tool for Python that can be used for text editors. / MIT |
| [jinja2](http://jinja.pocoo.org) | 2.10 | An easy to use stand-alone template engine written in pure python. / 3-Clause BSD |
| [jpeg](http://www.ijg.org/) | 9b | read/write jpeg COM, EXIF, IPTC medata / Custom free software license |
| [jsonschema](https://github.com/Julian/jsonschema) | 2.6.0 | An implementation of JSON Schema validation for Python / MIT |
| [jupyter](http://jupyter.org) | 1.0.0 | Jupyter metapackage. Install all the Jupyter components in one go. / BSD 3-Clause |
| [jupyter\_client](http://jupyter.org) | 5.2.2 | Jupyter protocol implementation and client libraries / BSD 3-clause |
| [jupyter\_console](http://jupyter.org) | 5.2.0 | Jupyter terminal console / BSD 3-Clause |
| [jupyter\_core](http://jupyter.org) | 4.4.0 | Core common functionality of Jupyter projects. / BSD 3-clause |
| [jupyterlab](https://github.com/jupyterlab/jupyterlab) | 0.31.5 | A pre-alpha version of a computational environment for Jupyter. / BSD 3-Clause |
| [jupyterlab\_launcher](http://github.com/jupyterlab/jupyterlab_launcher) | 0.10.2 | A Launcher for JupyterLab based applications. / BSD 3-Clause |
| [lazy-object-proxy](https://github.com/ionelmc/python-lazy-object-proxy) | 1.3.1 | A fast and thorough lazy object proxy. / BSD 2-Clause |
| [libcurl](http://curl.haxx.se/) | 7.58.0 | tool and library for transferring data with URL syntax / MIT/X derivate (`<http://curl.haxx.se/docs/copyright.html>`) |
| [libiconv](https://www.gnu.org/software/libiconv/) | 1.15 | Provides iconv for systems which don’t have one (or that cannot convert from/to Unicode.) / GPL and LGPL |
| [libpng](http://www.libpng.org/pub/png/libpng.html) | 1.6.34 | PNG reference library. / zlib/libpng |
| [libssh2](https://www.libssh2.org/) | 1.8.0 | the SSH library / BSD 3-Clause |
| [libtiff](http://www.libtiff.org/) | 4.0.9 | Support for the Tag Image File Format (TIFF). / HPND |
| [libxml2](http://xmlsoft.org/) | 2.9.7 | The XML C parser and toolkit of Gnome / MIT |
| [libxslt](http://xmlsoft.org/XSLT/) | 1.1.32 | The XSLT C library developed for the GNOME project / MIT |
| [llvmlite](https://github.com/numba/llvmlite) | 0.21.0 | A lightweight LLVM python binding for writing JIT compilers / New BSD License |
| [locket](https://github.com/mwilliamson/locket.py) | 0.2.0 | File-based locks for Python for Linux and Windows / BSD 2-Clause |
| [lxml](http://lxml.de/) | 4.1.1 | Pythonic binding for the C libraries libxml2 and libxslt. / BSD 3-Clause, GPL-2.0, ZPL-2.0, and ElementTree |
| [lzo](http://www.oberhumer.com/opensource/lzo/) | 2.10 | LZO is a portable lossless data compression library written in ANSI C. / GPL v2+ |
| [markupsafe](https://www.palletsprojects.com/p/markupsafe/) | 1.0 | A Python module that implements the jinja2.Markup string / BSD 3-Clause |
| [matplotlib](http://matplotlib.org/) | 2.1.2 | Publication quality figures in Python / PSF-based |
| [mccabe](https://github.com/PyCQA/mccabe) | 0.6.1 | McCabe complexity checker for Python / MIT |
| [menuinst](https://github.com/ContinuumIO/menuinst) | 1.4.11 | cross platform menu item installation / BSD |
| [mistune](https://github.com/lepture/mistune) | 0.8.3 | The fastest markdown parser in pure Python. / BSD 3-Clause |
| [mkl](https://software.intel.com/en-us/mkl) | 2018.0.1 | Math library for Intel and compatible processors / proprietary - Intel |
| [mkl-service](https://github.com/ContinuumIO/mkl-service) | 1.1.2 | Python bindings to MKL service functions / 3-clause BSD |
| [mpmath](http://mpmath.org) | 1.0.0 | Python library for arbitrary-precision floating-point arithmetic / BSD 3-Clause |
| [msgpack-python](http://msgpack.org/) | 0.5.1 | MessagePack (de)serializer. / Apache 2.0 |
| [multipledispatch](https://github.com/mrocklin/multipledispatch/) | 0.4.9 | Multiple dispatch in Python / BSD 3-Clause |
| [navigator-updater](https://github.com/ContinuumIO/navigator-updater) | 0.1.0 | Anaconda Navigator Updater / proprietary - Continuum Analytics, Inc. |
| [nbconvert](http://jupyter.org) | 5.3.1 | Converting Jupyter Notebooks / BSD 3-Clause |
| [nbformat](http://jupyter.org) | 4.4.0 | The reference implementation of the Jupyter Notebook format / BSD 3-clause |
| [networkx](https://networkx.github.io/) | 2.1 | Python package for creating and manipulating complex networks / BSD 3-Clause |
| [nltk](http://nltk.org/) | 3.2.5 | Build Python programs to work with human language data / Apache 2.0 |
| [nose](http://readthedocs.org/docs/nose/) | 1.3.7 | Nose extends unittest to make testing easier / LGPL-2.1 |
| [notebook](http://jupyter.org) | 5.4.0 | A web-based notebook environment for interactive computing / BSD 3-clause |
| [numba](http://numba.pydata.org/) | 0.36.2 | a just-in-time Python function compiler based on LLVM / BSD |
| [numexpr](https://github.com/pydata/numexpr) | 2.6.4 | Fast numerical expression evaluator for NumPy. / MIT |
| [numpy](http://numpy.scipy.org/) | 1.14.0 | Array processing for numbers, strings, records, and objects. / BSD 3-Clause |
| [numpydoc](https://github.com/numpy/numpydoc) | 0.7.0 | Sphinx extension to support docstrings in Numpy format / BSD 3-Clause |
| [odo](http://odo.pydata.org) | 0.5.1 | Data migration in Python / BSD-3-Clause |
| [olefile](http://www.decalage.info/python/olefileio) | 0.45.1 | parse, read and write Microsoft OLE2 files / BSD License 2-Clause |
| [openpyxl](https://openpyxl.readthedocs.io) | 2.4.10 | A Python library to read/write Excel 2010 xlsx/xlsm files / MIT |
| [openssl](http://www.openssl.org/) | 1.0.2n | OpenSSL is an open-source implementation of the SSL and TLS protocols / OpenSSL |
| [packaging](https://github.com/pypa/packaging) | 16.8 | Core utilities for Python packages / Apache 2.0 or BSD 2-Clause |
| [pandas](http://pandas.pydata.org) | 0.22.0 | High-performance, easy-to-use data structures and data analysis tools. / BSD 3-clause |
| [pandoc](http://johnmacfarlane.net/pandoc/) | 1.19.2.1 | Universal markup converter (repackaged binaries). / GPL-2.0 |
| [pandocfilters](https://github.com/jgm/pandocfilters) | 1.4.2 | A python module for writing pandoc filters / BSD-3-Clause |
| [parso](https://github.com/davidhalter/parso) | 0.1.1 | A Python Parser / MIT License |
| [partd](https://github.com/dask/partd) | 0.3.8 | Data structure for on-disk shuffle operations / BSD 3-Clause |
| [path.py](https://github.com/jaraco/path.py) | 10.5 | A module wrapper for os.path / MIT |
| [pathlib2](https://github.com/mcmtroffaes/pathlib2) | 2.3.0 | Fork of pathlib aiming to support the full stdlib Python API. / MIT |
| [patsy](https://github.com/pydata/patsy) | 0.5.0 | Describing statistical models in Python using symbolic formulas / BSD-2-Clause, PSF2 |
| [pep8](http://pep8.readthedocs.org/) | 1.7.1 | Python style guide checker / MIT |
| [pickleshare](https://github.com/vivainio/pickleshare) | 0.7.4 | Tiny ‘shelve’-like database with concurrency support / MIT |
| [pillow](http://python-imaging.github.io/) | 5.0.0 | Pillow is the friendly PIL fork by Alex Clark and Contributors. / PIL |
| [pip](https://pip.pypa.io/en/stable/) | 9.0.1 | PyPA recommended tool for installing Python packages / MIT |
| [pkginfo](https://code.launchpad.net/~tseaver/pkginfo/trunk) | 1.4.1 | Query metadatdata from sdists / bdists / installed packages. / MIT |
| [pluggy](https://github.com/pytest-dev/pluggy) | 0.6.0 | Plugin registration and hook calling for Python / MIT |
| [ply](http://www.dabeaz.com/ply/index.html) | 3.10 | Python Lex-Yacc / BSD 3-clause |
| [progress](https://github.com/verigak/progress) | 1.3 | Easy progress reporting for Python / ISC |
| [prompt\_toolkit](https://github.com/jonathanslenders/python-prompt-toolkit) | 1.0.15 | Library for building powerful interactive command lines in Python / BSD 3-clause |
| [psutil](https://github.com/giampaolo/psutil) | 5.4.3 | A cross-platform process and system utilities module for Python / BSD 3-Clause |
| [py](https://github.com/pytest-dev/py) | 1.5.2 | library with cross-python path, ini-parsing, io, code, log facilities / MIT |
| [pycodestyle](https://pycodestyle.readthedocs.io/) | 2.3.1 | Python style guide checker / MIT |
| [pycosat](https://github.com/ContinuumIO/pycosat) | 0.6.3 | Bindings to picosat (a SAT solver) / MIT |
| [pycparser](https://github.com/eliben/pycparser) | 2.18 | Complete C99 parser in pure Python / BSD 3-clause |
| [pycrypto](http://www.pycrypto.org/) | 2.6.1 | Cryptographic modules for Python. / Public Domain |
| [pycurl](http://pycurl.sourceforge.net/) | 7.43.0.1 | A Python Interface To The cURL library / LGPL, MIT |
| [pyflakes](https://github.com/PyCQA/pyflakes) | 1.6.0 | Pyflakes analyzes programs and detects various errors. / MIT |
| [pygments](http://pygments.org/) | 2.2.0 | Generic syntax highlighting package / BSD 2-clause |
| [pylint](http://www.pylint.org/) | 1.8.2 | python code static checker / GPL |
| [pyodbc](https://github.com/mkleehammer/pyodbc) | 4.0.22 | DB API Module for ODBC / MIT |
| [pyopenssl](https://github.com/pyca/pyopenssl) | 17.5.0 | Python wrapper module around the OpenSSL library / Apache 2.0 |
| [pyparsing](http://pyparsing.wikispaces.com/) | 2.2.0 | Create and execute simple grammars / MIT |
| [pyqt](http://www.riverbankcomputing.co.uk/software/pyqt) | 5.6.0 | Python binding of the cross-platform GUI toolkit Qt. / Commercial, GPL-2.0, GPL-3.0 |
| [pysocks](https://github.com/Anorov/PySocks) | 1.6.7 | A Python SOCKS client module. See [Anorov/PySocks](https://github.com/Anorov/PySocks) for more information. / BSD 3-Clause |
| [pytables](http://www.pytables.org) | 3.4.2 | Brings together Python, HDF5 and NumPy to easily handle large amounts of data. / BSD 3-Clause |
| [pytest](https://docs.pytest.org/en/latest/) | 3.3.2 | Simple and powerful testing with Python. / MIT |
| [python](http://www.python.org/) | 3.6.4 | General purpose programming language / PSF |
| [python-dateutil](https://dateutil.readthedocs.org/) | 2.6.1 | Extensions to the standard Python datetime module. / BSD 3-clause |
| [pytz](http://pythonhosted.org/pytz/) | 2017.3 | World timezone definitions, modern and historical. / MIT |
| [pywavelets](https://github.com/PyWavelets/pywt) | 0.5.2 | Discrete Wavelet Transforms in Python. / MIT |
| [pywin32](https://sourceforge.net/projects/pywin32) | 222 | Python extensions for Windows / PSF |
| [pywinpty](https://github.com/spyder-ide/pywinpty) | 0.5 | Python bindings for the winpty library / MIT |
| [pyyaml](http://pyyaml.org/wiki/PyYAML) | 3.12 | YAML parser and emitter for Python / MIT |
| [pyzmq](https://github.com/zeromq/pyzmq) | 16.0.3 | Python bindings for zeromq / BSD 3-clause |
| [qt](http://qt-project.org) | 5.6.2 | Qt is a cross-platform application and UI framework. / LGPL-3.0 |
| [qtawesome](https://github.com/spyder-ide/qtawesome) | 0.4.4 | Iconic fonts in PyQt and PySide applications / MIT |
| [qtconsole](http://jupyter.org) | 4.3.1 | Jupyter Qt console / BSD 3-Clause |
| [qtpy](https://github.com/spyder-ide/qtpy) | 1.3.1 | Abstraction layer for PyQt5/PyQt4/PySide / MIT |
| [requests](http://python-requests.org) | 2.18.4 | Python HTTP for Humans. / Apache 2.0 |
| [rope](https://github.com/python-rope/rope) | 0.10.7 | A python refactoring library… / GPL 2.0 |
| [ruamel\_yaml](https://bitbucket.org/ruamel/yaml) | 0.15.35 | A patched copy of ruamel.yaml. / MIT |
| [scikit-image](http://scikit-image.org/) | 0.13.1 | Image processing routines for SciPy. / BSD 3-Clause |
| [scikit-learn](http://scikit-learn.org/) | 0.19.1 | A set of python modules for machine learning and data mining / BSD 3-Clause |
| [scipy](http://www.scipy.org/) | 1.0.0 | Scientific Library for Python / BSD 3-Clause |
| [seaborn](http://stanford.edu/~mwaskom/software/seaborn/) | 0.8.1 | Statistical data visualization / BSD 3-Clause |
| [send2trash](https://github.com/hsoft/send2trash) | 1.4.2 | Python library to natively send files to Trash (or Recycle bin) on all platforms. / BSD-3-Clause |
| [setuptools](https://github.com/pypa/setuptools) | 38.4.0 | Download, build, install, upgrade, and uninstall Python packages / MIT |
| [simplegeneric](http://cheeseshop.python.org/pypi/simplegeneric) | 0.8.1 | Simple generic functions (similar to Python’s own len(), pickle.dump(), etc.) / Zope Public |
| [singledispatch](http://docs.python.org/3/library/functools.html#functools.singledispatch) | 3.4.0.3 | Transforms a function into a single-dispatch generic function / MIT |
| [sip](http://www.riverbankcomputing.com/software/sip/intro) | 4.18.1 | Create Python bindings for C and C++ libraries / GPL-3.0 |
| [six](http://pypi.python.org/pypi/six/) | 1.11.0 | Python 2 and 3 compatibility utilities / MIT |
| [snowballstemmer](https://github.com/shibukawa/snowball_py) | 1.2.1 | Snowball stemming library collection for Python / BSD-2-Clause |
| [sortedcollections](http://www.grantjenks.com/docs/sortedcollections/) | 0.5.3 | Python Sorted Collections / Apache-2.0 |
| [sortedcontainers](http://www.grantjenks.com/docs/sortedcontainers/) | 1.5.9 | Python Sorted Container Types: SortedList, SortedDict, and SortedSet / Apache 2.0 |
| [sphinx](http://www.sphinx-doc.org) | 1.6.6 | Sphinx is a tool that makes it easy to create intelligent and beautiful documentation / BSD 2-clause |
| sphinxcontrib | 1.0 | Python namespace for sphinxcontrib / BSD |
| [sphinxcontrib-websupport](https://pypi.python.org/pypi/sphinxcontrib-websupport) | 1.0.1 | Sphinx API for Web Apps / BSD-2-Clause |
| [spyder](https://github.com/spyder-ide/spyder) | 3.2.6 | Scientific PYthon Development EnviRonment / MIT |
| [sqlalchemy](http://www.sqlalchemy.org/) | 1.2.1 | Database Abstraction Library. / MIT |
| [sqlite](http://www.sqlite.org/) | 3.22.0 | Implements a self-contained, zero-configuration, SQL database engine. / Public-Domain (`<http://www.sqlite.org/copyright.html>`) |
| [statsmodels](https://www.statsmodels.org) | 0.8.0 | Statistical computations and models for use with SciPy / BSD 3-Clause |
| [sympy](http://sympy.org) | 1.1.1 | Python library for symbolic mathematics / 3-clause BSD |
| [tblib](https://github.com/ionelmc/python-tblib) | 1.3.2 | Traceback serialization library. / BSD 2-Clause |
| [terminado](http://github.com/mitsuhiko/markupsafe) | 0.8.1 | Terminals served by tornado websockets / BSD 3-clause |
| [testpath](https://testpath.readthedocs.io) | 0.3.1 | Testpath is a collection of utilities for Python code working with files and commands. / MIT |
| [tk](http://www.tcl.tk/) | 8.6.7 | A dynamic programming language with GUI support. Bundles Tcl and Tk. / Tcl/Tk |
| [toolz](http://toolz.readthedocs.org/) | 0.9.0 | A functional standard library for Python. / BSD 3-Clause |
| [tornado](http://www.tornadoweb.org/) | 4.5.3 | A Python web framework and asynchronous networking library, originally developed at FriendFeed. / Apache 2.0 |
| [traitlets](http://ipython.org/) | 4.3.2 | Configuration system for Python applications / BSD 3-clause |
| [typing](https://docs.python.org/3.5/library/typing.html) | 3.6.2 | Type Hints for Python - backport for `Python<3.5` / PSF |
| [unicodecsv](https://github.com/jdunck/python-unicodecsv) | 0.14.1 | Drop-in replacement for csv module which supports unicode strings / BSD |
| [urllib3](https://urllib3.readthedocs.io/) | 1.22 | HTTP library with thread-safe connection pooling, file post, and more. / MIT |
| [vc](https://github.com/conda/conda/wiki/VC-features) | 14 | A meta-package to track VC features. / Modified BSD License (3-clause) |
| [vs2015\_runtime](http://www.microsoft.com) | 14.0.25123 | Bundles of the MSVC 14 (VS 2015) runtime / Proprietary |
| [wcwidth](https://github.com/jquast/wcwidth) | 0.1.7 | Measures number of Terminal column cells of wide-character codes. / MIT |
| [webencodings](https://github.com/gsnedders/python-webencodings) | 0.5.1 | Character encoding aliases for legacy web content / BSD 3-Clause |
| [werkzeug](http://werkzeug.pocoo.org/) | 0.14.1 | The Python WSGI Utility Library. / BSD 3-Clause |
| [wheel](https://bitbucket.org/pypa/wheel/) | 0.30.0 | A built-package format for Python. / MIT |
| [widgetsnbextension](http://ipython.org) | 3.1.0 | IPython HTML widgets for Jupyter / BSD 3-clause |
| [win\_inet\_pton](https://github.com/hickeroar/win_inet_pton) | 1.0.1 | Native inet\_pton and inet\_ntop implementation for Python on Windows (with ctypes). / PUBLIC-DOMAIN |
| [win\_unicode\_console](https://github.com/Drekin/win-unicode-console) | 0.5 | A Python package to enable Unicode input and display when running Python from Windows console. / MIT |
| [wincertstore](https://bitbucket.org/tiran/wincertstore) | 0.2 | Python module to extract CA and CRL certs from Windows’ cert store (ctypes based). / PSF 2 |
| [winpty](https://github.com/rprichard/winpty) | 0.4.3 | Winpty provides an interface similar to a Unix pty-master for communicating with Windows console programs. / MIT |
| [wrapt](https://github.com/GrahamDumpleton/wrapt) | 1.10.11 | Module for decorators, wrappers and monkey patching. / BSD 2-Clause |
| [xlrd](http://www.python-excel.org/) | 1.1.0 | Library for developers to extract data from Microsoft Excel (tm) spreadsheet files / BSD 3-Clause and BSD with advertising |
| [xlsxwriter](https://xlsxwriter.readthedocs.io/) | 1.0.2 | A Python module for creating Excel XLSX files / BSD 2-Clause |
| [xlwings](http://xlwings.org/) | 0.11.5 | Interact with Excel from Python and vice versa / 3-clause BSD |
| [xlwt](http://www.python-excel.org/) | 1.3.0 | Writing data and formatting information to Excel files / BSD |
| [yaml](http://pyyaml.org/wiki/LibYAML) | 0.1.7 | A C library for parsing and emitting YAML. / MIT |
| [zict](http://github.com/mrocklin/zict) | 0.1.3 | Composable Dictionary Classes / BSD 3-Clause |
| [zlib](http://zlib.net/) | 1.2.11 | Massively spiffy yet delicately unobtrusive compression library / zlib |
| Name | Version | Summary / License |
|---|---|---|
| [\_ipyw\_jlab\_nb\_ext\_conf](https://github.com/ContinuumIO/anaconda-nb-extensions-meta-config) | 0.1.0 | A configuration metapackage for enabling Anaconda-bundled jupyter extensions / BSD |
| [alabaster](http://www.sphinx-doc.org/en/stable/index.html) | 0.7.10 | Configurable, Python 2+3 compatible Sphinx theme. / BSD 3-Clause |
| [anaconda-client](https://github.com/Anaconda-Platform/anaconda-client) | 1.6.9 | Anaconda Cloud command line client library / BSD 3-Clause |
| [anaconda-navigator](https://github.com/ContinuumIO/navigator) | 1.7.0 | Anaconda Navigator / proprietary - Continuum Analytics, Inc. |
| [anaconda-project](https://github.com/Anaconda-Platform/anaconda-project) | 0.8.2 | Tool for encapsulating, running, and reproducing data science projects / BSD 3-Clause |
| [appnope](http://github.com/minrk/appnope) | 0.1.0 | Disable App Nap on OS X 10.9 / BSD 2-Clause |
| [appscript](http://appscript.sourceforge.net/) | 1.0.1 | Control AppleScriptable applications from Python / Public-Domain |
| [asn1crypto](https://github.com/wbond/asn1crypto) | 0.24.0 | Python ASN.1 library with a focus on performance and a pythonic API / MIT |
| [astroid](https://www.astroid.org/) | 1.6.1 | A abstract syntax tree for Python with inference support. / LGPL 2.1 |
| [astropy](http://www.astropy.org/) | 2.0.3 | Community-developed Python Library for Astronomy / BSD |
| [attrs](https://attrs.readthedocs.io/en/stable/) | 17.4.0 | attrs is the Python package that will bring back the joy of writing classes by relieving you from the drudgery of implementing object protocols (aka dunder methods). / MIT |
| [babel](http://babel.pocoo.org/) | 2.5.3 | Utilities to internationalize and localize Python applications / BSD 3-clause |
| [backports](https://bitbucket.org/brandon/backports) | 1.0 | / BSD |
| [backports.shutil\_get\_terminal\_size](https://github.com/chrippa/backports.shutil_get_terminal_size) | 1.0.0 | A backport of the get\_terminal\_size function from Python 3.3’s shutil. / MIT |
| [beautifulsoup4](http://www.crummy.com/software/BeautifulSoup/) | 4.6.0 | Python library designed for screen-scraping / MIT |
| [bitarray](https://github.com/ilanschnell/bitarray) | 0.8.1 | efficient arrays of booleans – C extension / PSF |
| [bkcharts](http://github.com/bokeh/bkcharts) | 0.2 | High level chart types built on top of Bokeh / BSD 3-Clause |
| [blaze](http://blaze.pydata.org) | 0.11.3 | NumPy and Pandas interface to big data / BSD 3-Clause |
| [bleach](https://github.com/mozilla/bleach) | 2.1.2 | Easy, whitelist-based HTML-sanitizing tool / Apache-2.0 |
| [bokeh](http://bokeh.pydata.org/) | 0.12.13 | Statistical and novel interactive HTML plots for Python / BSD 3-Clause |
| [boto](https://github.com/boto/boto/) | 2.48.0 | Amazon Web Services Library / MIT |
| [bottleneck](http://berkeleyanalytics.com/bottleneck) | 1.2.1 | Fast NumPy array functions written in Cython. / BSD 2-Clause |
| [bzip2](http://www.bzip.org/) | 1.0.6 | high-quality data compressor / bzip2 |
| [ca-certificates](https://github.com/conda-forge/ca-certificates-feedstock) | 2017.08.26 | Certificates for use with other packages. / ISC |
| [certifi](http://certifi.io/) | 2018.1.18 | Python package for providing Mozilla’s CA Bundle. / ISC |
| [cffi](https://bitbucket.org/cffi/cffi) | 1.11.4 | Foreign Function Interface for Python calling C code. / MIT |
| [chardet](https://github.com/chardet/chardet) | 3.0.4 | Universal character encoding detector / LGPL2 |
| [click](http://click.pocoo.org/) | 6.7 | A simple wrapper around optparse for powerful command line utilities. / BSD 3-Clause |
| [cloudpickle](https://github.com/cloudpipe/cloudpickle) | 0.5.2 | Extended pickling support for Python objects / BSD 3-Clause |
| [clyent](https://github.com/Anaconda-Platform/clyent) | 1.2.2 | Command line client library for windows and posix / BSD 3-Clause |
| [colorama](https://github.com/tartley/colorama) | 0.3.9 | Cross-platform colored terminal text. / BSD 3-Clause |
| [conda](https://conda.io) | 4.4.10 | OS-agnostic, system-level binary package and environment manager. / BSD 3-Clause |
| [conda-build](https://github.com/conda/conda-build) | 3.4.1 | tools for building conda packages / BSD 3-Clause |
| [conda-env](https://github.com/conda/conda-env) | 2.6.0 | Tools for interacting with conda environments. / BSD 3-Clause |
| [conda-verify](https://github.com/conda/conda-verify) | 2.0.0 | tool for validating conda recipes and conda packages / BSD 3-Clause |
| [contextlib2](http://contextlib2.readthedocs.org) | 0.5.5 | Backports and enhancements for the contextlib module / PSF |
| [cryptography](https://github.com/pyca/cryptography) | 2.1.4 | Provides cryptographic recipes and primitives to Python developers / Apache 2.0 or BSD 3-Clause, PSF 2 |
| [curl](http://curl.haxx.se/) | 7.58.0 | tool and library for transferring data with URL syntax / MIT/X derivate (`<http://curl.haxx.se/docs/copyright.html>`) |
| [cycler](http://matplotlib.org/cycler) | 0.10.0 | Composable style cycles. / BSD 3-Clause |
| [cython](http://www.cython.org/) | 0.27.3 | The Cython compiler for writing C extensions for the Python language / Apache-2.0 |
| [cytoolz](https://github.com/pytoolz/cytoolz) | 0.9.0 | Cython implementation of Toolz. High performance functional utilities. / BSD 3-Clause |
| [dask](http://github.com/dask/dask/) | 0.16.1 | Parallel Python with task scheduling / BSD 3-Clause |
| [dask-core](http://github.com/dask/dask/) | 0.16.1 | Parallel Python with task scheduling / BSD 3-Clause |
| [datashape](http://datashape.pydata.org) | 0.5.4 | A data description language. / BSD 2-Clause |
| [dbus](http://www.freedesktop.org/wiki/Software/dbus/) | 1.12.2 | Simple message bus system for applications to talk to one another / GPL2 |
| [decorator](https://github.com/micheles/decorator) | 4.2.1 | Better living through Python with decorators. / BSD 3-Clause |
| [distributed](http://distributed.readthedocs.io/en/latest/) | 1.20.2 | Distributed computing with Dask / BSD 3-Clause |
| [docutils](http://docutils.sourceforge.net/) | 0.14 | Docutils – Python Documentation Utilities / Public Domain Dedictation and BSD 2-Clause and PSF 2.1.1 and GPL 3.0 |
| [entrypoints](https://github.com/takluyver/entrypoints) | 0.2.3 | Discover and load entry points from installed packages. / MIT License |
| [et\_xmlfile](https://bitbucket.org/openpyxl/et_xmlfile) | 1.0.1 | An implementation of lxml.xmlfile for the standard library / MIT |
| [expat](http://expat.sourceforge.net/) | 2.2.5 | Expat XML parser library in C. / MIT |
| [fastcache](https://github.com/pbrady/fastcache) | 1.0.2 | C implementation of Python 3 lru\_cache / MIT |
| [filelock](https://github.com/benediktschmitt/py-filelock) | 2.0.13 | A platform independent file lock. / Public Domain |
| [flask](http://flask.pocoo.org) | 0.12.2 | A microframework based on Werkzeug, Jinja2 and good intentions. / BSD 3-Clause |
| [flask-cors](https://github.com/corydolphin/flask-cors) | 3.0.3 | A Flask extension adding a decorator for CORS support / MIT |
| [freetype](https://www.freetype.org/) | 2.8 | A Free, High-Quality, and Portable Font Engine / GPL-2.0 and FreeType |
| [get\_terminal\_size](https://github.com/chrippa/backports.shutil_get_terminal_size) | 1.0.0 | Get the size of the terminal window. / MIT |
| [gettext](https://www.gnu.org/software/gettext/) | 0.19.8.1 | Internationalization package. / GPLv2 |
| [gevent](http://www.gevent.org/) | 1.2.2 | Coroutine-based network library / MIT |
| [glib](https://developer.gnome.org/glib/) | 2.53.6 | Provides core application building blocks for libraries and applications written in C. / LGPL-2.1 |
| [glob2](https://github.com/miracle2k/python-glob2) | 0.6 | Version of the glob module that supports recursion via \*\*, and can capture patterns. / BSD-2-Clause |
| [gmp](http://gmplib.org/) | 6.1.2 | The GNU multiprecision library. / GPL 2 and LGPL 3 |
| [gmpy2](https://pypi.python.org/pypi/gmpy2) | 2.0.8 | GMP/MPIR, MPFR, and MPC interface to Python 2.6+ and 3.x / LGPL 3 |
| [greenlet](https://github.com/python-greenlet/greenlet) | 0.4.12 | Lightweight in-process concurrent programming / MIT |
| [h5py](http://www.h5py.org/) | 2.7.1 | Read and write HDF5 files from Python. / BSD 3-Clause |
| [hdf5](http://www.hdfgroup.org/HDF5/) | 1.10.1 | HDF5 is a data model, library, and file format for storing and managing data / HDF5 |
| [heapdict](http://stutzbachenterprises.com/) | 1.0.0 | A heap with decrease-key and increase-key operations / BSD 3-Clause |
| [html5lib](https://github.com/html5lib/html5lib-python) | 1.0.1 | HTML parser based on the WHATWG HTML specification / MIT |
| [icu](http://site.icu-project.org/) | 58.2 | International Components for Unicode. / MIT |
| [idna](https://github.com/kjd/idna) | 2.6 | Internationalized Domain Names in Applications (IDNA). / BSD Like |
| [imageio](http://imageio.github.io) | 2.2.0 | a Python library for reading and writing image data / BSD 2-Clause |
| [imagesize](https://github.com/shibukawa/imagesize_py) | 0.7.1 | Getting image size from png/jpeg/jpeg2000/gif file / MIT |
| [intel-openmp](https://software.intel.com/en-us/node/522690) | 2018.0.0 | Math library for Intel and compatible processors / proprietary - Intel |
| [ipykernel](http://ipython.org) | 4.8.0 | IPython Kernel for Jupyter / BSD 3-clause |
| [ipython](http://ipython.org/) | 6.2.1 | IPython: Productive Interactive Computing / BSD 3-clause |
| [ipython\_genutils](http://ipython.org) | 0.2.0 | vestigial utilities from IPython / BSD 3-Clause |
| [ipywidgets](https://github.com/ipython/ipywidgets) | 7.1.1 | Jupyter Interactive Widgets / BSD 3-clause |
| [isort](https://github.com/timothycrosley/isort) | 4.2.15 | A Python utility / library to sort Python imports. / MIT |
| [itsdangerous](https://github.com/pallets/itsdangerous) | 0.24 | Various helpers to pass trusted data to untrusted environments. / BSD 3-Clause |
| [jbig](https://www.cl.cam.ac.uk/~mgk25/jbigkit) | 2.1 | Implementation of the JBIG1 data compression standard / GPL-2.0 |
| [jdcal](https://github.com/phn/jdcal) | 1.3 | Julian dates from proleptic Gregorian and Julian calendars. / BSD 2-Clause |
| [jedi](https://github.com/davidhalter/jedi/) | 0.11.1 | An autocompletion tool for Python that can be used for text editors. / MIT |
| [jinja2](http://jinja.pocoo.org) | 2.10 | An easy to use stand-alone template engine written in pure python. / 3-Clause BSD |
| [jpeg](http://www.ijg.org/) | 9b | read/write jpeg COM, EXIF, IPTC medata / Custom free software license |
| [jsonschema](https://github.com/Julian/jsonschema) | 2.6.0 | An implementation of JSON Schema validation for Python / MIT |
| [jupyter](http://jupyter.org) | 1.0.0 | Jupyter metapackage. Install all the Jupyter components in one go. / BSD 3-Clause |
| [jupyter\_client](http://jupyter.org) | 5.2.2 | Jupyter protocol implementation and client libraries / BSD 3-clause |
| [jupyter\_console](http://jupyter.org) | 5.2.0 | Jupyter terminal console / BSD 3-Clause |
| [jupyter\_core](http://jupyter.org) | 4.4.0 | Core common functionality of Jupyter projects. / BSD 3-clause |
| [jupyterlab](https://github.com/jupyterlab/jupyterlab) | 0.31.5 | A pre-alpha version of a computational environment for Jupyter. / BSD 3-Clause |
| [jupyterlab\_launcher](http://github.com/jupyterlab/jupyterlab_launcher) | 0.10.2 | A Launcher for JupyterLab based applications. / BSD 3-Clause |
| [lazy-object-proxy](https://github.com/ionelmc/python-lazy-object-proxy) | 1.3.1 | A fast and thorough lazy object proxy. / BSD 2-Clause |
| [libcurl](http://curl.haxx.se/) | 7.58.0 | tool and library for transferring data with URL syntax / MIT/X derivate (`<http://curl.haxx.se/docs/copyright.html>`) |
| [libcxx](http://libcxx.llvm.org/) | 4.0.1 | C++ Standard Library / MIT license or UIUC License |
| [libcxxabi](http://libcxxabi.llvm.org/) | 4.0.1 | C++ Standard Library Support / MIT license or UIUC License |
| [libedit](http://thrysoee.dk/editline/) | 3.1 | Editline Library (libedit) / NetBSD |
| [libffi](https://sourceware.org/libffi/) | 3.2.1 | A Portable Foreign Function Interface Library. / Custom |
| [libgfortran](http://gcc.gnu.org/) | 3.0.1 | Fortran libraries from the GNU Compiler Collection / GPL 3 (with GCC Runtime Library Exception 3.1) |
| [libiconv](https://www.gnu.org/software/libiconv/) | 1.15 | Provides iconv for systems which don’t have one (or that cannot convert from/to Unicode.) / GPL and LGPL |
| [libpng](http://www.libpng.org/pub/png/libpng.html) | 1.6.34 | PNG reference library. / zlib/libpng |
| [libsodium](http://libsodium.org) | 1.0.15 | A modern and easy-to-use crypto library. / ISC |
| [libssh2](https://www.libssh2.org/) | 1.8.0 | the SSH library / BSD 3-Clause |
| [libtiff](http://www.libtiff.org/) | 4.0.9 | Support for the Tag Image File Format (TIFF). / HPND |
| [libxml2](http://xmlsoft.org/) | 2.9.7 | The XML C parser and toolkit of Gnome / MIT |
| [libxslt](http://xmlsoft.org/XSLT/) | 1.1.32 | The XSLT C library developed for the GNOME project / MIT |
| [llvmlite](https://github.com/numba/llvmlite) | 0.21.0 | A lightweight LLVM python binding for writing JIT compilers / New BSD License |
| [locket](https://github.com/mwilliamson/locket.py) | 0.2.0 | File-based locks for Python for Linux and Windows / BSD 2-Clause |
| [lxml](http://lxml.de/) | 4.1.1 | Pythonic binding for the C libraries libxml2 and libxslt. / BSD 3-Clause, GPL-2.0, ZPL-2.0, and ElementTree |
| [lzo](http://www.oberhumer.com/opensource/lzo/) | 2.10 | LZO is a portable lossless data compression library written in ANSI C. / GPL v2+ |
| [markupsafe](https://www.palletsprojects.com/p/markupsafe/) | 1.0 | A Python module that implements the jinja2.Markup string / BSD 3-Clause |
| [matplotlib](http://matplotlib.org/) | 2.1.2 | Publication quality figures in Python / PSF-based |
| [mccabe](https://github.com/PyCQA/mccabe) | 0.6.1 | McCabe complexity checker for Python / MIT |
| [mistune](https://github.com/lepture/mistune) | 0.8.3 | The fastest markdown parser in pure Python. / BSD 3-Clause |
| [mkl](https://software.intel.com/en-us/mkl) | 2018.0.1 | Math library for Intel and compatible processors / proprietary - Intel |
| [mkl-service](https://github.com/ContinuumIO/mkl-service) | 1.1.2 | Python bindings to MKL service functions / 3-clause BSD |
| [mpc](http://www.multiprecision.org/) | 1.0.3 | A C library for the arithmetic of complex numbers with arbitrarily high precision. / LGPL 3 |
| [mpfr](http://www.mpfr.org/) | 3.1.5 | The MPFR library is a C library for multiple-precision floating-point computations with correct rounding. / LGPL 3 |
| [mpmath](http://mpmath.org) | 1.0.0 | Python library for arbitrary-precision floating-point arithmetic / BSD 3-Clause |
| [msgpack-python](http://msgpack.org/) | 0.5.1 | MessagePack (de)serializer. / Apache 2.0 |
| [multipledispatch](https://github.com/mrocklin/multipledispatch/) | 0.4.9 | Multiple dispatch in Python / BSD 3-Clause |
| [navigator-updater](https://github.com/ContinuumIO/navigator-updater) | 0.1.0 | Anaconda Navigator Updater / proprietary - Continuum Analytics, Inc. |
| [nbconvert](http://jupyter.org) | 5.3.1 | Converting Jupyter Notebooks / BSD 3-Clause |
| [nbformat](http://jupyter.org) | 4.4.0 | The reference implementation of the Jupyter Notebook format / BSD 3-clause |
| [ncurses](http://www.gnu.org/software/ncurses/) | 6.0 | Library for text-based user interfaces / Free software (MIT-like) |
| [networkx](https://networkx.github.io/) | 2.1 | Python package for creating and manipulating complex networks / BSD 3-Clause |
| [nltk](http://nltk.org/) | 3.2.5 | Build Python programs to work with human language data / Apache 2.0 |
| [nose](http://readthedocs.org/docs/nose/) | 1.3.7 | Nose extends unittest to make testing easier / LGPL-2.1 |
| [notebook](http://jupyter.org) | 5.4.0 | A web-based notebook environment for interactive computing / BSD 3-clause |
| [numba](http://numba.pydata.org/) | 0.36.2 | a just-in-time Python function compiler based on LLVM / BSD |
| [numexpr](https://github.com/pydata/numexpr) | 2.6.4 | Fast numerical expression evaluator for NumPy. / MIT |
| [numpy](http://numpy.scipy.org/) | 1.14.0 | Array processing for numbers, strings, records, and objects. / BSD 3-Clause |
| [numpydoc](https://github.com/numpy/numpydoc) | 0.7.0 | Sphinx extension to support docstrings in Numpy format / BSD 3-Clause |
| [odo](http://odo.pydata.org) | 0.5.1 | Data migration in Python / BSD-3-Clause |
| [olefile](http://www.decalage.info/python/olefileio) | 0.45.1 | parse, read and write Microsoft OLE2 files / BSD License 2-Clause |
| [openpyxl](https://openpyxl.readthedocs.io) | 2.4.10 | A Python library to read/write Excel 2010 xlsx/xlsm files / MIT |
| [openssl](http://www.openssl.org/) | 1.0.2n | OpenSSL is an open-source implementation of the SSL and TLS protocols / OpenSSL |
| [packaging](https://github.com/pypa/packaging) | 16.8 | Core utilities for Python packages / Apache 2.0 or BSD 2-Clause |
| [pandas](http://pandas.pydata.org) | 0.22.0 | High-performance, easy-to-use data structures and data analysis tools. / BSD 3-clause |
| [pandoc](http://johnmacfarlane.net/pandoc/) | 1.19.2.1 | Universal markup converter (repackaged binaries). / GPL-2.0 |
| [pandocfilters](https://github.com/jgm/pandocfilters) | 1.4.2 | A python module for writing pandoc filters / BSD-3-Clause |
| [parso](https://github.com/davidhalter/parso) | 0.1.1 | A Python Parser / MIT License |
| [partd](https://github.com/dask/partd) | 0.3.8 | Data structure for on-disk shuffle operations / BSD 3-Clause |
| [path.py](https://github.com/jaraco/path.py) | 10.5 | A module wrapper for os.path / MIT |
| [pathlib2](https://github.com/mcmtroffaes/pathlib2) | 2.3.0 | Fork of pathlib aiming to support the full stdlib Python API. / MIT |
| [patsy](https://github.com/pydata/patsy) | 0.5.0 | Describing statistical models in Python using symbolic formulas / BSD-2-Clause, PSF2 |
| [pcre](http://www.pcre.org/) | 8.41 | Regular expression pattern matching using the same syntax and semantics as Perl 5. / BSD 3-Clause |
| [pep8](http://pep8.readthedocs.org/) | 1.7.1 | Python style guide checker / MIT |
| [pexpect](http://pexpect.sourceforge.net/) | 4.3.1 | Pexpect makes Python a better tool for controlling other applications. / ISC |
| [pickleshare](https://github.com/vivainio/pickleshare) | 0.7.4 | Tiny ‘shelve’-like database with concurrency support / MIT |
| [pillow](http://python-imaging.github.io/) | 5.0.0 | Pillow is the friendly PIL fork by Alex Clark and Contributors. / PIL |
| [pip](https://pip.pypa.io/en/stable/) | 9.0.1 | PyPA recommended tool for installing Python packages / MIT |
| [pkginfo](https://code.launchpad.net/~tseaver/pkginfo/trunk) | 1.4.1 | Query metadatdata from sdists / bdists / installed packages. / MIT |
| [pluggy](https://github.com/pytest-dev/pluggy) | 0.6.0 | Plugin registration and hook calling for Python / MIT |
| [ply](http://www.dabeaz.com/ply/index.html) | 3.10 | Python Lex-Yacc / BSD 3-clause |
| [prompt\_toolkit](https://github.com/jonathanslenders/python-prompt-toolkit) | 1.0.15 | Library for building powerful interactive command lines in Python / BSD 3-clause |
| [psutil](https://github.com/giampaolo/psutil) | 5.4.3 | A cross-platform process and system utilities module for Python / BSD 3-Clause |
| [ptyprocess](https://github.com/pexpect/ptyprocess) | 0.5.2 | Run a subprocess in a pseudo terminal / ISC |
| [py](https://github.com/pytest-dev/py) | 1.5.2 | library with cross-python path, ini-parsing, io, code, log facilities / MIT |
| [pycodestyle](https://pycodestyle.readthedocs.io/) | 2.3.1 | Python style guide checker / MIT |
| [pycosat](https://github.com/ContinuumIO/pycosat) | 0.6.3 | Bindings to picosat (a SAT solver) / MIT |
| [pycparser](https://github.com/eliben/pycparser) | 2.18 | Complete C99 parser in pure Python / BSD 3-clause |
| [pycrypto](http://www.pycrypto.org/) | 2.6.1 | Cryptographic modules for Python. / Public Domain |
| [pycurl](http://pycurl.sourceforge.net/) | 7.43.0.1 | A Python Interface To The cURL library / LGPL, MIT |
| [pyflakes](https://github.com/PyCQA/pyflakes) | 1.6.0 | Pyflakes analyzes programs and detects various errors. / MIT |
| [pygments](http://pygments.org/) | 2.2.0 | Generic syntax highlighting package / BSD 2-clause |
| [pylint](http://www.pylint.org/) | 1.8.2 | python code static checker / GPL |
| [pyodbc](https://github.com/mkleehammer/pyodbc) | 4.0.22 | DB API Module for ODBC / MIT |
| [pyopenssl](https://github.com/pyca/pyopenssl) | 17.5.0 | Python wrapper module around the OpenSSL library / Apache 2.0 |
| [pyparsing](http://pyparsing.wikispaces.com/) | 2.2.0 | Create and execute simple grammars / MIT |
| [pyqt](http://www.riverbankcomputing.co.uk/software/pyqt) | 5.6.0 | Python binding of the cross-platform GUI toolkit Qt. / Commercial, GPL-2.0, GPL-3.0 |
| [pysocks](https://github.com/Anorov/PySocks) | 1.6.7 | A Python SOCKS client module. See [Anorov/PySocks](https://github.com/Anorov/PySocks) for more information. / BSD 3-Clause |
| [pytables](http://www.pytables.org) | 3.4.2 | Brings together Python, HDF5 and NumPy to easily handle large amounts of data. / BSD 3-Clause |
| [pytest](https://docs.pytest.org/en/latest/) | 3.3.2 | Simple and powerful testing with Python. / MIT |
| [python](http://www.python.org/) | 3.6.4 | General purpose programming language / PSF |
| [python-dateutil](https://dateutil.readthedocs.org/) | 2.6.1 | Extensions to the standard Python datetime module. / BSD 3-clause |
| python.app | 2 | Proxy on OS X letting Python libraries hook into the gui event loop / BSD |
| [pytz](http://pythonhosted.org/pytz/) | 2017.3 | World timezone definitions, modern and historical. / MIT |
| [pywavelets](https://github.com/PyWavelets/pywt) | 0.5.2 | Discrete Wavelet Transforms in Python. / MIT |
| [pyyaml](http://pyyaml.org/wiki/PyYAML) | 3.12 | YAML parser and emitter for Python / MIT |
| [pyzmq](https://github.com/zeromq/pyzmq) | 16.0.3 | Python bindings for zeromq / BSD 3-clause |
| [qt](http://qt-project.org) | 5.6.2 | Qt is a cross-platform application and UI framework. / LGPL-3.0 |
| [qtawesome](https://github.com/spyder-ide/qtawesome) | 0.4.4 | Iconic fonts in PyQt and PySide applications / MIT |
| [qtconsole](http://jupyter.org) | 4.3.1 | Jupyter Qt console / BSD 3-Clause |
| [qtpy](https://github.com/spyder-ide/qtpy) | 1.3.1 | Abstraction layer for PyQt5/PyQt4/PySide / MIT |
| [readline](https://cnswww.cns.cwru.edu/php/chet/readline/rltop.html) | 7.0 | library for editing command lines as they are typed in / GPL3 |
| [requests](http://python-requests.org) | 2.18.4 | Python HTTP for Humans. / Apache 2.0 |
| [rope](https://github.com/python-rope/rope) | 0.10.7 | A python refactoring library… / GPL 2.0 |
| [ruamel\_yaml](https://bitbucket.org/ruamel/yaml) | 0.15.35 | A patched copy of ruamel.yaml. / MIT |
| [scikit-image](http://scikit-image.org/) | 0.13.1 | Image processing routines for SciPy. / BSD 3-Clause |
| [scikit-learn](http://scikit-learn.org/) | 0.19.1 | A set of python modules for machine learning and data mining / BSD 3-Clause |
| [scipy](http://www.scipy.org/) | 1.0.0 | Scientific Library for Python / BSD 3-Clause |
| [seaborn](http://stanford.edu/~mwaskom/software/seaborn/) | 0.8.1 | Statistical data visualization / BSD 3-Clause |
| [send2trash](https://github.com/hsoft/send2trash) | 1.4.2 | Python library to natively send files to Trash (or Recycle bin) on all platforms. / BSD-3-Clause |
| [setuptools](https://github.com/pypa/setuptools) | 38.4.0 | Download, build, install, upgrade, and uninstall Python packages / MIT |
| [simplegeneric](http://cheeseshop.python.org/pypi/simplegeneric) | 0.8.1 | Simple generic functions (similar to Python’s own len(), pickle.dump(), etc.) / Zope Public |
| [singledispatch](http://docs.python.org/3/library/functools.html#functools.singledispatch) | 3.4.0.3 | Transforms a function into a single-dispatch generic function / MIT |
| [sip](http://www.riverbankcomputing.com/software/sip/intro) | 4.18.1 | Create Python bindings for C and C++ libraries / GPL-3.0 |
| [six](http://pypi.python.org/pypi/six/) | 1.11.0 | Python 2 and 3 compatibility utilities / MIT |
| [snowballstemmer](https://github.com/shibukawa/snowball_py) | 1.2.1 | Snowball stemming library collection for Python / BSD-2-Clause |
| [sortedcollections](http://www.grantjenks.com/docs/sortedcollections/) | 0.5.3 | Python Sorted Collections / Apache-2.0 |
| [sortedcontainers](http://www.grantjenks.com/docs/sortedcontainers/) | 1.5.9 | Python Sorted Container Types: SortedList, SortedDict, and SortedSet / Apache 2.0 |
| [sphinx](http://www.sphinx-doc.org) | 1.6.6 | Sphinx is a tool that makes it easy to create intelligent and beautiful documentation / BSD 2-clause |
| sphinxcontrib | 1.0 | Python namespace for sphinxcontrib / BSD |
| [sphinxcontrib-websupport](https://pypi.python.org/pypi/sphinxcontrib-websupport) | 1.0.1 | Sphinx API for Web Apps / BSD-2-Clause |
| [spyder](https://github.com/spyder-ide/spyder) | 3.2.6 | Scientific PYthon Development EnviRonment / MIT |
| [sqlalchemy](http://www.sqlalchemy.org/) | 1.2.1 | Database Abstraction Library. / MIT |
| [sqlite](http://www.sqlite.org/) | 3.22.0 | Implements a self-contained, zero-configuration, SQL database engine. / Public-Domain (`<http://www.sqlite.org/copyright.html>`) |
| [statsmodels](https://www.statsmodels.org) | 0.8.0 | Statistical computations and models for use with SciPy / BSD 3-Clause |
| [sympy](http://sympy.org) | 1.1.1 | Python library for symbolic mathematics / 3-clause BSD |
| [tblib](https://github.com/ionelmc/python-tblib) | 1.3.2 | Traceback serialization library. / BSD 2-Clause |
| [terminado](http://github.com/mitsuhiko/markupsafe) | 0.8.1 | Terminals served by tornado websockets / BSD 3-clause |
| [testpath](https://testpath.readthedocs.io) | 0.3.1 | Testpath is a collection of utilities for Python code working with files and commands. / MIT |
| [tk](http://www.tcl.tk/) | 8.6.7 | A dynamic programming language with GUI support. Bundles Tcl and Tk. / Tcl/Tk |
| [toolz](http://toolz.readthedocs.org/) | 0.9.0 | A functional standard library for Python. / BSD 3-Clause |
| [tornado](http://www.tornadoweb.org/) | 4.5.3 | A Python web framework and asynchronous networking library, originally developed at FriendFeed. / Apache 2.0 |
| [traitlets](http://ipython.org/) | 4.3.2 | Configuration system for Python applications / BSD 3-clause |
| [typing](https://docs.python.org/3.5/library/typing.html) | 3.6.2 | Type Hints for Python - backport for `Python<3.5` / PSF |
| [unicodecsv](https://github.com/jdunck/python-unicodecsv) | 0.14.1 | Drop-in replacement for csv module which supports unicode strings / BSD |
| [unixodbc](http://www.unixodbc.org/) | 2.3.4 | ODBC on non MS Windows platforms / LGPL-2.1 |
| [urllib3](https://urllib3.readthedocs.io/) | 1.22 | HTTP library with thread-safe connection pooling, file post, and more. / MIT |
| [wcwidth](https://github.com/jquast/wcwidth) | 0.1.7 | Measures number of Terminal column cells of wide-character codes. / MIT |
| [webencodings](https://github.com/gsnedders/python-webencodings) | 0.5.1 | Character encoding aliases for legacy web content / BSD 3-Clause |
| [werkzeug](http://werkzeug.pocoo.org/) | 0.14.1 | The Python WSGI Utility Library. / BSD 3-Clause |
| [wheel](https://bitbucket.org/pypa/wheel/) | 0.30.0 | A built-package format for Python. / MIT |
| [widgetsnbextension](http://ipython.org) | 3.1.0 | IPython HTML widgets for Jupyter / BSD 3-clause |
| [wrapt](https://github.com/GrahamDumpleton/wrapt) | 1.10.11 | Module for decorators, wrappers and monkey patching. / BSD 2-Clause |
| [xlrd](http://www.python-excel.org/) | 1.1.0 | Library for developers to extract data from Microsoft Excel (tm) spreadsheet files / BSD 3-Clause and BSD with advertising |
| [xlsxwriter](https://xlsxwriter.readthedocs.io/) | 1.0.2 | A Python module for creating Excel XLSX files / BSD 2-Clause |
| [xlwings](http://xlwings.org/) | 0.11.5 | Interact with Excel from Python and vice versa / 3-clause BSD |
| [xlwt](http://www.python-excel.org/) | 1.2.0 | Writing data and formatting information to Excel files / BSD |
| [xz](http://tukaani.org/xz/) | 5.2.3 | Data compression software with high compression ratio / LGPL-2.1 and GPL-2.0 |
| [yaml](http://pyyaml.org/wiki/LibYAML) | 0.1.7 | A C library for parsing and emitting YAML. / MIT |
| [zeromq](http://zeromq.org) | 4.2.2 | A high-performance asynchronous messaging library. / LGPL 3 |
| [zict](http://github.com/mrocklin/zict) | 0.1.3 | Composable Dictionary Classes / BSD 3-Clause |
| [zlib](http://zlib.net/) | 1.2.11 | Massively spiffy yet delicately unobtrusive compression library / zlib |
| Name | Version | Summary / License |
|---|---|---|
| [\_ipyw\_jlab\_nb\_ext\_conf](https://github.com/ContinuumIO/anaconda-nb-extensions-meta-config) | 0.1.0 | A configuration metapackage for enabling Anaconda-bundled jupyter extensions / BSD |
| [alabaster](http://www.sphinx-doc.org/en/stable/index.html) | 0.7.10 | Configurable, Python 2+3 compatible Sphinx theme. / BSD 3-Clause |
| [anaconda-client](https://github.com/Anaconda-Platform/anaconda-client) | 1.6.6 | Anaconda Cloud command line client library / BSD 3-Clause |
| [anaconda-project](https://github.com/Anaconda-Platform/anaconda-project) | 0.8.2 | Tool for encapsulating, running, and reproducing data science projects / BSD 3-Clause |
| [asn1crypto](https://github.com/wbond/asn1crypto) | 0.23.0 | Python ASN.1 library with a focus on performance and a pythonic API / MIT |
| [astroid](https://www.astroid.org/) | 1.6.1 | A abstract syntax tree for Python with inference support. / LGPL 2.1 |
| [astropy](http://www.astropy.org/) | 2.0.3 | Community-developed Python Library for Astronomy / BSD |
| [babel](http://babel.pocoo.org/) | 2.5.0 | Utilities to internationalize and localize Python applications / BSD 3-clause |
| [backports](https://bitbucket.org/brandon/backports) | 1.0 | / BSD |
| [backports.shutil\_get\_terminal\_size](https://github.com/chrippa/backports.shutil_get_terminal_size) | 1.0.0 | A backport of the get\_terminal\_size function from Python 3.3’s shutil. / MIT |
| [beautifulsoup4](http://www.crummy.com/software/BeautifulSoup/) | 4.6.0 | Python library designed for screen-scraping / MIT |
| [bitarray](https://github.com/ilanschnell/bitarray) | 0.8.1 | efficient arrays of booleans – C extension / PSF |
| [bkcharts](http://github.com/bokeh/bkcharts) | 0.2 | High level chart types built on top of Bokeh / BSD 3-Clause |
| [bleach](https://github.com/mozilla/bleach) | 2.1.2 | Easy, whitelist-based HTML-sanitizing tool / Apache-2.0 |
| [bokeh](http://bokeh.pydata.org/) | 0.12.13 | Statistical and novel interactive HTML plots for Python / BSD 3-Clause |
| [boto](https://github.com/boto/boto/) | 2.48.0 | Amazon Web Services Library / MIT |
| [bottleneck](http://berkeleyanalytics.com/bottleneck) | 1.2.1 | Fast NumPy array functions written in Cython. / BSD 2-Clause |
| [bzip2](http://www.bzip.org/) | 1.0.6 | high-quality data compressor / bzip2 |
| [ca-certificates](https://github.com/conda-forge/ca-certificates-feedstock) | 2017.08.26 | Certificates for use with other packages. / ISC |
| [cairo](http://cairographics.org/) | 1.14.10 | Cairo is a 2D graphics library with support for multiple output devices. / LGPL 2.1 or MPL 1.1 |
| [certifi](http://certifi.io/) | 2018.1.18 | Python package for providing Mozilla’s CA Bundle. / ISC |
| [cffi](https://bitbucket.org/cffi/cffi) | 1.11.2 | Foreign Function Interface for Python calling C code. / MIT |
| [chardet](https://github.com/chardet/chardet) | 3.0.4 | Universal character encoding detector / LGPL2 |
| [click](http://click.pocoo.org/) | 6.7 | A simple wrapper around optparse for powerful command line utilities. / BSD 3-Clause |
| [cloudpickle](https://github.com/cloudpipe/cloudpickle) | 0.5.2 | Extended pickling support for Python objects / BSD 3-Clause |
| [clyent](https://github.com/Anaconda-Platform/clyent) | 1.2.2 | Command line client library for windows and posix / BSD 3-Clause |
| [colorama](https://github.com/tartley/colorama) | 0.3.9 | Cross-platform colored terminal text. / BSD 3-Clause |
| [conda](https://conda.io) | 4.4.9 | OS-agnostic, system-level binary package and environment manager. / BSD 3-Clause |
| [conda-build](https://github.com/conda/conda-build) | 3.4.1 | tools for building conda packages / BSD 3-Clause |
| [conda-env](https://github.com/conda/conda-env) | 2.6.0 | Tools for interacting with conda environments. / BSD 3-Clause |
| [conda-verify](https://github.com/conda/conda-verify) | 3.0.0 | tool for validating conda recipes and conda packages / BSD 3-Clause |
| [contextlib2](http://contextlib2.readthedocs.org) | 0.5.5 | Backports and enhancements for the contextlib module / PSF |
| [cryptography](https://github.com/pyca/cryptography) | 2.1.4 | Provides cryptographic recipes and primitives to Python developers / Apache 2.0 or BSD 3-Clause, PSF 2 |
| [curl](http://curl.haxx.se/) | 7.55.1 | tool and library for transferring data with URL syntax / MIT/X derivate (`<http://curl.haxx.se/docs/copyright.html>`) |
| [cycler](http://matplotlib.org/cycler) | 0.10.0 | Composable style cycles. / BSD 3-Clause |
| [cython](http://www.cython.org/) | 0.27.3 | The Cython compiler for writing C extensions for the Python language / Apache-2.0 |
| [cytoolz](https://github.com/pytoolz/cytoolz) | 0.8.2 | Cython implementation of Toolz. High performance functional utilities. / BSD 3-Clause |
| [dask](http://github.com/dask/dask/) | 0.16.0 | Parallel Python with task scheduling / BSD 3-Clause |
| [dask-core](http://github.com/dask/dask/) | 0.16.0 | Parallel Python with task scheduling / BSD 3-Clause |
| [datashape](http://datashape.pydata.org) | 0.5.4 | A data description language. / BSD 2-Clause |
| [decorator](https://github.com/micheles/decorator) | 4.1.2 | Better living through Python with decorators. / BSD 3-Clause |
| [distributed](http://distributed.readthedocs.io/en/latest/) | 1.20.2 | Distributed computing with Dask / BSD 3-Clause |
| [docutils](http://docutils.sourceforge.net/) | 0.14 | Docutils – Python Documentation Utilities / Public Domain Dedictation and BSD 2-Clause and PSF 2.1.1 and GPL 3.0 |
| [entrypoints](https://github.com/takluyver/entrypoints) | 0.2.3 | Discover and load entry points from installed packages. / MIT License |
| [et\_xmlfile](https://bitbucket.org/openpyxl/et_xmlfile) | 1.0.1 | An implementation of lxml.xmlfile for the standard library / MIT |
| [expat](http://expat.sourceforge.net/) | 2.2.5 | Expat XML parser library in C. / MIT |
| [fastcache](https://github.com/pbrady/fastcache) | 1.0.2 | C implementation of Python 3 lru\_cache / MIT |
| [filelock](https://github.com/benediktschmitt/py-filelock) | 2.0.13 | A platform independent file lock. / Public Domain |
| [flask](http://flask.pocoo.org) | 0.12.2 | A microframework based on Werkzeug, Jinja2 and good intentions. / BSD 3-Clause |
| [flask-cors](https://github.com/corydolphin/flask-cors) | 3.0.3 | A Flask extension adding a decorator for CORS support / MIT |
| [fontconfig](http://www.freedesktop.org/wiki/Software/fontconfig/) | 2.12.4 | A library for configuring and customizing font access. / MIT |
| [freetype](https://www.freetype.org/) | 2.8 | A Free, High-Quality, and Portable Font Engine / GPL-2.0 and FreeType |
| [get\_terminal\_size](https://github.com/chrippa/backports.shutil_get_terminal_size) | 1.0.0 | Get the size of the terminal window. / MIT |
| [gevent](http://www.gevent.org/) | 1.2.2 | Coroutine-based network library / MIT |
| [glib](https://developer.gnome.org/glib/) | 2.53.6 | Provides core application building blocks for libraries and applications written in C. / LGPL-2.1 |
| [glob2](https://github.com/miracle2k/python-glob2) | 0.6 | Version of the glob module that supports recursion via \*\*, and can capture patterns. / BSD-2-Clause |
| [gmp](http://gmplib.org/) | 6.1.2 | The GNU multiprecision library. / GPL 2 and LGPL 3 |
| [gmpy2](https://pypi.python.org/pypi/gmpy2) | 2.0.8 | GMP/MPIR, MPFR, and MPC interface to Python 2.6+ and 3.x / LGPL 3 |
| [greenlet](https://github.com/python-greenlet/greenlet) | 0.4.12 | Lightweight in-process concurrent programming / MIT |
| [h5py](http://www.h5py.org/) | 2.7.1 | Read and write HDF5 files from Python. / BSD 3-Clause |
| [hdf5](http://www.hdfgroup.org/HDF5/) | 1.10.1 | HDF5 is a data model, library, and file format for storing and managing data / HDF5 |
| [heapdict](http://stutzbachenterprises.com/) | 1.0.0 | A heap with decrease-key and increase-key operations / BSD 3-Clause |
| [html5lib](https://github.com/html5lib/html5lib-python) | 1.0.1 | HTML parser based on the WHATWG HTML specification / MIT |
| [icu](http://site.icu-project.org/) | 58.2 | International Components for Unicode. / MIT |
| [idna](https://github.com/kjd/idna) | 2.6 | Internationalized Domain Names in Applications (IDNA). / BSD Like |
| [imageio](http://imageio.github.io) | 2.2.0 | a Python library for reading and writing image data / BSD 2-Clause |
| [imagesize](https://github.com/shibukawa/imagesize_py) | 0.7.1 | Getting image size from png/jpeg/jpeg2000/gif file / MIT |
| [ipykernel](http://ipython.org) | 4.8.0 | IPython Kernel for Jupyter / BSD 3-clause |
| [ipython](http://ipython.org/) | 6.2.1 | IPython: Productive Interactive Computing / BSD 3-clause |
| [ipython\_genutils](http://ipython.org) | 0.2.0 | vestigial utilities from IPython / BSD 3-Clause |
| [ipywidgets](https://github.com/ipython/ipywidgets) | 7.1.1 | Jupyter Interactive Widgets / BSD 3-clause |
| [isort](https://github.com/timothycrosley/isort) | 4.2.15 | A Python utility / library to sort Python imports. / MIT |
| [itsdangerous](https://github.com/pallets/itsdangerous) | 0.24 | Various helpers to pass trusted data to untrusted environments. / BSD 3-Clause |
| [jbig](https://www.cl.cam.ac.uk/~mgk25/jbigkit) | 2.1 | Implementation of the JBIG1 data compression standard / GPL-2.0 |
| [jdcal](https://github.com/phn/jdcal) | 1.3 | Julian dates from proleptic Gregorian and Julian calendars. / BSD 2-Clause |
| [jedi](https://github.com/davidhalter/jedi/) | 0.11.0 | An autocompletion tool for Python that can be used for text editors. / MIT |
| [jinja2](http://jinja.pocoo.org) | 2.10 | An easy to use stand-alone template engine written in pure python. / 3-Clause BSD |
| [jpeg](http://www.ijg.org/) | 9b | read/write jpeg COM, EXIF, IPTC medata / Custom free software license |
| [jsonschema](https://github.com/Julian/jsonschema) | 2.6.0 | An implementation of JSON Schema validation for Python / MIT |
| [jupyter](http://jupyter.org) | 1.0.0 | Jupyter metapackage. Install all the Jupyter components in one go. / BSD 3-Clause |
| [jupyter\_client](http://jupyter.org) | 5.2.2 | Jupyter protocol implementation and client libraries / BSD 3-clause |
| [jupyter\_console](http://jupyter.org) | 5.2.0 | Jupyter terminal console / BSD 3-Clause |
| [jupyter\_core](http://jupyter.org) | 4.4.0 | Core common functionality of Jupyter projects. / BSD 3-clause |
| [jupyterlab](https://github.com/jupyterlab/jupyterlab) | 0.31.5 | A pre-alpha version of a computational environment for Jupyter. / BSD 3-Clause |
| [jupyterlab\_launcher](http://github.com/jupyterlab/jupyterlab_launcher) | 0.10.2 | A Launcher for JupyterLab based applications. / BSD 3-Clause |
| [lazy-object-proxy](https://github.com/ionelmc/python-lazy-object-proxy) | 1.3.1 | A fast and thorough lazy object proxy. / BSD 2-Clause |
| [libedit](http://thrysoee.dk/editline/) | 3.1.20170329 | Editline Library (libedit) / NetBSD |
| [libffi](https://sourceware.org/libffi/) | 3.2.1 | A Portable Foreign Function Interface Library. / Custom |
| [libgcc-ng](https://gcc.gnu.org/onlinedocs/gccint/Libgcc.html) | 7.2.0 | The GCC low-level runtime library / GPL |
| [libgfortran](http://gcc.gnu.org/) | 3.0.0 | Fortran libraries from the GNU Compiler Collection / GPL 3 (with GCC Runtime Library Exception 3.1) |
| [libgfortran-ng](https://gcc.gnu.org/) | 7.2.0 | The GNU Fortran Runtime Library / GPL |
| [libiconv](https://www.gnu.org/software/libiconv/) | 1.14 | Provides iconv for systems which don’t have one (or that cannot convert from/to Unicode.) / GPL and LGPL |
| [libopenblas](http://www.openblas.net/) | 0.2.20 | An Optimized BLAS library / BSD |
| [libpng](http://www.libpng.org/pub/png/libpng.html) | 1.6.32 | PNG reference library. / zlib/libpng |
| [libsodium](http://libsodium.org) | 1.0.15 | A modern and easy-to-use crypto library. / ISC |
| [libssh2](https://www.libssh2.org/) | 1.8.0 | the SSH library / BSD 3-Clause |
| [libstdcxx-ng](https://gcc.gnu.org/) | 7.2.0 | The GNU C++ Runtime Library / GPL3 with runtime exception |
| [libtiff](http://www.libtiff.org/) | 4.0.9 | Support for the Tag Image File Format (TIFF). / HPND |
| [libxcb](http://xcb.freedesktop.org/) | 1.12 | This is the C-language Binding (XCB) package to the X Window System protocol / MIT |
| [libxml2](http://xmlsoft.org/) | 2.9.4 | The XML C parser and toolkit of Gnome / MIT |
| [libxslt](http://xmlsoft.org/XSLT/) | 1.1.29 | The XSLT C library developed for the GNOME project / MIT |
| [locket](https://github.com/mwilliamson/locket.py) | 0.2.0 | File-based locks for Python for Linux and Windows / BSD 2-Clause |
| [lxml](http://lxml.de/) | 4.1.1 | Pythonic binding for the C libraries libxml2 and libxslt. / BSD 3-Clause, GPL-2.0, ZPL-2.0, and ElementTree |
| [lzo](http://www.oberhumer.com/opensource/lzo/) | 2.10 | LZO is a portable lossless data compression library written in ANSI C. / GPL v2+ |
| [markupsafe](https://www.palletsprojects.com/p/markupsafe/) | 1.0 | A Python module that implements the jinja2.Markup string / BSD 3-Clause |
| [matplotlib](http://matplotlib.org/) | 2.1.2 | Publication quality figures in Python / PSF-based |
| [mccabe](https://github.com/PyCQA/mccabe) | 0.6.1 | McCabe complexity checker for Python / MIT |
| [mistune](https://github.com/lepture/mistune) | 0.8.1 | The fastest markdown parser in pure Python. / BSD 3-Clause |
| [mpc](http://www.multiprecision.org/) | 1.0.3 | A C library for the arithmetic of complex numbers with arbitrarily high precision. / LGPL 3 |
| [mpfr](http://www.mpfr.org/) | 3.1.5 | The MPFR library is a C library for multiple-precision floating-point computations with correct rounding. / LGPL 3 |
| [mpmath](http://mpmath.org) | 1.0.0 | Python library for arbitrary-precision floating-point arithmetic / BSD 3-Clause |
| [msgpack-python](http://msgpack.org/) | 0.4.8 | MessagePack (de)serializer. / Apache 2.0 |
| [multipledispatch](https://github.com/mrocklin/multipledispatch/) | 0.4.9 | Multiple dispatch in Python / BSD 3-Clause |
| [nbconvert](http://jupyter.org) | 5.3.1 | Converting Jupyter Notebooks / BSD 3-Clause |
| [nbformat](http://jupyter.org) | 4.4.0 | The reference implementation of the Jupyter Notebook format / BSD 3-clause |
| [ncurses](http://www.gnu.org/software/ncurses/) | 6.0 | Library for text-based user interfaces / Free software (MIT-like) |
| [networkx](https://networkx.github.io/) | 2.1 | Python package for creating and manipulating complex networks / BSD 3-Clause |
| [nltk](http://nltk.org/) | 3.2.5 | Build Python programs to work with human language data / Apache 2.0 |
| [nose](http://readthedocs.org/docs/nose/) | 1.3.7 | Nose extends unittest to make testing easier / LGPL-2.1 |
| [notebook](http://jupyter.org) | 5.4.0 | A web-based notebook environment for interactive computing / BSD 3-clause |
| [numexpr](https://github.com/pydata/numexpr) | 2.6.4 | Fast numerical expression evaluator for NumPy. / MIT |
| [numpy](http://numpy.scipy.org/) | 1.13.3 | Array processing for numbers, strings, records, and objects. / BSD 3-Clause |
| [numpydoc](https://github.com/numpy/numpydoc) | 0.7.0 | Sphinx extension to support docstrings in Numpy format / BSD 3-Clause |
| [odo](http://odo.pydata.org) | 0.5.1 | Data migration in Python / BSD-3-Clause |
| [olefile](http://www.decalage.info/python/olefileio) | 0.45.1 | parse, read and write Microsoft OLE2 files / BSD License 2-Clause |
| [openblas](http://www.openblas.net/) | 0.2.20 | An Optimized BLAS library / BSD |
| openblas-devel | 0.2.20 | |
| [openpyxl](https://openpyxl.readthedocs.io) | 2.4.10 | A Python library to read/write Excel 2010 xlsx/xlsm files / MIT |
| [openssl](http://www.openssl.org/) | 1.0.2n | OpenSSL is an open-source implementation of the SSL and TLS protocols / OpenSSL |
| [packaging](https://github.com/pypa/packaging) | 16.8 | Core utilities for Python packages / Apache 2.0 or BSD 2-Clause |
| [pandas](http://pandas.pydata.org) | 0.22.0 | High-performance, easy-to-use data structures and data analysis tools. / BSD 3-clause |
| [pandoc](http://johnmacfarlane.net/pandoc/) | 2.0.0.1 | Universal markup converter (repackaged binaries). / GPL-2.0 |
| [pandocfilters](https://github.com/jgm/pandocfilters) | 1.4.2 | A python module for writing pandoc filters / BSD-3-Clause |
| [parso](https://github.com/davidhalter/parso) | 0.1.1 | A Python Parser / MIT License |
| [partd](https://github.com/dask/partd) | 0.3.8 | Data structure for on-disk shuffle operations / BSD 3-Clause |
| [patchelf](http://nixos.org/patchelf.html) | 0.9 | A small utility to modify the dynamic linker and RPATH of ELF executables. / GPL 3 |
| [path.py](https://github.com/jaraco/path.py) | 10.5 | A module wrapper for os.path / MIT |
| [pathlib2](https://github.com/mcmtroffaes/pathlib2) | 2.3.0 | Fork of pathlib aiming to support the full stdlib Python API. / MIT |
| [patsy](https://github.com/pydata/patsy) | 0.4.1 | Describing statistical models in Python using symbolic formulas / BSD-2-Clause, PSF2 |
| [pcre](http://www.pcre.org/) | 8.41 | Regular expression pattern matching using the same syntax and semantics as Perl 5. / BSD 3-Clause |
| [pep8](http://pep8.readthedocs.org/) | 1.7.0 | Python style guide checker / MIT |
| [pexpect](http://pexpect.sourceforge.net/) | 4.3.0 | Pexpect makes Python a better tool for controlling other applications. / ISC |
| [pickleshare](https://github.com/vivainio/pickleshare) | 0.7.4 | Tiny ‘shelve’-like database with concurrency support / MIT |
| [pillow](http://python-imaging.github.io/) | 5.0.0 | Pillow is the friendly PIL fork by Alex Clark and Contributors. / PIL |
| [pip](https://pip.pypa.io/en/stable/) | 9.0.1 | PyPA recommended tool for installing Python packages / MIT |
| [pixman](http://www.pixman.org/) | 0.34.0 | A low-level software library for pixel manipulation. / MIT |
| [pkginfo](https://code.launchpad.net/~tseaver/pkginfo/trunk) | 1.4.1 | Query metadatdata from sdists / bdists / installed packages. / MIT |
| [ply](http://www.dabeaz.com/ply/index.html) | 3.10 | Python Lex-Yacc / BSD 3-clause |
| [prompt\_toolkit](https://github.com/jonathanslenders/python-prompt-toolkit) | 1.0.15 | Library for building powerful interactive command lines in Python / BSD 3-clause |
| [psutil](https://github.com/giampaolo/psutil) | 5.4.1 | A cross-platform process and system utilities module for Python / BSD 3-Clause |
| [ptyprocess](https://github.com/pexpect/ptyprocess) | 0.5.2 | Run a subprocess in a pseudo terminal / ISC |
| [py](https://github.com/pytest-dev/py) | 1.5.2 | library with cross-python path, ini-parsing, io, code, log facilities / MIT |
| [pycodestyle](https://pycodestyle.readthedocs.io/) | 2.3.1 | Python style guide checker / MIT |
| [pycosat](https://github.com/ContinuumIO/pycosat) | 0.6.3 | Bindings to picosat (a SAT solver) / MIT |
| [pycparser](https://github.com/eliben/pycparser) | 2.18 | Complete C99 parser in pure Python / BSD 3-clause |
| [pycrypto](http://www.pycrypto.org/) | 2.6.1 | Cryptographic modules for Python. / Public Domain |
| [pycurl](http://pycurl.sourceforge.net/) | 7.43.0 | A Python Interface To The cURL library / LGPL, MIT |
| [pyflakes](https://github.com/PyCQA/pyflakes) | 1.6.0 | Pyflakes analyzes programs and detects various errors. / MIT |
| [pygments](http://pygments.org/) | 2.2.0 | Generic syntax highlighting package / BSD 2-clause |
| [pylint](http://www.pylint.org/) | 1.8.2 | python code static checker / GPL |
| [pyodbc](https://github.com/mkleehammer/pyodbc) | 4.0.22 | DB API Module for ODBC / MIT |
| [pyopenssl](https://github.com/pyca/pyopenssl) | 17.5.0 | Python wrapper module around the OpenSSL library / Apache 2.0 |
| [pyparsing](http://pyparsing.wikispaces.com/) | 2.2.0 | Create and execute simple grammars / MIT |
| [pysocks](https://github.com/Anorov/PySocks) | 1.6.7 | A Python SOCKS client module. See [Anorov/PySocks](https://github.com/Anorov/PySocks) for more information. / BSD 3-Clause |
| [pytables](http://www.pytables.org) | 3.4.2 | Brings together Python, HDF5 and NumPy to easily handle large amounts of data. / BSD 3-Clause |
| [pytest](https://docs.pytest.org/en/latest/) | 3.2.5 | Simple and powerful testing with Python. / MIT |
| [python](http://www.python.org/) | 3.6.4 | General purpose programming language / PSF |
| [python-dateutil](https://dateutil.readthedocs.org/) | 2.6.1 | Extensions to the standard Python datetime module. / BSD 3-clause |
| [pytz](http://pythonhosted.org/pytz/) | 2017.3 | World timezone definitions, modern and historical. / MIT |
| [pywavelets](https://github.com/PyWavelets/pywt) | 0.5.2 | Discrete Wavelet Transforms in Python. / MIT |
| [pyyaml](http://pyyaml.org/wiki/PyYAML) | 3.12 | YAML parser and emitter for Python / MIT |
| [pyzmq](https://github.com/zeromq/pyzmq) | 16.0.3 | Python bindings for zeromq / BSD 3-clause |
| [readline](https://cnswww.cns.cwru.edu/php/chet/readline/rltop.html) | 7.0 | library for editing command lines as they are typed in / GPL3 |
| [requests](http://python-requests.org) | 2.18.4 | Python HTTP for Humans. / Apache 2.0 |
| [ruamel\_yaml](https://bitbucket.org/ruamel/yaml) | 0.15.35 | A patched copy of ruamel.yaml. / MIT |
| [scikit-image](http://scikit-image.org/) | 0.13.1 | Image processing routines for SciPy. / BSD 3-Clause |
| [scikit-learn](http://scikit-learn.org/) | 0.19.1 | A set of python modules for machine learning and data mining / BSD 3-Clause |
| [scipy](http://www.scipy.org/) | 1.0.0 | Scientific Library for Python / BSD 3-Clause |
| [seaborn](http://stanford.edu/~mwaskom/software/seaborn/) | 0.8.1 | Statistical data visualization / BSD 3-Clause |
| [send2trash](https://github.com/hsoft/send2trash) | 1.4.2 | Python library to natively send files to Trash (or Recycle bin) on all platforms. / BSD-3-Clause |
| [setuptools](https://github.com/pypa/setuptools) | 36.5.0 | Download, build, install, upgrade, and uninstall Python packages / MIT |
| [simplegeneric](http://cheeseshop.python.org/pypi/simplegeneric) | 0.8.1 | Simple generic functions (similar to Python’s own len(), pickle.dump(), etc.) / Zope Public |
| [singledispatch](http://docs.python.org/3/library/functools.html#functools.singledispatch) | 3.4.0.3 | Transforms a function into a single-dispatch generic function / MIT |
| [six](http://pypi.python.org/pypi/six/) | 1.11.0 | Python 2 and 3 compatibility utilities / MIT |
| [snowballstemmer](https://github.com/shibukawa/snowball_py) | 1.2.1 | Snowball stemming library collection for Python / BSD-2-Clause |
| [sortedcollections](http://www.grantjenks.com/docs/sortedcollections/) | 0.5.3 | Python Sorted Collections / Apache-2.0 |
| [sortedcontainers](http://www.grantjenks.com/docs/sortedcontainers/) | 1.5.7 | Python Sorted Container Types: SortedList, SortedDict, and SortedSet / Apache 2.0 |
| [sphinx](http://www.sphinx-doc.org) | 1.6.3 | Sphinx is a tool that makes it easy to create intelligent and beautiful documentation / BSD 2-clause |
| sphinxcontrib | 1.0 | Python namespace for sphinxcontrib / BSD |
| [sphinxcontrib-websupport](https://pypi.python.org/pypi/sphinxcontrib-websupport) | 1.0.1 | Sphinx API for Web Apps / BSD-2-Clause |
| [sqlalchemy](http://www.sqlalchemy.org/) | 1.2.1 | Database Abstraction Library. / MIT |
| [sqlite](http://www.sqlite.org/) | 3.21.0 | Implements a self-contained, zero-configuration, SQL database engine. / Public-Domain (`<http://www.sqlite.org/copyright.html>`) |
| [statsmodels](https://www.statsmodels.org) | 0.8.0 | Statistical computations and models for use with SciPy / BSD 3-Clause |
| [sympy](http://sympy.org) | 1.1.1 | Python library for symbolic mathematics / 3-clause BSD |
| [tblib](https://github.com/ionelmc/python-tblib) | 1.3.2 | Traceback serialization library. / BSD 2-Clause |
| [terminado](http://github.com/mitsuhiko/markupsafe) | 0.8.1 | Terminals served by tornado websockets / BSD 3-clause |
| [testpath](https://testpath.readthedocs.io) | 0.3.1 | Testpath is a collection of utilities for Python code working with files and commands. / MIT |
| [tk](http://www.tcl.tk/) | 8.6.7 | A dynamic programming language with GUI support. Bundles Tcl and Tk. / Tcl/Tk |
| [toolz](http://toolz.readthedocs.org/) | 0.8.2 | A functional standard library for Python. / BSD 3-Clause |
| [tornado](http://www.tornadoweb.org/) | 4.5.2 | A Python web framework and asynchronous networking library, originally developed at FriendFeed. / Apache 2.0 |
| [traitlets](http://ipython.org/) | 4.3.2 | Configuration system for Python applications / BSD 3-clause |
| [typing](https://docs.python.org/3.5/library/typing.html) | 3.6.2 | Type Hints for Python - backport for `Python<3.5` / PSF |
| [unicodecsv](https://github.com/jdunck/python-unicodecsv) | 0.14.1 | Drop-in replacement for csv module which supports unicode strings / BSD |
| [unixodbc](http://www.unixodbc.org/) | 2.3.4 | ODBC on non MS Windows platforms / LGPL-2.1 |
| [urllib3](https://urllib3.readthedocs.io/) | 1.22 | HTTP library with thread-safe connection pooling, file post, and more. / MIT |
| [wcwidth](https://github.com/jquast/wcwidth) | 0.1.7 | Measures number of Terminal column cells of wide-character codes. / MIT |
| [webencodings](https://github.com/gsnedders/python-webencodings) | 0.5.1 | Character encoding aliases for legacy web content / BSD 3-Clause |
| [werkzeug](http://werkzeug.pocoo.org/) | 0.12.2 | The Python WSGI Utility Library. / BSD 3-Clause |
| [wheel](https://bitbucket.org/pypa/wheel/) | 0.30.0 | A built-package format for Python. / MIT |
| [widgetsnbextension](http://ipython.org) | 3.1.0 | IPython HTML widgets for Jupyter / BSD 3-clause |
| [wrapt](https://github.com/GrahamDumpleton/wrapt) | 1.10.11 | Module for decorators, wrappers and monkey patching. / BSD 2-Clause |
| [xlrd](http://www.python-excel.org/) | 1.1.0 | Library for developers to extract data from Microsoft Excel (tm) spreadsheet files / BSD 3-Clause and BSD with advertising |
| [xlsxwriter](https://xlsxwriter.readthedocs.io/) | 1.0.2 | A Python module for creating Excel XLSX files / BSD 2-Clause |
| [xlwt](http://www.python-excel.org/) | 1.3.0 | Writing data and formatting information to Excel files / BSD |
| [xz](http://tukaani.org/xz/) | 5.2.3 | Data compression software with high compression ratio / LGPL-2.1 and GPL-2.0 |
| [yaml](http://pyyaml.org/wiki/LibYAML) | 0.1.7 | A C library for parsing and emitting YAML. / MIT |
| [zeromq](http://zeromq.org) | 4.2.2 | A high-performance asynchronous messaging library. / LGPL 3 |
| [zict](http://github.com/mrocklin/zict) | 0.1.3 | Composable Dictionary Classes / BSD 3-Clause |
| [zlib](http://zlib.net/) | 1.2.11 | Massively spiffy yet delicately unobtrusive compression library / zlib |
| Name | Version | Summary / License |
|---|---|---|
| [\_ipyw\_jlab\_nb\_ext\_conf](https://github.com/ContinuumIO/anaconda-nb-extensions-meta-config) | 0.1.0 | A configuration metapackage for enabling Anaconda-bundled jupyter extensions / BSD |
| [alabaster](http://www.sphinx-doc.org/en/stable/index.html) | 0.7.10 | Configurable, Python 2+3 compatible Sphinx theme. / BSD 3-Clause |
| [anaconda-client](https://github.com/Anaconda-Platform/anaconda-client) | 1.6.9 | Anaconda Cloud command line client library / BSD 3-Clause |
| [anaconda-navigator](https://github.com/ContinuumIO/navigator) | 1.7.0 | Anaconda Navigator / proprietary - Continuum Analytics, Inc. |
| [anaconda-project](https://github.com/Anaconda-Platform/anaconda-project) | 0.8.2 | Tool for encapsulating, running, and reproducing data science projects / BSD 3-Clause |
| [asn1crypto](https://github.com/wbond/asn1crypto) | 0.24.0 | Python ASN.1 library with a focus on performance and a pythonic API / MIT |
| [astroid](https://www.astroid.org/) | 1.6.1 | A abstract syntax tree for Python with inference support. / LGPL 2.1 |
| [astropy](http://www.astropy.org/) | 2.0.3 | Community-developed Python Library for Astronomy / BSD |
| [attrs](https://attrs.readthedocs.io/en/stable/) | 17.4.0 | attrs is the Python package that will bring back the joy of writing classes by relieving you from the drudgery of implementing object protocols (aka dunder methods). / MIT |
| [babel](http://babel.pocoo.org/) | 2.5.3 | Utilities to internationalize and localize Python applications / BSD 3-clause |
| [backports](https://bitbucket.org/brandon/backports) | 1.0 | / BSD |
| [backports.shutil\_get\_terminal\_size](https://github.com/chrippa/backports.shutil_get_terminal_size) | 1.0.0 | A backport of the get\_terminal\_size function from Python 3.3’s shutil. / MIT |
| [beautifulsoup4](http://www.crummy.com/software/BeautifulSoup/) | 4.6.0 | Python library designed for screen-scraping / MIT |
| [bitarray](https://github.com/ilanschnell/bitarray) | 0.8.1 | efficient arrays of booleans – C extension / PSF |
| [bkcharts](http://github.com/bokeh/bkcharts) | 0.2 | High level chart types built on top of Bokeh / BSD 3-Clause |
| [blaze](http://blaze.pydata.org) | 0.11.3 | NumPy and Pandas interface to big data / BSD 3-Clause |
| [bleach](https://github.com/mozilla/bleach) | 2.1.2 | Easy, whitelist-based HTML-sanitizing tool / Apache-2.0 |
| [bokeh](http://bokeh.pydata.org/) | 0.12.13 | Statistical and novel interactive HTML plots for Python / BSD 3-Clause |
| [boto](https://github.com/boto/boto/) | 2.48.0 | Amazon Web Services Library / MIT |
| [bottleneck](http://berkeleyanalytics.com/bottleneck) | 1.2.1 | Fast NumPy array functions written in Cython. / BSD 2-Clause |
| [bzip2](http://www.bzip.org/) | 1.0.6 | high-quality data compressor / bzip2 |
| [ca-certificates](https://github.com/conda-forge/ca-certificates-feedstock) | 2017.08.26 | Certificates for use with other packages. / ISC |
| [cairo](http://cairographics.org/) | 1.14.12 | Cairo is a 2D graphics library with support for multiple output devices. / LGPL 2.1 or MPL 1.1 |
| [certifi](http://certifi.io/) | 2018.1.18 | Python package for providing Mozilla’s CA Bundle. / ISC |
| [cffi](https://bitbucket.org/cffi/cffi) | 1.11.4 | Foreign Function Interface for Python calling C code. / MIT |
| [chardet](https://github.com/chardet/chardet) | 3.0.4 | Universal character encoding detector / LGPL2 |
| [click](http://click.pocoo.org/) | 6.7 | A simple wrapper around optparse for powerful command line utilities. / BSD 3-Clause |
| [cloudpickle](https://github.com/cloudpipe/cloudpickle) | 0.5.2 | Extended pickling support for Python objects / BSD 3-Clause |
| [clyent](https://github.com/Anaconda-Platform/clyent) | 1.2.2 | Command line client library for windows and posix / BSD 3-Clause |
| [colorama](https://github.com/tartley/colorama) | 0.3.9 | Cross-platform colored terminal text. / BSD 3-Clause |
| [conda](https://conda.io) | 4.4.10 | OS-agnostic, system-level binary package and environment manager. / BSD 3-Clause |
| [conda-build](https://github.com/conda/conda-build) | 3.4.1 | tools for building conda packages / BSD 3-Clause |
| [conda-env](https://github.com/conda/conda-env) | 2.6.0 | Tools for interacting with conda environments. / BSD 3-Clause |
| [conda-verify](https://github.com/conda/conda-verify) | 2.0.0 | tool for validating conda recipes and conda packages / BSD 3-Clause |
| [contextlib2](http://contextlib2.readthedocs.org) | 0.5.5 | Backports and enhancements for the contextlib module / PSF |
| [cryptography](https://github.com/pyca/cryptography) | 2.1.4 | Provides cryptographic recipes and primitives to Python developers / Apache 2.0 or BSD 3-Clause, PSF 2 |
| [curl](http://curl.haxx.se/) | 7.58.0 | tool and library for transferring data with URL syntax / MIT/X derivate (`<http://curl.haxx.se/docs/copyright.html>`) |
| [cycler](http://matplotlib.org/cycler) | 0.10.0 | Composable style cycles. / BSD 3-Clause |
| [cython](http://www.cython.org/) | 0.27.3 | The Cython compiler for writing C extensions for the Python language / Apache-2.0 |
| [cytoolz](https://github.com/pytoolz/cytoolz) | 0.9.0 | Cython implementation of Toolz. High performance functional utilities. / BSD 3-Clause |
| [dask](http://github.com/dask/dask/) | 0.16.1 | Parallel Python with task scheduling / BSD 3-Clause |
| [dask-core](http://github.com/dask/dask/) | 0.16.1 | Parallel Python with task scheduling / BSD 3-Clause |
| [datashape](http://datashape.pydata.org) | 0.5.4 | A data description language. / BSD 2-Clause |
| [dbus](http://www.freedesktop.org/wiki/Software/dbus/) | 1.12.2 | Simple message bus system for applications to talk to one another / GPL2 |
| [decorator](https://github.com/micheles/decorator) | 4.2.1 | Better living through Python with decorators. / BSD 3-Clause |
| [distributed](http://distributed.readthedocs.io/en/latest/) | 1.20.2 | Distributed computing with Dask / BSD 3-Clause |
| [docutils](http://docutils.sourceforge.net/) | 0.14 | Docutils – Python Documentation Utilities / Public Domain Dedictation and BSD 2-Clause and PSF 2.1.1 and GPL 3.0 |
| [entrypoints](https://github.com/takluyver/entrypoints) | 0.2.3 | Discover and load entry points from installed packages. / MIT License |
| [et\_xmlfile](https://bitbucket.org/openpyxl/et_xmlfile) | 1.0.1 | An implementation of lxml.xmlfile for the standard library / MIT |
| [expat](http://expat.sourceforge.net/) | 2.2.5 | Expat XML parser library in C. / MIT |
| [fastcache](https://github.com/pbrady/fastcache) | 1.0.2 | C implementation of Python 3 lru\_cache / MIT |
| [filelock](https://github.com/benediktschmitt/py-filelock) | 2.0.13 | A platform independent file lock. / Public Domain |
| [flask](http://flask.pocoo.org) | 0.12.2 | A microframework based on Werkzeug, Jinja2 and good intentions. / BSD 3-Clause |
| [flask-cors](https://github.com/corydolphin/flask-cors) | 3.0.3 | A Flask extension adding a decorator for CORS support / MIT |
| [fontconfig](http://www.freedesktop.org/wiki/Software/fontconfig/) | 2.12.4 | A library for configuring and customizing font access. / MIT |
| [freetype](https://www.freetype.org/) | 2.8 | A Free, High-Quality, and Portable Font Engine / GPL-2.0 and FreeType |
| [get\_terminal\_size](https://github.com/chrippa/backports.shutil_get_terminal_size) | 1.0.0 | Get the size of the terminal window. / MIT |
| [gevent](http://www.gevent.org/) | 1.2.2 | Coroutine-based network library / MIT |
| [glib](https://developer.gnome.org/glib/) | 2.53.6 | Provides core application building blocks for libraries and applications written in C. / LGPL-2.1 |
| [glob2](https://github.com/miracle2k/python-glob2) | 0.6 | Version of the glob module that supports recursion via \*\*, and can capture patterns. / BSD-2-Clause |
| [gmp](http://gmplib.org/) | 6.1.2 | The GNU multiprecision library. / GPL 2 and LGPL 3 |
| [gmpy2](https://pypi.python.org/pypi/gmpy2) | 2.0.8 | GMP/MPIR, MPFR, and MPC interface to Python 2.6+ and 3.x / LGPL 3 |
| [graphite2](http://graphite.sil.org/) | 1.3.10 | A “smart font” system that handles the complexities of lesser-known languages of the world. / LGPLv2 |
| [greenlet](https://github.com/python-greenlet/greenlet) | 0.4.12 | Lightweight in-process concurrent programming / MIT |
| [gst-plugins-base](http://gstreamer.freedesktop.org/) | 1.12.4 | GStreamer Base Plug-ins / GPL2 |
| [gstreamer](http://gstreamer.freedesktop.org/) | 1.12.4 | Library for constructing graphs of media-handling components / LGPL 2 |
| [h5py](http://www.h5py.org/) | 2.7.1 | Read and write HDF5 files from Python. / BSD 3-Clause |
| [harfbuzz](http://www.freedesktop.org/wiki/Software/HarfBuzz/) | 1.7.4 | An OpenType text shaping engine. / MIT |
| [hdf5](http://www.hdfgroup.org/HDF5/) | 1.10.1 | HDF5 is a data model, library, and file format for storing and managing data / HDF5 |
| [heapdict](http://stutzbachenterprises.com/) | 1.0.0 | A heap with decrease-key and increase-key operations / BSD 3-Clause |
| [html5lib](https://github.com/html5lib/html5lib-python) | 1.0.1 | HTML parser based on the WHATWG HTML specification / MIT |
| [icu](http://site.icu-project.org/) | 58.2 | International Components for Unicode. / MIT |
| [idna](https://github.com/kjd/idna) | 2.6 | Internationalized Domain Names in Applications (IDNA). / BSD Like |
| [imageio](http://imageio.github.io) | 2.2.0 | a Python library for reading and writing image data / BSD 2-Clause |
| [imagesize](https://github.com/shibukawa/imagesize_py) | 0.7.1 | Getting image size from png/jpeg/jpeg2000/gif file / MIT |
| [intel-openmp](https://software.intel.com/en-us/node/522690) | 2018.0.0 | Math library for Intel and compatible processors / proprietary - Intel |
| [ipykernel](http://ipython.org) | 4.8.0 | IPython Kernel for Jupyter / BSD 3-clause |
| [ipython](http://ipython.org/) | 6.2.1 | IPython: Productive Interactive Computing / BSD 3-clause |
| [ipython\_genutils](http://ipython.org) | 0.2.0 | vestigial utilities from IPython / BSD 3-Clause |
| [ipywidgets](https://github.com/ipython/ipywidgets) | 7.1.1 | Jupyter Interactive Widgets / BSD 3-clause |
| [isort](https://github.com/timothycrosley/isort) | 4.2.15 | A Python utility / library to sort Python imports. / MIT |
| [itsdangerous](https://github.com/pallets/itsdangerous) | 0.24 | Various helpers to pass trusted data to untrusted environments. / BSD 3-Clause |
| [jbig](https://www.cl.cam.ac.uk/~mgk25/jbigkit) | 2.1 | Implementation of the JBIG1 data compression standard / GPL-2.0 |
| [jdcal](https://github.com/phn/jdcal) | 1.3 | Julian dates from proleptic Gregorian and Julian calendars. / BSD 2-Clause |
| [jedi](https://github.com/davidhalter/jedi/) | 0.11.1 | An autocompletion tool for Python that can be used for text editors. / MIT |
| [jinja2](http://jinja.pocoo.org) | 2.10 | An easy to use stand-alone template engine written in pure python. / 3-Clause BSD |
| [jpeg](http://www.ijg.org/) | 9b | read/write jpeg COM, EXIF, IPTC medata / Custom free software license |
| [jsonschema](https://github.com/Julian/jsonschema) | 2.6.0 | An implementation of JSON Schema validation for Python / MIT |
| [jupyter](http://jupyter.org) | 1.0.0 | Jupyter metapackage. Install all the Jupyter components in one go. / BSD 3-Clause |
| [jupyter\_client](http://jupyter.org) | 5.2.2 | Jupyter protocol implementation and client libraries / BSD 3-clause |
| [jupyter\_console](http://jupyter.org) | 5.2.0 | Jupyter terminal console / BSD 3-Clause |
| [jupyter\_core](http://jupyter.org) | 4.4.0 | Core common functionality of Jupyter projects. / BSD 3-clause |
| [jupyterlab](https://github.com/jupyterlab/jupyterlab) | 0.31.5 | A pre-alpha version of a computational environment for Jupyter. / BSD 3-Clause |
| [jupyterlab\_launcher](http://github.com/jupyterlab/jupyterlab_launcher) | 0.10.2 | A Launcher for JupyterLab based applications. / BSD 3-Clause |
| [lazy-object-proxy](https://github.com/ionelmc/python-lazy-object-proxy) | 1.3.1 | A fast and thorough lazy object proxy. / BSD 2-Clause |
| [libcurl](http://curl.haxx.se/) | 7.58.0 | tool and library for transferring data with URL syntax / MIT/X derivate (`<http://curl.haxx.se/docs/copyright.html>`) |
| [libedit](http://thrysoee.dk/editline/) | 3.1 | Editline Library (libedit) / NetBSD |
| [libffi](https://sourceware.org/libffi/) | 3.2.1 | A Portable Foreign Function Interface Library. / Custom |
| [libgcc-ng](https://gcc.gnu.org/onlinedocs/gccint/Libgcc.html) | 7.2.0 | The GCC low-level runtime library / GPL |
| [libgfortran-ng](https://gcc.gnu.org/) | 7.2.0 | The GNU Fortran Runtime Library / GPL |
| [libpng](http://www.libpng.org/pub/png/libpng.html) | 1.6.34 | PNG reference library. / zlib/libpng |
| [libsodium](http://libsodium.org) | 1.0.15 | A modern and easy-to-use crypto library. / ISC |
| [libssh2](https://www.libssh2.org/) | 1.8.0 | the SSH library / BSD 3-Clause |
| [libstdcxx-ng](https://gcc.gnu.org/) | 7.2.0 | The GNU C++ Runtime Library / GPL3 with runtime exception |
| [libtiff](http://www.libtiff.org/) | 4.0.9 | Support for the Tag Image File Format (TIFF). / HPND |
| [libtool](http://www.gnu.org/software/libtool/) | 2.4.6 | The GNU Portable Library Tool / GPL 3 |
| [libxcb](http://xcb.freedesktop.org/) | 1.12 | This is the C-language Binding (XCB) package to the X Window System protocol / MIT |
| [libxml2](http://xmlsoft.org/) | 2.9.7 | The XML C parser and toolkit of Gnome / MIT |
| [libxslt](http://xmlsoft.org/XSLT/) | 1.1.32 | The XSLT C library developed for the GNOME project / MIT |
| [llvmlite](https://github.com/numba/llvmlite) | 0.21.0 | A lightweight LLVM python binding for writing JIT compilers / New BSD License |
| [locket](https://github.com/mwilliamson/locket.py) | 0.2.0 | File-based locks for Python for Linux and Windows / BSD 2-Clause |
| [lxml](http://lxml.de/) | 4.1.1 | Pythonic binding for the C libraries libxml2 and libxslt. / BSD 3-Clause, GPL-2.0, ZPL-2.0, and ElementTree |
| [lzo](http://www.oberhumer.com/opensource/lzo/) | 2.10 | LZO is a portable lossless data compression library written in ANSI C. / GPL v2+ |
| [markupsafe](https://www.palletsprojects.com/p/markupsafe/) | 1.0 | A Python module that implements the jinja2.Markup string / BSD 3-Clause |
| [matplotlib](http://matplotlib.org/) | 2.1.2 | Publication quality figures in Python / PSF-based |
| [mccabe](https://github.com/PyCQA/mccabe) | 0.6.1 | McCabe complexity checker for Python / MIT |
| [mistune](https://github.com/lepture/mistune) | 0.8.3 | The fastest markdown parser in pure Python. / BSD 3-Clause |
| [mkl](https://software.intel.com/en-us/mkl) | 2018.0.1 | Math library for Intel and compatible processors / proprietary - Intel |
| [mkl-service](https://github.com/ContinuumIO/mkl-service) | 1.1.2 | Python bindings to MKL service functions / 3-clause BSD |
| [mpc](http://www.multiprecision.org/) | 1.0.3 | A C library for the arithmetic of complex numbers with arbitrarily high precision. / LGPL 3 |
| [mpfr](http://www.mpfr.org/) | 3.1.5 | The MPFR library is a C library for multiple-precision floating-point computations with correct rounding. / LGPL 3 |
| [mpmath](http://mpmath.org) | 1.0.0 | Python library for arbitrary-precision floating-point arithmetic / BSD 3-Clause |
| [msgpack-python](http://msgpack.org/) | 0.5.1 | MessagePack (de)serializer. / Apache 2.0 |
| [multipledispatch](https://github.com/mrocklin/multipledispatch/) | 0.4.9 | Multiple dispatch in Python / BSD 3-Clause |
| [navigator-updater](https://github.com/ContinuumIO/navigator-updater) | 0.1.0 | Anaconda Navigator Updater / proprietary - Continuum Analytics, Inc. |
| [nbconvert](http://jupyter.org) | 5.3.1 | Converting Jupyter Notebooks / BSD 3-Clause |
| [nbformat](http://jupyter.org) | 4.4.0 | The reference implementation of the Jupyter Notebook format / BSD 3-clause |
| [ncurses](http://www.gnu.org/software/ncurses/) | 6.0 | Library for text-based user interfaces / Free software (MIT-like) |
| [networkx](https://networkx.github.io/) | 2.1 | Python package for creating and manipulating complex networks / BSD 3-Clause |
| [nltk](http://nltk.org/) | 3.2.5 | Build Python programs to work with human language data / Apache 2.0 |
| [nose](http://readthedocs.org/docs/nose/) | 1.3.7 | Nose extends unittest to make testing easier / LGPL-2.1 |
| [notebook](http://jupyter.org) | 5.4.0 | A web-based notebook environment for interactive computing / BSD 3-clause |
| [numba](http://numba.pydata.org/) | 0.36.2 | a just-in-time Python function compiler based on LLVM / BSD |
| [numexpr](https://github.com/pydata/numexpr) | 2.6.4 | Fast numerical expression evaluator for NumPy. / MIT |
| [numpy](http://numpy.scipy.org/) | 1.14.0 | Array processing for numbers, strings, records, and objects. / BSD 3-Clause |
| [numpydoc](https://github.com/numpy/numpydoc) | 0.7.0 | Sphinx extension to support docstrings in Numpy format / BSD 3-Clause |
| [odo](http://odo.pydata.org) | 0.5.1 | Data migration in Python / BSD-3-Clause |
| [olefile](http://www.decalage.info/python/olefileio) | 0.45.1 | parse, read and write Microsoft OLE2 files / BSD License 2-Clause |
| [openpyxl](https://openpyxl.readthedocs.io) | 2.4.10 | A Python library to read/write Excel 2010 xlsx/xlsm files / MIT |
| [openssl](http://www.openssl.org/) | 1.0.2n | OpenSSL is an open-source implementation of the SSL and TLS protocols / OpenSSL |
| [packaging](https://github.com/pypa/packaging) | 16.8 | Core utilities for Python packages / Apache 2.0 or BSD 2-Clause |
| [pandas](http://pandas.pydata.org) | 0.22.0 | High-performance, easy-to-use data structures and data analysis tools. / BSD 3-clause |
| [pandoc](http://johnmacfarlane.net/pandoc/) | 1.19.2.1 | Universal markup converter (repackaged binaries). / GPL-2.0 |
| [pandocfilters](https://github.com/jgm/pandocfilters) | 1.4.2 | A python module for writing pandoc filters / BSD-3-Clause |
| [pango](http://www.pango.org/) | 1.41.0 | Text layout and rendering engine. / LGPL-2.1 |
| [parso](https://github.com/davidhalter/parso) | 0.1.1 | A Python Parser / MIT License |
| [partd](https://github.com/dask/partd) | 0.3.8 | Data structure for on-disk shuffle operations / BSD 3-Clause |
| [patchelf](http://nixos.org/patchelf.html) | 0.9 | A small utility to modify the dynamic linker and RPATH of ELF executables. / GPL 3 |
| [path.py](https://github.com/jaraco/path.py) | 10.5 | A module wrapper for os.path / MIT |
| [pathlib2](https://github.com/mcmtroffaes/pathlib2) | 2.3.0 | Fork of pathlib aiming to support the full stdlib Python API. / MIT |
| [patsy](https://github.com/pydata/patsy) | 0.5.0 | Describing statistical models in Python using symbolic formulas / BSD-2-Clause, PSF2 |
| [pcre](http://www.pcre.org/) | 8.41 | Regular expression pattern matching using the same syntax and semantics as Perl 5. / BSD 3-Clause |
| [pep8](http://pep8.readthedocs.org/) | 1.7.1 | Python style guide checker / MIT |
| [pexpect](http://pexpect.sourceforge.net/) | 4.3.1 | Pexpect makes Python a better tool for controlling other applications. / ISC |
| [pickleshare](https://github.com/vivainio/pickleshare) | 0.7.4 | Tiny ‘shelve’-like database with concurrency support / MIT |
| [pillow](http://python-imaging.github.io/) | 5.0.0 | Pillow is the friendly PIL fork by Alex Clark and Contributors. / PIL |
| [pip](https://pip.pypa.io/en/stable/) | 9.0.1 | PyPA recommended tool for installing Python packages / MIT |
| [pixman](http://www.pixman.org/) | 0.34.0 | A low-level software library for pixel manipulation. / MIT |
| [pkginfo](https://code.launchpad.net/~tseaver/pkginfo/trunk) | 1.4.1 | Query metadatdata from sdists / bdists / installed packages. / MIT |
| [pluggy](https://github.com/pytest-dev/pluggy) | 0.6.0 | Plugin registration and hook calling for Python / MIT |
| [ply](http://www.dabeaz.com/ply/index.html) | 3.10 | Python Lex-Yacc / BSD 3-clause |
| [prompt\_toolkit](https://github.com/jonathanslenders/python-prompt-toolkit) | 1.0.15 | Library for building powerful interactive command lines in Python / BSD 3-clause |
| [psutil](https://github.com/giampaolo/psutil) | 5.4.3 | A cross-platform process and system utilities module for Python / BSD 3-Clause |
| [ptyprocess](https://github.com/pexpect/ptyprocess) | 0.5.2 | Run a subprocess in a pseudo terminal / ISC |
| [py](https://github.com/pytest-dev/py) | 1.5.2 | library with cross-python path, ini-parsing, io, code, log facilities / MIT |
| [pycodestyle](https://pycodestyle.readthedocs.io/) | 2.3.1 | Python style guide checker / MIT |
| [pycosat](https://github.com/ContinuumIO/pycosat) | 0.6.3 | Bindings to picosat (a SAT solver) / MIT |
| [pycparser](https://github.com/eliben/pycparser) | 2.18 | Complete C99 parser in pure Python / BSD 3-clause |
| [pycrypto](http://www.pycrypto.org/) | 2.6.1 | Cryptographic modules for Python. / Public Domain |
| [pycurl](http://pycurl.sourceforge.net/) | 7.43.0.1 | A Python Interface To The cURL library / LGPL, MIT |
| [pyflakes](https://github.com/PyCQA/pyflakes) | 1.6.0 | Pyflakes analyzes programs and detects various errors. / MIT |
| [pygments](http://pygments.org/) | 2.2.0 | Generic syntax highlighting package / BSD 2-clause |
| [pylint](http://www.pylint.org/) | 1.8.2 | python code static checker / GPL |
| [pyodbc](https://github.com/mkleehammer/pyodbc) | 4.0.22 | DB API Module for ODBC / MIT |
| [pyopenssl](https://github.com/pyca/pyopenssl) | 17.5.0 | Python wrapper module around the OpenSSL library / Apache 2.0 |
| [pyparsing](http://pyparsing.wikispaces.com/) | 2.2.0 | Create and execute simple grammars / MIT |
| [pyqt](http://www.riverbankcomputing.co.uk/software/pyqt) | 5.6.0 | Python binding of the cross-platform GUI toolkit Qt. / Commercial, GPL-2.0, GPL-3.0 |
| [pysocks](https://github.com/Anorov/PySocks) | 1.6.7 | A Python SOCKS client module. See [Anorov/PySocks](https://github.com/Anorov/PySocks) for more information. / BSD 3-Clause |
| [pytables](http://www.pytables.org) | 3.4.2 | Brings together Python, HDF5 and NumPy to easily handle large amounts of data. / BSD 3-Clause |
| [pytest](https://docs.pytest.org/en/latest/) | 3.3.2 | Simple and powerful testing with Python. / MIT |
| [python](http://www.python.org/) | 3.6.4 | General purpose programming language / PSF |
| [python-dateutil](https://dateutil.readthedocs.org/) | 2.6.1 | Extensions to the standard Python datetime module. / BSD 3-clause |
| [pytz](http://pythonhosted.org/pytz/) | 2017.3 | World timezone definitions, modern and historical. / MIT |
| [pywavelets](https://github.com/PyWavelets/pywt) | 0.5.2 | Discrete Wavelet Transforms in Python. / MIT |
| [pyyaml](http://pyyaml.org/wiki/PyYAML) | 3.12 | YAML parser and emitter for Python / MIT |
| [pyzmq](https://github.com/zeromq/pyzmq) | 16.0.3 | Python bindings for zeromq / BSD 3-clause |
| [qt](http://qt-project.org) | 5.6.2 | Qt is a cross-platform application and UI framework. / LGPL-3.0 |
| [qtawesome](https://github.com/spyder-ide/qtawesome) | 0.4.4 | Iconic fonts in PyQt and PySide applications / MIT |
| [qtconsole](http://jupyter.org) | 4.3.1 | Jupyter Qt console / BSD 3-Clause |
| [qtpy](https://github.com/spyder-ide/qtpy) | 1.3.1 | Abstraction layer for PyQt5/PyQt4/PySide / MIT |
| [readline](https://cnswww.cns.cwru.edu/php/chet/readline/rltop.html) | 7.0 | library for editing command lines as they are typed in / GPL3 |
| [requests](http://python-requests.org) | 2.18.4 | Python HTTP for Humans. / Apache 2.0 |
| [rope](https://github.com/python-rope/rope) | 0.10.7 | A python refactoring library… / GPL 2.0 |
| [ruamel\_yaml](https://bitbucket.org/ruamel/yaml) | 0.15.35 | A patched copy of ruamel.yaml. / MIT |
| [scikit-image](http://scikit-image.org/) | 0.13.1 | Image processing routines for SciPy. / BSD 3-Clause |
| [scikit-learn](http://scikit-learn.org/) | 0.19.1 | A set of python modules for machine learning and data mining / BSD 3-Clause |
| [scipy](http://www.scipy.org/) | 1.0.0 | Scientific Library for Python / BSD 3-Clause |
| [seaborn](http://stanford.edu/~mwaskom/software/seaborn/) | 0.8.1 | Statistical data visualization / BSD 3-Clause |
| [send2trash](https://github.com/hsoft/send2trash) | 1.4.2 | Python library to natively send files to Trash (or Recycle bin) on all platforms. / BSD-3-Clause |
| [setuptools](https://github.com/pypa/setuptools) | 38.4.0 | Download, build, install, upgrade, and uninstall Python packages / MIT |
| [simplegeneric](http://cheeseshop.python.org/pypi/simplegeneric) | 0.8.1 | Simple generic functions (similar to Python’s own len(), pickle.dump(), etc.) / Zope Public |
| [singledispatch](http://docs.python.org/3/library/functools.html#functools.singledispatch) | 3.4.0.3 | Transforms a function into a single-dispatch generic function / MIT |
| [sip](http://www.riverbankcomputing.com/software/sip/intro) | 4.18.1 | Create Python bindings for C and C++ libraries / GPL-3.0 |
| [six](http://pypi.python.org/pypi/six/) | 1.11.0 | Python 2 and 3 compatibility utilities / MIT |
| [snowballstemmer](https://github.com/shibukawa/snowball_py) | 1.2.1 | Snowball stemming library collection for Python / BSD-2-Clause |
| [sortedcollections](http://www.grantjenks.com/docs/sortedcollections/) | 0.5.3 | Python Sorted Collections / Apache-2.0 |
| [sortedcontainers](http://www.grantjenks.com/docs/sortedcontainers/) | 1.5.9 | Python Sorted Container Types: SortedList, SortedDict, and SortedSet / Apache 2.0 |
| [sphinx](http://www.sphinx-doc.org) | 1.6.6 | Sphinx is a tool that makes it easy to create intelligent and beautiful documentation / BSD 2-clause |
| sphinxcontrib | 1.0 | Python namespace for sphinxcontrib / BSD |
| [sphinxcontrib-websupport](https://pypi.python.org/pypi/sphinxcontrib-websupport) | 1.0.1 | Sphinx API for Web Apps / BSD-2-Clause |
| [spyder](https://github.com/spyder-ide/spyder) | 3.2.6 | Scientific PYthon Development EnviRonment / MIT |
| [sqlalchemy](http://www.sqlalchemy.org/) | 1.2.1 | Database Abstraction Library. / MIT |
| [sqlite](http://www.sqlite.org/) | 3.22.0 | Implements a self-contained, zero-configuration, SQL database engine. / Public-Domain (`<http://www.sqlite.org/copyright.html>`) |
| [statsmodels](https://www.statsmodels.org) | 0.8.0 | Statistical computations and models for use with SciPy / BSD 3-Clause |
| [sympy](http://sympy.org) | 1.1.1 | Python library for symbolic mathematics / 3-clause BSD |
| [tblib](https://github.com/ionelmc/python-tblib) | 1.3.2 | Traceback serialization library. / BSD 2-Clause |
| [terminado](http://github.com/mitsuhiko/markupsafe) | 0.8.1 | Terminals served by tornado websockets / BSD 3-clause |
| [testpath](https://testpath.readthedocs.io) | 0.3.1 | Testpath is a collection of utilities for Python code working with files and commands. / MIT |
| [tk](http://www.tcl.tk/) | 8.6.7 | A dynamic programming language with GUI support. Bundles Tcl and Tk. / Tcl/Tk |
| [toolz](http://toolz.readthedocs.org/) | 0.9.0 | A functional standard library for Python. / BSD 3-Clause |
| [tornado](http://www.tornadoweb.org/) | 4.5.3 | A Python web framework and asynchronous networking library, originally developed at FriendFeed. / Apache 2.0 |
| [traitlets](http://ipython.org/) | 4.3.2 | Configuration system for Python applications / BSD 3-clause |
| [typing](https://docs.python.org/3.5/library/typing.html) | 3.6.2 | Type Hints for Python - backport for `Python<3.5` / PSF |
| [unicodecsv](https://github.com/jdunck/python-unicodecsv) | 0.14.1 | Drop-in replacement for csv module which supports unicode strings / BSD |
| [unixodbc](http://www.unixodbc.org/) | 2.3.4 | ODBC on non MS Windows platforms / LGPL-2.1 |
| [urllib3](https://urllib3.readthedocs.io/) | 1.22 | HTTP library with thread-safe connection pooling, file post, and more. / MIT |
| [wcwidth](https://github.com/jquast/wcwidth) | 0.1.7 | Measures number of Terminal column cells of wide-character codes. / MIT |
| [webencodings](https://github.com/gsnedders/python-webencodings) | 0.5.1 | Character encoding aliases for legacy web content / BSD 3-Clause |
| [werkzeug](http://werkzeug.pocoo.org/) | 0.14.1 | The Python WSGI Utility Library. / BSD 3-Clause |
| [wheel](https://bitbucket.org/pypa/wheel/) | 0.30.0 | A built-package format for Python. / MIT |
| [widgetsnbextension](http://ipython.org) | 3.1.0 | IPython HTML widgets for Jupyter / BSD 3-clause |
| [wrapt](https://github.com/GrahamDumpleton/wrapt) | 1.10.11 | Module for decorators, wrappers and monkey patching. / BSD 2-Clause |
| [xlrd](http://www.python-excel.org/) | 1.1.0 | Library for developers to extract data from Microsoft Excel (tm) spreadsheet files / BSD 3-Clause and BSD with advertising |
| [xlsxwriter](https://xlsxwriter.readthedocs.io/) | 1.0.2 | A Python module for creating Excel XLSX files / BSD 2-Clause |
| [xlwt](http://www.python-excel.org/) | 1.3.0 | Writing data and formatting information to Excel files / BSD |
| [xz](http://tukaani.org/xz/) | 5.2.3 | Data compression software with high compression ratio / LGPL-2.1 and GPL-2.0 |
| [yaml](http://pyyaml.org/wiki/LibYAML) | 0.1.7 | A C library for parsing and emitting YAML. / MIT |
| [zeromq](http://zeromq.org) | 4.2.2 | A high-performance asynchronous messaging library. / LGPL 3 |
| [zict](http://github.com/mrocklin/zict) | 0.1.3 | Composable Dictionary Classes / BSD 3-Clause |
| [zlib](http://zlib.net/) | 1.2.11 | Massively spiffy yet delicately unobtrusive compression library / zlib |
| Name | Version | Summary / License |
|---|---|---|
| [\_ipyw\_jlab\_nb\_ext\_conf](https://github.com/ContinuumIO/anaconda-nb-extensions-meta-config) | 0.1.0 | A configuration metapackage for enabling Anaconda-bundled jupyter extensions / BSD |
| [alabaster](http://www.sphinx-doc.org/en/stable/index.html) | 0.7.10 | Configurable, Python 2+3 compatible Sphinx theme. / BSD 3-Clause |
| [anaconda-client](https://github.com/Anaconda-Platform/anaconda-client) | 1.6.9 | Anaconda Cloud command line client library / BSD 3-Clause |
| [anaconda-navigator](https://github.com/ContinuumIO/navigator) | 1.7.0 | Anaconda Navigator / proprietary - Continuum Analytics, Inc. |
| [anaconda-project](https://github.com/Anaconda-Platform/anaconda-project) | 0.8.2 | Tool for encapsulating, running, and reproducing data science projects / BSD 3-Clause |
| [asn1crypto](https://github.com/wbond/asn1crypto) | 0.24.0 | Python ASN.1 library with a focus on performance and a pythonic API / MIT |
| [astroid](https://www.astroid.org/) | 1.6.1 | A abstract syntax tree for Python with inference support. / LGPL 2.1 |
| [astropy](http://www.astropy.org/) | 2.0.3 | Community-developed Python Library for Astronomy / BSD |
| [attrs](https://attrs.readthedocs.io/en/stable/) | 17.4.0 | attrs is the Python package that will bring back the joy of writing classes by relieving you from the drudgery of implementing object protocols (aka dunder methods). / MIT |
| [babel](http://babel.pocoo.org/) | 2.5.3 | Utilities to internationalize and localize Python applications / BSD 3-clause |
| [backports](https://bitbucket.org/brandon/backports) | 1.0 | / BSD |
| [backports.shutil\_get\_terminal\_size](https://github.com/chrippa/backports.shutil_get_terminal_size) | 1.0.0 | A backport of the get\_terminal\_size function from Python 3.3’s shutil. / MIT |
| [beautifulsoup4](http://www.crummy.com/software/BeautifulSoup/) | 4.6.0 | Python library designed for screen-scraping / MIT |
| [bitarray](https://github.com/ilanschnell/bitarray) | 0.8.1 | efficient arrays of booleans – C extension / PSF |
| [bkcharts](http://github.com/bokeh/bkcharts) | 0.2 | High level chart types built on top of Bokeh / BSD 3-Clause |
| [blaze](http://blaze.pydata.org) | 0.11.3 | NumPy and Pandas interface to big data / BSD 3-Clause |
| [bleach](https://github.com/mozilla/bleach) | 2.1.2 | Easy, whitelist-based HTML-sanitizing tool / Apache-2.0 |
| [bokeh](http://bokeh.pydata.org/) | 0.12.13 | Statistical and novel interactive HTML plots for Python / BSD 3-Clause |
| [boto](https://github.com/boto/boto/) | 2.48.0 | Amazon Web Services Library / MIT |
| [bottleneck](http://berkeleyanalytics.com/bottleneck) | 1.2.1 | Fast NumPy array functions written in Cython. / BSD 2-Clause |
| [bzip2](http://www.bzip.org/) | 1.0.6 | high-quality data compressor / bzip2 |
| [ca-certificates](https://github.com/conda-forge/ca-certificates-feedstock) | 2017.08.26 | Certificates for use with other packages. / ISC |
| [cairo](http://cairographics.org/) | 1.14.12 | Cairo is a 2D graphics library with support for multiple output devices. / LGPL 2.1 or MPL 1.1 |
| [certifi](http://certifi.io/) | 2018.1.18 | Python package for providing Mozilla’s CA Bundle. / ISC |
| [cffi](https://bitbucket.org/cffi/cffi) | 1.11.4 | Foreign Function Interface for Python calling C code. / MIT |
| [chardet](https://github.com/chardet/chardet) | 3.0.4 | Universal character encoding detector / LGPL2 |
| [click](http://click.pocoo.org/) | 6.7 | A simple wrapper around optparse for powerful command line utilities. / BSD 3-Clause |
| [cloudpickle](https://github.com/cloudpipe/cloudpickle) | 0.5.2 | Extended pickling support for Python objects / BSD 3-Clause |
| [clyent](https://github.com/Anaconda-Platform/clyent) | 1.2.2 | Command line client library for windows and posix / BSD 3-Clause |
| [colorama](https://github.com/tartley/colorama) | 0.3.9 | Cross-platform colored terminal text. / BSD 3-Clause |
| [conda](https://conda.io) | 4.4.10 | OS-agnostic, system-level binary package and environment manager. / BSD 3-Clause |
| [conda-build](https://github.com/conda/conda-build) | 3.4.1 | tools for building conda packages / BSD 3-Clause |
| [conda-env](https://github.com/conda/conda-env) | 2.6.0 | Tools for interacting with conda environments. / BSD 3-Clause |
| [conda-verify](https://github.com/conda/conda-verify) | 2.0.0 | tool for validating conda recipes and conda packages / BSD 3-Clause |
| [contextlib2](http://contextlib2.readthedocs.org) | 0.5.5 | Backports and enhancements for the contextlib module / PSF |
| [cryptography](https://github.com/pyca/cryptography) | 2.1.4 | Provides cryptographic recipes and primitives to Python developers / Apache 2.0 or BSD 3-Clause, PSF 2 |
| [curl](http://curl.haxx.se/) | 7.58.0 | tool and library for transferring data with URL syntax / MIT/X derivate (`<http://curl.haxx.se/docs/copyright.html>`) |
| [cycler](http://matplotlib.org/cycler) | 0.10.0 | Composable style cycles. / BSD 3-Clause |
| [cython](http://www.cython.org/) | 0.27.3 | The Cython compiler for writing C extensions for the Python language / Apache-2.0 |
| [cytoolz](https://github.com/pytoolz/cytoolz) | 0.9.0 | Cython implementation of Toolz. High performance functional utilities. / BSD 3-Clause |
| [dask](http://github.com/dask/dask/) | 0.16.1 | Parallel Python with task scheduling / BSD 3-Clause |
| [dask-core](http://github.com/dask/dask/) | 0.16.1 | Parallel Python with task scheduling / BSD 3-Clause |
| [datashape](http://datashape.pydata.org) | 0.5.4 | A data description language. / BSD 2-Clause |
| [dbus](http://www.freedesktop.org/wiki/Software/dbus/) | 1.12.2 | Simple message bus system for applications to talk to one another / GPL2 |
| [decorator](https://github.com/micheles/decorator) | 4.2.1 | Better living through Python with decorators. / BSD 3-Clause |
| [distributed](http://distributed.readthedocs.io/en/latest/) | 1.20.2 | Distributed computing with Dask / BSD 3-Clause |
| [docutils](http://docutils.sourceforge.net/) | 0.14 | Docutils – Python Documentation Utilities / Public Domain Dedictation and BSD 2-Clause and PSF 2.1.1 and GPL 3.0 |
| [entrypoints](https://github.com/takluyver/entrypoints) | 0.2.3 | Discover and load entry points from installed packages. / MIT License |
| [et\_xmlfile](https://bitbucket.org/openpyxl/et_xmlfile) | 1.0.1 | An implementation of lxml.xmlfile for the standard library / MIT |
| [expat](http://expat.sourceforge.net/) | 2.2.5 | Expat XML parser library in C. / MIT |
| [fastcache](https://github.com/pbrady/fastcache) | 1.0.2 | C implementation of Python 3 lru\_cache / MIT |
| [filelock](https://github.com/benediktschmitt/py-filelock) | 2.0.13 | A platform independent file lock. / Public Domain |
| [flask](http://flask.pocoo.org) | 0.12.2 | A microframework based on Werkzeug, Jinja2 and good intentions. / BSD 3-Clause |
| [flask-cors](https://github.com/corydolphin/flask-cors) | 3.0.3 | A Flask extension adding a decorator for CORS support / MIT |
| [fontconfig](http://www.freedesktop.org/wiki/Software/fontconfig/) | 2.12.4 | A library for configuring and customizing font access. / MIT |
| [freetype](https://www.freetype.org/) | 2.8 | A Free, High-Quality, and Portable Font Engine / GPL-2.0 and FreeType |
| [get\_terminal\_size](https://github.com/chrippa/backports.shutil_get_terminal_size) | 1.0.0 | Get the size of the terminal window. / MIT |
| [gevent](http://www.gevent.org/) | 1.2.2 | Coroutine-based network library / MIT |
| [glib](https://developer.gnome.org/glib/) | 2.53.6 | Provides core application building blocks for libraries and applications written in C. / LGPL-2.1 |
| [glob2](https://github.com/miracle2k/python-glob2) | 0.6 | Version of the glob module that supports recursion via \*\*, and can capture patterns. / BSD-2-Clause |
| [gmp](http://gmplib.org/) | 6.1.2 | The GNU multiprecision library. / GPL 2 and LGPL 3 |
| [gmpy2](https://pypi.python.org/pypi/gmpy2) | 2.0.8 | GMP/MPIR, MPFR, and MPC interface to Python 2.6+ and 3.x / LGPL 3 |
| [graphite2](http://graphite.sil.org/) | 1.3.10 | A “smart font” system that handles the complexities of lesser-known languages of the world. / LGPLv2 |
| [greenlet](https://github.com/python-greenlet/greenlet) | 0.4.12 | Lightweight in-process concurrent programming / MIT |
| [gst-plugins-base](http://gstreamer.freedesktop.org/) | 1.12.4 | GStreamer Base Plug-ins / GPL2 |
| [gstreamer](http://gstreamer.freedesktop.org/) | 1.12.4 | Library for constructing graphs of media-handling components / LGPL 2 |
| [h5py](http://www.h5py.org/) | 2.7.1 | Read and write HDF5 files from Python. / BSD 3-Clause |
| [harfbuzz](http://www.freedesktop.org/wiki/Software/HarfBuzz/) | 1.7.4 | An OpenType text shaping engine. / MIT |
| [hdf5](http://www.hdfgroup.org/HDF5/) | 1.10.1 | HDF5 is a data model, library, and file format for storing and managing data / HDF5 |
| [heapdict](http://stutzbachenterprises.com/) | 1.0.0 | A heap with decrease-key and increase-key operations / BSD 3-Clause |
| [html5lib](https://github.com/html5lib/html5lib-python) | 1.0.1 | HTML parser based on the WHATWG HTML specification / MIT |
| [icu](http://site.icu-project.org/) | 58.2 | International Components for Unicode. / MIT |
| [idna](https://github.com/kjd/idna) | 2.6 | Internationalized Domain Names in Applications (IDNA). / BSD Like |
| [imageio](http://imageio.github.io) | 2.2.0 | a Python library for reading and writing image data / BSD 2-Clause |
| [imagesize](https://github.com/shibukawa/imagesize_py) | 0.7.1 | Getting image size from png/jpeg/jpeg2000/gif file / MIT |
| [intel-openmp](https://software.intel.com/en-us/node/522690) | 2018.0.0 | Math library for Intel and compatible processors / proprietary - Intel |
| [ipykernel](http://ipython.org) | 4.8.0 | IPython Kernel for Jupyter / BSD 3-clause |
| [ipython](http://ipython.org/) | 6.2.1 | IPython: Productive Interactive Computing / BSD 3-clause |
| [ipython\_genutils](http://ipython.org) | 0.2.0 | vestigial utilities from IPython / BSD 3-Clause |
| [ipywidgets](https://github.com/ipython/ipywidgets) | 7.1.1 | Jupyter Interactive Widgets / BSD 3-clause |
| [isort](https://github.com/timothycrosley/isort) | 4.2.15 | A Python utility / library to sort Python imports. / MIT |
| [itsdangerous](https://github.com/pallets/itsdangerous) | 0.24 | Various helpers to pass trusted data to untrusted environments. / BSD 3-Clause |
| [jbig](https://www.cl.cam.ac.uk/~mgk25/jbigkit) | 2.1 | Implementation of the JBIG1 data compression standard / GPL-2.0 |
| [jdcal](https://github.com/phn/jdcal) | 1.3 | Julian dates from proleptic Gregorian and Julian calendars. / BSD 2-Clause |
| [jedi](https://github.com/davidhalter/jedi/) | 0.11.1 | An autocompletion tool for Python that can be used for text editors. / MIT |
| [jinja2](http://jinja.pocoo.org) | 2.10 | An easy to use stand-alone template engine written in pure python. / 3-Clause BSD |
| [jpeg](http://www.ijg.org/) | 9b | read/write jpeg COM, EXIF, IPTC medata / Custom free software license |
| [jsonschema](https://github.com/Julian/jsonschema) | 2.6.0 | An implementation of JSON Schema validation for Python / MIT |
| [jupyter](http://jupyter.org) | 1.0.0 | Jupyter metapackage. Install all the Jupyter components in one go. / BSD 3-Clause |
| [jupyter\_client](http://jupyter.org) | 5.2.2 | Jupyter protocol implementation and client libraries / BSD 3-clause |
| [jupyter\_console](http://jupyter.org) | 5.2.0 | Jupyter terminal console / BSD 3-Clause |
| [jupyter\_core](http://jupyter.org) | 4.4.0 | Core common functionality of Jupyter projects. / BSD 3-clause |
| [jupyterlab](https://github.com/jupyterlab/jupyterlab) | 0.31.5 | A pre-alpha version of a computational environment for Jupyter. / BSD 3-Clause |
| [jupyterlab\_launcher](http://github.com/jupyterlab/jupyterlab_launcher) | 0.10.2 | A Launcher for JupyterLab based applications. / BSD 3-Clause |
| [lazy-object-proxy](https://github.com/ionelmc/python-lazy-object-proxy) | 1.3.1 | A fast and thorough lazy object proxy. / BSD 2-Clause |
| [libcurl](http://curl.haxx.se/) | 7.58.0 | tool and library for transferring data with URL syntax / MIT/X derivate (`<http://curl.haxx.se/docs/copyright.html>`) |
| [libedit](http://thrysoee.dk/editline/) | 3.1 | Editline Library (libedit) / NetBSD |
| [libffi](https://sourceware.org/libffi/) | 3.2.1 | A Portable Foreign Function Interface Library. / Custom |
| [libgcc-ng](https://gcc.gnu.org/onlinedocs/gccint/Libgcc.html) | 7.2.0 | The GCC low-level runtime library / GPL |
| [libgfortran-ng](https://gcc.gnu.org/) | 7.2.0 | The GNU Fortran Runtime Library / GPL |
| [libpng](http://www.libpng.org/pub/png/libpng.html) | 1.6.34 | PNG reference library. / zlib/libpng |
| [libsodium](http://libsodium.org) | 1.0.15 | A modern and easy-to-use crypto library. / ISC |
| [libssh2](https://www.libssh2.org/) | 1.8.0 | the SSH library / BSD 3-Clause |
| [libstdcxx-ng](https://gcc.gnu.org/) | 7.2.0 | The GNU C++ Runtime Library / GPL3 with runtime exception |
| [libtiff](http://www.libtiff.org/) | 4.0.9 | Support for the Tag Image File Format (TIFF). / HPND |
| [libtool](http://www.gnu.org/software/libtool/) | 2.4.6 | The GNU Portable Library Tool / GPL 3 |
| [libxcb](http://xcb.freedesktop.org/) | 1.12 | This is the C-language Binding (XCB) package to the X Window System protocol / MIT |
| [libxml2](http://xmlsoft.org/) | 2.9.7 | The XML C parser and toolkit of Gnome / MIT |
| [libxslt](http://xmlsoft.org/XSLT/) | 1.1.32 | The XSLT C library developed for the GNOME project / MIT |
| [llvmlite](https://github.com/numba/llvmlite) | 0.21.0 | A lightweight LLVM python binding for writing JIT compilers / New BSD License |
| [locket](https://github.com/mwilliamson/locket.py) | 0.2.0 | File-based locks for Python for Linux and Windows / BSD 2-Clause |
| [lxml](http://lxml.de/) | 4.1.1 | Pythonic binding for the C libraries libxml2 and libxslt. / BSD 3-Clause, GPL-2.0, ZPL-2.0, and ElementTree |
| [lzo](http://www.oberhumer.com/opensource/lzo/) | 2.10 | LZO is a portable lossless data compression library written in ANSI C. / GPL v2+ |
| [markupsafe](https://www.palletsprojects.com/p/markupsafe/) | 1.0 | A Python module that implements the jinja2.Markup string / BSD 3-Clause |
| [matplotlib](http://matplotlib.org/) | 2.1.2 | Publication quality figures in Python / PSF-based |
| [mccabe](https://github.com/PyCQA/mccabe) | 0.6.1 | McCabe complexity checker for Python / MIT |
| [mistune](https://github.com/lepture/mistune) | 0.8.3 | The fastest markdown parser in pure Python. / BSD 3-Clause |
| [mkl](https://software.intel.com/en-us/mkl) | 2018.0.1 | Math library for Intel and compatible processors / proprietary - Intel |
| [mkl-service](https://github.com/ContinuumIO/mkl-service) | 1.1.2 | Python bindings to MKL service functions / 3-clause BSD |
| [mpc](http://www.multiprecision.org/) | 1.0.3 | A C library for the arithmetic of complex numbers with arbitrarily high precision. / LGPL 3 |
| [mpfr](http://www.mpfr.org/) | 3.1.5 | The MPFR library is a C library for multiple-precision floating-point computations with correct rounding. / LGPL 3 |
| [mpmath](http://mpmath.org) | 1.0.0 | Python library for arbitrary-precision floating-point arithmetic / BSD 3-Clause |
| [msgpack-python](http://msgpack.org/) | 0.5.1 | MessagePack (de)serializer. / Apache 2.0 |
| [multipledispatch](https://github.com/mrocklin/multipledispatch/) | 0.4.9 | Multiple dispatch in Python / BSD 3-Clause |
| [navigator-updater](https://github.com/ContinuumIO/navigator-updater) | 0.1.0 | Anaconda Navigator Updater / proprietary - Continuum Analytics, Inc. |
| [nbconvert](http://jupyter.org) | 5.3.1 | Converting Jupyter Notebooks / BSD 3-Clause |
| [nbformat](http://jupyter.org) | 4.4.0 | The reference implementation of the Jupyter Notebook format / BSD 3-clause |
| [ncurses](http://www.gnu.org/software/ncurses/) | 6.0 | Library for text-based user interfaces / Free software (MIT-like) |
| [networkx](https://networkx.github.io/) | 2.1 | Python package for creating and manipulating complex networks / BSD 3-Clause |
| [nltk](http://nltk.org/) | 3.2.5 | Build Python programs to work with human language data / Apache 2.0 |
| [nose](http://readthedocs.org/docs/nose/) | 1.3.7 | Nose extends unittest to make testing easier / LGPL-2.1 |
| [notebook](http://jupyter.org) | 5.4.0 | A web-based notebook environment for interactive computing / BSD 3-clause |
| [numba](http://numba.pydata.org/) | 0.36.2 | a just-in-time Python function compiler based on LLVM / BSD |
| [numexpr](https://github.com/pydata/numexpr) | 2.6.4 | Fast numerical expression evaluator for NumPy. / MIT |
| [numpy](http://numpy.scipy.org/) | 1.14.0 | Array processing for numbers, strings, records, and objects. / BSD 3-Clause |
| [numpydoc](https://github.com/numpy/numpydoc) | 0.7.0 | Sphinx extension to support docstrings in Numpy format / BSD 3-Clause |
| [odo](http://odo.pydata.org) | 0.5.1 | Data migration in Python / BSD-3-Clause |
| [olefile](http://www.decalage.info/python/olefileio) | 0.45.1 | parse, read and write Microsoft OLE2 files / BSD License 2-Clause |
| [openpyxl](https://openpyxl.readthedocs.io) | 2.4.10 | A Python library to read/write Excel 2010 xlsx/xlsm files / MIT |
| [openssl](http://www.openssl.org/) | 1.0.2n | OpenSSL is an open-source implementation of the SSL and TLS protocols / OpenSSL |
| [packaging](https://github.com/pypa/packaging) | 16.8 | Core utilities for Python packages / Apache 2.0 or BSD 2-Clause |
| [pandas](http://pandas.pydata.org) | 0.22.0 | High-performance, easy-to-use data structures and data analysis tools. / BSD 3-clause |
| [pandoc](http://johnmacfarlane.net/pandoc/) | 1.15.0.6 | Universal markup converter (repackaged binaries). / GPL-2.0 |
| [pandocfilters](https://github.com/jgm/pandocfilters) | 1.4.2 | A python module for writing pandoc filters / BSD-3-Clause |
| [pango](http://www.pango.org/) | 1.41.0 | Text layout and rendering engine. / LGPL-2.1 |
| [parso](https://github.com/davidhalter/parso) | 0.1.1 | A Python Parser / MIT License |
| [partd](https://github.com/dask/partd) | 0.3.8 | Data structure for on-disk shuffle operations / BSD 3-Clause |
| [patchelf](http://nixos.org/patchelf.html) | 0.9 | A small utility to modify the dynamic linker and RPATH of ELF executables. / GPL 3 |
| [path.py](https://github.com/jaraco/path.py) | 10.5 | A module wrapper for os.path / MIT |
| [pathlib2](https://github.com/mcmtroffaes/pathlib2) | 2.3.0 | Fork of pathlib aiming to support the full stdlib Python API. / MIT |
| [patsy](https://github.com/pydata/patsy) | 0.5.0 | Describing statistical models in Python using symbolic formulas / BSD-2-Clause, PSF2 |
| [pcre](http://www.pcre.org/) | 8.41 | Regular expression pattern matching using the same syntax and semantics as Perl 5. / BSD 3-Clause |
| [pep8](http://pep8.readthedocs.org/) | 1.7.1 | Python style guide checker / MIT |
| [pexpect](http://pexpect.sourceforge.net/) | 4.3.1 | Pexpect makes Python a better tool for controlling other applications. / ISC |
| [pickleshare](https://github.com/vivainio/pickleshare) | 0.7.4 | Tiny ‘shelve’-like database with concurrency support / MIT |
| [pillow](http://python-imaging.github.io/) | 5.0.0 | Pillow is the friendly PIL fork by Alex Clark and Contributors. / PIL |
| [pip](https://pip.pypa.io/en/stable/) | 9.0.1 | PyPA recommended tool for installing Python packages / MIT |
| [pixman](http://www.pixman.org/) | 0.34.0 | A low-level software library for pixel manipulation. / MIT |
| [pkginfo](https://code.launchpad.net/~tseaver/pkginfo/trunk) | 1.4.1 | Query metadatdata from sdists / bdists / installed packages. / MIT |
| [pluggy](https://github.com/pytest-dev/pluggy) | 0.6.0 | Plugin registration and hook calling for Python / MIT |
| [ply](http://www.dabeaz.com/ply/index.html) | 3.10 | Python Lex-Yacc / BSD 3-clause |
| [prompt\_toolkit](https://github.com/jonathanslenders/python-prompt-toolkit) | 1.0.15 | Library for building powerful interactive command lines in Python / BSD 3-clause |
| [psutil](https://github.com/giampaolo/psutil) | 5.4.3 | A cross-platform process and system utilities module for Python / BSD 3-Clause |
| [ptyprocess](https://github.com/pexpect/ptyprocess) | 0.5.2 | Run a subprocess in a pseudo terminal / ISC |
| [py](https://github.com/pytest-dev/py) | 1.5.2 | library with cross-python path, ini-parsing, io, code, log facilities / MIT |
| [pycodestyle](https://pycodestyle.readthedocs.io/) | 2.3.1 | Python style guide checker / MIT |
| [pycosat](https://github.com/ContinuumIO/pycosat) | 0.6.3 | Bindings to picosat (a SAT solver) / MIT |
| [pycparser](https://github.com/eliben/pycparser) | 2.18 | Complete C99 parser in pure Python / BSD 3-clause |
| [pycrypto](http://www.pycrypto.org/) | 2.6.1 | Cryptographic modules for Python. / Public Domain |
| [pycurl](http://pycurl.sourceforge.net/) | 7.43.0.1 | A Python Interface To The cURL library / LGPL, MIT |
| [pyflakes](https://github.com/PyCQA/pyflakes) | 1.6.0 | Pyflakes analyzes programs and detects various errors. / MIT |
| [pygments](http://pygments.org/) | 2.2.0 | Generic syntax highlighting package / BSD 2-clause |
| [pylint](http://www.pylint.org/) | 1.8.2 | python code static checker / GPL |
| [pyodbc](https://github.com/mkleehammer/pyodbc) | 4.0.22 | DB API Module for ODBC / MIT |
| [pyopenssl](https://github.com/pyca/pyopenssl) | 17.5.0 | Python wrapper module around the OpenSSL library / Apache 2.0 |
| [pyparsing](http://pyparsing.wikispaces.com/) | 2.2.0 | Create and execute simple grammars / MIT |
| [pyqt](http://www.riverbankcomputing.co.uk/software/pyqt) | 5.6.0 | Python binding of the cross-platform GUI toolkit Qt. / Commercial, GPL-2.0, GPL-3.0 |
| [pysocks](https://github.com/Anorov/PySocks) | 1.6.7 | A Python SOCKS client module. See [Anorov/PySocks](https://github.com/Anorov/PySocks) for more information. / BSD 3-Clause |
| [pytables](http://www.pytables.org) | 3.4.2 | Brings together Python, HDF5 and NumPy to easily handle large amounts of data. / BSD 3-Clause |
| [pytest](https://docs.pytest.org/en/latest/) | 3.3.2 | Simple and powerful testing with Python. / MIT |
| [python](http://www.python.org/) | 3.6.4 | General purpose programming language / PSF |
| [python-dateutil](https://dateutil.readthedocs.org/) | 2.6.1 | Extensions to the standard Python datetime module. / BSD 3-clause |
| [pytz](http://pythonhosted.org/pytz/) | 2017.3 | World timezone definitions, modern and historical. / MIT |
| [pywavelets](https://github.com/PyWavelets/pywt) | 0.5.2 | Discrete Wavelet Transforms in Python. / MIT |
| [pyyaml](http://pyyaml.org/wiki/PyYAML) | 3.12 | YAML parser and emitter for Python / MIT |
| [pyzmq](https://github.com/zeromq/pyzmq) | 16.0.3 | Python bindings for zeromq / BSD 3-clause |
| [qt](http://qt-project.org) | 5.6.2 | Qt is a cross-platform application and UI framework. / LGPL-3.0 |
| [qtawesome](https://github.com/spyder-ide/qtawesome) | 0.4.4 | Iconic fonts in PyQt and PySide applications / MIT |
| [qtconsole](http://jupyter.org) | 4.3.1 | Jupyter Qt console / BSD 3-Clause |
| [qtpy](https://github.com/spyder-ide/qtpy) | 1.3.1 | Abstraction layer for PyQt5/PyQt4/PySide / MIT |
| [readline](https://cnswww.cns.cwru.edu/php/chet/readline/rltop.html) | 7.0 | library for editing command lines as they are typed in / GPL3 |
| [requests](http://python-requests.org) | 2.18.4 | Python HTTP for Humans. / Apache 2.0 |
| [rope](https://github.com/python-rope/rope) | 0.10.7 | A python refactoring library… / GPL 2.0 |
| [ruamel\_yaml](https://bitbucket.org/ruamel/yaml) | 0.15.35 | A patched copy of ruamel.yaml. / MIT |
| [scikit-image](http://scikit-image.org/) | 0.13.1 | Image processing routines for SciPy. / BSD 3-Clause |
| [scikit-learn](http://scikit-learn.org/) | 0.19.1 | A set of python modules for machine learning and data mining / BSD 3-Clause |
| [scipy](http://www.scipy.org/) | 1.0.0 | Scientific Library for Python / BSD 3-Clause |
| [seaborn](http://stanford.edu/~mwaskom/software/seaborn/) | 0.8.1 | Statistical data visualization / BSD 3-Clause |
| [send2trash](https://github.com/hsoft/send2trash) | 1.4.2 | Python library to natively send files to Trash (or Recycle bin) on all platforms. / BSD-3-Clause |
| [setuptools](https://github.com/pypa/setuptools) | 38.4.0 | Download, build, install, upgrade, and uninstall Python packages / MIT |
| [simplegeneric](http://cheeseshop.python.org/pypi/simplegeneric) | 0.8.1 | Simple generic functions (similar to Python’s own len(), pickle.dump(), etc.) / Zope Public |
| [singledispatch](http://docs.python.org/3/library/functools.html#functools.singledispatch) | 3.4.0.3 | Transforms a function into a single-dispatch generic function / MIT |
| [sip](http://www.riverbankcomputing.com/software/sip/intro) | 4.18.1 | Create Python bindings for C and C++ libraries / GPL-3.0 |
| [six](http://pypi.python.org/pypi/six/) | 1.11.0 | Python 2 and 3 compatibility utilities / MIT |
| [snowballstemmer](https://github.com/shibukawa/snowball_py) | 1.2.1 | Snowball stemming library collection for Python / BSD-2-Clause |
| [sortedcollections](http://www.grantjenks.com/docs/sortedcollections/) | 0.5.3 | Python Sorted Collections / Apache-2.0 |
| [sortedcontainers](http://www.grantjenks.com/docs/sortedcontainers/) | 1.5.9 | Python Sorted Container Types: SortedList, SortedDict, and SortedSet / Apache 2.0 |
| [sphinx](http://www.sphinx-doc.org) | 1.6.6 | Sphinx is a tool that makes it easy to create intelligent and beautiful documentation / BSD 2-clause |
| sphinxcontrib | 1.0 | Python namespace for sphinxcontrib / BSD |
| [sphinxcontrib-websupport](https://pypi.python.org/pypi/sphinxcontrib-websupport) | 1.0.1 | Sphinx API for Web Apps / BSD-2-Clause |
| [spyder](https://github.com/spyder-ide/spyder) | 3.2.6 | Scientific PYthon Development EnviRonment / MIT |
| [sqlalchemy](http://www.sqlalchemy.org/) | 1.2.1 | Database Abstraction Library. / MIT |
| [sqlite](http://www.sqlite.org/) | 3.22.0 | Implements a self-contained, zero-configuration, SQL database engine. / Public-Domain (`<http://www.sqlite.org/copyright.html>`) |
| [statsmodels](https://www.statsmodels.org) | 0.8.0 | Statistical computations and models for use with SciPy / BSD 3-Clause |
| [sympy](http://sympy.org) | 1.1.1 | Python library for symbolic mathematics / 3-clause BSD |
| [tblib](https://github.com/ionelmc/python-tblib) | 1.3.2 | Traceback serialization library. / BSD 2-Clause |
| [terminado](http://github.com/mitsuhiko/markupsafe) | 0.8.1 | Terminals served by tornado websockets / BSD 3-clause |
| [testpath](https://testpath.readthedocs.io) | 0.3.1 | Testpath is a collection of utilities for Python code working with files and commands. / MIT |
| [tk](http://www.tcl.tk/) | 8.6.7 | A dynamic programming language with GUI support. Bundles Tcl and Tk. / Tcl/Tk |
| [toolz](http://toolz.readthedocs.org/) | 0.9.0 | A functional standard library for Python. / BSD 3-Clause |
| [tornado](http://www.tornadoweb.org/) | 4.5.3 | A Python web framework and asynchronous networking library, originally developed at FriendFeed. / Apache 2.0 |
| [traitlets](http://ipython.org/) | 4.3.2 | Configuration system for Python applications / BSD 3-clause |
| [typing](https://docs.python.org/3.5/library/typing.html) | 3.6.2 | Type Hints for Python - backport for `Python<3.5` / PSF |
| [unicodecsv](https://github.com/jdunck/python-unicodecsv) | 0.14.1 | Drop-in replacement for csv module which supports unicode strings / BSD |
| [unixodbc](http://www.unixodbc.org/) | 2.3.4 | ODBC on non MS Windows platforms / LGPL-2.1 |
| [urllib3](https://urllib3.readthedocs.io/) | 1.22 | HTTP library with thread-safe connection pooling, file post, and more. / MIT |
| [wcwidth](https://github.com/jquast/wcwidth) | 0.1.7 | Measures number of Terminal column cells of wide-character codes. / MIT |
| [webencodings](https://github.com/gsnedders/python-webencodings) | 0.5.1 | Character encoding aliases for legacy web content / BSD 3-Clause |
| [werkzeug](http://werkzeug.pocoo.org/) | 0.14.1 | The Python WSGI Utility Library. / BSD 3-Clause |
| [wheel](https://bitbucket.org/pypa/wheel/) | 0.30.0 | A built-package format for Python. / MIT |
| [widgetsnbextension](http://ipython.org) | 3.1.0 | IPython HTML widgets for Jupyter / BSD 3-clause |
| [wrapt](https://github.com/GrahamDumpleton/wrapt) | 1.10.11 | Module for decorators, wrappers and monkey patching. / BSD 2-Clause |
| [xlrd](http://www.python-excel.org/) | 1.1.0 | Library for developers to extract data from Microsoft Excel (tm) spreadsheet files / BSD 3-Clause and BSD with advertising |
| [xlsxwriter](https://xlsxwriter.readthedocs.io/) | 1.0.2 | A Python module for creating Excel XLSX files / BSD 2-Clause |
| [xlwt](http://www.python-excel.org/) | 1.3.0 | Writing data and formatting information to Excel files / BSD |
| [xz](http://tukaani.org/xz/) | 5.2.3 | Data compression software with high compression ratio / LGPL-2.1 and GPL-2.0 |
| [yaml](http://pyyaml.org/wiki/LibYAML) | 0.1.7 | A C library for parsing and emitting YAML. / MIT |
| [zeromq](http://zeromq.org) | 4.2.2 | A high-performance asynchronous messaging library. / LGPL 3 |
| [zict](http://github.com/mrocklin/zict) | 0.1.3 | Composable Dictionary Classes / BSD 3-Clause |
| [zlib](http://zlib.net/) | 1.2.11 | Massively spiffy yet delicately unobtrusive compression library / zlib |
| Name | Version | Summary / License |
|---|---|---|
| [\_ipyw\_jlab\_nb\_ext\_conf](https://github.com/ContinuumIO/anaconda-nb-extensions-meta-config) | 0.1.0 | A configuration metapackage for enabling Anaconda-bundled jupyter extensions / BSD |
| [alabaster](http://www.sphinx-doc.org/en/stable/index.html) | 0.7.10 | Configurable, Python 2+3 compatible Sphinx theme. / BSD 3-Clause |
| [anaconda-client](https://github.com/Anaconda-Platform/anaconda-client) | 1.6.9 | Anaconda Cloud command line client library / BSD 3-Clause |
| [anaconda-navigator](https://github.com/ContinuumIO/navigator) | 1.7.0 | Anaconda Navigator / proprietary - Continuum Analytics, Inc. |
| [anaconda-project](https://github.com/Anaconda-Platform/anaconda-project) | 0.8.2 | Tool for encapsulating, running, and reproducing data science projects / BSD 3-Clause |
| [asn1crypto](https://github.com/wbond/asn1crypto) | 0.24.0 | Python ASN.1 library with a focus on performance and a pythonic API / MIT |
| [astroid](https://www.astroid.org/) | 1.6.1 | A abstract syntax tree for Python with inference support. / LGPL 2.1 |
| [astropy](http://www.astropy.org/) | 2.0.3 | Community-developed Python Library for Astronomy / BSD |
| [attrs](https://attrs.readthedocs.io/en/stable/) | 17.4.0 | attrs is the Python package that will bring back the joy of writing classes by relieving you from the drudgery of implementing object protocols (aka dunder methods). / MIT |
| [babel](http://babel.pocoo.org/) | 2.5.3 | Utilities to internationalize and localize Python applications / BSD 3-clause |
| [backports](https://bitbucket.org/brandon/backports) | 1.0 | / BSD |
| [backports.functools\_lru\_cache](https://github.com/jaraco/backports.functools_lru_cache) | 1.4 | Backport of functools.lru\_cache from Python 3.3 as published at ActiveState. / MIT |
| [backports.shutil\_get\_terminal\_size](https://github.com/chrippa/backports.shutil_get_terminal_size) | 1.0.0 | A backport of the get\_terminal\_size function from Python 3.3’s shutil. / MIT |
| [backports.shutil\_which](https://github.com/minrk/backports.shutil_which) | 3.5.1 | Backport of shutil.which from Python 3.3 / PSF2 & MIT |
| [backports\_abc](https://github.com/cython/backports_abc) | 0.5 | A backport of recent additions to the collections.abc module. / PSF 2 |
| [beautifulsoup4](http://www.crummy.com/software/BeautifulSoup/) | 4.6.0 | Python library designed for screen-scraping / MIT |
| [bitarray](https://github.com/ilanschnell/bitarray) | 0.8.1 | efficient arrays of booleans – C extension / PSF |
| [bkcharts](http://github.com/bokeh/bkcharts) | 0.2 | High level chart types built on top of Bokeh / BSD 3-Clause |
| [blaze](http://blaze.pydata.org) | 0.11.3 | NumPy and Pandas interface to big data / BSD 3-Clause |
| [bleach](https://github.com/mozilla/bleach) | 2.1.2 | Easy, whitelist-based HTML-sanitizing tool / Apache-2.0 |
| [bokeh](http://bokeh.pydata.org/) | 0.12.13 | Statistical and novel interactive HTML plots for Python / BSD 3-Clause |
| [boto](https://github.com/boto/boto/) | 2.48.0 | Amazon Web Services Library / MIT |
| [bottleneck](http://berkeleyanalytics.com/bottleneck) | 1.2.1 | Fast NumPy array functions written in Cython. / BSD 2-Clause |
| [bzip2](http://www.bzip.org/) | 1.0.6 | high-quality data compressor / bzip2 |
| [ca-certificates](https://github.com/conda-forge/ca-certificates-feedstock) | 2017.08.26 | Certificates for use with other packages. / ISC |
| [cdecimal](http://www.bytereef.org/mpdecimal/index.html) | 2.3 | Fast drop-in replacement for decimal.py / BSD 2-Clause |
| [certifi](http://certifi.io/) | 2018.1.18 | Python package for providing Mozilla’s CA Bundle. / ISC |
| [cffi](https://bitbucket.org/cffi/cffi) | 1.11.4 | Foreign Function Interface for Python calling C code. / MIT |
| [chardet](https://github.com/chardet/chardet) | 3.0.4 | Universal character encoding detector / LGPL2 |
| [click](http://click.pocoo.org/) | 6.7 | A simple wrapper around optparse for powerful command line utilities. / BSD 3-Clause |
| [cloudpickle](https://github.com/cloudpipe/cloudpickle) | 0.5.2 | Extended pickling support for Python objects / BSD 3-Clause |
| [clyent](https://github.com/Anaconda-Platform/clyent) | 1.2.2 | Command line client library for windows and posix / BSD 3-Clause |
| [colorama](https://github.com/tartley/colorama) | 0.3.9 | Cross-platform colored terminal text. / BSD 3-Clause |
| [comtypes](http://starship.python.net/crew/theller/comtypes/) | 1.1.4 | pure Python COM package / MIT |
| [conda](https://conda.io) | 4.4.10 | OS-agnostic, system-level binary package and environment manager. / BSD 3-Clause |
| [conda-build](https://github.com/conda/conda-build) | 3.4.1 | tools for building conda packages / BSD 3-Clause |
| [conda-env](https://github.com/conda/conda-env) | 2.6.0 | Tools for interacting with conda environments. / BSD 3-Clause |
| [conda-verify](https://github.com/conda/conda-verify) | 2.0.0 | tool for validating conda recipes and conda packages / BSD 3-Clause |
| [configparser](http://docs.python.org/3/library/configparser.html) | 3.5.0 | This library brings the updated configparser from Python 3.5 to Python 2.6-3.5 / MIT |
| console\_shortcut | 0.1.1 | Console shortcut creator for Windows (using menuinst) / BSD |
| [contextlib2](http://contextlib2.readthedocs.org) | 0.5.5 | Backports and enhancements for the contextlib module / PSF |
| [cryptography](https://github.com/pyca/cryptography) | 2.1.4 | Provides cryptographic recipes and primitives to Python developers / Apache 2.0 or BSD 3-Clause, PSF 2 |
| [curl](http://curl.haxx.se/) | 7.58.0 | tool and library for transferring data with URL syntax / MIT/X derivate (`<http://curl.haxx.se/docs/copyright.html>`) |
| [cycler](http://matplotlib.org/cycler) | 0.10.0 | Composable style cycles. / BSD 3-Clause |
| [cython](http://www.cython.org/) | 0.27.3 | The Cython compiler for writing C extensions for the Python language / Apache-2.0 |
| [cytoolz](https://github.com/pytoolz/cytoolz) | 0.9.0 | Cython implementation of Toolz. High performance functional utilities. / BSD 3-Clause |
| [dask](http://github.com/dask/dask/) | 0.16.1 | Parallel Python with task scheduling / BSD 3-Clause |
| [dask-core](http://github.com/dask/dask/) | 0.16.1 | Parallel Python with task scheduling / BSD 3-Clause |
| [datashape](http://datashape.pydata.org) | 0.5.4 | A data description language. / BSD 2-Clause |
| [decorator](https://github.com/micheles/decorator) | 4.2.1 | Better living through Python with decorators. / BSD 3-Clause |
| [distlib](https://bitbucket.org/pypa/distlib) | 0.2.5 | Distribution utilities / Python Software Foundation License |
| [distributed](http://distributed.readthedocs.io/en/latest/) | 1.20.2 | Distributed computing with Dask / BSD 3-Clause |
| [docutils](http://docutils.sourceforge.net/) | 0.14 | Docutils – Python Documentation Utilities / Public Domain Dedictation and BSD 2-Clause and PSF 2.1.1 and GPL 3.0 |
| [entrypoints](https://github.com/takluyver/entrypoints) | 0.2.3 | Discover and load entry points from installed packages. / MIT License |
| [enum34](https://bitbucket.org/stoneleaf/enum34) | 1.1.6 | Python 3.4 Enum backported to 3.3, 3.2, 3.1, 2.7, 2.6, 2.5, and 2.4 / BSD 3-Clause |
| [et\_xmlfile](https://bitbucket.org/openpyxl/et_xmlfile) | 1.0.1 | An implementation of lxml.xmlfile for the standard library / MIT |
| [fastcache](https://github.com/pbrady/fastcache) | 1.0.2 | C implementation of Python 3 lru\_cache / MIT |
| [filelock](https://github.com/benediktschmitt/py-filelock) | 2.0.13 | A platform independent file lock. / Public Domain |
| [flask](http://flask.pocoo.org) | 0.12.2 | A microframework based on Werkzeug, Jinja2 and good intentions. / BSD 3-Clause |
| [flask-cors](https://github.com/corydolphin/flask-cors) | 3.0.3 | A Flask extension adding a decorator for CORS support / MIT |
| [freetype](https://www.freetype.org/) | 2.8 | A Free, High-Quality, and Portable Font Engine / GPL-2.0 and FreeType |
| [funcsigs](http://funcsigs.readthedocs.org) | 1.0.2 | Python function signatures from PEP362 for Python 2.6, 2.7 and 3.2+. / Apache 2.0 |
| [functools32](https://github.com/MiCHiLU/python-functools32) | 3.2.3.2 | Backport of the functools module from Python 3.2.3 for use on 2.7 and PyPy. / PSF license |
| [futures](https://github.com/agronholm/pythonfutures) | 3.2.0 | Backport of the concurrent.futures package from Python 3.2 / PSF |
| [get\_terminal\_size](https://github.com/chrippa/backports.shutil_get_terminal_size) | 1.0.0 | Get the size of the terminal window. / MIT |
| [gevent](http://www.gevent.org/) | 1.2.2 | Coroutine-based network library / MIT |
| [glob2](https://github.com/miracle2k/python-glob2) | 0.6 | Version of the glob module that supports recursion via \*\*, and can capture patterns. / BSD-2-Clause |
| [greenlet](https://github.com/python-greenlet/greenlet) | 0.4.12 | Lightweight in-process concurrent programming / MIT |
| [grin](http://pypi.python.org/pypi/grin) | 1.2.1 | Enhanced grep-like tool / BSD 3-Clause |
| [h5py](http://www.h5py.org/) | 2.7.1 | Read and write HDF5 files from Python. / BSD 3-Clause |
| [hdf5](http://www.hdfgroup.org/HDF5/) | 1.10.1 | HDF5 is a data model, library, and file format for storing and managing data / HDF5 |
| [heapdict](http://stutzbachenterprises.com/) | 1.0.0 | A heap with decrease-key and increase-key operations / BSD 3-Clause |
| [html5lib](https://github.com/html5lib/html5lib-python) | 1.0.1 | HTML parser based on the WHATWG HTML specification / MIT |
| [icc\_rt](https://software.intel.com/en-us/node/522690) | 2017.0.4 | Intel runtime libraries for C, C++ and Fortran compilers / Intel proprietary |
| [icu](http://site.icu-project.org/) | 58.2 | International Components for Unicode. / MIT |
| [idna](https://github.com/kjd/idna) | 2.6 | Internationalized Domain Names in Applications (IDNA). / BSD Like |
| [imageio](http://imageio.github.io) | 2.2.0 | a Python library for reading and writing image data / BSD 2-Clause |
| [imagesize](https://github.com/shibukawa/imagesize_py) | 0.7.1 | Getting image size from png/jpeg/jpeg2000/gif file / MIT |
| [intel-openmp](https://software.intel.com/en-us/node/522690) | 2018.0.0 | Math library for Intel and compatible processors / proprietary - Intel |
| [ipaddress](https://github.com/phihag/ipaddress) | 1.0.19 | IPv4/IPv6 manipulation library / PSF 2 |
| [ipykernel](http://ipython.org) | 4.8.0 | IPython Kernel for Jupyter / BSD 3-clause |
| [ipython](http://ipython.org/) | 5.4.1 | IPython: Productive Interactive Computing / BSD 3-clause |
| [ipython\_genutils](http://ipython.org) | 0.2.0 | vestigial utilities from IPython / BSD 3-Clause |
| [ipywidgets](https://github.com/ipython/ipywidgets) | 7.1.1 | Jupyter Interactive Widgets / BSD 3-clause |
| [isort](https://github.com/timothycrosley/isort) | 4.2.15 | A Python utility / library to sort Python imports. / MIT |
| [itsdangerous](https://github.com/pallets/itsdangerous) | 0.24 | Various helpers to pass trusted data to untrusted environments. / BSD 3-Clause |
| [jdcal](https://github.com/phn/jdcal) | 1.3 | Julian dates from proleptic Gregorian and Julian calendars. / BSD 2-Clause |
| [jedi](https://github.com/davidhalter/jedi/) | 0.11.1 | An autocompletion tool for Python that can be used for text editors. / MIT |
| [jinja2](http://jinja.pocoo.org) | 2.10 | An easy to use stand-alone template engine written in pure python. / 3-Clause BSD |
| [jpeg](http://www.ijg.org/) | 9b | read/write jpeg COM, EXIF, IPTC medata / Custom free software license |
| [jsonschema](https://github.com/Julian/jsonschema) | 2.6.0 | An implementation of JSON Schema validation for Python / MIT |
| [jupyter](http://jupyter.org) | 1.0.0 | Jupyter metapackage. Install all the Jupyter components in one go. / BSD 3-Clause |
| [jupyter\_client](http://jupyter.org) | 5.2.2 | Jupyter protocol implementation and client libraries / BSD 3-clause |
| [jupyter\_console](http://jupyter.org) | 5.2.0 | Jupyter terminal console / BSD 3-Clause |
| [jupyter\_core](http://jupyter.org) | 4.4.0 | Core common functionality of Jupyter projects. / BSD 3-clause |
| [jupyterlab](https://github.com/jupyterlab/jupyterlab) | 0.31.4 | A pre-alpha version of a computational environment for Jupyter. / BSD 3-Clause |
| [jupyterlab\_launcher](http://github.com/jupyterlab/jupyterlab_launcher) | 0.10.2 | A Launcher for JupyterLab based applications. / BSD 3-Clause |
| [lazy-object-proxy](https://github.com/ionelmc/python-lazy-object-proxy) | 1.3.1 | A fast and thorough lazy object proxy. / BSD 2-Clause |
| [libcurl](http://curl.haxx.se/) | 7.58.0 | tool and library for transferring data with URL syntax / MIT/X derivate (`<http://curl.haxx.se/docs/copyright.html>`) |
| [libiconv](https://www.gnu.org/software/libiconv/) | 1.15 | Provides iconv for systems which don’t have one (or that cannot convert from/to Unicode.) / GPL and LGPL |
| [libpng](http://www.libpng.org/pub/png/libpng.html) | 1.6.34 | PNG reference library. / zlib/libpng |
| [libssh2](https://www.libssh2.org/) | 1.8.0 | the SSH library / BSD 3-Clause |
| [libtiff](http://www.libtiff.org/) | 4.0.9 | Support for the Tag Image File Format (TIFF). / HPND |
| [libxml2](http://xmlsoft.org/) | 2.9.7 | The XML C parser and toolkit of Gnome / MIT |
| [libxslt](http://xmlsoft.org/XSLT/) | 1.1.32 | The XSLT C library developed for the GNOME project / MIT |
| [llvmlite](https://github.com/numba/llvmlite) | 0.21.0 | A lightweight LLVM python binding for writing JIT compilers / New BSD License |
| [locket](https://github.com/mwilliamson/locket.py) | 0.2.0 | File-based locks for Python for Linux and Windows / BSD 2-Clause |
| [lxml](http://lxml.de/) | 4.1.1 | Pythonic binding for the C libraries libxml2 and libxslt. / BSD 3-Clause, GPL-2.0, ZPL-2.0, and ElementTree |
| [lzo](http://www.oberhumer.com/opensource/lzo/) | 2.10 | LZO is a portable lossless data compression library written in ANSI C. / GPL v2+ |
| [markupsafe](https://www.palletsprojects.com/p/markupsafe/) | 1.0 | A Python module that implements the jinja2.Markup string / BSD 3-Clause |
| [matplotlib](http://matplotlib.org/) | 2.1.2 | Publication quality figures in Python / PSF-based |
| [mccabe](https://github.com/PyCQA/mccabe) | 0.6.1 | McCabe complexity checker for Python / MIT |
| [menuinst](https://github.com/ContinuumIO/menuinst) | 1.4.11 | cross platform menu item installation / BSD |
| [mistune](https://github.com/lepture/mistune) | 0.8.3 | The fastest markdown parser in pure Python. / BSD 3-Clause |
| [mkl](https://software.intel.com/en-us/mkl) | 2018.0.1 | Math library for Intel and compatible processors / proprietary - Intel |
| [mkl-service](https://github.com/ContinuumIO/mkl-service) | 1.1.2 | Python bindings to MKL service functions / 3-clause BSD |
| [mpmath](http://mpmath.org) | 1.0.0 | Python library for arbitrary-precision floating-point arithmetic / BSD 3-Clause |
| [msgpack-python](http://msgpack.org/) | 0.5.1 | MessagePack (de)serializer. / Apache 2.0 |
| [multipledispatch](https://github.com/mrocklin/multipledispatch/) | 0.4.9 | Multiple dispatch in Python / BSD 3-Clause |
| [navigator-updater](https://github.com/ContinuumIO/navigator-updater) | 0.1.0 | Anaconda Navigator Updater / proprietary - Continuum Analytics, Inc. |
| [nbconvert](http://jupyter.org) | 5.3.1 | Converting Jupyter Notebooks / BSD 3-Clause |
| [nbformat](http://jupyter.org) | 4.4.0 | The reference implementation of the Jupyter Notebook format / BSD 3-clause |
| [networkx](https://networkx.github.io/) | 2.1 | Python package for creating and manipulating complex networks / BSD 3-Clause |
| [nltk](http://nltk.org/) | 3.2.5 | Build Python programs to work with human language data / Apache 2.0 |
| [nose](http://readthedocs.org/docs/nose/) | 1.3.7 | Nose extends unittest to make testing easier / LGPL-2.1 |
| [notebook](http://jupyter.org) | 5.4.0 | A web-based notebook environment for interactive computing / BSD 3-clause |
| [numba](http://numba.pydata.org/) | 0.36.2 | a just-in-time Python function compiler based on LLVM / BSD |
| [numexpr](https://github.com/pydata/numexpr) | 2.6.4 | Fast numerical expression evaluator for NumPy. / MIT |
| [numpy](http://numpy.scipy.org/) | 1.14.0 | Array processing for numbers, strings, records, and objects. / BSD 3-Clause |
| [numpydoc](https://github.com/numpy/numpydoc) | 0.7.0 | Sphinx extension to support docstrings in Numpy format / BSD 3-Clause |
| [odo](http://odo.pydata.org) | 0.5.1 | Data migration in Python / BSD-3-Clause |
| [olefile](http://www.decalage.info/python/olefileio) | 0.45.1 | parse, read and write Microsoft OLE2 files / BSD License 2-Clause |
| [openpyxl](https://openpyxl.readthedocs.io) | 2.4.10 | A Python library to read/write Excel 2010 xlsx/xlsm files / MIT |
| [openssl](http://www.openssl.org/) | 1.0.2n | OpenSSL is an open-source implementation of the SSL and TLS protocols / OpenSSL |
| [packaging](https://github.com/pypa/packaging) | 16.8 | Core utilities for Python packages / Apache 2.0 or BSD 2-Clause |
| [pandas](http://pandas.pydata.org) | 0.22.0 | High-performance, easy-to-use data structures and data analysis tools. / BSD 3-clause |
| [pandoc](http://johnmacfarlane.net/pandoc/) | 1.19.2.1 | Universal markup converter (repackaged binaries). / GPL-2.0 |
| [pandocfilters](https://github.com/jgm/pandocfilters) | 1.4.2 | A python module for writing pandoc filters / BSD-3-Clause |
| [parso](https://github.com/davidhalter/parso) | 0.1.1 | A Python Parser / MIT License |
| [partd](https://github.com/dask/partd) | 0.3.8 | Data structure for on-disk shuffle operations / BSD 3-Clause |
| [path.py](https://github.com/jaraco/path.py) | 10.5 | A module wrapper for os.path / MIT |
| [pathlib2](https://github.com/mcmtroffaes/pathlib2) | 2.3.0 | Fork of pathlib aiming to support the full stdlib Python API. / MIT |
| [patsy](https://github.com/pydata/patsy) | 0.5.0 | Describing statistical models in Python using symbolic formulas / BSD-2-Clause, PSF2 |
| [pep8](http://pep8.readthedocs.org/) | 1.7.1 | Python style guide checker / MIT |
| [pickleshare](https://github.com/vivainio/pickleshare) | 0.7.4 | Tiny ‘shelve’-like database with concurrency support / MIT |
| [pillow](http://python-imaging.github.io/) | 5.0.0 | Pillow is the friendly PIL fork by Alex Clark and Contributors. / PIL |
| [pip](https://pip.pypa.io/en/stable/) | 9.0.1 | PyPA recommended tool for installing Python packages / MIT |
| [pkginfo](https://code.launchpad.net/~tseaver/pkginfo/trunk) | 1.4.1 | Query metadatdata from sdists / bdists / installed packages. / MIT |
| [pluggy](https://github.com/pytest-dev/pluggy) | 0.6.0 | Plugin registration and hook calling for Python / MIT |
| [ply](http://www.dabeaz.com/ply/index.html) | 3.10 | Python Lex-Yacc / BSD 3-clause |
| [progress](https://github.com/verigak/progress) | 1.3 | Easy progress reporting for Python / ISC |
| [prompt\_toolkit](https://github.com/jonathanslenders/python-prompt-toolkit) | 1.0.15 | Library for building powerful interactive command lines in Python / BSD 3-clause |
| [psutil](https://github.com/giampaolo/psutil) | 5.4.3 | A cross-platform process and system utilities module for Python / BSD 3-Clause |
| [py](https://github.com/pytest-dev/py) | 1.5.2 | library with cross-python path, ini-parsing, io, code, log facilities / MIT |
| [pycodestyle](https://pycodestyle.readthedocs.io/) | 2.3.1 | Python style guide checker / MIT |
| [pycosat](https://github.com/ContinuumIO/pycosat) | 0.6.3 | Bindings to picosat (a SAT solver) / MIT |
| [pycparser](https://github.com/eliben/pycparser) | 2.18 | Complete C99 parser in pure Python / BSD 3-clause |
| [pycrypto](http://www.pycrypto.org/) | 2.6.1 | Cryptographic modules for Python. / Public Domain |
| [pycurl](http://pycurl.sourceforge.net/) | 7.43.0.1 | A Python Interface To The cURL library / LGPL, MIT |
| [pyflakes](https://github.com/PyCQA/pyflakes) | 1.6.0 | Pyflakes analyzes programs and detects various errors. / MIT |
| [pygments](http://pygments.org/) | 2.2.0 | Generic syntax highlighting package / BSD 2-clause |
| [pylint](http://www.pylint.org/) | 1.8.2 | python code static checker / GPL |
| [pyodbc](https://github.com/mkleehammer/pyodbc) | 4.0.22 | DB API Module for ODBC / MIT |
| [pyopenssl](https://github.com/pyca/pyopenssl) | 17.5.0 | Python wrapper module around the OpenSSL library / Apache 2.0 |
| [pyparsing](http://pyparsing.wikispaces.com/) | 2.2.0 | Create and execute simple grammars / MIT |
| [pyqt](http://www.riverbankcomputing.co.uk/software/pyqt) | 5.6.0 | Python binding of the cross-platform GUI toolkit Qt. / Commercial, GPL-2.0, GPL-3.0 |
| [pysocks](https://github.com/Anorov/PySocks) | 1.6.7 | A Python SOCKS client module. See [Anorov/PySocks](https://github.com/Anorov/PySocks) for more information. / BSD 3-Clause |
| [pytables](http://www.pytables.org) | 3.4.2 | Brings together Python, HDF5 and NumPy to easily handle large amounts of data. / BSD 3-Clause |
| [pytest](https://docs.pytest.org/en/latest/) | 3.3.2 | Simple and powerful testing with Python. / MIT |
| [python](http://www.python.org/) | 2.7.14 | General purpose programming language / PSF |
| [python-dateutil](https://dateutil.readthedocs.org/) | 2.6.1 | Extensions to the standard Python datetime module. / BSD 3-clause |
| [pytz](http://pythonhosted.org/pytz/) | 2017.3 | World timezone definitions, modern and historical. / MIT |
| [pywavelets](https://github.com/PyWavelets/pywt) | 0.5.2 | Discrete Wavelet Transforms in Python. / MIT |
| [pywin32](https://sourceforge.net/projects/pywin32) | 222 | Python extensions for Windows / PSF |
| [pywinpty](https://github.com/spyder-ide/pywinpty) | 0.5 | Python bindings for the winpty library / MIT |
| [pyyaml](http://pyyaml.org/wiki/PyYAML) | 3.12 | YAML parser and emitter for Python / MIT |
| [pyzmq](https://github.com/zeromq/pyzmq) | 16.0.3 | Python bindings for zeromq / BSD 3-clause |
| [qt](http://qt-project.org) | 5.6.2 | Qt is a cross-platform application and UI framework. / LGPL-3.0 |
| [qtawesome](https://github.com/spyder-ide/qtawesome) | 0.4.4 | Iconic fonts in PyQt and PySide applications / MIT |
| [qtconsole](http://jupyter.org) | 4.3.1 | Jupyter Qt console / BSD 3-Clause |
| [qtpy](https://github.com/spyder-ide/qtpy) | 1.3.1 | Abstraction layer for PyQt5/PyQt4/PySide / MIT |
| [requests](http://python-requests.org) | 2.18.4 | Python HTTP for Humans. / Apache 2.0 |
| [rope](https://github.com/python-rope/rope) | 0.10.7 | A python refactoring library… / GPL 2.0 |
| [ruamel\_yaml](https://bitbucket.org/ruamel/yaml) | 0.15.35 | A patched copy of ruamel.yaml. / MIT |
| [scandir](https://github.com/benhoyt/scandir) | 1.6 | scandir, a better directory iterator and faster os.walk() / BSD 3-Clause |
| [scikit-image](http://scikit-image.org/) | 0.13.1 | Image processing routines for SciPy. / BSD 3-Clause |
| [scikit-learn](http://scikit-learn.org/) | 0.19.1 | A set of python modules for machine learning and data mining / BSD 3-Clause |
| [scipy](http://www.scipy.org/) | 1.0.0 | Scientific Library for Python / BSD 3-Clause |
| [seaborn](http://stanford.edu/~mwaskom/software/seaborn/) | 0.8.1 | Statistical data visualization / BSD 3-Clause |
| [send2trash](https://github.com/hsoft/send2trash) | 1.4.2 | Python library to natively send files to Trash (or Recycle bin) on all platforms. / BSD-3-Clause |
| [setuptools](https://github.com/pypa/setuptools) | 38.4.0 | Download, build, install, upgrade, and uninstall Python packages / MIT |
| [simplegeneric](http://cheeseshop.python.org/pypi/simplegeneric) | 0.8.1 | Simple generic functions (similar to Python’s own len(), pickle.dump(), etc.) / Zope Public |
| [singledispatch](http://docs.python.org/3/library/functools.html#functools.singledispatch) | 3.4.0.3 | Transforms a function into a single-dispatch generic function / MIT |
| [sip](http://www.riverbankcomputing.com/software/sip/intro) | 4.18.1 | Create Python bindings for C and C++ libraries / GPL-3.0 |
| [six](http://pypi.python.org/pypi/six/) | 1.11.0 | Python 2 and 3 compatibility utilities / MIT |
| [snowballstemmer](https://github.com/shibukawa/snowball_py) | 1.2.1 | Snowball stemming library collection for Python / BSD-2-Clause |
| [sortedcollections](http://www.grantjenks.com/docs/sortedcollections/) | 0.5.3 | Python Sorted Collections / Apache-2.0 |
| [sortedcontainers](http://www.grantjenks.com/docs/sortedcontainers/) | 1.5.9 | Python Sorted Container Types: SortedList, SortedDict, and SortedSet / Apache 2.0 |
| [sphinx](http://www.sphinx-doc.org) | 1.6.6 | Sphinx is a tool that makes it easy to create intelligent and beautiful documentation / BSD 2-clause |
| sphinxcontrib | 1.0 | Python namespace for sphinxcontrib / BSD |
| [sphinxcontrib-websupport](https://pypi.python.org/pypi/sphinxcontrib-websupport) | 1.0.1 | Sphinx API for Web Apps / BSD-2-Clause |
| [spyder](https://github.com/spyder-ide/spyder) | 3.2.6 | Scientific PYthon Development EnviRonment / MIT |
| [sqlalchemy](http://www.sqlalchemy.org/) | 1.2.1 | Database Abstraction Library. / MIT |
| [sqlite](http://www.sqlite.org/) | 3.22.0 | Implements a self-contained, zero-configuration, SQL database engine. / Public-Domain (`<http://www.sqlite.org/copyright.html>`) |
| [ssl\_match\_hostname](http://bitbucket.org/brandon/backports.ssl_match_hostname) | 3.5.0.1 | The ssl.match\_hostname() function from Python 3.5 / PSF 2 |
| [statsmodels](https://www.statsmodels.org) | 0.8.0 | Statistical computations and models for use with SciPy / BSD 3-Clause |
| [subprocess32](https://github.com/google/python-subprocess32) | 3.2.7 | A backport of the subprocess module from Python 3.2/3.3 for use on 2.x. / PSF 2 |
| [sympy](http://sympy.org) | 1.1.1 | Python library for symbolic mathematics / 3-clause BSD |
| [tblib](https://github.com/ionelmc/python-tblib) | 1.3.2 | Traceback serialization library. / BSD 2-Clause |
| [terminado](http://github.com/mitsuhiko/markupsafe) | 0.8.1 | Terminals served by tornado websockets / BSD 3-clause |
| [testpath](https://testpath.readthedocs.io) | 0.3.1 | Testpath is a collection of utilities for Python code working with files and commands. / MIT |
| [tk](http://www.tcl.tk/) | 8.6.7 | A dynamic programming language with GUI support. Bundles Tcl and Tk. / Tcl/Tk |
| [toolz](http://toolz.readthedocs.org/) | 0.9.0 | A functional standard library for Python. / BSD 3-Clause |
| [tornado](http://www.tornadoweb.org/) | 4.5.3 | A Python web framework and asynchronous networking library, originally developed at FriendFeed. / Apache 2.0 |
| [traitlets](http://ipython.org/) | 4.3.2 | Configuration system for Python applications / BSD 3-clause |
| [typing](https://docs.python.org/3.5/library/typing.html) | 3.6.2 | Type Hints for Python - backport for `Python<3.5` / PSF |
| [unicodecsv](https://github.com/jdunck/python-unicodecsv) | 0.14.1 | Drop-in replacement for csv module which supports unicode strings / BSD |
| [urllib3](https://urllib3.readthedocs.io/) | 1.22 | HTTP library with thread-safe connection pooling, file post, and more. / MIT |
| [vc](https://github.com/conda/conda/wiki/VC-features) | 9 | A meta-package to track VC features. / Modified BSD License (3-clause) |
| [vs2008\_runtime](http://www.microsoft.com) | 9.00.30729.1 | Bundles of the MSVC 9 (VS 2008) runtime / Proprietary |
| [vs2015\_runtime](http://www.microsoft.com) | 14.0.25123 | Bundles of the MSVC 14 (VS 2015) runtime / Proprietary |
| [wcwidth](https://github.com/jquast/wcwidth) | 0.1.7 | Measures number of Terminal column cells of wide-character codes. / MIT |
| [webencodings](https://github.com/gsnedders/python-webencodings) | 0.5.1 | Character encoding aliases for legacy web content / BSD 3-Clause |
| [werkzeug](http://werkzeug.pocoo.org/) | 0.14.1 | The Python WSGI Utility Library. / BSD 3-Clause |
| [wheel](https://bitbucket.org/pypa/wheel/) | 0.30.0 | A built-package format for Python. / MIT |
| [widgetsnbextension](http://ipython.org) | 3.1.0 | IPython HTML widgets for Jupyter / BSD 3-clause |
| [win\_inet\_pton](https://github.com/hickeroar/win_inet_pton) | 1.0.1 | Native inet\_pton and inet\_ntop implementation for Python on Windows (with ctypes). / PUBLIC-DOMAIN |
| [win\_unicode\_console](https://github.com/Drekin/win-unicode-console) | 0.5 | A Python package to enable Unicode input and display when running Python from Windows console. / MIT |
| [wincertstore](https://bitbucket.org/tiran/wincertstore) | 0.2 | Python module to extract CA and CRL certs from Windows’ cert store (ctypes based). / PSF 2 |
| [winpty](https://github.com/rprichard/winpty) | 0.4.3 | Winpty provides an interface similar to a Unix pty-master for communicating with Windows console programs. / MIT |
| [wrapt](https://github.com/GrahamDumpleton/wrapt) | 1.10.11 | Module for decorators, wrappers and monkey patching. / BSD 2-Clause |
| [xlrd](http://www.python-excel.org/) | 1.1.0 | Library for developers to extract data from Microsoft Excel (tm) spreadsheet files / BSD 3-Clause and BSD with advertising |
| [xlsxwriter](https://xlsxwriter.readthedocs.io/) | 1.0.2 | A Python module for creating Excel XLSX files / BSD 2-Clause |
| [xlwings](http://xlwings.org/) | 0.11.5 | Interact with Excel from Python and vice versa / 3-clause BSD |
| [xlwt](http://www.python-excel.org/) | 1.3.0 | Writing data and formatting information to Excel files / BSD |
| [yaml](http://pyyaml.org/wiki/LibYAML) | 0.1.7 | A C library for parsing and emitting YAML. / MIT |
| [zict](http://github.com/mrocklin/zict) | 0.1.3 | Composable Dictionary Classes / BSD 3-Clause |
| [zlib](http://zlib.net/) | 1.2.11 | Massively spiffy yet delicately unobtrusive compression library / zlib |
| Name | Version | Summary / License |
|---|---|---|
| [\_ipyw\_jlab\_nb\_ext\_conf](https://github.com/ContinuumIO/anaconda-nb-extensions-meta-config) | 0.1.0 | A configuration metapackage for enabling Anaconda-bundled jupyter extensions / BSD |
| [alabaster](http://www.sphinx-doc.org/en/stable/index.html) | 0.7.10 | Configurable, Python 2+3 compatible Sphinx theme. / BSD 3-Clause |
| [anaconda-client](https://github.com/Anaconda-Platform/anaconda-client) | 1.6.9 | Anaconda Cloud command line client library / BSD 3-Clause |
| [anaconda-navigator](https://github.com/ContinuumIO/navigator) | 1.7.0 | Anaconda Navigator / proprietary - Continuum Analytics, Inc. |
| [anaconda-project](https://github.com/Anaconda-Platform/anaconda-project) | 0.8.2 | Tool for encapsulating, running, and reproducing data science projects / BSD 3-Clause |
| [asn1crypto](https://github.com/wbond/asn1crypto) | 0.24.0 | Python ASN.1 library with a focus on performance and a pythonic API / MIT |
| [astroid](https://www.astroid.org/) | 1.6.1 | A abstract syntax tree for Python with inference support. / LGPL 2.1 |
| [astropy](http://www.astropy.org/) | 2.0.3 | Community-developed Python Library for Astronomy / BSD |
| [attrs](https://attrs.readthedocs.io/en/stable/) | 17.4.0 | attrs is the Python package that will bring back the joy of writing classes by relieving you from the drudgery of implementing object protocols (aka dunder methods). / MIT |
| [babel](http://babel.pocoo.org/) | 2.5.3 | Utilities to internationalize and localize Python applications / BSD 3-clause |
| [backports](https://bitbucket.org/brandon/backports) | 1.0 | / BSD |
| [backports.functools\_lru\_cache](https://github.com/jaraco/backports.functools_lru_cache) | 1.4 | Backport of functools.lru\_cache from Python 3.3 as published at ActiveState. / MIT |
| [backports.shutil\_get\_terminal\_size](https://github.com/chrippa/backports.shutil_get_terminal_size) | 1.0.0 | A backport of the get\_terminal\_size function from Python 3.3’s shutil. / MIT |
| [backports.shutil\_which](https://github.com/minrk/backports.shutil_which) | 3.5.1 | Backport of shutil.which from Python 3.3 / PSF2 & MIT |
| [backports\_abc](https://github.com/cython/backports_abc) | 0.5 | A backport of recent additions to the collections.abc module. / PSF 2 |
| [beautifulsoup4](http://www.crummy.com/software/BeautifulSoup/) | 4.6.0 | Python library designed for screen-scraping / MIT |
| [bitarray](https://github.com/ilanschnell/bitarray) | 0.8.1 | efficient arrays of booleans – C extension / PSF |
| [bkcharts](http://github.com/bokeh/bkcharts) | 0.2 | High level chart types built on top of Bokeh / BSD 3-Clause |
| [blaze](http://blaze.pydata.org) | 0.11.3 | NumPy and Pandas interface to big data / BSD 3-Clause |
| [bleach](https://github.com/mozilla/bleach) | 2.1.2 | Easy, whitelist-based HTML-sanitizing tool / Apache-2.0 |
| [bokeh](http://bokeh.pydata.org/) | 0.12.13 | Statistical and novel interactive HTML plots for Python / BSD 3-Clause |
| [boto](https://github.com/boto/boto/) | 2.48.0 | Amazon Web Services Library / MIT |
| [bottleneck](http://berkeleyanalytics.com/bottleneck) | 1.2.1 | Fast NumPy array functions written in Cython. / BSD 2-Clause |
| [bzip2](http://www.bzip.org/) | 1.0.6 | high-quality data compressor / bzip2 |
| [ca-certificates](https://github.com/conda-forge/ca-certificates-feedstock) | 2017.08.26 | Certificates for use with other packages. / ISC |
| [cdecimal](http://www.bytereef.org/mpdecimal/index.html) | 2.3 | Fast drop-in replacement for decimal.py / BSD 2-Clause |
| [certifi](http://certifi.io/) | 2018.1.18 | Python package for providing Mozilla’s CA Bundle. / ISC |
| [cffi](https://bitbucket.org/cffi/cffi) | 1.11.4 | Foreign Function Interface for Python calling C code. / MIT |
| [chardet](https://github.com/chardet/chardet) | 3.0.4 | Universal character encoding detector / LGPL2 |
| [click](http://click.pocoo.org/) | 6.7 | A simple wrapper around optparse for powerful command line utilities. / BSD 3-Clause |
| [cloudpickle](https://github.com/cloudpipe/cloudpickle) | 0.5.2 | Extended pickling support for Python objects / BSD 3-Clause |
| [clyent](https://github.com/Anaconda-Platform/clyent) | 1.2.2 | Command line client library for windows and posix / BSD 3-Clause |
| [colorama](https://github.com/tartley/colorama) | 0.3.9 | Cross-platform colored terminal text. / BSD 3-Clause |
| [comtypes](http://starship.python.net/crew/theller/comtypes/) | 1.1.4 | pure Python COM package / MIT |
| [conda](https://conda.io) | 4.4.10 | OS-agnostic, system-level binary package and environment manager. / BSD 3-Clause |
| [conda-build](https://github.com/conda/conda-build) | 3.4.1 | tools for building conda packages / BSD 3-Clause |
| [conda-env](https://github.com/conda/conda-env) | 2.6.0 | Tools for interacting with conda environments. / BSD 3-Clause |
| [conda-verify](https://github.com/conda/conda-verify) | 2.0.0 | tool for validating conda recipes and conda packages / BSD 3-Clause |
| [configparser](http://docs.python.org/3/library/configparser.html) | 3.5.0 | This library brings the updated configparser from Python 3.5 to Python 2.6-3.5 / MIT |
| console\_shortcut | 0.1.1 | Console shortcut creator for Windows (using menuinst) / BSD |
| [contextlib2](http://contextlib2.readthedocs.org) | 0.5.5 | Backports and enhancements for the contextlib module / PSF |
| [cryptography](https://github.com/pyca/cryptography) | 2.1.4 | Provides cryptographic recipes and primitives to Python developers / Apache 2.0 or BSD 3-Clause, PSF 2 |
| [curl](http://curl.haxx.se/) | 7.58.0 | tool and library for transferring data with URL syntax / MIT/X derivate (`<http://curl.haxx.se/docs/copyright.html>`) |
| [cycler](http://matplotlib.org/cycler) | 0.10.0 | Composable style cycles. / BSD 3-Clause |
| [cython](http://www.cython.org/) | 0.27.3 | The Cython compiler for writing C extensions for the Python language / Apache-2.0 |
| [cytoolz](https://github.com/pytoolz/cytoolz) | 0.9.0 | Cython implementation of Toolz. High performance functional utilities. / BSD 3-Clause |
| [dask](http://github.com/dask/dask/) | 0.16.1 | Parallel Python with task scheduling / BSD 3-Clause |
| [dask-core](http://github.com/dask/dask/) | 0.16.1 | Parallel Python with task scheduling / BSD 3-Clause |
| [datashape](http://datashape.pydata.org) | 0.5.4 | A data description language. / BSD 2-Clause |
| [decorator](https://github.com/micheles/decorator) | 4.2.1 | Better living through Python with decorators. / BSD 3-Clause |
| [distlib](https://bitbucket.org/pypa/distlib) | 0.2.5 | Distribution utilities / Python Software Foundation License |
| [distributed](http://distributed.readthedocs.io/en/latest/) | 1.20.2 | Distributed computing with Dask / BSD 3-Clause |
| [docutils](http://docutils.sourceforge.net/) | 0.14 | Docutils – Python Documentation Utilities / Public Domain Dedictation and BSD 2-Clause and PSF 2.1.1 and GPL 3.0 |
| [entrypoints](https://github.com/takluyver/entrypoints) | 0.2.3 | Discover and load entry points from installed packages. / MIT License |
| [enum34](https://bitbucket.org/stoneleaf/enum34) | 1.1.6 | Python 3.4 Enum backported to 3.3, 3.2, 3.1, 2.7, 2.6, 2.5, and 2.4 / BSD 3-Clause |
| [et\_xmlfile](https://bitbucket.org/openpyxl/et_xmlfile) | 1.0.1 | An implementation of lxml.xmlfile for the standard library / MIT |
| [fastcache](https://github.com/pbrady/fastcache) | 1.0.2 | C implementation of Python 3 lru\_cache / MIT |
| [filelock](https://github.com/benediktschmitt/py-filelock) | 2.0.13 | A platform independent file lock. / Public Domain |
| [flask](http://flask.pocoo.org) | 0.12.2 | A microframework based on Werkzeug, Jinja2 and good intentions. / BSD 3-Clause |
| [flask-cors](https://github.com/corydolphin/flask-cors) | 3.0.3 | A Flask extension adding a decorator for CORS support / MIT |
| [freetype](https://www.freetype.org/) | 2.8 | A Free, High-Quality, and Portable Font Engine / GPL-2.0 and FreeType |
| [funcsigs](http://funcsigs.readthedocs.org) | 1.0.2 | Python function signatures from PEP362 for Python 2.6, 2.7 and 3.2+. / Apache 2.0 |
| [functools32](https://github.com/MiCHiLU/python-functools32) | 3.2.3.2 | Backport of the functools module from Python 3.2.3 for use on 2.7 and PyPy. / PSF license |
| [futures](https://github.com/agronholm/pythonfutures) | 3.2.0 | Backport of the concurrent.futures package from Python 3.2 / PSF |
| [get\_terminal\_size](https://github.com/chrippa/backports.shutil_get_terminal_size) | 1.0.0 | Get the size of the terminal window. / MIT |
| [gevent](http://www.gevent.org/) | 1.2.2 | Coroutine-based network library / MIT |
| [glob2](https://github.com/miracle2k/python-glob2) | 0.6 | Version of the glob module that supports recursion via \*\*, and can capture patterns. / BSD-2-Clause |
| [greenlet](https://github.com/python-greenlet/greenlet) | 0.4.12 | Lightweight in-process concurrent programming / MIT |
| [grin](http://pypi.python.org/pypi/grin) | 1.2.1 | Enhanced grep-like tool / BSD 3-Clause |
| [h5py](http://www.h5py.org/) | 2.7.1 | Read and write HDF5 files from Python. / BSD 3-Clause |
| [hdf5](http://www.hdfgroup.org/HDF5/) | 1.10.1 | HDF5 is a data model, library, and file format for storing and managing data / HDF5 |
| [heapdict](http://stutzbachenterprises.com/) | 1.0.0 | A heap with decrease-key and increase-key operations / BSD 3-Clause |
| [html5lib](https://github.com/html5lib/html5lib-python) | 1.0.1 | HTML parser based on the WHATWG HTML specification / MIT |
| [icc\_rt](https://software.intel.com/en-us/node/522690) | 2017.0.4 | Intel runtime libraries for C, C++ and Fortran compilers / Intel proprietary |
| [icu](http://site.icu-project.org/) | 58.2 | International Components for Unicode. / MIT |
| [idna](https://github.com/kjd/idna) | 2.6 | Internationalized Domain Names in Applications (IDNA). / BSD Like |
| [imageio](http://imageio.github.io) | 2.2.0 | a Python library for reading and writing image data / BSD 2-Clause |
| [imagesize](https://github.com/shibukawa/imagesize_py) | 0.7.1 | Getting image size from png/jpeg/jpeg2000/gif file / MIT |
| [intel-openmp](https://software.intel.com/en-us/node/522690) | 2018.0.0 | Math library for Intel and compatible processors / proprietary - Intel |
| [ipaddress](https://github.com/phihag/ipaddress) | 1.0.19 | IPv4/IPv6 manipulation library / PSF 2 |
| [ipykernel](http://ipython.org) | 4.8.0 | IPython Kernel for Jupyter / BSD 3-clause |
| [ipython](http://ipython.org/) | 5.4.1 | IPython: Productive Interactive Computing / BSD 3-clause |
| [ipython\_genutils](http://ipython.org) | 0.2.0 | vestigial utilities from IPython / BSD 3-Clause |
| [ipywidgets](https://github.com/ipython/ipywidgets) | 7.1.1 | Jupyter Interactive Widgets / BSD 3-clause |
| [isort](https://github.com/timothycrosley/isort) | 4.2.15 | A Python utility / library to sort Python imports. / MIT |
| [itsdangerous](https://github.com/pallets/itsdangerous) | 0.24 | Various helpers to pass trusted data to untrusted environments. / BSD 3-Clause |
| [jdcal](https://github.com/phn/jdcal) | 1.3 | Julian dates from proleptic Gregorian and Julian calendars. / BSD 2-Clause |
| [jedi](https://github.com/davidhalter/jedi/) | 0.11.1 | An autocompletion tool for Python that can be used for text editors. / MIT |
| [jinja2](http://jinja.pocoo.org) | 2.10 | An easy to use stand-alone template engine written in pure python. / 3-Clause BSD |
| [jpeg](http://www.ijg.org/) | 9b | read/write jpeg COM, EXIF, IPTC medata / Custom free software license |
| [jsonschema](https://github.com/Julian/jsonschema) | 2.6.0 | An implementation of JSON Schema validation for Python / MIT |
| [jupyter](http://jupyter.org) | 1.0.0 | Jupyter metapackage. Install all the Jupyter components in one go. / BSD 3-Clause |
| [jupyter\_client](http://jupyter.org) | 5.2.2 | Jupyter protocol implementation and client libraries / BSD 3-clause |
| [jupyter\_console](http://jupyter.org) | 5.2.0 | Jupyter terminal console / BSD 3-Clause |
| [jupyter\_core](http://jupyter.org) | 4.4.0 | Core common functionality of Jupyter projects. / BSD 3-clause |
| [jupyterlab](https://github.com/jupyterlab/jupyterlab) | 0.31.5 | A pre-alpha version of a computational environment for Jupyter. / BSD 3-Clause |
| [jupyterlab\_launcher](http://github.com/jupyterlab/jupyterlab_launcher) | 0.10.2 | A Launcher for JupyterLab based applications. / BSD 3-Clause |
| [lazy-object-proxy](https://github.com/ionelmc/python-lazy-object-proxy) | 1.3.1 | A fast and thorough lazy object proxy. / BSD 2-Clause |
| [libcurl](http://curl.haxx.se/) | 7.58.0 | tool and library for transferring data with URL syntax / MIT/X derivate (`<http://curl.haxx.se/docs/copyright.html>`) |
| [libiconv](https://www.gnu.org/software/libiconv/) | 1.15 | Provides iconv for systems which don’t have one (or that cannot convert from/to Unicode.) / GPL and LGPL |
| [libpng](http://www.libpng.org/pub/png/libpng.html) | 1.6.34 | PNG reference library. / zlib/libpng |
| [libssh2](https://www.libssh2.org/) | 1.8.0 | the SSH library / BSD 3-Clause |
| [libtiff](http://www.libtiff.org/) | 4.0.9 | Support for the Tag Image File Format (TIFF). / HPND |
| [libxml2](http://xmlsoft.org/) | 2.9.7 | The XML C parser and toolkit of Gnome / MIT |
| [libxslt](http://xmlsoft.org/XSLT/) | 1.1.32 | The XSLT C library developed for the GNOME project / MIT |
| [llvmlite](https://github.com/numba/llvmlite) | 0.21.0 | A lightweight LLVM python binding for writing JIT compilers / New BSD License |
| [locket](https://github.com/mwilliamson/locket.py) | 0.2.0 | File-based locks for Python for Linux and Windows / BSD 2-Clause |
| [lxml](http://lxml.de/) | 4.1.1 | Pythonic binding for the C libraries libxml2 and libxslt. / BSD 3-Clause, GPL-2.0, ZPL-2.0, and ElementTree |
| [lzo](http://www.oberhumer.com/opensource/lzo/) | 2.10 | LZO is a portable lossless data compression library written in ANSI C. / GPL v2+ |
| [markupsafe](https://www.palletsprojects.com/p/markupsafe/) | 1.0 | A Python module that implements the jinja2.Markup string / BSD 3-Clause |
| [matplotlib](http://matplotlib.org/) | 2.1.2 | Publication quality figures in Python / PSF-based |
| [mccabe](https://github.com/PyCQA/mccabe) | 0.6.1 | McCabe complexity checker for Python / MIT |
| [menuinst](https://github.com/ContinuumIO/menuinst) | 1.4.11 | cross platform menu item installation / BSD |
| [mistune](https://github.com/lepture/mistune) | 0.8.3 | The fastest markdown parser in pure Python. / BSD 3-Clause |
| [mkl](https://software.intel.com/en-us/mkl) | 2018.0.1 | Math library for Intel and compatible processors / proprietary - Intel |
| [mkl-service](https://github.com/ContinuumIO/mkl-service) | 1.1.2 | Python bindings to MKL service functions / 3-clause BSD |
| [mpmath](http://mpmath.org) | 1.0.0 | Python library for arbitrary-precision floating-point arithmetic / BSD 3-Clause |
| [msgpack-python](http://msgpack.org/) | 0.5.1 | MessagePack (de)serializer. / Apache 2.0 |
| [multipledispatch](https://github.com/mrocklin/multipledispatch/) | 0.4.9 | Multiple dispatch in Python / BSD 3-Clause |
| [navigator-updater](https://github.com/ContinuumIO/navigator-updater) | 0.1.0 | Anaconda Navigator Updater / proprietary - Continuum Analytics, Inc. |
| [nbconvert](http://jupyter.org) | 5.3.1 | Converting Jupyter Notebooks / BSD 3-Clause |
| [nbformat](http://jupyter.org) | 4.4.0 | The reference implementation of the Jupyter Notebook format / BSD 3-clause |
| [networkx](https://networkx.github.io/) | 2.1 | Python package for creating and manipulating complex networks / BSD 3-Clause |
| [nltk](http://nltk.org/) | 3.2.5 | Build Python programs to work with human language data / Apache 2.0 |
| [nose](http://readthedocs.org/docs/nose/) | 1.3.7 | Nose extends unittest to make testing easier / LGPL-2.1 |
| [notebook](http://jupyter.org) | 5.4.0 | A web-based notebook environment for interactive computing / BSD 3-clause |
| [numba](http://numba.pydata.org/) | 0.36.2 | a just-in-time Python function compiler based on LLVM / BSD |
| [numexpr](https://github.com/pydata/numexpr) | 2.6.4 | Fast numerical expression evaluator for NumPy. / MIT |
| [numpy](http://numpy.scipy.org/) | 1.14.0 | Array processing for numbers, strings, records, and objects. / BSD 3-Clause |
| [numpydoc](https://github.com/numpy/numpydoc) | 0.7.0 | Sphinx extension to support docstrings in Numpy format / BSD 3-Clause |
| [odo](http://odo.pydata.org) | 0.5.1 | Data migration in Python / BSD-3-Clause |
| [olefile](http://www.decalage.info/python/olefileio) | 0.45.1 | parse, read and write Microsoft OLE2 files / BSD License 2-Clause |
| [openpyxl](https://openpyxl.readthedocs.io) | 2.4.10 | A Python library to read/write Excel 2010 xlsx/xlsm files / MIT |
| [openssl](http://www.openssl.org/) | 1.0.2n | OpenSSL is an open-source implementation of the SSL and TLS protocols / OpenSSL |
| [packaging](https://github.com/pypa/packaging) | 16.8 | Core utilities for Python packages / Apache 2.0 or BSD 2-Clause |
| [pandas](http://pandas.pydata.org) | 0.22.0 | High-performance, easy-to-use data structures and data analysis tools. / BSD 3-clause |
| [pandoc](http://johnmacfarlane.net/pandoc/) | 1.19.2.1 | Universal markup converter (repackaged binaries). / GPL-2.0 |
| [pandocfilters](https://github.com/jgm/pandocfilters) | 1.4.2 | A python module for writing pandoc filters / BSD-3-Clause |
| [parso](https://github.com/davidhalter/parso) | 0.1.1 | A Python Parser / MIT License |
| [partd](https://github.com/dask/partd) | 0.3.8 | Data structure for on-disk shuffle operations / BSD 3-Clause |
| [path.py](https://github.com/jaraco/path.py) | 10.5 | A module wrapper for os.path / MIT |
| [pathlib2](https://github.com/mcmtroffaes/pathlib2) | 2.3.0 | Fork of pathlib aiming to support the full stdlib Python API. / MIT |
| [patsy](https://github.com/pydata/patsy) | 0.5.0 | Describing statistical models in Python using symbolic formulas / BSD-2-Clause, PSF2 |
| [pep8](http://pep8.readthedocs.org/) | 1.7.1 | Python style guide checker / MIT |
| [pickleshare](https://github.com/vivainio/pickleshare) | 0.7.4 | Tiny ‘shelve’-like database with concurrency support / MIT |
| [pillow](http://python-imaging.github.io/) | 5.0.0 | Pillow is the friendly PIL fork by Alex Clark and Contributors. / PIL |
| [pip](https://pip.pypa.io/en/stable/) | 9.0.1 | PyPA recommended tool for installing Python packages / MIT |
| [pkginfo](https://code.launchpad.net/~tseaver/pkginfo/trunk) | 1.4.1 | Query metadatdata from sdists / bdists / installed packages. / MIT |
| [pluggy](https://github.com/pytest-dev/pluggy) | 0.6.0 | Plugin registration and hook calling for Python / MIT |
| [ply](http://www.dabeaz.com/ply/index.html) | 3.10 | Python Lex-Yacc / BSD 3-clause |
| [progress](https://github.com/verigak/progress) | 1.3 | Easy progress reporting for Python / ISC |
| [prompt\_toolkit](https://github.com/jonathanslenders/python-prompt-toolkit) | 1.0.15 | Library for building powerful interactive command lines in Python / BSD 3-clause |
| [psutil](https://github.com/giampaolo/psutil) | 5.4.3 | A cross-platform process and system utilities module for Python / BSD 3-Clause |
| [py](https://github.com/pytest-dev/py) | 1.5.2 | library with cross-python path, ini-parsing, io, code, log facilities / MIT |
| [pycodestyle](https://pycodestyle.readthedocs.io/) | 2.3.1 | Python style guide checker / MIT |
| [pycosat](https://github.com/ContinuumIO/pycosat) | 0.6.3 | Bindings to picosat (a SAT solver) / MIT |
| [pycparser](https://github.com/eliben/pycparser) | 2.18 | Complete C99 parser in pure Python / BSD 3-clause |
| [pycrypto](http://www.pycrypto.org/) | 2.6.1 | Cryptographic modules for Python. / Public Domain |
| [pycurl](http://pycurl.sourceforge.net/) | 7.43.0.1 | A Python Interface To The cURL library / LGPL, MIT |
| [pyflakes](https://github.com/PyCQA/pyflakes) | 1.6.0 | Pyflakes analyzes programs and detects various errors. / MIT |
| [pygments](http://pygments.org/) | 2.2.0 | Generic syntax highlighting package / BSD 2-clause |
| [pylint](http://www.pylint.org/) | 1.8.2 | python code static checker / GPL |
| [pyodbc](https://github.com/mkleehammer/pyodbc) | 4.0.22 | DB API Module for ODBC / MIT |
| [pyopenssl](https://github.com/pyca/pyopenssl) | 17.5.0 | Python wrapper module around the OpenSSL library / Apache 2.0 |
| [pyparsing](http://pyparsing.wikispaces.com/) | 2.2.0 | Create and execute simple grammars / MIT |
| [pyqt](http://www.riverbankcomputing.co.uk/software/pyqt) | 5.6.0 | Python binding of the cross-platform GUI toolkit Qt. / Commercial, GPL-2.0, GPL-3.0 |
| [pysocks](https://github.com/Anorov/PySocks) | 1.6.7 | A Python SOCKS client module. See [Anorov/PySocks](https://github.com/Anorov/PySocks) for more information. / BSD 3-Clause |
| [pytables](http://www.pytables.org) | 3.4.2 | Brings together Python, HDF5 and NumPy to easily handle large amounts of data. / BSD 3-Clause |
| [pytest](https://docs.pytest.org/en/latest/) | 3.3.2 | Simple and powerful testing with Python. / MIT |
| [python](http://www.python.org/) | 2.7.14 | General purpose programming language / PSF |
| [python-dateutil](https://dateutil.readthedocs.org/) | 2.6.1 | Extensions to the standard Python datetime module. / BSD 3-clause |
| [pytz](http://pythonhosted.org/pytz/) | 2017.3 | World timezone definitions, modern and historical. / MIT |
| [pywavelets](https://github.com/PyWavelets/pywt) | 0.5.2 | Discrete Wavelet Transforms in Python. / MIT |
| [pywin32](https://sourceforge.net/projects/pywin32) | 222 | Python extensions for Windows / PSF |
| [pywinpty](https://github.com/spyder-ide/pywinpty) | 0.5 | Python bindings for the winpty library / MIT |
| [pyyaml](http://pyyaml.org/wiki/PyYAML) | 3.12 | YAML parser and emitter for Python / MIT |
| [pyzmq](https://github.com/zeromq/pyzmq) | 16.0.3 | Python bindings for zeromq / BSD 3-clause |
| [qt](http://qt-project.org) | 5.6.2 | Qt is a cross-platform application and UI framework. / LGPL-3.0 |
| [qtawesome](https://github.com/spyder-ide/qtawesome) | 0.4.4 | Iconic fonts in PyQt and PySide applications / MIT |
| [qtconsole](http://jupyter.org) | 4.3.1 | Jupyter Qt console / BSD 3-Clause |
| [qtpy](https://github.com/spyder-ide/qtpy) | 1.3.1 | Abstraction layer for PyQt5/PyQt4/PySide / MIT |
| [requests](http://python-requests.org) | 2.18.4 | Python HTTP for Humans. / Apache 2.0 |
| [rope](https://github.com/python-rope/rope) | 0.10.7 | A python refactoring library… / GPL 2.0 |
| [ruamel\_yaml](https://bitbucket.org/ruamel/yaml) | 0.15.35 | A patched copy of ruamel.yaml. / MIT |
| [scandir](https://github.com/benhoyt/scandir) | 1.6 | scandir, a better directory iterator and faster os.walk() / BSD 3-Clause |
| [scikit-image](http://scikit-image.org/) | 0.13.1 | Image processing routines for SciPy. / BSD 3-Clause |
| [scikit-learn](http://scikit-learn.org/) | 0.19.1 | A set of python modules for machine learning and data mining / BSD 3-Clause |
| [scipy](http://www.scipy.org/) | 1.0.0 | Scientific Library for Python / BSD 3-Clause |
| [seaborn](http://stanford.edu/~mwaskom/software/seaborn/) | 0.8.1 | Statistical data visualization / BSD 3-Clause |
| [send2trash](https://github.com/hsoft/send2trash) | 1.4.2 | Python library to natively send files to Trash (or Recycle bin) on all platforms. / BSD-3-Clause |
| [setuptools](https://github.com/pypa/setuptools) | 38.4.0 | Download, build, install, upgrade, and uninstall Python packages / MIT |
| [simplegeneric](http://cheeseshop.python.org/pypi/simplegeneric) | 0.8.1 | Simple generic functions (similar to Python’s own len(), pickle.dump(), etc.) / Zope Public |
| [singledispatch](http://docs.python.org/3/library/functools.html#functools.singledispatch) | 3.4.0.3 | Transforms a function into a single-dispatch generic function / MIT |
| [sip](http://www.riverbankcomputing.com/software/sip/intro) | 4.18.1 | Create Python bindings for C and C++ libraries / GPL-3.0 |
| [six](http://pypi.python.org/pypi/six/) | 1.11.0 | Python 2 and 3 compatibility utilities / MIT |
| [snowballstemmer](https://github.com/shibukawa/snowball_py) | 1.2.1 | Snowball stemming library collection for Python / BSD-2-Clause |
| [sortedcollections](http://www.grantjenks.com/docs/sortedcollections/) | 0.5.3 | Python Sorted Collections / Apache-2.0 |
| [sortedcontainers](http://www.grantjenks.com/docs/sortedcontainers/) | 1.5.9 | Python Sorted Container Types: SortedList, SortedDict, and SortedSet / Apache 2.0 |
| [sphinx](http://www.sphinx-doc.org) | 1.6.6 | Sphinx is a tool that makes it easy to create intelligent and beautiful documentation / BSD 2-clause |
| sphinxcontrib | 1.0 | Python namespace for sphinxcontrib / BSD |
| [sphinxcontrib-websupport](https://pypi.python.org/pypi/sphinxcontrib-websupport) | 1.0.1 | Sphinx API for Web Apps / BSD-2-Clause |
| [spyder](https://github.com/spyder-ide/spyder) | 3.2.6 | Scientific PYthon Development EnviRonment / MIT |
| [sqlalchemy](http://www.sqlalchemy.org/) | 1.2.1 | Database Abstraction Library. / MIT |
| [sqlite](http://www.sqlite.org/) | 3.22.0 | Implements a self-contained, zero-configuration, SQL database engine. / Public-Domain (`<http://www.sqlite.org/copyright.html>`) |
| [ssl\_match\_hostname](http://bitbucket.org/brandon/backports.ssl_match_hostname) | 3.5.0.1 | The ssl.match\_hostname() function from Python 3.5 / PSF 2 |
| [statsmodels](https://www.statsmodels.org) | 0.8.0 | Statistical computations and models for use with SciPy / BSD 3-Clause |
| [subprocess32](https://github.com/google/python-subprocess32) | 3.2.7 | A backport of the subprocess module from Python 3.2/3.3 for use on 2.x. / PSF 2 |
| [sympy](http://sympy.org) | 1.1.1 | Python library for symbolic mathematics / 3-clause BSD |
| [tblib](https://github.com/ionelmc/python-tblib) | 1.3.2 | Traceback serialization library. / BSD 2-Clause |
| [terminado](http://github.com/mitsuhiko/markupsafe) | 0.8.1 | Terminals served by tornado websockets / BSD 3-clause |
| [testpath](https://testpath.readthedocs.io) | 0.3.1 | Testpath is a collection of utilities for Python code working with files and commands. / MIT |
| [tk](http://www.tcl.tk/) | 8.6.7 | A dynamic programming language with GUI support. Bundles Tcl and Tk. / Tcl/Tk |
| [toolz](http://toolz.readthedocs.org/) | 0.9.0 | A functional standard library for Python. / BSD 3-Clause |
| [tornado](http://www.tornadoweb.org/) | 4.5.3 | A Python web framework and asynchronous networking library, originally developed at FriendFeed. / Apache 2.0 |
| [traitlets](http://ipython.org/) | 4.3.2 | Configuration system for Python applications / BSD 3-clause |
| [typing](https://docs.python.org/3.5/library/typing.html) | 3.6.2 | Type Hints for Python - backport for `Python<3.5` / PSF |
| [unicodecsv](https://github.com/jdunck/python-unicodecsv) | 0.14.1 | Drop-in replacement for csv module which supports unicode strings / BSD |
| [urllib3](https://urllib3.readthedocs.io/) | 1.22 | HTTP library with thread-safe connection pooling, file post, and more. / MIT |
| [vc](https://github.com/conda/conda/wiki/VC-features) | 9 | A meta-package to track VC features. / Modified BSD License (3-clause) |
| [vs2008\_runtime](http://www.microsoft.com) | 9.00.30729.1 | Bundles of the MSVC 9 (VS 2008) runtime / Proprietary |
| [vs2015\_runtime](http://www.microsoft.com) | 14.0.25123 | Bundles of the MSVC 14 (VS 2015) runtime / Proprietary |
| [wcwidth](https://github.com/jquast/wcwidth) | 0.1.7 | Measures number of Terminal column cells of wide-character codes. / MIT |
| [webencodings](https://github.com/gsnedders/python-webencodings) | 0.5.1 | Character encoding aliases for legacy web content / BSD 3-Clause |
| [werkzeug](http://werkzeug.pocoo.org/) | 0.14.1 | The Python WSGI Utility Library. / BSD 3-Clause |
| [wheel](https://bitbucket.org/pypa/wheel/) | 0.30.0 | A built-package format for Python. / MIT |
| [widgetsnbextension](http://ipython.org) | 3.1.0 | IPython HTML widgets for Jupyter / BSD 3-clause |
| [win\_inet\_pton](https://github.com/hickeroar/win_inet_pton) | 1.0.1 | Native inet\_pton and inet\_ntop implementation for Python on Windows (with ctypes). / PUBLIC-DOMAIN |
| [win\_unicode\_console](https://github.com/Drekin/win-unicode-console) | 0.5 | A Python package to enable Unicode input and display when running Python from Windows console. / MIT |
| [wincertstore](https://bitbucket.org/tiran/wincertstore) | 0.2 | Python module to extract CA and CRL certs from Windows’ cert store (ctypes based). / PSF 2 |
| [winpty](https://github.com/rprichard/winpty) | 0.4.3 | Winpty provides an interface similar to a Unix pty-master for communicating with Windows console programs. / MIT |
| [wrapt](https://github.com/GrahamDumpleton/wrapt) | 1.10.11 | Module for decorators, wrappers and monkey patching. / BSD 2-Clause |
| [xlrd](http://www.python-excel.org/) | 1.1.0 | Library for developers to extract data from Microsoft Excel (tm) spreadsheet files / BSD 3-Clause and BSD with advertising |
| [xlsxwriter](https://xlsxwriter.readthedocs.io/) | 1.0.2 | A Python module for creating Excel XLSX files / BSD 2-Clause |
| [xlwings](http://xlwings.org/) | 0.11.5 | Interact with Excel from Python and vice versa / 3-clause BSD |
| [xlwt](http://www.python-excel.org/) | 1.3.0 | Writing data and formatting information to Excel files / BSD |
| [yaml](http://pyyaml.org/wiki/LibYAML) | 0.1.7 | A C library for parsing and emitting YAML. / MIT |
| [zict](http://github.com/mrocklin/zict) | 0.1.3 | Composable Dictionary Classes / BSD 3-Clause |
| [zlib](http://zlib.net/) | 1.2.11 | Massively spiffy yet delicately unobtrusive compression library / zlib |
| Name | Version | Summary / License |
|---|---|---|
| [\_ipyw\_jlab\_nb\_ext\_conf](https://github.com/ContinuumIO/anaconda-nb-extensions-meta-config) | 0.1.0 | A configuration metapackage for enabling Anaconda-bundled jupyter extensions / BSD |
| [alabaster](http://www.sphinx-doc.org/en/stable/index.html) | 0.7.10 | Configurable, Python 2+3 compatible Sphinx theme. / BSD 3-Clause |
| [anaconda-client](https://github.com/Anaconda-Platform/anaconda-client) | 1.6.9 | Anaconda Cloud command line client library / BSD 3-Clause |
| [anaconda-navigator](https://github.com/ContinuumIO/navigator) | 1.7.0 | Anaconda Navigator / proprietary - Continuum Analytics, Inc. |
| [anaconda-project](https://github.com/Anaconda-Platform/anaconda-project) | 0.8.2 | Tool for encapsulating, running, and reproducing data science projects / BSD 3-Clause |
| [appnope](http://github.com/minrk/appnope) | 0.1.0 | Disable App Nap on OS X 10.9 / BSD 2-Clause |
| [appscript](http://appscript.sourceforge.net/) | 1.0.1 | Control AppleScriptable applications from Python / Public-Domain |
| [asn1crypto](https://github.com/wbond/asn1crypto) | 0.24.0 | Python ASN.1 library with a focus on performance and a pythonic API / MIT |
| [astroid](https://www.astroid.org/) | 1.6.1 | A abstract syntax tree for Python with inference support. / LGPL 2.1 |
| [astropy](http://www.astropy.org/) | 2.0.3 | Community-developed Python Library for Astronomy / BSD |
| [attrs](https://attrs.readthedocs.io/en/stable/) | 17.4.0 | attrs is the Python package that will bring back the joy of writing classes by relieving you from the drudgery of implementing object protocols (aka dunder methods). / MIT |
| [babel](http://babel.pocoo.org/) | 2.5.3 | Utilities to internationalize and localize Python applications / BSD 3-clause |
| [backports](https://bitbucket.org/brandon/backports) | 1.0 | / BSD |
| [backports.functools\_lru\_cache](https://github.com/jaraco/backports.functools_lru_cache) | 1.4 | Backport of functools.lru\_cache from Python 3.3 as published at ActiveState. / MIT |
| [backports.shutil\_get\_terminal\_size](https://github.com/chrippa/backports.shutil_get_terminal_size) | 1.0.0 | A backport of the get\_terminal\_size function from Python 3.3’s shutil. / MIT |
| [backports\_abc](https://github.com/cython/backports_abc) | 0.5 | A backport of recent additions to the collections.abc module. / PSF 2 |
| [beautifulsoup4](http://www.crummy.com/software/BeautifulSoup/) | 4.6.0 | Python library designed for screen-scraping / MIT |
| [bitarray](https://github.com/ilanschnell/bitarray) | 0.8.1 | efficient arrays of booleans – C extension / PSF |
| [bkcharts](http://github.com/bokeh/bkcharts) | 0.2 | High level chart types built on top of Bokeh / BSD 3-Clause |
| [blaze](http://blaze.pydata.org) | 0.11.3 | NumPy and Pandas interface to big data / BSD 3-Clause |
| [bleach](https://github.com/mozilla/bleach) | 2.1.2 | Easy, whitelist-based HTML-sanitizing tool / Apache-2.0 |
| [bokeh](http://bokeh.pydata.org/) | 0.12.13 | Statistical and novel interactive HTML plots for Python / BSD 3-Clause |
| [boto](https://github.com/boto/boto/) | 2.48.0 | Amazon Web Services Library / MIT |
| [bottleneck](http://berkeleyanalytics.com/bottleneck) | 1.2.1 | Fast NumPy array functions written in Cython. / BSD 2-Clause |
| [bzip2](http://www.bzip.org/) | 1.0.6 | high-quality data compressor / bzip2 |
| [ca-certificates](https://github.com/conda-forge/ca-certificates-feedstock) | 2017.08.26 | Certificates for use with other packages. / ISC |
| [cdecimal](http://www.bytereef.org/mpdecimal/index.html) | 2.3 | Fast drop-in replacement for decimal.py / BSD 2-Clause |
| [certifi](http://certifi.io/) | 2018.1.18 | Python package for providing Mozilla’s CA Bundle. / ISC |
| [cffi](https://bitbucket.org/cffi/cffi) | 1.11.4 | Foreign Function Interface for Python calling C code. / MIT |
| [chardet](https://github.com/chardet/chardet) | 3.0.4 | Universal character encoding detector / LGPL2 |
| [click](http://click.pocoo.org/) | 6.7 | A simple wrapper around optparse for powerful command line utilities. / BSD 3-Clause |
| [cloudpickle](https://github.com/cloudpipe/cloudpickle) | 0.5.2 | Extended pickling support for Python objects / BSD 3-Clause |
| [clyent](https://github.com/Anaconda-Platform/clyent) | 1.2.2 | Command line client library for windows and posix / BSD 3-Clause |
| [colorama](https://github.com/tartley/colorama) | 0.3.9 | Cross-platform colored terminal text. / BSD 3-Clause |
| [conda](https://conda.io) | 4.4.10 | OS-agnostic, system-level binary package and environment manager. / BSD 3-Clause |
| [conda-build](https://github.com/conda/conda-build) | 3.4.1 | tools for building conda packages / BSD 3-Clause |
| [conda-env](https://github.com/conda/conda-env) | 2.6.0 | Tools for interacting with conda environments. / BSD 3-Clause |
| [conda-verify](https://github.com/conda/conda-verify) | 2.0.0 | tool for validating conda recipes and conda packages / BSD 3-Clause |
| [configparser](http://docs.python.org/3/library/configparser.html) | 3.5.0 | This library brings the updated configparser from Python 3.5 to Python 2.6-3.5 / MIT |
| [contextlib2](http://contextlib2.readthedocs.org) | 0.5.5 | Backports and enhancements for the contextlib module / PSF |
| [cryptography](https://github.com/pyca/cryptography) | 2.1.4 | Provides cryptographic recipes and primitives to Python developers / Apache 2.0 or BSD 3-Clause, PSF 2 |
| [curl](http://curl.haxx.se/) | 7.58.0 | tool and library for transferring data with URL syntax / MIT/X derivate (`<http://curl.haxx.se/docs/copyright.html>`) |
| [cycler](http://matplotlib.org/cycler) | 0.10.0 | Composable style cycles. / BSD 3-Clause |
| [cython](http://www.cython.org/) | 0.27.3 | The Cython compiler for writing C extensions for the Python language / Apache-2.0 |
| [cytoolz](https://github.com/pytoolz/cytoolz) | 0.9.0 | Cython implementation of Toolz. High performance functional utilities. / BSD 3-Clause |
| [dask](http://github.com/dask/dask/) | 0.16.1 | Parallel Python with task scheduling / BSD 3-Clause |
| [dask-core](http://github.com/dask/dask/) | 0.16.1 | Parallel Python with task scheduling / BSD 3-Clause |
| [datashape](http://datashape.pydata.org) | 0.5.4 | A data description language. / BSD 2-Clause |
| [dbus](http://www.freedesktop.org/wiki/Software/dbus/) | 1.12.2 | Simple message bus system for applications to talk to one another / GPL2 |
| [decorator](https://github.com/micheles/decorator) | 4.2.1 | Better living through Python with decorators. / BSD 3-Clause |
| [distributed](http://distributed.readthedocs.io/en/latest/) | 1.20.2 | Distributed computing with Dask / BSD 3-Clause |
| [docutils](http://docutils.sourceforge.net/) | 0.14 | Docutils – Python Documentation Utilities / Public Domain Dedictation and BSD 2-Clause and PSF 2.1.1 and GPL 3.0 |
| [entrypoints](https://github.com/takluyver/entrypoints) | 0.2.3 | Discover and load entry points from installed packages. / MIT License |
| [enum34](https://bitbucket.org/stoneleaf/enum34) | 1.1.6 | Python 3.4 Enum backported to 3.3, 3.2, 3.1, 2.7, 2.6, 2.5, and 2.4 / BSD 3-Clause |
| [et\_xmlfile](https://bitbucket.org/openpyxl/et_xmlfile) | 1.0.1 | An implementation of lxml.xmlfile for the standard library / MIT |
| [expat](http://expat.sourceforge.net/) | 2.2.5 | Expat XML parser library in C. / MIT |
| [fastcache](https://github.com/pbrady/fastcache) | 1.0.2 | C implementation of Python 3 lru\_cache / MIT |
| [filelock](https://github.com/benediktschmitt/py-filelock) | 2.0.13 | A platform independent file lock. / Public Domain |
| [flask](http://flask.pocoo.org) | 0.12.2 | A microframework based on Werkzeug, Jinja2 and good intentions. / BSD 3-Clause |
| [flask-cors](https://github.com/corydolphin/flask-cors) | 3.0.3 | A Flask extension adding a decorator for CORS support / MIT |
| [freetype](https://www.freetype.org/) | 2.8 | A Free, High-Quality, and Portable Font Engine / GPL-2.0 and FreeType |
| [funcsigs](http://funcsigs.readthedocs.org) | 1.0.2 | Python function signatures from PEP362 for Python 2.6, 2.7 and 3.2+. / Apache 2.0 |
| [functools32](https://github.com/MiCHiLU/python-functools32) | 3.2.3.2 | Backport of the functools module from Python 3.2.3 for use on 2.7 and PyPy. / PSF license |
| [futures](https://github.com/agronholm/pythonfutures) | 3.2.0 | Backport of the concurrent.futures package from Python 3.2 / PSF |
| [get\_terminal\_size](https://github.com/chrippa/backports.shutil_get_terminal_size) | 1.0.0 | Get the size of the terminal window. / MIT |
| [gettext](https://www.gnu.org/software/gettext/) | 0.19.8.1 | Internationalization package. / GPLv2 |
| [gevent](http://www.gevent.org/) | 1.2.2 | Coroutine-based network library / MIT |
| [glib](https://developer.gnome.org/glib/) | 2.53.6 | Provides core application building blocks for libraries and applications written in C. / LGPL-2.1 |
| [glob2](https://github.com/miracle2k/python-glob2) | 0.6 | Version of the glob module that supports recursion via \*\*, and can capture patterns. / BSD-2-Clause |
| [gmp](http://gmplib.org/) | 6.1.2 | The GNU multiprecision library. / GPL 2 and LGPL 3 |
| [gmpy2](https://pypi.python.org/pypi/gmpy2) | 2.0.8 | GMP/MPIR, MPFR, and MPC interface to Python 2.6+ and 3.x / LGPL 3 |
| [greenlet](https://github.com/python-greenlet/greenlet) | 0.4.12 | Lightweight in-process concurrent programming / MIT |
| [grin](http://pypi.python.org/pypi/grin) | 1.2.1 | Enhanced grep-like tool / BSD 3-Clause |
| [h5py](http://www.h5py.org/) | 2.7.1 | Read and write HDF5 files from Python. / BSD 3-Clause |
| [hdf5](http://www.hdfgroup.org/HDF5/) | 1.10.1 | HDF5 is a data model, library, and file format for storing and managing data / HDF5 |
| [heapdict](http://stutzbachenterprises.com/) | 1.0.0 | A heap with decrease-key and increase-key operations / BSD 3-Clause |
| [html5lib](https://github.com/html5lib/html5lib-python) | 1.0.1 | HTML parser based on the WHATWG HTML specification / MIT |
| [icu](http://site.icu-project.org/) | 58.2 | International Components for Unicode. / MIT |
| [idna](https://github.com/kjd/idna) | 2.6 | Internationalized Domain Names in Applications (IDNA). / BSD Like |
| [imageio](http://imageio.github.io) | 2.2.0 | a Python library for reading and writing image data / BSD 2-Clause |
| [imagesize](https://github.com/shibukawa/imagesize_py) | 0.7.1 | Getting image size from png/jpeg/jpeg2000/gif file / MIT |
| [intel-openmp](https://software.intel.com/en-us/node/522690) | 2018.0.0 | Math library for Intel and compatible processors / proprietary - Intel |
| [ipaddress](https://github.com/phihag/ipaddress) | 1.0.19 | IPv4/IPv6 manipulation library / PSF 2 |
| [ipykernel](http://ipython.org) | 4.8.0 | IPython Kernel for Jupyter / BSD 3-clause |
| [ipython](http://ipython.org/) | 5.4.1 | IPython: Productive Interactive Computing / BSD 3-clause |
| [ipython\_genutils](http://ipython.org) | 0.2.0 | vestigial utilities from IPython / BSD 3-Clause |
| [ipywidgets](https://github.com/ipython/ipywidgets) | 7.1.1 | Jupyter Interactive Widgets / BSD 3-clause |
| [isort](https://github.com/timothycrosley/isort) | 4.2.15 | A Python utility / library to sort Python imports. / MIT |
| [itsdangerous](https://github.com/pallets/itsdangerous) | 0.24 | Various helpers to pass trusted data to untrusted environments. / BSD 3-Clause |
| [jbig](https://www.cl.cam.ac.uk/~mgk25/jbigkit) | 2.1 | Implementation of the JBIG1 data compression standard / GPL-2.0 |
| [jdcal](https://github.com/phn/jdcal) | 1.3 | Julian dates from proleptic Gregorian and Julian calendars. / BSD 2-Clause |
| [jedi](https://github.com/davidhalter/jedi/) | 0.11.1 | An autocompletion tool for Python that can be used for text editors. / MIT |
| [jinja2](http://jinja.pocoo.org) | 2.10 | An easy to use stand-alone template engine written in pure python. / 3-Clause BSD |
| [jpeg](http://www.ijg.org/) | 9b | read/write jpeg COM, EXIF, IPTC medata / Custom free software license |
| [jsonschema](https://github.com/Julian/jsonschema) | 2.6.0 | An implementation of JSON Schema validation for Python / MIT |
| [jupyter](http://jupyter.org) | 1.0.0 | Jupyter metapackage. Install all the Jupyter components in one go. / BSD 3-Clause |
| [jupyter\_client](http://jupyter.org) | 5.2.2 | Jupyter protocol implementation and client libraries / BSD 3-clause |
| [jupyter\_console](http://jupyter.org) | 5.2.0 | Jupyter terminal console / BSD 3-Clause |
| [jupyter\_core](http://jupyter.org) | 4.4.0 | Core common functionality of Jupyter projects. / BSD 3-clause |
| [jupyterlab](https://github.com/jupyterlab/jupyterlab) | 0.31.5 | A pre-alpha version of a computational environment for Jupyter. / BSD 3-Clause |
| [jupyterlab\_launcher](http://github.com/jupyterlab/jupyterlab_launcher) | 0.10.2 | A Launcher for JupyterLab based applications. / BSD 3-Clause |
| [lazy-object-proxy](https://github.com/ionelmc/python-lazy-object-proxy) | 1.3.1 | A fast and thorough lazy object proxy. / BSD 2-Clause |
| [libcurl](http://curl.haxx.se/) | 7.58.0 | tool and library for transferring data with URL syntax / MIT/X derivate (`<http://curl.haxx.se/docs/copyright.html>`) |
| [libcxx](http://libcxx.llvm.org/) | 4.0.1 | C++ Standard Library / MIT license or UIUC License |
| [libcxxabi](http://libcxxabi.llvm.org/) | 4.0.1 | C++ Standard Library Support / MIT license or UIUC License |
| [libedit](http://thrysoee.dk/editline/) | 3.1 | Editline Library (libedit) / NetBSD |
| [libffi](https://sourceware.org/libffi/) | 3.2.1 | A Portable Foreign Function Interface Library. / Custom |
| [libgfortran](http://gcc.gnu.org/) | 3.0.1 | Fortran libraries from the GNU Compiler Collection / GPL 3 (with GCC Runtime Library Exception 3.1) |
| [libiconv](https://www.gnu.org/software/libiconv/) | 1.15 | Provides iconv for systems which don’t have one (or that cannot convert from/to Unicode.) / GPL and LGPL |
| [libpng](http://www.libpng.org/pub/png/libpng.html) | 1.6.34 | PNG reference library. / zlib/libpng |
| [libsodium](http://libsodium.org) | 1.0.15 | A modern and easy-to-use crypto library. / ISC |
| [libssh2](https://www.libssh2.org/) | 1.8.0 | the SSH library / BSD 3-Clause |
| [libtiff](http://www.libtiff.org/) | 4.0.9 | Support for the Tag Image File Format (TIFF). / HPND |
| [libxml2](http://xmlsoft.org/) | 2.9.7 | The XML C parser and toolkit of Gnome / MIT |
| [libxslt](http://xmlsoft.org/XSLT/) | 1.1.32 | The XSLT C library developed for the GNOME project / MIT |
| [llvmlite](https://github.com/numba/llvmlite) | 0.21.0 | A lightweight LLVM python binding for writing JIT compilers / New BSD License |
| [locket](https://github.com/mwilliamson/locket.py) | 0.2.0 | File-based locks for Python for Linux and Windows / BSD 2-Clause |
| [lxml](http://lxml.de/) | 4.1.1 | Pythonic binding for the C libraries libxml2 and libxslt. / BSD 3-Clause, GPL-2.0, ZPL-2.0, and ElementTree |
| [lzo](http://www.oberhumer.com/opensource/lzo/) | 2.10 | LZO is a portable lossless data compression library written in ANSI C. / GPL v2+ |
| [markupsafe](https://www.palletsprojects.com/p/markupsafe/) | 1.0 | A Python module that implements the jinja2.Markup string / BSD 3-Clause |
| [matplotlib](http://matplotlib.org/) | 2.1.2 | Publication quality figures in Python / PSF-based |
| [mccabe](https://github.com/PyCQA/mccabe) | 0.6.1 | McCabe complexity checker for Python / MIT |
| [mistune](https://github.com/lepture/mistune) | 0.8.3 | The fastest markdown parser in pure Python. / BSD 3-Clause |
| [mkl](https://software.intel.com/en-us/mkl) | 2018.0.1 | Math library for Intel and compatible processors / proprietary - Intel |
| [mkl-service](https://github.com/ContinuumIO/mkl-service) | 1.1.2 | Python bindings to MKL service functions / 3-clause BSD |
| [mpc](http://www.multiprecision.org/) | 1.0.3 | A C library for the arithmetic of complex numbers with arbitrarily high precision. / LGPL 3 |
| [mpfr](http://www.mpfr.org/) | 3.1.5 | The MPFR library is a C library for multiple-precision floating-point computations with correct rounding. / LGPL 3 |
| [mpmath](http://mpmath.org) | 1.0.0 | Python library for arbitrary-precision floating-point arithmetic / BSD 3-Clause |
| [msgpack-python](http://msgpack.org/) | 0.5.1 | MessagePack (de)serializer. / Apache 2.0 |
| [multipledispatch](https://github.com/mrocklin/multipledispatch/) | 0.4.9 | Multiple dispatch in Python / BSD 3-Clause |
| [navigator-updater](https://github.com/ContinuumIO/navigator-updater) | 0.1.0 | Anaconda Navigator Updater / proprietary - Continuum Analytics, Inc. |
| [nbconvert](http://jupyter.org) | 5.3.1 | Converting Jupyter Notebooks / BSD 3-Clause |
| [nbformat](http://jupyter.org) | 4.4.0 | The reference implementation of the Jupyter Notebook format / BSD 3-clause |
| [ncurses](http://www.gnu.org/software/ncurses/) | 6.0 | Library for text-based user interfaces / Free software (MIT-like) |
| [networkx](https://networkx.github.io/) | 2.1 | Python package for creating and manipulating complex networks / BSD 3-Clause |
| [nltk](http://nltk.org/) | 3.2.5 | Build Python programs to work with human language data / Apache 2.0 |
| [nose](http://readthedocs.org/docs/nose/) | 1.3.7 | Nose extends unittest to make testing easier / LGPL-2.1 |
| [notebook](http://jupyter.org) | 5.4.0 | A web-based notebook environment for interactive computing / BSD 3-clause |
| [numba](http://numba.pydata.org/) | 0.36.2 | a just-in-time Python function compiler based on LLVM / BSD |
| [numexpr](https://github.com/pydata/numexpr) | 2.6.4 | Fast numerical expression evaluator for NumPy. / MIT |
| [numpy](http://numpy.scipy.org/) | 1.14.0 | Array processing for numbers, strings, records, and objects. / BSD 3-Clause |
| [numpydoc](https://github.com/numpy/numpydoc) | 0.7.0 | Sphinx extension to support docstrings in Numpy format / BSD 3-Clause |
| [odo](http://odo.pydata.org) | 0.5.1 | Data migration in Python / BSD-3-Clause |
| [olefile](http://www.decalage.info/python/olefileio) | 0.45.1 | parse, read and write Microsoft OLE2 files / BSD License 2-Clause |
| [openpyxl](https://openpyxl.readthedocs.io) | 2.4.10 | A Python library to read/write Excel 2010 xlsx/xlsm files / MIT |
| [openssl](http://www.openssl.org/) | 1.0.2n | OpenSSL is an open-source implementation of the SSL and TLS protocols / OpenSSL |
| [packaging](https://github.com/pypa/packaging) | 16.8 | Core utilities for Python packages / Apache 2.0 or BSD 2-Clause |
| [pandas](http://pandas.pydata.org) | 0.22.0 | High-performance, easy-to-use data structures and data analysis tools. / BSD 3-clause |
| [pandoc](http://johnmacfarlane.net/pandoc/) | 1.19.2.1 | Universal markup converter (repackaged binaries). / GPL-2.0 |
| [pandocfilters](https://github.com/jgm/pandocfilters) | 1.4.2 | A python module for writing pandoc filters / BSD-3-Clause |
| [parso](https://github.com/davidhalter/parso) | 0.1.1 | A Python Parser / MIT License |
| [partd](https://github.com/dask/partd) | 0.3.8 | Data structure for on-disk shuffle operations / BSD 3-Clause |
| [path.py](https://github.com/jaraco/path.py) | 10.5 | A module wrapper for os.path / MIT |
| [pathlib2](https://github.com/mcmtroffaes/pathlib2) | 2.3.0 | Fork of pathlib aiming to support the full stdlib Python API. / MIT |
| [patsy](https://github.com/pydata/patsy) | 0.5.0 | Describing statistical models in Python using symbolic formulas / BSD-2-Clause, PSF2 |
| [pcre](http://www.pcre.org/) | 8.41 | Regular expression pattern matching using the same syntax and semantics as Perl 5. / BSD 3-Clause |
| [pep8](http://pep8.readthedocs.org/) | 1.7.1 | Python style guide checker / MIT |
| [pexpect](http://pexpect.sourceforge.net/) | 4.3.1 | Pexpect makes Python a better tool for controlling other applications. / ISC |
| [pickleshare](https://github.com/vivainio/pickleshare) | 0.7.4 | Tiny ‘shelve’-like database with concurrency support / MIT |
| [pillow](http://python-imaging.github.io/) | 5.0.0 | Pillow is the friendly PIL fork by Alex Clark and Contributors. / PIL |
| [pip](https://pip.pypa.io/en/stable/) | 9.0.1 | PyPA recommended tool for installing Python packages / MIT |
| [pkginfo](https://code.launchpad.net/~tseaver/pkginfo/trunk) | 1.4.1 | Query metadatdata from sdists / bdists / installed packages. / MIT |
| [pluggy](https://github.com/pytest-dev/pluggy) | 0.6.0 | Plugin registration and hook calling for Python / MIT |
| [ply](http://www.dabeaz.com/ply/index.html) | 3.10 | Python Lex-Yacc / BSD 3-clause |
| [prompt\_toolkit](https://github.com/jonathanslenders/python-prompt-toolkit) | 1.0.15 | Library for building powerful interactive command lines in Python / BSD 3-clause |
| [psutil](https://github.com/giampaolo/psutil) | 5.4.3 | A cross-platform process and system utilities module for Python / BSD 3-Clause |
| [ptyprocess](https://github.com/pexpect/ptyprocess) | 0.5.2 | Run a subprocess in a pseudo terminal / ISC |
| [py](https://github.com/pytest-dev/py) | 1.5.2 | library with cross-python path, ini-parsing, io, code, log facilities / MIT |
| [pyaudio](http://people.csail.mit.edu/hubert/pyaudio/) | 0.2.7 | Bindings for PortAudio v19, the cross-platform audio stream library / MIT |
| [pycodestyle](https://pycodestyle.readthedocs.io/) | 2.3.1 | Python style guide checker / MIT |
| [pycosat](https://github.com/ContinuumIO/pycosat) | 0.6.3 | Bindings to picosat (a SAT solver) / MIT |
| [pycparser](https://github.com/eliben/pycparser) | 2.18 | Complete C99 parser in pure Python / BSD 3-clause |
| [pycrypto](http://www.pycrypto.org/) | 2.6.1 | Cryptographic modules for Python. / Public Domain |
| [pycurl](http://pycurl.sourceforge.net/) | 7.43.0.1 | A Python Interface To The cURL library / LGPL, MIT |
| [pyflakes](https://github.com/PyCQA/pyflakes) | 1.6.0 | Pyflakes analyzes programs and detects various errors. / MIT |
| [pygments](http://pygments.org/) | 2.2.0 | Generic syntax highlighting package / BSD 2-clause |
| [pylint](http://www.pylint.org/) | 1.8.2 | python code static checker / GPL |
| [pyodbc](https://github.com/mkleehammer/pyodbc) | 4.0.22 | DB API Module for ODBC / MIT |
| [pyopenssl](https://github.com/pyca/pyopenssl) | 17.5.0 | Python wrapper module around the OpenSSL library / Apache 2.0 |
| [pyparsing](http://pyparsing.wikispaces.com/) | 2.2.0 | Create and execute simple grammars / MIT |
| [pyqt](http://www.riverbankcomputing.co.uk/software/pyqt) | 5.6.0 | Python binding of the cross-platform GUI toolkit Qt. / Commercial, GPL-2.0, GPL-3.0 |
| [pysocks](https://github.com/Anorov/PySocks) | 1.6.7 | A Python SOCKS client module. See [Anorov/PySocks](https://github.com/Anorov/PySocks) for more information. / BSD 3-Clause |
| [pytables](http://www.pytables.org) | 3.4.2 | Brings together Python, HDF5 and NumPy to easily handle large amounts of data. / BSD 3-Clause |
| [pytest](https://docs.pytest.org/en/latest/) | 3.3.2 | Simple and powerful testing with Python. / MIT |
| [python](http://www.python.org/) | 2.7.14 | General purpose programming language / PSF |
| [python-dateutil](https://dateutil.readthedocs.org/) | 2.6.1 | Extensions to the standard Python datetime module. / BSD 3-clause |
| python.app | 2 | Proxy on OS X letting Python libraries hook into the gui event loop / BSD |
| [pytz](http://pythonhosted.org/pytz/) | 2017.3 | World timezone definitions, modern and historical. / MIT |
| [pywavelets](https://github.com/PyWavelets/pywt) | 0.5.2 | Discrete Wavelet Transforms in Python. / MIT |
| [pyyaml](http://pyyaml.org/wiki/PyYAML) | 3.12 | YAML parser and emitter for Python / MIT |
| [pyzmq](https://github.com/zeromq/pyzmq) | 16.0.3 | Python bindings for zeromq / BSD 3-clause |
| [qt](http://qt-project.org) | 5.6.2 | Qt is a cross-platform application and UI framework. / LGPL-3.0 |
| [qtawesome](https://github.com/spyder-ide/qtawesome) | 0.4.4 | Iconic fonts in PyQt and PySide applications / MIT |
| [qtconsole](http://jupyter.org) | 4.3.1 | Jupyter Qt console / BSD 3-Clause |
| [qtpy](https://github.com/spyder-ide/qtpy) | 1.3.1 | Abstraction layer for PyQt5/PyQt4/PySide / MIT |
| [readline](https://cnswww.cns.cwru.edu/php/chet/readline/rltop.html) | 7.0 | library for editing command lines as they are typed in / GPL3 |
| [requests](http://python-requests.org) | 2.18.4 | Python HTTP for Humans. / Apache 2.0 |
| [rope](https://github.com/python-rope/rope) | 0.10.7 | A python refactoring library… / GPL 2.0 |
| [ruamel\_yaml](https://bitbucket.org/ruamel/yaml) | 0.15.35 | A patched copy of ruamel.yaml. / MIT |
| [scandir](https://github.com/benhoyt/scandir) | 1.6 | scandir, a better directory iterator and faster os.walk() / BSD 3-Clause |
| [scikit-image](http://scikit-image.org/) | 0.13.1 | Image processing routines for SciPy. / BSD 3-Clause |
| [scikit-learn](http://scikit-learn.org/) | 0.19.1 | A set of python modules for machine learning and data mining / BSD 3-Clause |
| [scipy](http://www.scipy.org/) | 1.0.0 | Scientific Library for Python / BSD 3-Clause |
| [seaborn](http://stanford.edu/~mwaskom/software/seaborn/) | 0.8.1 | Statistical data visualization / BSD 3-Clause |
| [send2trash](https://github.com/hsoft/send2trash) | 1.4.2 | Python library to natively send files to Trash (or Recycle bin) on all platforms. / BSD-3-Clause |
| [setuptools](https://github.com/pypa/setuptools) | 38.4.0 | Download, build, install, upgrade, and uninstall Python packages / MIT |
| [simplegeneric](http://cheeseshop.python.org/pypi/simplegeneric) | 0.8.1 | Simple generic functions (similar to Python’s own len(), pickle.dump(), etc.) / Zope Public |
| [singledispatch](http://docs.python.org/3/library/functools.html#functools.singledispatch) | 3.4.0.3 | Transforms a function into a single-dispatch generic function / MIT |
| [sip](http://www.riverbankcomputing.com/software/sip/intro) | 4.18.1 | Create Python bindings for C and C++ libraries / GPL-3.0 |
| [six](http://pypi.python.org/pypi/six/) | 1.11.0 | Python 2 and 3 compatibility utilities / MIT |
| [snowballstemmer](https://github.com/shibukawa/snowball_py) | 1.2.1 | Snowball stemming library collection for Python / BSD-2-Clause |
| [sortedcollections](http://www.grantjenks.com/docs/sortedcollections/) | 0.5.3 | Python Sorted Collections / Apache-2.0 |
| [sortedcontainers](http://www.grantjenks.com/docs/sortedcontainers/) | 1.5.9 | Python Sorted Container Types: SortedList, SortedDict, and SortedSet / Apache 2.0 |
| [sphinx](http://www.sphinx-doc.org) | 1.6.6 | Sphinx is a tool that makes it easy to create intelligent and beautiful documentation / BSD 2-clause |
| sphinxcontrib | 1.0 | Python namespace for sphinxcontrib / BSD |
| [sphinxcontrib-websupport](https://pypi.python.org/pypi/sphinxcontrib-websupport) | 1.0.1 | Sphinx API for Web Apps / BSD-2-Clause |
| [spyder](https://github.com/spyder-ide/spyder) | 3.2.6 | Scientific PYthon Development EnviRonment / MIT |
| [sqlalchemy](http://www.sqlalchemy.org/) | 1.2.1 | Database Abstraction Library. / MIT |
| [sqlite](http://www.sqlite.org/) | 3.22.0 | Implements a self-contained, zero-configuration, SQL database engine. / Public-Domain (`<http://www.sqlite.org/copyright.html>`) |
| [ssl\_match\_hostname](http://bitbucket.org/brandon/backports.ssl_match_hostname) | 3.5.0.1 | The ssl.match\_hostname() function from Python 3.5 / PSF 2 |
| [statsmodels](https://www.statsmodels.org) | 0.8.0 | Statistical computations and models for use with SciPy / BSD 3-Clause |
| [subprocess32](https://github.com/google/python-subprocess32) | 3.2.7 | A backport of the subprocess module from Python 3.2/3.3 for use on 2.x. / PSF 2 |
| [sympy](http://sympy.org) | 1.1.1 | Python library for symbolic mathematics / 3-clause BSD |
| [tblib](https://github.com/ionelmc/python-tblib) | 1.3.2 | Traceback serialization library. / BSD 2-Clause |
| [terminado](http://github.com/mitsuhiko/markupsafe) | 0.8.1 | Terminals served by tornado websockets / BSD 3-clause |
| [testpath](https://testpath.readthedocs.io) | 0.3.1 | Testpath is a collection of utilities for Python code working with files and commands. / MIT |
| [tk](http://www.tcl.tk/) | 8.6.7 | A dynamic programming language with GUI support. Bundles Tcl and Tk. / Tcl/Tk |
| [toolz](http://toolz.readthedocs.org/) | 0.9.0 | A functional standard library for Python. / BSD 3-Clause |
| [tornado](http://www.tornadoweb.org/) | 4.5.3 | A Python web framework and asynchronous networking library, originally developed at FriendFeed. / Apache 2.0 |
| [traitlets](http://ipython.org/) | 4.3.2 | Configuration system for Python applications / BSD 3-clause |
| [typing](https://docs.python.org/3.5/library/typing.html) | 3.6.2 | Type Hints for Python - backport for `Python<3.5` / PSF |
| [unicodecsv](https://github.com/jdunck/python-unicodecsv) | 0.14.1 | Drop-in replacement for csv module which supports unicode strings / BSD |
| [unixodbc](http://www.unixodbc.org/) | 2.3.4 | ODBC on non MS Windows platforms / LGPL-2.1 |
| [urllib3](https://urllib3.readthedocs.io/) | 1.22 | HTTP library with thread-safe connection pooling, file post, and more. / MIT |
| [wcwidth](https://github.com/jquast/wcwidth) | 0.1.7 | Measures number of Terminal column cells of wide-character codes. / MIT |
| [webencodings](https://github.com/gsnedders/python-webencodings) | 0.5.1 | Character encoding aliases for legacy web content / BSD 3-Clause |
| [werkzeug](http://werkzeug.pocoo.org/) | 0.14.1 | The Python WSGI Utility Library. / BSD 3-Clause |
| [wheel](https://bitbucket.org/pypa/wheel/) | 0.30.0 | A built-package format for Python. / MIT |
| [widgetsnbextension](http://ipython.org) | 3.1.0 | IPython HTML widgets for Jupyter / BSD 3-clause |
| [wrapt](https://github.com/GrahamDumpleton/wrapt) | 1.10.11 | Module for decorators, wrappers and monkey patching. / BSD 2-Clause |
| [xlrd](http://www.python-excel.org/) | 1.1.0 | Library for developers to extract data from Microsoft Excel (tm) spreadsheet files / BSD 3-Clause and BSD with advertising |
| [xlsxwriter](https://xlsxwriter.readthedocs.io/) | 1.0.2 | A Python module for creating Excel XLSX files / BSD 2-Clause |
| [xlwings](http://xlwings.org/) | 0.11.5 | Interact with Excel from Python and vice versa / 3-clause BSD |
| [xlwt](http://www.python-excel.org/) | 1.2.0 | Writing data and formatting information to Excel files / BSD |
| [xz](http://tukaani.org/xz/) | 5.2.3 | Data compression software with high compression ratio / LGPL-2.1 and GPL-2.0 |
| [yaml](http://pyyaml.org/wiki/LibYAML) | 0.1.7 | A C library for parsing and emitting YAML. / MIT |
| [zeromq](http://zeromq.org) | 4.2.2 | A high-performance asynchronous messaging library. / LGPL 3 |
| [zict](http://github.com/mrocklin/zict) | 0.1.3 | Composable Dictionary Classes / BSD 3-Clause |
| [zlib](http://zlib.net/) | 1.2.11 | Massively spiffy yet delicately unobtrusive compression library / zlib |
| Name | Version | Summary / License |
|---|---|---|
| [\_ipyw\_jlab\_nb\_ext\_conf](https://github.com/ContinuumIO/anaconda-nb-extensions-meta-config) | 0.1.0 | A configuration metapackage for enabling Anaconda-bundled jupyter extensions / BSD |
| [alabaster](http://www.sphinx-doc.org/en/stable/index.html) | 0.7.10 | Configurable, Python 2+3 compatible Sphinx theme. / BSD 3-Clause |
| [anaconda-client](https://github.com/Anaconda-Platform/anaconda-client) | 1.6.6 | Anaconda Cloud command line client library / BSD 3-Clause |
| [anaconda-project](https://github.com/Anaconda-Platform/anaconda-project) | 0.8.2 | Tool for encapsulating, running, and reproducing data science projects / BSD 3-Clause |
| [asn1crypto](https://github.com/wbond/asn1crypto) | 0.23.0 | Python ASN.1 library with a focus on performance and a pythonic API / MIT |
| [astroid](https://www.astroid.org/) | 1.6.1 | A abstract syntax tree for Python with inference support. / LGPL 2.1 |
| [astropy](http://www.astropy.org/) | 2.0.3 | Community-developed Python Library for Astronomy / BSD |
| [babel](http://babel.pocoo.org/) | 2.5.0 | Utilities to internationalize and localize Python applications / BSD 3-clause |
| [backports](https://bitbucket.org/brandon/backports) | 1.0 | / BSD |
| [backports.functools\_lru\_cache](https://github.com/jaraco/backports.functools_lru_cache) | 1.4 | Backport of functools.lru\_cache from Python 3.3 as published at ActiveState. / MIT |
| [backports.shutil\_get\_terminal\_size](https://github.com/chrippa/backports.shutil_get_terminal_size) | 1.0.0 | A backport of the get\_terminal\_size function from Python 3.3’s shutil. / MIT |
| [backports\_abc](https://github.com/cython/backports_abc) | 0.5 | A backport of recent additions to the collections.abc module. / PSF 2 |
| [beautifulsoup4](http://www.crummy.com/software/BeautifulSoup/) | 4.6.0 | Python library designed for screen-scraping / MIT |
| [bitarray](https://github.com/ilanschnell/bitarray) | 0.8.1 | efficient arrays of booleans – C extension / PSF |
| [bkcharts](http://github.com/bokeh/bkcharts) | 0.2 | High level chart types built on top of Bokeh / BSD 3-Clause |
| [bleach](https://github.com/mozilla/bleach) | 2.1.2 | Easy, whitelist-based HTML-sanitizing tool / Apache-2.0 |
| [bokeh](http://bokeh.pydata.org/) | 0.12.13 | Statistical and novel interactive HTML plots for Python / BSD 3-Clause |
| [boto](https://github.com/boto/boto/) | 2.48.0 | Amazon Web Services Library / MIT |
| [bottleneck](http://berkeleyanalytics.com/bottleneck) | 1.2.1 | Fast NumPy array functions written in Cython. / BSD 2-Clause |
| [bzip2](http://www.bzip.org/) | 1.0.6 | high-quality data compressor / bzip2 |
| [ca-certificates](https://github.com/conda-forge/ca-certificates-feedstock) | 2017.08.26 | Certificates for use with other packages. / ISC |
| [cairo](http://cairographics.org/) | 1.14.10 | Cairo is a 2D graphics library with support for multiple output devices. / LGPL 2.1 or MPL 1.1 |
| [cdecimal](http://www.bytereef.org/mpdecimal/index.html) | 2.3 | Fast drop-in replacement for decimal.py / BSD 2-Clause |
| [certifi](http://certifi.io/) | 2018.1.18 | Python package for providing Mozilla’s CA Bundle. / ISC |
| [cffi](https://bitbucket.org/cffi/cffi) | 1.11.2 | Foreign Function Interface for Python calling C code. / MIT |
| [chardet](https://github.com/chardet/chardet) | 3.0.4 | Universal character encoding detector / LGPL2 |
| [click](http://click.pocoo.org/) | 6.7 | A simple wrapper around optparse for powerful command line utilities. / BSD 3-Clause |
| [cloudpickle](https://github.com/cloudpipe/cloudpickle) | 0.5.2 | Extended pickling support for Python objects / BSD 3-Clause |
| [clyent](https://github.com/Anaconda-Platform/clyent) | 1.2.2 | Command line client library for windows and posix / BSD 3-Clause |
| [colorama](https://github.com/tartley/colorama) | 0.3.9 | Cross-platform colored terminal text. / BSD 3-Clause |
| [conda](https://conda.io) | 4.4.9 | OS-agnostic, system-level binary package and environment manager. / BSD 3-Clause |
| [conda-build](https://github.com/conda/conda-build) | 3.4.1 | tools for building conda packages / BSD 3-Clause |
| [conda-env](https://github.com/conda/conda-env) | 2.6.0 | Tools for interacting with conda environments. / BSD 3-Clause |
| [conda-verify](https://github.com/conda/conda-verify) | 3.0.0 | tool for validating conda recipes and conda packages / BSD 3-Clause |
| [configparser](http://docs.python.org/3/library/configparser.html) | 3.5.0 | This library brings the updated configparser from Python 3.5 to Python 2.6-3.5 / MIT |
| [contextlib2](http://contextlib2.readthedocs.org) | 0.5.5 | Backports and enhancements for the contextlib module / PSF |
| [cryptography](https://github.com/pyca/cryptography) | 2.1.4 | Provides cryptographic recipes and primitives to Python developers / Apache 2.0 or BSD 3-Clause, PSF 2 |
| [curl](http://curl.haxx.se/) | 7.55.1 | tool and library for transferring data with URL syntax / MIT/X derivate (`<http://curl.haxx.se/docs/copyright.html>`) |
| [cycler](http://matplotlib.org/cycler) | 0.10.0 | Composable style cycles. / BSD 3-Clause |
| [cython](http://www.cython.org/) | 0.27.3 | The Cython compiler for writing C extensions for the Python language / Apache-2.0 |
| [cytoolz](https://github.com/pytoolz/cytoolz) | 0.8.2 | Cython implementation of Toolz. High performance functional utilities. / BSD 3-Clause |
| [dask](http://github.com/dask/dask/) | 0.16.0 | Parallel Python with task scheduling / BSD 3-Clause |
| [dask-core](http://github.com/dask/dask/) | 0.16.0 | Parallel Python with task scheduling / BSD 3-Clause |
| [datashape](http://datashape.pydata.org) | 0.5.4 | A data description language. / BSD 2-Clause |
| [decorator](https://github.com/micheles/decorator) | 4.1.2 | Better living through Python with decorators. / BSD 3-Clause |
| [distributed](http://distributed.readthedocs.io/en/latest/) | 1.20.2 | Distributed computing with Dask / BSD 3-Clause |
| [docutils](http://docutils.sourceforge.net/) | 0.14 | Docutils – Python Documentation Utilities / Public Domain Dedictation and BSD 2-Clause and PSF 2.1.1 and GPL 3.0 |
| [entrypoints](https://github.com/takluyver/entrypoints) | 0.2.3 | Discover and load entry points from installed packages. / MIT License |
| [enum34](https://bitbucket.org/stoneleaf/enum34) | 1.1.6 | Python 3.4 Enum backported to 3.3, 3.2, 3.1, 2.7, 2.6, 2.5, and 2.4 / BSD 3-Clause |
| [et\_xmlfile](https://bitbucket.org/openpyxl/et_xmlfile) | 1.0.1 | An implementation of lxml.xmlfile for the standard library / MIT |
| [expat](http://expat.sourceforge.net/) | 2.2.5 | Expat XML parser library in C. / MIT |
| [fastcache](https://github.com/pbrady/fastcache) | 1.0.2 | C implementation of Python 3 lru\_cache / MIT |
| [filelock](https://github.com/benediktschmitt/py-filelock) | 2.0.13 | A platform independent file lock. / Public Domain |
| [flask](http://flask.pocoo.org) | 0.12.2 | A microframework based on Werkzeug, Jinja2 and good intentions. / BSD 3-Clause |
| [flask-cors](https://github.com/corydolphin/flask-cors) | 3.0.3 | A Flask extension adding a decorator for CORS support / MIT |
| [fontconfig](http://www.freedesktop.org/wiki/Software/fontconfig/) | 2.12.4 | A library for configuring and customizing font access. / MIT |
| [freetype](https://www.freetype.org/) | 2.8 | A Free, High-Quality, and Portable Font Engine / GPL-2.0 and FreeType |
| [funcsigs](http://funcsigs.readthedocs.org) | 1.0.2 | Python function signatures from PEP362 for Python 2.6, 2.7 and 3.2+. / Apache 2.0 |
| [functools32](https://github.com/MiCHiLU/python-functools32) | 3.2.3.2 | Backport of the functools module from Python 3.2.3 for use on 2.7 and PyPy. / PSF license |
| [functools\_lru\_cache](https://github.com/jaraco/backports.functools_lru_cache) | 1.4 | Backport of functools.lru\_cache from Python 3.3 as published at ActiveState. / MIT |
| [futures](https://github.com/agronholm/pythonfutures) | 3.2.0 | Backport of the concurrent.futures package from Python 3.2 / PSF |
| [get\_terminal\_size](https://github.com/chrippa/backports.shutil_get_terminal_size) | 1.0.0 | Get the size of the terminal window. / MIT |
| [gevent](http://www.gevent.org/) | 1.2.2 | Coroutine-based network library / MIT |
| [glib](https://developer.gnome.org/glib/) | 2.53.6 | Provides core application building blocks for libraries and applications written in C. / LGPL-2.1 |
| [glob2](https://github.com/miracle2k/python-glob2) | 0.6 | Version of the glob module that supports recursion via \*\*, and can capture patterns. / BSD-2-Clause |
| [gmp](http://gmplib.org/) | 6.1.2 | The GNU multiprecision library. / GPL 2 and LGPL 3 |
| [gmpy2](https://pypi.python.org/pypi/gmpy2) | 2.0.8 | GMP/MPIR, MPFR, and MPC interface to Python 2.6+ and 3.x / LGPL 3 |
| [greenlet](https://github.com/python-greenlet/greenlet) | 0.4.12 | Lightweight in-process concurrent programming / MIT |
| [grin](http://pypi.python.org/pypi/grin) | 1.2.1 | Enhanced grep-like tool / BSD 3-Clause |
| [h5py](http://www.h5py.org/) | 2.7.1 | Read and write HDF5 files from Python. / BSD 3-Clause |
| [hdf5](http://www.hdfgroup.org/HDF5/) | 1.10.1 | HDF5 is a data model, library, and file format for storing and managing data / HDF5 |
| [heapdict](http://stutzbachenterprises.com/) | 1.0.0 | A heap with decrease-key and increase-key operations / BSD 3-Clause |
| [html5lib](https://github.com/html5lib/html5lib-python) | 1.0.1 | HTML parser based on the WHATWG HTML specification / MIT |
| [icu](http://site.icu-project.org/) | 58.2 | International Components for Unicode. / MIT |
| [idna](https://github.com/kjd/idna) | 2.6 | Internationalized Domain Names in Applications (IDNA). / BSD Like |
| [imageio](http://imageio.github.io) | 2.2.0 | a Python library for reading and writing image data / BSD 2-Clause |
| [imagesize](https://github.com/shibukawa/imagesize_py) | 0.7.1 | Getting image size from png/jpeg/jpeg2000/gif file / MIT |
| [ipaddress](https://github.com/phihag/ipaddress) | 1.0.18 | IPv4/IPv6 manipulation library / PSF 2 |
| [ipykernel](http://ipython.org) | 4.8.0 | IPython Kernel for Jupyter / BSD 3-clause |
| [ipython](http://ipython.org/) | 5.4.1 | IPython: Productive Interactive Computing / BSD 3-clause |
| [ipython\_genutils](http://ipython.org) | 0.2.0 | vestigial utilities from IPython / BSD 3-Clause |
| [ipywidgets](https://github.com/ipython/ipywidgets) | 7.1.1 | Jupyter Interactive Widgets / BSD 3-clause |
| [isort](https://github.com/timothycrosley/isort) | 4.2.15 | A Python utility / library to sort Python imports. / MIT |
| [itsdangerous](https://github.com/pallets/itsdangerous) | 0.24 | Various helpers to pass trusted data to untrusted environments. / BSD 3-Clause |
| [jbig](https://www.cl.cam.ac.uk/~mgk25/jbigkit) | 2.1 | Implementation of the JBIG1 data compression standard / GPL-2.0 |
| [jdcal](https://github.com/phn/jdcal) | 1.3 | Julian dates from proleptic Gregorian and Julian calendars. / BSD 2-Clause |
| [jedi](https://github.com/davidhalter/jedi/) | 0.11.0 | An autocompletion tool for Python that can be used for text editors. / MIT |
| [jinja2](http://jinja.pocoo.org) | 2.10 | An easy to use stand-alone template engine written in pure python. / 3-Clause BSD |
| [jpeg](http://www.ijg.org/) | 9b | read/write jpeg COM, EXIF, IPTC medata / Custom free software license |
| [jsonschema](https://github.com/Julian/jsonschema) | 2.6.0 | An implementation of JSON Schema validation for Python / MIT |
| [jupyter](http://jupyter.org) | 1.0.0 | Jupyter metapackage. Install all the Jupyter components in one go. / BSD 3-Clause |
| [jupyter\_client](http://jupyter.org) | 5.2.2 | Jupyter protocol implementation and client libraries / BSD 3-clause |
| [jupyter\_console](http://jupyter.org) | 5.2.0 | Jupyter terminal console / BSD 3-Clause |
| [jupyter\_core](http://jupyter.org) | 4.4.0 | Core common functionality of Jupyter projects. / BSD 3-clause |
| [jupyterlab](https://github.com/jupyterlab/jupyterlab) | 0.31.5 | A pre-alpha version of a computational environment for Jupyter. / BSD 3-Clause |
| [jupyterlab\_launcher](http://github.com/jupyterlab/jupyterlab_launcher) | 0.10.2 | A Launcher for JupyterLab based applications. / BSD 3-Clause |
| [lazy-object-proxy](https://github.com/ionelmc/python-lazy-object-proxy) | 1.3.1 | A fast and thorough lazy object proxy. / BSD 2-Clause |
| [libedit](http://thrysoee.dk/editline/) | 3.1.20170329 | Editline Library (libedit) / NetBSD |
| [libffi](https://sourceware.org/libffi/) | 3.2.1 | A Portable Foreign Function Interface Library. / Custom |
| [libgcc-ng](https://gcc.gnu.org/onlinedocs/gccint/Libgcc.html) | 7.2.0 | The GCC low-level runtime library / GPL |
| [libgfortran](http://gcc.gnu.org/) | 3.0.0 | Fortran libraries from the GNU Compiler Collection / GPL 3 (with GCC Runtime Library Exception 3.1) |
| [libgfortran-ng](https://gcc.gnu.org/) | 7.2.0 | The GNU Fortran Runtime Library / GPL |
| [libiconv](https://www.gnu.org/software/libiconv/) | 1.14 | Provides iconv for systems which don’t have one (or that cannot convert from/to Unicode.) / GPL and LGPL |
| [libopenblas](http://www.openblas.net/) | 0.2.20 | An Optimized BLAS library / BSD |
| [libpng](http://www.libpng.org/pub/png/libpng.html) | 1.6.32 | PNG reference library. / zlib/libpng |
| [libsodium](http://libsodium.org) | 1.0.15 | A modern and easy-to-use crypto library. / ISC |
| [libssh2](https://www.libssh2.org/) | 1.8.0 | the SSH library / BSD 3-Clause |
| [libstdcxx-ng](https://gcc.gnu.org/) | 7.2.0 | The GNU C++ Runtime Library / GPL3 with runtime exception |
| [libtiff](http://www.libtiff.org/) | 4.0.9 | Support for the Tag Image File Format (TIFF). / HPND |
| [libxcb](http://xcb.freedesktop.org/) | 1.12 | This is the C-language Binding (XCB) package to the X Window System protocol / MIT |
| [libxml2](http://xmlsoft.org/) | 2.9.4 | The XML C parser and toolkit of Gnome / MIT |
| [libxslt](http://xmlsoft.org/XSLT/) | 1.1.29 | The XSLT C library developed for the GNOME project / MIT |
| [locket](https://github.com/mwilliamson/locket.py) | 0.2.0 | File-based locks for Python for Linux and Windows / BSD 2-Clause |
| [lxml](http://lxml.de/) | 4.1.1 | Pythonic binding for the C libraries libxml2 and libxslt. / BSD 3-Clause, GPL-2.0, ZPL-2.0, and ElementTree |
| [lzo](http://www.oberhumer.com/opensource/lzo/) | 2.10 | LZO is a portable lossless data compression library written in ANSI C. / GPL v2+ |
| [markupsafe](https://www.palletsprojects.com/p/markupsafe/) | 1.0 | A Python module that implements the jinja2.Markup string / BSD 3-Clause |
| [matplotlib](http://matplotlib.org/) | 2.1.2 | Publication quality figures in Python / PSF-based |
| [mccabe](https://github.com/PyCQA/mccabe) | 0.6.1 | McCabe complexity checker for Python / MIT |
| [mistune](https://github.com/lepture/mistune) | 0.8.1 | The fastest markdown parser in pure Python. / BSD 3-Clause |
| [mpc](http://www.multiprecision.org/) | 1.0.3 | A C library for the arithmetic of complex numbers with arbitrarily high precision. / LGPL 3 |
| [mpfr](http://www.mpfr.org/) | 3.1.5 | The MPFR library is a C library for multiple-precision floating-point computations with correct rounding. / LGPL 3 |
| [mpmath](http://mpmath.org) | 1.0.0 | Python library for arbitrary-precision floating-point arithmetic / BSD 3-Clause |
| [msgpack-python](http://msgpack.org/) | 0.4.8 | MessagePack (de)serializer. / Apache 2.0 |
| [multipledispatch](https://github.com/mrocklin/multipledispatch/) | 0.4.9 | Multiple dispatch in Python / BSD 3-Clause |
| [nbconvert](http://jupyter.org) | 5.3.1 | Converting Jupyter Notebooks / BSD 3-Clause |
| [nbformat](http://jupyter.org) | 4.4.0 | The reference implementation of the Jupyter Notebook format / BSD 3-clause |
| [ncurses](http://www.gnu.org/software/ncurses/) | 6.0 | Library for text-based user interfaces / Free software (MIT-like) |
| [networkx](https://networkx.github.io/) | 2.1 | Python package for creating and manipulating complex networks / BSD 3-Clause |
| [nltk](http://nltk.org/) | 3.2.5 | Build Python programs to work with human language data / Apache 2.0 |
| [nose](http://readthedocs.org/docs/nose/) | 1.3.7 | Nose extends unittest to make testing easier / LGPL-2.1 |
| [notebook](http://jupyter.org) | 5.4.0 | A web-based notebook environment for interactive computing / BSD 3-clause |
| [numexpr](https://github.com/pydata/numexpr) | 2.6.4 | Fast numerical expression evaluator for NumPy. / MIT |
| [numpy](http://numpy.scipy.org/) | 1.13.3 | Array processing for numbers, strings, records, and objects. / BSD 3-Clause |
| [numpydoc](https://github.com/numpy/numpydoc) | 0.7.0 | Sphinx extension to support docstrings in Numpy format / BSD 3-Clause |
| [odo](http://odo.pydata.org) | 0.5.1 | Data migration in Python / BSD-3-Clause |
| [olefile](http://www.decalage.info/python/olefileio) | 0.45.1 | parse, read and write Microsoft OLE2 files / BSD License 2-Clause |
| [openblas](http://www.openblas.net/) | 0.2.20 | An Optimized BLAS library / BSD |
| openblas-devel | 0.2.20 | |
| [openpyxl](https://openpyxl.readthedocs.io) | 2.4.10 | A Python library to read/write Excel 2010 xlsx/xlsm files / MIT |
| [openssl](http://www.openssl.org/) | 1.0.2n | OpenSSL is an open-source implementation of the SSL and TLS protocols / OpenSSL |
| [packaging](https://github.com/pypa/packaging) | 16.8 | Core utilities for Python packages / Apache 2.0 or BSD 2-Clause |
| [pandas](http://pandas.pydata.org) | 0.22.0 | High-performance, easy-to-use data structures and data analysis tools. / BSD 3-clause |
| [pandoc](http://johnmacfarlane.net/pandoc/) | 2.0.0.1 | Universal markup converter (repackaged binaries). / GPL-2.0 |
| [pandocfilters](https://github.com/jgm/pandocfilters) | 1.4.2 | A python module for writing pandoc filters / BSD-3-Clause |
| [parso](https://github.com/davidhalter/parso) | 0.1.1 | A Python Parser / MIT License |
| [partd](https://github.com/dask/partd) | 0.3.8 | Data structure for on-disk shuffle operations / BSD 3-Clause |
| [patchelf](http://nixos.org/patchelf.html) | 0.9 | A small utility to modify the dynamic linker and RPATH of ELF executables. / GPL 3 |
| [path.py](https://github.com/jaraco/path.py) | 10.5 | A module wrapper for os.path / MIT |
| [pathlib2](https://github.com/mcmtroffaes/pathlib2) | 2.3.0 | Fork of pathlib aiming to support the full stdlib Python API. / MIT |
| [patsy](https://github.com/pydata/patsy) | 0.4.1 | Describing statistical models in Python using symbolic formulas / BSD-2-Clause, PSF2 |
| [pcre](http://www.pcre.org/) | 8.41 | Regular expression pattern matching using the same syntax and semantics as Perl 5. / BSD 3-Clause |
| [pep8](http://pep8.readthedocs.org/) | 1.7.0 | Python style guide checker / MIT |
| [pexpect](http://pexpect.sourceforge.net/) | 4.3.0 | Pexpect makes Python a better tool for controlling other applications. / ISC |
| [pickleshare](https://github.com/vivainio/pickleshare) | 0.7.4 | Tiny ‘shelve’-like database with concurrency support / MIT |
| [pillow](http://python-imaging.github.io/) | 5.0.0 | Pillow is the friendly PIL fork by Alex Clark and Contributors. / PIL |
| [pip](https://pip.pypa.io/en/stable/) | 9.0.1 | PyPA recommended tool for installing Python packages / MIT |
| [pixman](http://www.pixman.org/) | 0.34.0 | A low-level software library for pixel manipulation. / MIT |
| [pkginfo](https://code.launchpad.net/~tseaver/pkginfo/trunk) | 1.4.1 | Query metadatdata from sdists / bdists / installed packages. / MIT |
| [ply](http://www.dabeaz.com/ply/index.html) | 3.10 | Python Lex-Yacc / BSD 3-clause |
| [prompt\_toolkit](https://github.com/jonathanslenders/python-prompt-toolkit) | 1.0.15 | Library for building powerful interactive command lines in Python / BSD 3-clause |
| [psutil](https://github.com/giampaolo/psutil) | 5.4.1 | A cross-platform process and system utilities module for Python / BSD 3-Clause |
| [ptyprocess](https://github.com/pexpect/ptyprocess) | 0.5.2 | Run a subprocess in a pseudo terminal / ISC |
| [py](https://github.com/pytest-dev/py) | 1.5.2 | library with cross-python path, ini-parsing, io, code, log facilities / MIT |
| [pycairo](http://cairographics.org/pycairo/) | 1.13.3 | Python bindings for the Cairo graphics library. / LGPL 2.1, MPL 1.1 |
| [pycodestyle](https://pycodestyle.readthedocs.io/) | 2.3.1 | Python style guide checker / MIT |
| [pycosat](https://github.com/ContinuumIO/pycosat) | 0.6.3 | Bindings to picosat (a SAT solver) / MIT |
| [pycparser](https://github.com/eliben/pycparser) | 2.18 | Complete C99 parser in pure Python / BSD 3-clause |
| [pycrypto](http://www.pycrypto.org/) | 2.6.1 | Cryptographic modules for Python. / Public Domain |
| [pycurl](http://pycurl.sourceforge.net/) | 7.43.0 | A Python Interface To The cURL library / LGPL, MIT |
| [pyflakes](https://github.com/PyCQA/pyflakes) | 1.6.0 | Pyflakes analyzes programs and detects various errors. / MIT |
| [pygments](http://pygments.org/) | 2.2.0 | Generic syntax highlighting package / BSD 2-clause |
| [pylint](http://www.pylint.org/) | 1.8.2 | python code static checker / GPL |
| [pyodbc](https://github.com/mkleehammer/pyodbc) | 4.0.22 | DB API Module for ODBC / MIT |
| [pyopenssl](https://github.com/pyca/pyopenssl) | 17.5.0 | Python wrapper module around the OpenSSL library / Apache 2.0 |
| [pyparsing](http://pyparsing.wikispaces.com/) | 2.2.0 | Create and execute simple grammars / MIT |
| [pysocks](https://github.com/Anorov/PySocks) | 1.6.7 | A Python SOCKS client module. See [Anorov/PySocks](https://github.com/Anorov/PySocks) for more information. / BSD 3-Clause |
| [pytables](http://www.pytables.org) | 3.4.2 | Brings together Python, HDF5 and NumPy to easily handle large amounts of data. / BSD 3-Clause |
| [pytest](https://docs.pytest.org/en/latest/) | 3.2.5 | Simple and powerful testing with Python. / MIT |
| [python](http://www.python.org/) | 2.7.14 | General purpose programming language / PSF |
| [python-dateutil](https://dateutil.readthedocs.org/) | 2.6.1 | Extensions to the standard Python datetime module. / BSD 3-clause |
| [pytz](http://pythonhosted.org/pytz/) | 2017.3 | World timezone definitions, modern and historical. / MIT |
| [pywavelets](https://github.com/PyWavelets/pywt) | 0.5.2 | Discrete Wavelet Transforms in Python. / MIT |
| [pyyaml](http://pyyaml.org/wiki/PyYAML) | 3.12 | YAML parser and emitter for Python / MIT |
| [pyzmq](https://github.com/zeromq/pyzmq) | 16.0.3 | Python bindings for zeromq / BSD 3-clause |
| [readline](https://cnswww.cns.cwru.edu/php/chet/readline/rltop.html) | 7.0 | library for editing command lines as they are typed in / GPL3 |
| [requests](http://python-requests.org) | 2.18.4 | Python HTTP for Humans. / Apache 2.0 |
| [ruamel\_yaml](https://bitbucket.org/ruamel/yaml) | 0.15.35 | A patched copy of ruamel.yaml. / MIT |
| [scandir](https://github.com/benhoyt/scandir) | 1.6 | scandir, a better directory iterator and faster os.walk() / BSD 3-Clause |
| [scikit-image](http://scikit-image.org/) | 0.13.1 | Image processing routines for SciPy. / BSD 3-Clause |
| [scikit-learn](http://scikit-learn.org/) | 0.19.1 | A set of python modules for machine learning and data mining / BSD 3-Clause |
| [scipy](http://www.scipy.org/) | 1.0.0 | Scientific Library for Python / BSD 3-Clause |
| [seaborn](http://stanford.edu/~mwaskom/software/seaborn/) | 0.8.1 | Statistical data visualization / BSD 3-Clause |
| [send2trash](https://github.com/hsoft/send2trash) | 1.4.2 | Python library to natively send files to Trash (or Recycle bin) on all platforms. / BSD-3-Clause |
| [setuptools](https://github.com/pypa/setuptools) | 36.5.0 | Download, build, install, upgrade, and uninstall Python packages / MIT |
| [simplegeneric](http://cheeseshop.python.org/pypi/simplegeneric) | 0.8.1 | Simple generic functions (similar to Python’s own len(), pickle.dump(), etc.) / Zope Public |
| [singledispatch](http://docs.python.org/3/library/functools.html#functools.singledispatch) | 3.4.0.3 | Transforms a function into a single-dispatch generic function / MIT |
| [six](http://pypi.python.org/pypi/six/) | 1.11.0 | Python 2 and 3 compatibility utilities / MIT |
| [snowballstemmer](https://github.com/shibukawa/snowball_py) | 1.2.1 | Snowball stemming library collection for Python / BSD-2-Clause |
| [sortedcollections](http://www.grantjenks.com/docs/sortedcollections/) | 0.5.3 | Python Sorted Collections / Apache-2.0 |
| [sortedcontainers](http://www.grantjenks.com/docs/sortedcontainers/) | 1.5.7 | Python Sorted Container Types: SortedList, SortedDict, and SortedSet / Apache 2.0 |
| [sphinx](http://www.sphinx-doc.org) | 1.6.3 | Sphinx is a tool that makes it easy to create intelligent and beautiful documentation / BSD 2-clause |
| sphinxcontrib | 1.0 | Python namespace for sphinxcontrib / BSD |
| [sphinxcontrib-websupport](https://pypi.python.org/pypi/sphinxcontrib-websupport) | 1.0.1 | Sphinx API for Web Apps / BSD-2-Clause |
| [sqlalchemy](http://www.sqlalchemy.org/) | 1.2.1 | Database Abstraction Library. / MIT |
| [sqlite](http://www.sqlite.org/) | 3.21.0 | Implements a self-contained, zero-configuration, SQL database engine. / Public-Domain (`<http://www.sqlite.org/copyright.html>`) |
| [ssl\_match\_hostname](http://bitbucket.org/brandon/backports.ssl_match_hostname) | 3.5.0.1 | The ssl.match\_hostname() function from Python 3.5 / PSF 2 |
| [statsmodels](https://www.statsmodels.org) | 0.8.0 | Statistical computations and models for use with SciPy / BSD 3-Clause |
| [subprocess32](https://github.com/google/python-subprocess32) | 3.2.7 | A backport of the subprocess module from Python 3.2/3.3 for use on 2.x. / PSF 2 |
| [sympy](http://sympy.org) | 1.1.1 | Python library for symbolic mathematics / 3-clause BSD |
| [tblib](https://github.com/ionelmc/python-tblib) | 1.3.2 | Traceback serialization library. / BSD 2-Clause |
| [terminado](http://github.com/mitsuhiko/markupsafe) | 0.8.1 | Terminals served by tornado websockets / BSD 3-clause |
| [testpath](https://testpath.readthedocs.io) | 0.3.1 | Testpath is a collection of utilities for Python code working with files and commands. / MIT |
| [tk](http://www.tcl.tk/) | 8.6.7 | A dynamic programming language with GUI support. Bundles Tcl and Tk. / Tcl/Tk |
| [toolz](http://toolz.readthedocs.org/) | 0.8.2 | A functional standard library for Python. / BSD 3-Clause |
| [tornado](http://www.tornadoweb.org/) | 4.5.2 | A Python web framework and asynchronous networking library, originally developed at FriendFeed. / Apache 2.0 |
| [traitlets](http://ipython.org/) | 4.3.2 | Configuration system for Python applications / BSD 3-clause |
| [typing](https://docs.python.org/3.5/library/typing.html) | 3.6.2 | Type Hints for Python - backport for `Python<3.5` / PSF |
| [unicodecsv](https://github.com/jdunck/python-unicodecsv) | 0.14.1 | Drop-in replacement for csv module which supports unicode strings / BSD |
| [unixodbc](http://www.unixodbc.org/) | 2.3.4 | ODBC on non MS Windows platforms / LGPL-2.1 |
| [urllib3](https://urllib3.readthedocs.io/) | 1.22 | HTTP library with thread-safe connection pooling, file post, and more. / MIT |
| [wcwidth](https://github.com/jquast/wcwidth) | 0.1.7 | Measures number of Terminal column cells of wide-character codes. / MIT |
| [webencodings](https://github.com/gsnedders/python-webencodings) | 0.5.1 | Character encoding aliases for legacy web content / BSD 3-Clause |
| [werkzeug](http://werkzeug.pocoo.org/) | 0.12.2 | The Python WSGI Utility Library. / BSD 3-Clause |
| [wheel](https://bitbucket.org/pypa/wheel/) | 0.30.0 | A built-package format for Python. / MIT |
| [widgetsnbextension](http://ipython.org) | 3.1.0 | IPython HTML widgets for Jupyter / BSD 3-clause |
| [wrapt](https://github.com/GrahamDumpleton/wrapt) | 1.10.11 | Module for decorators, wrappers and monkey patching. / BSD 2-Clause |
| [xlrd](http://www.python-excel.org/) | 1.1.0 | Library for developers to extract data from Microsoft Excel (tm) spreadsheet files / BSD 3-Clause and BSD with advertising |
| [xlsxwriter](https://xlsxwriter.readthedocs.io/) | 1.0.2 | A Python module for creating Excel XLSX files / BSD 2-Clause |
| [xlwt](http://www.python-excel.org/) | 1.3.0 | Writing data and formatting information to Excel files / BSD |
| [xz](http://tukaani.org/xz/) | 5.2.3 | Data compression software with high compression ratio / LGPL-2.1 and GPL-2.0 |
| [yaml](http://pyyaml.org/wiki/LibYAML) | 0.1.7 | A C library for parsing and emitting YAML. / MIT |
| [zeromq](http://zeromq.org) | 4.2.2 | A high-performance asynchronous messaging library. / LGPL 3 |
| [zict](http://github.com/mrocklin/zict) | 0.1.3 | Composable Dictionary Classes / BSD 3-Clause |
| [zlib](http://zlib.net/) | 1.2.11 | Massively spiffy yet delicately unobtrusive compression library / zlib |
| Name | Version | Summary / License |
|---|---|---|
| [\_ipyw\_jlab\_nb\_ext\_conf](https://github.com/ContinuumIO/anaconda-nb-extensions-meta-config) | 0.1.0 | A configuration metapackage for enabling Anaconda-bundled jupyter extensions / BSD |
| [alabaster](http://www.sphinx-doc.org/en/stable/index.html) | 0.7.10 | Configurable, Python 2+3 compatible Sphinx theme. / BSD 3-Clause |
| [anaconda-client](https://github.com/Anaconda-Platform/anaconda-client) | 1.6.9 | Anaconda Cloud command line client library / BSD 3-Clause |
| [anaconda-navigator](https://github.com/ContinuumIO/navigator) | 1.7.0 | Anaconda Navigator / proprietary - Continuum Analytics, Inc. |
| [anaconda-project](https://github.com/Anaconda-Platform/anaconda-project) | 0.8.2 | Tool for encapsulating, running, and reproducing data science projects / BSD 3-Clause |
| [asn1crypto](https://github.com/wbond/asn1crypto) | 0.24.0 | Python ASN.1 library with a focus on performance and a pythonic API / MIT |
| [astroid](https://www.astroid.org/) | 1.6.1 | A abstract syntax tree for Python with inference support. / LGPL 2.1 |
| [astropy](http://www.astropy.org/) | 2.0.3 | Community-developed Python Library for Astronomy / BSD |
| [attrs](https://attrs.readthedocs.io/en/stable/) | 17.4.0 | attrs is the Python package that will bring back the joy of writing classes by relieving you from the drudgery of implementing object protocols (aka dunder methods). / MIT |
| [babel](http://babel.pocoo.org/) | 2.5.3 | Utilities to internationalize and localize Python applications / BSD 3-clause |
| [backports](https://bitbucket.org/brandon/backports) | 1.0 | / BSD |
| [backports.functools\_lru\_cache](https://github.com/jaraco/backports.functools_lru_cache) | 1.4 | Backport of functools.lru\_cache from Python 3.3 as published at ActiveState. / MIT |
| [backports.shutil\_get\_terminal\_size](https://github.com/chrippa/backports.shutil_get_terminal_size) | 1.0.0 | A backport of the get\_terminal\_size function from Python 3.3’s shutil. / MIT |
| [backports\_abc](https://github.com/cython/backports_abc) | 0.5 | A backport of recent additions to the collections.abc module. / PSF 2 |
| [beautifulsoup4](http://www.crummy.com/software/BeautifulSoup/) | 4.6.0 | Python library designed for screen-scraping / MIT |
| [bitarray](https://github.com/ilanschnell/bitarray) | 0.8.1 | efficient arrays of booleans – C extension / PSF |
| [bkcharts](http://github.com/bokeh/bkcharts) | 0.2 | High level chart types built on top of Bokeh / BSD 3-Clause |
| [blaze](http://blaze.pydata.org) | 0.11.3 | NumPy and Pandas interface to big data / BSD 3-Clause |
| [bleach](https://github.com/mozilla/bleach) | 2.1.2 | Easy, whitelist-based HTML-sanitizing tool / Apache-2.0 |
| [bokeh](http://bokeh.pydata.org/) | 0.12.13 | Statistical and novel interactive HTML plots for Python / BSD 3-Clause |
| [boto](https://github.com/boto/boto/) | 2.48.0 | Amazon Web Services Library / MIT |
| [bottleneck](http://berkeleyanalytics.com/bottleneck) | 1.2.1 | Fast NumPy array functions written in Cython. / BSD 2-Clause |
| [bzip2](http://www.bzip.org/) | 1.0.6 | high-quality data compressor / bzip2 |
| [ca-certificates](https://github.com/conda-forge/ca-certificates-feedstock) | 2017.08.26 | Certificates for use with other packages. / ISC |
| [cairo](http://cairographics.org/) | 1.14.12 | Cairo is a 2D graphics library with support for multiple output devices. / LGPL 2.1 or MPL 1.1 |
| [cdecimal](http://www.bytereef.org/mpdecimal/index.html) | 2.3 | Fast drop-in replacement for decimal.py / BSD 2-Clause |
| [certifi](http://certifi.io/) | 2018.1.18 | Python package for providing Mozilla’s CA Bundle. / ISC |
| [cffi](https://bitbucket.org/cffi/cffi) | 1.11.4 | Foreign Function Interface for Python calling C code. / MIT |
| [chardet](https://github.com/chardet/chardet) | 3.0.4 | Universal character encoding detector / LGPL2 |
| [click](http://click.pocoo.org/) | 6.7 | A simple wrapper around optparse for powerful command line utilities. / BSD 3-Clause |
| [cloudpickle](https://github.com/cloudpipe/cloudpickle) | 0.5.2 | Extended pickling support for Python objects / BSD 3-Clause |
| [clyent](https://github.com/Anaconda-Platform/clyent) | 1.2.2 | Command line client library for windows and posix / BSD 3-Clause |
| [colorama](https://github.com/tartley/colorama) | 0.3.9 | Cross-platform colored terminal text. / BSD 3-Clause |
| [conda](https://conda.io) | 4.4.10 | OS-agnostic, system-level binary package and environment manager. / BSD 3-Clause |
| [conda-build](https://github.com/conda/conda-build) | 3.4.1 | tools for building conda packages / BSD 3-Clause |
| [conda-env](https://github.com/conda/conda-env) | 2.6.0 | Tools for interacting with conda environments. / BSD 3-Clause |
| [conda-verify](https://github.com/conda/conda-verify) | 2.0.0 | tool for validating conda recipes and conda packages / BSD 3-Clause |
| [configparser](http://docs.python.org/3/library/configparser.html) | 3.5.0 | This library brings the updated configparser from Python 3.5 to Python 2.6-3.5 / MIT |
| [contextlib2](http://contextlib2.readthedocs.org) | 0.5.5 | Backports and enhancements for the contextlib module / PSF |
| [cryptography](https://github.com/pyca/cryptography) | 2.1.4 | Provides cryptographic recipes and primitives to Python developers / Apache 2.0 or BSD 3-Clause, PSF 2 |
| [curl](http://curl.haxx.se/) | 7.58.0 | tool and library for transferring data with URL syntax / MIT/X derivate (`<http://curl.haxx.se/docs/copyright.html>`) |
| [cycler](http://matplotlib.org/cycler) | 0.10.0 | Composable style cycles. / BSD 3-Clause |
| [cython](http://www.cython.org/) | 0.27.3 | The Cython compiler for writing C extensions for the Python language / Apache-2.0 |
| [cytoolz](https://github.com/pytoolz/cytoolz) | 0.9.0 | Cython implementation of Toolz. High performance functional utilities. / BSD 3-Clause |
| [dask](http://github.com/dask/dask/) | 0.16.1 | Parallel Python with task scheduling / BSD 3-Clause |
| [dask-core](http://github.com/dask/dask/) | 0.16.1 | Parallel Python with task scheduling / BSD 3-Clause |
| [datashape](http://datashape.pydata.org) | 0.5.4 | A data description language. / BSD 2-Clause |
| [dbus](http://www.freedesktop.org/wiki/Software/dbus/) | 1.12.2 | Simple message bus system for applications to talk to one another / GPL2 |
| [decorator](https://github.com/micheles/decorator) | 4.2.1 | Better living through Python with decorators. / BSD 3-Clause |
| [distributed](http://distributed.readthedocs.io/en/latest/) | 1.20.2 | Distributed computing with Dask / BSD 3-Clause |
| [docutils](http://docutils.sourceforge.net/) | 0.14 | Docutils – Python Documentation Utilities / Public Domain Dedictation and BSD 2-Clause and PSF 2.1.1 and GPL 3.0 |
| [entrypoints](https://github.com/takluyver/entrypoints) | 0.2.3 | Discover and load entry points from installed packages. / MIT License |
| [enum34](https://bitbucket.org/stoneleaf/enum34) | 1.1.6 | Python 3.4 Enum backported to 3.3, 3.2, 3.1, 2.7, 2.6, 2.5, and 2.4 / BSD 3-Clause |
| [et\_xmlfile](https://bitbucket.org/openpyxl/et_xmlfile) | 1.0.1 | An implementation of lxml.xmlfile for the standard library / MIT |
| [expat](http://expat.sourceforge.net/) | 2.2.5 | Expat XML parser library in C. / MIT |
| [fastcache](https://github.com/pbrady/fastcache) | 1.0.2 | C implementation of Python 3 lru\_cache / MIT |
| [filelock](https://github.com/benediktschmitt/py-filelock) | 2.0.13 | A platform independent file lock. / Public Domain |
| [flask](http://flask.pocoo.org) | 0.12.2 | A microframework based on Werkzeug, Jinja2 and good intentions. / BSD 3-Clause |
| [flask-cors](https://github.com/corydolphin/flask-cors) | 3.0.3 | A Flask extension adding a decorator for CORS support / MIT |
| [fontconfig](http://www.freedesktop.org/wiki/Software/fontconfig/) | 2.12.4 | A library for configuring and customizing font access. / MIT |
| [freetype](https://www.freetype.org/) | 2.8 | A Free, High-Quality, and Portable Font Engine / GPL-2.0 and FreeType |
| [funcsigs](http://funcsigs.readthedocs.org) | 1.0.2 | Python function signatures from PEP362 for Python 2.6, 2.7 and 3.2+. / Apache 2.0 |
| [functools32](https://github.com/MiCHiLU/python-functools32) | 3.2.3.2 | Backport of the functools module from Python 3.2.3 for use on 2.7 and PyPy. / PSF license |
| [futures](https://github.com/agronholm/pythonfutures) | 3.2.0 | Backport of the concurrent.futures package from Python 3.2 / PSF |
| [get\_terminal\_size](https://github.com/chrippa/backports.shutil_get_terminal_size) | 1.0.0 | Get the size of the terminal window. / MIT |
| [gevent](http://www.gevent.org/) | 1.2.2 | Coroutine-based network library / MIT |
| [glib](https://developer.gnome.org/glib/) | 2.53.6 | Provides core application building blocks for libraries and applications written in C. / LGPL-2.1 |
| [glob2](https://github.com/miracle2k/python-glob2) | 0.6 | Version of the glob module that supports recursion via \*\*, and can capture patterns. / BSD-2-Clause |
| [gmp](http://gmplib.org/) | 6.1.2 | The GNU multiprecision library. / GPL 2 and LGPL 3 |
| [gmpy2](https://pypi.python.org/pypi/gmpy2) | 2.0.8 | GMP/MPIR, MPFR, and MPC interface to Python 2.6+ and 3.x / LGPL 3 |
| [graphite2](http://graphite.sil.org/) | 1.3.10 | A “smart font” system that handles the complexities of lesser-known languages of the world. / LGPLv2 |
| [greenlet](https://github.com/python-greenlet/greenlet) | 0.4.12 | Lightweight in-process concurrent programming / MIT |
| [grin](http://pypi.python.org/pypi/grin) | 1.2.1 | Enhanced grep-like tool / BSD 3-Clause |
| [gst-plugins-base](http://gstreamer.freedesktop.org/) | 1.12.4 | GStreamer Base Plug-ins / GPL2 |
| [gstreamer](http://gstreamer.freedesktop.org/) | 1.12.4 | Library for constructing graphs of media-handling components / LGPL 2 |
| [h5py](http://www.h5py.org/) | 2.7.1 | Read and write HDF5 files from Python. / BSD 3-Clause |
| [harfbuzz](http://www.freedesktop.org/wiki/Software/HarfBuzz/) | 1.7.4 | An OpenType text shaping engine. / MIT |
| [hdf5](http://www.hdfgroup.org/HDF5/) | 1.10.1 | HDF5 is a data model, library, and file format for storing and managing data / HDF5 |
| [heapdict](http://stutzbachenterprises.com/) | 1.0.0 | A heap with decrease-key and increase-key operations / BSD 3-Clause |
| [html5lib](https://github.com/html5lib/html5lib-python) | 1.0.1 | HTML parser based on the WHATWG HTML specification / MIT |
| [icu](http://site.icu-project.org/) | 58.2 | International Components for Unicode. / MIT |
| [idna](https://github.com/kjd/idna) | 2.6 | Internationalized Domain Names in Applications (IDNA). / BSD Like |
| [imageio](http://imageio.github.io) | 2.2.0 | a Python library for reading and writing image data / BSD 2-Clause |
| [imagesize](https://github.com/shibukawa/imagesize_py) | 0.7.1 | Getting image size from png/jpeg/jpeg2000/gif file / MIT |
| [intel-openmp](https://software.intel.com/en-us/node/522690) | 2018.0.0 | Math library for Intel and compatible processors / proprietary - Intel |
| [ipaddress](https://github.com/phihag/ipaddress) | 1.0.19 | IPv4/IPv6 manipulation library / PSF 2 |
| [ipykernel](http://ipython.org) | 4.8.0 | IPython Kernel for Jupyter / BSD 3-clause |
| [ipython](http://ipython.org/) | 5.4.1 | IPython: Productive Interactive Computing / BSD 3-clause |
| [ipython\_genutils](http://ipython.org) | 0.2.0 | vestigial utilities from IPython / BSD 3-Clause |
| [ipywidgets](https://github.com/ipython/ipywidgets) | 7.1.1 | Jupyter Interactive Widgets / BSD 3-clause |
| [isort](https://github.com/timothycrosley/isort) | 4.2.15 | A Python utility / library to sort Python imports. / MIT |
| [itsdangerous](https://github.com/pallets/itsdangerous) | 0.24 | Various helpers to pass trusted data to untrusted environments. / BSD 3-Clause |
| [jbig](https://www.cl.cam.ac.uk/~mgk25/jbigkit) | 2.1 | Implementation of the JBIG1 data compression standard / GPL-2.0 |
| [jdcal](https://github.com/phn/jdcal) | 1.3 | Julian dates from proleptic Gregorian and Julian calendars. / BSD 2-Clause |
| [jedi](https://github.com/davidhalter/jedi/) | 0.11.1 | An autocompletion tool for Python that can be used for text editors. / MIT |
| [jinja2](http://jinja.pocoo.org) | 2.10 | An easy to use stand-alone template engine written in pure python. / 3-Clause BSD |
| [jpeg](http://www.ijg.org/) | 9b | read/write jpeg COM, EXIF, IPTC medata / Custom free software license |
| [jsonschema](https://github.com/Julian/jsonschema) | 2.6.0 | An implementation of JSON Schema validation for Python / MIT |
| [jupyter](http://jupyter.org) | 1.0.0 | Jupyter metapackage. Install all the Jupyter components in one go. / BSD 3-Clause |
| [jupyter\_client](http://jupyter.org) | 5.2.2 | Jupyter protocol implementation and client libraries / BSD 3-clause |
| [jupyter\_console](http://jupyter.org) | 5.2.0 | Jupyter terminal console / BSD 3-Clause |
| [jupyter\_core](http://jupyter.org) | 4.4.0 | Core common functionality of Jupyter projects. / BSD 3-clause |
| [jupyterlab](https://github.com/jupyterlab/jupyterlab) | 0.31.5 | A pre-alpha version of a computational environment for Jupyter. / BSD 3-Clause |
| [jupyterlab\_launcher](http://github.com/jupyterlab/jupyterlab_launcher) | 0.10.2 | A Launcher for JupyterLab based applications. / BSD 3-Clause |
| [lazy-object-proxy](https://github.com/ionelmc/python-lazy-object-proxy) | 1.3.1 | A fast and thorough lazy object proxy. / BSD 2-Clause |
| [libcurl](http://curl.haxx.se/) | 7.58.0 | tool and library for transferring data with URL syntax / MIT/X derivate (`<http://curl.haxx.se/docs/copyright.html>`) |
| [libedit](http://thrysoee.dk/editline/) | 3.1 | Editline Library (libedit) / NetBSD |
| [libffi](https://sourceware.org/libffi/) | 3.2.1 | A Portable Foreign Function Interface Library. / Custom |
| [libgcc-ng](https://gcc.gnu.org/onlinedocs/gccint/Libgcc.html) | 7.2.0 | The GCC low-level runtime library / GPL |
| [libgfortran-ng](https://gcc.gnu.org/) | 7.2.0 | The GNU Fortran Runtime Library / GPL |
| [libpng](http://www.libpng.org/pub/png/libpng.html) | 1.6.34 | PNG reference library. / zlib/libpng |
| [libsodium](http://libsodium.org) | 1.0.15 | A modern and easy-to-use crypto library. / ISC |
| [libssh2](https://www.libssh2.org/) | 1.8.0 | the SSH library / BSD 3-Clause |
| [libstdcxx-ng](https://gcc.gnu.org/) | 7.2.0 | The GNU C++ Runtime Library / GPL3 with runtime exception |
| [libtiff](http://www.libtiff.org/) | 4.0.9 | Support for the Tag Image File Format (TIFF). / HPND |
| [libtool](http://www.gnu.org/software/libtool/) | 2.4.6 | The GNU Portable Library Tool / GPL 3 |
| [libxcb](http://xcb.freedesktop.org/) | 1.12 | This is the C-language Binding (XCB) package to the X Window System protocol / MIT |
| [libxml2](http://xmlsoft.org/) | 2.9.7 | The XML C parser and toolkit of Gnome / MIT |
| [libxslt](http://xmlsoft.org/XSLT/) | 1.1.32 | The XSLT C library developed for the GNOME project / MIT |
| [llvmlite](https://github.com/numba/llvmlite) | 0.21.0 | A lightweight LLVM python binding for writing JIT compilers / New BSD License |
| [locket](https://github.com/mwilliamson/locket.py) | 0.2.0 | File-based locks for Python for Linux and Windows / BSD 2-Clause |
| [lxml](http://lxml.de/) | 4.1.1 | Pythonic binding for the C libraries libxml2 and libxslt. / BSD 3-Clause, GPL-2.0, ZPL-2.0, and ElementTree |
| [lzo](http://www.oberhumer.com/opensource/lzo/) | 2.10 | LZO is a portable lossless data compression library written in ANSI C. / GPL v2+ |
| [markupsafe](https://www.palletsprojects.com/p/markupsafe/) | 1.0 | A Python module that implements the jinja2.Markup string / BSD 3-Clause |
| [matplotlib](http://matplotlib.org/) | 2.1.2 | Publication quality figures in Python / PSF-based |
| [mccabe](https://github.com/PyCQA/mccabe) | 0.6.1 | McCabe complexity checker for Python / MIT |
| [mistune](https://github.com/lepture/mistune) | 0.8.3 | The fastest markdown parser in pure Python. / BSD 3-Clause |
| [mkl](https://software.intel.com/en-us/mkl) | 2018.0.1 | Math library for Intel and compatible processors / proprietary - Intel |
| [mkl-service](https://github.com/ContinuumIO/mkl-service) | 1.1.2 | Python bindings to MKL service functions / 3-clause BSD |
| [mpc](http://www.multiprecision.org/) | 1.0.3 | A C library for the arithmetic of complex numbers with arbitrarily high precision. / LGPL 3 |
| [mpfr](http://www.mpfr.org/) | 3.1.5 | The MPFR library is a C library for multiple-precision floating-point computations with correct rounding. / LGPL 3 |
| [mpmath](http://mpmath.org) | 1.0.0 | Python library for arbitrary-precision floating-point arithmetic / BSD 3-Clause |
| [msgpack-python](http://msgpack.org/) | 0.5.1 | MessagePack (de)serializer. / Apache 2.0 |
| [multipledispatch](https://github.com/mrocklin/multipledispatch/) | 0.4.9 | Multiple dispatch in Python / BSD 3-Clause |
| [navigator-updater](https://github.com/ContinuumIO/navigator-updater) | 0.1.0 | Anaconda Navigator Updater / proprietary - Continuum Analytics, Inc. |
| [nbconvert](http://jupyter.org) | 5.3.1 | Converting Jupyter Notebooks / BSD 3-Clause |
| [nbformat](http://jupyter.org) | 4.4.0 | The reference implementation of the Jupyter Notebook format / BSD 3-clause |
| [ncurses](http://www.gnu.org/software/ncurses/) | 6.0 | Library for text-based user interfaces / Free software (MIT-like) |
| [networkx](https://networkx.github.io/) | 2.1 | Python package for creating and manipulating complex networks / BSD 3-Clause |
| [nltk](http://nltk.org/) | 3.2.5 | Build Python programs to work with human language data / Apache 2.0 |
| [nose](http://readthedocs.org/docs/nose/) | 1.3.7 | Nose extends unittest to make testing easier / LGPL-2.1 |
| [notebook](http://jupyter.org) | 5.4.0 | A web-based notebook environment for interactive computing / BSD 3-clause |
| [numba](http://numba.pydata.org/) | 0.36.2 | a just-in-time Python function compiler based on LLVM / BSD |
| [numexpr](https://github.com/pydata/numexpr) | 2.6.4 | Fast numerical expression evaluator for NumPy. / MIT |
| [numpy](http://numpy.scipy.org/) | 1.14.0 | Array processing for numbers, strings, records, and objects. / BSD 3-Clause |
| [numpydoc](https://github.com/numpy/numpydoc) | 0.7.0 | Sphinx extension to support docstrings in Numpy format / BSD 3-Clause |
| [odo](http://odo.pydata.org) | 0.5.1 | Data migration in Python / BSD-3-Clause |
| [olefile](http://www.decalage.info/python/olefileio) | 0.45.1 | parse, read and write Microsoft OLE2 files / BSD License 2-Clause |
| [openpyxl](https://openpyxl.readthedocs.io) | 2.4.10 | A Python library to read/write Excel 2010 xlsx/xlsm files / MIT |
| [openssl](http://www.openssl.org/) | 1.0.2n | OpenSSL is an open-source implementation of the SSL and TLS protocols / OpenSSL |
| [packaging](https://github.com/pypa/packaging) | 16.8 | Core utilities for Python packages / Apache 2.0 or BSD 2-Clause |
| [pandas](http://pandas.pydata.org) | 0.22.0 | High-performance, easy-to-use data structures and data analysis tools. / BSD 3-clause |
| [pandoc](http://johnmacfarlane.net/pandoc/) | 1.19.2.1 | Universal markup converter (repackaged binaries). / GPL-2.0 |
| [pandocfilters](https://github.com/jgm/pandocfilters) | 1.4.2 | A python module for writing pandoc filters / BSD-3-Clause |
| [pango](http://www.pango.org/) | 1.41.0 | Text layout and rendering engine. / LGPL-2.1 |
| [parso](https://github.com/davidhalter/parso) | 0.1.1 | A Python Parser / MIT License |
| [partd](https://github.com/dask/partd) | 0.3.8 | Data structure for on-disk shuffle operations / BSD 3-Clause |
| [patchelf](http://nixos.org/patchelf.html) | 0.9 | A small utility to modify the dynamic linker and RPATH of ELF executables. / GPL 3 |
| [path.py](https://github.com/jaraco/path.py) | 10.5 | A module wrapper for os.path / MIT |
| [pathlib2](https://github.com/mcmtroffaes/pathlib2) | 2.3.0 | Fork of pathlib aiming to support the full stdlib Python API. / MIT |
| [patsy](https://github.com/pydata/patsy) | 0.5.0 | Describing statistical models in Python using symbolic formulas / BSD-2-Clause, PSF2 |
| [pcre](http://www.pcre.org/) | 8.41 | Regular expression pattern matching using the same syntax and semantics as Perl 5. / BSD 3-Clause |
| [pep8](http://pep8.readthedocs.org/) | 1.7.1 | Python style guide checker / MIT |
| [pexpect](http://pexpect.sourceforge.net/) | 4.3.1 | Pexpect makes Python a better tool for controlling other applications. / ISC |
| [pickleshare](https://github.com/vivainio/pickleshare) | 0.7.4 | Tiny ‘shelve’-like database with concurrency support / MIT |
| [pillow](http://python-imaging.github.io/) | 5.0.0 | Pillow is the friendly PIL fork by Alex Clark and Contributors. / PIL |
| [pip](https://pip.pypa.io/en/stable/) | 9.0.1 | PyPA recommended tool for installing Python packages / MIT |
| [pixman](http://www.pixman.org/) | 0.34.0 | A low-level software library for pixel manipulation. / MIT |
| [pkginfo](https://code.launchpad.net/~tseaver/pkginfo/trunk) | 1.4.1 | Query metadatdata from sdists / bdists / installed packages. / MIT |
| [pluggy](https://github.com/pytest-dev/pluggy) | 0.6.0 | Plugin registration and hook calling for Python / MIT |
| [ply](http://www.dabeaz.com/ply/index.html) | 3.10 | Python Lex-Yacc / BSD 3-clause |
| [prompt\_toolkit](https://github.com/jonathanslenders/python-prompt-toolkit) | 1.0.15 | Library for building powerful interactive command lines in Python / BSD 3-clause |
| [psutil](https://github.com/giampaolo/psutil) | 5.4.3 | A cross-platform process and system utilities module for Python / BSD 3-Clause |
| [ptyprocess](https://github.com/pexpect/ptyprocess) | 0.5.2 | Run a subprocess in a pseudo terminal / ISC |
| [py](https://github.com/pytest-dev/py) | 1.5.2 | library with cross-python path, ini-parsing, io, code, log facilities / MIT |
| [pycairo](http://cairographics.org/pycairo/) | 1.15.4 | Python bindings for the Cairo graphics library. / LGPL 2.1, MPL 1.1 |
| [pycodestyle](https://pycodestyle.readthedocs.io/) | 2.3.1 | Python style guide checker / MIT |
| [pycosat](https://github.com/ContinuumIO/pycosat) | 0.6.3 | Bindings to picosat (a SAT solver) / MIT |
| [pycparser](https://github.com/eliben/pycparser) | 2.18 | Complete C99 parser in pure Python / BSD 3-clause |
| [pycrypto](http://www.pycrypto.org/) | 2.6.1 | Cryptographic modules for Python. / Public Domain |
| [pycurl](http://pycurl.sourceforge.net/) | 7.43.0.1 | A Python Interface To The cURL library / LGPL, MIT |
| [pyflakes](https://github.com/PyCQA/pyflakes) | 1.6.0 | Pyflakes analyzes programs and detects various errors. / MIT |
| [pygments](http://pygments.org/) | 2.2.0 | Generic syntax highlighting package / BSD 2-clause |
| [pylint](http://www.pylint.org/) | 1.8.2 | python code static checker / GPL |
| [pyodbc](https://github.com/mkleehammer/pyodbc) | 4.0.22 | DB API Module for ODBC / MIT |
| [pyopenssl](https://github.com/pyca/pyopenssl) | 17.5.0 | Python wrapper module around the OpenSSL library / Apache 2.0 |
| [pyparsing](http://pyparsing.wikispaces.com/) | 2.2.0 | Create and execute simple grammars / MIT |
| [pyqt](http://www.riverbankcomputing.co.uk/software/pyqt) | 5.6.0 | Python binding of the cross-platform GUI toolkit Qt. / Commercial, GPL-2.0, GPL-3.0 |
| [pysocks](https://github.com/Anorov/PySocks) | 1.6.7 | A Python SOCKS client module. See [Anorov/PySocks](https://github.com/Anorov/PySocks) for more information. / BSD 3-Clause |
| [pytables](http://www.pytables.org) | 3.4.2 | Brings together Python, HDF5 and NumPy to easily handle large amounts of data. / BSD 3-Clause |
| [pytest](https://docs.pytest.org/en/latest/) | 3.3.2 | Simple and powerful testing with Python. / MIT |
| [python](http://www.python.org/) | 2.7.14 | General purpose programming language / PSF |
| [python-dateutil](https://dateutil.readthedocs.org/) | 2.6.1 | Extensions to the standard Python datetime module. / BSD 3-clause |
| [pytz](http://pythonhosted.org/pytz/) | 2017.3 | World timezone definitions, modern and historical. / MIT |
| [pywavelets](https://github.com/PyWavelets/pywt) | 0.5.2 | Discrete Wavelet Transforms in Python. / MIT |
| [pyyaml](http://pyyaml.org/wiki/PyYAML) | 3.12 | YAML parser and emitter for Python / MIT |
| [pyzmq](https://github.com/zeromq/pyzmq) | 16.0.3 | Python bindings for zeromq / BSD 3-clause |
| [qt](http://qt-project.org) | 5.6.2 | Qt is a cross-platform application and UI framework. / LGPL-3.0 |
| [qtawesome](https://github.com/spyder-ide/qtawesome) | 0.4.4 | Iconic fonts in PyQt and PySide applications / MIT |
| [qtconsole](http://jupyter.org) | 4.3.1 | Jupyter Qt console / BSD 3-Clause |
| [qtpy](https://github.com/spyder-ide/qtpy) | 1.3.1 | Abstraction layer for PyQt5/PyQt4/PySide / MIT |
| [readline](https://cnswww.cns.cwru.edu/php/chet/readline/rltop.html) | 7.0 | library for editing command lines as they are typed in / GPL3 |
| [requests](http://python-requests.org) | 2.18.4 | Python HTTP for Humans. / Apache 2.0 |
| [rope](https://github.com/python-rope/rope) | 0.10.7 | A python refactoring library… / GPL 2.0 |
| [ruamel\_yaml](https://bitbucket.org/ruamel/yaml) | 0.15.35 | A patched copy of ruamel.yaml. / MIT |
| [scandir](https://github.com/benhoyt/scandir) | 1.6 | scandir, a better directory iterator and faster os.walk() / BSD 3-Clause |
| [scikit-image](http://scikit-image.org/) | 0.13.1 | Image processing routines for SciPy. / BSD 3-Clause |
| [scikit-learn](http://scikit-learn.org/) | 0.19.1 | A set of python modules for machine learning and data mining / BSD 3-Clause |
| [scipy](http://www.scipy.org/) | 1.0.0 | Scientific Library for Python / BSD 3-Clause |
| [seaborn](http://stanford.edu/~mwaskom/software/seaborn/) | 0.8.1 | Statistical data visualization / BSD 3-Clause |
| [send2trash](https://github.com/hsoft/send2trash) | 1.4.2 | Python library to natively send files to Trash (or Recycle bin) on all platforms. / BSD-3-Clause |
| [setuptools](https://github.com/pypa/setuptools) | 38.4.0 | Download, build, install, upgrade, and uninstall Python packages / MIT |
| [simplegeneric](http://cheeseshop.python.org/pypi/simplegeneric) | 0.8.1 | Simple generic functions (similar to Python’s own len(), pickle.dump(), etc.) / Zope Public |
| [singledispatch](http://docs.python.org/3/library/functools.html#functools.singledispatch) | 3.4.0.3 | Transforms a function into a single-dispatch generic function / MIT |
| [sip](http://www.riverbankcomputing.com/software/sip/intro) | 4.18.1 | Create Python bindings for C and C++ libraries / GPL-3.0 |
| [six](http://pypi.python.org/pypi/six/) | 1.11.0 | Python 2 and 3 compatibility utilities / MIT |
| [snowballstemmer](https://github.com/shibukawa/snowball_py) | 1.2.1 | Snowball stemming library collection for Python / BSD-2-Clause |
| [sortedcollections](http://www.grantjenks.com/docs/sortedcollections/) | 0.5.3 | Python Sorted Collections / Apache-2.0 |
| [sortedcontainers](http://www.grantjenks.com/docs/sortedcontainers/) | 1.5.9 | Python Sorted Container Types: SortedList, SortedDict, and SortedSet / Apache 2.0 |
| [sphinx](http://www.sphinx-doc.org) | 1.6.6 | Sphinx is a tool that makes it easy to create intelligent and beautiful documentation / BSD 2-clause |
| sphinxcontrib | 1.0 | Python namespace for sphinxcontrib / BSD |
| [sphinxcontrib-websupport](https://pypi.python.org/pypi/sphinxcontrib-websupport) | 1.0.1 | Sphinx API for Web Apps / BSD-2-Clause |
| [spyder](https://github.com/spyder-ide/spyder) | 3.2.6 | Scientific PYthon Development EnviRonment / MIT |
| [sqlalchemy](http://www.sqlalchemy.org/) | 1.2.1 | Database Abstraction Library. / MIT |
| [sqlite](http://www.sqlite.org/) | 3.22.0 | Implements a self-contained, zero-configuration, SQL database engine. / Public-Domain (`<http://www.sqlite.org/copyright.html>`) |
| [ssl\_match\_hostname](http://bitbucket.org/brandon/backports.ssl_match_hostname) | 3.5.0.1 | The ssl.match\_hostname() function from Python 3.5 / PSF 2 |
| [statsmodels](https://www.statsmodels.org) | 0.8.0 | Statistical computations and models for use with SciPy / BSD 3-Clause |
| [subprocess32](https://github.com/google/python-subprocess32) | 3.2.7 | A backport of the subprocess module from Python 3.2/3.3 for use on 2.x. / PSF 2 |
| [sympy](http://sympy.org) | 1.1.1 | Python library for symbolic mathematics / 3-clause BSD |
| [tblib](https://github.com/ionelmc/python-tblib) | 1.3.2 | Traceback serialization library. / BSD 2-Clause |
| [terminado](http://github.com/mitsuhiko/markupsafe) | 0.8.1 | Terminals served by tornado websockets / BSD 3-clause |
| [testpath](https://testpath.readthedocs.io) | 0.3.1 | Testpath is a collection of utilities for Python code working with files and commands. / MIT |
| [tk](http://www.tcl.tk/) | 8.6.7 | A dynamic programming language with GUI support. Bundles Tcl and Tk. / Tcl/Tk |
| [toolz](http://toolz.readthedocs.org/) | 0.9.0 | A functional standard library for Python. / BSD 3-Clause |
| [tornado](http://www.tornadoweb.org/) | 4.5.3 | A Python web framework and asynchronous networking library, originally developed at FriendFeed. / Apache 2.0 |
| [traitlets](http://ipython.org/) | 4.3.2 | Configuration system for Python applications / BSD 3-clause |
| [typing](https://docs.python.org/3.5/library/typing.html) | 3.6.2 | Type Hints for Python - backport for `Python<3.5` / PSF |
| [unicodecsv](https://github.com/jdunck/python-unicodecsv) | 0.14.1 | Drop-in replacement for csv module which supports unicode strings / BSD |
| [unixodbc](http://www.unixodbc.org/) | 2.3.4 | ODBC on non MS Windows platforms / LGPL-2.1 |
| [urllib3](https://urllib3.readthedocs.io/) | 1.22 | HTTP library with thread-safe connection pooling, file post, and more. / MIT |
| [wcwidth](https://github.com/jquast/wcwidth) | 0.1.7 | Measures number of Terminal column cells of wide-character codes. / MIT |
| [webencodings](https://github.com/gsnedders/python-webencodings) | 0.5.1 | Character encoding aliases for legacy web content / BSD 3-Clause |
| [werkzeug](http://werkzeug.pocoo.org/) | 0.14.1 | The Python WSGI Utility Library. / BSD 3-Clause |
| [wheel](https://bitbucket.org/pypa/wheel/) | 0.30.0 | A built-package format for Python. / MIT |
| [widgetsnbextension](http://ipython.org) | 3.1.0 | IPython HTML widgets for Jupyter / BSD 3-clause |
| [wrapt](https://github.com/GrahamDumpleton/wrapt) | 1.10.11 | Module for decorators, wrappers and monkey patching. / BSD 2-Clause |
| [xlrd](http://www.python-excel.org/) | 1.1.0 | Library for developers to extract data from Microsoft Excel (tm) spreadsheet files / BSD 3-Clause and BSD with advertising |
| [xlsxwriter](https://xlsxwriter.readthedocs.io/) | 1.0.2 | A Python module for creating Excel XLSX files / BSD 2-Clause |
| [xlwt](http://www.python-excel.org/) | 1.3.0 | Writing data and formatting information to Excel files / BSD |
| [xz](http://tukaani.org/xz/) | 5.2.3 | Data compression software with high compression ratio / LGPL-2.1 and GPL-2.0 |
| [yaml](http://pyyaml.org/wiki/LibYAML) | 0.1.7 | A C library for parsing and emitting YAML. / MIT |
| [zeromq](http://zeromq.org) | 4.2.2 | A high-performance asynchronous messaging library. / LGPL 3 |
| [zict](http://github.com/mrocklin/zict) | 0.1.3 | Composable Dictionary Classes / BSD 3-Clause |
| [zlib](http://zlib.net/) | 1.2.11 | Massively spiffy yet delicately unobtrusive compression library / zlib |
| Name | Version | Summary / License |
|---|---|---|
| [\_ipyw\_jlab\_nb\_ext\_conf](https://github.com/ContinuumIO/anaconda-nb-extensions-meta-config) | 0.1.0 | A configuration metapackage for enabling Anaconda-bundled jupyter extensions / BSD |
| [alabaster](http://www.sphinx-doc.org/en/stable/index.html) | 0.7.10 | Configurable, Python 2+3 compatible Sphinx theme. / BSD 3-Clause |
| [anaconda-client](https://github.com/Anaconda-Platform/anaconda-client) | 1.6.9 | Anaconda Cloud command line client library / BSD 3-Clause |
| [anaconda-navigator](https://github.com/ContinuumIO/navigator) | 1.7.0 | Anaconda Navigator / proprietary - Continuum Analytics, Inc. |
| [anaconda-project](https://github.com/Anaconda-Platform/anaconda-project) | 0.8.2 | Tool for encapsulating, running, and reproducing data science projects / BSD 3-Clause |
| [asn1crypto](https://github.com/wbond/asn1crypto) | 0.24.0 | Python ASN.1 library with a focus on performance and a pythonic API / MIT |
| [astroid](https://www.astroid.org/) | 1.6.1 | A abstract syntax tree for Python with inference support. / LGPL 2.1 |
| [astropy](http://www.astropy.org/) | 2.0.3 | Community-developed Python Library for Astronomy / BSD |
| [attrs](https://attrs.readthedocs.io/en/stable/) | 17.4.0 | attrs is the Python package that will bring back the joy of writing classes by relieving you from the drudgery of implementing object protocols (aka dunder methods). / MIT |
| [babel](http://babel.pocoo.org/) | 2.5.3 | Utilities to internationalize and localize Python applications / BSD 3-clause |
| [backports](https://bitbucket.org/brandon/backports) | 1.0 | / BSD |
| [backports.functools\_lru\_cache](https://github.com/jaraco/backports.functools_lru_cache) | 1.4 | Backport of functools.lru\_cache from Python 3.3 as published at ActiveState. / MIT |
| [backports.shutil\_get\_terminal\_size](https://github.com/chrippa/backports.shutil_get_terminal_size) | 1.0.0 | A backport of the get\_terminal\_size function from Python 3.3’s shutil. / MIT |
| [backports\_abc](https://github.com/cython/backports_abc) | 0.5 | A backport of recent additions to the collections.abc module. / PSF 2 |
| [beautifulsoup4](http://www.crummy.com/software/BeautifulSoup/) | 4.6.0 | Python library designed for screen-scraping / MIT |
| [bitarray](https://github.com/ilanschnell/bitarray) | 0.8.1 | efficient arrays of booleans – C extension / PSF |
| [bkcharts](http://github.com/bokeh/bkcharts) | 0.2 | High level chart types built on top of Bokeh / BSD 3-Clause |
| [blaze](http://blaze.pydata.org) | 0.11.3 | NumPy and Pandas interface to big data / BSD 3-Clause |
| [bleach](https://github.com/mozilla/bleach) | 2.1.2 | Easy, whitelist-based HTML-sanitizing tool / Apache-2.0 |
| [bokeh](http://bokeh.pydata.org/) | 0.12.13 | Statistical and novel interactive HTML plots for Python / BSD 3-Clause |
| [boto](https://github.com/boto/boto/) | 2.48.0 | Amazon Web Services Library / MIT |
| [bottleneck](http://berkeleyanalytics.com/bottleneck) | 1.2.1 | Fast NumPy array functions written in Cython. / BSD 2-Clause |
| [bzip2](http://www.bzip.org/) | 1.0.6 | high-quality data compressor / bzip2 |
| [ca-certificates](https://github.com/conda-forge/ca-certificates-feedstock) | 2017.08.26 | Certificates for use with other packages. / ISC |
| [cairo](http://cairographics.org/) | 1.14.12 | Cairo is a 2D graphics library with support for multiple output devices. / LGPL 2.1 or MPL 1.1 |
| [cdecimal](http://www.bytereef.org/mpdecimal/index.html) | 2.3 | Fast drop-in replacement for decimal.py / BSD 2-Clause |
| [certifi](http://certifi.io/) | 2018.1.18 | Python package for providing Mozilla’s CA Bundle. / ISC |
| [cffi](https://bitbucket.org/cffi/cffi) | 1.11.4 | Foreign Function Interface for Python calling C code. / MIT |
| [chardet](https://github.com/chardet/chardet) | 3.0.4 | Universal character encoding detector / LGPL2 |
| [click](http://click.pocoo.org/) | 6.7 | A simple wrapper around optparse for powerful command line utilities. / BSD 3-Clause |
| [cloudpickle](https://github.com/cloudpipe/cloudpickle) | 0.5.2 | Extended pickling support for Python objects / BSD 3-Clause |
| [clyent](https://github.com/Anaconda-Platform/clyent) | 1.2.2 | Command line client library for windows and posix / BSD 3-Clause |
| [colorama](https://github.com/tartley/colorama) | 0.3.9 | Cross-platform colored terminal text. / BSD 3-Clause |
| [conda](https://conda.io) | 4.4.10 | OS-agnostic, system-level binary package and environment manager. / BSD 3-Clause |
| [conda-build](https://github.com/conda/conda-build) | 3.4.1 | tools for building conda packages / BSD 3-Clause |
| [conda-env](https://github.com/conda/conda-env) | 2.6.0 | Tools for interacting with conda environments. / BSD 3-Clause |
| [conda-verify](https://github.com/conda/conda-verify) | 2.0.0 | tool for validating conda recipes and conda packages / BSD 3-Clause |
| [configparser](http://docs.python.org/3/library/configparser.html) | 3.5.0 | This library brings the updated configparser from Python 3.5 to Python 2.6-3.5 / MIT |
| [contextlib2](http://contextlib2.readthedocs.org) | 0.5.5 | Backports and enhancements for the contextlib module / PSF |
| [cryptography](https://github.com/pyca/cryptography) | 2.1.4 | Provides cryptographic recipes and primitives to Python developers / Apache 2.0 or BSD 3-Clause, PSF 2 |
| [curl](http://curl.haxx.se/) | 7.58.0 | tool and library for transferring data with URL syntax / MIT/X derivate (`<http://curl.haxx.se/docs/copyright.html>`) |
| [cycler](http://matplotlib.org/cycler) | 0.10.0 | Composable style cycles. / BSD 3-Clause |
| [cython](http://www.cython.org/) | 0.27.3 | The Cython compiler for writing C extensions for the Python language / Apache-2.0 |
| [cytoolz](https://github.com/pytoolz/cytoolz) | 0.9.0 | Cython implementation of Toolz. High performance functional utilities. / BSD 3-Clause |
| [dask](http://github.com/dask/dask/) | 0.16.1 | Parallel Python with task scheduling / BSD 3-Clause |
| [dask-core](http://github.com/dask/dask/) | 0.16.1 | Parallel Python with task scheduling / BSD 3-Clause |
| [datashape](http://datashape.pydata.org) | 0.5.4 | A data description language. / BSD 2-Clause |
| [dbus](http://www.freedesktop.org/wiki/Software/dbus/) | 1.12.2 | Simple message bus system for applications to talk to one another / GPL2 |
| [decorator](https://github.com/micheles/decorator) | 4.2.1 | Better living through Python with decorators. / BSD 3-Clause |
| [distributed](http://distributed.readthedocs.io/en/latest/) | 1.20.2 | Distributed computing with Dask / BSD 3-Clause |
| [docutils](http://docutils.sourceforge.net/) | 0.14 | Docutils – Python Documentation Utilities / Public Domain Dedictation and BSD 2-Clause and PSF 2.1.1 and GPL 3.0 |
| [entrypoints](https://github.com/takluyver/entrypoints) | 0.2.3 | Discover and load entry points from installed packages. / MIT License |
| [enum34](https://bitbucket.org/stoneleaf/enum34) | 1.1.6 | Python 3.4 Enum backported to 3.3, 3.2, 3.1, 2.7, 2.6, 2.5, and 2.4 / BSD 3-Clause |
| [et\_xmlfile](https://bitbucket.org/openpyxl/et_xmlfile) | 1.0.1 | An implementation of lxml.xmlfile for the standard library / MIT |
| [expat](http://expat.sourceforge.net/) | 2.2.5 | Expat XML parser library in C. / MIT |
| [fastcache](https://github.com/pbrady/fastcache) | 1.0.2 | C implementation of Python 3 lru\_cache / MIT |
| [filelock](https://github.com/benediktschmitt/py-filelock) | 2.0.13 | A platform independent file lock. / Public Domain |
| [flask](http://flask.pocoo.org) | 0.12.2 | A microframework based on Werkzeug, Jinja2 and good intentions. / BSD 3-Clause |
| [flask-cors](https://github.com/corydolphin/flask-cors) | 3.0.3 | A Flask extension adding a decorator for CORS support / MIT |
| [fontconfig](http://www.freedesktop.org/wiki/Software/fontconfig/) | 2.12.4 | A library for configuring and customizing font access. / MIT |
| [freetype](https://www.freetype.org/) | 2.8 | A Free, High-Quality, and Portable Font Engine / GPL-2.0 and FreeType |
| [funcsigs](http://funcsigs.readthedocs.org) | 1.0.2 | Python function signatures from PEP362 for Python 2.6, 2.7 and 3.2+. / Apache 2.0 |
| [functools32](https://github.com/MiCHiLU/python-functools32) | 3.2.3.2 | Backport of the functools module from Python 3.2.3 for use on 2.7 and PyPy. / PSF license |
| [futures](https://github.com/agronholm/pythonfutures) | 3.2.0 | Backport of the concurrent.futures package from Python 3.2 / PSF |
| [get\_terminal\_size](https://github.com/chrippa/backports.shutil_get_terminal_size) | 1.0.0 | Get the size of the terminal window. / MIT |
| [gevent](http://www.gevent.org/) | 1.2.2 | Coroutine-based network library / MIT |
| [glib](https://developer.gnome.org/glib/) | 2.53.6 | Provides core application building blocks for libraries and applications written in C. / LGPL-2.1 |
| [glob2](https://github.com/miracle2k/python-glob2) | 0.6 | Version of the glob module that supports recursion via \*\*, and can capture patterns. / BSD-2-Clause |
| [gmp](http://gmplib.org/) | 6.1.2 | The GNU multiprecision library. / GPL 2 and LGPL 3 |
| [gmpy2](https://pypi.python.org/pypi/gmpy2) | 2.0.8 | GMP/MPIR, MPFR, and MPC interface to Python 2.6+ and 3.x / LGPL 3 |
| [graphite2](http://graphite.sil.org/) | 1.3.10 | A “smart font” system that handles the complexities of lesser-known languages of the world. / LGPLv2 |
| [greenlet](https://github.com/python-greenlet/greenlet) | 0.4.12 | Lightweight in-process concurrent programming / MIT |
| [grin](http://pypi.python.org/pypi/grin) | 1.2.1 | Enhanced grep-like tool / BSD 3-Clause |
| [gst-plugins-base](http://gstreamer.freedesktop.org/) | 1.12.4 | GStreamer Base Plug-ins / GPL2 |
| [gstreamer](http://gstreamer.freedesktop.org/) | 1.12.4 | Library for constructing graphs of media-handling components / LGPL 2 |
| [h5py](http://www.h5py.org/) | 2.7.1 | Read and write HDF5 files from Python. / BSD 3-Clause |
| [harfbuzz](http://www.freedesktop.org/wiki/Software/HarfBuzz/) | 1.7.4 | An OpenType text shaping engine. / MIT |
| [hdf5](http://www.hdfgroup.org/HDF5/) | 1.10.1 | HDF5 is a data model, library, and file format for storing and managing data / HDF5 |
| [heapdict](http://stutzbachenterprises.com/) | 1.0.0 | A heap with decrease-key and increase-key operations / BSD 3-Clause |
| [html5lib](https://github.com/html5lib/html5lib-python) | 1.0.1 | HTML parser based on the WHATWG HTML specification / MIT |
| [icu](http://site.icu-project.org/) | 58.2 | International Components for Unicode. / MIT |
| [idna](https://github.com/kjd/idna) | 2.6 | Internationalized Domain Names in Applications (IDNA). / BSD Like |
| [imageio](http://imageio.github.io) | 2.2.0 | a Python library for reading and writing image data / BSD 2-Clause |
| [imagesize](https://github.com/shibukawa/imagesize_py) | 0.7.1 | Getting image size from png/jpeg/jpeg2000/gif file / MIT |
| [intel-openmp](https://software.intel.com/en-us/node/522690) | 2018.0.0 | Math library for Intel and compatible processors / proprietary - Intel |
| [ipaddress](https://github.com/phihag/ipaddress) | 1.0.19 | IPv4/IPv6 manipulation library / PSF 2 |
| [ipykernel](http://ipython.org) | 4.8.0 | IPython Kernel for Jupyter / BSD 3-clause |
| [ipython](http://ipython.org/) | 5.4.1 | IPython: Productive Interactive Computing / BSD 3-clause |
| [ipython\_genutils](http://ipython.org) | 0.2.0 | vestigial utilities from IPython / BSD 3-Clause |
| [ipywidgets](https://github.com/ipython/ipywidgets) | 7.1.1 | Jupyter Interactive Widgets / BSD 3-clause |
| [isort](https://github.com/timothycrosley/isort) | 4.2.15 | A Python utility / library to sort Python imports. / MIT |
| [itsdangerous](https://github.com/pallets/itsdangerous) | 0.24 | Various helpers to pass trusted data to untrusted environments. / BSD 3-Clause |
| [jbig](https://www.cl.cam.ac.uk/~mgk25/jbigkit) | 2.1 | Implementation of the JBIG1 data compression standard / GPL-2.0 |
| [jdcal](https://github.com/phn/jdcal) | 1.3 | Julian dates from proleptic Gregorian and Julian calendars. / BSD 2-Clause |
| [jedi](https://github.com/davidhalter/jedi/) | 0.11.1 | An autocompletion tool for Python that can be used for text editors. / MIT |
| [jinja2](http://jinja.pocoo.org) | 2.10 | An easy to use stand-alone template engine written in pure python. / 3-Clause BSD |
| [jpeg](http://www.ijg.org/) | 9b | read/write jpeg COM, EXIF, IPTC medata / Custom free software license |
| [jsonschema](https://github.com/Julian/jsonschema) | 2.6.0 | An implementation of JSON Schema validation for Python / MIT |
| [jupyter](http://jupyter.org) | 1.0.0 | Jupyter metapackage. Install all the Jupyter components in one go. / BSD 3-Clause |
| [jupyter\_client](http://jupyter.org) | 5.2.2 | Jupyter protocol implementation and client libraries / BSD 3-clause |
| [jupyter\_console](http://jupyter.org) | 5.2.0 | Jupyter terminal console / BSD 3-Clause |
| [jupyter\_core](http://jupyter.org) | 4.4.0 | Core common functionality of Jupyter projects. / BSD 3-clause |
| [jupyterlab](https://github.com/jupyterlab/jupyterlab) | 0.31.5 | A pre-alpha version of a computational environment for Jupyter. / BSD 3-Clause |
| [jupyterlab\_launcher](http://github.com/jupyterlab/jupyterlab_launcher) | 0.10.2 | A Launcher for JupyterLab based applications. / BSD 3-Clause |
| [lazy-object-proxy](https://github.com/ionelmc/python-lazy-object-proxy) | 1.3.1 | A fast and thorough lazy object proxy. / BSD 2-Clause |
| [libcurl](http://curl.haxx.se/) | 7.58.0 | tool and library for transferring data with URL syntax / MIT/X derivate (`<http://curl.haxx.se/docs/copyright.html>`) |
| [libedit](http://thrysoee.dk/editline/) | 3.1 | Editline Library (libedit) / NetBSD |
| [libffi](https://sourceware.org/libffi/) | 3.2.1 | A Portable Foreign Function Interface Library. / Custom |
| [libgcc-ng](https://gcc.gnu.org/onlinedocs/gccint/Libgcc.html) | 7.2.0 | The GCC low-level runtime library / GPL |
| [libgfortran-ng](https://gcc.gnu.org/) | 7.2.0 | The GNU Fortran Runtime Library / GPL |
| [libpng](http://www.libpng.org/pub/png/libpng.html) | 1.6.34 | PNG reference library. / zlib/libpng |
| [libsodium](http://libsodium.org) | 1.0.15 | A modern and easy-to-use crypto library. / ISC |
| [libssh2](https://www.libssh2.org/) | 1.8.0 | the SSH library / BSD 3-Clause |
| [libstdcxx-ng](https://gcc.gnu.org/) | 7.2.0 | The GNU C++ Runtime Library / GPL3 with runtime exception |
| [libtiff](http://www.libtiff.org/) | 4.0.9 | Support for the Tag Image File Format (TIFF). / HPND |
| [libtool](http://www.gnu.org/software/libtool/) | 2.4.6 | The GNU Portable Library Tool / GPL 3 |
| [libxcb](http://xcb.freedesktop.org/) | 1.12 | This is the C-language Binding (XCB) package to the X Window System protocol / MIT |
| [libxml2](http://xmlsoft.org/) | 2.9.7 | The XML C parser and toolkit of Gnome / MIT |
| [libxslt](http://xmlsoft.org/XSLT/) | 1.1.32 | The XSLT C library developed for the GNOME project / MIT |
| [llvmlite](https://github.com/numba/llvmlite) | 0.21.0 | A lightweight LLVM python binding for writing JIT compilers / New BSD License |
| [locket](https://github.com/mwilliamson/locket.py) | 0.2.0 | File-based locks for Python for Linux and Windows / BSD 2-Clause |
| [lxml](http://lxml.de/) | 4.1.1 | Pythonic binding for the C libraries libxml2 and libxslt. / BSD 3-Clause, GPL-2.0, ZPL-2.0, and ElementTree |
| [lzo](http://www.oberhumer.com/opensource/lzo/) | 2.10 | LZO is a portable lossless data compression library written in ANSI C. / GPL v2+ |
| [markupsafe](https://www.palletsprojects.com/p/markupsafe/) | 1.0 | A Python module that implements the jinja2.Markup string / BSD 3-Clause |
| [matplotlib](http://matplotlib.org/) | 2.1.2 | Publication quality figures in Python / PSF-based |
| [mccabe](https://github.com/PyCQA/mccabe) | 0.6.1 | McCabe complexity checker for Python / MIT |
| [mistune](https://github.com/lepture/mistune) | 0.8.3 | The fastest markdown parser in pure Python. / BSD 3-Clause |
| [mkl](https://software.intel.com/en-us/mkl) | 2018.0.1 | Math library for Intel and compatible processors / proprietary - Intel |
| [mkl-service](https://github.com/ContinuumIO/mkl-service) | 1.1.2 | Python bindings to MKL service functions / 3-clause BSD |
| [mpc](http://www.multiprecision.org/) | 1.0.3 | A C library for the arithmetic of complex numbers with arbitrarily high precision. / LGPL 3 |
| [mpfr](http://www.mpfr.org/) | 3.1.5 | The MPFR library is a C library for multiple-precision floating-point computations with correct rounding. / LGPL 3 |
| [mpmath](http://mpmath.org) | 1.0.0 | Python library for arbitrary-precision floating-point arithmetic / BSD 3-Clause |
| [msgpack-python](http://msgpack.org/) | 0.5.1 | MessagePack (de)serializer. / Apache 2.0 |
| [multipledispatch](https://github.com/mrocklin/multipledispatch/) | 0.4.9 | Multiple dispatch in Python / BSD 3-Clause |
| [navigator-updater](https://github.com/ContinuumIO/navigator-updater) | 0.1.0 | Anaconda Navigator Updater / proprietary - Continuum Analytics, Inc. |
| [nbconvert](http://jupyter.org) | 5.3.1 | Converting Jupyter Notebooks / BSD 3-Clause |
| [nbformat](http://jupyter.org) | 4.4.0 | The reference implementation of the Jupyter Notebook format / BSD 3-clause |
| [ncurses](http://www.gnu.org/software/ncurses/) | 6.0 | Library for text-based user interfaces / Free software (MIT-like) |
| [networkx](https://networkx.github.io/) | 2.1 | Python package for creating and manipulating complex networks / BSD 3-Clause |
| [nltk](http://nltk.org/) | 3.2.5 | Build Python programs to work with human language data / Apache 2.0 |
| [nose](http://readthedocs.org/docs/nose/) | 1.3.7 | Nose extends unittest to make testing easier / LGPL-2.1 |
| [notebook](http://jupyter.org) | 5.4.0 | A web-based notebook environment for interactive computing / BSD 3-clause |
| [numba](http://numba.pydata.org/) | 0.36.2 | a just-in-time Python function compiler based on LLVM / BSD |
| [numexpr](https://github.com/pydata/numexpr) | 2.6.4 | Fast numerical expression evaluator for NumPy. / MIT |
| [numpy](http://numpy.scipy.org/) | 1.14.0 | Array processing for numbers, strings, records, and objects. / BSD 3-Clause |
| [numpydoc](https://github.com/numpy/numpydoc) | 0.7.0 | Sphinx extension to support docstrings in Numpy format / BSD 3-Clause |
| [odo](http://odo.pydata.org) | 0.5.1 | Data migration in Python / BSD-3-Clause |
| [olefile](http://www.decalage.info/python/olefileio) | 0.45.1 | parse, read and write Microsoft OLE2 files / BSD License 2-Clause |
| [openpyxl](https://openpyxl.readthedocs.io) | 2.4.10 | A Python library to read/write Excel 2010 xlsx/xlsm files / MIT |
| [openssl](http://www.openssl.org/) | 1.0.2n | OpenSSL is an open-source implementation of the SSL and TLS protocols / OpenSSL |
| [packaging](https://github.com/pypa/packaging) | 16.8 | Core utilities for Python packages / Apache 2.0 or BSD 2-Clause |
| [pandas](http://pandas.pydata.org) | 0.22.0 | High-performance, easy-to-use data structures and data analysis tools. / BSD 3-clause |
| [pandoc](http://johnmacfarlane.net/pandoc/) | 1.15.0.6 | Universal markup converter (repackaged binaries). / GPL-2.0 |
| [pandocfilters](https://github.com/jgm/pandocfilters) | 1.4.2 | A python module for writing pandoc filters / BSD-3-Clause |
| [pango](http://www.pango.org/) | 1.41.0 | Text layout and rendering engine. / LGPL-2.1 |
| [parso](https://github.com/davidhalter/parso) | 0.1.1 | A Python Parser / MIT License |
| [partd](https://github.com/dask/partd) | 0.3.8 | Data structure for on-disk shuffle operations / BSD 3-Clause |
| [patchelf](http://nixos.org/patchelf.html) | 0.9 | A small utility to modify the dynamic linker and RPATH of ELF executables. / GPL 3 |
| [path.py](https://github.com/jaraco/path.py) | 10.5 | A module wrapper for os.path / MIT |
| [pathlib2](https://github.com/mcmtroffaes/pathlib2) | 2.3.0 | Fork of pathlib aiming to support the full stdlib Python API. / MIT |
| [patsy](https://github.com/pydata/patsy) | 0.5.0 | Describing statistical models in Python using symbolic formulas / BSD-2-Clause, PSF2 |
| [pcre](http://www.pcre.org/) | 8.41 | Regular expression pattern matching using the same syntax and semantics as Perl 5. / BSD 3-Clause |
| [pep8](http://pep8.readthedocs.org/) | 1.7.1 | Python style guide checker / MIT |
| [pexpect](http://pexpect.sourceforge.net/) | 4.3.1 | Pexpect makes Python a better tool for controlling other applications. / ISC |
| [pickleshare](https://github.com/vivainio/pickleshare) | 0.7.4 | Tiny ‘shelve’-like database with concurrency support / MIT |
| [pillow](http://python-imaging.github.io/) | 5.0.0 | Pillow is the friendly PIL fork by Alex Clark and Contributors. / PIL |
| [pip](https://pip.pypa.io/en/stable/) | 9.0.1 | PyPA recommended tool for installing Python packages / MIT |
| [pixman](http://www.pixman.org/) | 0.34.0 | A low-level software library for pixel manipulation. / MIT |
| [pkginfo](https://code.launchpad.net/~tseaver/pkginfo/trunk) | 1.4.1 | Query metadatdata from sdists / bdists / installed packages. / MIT |
| [pluggy](https://github.com/pytest-dev/pluggy) | 0.6.0 | Plugin registration and hook calling for Python / MIT |
| [ply](http://www.dabeaz.com/ply/index.html) | 3.10 | Python Lex-Yacc / BSD 3-clause |
| [prompt\_toolkit](https://github.com/jonathanslenders/python-prompt-toolkit) | 1.0.15 | Library for building powerful interactive command lines in Python / BSD 3-clause |
| [psutil](https://github.com/giampaolo/psutil) | 5.4.3 | A cross-platform process and system utilities module for Python / BSD 3-Clause |
| [ptyprocess](https://github.com/pexpect/ptyprocess) | 0.5.2 | Run a subprocess in a pseudo terminal / ISC |
| [py](https://github.com/pytest-dev/py) | 1.5.2 | library with cross-python path, ini-parsing, io, code, log facilities / MIT |
| [pycairo](http://cairographics.org/pycairo/) | 1.15.4 | Python bindings for the Cairo graphics library. / LGPL 2.1, MPL 1.1 |
| [pycodestyle](https://pycodestyle.readthedocs.io/) | 2.3.1 | Python style guide checker / MIT |
| [pycosat](https://github.com/ContinuumIO/pycosat) | 0.6.3 | Bindings to picosat (a SAT solver) / MIT |
| [pycparser](https://github.com/eliben/pycparser) | 2.18 | Complete C99 parser in pure Python / BSD 3-clause |
| [pycrypto](http://www.pycrypto.org/) | 2.6.1 | Cryptographic modules for Python. / Public Domain |
| [pycurl](http://pycurl.sourceforge.net/) | 7.43.0.1 | A Python Interface To The cURL library / LGPL, MIT |
| [pyflakes](https://github.com/PyCQA/pyflakes) | 1.6.0 | Pyflakes analyzes programs and detects various errors. / MIT |
| [pygments](http://pygments.org/) | 2.2.0 | Generic syntax highlighting package / BSD 2-clause |
| [pylint](http://www.pylint.org/) | 1.8.2 | python code static checker / GPL |
| [pyodbc](https://github.com/mkleehammer/pyodbc) | 4.0.22 | DB API Module for ODBC / MIT |
| [pyopenssl](https://github.com/pyca/pyopenssl) | 17.5.0 | Python wrapper module around the OpenSSL library / Apache 2.0 |
| [pyparsing](http://pyparsing.wikispaces.com/) | 2.2.0 | Create and execute simple grammars / MIT |
| [pyqt](http://www.riverbankcomputing.co.uk/software/pyqt) | 5.6.0 | Python binding of the cross-platform GUI toolkit Qt. / Commercial, GPL-2.0, GPL-3.0 |
| [pysocks](https://github.com/Anorov/PySocks) | 1.6.7 | A Python SOCKS client module. See [Anorov/PySocks](https://github.com/Anorov/PySocks) for more information. / BSD 3-Clause |
| [pytables](http://www.pytables.org) | 3.4.2 | Brings together Python, HDF5 and NumPy to easily handle large amounts of data. / BSD 3-Clause |
| [pytest](https://docs.pytest.org/en/latest/) | 3.3.2 | Simple and powerful testing with Python. / MIT |
| [python](http://www.python.org/) | 2.7.14 | General purpose programming language / PSF |
| [python-dateutil](https://dateutil.readthedocs.org/) | 2.6.1 | Extensions to the standard Python datetime module. / BSD 3-clause |
| [pytz](http://pythonhosted.org/pytz/) | 2017.3 | World timezone definitions, modern and historical. / MIT |
| [pywavelets](https://github.com/PyWavelets/pywt) | 0.5.2 | Discrete Wavelet Transforms in Python. / MIT |
| [pyyaml](http://pyyaml.org/wiki/PyYAML) | 3.12 | YAML parser and emitter for Python / MIT |
| [pyzmq](https://github.com/zeromq/pyzmq) | 16.0.3 | Python bindings for zeromq / BSD 3-clause |
| [qt](http://qt-project.org) | 5.6.2 | Qt is a cross-platform application and UI framework. / LGPL-3.0 |
| [qtawesome](https://github.com/spyder-ide/qtawesome) | 0.4.4 | Iconic fonts in PyQt and PySide applications / MIT |
| [qtconsole](http://jupyter.org) | 4.3.1 | Jupyter Qt console / BSD 3-Clause |
| [qtpy](https://github.com/spyder-ide/qtpy) | 1.3.1 | Abstraction layer for PyQt5/PyQt4/PySide / MIT |
| [readline](https://cnswww.cns.cwru.edu/php/chet/readline/rltop.html) | 7.0 | library for editing command lines as they are typed in / GPL3 |
| [requests](http://python-requests.org) | 2.18.4 | Python HTTP for Humans. / Apache 2.0 |
| [rope](https://github.com/python-rope/rope) | 0.10.7 | A python refactoring library… / GPL 2.0 |
| [ruamel\_yaml](https://bitbucket.org/ruamel/yaml) | 0.15.35 | A patched copy of ruamel.yaml. / MIT |
| [scandir](https://github.com/benhoyt/scandir) | 1.6 | scandir, a better directory iterator and faster os.walk() / BSD 3-Clause |
| [scikit-image](http://scikit-image.org/) | 0.13.1 | Image processing routines for SciPy. / BSD 3-Clause |
| [scikit-learn](http://scikit-learn.org/) | 0.19.1 | A set of python modules for machine learning and data mining / BSD 3-Clause |
| [scipy](http://www.scipy.org/) | 1.0.0 | Scientific Library for Python / BSD 3-Clause |
| [seaborn](http://stanford.edu/~mwaskom/software/seaborn/) | 0.8.1 | Statistical data visualization / BSD 3-Clause |
| [send2trash](https://github.com/hsoft/send2trash) | 1.4.2 | Python library to natively send files to Trash (or Recycle bin) on all platforms. / BSD-3-Clause |
| [setuptools](https://github.com/pypa/setuptools) | 38.4.0 | Download, build, install, upgrade, and uninstall Python packages / MIT |
| [simplegeneric](http://cheeseshop.python.org/pypi/simplegeneric) | 0.8.1 | Simple generic functions (similar to Python’s own len(), pickle.dump(), etc.) / Zope Public |
| [singledispatch](http://docs.python.org/3/library/functools.html#functools.singledispatch) | 3.4.0.3 | Transforms a function into a single-dispatch generic function / MIT |
| [sip](http://www.riverbankcomputing.com/software/sip/intro) | 4.18.1 | Create Python bindings for C and C++ libraries / GPL-3.0 |
| [six](http://pypi.python.org/pypi/six/) | 1.11.0 | Python 2 and 3 compatibility utilities / MIT |
| [snowballstemmer](https://github.com/shibukawa/snowball_py) | 1.2.1 | Snowball stemming library collection for Python / BSD-2-Clause |
| [sortedcollections](http://www.grantjenks.com/docs/sortedcollections/) | 0.5.3 | Python Sorted Collections / Apache-2.0 |
| [sortedcontainers](http://www.grantjenks.com/docs/sortedcontainers/) | 1.5.9 | Python Sorted Container Types: SortedList, SortedDict, and SortedSet / Apache 2.0 |
| [sphinx](http://www.sphinx-doc.org) | 1.6.6 | Sphinx is a tool that makes it easy to create intelligent and beautiful documentation / BSD 2-clause |
| sphinxcontrib | 1.0 | Python namespace for sphinxcontrib / BSD |
| [sphinxcontrib-websupport](https://pypi.python.org/pypi/sphinxcontrib-websupport) | 1.0.1 | Sphinx API for Web Apps / BSD-2-Clause |
| [spyder](https://github.com/spyder-ide/spyder) | 3.2.6 | Scientific PYthon Development EnviRonment / MIT |
| [sqlalchemy](http://www.sqlalchemy.org/) | 1.2.1 | Database Abstraction Library. / MIT |
| [sqlite](http://www.sqlite.org/) | 3.22.0 | Implements a self-contained, zero-configuration, SQL database engine. / Public-Domain (`<http://www.sqlite.org/copyright.html>`) |
| [ssl\_match\_hostname](http://bitbucket.org/brandon/backports.ssl_match_hostname) | 3.5.0.1 | The ssl.match\_hostname() function from Python 3.5 / PSF 2 |
| [statsmodels](https://www.statsmodels.org) | 0.8.0 | Statistical computations and models for use with SciPy / BSD 3-Clause |
| [subprocess32](https://github.com/google/python-subprocess32) | 3.2.7 | A backport of the subprocess module from Python 3.2/3.3 for use on 2.x. / PSF 2 |
| [sympy](http://sympy.org) | 1.1.1 | Python library for symbolic mathematics / 3-clause BSD |
| [tblib](https://github.com/ionelmc/python-tblib) | 1.3.2 | Traceback serialization library. / BSD 2-Clause |
| [terminado](http://github.com/mitsuhiko/markupsafe) | 0.8.1 | Terminals served by tornado websockets / BSD 3-clause |
| [testpath](https://testpath.readthedocs.io) | 0.3.1 | Testpath is a collection of utilities for Python code working with files and commands. / MIT |
| [tk](http://www.tcl.tk/) | 8.6.7 | A dynamic programming language with GUI support. Bundles Tcl and Tk. / Tcl/Tk |
| [toolz](http://toolz.readthedocs.org/) | 0.9.0 | A functional standard library for Python. / BSD 3-Clause |
| [tornado](http://www.tornadoweb.org/) | 4.5.3 | A Python web framework and asynchronous networking library, originally developed at FriendFeed. / Apache 2.0 |
| [traitlets](http://ipython.org/) | 4.3.2 | Configuration system for Python applications / BSD 3-clause |
| [typing](https://docs.python.org/3.5/library/typing.html) | 3.6.2 | Type Hints for Python - backport for `Python<3.5` / PSF |
| [unicodecsv](https://github.com/jdunck/python-unicodecsv) | 0.14.1 | Drop-in replacement for csv module which supports unicode strings / BSD |
| [unixodbc](http://www.unixodbc.org/) | 2.3.4 | ODBC on non MS Windows platforms / LGPL-2.1 |
| [urllib3](https://urllib3.readthedocs.io/) | 1.22 | HTTP library with thread-safe connection pooling, file post, and more. / MIT |
| [wcwidth](https://github.com/jquast/wcwidth) | 0.1.7 | Measures number of Terminal column cells of wide-character codes. / MIT |
| [webencodings](https://github.com/gsnedders/python-webencodings) | 0.5.1 | Character encoding aliases for legacy web content / BSD 3-Clause |
| [werkzeug](http://werkzeug.pocoo.org/) | 0.14.1 | The Python WSGI Utility Library. / BSD 3-Clause |
| [wheel](https://bitbucket.org/pypa/wheel/) | 0.30.0 | A built-package format for Python. / MIT |
| [widgetsnbextension](http://ipython.org) | 3.1.0 | IPython HTML widgets for Jupyter / BSD 3-clause |
| [wrapt](https://github.com/GrahamDumpleton/wrapt) | 1.10.11 | Module for decorators, wrappers and monkey patching. / BSD 2-Clause |
| [xlrd](http://www.python-excel.org/) | 1.1.0 | Library for developers to extract data from Microsoft Excel (tm) spreadsheet files / BSD 3-Clause and BSD with advertising |
| [xlsxwriter](https://xlsxwriter.readthedocs.io/) | 1.0.2 | A Python module for creating Excel XLSX files / BSD 2-Clause |
| [xlwt](http://www.python-excel.org/) | 1.3.0 | Writing data and formatting information to Excel files / BSD |
| [xz](http://tukaani.org/xz/) | 5.2.3 | Data compression software with high compression ratio / LGPL-2.1 and GPL-2.0 |
| [yaml](http://pyyaml.org/wiki/LibYAML) | 0.1.7 | A C library for parsing and emitting YAML. / MIT |
| [zeromq](http://zeromq.org) | 4.2.2 | A high-performance asynchronous messaging library. / LGPL 3 |
| [zict](http://github.com/mrocklin/zict) | 0.1.3 | Composable Dictionary Classes / BSD 3-Clause |
| [zlib](http://zlib.net/) | 1.2.11 | Massively spiffy yet delicately unobtrusive compression library / zlib |
| Name | Version | Summary / License |
|---|---|---|
| [alabaster](http://www.sphinx-doc.org/en/stable/index.html) | 0.7.10 | Configurable, Python 2+3 compatible Sphinx theme. / BSD 3-Clause |
| [anaconda-client](http://anaconda.org) | 1.6.5 | anaconda.org command line client library / BSD 3-clause |
| [anaconda-navigator](https://github.com/ContinuumIO/navigator) | 1.6.9 | Anaconda Navigator / proprietary - Continuum Analytics, Inc. |
| [anaconda-project](https://github.com/Anaconda-Platform/anaconda-project) | 0.8.0 | Reproducible, executable project directories. / BSD 3-Clause |
| [asn1crypto](https://github.com/wbond/asn1crypto) | 0.22.0 | Python ASN.1 library with a focus on performance and a pythonic API / MIT |
| [astroid](https://www.astroid.org/) | 1.5.3 | A abstract syntax tree for Python with inference support. / LGPL 2.1 |
| [astropy](http://www.astropy.org/) | 2.0.2 | Community-developed Python Library for Astronomy / BSD |
| [babel](http://babel.pocoo.org/) | 2.5.0 | Utilities to internationalize and localize Python applications / BSD 3-clause |
| [backports](https://bitbucket.org/brandon/backports) | 1.0 | / BSD |
| [backports.shutil\_get\_terminal\_size](https://github.com/chrippa/backports.shutil_get_terminal_size) | 1.0.0 | A backport of the get\_terminal\_size function from Python 3.3’s shutil. / MIT |
| [beautifulsoup4](http://www.crummy.com/software/BeautifulSoup/) | 4.6.0 | Python library designed for screen-scraping / MIT |
| [bitarray](https://github.com/ilanschnell/bitarray) | 0.8.1 | efficient arrays of booleans – C extension / PSF |
| [bkcharts](http://github.com/bokeh/bkcharts) | 0.2 | High level chart types built on top of Bokeh / BSD 3-Clause |
| [blaze](http://blaze.pydata.org) | 0.11.3 | NumPy and Pandas interface to big data / BSD 3-Clause |
| [bleach](https://github.com/mozilla/bleach) | 2.0.0 | Easy, whitelist-based HTML-sanitizing tool / Apache-2.0 |
| [bokeh](http://bokeh.pydata.org/) | 0.12.10 | Statistical and novel interactive HTML plots for Python / BSD 3-Clause |
| [boto](https://github.com/boto/boto/) | 2.48.0 | Amazon Web Services Library / MIT |
| [bottleneck](http://berkeleyanalytics.com/bottleneck) | 1.2.1 | Fast NumPy array functions written in Cython. / BSD 2-Clause |
| [bzip2](http://www.bzip.org/) | 1.0.6 | high-quality data compressor / bzip2 |
| [ca-certificates](https://github.com/conda-forge/ca-certificates-feedstock) | 2017.08.26 | Certificates for use with other packages. / ISC |
| [cachecontrol](https://github.com/ionrock/cachecontrol) | 0.12.3 | httplib2 caching algorithms for use with requests / Apache Software License |
| [certifi](http://certifi.io/) | 2017.7.27.1 | Python package for providing Mozilla’s CA Bundle. / ISC |
| [cffi](https://bitbucket.org/cffi/cffi) | 1.10.0 | Foreign Function Interface for Python calling C code. / MIT |
| [chardet](https://github.com/chardet/chardet) | 3.0.4 | Universal character encoding detector / LGPL2 |
| [click](http://click.pocoo.org/) | 6.7 | A simple wrapper around optparse for powerful command line utilities. / BSD 3-Clause |
| [cloudpickle](https://github.com/cloudpipe/cloudpickle) | 0.4.0 | Extended pickling support for Python objects / BSD 3-Clause |
| [clyent](https://github.com/Anaconda-Platform/clyent) | 1.2.2 | Command line client library for windows and posix / BSD 3-Clause |
| [colorama](https://github.com/tartley/colorama) | 0.3.9 | Cross-platform colored terminal text. / BSD 3-Clause |
| [comtypes](http://starship.python.net/crew/theller/comtypes/) | 1.1.2 | pure Python COM package / MIT |
| [conda](http://conda.pydata.org/) | 4.3.30 | OS-agnostic, system-level binary package and environment manager. / BSD 3-Clause |
| [conda-build](https://github.com/conda/conda-build) | 3.0.27 | tools for building conda packages / BSD 3-Clause |
| console\_shortcut | 0.1.1 | Console shortcut creator for Windows (using menuinst) / BSD |
| [contextlib2](http://contextlib2.readthedocs.org) | 0.5.5 | Backports and enhancements for the contextlib module / PSF |
| [cryptography](https://github.com/pyca/cryptography) | 2.0.3 | Provides cryptographic recipes and primitives to Python developers / Apache 2.0 or BSD 3-Clause, PSF 2 |
| [curl](http://curl.haxx.se/) | 7.55.1 | tool and library for transferring data with URL syntax / MIT/X derivate (`<http://curl.haxx.se/docs/copyright.html>`) |
| [cycler](http://matplotlib.org/cycler) | 0.10.0 | Composable style cycles. / BSD 3-Clause |
| [cython](http://www.cython.org/) | 0.26.1 | The Cython compiler for writing C extensions for the Python language / Apache-2.0 |
| [cytoolz](https://github.com/pytoolz/cytoolz) | 0.8.2 | Cython implementation of Toolz. High performance functional utilities. / BSD 3-Clause |
| [dask](http://dask.pydata.org/en/latest/) | 0.15.3 | Parallel Python with task scheduling / BSD 3-Clause |
| [dask-core](http://github.com/dask/dask/) | 0.15.3 | Parallel Python with task scheduling / BSD 3-Clause |
| [datashape](http://datashape.pydata.org) | 0.5.4 | A data description language. / BSD 2-Clause |
| [decorator](https://github.com/micheles/decorator) | 4.1.2 | Better living through Python with decorators. / BSD 3-Clause |
| [distlib](https://bitbucket.org/pypa/distlib) | 0.2.5 | Distribution utilities / Python Software Foundation License |
| [distributed](http://distributed.readthedocs.io/en/latest/) | 1.19.1 | Distributed computing with Dask / BSD 3-Clause |
| [docutils](http://docutils.sourceforge.net/) | 0.14 | Docutils – Python Documentation Utilities / Public Domain Dedictation and BSD 2-Clause and PSF 2.1.1 and GPL 3.0 |
| [entrypoints](https://github.com/takluyver/entrypoints) | 0.2.3 | Discover and load entry points from installed packages. / MIT License |
| [et\_xmlfile](https://bitbucket.org/openpyxl/et_xmlfile) | 1.0.1 | An implementation of lxml.xmlfile for the standard library / MIT |
| [fastcache](https://github.com/pbrady/fastcache) | 1.0.2 | C implementation of Python 3 lru\_cache / MIT |
| [filelock](https://github.com/benediktschmitt/py-filelock) | 2.0.12 | A platform independent file lock. / Public Domain |
| [flask](http://flask.pocoo.org) | 0.12.2 | A microframework based on Werkzeug, Jinja2 and good intentions. / BSD 3-Clause |
| [flask-cors](https://github.com/corydolphin/flask-cors) | 3.0.3 | A Flask extension adding a decorator for CORS support / MIT |
| [freetype](https://www.freetype.org/) | 2.8 | A Free, High-Quality, and Portable Font Engine / GPL-2.0 and FreeType |
| [get\_terminal\_size](https://github.com/chrippa/backports.shutil_get_terminal_size) | 1.0.0 | Get the size of the terminal window. / MIT |
| [gevent](http://www.gevent.org/) | 1.2.2 | Coroutine-based network library / MIT |
| [glob2](https://github.com/miracle2k/python-glob2) | 0.5 | Version of the glob module that supports recursion via \*\*, and can capture patterns. / BSD-2-Clause |
| [greenlet](https://github.com/python-greenlet/greenlet) | 0.4.12 | Lightweight in-process concurrent programming / MIT |
| [h5py](http://www.h5py.org/) | 2.7.0 | Read and write HDF5 files from Python. / BSD 3-Clause |
| [hdf5](http://www.hdfgroup.org/HDF5/) | 1.10.1 | HDF5 is a data model, library, and file format for storing and managing data / HDF5 |
| [heapdict](http://stutzbachenterprises.com/) | 1.0.0 | A heap with decrease-key and increase-key operations / BSD 3-Clause |
| [html5lib](https://github.com/html5lib/html5lib-python) | 0.999999999 | HTML parser based on the WHATWG HTML specification / MIT |
| [icc\_rt](https://software.intel.com/en-us/node/522690) | 2017.0.4 | Intel runtime libraries for C, C++ and Fortran compilers / Intel proprietary |
| [icu](http://site.icu-project.org/) | 58.2 | International Components for Unicode. / MIT |
| [idna](https://github.com/kjd/idna) | 2.6 | Internationalized Domain Names in Applications (IDNA). / BSD Like |
| [imageio](http://imageio.github.io) | 2.2.0 | a Python library for reading and writing image data / BSD 2-Clause |
| [imagesize](https://github.com/shibukawa/imagesize_py) | 0.7.1 | Getting image size from png/jpeg/jpeg2000/gif file / MIT |
| [intel-openmp](https://software.intel.com/en-us/node/522690) | 2018.0.0 | Math library for Intel and compatible processors / proprietary - Intel |
| [ipykernel](http://ipython.org) | 4.6.1 | IPython Kernel for Jupyter / BSD 3-clause |
| [ipython](http://ipython.org/) | 6.1.0 | IPython: Productive Interactive Computing / BSD 3-clause |
| [ipython\_genutils](http://ipython.org) | 0.2.0 | vestigial utilities from IPython / BSD 3-Clause |
| [ipywidgets](https://github.com/ipython/ipywidgets) | 7.0.0 | Jupyter Interactive Widgets / BSD 3-clause |
| [isort](https://github.com/timothycrosley/isort) | 4.2.15 | A Python utility / library to sort Python imports. / MIT |
| [itsdangerous](https://github.com/pallets/itsdangerous) | 0.24 | Various helpers to pass trusted data to untrusted environments. / BSD 3-Clause |
| [jdcal](https://github.com/phn/jdcal) | 1.3 | Julian dates from proleptic Gregorian and Julian calendars. / BSD 2-Clause |
| [jedi](https://github.com/davidhalter/jedi/) | 0.10.2 | An autocompletion tool for Python that can be used for text editors. / MIT |
| [jinja2](http://jinja.pocoo.org) | 2.9.6 | An easy to use stand-alone template engine written in pure python. / 3-Clause BSD |
| [jpeg](http://www.ijg.org/) | 9b | read/write jpeg COM, EXIF, IPTC medata / Custom free software license |
| [jsonschema](https://github.com/Julian/jsonschema) | 2.6.0 | An implementation of JSON Schema validation for Python / MIT |
| [jupyter](http://jupyter.org) | 1.0.0 | Jupyter metapackage. Install all the Jupyter components in one go. / BSD 3-Clause |
| [jupyter\_client](http://jupyter.org) | 5.1.0 | Jupyter protocol implementation and client libraries / BSD 3-clause |
| [jupyter\_console](http://jupyter.org) | 5.2.0 | Jupyter terminal console / BSD 3-Clause |
| [jupyter\_core](http://jupyter.org) | 4.3.0 | Core common functionality of Jupyter projects. / BSD 3-clause |
| [jupyterlab](https://github.com/jupyterlab/jupyterlab) | 0.27.0 | A pre-alpha version of a computational environment for Jupyter. / BSD 3-Clause |
| [jupyterlab\_launcher](http://github.com/jupyterlab/jupyterlab_launcher) | 0.4.0 | A Launcher for JupyterLab based applications. / BSD 3-Clause |
| [lazy-object-proxy](https://github.com/ionelmc/python-lazy-object-proxy) | 1.3.1 | A fast and thorough lazy object proxy. / BSD 2-Clause |
| [libiconv](https://www.gnu.org/software/libiconv/) | 1.15 | Provides iconv for systems which don’t have one (or that cannot convert from/to Unicode.) / GPL and LGPL |
| [libpng](http://www.libpng.org/pub/png/libpng.html) | 1.6.32 | PNG reference library. / zlib/libpng |
| [libssh2](https://www.libssh2.org/) | 1.8.0 | the SSH library / BSD 3-Clause |
| [libtiff](http://www.libtiff.org/) | 4.0.8 | Support for the Tag Image File Format (TIFF). / HPND |
| [libxml2](http://xmlsoft.org/) | 2.9.4 | The XML C parser and toolkit of Gnome / MIT |
| [libxslt](http://xmlsoft.org/XSLT/) | 1.1.29 | The XSLT C library developed for the GNOME project / MIT |
| [llvmlite](http://llvmlite.pydata.org/) | 0.20.0 | Lightweight wrapper around basic LLVM functionality / BSD |
| [locket](https://github.com/mwilliamson/locket.py) | 0.2.0 | File-based locks for Python for Linux and Windows / BSD 2-Clause |
| [lockfile](http://launchpad.net/pylockfile) | 0.12.2 | Platform-independent file locking module / MIT |
| [lxml](http://lxml.de/) | 4.1.0 | Pythonic binding for the C libraries libxml2 and libxslt. / BSD 3-Clause, GPL-2.0, ZPL-2.0, and ElementTree |
| [lzo](http://www.oberhumer.com/opensource/lzo/) | 2.10 | LZO is a portable lossless data compression library written in ANSI C. / GPL v2+ |
| [markupsafe](https://www.palletsprojects.com/p/markupsafe/) | 1.0 | A Python module that implements the jinja2.Markup string / BSD 3-Clause |
| [matplotlib](http://matplotlib.org/) | 2.1.0 | Publication quality figures in Python / PSF-based |
| [mccabe](https://github.com/PyCQA/mccabe) | 0.6.1 | McCabe complexity checker for Python / MIT |
| [menuinst](https://github.com/ContinuumIO/menuinst) | 1.4.10 | cross platform menu item installation / BSD |
| [mistune](https://github.com/lepture/mistune) | 0.7.4 | The fastest markdown parser in pure Python. / BSD 3-Clause |
| [mkl](http://software.intel.com/en-us/articles/intel-mkl/) | 2018.0.0 | Math library for Intel and compatible processors / proprietary - Intel |
| [mkl-service](https://github.com/ContinuumIO/mkl-service) | 1.1.2 | Python bindings to MKL service functions / 3-clause BSD |
| [mpmath](http://mpmath.org) | 0.19 | Python library for arbitrary-precision floating-point arithmetic / BSD 3-Clause |
| [msgpack-python](http://msgpack.org/) | 0.4.8 | MessagePack (de)serializer. / Apache 2.0 |
| [multipledispatch](https://github.com/mrocklin/multipledispatch/) | 0.4.9 | Multiple dispatch in Python / BSD 3-Clause |
| [navigator-updater](https://github.com/ContinuumIO/navigator-updater) | 0.1.0 | Anaconda Navigator Updater / proprietary - Continuum Analytics, Inc. |
| [nbconvert](http://jupyter.org) | 5.3.1 | Converting Jupyter Notebooks / BSD 3-Clause |
| [nbformat](http://jupyter.org) | 4.4.0 | The reference implementation of the Jupyter Notebook format / BSD 3-clause |
| [networkx](https://networkx.github.io/) | 2.0 | Python package for creating and manipulating complex networks / BSD 3-Clause |
| [nltk](http://nltk.org/) | 3.2.4 | Build Python programs to work with human language data / Apache 2.0 |
| [nose](http://readthedocs.org/docs/nose/) | 1.3.7 | Nose extends unittest to make testing easier / LGPL-2.1 |
| [notebook](http://jupyter.org) | 5.0.0 | A web-based notebook environment for interactive computing / BSD 3-clause |
| [numba](http://numba.pydata.org/) | 0.35.0 | NumPy aware dynamic Python compiler using LLVM / BSD |
| [numexpr](https://github.com/pydata/numexpr) | 2.6.2 | Fast numerical expression evaluator for NumPy. / MIT |
| [numpy](http://numpy.scipy.org/) | 1.13.3 | Array processing for numbers, strings, records, and objects. / BSD 3-Clause |
| [numpydoc](https://github.com/numpy/numpydoc) | 0.7.0 | Sphinx extension to support docstrings in Numpy format / BSD 3-Clause |
| [odo](http://odo.pydata.org) | 0.5.1 | Data migration in Python / BSD-3-Clause |
| [olefile](http://www.decalage.info/python/olefileio) | 0.44 | parse, read and write Microsoft OLE2 files / BSD License 2-Clause |
| [openpyxl](https://openpyxl.readthedocs.io) | 2.4.8 | A Python library to read/write Excel 2010 xlsx/xlsm files / MIT |
| [openssl](http://www.openssl.org/) | 1.0.2l | OpenSSL is an open-source implementation of the SSL and TLS protocols / OpenSSL |
| [packaging](https://github.com/pypa/packaging) | 16.8 | Core utilities for Python packages / Apache 2.0 or BSD 2-Clause |
| [pandas](http://pandas.pydata.org) | 0.20.3 | High-performance, easy-to-use data structures and data analysis tools. / BSD 3-clause |
| [pandoc](http://johnmacfarlane.net/pandoc/) | 1.19.2.1 | Universal markup converter (repackaged binaries). / GPL-2.0 |
| [pandocfilters](https://github.com/jgm/pandocfilters) | 1.4.2 | A python module for writing pandoc filters / BSD-3-Clause |
| [partd](https://github.com/dask/partd) | 0.3.8 | Data structure for on-disk shuffle operations / BSD 3-Clause |
| [path.py](https://github.com/jaraco/path.py) | 10.3.1 | A module wrapper for os.path / MIT |
| [pathlib2](https://github.com/mcmtroffaes/pathlib2) | 2.3.0 | Fork of pathlib aiming to support the full stdlib Python API. / MIT |
| [patsy](https://github.com/pydata/patsy) | 0.4.1 | Describing statistical models in Python using symbolic formulas / BSD-2-Clause, PSF2 |
| [pep8](http://pep8.readthedocs.org/) | 1.7.0 | Python style guide checker / MIT |
| [pickleshare](https://github.com/vivainio/pickleshare) | 0.7.4 | Tiny ‘shelve’-like database with concurrency support / MIT |
| [pillow](http://python-imaging.github.io/) | 4.2.1 | Pillow is the friendly PIL fork by Alex Clark and Contributors. / PIL |
| [pip](https://pip.pypa.io/en/stable/) | 9.0.1 | PyPA recommended tool for installing Python packages / MIT |
| [pkginfo](https://code.launchpad.net/~tseaver/pkginfo/trunk) | 1.4.1 | Query metadatdata from sdists / bdists / installed packages. / MIT |
| [ply](http://www.dabeaz.com/ply/index.html) | 3.10 | Python Lex-Yacc / BSD 3-clause |
| [progress](https://github.com/verigak/progress) | 1.3 | Easy progress reporting for Python / ISC |
| [prompt\_toolkit](https://github.com/jonathanslenders/python-prompt-toolkit) | 1.0.15 | Library for building powerful interactive command lines in Python / BSD 3-clause |
| [psutil](https://github.com/giampaolo/psutil) | 5.4.0 | A cross-platform process and system utilities module for Python / BSD 3-Clause |
| [py](https://github.com/pytest-dev/py) | 1.4.34 | library with cross-python path, ini-parsing, io, code, log facilities / MIT |
| [pycodestyle](https://pycodestyle.readthedocs.io/) | 2.3.1 | Python style guide checker / MIT |
| [pycosat](https://github.com/ContinuumIO/pycosat) | 0.6.2 | Bindings to picosat (a SAT solver) / MIT |
| [pycparser](https://github.com/eliben/pycparser) | 2.18 | Complete C99 parser in pure Python / BSD 3-clause |
| [pycrypto](http://www.pycrypto.org/) | 2.6.1 | Cryptographic modules for Python. / Public Domain |
| [pycurl](http://pycurl.sourceforge.net/) | 7.43.0 | A Python Interface To The cURL library / LGPL, MIT |
| [pyflakes](https://github.com/PyCQA/pyflakes) | 1.6.0 | Pyflakes analyzes programs and detects various errors. / MIT |
| [pygments](http://pygments.org/) | 2.2.0 | Generic syntax highlighting package / BSD 2-clause |
| [pylint](http://www.pylint.org/) | 1.7.4 | python code static checker / GPL |
| [pyodbc](https://github.com/mkleehammer/pyodbc) | 4.0.17 | DB API Module for ODBC / MIT |
| [pyopenssl](https://github.com/pyca/pyopenssl) | 17.2.0 | Python wrapper module around the OpenSSL library / Apache 2.0 |
| [pyparsing](http://pyparsing.wikispaces.com/) | 2.2.0 | Create and execute simple grammars / MIT |
| [pyqt](http://www.riverbankcomputing.co.uk/software/pyqt) | 5.6.0 | Python binding of the cross-platform GUI toolkit Qt. / Commercial, GPL-2.0, GPL-3.0 |
| [pysocks](https://github.com/Anorov/PySocks) | 1.6.7 | A Python SOCKS client module. See [Anorov/PySocks](https://github.com/Anorov/PySocks) for more information. / BSD 3-Clause |
| [pytables](http://www.pytables.org) | 3.4.2 | Brings together Python, HDF5 and NumPy to easily handle large amounts of data. / BSD 3-Clause |
| [pytest](https://docs.pytest.org/en/latest/) | 3.2.1 | Simple and powerful testing with Python. / MIT |
| [python](http://www.python.org/) | 3.6.3 | General purpose programming language / PSF |
| [python-dateutil](https://dateutil.readthedocs.org/) | 2.6.1 | Extensions to the standard Python datetime module. / BSD 3-clause |
| [pytz](http://pythonhosted.org/pytz/) | 2017.2 | World timezone definitions, modern and historical. / MIT |
| [pywavelets](https://github.com/PyWavelets/pywt) | 0.5.2 | Discrete Wavelet Transforms in Python. / MIT |
| [pywin32](https://sourceforge.net/projects/pywin32) | 221 | Python extensions for Windows / PSF |
| [pyyaml](http://pyyaml.org/wiki/PyYAML) | 3.12 | YAML parser and emitter for Python / MIT |
| [pyzmq](https://github.com/zeromq/pyzmq) | 16.0.2 | Python bindings for zeromq / BSD 3-clause |
| [qt](http://qt-project.org) | 5.6.2 | Qt is a cross-platform application and UI framework. / LGPL-3.0 |
| [qtawesome](https://github.com/spyder-ide/qtawesome) | 0.4.4 | Iconic fonts in PyQt and PySide applications / MIT |
| [qtconsole](http://jupyter.org) | 4.3.1 | Jupyter Qt console / BSD 3-Clause |
| [qtpy](https://github.com/spyder-ide/qtpy) | 1.3.1 | Abstraction layer for PyQt5/PyQt4/PySide / MIT |
| [requests](http://python-requests.org) | 2.18.4 | Python HTTP for Humans. / Apache 2.0 |
| [rope](https://github.com/python-rope/rope) | 0.10.5 | A python refactoring library… / GPL 2.0 |
| [ruamel\_yaml](https://bitbucket.org/ruamel/yaml) | 0.11.14 | A patched copy of ruamel.yaml. / MIT |
| [scikit-image](http://scikit-image.org/) | 0.13.0 | Image processing routines for SciPy. / BSD 3-Clause |
| [scikit-learn](http://scikit-learn.org/) | 0.19.1 | A set of python modules for machine learning and data mining / BSD 3-Clause |
| [scipy](http://www.scipy.org/) | 0.19.1 | Scientific Library for Python / BSD 3-Clause |
| [seaborn](http://stanford.edu/~mwaskom/software/seaborn/) | 0.8.0 | Statistical data visualization / BSD 3-Clause |
| [setuptools](https://github.com/pypa/setuptools) | 36.5.0 | Download, build, install, upgrade, and uninstall Python packages / MIT |
| [simplegeneric](http://cheeseshop.python.org/pypi/simplegeneric) | 0.8.1 | Simple generic functions (similar to Python’s own len(), pickle.dump(), etc.) / Zope Public |
| [singledispatch](http://docs.python.org/3/library/functools.html#functools.singledispatch) | 3.4.0.3 | Transforms a function into a single-dispatch generic function / MIT |
| [sip](http://www.riverbankcomputing.com/software/sip/intro) | 4.18.1 | Create Python bindings for C and C++ libraries / GPL-3.0 |
| [six](http://pypi.python.org/pypi/six/) | 1.11.0 | Python 2 and 3 compatibility utilities / MIT |
| [snowballstemmer](https://github.com/shibukawa/snowball_py) | 1.2.1 | Snowball stemming library collection for Python / BSD-2-Clause |
| [sortedcollections](http://www.grantjenks.com/docs/sortedcollections/) | 0.5.3 | Python Sorted Collections / Apache-2.0 |
| [sortedcontainers](http://www.grantjenks.com/docs/sortedcontainers/) | 1.5.7 | Python Sorted Container Types: SortedList, SortedDict, and SortedSet / Apache 2.0 |
| [sphinx](http://www.sphinx-doc.org) | 1.6.3 | Sphinx is a tool that makes it easy to create intelligent and beautiful documentation / BSD 2-clause |
| sphinxcontrib | 1.0 | Python namespace for sphinxcontrib / BSD |
| [sphinxcontrib-websupport](https://pypi.python.org/pypi/sphinxcontrib-websupport) | 1.0.1 | Sphinx API for Web Apps / BSD-2-Clause |
| [spyder](https://github.com/spyder-ide/spyder) | 3.2.4 | Scientific PYthon Development EnviRonment / MIT |
| [sqlalchemy](http://www.sqlalchemy.org/) | 1.1.13 | Database Abstraction Library. / MIT |
| [sqlite](http://www.sqlite.org/) | 3.20.1 | Implements a self-contained, zero-configuration, SQL database engine. / Public-Domain (`<http://www.sqlite.org/copyright.html>`) |
| [statsmodels](https://www.statsmodels.org) | 0.8.0 | Statistical computations and models for use with SciPy / BSD 3-Clause |
| [sympy](http://sympy.org) | 1.1.1 | Python library for symbolic mathematics / 3-clause BSD |
| [tblib](https://github.com/ionelmc/python-tblib) | 1.3.2 | Traceback serialization library. / BSD 2-Clause |
| [testpath](https://testpath.readthedocs.io) | 0.3.1 | Testpath is a collection of utilities for Python code working with files and commands. / MIT |
| [tk](http://www.tcl.tk/) | 8.6.7 | A dynamic programming language with GUI support. Bundles Tcl and Tk. / Tcl/Tk |
| [toolz](http://toolz.readthedocs.org/) | 0.8.2 | A functional standard library for Python. / BSD 3-Clause |
| [tornado](http://www.tornadoweb.org/) | 4.5.2 | A Python web framework and asynchronous networking library, originally developed at FriendFeed. / Apache 2.0 |
| [traitlets](http://ipython.org/) | 4.3.2 | Configuration system for Python applications / BSD 3-clause |
| [typing](https://docs.python.org/3.5/library/typing.html) | 3.6.2 | Type Hints for Python - backport for `Python<3.5` / PSF |
| [unicodecsv](https://github.com/jdunck/python-unicodecsv) | 0.14.1 | Drop-in replacement for csv module which supports unicode strings / BSD |
| [urllib3](https://urllib3.readthedocs.io/) | 1.22 | HTTP library with thread-safe connection pooling, file post, and more. / MIT |
| [vc](https://github.com/conda/conda/wiki/VC-features) | 14 | A meta-package to track VC features. / Modified BSD License (3-clause) |
| [vs2015\_runtime](http://www.microsoft.com) | 14.0.25123 | Bundles of the MSVC 14 (VS 2015) runtime / Proprietary |
| [wcwidth](https://github.com/jquast/wcwidth) | 0.1.7 | Measures number of Terminal column cells of wide-character codes. / MIT |
| [webencodings](https://github.com/gsnedders/python-webencodings) | 0.5.1 | Character encoding aliases for legacy web content / BSD 3-Clause |
| [werkzeug](http://werkzeug.pocoo.org/) | 0.12.2 | The Python WSGI Utility Library. / BSD 3-Clause |
| [wheel](https://bitbucket.org/pypa/wheel/) | 0.29.0 | A built-package format for Python. / MIT |
| [widgetsnbextension](http://ipython.org) | 3.0.2 | IPython HTML widgets for Jupyter / BSD 3-clause |
| [win\_inet\_pton](https://github.com/hickeroar/win_inet_pton) | 1.0.1 | Native inet\_pton and inet\_ntop implementation for Python on Windows (with ctypes). / PUBLIC-DOMAIN |
| [win\_unicode\_console](https://github.com/Drekin/win-unicode-console) | 0.5 | A Python package to enable Unicode input and display when running Python from Windows console. / MIT |
| [wincertstore](https://bitbucket.org/tiran/wincertstore) | 0.2 | Python module to extract CA and CRL certs from Windows’ cert store (ctypes based). / PSF 2 |
| [wrapt](https://github.com/GrahamDumpleton/wrapt) | 1.10.11 | Module for decorators, wrappers and monkey patching. / BSD 2-Clause |
| [xlrd](http://www.python-excel.org/) | 1.1.0 | Library for developers to extract data from Microsoft Excel (tm) spreadsheet files / BSD 3-Clause and BSD with advertising |
| [xlsxwriter](https://xlsxwriter.readthedocs.io/) | 1.0.2 | A Python module for creating Excel XLSX files / BSD 2-Clause |
| [xlwings](http://xlwings.org/) | 0.11.4 | Interact with Excel from Python and vice versa / 3-clause BSD |
| [xlwt](http://www.python-excel.org/) | 1.3.0 | Writing data and formatting information to Excel files / BSD |
| [yaml](http://pyyaml.org/wiki/LibYAML) | 0.1.7 | A C library for parsing and emitting YAML. / MIT |
| [zict](http://github.com/mrocklin/zict) | 0.1.3 | Composable Dictionary Classes / BSD 3-Clause |
| [zlib](http://zlib.net/) | 1.2.11 | Massively spiffy yet delicately unobtrusive compression library / zlib |
| Name | Version | Summary / License |
|---|---|---|
| [alabaster](http://www.sphinx-doc.org/en/stable/index.html) | 0.7.10 | Configurable, Python 2+3 compatible Sphinx theme. / BSD 3-Clause |
| [anaconda-client](http://anaconda.org) | 1.6.5 | anaconda.org command line client library / BSD 3-clause |
| [anaconda-navigator](https://github.com/ContinuumIO/navigator) | 1.6.9 | Anaconda Navigator / proprietary - Continuum Analytics, Inc. |
| [anaconda-project](https://github.com/Anaconda-Platform/anaconda-project) | 0.8.0 | Reproducible, executable project directories. / BSD 3-Clause |
| [appnope](http://github.com/minrk/appnope) | 0.1.0 | Disable App Nap on OS X 10.9 / BSD 2-Clause |
| [appscript](http://appscript.sourceforge.net/) | 1.0.1 | Control AppleScriptable applications from Python / Public-Domain |
| [asn1crypto](https://github.com/wbond/asn1crypto) | 0.22.0 | Python ASN.1 library with a focus on performance and a pythonic API / MIT |
| [astroid](https://www.astroid.org/) | 1.5.3 | A abstract syntax tree for Python with inference support. / LGPL 2.1 |
| [astropy](http://www.astropy.org/) | 2.0.2 | Community-developed Python Library for Astronomy / BSD |
| [babel](http://babel.pocoo.org/) | 2.5.0 | Utilities to internationalize and localize Python applications / BSD 3-clause |
| [backports](https://bitbucket.org/brandon/backports) | 1.0 | / BSD |
| [backports.shutil\_get\_terminal\_size](https://github.com/chrippa/backports.shutil_get_terminal_size) | 1.0.0 | A backport of the get\_terminal\_size function from Python 3.3’s shutil. / MIT |
| [beautifulsoup4](http://www.crummy.com/software/BeautifulSoup/) | 4.6.0 | Python library designed for screen-scraping / MIT |
| [bitarray](https://github.com/ilanschnell/bitarray) | 0.8.1 | efficient arrays of booleans – C extension / PSF |
| [bkcharts](http://github.com/bokeh/bkcharts) | 0.2 | High level chart types built on top of Bokeh / BSD 3-Clause |
| [blaze](http://blaze.pydata.org) | 0.11.3 | NumPy and Pandas interface to big data / BSD 3-Clause |
| [bleach](https://github.com/mozilla/bleach) | 2.0.0 | Easy, whitelist-based HTML-sanitizing tool / Apache-2.0 |
| [bokeh](http://bokeh.pydata.org/) | 0.12.10 | Statistical and novel interactive HTML plots for Python / BSD 3-Clause |
| [boto](https://github.com/boto/boto/) | 2.48.0 | Amazon Web Services Library / MIT |
| [bottleneck](http://berkeleyanalytics.com/bottleneck) | 1.2.1 | Fast NumPy array functions written in Cython. / BSD 2-Clause |
| [bzip2](http://www.bzip.org/) | 1.0.6 | high-quality data compressor / bzip2 |
| [ca-certificates](https://github.com/conda-forge/ca-certificates-feedstock) | 2017.08.26 | Certificates for use with other packages. / ISC |
| [certifi](http://certifi.io/) | 2017.7.27.1 | Python package for providing Mozilla’s CA Bundle. / ISC |
| [cffi](https://bitbucket.org/cffi/cffi) | 1.10.0 | Foreign Function Interface for Python calling C code. / MIT |
| [chardet](https://github.com/chardet/chardet) | 3.0.4 | Universal character encoding detector / LGPL2 |
| [click](http://click.pocoo.org/) | 6.7 | A simple wrapper around optparse for powerful command line utilities. / BSD 3-Clause |
| [cloudpickle](https://github.com/cloudpipe/cloudpickle) | 0.4.0 | Extended pickling support for Python objects / BSD 3-Clause |
| [clyent](https://github.com/Anaconda-Platform/clyent) | 1.2.2 | Command line client library for windows and posix / BSD 3-Clause |
| [colorama](https://github.com/tartley/colorama) | 0.3.9 | Cross-platform colored terminal text. / BSD 3-Clause |
| [conda](http://conda.pydata.org/) | 4.3.30 | OS-agnostic, system-level binary package and environment manager. / BSD 3-Clause |
| [conda-build](https://github.com/conda/conda-build) | 3.0.27 | tools for building conda packages / BSD 3-Clause |
| [contextlib2](http://contextlib2.readthedocs.org) | 0.5.5 | Backports and enhancements for the contextlib module / PSF |
| [cryptography](https://github.com/pyca/cryptography) | 2.0.3 | Provides cryptographic recipes and primitives to Python developers / Apache 2.0 or BSD 3-Clause, PSF 2 |
| [curl](http://curl.haxx.se/) | 7.55.1 | tool and library for transferring data with URL syntax / MIT/X derivate (`<http://curl.haxx.se/docs/copyright.html>`) |
| [cycler](http://matplotlib.org/cycler) | 0.10.0 | Composable style cycles. / BSD 3-Clause |
| [cython](http://www.cython.org/) | 0.26.1 | The Cython compiler for writing C extensions for the Python language / Apache-2.0 |
| [cytoolz](https://github.com/pytoolz/cytoolz) | 0.8.2 | Cython implementation of Toolz. High performance functional utilities. / BSD 3-Clause |
| [dask](http://dask.pydata.org/en/latest/) | 0.15.3 | Parallel Python with task scheduling / BSD 3-Clause |
| [dask-core](http://github.com/dask/dask/) | 0.15.3 | Parallel Python with task scheduling / BSD 3-Clause |
| [datashape](http://datashape.pydata.org) | 0.5.4 | A data description language. / BSD 2-Clause |
| [dbus](http://www.freedesktop.org/wiki/Software/dbus/) | 1.10.22 | Simple message bus system for applications to talk to one another / GPL2 |
| [decorator](https://github.com/micheles/decorator) | 4.1.2 | Better living through Python with decorators. / BSD 3-Clause |
| [distributed](http://distributed.readthedocs.io/en/latest/) | 1.19.1 | Distributed computing with Dask / BSD 3-Clause |
| [docutils](http://docutils.sourceforge.net/) | 0.14 | Docutils – Python Documentation Utilities / Public Domain Dedictation and BSD 2-Clause and PSF 2.1.1 and GPL 3.0 |
| [entrypoints](https://github.com/takluyver/entrypoints) | 0.2.3 | Discover and load entry points from installed packages. / MIT License |
| [et\_xmlfile](https://bitbucket.org/openpyxl/et_xmlfile) | 1.0.1 | An implementation of lxml.xmlfile for the standard library / MIT |
| [expat](http://expat.sourceforge.net/) | 2.2.4 | Expat XML parser library in C. / MIT |
| [fastcache](https://github.com/pbrady/fastcache) | 1.0.2 | C implementation of Python 3 lru\_cache / MIT |
| [filelock](https://github.com/benediktschmitt/py-filelock) | 2.0.12 | A platform independent file lock. / Public Domain |
| [flask](http://flask.pocoo.org) | 0.12.2 | A microframework based on Werkzeug, Jinja2 and good intentions. / BSD 3-Clause |
| [flask-cors](https://github.com/corydolphin/flask-cors) | 3.0.3 | A Flask extension adding a decorator for CORS support / MIT |
| [freetype](https://www.freetype.org/) | 2.8 | A Free, High-Quality, and Portable Font Engine / GPL-2.0 and FreeType |
| [get\_terminal\_size](https://github.com/chrippa/backports.shutil_get_terminal_size) | 1.0.0 | Get the size of the terminal window. / MIT |
| [gettext](https://www.gnu.org/software/gettext/) | 0.19.8.1 | Internationalization package. / GPLv2 |
| [gettext](https://www.gnu.org/software/gettext/) | 0.19.8.1 | Internationalization package. / GPLv2 |
| [gevent](http://www.gevent.org/) | 1.2.2 | Coroutine-based network library / MIT |
| [glib](https://developer.gnome.org/glib/) | 2.53.6 | Provides core application building blocks for libraries and applications written in C. / LGPL-2.1 |
| [glib](https://developer.gnome.org/glib/) | 2.53.6 | Provides core application building blocks for libraries and applications written in C. / LGPL-2.1 |
| [glob2](https://github.com/miracle2k/python-glob2) | 0.5 | Version of the glob module that supports recursion via \*\*, and can capture patterns. / BSD-2-Clause |
| [gmp](http://gmplib.org/) | 6.1.2 | The GNU multiprecision library. / GPL 2 and LGPL 3 |
| [gmp](http://gmplib.org/) | 6.1.2 | The GNU multiprecision library. / GPL 2 and LGPL 3 |
| [gmpy2](https://pypi.python.org/pypi/gmpy2) | 2.0.8 | GMP/MPIR, MPFR, and MPC interface to Python 2.6+ and 3.x / LGPL 3 |
| [gmpy2](https://pypi.python.org/pypi/gmpy2) | 2.0.8 | GMP/MPIR, MPFR, and MPC interface to Python 2.6+ and 3.x / LGPL 3 |
| [greenlet](https://github.com/python-greenlet/greenlet) | 0.4.12 | Lightweight in-process concurrent programming / MIT |
| [h5py](http://www.h5py.org/) | 2.7.0 | Read and write HDF5 files from Python. / BSD 3-Clause |
| [hdf5](http://www.hdfgroup.org/HDF5/) | 1.10.1 | HDF5 is a data model, library, and file format for storing and managing data / HDF5 |
| [heapdict](http://stutzbachenterprises.com/) | 1.0.0 | A heap with decrease-key and increase-key operations / BSD 3-Clause |
| [html5lib](https://github.com/html5lib/html5lib-python) | 0.999999999 | HTML parser based on the WHATWG HTML specification / MIT |
| [icu](http://site.icu-project.org/) | 58.2 | International Components for Unicode. / MIT |
| [idna](https://github.com/kjd/idna) | 2.6 | Internationalized Domain Names in Applications (IDNA). / BSD Like |
| [imageio](http://imageio.github.io) | 2.2.0 | a Python library for reading and writing image data / BSD 2-Clause |
| [imagesize](https://github.com/shibukawa/imagesize_py) | 0.7.1 | Getting image size from png/jpeg/jpeg2000/gif file / MIT |
| [intel-openmp](https://software.intel.com/en-us/node/522690) | 2018.0.0 | Math library for Intel and compatible processors / proprietary - Intel |
| [ipykernel](http://ipython.org) | 4.6.1 | IPython Kernel for Jupyter / BSD 3-clause |
| [ipython](http://ipython.org/) | 6.1.0 | IPython: Productive Interactive Computing / BSD 3-clause |
| [ipython\_genutils](http://ipython.org) | 0.2.0 | vestigial utilities from IPython / BSD 3-Clause |
| [ipywidgets](https://github.com/ipython/ipywidgets) | 7.0.0 | Jupyter Interactive Widgets / BSD 3-clause |
| [isort](https://github.com/timothycrosley/isort) | 4.2.15 | A Python utility / library to sort Python imports. / MIT |
| [itsdangerous](https://github.com/pallets/itsdangerous) | 0.24 | Various helpers to pass trusted data to untrusted environments. / BSD 3-Clause |
| [jbig](https://www.cl.cam.ac.uk/~mgk25/jbigkit) | 2.1 | Implementation of the JBIG1 data compression standard / GPL-2.0 |
| [jdcal](https://github.com/phn/jdcal) | 1.3 | Julian dates from proleptic Gregorian and Julian calendars. / BSD 2-Clause |
| [jedi](https://github.com/davidhalter/jedi/) | 0.10.2 | An autocompletion tool for Python that can be used for text editors. / MIT |
| [jinja2](http://jinja.pocoo.org) | 2.9.6 | An easy to use stand-alone template engine written in pure python. / 3-Clause BSD |
| [jpeg](http://www.ijg.org/) | 9b | read/write jpeg COM, EXIF, IPTC medata / Custom free software license |
| [jsonschema](https://github.com/Julian/jsonschema) | 2.6.0 | An implementation of JSON Schema validation for Python / MIT |
| [jupyter](http://jupyter.org) | 1.0.0 | Jupyter metapackage. Install all the Jupyter components in one go. / BSD 3-Clause |
| [jupyter\_client](http://jupyter.org) | 5.1.0 | Jupyter protocol implementation and client libraries / BSD 3-clause |
| [jupyter\_console](http://jupyter.org) | 5.2.0 | Jupyter terminal console / BSD 3-Clause |
| [jupyter\_core](http://jupyter.org) | 4.3.0 | Core common functionality of Jupyter projects. / BSD 3-clause |
| [jupyterlab](https://github.com/jupyterlab/jupyterlab) | 0.27.0 | A pre-alpha version of a computational environment for Jupyter. / BSD 3-Clause |
| [jupyterlab\_launcher](http://github.com/jupyterlab/jupyterlab_launcher) | 0.4.0 | A Launcher for JupyterLab based applications. / BSD 3-Clause |
| [lazy-object-proxy](https://github.com/ionelmc/python-lazy-object-proxy) | 1.3.1 | A fast and thorough lazy object proxy. / BSD 2-Clause |
| [libcxx](http://libcxx.llvm.org/) | 4.0.1 | C++ Standard Library / MIT license or UIUC License |
| [libcxxabi](http://libcxxabi.llvm.org/) | 4.0.1 | C++ Standard Library Support / MIT license or UIUC License |
| [libedit](http://thrysoee.dk/editline/) | 3.1 | Editline Library (libedit) / 3-Clause BSD |
| [libffi](https://sourceware.org/libffi/) | 3.2.1 | A Portable Foreign Function Interface Library. / Custom |
| [libffi](https://sourceware.org/libffi/) | 3.2.1 | A Portable Foreign Function Interface Library. / Custom |
| [libgfortran](http://gcc.gnu.org/) | 3.0.1 | Fortran libraries from the GNU Compiler Collection / GPL 3 (with GCC Runtime Library Exception 3.1) |
| [libiconv](https://www.gnu.org/software/libiconv/) | 1.15 | Provides iconv for systems which don’t have one (or that cannot convert from/to Unicode.) / GPL and LGPL |
| [libpng](http://www.libpng.org/pub/png/libpng.html) | 1.6.32 | PNG reference library. / zlib/libpng |
| [libsodium](https://github.com/jedisct1/libsodium) | 1.0.13 | A modern and easy-to-use crypto library. / ISC |
| [libssh2](https://www.libssh2.org/) | 1.8.0 | the SSH library / BSD 3-Clause |
| [libtiff](http://www.libtiff.org/) | 4.0.8 | Support for the Tag Image File Format (TIFF). / HPND |
| [libxml2](http://xmlsoft.org/) | 2.9.4 | The XML C parser and toolkit of Gnome / MIT |
| [libxslt](http://xmlsoft.org/XSLT/) | 1.1.29 | The XSLT C library developed for the GNOME project / MIT |
| [llvmlite](http://llvmlite.pydata.org/) | 0.20.0 | Lightweight wrapper around basic LLVM functionality / BSD |
| [locket](https://github.com/mwilliamson/locket.py) | 0.2.0 | File-based locks for Python for Linux and Windows / BSD 2-Clause |
| [lxml](http://lxml.de/) | 4.1.0 | Pythonic binding for the C libraries libxml2 and libxslt. / BSD 3-Clause, GPL-2.0, ZPL-2.0, and ElementTree |
| [lzo](http://www.oberhumer.com/opensource/lzo/) | 2.10 | LZO is a portable lossless data compression library written in ANSI C. / GPL v2+ |
| [markupsafe](https://www.palletsprojects.com/p/markupsafe/) | 1.0 | A Python module that implements the jinja2.Markup string / BSD 3-Clause |
| [matplotlib](http://matplotlib.org/) | 2.1.0 | Publication quality figures in Python / PSF-based |
| [mccabe](https://github.com/PyCQA/mccabe) | 0.6.1 | McCabe complexity checker for Python / MIT |
| [mistune](https://github.com/lepture/mistune) | 0.7.4 | The fastest markdown parser in pure Python. / BSD 3-Clause |
| [mkl](http://software.intel.com/en-us/articles/intel-mkl/) | 2018.0.0 | Math library for Intel and compatible processors / proprietary - Intel |
| [mkl-service](https://github.com/ContinuumIO/mkl-service) | 1.1.2 | Python bindings to MKL service functions / 3-clause BSD |
| [mpc](http://www.multiprecision.org/) | 1.0.3 | A C library for the arithmetic of complex numbers with arbitrarily high precision. / LGPL 3 |
| [mpfr](http://www.mpfr.org/) | 3.1.5 | The MPFR library is a C library for multiple-precision floating-point computations with correct rounding. / LGPL 3 |
| [mpmath](http://mpmath.org) | 0.19 | Python library for arbitrary-precision floating-point arithmetic / BSD 3-Clause |
| [msgpack-python](http://msgpack.org/) | 0.4.8 | MessagePack (de)serializer. / Apache 2.0 |
| [multipledispatch](https://github.com/mrocklin/multipledispatch/) | 0.4.9 | Multiple dispatch in Python / BSD 3-Clause |
| [navigator-updater](https://github.com/ContinuumIO/navigator-updater) | 0.1.0 | Anaconda Navigator Updater / proprietary - Continuum Analytics, Inc. |
| [nbconvert](http://jupyter.org) | 5.3.1 | Converting Jupyter Notebooks / BSD 3-Clause |
| [nbformat](http://jupyter.org) | 4.4.0 | The reference implementation of the Jupyter Notebook format / BSD 3-clause |
| [ncurses](http://www.gnu.org/software/ncurses/) | 6.0 | Library for text-based user interfaces / Free software (MIT-like) |
| [networkx](https://networkx.github.io/) | 2.0 | Python package for creating and manipulating complex networks / BSD 3-Clause |
| [nltk](http://nltk.org/) | 3.2.4 | Build Python programs to work with human language data / Apache 2.0 |
| [nose](http://readthedocs.org/docs/nose/) | 1.3.7 | Nose extends unittest to make testing easier / LGPL-2.1 |
| [notebook](http://jupyter.org) | 5.0.0 | A web-based notebook environment for interactive computing / BSD 3-clause |
| [numba](http://numba.pydata.org/) | 0.35.0 | NumPy aware dynamic Python compiler using LLVM / BSD |
| [numexpr](https://github.com/pydata/numexpr) | 2.6.2 | Fast numerical expression evaluator for NumPy. / MIT |
| [numpy](http://numpy.scipy.org/) | 1.13.3 | Array processing for numbers, strings, records, and objects. / BSD 3-Clause |
| [numpydoc](https://github.com/numpy/numpydoc) | 0.7.0 | Sphinx extension to support docstrings in Numpy format / BSD 3-Clause |
| [odo](http://odo.pydata.org) | 0.5.1 | Data migration in Python / BSD-3-Clause |
| [olefile](http://www.decalage.info/python/olefileio) | 0.44 | parse, read and write Microsoft OLE2 files / BSD License 2-Clause |
| [openpyxl](https://openpyxl.readthedocs.io) | 2.4.8 | A Python library to read/write Excel 2010 xlsx/xlsm files / MIT |
| [openssl](http://www.openssl.org/) | 1.0.2l | OpenSSL is an open-source implementation of the SSL and TLS protocols / OpenSSL |
| [packaging](https://github.com/pypa/packaging) | 16.8 | Core utilities for Python packages / Apache 2.0 or BSD 2-Clause |
| [pandas](http://pandas.pydata.org) | 0.20.3 | High-performance, easy-to-use data structures and data analysis tools. / BSD 3-clause |
| [pandoc](http://johnmacfarlane.net/pandoc/) | 1.19.2.1 | Universal markup converter (repackaged binaries). / GPL-2.0 |
| [pandocfilters](https://github.com/jgm/pandocfilters) | 1.4.2 | A python module for writing pandoc filters / BSD-3-Clause |
| [partd](https://github.com/dask/partd) | 0.3.8 | Data structure for on-disk shuffle operations / BSD 3-Clause |
| [path.py](https://github.com/jaraco/path.py) | 10.3.1 | A module wrapper for os.path / MIT |
| [pathlib2](https://github.com/mcmtroffaes/pathlib2) | 2.3.0 | Fork of pathlib aiming to support the full stdlib Python API. / MIT |
| [patsy](https://github.com/pydata/patsy) | 0.4.1 | Describing statistical models in Python using symbolic formulas / BSD-2-Clause, PSF2 |
| [pcre](http://www.pcre.org/) | 8.41 | Regular expression pattern matching using the same syntax and semantics as Perl 5. / BSD 3-Clause |
| [pep8](http://pep8.readthedocs.org/) | 1.7.0 | Python style guide checker / MIT |
| [pexpect](http://pexpect.sourceforge.net/) | 4.2.1 | Pexpect makes Python a better tool for controlling other applications. / ISC |
| [pickleshare](https://github.com/vivainio/pickleshare) | 0.7.4 | Tiny ‘shelve’-like database with concurrency support / MIT |
| [pillow](http://python-imaging.github.io/) | 4.2.1 | Pillow is the friendly PIL fork by Alex Clark and Contributors. / PIL |
| [pip](https://pip.pypa.io/en/stable/) | 9.0.1 | PyPA recommended tool for installing Python packages / MIT |
| [pkginfo](https://code.launchpad.net/~tseaver/pkginfo/trunk) | 1.4.1 | Query metadatdata from sdists / bdists / installed packages. / MIT |
| [ply](http://www.dabeaz.com/ply/index.html) | 3.10 | Python Lex-Yacc / BSD 3-clause |
| [prompt\_toolkit](https://github.com/jonathanslenders/python-prompt-toolkit) | 1.0.15 | Library for building powerful interactive command lines in Python / BSD 3-clause |
| [psutil](https://github.com/giampaolo/psutil) | 5.4.0 | A cross-platform process and system utilities module for Python / BSD 3-Clause |
| [ptyprocess](https://github.com/pexpect/ptyprocess) | 0.5.2 | Run a subprocess in a pseudo terminal / ISC |
| [py](https://github.com/pytest-dev/py) | 1.4.34 | library with cross-python path, ini-parsing, io, code, log facilities / MIT |
| [pycodestyle](https://pycodestyle.readthedocs.io/) | 2.3.1 | Python style guide checker / MIT |
| [pycosat](https://github.com/ContinuumIO/pycosat) | 0.6.2 | Bindings to picosat (a SAT solver) / MIT |
| [pycparser](https://github.com/eliben/pycparser) | 2.18 | Complete C99 parser in pure Python / BSD 3-clause |
| [pycrypto](http://www.pycrypto.org/) | 2.6.1 | Cryptographic modules for Python. / Public Domain |
| [pycurl](http://pycurl.sourceforge.net/) | 7.43.0 | A Python Interface To The cURL library / LGPL, MIT |
| [pyflakes](https://github.com/PyCQA/pyflakes) | 1.6.0 | Pyflakes analyzes programs and detects various errors. / MIT |
| [pygments](http://pygments.org/) | 2.2.0 | Generic syntax highlighting package / BSD 2-clause |
| [pylint](http://www.pylint.org/) | 1.7.4 | python code static checker / GPL |
| [pyodbc](https://github.com/mkleehammer/pyodbc) | 4.0.17 | DB API Module for ODBC / MIT |
| [pyopenssl](https://github.com/pyca/pyopenssl) | 17.2.0 | Python wrapper module around the OpenSSL library / Apache 2.0 |
| [pyparsing](http://pyparsing.wikispaces.com/) | 2.2.0 | Create and execute simple grammars / MIT |
| [pyqt](http://www.riverbankcomputing.co.uk/software/pyqt) | 5.6.0 | Python binding of the cross-platform GUI toolkit Qt. / Commercial, GPL-2.0, GPL-3.0 |
| [pysocks](https://github.com/Anorov/PySocks) | 1.6.7 | A Python SOCKS client module. See [Anorov/PySocks](https://github.com/Anorov/PySocks) for more information. / BSD 3-Clause |
| [pytables](http://www.pytables.org) | 3.4.2 | Brings together Python, HDF5 and NumPy to easily handle large amounts of data. / BSD 3-Clause |
| [pytest](https://docs.pytest.org/en/latest/) | 3.2.1 | Simple and powerful testing with Python. / MIT |
| [python](http://www.python.org/) | 3.6.3 | General purpose programming language / PSF |
| [python-dateutil](https://dateutil.readthedocs.org/) | 2.6.1 | Extensions to the standard Python datetime module. / BSD 3-clause |
| python.app | 2 | Proxy on OS X letting Python libraries hook into the gui event loop / BSD |
| [pytz](http://pythonhosted.org/pytz/) | 2017.2 | World timezone definitions, modern and historical. / MIT |
| [pywavelets](https://github.com/PyWavelets/pywt) | 0.5.2 | Discrete Wavelet Transforms in Python. / MIT |
| [pyyaml](http://pyyaml.org/wiki/PyYAML) | 3.12 | YAML parser and emitter for Python / MIT |
| [pyzmq](https://github.com/zeromq/pyzmq) | 16.0.2 | Python bindings for zeromq / BSD 3-clause |
| [qt](http://qt-project.org) | 5.6.2 | Qt is a cross-platform application and UI framework. / LGPL-3.0 |
| [qtawesome](https://github.com/spyder-ide/qtawesome) | 0.4.4 | Iconic fonts in PyQt and PySide applications / MIT |
| [qtconsole](http://jupyter.org) | 4.3.1 | Jupyter Qt console / BSD 3-Clause |
| [qtpy](https://github.com/spyder-ide/qtpy) | 1.3.1 | Abstraction layer for PyQt5/PyQt4/PySide / MIT |
| [readline](https://cnswww.cns.cwru.edu/php/chet/readline/rltop.html) | 7.0 | library for editing command lines as they are typed in / GPL3 |
| [requests](http://python-requests.org) | 2.18.4 | Python HTTP for Humans. / Apache 2.0 |
| [rope](https://github.com/python-rope/rope) | 0.10.5 | A python refactoring library… / GPL 2.0 |
| [ruamel\_yaml](https://bitbucket.org/ruamel/yaml) | 0.11.14 | A patched copy of ruamel.yaml. / MIT |
| [scikit-image](http://scikit-image.org/) | 0.13.0 | Image processing routines for SciPy. / BSD 3-Clause |
| [scikit-learn](http://scikit-learn.org/) | 0.19.1 | A set of python modules for machine learning and data mining / BSD 3-Clause |
| [scipy](http://www.scipy.org/) | 0.19.1 | Scientific Library for Python / BSD 3-Clause |
| [seaborn](http://stanford.edu/~mwaskom/software/seaborn/) | 0.8.0 | Statistical data visualization / BSD 3-Clause |
| [setuptools](https://github.com/pypa/setuptools) | 36.5.0 | Download, build, install, upgrade, and uninstall Python packages / MIT |
| [simplegeneric](http://cheeseshop.python.org/pypi/simplegeneric) | 0.8.1 | Simple generic functions (similar to Python’s own len(), pickle.dump(), etc.) / Zope Public |
| [singledispatch](http://docs.python.org/3/library/functools.html#functools.singledispatch) | 3.4.0.3 | Transforms a function into a single-dispatch generic function / MIT |
| [sip](http://www.riverbankcomputing.com/software/sip/intro) | 4.18.1 | Create Python bindings for C and C++ libraries / GPL-3.0 |
| [six](http://pypi.python.org/pypi/six/) | 1.11.0 | Python 2 and 3 compatibility utilities / MIT |
| [snowballstemmer](https://github.com/shibukawa/snowball_py) | 1.2.1 | Snowball stemming library collection for Python / BSD-2-Clause |
| [sortedcollections](http://www.grantjenks.com/docs/sortedcollections/) | 0.5.3 | Python Sorted Collections / Apache-2.0 |
| [sortedcontainers](http://www.grantjenks.com/docs/sortedcontainers/) | 1.5.7 | Python Sorted Container Types: SortedList, SortedDict, and SortedSet / Apache 2.0 |
| [sphinx](http://www.sphinx-doc.org) | 1.6.3 | Sphinx is a tool that makes it easy to create intelligent and beautiful documentation / BSD 2-clause |
| sphinxcontrib | 1.0 | Python namespace for sphinxcontrib / BSD |
| [sphinxcontrib-websupport](https://pypi.python.org/pypi/sphinxcontrib-websupport) | 1.0.1 | Sphinx API for Web Apps / BSD-2-Clause |
| [spyder](https://github.com/spyder-ide/spyder) | 3.2.4 | Scientific PYthon Development EnviRonment / MIT |
| [sqlalchemy](http://www.sqlalchemy.org/) | 1.1.13 | Database Abstraction Library. / MIT |
| [sqlite](http://www.sqlite.org/) | 3.20.1 | Implements a self-contained, zero-configuration, SQL database engine. / Public-Domain (`<http://www.sqlite.org/copyright.html>`) |
| [statsmodels](https://www.statsmodels.org) | 0.8.0 | Statistical computations and models for use with SciPy / BSD 3-Clause |
| [sympy](http://sympy.org) | 1.1.1 | Python library for symbolic mathematics / 3-clause BSD |
| [tblib](https://github.com/ionelmc/python-tblib) | 1.3.2 | Traceback serialization library. / BSD 2-Clause |
| [terminado](http://github.com/mitsuhiko/markupsafe) | 0.6 | Terminals served by tornado websockets / BSD 3-clause |
| [testpath](https://testpath.readthedocs.io) | 0.3.1 | Testpath is a collection of utilities for Python code working with files and commands. / MIT |
| [tk](http://www.tcl.tk/) | 8.6.7 | A dynamic programming language with GUI support. Bundles Tcl and Tk. / Tcl/Tk |
| [toolz](http://toolz.readthedocs.org/) | 0.8.2 | A functional standard library for Python. / BSD 3-Clause |
| [tornado](http://www.tornadoweb.org/) | 4.5.2 | A Python web framework and asynchronous networking library, originally developed at FriendFeed. / Apache 2.0 |
| [traitlets](http://ipython.org/) | 4.3.2 | Configuration system for Python applications / BSD 3-clause |
| [typing](https://docs.python.org/3.5/library/typing.html) | 3.6.2 | Type Hints for Python - backport for `Python<3.5` / PSF |
| [unicodecsv](https://github.com/jdunck/python-unicodecsv) | 0.14.1 | Drop-in replacement for csv module which supports unicode strings / BSD |
| [unixodbc](http://www.unixodbc.org/) | 2.3.4 | ODBC on non MS Windows platforms / LGPL-2.1 |
| [urllib3](https://urllib3.readthedocs.io/) | 1.22 | HTTP library with thread-safe connection pooling, file post, and more. / MIT |
| [wcwidth](https://github.com/jquast/wcwidth) | 0.1.7 | Measures number of Terminal column cells of wide-character codes. / MIT |
| [webencodings](https://github.com/gsnedders/python-webencodings) | 0.5.1 | Character encoding aliases for legacy web content / BSD 3-Clause |
| [werkzeug](http://werkzeug.pocoo.org/) | 0.12.2 | The Python WSGI Utility Library. / BSD 3-Clause |
| [wheel](https://bitbucket.org/pypa/wheel/) | 0.29.0 | A built-package format for Python. / MIT |
| [widgetsnbextension](http://ipython.org) | 3.0.2 | IPython HTML widgets for Jupyter / BSD 3-clause |
| [wrapt](https://github.com/GrahamDumpleton/wrapt) | 1.10.11 | Module for decorators, wrappers and monkey patching. / BSD 2-Clause |
| [xlrd](http://www.python-excel.org/) | 1.1.0 | Library for developers to extract data from Microsoft Excel (tm) spreadsheet files / BSD 3-Clause and BSD with advertising |
| [xlsxwriter](https://xlsxwriter.readthedocs.io/) | 1.0.2 | A Python module for creating Excel XLSX files / BSD 2-Clause |
| [xlwings](http://xlwings.org/) | 0.11.4 | Interact with Excel from Python and vice versa / 3-clause BSD |
| [xlwt](http://www.python-excel.org/) | 1.2.0 | Writing data and formatting information to Excel files / BSD |
| [xz](http://tukaani.org/xz/) | 5.2.3 | Data compression software with high compression ratio / LGPL-2.1 and GPL-2.0 |
| [yaml](http://pyyaml.org/wiki/LibYAML) | 0.1.7 | A C library for parsing and emitting YAML. / MIT |
| [zeromq](http://zeromq.org) | 4.2.2 | A high-performance asynchronous messaging library. / LGPL 3 |
| [zict](http://github.com/mrocklin/zict) | 0.1.3 | Composable Dictionary Classes / BSD 3-Clause |
| [zlib](http://zlib.net/) | 1.2.11 | Massively spiffy yet delicately unobtrusive compression library / zlib |
| Name | Version | Summary / License |
|---|---|---|
| [alabaster](https://github.com/bitprophet/alabaster) | 0.7.10 | Configurable, Python 2+3 compatible Sphinx theme / BSD |
| [anaconda-client](http://anaconda.org) | 1.6.3 | anaconda.org command line client library / BSD 3-clause |
| [anaconda-project](https://github.com/Anaconda-Platform/anaconda-project/) | 0.6.0 | reproducible, executable project directories / BSD 3-clause |
| [asn1crypto](https://github.com/wbond/asn1crypto) | 0.22.0 | ASN.1 parser and serializer / MIT |
| [astroid](https://www.astroid.org/) | 1.5.3 | abstract syntax tree for Python with inference support / LGPL version 2.1 |
| [astropy](http://www.astropy.org/) | 2.0.1 | Community-developed Python Library for Astronomy / BSD |
| [babel](http://babel.pocoo.org/) | 2.5.0 | Utilities to internationalize and localize Python applications / BSD |
| [backports](https://bitbucket.org/brandon/backports) | 1.0 | / BSD |
| [beautifulsoup4](http://www.crummy.com/software/BeautifulSoup/) | 4.6.0 | Python library designed for screen-scraping / MIT |
| [bitarray](https://github.com/ilanschnell/bitarray) | 0.8.1 | efficient representation of arrays of booleans – C extension / PSF |
| [bkcharts](https://github.com/bokeh/bkcharts) | 0.2 | optional High Level charts API built on top of Bokeh / New BSD |
| [bleach](http://github.com/mozilla/bleach) | 1.5.0 | easy whitelist-based HTML-sanitizing tool / Apache License Version 2.0 |
| [bokeh](http://bokeh.pydata.org/) | 0.12.7 | Python interactive visualization library for modern web browsers / BSD |
| [boto](https://github.com/boto/boto/) | 2.48.0 | Amazon Web Services Library / MIT |
| [bottleneck](http://berkeleyanalytics.com/bottleneck) | 1.2.1 | Fast NumPy array functions written in Cython. / Simplified BSD |
| [cairo](http://cairographics.org/) | 1.14.8 | A 2D graphics library with support for multiple output devices / LGPL 2.1, MPL 1.1 |
| [certifi](https://certifi.io) | 2016.2.28 | Python package for providing Mozilla’s CA Bundle. / ISC |
| [cffi](http://cffi.readthedocs.org) | 1.10.0 | C Foreign Function Interface for Python / MIT |
| [chardet](https://github.com/chardet/chardet) | 3.0.4 | Universal character encoding detector / GNU Lesser General Public License |
| [click](http://click.pocoo.org/) | 6.7 | Command line interface creation kit / BSD |
| [cloudpickle](https://github.com/cloudpipe/cloudpickle) | 0.4.0 | extended pickling support for Python objects / BSD |
| [clyent](https://github.com/Anaconda-Server/clyent) | 1.2.2 | Command line client library for windows and posix / BSD |
| [colorama](https://github.com/tartley/colorama) | 0.3.9 | Cross-platform colored terminal text in Python / BSD |
| [conda](http://conda.pydata.org/) | 4.3.27 | Package management system and Environment management system / BSD |
| [conda-build](https://github.com/conda/conda-build) | 3.0.22 | Commands and tools for building conda packages / BSD 3-clause |
| [contextlib2](http://contextlib2.readthedocs.org/) | 0.5.5 | backports and enhancements for the contextlib module / PSF |
| [cryptography](https://cryptography.io) | 1.8.1 | Provides cryptographic recipes and primitives to Python developers / Apache and BSD |
| [curl](http://curl.haxx.se/) | 7.52.1 | Tool and library for transferring data with URL syntax / MIT/X derivate |
| [cycler](http://matplotlib.org/cycler/) | 0.10.0 | Composable style cycles / BSD |
| [cython](http://www.cython.org/) | 0.26 | The Cython compiler for writing C extensions for the Python language / Apache version 2.0 |
| [cytoolz](https://github.com/pytoolz/cytoolz) | 0.8.2 | Cython implementation of Toolz, high performance functional utilities / BSD |
| [dask](http://dask.pydata.org/en/latest/) | 0.15.2 | Task scheduling and blocked algorithms for parallel processing / BSD |
| [datashape](http://datashape.pydata.org) | 0.5.4 | Language defining a data description protocol / BSD |
| [decorator](http://pypi.python.org/pypi/decorator) | 4.1.2 | Better living through Python with decorators / BSD |
| [distributed](http://distributed.readthedocs.io/en/latest/) | 1.18.1 | Distributed computing / BSD 3-Clause |
| [docutils](http://docutils.sourceforge.net) | 0.14 | Utilities for general- and special-purpose documentation / Public-Domain, PSF, 2-clause BSD, GPLv3 |
| [entrypoints](https://github.com/takluyver/entrypoints) | 0.2.3 | / MIT |
| [et\_xmlfile](https://bitbucket.org/openpyxl/et_xmlfile) | 1.0.1 | Low memory library for creating large XML files / MIT |
| [expat](http://expat.sourceforge.net) | 2.1.0 | XML parser library written in C / MIT |
| [fastcache](https://github.com/pbrady/fastcache) | 1.0.2 | C implementation of Python 3 functools.lru\_cache / MIT |
| [filelock](https://github.com/benediktschmitt/py-filelock) | 2.0.7 | A platform independent file lock. / Public Domain |
| [flask](http://flask.pocoo.org/) | 0.12.2 | Microframework for Python based on Werkzeug, Jinja2. / BSD |
| [flask-cors](https://github.com/corydolphin/flask-cors) | 3.0.3 | Flask extension adding a decorator for CORS support / MIT |
| [fontconfig](http://www.freedesktop.org/wiki/Software/fontconfig/) | 2.12.1 | A library for configuring and customizing font access / BSD |
| [freetype](http://freetype.sourceforge.net/index2.html) | 2.5.5 | A Free, High-Quality, and Portable Font Engine / FreeType License |
| [get\_terminal\_size](https://github.com/chrippa/backports.shutil_get_terminal_size) | 1.0.0 | Get the size of the terminal window. / MIT |
| [gevent](http://www.gevent.org/) | 1.2.2 | Coroutine-based Python network library / MIT |
| [glob2](http://github.com/miracle2k/python-glob2/) | 0.5 | Enhanced glob that can capture patterns and supports recursive wildcards / BSD License |
| [greenlet](https://github.com/python-greenlet/greenlet) | 0.4.12 | Lightweight in-process concurrent programming / MIT |
| [h5py](http://www.h5py.org/) | 2.7.0 | Pythonic interface to the HDF5 binary data format / 3-clause BSD |
| [hdf5](http://www.hdfgroup.org/HDF5/) | 1.8.17 | A data model, library, and file format for storing and managing data / BSD-like |
| [heapdict](http://stutzbachenterprises.com/) | 1.0.0 | A heap with decrease-key and increase-key operations / BSD |
| [html5lib](https://github.com/html5lib/html5lib-python) | 0.9999999 | HTML parser based on the WHATWG HTML specification / MIT |
| [idna](https://github.com/kjd/idna) | 2.6 | Internationalized Domain Names in Applications / BSD |
| [imagesize](https://github.com/shibukawa/imagesize_py) | 0.7.1 | getting image size from png/jpeg/jpeg2000/gif file / MIT |
| [ipykernel](http://ipython.org) | 4.6.1 | Provides a rich toolkit to help you make the most of using Python interactively / BSD |
| [ipython](http://ipython.org/) | 6.1.0 | Productive Interactive Computing / BSD |
| [ipython\_genutils](http://jupyter.org) | 0.2.0 | vestigial utilities from IPython / BSD |
| [ipywidgets](https://github.com/ipython/ipywidgets) | 6.0.0 | Widgets for the Jupyter Notebook / BSD 3-clause |
| [isort](https://github.com/timothycrosley/isort) | 4.2.15 | Python utility / library to sort Python imports / MIT |
| [itsdangerous](https://pythonhosted.org/itsdangerous/) | 0.24 | Various helpers to pass trusted data to untrusted environments / BSD |
| [jbig](https://www.cl.cam.ac.uk/~mgk25/jbigkit) | 2.1 | Implementation of the JBIG1 data compression standard / GPL2 |
| [jdcal](http://github.com/phn/jdcal) | 1.3 | Julian dates from proleptic Gregorian and Julian calendars. / BSD |
| [jedi](http://jedi.jedidjah.ch/) | 0.10.2 | Autocompletion and static analysis library for Python / MIT |
| [jinja2](http://jinja.pocoo.org) | 2.9.6 | An easy to use stand-alone template engine written in pure python. / BSD |
| [jpeg](http://www.ijg.org/) | 9b | Read and write jpeg files / Custom free software license |
| [jsonschema](https://python-jsonschema.readthedocs.org) | 2.6.0 | An implementation of JSON Schema validation for Python / MIT |
| [jupyter](http://jupyter.org) | 1.0.0 | web-based notebook environment for interactive computing. / BSD |
| [jupyter\_client](http://jupyter.org) | 5.1.0 | Jupyter protocol implementation and client libraries / BSD |
| [jupyter\_console](http://jupyter.org) | 5.2.0 | Jupyter terminal console / BSD |
| [jupyter\_core](http://jupyter.org) | 4.3.0 | core Jupyter functionality / BSD |
| [lazy-object-proxy](https://github.com/ionelmc/python-lazy-object-proxy) | 1.3.1 | Fast and thorough lazy object proxy / BSD |
| [libffi](https://sourceware.org/libffi/) | 3.2.1 | portable foreign-function interface library / MIT |
| [libgfortran](https://gcc.gnu.org/fortran/) | 3.0.0 | the GNU Fortran compiler, part of GCC / GPL3 |
| [libiconv](https://www.gnu.org/software/libiconv/) | 1.14 | Provides iconv for systems which don’t have one / GPL and LGPL |
| [libpng](http://www.libpng.org/pub/png/libpng.html) | 1.6.30 | official PNG reference library / libpng license |
| [libsodium](http://libsodium.org) | 1.0.10 | A library for encryption, signatures, password hashing, etc. / ISC |
| [libtiff](http://www.libtiff.org/) | 4.0.6 | Support for Tag Image File Format (TIFF) / BSD-like |
| [libxml2](http://xmlsoft.org/) | 2.9.4 | The XML C parser and toolkit of Gnome / MIT |
| [libxslt](http://xmlsoft.org/XSLT/) | 1.1.29 | The XSLT C library developed for the GNOME project / MIT |
| [locket](http://github.com/mwilliamson/locket.py) | 0.2.0 | File based locks for Python for Linux and Windows / BSD |
| [lxml](http://lxml.de/) | 3.7.3 | XML and HTML with Python / BSD |
| [markupsafe](http://www.pocoo.org/projects/markupsafe/#markupsafe) | 1.0 | Implements a XML/HTML/XHTML Markup safe string for Python / BSD |
| [matplotlib](http://matplotlib.org/) | 2.0.2 | Python 2D plotting library / PSF-based |
| [mistune](https://github.com/lepture/mistune) | 0.7.4 | The fastest markdown parser in pure Python with renderer feature / BSD |
| [mpmath](http://mpmath.org) | 0.19 | Python library for arbitrary-precision floating-point arithmetic / BSD |
| [msgpack-python](http://msgpack.org/) | 0.4.8 | An efficient binary serialization format / Apache |
| [multipledispatch](http://github.com/mrocklin/multipledispatch/) | 0.4.9 | Multiple dispatch in Python / BSD |
| [nbconvert](http://jupyter.org) | 5.2.1 | converts notebooks to various other formats via Jinja templates / BSD |
| [nbformat](http://jupyter.org) | 4.4.0 | reference implementation of the Jupyter Notebook format / BSD |
| [networkx](http://networkx.lanl.gov/) | 1.11 | Python package for creating and manipulating complex networks / BSD |
| [nltk](http://nltk.org/) | 3.2.4 | Build Python programs to work with human language data / Apache Software License |
| [nose](http://readthedocs.org/docs/nose/) | 1.3.7 | Nose extends unittest to make testing easier / LGPL |
| [notebook](http://jupyter.org) | 5.0.0 | web-based notebook environment for interactive computing / BSD |
| [numexpr](https://github.com/pydata/numexpr) | 2.6.2 | Fast numerical expression evaluator for NumPy / MIT |
| [numpy](http://numpy.scipy.org/) | 1.13.1 | Array processing for numbers, strings, records, and objects / BSD |
| [numpydoc](https://github.com/numpy/numpydoc) | 0.7.0 | Sphinx extension to support docstrings in Numpy format / BSD |
| [odo](http://odo.pydata.org/en/latest/) | 0.5.1 | Shapeshifting for your data / BSD |
| [olefile](https://www.decalage.info/python/olefileio) | 0.44 | parse, read and write Microsoft OLE2 files / BSD License |
| [openblas](http://www.openblas.net/) | 0.2.19 | An Optimized BLAS library / BSD |
| [openpyxl](http://openpyxl.readthedocs.org) | 2.4.8 | A Python library to read/write Excel 2010 xlsx/xlsm files / MIT |
| [openssl](http://www.openssl.org/) | 1.0.2l | OpenSSL is an open-source implementation of the SSL and TLS protocols / Apache-style |
| [packaging](https://github.com/pypa/packaging) | 16.8 | core utilities for Python packages / BSD or Apache 2.0 |
| [pandas](http://pandas.pydata.org/) | 0.20.3 | Powerful Python data analysis toolkit / BSD |
| [pandocfilters](http://github.com/jgm/pandocfilters) | 1.4.2 | utilities for writing pandoc filters in python / BSD License |
| [partd](https://github.com/dask/partd) | 0.3.8 | Appendable key-value byte store / BSD |
| [patchelf](http://nixos.org/patchelf.html) | 0.9 | Modify the dynamic linker and RPATH of ELF executables / GPL3 |
| [path.py](http://github.com/jaraco/path.py) | 10.3.1 | An object representing a path to a file or directory / MIT |
| [pathlib2](https://pypi.python.org/pypi/pathlib2/) | 2.3.0 | object-oriented filesystem paths / MIT |
| [patsy](https://github.com/pydata/patsy) | 0.4.1 | Describing statistical models in Python using symbolic formulas / BSD |
| [pcre](http://www.pcre.org/) | 8.39 | A set of functions that implement regular expression pattern matching / 3-clause BSD License |
| [pep8](http://pep8.readthedocs.org/) | 1.7.0 | Python style guide checker / MIT |
| [pexpect](http://pexpect.readthedocs.org/) | 4.2.1 | Pexpect allows easy control of interactive console applications / ISC |
| [pickleshare](https://github.com/vivainio/pickleshare) | 0.7.4 | file system based database that uses Python pickles / MIT |
| [pillow](http://python-pillow.github.io/) | 4.2.1 | The friendly Python Imaging Library(PIL) fork / PIL license |
| [pip](https://pip.pypa.io/en/stable/) | 9.0.1 | PyPA recommended tool for installing Python packages / MIT |
| [pixman](http://www.pixman.org/) | 0.34.0 | A low-level software library for pixel manipulation / MIT |
| [pkginfo](https://pypi.python.org/pypi/pkginfo/) | 1.4.1 | query metadatdata from sdists or bdists installed packages / PSF |
| [ply](http://www.dabeaz.com/ply/) | 3.10 | implementation of Lex and Yacc / BSD |
| [prompt\_toolkit](https://github.com/jonathanslenders/python-prompt-toolkit) | 1.0.15 | library for building powerful interactive command lines in Python / BSD |
| [psutil](https://github.com/giampaolo/psutil) | 5.2.2 | cross-platform process and system utilities module for Python / BSD |
| [ptyprocess](https://github.com/pexpect/ptyprocess) | 0.5.2 | Run a subprocess in a pseudo terminal / ISC |
| [py](http://pylib.readthedocs.org/) | 1.4.34 | Library with cross-python path, ini-parsing, io, code, log facilities / MIT |
| [pycodestyle](https://pycodestyle.readthedocs.io/) | 2.3.1 | Python style guide checker / MIT License |
| [pycosat](https://github.com/ContinuumIO/pycosat) | 0.6.2 | Python bindings to the picosat SAT solver / MIT |
| [pycparser](https://github.com/eliben/pycparser) | 2.18 | C parser in Python / BSD |
| [pycrypto](http://www.pycrypto.org/) | 2.6.1 | Cryptographic modules for Python / Public-Domain |
| [pycurl](http://pycurl.sourceforge.net/) | 7.43.0 | A Python Interface To The cURL library / LGPL, MIT |
| [pyflakes](https://launchpad.net/pyflakes) | 1.6.0 | passive checker of Python programs / MIT |
| [pygments](http://pygments.org/) | 2.2.0 | Generic syntax highlighting package / BSD |
| [pylint](http://www.pylint.org/) | 1.7.2 | Python code static checker / GPL |
| [pyodbc](http://mkleehammer.github.io/pyodbc/) | 4.0.16 | DB API Module for ODBC / MIT |
| [pyopenssl](https://github.com/pyca/pyopenssl) | 17.0.0 | Python wrapper module around the OpenSSL library / Apache Software License |
| [pyparsing](http://pyparsing.wikispaces.com/) | 2.2.0 | Create and execute simple grammars / MIT |
| [pytables](http://www.pytables.org) | 3.4.2 | Manage hierarchical datasets to cope with large amounts of data / BSD |
| [pytest](http://pytest.org/) | 3.2.1 | Simple and powerful testing with Python / MIT |
| [python](http://www.python.org/) | 3.6.2 | General purpose programming language / PSF |
| [python-dateutil](https://dateutil.readthedocs.org/) | 2.6.1 | extensions to the standard Python datetime module / Simplified BSD |
| [pytz](http://pytz.sourceforge.net/) | 2017.2 | World timezone definitions, modern and historical / MIT |
| [pywavelets](https://github.com/PyWavelets/pywt) | 0.5.2 | wavelet transform module / MIT |
| [pyyaml](http://pyyaml.org/wiki/PyYAML) | 3.12 | YAML parser and emitter for Python / MIT |
| [pyzmq](https://github.com/zeromq/pyzmq) | 16.0.2 | zeromq bindings for Python / LGPL and BSD |
| [requests](http://docs.python-requests.org/en/latest/index.html) | 2.14.2 | Python HTTP for Humans / Apache Software License |
| [ruamel\_yaml](https://bitbucket.org/ruamel/yaml) | 0.11.14 | patched copy of ruamel.yaml (a yaml parser) / MIT |
| [scikit-image](http://scikit-image.org/) | 0.13.0 | Image processing routines for SciPy / 3-clause BSD |
| [scikit-learn](http://scikit-learn.org/stable/) | 0.19.0 | set of python modules for machine learning and data mining / 3-clause BSD |
| [scipy](http://www.scipy.org/) | 0.19.1 | Scientific Library for Python / BSD |
| [seaborn](http://stanford.edu/~mwaskom/software/seaborn/) | 0.8 | Statistical data visualization / BSD |
| [setuptools](https://pypi.python.org/pypi/setuptools) | 36.4.0 | Download, build, install, upgrade, and uninstall Python packages / MIT |
| [simplegeneric](https://pypi.python.org/pypi/simplegeneric) | 0.8.1 | Define simple single-dispatch generic functions / ZPL 2.1 |
| [singledispatch](http://docs.python.org/3/library/functools.html#functools.singledispatch) | 3.4.0.3 | Transforms a function into a single-dispatch generic function / MIT |
| [six](http://pypi.python.org/pypi/six/) | 1.10.0 | Python 2 and 3 compatibility utilities / MIT |
| [snowballstemmer](https://github.com/shibukawa/snowball_py) | 1.2.1 | Snowball stemming library collection for Python / BSD |
| [sortedcollections](http://www.grantjenks.com/docs/sortedcollections/) | 0.5.3 | Python Sorted Collections / Apache Software License |
| [sortedcontainers](http://www.grantjenks.com/docs/sortedcontainers/) | 1.5.7 | sorted Container Types: SortedList, SortedDict, and SortedSet / Apache 2.0 |
| [sphinx](http://sphinx-doc.org) | 1.6.3 | Documentation generator / BSD |
| sphinxcontrib | 1.0 | Python namespace for sphinxcontrib / BSD |
| [sphinxcontrib-websupport](https://pypi.python.org/pypi/sphinxcontrib-websupport) | 1.0.1 | Sphinx API for Web Apps / BSD-2-Clause |
| [sqlalchemy](http://www.sqlalchemy.org/) | 1.1.13 | Python SQL toolkit and Object Relational Mapper / MIT |
| [sqlite](http://www.sqlite.org/) | 3.13.0 | SQL database engine / Public-Domain |
| [statsmodels](http://statsmodels.sourceforge.net/) | 0.8.0 | Statistical computations and models / 3-clause BSD |
| [sympy](http://sympy.org) | 1.1.1 | Python library for symbolic mathematics / 3-clause BSD |
| [tblib](https://github.com/ionelmc/python-tblib) | 1.3.2 | Traceback serialization library / BSD |
| [terminado](https://github.com/takluyver/terminado) | 0.6 | Terminals served to term.js using Tornado websockets / BSD |
| [testpath](https://testpath.readthedocs.io) | 0.3.1 | collection of utilities for Python code working with files and commands / MIT |
| [tk](http://www.tcl.tk/) | 8.5.18 | Dynamic programming language with GUI elements / BSD-like |
| [toolz](http://toolz.readthedocs.org/en/latest/) | 0.8.2 | List processing tools and functional utilities / BSD |
| [tornado](http://www.tornadoweb.org/) | 4.5.2 | Tornado Web Server / Apache 2.0 |
| [traitlets](https://github.com/ipython/traitlets) | 4.3.2 | Configuration system for Python applications / Modified BSD |
| [unicodecsv](https://github.com/jdunck/python-unicodecsv) | 0.14.1 | Drop-in replacement for csv module which supports unicode strings / BSD |
| [unixodbc](http://www.unixodbc.org/) | 2.3.4 | ODBC (Open Database Connectivity) implementation for Unix / LGPLv2 |
| [wcwidth](https://github.com/jquast/wcwidth) | 0.1.7 | measures number of Terminal column cells of wide-character codes / MIT |
| [werkzeug](http://werkzeug.pocoo.org/) | 0.12.2 | A WSGI utility library for Python / BSD |
| [wheel](http://bitbucket.org/pypa/wheel/) | 0.29.0 | Built-package format for Python / MIT |
| [widgetsnbextension](http://ipython.org) | 3.0.2 | IPython HTML widgets for Jupyter / BSD 3-clause |
| [wrapt](https://github.com/GrahamDumpleton/wrapt) | 1.10.11 | Module for decorators, wrappers and monkey patching / BSD |
| [xlrd](http://www.lexicon.net/sjmachin/xlrd.htm) | 1.1.0 | extract data from Microsoft Excel spreadsheet files / BSD |
| [xlsxwriter](https://github.com/jmcnamara/XlsxWriter) | 0.9.8 | A Python module for creating Excel XLSX files / BSD |
| [xlwt](http://www.python-excel.org/) | 1.3.0 | writing data and formatting information to Excel files / BSD |
| [xz](http://tukaani.org/xz/) | 5.2.3 | Data compression software with high compression ratio / Public-Domain, GPL |
| [yaml](http://www.yaml.org/) | 0.1.6 | YAML Ain’t Markup Language / MIT |
| [zeromq](http://zeromq.org) | 4.1.5 | Distributed messaging / LGPL |
| [zict](http://github.com/mrocklin/zict/) | 0.1.2 | Composable Mutable Mapping tools / BSD |
| [zlib](http://zlib.net/) | 1.2.11 | Unobtrusive compression library / zlib |
| Name | Version | Summary / License |
|---|---|---|
| [alabaster](http://www.sphinx-doc.org/en/stable/index.html) | 0.7.10 | Configurable, Python 2+3 compatible Sphinx theme. / BSD 3-Clause |
| [anaconda-client](http://anaconda.org) | 1.6.5 | anaconda.org command line client library / BSD 3-clause |
| [anaconda-navigator](https://github.com/ContinuumIO/navigator) | 1.6.9 | Anaconda Navigator / proprietary - Continuum Analytics, Inc. |
| [anaconda-project](https://github.com/Anaconda-Platform/anaconda-project) | 0.8.0 | Reproducible, executable project directories. / BSD 3-Clause |
| [asn1crypto](https://github.com/wbond/asn1crypto) | 0.22.0 | Python ASN.1 library with a focus on performance and a pythonic API / MIT |
| [astroid](https://www.astroid.org/) | 1.5.3 | A abstract syntax tree for Python with inference support. / LGPL 2.1 |
| [astropy](http://www.astropy.org/) | 2.0.2 | Community-developed Python Library for Astronomy / BSD |
| [babel](http://babel.pocoo.org/) | 2.5.0 | Utilities to internationalize and localize Python applications / BSD 3-clause |
| [backports](https://bitbucket.org/brandon/backports) | 1.0 | / BSD |
| [backports.shutil\_get\_terminal\_size](https://github.com/chrippa/backports.shutil_get_terminal_size) | 1.0.0 | A backport of the get\_terminal\_size function from Python 3.3’s shutil. / MIT |
| [beautifulsoup4](http://www.crummy.com/software/BeautifulSoup/) | 4.6.0 | Python library designed for screen-scraping / MIT |
| [bitarray](https://github.com/ilanschnell/bitarray) | 0.8.1 | efficient arrays of booleans – C extension / PSF |
| [bkcharts](http://github.com/bokeh/bkcharts) | 0.2 | High level chart types built on top of Bokeh / BSD 3-Clause |
| [blaze](http://blaze.pydata.org) | 0.11.3 | NumPy and Pandas interface to big data / BSD 3-Clause |
| [bleach](https://github.com/mozilla/bleach) | 2.0.0 | Easy, whitelist-based HTML-sanitizing tool / Apache-2.0 |
| [bokeh](http://bokeh.pydata.org/) | 0.12.10 | Statistical and novel interactive HTML plots for Python / BSD 3-Clause |
| [boto](https://github.com/boto/boto/) | 2.48.0 | Amazon Web Services Library / MIT |
| [bottleneck](http://berkeleyanalytics.com/bottleneck) | 1.2.1 | Fast NumPy array functions written in Cython. / BSD 2-Clause |
| [bzip2](http://www.bzip.org/) | 1.0.6 | high-quality data compressor / bzip2 |
| [ca-certificates](https://github.com/conda-forge/ca-certificates-feedstock) | 2017.08.26 | Certificates for use with other packages. / ISC |
| [cairo](http://cairographics.org/) | 1.14.10 | Cairo is a 2D graphics library with support for multiple output devices. / LGPL 2.1 or MPL 1.1 |
| [certifi](http://certifi.io/) | 2017.7.27.1 | Python package for providing Mozilla’s CA Bundle. / ISC |
| [cffi](https://bitbucket.org/cffi/cffi) | 1.10.0 | Foreign Function Interface for Python calling C code. / MIT |
| [chardet](https://github.com/chardet/chardet) | 3.0.4 | Universal character encoding detector / LGPL2 |
| [click](http://click.pocoo.org/) | 6.7 | A simple wrapper around optparse for powerful command line utilities. / BSD 3-Clause |
| [cloudpickle](https://github.com/cloudpipe/cloudpickle) | 0.4.0 | Extended pickling support for Python objects / BSD 3-Clause |
| [clyent](https://github.com/Anaconda-Platform/clyent) | 1.2.2 | Command line client library for windows and posix / BSD 3-Clause |
| [colorama](https://github.com/tartley/colorama) | 0.3.9 | Cross-platform colored terminal text. / BSD 3-Clause |
| [conda](http://conda.pydata.org/) | 4.3.30 | OS-agnostic, system-level binary package and environment manager. / BSD 3-Clause |
| [conda-build](https://github.com/conda/conda-build) | 3.0.27 | tools for building conda packages / BSD 3-Clause |
| [contextlib2](http://contextlib2.readthedocs.org) | 0.5.5 | Backports and enhancements for the contextlib module / PSF |
| [cryptography](https://github.com/pyca/cryptography) | 2.0.3 | Provides cryptographic recipes and primitives to Python developers / Apache 2.0 or BSD 3-Clause, PSF 2 |
| [curl](http://curl.haxx.se/) | 7.55.1 | tool and library for transferring data with URL syntax / MIT/X derivate (`<http://curl.haxx.se/docs/copyright.html>`) |
| [cycler](http://matplotlib.org/cycler) | 0.10.0 | Composable style cycles. / BSD 3-Clause |
| [cython](http://www.cython.org/) | 0.26.1 | The Cython compiler for writing C extensions for the Python language / Apache-2.0 |
| [cytoolz](https://github.com/pytoolz/cytoolz) | 0.8.2 | Cython implementation of Toolz. High performance functional utilities. / BSD 3-Clause |
| [dask](http://dask.pydata.org/en/latest/) | 0.15.3 | Parallel Python with task scheduling / BSD 3-Clause |
| [dask-core](http://github.com/dask/dask/) | 0.15.3 | Parallel Python with task scheduling / BSD 3-Clause |
| [datashape](http://datashape.pydata.org) | 0.5.4 | A data description language. / BSD 2-Clause |
| [dbus](http://www.freedesktop.org/wiki/Software/dbus/) | 1.10.22 | Simple message bus system for applications to talk to one another / GPL2 |
| [decorator](https://github.com/micheles/decorator) | 4.1.2 | Better living through Python with decorators. / BSD 3-Clause |
| [distributed](http://distributed.readthedocs.io/en/latest/) | 1.19.1 | Distributed computing with Dask / BSD 3-Clause |
| [docutils](http://docutils.sourceforge.net/) | 0.14 | Docutils – Python Documentation Utilities / Public Domain Dedictation and BSD 2-Clause and PSF 2.1.1 and GPL 3.0 |
| [entrypoints](https://github.com/takluyver/entrypoints) | 0.2.3 | Discover and load entry points from installed packages. / MIT License |
| [et\_xmlfile](https://bitbucket.org/openpyxl/et_xmlfile) | 1.0.1 | An implementation of lxml.xmlfile for the standard library / MIT |
| [expat](http://expat.sourceforge.net/) | 2.2.4 | Expat XML parser library in C. / MIT |
| [fastcache](https://github.com/pbrady/fastcache) | 1.0.2 | C implementation of Python 3 lru\_cache / MIT |
| [filelock](https://github.com/benediktschmitt/py-filelock) | 2.0.12 | A platform independent file lock. / Public Domain |
| [flask](http://flask.pocoo.org) | 0.12.2 | A microframework based on Werkzeug, Jinja2 and good intentions. / BSD 3-Clause |
| [flask-cors](https://github.com/corydolphin/flask-cors) | 3.0.3 | A Flask extension adding a decorator for CORS support / MIT |
| [fontconfig](http://www.freedesktop.org/wiki/Software/fontconfig/) | 2.12.4 | A library for configuring and customizing font access. / MIT |
| [freetype](https://www.freetype.org/) | 2.8 | A Free, High-Quality, and Portable Font Engine / GPL-2.0 and FreeType |
| [get\_terminal\_size](https://github.com/chrippa/backports.shutil_get_terminal_size) | 1.0.0 | Get the size of the terminal window. / MIT |
| [gevent](http://www.gevent.org/) | 1.2.2 | Coroutine-based network library / MIT |
| [glib](https://developer.gnome.org/glib/) | 2.53.6 | Provides core application building blocks for libraries and applications written in C. / LGPL-2.1 |
| [glob2](https://github.com/miracle2k/python-glob2) | 0.5 | Version of the glob module that supports recursion via \*\*, and can capture patterns. / BSD-2-Clause |
| [gmp](http://gmplib.org/) | 6.1.2 | The GNU multiprecision library. / GPL 2 and LGPL 3 |
| [gmpy2](https://pypi.python.org/pypi/gmpy2) | 2.0.8 | GMP/MPIR, MPFR, and MPC interface to Python 2.6+ and 3.x / LGPL 3 |
| [graphite2](http://graphite.sil.org/) | 1.3.10 | A “smart font” system that handles the complexities of lesser-known languages of the world. / LGPLv2 |
| [greenlet](https://github.com/python-greenlet/greenlet) | 0.4.12 | Lightweight in-process concurrent programming / MIT |
| [gst-plugins-base](http://gstreamer.freedesktop.org/) | 1.12.2 | GStreamer Base Plug-ins / GPL2 |
| [gstreamer](http://gstreamer.freedesktop.org/) | 1.12.2 | Library for constructing graphs of media-handling components / LGPL 2 |
| [h5py](http://www.h5py.org/) | 2.7.0 | Read and write HDF5 files from Python. / BSD 3-Clause |
| [harfbuzz](http://www.freedesktop.org/wiki/Software/HarfBuzz/) | 1.5.0 | An OpenType text shaping engine. / MIT |
| [hdf5](http://www.hdfgroup.org/HDF5/) | 1.10.1 | HDF5 is a data model, library, and file format for storing and managing data / HDF5 |
| [heapdict](http://stutzbachenterprises.com/) | 1.0.0 | A heap with decrease-key and increase-key operations / BSD 3-Clause |
| [html5lib](https://github.com/html5lib/html5lib-python) | 0.999999999 | HTML parser based on the WHATWG HTML specification / MIT |
| [icu](http://site.icu-project.org/) | 58.2 | International Components for Unicode. / MIT |
| [idna](https://github.com/kjd/idna) | 2.6 | Internationalized Domain Names in Applications (IDNA). / BSD Like |
| [imageio](http://imageio.github.io) | 2.2.0 | a Python library for reading and writing image data / BSD 2-Clause |
| [imagesize](https://github.com/shibukawa/imagesize_py) | 0.7.1 | Getting image size from png/jpeg/jpeg2000/gif file / MIT |
| [intel-openmp](https://software.intel.com/en-us/node/522690) | 2018.0.0 | Math library for Intel and compatible processors / proprietary - Intel |
| [ipykernel](http://ipython.org) | 4.6.1 | IPython Kernel for Jupyter / BSD 3-clause |
| [ipython](http://ipython.org/) | 6.1.0 | IPython: Productive Interactive Computing / BSD 3-clause |
| [ipython\_genutils](http://ipython.org) | 0.2.0 | vestigial utilities from IPython / BSD 3-Clause |
| [ipywidgets](https://github.com/ipython/ipywidgets) | 7.0.0 | Jupyter Interactive Widgets / BSD 3-clause |
| [isort](https://github.com/timothycrosley/isort) | 4.2.15 | A Python utility / library to sort Python imports. / MIT |
| [itsdangerous](https://github.com/pallets/itsdangerous) | 0.24 | Various helpers to pass trusted data to untrusted environments. / BSD 3-Clause |
| [jbig](https://www.cl.cam.ac.uk/~mgk25/jbigkit) | 2.1 | Implementation of the JBIG1 data compression standard / GPL-2.0 |
| [jdcal](https://github.com/phn/jdcal) | 1.3 | Julian dates from proleptic Gregorian and Julian calendars. / BSD 2-Clause |
| [jedi](https://github.com/davidhalter/jedi/) | 0.10.2 | An autocompletion tool for Python that can be used for text editors. / MIT |
| [jinja2](http://jinja.pocoo.org) | 2.9.6 | An easy to use stand-alone template engine written in pure python. / 3-Clause BSD |
| [jpeg](http://www.ijg.org/) | 9b | read/write jpeg COM, EXIF, IPTC medata / Custom free software license |
| [jsonschema](https://github.com/Julian/jsonschema) | 2.6.0 | An implementation of JSON Schema validation for Python / MIT |
| [jupyter](http://jupyter.org) | 1.0.0 | Jupyter metapackage. Install all the Jupyter components in one go. / BSD 3-Clause |
| [jupyter\_client](http://jupyter.org) | 5.1.0 | Jupyter protocol implementation and client libraries / BSD 3-clause |
| [jupyter\_console](http://jupyter.org) | 5.2.0 | Jupyter terminal console / BSD 3-Clause |
| [jupyter\_core](http://jupyter.org) | 4.3.0 | Core common functionality of Jupyter projects. / BSD 3-clause |
| [jupyterlab](https://github.com/jupyterlab/jupyterlab) | 0.27.0 | A pre-alpha version of a computational environment for Jupyter. / BSD 3-Clause |
| [jupyterlab\_launcher](http://github.com/jupyterlab/jupyterlab_launcher) | 0.4.0 | A Launcher for JupyterLab based applications. / BSD 3-Clause |
| [lazy-object-proxy](https://github.com/ionelmc/python-lazy-object-proxy) | 1.3.1 | A fast and thorough lazy object proxy. / BSD 2-Clause |
| [libedit](http://thrysoee.dk/editline/) | 3.1 | Editline Library (libedit) / 3-Clause BSD |
| [libffi](https://sourceware.org/libffi/) | 3.2.1 | A Portable Foreign Function Interface Library. / Custom |
| [libgcc-ng](https://gcc.gnu.org/onlinedocs/gccint/Libgcc.html) | 7.2.0 | The GCC low-level runtime library / GPL |
| [libgfortran-ng](https://gcc.gnu.org/) | 7.2.0 | The GNU Fortran Runtime Library / GPL |
| [libpng](http://www.libpng.org/pub/png/libpng.html) | 1.6.32 | PNG reference library. / zlib/libpng |
| [libsodium](https://github.com/jedisct1/libsodium) | 1.0.13 | A modern and easy-to-use crypto library. / ISC |
| [libssh2](https://www.libssh2.org/) | 1.8.0 | the SSH library / BSD 3-Clause |
| [libstdcxx-ng](https://gcc.gnu.org/) | 7.2.0 | he GNU C++ Runtime Library / GPL3 with runtime exception |
| [libtiff](http://www.libtiff.org/) | 4.0.8 | Support for the Tag Image File Format (TIFF). / HPND |
| [libtool](http://www.gnu.org/software/libtool/) | 2.4.6 | The GNU Portable Library Tool / GPL 3 |
| [libxcb](http://xcb.freedesktop.org/) | 1.12 | This is the C-language Binding (XCB) package to the X Window System protocol / MIT |
| [libxml2](http://xmlsoft.org/) | 2.9.4 | The XML C parser and toolkit of Gnome / MIT |
| [libxslt](http://xmlsoft.org/XSLT/) | 1.1.29 | The XSLT C library developed for the GNOME project / MIT |
| [llvmlite](http://llvmlite.pydata.org/) | 0.20.0 | Lightweight wrapper around basic LLVM functionality / BSD |
| [locket](https://github.com/mwilliamson/locket.py) | 0.2.0 | File-based locks for Python for Linux and Windows / BSD 2-Clause |
| [lxml](http://lxml.de/) | 4.1.0 | Pythonic binding for the C libraries libxml2 and libxslt. / BSD 3-Clause, GPL-2.0, ZPL-2.0, and ElementTree |
| [lzo](http://www.oberhumer.com/opensource/lzo/) | 2.10 | LZO is a portable lossless data compression library written in ANSI C. / GPL v2+ |
| [markupsafe](https://www.palletsprojects.com/p/markupsafe/) | 1.0 | A Python module that implements the jinja2.Markup string / BSD 3-Clause |
| [matplotlib](http://matplotlib.org/) | 2.1.0 | Publication quality figures in Python / PSF-based |
| [mccabe](https://github.com/PyCQA/mccabe) | 0.6.1 | McCabe complexity checker for Python / MIT |
| [mistune](https://github.com/lepture/mistune) | 0.7.4 | The fastest markdown parser in pure Python. / BSD 3-Clause |
| [mkl](http://software.intel.com/en-us/articles/intel-mkl/) | 2018.0.0 | Math library for Intel and compatible processors / proprietary - Intel |
| [mkl-service](https://github.com/ContinuumIO/mkl-service) | 1.1.2 | Python bindings to MKL service functions / 3-clause BSD |
| [mpc](http://www.multiprecision.org/) | 1.0.3 | A C library for the arithmetic of complex numbers with arbitrarily high precision. / LGPL 3 |
| [mpfr](http://www.mpfr.org/) | 3.1.5 | The MPFR library is a C library for multiple-precision floating-point computations with correct rounding. / LGPL 3 |
| [mpmath](http://mpmath.org) | 0.19 | Python library for arbitrary-precision floating-point arithmetic / BSD 3-Clause |
| [msgpack-python](http://msgpack.org/) | 0.4.8 | MessagePack (de)serializer. / Apache 2.0 |
| [multipledispatch](https://github.com/mrocklin/multipledispatch/) | 0.4.9 | Multiple dispatch in Python / BSD 3-Clause |
| [navigator-updater](https://github.com/ContinuumIO/navigator-updater) | 0.1.0 | Anaconda Navigator Updater / proprietary - Continuum Analytics, Inc. |
| [nbconvert](http://jupyter.org) | 5.3.1 | Converting Jupyter Notebooks / BSD 3-Clause |
| [nbformat](http://jupyter.org) | 4.4.0 | The reference implementation of the Jupyter Notebook format / BSD 3-clause |
| [ncurses](http://www.gnu.org/software/ncurses/) | 6.0 | Library for text-based user interfaces / Free software (MIT-like) |
| [networkx](https://networkx.github.io/) | 2.0 | Python package for creating and manipulating complex networks / BSD 3-Clause |
| [nltk](http://nltk.org/) | 3.2.4 | Build Python programs to work with human language data / Apache 2.0 |
| [nose](http://readthedocs.org/docs/nose/) | 1.3.7 | Nose extends unittest to make testing easier / LGPL-2.1 |
| [notebook](http://jupyter.org) | 5.0.0 | A web-based notebook environment for interactive computing / BSD 3-clause |
| [numba](http://numba.pydata.org/) | 0.35.0 | NumPy aware dynamic Python compiler using LLVM / BSD |
| [numexpr](https://github.com/pydata/numexpr) | 2.6.2 | Fast numerical expression evaluator for NumPy. / MIT |
| [numpy](http://numpy.scipy.org/) | 1.13.3 | Array processing for numbers, strings, records, and objects. / BSD 3-Clause |
| [numpydoc](https://github.com/numpy/numpydoc) | 0.7.0 | Sphinx extension to support docstrings in Numpy format / BSD 3-Clause |
| [odo](http://odo.pydata.org) | 0.5.1 | Data migration in Python / BSD-3-Clause |
| [olefile](http://www.decalage.info/python/olefileio) | 0.44 | parse, read and write Microsoft OLE2 files / BSD License 2-Clause |
| [openpyxl](https://openpyxl.readthedocs.io) | 2.4.8 | A Python library to read/write Excel 2010 xlsx/xlsm files / MIT |
| [openssl](http://www.openssl.org/) | 1.0.2l | OpenSSL is an open-source implementation of the SSL and TLS protocols / OpenSSL |
| [packaging](https://github.com/pypa/packaging) | 16.8 | Core utilities for Python packages / Apache 2.0 or BSD 2-Clause |
| [pandas](http://pandas.pydata.org) | 0.20.3 | High-performance, easy-to-use data structures and data analysis tools. / BSD 3-clause |
| [pandoc](http://johnmacfarlane.net/pandoc/) | 1.19.2.1 | Universal markup converter (repackaged binaries). / GPL-2.0 |
| [pandocfilters](https://github.com/jgm/pandocfilters) | 1.4.2 | A python module for writing pandoc filters / BSD-3-Clause |
| [pango](http://www.pango.org/) | 1.40.11 | Text layout and rendering engine. / LGPL-2.1 |
| [partd](https://github.com/dask/partd) | 0.3.8 | Data structure for on-disk shuffle operations / BSD 3-Clause |
| [patchelf](http://nixos.org/patchelf.html) | 0.9 | A small utility to modify the dynamic linker and RPATH of ELF executables. / GPL 3 |
| [path.py](https://github.com/jaraco/path.py) | 10.3.1 | A module wrapper for os.path / MIT |
| [pathlib2](https://github.com/mcmtroffaes/pathlib2) | 2.3.0 | Fork of pathlib aiming to support the full stdlib Python API. / MIT |
| [patsy](https://github.com/pydata/patsy) | 0.4.1 | Describing statistical models in Python using symbolic formulas / BSD-2-Clause, PSF2 |
| [pcre](http://www.pcre.org/) | 8.41 | Regular expression pattern matching using the same syntax and semantics as Perl 5. / BSD 3-Clause |
| [pep8](http://pep8.readthedocs.org/) | 1.7.0 | Python style guide checker / MIT |
| [pexpect](http://pexpect.sourceforge.net/) | 4.2.1 | Pexpect makes Python a better tool for controlling other applications. / ISC |
| [pickleshare](https://github.com/vivainio/pickleshare) | 0.7.4 | Tiny ‘shelve’-like database with concurrency support / MIT |
| [pillow](http://python-imaging.github.io/) | 4.2.1 | Pillow is the friendly PIL fork by Alex Clark and Contributors. / PIL |
| [pip](https://pip.pypa.io/en/stable/) | 9.0.1 | PyPA recommended tool for installing Python packages / MIT |
| [pixman](http://www.pixman.org/) | 0.34.0 | A low-level software library for pixel manipulation. / MIT |
| [pkginfo](https://code.launchpad.net/~tseaver/pkginfo/trunk) | 1.4.1 | Query metadatdata from sdists / bdists / installed packages. / MIT |
| [ply](http://www.dabeaz.com/ply/index.html) | 3.10 | Python Lex-Yacc / BSD 3-clause |
| [prompt\_toolkit](https://github.com/jonathanslenders/python-prompt-toolkit) | 1.0.15 | Library for building powerful interactive command lines in Python / BSD 3-clause |
| [psutil](https://github.com/giampaolo/psutil) | 5.4.0 | A cross-platform process and system utilities module for Python / BSD 3-Clause |
| [ptyprocess](https://github.com/pexpect/ptyprocess) | 0.5.2 | Run a subprocess in a pseudo terminal / ISC |
| [py](https://github.com/pytest-dev/py) | 1.4.34 | library with cross-python path, ini-parsing, io, code, log facilities / MIT |
| [pycodestyle](https://pycodestyle.readthedocs.io/) | 2.3.1 | Python style guide checker / MIT |
| [pycosat](https://github.com/ContinuumIO/pycosat) | 0.6.2 | Bindings to picosat (a SAT solver) / MIT |
| [pycparser](https://github.com/eliben/pycparser) | 2.18 | Complete C99 parser in pure Python / BSD 3-clause |
| [pycrypto](http://www.pycrypto.org/) | 2.6.1 | Cryptographic modules for Python. / Public Domain |
| [pycurl](http://pycurl.sourceforge.net/) | 7.43.0 | A Python Interface To The cURL library / LGPL, MIT |
| [pyflakes](https://github.com/PyCQA/pyflakes) | 1.6.0 | Pyflakes analyzes programs and detects various errors. / MIT |
| [pygments](http://pygments.org/) | 2.2.0 | Generic syntax highlighting package / BSD 2-clause |
| [pylint](http://www.pylint.org/) | 1.7.4 | python code static checker / GPL |
| [pyodbc](https://github.com/mkleehammer/pyodbc) | 4.0.17 | DB API Module for ODBC / MIT |
| [pyopenssl](https://github.com/pyca/pyopenssl) | 17.2.0 | Python wrapper module around the OpenSSL library / Apache 2.0 |
| [pyparsing](http://pyparsing.wikispaces.com/) | 2.2.0 | Create and execute simple grammars / MIT |
| [pyqt](http://www.riverbankcomputing.co.uk/software/pyqt) | 5.6.0 | Python binding of the cross-platform GUI toolkit Qt. / Commercial, GPL-2.0, GPL-3.0 |
| [pysocks](https://github.com/Anorov/PySocks) | 1.6.7 | A Python SOCKS client module. See [Anorov/PySocks](https://github.com/Anorov/PySocks) for more information. / BSD 3-Clause |
| [pytables](http://www.pytables.org) | 3.4.2 | Brings together Python, HDF5 and NumPy to easily handle large amounts of data. / BSD 3-Clause |
| [pytest](https://docs.pytest.org/en/latest/) | 3.2.1 | Simple and powerful testing with Python. / MIT |
| [python](http://www.python.org/) | 3.6.3 | General purpose programming language / PSF |
| [python-dateutil](https://dateutil.readthedocs.org/) | 2.6.1 | Extensions to the standard Python datetime module. / BSD 3-clause |
| [pytz](http://pythonhosted.org/pytz/) | 2017.2 | World timezone definitions, modern and historical. / MIT |
| [pywavelets](https://github.com/PyWavelets/pywt) | 0.5.2 | Discrete Wavelet Transforms in Python. / MIT |
| [pyyaml](http://pyyaml.org/wiki/PyYAML) | 3.12 | YAML parser and emitter for Python / MIT |
| [pyzmq](https://github.com/zeromq/pyzmq) | 16.0.2 | Python bindings for zeromq / BSD 3-clause |
| [qt](http://qt-project.org) | 5.6.2 | Qt is a cross-platform application and UI framework. / LGPL-3.0 |
| [qtawesome](https://github.com/spyder-ide/qtawesome) | 0.4.4 | Iconic fonts in PyQt and PySide applications / MIT |
| [qtconsole](http://jupyter.org) | 4.3.1 | Jupyter Qt console / BSD 3-Clause |
| [qtpy](https://github.com/spyder-ide/qtpy) | 1.3.1 | Abstraction layer for PyQt5/PyQt4/PySide / MIT |
| [readline](https://cnswww.cns.cwru.edu/php/chet/readline/rltop.html) | 7.0 | library for editing command lines as they are typed in / GPL3 |
| [requests](http://python-requests.org) | 2.18.4 | Python HTTP for Humans. / Apache 2.0 |
| [rope](https://github.com/python-rope/rope) | 0.10.5 | A python refactoring library… / GPL 2.0 |
| [ruamel\_yaml](https://bitbucket.org/ruamel/yaml) | 0.11.14 | A patched copy of ruamel.yaml. / MIT |
| [scikit-image](http://scikit-image.org/) | 0.13.0 | Image processing routines for SciPy. / BSD 3-Clause |
| [scikit-learn](http://scikit-learn.org/) | 0.19.1 | A set of python modules for machine learning and data mining / BSD 3-Clause |
| [scipy](http://www.scipy.org/) | 0.19.1 | Scientific Library for Python / BSD 3-Clause |
| [seaborn](http://stanford.edu/~mwaskom/software/seaborn/) | 0.8.0 | Statistical data visualization / BSD 3-Clause |
| [setuptools](https://github.com/pypa/setuptools) | 36.5.0 | Download, build, install, upgrade, and uninstall Python packages / MIT |
| [simplegeneric](http://cheeseshop.python.org/pypi/simplegeneric) | 0.8.1 | Simple generic functions (similar to Python’s own len(), pickle.dump(), etc.) / Zope Public |
| [singledispatch](http://docs.python.org/3/library/functools.html#functools.singledispatch) | 3.4.0.3 | Transforms a function into a single-dispatch generic function / MIT |
| [sip](http://www.riverbankcomputing.com/software/sip/intro) | 4.18.1 | Create Python bindings for C and C++ libraries / GPL-3.0 |
| [six](http://pypi.python.org/pypi/six/) | 1.11.0 | Python 2 and 3 compatibility utilities / MIT |
| [snowballstemmer](https://github.com/shibukawa/snowball_py) | 1.2.1 | Snowball stemming library collection for Python / BSD-2-Clause |
| [sortedcollections](http://www.grantjenks.com/docs/sortedcollections/) | 0.5.3 | Python Sorted Collections / Apache-2.0 |
| [sortedcontainers](http://www.grantjenks.com/docs/sortedcontainers/) | 1.5.7 | Python Sorted Container Types: SortedList, SortedDict, and SortedSet / Apache 2.0 |
| [sphinx](http://www.sphinx-doc.org) | 1.6.3 | Sphinx is a tool that makes it easy to create intelligent and beautiful documentation / BSD 2-clause |
| sphinxcontrib | 1.0 | Python namespace for sphinxcontrib / BSD |
| [sphinxcontrib-websupport](https://pypi.python.org/pypi/sphinxcontrib-websupport) | 1.0.1 | Sphinx API for Web Apps / BSD-2-Clause |
| [spyder](https://github.com/spyder-ide/spyder) | 3.2.4 | Scientific PYthon Development EnviRonment / MIT |
| [sqlalchemy](http://www.sqlalchemy.org/) | 1.1.13 | Database Abstraction Library. / MIT |
| [sqlite](http://www.sqlite.org/) | 3.20.1 | Implements a self-contained, zero-configuration, SQL database engine. / Public-Domain (`<http://www.sqlite.org/copyright.html>`) |
| [statsmodels](https://www.statsmodels.org) | 0.8.0 | Statistical computations and models for use with SciPy / BSD 3-Clause |
| [sympy](http://sympy.org) | 1.1.1 | Python library for symbolic mathematics / 3-clause BSD |
| [tblib](https://github.com/ionelmc/python-tblib) | 1.3.2 | Traceback serialization library. / BSD 2-Clause |
| [terminado](http://github.com/mitsuhiko/markupsafe) | 0.6 | Terminals served by tornado websockets / BSD 3-clause |
| [testpath](https://testpath.readthedocs.io) | 0.3.1 | Testpath is a collection of utilities for Python code working with files and commands. / MIT |
| [tk](http://www.tcl.tk/) | 8.6.7 | A dynamic programming language with GUI support. Bundles Tcl and Tk. / Tcl/Tk |
| [toolz](http://toolz.readthedocs.org/) | 0.8.2 | A functional standard library for Python. / BSD 3-Clause |
| [tornado](http://www.tornadoweb.org/) | 4.5.2 | A Python web framework and asynchronous networking library, originally developed at FriendFeed. / Apache 2.0 |
| [traitlets](http://ipython.org/) | 4.3.2 | Configuration system for Python applications / BSD 3-clause |
| [typing](https://docs.python.org/3.5/library/typing.html) | 3.6.2 | Type Hints for Python - backport for `Python<3.5` / PSF |
| [unicodecsv](https://github.com/jdunck/python-unicodecsv) | 0.14.1 | Drop-in replacement for csv module which supports unicode strings / BSD |
| [unixodbc](http://www.unixodbc.org/) | 2.3.4 | ODBC on non MS Windows platforms / LGPL-2.1 |
| [urllib3](https://urllib3.readthedocs.io/) | 1.22 | HTTP library with thread-safe connection pooling, file post, and more. / MIT |
| [wcwidth](https://github.com/jquast/wcwidth) | 0.1.7 | Measures number of Terminal column cells of wide-character codes. / MIT |
| [webencodings](https://github.com/gsnedders/python-webencodings) | 0.5.1 | Character encoding aliases for legacy web content / BSD 3-Clause |
| [werkzeug](http://werkzeug.pocoo.org/) | 0.12.2 | The Python WSGI Utility Library. / BSD 3-Clause |
| [wheel](https://bitbucket.org/pypa/wheel/) | 0.29.0 | A built-package format for Python. / MIT |
| [widgetsnbextension](http://ipython.org) | 3.0.2 | IPython HTML widgets for Jupyter / BSD 3-clause |
| [wrapt](https://github.com/GrahamDumpleton/wrapt) | 1.10.11 | Module for decorators, wrappers and monkey patching. / BSD 2-Clause |
| [xlrd](http://www.python-excel.org/) | 1.1.0 | Library for developers to extract data from Microsoft Excel (tm) spreadsheet files / BSD 3-Clause and BSD with advertising |
| [xlsxwriter](https://xlsxwriter.readthedocs.io/) | 1.0.2 | A Python module for creating Excel XLSX files / BSD 2-Clause |
| [xlwt](http://www.python-excel.org/) | 1.3.0 | Writing data and formatting information to Excel files / BSD |
| [xz](http://tukaani.org/xz/) | 5.2.3 | Data compression software with high compression ratio / LGPL-2.1 and GPL-2.0 |
| [yaml](http://pyyaml.org/wiki/LibYAML) | 0.1.7 | A C library for parsing and emitting YAML. / MIT |
| [zeromq](http://zeromq.org) | 4.2.2 | A high-performance asynchronous messaging library. / LGPL 3 |
| [zict](http://github.com/mrocklin/zict) | 0.1.3 | Composable Dictionary Classes / BSD 3-Clause |
| [zlib](http://zlib.net/) | 1.2.11 | Massively spiffy yet delicately unobtrusive compression library / zlib |
| Name | Version | Summary / License |
|---|---|---|
| [alabaster](http://www.sphinx-doc.org/en/stable/index.html) | 0.7.10 | Configurable, Python 2+3 compatible Sphinx theme. / BSD 3-Clause |
| [anaconda-client](http://anaconda.org) | 1.6.5 | anaconda.org command line client library / BSD 3-clause |
| [anaconda-navigator](https://github.com/ContinuumIO/navigator) | 1.6.9 | Anaconda Navigator / proprietary - Continuum Analytics, Inc. |
| [anaconda-project](https://github.com/Anaconda-Platform/anaconda-project) | 0.8.0 | Reproducible, executable project directories. / BSD 3-Clause |
| [asn1crypto](https://github.com/wbond/asn1crypto) | 0.22.0 | Python ASN.1 library with a focus on performance and a pythonic API / MIT |
| [astroid](https://www.astroid.org/) | 1.5.3 | A abstract syntax tree for Python with inference support. / LGPL 2.1 |
| [astropy](http://www.astropy.org/) | 2.0.2 | Community-developed Python Library for Astronomy / BSD |
| [babel](http://babel.pocoo.org/) | 2.5.0 | Utilities to internationalize and localize Python applications / BSD 3-clause |
| [backports](https://bitbucket.org/brandon/backports) | 1.0 | / BSD |
| [backports.shutil\_get\_terminal\_size](https://github.com/chrippa/backports.shutil_get_terminal_size) | 1.0.0 | A backport of the get\_terminal\_size function from Python 3.3’s shutil. / MIT |
| [beautifulsoup4](http://www.crummy.com/software/BeautifulSoup/) | 4.6.0 | Python library designed for screen-scraping / MIT |
| [bitarray](https://github.com/ilanschnell/bitarray) | 0.8.1 | efficient arrays of booleans – C extension / PSF |
| [bkcharts](http://github.com/bokeh/bkcharts) | 0.2 | High level chart types built on top of Bokeh / BSD 3-Clause |
| [blaze](http://blaze.pydata.org) | 0.11.3 | NumPy and Pandas interface to big data / BSD 3-Clause |
| [bleach](https://github.com/mozilla/bleach) | 2.0.0 | Easy, whitelist-based HTML-sanitizing tool / Apache-2.0 |
| [bokeh](http://bokeh.pydata.org/) | 0.12.10 | Statistical and novel interactive HTML plots for Python / BSD 3-Clause |
| [boto](https://github.com/boto/boto/) | 2.48.0 | Amazon Web Services Library / MIT |
| [bottleneck](http://berkeleyanalytics.com/bottleneck) | 1.2.1 | Fast NumPy array functions written in Cython. / BSD 2-Clause |
| [bzip2](http://www.bzip.org/) | 1.0.6 | high-quality data compressor / bzip2 |
| [ca-certificates](https://github.com/conda-forge/ca-certificates-feedstock) | 2017.08.26 | Certificates for use with other packages. / ISC |
| [cairo](http://cairographics.org/) | 1.14.10 | Cairo is a 2D graphics library with support for multiple output devices. / LGPL 2.1 or MPL 1.1 |
| [certifi](http://certifi.io/) | 2017.7.27.1 | Python package for providing Mozilla’s CA Bundle. / ISC |
| [cffi](https://bitbucket.org/cffi/cffi) | 1.10.0 | Foreign Function Interface for Python calling C code. / MIT |
| [chardet](https://github.com/chardet/chardet) | 3.0.4 | Universal character encoding detector / LGPL2 |
| [click](http://click.pocoo.org/) | 6.7 | A simple wrapper around optparse for powerful command line utilities. / BSD 3-Clause |
| [cloudpickle](https://github.com/cloudpipe/cloudpickle) | 0.4.0 | Extended pickling support for Python objects / BSD 3-Clause |
| [clyent](https://github.com/Anaconda-Platform/clyent) | 1.2.2 | Command line client library for windows and posix / BSD 3-Clause |
| [colorama](https://github.com/tartley/colorama) | 0.3.9 | Cross-platform colored terminal text. / BSD 3-Clause |
| [conda](http://conda.pydata.org/) | 4.3.30 | OS-agnostic, system-level binary package and environment manager. / BSD 3-Clause |
| [conda-build](https://github.com/conda/conda-build) | 3.0.27 | tools for building conda packages / BSD 3-Clause |
| [contextlib2](http://contextlib2.readthedocs.org) | 0.5.5 | Backports and enhancements for the contextlib module / PSF |
| [cryptography](https://github.com/pyca/cryptography) | 2.0.3 | Provides cryptographic recipes and primitives to Python developers / Apache 2.0 or BSD 3-Clause, PSF 2 |
| [curl](http://curl.haxx.se/) | 7.55.1 | tool and library for transferring data with URL syntax / MIT/X derivate (`<http://curl.haxx.se/docs/copyright.html>`) |
| [cycler](http://matplotlib.org/cycler) | 0.10.0 | Composable style cycles. / BSD 3-Clause |
| [cython](http://www.cython.org/) | 0.26.1 | The Cython compiler for writing C extensions for the Python language / Apache-2.0 |
| [cytoolz](https://github.com/pytoolz/cytoolz) | 0.8.2 | Cython implementation of Toolz. High performance functional utilities. / BSD 3-Clause |
| [dask](http://dask.pydata.org/en/latest/) | 0.15.3 | Parallel Python with task scheduling / BSD 3-Clause |
| [dask-core](http://github.com/dask/dask/) | 0.15.3 | Parallel Python with task scheduling / BSD 3-Clause |
| [datashape](http://datashape.pydata.org) | 0.5.4 | A data description language. / BSD 2-Clause |
| [dbus](http://www.freedesktop.org/wiki/Software/dbus/) | 1.10.22 | Simple message bus system for applications to talk to one another / GPL2 |
| [decorator](https://github.com/micheles/decorator) | 4.1.2 | Better living through Python with decorators. / BSD 3-Clause |
| [distributed](http://distributed.readthedocs.io/en/latest/) | 1.19.1 | Distributed computing with Dask / BSD 3-Clause |
| [docutils](http://docutils.sourceforge.net/) | 0.14 | Docutils – Python Documentation Utilities / Public Domain Dedictation and BSD 2-Clause and PSF 2.1.1 and GPL 3.0 |
| [entrypoints](https://github.com/takluyver/entrypoints) | 0.2.3 | Discover and load entry points from installed packages. / MIT License |
| [et\_xmlfile](https://bitbucket.org/openpyxl/et_xmlfile) | 1.0.1 | An implementation of lxml.xmlfile for the standard library / MIT |
| [expat](http://expat.sourceforge.net/) | 2.2.4 | Expat XML parser library in C. / MIT |
| [fastcache](https://github.com/pbrady/fastcache) | 1.0.2 | C implementation of Python 3 lru\_cache / MIT |
| [filelock](https://github.com/benediktschmitt/py-filelock) | 2.0.12 | A platform independent file lock. / Public Domain |
| [flask](http://flask.pocoo.org) | 0.12.2 | A microframework based on Werkzeug, Jinja2 and good intentions. / BSD 3-Clause |
| [flask-cors](https://github.com/corydolphin/flask-cors) | 3.0.3 | A Flask extension adding a decorator for CORS support / MIT |
| [fontconfig](http://www.freedesktop.org/wiki/Software/fontconfig/) | 2.12.4 | A library for configuring and customizing font access. / MIT |
| [freetype](https://www.freetype.org/) | 2.8 | A Free, High-Quality, and Portable Font Engine / GPL-2.0 and FreeType |
| [get\_terminal\_size](https://github.com/chrippa/backports.shutil_get_terminal_size) | 1.0.0 | Get the size of the terminal window. / MIT |
| [gevent](http://www.gevent.org/) | 1.2.2 | Coroutine-based network library / MIT |
| [glib](https://developer.gnome.org/glib/) | 2.53.6 | Provides core application building blocks for libraries and applications written in C. / LGPL-2.1 |
| [glob2](https://github.com/miracle2k/python-glob2) | 0.5 | Version of the glob module that supports recursion via \*\*, and can capture patterns. / BSD-2-Clause |
| [gmp](http://gmplib.org/) | 6.1.2 | The GNU multiprecision library. / GPL 2 and LGPL 3 |
| [gmpy2](https://pypi.python.org/pypi/gmpy2) | 2.0.8 | GMP/MPIR, MPFR, and MPC interface to Python 2.6+ and 3.x / LGPL 3 |
| [graphite2](http://graphite.sil.org/) | 1.3.10 | A “smart font” system that handles the complexities of lesser-known languages of the world. / LGPLv2 |
| [greenlet](https://github.com/python-greenlet/greenlet) | 0.4.12 | Lightweight in-process concurrent programming / MIT |
| [gst-plugins-base](http://gstreamer.freedesktop.org/) | 1.12.2 | GStreamer Base Plug-ins / GPL2 |
| [gstreamer](http://gstreamer.freedesktop.org/) | 1.12.2 | Library for constructing graphs of media-handling components / LGPL 2 |
| [h5py](http://www.h5py.org/) | 2.7.0 | Read and write HDF5 files from Python. / BSD 3-Clause |
| [harfbuzz](http://www.freedesktop.org/wiki/Software/HarfBuzz/) | 1.5.0 | An OpenType text shaping engine. / MIT |
| [hdf5](http://www.hdfgroup.org/HDF5/) | 1.10.1 | HDF5 is a data model, library, and file format for storing and managing data / HDF5 |
| [heapdict](http://stutzbachenterprises.com/) | 1.0.0 | A heap with decrease-key and increase-key operations / BSD 3-Clause |
| [html5lib](https://github.com/html5lib/html5lib-python) | 0.999999999 | HTML parser based on the WHATWG HTML specification / MIT |
| [icu](http://site.icu-project.org/) | 58.2 | International Components for Unicode. / MIT |
| [idna](https://github.com/kjd/idna) | 2.6 | Internationalized Domain Names in Applications (IDNA). / BSD Like |
| [imageio](http://imageio.github.io) | 2.2.0 | a Python library for reading and writing image data / BSD 2-Clause |
| [imagesize](https://github.com/shibukawa/imagesize_py) | 0.7.1 | Getting image size from png/jpeg/jpeg2000/gif file / MIT |
| [intel-openmp](https://software.intel.com/en-us/node/522690) | 2018.0.0 | Math library for Intel and compatible processors / proprietary - Intel |
| [ipykernel](http://ipython.org) | 4.6.1 | IPython Kernel for Jupyter / BSD 3-clause |
| [ipython](http://ipython.org/) | 6.1.0 | IPython: Productive Interactive Computing / BSD 3-clause |
| [ipython\_genutils](http://ipython.org) | 0.2.0 | vestigial utilities from IPython / BSD 3-Clause |
| [ipywidgets](https://github.com/ipython/ipywidgets) | 7.0.0 | Jupyter Interactive Widgets / BSD 3-clause |
| [isort](https://github.com/timothycrosley/isort) | 4.2.15 | A Python utility / library to sort Python imports. / MIT |
| [itsdangerous](https://github.com/pallets/itsdangerous) | 0.24 | Various helpers to pass trusted data to untrusted environments. / BSD 3-Clause |
| [jbig](https://www.cl.cam.ac.uk/~mgk25/jbigkit) | 2.1 | Implementation of the JBIG1 data compression standard / GPL-2.0 |
| [jdcal](https://github.com/phn/jdcal) | 1.3 | Julian dates from proleptic Gregorian and Julian calendars. / BSD 2-Clause |
| [jedi](https://github.com/davidhalter/jedi/) | 0.10.2 | An autocompletion tool for Python that can be used for text editors. / MIT |
| [jinja2](http://jinja.pocoo.org) | 2.9.6 | An easy to use stand-alone template engine written in pure python. / 3-Clause BSD |
| [jpeg](http://www.ijg.org/) | 9b | read/write jpeg COM, EXIF, IPTC medata / Custom free software license |
| [jsonschema](https://github.com/Julian/jsonschema) | 2.6.0 | An implementation of JSON Schema validation for Python / MIT |
| [jupyter](http://jupyter.org) | 1.0.0 | Jupyter metapackage. Install all the Jupyter components in one go. / BSD 3-Clause |
| [jupyter\_client](http://jupyter.org) | 5.1.0 | Jupyter protocol implementation and client libraries / BSD 3-clause |
| [jupyter\_console](http://jupyter.org) | 5.2.0 | Jupyter terminal console / BSD 3-Clause |
| [jupyter\_core](http://jupyter.org) | 4.3.0 | Core common functionality of Jupyter projects. / BSD 3-clause |
| [jupyterlab](https://github.com/jupyterlab/jupyterlab) | 0.27.0 | A pre-alpha version of a computational environment for Jupyter. / BSD 3-Clause |
| [jupyterlab\_launcher](http://github.com/jupyterlab/jupyterlab_launcher) | 0.4.0 | A Launcher for JupyterLab based applications. / BSD 3-Clause |
| [lazy-object-proxy](https://github.com/ionelmc/python-lazy-object-proxy) | 1.3.1 | A fast and thorough lazy object proxy. / BSD 2-Clause |
| [libedit](http://thrysoee.dk/editline/) | 3.1 | Editline Library (libedit) / 3-Clause BSD |
| [libffi](https://sourceware.org/libffi/) | 3.2.1 | A Portable Foreign Function Interface Library. / Custom |
| [libgcc-ng](https://gcc.gnu.org/onlinedocs/gccint/Libgcc.html) | 7.2.0 | The GCC low-level runtime library / GPL |
| [libgfortran-ng](https://gcc.gnu.org/) | 7.2.0 | The GNU Fortran Runtime Library / GPL |
| [libpng](http://www.libpng.org/pub/png/libpng.html) | 1.6.32 | PNG reference library. / zlib/libpng |
| [libsodium](https://github.com/jedisct1/libsodium) | 1.0.13 | A modern and easy-to-use crypto library. / ISC |
| [libssh2](https://www.libssh2.org/) | 1.8.0 | the SSH library / BSD 3-Clause |
| [libstdcxx-ng](https://gcc.gnu.org/) | 7.2.0 | he GNU C++ Runtime Library / GPL3 with runtime exception |
| [libtiff](http://www.libtiff.org/) | 4.0.8 | Support for the Tag Image File Format (TIFF). / HPND |
| [libtool](http://www.gnu.org/software/libtool/) | 2.4.6 | The GNU Portable Library Tool / GPL 3 |
| [libxcb](http://xcb.freedesktop.org/) | 1.12 | This is the C-language Binding (XCB) package to the X Window System protocol / MIT |
| [libxml2](http://xmlsoft.org/) | 2.9.4 | The XML C parser and toolkit of Gnome / MIT |
| [libxslt](http://xmlsoft.org/XSLT/) | 1.1.29 | The XSLT C library developed for the GNOME project / MIT |
| [llvmlite](http://llvmlite.pydata.org/) | 0.20.0 | Lightweight wrapper around basic LLVM functionality / BSD |
| [locket](https://github.com/mwilliamson/locket.py) | 0.2.0 | File-based locks for Python for Linux and Windows / BSD 2-Clause |
| [lxml](http://lxml.de/) | 4.1.0 | Pythonic binding for the C libraries libxml2 and libxslt. / BSD 3-Clause, GPL-2.0, ZPL-2.0, and ElementTree |
| [lzo](http://www.oberhumer.com/opensource/lzo/) | 2.10 | LZO is a portable lossless data compression library written in ANSI C. / GPL v2+ |
| [markupsafe](https://www.palletsprojects.com/p/markupsafe/) | 1.0 | A Python module that implements the jinja2.Markup string / BSD 3-Clause |
| [matplotlib](http://matplotlib.org/) | 2.1.0 | Publication quality figures in Python / PSF-based |
| [mccabe](https://github.com/PyCQA/mccabe) | 0.6.1 | McCabe complexity checker for Python / MIT |
| [mistune](https://github.com/lepture/mistune) | 0.7.4 | The fastest markdown parser in pure Python. / BSD 3-Clause |
| [mkl](http://software.intel.com/en-us/articles/intel-mkl/) | 2018.0.0 | Math library for Intel and compatible processors / proprietary - Intel |
| [mkl-service](https://github.com/ContinuumIO/mkl-service) | 1.1.2 | Python bindings to MKL service functions / 3-clause BSD |
| [mpc](http://www.multiprecision.org/) | 1.0.3 | A C library for the arithmetic of complex numbers with arbitrarily high precision. / LGPL 3 |
| [mpfr](http://www.mpfr.org/) | 3.1.5 | The MPFR library is a C library for multiple-precision floating-point computations with correct rounding. / LGPL 3 |
| [mpmath](http://mpmath.org) | 0.19 | Python library for arbitrary-precision floating-point arithmetic / BSD 3-Clause |
| [msgpack-python](http://msgpack.org/) | 0.4.8 | MessagePack (de)serializer. / Apache 2.0 |
| [multipledispatch](https://github.com/mrocklin/multipledispatch/) | 0.4.9 | Multiple dispatch in Python / BSD 3-Clause |
| [navigator-updater](https://github.com/ContinuumIO/navigator-updater) | 0.1.0 | Anaconda Navigator Updater / proprietary - Continuum Analytics, Inc. |
| [nbconvert](http://jupyter.org) | 5.3.1 | Converting Jupyter Notebooks / BSD 3-Clause |
| [nbformat](http://jupyter.org) | 4.4.0 | The reference implementation of the Jupyter Notebook format / BSD 3-clause |
| [ncurses](http://www.gnu.org/software/ncurses/) | 6.0 | Library for text-based user interfaces / Free software (MIT-like) |
| [networkx](https://networkx.github.io/) | 2.0 | Python package for creating and manipulating complex networks / BSD 3-Clause |
| [nltk](http://nltk.org/) | 3.2.4 | Build Python programs to work with human language data / Apache 2.0 |
| [nose](http://readthedocs.org/docs/nose/) | 1.3.7 | Nose extends unittest to make testing easier / LGPL-2.1 |
| [notebook](http://jupyter.org) | 5.0.0 | A web-based notebook environment for interactive computing / BSD 3-clause |
| [numba](http://numba.pydata.org/) | 0.35.0 | NumPy aware dynamic Python compiler using LLVM / BSD |
| [numexpr](https://github.com/pydata/numexpr) | 2.6.2 | Fast numerical expression evaluator for NumPy. / MIT |
| [numpy](http://numpy.scipy.org/) | 1.13.3 | Array processing for numbers, strings, records, and objects. / BSD 3-Clause |
| [numpydoc](https://github.com/numpy/numpydoc) | 0.7.0 | Sphinx extension to support docstrings in Numpy format / BSD 3-Clause |
| [odo](http://odo.pydata.org) | 0.5.1 | Data migration in Python / BSD-3-Clause |
| [olefile](http://www.decalage.info/python/olefileio) | 0.44 | parse, read and write Microsoft OLE2 files / BSD License 2-Clause |
| [openpyxl](https://openpyxl.readthedocs.io) | 2.4.8 | A Python library to read/write Excel 2010 xlsx/xlsm files / MIT |
| [openssl](http://www.openssl.org/) | 1.0.2l | OpenSSL is an open-source implementation of the SSL and TLS protocols / OpenSSL |
| [packaging](https://github.com/pypa/packaging) | 16.8 | Core utilities for Python packages / Apache 2.0 or BSD 2-Clause |
| [pandas](http://pandas.pydata.org) | 0.20.3 | High-performance, easy-to-use data structures and data analysis tools. / BSD 3-clause |
| [pandoc](http://johnmacfarlane.net/pandoc/) | 1.15.0.6 | Universal markup converter (repackaged binaries). / GPL-2.0 |
| [pandocfilters](https://github.com/jgm/pandocfilters) | 1.4.2 | A python module for writing pandoc filters / BSD-3-Clause |
| [pango](http://www.pango.org/) | 1.40.11 | Text layout and rendering engine. / LGPL-2.1 |
| [partd](https://github.com/dask/partd) | 0.3.8 | Data structure for on-disk shuffle operations / BSD 3-Clause |
| [patchelf](http://nixos.org/patchelf.html) | 0.9 | A small utility to modify the dynamic linker and RPATH of ELF executables. / GPL 3 |
| [path.py](https://github.com/jaraco/path.py) | 10.3.1 | A module wrapper for os.path / MIT |
| [pathlib2](https://github.com/mcmtroffaes/pathlib2) | 2.3.0 | Fork of pathlib aiming to support the full stdlib Python API. / MIT |
| [patsy](https://github.com/pydata/patsy) | 0.4.1 | Describing statistical models in Python using symbolic formulas / BSD-2-Clause, PSF2 |
| [pcre](http://www.pcre.org/) | 8.41 | Regular expression pattern matching using the same syntax and semantics as Perl 5. / BSD 3-Clause |
| [pep8](http://pep8.readthedocs.org/) | 1.7.0 | Python style guide checker / MIT |
| [pexpect](http://pexpect.sourceforge.net/) | 4.2.1 | Pexpect makes Python a better tool for controlling other applications. / ISC |
| [pickleshare](https://github.com/vivainio/pickleshare) | 0.7.4 | Tiny ‘shelve’-like database with concurrency support / MIT |
| [pillow](http://python-imaging.github.io/) | 4.2.1 | Pillow is the friendly PIL fork by Alex Clark and Contributors. / PIL |
| [pip](https://pip.pypa.io/en/stable/) | 9.0.1 | PyPA recommended tool for installing Python packages / MIT |
| [pixman](http://www.pixman.org/) | 0.34.0 | A low-level software library for pixel manipulation. / MIT |
| [pkginfo](https://code.launchpad.net/~tseaver/pkginfo/trunk) | 1.4.1 | Query metadatdata from sdists / bdists / installed packages. / MIT |
| [ply](http://www.dabeaz.com/ply/index.html) | 3.10 | Python Lex-Yacc / BSD 3-clause |
| [prompt\_toolkit](https://github.com/jonathanslenders/python-prompt-toolkit) | 1.0.15 | Library for building powerful interactive command lines in Python / BSD 3-clause |
| [psutil](https://github.com/giampaolo/psutil) | 5.4.0 | A cross-platform process and system utilities module for Python / BSD 3-Clause |
| [ptyprocess](https://github.com/pexpect/ptyprocess) | 0.5.2 | Run a subprocess in a pseudo terminal / ISC |
| [py](https://github.com/pytest-dev/py) | 1.4.34 | library with cross-python path, ini-parsing, io, code, log facilities / MIT |
| [pycodestyle](https://pycodestyle.readthedocs.io/) | 2.3.1 | Python style guide checker / MIT |
| [pycosat](https://github.com/ContinuumIO/pycosat) | 0.6.2 | Bindings to picosat (a SAT solver) / MIT |
| [pycparser](https://github.com/eliben/pycparser) | 2.18 | Complete C99 parser in pure Python / BSD 3-clause |
| [pycrypto](http://www.pycrypto.org/) | 2.6.1 | Cryptographic modules for Python. / Public Domain |
| [pycurl](http://pycurl.sourceforge.net/) | 7.43.0 | A Python Interface To The cURL library / LGPL, MIT |
| [pyflakes](https://github.com/PyCQA/pyflakes) | 1.6.0 | Pyflakes analyzes programs and detects various errors. / MIT |
| [pygments](http://pygments.org/) | 2.2.0 | Generic syntax highlighting package / BSD 2-clause |
| [pylint](http://www.pylint.org/) | 1.7.4 | python code static checker / GPL |
| [pyodbc](https://github.com/mkleehammer/pyodbc) | 4.0.17 | DB API Module for ODBC / MIT |
| [pyopenssl](https://github.com/pyca/pyopenssl) | 17.2.0 | Python wrapper module around the OpenSSL library / Apache 2.0 |
| [pyparsing](http://pyparsing.wikispaces.com/) | 2.2.0 | Create and execute simple grammars / MIT |
| [pyqt](http://www.riverbankcomputing.co.uk/software/pyqt) | 5.6.0 | Python binding of the cross-platform GUI toolkit Qt. / Commercial, GPL-2.0, GPL-3.0 |
| [pysocks](https://github.com/Anorov/PySocks) | 1.6.7 | A Python SOCKS client module. See [Anorov/PySocks](https://github.com/Anorov/PySocks) for more information. / BSD 3-Clause |
| [pytables](http://www.pytables.org) | 3.4.2 | Brings together Python, HDF5 and NumPy to easily handle large amounts of data. / BSD 3-Clause |
| [pytest](https://docs.pytest.org/en/latest/) | 3.2.1 | Simple and powerful testing with Python. / MIT |
| [python](http://www.python.org/) | 3.6.3 | General purpose programming language / PSF |
| [python-dateutil](https://dateutil.readthedocs.org/) | 2.6.1 | Extensions to the standard Python datetime module. / BSD 3-clause |
| [pytz](http://pythonhosted.org/pytz/) | 2017.2 | World timezone definitions, modern and historical. / MIT |
| [pywavelets](https://github.com/PyWavelets/pywt) | 0.5.2 | Discrete Wavelet Transforms in Python. / MIT |
| [pyyaml](http://pyyaml.org/wiki/PyYAML) | 3.12 | YAML parser and emitter for Python / MIT |
| [pyzmq](https://github.com/zeromq/pyzmq) | 16.0.2 | Python bindings for zeromq / BSD 3-clause |
| [qt](http://qt-project.org) | 5.6.2 | Qt is a cross-platform application and UI framework. / LGPL-3.0 |
| [qtawesome](https://github.com/spyder-ide/qtawesome) | 0.4.4 | Iconic fonts in PyQt and PySide applications / MIT |
| [qtconsole](http://jupyter.org) | 4.3.1 | Jupyter Qt console / BSD 3-Clause |
| [qtpy](https://github.com/spyder-ide/qtpy) | 1.3.1 | Abstraction layer for PyQt5/PyQt4/PySide / MIT |
| [readline](https://cnswww.cns.cwru.edu/php/chet/readline/rltop.html) | 7.0 | library for editing command lines as they are typed in / GPL3 |
| [requests](http://python-requests.org) | 2.18.4 | Python HTTP for Humans. / Apache 2.0 |
| [rope](https://github.com/python-rope/rope) | 0.10.5 | A python refactoring library… / GPL 2.0 |
| [ruamel\_yaml](https://bitbucket.org/ruamel/yaml) | 0.11.14 | A patched copy of ruamel.yaml. / MIT |
| [scikit-image](http://scikit-image.org/) | 0.13.0 | Image processing routines for SciPy. / BSD 3-Clause |
| [scikit-learn](http://scikit-learn.org/) | 0.19.1 | A set of python modules for machine learning and data mining / BSD 3-Clause |
| [scipy](http://www.scipy.org/) | 0.19.1 | Scientific Library for Python / BSD 3-Clause |
| [seaborn](http://stanford.edu/~mwaskom/software/seaborn/) | 0.8.0 | Statistical data visualization / BSD 3-Clause |
| [setuptools](https://github.com/pypa/setuptools) | 36.5.0 | Download, build, install, upgrade, and uninstall Python packages / MIT |
| [simplegeneric](http://cheeseshop.python.org/pypi/simplegeneric) | 0.8.1 | Simple generic functions (similar to Python’s own len(), pickle.dump(), etc.) / Zope Public |
| [singledispatch](http://docs.python.org/3/library/functools.html#functools.singledispatch) | 3.4.0.3 | Transforms a function into a single-dispatch generic function / MIT |
| [sip](http://www.riverbankcomputing.com/software/sip/intro) | 4.18.1 | Create Python bindings for C and C++ libraries / GPL-3.0 |
| [six](http://pypi.python.org/pypi/six/) | 1.11.0 | Python 2 and 3 compatibility utilities / MIT |
| [snowballstemmer](https://github.com/shibukawa/snowball_py) | 1.2.1 | Snowball stemming library collection for Python / BSD-2-Clause |
| [sortedcollections](http://www.grantjenks.com/docs/sortedcollections/) | 0.5.3 | Python Sorted Collections / Apache-2.0 |
| [sortedcontainers](http://www.grantjenks.com/docs/sortedcontainers/) | 1.5.7 | Python Sorted Container Types: SortedList, SortedDict, and SortedSet / Apache 2.0 |
| [sphinx](http://www.sphinx-doc.org) | 1.6.3 | Sphinx is a tool that makes it easy to create intelligent and beautiful documentation / BSD 2-clause |
| sphinxcontrib | 1.0 | Python namespace for sphinxcontrib / BSD |
| [sphinxcontrib-websupport](https://pypi.python.org/pypi/sphinxcontrib-websupport) | 1.0.1 | Sphinx API for Web Apps / BSD-2-Clause |
| [spyder](https://github.com/spyder-ide/spyder) | 3.2.4 | Scientific PYthon Development EnviRonment / MIT |
| [sqlalchemy](http://www.sqlalchemy.org/) | 1.1.13 | Database Abstraction Library. / MIT |
| [sqlite](http://www.sqlite.org/) | 3.20.1 | Implements a self-contained, zero-configuration, SQL database engine. / Public-Domain (`<http://www.sqlite.org/copyright.html>`) |
| [statsmodels](https://www.statsmodels.org) | 0.8.0 | Statistical computations and models for use with SciPy / BSD 3-Clause |
| [sympy](http://sympy.org) | 1.1.1 | Python library for symbolic mathematics / 3-clause BSD |
| [tblib](https://github.com/ionelmc/python-tblib) | 1.3.2 | Traceback serialization library. / BSD 2-Clause |
| [terminado](http://github.com/mitsuhiko/markupsafe) | 0.6 | Terminals served by tornado websockets / BSD 3-clause |
| [testpath](https://testpath.readthedocs.io) | 0.3.1 | Testpath is a collection of utilities for Python code working with files and commands. / MIT |
| [tk](http://www.tcl.tk/) | 8.6.7 | A dynamic programming language with GUI support. Bundles Tcl and Tk. / Tcl/Tk |
| [toolz](http://toolz.readthedocs.org/) | 0.8.2 | A functional standard library for Python. / BSD 3-Clause |
| [tornado](http://www.tornadoweb.org/) | 4.5.2 | A Python web framework and asynchronous networking library, originally developed at FriendFeed. / Apache 2.0 |
| [traitlets](http://ipython.org/) | 4.3.2 | Configuration system for Python applications / BSD 3-clause |
| [typing](https://docs.python.org/3.5/library/typing.html) | 3.6.2 | Type Hints for Python - backport for `Python<3.5` / PSF |
| [unicodecsv](https://github.com/jdunck/python-unicodecsv) | 0.14.1 | Drop-in replacement for csv module which supports unicode strings / BSD |
| [unixodbc](http://www.unixodbc.org/) | 2.3.4 | ODBC on non MS Windows platforms / LGPL-2.1 |
| [urllib3](https://urllib3.readthedocs.io/) | 1.22 | HTTP library with thread-safe connection pooling, file post, and more. / MIT |
| [wcwidth](https://github.com/jquast/wcwidth) | 0.1.7 | Measures number of Terminal column cells of wide-character codes. / MIT |
| [webencodings](https://github.com/gsnedders/python-webencodings) | 0.5.1 | Character encoding aliases for legacy web content / BSD 3-Clause |
| [werkzeug](http://werkzeug.pocoo.org/) | 0.12.2 | The Python WSGI Utility Library. / BSD 3-Clause |
| [wheel](https://bitbucket.org/pypa/wheel/) | 0.29.0 | A built-package format for Python. / MIT |
| [widgetsnbextension](http://ipython.org) | 3.0.2 | IPython HTML widgets for Jupyter / BSD 3-clause |
| [wrapt](https://github.com/GrahamDumpleton/wrapt) | 1.10.11 | Module for decorators, wrappers and monkey patching. / BSD 2-Clause |
| [xlrd](http://www.python-excel.org/) | 1.1.0 | Library for developers to extract data from Microsoft Excel (tm) spreadsheet files / BSD 3-Clause and BSD with advertising |
| [xlsxwriter](https://xlsxwriter.readthedocs.io/) | 1.0.2 | A Python module for creating Excel XLSX files / BSD 2-Clause |
| [xlwt](http://www.python-excel.org/) | 1.3.0 | Writing data and formatting information to Excel files / BSD |
| [xz](http://tukaani.org/xz/) | 5.2.3 | Data compression software with high compression ratio / LGPL-2.1 and GPL-2.0 |
| [yaml](http://pyyaml.org/wiki/LibYAML) | 0.1.7 | A C library for parsing and emitting YAML. / MIT |
| [zeromq](http://zeromq.org) | 4.2.2 | A high-performance asynchronous messaging library. / LGPL 3 |
| [zict](http://github.com/mrocklin/zict) | 0.1.3 | Composable Dictionary Classes / BSD 3-Clause |
| [zlib](http://zlib.net/) | 1.2.11 | Massively spiffy yet delicately unobtrusive compression library / zlib |
| Name | Version | Summary / License |
|---|---|---|
| [alabaster](http://www.sphinx-doc.org/en/stable/index.html) | 0.7.10 | Configurable, Python 2+3 compatible Sphinx theme. / BSD 3-Clause |
| [anaconda-client](http://anaconda.org) | 1.6.5 | anaconda.org command line client library / BSD 3-clause |
| [anaconda-navigator](https://github.com/ContinuumIO/navigator) | 1.6.9 | Anaconda Navigator / proprietary - Continuum Analytics, Inc. |
| [anaconda-project](https://github.com/Anaconda-Platform/anaconda-project) | 0.8.0 | Reproducible, executable project directories. / BSD 3-Clause |
| [asn1crypto](https://github.com/wbond/asn1crypto) | 0.22.0 | Python ASN.1 library with a focus on performance and a pythonic API / MIT |
| [astroid](https://www.astroid.org/) | 1.5.3 | A abstract syntax tree for Python with inference support. / LGPL 2.1 |
| [astropy](http://www.astropy.org/) | 2.0.2 | Community-developed Python Library for Astronomy / BSD |
| [babel](http://babel.pocoo.org/) | 2.5.0 | Utilities to internationalize and localize Python applications / BSD 3-clause |
| [backports](https://bitbucket.org/brandon/backports) | 1.0 | / BSD |
| [backports.functools\_lru\_cache](https://github.com/jaraco/backports.functools_lru_cache) | 1.4 | Backport of functools.lru\_cache from Python 3.3 as published at ActiveState. / MIT |
| [backports.shutil\_get\_terminal\_size](https://github.com/chrippa/backports.shutil_get_terminal_size) | 1.0.0 | A backport of the get\_terminal\_size function from Python 3.3’s shutil. / MIT |
| [backports\_abc](https://github.com/cython/backports_abc) | 0.5 | A backport of recent additions to the collections.abc module. / PSF 2 |
| [beautifulsoup4](http://www.crummy.com/software/BeautifulSoup/) | 4.6.0 | Python library designed for screen-scraping / MIT |
| [bitarray](https://github.com/ilanschnell/bitarray) | 0.8.1 | efficient arrays of booleans – C extension / PSF |
| [bkcharts](http://github.com/bokeh/bkcharts) | 0.2 | High level chart types built on top of Bokeh / BSD 3-Clause |
| [blaze](http://blaze.pydata.org) | 0.11.3 | NumPy and Pandas interface to big data / BSD 3-Clause |
| [bleach](https://github.com/mozilla/bleach) | 2.0.0 | Easy, whitelist-based HTML-sanitizing tool / Apache-2.0 |
| [bokeh](http://bokeh.pydata.org/) | 0.12.10 | Statistical and novel interactive HTML plots for Python / BSD 3-Clause |
| [boto](https://github.com/boto/boto/) | 2.48.0 | Amazon Web Services Library / MIT |
| [bottleneck](http://berkeleyanalytics.com/bottleneck) | 1.2.1 | Fast NumPy array functions written in Cython. / BSD 2-Clause |
| [bzip2](http://www.bzip.org/) | 1.0.6 | high-quality data compressor / bzip2 |
| [ca-certificates](https://github.com/conda-forge/ca-certificates-feedstock) | 2017.08.26 | Certificates for use with other packages. / ISC |
| [cachecontrol](https://github.com/ionrock/cachecontrol) | 0.12.3 | httplib2 caching algorithms for use with requests / Apache Software License |
| [cdecimal](http://www.bytereef.org/mpdecimal/index.html) | 2.3 | Fast drop-in replacement for decimal.py / BSD 2-Clause |
| [certifi](http://certifi.io/) | 2017.7.27.1 | Python package for providing Mozilla’s CA Bundle. / ISC |
| [cffi](https://bitbucket.org/cffi/cffi) | 1.10.0 | Foreign Function Interface for Python calling C code. / MIT |
| [chardet](https://github.com/chardet/chardet) | 3.0.4 | Universal character encoding detector / LGPL2 |
| [click](http://click.pocoo.org/) | 6.7 | A simple wrapper around optparse for powerful command line utilities. / BSD 3-Clause |
| [cloudpickle](https://github.com/cloudpipe/cloudpickle) | 0.4.0 | Extended pickling support for Python objects / BSD 3-Clause |
| [clyent](https://github.com/Anaconda-Platform/clyent) | 1.2.2 | Command line client library for windows and posix / BSD 3-Clause |
| [colorama](https://github.com/tartley/colorama) | 0.3.9 | Cross-platform colored terminal text. / BSD 3-Clause |
| [comtypes](http://starship.python.net/crew/theller/comtypes/) | 1.1.2 | pure Python COM package / MIT |
| [conda](http://conda.pydata.org/) | 4.3.30 | OS-agnostic, system-level binary package and environment manager. / BSD 3-Clause |
| [conda-build](https://github.com/conda/conda-build) | 3.0.27 | tools for building conda packages / BSD 3-Clause |
| [configparser](http://docs.python.org/3/library/configparser.html) | 3.5.0 | This library brings the updated configparser from Python 3.5 to Python 2.6-3.5 / MIT |
| console\_shortcut | 0.1.1 | Console shortcut creator for Windows (using menuinst) / BSD |
| [contextlib2](http://contextlib2.readthedocs.org) | 0.5.5 | Backports and enhancements for the contextlib module / PSF |
| [cryptography](https://github.com/pyca/cryptography) | 2.0.3 | Provides cryptographic recipes and primitives to Python developers / Apache 2.0 or BSD 3-Clause, PSF 2 |
| [curl](http://curl.haxx.se/) | 7.55.1 | tool and library for transferring data with URL syntax / MIT/X derivate (`<http://curl.haxx.se/docs/copyright.html>`) |
| [cycler](http://matplotlib.org/cycler) | 0.10.0 | Composable style cycles. / BSD 3-Clause |
| [cython](http://www.cython.org/) | 0.26.1 | The Cython compiler for writing C extensions for the Python language / Apache-2.0 |
| [cytoolz](https://github.com/pytoolz/cytoolz) | 0.8.2 | Cython implementation of Toolz. High performance functional utilities. / BSD 3-Clause |
| [dask](http://dask.pydata.org/en/latest/) | 0.15.3 | Parallel Python with task scheduling / BSD 3-Clause |
| [dask-core](http://github.com/dask/dask/) | 0.15.3 | Parallel Python with task scheduling / BSD 3-Clause |
| [datashape](http://datashape.pydata.org) | 0.5.4 | A data description language. / BSD 2-Clause |
| [decorator](https://github.com/micheles/decorator) | 4.1.2 | Better living through Python with decorators. / BSD 3-Clause |
| [distlib](https://bitbucket.org/pypa/distlib) | 0.2.5 | Distribution utilities / Python Software Foundation License |
| [distributed](http://distributed.readthedocs.io/en/latest/) | 1.19.1 | Distributed computing with Dask / BSD 3-Clause |
| [docutils](http://docutils.sourceforge.net/) | 0.14 | Docutils – Python Documentation Utilities / Public Domain Dedictation and BSD 2-Clause and PSF 2.1.1 and GPL 3.0 |
| [entrypoints](https://github.com/takluyver/entrypoints) | 0.2.3 | Discover and load entry points from installed packages. / MIT License |
| [enum34](https://bitbucket.org/stoneleaf/enum34) | 1.1.6 | Python 3.4 Enum backported to 3.3, 3.2, 3.1, 2.7, 2.6, 2.5, and 2.4 / BSD 3-Clause |
| [et\_xmlfile](https://bitbucket.org/openpyxl/et_xmlfile) | 1.0.1 | An implementation of lxml.xmlfile for the standard library / MIT |
| [fastcache](https://github.com/pbrady/fastcache) | 1.0.2 | C implementation of Python 3 lru\_cache / MIT |
| [filelock](https://github.com/benediktschmitt/py-filelock) | 2.0.12 | A platform independent file lock. / Public Domain |
| [flask](http://flask.pocoo.org) | 0.12.2 | A microframework based on Werkzeug, Jinja2 and good intentions. / BSD 3-Clause |
| [flask-cors](https://github.com/corydolphin/flask-cors) | 3.0.3 | A Flask extension adding a decorator for CORS support / MIT |
| [freetype](https://www.freetype.org/) | 2.8 | A Free, High-Quality, and Portable Font Engine / GPL-2.0 and FreeType |
| [funcsigs](http://funcsigs.readthedocs.org) | 1.0.2 | Python function signatures from PEP362 for Python 2.6, 2.7 and 3.2+. / Apache 2.0 |
| [functools32](https://github.com/MiCHiLU/python-functools32) | 3.2.3.2 | Backport of the functools module from Python 3.2.3 for use on 2.7 and PyPy. / PSF license |
| [futures](https://github.com/agronholm/pythonfutures) | 3.1.1 | Backport of the concurrent.futures package from Python 3.2 / PSF |
| [get\_terminal\_size](https://github.com/chrippa/backports.shutil_get_terminal_size) | 1.0.0 | Get the size of the terminal window. / MIT |
| [gevent](http://www.gevent.org/) | 1.2.2 | Coroutine-based network library / MIT |
| [glob2](https://github.com/miracle2k/python-glob2) | 0.5 | Version of the glob module that supports recursion via \*\*, and can capture patterns. / BSD-2-Clause |
| [greenlet](https://github.com/python-greenlet/greenlet) | 0.4.12 | Lightweight in-process concurrent programming / MIT |
| [grin](http://pypi.python.org/pypi/grin) | 1.2.1 | Enhanced grep-like tool / BSD 3-Clause |
| [h5py](http://www.h5py.org/) | 2.7.0 | Read and write HDF5 files from Python. / BSD 3-Clause |
| [hdf5](http://www.hdfgroup.org/HDF5/) | 1.10.1 | HDF5 is a data model, library, and file format for storing and managing data / HDF5 |
| [heapdict](http://stutzbachenterprises.com/) | 1.0.0 | A heap with decrease-key and increase-key operations / BSD 3-Clause |
| [html5lib](https://github.com/html5lib/html5lib-python) | 0.999999999 | HTML parser based on the WHATWG HTML specification / MIT |
| [icc\_rt](https://software.intel.com/en-us/node/522690) | 2017.0.4 | Intel runtime libraries for C, C++ and Fortran compilers / Intel proprietary |
| [icu](http://site.icu-project.org/) | 58.2 | International Components for Unicode. / MIT |
| [idna](https://github.com/kjd/idna) | 2.6 | Internationalized Domain Names in Applications (IDNA). / BSD Like |
| [imageio](http://imageio.github.io) | 2.2.0 | a Python library for reading and writing image data / BSD 2-Clause |
| [imagesize](https://github.com/shibukawa/imagesize_py) | 0.7.1 | Getting image size from png/jpeg/jpeg2000/gif file / MIT |
| [intel-openmp](https://software.intel.com/en-us/node/522690) | 2018.0.0 | Math library for Intel and compatible processors / proprietary - Intel |
| [ipaddress](https://github.com/phihag/ipaddress) | 1.0.18 | IPv4/IPv6 manipulation library / PSF 2 |
| [ipykernel](http://ipython.org) | 4.6.1 | IPython Kernel for Jupyter / BSD 3-clause |
| [ipython](http://ipython.org/) | 5.4.1 | IPython: Productive Interactive Computing / BSD 3-clause |
| [ipython\_genutils](http://ipython.org) | 0.2.0 | vestigial utilities from IPython / BSD 3-Clause |
| [ipywidgets](https://github.com/ipython/ipywidgets) | 7.0.0 | Jupyter Interactive Widgets / BSD 3-clause |
| [isort](https://github.com/timothycrosley/isort) | 4.2.15 | A Python utility / library to sort Python imports. / MIT |
| [itsdangerous](https://github.com/pallets/itsdangerous) | 0.24 | Various helpers to pass trusted data to untrusted environments. / BSD 3-Clause |
| [jdcal](https://github.com/phn/jdcal) | 1.3 | Julian dates from proleptic Gregorian and Julian calendars. / BSD 2-Clause |
| [jedi](https://github.com/davidhalter/jedi/) | 0.10.2 | An autocompletion tool for Python that can be used for text editors. / MIT |
| [jinja2](http://jinja.pocoo.org) | 2.9.6 | An easy to use stand-alone template engine written in pure python. / 3-Clause BSD |
| [jpeg](http://www.ijg.org/) | 9b | read/write jpeg COM, EXIF, IPTC medata / Custom free software license |
| [jsonschema](https://github.com/Julian/jsonschema) | 2.6.0 | An implementation of JSON Schema validation for Python / MIT |
| [jupyter](http://jupyter.org) | 1.0.0 | Jupyter metapackage. Install all the Jupyter components in one go. / BSD 3-Clause |
| [jupyter\_client](http://jupyter.org) | 5.1.0 | Jupyter protocol implementation and client libraries / BSD 3-clause |
| [jupyter\_console](http://jupyter.org) | 5.2.0 | Jupyter terminal console / BSD 3-Clause |
| [jupyter\_core](http://jupyter.org) | 4.3.0 | Core common functionality of Jupyter projects. / BSD 3-clause |
| [jupyterlab](https://github.com/jupyterlab/jupyterlab) | 0.27.0 | A pre-alpha version of a computational environment for Jupyter. / BSD 3-Clause |
| [jupyterlab\_launcher](http://github.com/jupyterlab/jupyterlab_launcher) | 0.4.0 | A Launcher for JupyterLab based applications. / BSD 3-Clause |
| [lazy-object-proxy](https://github.com/ionelmc/python-lazy-object-proxy) | 1.3.1 | A fast and thorough lazy object proxy. / BSD 2-Clause |
| [libiconv](https://www.gnu.org/software/libiconv/) | 1.15 | Provides iconv for systems which don’t have one (or that cannot convert from/to Unicode.) / GPL and LGPL |
| [libpng](http://www.libpng.org/pub/png/libpng.html) | 1.6.32 | PNG reference library. / zlib/libpng |
| [libssh2](https://www.libssh2.org/) | 1.8.0 | the SSH library / BSD 3-Clause |
| [libtiff](http://www.libtiff.org/) | 4.0.8 | Support for the Tag Image File Format (TIFF). / HPND |
| [libxml2](http://xmlsoft.org/) | 2.9.4 | The XML C parser and toolkit of Gnome / MIT |
| [libxslt](http://xmlsoft.org/XSLT/) | 1.1.29 | The XSLT C library developed for the GNOME project / MIT |
| [llvmlite](http://llvmlite.pydata.org/) | 0.20.0 | Lightweight wrapper around basic LLVM functionality / BSD |
| [locket](https://github.com/mwilliamson/locket.py) | 0.2.0 | File-based locks for Python for Linux and Windows / BSD 2-Clause |
| [lockfile](http://launchpad.net/pylockfile) | 0.12.2 | Platform-independent file locking module / MIT |
| [lxml](http://lxml.de/) | 4.1.0 | Pythonic binding for the C libraries libxml2 and libxslt. / BSD 3-Clause, GPL-2.0, ZPL-2.0, and ElementTree |
| [lzo](http://www.oberhumer.com/opensource/lzo/) | 2.10 | LZO is a portable lossless data compression library written in ANSI C. / GPL v2+ |
| [markupsafe](https://www.palletsprojects.com/p/markupsafe/) | 1.0 | A Python module that implements the jinja2.Markup string / BSD 3-Clause |
| [matplotlib](http://matplotlib.org/) | 2.1.0 | Publication quality figures in Python / PSF-based |
| [mccabe](https://github.com/PyCQA/mccabe) | 0.6.1 | McCabe complexity checker for Python / MIT |
| [menuinst](https://github.com/ContinuumIO/menuinst) | 1.4.10 | cross platform menu item installation / BSD |
| [mistune](https://github.com/lepture/mistune) | 0.7.4 | The fastest markdown parser in pure Python. / BSD 3-Clause |
| [mkl](http://software.intel.com/en-us/articles/intel-mkl/) | 2018.0.0 | Math library for Intel and compatible processors / proprietary - Intel |
| [mkl-service](https://github.com/ContinuumIO/mkl-service) | 1.1.2 | Python bindings to MKL service functions / 3-clause BSD |
| [mpmath](http://mpmath.org) | 0.19 | Python library for arbitrary-precision floating-point arithmetic / BSD 3-Clause |
| [msgpack-python](http://msgpack.org/) | 0.4.8 | MessagePack (de)serializer. / Apache 2.0 |
| [multipledispatch](https://github.com/mrocklin/multipledispatch/) | 0.4.9 | Multiple dispatch in Python / BSD 3-Clause |
| [navigator-updater](https://github.com/ContinuumIO/navigator-updater) | 0.1.0 | Anaconda Navigator Updater / proprietary - Continuum Analytics, Inc. |
| [nbconvert](http://jupyter.org) | 5.3.1 | Converting Jupyter Notebooks / BSD 3-Clause |
| [nbformat](http://jupyter.org) | 4.4.0 | The reference implementation of the Jupyter Notebook format / BSD 3-clause |
| [networkx](https://networkx.github.io/) | 2.0 | Python package for creating and manipulating complex networks / BSD 3-Clause |
| [nltk](http://nltk.org/) | 3.2.4 | Build Python programs to work with human language data / Apache 2.0 |
| [nose](http://readthedocs.org/docs/nose/) | 1.3.7 | Nose extends unittest to make testing easier / LGPL-2.1 |
| [notebook](http://jupyter.org) | 5.0.0 | A web-based notebook environment for interactive computing / BSD 3-clause |
| [numba](http://numba.pydata.org/) | 0.35.0 | NumPy aware dynamic Python compiler using LLVM / BSD |
| [numexpr](https://github.com/pydata/numexpr) | 2.6.2 | Fast numerical expression evaluator for NumPy. / MIT |
| [numpy](http://numpy.scipy.org/) | 1.13.3 | Array processing for numbers, strings, records, and objects. / BSD 3-Clause |
| [numpydoc](https://github.com/numpy/numpydoc) | 0.7.0 | Sphinx extension to support docstrings in Numpy format / BSD 3-Clause |
| [odo](http://odo.pydata.org) | 0.5.1 | Data migration in Python / BSD-3-Clause |
| [olefile](http://www.decalage.info/python/olefileio) | 0.44 | parse, read and write Microsoft OLE2 files / BSD License 2-Clause |
| [openpyxl](https://openpyxl.readthedocs.io) | 2.4.8 | A Python library to read/write Excel 2010 xlsx/xlsm files / MIT |
| [openssl](http://www.openssl.org/) | 1.0.2l | OpenSSL is an open-source implementation of the SSL and TLS protocols / OpenSSL |
| [packaging](https://github.com/pypa/packaging) | 16.8 | Core utilities for Python packages / Apache 2.0 or BSD 2-Clause |
| [pandas](http://pandas.pydata.org) | 0.20.3 | High-performance, easy-to-use data structures and data analysis tools. / BSD 3-clause |
| [pandoc](http://johnmacfarlane.net/pandoc/) | 1.19.2.1 | Universal markup converter (repackaged binaries). / GPL-2.0 |
| [pandocfilters](https://github.com/jgm/pandocfilters) | 1.4.2 | A python module for writing pandoc filters / BSD-3-Clause |
| [partd](https://github.com/dask/partd) | 0.3.8 | Data structure for on-disk shuffle operations / BSD 3-Clause |
| [path.py](https://github.com/jaraco/path.py) | 10.3.1 | A module wrapper for os.path / MIT |
| [pathlib2](https://github.com/mcmtroffaes/pathlib2) | 2.3.0 | Fork of pathlib aiming to support the full stdlib Python API. / MIT |
| [patsy](https://github.com/pydata/patsy) | 0.4.1 | Describing statistical models in Python using symbolic formulas / BSD-2-Clause, PSF2 |
| [pep8](http://pep8.readthedocs.org/) | 1.7.0 | Python style guide checker / MIT |
| [pickleshare](https://github.com/vivainio/pickleshare) | 0.7.4 | Tiny ‘shelve’-like database with concurrency support / MIT |
| [pillow](http://python-imaging.github.io/) | 4.2.1 | Pillow is the friendly PIL fork by Alex Clark and Contributors. / PIL |
| [pip](https://pip.pypa.io/en/stable/) | 9.0.1 | PyPA recommended tool for installing Python packages / MIT |
| [pkginfo](https://code.launchpad.net/~tseaver/pkginfo/trunk) | 1.4.1 | Query metadatdata from sdists / bdists / installed packages. / MIT |
| [ply](http://www.dabeaz.com/ply/index.html) | 3.10 | Python Lex-Yacc / BSD 3-clause |
| [progress](https://github.com/verigak/progress) | 1.3 | Easy progress reporting for Python / ISC |
| [prompt\_toolkit](https://github.com/jonathanslenders/python-prompt-toolkit) | 1.0.15 | Library for building powerful interactive command lines in Python / BSD 3-clause |
| [psutil](https://github.com/giampaolo/psutil) | 5.4.0 | A cross-platform process and system utilities module for Python / BSD 3-Clause |
| [py](https://github.com/pytest-dev/py) | 1.4.34 | library with cross-python path, ini-parsing, io, code, log facilities / MIT |
| [pycodestyle](https://pycodestyle.readthedocs.io/) | 2.3.1 | Python style guide checker / MIT |
| [pycosat](https://github.com/ContinuumIO/pycosat) | 0.6.2 | Bindings to picosat (a SAT solver) / MIT |
| [pycparser](https://github.com/eliben/pycparser) | 2.18 | Complete C99 parser in pure Python / BSD 3-clause |
| [pycrypto](http://www.pycrypto.org/) | 2.6.1 | Cryptographic modules for Python. / Public Domain |
| [pycurl](http://pycurl.sourceforge.net/) | 7.43.0 | A Python Interface To The cURL library / LGPL, MIT |
| [pyflakes](https://github.com/PyCQA/pyflakes) | 1.6.0 | Pyflakes analyzes programs and detects various errors. / MIT |
| [pygments](http://pygments.org/) | 2.2.0 | Generic syntax highlighting package / BSD 2-clause |
| [pylint](http://www.pylint.org/) | 1.7.4 | python code static checker / GPL |
| [pyodbc](https://github.com/mkleehammer/pyodbc) | 4.0.17 | DB API Module for ODBC / MIT |
| [pyopenssl](https://github.com/pyca/pyopenssl) | 17.2.0 | Python wrapper module around the OpenSSL library / Apache 2.0 |
| [pyparsing](http://pyparsing.wikispaces.com/) | 2.2.0 | Create and execute simple grammars / MIT |
| [pyqt](http://www.riverbankcomputing.co.uk/software/pyqt) | 5.6.0 | Python binding of the cross-platform GUI toolkit Qt. / Commercial, GPL-2.0, GPL-3.0 |
| [pysocks](https://github.com/Anorov/PySocks) | 1.6.7 | A Python SOCKS client module. See [Anorov/PySocks](https://github.com/Anorov/PySocks) for more information. / BSD 3-Clause |
| [pytables](http://www.pytables.org) | 3.4.2 | Brings together Python, HDF5 and NumPy to easily handle large amounts of data. / BSD 3-Clause |
| [pytest](https://docs.pytest.org/en/latest/) | 3.2.1 | Simple and powerful testing with Python. / MIT |
| [python](http://www.python.org/) | 2.7.14 | General purpose programming language / PSF |
| [python-dateutil](https://dateutil.readthedocs.org/) | 2.6.1 | Extensions to the standard Python datetime module. / BSD 3-clause |
| [pytz](http://pythonhosted.org/pytz/) | 2017.2 | World timezone definitions, modern and historical. / MIT |
| [pywavelets](https://github.com/PyWavelets/pywt) | 0.5.2 | Discrete Wavelet Transforms in Python. / MIT |
| [pywin32](https://sourceforge.net/projects/pywin32) | 221 | Python extensions for Windows / PSF |
| [pyyaml](http://pyyaml.org/wiki/PyYAML) | 3.12 | YAML parser and emitter for Python / MIT |
| [pyzmq](https://github.com/zeromq/pyzmq) | 16.0.2 | Python bindings for zeromq / BSD 3-clause |
| [qt](http://qt-project.org) | 5.6.2 | Qt is a cross-platform application and UI framework. / LGPL-3.0 |
| [qtawesome](https://github.com/spyder-ide/qtawesome) | 0.4.4 | Iconic fonts in PyQt and PySide applications / MIT |
| [qtconsole](http://jupyter.org) | 4.3.1 | Jupyter Qt console / BSD 3-Clause |
| [qtpy](https://github.com/spyder-ide/qtpy) | 1.3.1 | Abstraction layer for PyQt5/PyQt4/PySide / MIT |
| [requests](http://python-requests.org) | 2.18.4 | Python HTTP for Humans. / Apache 2.0 |
| [rope](https://github.com/python-rope/rope) | 0.10.5 | A python refactoring library… / GPL 2.0 |
| [ruamel\_yaml](https://bitbucket.org/ruamel/yaml) | 0.11.14 | A patched copy of ruamel.yaml. / MIT |
| [scandir](https://github.com/benhoyt/scandir) | 1.6 | scandir, a better directory iterator and faster os.walk() / BSD 3-Clause |
| [scikit-image](http://scikit-image.org/) | 0.13.0 | Image processing routines for SciPy. / BSD 3-Clause |
| [scikit-learn](http://scikit-learn.org/) | 0.19.1 | A set of python modules for machine learning and data mining / BSD 3-Clause |
| [scipy](http://www.scipy.org/) | 0.19.1 | Scientific Library for Python / BSD 3-Clause |
| [seaborn](http://stanford.edu/~mwaskom/software/seaborn/) | 0.8.0 | Statistical data visualization / BSD 3-Clause |
| [setuptools](https://github.com/pypa/setuptools) | 36.5.0 | Download, build, install, upgrade, and uninstall Python packages / MIT |
| [simplegeneric](http://cheeseshop.python.org/pypi/simplegeneric) | 0.8.1 | Simple generic functions (similar to Python’s own len(), pickle.dump(), etc.) / Zope Public |
| [singledispatch](http://docs.python.org/3/library/functools.html#functools.singledispatch) | 3.4.0.3 | Transforms a function into a single-dispatch generic function / MIT |
| [sip](http://www.riverbankcomputing.com/software/sip/intro) | 4.18.1 | Create Python bindings for C and C++ libraries / GPL-3.0 |
| [six](http://pypi.python.org/pypi/six/) | 1.11.0 | Python 2 and 3 compatibility utilities / MIT |
| [snowballstemmer](https://github.com/shibukawa/snowball_py) | 1.2.1 | Snowball stemming library collection for Python / BSD-2-Clause |
| [sortedcollections](http://www.grantjenks.com/docs/sortedcollections/) | 0.5.3 | Python Sorted Collections / Apache-2.0 |
| [sortedcontainers](http://www.grantjenks.com/docs/sortedcontainers/) | 1.5.7 | Python Sorted Container Types: SortedList, SortedDict, and SortedSet / Apache 2.0 |
| [sphinx](http://www.sphinx-doc.org) | 1.6.3 | Sphinx is a tool that makes it easy to create intelligent and beautiful documentation / BSD 2-clause |
| sphinxcontrib | 1.0 | Python namespace for sphinxcontrib / BSD |
| [sphinxcontrib-websupport](https://pypi.python.org/pypi/sphinxcontrib-websupport) | 1.0.1 | Sphinx API for Web Apps / BSD-2-Clause |
| [spyder](https://github.com/spyder-ide/spyder) | 3.2.4 | Scientific PYthon Development EnviRonment / MIT |
| [sqlalchemy](http://www.sqlalchemy.org/) | 1.1.13 | Database Abstraction Library. / MIT |
| [sqlite](http://www.sqlite.org/) | 3.20.1 | Implements a self-contained, zero-configuration, SQL database engine. / Public-Domain (`<http://www.sqlite.org/copyright.html>`) |
| [ssl\_match\_hostname](http://bitbucket.org/brandon/backports.ssl_match_hostname) | 3.5.0.1 | The ssl.match\_hostname() function from Python 3.5 / PSF 2 |
| [statsmodels](https://www.statsmodels.org) | 0.8.0 | Statistical computations and models for use with SciPy / BSD 3-Clause |
| [subprocess32](https://github.com/google/python-subprocess32) | 3.2.7 | A backport of the subprocess module from Python 3.2/3.3 for use on 2.x. / PSF 2 |
| [sympy](http://sympy.org) | 1.1.1 | Python library for symbolic mathematics / 3-clause BSD |
| [tblib](https://github.com/ionelmc/python-tblib) | 1.3.2 | Traceback serialization library. / BSD 2-Clause |
| [testpath](https://testpath.readthedocs.io) | 0.3.1 | Testpath is a collection of utilities for Python code working with files and commands. / MIT |
| [tk](http://www.tcl.tk/) | 8.6.7 | A dynamic programming language with GUI support. Bundles Tcl and Tk. / Tcl/Tk |
| [toolz](http://toolz.readthedocs.org/) | 0.8.2 | A functional standard library for Python. / BSD 3-Clause |
| [tornado](http://www.tornadoweb.org/) | 4.5.2 | A Python web framework and asynchronous networking library, originally developed at FriendFeed. / Apache 2.0 |
| [traitlets](http://ipython.org/) | 4.3.2 | Configuration system for Python applications / BSD 3-clause |
| [typing](https://docs.python.org/3.5/library/typing.html) | 3.6.2 | Type Hints for Python - backport for `Python<3.5` / PSF |
| [unicodecsv](https://github.com/jdunck/python-unicodecsv) | 0.14.1 | Drop-in replacement for csv module which supports unicode strings / BSD |
| [urllib3](https://urllib3.readthedocs.io/) | 1.22 | HTTP library with thread-safe connection pooling, file post, and more. / MIT |
| [vc](https://github.com/conda/conda/wiki/VC-features) | 9 | A meta-package to track VC features. / Modified BSD License (3-clause) |
| [vs2008\_runtime](http://www.microsoft.com) | 9.00.30729.1 | Bundles of the MSVC 9 (VS 2008) runtime / Proprietary |
| [vs2015\_runtime](http://www.microsoft.com) | 14.0.25123 | Bundles of the MSVC 14 (VS 2015) runtime / Proprietary |
| [wcwidth](https://github.com/jquast/wcwidth) | 0.1.7 | Measures number of Terminal column cells of wide-character codes. / MIT |
| [webencodings](https://github.com/gsnedders/python-webencodings) | 0.5.1 | Character encoding aliases for legacy web content / BSD 3-Clause |
| [werkzeug](http://werkzeug.pocoo.org/) | 0.12.2 | The Python WSGI Utility Library. / BSD 3-Clause |
| [wheel](https://bitbucket.org/pypa/wheel/) | 0.29.0 | A built-package format for Python. / MIT |
| [widgetsnbextension](http://ipython.org) | 3.0.2 | IPython HTML widgets for Jupyter / BSD 3-clause |
| [win\_inet\_pton](https://github.com/hickeroar/win_inet_pton) | 1.0.1 | Native inet\_pton and inet\_ntop implementation for Python on Windows (with ctypes). / PUBLIC-DOMAIN |
| [win\_unicode\_console](https://github.com/Drekin/win-unicode-console) | 0.5 | A Python package to enable Unicode input and display when running Python from Windows console. / MIT |
| [wincertstore](https://bitbucket.org/tiran/wincertstore) | 0.2 | Python module to extract CA and CRL certs from Windows’ cert store (ctypes based). / PSF 2 |
| [wrapt](https://github.com/GrahamDumpleton/wrapt) | 1.10.11 | Module for decorators, wrappers and monkey patching. / BSD 2-Clause |
| [xlrd](http://www.python-excel.org/) | 1.1.0 | Library for developers to extract data from Microsoft Excel (tm) spreadsheet files / BSD 3-Clause and BSD with advertising |
| [xlsxwriter](https://xlsxwriter.readthedocs.io/) | 1.0.2 | A Python module for creating Excel XLSX files / BSD 2-Clause |
| [xlwings](http://xlwings.org/) | 0.11.4 | Interact with Excel from Python and vice versa / 3-clause BSD |
| [xlwt](http://www.python-excel.org/) | 1.3.0 | Writing data and formatting information to Excel files / BSD |
| [yaml](http://pyyaml.org/wiki/LibYAML) | 0.1.7 | A C library for parsing and emitting YAML. / MIT |
| [zict](http://github.com/mrocklin/zict) | 0.1.3 | Composable Dictionary Classes / BSD 3-Clause |
| [zlib](http://zlib.net/) | 1.2.11 | Massively spiffy yet delicately unobtrusive compression library / zlib |
| Name | Version | Summary / License |
|---|---|---|
| [alabaster](http://www.sphinx-doc.org/en/stable/index.html) | 0.7.10 | Configurable, Python 2+3 compatible Sphinx theme. / BSD 3-Clause |
| [anaconda-client](http://anaconda.org) | 1.6.5 | anaconda.org command line client library / BSD 3-clause |
| [anaconda-navigator](https://github.com/ContinuumIO/navigator) | 1.6.9 | Anaconda Navigator / proprietary - Continuum Analytics, Inc. |
| [anaconda-project](https://github.com/Anaconda-Platform/anaconda-project) | 0.8.0 | Reproducible, executable project directories. / BSD 3-Clause |
| [appnope](http://github.com/minrk/appnope) | 0.1.0 | Disable App Nap on OS X 10.9 / BSD 2-Clause |
| [appscript](http://appscript.sourceforge.net/) | 1.0.1 | Control AppleScriptable applications from Python / Public-Domain |
| [asn1crypto](https://github.com/wbond/asn1crypto) | 0.22.0 | Python ASN.1 library with a focus on performance and a pythonic API / MIT |
| [astroid](https://www.astroid.org/) | 1.5.3 | A abstract syntax tree for Python with inference support. / LGPL 2.1 |
| [astropy](http://www.astropy.org/) | 2.0.2 | Community-developed Python Library for Astronomy / BSD |
| [babel](http://babel.pocoo.org/) | 2.5.0 | Utilities to internationalize and localize Python applications / BSD 3-clause |
| [backports](https://bitbucket.org/brandon/backports) | 1.0 | / BSD |
| [backports.functools\_lru\_cache](https://github.com/jaraco/backports.functools_lru_cache) | 1.4 | Backport of functools.lru\_cache from Python 3.3 as published at ActiveState. / MIT |
| [backports.shutil\_get\_terminal\_size](https://github.com/chrippa/backports.shutil_get_terminal_size) | 1.0.0 | A backport of the get\_terminal\_size function from Python 3.3’s shutil. / MIT |
| [backports\_abc](https://github.com/cython/backports_abc) | 0.5 | A backport of recent additions to the collections.abc module. / PSF 2 |
| [beautifulsoup4](http://www.crummy.com/software/BeautifulSoup/) | 4.6.0 | Python library designed for screen-scraping / MIT |
| [bitarray](https://github.com/ilanschnell/bitarray) | 0.8.1 | efficient arrays of booleans – C extension / PSF |
| [bkcharts](http://github.com/bokeh/bkcharts) | 0.2 | High level chart types built on top of Bokeh / BSD 3-Clause |
| [blaze](http://blaze.pydata.org) | 0.11.3 | NumPy and Pandas interface to big data / BSD 3-Clause |
| [bleach](https://github.com/mozilla/bleach) | 2.0.0 | Easy, whitelist-based HTML-sanitizing tool / Apache-2.0 |
| [bokeh](http://bokeh.pydata.org/) | 0.12.10 | Statistical and novel interactive HTML plots for Python / BSD 3-Clause |
| [boto](https://github.com/boto/boto/) | 2.48.0 | Amazon Web Services Library / MIT |
| [bottleneck](http://berkeleyanalytics.com/bottleneck) | 1.2.1 | Fast NumPy array functions written in Cython. / BSD 2-Clause |
| [bzip2](http://www.bzip.org/) | 1.0.6 | high-quality data compressor / bzip2 |
| [ca-certificates](https://github.com/conda-forge/ca-certificates-feedstock) | 2017.08.26 | Certificates for use with other packages. / ISC |
| [cdecimal](http://www.bytereef.org/mpdecimal/index.html) | 2.3 | Fast drop-in replacement for decimal.py / BSD 2-Clause |
| [certifi](http://certifi.io/) | 2017.7.27.1 | Python package for providing Mozilla’s CA Bundle. / ISC |
| [cffi](https://bitbucket.org/cffi/cffi) | 1.10.0 | Foreign Function Interface for Python calling C code. / MIT |
| [chardet](https://github.com/chardet/chardet) | 3.0.4 | Universal character encoding detector / LGPL2 |
| [click](http://click.pocoo.org/) | 6.7 | A simple wrapper around optparse for powerful command line utilities. / BSD 3-Clause |
| [cloudpickle](https://github.com/cloudpipe/cloudpickle) | 0.4.0 | Extended pickling support for Python objects / BSD 3-Clause |
| [clyent](https://github.com/Anaconda-Platform/clyent) | 1.2.2 | Command line client library for windows and posix / BSD 3-Clause |
| [colorama](https://github.com/tartley/colorama) | 0.3.9 | Cross-platform colored terminal text. / BSD 3-Clause |
| [conda](http://conda.pydata.org/) | 4.3.30 | OS-agnostic, system-level binary package and environment manager. / BSD 3-Clause |
| [conda-build](https://github.com/conda/conda-build) | 3.0.27 | tools for building conda packages / BSD 3-Clause |
| [configparser](http://docs.python.org/3/library/configparser.html) | 3.5.0 | This library brings the updated configparser from Python 3.5 to Python 2.6-3.5 / MIT |
| [contextlib2](http://contextlib2.readthedocs.org) | 0.5.5 | Backports and enhancements for the contextlib module / PSF |
| [cryptography](https://github.com/pyca/cryptography) | 2.0.3 | Provides cryptographic recipes and primitives to Python developers / Apache 2.0 or BSD 3-Clause, PSF 2 |
| [curl](http://curl.haxx.se/) | 7.55.1 | tool and library for transferring data with URL syntax / MIT/X derivate (`<http://curl.haxx.se/docs/copyright.html>`) |
| [cycler](http://matplotlib.org/cycler) | 0.10.0 | Composable style cycles. / BSD 3-Clause |
| [cython](http://www.cython.org/) | 0.26.1 | The Cython compiler for writing C extensions for the Python language / Apache-2.0 |
| [cytoolz](https://github.com/pytoolz/cytoolz) | 0.8.2 | Cython implementation of Toolz. High performance functional utilities. / BSD 3-Clause |
| [dask](http://dask.pydata.org/en/latest/) | 0.15.3 | Parallel Python with task scheduling / BSD 3-Clause |
| [dask-core](http://github.com/dask/dask/) | 0.15.3 | Parallel Python with task scheduling / BSD 3-Clause |
| [datashape](http://datashape.pydata.org) | 0.5.4 | A data description language. / BSD 2-Clause |
| [dbus](http://www.freedesktop.org/wiki/Software/dbus/) | 1.10.22 | Simple message bus system for applications to talk to one another / GPL2 |
| [decorator](https://github.com/micheles/decorator) | 4.1.2 | Better living through Python with decorators. / BSD 3-Clause |
| [distributed](http://distributed.readthedocs.io/en/latest/) | 1.19.1 | Distributed computing with Dask / BSD 3-Clause |
| [docutils](http://docutils.sourceforge.net/) | 0.14 | Docutils – Python Documentation Utilities / Public Domain Dedictation and BSD 2-Clause and PSF 2.1.1 and GPL 3.0 |
| [entrypoints](https://github.com/takluyver/entrypoints) | 0.2.3 | Discover and load entry points from installed packages. / MIT License |
| [enum34](https://bitbucket.org/stoneleaf/enum34) | 1.1.6 | Python 3.4 Enum backported to 3.3, 3.2, 3.1, 2.7, 2.6, 2.5, and 2.4 / BSD 3-Clause |
| [et\_xmlfile](https://bitbucket.org/openpyxl/et_xmlfile) | 1.0.1 | An implementation of lxml.xmlfile for the standard library / MIT |
| [expat](http://expat.sourceforge.net/) | 2.2.4 | Expat XML parser library in C. / MIT |
| [fastcache](https://github.com/pbrady/fastcache) | 1.0.2 | C implementation of Python 3 lru\_cache / MIT |
| [filelock](https://github.com/benediktschmitt/py-filelock) | 2.0.12 | A platform independent file lock. / Public Domain |
| [flask](http://flask.pocoo.org) | 0.12.2 | A microframework based on Werkzeug, Jinja2 and good intentions. / BSD 3-Clause |
| [flask-cors](https://github.com/corydolphin/flask-cors) | 3.0.3 | A Flask extension adding a decorator for CORS support / MIT |
| [freetype](https://www.freetype.org/) | 2.8 | A Free, High-Quality, and Portable Font Engine / GPL-2.0 and FreeType |
| [funcsigs](http://funcsigs.readthedocs.org) | 1.0.2 | Python function signatures from PEP362 for Python 2.6, 2.7 and 3.2+. / Apache 2.0 |
| [functools32](https://github.com/MiCHiLU/python-functools32) | 3.2.3.2 | Backport of the functools module from Python 3.2.3 for use on 2.7 and PyPy. / PSF license |
| [futures](https://github.com/agronholm/pythonfutures) | 3.1.1 | Backport of the concurrent.futures package from Python 3.2 / PSF |
| [get\_terminal\_size](https://github.com/chrippa/backports.shutil_get_terminal_size) | 1.0.0 | Get the size of the terminal window. / MIT |
| [gettext](https://www.gnu.org/software/gettext/) | 0.19.8.1 | Internationalization package. / GPLv2 |
| [gettext](https://www.gnu.org/software/gettext/) | 0.19.8.1 | Internationalization package. / GPLv2 |
| [gevent](http://www.gevent.org/) | 1.2.2 | Coroutine-based network library / MIT |
| [glib](https://developer.gnome.org/glib/) | 2.53.6 | Provides core application building blocks for libraries and applications written in C. / LGPL-2.1 |
| [glib](https://developer.gnome.org/glib/) | 2.53.6 | Provides core application building blocks for libraries and applications written in C. / LGPL-2.1 |
| [glob2](https://github.com/miracle2k/python-glob2) | 0.5 | Version of the glob module that supports recursion via \*\*, and can capture patterns. / BSD-2-Clause |
| [gmp](http://gmplib.org/) | 6.1.2 | The GNU multiprecision library. / GPL 2 and LGPL 3 |
| [gmp](http://gmplib.org/) | 6.1.2 | The GNU multiprecision library. / GPL 2 and LGPL 3 |
| [gmpy2](https://pypi.python.org/pypi/gmpy2) | 2.0.8 | GMP/MPIR, MPFR, and MPC interface to Python 2.6+ and 3.x / LGPL 3 |
| [gmpy2](https://pypi.python.org/pypi/gmpy2) | 2.0.8 | GMP/MPIR, MPFR, and MPC interface to Python 2.6+ and 3.x / LGPL 3 |
| [greenlet](https://github.com/python-greenlet/greenlet) | 0.4.12 | Lightweight in-process concurrent programming / MIT |
| [grin](http://pypi.python.org/pypi/grin) | 1.2.1 | Enhanced grep-like tool / BSD 3-Clause |
| [h5py](http://www.h5py.org/) | 2.7.0 | Read and write HDF5 files from Python. / BSD 3-Clause |
| [hdf5](http://www.hdfgroup.org/HDF5/) | 1.10.1 | HDF5 is a data model, library, and file format for storing and managing data / HDF5 |
| [heapdict](http://stutzbachenterprises.com/) | 1.0.0 | A heap with decrease-key and increase-key operations / BSD 3-Clause |
| [html5lib](https://github.com/html5lib/html5lib-python) | 0.999999999 | HTML parser based on the WHATWG HTML specification / MIT |
| [icu](http://site.icu-project.org/) | 58.2 | International Components for Unicode. / MIT |
| [idna](https://github.com/kjd/idna) | 2.6 | Internationalized Domain Names in Applications (IDNA). / BSD Like |
| [imageio](http://imageio.github.io) | 2.2.0 | a Python library for reading and writing image data / BSD 2-Clause |
| [imagesize](https://github.com/shibukawa/imagesize_py) | 0.7.1 | Getting image size from png/jpeg/jpeg2000/gif file / MIT |
| [intel-openmp](https://software.intel.com/en-us/node/522690) | 2018.0.0 | Math library for Intel and compatible processors / proprietary - Intel |
| [ipaddress](https://github.com/phihag/ipaddress) | 1.0.18 | IPv4/IPv6 manipulation library / PSF 2 |
| [ipykernel](http://ipython.org) | 4.6.1 | IPython Kernel for Jupyter / BSD 3-clause |
| [ipython](http://ipython.org/) | 5.4.1 | IPython: Productive Interactive Computing / BSD 3-clause |
| [ipython\_genutils](http://ipython.org) | 0.2.0 | vestigial utilities from IPython / BSD 3-Clause |
| [ipywidgets](https://github.com/ipython/ipywidgets) | 7.0.0 | Jupyter Interactive Widgets / BSD 3-clause |
| [isort](https://github.com/timothycrosley/isort) | 4.2.15 | A Python utility / library to sort Python imports. / MIT |
| [itsdangerous](https://github.com/pallets/itsdangerous) | 0.24 | Various helpers to pass trusted data to untrusted environments. / BSD 3-Clause |
| [jbig](https://www.cl.cam.ac.uk/~mgk25/jbigkit) | 2.1 | Implementation of the JBIG1 data compression standard / GPL-2.0 |
| [jdcal](https://github.com/phn/jdcal) | 1.3 | Julian dates from proleptic Gregorian and Julian calendars. / BSD 2-Clause |
| [jedi](https://github.com/davidhalter/jedi/) | 0.10.2 | An autocompletion tool for Python that can be used for text editors. / MIT |
| [jinja2](http://jinja.pocoo.org) | 2.9.6 | An easy to use stand-alone template engine written in pure python. / 3-Clause BSD |
| [jpeg](http://www.ijg.org/) | 9b | read/write jpeg COM, EXIF, IPTC medata / Custom free software license |
| [jsonschema](https://github.com/Julian/jsonschema) | 2.6.0 | An implementation of JSON Schema validation for Python / MIT |
| [jupyter](http://jupyter.org) | 1.0.0 | Jupyter metapackage. Install all the Jupyter components in one go. / BSD 3-Clause |
| [jupyter\_client](http://jupyter.org) | 5.1.0 | Jupyter protocol implementation and client libraries / BSD 3-clause |
| [jupyter\_console](http://jupyter.org) | 5.2.0 | Jupyter terminal console / BSD 3-Clause |
| [jupyter\_core](http://jupyter.org) | 4.3.0 | Core common functionality of Jupyter projects. / BSD 3-clause |
| [jupyterlab](https://github.com/jupyterlab/jupyterlab) | 0.27.0 | A pre-alpha version of a computational environment for Jupyter. / BSD 3-Clause |
| [jupyterlab\_launcher](http://github.com/jupyterlab/jupyterlab_launcher) | 0.4.0 | A Launcher for JupyterLab based applications. / BSD 3-Clause |
| [lazy-object-proxy](https://github.com/ionelmc/python-lazy-object-proxy) | 1.3.1 | A fast and thorough lazy object proxy. / BSD 2-Clause |
| [libcxx](http://libcxx.llvm.org/) | 4.0.1 | C++ Standard Library / MIT license or UIUC License |
| [libcxxabi](http://libcxxabi.llvm.org/) | 4.0.1 | C++ Standard Library Support / MIT license or UIUC License |
| [libedit](http://thrysoee.dk/editline/) | 3.1 | Editline Library (libedit) / 3-Clause BSD |
| [libffi](https://sourceware.org/libffi/) | 3.2.1 | A Portable Foreign Function Interface Library. / Custom |
| [libffi](https://sourceware.org/libffi/) | 3.2.1 | A Portable Foreign Function Interface Library. / Custom |
| [libgfortran](http://gcc.gnu.org/) | 3.0.1 | Fortran libraries from the GNU Compiler Collection / GPL 3 (with GCC Runtime Library Exception 3.1) |
| [libiconv](https://www.gnu.org/software/libiconv/) | 1.15 | Provides iconv for systems which don’t have one (or that cannot convert from/to Unicode.) / GPL and LGPL |
| [libpng](http://www.libpng.org/pub/png/libpng.html) | 1.6.32 | PNG reference library. / zlib/libpng |
| [libsodium](https://github.com/jedisct1/libsodium) | 1.0.13 | A modern and easy-to-use crypto library. / ISC |
| [libssh2](https://www.libssh2.org/) | 1.8.0 | the SSH library / BSD 3-Clause |
| [libtiff](http://www.libtiff.org/) | 4.0.8 | Support for the Tag Image File Format (TIFF). / HPND |
| [libxml2](http://xmlsoft.org/) | 2.9.4 | The XML C parser and toolkit of Gnome / MIT |
| [libxslt](http://xmlsoft.org/XSLT/) | 1.1.29 | The XSLT C library developed for the GNOME project / MIT |
| [llvmlite](http://llvmlite.pydata.org/) | 0.20.0 | Lightweight wrapper around basic LLVM functionality / BSD |
| [locket](https://github.com/mwilliamson/locket.py) | 0.2.0 | File-based locks for Python for Linux and Windows / BSD 2-Clause |
| [lxml](http://lxml.de/) | 4.1.0 | Pythonic binding for the C libraries libxml2 and libxslt. / BSD 3-Clause, GPL-2.0, ZPL-2.0, and ElementTree |
| [lzo](http://www.oberhumer.com/opensource/lzo/) | 2.10 | LZO is a portable lossless data compression library written in ANSI C. / GPL v2+ |
| [markupsafe](https://www.palletsprojects.com/p/markupsafe/) | 1.0 | A Python module that implements the jinja2.Markup string / BSD 3-Clause |
| [matplotlib](http://matplotlib.org/) | 2.1.0 | Publication quality figures in Python / PSF-based |
| [mccabe](https://github.com/PyCQA/mccabe) | 0.6.1 | McCabe complexity checker for Python / MIT |
| [mistune](https://github.com/lepture/mistune) | 0.7.4 | The fastest markdown parser in pure Python. / BSD 3-Clause |
| [mkl](http://software.intel.com/en-us/articles/intel-mkl/) | 2018.0.0 | Math library for Intel and compatible processors / proprietary - Intel |
| [mkl-service](https://github.com/ContinuumIO/mkl-service) | 1.1.2 | Python bindings to MKL service functions / 3-clause BSD |
| [mpc](http://www.multiprecision.org/) | 1.0.3 | A C library for the arithmetic of complex numbers with arbitrarily high precision. / LGPL 3 |
| [mpfr](http://www.mpfr.org/) | 3.1.5 | The MPFR library is a C library for multiple-precision floating-point computations with correct rounding. / LGPL 3 |
| [mpmath](http://mpmath.org) | 0.19 | Python library for arbitrary-precision floating-point arithmetic / BSD 3-Clause |
| [msgpack-python](http://msgpack.org/) | 0.4.8 | MessagePack (de)serializer. / Apache 2.0 |
| [multipledispatch](https://github.com/mrocklin/multipledispatch/) | 0.4.9 | Multiple dispatch in Python / BSD 3-Clause |
| [navigator-updater](https://github.com/ContinuumIO/navigator-updater) | 0.1.0 | Anaconda Navigator Updater / proprietary - Continuum Analytics, Inc. |
| [nbconvert](http://jupyter.org) | 5.3.1 | Converting Jupyter Notebooks / BSD 3-Clause |
| [nbformat](http://jupyter.org) | 4.4.0 | The reference implementation of the Jupyter Notebook format / BSD 3-clause |
| [ncurses](http://www.gnu.org/software/ncurses/) | 6.0 | Library for text-based user interfaces / Free software (MIT-like) |
| [networkx](https://networkx.github.io/) | 2.0 | Python package for creating and manipulating complex networks / BSD 3-Clause |
| [nltk](http://nltk.org/) | 3.2.4 | Build Python programs to work with human language data / Apache 2.0 |
| [nose](http://readthedocs.org/docs/nose/) | 1.3.7 | Nose extends unittest to make testing easier / LGPL-2.1 |
| [notebook](http://jupyter.org) | 5.0.0 | A web-based notebook environment for interactive computing / BSD 3-clause |
| [numba](http://numba.pydata.org/) | 0.35.0 | NumPy aware dynamic Python compiler using LLVM / BSD |
| [numexpr](https://github.com/pydata/numexpr) | 2.6.2 | Fast numerical expression evaluator for NumPy. / MIT |
| [numpy](http://numpy.scipy.org/) | 1.13.3 | Array processing for numbers, strings, records, and objects. / BSD 3-Clause |
| [numpydoc](https://github.com/numpy/numpydoc) | 0.7.0 | Sphinx extension to support docstrings in Numpy format / BSD 3-Clause |
| [odo](http://odo.pydata.org) | 0.5.1 | Data migration in Python / BSD-3-Clause |
| [olefile](http://www.decalage.info/python/olefileio) | 0.44 | parse, read and write Microsoft OLE2 files / BSD License 2-Clause |
| [openpyxl](https://openpyxl.readthedocs.io) | 2.4.8 | A Python library to read/write Excel 2010 xlsx/xlsm files / MIT |
| [openssl](http://www.openssl.org/) | 1.0.2l | OpenSSL is an open-source implementation of the SSL and TLS protocols / OpenSSL |
| [packaging](https://github.com/pypa/packaging) | 16.8 | Core utilities for Python packages / Apache 2.0 or BSD 2-Clause |
| [pandas](http://pandas.pydata.org) | 0.20.3 | High-performance, easy-to-use data structures and data analysis tools. / BSD 3-clause |
| [pandoc](http://johnmacfarlane.net/pandoc/) | 1.19.2.1 | Universal markup converter (repackaged binaries). / GPL-2.0 |
| [pandocfilters](https://github.com/jgm/pandocfilters) | 1.4.2 | A python module for writing pandoc filters / BSD-3-Clause |
| [partd](https://github.com/dask/partd) | 0.3.8 | Data structure for on-disk shuffle operations / BSD 3-Clause |
| [path.py](https://github.com/jaraco/path.py) | 10.3.1 | A module wrapper for os.path / MIT |
| [pathlib2](https://github.com/mcmtroffaes/pathlib2) | 2.3.0 | Fork of pathlib aiming to support the full stdlib Python API. / MIT |
| [patsy](https://github.com/pydata/patsy) | 0.4.1 | Describing statistical models in Python using symbolic formulas / BSD-2-Clause, PSF2 |
| [pcre](http://www.pcre.org/) | 8.41 | Regular expression pattern matching using the same syntax and semantics as Perl 5. / BSD 3-Clause |
| [pep8](http://pep8.readthedocs.org/) | 1.7.0 | Python style guide checker / MIT |
| [pexpect](http://pexpect.sourceforge.net/) | 4.2.1 | Pexpect makes Python a better tool for controlling other applications. / ISC |
| [pickleshare](https://github.com/vivainio/pickleshare) | 0.7.4 | Tiny ‘shelve’-like database with concurrency support / MIT |
| [pillow](http://python-imaging.github.io/) | 4.2.1 | Pillow is the friendly PIL fork by Alex Clark and Contributors. / PIL |
| [pip](https://pip.pypa.io/en/stable/) | 9.0.1 | PyPA recommended tool for installing Python packages / MIT |
| [pkginfo](https://code.launchpad.net/~tseaver/pkginfo/trunk) | 1.4.1 | Query metadatdata from sdists / bdists / installed packages. / MIT |
| [ply](http://www.dabeaz.com/ply/index.html) | 3.10 | Python Lex-Yacc / BSD 3-clause |
| [prompt\_toolkit](https://github.com/jonathanslenders/python-prompt-toolkit) | 1.0.15 | Library for building powerful interactive command lines in Python / BSD 3-clause |
| [psutil](https://github.com/giampaolo/psutil) | 5.4.0 | A cross-platform process and system utilities module for Python / BSD 3-Clause |
| [ptyprocess](https://github.com/pexpect/ptyprocess) | 0.5.2 | Run a subprocess in a pseudo terminal / ISC |
| [py](https://github.com/pytest-dev/py) | 1.4.34 | library with cross-python path, ini-parsing, io, code, log facilities / MIT |
| [pyaudio](http://people.csail.mit.edu/hubert/pyaudio/) | 0.2.7 | Bindings for PortAudio v19, the cross-platform audio stream library / MIT |
| [pycodestyle](https://pycodestyle.readthedocs.io/) | 2.3.1 | Python style guide checker / MIT |
| [pycosat](https://github.com/ContinuumIO/pycosat) | 0.6.2 | Bindings to picosat (a SAT solver) / MIT |
| [pycparser](https://github.com/eliben/pycparser) | 2.18 | Complete C99 parser in pure Python / BSD 3-clause |
| [pycrypto](http://www.pycrypto.org/) | 2.6.1 | Cryptographic modules for Python. / Public Domain |
| [pycurl](http://pycurl.sourceforge.net/) | 7.43.0 | A Python Interface To The cURL library / LGPL, MIT |
| [pyflakes](https://github.com/PyCQA/pyflakes) | 1.6.0 | Pyflakes analyzes programs and detects various errors. / MIT |
| [pygments](http://pygments.org/) | 2.2.0 | Generic syntax highlighting package / BSD 2-clause |
| [pylint](http://www.pylint.org/) | 1.7.4 | python code static checker / GPL |
| [pyodbc](https://github.com/mkleehammer/pyodbc) | 4.0.17 | DB API Module for ODBC / MIT |
| [pyopenssl](https://github.com/pyca/pyopenssl) | 17.2.0 | Python wrapper module around the OpenSSL library / Apache 2.0 |
| [pyparsing](http://pyparsing.wikispaces.com/) | 2.2.0 | Create and execute simple grammars / MIT |
| [pyqt](http://www.riverbankcomputing.co.uk/software/pyqt) | 5.6.0 | Python binding of the cross-platform GUI toolkit Qt. / Commercial, GPL-2.0, GPL-3.0 |
| [pysocks](https://github.com/Anorov/PySocks) | 1.6.7 | A Python SOCKS client module. See [Anorov/PySocks](https://github.com/Anorov/PySocks) for more information. / BSD 3-Clause |
| [pytables](http://www.pytables.org) | 3.4.2 | Brings together Python, HDF5 and NumPy to easily handle large amounts of data. / BSD 3-Clause |
| [pytest](https://docs.pytest.org/en/latest/) | 3.2.1 | Simple and powerful testing with Python. / MIT |
| [python](http://www.python.org/) | 2.7.14 | General purpose programming language / PSF |
| [python-dateutil](https://dateutil.readthedocs.org/) | 2.6.1 | Extensions to the standard Python datetime module. / BSD 3-clause |
| python.app | 2 | Proxy on OS X letting Python libraries hook into the gui event loop / BSD |
| [pytz](http://pythonhosted.org/pytz/) | 2017.2 | World timezone definitions, modern and historical. / MIT |
| [pywavelets](https://github.com/PyWavelets/pywt) | 0.5.2 | Discrete Wavelet Transforms in Python. / MIT |
| [pyyaml](http://pyyaml.org/wiki/PyYAML) | 3.12 | YAML parser and emitter for Python / MIT |
| [pyzmq](https://github.com/zeromq/pyzmq) | 16.0.2 | Python bindings for zeromq / BSD 3-clause |
| [qt](http://qt-project.org) | 5.6.2 | Qt is a cross-platform application and UI framework. / LGPL-3.0 |
| [qtawesome](https://github.com/spyder-ide/qtawesome) | 0.4.4 | Iconic fonts in PyQt and PySide applications / MIT |
| [qtconsole](http://jupyter.org) | 4.3.1 | Jupyter Qt console / BSD 3-Clause |
| [qtpy](https://github.com/spyder-ide/qtpy) | 1.3.1 | Abstraction layer for PyQt5/PyQt4/PySide / MIT |
| [readline](https://cnswww.cns.cwru.edu/php/chet/readline/rltop.html) | 7.0 | library for editing command lines as they are typed in / GPL3 |
| [requests](http://python-requests.org) | 2.18.4 | Python HTTP for Humans. / Apache 2.0 |
| [rope](https://github.com/python-rope/rope) | 0.10.5 | A python refactoring library… / GPL 2.0 |
| [ruamel\_yaml](https://bitbucket.org/ruamel/yaml) | 0.11.14 | A patched copy of ruamel.yaml. / MIT |
| [scandir](https://github.com/benhoyt/scandir) | 1.6 | scandir, a better directory iterator and faster os.walk() / BSD 3-Clause |
| [scikit-image](http://scikit-image.org/) | 0.13.0 | Image processing routines for SciPy. / BSD 3-Clause |
| [scikit-learn](http://scikit-learn.org/) | 0.19.1 | A set of python modules for machine learning and data mining / BSD 3-Clause |
| [scipy](http://www.scipy.org/) | 0.19.1 | Scientific Library for Python / BSD 3-Clause |
| [seaborn](http://stanford.edu/~mwaskom/software/seaborn/) | 0.8.0 | Statistical data visualization / BSD 3-Clause |
| [setuptools](https://github.com/pypa/setuptools) | 36.5.0 | Download, build, install, upgrade, and uninstall Python packages / MIT |
| [simplegeneric](http://cheeseshop.python.org/pypi/simplegeneric) | 0.8.1 | Simple generic functions (similar to Python’s own len(), pickle.dump(), etc.) / Zope Public |
| [singledispatch](http://docs.python.org/3/library/functools.html#functools.singledispatch) | 3.4.0.3 | Transforms a function into a single-dispatch generic function / MIT |
| [sip](http://www.riverbankcomputing.com/software/sip/intro) | 4.18.1 | Create Python bindings for C and C++ libraries / GPL-3.0 |
| [six](http://pypi.python.org/pypi/six/) | 1.11.0 | Python 2 and 3 compatibility utilities / MIT |
| [snowballstemmer](https://github.com/shibukawa/snowball_py) | 1.2.1 | Snowball stemming library collection for Python / BSD-2-Clause |
| [sortedcollections](http://www.grantjenks.com/docs/sortedcollections/) | 0.5.3 | Python Sorted Collections / Apache-2.0 |
| [sortedcontainers](http://www.grantjenks.com/docs/sortedcontainers/) | 1.5.7 | Python Sorted Container Types: SortedList, SortedDict, and SortedSet / Apache 2.0 |
| [sphinx](http://www.sphinx-doc.org) | 1.6.3 | Sphinx is a tool that makes it easy to create intelligent and beautiful documentation / BSD 2-clause |
| sphinxcontrib | 1.0 | Python namespace for sphinxcontrib / BSD |
| [sphinxcontrib-websupport](https://pypi.python.org/pypi/sphinxcontrib-websupport) | 1.0.1 | Sphinx API for Web Apps / BSD-2-Clause |
| [spyder](https://github.com/spyder-ide/spyder) | 3.2.4 | Scientific PYthon Development EnviRonment / MIT |
| [sqlalchemy](http://www.sqlalchemy.org/) | 1.1.13 | Database Abstraction Library. / MIT |
| [sqlite](http://www.sqlite.org/) | 3.20.1 | Implements a self-contained, zero-configuration, SQL database engine. / Public-Domain (`<http://www.sqlite.org/copyright.html>`) |
| [ssl\_match\_hostname](http://bitbucket.org/brandon/backports.ssl_match_hostname) | 3.5.0.1 | The ssl.match\_hostname() function from Python 3.5 / PSF 2 |
| [statsmodels](https://www.statsmodels.org) | 0.8.0 | Statistical computations and models for use with SciPy / BSD 3-Clause |
| [subprocess32](https://github.com/google/python-subprocess32) | 3.2.7 | A backport of the subprocess module from Python 3.2/3.3 for use on 2.x. / PSF 2 |
| [sympy](http://sympy.org) | 1.1.1 | Python library for symbolic mathematics / 3-clause BSD |
| [tblib](https://github.com/ionelmc/python-tblib) | 1.3.2 | Traceback serialization library. / BSD 2-Clause |
| [terminado](http://github.com/mitsuhiko/markupsafe) | 0.6 | Terminals served by tornado websockets / BSD 3-clause |
| [testpath](https://testpath.readthedocs.io) | 0.3.1 | Testpath is a collection of utilities for Python code working with files and commands. / MIT |
| [tk](http://www.tcl.tk/) | 8.6.7 | A dynamic programming language with GUI support. Bundles Tcl and Tk. / Tcl/Tk |
| [toolz](http://toolz.readthedocs.org/) | 0.8.2 | A functional standard library for Python. / BSD 3-Clause |
| [tornado](http://www.tornadoweb.org/) | 4.5.2 | A Python web framework and asynchronous networking library, originally developed at FriendFeed. / Apache 2.0 |
| [traitlets](http://ipython.org/) | 4.3.2 | Configuration system for Python applications / BSD 3-clause |
| [typing](https://docs.python.org/3.5/library/typing.html) | 3.6.2 | Type Hints for Python - backport for `Python<3.5` / PSF |
| [unicodecsv](https://github.com/jdunck/python-unicodecsv) | 0.14.1 | Drop-in replacement for csv module which supports unicode strings / BSD |
| [unixodbc](http://www.unixodbc.org/) | 2.3.4 | ODBC on non MS Windows platforms / LGPL-2.1 |
| [urllib3](https://urllib3.readthedocs.io/) | 1.22 | HTTP library with thread-safe connection pooling, file post, and more. / MIT |
| [wcwidth](https://github.com/jquast/wcwidth) | 0.1.7 | Measures number of Terminal column cells of wide-character codes. / MIT |
| [webencodings](https://github.com/gsnedders/python-webencodings) | 0.5.1 | Character encoding aliases for legacy web content / BSD 3-Clause |
| [werkzeug](http://werkzeug.pocoo.org/) | 0.12.2 | The Python WSGI Utility Library. / BSD 3-Clause |
| [wheel](https://bitbucket.org/pypa/wheel/) | 0.29.0 | A built-package format for Python. / MIT |
| [widgetsnbextension](http://ipython.org) | 3.0.2 | IPython HTML widgets for Jupyter / BSD 3-clause |
| [wrapt](https://github.com/GrahamDumpleton/wrapt) | 1.10.11 | Module for decorators, wrappers and monkey patching. / BSD 2-Clause |
| [xlrd](http://www.python-excel.org/) | 1.1.0 | Library for developers to extract data from Microsoft Excel (tm) spreadsheet files / BSD 3-Clause and BSD with advertising |
| [xlsxwriter](https://xlsxwriter.readthedocs.io/) | 1.0.2 | A Python module for creating Excel XLSX files / BSD 2-Clause |
| [xlwings](http://xlwings.org/) | 0.11.4 | Interact with Excel from Python and vice versa / 3-clause BSD |
| [xlwt](http://www.python-excel.org/) | 1.2.0 | Writing data and formatting information to Excel files / BSD |
| [xz](http://tukaani.org/xz/) | 5.2.3 | Data compression software with high compression ratio / LGPL-2.1 and GPL-2.0 |
| [yaml](http://pyyaml.org/wiki/LibYAML) | 0.1.7 | A C library for parsing and emitting YAML. / MIT |
| [zeromq](http://zeromq.org) | 4.2.2 | A high-performance asynchronous messaging library. / LGPL 3 |
| [zict](http://github.com/mrocklin/zict) | 0.1.3 | Composable Dictionary Classes / BSD 3-Clause |
| [zlib](http://zlib.net/) | 1.2.11 | Massively spiffy yet delicately unobtrusive compression library / zlib |
| Name | Version | Summary / License |
|---|---|---|
| [alabaster](https://github.com/bitprophet/alabaster) | 0.7.10 | Configurable, Python 2+3 compatible Sphinx theme / BSD |
| [anaconda-client](http://anaconda.org) | 1.6.3 | anaconda.org command line client library / BSD 3-clause |
| [anaconda-project](https://github.com/Anaconda-Platform/anaconda-project/) | 0.6.0 | reproducible, executable project directories / BSD 3-clause |
| [asn1crypto](https://github.com/wbond/asn1crypto) | 0.22.0 | ASN.1 parser and serializer / MIT |
| [astroid](https://www.astroid.org/) | 1.5.3 | abstract syntax tree for Python with inference support / LGPL version 2.1 |
| [astropy](http://www.astropy.org/) | 2.0.1 | Community-developed Python Library for Astronomy / BSD |
| [babel](http://babel.pocoo.org/) | 2.5.0 | Utilities to internationalize and localize Python applications / BSD |
| [backports](https://bitbucket.org/brandon/backports) | 1.0 | / BSD |
| [backports\_abc](https://github.com/cython/backports_abc) | 0.5 | backport of recent additions to the ‘collections.abc’ module / PSF |
| [beautifulsoup4](http://www.crummy.com/software/BeautifulSoup/) | 4.6.0 | Python library designed for screen-scraping / MIT |
| [bitarray](https://github.com/ilanschnell/bitarray) | 0.8.1 | efficient representation of arrays of booleans – C extension / PSF |
| [bkcharts](https://github.com/bokeh/bkcharts) | 0.2 | optional High Level charts API built on top of Bokeh / New BSD |
| [bleach](http://github.com/mozilla/bleach) | 1.5.0 | easy whitelist-based HTML-sanitizing tool / Apache License Version 2.0 |
| [bokeh](http://bokeh.pydata.org/) | 0.12.7 | Python interactive visualization library for modern web browsers / BSD |
| [boto](https://github.com/boto/boto/) | 2.48.0 | Amazon Web Services Library / MIT |
| [bottleneck](http://berkeleyanalytics.com/bottleneck) | 1.2.1 | Fast NumPy array functions written in Cython. / Simplified BSD |
| [cairo](http://cairographics.org/) | 1.14.8 | A 2D graphics library with support for multiple output devices / LGPL 2.1, MPL 1.1 |
| [cdecimal](http://www.bytereef.org/mpdecimal/index.html) | 2.3 | Fast drop-in replacement for decimal.py / BSD |
| [certifi](https://certifi.io) | 2016.2.28 | Python package for providing Mozilla’s CA Bundle. / ISC |
| [cffi](http://cffi.readthedocs.org) | 1.10.0 | C Foreign Function Interface for Python / MIT |
| [chardet](https://github.com/chardet/chardet) | 3.0.4 | Universal character encoding detector / GNU Lesser General Public License |
| [click](http://click.pocoo.org/) | 6.7 | Command line interface creation kit / BSD |
| [cloudpickle](https://github.com/cloudpipe/cloudpickle) | 0.4.0 | extended pickling support for Python objects / BSD |
| [clyent](https://github.com/Anaconda-Server/clyent) | 1.2.2 | Command line client library for windows and posix / BSD |
| [colorama](https://github.com/tartley/colorama) | 0.3.9 | Cross-platform colored terminal text in Python / BSD |
| [conda](http://conda.pydata.org/) | 4.3.27 | Package management system and Environment management system / BSD |
| [conda-build](https://github.com/conda/conda-build) | 3.0.22 | Commands and tools for building conda packages / BSD 3-clause |
| [configparser](http://docs.python.org/3/library/configparser.html) | 3.5.0 | brings the updated configparser from Python 3.5 to Python 2.6-3.5 / MIT |
| [contextlib2](http://contextlib2.readthedocs.org/) | 0.5.5 | backports and enhancements for the contextlib module / PSF |
| [cryptography](https://cryptography.io) | 1.8.1 | Provides cryptographic recipes and primitives to Python developers / Apache and BSD |
| [curl](http://curl.haxx.se/) | 7.52.1 | Tool and library for transferring data with URL syntax / MIT/X derivate |
| [cycler](http://matplotlib.org/cycler/) | 0.10.0 | Composable style cycles / BSD |
| [cython](http://www.cython.org/) | 0.26 | The Cython compiler for writing C extensions for the Python language / Apache version 2.0 |
| [cytoolz](https://github.com/pytoolz/cytoolz) | 0.8.2 | Cython implementation of Toolz, high performance functional utilities / BSD |
| [dask](http://dask.pydata.org/en/latest/) | 0.15.2 | Task scheduling and blocked algorithms for parallel processing / BSD |
| [datashape](http://datashape.pydata.org) | 0.5.4 | Language defining a data description protocol / BSD |
| [decorator](http://pypi.python.org/pypi/decorator) | 4.1.2 | Better living through Python with decorators / BSD |
| [distributed](http://distributed.readthedocs.io/en/latest/) | 1.18.1 | Distributed computing / BSD 3-Clause |
| [docutils](http://docutils.sourceforge.net) | 0.14 | Utilities for general- and special-purpose documentation / Public-Domain, PSF, 2-clause BSD, GPLv3 |
| [entrypoints](https://github.com/takluyver/entrypoints) | 0.2.3 | / MIT |
| [enum34](https://pypi.python.org/pypi/enum34) | 1.1.6 | Robust enumerated type support in Python / BSD |
| [et\_xmlfile](https://bitbucket.org/openpyxl/et_xmlfile) | 1.0.1 | Low memory library for creating large XML files / MIT |
| [expat](http://expat.sourceforge.net) | 2.1.0 | XML parser library written in C / MIT |
| [fastcache](https://github.com/pbrady/fastcache) | 1.0.2 | C implementation of Python 3 functools.lru\_cache / MIT |
| [filelock](https://github.com/benediktschmitt/py-filelock) | 2.0.7 | A platform independent file lock. / Public Domain |
| [flask](http://flask.pocoo.org/) | 0.12.2 | Microframework for Python based on Werkzeug, Jinja2. / BSD |
| [flask-cors](https://github.com/corydolphin/flask-cors) | 3.0.3 | Flask extension adding a decorator for CORS support / MIT |
| [fontconfig](http://www.freedesktop.org/wiki/Software/fontconfig/) | 2.12.1 | A library for configuring and customizing font access / BSD |
| [freetype](http://freetype.sourceforge.net/index2.html) | 2.5.5 | A Free, High-Quality, and Portable Font Engine / FreeType License |
| [funcsigs](http://funcsigs.readthedocs.org/) | 1.0.2 | Python function signatures from PEP362 for Python 2.6, 2.7 and 3.2+ / Apache |
| [functools32](https://github.com/MiCHiLU/python-functools32) | 3.2.3.2 | backport of the functools module from Python 3.2.3 for use on 2.7 and PyPy. / PSF |
| [functools\_lru\_cache](https://github.com/jaraco/backports.functools_lru_cache) | 1.4 | backport of functools.lru\_cache from Python 3.3 / MIT |
| [futures](http://code.google.com/p/pythonfutures) | 3.1.1 | A Java-style futures package for Python / PSF |
| [get\_terminal\_size](https://github.com/chrippa/backports.shutil_get_terminal_size) | 1.0.0 | Get the size of the terminal window. / MIT |
| [gevent](http://www.gevent.org/) | 1.2.2 | Coroutine-based Python network library / MIT |
| [glob2](http://github.com/miracle2k/python-glob2/) | 0.5 | Enhanced glob that can capture patterns and supports recursive wildcards / BSD License |
| [greenlet](https://github.com/python-greenlet/greenlet) | 0.4.12 | Lightweight in-process concurrent programming / MIT |
| [grin](http://pypi.python.org/pypi/grin) | 1.2.1 | Enhanced grep-like tool / BSD |
| [h5py](http://www.h5py.org/) | 2.7.0 | Pythonic interface to the HDF5 binary data format / 3-clause BSD |
| [hdf5](http://www.hdfgroup.org/HDF5/) | 1.8.17 | A data model, library, and file format for storing and managing data / BSD-like |
| [heapdict](http://stutzbachenterprises.com/) | 1.0.0 | A heap with decrease-key and increase-key operations / BSD |
| [html5lib](https://github.com/html5lib/html5lib-python) | 0.9999999 | HTML parser based on the WHATWG HTML specification / MIT |
| [idna](https://github.com/kjd/idna) | 2.6 | Internationalized Domain Names in Applications / BSD |
| [imagesize](https://github.com/shibukawa/imagesize_py) | 0.7.1 | getting image size from png/jpeg/jpeg2000/gif file / MIT |
| [ipaddress](https://github.com/phihag/ipaddress) | 1.0.18 | IPv4/IPv6 manipulation library / Python Software Foundation License |
| [ipykernel](http://ipython.org) | 4.6.1 | Provides a rich toolkit to help you make the most of using Python interactively / BSD |
| [ipython](http://ipython.org/) | 5.3.0 | Productive Interactive Computing / BSD |
| [ipython\_genutils](http://jupyter.org) | 0.2.0 | vestigial utilities from IPython / BSD |
| [ipywidgets](https://github.com/ipython/ipywidgets) | 6.0.0 | Widgets for the Jupyter Notebook / BSD 3-clause |
| [isort](https://github.com/timothycrosley/isort) | 4.2.15 | Python utility / library to sort Python imports / MIT |
| [itsdangerous](https://pythonhosted.org/itsdangerous/) | 0.24 | Various helpers to pass trusted data to untrusted environments / BSD |
| [jbig](https://www.cl.cam.ac.uk/~mgk25/jbigkit) | 2.1 | Implementation of the JBIG1 data compression standard / GPL2 |
| [jdcal](http://github.com/phn/jdcal) | 1.3 | Julian dates from proleptic Gregorian and Julian calendars. / BSD |
| [jedi](http://jedi.jedidjah.ch/) | 0.10.2 | Autocompletion and static analysis library for Python / MIT |
| [jinja2](http://jinja.pocoo.org) | 2.9.6 | An easy to use stand-alone template engine written in pure python. / BSD |
| [jpeg](http://www.ijg.org/) | 9b | Read and write jpeg files / Custom free software license |
| [jsonschema](https://python-jsonschema.readthedocs.org) | 2.6.0 | An implementation of JSON Schema validation for Python / MIT |
| [jupyter](http://jupyter.org) | 1.0.0 | web-based notebook environment for interactive computing. / BSD |
| [jupyter\_client](http://jupyter.org) | 5.1.0 | Jupyter protocol implementation and client libraries / BSD |
| [jupyter\_console](http://jupyter.org) | 5.2.0 | Jupyter terminal console / BSD |
| [jupyter\_core](http://jupyter.org) | 4.3.0 | core Jupyter functionality / BSD |
| [lazy-object-proxy](https://github.com/ionelmc/python-lazy-object-proxy) | 1.3.1 | Fast and thorough lazy object proxy / BSD |
| [libffi](https://sourceware.org/libffi/) | 3.2.1 | portable foreign-function interface library / MIT |
| [libgfortran](https://gcc.gnu.org/fortran/) | 3.0.0 | the GNU Fortran compiler, part of GCC / GPL3 |
| [libiconv](https://www.gnu.org/software/libiconv/) | 1.14 | Provides iconv for systems which don’t have one / GPL and LGPL |
| [libpng](http://www.libpng.org/pub/png/libpng.html) | 1.6.30 | official PNG reference library / libpng license |
| [libsodium](http://libsodium.org) | 1.0.10 | A library for encryption, signatures, password hashing, etc. / ISC |
| [libtiff](http://www.libtiff.org/) | 4.0.6 | Support for Tag Image File Format (TIFF) / BSD-like |
| [libxml2](http://xmlsoft.org/) | 2.9.4 | The XML C parser and toolkit of Gnome / MIT |
| [libxslt](http://xmlsoft.org/XSLT/) | 1.1.29 | The XSLT C library developed for the GNOME project / MIT |
| [locket](http://github.com/mwilliamson/locket.py) | 0.2.0 | File based locks for Python for Linux and Windows / BSD |
| [lxml](http://lxml.de/) | 3.7.3 | XML and HTML with Python / BSD |
| [markupsafe](http://www.pocoo.org/projects/markupsafe/#markupsafe) | 1.0 | Implements a XML/HTML/XHTML Markup safe string for Python / BSD |
| [matplotlib](http://matplotlib.org/) | 2.0.2 | Python 2D plotting library / PSF-based |
| [mistune](https://github.com/lepture/mistune) | 0.7.4 | The fastest markdown parser in pure Python with renderer feature / BSD |
| [mpmath](http://mpmath.org) | 0.19 | Python library for arbitrary-precision floating-point arithmetic / BSD |
| [msgpack-python](http://msgpack.org/) | 0.4.8 | An efficient binary serialization format / Apache |
| [multipledispatch](http://github.com/mrocklin/multipledispatch/) | 0.4.9 | Multiple dispatch in Python / BSD |
| [nbconvert](http://jupyter.org) | 5.2.1 | converts notebooks to various other formats via Jinja templates / BSD |
| [nbformat](http://jupyter.org) | 4.4.0 | reference implementation of the Jupyter Notebook format / BSD |
| [networkx](http://networkx.lanl.gov/) | 1.11 | Python package for creating and manipulating complex networks / BSD |
| [nltk](http://nltk.org/) | 3.2.4 | Build Python programs to work with human language data / Apache Software License |
| [nose](http://readthedocs.org/docs/nose/) | 1.3.7 | Nose extends unittest to make testing easier / LGPL |
| [notebook](http://jupyter.org) | 5.0.0 | web-based notebook environment for interactive computing / BSD |
| [numexpr](https://github.com/pydata/numexpr) | 2.6.2 | Fast numerical expression evaluator for NumPy / MIT |
| [numpy](http://numpy.scipy.org/) | 1.13.1 | Array processing for numbers, strings, records, and objects / BSD |
| [numpydoc](https://github.com/numpy/numpydoc) | 0.7.0 | Sphinx extension to support docstrings in Numpy format / BSD |
| [odo](http://odo.pydata.org/en/latest/) | 0.5.1 | Shapeshifting for your data / BSD |
| [olefile](https://www.decalage.info/python/olefileio) | 0.44 | parse, read and write Microsoft OLE2 files / BSD License |
| [openblas](http://www.openblas.net/) | 0.2.19 | An Optimized BLAS library / BSD |
| [openpyxl](http://openpyxl.readthedocs.org) | 2.4.8 | A Python library to read/write Excel 2010 xlsx/xlsm files / MIT |
| [openssl](http://www.openssl.org/) | 1.0.2l | OpenSSL is an open-source implementation of the SSL and TLS protocols / Apache-style |
| [packaging](https://github.com/pypa/packaging) | 16.8 | core utilities for Python packages / BSD or Apache 2.0 |
| [pandas](http://pandas.pydata.org/) | 0.20.3 | Powerful Python data analysis toolkit / BSD |
| [pandocfilters](http://github.com/jgm/pandocfilters) | 1.4.2 | utilities for writing pandoc filters in python / BSD License |
| [partd](https://github.com/dask/partd) | 0.3.8 | Appendable key-value byte store / BSD |
| [patchelf](http://nixos.org/patchelf.html) | 0.9 | Modify the dynamic linker and RPATH of ELF executables / GPL3 |
| [path.py](http://github.com/jaraco/path.py) | 10.3.1 | An object representing a path to a file or directory / MIT |
| [pathlib2](https://pypi.python.org/pypi/pathlib2/) | 2.3.0 | object-oriented filesystem paths / MIT |
| [patsy](https://github.com/pydata/patsy) | 0.4.1 | Describing statistical models in Python using symbolic formulas / BSD |
| [pcre](http://www.pcre.org/) | 8.39 | A set of functions that implement regular expression pattern matching / 3-clause BSD License |
| [pep8](http://pep8.readthedocs.org/) | 1.7.0 | Python style guide checker / MIT |
| [pexpect](http://pexpect.readthedocs.org/) | 4.2.1 | Pexpect allows easy control of interactive console applications / ISC |
| [pickleshare](https://github.com/vivainio/pickleshare) | 0.7.4 | file system based database that uses Python pickles / MIT |
| [pillow](http://python-pillow.github.io/) | 4.2.1 | The friendly Python Imaging Library(PIL) fork / PIL license |
| [pip](https://pip.pypa.io/en/stable/) | 9.0.1 | PyPA recommended tool for installing Python packages / MIT |
| [pixman](http://www.pixman.org/) | 0.34.0 | A low-level software library for pixel manipulation / MIT |
| [pkginfo](https://pypi.python.org/pypi/pkginfo/) | 1.4.1 | query metadatdata from sdists or bdists installed packages / PSF |
| [ply](http://www.dabeaz.com/ply/) | 3.10 | implementation of Lex and Yacc / BSD |
| [prompt\_toolkit](https://github.com/jonathanslenders/python-prompt-toolkit) | 1.0.15 | library for building powerful interactive command lines in Python / BSD |
| [psutil](https://github.com/giampaolo/psutil) | 5.2.2 | cross-platform process and system utilities module for Python / BSD |
| [ptyprocess](https://github.com/pexpect/ptyprocess) | 0.5.2 | Run a subprocess in a pseudo terminal / ISC |
| [py](http://pylib.readthedocs.org/) | 1.4.34 | Library with cross-python path, ini-parsing, io, code, log facilities / MIT |
| [pycairo](http://cairographics.org/pycairo/) | 1.10.0 | A set of Python bindings for the cairo graphics library / LGPL 2.1, MPL 1.1 |
| [pycodestyle](https://pycodestyle.readthedocs.io/) | 2.3.1 | Python style guide checker / MIT License |
| [pycosat](https://github.com/ContinuumIO/pycosat) | 0.6.2 | Python bindings to the picosat SAT solver / MIT |
| [pycparser](https://github.com/eliben/pycparser) | 2.18 | C parser in Python / BSD |
| [pycrypto](http://www.pycrypto.org/) | 2.6.1 | Cryptographic modules for Python / Public-Domain |
| [pycurl](http://pycurl.sourceforge.net/) | 7.43.0 | A Python Interface To The cURL library / LGPL, MIT |
| [pyflakes](https://launchpad.net/pyflakes) | 1.6.0 | passive checker of Python programs / MIT |
| [pygments](http://pygments.org/) | 2.2.0 | Generic syntax highlighting package / BSD |
| [pylint](http://www.pylint.org/) | 1.7.2 | Python code static checker / GPL |
| [pyodbc](http://mkleehammer.github.io/pyodbc/) | 4.0.16 | DB API Module for ODBC / MIT |
| [pyopenssl](https://github.com/pyca/pyopenssl) | 17.0.0 | Python wrapper module around the OpenSSL library / Apache Software License |
| [pyparsing](http://pyparsing.wikispaces.com/) | 2.2.0 | Create and execute simple grammars / MIT |
| [pytables](http://www.pytables.org) | 3.4.2 | Manage hierarchical datasets to cope with large amounts of data / BSD |
| [pytest](http://pytest.org/) | 3.2.1 | Simple and powerful testing with Python / MIT |
| [python](http://www.python.org/) | 2.7.13 | General purpose programming language / PSF |
| [python-dateutil](https://dateutil.readthedocs.org/) | 2.6.1 | extensions to the standard Python datetime module / Simplified BSD |
| [pytz](http://pytz.sourceforge.net/) | 2017.2 | World timezone definitions, modern and historical / MIT |
| [pywavelets](https://github.com/PyWavelets/pywt) | 0.5.2 | wavelet transform module / MIT |
| [pyyaml](http://pyyaml.org/wiki/PyYAML) | 3.12 | YAML parser and emitter for Python / MIT |
| [pyzmq](https://github.com/zeromq/pyzmq) | 16.0.2 | zeromq bindings for Python / LGPL and BSD |
| [requests](http://docs.python-requests.org/en/latest/index.html) | 2.14.2 | Python HTTP for Humans / Apache Software License |
| [ruamel\_yaml](https://bitbucket.org/ruamel/yaml) | 0.11.14 | patched copy of ruamel.yaml (a yaml parser) / MIT |
| [scandir](https://github.com/benhoyt/scandir) | 1.5 | scandir, a better directory iterator and faster os.walk() / BSD License |
| [scikit-image](http://scikit-image.org/) | 0.13.0 | Image processing routines for SciPy / 3-clause BSD |
| [scikit-learn](http://scikit-learn.org/stable/) | 0.19.0 | set of python modules for machine learning and data mining / 3-clause BSD |
| [scipy](http://www.scipy.org/) | 0.19.1 | Scientific Library for Python / BSD |
| [seaborn](http://stanford.edu/~mwaskom/software/seaborn/) | 0.8 | Statistical data visualization / BSD |
| [setuptools](https://pypi.python.org/pypi/setuptools) | 36.4.0 | Download, build, install, upgrade, and uninstall Python packages / MIT |
| [simplegeneric](https://pypi.python.org/pypi/simplegeneric) | 0.8.1 | Define simple single-dispatch generic functions / ZPL 2.1 |
| [singledispatch](http://docs.python.org/3/library/functools.html#functools.singledispatch) | 3.4.0.3 | Transforms a function into a single-dispatch generic function / MIT |
| [six](http://pypi.python.org/pypi/six/) | 1.10.0 | Python 2 and 3 compatibility utilities / MIT |
| [snowballstemmer](https://github.com/shibukawa/snowball_py) | 1.2.1 | Snowball stemming library collection for Python / BSD |
| [sortedcollections](http://www.grantjenks.com/docs/sortedcollections/) | 0.5.3 | Python Sorted Collections / Apache Software License |
| [sortedcontainers](http://www.grantjenks.com/docs/sortedcontainers/) | 1.5.7 | sorted Container Types: SortedList, SortedDict, and SortedSet / Apache 2.0 |
| [sphinx](http://sphinx-doc.org) | 1.6.3 | Documentation generator / BSD |
| sphinxcontrib | 1.0 | Python namespace for sphinxcontrib / BSD |
| [sphinxcontrib-websupport](https://pypi.python.org/pypi/sphinxcontrib-websupport) | 1.0.1 | Sphinx API for Web Apps / BSD-2-Clause |
| [sqlalchemy](http://www.sqlalchemy.org/) | 1.1.13 | Python SQL toolkit and Object Relational Mapper / MIT |
| [sqlite](http://www.sqlite.org/) | 3.13.0 | SQL database engine / Public-Domain |
| [ssl\_match\_hostname](http://bitbucket.org/brandon/backports.ssl_match_hostname) | 3.5.0.1 | The ssl.match\_hostname() function from Python 3.4 / PSF |
| [statsmodels](http://statsmodels.sourceforge.net/) | 0.8.0 | Statistical computations and models / 3-clause BSD |
| [subprocess32](https://github.com/google/python-subprocess32) | 3.2.7 | backport of the subprocess module from Python 3.2/3.3 for use on 2.x / Python Software Foundation License |
| [sympy](http://sympy.org) | 1.1.1 | Python library for symbolic mathematics / 3-clause BSD |
| [tblib](https://github.com/ionelmc/python-tblib) | 1.3.2 | Traceback serialization library / BSD |
| [terminado](https://github.com/takluyver/terminado) | 0.6 | Terminals served to term.js using Tornado websockets / BSD |
| [testpath](https://testpath.readthedocs.io) | 0.3.1 | collection of utilities for Python code working with files and commands / MIT |
| [tk](http://www.tcl.tk/) | 8.5.18 | Dynamic programming language with GUI elements / BSD-like |
| [toolz](http://toolz.readthedocs.org/en/latest/) | 0.8.2 | List processing tools and functional utilities / BSD |
| [tornado](http://www.tornadoweb.org/) | 4.5.2 | Tornado Web Server / Apache 2.0 |
| [traitlets](https://github.com/ipython/traitlets) | 4.3.2 | Configuration system for Python applications / Modified BSD |
| [typing](https://docs.python.org/3.5/library/typing.html) | 3.6.2 | backport of the standard library typing module to Python versions older than 3.6 / PSF |
| [typing](https://docs.python.org/3.5/library/typing.html) | 3.6.2 | Type Hints for Python - backport for `Python<3.5` / PSF |
| [unicodecsv](https://github.com/jdunck/python-unicodecsv) | 0.14.1 | Drop-in replacement for csv module which supports unicode strings / BSD |
| [unixodbc](http://www.unixodbc.org/) | 2.3.4 | ODBC (Open Database Connectivity) implementation for Unix / LGPLv2 |
| [wcwidth](https://github.com/jquast/wcwidth) | 0.1.7 | measures number of Terminal column cells of wide-character codes / MIT |
| [werkzeug](http://werkzeug.pocoo.org/) | 0.12.2 | A WSGI utility library for Python / BSD |
| [wheel](http://bitbucket.org/pypa/wheel/) | 0.29.0 | Built-package format for Python / MIT |
| [widgetsnbextension](http://ipython.org) | 3.0.2 | IPython HTML widgets for Jupyter / BSD 3-clause |
| [wrapt](https://github.com/GrahamDumpleton/wrapt) | 1.10.11 | Module for decorators, wrappers and monkey patching / BSD |
| [xlrd](http://www.lexicon.net/sjmachin/xlrd.htm) | 1.1.0 | extract data from Microsoft Excel spreadsheet files / BSD |
| [xlsxwriter](https://github.com/jmcnamara/XlsxWriter) | 0.9.8 | A Python module for creating Excel XLSX files / BSD |
| [xlwt](http://www.python-excel.org/) | 1.3.0 | writing data and formatting information to Excel files / BSD |
| [xz](http://tukaani.org/xz/) | 5.2.3 | Data compression software with high compression ratio / Public-Domain, GPL |
| [yaml](http://www.yaml.org/) | 0.1.6 | YAML Ain’t Markup Language / MIT |
| [zeromq](http://zeromq.org) | 4.1.5 | Distributed messaging / LGPL |
| [zict](http://github.com/mrocklin/zict/) | 0.1.2 | Composable Mutable Mapping tools / BSD |
| [zlib](http://zlib.net/) | 1.2.11 | Unobtrusive compression library / zlib |
| Name | Version | Summary / License |
|---|---|---|
| [alabaster](http://www.sphinx-doc.org/en/stable/index.html) | 0.7.10 | Configurable, Python 2+3 compatible Sphinx theme. / BSD 3-Clause |
| [anaconda-client](http://anaconda.org) | 1.6.5 | anaconda.org command line client library / BSD 3-clause |
| [anaconda-navigator](https://github.com/ContinuumIO/navigator) | 1.6.9 | Anaconda Navigator / proprietary - Continuum Analytics, Inc. |
| [anaconda-project](https://github.com/Anaconda-Platform/anaconda-project) | 0.8.0 | Reproducible, executable project directories. / BSD 3-Clause |
| [asn1crypto](https://github.com/wbond/asn1crypto) | 0.22.0 | Python ASN.1 library with a focus on performance and a pythonic API / MIT |
| [astroid](https://www.astroid.org/) | 1.5.3 | A abstract syntax tree for Python with inference support. / LGPL 2.1 |
| [astropy](http://www.astropy.org/) | 2.0.2 | Community-developed Python Library for Astronomy / BSD |
| [babel](http://babel.pocoo.org/) | 2.5.0 | Utilities to internationalize and localize Python applications / BSD 3-clause |
| [backports](https://bitbucket.org/brandon/backports) | 1.0 | / BSD |
| [backports.functools\_lru\_cache](https://github.com/jaraco/backports.functools_lru_cache) | 1.4 | Backport of functools.lru\_cache from Python 3.3 as published at ActiveState. / MIT |
| [backports.shutil\_get\_terminal\_size](https://github.com/chrippa/backports.shutil_get_terminal_size) | 1.0.0 | A backport of the get\_terminal\_size function from Python 3.3’s shutil. / MIT |
| [backports\_abc](https://github.com/cython/backports_abc) | 0.5 | A backport of recent additions to the collections.abc module. / PSF 2 |
| [beautifulsoup4](http://www.crummy.com/software/BeautifulSoup/) | 4.6.0 | Python library designed for screen-scraping / MIT |
| [bitarray](https://github.com/ilanschnell/bitarray) | 0.8.1 | efficient arrays of booleans – C extension / PSF |
| [bkcharts](http://github.com/bokeh/bkcharts) | 0.2 | High level chart types built on top of Bokeh / BSD 3-Clause |
| [blaze](http://blaze.pydata.org) | 0.11.3 | NumPy and Pandas interface to big data / BSD 3-Clause |
| [bleach](https://github.com/mozilla/bleach) | 2.0.0 | Easy, whitelist-based HTML-sanitizing tool / Apache-2.0 |
| [bokeh](http://bokeh.pydata.org/) | 0.12.10 | Statistical and novel interactive HTML plots for Python / BSD 3-Clause |
| [boto](https://github.com/boto/boto/) | 2.48.0 | Amazon Web Services Library / MIT |
| [bottleneck](http://berkeleyanalytics.com/bottleneck) | 1.2.1 | Fast NumPy array functions written in Cython. / BSD 2-Clause |
| [bzip2](http://www.bzip.org/) | 1.0.6 | high-quality data compressor / bzip2 |
| [ca-certificates](https://github.com/conda-forge/ca-certificates-feedstock) | 2017.08.26 | Certificates for use with other packages. / ISC |
| [cairo](http://cairographics.org/) | 1.14.10 | Cairo is a 2D graphics library with support for multiple output devices. / LGPL 2.1 or MPL 1.1 |
| [cdecimal](http://www.bytereef.org/mpdecimal/index.html) | 2.3 | Fast drop-in replacement for decimal.py / BSD 2-Clause |
| [certifi](http://certifi.io/) | 2017.7.27.1 | Python package for providing Mozilla’s CA Bundle. / ISC |
| [cffi](https://bitbucket.org/cffi/cffi) | 1.10.0 | Foreign Function Interface for Python calling C code. / MIT |
| [chardet](https://github.com/chardet/chardet) | 3.0.4 | Universal character encoding detector / LGPL2 |
| [click](http://click.pocoo.org/) | 6.7 | A simple wrapper around optparse for powerful command line utilities. / BSD 3-Clause |
| [cloudpickle](https://github.com/cloudpipe/cloudpickle) | 0.4.0 | Extended pickling support for Python objects / BSD 3-Clause |
| [clyent](https://github.com/Anaconda-Platform/clyent) | 1.2.2 | Command line client library for windows and posix / BSD 3-Clause |
| [colorama](https://github.com/tartley/colorama) | 0.3.9 | Cross-platform colored terminal text. / BSD 3-Clause |
| [conda](http://conda.pydata.org/) | 4.3.30 | OS-agnostic, system-level binary package and environment manager. / BSD 3-Clause |
| [conda-build](https://github.com/conda/conda-build) | 3.0.27 | tools for building conda packages / BSD 3-Clause |
| [configparser](http://docs.python.org/3/library/configparser.html) | 3.5.0 | This library brings the updated configparser from Python 3.5 to Python 2.6-3.5 / MIT |
| [contextlib2](http://contextlib2.readthedocs.org) | 0.5.5 | Backports and enhancements for the contextlib module / PSF |
| [cryptography](https://github.com/pyca/cryptography) | 2.0.3 | Provides cryptographic recipes and primitives to Python developers / Apache 2.0 or BSD 3-Clause, PSF 2 |
| [curl](http://curl.haxx.se/) | 7.55.1 | tool and library for transferring data with URL syntax / MIT/X derivate (`<http://curl.haxx.se/docs/copyright.html>`) |
| [cycler](http://matplotlib.org/cycler) | 0.10.0 | Composable style cycles. / BSD 3-Clause |
| [cython](http://www.cython.org/) | 0.26.1 | The Cython compiler for writing C extensions for the Python language / Apache-2.0 |
| [cytoolz](https://github.com/pytoolz/cytoolz) | 0.8.2 | Cython implementation of Toolz. High performance functional utilities. / BSD 3-Clause |
| [dask](http://dask.pydata.org/en/latest/) | 0.15.3 | Parallel Python with task scheduling / BSD 3-Clause |
| [dask-core](http://github.com/dask/dask/) | 0.15.3 | Parallel Python with task scheduling / BSD 3-Clause |
| [datashape](http://datashape.pydata.org) | 0.5.4 | A data description language. / BSD 2-Clause |
| [dbus](http://www.freedesktop.org/wiki/Software/dbus/) | 1.10.22 | Simple message bus system for applications to talk to one another / GPL2 |
| [decorator](https://github.com/micheles/decorator) | 4.1.2 | Better living through Python with decorators. / BSD 3-Clause |
| [distributed](http://distributed.readthedocs.io/en/latest/) | 1.19.1 | Distributed computing with Dask / BSD 3-Clause |
| [docutils](http://docutils.sourceforge.net/) | 0.14 | Docutils – Python Documentation Utilities / Public Domain Dedictation and BSD 2-Clause and PSF 2.1.1 and GPL 3.0 |
| [entrypoints](https://github.com/takluyver/entrypoints) | 0.2.3 | Discover and load entry points from installed packages. / MIT License |
| [enum34](https://bitbucket.org/stoneleaf/enum34) | 1.1.6 | Python 3.4 Enum backported to 3.3, 3.2, 3.1, 2.7, 2.6, 2.5, and 2.4 / BSD 3-Clause |
| [et\_xmlfile](https://bitbucket.org/openpyxl/et_xmlfile) | 1.0.1 | An implementation of lxml.xmlfile for the standard library / MIT |
| [expat](http://expat.sourceforge.net/) | 2.2.4 | Expat XML parser library in C. / MIT |
| [fastcache](https://github.com/pbrady/fastcache) | 1.0.2 | C implementation of Python 3 lru\_cache / MIT |
| [filelock](https://github.com/benediktschmitt/py-filelock) | 2.0.12 | A platform independent file lock. / Public Domain |
| [flask](http://flask.pocoo.org) | 0.12.2 | A microframework based on Werkzeug, Jinja2 and good intentions. / BSD 3-Clause |
| [flask-cors](https://github.com/corydolphin/flask-cors) | 3.0.3 | A Flask extension adding a decorator for CORS support / MIT |
| [fontconfig](http://www.freedesktop.org/wiki/Software/fontconfig/) | 2.12.4 | A library for configuring and customizing font access. / MIT |
| [freetype](https://www.freetype.org/) | 2.8 | A Free, High-Quality, and Portable Font Engine / GPL-2.0 and FreeType |
| [funcsigs](http://funcsigs.readthedocs.org) | 1.0.2 | Python function signatures from PEP362 for Python 2.6, 2.7 and 3.2+. / Apache 2.0 |
| [functools32](https://github.com/MiCHiLU/python-functools32) | 3.2.3.2 | Backport of the functools module from Python 3.2.3 for use on 2.7 and PyPy. / PSF license |
| [futures](https://github.com/agronholm/pythonfutures) | 3.1.1 | Backport of the concurrent.futures package from Python 3.2 / PSF |
| [get\_terminal\_size](https://github.com/chrippa/backports.shutil_get_terminal_size) | 1.0.0 | Get the size of the terminal window. / MIT |
| [gevent](http://www.gevent.org/) | 1.2.2 | Coroutine-based network library / MIT |
| [glib](https://developer.gnome.org/glib/) | 2.53.6 | Provides core application building blocks for libraries and applications written in C. / LGPL-2.1 |
| [glob2](https://github.com/miracle2k/python-glob2) | 0.5 | Version of the glob module that supports recursion via \*\*, and can capture patterns. / BSD-2-Clause |
| [gmp](http://gmplib.org/) | 6.1.2 | The GNU multiprecision library. / GPL 2 and LGPL 3 |
| [gmpy2](https://pypi.python.org/pypi/gmpy2) | 2.0.8 | GMP/MPIR, MPFR, and MPC interface to Python 2.6+ and 3.x / LGPL 3 |
| [graphite2](http://graphite.sil.org/) | 1.3.10 | A “smart font” system that handles the complexities of lesser-known languages of the world. / LGPLv2 |
| [greenlet](https://github.com/python-greenlet/greenlet) | 0.4.12 | Lightweight in-process concurrent programming / MIT |
| [grin](http://pypi.python.org/pypi/grin) | 1.2.1 | Enhanced grep-like tool / BSD 3-Clause |
| [gst-plugins-base](http://gstreamer.freedesktop.org/) | 1.12.2 | GStreamer Base Plug-ins / GPL2 |
| [gstreamer](http://gstreamer.freedesktop.org/) | 1.12.2 | Library for constructing graphs of media-handling components / LGPL 2 |
| [h5py](http://www.h5py.org/) | 2.7.0 | Read and write HDF5 files from Python. / BSD 3-Clause |
| [harfbuzz](http://www.freedesktop.org/wiki/Software/HarfBuzz/) | 1.5.0 | An OpenType text shaping engine. / MIT |
| [hdf5](http://www.hdfgroup.org/HDF5/) | 1.10.1 | HDF5 is a data model, library, and file format for storing and managing data / HDF5 |
| [heapdict](http://stutzbachenterprises.com/) | 1.0.0 | A heap with decrease-key and increase-key operations / BSD 3-Clause |
| [html5lib](https://github.com/html5lib/html5lib-python) | 0.999999999 | HTML parser based on the WHATWG HTML specification / MIT |
| [icu](http://site.icu-project.org/) | 58.2 | International Components for Unicode. / MIT |
| [idna](https://github.com/kjd/idna) | 2.6 | Internationalized Domain Names in Applications (IDNA). / BSD Like |
| [imageio](http://imageio.github.io) | 2.2.0 | a Python library for reading and writing image data / BSD 2-Clause |
| [imagesize](https://github.com/shibukawa/imagesize_py) | 0.7.1 | Getting image size from png/jpeg/jpeg2000/gif file / MIT |
| [intel-openmp](https://software.intel.com/en-us/node/522690) | 2018.0.0 | Math library for Intel and compatible processors / proprietary - Intel |
| [ipaddress](https://github.com/phihag/ipaddress) | 1.0.18 | IPv4/IPv6 manipulation library / PSF 2 |
| [ipykernel](http://ipython.org) | 4.6.1 | IPython Kernel for Jupyter / BSD 3-clause |
| [ipython](http://ipython.org/) | 5.4.1 | IPython: Productive Interactive Computing / BSD 3-clause |
| [ipython\_genutils](http://ipython.org) | 0.2.0 | vestigial utilities from IPython / BSD 3-Clause |
| [ipywidgets](https://github.com/ipython/ipywidgets) | 7.0.0 | Jupyter Interactive Widgets / BSD 3-clause |
| [isort](https://github.com/timothycrosley/isort) | 4.2.15 | A Python utility / library to sort Python imports. / MIT |
| [itsdangerous](https://github.com/pallets/itsdangerous) | 0.24 | Various helpers to pass trusted data to untrusted environments. / BSD 3-Clause |
| [jbig](https://www.cl.cam.ac.uk/~mgk25/jbigkit) | 2.1 | Implementation of the JBIG1 data compression standard / GPL-2.0 |
| [jdcal](https://github.com/phn/jdcal) | 1.3 | Julian dates from proleptic Gregorian and Julian calendars. / BSD 2-Clause |
| [jedi](https://github.com/davidhalter/jedi/) | 0.10.2 | An autocompletion tool for Python that can be used for text editors. / MIT |
| [jinja2](http://jinja.pocoo.org) | 2.9.6 | An easy to use stand-alone template engine written in pure python. / 3-Clause BSD |
| [jpeg](http://www.ijg.org/) | 9b | read/write jpeg COM, EXIF, IPTC medata / Custom free software license |
| [jsonschema](https://github.com/Julian/jsonschema) | 2.6.0 | An implementation of JSON Schema validation for Python / MIT |
| [jupyter](http://jupyter.org) | 1.0.0 | Jupyter metapackage. Install all the Jupyter components in one go. / BSD 3-Clause |
| [jupyter\_client](http://jupyter.org) | 5.1.0 | Jupyter protocol implementation and client libraries / BSD 3-clause |
| [jupyter\_console](http://jupyter.org) | 5.2.0 | Jupyter terminal console / BSD 3-Clause |
| [jupyter\_core](http://jupyter.org) | 4.3.0 | Core common functionality of Jupyter projects. / BSD 3-clause |
| [jupyterlab](https://github.com/jupyterlab/jupyterlab) | 0.27.0 | A pre-alpha version of a computational environment for Jupyter. / BSD 3-Clause |
| [jupyterlab\_launcher](http://github.com/jupyterlab/jupyterlab_launcher) | 0.4.0 | A Launcher for JupyterLab based applications. / BSD 3-Clause |
| [lazy-object-proxy](https://github.com/ionelmc/python-lazy-object-proxy) | 1.3.1 | A fast and thorough lazy object proxy. / BSD 2-Clause |
| [libedit](http://thrysoee.dk/editline/) | 3.1 | Editline Library (libedit) / 3-Clause BSD |
| [libffi](https://sourceware.org/libffi/) | 3.2.1 | A Portable Foreign Function Interface Library. / Custom |
| [libgcc-ng](https://gcc.gnu.org/onlinedocs/gccint/Libgcc.html) | 7.2.0 | The GCC low-level runtime library / GPL |
| [libgfortran-ng](https://gcc.gnu.org/) | 7.2.0 | The GNU Fortran Runtime Library / GPL |
| [libpng](http://www.libpng.org/pub/png/libpng.html) | 1.6.32 | PNG reference library. / zlib/libpng |
| [libsodium](https://github.com/jedisct1/libsodium) | 1.0.13 | A modern and easy-to-use crypto library. / ISC |
| [libssh2](https://www.libssh2.org/) | 1.8.0 | the SSH library / BSD 3-Clause |
| [libstdcxx-ng](https://gcc.gnu.org/) | 7.2.0 | he GNU C++ Runtime Library / GPL3 with runtime exception |
| [libtiff](http://www.libtiff.org/) | 4.0.8 | Support for the Tag Image File Format (TIFF). / HPND |
| [libtool](http://www.gnu.org/software/libtool/) | 2.4.6 | The GNU Portable Library Tool / GPL 3 |
| [libxcb](http://xcb.freedesktop.org/) | 1.12 | This is the C-language Binding (XCB) package to the X Window System protocol / MIT |
| [libxml2](http://xmlsoft.org/) | 2.9.4 | The XML C parser and toolkit of Gnome / MIT |
| [libxslt](http://xmlsoft.org/XSLT/) | 1.1.29 | The XSLT C library developed for the GNOME project / MIT |
| [llvmlite](http://llvmlite.pydata.org/) | 0.20.0 | Lightweight wrapper around basic LLVM functionality / BSD |
| [locket](https://github.com/mwilliamson/locket.py) | 0.2.0 | File-based locks for Python for Linux and Windows / BSD 2-Clause |
| [lxml](http://lxml.de/) | 4.1.0 | Pythonic binding for the C libraries libxml2 and libxslt. / BSD 3-Clause, GPL-2.0, ZPL-2.0, and ElementTree |
| [lzo](http://www.oberhumer.com/opensource/lzo/) | 2.10 | LZO is a portable lossless data compression library written in ANSI C. / GPL v2+ |
| [markupsafe](https://www.palletsprojects.com/p/markupsafe/) | 1.0 | A Python module that implements the jinja2.Markup string / BSD 3-Clause |
| [matplotlib](http://matplotlib.org/) | 2.1.0 | Publication quality figures in Python / PSF-based |
| [mccabe](https://github.com/PyCQA/mccabe) | 0.6.1 | McCabe complexity checker for Python / MIT |
| [mistune](https://github.com/lepture/mistune) | 0.7.4 | The fastest markdown parser in pure Python. / BSD 3-Clause |
| [mkl](http://software.intel.com/en-us/articles/intel-mkl/) | 2018.0.0 | Math library for Intel and compatible processors / proprietary - Intel |
| [mkl-service](https://github.com/ContinuumIO/mkl-service) | 1.1.2 | Python bindings to MKL service functions / 3-clause BSD |
| [mpc](http://www.multiprecision.org/) | 1.0.3 | A C library for the arithmetic of complex numbers with arbitrarily high precision. / LGPL 3 |
| [mpfr](http://www.mpfr.org/) | 3.1.5 | The MPFR library is a C library for multiple-precision floating-point computations with correct rounding. / LGPL 3 |
| [mpmath](http://mpmath.org) | 0.19 | Python library for arbitrary-precision floating-point arithmetic / BSD 3-Clause |
| [msgpack-python](http://msgpack.org/) | 0.4.8 | MessagePack (de)serializer. / Apache 2.0 |
| [multipledispatch](https://github.com/mrocklin/multipledispatch/) | 0.4.9 | Multiple dispatch in Python / BSD 3-Clause |
| [navigator-updater](https://github.com/ContinuumIO/navigator-updater) | 0.1.0 | Anaconda Navigator Updater / proprietary - Continuum Analytics, Inc. |
| [nbconvert](http://jupyter.org) | 5.3.1 | Converting Jupyter Notebooks / BSD 3-Clause |
| [nbformat](http://jupyter.org) | 4.4.0 | The reference implementation of the Jupyter Notebook format / BSD 3-clause |
| [ncurses](http://www.gnu.org/software/ncurses/) | 6.0 | Library for text-based user interfaces / Free software (MIT-like) |
| [networkx](https://networkx.github.io/) | 2.0 | Python package for creating and manipulating complex networks / BSD 3-Clause |
| [nltk](http://nltk.org/) | 3.2.4 | Build Python programs to work with human language data / Apache 2.0 |
| [nose](http://readthedocs.org/docs/nose/) | 1.3.7 | Nose extends unittest to make testing easier / LGPL-2.1 |
| [notebook](http://jupyter.org) | 5.0.0 | A web-based notebook environment for interactive computing / BSD 3-clause |
| [numba](http://numba.pydata.org/) | 0.35.0 | NumPy aware dynamic Python compiler using LLVM / BSD |
| [numexpr](https://github.com/pydata/numexpr) | 2.6.2 | Fast numerical expression evaluator for NumPy. / MIT |
| [numpy](http://numpy.scipy.org/) | 1.13.3 | Array processing for numbers, strings, records, and objects. / BSD 3-Clause |
| [numpydoc](https://github.com/numpy/numpydoc) | 0.7.0 | Sphinx extension to support docstrings in Numpy format / BSD 3-Clause |
| [odo](http://odo.pydata.org) | 0.5.1 | Data migration in Python / BSD-3-Clause |
| [olefile](http://www.decalage.info/python/olefileio) | 0.44 | parse, read and write Microsoft OLE2 files / BSD License 2-Clause |
| [openpyxl](https://openpyxl.readthedocs.io) | 2.4.8 | A Python library to read/write Excel 2010 xlsx/xlsm files / MIT |
| [openssl](http://www.openssl.org/) | 1.0.2l | OpenSSL is an open-source implementation of the SSL and TLS protocols / OpenSSL |
| [packaging](https://github.com/pypa/packaging) | 16.8 | Core utilities for Python packages / Apache 2.0 or BSD 2-Clause |
| [pandas](http://pandas.pydata.org) | 0.20.3 | High-performance, easy-to-use data structures and data analysis tools. / BSD 3-clause |
| [pandoc](http://johnmacfarlane.net/pandoc/) | 1.19.2.1 | Universal markup converter (repackaged binaries). / GPL-2.0 |
| [pandocfilters](https://github.com/jgm/pandocfilters) | 1.4.2 | A python module for writing pandoc filters / BSD-3-Clause |
| [pango](http://www.pango.org/) | 1.40.11 | Text layout and rendering engine. / LGPL-2.1 |
| [partd](https://github.com/dask/partd) | 0.3.8 | Data structure for on-disk shuffle operations / BSD 3-Clause |
| [patchelf](http://nixos.org/patchelf.html) | 0.9 | A small utility to modify the dynamic linker and RPATH of ELF executables. / GPL 3 |
| [path.py](https://github.com/jaraco/path.py) | 10.3.1 | A module wrapper for os.path / MIT |
| [pathlib2](https://github.com/mcmtroffaes/pathlib2) | 2.3.0 | Fork of pathlib aiming to support the full stdlib Python API. / MIT |
| [patsy](https://github.com/pydata/patsy) | 0.4.1 | Describing statistical models in Python using symbolic formulas / BSD-2-Clause, PSF2 |
| [pcre](http://www.pcre.org/) | 8.41 | Regular expression pattern matching using the same syntax and semantics as Perl 5. / BSD 3-Clause |
| [pep8](http://pep8.readthedocs.org/) | 1.7.0 | Python style guide checker / MIT |
| [pexpect](http://pexpect.sourceforge.net/) | 4.2.1 | Pexpect makes Python a better tool for controlling other applications. / ISC |
| [pickleshare](https://github.com/vivainio/pickleshare) | 0.7.4 | Tiny ‘shelve’-like database with concurrency support / MIT |
| [pillow](http://python-imaging.github.io/) | 4.2.1 | Pillow is the friendly PIL fork by Alex Clark and Contributors. / PIL |
| [pip](https://pip.pypa.io/en/stable/) | 9.0.1 | PyPA recommended tool for installing Python packages / MIT |
| [pixman](http://www.pixman.org/) | 0.34.0 | A low-level software library for pixel manipulation. / MIT |
| [pkginfo](https://code.launchpad.net/~tseaver/pkginfo/trunk) | 1.4.1 | Query metadatdata from sdists / bdists / installed packages. / MIT |
| [ply](http://www.dabeaz.com/ply/index.html) | 3.10 | Python Lex-Yacc / BSD 3-clause |
| [prompt\_toolkit](https://github.com/jonathanslenders/python-prompt-toolkit) | 1.0.15 | Library for building powerful interactive command lines in Python / BSD 3-clause |
| [psutil](https://github.com/giampaolo/psutil) | 5.4.0 | A cross-platform process and system utilities module for Python / BSD 3-Clause |
| [ptyprocess](https://github.com/pexpect/ptyprocess) | 0.5.2 | Run a subprocess in a pseudo terminal / ISC |
| [py](https://github.com/pytest-dev/py) | 1.4.34 | library with cross-python path, ini-parsing, io, code, log facilities / MIT |
| [pycairo](http://cairographics.org/pycairo/) | 1.13.3 | Python bindings for the Cairo graphics library. / LGPL 2.1, MPL 1.1 |
| [pycodestyle](https://pycodestyle.readthedocs.io/) | 2.3.1 | Python style guide checker / MIT |
| [pycosat](https://github.com/ContinuumIO/pycosat) | 0.6.2 | Bindings to picosat (a SAT solver) / MIT |
| [pycparser](https://github.com/eliben/pycparser) | 2.18 | Complete C99 parser in pure Python / BSD 3-clause |
| [pycrypto](http://www.pycrypto.org/) | 2.6.1 | Cryptographic modules for Python. / Public Domain |
| [pycurl](http://pycurl.sourceforge.net/) | 7.43.0 | A Python Interface To The cURL library / LGPL, MIT |
| [pyflakes](https://github.com/PyCQA/pyflakes) | 1.6.0 | Pyflakes analyzes programs and detects various errors. / MIT |
| [pygments](http://pygments.org/) | 2.2.0 | Generic syntax highlighting package / BSD 2-clause |
| [pylint](http://www.pylint.org/) | 1.7.4 | python code static checker / GPL |
| [pyodbc](https://github.com/mkleehammer/pyodbc) | 4.0.17 | DB API Module for ODBC / MIT |
| [pyopenssl](https://github.com/pyca/pyopenssl) | 17.2.0 | Python wrapper module around the OpenSSL library / Apache 2.0 |
| [pyparsing](http://pyparsing.wikispaces.com/) | 2.2.0 | Create and execute simple grammars / MIT |
| [pyqt](http://www.riverbankcomputing.co.uk/software/pyqt) | 5.6.0 | Python binding of the cross-platform GUI toolkit Qt. / Commercial, GPL-2.0, GPL-3.0 |
| [pysocks](https://github.com/Anorov/PySocks) | 1.6.7 | A Python SOCKS client module. See [Anorov/PySocks](https://github.com/Anorov/PySocks) for more information. / BSD 3-Clause |
| [pytables](http://www.pytables.org) | 3.4.2 | Brings together Python, HDF5 and NumPy to easily handle large amounts of data. / BSD 3-Clause |
| [pytest](https://docs.pytest.org/en/latest/) | 3.2.1 | Simple and powerful testing with Python. / MIT |
| [python](http://www.python.org/) | 2.7.14 | General purpose programming language / PSF |
| [python-dateutil](https://dateutil.readthedocs.org/) | 2.6.1 | Extensions to the standard Python datetime module. / BSD 3-clause |
| [pytz](http://pythonhosted.org/pytz/) | 2017.2 | World timezone definitions, modern and historical. / MIT |
| [pywavelets](https://github.com/PyWavelets/pywt) | 0.5.2 | Discrete Wavelet Transforms in Python. / MIT |
| [pyyaml](http://pyyaml.org/wiki/PyYAML) | 3.12 | YAML parser and emitter for Python / MIT |
| [pyzmq](https://github.com/zeromq/pyzmq) | 16.0.2 | Python bindings for zeromq / BSD 3-clause |
| [qt](http://qt-project.org) | 5.6.2 | Qt is a cross-platform application and UI framework. / LGPL-3.0 |
| [qtawesome](https://github.com/spyder-ide/qtawesome) | 0.4.4 | Iconic fonts in PyQt and PySide applications / MIT |
| [qtconsole](http://jupyter.org) | 4.3.1 | Jupyter Qt console / BSD 3-Clause |
| [qtpy](https://github.com/spyder-ide/qtpy) | 1.3.1 | Abstraction layer for PyQt5/PyQt4/PySide / MIT |
| [readline](https://cnswww.cns.cwru.edu/php/chet/readline/rltop.html) | 7.0 | library for editing command lines as they are typed in / GPL3 |
| [requests](http://python-requests.org) | 2.18.4 | Python HTTP for Humans. / Apache 2.0 |
| [rope](https://github.com/python-rope/rope) | 0.10.5 | A python refactoring library… / GPL 2.0 |
| [ruamel\_yaml](https://bitbucket.org/ruamel/yaml) | 0.11.14 | A patched copy of ruamel.yaml. / MIT |
| [scandir](https://github.com/benhoyt/scandir) | 1.6 | scandir, a better directory iterator and faster os.walk() / BSD 3-Clause |
| [scikit-image](http://scikit-image.org/) | 0.13.0 | Image processing routines for SciPy. / BSD 3-Clause |
| [scikit-learn](http://scikit-learn.org/) | 0.19.1 | A set of python modules for machine learning and data mining / BSD 3-Clause |
| [scipy](http://www.scipy.org/) | 0.19.1 | Scientific Library for Python / BSD 3-Clause |
| [seaborn](http://stanford.edu/~mwaskom/software/seaborn/) | 0.8.0 | Statistical data visualization / BSD 3-Clause |
| [setuptools](https://github.com/pypa/setuptools) | 36.5.0 | Download, build, install, upgrade, and uninstall Python packages / MIT |
| [simplegeneric](http://cheeseshop.python.org/pypi/simplegeneric) | 0.8.1 | Simple generic functions (similar to Python’s own len(), pickle.dump(), etc.) / Zope Public |
| [singledispatch](http://docs.python.org/3/library/functools.html#functools.singledispatch) | 3.4.0.3 | Transforms a function into a single-dispatch generic function / MIT |
| [sip](http://www.riverbankcomputing.com/software/sip/intro) | 4.18.1 | Create Python bindings for C and C++ libraries / GPL-3.0 |
| [six](http://pypi.python.org/pypi/six/) | 1.11.0 | Python 2 and 3 compatibility utilities / MIT |
| [snowballstemmer](https://github.com/shibukawa/snowball_py) | 1.2.1 | Snowball stemming library collection for Python / BSD-2-Clause |
| [sortedcollections](http://www.grantjenks.com/docs/sortedcollections/) | 0.5.3 | Python Sorted Collections / Apache-2.0 |
| [sortedcontainers](http://www.grantjenks.com/docs/sortedcontainers/) | 1.5.7 | Python Sorted Container Types: SortedList, SortedDict, and SortedSet / Apache 2.0 |
| [sphinx](http://www.sphinx-doc.org) | 1.6.3 | Sphinx is a tool that makes it easy to create intelligent and beautiful documentation / BSD 2-clause |
| sphinxcontrib | 1.0 | Python namespace for sphinxcontrib / BSD |
| [sphinxcontrib-websupport](https://pypi.python.org/pypi/sphinxcontrib-websupport) | 1.0.1 | Sphinx API for Web Apps / BSD-2-Clause |
| [spyder](https://github.com/spyder-ide/spyder) | 3.2.4 | Scientific PYthon Development EnviRonment / MIT |
| [sqlalchemy](http://www.sqlalchemy.org/) | 1.1.13 | Database Abstraction Library. / MIT |
| [sqlite](http://www.sqlite.org/) | 3.20.1 | Implements a self-contained, zero-configuration, SQL database engine. / Public-Domain (`<http://www.sqlite.org/copyright.html>`) |
| [ssl\_match\_hostname](http://bitbucket.org/brandon/backports.ssl_match_hostname) | 3.5.0.1 | The ssl.match\_hostname() function from Python 3.5 / PSF 2 |
| [statsmodels](https://www.statsmodels.org) | 0.8.0 | Statistical computations and models for use with SciPy / BSD 3-Clause |
| [subprocess32](https://github.com/google/python-subprocess32) | 3.2.7 | A backport of the subprocess module from Python 3.2/3.3 for use on 2.x. / PSF 2 |
| [sympy](http://sympy.org) | 1.1.1 | Python library for symbolic mathematics / 3-clause BSD |
| [tblib](https://github.com/ionelmc/python-tblib) | 1.3.2 | Traceback serialization library. / BSD 2-Clause |
| [terminado](http://github.com/mitsuhiko/markupsafe) | 0.6 | Terminals served by tornado websockets / BSD 3-clause |
| [testpath](https://testpath.readthedocs.io) | 0.3.1 | Testpath is a collection of utilities for Python code working with files and commands. / MIT |
| [tk](http://www.tcl.tk/) | 8.6.7 | A dynamic programming language with GUI support. Bundles Tcl and Tk. / Tcl/Tk |
| [toolz](http://toolz.readthedocs.org/) | 0.8.2 | A functional standard library for Python. / BSD 3-Clause |
| [tornado](http://www.tornadoweb.org/) | 4.5.2 | A Python web framework and asynchronous networking library, originally developed at FriendFeed. / Apache 2.0 |
| [traitlets](http://ipython.org/) | 4.3.2 | Configuration system for Python applications / BSD 3-clause |
| [typing](https://docs.python.org/3.5/library/typing.html) | 3.6.2 | Type Hints for Python - backport for `Python<3.5` / PSF |
| [unicodecsv](https://github.com/jdunck/python-unicodecsv) | 0.14.1 | Drop-in replacement for csv module which supports unicode strings / BSD |
| [unixodbc](http://www.unixodbc.org/) | 2.3.4 | ODBC on non MS Windows platforms / LGPL-2.1 |
| [urllib3](https://urllib3.readthedocs.io/) | 1.22 | HTTP library with thread-safe connection pooling, file post, and more. / MIT |
| [wcwidth](https://github.com/jquast/wcwidth) | 0.1.7 | Measures number of Terminal column cells of wide-character codes. / MIT |
| [webencodings](https://github.com/gsnedders/python-webencodings) | 0.5.1 | Character encoding aliases for legacy web content / BSD 3-Clause |
| [werkzeug](http://werkzeug.pocoo.org/) | 0.12.2 | The Python WSGI Utility Library. / BSD 3-Clause |
| [wheel](https://bitbucket.org/pypa/wheel/) | 0.29.0 | A built-package format for Python. / MIT |
| [widgetsnbextension](http://ipython.org) | 3.0.2 | IPython HTML widgets for Jupyter / BSD 3-clause |
| [wrapt](https://github.com/GrahamDumpleton/wrapt) | 1.10.11 | Module for decorators, wrappers and monkey patching. / BSD 2-Clause |
| [xlrd](http://www.python-excel.org/) | 1.1.0 | Library for developers to extract data from Microsoft Excel (tm) spreadsheet files / BSD 3-Clause and BSD with advertising |
| [xlsxwriter](https://xlsxwriter.readthedocs.io/) | 1.0.2 | A Python module for creating Excel XLSX files / BSD 2-Clause |
| [xlwt](http://www.python-excel.org/) | 1.3.0 | Writing data and formatting information to Excel files / BSD |
| [xz](http://tukaani.org/xz/) | 5.2.3 | Data compression software with high compression ratio / LGPL-2.1 and GPL-2.0 |
| [yaml](http://pyyaml.org/wiki/LibYAML) | 0.1.7 | A C library for parsing and emitting YAML. / MIT |
| [zeromq](http://zeromq.org) | 4.2.2 | A high-performance asynchronous messaging library. / LGPL 3 |
| [zict](http://github.com/mrocklin/zict) | 0.1.3 | Composable Dictionary Classes / BSD 3-Clause |
| [zlib](http://zlib.net/) | 1.2.11 | Massively spiffy yet delicately unobtrusive compression library / zlib |
| Name | Version | Summary / License |
|---|---|---|
| [alabaster](http://www.sphinx-doc.org/en/stable/index.html) | 0.7.10 | Configurable, Python 2+3 compatible Sphinx theme. / BSD 3-Clause |
| [anaconda-client](http://anaconda.org) | 1.6.5 | anaconda.org command line client library / BSD 3-clause |
| [anaconda-navigator](https://github.com/ContinuumIO/navigator) | 1.6.9 | Anaconda Navigator / proprietary - Continuum Analytics, Inc. |
| [anaconda-project](https://github.com/Anaconda-Platform/anaconda-project) | 0.8.0 | Reproducible, executable project directories. / BSD 3-Clause |
| [asn1crypto](https://github.com/wbond/asn1crypto) | 0.22.0 | Python ASN.1 library with a focus on performance and a pythonic API / MIT |
| [astroid](https://www.astroid.org/) | 1.5.3 | A abstract syntax tree for Python with inference support. / LGPL 2.1 |
| [astropy](http://www.astropy.org/) | 2.0.2 | Community-developed Python Library for Astronomy / BSD |
| [babel](http://babel.pocoo.org/) | 2.5.0 | Utilities to internationalize and localize Python applications / BSD 3-clause |
| [backports](https://bitbucket.org/brandon/backports) | 1.0 | / BSD |
| [backports.functools\_lru\_cache](https://github.com/jaraco/backports.functools_lru_cache) | 1.4 | Backport of functools.lru\_cache from Python 3.3 as published at ActiveState. / MIT |
| [backports.shutil\_get\_terminal\_size](https://github.com/chrippa/backports.shutil_get_terminal_size) | 1.0.0 | A backport of the get\_terminal\_size function from Python 3.3’s shutil. / MIT |
| [backports\_abc](https://github.com/cython/backports_abc) | 0.5 | A backport of recent additions to the collections.abc module. / PSF 2 |
| [beautifulsoup4](http://www.crummy.com/software/BeautifulSoup/) | 4.6.0 | Python library designed for screen-scraping / MIT |
| [bitarray](https://github.com/ilanschnell/bitarray) | 0.8.1 | efficient arrays of booleans – C extension / PSF |
| [bkcharts](http://github.com/bokeh/bkcharts) | 0.2 | High level chart types built on top of Bokeh / BSD 3-Clause |
| [blaze](http://blaze.pydata.org) | 0.11.3 | NumPy and Pandas interface to big data / BSD 3-Clause |
| [bleach](https://github.com/mozilla/bleach) | 2.0.0 | Easy, whitelist-based HTML-sanitizing tool / Apache-2.0 |
| [bokeh](http://bokeh.pydata.org/) | 0.12.10 | Statistical and novel interactive HTML plots for Python / BSD 3-Clause |
| [boto](https://github.com/boto/boto/) | 2.48.0 | Amazon Web Services Library / MIT |
| [bottleneck](http://berkeleyanalytics.com/bottleneck) | 1.2.1 | Fast NumPy array functions written in Cython. / BSD 2-Clause |
| [bzip2](http://www.bzip.org/) | 1.0.6 | high-quality data compressor / bzip2 |
| [ca-certificates](https://github.com/conda-forge/ca-certificates-feedstock) | 2017.08.26 | Certificates for use with other packages. / ISC |
| [cairo](http://cairographics.org/) | 1.14.10 | Cairo is a 2D graphics library with support for multiple output devices. / LGPL 2.1 or MPL 1.1 |
| [cdecimal](http://www.bytereef.org/mpdecimal/index.html) | 2.3 | Fast drop-in replacement for decimal.py / BSD 2-Clause |
| [certifi](http://certifi.io/) | 2017.7.27.1 | Python package for providing Mozilla’s CA Bundle. / ISC |
| [cffi](https://bitbucket.org/cffi/cffi) | 1.10.0 | Foreign Function Interface for Python calling C code. / MIT |
| [chardet](https://github.com/chardet/chardet) | 3.0.4 | Universal character encoding detector / LGPL2 |
| [click](http://click.pocoo.org/) | 6.7 | A simple wrapper around optparse for powerful command line utilities. / BSD 3-Clause |
| [cloudpickle](https://github.com/cloudpipe/cloudpickle) | 0.4.0 | Extended pickling support for Python objects / BSD 3-Clause |
| [clyent](https://github.com/Anaconda-Platform/clyent) | 1.2.2 | Command line client library for windows and posix / BSD 3-Clause |
| [colorama](https://github.com/tartley/colorama) | 0.3.9 | Cross-platform colored terminal text. / BSD 3-Clause |
| [conda](http://conda.pydata.org/) | 4.3.30 | OS-agnostic, system-level binary package and environment manager. / BSD 3-Clause |
| [conda-build](https://github.com/conda/conda-build) | 3.0.27 | tools for building conda packages / BSD 3-Clause |
| [configparser](http://docs.python.org/3/library/configparser.html) | 3.5.0 | This library brings the updated configparser from Python 3.5 to Python 2.6-3.5 / MIT |
| [contextlib2](http://contextlib2.readthedocs.org) | 0.5.5 | Backports and enhancements for the contextlib module / PSF |
| [cryptography](https://github.com/pyca/cryptography) | 2.0.3 | Provides cryptographic recipes and primitives to Python developers / Apache 2.0 or BSD 3-Clause, PSF 2 |
| [curl](http://curl.haxx.se/) | 7.55.1 | tool and library for transferring data with URL syntax / MIT/X derivate (`<http://curl.haxx.se/docs/copyright.html>`) |
| [cycler](http://matplotlib.org/cycler) | 0.10.0 | Composable style cycles. / BSD 3-Clause |
| [cython](http://www.cython.org/) | 0.26.1 | The Cython compiler for writing C extensions for the Python language / Apache-2.0 |
| [cytoolz](https://github.com/pytoolz/cytoolz) | 0.8.2 | Cython implementation of Toolz. High performance functional utilities. / BSD 3-Clause |
| [dask](http://dask.pydata.org/en/latest/) | 0.15.3 | Parallel Python with task scheduling / BSD 3-Clause |
| [dask-core](http://github.com/dask/dask/) | 0.15.3 | Parallel Python with task scheduling / BSD 3-Clause |
| [datashape](http://datashape.pydata.org) | 0.5.4 | A data description language. / BSD 2-Clause |
| [dbus](http://www.freedesktop.org/wiki/Software/dbus/) | 1.10.22 | Simple message bus system for applications to talk to one another / GPL2 |
| [decorator](https://github.com/micheles/decorator) | 4.1.2 | Better living through Python with decorators. / BSD 3-Clause |
| [distributed](http://distributed.readthedocs.io/en/latest/) | 1.19.1 | Distributed computing with Dask / BSD 3-Clause |
| [docutils](http://docutils.sourceforge.net/) | 0.14 | Docutils – Python Documentation Utilities / Public Domain Dedictation and BSD 2-Clause and PSF 2.1.1 and GPL 3.0 |
| [entrypoints](https://github.com/takluyver/entrypoints) | 0.2.3 | Discover and load entry points from installed packages. / MIT License |
| [enum34](https://bitbucket.org/stoneleaf/enum34) | 1.1.6 | Python 3.4 Enum backported to 3.3, 3.2, 3.1, 2.7, 2.6, 2.5, and 2.4 / BSD 3-Clause |
| [et\_xmlfile](https://bitbucket.org/openpyxl/et_xmlfile) | 1.0.1 | An implementation of lxml.xmlfile for the standard library / MIT |
| [expat](http://expat.sourceforge.net/) | 2.2.4 | Expat XML parser library in C. / MIT |
| [fastcache](https://github.com/pbrady/fastcache) | 1.0.2 | C implementation of Python 3 lru\_cache / MIT |
| [filelock](https://github.com/benediktschmitt/py-filelock) | 2.0.12 | A platform independent file lock. / Public Domain |
| [flask](http://flask.pocoo.org) | 0.12.2 | A microframework based on Werkzeug, Jinja2 and good intentions. / BSD 3-Clause |
| [flask-cors](https://github.com/corydolphin/flask-cors) | 3.0.3 | A Flask extension adding a decorator for CORS support / MIT |
| [fontconfig](http://www.freedesktop.org/wiki/Software/fontconfig/) | 2.12.4 | A library for configuring and customizing font access. / MIT |
| [freetype](https://www.freetype.org/) | 2.8 | A Free, High-Quality, and Portable Font Engine / GPL-2.0 and FreeType |
| [funcsigs](http://funcsigs.readthedocs.org) | 1.0.2 | Python function signatures from PEP362 for Python 2.6, 2.7 and 3.2+. / Apache 2.0 |
| [functools32](https://github.com/MiCHiLU/python-functools32) | 3.2.3.2 | Backport of the functools module from Python 3.2.3 for use on 2.7 and PyPy. / PSF license |
| [futures](https://github.com/agronholm/pythonfutures) | 3.1.1 | Backport of the concurrent.futures package from Python 3.2 / PSF |
| [get\_terminal\_size](https://github.com/chrippa/backports.shutil_get_terminal_size) | 1.0.0 | Get the size of the terminal window. / MIT |
| [gevent](http://www.gevent.org/) | 1.2.2 | Coroutine-based network library / MIT |
| [glib](https://developer.gnome.org/glib/) | 2.53.6 | Provides core application building blocks for libraries and applications written in C. / LGPL-2.1 |
| [glob2](https://github.com/miracle2k/python-glob2) | 0.5 | Version of the glob module that supports recursion via \*\*, and can capture patterns. / BSD-2-Clause |
| [gmp](http://gmplib.org/) | 6.1.2 | The GNU multiprecision library. / GPL 2 and LGPL 3 |
| [gmpy2](https://pypi.python.org/pypi/gmpy2) | 2.0.8 | GMP/MPIR, MPFR, and MPC interface to Python 2.6+ and 3.x / LGPL 3 |
| [graphite2](http://graphite.sil.org/) | 1.3.10 | A “smart font” system that handles the complexities of lesser-known languages of the world. / LGPLv2 |
| [greenlet](https://github.com/python-greenlet/greenlet) | 0.4.12 | Lightweight in-process concurrent programming / MIT |
| [grin](http://pypi.python.org/pypi/grin) | 1.2.1 | Enhanced grep-like tool / BSD 3-Clause |
| [gst-plugins-base](http://gstreamer.freedesktop.org/) | 1.12.2 | GStreamer Base Plug-ins / GPL2 |
| [gstreamer](http://gstreamer.freedesktop.org/) | 1.12.2 | Library for constructing graphs of media-handling components / LGPL 2 |
| [h5py](http://www.h5py.org/) | 2.7.0 | Read and write HDF5 files from Python. / BSD 3-Clause |
| [harfbuzz](http://www.freedesktop.org/wiki/Software/HarfBuzz/) | 1.5.0 | An OpenType text shaping engine. / MIT |
| [hdf5](http://www.hdfgroup.org/HDF5/) | 1.10.1 | HDF5 is a data model, library, and file format for storing and managing data / HDF5 |
| [heapdict](http://stutzbachenterprises.com/) | 1.0.0 | A heap with decrease-key and increase-key operations / BSD 3-Clause |
| [html5lib](https://github.com/html5lib/html5lib-python) | 0.999999999 | HTML parser based on the WHATWG HTML specification / MIT |
| [icu](http://site.icu-project.org/) | 58.2 | International Components for Unicode. / MIT |
| [idna](https://github.com/kjd/idna) | 2.6 | Internationalized Domain Names in Applications (IDNA). / BSD Like |
| [imageio](http://imageio.github.io) | 2.2.0 | a Python library for reading and writing image data / BSD 2-Clause |
| [imagesize](https://github.com/shibukawa/imagesize_py) | 0.7.1 | Getting image size from png/jpeg/jpeg2000/gif file / MIT |
| [intel-openmp](https://software.intel.com/en-us/node/522690) | 2018.0.0 | Math library for Intel and compatible processors / proprietary - Intel |
| [ipaddress](https://github.com/phihag/ipaddress) | 1.0.18 | IPv4/IPv6 manipulation library / PSF 2 |
| [ipykernel](http://ipython.org) | 4.6.1 | IPython Kernel for Jupyter / BSD 3-clause |
| [ipython](http://ipython.org/) | 5.4.1 | IPython: Productive Interactive Computing / BSD 3-clause |
| [ipython\_genutils](http://ipython.org) | 0.2.0 | vestigial utilities from IPython / BSD 3-Clause |
| [ipywidgets](https://github.com/ipython/ipywidgets) | 7.0.0 | Jupyter Interactive Widgets / BSD 3-clause |
| [isort](https://github.com/timothycrosley/isort) | 4.2.15 | A Python utility / library to sort Python imports. / MIT |
| [itsdangerous](https://github.com/pallets/itsdangerous) | 0.24 | Various helpers to pass trusted data to untrusted environments. / BSD 3-Clause |
| [jbig](https://www.cl.cam.ac.uk/~mgk25/jbigkit) | 2.1 | Implementation of the JBIG1 data compression standard / GPL-2.0 |
| [jdcal](https://github.com/phn/jdcal) | 1.3 | Julian dates from proleptic Gregorian and Julian calendars. / BSD 2-Clause |
| [jedi](https://github.com/davidhalter/jedi/) | 0.10.2 | An autocompletion tool for Python that can be used for text editors. / MIT |
| [jinja2](http://jinja.pocoo.org) | 2.9.6 | An easy to use stand-alone template engine written in pure python. / 3-Clause BSD |
| [jpeg](http://www.ijg.org/) | 9b | read/write jpeg COM, EXIF, IPTC medata / Custom free software license |
| [jsonschema](https://github.com/Julian/jsonschema) | 2.6.0 | An implementation of JSON Schema validation for Python / MIT |
| [jupyter](http://jupyter.org) | 1.0.0 | Jupyter metapackage. Install all the Jupyter components in one go. / BSD 3-Clause |
| [jupyter\_client](http://jupyter.org) | 5.1.0 | Jupyter protocol implementation and client libraries / BSD 3-clause |
| [jupyter\_console](http://jupyter.org) | 5.2.0 | Jupyter terminal console / BSD 3-Clause |
| [jupyter\_core](http://jupyter.org) | 4.3.0 | Core common functionality of Jupyter projects. / BSD 3-clause |
| [jupyterlab](https://github.com/jupyterlab/jupyterlab) | 0.27.0 | A pre-alpha version of a computational environment for Jupyter. / BSD 3-Clause |
| [jupyterlab\_launcher](http://github.com/jupyterlab/jupyterlab_launcher) | 0.4.0 | A Launcher for JupyterLab based applications. / BSD 3-Clause |
| [lazy-object-proxy](https://github.com/ionelmc/python-lazy-object-proxy) | 1.3.1 | A fast and thorough lazy object proxy. / BSD 2-Clause |
| [libedit](http://thrysoee.dk/editline/) | 3.1 | Editline Library (libedit) / 3-Clause BSD |
| [libffi](https://sourceware.org/libffi/) | 3.2.1 | A Portable Foreign Function Interface Library. / Custom |
| [libgcc-ng](https://gcc.gnu.org/onlinedocs/gccint/Libgcc.html) | 7.2.0 | The GCC low-level runtime library / GPL |
| [libgfortran-ng](https://gcc.gnu.org/) | 7.2.0 | The GNU Fortran Runtime Library / GPL |
| [libpng](http://www.libpng.org/pub/png/libpng.html) | 1.6.32 | PNG reference library. / zlib/libpng |
| [libsodium](https://github.com/jedisct1/libsodium) | 1.0.13 | A modern and easy-to-use crypto library. / ISC |
| [libssh2](https://www.libssh2.org/) | 1.8.0 | the SSH library / BSD 3-Clause |
| [libstdcxx-ng](https://gcc.gnu.org/) | 7.2.0 | he GNU C++ Runtime Library / GPL3 with runtime exception |
| [libtiff](http://www.libtiff.org/) | 4.0.8 | Support for the Tag Image File Format (TIFF). / HPND |
| [libtool](http://www.gnu.org/software/libtool/) | 2.4.6 | The GNU Portable Library Tool / GPL 3 |
| [libxcb](http://xcb.freedesktop.org/) | 1.12 | This is the C-language Binding (XCB) package to the X Window System protocol / MIT |
| [libxml2](http://xmlsoft.org/) | 2.9.4 | The XML C parser and toolkit of Gnome / MIT |
| [libxslt](http://xmlsoft.org/XSLT/) | 1.1.29 | The XSLT C library developed for the GNOME project / MIT |
| [llvmlite](http://llvmlite.pydata.org/) | 0.20.0 | Lightweight wrapper around basic LLVM functionality / BSD |
| [locket](https://github.com/mwilliamson/locket.py) | 0.2.0 | File-based locks for Python for Linux and Windows / BSD 2-Clause |
| [lxml](http://lxml.de/) | 4.1.0 | Pythonic binding for the C libraries libxml2 and libxslt. / BSD 3-Clause, GPL-2.0, ZPL-2.0, and ElementTree |
| [lzo](http://www.oberhumer.com/opensource/lzo/) | 2.10 | LZO is a portable lossless data compression library written in ANSI C. / GPL v2+ |
| [markupsafe](https://www.palletsprojects.com/p/markupsafe/) | 1.0 | A Python module that implements the jinja2.Markup string / BSD 3-Clause |
| [matplotlib](http://matplotlib.org/) | 2.1.0 | Publication quality figures in Python / PSF-based |
| [mccabe](https://github.com/PyCQA/mccabe) | 0.6.1 | McCabe complexity checker for Python / MIT |
| [mistune](https://github.com/lepture/mistune) | 0.7.4 | The fastest markdown parser in pure Python. / BSD 3-Clause |
| [mkl](http://software.intel.com/en-us/articles/intel-mkl/) | 2018.0.0 | Math library for Intel and compatible processors / proprietary - Intel |
| [mkl-service](https://github.com/ContinuumIO/mkl-service) | 1.1.2 | Python bindings to MKL service functions / 3-clause BSD |
| [mpc](http://www.multiprecision.org/) | 1.0.3 | A C library for the arithmetic of complex numbers with arbitrarily high precision. / LGPL 3 |
| [mpfr](http://www.mpfr.org/) | 3.1.5 | The MPFR library is a C library for multiple-precision floating-point computations with correct rounding. / LGPL 3 |
| [mpmath](http://mpmath.org) | 0.19 | Python library for arbitrary-precision floating-point arithmetic / BSD 3-Clause |
| [msgpack-python](http://msgpack.org/) | 0.4.8 | MessagePack (de)serializer. / Apache 2.0 |
| [multipledispatch](https://github.com/mrocklin/multipledispatch/) | 0.4.9 | Multiple dispatch in Python / BSD 3-Clause |
| [navigator-updater](https://github.com/ContinuumIO/navigator-updater) | 0.1.0 | Anaconda Navigator Updater / proprietary - Continuum Analytics, Inc. |
| [nbconvert](http://jupyter.org) | 5.3.1 | Converting Jupyter Notebooks / BSD 3-Clause |
| [nbformat](http://jupyter.org) | 4.4.0 | The reference implementation of the Jupyter Notebook format / BSD 3-clause |
| [ncurses](http://www.gnu.org/software/ncurses/) | 6.0 | Library for text-based user interfaces / Free software (MIT-like) |
| [networkx](https://networkx.github.io/) | 2.0 | Python package for creating and manipulating complex networks / BSD 3-Clause |
| [nltk](http://nltk.org/) | 3.2.4 | Build Python programs to work with human language data / Apache 2.0 |
| [nose](http://readthedocs.org/docs/nose/) | 1.3.7 | Nose extends unittest to make testing easier / LGPL-2.1 |
| [notebook](http://jupyter.org) | 5.0.0 | A web-based notebook environment for interactive computing / BSD 3-clause |
| [numba](http://numba.pydata.org/) | 0.35.0 | NumPy aware dynamic Python compiler using LLVM / BSD |
| [numexpr](https://github.com/pydata/numexpr) | 2.6.2 | Fast numerical expression evaluator for NumPy. / MIT |
| [numpy](http://numpy.scipy.org/) | 1.13.3 | Array processing for numbers, strings, records, and objects. / BSD 3-Clause |
| [numpydoc](https://github.com/numpy/numpydoc) | 0.7.0 | Sphinx extension to support docstrings in Numpy format / BSD 3-Clause |
| [odo](http://odo.pydata.org) | 0.5.1 | Data migration in Python / BSD-3-Clause |
| [olefile](http://www.decalage.info/python/olefileio) | 0.44 | parse, read and write Microsoft OLE2 files / BSD License 2-Clause |
| [openpyxl](https://openpyxl.readthedocs.io) | 2.4.8 | A Python library to read/write Excel 2010 xlsx/xlsm files / MIT |
| [openssl](http://www.openssl.org/) | 1.0.2l | OpenSSL is an open-source implementation of the SSL and TLS protocols / OpenSSL |
| [packaging](https://github.com/pypa/packaging) | 16.8 | Core utilities for Python packages / Apache 2.0 or BSD 2-Clause |
| [pandas](http://pandas.pydata.org) | 0.20.3 | High-performance, easy-to-use data structures and data analysis tools. / BSD 3-clause |
| [pandoc](http://johnmacfarlane.net/pandoc/) | 1.15.0.6 | Universal markup converter (repackaged binaries). / GPL-2.0 |
| [pandocfilters](https://github.com/jgm/pandocfilters) | 1.4.2 | A python module for writing pandoc filters / BSD-3-Clause |
| [pango](http://www.pango.org/) | 1.40.11 | Text layout and rendering engine. / LGPL-2.1 |
| [partd](https://github.com/dask/partd) | 0.3.8 | Data structure for on-disk shuffle operations / BSD 3-Clause |
| [patchelf](http://nixos.org/patchelf.html) | 0.9 | A small utility to modify the dynamic linker and RPATH of ELF executables. / GPL 3 |
| [path.py](https://github.com/jaraco/path.py) | 10.3.1 | A module wrapper for os.path / MIT |
| [pathlib2](https://github.com/mcmtroffaes/pathlib2) | 2.3.0 | Fork of pathlib aiming to support the full stdlib Python API. / MIT |
| [patsy](https://github.com/pydata/patsy) | 0.4.1 | Describing statistical models in Python using symbolic formulas / BSD-2-Clause, PSF2 |
| [pcre](http://www.pcre.org/) | 8.41 | Regular expression pattern matching using the same syntax and semantics as Perl 5. / BSD 3-Clause |
| [pep8](http://pep8.readthedocs.org/) | 1.7.0 | Python style guide checker / MIT |
| [pexpect](http://pexpect.sourceforge.net/) | 4.2.1 | Pexpect makes Python a better tool for controlling other applications. / ISC |
| [pickleshare](https://github.com/vivainio/pickleshare) | 0.7.4 | Tiny ‘shelve’-like database with concurrency support / MIT |
| [pillow](http://python-imaging.github.io/) | 4.2.1 | Pillow is the friendly PIL fork by Alex Clark and Contributors. / PIL |
| [pip](https://pip.pypa.io/en/stable/) | 9.0.1 | PyPA recommended tool for installing Python packages / MIT |
| [pixman](http://www.pixman.org/) | 0.34.0 | A low-level software library for pixel manipulation. / MIT |
| [pkginfo](https://code.launchpad.net/~tseaver/pkginfo/trunk) | 1.4.1 | Query metadatdata from sdists / bdists / installed packages. / MIT |
| [ply](http://www.dabeaz.com/ply/index.html) | 3.10 | Python Lex-Yacc / BSD 3-clause |
| [prompt\_toolkit](https://github.com/jonathanslenders/python-prompt-toolkit) | 1.0.15 | Library for building powerful interactive command lines in Python / BSD 3-clause |
| [psutil](https://github.com/giampaolo/psutil) | 5.4.0 | A cross-platform process and system utilities module for Python / BSD 3-Clause |
| [ptyprocess](https://github.com/pexpect/ptyprocess) | 0.5.2 | Run a subprocess in a pseudo terminal / ISC |
| [py](https://github.com/pytest-dev/py) | 1.4.34 | library with cross-python path, ini-parsing, io, code, log facilities / MIT |
| [pycairo](http://cairographics.org/pycairo/) | 1.13.3 | Python bindings for the Cairo graphics library. / LGPL 2.1, MPL 1.1 |
| [pycodestyle](https://pycodestyle.readthedocs.io/) | 2.3.1 | Python style guide checker / MIT |
| [pycosat](https://github.com/ContinuumIO/pycosat) | 0.6.2 | Bindings to picosat (a SAT solver) / MIT |
| [pycparser](https://github.com/eliben/pycparser) | 2.18 | Complete C99 parser in pure Python / BSD 3-clause |
| [pycrypto](http://www.pycrypto.org/) | 2.6.1 | Cryptographic modules for Python. / Public Domain |
| [pycurl](http://pycurl.sourceforge.net/) | 7.43.0 | A Python Interface To The cURL library / LGPL, MIT |
| [pyflakes](https://github.com/PyCQA/pyflakes) | 1.6.0 | Pyflakes analyzes programs and detects various errors. / MIT |
| [pygments](http://pygments.org/) | 2.2.0 | Generic syntax highlighting package / BSD 2-clause |
| [pylint](http://www.pylint.org/) | 1.7.4 | python code static checker / GPL |
| [pyodbc](https://github.com/mkleehammer/pyodbc) | 4.0.17 | DB API Module for ODBC / MIT |
| [pyopenssl](https://github.com/pyca/pyopenssl) | 17.2.0 | Python wrapper module around the OpenSSL library / Apache 2.0 |
| [pyparsing](http://pyparsing.wikispaces.com/) | 2.2.0 | Create and execute simple grammars / MIT |
| [pyqt](http://www.riverbankcomputing.co.uk/software/pyqt) | 5.6.0 | Python binding of the cross-platform GUI toolkit Qt. / Commercial, GPL-2.0, GPL-3.0 |
| [pysocks](https://github.com/Anorov/PySocks) | 1.6.7 | A Python SOCKS client module. See [Anorov/PySocks](https://github.com/Anorov/PySocks) for more information. / BSD 3-Clause |
| [pytables](http://www.pytables.org) | 3.4.2 | Brings together Python, HDF5 and NumPy to easily handle large amounts of data. / BSD 3-Clause |
| [pytest](https://docs.pytest.org/en/latest/) | 3.2.1 | Simple and powerful testing with Python. / MIT |
| [python](http://www.python.org/) | 2.7.14 | General purpose programming language / PSF |
| [python-dateutil](https://dateutil.readthedocs.org/) | 2.6.1 | Extensions to the standard Python datetime module. / BSD 3-clause |
| [pytz](http://pythonhosted.org/pytz/) | 2017.2 | World timezone definitions, modern and historical. / MIT |
| [pywavelets](https://github.com/PyWavelets/pywt) | 0.5.2 | Discrete Wavelet Transforms in Python. / MIT |
| [pyyaml](http://pyyaml.org/wiki/PyYAML) | 3.12 | YAML parser and emitter for Python / MIT |
| [pyzmq](https://github.com/zeromq/pyzmq) | 16.0.2 | Python bindings for zeromq / BSD 3-clause |
| [qt](http://qt-project.org) | 5.6.2 | Qt is a cross-platform application and UI framework. / LGPL-3.0 |
| [qtawesome](https://github.com/spyder-ide/qtawesome) | 0.4.4 | Iconic fonts in PyQt and PySide applications / MIT |
| [qtconsole](http://jupyter.org) | 4.3.1 | Jupyter Qt console / BSD 3-Clause |
| [qtpy](https://github.com/spyder-ide/qtpy) | 1.3.1 | Abstraction layer for PyQt5/PyQt4/PySide / MIT |
| [readline](https://cnswww.cns.cwru.edu/php/chet/readline/rltop.html) | 7.0 | library for editing command lines as they are typed in / GPL3 |
| [requests](http://python-requests.org) | 2.18.4 | Python HTTP for Humans. / Apache 2.0 |
| [rope](https://github.com/python-rope/rope) | 0.10.5 | A python refactoring library… / GPL 2.0 |
| [ruamel\_yaml](https://bitbucket.org/ruamel/yaml) | 0.11.14 | A patched copy of ruamel.yaml. / MIT |
| [scandir](https://github.com/benhoyt/scandir) | 1.6 | scandir, a better directory iterator and faster os.walk() / BSD 3-Clause |
| [scikit-image](http://scikit-image.org/) | 0.13.0 | Image processing routines for SciPy. / BSD 3-Clause |
| [scikit-learn](http://scikit-learn.org/) | 0.19.1 | A set of python modules for machine learning and data mining / BSD 3-Clause |
| [scipy](http://www.scipy.org/) | 0.19.1 | Scientific Library for Python / BSD 3-Clause |
| [seaborn](http://stanford.edu/~mwaskom/software/seaborn/) | 0.8.0 | Statistical data visualization / BSD 3-Clause |
| [setuptools](https://github.com/pypa/setuptools) | 36.5.0 | Download, build, install, upgrade, and uninstall Python packages / MIT |
| [simplegeneric](http://cheeseshop.python.org/pypi/simplegeneric) | 0.8.1 | Simple generic functions (similar to Python’s own len(), pickle.dump(), etc.) / Zope Public |
| [singledispatch](http://docs.python.org/3/library/functools.html#functools.singledispatch) | 3.4.0.3 | Transforms a function into a single-dispatch generic function / MIT |
| [sip](http://www.riverbankcomputing.com/software/sip/intro) | 4.18.1 | Create Python bindings for C and C++ libraries / GPL-3.0 |
| [six](http://pypi.python.org/pypi/six/) | 1.11.0 | Python 2 and 3 compatibility utilities / MIT |
| [snowballstemmer](https://github.com/shibukawa/snowball_py) | 1.2.1 | Snowball stemming library collection for Python / BSD-2-Clause |
| [sortedcollections](http://www.grantjenks.com/docs/sortedcollections/) | 0.5.3 | Python Sorted Collections / Apache-2.0 |
| [sortedcontainers](http://www.grantjenks.com/docs/sortedcontainers/) | 1.5.7 | Python Sorted Container Types: SortedList, SortedDict, and SortedSet / Apache 2.0 |
| [sphinx](http://www.sphinx-doc.org) | 1.6.3 | Sphinx is a tool that makes it easy to create intelligent and beautiful documentation / BSD 2-clause |
| sphinxcontrib | 1.0 | Python namespace for sphinxcontrib / BSD |
| [sphinxcontrib-websupport](https://pypi.python.org/pypi/sphinxcontrib-websupport) | 1.0.1 | Sphinx API for Web Apps / BSD-2-Clause |
| [spyder](https://github.com/spyder-ide/spyder) | 3.2.4 | Scientific PYthon Development EnviRonment / MIT |
| [sqlalchemy](http://www.sqlalchemy.org/) | 1.1.13 | Database Abstraction Library. / MIT |
| [sqlite](http://www.sqlite.org/) | 3.20.1 | Implements a self-contained, zero-configuration, SQL database engine. / Public-Domain (`<http://www.sqlite.org/copyright.html>`) |
| [ssl\_match\_hostname](http://bitbucket.org/brandon/backports.ssl_match_hostname) | 3.5.0.1 | The ssl.match\_hostname() function from Python 3.5 / PSF 2 |
| [statsmodels](https://www.statsmodels.org) | 0.8.0 | Statistical computations and models for use with SciPy / BSD 3-Clause |
| [subprocess32](https://github.com/google/python-subprocess32) | 3.2.7 | A backport of the subprocess module from Python 3.2/3.3 for use on 2.x. / PSF 2 |
| [sympy](http://sympy.org) | 1.1.1 | Python library for symbolic mathematics / 3-clause BSD |
| [tblib](https://github.com/ionelmc/python-tblib) | 1.3.2 | Traceback serialization library. / BSD 2-Clause |
| [terminado](http://github.com/mitsuhiko/markupsafe) | 0.6 | Terminals served by tornado websockets / BSD 3-clause |
| [testpath](https://testpath.readthedocs.io) | 0.3.1 | Testpath is a collection of utilities for Python code working with files and commands. / MIT |
| [tk](http://www.tcl.tk/) | 8.6.7 | A dynamic programming language with GUI support. Bundles Tcl and Tk. / Tcl/Tk |
| [toolz](http://toolz.readthedocs.org/) | 0.8.2 | A functional standard library for Python. / BSD 3-Clause |
| [tornado](http://www.tornadoweb.org/) | 4.5.2 | A Python web framework and asynchronous networking library, originally developed at FriendFeed. / Apache 2.0 |
| [traitlets](http://ipython.org/) | 4.3.2 | Configuration system for Python applications / BSD 3-clause |
| [typing](https://docs.python.org/3.5/library/typing.html) | 3.6.2 | Type Hints for Python - backport for `Python<3.5` / PSF |
| [unicodecsv](https://github.com/jdunck/python-unicodecsv) | 0.14.1 | Drop-in replacement for csv module which supports unicode strings / BSD |
| [unixodbc](http://www.unixodbc.org/) | 2.3.4 | ODBC on non MS Windows platforms / LGPL-2.1 |
| [urllib3](https://urllib3.readthedocs.io/) | 1.22 | HTTP library with thread-safe connection pooling, file post, and more. / MIT |
| [wcwidth](https://github.com/jquast/wcwidth) | 0.1.7 | Measures number of Terminal column cells of wide-character codes. / MIT |
| [webencodings](https://github.com/gsnedders/python-webencodings) | 0.5.1 | Character encoding aliases for legacy web content / BSD 3-Clause |
| [werkzeug](http://werkzeug.pocoo.org/) | 0.12.2 | The Python WSGI Utility Library. / BSD 3-Clause |
| [wheel](https://bitbucket.org/pypa/wheel/) | 0.29.0 | A built-package format for Python. / MIT |
| [widgetsnbextension](http://ipython.org) | 3.0.2 | IPython HTML widgets for Jupyter / BSD 3-clause |
| [wrapt](https://github.com/GrahamDumpleton/wrapt) | 1.10.11 | Module for decorators, wrappers and monkey patching. / BSD 2-Clause |
| [xlrd](http://www.python-excel.org/) | 1.1.0 | Library for developers to extract data from Microsoft Excel (tm) spreadsheet files / BSD 3-Clause and BSD with advertising |
| [xlsxwriter](https://xlsxwriter.readthedocs.io/) | 1.0.2 | A Python module for creating Excel XLSX files / BSD 2-Clause |
| [xlwt](http://www.python-excel.org/) | 1.3.0 | Writing data and formatting information to Excel files / BSD |
| [xz](http://tukaani.org/xz/) | 5.2.3 | Data compression software with high compression ratio / LGPL-2.1 and GPL-2.0 |
| [yaml](http://pyyaml.org/wiki/LibYAML) | 0.1.7 | A C library for parsing and emitting YAML. / MIT |
| [zeromq](http://zeromq.org) | 4.2.2 | A high-performance asynchronous messaging library. / LGPL 3 |
| [zict](http://github.com/mrocklin/zict) | 0.1.3 | Composable Dictionary Classes / BSD 3-Clause |
| [zlib](http://zlib.net/) | 1.2.11 | Massively spiffy yet delicately unobtrusive compression library / zlib |
| Name | Version | Summary / License |
|---|---|---|
| [alabaster](http://www.sphinx-doc.org/en/stable/index.html) | 0.7.10 | Configurable, Python 2+3 compatible Sphinx theme. / BSD 3-Clause |
| [anaconda-client](http://anaconda.org) | 1.6.5 | anaconda.org command line client library / BSD 3-clause |
| [anaconda-navigator](https://github.com/ContinuumIO/navigator) | 1.6.8 | Anaconda Navigator / proprietary - Continuum Analytics, Inc. |
| [anaconda-project](https://github.com/Anaconda-Platform/anaconda-project) | 0.8.0 | Reproducible, executable project directories. / BSD 3-Clause |
| [asn1crypto](https://github.com/wbond/asn1crypto) | 0.22.0 | Python ASN.1 library with a focus on performance and a pythonic API / MIT |
| [astroid](https://www.astroid.org/) | 1.5.3 | A abstract syntax tree for Python with inference support. / LGPL 2.1 |
| [astropy](http://www.astropy.org/) | 2.0.2 | Community-developed Python Library for Astronomy / BSD |
| [babel](http://babel.pocoo.org/) | 2.5.0 | Utilities to internationalize and localize Python applications / BSD 3-clause |
| [backports](https://bitbucket.org/brandon/backports) | 1.0 | / BSD |
| [backports.shutil\_get\_terminal\_size](https://github.com/chrippa/backports.shutil_get_terminal_size) | 1.0.0 | A backport of the get\_terminal\_size function from Python 3.3’s shutil. / MIT |
| [beautifulsoup4](http://www.crummy.com/software/BeautifulSoup/) | 4.6.0 | Python library designed for screen-scraping / MIT |
| [bitarray](https://github.com/ilanschnell/bitarray) | 0.8.1 | efficient arrays of booleans – C extension / PSF |
| [bkcharts](http://github.com/bokeh/bkcharts) | 0.2 | High level chart types built on top of Bokeh / BSD 3-Clause |
| [blaze](http://blaze.pydata.org) | 0.11.3 | NumPy and Pandas interface to big data / BSD 3-Clause |
| [bleach](https://github.com/mozilla/bleach) | 2.0.0 | Easy, whitelist-based HTML-sanitizing tool / Apache-2.0 |
| [bokeh](http://bokeh.pydata.org/) | 0.12.7 | Statistical and novel interactive HTML plots for Python / BSD 3-Clause |
| [boto](https://github.com/boto/boto/) | 2.48.0 | Amazon Web Services Library / MIT |
| [bottleneck](http://berkeleyanalytics.com/bottleneck) | 1.2.1 | Fast NumPy array functions written in Cython. / BSD 2-Clause |
| [bzip2](http://www.bzip.org/) | 1.0.6 | high-quality data compressor / bzip2 |
| [ca-certificates](https://github.com/conda-forge/ca-certificates-feedstock) | 2017.08.26 | Certificates for use with other packages. / ISC |
| [certifi](http://certifi.io/) | 2017.7.27.1 | Python package for providing Mozilla’s CA Bundle. / ISC |
| [cffi](https://bitbucket.org/cffi/cffi) | 1.10.0 | Foreign Function Interface for Python calling C code. / MIT |
| [chardet](https://github.com/chardet/chardet) | 3.0.4 | Universal character encoding detector / LGPL2 |
| [click](http://click.pocoo.org/) | 6.7 | A simple wrapper around optparse for powerful command line utilities. / BSD 3-Clause |
| [cloudpickle](https://github.com/cloudpipe/cloudpickle) | 0.4.0 | Extended pickling support for Python objects / BSD 3-Clause |
| [clyent](https://github.com/Anaconda-Platform/clyent) | 1.2.2 | Command line client library for windows and posix / BSD 3-Clause |
| [colorama](https://github.com/tartley/colorama) | 0.3.9 | Cross-platform colored terminal text. / BSD 3-Clause |
| [comtypes](http://starship.python.net/crew/theller/comtypes/) | 1.1.2 | pure Python COM package / MIT |
| [conda](http://conda.pydata.org/) | 4.3.27 | OS-agnostic, system-level binary package and environment manager. / BSD 3-Clause |
| [conda-build](https://github.com/conda/conda-build) | 3.0.22 | tools for building conda packages / BSD 3-Clause |
| console\_shortcut | 0.1.1 | Console shortcut creator for Windows (using menuinst) / BSD |
| [contextlib2](http://contextlib2.readthedocs.org) | 0.5.5 | Backports and enhancements for the contextlib module / PSF |
| [cryptography](https://github.com/pyca/cryptography) | 2.0.3 | Provides cryptographic recipes and primitives to Python developers / Apache 2.0 or BSD 3-Clause, PSF 2 |
| [curl](http://curl.haxx.se/) | 7.55.1 | tool and library for transferring data with URL syntax / MIT/X derivate (`<http://curl.haxx.se/docs/copyright.html>`) |
| [cycler](http://matplotlib.org/cycler) | 0.10.0 | Composable style cycles. / BSD 3-Clause |
| [cython](http://www.cython.org/) | 0.26.1 | The Cython compiler for writing C extensions for the Python language / Apache-2.0 |
| [cytoolz](https://github.com/pytoolz/cytoolz) | 0.8.2 | Cython implementation of Toolz. High performance functional utilities. / BSD 3-Clause |
| [dask](http://dask.pydata.org/en/latest/) | 0.15.2 | Parallel Python with task scheduling / BSD 3-Clause |
| [dask-core](http://github.com/dask/dask/) | 0.15.2 | Parallel Python with task scheduling / BSD 3-Clause |
| [datashape](http://datashape.pydata.org) | 0.5.4 | A data description language. / BSD 2-Clause |
| [decorator](https://github.com/micheles/decorator) | 4.1.2 | Better living through Python with decorators. / BSD 3-Clause |
| [distributed](http://distributed.readthedocs.io/en/latest/) | 1.18.3 | Distributed computing with Dask / BSD 3-Clause |
| [docutils](http://docutils.sourceforge.net/) | 0.14 | Docutils – Python Documentation Utilities / Public Domain Dedictation and BSD 2-Clause and PSF 2.1.1 and GPL 3.0 |
| [entrypoints](https://github.com/takluyver/entrypoints) | 0.2.3 | Discover and load entry points from installed packages. / MIT License |
| [et\_xmlfile](https://bitbucket.org/openpyxl/et_xmlfile) | 1.0.1 | An implementation of lxml.xmlfile for the standard library / MIT |
| [fastcache](https://github.com/pbrady/fastcache) | 1.0.2 | C implementation of Python 3 lru\_cache / MIT |
| [filelock](https://github.com/benediktschmitt/py-filelock) | 2.0.12 | A platform independent file lock. / Public Domain |
| [flask](http://flask.pocoo.org) | 0.12.2 | A microframework based on Werkzeug, Jinja2 and good intentions. / BSD 3-Clause |
| [flask-cors](https://github.com/corydolphin/flask-cors) | 3.0.3 | A Flask extension adding a decorator for CORS support / MIT |
| [freetype](https://www.freetype.org/) | 2.8 | A Free, High-Quality, and Portable Font Engine / GPL-2.0 and FreeType |
| [get\_terminal\_size](https://github.com/chrippa/backports.shutil_get_terminal_size) | 1.0.0 | Get the size of the terminal window. / MIT |
| [gevent](http://www.gevent.org/) | 1.2.2 | Coroutine-based network library / MIT |
| [glob2](https://github.com/miracle2k/python-glob2) | 0.5 | Version of the glob module that supports recursion via \*\*, and can capture patterns. / BSD-2-Clause |
| [greenlet](https://github.com/python-greenlet/greenlet) | 0.4.12 | Lightweight in-process concurrent programming / MIT |
| [h5py](http://www.h5py.org/) | 2.7.0 | Read and write HDF5 files from Python. / BSD 3-Clause |
| [hdf5](http://www.hdfgroup.org/HDF5/) | 1.10.1 | HDF5 is a data model, library, and file format for storing and managing data / HDF5 |
| [heapdict](http://stutzbachenterprises.com/) | 1.0.0 | A heap with decrease-key and increase-key operations / BSD 3-Clause |
| [html5lib](https://github.com/html5lib/html5lib-python) | 0.999999999 | HTML parser based on the WHATWG HTML specification / MIT |
| [icc\_rt](https://software.intel.com/en-us/node/522690) | 2017.0.4 | Intel runtime libraries for C, C++ and Fortran compilers / Intel proprietary |
| [icu](http://site.icu-project.org/) | 58.2 | International Components for Unicode. / MIT |
| [idna](https://github.com/kjd/idna) | 2.6 | Internationalized Domain Names in Applications (IDNA). / BSD Like |
| [imageio](http://imageio.github.io) | 2.2.0 | a Python library for reading and writing image data / BSD 2-Clause |
| [imagesize](https://github.com/shibukawa/imagesize_py) | 0.7.1 | Getting image size from png/jpeg/jpeg2000/gif file / MIT |
| [intel-openmp](https://software.intel.com/en-us/node/522690) | 2018.0.0 | Math library for Intel and compatible processors / proprietary - Intel |
| [ipykernel](http://ipython.org) | 4.6.1 | IPython Kernel for Jupyter / BSD 3-clause |
| [ipython](http://ipython.org/) | 6.1.0 | IPython: Productive Interactive Computing / BSD 3-clause |
| [ipython\_genutils](http://ipython.org) | 0.2.0 | vestigial utilities from IPython / BSD 3-Clause |
| [ipywidgets](https://github.com/ipython/ipywidgets) | 7.0.0 | Jupyter Interactive Widgets / BSD 3-clause |
| [isort](https://github.com/timothycrosley/isort) | 4.2.15 | A Python utility / library to sort Python imports. / MIT |
| [itsdangerous](https://github.com/pallets/itsdangerous) | 0.24 | Various helpers to pass trusted data to untrusted environments. / BSD 3-Clause |
| [jdcal](https://github.com/phn/jdcal) | 1.3 | Julian dates from proleptic Gregorian and Julian calendars. / BSD 2-Clause |
| [jedi](https://github.com/davidhalter/jedi/) | 0.10.2 | An autocompletion tool for Python that can be used for text editors. / MIT |
| [jinja2](http://jinja.pocoo.org) | 2.9.6 | An easy to use stand-alone template engine written in pure python. / 3-Clause BSD |
| [jpeg](http://www.ijg.org/) | 9b | read/write jpeg COM, EXIF, IPTC medata / Custom free software license |
| [jsonschema](https://github.com/Julian/jsonschema) | 2.6.0 | An implementation of JSON Schema validation for Python / MIT |
| [jupyter](http://jupyter.org) | 1.0.0 | Jupyter metapackage. Install all the Jupyter components in one go. / BSD 3-Clause |
| [jupyter\_client](http://jupyter.org) | 5.1.0 | Jupyter protocol implementation and client libraries / BSD 3-clause |
| [jupyter\_console](http://jupyter.org) | 5.2.0 | Jupyter terminal console / BSD 3-Clause |
| [jupyter\_core](http://jupyter.org) | 4.3.0 | Core common functionality of Jupyter projects. / BSD 3-clause |
| [jupyterlab](https://github.com/jupyterlab/jupyterlab) | 0.27.0 | A pre-alpha version of a computational environment for Jupyter. / BSD 3-Clause |
| [jupyterlab\_launcher](http://github.com/jupyterlab/jupyterlab_launcher) | 0.4.0 | A Launcher for JupyterLab based applications. / BSD 3-Clause |
| [lazy-object-proxy](https://github.com/ionelmc/python-lazy-object-proxy) | 1.3.1 | A fast and thorough lazy object proxy. / BSD 2-Clause |
| [libiconv](https://www.gnu.org/software/libiconv/) | 1.15 | Provides iconv for systems which don’t have one (or that cannot convert from/to Unicode.) / GPL and LGPL |
| [libpng](http://www.libpng.org/pub/png/libpng.html) | 1.6.32 | PNG reference library. / zlib/libpng |
| [libssh2](https://www.libssh2.org/) | 1.8.0 | the SSH library / BSD 3-Clause |
| [libtiff](http://www.libtiff.org/) | 4.0.8 | Support for the Tag Image File Format (TIFF). / HPND |
| [libxml2](http://xmlsoft.org/) | 2.9.4 | The XML C parser and toolkit of Gnome / MIT |
| [libxslt](http://xmlsoft.org/XSLT/) | 1.1.29 | The XSLT C library developed for the GNOME project / MIT |
| [llvmlite](http://llvmlite.pydata.org/) | 0.20.0 | Lightweight wrapper around basic LLVM functionality / BSD |
| [locket](https://github.com/mwilliamson/locket.py) | 0.2.0 | File-based locks for Python for Linux and Windows / BSD 2-Clause |
| [lxml](http://lxml.de/) | 3.8.0 | Pythonic binding for the C libraries libxml2 and libxslt. / BSD 3-Clause, GPL-2.0, ZPL-2.0, and ElementTree |
| [markupsafe](https://www.palletsprojects.com/p/markupsafe/) | 1.0 | A Python module that implements the jinja2.Markup string / BSD 3-Clause |
| [matplotlib](http://matplotlib.org/) | 2.0.2 | Publication quality figures in Python / PSF-based |
| [mccabe](https://github.com/PyCQA/mccabe) | 0.6.1 | McCabe complexity checker for Python / MIT |
| [menuinst](https://github.com/ContinuumIO/menuinst) | 1.4.8 | cross platform menu item installation / BSD |
| [mistune](https://github.com/lepture/mistune) | 0.7.4 | The fastest markdown parser in pure Python. / BSD 3-Clause |
| [mkl](http://software.intel.com/en-us/articles/intel-mkl/) | 2018.0.0 | Math library for Intel and compatible processors / proprietary - Intel |
| [mkl-service](https://github.com/ContinuumIO/mkl-service) | 1.1.2 | Python bindings to MKL service functions / 3-clause BSD |
| [mpmath](http://mpmath.org) | 0.19 | Python library for arbitrary-precision floating-point arithmetic / BSD 3-Clause |
| [msgpack-python](http://msgpack.org/) | 0.4.8 | MessagePack (de)serializer. / Apache 2.0 |
| [multipledispatch](https://github.com/mrocklin/multipledispatch/) | 0.4.9 | Multiple dispatch in Python / BSD 3-Clause |
| [navigator-updater](https://github.com/ContinuumIO/navigator-updater) | 0.1.0 | Anaconda Navigator Updater / proprietary - Continuum Analytics, Inc. |
| [nbconvert](http://jupyter.org) | 5.3.1 | Converting Jupyter Notebooks / BSD 3-Clause |
| [nbformat](http://jupyter.org) | 4.4.0 | The reference implementation of the Jupyter Notebook format / BSD 3-clause |
| [networkx](https://networkx.github.io/) | 1.11 | Python package for creating and manipulating complex networks / BSD 3-Clause |
| [nltk](http://nltk.org/) | 3.2.4 | Build Python programs to work with human language data / Apache 2.0 |
| [nose](http://readthedocs.org/docs/nose/) | 1.3.7 | Nose extends unittest to make testing easier / LGPL-2.1 |
| [notebook](http://jupyter.org) | 5.0.0 | A web-based notebook environment for interactive computing / BSD 3-clause |
| [numba](http://numba.pydata.org/) | 0.35.0 | NumPy aware dynamic Python compiler using LLVM / BSD |
| [numexpr](https://github.com/pydata/numexpr) | 2.6.2 | Fast numerical expression evaluator for NumPy. / MIT |
| [numpy](http://numpy.scipy.org/) | 1.13.1 | Array processing for numbers, strings, records, and objects. / BSD 3-Clause |
| [numpydoc](https://github.com/numpy/numpydoc) | 0.7.0 | Sphinx extension to support docstrings in Numpy format / BSD 3-Clause |
| [odo](http://odo.pydata.org) | 0.5.1 | Data migration in Python / BSD-3-Clause |
| [olefile](http://www.decalage.info/python/olefileio) | 0.44 | parse, read and write Microsoft OLE2 files / BSD License 2-Clause |
| [openpyxl](https://openpyxl.readthedocs.io) | 2.4.8 | A Python library to read/write Excel 2010 xlsx/xlsm files / MIT |
| [openssl](http://www.openssl.org/) | 1.0.2l | OpenSSL is an open-source implementation of the SSL and TLS protocols / OpenSSL |
| [packaging](https://github.com/pypa/packaging) | 16.8 | Core utilities for Python packages / Apache 2.0 or BSD 2-Clause |
| [pandas](http://pandas.pydata.org) | 0.20.3 | High-performance, easy-to-use data structures and data analysis tools. / BSD 3-clause |
| [pandoc](http://johnmacfarlane.net/pandoc/) | 1.19.2.1 | Universal markup converter (repackaged binaries). / GPL-2.0 |
| [pandocfilters](https://github.com/jgm/pandocfilters) | 1.4.2 | A python module for writing pandoc filters / BSD-3-Clause |
| [partd](https://github.com/dask/partd) | 0.3.8 | Data structure for on-disk shuffle operations / BSD 3-Clause |
| [path.py](https://github.com/jaraco/path.py) | 10.3.1 | A module wrapper for os.path / MIT |
| [pathlib2](https://github.com/mcmtroffaes/pathlib2) | 2.3.0 | Fork of pathlib aiming to support the full stdlib Python API. / MIT |
| [patsy](https://github.com/pydata/patsy) | 0.4.1 | Describing statistical models in Python using symbolic formulas / BSD-2-Clause, PSF2 |
| [pep8](http://pep8.readthedocs.org/) | 1.7.0 | Python style guide checker / MIT |
| [pickleshare](https://github.com/vivainio/pickleshare) | 0.7.4 | Tiny ‘shelve’-like database with concurrency support / MIT |
| [pillow](http://python-imaging.github.io/) | 4.2.1 | Pillow is the friendly PIL fork by Alex Clark and Contributors. / PIL |
| [pip](https://pip.pypa.io/en/stable/) | 9.0.1 | PyPA recommended tool for installing Python packages / MIT |
| [pkginfo](https://code.launchpad.net/~tseaver/pkginfo/trunk) | 1.4.1 | Query metadatdata from sdists / bdists / installed packages. / MIT |
| [ply](http://www.dabeaz.com/ply/index.html) | 3.10 | Python Lex-Yacc / BSD 3-clause |
| [prompt\_toolkit](https://github.com/jonathanslenders/python-prompt-toolkit) | 1.0.15 | Library for building powerful interactive command lines in Python / BSD 3-clause |
| [psutil](https://github.com/giampaolo/psutil) | 5.2.2 | A cross-platform process and system utilities module for Python / BSD 3-Clause |
| [py](https://github.com/pytest-dev/py) | 1.4.34 | library with cross-python path, ini-parsing, io, code, log facilities / MIT |
| [pycodestyle](https://pycodestyle.readthedocs.io/) | 2.3.1 | Python style guide checker / MIT |
| [pycosat](https://github.com/ContinuumIO/pycosat) | 0.6.2 | Bindings to picosat (a SAT solver) / MIT |
| [pycparser](https://github.com/eliben/pycparser) | 2.18 | Complete C99 parser in pure Python / BSD 3-clause |
| [pycrypto](http://www.pycrypto.org/) | 2.6.1 | Cryptographic modules for Python. / Public Domain |
| [pycurl](http://pycurl.sourceforge.net/) | 7.43.0 | A Python Interface To The cURL library / LGPL, MIT |
| [pyflakes](https://github.com/PyCQA/pyflakes) | 1.5.0 | Pyflakes analyzes programs and detects various errors. / MIT |
| [pygments](http://pygments.org/) | 2.2.0 | Generic syntax highlighting package / BSD 2-clause |
| [pylint](http://www.pylint.org/) | 1.7.2 | python code static checker / GPL |
| [pyodbc](https://github.com/mkleehammer/pyodbc) | 4.0.17 | DB API Module for ODBC / MIT |
| [pyopenssl](https://github.com/pyca/pyopenssl) | 17.2.0 | Python wrapper module around the OpenSSL library / Apache 2.0 |
| [pyparsing](http://pyparsing.wikispaces.com/) | 2.2.0 | Create and execute simple grammars / MIT |
| [pyqt](http://www.riverbankcomputing.co.uk/software/pyqt) | 5.6.0 | Python binding of the cross-platform GUI toolkit Qt. / Commercial, GPL-2.0, GPL-3.0 |
| [pysocks](https://github.com/Anorov/PySocks) | 1.6.7 | A Python SOCKS client module. See [Anorov/PySocks](https://github.com/Anorov/PySocks) for more information. / BSD 3-Clause |
| [pytables](http://www.pytables.org) | 3.4.2 | Brings together Python, HDF5 and NumPy to easily handle large amounts of data. / BSD 3-Clause |
| [pytest](https://docs.pytest.org/en/latest/) | 3.2.1 | Simple and powerful testing with Python. / MIT |
| [python](http://www.python.org/) | 3.6.2 | General purpose programming language / PSF |
| [python-dateutil](https://dateutil.readthedocs.org/) | 2.6.1 | Extensions to the standard Python datetime module. / BSD 3-clause |
| [pytz](http://pythonhosted.org/pytz/) | 2017.2 | World timezone definitions, modern and historical. / MIT |
| [pywavelets](https://github.com/PyWavelets/pywt) | 0.5.2 | Discrete Wavelet Transforms in Python. / MIT |
| [pywin32](https://sourceforge.net/projects/pywin32) | 221 | Python extensions for Windows / PSF |
| [pyyaml](http://pyyaml.org/wiki/PyYAML) | 3.12 | YAML parser and emitter for Python / MIT |
| [pyzmq](https://github.com/zeromq/pyzmq) | 16.0.2 | Python bindings for zeromq / BSD 3-clause |
| [qt](http://qt-project.org) | 5.6.2 | Qt is a cross-platform application and UI framework. / LGPL-3.0 |
| [qtawesome](https://github.com/spyder-ide/qtawesome) | 0.4.4 | Iconic fonts in PyQt and PySide applications / MIT |
| [qtconsole](http://jupyter.org) | 4.3.1 | Jupyter Qt console / BSD 3-Clause |
| [qtpy](https://github.com/spyder-ide/qtpy) | 1.3.1 | Abstraction layer for PyQt5/PyQt4/PySide / MIT |
| [requests](http://python-requests.org) | 2.18.4 | Python HTTP for Humans. / Apache 2.0 |
| [rope](https://github.com/python-rope/rope) | 0.10.5 | A python refactoring library… / GPL 2.0 |
| [ruamel\_yaml](https://bitbucket.org/ruamel/yaml) | 0.11.14 | A patched copy of ruamel.yaml. / MIT |
| [scikit-image](http://scikit-image.org/) | 0.13.0 | Image processing routines for SciPy. / BSD 3-Clause |
| [scikit-learn](http://scikit-learn.org/) | 0.19.0 | A set of python modules for machine learning and data mining / BSD 3-Clause |
| [scipy](http://www.scipy.org/) | 0.19.1 | Scientific Library for Python / BSD 3-Clause |
| [seaborn](http://stanford.edu/~mwaskom/software/seaborn/) | 0.8.0 | Statistical data visualization / BSD 3-Clause |
| [setuptools](https://github.com/pypa/setuptools) | 36.5.0 | Download, build, install, upgrade, and uninstall Python packages / MIT |
| [simplegeneric](http://cheeseshop.python.org/pypi/simplegeneric) | 0.8.1 | Simple generic functions (similar to Python’s own len(), pickle.dump(), etc.) / Zope Public |
| [singledispatch](http://docs.python.org/3/library/functools.html#functools.singledispatch) | 3.4.0.3 | Transforms a function into a single-dispatch generic function / MIT |
| [sip](http://www.riverbankcomputing.com/software/sip/intro) | 4.18.1 | Create Python bindings for C and C++ libraries / GPL-3.0 |
| [six](http://pypi.python.org/pypi/six/) | 1.10.0 | Python 2 and 3 compatibility utilities / MIT |
| [snowballstemmer](https://github.com/shibukawa/snowball_py) | 1.2.1 | Snowball stemming library collection for Python / BSD-2-Clause |
| [sortedcollections](http://www.grantjenks.com/docs/sortedcollections/) | 0.5.3 | Python Sorted Collections / Apache-2.0 |
| [sortedcontainers](http://www.grantjenks.com/docs/sortedcontainers/) | 1.5.7 | Python Sorted Container Types: SortedList, SortedDict, and SortedSet / Apache 2.0 |
| [sphinx](http://www.sphinx-doc.org) | 1.6.3 | Sphinx is a tool that makes it easy to create intelligent and beautiful documentation / BSD 2-clause |
| sphinxcontrib | 1.0 | Python namespace for sphinxcontrib / BSD |
| [sphinxcontrib-websupport](https://pypi.python.org/pypi/sphinxcontrib-websupport) | 1.0.1 | Sphinx API for Web Apps / BSD-2-Clause |
| [spyder](https://github.com/spyder-ide/spyder) | 3.2.3 | Scientific PYthon Development EnviRonment / MIT |
| [sqlalchemy](http://www.sqlalchemy.org/) | 1.1.13 | Database Abstraction Library. / MIT |
| [sqlite](http://www.sqlite.org/) | 3.20.1 | Implements a self-contained, zero-configuration, SQL database engine. / Public-Domain (`<http://www.sqlite.org/copyright.html>`) |
| [statsmodels](https://www.statsmodels.org) | 0.8.0 | Statistical computations and models for use with SciPy / BSD 3-Clause |
| [sympy](http://sympy.org) | 1.1.1 | Python library for symbolic mathematics / 3-clause BSD |
| [tblib](https://github.com/ionelmc/python-tblib) | 1.3.2 | Traceback serialization library. / BSD 2-Clause |
| [testpath](https://testpath.readthedocs.io) | 0.3.1 | Testpath is a collection of utilities for Python code working with files and commands. / MIT |
| [tk](http://www.tcl.tk/) | 8.6.7 | A dynamic programming language with GUI support. Bundles Tcl and Tk. / Tcl/Tk |
| [toolz](http://toolz.readthedocs.org/) | 0.8.2 | A functional standard library for Python. / BSD 3-Clause |
| [tornado](http://www.tornadoweb.org/) | 4.5.2 | A Python web framework and asynchronous networking library, originally developed at FriendFeed. / Apache 2.0 |
| [traitlets](http://ipython.org/) | 4.3.2 | Configuration system for Python applications / BSD 3-clause |
| [typing](https://docs.python.org/3.5/library/typing.html) | 3.6.2 | Type Hints for Python - backport for `Python<3.5` / PSF |
| [unicodecsv](https://github.com/jdunck/python-unicodecsv) | 0.14.1 | Drop-in replacement for csv module which supports unicode strings / BSD |
| [urllib3](https://urllib3.readthedocs.io/) | 1.22 | HTTP library with thread-safe connection pooling, file post, and more. / MIT |
| [vc](https://github.com/conda/conda/wiki/VC-features) | 14 | A meta-package to track VC features. / Modified BSD License (3-clause) |
| [vs2015\_runtime](http://www.microsoft.com) | 14.0.25123 | Bundles of the MSVC 14 (VS 2015) runtime / Proprietary |
| [wcwidth](https://github.com/jquast/wcwidth) | 0.1.7 | Measures number of Terminal column cells of wide-character codes. / MIT |
| [webencodings](https://github.com/gsnedders/python-webencodings) | 0.5.1 | Character encoding aliases for legacy web content / BSD 3-Clause |
| [werkzeug](http://werkzeug.pocoo.org/) | 0.12.2 | The Python WSGI Utility Library. / BSD 3-Clause |
| [wheel](https://bitbucket.org/pypa/wheel/) | 0.29.0 | A built-package format for Python. / MIT |
| [widgetsnbextension](http://ipython.org) | 3.0.2 | IPython HTML widgets for Jupyter / BSD 3-clause |
| [win\_inet\_pton](https://github.com/hickeroar/win_inet_pton) | 1.0.1 | Native inet\_pton and inet\_ntop implementation for Python on Windows (with ctypes). / PUBLIC-DOMAIN |
| [win\_unicode\_console](https://github.com/Drekin/win-unicode-console) | 0.5 | A Python package to enable Unicode input and display when running Python from Windows console. / MIT |
| [wincertstore](https://bitbucket.org/tiran/wincertstore) | 0.2 | Python module to extract CA and CRL certs from Windows’ cert store (ctypes based). / PSF 2 |
| [wrapt](https://github.com/GrahamDumpleton/wrapt) | 1.10.11 | Module for decorators, wrappers and monkey patching. / BSD 2-Clause |
| [xlrd](http://www.python-excel.org/) | 1.1.0 | Library for developers to extract data from Microsoft Excel (tm) spreadsheet files / BSD 3-Clause and BSD with advertising |
| [xlsxwriter](https://xlsxwriter.readthedocs.io/) | 0.9.8 | A Python module for creating Excel XLSX files / BSD 2-Clause |
| [xlwings](http://xlwings.org/) | 0.11.4 | Interact with Excel from Python and vice versa / 3-clause BSD |
| [xlwt](http://www.python-excel.org/) | 1.3.0 | Writing data and formatting information to Excel files / BSD |
| [yaml](http://pyyaml.org/wiki/LibYAML) | 0.1.7 | A C library for parsing and emitting YAML. / MIT |
| [zict](http://github.com/mrocklin/zict) | 0.1.2 | Composable Dictionary Classes / BSD 3-Clause |
| [zlib](http://zlib.net/) | 1.2.11 | Massively spiffy yet delicately unobtrusive compression library / zlib |
| Name | Version | Summary / License |
|---|---|---|
| [alabaster](http://www.sphinx-doc.org/en/stable/index.html) | 0.7.10 | Configurable, Python 2+3 compatible Sphinx theme. / BSD 3-Clause |
| [anaconda-client](http://anaconda.org) | 1.6.5 | anaconda.org command line client library / BSD 3-clause |
| [anaconda-navigator](https://github.com/ContinuumIO/navigator) | 1.6.8 | Anaconda Navigator / proprietary - Continuum Analytics, Inc. |
| [anaconda-project](https://github.com/Anaconda-Platform/anaconda-project) | 0.8.0 | Reproducible, executable project directories. / BSD 3-Clause |
| [appnope](http://github.com/minrk/appnope) | 0.1.0 | Disable App Nap on OS X 10.9 / BSD 2-Clause |
| [appscript](http://appscript.sourceforge.net/) | 1.0.1 | Control AppleScriptable applications from Python / Public-Domain |
| [asn1crypto](https://github.com/wbond/asn1crypto) | 0.22.0 | Python ASN.1 library with a focus on performance and a pythonic API / MIT |
| [astroid](https://www.astroid.org/) | 1.5.3 | A abstract syntax tree for Python with inference support. / LGPL 2.1 |
| [astropy](http://www.astropy.org/) | 2.0.2 | Community-developed Python Library for Astronomy / BSD |
| [babel](http://babel.pocoo.org/) | 2.5.0 | Utilities to internationalize and localize Python applications / BSD 3-clause |
| [backports](https://bitbucket.org/brandon/backports) | 1.0 | / BSD |
| [backports.shutil\_get\_terminal\_size](https://github.com/chrippa/backports.shutil_get_terminal_size) | 1.0.0 | A backport of the get\_terminal\_size function from Python 3.3’s shutil. / MIT |
| [beautifulsoup4](http://www.crummy.com/software/BeautifulSoup/) | 4.6.0 | Python library designed for screen-scraping / MIT |
| [bitarray](https://github.com/ilanschnell/bitarray) | 0.8.1 | efficient arrays of booleans – C extension / PSF |
| [bkcharts](http://github.com/bokeh/bkcharts) | 0.2 | High level chart types built on top of Bokeh / BSD 3-Clause |
| [blaze](http://blaze.pydata.org) | 0.11.3 | NumPy and Pandas interface to big data / BSD 3-Clause |
| [bleach](https://github.com/mozilla/bleach) | 2.0.0 | Easy, whitelist-based HTML-sanitizing tool / Apache-2.0 |
| [bokeh](http://bokeh.pydata.org/) | 0.12.7 | Statistical and novel interactive HTML plots for Python / BSD 3-Clause |
| [boto](https://github.com/boto/boto/) | 2.48.0 | Amazon Web Services Library / MIT |
| [bottleneck](http://berkeleyanalytics.com/bottleneck) | 1.2.1 | Fast NumPy array functions written in Cython. / BSD 2-Clause |
| [ca-certificates](https://github.com/conda-forge/ca-certificates-feedstock) | 2017.08.26 | Certificates for use with other packages. / ISC |
| [certifi](http://certifi.io/) | 2017.7.27.1 | Python package for providing Mozilla’s CA Bundle. / ISC |
| [cffi](https://bitbucket.org/cffi/cffi) | 1.10.0 | Foreign Function Interface for Python calling C code. / MIT |
| [chardet](https://github.com/chardet/chardet) | 3.0.4 | Universal character encoding detector / LGPL2 |
| [click](http://click.pocoo.org/) | 6.7 | A simple wrapper around optparse for powerful command line utilities. / BSD 3-Clause |
| [cloudpickle](https://github.com/cloudpipe/cloudpickle) | 0.4.0 | Extended pickling support for Python objects / BSD 3-Clause |
| [clyent](https://github.com/Anaconda-Platform/clyent) | 1.2.2 | Command line client library for windows and posix / BSD 3-Clause |
| [colorama](https://github.com/tartley/colorama) | 0.3.9 | Cross-platform colored terminal text. / BSD 3-Clause |
| [conda](http://conda.pydata.org/) | 4.3.27 | OS-agnostic, system-level binary package and environment manager. / BSD 3-Clause |
| [conda-build](https://github.com/conda/conda-build) | 3.0.22 | tools for building conda packages / BSD 3-Clause |
| [contextlib2](http://contextlib2.readthedocs.org) | 0.5.5 | Backports and enhancements for the contextlib module / PSF |
| [cryptography](https://github.com/pyca/cryptography) | 2.0.3 | Provides cryptographic recipes and primitives to Python developers / Apache 2.0 or BSD 3-Clause, PSF 2 |
| [curl](http://curl.haxx.se/) | 7.55.1 | tool and library for transferring data with URL syntax / MIT/X derivate (`<http://curl.haxx.se/docs/copyright.html>`) |
| [cycler](http://matplotlib.org/cycler) | 0.10.0 | Composable style cycles. / BSD 3-Clause |
| [cython](http://www.cython.org/) | 0.26.1 | The Cython compiler for writing C extensions for the Python language / Apache-2.0 |
| [cytoolz](https://github.com/pytoolz/cytoolz) | 0.8.2 | Cython implementation of Toolz. High performance functional utilities. / BSD 3-Clause |
| [dask](http://dask.pydata.org/en/latest/) | 0.15.2 | Parallel Python with task scheduling / BSD 3-Clause |
| [dask-core](http://github.com/dask/dask/) | 0.15.2 | Parallel Python with task scheduling / BSD 3-Clause |
| [datashape](http://datashape.pydata.org) | 0.5.4 | A data description language. / BSD 2-Clause |
| [dbus](http://www.freedesktop.org/wiki/Software/dbus/) | 1.10.22 | Simple message bus system for applications to talk to one another / GPL2 |
| [decorator](https://github.com/micheles/decorator) | 4.1.2 | Better living through Python with decorators. / BSD 3-Clause |
| [distributed](http://distributed.readthedocs.io/en/latest/) | 1.18.3 | Distributed computing with Dask / BSD 3-Clause |
| [docutils](http://docutils.sourceforge.net/) | 0.14 | Docutils – Python Documentation Utilities / Public Domain Dedictation and BSD 2-Clause and PSF 2.1.1 and GPL 3.0 |
| [entrypoints](https://github.com/takluyver/entrypoints) | 0.2.3 | Discover and load entry points from installed packages. / MIT License |
| [et\_xmlfile](https://bitbucket.org/openpyxl/et_xmlfile) | 1.0.1 | An implementation of lxml.xmlfile for the standard library / MIT |
| [expat](http://expat.sourceforge.net/) | 2.2.4 | Expat XML parser library in C. / MIT |
| [fastcache](https://github.com/pbrady/fastcache) | 1.0.2 | C implementation of Python 3 lru\_cache / MIT |
| [filelock](https://github.com/benediktschmitt/py-filelock) | 2.0.12 | A platform independent file lock. / Public Domain |
| [flask](http://flask.pocoo.org) | 0.12.2 | A microframework based on Werkzeug, Jinja2 and good intentions. / BSD 3-Clause |
| [flask-cors](https://github.com/corydolphin/flask-cors) | 3.0.3 | A Flask extension adding a decorator for CORS support / MIT |
| [freetype](https://www.freetype.org/) | 2.8 | A Free, High-Quality, and Portable Font Engine / GPL-2.0 and FreeType |
| [get\_terminal\_size](https://github.com/chrippa/backports.shutil_get_terminal_size) | 1.0.0 | Get the size of the terminal window. / MIT |
| [gettext](https://www.gnu.org/software/gettext/) | 0.19.8.1 | Internationalization package. / GPLv2 |
| [gevent](http://www.gevent.org/) | 1.2.2 | Coroutine-based network library / MIT |
| [glib](https://developer.gnome.org/glib/) | 2.53.6 | Provides core application building blocks for libraries and applications written in C. / LGPL-2.1 |
| [glob2](https://github.com/miracle2k/python-glob2) | 0.5 | Version of the glob module that supports recursion via \*\*, and can capture patterns. / BSD-2-Clause |
| [gmp](http://gmplib.org/) | 6.1.2 | The GNU multiprecision library. / GPL 2 and LGPL 3 |
| [gmpy2](https://pypi.python.org/pypi/gmpy2) | 2.0.8 | GMP/MPIR, MPFR, and MPC interface to Python 2.6+ and 3.x / LGPL 3 |
| [greenlet](https://github.com/python-greenlet/greenlet) | 0.4.12 | Lightweight in-process concurrent programming / MIT |
| [h5py](http://www.h5py.org/) | 2.7.0 | Read and write HDF5 files from Python. / BSD 3-Clause |
| [hdf5](http://www.hdfgroup.org/HDF5/) | 1.10.1 | HDF5 is a data model, library, and file format for storing and managing data / HDF5 |
| [heapdict](http://stutzbachenterprises.com/) | 1.0.0 | A heap with decrease-key and increase-key operations / BSD 3-Clause |
| [html5lib](https://github.com/html5lib/html5lib-python) | 0.999999999 | HTML parser based on the WHATWG HTML specification / MIT |
| [icu](http://site.icu-project.org/) | 58.2 | International Components for Unicode. / MIT |
| [idna](https://github.com/kjd/idna) | 2.6 | Internationalized Domain Names in Applications (IDNA). / BSD Like |
| [imageio](http://imageio.github.io) | 2.2.0 | a Python library for reading and writing image data / BSD 2-Clause |
| [imagesize](https://github.com/shibukawa/imagesize_py) | 0.7.1 | Getting image size from png/jpeg/jpeg2000/gif file / MIT |
| [intel-openmp](https://software.intel.com/en-us/node/522690) | 2018.0.0 | Math library for Intel and compatible processors / proprietary - Intel |
| [ipykernel](http://ipython.org) | 4.6.1 | IPython Kernel for Jupyter / BSD 3-clause |
| [ipython](http://ipython.org/) | 6.1.0 | IPython: Productive Interactive Computing / BSD 3-clause |
| [ipython\_genutils](http://ipython.org) | 0.2.0 | vestigial utilities from IPython / BSD 3-Clause |
| [ipywidgets](https://github.com/ipython/ipywidgets) | 7.0.0 | Jupyter Interactive Widgets / BSD 3-clause |
| [isort](https://github.com/timothycrosley/isort) | 4.2.15 | A Python utility / library to sort Python imports. / MIT |
| [itsdangerous](https://github.com/pallets/itsdangerous) | 0.24 | Various helpers to pass trusted data to untrusted environments. / BSD 3-Clause |
| [jbig](https://www.cl.cam.ac.uk/~mgk25/jbigkit) | 2.1 | Implementation of the JBIG1 data compression standard / GPL-2.0 |
| [jdcal](https://github.com/phn/jdcal) | 1.3 | Julian dates from proleptic Gregorian and Julian calendars. / BSD 2-Clause |
| [jedi](https://github.com/davidhalter/jedi/) | 0.10.2 | An autocompletion tool for Python that can be used for text editors. / MIT |
| [jinja2](http://jinja.pocoo.org) | 2.9.6 | An easy to use stand-alone template engine written in pure python. / 3-Clause BSD |
| [jpeg](http://www.ijg.org/) | 9b | read/write jpeg COM, EXIF, IPTC medata / Custom free software license |
| [jsonschema](https://github.com/Julian/jsonschema) | 2.6.0 | An implementation of JSON Schema validation for Python / MIT |
| [jupyter](http://jupyter.org) | 1.0.0 | Jupyter metapackage. Install all the Jupyter components in one go. / BSD 3-Clause |
| [jupyter\_client](http://jupyter.org) | 5.1.0 | Jupyter protocol implementation and client libraries / BSD 3-clause |
| [jupyter\_console](http://jupyter.org) | 5.2.0 | Jupyter terminal console / BSD 3-Clause |
| [jupyter\_core](http://jupyter.org) | 4.3.0 | Core common functionality of Jupyter projects. / BSD 3-clause |
| [jupyterlab](https://github.com/jupyterlab/jupyterlab) | 0.27.0 | A pre-alpha version of a computational environment for Jupyter. / BSD 3-Clause |
| [jupyterlab\_launcher](http://github.com/jupyterlab/jupyterlab_launcher) | 0.4.0 | A Launcher for JupyterLab based applications. / BSD 3-Clause |
| [lazy-object-proxy](https://github.com/ionelmc/python-lazy-object-proxy) | 1.3.1 | A fast and thorough lazy object proxy. / BSD 2-Clause |
| [libcxx](http://libcxx.llvm.org/) | 4.0.1 | C++ Standard Library / MIT license or UIUC License |
| [libcxxabi](http://libcxxabi.llvm.org/) | 4.0.1 | C++ Standard Library Support / MIT license or UIUC License |
| [libedit](http://thrysoee.dk/editline/) | 3.1 | Editline Library (libedit) / 3-Clause BSD |
| [libffi](https://sourceware.org/libffi/) | 3.2.1 | A Portable Foreign Function Interface Library. / Custom |
| [libgfortran](http://gcc.gnu.org/) | 3.0.1 | Fortran libraries from the GNU Compiler Collection / GPL 3 (with GCC Runtime Library Exception 3.1) |
| [libiconv](https://www.gnu.org/software/libiconv/) | 1.15 | Provides iconv for systems which don’t have one (or that cannot convert from/to Unicode.) / GPL and LGPL |
| [libpng](http://www.libpng.org/pub/png/libpng.html) | 1.6.32 | PNG reference library. / zlib/libpng |
| [libsodium](https://github.com/jedisct1/libsodium) | 1.0.13 | A modern and easy-to-use crypto library. / ISC |
| [libssh2](https://www.libssh2.org/) | 1.8.0 | the SSH library / BSD 3-Clause |
| [libtiff](http://www.libtiff.org/) | 4.0.8 | Support for the Tag Image File Format (TIFF). / HPND |
| [libxml2](http://xmlsoft.org/) | 2.9.4 | The XML C parser and toolkit of Gnome / MIT |
| [libxslt](http://xmlsoft.org/XSLT/) | 1.1.29 | The XSLT C library developed for the GNOME project / MIT |
| [llvmlite](http://llvmlite.pydata.org/) | 0.20.0 | Lightweight wrapper around basic LLVM functionality / BSD |
| [locket](https://github.com/mwilliamson/locket.py) | 0.2.0 | File-based locks for Python for Linux and Windows / BSD 2-Clause |
| [lxml](http://lxml.de/) | 3.8.0 | Pythonic binding for the C libraries libxml2 and libxslt. / BSD 3-Clause, GPL-2.0, ZPL-2.0, and ElementTree |
| [markupsafe](https://www.palletsprojects.com/p/markupsafe/) | 1.0 | A Python module that implements the jinja2.Markup string / BSD 3-Clause |
| [matplotlib](http://matplotlib.org/) | 2.0.2 | Publication quality figures in Python / PSF-based |
| [mccabe](https://github.com/PyCQA/mccabe) | 0.6.1 | McCabe complexity checker for Python / MIT |
| [mistune](https://github.com/lepture/mistune) | 0.7.4 | The fastest markdown parser in pure Python. / BSD 3-Clause |
| [mkl](http://software.intel.com/en-us/articles/intel-mkl/) | 2018.0.0 | Math library for Intel and compatible processors / proprietary - Intel |
| [mkl-service](https://github.com/ContinuumIO/mkl-service) | 1.1.2 | Python bindings to MKL service functions / 3-clause BSD |
| [mpc](http://www.multiprecision.org/) | 1.0.3 | A C library for the arithmetic of complex numbers with arbitrarily high precision. / LGPL 3 |
| [mpfr](http://www.mpfr.org/) | 3.1.5 | The MPFR library is a C library for multiple-precision floating-point computations with correct rounding. / LGPL 3 |
| [mpmath](http://mpmath.org) | 0.19 | Python library for arbitrary-precision floating-point arithmetic / BSD 3-Clause |
| [msgpack-python](http://msgpack.org/) | 0.4.8 | MessagePack (de)serializer. / Apache 2.0 |
| [multipledispatch](https://github.com/mrocklin/multipledispatch/) | 0.4.9 | Multiple dispatch in Python / BSD 3-Clause |
| [navigator-updater](https://github.com/ContinuumIO/navigator-updater) | 0.1.0 | Anaconda Navigator Updater / proprietary - Continuum Analytics, Inc. |
| [nbconvert](http://jupyter.org) | 5.3.1 | Converting Jupyter Notebooks / BSD 3-Clause |
| [nbformat](http://jupyter.org) | 4.4.0 | The reference implementation of the Jupyter Notebook format / BSD 3-clause |
| [ncurses](http://www.gnu.org/software/ncurses/) | 6.0 | Library for text-based user interfaces / Free software (MIT-like) |
| [networkx](https://networkx.github.io/) | 1.11 | Python package for creating and manipulating complex networks / BSD 3-Clause |
| [nltk](http://nltk.org/) | 3.2.4 | Build Python programs to work with human language data / Apache 2.0 |
| [nose](http://readthedocs.org/docs/nose/) | 1.3.7 | Nose extends unittest to make testing easier / LGPL-2.1 |
| [notebook](http://jupyter.org) | 5.0.0 | A web-based notebook environment for interactive computing / BSD 3-clause |
| [numba](http://numba.pydata.org/) | 0.35.0 | NumPy aware dynamic Python compiler using LLVM / BSD |
| [numexpr](https://github.com/pydata/numexpr) | 2.6.2 | Fast numerical expression evaluator for NumPy. / MIT |
| [numpy](http://numpy.scipy.org/) | 1.13.1 | Array processing for numbers, strings, records, and objects. / BSD 3-Clause |
| [numpydoc](https://github.com/numpy/numpydoc) | 0.7.0 | Sphinx extension to support docstrings in Numpy format / BSD 3-Clause |
| [odo](http://odo.pydata.org) | 0.5.1 | Data migration in Python / BSD-3-Clause |
| [olefile](http://www.decalage.info/python/olefileio) | 0.44 | parse, read and write Microsoft OLE2 files / BSD License 2-Clause |
| [openpyxl](https://openpyxl.readthedocs.io) | 2.4.8 | A Python library to read/write Excel 2010 xlsx/xlsm files / MIT |
| [openssl](http://www.openssl.org/) | 1.0.2l | OpenSSL is an open-source implementation of the SSL and TLS protocols / OpenSSL |
| [packaging](https://github.com/pypa/packaging) | 16.8 | Core utilities for Python packages / Apache 2.0 or BSD 2-Clause |
| [pandas](http://pandas.pydata.org) | 0.20.3 | High-performance, easy-to-use data structures and data analysis tools. / BSD 3-clause |
| [pandoc](http://johnmacfarlane.net/pandoc/) | 1.19.2.1 | Universal markup converter (repackaged binaries). / GPL-2.0 |
| [pandocfilters](https://github.com/jgm/pandocfilters) | 1.4.2 | A python module for writing pandoc filters / BSD-3-Clause |
| [partd](https://github.com/dask/partd) | 0.3.8 | Data structure for on-disk shuffle operations / BSD 3-Clause |
| [path.py](https://github.com/jaraco/path.py) | 10.3.1 | A module wrapper for os.path / MIT |
| [pathlib2](https://github.com/mcmtroffaes/pathlib2) | 2.3.0 | Fork of pathlib aiming to support the full stdlib Python API. / MIT |
| [patsy](https://github.com/pydata/patsy) | 0.4.1 | Describing statistical models in Python using symbolic formulas / BSD-2-Clause, PSF2 |
| [pcre](http://www.pcre.org/) | 8.41 | Regular expression pattern matching using the same syntax and semantics as Perl 5. / BSD 3-Clause |
| [pep8](http://pep8.readthedocs.org/) | 1.7.0 | Python style guide checker / MIT |
| [pexpect](http://pexpect.sourceforge.net/) | 4.2.1 | Pexpect makes Python a better tool for controlling other applications. / ISC |
| [pickleshare](https://github.com/vivainio/pickleshare) | 0.7.4 | Tiny ‘shelve’-like database with concurrency support / MIT |
| [pillow](http://python-imaging.github.io/) | 4.2.1 | Pillow is the friendly PIL fork by Alex Clark and Contributors. / PIL |
| [pip](https://pip.pypa.io/en/stable/) | 9.0.1 | PyPA recommended tool for installing Python packages / MIT |
| [pkginfo](https://code.launchpad.net/~tseaver/pkginfo/trunk) | 1.4.1 | Query metadatdata from sdists / bdists / installed packages. / MIT |
| [ply](http://www.dabeaz.com/ply/index.html) | 3.10 | Python Lex-Yacc / BSD 3-clause |
| [prompt\_toolkit](https://github.com/jonathanslenders/python-prompt-toolkit) | 1.0.15 | Library for building powerful interactive command lines in Python / BSD 3-clause |
| [psutil](https://github.com/giampaolo/psutil) | 5.2.2 | A cross-platform process and system utilities module for Python / BSD 3-Clause |
| [ptyprocess](https://github.com/pexpect/ptyprocess) | 0.5.2 | Run a subprocess in a pseudo terminal / ISC |
| [py](https://github.com/pytest-dev/py) | 1.4.34 | library with cross-python path, ini-parsing, io, code, log facilities / MIT |
| [pycodestyle](https://pycodestyle.readthedocs.io/) | 2.3.1 | Python style guide checker / MIT |
| [pycosat](https://github.com/ContinuumIO/pycosat) | 0.6.2 | Bindings to picosat (a SAT solver) / MIT |
| [pycparser](https://github.com/eliben/pycparser) | 2.18 | Complete C99 parser in pure Python / BSD 3-clause |
| [pycrypto](http://www.pycrypto.org/) | 2.6.1 | Cryptographic modules for Python. / Public Domain |
| [pycurl](http://pycurl.sourceforge.net/) | 7.43.0 | A Python Interface To The cURL library / LGPL, MIT |
| [pyflakes](https://github.com/PyCQA/pyflakes) | 1.5.0 | Pyflakes analyzes programs and detects various errors. / MIT |
| [pygments](http://pygments.org/) | 2.2.0 | Generic syntax highlighting package / BSD 2-clause |
| [pylint](http://www.pylint.org/) | 1.7.2 | python code static checker / GPL |
| [pyodbc](https://github.com/mkleehammer/pyodbc) | 4.0.17 | DB API Module for ODBC / MIT |
| [pyopenssl](https://github.com/pyca/pyopenssl) | 17.2.0 | Python wrapper module around the OpenSSL library / Apache 2.0 |
| [pyparsing](http://pyparsing.wikispaces.com/) | 2.2.0 | Create and execute simple grammars / MIT |
| [pyqt](http://www.riverbankcomputing.co.uk/software/pyqt) | 5.6.0 | Python binding of the cross-platform GUI toolkit Qt. / Commercial, GPL-2.0, GPL-3.0 |
| [pysocks](https://github.com/Anorov/PySocks) | 1.6.7 | A Python SOCKS client module. See [Anorov/PySocks](https://github.com/Anorov/PySocks) for more information. / BSD 3-Clause |
| [pytables](http://www.pytables.org) | 3.4.2 | Brings together Python, HDF5 and NumPy to easily handle large amounts of data. / BSD 3-Clause |
| [pytest](https://docs.pytest.org/en/latest/) | 3.2.1 | Simple and powerful testing with Python. / MIT |
| [python](http://www.python.org/) | 3.6.2 | General purpose programming language / PSF |
| [python-dateutil](https://dateutil.readthedocs.org/) | 2.6.1 | Extensions to the standard Python datetime module. / BSD 3-clause |
| python.app | 2 | Proxy on OS X letting Python libraries hook into the gui event loop / BSD |
| [pytz](http://pythonhosted.org/pytz/) | 2017.2 | World timezone definitions, modern and historical. / MIT |
| [pywavelets](https://github.com/PyWavelets/pywt) | 0.5.2 | Discrete Wavelet Transforms in Python. / MIT |
| [pyyaml](http://pyyaml.org/wiki/PyYAML) | 3.12 | YAML parser and emitter for Python / MIT |
| [pyzmq](https://github.com/zeromq/pyzmq) | 16.0.2 | Python bindings for zeromq / BSD 3-clause |
| [qt](http://qt-project.org) | 5.6.2 | Qt is a cross-platform application and UI framework. / LGPL-3.0 |
| [qtawesome](https://github.com/spyder-ide/qtawesome) | 0.4.4 | Iconic fonts in PyQt and PySide applications / MIT |
| [qtconsole](http://jupyter.org) | 4.3.1 | Jupyter Qt console / BSD 3-Clause |
| [qtpy](https://github.com/spyder-ide/qtpy) | 1.3.1 | Abstraction layer for PyQt5/PyQt4/PySide / MIT |
| [readline](https://cnswww.cns.cwru.edu/php/chet/readline/rltop.html) | 7.0 | library for editing command lines as they are typed in / GPL3 |
| [requests](http://python-requests.org) | 2.18.4 | Python HTTP for Humans. / Apache 2.0 |
| [rope](https://github.com/python-rope/rope) | 0.10.5 | A python refactoring library… / GPL 2.0 |
| [ruamel\_yaml](https://bitbucket.org/ruamel/yaml) | 0.11.14 | A patched copy of ruamel.yaml. / MIT |
| [scikit-image](http://scikit-image.org/) | 0.13.0 | Image processing routines for SciPy. / BSD 3-Clause |
| [scikit-learn](http://scikit-learn.org/) | 0.19.0 | A set of python modules for machine learning and data mining / BSD 3-Clause |
| [scipy](http://www.scipy.org/) | 0.19.1 | Scientific Library for Python / BSD 3-Clause |
| [seaborn](http://stanford.edu/~mwaskom/software/seaborn/) | 0.8.0 | Statistical data visualization / BSD 3-Clause |
| [setuptools](https://github.com/pypa/setuptools) | 36.5.0 | Download, build, install, upgrade, and uninstall Python packages / MIT |
| [simplegeneric](http://cheeseshop.python.org/pypi/simplegeneric) | 0.8.1 | Simple generic functions (similar to Python’s own len(), pickle.dump(), etc.) / Zope Public |
| [singledispatch](http://docs.python.org/3/library/functools.html#functools.singledispatch) | 3.4.0.3 | Transforms a function into a single-dispatch generic function / MIT |
| [sip](http://www.riverbankcomputing.com/software/sip/intro) | 4.18.1 | Create Python bindings for C and C++ libraries / GPL-3.0 |
| [six](http://pypi.python.org/pypi/six/) | 1.10.0 | Python 2 and 3 compatibility utilities / MIT |
| [snowballstemmer](https://github.com/shibukawa/snowball_py) | 1.2.1 | Snowball stemming library collection for Python / BSD-2-Clause |
| [sortedcollections](http://www.grantjenks.com/docs/sortedcollections/) | 0.5.3 | Python Sorted Collections / Apache-2.0 |
| [sortedcontainers](http://www.grantjenks.com/docs/sortedcontainers/) | 1.5.7 | Python Sorted Container Types: SortedList, SortedDict, and SortedSet / Apache 2.0 |
| [sphinx](http://www.sphinx-doc.org) | 1.6.3 | Sphinx is a tool that makes it easy to create intelligent and beautiful documentation / BSD 2-clause |
| sphinxcontrib | 1.0 | Python namespace for sphinxcontrib / BSD |
| [sphinxcontrib-websupport](https://pypi.python.org/pypi/sphinxcontrib-websupport) | 1.0.1 | Sphinx API for Web Apps / BSD-2-Clause |
| [spyder](https://github.com/spyder-ide/spyder) | 3.2.3 | Scientific PYthon Development EnviRonment / MIT |
| [sqlalchemy](http://www.sqlalchemy.org/) | 1.1.13 | Database Abstraction Library. / MIT |
| [sqlite](http://www.sqlite.org/) | 3.20.1 | Implements a self-contained, zero-configuration, SQL database engine. / Public-Domain (`<http://www.sqlite.org/copyright.html>`) |
| [statsmodels](https://www.statsmodels.org) | 0.8.0 | Statistical computations and models for use with SciPy / BSD 3-Clause |
| [sympy](http://sympy.org) | 1.1.1 | Python library for symbolic mathematics / 3-clause BSD |
| [tblib](https://github.com/ionelmc/python-tblib) | 1.3.2 | Traceback serialization library. / BSD 2-Clause |
| [terminado](http://github.com/mitsuhiko/markupsafe) | 0.6 | Terminals served by tornado websockets / BSD 3-clause |
| [testpath](https://testpath.readthedocs.io) | 0.3.1 | Testpath is a collection of utilities for Python code working with files and commands. / MIT |
| [tk](http://www.tcl.tk/) | 8.6.7 | A dynamic programming language with GUI support. Bundles Tcl and Tk. / Tcl/Tk |
| [toolz](http://toolz.readthedocs.org/) | 0.8.2 | A functional standard library for Python. / BSD 3-Clause |
| [tornado](http://www.tornadoweb.org/) | 4.5.2 | A Python web framework and asynchronous networking library, originally developed at FriendFeed. / Apache 2.0 |
| [traitlets](http://ipython.org/) | 4.3.2 | Configuration system for Python applications / BSD 3-clause |
| [typing](https://docs.python.org/3.5/library/typing.html) | 3.6.2 | Type Hints for Python - backport for `Python<3.5` / PSF |
| [unicodecsv](https://github.com/jdunck/python-unicodecsv) | 0.14.1 | Drop-in replacement for csv module which supports unicode strings / BSD |
| [unixodbc](http://www.unixodbc.org/) | 2.3.4 | ODBC on non MS Windows platforms / LGPL-2.1 |
| [urllib3](https://urllib3.readthedocs.io/) | 1.22 | HTTP library with thread-safe connection pooling, file post, and more. / MIT |
| [wcwidth](https://github.com/jquast/wcwidth) | 0.1.7 | Measures number of Terminal column cells of wide-character codes. / MIT |
| [webencodings](https://github.com/gsnedders/python-webencodings) | 0.5.1 | Character encoding aliases for legacy web content / BSD 3-Clause |
| [werkzeug](http://werkzeug.pocoo.org/) | 0.12.2 | The Python WSGI Utility Library. / BSD 3-Clause |
| [wheel](https://bitbucket.org/pypa/wheel/) | 0.29.0 | A built-package format for Python. / MIT |
| [widgetsnbextension](http://ipython.org) | 3.0.2 | IPython HTML widgets for Jupyter / BSD 3-clause |
| [wrapt](https://github.com/GrahamDumpleton/wrapt) | 1.10.11 | Module for decorators, wrappers and monkey patching. / BSD 2-Clause |
| [xlrd](http://www.python-excel.org/) | 1.1.0 | Library for developers to extract data from Microsoft Excel (tm) spreadsheet files / BSD 3-Clause and BSD with advertising |
| [xlsxwriter](https://xlsxwriter.readthedocs.io/) | 0.9.8 | A Python module for creating Excel XLSX files / BSD 2-Clause |
| [xlwings](http://xlwings.org/) | 0.11.4 | Interact with Excel from Python and vice versa / 3-clause BSD |
| [xlwt](http://www.python-excel.org/) | 1.2.0 | Writing data and formatting information to Excel files / BSD |
| [xz](http://tukaani.org/xz/) | 5.2.3 | Data compression software with high compression ratio / LGPL-2.1 and GPL-2.0 |
| [yaml](http://pyyaml.org/wiki/LibYAML) | 0.1.7 | A C library for parsing and emitting YAML. / MIT |
| [zeromq](http://zeromq.org) | 4.2.2 | A high-performance asynchronous messaging library. / LGPL 3 |
| [zict](http://github.com/mrocklin/zict) | 0.1.2 | Composable Dictionary Classes / BSD 3-Clause |
| [zlib](http://zlib.net/) | 1.2.11 | Massively spiffy yet delicately unobtrusive compression library / zlib |
| Name | Version | Summary / License |
|---|---|---|
| [alabaster](https://github.com/bitprophet/alabaster) | 0.7.10 | Configurable, Python 2+3 compatible Sphinx theme / BSD |
| [anaconda-client](http://anaconda.org) | 1.6.3 | anaconda.org command line client library / BSD 3-clause |
| [anaconda-project](https://github.com/Anaconda-Platform/anaconda-project/) | 0.6.0 | reproducible, executable project directories / BSD 3-clause |
| [asn1crypto](https://github.com/wbond/asn1crypto) | 0.22.0 | ASN.1 parser and serializer / MIT |
| [astroid](https://www.astroid.org/) | 1.5.3 | abstract syntax tree for Python with inference support / LGPL version 2.1 |
| [astropy](http://www.astropy.org/) | 2.0.1 | Community-developed Python Library for Astronomy / BSD |
| [babel](http://babel.pocoo.org/) | 2.5.0 | Utilities to internationalize and localize Python applications / BSD |
| [backports](https://bitbucket.org/brandon/backports) | 1.0 | / BSD |
| [beautifulsoup4](http://www.crummy.com/software/BeautifulSoup/) | 4.6.0 | Python library designed for screen-scraping / MIT |
| [bitarray](https://github.com/ilanschnell/bitarray) | 0.8.1 | efficient representation of arrays of booleans – C extension / PSF |
| [bkcharts](https://github.com/bokeh/bkcharts) | 0.2 | optional High Level charts API built on top of Bokeh / New BSD |
| [bleach](http://github.com/mozilla/bleach) | 1.5.0 | easy whitelist-based HTML-sanitizing tool / Apache License Version 2.0 |
| [bokeh](http://bokeh.pydata.org/) | 0.12.7 | Python interactive visualization library for modern web browsers / BSD |
| [boto](https://github.com/boto/boto/) | 2.48.0 | Amazon Web Services Library / MIT |
| [bottleneck](http://berkeleyanalytics.com/bottleneck) | 1.2.1 | Fast NumPy array functions written in Cython. / Simplified BSD |
| [cairo](http://cairographics.org/) | 1.14.8 | A 2D graphics library with support for multiple output devices / LGPL 2.1, MPL 1.1 |
| [certifi](https://certifi.io) | 2016.2.28 | Python package for providing Mozilla’s CA Bundle. / ISC |
| [cffi](http://cffi.readthedocs.org) | 1.10.0 | C Foreign Function Interface for Python / MIT |
| [chardet](https://github.com/chardet/chardet) | 3.0.4 | Universal character encoding detector / GNU Lesser General Public License |
| [click](http://click.pocoo.org/) | 6.7 | Command line interface creation kit / BSD |
| [cloudpickle](https://github.com/cloudpipe/cloudpickle) | 0.4.0 | extended pickling support for Python objects / BSD |
| [clyent](https://github.com/Anaconda-Server/clyent) | 1.2.2 | Command line client library for windows and posix / BSD |
| [colorama](https://github.com/tartley/colorama) | 0.3.9 | Cross-platform colored terminal text in Python / BSD |
| [conda](http://conda.pydata.org/) | 4.3.27 | Package management system and Environment management system / BSD |
| [conda-build](https://github.com/conda/conda-build) | 3.0.22 | Commands and tools for building conda packages / BSD 3-clause |
| [contextlib2](http://contextlib2.readthedocs.org/) | 0.5.5 | backports and enhancements for the contextlib module / PSF |
| [cryptography](https://cryptography.io) | 1.8.1 | Provides cryptographic recipes and primitives to Python developers / Apache and BSD |
| [curl](http://curl.haxx.se/) | 7.52.1 | Tool and library for transferring data with URL syntax / MIT/X derivate |
| [cycler](http://matplotlib.org/cycler/) | 0.10.0 | Composable style cycles / BSD |
| [cython](http://www.cython.org/) | 0.26 | The Cython compiler for writing C extensions for the Python language / Apache version 2.0 |
| [cytoolz](https://github.com/pytoolz/cytoolz) | 0.8.2 | Cython implementation of Toolz, high performance functional utilities / BSD |
| [dask](http://dask.pydata.org/en/latest/) | 0.15.2 | Task scheduling and blocked algorithms for parallel processing / BSD |
| [datashape](http://datashape.pydata.org) | 0.5.4 | Language defining a data description protocol / BSD |
| [decorator](http://pypi.python.org/pypi/decorator) | 4.1.2 | Better living through Python with decorators / BSD |
| [distributed](http://distributed.readthedocs.io/en/latest/) | 1.18.1 | Distributed computing / BSD 3-Clause |
| [docutils](http://docutils.sourceforge.net) | 0.14 | Utilities for general- and special-purpose documentation / Public-Domain, PSF, 2-clause BSD, GPLv3 |
| [entrypoints](https://github.com/takluyver/entrypoints) | 0.2.3 | / MIT |
| [et\_xmlfile](https://bitbucket.org/openpyxl/et_xmlfile) | 1.0.1 | Low memory library for creating large XML files / MIT |
| [expat](http://expat.sourceforge.net) | 2.1.0 | XML parser library written in C / MIT |
| [fastcache](https://github.com/pbrady/fastcache) | 1.0.2 | C implementation of Python 3 functools.lru\_cache / MIT |
| [filelock](https://github.com/benediktschmitt/py-filelock) | 2.0.7 | A platform independent file lock. / Public Domain |
| [flask](http://flask.pocoo.org/) | 0.12.2 | Microframework for Python based on Werkzeug, Jinja2. / BSD |
| [flask-cors](https://github.com/corydolphin/flask-cors) | 3.0.3 | Flask extension adding a decorator for CORS support / MIT |
| [fontconfig](http://www.freedesktop.org/wiki/Software/fontconfig/) | 2.12.1 | A library for configuring and customizing font access / BSD |
| [freetype](http://freetype.sourceforge.net/index2.html) | 2.5.5 | A Free, High-Quality, and Portable Font Engine / FreeType License |
| [get\_terminal\_size](https://github.com/chrippa/backports.shutil_get_terminal_size) | 1.0.0 | Get the size of the terminal window. / MIT |
| [gevent](http://www.gevent.org/) | 1.2.2 | Coroutine-based Python network library / MIT |
| [glob2](http://github.com/miracle2k/python-glob2/) | 0.5 | Enhanced glob that can capture patterns and supports recursive wildcards / BSD License |
| [greenlet](https://github.com/python-greenlet/greenlet) | 0.4.12 | Lightweight in-process concurrent programming / MIT |
| [h5py](http://www.h5py.org/) | 2.7.0 | Pythonic interface to the HDF5 binary data format / 3-clause BSD |
| [hdf5](http://www.hdfgroup.org/HDF5/) | 1.8.17 | A data model, library, and file format for storing and managing data / BSD-like |
| [heapdict](http://stutzbachenterprises.com/) | 1.0.0 | A heap with decrease-key and increase-key operations / BSD |
| [html5lib](https://github.com/html5lib/html5lib-python) | 0.9999999 | HTML parser based on the WHATWG HTML specification / MIT |
| [idna](https://github.com/kjd/idna) | 2.6 | Internationalized Domain Names in Applications / BSD |
| [imagesize](https://github.com/shibukawa/imagesize_py) | 0.7.1 | getting image size from png/jpeg/jpeg2000/gif file / MIT |
| [ipykernel](http://ipython.org) | 4.6.1 | Provides a rich toolkit to help you make the most of using Python interactively / BSD |
| [ipython](http://ipython.org/) | 6.1.0 | Productive Interactive Computing / BSD |
| [ipython\_genutils](http://jupyter.org) | 0.2.0 | vestigial utilities from IPython / BSD |
| [ipywidgets](https://github.com/ipython/ipywidgets) | 6.0.0 | Widgets for the Jupyter Notebook / BSD 3-clause |
| [isort](https://github.com/timothycrosley/isort) | 4.2.15 | Python utility / library to sort Python imports / MIT |
| [itsdangerous](https://pythonhosted.org/itsdangerous/) | 0.24 | Various helpers to pass trusted data to untrusted environments / BSD |
| [jbig](https://www.cl.cam.ac.uk/~mgk25/jbigkit) | 2.1 | Implementation of the JBIG1 data compression standard / GPL2 |
| [jdcal](http://github.com/phn/jdcal) | 1.3 | Julian dates from proleptic Gregorian and Julian calendars. / BSD |
| [jedi](http://jedi.jedidjah.ch/) | 0.10.2 | Autocompletion and static analysis library for Python / MIT |
| [jinja2](http://jinja.pocoo.org) | 2.9.6 | An easy to use stand-alone template engine written in pure python. / BSD |
| [jpeg](http://www.ijg.org/) | 9b | Read and write jpeg files / Custom free software license |
| [jsonschema](https://python-jsonschema.readthedocs.org) | 2.6.0 | An implementation of JSON Schema validation for Python / MIT |
| [jupyter](http://jupyter.org) | 1.0.0 | web-based notebook environment for interactive computing. / BSD |
| [jupyter\_client](http://jupyter.org) | 5.1.0 | Jupyter protocol implementation and client libraries / BSD |
| [jupyter\_console](http://jupyter.org) | 5.2.0 | Jupyter terminal console / BSD |
| [jupyter\_core](http://jupyter.org) | 4.3.0 | core Jupyter functionality / BSD |
| [lazy-object-proxy](https://github.com/ionelmc/python-lazy-object-proxy) | 1.3.1 | Fast and thorough lazy object proxy / BSD |
| [libffi](https://sourceware.org/libffi/) | 3.2.1 | portable foreign-function interface library / MIT |
| [libgfortran](https://gcc.gnu.org/fortran/) | 3.0.0 | the GNU Fortran compiler, part of GCC / GPL3 |
| [libiconv](https://www.gnu.org/software/libiconv/) | 1.14 | Provides iconv for systems which don’t have one / GPL and LGPL |
| [libpng](http://www.libpng.org/pub/png/libpng.html) | 1.6.30 | official PNG reference library / libpng license |
| [libsodium](http://libsodium.org) | 1.0.10 | A library for encryption, signatures, password hashing, etc. / ISC |
| [libtiff](http://www.libtiff.org/) | 4.0.6 | Support for Tag Image File Format (TIFF) / BSD-like |
| [libxml2](http://xmlsoft.org/) | 2.9.4 | The XML C parser and toolkit of Gnome / MIT |
| [libxslt](http://xmlsoft.org/XSLT/) | 1.1.29 | The XSLT C library developed for the GNOME project / MIT |
| [locket](http://github.com/mwilliamson/locket.py) | 0.2.0 | File based locks for Python for Linux and Windows / BSD |
| [lxml](http://lxml.de/) | 3.7.3 | XML and HTML with Python / BSD |
| [markupsafe](http://www.pocoo.org/projects/markupsafe/#markupsafe) | 1.0 | Implements a XML/HTML/XHTML Markup safe string for Python / BSD |
| [matplotlib](http://matplotlib.org/) | 2.0.2 | Python 2D plotting library / PSF-based |
| [mistune](https://github.com/lepture/mistune) | 0.7.4 | The fastest markdown parser in pure Python with renderer feature / BSD |
| [mpmath](http://mpmath.org) | 0.19 | Python library for arbitrary-precision floating-point arithmetic / BSD |
| [msgpack-python](http://msgpack.org/) | 0.4.8 | An efficient binary serialization format / Apache |
| [multipledispatch](http://github.com/mrocklin/multipledispatch/) | 0.4.9 | Multiple dispatch in Python / BSD |
| [nbconvert](http://jupyter.org) | 5.2.1 | converts notebooks to various other formats via Jinja templates / BSD |
| [nbformat](http://jupyter.org) | 4.4.0 | reference implementation of the Jupyter Notebook format / BSD |
| [networkx](http://networkx.lanl.gov/) | 1.11 | Python package for creating and manipulating complex networks / BSD |
| [nltk](http://nltk.org/) | 3.2.4 | Build Python programs to work with human language data / Apache Software License |
| [nose](http://readthedocs.org/docs/nose/) | 1.3.7 | Nose extends unittest to make testing easier / LGPL |
| [notebook](http://jupyter.org) | 5.0.0 | web-based notebook environment for interactive computing / BSD |
| [numexpr](https://github.com/pydata/numexpr) | 2.6.2 | Fast numerical expression evaluator for NumPy / MIT |
| [numpy](http://numpy.scipy.org/) | 1.13.1 | Array processing for numbers, strings, records, and objects / BSD |
| [numpydoc](https://github.com/numpy/numpydoc) | 0.7.0 | Sphinx extension to support docstrings in Numpy format / BSD |
| [odo](http://odo.pydata.org/en/latest/) | 0.5.1 | Shapeshifting for your data / BSD |
| [olefile](https://www.decalage.info/python/olefileio) | 0.44 | parse, read and write Microsoft OLE2 files / BSD License |
| [openblas](http://www.openblas.net/) | 0.2.19 | An Optimized BLAS library / BSD |
| [openpyxl](http://openpyxl.readthedocs.org) | 2.4.8 | A Python library to read/write Excel 2010 xlsx/xlsm files / MIT |
| [openssl](http://www.openssl.org/) | 1.0.2l | OpenSSL is an open-source implementation of the SSL and TLS protocols / Apache-style |
| [packaging](https://github.com/pypa/packaging) | 16.8 | core utilities for Python packages / BSD or Apache 2.0 |
| [pandas](http://pandas.pydata.org/) | 0.20.3 | Powerful Python data analysis toolkit / BSD |
| [pandocfilters](http://github.com/jgm/pandocfilters) | 1.4.2 | utilities for writing pandoc filters in python / BSD License |
| [partd](https://github.com/dask/partd) | 0.3.8 | Appendable key-value byte store / BSD |
| [patchelf](http://nixos.org/patchelf.html) | 0.9 | Modify the dynamic linker and RPATH of ELF executables / GPL3 |
| [path.py](http://github.com/jaraco/path.py) | 10.3.1 | An object representing a path to a file or directory / MIT |
| [pathlib2](https://pypi.python.org/pypi/pathlib2/) | 2.3.0 | object-oriented filesystem paths / MIT |
| [patsy](https://github.com/pydata/patsy) | 0.4.1 | Describing statistical models in Python using symbolic formulas / BSD |
| [pcre](http://www.pcre.org/) | 8.39 | A set of functions that implement regular expression pattern matching / 3-clause BSD License |
| [pep8](http://pep8.readthedocs.org/) | 1.7.0 | Python style guide checker / MIT |
| [pexpect](http://pexpect.readthedocs.org/) | 4.2.1 | Pexpect allows easy control of interactive console applications / ISC |
| [pickleshare](https://github.com/vivainio/pickleshare) | 0.7.4 | file system based database that uses Python pickles / MIT |
| [pillow](http://python-pillow.github.io/) | 4.2.1 | The friendly Python Imaging Library(PIL) fork / PIL license |
| [pip](https://pip.pypa.io/en/stable/) | 9.0.1 | PyPA recommended tool for installing Python packages / MIT |
| [pixman](http://www.pixman.org/) | 0.34.0 | A low-level software library for pixel manipulation / MIT |
| [pkginfo](https://pypi.python.org/pypi/pkginfo/) | 1.4.1 | query metadatdata from sdists or bdists installed packages / PSF |
| [ply](http://www.dabeaz.com/ply/) | 3.10 | implementation of Lex and Yacc / BSD |
| [prompt\_toolkit](https://github.com/jonathanslenders/python-prompt-toolkit) | 1.0.15 | library for building powerful interactive command lines in Python / BSD |
| [psutil](https://github.com/giampaolo/psutil) | 5.2.2 | cross-platform process and system utilities module for Python / BSD |
| [ptyprocess](https://github.com/pexpect/ptyprocess) | 0.5.2 | Run a subprocess in a pseudo terminal / ISC |
| [py](http://pylib.readthedocs.org/) | 1.4.34 | Library with cross-python path, ini-parsing, io, code, log facilities / MIT |
| [pycodestyle](https://pycodestyle.readthedocs.io/) | 2.3.1 | Python style guide checker / MIT License |
| [pycosat](https://github.com/ContinuumIO/pycosat) | 0.6.2 | Python bindings to the picosat SAT solver / MIT |
| [pycparser](https://github.com/eliben/pycparser) | 2.18 | C parser in Python / BSD |
| [pycrypto](http://www.pycrypto.org/) | 2.6.1 | Cryptographic modules for Python / Public-Domain |
| [pycurl](http://pycurl.sourceforge.net/) | 7.43.0 | A Python Interface To The cURL library / LGPL, MIT |
| [pyflakes](https://launchpad.net/pyflakes) | 1.6.0 | passive checker of Python programs / MIT |
| [pygments](http://pygments.org/) | 2.2.0 | Generic syntax highlighting package / BSD |
| [pylint](http://www.pylint.org/) | 1.7.2 | Python code static checker / GPL |
| [pyodbc](http://mkleehammer.github.io/pyodbc/) | 4.0.16 | DB API Module for ODBC / MIT |
| [pyopenssl](https://github.com/pyca/pyopenssl) | 17.0.0 | Python wrapper module around the OpenSSL library / Apache Software License |
| [pyparsing](http://pyparsing.wikispaces.com/) | 2.2.0 | Create and execute simple grammars / MIT |
| [pytables](http://www.pytables.org) | 3.4.2 | Manage hierarchical datasets to cope with large amounts of data / BSD |
| [pytest](http://pytest.org/) | 3.2.1 | Simple and powerful testing with Python / MIT |
| [python](http://www.python.org/) | 3.6.2 | General purpose programming language / PSF |
| [python-dateutil](https://dateutil.readthedocs.org/) | 2.6.1 | extensions to the standard Python datetime module / Simplified BSD |
| [pytz](http://pytz.sourceforge.net/) | 2017.2 | World timezone definitions, modern and historical / MIT |
| [pywavelets](https://github.com/PyWavelets/pywt) | 0.5.2 | wavelet transform module / MIT |
| [pyyaml](http://pyyaml.org/wiki/PyYAML) | 3.12 | YAML parser and emitter for Python / MIT |
| [pyzmq](https://github.com/zeromq/pyzmq) | 16.0.2 | zeromq bindings for Python / LGPL and BSD |
| [requests](http://docs.python-requests.org/en/latest/index.html) | 2.14.2 | Python HTTP for Humans / Apache Software License |
| [ruamel\_yaml](https://bitbucket.org/ruamel/yaml) | 0.11.14 | patched copy of ruamel.yaml (a yaml parser) / MIT |
| [scikit-image](http://scikit-image.org/) | 0.13.0 | Image processing routines for SciPy / 3-clause BSD |
| [scikit-learn](http://scikit-learn.org/stable/) | 0.19.0 | set of python modules for machine learning and data mining / 3-clause BSD |
| [scipy](http://www.scipy.org/) | 0.19.1 | Scientific Library for Python / BSD |
| [seaborn](http://stanford.edu/~mwaskom/software/seaborn/) | 0.8 | Statistical data visualization / BSD |
| [setuptools](https://pypi.python.org/pypi/setuptools) | 36.4.0 | Download, build, install, upgrade, and uninstall Python packages / MIT |
| [simplegeneric](https://pypi.python.org/pypi/simplegeneric) | 0.8.1 | Define simple single-dispatch generic functions / ZPL 2.1 |
| [singledispatch](http://docs.python.org/3/library/functools.html#functools.singledispatch) | 3.4.0.3 | Transforms a function into a single-dispatch generic function / MIT |
| [six](http://pypi.python.org/pypi/six/) | 1.10.0 | Python 2 and 3 compatibility utilities / MIT |
| [snowballstemmer](https://github.com/shibukawa/snowball_py) | 1.2.1 | Snowball stemming library collection for Python / BSD |
| [sortedcollections](http://www.grantjenks.com/docs/sortedcollections/) | 0.5.3 | Python Sorted Collections / Apache Software License |
| [sortedcontainers](http://www.grantjenks.com/docs/sortedcontainers/) | 1.5.7 | sorted Container Types: SortedList, SortedDict, and SortedSet / Apache 2.0 |
| [sphinx](http://sphinx-doc.org) | 1.6.3 | Documentation generator / BSD |
| sphinxcontrib | 1.0 | Python namespace for sphinxcontrib / BSD |
| [sphinxcontrib-websupport](https://pypi.python.org/pypi/sphinxcontrib-websupport) | 1.0.1 | Sphinx API for Web Apps / BSD-2-Clause |
| [sqlalchemy](http://www.sqlalchemy.org/) | 1.1.13 | Python SQL toolkit and Object Relational Mapper / MIT |
| [sqlite](http://www.sqlite.org/) | 3.13.0 | SQL database engine / Public-Domain |
| [statsmodels](http://statsmodels.sourceforge.net/) | 0.8.0 | Statistical computations and models / 3-clause BSD |
| [sympy](http://sympy.org) | 1.1.1 | Python library for symbolic mathematics / 3-clause BSD |
| [tblib](https://github.com/ionelmc/python-tblib) | 1.3.2 | Traceback serialization library / BSD |
| [terminado](https://github.com/takluyver/terminado) | 0.6 | Terminals served to term.js using Tornado websockets / BSD |
| [testpath](https://testpath.readthedocs.io) | 0.3.1 | collection of utilities for Python code working with files and commands / MIT |
| [tk](http://www.tcl.tk/) | 8.5.18 | Dynamic programming language with GUI elements / BSD-like |
| [toolz](http://toolz.readthedocs.org/en/latest/) | 0.8.2 | List processing tools and functional utilities / BSD |
| [tornado](http://www.tornadoweb.org/) | 4.5.2 | Tornado Web Server / Apache 2.0 |
| [traitlets](https://github.com/ipython/traitlets) | 4.3.2 | Configuration system for Python applications / Modified BSD |
| [unicodecsv](https://github.com/jdunck/python-unicodecsv) | 0.14.1 | Drop-in replacement for csv module which supports unicode strings / BSD |
| [unixodbc](http://www.unixodbc.org/) | 2.3.4 | ODBC (Open Database Connectivity) implementation for Unix / LGPLv2 |
| [wcwidth](https://github.com/jquast/wcwidth) | 0.1.7 | measures number of Terminal column cells of wide-character codes / MIT |
| [werkzeug](http://werkzeug.pocoo.org/) | 0.12.2 | A WSGI utility library for Python / BSD |
| [wheel](http://bitbucket.org/pypa/wheel/) | 0.29.0 | Built-package format for Python / MIT |
| [widgetsnbextension](http://ipython.org) | 3.0.2 | IPython HTML widgets for Jupyter / BSD 3-clause |
| [wrapt](https://github.com/GrahamDumpleton/wrapt) | 1.10.11 | Module for decorators, wrappers and monkey patching / BSD |
| [xlrd](http://www.lexicon.net/sjmachin/xlrd.htm) | 1.1.0 | extract data from Microsoft Excel spreadsheet files / BSD |
| [xlsxwriter](https://github.com/jmcnamara/XlsxWriter) | 0.9.8 | A Python module for creating Excel XLSX files / BSD |
| [xlwt](http://www.python-excel.org/) | 1.3.0 | writing data and formatting information to Excel files / BSD |
| [xz](http://tukaani.org/xz/) | 5.2.3 | Data compression software with high compression ratio / Public-Domain, GPL |
| [yaml](http://www.yaml.org/) | 0.1.6 | YAML Ain’t Markup Language / MIT |
| [zeromq](http://zeromq.org) | 4.1.5 | Distributed messaging / LGPL |
| [zict](http://github.com/mrocklin/zict/) | 0.1.2 | Composable Mutable Mapping tools / BSD |
| [zlib](http://zlib.net/) | 1.2.11 | Unobtrusive compression library / zlib |
| Name | Version | Summary / License |
|---|---|---|
| [alabaster](http://www.sphinx-doc.org/en/stable/index.html) | 0.7.10 | Configurable, Python 2+3 compatible Sphinx theme. / BSD 3-Clause |
| [anaconda-client](http://anaconda.org) | 1.6.5 | anaconda.org command line client library / BSD 3-clause |
| [anaconda-navigator](https://github.com/ContinuumIO/navigator) | 1.6.8 | Anaconda Navigator / proprietary - Continuum Analytics, Inc. |
| [anaconda-project](https://github.com/Anaconda-Platform/anaconda-project) | 0.8.0 | Reproducible, executable project directories. / BSD 3-Clause |
| [asn1crypto](https://github.com/wbond/asn1crypto) | 0.22.0 | Python ASN.1 library with a focus on performance and a pythonic API / MIT |
| [astroid](https://www.astroid.org/) | 1.5.3 | A abstract syntax tree for Python with inference support. / LGPL 2.1 |
| [astropy](http://www.astropy.org/) | 2.0.2 | Community-developed Python Library for Astronomy / BSD |
| [babel](http://babel.pocoo.org/) | 2.5.0 | Utilities to internationalize and localize Python applications / BSD 3-clause |
| [backports](https://bitbucket.org/brandon/backports) | 1.0 | / BSD |
| [backports.shutil\_get\_terminal\_size](https://github.com/chrippa/backports.shutil_get_terminal_size) | 1.0.0 | A backport of the get\_terminal\_size function from Python 3.3’s shutil. / MIT |
| [beautifulsoup4](http://www.crummy.com/software/BeautifulSoup/) | 4.6.0 | Python library designed for screen-scraping / MIT |
| [bitarray](https://github.com/ilanschnell/bitarray) | 0.8.1 | efficient arrays of booleans – C extension / PSF |
| [bkcharts](http://github.com/bokeh/bkcharts) | 0.2 | High level chart types built on top of Bokeh / BSD 3-Clause |
| [blaze](http://blaze.pydata.org) | 0.11.3 | NumPy and Pandas interface to big data / BSD 3-Clause |
| [bleach](https://github.com/mozilla/bleach) | 2.0.0 | Easy, whitelist-based HTML-sanitizing tool / Apache-2.0 |
| [bokeh](http://bokeh.pydata.org/) | 0.12.7 | Statistical and novel interactive HTML plots for Python / BSD 3-Clause |
| [boto](https://github.com/boto/boto/) | 2.48.0 | Amazon Web Services Library / MIT |
| [bottleneck](http://berkeleyanalytics.com/bottleneck) | 1.2.1 | Fast NumPy array functions written in Cython. / BSD 2-Clause |
| [ca-certificates](https://github.com/conda-forge/ca-certificates-feedstock) | 2017.08.26 | Certificates for use with other packages. / ISC |
| [cairo](http://cairographics.org/) | 1.14.10 | Cairo is a 2D graphics library with support for multiple output devices. / LGPL 2.1 or MPL 1.1 |
| [certifi](http://certifi.io/) | 2017.7.27.1 | Python package for providing Mozilla’s CA Bundle. / ISC |
| [cffi](https://bitbucket.org/cffi/cffi) | 1.10.0 | Foreign Function Interface for Python calling C code. / MIT |
| [chardet](https://github.com/chardet/chardet) | 3.0.4 | Universal character encoding detector / LGPL2 |
| [click](http://click.pocoo.org/) | 6.7 | A simple wrapper around optparse for powerful command line utilities. / BSD 3-Clause |
| [cloudpickle](https://github.com/cloudpipe/cloudpickle) | 0.4.0 | Extended pickling support for Python objects / BSD 3-Clause |
| [clyent](https://github.com/Anaconda-Platform/clyent) | 1.2.2 | Command line client library for windows and posix / BSD 3-Clause |
| [colorama](https://github.com/tartley/colorama) | 0.3.9 | Cross-platform colored terminal text. / BSD 3-Clause |
| [conda](http://conda.pydata.org/) | 4.3.27 | OS-agnostic, system-level binary package and environment manager. / BSD 3-Clause |
| [conda-build](https://github.com/conda/conda-build) | 3.0.22 | tools for building conda packages / BSD 3-Clause |
| [contextlib2](http://contextlib2.readthedocs.org) | 0.5.5 | Backports and enhancements for the contextlib module / PSF |
| [cryptography](https://github.com/pyca/cryptography) | 2.0.3 | Provides cryptographic recipes and primitives to Python developers / Apache 2.0 or BSD 3-Clause, PSF 2 |
| [curl](http://curl.haxx.se/) | 7.55.1 | tool and library for transferring data with URL syntax / MIT/X derivate (`<http://curl.haxx.se/docs/copyright.html>`) |
| [cycler](http://matplotlib.org/cycler) | 0.10.0 | Composable style cycles. / BSD 3-Clause |
| [cython](http://www.cython.org/) | 0.26.1 | The Cython compiler for writing C extensions for the Python language / Apache-2.0 |
| [cytoolz](https://github.com/pytoolz/cytoolz) | 0.8.2 | Cython implementation of Toolz. High performance functional utilities. / BSD 3-Clause |
| [dask](http://dask.pydata.org/en/latest/) | 0.15.2 | Parallel Python with task scheduling / BSD 3-Clause |
| [dask-core](http://github.com/dask/dask/) | 0.15.2 | Parallel Python with task scheduling / BSD 3-Clause |
| [datashape](http://datashape.pydata.org) | 0.5.4 | A data description language. / BSD 2-Clause |
| [dbus](http://www.freedesktop.org/wiki/Software/dbus/) | 1.10.22 | Simple message bus system for applications to talk to one another / GPL2 |
| [decorator](https://github.com/micheles/decorator) | 4.1.2 | Better living through Python with decorators. / BSD 3-Clause |
| [distributed](http://distributed.readthedocs.io/en/latest/) | 1.18.3 | Distributed computing with Dask / BSD 3-Clause |
| [docutils](http://docutils.sourceforge.net/) | 0.14 | Docutils – Python Documentation Utilities / Public Domain Dedictation and BSD 2-Clause and PSF 2.1.1 and GPL 3.0 |
| [entrypoints](https://github.com/takluyver/entrypoints) | 0.2.3 | Discover and load entry points from installed packages. / MIT License |
| [et\_xmlfile](https://bitbucket.org/openpyxl/et_xmlfile) | 1.0.1 | An implementation of lxml.xmlfile for the standard library / MIT |
| [expat](http://expat.sourceforge.net/) | 2.2.4 | Expat XML parser library in C. / MIT |
| [fastcache](https://github.com/pbrady/fastcache) | 1.0.2 | C implementation of Python 3 lru\_cache / MIT |
| [filelock](https://github.com/benediktschmitt/py-filelock) | 2.0.12 | A platform independent file lock. / Public Domain |
| [flask](http://flask.pocoo.org) | 0.12.2 | A microframework based on Werkzeug, Jinja2 and good intentions. / BSD 3-Clause |
| [flask-cors](https://github.com/corydolphin/flask-cors) | 3.0.3 | A Flask extension adding a decorator for CORS support / MIT |
| [fontconfig](http://www.freedesktop.org/wiki/Software/fontconfig/) | 2.12.4 | A library for configuring and customizing font access. / MIT |
| [freetype](https://www.freetype.org/) | 2.8 | A Free, High-Quality, and Portable Font Engine / GPL-2.0 and FreeType |
| [get\_terminal\_size](https://github.com/chrippa/backports.shutil_get_terminal_size) | 1.0.0 | Get the size of the terminal window. / MIT |
| [gevent](http://www.gevent.org/) | 1.2.2 | Coroutine-based network library / MIT |
| [glib](https://developer.gnome.org/glib/) | 2.53.6 | Provides core application building blocks for libraries and applications written in C. / LGPL-2.1 |
| [glob2](https://github.com/miracle2k/python-glob2) | 0.5 | Version of the glob module that supports recursion via \*\*, and can capture patterns. / BSD-2-Clause |
| [gmp](http://gmplib.org/) | 6.1.2 | The GNU multiprecision library. / GPL 2 and LGPL 3 |
| [gmpy2](https://pypi.python.org/pypi/gmpy2) | 2.0.8 | GMP/MPIR, MPFR, and MPC interface to Python 2.6+ and 3.x / LGPL 3 |
| [graphite2](http://graphite.sil.org/) | 1.3.10 | A “smart font” system that handles the complexities of lesser-known languages of the world. / LGPLv2 |
| [greenlet](https://github.com/python-greenlet/greenlet) | 0.4.12 | Lightweight in-process concurrent programming / MIT |
| [gst-plugins-base](http://gstreamer.freedesktop.org/) | 1.12.2 | GStreamer Base Plug-ins / GPL2 |
| [gstreamer](http://gstreamer.freedesktop.org/) | 1.12.2 | Library for constructing graphs of media-handling components / LGPL 2 |
| [h5py](http://www.h5py.org/) | 2.7.0 | Read and write HDF5 files from Python. / BSD 3-Clause |
| [harfbuzz](http://www.freedesktop.org/wiki/Software/HarfBuzz/) | 1.5.0 | An OpenType text shaping engine. / MIT |
| [hdf5](http://www.hdfgroup.org/HDF5/) | 1.10.1 | HDF5 is a data model, library, and file format for storing and managing data / HDF5 |
| [heapdict](http://stutzbachenterprises.com/) | 1.0.0 | A heap with decrease-key and increase-key operations / BSD 3-Clause |
| [html5lib](https://github.com/html5lib/html5lib-python) | 0.999999999 | HTML parser based on the WHATWG HTML specification / MIT |
| [icu](http://site.icu-project.org/) | 58.2 | International Components for Unicode. / MIT |
| [idna](https://github.com/kjd/idna) | 2.6 | Internationalized Domain Names in Applications (IDNA). / BSD Like |
| [imageio](http://imageio.github.io) | 2.2.0 | a Python library for reading and writing image data / BSD 2-Clause |
| [imagesize](https://github.com/shibukawa/imagesize_py) | 0.7.1 | Getting image size from png/jpeg/jpeg2000/gif file / MIT |
| [intel-openmp](https://software.intel.com/en-us/node/522690) | 2018.0.0 | Math library for Intel and compatible processors / proprietary - Intel |
| [ipykernel](http://ipython.org) | 4.6.1 | IPython Kernel for Jupyter / BSD 3-clause |
| [ipython](http://ipython.org/) | 6.1.0 | IPython: Productive Interactive Computing / BSD 3-clause |
| [ipython\_genutils](http://ipython.org) | 0.2.0 | vestigial utilities from IPython / BSD 3-Clause |
| [ipywidgets](https://github.com/ipython/ipywidgets) | 7.0.0 | Jupyter Interactive Widgets / BSD 3-clause |
| [isort](https://github.com/timothycrosley/isort) | 4.2.15 | A Python utility / library to sort Python imports. / MIT |
| [itsdangerous](https://github.com/pallets/itsdangerous) | 0.24 | Various helpers to pass trusted data to untrusted environments. / BSD 3-Clause |
| [jbig](https://www.cl.cam.ac.uk/~mgk25/jbigkit) | 2.1 | Implementation of the JBIG1 data compression standard / GPL-2.0 |
| [jdcal](https://github.com/phn/jdcal) | 1.3 | Julian dates from proleptic Gregorian and Julian calendars. / BSD 2-Clause |
| [jedi](https://github.com/davidhalter/jedi/) | 0.10.2 | An autocompletion tool for Python that can be used for text editors. / MIT |
| [jinja2](http://jinja.pocoo.org) | 2.9.6 | An easy to use stand-alone template engine written in pure python. / 3-Clause BSD |
| [jpeg](http://www.ijg.org/) | 9b | read/write jpeg COM, EXIF, IPTC medata / Custom free software license |
| [jsonschema](https://github.com/Julian/jsonschema) | 2.6.0 | An implementation of JSON Schema validation for Python / MIT |
| [jupyter](http://jupyter.org) | 1.0.0 | Jupyter metapackage. Install all the Jupyter components in one go. / BSD 3-Clause |
| [jupyter\_client](http://jupyter.org) | 5.1.0 | Jupyter protocol implementation and client libraries / BSD 3-clause |
| [jupyter\_console](http://jupyter.org) | 5.2.0 | Jupyter terminal console / BSD 3-Clause |
| [jupyter\_core](http://jupyter.org) | 4.3.0 | Core common functionality of Jupyter projects. / BSD 3-clause |
| [jupyterlab](https://github.com/jupyterlab/jupyterlab) | 0.27.0 | A pre-alpha version of a computational environment for Jupyter. / BSD 3-Clause |
| [jupyterlab\_launcher](http://github.com/jupyterlab/jupyterlab_launcher) | 0.4.0 | A Launcher for JupyterLab based applications. / BSD 3-Clause |
| [lazy-object-proxy](https://github.com/ionelmc/python-lazy-object-proxy) | 1.3.1 | A fast and thorough lazy object proxy. / BSD 2-Clause |
| [libedit](http://thrysoee.dk/editline/) | 3.1 | Editline Library (libedit) / 3-Clause BSD |
| [libffi](https://sourceware.org/libffi/) | 3.2.1 | A Portable Foreign Function Interface Library. / Custom |
| [libgcc-ng](https://gcc.gnu.org/onlinedocs/gccint/Libgcc.html) | 7.2.0 | The GCC low-level runtime library / GPL |
| [libgfortran-ng](https://gcc.gnu.org/) | 7.2.0 | The GNU Fortran Runtime Library / GPL |
| [libpng](http://www.libpng.org/pub/png/libpng.html) | 1.6.32 | PNG reference library. / zlib/libpng |
| [libsodium](https://github.com/jedisct1/libsodium) | 1.0.13 | A modern and easy-to-use crypto library. / ISC |
| [libssh2](https://www.libssh2.org/) | 1.8.0 | the SSH library / BSD 3-Clause |
| [libstdcxx-ng](https://gcc.gnu.org/) | 7.2.0 | he GNU C++ Runtime Library / GPL3 with runtime exception |
| [libtiff](http://www.libtiff.org/) | 4.0.8 | Support for the Tag Image File Format (TIFF). / HPND |
| [libtool](http://www.gnu.org/software/libtool/) | 2.4.6 | The GNU Portable Library Tool / GPL 3 |
| [libxcb](http://xcb.freedesktop.org/) | 1.12 | This is the C-language Binding (XCB) package to the X Window System protocol / MIT |
| [libxml2](http://xmlsoft.org/) | 2.9.4 | The XML C parser and toolkit of Gnome / MIT |
| [libxslt](http://xmlsoft.org/XSLT/) | 1.1.29 | The XSLT C library developed for the GNOME project / MIT |
| [llvmlite](http://llvmlite.pydata.org/) | 0.20.0 | Lightweight wrapper around basic LLVM functionality / BSD |
| [locket](https://github.com/mwilliamson/locket.py) | 0.2.0 | File-based locks for Python for Linux and Windows / BSD 2-Clause |
| [lxml](http://lxml.de/) | 3.8.0 | Pythonic binding for the C libraries libxml2 and libxslt. / BSD 3-Clause, GPL-2.0, ZPL-2.0, and ElementTree |
| [lzo](http://www.oberhumer.com/opensource/lzo/) | 2.10 | LZO is a portable lossless data compression library written in ANSI C. / GPL v2+ |
| [markupsafe](https://www.palletsprojects.com/p/markupsafe/) | 1.0 | A Python module that implements the jinja2.Markup string / BSD 3-Clause |
| [matplotlib](http://matplotlib.org/) | 2.0.2 | Publication quality figures in Python / PSF-based |
| [mccabe](https://github.com/PyCQA/mccabe) | 0.6.1 | McCabe complexity checker for Python / MIT |
| [mistune](https://github.com/lepture/mistune) | 0.7.4 | The fastest markdown parser in pure Python. / BSD 3-Clause |
| [mkl](http://software.intel.com/en-us/articles/intel-mkl/) | 2018.0.0 | Math library for Intel and compatible processors / proprietary - Intel |
| [mkl-service](https://github.com/ContinuumIO/mkl-service) | 1.1.2 | Python bindings to MKL service functions / 3-clause BSD |
| [mpc](http://www.multiprecision.org/) | 1.0.3 | A C library for the arithmetic of complex numbers with arbitrarily high precision. / LGPL 3 |
| [mpfr](http://www.mpfr.org/) | 3.1.5 | The MPFR library is a C library for multiple-precision floating-point computations with correct rounding. / LGPL 3 |
| [mpmath](http://mpmath.org) | 0.19 | Python library for arbitrary-precision floating-point arithmetic / BSD 3-Clause |
| [msgpack-python](http://msgpack.org/) | 0.4.8 | MessagePack (de)serializer. / Apache 2.0 |
| [multipledispatch](https://github.com/mrocklin/multipledispatch/) | 0.4.9 | Multiple dispatch in Python / BSD 3-Clause |
| [navigator-updater](https://github.com/ContinuumIO/navigator-updater) | 0.1.0 | Anaconda Navigator Updater / proprietary - Continuum Analytics, Inc. |
| [nbconvert](http://jupyter.org) | 5.3.1 | Converting Jupyter Notebooks / BSD 3-Clause |
| [nbformat](http://jupyter.org) | 4.4.0 | The reference implementation of the Jupyter Notebook format / BSD 3-clause |
| [ncurses](http://www.gnu.org/software/ncurses/) | 6.0 | Library for text-based user interfaces / Free software (MIT-like) |
| [networkx](https://networkx.github.io/) | 1.11 | Python package for creating and manipulating complex networks / BSD 3-Clause |
| [nltk](http://nltk.org/) | 3.2.4 | Build Python programs to work with human language data / Apache 2.0 |
| [nose](http://readthedocs.org/docs/nose/) | 1.3.7 | Nose extends unittest to make testing easier / LGPL-2.1 |
| [notebook](http://jupyter.org) | 5.0.0 | A web-based notebook environment for interactive computing / BSD 3-clause |
| [numba](http://numba.pydata.org/) | 0.35.0 | NumPy aware dynamic Python compiler using LLVM / BSD |
| [numexpr](https://github.com/pydata/numexpr) | 2.6.2 | Fast numerical expression evaluator for NumPy. / MIT |
| [numpy](http://numpy.scipy.org/) | 1.13.1 | Array processing for numbers, strings, records, and objects. / BSD 3-Clause |
| [numpydoc](https://github.com/numpy/numpydoc) | 0.7.0 | Sphinx extension to support docstrings in Numpy format / BSD 3-Clause |
| [odo](http://odo.pydata.org) | 0.5.1 | Data migration in Python / BSD-3-Clause |
| [olefile](http://www.decalage.info/python/olefileio) | 0.44 | parse, read and write Microsoft OLE2 files / BSD License 2-Clause |
| [openpyxl](https://openpyxl.readthedocs.io) | 2.4.8 | A Python library to read/write Excel 2010 xlsx/xlsm files / MIT |
| [openssl](http://www.openssl.org/) | 1.0.2l | OpenSSL is an open-source implementation of the SSL and TLS protocols / OpenSSL |
| [packaging](https://github.com/pypa/packaging) | 16.8 | Core utilities for Python packages / Apache 2.0 or BSD 2-Clause |
| [pandas](http://pandas.pydata.org) | 0.20.3 | High-performance, easy-to-use data structures and data analysis tools. / BSD 3-clause |
| [pandoc](http://johnmacfarlane.net/pandoc/) | 1.19.2.1 | Universal markup converter (repackaged binaries). / GPL-2.0 |
| [pandocfilters](https://github.com/jgm/pandocfilters) | 1.4.2 | A python module for writing pandoc filters / BSD-3-Clause |
| [pango](http://www.pango.org/) | 1.40.11 | Text layout and rendering engine. / LGPL-2.1 |
| [partd](https://github.com/dask/partd) | 0.3.8 | Data structure for on-disk shuffle operations / BSD 3-Clause |
| [patchelf](http://nixos.org/patchelf.html) | 0.9 | A small utility to modify the dynamic linker and RPATH of ELF executables. / GPL 3 |
| [path.py](https://github.com/jaraco/path.py) | 10.3.1 | A module wrapper for os.path / MIT |
| [pathlib2](https://github.com/mcmtroffaes/pathlib2) | 2.3.0 | Fork of pathlib aiming to support the full stdlib Python API. / MIT |
| [patsy](https://github.com/pydata/patsy) | 0.4.1 | Describing statistical models in Python using symbolic formulas / BSD-2-Clause, PSF2 |
| [pcre](http://www.pcre.org/) | 8.41 | Regular expression pattern matching using the same syntax and semantics as Perl 5. / BSD 3-Clause |
| [pep8](http://pep8.readthedocs.org/) | 1.7.0 | Python style guide checker / MIT |
| [pexpect](http://pexpect.sourceforge.net/) | 4.2.1 | Pexpect makes Python a better tool for controlling other applications. / ISC |
| [pickleshare](https://github.com/vivainio/pickleshare) | 0.7.4 | Tiny ‘shelve’-like database with concurrency support / MIT |
| [pillow](http://python-imaging.github.io/) | 4.2.1 | Pillow is the friendly PIL fork by Alex Clark and Contributors. / PIL |
| [pip](https://pip.pypa.io/en/stable/) | 9.0.1 | PyPA recommended tool for installing Python packages / MIT |
| [pixman](http://www.pixman.org/) | 0.34.0 | A low-level software library for pixel manipulation. / MIT |
| [pkginfo](https://code.launchpad.net/~tseaver/pkginfo/trunk) | 1.4.1 | Query metadatdata from sdists / bdists / installed packages. / MIT |
| [ply](http://www.dabeaz.com/ply/index.html) | 3.10 | Python Lex-Yacc / BSD 3-clause |
| [prompt\_toolkit](https://github.com/jonathanslenders/python-prompt-toolkit) | 1.0.15 | Library for building powerful interactive command lines in Python / BSD 3-clause |
| [psutil](https://github.com/giampaolo/psutil) | 5.2.2 | A cross-platform process and system utilities module for Python / BSD 3-Clause |
| [ptyprocess](https://github.com/pexpect/ptyprocess) | 0.5.2 | Run a subprocess in a pseudo terminal / ISC |
| [py](https://github.com/pytest-dev/py) | 1.4.34 | library with cross-python path, ini-parsing, io, code, log facilities / MIT |
| [pycodestyle](https://pycodestyle.readthedocs.io/) | 2.3.1 | Python style guide checker / MIT |
| [pycosat](https://github.com/ContinuumIO/pycosat) | 0.6.2 | Bindings to picosat (a SAT solver) / MIT |
| [pycparser](https://github.com/eliben/pycparser) | 2.18 | Complete C99 parser in pure Python / BSD 3-clause |
| [pycrypto](http://www.pycrypto.org/) | 2.6.1 | Cryptographic modules for Python. / Public Domain |
| [pycurl](http://pycurl.sourceforge.net/) | 7.43.0 | A Python Interface To The cURL library / LGPL, MIT |
| [pyflakes](https://github.com/PyCQA/pyflakes) | 1.5.0 | Pyflakes analyzes programs and detects various errors. / MIT |
| [pygments](http://pygments.org/) | 2.2.0 | Generic syntax highlighting package / BSD 2-clause |
| [pylint](http://www.pylint.org/) | 1.7.2 | python code static checker / GPL |
| [pyodbc](https://github.com/mkleehammer/pyodbc) | 4.0.17 | DB API Module for ODBC / MIT |
| [pyopenssl](https://github.com/pyca/pyopenssl) | 17.2.0 | Python wrapper module around the OpenSSL library / Apache 2.0 |
| [pyparsing](http://pyparsing.wikispaces.com/) | 2.2.0 | Create and execute simple grammars / MIT |
| [pyqt](http://www.riverbankcomputing.co.uk/software/pyqt) | 5.6.0 | Python binding of the cross-platform GUI toolkit Qt. / Commercial, GPL-2.0, GPL-3.0 |
| [pysocks](https://github.com/Anorov/PySocks) | 1.6.7 | A Python SOCKS client module. See [Anorov/PySocks](https://github.com/Anorov/PySocks) for more information. / BSD 3-Clause |
| [pytables](http://www.pytables.org) | 3.4.2 | Brings together Python, HDF5 and NumPy to easily handle large amounts of data. / BSD 3-Clause |
| [pytest](https://docs.pytest.org/en/latest/) | 3.2.1 | Simple and powerful testing with Python. / MIT |
| [python](http://www.python.org/) | 3.6.2 | General purpose programming language / PSF |
| [python-dateutil](https://dateutil.readthedocs.org/) | 2.6.1 | Extensions to the standard Python datetime module. / BSD 3-clause |
| [pytz](http://pythonhosted.org/pytz/) | 2017.2 | World timezone definitions, modern and historical. / MIT |
| [pywavelets](https://github.com/PyWavelets/pywt) | 0.5.2 | Discrete Wavelet Transforms in Python. / MIT |
| [pyyaml](http://pyyaml.org/wiki/PyYAML) | 3.12 | YAML parser and emitter for Python / MIT |
| [pyzmq](https://github.com/zeromq/pyzmq) | 16.0.2 | Python bindings for zeromq / BSD 3-clause |
| [qt](http://qt-project.org) | 5.6.2 | Qt is a cross-platform application and UI framework. / LGPL-3.0 |
| [qtawesome](https://github.com/spyder-ide/qtawesome) | 0.4.4 | Iconic fonts in PyQt and PySide applications / MIT |
| [qtconsole](http://jupyter.org) | 4.3.1 | Jupyter Qt console / BSD 3-Clause |
| [qtpy](https://github.com/spyder-ide/qtpy) | 1.3.1 | Abstraction layer for PyQt5/PyQt4/PySide / MIT |
| [readline](https://cnswww.cns.cwru.edu/php/chet/readline/rltop.html) | 7.0 | library for editing command lines as they are typed in / GPL3 |
| [requests](http://python-requests.org) | 2.18.4 | Python HTTP for Humans. / Apache 2.0 |
| [rope](https://github.com/python-rope/rope) | 0.10.5 | A python refactoring library… / GPL 2.0 |
| [ruamel\_yaml](https://bitbucket.org/ruamel/yaml) | 0.11.14 | A patched copy of ruamel.yaml. / MIT |
| [scikit-image](http://scikit-image.org/) | 0.13.0 | Image processing routines for SciPy. / BSD 3-Clause |
| [scikit-learn](http://scikit-learn.org/) | 0.19.0 | A set of python modules for machine learning and data mining / BSD 3-Clause |
| [scipy](http://www.scipy.org/) | 0.19.1 | Scientific Library for Python / BSD 3-Clause |
| [seaborn](http://stanford.edu/~mwaskom/software/seaborn/) | 0.8.0 | Statistical data visualization / BSD 3-Clause |
| [setuptools](https://github.com/pypa/setuptools) | 36.5.0 | Download, build, install, upgrade, and uninstall Python packages / MIT |
| [simplegeneric](http://cheeseshop.python.org/pypi/simplegeneric) | 0.8.1 | Simple generic functions (similar to Python’s own len(), pickle.dump(), etc.) / Zope Public |
| [singledispatch](http://docs.python.org/3/library/functools.html#functools.singledispatch) | 3.4.0.3 | Transforms a function into a single-dispatch generic function / MIT |
| [sip](http://www.riverbankcomputing.com/software/sip/intro) | 4.18.1 | Create Python bindings for C and C++ libraries / GPL-3.0 |
| [six](http://pypi.python.org/pypi/six/) | 1.10.0 | Python 2 and 3 compatibility utilities / MIT |
| [snowballstemmer](https://github.com/shibukawa/snowball_py) | 1.2.1 | Snowball stemming library collection for Python / BSD-2-Clause |
| [sortedcollections](http://www.grantjenks.com/docs/sortedcollections/) | 0.5.3 | Python Sorted Collections / Apache-2.0 |
| [sortedcontainers](http://www.grantjenks.com/docs/sortedcontainers/) | 1.5.7 | Python Sorted Container Types: SortedList, SortedDict, and SortedSet / Apache 2.0 |
| [sphinx](http://www.sphinx-doc.org) | 1.6.3 | Sphinx is a tool that makes it easy to create intelligent and beautiful documentation / BSD 2-clause |
| sphinxcontrib | 1.0 | Python namespace for sphinxcontrib / BSD |
| [sphinxcontrib-websupport](https://pypi.python.org/pypi/sphinxcontrib-websupport) | 1.0.1 | Sphinx API for Web Apps / BSD-2-Clause |
| [spyder](https://github.com/spyder-ide/spyder) | 3.2.3 | Scientific PYthon Development EnviRonment / MIT |
| [sqlalchemy](http://www.sqlalchemy.org/) | 1.1.13 | Database Abstraction Library. / MIT |
| [sqlite](http://www.sqlite.org/) | 3.20.1 | Implements a self-contained, zero-configuration, SQL database engine. / Public-Domain (`<http://www.sqlite.org/copyright.html>`) |
| [statsmodels](https://www.statsmodels.org) | 0.8.0 | Statistical computations and models for use with SciPy / BSD 3-Clause |
| [sympy](http://sympy.org) | 1.1.1 | Python library for symbolic mathematics / 3-clause BSD |
| [tblib](https://github.com/ionelmc/python-tblib) | 1.3.2 | Traceback serialization library. / BSD 2-Clause |
| [terminado](http://github.com/mitsuhiko/markupsafe) | 0.6 | Terminals served by tornado websockets / BSD 3-clause |
| [testpath](https://testpath.readthedocs.io) | 0.3.1 | Testpath is a collection of utilities for Python code working with files and commands. / MIT |
| [tk](http://www.tcl.tk/) | 8.6.7 | A dynamic programming language with GUI support. Bundles Tcl and Tk. / Tcl/Tk |
| [toolz](http://toolz.readthedocs.org/) | 0.8.2 | A functional standard library for Python. / BSD 3-Clause |
| [tornado](http://www.tornadoweb.org/) | 4.5.2 | A Python web framework and asynchronous networking library, originally developed at FriendFeed. / Apache 2.0 |
| [traitlets](http://ipython.org/) | 4.3.2 | Configuration system for Python applications / BSD 3-clause |
| [typing](https://docs.python.org/3.5/library/typing.html) | 3.6.2 | Type Hints for Python - backport for `Python<3.5` / PSF |
| [unicodecsv](https://github.com/jdunck/python-unicodecsv) | 0.14.1 | Drop-in replacement for csv module which supports unicode strings / BSD |
| [unixodbc](http://www.unixodbc.org/) | 2.3.4 | ODBC on non MS Windows platforms / LGPL-2.1 |
| [urllib3](https://urllib3.readthedocs.io/) | 1.22 | HTTP library with thread-safe connection pooling, file post, and more. / MIT |
| [wcwidth](https://github.com/jquast/wcwidth) | 0.1.7 | Measures number of Terminal column cells of wide-character codes. / MIT |
| [webencodings](https://github.com/gsnedders/python-webencodings) | 0.5.1 | Character encoding aliases for legacy web content / BSD 3-Clause |
| [werkzeug](http://werkzeug.pocoo.org/) | 0.12.2 | The Python WSGI Utility Library. / BSD 3-Clause |
| [wheel](https://bitbucket.org/pypa/wheel/) | 0.29.0 | A built-package format for Python. / MIT |
| [widgetsnbextension](http://ipython.org) | 3.0.2 | IPython HTML widgets for Jupyter / BSD 3-clause |
| [wrapt](https://github.com/GrahamDumpleton/wrapt) | 1.10.11 | Module for decorators, wrappers and monkey patching. / BSD 2-Clause |
| [xlrd](http://www.python-excel.org/) | 1.1.0 | Library for developers to extract data from Microsoft Excel (tm) spreadsheet files / BSD 3-Clause and BSD with advertising |
| [xlsxwriter](https://xlsxwriter.readthedocs.io/) | 0.9.8 | A Python module for creating Excel XLSX files / BSD 2-Clause |
| [xlwt](http://www.python-excel.org/) | 1.3.0 | Writing data and formatting information to Excel files / BSD |
| [xz](http://tukaani.org/xz/) | 5.2.3 | Data compression software with high compression ratio / LGPL-2.1 and GPL-2.0 |
| [yaml](http://pyyaml.org/wiki/LibYAML) | 0.1.7 | A C library for parsing and emitting YAML. / MIT |
| [zeromq](http://zeromq.org) | 4.2.2 | A high-performance asynchronous messaging library. / LGPL 3 |
| [zict](http://github.com/mrocklin/zict) | 0.1.2 | Composable Dictionary Classes / BSD 3-Clause |
| [zlib](http://zlib.net/) | 1.2.11 | Massively spiffy yet delicately unobtrusive compression library / zlib |
| Name | Version | Summary / License |
|---|---|---|
| [alabaster](http://www.sphinx-doc.org/en/stable/index.html) | 0.7.10 | Configurable, Python 2+3 compatible Sphinx theme. / BSD 3-Clause |
| [anaconda-client](http://anaconda.org) | 1.6.5 | anaconda.org command line client library / BSD 3-clause |
| [anaconda-navigator](https://github.com/ContinuumIO/navigator) | 1.6.8 | Anaconda Navigator / proprietary - Continuum Analytics, Inc. |
| [anaconda-project](https://github.com/Anaconda-Platform/anaconda-project) | 0.8.0 | Reproducible, executable project directories. / BSD 3-Clause |
| [asn1crypto](https://github.com/wbond/asn1crypto) | 0.22.0 | Python ASN.1 library with a focus on performance and a pythonic API / MIT |
| [astroid](https://www.astroid.org/) | 1.5.3 | A abstract syntax tree for Python with inference support. / LGPL 2.1 |
| [astropy](http://www.astropy.org/) | 2.0.2 | Community-developed Python Library for Astronomy / BSD |
| [babel](http://babel.pocoo.org/) | 2.5.0 | Utilities to internationalize and localize Python applications / BSD 3-clause |
| [backports](https://bitbucket.org/brandon/backports) | 1.0 | / BSD |
| [backports.shutil\_get\_terminal\_size](https://github.com/chrippa/backports.shutil_get_terminal_size) | 1.0.0 | A backport of the get\_terminal\_size function from Python 3.3’s shutil. / MIT |
| [beautifulsoup4](http://www.crummy.com/software/BeautifulSoup/) | 4.6.0 | Python library designed for screen-scraping / MIT |
| [bitarray](https://github.com/ilanschnell/bitarray) | 0.8.1 | efficient arrays of booleans – C extension / PSF |
| [bkcharts](http://github.com/bokeh/bkcharts) | 0.2 | High level chart types built on top of Bokeh / BSD 3-Clause |
| [blaze](http://blaze.pydata.org) | 0.11.3 | NumPy and Pandas interface to big data / BSD 3-Clause |
| [bleach](https://github.com/mozilla/bleach) | 2.0.0 | Easy, whitelist-based HTML-sanitizing tool / Apache-2.0 |
| [bokeh](http://bokeh.pydata.org/) | 0.12.7 | Statistical and novel interactive HTML plots for Python / BSD 3-Clause |
| [boto](https://github.com/boto/boto/) | 2.48.0 | Amazon Web Services Library / MIT |
| [bottleneck](http://berkeleyanalytics.com/bottleneck) | 1.2.1 | Fast NumPy array functions written in Cython. / BSD 2-Clause |
| [ca-certificates](https://github.com/conda-forge/ca-certificates-feedstock) | 2017.08.26 | Certificates for use with other packages. / ISC |
| [cairo](http://cairographics.org/) | 1.14.10 | Cairo is a 2D graphics library with support for multiple output devices. / LGPL 2.1 or MPL 1.1 |
| [certifi](http://certifi.io/) | 2017.7.27.1 | Python package for providing Mozilla’s CA Bundle. / ISC |
| [cffi](https://bitbucket.org/cffi/cffi) | 1.10.0 | Foreign Function Interface for Python calling C code. / MIT |
| [chardet](https://github.com/chardet/chardet) | 3.0.4 | Universal character encoding detector / LGPL2 |
| [click](http://click.pocoo.org/) | 6.7 | A simple wrapper around optparse for powerful command line utilities. / BSD 3-Clause |
| [cloudpickle](https://github.com/cloudpipe/cloudpickle) | 0.4.0 | Extended pickling support for Python objects / BSD 3-Clause |
| [clyent](https://github.com/Anaconda-Platform/clyent) | 1.2.2 | Command line client library for windows and posix / BSD 3-Clause |
| [colorama](https://github.com/tartley/colorama) | 0.3.9 | Cross-platform colored terminal text. / BSD 3-Clause |
| [conda](http://conda.pydata.org/) | 4.3.27 | OS-agnostic, system-level binary package and environment manager. / BSD 3-Clause |
| [conda-build](https://github.com/conda/conda-build) | 3.0.22 | tools for building conda packages / BSD 3-Clause |
| [contextlib2](http://contextlib2.readthedocs.org) | 0.5.5 | Backports and enhancements for the contextlib module / PSF |
| [cryptography](https://github.com/pyca/cryptography) | 2.0.3 | Provides cryptographic recipes and primitives to Python developers / Apache 2.0 or BSD 3-Clause, PSF 2 |
| [curl](http://curl.haxx.se/) | 7.55.1 | tool and library for transferring data with URL syntax / MIT/X derivate (`<http://curl.haxx.se/docs/copyright.html>`) |
| [cycler](http://matplotlib.org/cycler) | 0.10.0 | Composable style cycles. / BSD 3-Clause |
| [cython](http://www.cython.org/) | 0.26.1 | The Cython compiler for writing C extensions for the Python language / Apache-2.0 |
| [cytoolz](https://github.com/pytoolz/cytoolz) | 0.8.2 | Cython implementation of Toolz. High performance functional utilities. / BSD 3-Clause |
| [dask](http://dask.pydata.org/en/latest/) | 0.15.2 | Parallel Python with task scheduling / BSD 3-Clause |
| [dask-core](http://github.com/dask/dask/) | 0.15.2 | Parallel Python with task scheduling / BSD 3-Clause |
| [datashape](http://datashape.pydata.org) | 0.5.4 | A data description language. / BSD 2-Clause |
| [dbus](http://www.freedesktop.org/wiki/Software/dbus/) | 1.10.22 | Simple message bus system for applications to talk to one another / GPL2 |
| [decorator](https://github.com/micheles/decorator) | 4.1.2 | Better living through Python with decorators. / BSD 3-Clause |
| [distributed](http://distributed.readthedocs.io/en/latest/) | 1.18.3 | Distributed computing with Dask / BSD 3-Clause |
| [docutils](http://docutils.sourceforge.net/) | 0.14 | Docutils – Python Documentation Utilities / Public Domain Dedictation and BSD 2-Clause and PSF 2.1.1 and GPL 3.0 |
| [entrypoints](https://github.com/takluyver/entrypoints) | 0.2.3 | Discover and load entry points from installed packages. / MIT License |
| [et\_xmlfile](https://bitbucket.org/openpyxl/et_xmlfile) | 1.0.1 | An implementation of lxml.xmlfile for the standard library / MIT |
| [expat](http://expat.sourceforge.net/) | 2.2.4 | Expat XML parser library in C. / MIT |
| [fastcache](https://github.com/pbrady/fastcache) | 1.0.2 | C implementation of Python 3 lru\_cache / MIT |
| [filelock](https://github.com/benediktschmitt/py-filelock) | 2.0.12 | A platform independent file lock. / Public Domain |
| [flask](http://flask.pocoo.org) | 0.12.2 | A microframework based on Werkzeug, Jinja2 and good intentions. / BSD 3-Clause |
| [flask-cors](https://github.com/corydolphin/flask-cors) | 3.0.3 | A Flask extension adding a decorator for CORS support / MIT |
| [fontconfig](http://www.freedesktop.org/wiki/Software/fontconfig/) | 2.12.4 | A library for configuring and customizing font access. / MIT |
| [freetype](https://www.freetype.org/) | 2.8 | A Free, High-Quality, and Portable Font Engine / GPL-2.0 and FreeType |
| [get\_terminal\_size](https://github.com/chrippa/backports.shutil_get_terminal_size) | 1.0.0 | Get the size of the terminal window. / MIT |
| [gevent](http://www.gevent.org/) | 1.2.2 | Coroutine-based network library / MIT |
| [glib](https://developer.gnome.org/glib/) | 2.53.6 | Provides core application building blocks for libraries and applications written in C. / LGPL-2.1 |
| [glob2](https://github.com/miracle2k/python-glob2) | 0.5 | Version of the glob module that supports recursion via \*\*, and can capture patterns. / BSD-2-Clause |
| [gmp](http://gmplib.org/) | 6.1.2 | The GNU multiprecision library. / GPL 2 and LGPL 3 |
| [gmpy2](https://pypi.python.org/pypi/gmpy2) | 2.0.8 | GMP/MPIR, MPFR, and MPC interface to Python 2.6+ and 3.x / LGPL 3 |
| [graphite2](http://graphite.sil.org/) | 1.3.10 | A “smart font” system that handles the complexities of lesser-known languages of the world. / LGPLv2 |
| [greenlet](https://github.com/python-greenlet/greenlet) | 0.4.12 | Lightweight in-process concurrent programming / MIT |
| [gst-plugins-base](http://gstreamer.freedesktop.org/) | 1.12.2 | GStreamer Base Plug-ins / GPL2 |
| [gstreamer](http://gstreamer.freedesktop.org/) | 1.12.2 | Library for constructing graphs of media-handling components / LGPL 2 |
| [h5py](http://www.h5py.org/) | 2.7.0 | Read and write HDF5 files from Python. / BSD 3-Clause |
| [harfbuzz](http://www.freedesktop.org/wiki/Software/HarfBuzz/) | 1.5.0 | An OpenType text shaping engine. / MIT |
| [hdf5](http://www.hdfgroup.org/HDF5/) | 1.10.1 | HDF5 is a data model, library, and file format for storing and managing data / HDF5 |
| [heapdict](http://stutzbachenterprises.com/) | 1.0.0 | A heap with decrease-key and increase-key operations / BSD 3-Clause |
| [html5lib](https://github.com/html5lib/html5lib-python) | 0.999999999 | HTML parser based on the WHATWG HTML specification / MIT |
| [icu](http://site.icu-project.org/) | 58.2 | International Components for Unicode. / MIT |
| [idna](https://github.com/kjd/idna) | 2.6 | Internationalized Domain Names in Applications (IDNA). / BSD Like |
| [imageio](http://imageio.github.io) | 2.2.0 | a Python library for reading and writing image data / BSD 2-Clause |
| [imagesize](https://github.com/shibukawa/imagesize_py) | 0.7.1 | Getting image size from png/jpeg/jpeg2000/gif file / MIT |
| [intel-openmp](https://software.intel.com/en-us/node/522690) | 2018.0.0 | Math library for Intel and compatible processors / proprietary - Intel |
| [ipykernel](http://ipython.org) | 4.6.1 | IPython Kernel for Jupyter / BSD 3-clause |
| [ipython](http://ipython.org/) | 6.1.0 | IPython: Productive Interactive Computing / BSD 3-clause |
| [ipython\_genutils](http://ipython.org) | 0.2.0 | vestigial utilities from IPython / BSD 3-Clause |
| [ipywidgets](https://github.com/ipython/ipywidgets) | 7.0.0 | Jupyter Interactive Widgets / BSD 3-clause |
| [isort](https://github.com/timothycrosley/isort) | 4.2.15 | A Python utility / library to sort Python imports. / MIT |
| [itsdangerous](https://github.com/pallets/itsdangerous) | 0.24 | Various helpers to pass trusted data to untrusted environments. / BSD 3-Clause |
| [jbig](https://www.cl.cam.ac.uk/~mgk25/jbigkit) | 2.1 | Implementation of the JBIG1 data compression standard / GPL-2.0 |
| [jdcal](https://github.com/phn/jdcal) | 1.3 | Julian dates from proleptic Gregorian and Julian calendars. / BSD 2-Clause |
| [jedi](https://github.com/davidhalter/jedi/) | 0.10.2 | An autocompletion tool for Python that can be used for text editors. / MIT |
| [jinja2](http://jinja.pocoo.org) | 2.9.6 | An easy to use stand-alone template engine written in pure python. / 3-Clause BSD |
| [jpeg](http://www.ijg.org/) | 9b | read/write jpeg COM, EXIF, IPTC medata / Custom free software license |
| [jsonschema](https://github.com/Julian/jsonschema) | 2.6.0 | An implementation of JSON Schema validation for Python / MIT |
| [jupyter](http://jupyter.org) | 1.0.0 | Jupyter metapackage. Install all the Jupyter components in one go. / BSD 3-Clause |
| [jupyter\_client](http://jupyter.org) | 5.1.0 | Jupyter protocol implementation and client libraries / BSD 3-clause |
| [jupyter\_console](http://jupyter.org) | 5.2.0 | Jupyter terminal console / BSD 3-Clause |
| [jupyter\_core](http://jupyter.org) | 4.3.0 | Core common functionality of Jupyter projects. / BSD 3-clause |
| [jupyterlab](https://github.com/jupyterlab/jupyterlab) | 0.27.0 | A pre-alpha version of a computational environment for Jupyter. / BSD 3-Clause |
| [jupyterlab\_launcher](http://github.com/jupyterlab/jupyterlab_launcher) | 0.4.0 | A Launcher for JupyterLab based applications. / BSD 3-Clause |
| [lazy-object-proxy](https://github.com/ionelmc/python-lazy-object-proxy) | 1.3.1 | A fast and thorough lazy object proxy. / BSD 2-Clause |
| [libedit](http://thrysoee.dk/editline/) | 3.1 | Editline Library (libedit) / 3-Clause BSD |
| [libffi](https://sourceware.org/libffi/) | 3.2.1 | A Portable Foreign Function Interface Library. / Custom |
| [libgcc-ng](https://gcc.gnu.org/onlinedocs/gccint/Libgcc.html) | 7.2.0 | The GCC low-level runtime library / GPL |
| [libgfortran-ng](https://gcc.gnu.org/) | 7.2.0 | The GNU Fortran Runtime Library / GPL |
| [libpng](http://www.libpng.org/pub/png/libpng.html) | 1.6.32 | PNG reference library. / zlib/libpng |
| [libsodium](https://github.com/jedisct1/libsodium) | 1.0.13 | A modern and easy-to-use crypto library. / ISC |
| [libssh2](https://www.libssh2.org/) | 1.8.0 | the SSH library / BSD 3-Clause |
| [libstdcxx-ng](https://gcc.gnu.org/) | 7.2.0 | he GNU C++ Runtime Library / GPL3 with runtime exception |
| [libtiff](http://www.libtiff.org/) | 4.0.8 | Support for the Tag Image File Format (TIFF). / HPND |
| [libtool](http://www.gnu.org/software/libtool/) | 2.4.6 | The GNU Portable Library Tool / GPL 3 |
| [libxcb](http://xcb.freedesktop.org/) | 1.12 | This is the C-language Binding (XCB) package to the X Window System protocol / MIT |
| [libxml2](http://xmlsoft.org/) | 2.9.4 | The XML C parser and toolkit of Gnome / MIT |
| [libxslt](http://xmlsoft.org/XSLT/) | 1.1.29 | The XSLT C library developed for the GNOME project / MIT |
| [llvmlite](http://llvmlite.pydata.org/) | 0.20.0 | Lightweight wrapper around basic LLVM functionality / BSD |
| [locket](https://github.com/mwilliamson/locket.py) | 0.2.0 | File-based locks for Python for Linux and Windows / BSD 2-Clause |
| [lxml](http://lxml.de/) | 3.8.0 | Pythonic binding for the C libraries libxml2 and libxslt. / BSD 3-Clause, GPL-2.0, ZPL-2.0, and ElementTree |
| [lzo](http://www.oberhumer.com/opensource/lzo/) | 2.10 | LZO is a portable lossless data compression library written in ANSI C. / GPL v2+ |
| [markupsafe](https://www.palletsprojects.com/p/markupsafe/) | 1.0 | A Python module that implements the jinja2.Markup string / BSD 3-Clause |
| [matplotlib](http://matplotlib.org/) | 2.0.2 | Publication quality figures in Python / PSF-based |
| [mccabe](https://github.com/PyCQA/mccabe) | 0.6.1 | McCabe complexity checker for Python / MIT |
| [mistune](https://github.com/lepture/mistune) | 0.7.4 | The fastest markdown parser in pure Python. / BSD 3-Clause |
| [mkl](http://software.intel.com/en-us/articles/intel-mkl/) | 2018.0.0 | Math library for Intel and compatible processors / proprietary - Intel |
| [mkl-service](https://github.com/ContinuumIO/mkl-service) | 1.1.2 | Python bindings to MKL service functions / 3-clause BSD |
| [mpc](http://www.multiprecision.org/) | 1.0.3 | A C library for the arithmetic of complex numbers with arbitrarily high precision. / LGPL 3 |
| [mpfr](http://www.mpfr.org/) | 3.1.5 | The MPFR library is a C library for multiple-precision floating-point computations with correct rounding. / LGPL 3 |
| [mpmath](http://mpmath.org) | 0.19 | Python library for arbitrary-precision floating-point arithmetic / BSD 3-Clause |
| [msgpack-python](http://msgpack.org/) | 0.4.8 | MessagePack (de)serializer. / Apache 2.0 |
| [multipledispatch](https://github.com/mrocklin/multipledispatch/) | 0.4.9 | Multiple dispatch in Python / BSD 3-Clause |
| [navigator-updater](https://github.com/ContinuumIO/navigator-updater) | 0.1.0 | Anaconda Navigator Updater / proprietary - Continuum Analytics, Inc. |
| [nbconvert](http://jupyter.org) | 5.3.1 | Converting Jupyter Notebooks / BSD 3-Clause |
| [nbformat](http://jupyter.org) | 4.4.0 | The reference implementation of the Jupyter Notebook format / BSD 3-clause |
| [ncurses](http://www.gnu.org/software/ncurses/) | 6.0 | Library for text-based user interfaces / Free software (MIT-like) |
| [networkx](https://networkx.github.io/) | 1.11 | Python package for creating and manipulating complex networks / BSD 3-Clause |
| [nltk](http://nltk.org/) | 3.2.4 | Build Python programs to work with human language data / Apache 2.0 |
| [nose](http://readthedocs.org/docs/nose/) | 1.3.7 | Nose extends unittest to make testing easier / LGPL-2.1 |
| [notebook](http://jupyter.org) | 5.0.0 | A web-based notebook environment for interactive computing / BSD 3-clause |
| [numba](http://numba.pydata.org/) | 0.35.0 | NumPy aware dynamic Python compiler using LLVM / BSD |
| [numexpr](https://github.com/pydata/numexpr) | 2.6.2 | Fast numerical expression evaluator for NumPy. / MIT |
| [numpy](http://numpy.scipy.org/) | 1.13.1 | Array processing for numbers, strings, records, and objects. / BSD 3-Clause |
| [numpydoc](https://github.com/numpy/numpydoc) | 0.7.0 | Sphinx extension to support docstrings in Numpy format / BSD 3-Clause |
| [odo](http://odo.pydata.org) | 0.5.1 | Data migration in Python / BSD-3-Clause |
| [olefile](http://www.decalage.info/python/olefileio) | 0.44 | parse, read and write Microsoft OLE2 files / BSD License 2-Clause |
| [openpyxl](https://openpyxl.readthedocs.io) | 2.4.8 | A Python library to read/write Excel 2010 xlsx/xlsm files / MIT |
| [openssl](http://www.openssl.org/) | 1.0.2l | OpenSSL is an open-source implementation of the SSL and TLS protocols / OpenSSL |
| [packaging](https://github.com/pypa/packaging) | 16.8 | Core utilities for Python packages / Apache 2.0 or BSD 2-Clause |
| [pandas](http://pandas.pydata.org) | 0.20.3 | High-performance, easy-to-use data structures and data analysis tools. / BSD 3-clause |
| [pandoc](http://johnmacfarlane.net/pandoc/) | 1.15.0.6 | Universal markup converter (repackaged binaries). / GPL-2.0 |
| [pandocfilters](https://github.com/jgm/pandocfilters) | 1.4.2 | A python module for writing pandoc filters / BSD-3-Clause |
| [pango](http://www.pango.org/) | 1.40.11 | Text layout and rendering engine. / LGPL-2.1 |
| [partd](https://github.com/dask/partd) | 0.3.8 | Data structure for on-disk shuffle operations / BSD 3-Clause |
| [patchelf](http://nixos.org/patchelf.html) | 0.9 | A small utility to modify the dynamic linker and RPATH of ELF executables. / GPL 3 |
| [path.py](https://github.com/jaraco/path.py) | 10.3.1 | A module wrapper for os.path / MIT |
| [pathlib2](https://github.com/mcmtroffaes/pathlib2) | 2.3.0 | Fork of pathlib aiming to support the full stdlib Python API. / MIT |
| [patsy](https://github.com/pydata/patsy) | 0.4.1 | Describing statistical models in Python using symbolic formulas / BSD-2-Clause, PSF2 |
| [pcre](http://www.pcre.org/) | 8.41 | Regular expression pattern matching using the same syntax and semantics as Perl 5. / BSD 3-Clause |
| [pep8](http://pep8.readthedocs.org/) | 1.7.0 | Python style guide checker / MIT |
| [pexpect](http://pexpect.sourceforge.net/) | 4.2.1 | Pexpect makes Python a better tool for controlling other applications. / ISC |
| [pickleshare](https://github.com/vivainio/pickleshare) | 0.7.4 | Tiny ‘shelve’-like database with concurrency support / MIT |
| [pillow](http://python-imaging.github.io/) | 4.2.1 | Pillow is the friendly PIL fork by Alex Clark and Contributors. / PIL |
| [pip](https://pip.pypa.io/en/stable/) | 9.0.1 | PyPA recommended tool for installing Python packages / MIT |
| [pixman](http://www.pixman.org/) | 0.34.0 | A low-level software library for pixel manipulation. / MIT |
| [pkginfo](https://code.launchpad.net/~tseaver/pkginfo/trunk) | 1.4.1 | Query metadatdata from sdists / bdists / installed packages. / MIT |
| [ply](http://www.dabeaz.com/ply/index.html) | 3.10 | Python Lex-Yacc / BSD 3-clause |
| [prompt\_toolkit](https://github.com/jonathanslenders/python-prompt-toolkit) | 1.0.15 | Library for building powerful interactive command lines in Python / BSD 3-clause |
| [psutil](https://github.com/giampaolo/psutil) | 5.2.2 | A cross-platform process and system utilities module for Python / BSD 3-Clause |
| [ptyprocess](https://github.com/pexpect/ptyprocess) | 0.5.2 | Run a subprocess in a pseudo terminal / ISC |
| [py](https://github.com/pytest-dev/py) | 1.4.34 | library with cross-python path, ini-parsing, io, code, log facilities / MIT |
| [pycodestyle](https://pycodestyle.readthedocs.io/) | 2.3.1 | Python style guide checker / MIT |
| [pycosat](https://github.com/ContinuumIO/pycosat) | 0.6.2 | Bindings to picosat (a SAT solver) / MIT |
| [pycparser](https://github.com/eliben/pycparser) | 2.18 | Complete C99 parser in pure Python / BSD 3-clause |
| [pycrypto](http://www.pycrypto.org/) | 2.6.1 | Cryptographic modules for Python. / Public Domain |
| [pycurl](http://pycurl.sourceforge.net/) | 7.43.0 | A Python Interface To The cURL library / LGPL, MIT |
| [pyflakes](https://github.com/PyCQA/pyflakes) | 1.5.0 | Pyflakes analyzes programs and detects various errors. / MIT |
| [pygments](http://pygments.org/) | 2.2.0 | Generic syntax highlighting package / BSD 2-clause |
| [pylint](http://www.pylint.org/) | 1.7.2 | python code static checker / GPL |
| [pyodbc](https://github.com/mkleehammer/pyodbc) | 4.0.17 | DB API Module for ODBC / MIT |
| [pyopenssl](https://github.com/pyca/pyopenssl) | 17.2.0 | Python wrapper module around the OpenSSL library / Apache 2.0 |
| [pyparsing](http://pyparsing.wikispaces.com/) | 2.2.0 | Create and execute simple grammars / MIT |
| [pyqt](http://www.riverbankcomputing.co.uk/software/pyqt) | 5.6.0 | Python binding of the cross-platform GUI toolkit Qt. / Commercial, GPL-2.0, GPL-3.0 |
| [pysocks](https://github.com/Anorov/PySocks) | 1.6.7 | A Python SOCKS client module. See [Anorov/PySocks](https://github.com/Anorov/PySocks) for more information. / BSD 3-Clause |
| [pytables](http://www.pytables.org) | 3.4.2 | Brings together Python, HDF5 and NumPy to easily handle large amounts of data. / BSD 3-Clause |
| [pytest](https://docs.pytest.org/en/latest/) | 3.2.1 | Simple and powerful testing with Python. / MIT |
| [python](http://www.python.org/) | 3.6.2 | General purpose programming language / PSF |
| [python-dateutil](https://dateutil.readthedocs.org/) | 2.6.1 | Extensions to the standard Python datetime module. / BSD 3-clause |
| [pytz](http://pythonhosted.org/pytz/) | 2017.2 | World timezone definitions, modern and historical. / MIT |
| [pywavelets](https://github.com/PyWavelets/pywt) | 0.5.2 | Discrete Wavelet Transforms in Python. / MIT |
| [pyyaml](http://pyyaml.org/wiki/PyYAML) | 3.12 | YAML parser and emitter for Python / MIT |
| [pyzmq](https://github.com/zeromq/pyzmq) | 16.0.2 | Python bindings for zeromq / BSD 3-clause |
| [qt](http://qt-project.org) | 5.6.2 | Qt is a cross-platform application and UI framework. / LGPL-3.0 |
| [qtawesome](https://github.com/spyder-ide/qtawesome) | 0.4.4 | Iconic fonts in PyQt and PySide applications / MIT |
| [qtconsole](http://jupyter.org) | 4.3.1 | Jupyter Qt console / BSD 3-Clause |
| [qtpy](https://github.com/spyder-ide/qtpy) | 1.3.1 | Abstraction layer for PyQt5/PyQt4/PySide / MIT |
| [readline](https://cnswww.cns.cwru.edu/php/chet/readline/rltop.html) | 7.0 | library for editing command lines as they are typed in / GPL3 |
| [requests](http://python-requests.org) | 2.18.4 | Python HTTP for Humans. / Apache 2.0 |
| [rope](https://github.com/python-rope/rope) | 0.10.5 | A python refactoring library… / GPL 2.0 |
| [ruamel\_yaml](https://bitbucket.org/ruamel/yaml) | 0.11.14 | A patched copy of ruamel.yaml. / MIT |
| [scikit-image](http://scikit-image.org/) | 0.13.0 | Image processing routines for SciPy. / BSD 3-Clause |
| [scikit-learn](http://scikit-learn.org/) | 0.19.0 | A set of python modules for machine learning and data mining / BSD 3-Clause |
| [scipy](http://www.scipy.org/) | 0.19.1 | Scientific Library for Python / BSD 3-Clause |
| [seaborn](http://stanford.edu/~mwaskom/software/seaborn/) | 0.8.0 | Statistical data visualization / BSD 3-Clause |
| [setuptools](https://github.com/pypa/setuptools) | 36.5.0 | Download, build, install, upgrade, and uninstall Python packages / MIT |
| [simplegeneric](http://cheeseshop.python.org/pypi/simplegeneric) | 0.8.1 | Simple generic functions (similar to Python’s own len(), pickle.dump(), etc.) / Zope Public |
| [singledispatch](http://docs.python.org/3/library/functools.html#functools.singledispatch) | 3.4.0.3 | Transforms a function into a single-dispatch generic function / MIT |
| [sip](http://www.riverbankcomputing.com/software/sip/intro) | 4.18.1 | Create Python bindings for C and C++ libraries / GPL-3.0 |
| [six](http://pypi.python.org/pypi/six/) | 1.10.0 | Python 2 and 3 compatibility utilities / MIT |
| [snowballstemmer](https://github.com/shibukawa/snowball_py) | 1.2.1 | Snowball stemming library collection for Python / BSD-2-Clause |
| [sortedcollections](http://www.grantjenks.com/docs/sortedcollections/) | 0.5.3 | Python Sorted Collections / Apache-2.0 |
| [sortedcontainers](http://www.grantjenks.com/docs/sortedcontainers/) | 1.5.7 | Python Sorted Container Types: SortedList, SortedDict, and SortedSet / Apache 2.0 |
| [sphinx](http://www.sphinx-doc.org) | 1.6.3 | Sphinx is a tool that makes it easy to create intelligent and beautiful documentation / BSD 2-clause |
| sphinxcontrib | 1.0 | Python namespace for sphinxcontrib / BSD |
| [sphinxcontrib-websupport](https://pypi.python.org/pypi/sphinxcontrib-websupport) | 1.0.1 | Sphinx API for Web Apps / BSD-2-Clause |
| [spyder](https://github.com/spyder-ide/spyder) | 3.2.3 | Scientific PYthon Development EnviRonment / MIT |
| [sqlalchemy](http://www.sqlalchemy.org/) | 1.1.13 | Database Abstraction Library. / MIT |
| [sqlite](http://www.sqlite.org/) | 3.20.1 | Implements a self-contained, zero-configuration, SQL database engine. / Public-Domain (`<http://www.sqlite.org/copyright.html>`) |
| [statsmodels](https://www.statsmodels.org) | 0.8.0 | Statistical computations and models for use with SciPy / BSD 3-Clause |
| [sympy](http://sympy.org) | 1.1.1 | Python library for symbolic mathematics / 3-clause BSD |
| [tblib](https://github.com/ionelmc/python-tblib) | 1.3.2 | Traceback serialization library. / BSD 2-Clause |
| [terminado](http://github.com/mitsuhiko/markupsafe) | 0.6 | Terminals served by tornado websockets / BSD 3-clause |
| [testpath](https://testpath.readthedocs.io) | 0.3.1 | Testpath is a collection of utilities for Python code working with files and commands. / MIT |
| [tk](http://www.tcl.tk/) | 8.6.7 | A dynamic programming language with GUI support. Bundles Tcl and Tk. / Tcl/Tk |
| [toolz](http://toolz.readthedocs.org/) | 0.8.2 | A functional standard library for Python. / BSD 3-Clause |
| [tornado](http://www.tornadoweb.org/) | 4.5.2 | A Python web framework and asynchronous networking library, originally developed at FriendFeed. / Apache 2.0 |
| [traitlets](http://ipython.org/) | 4.3.2 | Configuration system for Python applications / BSD 3-clause |
| [typing](https://docs.python.org/3.5/library/typing.html) | 3.6.2 | Type Hints for Python - backport for `Python<3.5` / PSF |
| [unicodecsv](https://github.com/jdunck/python-unicodecsv) | 0.14.1 | Drop-in replacement for csv module which supports unicode strings / BSD |
| [unixodbc](http://www.unixodbc.org/) | 2.3.4 | ODBC on non MS Windows platforms / LGPL-2.1 |
| [urllib3](https://urllib3.readthedocs.io/) | 1.22 | HTTP library with thread-safe connection pooling, file post, and more. / MIT |
| [wcwidth](https://github.com/jquast/wcwidth) | 0.1.7 | Measures number of Terminal column cells of wide-character codes. / MIT |
| [webencodings](https://github.com/gsnedders/python-webencodings) | 0.5.1 | Character encoding aliases for legacy web content / BSD 3-Clause |
| [werkzeug](http://werkzeug.pocoo.org/) | 0.12.2 | The Python WSGI Utility Library. / BSD 3-Clause |
| [wheel](https://bitbucket.org/pypa/wheel/) | 0.29.0 | A built-package format for Python. / MIT |
| [widgetsnbextension](http://ipython.org) | 3.0.2 | IPython HTML widgets for Jupyter / BSD 3-clause |
| [wrapt](https://github.com/GrahamDumpleton/wrapt) | 1.10.11 | Module for decorators, wrappers and monkey patching. / BSD 2-Clause |
| [xlrd](http://www.python-excel.org/) | 1.1.0 | Library for developers to extract data from Microsoft Excel (tm) spreadsheet files / BSD 3-Clause and BSD with advertising |
| [xlsxwriter](https://xlsxwriter.readthedocs.io/) | 0.9.8 | A Python module for creating Excel XLSX files / BSD 2-Clause |
| [xlwt](http://www.python-excel.org/) | 1.3.0 | Writing data and formatting information to Excel files / BSD |
| [xz](http://tukaani.org/xz/) | 5.2.3 | Data compression software with high compression ratio / LGPL-2.1 and GPL-2.0 |
| [yaml](http://pyyaml.org/wiki/LibYAML) | 0.1.7 | A C library for parsing and emitting YAML. / MIT |
| [zeromq](http://zeromq.org) | 4.2.2 | A high-performance asynchronous messaging library. / LGPL 3 |
| [zict](http://github.com/mrocklin/zict) | 0.1.2 | Composable Dictionary Classes / BSD 3-Clause |
| [zlib](http://zlib.net/) | 1.2.11 | Massively spiffy yet delicately unobtrusive compression library / zlib |
| Name | Version | Summary / License |
|---|---|---|
| [alabaster](http://www.sphinx-doc.org/en/stable/index.html) | 0.7.10 | Configurable, Python 2+3 compatible Sphinx theme. / BSD 3-Clause |
| [anaconda-client](http://anaconda.org) | 1.6.5 | anaconda.org command line client library / BSD 3-clause |
| [anaconda-navigator](https://github.com/ContinuumIO/navigator) | 1.6.8 | Anaconda Navigator / proprietary - Continuum Analytics, Inc. |
| [anaconda-project](https://github.com/Anaconda-Platform/anaconda-project) | 0.8.0 | Reproducible, executable project directories. / BSD 3-Clause |
| [asn1crypto](https://github.com/wbond/asn1crypto) | 0.22.0 | Python ASN.1 library with a focus on performance and a pythonic API / MIT |
| [astroid](https://www.astroid.org/) | 1.5.3 | A abstract syntax tree for Python with inference support. / LGPL 2.1 |
| [astropy](http://www.astropy.org/) | 2.0.2 | Community-developed Python Library for Astronomy / BSD |
| [babel](http://babel.pocoo.org/) | 2.5.0 | Utilities to internationalize and localize Python applications / BSD 3-clause |
| [backports](https://bitbucket.org/brandon/backports) | 1.0 | / BSD |
| [backports.functools\_lru\_cache](https://github.com/jaraco/backports.functools_lru_cache) | 1.4 | Backport of functools.lru\_cache from Python 3.3 as published at ActiveState. / MIT |
| [backports.shutil\_get\_terminal\_size](https://github.com/chrippa/backports.shutil_get_terminal_size) | 1.0.0 | A backport of the get\_terminal\_size function from Python 3.3’s shutil. / MIT |
| [backports\_abc](https://github.com/cython/backports_abc) | 0.5 | A backport of recent additions to the collections.abc module. / PSF 2 |
| [beautifulsoup4](http://www.crummy.com/software/BeautifulSoup/) | 4.6.0 | Python library designed for screen-scraping / MIT |
| [bitarray](https://github.com/ilanschnell/bitarray) | 0.8.1 | efficient arrays of booleans – C extension / PSF |
| [bkcharts](http://github.com/bokeh/bkcharts) | 0.2 | High level chart types built on top of Bokeh / BSD 3-Clause |
| [blaze](http://blaze.pydata.org) | 0.11.3 | NumPy and Pandas interface to big data / BSD 3-Clause |
| [bleach](https://github.com/mozilla/bleach) | 2.0.0 | Easy, whitelist-based HTML-sanitizing tool / Apache-2.0 |
| [bokeh](http://bokeh.pydata.org/) | 0.12.7 | Statistical and novel interactive HTML plots for Python / BSD 3-Clause |
| [boto](https://github.com/boto/boto/) | 2.48.0 | Amazon Web Services Library / MIT |
| [bottleneck](http://berkeleyanalytics.com/bottleneck) | 1.2.1 | Fast NumPy array functions written in Cython. / BSD 2-Clause |
| [bzip2](http://www.bzip.org/) | 1.0.6 | high-quality data compressor / bzip2 |
| [ca-certificates](https://github.com/conda-forge/ca-certificates-feedstock) | 2017.08.26 | Certificates for use with other packages. / ISC |
| [cdecimal](http://www.bytereef.org/mpdecimal/index.html) | 2.3 | Fast drop-in replacement for decimal.py / BSD 2-Clause |
| [certifi](http://certifi.io/) | 2017.7.27.1 | Python package for providing Mozilla’s CA Bundle. / ISC |
| [cffi](https://bitbucket.org/cffi/cffi) | 1.10.0 | Foreign Function Interface for Python calling C code. / MIT |
| [chardet](https://github.com/chardet/chardet) | 3.0.4 | Universal character encoding detector / LGPL2 |
| [click](http://click.pocoo.org/) | 6.7 | A simple wrapper around optparse for powerful command line utilities. / BSD 3-Clause |
| [cloudpickle](https://github.com/cloudpipe/cloudpickle) | 0.4.0 | Extended pickling support for Python objects / BSD 3-Clause |
| [clyent](https://github.com/Anaconda-Platform/clyent) | 1.2.2 | Command line client library for windows and posix / BSD 3-Clause |
| [colorama](https://github.com/tartley/colorama) | 0.3.9 | Cross-platform colored terminal text. / BSD 3-Clause |
| [comtypes](http://starship.python.net/crew/theller/comtypes/) | 1.1.2 | pure Python COM package / MIT |
| [conda](http://conda.pydata.org/) | 4.3.27 | OS-agnostic, system-level binary package and environment manager. / BSD 3-Clause |
| [conda-build](https://github.com/conda/conda-build) | 3.0.22 | tools for building conda packages / BSD 3-Clause |
| [configparser](http://docs.python.org/3/library/configparser.html) | 3.5.0 | This library brings the updated configparser from Python 3.5 to Python 2.6-3.5 / MIT |
| console\_shortcut | 0.1.1 | Console shortcut creator for Windows (using menuinst) / BSD |
| [contextlib2](http://contextlib2.readthedocs.org) | 0.5.5 | Backports and enhancements for the contextlib module / PSF |
| [cryptography](https://github.com/pyca/cryptography) | 2.0.3 | Provides cryptographic recipes and primitives to Python developers / Apache 2.0 or BSD 3-Clause, PSF 2 |
| [curl](http://curl.haxx.se/) | 7.55.1 | tool and library for transferring data with URL syntax / MIT/X derivate (`<http://curl.haxx.se/docs/copyright.html>`) |
| [cycler](http://matplotlib.org/cycler) | 0.10.0 | Composable style cycles. / BSD 3-Clause |
| [cython](http://www.cython.org/) | 0.26.1 | The Cython compiler for writing C extensions for the Python language / Apache-2.0 |
| [cytoolz](https://github.com/pytoolz/cytoolz) | 0.8.2 | Cython implementation of Toolz. High performance functional utilities. / BSD 3-Clause |
| [dask](http://dask.pydata.org/en/latest/) | 0.15.2 | Parallel Python with task scheduling / BSD 3-Clause |
| [dask-core](http://github.com/dask/dask/) | 0.15.2 | Parallel Python with task scheduling / BSD 3-Clause |
| [datashape](http://datashape.pydata.org) | 0.5.4 | A data description language. / BSD 2-Clause |
| [decorator](https://github.com/micheles/decorator) | 4.1.2 | Better living through Python with decorators. / BSD 3-Clause |
| [distributed](http://distributed.readthedocs.io/en/latest/) | 1.18.3 | Distributed computing with Dask / BSD 3-Clause |
| [docutils](http://docutils.sourceforge.net/) | 0.14 | Docutils – Python Documentation Utilities / Public Domain Dedictation and BSD 2-Clause and PSF 2.1.1 and GPL 3.0 |
| [entrypoints](https://github.com/takluyver/entrypoints) | 0.2.3 | Discover and load entry points from installed packages. / MIT License |
| [enum34](https://bitbucket.org/stoneleaf/enum34) | 1.1.6 | Python 3.4 Enum backported to 3.3, 3.2, 3.1, 2.7, 2.6, 2.5, and 2.4 / BSD 3-Clause |
| [et\_xmlfile](https://bitbucket.org/openpyxl/et_xmlfile) | 1.0.1 | An implementation of lxml.xmlfile for the standard library / MIT |
| [fastcache](https://github.com/pbrady/fastcache) | 1.0.2 | C implementation of Python 3 lru\_cache / MIT |
| [filelock](https://github.com/benediktschmitt/py-filelock) | 2.0.12 | A platform independent file lock. / Public Domain |
| [flask](http://flask.pocoo.org) | 0.12.2 | A microframework based on Werkzeug, Jinja2 and good intentions. / BSD 3-Clause |
| [flask-cors](https://github.com/corydolphin/flask-cors) | 3.0.3 | A Flask extension adding a decorator for CORS support / MIT |
| [freetype](https://www.freetype.org/) | 2.8 | A Free, High-Quality, and Portable Font Engine / GPL-2.0 and FreeType |
| [funcsigs](http://funcsigs.readthedocs.org) | 1.0.2 | Python function signatures from PEP362 for Python 2.6, 2.7 and 3.2+. / Apache 2.0 |
| [functools32](https://github.com/MiCHiLU/python-functools32) | 3.2.3.2 | Backport of the functools module from Python 3.2.3 for use on 2.7 and PyPy. / PSF license |
| [futures](https://github.com/agronholm/pythonfutures) | 3.1.1 | Backport of the concurrent.futures package from Python 3.2 / PSF |
| [get\_terminal\_size](https://github.com/chrippa/backports.shutil_get_terminal_size) | 1.0.0 | Get the size of the terminal window. / MIT |
| [gevent](http://www.gevent.org/) | 1.2.2 | Coroutine-based network library / MIT |
| [glob2](https://github.com/miracle2k/python-glob2) | 0.5 | Version of the glob module that supports recursion via \*\*, and can capture patterns. / BSD-2-Clause |
| [greenlet](https://github.com/python-greenlet/greenlet) | 0.4.12 | Lightweight in-process concurrent programming / MIT |
| [grin](http://pypi.python.org/pypi/grin) | 1.2.1 | Enhanced grep-like tool / BSD 3-Clause |
| [h5py](http://www.h5py.org/) | 2.7.0 | Read and write HDF5 files from Python. / BSD 3-Clause |
| [hdf5](http://www.hdfgroup.org/HDF5/) | 1.10.1 | HDF5 is a data model, library, and file format for storing and managing data / HDF5 |
| [heapdict](http://stutzbachenterprises.com/) | 1.0.0 | A heap with decrease-key and increase-key operations / BSD 3-Clause |
| [html5lib](https://github.com/html5lib/html5lib-python) | 0.999999999 | HTML parser based on the WHATWG HTML specification / MIT |
| [icc\_rt](https://software.intel.com/en-us/node/522690) | 2017.0.4 | Intel runtime libraries for C, C++ and Fortran compilers / Intel proprietary |
| [icu](http://site.icu-project.org/) | 58.2 | International Components for Unicode. / MIT |
| [idna](https://github.com/kjd/idna) | 2.6 | Internationalized Domain Names in Applications (IDNA). / BSD Like |
| [imageio](http://imageio.github.io) | 2.2.0 | a Python library for reading and writing image data / BSD 2-Clause |
| [imagesize](https://github.com/shibukawa/imagesize_py) | 0.7.1 | Getting image size from png/jpeg/jpeg2000/gif file / MIT |
| [intel-openmp](https://software.intel.com/en-us/node/522690) | 2018.0.0 | Math library for Intel and compatible processors / proprietary - Intel |
| [ipaddress](https://github.com/phihag/ipaddress) | 1.0.18 | IPv4/IPv6 manipulation library / PSF 2 |
| [ipykernel](http://ipython.org) | 4.6.1 | IPython Kernel for Jupyter / BSD 3-clause |
| [ipython](http://ipython.org/) | 5.4.1 | IPython: Productive Interactive Computing / BSD 3-clause |
| [ipython\_genutils](http://ipython.org) | 0.2.0 | vestigial utilities from IPython / BSD 3-Clause |
| [ipywidgets](https://github.com/ipython/ipywidgets) | 7.0.0 | Jupyter Interactive Widgets / BSD 3-clause |
| [isort](https://github.com/timothycrosley/isort) | 4.2.15 | A Python utility / library to sort Python imports. / MIT |
| [itsdangerous](https://github.com/pallets/itsdangerous) | 0.24 | Various helpers to pass trusted data to untrusted environments. / BSD 3-Clause |
| [jdcal](https://github.com/phn/jdcal) | 1.3 | Julian dates from proleptic Gregorian and Julian calendars. / BSD 2-Clause |
| [jedi](https://github.com/davidhalter/jedi/) | 0.10.2 | An autocompletion tool for Python that can be used for text editors. / MIT |
| [jinja2](http://jinja.pocoo.org) | 2.9.6 | An easy to use stand-alone template engine written in pure python. / 3-Clause BSD |
| [jpeg](http://www.ijg.org/) | 9b | read/write jpeg COM, EXIF, IPTC medata / Custom free software license |
| [jsonschema](https://github.com/Julian/jsonschema) | 2.6.0 | An implementation of JSON Schema validation for Python / MIT |
| [jupyter](http://jupyter.org) | 1.0.0 | Jupyter metapackage. Install all the Jupyter components in one go. / BSD 3-Clause |
| [jupyter\_client](http://jupyter.org) | 5.1.0 | Jupyter protocol implementation and client libraries / BSD 3-clause |
| [jupyter\_console](http://jupyter.org) | 5.2.0 | Jupyter terminal console / BSD 3-Clause |
| [jupyter\_core](http://jupyter.org) | 4.3.0 | Core common functionality of Jupyter projects. / BSD 3-clause |
| [jupyterlab](https://github.com/jupyterlab/jupyterlab) | 0.27.0 | A pre-alpha version of a computational environment for Jupyter. / BSD 3-Clause |
| [jupyterlab\_launcher](http://github.com/jupyterlab/jupyterlab_launcher) | 0.4.0 | A Launcher for JupyterLab based applications. / BSD 3-Clause |
| [lazy-object-proxy](https://github.com/ionelmc/python-lazy-object-proxy) | 1.3.1 | A fast and thorough lazy object proxy. / BSD 2-Clause |
| [libiconv](https://www.gnu.org/software/libiconv/) | 1.15 | Provides iconv for systems which don’t have one (or that cannot convert from/to Unicode.) / GPL and LGPL |
| [libpng](http://www.libpng.org/pub/png/libpng.html) | 1.6.32 | PNG reference library. / zlib/libpng |
| [libssh2](https://www.libssh2.org/) | 1.8.0 | the SSH library / BSD 3-Clause |
| [libtiff](http://www.libtiff.org/) | 4.0.8 | Support for the Tag Image File Format (TIFF). / HPND |
| [libxml2](http://xmlsoft.org/) | 2.9.4 | The XML C parser and toolkit of Gnome / MIT |
| [libxslt](http://xmlsoft.org/XSLT/) | 1.1.29 | The XSLT C library developed for the GNOME project / MIT |
| [llvmlite](http://llvmlite.pydata.org/) | 0.20.0 | Lightweight wrapper around basic LLVM functionality / BSD |
| [locket](https://github.com/mwilliamson/locket.py) | 0.2.0 | File-based locks for Python for Linux and Windows / BSD 2-Clause |
| [lxml](http://lxml.de/) | 3.8.0 | Pythonic binding for the C libraries libxml2 and libxslt. / BSD 3-Clause, GPL-2.0, ZPL-2.0, and ElementTree |
| [markupsafe](https://www.palletsprojects.com/p/markupsafe/) | 1.0 | A Python module that implements the jinja2.Markup string / BSD 3-Clause |
| [matplotlib](http://matplotlib.org/) | 2.0.2 | Publication quality figures in Python / PSF-based |
| [mccabe](https://github.com/PyCQA/mccabe) | 0.6.1 | McCabe complexity checker for Python / MIT |
| [menuinst](https://github.com/ContinuumIO/menuinst) | 1.4.8 | cross platform menu item installation / BSD |
| [mistune](https://github.com/lepture/mistune) | 0.7.4 | The fastest markdown parser in pure Python. / BSD 3-Clause |
| [mkl](http://software.intel.com/en-us/articles/intel-mkl/) | 2018.0.0 | Math library for Intel and compatible processors / proprietary - Intel |
| [mkl-service](https://github.com/ContinuumIO/mkl-service) | 1.1.2 | Python bindings to MKL service functions / 3-clause BSD |
| [mpmath](http://mpmath.org) | 0.19 | Python library for arbitrary-precision floating-point arithmetic / BSD 3-Clause |
| [msgpack-python](http://msgpack.org/) | 0.4.8 | MessagePack (de)serializer. / Apache 2.0 |
| [multipledispatch](https://github.com/mrocklin/multipledispatch/) | 0.4.9 | Multiple dispatch in Python / BSD 3-Clause |
| [navigator-updater](https://github.com/ContinuumIO/navigator-updater) | 0.1.0 | Anaconda Navigator Updater / proprietary - Continuum Analytics, Inc. |
| [nbconvert](http://jupyter.org) | 5.3.1 | Converting Jupyter Notebooks / BSD 3-Clause |
| [nbformat](http://jupyter.org) | 4.4.0 | The reference implementation of the Jupyter Notebook format / BSD 3-clause |
| [networkx](https://networkx.github.io/) | 1.11 | Python package for creating and manipulating complex networks / BSD 3-Clause |
| [nltk](http://nltk.org/) | 3.2.4 | Build Python programs to work with human language data / Apache 2.0 |
| [nose](http://readthedocs.org/docs/nose/) | 1.3.7 | Nose extends unittest to make testing easier / LGPL-2.1 |
| [notebook](http://jupyter.org) | 5.0.0 | A web-based notebook environment for interactive computing / BSD 3-clause |
| [numba](http://numba.pydata.org/) | 0.35.0 | NumPy aware dynamic Python compiler using LLVM / BSD |
| [numexpr](https://github.com/pydata/numexpr) | 2.6.2 | Fast numerical expression evaluator for NumPy. / MIT |
| [numpy](http://numpy.scipy.org/) | 1.13.1 | Array processing for numbers, strings, records, and objects. / BSD 3-Clause |
| [numpydoc](https://github.com/numpy/numpydoc) | 0.7.0 | Sphinx extension to support docstrings in Numpy format / BSD 3-Clause |
| [odo](http://odo.pydata.org) | 0.5.1 | Data migration in Python / BSD-3-Clause |
| [olefile](http://www.decalage.info/python/olefileio) | 0.44 | parse, read and write Microsoft OLE2 files / BSD License 2-Clause |
| [openpyxl](https://openpyxl.readthedocs.io) | 2.4.8 | A Python library to read/write Excel 2010 xlsx/xlsm files / MIT |
| [openssl](http://www.openssl.org/) | 1.0.2l | OpenSSL is an open-source implementation of the SSL and TLS protocols / OpenSSL |
| [packaging](https://github.com/pypa/packaging) | 16.8 | Core utilities for Python packages / Apache 2.0 or BSD 2-Clause |
| [pandas](http://pandas.pydata.org) | 0.20.3 | High-performance, easy-to-use data structures and data analysis tools. / BSD 3-clause |
| [pandoc](http://johnmacfarlane.net/pandoc/) | 1.19.2.1 | Universal markup converter (repackaged binaries). / GPL-2.0 |
| [pandocfilters](https://github.com/jgm/pandocfilters) | 1.4.2 | A python module for writing pandoc filters / BSD-3-Clause |
| [partd](https://github.com/dask/partd) | 0.3.8 | Data structure for on-disk shuffle operations / BSD 3-Clause |
| [path.py](https://github.com/jaraco/path.py) | 10.3.1 | A module wrapper for os.path / MIT |
| [pathlib2](https://github.com/mcmtroffaes/pathlib2) | 2.3.0 | Fork of pathlib aiming to support the full stdlib Python API. / MIT |
| [patsy](https://github.com/pydata/patsy) | 0.4.1 | Describing statistical models in Python using symbolic formulas / BSD-2-Clause, PSF2 |
| [pep8](http://pep8.readthedocs.org/) | 1.7.0 | Python style guide checker / MIT |
| [pickleshare](https://github.com/vivainio/pickleshare) | 0.7.4 | Tiny ‘shelve’-like database with concurrency support / MIT |
| [pillow](http://python-imaging.github.io/) | 4.2.1 | Pillow is the friendly PIL fork by Alex Clark and Contributors. / PIL |
| [pip](https://pip.pypa.io/en/stable/) | 9.0.1 | PyPA recommended tool for installing Python packages / MIT |
| [pkginfo](https://code.launchpad.net/~tseaver/pkginfo/trunk) | 1.4.1 | Query metadatdata from sdists / bdists / installed packages. / MIT |
| [ply](http://www.dabeaz.com/ply/index.html) | 3.10 | Python Lex-Yacc / BSD 3-clause |
| [prompt\_toolkit](https://github.com/jonathanslenders/python-prompt-toolkit) | 1.0.15 | Library for building powerful interactive command lines in Python / BSD 3-clause |
| [psutil](https://github.com/giampaolo/psutil) | 5.2.2 | A cross-platform process and system utilities module for Python / BSD 3-Clause |
| [py](https://github.com/pytest-dev/py) | 1.4.34 | library with cross-python path, ini-parsing, io, code, log facilities / MIT |
| [pycodestyle](https://pycodestyle.readthedocs.io/) | 2.3.1 | Python style guide checker / MIT |
| [pycosat](https://github.com/ContinuumIO/pycosat) | 0.6.2 | Bindings to picosat (a SAT solver) / MIT |
| [pycparser](https://github.com/eliben/pycparser) | 2.18 | Complete C99 parser in pure Python / BSD 3-clause |
| [pycrypto](http://www.pycrypto.org/) | 2.6.1 | Cryptographic modules for Python. / Public Domain |
| [pycurl](http://pycurl.sourceforge.net/) | 7.43.0 | A Python Interface To The cURL library / LGPL, MIT |
| [pyflakes](https://github.com/PyCQA/pyflakes) | 1.5.0 | Pyflakes analyzes programs and detects various errors. / MIT |
| [pygments](http://pygments.org/) | 2.2.0 | Generic syntax highlighting package / BSD 2-clause |
| [pylint](http://www.pylint.org/) | 1.7.2 | python code static checker / GPL |
| [pyodbc](https://github.com/mkleehammer/pyodbc) | 4.0.17 | DB API Module for ODBC / MIT |
| [pyopenssl](https://github.com/pyca/pyopenssl) | 17.2.0 | Python wrapper module around the OpenSSL library / Apache 2.0 |
| [pyparsing](http://pyparsing.wikispaces.com/) | 2.2.0 | Create and execute simple grammars / MIT |
| [pyqt](http://www.riverbankcomputing.co.uk/software/pyqt) | 5.6.0 | Python binding of the cross-platform GUI toolkit Qt. / Commercial, GPL-2.0, GPL-3.0 |
| [pysocks](https://github.com/Anorov/PySocks) | 1.6.7 | A Python SOCKS client module. See [Anorov/PySocks](https://github.com/Anorov/PySocks) for more information. / BSD 3-Clause |
| [pytables](http://www.pytables.org) | 3.4.2 | Brings together Python, HDF5 and NumPy to easily handle large amounts of data. / BSD 3-Clause |
| [pytest](https://docs.pytest.org/en/latest/) | 3.2.1 | Simple and powerful testing with Python. / MIT |
| [python](http://www.python.org/) | 2.7.13 | General purpose programming language / PSF |
| [python-dateutil](https://dateutil.readthedocs.org/) | 2.6.1 | Extensions to the standard Python datetime module. / BSD 3-clause |
| [pytz](http://pythonhosted.org/pytz/) | 2017.2 | World timezone definitions, modern and historical. / MIT |
| [pywavelets](https://github.com/PyWavelets/pywt) | 0.5.2 | Discrete Wavelet Transforms in Python. / MIT |
| [pywin32](https://sourceforge.net/projects/pywin32) | 221 | Python extensions for Windows / PSF |
| [pyyaml](http://pyyaml.org/wiki/PyYAML) | 3.12 | YAML parser and emitter for Python / MIT |
| [pyzmq](https://github.com/zeromq/pyzmq) | 16.0.2 | Python bindings for zeromq / BSD 3-clause |
| [qt](http://qt-project.org) | 5.6.2 | Qt is a cross-platform application and UI framework. / LGPL-3.0 |
| [qtawesome](https://github.com/spyder-ide/qtawesome) | 0.4.4 | Iconic fonts in PyQt and PySide applications / MIT |
| [qtconsole](http://jupyter.org) | 4.3.1 | Jupyter Qt console / BSD 3-Clause |
| [qtpy](https://github.com/spyder-ide/qtpy) | 1.3.1 | Abstraction layer for PyQt5/PyQt4/PySide / MIT |
| [requests](http://python-requests.org) | 2.18.4 | Python HTTP for Humans. / Apache 2.0 |
| [rope](https://github.com/python-rope/rope) | 0.10.5 | A python refactoring library… / GPL 2.0 |
| [ruamel\_yaml](https://bitbucket.org/ruamel/yaml) | 0.11.14 | A patched copy of ruamel.yaml. / MIT |
| [scandir](https://github.com/benhoyt/scandir) | 1.5 | scandir, a better directory iterator and faster os.walk() / BSD 3-Clause |
| [scikit-image](http://scikit-image.org/) | 0.13.0 | Image processing routines for SciPy. / BSD 3-Clause |
| [scikit-learn](http://scikit-learn.org/) | 0.19.0 | A set of python modules for machine learning and data mining / BSD 3-Clause |
| [scipy](http://www.scipy.org/) | 0.19.1 | Scientific Library for Python / BSD 3-Clause |
| [seaborn](http://stanford.edu/~mwaskom/software/seaborn/) | 0.8.0 | Statistical data visualization / BSD 3-Clause |
| [setuptools](https://github.com/pypa/setuptools) | 36.5.0 | Download, build, install, upgrade, and uninstall Python packages / MIT |
| [simplegeneric](http://cheeseshop.python.org/pypi/simplegeneric) | 0.8.1 | Simple generic functions (similar to Python’s own len(), pickle.dump(), etc.) / Zope Public |
| [singledispatch](http://docs.python.org/3/library/functools.html#functools.singledispatch) | 3.4.0.3 | Transforms a function into a single-dispatch generic function / MIT |
| [sip](http://www.riverbankcomputing.com/software/sip/intro) | 4.18.1 | Create Python bindings for C and C++ libraries / GPL-3.0 |
| [six](http://pypi.python.org/pypi/six/) | 1.10.0 | Python 2 and 3 compatibility utilities / MIT |
| [snowballstemmer](https://github.com/shibukawa/snowball_py) | 1.2.1 | Snowball stemming library collection for Python / BSD-2-Clause |
| [sortedcollections](http://www.grantjenks.com/docs/sortedcollections/) | 0.5.3 | Python Sorted Collections / Apache-2.0 |
| [sortedcontainers](http://www.grantjenks.com/docs/sortedcontainers/) | 1.5.7 | Python Sorted Container Types: SortedList, SortedDict, and SortedSet / Apache 2.0 |
| [sphinx](http://www.sphinx-doc.org) | 1.6.3 | Sphinx is a tool that makes it easy to create intelligent and beautiful documentation / BSD 2-clause |
| sphinxcontrib | 1.0 | Python namespace for sphinxcontrib / BSD |
| [sphinxcontrib-websupport](https://pypi.python.org/pypi/sphinxcontrib-websupport) | 1.0.1 | Sphinx API for Web Apps / BSD-2-Clause |
| [spyder](https://github.com/spyder-ide/spyder) | 3.2.3 | Scientific PYthon Development EnviRonment / MIT |
| [sqlalchemy](http://www.sqlalchemy.org/) | 1.1.13 | Database Abstraction Library. / MIT |
| [sqlite](http://www.sqlite.org/) | 3.20.1 | Implements a self-contained, zero-configuration, SQL database engine. / Public-Domain (`<http://www.sqlite.org/copyright.html>`) |
| [ssl\_match\_hostname](http://bitbucket.org/brandon/backports.ssl_match_hostname) | 3.5.0.1 | The ssl.match\_hostname() function from Python 3.5 / PSF 2 |
| [statsmodels](https://www.statsmodels.org) | 0.8.0 | Statistical computations and models for use with SciPy / BSD 3-Clause |
| [subprocess32](https://github.com/google/python-subprocess32) | 3.2.7 | A backport of the subprocess module from Python 3.2/3.3 for use on 2.x. / PSF 2 |
| [sympy](http://sympy.org) | 1.1.1 | Python library for symbolic mathematics / 3-clause BSD |
| [tblib](https://github.com/ionelmc/python-tblib) | 1.3.2 | Traceback serialization library. / BSD 2-Clause |
| [testpath](https://testpath.readthedocs.io) | 0.3.1 | Testpath is a collection of utilities for Python code working with files and commands. / MIT |
| [tk](http://www.tcl.tk/) | 8.6.7 | A dynamic programming language with GUI support. Bundles Tcl and Tk. / Tcl/Tk |
| [toolz](http://toolz.readthedocs.org/) | 0.8.2 | A functional standard library for Python. / BSD 3-Clause |
| [tornado](http://www.tornadoweb.org/) | 4.5.2 | A Python web framework and asynchronous networking library, originally developed at FriendFeed. / Apache 2.0 |
| [traitlets](http://ipython.org/) | 4.3.2 | Configuration system for Python applications / BSD 3-clause |
| [typing](https://docs.python.org/3.5/library/typing.html) | 3.6.2 | Type Hints for Python - backport for `Python<3.5` / PSF |
| [unicodecsv](https://github.com/jdunck/python-unicodecsv) | 0.14.1 | Drop-in replacement for csv module which supports unicode strings / BSD |
| [urllib3](https://urllib3.readthedocs.io/) | 1.22 | HTTP library with thread-safe connection pooling, file post, and more. / MIT |
| [vc](https://github.com/conda/conda/wiki/VC-features) | 9 | A meta-package to track VC features. / Modified BSD License (3-clause) |
| [vs2008\_runtime](http://www.microsoft.com) | 9.00.30729.1 | Bundles of the MSVC 9 (VS 2008) runtime / Proprietary |
| [vs2015\_runtime](http://www.microsoft.com) | 14.0.25123 | Bundles of the MSVC 14 (VS 2015) runtime / Proprietary |
| [wcwidth](https://github.com/jquast/wcwidth) | 0.1.7 | Measures number of Terminal column cells of wide-character codes. / MIT |
| [webencodings](https://github.com/gsnedders/python-webencodings) | 0.5.1 | Character encoding aliases for legacy web content / BSD 3-Clause |
| [werkzeug](http://werkzeug.pocoo.org/) | 0.12.2 | The Python WSGI Utility Library. / BSD 3-Clause |
| [wheel](https://bitbucket.org/pypa/wheel/) | 0.29.0 | A built-package format for Python. / MIT |
| [widgetsnbextension](http://ipython.org) | 3.0.2 | IPython HTML widgets for Jupyter / BSD 3-clause |
| [win\_inet\_pton](https://github.com/hickeroar/win_inet_pton) | 1.0.1 | Native inet\_pton and inet\_ntop implementation for Python on Windows (with ctypes). / PUBLIC-DOMAIN |
| [win\_unicode\_console](https://github.com/Drekin/win-unicode-console) | 0.5 | A Python package to enable Unicode input and display when running Python from Windows console. / MIT |
| [wincertstore](https://bitbucket.org/tiran/wincertstore) | 0.2 | Python module to extract CA and CRL certs from Windows’ cert store (ctypes based). / PSF 2 |
| [wrapt](https://github.com/GrahamDumpleton/wrapt) | 1.10.11 | Module for decorators, wrappers and monkey patching. / BSD 2-Clause |
| [xlrd](http://www.python-excel.org/) | 1.1.0 | Library for developers to extract data from Microsoft Excel (tm) spreadsheet files / BSD 3-Clause and BSD with advertising |
| [xlsxwriter](https://xlsxwriter.readthedocs.io/) | 0.9.8 | A Python module for creating Excel XLSX files / BSD 2-Clause |
| [xlwings](http://xlwings.org/) | 0.11.4 | Interact with Excel from Python and vice versa / 3-clause BSD |
| [xlwt](http://www.python-excel.org/) | 1.3.0 | Writing data and formatting information to Excel files / BSD |
| [yaml](http://pyyaml.org/wiki/LibYAML) | 0.1.7 | A C library for parsing and emitting YAML. / MIT |
| [zict](http://github.com/mrocklin/zict) | 0.1.2 | Composable Dictionary Classes / BSD 3-Clause |
| [zlib](http://zlib.net/) | 1.2.11 | Massively spiffy yet delicately unobtrusive compression library / zlib |
| Name | Version | Summary / License |
|---|---|---|
| [alabaster](http://www.sphinx-doc.org/en/stable/index.html) | 0.7.10 | Configurable, Python 2+3 compatible Sphinx theme. / BSD 3-Clause |
| [anaconda-client](http://anaconda.org) | 1.6.5 | anaconda.org command line client library / BSD 3-clause |
| [anaconda-navigator](https://github.com/ContinuumIO/navigator) | 1.6.8 | Anaconda Navigator / proprietary - Continuum Analytics, Inc. |
| [anaconda-project](https://github.com/Anaconda-Platform/anaconda-project) | 0.8.0 | Reproducible, executable project directories. / BSD 3-Clause |
| [appnope](http://github.com/minrk/appnope) | 0.1.0 | Disable App Nap on OS X 10.9 / BSD 2-Clause |
| [appscript](http://appscript.sourceforge.net/) | 1.0.1 | Control AppleScriptable applications from Python / Public-Domain |
| [asn1crypto](https://github.com/wbond/asn1crypto) | 0.22.0 | Python ASN.1 library with a focus on performance and a pythonic API / MIT |
| [astroid](https://www.astroid.org/) | 1.5.3 | A abstract syntax tree for Python with inference support. / LGPL 2.1 |
| [astropy](http://www.astropy.org/) | 2.0.2 | Community-developed Python Library for Astronomy / BSD |
| [babel](http://babel.pocoo.org/) | 2.5.0 | Utilities to internationalize and localize Python applications / BSD 3-clause |
| [backports](https://bitbucket.org/brandon/backports) | 1.0 | / BSD |
| [backports.functools\_lru\_cache](https://github.com/jaraco/backports.functools_lru_cache) | 1.4 | Backport of functools.lru\_cache from Python 3.3 as published at ActiveState. / MIT |
| [backports.shutil\_get\_terminal\_size](https://github.com/chrippa/backports.shutil_get_terminal_size) | 1.0.0 | A backport of the get\_terminal\_size function from Python 3.3’s shutil. / MIT |
| [backports\_abc](https://github.com/cython/backports_abc) | 0.5 | A backport of recent additions to the collections.abc module. / PSF 2 |
| [beautifulsoup4](http://www.crummy.com/software/BeautifulSoup/) | 4.6.0 | Python library designed for screen-scraping / MIT |
| [bitarray](https://github.com/ilanschnell/bitarray) | 0.8.1 | efficient arrays of booleans – C extension / PSF |
| [bkcharts](http://github.com/bokeh/bkcharts) | 0.2 | High level chart types built on top of Bokeh / BSD 3-Clause |
| [blaze](http://blaze.pydata.org) | 0.11.3 | NumPy and Pandas interface to big data / BSD 3-Clause |
| [bleach](https://github.com/mozilla/bleach) | 2.0.0 | Easy, whitelist-based HTML-sanitizing tool / Apache-2.0 |
| [bokeh](http://bokeh.pydata.org/) | 0.12.7 | Statistical and novel interactive HTML plots for Python / BSD 3-Clause |
| [boto](https://github.com/boto/boto/) | 2.48.0 | Amazon Web Services Library / MIT |
| [bottleneck](http://berkeleyanalytics.com/bottleneck) | 1.2.1 | Fast NumPy array functions written in Cython. / BSD 2-Clause |
| [ca-certificates](https://github.com/conda-forge/ca-certificates-feedstock) | 2017.08.26 | Certificates for use with other packages. / ISC |
| [cdecimal](http://www.bytereef.org/mpdecimal/index.html) | 2.3 | Fast drop-in replacement for decimal.py / BSD 2-Clause |
| [certifi](http://certifi.io/) | 2017.7.27.1 | Python package for providing Mozilla’s CA Bundle. / ISC |
| [cffi](https://bitbucket.org/cffi/cffi) | 1.10.0 | Foreign Function Interface for Python calling C code. / MIT |
| [chardet](https://github.com/chardet/chardet) | 3.0.4 | Universal character encoding detector / LGPL2 |
| [click](http://click.pocoo.org/) | 6.7 | A simple wrapper around optparse for powerful command line utilities. / BSD 3-Clause |
| [cloudpickle](https://github.com/cloudpipe/cloudpickle) | 0.4.0 | Extended pickling support for Python objects / BSD 3-Clause |
| [clyent](https://github.com/Anaconda-Platform/clyent) | 1.2.2 | Command line client library for windows and posix / BSD 3-Clause |
| [colorama](https://github.com/tartley/colorama) | 0.3.9 | Cross-platform colored terminal text. / BSD 3-Clause |
| [conda](http://conda.pydata.org/) | 4.3.27 | OS-agnostic, system-level binary package and environment manager. / BSD 3-Clause |
| [conda-build](https://github.com/conda/conda-build) | 3.0.22 | tools for building conda packages / BSD 3-Clause |
| [configparser](http://docs.python.org/3/library/configparser.html) | 3.5.0 | This library brings the updated configparser from Python 3.5 to Python 2.6-3.5 / MIT |
| [contextlib2](http://contextlib2.readthedocs.org) | 0.5.5 | Backports and enhancements for the contextlib module / PSF |
| [cryptography](https://github.com/pyca/cryptography) | 2.0.3 | Provides cryptographic recipes and primitives to Python developers / Apache 2.0 or BSD 3-Clause, PSF 2 |
| [curl](http://curl.haxx.se/) | 7.55.1 | tool and library for transferring data with URL syntax / MIT/X derivate (`<http://curl.haxx.se/docs/copyright.html>`) |
| [cycler](http://matplotlib.org/cycler) | 0.10.0 | Composable style cycles. / BSD 3-Clause |
| [cython](http://www.cython.org/) | 0.26.1 | The Cython compiler for writing C extensions for the Python language / Apache-2.0 |
| [cytoolz](https://github.com/pytoolz/cytoolz) | 0.8.2 | Cython implementation of Toolz. High performance functional utilities. / BSD 3-Clause |
| [dask](http://dask.pydata.org/en/latest/) | 0.15.2 | Parallel Python with task scheduling / BSD 3-Clause |
| [dask-core](http://github.com/dask/dask/) | 0.15.2 | Parallel Python with task scheduling / BSD 3-Clause |
| [datashape](http://datashape.pydata.org) | 0.5.4 | A data description language. / BSD 2-Clause |
| [dbus](http://www.freedesktop.org/wiki/Software/dbus/) | 1.10.22 | Simple message bus system for applications to talk to one another / GPL2 |
| [decorator](https://github.com/micheles/decorator) | 4.1.2 | Better living through Python with decorators. / BSD 3-Clause |
| [distributed](http://distributed.readthedocs.io/en/latest/) | 1.18.3 | Distributed computing with Dask / BSD 3-Clause |
| [docutils](http://docutils.sourceforge.net/) | 0.14 | Docutils – Python Documentation Utilities / Public Domain Dedictation and BSD 2-Clause and PSF 2.1.1 and GPL 3.0 |
| [entrypoints](https://github.com/takluyver/entrypoints) | 0.2.3 | Discover and load entry points from installed packages. / MIT License |
| [enum34](https://bitbucket.org/stoneleaf/enum34) | 1.1.6 | Python 3.4 Enum backported to 3.3, 3.2, 3.1, 2.7, 2.6, 2.5, and 2.4 / BSD 3-Clause |
| [et\_xmlfile](https://bitbucket.org/openpyxl/et_xmlfile) | 1.0.1 | An implementation of lxml.xmlfile for the standard library / MIT |
| [expat](http://expat.sourceforge.net/) | 2.2.4 | Expat XML parser library in C. / MIT |
| [fastcache](https://github.com/pbrady/fastcache) | 1.0.2 | C implementation of Python 3 lru\_cache / MIT |
| [filelock](https://github.com/benediktschmitt/py-filelock) | 2.0.12 | A platform independent file lock. / Public Domain |
| [flask](http://flask.pocoo.org) | 0.12.2 | A microframework based on Werkzeug, Jinja2 and good intentions. / BSD 3-Clause |
| [flask-cors](https://github.com/corydolphin/flask-cors) | 3.0.3 | A Flask extension adding a decorator for CORS support / MIT |
| [freetype](https://www.freetype.org/) | 2.8 | A Free, High-Quality, and Portable Font Engine / GPL-2.0 and FreeType |
| [funcsigs](http://funcsigs.readthedocs.org) | 1.0.2 | Python function signatures from PEP362 for Python 2.6, 2.7 and 3.2+. / Apache 2.0 |
| [functools32](https://github.com/MiCHiLU/python-functools32) | 3.2.3.2 | Backport of the functools module from Python 3.2.3 for use on 2.7 and PyPy. / PSF license |
| [futures](https://github.com/agronholm/pythonfutures) | 3.1.1 | Backport of the concurrent.futures package from Python 3.2 / PSF |
| [get\_terminal\_size](https://github.com/chrippa/backports.shutil_get_terminal_size) | 1.0.0 | Get the size of the terminal window. / MIT |
| [gettext](https://www.gnu.org/software/gettext/) | 0.19.8.1 | Internationalization package. / GPLv2 |
| [gevent](http://www.gevent.org/) | 1.2.2 | Coroutine-based network library / MIT |
| [glib](https://developer.gnome.org/glib/) | 2.53.6 | Provides core application building blocks for libraries and applications written in C. / LGPL-2.1 |
| [glob2](https://github.com/miracle2k/python-glob2) | 0.5 | Version of the glob module that supports recursion via \*\*, and can capture patterns. / BSD-2-Clause |
| [gmp](http://gmplib.org/) | 6.1.2 | The GNU multiprecision library. / GPL 2 and LGPL 3 |
| [gmpy2](https://pypi.python.org/pypi/gmpy2) | 2.0.8 | GMP/MPIR, MPFR, and MPC interface to Python 2.6+ and 3.x / LGPL 3 |
| [greenlet](https://github.com/python-greenlet/greenlet) | 0.4.12 | Lightweight in-process concurrent programming / MIT |
| [grin](http://pypi.python.org/pypi/grin) | 1.2.1 | Enhanced grep-like tool / BSD 3-Clause |
| [h5py](http://www.h5py.org/) | 2.7.0 | Read and write HDF5 files from Python. / BSD 3-Clause |
| [hdf5](http://www.hdfgroup.org/HDF5/) | 1.10.1 | HDF5 is a data model, library, and file format for storing and managing data / HDF5 |
| [heapdict](http://stutzbachenterprises.com/) | 1.0.0 | A heap with decrease-key and increase-key operations / BSD 3-Clause |
| [html5lib](https://github.com/html5lib/html5lib-python) | 0.999999999 | HTML parser based on the WHATWG HTML specification / MIT |
| [icu](http://site.icu-project.org/) | 58.2 | International Components for Unicode. / MIT |
| [idna](https://github.com/kjd/idna) | 2.6 | Internationalized Domain Names in Applications (IDNA). / BSD Like |
| [imageio](http://imageio.github.io) | 2.2.0 | a Python library for reading and writing image data / BSD 2-Clause |
| [imagesize](https://github.com/shibukawa/imagesize_py) | 0.7.1 | Getting image size from png/jpeg/jpeg2000/gif file / MIT |
| [intel-openmp](https://software.intel.com/en-us/node/522690) | 2018.0.0 | Math library for Intel and compatible processors / proprietary - Intel |
| [ipaddress](https://github.com/phihag/ipaddress) | 1.0.18 | IPv4/IPv6 manipulation library / PSF 2 |
| [ipykernel](http://ipython.org) | 4.6.1 | IPython Kernel for Jupyter / BSD 3-clause |
| [ipython](http://ipython.org/) | 5.4.1 | IPython: Productive Interactive Computing / BSD 3-clause |
| [ipython\_genutils](http://ipython.org) | 0.2.0 | vestigial utilities from IPython / BSD 3-Clause |
| [ipywidgets](https://github.com/ipython/ipywidgets) | 7.0.0 | Jupyter Interactive Widgets / BSD 3-clause |
| [isort](https://github.com/timothycrosley/isort) | 4.2.15 | A Python utility / library to sort Python imports. / MIT |
| [itsdangerous](https://github.com/pallets/itsdangerous) | 0.24 | Various helpers to pass trusted data to untrusted environments. / BSD 3-Clause |
| [jbig](https://www.cl.cam.ac.uk/~mgk25/jbigkit) | 2.1 | Implementation of the JBIG1 data compression standard / GPL-2.0 |
| [jdcal](https://github.com/phn/jdcal) | 1.3 | Julian dates from proleptic Gregorian and Julian calendars. / BSD 2-Clause |
| [jedi](https://github.com/davidhalter/jedi/) | 0.10.2 | An autocompletion tool for Python that can be used for text editors. / MIT |
| [jinja2](http://jinja.pocoo.org) | 2.9.6 | An easy to use stand-alone template engine written in pure python. / 3-Clause BSD |
| [jpeg](http://www.ijg.org/) | 9b | read/write jpeg COM, EXIF, IPTC medata / Custom free software license |
| [jsonschema](https://github.com/Julian/jsonschema) | 2.6.0 | An implementation of JSON Schema validation for Python / MIT |
| [jupyter](http://jupyter.org) | 1.0.0 | Jupyter metapackage. Install all the Jupyter components in one go. / BSD 3-Clause |
| [jupyter\_client](http://jupyter.org) | 5.1.0 | Jupyter protocol implementation and client libraries / BSD 3-clause |
| [jupyter\_console](http://jupyter.org) | 5.2.0 | Jupyter terminal console / BSD 3-Clause |
| [jupyter\_core](http://jupyter.org) | 4.3.0 | Core common functionality of Jupyter projects. / BSD 3-clause |
| [jupyterlab](https://github.com/jupyterlab/jupyterlab) | 0.27.0 | A pre-alpha version of a computational environment for Jupyter. / BSD 3-Clause |
| [jupyterlab\_launcher](http://github.com/jupyterlab/jupyterlab_launcher) | 0.4.0 | A Launcher for JupyterLab based applications. / BSD 3-Clause |
| [lazy-object-proxy](https://github.com/ionelmc/python-lazy-object-proxy) | 1.3.1 | A fast and thorough lazy object proxy. / BSD 2-Clause |
| [libcxx](http://libcxx.llvm.org/) | 4.0.1 | C++ Standard Library / MIT license or UIUC License |
| [libcxxabi](http://libcxxabi.llvm.org/) | 4.0.1 | C++ Standard Library Support / MIT license or UIUC License |
| [libedit](http://thrysoee.dk/editline/) | 3.1 | Editline Library (libedit) / 3-Clause BSD |
| [libffi](https://sourceware.org/libffi/) | 3.2.1 | A Portable Foreign Function Interface Library. / Custom |
| [libgfortran](http://gcc.gnu.org/) | 3.0.1 | Fortran libraries from the GNU Compiler Collection / GPL 3 (with GCC Runtime Library Exception 3.1) |
| [libiconv](https://www.gnu.org/software/libiconv/) | 1.15 | Provides iconv for systems which don’t have one (or that cannot convert from/to Unicode.) / GPL and LGPL |
| [libpng](http://www.libpng.org/pub/png/libpng.html) | 1.6.32 | PNG reference library. / zlib/libpng |
| [libsodium](https://github.com/jedisct1/libsodium) | 1.0.13 | A modern and easy-to-use crypto library. / ISC |
| [libssh2](https://www.libssh2.org/) | 1.8.0 | the SSH library / BSD 3-Clause |
| [libtiff](http://www.libtiff.org/) | 4.0.8 | Support for the Tag Image File Format (TIFF). / HPND |
| [libxml2](http://xmlsoft.org/) | 2.9.4 | The XML C parser and toolkit of Gnome / MIT |
| [libxslt](http://xmlsoft.org/XSLT/) | 1.1.29 | The XSLT C library developed for the GNOME project / MIT |
| [llvmlite](http://llvmlite.pydata.org/) | 0.20.0 | Lightweight wrapper around basic LLVM functionality / BSD |
| [locket](https://github.com/mwilliamson/locket.py) | 0.2.0 | File-based locks for Python for Linux and Windows / BSD 2-Clause |
| [lxml](http://lxml.de/) | 3.8.0 | Pythonic binding for the C libraries libxml2 and libxslt. / BSD 3-Clause, GPL-2.0, ZPL-2.0, and ElementTree |
| [markupsafe](https://www.palletsprojects.com/p/markupsafe/) | 1.0 | A Python module that implements the jinja2.Markup string / BSD 3-Clause |
| [matplotlib](http://matplotlib.org/) | 2.0.2 | Publication quality figures in Python / PSF-based |
| [mccabe](https://github.com/PyCQA/mccabe) | 0.6.1 | McCabe complexity checker for Python / MIT |
| [mistune](https://github.com/lepture/mistune) | 0.7.4 | The fastest markdown parser in pure Python. / BSD 3-Clause |
| [mkl](http://software.intel.com/en-us/articles/intel-mkl/) | 2018.0.0 | Math library for Intel and compatible processors / proprietary - Intel |
| [mkl-service](https://github.com/ContinuumIO/mkl-service) | 1.1.2 | Python bindings to MKL service functions / 3-clause BSD |
| [mpc](http://www.multiprecision.org/) | 1.0.3 | A C library for the arithmetic of complex numbers with arbitrarily high precision. / LGPL 3 |
| [mpfr](http://www.mpfr.org/) | 3.1.5 | The MPFR library is a C library for multiple-precision floating-point computations with correct rounding. / LGPL 3 |
| [mpmath](http://mpmath.org) | 0.19 | Python library for arbitrary-precision floating-point arithmetic / BSD 3-Clause |
| [msgpack-python](http://msgpack.org/) | 0.4.8 | MessagePack (de)serializer. / Apache 2.0 |
| [multipledispatch](https://github.com/mrocklin/multipledispatch/) | 0.4.9 | Multiple dispatch in Python / BSD 3-Clause |
| [navigator-updater](https://github.com/ContinuumIO/navigator-updater) | 0.1.0 | Anaconda Navigator Updater / proprietary - Continuum Analytics, Inc. |
| [nbconvert](http://jupyter.org) | 5.3.1 | Converting Jupyter Notebooks / BSD 3-Clause |
| [nbformat](http://jupyter.org) | 4.4.0 | The reference implementation of the Jupyter Notebook format / BSD 3-clause |
| [ncurses](http://www.gnu.org/software/ncurses/) | 6.0 | Library for text-based user interfaces / Free software (MIT-like) |
| [networkx](https://networkx.github.io/) | 1.11 | Python package for creating and manipulating complex networks / BSD 3-Clause |
| [nltk](http://nltk.org/) | 3.2.4 | Build Python programs to work with human language data / Apache 2.0 |
| [nose](http://readthedocs.org/docs/nose/) | 1.3.7 | Nose extends unittest to make testing easier / LGPL-2.1 |
| [notebook](http://jupyter.org) | 5.0.0 | A web-based notebook environment for interactive computing / BSD 3-clause |
| [numba](http://numba.pydata.org/) | 0.35.0 | NumPy aware dynamic Python compiler using LLVM / BSD |
| [numexpr](https://github.com/pydata/numexpr) | 2.6.2 | Fast numerical expression evaluator for NumPy. / MIT |
| [numpy](http://numpy.scipy.org/) | 1.13.1 | Array processing for numbers, strings, records, and objects. / BSD 3-Clause |
| [numpydoc](https://github.com/numpy/numpydoc) | 0.7.0 | Sphinx extension to support docstrings in Numpy format / BSD 3-Clause |
| [odo](http://odo.pydata.org) | 0.5.1 | Data migration in Python / BSD-3-Clause |
| [olefile](http://www.decalage.info/python/olefileio) | 0.44 | parse, read and write Microsoft OLE2 files / BSD License 2-Clause |
| [openpyxl](https://openpyxl.readthedocs.io) | 2.4.8 | A Python library to read/write Excel 2010 xlsx/xlsm files / MIT |
| [openssl](http://www.openssl.org/) | 1.0.2l | OpenSSL is an open-source implementation of the SSL and TLS protocols / OpenSSL |
| [packaging](https://github.com/pypa/packaging) | 16.8 | Core utilities for Python packages / Apache 2.0 or BSD 2-Clause |
| [pandas](http://pandas.pydata.org) | 0.20.3 | High-performance, easy-to-use data structures and data analysis tools. / BSD 3-clause |
| [pandoc](http://johnmacfarlane.net/pandoc/) | 1.19.2.1 | Universal markup converter (repackaged binaries). / GPL-2.0 |
| [pandocfilters](https://github.com/jgm/pandocfilters) | 1.4.2 | A python module for writing pandoc filters / BSD-3-Clause |
| [partd](https://github.com/dask/partd) | 0.3.8 | Data structure for on-disk shuffle operations / BSD 3-Clause |
| [path.py](https://github.com/jaraco/path.py) | 10.3.1 | A module wrapper for os.path / MIT |
| [pathlib2](https://github.com/mcmtroffaes/pathlib2) | 2.3.0 | Fork of pathlib aiming to support the full stdlib Python API. / MIT |
| [patsy](https://github.com/pydata/patsy) | 0.4.1 | Describing statistical models in Python using symbolic formulas / BSD-2-Clause, PSF2 |
| [pcre](http://www.pcre.org/) | 8.41 | Regular expression pattern matching using the same syntax and semantics as Perl 5. / BSD 3-Clause |
| [pep8](http://pep8.readthedocs.org/) | 1.7.0 | Python style guide checker / MIT |
| [pexpect](http://pexpect.sourceforge.net/) | 4.2.1 | Pexpect makes Python a better tool for controlling other applications. / ISC |
| [pickleshare](https://github.com/vivainio/pickleshare) | 0.7.4 | Tiny ‘shelve’-like database with concurrency support / MIT |
| [pillow](http://python-imaging.github.io/) | 4.2.1 | Pillow is the friendly PIL fork by Alex Clark and Contributors. / PIL |
| [pip](https://pip.pypa.io/en/stable/) | 9.0.1 | PyPA recommended tool for installing Python packages / MIT |
| [pkginfo](https://code.launchpad.net/~tseaver/pkginfo/trunk) | 1.4.1 | Query metadatdata from sdists / bdists / installed packages. / MIT |
| [ply](http://www.dabeaz.com/ply/index.html) | 3.10 | Python Lex-Yacc / BSD 3-clause |
| [prompt\_toolkit](https://github.com/jonathanslenders/python-prompt-toolkit) | 1.0.15 | Library for building powerful interactive command lines in Python / BSD 3-clause |
| [psutil](https://github.com/giampaolo/psutil) | 5.2.2 | A cross-platform process and system utilities module for Python / BSD 3-Clause |
| [ptyprocess](https://github.com/pexpect/ptyprocess) | 0.5.2 | Run a subprocess in a pseudo terminal / ISC |
| [py](https://github.com/pytest-dev/py) | 1.4.34 | library with cross-python path, ini-parsing, io, code, log facilities / MIT |
| [pyaudio](http://people.csail.mit.edu/hubert/pyaudio/) | 0.2.7 | Bindings for PortAudio v19, the cross-platform audio stream library / MIT |
| [pycodestyle](https://pycodestyle.readthedocs.io/) | 2.3.1 | Python style guide checker / MIT |
| [pycosat](https://github.com/ContinuumIO/pycosat) | 0.6.2 | Bindings to picosat (a SAT solver) / MIT |
| [pycparser](https://github.com/eliben/pycparser) | 2.18 | Complete C99 parser in pure Python / BSD 3-clause |
| [pycrypto](http://www.pycrypto.org/) | 2.6.1 | Cryptographic modules for Python. / Public Domain |
| [pycurl](http://pycurl.sourceforge.net/) | 7.43.0 | A Python Interface To The cURL library / LGPL, MIT |
| [pyflakes](https://github.com/PyCQA/pyflakes) | 1.5.0 | Pyflakes analyzes programs and detects various errors. / MIT |
| [pygments](http://pygments.org/) | 2.2.0 | Generic syntax highlighting package / BSD 2-clause |
| [pylint](http://www.pylint.org/) | 1.7.2 | python code static checker / GPL |
| [pyodbc](https://github.com/mkleehammer/pyodbc) | 4.0.17 | DB API Module for ODBC / MIT |
| [pyopenssl](https://github.com/pyca/pyopenssl) | 17.2.0 | Python wrapper module around the OpenSSL library / Apache 2.0 |
| [pyparsing](http://pyparsing.wikispaces.com/) | 2.2.0 | Create and execute simple grammars / MIT |
| [pyqt](http://www.riverbankcomputing.co.uk/software/pyqt) | 5.6.0 | Python binding of the cross-platform GUI toolkit Qt. / Commercial, GPL-2.0, GPL-3.0 |
| [pysocks](https://github.com/Anorov/PySocks) | 1.6.7 | A Python SOCKS client module. See [Anorov/PySocks](https://github.com/Anorov/PySocks) for more information. / BSD 3-Clause |
| [pytables](http://www.pytables.org) | 3.4.2 | Brings together Python, HDF5 and NumPy to easily handle large amounts of data. / BSD 3-Clause |
| [pytest](https://docs.pytest.org/en/latest/) | 3.2.1 | Simple and powerful testing with Python. / MIT |
| [python](http://www.python.org/) | 2.7.13 | General purpose programming language / PSF |
| [python-dateutil](https://dateutil.readthedocs.org/) | 2.6.1 | Extensions to the standard Python datetime module. / BSD 3-clause |
| python.app | 2 | Proxy on OS X letting Python libraries hook into the gui event loop / BSD |
| [pytz](http://pythonhosted.org/pytz/) | 2017.2 | World timezone definitions, modern and historical. / MIT |
| [pywavelets](https://github.com/PyWavelets/pywt) | 0.5.2 | Discrete Wavelet Transforms in Python. / MIT |
| [pyyaml](http://pyyaml.org/wiki/PyYAML) | 3.12 | YAML parser and emitter for Python / MIT |
| [pyzmq](https://github.com/zeromq/pyzmq) | 16.0.2 | Python bindings for zeromq / BSD 3-clause |
| [qt](http://qt-project.org) | 5.6.2 | Qt is a cross-platform application and UI framework. / LGPL-3.0 |
| [qtawesome](https://github.com/spyder-ide/qtawesome) | 0.4.4 | Iconic fonts in PyQt and PySide applications / MIT |
| [qtconsole](http://jupyter.org) | 4.3.1 | Jupyter Qt console / BSD 3-Clause |
| [qtpy](https://github.com/spyder-ide/qtpy) | 1.3.1 | Abstraction layer for PyQt5/PyQt4/PySide / MIT |
| [readline](https://cnswww.cns.cwru.edu/php/chet/readline/rltop.html) | 7.0 | library for editing command lines as they are typed in / GPL3 |
| [requests](http://python-requests.org) | 2.18.4 | Python HTTP for Humans. / Apache 2.0 |
| [rope](https://github.com/python-rope/rope) | 0.10.5 | A python refactoring library… / GPL 2.0 |
| [ruamel\_yaml](https://bitbucket.org/ruamel/yaml) | 0.11.14 | A patched copy of ruamel.yaml. / MIT |
| [scandir](https://github.com/benhoyt/scandir) | 1.5 | scandir, a better directory iterator and faster os.walk() / BSD 3-Clause |
| [scikit-image](http://scikit-image.org/) | 0.13.0 | Image processing routines for SciPy. / BSD 3-Clause |
| [scikit-learn](http://scikit-learn.org/) | 0.19.0 | A set of python modules for machine learning and data mining / BSD 3-Clause |
| [scipy](http://www.scipy.org/) | 0.19.1 | Scientific Library for Python / BSD 3-Clause |
| [seaborn](http://stanford.edu/~mwaskom/software/seaborn/) | 0.8.0 | Statistical data visualization / BSD 3-Clause |
| [setuptools](https://github.com/pypa/setuptools) | 36.5.0 | Download, build, install, upgrade, and uninstall Python packages / MIT |
| [simplegeneric](http://cheeseshop.python.org/pypi/simplegeneric) | 0.8.1 | Simple generic functions (similar to Python’s own len(), pickle.dump(), etc.) / Zope Public |
| [singledispatch](http://docs.python.org/3/library/functools.html#functools.singledispatch) | 3.4.0.3 | Transforms a function into a single-dispatch generic function / MIT |
| [sip](http://www.riverbankcomputing.com/software/sip/intro) | 4.18.1 | Create Python bindings for C and C++ libraries / GPL-3.0 |
| [six](http://pypi.python.org/pypi/six/) | 1.10.0 | Python 2 and 3 compatibility utilities / MIT |
| [snowballstemmer](https://github.com/shibukawa/snowball_py) | 1.2.1 | Snowball stemming library collection for Python / BSD-2-Clause |
| [sortedcollections](http://www.grantjenks.com/docs/sortedcollections/) | 0.5.3 | Python Sorted Collections / Apache-2.0 |
| [sortedcontainers](http://www.grantjenks.com/docs/sortedcontainers/) | 1.5.7 | Python Sorted Container Types: SortedList, SortedDict, and SortedSet / Apache 2.0 |
| [sphinx](http://www.sphinx-doc.org) | 1.6.3 | Sphinx is a tool that makes it easy to create intelligent and beautiful documentation / BSD 2-clause |
| sphinxcontrib | 1.0 | Python namespace for sphinxcontrib / BSD |
| [sphinxcontrib-websupport](https://pypi.python.org/pypi/sphinxcontrib-websupport) | 1.0.1 | Sphinx API for Web Apps / BSD-2-Clause |
| [spyder](https://github.com/spyder-ide/spyder) | 3.2.3 | Scientific PYthon Development EnviRonment / MIT |
| [sqlalchemy](http://www.sqlalchemy.org/) | 1.1.13 | Database Abstraction Library. / MIT |
| [sqlite](http://www.sqlite.org/) | 3.20.1 | Implements a self-contained, zero-configuration, SQL database engine. / Public-Domain (`<http://www.sqlite.org/copyright.html>`) |
| [ssl\_match\_hostname](http://bitbucket.org/brandon/backports.ssl_match_hostname) | 3.5.0.1 | The ssl.match\_hostname() function from Python 3.5 / PSF 2 |
| [statsmodels](https://www.statsmodels.org) | 0.8.0 | Statistical computations and models for use with SciPy / BSD 3-Clause |
| [subprocess32](https://github.com/google/python-subprocess32) | 3.2.7 | A backport of the subprocess module from Python 3.2/3.3 for use on 2.x. / PSF 2 |
| [sympy](http://sympy.org) | 1.1.1 | Python library for symbolic mathematics / 3-clause BSD |
| [tblib](https://github.com/ionelmc/python-tblib) | 1.3.2 | Traceback serialization library. / BSD 2-Clause |
| [terminado](http://github.com/mitsuhiko/markupsafe) | 0.6 | Terminals served by tornado websockets / BSD 3-clause |
| [testpath](https://testpath.readthedocs.io) | 0.3.1 | Testpath is a collection of utilities for Python code working with files and commands. / MIT |
| [tk](http://www.tcl.tk/) | 8.6.7 | A dynamic programming language with GUI support. Bundles Tcl and Tk. / Tcl/Tk |
| [toolz](http://toolz.readthedocs.org/) | 0.8.2 | A functional standard library for Python. / BSD 3-Clause |
| [tornado](http://www.tornadoweb.org/) | 4.5.2 | A Python web framework and asynchronous networking library, originally developed at FriendFeed. / Apache 2.0 |
| [traitlets](http://ipython.org/) | 4.3.2 | Configuration system for Python applications / BSD 3-clause |
| [typing](https://docs.python.org/3.5/library/typing.html) | 3.6.2 | Type Hints for Python - backport for `Python<3.5` / PSF |
| [unicodecsv](https://github.com/jdunck/python-unicodecsv) | 0.14.1 | Drop-in replacement for csv module which supports unicode strings / BSD |
| [unixodbc](http://www.unixodbc.org/) | 2.3.4 | ODBC on non MS Windows platforms / LGPL-2.1 |
| [urllib3](https://urllib3.readthedocs.io/) | 1.22 | HTTP library with thread-safe connection pooling, file post, and more. / MIT |
| [wcwidth](https://github.com/jquast/wcwidth) | 0.1.7 | Measures number of Terminal column cells of wide-character codes. / MIT |
| [webencodings](https://github.com/gsnedders/python-webencodings) | 0.5.1 | Character encoding aliases for legacy web content / BSD 3-Clause |
| [werkzeug](http://werkzeug.pocoo.org/) | 0.12.2 | The Python WSGI Utility Library. / BSD 3-Clause |
| [wheel](https://bitbucket.org/pypa/wheel/) | 0.29.0 | A built-package format for Python. / MIT |
| [widgetsnbextension](http://ipython.org) | 3.0.2 | IPython HTML widgets for Jupyter / BSD 3-clause |
| [wrapt](https://github.com/GrahamDumpleton/wrapt) | 1.10.11 | Module for decorators, wrappers and monkey patching. / BSD 2-Clause |
| [xlrd](http://www.python-excel.org/) | 1.1.0 | Library for developers to extract data from Microsoft Excel (tm) spreadsheet files / BSD 3-Clause and BSD with advertising |
| [xlsxwriter](https://xlsxwriter.readthedocs.io/) | 0.9.8 | A Python module for creating Excel XLSX files / BSD 2-Clause |
| [xlwings](http://xlwings.org/) | 0.11.4 | Interact with Excel from Python and vice versa / 3-clause BSD |
| [xlwt](http://www.python-excel.org/) | 1.2.0 | Writing data and formatting information to Excel files / BSD |
| [xz](http://tukaani.org/xz/) | 5.2.3 | Data compression software with high compression ratio / LGPL-2.1 and GPL-2.0 |
| [yaml](http://pyyaml.org/wiki/LibYAML) | 0.1.7 | A C library for parsing and emitting YAML. / MIT |
| [zeromq](http://zeromq.org) | 4.2.2 | A high-performance asynchronous messaging library. / LGPL 3 |
| [zict](http://github.com/mrocklin/zict) | 0.1.2 | Composable Dictionary Classes / BSD 3-Clause |
| [zlib](http://zlib.net/) | 1.2.11 | Massively spiffy yet delicately unobtrusive compression library / zlib |
| Name | Version | Summary / License |
|---|---|---|
| [alabaster](https://github.com/bitprophet/alabaster) | 0.7.10 | Configurable, Python 2+3 compatible Sphinx theme / BSD |
| [anaconda-client](http://anaconda.org) | 1.6.3 | anaconda.org command line client library / BSD 3-clause |
| [anaconda-project](https://github.com/Anaconda-Platform/anaconda-project/) | 0.6.0 | reproducible, executable project directories / BSD 3-clause |
| [asn1crypto](https://github.com/wbond/asn1crypto) | 0.22.0 | ASN.1 parser and serializer / MIT |
| [astroid](https://www.astroid.org/) | 1.5.3 | abstract syntax tree for Python with inference support / LGPL version 2.1 |
| [astropy](http://www.astropy.org/) | 2.0.1 | Community-developed Python Library for Astronomy / BSD |
| [babel](http://babel.pocoo.org/) | 2.5.0 | Utilities to internationalize and localize Python applications / BSD |
| [backports](https://bitbucket.org/brandon/backports) | 1.0 | / BSD |
| [backports\_abc](https://github.com/cython/backports_abc) | 0.5 | backport of recent additions to the ‘collections.abc’ module / PSF |
| [beautifulsoup4](http://www.crummy.com/software/BeautifulSoup/) | 4.6.0 | Python library designed for screen-scraping / MIT |
| [bitarray](https://github.com/ilanschnell/bitarray) | 0.8.1 | efficient representation of arrays of booleans – C extension / PSF |
| [bkcharts](https://github.com/bokeh/bkcharts) | 0.2 | optional High Level charts API built on top of Bokeh / New BSD |
| [bleach](http://github.com/mozilla/bleach) | 1.5.0 | easy whitelist-based HTML-sanitizing tool / Apache License Version 2.0 |
| [bokeh](http://bokeh.pydata.org/) | 0.12.7 | Python interactive visualization library for modern web browsers / BSD |
| [boto](https://github.com/boto/boto/) | 2.48.0 | Amazon Web Services Library / MIT |
| [bottleneck](http://berkeleyanalytics.com/bottleneck) | 1.2.1 | Fast NumPy array functions written in Cython. / Simplified BSD |
| [cairo](http://cairographics.org/) | 1.14.8 | A 2D graphics library with support for multiple output devices / LGPL 2.1, MPL 1.1 |
| [cdecimal](http://www.bytereef.org/mpdecimal/index.html) | 2.3 | Fast drop-in replacement for decimal.py / BSD |
| [certifi](https://certifi.io) | 2016.2.28 | Python package for providing Mozilla’s CA Bundle. / ISC |
| [cffi](http://cffi.readthedocs.org) | 1.10.0 | C Foreign Function Interface for Python / MIT |
| [chardet](https://github.com/chardet/chardet) | 3.0.4 | Universal character encoding detector / GNU Lesser General Public License |
| [click](http://click.pocoo.org/) | 6.7 | Command line interface creation kit / BSD |
| [cloudpickle](https://github.com/cloudpipe/cloudpickle) | 0.4.0 | extended pickling support for Python objects / BSD |
| [clyent](https://github.com/Anaconda-Server/clyent) | 1.2.2 | Command line client library for windows and posix / BSD |
| [colorama](https://github.com/tartley/colorama) | 0.3.9 | Cross-platform colored terminal text in Python / BSD |
| [conda](http://conda.pydata.org/) | 4.3.27 | Package management system and Environment management system / BSD |
| [conda-build](https://github.com/conda/conda-build) | 3.0.22 | Commands and tools for building conda packages / BSD 3-clause |
| [configparser](http://docs.python.org/3/library/configparser.html) | 3.5.0 | brings the updated configparser from Python 3.5 to Python 2.6-3.5 / MIT |
| [contextlib2](http://contextlib2.readthedocs.org/) | 0.5.5 | backports and enhancements for the contextlib module / PSF |
| [cryptography](https://cryptography.io) | 1.8.1 | Provides cryptographic recipes and primitives to Python developers / Apache and BSD |
| [curl](http://curl.haxx.se/) | 7.52.1 | Tool and library for transferring data with URL syntax / MIT/X derivate |
| [cycler](http://matplotlib.org/cycler/) | 0.10.0 | Composable style cycles / BSD |
| [cython](http://www.cython.org/) | 0.26 | The Cython compiler for writing C extensions for the Python language / Apache version 2.0 |
| [cytoolz](https://github.com/pytoolz/cytoolz) | 0.8.2 | Cython implementation of Toolz, high performance functional utilities / BSD |
| [dask](http://dask.pydata.org/en/latest/) | 0.15.2 | Task scheduling and blocked algorithms for parallel processing / BSD |
| [datashape](http://datashape.pydata.org) | 0.5.4 | Language defining a data description protocol / BSD |
| [decorator](http://pypi.python.org/pypi/decorator) | 4.1.2 | Better living through Python with decorators / BSD |
| [distributed](http://distributed.readthedocs.io/en/latest/) | 1.18.1 | Distributed computing / BSD 3-Clause |
| [docutils](http://docutils.sourceforge.net) | 0.14 | Utilities for general- and special-purpose documentation / Public-Domain, PSF, 2-clause BSD, GPLv3 |
| [entrypoints](https://github.com/takluyver/entrypoints) | 0.2.3 | / MIT |
| [enum34](https://pypi.python.org/pypi/enum34) | 1.1.6 | Robust enumerated type support in Python / BSD |
| [et\_xmlfile](https://bitbucket.org/openpyxl/et_xmlfile) | 1.0.1 | Low memory library for creating large XML files / MIT |
| [expat](http://expat.sourceforge.net) | 2.1.0 | XML parser library written in C / MIT |
| [fastcache](https://github.com/pbrady/fastcache) | 1.0.2 | C implementation of Python 3 functools.lru\_cache / MIT |
| [filelock](https://github.com/benediktschmitt/py-filelock) | 2.0.7 | A platform independent file lock. / Public Domain |
| [flask](http://flask.pocoo.org/) | 0.12.2 | Microframework for Python based on Werkzeug, Jinja2. / BSD |
| [flask-cors](https://github.com/corydolphin/flask-cors) | 3.0.3 | Flask extension adding a decorator for CORS support / MIT |
| [fontconfig](http://www.freedesktop.org/wiki/Software/fontconfig/) | 2.12.1 | A library for configuring and customizing font access / BSD |
| [freetype](http://freetype.sourceforge.net/index2.html) | 2.5.5 | A Free, High-Quality, and Portable Font Engine / FreeType License |
| [funcsigs](http://funcsigs.readthedocs.org/) | 1.0.2 | Python function signatures from PEP362 for Python 2.6, 2.7 and 3.2+ / Apache |
| [functools32](https://github.com/MiCHiLU/python-functools32) | 3.2.3.2 | backport of the functools module from Python 3.2.3 for use on 2.7 and PyPy. / PSF |
| [functools\_lru\_cache](https://github.com/jaraco/backports.functools_lru_cache) | 1.4 | backport of functools.lru\_cache from Python 3.3 / MIT |
| [futures](http://code.google.com/p/pythonfutures) | 3.1.1 | A Java-style futures package for Python / PSF |
| [get\_terminal\_size](https://github.com/chrippa/backports.shutil_get_terminal_size) | 1.0.0 | Get the size of the terminal window. / MIT |
| [gevent](http://www.gevent.org/) | 1.2.2 | Coroutine-based Python network library / MIT |
| [glob2](http://github.com/miracle2k/python-glob2/) | 0.5 | Enhanced glob that can capture patterns and supports recursive wildcards / BSD License |
| [greenlet](https://github.com/python-greenlet/greenlet) | 0.4.12 | Lightweight in-process concurrent programming / MIT |
| [grin](http://pypi.python.org/pypi/grin) | 1.2.1 | Enhanced grep-like tool / BSD |
| [h5py](http://www.h5py.org/) | 2.7.0 | Pythonic interface to the HDF5 binary data format / 3-clause BSD |
| [hdf5](http://www.hdfgroup.org/HDF5/) | 1.8.17 | A data model, library, and file format for storing and managing data / BSD-like |
| [heapdict](http://stutzbachenterprises.com/) | 1.0.0 | A heap with decrease-key and increase-key operations / BSD |
| [html5lib](https://github.com/html5lib/html5lib-python) | 0.9999999 | HTML parser based on the WHATWG HTML specification / MIT |
| [idna](https://github.com/kjd/idna) | 2.6 | Internationalized Domain Names in Applications / BSD |
| [imagesize](https://github.com/shibukawa/imagesize_py) | 0.7.1 | getting image size from png/jpeg/jpeg2000/gif file / MIT |
| [ipaddress](https://github.com/phihag/ipaddress) | 1.0.18 | IPv4/IPv6 manipulation library / Python Software Foundation License |
| [ipykernel](http://ipython.org) | 4.6.1 | Provides a rich toolkit to help you make the most of using Python interactively / BSD |
| [ipython](http://ipython.org/) | 5.3.0 | Productive Interactive Computing / BSD |
| [ipython\_genutils](http://jupyter.org) | 0.2.0 | vestigial utilities from IPython / BSD |
| [ipywidgets](https://github.com/ipython/ipywidgets) | 6.0.0 | Widgets for the Jupyter Notebook / BSD 3-clause |
| [isort](https://github.com/timothycrosley/isort) | 4.2.15 | Python utility / library to sort Python imports / MIT |
| [itsdangerous](https://pythonhosted.org/itsdangerous/) | 0.24 | Various helpers to pass trusted data to untrusted environments / BSD |
| [jbig](https://www.cl.cam.ac.uk/~mgk25/jbigkit) | 2.1 | Implementation of the JBIG1 data compression standard / GPL2 |
| [jdcal](http://github.com/phn/jdcal) | 1.3 | Julian dates from proleptic Gregorian and Julian calendars. / BSD |
| [jedi](http://jedi.jedidjah.ch/) | 0.10.2 | Autocompletion and static analysis library for Python / MIT |
| [jinja2](http://jinja.pocoo.org) | 2.9.6 | An easy to use stand-alone template engine written in pure python. / BSD |
| [jpeg](http://www.ijg.org/) | 9b | Read and write jpeg files / Custom free software license |
| [jsonschema](https://python-jsonschema.readthedocs.org) | 2.6.0 | An implementation of JSON Schema validation for Python / MIT |
| [jupyter](http://jupyter.org) | 1.0.0 | web-based notebook environment for interactive computing. / BSD |
| [jupyter\_client](http://jupyter.org) | 5.1.0 | Jupyter protocol implementation and client libraries / BSD |
| [jupyter\_console](http://jupyter.org) | 5.2.0 | Jupyter terminal console / BSD |
| [jupyter\_core](http://jupyter.org) | 4.3.0 | core Jupyter functionality / BSD |
| [lazy-object-proxy](https://github.com/ionelmc/python-lazy-object-proxy) | 1.3.1 | Fast and thorough lazy object proxy / BSD |
| [libffi](https://sourceware.org/libffi/) | 3.2.1 | portable foreign-function interface library / MIT |
| [libgfortran](https://gcc.gnu.org/fortran/) | 3.0.0 | the GNU Fortran compiler, part of GCC / GPL3 |
| [libiconv](https://www.gnu.org/software/libiconv/) | 1.14 | Provides iconv for systems which don’t have one / GPL and LGPL |
| [libpng](http://www.libpng.org/pub/png/libpng.html) | 1.6.30 | official PNG reference library / libpng license |
| [libsodium](http://libsodium.org) | 1.0.10 | A library for encryption, signatures, password hashing, etc. / ISC |
| [libtiff](http://www.libtiff.org/) | 4.0.6 | Support for Tag Image File Format (TIFF) / BSD-like |
| [libxml2](http://xmlsoft.org/) | 2.9.4 | The XML C parser and toolkit of Gnome / MIT |
| [libxslt](http://xmlsoft.org/XSLT/) | 1.1.29 | The XSLT C library developed for the GNOME project / MIT |
| [locket](http://github.com/mwilliamson/locket.py) | 0.2.0 | File based locks for Python for Linux and Windows / BSD |
| [lxml](http://lxml.de/) | 3.7.3 | XML and HTML with Python / BSD |
| [markupsafe](http://www.pocoo.org/projects/markupsafe/#markupsafe) | 1.0 | Implements a XML/HTML/XHTML Markup safe string for Python / BSD |
| [matplotlib](http://matplotlib.org/) | 2.0.2 | Python 2D plotting library / PSF-based |
| [mistune](https://github.com/lepture/mistune) | 0.7.4 | The fastest markdown parser in pure Python with renderer feature / BSD |
| [mpmath](http://mpmath.org) | 0.19 | Python library for arbitrary-precision floating-point arithmetic / BSD |
| [msgpack-python](http://msgpack.org/) | 0.4.8 | An efficient binary serialization format / Apache |
| [multipledispatch](http://github.com/mrocklin/multipledispatch/) | 0.4.9 | Multiple dispatch in Python / BSD |
| [nbconvert](http://jupyter.org) | 5.2.1 | converts notebooks to various other formats via Jinja templates / BSD |
| [nbformat](http://jupyter.org) | 4.4.0 | reference implementation of the Jupyter Notebook format / BSD |
| [networkx](http://networkx.lanl.gov/) | 1.11 | Python package for creating and manipulating complex networks / BSD |
| [nltk](http://nltk.org/) | 3.2.4 | Build Python programs to work with human language data / Apache Software License |
| [nose](http://readthedocs.org/docs/nose/) | 1.3.7 | Nose extends unittest to make testing easier / LGPL |
| [notebook](http://jupyter.org) | 5.0.0 | web-based notebook environment for interactive computing / BSD |
| [numexpr](https://github.com/pydata/numexpr) | 2.6.2 | Fast numerical expression evaluator for NumPy / MIT |
| [numpy](http://numpy.scipy.org/) | 1.13.1 | Array processing for numbers, strings, records, and objects / BSD |
| [numpydoc](https://github.com/numpy/numpydoc) | 0.7.0 | Sphinx extension to support docstrings in Numpy format / BSD |
| [odo](http://odo.pydata.org/en/latest/) | 0.5.1 | Shapeshifting for your data / BSD |
| [olefile](https://www.decalage.info/python/olefileio) | 0.44 | parse, read and write Microsoft OLE2 files / BSD License |
| [openblas](http://www.openblas.net/) | 0.2.19 | An Optimized BLAS library / BSD |
| [openpyxl](http://openpyxl.readthedocs.org) | 2.4.8 | A Python library to read/write Excel 2010 xlsx/xlsm files / MIT |
| [openssl](http://www.openssl.org/) | 1.0.2l | OpenSSL is an open-source implementation of the SSL and TLS protocols / Apache-style |
| [packaging](https://github.com/pypa/packaging) | 16.8 | core utilities for Python packages / BSD or Apache 2.0 |
| [pandas](http://pandas.pydata.org/) | 0.20.3 | Powerful Python data analysis toolkit / BSD |
| [pandocfilters](http://github.com/jgm/pandocfilters) | 1.4.2 | utilities for writing pandoc filters in python / BSD License |
| [partd](https://github.com/dask/partd) | 0.3.8 | Appendable key-value byte store / BSD |
| [patchelf](http://nixos.org/patchelf.html) | 0.9 | Modify the dynamic linker and RPATH of ELF executables / GPL3 |
| [path.py](http://github.com/jaraco/path.py) | 10.3.1 | An object representing a path to a file or directory / MIT |
| [pathlib2](https://pypi.python.org/pypi/pathlib2/) | 2.3.0 | object-oriented filesystem paths / MIT |
| [patsy](https://github.com/pydata/patsy) | 0.4.1 | Describing statistical models in Python using symbolic formulas / BSD |
| [pcre](http://www.pcre.org/) | 8.39 | A set of functions that implement regular expression pattern matching / 3-clause BSD License |
| [pep8](http://pep8.readthedocs.org/) | 1.7.0 | Python style guide checker / MIT |
| [pexpect](http://pexpect.readthedocs.org/) | 4.2.1 | Pexpect allows easy control of interactive console applications / ISC |
| [pickleshare](https://github.com/vivainio/pickleshare) | 0.7.4 | file system based database that uses Python pickles / MIT |
| [pillow](http://python-pillow.github.io/) | 4.2.1 | The friendly Python Imaging Library(PIL) fork / PIL license |
| [pip](https://pip.pypa.io/en/stable/) | 9.0.1 | PyPA recommended tool for installing Python packages / MIT |
| [pixman](http://www.pixman.org/) | 0.34.0 | A low-level software library for pixel manipulation / MIT |
| [pkginfo](https://pypi.python.org/pypi/pkginfo/) | 1.4.1 | query metadatdata from sdists or bdists installed packages / PSF |
| [ply](http://www.dabeaz.com/ply/) | 3.10 | implementation of Lex and Yacc / BSD |
| [prompt\_toolkit](https://github.com/jonathanslenders/python-prompt-toolkit) | 1.0.15 | library for building powerful interactive command lines in Python / BSD |
| [psutil](https://github.com/giampaolo/psutil) | 5.2.2 | cross-platform process and system utilities module for Python / BSD |
| [ptyprocess](https://github.com/pexpect/ptyprocess) | 0.5.2 | Run a subprocess in a pseudo terminal / ISC |
| [py](http://pylib.readthedocs.org/) | 1.4.34 | Library with cross-python path, ini-parsing, io, code, log facilities / MIT |
| [pycairo](http://cairographics.org/pycairo/) | 1.10.0 | A set of Python bindings for the cairo graphics library / LGPL 2.1, MPL 1.1 |
| [pycodestyle](https://pycodestyle.readthedocs.io/) | 2.3.1 | Python style guide checker / MIT License |
| [pycosat](https://github.com/ContinuumIO/pycosat) | 0.6.2 | Python bindings to the picosat SAT solver / MIT |
| [pycparser](https://github.com/eliben/pycparser) | 2.18 | C parser in Python / BSD |
| [pycrypto](http://www.pycrypto.org/) | 2.6.1 | Cryptographic modules for Python / Public-Domain |
| [pycurl](http://pycurl.sourceforge.net/) | 7.43.0 | A Python Interface To The cURL library / LGPL, MIT |
| [pyflakes](https://launchpad.net/pyflakes) | 1.6.0 | passive checker of Python programs / MIT |
| [pygments](http://pygments.org/) | 2.2.0 | Generic syntax highlighting package / BSD |
| [pylint](http://www.pylint.org/) | 1.7.2 | Python code static checker / GPL |
| [pyodbc](http://mkleehammer.github.io/pyodbc/) | 4.0.16 | DB API Module for ODBC / MIT |
| [pyopenssl](https://github.com/pyca/pyopenssl) | 17.0.0 | Python wrapper module around the OpenSSL library / Apache Software License |
| [pyparsing](http://pyparsing.wikispaces.com/) | 2.2.0 | Create and execute simple grammars / MIT |
| [pytables](http://www.pytables.org) | 3.4.2 | Manage hierarchical datasets to cope with large amounts of data / BSD |
| [pytest](http://pytest.org/) | 3.2.1 | Simple and powerful testing with Python / MIT |
| [python](http://www.python.org/) | 2.7.13 | General purpose programming language / PSF |
| [python-dateutil](https://dateutil.readthedocs.org/) | 2.6.1 | extensions to the standard Python datetime module / Simplified BSD |
| [pytz](http://pytz.sourceforge.net/) | 2017.2 | World timezone definitions, modern and historical / MIT |
| [pywavelets](https://github.com/PyWavelets/pywt) | 0.5.2 | wavelet transform module / MIT |
| [pyyaml](http://pyyaml.org/wiki/PyYAML) | 3.12 | YAML parser and emitter for Python / MIT |
| [pyzmq](https://github.com/zeromq/pyzmq) | 16.0.2 | zeromq bindings for Python / LGPL and BSD |
| [requests](http://docs.python-requests.org/en/latest/index.html) | 2.14.2 | Python HTTP for Humans / Apache Software License |
| [ruamel\_yaml](https://bitbucket.org/ruamel/yaml) | 0.11.14 | patched copy of ruamel.yaml (a yaml parser) / MIT |
| [scandir](https://github.com/benhoyt/scandir) | 1.5 | scandir, a better directory iterator and faster os.walk() / BSD License |
| [scikit-image](http://scikit-image.org/) | 0.13.0 | Image processing routines for SciPy / 3-clause BSD |
| [scikit-learn](http://scikit-learn.org/stable/) | 0.19.0 | set of python modules for machine learning and data mining / 3-clause BSD |
| [scipy](http://www.scipy.org/) | 0.19.1 | Scientific Library for Python / BSD |
| [seaborn](http://stanford.edu/~mwaskom/software/seaborn/) | 0.8 | Statistical data visualization / BSD |
| [setuptools](https://pypi.python.org/pypi/setuptools) | 36.4.0 | Download, build, install, upgrade, and uninstall Python packages / MIT |
| [simplegeneric](https://pypi.python.org/pypi/simplegeneric) | 0.8.1 | Define simple single-dispatch generic functions / ZPL 2.1 |
| [singledispatch](http://docs.python.org/3/library/functools.html#functools.singledispatch) | 3.4.0.3 | Transforms a function into a single-dispatch generic function / MIT |
| [six](http://pypi.python.org/pypi/six/) | 1.10.0 | Python 2 and 3 compatibility utilities / MIT |
| [snowballstemmer](https://github.com/shibukawa/snowball_py) | 1.2.1 | Snowball stemming library collection for Python / BSD |
| [sortedcollections](http://www.grantjenks.com/docs/sortedcollections/) | 0.5.3 | Python Sorted Collections / Apache Software License |
| [sortedcontainers](http://www.grantjenks.com/docs/sortedcontainers/) | 1.5.7 | sorted Container Types: SortedList, SortedDict, and SortedSet / Apache 2.0 |
| [sphinx](http://sphinx-doc.org) | 1.6.3 | Documentation generator / BSD |
| sphinxcontrib | 1.0 | Python namespace for sphinxcontrib / BSD |
| [sphinxcontrib-websupport](https://pypi.python.org/pypi/sphinxcontrib-websupport) | 1.0.1 | Sphinx API for Web Apps / BSD-2-Clause |
| [sqlalchemy](http://www.sqlalchemy.org/) | 1.1.13 | Python SQL toolkit and Object Relational Mapper / MIT |
| [sqlite](http://www.sqlite.org/) | 3.13.0 | SQL database engine / Public-Domain |
| [ssl\_match\_hostname](http://bitbucket.org/brandon/backports.ssl_match_hostname) | 3.5.0.1 | The ssl.match\_hostname() function from Python 3.4 / PSF |
| [statsmodels](http://statsmodels.sourceforge.net/) | 0.8.0 | Statistical computations and models / 3-clause BSD |
| [subprocess32](https://github.com/google/python-subprocess32) | 3.2.7 | backport of the subprocess module from Python 3.2/3.3 for use on 2.x / Python Software Foundation License |
| [sympy](http://sympy.org) | 1.1.1 | Python library for symbolic mathematics / 3-clause BSD |
| [tblib](https://github.com/ionelmc/python-tblib) | 1.3.2 | Traceback serialization library / BSD |
| [terminado](https://github.com/takluyver/terminado) | 0.6 | Terminals served to term.js using Tornado websockets / BSD |
| [testpath](https://testpath.readthedocs.io) | 0.3.1 | collection of utilities for Python code working with files and commands / MIT |
| [tk](http://www.tcl.tk/) | 8.5.18 | Dynamic programming language with GUI elements / BSD-like |
| [toolz](http://toolz.readthedocs.org/en/latest/) | 0.8.2 | List processing tools and functional utilities / BSD |
| [tornado](http://www.tornadoweb.org/) | 4.5.2 | Tornado Web Server / Apache 2.0 |
| [traitlets](https://github.com/ipython/traitlets) | 4.3.2 | Configuration system for Python applications / Modified BSD |
| [typing](https://docs.python.org/3.5/library/typing.html) | 3.6.2 | backport of the standard library typing module to Python versions older than 3.6 / PSF |
| [typing](https://docs.python.org/3.5/library/typing.html) | 3.6.2 | Type Hints for Python - backport for `Python<3.5` / PSF |
| [unicodecsv](https://github.com/jdunck/python-unicodecsv) | 0.14.1 | Drop-in replacement for csv module which supports unicode strings / BSD |
| [unixodbc](http://www.unixodbc.org/) | 2.3.4 | ODBC (Open Database Connectivity) implementation for Unix / LGPLv2 |
| [wcwidth](https://github.com/jquast/wcwidth) | 0.1.7 | measures number of Terminal column cells of wide-character codes / MIT |
| [werkzeug](http://werkzeug.pocoo.org/) | 0.12.2 | A WSGI utility library for Python / BSD |
| [wheel](http://bitbucket.org/pypa/wheel/) | 0.29.0 | Built-package format for Python / MIT |
| [widgetsnbextension](http://ipython.org) | 3.0.2 | IPython HTML widgets for Jupyter / BSD 3-clause |
| [wrapt](https://github.com/GrahamDumpleton/wrapt) | 1.10.11 | Module for decorators, wrappers and monkey patching / BSD |
| [xlrd](http://www.lexicon.net/sjmachin/xlrd.htm) | 1.1.0 | extract data from Microsoft Excel spreadsheet files / BSD |
| [xlsxwriter](https://github.com/jmcnamara/XlsxWriter) | 0.9.8 | A Python module for creating Excel XLSX files / BSD |
| [xlwt](http://www.python-excel.org/) | 1.3.0 | writing data and formatting information to Excel files / BSD |
| [xz](http://tukaani.org/xz/) | 5.2.3 | Data compression software with high compression ratio / Public-Domain, GPL |
| [yaml](http://www.yaml.org/) | 0.1.6 | YAML Ain’t Markup Language / MIT |
| [zeromq](http://zeromq.org) | 4.1.5 | Distributed messaging / LGPL |
| [zict](http://github.com/mrocklin/zict/) | 0.1.2 | Composable Mutable Mapping tools / BSD |
| [zlib](http://zlib.net/) | 1.2.11 | Unobtrusive compression library / zlib |
| Name | Version | Summary / License |
|---|---|---|
| [alabaster](http://www.sphinx-doc.org/en/stable/index.html) | 0.7.10 | Configurable, Python 2+3 compatible Sphinx theme. / BSD 3-Clause |
| [anaconda-client](http://anaconda.org) | 1.6.5 | anaconda.org command line client library / BSD 3-clause |
| [anaconda-navigator](https://github.com/ContinuumIO/navigator) | 1.6.8 | Anaconda Navigator / proprietary - Continuum Analytics, Inc. |
| [anaconda-project](https://github.com/Anaconda-Platform/anaconda-project) | 0.8.0 | Reproducible, executable project directories. / BSD 3-Clause |
| [asn1crypto](https://github.com/wbond/asn1crypto) | 0.22.0 | Python ASN.1 library with a focus on performance and a pythonic API / MIT |
| [astroid](https://www.astroid.org/) | 1.5.3 | A abstract syntax tree for Python with inference support. / LGPL 2.1 |
| [astropy](http://www.astropy.org/) | 2.0.2 | Community-developed Python Library for Astronomy / BSD |
| [babel](http://babel.pocoo.org/) | 2.5.0 | Utilities to internationalize and localize Python applications / BSD 3-clause |
| [backports](https://bitbucket.org/brandon/backports) | 1.0 | / BSD |
| [backports.functools\_lru\_cache](https://github.com/jaraco/backports.functools_lru_cache) | 1.4 | Backport of functools.lru\_cache from Python 3.3 as published at ActiveState. / MIT |
| [backports.shutil\_get\_terminal\_size](https://github.com/chrippa/backports.shutil_get_terminal_size) | 1.0.0 | A backport of the get\_terminal\_size function from Python 3.3’s shutil. / MIT |
| [backports\_abc](https://github.com/cython/backports_abc) | 0.5 | A backport of recent additions to the collections.abc module. / PSF 2 |
| [beautifulsoup4](http://www.crummy.com/software/BeautifulSoup/) | 4.6.0 | Python library designed for screen-scraping / MIT |
| [bitarray](https://github.com/ilanschnell/bitarray) | 0.8.1 | efficient arrays of booleans – C extension / PSF |
| [bkcharts](http://github.com/bokeh/bkcharts) | 0.2 | High level chart types built on top of Bokeh / BSD 3-Clause |
| [blaze](http://blaze.pydata.org) | 0.11.3 | NumPy and Pandas interface to big data / BSD 3-Clause |
| [bleach](https://github.com/mozilla/bleach) | 2.0.0 | Easy, whitelist-based HTML-sanitizing tool / Apache-2.0 |
| [bokeh](http://bokeh.pydata.org/) | 0.12.7 | Statistical and novel interactive HTML plots for Python / BSD 3-Clause |
| [boto](https://github.com/boto/boto/) | 2.48.0 | Amazon Web Services Library / MIT |
| [bottleneck](http://berkeleyanalytics.com/bottleneck) | 1.2.1 | Fast NumPy array functions written in Cython. / BSD 2-Clause |
| [ca-certificates](https://github.com/conda-forge/ca-certificates-feedstock) | 2017.08.26 | Certificates for use with other packages. / ISC |
| [cairo](http://cairographics.org/) | 1.14.10 | Cairo is a 2D graphics library with support for multiple output devices. / LGPL 2.1 or MPL 1.1 |
| [cdecimal](http://www.bytereef.org/mpdecimal/index.html) | 2.3 | Fast drop-in replacement for decimal.py / BSD 2-Clause |
| [certifi](http://certifi.io/) | 2017.7.27.1 | Python package for providing Mozilla’s CA Bundle. / ISC |
| [cffi](https://bitbucket.org/cffi/cffi) | 1.10.0 | Foreign Function Interface for Python calling C code. / MIT |
| [chardet](https://github.com/chardet/chardet) | 3.0.4 | Universal character encoding detector / LGPL2 |
| [click](http://click.pocoo.org/) | 6.7 | A simple wrapper around optparse for powerful command line utilities. / BSD 3-Clause |
| [cloudpickle](https://github.com/cloudpipe/cloudpickle) | 0.4.0 | Extended pickling support for Python objects / BSD 3-Clause |
| [clyent](https://github.com/Anaconda-Platform/clyent) | 1.2.2 | Command line client library for windows and posix / BSD 3-Clause |
| [colorama](https://github.com/tartley/colorama) | 0.3.9 | Cross-platform colored terminal text. / BSD 3-Clause |
| [conda](http://conda.pydata.org/) | 4.3.27 | OS-agnostic, system-level binary package and environment manager. / BSD 3-Clause |
| [conda-build](https://github.com/conda/conda-build) | 3.0.22 | tools for building conda packages / BSD 3-Clause |
| [configparser](http://docs.python.org/3/library/configparser.html) | 3.5.0 | This library brings the updated configparser from Python 3.5 to Python 2.6-3.5 / MIT |
| [contextlib2](http://contextlib2.readthedocs.org) | 0.5.5 | Backports and enhancements for the contextlib module / PSF |
| [cryptography](https://github.com/pyca/cryptography) | 2.0.3 | Provides cryptographic recipes and primitives to Python developers / Apache 2.0 or BSD 3-Clause, PSF 2 |
| [curl](http://curl.haxx.se/) | 7.55.1 | tool and library for transferring data with URL syntax / MIT/X derivate (`<http://curl.haxx.se/docs/copyright.html>`) |
| [cycler](http://matplotlib.org/cycler) | 0.10.0 | Composable style cycles. / BSD 3-Clause |
| [cython](http://www.cython.org/) | 0.26.1 | The Cython compiler for writing C extensions for the Python language / Apache-2.0 |
| [cytoolz](https://github.com/pytoolz/cytoolz) | 0.8.2 | Cython implementation of Toolz. High performance functional utilities. / BSD 3-Clause |
| [dask](http://dask.pydata.org/en/latest/) | 0.15.2 | Parallel Python with task scheduling / BSD 3-Clause |
| [dask-core](http://github.com/dask/dask/) | 0.15.2 | Parallel Python with task scheduling / BSD 3-Clause |
| [datashape](http://datashape.pydata.org) | 0.5.4 | A data description language. / BSD 2-Clause |
| [dbus](http://www.freedesktop.org/wiki/Software/dbus/) | 1.10.22 | Simple message bus system for applications to talk to one another / GPL2 |
| [decorator](https://github.com/micheles/decorator) | 4.1.2 | Better living through Python with decorators. / BSD 3-Clause |
| [distributed](http://distributed.readthedocs.io/en/latest/) | 1.18.3 | Distributed computing with Dask / BSD 3-Clause |
| [docutils](http://docutils.sourceforge.net/) | 0.14 | Docutils – Python Documentation Utilities / Public Domain Dedictation and BSD 2-Clause and PSF 2.1.1 and GPL 3.0 |
| [entrypoints](https://github.com/takluyver/entrypoints) | 0.2.3 | Discover and load entry points from installed packages. / MIT License |
| [enum34](https://bitbucket.org/stoneleaf/enum34) | 1.1.6 | Python 3.4 Enum backported to 3.3, 3.2, 3.1, 2.7, 2.6, 2.5, and 2.4 / BSD 3-Clause |
| [et\_xmlfile](https://bitbucket.org/openpyxl/et_xmlfile) | 1.0.1 | An implementation of lxml.xmlfile for the standard library / MIT |
| [expat](http://expat.sourceforge.net/) | 2.2.4 | Expat XML parser library in C. / MIT |
| [fastcache](https://github.com/pbrady/fastcache) | 1.0.2 | C implementation of Python 3 lru\_cache / MIT |
| [filelock](https://github.com/benediktschmitt/py-filelock) | 2.0.12 | A platform independent file lock. / Public Domain |
| [flask](http://flask.pocoo.org) | 0.12.2 | A microframework based on Werkzeug, Jinja2 and good intentions. / BSD 3-Clause |
| [flask-cors](https://github.com/corydolphin/flask-cors) | 3.0.3 | A Flask extension adding a decorator for CORS support / MIT |
| [fontconfig](http://www.freedesktop.org/wiki/Software/fontconfig/) | 2.12.4 | A library for configuring and customizing font access. / MIT |
| [freetype](https://www.freetype.org/) | 2.8 | A Free, High-Quality, and Portable Font Engine / GPL-2.0 and FreeType |
| [funcsigs](http://funcsigs.readthedocs.org) | 1.0.2 | Python function signatures from PEP362 for Python 2.6, 2.7 and 3.2+. / Apache 2.0 |
| [functools32](https://github.com/MiCHiLU/python-functools32) | 3.2.3.2 | Backport of the functools module from Python 3.2.3 for use on 2.7 and PyPy. / PSF license |
| [futures](https://github.com/agronholm/pythonfutures) | 3.1.1 | Backport of the concurrent.futures package from Python 3.2 / PSF |
| [get\_terminal\_size](https://github.com/chrippa/backports.shutil_get_terminal_size) | 1.0.0 | Get the size of the terminal window. / MIT |
| [gevent](http://www.gevent.org/) | 1.2.2 | Coroutine-based network library / MIT |
| [glib](https://developer.gnome.org/glib/) | 2.53.6 | Provides core application building blocks for libraries and applications written in C. / LGPL-2.1 |
| [glob2](https://github.com/miracle2k/python-glob2) | 0.5 | Version of the glob module that supports recursion via \*\*, and can capture patterns. / BSD-2-Clause |
| [gmp](http://gmplib.org/) | 6.1.2 | The GNU multiprecision library. / GPL 2 and LGPL 3 |
| [gmpy2](https://pypi.python.org/pypi/gmpy2) | 2.0.8 | GMP/MPIR, MPFR, and MPC interface to Python 2.6+ and 3.x / LGPL 3 |
| [graphite2](http://graphite.sil.org/) | 1.3.10 | A “smart font” system that handles the complexities of lesser-known languages of the world. / LGPLv2 |
| [greenlet](https://github.com/python-greenlet/greenlet) | 0.4.12 | Lightweight in-process concurrent programming / MIT |
| [grin](http://pypi.python.org/pypi/grin) | 1.2.1 | Enhanced grep-like tool / BSD 3-Clause |
| [gst-plugins-base](http://gstreamer.freedesktop.org/) | 1.12.2 | GStreamer Base Plug-ins / GPL2 |
| [gstreamer](http://gstreamer.freedesktop.org/) | 1.12.2 | Library for constructing graphs of media-handling components / LGPL 2 |
| [h5py](http://www.h5py.org/) | 2.7.0 | Read and write HDF5 files from Python. / BSD 3-Clause |
| [harfbuzz](http://www.freedesktop.org/wiki/Software/HarfBuzz/) | 1.5.0 | An OpenType text shaping engine. / MIT |
| [hdf5](http://www.hdfgroup.org/HDF5/) | 1.10.1 | HDF5 is a data model, library, and file format for storing and managing data / HDF5 |
| [heapdict](http://stutzbachenterprises.com/) | 1.0.0 | A heap with decrease-key and increase-key operations / BSD 3-Clause |
| [html5lib](https://github.com/html5lib/html5lib-python) | 0.999999999 | HTML parser based on the WHATWG HTML specification / MIT |
| [icu](http://site.icu-project.org/) | 58.2 | International Components for Unicode. / MIT |
| [idna](https://github.com/kjd/idna) | 2.6 | Internationalized Domain Names in Applications (IDNA). / BSD Like |
| [imageio](http://imageio.github.io) | 2.2.0 | a Python library for reading and writing image data / BSD 2-Clause |
| [imagesize](https://github.com/shibukawa/imagesize_py) | 0.7.1 | Getting image size from png/jpeg/jpeg2000/gif file / MIT |
| [intel-openmp](https://software.intel.com/en-us/node/522690) | 2018.0.0 | Math library for Intel and compatible processors / proprietary - Intel |
| [ipaddress](https://github.com/phihag/ipaddress) | 1.0.18 | IPv4/IPv6 manipulation library / PSF 2 |
| [ipykernel](http://ipython.org) | 4.6.1 | IPython Kernel for Jupyter / BSD 3-clause |
| [ipython](http://ipython.org/) | 5.4.1 | IPython: Productive Interactive Computing / BSD 3-clause |
| [ipython\_genutils](http://ipython.org) | 0.2.0 | vestigial utilities from IPython / BSD 3-Clause |
| [ipywidgets](https://github.com/ipython/ipywidgets) | 7.0.0 | Jupyter Interactive Widgets / BSD 3-clause |
| [isort](https://github.com/timothycrosley/isort) | 4.2.15 | A Python utility / library to sort Python imports. / MIT |
| [itsdangerous](https://github.com/pallets/itsdangerous) | 0.24 | Various helpers to pass trusted data to untrusted environments. / BSD 3-Clause |
| [jbig](https://www.cl.cam.ac.uk/~mgk25/jbigkit) | 2.1 | Implementation of the JBIG1 data compression standard / GPL-2.0 |
| [jdcal](https://github.com/phn/jdcal) | 1.3 | Julian dates from proleptic Gregorian and Julian calendars. / BSD 2-Clause |
| [jedi](https://github.com/davidhalter/jedi/) | 0.10.2 | An autocompletion tool for Python that can be used for text editors. / MIT |
| [jinja2](http://jinja.pocoo.org) | 2.9.6 | An easy to use stand-alone template engine written in pure python. / 3-Clause BSD |
| [jpeg](http://www.ijg.org/) | 9b | read/write jpeg COM, EXIF, IPTC medata / Custom free software license |
| [jsonschema](https://github.com/Julian/jsonschema) | 2.6.0 | An implementation of JSON Schema validation for Python / MIT |
| [jupyter](http://jupyter.org) | 1.0.0 | Jupyter metapackage. Install all the Jupyter components in one go. / BSD 3-Clause |
| [jupyter\_client](http://jupyter.org) | 5.1.0 | Jupyter protocol implementation and client libraries / BSD 3-clause |
| [jupyter\_console](http://jupyter.org) | 5.2.0 | Jupyter terminal console / BSD 3-Clause |
| [jupyter\_core](http://jupyter.org) | 4.3.0 | Core common functionality of Jupyter projects. / BSD 3-clause |
| [jupyterlab](https://github.com/jupyterlab/jupyterlab) | 0.27.0 | A pre-alpha version of a computational environment for Jupyter. / BSD 3-Clause |
| [jupyterlab\_launcher](http://github.com/jupyterlab/jupyterlab_launcher) | 0.4.0 | A Launcher for JupyterLab based applications. / BSD 3-Clause |
| [lazy-object-proxy](https://github.com/ionelmc/python-lazy-object-proxy) | 1.3.1 | A fast and thorough lazy object proxy. / BSD 2-Clause |
| [libedit](http://thrysoee.dk/editline/) | 3.1 | Editline Library (libedit) / 3-Clause BSD |
| [libffi](https://sourceware.org/libffi/) | 3.2.1 | A Portable Foreign Function Interface Library. / Custom |
| [libgcc-ng](https://gcc.gnu.org/onlinedocs/gccint/Libgcc.html) | 7.2.0 | The GCC low-level runtime library / GPL |
| [libgfortran-ng](https://gcc.gnu.org/) | 7.2.0 | The GNU Fortran Runtime Library / GPL |
| [libpng](http://www.libpng.org/pub/png/libpng.html) | 1.6.32 | PNG reference library. / zlib/libpng |
| [libsodium](https://github.com/jedisct1/libsodium) | 1.0.13 | A modern and easy-to-use crypto library. / ISC |
| [libssh2](https://www.libssh2.org/) | 1.8.0 | the SSH library / BSD 3-Clause |
| [libstdcxx-ng](https://gcc.gnu.org/) | 7.2.0 | he GNU C++ Runtime Library / GPL3 with runtime exception |
| [libtiff](http://www.libtiff.org/) | 4.0.8 | Support for the Tag Image File Format (TIFF). / HPND |
| [libtool](http://www.gnu.org/software/libtool/) | 2.4.6 | The GNU Portable Library Tool / GPL 3 |
| [libxcb](http://xcb.freedesktop.org/) | 1.12 | This is the C-language Binding (XCB) package to the X Window System protocol / MIT |
| [libxml2](http://xmlsoft.org/) | 2.9.4 | The XML C parser and toolkit of Gnome / MIT |
| [libxslt](http://xmlsoft.org/XSLT/) | 1.1.29 | The XSLT C library developed for the GNOME project / MIT |
| [llvmlite](http://llvmlite.pydata.org/) | 0.20.0 | Lightweight wrapper around basic LLVM functionality / BSD |
| [locket](https://github.com/mwilliamson/locket.py) | 0.2.0 | File-based locks for Python for Linux and Windows / BSD 2-Clause |
| [lxml](http://lxml.de/) | 3.8.0 | Pythonic binding for the C libraries libxml2 and libxslt. / BSD 3-Clause, GPL-2.0, ZPL-2.0, and ElementTree |
| [lzo](http://www.oberhumer.com/opensource/lzo/) | 2.10 | LZO is a portable lossless data compression library written in ANSI C. / GPL v2+ |
| [markupsafe](https://www.palletsprojects.com/p/markupsafe/) | 1.0 | A Python module that implements the jinja2.Markup string / BSD 3-Clause |
| [matplotlib](http://matplotlib.org/) | 2.0.2 | Publication quality figures in Python / PSF-based |
| [mccabe](https://github.com/PyCQA/mccabe) | 0.6.1 | McCabe complexity checker for Python / MIT |
| [mistune](https://github.com/lepture/mistune) | 0.7.4 | The fastest markdown parser in pure Python. / BSD 3-Clause |
| [mkl](http://software.intel.com/en-us/articles/intel-mkl/) | 2018.0.0 | Math library for Intel and compatible processors / proprietary - Intel |
| [mkl-service](https://github.com/ContinuumIO/mkl-service) | 1.1.2 | Python bindings to MKL service functions / 3-clause BSD |
| [mpc](http://www.multiprecision.org/) | 1.0.3 | A C library for the arithmetic of complex numbers with arbitrarily high precision. / LGPL 3 |
| [mpfr](http://www.mpfr.org/) | 3.1.5 | The MPFR library is a C library for multiple-precision floating-point computations with correct rounding. / LGPL 3 |
| [mpmath](http://mpmath.org) | 0.19 | Python library for arbitrary-precision floating-point arithmetic / BSD 3-Clause |
| [msgpack-python](http://msgpack.org/) | 0.4.8 | MessagePack (de)serializer. / Apache 2.0 |
| [multipledispatch](https://github.com/mrocklin/multipledispatch/) | 0.4.9 | Multiple dispatch in Python / BSD 3-Clause |
| [navigator-updater](https://github.com/ContinuumIO/navigator-updater) | 0.1.0 | Anaconda Navigator Updater / proprietary - Continuum Analytics, Inc. |
| [nbconvert](http://jupyter.org) | 5.3.1 | Converting Jupyter Notebooks / BSD 3-Clause |
| [nbformat](http://jupyter.org) | 4.4.0 | The reference implementation of the Jupyter Notebook format / BSD 3-clause |
| [ncurses](http://www.gnu.org/software/ncurses/) | 6.0 | Library for text-based user interfaces / Free software (MIT-like) |
| [networkx](https://networkx.github.io/) | 1.11 | Python package for creating and manipulating complex networks / BSD 3-Clause |
| [nltk](http://nltk.org/) | 3.2.4 | Build Python programs to work with human language data / Apache 2.0 |
| [nose](http://readthedocs.org/docs/nose/) | 1.3.7 | Nose extends unittest to make testing easier / LGPL-2.1 |
| [notebook](http://jupyter.org) | 5.0.0 | A web-based notebook environment for interactive computing / BSD 3-clause |
| [numba](http://numba.pydata.org/) | 0.35.0 | NumPy aware dynamic Python compiler using LLVM / BSD |
| [numexpr](https://github.com/pydata/numexpr) | 2.6.2 | Fast numerical expression evaluator for NumPy. / MIT |
| [numpy](http://numpy.scipy.org/) | 1.13.1 | Array processing for numbers, strings, records, and objects. / BSD 3-Clause |
| [numpydoc](https://github.com/numpy/numpydoc) | 0.7.0 | Sphinx extension to support docstrings in Numpy format / BSD 3-Clause |
| [odo](http://odo.pydata.org) | 0.5.1 | Data migration in Python / BSD-3-Clause |
| [olefile](http://www.decalage.info/python/olefileio) | 0.44 | parse, read and write Microsoft OLE2 files / BSD License 2-Clause |
| [openpyxl](https://openpyxl.readthedocs.io) | 2.4.8 | A Python library to read/write Excel 2010 xlsx/xlsm files / MIT |
| [openssl](http://www.openssl.org/) | 1.0.2l | OpenSSL is an open-source implementation of the SSL and TLS protocols / OpenSSL |
| [packaging](https://github.com/pypa/packaging) | 16.8 | Core utilities for Python packages / Apache 2.0 or BSD 2-Clause |
| [pandas](http://pandas.pydata.org) | 0.20.3 | High-performance, easy-to-use data structures and data analysis tools. / BSD 3-clause |
| [pandoc](http://johnmacfarlane.net/pandoc/) | 1.19.2.1 | Universal markup converter (repackaged binaries). / GPL-2.0 |
| [pandocfilters](https://github.com/jgm/pandocfilters) | 1.4.2 | A python module for writing pandoc filters / BSD-3-Clause |
| [pango](http://www.pango.org/) | 1.40.11 | Text layout and rendering engine. / LGPL-2.1 |
| [partd](https://github.com/dask/partd) | 0.3.8 | Data structure for on-disk shuffle operations / BSD 3-Clause |
| [patchelf](http://nixos.org/patchelf.html) | 0.9 | A small utility to modify the dynamic linker and RPATH of ELF executables. / GPL 3 |
| [path.py](https://github.com/jaraco/path.py) | 10.3.1 | A module wrapper for os.path / MIT |
| [pathlib2](https://github.com/mcmtroffaes/pathlib2) | 2.3.0 | Fork of pathlib aiming to support the full stdlib Python API. / MIT |
| [patsy](https://github.com/pydata/patsy) | 0.4.1 | Describing statistical models in Python using symbolic formulas / BSD-2-Clause, PSF2 |
| [pcre](http://www.pcre.org/) | 8.41 | Regular expression pattern matching using the same syntax and semantics as Perl 5. / BSD 3-Clause |
| [pep8](http://pep8.readthedocs.org/) | 1.7.0 | Python style guide checker / MIT |
| [pexpect](http://pexpect.sourceforge.net/) | 4.2.1 | Pexpect makes Python a better tool for controlling other applications. / ISC |
| [pickleshare](https://github.com/vivainio/pickleshare) | 0.7.4 | Tiny ‘shelve’-like database with concurrency support / MIT |
| [pillow](http://python-imaging.github.io/) | 4.2.1 | Pillow is the friendly PIL fork by Alex Clark and Contributors. / PIL |
| [pip](https://pip.pypa.io/en/stable/) | 9.0.1 | PyPA recommended tool for installing Python packages / MIT |
| [pixman](http://www.pixman.org/) | 0.34.0 | A low-level software library for pixel manipulation. / MIT |
| [pkginfo](https://code.launchpad.net/~tseaver/pkginfo/trunk) | 1.4.1 | Query metadatdata from sdists / bdists / installed packages. / MIT |
| [ply](http://www.dabeaz.com/ply/index.html) | 3.10 | Python Lex-Yacc / BSD 3-clause |
| [prompt\_toolkit](https://github.com/jonathanslenders/python-prompt-toolkit) | 1.0.15 | Library for building powerful interactive command lines in Python / BSD 3-clause |
| [psutil](https://github.com/giampaolo/psutil) | 5.2.2 | A cross-platform process and system utilities module for Python / BSD 3-Clause |
| [ptyprocess](https://github.com/pexpect/ptyprocess) | 0.5.2 | Run a subprocess in a pseudo terminal / ISC |
| [py](https://github.com/pytest-dev/py) | 1.4.34 | library with cross-python path, ini-parsing, io, code, log facilities / MIT |
| [pycairo](http://cairographics.org/pycairo/) | 1.13.3 | Python bindings for the Cairo graphics library. / LGPL 2.1, MPL 1.1 |
| [pycodestyle](https://pycodestyle.readthedocs.io/) | 2.3.1 | Python style guide checker / MIT |
| [pycosat](https://github.com/ContinuumIO/pycosat) | 0.6.2 | Bindings to picosat (a SAT solver) / MIT |
| [pycparser](https://github.com/eliben/pycparser) | 2.18 | Complete C99 parser in pure Python / BSD 3-clause |
| [pycrypto](http://www.pycrypto.org/) | 2.6.1 | Cryptographic modules for Python. / Public Domain |
| [pycurl](http://pycurl.sourceforge.net/) | 7.43.0 | A Python Interface To The cURL library / LGPL, MIT |
| [pyflakes](https://github.com/PyCQA/pyflakes) | 1.5.0 | Pyflakes analyzes programs and detects various errors. / MIT |
| [pygments](http://pygments.org/) | 2.2.0 | Generic syntax highlighting package / BSD 2-clause |
| [pylint](http://www.pylint.org/) | 1.7.2 | python code static checker / GPL |
| [pyodbc](https://github.com/mkleehammer/pyodbc) | 4.0.17 | DB API Module for ODBC / MIT |
| [pyopenssl](https://github.com/pyca/pyopenssl) | 17.2.0 | Python wrapper module around the OpenSSL library / Apache 2.0 |
| [pyparsing](http://pyparsing.wikispaces.com/) | 2.2.0 | Create and execute simple grammars / MIT |
| [pyqt](http://www.riverbankcomputing.co.uk/software/pyqt) | 5.6.0 | Python binding of the cross-platform GUI toolkit Qt. / Commercial, GPL-2.0, GPL-3.0 |
| [pysocks](https://github.com/Anorov/PySocks) | 1.6.7 | A Python SOCKS client module. See [Anorov/PySocks](https://github.com/Anorov/PySocks) for more information. / BSD 3-Clause |
| [pytables](http://www.pytables.org) | 3.4.2 | Brings together Python, HDF5 and NumPy to easily handle large amounts of data. / BSD 3-Clause |
| [pytest](https://docs.pytest.org/en/latest/) | 3.2.1 | Simple and powerful testing with Python. / MIT |
| [python](http://www.python.org/) | 2.7.13 | General purpose programming language / PSF |
| [python-dateutil](https://dateutil.readthedocs.org/) | 2.6.1 | Extensions to the standard Python datetime module. / BSD 3-clause |
| [pytz](http://pythonhosted.org/pytz/) | 2017.2 | World timezone definitions, modern and historical. / MIT |
| [pywavelets](https://github.com/PyWavelets/pywt) | 0.5.2 | Discrete Wavelet Transforms in Python. / MIT |
| [pyyaml](http://pyyaml.org/wiki/PyYAML) | 3.12 | YAML parser and emitter for Python / MIT |
| [pyzmq](https://github.com/zeromq/pyzmq) | 16.0.2 | Python bindings for zeromq / BSD 3-clause |
| [qt](http://qt-project.org) | 5.6.2 | Qt is a cross-platform application and UI framework. / LGPL-3.0 |
| [qtawesome](https://github.com/spyder-ide/qtawesome) | 0.4.4 | Iconic fonts in PyQt and PySide applications / MIT |
| [qtconsole](http://jupyter.org) | 4.3.1 | Jupyter Qt console / BSD 3-Clause |
| [qtpy](https://github.com/spyder-ide/qtpy) | 1.3.1 | Abstraction layer for PyQt5/PyQt4/PySide / MIT |
| [readline](https://cnswww.cns.cwru.edu/php/chet/readline/rltop.html) | 7.0 | library for editing command lines as they are typed in / GPL3 |
| [requests](http://python-requests.org) | 2.18.4 | Python HTTP for Humans. / Apache 2.0 |
| [rope](https://github.com/python-rope/rope) | 0.10.5 | A python refactoring library… / GPL 2.0 |
| [ruamel\_yaml](https://bitbucket.org/ruamel/yaml) | 0.11.14 | A patched copy of ruamel.yaml. / MIT |
| [scandir](https://github.com/benhoyt/scandir) | 1.5 | scandir, a better directory iterator and faster os.walk() / BSD 3-Clause |
| [scikit-image](http://scikit-image.org/) | 0.13.0 | Image processing routines for SciPy. / BSD 3-Clause |
| [scikit-learn](http://scikit-learn.org/) | 0.19.0 | A set of python modules for machine learning and data mining / BSD 3-Clause |
| [scipy](http://www.scipy.org/) | 0.19.1 | Scientific Library for Python / BSD 3-Clause |
| [seaborn](http://stanford.edu/~mwaskom/software/seaborn/) | 0.8.0 | Statistical data visualization / BSD 3-Clause |
| [setuptools](https://github.com/pypa/setuptools) | 36.5.0 | Download, build, install, upgrade, and uninstall Python packages / MIT |
| [simplegeneric](http://cheeseshop.python.org/pypi/simplegeneric) | 0.8.1 | Simple generic functions (similar to Python’s own len(), pickle.dump(), etc.) / Zope Public |
| [singledispatch](http://docs.python.org/3/library/functools.html#functools.singledispatch) | 3.4.0.3 | Transforms a function into a single-dispatch generic function / MIT |
| [sip](http://www.riverbankcomputing.com/software/sip/intro) | 4.18.1 | Create Python bindings for C and C++ libraries / GPL-3.0 |
| [six](http://pypi.python.org/pypi/six/) | 1.10.0 | Python 2 and 3 compatibility utilities / MIT |
| [snowballstemmer](https://github.com/shibukawa/snowball_py) | 1.2.1 | Snowball stemming library collection for Python / BSD-2-Clause |
| [sortedcollections](http://www.grantjenks.com/docs/sortedcollections/) | 0.5.3 | Python Sorted Collections / Apache-2.0 |
| [sortedcontainers](http://www.grantjenks.com/docs/sortedcontainers/) | 1.5.7 | Python Sorted Container Types: SortedList, SortedDict, and SortedSet / Apache 2.0 |
| [sphinx](http://www.sphinx-doc.org) | 1.6.3 | Sphinx is a tool that makes it easy to create intelligent and beautiful documentation / BSD 2-clause |
| sphinxcontrib | 1.0 | Python namespace for sphinxcontrib / BSD |
| [sphinxcontrib-websupport](https://pypi.python.org/pypi/sphinxcontrib-websupport) | 1.0.1 | Sphinx API for Web Apps / BSD-2-Clause |
| [spyder](https://github.com/spyder-ide/spyder) | 3.2.3 | Scientific PYthon Development EnviRonment / MIT |
| [sqlalchemy](http://www.sqlalchemy.org/) | 1.1.13 | Database Abstraction Library. / MIT |
| [sqlite](http://www.sqlite.org/) | 3.20.1 | Implements a self-contained, zero-configuration, SQL database engine. / Public-Domain (`<http://www.sqlite.org/copyright.html>`) |
| [ssl\_match\_hostname](http://bitbucket.org/brandon/backports.ssl_match_hostname) | 3.5.0.1 | The ssl.match\_hostname() function from Python 3.5 / PSF 2 |
| [statsmodels](https://www.statsmodels.org) | 0.8.0 | Statistical computations and models for use with SciPy / BSD 3-Clause |
| [subprocess32](https://github.com/google/python-subprocess32) | 3.2.7 | A backport of the subprocess module from Python 3.2/3.3 for use on 2.x. / PSF 2 |
| [sympy](http://sympy.org) | 1.1.1 | Python library for symbolic mathematics / 3-clause BSD |
| [tblib](https://github.com/ionelmc/python-tblib) | 1.3.2 | Traceback serialization library. / BSD 2-Clause |
| [terminado](http://github.com/mitsuhiko/markupsafe) | 0.6 | Terminals served by tornado websockets / BSD 3-clause |
| [testpath](https://testpath.readthedocs.io) | 0.3.1 | Testpath is a collection of utilities for Python code working with files and commands. / MIT |
| [tk](http://www.tcl.tk/) | 8.6.7 | A dynamic programming language with GUI support. Bundles Tcl and Tk. / Tcl/Tk |
| [toolz](http://toolz.readthedocs.org/) | 0.8.2 | A functional standard library for Python. / BSD 3-Clause |
| [tornado](http://www.tornadoweb.org/) | 4.5.2 | A Python web framework and asynchronous networking library, originally developed at FriendFeed. / Apache 2.0 |
| [traitlets](http://ipython.org/) | 4.3.2 | Configuration system for Python applications / BSD 3-clause |
| [typing](https://docs.python.org/3.5/library/typing.html) | 3.6.2 | Type Hints for Python - backport for `Python<3.5` / PSF |
| [unicodecsv](https://github.com/jdunck/python-unicodecsv) | 0.14.1 | Drop-in replacement for csv module which supports unicode strings / BSD |
| [unixodbc](http://www.unixodbc.org/) | 2.3.4 | ODBC on non MS Windows platforms / LGPL-2.1 |
| [urllib3](https://urllib3.readthedocs.io/) | 1.22 | HTTP library with thread-safe connection pooling, file post, and more. / MIT |
| [wcwidth](https://github.com/jquast/wcwidth) | 0.1.7 | Measures number of Terminal column cells of wide-character codes. / MIT |
| [webencodings](https://github.com/gsnedders/python-webencodings) | 0.5.1 | Character encoding aliases for legacy web content / BSD 3-Clause |
| [werkzeug](http://werkzeug.pocoo.org/) | 0.12.2 | The Python WSGI Utility Library. / BSD 3-Clause |
| [wheel](https://bitbucket.org/pypa/wheel/) | 0.29.0 | A built-package format for Python. / MIT |
| [widgetsnbextension](http://ipython.org) | 3.0.2 | IPython HTML widgets for Jupyter / BSD 3-clause |
| [wrapt](https://github.com/GrahamDumpleton/wrapt) | 1.10.11 | Module for decorators, wrappers and monkey patching. / BSD 2-Clause |
| [xlrd](http://www.python-excel.org/) | 1.1.0 | Library for developers to extract data from Microsoft Excel (tm) spreadsheet files / BSD 3-Clause and BSD with advertising |
| [xlsxwriter](https://xlsxwriter.readthedocs.io/) | 0.9.8 | A Python module for creating Excel XLSX files / BSD 2-Clause |
| [xlwt](http://www.python-excel.org/) | 1.3.0 | Writing data and formatting information to Excel files / BSD |
| [xz](http://tukaani.org/xz/) | 5.2.3 | Data compression software with high compression ratio / LGPL-2.1 and GPL-2.0 |
| [yaml](http://pyyaml.org/wiki/LibYAML) | 0.1.7 | A C library for parsing and emitting YAML. / MIT |
| [zeromq](http://zeromq.org) | 4.2.2 | A high-performance asynchronous messaging library. / LGPL 3 |
| [zict](http://github.com/mrocklin/zict) | 0.1.2 | Composable Dictionary Classes / BSD 3-Clause |
| [zlib](http://zlib.net/) | 1.2.11 | Massively spiffy yet delicately unobtrusive compression library / zlib |
| Name | Version | Summary / License |
|---|---|---|
| [alabaster](http://www.sphinx-doc.org/en/stable/index.html) | 0.7.10 | Configurable, Python 2+3 compatible Sphinx theme. / BSD 3-Clause |
| [anaconda-client](http://anaconda.org) | 1.6.5 | anaconda.org command line client library / BSD 3-clause |
| [anaconda-navigator](https://github.com/ContinuumIO/navigator) | 1.6.8 | Anaconda Navigator / proprietary - Continuum Analytics, Inc. |
| [anaconda-project](https://github.com/Anaconda-Platform/anaconda-project) | 0.8.0 | Reproducible, executable project directories. / BSD 3-Clause |
| [asn1crypto](https://github.com/wbond/asn1crypto) | 0.22.0 | Python ASN.1 library with a focus on performance and a pythonic API / MIT |
| [astroid](https://www.astroid.org/) | 1.5.3 | A abstract syntax tree for Python with inference support. / LGPL 2.1 |
| [astropy](http://www.astropy.org/) | 2.0.2 | Community-developed Python Library for Astronomy / BSD |
| [babel](http://babel.pocoo.org/) | 2.5.0 | Utilities to internationalize and localize Python applications / BSD 3-clause |
| [backports](https://bitbucket.org/brandon/backports) | 1.0 | / BSD |
| [backports.functools\_lru\_cache](https://github.com/jaraco/backports.functools_lru_cache) | 1.4 | Backport of functools.lru\_cache from Python 3.3 as published at ActiveState. / MIT |
| [backports.shutil\_get\_terminal\_size](https://github.com/chrippa/backports.shutil_get_terminal_size) | 1.0.0 | A backport of the get\_terminal\_size function from Python 3.3’s shutil. / MIT |
| [backports\_abc](https://github.com/cython/backports_abc) | 0.5 | A backport of recent additions to the collections.abc module. / PSF 2 |
| [beautifulsoup4](http://www.crummy.com/software/BeautifulSoup/) | 4.6.0 | Python library designed for screen-scraping / MIT |
| [bitarray](https://github.com/ilanschnell/bitarray) | 0.8.1 | efficient arrays of booleans – C extension / PSF |
| [bkcharts](http://github.com/bokeh/bkcharts) | 0.2 | High level chart types built on top of Bokeh / BSD 3-Clause |
| [blaze](http://blaze.pydata.org) | 0.11.3 | NumPy and Pandas interface to big data / BSD 3-Clause |
| [bleach](https://github.com/mozilla/bleach) | 2.0.0 | Easy, whitelist-based HTML-sanitizing tool / Apache-2.0 |
| [bokeh](http://bokeh.pydata.org/) | 0.12.7 | Statistical and novel interactive HTML plots for Python / BSD 3-Clause |
| [boto](https://github.com/boto/boto/) | 2.48.0 | Amazon Web Services Library / MIT |
| [bottleneck](http://berkeleyanalytics.com/bottleneck) | 1.2.1 | Fast NumPy array functions written in Cython. / BSD 2-Clause |
| [ca-certificates](https://github.com/conda-forge/ca-certificates-feedstock) | 2017.08.26 | Certificates for use with other packages. / ISC |
| [cairo](http://cairographics.org/) | 1.14.10 | Cairo is a 2D graphics library with support for multiple output devices. / LGPL 2.1 or MPL 1.1 |
| [cdecimal](http://www.bytereef.org/mpdecimal/index.html) | 2.3 | Fast drop-in replacement for decimal.py / BSD 2-Clause |
| [certifi](http://certifi.io/) | 2017.7.27.1 | Python package for providing Mozilla’s CA Bundle. / ISC |
| [cffi](https://bitbucket.org/cffi/cffi) | 1.10.0 | Foreign Function Interface for Python calling C code. / MIT |
| [chardet](https://github.com/chardet/chardet) | 3.0.4 | Universal character encoding detector / LGPL2 |
| [click](http://click.pocoo.org/) | 6.7 | A simple wrapper around optparse for powerful command line utilities. / BSD 3-Clause |
| [cloudpickle](https://github.com/cloudpipe/cloudpickle) | 0.4.0 | Extended pickling support for Python objects / BSD 3-Clause |
| [clyent](https://github.com/Anaconda-Platform/clyent) | 1.2.2 | Command line client library for windows and posix / BSD 3-Clause |
| [colorama](https://github.com/tartley/colorama) | 0.3.9 | Cross-platform colored terminal text. / BSD 3-Clause |
| [conda](http://conda.pydata.org/) | 4.3.27 | OS-agnostic, system-level binary package and environment manager. / BSD 3-Clause |
| [conda-build](https://github.com/conda/conda-build) | 3.0.22 | tools for building conda packages / BSD 3-Clause |
| [configparser](http://docs.python.org/3/library/configparser.html) | 3.5.0 | This library brings the updated configparser from Python 3.5 to Python 2.6-3.5 / MIT |
| [contextlib2](http://contextlib2.readthedocs.org) | 0.5.5 | Backports and enhancements for the contextlib module / PSF |
| [cryptography](https://github.com/pyca/cryptography) | 2.0.3 | Provides cryptographic recipes and primitives to Python developers / Apache 2.0 or BSD 3-Clause, PSF 2 |
| [curl](http://curl.haxx.se/) | 7.55.1 | tool and library for transferring data with URL syntax / MIT/X derivate (`<http://curl.haxx.se/docs/copyright.html>`) |
| [cycler](http://matplotlib.org/cycler) | 0.10.0 | Composable style cycles. / BSD 3-Clause |
| [cython](http://www.cython.org/) | 0.26.1 | The Cython compiler for writing C extensions for the Python language / Apache-2.0 |
| [cytoolz](https://github.com/pytoolz/cytoolz) | 0.8.2 | Cython implementation of Toolz. High performance functional utilities. / BSD 3-Clause |
| [dask](http://dask.pydata.org/en/latest/) | 0.15.2 | Parallel Python with task scheduling / BSD 3-Clause |
| [dask-core](http://github.com/dask/dask/) | 0.15.2 | Parallel Python with task scheduling / BSD 3-Clause |
| [datashape](http://datashape.pydata.org) | 0.5.4 | A data description language. / BSD 2-Clause |
| [dbus](http://www.freedesktop.org/wiki/Software/dbus/) | 1.10.22 | Simple message bus system for applications to talk to one another / GPL2 |
| [decorator](https://github.com/micheles/decorator) | 4.1.2 | Better living through Python with decorators. / BSD 3-Clause |
| [distributed](http://distributed.readthedocs.io/en/latest/) | 1.18.3 | Distributed computing with Dask / BSD 3-Clause |
| [docutils](http://docutils.sourceforge.net/) | 0.14 | Docutils – Python Documentation Utilities / Public Domain Dedictation and BSD 2-Clause and PSF 2.1.1 and GPL 3.0 |
| [entrypoints](https://github.com/takluyver/entrypoints) | 0.2.3 | Discover and load entry points from installed packages. / MIT License |
| [enum34](https://bitbucket.org/stoneleaf/enum34) | 1.1.6 | Python 3.4 Enum backported to 3.3, 3.2, 3.1, 2.7, 2.6, 2.5, and 2.4 / BSD 3-Clause |
| [et\_xmlfile](https://bitbucket.org/openpyxl/et_xmlfile) | 1.0.1 | An implementation of lxml.xmlfile for the standard library / MIT |
| [expat](http://expat.sourceforge.net/) | 2.2.4 | Expat XML parser library in C. / MIT |
| [fastcache](https://github.com/pbrady/fastcache) | 1.0.2 | C implementation of Python 3 lru\_cache / MIT |
| [filelock](https://github.com/benediktschmitt/py-filelock) | 2.0.12 | A platform independent file lock. / Public Domain |
| [flask](http://flask.pocoo.org) | 0.12.2 | A microframework based on Werkzeug, Jinja2 and good intentions. / BSD 3-Clause |
| [flask-cors](https://github.com/corydolphin/flask-cors) | 3.0.3 | A Flask extension adding a decorator for CORS support / MIT |
| [fontconfig](http://www.freedesktop.org/wiki/Software/fontconfig/) | 2.12.4 | A library for configuring and customizing font access. / MIT |
| [freetype](https://www.freetype.org/) | 2.8 | A Free, High-Quality, and Portable Font Engine / GPL-2.0 and FreeType |
| [funcsigs](http://funcsigs.readthedocs.org) | 1.0.2 | Python function signatures from PEP362 for Python 2.6, 2.7 and 3.2+. / Apache 2.0 |
| [functools32](https://github.com/MiCHiLU/python-functools32) | 3.2.3.2 | Backport of the functools module from Python 3.2.3 for use on 2.7 and PyPy. / PSF license |
| [futures](https://github.com/agronholm/pythonfutures) | 3.1.1 | Backport of the concurrent.futures package from Python 3.2 / PSF |
| [get\_terminal\_size](https://github.com/chrippa/backports.shutil_get_terminal_size) | 1.0.0 | Get the size of the terminal window. / MIT |
| [gevent](http://www.gevent.org/) | 1.2.2 | Coroutine-based network library / MIT |
| [glib](https://developer.gnome.org/glib/) | 2.53.6 | Provides core application building blocks for libraries and applications written in C. / LGPL-2.1 |
| [glob2](https://github.com/miracle2k/python-glob2) | 0.5 | Version of the glob module that supports recursion via \*\*, and can capture patterns. / BSD-2-Clause |
| [gmp](http://gmplib.org/) | 6.1.2 | The GNU multiprecision library. / GPL 2 and LGPL 3 |
| [gmpy2](https://pypi.python.org/pypi/gmpy2) | 2.0.8 | GMP/MPIR, MPFR, and MPC interface to Python 2.6+ and 3.x / LGPL 3 |
| [graphite2](http://graphite.sil.org/) | 1.3.10 | A “smart font” system that handles the complexities of lesser-known languages of the world. / LGPLv2 |
| [greenlet](https://github.com/python-greenlet/greenlet) | 0.4.12 | Lightweight in-process concurrent programming / MIT |
| [grin](http://pypi.python.org/pypi/grin) | 1.2.1 | Enhanced grep-like tool / BSD 3-Clause |
| [gst-plugins-base](http://gstreamer.freedesktop.org/) | 1.12.2 | GStreamer Base Plug-ins / GPL2 |
| [gstreamer](http://gstreamer.freedesktop.org/) | 1.12.2 | Library for constructing graphs of media-handling components / LGPL 2 |
| [h5py](http://www.h5py.org/) | 2.7.0 | Read and write HDF5 files from Python. / BSD 3-Clause |
| [harfbuzz](http://www.freedesktop.org/wiki/Software/HarfBuzz/) | 1.5.0 | An OpenType text shaping engine. / MIT |
| [hdf5](http://www.hdfgroup.org/HDF5/) | 1.10.1 | HDF5 is a data model, library, and file format for storing and managing data / HDF5 |
| [heapdict](http://stutzbachenterprises.com/) | 1.0.0 | A heap with decrease-key and increase-key operations / BSD 3-Clause |
| [html5lib](https://github.com/html5lib/html5lib-python) | 0.999999999 | HTML parser based on the WHATWG HTML specification / MIT |
| [icu](http://site.icu-project.org/) | 58.2 | International Components for Unicode. / MIT |
| [idna](https://github.com/kjd/idna) | 2.6 | Internationalized Domain Names in Applications (IDNA). / BSD Like |
| [imageio](http://imageio.github.io) | 2.2.0 | a Python library for reading and writing image data / BSD 2-Clause |
| [imagesize](https://github.com/shibukawa/imagesize_py) | 0.7.1 | Getting image size from png/jpeg/jpeg2000/gif file / MIT |
| [intel-openmp](https://software.intel.com/en-us/node/522690) | 2018.0.0 | Math library for Intel and compatible processors / proprietary - Intel |
| [ipaddress](https://github.com/phihag/ipaddress) | 1.0.18 | IPv4/IPv6 manipulation library / PSF 2 |
| [ipykernel](http://ipython.org) | 4.6.1 | IPython Kernel for Jupyter / BSD 3-clause |
| [ipython](http://ipython.org/) | 5.4.1 | IPython: Productive Interactive Computing / BSD 3-clause |
| [ipython\_genutils](http://ipython.org) | 0.2.0 | vestigial utilities from IPython / BSD 3-Clause |
| [ipywidgets](https://github.com/ipython/ipywidgets) | 7.0.0 | Jupyter Interactive Widgets / BSD 3-clause |
| [isort](https://github.com/timothycrosley/isort) | 4.2.15 | A Python utility / library to sort Python imports. / MIT |
| [itsdangerous](https://github.com/pallets/itsdangerous) | 0.24 | Various helpers to pass trusted data to untrusted environments. / BSD 3-Clause |
| [jbig](https://www.cl.cam.ac.uk/~mgk25/jbigkit) | 2.1 | Implementation of the JBIG1 data compression standard / GPL-2.0 |
| [jdcal](https://github.com/phn/jdcal) | 1.3 | Julian dates from proleptic Gregorian and Julian calendars. / BSD 2-Clause |
| [jedi](https://github.com/davidhalter/jedi/) | 0.10.2 | An autocompletion tool for Python that can be used for text editors. / MIT |
| [jinja2](http://jinja.pocoo.org) | 2.9.6 | An easy to use stand-alone template engine written in pure python. / 3-Clause BSD |
| [jpeg](http://www.ijg.org/) | 9b | read/write jpeg COM, EXIF, IPTC medata / Custom free software license |
| [jsonschema](https://github.com/Julian/jsonschema) | 2.6.0 | An implementation of JSON Schema validation for Python / MIT |
| [jupyter](http://jupyter.org) | 1.0.0 | Jupyter metapackage. Install all the Jupyter components in one go. / BSD 3-Clause |
| [jupyter\_client](http://jupyter.org) | 5.1.0 | Jupyter protocol implementation and client libraries / BSD 3-clause |
| [jupyter\_console](http://jupyter.org) | 5.2.0 | Jupyter terminal console / BSD 3-Clause |
| [jupyter\_core](http://jupyter.org) | 4.3.0 | Core common functionality of Jupyter projects. / BSD 3-clause |
| [jupyterlab](https://github.com/jupyterlab/jupyterlab) | 0.27.0 | A pre-alpha version of a computational environment for Jupyter. / BSD 3-Clause |
| [jupyterlab\_launcher](http://github.com/jupyterlab/jupyterlab_launcher) | 0.4.0 | A Launcher for JupyterLab based applications. / BSD 3-Clause |
| [lazy-object-proxy](https://github.com/ionelmc/python-lazy-object-proxy) | 1.3.1 | A fast and thorough lazy object proxy. / BSD 2-Clause |
| [libedit](http://thrysoee.dk/editline/) | 3.1 | Editline Library (libedit) / 3-Clause BSD |
| [libffi](https://sourceware.org/libffi/) | 3.2.1 | A Portable Foreign Function Interface Library. / Custom |
| [libgcc-ng](https://gcc.gnu.org/onlinedocs/gccint/Libgcc.html) | 7.2.0 | The GCC low-level runtime library / GPL |
| [libgfortran-ng](https://gcc.gnu.org/) | 7.2.0 | The GNU Fortran Runtime Library / GPL |
| [libpng](http://www.libpng.org/pub/png/libpng.html) | 1.6.32 | PNG reference library. / zlib/libpng |
| [libsodium](https://github.com/jedisct1/libsodium) | 1.0.13 | A modern and easy-to-use crypto library. / ISC |
| [libssh2](https://www.libssh2.org/) | 1.8.0 | the SSH library / BSD 3-Clause |
| [libstdcxx-ng](https://gcc.gnu.org/) | 7.2.0 | he GNU C++ Runtime Library / GPL3 with runtime exception |
| [libtiff](http://www.libtiff.org/) | 4.0.8 | Support for the Tag Image File Format (TIFF). / HPND |
| [libtool](http://www.gnu.org/software/libtool/) | 2.4.6 | The GNU Portable Library Tool / GPL 3 |
| [libxcb](http://xcb.freedesktop.org/) | 1.12 | This is the C-language Binding (XCB) package to the X Window System protocol / MIT |
| [libxml2](http://xmlsoft.org/) | 2.9.4 | The XML C parser and toolkit of Gnome / MIT |
| [libxslt](http://xmlsoft.org/XSLT/) | 1.1.29 | The XSLT C library developed for the GNOME project / MIT |
| [llvmlite](http://llvmlite.pydata.org/) | 0.20.0 | Lightweight wrapper around basic LLVM functionality / BSD |
| [locket](https://github.com/mwilliamson/locket.py) | 0.2.0 | File-based locks for Python for Linux and Windows / BSD 2-Clause |
| [lxml](http://lxml.de/) | 3.8.0 | Pythonic binding for the C libraries libxml2 and libxslt. / BSD 3-Clause, GPL-2.0, ZPL-2.0, and ElementTree |
| [lzo](http://www.oberhumer.com/opensource/lzo/) | 2.10 | LZO is a portable lossless data compression library written in ANSI C. / GPL v2+ |
| [markupsafe](https://www.palletsprojects.com/p/markupsafe/) | 1.0 | A Python module that implements the jinja2.Markup string / BSD 3-Clause |
| [matplotlib](http://matplotlib.org/) | 2.0.2 | Publication quality figures in Python / PSF-based |
| [mccabe](https://github.com/PyCQA/mccabe) | 0.6.1 | McCabe complexity checker for Python / MIT |
| [mistune](https://github.com/lepture/mistune) | 0.7.4 | The fastest markdown parser in pure Python. / BSD 3-Clause |
| [mkl](http://software.intel.com/en-us/articles/intel-mkl/) | 2018.0.0 | Math library for Intel and compatible processors / proprietary - Intel |
| [mkl-service](https://github.com/ContinuumIO/mkl-service) | 1.1.2 | Python bindings to MKL service functions / 3-clause BSD |
| [mpc](http://www.multiprecision.org/) | 1.0.3 | A C library for the arithmetic of complex numbers with arbitrarily high precision. / LGPL 3 |
| [mpfr](http://www.mpfr.org/) | 3.1.5 | The MPFR library is a C library for multiple-precision floating-point computations with correct rounding. / LGPL 3 |
| [mpmath](http://mpmath.org) | 0.19 | Python library for arbitrary-precision floating-point arithmetic / BSD 3-Clause |
| [msgpack-python](http://msgpack.org/) | 0.4.8 | MessagePack (de)serializer. / Apache 2.0 |
| [multipledispatch](https://github.com/mrocklin/multipledispatch/) | 0.4.9 | Multiple dispatch in Python / BSD 3-Clause |
| [navigator-updater](https://github.com/ContinuumIO/navigator-updater) | 0.1.0 | Anaconda Navigator Updater / proprietary - Continuum Analytics, Inc. |
| [nbconvert](http://jupyter.org) | 5.3.1 | Converting Jupyter Notebooks / BSD 3-Clause |
| [nbformat](http://jupyter.org) | 4.4.0 | The reference implementation of the Jupyter Notebook format / BSD 3-clause |
| [ncurses](http://www.gnu.org/software/ncurses/) | 6.0 | Library for text-based user interfaces / Free software (MIT-like) |
| [networkx](https://networkx.github.io/) | 1.11 | Python package for creating and manipulating complex networks / BSD 3-Clause |
| [nltk](http://nltk.org/) | 3.2.4 | Build Python programs to work with human language data / Apache 2.0 |
| [nose](http://readthedocs.org/docs/nose/) | 1.3.7 | Nose extends unittest to make testing easier / LGPL-2.1 |
| [notebook](http://jupyter.org) | 5.0.0 | A web-based notebook environment for interactive computing / BSD 3-clause |
| [numba](http://numba.pydata.org/) | 0.35.0 | NumPy aware dynamic Python compiler using LLVM / BSD |
| [numexpr](https://github.com/pydata/numexpr) | 2.6.2 | Fast numerical expression evaluator for NumPy. / MIT |
| [numpy](http://numpy.scipy.org/) | 1.13.1 | Array processing for numbers, strings, records, and objects. / BSD 3-Clause |
| [numpydoc](https://github.com/numpy/numpydoc) | 0.7.0 | Sphinx extension to support docstrings in Numpy format / BSD 3-Clause |
| [odo](http://odo.pydata.org) | 0.5.1 | Data migration in Python / BSD-3-Clause |
| [olefile](http://www.decalage.info/python/olefileio) | 0.44 | parse, read and write Microsoft OLE2 files / BSD License 2-Clause |
| [openpyxl](https://openpyxl.readthedocs.io) | 2.4.8 | A Python library to read/write Excel 2010 xlsx/xlsm files / MIT |
| [openssl](http://www.openssl.org/) | 1.0.2l | OpenSSL is an open-source implementation of the SSL and TLS protocols / OpenSSL |
| [packaging](https://github.com/pypa/packaging) | 16.8 | Core utilities for Python packages / Apache 2.0 or BSD 2-Clause |
| [pandas](http://pandas.pydata.org) | 0.20.3 | High-performance, easy-to-use data structures and data analysis tools. / BSD 3-clause |
| [pandoc](http://johnmacfarlane.net/pandoc/) | 1.15.0.6 | Universal markup converter (repackaged binaries). / GPL-2.0 |
| [pandocfilters](https://github.com/jgm/pandocfilters) | 1.4.2 | A python module for writing pandoc filters / BSD-3-Clause |
| [pango](http://www.pango.org/) | 1.40.11 | Text layout and rendering engine. / LGPL-2.1 |
| [partd](https://github.com/dask/partd) | 0.3.8 | Data structure for on-disk shuffle operations / BSD 3-Clause |
| [patchelf](http://nixos.org/patchelf.html) | 0.9 | A small utility to modify the dynamic linker and RPATH of ELF executables. / GPL 3 |
| [path.py](https://github.com/jaraco/path.py) | 10.3.1 | A module wrapper for os.path / MIT |
| [pathlib2](https://github.com/mcmtroffaes/pathlib2) | 2.3.0 | Fork of pathlib aiming to support the full stdlib Python API. / MIT |
| [patsy](https://github.com/pydata/patsy) | 0.4.1 | Describing statistical models in Python using symbolic formulas / BSD-2-Clause, PSF2 |
| [pcre](http://www.pcre.org/) | 8.41 | Regular expression pattern matching using the same syntax and semantics as Perl 5. / BSD 3-Clause |
| [pep8](http://pep8.readthedocs.org/) | 1.7.0 | Python style guide checker / MIT |
| [pexpect](http://pexpect.sourceforge.net/) | 4.2.1 | Pexpect makes Python a better tool for controlling other applications. / ISC |
| [pickleshare](https://github.com/vivainio/pickleshare) | 0.7.4 | Tiny ‘shelve’-like database with concurrency support / MIT |
| [pillow](http://python-imaging.github.io/) | 4.2.1 | Pillow is the friendly PIL fork by Alex Clark and Contributors. / PIL |
| [pip](https://pip.pypa.io/en/stable/) | 9.0.1 | PyPA recommended tool for installing Python packages / MIT |
| [pixman](http://www.pixman.org/) | 0.34.0 | A low-level software library for pixel manipulation. / MIT |
| [pkginfo](https://code.launchpad.net/~tseaver/pkginfo/trunk) | 1.4.1 | Query metadatdata from sdists / bdists / installed packages. / MIT |
| [ply](http://www.dabeaz.com/ply/index.html) | 3.10 | Python Lex-Yacc / BSD 3-clause |
| [prompt\_toolkit](https://github.com/jonathanslenders/python-prompt-toolkit) | 1.0.15 | Library for building powerful interactive command lines in Python / BSD 3-clause |
| [psutil](https://github.com/giampaolo/psutil) | 5.2.2 | A cross-platform process and system utilities module for Python / BSD 3-Clause |
| [ptyprocess](https://github.com/pexpect/ptyprocess) | 0.5.2 | Run a subprocess in a pseudo terminal / ISC |
| [py](https://github.com/pytest-dev/py) | 1.4.34 | library with cross-python path, ini-parsing, io, code, log facilities / MIT |
| [pycairo](http://cairographics.org/pycairo/) | 1.13.3 | Python bindings for the Cairo graphics library. / LGPL 2.1, MPL 1.1 |
| [pycodestyle](https://pycodestyle.readthedocs.io/) | 2.3.1 | Python style guide checker / MIT |
| [pycosat](https://github.com/ContinuumIO/pycosat) | 0.6.2 | Bindings to picosat (a SAT solver) / MIT |
| [pycparser](https://github.com/eliben/pycparser) | 2.18 | Complete C99 parser in pure Python / BSD 3-clause |
| [pycrypto](http://www.pycrypto.org/) | 2.6.1 | Cryptographic modules for Python. / Public Domain |
| [pycurl](http://pycurl.sourceforge.net/) | 7.43.0 | A Python Interface To The cURL library / LGPL, MIT |
| [pyflakes](https://github.com/PyCQA/pyflakes) | 1.5.0 | Pyflakes analyzes programs and detects various errors. / MIT |
| [pygments](http://pygments.org/) | 2.2.0 | Generic syntax highlighting package / BSD 2-clause |
| [pylint](http://www.pylint.org/) | 1.7.2 | python code static checker / GPL |
| [pyodbc](https://github.com/mkleehammer/pyodbc) | 4.0.17 | DB API Module for ODBC / MIT |
| [pyopenssl](https://github.com/pyca/pyopenssl) | 17.2.0 | Python wrapper module around the OpenSSL library / Apache 2.0 |
| [pyparsing](http://pyparsing.wikispaces.com/) | 2.2.0 | Create and execute simple grammars / MIT |
| [pyqt](http://www.riverbankcomputing.co.uk/software/pyqt) | 5.6.0 | Python binding of the cross-platform GUI toolkit Qt. / Commercial, GPL-2.0, GPL-3.0 |
| [pysocks](https://github.com/Anorov/PySocks) | 1.6.7 | A Python SOCKS client module. See [Anorov/PySocks](https://github.com/Anorov/PySocks) for more information. / BSD 3-Clause |
| [pytables](http://www.pytables.org) | 3.4.2 | Brings together Python, HDF5 and NumPy to easily handle large amounts of data. / BSD 3-Clause |
| [pytest](https://docs.pytest.org/en/latest/) | 3.2.1 | Simple and powerful testing with Python. / MIT |
| [python](http://www.python.org/) | 2.7.13 | General purpose programming language / PSF |
| [python-dateutil](https://dateutil.readthedocs.org/) | 2.6.1 | Extensions to the standard Python datetime module. / BSD 3-clause |
| [pytz](http://pythonhosted.org/pytz/) | 2017.2 | World timezone definitions, modern and historical. / MIT |
| [pywavelets](https://github.com/PyWavelets/pywt) | 0.5.2 | Discrete Wavelet Transforms in Python. / MIT |
| [pyyaml](http://pyyaml.org/wiki/PyYAML) | 3.12 | YAML parser and emitter for Python / MIT |
| [pyzmq](https://github.com/zeromq/pyzmq) | 16.0.2 | Python bindings for zeromq / BSD 3-clause |
| [qt](http://qt-project.org) | 5.6.2 | Qt is a cross-platform application and UI framework. / LGPL-3.0 |
| [qtawesome](https://github.com/spyder-ide/qtawesome) | 0.4.4 | Iconic fonts in PyQt and PySide applications / MIT |
| [qtconsole](http://jupyter.org) | 4.3.1 | Jupyter Qt console / BSD 3-Clause |
| [qtpy](https://github.com/spyder-ide/qtpy) | 1.3.1 | Abstraction layer for PyQt5/PyQt4/PySide / MIT |
| [readline](https://cnswww.cns.cwru.edu/php/chet/readline/rltop.html) | 7.0 | library for editing command lines as they are typed in / GPL3 |
| [requests](http://python-requests.org) | 2.18.4 | Python HTTP for Humans. / Apache 2.0 |
| [rope](https://github.com/python-rope/rope) | 0.10.5 | A python refactoring library… / GPL 2.0 |
| [ruamel\_yaml](https://bitbucket.org/ruamel/yaml) | 0.11.14 | A patched copy of ruamel.yaml. / MIT |
| [scandir](https://github.com/benhoyt/scandir) | 1.5 | scandir, a better directory iterator and faster os.walk() / BSD 3-Clause |
| [scikit-image](http://scikit-image.org/) | 0.13.0 | Image processing routines for SciPy. / BSD 3-Clause |
| [scikit-learn](http://scikit-learn.org/) | 0.19.0 | A set of python modules for machine learning and data mining / BSD 3-Clause |
| [scipy](http://www.scipy.org/) | 0.19.1 | Scientific Library for Python / BSD 3-Clause |
| [seaborn](http://stanford.edu/~mwaskom/software/seaborn/) | 0.8.0 | Statistical data visualization / BSD 3-Clause |
| [setuptools](https://github.com/pypa/setuptools) | 36.5.0 | Download, build, install, upgrade, and uninstall Python packages / MIT |
| [simplegeneric](http://cheeseshop.python.org/pypi/simplegeneric) | 0.8.1 | Simple generic functions (similar to Python’s own len(), pickle.dump(), etc.) / Zope Public |
| [singledispatch](http://docs.python.org/3/library/functools.html#functools.singledispatch) | 3.4.0.3 | Transforms a function into a single-dispatch generic function / MIT |
| [sip](http://www.riverbankcomputing.com/software/sip/intro) | 4.18.1 | Create Python bindings for C and C++ libraries / GPL-3.0 |
| [six](http://pypi.python.org/pypi/six/) | 1.10.0 | Python 2 and 3 compatibility utilities / MIT |
| [snowballstemmer](https://github.com/shibukawa/snowball_py) | 1.2.1 | Snowball stemming library collection for Python / BSD-2-Clause |
| [sortedcollections](http://www.grantjenks.com/docs/sortedcollections/) | 0.5.3 | Python Sorted Collections / Apache-2.0 |
| [sortedcontainers](http://www.grantjenks.com/docs/sortedcontainers/) | 1.5.7 | Python Sorted Container Types: SortedList, SortedDict, and SortedSet / Apache 2.0 |
| [sphinx](http://www.sphinx-doc.org) | 1.6.3 | Sphinx is a tool that makes it easy to create intelligent and beautiful documentation / BSD 2-clause |
| sphinxcontrib | 1.0 | Python namespace for sphinxcontrib / BSD |
| [sphinxcontrib-websupport](https://pypi.python.org/pypi/sphinxcontrib-websupport) | 1.0.1 | Sphinx API for Web Apps / BSD-2-Clause |
| [spyder](https://github.com/spyder-ide/spyder) | 3.2.3 | Scientific PYthon Development EnviRonment / MIT |
| [sqlalchemy](http://www.sqlalchemy.org/) | 1.1.13 | Database Abstraction Library. / MIT |
| [sqlite](http://www.sqlite.org/) | 3.20.1 | Implements a self-contained, zero-configuration, SQL database engine. / Public-Domain (`<http://www.sqlite.org/copyright.html>`) |
| [ssl\_match\_hostname](http://bitbucket.org/brandon/backports.ssl_match_hostname) | 3.5.0.1 | The ssl.match\_hostname() function from Python 3.5 / PSF 2 |
| [statsmodels](https://www.statsmodels.org) | 0.8.0 | Statistical computations and models for use with SciPy / BSD 3-Clause |
| [subprocess32](https://github.com/google/python-subprocess32) | 3.2.7 | A backport of the subprocess module from Python 3.2/3.3 for use on 2.x. / PSF 2 |
| [sympy](http://sympy.org) | 1.1.1 | Python library for symbolic mathematics / 3-clause BSD |
| [tblib](https://github.com/ionelmc/python-tblib) | 1.3.2 | Traceback serialization library. / BSD 2-Clause |
| [terminado](http://github.com/mitsuhiko/markupsafe) | 0.6 | Terminals served by tornado websockets / BSD 3-clause |
| [testpath](https://testpath.readthedocs.io) | 0.3.1 | Testpath is a collection of utilities for Python code working with files and commands. / MIT |
| [tk](http://www.tcl.tk/) | 8.6.7 | A dynamic programming language with GUI support. Bundles Tcl and Tk. / Tcl/Tk |
| [toolz](http://toolz.readthedocs.org/) | 0.8.2 | A functional standard library for Python. / BSD 3-Clause |
| [tornado](http://www.tornadoweb.org/) | 4.5.2 | A Python web framework and asynchronous networking library, originally developed at FriendFeed. / Apache 2.0 |
| [traitlets](http://ipython.org/) | 4.3.2 | Configuration system for Python applications / BSD 3-clause |
| [typing](https://docs.python.org/3.5/library/typing.html) | 3.6.2 | Type Hints for Python - backport for `Python<3.5` / PSF |
| [unicodecsv](https://github.com/jdunck/python-unicodecsv) | 0.14.1 | Drop-in replacement for csv module which supports unicode strings / BSD |
| [unixodbc](http://www.unixodbc.org/) | 2.3.4 | ODBC on non MS Windows platforms / LGPL-2.1 |
| [urllib3](https://urllib3.readthedocs.io/) | 1.22 | HTTP library with thread-safe connection pooling, file post, and more. / MIT |
| [wcwidth](https://github.com/jquast/wcwidth) | 0.1.7 | Measures number of Terminal column cells of wide-character codes. / MIT |
| [webencodings](https://github.com/gsnedders/python-webencodings) | 0.5.1 | Character encoding aliases for legacy web content / BSD 3-Clause |
| [werkzeug](http://werkzeug.pocoo.org/) | 0.12.2 | The Python WSGI Utility Library. / BSD 3-Clause |
| [wheel](https://bitbucket.org/pypa/wheel/) | 0.29.0 | A built-package format for Python. / MIT |
| [widgetsnbextension](http://ipython.org) | 3.0.2 | IPython HTML widgets for Jupyter / BSD 3-clause |
| [wrapt](https://github.com/GrahamDumpleton/wrapt) | 1.10.11 | Module for decorators, wrappers and monkey patching. / BSD 2-Clause |
| [xlrd](http://www.python-excel.org/) | 1.1.0 | Library for developers to extract data from Microsoft Excel (tm) spreadsheet files / BSD 3-Clause and BSD with advertising |
| [xlsxwriter](https://xlsxwriter.readthedocs.io/) | 0.9.8 | A Python module for creating Excel XLSX files / BSD 2-Clause |
| [xlwt](http://www.python-excel.org/) | 1.3.0 | Writing data and formatting information to Excel files / BSD |
| [xz](http://tukaani.org/xz/) | 5.2.3 | Data compression software with high compression ratio / LGPL-2.1 and GPL-2.0 |
| [yaml](http://pyyaml.org/wiki/LibYAML) | 0.1.7 | A C library for parsing and emitting YAML. / MIT |
| [zeromq](http://zeromq.org) | 4.2.2 | A high-performance asynchronous messaging library. / LGPL 3 |
| [zict](http://github.com/mrocklin/zict) | 0.1.2 | Composable Dictionary Classes / BSD 3-Clause |
| [zlib](http://zlib.net/) | 1.2.11 | Massively spiffy yet delicately unobtrusive compression library / zlib |
{children}
{children}
| Package Name | linux-64 | linux-aarch64 | linux-s390x | osx-arm64 | osx-64 | win-64 |
|---|---|---|---|---|---|---|
| \_libgcc\_mutex | 0.1 | 0.1 | 0.1 | |||
| \_openmp\_mutex | 5.1 | 5.1 | 5.1 | |||
| anaconda-anon-usage | 0.5.0 | 0.5.0 | 0.5.0 | 0.5.0 | 0.5.0 | 0.5.0 |
| anaconda\_powershell\_prompt | 1.1.0 | |||||
| anaconda\_prompt | 1.1.0 | |||||
| annotated-types | 0.6.0 | 0.6.0 | 0.6.0 | 0.6.0 | 0.6.0 | 0.6.0 |
| archspec | 0.2.3 | 0.2.3 | 0.2.3 | 0.2.3 | 0.2.3 | 0.2.3 |
| boltons | 24.1.0 | 24.1.0 | 24.1.0 | 24.1.0 | 24.1.0 | 24.1.0 |
| brotli-python | 1.0.9 | 1.0.9 | 1.0.9 | 1.0.9 | 1.0.9 | 1.0.9 |
| bzip2 | 1.0.8 | 1.0.8 | 1.0.8 | 1.0.8 | 1.0.8 | 1.0.8 |
| c-ares | 1.19.1 | 1.19.1 | 1.19.1 | 1.19.1 | 1.19.1 | |
| ca-certificates | 2024.12.31 | 2024.12.31 | 2024.12.31 | 2024.12.31 | 2024.12.31 | 2024.12.31 |
| certifi | 2025.1.31 | 2025.1.31 | 2025.1.31 | 2025.1.31 | 2025.1.31 | 2025.1.31 |
| cffi | 1.17.1 | 1.17.1 | 1.17.1 | 1.17.1 | 1.17.1 | 1.17.1 |
| charset-normalizer | 3.3.2 | 3.3.2 | 3.3.2 | 3.3.2 | 3.3.2 | 3.3.2 |
| colorama | 0.4.6 | |||||
| conda | 25.1.1 | 25.1.1 | 25.1.1 | 25.1.1 | 25.1.1 | 25.1.1 |
| conda-anaconda-telemetry | 0.1.2 | 0.1.2 | 0.1.2 | 0.1.2 | 0.1.2 | 0.1.2 |
| conda-anaconda-tos | 0.1.2 | 0.1.2 | 0.1.2 | 0.1.2 | 0.1.2 | 0.1.2 |
| conda-content-trust | 0.2.0 | 0.2.0 | 0.2.0 | 0.2.0 | 0.2.0 | 0.2.0 |
| conda-libmamba-solver | 25.1.1 | 25.1.1 | 25.1.1 | 25.1.1 | 25.1.1 | 25.1.1 |
| conda-package-handling | 2.4.0 | 2.4.0 | 2.4.0 | 2.4.0 | 2.4.0 | 2.4.0 |
| conda-package-streaming | 0.11.0 | 0.11.0 | 0.11.0 | 0.11.0 | 0.11.0 | 0.11.0 |
| cpp-expected | 1.1.0 | 1.1.0 | 1.1.0 | 1.1.0 | 1.1.0 | 1.1.0 |
| cryptography | 43.0.3 | 43.0.3 | 43.0.3 | 43.0.3 | 43.0.3 | 43.0.3 |
| distro | 1.9.0 | 1.9.0 | 1.9.0 | 1.9.0 | 1.9.0 | 1.9.0 |
| expat | 2.6.4 | 2.6.4 | 2.6.4 | 2.6.4 | 2.6.4 | 2.6.4 |
| fmt | 9.1.0 | 9.1.0 | 9.1.0 | 9.1.0 | 9.1.0 | 9.1.0 |
| frozendict | 2.4.2 | 2.4.2 | 2.4.2 | 2.4.2 | 2.4.2 | 2.4.2 |
| icu | 73.1 | 73.1 | 73.1 | 73.1 | 73.1 | |
| idna | 3.7 | 3.7 | 3.7 | 3.7 | 3.7 | 3.7 |
| jsonpatch | 1.33 | 1.33 | 1.33 | 1.33 | 1.33 | 1.33 |
| jsonpointer | 2.1 | 2.1 | 2.1 | 2.1 | 2.1 | 2.1 |
| krb5 | 1.20.1 | 1.20.1 | 1.20.1 | 1.20.1 | 1.20.1 | |
| ld\_impl\_linux-64 | 2.40 | |||||
| ld\_impl\_linux-aarch64 | 2.40 | |||||
| ld\_impl\_linux-s390x | 2.40 | |||||
| libarchive | 3.7.7 | 3.7.7 | 3.7.7 | 3.7.7 | 3.7.7 | 3.7.7 |
| libcurl | 8.11.1 | 8.11.1 | 8.11.1 | 8.11.1 | 8.11.1 | 8.11.1 |
| libcxx | 14.0.6 | 14.0.6 | ||||
| libedit | 3.1.20230828 | 3.1.20230828 | 3.1.20230828 | 3.1.20230828 | 3.1.20230828 | |
| libev | 4.33 | 4.33 | 4.33 | 4.33 | 4.33 | |
| libffi | 3.4.4 | 3.4.4 | 3.4.4 | 3.4.4 | 3.4.4 | 3.4.4 |
| libgcc-ng | 11.2.0 | 11.2.0 | 11.2.0 | |||
| libgomp | 11.2.0 | 11.2.0 | 11.2.0 | |||
| libiconv | 1.16 | 1.16 | 1.16 | |||
| libmamba | 2.0.5 | 2.0.5 | 2.0.5 | 2.0.5 | 2.0.5 | 2.0.5 |
| libmambapy | 2.0.5 | 2.0.5 | 2.0.5 | 2.0.5 | 2.0.5 | 2.0.5 |
| libnghttp2 | 1.57.0 | 1.57.0 | 1.57.0 | 1.57.0 | 1.57.0 | |
| libsolv | 0.7.30 | 0.7.30 | 0.7.30 | 0.7.30 | 0.7.30 | 0.7.30 |
| libssh2 | 1.11.1 | 1.11.1 | 1.11.1 | 1.11.1 | 1.11.1 | 1.11.1 |
| libstdcxx-ng | 11.2.0 | 11.2.0 | 11.2.0 | |||
| libuuid | 1.41.5 | 1.41.5 | 1.41.5 | |||
| libxml2 | 2.13.5 | 2.13.5 | 2.13.5 | 2.13.5 | 2.13.5 | 2.13.5 |
| lz4-c | 1.9.4 | 1.9.4 | 1.9.4 | 1.9.4 | 1.9.4 | 1.9.4 |
| markdown-it-py | 2.2.0 | 2.2.0 | 2.2.0 | 2.2.0 | 2.2.0 | 2.2.0 |
| mdurl | 0.1.0 | 0.1.0 | 0.1.0 | 0.1.0 | 0.1.0 | 0.1.0 |
| menuinst | 2.2.0 | 2.2.0 | 2.2.0 | 2.2.0 | 2.2.0 | 2.2.0 |
| ncurses | 6.4 | 6.4 | 6.4 | 6.4 | 6.4 | |
| nlohmann\_json | 3.11.2 | 3.11.2 | 3.11.2 | 3.11.2 | 3.11.2 | 3.11.2 |
| openssl | 3.0.15 | 3.0.15 | 3.0.15 | 3.0.15 | 3.0.15 | 3.0.15 |
| packaging | 24.2 | 24.2 | 24.2 | 24.2 | 24.2 | 24.2 |
| pcre2 | 10.42 | 10.42 | 10.42 | 10.42 | 10.42 | 10.42 |
| pip | 25.0 | 25.0 | 25.0 | 25.0 | 25.0 | 25.0 |
| platformdirs | 3.10.0 | 3.10.0 | 3.10.0 | 3.10.0 | 3.10.0 | 3.10.0 |
| pluggy | 1.5.0 | 1.5.0 | 1.5.0 | 1.5.0 | 1.5.0 | 1.5.0 |
| pybind11-abi | 5 | 5 | 5 | 5 | 5 | 5 |
| pycosat | 0.6.6 | 0.6.6 | 0.6.6 | 0.6.6 | 0.6.6 | 0.6.6 |
| pycparser | 2.21 | 2.21 | 2.21 | 2.21 | 2.21 | 2.21 |
| pydantic | 2.10.3 | 2.10.3 | 2.10.3 | 2.10.3 | 2.10.3 | 2.10.3 |
| pydantic-core | 2.27.1 | 2.27.1 | 2.27.1 | 2.27.1 | 2.27.1 | 2.27.1 |
| pygments | 2.15.1 | 2.15.1 | 2.15.1 | 2.15.1 | 2.15.1 | 2.15.1 |
| pysocks | 1.7.1 | 1.7.1 | 1.7.1 | 1.7.1 | 1.7.1 | 1.7.1 |
| python | 3.12.9 | 3.12.9 | 3.12.9 | 3.12.9 | 3.12.9 | 3.12.9 |
| python.app | 3 | 3 | ||||
| readline | 8.2 | 8.2 | 8.2 | 8.2 | 8.2 | |
| reproc | 14.2.4 | 14.2.4 | 14.2.4 | 14.2.4 | 14.2.4 | 14.2.4 |
| reproc-cpp | 14.2.4 | 14.2.4 | 14.2.4 | 14.2.4 | 14.2.4 | 14.2.4 |
| requests | 2.32.3 | 2.32.3 | 2.32.3 | 2.32.3 | 2.32.3 | 2.32.3 |
| rich | 13.9.4 | 13.9.4 | 13.9.4 | 13.9.4 | 13.9.4 | 13.9.4 |
| ruamel.yaml | 0.18.6 | 0.18.6 | 0.18.6 | 0.18.6 | 0.18.6 | 0.18.6 |
| ruamel.yaml.clib | 0.2.8 | 0.2.8 | 0.2.8 | 0.2.8 | 0.2.8 | 0.2.8 |
| setuptools | 75.8.0 | 75.8.0 | 75.8.0 | 75.8.0 | 75.8.0 | 75.8.0 |
| simdjson | 3.10.1 | 3.10.1 | 3.10.1 | 3.10.1 | 3.10.1 | 3.10.1 |
| spdlog | 1.11.0 | 1.11.0 | 1.11.0 | 1.11.0 | 1.11.0 | 1.11.0 |
| sqlite | 3.45.3 | 3.45.3 | 3.45.3 | 3.45.3 | 3.45.3 | 3.45.3 |
| tk | 8.6.14 | 8.6.14 | 8.6.14 | 8.6.14 | 8.6.14 | 8.6.14 |
| tqdm | 4.67.1 | 4.67.1 | 4.67.1 | 4.67.1 | 4.67.1 | 4.67.1 |
| truststore | 0.10.0 | 0.10.0 | 0.10.0 | 0.10.0 | 0.10.0 | 0.10.0 |
| typing-extensions | 4.12.2 | 4.12.2 | 4.12.2 | 4.12.2 | 4.12.2 | 4.12.2 |
| typing\_extensions | 4.12.2 | 4.12.2 | 4.12.2 | 4.12.2 | 4.12.2 | 4.12.2 |
| tzdata | 2025a | 2025a | 2025a | 2025a | 2025a | 2025a |
| urllib3 | 2.3.0 | 2.3.0 | 2.3.0 | 2.3.0 | 2.3.0 | 2.3.0 |
| vc | 14.42 | |||||
| vs2015\_runtime | 14.42.34433 | |||||
| wheel | 0.45.1 | 0.45.1 | 0.45.1 | 0.45.1 | 0.45.1 | 0.45.1 |
| win\_inet\_pton | 1.1.0 | |||||
| xz | 5.4.6 | 5.4.6 | 5.4.6 | 5.4.6 | 5.4.6 | 5.4.6 |
| yaml-cpp | 0.8.0 | 0.8.0 | 0.8.0 | 0.8.0 | 0.8.0 | 0.8.0 |
| zlib | 1.2.13 | 1.2.13 | 1.2.13 | 1.2.13 | 1.2.13 | 1.2.13 |
| zstandard | 0.23.0 | 0.23.0 | 0.23.0 | 0.23.0 | 0.23.0 | 0.23.0 |
| zstd | 1.5.6 | 1.5.6 | 1.5.6 | 1.5.6 | 1.5.6 | 1.5.6 |
| Package Name | linux-64 | linux-aarch64 | linux-s390x |
|---|---|---|---|
| \_libgcc\_mutex | 0.1 | 0.1 | 0.1 |
| \_openmp\_mutex | 5.1 | 5.1 | 5.1 |
| anaconda-anon-usage | 0.5.0 | 0.5.0 | 0.5.0 |
| annotated-types | 0.6.0 | 0.6.0 | 0.6.0 |
| archspec | 0.2.3 | 0.2.3 | 0.2.3 |
| boltons | 24.1.0 | 24.1.0 | 24.1.0 |
| brotli-python | 1.0.9 | 1.0.9 | 1.0.9 |
| bzip2 | 1.0.8 | 1.0.8 | 1.0.8 |
| c-ares | 1.19.1 | 1.19.1 | 1.19.1 |
| ca-certificates | 2024.12.31 | 2024.12.31 | 2024.12.31 |
| certifi | 2025.1.31 | 2025.1.31 | 2025.1.31 |
| cffi | 1.17.1 | 1.17.1 | 1.17.1 |
| charset-normalizer | 3.3.2 | 3.3.2 | 3.3.2 |
| conda | 25.1.1 | 25.1.1 | 25.1.1 |
| conda-anaconda-telemetry | 0.1.2 | 0.1.2 | 0.1.2 |
| conda-anaconda-tos | 0.1.2 | 0.1.2 | 0.1.2 |
| conda-content-trust | 0.2.0 | 0.2.0 | 0.2.0 |
| conda-libmamba-solver | 25.1.1 | 25.1.1 | 25.1.1 |
| conda-package-handling | 2.4.0 | 2.4.0 | 2.4.0 |
| conda-package-streaming | 0.11.0 | 0.11.0 | 0.11.0 |
| cpp-expected | 1.1.0 | 1.1.0 | 1.1.0 |
| cryptography | 43.0.3 | 43.0.3 | 43.0.3 |
| distro | 1.9.0 | 1.9.0 | 1.9.0 |
| expat | 2.6.4 | 2.6.4 | 2.6.4 |
| fmt | 9.1.0 | 9.1.0 | 9.1.0 |
| frozendict | 2.4.2 | 2.4.2 | 2.4.2 |
| icu | 73.1 | 73.1 | 73.1 |
| idna | 3.7 | 3.7 | 3.7 |
| jsonpatch | 1.33 | 1.33 | 1.33 |
| jsonpointer | 2.1 | 2.1 | 2.1 |
| krb5 | 1.20.1 | 1.20.1 | 1.20.1 |
| ld\_impl\_linux-64 | 2.40 | ||
| ld\_impl\_linux-aarch64 | 2.40 | ||
| ld\_impl\_linux-s390x | 2.40 | ||
| libarchive | 3.7.7 | 3.7.7 | 3.7.7 |
| libcurl | 8.11.1 | 8.11.1 | 8.11.1 |
| libedit | 3.1.20230828 | 3.1.20230828 | 3.1.20230828 |
| libev | 4.33 | 4.33 | 4.33 |
| libffi | 3.4.4 | 3.4.4 | 3.4.4 |
| libgcc-ng | 11.2.0 | 11.2.0 | 11.2.0 |
| libgomp | 11.2.0 | 11.2.0 | 11.2.0 |
| libmamba | 2.0.5 | 2.0.5 | 2.0.5 |
| libmambapy | 2.0.5 | 2.0.5 | 2.0.5 |
| libnghttp2 | 1.57.0 | 1.57.0 | 1.57.0 |
| libsolv | 0.7.30 | 0.7.30 | 0.7.30 |
| libssh2 | 1.11.1 | 1.11.1 | 1.11.1 |
| libstdcxx-ng | 11.2.0 | 11.2.0 | 11.2.0 |
| libuuid | 1.41.5 | 1.41.5 | 1.41.5 |
| libxml2 | 2.13.5 | 2.13.5 | 2.13.5 |
| lz4-c | 1.9.4 | 1.9.4 | 1.9.4 |
| markdown-it-py | 2.2.0 | 2.2.0 | 2.2.0 |
| mdurl | 0.1.0 | 0.1.0 | 0.1.0 |
| menuinst | 2.2.0 | 2.2.0 | 2.2.0 |
| ncurses | 6.4 | 6.4 | 6.4 |
| nlohmann\_json | 3.11.2 | 3.11.2 | 3.11.2 |
| openssl | 3.0.15 | 3.0.15 | 3.0.15 |
| packaging | 24.2 | 24.2 | 24.2 |
| pcre2 | 10.42 | 10.42 | 10.42 |
| pip | 25.0 | 25.0 | 25.0 |
| platformdirs | 3.10.0 | 3.10.0 | 3.10.0 |
| pluggy | 1.5.0 | 1.5.0 | 1.5.0 |
| pybind11-abi | 5 | 5 | 5 |
| pycosat | 0.6.6 | 0.6.6 | 0.6.6 |
| pycparser | 2.21 | 2.21 | 2.21 |
| pydantic | 2.10.3 | 2.10.3 | 2.10.3 |
| pydantic-core | 2.27.1 | 2.27.1 | 2.27.1 |
| pygments | 2.15.1 | 2.15.1 | 2.15.1 |
| pysocks | 1.7.1 | 1.7.1 | 1.7.1 |
| python | 3.12.9 | 3.12.9 | 3.12.9 |
| readline | 8.2 | 8.2 | 8.2 |
| reproc | 14.2.4 | 14.2.4 | 14.2.4 |
| reproc-cpp | 14.2.4 | 14.2.4 | 14.2.4 |
| requests | 2.32.3 | 2.32.3 | 2.32.3 |
| rich | 13.9.4 | 13.9.4 | 13.9.4 |
| ruamel.yaml | 0.18.6 | 0.18.6 | 0.18.6 |
| ruamel.yaml.clib | 0.2.8 | 0.2.8 | 0.2.8 |
| setuptools | 75.8.0 | 75.8.0 | 75.8.0 |
| simdjson | 3.10.1 | 3.10.1 | 3.10.1 |
| spdlog | 1.11.0 | 1.11.0 | 1.11.0 |
| sqlite | 3.45.3 | 3.45.3 | 3.45.3 |
| tk | 8.6.14 | 8.6.14 | 8.6.14 |
| tqdm | 4.67.1 | 4.67.1 | 4.67.1 |
| truststore | 0.10.0 | 0.10.0 | 0.10.0 |
| typing-extensions | 4.12.2 | 4.12.2 | 4.12.2 |
| typing\_extensions | 4.12.2 | 4.12.2 | 4.12.2 |
| tzdata | 2025a | 2025a | 2025a |
| urllib3 | 2.3.0 | 2.3.0 | 2.3.0 |
| wheel | 0.45.1 | 0.45.1 | 0.45.1 |
| xz | 5.4.6 | 5.4.6 | 5.4.6 |
| yaml-cpp | 0.8.0 | 0.8.0 | 0.8.0 |
| zlib | 1.2.13 | 1.2.13 | 1.2.13 |
| zstandard | 0.23.0 | 0.23.0 | 0.23.0 |
| zstd | 1.5.6 | 1.5.6 | 1.5.6 |
| Package Name | osx-arm64 | osx-64 |
|---|---|---|
| anaconda-anon-usage | 0.5.0 | 0.5.0 |
| annotated-types | 0.6.0 | 0.6.0 |
| archspec | 0.2.3 | 0.2.3 |
| boltons | 24.1.0 | 24.1.0 |
| brotli-python | 1.0.9 | 1.0.9 |
| bzip2 | 1.0.8 | 1.0.8 |
| c-ares | 1.19.1 | 1.19.1 |
| ca-certificates | 2024.12.31 | 2024.12.31 |
| certifi | 2025.1.31 | 2025.1.31 |
| cffi | 1.17.1 | 1.17.1 |
| charset-normalizer | 3.3.2 | 3.3.2 |
| conda | 25.1.1 | 25.1.1 |
| conda-anaconda-telemetry | 0.1.2 | 0.1.2 |
| conda-anaconda-tos | 0.1.2 | 0.1.2 |
| conda-content-trust | 0.2.0 | 0.2.0 |
| conda-libmamba-solver | 25.1.1 | 25.1.1 |
| conda-package-handling | 2.4.0 | 2.4.0 |
| conda-package-streaming | 0.11.0 | 0.11.0 |
| cpp-expected | 1.1.0 | 1.1.0 |
| cryptography | 43.0.3 | 43.0.3 |
| distro | 1.9.0 | 1.9.0 |
| expat | 2.6.4 | 2.6.4 |
| fmt | 9.1.0 | 9.1.0 |
| frozendict | 2.4.2 | 2.4.2 |
| icu | 73.1 | 73.1 |
| idna | 3.7 | 3.7 |
| jsonpatch | 1.33 | 1.33 |
| jsonpointer | 2.1 | 2.1 |
| krb5 | 1.20.1 | 1.20.1 |
| libarchive | 3.7.7 | 3.7.7 |
| libcurl | 8.11.1 | 8.11.1 |
| libcxx | 14.0.6 | 14.0.6 |
| libedit | 3.1.20230828 | 3.1.20230828 |
| libev | 4.33 | 4.33 |
| libffi | 3.4.4 | 3.4.4 |
| libiconv | 1.16 | 1.16 |
| libmamba | 2.0.5 | 2.0.5 |
| libmambapy | 2.0.5 | 2.0.5 |
| libnghttp2 | 1.57.0 | 1.57.0 |
| libsolv | 0.7.30 | 0.7.30 |
| libssh2 | 1.11.1 | 1.11.1 |
| libxml2 | 2.13.5 | 2.13.5 |
| lz4-c | 1.9.4 | 1.9.4 |
| markdown-it-py | 2.2.0 | 2.2.0 |
| mdurl | 0.1.0 | 0.1.0 |
| menuinst | 2.2.0 | 2.2.0 |
| ncurses | 6.4 | 6.4 |
| nlohmann\_json | 3.11.2 | 3.11.2 |
| openssl | 3.0.15 | 3.0.15 |
| packaging | 24.2 | 24.2 |
| pcre2 | 10.42 | 10.42 |
| pip | 25.0 | 25.0 |
| platformdirs | 3.10.0 | 3.10.0 |
| pluggy | 1.5.0 | 1.5.0 |
| pybind11-abi | 5 | 5 |
| pycosat | 0.6.6 | 0.6.6 |
| pycparser | 2.21 | 2.21 |
| pydantic | 2.10.3 | 2.10.3 |
| pydantic-core | 2.27.1 | 2.27.1 |
| pygments | 2.15.1 | 2.15.1 |
| pysocks | 1.7.1 | 1.7.1 |
| python | 3.12.9 | 3.12.9 |
| python.app | 3 | 3 |
| readline | 8.2 | 8.2 |
| reproc | 14.2.4 | 14.2.4 |
| reproc-cpp | 14.2.4 | 14.2.4 |
| requests | 2.32.3 | 2.32.3 |
| rich | 13.9.4 | 13.9.4 |
| ruamel.yaml | 0.18.6 | 0.18.6 |
| ruamel.yaml.clib | 0.2.8 | 0.2.8 |
| setuptools | 75.8.0 | 75.8.0 |
| simdjson | 3.10.1 | 3.10.1 |
| spdlog | 1.11.0 | 1.11.0 |
| sqlite | 3.45.3 | 3.45.3 |
| tk | 8.6.14 | 8.6.14 |
| tqdm | 4.67.1 | 4.67.1 |
| truststore | 0.10.0 | 0.10.0 |
| typing-extensions | 4.12.2 | 4.12.2 |
| typing\_extensions | 4.12.2 | 4.12.2 |
| tzdata | 2025a | 2025a |
| urllib3 | 2.3.0 | 2.3.0 |
| wheel | 0.45.1 | 0.45.1 |
| xz | 5.4.6 | 5.4.6 |
| yaml-cpp | 0.8.0 | 0.8.0 |
| zlib | 1.2.13 | 1.2.13 |
| zstandard | 0.23.0 | 0.23.0 |
| zstd | 1.5.6 | 1.5.6 |
| Package Name | win-64 |
|---|---|
| anaconda-anon-usage | 0.5.0 |
| anaconda\_powershell\_prompt | 1.1.0 |
| anaconda\_prompt | 1.1.0 |
| annotated-types | 0.6.0 |
| archspec | 0.2.3 |
| boltons | 24.1.0 |
| brotli-python | 1.0.9 |
| bzip2 | 1.0.8 |
| ca-certificates | 2024.12.31 |
| certifi | 2025.1.31 |
| cffi | 1.17.1 |
| charset-normalizer | 3.3.2 |
| colorama | 0.4.6 |
| conda | 25.1.1 |
| conda-anaconda-telemetry | 0.1.2 |
| conda-anaconda-tos | 0.1.2 |
| conda-content-trust | 0.2.0 |
| conda-libmamba-solver | 25.1.1 |
| conda-package-handling | 2.4.0 |
| conda-package-streaming | 0.11.0 |
| cpp-expected | 1.1.0 |
| cryptography | 43.0.3 |
| distro | 1.9.0 |
| expat | 2.6.4 |
| fmt | 9.1.0 |
| frozendict | 2.4.2 |
| idna | 3.7 |
| jsonpatch | 1.33 |
| jsonpointer | 2.1 |
| libarchive | 3.7.7 |
| libcurl | 8.11.1 |
| libffi | 3.4.4 |
| libiconv | 1.16 |
| libmamba | 2.0.5 |
| libmambapy | 2.0.5 |
| libsolv | 0.7.30 |
| libssh2 | 1.11.1 |
| libxml2 | 2.13.5 |
| lz4-c | 1.9.4 |
| markdown-it-py | 2.2.0 |
| mdurl | 0.1.0 |
| menuinst | 2.2.0 |
| nlohmann\_json | 3.11.2 |
| openssl | 3.0.15 |
| packaging | 24.2 |
| pcre2 | 10.42 |
| pip | 25.0 |
| platformdirs | 3.10.0 |
| pluggy | 1.5.0 |
| pybind11-abi | 5 |
| pycosat | 0.6.6 |
| pycparser | 2.21 |
| pydantic | 2.10.3 |
| pydantic-core | 2.27.1 |
| pygments | 2.15.1 |
| pysocks | 1.7.1 |
| python | 3.12.9 |
| reproc | 14.2.4 |
| reproc-cpp | 14.2.4 |
| requests | 2.32.3 |
| rich | 13.9.4 |
| ruamel.yaml | 0.18.6 |
| ruamel.yaml.clib | 0.2.8 |
| setuptools | 75.8.0 |
| simdjson | 3.10.1 |
| spdlog | 1.11.0 |
| sqlite | 3.45.3 |
| tk | 8.6.14 |
| tqdm | 4.67.1 |
| truststore | 0.10.0 |
| typing-extensions | 4.12.2 |
| typing\_extensions | 4.12.2 |
| tzdata | 2025a |
| urllib3 | 2.3.0 |
| vc | 14.42 |
| vs2015\_runtime | 14.42.34433 |
| wheel | 0.45.1 |
| win\_inet\_pton | 1.1.0 |
| xz | 5.4.6 |
| yaml-cpp | 0.8.0 |
| zlib | 1.2.13 |
| zstandard | 0.23.0 |
| zstd | 1.5.6 |
| Package Name | linux-64 | linux-aarch64 | linux-s390x | osx-arm64 | osx-64 | win-64 |
|---|---|---|---|---|---|---|
| \_libgcc\_mutex | 0.1 | 0.1 | 0.1 | |||
| \_openmp\_mutex | 5.1 | 5.1 | 5.1 | |||
| anaconda-anon-usage | 0.5.0 | 0.5.0 | 0.5.0 | 0.5.0 | 0.5.0 | 0.5.0 |
| anaconda\_powershell\_prompt | 1.1.0 | |||||
| anaconda\_prompt | 1.1.0 | |||||
| annotated-types | 0.6.0 | 0.6.0 | 0.6.0 | 0.6.0 | 0.6.0 | 0.6.0 |
| archspec | 0.2.3 | 0.2.3 | 0.2.3 | 0.2.3 | 0.2.3 | 0.2.3 |
| boltons | 24.1.0 | 24.1.0 | 24.1.0 | 24.1.0 | 24.1.0 | 24.1.0 |
| brotli-python | 1.0.9 | 1.0.9 | 1.0.9 | 1.0.9 | 1.0.9 | 1.0.9 |
| bzip2 | 1.0.8 | 1.0.8 | 1.0.8 | 1.0.8 | 1.0.8 | 1.0.8 |
| c-ares | 1.19.1 | 1.19.1 | 1.19.1 | 1.19.1 | 1.19.1 | |
| ca-certificates | 2024.12.31 | 2024.12.31 | 2024.12.31 | 2024.12.31 | 2024.12.31 | 2024.12.31 |
| certifi | 2025.1.31 | 2025.1.31 | 2025.1.31 | 2025.1.31 | 2025.1.31 | 2025.1.31 |
| cffi | 1.17.1 | 1.17.1 | 1.17.1 | 1.17.1 | 1.17.1 | 1.17.1 |
| charset-normalizer | 3.3.2 | 3.3.2 | 3.3.2 | 3.3.2 | 3.3.2 | 3.3.2 |
| colorama | 0.4.6 | |||||
| conda | 25.1.1 | 25.1.1 | 25.1.1 | 25.1.1 | 25.1.1 | 25.1.1 |
| conda-anaconda-telemetry | 0.1.2 | 0.1.2 | 0.1.2 | 0.1.2 | 0.1.2 | 0.1.2 |
| conda-anaconda-tos | 0.1.1 | 0.1.1 | 0.1.1 | 0.1.1 | 0.1.1 | 0.1.1 |
| conda-content-trust | 0.2.0 | 0.2.0 | 0.2.0 | 0.2.0 | 0.2.0 | 0.2.0 |
| conda-libmamba-solver | 25.1.1 | 25.1.1 | 25.1.1 | 25.1.1 | 25.1.1 | 25.1.1 |
| conda-package-handling | 2.4.0 | 2.4.0 | 2.4.0 | 2.4.0 | 2.4.0 | 2.4.0 |
| conda-package-streaming | 0.11.0 | 0.11.0 | 0.11.0 | 0.11.0 | 0.11.0 | 0.11.0 |
| cpp-expected | 1.1.0 | 1.1.0 | 1.1.0 | 1.1.0 | 1.1.0 | 1.1.0 |
| cryptography | 43.0.3 | 43.0.3 | 43.0.3 | 43.0.3 | 43.0.3 | 43.0.3 |
| distro | 1.9.0 | 1.9.0 | 1.9.0 | 1.9.0 | 1.9.0 | 1.9.0 |
| expat | 2.6.4 | 2.6.4 | 2.6.4 | 2.6.4 | 2.6.4 | 2.6.4 |
| fmt | 9.1.0 | 9.1.0 | 9.1.0 | 9.1.0 | 9.1.0 | 9.1.0 |
| frozendict | 2.4.2 | 2.4.2 | 2.4.2 | 2.4.2 | 2.4.2 | 2.4.2 |
| icu | 73.1 | 73.1 | 73.1 | 73.1 | 73.1 | |
| idna | 3.7 | 3.7 | 3.7 | 3.7 | 3.7 | 3.7 |
| jsonpatch | 1.33 | 1.33 | 1.33 | 1.33 | 1.33 | 1.33 |
| jsonpointer | 2.1 | 2.1 | 2.1 | 2.1 | 2.1 | 2.1 |
| krb5 | 1.20.1 | 1.20.1 | 1.20.1 | 1.20.1 | 1.20.1 | |
| ld\_impl\_linux-64 | 2.40 | |||||
| ld\_impl\_linux-aarch64 | 2.40 | |||||
| ld\_impl\_linux-s390x | 2.40 | |||||
| libarchive | 3.7.7 | 3.7.7 | 3.7.7 | 3.7.7 | 3.7.7 | 3.7.7 |
| libcurl | 8.11.1 | 8.11.1 | 8.11.1 | 8.11.1 | 8.11.1 | 8.11.1 |
| libcxx | 14.0.6 | 14.0.6 | ||||
| libedit | 3.1.20230828 | 3.1.20230828 | 3.1.20230828 | 3.1.20230828 | 3.1.20230828 | |
| libev | 4.33 | 4.33 | 4.33 | 4.33 | 4.33 | |
| libffi | 3.4.4 | 3.4.4 | 3.4.4 | 3.4.4 | 3.4.4 | 3.4.4 |
| libgcc-ng | 11.2.0 | 11.2.0 | 11.2.0 | |||
| libgomp | 11.2.0 | 11.2.0 | 11.2.0 | |||
| libiconv | 1.16 | 1.16 | 1.16 | |||
| libmamba | 2.0.5 | 2.0.5 | 2.0.5 | 2.0.5 | 2.0.5 | 2.0.5 |
| libmambapy | 2.0.5 | 2.0.5 | 2.0.5 | 2.0.5 | 2.0.5 | 2.0.5 |
| libnghttp2 | 1.57.0 | 1.57.0 | 1.57.0 | 1.57.0 | 1.57.0 | |
| libsolv | 0.7.30 | 0.7.30 | 0.7.30 | 0.7.30 | 0.7.30 | 0.7.30 |
| libssh2 | 1.11.1 | 1.11.1 | 1.11.1 | 1.11.1 | 1.11.1 | 1.11.1 |
| libstdcxx-ng | 11.2.0 | 11.2.0 | 11.2.0 | |||
| libuuid | 1.41.5 | 1.41.5 | 1.41.5 | |||
| libxml2 | 2.13.5 | 2.13.5 | 2.13.5 | 2.13.5 | 2.13.5 | 2.13.5 |
| lz4-c | 1.9.4 | 1.9.4 | 1.9.4 | 1.9.4 | 1.9.4 | 1.9.4 |
| markdown-it-py | 2.2.0 | 2.2.0 | 2.2.0 | 2.2.0 | 2.2.0 | 2.2.0 |
| mdurl | 0.1.0 | 0.1.0 | 0.1.0 | 0.1.0 | 0.1.0 | 0.1.0 |
| menuinst | 2.2.0 | 2.2.0 | 2.2.0 | 2.2.0 | 2.2.0 | 2.2.0 |
| ncurses | 6.4 | 6.4 | 6.4 | 6.4 | 6.4 | |
| nlohmann\_json | 3.11.2 | 3.11.2 | 3.11.2 | 3.11.2 | 3.11.2 | 3.11.2 |
| openssl | 3.0.15 | 3.0.15 | 3.0.15 | 3.0.15 | 3.0.15 | 3.0.15 |
| packaging | 24.2 | 24.2 | 24.2 | 24.2 | 24.2 | 24.2 |
| pcre2 | 10.42 | 10.42 | 10.42 | 10.42 | 10.42 | 10.42 |
| pip | 25.0 | 25.0 | 25.0 | 25.0 | 25.0 | 25.0 |
| platformdirs | 3.10.0 | 3.10.0 | 3.10.0 | 3.10.0 | 3.10.0 | 3.10.0 |
| pluggy | 1.5.0 | 1.5.0 | 1.5.0 | 1.5.0 | 1.5.0 | 1.5.0 |
| pybind11-abi | 5 | 5 | 5 | 5 | 5 | 5 |
| pycosat | 0.6.6 | 0.6.6 | 0.6.6 | 0.6.6 | 0.6.6 | 0.6.6 |
| pycparser | 2.21 | 2.21 | 2.21 | 2.21 | 2.21 | 2.21 |
| pydantic | 2.10.3 | 2.10.3 | 2.10.3 | 2.10.3 | 2.10.3 | 2.10.3 |
| pydantic-core | 2.27.1 | 2.27.1 | 2.27.1 | 2.27.1 | 2.27.1 | 2.27.1 |
| pygments | 2.15.1 | 2.15.1 | 2.15.1 | 2.15.1 | 2.15.1 | 2.15.1 |
| pysocks | 1.7.1 | 1.7.1 | 1.7.1 | 1.7.1 | 1.7.1 | 1.7.1 |
| python | 3.12.9 | 3.12.9 | 3.12.9 | 3.12.9 | 3.12.9 | 3.12.9 |
| python.app | 3 | 3 | ||||
| readline | 8.2 | 8.2 | 8.2 | 8.2 | 8.2 | |
| reproc | 14.2.4 | 14.2.4 | 14.2.4 | 14.2.4 | 14.2.4 | 14.2.4 |
| reproc-cpp | 14.2.4 | 14.2.4 | 14.2.4 | 14.2.4 | 14.2.4 | 14.2.4 |
| requests | 2.32.3 | 2.32.3 | 2.32.3 | 2.32.3 | 2.32.3 | 2.32.3 |
| rich | 13.9.4 | 13.9.4 | 13.9.4 | 13.9.4 | 13.9.4 | 13.9.4 |
| ruamel.yaml | 0.18.6 | 0.18.6 | 0.18.6 | 0.18.6 | 0.18.6 | 0.18.6 |
| ruamel.yaml.clib | 0.2.8 | 0.2.8 | 0.2.8 | 0.2.8 | 0.2.8 | 0.2.8 |
| setuptools | 75.8.0 | 75.8.0 | 75.8.0 | 75.8.0 | 75.8.0 | 75.8.0 |
| simdjson | 3.10.1 | 3.10.1 | 3.10.1 | 3.10.1 | 3.10.1 | 3.10.1 |
| spdlog | 1.11.0 | 1.11.0 | 1.11.0 | 1.11.0 | 1.11.0 | 1.11.0 |
| sqlite | 3.45.3 | 3.45.3 | 3.45.3 | 3.45.3 | 3.45.3 | 3.45.3 |
| tk | 8.6.14 | 8.6.14 | 8.6.14 | 8.6.14 | 8.6.14 | 8.6.14 |
| tqdm | 4.67.1 | 4.67.1 | 4.67.1 | 4.67.1 | 4.67.1 | 4.67.1 |
| truststore | 0.10.0 | 0.10.0 | 0.10.0 | 0.10.0 | 0.10.0 | 0.10.0 |
| typing-extensions | 4.12.2 | 4.12.2 | 4.12.2 | 4.12.2 | 4.12.2 | 4.12.2 |
| typing\_extensions | 4.12.2 | 4.12.2 | 4.12.2 | 4.12.2 | 4.12.2 | 4.12.2 |
| tzdata | 2025a | 2025a | 2025a | 2025a | 2025a | 2025a |
| urllib3 | 2.3.0 | 2.3.0 | 2.3.0 | 2.3.0 | 2.3.0 | 2.3.0 |
| vc | 14.42 | |||||
| vs2015\_runtime | 14.42.34433 | |||||
| wheel | 0.45.1 | 0.45.1 | 0.45.1 | 0.45.1 | 0.45.1 | 0.45.1 |
| win\_inet\_pton | 1.1.0 | |||||
| xz | 5.4.6 | 5.4.6 | 5.4.6 | 5.4.6 | 5.4.6 | 5.4.6 |
| yaml-cpp | 0.8.0 | 0.8.0 | 0.8.0 | 0.8.0 | 0.8.0 | 0.8.0 |
| zlib | 1.2.13 | 1.2.13 | 1.2.13 | 1.2.13 | 1.2.13 | 1.2.13 |
| zstandard | 0.23.0 | 0.23.0 | 0.23.0 | 0.23.0 | 0.23.0 | 0.23.0 |
| zstd | 1.5.6 | 1.5.6 | 1.5.6 | 1.5.6 | 1.5.6 | 1.5.6 |
| Package Name | linux-64 | linux-aarch64 | linux-s390x |
|---|---|---|---|
| \_libgcc\_mutex | 0.1 | 0.1 | 0.1 |
| \_openmp\_mutex | 5.1 | 5.1 | 5.1 |
| anaconda-anon-usage | 0.5.0 | 0.5.0 | 0.5.0 |
| annotated-types | 0.6.0 | 0.6.0 | 0.6.0 |
| archspec | 0.2.3 | 0.2.3 | 0.2.3 |
| boltons | 24.1.0 | 24.1.0 | 24.1.0 |
| brotli-python | 1.0.9 | 1.0.9 | 1.0.9 |
| bzip2 | 1.0.8 | 1.0.8 | 1.0.8 |
| c-ares | 1.19.1 | 1.19.1 | 1.19.1 |
| ca-certificates | 2024.12.31 | 2024.12.31 | 2024.12.31 |
| certifi | 2025.1.31 | 2025.1.31 | 2025.1.31 |
| cffi | 1.17.1 | 1.17.1 | 1.17.1 |
| charset-normalizer | 3.3.2 | 3.3.2 | 3.3.2 |
| conda | 25.1.1 | 25.1.1 | 25.1.1 |
| conda-anaconda-telemetry | 0.1.2 | 0.1.2 | 0.1.2 |
| conda-anaconda-tos | 0.1.1 | 0.1.1 | 0.1.1 |
| conda-content-trust | 0.2.0 | 0.2.0 | 0.2.0 |
| conda-libmamba-solver | 25.1.1 | 25.1.1 | 25.1.1 |
| conda-package-handling | 2.4.0 | 2.4.0 | 2.4.0 |
| conda-package-streaming | 0.11.0 | 0.11.0 | 0.11.0 |
| cpp-expected | 1.1.0 | 1.1.0 | 1.1.0 |
| cryptography | 43.0.3 | 43.0.3 | 43.0.3 |
| distro | 1.9.0 | 1.9.0 | 1.9.0 |
| expat | 2.6.4 | 2.6.4 | 2.6.4 |
| fmt | 9.1.0 | 9.1.0 | 9.1.0 |
| frozendict | 2.4.2 | 2.4.2 | 2.4.2 |
| icu | 73.1 | 73.1 | 73.1 |
| idna | 3.7 | 3.7 | 3.7 |
| jsonpatch | 1.33 | 1.33 | 1.33 |
| jsonpointer | 2.1 | 2.1 | 2.1 |
| krb5 | 1.20.1 | 1.20.1 | 1.20.1 |
| ld\_impl\_linux-64 | 2.40 | ||
| ld\_impl\_linux-aarch64 | 2.40 | ||
| ld\_impl\_linux-s390x | 2.40 | ||
| libarchive | 3.7.7 | 3.7.7 | 3.7.7 |
| libcurl | 8.11.1 | 8.11.1 | 8.11.1 |
| libedit | 3.1.20230828 | 3.1.20230828 | 3.1.20230828 |
| libev | 4.33 | 4.33 | 4.33 |
| libffi | 3.4.4 | 3.4.4 | 3.4.4 |
| libgcc-ng | 11.2.0 | 11.2.0 | 11.2.0 |
| libgomp | 11.2.0 | 11.2.0 | 11.2.0 |
| libmamba | 2.0.5 | 2.0.5 | 2.0.5 |
| libmambapy | 2.0.5 | 2.0.5 | 2.0.5 |
| libnghttp2 | 1.57.0 | 1.57.0 | 1.57.0 |
| libsolv | 0.7.30 | 0.7.30 | 0.7.30 |
| libssh2 | 1.11.1 | 1.11.1 | 1.11.1 |
| libstdcxx-ng | 11.2.0 | 11.2.0 | 11.2.0 |
| libuuid | 1.41.5 | 1.41.5 | 1.41.5 |
| libxml2 | 2.13.5 | 2.13.5 | 2.13.5 |
| lz4-c | 1.9.4 | 1.9.4 | 1.9.4 |
| markdown-it-py | 2.2.0 | 2.2.0 | 2.2.0 |
| mdurl | 0.1.0 | 0.1.0 | 0.1.0 |
| menuinst | 2.2.0 | 2.2.0 | 2.2.0 |
| ncurses | 6.4 | 6.4 | 6.4 |
| nlohmann\_json | 3.11.2 | 3.11.2 | 3.11.2 |
| openssl | 3.0.15 | 3.0.15 | 3.0.15 |
| packaging | 24.2 | 24.2 | 24.2 |
| pcre2 | 10.42 | 10.42 | 10.42 |
| pip | 25.0 | 25.0 | 25.0 |
| platformdirs | 3.10.0 | 3.10.0 | 3.10.0 |
| pluggy | 1.5.0 | 1.5.0 | 1.5.0 |
| pybind11-abi | 5 | 5 | 5 |
| pycosat | 0.6.6 | 0.6.6 | 0.6.6 |
| pycparser | 2.21 | 2.21 | 2.21 |
| pydantic | 2.10.3 | 2.10.3 | 2.10.3 |
| pydantic-core | 2.27.1 | 2.27.1 | 2.27.1 |
| pygments | 2.15.1 | 2.15.1 | 2.15.1 |
| pysocks | 1.7.1 | 1.7.1 | 1.7.1 |
| python | 3.12.9 | 3.12.9 | 3.12.9 |
| readline | 8.2 | 8.2 | 8.2 |
| reproc | 14.2.4 | 14.2.4 | 14.2.4 |
| reproc-cpp | 14.2.4 | 14.2.4 | 14.2.4 |
| requests | 2.32.3 | 2.32.3 | 2.32.3 |
| rich | 13.9.4 | 13.9.4 | 13.9.4 |
| ruamel.yaml | 0.18.6 | 0.18.6 | 0.18.6 |
| ruamel.yaml.clib | 0.2.8 | 0.2.8 | 0.2.8 |
| setuptools | 75.8.0 | 75.8.0 | 75.8.0 |
| simdjson | 3.10.1 | 3.10.1 | 3.10.1 |
| spdlog | 1.11.0 | 1.11.0 | 1.11.0 |
| sqlite | 3.45.3 | 3.45.3 | 3.45.3 |
| tk | 8.6.14 | 8.6.14 | 8.6.14 |
| tqdm | 4.67.1 | 4.67.1 | 4.67.1 |
| truststore | 0.10.0 | 0.10.0 | 0.10.0 |
| typing-extensions | 4.12.2 | 4.12.2 | 4.12.2 |
| typing\_extensions | 4.12.2 | 4.12.2 | 4.12.2 |
| tzdata | 2025a | 2025a | 2025a |
| urllib3 | 2.3.0 | 2.3.0 | 2.3.0 |
| wheel | 0.45.1 | 0.45.1 | 0.45.1 |
| xz | 5.4.6 | 5.4.6 | 5.4.6 |
| yaml-cpp | 0.8.0 | 0.8.0 | 0.8.0 |
| zlib | 1.2.13 | 1.2.13 | 1.2.13 |
| zstandard | 0.23.0 | 0.23.0 | 0.23.0 |
| zstd | 1.5.6 | 1.5.6 | 1.5.6 |
| Package Name | osx-arm64 | osx-64 |
|---|---|---|
| anaconda-anon-usage | 0.5.0 | 0.5.0 |
| annotated-types | 0.6.0 | 0.6.0 |
| archspec | 0.2.3 | 0.2.3 |
| boltons | 24.1.0 | 24.1.0 |
| brotli-python | 1.0.9 | 1.0.9 |
| bzip2 | 1.0.8 | 1.0.8 |
| c-ares | 1.19.1 | 1.19.1 |
| ca-certificates | 2024.12.31 | 2024.12.31 |
| certifi | 2025.1.31 | 2025.1.31 |
| cffi | 1.17.1 | 1.17.1 |
| charset-normalizer | 3.3.2 | 3.3.2 |
| conda | 25.1.1 | 25.1.1 |
| conda-anaconda-telemetry | 0.1.2 | 0.1.2 |
| conda-anaconda-tos | 0.1.1 | 0.1.1 |
| conda-content-trust | 0.2.0 | 0.2.0 |
| conda-libmamba-solver | 25.1.1 | 25.1.1 |
| conda-package-handling | 2.4.0 | 2.4.0 |
| conda-package-streaming | 0.11.0 | 0.11.0 |
| cpp-expected | 1.1.0 | 1.1.0 |
| cryptography | 43.0.3 | 43.0.3 |
| distro | 1.9.0 | 1.9.0 |
| expat | 2.6.4 | 2.6.4 |
| fmt | 9.1.0 | 9.1.0 |
| frozendict | 2.4.2 | 2.4.2 |
| icu | 73.1 | 73.1 |
| idna | 3.7 | 3.7 |
| jsonpatch | 1.33 | 1.33 |
| jsonpointer | 2.1 | 2.1 |
| krb5 | 1.20.1 | 1.20.1 |
| libarchive | 3.7.7 | 3.7.7 |
| libcurl | 8.11.1 | 8.11.1 |
| libcxx | 14.0.6 | 14.0.6 |
| libedit | 3.1.20230828 | 3.1.20230828 |
| libev | 4.33 | 4.33 |
| libffi | 3.4.4 | 3.4.4 |
| libiconv | 1.16 | 1.16 |
| libmamba | 2.0.5 | 2.0.5 |
| libmambapy | 2.0.5 | 2.0.5 |
| libnghttp2 | 1.57.0 | 1.57.0 |
| libsolv | 0.7.30 | 0.7.30 |
| libssh2 | 1.11.1 | 1.11.1 |
| libxml2 | 2.13.5 | 2.13.5 |
| lz4-c | 1.9.4 | 1.9.4 |
| markdown-it-py | 2.2.0 | 2.2.0 |
| mdurl | 0.1.0 | 0.1.0 |
| menuinst | 2.2.0 | 2.2.0 |
| ncurses | 6.4 | 6.4 |
| nlohmann\_json | 3.11.2 | 3.11.2 |
| openssl | 3.0.15 | 3.0.15 |
| packaging | 24.2 | 24.2 |
| pcre2 | 10.42 | 10.42 |
| pip | 25.0 | 25.0 |
| platformdirs | 3.10.0 | 3.10.0 |
| pluggy | 1.5.0 | 1.5.0 |
| pybind11-abi | 5 | 5 |
| pycosat | 0.6.6 | 0.6.6 |
| pycparser | 2.21 | 2.21 |
| pydantic | 2.10.3 | 2.10.3 |
| pydantic-core | 2.27.1 | 2.27.1 |
| pygments | 2.15.1 | 2.15.1 |
| pysocks | 1.7.1 | 1.7.1 |
| python | 3.12.9 | 3.12.9 |
| python.app | 3 | 3 |
| readline | 8.2 | 8.2 |
| reproc | 14.2.4 | 14.2.4 |
| reproc-cpp | 14.2.4 | 14.2.4 |
| requests | 2.32.3 | 2.32.3 |
| rich | 13.9.4 | 13.9.4 |
| ruamel.yaml | 0.18.6 | 0.18.6 |
| ruamel.yaml.clib | 0.2.8 | 0.2.8 |
| setuptools | 75.8.0 | 75.8.0 |
| simdjson | 3.10.1 | 3.10.1 |
| spdlog | 1.11.0 | 1.11.0 |
| sqlite | 3.45.3 | 3.45.3 |
| tk | 8.6.14 | 8.6.14 |
| tqdm | 4.67.1 | 4.67.1 |
| truststore | 0.10.0 | 0.10.0 |
| typing-extensions | 4.12.2 | 4.12.2 |
| typing\_extensions | 4.12.2 | 4.12.2 |
| tzdata | 2025a | 2025a |
| urllib3 | 2.3.0 | 2.3.0 |
| wheel | 0.45.1 | 0.45.1 |
| xz | 5.4.6 | 5.4.6 |
| yaml-cpp | 0.8.0 | 0.8.0 |
| zlib | 1.2.13 | 1.2.13 |
| zstandard | 0.23.0 | 0.23.0 |
| zstd | 1.5.6 | 1.5.6 |
| Package Name | win-64 |
|---|---|
| anaconda-anon-usage | 0.5.0 |
| anaconda\_powershell\_prompt | 1.1.0 |
| anaconda\_prompt | 1.1.0 |
| annotated-types | 0.6.0 |
| archspec | 0.2.3 |
| boltons | 24.1.0 |
| brotli-python | 1.0.9 |
| bzip2 | 1.0.8 |
| ca-certificates | 2024.12.31 |
| certifi | 2025.1.31 |
| cffi | 1.17.1 |
| charset-normalizer | 3.3.2 |
| colorama | 0.4.6 |
| conda | 25.1.1 |
| conda-anaconda-telemetry | 0.1.2 |
| conda-anaconda-tos | 0.1.1 |
| conda-content-trust | 0.2.0 |
| conda-libmamba-solver | 25.1.1 |
| conda-package-handling | 2.4.0 |
| conda-package-streaming | 0.11.0 |
| cpp-expected | 1.1.0 |
| cryptography | 43.0.3 |
| distro | 1.9.0 |
| expat | 2.6.4 |
| fmt | 9.1.0 |
| frozendict | 2.4.2 |
| idna | 3.7 |
| jsonpatch | 1.33 |
| jsonpointer | 2.1 |
| libarchive | 3.7.7 |
| libcurl | 8.11.1 |
| libffi | 3.4.4 |
| libiconv | 1.16 |
| libmamba | 2.0.5 |
| libmambapy | 2.0.5 |
| libsolv | 0.7.30 |
| libssh2 | 1.11.1 |
| libxml2 | 2.13.5 |
| lz4-c | 1.9.4 |
| markdown-it-py | 2.2.0 |
| mdurl | 0.1.0 |
| menuinst | 2.2.0 |
| nlohmann\_json | 3.11.2 |
| openssl | 3.0.15 |
| packaging | 24.2 |
| pcre2 | 10.42 |
| pip | 25.0 |
| platformdirs | 3.10.0 |
| pluggy | 1.5.0 |
| pybind11-abi | 5 |
| pycosat | 0.6.6 |
| pycparser | 2.21 |
| pydantic | 2.10.3 |
| pydantic-core | 2.27.1 |
| pygments | 2.15.1 |
| pysocks | 1.7.1 |
| python | 3.12.9 |
| reproc | 14.2.4 |
| reproc-cpp | 14.2.4 |
| requests | 2.32.3 |
| rich | 13.9.4 |
| ruamel.yaml | 0.18.6 |
| ruamel.yaml.clib | 0.2.8 |
| setuptools | 75.8.0 |
| simdjson | 3.10.1 |
| spdlog | 1.11.0 |
| sqlite | 3.45.3 |
| tk | 8.6.14 |
| tqdm | 4.67.1 |
| truststore | 0.10.0 |
| typing-extensions | 4.12.2 |
| typing\_extensions | 4.12.2 |
| tzdata | 2025a |
| urllib3 | 2.3.0 |
| vc | 14.42 |
| vs2015\_runtime | 14.42.34433 |
| wheel | 0.45.1 |
| win\_inet\_pton | 1.1.0 |
| xz | 5.4.6 |
| yaml-cpp | 0.8.0 |
| zlib | 1.2.13 |
| zstandard | 0.23.0 |
| zstd | 1.5.6 |
| Package Name | linux-64 | linux-aarch64 | linux-s390x | osx-arm64 | osx-64 | win-64 |
|---|---|---|---|---|---|---|
| \_libgcc\_mutex | 0.1 | 0.1 | 0.1 | |||
| \_openmp\_mutex | 5.1 | 5.1 | 5.1 | |||
| anaconda-anon-usage | 0.5.0 | 0.5.0 | 0.5.0 | 0.5.0 | 0.5.0 | 0.5.0 |
| anaconda\_powershell\_prompt | 1.1.0 | |||||
| anaconda\_prompt | 1.1.0 | |||||
| annotated-types | 0.6.0 | 0.6.0 | 0.6.0 | 0.6.0 | 0.6.0 | 0.6.0 |
| archspec | 0.2.3 | 0.2.3 | 0.2.3 | 0.2.3 | 0.2.3 | 0.2.3 |
| boltons | 24.1.0 | 24.1.0 | 24.1.0 | 24.1.0 | 24.1.0 | 24.1.0 |
| brotli-python | 1.0.9 | 1.0.9 | 1.0.9 | 1.0.9 | 1.0.9 | 1.0.9 |
| bzip2 | 1.0.8 | 1.0.8 | 1.0.8 | 1.0.8 | 1.0.8 | 1.0.8 |
| c-ares | 1.19.1 | 1.19.1 | 1.19.1 | 1.19.1 | 1.19.1 | |
| ca-certificates | 2024.12.31 | 2024.12.31 | 2024.12.31 | 2024.12.31 | 2024.12.31 | 2024.12.31 |
| certifi | 2024.12.14 | 2024.12.14 | 2024.12.14 | 2024.12.14 | 2024.12.14 | 2024.12.14 |
| cffi | 1.17.1 | 1.17.1 | 1.17.1 | 1.17.1 | 1.17.1 | 1.17.1 |
| charset-normalizer | 3.3.2 | 3.3.2 | 3.3.2 | 3.3.2 | 3.3.2 | 3.3.2 |
| colorama | 0.4.6 | |||||
| conda | 25.1.1 | 25.1.1 | 25.1.1 | 25.1.1 | 25.1.1 | 25.1.1 |
| conda-anaconda-telemetry | 0.1.2 | 0.1.2 | 0.1.2 | 0.1.2 | 0.1.2 | 0.1.2 |
| conda-anaconda-tos | 0.1.1 | 0.1.1 | 0.1.1 | 0.1.1 | 0.1.1 | 0.1.1 |
| conda-content-trust | 0.2.0 | 0.2.0 | 0.2.0 | 0.2.0 | 0.2.0 | 0.2.0 |
| conda-libmamba-solver | 25.1.1 | 25.1.1 | 25.1.1 | 25.1.1 | 25.1.1 | 25.1.1 |
| conda-package-handling | 2.4.0 | 2.4.0 | 2.4.0 | 2.4.0 | 2.4.0 | 2.4.0 |
| conda-package-streaming | 0.11.0 | 0.11.0 | 0.11.0 | 0.11.0 | 0.11.0 | 0.11.0 |
| cpp-expected | 1.1.0 | 1.1.0 | 1.1.0 | 1.1.0 | 1.1.0 | 1.1.0 |
| cryptography | 43.0.3 | 43.0.3 | 43.0.3 | 43.0.3 | 43.0.3 | 43.0.3 |
| distro | 1.9.0 | 1.9.0 | 1.9.0 | 1.9.0 | 1.9.0 | 1.9.0 |
| expat | 2.6.4 | 2.6.4 | 2.6.4 | 2.6.4 | 2.6.4 | 2.6.4 |
| fmt | 9.1.0 | 9.1.0 | 9.1.0 | 9.1.0 | 9.1.0 | 9.1.0 |
| frozendict | 2.4.2 | 2.4.2 | 2.4.2 | 2.4.2 | 2.4.2 | 2.4.2 |
| icu | 73.1 | 73.1 | 73.1 | 73.1 | 73.1 | |
| idna | 3.7 | 3.7 | 3.7 | 3.7 | 3.7 | 3.7 |
| jsonpatch | 1.33 | 1.33 | 1.33 | 1.33 | 1.33 | 1.33 |
| jsonpointer | 2.1 | 2.1 | 2.1 | 2.1 | 2.1 | 2.1 |
| krb5 | 1.20.1 | 1.20.1 | 1.20.1 | 1.20.1 | 1.20.1 | |
| ld\_impl\_linux-64 | 2.40 | |||||
| ld\_impl\_linux-aarch64 | 2.40 | |||||
| ld\_impl\_linux-s390x | 2.40 | |||||
| libarchive | 3.7.7 | 3.7.7 | 3.7.7 | 3.7.7 | 3.7.7 | 3.7.7 |
| libcurl | 8.11.1 | 8.11.1 | 8.11.1 | 8.11.1 | 8.11.1 | 8.11.1 |
| libcxx | 14.0.6 | 14.0.6 | ||||
| libedit | 3.1.20230828 | 3.1.20230828 | 3.1.20230828 | 3.1.20230828 | 3.1.20230828 | |
| libev | 4.33 | 4.33 | 4.33 | 4.33 | 4.33 | |
| libffi | 3.4.4 | 3.4.4 | 3.4.4 | 3.4.4 | 3.4.4 | 3.4.4 |
| libgcc-ng | 11.2.0 | 11.2.0 | 11.2.0 | |||
| libgomp | 11.2.0 | 11.2.0 | 11.2.0 | |||
| libiconv | 1.16 | 1.16 | 1.16 | |||
| libmamba | 2.0.5 | 2.0.5 | 2.0.5 | 2.0.5 | 2.0.5 | 2.0.5 |
| libmambapy | 2.0.5 | 2.0.5 | 2.0.5 | 2.0.5 | 2.0.5 | 2.0.5 |
| libnghttp2 | 1.57.0 | 1.57.0 | 1.57.0 | 1.57.0 | 1.57.0 | |
| libsolv | 0.7.30 | 0.7.30 | 0.7.30 | 0.7.30 | 0.7.30 | 0.7.30 |
| libssh2 | 1.11.1 | 1.11.1 | 1.11.1 | 1.11.1 | 1.11.1 | 1.11.1 |
| libstdcxx-ng | 11.2.0 | 11.2.0 | 11.2.0 | |||
| libuuid | 1.41.5 | 1.41.5 | 1.41.5 | |||
| libxml2 | 2.13.5 | 2.13.5 | 2.13.5 | 2.13.5 | 2.13.5 | 2.13.5 |
| lz4-c | 1.9.4 | 1.9.4 | 1.9.4 | 1.9.4 | 1.9.4 | 1.9.4 |
| markdown-it-py | 2.2.0 | 2.2.0 | 2.2.0 | 2.2.0 | 2.2.0 | 2.2.0 |
| mdurl | 0.1.0 | 0.1.0 | 0.1.0 | 0.1.0 | 0.1.0 | 0.1.0 |
| menuinst | 2.2.0 | 2.2.0 | 2.2.0 | 2.2.0 | 2.2.0 | 2.2.0 |
| ncurses | 6.4 | 6.4 | 6.4 | 6.4 | 6.4 | |
| nlohmann\_json | 3.11.2 | 3.11.2 | 3.11.2 | 3.11.2 | 3.11.2 | 3.11.2 |
| openssl | 3.0.15 | 3.0.15 | 3.0.15 | 3.0.15 | 3.0.15 | 3.0.15 |
| packaging | 24.2 | 24.2 | 24.2 | 24.2 | 24.2 | 24.2 |
| pcre2 | 10.42 | 10.42 | 10.42 | 10.42 | 10.42 | 10.42 |
| pip | 25.0 | 25.0 | 25.0 | 25.0 | 25.0 | 25.0 |
| platformdirs | 3.10.0 | 3.10.0 | 3.10.0 | 3.10.0 | 3.10.0 | 3.10.0 |
| pluggy | 1.5.0 | 1.5.0 | 1.5.0 | 1.5.0 | 1.5.0 | 1.5.0 |
| pybind11-abi | 5 | 5 | 5 | 5 | 5 | 5 |
| pycosat | 0.6.6 | 0.6.6 | 0.6.6 | 0.6.6 | 0.6.6 | 0.6.6 |
| pycparser | 2.21 | 2.21 | 2.21 | 2.21 | 2.21 | 2.21 |
| pydantic | 2.10.3 | 2.10.3 | 2.10.3 | 2.10.3 | 2.10.3 | 2.10.3 |
| pydantic-core | 2.27.1 | 2.27.1 | 2.27.1 | 2.27.1 | 2.27.1 | 2.27.1 |
| pygments | 2.15.1 | 2.15.1 | 2.15.1 | 2.15.1 | 2.15.1 | 2.15.1 |
| pysocks | 1.7.1 | 1.7.1 | 1.7.1 | 1.7.1 | 1.7.1 | 1.7.1 |
| python | 3.12.8 | 3.12.8 | 3.12.8 | 3.12.8 | 3.12.8 | 3.12.8 |
| python.app | 3 | 3 | ||||
| readline | 8.2 | 8.2 | 8.2 | 8.2 | 8.2 | |
| reproc | 14.2.4 | 14.2.4 | 14.2.4 | 14.2.4 | 14.2.4 | 14.2.4 |
| reproc-cpp | 14.2.4 | 14.2.4 | 14.2.4 | 14.2.4 | 14.2.4 | 14.2.4 |
| requests | 2.32.3 | 2.32.3 | 2.32.3 | 2.32.3 | 2.32.3 | 2.32.3 |
| rich | 13.9.4 | 13.9.4 | 13.9.4 | 13.9.4 | 13.9.4 | 13.9.4 |
| ruamel.yaml | 0.18.6 | 0.18.6 | 0.18.6 | 0.18.6 | 0.18.6 | 0.18.6 |
| ruamel.yaml.clib | 0.2.8 | 0.2.8 | 0.2.8 | 0.2.8 | 0.2.8 | 0.2.8 |
| setuptools | 75.8.0 | 75.8.0 | 75.8.0 | 75.8.0 | 75.8.0 | 75.8.0 |
| simdjson | 3.10.1 | 3.10.1 | 3.10.1 | 3.10.1 | 3.10.1 | 3.10.1 |
| spdlog | 1.11.0 | 1.11.0 | 1.11.0 | 1.11.0 | 1.11.0 | 1.11.0 |
| sqlite | 3.45.3 | 3.45.3 | 3.45.3 | 3.45.3 | 3.45.3 | 3.45.3 |
| tk | 8.6.14 | 8.6.14 | 8.6.14 | 8.6.14 | 8.6.14 | 8.6.14 |
| tqdm | 4.66.5 | 4.66.5 | 4.66.5 | 4.66.5 | 4.66.5 | 4.66.5 |
| truststore | 0.10.0 | 0.10.0 | 0.10.0 | 0.10.0 | 0.10.0 | 0.10.0 |
| typing-extensions | 4.12.2 | 4.12.2 | 4.12.2 | 4.12.2 | 4.12.2 | 4.12.2 |
| typing\_extensions | 4.12.2 | 4.12.2 | 4.12.2 | 4.12.2 | 4.12.2 | 4.12.2 |
| tzdata | 2025a | 2025a | 2025a | 2025a | 2025a | 2025a |
| urllib3 | 2.3.0 | 2.3.0 | 2.3.0 | 2.3.0 | 2.3.0 | 2.3.0 |
| vc | 14.40 | |||||
| vs2015\_runtime | 14.42.34433 | |||||
| wheel | 0.45.1 | 0.45.1 | 0.45.1 | 0.45.1 | 0.45.1 | 0.45.1 |
| win\_inet\_pton | 1.1.0 | |||||
| xz | 5.4.6 | 5.4.6 | 5.4.6 | 5.4.6 | 5.4.6 | 5.4.6 |
| yaml-cpp | 0.8.0 | 0.8.0 | 0.8.0 | 0.8.0 | 0.8.0 | 0.8.0 |
| zlib | 1.2.13 | 1.2.13 | 1.2.13 | 1.2.13 | 1.2.13 | 1.2.13 |
| zstandard | 0.23.0 | 0.23.0 | 0.23.0 | 0.23.0 | 0.23.0 | 0.23.0 |
| zstd | 1.5.6 | 1.5.6 | 1.5.6 | 1.5.6 | 1.5.6 | 1.5.6 |
| Package Name | linux-64 | linux-aarch64 | linux-s390x |
|---|---|---|---|
| \_libgcc\_mutex | 0.1 | 0.1 | 0.1 |
| \_openmp\_mutex | 5.1 | 5.1 | 5.1 |
| anaconda-anon-usage | 0.5.0 | 0.5.0 | 0.5.0 |
| annotated-types | 0.6.0 | 0.6.0 | 0.6.0 |
| archspec | 0.2.3 | 0.2.3 | 0.2.3 |
| boltons | 24.1.0 | 24.1.0 | 24.1.0 |
| brotli-python | 1.0.9 | 1.0.9 | 1.0.9 |
| bzip2 | 1.0.8 | 1.0.8 | 1.0.8 |
| c-ares | 1.19.1 | 1.19.1 | 1.19.1 |
| ca-certificates | 2024.12.31 | 2024.12.31 | 2024.12.31 |
| certifi | 2024.12.14 | 2024.12.14 | 2024.12.14 |
| cffi | 1.17.1 | 1.17.1 | 1.17.1 |
| charset-normalizer | 3.3.2 | 3.3.2 | 3.3.2 |
| conda | 25.1.1 | 25.1.1 | 25.1.1 |
| conda-anaconda-telemetry | 0.1.2 | 0.1.2 | 0.1.2 |
| conda-anaconda-tos | 0.1.1 | 0.1.1 | 0.1.1 |
| conda-content-trust | 0.2.0 | 0.2.0 | 0.2.0 |
| conda-libmamba-solver | 25.1.1 | 25.1.1 | 25.1.1 |
| conda-package-handling | 2.4.0 | 2.4.0 | 2.4.0 |
| conda-package-streaming | 0.11.0 | 0.11.0 | 0.11.0 |
| cpp-expected | 1.1.0 | 1.1.0 | 1.1.0 |
| cryptography | 43.0.3 | 43.0.3 | 43.0.3 |
| distro | 1.9.0 | 1.9.0 | 1.9.0 |
| expat | 2.6.4 | 2.6.4 | 2.6.4 |
| fmt | 9.1.0 | 9.1.0 | 9.1.0 |
| frozendict | 2.4.2 | 2.4.2 | 2.4.2 |
| icu | 73.1 | 73.1 | 73.1 |
| idna | 3.7 | 3.7 | 3.7 |
| jsonpatch | 1.33 | 1.33 | 1.33 |
| jsonpointer | 2.1 | 2.1 | 2.1 |
| krb5 | 1.20.1 | 1.20.1 | 1.20.1 |
| ld\_impl\_linux-64 | 2.40 | ||
| ld\_impl\_linux-aarch64 | 2.40 | ||
| ld\_impl\_linux-s390x | 2.40 | ||
| libarchive | 3.7.7 | 3.7.7 | 3.7.7 |
| libcurl | 8.11.1 | 8.11.1 | 8.11.1 |
| libedit | 3.1.20230828 | 3.1.20230828 | 3.1.20230828 |
| libev | 4.33 | 4.33 | 4.33 |
| libffi | 3.4.4 | 3.4.4 | 3.4.4 |
| libgcc-ng | 11.2.0 | 11.2.0 | 11.2.0 |
| libgomp | 11.2.0 | 11.2.0 | 11.2.0 |
| libmamba | 2.0.5 | 2.0.5 | 2.0.5 |
| libmambapy | 2.0.5 | 2.0.5 | 2.0.5 |
| libnghttp2 | 1.57.0 | 1.57.0 | 1.57.0 |
| libsolv | 0.7.30 | 0.7.30 | 0.7.30 |
| libssh2 | 1.11.1 | 1.11.1 | 1.11.1 |
| libstdcxx-ng | 11.2.0 | 11.2.0 | 11.2.0 |
| libuuid | 1.41.5 | 1.41.5 | 1.41.5 |
| libxml2 | 2.13.5 | 2.13.5 | 2.13.5 |
| lz4-c | 1.9.4 | 1.9.4 | 1.9.4 |
| markdown-it-py | 2.2.0 | 2.2.0 | 2.2.0 |
| mdurl | 0.1.0 | 0.1.0 | 0.1.0 |
| menuinst | 2.2.0 | 2.2.0 | 2.2.0 |
| ncurses | 6.4 | 6.4 | 6.4 |
| nlohmann\_json | 3.11.2 | 3.11.2 | 3.11.2 |
| openssl | 3.0.15 | 3.0.15 | 3.0.15 |
| packaging | 24.2 | 24.2 | 24.2 |
| pcre2 | 10.42 | 10.42 | 10.42 |
| pip | 25.0 | 25.0 | 25.0 |
| platformdirs | 3.10.0 | 3.10.0 | 3.10.0 |
| pluggy | 1.5.0 | 1.5.0 | 1.5.0 |
| pybind11-abi | 5 | 5 | 5 |
| pycosat | 0.6.6 | 0.6.6 | 0.6.6 |
| pycparser | 2.21 | 2.21 | 2.21 |
| pydantic | 2.10.3 | 2.10.3 | 2.10.3 |
| pydantic-core | 2.27.1 | 2.27.1 | 2.27.1 |
| pygments | 2.15.1 | 2.15.1 | 2.15.1 |
| pysocks | 1.7.1 | 1.7.1 | 1.7.1 |
| python | 3.12.8 | 3.12.8 | 3.12.8 |
| readline | 8.2 | 8.2 | 8.2 |
| reproc | 14.2.4 | 14.2.4 | 14.2.4 |
| reproc-cpp | 14.2.4 | 14.2.4 | 14.2.4 |
| requests | 2.32.3 | 2.32.3 | 2.32.3 |
| rich | 13.9.4 | 13.9.4 | 13.9.4 |
| ruamel.yaml | 0.18.6 | 0.18.6 | 0.18.6 |
| ruamel.yaml.clib | 0.2.8 | 0.2.8 | 0.2.8 |
| setuptools | 75.8.0 | 75.8.0 | 75.8.0 |
| simdjson | 3.10.1 | 3.10.1 | 3.10.1 |
| spdlog | 1.11.0 | 1.11.0 | 1.11.0 |
| sqlite | 3.45.3 | 3.45.3 | 3.45.3 |
| tk | 8.6.14 | 8.6.14 | 8.6.14 |
| tqdm | 4.66.5 | 4.66.5 | 4.66.5 |
| truststore | 0.10.0 | 0.10.0 | 0.10.0 |
| typing-extensions | 4.12.2 | 4.12.2 | 4.12.2 |
| typing\_extensions | 4.12.2 | 4.12.2 | 4.12.2 |
| tzdata | 2025a | 2025a | 2025a |
| urllib3 | 2.3.0 | 2.3.0 | 2.3.0 |
| wheel | 0.45.1 | 0.45.1 | 0.45.1 |
| xz | 5.4.6 | 5.4.6 | 5.4.6 |
| yaml-cpp | 0.8.0 | 0.8.0 | 0.8.0 |
| zlib | 1.2.13 | 1.2.13 | 1.2.13 |
| zstandard | 0.23.0 | 0.23.0 | 0.23.0 |
| zstd | 1.5.6 | 1.5.6 | 1.5.6 |
| Package Name | osx-arm64 | osx-64 |
|---|---|---|
| anaconda-anon-usage | 0.5.0 | 0.5.0 |
| annotated-types | 0.6.0 | 0.6.0 |
| archspec | 0.2.3 | 0.2.3 |
| boltons | 24.1.0 | 24.1.0 |
| brotli-python | 1.0.9 | 1.0.9 |
| bzip2 | 1.0.8 | 1.0.8 |
| c-ares | 1.19.1 | 1.19.1 |
| ca-certificates | 2024.12.31 | 2024.12.31 |
| certifi | 2024.12.14 | 2024.12.14 |
| cffi | 1.17.1 | 1.17.1 |
| charset-normalizer | 3.3.2 | 3.3.2 |
| conda | 25.1.1 | 25.1.1 |
| conda-anaconda-telemetry | 0.1.2 | 0.1.2 |
| conda-anaconda-tos | 0.1.1 | 0.1.1 |
| conda-content-trust | 0.2.0 | 0.2.0 |
| conda-libmamba-solver | 25.1.1 | 25.1.1 |
| conda-package-handling | 2.4.0 | 2.4.0 |
| conda-package-streaming | 0.11.0 | 0.11.0 |
| cpp-expected | 1.1.0 | 1.1.0 |
| cryptography | 43.0.3 | 43.0.3 |
| distro | 1.9.0 | 1.9.0 |
| expat | 2.6.4 | 2.6.4 |
| fmt | 9.1.0 | 9.1.0 |
| frozendict | 2.4.2 | 2.4.2 |
| icu | 73.1 | 73.1 |
| idna | 3.7 | 3.7 |
| jsonpatch | 1.33 | 1.33 |
| jsonpointer | 2.1 | 2.1 |
| krb5 | 1.20.1 | 1.20.1 |
| libarchive | 3.7.7 | 3.7.7 |
| libcurl | 8.11.1 | 8.11.1 |
| libcxx | 14.0.6 | 14.0.6 |
| libedit | 3.1.20230828 | 3.1.20230828 |
| libev | 4.33 | 4.33 |
| libffi | 3.4.4 | 3.4.4 |
| libiconv | 1.16 | 1.16 |
| libmamba | 2.0.5 | 2.0.5 |
| libmambapy | 2.0.5 | 2.0.5 |
| libnghttp2 | 1.57.0 | 1.57.0 |
| libsolv | 0.7.30 | 0.7.30 |
| libssh2 | 1.11.1 | 1.11.1 |
| libxml2 | 2.13.5 | 2.13.5 |
| lz4-c | 1.9.4 | 1.9.4 |
| markdown-it-py | 2.2.0 | 2.2.0 |
| mdurl | 0.1.0 | 0.1.0 |
| menuinst | 2.2.0 | 2.2.0 |
| ncurses | 6.4 | 6.4 |
| nlohmann\_json | 3.11.2 | 3.11.2 |
| openssl | 3.0.15 | 3.0.15 |
| packaging | 24.2 | 24.2 |
| pcre2 | 10.42 | 10.42 |
| pip | 25.0 | 25.0 |
| platformdirs | 3.10.0 | 3.10.0 |
| pluggy | 1.5.0 | 1.5.0 |
| pybind11-abi | 5 | 5 |
| pycosat | 0.6.6 | 0.6.6 |
| pycparser | 2.21 | 2.21 |
| pydantic | 2.10.3 | 2.10.3 |
| pydantic-core | 2.27.1 | 2.27.1 |
| pygments | 2.15.1 | 2.15.1 |
| pysocks | 1.7.1 | 1.7.1 |
| python | 3.12.8 | 3.12.8 |
| python.app | 3 | 3 |
| readline | 8.2 | 8.2 |
| reproc | 14.2.4 | 14.2.4 |
| reproc-cpp | 14.2.4 | 14.2.4 |
| requests | 2.32.3 | 2.32.3 |
| rich | 13.9.4 | 13.9.4 |
| ruamel.yaml | 0.18.6 | 0.18.6 |
| ruamel.yaml.clib | 0.2.8 | 0.2.8 |
| setuptools | 75.8.0 | 75.8.0 |
| simdjson | 3.10.1 | 3.10.1 |
| spdlog | 1.11.0 | 1.11.0 |
| sqlite | 3.45.3 | 3.45.3 |
| tk | 8.6.14 | 8.6.14 |
| tqdm | 4.66.5 | 4.66.5 |
| truststore | 0.10.0 | 0.10.0 |
| typing-extensions | 4.12.2 | 4.12.2 |
| typing\_extensions | 4.12.2 | 4.12.2 |
| tzdata | 2025a | 2025a |
| urllib3 | 2.3.0 | 2.3.0 |
| wheel | 0.45.1 | 0.45.1 |
| xz | 5.4.6 | 5.4.6 |
| yaml-cpp | 0.8.0 | 0.8.0 |
| zlib | 1.2.13 | 1.2.13 |
| zstandard | 0.23.0 | 0.23.0 |
| zstd | 1.5.6 | 1.5.6 |
| Package Name | win-64 |
|---|---|
| anaconda-anon-usage | 0.5.0 |
| anaconda\_powershell\_prompt | 1.1.0 |
| anaconda\_prompt | 1.1.0 |
| annotated-types | 0.6.0 |
| archspec | 0.2.3 |
| boltons | 24.1.0 |
| brotli-python | 1.0.9 |
| bzip2 | 1.0.8 |
| ca-certificates | 2024.12.31 |
| certifi | 2024.12.14 |
| cffi | 1.17.1 |
| charset-normalizer | 3.3.2 |
| colorama | 0.4.6 |
| conda | 25.1.1 |
| conda-anaconda-telemetry | 0.1.2 |
| conda-anaconda-tos | 0.1.1 |
| conda-content-trust | 0.2.0 |
| conda-libmamba-solver | 25.1.1 |
| conda-package-handling | 2.4.0 |
| conda-package-streaming | 0.11.0 |
| cpp-expected | 1.1.0 |
| cryptography | 43.0.3 |
| distro | 1.9.0 |
| expat | 2.6.4 |
| fmt | 9.1.0 |
| frozendict | 2.4.2 |
| idna | 3.7 |
| jsonpatch | 1.33 |
| jsonpointer | 2.1 |
| libarchive | 3.7.7 |
| libcurl | 8.11.1 |
| libffi | 3.4.4 |
| libiconv | 1.16 |
| libmamba | 2.0.5 |
| libmambapy | 2.0.5 |
| libsolv | 0.7.30 |
| libssh2 | 1.11.1 |
| libxml2 | 2.13.5 |
| lz4-c | 1.9.4 |
| markdown-it-py | 2.2.0 |
| mdurl | 0.1.0 |
| menuinst | 2.2.0 |
| nlohmann\_json | 3.11.2 |
| openssl | 3.0.15 |
| packaging | 24.2 |
| pcre2 | 10.42 |
| pip | 25.0 |
| platformdirs | 3.10.0 |
| pluggy | 1.5.0 |
| pybind11-abi | 5 |
| pycosat | 0.6.6 |
| pycparser | 2.21 |
| pydantic | 2.10.3 |
| pydantic-core | 2.27.1 |
| pygments | 2.15.1 |
| pysocks | 1.7.1 |
| python | 3.12.8 |
| reproc | 14.2.4 |
| reproc-cpp | 14.2.4 |
| requests | 2.32.3 |
| rich | 13.9.4 |
| ruamel.yaml | 0.18.6 |
| ruamel.yaml.clib | 0.2.8 |
| setuptools | 75.8.0 |
| simdjson | 3.10.1 |
| spdlog | 1.11.0 |
| sqlite | 3.45.3 |
| tk | 8.6.14 |
| tqdm | 4.66.5 |
| truststore | 0.10.0 |
| typing-extensions | 4.12.2 |
| typing\_extensions | 4.12.2 |
| tzdata | 2025a |
| urllib3 | 2.3.0 |
| vc | 14.40 |
| vs2015\_runtime | 14.42.34433 |
| wheel | 0.45.1 |
| win\_inet\_pton | 1.1.0 |
| xz | 5.4.6 |
| yaml-cpp | 0.8.0 |
| zlib | 1.2.13 |
| zstandard | 0.23.0 |
| zstd | 1.5.6 |
| Package Name | linux-64 | linux-aarch64 | linux-s390x | osx-arm64 | osx-64 | win-64 |
|---|---|---|---|---|---|---|
| \_libgcc\_mutex | 0.1 | 0.1 | 0.1 | |||
| \_openmp\_mutex | 5.1 | 5.1 | 5.1 | |||
| anaconda-anon-usage | 0.5.0 | 0.5.0 | 0.5.0 | 0.5.0 | 0.5.0 | 0.5.0 |
| anaconda\_powershell\_prompt | 1.1.0 | |||||
| anaconda\_prompt | 1.1.0 | |||||
| archspec | 0.2.3 | 0.2.3 | 0.2.3 | 0.2.3 | 0.2.3 | 0.2.3 |
| boltons | 23.0.0 | 23.0.0 | 23.0.0 | 23.0.0 | 23.0.0 | 23.0.0 |
| brotli-python | 1.0.9 | 1.0.9 | 1.0.9 | 1.0.9 | 1.0.9 | 1.0.9 |
| bzip2 | 1.0.8 | 1.0.8 | 1.0.8 | 1.0.8 | 1.0.8 | 1.0.8 |
| c-ares | 1.19.1 | 1.19.1 | 1.19.1 | 1.19.1 | 1.19.1 | |
| ca-certificates | 2024.11.26 | 2024.11.26 | 2024.11.26 | 2024.11.26 | 2024.11.26 | 2024.11.26 |
| certifi | 2024.8.30 | 2024.8.30 | 2024.8.30 | 2024.8.30 | 2024.8.30 | 2024.8.30 |
| cffi | 1.17.1 | 1.17.1 | 1.17.1 | 1.17.1 | 1.17.1 | 1.17.1 |
| charset-normalizer | 3.3.2 | 3.3.2 | 3.3.2 | 3.3.2 | 3.3.2 | 3.3.2 |
| colorama | 0.4.6 | |||||
| conda | 24.11.1 | 24.11.1 | 24.11.1 | 24.11.1 | 24.11.1 | 24.11.1 |
| conda-anaconda-telemetry | 0.1.1 | 0.1.1 | 0.1.1 | 0.1.1 | 0.1.1 | 0.1.1 |
| conda-content-trust | 0.2.0 | 0.2.0 | 0.2.0 | 0.2.0 | 0.2.0 | 0.2.0 |
| conda-libmamba-solver | 24.9.0 | 24.9.0 | 24.9.0 | 24.9.0 | 24.9.0 | 24.9.0 |
| conda-package-handling | 2.4.0 | 2.4.0 | 2.4.0 | 2.4.0 | 2.4.0 | 2.4.0 |
| conda-package-streaming | 0.11.0 | 0.11.0 | 0.11.0 | 0.11.0 | 0.11.0 | 0.11.0 |
| cryptography | 43.0.3 | 43.0.3 | 43.0.3 | 43.0.3 | 43.0.3 | 43.0.3 |
| distro | 1.9.0 | 1.9.0 | 1.9.0 | 1.9.0 | 1.9.0 | 1.9.0 |
| expat | 2.6.4 | 2.6.4 | 2.6.4 | 2.6.4 | 2.6.4 | 2.6.4 |
| fmt | 9.1.0 | 9.1.0 | 9.1.0 | 9.1.0 | 9.1.0 | 9.1.0 |
| frozendict | 2.4.2 | 2.4.2 | 2.4.2 | 2.4.2 | 2.4.2 | 2.4.2 |
| icu | 73.1 | 73.1 | 73.1 | 73.1 | 73.1 | |
| idna | 3.7 | 3.7 | 3.7 | 3.7 | 3.7 | 3.7 |
| jsonpatch | 1.33 | 1.33 | 1.33 | 1.33 | 1.33 | 1.33 |
| jsonpointer | 2.1 | 2.1 | 2.1 | 2.1 | 2.1 | 2.1 |
| krb5 | 1.20.1 | 1.20.1 | 1.20.1 | 1.20.1 | 1.20.1 | |
| ld\_impl\_linux-64 | 2.40 | |||||
| ld\_impl\_linux-aarch64 | 2.40 | |||||
| ld\_impl\_linux-s390x | 2.40 | |||||
| libarchive | 3.7.4 | 3.7.4 | 3.7.4 | 3.7.4 | 3.7.4 | 3.7.4 |
| libcurl | 8.9.1 | 8.9.1 | 8.9.1 | 8.9.1 | 8.9.1 | 8.9.1 |
| libcxx | 14.0.6 | 14.0.6 | ||||
| libedit | 3.1.20230828 | 3.1.20230828 | 3.1.20230828 | 3.1.20230828 | 3.1.20230828 | |
| libev | 4.33 | 4.33 | 4.33 | 4.33 | 4.33 | |
| libffi | 3.4.4 | 3.4.4 | 3.4.4 | 3.4.4 | 3.4.4 | 3.4.4 |
| libgcc-ng | 11.2.0 | 11.2.0 | 11.2.0 | |||
| libgomp | 11.2.0 | 11.2.0 | 11.2.0 | |||
| libiconv | 1.16 | 1.16 | 1.16 | |||
| libmamba | 1.5.11 | 1.5.11 | 1.5.11 | 1.5.11 | 1.5.11 | 1.5.11 |
| libmambapy | 1.5.11 | 1.5.11 | 1.5.11 | 1.5.11 | 1.5.11 | 1.5.11 |
| libnghttp2 | 1.57.0 | 1.57.0 | 1.57.0 | 1.57.0 | 1.57.0 | |
| libsolv | 0.7.24 | 0.7.24 | 0.7.24 | 0.7.24 | 0.7.24 | 0.7.24 |
| libssh2 | 1.11.1 | 1.11.1 | 1.11.1 | 1.11.1 | 1.11.1 | 1.11.1 |
| libstdcxx-ng | 11.2.0 | 11.2.0 | 11.2.0 | |||
| libuuid | 1.41.5 | 1.41.5 | 1.41.5 | |||
| libxml2 | 2.13.5 | 2.13.5 | 2.13.5 | 2.13.5 | 2.13.5 | 2.13.5 |
| lz4-c | 1.9.4 | 1.9.4 | 1.9.4 | 1.9.4 | 1.9.4 | 1.9.4 |
| menuinst | 2.2.0 | 2.2.0 | 2.2.0 | 2.2.0 | 2.2.0 | 2.2.0 |
| ncurses | 6.4 | 6.4 | 6.4 | 6.4 | 6.4 | |
| openssl | 3.0.15 | 3.0.15 | 3.0.15 | 3.0.15 | 3.0.15 | 3.0.15 |
| packaging | 24.1 | 24.1 | 24.1 | 24.1 | 24.1 | 24.1 |
| pcre2 | 10.42 | 10.42 | 10.42 | 10.42 | 10.42 | 10.42 |
| pip | 24.2 | 24.2 | 24.2 | 24.2 | 24.2 | 24.2 |
| platformdirs | 3.10.0 | 3.10.0 | 3.10.0 | 3.10.0 | 3.10.0 | 3.10.0 |
| pluggy | 1.5.0 | 1.5.0 | 1.5.0 | 1.5.0 | 1.5.0 | 1.5.0 |
| pybind11-abi | 5 | 5 | 5 | 5 | 5 | 5 |
| pycosat | 0.6.6 | 0.6.6 | 0.6.6 | 0.6.6 | 0.6.6 | 0.6.6 |
| pycparser | 2.21 | 2.21 | 2.21 | 2.21 | 2.21 | 2.21 |
| pysocks | 1.7.1 | 1.7.1 | 1.7.1 | 1.7.1 | 1.7.1 | 1.7.1 |
| python | 3.12.8 | 3.12.8 | 3.12.8 | 3.12.8 | 3.12.8 | 3.12.8 |
| python.app | 3 | 3 | ||||
| readline | 8.2 | 8.2 | 8.2 | 8.2 | 8.2 | |
| reproc | 14.2.4 | 14.2.4 | 14.2.4 | 14.2.4 | 14.2.4 | 14.2.4 |
| reproc-cpp | 14.2.4 | 14.2.4 | 14.2.4 | 14.2.4 | 14.2.4 | 14.2.4 |
| requests | 2.32.3 | 2.32.3 | 2.32.3 | 2.32.3 | 2.32.3 | 2.32.3 |
| ruamel.yaml | 0.18.6 | 0.18.6 | 0.18.6 | 0.18.6 | 0.18.6 | 0.18.6 |
| ruamel.yaml.clib | 0.2.8 | 0.2.8 | 0.2.8 | 0.2.8 | 0.2.8 | 0.2.8 |
| setuptools | 75.1.0 | 75.1.0 | 75.1.0 | 75.1.0 | 75.1.0 | 75.1.0 |
| sqlite | 3.45.3 | 3.45.3 | 3.45.3 | 3.45.3 | 3.45.3 | 3.45.3 |
| tk | 8.6.14 | 8.6.14 | 8.6.14 | 8.6.14 | 8.6.14 | 8.6.14 |
| tqdm | 4.66.5 | 4.66.5 | 4.66.5 | 4.66.5 | 4.66.5 | 4.66.5 |
| truststore | 0.8.0 | 0.8.0 | 0.8.0 | 0.8.0 | 0.8.0 | 0.8.0 |
| tzdata | 2024b | 2024b | 2024b | 2024b | 2024b | 2024b |
| urllib3 | 2.2.3 | 2.2.3 | 2.2.3 | 2.2.3 | 2.2.3 | 2.2.3 |
| vc | 14.40 | |||||
| vs2015\_runtime | 14.42.34433 | |||||
| wheel | 0.44.0 | 0.44.0 | 0.44.0 | 0.44.0 | 0.44.0 | 0.44.0 |
| win\_inet\_pton | 1.1.0 | |||||
| xz | 5.4.6 | 5.4.6 | 5.4.6 | 5.4.6 | 5.4.6 | 5.4.6 |
| yaml-cpp | 0.8.0 | 0.8.0 | 0.8.0 | 0.8.0 | 0.8.0 | 0.8.0 |
| zlib | 1.2.13 | 1.2.13 | 1.2.13 | 1.2.13 | 1.2.13 | 1.2.13 |
| zstandard | 0.23.0 | 0.23.0 | 0.23.0 | 0.23.0 | 0.23.0 | 0.23.0 |
| zstd | 1.5.6 | 1.5.6 | 1.5.6 | 1.5.6 | 1.5.6 | 1.5.6 |
| Package Name | linux-64 | linux-aarch64 | linux-s390x |
|---|---|---|---|
| \_libgcc\_mutex | 0.1 | 0.1 | 0.1 |
| \_openmp\_mutex | 5.1 | 5.1 | 5.1 |
| anaconda-anon-usage | 0.5.0 | 0.5.0 | 0.5.0 |
| archspec | 0.2.3 | 0.2.3 | 0.2.3 |
| boltons | 23.0.0 | 23.0.0 | 23.0.0 |
| brotli-python | 1.0.9 | 1.0.9 | 1.0.9 |
| bzip2 | 1.0.8 | 1.0.8 | 1.0.8 |
| c-ares | 1.19.1 | 1.19.1 | 1.19.1 |
| ca-certificates | 2024.11.26 | 2024.11.26 | 2024.11.26 |
| certifi | 2024.8.30 | 2024.8.30 | 2024.8.30 |
| cffi | 1.17.1 | 1.17.1 | 1.17.1 |
| charset-normalizer | 3.3.2 | 3.3.2 | 3.3.2 |
| conda | 24.11.1 | 24.11.1 | 24.11.1 |
| conda-anaconda-telemetry | 0.1.1 | 0.1.1 | 0.1.1 |
| conda-content-trust | 0.2.0 | 0.2.0 | 0.2.0 |
| conda-libmamba-solver | 24.9.0 | 24.9.0 | 24.9.0 |
| conda-package-handling | 2.4.0 | 2.4.0 | 2.4.0 |
| conda-package-streaming | 0.11.0 | 0.11.0 | 0.11.0 |
| cryptography | 43.0.3 | 43.0.3 | 43.0.3 |
| distro | 1.9.0 | 1.9.0 | 1.9.0 |
| expat | 2.6.4 | 2.6.4 | 2.6.4 |
| fmt | 9.1.0 | 9.1.0 | 9.1.0 |
| frozendict | 2.4.2 | 2.4.2 | 2.4.2 |
| icu | 73.1 | 73.1 | 73.1 |
| idna | 3.7 | 3.7 | 3.7 |
| jsonpatch | 1.33 | 1.33 | 1.33 |
| jsonpointer | 2.1 | 2.1 | 2.1 |
| krb5 | 1.20.1 | 1.20.1 | 1.20.1 |
| ld\_impl\_linux-64 | 2.40 | ||
| ld\_impl\_linux-aarch64 | 2.40 | ||
| ld\_impl\_linux-s390x | 2.40 | ||
| libarchive | 3.7.4 | 3.7.4 | 3.7.4 |
| libcurl | 8.9.1 | 8.9.1 | 8.9.1 |
| libedit | 3.1.20230828 | 3.1.20230828 | 3.1.20230828 |
| libev | 4.33 | 4.33 | 4.33 |
| libffi | 3.4.4 | 3.4.4 | 3.4.4 |
| libgcc-ng | 11.2.0 | 11.2.0 | 11.2.0 |
| libgomp | 11.2.0 | 11.2.0 | 11.2.0 |
| libmamba | 1.5.11 | 1.5.11 | 1.5.11 |
| libmambapy | 1.5.11 | 1.5.11 | 1.5.11 |
| libnghttp2 | 1.57.0 | 1.57.0 | 1.57.0 |
| libsolv | 0.7.24 | 0.7.24 | 0.7.24 |
| libssh2 | 1.11.1 | 1.11.1 | 1.11.1 |
| libstdcxx-ng | 11.2.0 | 11.2.0 | 11.2.0 |
| libuuid | 1.41.5 | 1.41.5 | 1.41.5 |
| libxml2 | 2.13.5 | 2.13.5 | 2.13.5 |
| lz4-c | 1.9.4 | 1.9.4 | 1.9.4 |
| menuinst | 2.2.0 | 2.2.0 | 2.2.0 |
| ncurses | 6.4 | 6.4 | 6.4 |
| openssl | 3.0.15 | 3.0.15 | 3.0.15 |
| packaging | 24.1 | 24.1 | 24.1 |
| pcre2 | 10.42 | 10.42 | 10.42 |
| pip | 24.2 | 24.2 | 24.2 |
| platformdirs | 3.10.0 | 3.10.0 | 3.10.0 |
| pluggy | 1.5.0 | 1.5.0 | 1.5.0 |
| pybind11-abi | 5 | 5 | 5 |
| pycosat | 0.6.6 | 0.6.6 | 0.6.6 |
| pycparser | 2.21 | 2.21 | 2.21 |
| pysocks | 1.7.1 | 1.7.1 | 1.7.1 |
| python | 3.12.8 | 3.12.8 | 3.12.8 |
| readline | 8.2 | 8.2 | 8.2 |
| reproc | 14.2.4 | 14.2.4 | 14.2.4 |
| reproc-cpp | 14.2.4 | 14.2.4 | 14.2.4 |
| requests | 2.32.3 | 2.32.3 | 2.32.3 |
| ruamel.yaml | 0.18.6 | 0.18.6 | 0.18.6 |
| ruamel.yaml.clib | 0.2.8 | 0.2.8 | 0.2.8 |
| setuptools | 75.1.0 | 75.1.0 | 75.1.0 |
| sqlite | 3.45.3 | 3.45.3 | 3.45.3 |
| tk | 8.6.14 | 8.6.14 | 8.6.14 |
| tqdm | 4.66.5 | 4.66.5 | 4.66.5 |
| truststore | 0.8.0 | 0.8.0 | 0.8.0 |
| tzdata | 2024b | 2024b | 2024b |
| urllib3 | 2.2.3 | 2.2.3 | 2.2.3 |
| wheel | 0.44.0 | 0.44.0 | 0.44.0 |
| xz | 5.4.6 | 5.4.6 | 5.4.6 |
| yaml-cpp | 0.8.0 | 0.8.0 | 0.8.0 |
| zlib | 1.2.13 | 1.2.13 | 1.2.13 |
| zstandard | 0.23.0 | 0.23.0 | 0.23.0 |
| zstd | 1.5.6 | 1.5.6 | 1.5.6 |
| Package Name | osx-arm64 | osx-64 |
|---|---|---|
| anaconda-anon-usage | 0.5.0 | 0.5.0 |
| archspec | 0.2.3 | 0.2.3 |
| boltons | 23.0.0 | 23.0.0 |
| brotli-python | 1.0.9 | 1.0.9 |
| bzip2 | 1.0.8 | 1.0.8 |
| c-ares | 1.19.1 | 1.19.1 |
| ca-certificates | 2024.11.26 | 2024.11.26 |
| certifi | 2024.8.30 | 2024.8.30 |
| cffi | 1.17.1 | 1.17.1 |
| charset-normalizer | 3.3.2 | 3.3.2 |
| conda | 24.11.1 | 24.11.1 |
| conda-anaconda-telemetry | 0.1.1 | 0.1.1 |
| conda-content-trust | 0.2.0 | 0.2.0 |
| conda-libmamba-solver | 24.9.0 | 24.9.0 |
| conda-package-handling | 2.4.0 | 2.4.0 |
| conda-package-streaming | 0.11.0 | 0.11.0 |
| cryptography | 43.0.3 | 43.0.3 |
| distro | 1.9.0 | 1.9.0 |
| expat | 2.6.4 | 2.6.4 |
| fmt | 9.1.0 | 9.1.0 |
| frozendict | 2.4.2 | 2.4.2 |
| icu | 73.1 | 73.1 |
| idna | 3.7 | 3.7 |
| jsonpatch | 1.33 | 1.33 |
| jsonpointer | 2.1 | 2.1 |
| krb5 | 1.20.1 | 1.20.1 |
| libarchive | 3.7.4 | 3.7.4 |
| libcurl | 8.9.1 | 8.9.1 |
| libcxx | 14.0.6 | 14.0.6 |
| libedit | 3.1.20230828 | 3.1.20230828 |
| libev | 4.33 | 4.33 |
| libffi | 3.4.4 | 3.4.4 |
| libiconv | 1.16 | 1.16 |
| libmamba | 1.5.11 | 1.5.11 |
| libmambapy | 1.5.11 | 1.5.11 |
| libnghttp2 | 1.57.0 | 1.57.0 |
| libsolv | 0.7.24 | 0.7.24 |
| libssh2 | 1.11.1 | 1.11.1 |
| libxml2 | 2.13.5 | 2.13.5 |
| lz4-c | 1.9.4 | 1.9.4 |
| menuinst | 2.2.0 | 2.2.0 |
| ncurses | 6.4 | 6.4 |
| openssl | 3.0.15 | 3.0.15 |
| packaging | 24.1 | 24.1 |
| pcre2 | 10.42 | 10.42 |
| pip | 24.2 | 24.2 |
| platformdirs | 3.10.0 | 3.10.0 |
| pluggy | 1.5.0 | 1.5.0 |
| pybind11-abi | 5 | 5 |
| pycosat | 0.6.6 | 0.6.6 |
| pycparser | 2.21 | 2.21 |
| pysocks | 1.7.1 | 1.7.1 |
| python | 3.12.8 | 3.12.8 |
| python.app | 3 | 3 |
| readline | 8.2 | 8.2 |
| reproc | 14.2.4 | 14.2.4 |
| reproc-cpp | 14.2.4 | 14.2.4 |
| requests | 2.32.3 | 2.32.3 |
| ruamel.yaml | 0.18.6 | 0.18.6 |
| ruamel.yaml.clib | 0.2.8 | 0.2.8 |
| setuptools | 75.1.0 | 75.1.0 |
| sqlite | 3.45.3 | 3.45.3 |
| tk | 8.6.14 | 8.6.14 |
| tqdm | 4.66.5 | 4.66.5 |
| truststore | 0.8.0 | 0.8.0 |
| tzdata | 2024b | 2024b |
| urllib3 | 2.2.3 | 2.2.3 |
| wheel | 0.44.0 | 0.44.0 |
| xz | 5.4.6 | 5.4.6 |
| yaml-cpp | 0.8.0 | 0.8.0 |
| zlib | 1.2.13 | 1.2.13 |
| zstandard | 0.23.0 | 0.23.0 |
| zstd | 1.5.6 | 1.5.6 |
| Package Name | win-64 |
|---|---|
| anaconda-anon-usage | 0.5.0 |
| anaconda\_powershell\_prompt | 1.1.0 |
| anaconda\_prompt | 1.1.0 |
| archspec | 0.2.3 |
| boltons | 23.0.0 |
| brotli-python | 1.0.9 |
| bzip2 | 1.0.8 |
| ca-certificates | 2024.11.26 |
| certifi | 2024.8.30 |
| cffi | 1.17.1 |
| charset-normalizer | 3.3.2 |
| colorama | 0.4.6 |
| conda | 24.11.1 |
| conda-anaconda-telemetry | 0.1.1 |
| conda-content-trust | 0.2.0 |
| conda-libmamba-solver | 24.9.0 |
| conda-package-handling | 2.4.0 |
| conda-package-streaming | 0.11.0 |
| cryptography | 43.0.3 |
| distro | 1.9.0 |
| expat | 2.6.4 |
| fmt | 9.1.0 |
| frozendict | 2.4.2 |
| idna | 3.7 |
| jsonpatch | 1.33 |
| jsonpointer | 2.1 |
| libarchive | 3.7.4 |
| libcurl | 8.9.1 |
| libffi | 3.4.4 |
| libiconv | 1.16 |
| libmamba | 1.5.11 |
| libmambapy | 1.5.11 |
| libsolv | 0.7.24 |
| libssh2 | 1.11.1 |
| libxml2 | 2.13.5 |
| lz4-c | 1.9.4 |
| menuinst | 2.2.0 |
| openssl | 3.0.15 |
| packaging | 24.1 |
| pcre2 | 10.42 |
| pip | 24.2 |
| platformdirs | 3.10.0 |
| pluggy | 1.5.0 |
| pybind11-abi | 5 |
| pycosat | 0.6.6 |
| pycparser | 2.21 |
| pysocks | 1.7.1 |
| python | 3.12.8 |
| reproc | 14.2.4 |
| reproc-cpp | 14.2.4 |
| requests | 2.32.3 |
| ruamel.yaml | 0.18.6 |
| ruamel.yaml.clib | 0.2.8 |
| setuptools | 75.1.0 |
| sqlite | 3.45.3 |
| tk | 8.6.14 |
| tqdm | 4.66.5 |
| truststore | 0.8.0 |
| tzdata | 2024b |
| urllib3 | 2.2.3 |
| vc | 14.40 |
| vs2015\_runtime | 14.42.34433 |
| wheel | 0.44.0 |
| win\_inet\_pton | 1.1.0 |
| xz | 5.4.6 |
| yaml-cpp | 0.8.0 |
| zlib | 1.2.13 |
| zstandard | 0.23.0 |
| zstd | 1.5.6 |
| Package Name | linux-64 | linux-aarch64 | linux-s390x | osx-arm64 | osx-64 | win-64 |
|---|---|---|---|---|---|---|
| \_libgcc\_mutex | 0.1 | 0.1 | 0.1 | |||
| \_openmp\_mutex | 5.1 | 5.1 | 5.1 | |||
| anaconda-anon-usage | 0.4.4 | 0.4.4 | 0.4.4 | 0.4.4 | 0.4.4 | 0.4.4 |
| anaconda\_powershell\_prompt | 1.1.0 | |||||
| anaconda\_prompt | 1.1.0 | |||||
| archspec | 0.2.3 | 0.2.3 | 0.2.3 | 0.2.3 | 0.2.3 | 0.2.3 |
| boltons | 23.0.0 | 23.0.0 | 23.0.0 | 23.0.0 | 23.0.0 | 23.0.0 |
| brotli-python | 1.0.9 | 1.0.9 | 1.0.9 | 1.0.9 | 1.0.9 | 1.0.9 |
| bzip2 | 1.0.8 | 1.0.8 | 1.0.8 | 1.0.8 | 1.0.8 | 1.0.8 |
| c-ares | 1.19.1 | 1.19.1 | 1.19.1 | 1.19.1 | 1.19.1 | |
| ca-certificates | 2024.9.24 | 2024.9.24 | 2024.9.24 | 2024.9.24 | 2024.9.24 | 2024.9.24 |
| certifi | 2024.8.30 | 2024.8.30 | 2024.8.30 | 2024.8.30 | 2024.8.30 | 2024.8.30 |
| cffi | 1.17.1 | 1.17.1 | 1.17.1 | 1.17.1 | 1.17.1 | 1.17.1 |
| charset-normalizer | 3.3.2 | 3.3.2 | 3.3.2 | 3.3.2 | 3.3.2 | 3.3.2 |
| colorama | 0.4.6 | |||||
| conda | 24.9.2 | 24.9.2 | 24.9.2 | 24.9.2 | 24.9.2 | 24.9.2 |
| conda-content-trust | 0.2.0 | 0.2.0 | 0.2.0 | 0.2.0 | 0.2.0 | 0.2.0 |
| conda-libmamba-solver | 24.9.0 | 24.9.0 | 24.9.0 | 24.9.0 | 24.9.0 | 24.9.0 |
| conda-package-handling | 2.3.0 | 2.3.0 | 2.3.0 | 2.3.0 | 2.3.0 | 2.3.0 |
| conda-package-streaming | 0.10.0 | 0.10.0 | 0.10.0 | 0.10.0 | 0.10.0 | 0.10.0 |
| cryptography | 43.0.0 | 43.0.0 | 43.0.0 | 43.0.0 | 43.0.0 | 43.0.0 |
| distro | 1.9.0 | 1.9.0 | 1.9.0 | 1.9.0 | 1.9.0 | 1.9.0 |
| expat | 2.6.3 | 2.6.3 | 2.6.3 | 2.6.3 | 2.6.3 | 2.6.3 |
| fmt | 9.1.0 | 9.1.0 | 9.1.0 | 9.1.0 | 9.1.0 | 9.1.0 |
| frozendict | 2.4.2 | 2.4.2 | 2.4.2 | 2.4.2 | 2.4.2 | 2.4.2 |
| icu | 73.1 | 73.1 | 73.1 | 73.1 | 73.1 | |
| idna | 3.7 | 3.7 | 3.7 | 3.7 | 3.7 | 3.7 |
| jsonpatch | 1.33 | 1.33 | 1.33 | 1.33 | 1.33 | 1.33 |
| jsonpointer | 2.1 | 2.1 | 2.1 | 2.1 | 2.1 | 2.1 |
| krb5 | 1.20.1 | 1.20.1 | 1.20.1 | 1.20.1 | 1.20.1 | |
| ld\_impl\_linux-64 | 2.40 | |||||
| ld\_impl\_linux-aarch64 | 2.40 | |||||
| ld\_impl\_linux-s390x | 2.40 | |||||
| libarchive | 3.7.4 | 3.7.4 | 3.7.4 | 3.7.4 | 3.7.4 | 3.7.4 |
| libcurl | 8.9.1 | 8.9.1 | 8.9.1 | 8.9.1 | 8.9.1 | 8.9.1 |
| libcxx | 14.0.6 | 14.0.6 | ||||
| libedit | 3.1.20230828 | 3.1.20230828 | 3.1.20230828 | 3.1.20230828 | 3.1.20230828 | |
| libev | 4.33 | 4.33 | 4.33 | 4.33 | 4.33 | |
| libffi | 3.4.4 | 3.4.4 | 3.4.4 | 3.4.4 | 3.4.4 | 3.4.4 |
| libgcc-ng | 11.2.0 | 11.2.0 | 11.2.0 | |||
| libgomp | 11.2.0 | 11.2.0 | 11.2.0 | |||
| libiconv | 1.16 | 1.16 | 1.16 | |||
| libmamba | 1.5.8 | 1.5.8 | 1.5.8 | 1.5.8 | 1.5.8 | 1.5.8 |
| libmambapy | 1.5.8 | 1.5.8 | 1.5.8 | 1.5.8 | 1.5.8 | 1.5.8 |
| libnghttp2 | 1.57.0 | 1.57.0 | 1.57.0 | 1.57.0 | 1.57.0 | |
| libsolv | 0.7.24 | 0.7.24 | 0.7.24 | 0.7.24 | 0.7.24 | 0.7.24 |
| libssh2 | 1.11.0 | 1.11.0 | 1.11.0 | 1.11.0 | 1.11.0 | 1.11.0 |
| libstdcxx-ng | 11.2.0 | 11.2.0 | 11.2.0 | |||
| libuuid | 1.41.5 | 1.41.5 | 1.41.5 | |||
| libxml2 | 2.13.1 | 2.13.1 | 2.13.1 | 2.13.1 | 2.13.1 | 2.13.1 |
| lz4-c | 1.9.4 | 1.9.4 | 1.9.4 | 1.9.4 | 1.9.4 | 1.9.4 |
| menuinst | 2.1.2 | 2.1.2 | 2.1.2 | 2.1.2 | 2.1.2 | 2.1.2 |
| ncurses | 6.4 | 6.4 | 6.4 | 6.4 | 6.4 | |
| openssl | 3.0.15 | 3.0.15 | 3.0.15 | 3.0.15 | 3.0.15 | 3.0.15 |
| packaging | 24.1 | 24.1 | 24.1 | 24.1 | 24.1 | 24.1 |
| pcre2 | 10.42 | 10.42 | 10.42 | 10.42 | 10.42 | 10.42 |
| pip | 24.2 | 24.2 | 24.2 | 24.2 | 24.2 | 24.2 |
| platformdirs | 3.10.0 | 3.10.0 | 3.10.0 | 3.10.0 | 3.10.0 | 3.10.0 |
| pluggy | 1.0.0 | 1.0.0 | 1.0.0 | 1.0.0 | 1.0.0 | 1.0.0 |
| pybind11-abi | 5 | 5 | 5 | 5 | 5 | 5 |
| pycosat | 0.6.6 | 0.6.6 | 0.6.6 | 0.6.6 | 0.6.6 | 0.6.6 |
| pycparser | 2.21 | 2.21 | 2.21 | 2.21 | 2.21 | 2.21 |
| pysocks | 1.7.1 | 1.7.1 | 1.7.1 | 1.7.1 | 1.7.1 | 1.7.1 |
| python | 3.12.7 | 3.12.7 | 3.12.7 | 3.12.7 | 3.12.7 | 3.12.7 |
| python.app | 3 | 3 | ||||
| readline | 8.2 | 8.2 | 8.2 | 8.2 | 8.2 | |
| reproc | 14.2.4 | 14.2.4 | 14.2.4 | 14.2.4 | 14.2.4 | 14.2.4 |
| reproc-cpp | 14.2.4 | 14.2.4 | 14.2.4 | 14.2.4 | 14.2.4 | 14.2.4 |
| requests | 2.32.3 | 2.32.3 | 2.32.3 | 2.32.3 | 2.32.3 | 2.32.3 |
| ruamel.yaml | 0.18.6 | 0.18.6 | 0.18.6 | 0.18.6 | 0.18.6 | 0.18.6 |
| ruamel.yaml.clib | 0.2.8 | 0.2.8 | 0.2.8 | 0.2.8 | 0.2.8 | 0.2.8 |
| setuptools | 75.1.0 | 75.1.0 | 75.1.0 | 75.1.0 | 75.1.0 | 75.1.0 |
| sqlite | 3.45.3 | 3.45.3 | 3.45.3 | 3.45.3 | 3.45.3 | 3.45.3 |
| tk | 8.6.14 | 8.6.14 | 8.6.14 | 8.6.14 | 8.6.14 | 8.6.14 |
| tqdm | 4.66.5 | 4.66.5 | 4.66.5 | 4.66.5 | 4.66.5 | 4.66.5 |
| truststore | 0.8.0 | 0.8.0 | 0.8.0 | 0.8.0 | 0.8.0 | 0.8.0 |
| tzdata | 2024b | 2024b | 2024b | 2024b | 2024b | 2024b |
| urllib3 | 2.2.3 | 2.2.3 | 2.2.3 | 2.2.3 | 2.2.3 | 2.2.3 |
| vc | 14.40 | |||||
| vs2015\_runtime | 14.40.33807 | |||||
| wheel | 0.44.0 | 0.44.0 | 0.44.0 | 0.44.0 | 0.44.0 | 0.44.0 |
| win\_inet\_pton | 1.1.0 | |||||
| xz | 5.4.6 | 5.4.6 | 5.4.6 | 5.4.6 | 5.4.6 | 5.4.6 |
| yaml-cpp | 0.8.0 | 0.8.0 | 0.8.0 | 0.8.0 | 0.8.0 | 0.8.0 |
| zlib | 1.2.13 | 1.2.13 | 1.2.13 | 1.2.13 | 1.2.13 | 1.2.13 |
| zstandard | 0.23.0 | 0.23.0 | 0.23.0 | 0.23.0 | 0.23.0 | 0.23.0 |
| zstd | 1.5.6 | 1.5.6 | 1.5.6 | 1.5.6 | 1.5.6 | 1.5.6 |
| Package Name | linux-64 | linux-aarch64 | linux-s390x |
|---|---|---|---|
| \_libgcc\_mutex | 0.1 | 0.1 | 0.1 |
| \_openmp\_mutex | 5.1 | 5.1 | 5.1 |
| anaconda-anon-usage | 0.4.4 | 0.4.4 | 0.4.4 |
| archspec | 0.2.3 | 0.2.3 | 0.2.3 |
| boltons | 23.0.0 | 23.0.0 | 23.0.0 |
| brotli-python | 1.0.9 | 1.0.9 | 1.0.9 |
| bzip2 | 1.0.8 | 1.0.8 | 1.0.8 |
| c-ares | 1.19.1 | 1.19.1 | 1.19.1 |
| ca-certificates | 2024.9.24 | 2024.9.24 | 2024.9.24 |
| certifi | 2024.8.30 | 2024.8.30 | 2024.8.30 |
| cffi | 1.17.1 | 1.17.1 | 1.17.1 |
| charset-normalizer | 3.3.2 | 3.3.2 | 3.3.2 |
| conda | 24.9.2 | 24.9.2 | 24.9.2 |
| conda-content-trust | 0.2.0 | 0.2.0 | 0.2.0 |
| conda-libmamba-solver | 24.9.0 | 24.9.0 | 24.9.0 |
| conda-package-handling | 2.3.0 | 2.3.0 | 2.3.0 |
| conda-package-streaming | 0.10.0 | 0.10.0 | 0.10.0 |
| cryptography | 43.0.0 | 43.0.0 | 43.0.0 |
| distro | 1.9.0 | 1.9.0 | 1.9.0 |
| expat | 2.6.3 | 2.6.3 | 2.6.3 |
| fmt | 9.1.0 | 9.1.0 | 9.1.0 |
| frozendict | 2.4.2 | 2.4.2 | 2.4.2 |
| icu | 73.1 | 73.1 | 73.1 |
| idna | 3.7 | 3.7 | 3.7 |
| jsonpatch | 1.33 | 1.33 | 1.33 |
| jsonpointer | 2.1 | 2.1 | 2.1 |
| krb5 | 1.20.1 | 1.20.1 | 1.20.1 |
| ld\_impl\_linux-64 | 2.40 | ||
| ld\_impl\_linux-aarch64 | 2.40 | ||
| ld\_impl\_linux-s390x | 2.40 | ||
| libarchive | 3.7.4 | 3.7.4 | 3.7.4 |
| libcurl | 8.9.1 | 8.9.1 | 8.9.1 |
| libedit | 3.1.20230828 | 3.1.20230828 | 3.1.20230828 |
| libev | 4.33 | 4.33 | 4.33 |
| libffi | 3.4.4 | 3.4.4 | 3.4.4 |
| libgcc-ng | 11.2.0 | 11.2.0 | 11.2.0 |
| libgomp | 11.2.0 | 11.2.0 | 11.2.0 |
| libmamba | 1.5.8 | 1.5.8 | 1.5.8 |
| libmambapy | 1.5.8 | 1.5.8 | 1.5.8 |
| libnghttp2 | 1.57.0 | 1.57.0 | 1.57.0 |
| libsolv | 0.7.24 | 0.7.24 | 0.7.24 |
| libssh2 | 1.11.0 | 1.11.0 | 1.11.0 |
| libstdcxx-ng | 11.2.0 | 11.2.0 | 11.2.0 |
| libuuid | 1.41.5 | 1.41.5 | 1.41.5 |
| libxml2 | 2.13.1 | 2.13.1 | 2.13.1 |
| lz4-c | 1.9.4 | 1.9.4 | 1.9.4 |
| menuinst | 2.1.2 | 2.1.2 | 2.1.2 |
| ncurses | 6.4 | 6.4 | 6.4 |
| openssl | 3.0.15 | 3.0.15 | 3.0.15 |
| packaging | 24.1 | 24.1 | 24.1 |
| pcre2 | 10.42 | 10.42 | 10.42 |
| pip | 24.2 | 24.2 | 24.2 |
| platformdirs | 3.10.0 | 3.10.0 | 3.10.0 |
| pluggy | 1.0.0 | 1.0.0 | 1.0.0 |
| pybind11-abi | 5 | 5 | 5 |
| pycosat | 0.6.6 | 0.6.6 | 0.6.6 |
| pycparser | 2.21 | 2.21 | 2.21 |
| pysocks | 1.7.1 | 1.7.1 | 1.7.1 |
| python | 3.12.7 | 3.12.7 | 3.12.7 |
| readline | 8.2 | 8.2 | 8.2 |
| reproc | 14.2.4 | 14.2.4 | 14.2.4 |
| reproc-cpp | 14.2.4 | 14.2.4 | 14.2.4 |
| requests | 2.32.3 | 2.32.3 | 2.32.3 |
| ruamel.yaml | 0.18.6 | 0.18.6 | 0.18.6 |
| ruamel.yaml.clib | 0.2.8 | 0.2.8 | 0.2.8 |
| setuptools | 75.1.0 | 75.1.0 | 75.1.0 |
| sqlite | 3.45.3 | 3.45.3 | 3.45.3 |
| tk | 8.6.14 | 8.6.14 | 8.6.14 |
| tqdm | 4.66.5 | 4.66.5 | 4.66.5 |
| truststore | 0.8.0 | 0.8.0 | 0.8.0 |
| tzdata | 2024b | 2024b | 2024b |
| urllib3 | 2.2.3 | 2.2.3 | 2.2.3 |
| wheel | 0.44.0 | 0.44.0 | 0.44.0 |
| xz | 5.4.6 | 5.4.6 | 5.4.6 |
| yaml-cpp | 0.8.0 | 0.8.0 | 0.8.0 |
| zlib | 1.2.13 | 1.2.13 | 1.2.13 |
| zstandard | 0.23.0 | 0.23.0 | 0.23.0 |
| zstd | 1.5.6 | 1.5.6 | 1.5.6 |
| Package Name | osx-arm64 | osx-64 |
|---|---|---|
| anaconda-anon-usage | 0.4.4 | 0.4.4 |
| archspec | 0.2.3 | 0.2.3 |
| boltons | 23.0.0 | 23.0.0 |
| brotli-python | 1.0.9 | 1.0.9 |
| bzip2 | 1.0.8 | 1.0.8 |
| c-ares | 1.19.1 | 1.19.1 |
| ca-certificates | 2024.9.24 | 2024.9.24 |
| certifi | 2024.8.30 | 2024.8.30 |
| cffi | 1.17.1 | 1.17.1 |
| charset-normalizer | 3.3.2 | 3.3.2 |
| conda | 24.9.2 | 24.9.2 |
| conda-content-trust | 0.2.0 | 0.2.0 |
| conda-libmamba-solver | 24.9.0 | 24.9.0 |
| conda-package-handling | 2.3.0 | 2.3.0 |
| conda-package-streaming | 0.10.0 | 0.10.0 |
| cryptography | 43.0.0 | 43.0.0 |
| distro | 1.9.0 | 1.9.0 |
| expat | 2.6.3 | 2.6.3 |
| fmt | 9.1.0 | 9.1.0 |
| frozendict | 2.4.2 | 2.4.2 |
| icu | 73.1 | 73.1 |
| idna | 3.7 | 3.7 |
| jsonpatch | 1.33 | 1.33 |
| jsonpointer | 2.1 | 2.1 |
| krb5 | 1.20.1 | 1.20.1 |
| libarchive | 3.7.4 | 3.7.4 |
| libcurl | 8.9.1 | 8.9.1 |
| libcxx | 14.0.6 | 14.0.6 |
| libedit | 3.1.20230828 | 3.1.20230828 |
| libev | 4.33 | 4.33 |
| libffi | 3.4.4 | 3.4.4 |
| libiconv | 1.16 | 1.16 |
| libmamba | 1.5.8 | 1.5.8 |
| libmambapy | 1.5.8 | 1.5.8 |
| libnghttp2 | 1.57.0 | 1.57.0 |
| libsolv | 0.7.24 | 0.7.24 |
| libssh2 | 1.11.0 | 1.11.0 |
| libxml2 | 2.13.1 | 2.13.1 |
| lz4-c | 1.9.4 | 1.9.4 |
| menuinst | 2.1.2 | 2.1.2 |
| ncurses | 6.4 | 6.4 |
| openssl | 3.0.15 | 3.0.15 |
| packaging | 24.1 | 24.1 |
| pcre2 | 10.42 | 10.42 |
| pip | 24.2 | 24.2 |
| platformdirs | 3.10.0 | 3.10.0 |
| pluggy | 1.0.0 | 1.0.0 |
| pybind11-abi | 5 | 5 |
| pycosat | 0.6.6 | 0.6.6 |
| pycparser | 2.21 | 2.21 |
| pysocks | 1.7.1 | 1.7.1 |
| python | 3.12.7 | 3.12.7 |
| python.app | 3 | 3 |
| readline | 8.2 | 8.2 |
| reproc | 14.2.4 | 14.2.4 |
| reproc-cpp | 14.2.4 | 14.2.4 |
| requests | 2.32.3 | 2.32.3 |
| ruamel.yaml | 0.18.6 | 0.18.6 |
| ruamel.yaml.clib | 0.2.8 | 0.2.8 |
| setuptools | 75.1.0 | 75.1.0 |
| sqlite | 3.45.3 | 3.45.3 |
| tk | 8.6.14 | 8.6.14 |
| tqdm | 4.66.5 | 4.66.5 |
| truststore | 0.8.0 | 0.8.0 |
| tzdata | 2024b | 2024b |
| urllib3 | 2.2.3 | 2.2.3 |
| wheel | 0.44.0 | 0.44.0 |
| xz | 5.4.6 | 5.4.6 |
| yaml-cpp | 0.8.0 | 0.8.0 |
| zlib | 1.2.13 | 1.2.13 |
| zstandard | 0.23.0 | 0.23.0 |
| zstd | 1.5.6 | 1.5.6 |
| Package Name | win-64 |
|---|---|
| anaconda-anon-usage | 0.4.4 |
| anaconda\_powershell\_prompt | 1.1.0 |
| anaconda\_prompt | 1.1.0 |
| archspec | 0.2.3 |
| boltons | 23.0.0 |
| brotli-python | 1.0.9 |
| bzip2 | 1.0.8 |
| ca-certificates | 2024.9.24 |
| certifi | 2024.8.30 |
| cffi | 1.17.1 |
| charset-normalizer | 3.3.2 |
| colorama | 0.4.6 |
| conda | 24.9.2 |
| conda-content-trust | 0.2.0 |
| conda-libmamba-solver | 24.9.0 |
| conda-package-handling | 2.3.0 |
| conda-package-streaming | 0.10.0 |
| cryptography | 43.0.0 |
| distro | 1.9.0 |
| expat | 2.6.3 |
| fmt | 9.1.0 |
| frozendict | 2.4.2 |
| idna | 3.7 |
| jsonpatch | 1.33 |
| jsonpointer | 2.1 |
| libarchive | 3.7.4 |
| libcurl | 8.9.1 |
| libffi | 3.4.4 |
| libiconv | 1.16 |
| libmamba | 1.5.8 |
| libmambapy | 1.5.8 |
| libsolv | 0.7.24 |
| libssh2 | 1.11.0 |
| libxml2 | 2.13.1 |
| lz4-c | 1.9.4 |
| menuinst | 2.1.2 |
| openssl | 3.0.15 |
| packaging | 24.1 |
| pcre2 | 10.42 |
| pip | 24.2 |
| platformdirs | 3.10.0 |
| pluggy | 1.0.0 |
| pybind11-abi | 5 |
| pycosat | 0.6.6 |
| pycparser | 2.21 |
| pysocks | 1.7.1 |
| python | 3.12.7 |
| reproc | 14.2.4 |
| reproc-cpp | 14.2.4 |
| requests | 2.32.3 |
| ruamel.yaml | 0.18.6 |
| ruamel.yaml.clib | 0.2.8 |
| setuptools | 75.1.0 |
| sqlite | 3.45.3 |
| tk | 8.6.14 |
| tqdm | 4.66.5 |
| truststore | 0.8.0 |
| tzdata | 2024b |
| urllib3 | 2.2.3 |
| vc | 14.40 |
| vs2015\_runtime | 14.40.33807 |
| wheel | 0.44.0 |
| win\_inet\_pton | 1.1.0 |
| xz | 5.4.6 |
| yaml-cpp | 0.8.0 |
| zlib | 1.2.13 |
| zstandard | 0.23.0 |
| zstd | 1.5.6 |
| Package Name | linux-64 | linux-aarch64 | linux-s390x | osx-arm64 | osx-64 | win-64 |
|---|---|---|---|---|---|---|
| \_libgcc\_mutex | 0.1 | 0.1 | 0.1 | |||
| \_openmp\_mutex | 5.1 | 5.1 | 5.1 | |||
| anaconda-anon-usage | 0.4.4 | 0.4.4 | 0.4.4 | 0.4.4 | 0.4.4 | 0.4.4 |
| archspec | 0.2.3 | 0.2.3 | 0.2.3 | 0.2.3 | 0.2.3 | 0.2.3 |
| boltons | 23.0.0 | 23.0.0 | 23.0.0 | 23.0.0 | 23.0.0 | 23.0.0 |
| brotli-python | 1.0.9 | 1.0.9 | 1.0.9 | 1.0.9 | 1.0.9 | 1.0.9 |
| bzip2 | 1.0.8 | 1.0.8 | 1.0.8 | 1.0.8 | 1.0.8 | 1.0.8 |
| c-ares | 1.19.1 | 1.19.1 | 1.19.1 | 1.19.1 | 1.19.1 | |
| ca-certificates | 2024.7.2 | 2024.7.2 | 2024.7.2 | 2024.7.2 | 2024.7.2 | 2024.7.2 |
| certifi | 2024.7.4 | 2024.7.4 | 2024.7.4 | 2024.7.4 | 2024.7.4 | 2024.7.4 |
| cffi | 1.16.0 | 1.16.0 | 1.16.0 | 1.16.0 | 1.16.0 | 1.16.0 |
| charset-normalizer | 3.3.2 | 3.3.2 | 3.3.2 | 3.3.2 | 3.3.2 | 3.3.2 |
| colorama | 0.4.6 | |||||
| conda | 24.7.1 | 24.7.1 | 24.7.1 | 24.7.1 | 24.7.1 | 24.7.1 |
| conda-content-trust | 0.2.0 | 0.2.0 | 0.2.0 | 0.2.0 | 0.2.0 | 0.2.0 |
| conda-libmamba-solver | 24.7.0 | 24.7.0 | 24.7.0 | 24.7.0 | 24.7.0 | 24.7.0 |
| conda-package-handling | 2.3.0 | 2.3.0 | 2.3.0 | 2.3.0 | 2.3.0 | 2.3.0 |
| conda-package-streaming | 0.10.0 | 0.10.0 | 0.10.0 | 0.10.0 | 0.10.0 | 0.10.0 |
| console\_shortcut\_miniconda | 0.1.1 | |||||
| cryptography | 42.0.5 | 42.0.5 | 42.0.5 | 42.0.5 | 42.0.5 | 42.0.5 |
| distro | 1.9.0 | 1.9.0 | 1.9.0 | 1.9.0 | 1.9.0 | 1.9.0 |
| expat | 2.6.2 | 2.6.2 | 2.6.2 | 2.6.2 | 2.6.2 | 2.6.2 |
| fmt | 9.1.0 | 9.1.0 | 9.1.0 | 9.1.0 | 9.1.0 | 9.1.0 |
| frozendict | 2.4.2 | 2.4.2 | 2.4.2 | 2.4.2 | 2.4.2 | 2.4.2 |
| icu | 73.1 | 73.1 | 73.1 | 73.1 | 73.1 | |
| idna | 3.7 | 3.7 | 3.7 | 3.7 | 3.7 | 3.7 |
| jsonpatch | 1.33 | 1.33 | 1.33 | 1.33 | 1.33 | 1.33 |
| jsonpointer | 2.1 | 2.1 | 2.1 | 2.1 | 2.1 | 2.1 |
| krb5 | 1.20.1 | 1.20.1 | 1.20.1 | 1.20.1 | 1.20.1 | |
| ld\_impl\_linux-64 | 2.38 | |||||
| ld\_impl\_linux-aarch64 | 2.38 | |||||
| ld\_impl\_linux-s390x | 2.38 | |||||
| libarchive | 3.6.2 | 3.6.2 | 3.6.2 | 3.6.2 | 3.6.2 | 3.6.2 |
| libcurl | 8.7.1 | 8.7.1 | 8.7.1 | 8.7.1 | 8.7.1 | 8.7.1 |
| libcxx | 14.0.6 | 14.0.6 | ||||
| libedit | 3.1.20230828 | 3.1.20230828 | 3.1.20230828 | 3.1.20230828 | 3.1.20230828 | |
| libev | 4.33 | 4.33 | 4.33 | 4.33 | 4.33 | |
| libffi | 3.4.4 | 3.4.4 | 3.4.4 | 3.4.4 | 3.4.4 | 3.4.4 |
| libgcc-ng | 11.2.0 | 11.2.0 | 11.2.0 | |||
| libgomp | 11.2.0 | 11.2.0 | 11.2.0 | |||
| libiconv | 1.16 | 1.16 | 1.16 | |||
| libmamba | 1.5.8 | 1.5.8 | 1.5.8 | 1.5.8 | 1.5.8 | 1.5.8 |
| libmambapy | 1.5.8 | 1.5.8 | 1.5.8 | 1.5.8 | 1.5.8 | 1.5.8 |
| libnghttp2 | 1.57.0 | 1.57.0 | 1.57.0 | 1.57.0 | 1.57.0 | |
| libsolv | 0.7.24 | 0.7.24 | 0.7.24 | 0.7.24 | 0.7.24 | 0.7.24 |
| libssh2 | 1.11.0 | 1.11.0 | 1.11.0 | 1.11.0 | 1.11.0 | 1.11.0 |
| libstdcxx-ng | 11.2.0 | 11.2.0 | 11.2.0 | |||
| libuuid | 1.41.5 | 1.41.5 | 1.41.5 | |||
| libxml2 | 2.13.1 | 2.13.1 | 2.13.1 | 2.10.4 | 2.10.4 | 2.13.1 |
| lz4-c | 1.9.4 | 1.9.4 | 1.9.4 | 1.9.4 | 1.9.4 | 1.9.4 |
| menuinst | 2.1.2 | 2.1.2 | 2.1.2 | 2.1.2 | 2.1.2 | 2.1.2 |
| ncurses | 6.4 | 6.4 | 6.4 | 6.4 | 6.4 | |
| openssl | 3.0.14 | 3.0.14 | 3.0.14 | 3.0.14 | 3.0.14 | 3.0.14 |
| packaging | 24.1 | 24.1 | 24.1 | 24.1 | 24.1 | 24.1 |
| pcre2 | 10.42 | 10.42 | 10.42 | 10.42 | 10.42 | 10.42 |
| pip | 24.2 | 24.2 | 24.2 | 24.2 | 24.2 | 24.2 |
| platformdirs | 3.10.0 | 3.10.0 | 3.10.0 | 3.10.0 | 3.10.0 | 3.10.0 |
| pluggy | 1.0.0 | 1.0.0 | 1.0.0 | 1.0.0 | 1.0.0 | 1.0.0 |
| powershell\_shortcut\_miniconda | 0.0.1 | |||||
| pybind11-abi | 5 | 5 | 5 | 5 | 5 | 5 |
| pycosat | 0.6.6 | 0.6.6 | 0.6.6 | 0.6.6 | 0.6.6 | 0.6.6 |
| pycparser | 2.21 | 2.21 | 2.21 | 2.21 | 2.21 | 2.21 |
| pysocks | 1.7.1 | 1.7.1 | 1.7.1 | 1.7.1 | 1.7.1 | 1.7.1 |
| python | 3.12.4 | 3.12.4 | 3.12.4 | 3.12.4 | 3.12.4 | 3.12.4 |
| python.app | 3 | 3 | ||||
| readline | 8.2 | 8.2 | 8.2 | 8.2 | 8.2 | |
| reproc | 14.2.4 | 14.2.4 | 14.2.4 | 14.2.4 | 14.2.4 | 14.2.4 |
| reproc-cpp | 14.2.4 | 14.2.4 | 14.2.4 | 14.2.4 | 14.2.4 | 14.2.4 |
| requests | 2.32.3 | 2.32.3 | 2.32.3 | 2.32.3 | 2.32.3 | 2.32.3 |
| ruamel.yaml | 0.17.21 | 0.17.21 | 0.17.21 | 0.17.21 | 0.17.21 | 0.17.21 |
| setuptools | 72.1.0 | 72.1.0 | 72.1.0 | 72.1.0 | 72.1.0 | 72.1.0 |
| sqlite | 3.45.3 | 3.45.3 | 3.45.3 | 3.45.3 | 3.45.3 | 3.45.3 |
| tk | 8.6.14 | 8.6.14 | 8.6.14 | 8.6.14 | 8.6.14 | 8.6.14 |
| tqdm | 4.66.4 | 4.66.4 | 4.66.4 | 4.66.4 | 4.66.4 | 4.66.4 |
| truststore | 0.8.0 | 0.8.0 | 0.8.0 | 0.8.0 | 0.8.0 | 0.8.0 |
| tzdata | 2024a | 2024a | 2024a | 2024a | 2024a | 2024a |
| urllib3 | 2.2.2 | 2.2.2 | 2.2.2 | 2.2.2 | 2.2.2 | 2.2.2 |
| vc | 14.40 | |||||
| vs2015\_runtime | 14.40.33807 | |||||
| wheel | 0.43.0 | 0.43.0 | 0.43.0 | 0.43.0 | 0.43.0 | 0.43.0 |
| win\_inet\_pton | 1.1.0 | |||||
| xz | 5.4.6 | 5.4.6 | 5.4.6 | 5.4.6 | 5.4.6 | 5.4.6 |
| yaml-cpp | 0.8.0 | 0.8.0 | 0.8.0 | 0.8.0 | 0.8.0 | 0.8.0 |
| zlib | 1.2.13 | 1.2.13 | 1.2.13 | 1.2.13 | 1.2.13 | 1.2.13 |
| zstandard | 0.22.0 | 0.22.0 | 0.22.0 | 0.22.0 | 0.22.0 | 0.22.0 |
| zstd | 1.5.5 | 1.5.5 | 1.5.5 | 1.5.5 | 1.5.5 | 1.5.5 |
| Package Name | linux-64 | linux-aarch64 | linux-s390x |
|---|---|---|---|
| \_libgcc\_mutex | 0.1 | 0.1 | 0.1 |
| \_openmp\_mutex | 5.1 | 5.1 | 5.1 |
| anaconda-anon-usage | 0.4.4 | 0.4.4 | 0.4.4 |
| archspec | 0.2.3 | 0.2.3 | 0.2.3 |
| boltons | 23.0.0 | 23.0.0 | 23.0.0 |
| brotli-python | 1.0.9 | 1.0.9 | 1.0.9 |
| bzip2 | 1.0.8 | 1.0.8 | 1.0.8 |
| c-ares | 1.19.1 | 1.19.1 | 1.19.1 |
| ca-certificates | 2024.7.2 | 2024.7.2 | 2024.7.2 |
| certifi | 2024.7.4 | 2024.7.4 | 2024.7.4 |
| cffi | 1.16.0 | 1.16.0 | 1.16.0 |
| charset-normalizer | 3.3.2 | 3.3.2 | 3.3.2 |
| conda | 24.7.1 | 24.7.1 | 24.7.1 |
| conda-content-trust | 0.2.0 | 0.2.0 | 0.2.0 |
| conda-libmamba-solver | 24.7.0 | 24.7.0 | 24.7.0 |
| conda-package-handling | 2.3.0 | 2.3.0 | 2.3.0 |
| conda-package-streaming | 0.10.0 | 0.10.0 | 0.10.0 |
| cryptography | 42.0.5 | 42.0.5 | 42.0.5 |
| distro | 1.9.0 | 1.9.0 | 1.9.0 |
| expat | 2.6.2 | 2.6.2 | 2.6.2 |
| fmt | 9.1.0 | 9.1.0 | 9.1.0 |
| frozendict | 2.4.2 | 2.4.2 | 2.4.2 |
| icu | 73.1 | 73.1 | 73.1 |
| idna | 3.7 | 3.7 | 3.7 |
| jsonpatch | 1.33 | 1.33 | 1.33 |
| jsonpointer | 2.1 | 2.1 | 2.1 |
| krb5 | 1.20.1 | 1.20.1 | 1.20.1 |
| ld\_impl\_linux-64 | 2.38 | ||
| ld\_impl\_linux-aarch64 | 2.38 | ||
| ld\_impl\_linux-s390x | 2.38 | ||
| libarchive | 3.6.2 | 3.6.2 | 3.6.2 |
| libcurl | 8.7.1 | 8.7.1 | 8.7.1 |
| libedit | 3.1.20230828 | 3.1.20230828 | 3.1.20230828 |
| libev | 4.33 | 4.33 | 4.33 |
| libffi | 3.4.4 | 3.4.4 | 3.4.4 |
| libgcc-ng | 11.2.0 | 11.2.0 | 11.2.0 |
| libgomp | 11.2.0 | 11.2.0 | 11.2.0 |
| libmamba | 1.5.8 | 1.5.8 | 1.5.8 |
| libmambapy | 1.5.8 | 1.5.8 | 1.5.8 |
| libnghttp2 | 1.57.0 | 1.57.0 | 1.57.0 |
| libsolv | 0.7.24 | 0.7.24 | 0.7.24 |
| libssh2 | 1.11.0 | 1.11.0 | 1.11.0 |
| libstdcxx-ng | 11.2.0 | 11.2.0 | 11.2.0 |
| libuuid | 1.41.5 | 1.41.5 | 1.41.5 |
| libxml2 | 2.13.1 | 2.13.1 | 2.13.1 |
| lz4-c | 1.9.4 | 1.9.4 | 1.9.4 |
| menuinst | 2.1.2 | 2.1.2 | 2.1.2 |
| ncurses | 6.4 | 6.4 | 6.4 |
| openssl | 3.0.14 | 3.0.14 | 3.0.14 |
| packaging | 24.1 | 24.1 | 24.1 |
| pcre2 | 10.42 | 10.42 | 10.42 |
| pip | 24.2 | 24.2 | 24.2 |
| platformdirs | 3.10.0 | 3.10.0 | 3.10.0 |
| pluggy | 1.0.0 | 1.0.0 | 1.0.0 |
| pybind11-abi | 5 | 5 | 5 |
| pycosat | 0.6.6 | 0.6.6 | 0.6.6 |
| pycparser | 2.21 | 2.21 | 2.21 |
| pysocks | 1.7.1 | 1.7.1 | 1.7.1 |
| python | 3.12.4 | 3.12.4 | 3.12.4 |
| readline | 8.2 | 8.2 | 8.2 |
| reproc | 14.2.4 | 14.2.4 | 14.2.4 |
| reproc-cpp | 14.2.4 | 14.2.4 | 14.2.4 |
| requests | 2.32.3 | 2.32.3 | 2.32.3 |
| ruamel.yaml | 0.17.21 | 0.17.21 | 0.17.21 |
| setuptools | 72.1.0 | 72.1.0 | 72.1.0 |
| sqlite | 3.45.3 | 3.45.3 | 3.45.3 |
| tk | 8.6.14 | 8.6.14 | 8.6.14 |
| tqdm | 4.66.4 | 4.66.4 | 4.66.4 |
| truststore | 0.8.0 | 0.8.0 | 0.8.0 |
| tzdata | 2024a | 2024a | 2024a |
| urllib3 | 2.2.2 | 2.2.2 | 2.2.2 |
| wheel | 0.43.0 | 0.43.0 | 0.43.0 |
| xz | 5.4.6 | 5.4.6 | 5.4.6 |
| yaml-cpp | 0.8.0 | 0.8.0 | 0.8.0 |
| zlib | 1.2.13 | 1.2.13 | 1.2.13 |
| zstandard | 0.22.0 | 0.22.0 | 0.22.0 |
| zstd | 1.5.5 | 1.5.5 | 1.5.5 |
| Package Name | osx-arm64 | osx-64 |
|---|---|---|
| anaconda-anon-usage | 0.4.4 | 0.4.4 |
| archspec | 0.2.3 | 0.2.3 |
| boltons | 23.0.0 | 23.0.0 |
| brotli-python | 1.0.9 | 1.0.9 |
| bzip2 | 1.0.8 | 1.0.8 |
| c-ares | 1.19.1 | 1.19.1 |
| ca-certificates | 2024.7.2 | 2024.7.2 |
| certifi | 2024.7.4 | 2024.7.4 |
| cffi | 1.16.0 | 1.16.0 |
| charset-normalizer | 3.3.2 | 3.3.2 |
| conda | 24.7.1 | 24.7.1 |
| conda-content-trust | 0.2.0 | 0.2.0 |
| conda-libmamba-solver | 24.7.0 | 24.7.0 |
| conda-package-handling | 2.3.0 | 2.3.0 |
| conda-package-streaming | 0.10.0 | 0.10.0 |
| cryptography | 42.0.5 | 42.0.5 |
| distro | 1.9.0 | 1.9.0 |
| expat | 2.6.2 | 2.6.2 |
| fmt | 9.1.0 | 9.1.0 |
| frozendict | 2.4.2 | 2.4.2 |
| icu | 73.1 | 73.1 |
| idna | 3.7 | 3.7 |
| jsonpatch | 1.33 | 1.33 |
| jsonpointer | 2.1 | 2.1 |
| krb5 | 1.20.1 | 1.20.1 |
| libarchive | 3.6.2 | 3.6.2 |
| libcurl | 8.7.1 | 8.7.1 |
| libcxx | 14.0.6 | 14.0.6 |
| libedit | 3.1.20230828 | 3.1.20230828 |
| libev | 4.33 | 4.33 |
| libffi | 3.4.4 | 3.4.4 |
| libiconv | 1.16 | 1.16 |
| libmamba | 1.5.8 | 1.5.8 |
| libmambapy | 1.5.8 | 1.5.8 |
| libnghttp2 | 1.57.0 | 1.57.0 |
| libsolv | 0.7.24 | 0.7.24 |
| libssh2 | 1.11.0 | 1.11.0 |
| libxml2 | 2.10.4 | 2.10.4 |
| lz4-c | 1.9.4 | 1.9.4 |
| menuinst | 2.1.2 | 2.1.2 |
| ncurses | 6.4 | 6.4 |
| openssl | 3.0.14 | 3.0.14 |
| packaging | 24.1 | 24.1 |
| pcre2 | 10.42 | 10.42 |
| pip | 24.2 | 24.2 |
| platformdirs | 3.10.0 | 3.10.0 |
| pluggy | 1.0.0 | 1.0.0 |
| pybind11-abi | 5 | 5 |
| pycosat | 0.6.6 | 0.6.6 |
| pycparser | 2.21 | 2.21 |
| pysocks | 1.7.1 | 1.7.1 |
| python | 3.12.4 | 3.12.4 |
| python.app | 3 | 3 |
| readline | 8.2 | 8.2 |
| reproc | 14.2.4 | 14.2.4 |
| reproc-cpp | 14.2.4 | 14.2.4 |
| requests | 2.32.3 | 2.32.3 |
| ruamel.yaml | 0.17.21 | 0.17.21 |
| setuptools | 72.1.0 | 72.1.0 |
| sqlite | 3.45.3 | 3.45.3 |
| tk | 8.6.14 | 8.6.14 |
| tqdm | 4.66.4 | 4.66.4 |
| truststore | 0.8.0 | 0.8.0 |
| tzdata | 2024a | 2024a |
| urllib3 | 2.2.2 | 2.2.2 |
| wheel | 0.43.0 | 0.43.0 |
| xz | 5.4.6 | 5.4.6 |
| yaml-cpp | 0.8.0 | 0.8.0 |
| zlib | 1.2.13 | 1.2.13 |
| zstandard | 0.22.0 | 0.22.0 |
| zstd | 1.5.5 | 1.5.5 |
| Package Name | win-64 |
|---|---|
| anaconda-anon-usage | 0.4.4 |
| archspec | 0.2.3 |
| boltons | 23.0.0 |
| brotli-python | 1.0.9 |
| bzip2 | 1.0.8 |
| ca-certificates | 2024.7.2 |
| certifi | 2024.7.4 |
| cffi | 1.16.0 |
| charset-normalizer | 3.3.2 |
| colorama | 0.4.6 |
| conda | 24.7.1 |
| conda-content-trust | 0.2.0 |
| conda-libmamba-solver | 24.7.0 |
| conda-package-handling | 2.3.0 |
| conda-package-streaming | 0.10.0 |
| console\_shortcut\_miniconda | 0.1.1 |
| cryptography | 42.0.5 |
| distro | 1.9.0 |
| expat | 2.6.2 |
| fmt | 9.1.0 |
| frozendict | 2.4.2 |
| idna | 3.7 |
| jsonpatch | 1.33 |
| jsonpointer | 2.1 |
| libarchive | 3.6.2 |
| libcurl | 8.7.1 |
| libffi | 3.4.4 |
| libiconv | 1.16 |
| libmamba | 1.5.8 |
| libmambapy | 1.5.8 |
| libsolv | 0.7.24 |
| libssh2 | 1.11.0 |
| libxml2 | 2.13.1 |
| lz4-c | 1.9.4 |
| menuinst | 2.1.2 |
| openssl | 3.0.14 |
| packaging | 24.1 |
| pcre2 | 10.42 |
| pip | 24.2 |
| platformdirs | 3.10.0 |
| pluggy | 1.0.0 |
| powershell\_shortcut\_miniconda | 0.0.1 |
| pybind11-abi | 5 |
| pycosat | 0.6.6 |
| pycparser | 2.21 |
| pysocks | 1.7.1 |
| python | 3.12.4 |
| reproc | 14.2.4 |
| reproc-cpp | 14.2.4 |
| requests | 2.32.3 |
| ruamel.yaml | 0.17.21 |
| setuptools | 72.1.0 |
| sqlite | 3.45.3 |
| tk | 8.6.14 |
| tqdm | 4.66.4 |
| truststore | 0.8.0 |
| tzdata | 2024a |
| urllib3 | 2.2.2 |
| vc | 14.40 |
| vs2015\_runtime | 14.40.33807 |
| wheel | 0.43.0 |
| win\_inet\_pton | 1.1.0 |
| xz | 5.4.6 |
| yaml-cpp | 0.8.0 |
| zlib | 1.2.13 |
| zstandard | 0.22.0 |
| zstd | 1.5.5 |
| Package Name | linux-64 | linux-aarch64 | linux-s390x | osx-arm64 | osx-64 | win-64 |
|---|---|---|---|---|---|---|
| \_libgcc\_mutex | 0.1 | 0.1 | 0.1 | |||
| \_openmp\_mutex | 5.1 | 5.1 | 5.1 | |||
| archspec | 0.2.1 | 0.2.1 | 0.2.1 | 0.2.1 | 0.2.1 | 0.2.1 |
| boltons | 23.0.0 | 23.0.0 | 23.0.0 | 23.0.0 | 23.0.0 | 23.0.0 |
| brotli-python | 1.0.9 | 1.0.9 | 1.0.9 | 1.0.9 | 1.0.9 | 1.0.9 |
| bzip2 | 1.0.8 | 1.0.8 | 1.0.8 | 1.0.8 | 1.0.8 | 1.0.8 |
| c-ares | 1.19.1 | 1.19.1 | 1.19.1 | 1.19.1 | 1.19.1 | |
| ca-certificates | 2023.12.12 | 2023.12.12 | 2023.12.12 | 2023.12.12 | 2023.12.12 | 2023.12.12 |
| certifi | 2023.11.17 | 2023.11.17 | 2023.11.17 | 2023.11.17 | 2023.11.17 | 2023.11.17 |
| cffi | 1.16.0 | 1.16.0 | 1.16.0 | 1.16.0 | 1.16.0 | 1.16.0 |
| charset-normalizer | 2.0.4 | 2.0.4 | 2.0.4 | 2.0.4 | 2.0.4 | 2.0.4 |
| colorama | 0.4.6 | |||||
| conda | 23.11.0 | 23.11.0 | 23.11.0 | 23.11.0 | 23.11.0 | 23.11.0 |
| conda-content-trust | 0.2.0 | 0.2.0 | 0.2.0 | 0.2.0 | 0.2.0 | 0.2.0 |
| conda-libmamba-solver | 23.12.0 | 23.12.0 | 23.12.0 | 23.12.0 | 23.12.0 | 23.12.0 |
| conda-package-handling | 2.2.0 | 2.2.0 | 2.2.0 | 2.2.0 | 2.2.0 | 2.2.0 |
| conda-package-streaming | 0.9.0 | 0.9.0 | 0.9.0 | 0.9.0 | 0.9.0 | 0.9.0 |
| console\_shortcut\_miniconda | 0.1.1 | |||||
| cryptography | 41.0.7 | 41.0.7 | 41.0.7 | 41.0.7 | 41.0.7 | 41.0.7 |
| distro | 1.8.0 | 1.8.0 | 1.8.0 | 1.8.0 | 1.8.0 | 1.8.0 |
| fmt | 9.1.0 | 9.1.0 | 9.1.0 | 9.1.0 | 9.1.0 | 9.1.0 |
| icu | 73.1 | 73.1 | 73.1 | 73.1 | 73.1 | |
| idna | 3.4 | 3.4 | 3.3 | 3.4 | 3.4 | 3.4 |
| jsonpatch | 1.32 | 1.32 | 1.32 | 1.32 | 1.32 | 1.32 |
| jsonpointer | 2.1 | 2.1 | 2.1 | 2.1 | 2.1 | 2.1 |
| krb5 | 1.20.1 | 1.20.1 | 1.20.1 | 1.20.1 | 1.20.1 | |
| ld\_impl\_linux-64 | 2.38 | |||||
| ld\_impl\_linux-aarch64 | 2.38 | |||||
| ld\_impl\_linux-s390x | 2.38 | |||||
| libarchive | 3.6.2 | 3.6.2 | 3.6.2 | 3.6.2 | 3.6.2 | 3.6.2 |
| libcurl | 8.4.0 | 8.4.0 | 8.4.0 | 8.4.0 | 8.4.0 | 8.4.0 |
| libcxx | 14.0.6 | 14.0.6 | ||||
| libedit | 3.1.20230828 | 3.1.20230828 | 3.1.20230828 | 3.1.20230828 | 3.1.20230828 | |
| libev | 4.33 | 4.33 | 4.33 | 4.33 | 4.33 | |
| libffi | 3.4.4 | 3.4.4 | 3.4.2 | 3.4.4 | 3.4.4 | 3.4.4 |
| libgcc-ng | 11.2.0 | 11.2.0 | 11.2.0 | |||
| libgomp | 11.2.0 | 11.2.0 | 11.2.0 | |||
| libiconv | 1.16 | 1.16 | 1.16 | |||
| libmamba | 1.5.3 | 1.5.3 | 1.5.3 | 1.5.3 | 1.5.3 | 1.5.3 |
| libmambapy | 1.5.3 | 1.5.3 | 1.5.3 | 1.5.3 | 1.5.3 | 1.5.3 |
| libnghttp2 | 1.57.0 | 1.57.0 | 1.57.0 | 1.57.0 | 1.57.0 | |
| libsolv | 0.7.24 | 0.7.24 | 0.7.24 | 0.7.24 | 0.7.24 | 0.7.24 |
| libssh2 | 1.10.0 | 1.10.0 | 1.10.0 | 1.10.0 | 1.10.0 | 1.10.0 |
| libstdcxx-ng | 11.2.0 | 11.2.0 | 11.2.0 | |||
| libuuid | 1.41.5 | 1.41.5 | 1.41.5 | |||
| libxml2 | 2.10.4 | 2.10.4 | 2.10.4 | 2.10.4 | 2.10.4 | 2.10.4 |
| lz4-c | 1.9.4 | 1.9.4 | 1.9.4 | 1.9.4 | 1.9.4 | 1.9.4 |
| menuinst | 2.0.1 | 2.0.1 | 2.0.1 | 2.0.1 | 2.0.1 | 2.0.1 |
| ncurses | 6.4 | 6.4 | 6.4 | 6.4 | 6.4 | |
| openssl | 3.0.12 | 3.0.12 | 3.0.12 | 3.0.12 | 3.0.12 | 3.0.12 |
| packaging | 23.1 | 23.1 | 23.1 | 23.1 | 23.1 | 23.1 |
| pcre2 | 10.42 | 10.42 | 10.42 | 10.42 | 10.42 | 10.42 |
| pip | 23.3.1 | 23.3.1 | 23.3.1 | 23.3.1 | 23.3.1 | 23.3.1 |
| platformdirs | 3.10.0 | 3.10.0 | 3.10.0 | 3.10.0 | 3.10.0 | 3.10.0 |
| pluggy | 1.0.0 | 1.0.0 | 1.0.0 | 1.0.0 | 1.0.0 | 1.0.0 |
| powershell\_shortcut\_miniconda | 0.0.1 | |||||
| pybind11-abi | 4 | 4 | 4 | 4 | 4 | 4 |
| pycosat | 0.6.6 | 0.6.6 | 0.6.6 | 0.6.6 | 0.6.6 | 0.6.6 |
| pycparser | 2.21 | 2.21 | 2.21 | 2.21 | 2.21 | 2.21 |
| pyopenssl | 23.2.0 | 23.2.0 | 23.2.0 | 23.2.0 | 23.2.0 | 23.2.0 |
| pysocks | 1.7.1 | 1.7.1 | 1.7.1 | 1.7.1 | 1.7.1 | 1.7.1 |
| python | 3.11.5 | 3.11.5 | 3.11.5 | 3.11.5 | 3.11.5 | 3.11.5 |
| python.app | 3 | 3 | ||||
| readline | 8.2 | 8.2 | 8.2 | 8.2 | 8.2 | |
| reproc | 14.2.4 | 14.2.4 | 14.2.4 | 14.2.4 | 14.2.4 | 14.2.4 |
| reproc-cpp | 14.2.4 | 14.2.4 | 14.2.4 | 14.2.4 | 14.2.4 | 14.2.4 |
| requests | 2.31.0 | 2.31.0 | 2.31.0 | 2.31.0 | 2.31.0 | 2.31.0 |
| ruamel.yaml | 0.17.21 | 0.17.21 | 0.17.21 | 0.17.21 | 0.17.21 | 0.17.21 |
| setuptools | 68.2.2 | 68.2.2 | 68.2.2 | 68.2.2 | 68.2.2 | 68.2.2 |
| sqlite | 3.41.2 | 3.41.2 | 3.41.2 | 3.41.2 | 3.41.2 | 3.41.2 |
| tk | 8.6.12 | 8.6.12 | 8.6.12 | 8.6.12 | 8.6.12 | 8.6.12 |
| tqdm | 4.65.0 | 4.65.0 | 4.65.0 | 4.65.0 | 4.65.0 | 4.65.0 |
| truststore | 0.8.0 | 0.8.0 | 0.8.0 | 0.8.0 | 0.8.0 | 0.8.0 |
| tzdata | 2023c | 2023c | 2023c | 2023c | 2023c | 2023c |
| urllib3 | 1.26.18 | 1.26.18 | 1.26.18 | 1.26.18 | 1.26.18 | 1.26.18 |
| vc | 14.2 | |||||
| vs2015\_runtime | 14.27.29016 | |||||
| wheel | 0.41.2 | 0.41.2 | 0.41.2 | 0.41.2 | 0.41.2 | 0.41.2 |
| win\_inet\_pton | 1.1.0 | |||||
| xz | 5.4.5 | 5.4.5 | 5.4.5 | 5.4.5 | 5.4.5 | 5.4.5 |
| yaml-cpp | 0.8.0 | 0.8.0 | 0.8.0 | 0.8.0 | 0.8.0 | 0.8.0 |
| zlib | 1.2.13 | 1.2.13 | 1.2.13 | 1.2.13 | 1.2.13 | 1.2.13 |
| zstandard | 0.19.0 | 0.19.0 | 0.19.0 | 0.19.0 | 0.19.0 | 0.19.0 |
| zstd | 1.5.5 | 1.5.5 | 1.5.5 | 1.5.5 | 1.5.5 | 1.5.5 |
| Package Name | linux-64 | linux-aarch64 | linux-s390x |
|---|---|---|---|
| \_libgcc\_mutex | 0.1 | 0.1 | 0.1 |
| \_openmp\_mutex | 5.1 | 5.1 | 5.1 |
| archspec | 0.2.1 | 0.2.1 | 0.2.1 |
| boltons | 23.0.0 | 23.0.0 | 23.0.0 |
| brotli-python | 1.0.9 | 1.0.9 | 1.0.9 |
| bzip2 | 1.0.8 | 1.0.8 | 1.0.8 |
| c-ares | 1.19.1 | 1.19.1 | 1.19.1 |
| ca-certificates | 2023.12.12 | 2023.12.12 | 2023.12.12 |
| certifi | 2023.11.17 | 2023.11.17 | 2023.11.17 |
| cffi | 1.16.0 | 1.16.0 | 1.16.0 |
| charset-normalizer | 2.0.4 | 2.0.4 | 2.0.4 |
| conda | 23.11.0 | 23.11.0 | 23.11.0 |
| conda-content-trust | 0.2.0 | 0.2.0 | 0.2.0 |
| conda-libmamba-solver | 23.12.0 | 23.12.0 | 23.12.0 |
| conda-package-handling | 2.2.0 | 2.2.0 | 2.2.0 |
| conda-package-streaming | 0.9.0 | 0.9.0 | 0.9.0 |
| cryptography | 41.0.7 | 41.0.7 | 41.0.7 |
| distro | 1.8.0 | 1.8.0 | 1.8.0 |
| fmt | 9.1.0 | 9.1.0 | 9.1.0 |
| icu | 73.1 | 73.1 | 73.1 |
| idna | 3.4 | 3.4 | 3.3 |
| jsonpatch | 1.32 | 1.32 | 1.32 |
| jsonpointer | 2.1 | 2.1 | 2.1 |
| krb5 | 1.20.1 | 1.20.1 | 1.20.1 |
| ld\_impl\_linux-64 | 2.38 | ||
| ld\_impl\_linux-aarch64 | 2.38 | ||
| ld\_impl\_linux-s390x | 2.38 | ||
| libarchive | 3.6.2 | 3.6.2 | 3.6.2 |
| libcurl | 8.4.0 | 8.4.0 | 8.4.0 |
| libedit | 3.1.20230828 | 3.1.20230828 | 3.1.20230828 |
| libev | 4.33 | 4.33 | 4.33 |
| libffi | 3.4.4 | 3.4.4 | 3.4.2 |
| libgcc-ng | 11.2.0 | 11.2.0 | 11.2.0 |
| libgomp | 11.2.0 | 11.2.0 | 11.2.0 |
| libmamba | 1.5.3 | 1.5.3 | 1.5.3 |
| libmambapy | 1.5.3 | 1.5.3 | 1.5.3 |
| libnghttp2 | 1.57.0 | 1.57.0 | 1.57.0 |
| libsolv | 0.7.24 | 0.7.24 | 0.7.24 |
| libssh2 | 1.10.0 | 1.10.0 | 1.10.0 |
| libstdcxx-ng | 11.2.0 | 11.2.0 | 11.2.0 |
| libuuid | 1.41.5 | 1.41.5 | 1.41.5 |
| libxml2 | 2.10.4 | 2.10.4 | 2.10.4 |
| lz4-c | 1.9.4 | 1.9.4 | 1.9.4 |
| menuinst | 2.0.1 | 2.0.1 | 2.0.1 |
| ncurses | 6.4 | 6.4 | 6.4 |
| openssl | 3.0.12 | 3.0.12 | 3.0.12 |
| packaging | 23.1 | 23.1 | 23.1 |
| pcre2 | 10.42 | 10.42 | 10.42 |
| pip | 23.3.1 | 23.3.1 | 23.3.1 |
| platformdirs | 3.10.0 | 3.10.0 | 3.10.0 |
| pluggy | 1.0.0 | 1.0.0 | 1.0.0 |
| pybind11-abi | 4 | 4 | 4 |
| pycosat | 0.6.6 | 0.6.6 | 0.6.6 |
| pycparser | 2.21 | 2.21 | 2.21 |
| pyopenssl | 23.2.0 | 23.2.0 | 23.2.0 |
| pysocks | 1.7.1 | 1.7.1 | 1.7.1 |
| python | 3.11.5 | 3.11.5 | 3.11.5 |
| readline | 8.2 | 8.2 | 8.2 |
| reproc | 14.2.4 | 14.2.4 | 14.2.4 |
| reproc-cpp | 14.2.4 | 14.2.4 | 14.2.4 |
| requests | 2.31.0 | 2.31.0 | 2.31.0 |
| ruamel.yaml | 0.17.21 | 0.17.21 | 0.17.21 |
| setuptools | 68.2.2 | 68.2.2 | 68.2.2 |
| sqlite | 3.41.2 | 3.41.2 | 3.41.2 |
| tk | 8.6.12 | 8.6.12 | 8.6.12 |
| tqdm | 4.65.0 | 4.65.0 | 4.65.0 |
| truststore | 0.8.0 | 0.8.0 | 0.8.0 |
| tzdata | 2023c | 2023c | 2023c |
| urllib3 | 1.26.18 | 1.26.18 | 1.26.18 |
| wheel | 0.41.2 | 0.41.2 | 0.41.2 |
| xz | 5.4.5 | 5.4.5 | 5.4.5 |
| yaml-cpp | 0.8.0 | 0.8.0 | 0.8.0 |
| zlib | 1.2.13 | 1.2.13 | 1.2.13 |
| zstandard | 0.19.0 | 0.19.0 | 0.19.0 |
| zstd | 1.5.5 | 1.5.5 | 1.5.5 |
| Package Name | osx-arm64 | osx-64 |
|---|---|---|
| archspec | 0.2.1 | 0.2.1 |
| boltons | 23.0.0 | 23.0.0 |
| brotli-python | 1.0.9 | 1.0.9 |
| bzip2 | 1.0.8 | 1.0.8 |
| c-ares | 1.19.1 | 1.19.1 |
| ca-certificates | 2023.12.12 | 2023.12.12 |
| certifi | 2023.11.17 | 2023.11.17 |
| cffi | 1.16.0 | 1.16.0 |
| charset-normalizer | 2.0.4 | 2.0.4 |
| conda | 23.11.0 | 23.11.0 |
| conda-content-trust | 0.2.0 | 0.2.0 |
| conda-libmamba-solver | 23.12.0 | 23.12.0 |
| conda-package-handling | 2.2.0 | 2.2.0 |
| conda-package-streaming | 0.9.0 | 0.9.0 |
| cryptography | 41.0.7 | 41.0.7 |
| distro | 1.8.0 | 1.8.0 |
| fmt | 9.1.0 | 9.1.0 |
| icu | 73.1 | 73.1 |
| idna | 3.4 | 3.4 |
| jsonpatch | 1.32 | 1.32 |
| jsonpointer | 2.1 | 2.1 |
| krb5 | 1.20.1 | 1.20.1 |
| libarchive | 3.6.2 | 3.6.2 |
| libcurl | 8.4.0 | 8.4.0 |
| libcxx | 14.0.6 | 14.0.6 |
| libedit | 3.1.20230828 | 3.1.20230828 |
| libev | 4.33 | 4.33 |
| libffi | 3.4.4 | 3.4.4 |
| libiconv | 1.16 | 1.16 |
| libmamba | 1.5.3 | 1.5.3 |
| libmambapy | 1.5.3 | 1.5.3 |
| libnghttp2 | 1.57.0 | 1.57.0 |
| libsolv | 0.7.24 | 0.7.24 |
| libssh2 | 1.10.0 | 1.10.0 |
| libxml2 | 2.10.4 | 2.10.4 |
| lz4-c | 1.9.4 | 1.9.4 |
| menuinst | 2.0.1 | 2.0.1 |
| ncurses | 6.4 | 6.4 |
| openssl | 3.0.12 | 3.0.12 |
| packaging | 23.1 | 23.1 |
| pcre2 | 10.42 | 10.42 |
| pip | 23.3.1 | 23.3.1 |
| platformdirs | 3.10.0 | 3.10.0 |
| pluggy | 1.0.0 | 1.0.0 |
| pybind11-abi | 4 | 4 |
| pycosat | 0.6.6 | 0.6.6 |
| pycparser | 2.21 | 2.21 |
| pyopenssl | 23.2.0 | 23.2.0 |
| pysocks | 1.7.1 | 1.7.1 |
| python | 3.11.5 | 3.11.5 |
| python.app | 3 | 3 |
| readline | 8.2 | 8.2 |
| reproc | 14.2.4 | 14.2.4 |
| reproc-cpp | 14.2.4 | 14.2.4 |
| requests | 2.31.0 | 2.31.0 |
| ruamel.yaml | 0.17.21 | 0.17.21 |
| setuptools | 68.2.2 | 68.2.2 |
| sqlite | 3.41.2 | 3.41.2 |
| tk | 8.6.12 | 8.6.12 |
| tqdm | 4.65.0 | 4.65.0 |
| truststore | 0.8.0 | 0.8.0 |
| tzdata | 2023c | 2023c |
| urllib3 | 1.26.18 | 1.26.18 |
| wheel | 0.41.2 | 0.41.2 |
| xz | 5.4.5 | 5.4.5 |
| yaml-cpp | 0.8.0 | 0.8.0 |
| zlib | 1.2.13 | 1.2.13 |
| zstandard | 0.19.0 | 0.19.0 |
| zstd | 1.5.5 | 1.5.5 |
| Package Name | win-64 |
|---|---|
| archspec | 0.2.1 |
| boltons | 23.0.0 |
| brotli-python | 1.0.9 |
| bzip2 | 1.0.8 |
| ca-certificates | 2023.12.12 |
| certifi | 2023.11.17 |
| cffi | 1.16.0 |
| charset-normalizer | 2.0.4 |
| colorama | 0.4.6 |
| conda | 23.11.0 |
| conda-content-trust | 0.2.0 |
| conda-libmamba-solver | 23.12.0 |
| conda-package-handling | 2.2.0 |
| conda-package-streaming | 0.9.0 |
| console\_shortcut\_miniconda | 0.1.1 |
| cryptography | 41.0.7 |
| distro | 1.8.0 |
| fmt | 9.1.0 |
| idna | 3.4 |
| jsonpatch | 1.32 |
| jsonpointer | 2.1 |
| libarchive | 3.6.2 |
| libcurl | 8.4.0 |
| libffi | 3.4.4 |
| libiconv | 1.16 |
| libmamba | 1.5.3 |
| libmambapy | 1.5.3 |
| libsolv | 0.7.24 |
| libssh2 | 1.10.0 |
| libxml2 | 2.10.4 |
| lz4-c | 1.9.4 |
| menuinst | 2.0.1 |
| openssl | 3.0.12 |
| packaging | 23.1 |
| pcre2 | 10.42 |
| pip | 23.3.1 |
| platformdirs | 3.10.0 |
| pluggy | 1.0.0 |
| powershell\_shortcut\_miniconda | 0.0.1 |
| pybind11-abi | 4 |
| pycosat | 0.6.6 |
| pycparser | 2.21 |
| pyopenssl | 23.2.0 |
| pysocks | 1.7.1 |
| python | 3.11.5 |
| reproc | 14.2.4 |
| reproc-cpp | 14.2.4 |
| requests | 2.31.0 |
| ruamel.yaml | 0.17.21 |
| setuptools | 68.2.2 |
| sqlite | 3.41.2 |
| tk | 8.6.12 |
| tqdm | 4.65.0 |
| truststore | 0.8.0 |
| tzdata | 2023c |
| urllib3 | 1.26.18 |
| vc | 14.2 |
| vs2015\_runtime | 14.27.29016 |
| wheel | 0.41.2 |
| win\_inet\_pton | 1.1.0 |
| xz | 5.4.5 |
| yaml-cpp | 0.8.0 |
| zlib | 1.2.13 |
| zstandard | 0.19.0 |
| zstd | 1.5.5 |
| Package Name | linux-64 | linux-aarch64 | linux-s390x | osx-arm64 | osx-64 | win-64 |
|---|---|---|---|---|---|---|
| \_libgcc\_mutex | 0.1 | 0.1 | 0.1 | |||
| \_openmp\_mutex | 5.1 | 5.1 | 5.1 | |||
| archspec | 0.2.1 | 0.2.1 | 0.2.1 | 0.2.1 | 0.2.1 | 0.2.1 |
| boltons | 23.0.0 | 23.0.0 | 23.0.0 | 23.0.0 | 23.0.0 | 23.0.0 |
| brotli-python | 1.0.9 | 1.0.9 | 1.0.9 | 1.0.9 | 1.0.9 | 1.0.9 |
| bzip2 | 1.0.8 | 1.0.8 | 1.0.8 | 1.0.8 | 1.0.8 | 1.0.8 |
| c-ares | 1.19.1 | 1.19.1 | 1.19.1 | 1.19.1 | 1.19.1 | |
| ca-certificates | 2023.08.22 | 2023.08.22 | 2023.08.22 | 2023.08.22 | 2023.08.22 | 2023.08.22 |
| certifi | 2023.11.17 | 2023.11.17 | 2023.11.17 | 2023.11.17 | 2023.11.17 | 2023.11.17 |
| cffi | 1.16.0 | 1.16.0 | 1.16.0 | 1.16.0 | 1.16.0 | 1.16.0 |
| charset-normalizer | 2.0.4 | 2.0.4 | 2.0.4 | 2.0.4 | 2.0.4 | 2.0.4 |
| colorama | 0.4.6 | |||||
| conda | 23.11.0 | 23.11.0 | 23.11.0 | 23.11.0 | 23.11.0 | 23.11.0 |
| conda-content-trust | 0.2.0 | 0.2.0 | 0.2.0 | 0.2.0 | 0.2.0 | 0.2.0 |
| conda-libmamba-solver | 23.12.0 | 23.12.0 | 23.12.0 | 23.12.0 | 23.12.0 | 23.12.0 |
| conda-package-handling | 2.2.0 | 2.2.0 | 2.2.0 | 2.2.0 | 2.2.0 | 2.2.0 |
| conda-package-streaming | 0.9.0 | 0.9.0 | 0.9.0 | 0.9.0 | 0.9.0 | 0.9.0 |
| console\_shortcut\_miniconda | 0.1.1 | |||||
| cryptography | 41.0.7 | 41.0.7 | 41.0.7 | 41.0.7 | 41.0.7 | 41.0.7 |
| distro | 1.8.0 | 1.8.0 | 1.8.0 | 1.8.0 | 1.8.0 | 1.8.0 |
| fmt | 9.1.0 | 9.1.0 | 9.1.0 | 9.1.0 | 9.1.0 | 9.1.0 |
| icu | 73.1 | 73.1 | 73.1 | 73.1 | 73.1 | |
| idna | 3.4 | 3.4 | 3.3 | 3.4 | 3.4 | 3.4 |
| jsonpatch | 1.32 | 1.32 | 1.32 | 1.32 | 1.32 | 1.32 |
| jsonpointer | 2.1 | 2.1 | 2.1 | 2.1 | 2.1 | 2.1 |
| krb5 | 1.20.1 | 1.20.1 | 1.20.1 | 1.20.1 | 1.20.1 | |
| ld\_impl\_linux-64 | 2.38 | |||||
| ld\_impl\_linux-aarch64 | 2.38 | |||||
| ld\_impl\_linux-s390x | 2.38 | |||||
| libarchive | 3.6.2 | 3.6.2 | 3.6.2 | 3.6.2 | 3.6.2 | 3.6.2 |
| libcurl | 8.4.0 | 8.4.0 | 8.4.0 | 8.4.0 | 8.4.0 | 8.4.0 |
| libcxx | 14.0.6 | 14.0.6 | ||||
| libedit | 3.1.20221030 | 3.1.20221030 | 3.1.20221030 | 3.1.20221030 | 3.1.20221030 | |
| libev | 4.33 | 4.33 | 4.33 | 4.33 | 4.33 | |
| libffi | 3.4.4 | 3.4.4 | 3.4.2 | 3.4.4 | 3.4.4 | 3.4.4 |
| libgcc-ng | 11.2.0 | 11.2.0 | 11.2.0 | |||
| libgomp | 11.2.0 | 11.2.0 | 11.2.0 | |||
| libiconv | 1.16 | 1.16 | 1.16 | |||
| libmamba | 1.5.3 | 1.5.3 | 1.5.3 | 1.5.3 | 1.5.3 | 1.5.3 |
| libmambapy | 1.5.3 | 1.5.3 | 1.5.3 | 1.5.3 | 1.5.3 | 1.5.3 |
| libnghttp2 | 1.57.0 | 1.57.0 | 1.57.0 | 1.57.0 | 1.57.0 | |
| libsolv | 0.7.24 | 0.7.24 | 0.7.24 | 0.7.24 | 0.7.24 | 0.7.24 |
| libssh2 | 1.10.0 | 1.10.0 | 1.10.0 | 1.10.0 | 1.10.0 | 1.10.0 |
| libstdcxx-ng | 11.2.0 | 11.2.0 | 11.2.0 | |||
| libuuid | 1.41.5 | 1.41.5 | 1.41.5 | |||
| libxml2 | 2.10.4 | 2.10.4 | 2.10.4 | 2.10.4 | 2.10.4 | 2.10.4 |
| lz4-c | 1.9.4 | 1.9.4 | 1.9.4 | 1.9.4 | 1.9.4 | 1.9.4 |
| menuinst | 2.0.1 | 2.0.1 | 2.0.1 | 2.0.1 | 2.0.1 | 2.0.1 |
| ncurses | 6.4 | 6.4 | 6.4 | 6.4 | 6.4 | |
| openssl | 3.0.12 | 3.0.12 | 3.0.12 | 3.0.12 | 3.0.12 | 3.0.12 |
| packaging | 23.1 | 23.1 | 23.1 | 23.1 | 23.1 | 23.1 |
| pcre2 | 10.42 | 10.42 | 10.42 | 10.42 | 10.42 | 10.42 |
| pip | 23.3.1 | 23.3.1 | 23.3.1 | 23.3.1 | 23.3.1 | 23.3.1 |
| platformdirs | 3.10.0 | 3.10.0 | 3.10.0 | 3.10.0 | 3.10.0 | 3.10.0 |
| pluggy | 1.0.0 | 1.0.0 | 1.0.0 | 1.0.0 | 1.0.0 | 1.0.0 |
| powershell\_shortcut\_miniconda | 0.0.1 | |||||
| pybind11-abi | 4 | 4 | 4 | 4 | 4 | 4 |
| pycosat | 0.6.6 | 0.6.6 | 0.6.6 | 0.6.6 | 0.6.6 | 0.6.6 |
| pycparser | 2.21 | 2.21 | 2.21 | 2.21 | 2.21 | 2.21 |
| pyopenssl | 23.2.0 | 23.2.0 | 23.2.0 | 23.2.0 | 23.2.0 | 23.2.0 |
| pysocks | 1.7.1 | 1.7.1 | 1.7.1 | 1.7.1 | 1.7.1 | 1.7.1 |
| python | 3.11.5 | 3.11.5 | 3.11.5 | 3.11.5 | 3.11.5 | 3.11.5 |
| python.app | 3 | 3 | ||||
| readline | 8.2 | 8.2 | 8.2 | 8.2 | 8.2 | |
| reproc | 14.2.4 | 14.2.4 | 14.2.4 | 14.2.4 | 14.2.4 | 14.2.4 |
| reproc-cpp | 14.2.4 | 14.2.4 | 14.2.4 | 14.2.4 | 14.2.4 | 14.2.4 |
| requests | 2.31.0 | 2.31.0 | 2.31.0 | 2.31.0 | 2.31.0 | 2.31.0 |
| ruamel.yaml | 0.17.21 | 0.17.21 | 0.17.21 | 0.17.21 | 0.17.21 | 0.17.21 |
| setuptools | 68.2.2 | 68.2.2 | 68.2.2 | 68.2.2 | 68.2.2 | 68.2.2 |
| sqlite | 3.41.2 | 3.41.2 | 3.41.2 | 3.41.2 | 3.41.2 | 3.41.2 |
| tk | 8.6.12 | 8.6.12 | 8.6.12 | 8.6.12 | 8.6.12 | 8.6.12 |
| tqdm | 4.65.0 | 4.65.0 | 4.65.0 | 4.65.0 | 4.65.0 | 4.65.0 |
| truststore | 0.8.0 | 0.8.0 | 0.8.0 | 0.8.0 | 0.8.0 | 0.8.0 |
| tzdata | 2023c | 2023c | 2023c | 2023c | 2023c | 2023c |
| urllib3 | 1.26.18 | 1.26.18 | 1.26.18 | 1.26.18 | 1.26.18 | 1.26.18 |
| vc | 14.2 | |||||
| vs2015\_runtime | 14.27.29016 | |||||
| wheel | 0.41.2 | 0.41.2 | 0.41.2 | 0.41.2 | 0.41.2 | 0.41.2 |
| win\_inet\_pton | 1.1.0 | |||||
| xz | 5.4.5 | 5.4.5 | 5.4.5 | 5.4.5 | 5.4.5 | 5.4.5 |
| yaml-cpp | 0.8.0 | 0.8.0 | 0.8.0 | 0.8.0 | 0.8.0 | 0.8.0 |
| zlib | 1.2.13 | 1.2.13 | 1.2.13 | 1.2.13 | 1.2.13 | 1.2.13 |
| zstandard | 0.19.0 | 0.19.0 | 0.19.0 | 0.19.0 | 0.19.0 | 0.19.0 |
| zstd | 1.5.5 | 1.5.5 | 1.5.5 | 1.5.5 | 1.5.5 | 1.5.5 |
| Package Name | linux-64 | linux-aarch64 | linux-s390x |
|---|---|---|---|
| \_libgcc\_mutex | 0.1 | 0.1 | 0.1 |
| \_openmp\_mutex | 5.1 | 5.1 | 5.1 |
| archspec | 0.2.1 | 0.2.1 | 0.2.1 |
| boltons | 23.0.0 | 23.0.0 | 23.0.0 |
| brotli-python | 1.0.9 | 1.0.9 | 1.0.9 |
| bzip2 | 1.0.8 | 1.0.8 | 1.0.8 |
| c-ares | 1.19.1 | 1.19.1 | 1.19.1 |
| ca-certificates | 2023.08.22 | 2023.08.22 | 2023.08.22 |
| certifi | 2023.11.17 | 2023.11.17 | 2023.11.17 |
| cffi | 1.16.0 | 1.16.0 | 1.16.0 |
| charset-normalizer | 2.0.4 | 2.0.4 | 2.0.4 |
| conda | 23.11.0 | 23.11.0 | 23.11.0 |
| conda-content-trust | 0.2.0 | 0.2.0 | 0.2.0 |
| conda-libmamba-solver | 23.12.0 | 23.12.0 | 23.12.0 |
| conda-package-handling | 2.2.0 | 2.2.0 | 2.2.0 |
| conda-package-streaming | 0.9.0 | 0.9.0 | 0.9.0 |
| cryptography | 41.0.7 | 41.0.7 | 41.0.7 |
| distro | 1.8.0 | 1.8.0 | 1.8.0 |
| fmt | 9.1.0 | 9.1.0 | 9.1.0 |
| icu | 73.1 | 73.1 | 73.1 |
| idna | 3.4 | 3.4 | 3.3 |
| jsonpatch | 1.32 | 1.32 | 1.32 |
| jsonpointer | 2.1 | 2.1 | 2.1 |
| krb5 | 1.20.1 | 1.20.1 | 1.20.1 |
| ld\_impl\_linux-64 | 2.38 | ||
| ld\_impl\_linux-aarch64 | 2.38 | ||
| ld\_impl\_linux-s390x | 2.38 | ||
| libarchive | 3.6.2 | 3.6.2 | 3.6.2 |
| libcurl | 8.4.0 | 8.4.0 | 8.4.0 |
| libedit | 3.1.20221030 | 3.1.20221030 | 3.1.20221030 |
| libev | 4.33 | 4.33 | 4.33 |
| libffi | 3.4.4 | 3.4.4 | 3.4.2 |
| libgcc-ng | 11.2.0 | 11.2.0 | 11.2.0 |
| libgomp | 11.2.0 | 11.2.0 | 11.2.0 |
| libmamba | 1.5.3 | 1.5.3 | 1.5.3 |
| libmambapy | 1.5.3 | 1.5.3 | 1.5.3 |
| libnghttp2 | 1.57.0 | 1.57.0 | 1.57.0 |
| libsolv | 0.7.24 | 0.7.24 | 0.7.24 |
| libssh2 | 1.10.0 | 1.10.0 | 1.10.0 |
| libstdcxx-ng | 11.2.0 | 11.2.0 | 11.2.0 |
| libuuid | 1.41.5 | 1.41.5 | 1.41.5 |
| libxml2 | 2.10.4 | 2.10.4 | 2.10.4 |
| lz4-c | 1.9.4 | 1.9.4 | 1.9.4 |
| menuinst | 2.0.1 | 2.0.1 | 2.0.1 |
| ncurses | 6.4 | 6.4 | 6.4 |
| openssl | 3.0.12 | 3.0.12 | 3.0.12 |
| packaging | 23.1 | 23.1 | 23.1 |
| pcre2 | 10.42 | 10.42 | 10.42 |
| pip | 23.3.1 | 23.3.1 | 23.3.1 |
| platformdirs | 3.10.0 | 3.10.0 | 3.10.0 |
| pluggy | 1.0.0 | 1.0.0 | 1.0.0 |
| pybind11-abi | 4 | 4 | 4 |
| pycosat | 0.6.6 | 0.6.6 | 0.6.6 |
| pycparser | 2.21 | 2.21 | 2.21 |
| pyopenssl | 23.2.0 | 23.2.0 | 23.2.0 |
| pysocks | 1.7.1 | 1.7.1 | 1.7.1 |
| python | 3.11.5 | 3.11.5 | 3.11.5 |
| readline | 8.2 | 8.2 | 8.2 |
| reproc | 14.2.4 | 14.2.4 | 14.2.4 |
| reproc-cpp | 14.2.4 | 14.2.4 | 14.2.4 |
| requests | 2.31.0 | 2.31.0 | 2.31.0 |
| ruamel.yaml | 0.17.21 | 0.17.21 | 0.17.21 |
| setuptools | 68.2.2 | 68.2.2 | 68.2.2 |
| sqlite | 3.41.2 | 3.41.2 | 3.41.2 |
| tk | 8.6.12 | 8.6.12 | 8.6.12 |
| tqdm | 4.65.0 | 4.65.0 | 4.65.0 |
| truststore | 0.8.0 | 0.8.0 | 0.8.0 |
| tzdata | 2023c | 2023c | 2023c |
| urllib3 | 1.26.18 | 1.26.18 | 1.26.18 |
| wheel | 0.41.2 | 0.41.2 | 0.41.2 |
| xz | 5.4.5 | 5.4.5 | 5.4.5 |
| yaml-cpp | 0.8.0 | 0.8.0 | 0.8.0 |
| zlib | 1.2.13 | 1.2.13 | 1.2.13 |
| zstandard | 0.19.0 | 0.19.0 | 0.19.0 |
| zstd | 1.5.5 | 1.5.5 | 1.5.5 |
| Package Name | osx-arm64 | osx-64 |
|---|---|---|
| archspec | 0.2.1 | 0.2.1 |
| boltons | 23.0.0 | 23.0.0 |
| brotli-python | 1.0.9 | 1.0.9 |
| bzip2 | 1.0.8 | 1.0.8 |
| c-ares | 1.19.1 | 1.19.1 |
| ca-certificates | 2023.08.22 | 2023.08.22 |
| certifi | 2023.11.17 | 2023.11.17 |
| cffi | 1.16.0 | 1.16.0 |
| charset-normalizer | 2.0.4 | 2.0.4 |
| conda | 23.11.0 | 23.11.0 |
| conda-content-trust | 0.2.0 | 0.2.0 |
| conda-libmamba-solver | 23.12.0 | 23.12.0 |
| conda-package-handling | 2.2.0 | 2.2.0 |
| conda-package-streaming | 0.9.0 | 0.9.0 |
| cryptography | 41.0.7 | 41.0.7 |
| distro | 1.8.0 | 1.8.0 |
| fmt | 9.1.0 | 9.1.0 |
| icu | 73.1 | 73.1 |
| idna | 3.4 | 3.4 |
| jsonpatch | 1.32 | 1.32 |
| jsonpointer | 2.1 | 2.1 |
| krb5 | 1.20.1 | 1.20.1 |
| libarchive | 3.6.2 | 3.6.2 |
| libcurl | 8.4.0 | 8.4.0 |
| libcxx | 14.0.6 | 14.0.6 |
| libedit | 3.1.20221030 | 3.1.20221030 |
| libev | 4.33 | 4.33 |
| libffi | 3.4.4 | 3.4.4 |
| libiconv | 1.16 | 1.16 |
| libmamba | 1.5.3 | 1.5.3 |
| libmambapy | 1.5.3 | 1.5.3 |
| libnghttp2 | 1.57.0 | 1.57.0 |
| libsolv | 0.7.24 | 0.7.24 |
| libssh2 | 1.10.0 | 1.10.0 |
| libxml2 | 2.10.4 | 2.10.4 |
| lz4-c | 1.9.4 | 1.9.4 |
| menuinst | 2.0.1 | 2.0.1 |
| ncurses | 6.4 | 6.4 |
| openssl | 3.0.12 | 3.0.12 |
| packaging | 23.1 | 23.1 |
| pcre2 | 10.42 | 10.42 |
| pip | 23.3.1 | 23.3.1 |
| platformdirs | 3.10.0 | 3.10.0 |
| pluggy | 1.0.0 | 1.0.0 |
| pybind11-abi | 4 | 4 |
| pycosat | 0.6.6 | 0.6.6 |
| pycparser | 2.21 | 2.21 |
| pyopenssl | 23.2.0 | 23.2.0 |
| pysocks | 1.7.1 | 1.7.1 |
| python | 3.11.5 | 3.11.5 |
| python.app | 3 | 3 |
| readline | 8.2 | 8.2 |
| reproc | 14.2.4 | 14.2.4 |
| reproc-cpp | 14.2.4 | 14.2.4 |
| requests | 2.31.0 | 2.31.0 |
| ruamel.yaml | 0.17.21 | 0.17.21 |
| setuptools | 68.2.2 | 68.2.2 |
| sqlite | 3.41.2 | 3.41.2 |
| tk | 8.6.12 | 8.6.12 |
| tqdm | 4.65.0 | 4.65.0 |
| truststore | 0.8.0 | 0.8.0 |
| tzdata | 2023c | 2023c |
| urllib3 | 1.26.18 | 1.26.18 |
| wheel | 0.41.2 | 0.41.2 |
| xz | 5.4.5 | 5.4.5 |
| yaml-cpp | 0.8.0 | 0.8.0 |
| zlib | 1.2.13 | 1.2.13 |
| zstandard | 0.19.0 | 0.19.0 |
| zstd | 1.5.5 | 1.5.5 |
| Package Name | win-64 |
|---|---|
| archspec | 0.2.1 |
| boltons | 23.0.0 |
| brotli-python | 1.0.9 |
| bzip2 | 1.0.8 |
| ca-certificates | 2023.08.22 |
| certifi | 2023.11.17 |
| cffi | 1.16.0 |
| charset-normalizer | 2.0.4 |
| colorama | 0.4.6 |
| conda | 23.11.0 |
| conda-content-trust | 0.2.0 |
| conda-libmamba-solver | 23.12.0 |
| conda-package-handling | 2.2.0 |
| conda-package-streaming | 0.9.0 |
| console\_shortcut\_miniconda | 0.1.1 |
| cryptography | 41.0.7 |
| distro | 1.8.0 |
| fmt | 9.1.0 |
| idna | 3.4 |
| jsonpatch | 1.32 |
| jsonpointer | 2.1 |
| libarchive | 3.6.2 |
| libcurl | 8.4.0 |
| libffi | 3.4.4 |
| libiconv | 1.16 |
| libmamba | 1.5.3 |
| libmambapy | 1.5.3 |
| libsolv | 0.7.24 |
| libssh2 | 1.10.0 |
| libxml2 | 2.10.4 |
| lz4-c | 1.9.4 |
| menuinst | 2.0.1 |
| openssl | 3.0.12 |
| packaging | 23.1 |
| pcre2 | 10.42 |
| pip | 23.3.1 |
| platformdirs | 3.10.0 |
| pluggy | 1.0.0 |
| powershell\_shortcut\_miniconda | 0.0.1 |
| pybind11-abi | 4 |
| pycosat | 0.6.6 |
| pycparser | 2.21 |
| pyopenssl | 23.2.0 |
| pysocks | 1.7.1 |
| python | 3.11.5 |
| reproc | 14.2.4 |
| reproc-cpp | 14.2.4 |
| requests | 2.31.0 |
| ruamel.yaml | 0.17.21 |
| setuptools | 68.2.2 |
| sqlite | 3.41.2 |
| tk | 8.6.12 |
| tqdm | 4.65.0 |
| truststore | 0.8.0 |
| tzdata | 2023c |
| urllib3 | 1.26.18 |
| vc | 14.2 |
| vs2015\_runtime | 14.27.29016 |
| wheel | 0.41.2 |
| win\_inet\_pton | 1.1.0 |
| xz | 5.4.5 |
| yaml-cpp | 0.8.0 |
| zlib | 1.2.13 |
| zstandard | 0.19.0 |
| zstd | 1.5.5 |
| Package Name | linux-64 | linux-aarch64 | linux-ppc64le | linux-s390x | osx-arm64 | osx-64 | win-64 |
|---|---|---|---|---|---|---|---|
| \_libgcc\_mutex | 0.1 | 0.1 | 0.1 | 0.1 | |||
| \_openmp\_mutex | 5.1 | 5.1 | 5.1 | 5.1 | |||
| archspec | 0.2.1 | 0.2.1 | 0.2.1 | 0.2.1 | 0.2.1 | 0.2.1 | 0.2.1 |
| boltons | 23.0.0 | 23.0.0 | 23.0.0 | 23.0.0 | 23.0.0 | 23.0.0 | 23.0.0 |
| brotli-python | 1.0.9 | 1.0.9 | 1.0.9 | 1.0.9 | 1.0.9 | 1.0.9 | 1.0.9 |
| bzip2 | 1.0.8 | 1.0.8 | 1.0.8 | 1.0.8 | 1.0.8 | 1.0.8 | 1.0.8 |
| c-ares | 1.19.1 | 1.19.1 | 1.19.1 | 1.19.1 | 1.19.1 | 1.19.1 | |
| ca-certificates | 2023.08.22 | 2023.08.22 | 2023.08.22 | 2023.08.22 | 2023.08.22 | 2023.08.22 | 2023.08.22 |
| certifi | 2023.7.22 | 2023.7.22 | 2023.7.22 | 2023.7.22 | 2023.7.22 | 2023.7.22 | 2023.7.22 |
| cffi | 1.15.1 | 1.15.1 | 1.15.1 | 1.15.1 | 1.15.1 | 1.15.1 | 1.15.1 |
| charset-normalizer | 2.0.4 | 2.0.4 | 2.0.4 | 2.0.4 | 2.0.4 | 2.0.4 | 2.0.4 |
| colorama | 0.4.6 | ||||||
| conda | 23.10.0 | 23.10.0 | 23.10.0 | 23.10.0 | 23.10.0 | 23.10.0 | 23.10.0 |
| conda-content-trust | 0.2.0 | 0.2.0 | 0.2.0 | 0.2.0 | 0.2.0 | 0.2.0 | 0.2.0 |
| conda-libmamba-solver | 23.11.1 | 23.11.1 | 23.11.1 | 23.11.1 | 23.11.1 | 23.11.1 | 23.11.1 |
| conda-package-handling | 2.2.0 | 2.2.0 | 2.2.0 | 2.2.0 | 2.2.0 | 2.2.0 | 2.2.0 |
| conda-package-streaming | 0.9.0 | 0.9.0 | 0.9.0 | 0.9.0 | 0.9.0 | 0.9.0 | 0.9.0 |
| console\_shortcut\_miniconda | 0.1.1 | ||||||
| cryptography | 41.0.3 | 41.0.3 | 41.0.3 | 41.0.3 | 41.0.3 | 41.0.3 | 41.0.3 |
| fmt | 9.1.0 | 9.1.0 | 9.1.0 | 9.1.0 | 9.1.0 | 9.1.0 | 9.1.0 |
| icu | 73.1 | 73.1 | 73.1 | 73.1 | 73.1 | 73.1 | |
| idna | 3.4 | 3.4 | 3.4 | 3.3 | 3.4 | 3.4 | 3.4 |
| jsonpatch | 1.32 | 1.32 | 1.32 | 1.32 | 1.32 | 1.32 | 1.32 |
| jsonpointer | 2.1 | 2.1 | 2.1 | 2.1 | 2.1 | 2.1 | 2.1 |
| krb5 | 1.20.1 | 1.20.1 | 1.20.1 | 1.20.1 | 1.20.1 | 1.20.1 | |
| ld\_impl\_linux-64 | 2.38 | ||||||
| ld\_impl\_linux-aarch64 | 2.38 | ||||||
| ld\_impl\_linux-ppc64le | 2.38 | ||||||
| ld\_impl\_linux-s390x | 2.38 | ||||||
| libarchive | 3.6.2 | 3.6.2 | 3.6.2 | 3.6.2 | 3.6.2 | 3.6.2 | 3.6.2 |
| libcurl | 8.4.0 | 8.4.0 | 8.4.0 | 8.4.0 | 8.4.0 | 8.4.0 | 8.1.1 |
| libcxx | 14.0.6 | 14.0.6 | |||||
| libedit | 3.1.20221030 | 3.1.20221030 | 3.1.20221030 | 3.1.20221030 | 3.1.20221030 | 3.1.20221030 | |
| libev | 4.33 | 4.33 | 4.33 | 4.33 | 4.33 | 4.33 | |
| libffi | 3.4.4 | 3.4.4 | 3.4.4 | 3.4.2 | 3.4.4 | 3.4.4 | 3.4.4 |
| libgcc-ng | 11.2.0 | 11.2.0 | 11.2.0 | 11.2.0 | |||
| libgomp | 11.2.0 | 11.2.0 | 11.2.0 | 11.2.0 | |||
| libiconv | 1.16 | 1.16 | 1.16 | ||||
| libmamba | 1.5.3 | 1.5.3 | 1.5.3 | 1.5.3 | 1.5.3 | 1.5.3 | 1.5.3 |
| libmambapy | 1.5.3 | 1.5.3 | 1.5.3 | 1.5.3 | 1.5.3 | 1.5.3 | 1.5.3 |
| libnghttp2 | 1.57.0 | 1.57.0 | 1.57.0 | 1.57.0 | 1.57.0 | 1.57.0 | |
| libsolv | 0.7.24 | 0.7.24 | 0.7.24 | 0.7.24 | 0.7.24 | 0.7.24 | 0.7.24 |
| libssh2 | 1.10.0 | 1.10.0 | 1.10.0 | 1.10.0 | 1.10.0 | 1.10.0 | 1.10.0 |
| libstdcxx-ng | 11.2.0 | 11.2.0 | 11.2.0 | 11.2.0 | |||
| libuuid | 1.41.5 | 1.41.5 | 1.41.5 | 1.41.5 | |||
| libxml2 | 2.10.4 | 2.10.4 | 2.10.4 | 2.10.4 | 2.10.4 | 2.10.4 | 2.10.4 |
| lz4-c | 1.9.4 | 1.9.4 | 1.9.4 | 1.9.4 | 1.9.4 | 1.9.4 | 1.9.4 |
| menuinst | 1.4.19 | ||||||
| ncurses | 6.4 | 6.4 | 6.4 | 6.4 | 6.4 | 6.4 | |
| openssl | 3.0.12 | 3.0.12 | 3.0.12 | 3.0.12 | 3.0.12 | 3.0.12 | 3.0.12 |
| packaging | 23.1 | 23.1 | 23.1 | 23.1 | 23.1 | 23.1 | 23.1 |
| pcre2 | 10.42 | 10.42 | 10.42 | 10.42 | 10.42 | 10.42 | 10.42 |
| pip | 23.3 | 23.3 | 23.3 | 23.3 | 23.3 | 23.3 | 23.3 |
| pluggy | 1.0.0 | 1.0.0 | 1.0.0 | 1.0.0 | 1.0.0 | 1.0.0 | 1.0.0 |
| powershell\_shortcut\_miniconda | 0.0.1 | ||||||
| pybind11-abi | 4 | 4 | 4 | 4 | 4 | 4 | 4 |
| pycosat | 0.6.6 | 0.6.6 | 0.6.6 | 0.6.6 | 0.6.6 | 0.6.6 | 0.6.6 |
| pycparser | 2.21 | 2.21 | 2.21 | 2.21 | 2.21 | 2.21 | 2.21 |
| pyopenssl | 23.2.0 | 23.2.0 | 23.2.0 | 23.2.0 | 23.2.0 | 23.2.0 | 23.2.0 |
| pysocks | 1.7.1 | 1.7.1 | 1.7.1 | 1.7.1 | 1.7.1 | 1.7.1 | 1.7.1 |
| python | 3.11.5 | 3.11.5 | 3.11.5 | 3.11.5 | 3.11.5 | 3.11.5 | 3.11.5 |
| python.app | 3 | 3 | |||||
| readline | 8.2 | 8.2 | 8.2 | 8.2 | 8.2 | 8.2 | |
| reproc | 14.2.4 | 14.2.4 | 14.2.4 | 14.2.4 | 14.2.4 | 14.2.4 | 14.2.4 |
| reproc-cpp | 14.2.4 | 14.2.4 | 14.2.4 | 14.2.4 | 14.2.4 | 14.2.4 | 14.2.4 |
| requests | 2.31.0 | 2.31.0 | 2.31.0 | 2.31.0 | 2.31.0 | 2.31.0 | 2.31.0 |
| ruamel.yaml | 0.17.21 | 0.17.21 | 0.17.21 | 0.17.21 | 0.17.21 | 0.17.21 | 0.17.21 |
| setuptools | 68.0.0 | 68.0.0 | 68.0.0 | 68.0.0 | 68.0.0 | 68.0.0 | 68.0.0 |
| sqlite | 3.41.2 | 3.41.2 | 3.41.2 | 3.41.2 | 3.41.2 | 3.41.2 | 3.41.2 |
| tk | 8.6.12 | 8.6.12 | 8.6.12 | 8.6.12 | 8.6.12 | 8.6.12 | 8.6.12 |
| tqdm | 4.65.0 | 4.65.0 | 4.65.0 | 4.65.0 | 4.65.0 | 4.65.0 | 4.65.0 |
| truststore | 0.8.0 | 0.8.0 | 0.8.0 | 0.8.0 | 0.8.0 | 0.8.0 | 0.8.0 |
| tzdata | 2023c | 2023c | 2023c | 2023c | 2023c | 2023c | 2023c |
| urllib3 | 1.26.18 | 1.26.18 | 1.26.18 | 1.26.18 | 1.26.18 | 1.26.18 | 1.26.18 |
| vc | 14.2 | ||||||
| vs2015\_runtime | 14.27.29016 | ||||||
| wheel | 0.41.2 | 0.41.2 | 0.41.2 | 0.41.2 | 0.41.2 | 0.41.2 | 0.41.2 |
| win\_inet\_pton | 1.1.0 | ||||||
| xz | 5.4.2 | 5.4.2 | 5.4.2 | 5.4.2 | 5.4.2 | 5.4.2 | 5.4.2 |
| yaml-cpp | 0.8.0 | 0.8.0 | 0.8.0 | 0.8.0 | 0.8.0 | 0.8.0 | 0.8.0 |
| zlib | 1.2.13 | 1.2.13 | 1.2.13 | 1.2.13 | 1.2.13 | 1.2.13 | 1.2.13 |
| zstandard | 0.19.0 | 0.19.0 | 0.19.0 | 0.19.0 | 0.19.0 | 0.19.0 | 0.19.0 |
| zstd | 1.5.5 | 1.5.5 | 1.5.5 | 1.5.5 | 1.5.5 | 1.5.5 | 1.5.5 |
| Package Name | linux-64 | linux-aarch64 | linux-ppc64le | linux-s390x |
|---|---|---|---|---|
| \_libgcc\_mutex | 0.1 | 0.1 | 0.1 | 0.1 |
| \_openmp\_mutex | 5.1 | 5.1 | 5.1 | 5.1 |
| archspec | 0.2.1 | 0.2.1 | 0.2.1 | 0.2.1 |
| boltons | 23.0.0 | 23.0.0 | 23.0.0 | 23.0.0 |
| brotli-python | 1.0.9 | 1.0.9 | 1.0.9 | 1.0.9 |
| bzip2 | 1.0.8 | 1.0.8 | 1.0.8 | 1.0.8 |
| c-ares | 1.19.1 | 1.19.1 | 1.19.1 | 1.19.1 |
| ca-certificates | 2023.08.22 | 2023.08.22 | 2023.08.22 | 2023.08.22 |
| certifi | 2023.7.22 | 2023.7.22 | 2023.7.22 | 2023.7.22 |
| cffi | 1.15.1 | 1.15.1 | 1.15.1 | 1.15.1 |
| charset-normalizer | 2.0.4 | 2.0.4 | 2.0.4 | 2.0.4 |
| conda | 23.10.0 | 23.10.0 | 23.10.0 | 23.10.0 |
| conda-content-trust | 0.2.0 | 0.2.0 | 0.2.0 | 0.2.0 |
| conda-libmamba-solver | 23.11.1 | 23.11.1 | 23.11.1 | 23.11.1 |
| conda-package-handling | 2.2.0 | 2.2.0 | 2.2.0 | 2.2.0 |
| conda-package-streaming | 0.9.0 | 0.9.0 | 0.9.0 | 0.9.0 |
| cryptography | 41.0.3 | 41.0.3 | 41.0.3 | 41.0.3 |
| fmt | 9.1.0 | 9.1.0 | 9.1.0 | 9.1.0 |
| icu | 73.1 | 73.1 | 73.1 | 73.1 |
| idna | 3.4 | 3.4 | 3.4 | 3.3 |
| jsonpatch | 1.32 | 1.32 | 1.32 | 1.32 |
| jsonpointer | 2.1 | 2.1 | 2.1 | 2.1 |
| krb5 | 1.20.1 | 1.20.1 | 1.20.1 | 1.20.1 |
| ld\_impl\_linux-64 | 2.38 | |||
| ld\_impl\_linux-aarch64 | 2.38 | |||
| ld\_impl\_linux-ppc64le | 2.38 | |||
| ld\_impl\_linux-s390x | 2.38 | |||
| libarchive | 3.6.2 | 3.6.2 | 3.6.2 | 3.6.2 |
| libcurl | 8.4.0 | 8.4.0 | 8.4.0 | 8.4.0 |
| libedit | 3.1.20221030 | 3.1.20221030 | 3.1.20221030 | 3.1.20221030 |
| libev | 4.33 | 4.33 | 4.33 | 4.33 |
| libffi | 3.4.4 | 3.4.4 | 3.4.4 | 3.4.2 |
| libgcc-ng | 11.2.0 | 11.2.0 | 11.2.0 | 11.2.0 |
| libgomp | 11.2.0 | 11.2.0 | 11.2.0 | 11.2.0 |
| libmamba | 1.5.3 | 1.5.3 | 1.5.3 | 1.5.3 |
| libmambapy | 1.5.3 | 1.5.3 | 1.5.3 | 1.5.3 |
| libnghttp2 | 1.57.0 | 1.57.0 | 1.57.0 | 1.57.0 |
| libsolv | 0.7.24 | 0.7.24 | 0.7.24 | 0.7.24 |
| libssh2 | 1.10.0 | 1.10.0 | 1.10.0 | 1.10.0 |
| libstdcxx-ng | 11.2.0 | 11.2.0 | 11.2.0 | 11.2.0 |
| libuuid | 1.41.5 | 1.41.5 | 1.41.5 | 1.41.5 |
| libxml2 | 2.10.4 | 2.10.4 | 2.10.4 | 2.10.4 |
| lz4-c | 1.9.4 | 1.9.4 | 1.9.4 | 1.9.4 |
| ncurses | 6.4 | 6.4 | 6.4 | 6.4 |
| openssl | 3.0.12 | 3.0.12 | 3.0.12 | 3.0.12 |
| packaging | 23.1 | 23.1 | 23.1 | 23.1 |
| pcre2 | 10.42 | 10.42 | 10.42 | 10.42 |
| pip | 23.3 | 23.3 | 23.3 | 23.3 |
| pluggy | 1.0.0 | 1.0.0 | 1.0.0 | 1.0.0 |
| pybind11-abi | 4 | 4 | 4 | 4 |
| pycosat | 0.6.6 | 0.6.6 | 0.6.6 | 0.6.6 |
| pycparser | 2.21 | 2.21 | 2.21 | 2.21 |
| pyopenssl | 23.2.0 | 23.2.0 | 23.2.0 | 23.2.0 |
| pysocks | 1.7.1 | 1.7.1 | 1.7.1 | 1.7.1 |
| python | 3.11.5 | 3.11.5 | 3.11.5 | 3.11.5 |
| readline | 8.2 | 8.2 | 8.2 | 8.2 |
| reproc | 14.2.4 | 14.2.4 | 14.2.4 | 14.2.4 |
| reproc-cpp | 14.2.4 | 14.2.4 | 14.2.4 | 14.2.4 |
| requests | 2.31.0 | 2.31.0 | 2.31.0 | 2.31.0 |
| ruamel.yaml | 0.17.21 | 0.17.21 | 0.17.21 | 0.17.21 |
| setuptools | 68.0.0 | 68.0.0 | 68.0.0 | 68.0.0 |
| sqlite | 3.41.2 | 3.41.2 | 3.41.2 | 3.41.2 |
| tk | 8.6.12 | 8.6.12 | 8.6.12 | 8.6.12 |
| tqdm | 4.65.0 | 4.65.0 | 4.65.0 | 4.65.0 |
| truststore | 0.8.0 | 0.8.0 | 0.8.0 | 0.8.0 |
| tzdata | 2023c | 2023c | 2023c | 2023c |
| urllib3 | 1.26.18 | 1.26.18 | 1.26.18 | 1.26.18 |
| wheel | 0.41.2 | 0.41.2 | 0.41.2 | 0.41.2 |
| xz | 5.4.2 | 5.4.2 | 5.4.2 | 5.4.2 |
| yaml-cpp | 0.8.0 | 0.8.0 | 0.8.0 | 0.8.0 |
| zlib | 1.2.13 | 1.2.13 | 1.2.13 | 1.2.13 |
| zstandard | 0.19.0 | 0.19.0 | 0.19.0 | 0.19.0 |
| zstd | 1.5.5 | 1.5.5 | 1.5.5 | 1.5.5 |
| Package Name | osx-arm64 | osx-64 |
|---|---|---|
| archspec | 0.2.1 | 0.2.1 |
| boltons | 23.0.0 | 23.0.0 |
| brotli-python | 1.0.9 | 1.0.9 |
| bzip2 | 1.0.8 | 1.0.8 |
| c-ares | 1.19.1 | 1.19.1 |
| ca-certificates | 2023.08.22 | 2023.08.22 |
| certifi | 2023.7.22 | 2023.7.22 |
| cffi | 1.15.1 | 1.15.1 |
| charset-normalizer | 2.0.4 | 2.0.4 |
| conda | 23.10.0 | 23.10.0 |
| conda-content-trust | 0.2.0 | 0.2.0 |
| conda-libmamba-solver | 23.11.1 | 23.11.1 |
| conda-package-handling | 2.2.0 | 2.2.0 |
| conda-package-streaming | 0.9.0 | 0.9.0 |
| cryptography | 41.0.3 | 41.0.3 |
| fmt | 9.1.0 | 9.1.0 |
| icu | 73.1 | 73.1 |
| idna | 3.4 | 3.4 |
| jsonpatch | 1.32 | 1.32 |
| jsonpointer | 2.1 | 2.1 |
| krb5 | 1.20.1 | 1.20.1 |
| libarchive | 3.6.2 | 3.6.2 |
| libcurl | 8.4.0 | 8.4.0 |
| libcxx | 14.0.6 | 14.0.6 |
| libedit | 3.1.20221030 | 3.1.20221030 |
| libev | 4.33 | 4.33 |
| libffi | 3.4.4 | 3.4.4 |
| libiconv | 1.16 | 1.16 |
| libmamba | 1.5.3 | 1.5.3 |
| libmambapy | 1.5.3 | 1.5.3 |
| libnghttp2 | 1.57.0 | 1.57.0 |
| libsolv | 0.7.24 | 0.7.24 |
| libssh2 | 1.10.0 | 1.10.0 |
| libxml2 | 2.10.4 | 2.10.4 |
| lz4-c | 1.9.4 | 1.9.4 |
| ncurses | 6.4 | 6.4 |
| openssl | 3.0.12 | 3.0.12 |
| packaging | 23.1 | 23.1 |
| pcre2 | 10.42 | 10.42 |
| pip | 23.3 | 23.3 |
| pluggy | 1.0.0 | 1.0.0 |
| pybind11-abi | 4 | 4 |
| pycosat | 0.6.6 | 0.6.6 |
| pycparser | 2.21 | 2.21 |
| pyopenssl | 23.2.0 | 23.2.0 |
| pysocks | 1.7.1 | 1.7.1 |
| python | 3.11.5 | 3.11.5 |
| python.app | 3 | 3 |
| readline | 8.2 | 8.2 |
| reproc | 14.2.4 | 14.2.4 |
| reproc-cpp | 14.2.4 | 14.2.4 |
| requests | 2.31.0 | 2.31.0 |
| ruamel.yaml | 0.17.21 | 0.17.21 |
| setuptools | 68.0.0 | 68.0.0 |
| sqlite | 3.41.2 | 3.41.2 |
| tk | 8.6.12 | 8.6.12 |
| tqdm | 4.65.0 | 4.65.0 |
| truststore | 0.8.0 | 0.8.0 |
| tzdata | 2023c | 2023c |
| urllib3 | 1.26.18 | 1.26.18 |
| wheel | 0.41.2 | 0.41.2 |
| xz | 5.4.2 | 5.4.2 |
| yaml-cpp | 0.8.0 | 0.8.0 |
| zlib | 1.2.13 | 1.2.13 |
| zstandard | 0.19.0 | 0.19.0 |
| zstd | 1.5.5 | 1.5.5 |
| Package Name | win-64 |
|---|---|
| archspec | 0.2.1 |
| boltons | 23.0.0 |
| brotli-python | 1.0.9 |
| bzip2 | 1.0.8 |
| ca-certificates | 2023.08.22 |
| certifi | 2023.7.22 |
| cffi | 1.15.1 |
| charset-normalizer | 2.0.4 |
| colorama | 0.4.6 |
| conda | 23.10.0 |
| conda-content-trust | 0.2.0 |
| conda-libmamba-solver | 23.11.1 |
| conda-package-handling | 2.2.0 |
| conda-package-streaming | 0.9.0 |
| console\_shortcut\_miniconda | 0.1.1 |
| cryptography | 41.0.3 |
| fmt | 9.1.0 |
| idna | 3.4 |
| jsonpatch | 1.32 |
| jsonpointer | 2.1 |
| libarchive | 3.6.2 |
| libcurl | 8.1.1 |
| libffi | 3.4.4 |
| libiconv | 1.16 |
| libmamba | 1.5.3 |
| libmambapy | 1.5.3 |
| libsolv | 0.7.24 |
| libssh2 | 1.10.0 |
| libxml2 | 2.10.4 |
| lz4-c | 1.9.4 |
| menuinst | 1.4.19 |
| openssl | 3.0.12 |
| packaging | 23.1 |
| pcre2 | 10.42 |
| pip | 23.3 |
| pluggy | 1.0.0 |
| powershell\_shortcut\_miniconda | 0.0.1 |
| pybind11-abi | 4 |
| pycosat | 0.6.6 |
| pycparser | 2.21 |
| pyopenssl | 23.2.0 |
| pysocks | 1.7.1 |
| python | 3.11.5 |
| reproc | 14.2.4 |
| reproc-cpp | 14.2.4 |
| requests | 2.31.0 |
| ruamel.yaml | 0.17.21 |
| setuptools | 68.0.0 |
| sqlite | 3.41.2 |
| tk | 8.6.12 |
| tqdm | 4.65.0 |
| truststore | 0.8.0 |
| tzdata | 2023c |
| urllib3 | 1.26.18 |
| vc | 14.2 |
| vs2015\_runtime | 14.27.29016 |
| wheel | 0.41.2 |
| win\_inet\_pton | 1.1.0 |
| xz | 5.4.2 |
| yaml-cpp | 0.8.0 |
| zlib | 1.2.13 |
| zstandard | 0.19.0 |
| zstd | 1.5.5 |
| Package Name | linux-64 | linux-aarch64 | linux-ppc64le | linux-s390x | osx-arm64 | osx-64 | win-64 |
|---|---|---|---|---|---|---|---|
| \_libgcc\_mutex | 0.1 | 0.1 | 0.1 | 0.1 | |||
| \_openmp\_mutex | 5.1 | 5.1 | 5.1 | 5.1 | |||
| boltons | 23.0.0 | 23.0.0 | 23.0.0 | 23.0.0 | 23.0.0 | 23.0.0 | 23.0.0 |
| brotlipy | 0.7.0 | 0.7.0 | 0.7.0 | 0.7.0 | 0.7.0 | 0.7.0 | 0.7.0 |
| bzip2 | 1.0.8 | 1.0.8 | 1.0.8 | 1.0.8 | 1.0.8 | 1.0.8 | 1.0.8 |
| c-ares | 1.19.1 | 1.19.1 | 1.19.1 | 1.19.1 | 1.19.1 | 1.19.1 | |
| ca-certificates | 2023.08.22 | 2023.08.22 | 2023.08.22 | 2023.08.22 | 2023.08.22 | 2023.08.22 | 2023.08.22 |
| certifi | 2023.7.22 | 2023.7.22 | 2023.7.22 | 2023.7.22 | 2023.7.22 | 2023.7.22 | 2023.7.22 |
| cffi | 1.15.1 | 1.15.1 | 1.15.1 | 1.15.1 | 1.15.1 | 1.15.1 | 1.15.1 |
| charset-normalizer | 2.0.4 | 2.0.4 | 2.0.4 | 2.0.4 | 2.0.4 | 2.0.4 | 2.0.4 |
| colorama | 0.4.6 | ||||||
| conda | 23.9.0 | 23.9.0 | 23.9.0 | 23.9.0 | 23.9.0 | 23.9.0 | 23.9.0 |
| conda-content-trust | 0.2.0 | 0.2.0 | 0.2.0 | 0.2.0 | 0.2.0 | 0.2.0 | 0.2.0 |
| conda-libmamba-solver | 23.9.1 | 23.9.1 | 23.9.1 | 23.9.1 | 23.9.1 | 23.9.1 | 23.9.1 |
| conda-package-handling | 2.2.0 | 2.2.0 | 2.2.0 | 2.2.0 | 2.2.0 | 2.2.0 | 2.2.0 |
| conda-package-streaming | 0.9.0 | 0.9.0 | 0.9.0 | 0.9.0 | 0.9.0 | 0.9.0 | 0.9.0 |
| console\_shortcut\_miniconda | 0.1.1 | ||||||
| cryptography | 41.0.3 | 41.0.3 | 41.0.3 | 41.0.3 | 41.0.3 | 41.0.3 | 41.0.3 |
| fmt | 9.1.0 | 9.1.0 | 9.1.0 | 9.1.0 | 9.1.0 | 9.1.0 | 9.1.0 |
| icu | 73.1 | 73.1 | 73.1 | 73.1 | 73.1 | 73.1 | |
| idna | 3.4 | 3.4 | 3.4 | 3.3 | 3.4 | 3.4 | 3.4 |
| jsonpatch | 1.32 | 1.32 | 1.32 | 1.32 | 1.32 | 1.32 | 1.32 |
| jsonpointer | 2.1 | 2.1 | 2.1 | 2.1 | 2.1 | 2.1 | 2.1 |
| krb5 | 1.20.1 | 1.20.1 | 1.20.1 | 1.20.1 | 1.20.1 | 1.20.1 | |
| ld\_impl\_linux-64 | 2.38 | ||||||
| ld\_impl\_linux-aarch64 | 2.38 | ||||||
| ld\_impl\_linux-ppc64le | 2.38 | ||||||
| ld\_impl\_linux-s390x | 2.38 | ||||||
| libarchive | 3.6.2 | 3.6.2 | 3.6.2 | 3.6.2 | 3.6.2 | 3.6.2 | 3.6.2 |
| libcurl | 8.2.1 | 8.2.1 | 8.2.1 | 8.2.1 | 8.2.1 | 8.2.1 | 8.1.1 |
| libcxx | 14.0.6 | 14.0.6 | |||||
| libedit | 3.1.20221030 | 3.1.20221030 | 3.1.20221030 | 3.1.20221030 | 3.1.20221030 | 3.1.20221030 | |
| libev | 4.33 | 4.33 | 4.33 | 4.33 | 4.33 | 4.33 | |
| libffi | 3.4.4 | 3.4.4 | 3.4.4 | 3.4.2 | 3.4.4 | 3.4.4 | 3.4.4 |
| libgcc-ng | 11.2.0 | 11.2.0 | 11.2.0 | 11.2.0 | |||
| libgomp | 11.2.0 | 11.2.0 | 11.2.0 | 11.2.0 | |||
| libiconv | 1.16 | 1.16 | 1.16 | ||||
| libmamba | 1.5.1 | 1.5.1 | 1.5.1 | 1.5.1 | 1.5.1 | 1.5.1 | 1.5.1 |
| libmambapy | 1.5.1 | 1.5.1 | 1.5.1 | 1.5.1 | 1.5.1 | 1.5.1 | 1.5.1 |
| libnghttp2 | 1.52.0 | 1.52.0 | 1.52.0 | 1.52.0 | 1.52.0 | 1.52.0 | |
| libsolv | 0.7.24 | 0.7.24 | 0.7.24 | 0.7.24 | 0.7.24 | 0.7.24 | 0.7.24 |
| libssh2 | 1.10.0 | 1.10.0 | 1.10.0 | 1.10.0 | 1.10.0 | 1.10.0 | 1.10.0 |
| libstdcxx-ng | 11.2.0 | 11.2.0 | 11.2.0 | 11.2.0 | |||
| libuuid | 1.41.5 | 1.41.5 | 1.41.5 | 1.41.5 | |||
| libxml2 | 2.10.4 | 2.10.4 | 2.10.4 | 2.10.4 | 2.10.4 | 2.10.4 | 2.10.4 |
| lz4-c | 1.9.4 | 1.9.4 | 1.9.4 | 1.9.4 | 1.9.4 | 1.9.4 | 1.9.4 |
| menuinst | 1.4.19 | ||||||
| ncurses | 6.4 | 6.4 | 6.4 | 6.4 | 6.4 | 6.4 | |
| openssl | 3.0.11 | 3.0.11 | 3.0.11 | 3.0.11 | 3.0.11 | 3.0.11 | 3.0.11 |
| packaging | 23.1 | 23.1 | 23.1 | 23.1 | 23.1 | 23.1 | 23.1 |
| pcre2 | 10.42 | 10.42 | 10.42 | 10.42 | 10.42 | 10.42 | 10.42 |
| pip | 23.2.1 | 23.2.1 | 23.2.1 | 23.2.1 | 23.2.1 | 23.2.1 | 23.2.1 |
| pluggy | 1.0.0 | 1.0.0 | 1.0.0 | 1.0.0 | 1.0.0 | 1.0.0 | 1.0.0 |
| powershell\_shortcut\_miniconda | 0.0.1 | ||||||
| pybind11-abi | 4 | 4 | 4 | 4 | 4 | 4 | 4 |
| pycosat | 0.6.6 | 0.6.6 | 0.6.6 | 0.6.6 | 0.6.6 | 0.6.6 | 0.6.6 |
| pycparser | 2.21 | 2.21 | 2.21 | 2.21 | 2.21 | 2.21 | 2.21 |
| pyopenssl | 23.2.0 | 23.2.0 | 23.2.0 | 23.2.0 | 23.2.0 | 23.2.0 | 23.2.0 |
| pysocks | 1.7.1 | 1.7.1 | 1.7.1 | 1.7.1 | 1.7.1 | 1.7.1 | 1.7.1 |
| python | 3.11.5 | 3.11.5 | 3.11.5 | 3.11.5 | 3.11.5 | 3.11.5 | 3.11.5 |
| python.app | 3 | 3 | |||||
| readline | 8.2 | 8.2 | 8.2 | 8.2 | 8.2 | 8.2 | |
| reproc | 14.2.4 | 14.2.4 | 14.2.4 | 14.2.4 | 14.2.4 | 14.2.4 | 14.2.4 |
| reproc-cpp | 14.2.4 | 14.2.4 | 14.2.4 | 14.2.4 | 14.2.4 | 14.2.4 | 14.2.4 |
| requests | 2.31.0 | 2.31.0 | 2.31.0 | 2.31.0 | 2.31.0 | 2.31.0 | 2.31.0 |
| ruamel.yaml | 0.17.21 | 0.17.21 | 0.17.21 | 0.17.21 | 0.17.21 | 0.17.21 | 0.17.21 |
| setuptools | 68.0.0 | 68.0.0 | 68.0.0 | 68.0.0 | 68.0.0 | 68.0.0 | 68.0.0 |
| sqlite | 3.41.2 | 3.41.2 | 3.41.2 | 3.41.2 | 3.41.2 | 3.41.2 | 3.41.2 |
| tk | 8.6.12 | 8.6.12 | 8.6.12 | 8.6.12 | 8.6.12 | 8.6.12 | 8.6.12 |
| tqdm | 4.65.0 | 4.65.0 | 4.65.0 | 4.65.0 | 4.65.0 | 4.65.0 | 4.65.0 |
| truststore | 0.8.0 | 0.8.0 | 0.8.0 | 0.8.0 | 0.8.0 | 0.8.0 | 0.8.0 |
| tzdata | 2023c | 2023c | 2023c | 2023c | 2023c | 2023c | 2023c |
| urllib3 | 1.26.16 | 1.26.16 | 1.26.16 | 1.26.16 | 1.26.16 | 1.26.16 | 1.26.16 |
| vc | 14.2 | ||||||
| vs2015\_runtime | 14.27.29016 | ||||||
| wheel | 0.41.2 | 0.41.2 | 0.41.2 | 0.41.2 | 0.41.2 | 0.41.2 | 0.41.2 |
| win\_inet\_pton | 1.1.0 | ||||||
| xz | 5.4.2 | 5.4.2 | 5.4.2 | 5.4.2 | 5.4.2 | 5.4.2 | 5.4.2 |
| yaml-cpp | 0.7.0 | 0.7.0 | 0.7.0 | 0.7.0 | 0.7.0 | 0.7.0 | 0.7.0 |
| zlib | 1.2.13 | 1.2.13 | 1.2.13 | 1.2.13 | 1.2.13 | 1.2.13 | 1.2.13 |
| zstandard | 0.19.0 | 0.19.0 | 0.19.0 | 0.19.0 | 0.19.0 | 0.19.0 | 0.19.0 |
| zstd | 1.5.5 | 1.5.5 | 1.5.5 | 1.5.5 | 1.5.5 | 1.5.5 | 1.5.5 |
| Package Name | linux-64 | linux-aarch64 | linux-ppc64le | linux-s390x |
|---|---|---|---|---|
| \_libgcc\_mutex | 0.1 | 0.1 | 0.1 | 0.1 |
| \_openmp\_mutex | 5.1 | 5.1 | 5.1 | 5.1 |
| boltons | 23.0.0 | 23.0.0 | 23.0.0 | 23.0.0 |
| brotlipy | 0.7.0 | 0.7.0 | 0.7.0 | 0.7.0 |
| bzip2 | 1.0.8 | 1.0.8 | 1.0.8 | 1.0.8 |
| c-ares | 1.19.1 | 1.19.1 | 1.19.1 | 1.19.1 |
| ca-certificates | 2023.08.22 | 2023.08.22 | 2023.08.22 | 2023.08.22 |
| certifi | 2023.7.22 | 2023.7.22 | 2023.7.22 | 2023.7.22 |
| cffi | 1.15.1 | 1.15.1 | 1.15.1 | 1.15.1 |
| charset-normalizer | 2.0.4 | 2.0.4 | 2.0.4 | 2.0.4 |
| conda | 23.9.0 | 23.9.0 | 23.9.0 | 23.9.0 |
| conda-content-trust | 0.2.0 | 0.2.0 | 0.2.0 | 0.2.0 |
| conda-libmamba-solver | 23.9.1 | 23.9.1 | 23.9.1 | 23.9.1 |
| conda-package-handling | 2.2.0 | 2.2.0 | 2.2.0 | 2.2.0 |
| conda-package-streaming | 0.9.0 | 0.9.0 | 0.9.0 | 0.9.0 |
| cryptography | 41.0.3 | 41.0.3 | 41.0.3 | 41.0.3 |
| fmt | 9.1.0 | 9.1.0 | 9.1.0 | 9.1.0 |
| icu | 73.1 | 73.1 | 73.1 | 73.1 |
| idna | 3.4 | 3.4 | 3.4 | 3.3 |
| jsonpatch | 1.32 | 1.32 | 1.32 | 1.32 |
| jsonpointer | 2.1 | 2.1 | 2.1 | 2.1 |
| krb5 | 1.20.1 | 1.20.1 | 1.20.1 | 1.20.1 |
| ld\_impl\_linux-64 | 2.38 | |||
| ld\_impl\_linux-aarch64 | 2.38 | |||
| ld\_impl\_linux-ppc64le | 2.38 | |||
| ld\_impl\_linux-s390x | 2.38 | |||
| libarchive | 3.6.2 | 3.6.2 | 3.6.2 | 3.6.2 |
| libcurl | 8.2.1 | 8.2.1 | 8.2.1 | 8.2.1 |
| libedit | 3.1.20221030 | 3.1.20221030 | 3.1.20221030 | 3.1.20221030 |
| libev | 4.33 | 4.33 | 4.33 | 4.33 |
| libffi | 3.4.4 | 3.4.4 | 3.4.4 | 3.4.2 |
| libgcc-ng | 11.2.0 | 11.2.0 | 11.2.0 | 11.2.0 |
| libgomp | 11.2.0 | 11.2.0 | 11.2.0 | 11.2.0 |
| libmamba | 1.5.1 | 1.5.1 | 1.5.1 | 1.5.1 |
| libmambapy | 1.5.1 | 1.5.1 | 1.5.1 | 1.5.1 |
| libnghttp2 | 1.52.0 | 1.52.0 | 1.52.0 | 1.52.0 |
| libsolv | 0.7.24 | 0.7.24 | 0.7.24 | 0.7.24 |
| libssh2 | 1.10.0 | 1.10.0 | 1.10.0 | 1.10.0 |
| libstdcxx-ng | 11.2.0 | 11.2.0 | 11.2.0 | 11.2.0 |
| libuuid | 1.41.5 | 1.41.5 | 1.41.5 | 1.41.5 |
| libxml2 | 2.10.4 | 2.10.4 | 2.10.4 | 2.10.4 |
| lz4-c | 1.9.4 | 1.9.4 | 1.9.4 | 1.9.4 |
| ncurses | 6.4 | 6.4 | 6.4 | 6.4 |
| openssl | 3.0.11 | 3.0.11 | 3.0.11 | 3.0.11 |
| packaging | 23.1 | 23.1 | 23.1 | 23.1 |
| pcre2 | 10.42 | 10.42 | 10.42 | 10.42 |
| pip | 23.2.1 | 23.2.1 | 23.2.1 | 23.2.1 |
| pluggy | 1.0.0 | 1.0.0 | 1.0.0 | 1.0.0 |
| pybind11-abi | 4 | 4 | 4 | 4 |
| pycosat | 0.6.6 | 0.6.6 | 0.6.6 | 0.6.6 |
| pycparser | 2.21 | 2.21 | 2.21 | 2.21 |
| pyopenssl | 23.2.0 | 23.2.0 | 23.2.0 | 23.2.0 |
| pysocks | 1.7.1 | 1.7.1 | 1.7.1 | 1.7.1 |
| python | 3.11.5 | 3.11.5 | 3.11.5 | 3.11.5 |
| readline | 8.2 | 8.2 | 8.2 | 8.2 |
| reproc | 14.2.4 | 14.2.4 | 14.2.4 | 14.2.4 |
| reproc-cpp | 14.2.4 | 14.2.4 | 14.2.4 | 14.2.4 |
| requests | 2.31.0 | 2.31.0 | 2.31.0 | 2.31.0 |
| ruamel.yaml | 0.17.21 | 0.17.21 | 0.17.21 | 0.17.21 |
| setuptools | 68.0.0 | 68.0.0 | 68.0.0 | 68.0.0 |
| sqlite | 3.41.2 | 3.41.2 | 3.41.2 | 3.41.2 |
| tk | 8.6.12 | 8.6.12 | 8.6.12 | 8.6.12 |
| tqdm | 4.65.0 | 4.65.0 | 4.65.0 | 4.65.0 |
| truststore | 0.8.0 | 0.8.0 | 0.8.0 | 0.8.0 |
| tzdata | 2023c | 2023c | 2023c | 2023c |
| urllib3 | 1.26.16 | 1.26.16 | 1.26.16 | 1.26.16 |
| wheel | 0.41.2 | 0.41.2 | 0.41.2 | 0.41.2 |
| xz | 5.4.2 | 5.4.2 | 5.4.2 | 5.4.2 |
| yaml-cpp | 0.7.0 | 0.7.0 | 0.7.0 | 0.7.0 |
| zlib | 1.2.13 | 1.2.13 | 1.2.13 | 1.2.13 |
| zstandard | 0.19.0 | 0.19.0 | 0.19.0 | 0.19.0 |
| zstd | 1.5.5 | 1.5.5 | 1.5.5 | 1.5.5 |
| Package Name | osx-arm64 | osx-64 |
|---|---|---|
| boltons | 23.0.0 | 23.0.0 |
| brotlipy | 0.7.0 | 0.7.0 |
| bzip2 | 1.0.8 | 1.0.8 |
| c-ares | 1.19.1 | 1.19.1 |
| ca-certificates | 2023.08.22 | 2023.08.22 |
| certifi | 2023.7.22 | 2023.7.22 |
| cffi | 1.15.1 | 1.15.1 |
| charset-normalizer | 2.0.4 | 2.0.4 |
| conda | 23.9.0 | 23.9.0 |
| conda-content-trust | 0.2.0 | 0.2.0 |
| conda-libmamba-solver | 23.9.1 | 23.9.1 |
| conda-package-handling | 2.2.0 | 2.2.0 |
| conda-package-streaming | 0.9.0 | 0.9.0 |
| cryptography | 41.0.3 | 41.0.3 |
| fmt | 9.1.0 | 9.1.0 |
| icu | 73.1 | 73.1 |
| idna | 3.4 | 3.4 |
| jsonpatch | 1.32 | 1.32 |
| jsonpointer | 2.1 | 2.1 |
| krb5 | 1.20.1 | 1.20.1 |
| libarchive | 3.6.2 | 3.6.2 |
| libcurl | 8.2.1 | 8.2.1 |
| libcxx | 14.0.6 | 14.0.6 |
| libedit | 3.1.20221030 | 3.1.20221030 |
| libev | 4.33 | 4.33 |
| libffi | 3.4.4 | 3.4.4 |
| libiconv | 1.16 | 1.16 |
| libmamba | 1.5.1 | 1.5.1 |
| libmambapy | 1.5.1 | 1.5.1 |
| libnghttp2 | 1.52.0 | 1.52.0 |
| libsolv | 0.7.24 | 0.7.24 |
| libssh2 | 1.10.0 | 1.10.0 |
| libxml2 | 2.10.4 | 2.10.4 |
| lz4-c | 1.9.4 | 1.9.4 |
| ncurses | 6.4 | 6.4 |
| openssl | 3.0.11 | 3.0.11 |
| packaging | 23.1 | 23.1 |
| pcre2 | 10.42 | 10.42 |
| pip | 23.2.1 | 23.2.1 |
| pluggy | 1.0.0 | 1.0.0 |
| pybind11-abi | 4 | 4 |
| pycosat | 0.6.6 | 0.6.6 |
| pycparser | 2.21 | 2.21 |
| pyopenssl | 23.2.0 | 23.2.0 |
| pysocks | 1.7.1 | 1.7.1 |
| python | 3.11.5 | 3.11.5 |
| python.app | 3 | 3 |
| readline | 8.2 | 8.2 |
| reproc | 14.2.4 | 14.2.4 |
| reproc-cpp | 14.2.4 | 14.2.4 |
| requests | 2.31.0 | 2.31.0 |
| ruamel.yaml | 0.17.21 | 0.17.21 |
| setuptools | 68.0.0 | 68.0.0 |
| sqlite | 3.41.2 | 3.41.2 |
| tk | 8.6.12 | 8.6.12 |
| tqdm | 4.65.0 | 4.65.0 |
| truststore | 0.8.0 | 0.8.0 |
| tzdata | 2023c | 2023c |
| urllib3 | 1.26.16 | 1.26.16 |
| wheel | 0.41.2 | 0.41.2 |
| xz | 5.4.2 | 5.4.2 |
| yaml-cpp | 0.7.0 | 0.7.0 |
| zlib | 1.2.13 | 1.2.13 |
| zstandard | 0.19.0 | 0.19.0 |
| zstd | 1.5.5 | 1.5.5 |
| Package Name | win-64 |
|---|---|
| boltons | 23.0.0 |
| brotlipy | 0.7.0 |
| bzip2 | 1.0.8 |
| ca-certificates | 2023.08.22 |
| certifi | 2023.7.22 |
| cffi | 1.15.1 |
| charset-normalizer | 2.0.4 |
| colorama | 0.4.6 |
| conda | 23.9.0 |
| conda-content-trust | 0.2.0 |
| conda-libmamba-solver | 23.9.1 |
| conda-package-handling | 2.2.0 |
| conda-package-streaming | 0.9.0 |
| console\_shortcut\_miniconda | 0.1.1 |
| cryptography | 41.0.3 |
| fmt | 9.1.0 |
| idna | 3.4 |
| jsonpatch | 1.32 |
| jsonpointer | 2.1 |
| libarchive | 3.6.2 |
| libcurl | 8.1.1 |
| libffi | 3.4.4 |
| libiconv | 1.16 |
| libmamba | 1.5.1 |
| libmambapy | 1.5.1 |
| libsolv | 0.7.24 |
| libssh2 | 1.10.0 |
| libxml2 | 2.10.4 |
| lz4-c | 1.9.4 |
| menuinst | 1.4.19 |
| openssl | 3.0.11 |
| packaging | 23.1 |
| pcre2 | 10.42 |
| pip | 23.2.1 |
| pluggy | 1.0.0 |
| powershell\_shortcut\_miniconda | 0.0.1 |
| pybind11-abi | 4 |
| pycosat | 0.6.6 |
| pycparser | 2.21 |
| pyopenssl | 23.2.0 |
| pysocks | 1.7.1 |
| python | 3.11.5 |
| reproc | 14.2.4 |
| reproc-cpp | 14.2.4 |
| requests | 2.31.0 |
| ruamel.yaml | 0.17.21 |
| setuptools | 68.0.0 |
| sqlite | 3.41.2 |
| tk | 8.6.12 |
| tqdm | 4.65.0 |
| truststore | 0.8.0 |
| tzdata | 2023c |
| urllib3 | 1.26.16 |
| vc | 14.2 |
| vs2015\_runtime | 14.27.29016 |
| wheel | 0.41.2 |
| win\_inet\_pton | 1.1.0 |
| xz | 5.4.2 |
| yaml-cpp | 0.7.0 |
| zlib | 1.2.13 |
| zstandard | 0.19.0 |
| zstd | 1.5.5 |
| Package Name | linux-64 | linux-aarch64 | linux-ppc64le | linux-s390x | osx-arm64 | osx-64 | win-64 |
|---|---|---|---|---|---|---|---|
| \_libgcc\_mutex | 0.1 | 0.1 | 0.1 | 0.1 | |||
| \_openmp\_mutex | 5.1 | 5.1 | 5.1 | 5.1 | |||
| boltons | 23.0.0 | 23.0.0 | 23.0.0 | 23.0.0 | 23.0.0 | 23.0.0 | 23.0.0 |
| brotlipy | 0.7.0 | 0.7.0 | 0.7.0 | 0.7.0 | 0.7.0 | 0.7.0 | 0.7.0 |
| bzip2 | 1.0.8 | 1.0.8 | 1.0.8 | 1.0.8 | 1.0.8 | 1.0.8 | 1.0.8 |
| c-ares | 1.19.0 | 1.19.0 | 1.19.0 | 1.19.0 | 1.19.0 | 1.19.0 | |
| ca-certificates | 2023.05.30 | 2023.05.30 | 2023.05.30 | 2023.05.30 | 2023.05.30 | 2023.05.30 | 2023.05.30 |
| certifi | 2023.5.7 | 2023.5.7 | 2023.5.7 | 2023.5.7 | 2023.5.7 | 2023.5.7 | 2023.5.7 |
| cffi | 1.15.1 | 1.15.1 | 1.15.1 | 1.15.1 | 1.15.1 | 1.15.1 | 1.15.1 |
| charset-normalizer | 2.0.4 | 2.0.4 | 2.0.4 | 2.0.4 | 2.0.4 | 2.0.4 | 2.0.4 |
| colorama | 0.4.6 | ||||||
| conda | 23.5.2 | 23.5.2 | 23.5.2 | 23.5.2 | 23.5.2 | 23.5.2 | 23.5.2 |
| conda-content-trust | 0.1.3 | 0.1.3 | 0.1.3 | 0.1.3 | 0.1.3 | 0.1.3 | 0.1.3 |
| conda-libmamba-solver | 23.5.0 | 23.5.0 | 23.5.0 | 23.5.0 | 23.5.0 | 23.5.0 | 23.5.0 |
| conda-package-handling | 2.1.0 | 2.1.0 | 2.1.0 | 2.1.0 | 2.1.0 | 2.1.0 | 2.1.0 |
| conda-package-streaming | 0.8.0 | 0.8.0 | 0.8.0 | 0.8.0 | 0.8.0 | 0.8.0 | 0.8.0 |
| console\_shortcut\_miniconda | 0.1.1 | ||||||
| cryptography | 39.0.1 | 39.0.1 | 39.0.1 | 39.0.1 | 39.0.1 | 39.0.1 | 39.0.1 |
| fmt | 9.1.0 | 9.1.0 | 9.1.0 | 9.1.0 | 9.1.0 | 9.1.0 | 9.1.0 |
| icu | 58.2 | 68.1 | 58.2 | 68.1 | 68.1 | 58.2 | |
| idna | 3.4 | 3.4 | 3.4 | 3.3 | 3.4 | 3.4 | 3.4 |
| jsonpatch | 1.32 | 1.32 | 1.32 | 1.32 | 1.32 | 1.32 | 1.32 |
| jsonpointer | 2.1 | 2.1 | 2.1 | 2.1 | 2.1 | 2.1 | 2.1 |
| krb5 | 1.20.1 | 1.20.1 | 1.20.1 | 1.20.1 | 1.20.1 | 1.20.1 | |
| ld\_impl\_linux-64 | 2.38 | ||||||
| ld\_impl\_linux-aarch64 | 2.38 | ||||||
| ld\_impl\_linux-ppc64le | 2.38 | ||||||
| ld\_impl\_linux-s390x | 2.38 | ||||||
| libarchive | 3.6.2 | 3.6.2 | 3.6.2 | 3.6.2 | 3.6.2 | 3.6.2 | 3.6.2 |
| libcurl | 8.1.1 | 8.1.1 | 8.1.1 | 8.1.1 | 8.1.1 | 8.1.1 | 8.1.1 |
| libcxx | 14.0.6 | 14.0.6 | |||||
| libedit | 3.1.20221030 | 3.1.20221030 | 3.1.20221030 | 3.1.20221030 | 3.1.20221030 | 3.1.20221030 | |
| libev | 4.33 | 4.33 | 4.33 | 4.33 | 4.33 | 4.33 | |
| libffi | 3.4.4 | 3.4.4 | 3.4.4 | 3.4.2 | 3.4.4 | 3.4.4 | 3.4.4 |
| libgcc-ng | 11.2.0 | 11.2.0 | 11.2.0 | 11.2.0 | |||
| libgomp | 11.2.0 | 11.2.0 | 11.2.0 | 11.2.0 | |||
| libiconv | 1.16 | 1.16 | 1.16 | ||||
| libmamba | 1.4.1 | 1.4.1 | 1.4.1 | 1.4.1 | 1.4.1 | 1.4.1 | 1.4.1 |
| libmambapy | 1.4.1 | 1.4.1 | 1.4.1 | 1.4.1 | 1.4.1 | 1.4.1 | 1.4.1 |
| libnghttp2 | 1.52.0 | 1.52.0 | 1.52.0 | 1.52.0 | 1.52.0 | 1.52.0 | |
| libsolv | 0.7.22 | 0.7.22 | 0.7.22 | 0.7.22 | 0.7.22 | 0.7.22 | 0.7.22 |
| libssh2 | 1.10.0 | 1.10.0 | 1.10.0 | 1.10.0 | 1.10.0 | 1.10.0 | 1.10.0 |
| libstdcxx-ng | 11.2.0 | 11.2.0 | 11.2.0 | 11.2.0 | |||
| libuuid | 1.41.5 | 1.41.5 | 1.41.5 | 1.41.5 | |||
| libxml2 | 2.10.3 | 2.10.3 | 2.10.3 | 2.10.3 | 2.10.3 | 2.10.3 | 2.10.3 |
| lz4-c | 1.9.4 | 1.9.4 | 1.9.4 | 1.9.4 | 1.9.4 | 1.9.4 | 1.9.4 |
| menuinst | 1.4.19 | ||||||
| ncurses | 6.4 | 6.4 | 6.4 | 6.4 | 6.4 | 6.4 | |
| openssl | 3.0.9 | 3.0.9 | 3.0.9 | 3.0.9 | 3.0.9 | 3.0.9 | 3.0.9 |
| packaging | 23.0 | 23.0 | 23.0 | 23.0 | 23.0 | 23.0 | 23.0 |
| pcre2 | 10.37 | 10.37 | 10.37 | 10.37 | 10.37 | 10.37 | 10.37 |
| pip | 23.1.2 | 23.1.2 | 23.1.2 | 23.1.2 | 23.1.2 | 23.1.2 | 23.1.2 |
| pluggy | 1.0.0 | 1.0.0 | 1.0.0 | 1.0.0 | 1.0.0 | 1.0.0 | 1.0.0 |
| powershell\_shortcut\_miniconda | 0.0.1 | ||||||
| pybind11-abi | 4 | 4 | 4 | 4 | 4 | 4 | 4 |
| pycosat | 0.6.4 | 0.6.4 | 0.6.4 | 0.6.4 | 0.6.4 | 0.6.4 | 0.6.4 |
| pycparser | 2.21 | 2.21 | 2.21 | 2.21 | 2.21 | 2.21 | 2.21 |
| pyopenssl | 23.0.0 | 23.0.0 | 23.0.0 | 23.0.0 | 23.0.0 | 23.0.0 | 23.0.0 |
| pysocks | 1.7.1 | 1.7.1 | 1.7.1 | 1.7.1 | 1.7.1 | 1.7.1 | 1.7.1 |
| python | 3.11.4 | 3.11.4 | 3.11.4 | 3.11.4 | 3.11.4 | 3.11.4 | 3.11.4 |
| python.app | 3 | 3 | |||||
| readline | 8.2 | 8.2 | 8.2 | 8.2 | 8.2 | 8.2 | |
| reproc | 14.2.4 | 14.2.4 | 14.2.4 | 14.2.4 | 14.2.4 | 14.2.4 | 14.2.4 |
| reproc-cpp | 14.2.4 | 14.2.4 | 14.2.4 | 14.2.4 | 14.2.4 | 14.2.4 | 14.2.4 |
| requests | 2.29.0 | 2.29.0 | 2.29.0 | 2.29.0 | 2.29.0 | 2.29.0 | 2.29.0 |
| ruamel.yaml | 0.17.21 | 0.17.21 | 0.17.21 | 0.17.21 | 0.17.21 | 0.17.21 | 0.17.21 |
| setuptools | 67.8.0 | 67.8.0 | 67.8.0 | 67.8.0 | 67.8.0 | 67.8.0 | 67.8.0 |
| six | 1.16.0 | 1.16.0 | 1.16.0 | 1.16.0 | 1.16.0 | 1.16.0 | 1.16.0 |
| sqlite | 3.41.2 | 3.41.2 | 3.41.2 | 3.41.2 | 3.41.2 | 3.41.2 | 3.41.2 |
| tk | 8.6.12 | 8.6.12 | 8.6.12 | 8.6.12 | 8.6.12 | 8.6.12 | 8.6.12 |
| toolz | 0.12.0 | 0.12.0 | 0.12.0 | 0.12.0 | 0.12.0 | 0.12.0 | 0.12.0 |
| tqdm | 4.65.0 | 4.65.0 | 4.65.0 | 4.65.0 | 4.65.0 | 4.65.0 | 4.65.0 |
| tzdata | 2023c | 2023c | 2023c | 2023c | 2023c | 2023c | 2023c |
| urllib3 | 1.26.16 | 1.26.16 | 1.26.16 | 1.26.16 | 1.26.16 | 1.26.16 | 1.26.16 |
| vc | 14.2 | ||||||
| vs2015\_runtime | 14.27.29016 | ||||||
| wheel | 0.38.4 | 0.38.4 | 0.38.4 | 0.38.4 | 0.38.4 | 0.38.4 | 0.38.4 |
| win\_inet\_pton | 1.1.0 | ||||||
| xz | 5.4.2 | 5.4.2 | 5.4.2 | 5.4.2 | 5.4.2 | 5.4.2 | 5.4.2 |
| yaml-cpp | 0.7.0 | 0.7.0 | 0.7.0 | 0.7.0 | 0.7.0 | 0.7.0 | 0.7.0 |
| zlib | 1.2.13 | 1.2.13 | 1.2.13 | 1.2.13 | 1.2.13 | 1.2.13 | 1.2.13 |
| zstandard | 0.19.0 | 0.19.0 | 0.19.0 | 0.19.0 | 0.19.0 | 0.19.0 | 0.19.0 |
| zstd | 1.5.5 | 1.5.5 | 1.5.5 | 1.5.5 | 1.5.5 | 1.5.5 | 1.5.5 |
| Package Name | linux-64 | linux-aarch64 | linux-ppc64le | linux-s390x |
|---|---|---|---|---|
| \_libgcc\_mutex | 0.1 | 0.1 | 0.1 | 0.1 |
| \_openmp\_mutex | 5.1 | 5.1 | 5.1 | 5.1 |
| boltons | 23.0.0 | 23.0.0 | 23.0.0 | 23.0.0 |
| brotlipy | 0.7.0 | 0.7.0 | 0.7.0 | 0.7.0 |
| bzip2 | 1.0.8 | 1.0.8 | 1.0.8 | 1.0.8 |
| c-ares | 1.19.0 | 1.19.0 | 1.19.0 | 1.19.0 |
| ca-certificates | 2023.05.30 | 2023.05.30 | 2023.05.30 | 2023.05.30 |
| certifi | 2023.5.7 | 2023.5.7 | 2023.5.7 | 2023.5.7 |
| cffi | 1.15.1 | 1.15.1 | 1.15.1 | 1.15.1 |
| charset-normalizer | 2.0.4 | 2.0.4 | 2.0.4 | 2.0.4 |
| conda | 23.5.2 | 23.5.2 | 23.5.2 | 23.5.2 |
| conda-content-trust | 0.1.3 | 0.1.3 | 0.1.3 | 0.1.3 |
| conda-libmamba-solver | 23.5.0 | 23.5.0 | 23.5.0 | 23.5.0 |
| conda-package-handling | 2.1.0 | 2.1.0 | 2.1.0 | 2.1.0 |
| conda-package-streaming | 0.8.0 | 0.8.0 | 0.8.0 | 0.8.0 |
| cryptography | 39.0.1 | 39.0.1 | 39.0.1 | 39.0.1 |
| fmt | 9.1.0 | 9.1.0 | 9.1.0 | 9.1.0 |
| icu | 58.2 | 68.1 | 58.2 | 68.1 |
| idna | 3.4 | 3.4 | 3.4 | 3.3 |
| jsonpatch | 1.32 | 1.32 | 1.32 | 1.32 |
| jsonpointer | 2.1 | 2.1 | 2.1 | 2.1 |
| krb5 | 1.20.1 | 1.20.1 | 1.20.1 | 1.20.1 |
| ld\_impl\_linux-64 | 2.38 | |||
| ld\_impl\_linux-aarch64 | 2.38 | |||
| ld\_impl\_linux-ppc64le | 2.38 | |||
| ld\_impl\_linux-s390x | 2.38 | |||
| libarchive | 3.6.2 | 3.6.2 | 3.6.2 | 3.6.2 |
| libcurl | 8.1.1 | 8.1.1 | 8.1.1 | 8.1.1 |
| libedit | 3.1.20221030 | 3.1.20221030 | 3.1.20221030 | 3.1.20221030 |
| libev | 4.33 | 4.33 | 4.33 | 4.33 |
| libffi | 3.4.4 | 3.4.4 | 3.4.4 | 3.4.2 |
| libgcc-ng | 11.2.0 | 11.2.0 | 11.2.0 | 11.2.0 |
| libgomp | 11.2.0 | 11.2.0 | 11.2.0 | 11.2.0 |
| libmamba | 1.4.1 | 1.4.1 | 1.4.1 | 1.4.1 |
| libmambapy | 1.4.1 | 1.4.1 | 1.4.1 | 1.4.1 |
| libnghttp2 | 1.52.0 | 1.52.0 | 1.52.0 | 1.52.0 |
| libsolv | 0.7.22 | 0.7.22 | 0.7.22 | 0.7.22 |
| libssh2 | 1.10.0 | 1.10.0 | 1.10.0 | 1.10.0 |
| libstdcxx-ng | 11.2.0 | 11.2.0 | 11.2.0 | 11.2.0 |
| libuuid | 1.41.5 | 1.41.5 | 1.41.5 | 1.41.5 |
| libxml2 | 2.10.3 | 2.10.3 | 2.10.3 | 2.10.3 |
| lz4-c | 1.9.4 | 1.9.4 | 1.9.4 | 1.9.4 |
| ncurses | 6.4 | 6.4 | 6.4 | 6.4 |
| openssl | 3.0.9 | 3.0.9 | 3.0.9 | 3.0.9 |
| packaging | 23.0 | 23.0 | 23.0 | 23.0 |
| pcre2 | 10.37 | 10.37 | 10.37 | 10.37 |
| pip | 23.1.2 | 23.1.2 | 23.1.2 | 23.1.2 |
| pluggy | 1.0.0 | 1.0.0 | 1.0.0 | 1.0.0 |
| pybind11-abi | 4 | 4 | 4 | 4 |
| pycosat | 0.6.4 | 0.6.4 | 0.6.4 | 0.6.4 |
| pycparser | 2.21 | 2.21 | 2.21 | 2.21 |
| pyopenssl | 23.0.0 | 23.0.0 | 23.0.0 | 23.0.0 |
| pysocks | 1.7.1 | 1.7.1 | 1.7.1 | 1.7.1 |
| python | 3.11.4 | 3.11.4 | 3.11.4 | 3.11.4 |
| readline | 8.2 | 8.2 | 8.2 | 8.2 |
| reproc | 14.2.4 | 14.2.4 | 14.2.4 | 14.2.4 |
| reproc-cpp | 14.2.4 | 14.2.4 | 14.2.4 | 14.2.4 |
| requests | 2.29.0 | 2.29.0 | 2.29.0 | 2.29.0 |
| ruamel.yaml | 0.17.21 | 0.17.21 | 0.17.21 | 0.17.21 |
| setuptools | 67.8.0 | 67.8.0 | 67.8.0 | 67.8.0 |
| six | 1.16.0 | 1.16.0 | 1.16.0 | 1.16.0 |
| sqlite | 3.41.2 | 3.41.2 | 3.41.2 | 3.41.2 |
| tk | 8.6.12 | 8.6.12 | 8.6.12 | 8.6.12 |
| toolz | 0.12.0 | 0.12.0 | 0.12.0 | 0.12.0 |
| tqdm | 4.65.0 | 4.65.0 | 4.65.0 | 4.65.0 |
| tzdata | 2023c | 2023c | 2023c | 2023c |
| urllib3 | 1.26.16 | 1.26.16 | 1.26.16 | 1.26.16 |
| wheel | 0.38.4 | 0.38.4 | 0.38.4 | 0.38.4 |
| xz | 5.4.2 | 5.4.2 | 5.4.2 | 5.4.2 |
| yaml-cpp | 0.7.0 | 0.7.0 | 0.7.0 | 0.7.0 |
| zlib | 1.2.13 | 1.2.13 | 1.2.13 | 1.2.13 |
| zstandard | 0.19.0 | 0.19.0 | 0.19.0 | 0.19.0 |
| zstd | 1.5.5 | 1.5.5 | 1.5.5 | 1.5.5 |
| Package Name | osx-arm64 | osx-64 |
|---|---|---|
| boltons | 23.0.0 | 23.0.0 |
| brotlipy | 0.7.0 | 0.7.0 |
| bzip2 | 1.0.8 | 1.0.8 |
| c-ares | 1.19.0 | 1.19.0 |
| ca-certificates | 2023.05.30 | 2023.05.30 |
| certifi | 2023.5.7 | 2023.5.7 |
| cffi | 1.15.1 | 1.15.1 |
| charset-normalizer | 2.0.4 | 2.0.4 |
| conda | 23.5.2 | 23.5.2 |
| conda-content-trust | 0.1.3 | 0.1.3 |
| conda-libmamba-solver | 23.5.0 | 23.5.0 |
| conda-package-handling | 2.1.0 | 2.1.0 |
| conda-package-streaming | 0.8.0 | 0.8.0 |
| cryptography | 39.0.1 | 39.0.1 |
| fmt | 9.1.0 | 9.1.0 |
| icu | 68.1 | 58.2 |
| idna | 3.4 | 3.4 |
| jsonpatch | 1.32 | 1.32 |
| jsonpointer | 2.1 | 2.1 |
| krb5 | 1.20.1 | 1.20.1 |
| libarchive | 3.6.2 | 3.6.2 |
| libcurl | 8.1.1 | 8.1.1 |
| libcxx | 14.0.6 | 14.0.6 |
| libedit | 3.1.20221030 | 3.1.20221030 |
| libev | 4.33 | 4.33 |
| libffi | 3.4.4 | 3.4.4 |
| libiconv | 1.16 | 1.16 |
| libmamba | 1.4.1 | 1.4.1 |
| libmambapy | 1.4.1 | 1.4.1 |
| libnghttp2 | 1.52.0 | 1.52.0 |
| libsolv | 0.7.22 | 0.7.22 |
| libssh2 | 1.10.0 | 1.10.0 |
| libxml2 | 2.10.3 | 2.10.3 |
| lz4-c | 1.9.4 | 1.9.4 |
| ncurses | 6.4 | 6.4 |
| openssl | 3.0.9 | 3.0.9 |
| packaging | 23.0 | 23.0 |
| pcre2 | 10.37 | 10.37 |
| pip | 23.1.2 | 23.1.2 |
| pluggy | 1.0.0 | 1.0.0 |
| pybind11-abi | 4 | 4 |
| pycosat | 0.6.4 | 0.6.4 |
| pycparser | 2.21 | 2.21 |
| pyopenssl | 23.0.0 | 23.0.0 |
| pysocks | 1.7.1 | 1.7.1 |
| python | 3.11.4 | 3.11.4 |
| python.app | 3 | 3 |
| readline | 8.2 | 8.2 |
| reproc | 14.2.4 | 14.2.4 |
| reproc-cpp | 14.2.4 | 14.2.4 |
| requests | 2.29.0 | 2.29.0 |
| ruamel.yaml | 0.17.21 | 0.17.21 |
| setuptools | 67.8.0 | 67.8.0 |
| six | 1.16.0 | 1.16.0 |
| sqlite | 3.41.2 | 3.41.2 |
| tk | 8.6.12 | 8.6.12 |
| toolz | 0.12.0 | 0.12.0 |
| tqdm | 4.65.0 | 4.65.0 |
| tzdata | 2023c | 2023c |
| urllib3 | 1.26.16 | 1.26.16 |
| wheel | 0.38.4 | 0.38.4 |
| xz | 5.4.2 | 5.4.2 |
| yaml-cpp | 0.7.0 | 0.7.0 |
| zlib | 1.2.13 | 1.2.13 |
| zstandard | 0.19.0 | 0.19.0 |
| zstd | 1.5.5 | 1.5.5 |
| Package Name | win-64 |
|---|---|
| boltons | 23.0.0 |
| brotlipy | 0.7.0 |
| bzip2 | 1.0.8 |
| ca-certificates | 2023.05.30 |
| certifi | 2023.5.7 |
| cffi | 1.15.1 |
| charset-normalizer | 2.0.4 |
| colorama | 0.4.6 |
| conda | 23.5.2 |
| conda-content-trust | 0.1.3 |
| conda-libmamba-solver | 23.5.0 |
| conda-package-handling | 2.1.0 |
| conda-package-streaming | 0.8.0 |
| console\_shortcut\_miniconda | 0.1.1 |
| cryptography | 39.0.1 |
| fmt | 9.1.0 |
| idna | 3.4 |
| jsonpatch | 1.32 |
| jsonpointer | 2.1 |
| libarchive | 3.6.2 |
| libcurl | 8.1.1 |
| libffi | 3.4.4 |
| libiconv | 1.16 |
| libmamba | 1.4.1 |
| libmambapy | 1.4.1 |
| libsolv | 0.7.22 |
| libssh2 | 1.10.0 |
| libxml2 | 2.10.3 |
| lz4-c | 1.9.4 |
| menuinst | 1.4.19 |
| openssl | 3.0.9 |
| packaging | 23.0 |
| pcre2 | 10.37 |
| pip | 23.1.2 |
| pluggy | 1.0.0 |
| powershell\_shortcut\_miniconda | 0.0.1 |
| pybind11-abi | 4 |
| pycosat | 0.6.4 |
| pycparser | 2.21 |
| pyopenssl | 23.0.0 |
| pysocks | 1.7.1 |
| python | 3.11.4 |
| reproc | 14.2.4 |
| reproc-cpp | 14.2.4 |
| requests | 2.29.0 |
| ruamel.yaml | 0.17.21 |
| setuptools | 67.8.0 |
| six | 1.16.0 |
| sqlite | 3.41.2 |
| tk | 8.6.12 |
| toolz | 0.12.0 |
| tqdm | 4.65.0 |
| tzdata | 2023c |
| urllib3 | 1.26.16 |
| vc | 14.2 |
| vs2015\_runtime | 14.27.29016 |
| wheel | 0.38.4 |
| win\_inet\_pton | 1.1.0 |
| xz | 5.4.2 |
| yaml-cpp | 0.7.0 |
| zlib | 1.2.13 |
| zstandard | 0.19.0 |
| zstd | 1.5.5 |
| Package Name | linux-64 | linux-aarch64 | linux-ppc64le | linux-s390x | osx-arm64 | osx-64 | win-64 |
|---|---|---|---|---|---|---|---|
| \_libgcc\_mutex | 0.1 | 0.1 | 0.1 | 0.1 | |||
| \_openmp\_mutex | 5.1 | 5.1 | 5.1 | 5.1 | |||
| boltons | 23.0.0 | 23.0.0 | 23.0.0 | 23.0.0 | 23.0.0 | 23.0.0 | 23.0.0 |
| brotlipy | 0.7.0 | 0.7.0 | 0.7.0 | 0.7.0 | 0.7.0 | 0.7.0 | 0.7.0 |
| bzip2 | 1.0.8 | 1.0.8 | 1.0.8 | 1.0.8 | 1.0.8 | 1.0.8 | 1.0.8 |
| c-ares | 1.19.0 | 1.19.0 | 1.19.0 | 1.19.0 | 1.19.0 | 1.19.0 | |
| ca-certificates | 2023.05.30 | 2023.05.30 | 2023.05.30 | 2023.05.30 | 2023.05.30 | 2023.05.30 | 2023.05.30 |
| certifi | 2023.5.7 | 2023.5.7 | 2023.5.7 | 2023.5.7 | 2023.5.7 | 2023.5.7 | 2023.5.7 |
| cffi | 1.15.1 | 1.15.1 | 1.15.1 | 1.15.1 | 1.15.1 | 1.15.1 | 1.15.1 |
| charset-normalizer | 2.0.4 | 2.0.4 | 2.0.4 | 2.0.4 | 2.0.4 | 2.0.4 | 2.0.4 |
| colorama | 0.4.6 | ||||||
| conda | 23.5.1 | 23.5.1 | 23.5.1 | 23.5.1 | 23.5.1 | 23.5.1 | 23.5.1 |
| conda-content-trust | 0.1.3 | 0.1.3 | 0.1.3 | 0.1.3 | 0.1.3 | 0.1.3 | 0.1.3 |
| conda-libmamba-solver | 23.5.0 | 23.5.0 | 23.5.0 | 23.5.0 | 23.5.0 | 23.5.0 | 23.5.0 |
| conda-package-handling | 2.1.0 | 2.1.0 | 2.1.0 | 2.1.0 | 2.1.0 | 2.1.0 | 2.1.0 |
| conda-package-streaming | 0.8.0 | 0.8.0 | 0.8.0 | 0.8.0 | 0.8.0 | 0.8.0 | 0.8.0 |
| console\_shortcut\_miniconda | 0.1.1 | ||||||
| cryptography | 39.0.1 | 39.0.1 | 39.0.1 | 39.0.1 | 39.0.1 | 39.0.1 | 39.0.1 |
| fmt | 9.1.0 | 9.1.0 | 9.1.0 | 9.1.0 | 9.1.0 | 9.1.0 | 9.1.0 |
| icu | 58.2 | 68.1 | 58.2 | 68.1 | 68.1 | 58.2 | |
| idna | 3.4 | 3.4 | 3.4 | 3.3 | 3.4 | 3.4 | 3.4 |
| jsonpatch | 1.32 | 1.32 | 1.32 | 1.32 | 1.32 | 1.32 | 1.32 |
| jsonpointer | 2.1 | 2.1 | 2.1 | 2.1 | 2.1 | 2.1 | 2.1 |
| krb5 | 1.20.1 | 1.20.1 | 1.20.1 | 1.20.1 | 1.20.1 | 1.20.1 | |
| ld\_impl\_linux-64 | 2.38 | ||||||
| ld\_impl\_linux-aarch64 | 2.38 | ||||||
| ld\_impl\_linux-ppc64le | 2.38 | ||||||
| ld\_impl\_linux-s390x | 2.38 | ||||||
| libarchive | 3.6.2 | 3.6.2 | 3.6.2 | 3.6.2 | 3.6.2 | 3.6.2 | 3.6.2 |
| libcurl | 8.1.1 | 8.1.1 | 8.1.1 | 8.1.1 | 8.1.1 | 8.1.1 | 8.1.1 |
| libcxx | 14.0.6 | 14.0.6 | |||||
| libedit | 3.1.20221030 | 3.1.20221030 | 3.1.20221030 | 3.1.20221030 | 3.1.20221030 | 3.1.20221030 | |
| libev | 4.33 | 4.33 | 4.33 | 4.33 | 4.33 | 4.33 | |
| libffi | 3.4.4 | 3.4.4 | 3.4.4 | 3.4.2 | 3.4.4 | 3.4.4 | 3.4.4 |
| libgcc-ng | 11.2.0 | 11.2.0 | 11.2.0 | 11.2.0 | |||
| libgomp | 11.2.0 | 11.2.0 | 11.2.0 | 11.2.0 | |||
| libiconv | 1.16 | 1.16 | 1.16 | ||||
| libmamba | 1.4.1 | 1.4.1 | 1.4.1 | 1.4.1 | 1.4.1 | 1.4.1 | 1.4.1 |
| libmambapy | 1.4.1 | 1.4.1 | 1.4.1 | 1.4.1 | 1.4.1 | 1.4.1 | 1.4.1 |
| libnghttp2 | 1.52.0 | 1.52.0 | 1.52.0 | 1.52.0 | 1.52.0 | 1.52.0 | |
| libsolv | 0.7.22 | 0.7.22 | 0.7.22 | 0.7.22 | 0.7.22 | 0.7.22 | 0.7.22 |
| libssh2 | 1.10.0 | 1.10.0 | 1.10.0 | 1.10.0 | 1.10.0 | 1.10.0 | 1.10.0 |
| libstdcxx-ng | 11.2.0 | 11.2.0 | 11.2.0 | 11.2.0 | |||
| libuuid | 1.41.5 | 1.41.5 | 1.41.5 | 1.41.5 | |||
| libxml2 | 2.10.3 | 2.10.3 | 2.10.3 | 2.10.3 | 2.10.3 | 2.10.3 | 2.10.3 |
| lz4-c | 1.9.4 | 1.9.4 | 1.9.4 | 1.9.4 | 1.9.4 | 1.9.4 | 1.9.4 |
| menuinst | 1.4.19 | ||||||
| ncurses | 6.4 | 6.4 | 6.4 | 6.4 | 6.4 | 6.4 | |
| openssl | 3.0.9 | 3.0.9 | 3.0.9 | 3.0.9 | 3.0.9 | 3.0.9 | 3.0.9 |
| packaging | 23.0 | 23.0 | 23.0 | 23.0 | 23.0 | 23.0 | 23.0 |
| pcre2 | 10.37 | 10.37 | 10.37 | 10.37 | 10.37 | 10.37 | 10.37 |
| pip | 23.1.2 | 23.1.2 | 23.1.2 | 23.1.2 | 23.1.2 | 23.1.2 | 23.1.2 |
| pluggy | 1.0.0 | 1.0.0 | 1.0.0 | 1.0.0 | 1.0.0 | 1.0.0 | 1.0.0 |
| powershell\_shortcut\_miniconda | 0.0.1 | ||||||
| pybind11-abi | 4 | 4 | 4 | 4 | 4 | 4 | 4 |
| pycosat | 0.6.4 | 0.6.4 | 0.6.4 | 0.6.4 | 0.6.4 | 0.6.4 | 0.6.4 |
| pycparser | 2.21 | 2.21 | 2.21 | 2.21 | 2.21 | 2.21 | 2.21 |
| pyopenssl | 23.0.0 | 23.0.0 | 23.0.0 | 23.0.0 | 23.0.0 | 23.0.0 | 23.0.0 |
| pysocks | 1.7.1 | 1.7.1 | 1.7.1 | 1.7.1 | 1.7.1 | 1.7.1 | 1.7.1 |
| python | 3.11.4 | 3.11.4 | 3.11.4 | 3.11.4 | 3.11.4 | 3.11.4 | 3.11.4 |
| python.app | 3 | 3 | |||||
| readline | 8.2 | 8.2 | 8.2 | 8.2 | 8.2 | 8.2 | |
| reproc | 14.2.4 | 14.2.4 | 14.2.4 | 14.2.4 | 14.2.4 | 14.2.4 | 14.2.4 |
| reproc-cpp | 14.2.4 | 14.2.4 | 14.2.4 | 14.2.4 | 14.2.4 | 14.2.4 | 14.2.4 |
| requests | 2.29.0 | 2.29.0 | 2.29.0 | 2.29.0 | 2.29.0 | 2.29.0 | 2.29.0 |
| ruamel.yaml | 0.17.21 | 0.17.21 | 0.17.21 | 0.17.21 | 0.17.21 | 0.17.21 | 0.17.21 |
| setuptools | 67.8.0 | 67.8.0 | 67.8.0 | 67.8.0 | 67.8.0 | 67.8.0 | 67.8.0 |
| six | 1.16.0 | 1.16.0 | 1.16.0 | 1.16.0 | 1.16.0 | 1.16.0 | 1.16.0 |
| sqlite | 3.41.2 | 3.41.2 | 3.41.2 | 3.41.2 | 3.41.2 | 3.41.2 | 3.41.2 |
| tk | 8.6.12 | 8.6.12 | 8.6.12 | 8.6.12 | 8.6.12 | 8.6.12 | 8.6.12 |
| toolz | 0.12.0 | 0.12.0 | 0.12.0 | 0.12.0 | 0.12.0 | 0.12.0 | 0.12.0 |
| tqdm | 4.65.0 | 4.65.0 | 4.65.0 | 4.65.0 | 4.65.0 | 4.65.0 | 4.65.0 |
| tzdata | 2023c | 2023c | 2023c | 2023c | 2023c | 2023c | 2023c |
| urllib3 | 1.26.16 | 1.26.16 | 1.26.16 | 1.26.16 | 1.26.16 | 1.26.16 | 1.26.16 |
| vc | 14.2 | ||||||
| vs2015\_runtime | 14.27.29016 | ||||||
| wheel | 0.38.4 | 0.38.4 | 0.38.4 | 0.38.4 | 0.38.4 | 0.38.4 | 0.38.4 |
| win\_inet\_pton | 1.1.0 | ||||||
| xz | 5.4.2 | 5.4.2 | 5.4.2 | 5.4.2 | 5.4.2 | 5.4.2 | 5.4.2 |
| yaml-cpp | 0.7.0 | 0.7.0 | 0.7.0 | 0.7.0 | 0.7.0 | 0.7.0 | 0.7.0 |
| zlib | 1.2.13 | 1.2.13 | 1.2.13 | 1.2.13 | 1.2.13 | 1.2.13 | 1.2.13 |
| zstandard | 0.19.0 | 0.19.0 | 0.19.0 | 0.19.0 | 0.19.0 | 0.19.0 | 0.19.0 |
| zstd | 1.5.5 | 1.5.5 | 1.5.5 | 1.5.5 | 1.5.5 | 1.5.5 | 1.5.5 |
| Package Name | linux-64 | linux-aarch64 | linux-ppc64le | linux-s390x |
|---|---|---|---|---|
| \_libgcc\_mutex | 0.1 | 0.1 | 0.1 | 0.1 |
| \_openmp\_mutex | 5.1 | 5.1 | 5.1 | 5.1 |
| boltons | 23.0.0 | 23.0.0 | 23.0.0 | 23.0.0 |
| brotlipy | 0.7.0 | 0.7.0 | 0.7.0 | 0.7.0 |
| bzip2 | 1.0.8 | 1.0.8 | 1.0.8 | 1.0.8 |
| c-ares | 1.19.0 | 1.19.0 | 1.19.0 | 1.19.0 |
| ca-certificates | 2023.05.30 | 2023.05.30 | 2023.05.30 | 2023.05.30 |
| certifi | 2023.5.7 | 2023.5.7 | 2023.5.7 | 2023.5.7 |
| cffi | 1.15.1 | 1.15.1 | 1.15.1 | 1.15.1 |
| charset-normalizer | 2.0.4 | 2.0.4 | 2.0.4 | 2.0.4 |
| conda | 23.5.1 | 23.5.1 | 23.5.1 | 23.5.1 |
| conda-content-trust | 0.1.3 | 0.1.3 | 0.1.3 | 0.1.3 |
| conda-libmamba-solver | 23.5.0 | 23.5.0 | 23.5.0 | 23.5.0 |
| conda-package-handling | 2.1.0 | 2.1.0 | 2.1.0 | 2.1.0 |
| conda-package-streaming | 0.8.0 | 0.8.0 | 0.8.0 | 0.8.0 |
| cryptography | 39.0.1 | 39.0.1 | 39.0.1 | 39.0.1 |
| fmt | 9.1.0 | 9.1.0 | 9.1.0 | 9.1.0 |
| icu | 58.2 | 68.1 | 58.2 | 68.1 |
| idna | 3.4 | 3.4 | 3.4 | 3.3 |
| jsonpatch | 1.32 | 1.32 | 1.32 | 1.32 |
| jsonpointer | 2.1 | 2.1 | 2.1 | 2.1 |
| krb5 | 1.20.1 | 1.20.1 | 1.20.1 | 1.20.1 |
| ld\_impl\_linux-64 | 2.38 | |||
| ld\_impl\_linux-aarch64 | 2.38 | |||
| ld\_impl\_linux-ppc64le | 2.38 | |||
| ld\_impl\_linux-s390x | 2.38 | |||
| libarchive | 3.6.2 | 3.6.2 | 3.6.2 | 3.6.2 |
| libcurl | 8.1.1 | 8.1.1 | 8.1.1 | 8.1.1 |
| libedit | 3.1.20221030 | 3.1.20221030 | 3.1.20221030 | 3.1.20221030 |
| libev | 4.33 | 4.33 | 4.33 | 4.33 |
| libffi | 3.4.4 | 3.4.4 | 3.4.4 | 3.4.2 |
| libgcc-ng | 11.2.0 | 11.2.0 | 11.2.0 | 11.2.0 |
| libgomp | 11.2.0 | 11.2.0 | 11.2.0 | 11.2.0 |
| libmamba | 1.4.1 | 1.4.1 | 1.4.1 | 1.4.1 |
| libmambapy | 1.4.1 | 1.4.1 | 1.4.1 | 1.4.1 |
| libnghttp2 | 1.52.0 | 1.52.0 | 1.52.0 | 1.52.0 |
| libsolv | 0.7.22 | 0.7.22 | 0.7.22 | 0.7.22 |
| libssh2 | 1.10.0 | 1.10.0 | 1.10.0 | 1.10.0 |
| libstdcxx-ng | 11.2.0 | 11.2.0 | 11.2.0 | 11.2.0 |
| libuuid | 1.41.5 | 1.41.5 | 1.41.5 | 1.41.5 |
| libxml2 | 2.10.3 | 2.10.3 | 2.10.3 | 2.10.3 |
| lz4-c | 1.9.4 | 1.9.4 | 1.9.4 | 1.9.4 |
| ncurses | 6.4 | 6.4 | 6.4 | 6.4 |
| openssl | 3.0.9 | 3.0.9 | 3.0.9 | 3.0.9 |
| packaging | 23.0 | 23.0 | 23.0 | 23.0 |
| pcre2 | 10.37 | 10.37 | 10.37 | 10.37 |
| pip | 23.1.2 | 23.1.2 | 23.1.2 | 23.1.2 |
| pluggy | 1.0.0 | 1.0.0 | 1.0.0 | 1.0.0 |
| pybind11-abi | 4 | 4 | 4 | 4 |
| pycosat | 0.6.4 | 0.6.4 | 0.6.4 | 0.6.4 |
| pycparser | 2.21 | 2.21 | 2.21 | 2.21 |
| pyopenssl | 23.0.0 | 23.0.0 | 23.0.0 | 23.0.0 |
| pysocks | 1.7.1 | 1.7.1 | 1.7.1 | 1.7.1 |
| python | 3.11.4 | 3.11.4 | 3.11.4 | 3.11.4 |
| readline | 8.2 | 8.2 | 8.2 | 8.2 |
| reproc | 14.2.4 | 14.2.4 | 14.2.4 | 14.2.4 |
| reproc-cpp | 14.2.4 | 14.2.4 | 14.2.4 | 14.2.4 |
| requests | 2.29.0 | 2.29.0 | 2.29.0 | 2.29.0 |
| ruamel.yaml | 0.17.21 | 0.17.21 | 0.17.21 | 0.17.21 |
| setuptools | 67.8.0 | 67.8.0 | 67.8.0 | 67.8.0 |
| six | 1.16.0 | 1.16.0 | 1.16.0 | 1.16.0 |
| sqlite | 3.41.2 | 3.41.2 | 3.41.2 | 3.41.2 |
| tk | 8.6.12 | 8.6.12 | 8.6.12 | 8.6.12 |
| toolz | 0.12.0 | 0.12.0 | 0.12.0 | 0.12.0 |
| tqdm | 4.65.0 | 4.65.0 | 4.65.0 | 4.65.0 |
| tzdata | 2023c | 2023c | 2023c | 2023c |
| urllib3 | 1.26.16 | 1.26.16 | 1.26.16 | 1.26.16 |
| wheel | 0.38.4 | 0.38.4 | 0.38.4 | 0.38.4 |
| xz | 5.4.2 | 5.4.2 | 5.4.2 | 5.4.2 |
| yaml-cpp | 0.7.0 | 0.7.0 | 0.7.0 | 0.7.0 |
| zlib | 1.2.13 | 1.2.13 | 1.2.13 | 1.2.13 |
| zstandard | 0.19.0 | 0.19.0 | 0.19.0 | 0.19.0 |
| zstd | 1.5.5 | 1.5.5 | 1.5.5 | 1.5.5 |
| Package Name | osx-arm64 | osx-64 |
|---|---|---|
| boltons | 23.0.0 | 23.0.0 |
| brotlipy | 0.7.0 | 0.7.0 |
| bzip2 | 1.0.8 | 1.0.8 |
| c-ares | 1.19.0 | 1.19.0 |
| ca-certificates | 2023.05.30 | 2023.05.30 |
| certifi | 2023.5.7 | 2023.5.7 |
| cffi | 1.15.1 | 1.15.1 |
| charset-normalizer | 2.0.4 | 2.0.4 |
| conda | 23.5.1 | 23.5.1 |
| conda-content-trust | 0.1.3 | 0.1.3 |
| conda-libmamba-solver | 23.5.0 | 23.5.0 |
| conda-package-handling | 2.1.0 | 2.1.0 |
| conda-package-streaming | 0.8.0 | 0.8.0 |
| cryptography | 39.0.1 | 39.0.1 |
| fmt | 9.1.0 | 9.1.0 |
| icu | 68.1 | 58.2 |
| idna | 3.4 | 3.4 |
| jsonpatch | 1.32 | 1.32 |
| jsonpointer | 2.1 | 2.1 |
| krb5 | 1.20.1 | 1.20.1 |
| libarchive | 3.6.2 | 3.6.2 |
| libcurl | 8.1.1 | 8.1.1 |
| libcxx | 14.0.6 | 14.0.6 |
| libedit | 3.1.20221030 | 3.1.20221030 |
| libev | 4.33 | 4.33 |
| libffi | 3.4.4 | 3.4.4 |
| libiconv | 1.16 | 1.16 |
| libmamba | 1.4.1 | 1.4.1 |
| libmambapy | 1.4.1 | 1.4.1 |
| libnghttp2 | 1.52.0 | 1.52.0 |
| libsolv | 0.7.22 | 0.7.22 |
| libssh2 | 1.10.0 | 1.10.0 |
| libxml2 | 2.10.3 | 2.10.3 |
| lz4-c | 1.9.4 | 1.9.4 |
| ncurses | 6.4 | 6.4 |
| openssl | 3.0.9 | 3.0.9 |
| packaging | 23.0 | 23.0 |
| pcre2 | 10.37 | 10.37 |
| pip | 23.1.2 | 23.1.2 |
| pluggy | 1.0.0 | 1.0.0 |
| pybind11-abi | 4 | 4 |
| pycosat | 0.6.4 | 0.6.4 |
| pycparser | 2.21 | 2.21 |
| pyopenssl | 23.0.0 | 23.0.0 |
| pysocks | 1.7.1 | 1.7.1 |
| python | 3.11.4 | 3.11.4 |
| python.app | 3 | 3 |
| readline | 8.2 | 8.2 |
| reproc | 14.2.4 | 14.2.4 |
| reproc-cpp | 14.2.4 | 14.2.4 |
| requests | 2.29.0 | 2.29.0 |
| ruamel.yaml | 0.17.21 | 0.17.21 |
| setuptools | 67.8.0 | 67.8.0 |
| six | 1.16.0 | 1.16.0 |
| sqlite | 3.41.2 | 3.41.2 |
| tk | 8.6.12 | 8.6.12 |
| toolz | 0.12.0 | 0.12.0 |
| tqdm | 4.65.0 | 4.65.0 |
| tzdata | 2023c | 2023c |
| urllib3 | 1.26.16 | 1.26.16 |
| wheel | 0.38.4 | 0.38.4 |
| xz | 5.4.2 | 5.4.2 |
| yaml-cpp | 0.7.0 | 0.7.0 |
| zlib | 1.2.13 | 1.2.13 |
| zstandard | 0.19.0 | 0.19.0 |
| zstd | 1.5.5 | 1.5.5 |
| Package Name | win-64 |
|---|---|
| boltons | 23.0.0 |
| brotlipy | 0.7.0 |
| bzip2 | 1.0.8 |
| ca-certificates | 2023.05.30 |
| certifi | 2023.5.7 |
| cffi | 1.15.1 |
| charset-normalizer | 2.0.4 |
| colorama | 0.4.6 |
| conda | 23.5.1 |
| conda-content-trust | 0.1.3 |
| conda-libmamba-solver | 23.5.0 |
| conda-package-handling | 2.1.0 |
| conda-package-streaming | 0.8.0 |
| console\_shortcut\_miniconda | 0.1.1 |
| cryptography | 39.0.1 |
| fmt | 9.1.0 |
| idna | 3.4 |
| jsonpatch | 1.32 |
| jsonpointer | 2.1 |
| libarchive | 3.6.2 |
| libcurl | 8.1.1 |
| libffi | 3.4.4 |
| libiconv | 1.16 |
| libmamba | 1.4.1 |
| libmambapy | 1.4.1 |
| libsolv | 0.7.22 |
| libssh2 | 1.10.0 |
| libxml2 | 2.10.3 |
| lz4-c | 1.9.4 |
| menuinst | 1.4.19 |
| openssl | 3.0.9 |
| packaging | 23.0 |
| pcre2 | 10.37 |
| pip | 23.1.2 |
| pluggy | 1.0.0 |
| powershell\_shortcut\_miniconda | 0.0.1 |
| pybind11-abi | 4 |
| pycosat | 0.6.4 |
| pycparser | 2.21 |
| pyopenssl | 23.0.0 |
| pysocks | 1.7.1 |
| python | 3.11.4 |
| reproc | 14.2.4 |
| reproc-cpp | 14.2.4 |
| requests | 2.29.0 |
| ruamel.yaml | 0.17.21 |
| setuptools | 67.8.0 |
| six | 1.16.0 |
| sqlite | 3.41.2 |
| tk | 8.6.12 |
| toolz | 0.12.0 |
| tqdm | 4.65.0 |
| tzdata | 2023c |
| urllib3 | 1.26.16 |
| vc | 14.2 |
| vs2015\_runtime | 14.27.29016 |
| wheel | 0.38.4 |
| win\_inet\_pton | 1.1.0 |
| xz | 5.4.2 |
| yaml-cpp | 0.7.0 |
| zlib | 1.2.13 |
| zstandard | 0.19.0 |
| zstd | 1.5.5 |
| Package Name | linux-64 | linux-aarch64 | linux-ppc64le | linux-s390x | osx-arm64 | osx-64 | win-64 |
|---|---|---|---|---|---|---|---|
| \_libgcc\_mutex | 0.1 | 0.1 | 0.1 | 0.1 | |||
| \_openmp\_mutex | 5.1 | 5.1 | 5.1 | 5.1 | |||
| boltons | 23.0.0 | 23.0.0 | 23.0.0 | 23.0.0 | 23.0.0 | 23.0.0 | 23.0.0 |
| brotlipy | 0.7.0 | 0.7.0 | 0.7.0 | 0.7.0 | 0.7.0 | 0.7.0 | 0.7.0 |
| bzip2 | 1.0.8 | 1.0.8 | 1.0.8 | 1.0.8 | 1.0.8 | 1.0.8 | 1.0.8 |
| c-ares | 1.19.0 | 1.19.0 | 1.19.0 | 1.19.0 | 1.19.0 | 1.19.0 | |
| ca-certificates | 2023.05.30 | 2023.05.30 | 2023.05.30 | 2023.05.30 | 2023.05.30 | 2023.05.30 | 2023.05.30 |
| certifi | 2023.5.7 | 2023.5.7 | 2023.5.7 | 2023.5.7 | 2023.5.7 | 2023.5.7 | 2023.5.7 |
| cffi | 1.15.1 | 1.15.1 | 1.15.1 | 1.15.1 | 1.15.1 | 1.15.1 | 1.15.1 |
| charset-normalizer | 2.0.4 | 2.0.4 | 2.0.4 | 2.0.4 | 2.0.4 | 2.0.4 | 2.0.4 |
| colorama | 0.4.6 | ||||||
| conda | 23.5.0 | 23.5.0 | 23.5.0 | 23.5.0 | 23.5.0 | 23.5.0 | 23.5.0 |
| conda-content-trust | 0.1.3 | 0.1.3 | 0.1.3 | 0.1.3 | 0.1.3 | 0.1.3 | 0.1.3 |
| conda-libmamba-solver | 23.5.0 | 23.5.0 | 23.5.0 | 23.5.0 | 23.5.0 | 23.5.0 | 23.5.0 |
| conda-package-handling | 2.1.0 | 2.1.0 | 2.1.0 | 2.1.0 | 2.1.0 | 2.1.0 | 2.1.0 |
| conda-package-streaming | 0.8.0 | 0.8.0 | 0.8.0 | 0.8.0 | 0.8.0 | 0.8.0 | 0.8.0 |
| console\_shortcut\_miniconda | 0.1.1 | ||||||
| cryptography | 39.0.1 | 39.0.1 | 39.0.1 | 39.0.1 | 39.0.1 | 39.0.1 | 39.0.1 |
| fmt | 9.1.0 | 9.1.0 | 9.1.0 | 9.1.0 | 9.1.0 | 9.1.0 | 9.1.0 |
| icu | 58.2 | 68.1 | 58.2 | 68.1 | 68.1 | 58.2 | |
| idna | 3.4 | 3.4 | 3.4 | 3.3 | 3.4 | 3.4 | 3.4 |
| jsonpatch | 1.32 | 1.32 | 1.32 | 1.32 | 1.32 | 1.32 | 1.32 |
| jsonpointer | 2.1 | 2.1 | 2.1 | 2.1 | 2.1 | 2.1 | 2.1 |
| krb5 | 1.20.1 | 1.20.1 | 1.20.1 | 1.20.1 | 1.20.1 | 1.20.1 | |
| ld\_impl\_linux-64 | 2.38 | ||||||
| ld\_impl\_linux-aarch64 | 2.38 | ||||||
| ld\_impl\_linux-ppc64le | 2.38 | ||||||
| ld\_impl\_linux-s390x | 2.38 | ||||||
| libarchive | 3.6.2 | 3.6.2 | 3.6.2 | 3.6.2 | 3.6.2 | 3.6.2 | 3.6.2 |
| libcurl | 8.1.1 | 8.1.1 | 8.1.1 | 8.1.1 | 8.1.1 | 8.1.1 | 8.1.1 |
| libcxx | 14.0.6 | 14.0.6 | |||||
| libedit | 3.1.20221030 | 3.1.20221030 | 3.1.20221030 | 3.1.20221030 | 3.1.20221030 | 3.1.20221030 | |
| libev | 4.33 | 4.33 | 4.33 | 4.33 | 4.33 | 4.33 | |
| libffi | 3.4.4 | 3.4.4 | 3.4.4 | 3.4.2 | 3.4.4 | 3.4.4 | 3.4.4 |
| libgcc-ng | 11.2.0 | 11.2.0 | 11.2.0 | 11.2.0 | |||
| libgomp | 11.2.0 | 11.2.0 | 11.2.0 | 11.2.0 | |||
| libiconv | 1.16 | 1.16 | 1.16 | ||||
| libmamba | 1.4.1 | 1.4.1 | 1.4.1 | 1.4.1 | 1.4.1 | 1.4.1 | 1.4.1 |
| libmambapy | 1.4.1 | 1.4.1 | 1.4.1 | 1.4.1 | 1.4.1 | 1.4.1 | 1.4.1 |
| libnghttp2 | 1.52.0 | 1.52.0 | 1.52.0 | 1.52.0 | 1.52.0 | 1.52.0 | |
| libsolv | 0.7.22 | 0.7.22 | 0.7.22 | 0.7.22 | 0.7.22 | 0.7.22 | 0.7.22 |
| libssh2 | 1.10.0 | 1.10.0 | 1.10.0 | 1.10.0 | 1.10.0 | 1.10.0 | 1.10.0 |
| libstdcxx-ng | 11.2.0 | 11.2.0 | 11.2.0 | 11.2.0 | |||
| libuuid | 1.41.5 | 1.41.5 | 1.41.5 | 1.41.5 | |||
| libxml2 | 2.10.3 | 2.10.3 | 2.10.3 | 2.10.3 | 2.10.3 | 2.10.3 | 2.10.3 |
| lz4-c | 1.9.4 | 1.9.4 | 1.9.4 | 1.9.4 | 1.9.4 | 1.9.4 | 1.9.4 |
| menuinst | 1.4.19 | ||||||
| ncurses | 6.4 | 6.4 | 6.4 | 6.4 | 6.4 | 6.4 | |
| openssl | 3.0.9 | 3.0.9 | 3.0.9 | 3.0.9 | 3.0.9 | 3.0.9 | 3.0.9 |
| packaging | 23.0 | 23.0 | 23.0 | 23.0 | 23.0 | 23.0 | 23.0 |
| pcre2 | 10.37 | 10.37 | 10.37 | 10.37 | 10.37 | 10.37 | 10.37 |
| pip | 23.1.2 | 23.1.2 | 23.1.2 | 23.1.2 | 23.1.2 | 23.1.2 | 23.1.2 |
| pluggy | 1.0.0 | 1.0.0 | 1.0.0 | 1.0.0 | 1.0.0 | 1.0.0 | 1.0.0 |
| powershell\_shortcut\_miniconda | 0.0.1 | ||||||
| pybind11-abi | 4 | 4 | 4 | 4 | 4 | 4 | 4 |
| pycosat | 0.6.4 | 0.6.4 | 0.6.4 | 0.6.4 | 0.6.4 | 0.6.4 | 0.6.4 |
| pycparser | 2.21 | 2.21 | 2.21 | 2.21 | 2.21 | 2.21 | 2.21 |
| pyopenssl | 23.0.0 | 23.0.0 | 23.0.0 | 23.0.0 | 23.0.0 | 23.0.0 | 23.0.0 |
| pysocks | 1.7.1 | 1.7.1 | 1.7.1 | 1.7.1 | 1.7.1 | 1.7.1 | 1.7.1 |
| python | 3.11.4 | 3.11.4 | 3.11.4 | 3.11.4 | 3.11.4 | 3.11.4 | 3.11.4 |
| python.app | 3 | 3 | |||||
| readline | 8.2 | 8.2 | 8.2 | 8.2 | 8.2 | 8.2 | |
| reproc | 14.2.4 | 14.2.4 | 14.2.4 | 14.2.4 | 14.2.4 | 14.2.4 | 14.2.4 |
| reproc-cpp | 14.2.4 | 14.2.4 | 14.2.4 | 14.2.4 | 14.2.4 | 14.2.4 | 14.2.4 |
| requests | 2.29.0 | 2.29.0 | 2.29.0 | 2.29.0 | 2.29.0 | 2.29.0 | 2.29.0 |
| ruamel.yaml | 0.17.21 | 0.17.21 | 0.17.21 | 0.17.21 | 0.17.21 | 0.17.21 | 0.17.21 |
| setuptools | 67.8.0 | 67.8.0 | 67.8.0 | 67.8.0 | 67.8.0 | 67.8.0 | 67.8.0 |
| six | 1.16.0 | 1.16.0 | 1.16.0 | 1.16.0 | 1.16.0 | 1.16.0 | 1.16.0 |
| sqlite | 3.41.2 | 3.41.2 | 3.41.2 | 3.41.2 | 3.41.2 | 3.41.2 | 3.41.2 |
| tk | 8.6.12 | 8.6.12 | 8.6.12 | 8.6.12 | 8.6.12 | 8.6.12 | 8.6.12 |
| toolz | 0.12.0 | 0.12.0 | 0.12.0 | 0.12.0 | 0.12.0 | 0.12.0 | 0.12.0 |
| tqdm | 4.65.0 | 4.65.0 | 4.65.0 | 4.65.0 | 4.65.0 | 4.65.0 | 4.65.0 |
| tzdata | 2023c | 2023c | 2023c | 2023c | 2023c | 2023c | 2023c |
| urllib3 | 1.26.16 | 1.26.16 | 1.26.16 | 1.26.16 | 1.26.16 | 1.26.16 | 1.26.16 |
| vc | 14.2 | ||||||
| vs2015\_runtime | 14.27.29016 | ||||||
| wheel | 0.38.4 | 0.38.4 | 0.38.4 | 0.38.4 | 0.38.4 | 0.38.4 | 0.38.4 |
| win\_inet\_pton | 1.1.0 | ||||||
| xz | 5.4.2 | 5.4.2 | 5.4.2 | 5.4.2 | 5.4.2 | 5.4.2 | 5.4.2 |
| yaml-cpp | 0.7.0 | 0.7.0 | 0.7.0 | 0.7.0 | 0.7.0 | 0.7.0 | 0.7.0 |
| zlib | 1.2.13 | 1.2.13 | 1.2.13 | 1.2.13 | 1.2.13 | 1.2.13 | 1.2.13 |
| zstandard | 0.19.0 | 0.19.0 | 0.19.0 | 0.19.0 | 0.19.0 | 0.19.0 | 0.19.0 |
| zstd | 1.5.5 | 1.5.5 | 1.5.5 | 1.5.5 | 1.5.5 | 1.5.5 | 1.5.5 |
| Package Name | linux-64 | linux-aarch64 | linux-ppc64le | linux-s390x |
|---|---|---|---|---|
| \_libgcc\_mutex | 0.1 | 0.1 | 0.1 | 0.1 |
| \_openmp\_mutex | 5.1 | 5.1 | 5.1 | 5.1 |
| boltons | 23.0.0 | 23.0.0 | 23.0.0 | 23.0.0 |
| brotlipy | 0.7.0 | 0.7.0 | 0.7.0 | 0.7.0 |
| bzip2 | 1.0.8 | 1.0.8 | 1.0.8 | 1.0.8 |
| c-ares | 1.19.0 | 1.19.0 | 1.19.0 | 1.19.0 |
| ca-certificates | 2023.05.30 | 2023.05.30 | 2023.05.30 | 2023.05.30 |
| certifi | 2023.5.7 | 2023.5.7 | 2023.5.7 | 2023.5.7 |
| cffi | 1.15.1 | 1.15.1 | 1.15.1 | 1.15.1 |
| charset-normalizer | 2.0.4 | 2.0.4 | 2.0.4 | 2.0.4 |
| conda | 23.5.0 | 23.5.0 | 23.5.0 | 23.5.0 |
| conda-content-trust | 0.1.3 | 0.1.3 | 0.1.3 | 0.1.3 |
| conda-libmamba-solver | 23.5.0 | 23.5.0 | 23.5.0 | 23.5.0 |
| conda-package-handling | 2.1.0 | 2.1.0 | 2.1.0 | 2.1.0 |
| conda-package-streaming | 0.8.0 | 0.8.0 | 0.8.0 | 0.8.0 |
| cryptography | 39.0.1 | 39.0.1 | 39.0.1 | 39.0.1 |
| fmt | 9.1.0 | 9.1.0 | 9.1.0 | 9.1.0 |
| icu | 58.2 | 68.1 | 58.2 | 68.1 |
| idna | 3.4 | 3.4 | 3.4 | 3.3 |
| jsonpatch | 1.32 | 1.32 | 1.32 | 1.32 |
| jsonpointer | 2.1 | 2.1 | 2.1 | 2.1 |
| krb5 | 1.20.1 | 1.20.1 | 1.20.1 | 1.20.1 |
| ld\_impl\_linux-64 | 2.38 | |||
| ld\_impl\_linux-aarch64 | 2.38 | |||
| ld\_impl\_linux-ppc64le | 2.38 | |||
| ld\_impl\_linux-s390x | 2.38 | |||
| libarchive | 3.6.2 | 3.6.2 | 3.6.2 | 3.6.2 |
| libcurl | 8.1.1 | 8.1.1 | 8.1.1 | 8.1.1 |
| libedit | 3.1.20221030 | 3.1.20221030 | 3.1.20221030 | 3.1.20221030 |
| libev | 4.33 | 4.33 | 4.33 | 4.33 |
| libffi | 3.4.4 | 3.4.4 | 3.4.4 | 3.4.2 |
| libgcc-ng | 11.2.0 | 11.2.0 | 11.2.0 | 11.2.0 |
| libgomp | 11.2.0 | 11.2.0 | 11.2.0 | 11.2.0 |
| libmamba | 1.4.1 | 1.4.1 | 1.4.1 | 1.4.1 |
| libmambapy | 1.4.1 | 1.4.1 | 1.4.1 | 1.4.1 |
| libnghttp2 | 1.52.0 | 1.52.0 | 1.52.0 | 1.52.0 |
| libsolv | 0.7.22 | 0.7.22 | 0.7.22 | 0.7.22 |
| libssh2 | 1.10.0 | 1.10.0 | 1.10.0 | 1.10.0 |
| libstdcxx-ng | 11.2.0 | 11.2.0 | 11.2.0 | 11.2.0 |
| libuuid | 1.41.5 | 1.41.5 | 1.41.5 | 1.41.5 |
| libxml2 | 2.10.3 | 2.10.3 | 2.10.3 | 2.10.3 |
| lz4-c | 1.9.4 | 1.9.4 | 1.9.4 | 1.9.4 |
| ncurses | 6.4 | 6.4 | 6.4 | 6.4 |
| openssl | 3.0.9 | 3.0.9 | 3.0.9 | 3.0.9 |
| packaging | 23.0 | 23.0 | 23.0 | 23.0 |
| pcre2 | 10.37 | 10.37 | 10.37 | 10.37 |
| pip | 23.1.2 | 23.1.2 | 23.1.2 | 23.1.2 |
| pluggy | 1.0.0 | 1.0.0 | 1.0.0 | 1.0.0 |
| pybind11-abi | 4 | 4 | 4 | 4 |
| pycosat | 0.6.4 | 0.6.4 | 0.6.4 | 0.6.4 |
| pycparser | 2.21 | 2.21 | 2.21 | 2.21 |
| pyopenssl | 23.0.0 | 23.0.0 | 23.0.0 | 23.0.0 |
| pysocks | 1.7.1 | 1.7.1 | 1.7.1 | 1.7.1 |
| python | 3.11.4 | 3.11.4 | 3.11.4 | 3.11.4 |
| readline | 8.2 | 8.2 | 8.2 | 8.2 |
| reproc | 14.2.4 | 14.2.4 | 14.2.4 | 14.2.4 |
| reproc-cpp | 14.2.4 | 14.2.4 | 14.2.4 | 14.2.4 |
| requests | 2.29.0 | 2.29.0 | 2.29.0 | 2.29.0 |
| ruamel.yaml | 0.17.21 | 0.17.21 | 0.17.21 | 0.17.21 |
| setuptools | 67.8.0 | 67.8.0 | 67.8.0 | 67.8.0 |
| six | 1.16.0 | 1.16.0 | 1.16.0 | 1.16.0 |
| sqlite | 3.41.2 | 3.41.2 | 3.41.2 | 3.41.2 |
| tk | 8.6.12 | 8.6.12 | 8.6.12 | 8.6.12 |
| toolz | 0.12.0 | 0.12.0 | 0.12.0 | 0.12.0 |
| tqdm | 4.65.0 | 4.65.0 | 4.65.0 | 4.65.0 |
| tzdata | 2023c | 2023c | 2023c | 2023c |
| urllib3 | 1.26.16 | 1.26.16 | 1.26.16 | 1.26.16 |
| wheel | 0.38.4 | 0.38.4 | 0.38.4 | 0.38.4 |
| xz | 5.4.2 | 5.4.2 | 5.4.2 | 5.4.2 |
| yaml-cpp | 0.7.0 | 0.7.0 | 0.7.0 | 0.7.0 |
| zlib | 1.2.13 | 1.2.13 | 1.2.13 | 1.2.13 |
| zstandard | 0.19.0 | 0.19.0 | 0.19.0 | 0.19.0 |
| zstd | 1.5.5 | 1.5.5 | 1.5.5 | 1.5.5 |
| Package Name | osx-arm64 | osx-64 |
|---|---|---|
| boltons | 23.0.0 | 23.0.0 |
| brotlipy | 0.7.0 | 0.7.0 |
| bzip2 | 1.0.8 | 1.0.8 |
| c-ares | 1.19.0 | 1.19.0 |
| ca-certificates | 2023.05.30 | 2023.05.30 |
| certifi | 2023.5.7 | 2023.5.7 |
| cffi | 1.15.1 | 1.15.1 |
| charset-normalizer | 2.0.4 | 2.0.4 |
| conda | 23.5.0 | 23.5.0 |
| conda-content-trust | 0.1.3 | 0.1.3 |
| conda-libmamba-solver | 23.5.0 | 23.5.0 |
| conda-package-handling | 2.1.0 | 2.1.0 |
| conda-package-streaming | 0.8.0 | 0.8.0 |
| cryptography | 39.0.1 | 39.0.1 |
| fmt | 9.1.0 | 9.1.0 |
| icu | 68.1 | 58.2 |
| idna | 3.4 | 3.4 |
| jsonpatch | 1.32 | 1.32 |
| jsonpointer | 2.1 | 2.1 |
| krb5 | 1.20.1 | 1.20.1 |
| libarchive | 3.6.2 | 3.6.2 |
| libcurl | 8.1.1 | 8.1.1 |
| libcxx | 14.0.6 | 14.0.6 |
| libedit | 3.1.20221030 | 3.1.20221030 |
| libev | 4.33 | 4.33 |
| libffi | 3.4.4 | 3.4.4 |
| libiconv | 1.16 | 1.16 |
| libmamba | 1.4.1 | 1.4.1 |
| libmambapy | 1.4.1 | 1.4.1 |
| libnghttp2 | 1.52.0 | 1.52.0 |
| libsolv | 0.7.22 | 0.7.22 |
| libssh2 | 1.10.0 | 1.10.0 |
| libxml2 | 2.10.3 | 2.10.3 |
| lz4-c | 1.9.4 | 1.9.4 |
| ncurses | 6.4 | 6.4 |
| openssl | 3.0.9 | 3.0.9 |
| packaging | 23.0 | 23.0 |
| pcre2 | 10.37 | 10.37 |
| pip | 23.1.2 | 23.1.2 |
| pluggy | 1.0.0 | 1.0.0 |
| pybind11-abi | 4 | 4 |
| pycosat | 0.6.4 | 0.6.4 |
| pycparser | 2.21 | 2.21 |
| pyopenssl | 23.0.0 | 23.0.0 |
| pysocks | 1.7.1 | 1.7.1 |
| python | 3.11.4 | 3.11.4 |
| python.app | 3 | 3 |
| readline | 8.2 | 8.2 |
| reproc | 14.2.4 | 14.2.4 |
| reproc-cpp | 14.2.4 | 14.2.4 |
| requests | 2.29.0 | 2.29.0 |
| ruamel.yaml | 0.17.21 | 0.17.21 |
| setuptools | 67.8.0 | 67.8.0 |
| six | 1.16.0 | 1.16.0 |
| sqlite | 3.41.2 | 3.41.2 |
| tk | 8.6.12 | 8.6.12 |
| toolz | 0.12.0 | 0.12.0 |
| tqdm | 4.65.0 | 4.65.0 |
| tzdata | 2023c | 2023c |
| urllib3 | 1.26.16 | 1.26.16 |
| wheel | 0.38.4 | 0.38.4 |
| xz | 5.4.2 | 5.4.2 |
| yaml-cpp | 0.7.0 | 0.7.0 |
| zlib | 1.2.13 | 1.2.13 |
| zstandard | 0.19.0 | 0.19.0 |
| zstd | 1.5.5 | 1.5.5 |
| Package Name | win-64 |
|---|---|
| boltons | 23.0.0 |
| brotlipy | 0.7.0 |
| bzip2 | 1.0.8 |
| ca-certificates | 2023.05.30 |
| certifi | 2023.5.7 |
| cffi | 1.15.1 |
| charset-normalizer | 2.0.4 |
| colorama | 0.4.6 |
| conda | 23.5.0 |
| conda-content-trust | 0.1.3 |
| conda-libmamba-solver | 23.5.0 |
| conda-package-handling | 2.1.0 |
| conda-package-streaming | 0.8.0 |
| console\_shortcut\_miniconda | 0.1.1 |
| cryptography | 39.0.1 |
| fmt | 9.1.0 |
| idna | 3.4 |
| jsonpatch | 1.32 |
| jsonpointer | 2.1 |
| libarchive | 3.6.2 |
| libcurl | 8.1.1 |
| libffi | 3.4.4 |
| libiconv | 1.16 |
| libmamba | 1.4.1 |
| libmambapy | 1.4.1 |
| libsolv | 0.7.22 |
| libssh2 | 1.10.0 |
| libxml2 | 2.10.3 |
| lz4-c | 1.9.4 |
| menuinst | 1.4.19 |
| openssl | 3.0.9 |
| packaging | 23.0 |
| pcre2 | 10.37 |
| pip | 23.1.2 |
| pluggy | 1.0.0 |
| powershell\_shortcut\_miniconda | 0.0.1 |
| pybind11-abi | 4 |
| pycosat | 0.6.4 |
| pycparser | 2.21 |
| pyopenssl | 23.0.0 |
| pysocks | 1.7.1 |
| python | 3.11.4 |
| reproc | 14.2.4 |
| reproc-cpp | 14.2.4 |
| requests | 2.29.0 |
| ruamel.yaml | 0.17.21 |
| setuptools | 67.8.0 |
| six | 1.16.0 |
| sqlite | 3.41.2 |
| tk | 8.6.12 |
| toolz | 0.12.0 |
| tqdm | 4.65.0 |
| tzdata | 2023c |
| urllib3 | 1.26.16 |
| vc | 14.2 |
| vs2015\_runtime | 14.27.29016 |
| wheel | 0.38.4 |
| win\_inet\_pton | 1.1.0 |
| xz | 5.4.2 |
| yaml-cpp | 0.7.0 |
| zlib | 1.2.13 |
| zstandard | 0.19.0 |
| zstd | 1.5.5 |
| Package Name | linux-64 | linux-aarch64 | linux-s390x | osx-arm64 | osx-64 | win-64 |
|---|---|---|---|---|---|---|
| \_libgcc\_mutex | 0.1 | 0.1 | 0.1 | |||
| \_openmp\_mutex | 5.1 | 5.1 | 5.1 | |||
| anaconda-anon-usage | 0.5.0 | 0.5.0 | 0.5.0 | 0.5.0 | 0.5.0 | 0.5.0 |
| anaconda\_powershell\_prompt | 1.1.0 | |||||
| anaconda\_prompt | 1.1.0 | |||||
| archspec | 0.2.3 | 0.2.3 | 0.2.3 | 0.2.3 | 0.2.3 | 0.2.3 |
| boltons | 23.0.0 | 23.0.0 | 23.0.0 | 23.0.0 | 23.0.0 | 23.0.0 |
| brotli-python | 1.0.9 | 1.0.9 | 1.0.9 | 1.0.9 | 1.0.9 | 1.0.9 |
| bzip2 | 1.0.8 | 1.0.8 | 1.0.8 | 1.0.8 | 1.0.8 | 1.0.8 |
| c-ares | 1.19.1 | 1.19.1 | 1.19.1 | 1.19.1 | 1.19.1 | |
| ca-certificates | 2024.11.26 | 2024.11.26 | 2024.11.26 | 2024.11.26 | 2024.11.26 | 2024.11.26 |
| certifi | 2024.8.30 | 2024.8.30 | 2024.8.30 | 2024.8.30 | 2024.8.30 | 2024.8.30 |
| cffi | 1.17.1 | 1.17.1 | 1.17.1 | 1.17.1 | 1.17.1 | 1.17.1 |
| charset-normalizer | 3.3.2 | 3.3.2 | 3.3.2 | 3.3.2 | 3.3.2 | 3.3.2 |
| colorama | 0.4.6 | |||||
| conda | 24.11.1 | 24.11.1 | 24.11.1 | 24.11.1 | 24.11.1 | 24.11.1 |
| conda-anaconda-telemetry | 0.1.1 | 0.1.1 | 0.1.1 | 0.1.1 | 0.1.1 | 0.1.1 |
| conda-content-trust | 0.2.0 | 0.2.0 | 0.2.0 | 0.2.0 | 0.2.0 | 0.2.0 |
| conda-libmamba-solver | 24.9.0 | 24.9.0 | 24.9.0 | 24.9.0 | 24.9.0 | 24.9.0 |
| conda-package-handling | 2.4.0 | 2.4.0 | 2.4.0 | 2.4.0 | 2.4.0 | 2.4.0 |
| conda-package-streaming | 0.11.0 | 0.11.0 | 0.11.0 | 0.11.0 | 0.11.0 | 0.11.0 |
| cryptography | 43.0.3 | 43.0.3 | 43.0.3 | 43.0.3 | 43.0.3 | 43.0.3 |
| distro | 1.9.0 | 1.9.0 | 1.9.0 | 1.9.0 | 1.9.0 | 1.9.0 |
| expat | 2.6.4 | 2.6.4 | 2.6.4 | 2.6.4 | 2.6.4 | 2.6.4 |
| fmt | 9.1.0 | 9.1.0 | 9.1.0 | 9.1.0 | 9.1.0 | 9.1.0 |
| frozendict | 2.4.2 | 2.4.2 | 2.4.2 | 2.4.2 | 2.4.2 | 2.4.2 |
| icu | 73.1 | 73.1 | 73.1 | 73.1 | 73.1 | |
| idna | 3.7 | 3.7 | 3.7 | 3.7 | 3.7 | 3.7 |
| jsonpatch | 1.33 | 1.33 | 1.33 | 1.33 | 1.33 | 1.33 |
| jsonpointer | 2.1 | 2.1 | 2.1 | 2.1 | 2.1 | 2.1 |
| krb5 | 1.20.1 | 1.20.1 | 1.20.1 | 1.20.1 | 1.20.1 | |
| ld\_impl\_linux-64 | 2.40 | |||||
| ld\_impl\_linux-aarch64 | 2.40 | |||||
| ld\_impl\_linux-s390x | 2.40 | |||||
| libarchive | 3.7.4 | 3.7.4 | 3.7.4 | 3.7.4 | 3.7.4 | 3.7.4 |
| libcurl | 8.9.1 | 8.9.1 | 8.9.1 | 8.9.1 | 8.9.1 | 8.9.1 |
| libcxx | 14.0.6 | 14.0.6 | ||||
| libedit | 3.1.20230828 | 3.1.20230828 | 3.1.20230828 | 3.1.20230828 | 3.1.20230828 | |
| libev | 4.33 | 4.33 | 4.33 | 4.33 | 4.33 | |
| libffi | 3.4.4 | 3.4.4 | 3.4.4 | 3.4.4 | 3.4.4 | 3.4.4 |
| libgcc-ng | 11.2.0 | 11.2.0 | 11.2.0 | |||
| libgomp | 11.2.0 | 11.2.0 | 11.2.0 | |||
| libiconv | 1.16 | 1.16 | 1.16 | |||
| libmamba | 1.5.11 | 1.5.11 | 1.5.11 | 1.5.11 | 1.5.11 | 1.5.11 |
| libmambapy | 1.5.11 | 1.5.11 | 1.5.11 | 1.5.11 | 1.5.11 | 1.5.11 |
| libnghttp2 | 1.57.0 | 1.57.0 | 1.57.0 | 1.57.0 | 1.57.0 | |
| libsolv | 0.7.24 | 0.7.24 | 0.7.24 | 0.7.24 | 0.7.24 | 0.7.24 |
| libssh2 | 1.11.1 | 1.11.1 | 1.11.1 | 1.11.1 | 1.11.1 | 1.11.1 |
| libstdcxx-ng | 11.2.0 | 11.2.0 | 11.2.0 | |||
| libuuid | 1.41.5 | 1.41.5 | 1.41.5 | |||
| libxml2 | 2.13.5 | 2.13.5 | 2.13.5 | 2.13.5 | 2.13.5 | 2.13.5 |
| lz4-c | 1.9.4 | 1.9.4 | 1.9.4 | 1.9.4 | 1.9.4 | 1.9.4 |
| menuinst | 2.2.0 | 2.2.0 | 2.2.0 | 2.2.0 | 2.2.0 | 2.2.0 |
| ncurses | 6.4 | 6.4 | 6.4 | 6.4 | 6.4 | |
| openssl | 3.0.15 | 3.0.15 | 3.0.15 | 3.0.15 | 3.0.15 | 3.0.15 |
| packaging | 24.1 | 24.1 | 24.1 | 24.1 | 24.1 | 24.1 |
| pcre2 | 10.42 | 10.42 | 10.42 | 10.42 | 10.42 | 10.42 |
| pip | 24.2 | 24.2 | 24.2 | 24.2 | 24.2 | 24.2 |
| platformdirs | 3.10.0 | 3.10.0 | 3.10.0 | 3.10.0 | 3.10.0 | 3.10.0 |
| pluggy | 1.5.0 | 1.5.0 | 1.5.0 | 1.5.0 | 1.5.0 | 1.5.0 |
| pybind11-abi | 5 | 5 | 5 | 5 | 5 | 5 |
| pycosat | 0.6.6 | 0.6.6 | 0.6.6 | 0.6.6 | 0.6.6 | 0.6.6 |
| pycparser | 2.21 | 2.21 | 2.21 | 2.21 | 2.21 | 2.21 |
| pysocks | 1.7.1 | 1.7.1 | 1.7.1 | 1.7.1 | 1.7.1 | 1.7.1 |
| python | 3.12.8 | 3.12.8 | 3.12.8 | 3.12.8 | 3.12.8 | 3.12.8 |
| python.app | 3 | 3 | ||||
| readline | 8.2 | 8.2 | 8.2 | 8.2 | 8.2 | |
| reproc | 14.2.4 | 14.2.4 | 14.2.4 | 14.2.4 | 14.2.4 | 14.2.4 |
| reproc-cpp | 14.2.4 | 14.2.4 | 14.2.4 | 14.2.4 | 14.2.4 | 14.2.4 |
| requests | 2.32.3 | 2.32.3 | 2.32.3 | 2.32.3 | 2.32.3 | 2.32.3 |
| ruamel.yaml | 0.18.6 | 0.18.6 | 0.18.6 | 0.18.6 | 0.18.6 | 0.18.6 |
| ruamel.yaml.clib | 0.2.8 | 0.2.8 | 0.2.8 | 0.2.8 | 0.2.8 | 0.2.8 |
| setuptools | 75.1.0 | 75.1.0 | 75.1.0 | 75.1.0 | 75.1.0 | 75.1.0 |
| sqlite | 3.45.3 | 3.45.3 | 3.45.3 | 3.45.3 | 3.45.3 | 3.45.3 |
| tk | 8.6.14 | 8.6.14 | 8.6.14 | 8.6.14 | 8.6.14 | 8.6.14 |
| tqdm | 4.66.5 | 4.66.5 | 4.66.5 | 4.66.5 | 4.66.5 | 4.66.5 |
| truststore | 0.8.0 | 0.8.0 | 0.8.0 | 0.8.0 | 0.8.0 | 0.8.0 |
| tzdata | 2024b | 2024b | 2024b | 2024b | 2024b | 2024b |
| urllib3 | 2.2.3 | 2.2.3 | 2.2.3 | 2.2.3 | 2.2.3 | 2.2.3 |
| vc | 14.40 | |||||
| vs2015\_runtime | 14.42.34433 | |||||
| wheel | 0.44.0 | 0.44.0 | 0.44.0 | 0.44.0 | 0.44.0 | 0.44.0 |
| win\_inet\_pton | 1.1.0 | |||||
| xz | 5.4.6 | 5.4.6 | 5.4.6 | 5.4.6 | 5.4.6 | 5.4.6 |
| yaml-cpp | 0.8.0 | 0.8.0 | 0.8.0 | 0.8.0 | 0.8.0 | 0.8.0 |
| zlib | 1.2.13 | 1.2.13 | 1.2.13 | 1.2.13 | 1.2.13 | 1.2.13 |
| zstandard | 0.23.0 | 0.23.0 | 0.23.0 | 0.23.0 | 0.23.0 | 0.23.0 |
| zstd | 1.5.6 | 1.5.6 | 1.5.6 | 1.5.6 | 1.5.6 | 1.5.6 |
| Package Name | linux-64 | linux-aarch64 | linux-s390x |
|---|---|---|---|
| \_libgcc\_mutex | 0.1 | 0.1 | 0.1 |
| \_openmp\_mutex | 5.1 | 5.1 | 5.1 |
| anaconda-anon-usage | 0.5.0 | 0.5.0 | 0.5.0 |
| archspec | 0.2.3 | 0.2.3 | 0.2.3 |
| boltons | 23.0.0 | 23.0.0 | 23.0.0 |
| brotli-python | 1.0.9 | 1.0.9 | 1.0.9 |
| bzip2 | 1.0.8 | 1.0.8 | 1.0.8 |
| c-ares | 1.19.1 | 1.19.1 | 1.19.1 |
| ca-certificates | 2024.11.26 | 2024.11.26 | 2024.11.26 |
| certifi | 2024.8.30 | 2024.8.30 | 2024.8.30 |
| cffi | 1.17.1 | 1.17.1 | 1.17.1 |
| charset-normalizer | 3.3.2 | 3.3.2 | 3.3.2 |
| conda | 24.11.1 | 24.11.1 | 24.11.1 |
| conda-anaconda-telemetry | 0.1.1 | 0.1.1 | 0.1.1 |
| conda-content-trust | 0.2.0 | 0.2.0 | 0.2.0 |
| conda-libmamba-solver | 24.9.0 | 24.9.0 | 24.9.0 |
| conda-package-handling | 2.4.0 | 2.4.0 | 2.4.0 |
| conda-package-streaming | 0.11.0 | 0.11.0 | 0.11.0 |
| cryptography | 43.0.3 | 43.0.3 | 43.0.3 |
| distro | 1.9.0 | 1.9.0 | 1.9.0 |
| expat | 2.6.4 | 2.6.4 | 2.6.4 |
| fmt | 9.1.0 | 9.1.0 | 9.1.0 |
| frozendict | 2.4.2 | 2.4.2 | 2.4.2 |
| icu | 73.1 | 73.1 | 73.1 |
| idna | 3.7 | 3.7 | 3.7 |
| jsonpatch | 1.33 | 1.33 | 1.33 |
| jsonpointer | 2.1 | 2.1 | 2.1 |
| krb5 | 1.20.1 | 1.20.1 | 1.20.1 |
| ld\_impl\_linux-64 | 2.40 | ||
| ld\_impl\_linux-aarch64 | 2.40 | ||
| ld\_impl\_linux-s390x | 2.40 | ||
| libarchive | 3.7.4 | 3.7.4 | 3.7.4 |
| libcurl | 8.9.1 | 8.9.1 | 8.9.1 |
| libedit | 3.1.20230828 | 3.1.20230828 | 3.1.20230828 |
| libev | 4.33 | 4.33 | 4.33 |
| libffi | 3.4.4 | 3.4.4 | 3.4.4 |
| libgcc-ng | 11.2.0 | 11.2.0 | 11.2.0 |
| libgomp | 11.2.0 | 11.2.0 | 11.2.0 |
| libmamba | 1.5.11 | 1.5.11 | 1.5.11 |
| libmambapy | 1.5.11 | 1.5.11 | 1.5.11 |
| libnghttp2 | 1.57.0 | 1.57.0 | 1.57.0 |
| libsolv | 0.7.24 | 0.7.24 | 0.7.24 |
| libssh2 | 1.11.1 | 1.11.1 | 1.11.1 |
| libstdcxx-ng | 11.2.0 | 11.2.0 | 11.2.0 |
| libuuid | 1.41.5 | 1.41.5 | 1.41.5 |
| libxml2 | 2.13.5 | 2.13.5 | 2.13.5 |
| lz4-c | 1.9.4 | 1.9.4 | 1.9.4 |
| menuinst | 2.2.0 | 2.2.0 | 2.2.0 |
| ncurses | 6.4 | 6.4 | 6.4 |
| openssl | 3.0.15 | 3.0.15 | 3.0.15 |
| packaging | 24.1 | 24.1 | 24.1 |
| pcre2 | 10.42 | 10.42 | 10.42 |
| pip | 24.2 | 24.2 | 24.2 |
| platformdirs | 3.10.0 | 3.10.0 | 3.10.0 |
| pluggy | 1.5.0 | 1.5.0 | 1.5.0 |
| pybind11-abi | 5 | 5 | 5 |
| pycosat | 0.6.6 | 0.6.6 | 0.6.6 |
| pycparser | 2.21 | 2.21 | 2.21 |
| pysocks | 1.7.1 | 1.7.1 | 1.7.1 |
| python | 3.12.8 | 3.12.8 | 3.12.8 |
| readline | 8.2 | 8.2 | 8.2 |
| reproc | 14.2.4 | 14.2.4 | 14.2.4 |
| reproc-cpp | 14.2.4 | 14.2.4 | 14.2.4 |
| requests | 2.32.3 | 2.32.3 | 2.32.3 |
| ruamel.yaml | 0.18.6 | 0.18.6 | 0.18.6 |
| ruamel.yaml.clib | 0.2.8 | 0.2.8 | 0.2.8 |
| setuptools | 75.1.0 | 75.1.0 | 75.1.0 |
| sqlite | 3.45.3 | 3.45.3 | 3.45.3 |
| tk | 8.6.14 | 8.6.14 | 8.6.14 |
| tqdm | 4.66.5 | 4.66.5 | 4.66.5 |
| truststore | 0.8.0 | 0.8.0 | 0.8.0 |
| tzdata | 2024b | 2024b | 2024b |
| urllib3 | 2.2.3 | 2.2.3 | 2.2.3 |
| wheel | 0.44.0 | 0.44.0 | 0.44.0 |
| xz | 5.4.6 | 5.4.6 | 5.4.6 |
| yaml-cpp | 0.8.0 | 0.8.0 | 0.8.0 |
| zlib | 1.2.13 | 1.2.13 | 1.2.13 |
| zstandard | 0.23.0 | 0.23.0 | 0.23.0 |
| zstd | 1.5.6 | 1.5.6 | 1.5.6 |
| Package Name | osx-arm64 | osx-64 |
|---|---|---|
| anaconda-anon-usage | 0.5.0 | 0.5.0 |
| archspec | 0.2.3 | 0.2.3 |
| boltons | 23.0.0 | 23.0.0 |
| brotli-python | 1.0.9 | 1.0.9 |
| bzip2 | 1.0.8 | 1.0.8 |
| c-ares | 1.19.1 | 1.19.1 |
| ca-certificates | 2024.11.26 | 2024.11.26 |
| certifi | 2024.8.30 | 2024.8.30 |
| cffi | 1.17.1 | 1.17.1 |
| charset-normalizer | 3.3.2 | 3.3.2 |
| conda | 24.11.1 | 24.11.1 |
| conda-anaconda-telemetry | 0.1.1 | 0.1.1 |
| conda-content-trust | 0.2.0 | 0.2.0 |
| conda-libmamba-solver | 24.9.0 | 24.9.0 |
| conda-package-handling | 2.4.0 | 2.4.0 |
| conda-package-streaming | 0.11.0 | 0.11.0 |
| cryptography | 43.0.3 | 43.0.3 |
| distro | 1.9.0 | 1.9.0 |
| expat | 2.6.4 | 2.6.4 |
| fmt | 9.1.0 | 9.1.0 |
| frozendict | 2.4.2 | 2.4.2 |
| icu | 73.1 | 73.1 |
| idna | 3.7 | 3.7 |
| jsonpatch | 1.33 | 1.33 |
| jsonpointer | 2.1 | 2.1 |
| krb5 | 1.20.1 | 1.20.1 |
| libarchive | 3.7.4 | 3.7.4 |
| libcurl | 8.9.1 | 8.9.1 |
| libcxx | 14.0.6 | 14.0.6 |
| libedit | 3.1.20230828 | 3.1.20230828 |
| libev | 4.33 | 4.33 |
| libffi | 3.4.4 | 3.4.4 |
| libiconv | 1.16 | 1.16 |
| libmamba | 1.5.11 | 1.5.11 |
| libmambapy | 1.5.11 | 1.5.11 |
| libnghttp2 | 1.57.0 | 1.57.0 |
| libsolv | 0.7.24 | 0.7.24 |
| libssh2 | 1.11.1 | 1.11.1 |
| libxml2 | 2.13.5 | 2.13.5 |
| lz4-c | 1.9.4 | 1.9.4 |
| menuinst | 2.2.0 | 2.2.0 |
| ncurses | 6.4 | 6.4 |
| openssl | 3.0.15 | 3.0.15 |
| packaging | 24.1 | 24.1 |
| pcre2 | 10.42 | 10.42 |
| pip | 24.2 | 24.2 |
| platformdirs | 3.10.0 | 3.10.0 |
| pluggy | 1.5.0 | 1.5.0 |
| pybind11-abi | 5 | 5 |
| pycosat | 0.6.6 | 0.6.6 |
| pycparser | 2.21 | 2.21 |
| pysocks | 1.7.1 | 1.7.1 |
| python | 3.12.8 | 3.12.8 |
| python.app | 3 | 3 |
| readline | 8.2 | 8.2 |
| reproc | 14.2.4 | 14.2.4 |
| reproc-cpp | 14.2.4 | 14.2.4 |
| requests | 2.32.3 | 2.32.3 |
| ruamel.yaml | 0.18.6 | 0.18.6 |
| ruamel.yaml.clib | 0.2.8 | 0.2.8 |
| setuptools | 75.1.0 | 75.1.0 |
| sqlite | 3.45.3 | 3.45.3 |
| tk | 8.6.14 | 8.6.14 |
| tqdm | 4.66.5 | 4.66.5 |
| truststore | 0.8.0 | 0.8.0 |
| tzdata | 2024b | 2024b |
| urllib3 | 2.2.3 | 2.2.3 |
| wheel | 0.44.0 | 0.44.0 |
| xz | 5.4.6 | 5.4.6 |
| yaml-cpp | 0.8.0 | 0.8.0 |
| zlib | 1.2.13 | 1.2.13 |
| zstandard | 0.23.0 | 0.23.0 |
| zstd | 1.5.6 | 1.5.6 |
| Package Name | win-64 |
|---|---|
| anaconda-anon-usage | 0.5.0 |
| anaconda\_powershell\_prompt | 1.1.0 |
| anaconda\_prompt | 1.1.0 |
| archspec | 0.2.3 |
| boltons | 23.0.0 |
| brotli-python | 1.0.9 |
| bzip2 | 1.0.8 |
| ca-certificates | 2024.11.26 |
| certifi | 2024.8.30 |
| cffi | 1.17.1 |
| charset-normalizer | 3.3.2 |
| colorama | 0.4.6 |
| conda | 24.11.1 |
| conda-anaconda-telemetry | 0.1.1 |
| conda-content-trust | 0.2.0 |
| conda-libmamba-solver | 24.9.0 |
| conda-package-handling | 2.4.0 |
| conda-package-streaming | 0.11.0 |
| cryptography | 43.0.3 |
| distro | 1.9.0 |
| expat | 2.6.4 |
| fmt | 9.1.0 |
| frozendict | 2.4.2 |
| idna | 3.7 |
| jsonpatch | 1.33 |
| jsonpointer | 2.1 |
| libarchive | 3.7.4 |
| libcurl | 8.9.1 |
| libffi | 3.4.4 |
| libiconv | 1.16 |
| libmamba | 1.5.11 |
| libmambapy | 1.5.11 |
| libsolv | 0.7.24 |
| libssh2 | 1.11.1 |
| libxml2 | 2.13.5 |
| lz4-c | 1.9.4 |
| menuinst | 2.2.0 |
| openssl | 3.0.15 |
| packaging | 24.1 |
| pcre2 | 10.42 |
| pip | 24.2 |
| platformdirs | 3.10.0 |
| pluggy | 1.5.0 |
| pybind11-abi | 5 |
| pycosat | 0.6.6 |
| pycparser | 2.21 |
| pysocks | 1.7.1 |
| python | 3.12.8 |
| reproc | 14.2.4 |
| reproc-cpp | 14.2.4 |
| requests | 2.32.3 |
| ruamel.yaml | 0.18.6 |
| ruamel.yaml.clib | 0.2.8 |
| setuptools | 75.1.0 |
| sqlite | 3.45.3 |
| tk | 8.6.14 |
| tqdm | 4.66.5 |
| truststore | 0.8.0 |
| tzdata | 2024b |
| urllib3 | 2.2.3 |
| vc | 14.40 |
| vs2015\_runtime | 14.42.34433 |
| wheel | 0.44.0 |
| win\_inet\_pton | 1.1.0 |
| xz | 5.4.6 |
| yaml-cpp | 0.8.0 |
| zlib | 1.2.13 |
| zstandard | 0.23.0 |
| zstd | 1.5.6 |
| Package Name | linux-64 | linux-aarch64 | linux-s390x | osx-arm64 | osx-64 | win-64 |
|---|---|---|---|---|---|---|
| \_libgcc\_mutex | 0.1 | 0.1 | 0.1 | |||
| \_openmp\_mutex | 5.1 | 5.1 | 5.1 | |||
| anaconda-anon-usage | 0.4.4 | 0.4.4 | 0.4.4 | 0.4.4 | 0.4.4 | 0.4.4 |
| anaconda\_powershell\_prompt | 1.1.0 | |||||
| anaconda\_prompt | 1.1.0 | |||||
| archspec | 0.2.3 | 0.2.3 | 0.2.3 | 0.2.3 | 0.2.3 | 0.2.3 |
| boltons | 23.0.0 | 23.0.0 | 23.0.0 | 23.0.0 | 23.0.0 | 23.0.0 |
| brotli-python | 1.0.9 | 1.0.9 | 1.0.9 | 1.0.9 | 1.0.9 | 1.0.9 |
| bzip2 | 1.0.8 | 1.0.8 | 1.0.8 | 1.0.8 | 1.0.8 | 1.0.8 |
| c-ares | 1.19.1 | 1.19.1 | 1.19.1 | 1.19.1 | 1.19.1 | |
| ca-certificates | 2024.9.24 | 2024.9.24 | 2024.9.24 | 2024.9.24 | 2024.9.24 | 2024.9.24 |
| certifi | 2024.8.30 | 2024.8.30 | 2024.8.30 | 2024.8.30 | 2024.8.30 | 2024.8.30 |
| cffi | 1.17.1 | 1.17.1 | 1.17.1 | 1.17.1 | 1.17.1 | 1.17.1 |
| charset-normalizer | 3.3.2 | 3.3.2 | 3.3.2 | 3.3.2 | 3.3.2 | 3.3.2 |
| colorama | 0.4.6 | |||||
| conda | 24.9.2 | 24.9.2 | 24.9.2 | 24.9.2 | 24.9.2 | 24.9.2 |
| conda-content-trust | 0.2.0 | 0.2.0 | 0.2.0 | 0.2.0 | 0.2.0 | 0.2.0 |
| conda-libmamba-solver | 24.9.0 | 24.9.0 | 24.9.0 | 24.9.0 | 24.9.0 | 24.9.0 |
| conda-package-handling | 2.3.0 | 2.3.0 | 2.3.0 | 2.3.0 | 2.3.0 | 2.3.0 |
| conda-package-streaming | 0.10.0 | 0.10.0 | 0.10.0 | 0.10.0 | 0.10.0 | 0.10.0 |
| cryptography | 43.0.0 | 43.0.0 | 43.0.0 | 43.0.0 | 43.0.0 | 43.0.0 |
| distro | 1.9.0 | 1.9.0 | 1.9.0 | 1.9.0 | 1.9.0 | 1.9.0 |
| expat | 2.6.3 | 2.6.3 | 2.6.3 | 2.6.3 | 2.6.3 | 2.6.3 |
| fmt | 9.1.0 | 9.1.0 | 9.1.0 | 9.1.0 | 9.1.0 | 9.1.0 |
| frozendict | 2.4.2 | 2.4.2 | 2.4.2 | 2.4.2 | 2.4.2 | 2.4.2 |
| icu | 73.1 | 73.1 | 73.1 | 73.1 | 73.1 | |
| idna | 3.7 | 3.7 | 3.7 | 3.7 | 3.7 | 3.7 |
| jsonpatch | 1.33 | 1.33 | 1.33 | 1.33 | 1.33 | 1.33 |
| jsonpointer | 2.1 | 2.1 | 2.1 | 2.1 | 2.1 | 2.1 |
| krb5 | 1.20.1 | 1.20.1 | 1.20.1 | 1.20.1 | 1.20.1 | |
| ld\_impl\_linux-64 | 2.40 | |||||
| ld\_impl\_linux-aarch64 | 2.40 | |||||
| ld\_impl\_linux-s390x | 2.40 | |||||
| libarchive | 3.7.4 | 3.7.4 | 3.7.4 | 3.7.4 | 3.7.4 | 3.7.4 |
| libcurl | 8.9.1 | 8.9.1 | 8.9.1 | 8.9.1 | 8.9.1 | 8.9.1 |
| libcxx | 14.0.6 | 14.0.6 | ||||
| libedit | 3.1.20230828 | 3.1.20230828 | 3.1.20230828 | 3.1.20230828 | 3.1.20230828 | |
| libev | 4.33 | 4.33 | 4.33 | 4.33 | 4.33 | |
| libffi | 3.4.4 | 3.4.4 | 3.4.4 | 3.4.4 | 3.4.4 | 3.4.4 |
| libgcc-ng | 11.2.0 | 11.2.0 | 11.2.0 | |||
| libgomp | 11.2.0 | 11.2.0 | 11.2.0 | |||
| libiconv | 1.16 | 1.16 | 1.16 | |||
| libmamba | 1.5.8 | 1.5.8 | 1.5.8 | 1.5.8 | 1.5.8 | 1.5.8 |
| libmambapy | 1.5.8 | 1.5.8 | 1.5.8 | 1.5.8 | 1.5.8 | 1.5.8 |
| libnghttp2 | 1.57.0 | 1.57.0 | 1.57.0 | 1.57.0 | 1.57.0 | |
| libsolv | 0.7.24 | 0.7.24 | 0.7.24 | 0.7.24 | 0.7.24 | 0.7.24 |
| libssh2 | 1.11.0 | 1.11.0 | 1.11.0 | 1.11.0 | 1.11.0 | 1.11.0 |
| libstdcxx-ng | 11.2.0 | 11.2.0 | 11.2.0 | |||
| libuuid | 1.41.5 | 1.41.5 | 1.41.5 | |||
| libxml2 | 2.13.1 | 2.13.1 | 2.13.1 | 2.13.1 | 2.13.1 | 2.13.1 |
| lz4-c | 1.9.4 | 1.9.4 | 1.9.4 | 1.9.4 | 1.9.4 | 1.9.4 |
| menuinst | 2.1.2 | 2.1.2 | 2.1.2 | 2.1.2 | 2.1.2 | 2.1.2 |
| ncurses | 6.4 | 6.4 | 6.4 | 6.4 | 6.4 | |
| openssl | 3.0.15 | 3.0.15 | 3.0.15 | 3.0.15 | 3.0.15 | 3.0.15 |
| packaging | 24.1 | 24.1 | 24.1 | 24.1 | 24.1 | 24.1 |
| pcre2 | 10.42 | 10.42 | 10.42 | 10.42 | 10.42 | 10.42 |
| pip | 24.2 | 24.2 | 24.2 | 24.2 | 24.2 | 24.2 |
| platformdirs | 3.10.0 | 3.10.0 | 3.10.0 | 3.10.0 | 3.10.0 | 3.10.0 |
| pluggy | 1.0.0 | 1.0.0 | 1.0.0 | 1.0.0 | 1.0.0 | 1.0.0 |
| pybind11-abi | 5 | 5 | 5 | 5 | 5 | 5 |
| pycosat | 0.6.6 | 0.6.6 | 0.6.6 | 0.6.6 | 0.6.6 | 0.6.6 |
| pycparser | 2.21 | 2.21 | 2.21 | 2.21 | 2.21 | 2.21 |
| pysocks | 1.7.1 | 1.7.1 | 1.7.1 | 1.7.1 | 1.7.1 | 1.7.1 |
| python | 3.12.7 | 3.12.7 | 3.12.7 | 3.12.7 | 3.12.7 | 3.12.7 |
| python.app | 3 | 3 | ||||
| readline | 8.2 | 8.2 | 8.2 | 8.2 | 8.2 | |
| reproc | 14.2.4 | 14.2.4 | 14.2.4 | 14.2.4 | 14.2.4 | 14.2.4 |
| reproc-cpp | 14.2.4 | 14.2.4 | 14.2.4 | 14.2.4 | 14.2.4 | 14.2.4 |
| requests | 2.32.3 | 2.32.3 | 2.32.3 | 2.32.3 | 2.32.3 | 2.32.3 |
| ruamel.yaml | 0.18.6 | 0.18.6 | 0.18.6 | 0.18.6 | 0.18.6 | 0.18.6 |
| ruamel.yaml.clib | 0.2.8 | 0.2.8 | 0.2.8 | 0.2.8 | 0.2.8 | 0.2.8 |
| setuptools | 75.1.0 | 75.1.0 | 75.1.0 | 75.1.0 | 75.1.0 | 75.1.0 |
| sqlite | 3.45.3 | 3.45.3 | 3.45.3 | 3.45.3 | 3.45.3 | 3.45.3 |
| tk | 8.6.14 | 8.6.14 | 8.6.14 | 8.6.14 | 8.6.14 | 8.6.14 |
| tqdm | 4.66.5 | 4.66.5 | 4.66.5 | 4.66.5 | 4.66.5 | 4.66.5 |
| truststore | 0.8.0 | 0.8.0 | 0.8.0 | 0.8.0 | 0.8.0 | 0.8.0 |
| tzdata | 2024b | 2024b | 2024b | 2024b | 2024b | 2024b |
| urllib3 | 2.2.3 | 2.2.3 | 2.2.3 | 2.2.3 | 2.2.3 | 2.2.3 |
| vc | 14.40 | |||||
| vs2015\_runtime | 14.40.33807 | |||||
| wheel | 0.44.0 | 0.44.0 | 0.44.0 | 0.44.0 | 0.44.0 | 0.44.0 |
| win\_inet\_pton | 1.1.0 | |||||
| xz | 5.4.6 | 5.4.6 | 5.4.6 | 5.4.6 | 5.4.6 | 5.4.6 |
| yaml-cpp | 0.8.0 | 0.8.0 | 0.8.0 | 0.8.0 | 0.8.0 | 0.8.0 |
| zlib | 1.2.13 | 1.2.13 | 1.2.13 | 1.2.13 | 1.2.13 | 1.2.13 |
| zstandard | 0.23.0 | 0.23.0 | 0.23.0 | 0.23.0 | 0.23.0 | 0.23.0 |
| zstd | 1.5.6 | 1.5.6 | 1.5.6 | 1.5.6 | 1.5.6 | 1.5.6 |
| Package Name | linux-64 | linux-aarch64 | linux-s390x |
|---|---|---|---|
| \_libgcc\_mutex | 0.1 | 0.1 | 0.1 |
| \_openmp\_mutex | 5.1 | 5.1 | 5.1 |
| anaconda-anon-usage | 0.4.4 | 0.4.4 | 0.4.4 |
| archspec | 0.2.3 | 0.2.3 | 0.2.3 |
| boltons | 23.0.0 | 23.0.0 | 23.0.0 |
| brotli-python | 1.0.9 | 1.0.9 | 1.0.9 |
| bzip2 | 1.0.8 | 1.0.8 | 1.0.8 |
| c-ares | 1.19.1 | 1.19.1 | 1.19.1 |
| ca-certificates | 2024.9.24 | 2024.9.24 | 2024.9.24 |
| certifi | 2024.8.30 | 2024.8.30 | 2024.8.30 |
| cffi | 1.17.1 | 1.17.1 | 1.17.1 |
| charset-normalizer | 3.3.2 | 3.3.2 | 3.3.2 |
| conda | 24.9.2 | 24.9.2 | 24.9.2 |
| conda-content-trust | 0.2.0 | 0.2.0 | 0.2.0 |
| conda-libmamba-solver | 24.9.0 | 24.9.0 | 24.9.0 |
| conda-package-handling | 2.3.0 | 2.3.0 | 2.3.0 |
| conda-package-streaming | 0.10.0 | 0.10.0 | 0.10.0 |
| cryptography | 43.0.0 | 43.0.0 | 43.0.0 |
| distro | 1.9.0 | 1.9.0 | 1.9.0 |
| expat | 2.6.3 | 2.6.3 | 2.6.3 |
| fmt | 9.1.0 | 9.1.0 | 9.1.0 |
| frozendict | 2.4.2 | 2.4.2 | 2.4.2 |
| icu | 73.1 | 73.1 | 73.1 |
| idna | 3.7 | 3.7 | 3.7 |
| jsonpatch | 1.33 | 1.33 | 1.33 |
| jsonpointer | 2.1 | 2.1 | 2.1 |
| krb5 | 1.20.1 | 1.20.1 | 1.20.1 |
| ld\_impl\_linux-64 | 2.40 | ||
| ld\_impl\_linux-aarch64 | 2.40 | ||
| ld\_impl\_linux-s390x | 2.40 | ||
| libarchive | 3.7.4 | 3.7.4 | 3.7.4 |
| libcurl | 8.9.1 | 8.9.1 | 8.9.1 |
| libedit | 3.1.20230828 | 3.1.20230828 | 3.1.20230828 |
| libev | 4.33 | 4.33 | 4.33 |
| libffi | 3.4.4 | 3.4.4 | 3.4.4 |
| libgcc-ng | 11.2.0 | 11.2.0 | 11.2.0 |
| libgomp | 11.2.0 | 11.2.0 | 11.2.0 |
| libmamba | 1.5.8 | 1.5.8 | 1.5.8 |
| libmambapy | 1.5.8 | 1.5.8 | 1.5.8 |
| libnghttp2 | 1.57.0 | 1.57.0 | 1.57.0 |
| libsolv | 0.7.24 | 0.7.24 | 0.7.24 |
| libssh2 | 1.11.0 | 1.11.0 | 1.11.0 |
| libstdcxx-ng | 11.2.0 | 11.2.0 | 11.2.0 |
| libuuid | 1.41.5 | 1.41.5 | 1.41.5 |
| libxml2 | 2.13.1 | 2.13.1 | 2.13.1 |
| lz4-c | 1.9.4 | 1.9.4 | 1.9.4 |
| menuinst | 2.1.2 | 2.1.2 | 2.1.2 |
| ncurses | 6.4 | 6.4 | 6.4 |
| openssl | 3.0.15 | 3.0.15 | 3.0.15 |
| packaging | 24.1 | 24.1 | 24.1 |
| pcre2 | 10.42 | 10.42 | 10.42 |
| pip | 24.2 | 24.2 | 24.2 |
| platformdirs | 3.10.0 | 3.10.0 | 3.10.0 |
| pluggy | 1.0.0 | 1.0.0 | 1.0.0 |
| pybind11-abi | 5 | 5 | 5 |
| pycosat | 0.6.6 | 0.6.6 | 0.6.6 |
| pycparser | 2.21 | 2.21 | 2.21 |
| pysocks | 1.7.1 | 1.7.1 | 1.7.1 |
| python | 3.12.7 | 3.12.7 | 3.12.7 |
| readline | 8.2 | 8.2 | 8.2 |
| reproc | 14.2.4 | 14.2.4 | 14.2.4 |
| reproc-cpp | 14.2.4 | 14.2.4 | 14.2.4 |
| requests | 2.32.3 | 2.32.3 | 2.32.3 |
| ruamel.yaml | 0.18.6 | 0.18.6 | 0.18.6 |
| ruamel.yaml.clib | 0.2.8 | 0.2.8 | 0.2.8 |
| setuptools | 75.1.0 | 75.1.0 | 75.1.0 |
| sqlite | 3.45.3 | 3.45.3 | 3.45.3 |
| tk | 8.6.14 | 8.6.14 | 8.6.14 |
| tqdm | 4.66.5 | 4.66.5 | 4.66.5 |
| truststore | 0.8.0 | 0.8.0 | 0.8.0 |
| tzdata | 2024b | 2024b | 2024b |
| urllib3 | 2.2.3 | 2.2.3 | 2.2.3 |
| wheel | 0.44.0 | 0.44.0 | 0.44.0 |
| xz | 5.4.6 | 5.4.6 | 5.4.6 |
| yaml-cpp | 0.8.0 | 0.8.0 | 0.8.0 |
| zlib | 1.2.13 | 1.2.13 | 1.2.13 |
| zstandard | 0.23.0 | 0.23.0 | 0.23.0 |
| zstd | 1.5.6 | 1.5.6 | 1.5.6 |
| Package Name | osx-arm64 | osx-64 |
|---|---|---|
| anaconda-anon-usage | 0.4.4 | 0.4.4 |
| archspec | 0.2.3 | 0.2.3 |
| boltons | 23.0.0 | 23.0.0 |
| brotli-python | 1.0.9 | 1.0.9 |
| bzip2 | 1.0.8 | 1.0.8 |
| c-ares | 1.19.1 | 1.19.1 |
| ca-certificates | 2024.9.24 | 2024.9.24 |
| certifi | 2024.8.30 | 2024.8.30 |
| cffi | 1.17.1 | 1.17.1 |
| charset-normalizer | 3.3.2 | 3.3.2 |
| conda | 24.9.2 | 24.9.2 |
| conda-content-trust | 0.2.0 | 0.2.0 |
| conda-libmamba-solver | 24.9.0 | 24.9.0 |
| conda-package-handling | 2.3.0 | 2.3.0 |
| conda-package-streaming | 0.10.0 | 0.10.0 |
| cryptography | 43.0.0 | 43.0.0 |
| distro | 1.9.0 | 1.9.0 |
| expat | 2.6.3 | 2.6.3 |
| fmt | 9.1.0 | 9.1.0 |
| frozendict | 2.4.2 | 2.4.2 |
| icu | 73.1 | 73.1 |
| idna | 3.7 | 3.7 |
| jsonpatch | 1.33 | 1.33 |
| jsonpointer | 2.1 | 2.1 |
| krb5 | 1.20.1 | 1.20.1 |
| libarchive | 3.7.4 | 3.7.4 |
| libcurl | 8.9.1 | 8.9.1 |
| libcxx | 14.0.6 | 14.0.6 |
| libedit | 3.1.20230828 | 3.1.20230828 |
| libev | 4.33 | 4.33 |
| libffi | 3.4.4 | 3.4.4 |
| libiconv | 1.16 | 1.16 |
| libmamba | 1.5.8 | 1.5.8 |
| libmambapy | 1.5.8 | 1.5.8 |
| libnghttp2 | 1.57.0 | 1.57.0 |
| libsolv | 0.7.24 | 0.7.24 |
| libssh2 | 1.11.0 | 1.11.0 |
| libxml2 | 2.13.1 | 2.13.1 |
| lz4-c | 1.9.4 | 1.9.4 |
| menuinst | 2.1.2 | 2.1.2 |
| ncurses | 6.4 | 6.4 |
| openssl | 3.0.15 | 3.0.15 |
| packaging | 24.1 | 24.1 |
| pcre2 | 10.42 | 10.42 |
| pip | 24.2 | 24.2 |
| platformdirs | 3.10.0 | 3.10.0 |
| pluggy | 1.0.0 | 1.0.0 |
| pybind11-abi | 5 | 5 |
| pycosat | 0.6.6 | 0.6.6 |
| pycparser | 2.21 | 2.21 |
| pysocks | 1.7.1 | 1.7.1 |
| python | 3.12.7 | 3.12.7 |
| python.app | 3 | 3 |
| readline | 8.2 | 8.2 |
| reproc | 14.2.4 | 14.2.4 |
| reproc-cpp | 14.2.4 | 14.2.4 |
| requests | 2.32.3 | 2.32.3 |
| ruamel.yaml | 0.18.6 | 0.18.6 |
| ruamel.yaml.clib | 0.2.8 | 0.2.8 |
| setuptools | 75.1.0 | 75.1.0 |
| sqlite | 3.45.3 | 3.45.3 |
| tk | 8.6.14 | 8.6.14 |
| tqdm | 4.66.5 | 4.66.5 |
| truststore | 0.8.0 | 0.8.0 |
| tzdata | 2024b | 2024b |
| urllib3 | 2.2.3 | 2.2.3 |
| wheel | 0.44.0 | 0.44.0 |
| xz | 5.4.6 | 5.4.6 |
| yaml-cpp | 0.8.0 | 0.8.0 |
| zlib | 1.2.13 | 1.2.13 |
| zstandard | 0.23.0 | 0.23.0 |
| zstd | 1.5.6 | 1.5.6 |
| Package Name | win-64 |
|---|---|
| anaconda-anon-usage | 0.4.4 |
| anaconda\_powershell\_prompt | 1.1.0 |
| anaconda\_prompt | 1.1.0 |
| archspec | 0.2.3 |
| boltons | 23.0.0 |
| brotli-python | 1.0.9 |
| bzip2 | 1.0.8 |
| ca-certificates | 2024.9.24 |
| certifi | 2024.8.30 |
| cffi | 1.17.1 |
| charset-normalizer | 3.3.2 |
| colorama | 0.4.6 |
| conda | 24.9.2 |
| conda-content-trust | 0.2.0 |
| conda-libmamba-solver | 24.9.0 |
| conda-package-handling | 2.3.0 |
| conda-package-streaming | 0.10.0 |
| cryptography | 43.0.0 |
| distro | 1.9.0 |
| expat | 2.6.3 |
| fmt | 9.1.0 |
| frozendict | 2.4.2 |
| idna | 3.7 |
| jsonpatch | 1.33 |
| jsonpointer | 2.1 |
| libarchive | 3.7.4 |
| libcurl | 8.9.1 |
| libffi | 3.4.4 |
| libiconv | 1.16 |
| libmamba | 1.5.8 |
| libmambapy | 1.5.8 |
| libsolv | 0.7.24 |
| libssh2 | 1.11.0 |
| libxml2 | 2.13.1 |
| lz4-c | 1.9.4 |
| menuinst | 2.1.2 |
| openssl | 3.0.15 |
| packaging | 24.1 |
| pcre2 | 10.42 |
| pip | 24.2 |
| platformdirs | 3.10.0 |
| pluggy | 1.0.0 |
| pybind11-abi | 5 |
| pycosat | 0.6.6 |
| pycparser | 2.21 |
| pysocks | 1.7.1 |
| python | 3.12.7 |
| reproc | 14.2.4 |
| reproc-cpp | 14.2.4 |
| requests | 2.32.3 |
| ruamel.yaml | 0.18.6 |
| ruamel.yaml.clib | 0.2.8 |
| setuptools | 75.1.0 |
| sqlite | 3.45.3 |
| tk | 8.6.14 |
| tqdm | 4.66.5 |
| truststore | 0.8.0 |
| tzdata | 2024b |
| urllib3 | 2.2.3 |
| vc | 14.40 |
| vs2015\_runtime | 14.40.33807 |
| wheel | 0.44.0 |
| win\_inet\_pton | 1.1.0 |
| xz | 5.4.6 |
| yaml-cpp | 0.8.0 |
| zlib | 1.2.13 |
| zstandard | 0.23.0 |
| zstd | 1.5.6 |
| Package Name | linux-64 | linux-aarch64 | linux-s390x | osx-arm64 | osx-64 | win-64 |
|---|---|---|---|---|---|---|
| \_libgcc\_mutex | 0.1 | 0.1 | 0.1 | |||
| \_openmp\_mutex | 5.1 | 5.1 | 5.1 | |||
| anaconda-anon-usage | 0.4.4 | 0.4.4 | 0.4.4 | 0.4.4 | 0.4.4 | 0.4.4 |
| archspec | 0.2.3 | 0.2.3 | 0.2.3 | 0.2.3 | 0.2.3 | 0.2.3 |
| boltons | 23.0.0 | 23.0.0 | 23.0.0 | 23.0.0 | 23.0.0 | 23.0.0 |
| brotli-python | 1.0.9 | 1.0.9 | 1.0.9 | 1.0.9 | 1.0.9 | 1.0.9 |
| bzip2 | 1.0.8 | 1.0.8 | 1.0.8 | 1.0.8 | 1.0.8 | 1.0.8 |
| c-ares | 1.19.1 | 1.19.1 | 1.19.1 | 1.19.1 | 1.19.1 | |
| ca-certificates | 2024.7.2 | 2024.7.2 | 2024.7.2 | 2024.7.2 | 2024.7.2 | 2024.7.2 |
| certifi | 2024.7.4 | 2024.7.4 | 2024.7.4 | 2024.7.4 | 2024.7.4 | 2024.7.4 |
| cffi | 1.16.0 | 1.16.0 | 1.16.0 | 1.16.0 | 1.16.0 | 1.16.0 |
| charset-normalizer | 3.3.2 | 3.3.2 | 3.3.2 | 3.3.2 | 3.3.2 | 3.3.2 |
| colorama | 0.4.6 | |||||
| conda | 24.7.1 | 24.7.1 | 24.7.1 | 24.7.1 | 24.7.1 | 24.7.1 |
| conda-content-trust | 0.2.0 | 0.2.0 | 0.2.0 | 0.2.0 | 0.2.0 | 0.2.0 |
| conda-libmamba-solver | 24.7.0 | 24.7.0 | 24.7.0 | 24.7.0 | 24.7.0 | 24.7.0 |
| conda-package-handling | 2.3.0 | 2.3.0 | 2.3.0 | 2.3.0 | 2.3.0 | 2.3.0 |
| conda-package-streaming | 0.10.0 | 0.10.0 | 0.10.0 | 0.10.0 | 0.10.0 | 0.10.0 |
| console\_shortcut\_miniconda | 0.1.1 | |||||
| cryptography | 42.0.5 | 42.0.5 | 42.0.5 | 42.0.5 | 42.0.5 | 42.0.5 |
| distro | 1.9.0 | 1.9.0 | 1.9.0 | 1.9.0 | 1.9.0 | 1.9.0 |
| expat | 2.6.2 | 2.6.2 | 2.6.2 | 2.6.2 | 2.6.2 | 2.6.2 |
| fmt | 9.1.0 | 9.1.0 | 9.1.0 | 9.1.0 | 9.1.0 | 9.1.0 |
| frozendict | 2.4.2 | 2.4.2 | 2.4.2 | 2.4.2 | 2.4.2 | 2.4.2 |
| icu | 73.1 | 73.1 | 73.1 | 73.1 | 73.1 | |
| idna | 3.7 | 3.7 | 3.7 | 3.7 | 3.7 | 3.7 |
| jsonpatch | 1.33 | 1.33 | 1.33 | 1.33 | 1.33 | 1.33 |
| jsonpointer | 2.1 | 2.1 | 2.1 | 2.1 | 2.1 | 2.1 |
| krb5 | 1.20.1 | 1.20.1 | 1.20.1 | 1.20.1 | 1.20.1 | |
| ld\_impl\_linux-64 | 2.38 | |||||
| ld\_impl\_linux-aarch64 | 2.38 | |||||
| ld\_impl\_linux-s390x | 2.38 | |||||
| libarchive | 3.6.2 | 3.6.2 | 3.6.2 | 3.6.2 | 3.6.2 | 3.6.2 |
| libcurl | 8.7.1 | 8.7.1 | 8.7.1 | 8.7.1 | 8.7.1 | 8.7.1 |
| libcxx | 14.0.6 | 14.0.6 | ||||
| libedit | 3.1.20230828 | 3.1.20230828 | 3.1.20230828 | 3.1.20230828 | 3.1.20230828 | |
| libev | 4.33 | 4.33 | 4.33 | 4.33 | 4.33 | |
| libffi | 3.4.4 | 3.4.4 | 3.4.4 | 3.4.4 | 3.4.4 | 3.4.4 |
| libgcc-ng | 11.2.0 | 11.2.0 | 11.2.0 | |||
| libgomp | 11.2.0 | 11.2.0 | 11.2.0 | |||
| libiconv | 1.16 | 1.16 | 1.16 | |||
| libmamba | 1.5.8 | 1.5.8 | 1.5.8 | 1.5.8 | 1.5.8 | 1.5.8 |
| libmambapy | 1.5.8 | 1.5.8 | 1.5.8 | 1.5.8 | 1.5.8 | 1.5.8 |
| libnghttp2 | 1.57.0 | 1.57.0 | 1.57.0 | 1.57.0 | 1.57.0 | |
| libsolv | 0.7.24 | 0.7.24 | 0.7.24 | 0.7.24 | 0.7.24 | 0.7.24 |
| libssh2 | 1.11.0 | 1.11.0 | 1.11.0 | 1.11.0 | 1.11.0 | 1.11.0 |
| libstdcxx-ng | 11.2.0 | 11.2.0 | 11.2.0 | |||
| libuuid | 1.41.5 | 1.41.5 | 1.41.5 | |||
| libxml2 | 2.13.1 | 2.13.1 | 2.13.1 | 2.10.4 | 2.10.4 | 2.13.1 |
| lz4-c | 1.9.4 | 1.9.4 | 1.9.4 | 1.9.4 | 1.9.4 | 1.9.4 |
| menuinst | 2.1.2 | 2.1.2 | 2.1.2 | 2.1.2 | 2.1.2 | 2.1.2 |
| ncurses | 6.4 | 6.4 | 6.4 | 6.4 | 6.4 | |
| openssl | 3.0.14 | 3.0.14 | 3.0.14 | 3.0.14 | 3.0.14 | 3.0.14 |
| packaging | 24.1 | 24.1 | 24.1 | 24.1 | 24.1 | 24.1 |
| pcre2 | 10.42 | 10.42 | 10.42 | 10.42 | 10.42 | 10.42 |
| pip | 24.2 | 24.2 | 24.2 | 24.2 | 24.2 | 24.2 |
| platformdirs | 3.10.0 | 3.10.0 | 3.10.0 | 3.10.0 | 3.10.0 | 3.10.0 |
| pluggy | 1.0.0 | 1.0.0 | 1.0.0 | 1.0.0 | 1.0.0 | 1.0.0 |
| powershell\_shortcut\_miniconda | 0.0.1 | |||||
| pybind11-abi | 5 | 5 | 5 | 5 | 5 | 5 |
| pycosat | 0.6.6 | 0.6.6 | 0.6.6 | 0.6.6 | 0.6.6 | 0.6.6 |
| pycparser | 2.21 | 2.21 | 2.21 | 2.21 | 2.21 | 2.21 |
| pysocks | 1.7.1 | 1.7.1 | 1.7.1 | 1.7.1 | 1.7.1 | 1.7.1 |
| python | 3.12.4 | 3.12.4 | 3.12.4 | 3.12.4 | 3.12.4 | 3.12.4 |
| python.app | 3 | 3 | ||||
| readline | 8.2 | 8.2 | 8.2 | 8.2 | 8.2 | |
| reproc | 14.2.4 | 14.2.4 | 14.2.4 | 14.2.4 | 14.2.4 | 14.2.4 |
| reproc-cpp | 14.2.4 | 14.2.4 | 14.2.4 | 14.2.4 | 14.2.4 | 14.2.4 |
| requests | 2.32.3 | 2.32.3 | 2.32.3 | 2.32.3 | 2.32.3 | 2.32.3 |
| ruamel.yaml | 0.17.21 | 0.17.21 | 0.17.21 | 0.17.21 | 0.17.21 | 0.17.21 |
| setuptools | 72.1.0 | 72.1.0 | 72.1.0 | 72.1.0 | 72.1.0 | 72.1.0 |
| sqlite | 3.45.3 | 3.45.3 | 3.45.3 | 3.45.3 | 3.45.3 | 3.45.3 |
| tk | 8.6.14 | 8.6.14 | 8.6.14 | 8.6.14 | 8.6.14 | 8.6.14 |
| tqdm | 4.66.4 | 4.66.4 | 4.66.4 | 4.66.4 | 4.66.4 | 4.66.4 |
| truststore | 0.8.0 | 0.8.0 | 0.8.0 | 0.8.0 | 0.8.0 | 0.8.0 |
| tzdata | 2024a | 2024a | 2024a | 2024a | 2024a | 2024a |
| urllib3 | 2.2.2 | 2.2.2 | 2.2.2 | 2.2.2 | 2.2.2 | 2.2.2 |
| vc | 14.40 | |||||
| vs2015\_runtime | 14.40.33807 | |||||
| wheel | 0.43.0 | 0.43.0 | 0.43.0 | 0.43.0 | 0.43.0 | 0.43.0 |
| win\_inet\_pton | 1.1.0 | |||||
| xz | 5.4.6 | 5.4.6 | 5.4.6 | 5.4.6 | 5.4.6 | 5.4.6 |
| yaml-cpp | 0.8.0 | 0.8.0 | 0.8.0 | 0.8.0 | 0.8.0 | 0.8.0 |
| zlib | 1.2.13 | 1.2.13 | 1.2.13 | 1.2.13 | 1.2.13 | 1.2.13 |
| zstandard | 0.22.0 | 0.22.0 | 0.22.0 | 0.22.0 | 0.22.0 | 0.22.0 |
| zstd | 1.5.5 | 1.5.5 | 1.5.5 | 1.5.5 | 1.5.5 | 1.5.5 |
| Package Name | linux-64 | linux-aarch64 | linux-s390x |
|---|---|---|---|
| \_libgcc\_mutex | 0.1 | 0.1 | 0.1 |
| \_openmp\_mutex | 5.1 | 5.1 | 5.1 |
| anaconda-anon-usage | 0.4.4 | 0.4.4 | 0.4.4 |
| archspec | 0.2.3 | 0.2.3 | 0.2.3 |
| boltons | 23.0.0 | 23.0.0 | 23.0.0 |
| brotli-python | 1.0.9 | 1.0.9 | 1.0.9 |
| bzip2 | 1.0.8 | 1.0.8 | 1.0.8 |
| c-ares | 1.19.1 | 1.19.1 | 1.19.1 |
| ca-certificates | 2024.7.2 | 2024.7.2 | 2024.7.2 |
| certifi | 2024.7.4 | 2024.7.4 | 2024.7.4 |
| cffi | 1.16.0 | 1.16.0 | 1.16.0 |
| charset-normalizer | 3.3.2 | 3.3.2 | 3.3.2 |
| conda | 24.7.1 | 24.7.1 | 24.7.1 |
| conda-content-trust | 0.2.0 | 0.2.0 | 0.2.0 |
| conda-libmamba-solver | 24.7.0 | 24.7.0 | 24.7.0 |
| conda-package-handling | 2.3.0 | 2.3.0 | 2.3.0 |
| conda-package-streaming | 0.10.0 | 0.10.0 | 0.10.0 |
| cryptography | 42.0.5 | 42.0.5 | 42.0.5 |
| distro | 1.9.0 | 1.9.0 | 1.9.0 |
| expat | 2.6.2 | 2.6.2 | 2.6.2 |
| fmt | 9.1.0 | 9.1.0 | 9.1.0 |
| frozendict | 2.4.2 | 2.4.2 | 2.4.2 |
| icu | 73.1 | 73.1 | 73.1 |
| idna | 3.7 | 3.7 | 3.7 |
| jsonpatch | 1.33 | 1.33 | 1.33 |
| jsonpointer | 2.1 | 2.1 | 2.1 |
| krb5 | 1.20.1 | 1.20.1 | 1.20.1 |
| ld\_impl\_linux-64 | 2.38 | ||
| ld\_impl\_linux-aarch64 | 2.38 | ||
| ld\_impl\_linux-s390x | 2.38 | ||
| libarchive | 3.6.2 | 3.6.2 | 3.6.2 |
| libcurl | 8.7.1 | 8.7.1 | 8.7.1 |
| libedit | 3.1.20230828 | 3.1.20230828 | 3.1.20230828 |
| libev | 4.33 | 4.33 | 4.33 |
| libffi | 3.4.4 | 3.4.4 | 3.4.4 |
| libgcc-ng | 11.2.0 | 11.2.0 | 11.2.0 |
| libgomp | 11.2.0 | 11.2.0 | 11.2.0 |
| libmamba | 1.5.8 | 1.5.8 | 1.5.8 |
| libmambapy | 1.5.8 | 1.5.8 | 1.5.8 |
| libnghttp2 | 1.57.0 | 1.57.0 | 1.57.0 |
| libsolv | 0.7.24 | 0.7.24 | 0.7.24 |
| libssh2 | 1.11.0 | 1.11.0 | 1.11.0 |
| libstdcxx-ng | 11.2.0 | 11.2.0 | 11.2.0 |
| libuuid | 1.41.5 | 1.41.5 | 1.41.5 |
| libxml2 | 2.13.1 | 2.13.1 | 2.13.1 |
| lz4-c | 1.9.4 | 1.9.4 | 1.9.4 |
| menuinst | 2.1.2 | 2.1.2 | 2.1.2 |
| ncurses | 6.4 | 6.4 | 6.4 |
| openssl | 3.0.14 | 3.0.14 | 3.0.14 |
| packaging | 24.1 | 24.1 | 24.1 |
| pcre2 | 10.42 | 10.42 | 10.42 |
| pip | 24.2 | 24.2 | 24.2 |
| platformdirs | 3.10.0 | 3.10.0 | 3.10.0 |
| pluggy | 1.0.0 | 1.0.0 | 1.0.0 |
| pybind11-abi | 5 | 5 | 5 |
| pycosat | 0.6.6 | 0.6.6 | 0.6.6 |
| pycparser | 2.21 | 2.21 | 2.21 |
| pysocks | 1.7.1 | 1.7.1 | 1.7.1 |
| python | 3.12.4 | 3.12.4 | 3.12.4 |
| readline | 8.2 | 8.2 | 8.2 |
| reproc | 14.2.4 | 14.2.4 | 14.2.4 |
| reproc-cpp | 14.2.4 | 14.2.4 | 14.2.4 |
| requests | 2.32.3 | 2.32.3 | 2.32.3 |
| ruamel.yaml | 0.17.21 | 0.17.21 | 0.17.21 |
| setuptools | 72.1.0 | 72.1.0 | 72.1.0 |
| sqlite | 3.45.3 | 3.45.3 | 3.45.3 |
| tk | 8.6.14 | 8.6.14 | 8.6.14 |
| tqdm | 4.66.4 | 4.66.4 | 4.66.4 |
| truststore | 0.8.0 | 0.8.0 | 0.8.0 |
| tzdata | 2024a | 2024a | 2024a |
| urllib3 | 2.2.2 | 2.2.2 | 2.2.2 |
| wheel | 0.43.0 | 0.43.0 | 0.43.0 |
| xz | 5.4.6 | 5.4.6 | 5.4.6 |
| yaml-cpp | 0.8.0 | 0.8.0 | 0.8.0 |
| zlib | 1.2.13 | 1.2.13 | 1.2.13 |
| zstandard | 0.22.0 | 0.22.0 | 0.22.0 |
| zstd | 1.5.5 | 1.5.5 | 1.5.5 |
| Package Name | osx-arm64 | osx-64 |
|---|---|---|
| anaconda-anon-usage | 0.4.4 | 0.4.4 |
| archspec | 0.2.3 | 0.2.3 |
| boltons | 23.0.0 | 23.0.0 |
| brotli-python | 1.0.9 | 1.0.9 |
| bzip2 | 1.0.8 | 1.0.8 |
| c-ares | 1.19.1 | 1.19.1 |
| ca-certificates | 2024.7.2 | 2024.7.2 |
| certifi | 2024.7.4 | 2024.7.4 |
| cffi | 1.16.0 | 1.16.0 |
| charset-normalizer | 3.3.2 | 3.3.2 |
| conda | 24.7.1 | 24.7.1 |
| conda-content-trust | 0.2.0 | 0.2.0 |
| conda-libmamba-solver | 24.7.0 | 24.7.0 |
| conda-package-handling | 2.3.0 | 2.3.0 |
| conda-package-streaming | 0.10.0 | 0.10.0 |
| cryptography | 42.0.5 | 42.0.5 |
| distro | 1.9.0 | 1.9.0 |
| expat | 2.6.2 | 2.6.2 |
| fmt | 9.1.0 | 9.1.0 |
| frozendict | 2.4.2 | 2.4.2 |
| icu | 73.1 | 73.1 |
| idna | 3.7 | 3.7 |
| jsonpatch | 1.33 | 1.33 |
| jsonpointer | 2.1 | 2.1 |
| krb5 | 1.20.1 | 1.20.1 |
| libarchive | 3.6.2 | 3.6.2 |
| libcurl | 8.7.1 | 8.7.1 |
| libcxx | 14.0.6 | 14.0.6 |
| libedit | 3.1.20230828 | 3.1.20230828 |
| libev | 4.33 | 4.33 |
| libffi | 3.4.4 | 3.4.4 |
| libiconv | 1.16 | 1.16 |
| libmamba | 1.5.8 | 1.5.8 |
| libmambapy | 1.5.8 | 1.5.8 |
| libnghttp2 | 1.57.0 | 1.57.0 |
| libsolv | 0.7.24 | 0.7.24 |
| libssh2 | 1.11.0 | 1.11.0 |
| libxml2 | 2.10.4 | 2.10.4 |
| lz4-c | 1.9.4 | 1.9.4 |
| menuinst | 2.1.2 | 2.1.2 |
| ncurses | 6.4 | 6.4 |
| openssl | 3.0.14 | 3.0.14 |
| packaging | 24.1 | 24.1 |
| pcre2 | 10.42 | 10.42 |
| pip | 24.2 | 24.2 |
| platformdirs | 3.10.0 | 3.10.0 |
| pluggy | 1.0.0 | 1.0.0 |
| pybind11-abi | 5 | 5 |
| pycosat | 0.6.6 | 0.6.6 |
| pycparser | 2.21 | 2.21 |
| pysocks | 1.7.1 | 1.7.1 |
| python | 3.12.4 | 3.12.4 |
| python.app | 3 | 3 |
| readline | 8.2 | 8.2 |
| reproc | 14.2.4 | 14.2.4 |
| reproc-cpp | 14.2.4 | 14.2.4 |
| requests | 2.32.3 | 2.32.3 |
| ruamel.yaml | 0.17.21 | 0.17.21 |
| setuptools | 72.1.0 | 72.1.0 |
| sqlite | 3.45.3 | 3.45.3 |
| tk | 8.6.14 | 8.6.14 |
| tqdm | 4.66.4 | 4.66.4 |
| truststore | 0.8.0 | 0.8.0 |
| tzdata | 2024a | 2024a |
| urllib3 | 2.2.2 | 2.2.2 |
| wheel | 0.43.0 | 0.43.0 |
| xz | 5.4.6 | 5.4.6 |
| yaml-cpp | 0.8.0 | 0.8.0 |
| zlib | 1.2.13 | 1.2.13 |
| zstandard | 0.22.0 | 0.22.0 |
| zstd | 1.5.5 | 1.5.5 |
| Package Name | win-64 |
|---|---|
| anaconda-anon-usage | 0.4.4 |
| archspec | 0.2.3 |
| boltons | 23.0.0 |
| brotli-python | 1.0.9 |
| bzip2 | 1.0.8 |
| ca-certificates | 2024.7.2 |
| certifi | 2024.7.4 |
| cffi | 1.16.0 |
| charset-normalizer | 3.3.2 |
| colorama | 0.4.6 |
| conda | 24.7.1 |
| conda-content-trust | 0.2.0 |
| conda-libmamba-solver | 24.7.0 |
| conda-package-handling | 2.3.0 |
| conda-package-streaming | 0.10.0 |
| console\_shortcut\_miniconda | 0.1.1 |
| cryptography | 42.0.5 |
| distro | 1.9.0 |
| expat | 2.6.2 |
| fmt | 9.1.0 |
| frozendict | 2.4.2 |
| idna | 3.7 |
| jsonpatch | 1.33 |
| jsonpointer | 2.1 |
| libarchive | 3.6.2 |
| libcurl | 8.7.1 |
| libffi | 3.4.4 |
| libiconv | 1.16 |
| libmamba | 1.5.8 |
| libmambapy | 1.5.8 |
| libsolv | 0.7.24 |
| libssh2 | 1.11.0 |
| libxml2 | 2.13.1 |
| lz4-c | 1.9.4 |
| menuinst | 2.1.2 |
| openssl | 3.0.14 |
| packaging | 24.1 |
| pcre2 | 10.42 |
| pip | 24.2 |
| platformdirs | 3.10.0 |
| pluggy | 1.0.0 |
| powershell\_shortcut\_miniconda | 0.0.1 |
| pybind11-abi | 5 |
| pycosat | 0.6.6 |
| pycparser | 2.21 |
| pysocks | 1.7.1 |
| python | 3.12.4 |
| reproc | 14.2.4 |
| reproc-cpp | 14.2.4 |
| requests | 2.32.3 |
| ruamel.yaml | 0.17.21 |
| setuptools | 72.1.0 |
| sqlite | 3.45.3 |
| tk | 8.6.14 |
| tqdm | 4.66.4 |
| truststore | 0.8.0 |
| tzdata | 2024a |
| urllib3 | 2.2.2 |
| vc | 14.40 |
| vs2015\_runtime | 14.40.33807 |
| wheel | 0.43.0 |
| win\_inet\_pton | 1.1.0 |
| xz | 5.4.6 |
| yaml-cpp | 0.8.0 |
| zlib | 1.2.13 |
| zstandard | 0.22.0 |
| zstd | 1.5.5 |
| Package Name | linux-64 | linux-aarch64 | linux-s390x | osx-arm64 | osx-64 | win-64 |
|---|---|---|---|---|---|---|
| \_libgcc\_mutex | 0.1 | 0.1 | 0.1 | |||
| \_openmp\_mutex | 5.1 | 5.1 | 5.1 | |||
| anaconda-anon-usage | 0.4.4 | 0.4.4 | 0.4.4 | 0.4.4 | 0.4.4 | 0.4.4 |
| archspec | 0.2.3 | 0.2.3 | 0.2.3 | 0.2.3 | 0.2.3 | 0.2.3 |
| boltons | 23.0.0 | 23.0.0 | 23.0.0 | 23.0.0 | 23.0.0 | 23.0.0 |
| brotli-python | 1.0.9 | 1.0.9 | 1.0.9 | 1.0.9 | 1.0.9 | 1.0.9 |
| bzip2 | 1.0.8 | 1.0.8 | 1.0.8 | 1.0.8 | 1.0.8 | 1.0.8 |
| c-ares | 1.19.1 | 1.19.1 | 1.19.1 | 1.19.1 | 1.19.1 | |
| ca-certificates | 2024.3.11 | 2024.3.11 | 2024.3.11 | 2024.3.11 | 2024.3.11 | 2024.3.11 |
| certifi | 2024.6.2 | 2024.6.2 | 2024.6.2 | 2024.6.2 | 2024.6.2 | 2024.6.2 |
| cffi | 1.16.0 | 1.16.0 | 1.16.0 | 1.16.0 | 1.16.0 | 1.16.0 |
| charset-normalizer | 2.0.4 | 2.0.4 | 2.0.4 | 2.0.4 | 2.0.4 | 2.0.4 |
| colorama | 0.4.6 | |||||
| conda | 24.5.0 | 24.5.0 | 24.5.0 | 24.5.0 | 24.5.0 | 24.5.0 |
| conda-content-trust | 0.2.0 | 0.2.0 | 0.2.0 | 0.2.0 | 0.2.0 | 0.2.0 |
| conda-libmamba-solver | 24.1.0 | 24.1.0 | 24.1.0 | 24.1.0 | 24.1.0 | 24.1.0 |
| conda-package-handling | 2.3.0 | 2.3.0 | 2.3.0 | 2.3.0 | 2.3.0 | 2.3.0 |
| conda-package-streaming | 0.10.0 | 0.10.0 | 0.10.0 | 0.10.0 | 0.10.0 | 0.10.0 |
| console\_shortcut\_miniconda | 0.1.1 | |||||
| cryptography | 42.0.5 | 42.0.5 | 42.0.5 | 42.0.5 | 42.0.5 | 42.0.5 |
| distro | 1.9.0 | 1.9.0 | 1.9.0 | 1.9.0 | 1.9.0 | 1.9.0 |
| expat | 2.6.2 | 2.6.2 | 2.6.2 | 2.6.2 | 2.6.2 | 2.6.2 |
| fmt | 9.1.0 | 9.1.0 | 9.1.0 | 9.1.0 | 9.1.0 | 9.1.0 |
| frozendict | 2.4.2 | 2.4.2 | 2.4.2 | 2.4.2 | 2.4.2 | 2.4.2 |
| icu | 73.1 | 73.1 | 73.1 | 73.1 | 73.1 | |
| idna | 3.7 | 3.7 | 3.7 | 3.7 | 3.7 | 3.7 |
| jsonpatch | 1.33 | 1.33 | 1.33 | 1.33 | 1.33 | 1.33 |
| jsonpointer | 2.1 | 2.1 | 2.1 | 2.1 | 2.1 | 2.1 |
| krb5 | 1.20.1 | 1.20.1 | 1.20.1 | 1.20.1 | 1.20.1 | |
| ld\_impl\_linux-64 | 2.38 | |||||
| ld\_impl\_linux-aarch64 | 2.38 | |||||
| ld\_impl\_linux-s390x | 2.38 | |||||
| libarchive | 3.6.2 | 3.6.2 | 3.6.2 | 3.6.2 | 3.6.2 | 3.6.2 |
| libcurl | 8.7.1 | 8.7.1 | 8.7.1 | 8.7.1 | 8.7.1 | 8.7.1 |
| libcxx | 14.0.6 | 14.0.6 | ||||
| libedit | 3.1.20230828 | 3.1.20230828 | 3.1.20230828 | 3.1.20230828 | 3.1.20230828 | |
| libev | 4.33 | 4.33 | 4.33 | 4.33 | 4.33 | |
| libffi | 3.4.4 | 3.4.4 | 3.4.4 | 3.4.4 | 3.4.4 | 3.4.4 |
| libgcc-ng | 11.2.0 | 11.2.0 | 11.2.0 | |||
| libgomp | 11.2.0 | 11.2.0 | 11.2.0 | |||
| libiconv | 1.16 | 1.16 | 1.16 | |||
| libmamba | 1.5.8 | 1.5.8 | 1.5.8 | 1.5.8 | 1.5.8 | 1.5.8 |
| libmambapy | 1.5.8 | 1.5.8 | 1.5.8 | 1.5.8 | 1.5.8 | 1.5.8 |
| libnghttp2 | 1.57.0 | 1.57.0 | 1.57.0 | 1.57.0 | 1.57.0 | |
| libsolv | 0.7.24 | 0.7.24 | 0.7.24 | 0.7.24 | 0.7.24 | 0.7.24 |
| libssh2 | 1.11.0 | 1.11.0 | 1.11.0 | 1.11.0 | 1.11.0 | 1.11.0 |
| libstdcxx-ng | 11.2.0 | 11.2.0 | 11.2.0 | |||
| libuuid | 1.41.5 | 1.41.5 | 1.41.5 | |||
| libxml2 | 2.10.4 | 2.10.4 | 2.10.4 | 2.10.4 | 2.10.4 | 2.10.4 |
| lz4-c | 1.9.4 | 1.9.4 | 1.9.4 | 1.9.4 | 1.9.4 | 1.9.4 |
| menuinst | 2.1.1 | 2.1.1 | 2.1.1 | 2.1.1 | 2.1.1 | 2.1.1 |
| ncurses | 6.4 | 6.4 | 6.4 | 6.4 | 6.4 | |
| openssl | 3.0.14 | 3.0.14 | 3.0.14 | 3.0.14 | 3.0.14 | 3.0.14 |
| packaging | 23.2 | 23.2 | 23.2 | 23.2 | 23.2 | 23.2 |
| pcre2 | 10.42 | 10.42 | 10.42 | 10.42 | 10.42 | 10.42 |
| pip | 24.0 | 24.0 | 24.0 | 24.0 | 24.0 | 24.0 |
| platformdirs | 3.10.0 | 3.10.0 | 3.10.0 | 3.10.0 | 3.10.0 | 3.10.0 |
| pluggy | 1.0.0 | 1.0.0 | 1.0.0 | 1.0.0 | 1.0.0 | 1.0.0 |
| powershell\_shortcut\_miniconda | 0.0.1 | |||||
| pybind11-abi | 5 | 5 | 5 | 5 | 5 | 5 |
| pycosat | 0.6.6 | 0.6.6 | 0.6.6 | 0.6.6 | 0.6.6 | 0.6.6 |
| pycparser | 2.21 | 2.21 | 2.21 | 2.21 | 2.21 | 2.21 |
| pysocks | 1.7.1 | 1.7.1 | 1.7.1 | 1.7.1 | 1.7.1 | 1.7.1 |
| python | 3.12.4 | 3.12.4 | 3.12.4 | 3.12.4 | 3.12.4 | 3.12.4 |
| python.app | 3 | 3 | ||||
| readline | 8.2 | 8.2 | 8.2 | 8.2 | 8.2 | |
| reproc | 14.2.4 | 14.2.4 | 14.2.4 | 14.2.4 | 14.2.4 | 14.2.4 |
| reproc-cpp | 14.2.4 | 14.2.4 | 14.2.4 | 14.2.4 | 14.2.4 | 14.2.4 |
| requests | 2.32.2 | 2.32.2 | 2.32.2 | 2.32.2 | 2.32.2 | 2.32.2 |
| ruamel.yaml | 0.17.21 | 0.17.21 | 0.17.21 | 0.17.21 | 0.17.21 | 0.17.21 |
| setuptools | 69.5.1 | 69.5.1 | 69.5.1 | 69.5.1 | 69.5.1 | 69.5.1 |
| sqlite | 3.45.3 | 3.45.3 | 3.45.3 | 3.45.3 | 3.45.3 | 3.45.3 |
| tk | 8.6.14 | 8.6.14 | 8.6.14 | 8.6.14 | 8.6.14 | 8.6.14 |
| tqdm | 4.66.4 | 4.66.4 | 4.66.4 | 4.66.4 | 4.66.4 | 4.66.4 |
| truststore | 0.8.0 | 0.8.0 | 0.8.0 | 0.8.0 | 0.8.0 | 0.8.0 |
| tzdata | 2024a | 2024a | 2024a | 2024a | 2024a | 2024a |
| urllib3 | 2.2.2 | 2.2.2 | 2.2.2 | 2.2.2 | 2.2.2 | 2.2.2 |
| vc | 14.2 | |||||
| vs2015\_runtime | 14.29.30133 | |||||
| wheel | 0.43.0 | 0.43.0 | 0.43.0 | 0.43.0 | 0.43.0 | 0.43.0 |
| win\_inet\_pton | 1.1.0 | |||||
| xz | 5.4.6 | 5.4.6 | 5.4.6 | 5.4.6 | 5.4.6 | 5.4.6 |
| yaml-cpp | 0.8.0 | 0.8.0 | 0.8.0 | 0.8.0 | 0.8.0 | 0.8.0 |
| zlib | 1.2.13 | 1.2.13 | 1.2.13 | 1.2.13 | 1.2.13 | 1.2.13 |
| zstandard | 0.22.0 | 0.22.0 | 0.22.0 | 0.22.0 | 0.22.0 | 0.22.0 |
| zstd | 1.5.5 | 1.5.5 | 1.5.5 | 1.5.5 | 1.5.5 | 1.5.5 |
| Package Name | linux-64 | linux-aarch64 | linux-s390x |
|---|---|---|---|
| \_libgcc\_mutex | 0.1 | 0.1 | 0.1 |
| \_openmp\_mutex | 5.1 | 5.1 | 5.1 |
| anaconda-anon-usage | 0.4.4 | 0.4.4 | 0.4.4 |
| archspec | 0.2.3 | 0.2.3 | 0.2.3 |
| boltons | 23.0.0 | 23.0.0 | 23.0.0 |
| brotli-python | 1.0.9 | 1.0.9 | 1.0.9 |
| bzip2 | 1.0.8 | 1.0.8 | 1.0.8 |
| c-ares | 1.19.1 | 1.19.1 | 1.19.1 |
| ca-certificates | 2024.3.11 | 2024.3.11 | 2024.3.11 |
| certifi | 2024.6.2 | 2024.6.2 | 2024.6.2 |
| cffi | 1.16.0 | 1.16.0 | 1.16.0 |
| charset-normalizer | 2.0.4 | 2.0.4 | 2.0.4 |
| conda | 24.5.0 | 24.5.0 | 24.5.0 |
| conda-content-trust | 0.2.0 | 0.2.0 | 0.2.0 |
| conda-libmamba-solver | 24.1.0 | 24.1.0 | 24.1.0 |
| conda-package-handling | 2.3.0 | 2.3.0 | 2.3.0 |
| conda-package-streaming | 0.10.0 | 0.10.0 | 0.10.0 |
| cryptography | 42.0.5 | 42.0.5 | 42.0.5 |
| distro | 1.9.0 | 1.9.0 | 1.9.0 |
| expat | 2.6.2 | 2.6.2 | 2.6.2 |
| fmt | 9.1.0 | 9.1.0 | 9.1.0 |
| frozendict | 2.4.2 | 2.4.2 | 2.4.2 |
| icu | 73.1 | 73.1 | 73.1 |
| idna | 3.7 | 3.7 | 3.7 |
| jsonpatch | 1.33 | 1.33 | 1.33 |
| jsonpointer | 2.1 | 2.1 | 2.1 |
| krb5 | 1.20.1 | 1.20.1 | 1.20.1 |
| ld\_impl\_linux-64 | 2.38 | ||
| ld\_impl\_linux-aarch64 | 2.38 | ||
| ld\_impl\_linux-s390x | 2.38 | ||
| libarchive | 3.6.2 | 3.6.2 | 3.6.2 |
| libcurl | 8.7.1 | 8.7.1 | 8.7.1 |
| libedit | 3.1.20230828 | 3.1.20230828 | 3.1.20230828 |
| libev | 4.33 | 4.33 | 4.33 |
| libffi | 3.4.4 | 3.4.4 | 3.4.4 |
| libgcc-ng | 11.2.0 | 11.2.0 | 11.2.0 |
| libgomp | 11.2.0 | 11.2.0 | 11.2.0 |
| libmamba | 1.5.8 | 1.5.8 | 1.5.8 |
| libmambapy | 1.5.8 | 1.5.8 | 1.5.8 |
| libnghttp2 | 1.57.0 | 1.57.0 | 1.57.0 |
| libsolv | 0.7.24 | 0.7.24 | 0.7.24 |
| libssh2 | 1.11.0 | 1.11.0 | 1.11.0 |
| libstdcxx-ng | 11.2.0 | 11.2.0 | 11.2.0 |
| libuuid | 1.41.5 | 1.41.5 | 1.41.5 |
| libxml2 | 2.10.4 | 2.10.4 | 2.10.4 |
| lz4-c | 1.9.4 | 1.9.4 | 1.9.4 |
| menuinst | 2.1.1 | 2.1.1 | 2.1.1 |
| ncurses | 6.4 | 6.4 | 6.4 |
| openssl | 3.0.14 | 3.0.14 | 3.0.14 |
| packaging | 23.2 | 23.2 | 23.2 |
| pcre2 | 10.42 | 10.42 | 10.42 |
| pip | 24.0 | 24.0 | 24.0 |
| platformdirs | 3.10.0 | 3.10.0 | 3.10.0 |
| pluggy | 1.0.0 | 1.0.0 | 1.0.0 |
| pybind11-abi | 5 | 5 | 5 |
| pycosat | 0.6.6 | 0.6.6 | 0.6.6 |
| pycparser | 2.21 | 2.21 | 2.21 |
| pysocks | 1.7.1 | 1.7.1 | 1.7.1 |
| python | 3.12.4 | 3.12.4 | 3.12.4 |
| readline | 8.2 | 8.2 | 8.2 |
| reproc | 14.2.4 | 14.2.4 | 14.2.4 |
| reproc-cpp | 14.2.4 | 14.2.4 | 14.2.4 |
| requests | 2.32.2 | 2.32.2 | 2.32.2 |
| ruamel.yaml | 0.17.21 | 0.17.21 | 0.17.21 |
| setuptools | 69.5.1 | 69.5.1 | 69.5.1 |
| sqlite | 3.45.3 | 3.45.3 | 3.45.3 |
| tk | 8.6.14 | 8.6.14 | 8.6.14 |
| tqdm | 4.66.4 | 4.66.4 | 4.66.4 |
| truststore | 0.8.0 | 0.8.0 | 0.8.0 |
| tzdata | 2024a | 2024a | 2024a |
| urllib3 | 2.2.2 | 2.2.2 | 2.2.2 |
| wheel | 0.43.0 | 0.43.0 | 0.43.0 |
| xz | 5.4.6 | 5.4.6 | 5.4.6 |
| yaml-cpp | 0.8.0 | 0.8.0 | 0.8.0 |
| zlib | 1.2.13 | 1.2.13 | 1.2.13 |
| zstandard | 0.22.0 | 0.22.0 | 0.22.0 |
| zstd | 1.5.5 | 1.5.5 | 1.5.5 |
| Package Name | osx-arm64 | osx-64 |
|---|---|---|
| anaconda-anon-usage | 0.4.4 | 0.4.4 |
| archspec | 0.2.3 | 0.2.3 |
| boltons | 23.0.0 | 23.0.0 |
| brotli-python | 1.0.9 | 1.0.9 |
| bzip2 | 1.0.8 | 1.0.8 |
| c-ares | 1.19.1 | 1.19.1 |
| ca-certificates | 2024.3.11 | 2024.3.11 |
| certifi | 2024.6.2 | 2024.6.2 |
| cffi | 1.16.0 | 1.16.0 |
| charset-normalizer | 2.0.4 | 2.0.4 |
| conda | 24.5.0 | 24.5.0 |
| conda-content-trust | 0.2.0 | 0.2.0 |
| conda-libmamba-solver | 24.1.0 | 24.1.0 |
| conda-package-handling | 2.3.0 | 2.3.0 |
| conda-package-streaming | 0.10.0 | 0.10.0 |
| cryptography | 42.0.5 | 42.0.5 |
| distro | 1.9.0 | 1.9.0 |
| expat | 2.6.2 | 2.6.2 |
| fmt | 9.1.0 | 9.1.0 |
| frozendict | 2.4.2 | 2.4.2 |
| icu | 73.1 | 73.1 |
| idna | 3.7 | 3.7 |
| jsonpatch | 1.33 | 1.33 |
| jsonpointer | 2.1 | 2.1 |
| krb5 | 1.20.1 | 1.20.1 |
| libarchive | 3.6.2 | 3.6.2 |
| libcurl | 8.7.1 | 8.7.1 |
| libcxx | 14.0.6 | 14.0.6 |
| libedit | 3.1.20230828 | 3.1.20230828 |
| libev | 4.33 | 4.33 |
| libffi | 3.4.4 | 3.4.4 |
| libiconv | 1.16 | 1.16 |
| libmamba | 1.5.8 | 1.5.8 |
| libmambapy | 1.5.8 | 1.5.8 |
| libnghttp2 | 1.57.0 | 1.57.0 |
| libsolv | 0.7.24 | 0.7.24 |
| libssh2 | 1.11.0 | 1.11.0 |
| libxml2 | 2.10.4 | 2.10.4 |
| lz4-c | 1.9.4 | 1.9.4 |
| menuinst | 2.1.1 | 2.1.1 |
| ncurses | 6.4 | 6.4 |
| openssl | 3.0.14 | 3.0.14 |
| packaging | 23.2 | 23.2 |
| pcre2 | 10.42 | 10.42 |
| pip | 24.0 | 24.0 |
| platformdirs | 3.10.0 | 3.10.0 |
| pluggy | 1.0.0 | 1.0.0 |
| pybind11-abi | 5 | 5 |
| pycosat | 0.6.6 | 0.6.6 |
| pycparser | 2.21 | 2.21 |
| pysocks | 1.7.1 | 1.7.1 |
| python | 3.12.4 | 3.12.4 |
| python.app | 3 | 3 |
| readline | 8.2 | 8.2 |
| reproc | 14.2.4 | 14.2.4 |
| reproc-cpp | 14.2.4 | 14.2.4 |
| requests | 2.32.2 | 2.32.2 |
| ruamel.yaml | 0.17.21 | 0.17.21 |
| setuptools | 69.5.1 | 69.5.1 |
| sqlite | 3.45.3 | 3.45.3 |
| tk | 8.6.14 | 8.6.14 |
| tqdm | 4.66.4 | 4.66.4 |
| truststore | 0.8.0 | 0.8.0 |
| tzdata | 2024a | 2024a |
| urllib3 | 2.2.2 | 2.2.2 |
| wheel | 0.43.0 | 0.43.0 |
| xz | 5.4.6 | 5.4.6 |
| yaml-cpp | 0.8.0 | 0.8.0 |
| zlib | 1.2.13 | 1.2.13 |
| zstandard | 0.22.0 | 0.22.0 |
| zstd | 1.5.5 | 1.5.5 |
| Package Name | win-64 |
|---|---|
| anaconda-anon-usage | 0.4.4 |
| archspec | 0.2.3 |
| boltons | 23.0.0 |
| brotli-python | 1.0.9 |
| bzip2 | 1.0.8 |
| ca-certificates | 2024.3.11 |
| certifi | 2024.6.2 |
| cffi | 1.16.0 |
| charset-normalizer | 2.0.4 |
| colorama | 0.4.6 |
| conda | 24.5.0 |
| conda-content-trust | 0.2.0 |
| conda-libmamba-solver | 24.1.0 |
| conda-package-handling | 2.3.0 |
| conda-package-streaming | 0.10.0 |
| console\_shortcut\_miniconda | 0.1.1 |
| cryptography | 42.0.5 |
| distro | 1.9.0 |
| expat | 2.6.2 |
| fmt | 9.1.0 |
| frozendict | 2.4.2 |
| idna | 3.7 |
| jsonpatch | 1.33 |
| jsonpointer | 2.1 |
| libarchive | 3.6.2 |
| libcurl | 8.7.1 |
| libffi | 3.4.4 |
| libiconv | 1.16 |
| libmamba | 1.5.8 |
| libmambapy | 1.5.8 |
| libsolv | 0.7.24 |
| libssh2 | 1.11.0 |
| libxml2 | 2.10.4 |
| lz4-c | 1.9.4 |
| menuinst | 2.1.1 |
| openssl | 3.0.14 |
| packaging | 23.2 |
| pcre2 | 10.42 |
| pip | 24.0 |
| platformdirs | 3.10.0 |
| pluggy | 1.0.0 |
| powershell\_shortcut\_miniconda | 0.0.1 |
| pybind11-abi | 5 |
| pycosat | 0.6.6 |
| pycparser | 2.21 |
| pysocks | 1.7.1 |
| python | 3.12.4 |
| reproc | 14.2.4 |
| reproc-cpp | 14.2.4 |
| requests | 2.32.2 |
| ruamel.yaml | 0.17.21 |
| setuptools | 69.5.1 |
| sqlite | 3.45.3 |
| tk | 8.6.14 |
| tqdm | 4.66.4 |
| truststore | 0.8.0 |
| tzdata | 2024a |
| urllib3 | 2.2.2 |
| vc | 14.2 |
| vs2015\_runtime | 14.29.30133 |
| wheel | 0.43.0 |
| win\_inet\_pton | 1.1.0 |
| xz | 5.4.6 |
| yaml-cpp | 0.8.0 |
| zlib | 1.2.13 |
| zstandard | 0.22.0 |
| zstd | 1.5.5 |
| Package Name | linux-64 | linux-aarch64 | linux-s390x | osx-arm64 | osx-64 | win-64 |
|---|---|---|---|---|---|---|
| \_libgcc\_mutex | 0.1 | 0.1 | 0.1 | |||
| \_openmp\_mutex | 5.1 | 5.1 | 5.1 | |||
| anaconda-anon-usage | 0.4.4 | 0.4.4 | 0.4.4 | 0.4.4 | 0.4.4 | 0.4.4 |
| archspec | 0.2.3 | 0.2.3 | 0.2.3 | 0.2.3 | 0.2.3 | 0.2.3 |
| boltons | 23.0.0 | 23.0.0 | 23.0.0 | 23.0.0 | 23.0.0 | 23.0.0 |
| brotli-python | 1.0.9 | 1.0.9 | 1.0.9 | 1.0.9 | 1.0.9 | 1.0.9 |
| bzip2 | 1.0.8 | 1.0.8 | 1.0.8 | 1.0.8 | 1.0.8 | 1.0.8 |
| c-ares | 1.19.1 | 1.19.1 | 1.19.1 | 1.19.1 | 1.19.1 | |
| ca-certificates | 2024.3.11 | 2024.3.11 | 2024.3.11 | 2024.3.11 | 2024.3.11 | 2024.3.11 |
| certifi | 2024.2.2 | 2024.2.2 | 2024.2.2 | 2024.2.2 | 2024.2.2 | 2024.2.2 |
| cffi | 1.16.0 | 1.16.0 | 1.16.0 | 1.16.0 | 1.16.0 | 1.16.0 |
| charset-normalizer | 2.0.4 | 2.0.4 | 2.0.4 | 2.0.4 | 2.0.4 | 2.0.4 |
| colorama | 0.4.6 | |||||
| conda | 24.4.0 | 24.4.0 | 24.4.0 | 24.4.0 | 24.4.0 | 24.4.0 |
| conda-content-trust | 0.2.0 | 0.2.0 | 0.2.0 | 0.2.0 | 0.2.0 | 0.2.0 |
| conda-libmamba-solver | 24.1.0 | 24.1.0 | 24.1.0 | 24.1.0 | 24.1.0 | 24.1.0 |
| conda-package-handling | 2.2.0 | 2.2.0 | 2.2.0 | 2.2.0 | 2.2.0 | 2.2.0 |
| conda-package-streaming | 0.9.0 | 0.9.0 | 0.9.0 | 0.9.0 | 0.9.0 | 0.9.0 |
| console\_shortcut\_miniconda | 0.1.1 | |||||
| cryptography | 42.0.5 | 42.0.5 | 42.0.5 | 42.0.5 | 42.0.5 | 42.0.5 |
| distro | 1.9.0 | 1.9.0 | 1.9.0 | 1.9.0 | 1.9.0 | 1.9.0 |
| expat | 2.6.2 | 2.6.2 | 2.6.2 | 2.6.2 | 2.6.2 | 2.6.2 |
| fmt | 9.1.0 | 9.1.0 | 9.1.0 | 9.1.0 | 9.1.0 | 9.1.0 |
| icu | 73.1 | 73.1 | 73.1 | 73.1 | 73.1 | |
| idna | 3.7 | 3.7 | 3.7 | 3.7 | 3.7 | 3.7 |
| jsonpatch | 1.33 | 1.33 | 1.33 | 1.33 | 1.33 | 1.33 |
| jsonpointer | 2.1 | 2.1 | 2.1 | 2.1 | 2.1 | 2.1 |
| krb5 | 1.20.1 | 1.20.1 | 1.20.1 | 1.20.1 | 1.20.1 | |
| ld\_impl\_linux-64 | 2.38 | |||||
| ld\_impl\_linux-aarch64 | 2.38 | |||||
| ld\_impl\_linux-s390x | 2.38 | |||||
| libarchive | 3.6.2 | 3.6.2 | 3.6.2 | 3.6.2 | 3.6.2 | 3.6.2 |
| libcurl | 8.7.1 | 8.7.1 | 8.7.1 | 8.7.1 | 8.7.1 | 8.7.1 |
| libcxx | 14.0.6 | 14.0.6 | ||||
| libedit | 3.1.20230828 | 3.1.20230828 | 3.1.20230828 | 3.1.20230828 | 3.1.20230828 | |
| libev | 4.33 | 4.33 | 4.33 | 4.33 | 4.33 | |
| libffi | 3.4.4 | 3.4.4 | 3.4.4 | 3.4.4 | 3.4.4 | 3.4.4 |
| libgcc-ng | 11.2.0 | 11.2.0 | 11.2.0 | |||
| libgomp | 11.2.0 | 11.2.0 | 11.2.0 | |||
| libiconv | 1.16 | 1.16 | 1.16 | |||
| libmamba | 1.5.8 | 1.5.8 | 1.5.8 | 1.5.8 | 1.5.8 | 1.5.8 |
| libmambapy | 1.5.8 | 1.5.8 | 1.5.8 | 1.5.8 | 1.5.8 | 1.5.8 |
| libnghttp2 | 1.57.0 | 1.57.0 | 1.57.0 | 1.57.0 | 1.57.0 | |
| libsolv | 0.7.24 | 0.7.24 | 0.7.24 | 0.7.24 | 0.7.24 | 0.7.24 |
| libssh2 | 1.11.0 | 1.11.0 | 1.11.0 | 1.11.0 | 1.11.0 | 1.11.0 |
| libstdcxx-ng | 11.2.0 | 11.2.0 | 11.2.0 | |||
| libuuid | 1.41.5 | 1.41.5 | 1.41.5 | |||
| libxml2 | 2.10.4 | 2.10.4 | 2.10.4 | 2.10.4 | 2.10.4 | 2.10.4 |
| lz4-c | 1.9.4 | 1.9.4 | 1.9.4 | 1.9.4 | 1.9.4 | 1.9.4 |
| menuinst | 2.0.2 | 2.0.2 | 2.0.2 | 2.0.2 | 2.0.2 | 2.0.2 |
| ncurses | 6.4 | 6.4 | 6.4 | 6.4 | 6.4 | |
| openssl | 3.0.13 | 3.0.13 | 3.0.13 | 3.0.13 | 3.0.13 | 3.0.13 |
| packaging | 23.2 | 23.2 | 23.2 | 23.2 | 23.2 | 23.2 |
| pcre2 | 10.42 | 10.42 | 10.42 | 10.42 | 10.42 | 10.42 |
| pip | 24.0 | 24.0 | 24.0 | 24.0 | 24.0 | 24.0 |
| platformdirs | 3.10.0 | 3.10.0 | 3.10.0 | 3.10.0 | 3.10.0 | 3.10.0 |
| pluggy | 1.0.0 | 1.0.0 | 1.0.0 | 1.0.0 | 1.0.0 | 1.0.0 |
| powershell\_shortcut\_miniconda | 0.0.1 | |||||
| pybind11-abi | 5 | 5 | 5 | 5 | 5 | 5 |
| pycosat | 0.6.6 | 0.6.6 | 0.6.6 | 0.6.6 | 0.6.6 | 0.6.6 |
| pycparser | 2.21 | 2.21 | 2.21 | 2.21 | 2.21 | 2.21 |
| pysocks | 1.7.1 | 1.7.1 | 1.7.1 | 1.7.1 | 1.7.1 | 1.7.1 |
| python | 3.12.3 | 3.12.3 | 3.12.3 | 3.12.3 | 3.12.3 | 3.12.3 |
| python.app | 3 | 3 | ||||
| readline | 8.2 | 8.2 | 8.2 | 8.2 | 8.2 | |
| reproc | 14.2.4 | 14.2.4 | 14.2.4 | 14.2.4 | 14.2.4 | 14.2.4 |
| reproc-cpp | 14.2.4 | 14.2.4 | 14.2.4 | 14.2.4 | 14.2.4 | 14.2.4 |
| requests | 2.31.0 | 2.31.0 | 2.31.0 | 2.31.0 | 2.31.0 | 2.31.0 |
| ruamel.yaml | 0.17.21 | 0.17.21 | 0.17.21 | 0.17.21 | 0.17.21 | 0.17.21 |
| setuptools | 69.5.1 | 69.5.1 | 69.5.1 | 69.5.1 | 69.5.1 | 69.5.1 |
| sqlite | 3.45.3 | 3.45.3 | 3.45.3 | 3.45.3 | 3.45.3 | 3.45.3 |
| tk | 8.6.14 | 8.6.14 | 8.6.14 | 8.6.14 | 8.6.14 | 8.6.14 |
| tqdm | 4.66.2 | 4.66.2 | 4.66.2 | 4.66.2 | 4.66.2 | 4.66.2 |
| truststore | 0.8.0 | 0.8.0 | 0.8.0 | 0.8.0 | 0.8.0 | 0.8.0 |
| tzdata | 2024a | 2024a | 2024a | 2024a | 2024a | 2024a |
| urllib3 | 2.1.0 | 2.1.0 | 2.1.0 | 2.1.0 | 2.1.0 | 2.1.0 |
| vc | 14.2 | |||||
| vs2015\_runtime | 14.27.29016 | |||||
| wheel | 0.43.0 | 0.43.0 | 0.43.0 | 0.43.0 | 0.43.0 | 0.43.0 |
| win\_inet\_pton | 1.1.0 | |||||
| xz | 5.4.6 | 5.4.6 | 5.4.6 | 5.4.6 | 5.4.6 | 5.4.6 |
| yaml-cpp | 0.8.0 | 0.8.0 | 0.8.0 | 0.8.0 | 0.8.0 | 0.8.0 |
| zlib | 1.2.13 | 1.2.13 | 1.2.13 | 1.2.13 | 1.2.13 | 1.2.13 |
| zstandard | 0.22.0 | 0.22.0 | 0.22.0 | 0.22.0 | 0.22.0 | 0.22.0 |
| zstd | 1.5.5 | 1.5.5 | 1.5.5 | 1.5.5 | 1.5.5 | 1.5.5 |
| Package Name | linux-64 | linux-aarch64 | linux-s390x |
|---|---|---|---|
| \_libgcc\_mutex | 0.1 | 0.1 | 0.1 |
| \_openmp\_mutex | 5.1 | 5.1 | 5.1 |
| anaconda-anon-usage | 0.4.4 | 0.4.4 | 0.4.4 |
| archspec | 0.2.3 | 0.2.3 | 0.2.3 |
| boltons | 23.0.0 | 23.0.0 | 23.0.0 |
| brotli-python | 1.0.9 | 1.0.9 | 1.0.9 |
| bzip2 | 1.0.8 | 1.0.8 | 1.0.8 |
| c-ares | 1.19.1 | 1.19.1 | 1.19.1 |
| ca-certificates | 2024.3.11 | 2024.3.11 | 2024.3.11 |
| certifi | 2024.2.2 | 2024.2.2 | 2024.2.2 |
| cffi | 1.16.0 | 1.16.0 | 1.16.0 |
| charset-normalizer | 2.0.4 | 2.0.4 | 2.0.4 |
| conda | 24.4.0 | 24.4.0 | 24.4.0 |
| conda-content-trust | 0.2.0 | 0.2.0 | 0.2.0 |
| conda-libmamba-solver | 24.1.0 | 24.1.0 | 24.1.0 |
| conda-package-handling | 2.2.0 | 2.2.0 | 2.2.0 |
| conda-package-streaming | 0.9.0 | 0.9.0 | 0.9.0 |
| cryptography | 42.0.5 | 42.0.5 | 42.0.5 |
| distro | 1.9.0 | 1.9.0 | 1.9.0 |
| expat | 2.6.2 | 2.6.2 | 2.6.2 |
| fmt | 9.1.0 | 9.1.0 | 9.1.0 |
| icu | 73.1 | 73.1 | 73.1 |
| idna | 3.7 | 3.7 | 3.7 |
| jsonpatch | 1.33 | 1.33 | 1.33 |
| jsonpointer | 2.1 | 2.1 | 2.1 |
| krb5 | 1.20.1 | 1.20.1 | 1.20.1 |
| ld\_impl\_linux-64 | 2.38 | ||
| ld\_impl\_linux-aarch64 | 2.38 | ||
| ld\_impl\_linux-s390x | 2.38 | ||
| libarchive | 3.6.2 | 3.6.2 | 3.6.2 |
| libcurl | 8.7.1 | 8.7.1 | 8.7.1 |
| libedit | 3.1.20230828 | 3.1.20230828 | 3.1.20230828 |
| libev | 4.33 | 4.33 | 4.33 |
| libffi | 3.4.4 | 3.4.4 | 3.4.4 |
| libgcc-ng | 11.2.0 | 11.2.0 | 11.2.0 |
| libgomp | 11.2.0 | 11.2.0 | 11.2.0 |
| libmamba | 1.5.8 | 1.5.8 | 1.5.8 |
| libmambapy | 1.5.8 | 1.5.8 | 1.5.8 |
| libnghttp2 | 1.57.0 | 1.57.0 | 1.57.0 |
| libsolv | 0.7.24 | 0.7.24 | 0.7.24 |
| libssh2 | 1.11.0 | 1.11.0 | 1.11.0 |
| libstdcxx-ng | 11.2.0 | 11.2.0 | 11.2.0 |
| libuuid | 1.41.5 | 1.41.5 | 1.41.5 |
| libxml2 | 2.10.4 | 2.10.4 | 2.10.4 |
| lz4-c | 1.9.4 | 1.9.4 | 1.9.4 |
| menuinst | 2.0.2 | 2.0.2 | 2.0.2 |
| ncurses | 6.4 | 6.4 | 6.4 |
| openssl | 3.0.13 | 3.0.13 | 3.0.13 |
| packaging | 23.2 | 23.2 | 23.2 |
| pcre2 | 10.42 | 10.42 | 10.42 |
| pip | 24.0 | 24.0 | 24.0 |
| platformdirs | 3.10.0 | 3.10.0 | 3.10.0 |
| pluggy | 1.0.0 | 1.0.0 | 1.0.0 |
| pybind11-abi | 5 | 5 | 5 |
| pycosat | 0.6.6 | 0.6.6 | 0.6.6 |
| pycparser | 2.21 | 2.21 | 2.21 |
| pysocks | 1.7.1 | 1.7.1 | 1.7.1 |
| python | 3.12.3 | 3.12.3 | 3.12.3 |
| readline | 8.2 | 8.2 | 8.2 |
| reproc | 14.2.4 | 14.2.4 | 14.2.4 |
| reproc-cpp | 14.2.4 | 14.2.4 | 14.2.4 |
| requests | 2.31.0 | 2.31.0 | 2.31.0 |
| ruamel.yaml | 0.17.21 | 0.17.21 | 0.17.21 |
| setuptools | 69.5.1 | 69.5.1 | 69.5.1 |
| sqlite | 3.45.3 | 3.45.3 | 3.45.3 |
| tk | 8.6.14 | 8.6.14 | 8.6.14 |
| tqdm | 4.66.2 | 4.66.2 | 4.66.2 |
| truststore | 0.8.0 | 0.8.0 | 0.8.0 |
| tzdata | 2024a | 2024a | 2024a |
| urllib3 | 2.1.0 | 2.1.0 | 2.1.0 |
| wheel | 0.43.0 | 0.43.0 | 0.43.0 |
| xz | 5.4.6 | 5.4.6 | 5.4.6 |
| yaml-cpp | 0.8.0 | 0.8.0 | 0.8.0 |
| zlib | 1.2.13 | 1.2.13 | 1.2.13 |
| zstandard | 0.22.0 | 0.22.0 | 0.22.0 |
| zstd | 1.5.5 | 1.5.5 | 1.5.5 |
| Package Name | osx-arm64 | osx-64 |
|---|---|---|
| anaconda-anon-usage | 0.4.4 | 0.4.4 |
| archspec | 0.2.3 | 0.2.3 |
| boltons | 23.0.0 | 23.0.0 |
| brotli-python | 1.0.9 | 1.0.9 |
| bzip2 | 1.0.8 | 1.0.8 |
| c-ares | 1.19.1 | 1.19.1 |
| ca-certificates | 2024.3.11 | 2024.3.11 |
| certifi | 2024.2.2 | 2024.2.2 |
| cffi | 1.16.0 | 1.16.0 |
| charset-normalizer | 2.0.4 | 2.0.4 |
| conda | 24.4.0 | 24.4.0 |
| conda-content-trust | 0.2.0 | 0.2.0 |
| conda-libmamba-solver | 24.1.0 | 24.1.0 |
| conda-package-handling | 2.2.0 | 2.2.0 |
| conda-package-streaming | 0.9.0 | 0.9.0 |
| cryptography | 42.0.5 | 42.0.5 |
| distro | 1.9.0 | 1.9.0 |
| expat | 2.6.2 | 2.6.2 |
| fmt | 9.1.0 | 9.1.0 |
| icu | 73.1 | 73.1 |
| idna | 3.7 | 3.7 |
| jsonpatch | 1.33 | 1.33 |
| jsonpointer | 2.1 | 2.1 |
| krb5 | 1.20.1 | 1.20.1 |
| libarchive | 3.6.2 | 3.6.2 |
| libcurl | 8.7.1 | 8.7.1 |
| libcxx | 14.0.6 | 14.0.6 |
| libedit | 3.1.20230828 | 3.1.20230828 |
| libev | 4.33 | 4.33 |
| libffi | 3.4.4 | 3.4.4 |
| libiconv | 1.16 | 1.16 |
| libmamba | 1.5.8 | 1.5.8 |
| libmambapy | 1.5.8 | 1.5.8 |
| libnghttp2 | 1.57.0 | 1.57.0 |
| libsolv | 0.7.24 | 0.7.24 |
| libssh2 | 1.11.0 | 1.11.0 |
| libxml2 | 2.10.4 | 2.10.4 |
| lz4-c | 1.9.4 | 1.9.4 |
| menuinst | 2.0.2 | 2.0.2 |
| ncurses | 6.4 | 6.4 |
| openssl | 3.0.13 | 3.0.13 |
| packaging | 23.2 | 23.2 |
| pcre2 | 10.42 | 10.42 |
| pip | 24.0 | 24.0 |
| platformdirs | 3.10.0 | 3.10.0 |
| pluggy | 1.0.0 | 1.0.0 |
| pybind11-abi | 5 | 5 |
| pycosat | 0.6.6 | 0.6.6 |
| pycparser | 2.21 | 2.21 |
| pysocks | 1.7.1 | 1.7.1 |
| python | 3.12.3 | 3.12.3 |
| python.app | 3 | 3 |
| readline | 8.2 | 8.2 |
| reproc | 14.2.4 | 14.2.4 |
| reproc-cpp | 14.2.4 | 14.2.4 |
| requests | 2.31.0 | 2.31.0 |
| ruamel.yaml | 0.17.21 | 0.17.21 |
| setuptools | 69.5.1 | 69.5.1 |
| sqlite | 3.45.3 | 3.45.3 |
| tk | 8.6.14 | 8.6.14 |
| tqdm | 4.66.2 | 4.66.2 |
| truststore | 0.8.0 | 0.8.0 |
| tzdata | 2024a | 2024a |
| urllib3 | 2.1.0 | 2.1.0 |
| wheel | 0.43.0 | 0.43.0 |
| xz | 5.4.6 | 5.4.6 |
| yaml-cpp | 0.8.0 | 0.8.0 |
| zlib | 1.2.13 | 1.2.13 |
| zstandard | 0.22.0 | 0.22.0 |
| zstd | 1.5.5 | 1.5.5 |
| Package Name | win-64 |
|---|---|
| anaconda-anon-usage | 0.4.4 |
| archspec | 0.2.3 |
| boltons | 23.0.0 |
| brotli-python | 1.0.9 |
| bzip2 | 1.0.8 |
| ca-certificates | 2024.3.11 |
| certifi | 2024.2.2 |
| cffi | 1.16.0 |
| charset-normalizer | 2.0.4 |
| colorama | 0.4.6 |
| conda | 24.4.0 |
| conda-content-trust | 0.2.0 |
| conda-libmamba-solver | 24.1.0 |
| conda-package-handling | 2.2.0 |
| conda-package-streaming | 0.9.0 |
| console\_shortcut\_miniconda | 0.1.1 |
| cryptography | 42.0.5 |
| distro | 1.9.0 |
| expat | 2.6.2 |
| fmt | 9.1.0 |
| idna | 3.7 |
| jsonpatch | 1.33 |
| jsonpointer | 2.1 |
| libarchive | 3.6.2 |
| libcurl | 8.7.1 |
| libffi | 3.4.4 |
| libiconv | 1.16 |
| libmamba | 1.5.8 |
| libmambapy | 1.5.8 |
| libsolv | 0.7.24 |
| libssh2 | 1.11.0 |
| libxml2 | 2.10.4 |
| lz4-c | 1.9.4 |
| menuinst | 2.0.2 |
| openssl | 3.0.13 |
| packaging | 23.2 |
| pcre2 | 10.42 |
| pip | 24.0 |
| platformdirs | 3.10.0 |
| pluggy | 1.0.0 |
| powershell\_shortcut\_miniconda | 0.0.1 |
| pybind11-abi | 5 |
| pycosat | 0.6.6 |
| pycparser | 2.21 |
| pysocks | 1.7.1 |
| python | 3.12.3 |
| reproc | 14.2.4 |
| reproc-cpp | 14.2.4 |
| requests | 2.31.0 |
| ruamel.yaml | 0.17.21 |
| setuptools | 69.5.1 |
| sqlite | 3.45.3 |
| tk | 8.6.14 |
| tqdm | 4.66.2 |
| truststore | 0.8.0 |
| tzdata | 2024a |
| urllib3 | 2.1.0 |
| vc | 14.2 |
| vs2015\_runtime | 14.27.29016 |
| wheel | 0.43.0 |
| win\_inet\_pton | 1.1.0 |
| xz | 5.4.6 |
| yaml-cpp | 0.8.0 |
| zlib | 1.2.13 |
| zstandard | 0.22.0 |
| zstd | 1.5.5 |
| Package Name | linux-64 | linux-aarch64 | linux-s390x | osx-arm64 | osx-64 | win-64 |
|---|---|---|---|---|---|---|
| \_libgcc\_mutex | 0.1 | 0.1 | 0.1 | |||
| \_openmp\_mutex | 5.1 | 5.1 | 5.1 | |||
| anaconda-anon-usage | 0.4.4 | 0.4.4 | 0.4.4 | 0.4.4 | 0.4.4 | 0.4.4 |
| archspec | 0.2.3 | 0.2.3 | 0.2.3 | 0.2.3 | 0.2.3 | 0.2.3 |
| boltons | 23.0.0 | 23.0.0 | 23.0.0 | 23.0.0 | 23.0.0 | 23.0.0 |
| brotli-python | 1.0.9 | 1.0.9 | 1.0.9 | 1.0.9 | 1.0.9 | 1.0.9 |
| bzip2 | 1.0.8 | 1.0.8 | 1.0.8 | 1.0.8 | 1.0.8 | 1.0.8 |
| c-ares | 1.19.1 | 1.19.1 | 1.19.1 | 1.19.1 | 1.19.1 | |
| ca-certificates | 2024.3.11 | 2024.3.11 | 2024.3.11 | 2024.3.11 | 2024.3.11 | 2024.3.11 |
| certifi | 2024.2.2 | 2024.2.2 | 2024.2.2 | 2024.2.2 | 2024.2.2 | 2024.2.2 |
| cffi | 1.16.0 | 1.16.0 | 1.16.0 | 1.16.0 | 1.16.0 | 1.16.0 |
| charset-normalizer | 2.0.4 | 2.0.4 | 2.0.4 | 2.0.4 | 2.0.4 | 2.0.4 |
| colorama | 0.4.6 | 0.4.6 | ||||
| conda | 24.3.0 | 24.3.0 | 24.3.0 | 24.3.0 | 24.3.0 | 24.3.0 |
| conda-content-trust | 0.2.0 | 0.2.0 | 0.2.0 | 0.2.0 | 0.2.0 | 0.2.0 |
| conda-libmamba-solver | 24.1.0 | 24.1.0 | 24.1.0 | 24.1.0 | 24.1.0 | 24.1.0 |
| conda-package-handling | 2.2.0 | 2.2.0 | 2.2.0 | 2.2.0 | 2.2.0 | 2.2.0 |
| conda-package-streaming | 0.9.0 | 0.9.0 | 0.9.0 | 0.9.0 | 0.9.0 | 0.9.0 |
| console\_shortcut\_miniconda | 0.1.1 | |||||
| cryptography | 42.0.5 | 42.0.5 | 42.0.5 | 42.0.5 | 42.0.5 | 42.0.5 |
| distro | 1.8.0 | 1.8.0 | 1.8.0 | 1.8.0 | 1.8.0 | 1.8.0 |
| expat | 2.5.0 | 2.5.0 | 2.5.0 | 2.5.0 | 2.5.0 | 2.5.0 |
| fmt | 9.1.0 | 9.1.0 | 9.1.0 | 9.1.0 | 9.1.0 | 9.1.0 |
| icu | 73.1 | 73.1 | 73.1 | 73.1 | 73.1 | |
| idna | 3.4 | 3.4 | 3.3 | 3.4 | 3.4 | 3.4 |
| jsonpatch | 1.33 | 1.33 | 1.33 | 1.33 | 1.33 | 1.33 |
| jsonpointer | 2.1 | 2.1 | 2.1 | 2.1 | 2.1 | 2.1 |
| krb5 | 1.20.1 | 1.20.1 | 1.20.1 | 1.20.1 | 1.20.1 | |
| ld\_impl\_linux-64 | 2.38 | |||||
| ld\_impl\_linux-aarch64 | 2.38 | |||||
| ld\_impl\_linux-s390x | 2.38 | |||||
| libarchive | 3.6.2 | 3.6.2 | 3.6.2 | 3.6.2 | 3.6.2 | 3.6.2 |
| libcurl | 8.5.0 | 8.5.0 | 8.5.0 | 8.5.0 | 8.5.0 | 8.5.0 |
| libcxx | 14.0.6 | 14.0.6 | ||||
| libedit | 3.1.20230828 | 3.1.20230828 | 3.1.20230828 | 3.1.20230828 | 3.1.20230828 | |
| libev | 4.33 | 4.33 | 4.33 | 4.33 | 4.33 | |
| libffi | 3.4.4 | 3.4.4 | 3.4.2 | 3.4.4 | 3.4.4 | 3.4.4 |
| libgcc-ng | 11.2.0 | 11.2.0 | 11.2.0 | |||
| libgomp | 11.2.0 | 11.2.0 | 11.2.0 | |||
| libiconv | 1.16 | 1.16 | 1.16 | |||
| libmamba | 1.5.8 | 1.5.8 | 1.5.8 | 1.5.8 | 1.5.8 | 1.5.8 |
| libmambapy | 1.5.8 | 1.5.8 | 1.5.8 | 1.5.8 | 1.5.8 | 1.5.8 |
| libnghttp2 | 1.57.0 | 1.57.0 | 1.57.0 | 1.57.0 | 1.57.0 | |
| libsolv | 0.7.24 | 0.7.24 | 0.7.24 | 0.7.24 | 0.7.24 | 0.7.24 |
| libssh2 | 1.10.0 | 1.10.0 | 1.10.0 | 1.10.0 | 1.10.0 | 1.10.0 |
| libstdcxx-ng | 11.2.0 | 11.2.0 | 11.2.0 | |||
| libuuid | 1.41.5 | 1.41.5 | 1.41.5 | |||
| libxml2 | 2.10.4 | 2.10.4 | 2.10.4 | 2.10.4 | 2.10.4 | 2.10.4 |
| lz4-c | 1.9.4 | 1.9.4 | 1.9.4 | 1.9.4 | 1.9.4 | 1.9.4 |
| menuinst | 2.0.2 | 2.0.2 | 2.0.2 | 2.0.2 | 2.0.2 | 2.0.2 |
| ncurses | 6.4 | 6.4 | 6.4 | 6.4 | 6.4 | |
| openssl | 3.0.13 | 3.0.13 | 3.0.13 | 3.0.13 | 3.0.13 | 3.0.13 |
| packaging | 23.2 | 23.2 | 23.2 | 23.2 | 23.2 | 23.2 |
| pcre2 | 10.42 | 10.42 | 10.42 | 10.42 | 10.42 | 10.42 |
| pip | 23.3.1 | 23.3.1 | 23.3.1 | 23.3.1 | 23.3.1 | 23.3.1 |
| platformdirs | 3.10.0 | 3.10.0 | 3.10.0 | 3.10.0 | 3.10.0 | 3.10.0 |
| pluggy | 1.0.0 | 1.0.0 | 1.0.0 | 1.0.0 | 1.0.0 | 1.0.0 |
| powershell\_shortcut\_miniconda | 0.0.1 | |||||
| pybind11-abi | 4 | 4 | 4 | 4 | 4 | 4 |
| pycosat | 0.6.6 | 0.6.6 | 0.6.6 | 0.6.6 | 0.6.6 | 0.6.6 |
| pycparser | 2.21 | 2.21 | 2.21 | 2.21 | 2.21 | 2.21 |
| pysocks | 1.7.1 | 1.7.1 | 1.7.1 | 1.7.1 | 1.7.1 | 1.7.1 |
| python | 3.12.2 | 3.12.2 | 3.12.2 | 3.12.2 | 3.12.2 | 3.12.2 |
| python.app | 3 | 3 | ||||
| readline | 8.2 | 8.2 | 8.2 | 8.2 | 8.2 | |
| reproc | 14.2.4 | 14.2.4 | 14.2.4 | 14.2.4 | 14.2.4 | 14.2.4 |
| reproc-cpp | 14.2.4 | 14.2.4 | 14.2.4 | 14.2.4 | 14.2.4 | 14.2.4 |
| requests | 2.31.0 | 2.31.0 | 2.31.0 | 2.31.0 | 2.31.0 | 2.31.0 |
| ruamel.yaml | 0.17.21 | 0.17.21 | 0.17.21 | 0.17.21 | 0.17.21 | 0.17.21 |
| setuptools | 68.2.2 | 68.2.2 | 68.2.2 | 68.2.2 | 68.2.2 | 68.2.2 |
| sqlite | 3.41.2 | 3.41.2 | 3.41.2 | 3.41.2 | 3.41.2 | 3.41.2 |
| tk | 8.6.12 | 8.6.12 | 8.6.12 | 8.6.12 | 8.6.12 | 8.6.12 |
| tqdm | 4.65.0 | 4.65.0 | 4.63.0 | 4.65.0 | 4.65.0 | 4.65.0 |
| truststore | 0.8.0 | 0.8.0 | 0.8.0 | 0.8.0 | 0.8.0 | 0.8.0 |
| tzdata | 2024a | 2024a | 2024a | 2024a | 2024a | 2024a |
| urllib3 | 2.1.0 | 2.1.0 | 2.1.0 | 2.1.0 | 2.1.0 | 2.1.0 |
| vc | 14.2 | |||||
| vs2015\_runtime | 14.27.29016 | |||||
| wheel | 0.41.2 | 0.41.2 | 0.41.2 | 0.41.2 | 0.41.2 | 0.41.2 |
| win\_inet\_pton | 1.1.0 | |||||
| xz | 5.4.6 | 5.4.6 | 5.4.6 | 5.4.6 | 5.4.6 | 5.4.6 |
| yaml-cpp | 0.8.0 | 0.8.0 | 0.8.0 | 0.8.0 | 0.8.0 | 0.8.0 |
| zlib | 1.2.13 | 1.2.13 | 1.2.13 | 1.2.13 | 1.2.13 | 1.2.13 |
| zstandard | 0.19.0 | 0.19.0 | 0.19.0 | 0.19.0 | 0.19.0 | 0.19.0 |
| zstd | 1.5.5 | 1.5.5 | 1.5.5 | 1.5.5 | 1.5.5 | 1.5.5 |
| Package Name | linux-64 | linux-aarch64 | linux-s390x |
|---|---|---|---|
| \_libgcc\_mutex | 0.1 | 0.1 | 0.1 |
| \_openmp\_mutex | 5.1 | 5.1 | 5.1 |
| anaconda-anon-usage | 0.4.4 | 0.4.4 | 0.4.4 |
| archspec | 0.2.3 | 0.2.3 | 0.2.3 |
| boltons | 23.0.0 | 23.0.0 | 23.0.0 |
| brotli-python | 1.0.9 | 1.0.9 | 1.0.9 |
| bzip2 | 1.0.8 | 1.0.8 | 1.0.8 |
| c-ares | 1.19.1 | 1.19.1 | 1.19.1 |
| ca-certificates | 2024.3.11 | 2024.3.11 | 2024.3.11 |
| certifi | 2024.2.2 | 2024.2.2 | 2024.2.2 |
| cffi | 1.16.0 | 1.16.0 | 1.16.0 |
| charset-normalizer | 2.0.4 | 2.0.4 | 2.0.4 |
| colorama | 0.4.6 | ||
| conda | 24.3.0 | 24.3.0 | 24.3.0 |
| conda-content-trust | 0.2.0 | 0.2.0 | 0.2.0 |
| conda-libmamba-solver | 24.1.0 | 24.1.0 | 24.1.0 |
| conda-package-handling | 2.2.0 | 2.2.0 | 2.2.0 |
| conda-package-streaming | 0.9.0 | 0.9.0 | 0.9.0 |
| cryptography | 42.0.5 | 42.0.5 | 42.0.5 |
| distro | 1.8.0 | 1.8.0 | 1.8.0 |
| expat | 2.5.0 | 2.5.0 | 2.5.0 |
| fmt | 9.1.0 | 9.1.0 | 9.1.0 |
| icu | 73.1 | 73.1 | 73.1 |
| idna | 3.4 | 3.4 | 3.3 |
| jsonpatch | 1.33 | 1.33 | 1.33 |
| jsonpointer | 2.1 | 2.1 | 2.1 |
| krb5 | 1.20.1 | 1.20.1 | 1.20.1 |
| ld\_impl\_linux-64 | 2.38 | ||
| ld\_impl\_linux-aarch64 | 2.38 | ||
| ld\_impl\_linux-s390x | 2.38 | ||
| libarchive | 3.6.2 | 3.6.2 | 3.6.2 |
| libcurl | 8.5.0 | 8.5.0 | 8.5.0 |
| libedit | 3.1.20230828 | 3.1.20230828 | 3.1.20230828 |
| libev | 4.33 | 4.33 | 4.33 |
| libffi | 3.4.4 | 3.4.4 | 3.4.2 |
| libgcc-ng | 11.2.0 | 11.2.0 | 11.2.0 |
| libgomp | 11.2.0 | 11.2.0 | 11.2.0 |
| libmamba | 1.5.8 | 1.5.8 | 1.5.8 |
| libmambapy | 1.5.8 | 1.5.8 | 1.5.8 |
| libnghttp2 | 1.57.0 | 1.57.0 | 1.57.0 |
| libsolv | 0.7.24 | 0.7.24 | 0.7.24 |
| libssh2 | 1.10.0 | 1.10.0 | 1.10.0 |
| libstdcxx-ng | 11.2.0 | 11.2.0 | 11.2.0 |
| libuuid | 1.41.5 | 1.41.5 | 1.41.5 |
| libxml2 | 2.10.4 | 2.10.4 | 2.10.4 |
| lz4-c | 1.9.4 | 1.9.4 | 1.9.4 |
| menuinst | 2.0.2 | 2.0.2 | 2.0.2 |
| ncurses | 6.4 | 6.4 | 6.4 |
| openssl | 3.0.13 | 3.0.13 | 3.0.13 |
| packaging | 23.2 | 23.2 | 23.2 |
| pcre2 | 10.42 | 10.42 | 10.42 |
| pip | 23.3.1 | 23.3.1 | 23.3.1 |
| platformdirs | 3.10.0 | 3.10.0 | 3.10.0 |
| pluggy | 1.0.0 | 1.0.0 | 1.0.0 |
| pybind11-abi | 4 | 4 | 4 |
| pycosat | 0.6.6 | 0.6.6 | 0.6.6 |
| pycparser | 2.21 | 2.21 | 2.21 |
| pysocks | 1.7.1 | 1.7.1 | 1.7.1 |
| python | 3.12.2 | 3.12.2 | 3.12.2 |
| readline | 8.2 | 8.2 | 8.2 |
| reproc | 14.2.4 | 14.2.4 | 14.2.4 |
| reproc-cpp | 14.2.4 | 14.2.4 | 14.2.4 |
| requests | 2.31.0 | 2.31.0 | 2.31.0 |
| ruamel.yaml | 0.17.21 | 0.17.21 | 0.17.21 |
| setuptools | 68.2.2 | 68.2.2 | 68.2.2 |
| sqlite | 3.41.2 | 3.41.2 | 3.41.2 |
| tk | 8.6.12 | 8.6.12 | 8.6.12 |
| tqdm | 4.65.0 | 4.65.0 | 4.63.0 |
| truststore | 0.8.0 | 0.8.0 | 0.8.0 |
| tzdata | 2024a | 2024a | 2024a |
| urllib3 | 2.1.0 | 2.1.0 | 2.1.0 |
| wheel | 0.41.2 | 0.41.2 | 0.41.2 |
| xz | 5.4.6 | 5.4.6 | 5.4.6 |
| yaml-cpp | 0.8.0 | 0.8.0 | 0.8.0 |
| zlib | 1.2.13 | 1.2.13 | 1.2.13 |
| zstandard | 0.19.0 | 0.19.0 | 0.19.0 |
| zstd | 1.5.5 | 1.5.5 | 1.5.5 |
| Package Name | osx-arm64 | osx-64 |
|---|---|---|
| anaconda-anon-usage | 0.4.4 | 0.4.4 |
| archspec | 0.2.3 | 0.2.3 |
| boltons | 23.0.0 | 23.0.0 |
| brotli-python | 1.0.9 | 1.0.9 |
| bzip2 | 1.0.8 | 1.0.8 |
| c-ares | 1.19.1 | 1.19.1 |
| ca-certificates | 2024.3.11 | 2024.3.11 |
| certifi | 2024.2.2 | 2024.2.2 |
| cffi | 1.16.0 | 1.16.0 |
| charset-normalizer | 2.0.4 | 2.0.4 |
| conda | 24.3.0 | 24.3.0 |
| conda-content-trust | 0.2.0 | 0.2.0 |
| conda-libmamba-solver | 24.1.0 | 24.1.0 |
| conda-package-handling | 2.2.0 | 2.2.0 |
| conda-package-streaming | 0.9.0 | 0.9.0 |
| cryptography | 42.0.5 | 42.0.5 |
| distro | 1.8.0 | 1.8.0 |
| expat | 2.5.0 | 2.5.0 |
| fmt | 9.1.0 | 9.1.0 |
| icu | 73.1 | 73.1 |
| idna | 3.4 | 3.4 |
| jsonpatch | 1.33 | 1.33 |
| jsonpointer | 2.1 | 2.1 |
| krb5 | 1.20.1 | 1.20.1 |
| libarchive | 3.6.2 | 3.6.2 |
| libcurl | 8.5.0 | 8.5.0 |
| libcxx | 14.0.6 | 14.0.6 |
| libedit | 3.1.20230828 | 3.1.20230828 |
| libev | 4.33 | 4.33 |
| libffi | 3.4.4 | 3.4.4 |
| libiconv | 1.16 | 1.16 |
| libmamba | 1.5.8 | 1.5.8 |
| libmambapy | 1.5.8 | 1.5.8 |
| libnghttp2 | 1.57.0 | 1.57.0 |
| libsolv | 0.7.24 | 0.7.24 |
| libssh2 | 1.10.0 | 1.10.0 |
| libxml2 | 2.10.4 | 2.10.4 |
| lz4-c | 1.9.4 | 1.9.4 |
| menuinst | 2.0.2 | 2.0.2 |
| ncurses | 6.4 | 6.4 |
| openssl | 3.0.13 | 3.0.13 |
| packaging | 23.2 | 23.2 |
| pcre2 | 10.42 | 10.42 |
| pip | 23.3.1 | 23.3.1 |
| platformdirs | 3.10.0 | 3.10.0 |
| pluggy | 1.0.0 | 1.0.0 |
| pybind11-abi | 4 | 4 |
| pycosat | 0.6.6 | 0.6.6 |
| pycparser | 2.21 | 2.21 |
| pysocks | 1.7.1 | 1.7.1 |
| python | 3.12.2 | 3.12.2 |
| python.app | 3 | 3 |
| readline | 8.2 | 8.2 |
| reproc | 14.2.4 | 14.2.4 |
| reproc-cpp | 14.2.4 | 14.2.4 |
| requests | 2.31.0 | 2.31.0 |
| ruamel.yaml | 0.17.21 | 0.17.21 |
| setuptools | 68.2.2 | 68.2.2 |
| sqlite | 3.41.2 | 3.41.2 |
| tk | 8.6.12 | 8.6.12 |
| tqdm | 4.65.0 | 4.65.0 |
| truststore | 0.8.0 | 0.8.0 |
| tzdata | 2024a | 2024a |
| urllib3 | 2.1.0 | 2.1.0 |
| wheel | 0.41.2 | 0.41.2 |
| xz | 5.4.6 | 5.4.6 |
| yaml-cpp | 0.8.0 | 0.8.0 |
| zlib | 1.2.13 | 1.2.13 |
| zstandard | 0.19.0 | 0.19.0 |
| zstd | 1.5.5 | 1.5.5 |
| Package Name | win-64 |
|---|---|
| anaconda-anon-usage | 0.4.4 |
| archspec | 0.2.3 |
| boltons | 23.0.0 |
| brotli-python | 1.0.9 |
| bzip2 | 1.0.8 |
| ca-certificates | 2024.3.11 |
| certifi | 2024.2.2 |
| cffi | 1.16.0 |
| charset-normalizer | 2.0.4 |
| colorama | 0.4.6 |
| conda | 24.3.0 |
| conda-content-trust | 0.2.0 |
| conda-libmamba-solver | 24.1.0 |
| conda-package-handling | 2.2.0 |
| conda-package-streaming | 0.9.0 |
| console\_shortcut\_miniconda | 0.1.1 |
| cryptography | 42.0.5 |
| distro | 1.8.0 |
| expat | 2.5.0 |
| fmt | 9.1.0 |
| idna | 3.4 |
| jsonpatch | 1.33 |
| jsonpointer | 2.1 |
| libarchive | 3.6.2 |
| libcurl | 8.5.0 |
| libffi | 3.4.4 |
| libiconv | 1.16 |
| libmamba | 1.5.8 |
| libmambapy | 1.5.8 |
| libsolv | 0.7.24 |
| libssh2 | 1.10.0 |
| libxml2 | 2.10.4 |
| lz4-c | 1.9.4 |
| menuinst | 2.0.2 |
| openssl | 3.0.13 |
| packaging | 23.2 |
| pcre2 | 10.42 |
| pip | 23.3.1 |
| platformdirs | 3.10.0 |
| pluggy | 1.0.0 |
| powershell\_shortcut\_miniconda | 0.0.1 |
| pybind11-abi | 4 |
| pycosat | 0.6.6 |
| pycparser | 2.21 |
| pysocks | 1.7.1 |
| python | 3.12.2 |
| reproc | 14.2.4 |
| reproc-cpp | 14.2.4 |
| requests | 2.31.0 |
| ruamel.yaml | 0.17.21 |
| setuptools | 68.2.2 |
| sqlite | 3.41.2 |
| tk | 8.6.12 |
| tqdm | 4.65.0 |
| truststore | 0.8.0 |
| tzdata | 2024a |
| urllib3 | 2.1.0 |
| vc | 14.2 |
| vs2015\_runtime | 14.27.29016 |
| wheel | 0.41.2 |
| win\_inet\_pton | 1.1.0 |
| xz | 5.4.6 |
| yaml-cpp | 0.8.0 |
| zlib | 1.2.13 |
| zstandard | 0.19.0 |
| zstd | 1.5.5 |
| Package Name | linux-64 | linux-aarch64 | linux-s390x | osx-arm64 | osx-64 | win-64 |
|---|---|---|---|---|---|---|
| \_libgcc\_mutex | 0.1 | 0.1 | 0.1 | |||
| \_openmp\_mutex | 5.1 | 5.1 | 5.1 | |||
| archspec | 0.2.1 | 0.2.1 | 0.2.1 | 0.2.1 | 0.2.1 | 0.2.1 |
| boltons | 23.0.0 | 23.0.0 | 23.0.0 | 23.0.0 | 23.0.0 | 23.0.0 |
| brotli-python | 1.0.9 | 1.0.9 | 1.0.9 | 1.0.9 | 1.0.9 | 1.0.9 |
| bzip2 | 1.0.8 | 1.0.8 | 1.0.8 | 1.0.8 | 1.0.8 | 1.0.8 |
| c-ares | 1.19.1 | 1.19.1 | 1.19.1 | 1.19.1 | 1.19.1 | |
| ca-certificates | 2023.12.12 | 2023.12.12 | 2023.12.12 | 2023.12.12 | 2023.12.12 | 2023.12.12 |
| certifi | 2024.2.2 | 2024.2.2 | 2024.2.2 | 2024.2.2 | 2024.2.2 | 2024.2.2 |
| cffi | 1.16.0 | 1.16.0 | 1.16.0 | 1.16.0 | 1.16.0 | 1.16.0 |
| charset-normalizer | 2.0.4 | 2.0.4 | 2.0.4 | 2.0.4 | 2.0.4 | 2.0.4 |
| colorama | 0.4.6 | 0.4.6 | ||||
| conda | 24.1.2 | 24.1.2 | 24.1.2 | 24.1.2 | 24.1.2 | 24.1.2 |
| conda-content-trust | 0.2.0 | 0.2.0 | 0.2.0 | 0.2.0 | 0.2.0 | 0.2.0 |
| conda-libmamba-solver | 23.12.0 | 23.12.0 | 23.12.0 | 23.12.0 | 23.12.0 | 23.12.0 |
| conda-package-handling | 2.2.0 | 2.2.0 | 2.2.0 | 2.2.0 | 2.2.0 | 2.2.0 |
| conda-package-streaming | 0.9.0 | 0.9.0 | 0.9.0 | 0.9.0 | 0.9.0 | 0.9.0 |
| console\_shortcut\_miniconda | 0.1.1 | |||||
| cryptography | 41.0.7 | 41.0.7 | 41.0.7 | 41.0.7 | 41.0.7 | 41.0.7 |
| distro | 1.8.0 | 1.8.0 | 1.8.0 | 1.8.0 | 1.8.0 | 1.8.0 |
| expat | 2.5.0 | 2.5.0 | 2.5.0 | 2.5.0 | 2.5.0 | 2.5.0 |
| fmt | 9.1.0 | 9.1.0 | 9.1.0 | 9.1.0 | 9.1.0 | 9.1.0 |
| icu | 73.1 | 73.1 | 73.1 | 73.1 | 73.1 | |
| idna | 3.4 | 3.4 | 3.3 | 3.4 | 3.4 | 3.4 |
| jsonpatch | 1.32 | 1.32 | 1.32 | 1.32 | 1.32 | 1.32 |
| jsonpointer | 2.1 | 2.1 | 2.1 | 2.1 | 2.1 | 2.1 |
| krb5 | 1.20.1 | 1.20.1 | 1.20.1 | 1.20.1 | 1.20.1 | |
| ld\_impl\_linux-64 | 2.38 | |||||
| ld\_impl\_linux-aarch64 | 2.38 | |||||
| ld\_impl\_linux-s390x | 2.38 | |||||
| libarchive | 3.6.2 | 3.6.2 | 3.6.2 | 3.6.2 | 3.6.2 | 3.6.2 |
| libcurl | 8.5.0 | 8.5.0 | 8.5.0 | 8.5.0 | 8.5.0 | 8.5.0 |
| libcxx | 14.0.6 | 14.0.6 | ||||
| libedit | 3.1.20230828 | 3.1.20230828 | 3.1.20230828 | 3.1.20230828 | 3.1.20230828 | |
| libev | 4.33 | 4.33 | 4.33 | 4.33 | 4.33 | |
| libffi | 3.4.4 | 3.4.4 | 3.4.2 | 3.4.4 | 3.4.4 | 3.4.4 |
| libgcc-ng | 11.2.0 | 11.2.0 | 11.2.0 | |||
| libgomp | 11.2.0 | 11.2.0 | 11.2.0 | |||
| libiconv | 1.16 | 1.16 | 1.16 | |||
| libmamba | 1.5.3 | 1.5.3 | 1.5.3 | 1.5.3 | 1.5.3 | 1.5.3 |
| libmambapy | 1.5.3 | 1.5.3 | 1.5.3 | 1.5.3 | 1.5.3 | 1.5.3 |
| libnghttp2 | 1.57.0 | 1.57.0 | 1.57.0 | 1.57.0 | 1.57.0 | |
| libsolv | 0.7.24 | 0.7.24 | 0.7.24 | 0.7.24 | 0.7.24 | 0.7.24 |
| libssh2 | 1.10.0 | 1.10.0 | 1.10.0 | 1.10.0 | 1.10.0 | 1.10.0 |
| libstdcxx-ng | 11.2.0 | 11.2.0 | 11.2.0 | |||
| libuuid | 1.41.5 | 1.41.5 | 1.41.5 | |||
| libxml2 | 2.10.4 | 2.10.4 | 2.10.4 | 2.10.4 | 2.10.4 | 2.10.4 |
| lz4-c | 1.9.4 | 1.9.4 | 1.9.4 | 1.9.4 | 1.9.4 | 1.9.4 |
| menuinst | 2.0.2 | 2.0.2 | 2.0.2 | 2.0.2 | 2.0.2 | 2.0.2 |
| ncurses | 6.4 | 6.4 | 6.4 | 6.4 | 6.4 | |
| openssl | 3.0.13 | 3.0.13 | 3.0.13 | 3.0.13 | 3.0.13 | 3.0.13 |
| packaging | 23.1 | 23.1 | 23.1 | 23.1 | 23.1 | 23.1 |
| pcre2 | 10.42 | 10.42 | 10.42 | 10.42 | 10.42 | 10.42 |
| pip | 23.3.1 | 23.3.1 | 23.3.1 | 23.3.1 | 23.3.1 | 23.3.1 |
| platformdirs | 3.10.0 | 3.10.0 | 3.10.0 | 3.10.0 | 3.10.0 | 3.10.0 |
| pluggy | 1.0.0 | 1.0.0 | 1.0.0 | 1.0.0 | 1.0.0 | 1.0.0 |
| powershell\_shortcut\_miniconda | 0.0.1 | |||||
| pybind11-abi | 4 | 4 | 4 | 4 | 4 | 4 |
| pycosat | 0.6.6 | 0.6.6 | 0.6.6 | 0.6.6 | 0.6.6 | 0.6.6 |
| pycparser | 2.21 | 2.21 | 2.21 | 2.21 | 2.21 | 2.21 |
| pysocks | 1.7.1 | 1.7.1 | 1.7.1 | 1.7.1 | 1.7.1 | 1.7.1 |
| python | 3.12.1 | 3.12.1 | 3.12.1 | 3.12.1 | 3.12.1 | 3.12.1 |
| python.app | 3 | 3 | ||||
| readline | 8.2 | 8.2 | 8.2 | 8.2 | 8.2 | |
| reproc | 14.2.4 | 14.2.4 | 14.2.4 | 14.2.4 | 14.2.4 | 14.2.4 |
| reproc-cpp | 14.2.4 | 14.2.4 | 14.2.4 | 14.2.4 | 14.2.4 | 14.2.4 |
| requests | 2.31.0 | 2.31.0 | 2.31.0 | 2.31.0 | 2.31.0 | 2.31.0 |
| ruamel.yaml | 0.17.21 | 0.17.21 | 0.17.21 | 0.17.21 | 0.17.21 | 0.17.21 |
| setuptools | 68.2.2 | 68.2.2 | 68.2.2 | 68.2.2 | 68.2.2 | 68.2.2 |
| sqlite | 3.41.2 | 3.41.2 | 3.41.2 | 3.41.2 | 3.41.2 | 3.41.2 |
| tk | 8.6.12 | 8.6.12 | 8.6.12 | 8.6.12 | 8.6.12 | 8.6.12 |
| tqdm | 4.65.0 | 4.65.0 | 4.63.0 | 4.65.0 | 4.65.0 | 4.65.0 |
| truststore | 0.8.0 | 0.8.0 | 0.8.0 | 0.8.0 | 0.8.0 | 0.8.0 |
| tzdata | 2023d | 2023d | 2023d | 2023d | 2023d | 2023d |
| urllib3 | 2.1.0 | 2.1.0 | 2.1.0 | 2.1.0 | 2.1.0 | 2.1.0 |
| vc | 14.2 | |||||
| vs2015\_runtime | 14.27.29016 | |||||
| wheel | 0.41.2 | 0.41.2 | 0.41.2 | 0.41.2 | 0.41.2 | 0.41.2 |
| win\_inet\_pton | 1.1.0 | |||||
| xz | 5.4.5 | 5.4.5 | 5.4.5 | 5.4.5 | 5.4.5 | 5.4.5 |
| yaml-cpp | 0.8.0 | 0.8.0 | 0.8.0 | 0.8.0 | 0.8.0 | 0.8.0 |
| zlib | 1.2.13 | 1.2.13 | 1.2.13 | 1.2.13 | 1.2.13 | 1.2.13 |
| zstandard | 0.19.0 | 0.19.0 | 0.19.0 | 0.19.0 | 0.19.0 | 0.19.0 |
| zstd | 1.5.5 | 1.5.5 | 1.5.5 | 1.5.5 | 1.5.5 | 1.5.5 |
| Package Name | linux-64 | linux-aarch64 | linux-s390x |
|---|---|---|---|
| \_libgcc\_mutex | 0.1 | 0.1 | 0.1 |
| \_openmp\_mutex | 5.1 | 5.1 | 5.1 |
| archspec | 0.2.1 | 0.2.1 | 0.2.1 |
| boltons | 23.0.0 | 23.0.0 | 23.0.0 |
| brotli-python | 1.0.9 | 1.0.9 | 1.0.9 |
| bzip2 | 1.0.8 | 1.0.8 | 1.0.8 |
| c-ares | 1.19.1 | 1.19.1 | 1.19.1 |
| ca-certificates | 2023.12.12 | 2023.12.12 | 2023.12.12 |
| certifi | 2024.2.2 | 2024.2.2 | 2024.2.2 |
| cffi | 1.16.0 | 1.16.0 | 1.16.0 |
| charset-normalizer | 2.0.4 | 2.0.4 | 2.0.4 |
| colorama | 0.4.6 | ||
| conda | 24.1.2 | 24.1.2 | 24.1.2 |
| conda-content-trust | 0.2.0 | 0.2.0 | 0.2.0 |
| conda-libmamba-solver | 23.12.0 | 23.12.0 | 23.12.0 |
| conda-package-handling | 2.2.0 | 2.2.0 | 2.2.0 |
| conda-package-streaming | 0.9.0 | 0.9.0 | 0.9.0 |
| cryptography | 41.0.7 | 41.0.7 | 41.0.7 |
| distro | 1.8.0 | 1.8.0 | 1.8.0 |
| expat | 2.5.0 | 2.5.0 | 2.5.0 |
| fmt | 9.1.0 | 9.1.0 | 9.1.0 |
| icu | 73.1 | 73.1 | 73.1 |
| idna | 3.4 | 3.4 | 3.3 |
| jsonpatch | 1.32 | 1.32 | 1.32 |
| jsonpointer | 2.1 | 2.1 | 2.1 |
| krb5 | 1.20.1 | 1.20.1 | 1.20.1 |
| ld\_impl\_linux-64 | 2.38 | ||
| ld\_impl\_linux-aarch64 | 2.38 | ||
| ld\_impl\_linux-s390x | 2.38 | ||
| libarchive | 3.6.2 | 3.6.2 | 3.6.2 |
| libcurl | 8.5.0 | 8.5.0 | 8.5.0 |
| libedit | 3.1.20230828 | 3.1.20230828 | 3.1.20230828 |
| libev | 4.33 | 4.33 | 4.33 |
| libffi | 3.4.4 | 3.4.4 | 3.4.2 |
| libgcc-ng | 11.2.0 | 11.2.0 | 11.2.0 |
| libgomp | 11.2.0 | 11.2.0 | 11.2.0 |
| libmamba | 1.5.3 | 1.5.3 | 1.5.3 |
| libmambapy | 1.5.3 | 1.5.3 | 1.5.3 |
| libnghttp2 | 1.57.0 | 1.57.0 | 1.57.0 |
| libsolv | 0.7.24 | 0.7.24 | 0.7.24 |
| libssh2 | 1.10.0 | 1.10.0 | 1.10.0 |
| libstdcxx-ng | 11.2.0 | 11.2.0 | 11.2.0 |
| libuuid | 1.41.5 | 1.41.5 | 1.41.5 |
| libxml2 | 2.10.4 | 2.10.4 | 2.10.4 |
| lz4-c | 1.9.4 | 1.9.4 | 1.9.4 |
| menuinst | 2.0.2 | 2.0.2 | 2.0.2 |
| ncurses | 6.4 | 6.4 | 6.4 |
| openssl | 3.0.13 | 3.0.13 | 3.0.13 |
| packaging | 23.1 | 23.1 | 23.1 |
| pcre2 | 10.42 | 10.42 | 10.42 |
| pip | 23.3.1 | 23.3.1 | 23.3.1 |
| platformdirs | 3.10.0 | 3.10.0 | 3.10.0 |
| pluggy | 1.0.0 | 1.0.0 | 1.0.0 |
| pybind11-abi | 4 | 4 | 4 |
| pycosat | 0.6.6 | 0.6.6 | 0.6.6 |
| pycparser | 2.21 | 2.21 | 2.21 |
| pysocks | 1.7.1 | 1.7.1 | 1.7.1 |
| python | 3.12.1 | 3.12.1 | 3.12.1 |
| readline | 8.2 | 8.2 | 8.2 |
| reproc | 14.2.4 | 14.2.4 | 14.2.4 |
| reproc-cpp | 14.2.4 | 14.2.4 | 14.2.4 |
| requests | 2.31.0 | 2.31.0 | 2.31.0 |
| ruamel.yaml | 0.17.21 | 0.17.21 | 0.17.21 |
| setuptools | 68.2.2 | 68.2.2 | 68.2.2 |
| sqlite | 3.41.2 | 3.41.2 | 3.41.2 |
| tk | 8.6.12 | 8.6.12 | 8.6.12 |
| tqdm | 4.65.0 | 4.65.0 | 4.63.0 |
| truststore | 0.8.0 | 0.8.0 | 0.8.0 |
| tzdata | 2023d | 2023d | 2023d |
| urllib3 | 2.1.0 | 2.1.0 | 2.1.0 |
| wheel | 0.41.2 | 0.41.2 | 0.41.2 |
| xz | 5.4.5 | 5.4.5 | 5.4.5 |
| yaml-cpp | 0.8.0 | 0.8.0 | 0.8.0 |
| zlib | 1.2.13 | 1.2.13 | 1.2.13 |
| zstandard | 0.19.0 | 0.19.0 | 0.19.0 |
| zstd | 1.5.5 | 1.5.5 | 1.5.5 |
| Package Name | osx-arm64 | osx-64 |
|---|---|---|
| archspec | 0.2.1 | 0.2.1 |
| boltons | 23.0.0 | 23.0.0 |
| brotli-python | 1.0.9 | 1.0.9 |
| bzip2 | 1.0.8 | 1.0.8 |
| c-ares | 1.19.1 | 1.19.1 |
| ca-certificates | 2023.12.12 | 2023.12.12 |
| certifi | 2024.2.2 | 2024.2.2 |
| cffi | 1.16.0 | 1.16.0 |
| charset-normalizer | 2.0.4 | 2.0.4 |
| conda | 24.1.2 | 24.1.2 |
| conda-content-trust | 0.2.0 | 0.2.0 |
| conda-libmamba-solver | 23.12.0 | 23.12.0 |
| conda-package-handling | 2.2.0 | 2.2.0 |
| conda-package-streaming | 0.9.0 | 0.9.0 |
| cryptography | 41.0.7 | 41.0.7 |
| distro | 1.8.0 | 1.8.0 |
| expat | 2.5.0 | 2.5.0 |
| fmt | 9.1.0 | 9.1.0 |
| icu | 73.1 | 73.1 |
| idna | 3.4 | 3.4 |
| jsonpatch | 1.32 | 1.32 |
| jsonpointer | 2.1 | 2.1 |
| krb5 | 1.20.1 | 1.20.1 |
| libarchive | 3.6.2 | 3.6.2 |
| libcurl | 8.5.0 | 8.5.0 |
| libcxx | 14.0.6 | 14.0.6 |
| libedit | 3.1.20230828 | 3.1.20230828 |
| libev | 4.33 | 4.33 |
| libffi | 3.4.4 | 3.4.4 |
| libiconv | 1.16 | 1.16 |
| libmamba | 1.5.3 | 1.5.3 |
| libmambapy | 1.5.3 | 1.5.3 |
| libnghttp2 | 1.57.0 | 1.57.0 |
| libsolv | 0.7.24 | 0.7.24 |
| libssh2 | 1.10.0 | 1.10.0 |
| libxml2 | 2.10.4 | 2.10.4 |
| lz4-c | 1.9.4 | 1.9.4 |
| menuinst | 2.0.2 | 2.0.2 |
| ncurses | 6.4 | 6.4 |
| openssl | 3.0.13 | 3.0.13 |
| packaging | 23.1 | 23.1 |
| pcre2 | 10.42 | 10.42 |
| pip | 23.3.1 | 23.3.1 |
| platformdirs | 3.10.0 | 3.10.0 |
| pluggy | 1.0.0 | 1.0.0 |
| pybind11-abi | 4 | 4 |
| pycosat | 0.6.6 | 0.6.6 |
| pycparser | 2.21 | 2.21 |
| pysocks | 1.7.1 | 1.7.1 |
| python | 3.12.1 | 3.12.1 |
| python.app | 3 | 3 |
| readline | 8.2 | 8.2 |
| reproc | 14.2.4 | 14.2.4 |
| reproc-cpp | 14.2.4 | 14.2.4 |
| requests | 2.31.0 | 2.31.0 |
| ruamel.yaml | 0.17.21 | 0.17.21 |
| setuptools | 68.2.2 | 68.2.2 |
| sqlite | 3.41.2 | 3.41.2 |
| tk | 8.6.12 | 8.6.12 |
| tqdm | 4.65.0 | 4.65.0 |
| truststore | 0.8.0 | 0.8.0 |
| tzdata | 2023d | 2023d |
| urllib3 | 2.1.0 | 2.1.0 |
| wheel | 0.41.2 | 0.41.2 |
| xz | 5.4.5 | 5.4.5 |
| yaml-cpp | 0.8.0 | 0.8.0 |
| zlib | 1.2.13 | 1.2.13 |
| zstandard | 0.19.0 | 0.19.0 |
| zstd | 1.5.5 | 1.5.5 |
| Package Name | win-64 |
|---|---|
| archspec | 0.2.1 |
| boltons | 23.0.0 |
| brotli-python | 1.0.9 |
| bzip2 | 1.0.8 |
| ca-certificates | 2023.12.12 |
| certifi | 2024.2.2 |
| cffi | 1.16.0 |
| charset-normalizer | 2.0.4 |
| colorama | 0.4.6 |
| conda | 24.1.2 |
| conda-content-trust | 0.2.0 |
| conda-libmamba-solver | 23.12.0 |
| conda-package-handling | 2.2.0 |
| conda-package-streaming | 0.9.0 |
| console\_shortcut\_miniconda | 0.1.1 |
| cryptography | 41.0.7 |
| distro | 1.8.0 |
| expat | 2.5.0 |
| fmt | 9.1.0 |
| idna | 3.4 |
| jsonpatch | 1.32 |
| jsonpointer | 2.1 |
| libarchive | 3.6.2 |
| libcurl | 8.5.0 |
| libffi | 3.4.4 |
| libiconv | 1.16 |
| libmamba | 1.5.3 |
| libmambapy | 1.5.3 |
| libsolv | 0.7.24 |
| libssh2 | 1.10.0 |
| libxml2 | 2.10.4 |
| lz4-c | 1.9.4 |
| menuinst | 2.0.2 |
| openssl | 3.0.13 |
| packaging | 23.1 |
| pcre2 | 10.42 |
| pip | 23.3.1 |
| platformdirs | 3.10.0 |
| pluggy | 1.0.0 |
| powershell\_shortcut\_miniconda | 0.0.1 |
| pybind11-abi | 4 |
| pycosat | 0.6.6 |
| pycparser | 2.21 |
| pysocks | 1.7.1 |
| python | 3.12.1 |
| reproc | 14.2.4 |
| reproc-cpp | 14.2.4 |
| requests | 2.31.0 |
| ruamel.yaml | 0.17.21 |
| setuptools | 68.2.2 |
| sqlite | 3.41.2 |
| tk | 8.6.12 |
| tqdm | 4.65.0 |
| truststore | 0.8.0 |
| tzdata | 2023d |
| urllib3 | 2.1.0 |
| vc | 14.2 |
| vs2015\_runtime | 14.27.29016 |
| wheel | 0.41.2 |
| win\_inet\_pton | 1.1.0 |
| xz | 5.4.5 |
| yaml-cpp | 0.8.0 |
| zlib | 1.2.13 |
| zstandard | 0.19.0 |
| zstd | 1.5.5 |
| Package Name | linux-64 | linux-aarch64 | linux-s390x | osx-arm64 | osx-64 | win-64 |
|---|---|---|---|---|---|---|
| \_libgcc\_mutex | 0.1 | 0.1 | 0.1 | |||
| \_openmp\_mutex | 5.1 | 5.1 | 5.1 | |||
| anaconda-anon-usage | 0.5.0 | 0.5.0 | 0.5.0 | 0.5.0 | 0.5.0 | 0.5.0 |
| anaconda\_powershell\_prompt | 1.1.0 | |||||
| anaconda\_prompt | 1.1.0 | |||||
| annotated-types | 0.6.0 | 0.6.0 | 0.6.0 | 0.6.0 | 0.6.0 | 0.6.0 |
| archspec | 0.2.3 | 0.2.3 | 0.2.3 | 0.2.3 | 0.2.3 | 0.2.3 |
| boltons | 24.1.0 | 24.1.0 | 24.1.0 | 24.1.0 | 24.1.0 | 24.1.0 |
| brotli-python | 1.0.9 | 1.0.9 | 1.0.9 | 1.0.9 | 1.0.9 | 1.0.9 |
| bzip2 | 1.0.8 | 1.0.8 | 1.0.8 | 1.0.8 | 1.0.8 | 1.0.8 |
| c-ares | 1.19.1 | 1.19.1 | 1.19.1 | 1.19.1 | 1.19.1 | |
| ca-certificates | 2024.12.31 | 2024.12.31 | 2024.12.31 | 2024.12.31 | 2024.12.31 | 2024.12.31 |
| certifi | 2025.1.31 | 2025.1.31 | 2025.1.31 | 2025.1.31 | 2025.1.31 | 2025.1.31 |
| cffi | 1.17.1 | 1.17.1 | 1.17.1 | 1.17.1 | 1.17.1 | 1.17.1 |
| charset-normalizer | 3.3.2 | 3.3.2 | 3.3.2 | 3.3.2 | 3.3.2 | 3.3.2 |
| colorama | 0.4.6 | |||||
| conda | 25.1.1 | 25.1.1 | 25.1.1 | 25.1.1 | 25.1.1 | 25.1.1 |
| conda-anaconda-telemetry | 0.1.2 | 0.1.2 | 0.1.2 | 0.1.2 | 0.1.2 | 0.1.2 |
| conda-anaconda-tos | 0.1.2 | 0.1.2 | 0.1.2 | 0.1.2 | 0.1.2 | 0.1.2 |
| conda-content-trust | 0.2.0 | 0.2.0 | 0.2.0 | 0.2.0 | 0.2.0 | 0.2.0 |
| conda-libmamba-solver | 25.1.1 | 25.1.1 | 25.1.1 | 25.1.1 | 25.1.1 | 25.1.1 |
| conda-package-handling | 2.4.0 | 2.4.0 | 2.4.0 | 2.4.0 | 2.4.0 | 2.4.0 |
| conda-package-streaming | 0.11.0 | 0.11.0 | 0.11.0 | 0.11.0 | 0.11.0 | 0.11.0 |
| cpp-expected | 1.1.0 | 1.1.0 | 1.1.0 | 1.1.0 | 1.1.0 | 1.1.0 |
| cryptography | 43.0.3 | 43.0.3 | 43.0.3 | 43.0.3 | 43.0.3 | 43.0.3 |
| distro | 1.9.0 | 1.9.0 | 1.9.0 | 1.9.0 | 1.9.0 | 1.9.0 |
| expat | 2.6.4 | 2.6.4 | 2.6.4 | 2.6.4 | 2.6.4 | 2.6.4 |
| fmt | 9.1.0 | 9.1.0 | 9.1.0 | 9.1.0 | 9.1.0 | 9.1.0 |
| frozendict | 2.4.2 | 2.4.2 | 2.4.2 | 2.4.2 | 2.4.2 | 2.4.2 |
| icu | 73.1 | 73.1 | 73.1 | 73.1 | 73.1 | |
| idna | 3.7 | 3.7 | 3.7 | 3.7 | 3.7 | 3.7 |
| jsonpatch | 1.33 | 1.33 | 1.33 | 1.33 | 1.33 | 1.33 |
| jsonpointer | 2.1 | 2.1 | 2.1 | 2.1 | 2.1 | 2.1 |
| krb5 | 1.20.1 | 1.20.1 | 1.20.1 | 1.20.1 | 1.20.1 | |
| ld\_impl\_linux-64 | 2.40 | |||||
| ld\_impl\_linux-aarch64 | 2.40 | |||||
| ld\_impl\_linux-s390x | 2.40 | |||||
| libarchive | 3.7.7 | 3.7.7 | 3.7.7 | 3.7.7 | 3.7.7 | 3.7.7 |
| libcurl | 8.11.1 | 8.11.1 | 8.11.1 | 8.11.1 | 8.11.1 | 8.11.1 |
| libcxx | 14.0.6 | 14.0.6 | ||||
| libedit | 3.1.20230828 | 3.1.20230828 | 3.1.20230828 | 3.1.20230828 | 3.1.20230828 | |
| libev | 4.33 | 4.33 | 4.33 | 4.33 | 4.33 | |
| libffi | 3.4.4 | 3.4.4 | 3.4.4 | 3.4.4 | 3.4.4 | 3.4.4 |
| libgcc-ng | 11.2.0 | 11.2.0 | 11.2.0 | |||
| libgomp | 11.2.0 | 11.2.0 | 11.2.0 | |||
| libiconv | 1.16 | 1.16 | 1.16 | |||
| libmamba | 2.0.5 | 2.0.5 | 2.0.5 | 2.0.5 | 2.0.5 | 2.0.5 |
| libmambapy | 2.0.5 | 2.0.5 | 2.0.5 | 2.0.5 | 2.0.5 | 2.0.5 |
| libnghttp2 | 1.57.0 | 1.57.0 | 1.57.0 | 1.57.0 | 1.57.0 | |
| libsolv | 0.7.30 | 0.7.30 | 0.7.30 | 0.7.30 | 0.7.30 | 0.7.30 |
| libssh2 | 1.11.1 | 1.11.1 | 1.11.1 | 1.11.1 | 1.11.1 | 1.11.1 |
| libstdcxx-ng | 11.2.0 | 11.2.0 | 11.2.0 | |||
| libuuid | 1.41.5 | 1.41.5 | 1.41.5 | |||
| libxml2 | 2.13.5 | 2.13.5 | 2.13.5 | 2.13.5 | 2.13.5 | 2.13.5 |
| lz4-c | 1.9.4 | 1.9.4 | 1.9.4 | 1.9.4 | 1.9.4 | 1.9.4 |
| markdown-it-py | 2.2.0 | 2.2.0 | 2.2.0 | 2.2.0 | 2.2.0 | 2.2.0 |
| mdurl | 0.1.0 | 0.1.0 | 0.1.0 | 0.1.0 | 0.1.0 | 0.1.0 |
| menuinst | 2.2.0 | 2.2.0 | 2.2.0 | 2.2.0 | 2.2.0 | 2.2.0 |
| ncurses | 6.4 | 6.4 | 6.4 | 6.4 | 6.4 | |
| nlohmann\_json | 3.11.2 | 3.11.2 | 3.11.2 | 3.11.2 | 3.11.2 | 3.11.2 |
| openssl | 3.0.15 | 3.0.15 | 3.0.15 | 3.0.15 | 3.0.15 | 3.0.15 |
| packaging | 24.2 | 24.2 | 24.2 | 24.2 | 24.2 | 24.2 |
| pcre2 | 10.42 | 10.42 | 10.42 | 10.42 | 10.42 | 10.42 |
| pip | 25.0 | 25.0 | 25.0 | 25.0 | 25.0 | 25.0 |
| platformdirs | 3.10.0 | 3.10.0 | 3.10.0 | 3.10.0 | 3.10.0 | 3.10.0 |
| pluggy | 1.5.0 | 1.5.0 | 1.5.0 | 1.5.0 | 1.5.0 | 1.5.0 |
| pybind11-abi | 5 | 5 | 5 | 5 | 5 | 5 |
| pycosat | 0.6.6 | 0.6.6 | 0.6.6 | 0.6.6 | 0.6.6 | 0.6.6 |
| pycparser | 2.21 | 2.21 | 2.21 | 2.21 | 2.21 | 2.21 |
| pydantic | 2.10.3 | 2.10.3 | 2.10.3 | 2.10.3 | 2.10.3 | 2.10.3 |
| pydantic-core | 2.27.1 | 2.27.1 | 2.27.1 | 2.27.1 | 2.27.1 | 2.27.1 |
| pygments | 2.15.1 | 2.15.1 | 2.15.1 | 2.15.1 | 2.15.1 | 2.15.1 |
| pysocks | 1.7.1 | 1.7.1 | 1.7.1 | 1.7.1 | 1.7.1 | 1.7.1 |
| python | 3.12.9 | 3.12.9 | 3.12.9 | 3.12.9 | 3.12.9 | 3.12.9 |
| python.app | 3 | 3 | ||||
| readline | 8.2 | 8.2 | 8.2 | 8.2 | 8.2 | |
| reproc | 14.2.4 | 14.2.4 | 14.2.4 | 14.2.4 | 14.2.4 | 14.2.4 |
| reproc-cpp | 14.2.4 | 14.2.4 | 14.2.4 | 14.2.4 | 14.2.4 | 14.2.4 |
| requests | 2.32.3 | 2.32.3 | 2.32.3 | 2.32.3 | 2.32.3 | 2.32.3 |
| rich | 13.9.4 | 13.9.4 | 13.9.4 | 13.9.4 | 13.9.4 | 13.9.4 |
| ruamel.yaml | 0.18.6 | 0.18.6 | 0.18.6 | 0.18.6 | 0.18.6 | 0.18.6 |
| ruamel.yaml.clib | 0.2.8 | 0.2.8 | 0.2.8 | 0.2.8 | 0.2.8 | 0.2.8 |
| setuptools | 75.8.0 | 75.8.0 | 75.8.0 | 75.8.0 | 75.8.0 | 75.8.0 |
| simdjson | 3.10.1 | 3.10.1 | 3.10.1 | 3.10.1 | 3.10.1 | 3.10.1 |
| spdlog | 1.11.0 | 1.11.0 | 1.11.0 | 1.11.0 | 1.11.0 | 1.11.0 |
| sqlite | 3.45.3 | 3.45.3 | 3.45.3 | 3.45.3 | 3.45.3 | 3.45.3 |
| tk | 8.6.14 | 8.6.14 | 8.6.14 | 8.6.14 | 8.6.14 | 8.6.14 |
| tqdm | 4.67.1 | 4.67.1 | 4.67.1 | 4.67.1 | 4.67.1 | 4.67.1 |
| truststore | 0.10.0 | 0.10.0 | 0.10.0 | 0.10.0 | 0.10.0 | 0.10.0 |
| typing-extensions | 4.12.2 | 4.12.2 | 4.12.2 | 4.12.2 | 4.12.2 | 4.12.2 |
| typing\_extensions | 4.12.2 | 4.12.2 | 4.12.2 | 4.12.2 | 4.12.2 | 4.12.2 |
| tzdata | 2025a | 2025a | 2025a | 2025a | 2025a | 2025a |
| urllib3 | 2.3.0 | 2.3.0 | 2.3.0 | 2.3.0 | 2.3.0 | 2.3.0 |
| vc | 14.42 | |||||
| vs2015\_runtime | 14.42.34433 | |||||
| wheel | 0.45.1 | 0.45.1 | 0.45.1 | 0.45.1 | 0.45.1 | 0.45.1 |
| win\_inet\_pton | 1.1.0 | |||||
| xz | 5.4.6 | 5.4.6 | 5.4.6 | 5.4.6 | 5.4.6 | 5.4.6 |
| yaml-cpp | 0.8.0 | 0.8.0 | 0.8.0 | 0.8.0 | 0.8.0 | 0.8.0 |
| zlib | 1.2.13 | 1.2.13 | 1.2.13 | 1.2.13 | 1.2.13 | 1.2.13 |
| zstandard | 0.23.0 | 0.23.0 | 0.23.0 | 0.23.0 | 0.23.0 | 0.23.0 |
| zstd | 1.5.6 | 1.5.6 | 1.5.6 | 1.5.6 | 1.5.6 | 1.5.6 |
| Package Name | linux-64 | linux-aarch64 | linux-s390x |
|---|---|---|---|
| \_libgcc\_mutex | 0.1 | 0.1 | 0.1 |
| \_openmp\_mutex | 5.1 | 5.1 | 5.1 |
| anaconda-anon-usage | 0.5.0 | 0.5.0 | 0.5.0 |
| annotated-types | 0.6.0 | 0.6.0 | 0.6.0 |
| archspec | 0.2.3 | 0.2.3 | 0.2.3 |
| boltons | 24.1.0 | 24.1.0 | 24.1.0 |
| brotli-python | 1.0.9 | 1.0.9 | 1.0.9 |
| bzip2 | 1.0.8 | 1.0.8 | 1.0.8 |
| c-ares | 1.19.1 | 1.19.1 | 1.19.1 |
| ca-certificates | 2024.12.31 | 2024.12.31 | 2024.12.31 |
| certifi | 2025.1.31 | 2025.1.31 | 2025.1.31 |
| cffi | 1.17.1 | 1.17.1 | 1.17.1 |
| charset-normalizer | 3.3.2 | 3.3.2 | 3.3.2 |
| conda | 25.1.1 | 25.1.1 | 25.1.1 |
| conda-anaconda-telemetry | 0.1.2 | 0.1.2 | 0.1.2 |
| conda-anaconda-tos | 0.1.2 | 0.1.2 | 0.1.2 |
| conda-content-trust | 0.2.0 | 0.2.0 | 0.2.0 |
| conda-libmamba-solver | 25.1.1 | 25.1.1 | 25.1.1 |
| conda-package-handling | 2.4.0 | 2.4.0 | 2.4.0 |
| conda-package-streaming | 0.11.0 | 0.11.0 | 0.11.0 |
| cpp-expected | 1.1.0 | 1.1.0 | 1.1.0 |
| cryptography | 43.0.3 | 43.0.3 | 43.0.3 |
| distro | 1.9.0 | 1.9.0 | 1.9.0 |
| expat | 2.6.4 | 2.6.4 | 2.6.4 |
| fmt | 9.1.0 | 9.1.0 | 9.1.0 |
| frozendict | 2.4.2 | 2.4.2 | 2.4.2 |
| icu | 73.1 | 73.1 | 73.1 |
| idna | 3.7 | 3.7 | 3.7 |
| jsonpatch | 1.33 | 1.33 | 1.33 |
| jsonpointer | 2.1 | 2.1 | 2.1 |
| krb5 | 1.20.1 | 1.20.1 | 1.20.1 |
| ld\_impl\_linux-64 | 2.40 | ||
| ld\_impl\_linux-aarch64 | 2.40 | ||
| ld\_impl\_linux-s390x | 2.40 | ||
| libarchive | 3.7.7 | 3.7.7 | 3.7.7 |
| libcurl | 8.11.1 | 8.11.1 | 8.11.1 |
| libedit | 3.1.20230828 | 3.1.20230828 | 3.1.20230828 |
| libev | 4.33 | 4.33 | 4.33 |
| libffi | 3.4.4 | 3.4.4 | 3.4.4 |
| libgcc-ng | 11.2.0 | 11.2.0 | 11.2.0 |
| libgomp | 11.2.0 | 11.2.0 | 11.2.0 |
| libmamba | 2.0.5 | 2.0.5 | 2.0.5 |
| libmambapy | 2.0.5 | 2.0.5 | 2.0.5 |
| libnghttp2 | 1.57.0 | 1.57.0 | 1.57.0 |
| libsolv | 0.7.30 | 0.7.30 | 0.7.30 |
| libssh2 | 1.11.1 | 1.11.1 | 1.11.1 |
| libstdcxx-ng | 11.2.0 | 11.2.0 | 11.2.0 |
| libuuid | 1.41.5 | 1.41.5 | 1.41.5 |
| libxml2 | 2.13.5 | 2.13.5 | 2.13.5 |
| lz4-c | 1.9.4 | 1.9.4 | 1.9.4 |
| markdown-it-py | 2.2.0 | 2.2.0 | 2.2.0 |
| mdurl | 0.1.0 | 0.1.0 | 0.1.0 |
| menuinst | 2.2.0 | 2.2.0 | 2.2.0 |
| ncurses | 6.4 | 6.4 | 6.4 |
| nlohmann\_json | 3.11.2 | 3.11.2 | 3.11.2 |
| openssl | 3.0.15 | 3.0.15 | 3.0.15 |
| packaging | 24.2 | 24.2 | 24.2 |
| pcre2 | 10.42 | 10.42 | 10.42 |
| pip | 25.0 | 25.0 | 25.0 |
| platformdirs | 3.10.0 | 3.10.0 | 3.10.0 |
| pluggy | 1.5.0 | 1.5.0 | 1.5.0 |
| pybind11-abi | 5 | 5 | 5 |
| pycosat | 0.6.6 | 0.6.6 | 0.6.6 |
| pycparser | 2.21 | 2.21 | 2.21 |
| pydantic | 2.10.3 | 2.10.3 | 2.10.3 |
| pydantic-core | 2.27.1 | 2.27.1 | 2.27.1 |
| pygments | 2.15.1 | 2.15.1 | 2.15.1 |
| pysocks | 1.7.1 | 1.7.1 | 1.7.1 |
| python | 3.12.9 | 3.12.9 | 3.12.9 |
| readline | 8.2 | 8.2 | 8.2 |
| reproc | 14.2.4 | 14.2.4 | 14.2.4 |
| reproc-cpp | 14.2.4 | 14.2.4 | 14.2.4 |
| requests | 2.32.3 | 2.32.3 | 2.32.3 |
| rich | 13.9.4 | 13.9.4 | 13.9.4 |
| ruamel.yaml | 0.18.6 | 0.18.6 | 0.18.6 |
| ruamel.yaml.clib | 0.2.8 | 0.2.8 | 0.2.8 |
| setuptools | 75.8.0 | 75.8.0 | 75.8.0 |
| simdjson | 3.10.1 | 3.10.1 | 3.10.1 |
| spdlog | 1.11.0 | 1.11.0 | 1.11.0 |
| sqlite | 3.45.3 | 3.45.3 | 3.45.3 |
| tk | 8.6.14 | 8.6.14 | 8.6.14 |
| tqdm | 4.67.1 | 4.67.1 | 4.67.1 |
| truststore | 0.10.0 | 0.10.0 | 0.10.0 |
| typing-extensions | 4.12.2 | 4.12.2 | 4.12.2 |
| typing\_extensions | 4.12.2 | 4.12.2 | 4.12.2 |
| tzdata | 2025a | 2025a | 2025a |
| urllib3 | 2.3.0 | 2.3.0 | 2.3.0 |
| wheel | 0.45.1 | 0.45.1 | 0.45.1 |
| xz | 5.4.6 | 5.4.6 | 5.4.6 |
| yaml-cpp | 0.8.0 | 0.8.0 | 0.8.0 |
| zlib | 1.2.13 | 1.2.13 | 1.2.13 |
| zstandard | 0.23.0 | 0.23.0 | 0.23.0 |
| zstd | 1.5.6 | 1.5.6 | 1.5.6 |
| Package Name | osx-arm64 | osx-64 |
|---|---|---|
| anaconda-anon-usage | 0.5.0 | 0.5.0 |
| annotated-types | 0.6.0 | 0.6.0 |
| archspec | 0.2.3 | 0.2.3 |
| boltons | 24.1.0 | 24.1.0 |
| brotli-python | 1.0.9 | 1.0.9 |
| bzip2 | 1.0.8 | 1.0.8 |
| c-ares | 1.19.1 | 1.19.1 |
| ca-certificates | 2024.12.31 | 2024.12.31 |
| certifi | 2025.1.31 | 2025.1.31 |
| cffi | 1.17.1 | 1.17.1 |
| charset-normalizer | 3.3.2 | 3.3.2 |
| conda | 25.1.1 | 25.1.1 |
| conda-anaconda-telemetry | 0.1.2 | 0.1.2 |
| conda-anaconda-tos | 0.1.2 | 0.1.2 |
| conda-content-trust | 0.2.0 | 0.2.0 |
| conda-libmamba-solver | 25.1.1 | 25.1.1 |
| conda-package-handling | 2.4.0 | 2.4.0 |
| conda-package-streaming | 0.11.0 | 0.11.0 |
| cpp-expected | 1.1.0 | 1.1.0 |
| cryptography | 43.0.3 | 43.0.3 |
| distro | 1.9.0 | 1.9.0 |
| expat | 2.6.4 | 2.6.4 |
| fmt | 9.1.0 | 9.1.0 |
| frozendict | 2.4.2 | 2.4.2 |
| icu | 73.1 | 73.1 |
| idna | 3.7 | 3.7 |
| jsonpatch | 1.33 | 1.33 |
| jsonpointer | 2.1 | 2.1 |
| krb5 | 1.20.1 | 1.20.1 |
| libarchive | 3.7.7 | 3.7.7 |
| libcurl | 8.11.1 | 8.11.1 |
| libcxx | 14.0.6 | 14.0.6 |
| libedit | 3.1.20230828 | 3.1.20230828 |
| libev | 4.33 | 4.33 |
| libffi | 3.4.4 | 3.4.4 |
| libiconv | 1.16 | 1.16 |
| libmamba | 2.0.5 | 2.0.5 |
| libmambapy | 2.0.5 | 2.0.5 |
| libnghttp2 | 1.57.0 | 1.57.0 |
| libsolv | 0.7.30 | 0.7.30 |
| libssh2 | 1.11.1 | 1.11.1 |
| libxml2 | 2.13.5 | 2.13.5 |
| lz4-c | 1.9.4 | 1.9.4 |
| markdown-it-py | 2.2.0 | 2.2.0 |
| mdurl | 0.1.0 | 0.1.0 |
| menuinst | 2.2.0 | 2.2.0 |
| ncurses | 6.4 | 6.4 |
| nlohmann\_json | 3.11.2 | 3.11.2 |
| openssl | 3.0.15 | 3.0.15 |
| packaging | 24.2 | 24.2 |
| pcre2 | 10.42 | 10.42 |
| pip | 25.0 | 25.0 |
| platformdirs | 3.10.0 | 3.10.0 |
| pluggy | 1.5.0 | 1.5.0 |
| pybind11-abi | 5 | 5 |
| pycosat | 0.6.6 | 0.6.6 |
| pycparser | 2.21 | 2.21 |
| pydantic | 2.10.3 | 2.10.3 |
| pydantic-core | 2.27.1 | 2.27.1 |
| pygments | 2.15.1 | 2.15.1 |
| pysocks | 1.7.1 | 1.7.1 |
| python | 3.12.9 | 3.12.9 |
| python.app | 3 | 3 |
| readline | 8.2 | 8.2 |
| reproc | 14.2.4 | 14.2.4 |
| reproc-cpp | 14.2.4 | 14.2.4 |
| requests | 2.32.3 | 2.32.3 |
| rich | 13.9.4 | 13.9.4 |
| ruamel.yaml | 0.18.6 | 0.18.6 |
| ruamel.yaml.clib | 0.2.8 | 0.2.8 |
| setuptools | 75.8.0 | 75.8.0 |
| simdjson | 3.10.1 | 3.10.1 |
| spdlog | 1.11.0 | 1.11.0 |
| sqlite | 3.45.3 | 3.45.3 |
| tk | 8.6.14 | 8.6.14 |
| tqdm | 4.67.1 | 4.67.1 |
| truststore | 0.10.0 | 0.10.0 |
| typing-extensions | 4.12.2 | 4.12.2 |
| typing\_extensions | 4.12.2 | 4.12.2 |
| tzdata | 2025a | 2025a |
| urllib3 | 2.3.0 | 2.3.0 |
| wheel | 0.45.1 | 0.45.1 |
| xz | 5.4.6 | 5.4.6 |
| yaml-cpp | 0.8.0 | 0.8.0 |
| zlib | 1.2.13 | 1.2.13 |
| zstandard | 0.23.0 | 0.23.0 |
| zstd | 1.5.6 | 1.5.6 |
| Package Name | win-64 |
|---|---|
| anaconda-anon-usage | 0.5.0 |
| anaconda\_powershell\_prompt | 1.1.0 |
| anaconda\_prompt | 1.1.0 |
| annotated-types | 0.6.0 |
| archspec | 0.2.3 |
| boltons | 24.1.0 |
| brotli-python | 1.0.9 |
| bzip2 | 1.0.8 |
| ca-certificates | 2024.12.31 |
| certifi | 2025.1.31 |
| cffi | 1.17.1 |
| charset-normalizer | 3.3.2 |
| colorama | 0.4.6 |
| conda | 25.1.1 |
| conda-anaconda-telemetry | 0.1.2 |
| conda-anaconda-tos | 0.1.2 |
| conda-content-trust | 0.2.0 |
| conda-libmamba-solver | 25.1.1 |
| conda-package-handling | 2.4.0 |
| conda-package-streaming | 0.11.0 |
| cpp-expected | 1.1.0 |
| cryptography | 43.0.3 |
| distro | 1.9.0 |
| expat | 2.6.4 |
| fmt | 9.1.0 |
| frozendict | 2.4.2 |
| idna | 3.7 |
| jsonpatch | 1.33 |
| jsonpointer | 2.1 |
| libarchive | 3.7.7 |
| libcurl | 8.11.1 |
| libffi | 3.4.4 |
| libiconv | 1.16 |
| libmamba | 2.0.5 |
| libmambapy | 2.0.5 |
| libsolv | 0.7.30 |
| libssh2 | 1.11.1 |
| libxml2 | 2.13.5 |
| lz4-c | 1.9.4 |
| markdown-it-py | 2.2.0 |
| mdurl | 0.1.0 |
| menuinst | 2.2.0 |
| nlohmann\_json | 3.11.2 |
| openssl | 3.0.15 |
| packaging | 24.2 |
| pcre2 | 10.42 |
| pip | 25.0 |
| platformdirs | 3.10.0 |
| pluggy | 1.5.0 |
| pybind11-abi | 5 |
| pycosat | 0.6.6 |
| pycparser | 2.21 |
| pydantic | 2.10.3 |
| pydantic-core | 2.27.1 |
| pygments | 2.15.1 |
| pysocks | 1.7.1 |
| python | 3.12.9 |
| reproc | 14.2.4 |
| reproc-cpp | 14.2.4 |
| requests | 2.32.3 |
| rich | 13.9.4 |
| ruamel.yaml | 0.18.6 |
| ruamel.yaml.clib | 0.2.8 |
| setuptools | 75.8.0 |
| simdjson | 3.10.1 |
| spdlog | 1.11.0 |
| sqlite | 3.45.3 |
| tk | 8.6.14 |
| tqdm | 4.67.1 |
| truststore | 0.10.0 |
| typing-extensions | 4.12.2 |
| typing\_extensions | 4.12.2 |
| tzdata | 2025a |
| urllib3 | 2.3.0 |
| vc | 14.42 |
| vs2015\_runtime | 14.42.34433 |
| wheel | 0.45.1 |
| win\_inet\_pton | 1.1.0 |
| xz | 5.4.6 |
| yaml-cpp | 0.8.0 |
| zlib | 1.2.13 |
| zstandard | 0.23.0 |
| zstd | 1.5.6 |
| Package Name | linux-64 | linux-aarch64 | linux-s390x | osx-arm64 | osx-64 | win-64 |
|---|---|---|---|---|---|---|
| \_libgcc\_mutex | 0.1 | 0.1 | 0.1 | |||
| \_openmp\_mutex | 5.1 | 5.1 | 5.1 | |||
| anaconda-anon-usage | 0.5.0 | 0.5.0 | 0.5.0 | 0.5.0 | 0.5.0 | 0.5.0 |
| anaconda\_powershell\_prompt | 1.1.0 | |||||
| anaconda\_prompt | 1.1.0 | |||||
| annotated-types | 0.6.0 | 0.6.0 | 0.6.0 | 0.6.0 | 0.6.0 | 0.6.0 |
| archspec | 0.2.3 | 0.2.3 | 0.2.3 | 0.2.3 | 0.2.3 | 0.2.3 |
| boltons | 24.1.0 | 24.1.0 | 24.1.0 | 24.1.0 | 24.1.0 | 24.1.0 |
| brotli-python | 1.0.9 | 1.0.9 | 1.0.9 | 1.0.9 | 1.0.9 | 1.0.9 |
| bzip2 | 1.0.8 | 1.0.8 | 1.0.8 | 1.0.8 | 1.0.8 | 1.0.8 |
| c-ares | 1.19.1 | 1.19.1 | 1.19.1 | 1.19.1 | 1.19.1 | |
| ca-certificates | 2024.12.31 | 2024.12.31 | 2024.12.31 | 2024.12.31 | 2024.12.31 | 2024.12.31 |
| certifi | 2025.1.31 | 2025.1.31 | 2025.1.31 | 2025.1.31 | 2025.1.31 | 2025.1.31 |
| cffi | 1.17.1 | 1.17.1 | 1.17.1 | 1.17.1 | 1.17.1 | 1.17.1 |
| charset-normalizer | 3.3.2 | 3.3.2 | 3.3.2 | 3.3.2 | 3.3.2 | 3.3.2 |
| colorama | 0.4.6 | |||||
| conda | 25.1.1 | 25.1.1 | 25.1.1 | 25.1.1 | 25.1.1 | 25.1.1 |
| conda-anaconda-telemetry | 0.1.2 | 0.1.2 | 0.1.2 | 0.1.2 | 0.1.2 | 0.1.2 |
| conda-anaconda-tos | 0.1.1 | 0.1.1 | 0.1.1 | 0.1.1 | 0.1.1 | 0.1.1 |
| conda-content-trust | 0.2.0 | 0.2.0 | 0.2.0 | 0.2.0 | 0.2.0 | 0.2.0 |
| conda-libmamba-solver | 25.1.1 | 25.1.1 | 25.1.1 | 25.1.1 | 25.1.1 | 25.1.1 |
| conda-package-handling | 2.4.0 | 2.4.0 | 2.4.0 | 2.4.0 | 2.4.0 | 2.4.0 |
| conda-package-streaming | 0.11.0 | 0.11.0 | 0.11.0 | 0.11.0 | 0.11.0 | 0.11.0 |
| cpp-expected | 1.1.0 | 1.1.0 | 1.1.0 | 1.1.0 | 1.1.0 | 1.1.0 |
| cryptography | 43.0.3 | 43.0.3 | 43.0.3 | 43.0.3 | 43.0.3 | 43.0.3 |
| distro | 1.9.0 | 1.9.0 | 1.9.0 | 1.9.0 | 1.9.0 | 1.9.0 |
| expat | 2.6.4 | 2.6.4 | 2.6.4 | 2.6.4 | 2.6.4 | 2.6.4 |
| fmt | 9.1.0 | 9.1.0 | 9.1.0 | 9.1.0 | 9.1.0 | 9.1.0 |
| frozendict | 2.4.2 | 2.4.2 | 2.4.2 | 2.4.2 | 2.4.2 | 2.4.2 |
| icu | 73.1 | 73.1 | 73.1 | 73.1 | 73.1 | |
| idna | 3.7 | 3.7 | 3.7 | 3.7 | 3.7 | 3.7 |
| jsonpatch | 1.33 | 1.33 | 1.33 | 1.33 | 1.33 | 1.33 |
| jsonpointer | 2.1 | 2.1 | 2.1 | 2.1 | 2.1 | 2.1 |
| krb5 | 1.20.1 | 1.20.1 | 1.20.1 | 1.20.1 | 1.20.1 | |
| ld\_impl\_linux-64 | 2.40 | |||||
| ld\_impl\_linux-aarch64 | 2.40 | |||||
| ld\_impl\_linux-s390x | 2.40 | |||||
| libarchive | 3.7.7 | 3.7.7 | 3.7.7 | 3.7.7 | 3.7.7 | 3.7.7 |
| libcurl | 8.11.1 | 8.11.1 | 8.11.1 | 8.11.1 | 8.11.1 | 8.11.1 |
| libcxx | 14.0.6 | 14.0.6 | ||||
| libedit | 3.1.20230828 | 3.1.20230828 | 3.1.20230828 | 3.1.20230828 | 3.1.20230828 | |
| libev | 4.33 | 4.33 | 4.33 | 4.33 | 4.33 | |
| libffi | 3.4.4 | 3.4.4 | 3.4.4 | 3.4.4 | 3.4.4 | 3.4.4 |
| libgcc-ng | 11.2.0 | 11.2.0 | 11.2.0 | |||
| libgomp | 11.2.0 | 11.2.0 | 11.2.0 | |||
| libiconv | 1.16 | 1.16 | 1.16 | |||
| libmamba | 2.0.5 | 2.0.5 | 2.0.5 | 2.0.5 | 2.0.5 | 2.0.5 |
| libmambapy | 2.0.5 | 2.0.5 | 2.0.5 | 2.0.5 | 2.0.5 | 2.0.5 |
| libnghttp2 | 1.57.0 | 1.57.0 | 1.57.0 | 1.57.0 | 1.57.0 | |
| libsolv | 0.7.30 | 0.7.30 | 0.7.30 | 0.7.30 | 0.7.30 | 0.7.30 |
| libssh2 | 1.11.1 | 1.11.1 | 1.11.1 | 1.11.1 | 1.11.1 | 1.11.1 |
| libstdcxx-ng | 11.2.0 | 11.2.0 | 11.2.0 | |||
| libuuid | 1.41.5 | 1.41.5 | 1.41.5 | |||
| libxml2 | 2.13.5 | 2.13.5 | 2.13.5 | 2.13.5 | 2.13.5 | 2.13.5 |
| lz4-c | 1.9.4 | 1.9.4 | 1.9.4 | 1.9.4 | 1.9.4 | 1.9.4 |
| markdown-it-py | 2.2.0 | 2.2.0 | 2.2.0 | 2.2.0 | 2.2.0 | 2.2.0 |
| mdurl | 0.1.0 | 0.1.0 | 0.1.0 | 0.1.0 | 0.1.0 | 0.1.0 |
| menuinst | 2.2.0 | 2.2.0 | 2.2.0 | 2.2.0 | 2.2.0 | 2.2.0 |
| ncurses | 6.4 | 6.4 | 6.4 | 6.4 | 6.4 | |
| nlohmann\_json | 3.11.2 | 3.11.2 | 3.11.2 | 3.11.2 | 3.11.2 | 3.11.2 |
| openssl | 3.0.15 | 3.0.15 | 3.0.15 | 3.0.15 | 3.0.15 | 3.0.15 |
| packaging | 24.2 | 24.2 | 24.2 | 24.2 | 24.2 | 24.2 |
| pcre2 | 10.42 | 10.42 | 10.42 | 10.42 | 10.42 | 10.42 |
| pip | 25.0 | 25.0 | 25.0 | 25.0 | 25.0 | 25.0 |
| platformdirs | 3.10.0 | 3.10.0 | 3.10.0 | 3.10.0 | 3.10.0 | 3.10.0 |
| pluggy | 1.5.0 | 1.5.0 | 1.5.0 | 1.5.0 | 1.5.0 | 1.5.0 |
| pybind11-abi | 5 | 5 | 5 | 5 | 5 | 5 |
| pycosat | 0.6.6 | 0.6.6 | 0.6.6 | 0.6.6 | 0.6.6 | 0.6.6 |
| pycparser | 2.21 | 2.21 | 2.21 | 2.21 | 2.21 | 2.21 |
| pydantic | 2.10.3 | 2.10.3 | 2.10.3 | 2.10.3 | 2.10.3 | 2.10.3 |
| pydantic-core | 2.27.1 | 2.27.1 | 2.27.1 | 2.27.1 | 2.27.1 | 2.27.1 |
| pygments | 2.15.1 | 2.15.1 | 2.15.1 | 2.15.1 | 2.15.1 | 2.15.1 |
| pysocks | 1.7.1 | 1.7.1 | 1.7.1 | 1.7.1 | 1.7.1 | 1.7.1 |
| python | 3.12.9 | 3.12.9 | 3.12.9 | 3.12.9 | 3.12.9 | 3.12.9 |
| python.app | 3 | 3 | ||||
| readline | 8.2 | 8.2 | 8.2 | 8.2 | 8.2 | |
| reproc | 14.2.4 | 14.2.4 | 14.2.4 | 14.2.4 | 14.2.4 | 14.2.4 |
| reproc-cpp | 14.2.4 | 14.2.4 | 14.2.4 | 14.2.4 | 14.2.4 | 14.2.4 |
| requests | 2.32.3 | 2.32.3 | 2.32.3 | 2.32.3 | 2.32.3 | 2.32.3 |
| rich | 13.9.4 | 13.9.4 | 13.9.4 | 13.9.4 | 13.9.4 | 13.9.4 |
| ruamel.yaml | 0.18.6 | 0.18.6 | 0.18.6 | 0.18.6 | 0.18.6 | 0.18.6 |
| ruamel.yaml.clib | 0.2.8 | 0.2.8 | 0.2.8 | 0.2.8 | 0.2.8 | 0.2.8 |
| setuptools | 75.8.0 | 75.8.0 | 75.8.0 | 75.8.0 | 75.8.0 | 75.8.0 |
| simdjson | 3.10.1 | 3.10.1 | 3.10.1 | 3.10.1 | 3.10.1 | 3.10.1 |
| spdlog | 1.11.0 | 1.11.0 | 1.11.0 | 1.11.0 | 1.11.0 | 1.11.0 |
| sqlite | 3.45.3 | 3.45.3 | 3.45.3 | 3.45.3 | 3.45.3 | 3.45.3 |
| tk | 8.6.14 | 8.6.14 | 8.6.14 | 8.6.14 | 8.6.14 | 8.6.14 |
| tqdm | 4.67.1 | 4.67.1 | 4.67.1 | 4.67.1 | 4.67.1 | 4.67.1 |
| truststore | 0.10.0 | 0.10.0 | 0.10.0 | 0.10.0 | 0.10.0 | 0.10.0 |
| typing-extensions | 4.12.2 | 4.12.2 | 4.12.2 | 4.12.2 | 4.12.2 | 4.12.2 |
| typing\_extensions | 4.12.2 | 4.12.2 | 4.12.2 | 4.12.2 | 4.12.2 | 4.12.2 |
| tzdata | 2025a | 2025a | 2025a | 2025a | 2025a | 2025a |
| urllib3 | 2.3.0 | 2.3.0 | 2.3.0 | 2.3.0 | 2.3.0 | 2.3.0 |
| vc | 14.42 | |||||
| vs2015\_runtime | 14.42.34433 | |||||
| wheel | 0.45.1 | 0.45.1 | 0.45.1 | 0.45.1 | 0.45.1 | 0.45.1 |
| win\_inet\_pton | 1.1.0 | |||||
| xz | 5.4.6 | 5.4.6 | 5.4.6 | 5.4.6 | 5.4.6 | 5.4.6 |
| yaml-cpp | 0.8.0 | 0.8.0 | 0.8.0 | 0.8.0 | 0.8.0 | 0.8.0 |
| zlib | 1.2.13 | 1.2.13 | 1.2.13 | 1.2.13 | 1.2.13 | 1.2.13 |
| zstandard | 0.23.0 | 0.23.0 | 0.23.0 | 0.23.0 | 0.23.0 | 0.23.0 |
| zstd | 1.5.6 | 1.5.6 | 1.5.6 | 1.5.6 | 1.5.6 | 1.5.6 |
| Package Name | linux-64 | linux-aarch64 | linux-s390x |
|---|---|---|---|
| \_libgcc\_mutex | 0.1 | 0.1 | 0.1 |
| \_openmp\_mutex | 5.1 | 5.1 | 5.1 |
| anaconda-anon-usage | 0.5.0 | 0.5.0 | 0.5.0 |
| annotated-types | 0.6.0 | 0.6.0 | 0.6.0 |
| archspec | 0.2.3 | 0.2.3 | 0.2.3 |
| boltons | 24.1.0 | 24.1.0 | 24.1.0 |
| brotli-python | 1.0.9 | 1.0.9 | 1.0.9 |
| bzip2 | 1.0.8 | 1.0.8 | 1.0.8 |
| c-ares | 1.19.1 | 1.19.1 | 1.19.1 |
| ca-certificates | 2024.12.31 | 2024.12.31 | 2024.12.31 |
| certifi | 2025.1.31 | 2025.1.31 | 2025.1.31 |
| cffi | 1.17.1 | 1.17.1 | 1.17.1 |
| charset-normalizer | 3.3.2 | 3.3.2 | 3.3.2 |
| conda | 25.1.1 | 25.1.1 | 25.1.1 |
| conda-anaconda-telemetry | 0.1.2 | 0.1.2 | 0.1.2 |
| conda-anaconda-tos | 0.1.1 | 0.1.1 | 0.1.1 |
| conda-content-trust | 0.2.0 | 0.2.0 | 0.2.0 |
| conda-libmamba-solver | 25.1.1 | 25.1.1 | 25.1.1 |
| conda-package-handling | 2.4.0 | 2.4.0 | 2.4.0 |
| conda-package-streaming | 0.11.0 | 0.11.0 | 0.11.0 |
| cpp-expected | 1.1.0 | 1.1.0 | 1.1.0 |
| cryptography | 43.0.3 | 43.0.3 | 43.0.3 |
| distro | 1.9.0 | 1.9.0 | 1.9.0 |
| expat | 2.6.4 | 2.6.4 | 2.6.4 |
| fmt | 9.1.0 | 9.1.0 | 9.1.0 |
| frozendict | 2.4.2 | 2.4.2 | 2.4.2 |
| icu | 73.1 | 73.1 | 73.1 |
| idna | 3.7 | 3.7 | 3.7 |
| jsonpatch | 1.33 | 1.33 | 1.33 |
| jsonpointer | 2.1 | 2.1 | 2.1 |
| krb5 | 1.20.1 | 1.20.1 | 1.20.1 |
| ld\_impl\_linux-64 | 2.40 | ||
| ld\_impl\_linux-aarch64 | 2.40 | ||
| ld\_impl\_linux-s390x | 2.40 | ||
| libarchive | 3.7.7 | 3.7.7 | 3.7.7 |
| libcurl | 8.11.1 | 8.11.1 | 8.11.1 |
| libedit | 3.1.20230828 | 3.1.20230828 | 3.1.20230828 |
| libev | 4.33 | 4.33 | 4.33 |
| libffi | 3.4.4 | 3.4.4 | 3.4.4 |
| libgcc-ng | 11.2.0 | 11.2.0 | 11.2.0 |
| libgomp | 11.2.0 | 11.2.0 | 11.2.0 |
| libmamba | 2.0.5 | 2.0.5 | 2.0.5 |
| libmambapy | 2.0.5 | 2.0.5 | 2.0.5 |
| libnghttp2 | 1.57.0 | 1.57.0 | 1.57.0 |
| libsolv | 0.7.30 | 0.7.30 | 0.7.30 |
| libssh2 | 1.11.1 | 1.11.1 | 1.11.1 |
| libstdcxx-ng | 11.2.0 | 11.2.0 | 11.2.0 |
| libuuid | 1.41.5 | 1.41.5 | 1.41.5 |
| libxml2 | 2.13.5 | 2.13.5 | 2.13.5 |
| lz4-c | 1.9.4 | 1.9.4 | 1.9.4 |
| markdown-it-py | 2.2.0 | 2.2.0 | 2.2.0 |
| mdurl | 0.1.0 | 0.1.0 | 0.1.0 |
| menuinst | 2.2.0 | 2.2.0 | 2.2.0 |
| ncurses | 6.4 | 6.4 | 6.4 |
| nlohmann\_json | 3.11.2 | 3.11.2 | 3.11.2 |
| openssl | 3.0.15 | 3.0.15 | 3.0.15 |
| packaging | 24.2 | 24.2 | 24.2 |
| pcre2 | 10.42 | 10.42 | 10.42 |
| pip | 25.0 | 25.0 | 25.0 |
| platformdirs | 3.10.0 | 3.10.0 | 3.10.0 |
| pluggy | 1.5.0 | 1.5.0 | 1.5.0 |
| pybind11-abi | 5 | 5 | 5 |
| pycosat | 0.6.6 | 0.6.6 | 0.6.6 |
| pycparser | 2.21 | 2.21 | 2.21 |
| pydantic | 2.10.3 | 2.10.3 | 2.10.3 |
| pydantic-core | 2.27.1 | 2.27.1 | 2.27.1 |
| pygments | 2.15.1 | 2.15.1 | 2.15.1 |
| pysocks | 1.7.1 | 1.7.1 | 1.7.1 |
| python | 3.12.9 | 3.12.9 | 3.12.9 |
| readline | 8.2 | 8.2 | 8.2 |
| reproc | 14.2.4 | 14.2.4 | 14.2.4 |
| reproc-cpp | 14.2.4 | 14.2.4 | 14.2.4 |
| requests | 2.32.3 | 2.32.3 | 2.32.3 |
| rich | 13.9.4 | 13.9.4 | 13.9.4 |
| ruamel.yaml | 0.18.6 | 0.18.6 | 0.18.6 |
| ruamel.yaml.clib | 0.2.8 | 0.2.8 | 0.2.8 |
| setuptools | 75.8.0 | 75.8.0 | 75.8.0 |
| simdjson | 3.10.1 | 3.10.1 | 3.10.1 |
| spdlog | 1.11.0 | 1.11.0 | 1.11.0 |
| sqlite | 3.45.3 | 3.45.3 | 3.45.3 |
| tk | 8.6.14 | 8.6.14 | 8.6.14 |
| tqdm | 4.67.1 | 4.67.1 | 4.67.1 |
| truststore | 0.10.0 | 0.10.0 | 0.10.0 |
| typing-extensions | 4.12.2 | 4.12.2 | 4.12.2 |
| typing\_extensions | 4.12.2 | 4.12.2 | 4.12.2 |
| tzdata | 2025a | 2025a | 2025a |
| urllib3 | 2.3.0 | 2.3.0 | 2.3.0 |
| wheel | 0.45.1 | 0.45.1 | 0.45.1 |
| xz | 5.4.6 | 5.4.6 | 5.4.6 |
| yaml-cpp | 0.8.0 | 0.8.0 | 0.8.0 |
| zlib | 1.2.13 | 1.2.13 | 1.2.13 |
| zstandard | 0.23.0 | 0.23.0 | 0.23.0 |
| zstd | 1.5.6 | 1.5.6 | 1.5.6 |
| Package Name | osx-arm64 | osx-64 |
|---|---|---|
| anaconda-anon-usage | 0.5.0 | 0.5.0 |
| annotated-types | 0.6.0 | 0.6.0 |
| archspec | 0.2.3 | 0.2.3 |
| boltons | 24.1.0 | 24.1.0 |
| brotli-python | 1.0.9 | 1.0.9 |
| bzip2 | 1.0.8 | 1.0.8 |
| c-ares | 1.19.1 | 1.19.1 |
| ca-certificates | 2024.12.31 | 2024.12.31 |
| certifi | 2025.1.31 | 2025.1.31 |
| cffi | 1.17.1 | 1.17.1 |
| charset-normalizer | 3.3.2 | 3.3.2 |
| conda | 25.1.1 | 25.1.1 |
| conda-anaconda-telemetry | 0.1.2 | 0.1.2 |
| conda-anaconda-tos | 0.1.1 | 0.1.1 |
| conda-content-trust | 0.2.0 | 0.2.0 |
| conda-libmamba-solver | 25.1.1 | 25.1.1 |
| conda-package-handling | 2.4.0 | 2.4.0 |
| conda-package-streaming | 0.11.0 | 0.11.0 |
| cpp-expected | 1.1.0 | 1.1.0 |
| cryptography | 43.0.3 | 43.0.3 |
| distro | 1.9.0 | 1.9.0 |
| expat | 2.6.4 | 2.6.4 |
| fmt | 9.1.0 | 9.1.0 |
| frozendict | 2.4.2 | 2.4.2 |
| icu | 73.1 | 73.1 |
| idna | 3.7 | 3.7 |
| jsonpatch | 1.33 | 1.33 |
| jsonpointer | 2.1 | 2.1 |
| krb5 | 1.20.1 | 1.20.1 |
| libarchive | 3.7.7 | 3.7.7 |
| libcurl | 8.11.1 | 8.11.1 |
| libcxx | 14.0.6 | 14.0.6 |
| libedit | 3.1.20230828 | 3.1.20230828 |
| libev | 4.33 | 4.33 |
| libffi | 3.4.4 | 3.4.4 |
| libiconv | 1.16 | 1.16 |
| libmamba | 2.0.5 | 2.0.5 |
| libmambapy | 2.0.5 | 2.0.5 |
| libnghttp2 | 1.57.0 | 1.57.0 |
| libsolv | 0.7.30 | 0.7.30 |
| libssh2 | 1.11.1 | 1.11.1 |
| libxml2 | 2.13.5 | 2.13.5 |
| lz4-c | 1.9.4 | 1.9.4 |
| markdown-it-py | 2.2.0 | 2.2.0 |
| mdurl | 0.1.0 | 0.1.0 |
| menuinst | 2.2.0 | 2.2.0 |
| ncurses | 6.4 | 6.4 |
| nlohmann\_json | 3.11.2 | 3.11.2 |
| openssl | 3.0.15 | 3.0.15 |
| packaging | 24.2 | 24.2 |
| pcre2 | 10.42 | 10.42 |
| pip | 25.0 | 25.0 |
| platformdirs | 3.10.0 | 3.10.0 |
| pluggy | 1.5.0 | 1.5.0 |
| pybind11-abi | 5 | 5 |
| pycosat | 0.6.6 | 0.6.6 |
| pycparser | 2.21 | 2.21 |
| pydantic | 2.10.3 | 2.10.3 |
| pydantic-core | 2.27.1 | 2.27.1 |
| pygments | 2.15.1 | 2.15.1 |
| pysocks | 1.7.1 | 1.7.1 |
| python | 3.12.9 | 3.12.9 |
| python.app | 3 | 3 |
| readline | 8.2 | 8.2 |
| reproc | 14.2.4 | 14.2.4 |
| reproc-cpp | 14.2.4 | 14.2.4 |
| requests | 2.32.3 | 2.32.3 |
| rich | 13.9.4 | 13.9.4 |
| ruamel.yaml | 0.18.6 | 0.18.6 |
| ruamel.yaml.clib | 0.2.8 | 0.2.8 |
| setuptools | 75.8.0 | 75.8.0 |
| simdjson | 3.10.1 | 3.10.1 |
| spdlog | 1.11.0 | 1.11.0 |
| sqlite | 3.45.3 | 3.45.3 |
| tk | 8.6.14 | 8.6.14 |
| tqdm | 4.67.1 | 4.67.1 |
| truststore | 0.10.0 | 0.10.0 |
| typing-extensions | 4.12.2 | 4.12.2 |
| typing\_extensions | 4.12.2 | 4.12.2 |
| tzdata | 2025a | 2025a |
| urllib3 | 2.3.0 | 2.3.0 |
| wheel | 0.45.1 | 0.45.1 |
| xz | 5.4.6 | 5.4.6 |
| yaml-cpp | 0.8.0 | 0.8.0 |
| zlib | 1.2.13 | 1.2.13 |
| zstandard | 0.23.0 | 0.23.0 |
| zstd | 1.5.6 | 1.5.6 |
| Package Name | win-64 |
|---|---|
| anaconda-anon-usage | 0.5.0 |
| anaconda\_powershell\_prompt | 1.1.0 |
| anaconda\_prompt | 1.1.0 |
| annotated-types | 0.6.0 |
| archspec | 0.2.3 |
| boltons | 24.1.0 |
| brotli-python | 1.0.9 |
| bzip2 | 1.0.8 |
| ca-certificates | 2024.12.31 |
| certifi | 2025.1.31 |
| cffi | 1.17.1 |
| charset-normalizer | 3.3.2 |
| colorama | 0.4.6 |
| conda | 25.1.1 |
| conda-anaconda-telemetry | 0.1.2 |
| conda-anaconda-tos | 0.1.1 |
| conda-content-trust | 0.2.0 |
| conda-libmamba-solver | 25.1.1 |
| conda-package-handling | 2.4.0 |
| conda-package-streaming | 0.11.0 |
| cpp-expected | 1.1.0 |
| cryptography | 43.0.3 |
| distro | 1.9.0 |
| expat | 2.6.4 |
| fmt | 9.1.0 |
| frozendict | 2.4.2 |
| idna | 3.7 |
| jsonpatch | 1.33 |
| jsonpointer | 2.1 |
| libarchive | 3.7.7 |
| libcurl | 8.11.1 |
| libffi | 3.4.4 |
| libiconv | 1.16 |
| libmamba | 2.0.5 |
| libmambapy | 2.0.5 |
| libsolv | 0.7.30 |
| libssh2 | 1.11.1 |
| libxml2 | 2.13.5 |
| lz4-c | 1.9.4 |
| markdown-it-py | 2.2.0 |
| mdurl | 0.1.0 |
| menuinst | 2.2.0 |
| nlohmann\_json | 3.11.2 |
| openssl | 3.0.15 |
| packaging | 24.2 |
| pcre2 | 10.42 |
| pip | 25.0 |
| platformdirs | 3.10.0 |
| pluggy | 1.5.0 |
| pybind11-abi | 5 |
| pycosat | 0.6.6 |
| pycparser | 2.21 |
| pydantic | 2.10.3 |
| pydantic-core | 2.27.1 |
| pygments | 2.15.1 |
| pysocks | 1.7.1 |
| python | 3.12.9 |
| reproc | 14.2.4 |
| reproc-cpp | 14.2.4 |
| requests | 2.32.3 |
| rich | 13.9.4 |
| ruamel.yaml | 0.18.6 |
| ruamel.yaml.clib | 0.2.8 |
| setuptools | 75.8.0 |
| simdjson | 3.10.1 |
| spdlog | 1.11.0 |
| sqlite | 3.45.3 |
| tk | 8.6.14 |
| tqdm | 4.67.1 |
| truststore | 0.10.0 |
| typing-extensions | 4.12.2 |
| typing\_extensions | 4.12.2 |
| tzdata | 2025a |
| urllib3 | 2.3.0 |
| vc | 14.42 |
| vs2015\_runtime | 14.42.34433 |
| wheel | 0.45.1 |
| win\_inet\_pton | 1.1.0 |
| xz | 5.4.6 |
| yaml-cpp | 0.8.0 |
| zlib | 1.2.13 |
| zstandard | 0.23.0 |
| zstd | 1.5.6 |
| Package Name | linux-64 | linux-aarch64 | linux-s390x | osx-arm64 | osx-64 | win-64 |
|---|---|---|---|---|---|---|
| \_libgcc\_mutex | 0.1 | 0.1 | 0.1 | |||
| \_openmp\_mutex | 5.1 | 5.1 | 5.1 | |||
| anaconda-anon-usage | 0.5.0 | 0.5.0 | 0.5.0 | 0.5.0 | 0.5.0 | 0.5.0 |
| anaconda\_powershell\_prompt | 1.1.0 | |||||
| anaconda\_prompt | 1.1.0 | |||||
| annotated-types | 0.6.0 | 0.6.0 | 0.6.0 | 0.6.0 | 0.6.0 | 0.6.0 |
| archspec | 0.2.3 | 0.2.3 | 0.2.3 | 0.2.3 | 0.2.3 | 0.2.3 |
| boltons | 24.1.0 | 24.1.0 | 24.1.0 | 24.1.0 | 24.1.0 | 24.1.0 |
| brotli-python | 1.0.9 | 1.0.9 | 1.0.9 | 1.0.9 | 1.0.9 | 1.0.9 |
| bzip2 | 1.0.8 | 1.0.8 | 1.0.8 | 1.0.8 | 1.0.8 | 1.0.8 |
| c-ares | 1.19.1 | 1.19.1 | 1.19.1 | 1.19.1 | 1.19.1 | |
| ca-certificates | 2024.12.31 | 2024.12.31 | 2024.12.31 | 2024.12.31 | 2024.12.31 | 2024.12.31 |
| certifi | 2024.12.14 | 2024.12.14 | 2024.12.14 | 2024.12.14 | 2024.12.14 | 2024.12.14 |
| cffi | 1.17.1 | 1.17.1 | 1.17.1 | 1.17.1 | 1.17.1 | 1.17.1 |
| charset-normalizer | 3.3.2 | 3.3.2 | 3.3.2 | 3.3.2 | 3.3.2 | 3.3.2 |
| colorama | 0.4.6 | |||||
| conda | 25.1.1 | 25.1.1 | 25.1.1 | 25.1.1 | 25.1.1 | 25.1.1 |
| conda-anaconda-telemetry | 0.1.2 | 0.1.2 | 0.1.2 | 0.1.2 | 0.1.2 | 0.1.2 |
| conda-anaconda-tos | 0.1.1 | 0.1.1 | 0.1.1 | 0.1.1 | 0.1.1 | 0.1.1 |
| conda-content-trust | 0.2.0 | 0.2.0 | 0.2.0 | 0.2.0 | 0.2.0 | 0.2.0 |
| conda-libmamba-solver | 25.1.1 | 25.1.1 | 25.1.1 | 25.1.1 | 25.1.1 | 25.1.1 |
| conda-package-handling | 2.4.0 | 2.4.0 | 2.4.0 | 2.4.0 | 2.4.0 | 2.4.0 |
| conda-package-streaming | 0.11.0 | 0.11.0 | 0.11.0 | 0.11.0 | 0.11.0 | 0.11.0 |
| cpp-expected | 1.1.0 | 1.1.0 | 1.1.0 | 1.1.0 | 1.1.0 | 1.1.0 |
| cryptography | 43.0.3 | 43.0.3 | 43.0.3 | 43.0.3 | 43.0.3 | 43.0.3 |
| distro | 1.9.0 | 1.9.0 | 1.9.0 | 1.9.0 | 1.9.0 | 1.9.0 |
| expat | 2.6.4 | 2.6.4 | 2.6.4 | 2.6.4 | 2.6.4 | 2.6.4 |
| fmt | 9.1.0 | 9.1.0 | 9.1.0 | 9.1.0 | 9.1.0 | 9.1.0 |
| frozendict | 2.4.2 | 2.4.2 | 2.4.2 | 2.4.2 | 2.4.2 | 2.4.2 |
| icu | 73.1 | 73.1 | 73.1 | 73.1 | 73.1 | |
| idna | 3.7 | 3.7 | 3.7 | 3.7 | 3.7 | 3.7 |
| jsonpatch | 1.33 | 1.33 | 1.33 | 1.33 | 1.33 | 1.33 |
| jsonpointer | 2.1 | 2.1 | 2.1 | 2.1 | 2.1 | 2.1 |
| krb5 | 1.20.1 | 1.20.1 | 1.20.1 | 1.20.1 | 1.20.1 | |
| ld\_impl\_linux-64 | 2.40 | |||||
| ld\_impl\_linux-aarch64 | 2.40 | |||||
| ld\_impl\_linux-s390x | 2.40 | |||||
| libarchive | 3.7.7 | 3.7.7 | 3.7.7 | 3.7.7 | 3.7.7 | 3.7.7 |
| libcurl | 8.11.1 | 8.11.1 | 8.11.1 | 8.11.1 | 8.11.1 | 8.11.1 |
| libcxx | 14.0.6 | 14.0.6 | ||||
| libedit | 3.1.20230828 | 3.1.20230828 | 3.1.20230828 | 3.1.20230828 | 3.1.20230828 | |
| libev | 4.33 | 4.33 | 4.33 | 4.33 | 4.33 | |
| libffi | 3.4.4 | 3.4.4 | 3.4.4 | 3.4.4 | 3.4.4 | 3.4.4 |
| libgcc-ng | 11.2.0 | 11.2.0 | 11.2.0 | |||
| libgomp | 11.2.0 | 11.2.0 | 11.2.0 | |||
| libiconv | 1.16 | 1.16 | 1.16 | |||
| libmamba | 2.0.5 | 2.0.5 | 2.0.5 | 2.0.5 | 2.0.5 | 2.0.5 |
| libmambapy | 2.0.5 | 2.0.5 | 2.0.5 | 2.0.5 | 2.0.5 | 2.0.5 |
| libnghttp2 | 1.57.0 | 1.57.0 | 1.57.0 | 1.57.0 | 1.57.0 | |
| libsolv | 0.7.30 | 0.7.30 | 0.7.30 | 0.7.30 | 0.7.30 | 0.7.30 |
| libssh2 | 1.11.1 | 1.11.1 | 1.11.1 | 1.11.1 | 1.11.1 | 1.11.1 |
| libstdcxx-ng | 11.2.0 | 11.2.0 | 11.2.0 | |||
| libuuid | 1.41.5 | 1.41.5 | 1.41.5 | |||
| libxml2 | 2.13.5 | 2.13.5 | 2.13.5 | 2.13.5 | 2.13.5 | 2.13.5 |
| lz4-c | 1.9.4 | 1.9.4 | 1.9.4 | 1.9.4 | 1.9.4 | 1.9.4 |
| markdown-it-py | 2.2.0 | 2.2.0 | 2.2.0 | 2.2.0 | 2.2.0 | 2.2.0 |
| mdurl | 0.1.0 | 0.1.0 | 0.1.0 | 0.1.0 | 0.1.0 | 0.1.0 |
| menuinst | 2.2.0 | 2.2.0 | 2.2.0 | 2.2.0 | 2.2.0 | 2.2.0 |
| ncurses | 6.4 | 6.4 | 6.4 | 6.4 | 6.4 | |
| nlohmann\_json | 3.11.2 | 3.11.2 | 3.11.2 | 3.11.2 | 3.11.2 | 3.11.2 |
| openssl | 3.0.15 | 3.0.15 | 3.0.15 | 3.0.15 | 3.0.15 | 3.0.15 |
| packaging | 24.2 | 24.2 | 24.2 | 24.2 | 24.2 | 24.2 |
| pcre2 | 10.42 | 10.42 | 10.42 | 10.42 | 10.42 | 10.42 |
| pip | 25.0 | 25.0 | 25.0 | 25.0 | 25.0 | 25.0 |
| platformdirs | 3.10.0 | 3.10.0 | 3.10.0 | 3.10.0 | 3.10.0 | 3.10.0 |
| pluggy | 1.5.0 | 1.5.0 | 1.5.0 | 1.5.0 | 1.5.0 | 1.5.0 |
| pybind11-abi | 5 | 5 | 5 | 5 | 5 | 5 |
| pycosat | 0.6.6 | 0.6.6 | 0.6.6 | 0.6.6 | 0.6.6 | 0.6.6 |
| pycparser | 2.21 | 2.21 | 2.21 | 2.21 | 2.21 | 2.21 |
| pydantic | 2.10.3 | 2.10.3 | 2.10.3 | 2.10.3 | 2.10.3 | 2.10.3 |
| pydantic-core | 2.27.1 | 2.27.1 | 2.27.1 | 2.27.1 | 2.27.1 | 2.27.1 |
| pygments | 2.15.1 | 2.15.1 | 2.15.1 | 2.15.1 | 2.15.1 | 2.15.1 |
| pysocks | 1.7.1 | 1.7.1 | 1.7.1 | 1.7.1 | 1.7.1 | 1.7.1 |
| python | 3.12.8 | 3.12.8 | 3.12.8 | 3.12.8 | 3.12.8 | 3.12.8 |
| python.app | 3 | 3 | ||||
| readline | 8.2 | 8.2 | 8.2 | 8.2 | 8.2 | |
| reproc | 14.2.4 | 14.2.4 | 14.2.4 | 14.2.4 | 14.2.4 | 14.2.4 |
| reproc-cpp | 14.2.4 | 14.2.4 | 14.2.4 | 14.2.4 | 14.2.4 | 14.2.4 |
| requests | 2.32.3 | 2.32.3 | 2.32.3 | 2.32.3 | 2.32.3 | 2.32.3 |
| rich | 13.9.4 | 13.9.4 | 13.9.4 | 13.9.4 | 13.9.4 | 13.9.4 |
| ruamel.yaml | 0.18.6 | 0.18.6 | 0.18.6 | 0.18.6 | 0.18.6 | 0.18.6 |
| ruamel.yaml.clib | 0.2.8 | 0.2.8 | 0.2.8 | 0.2.8 | 0.2.8 | 0.2.8 |
| setuptools | 75.8.0 | 75.8.0 | 75.8.0 | 75.8.0 | 75.8.0 | 75.8.0 |
| simdjson | 3.10.1 | 3.10.1 | 3.10.1 | 3.10.1 | 3.10.1 | 3.10.1 |
| spdlog | 1.11.0 | 1.11.0 | 1.11.0 | 1.11.0 | 1.11.0 | 1.11.0 |
| sqlite | 3.45.3 | 3.45.3 | 3.45.3 | 3.45.3 | 3.45.3 | 3.45.3 |
| tk | 8.6.14 | 8.6.14 | 8.6.14 | 8.6.14 | 8.6.14 | 8.6.14 |
| tqdm | 4.66.5 | 4.66.5 | 4.66.5 | 4.66.5 | 4.66.5 | 4.66.5 |
| truststore | 0.10.0 | 0.10.0 | 0.10.0 | 0.10.0 | 0.10.0 | 0.10.0 |
| typing-extensions | 4.12.2 | 4.12.2 | 4.12.2 | 4.12.2 | 4.12.2 | 4.12.2 |
| typing\_extensions | 4.12.2 | 4.12.2 | 4.12.2 | 4.12.2 | 4.12.2 | 4.12.2 |
| tzdata | 2025a | 2025a | 2025a | 2025a | 2025a | 2025a |
| urllib3 | 2.3.0 | 2.3.0 | 2.3.0 | 2.3.0 | 2.3.0 | 2.3.0 |
| vc | 14.40 | |||||
| vs2015\_runtime | 14.42.34433 | |||||
| wheel | 0.45.1 | 0.45.1 | 0.45.1 | 0.45.1 | 0.45.1 | 0.45.1 |
| win\_inet\_pton | 1.1.0 | |||||
| xz | 5.4.6 | 5.4.6 | 5.4.6 | 5.4.6 | 5.4.6 | 5.4.6 |
| yaml-cpp | 0.8.0 | 0.8.0 | 0.8.0 | 0.8.0 | 0.8.0 | 0.8.0 |
| zlib | 1.2.13 | 1.2.13 | 1.2.13 | 1.2.13 | 1.2.13 | 1.2.13 |
| zstandard | 0.23.0 | 0.23.0 | 0.23.0 | 0.23.0 | 0.23.0 | 0.23.0 |
| zstd | 1.5.6 | 1.5.6 | 1.5.6 | 1.5.6 | 1.5.6 | 1.5.6 |
| Package Name | linux-64 | linux-aarch64 | linux-s390x |
|---|---|---|---|
| \_libgcc\_mutex | 0.1 | 0.1 | 0.1 |
| \_openmp\_mutex | 5.1 | 5.1 | 5.1 |
| anaconda-anon-usage | 0.5.0 | 0.5.0 | 0.5.0 |
| annotated-types | 0.6.0 | 0.6.0 | 0.6.0 |
| archspec | 0.2.3 | 0.2.3 | 0.2.3 |
| boltons | 24.1.0 | 24.1.0 | 24.1.0 |
| brotli-python | 1.0.9 | 1.0.9 | 1.0.9 |
| bzip2 | 1.0.8 | 1.0.8 | 1.0.8 |
| c-ares | 1.19.1 | 1.19.1 | 1.19.1 |
| ca-certificates | 2024.12.31 | 2024.12.31 | 2024.12.31 |
| certifi | 2024.12.14 | 2024.12.14 | 2024.12.14 |
| cffi | 1.17.1 | 1.17.1 | 1.17.1 |
| charset-normalizer | 3.3.2 | 3.3.2 | 3.3.2 |
| conda | 25.1.1 | 25.1.1 | 25.1.1 |
| conda-anaconda-telemetry | 0.1.2 | 0.1.2 | 0.1.2 |
| conda-anaconda-tos | 0.1.1 | 0.1.1 | 0.1.1 |
| conda-content-trust | 0.2.0 | 0.2.0 | 0.2.0 |
| conda-libmamba-solver | 25.1.1 | 25.1.1 | 25.1.1 |
| conda-package-handling | 2.4.0 | 2.4.0 | 2.4.0 |
| conda-package-streaming | 0.11.0 | 0.11.0 | 0.11.0 |
| cpp-expected | 1.1.0 | 1.1.0 | 1.1.0 |
| cryptography | 43.0.3 | 43.0.3 | 43.0.3 |
| distro | 1.9.0 | 1.9.0 | 1.9.0 |
| expat | 2.6.4 | 2.6.4 | 2.6.4 |
| fmt | 9.1.0 | 9.1.0 | 9.1.0 |
| frozendict | 2.4.2 | 2.4.2 | 2.4.2 |
| icu | 73.1 | 73.1 | 73.1 |
| idna | 3.7 | 3.7 | 3.7 |
| jsonpatch | 1.33 | 1.33 | 1.33 |
| jsonpointer | 2.1 | 2.1 | 2.1 |
| krb5 | 1.20.1 | 1.20.1 | 1.20.1 |
| ld\_impl\_linux-64 | 2.40 | ||
| ld\_impl\_linux-aarch64 | 2.40 | ||
| ld\_impl\_linux-s390x | 2.40 | ||
| libarchive | 3.7.7 | 3.7.7 | 3.7.7 |
| libcurl | 8.11.1 | 8.11.1 | 8.11.1 |
| libedit | 3.1.20230828 | 3.1.20230828 | 3.1.20230828 |
| libev | 4.33 | 4.33 | 4.33 |
| libffi | 3.4.4 | 3.4.4 | 3.4.4 |
| libgcc-ng | 11.2.0 | 11.2.0 | 11.2.0 |
| libgomp | 11.2.0 | 11.2.0 | 11.2.0 |
| libmamba | 2.0.5 | 2.0.5 | 2.0.5 |
| libmambapy | 2.0.5 | 2.0.5 | 2.0.5 |
| libnghttp2 | 1.57.0 | 1.57.0 | 1.57.0 |
| libsolv | 0.7.30 | 0.7.30 | 0.7.30 |
| libssh2 | 1.11.1 | 1.11.1 | 1.11.1 |
| libstdcxx-ng | 11.2.0 | 11.2.0 | 11.2.0 |
| libuuid | 1.41.5 | 1.41.5 | 1.41.5 |
| libxml2 | 2.13.5 | 2.13.5 | 2.13.5 |
| lz4-c | 1.9.4 | 1.9.4 | 1.9.4 |
| markdown-it-py | 2.2.0 | 2.2.0 | 2.2.0 |
| mdurl | 0.1.0 | 0.1.0 | 0.1.0 |
| menuinst | 2.2.0 | 2.2.0 | 2.2.0 |
| ncurses | 6.4 | 6.4 | 6.4 |
| nlohmann\_json | 3.11.2 | 3.11.2 | 3.11.2 |
| openssl | 3.0.15 | 3.0.15 | 3.0.15 |
| packaging | 24.2 | 24.2 | 24.2 |
| pcre2 | 10.42 | 10.42 | 10.42 |
| pip | 25.0 | 25.0 | 25.0 |
| platformdirs | 3.10.0 | 3.10.0 | 3.10.0 |
| pluggy | 1.5.0 | 1.5.0 | 1.5.0 |
| pybind11-abi | 5 | 5 | 5 |
| pycosat | 0.6.6 | 0.6.6 | 0.6.6 |
| pycparser | 2.21 | 2.21 | 2.21 |
| pydantic | 2.10.3 | 2.10.3 | 2.10.3 |
| pydantic-core | 2.27.1 | 2.27.1 | 2.27.1 |
| pygments | 2.15.1 | 2.15.1 | 2.15.1 |
| pysocks | 1.7.1 | 1.7.1 | 1.7.1 |
| python | 3.12.8 | 3.12.8 | 3.12.8 |
| readline | 8.2 | 8.2 | 8.2 |
| reproc | 14.2.4 | 14.2.4 | 14.2.4 |
| reproc-cpp | 14.2.4 | 14.2.4 | 14.2.4 |
| requests | 2.32.3 | 2.32.3 | 2.32.3 |
| rich | 13.9.4 | 13.9.4 | 13.9.4 |
| ruamel.yaml | 0.18.6 | 0.18.6 | 0.18.6 |
| ruamel.yaml.clib | 0.2.8 | 0.2.8 | 0.2.8 |
| setuptools | 75.8.0 | 75.8.0 | 75.8.0 |
| simdjson | 3.10.1 | 3.10.1 | 3.10.1 |
| spdlog | 1.11.0 | 1.11.0 | 1.11.0 |
| sqlite | 3.45.3 | 3.45.3 | 3.45.3 |
| tk | 8.6.14 | 8.6.14 | 8.6.14 |
| tqdm | 4.66.5 | 4.66.5 | 4.66.5 |
| truststore | 0.10.0 | 0.10.0 | 0.10.0 |
| typing-extensions | 4.12.2 | 4.12.2 | 4.12.2 |
| typing\_extensions | 4.12.2 | 4.12.2 | 4.12.2 |
| tzdata | 2025a | 2025a | 2025a |
| urllib3 | 2.3.0 | 2.3.0 | 2.3.0 |
| wheel | 0.45.1 | 0.45.1 | 0.45.1 |
| xz | 5.4.6 | 5.4.6 | 5.4.6 |
| yaml-cpp | 0.8.0 | 0.8.0 | 0.8.0 |
| zlib | 1.2.13 | 1.2.13 | 1.2.13 |
| zstandard | 0.23.0 | 0.23.0 | 0.23.0 |
| zstd | 1.5.6 | 1.5.6 | 1.5.6 |
| Package Name | osx-arm64 | osx-64 |
|---|---|---|
| anaconda-anon-usage | 0.5.0 | 0.5.0 |
| annotated-types | 0.6.0 | 0.6.0 |
| archspec | 0.2.3 | 0.2.3 |
| boltons | 24.1.0 | 24.1.0 |
| brotli-python | 1.0.9 | 1.0.9 |
| bzip2 | 1.0.8 | 1.0.8 |
| c-ares | 1.19.1 | 1.19.1 |
| ca-certificates | 2024.12.31 | 2024.12.31 |
| certifi | 2024.12.14 | 2024.12.14 |
| cffi | 1.17.1 | 1.17.1 |
| charset-normalizer | 3.3.2 | 3.3.2 |
| conda | 25.1.1 | 25.1.1 |
| conda-anaconda-telemetry | 0.1.2 | 0.1.2 |
| conda-anaconda-tos | 0.1.1 | 0.1.1 |
| conda-content-trust | 0.2.0 | 0.2.0 |
| conda-libmamba-solver | 25.1.1 | 25.1.1 |
| conda-package-handling | 2.4.0 | 2.4.0 |
| conda-package-streaming | 0.11.0 | 0.11.0 |
| cpp-expected | 1.1.0 | 1.1.0 |
| cryptography | 43.0.3 | 43.0.3 |
| distro | 1.9.0 | 1.9.0 |
| expat | 2.6.4 | 2.6.4 |
| fmt | 9.1.0 | 9.1.0 |
| frozendict | 2.4.2 | 2.4.2 |
| icu | 73.1 | 73.1 |
| idna | 3.7 | 3.7 |
| jsonpatch | 1.33 | 1.33 |
| jsonpointer | 2.1 | 2.1 |
| krb5 | 1.20.1 | 1.20.1 |
| libarchive | 3.7.7 | 3.7.7 |
| libcurl | 8.11.1 | 8.11.1 |
| libcxx | 14.0.6 | 14.0.6 |
| libedit | 3.1.20230828 | 3.1.20230828 |
| libev | 4.33 | 4.33 |
| libffi | 3.4.4 | 3.4.4 |
| libiconv | 1.16 | 1.16 |
| libmamba | 2.0.5 | 2.0.5 |
| libmambapy | 2.0.5 | 2.0.5 |
| libnghttp2 | 1.57.0 | 1.57.0 |
| libsolv | 0.7.30 | 0.7.30 |
| libssh2 | 1.11.1 | 1.11.1 |
| libxml2 | 2.13.5 | 2.13.5 |
| lz4-c | 1.9.4 | 1.9.4 |
| markdown-it-py | 2.2.0 | 2.2.0 |
| mdurl | 0.1.0 | 0.1.0 |
| menuinst | 2.2.0 | 2.2.0 |
| ncurses | 6.4 | 6.4 |
| nlohmann\_json | 3.11.2 | 3.11.2 |
| openssl | 3.0.15 | 3.0.15 |
| packaging | 24.2 | 24.2 |
| pcre2 | 10.42 | 10.42 |
| pip | 25.0 | 25.0 |
| platformdirs | 3.10.0 | 3.10.0 |
| pluggy | 1.5.0 | 1.5.0 |
| pybind11-abi | 5 | 5 |
| pycosat | 0.6.6 | 0.6.6 |
| pycparser | 2.21 | 2.21 |
| pydantic | 2.10.3 | 2.10.3 |
| pydantic-core | 2.27.1 | 2.27.1 |
| pygments | 2.15.1 | 2.15.1 |
| pysocks | 1.7.1 | 1.7.1 |
| python | 3.12.8 | 3.12.8 |
| python.app | 3 | 3 |
| readline | 8.2 | 8.2 |
| reproc | 14.2.4 | 14.2.4 |
| reproc-cpp | 14.2.4 | 14.2.4 |
| requests | 2.32.3 | 2.32.3 |
| rich | 13.9.4 | 13.9.4 |
| ruamel.yaml | 0.18.6 | 0.18.6 |
| ruamel.yaml.clib | 0.2.8 | 0.2.8 |
| setuptools | 75.8.0 | 75.8.0 |
| simdjson | 3.10.1 | 3.10.1 |
| spdlog | 1.11.0 | 1.11.0 |
| sqlite | 3.45.3 | 3.45.3 |
| tk | 8.6.14 | 8.6.14 |
| tqdm | 4.66.5 | 4.66.5 |
| truststore | 0.10.0 | 0.10.0 |
| typing-extensions | 4.12.2 | 4.12.2 |
| typing\_extensions | 4.12.2 | 4.12.2 |
| tzdata | 2025a | 2025a |
| urllib3 | 2.3.0 | 2.3.0 |
| wheel | 0.45.1 | 0.45.1 |
| xz | 5.4.6 | 5.4.6 |
| yaml-cpp | 0.8.0 | 0.8.0 |
| zlib | 1.2.13 | 1.2.13 |
| zstandard | 0.23.0 | 0.23.0 |
| zstd | 1.5.6 | 1.5.6 |
| Package Name | win-64 |
|---|---|
| anaconda-anon-usage | 0.5.0 |
| anaconda\_powershell\_prompt | 1.1.0 |
| anaconda\_prompt | 1.1.0 |
| annotated-types | 0.6.0 |
| archspec | 0.2.3 |
| boltons | 24.1.0 |
| brotli-python | 1.0.9 |
| bzip2 | 1.0.8 |
| ca-certificates | 2024.12.31 |
| certifi | 2024.12.14 |
| cffi | 1.17.1 |
| charset-normalizer | 3.3.2 |
| colorama | 0.4.6 |
| conda | 25.1.1 |
| conda-anaconda-telemetry | 0.1.2 |
| conda-anaconda-tos | 0.1.1 |
| conda-content-trust | 0.2.0 |
| conda-libmamba-solver | 25.1.1 |
| conda-package-handling | 2.4.0 |
| conda-package-streaming | 0.11.0 |
| cpp-expected | 1.1.0 |
| cryptography | 43.0.3 |
| distro | 1.9.0 |
| expat | 2.6.4 |
| fmt | 9.1.0 |
| frozendict | 2.4.2 |
| idna | 3.7 |
| jsonpatch | 1.33 |
| jsonpointer | 2.1 |
| libarchive | 3.7.7 |
| libcurl | 8.11.1 |
| libffi | 3.4.4 |
| libiconv | 1.16 |
| libmamba | 2.0.5 |
| libmambapy | 2.0.5 |
| libsolv | 0.7.30 |
| libssh2 | 1.11.1 |
| libxml2 | 2.13.5 |
| lz4-c | 1.9.4 |
| markdown-it-py | 2.2.0 |
| mdurl | 0.1.0 |
| menuinst | 2.2.0 |
| nlohmann\_json | 3.11.2 |
| openssl | 3.0.15 |
| packaging | 24.2 |
| pcre2 | 10.42 |
| pip | 25.0 |
| platformdirs | 3.10.0 |
| pluggy | 1.5.0 |
| pybind11-abi | 5 |
| pycosat | 0.6.6 |
| pycparser | 2.21 |
| pydantic | 2.10.3 |
| pydantic-core | 2.27.1 |
| pygments | 2.15.1 |
| pysocks | 1.7.1 |
| python | 3.12.8 |
| reproc | 14.2.4 |
| reproc-cpp | 14.2.4 |
| requests | 2.32.3 |
| rich | 13.9.4 |
| ruamel.yaml | 0.18.6 |
| ruamel.yaml.clib | 0.2.8 |
| setuptools | 75.8.0 |
| simdjson | 3.10.1 |
| spdlog | 1.11.0 |
| sqlite | 3.45.3 |
| tk | 8.6.14 |
| tqdm | 4.66.5 |
| truststore | 0.10.0 |
| typing-extensions | 4.12.2 |
| typing\_extensions | 4.12.2 |
| tzdata | 2025a |
| urllib3 | 2.3.0 |
| vc | 14.40 |
| vs2015\_runtime | 14.42.34433 |
| wheel | 0.45.1 |
| win\_inet\_pton | 1.1.0 |
| xz | 5.4.6 |
| yaml-cpp | 0.8.0 |
| zlib | 1.2.13 |
| zstandard | 0.23.0 |
| zstd | 1.5.6 |
{children}
 Click **Yes** to update Navigator to the current version.
 The dropdown contains filters for all applications, applications that are installed on your computer, applications that are not installed, and applications that have an update available.
## Managing environments
Navigator uses the conda package and environment manager to create conda environments. Conda environments are directories within your file system that contain a specific collection of packages and package dependencies. Environments are isolated from one another and enable you to quickly switch between projects with drastically different needs.
In this example, we will create a new environment named `myenvironment`:
1. On the **Environments** page, click **Create**.
The dropdown contains filters for all applications, applications that are installed on your computer, applications that are not installed, and applications that have an update available.
## Managing environments
Navigator uses the conda package and environment manager to create conda environments. Conda environments are directories within your file system that contain a specific collection of packages and package dependencies. Environments are isolated from one another and enable you to quickly switch between projects with drastically different needs.
In this example, we will create a new environment named `myenvironment`:
1. On the **Environments** page, click **Create**.
 2. In the **Environment** name field, type a descriptive name for your environment.
3. Click **Create**. Navigator creates the new environment and activates it.
4. Now you have two environments: the default environment `base (root)` and `myenvironment`.
2. In the **Environment** name field, type a descriptive name for your environment.
3. Click **Create**. Navigator creates the new environment and activates it.
4. Now you have two environments: the default environment `base (root)` and `myenvironment`.
 3. Select the Python package checkbox and hover over *Mark for specific version installation*.
4. Select *3.12.0* from the dropdown that appears.
5. Click **Apply**.
6. A dialog listing all the packages that will be modified appears. Click **Apply**.
## Managing packages
On the **Environments** page, you can:
* View which packages are in each environment
* Search for and install new packages
* Upgrade existing packages
* Delete packages
In this example, we will install a package called `beautifulsoup4` into `myenvironment`.
1. On the **Environments** page, select `myenvironment` from the environment list to activate it.
2. Open the package filter dropdown and select *Not installed* to view a list of packages that are available to install from the channels you are connected to.
3. Type “beautifulsoup4” into the **Search packages** box.
3. Select the Python package checkbox and hover over *Mark for specific version installation*.
4. Select *3.12.0* from the dropdown that appears.
5. Click **Apply**.
6. A dialog listing all the packages that will be modified appears. Click **Apply**.
## Managing packages
On the **Environments** page, you can:
* View which packages are in each environment
* Search for and install new packages
* Upgrade existing packages
* Delete packages
In this example, we will install a package called `beautifulsoup4` into `myenvironment`.
1. On the **Environments** page, select `myenvironment` from the environment list to activate it.
2. Open the package filter dropdown and select *Not installed* to view a list of packages that are available to install from the channels you are connected to.
3. Type “beautifulsoup4” into the **Search packages** box.
 4. Select the checkbox beside `beautifulsoup4` in the package list.
5. Click **Apply**.
6. A dialog appears that lists all packages that will be installed. Click **Apply**.
7. Open the package filter dropdown and select *Installed*.
The newly-installed `beautifulsoup4` package is now displayed in the list of installed programs in the current environment.
For more documentation on packages, see [Managing packages](/tools/anaconda-navigator/tutorials/manage-packages) in the Tutorials section.
## Managing channels
By default, Navigator searches in and installs packages from Anaconda’s free public repositories, also known as `defaults`. This contains the package repositories `main`, `r`, and `msys2` (Windows only), which are hosted at [repo.anaconda.com/pkgs/](https://repo.anaconda.com/pkgs/). There are many more package channels available, hosted on Anaconda.org, in Anaconda.com, or in an on-premises server, if your organization hosts their own packages via Anaconda Server.
In this example, we will add a channel connection to conda-forge in Navigator’s channel manager.
1. Click **Channels**.
2. Click **Add…**.
3. Enter “conda-forge” into the textbox that appears.
4. Press Enter (Windows)/Return (Mac) on your keyboard.
5. Click **Update channels**.
Your package search within Navigator will now also include packages available via conda-forge.
For more documentation on channels, see [Managing channels](/tools/anaconda-navigator/tutorials/manage-channels/) in the Tutorials section.
## More information
* [Community support](https://forum.anaconda.com)
* [Paid support options](https://anaconda.com/app/support-center)
* [Learning resources](https://anaconda.com/learning?utm_campaign=learning\&utm_medium=documentation\&utm_source=anacondadocs\&utm_content=navgsg)
# Installing Navigator
Source: https://anaconda.com/docs/tools/anaconda-navigator/install
This topic explains how to install or uninstall Anaconda Navigator.
4. Select the checkbox beside `beautifulsoup4` in the package list.
5. Click **Apply**.
6. A dialog appears that lists all packages that will be installed. Click **Apply**.
7. Open the package filter dropdown and select *Installed*.
The newly-installed `beautifulsoup4` package is now displayed in the list of installed programs in the current environment.
For more documentation on packages, see [Managing packages](/tools/anaconda-navigator/tutorials/manage-packages) in the Tutorials section.
## Managing channels
By default, Navigator searches in and installs packages from Anaconda’s free public repositories, also known as `defaults`. This contains the package repositories `main`, `r`, and `msys2` (Windows only), which are hosted at [repo.anaconda.com/pkgs/](https://repo.anaconda.com/pkgs/). There are many more package channels available, hosted on Anaconda.org, in Anaconda.com, or in an on-premises server, if your organization hosts their own packages via Anaconda Server.
In this example, we will add a channel connection to conda-forge in Navigator’s channel manager.
1. Click **Channels**.
2. Click **Add…**.
3. Enter “conda-forge” into the textbox that appears.
4. Press Enter (Windows)/Return (Mac) on your keyboard.
5. Click **Update channels**.
Your package search within Navigator will now also include packages available via conda-forge.
For more documentation on channels, see [Managing channels](/tools/anaconda-navigator/tutorials/manage-channels/) in the Tutorials section.
## More information
* [Community support](https://forum.anaconda.com)
* [Paid support options](https://anaconda.com/app/support-center)
* [Learning resources](https://anaconda.com/learning?utm_campaign=learning\&utm_medium=documentation\&utm_source=anacondadocs\&utm_content=navgsg)
# Installing Navigator
Source: https://anaconda.com/docs/tools/anaconda-navigator/install
This topic explains how to install or uninstall Anaconda Navigator.
 ### Why use Navigator?
In order to run, many scientific packages depend on specific versions of other packages. Data scientists often use multiple versions of many packages and use multiple environments to separate these different versions.
The CLI program conda is both a package manager and an environment manager. This helps data scientists ensure that each version of each package has all the dependencies it requires and works correctly.
Navigator is a graphical interface that enables you work with packages and environments without needing to type conda commands in a terminal window. You can use it to find the packages you want, install them in an environment, run the packages, and update them – all inside Navigator.
### What applications can I access using Navigator?
For information on what applications are available by default in Navigator, see [Home page](/tools/anaconda-navigator/overview#home-page).
Advanced conda users can also [build their own Navigator applications](/tools/anaconda-navigator/tutorials/nav-app).
### How can I run code with Navigator?
The simplest way is with Spyder. From the Navigator Home page, click the Spyder tile, and use the Spyder interface that opens to write and execute your code.
You can also use Jupyter Notebook the same way. Jupyter Notebook is an increasingly popular system that combines your code, descriptive text, output, images, and interactive interfaces into a single notebook file that is edited, viewed, and used in a web browser.
### Why use Navigator?
In order to run, many scientific packages depend on specific versions of other packages. Data scientists often use multiple versions of many packages and use multiple environments to separate these different versions.
The CLI program conda is both a package manager and an environment manager. This helps data scientists ensure that each version of each package has all the dependencies it requires and works correctly.
Navigator is a graphical interface that enables you work with packages and environments without needing to type conda commands in a terminal window. You can use it to find the packages you want, install them in an environment, run the packages, and update them – all inside Navigator.
### What applications can I access using Navigator?
For information on what applications are available by default in Navigator, see [Home page](/tools/anaconda-navigator/overview#home-page).
Advanced conda users can also [build their own Navigator applications](/tools/anaconda-navigator/tutorials/nav-app).
### How can I run code with Navigator?
The simplest way is with Spyder. From the Navigator Home page, click the Spyder tile, and use the Spyder interface that opens to write and execute your code.
You can also use Jupyter Notebook the same way. Jupyter Notebook is an increasingly popular system that combines your code, descriptive text, output, images, and interactive interfaces into a single notebook file that is edited, viewed, and used in a web browser.

 The left column lists your environments. Click an environment to activate it.
**Environments**
With Navigator, like with conda, you can create, export, list, remove, and update environments that have different versions of Python and/or other packages installed. Switching or moving between environments is called activating the environment. Only one environment is active at any point in time. For more information, see [Managing environments](/tools/anaconda-navigator/tutorials/manage-environments).
**Packages**
The right column lists packages installed in the currently-activated environment. The default view is Installed packages. To change which packages are displayed, click the arrow beside the list, then select from Installed, Not Installed, Updatable, Selected, or All packages. For more information, see [Managing packages](/tools/anaconda-navigator/tutorials/manage-packages/).
**Channels**
Channels are locations where Navigator or conda looks for packages. Click **Channels** to modify which channels Navigator uses. For more information, see [Managing channels](/tools/anaconda-navigator/tutorials/manage-channels/).
## Learning page
On the **Learning** page, you can learn more about Navigator, the Anaconda platform, and open data science. Click **Documentation** or **Training** to filter the learning tiles visible to you. Click any tile to open it in a browser window.
The left column lists your environments. Click an environment to activate it.
**Environments**
With Navigator, like with conda, you can create, export, list, remove, and update environments that have different versions of Python and/or other packages installed. Switching or moving between environments is called activating the environment. Only one environment is active at any point in time. For more information, see [Managing environments](/tools/anaconda-navigator/tutorials/manage-environments).
**Packages**
The right column lists packages installed in the currently-activated environment. The default view is Installed packages. To change which packages are displayed, click the arrow beside the list, then select from Installed, Not Installed, Updatable, Selected, or All packages. For more information, see [Managing packages](/tools/anaconda-navigator/tutorials/manage-packages/).
**Channels**
Channels are locations where Navigator or conda looks for packages. Click **Channels** to modify which channels Navigator uses. For more information, see [Managing channels](/tools/anaconda-navigator/tutorials/manage-channels/).
## Learning page
On the **Learning** page, you can learn more about Navigator, the Anaconda platform, and open data science. Click **Documentation** or **Training** to filter the learning tiles visible to you. Click any tile to open it in a browser window.
 ## Community page
On the **Community** page, you can learn more about support forums and social networking relating to Navigator. Click **Forum** or **Social** to filter the community tiles visible to you. Click any tile to open it in a browser window.
## Community page
On the **Community** page, you can learn more about support forums and social networking relating to Navigator. Click **Forum** or **Social** to filter the community tiles visible to you. Click any tile to open it in a browser window.
 ## Related documentation
* [Navigator preferences](/tools/anaconda-navigator/preferences)
* [Reviewing Navigator’s logs](/tools/anaconda-navigator/tutorials/reviewing-logs)
* [Enabling offline mode](/tools/anaconda-navigator/tutorials/offline-mode)
# Navigator preferences
Source: https://anaconda.com/docs/tools/anaconda-navigator/preferences
The Navigator Preferences dialog contains configuration settings for Navigator. This page defines each option in the Preferences dialog.
To open Preferences:
## Related documentation
* [Navigator preferences](/tools/anaconda-navigator/preferences)
* [Reviewing Navigator’s logs](/tools/anaconda-navigator/tutorials/reviewing-logs)
* [Enabling offline mode](/tools/anaconda-navigator/tutorials/offline-mode)
# Navigator preferences
Source: https://anaconda.com/docs/tools/anaconda-navigator/preferences
The Navigator Preferences dialog contains configuration settings for Navigator. This page defines each option in the Preferences dialog.
To open Preferences:
 From here you have several options for account registration:
* Sign up manually with an email and password
* Authenticate with a GitHub, Gmail, or Microsoft account
### Signing up manually
1. Click **Sign Up with Email**.
2. Enter your name, email address, and password.
3. Check your email for the verification email.
4. Click the verification link in your email to complete account verification.
5. (Optional) Complete the user survey. This survey helps Anaconda get to know you as a user and improve your experience in the future.
## Connecting Anaconda.com to Navigator
Once you have become an Anaconda.com organization member, [Sign in to Anaconda.com](https://auth.anaconda.com/ui/login?return_to=https://anaconda.com/app/) from Navigator. To connect Navigator to Anaconda.com:
1. At the top of the Navigator window, click **Connect**.
2. In the **Connect** dropdown, click **Sign in** by **Anaconda Cloud**.
From here you have several options for account registration:
* Sign up manually with an email and password
* Authenticate with a GitHub, Gmail, or Microsoft account
### Signing up manually
1. Click **Sign Up with Email**.
2. Enter your name, email address, and password.
3. Check your email for the verification email.
4. Click the verification link in your email to complete account verification.
5. (Optional) Complete the user survey. This survey helps Anaconda get to know you as a user and improve your experience in the future.
## Connecting Anaconda.com to Navigator
Once you have become an Anaconda.com organization member, [Sign in to Anaconda.com](https://auth.anaconda.com/ui/login?return_to=https://anaconda.com/app/) from Navigator. To connect Navigator to Anaconda.com:
1. At the top of the Navigator window, click **Connect**.
2. In the **Connect** dropdown, click **Sign in** by **Anaconda Cloud**.

 4. Enter the credentials you use to log in to your Anaconda Server instance.
5. Click **Login**. If all credentials are correct, you will be signed in.
4. Enter the credentials you use to log in to your Anaconda Server instance.
5. Click **Login**. If all credentials are correct, you will be signed in.


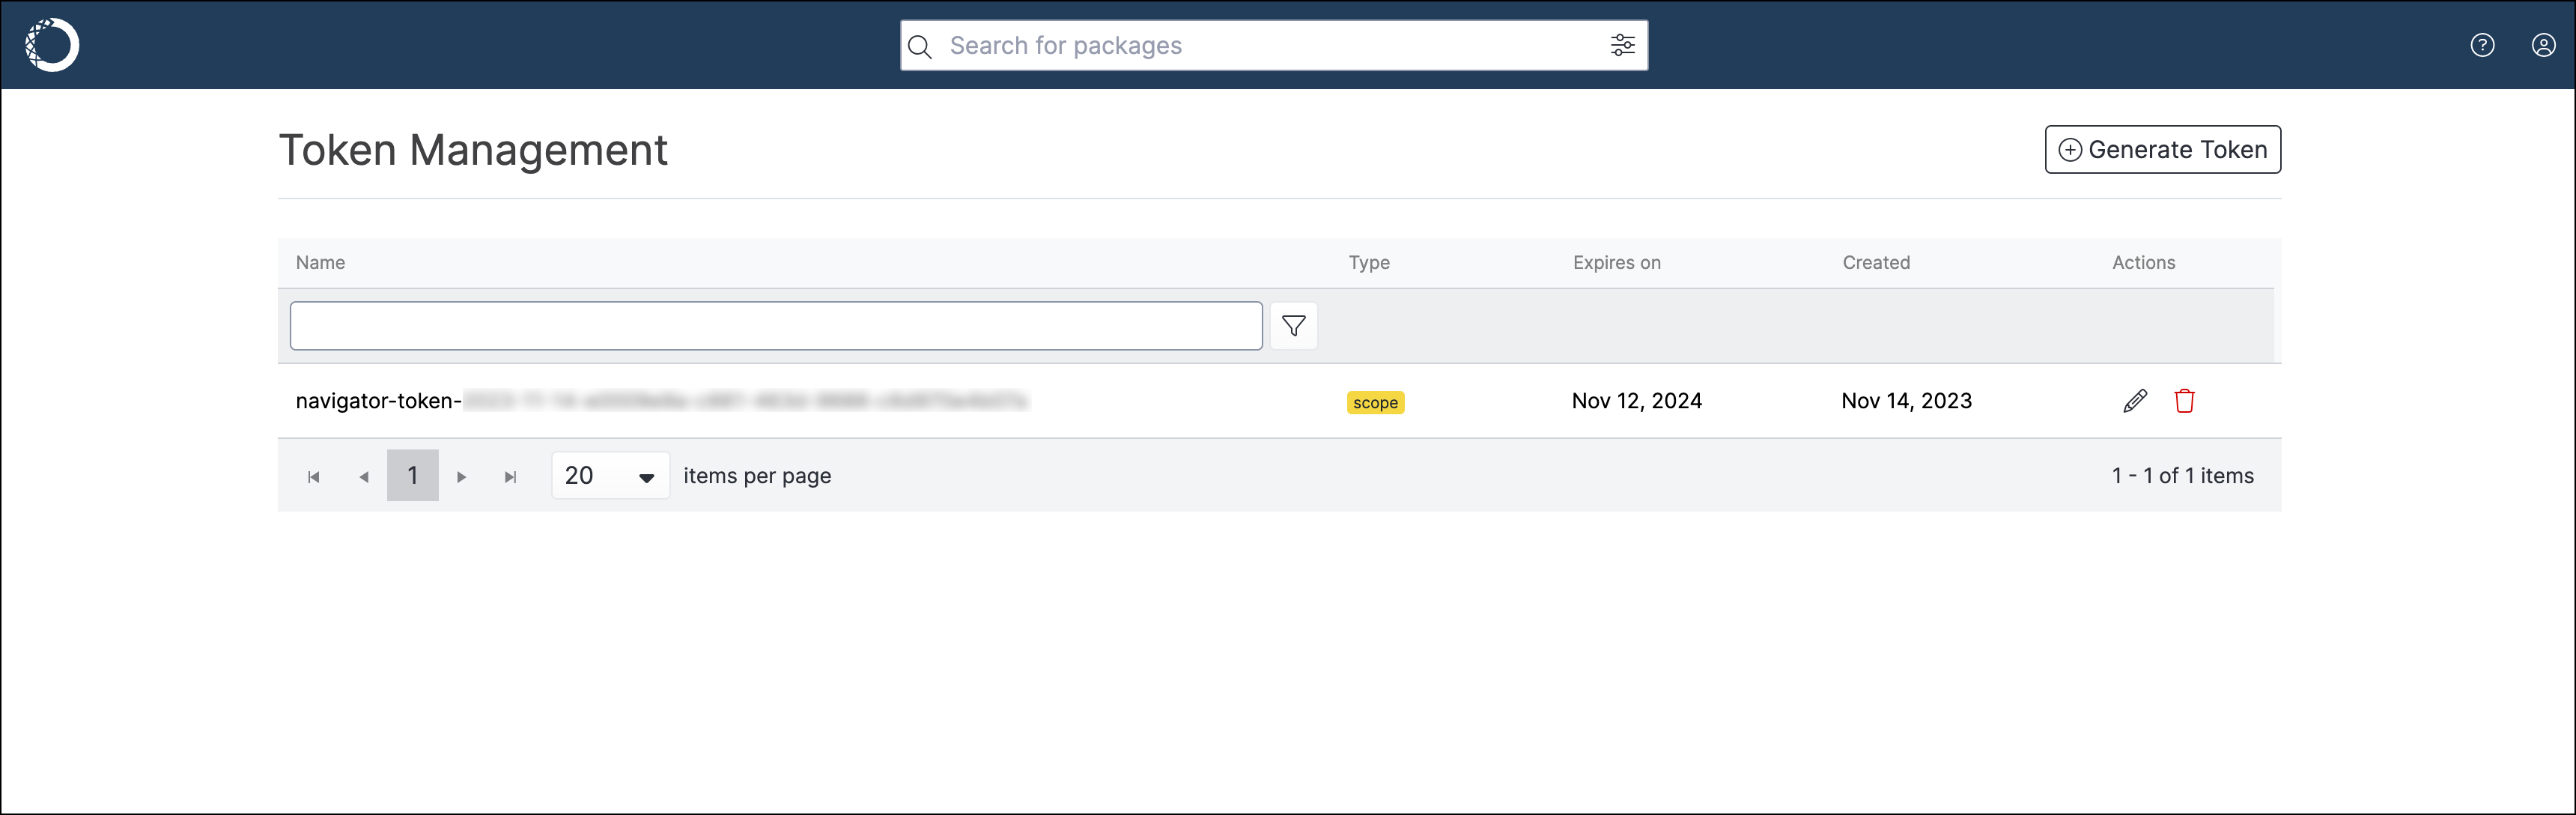
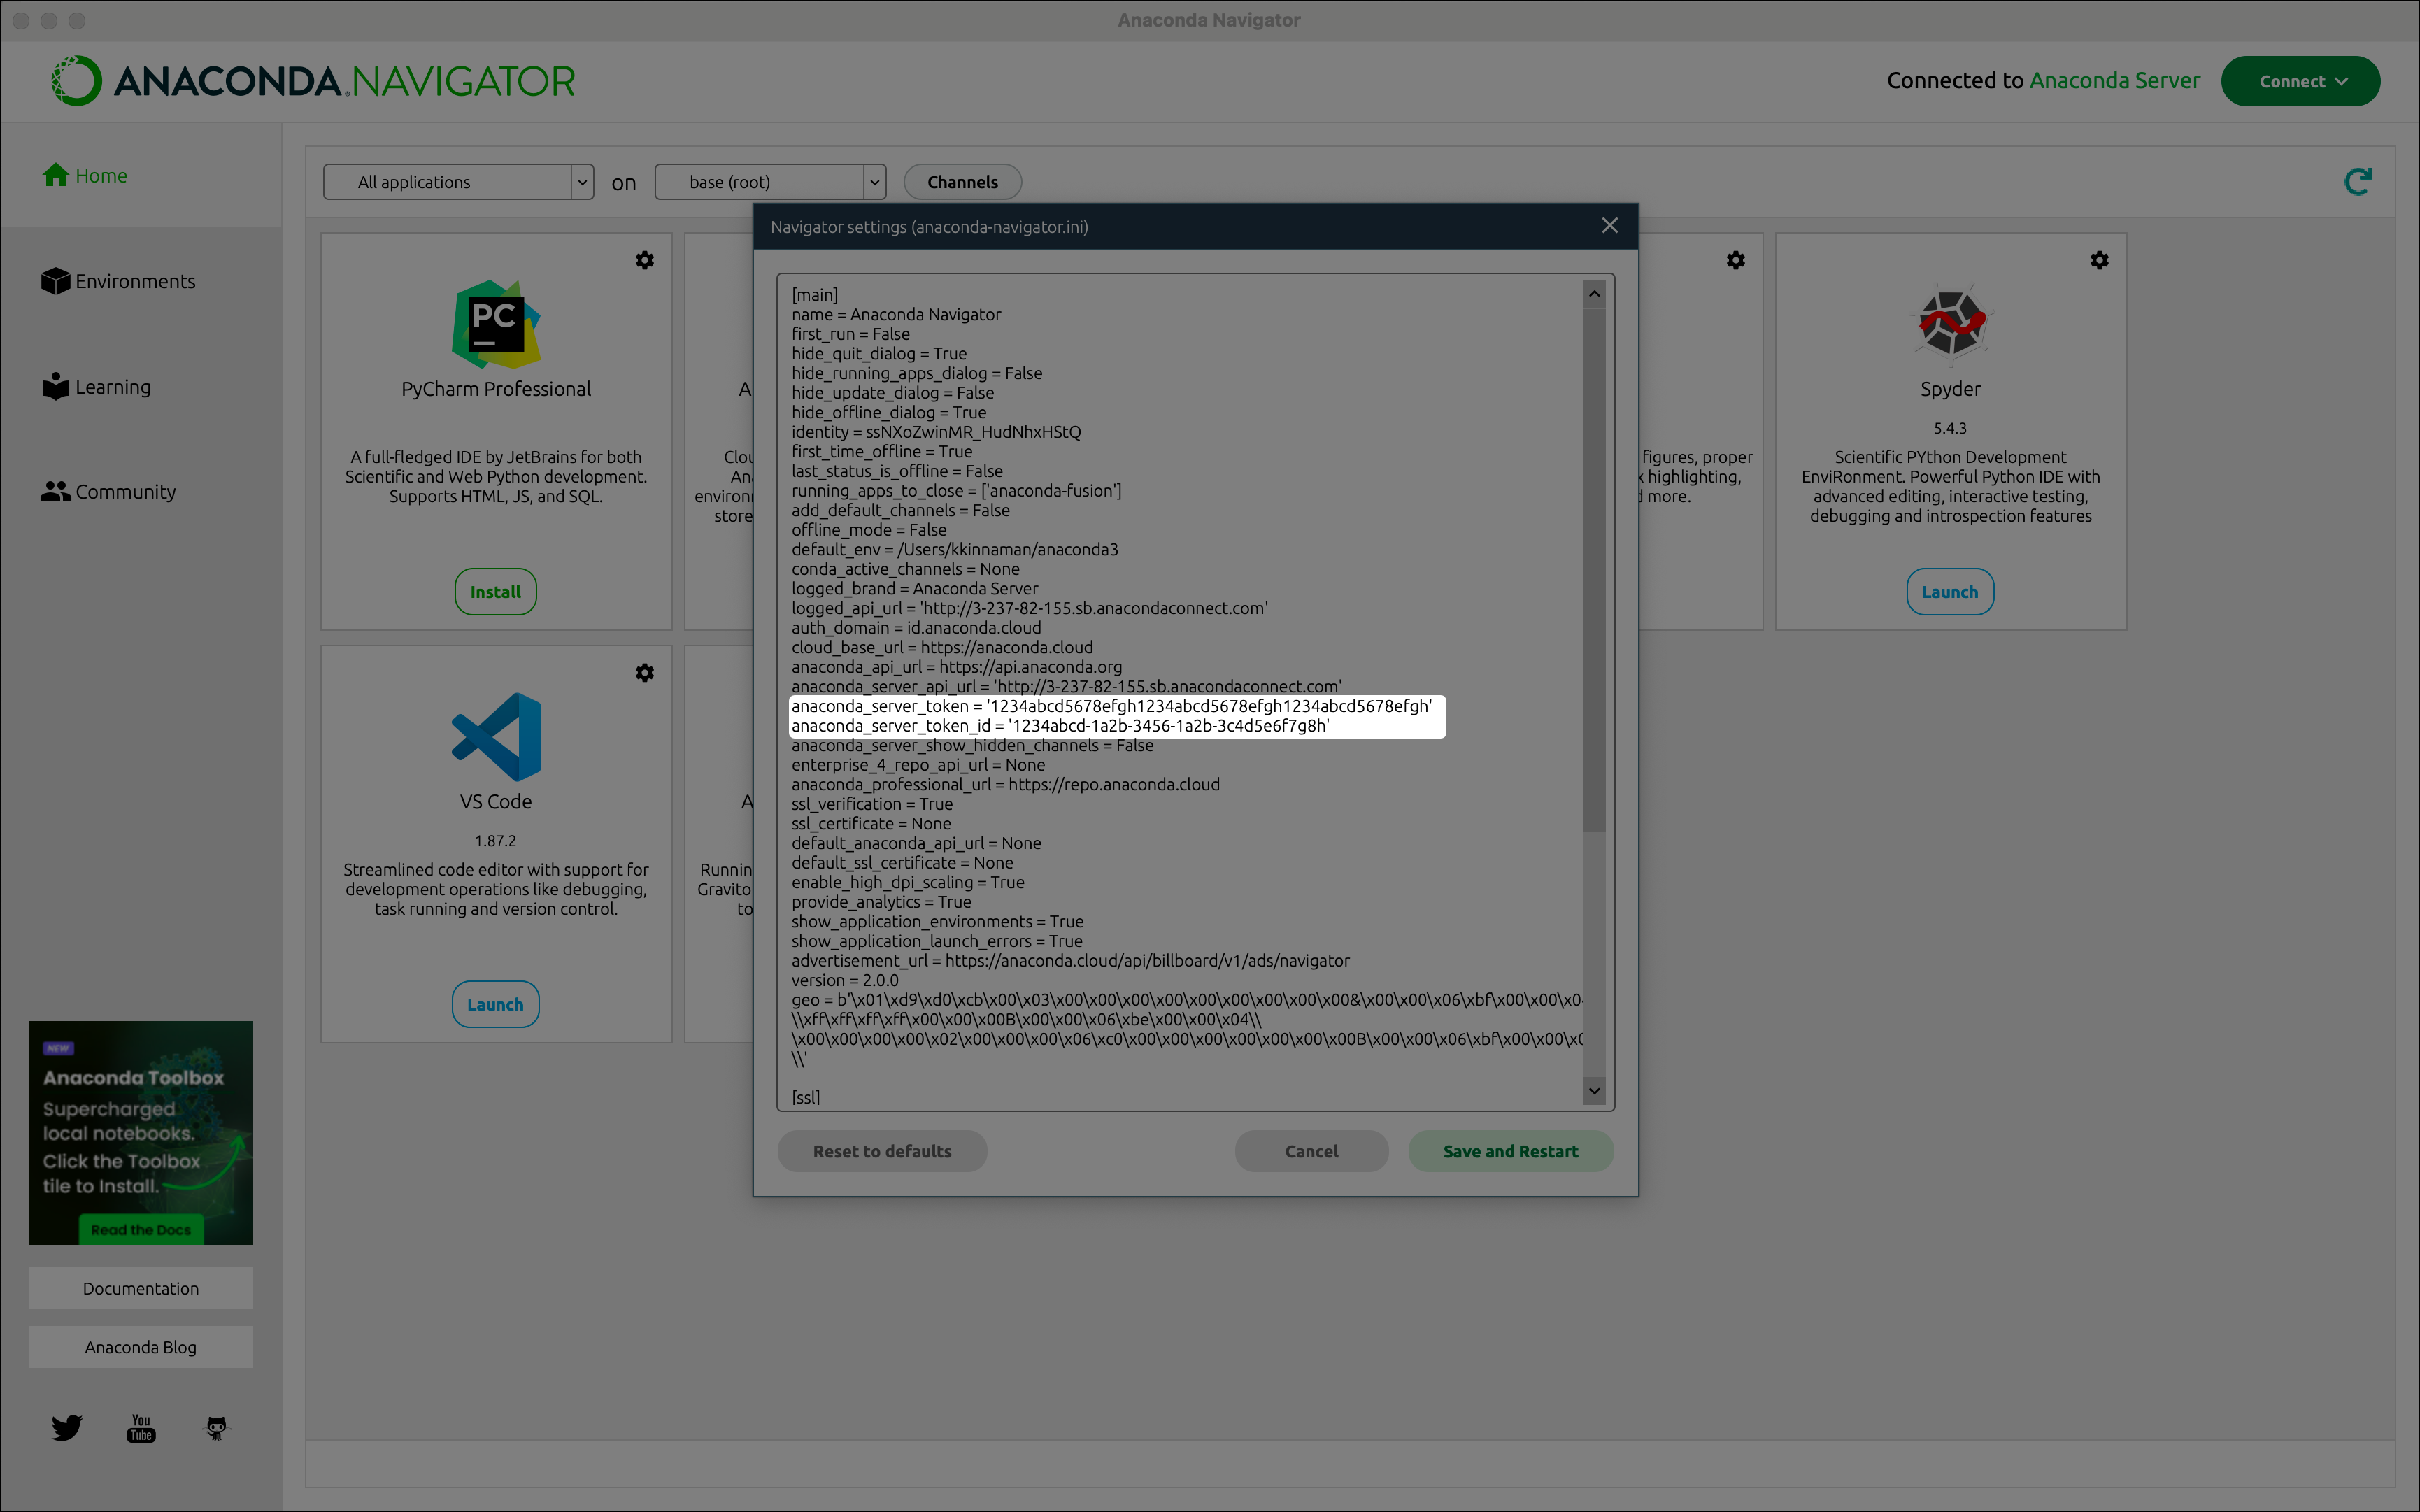
 4. Click **Save and Restart** to save any changes to the open configuration file and restart Navigator.
## Editing with your preferred text editor
Follow these steps to locate, open, and edit the `.condarc` or `anaconda-navigator.ini` files in your preferred text editor:
4. Click **Save and Restart** to save any changes to the open configuration file and restart Navigator.
## Editing with your preferred text editor
Follow these steps to locate, open, and edit the `.condarc` or `anaconda-navigator.ini` files in your preferred text editor:
 3. Enter the channel name or URL and press Enter (Windows)/Return (Mac).
 # Managing environments
Source: https://anaconda.com/docs/tools/anaconda-navigator/tutorials/manage-environments
export const Danger = ({children}) => {
return
# Managing environments
Source: https://anaconda.com/docs/tools/anaconda-navigator/tutorials/manage-environments
export const Danger = ({children}) => {
return
{children}
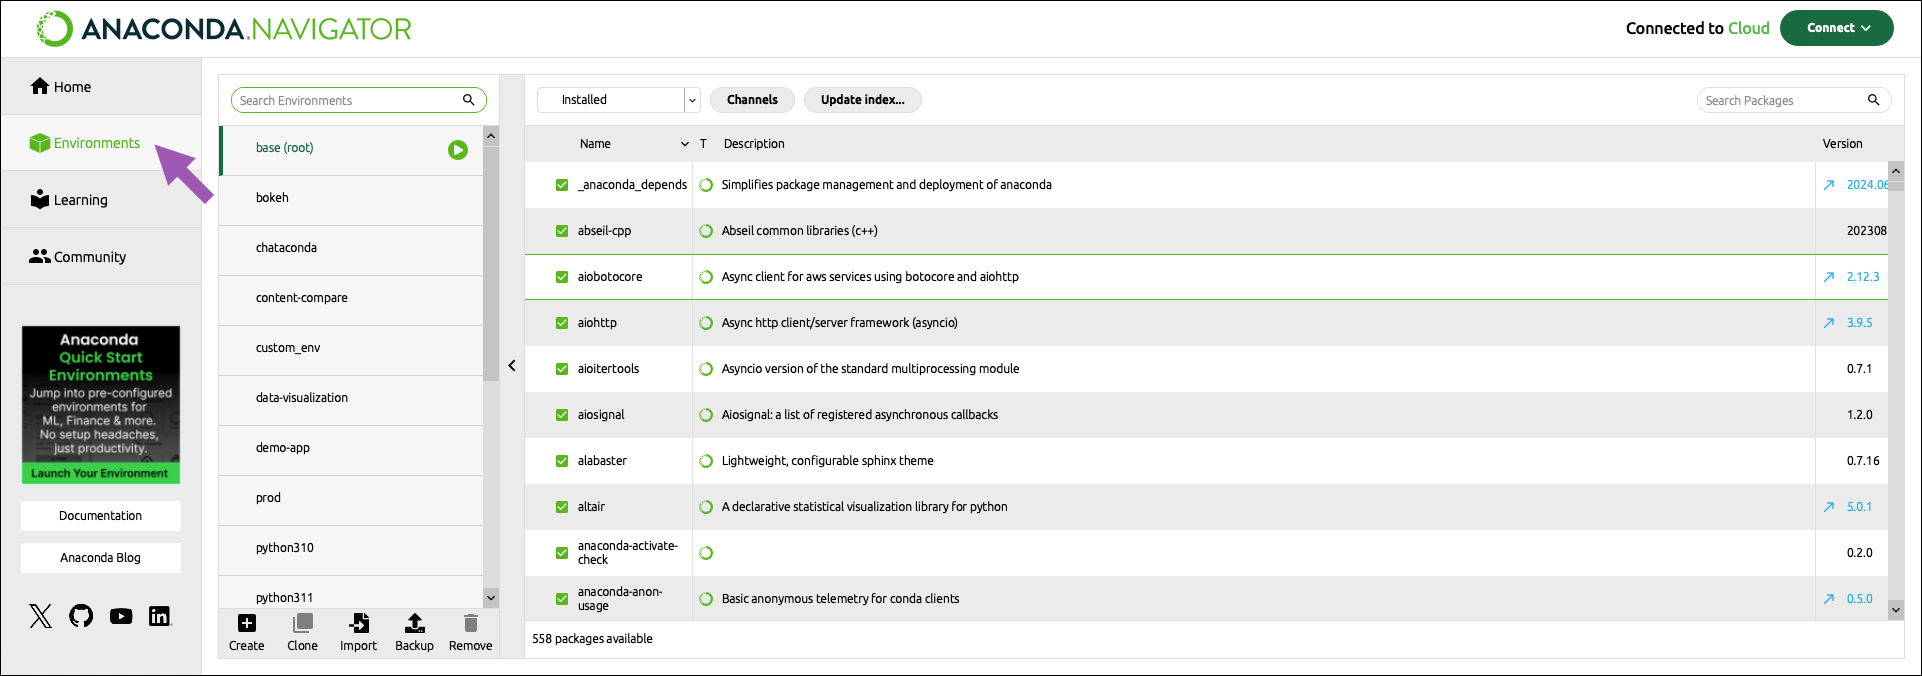 ## Searching for an environment
In the **Search Environments** box, enter all or part of an environment name to filter the environment list.
## Searching for an environment
In the **Search Environments** box, enter all or part of an environment name to filter the environment list.
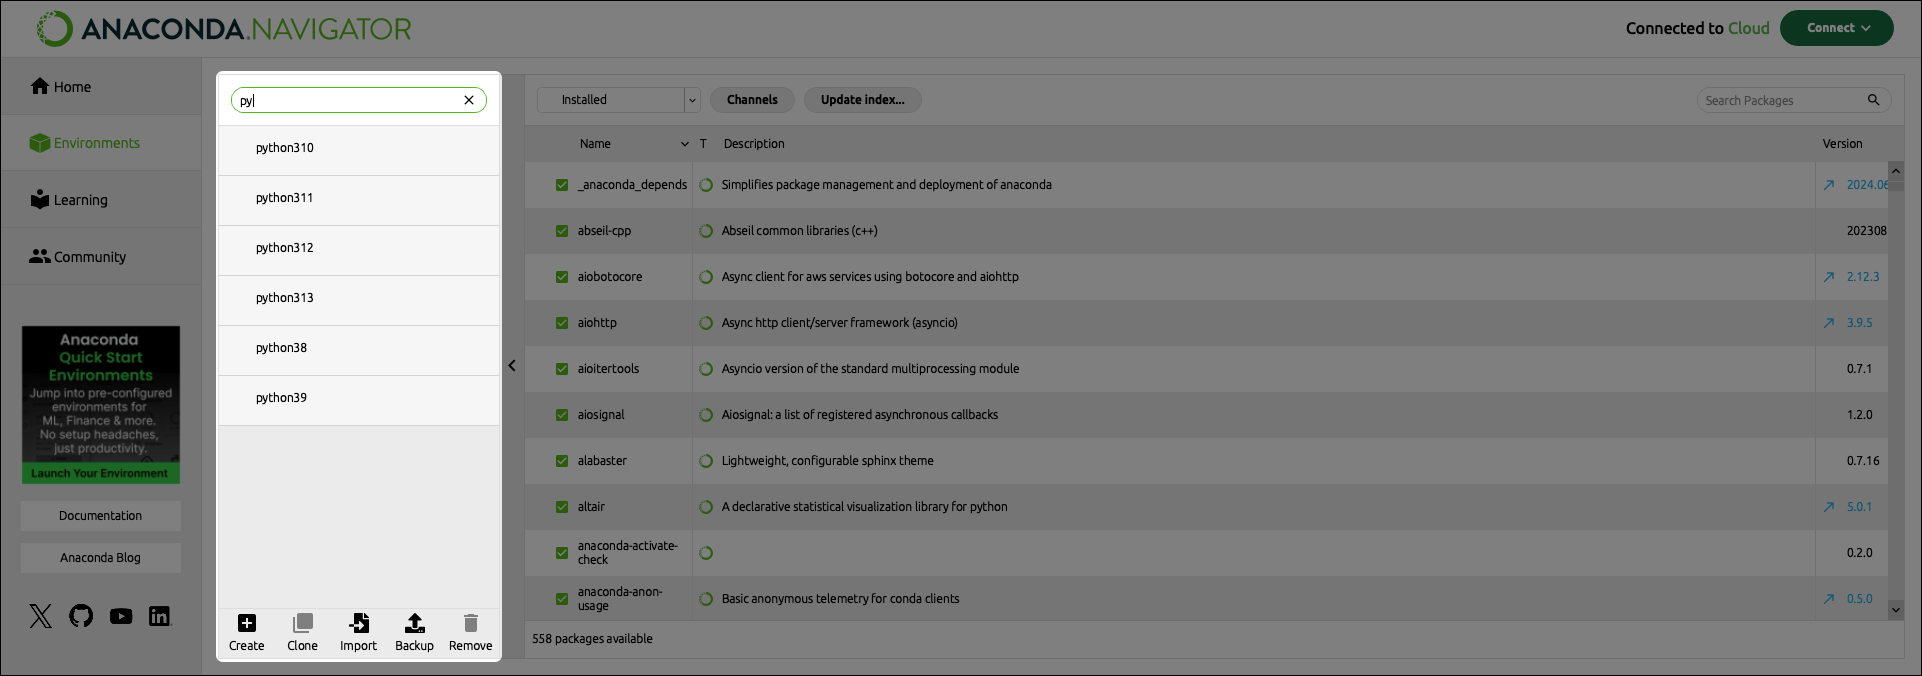 ## Creating a new environment
1. At the bottom of the environments list, select **Create**.
2. In the Create new environment dialog, enter a descriptive name for the new environment.
## Creating a new environment
1. At the bottom of the environments list, select **Create**.
2. In the Create new environment dialog, enter a descriptive name for the new environment.
 3. Select Python or R to set the package type for your environment.
4. Select a version for your Python or R installation.
5. Click **Create**.
## Using an environment
1. In the environments list, select the environment name to activate it.
2. Click the arrow button beside the environment name to open the activation options dropdown.
3. Select Python or R to set the package type for your environment.
4. Select a version for your Python or R installation.
5. Click **Create**.
## Using an environment
1. In the environments list, select the environment name to activate it.
2. Click the arrow button beside the environment name to open the activation options dropdown.
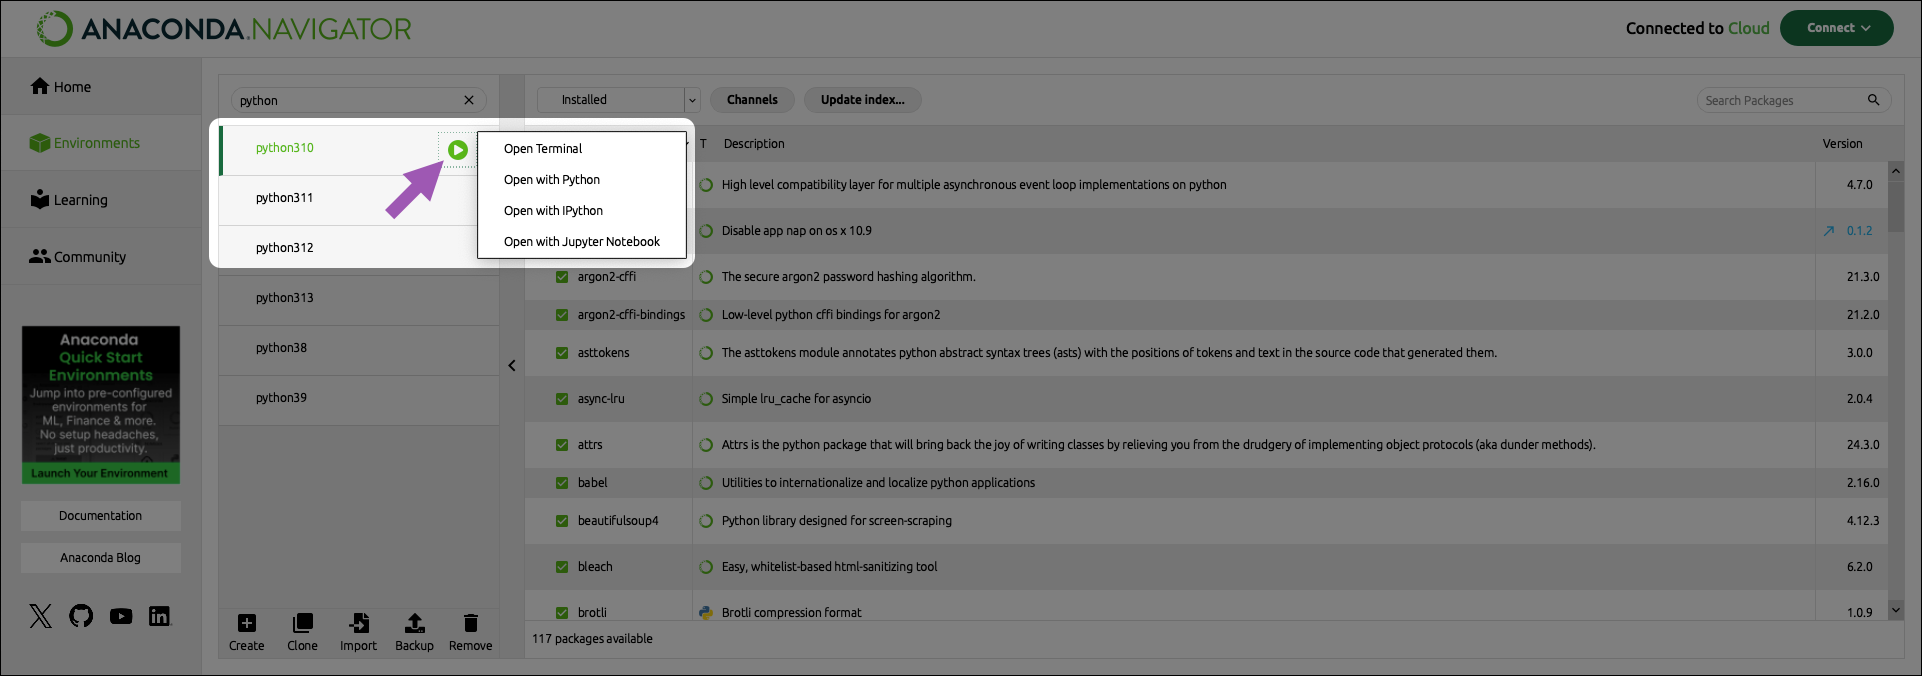 3. Select one of the following options for opening the environment:
* Terminal
* Python interpreter
* IPython Console
* Jupyter Notebook.
3. Select one of the following options for opening the environment:
* Terminal
* Python interpreter
* IPython Console
* Jupyter Notebook.
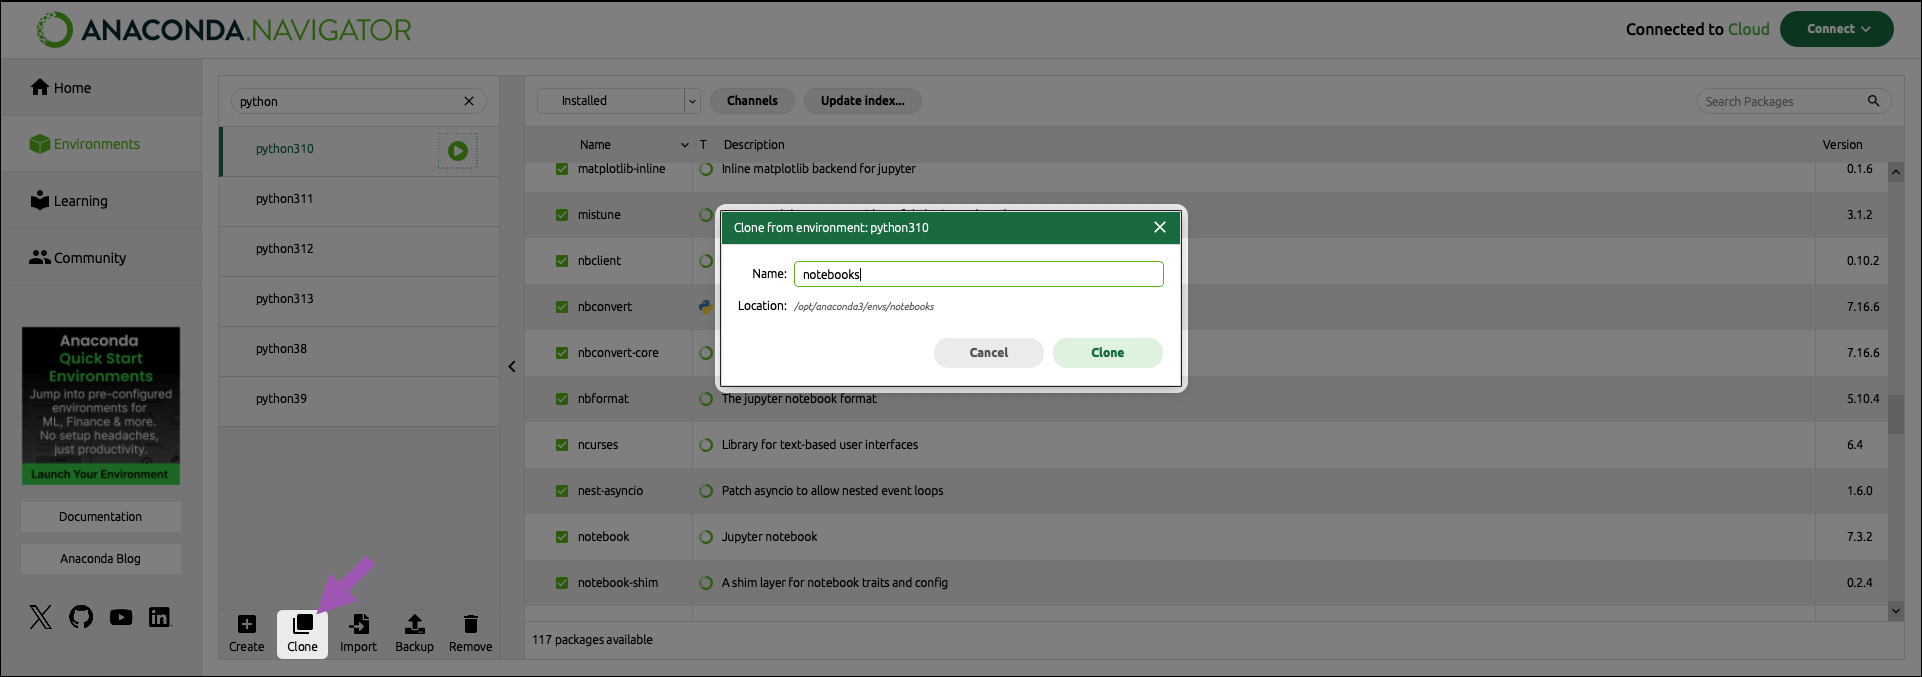 ## Importing an environment
Environment creation information can be shared using a `.yml`-formatted configuration file. If someone has given you an environment file that you want to use—for example `shared-environment-file.yml`—and you have saved it to your computer, you can import it into Navigator. Furthermore, if you have backed up an environment either locally or to [Anaconda.com](https://anaconda.com/app/), you can import it onto your local computer with Navigator.
## Importing an environment
Environment creation information can be shared using a `.yml`-formatted configuration file. If someone has given you an environment file that you want to use—for example `shared-environment-file.yml`—and you have saved it to your computer, you can import it into Navigator. Furthermore, if you have backed up an environment either locally or to [Anaconda.com](https://anaconda.com/app/), you can import it onto your local computer with Navigator.


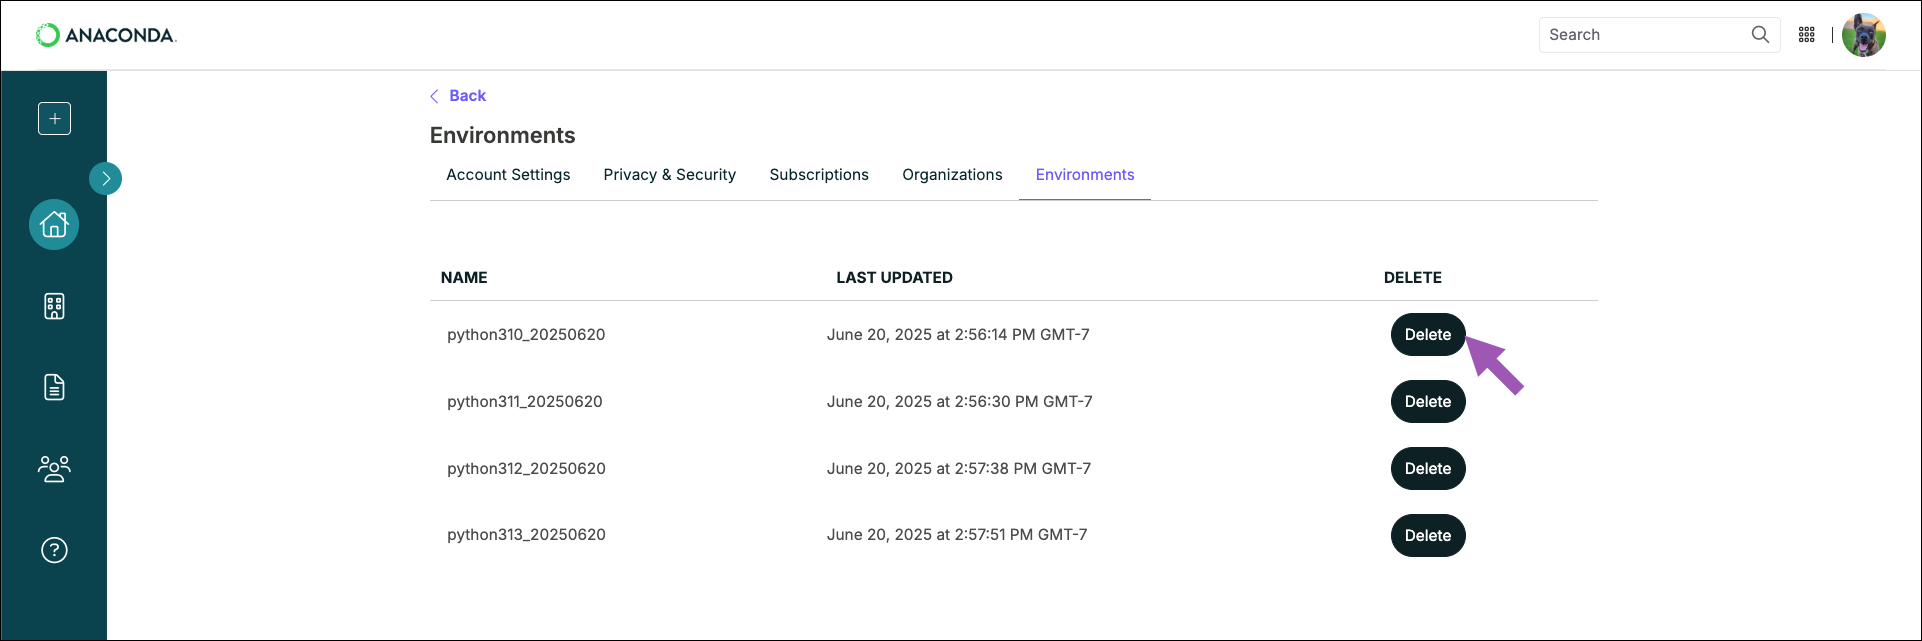

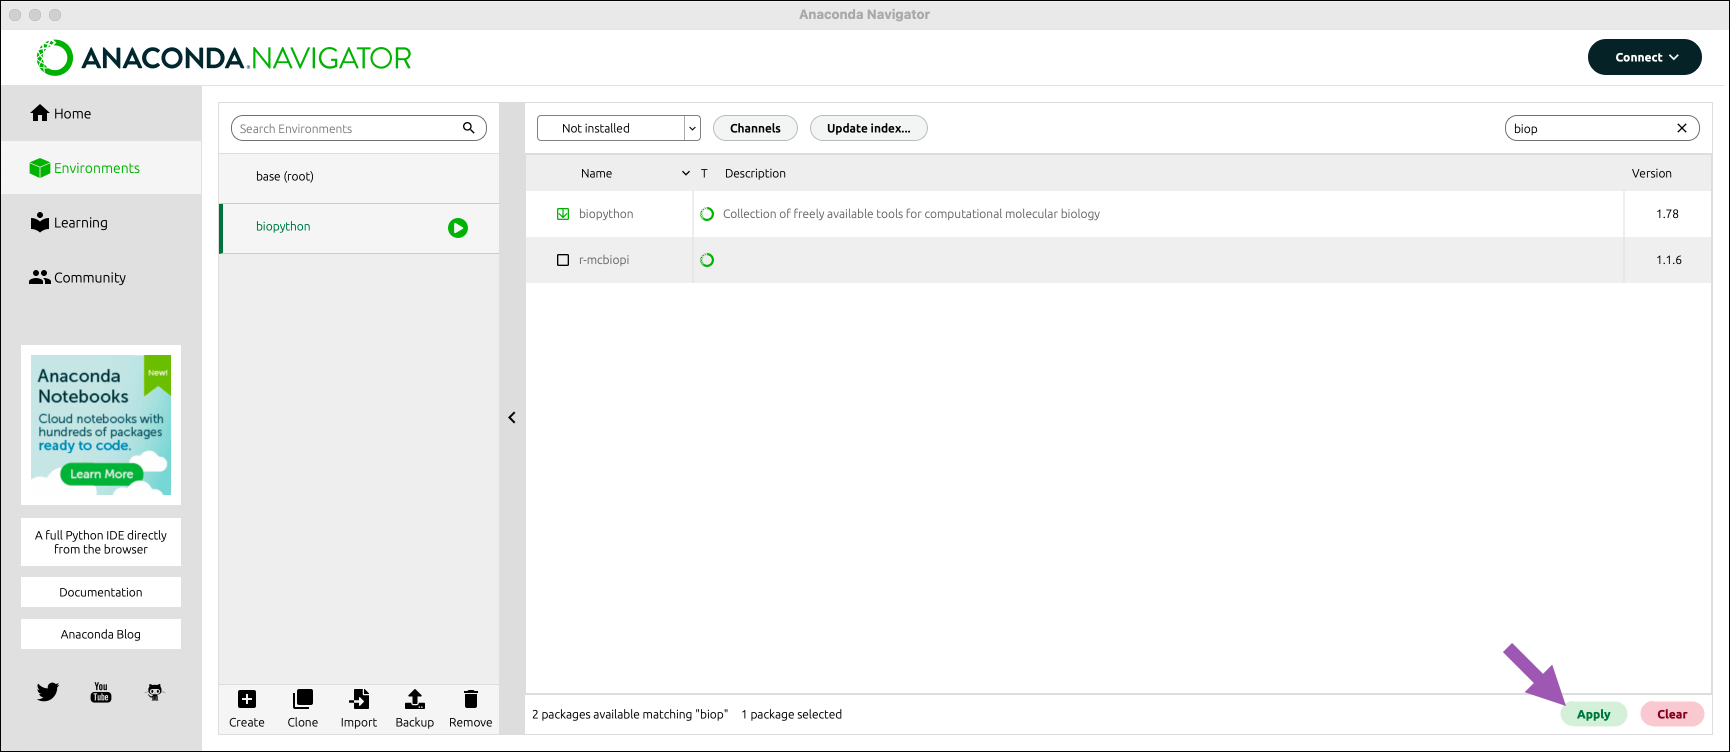 6. Review the **Install Packages** information. This dialog lists the packages chosen for installation and all dependencies of those packages that also need to be installed.
You can sort the list of packages to be installed by the following information:
**Name**: The name of the package.
**Unlink**: The package version being uninstalled.
**Link**: The package version being installed.
**Channel**: The channel from which the package is being installed.
**Action**: The action being taken. In this case, “Install”.
6. Review the **Install Packages** information. This dialog lists the packages chosen for installation and all dependencies of those packages that also need to be installed.
You can sort the list of packages to be installed by the following information:
**Name**: The name of the package.
**Unlink**: The package version being uninstalled.
**Link**: The package version being installed.
**Channel**: The channel from which the package is being installed.
**Action**: The action being taken. In this case, “Install”.
 7. Click **Apply**.
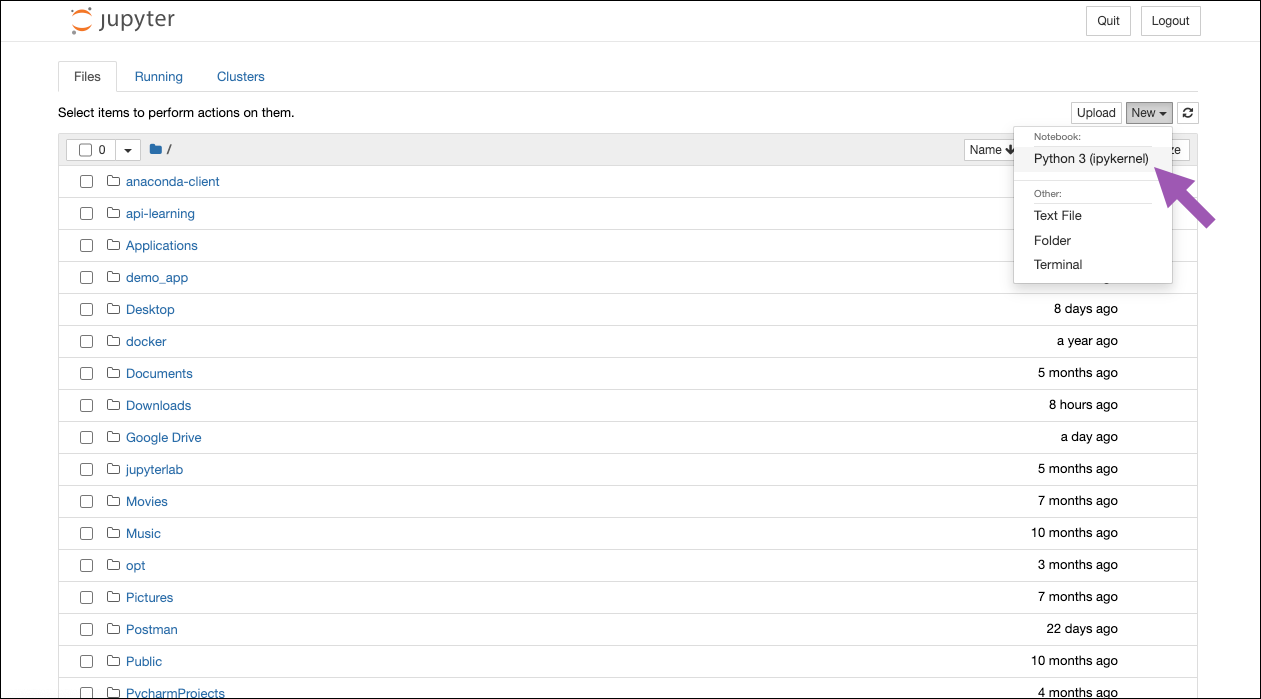 5. Copy and paste the following code into the first cell:
```sh
import Bio
help(Bio)
```
6. To run the code, click **Run** or use the keyboard shortcut Ctrl+Enter (Windows)/Ctrl+Return (Mac).
7. The BioPython help text is displayed.
5. Copy and paste the following code into the first cell:
```sh
import Bio
help(Bio)
```
6. To run the code, click **Run** or use the keyboard shortcut Ctrl+Enter (Windows)/Ctrl+Return (Mac).
7. The BioPython help text is displayed.

 ## Installing a different package version
1. Select the checkbox beside the package whose version you want to change.
2. Select *Mark for specific version installation*. If other versions are available for this package, they are displayed in a list.
## Installing a different package version
1. Select the checkbox beside the package whose version you want to change.
2. Select *Mark for specific version installation*. If other versions are available for this package, they are displayed in a list.
 3. Select the package version you want to install.
4. Click **Apply**.
## Removing a package
1. Select the checkbox beside the package you want to remove.
2. Select *Mark for removal*.
3. Select the package version you want to install.
4. Click **Apply**.
## Removing a package
1. Select the checkbox beside the package you want to remove.
2. Select *Mark for removal*.
 3. Click **Apply**.
## Advanced package management
Navigator provides a convenient graphical interface for managing conda environments, channels, and packages. But if you’re comfortable working with Anaconda Prompt (terminal on Linux or macOS), you can access additional, advanced management features. To learn more, see [Managing packages](https://docs.conda.io/projects/conda/en/latest/user-guide/tasks/manage-pkgs.html) in the conda documentation.
# Building Anaconda Navigator applications
Source: https://anaconda.com/docs/tools/anaconda-navigator/tutorials/nav-app
In this tutorial, you will learn how to add a tile to Anaconda Navigator that launches your custom application.
Using the JupyterLab feedstock as a base, you’ll make modifications to files in the build recipe to declare the package as an application for Navigator, then rebuild it and upload it to an Anaconda.org channel. We’ll then add the channel in Navigator, causing the application to appear as a tile on the Home page.
## Who is this for?
This tutorial is for users who want to generate an Anaconda Navigator app conda package from a given recipe. Prior knowledge of conda-build or conda recipes is recommended.
## Prerequisites
3. Click **Apply**.
## Advanced package management
Navigator provides a convenient graphical interface for managing conda environments, channels, and packages. But if you’re comfortable working with Anaconda Prompt (terminal on Linux or macOS), you can access additional, advanced management features. To learn more, see [Managing packages](https://docs.conda.io/projects/conda/en/latest/user-guide/tasks/manage-pkgs.html) in the conda documentation.
# Building Anaconda Navigator applications
Source: https://anaconda.com/docs/tools/anaconda-navigator/tutorials/nav-app
In this tutorial, you will learn how to add a tile to Anaconda Navigator that launches your custom application.
Using the JupyterLab feedstock as a base, you’ll make modifications to files in the build recipe to declare the package as an application for Navigator, then rebuild it and upload it to an Anaconda.org channel. We’ll then add the channel in Navigator, causing the application to appear as a tile on the Home page.
## Who is this for?
This tutorial is for users who want to generate an Anaconda Navigator app conda package from a given recipe. Prior knowledge of conda-build or conda recipes is recommended.
## Prerequisites
 4. Close and restart Anaconda Navigator. Your app will be displayed on the Home page.
## Troubleshooting
### My app isn’t appearing on the Home page
* Check that the conda package has been uploaded to your Anaconda.org channel.
* Check that your channel has been added to the Channels list.
* Remove the `.anaconda/navigator` folder from your home directory to reset Navigator’s configuration information, then restart Navigator.
### My app isn’t launching
1. If the application does not launch after installation, confirm that it works via the command line by running the following command:
```sh
conda run jupyter lab
```
4. Close and restart Anaconda Navigator. Your app will be displayed on the Home page.
## Troubleshooting
### My app isn’t appearing on the Home page
* Check that the conda package has been uploaded to your Anaconda.org channel.
* Check that your channel has been added to the Channels list.
* Remove the `.anaconda/navigator` folder from your home directory to reset Navigator’s configuration information, then restart Navigator.
### My app isn’t launching
1. If the application does not launch after installation, confirm that it works via the command line by running the following command:
```sh
conda run jupyter lab
```
 In the Preferences dialog, select **Enable offline mode** to enter offline mode even if internet access is available.
Using Navigator in offline mode is equivalent to using the command line conda commands `create`, `install`, `remove`, and `update` with the flag `--offline` so that conda does not connect to the internet.
# How to install and run Pandas from Anaconda Navigator
Source: https://anaconda.com/docs/tools/anaconda-navigator/tutorials/pandas
Pandas is a common Python tool for data manipulation and analysis. This topic explains how to use Navigator to set up and begin working with Pandas via your choice of tool: terminal, Python, IPython, or Jupyter Notebook. The steps are similar for [installing and opening](/tools/anaconda-navigator/getting-started#managing-packages) nearly any package.
1. [Start Navigator](/tools/anaconda-navigator/getting-started#starting-navigator).
2. Open the **Environments** page.
3. Click **Create**. When prompted, enter a descriptive name for the environment, such as “Pandas”.
In the Preferences dialog, select **Enable offline mode** to enter offline mode even if internet access is available.
Using Navigator in offline mode is equivalent to using the command line conda commands `create`, `install`, `remove`, and `update` with the flag `--offline` so that conda does not connect to the internet.
# How to install and run Pandas from Anaconda Navigator
Source: https://anaconda.com/docs/tools/anaconda-navigator/tutorials/pandas
Pandas is a common Python tool for data manipulation and analysis. This topic explains how to use Navigator to set up and begin working with Pandas via your choice of tool: terminal, Python, IPython, or Jupyter Notebook. The steps are similar for [installing and opening](/tools/anaconda-navigator/getting-started#managing-packages) nearly any package.
1. [Start Navigator](/tools/anaconda-navigator/getting-started#starting-navigator).
2. Open the **Environments** page.
3. Click **Create**. When prompted, enter a descriptive name for the environment, such as “Pandas”.
 4. Select a Python version to run in the environment.
5. Click **Create**.
6. The new, active environment appears in the environments list. An active environment is highlighted with a green play icon.
4. Select a Python version to run in the environment.
5. Click **Create**.
6. The new, active environment appears in the environments list. An active environment is highlighted with a green play icon.
 7. In the list above the packages table, select *All* to filter the table to show all packages in all channels.
8. In the **Search Packages** field, search for “pandas”. Pandas appears as a package available for installation.
7. In the list above the packages table, select *All* to filter the table to show all packages in all channels.
8. In the **Search Packages** field, search for “pandas”. Pandas appears as a package available for installation.
 9. Select the checkbox in front of the Pandas package name.
10. Click **Apply**.
11. Review the dialog that displays pandas and all of its dependencies.
12. Click **Apply**.
9. Select the checkbox in front of the Pandas package name.
10. Click **Apply**.
11. Review the dialog that displays pandas and all of its dependencies.
12. Click **Apply**.
 13. A progress bar appears below the packages pane while Pandas and its dependencies are installed.
14. To begin using your new environment, on the **Environments** page, click the play button beside your active Pandas environment name.
15. In the list that appears, select the tool to use to open Pandas. To access the iPython or Jupyter Notebook tool options, install JupyterLab or Jupyter Notebooks from the **Home** page.
13. A progress bar appears below the packages pane while Pandas and its dependencies are installed.
14. To begin using your new environment, on the **Environments** page, click the play button beside your active Pandas environment name.
15. In the list that appears, select the tool to use to open Pandas. To access the iPython or Jupyter Notebook tool options, install JupyterLab or Jupyter Notebooks from the **Home** page.

 These logs can also be found in the `navigator.log` file, available in the following paths, depending on your operating system:
 All packages containing the characters typed into **Search Packages** will appear in the package list below.
For more information on installing and using the packages you find on Anaconda.org, see [Package installation for Anaconda](/tools/anaconda-navigator/getting-started#managing-packages).
# Uninstalling Navigator
Source: https://anaconda.com/docs/tools/anaconda-navigator/uninstall-navigator
All packages containing the characters typed into **Search Packages** will appear in the package list below.
For more information on installing and using the packages you find on Anaconda.org, see [Package installation for Anaconda](/tools/anaconda-navigator/getting-started#managing-packages).
# Uninstalling Navigator
Source: https://anaconda.com/docs/tools/anaconda-navigator/uninstall-navigator
 ## Manual update
You can also update Navigator manually through a command line interface (CLI). This can either be done with the `update` or `install` commands:
## Manual update
You can also update Navigator manually through a command line interface (CLI). This can either be done with the `update` or `install` commands:


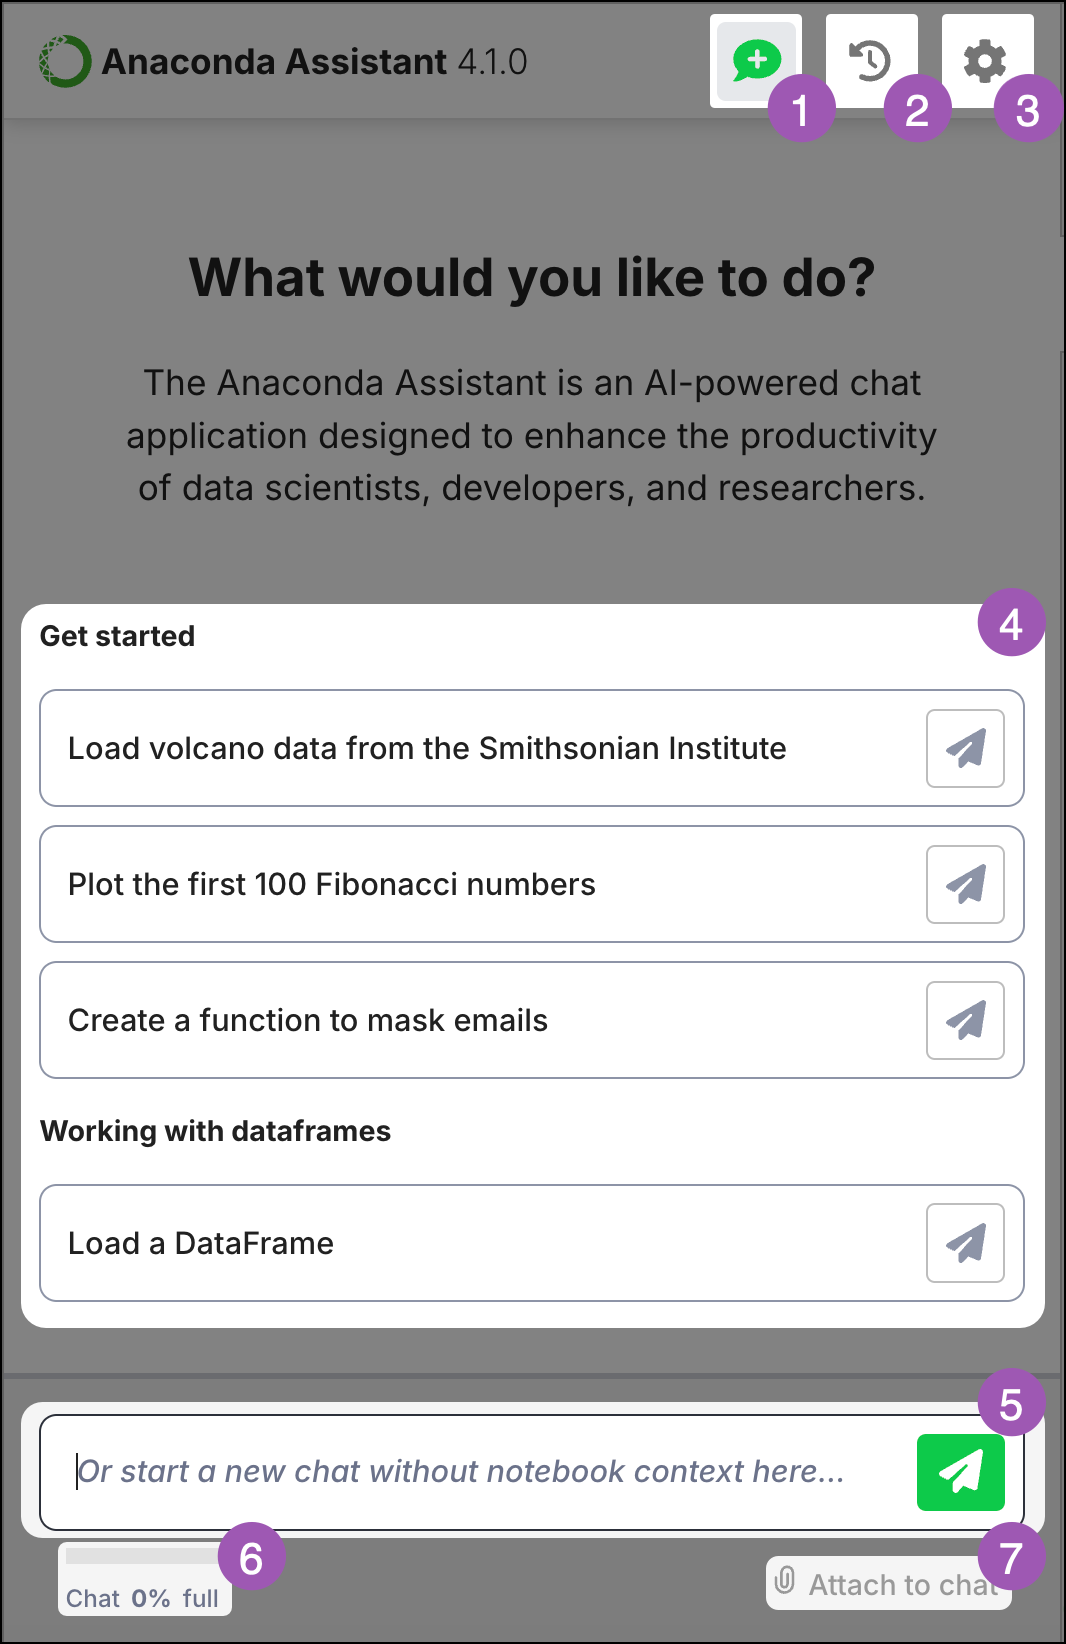
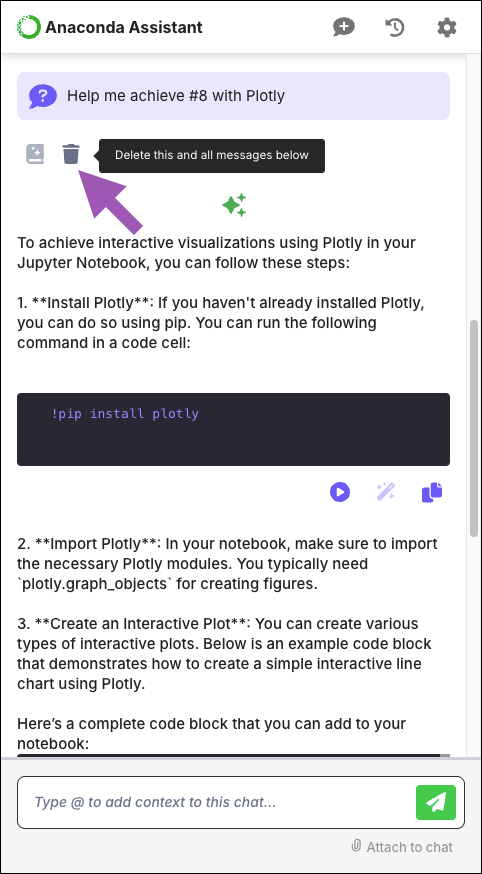 ### Setting code location
To change where code generated by the Assistant gets added to your notebook, click
### Setting code location
To change where code generated by the Assistant gets added to your notebook, click 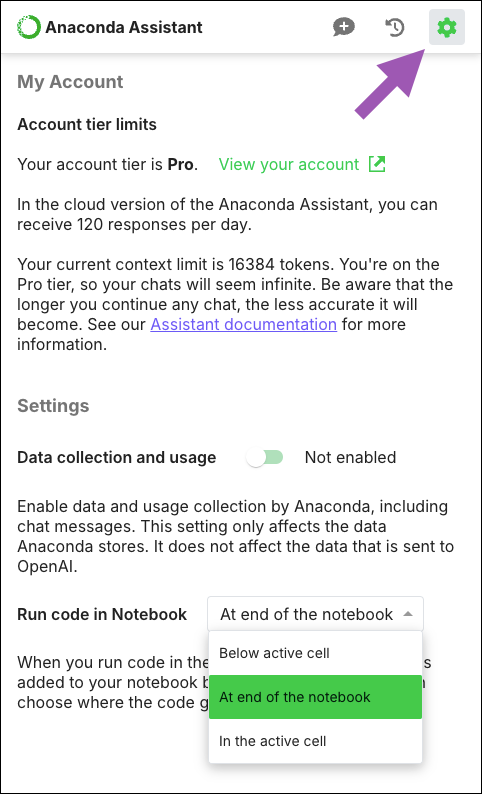 ### Stopping a response from the Assistant
If you want to interrupt the Assistant mid-response (perhaps the Assistant misunderstood your prompt and is providing unnecessary information), press Enter (Windows)/Return (Mac) on your keyboard. Alternatively, you can click
### Stopping a response from the Assistant
If you want to interrupt the Assistant mid-response (perhaps the Assistant misunderstood your prompt and is providing unnecessary information), press Enter (Windows)/Return (Mac) on your keyboard. Alternatively, you can click 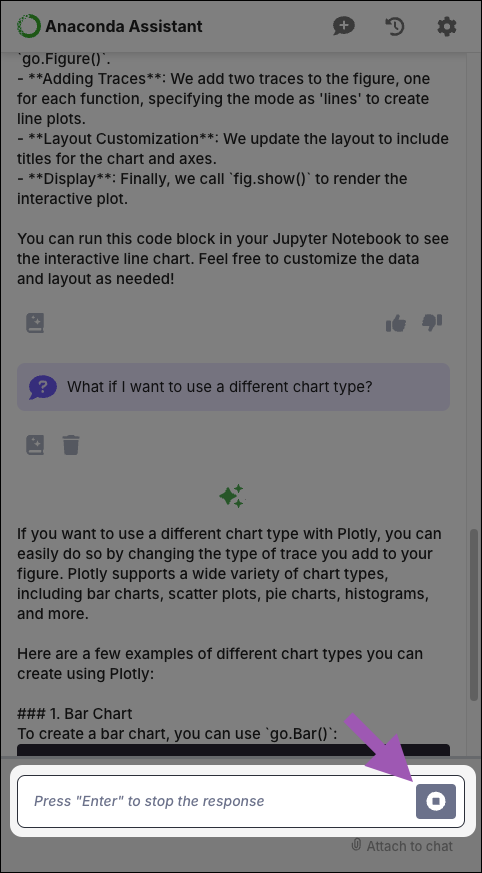 ## Frequently asked questions
### Why am I not seeing all options under Working with DataFrames?
Some options for working with DataFrames are hidden until you run cells in your notebook that generate a DataFrame. Click
## Frequently asked questions
### Why am I not seeing all options under Working with DataFrames?
Some options for working with DataFrames are hidden until you run cells in your notebook that generate a DataFrame. Click 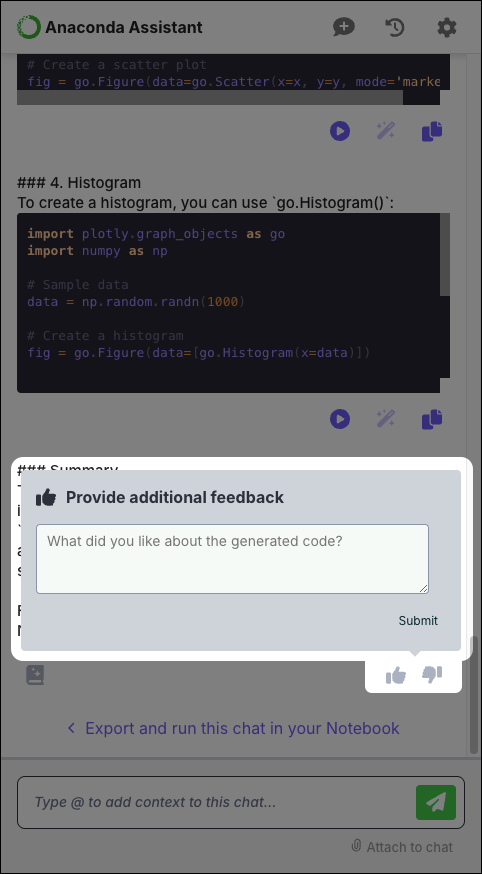 # Working with Code Snippets
Source: https://anaconda.com/docs/tools/anaconda-notebooks/anaconda-toolbox/code-snippets
export const NotebooksBadge = () => {
return
;
};
Code Snippets enable you to securely upload reusable blocks of code to Anaconda.com. You can then share your snippets with other users, access your snippets in [Excel](/tools/excel/main), and insert your snippets across notebooks.
Anaconda maintains a Jupyter notebook that includes example code snippets you can modify and add to your own projects:
[
# Working with Code Snippets
Source: https://anaconda.com/docs/tools/anaconda-notebooks/anaconda-toolbox/code-snippets
export const NotebooksBadge = () => {
return
;
};
Code Snippets enable you to securely upload reusable blocks of code to Anaconda.com. You can then share your snippets with other users, access your snippets in [Excel](/tools/excel/main), and insert your snippets across notebooks.
Anaconda maintains a Jupyter notebook that includes example code snippets you can modify and add to your own projects:
[ ## Anaconda Cloud
Create new projects and notebooks that can be securely uploaded to [Anaconda.com](/tools/anaconda-notebooks/anaconda-toolbox/using-projects), shared with teammates in your organization, and accessed on any machine with Anaconda Notebooks or Microsoft Excel.
## Code Snippets
Write reusable [code snippets](/tools/anaconda-notebooks/anaconda-toolbox/code-snippets) that can be saved to your Anaconda **Cloud** projects and then used across notebooks, added to Excel workbooks, and shared with teammates.
## Anaconda AI Assistant
Use [Anaconda Assistant](/tools/anaconda-notebooks/anaconda-toolbox/anaconda-assistant) to help you write, analyze, and debug code right within your notebooks.
# Using Anaconda projects
Source: https://anaconda.com/docs/tools/anaconda-notebooks/anaconda-toolbox/using-projects
export const Danger = ({children}) => {
return
## Anaconda Cloud
Create new projects and notebooks that can be securely uploaded to [Anaconda.com](/tools/anaconda-notebooks/anaconda-toolbox/using-projects), shared with teammates in your organization, and accessed on any machine with Anaconda Notebooks or Microsoft Excel.
## Code Snippets
Write reusable [code snippets](/tools/anaconda-notebooks/anaconda-toolbox/code-snippets) that can be saved to your Anaconda **Cloud** projects and then used across notebooks, added to Excel workbooks, and shared with teammates.
## Anaconda AI Assistant
Use [Anaconda Assistant](/tools/anaconda-notebooks/anaconda-toolbox/anaconda-assistant) to help you write, analyze, and debug code right within your notebooks.
# Using Anaconda projects
Source: https://anaconda.com/docs/tools/anaconda-notebooks/anaconda-toolbox/using-projects
export const Danger = ({children}) => {
return
{children}
 3. In the Manage Permissions dialog, select your organization from the dropdown under **Your Organizations**.
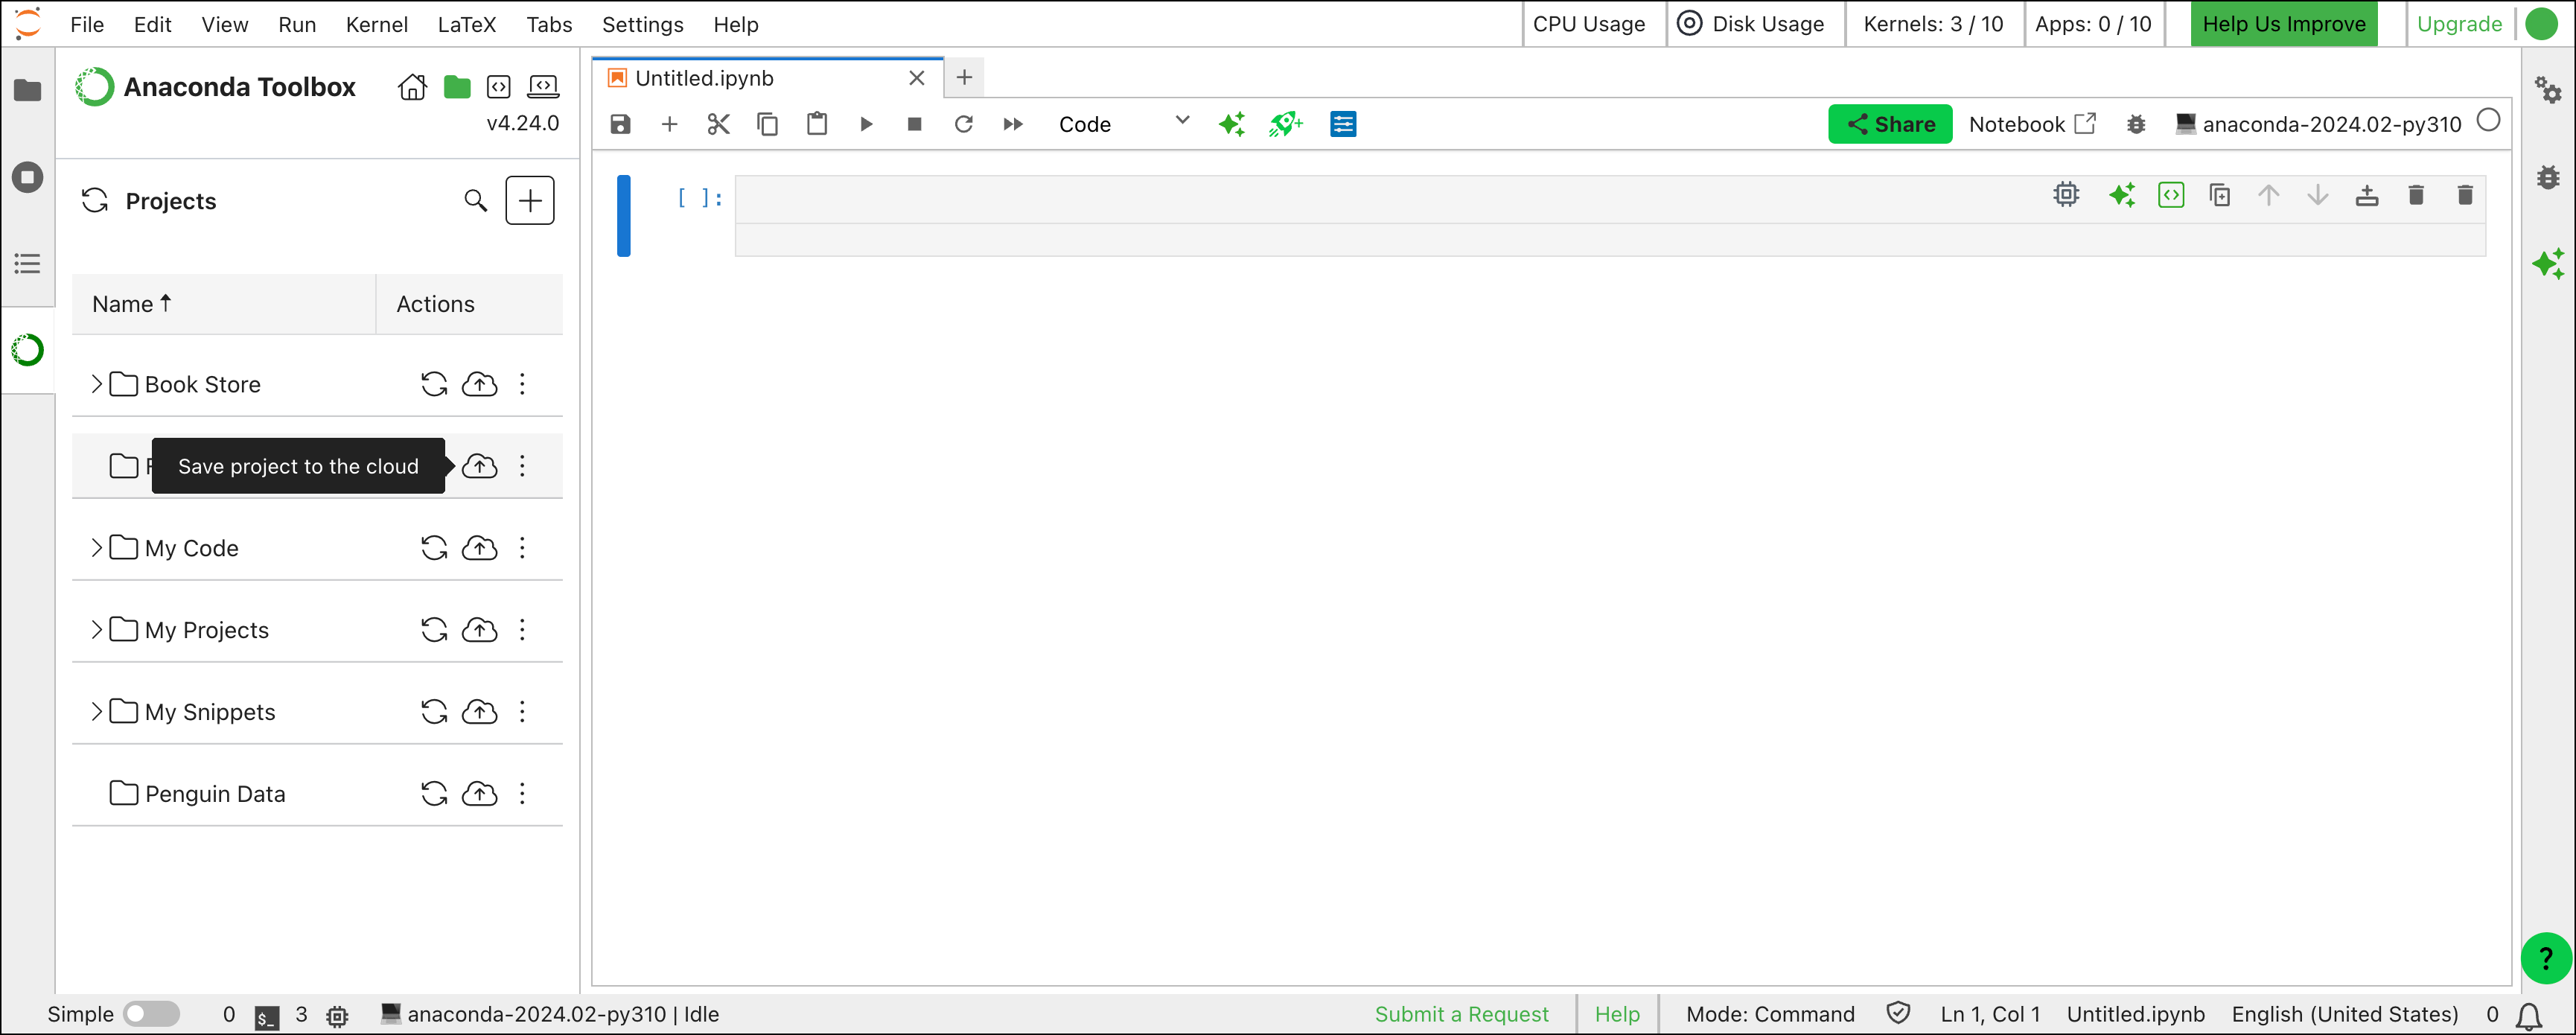 Sync your local projects with those stored on Anaconda's cloud storage by clicking **Refresh Project** beside the project title.
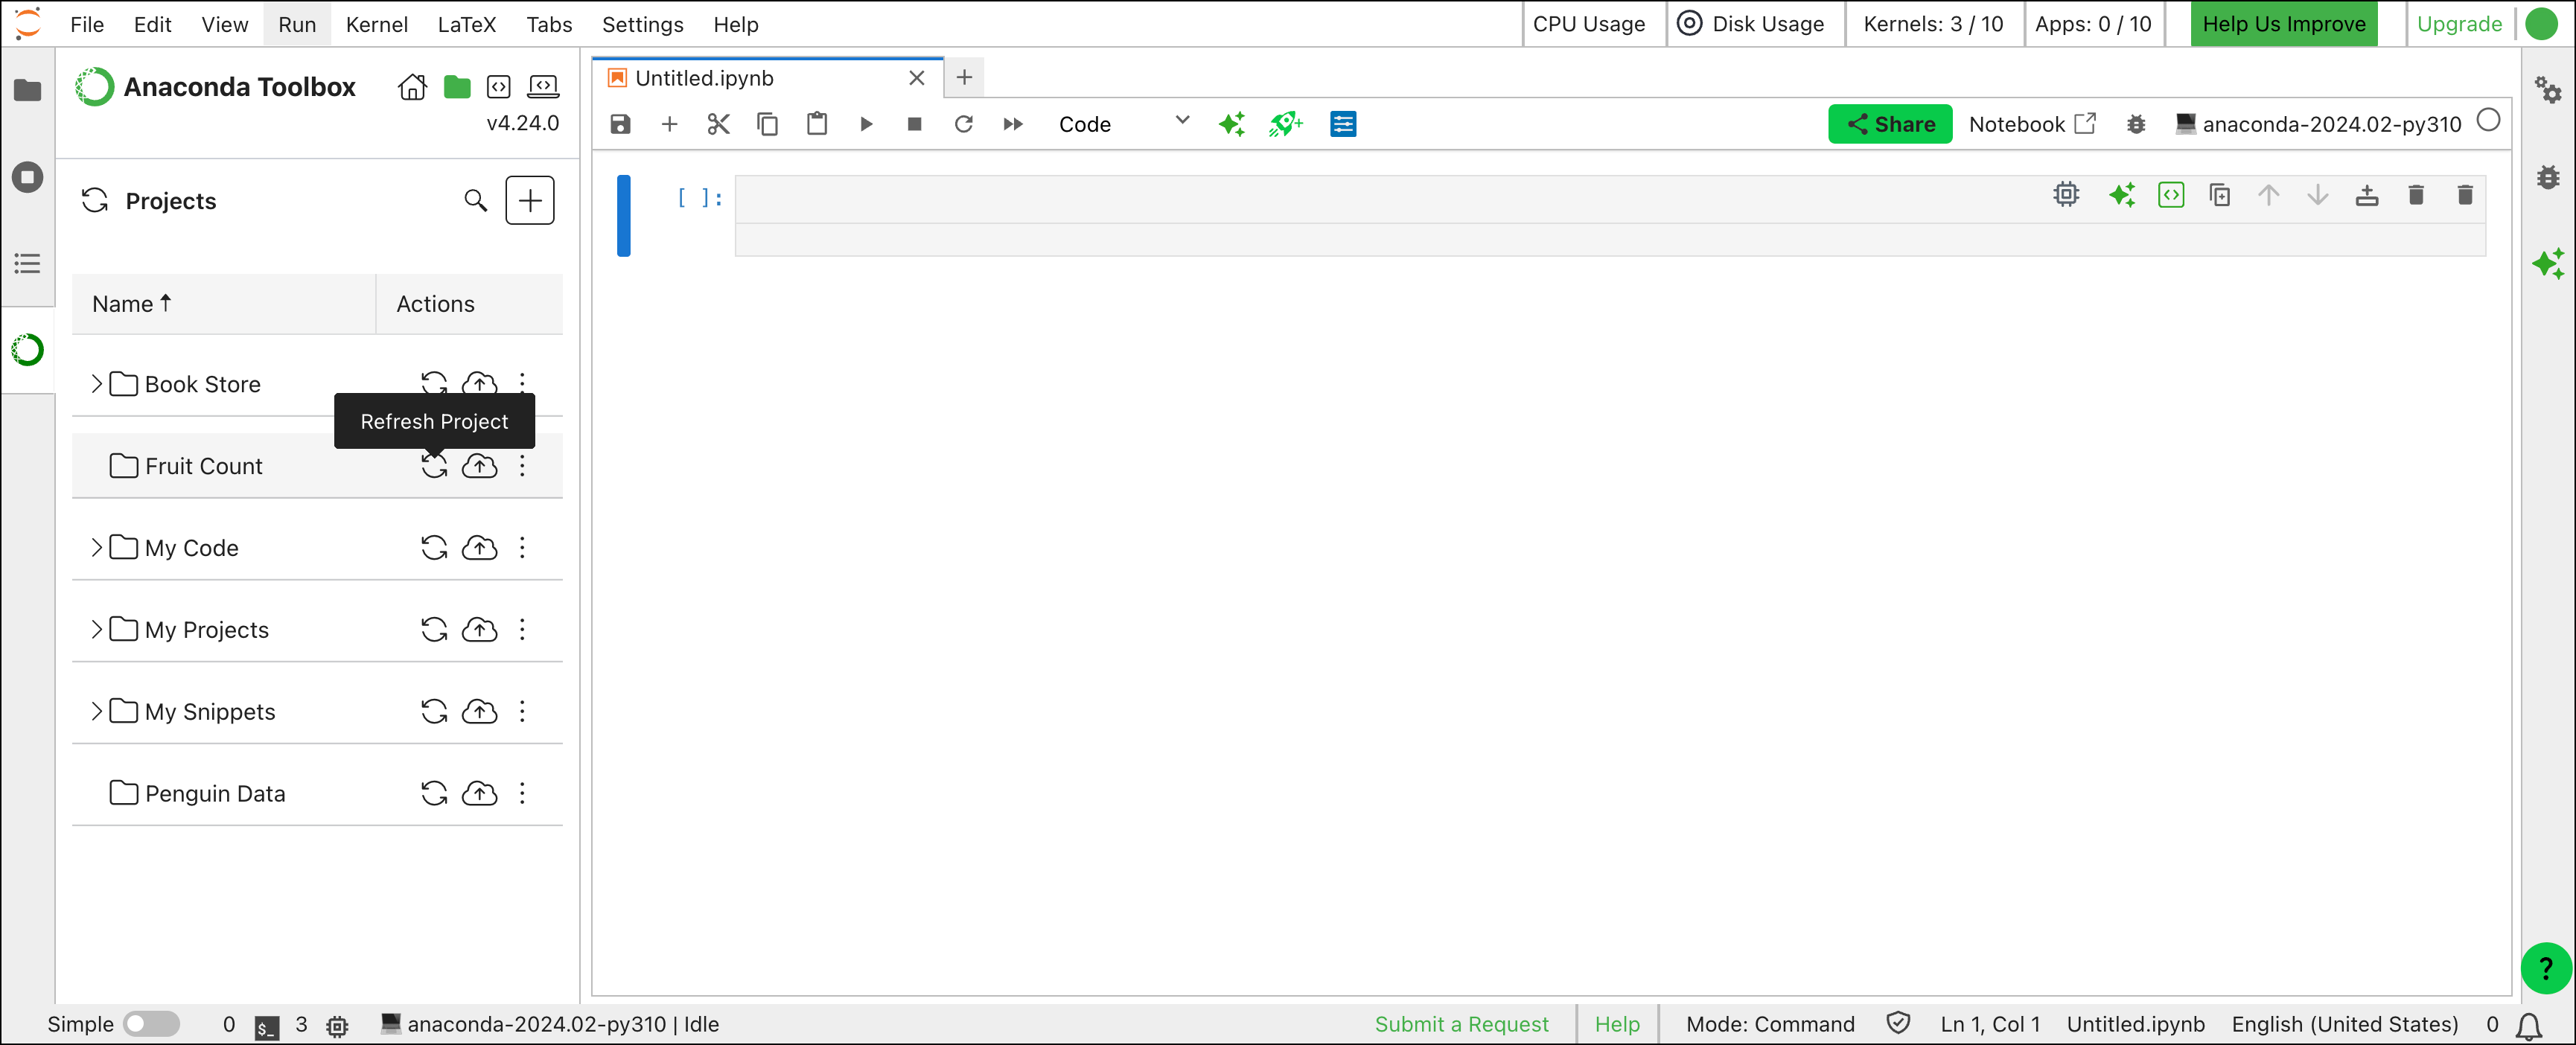
{children}
 3. In the Launch a Kernel dialog, open the **Environment** dropdown and select a kernel.
4. Use the slider or type a number in the text box to reserve time for the kernel session (in minutes).
5. Assign a name for your kernel or use the default kernel name.
6. Click **Launch a Kernel**.
3. In the Launch a Kernel dialog, open the **Environment** dropdown and select a kernel.
4. Use the slider or type a number in the text box to reserve time for the kernel session (in minutes).
5. Assign a name for your kernel or use the default kernel name.
6. Click **Launch a Kernel**.
 3. In the Assign a Kernel dialog, make sure the remote kernel is selected in the dropdown.
4. Use the slider or type a number in the text box to reserve time for the kernel session (in minutes).
3. In the Assign a Kernel dialog, make sure the remote kernel is selected in the dropdown.
4. Use the slider or type a number in the text box to reserve time for the kernel session (in minutes).
 3. Click **Assign a Cell Kernel**.
4. Select the Environment and Kernel name.
5. Click **Assign from the Environment**.
A green bar appears beneath the cell, which indicates that the cell has successfully connected to the GPU kernel.
3. Click **Assign a Cell Kernel**.
4. Select the Environment and Kernel name.
5. Click **Assign from the Environment**.
A green bar appears beneath the cell, which indicates that the cell has successfully connected to the GPU kernel.
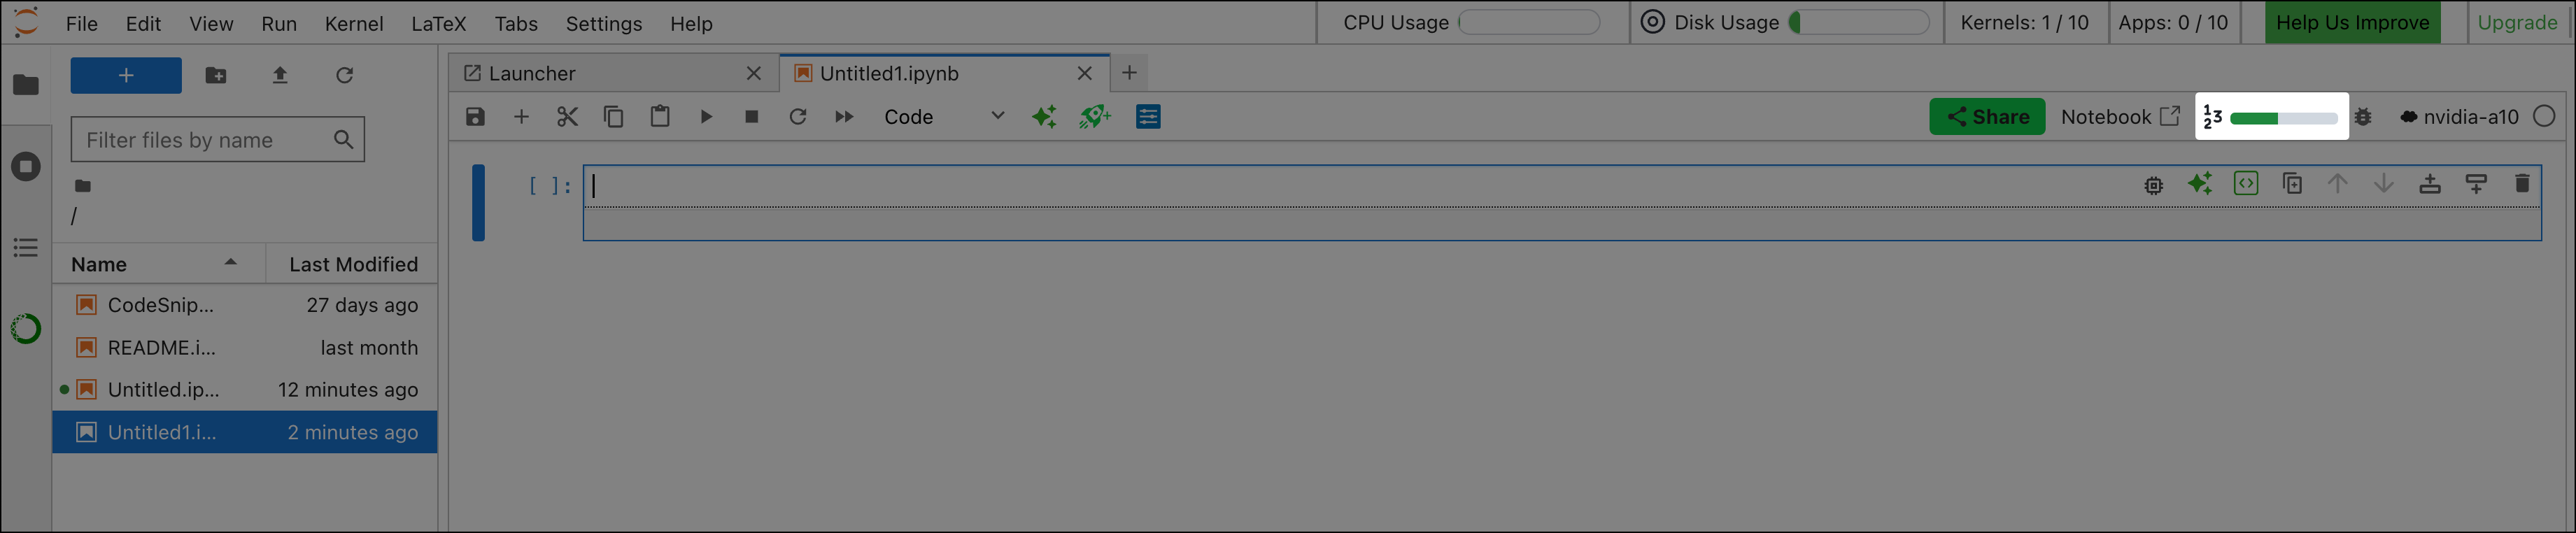
 * The **Overview** page shows your running GPU kernels, remaining credits, and historical credit consumption.
* The **History** page shows your usage history, including GPU session kernel names, types, start date, end date, credits used, and session duration.
* The **Reservations** page shows any currently running GPU kernels, the credits assigned to the reservation session, and the reservation start and end times.
### Using credits
Anaconda offers credits to access GPU compute time. One credit equals 100 real-world seconds. Note that this is different from how [high-compute seconds](/tools/anaconda-notebooks/notebook-storage-memory) are calculated for CPU use.
Credits are automatically deducted as reserved time is used. For example, if you use 10 minutes of reserved time, 6.00 credits will be deducted from your account.
View your remaining credits on the Usage Overview page.
At this time, Anaconda is offering 500 free credits to select paid subscribers only. See [note](/tools/anaconda-notebooks/gpu-kernels) for details on upgrading your subscription to gain access.
## Troubleshooting
### I ran out of credits
To request additional GPU credits, [file a support ticket](https://support.anaconda.com/hc/en-us/requests/new?ticket_form_id=360000993773).
### The GPU kernel does not start up
Reload the Anaconda Notebooks page and then click “Launch a Remote Kernel” from the Launcher. If you’re still unable to run a GPU kernel, [file a support ticket](https://support.anaconda.com/hc/en-us/requests/new?ticket_form_id=360000993773).
### My code isn’t running
Check for missing import statements and verify that variables were correctly [transferred](#transferring-variables-in-gpu-kernel-cells) to the GPU kernel.
# (Local) Anaconda Assistant in JupyterLab
Source: https://anaconda.com/docs/tools/anaconda-notebooks/local-assistant
Anaconda Assistant, the AI coding assistant included with Anaconda Toolbox, is available in your local (desktop) instance of JupyterLab, too! As the Assistant is virtually identical to its cloud counterpart in [Anaconda Notebooks](http://nb.anaconda.cloud), you can refer to our [Anaconda Assistant quickstart guide](/tools/anaconda-notebooks/anaconda-toolbox/anaconda-assistant) for guidance on using the Assistant.
## Installing Anaconda Assistant
You can enable and access the Assistant in a local JupyterLab instance through either the command line interface (CLI) or Navigator, the graphical user interface (GUI) that is automatically installed with Anaconda.
* The **Overview** page shows your running GPU kernels, remaining credits, and historical credit consumption.
* The **History** page shows your usage history, including GPU session kernel names, types, start date, end date, credits used, and session duration.
* The **Reservations** page shows any currently running GPU kernels, the credits assigned to the reservation session, and the reservation start and end times.
### Using credits
Anaconda offers credits to access GPU compute time. One credit equals 100 real-world seconds. Note that this is different from how [high-compute seconds](/tools/anaconda-notebooks/notebook-storage-memory) are calculated for CPU use.
Credits are automatically deducted as reserved time is used. For example, if you use 10 minutes of reserved time, 6.00 credits will be deducted from your account.
View your remaining credits on the Usage Overview page.
At this time, Anaconda is offering 500 free credits to select paid subscribers only. See [note](/tools/anaconda-notebooks/gpu-kernels) for details on upgrading your subscription to gain access.
## Troubleshooting
### I ran out of credits
To request additional GPU credits, [file a support ticket](https://support.anaconda.com/hc/en-us/requests/new?ticket_form_id=360000993773).
### The GPU kernel does not start up
Reload the Anaconda Notebooks page and then click “Launch a Remote Kernel” from the Launcher. If you’re still unable to run a GPU kernel, [file a support ticket](https://support.anaconda.com/hc/en-us/requests/new?ticket_form_id=360000993773).
### My code isn’t running
Check for missing import statements and verify that variables were correctly [transferred](#transferring-variables-in-gpu-kernel-cells) to the GPU kernel.
# (Local) Anaconda Assistant in JupyterLab
Source: https://anaconda.com/docs/tools/anaconda-notebooks/local-assistant
Anaconda Assistant, the AI coding assistant included with Anaconda Toolbox, is available in your local (desktop) instance of JupyterLab, too! As the Assistant is virtually identical to its cloud counterpart in [Anaconda Notebooks](http://nb.anaconda.cloud), you can refer to our [Anaconda Assistant quickstart guide](/tools/anaconda-notebooks/anaconda-toolbox/anaconda-assistant) for guidance on using the Assistant.
## Installing Anaconda Assistant
You can enable and access the Assistant in a local JupyterLab instance through either the command line interface (CLI) or Navigator, the graphical user interface (GUI) that is automatically installed with Anaconda.
 5. [Sign in to Anaconda.com](https://auth.anaconda.com/ui/login?return_to=https://anaconda.com/app/).
5. Log in or create an account on Anaconda.com.
5. [Sign in to Anaconda.com](https://auth.anaconda.com/ui/login?return_to=https://anaconda.com/app/).
5. Log in or create an account on Anaconda.com.
{children}
 # Environments
Source: https://anaconda.com/docs/tools/anaconda-notebooks/notebook-environments
Anaconda Notebooks is a hosted JupyterLab service that enables you to run JupyterLab notebooks online while simultaneously taking advantage of conda’s robust environment management tools. To execute code in a conda environment in Anaconda Notebooks, you must associate each environment with a language-specific kernel.
## Environments and kernels
### What is an environment?
An environment is a folder or directory that contains a specific collection of conda packages and their dependencies.
Working in separate environments allows you to maintain and run packages without interference from other collections of packages. For example, you may require separate conda environments to maintain distinct versions of Python based on distinct package dependencies.
### What is a kernel?
A kernel is a programming-language-specific process that interprets your code, runs it, and gives you the results. In Jupyter Notebooks, kernels allow users to run code in cells and receive immediate output. For example, `ipykernel` enables interactive computing in Python, and `r-irkernel` enables the same for R.
In order for an environment to be able to run code for a notebook, it must contain a kernel package; otherwise, the environment will not be recognized by JupyterLab as an available kernel. For this reason, the default environments available in Anaconda Notebooks already contain the `ipykernel` package.
To add a kernel package to a custom environment, see [creating custom environment](#creating-custom-environments).
## Using default environments
Custom environments often use large amounts of your limited Anaconda Notebooks storage space. Because of this, Anaconda provides a number of *read-only* default environments that contain all the packages from the latest release of Anaconda Distribution.
The default environment naming convention is typically `anaconda-
# Environments
Source: https://anaconda.com/docs/tools/anaconda-notebooks/notebook-environments
Anaconda Notebooks is a hosted JupyterLab service that enables you to run JupyterLab notebooks online while simultaneously taking advantage of conda’s robust environment management tools. To execute code in a conda environment in Anaconda Notebooks, you must associate each environment with a language-specific kernel.
## Environments and kernels
### What is an environment?
An environment is a folder or directory that contains a specific collection of conda packages and their dependencies.
Working in separate environments allows you to maintain and run packages without interference from other collections of packages. For example, you may require separate conda environments to maintain distinct versions of Python based on distinct package dependencies.
### What is a kernel?
A kernel is a programming-language-specific process that interprets your code, runs it, and gives you the results. In Jupyter Notebooks, kernels allow users to run code in cells and receive immediate output. For example, `ipykernel` enables interactive computing in Python, and `r-irkernel` enables the same for R.
In order for an environment to be able to run code for a notebook, it must contain a kernel package; otherwise, the environment will not be recognized by JupyterLab as an available kernel. For this reason, the default environments available in Anaconda Notebooks already contain the `ipykernel` package.
To add a kernel package to a custom environment, see [creating custom environment](#creating-custom-environments).
## Using default environments
Custom environments often use large amounts of your limited Anaconda Notebooks storage space. Because of this, Anaconda provides a number of *read-only* default environments that contain all the packages from the latest release of Anaconda Distribution.
The default environment naming convention is typically `anaconda-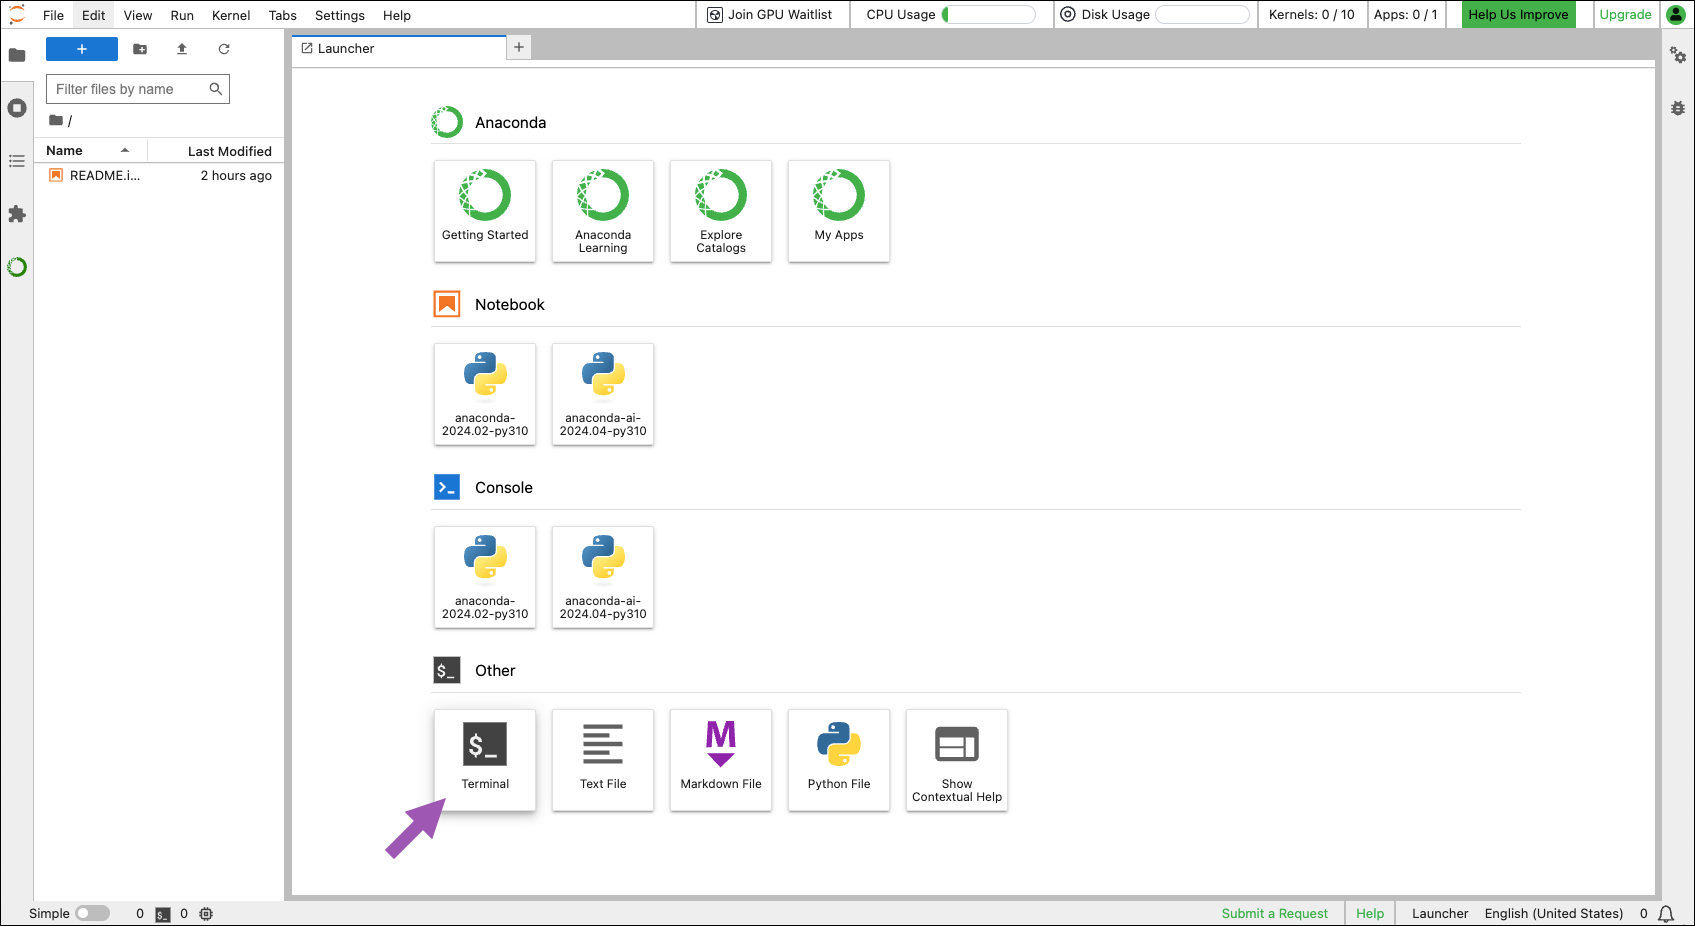 2. Create a conda environment with an associated kernel by running the following command:
```sh
# Replace
2. Create a conda environment with an associated kernel by running the following command:
```sh
# Replace 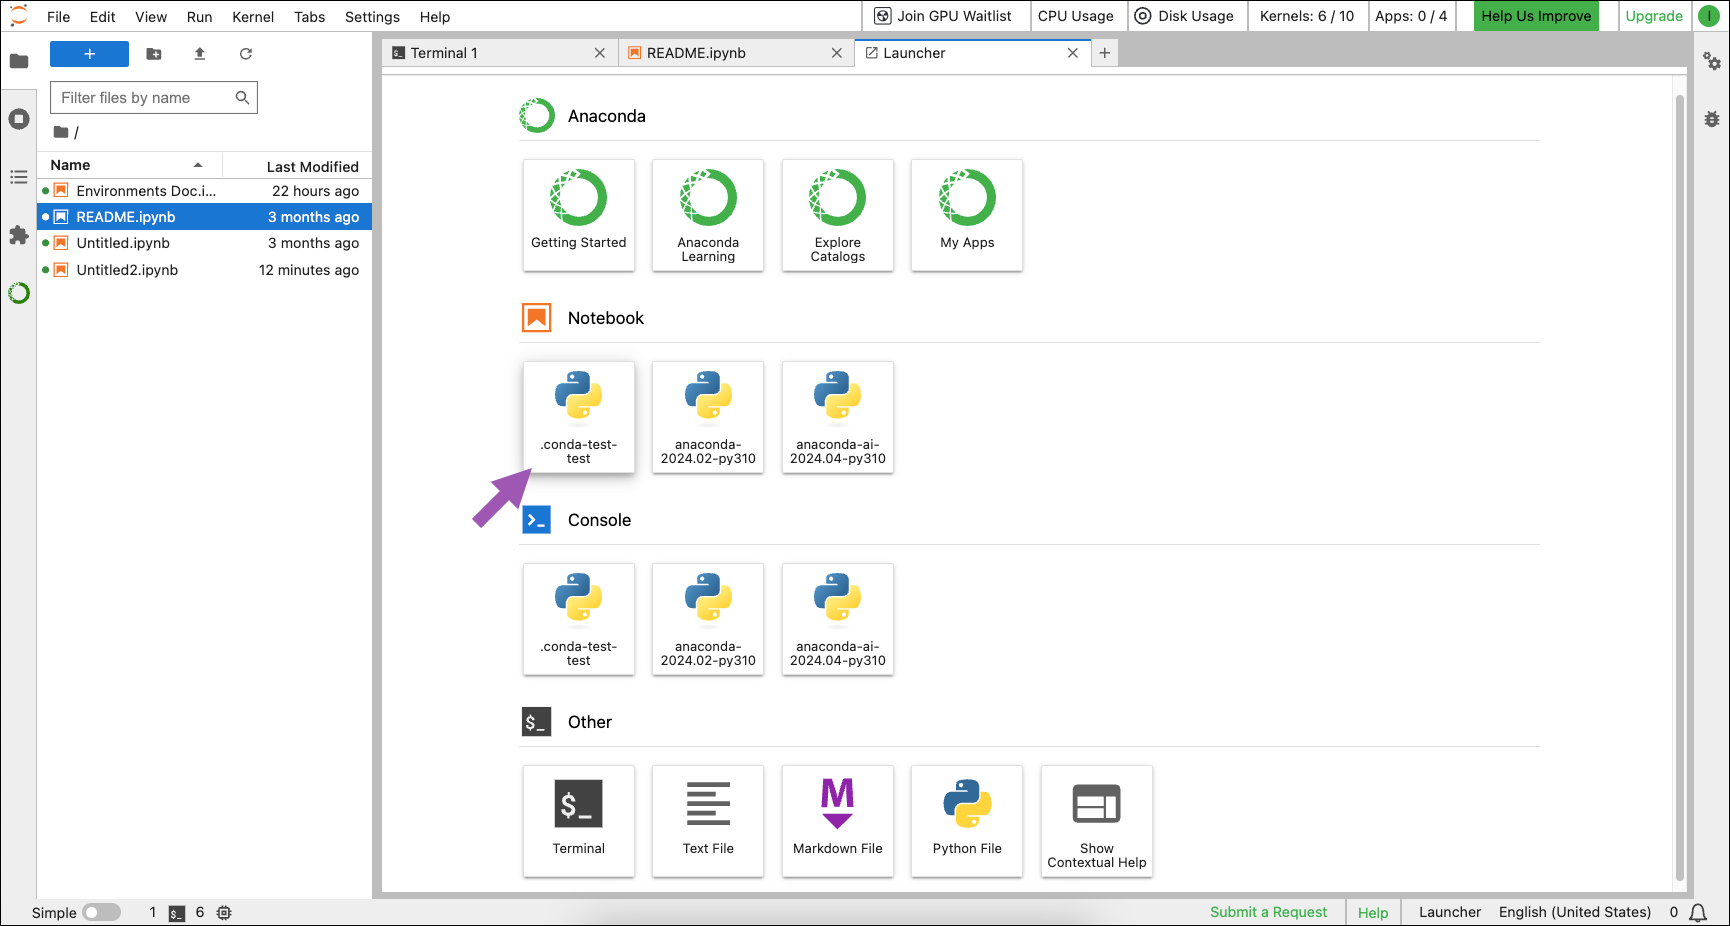
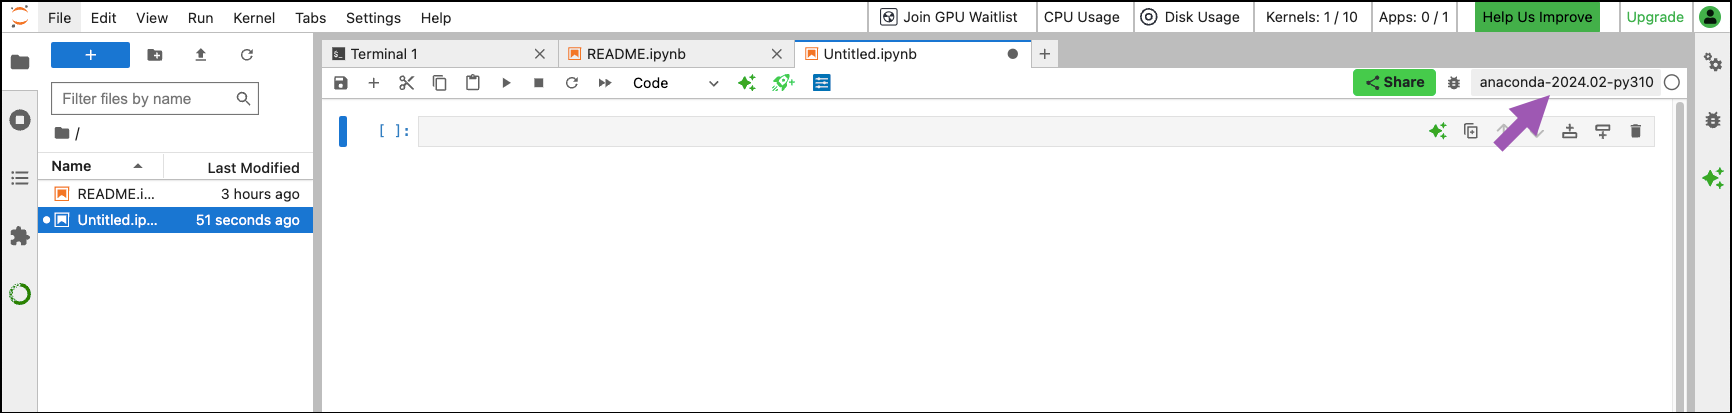
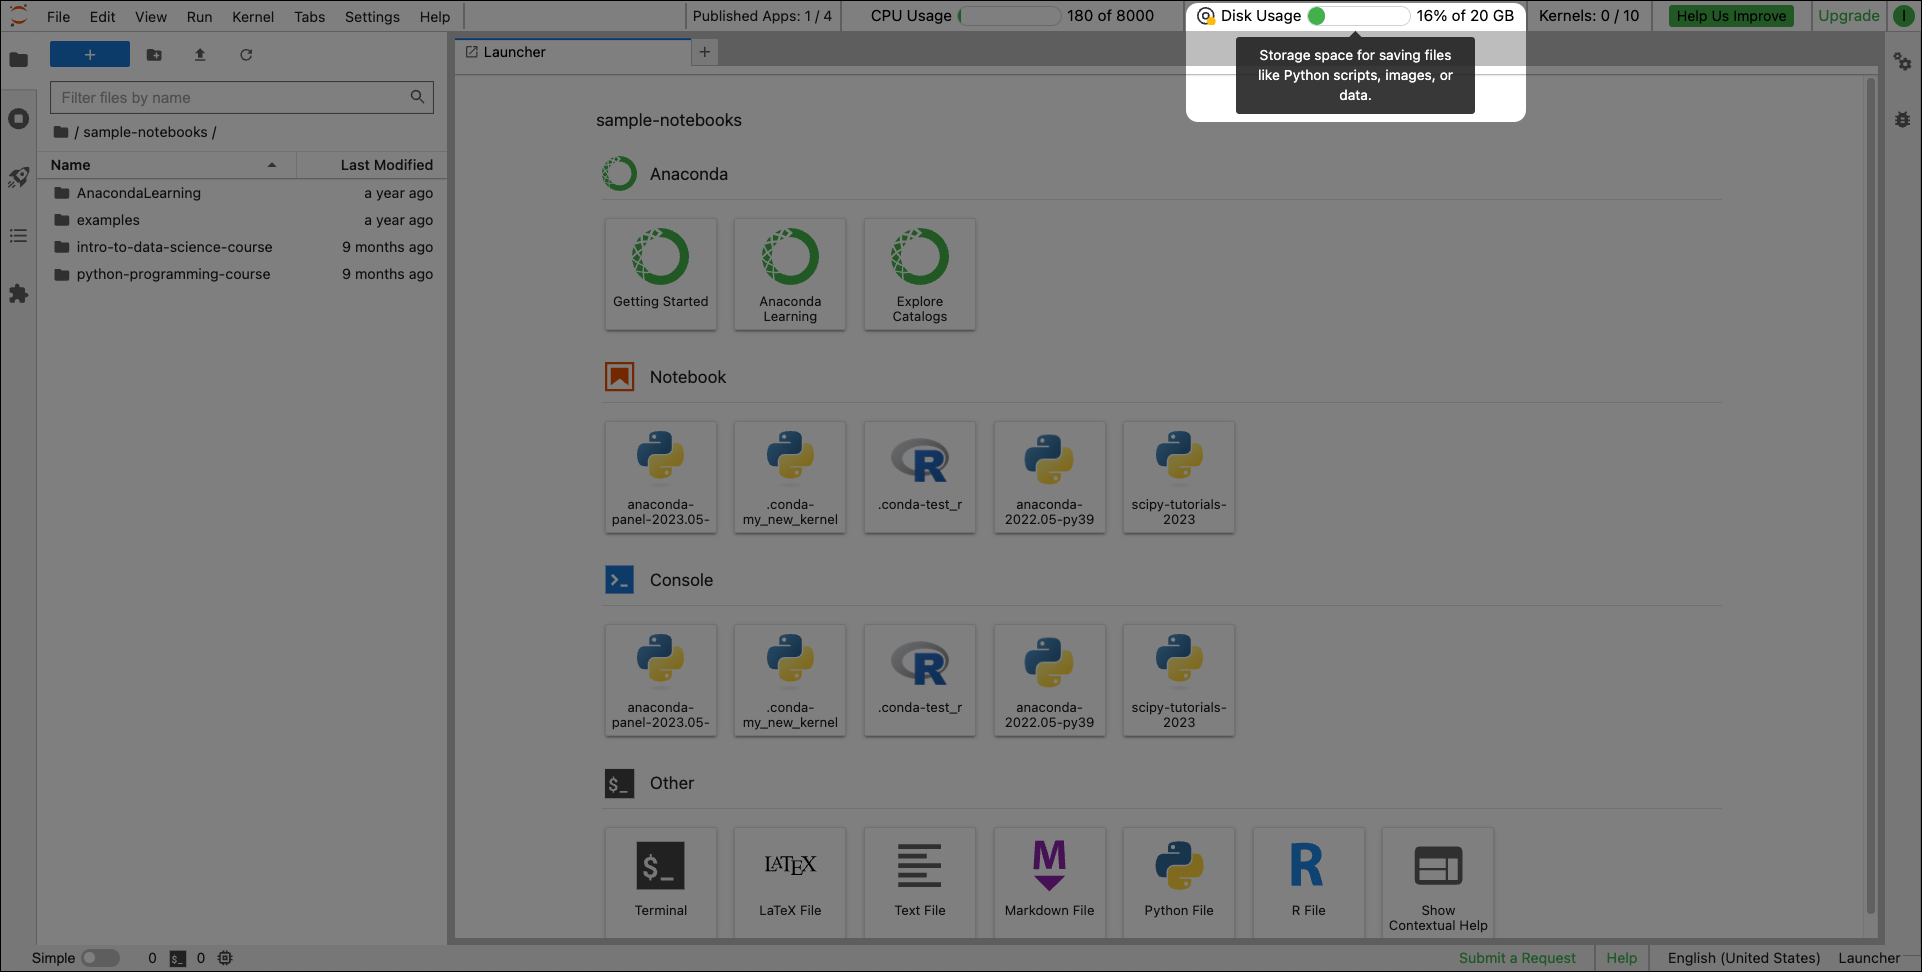
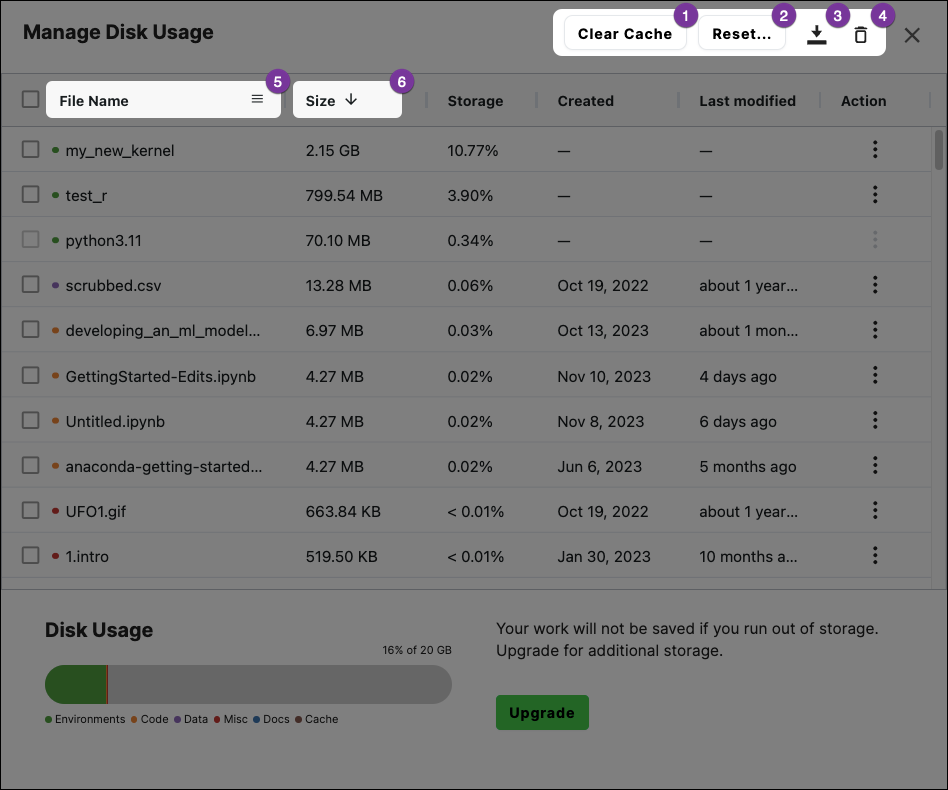 1. **Clear Cache**: Anaconda recommends clearing your cache on a regular basis to save on space.
2. **Reset…**: Restores all selected items to their default state. Select **Download items before deleting** to ensure you don’t lose valuable work.
3. **Download**: Downloads selected files. Consider downloading valuable files before deleting.
4. **Delete**: Deletes selected files.
5. **File Name**: Hovering over the **File Name** column header exposes a filter tool to further sort through your files. Clicking **File Name** orders (and reverses the order of) files alphabetically.
6. **Size**: Clicking **Size** orders (and reverses the order of) files by size.
1. **Clear Cache**: Anaconda recommends clearing your cache on a regular basis to save on space.
2. **Reset…**: Restores all selected items to their default state. Select **Download items before deleting** to ensure you don’t lose valuable work.
3. **Download**: Downloads selected files. Consider downloading valuable files before deleting.
4. **Delete**: Deletes selected files.
5. **File Name**: Hovering over the **File Name** column header exposes a filter tool to further sort through your files. Clicking **File Name** orders (and reverses the order of) files alphabetically.
6. **Size**: Clicking **Size** orders (and reverses the order of) files by size.
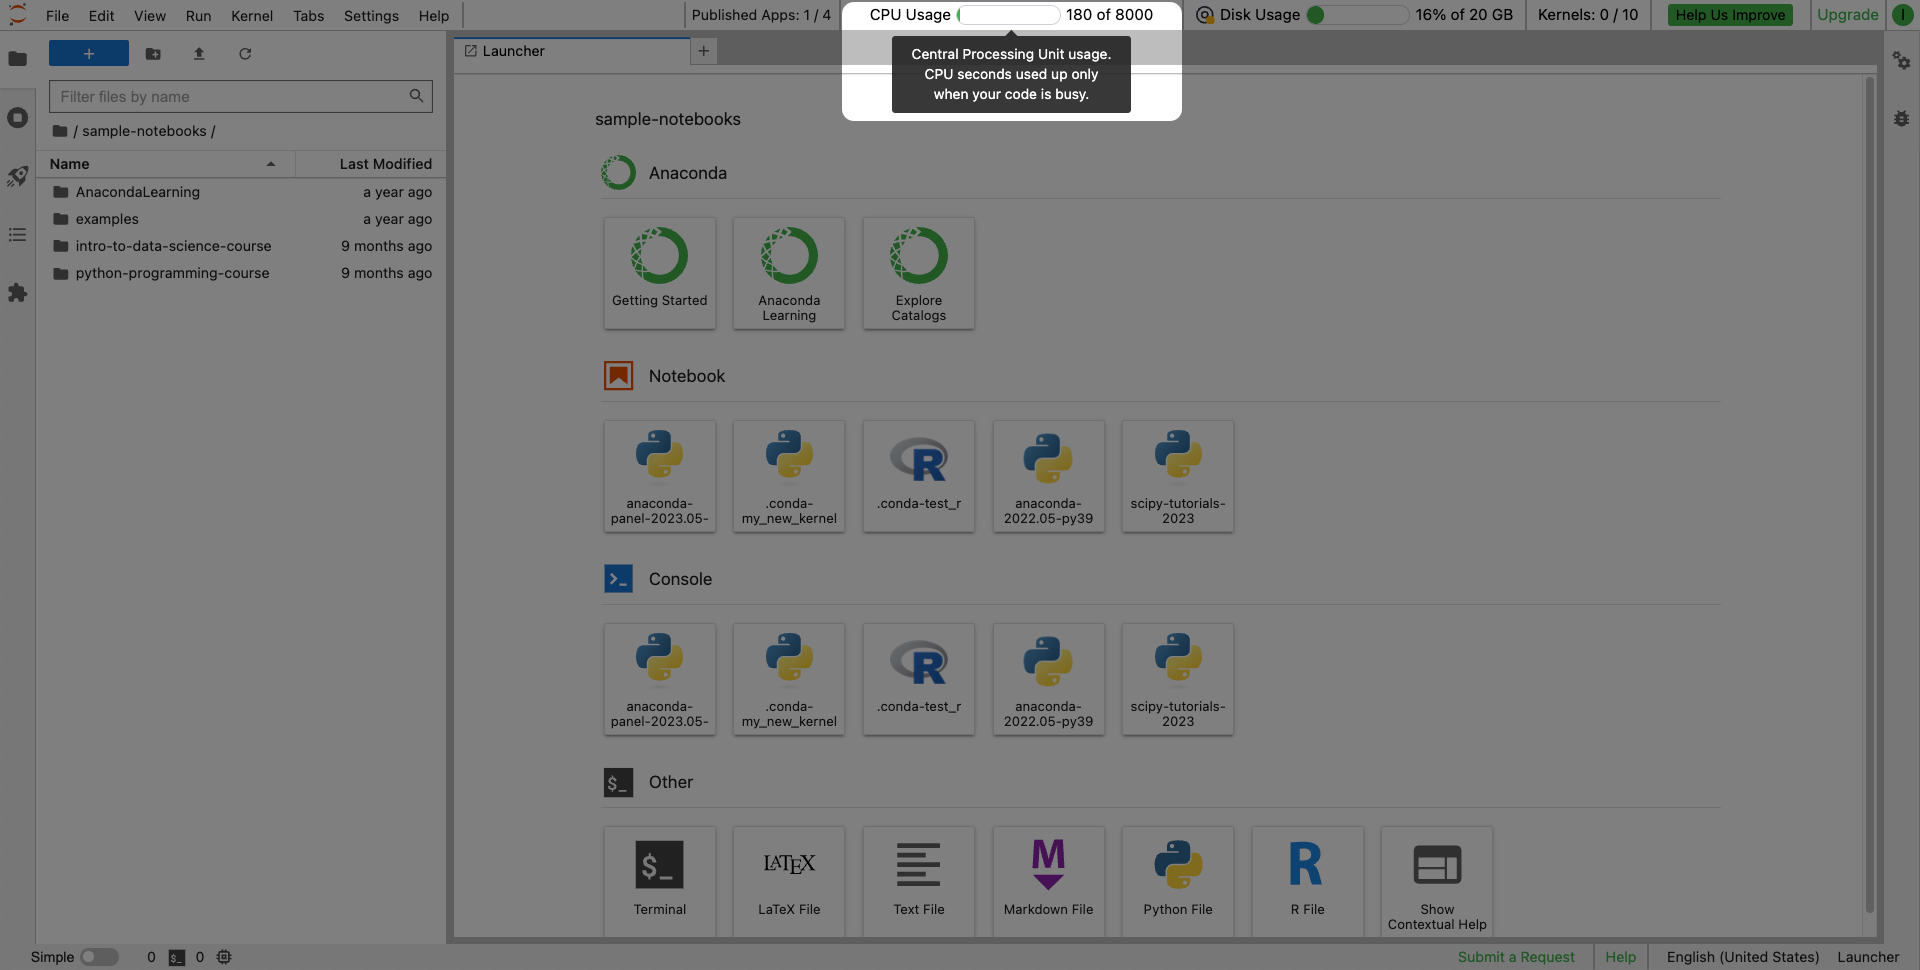 To better manage your CPU usage, regularly check the **Running Terminals and Kernels** tab in the left sidebar and shut down unnecessary kernels when you no longer need them.
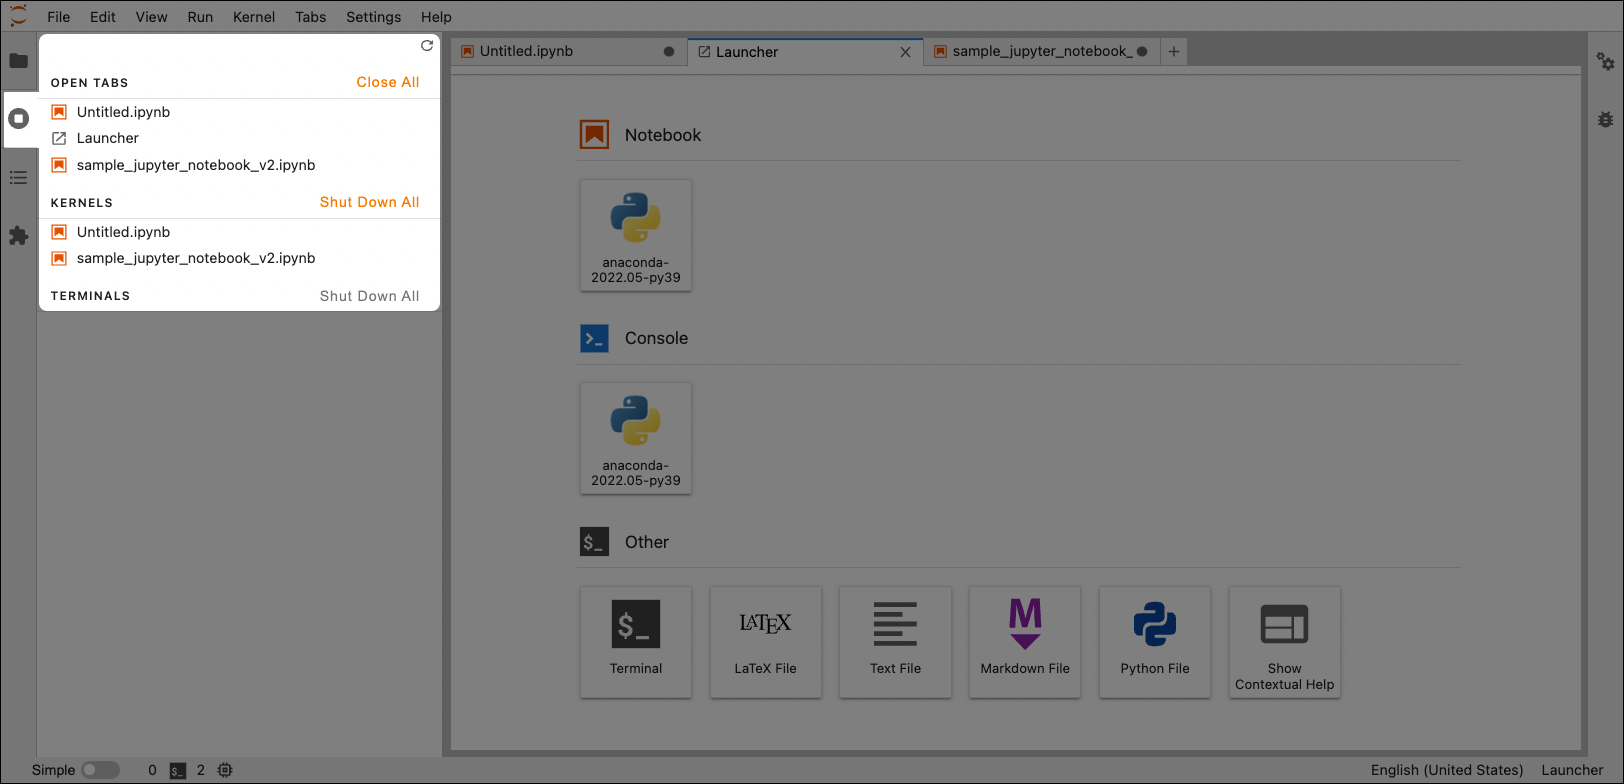 # Publishing notebooks
Source: https://anaconda.com/docs/tools/anaconda-notebooks/publishing-notebooks
export const PreviewPanel = () => {
return
;
};
export const Publish = () => {
return
;
};
This topic provides guidance on previewing and publishing your Panel apps as working applications with a custom URL. This spins up an application on the Anaconda Notebooks infrastructure, which you can then share with others.
## Previewing Panel apps
You can render a working preview of the Panel apps in your notebook by clicking
# Publishing notebooks
Source: https://anaconda.com/docs/tools/anaconda-notebooks/publishing-notebooks
export const PreviewPanel = () => {
return
;
};
export const Publish = () => {
return
;
};
This topic provides guidance on previewing and publishing your Panel apps as working applications with a custom URL. This spins up an application on the Anaconda Notebooks infrastructure, which you can then share with others.
## Previewing Panel apps
You can render a working preview of the Panel apps in your notebook by clicking  2. Provide a title and detailed description.
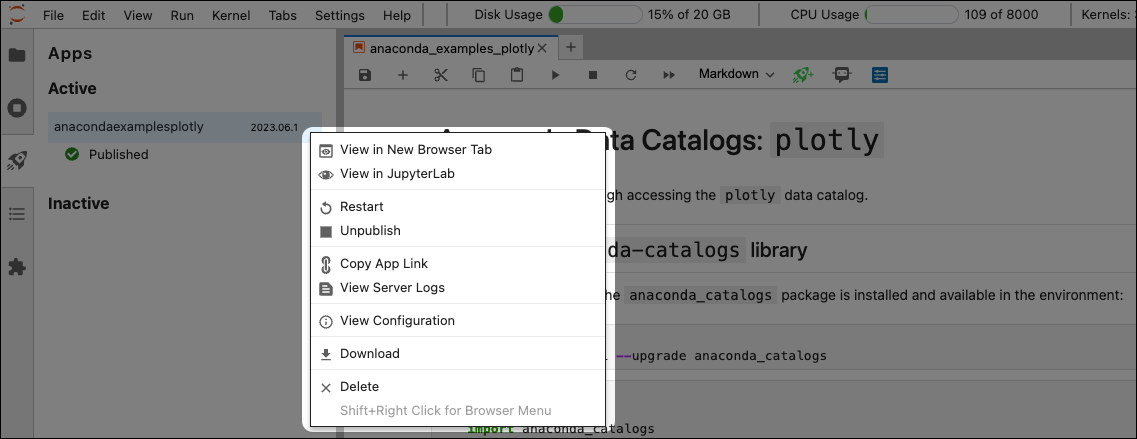 ### Publishing limits
The number of applications you can publish depends on your Anaconda subscription tier.
| Capabilities | Free | Starter | Pro\*/Business | Enterprise |
| :--------------------- | :--- | :------ | :------------- | :--------- |
| Published applications | 1 | 4 | 10 | Unlimited |
### Publishing limits
The number of applications you can publish depends on your Anaconda subscription tier.
| Capabilities | Free | Starter | Pro\*/Business | Enterprise |
| :--------------------- | :--- | :------ | :------------- | :--------- |
| Published applications | 1 | 4 | 10 | Unlimited |
{children}
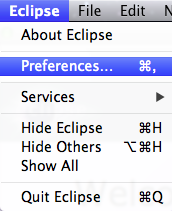 2. In the PyDev list, select Interpreters, and then select Python Interpreter.
3. Click the Browse for python/pypy exe button:
2. In the PyDev list, select Interpreters, and then select Python Interpreter.
3. Click the Browse for python/pypy exe button:
 4. In the Interpreter Name box, type `Anaconda Python`.
5. Browse to your Anaconda [Python interpreter path](./python-path).
The interpreter you choose is related to your environment, so Eclipse
will have access to all of the packages in that environment. To add
new packages, you may need to `conda install package-name`
in your Anaconda Prompt or terminal.
6. Click the OK button:
4. In the Interpreter Name box, type `Anaconda Python`.
5. Browse to your Anaconda [Python interpreter path](./python-path).
The interpreter you choose is related to your environment, so Eclipse
will have access to all of the packages in that environment. To add
new packages, you may need to `conda install package-name`
in your Anaconda Prompt or terminal.
6. Click the OK button:
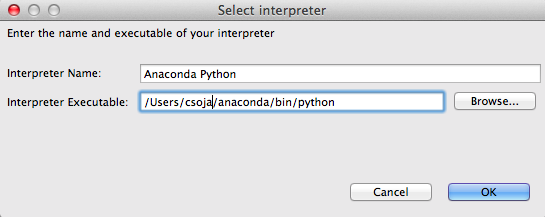 7. In the next window, select the folders to add to the SYSTEM Python path:
1. Select all the folders
2. Click the OK button.
The Python Interpreters window now displays Anaconda Python:
7. In the next window, select the folders to add to the SYSTEM Python path:
1. Select all the folders
2. Click the OK button.
The Python Interpreters window now displays Anaconda Python:
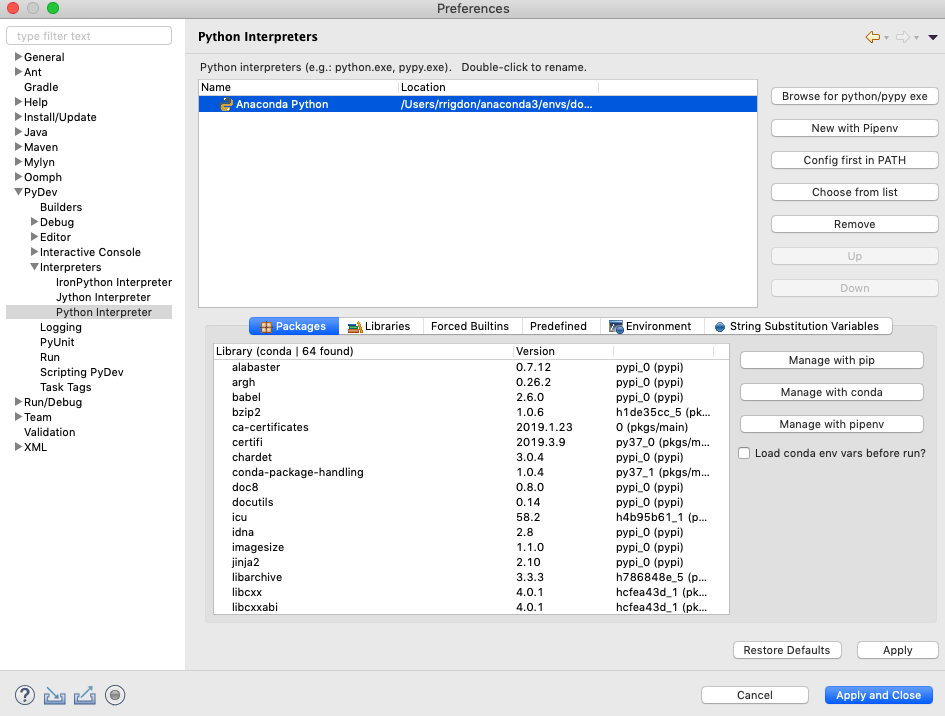 3. Click the Apply and Close button.
You are now ready to use Anaconda Python with your Eclipse and PyDev
installation.
# IDLE (deprecated)
Source: https://anaconda.com/docs/tools/working-with-conda/ide-tutorials/idle
3. Click the Apply and Close button.
You are now ready to use Anaconda Python with your Eclipse and PyDev
installation.
# IDLE (deprecated)
Source: https://anaconda.com/docs/tools/working-with-conda/ide-tutorials/idle
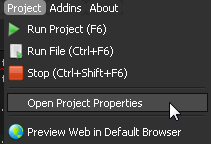 2. On the **Project Execution** tab, in the Python Custom Interpreter box, enter the [Anaconda Python interpreter path](./python-path) to select Anaconda Python:
 3. Verify the setup with a test script:
To create the test script, enter this code:
```sh
import sys
print(sys.version)
```
4. Run your test script.
In the command output, your Anaconda Python version is listed:
3. Verify the setup with a test script:
To create the test script, enter this code:
```sh
import sys
print(sys.version)
```
4. Run your test script.
In the command output, your Anaconda Python version is listed:
 For more information, see
the [Ninja-IDE documentation](https://ninja-ide.readthedocs.org/en/latest/).
# PyCharm
Source: https://anaconda.com/docs/tools/working-with-conda/ide-tutorials/pycharm
For more information, see
the [Ninja-IDE documentation](https://ninja-ide.readthedocs.org/en/latest/).
# PyCharm
Source: https://anaconda.com/docs/tools/working-with-conda/ide-tutorials/pycharm
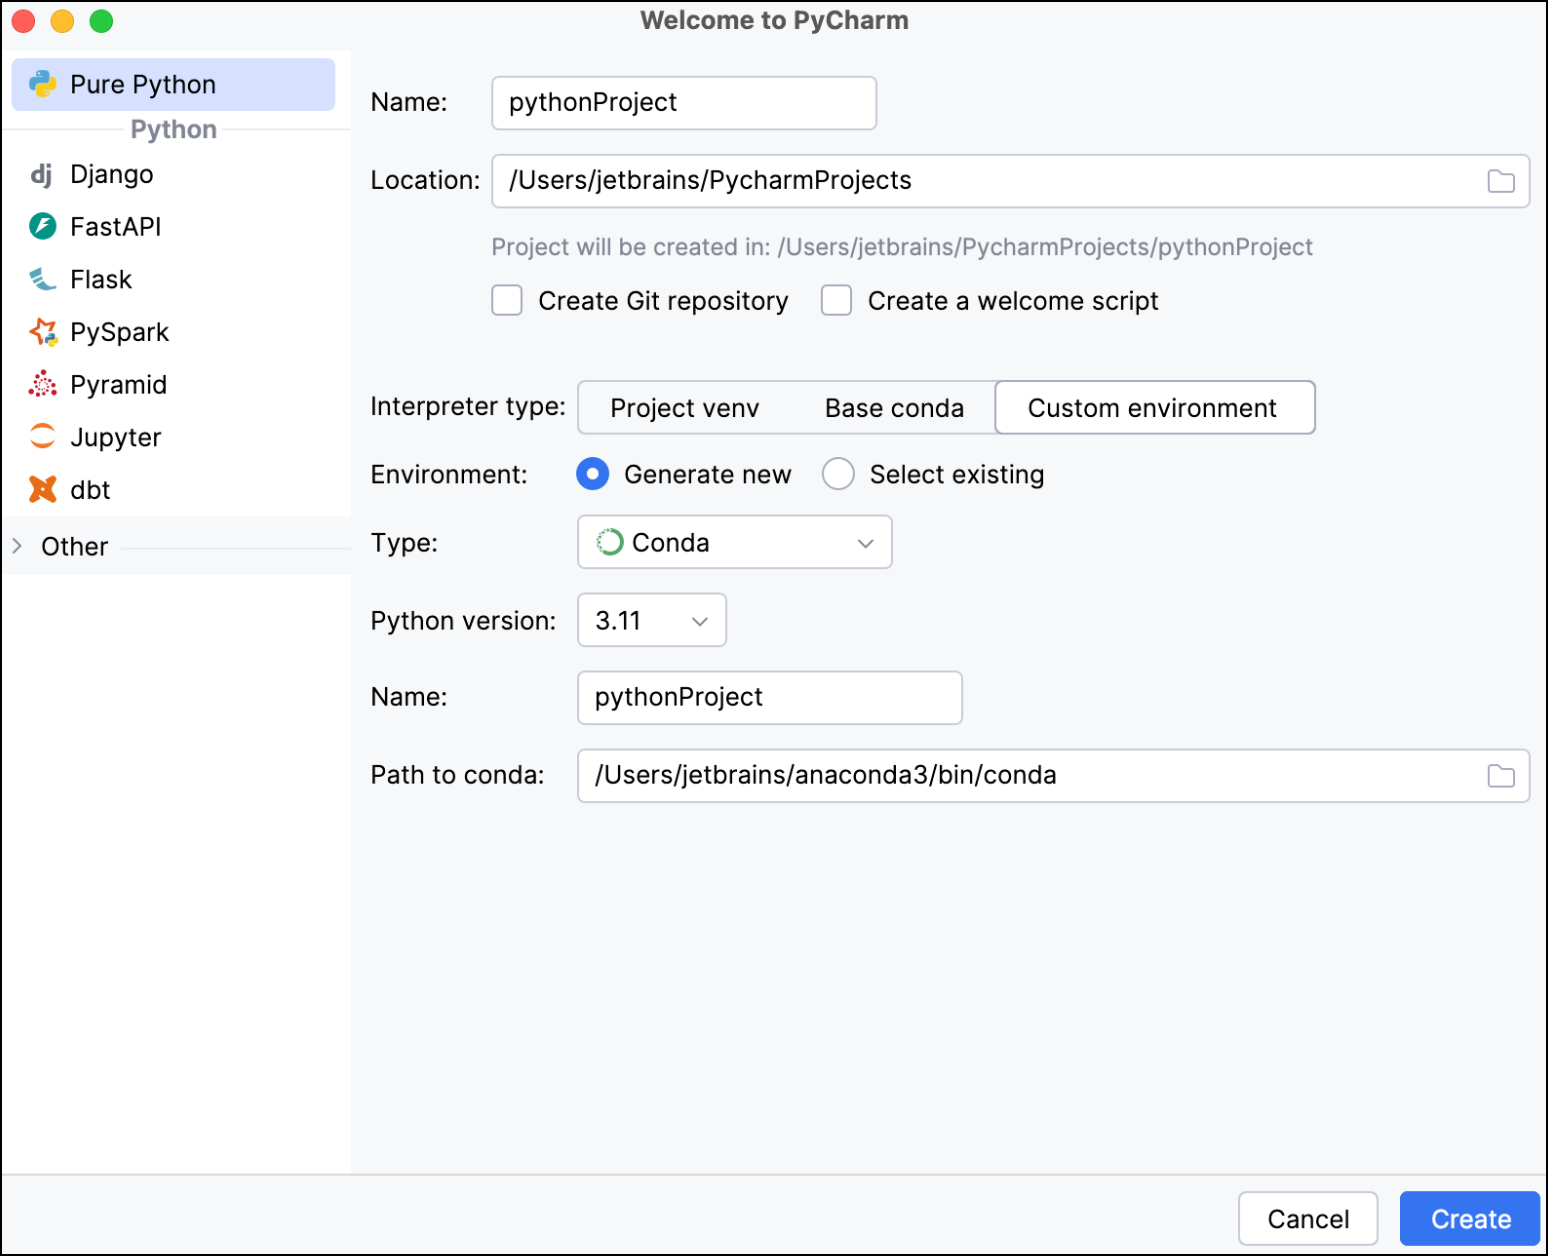 10. Click **Create** to create the PyCharm project and conda environment.
11. You can check that the conda environment was created by using `conda info --envs` in Anaconda Prompt (Terminal on macOS/Linux):
```sh
conda info --envs
# conda environments:
base * C:\Users\doc\anaconda3
pythonProject1 C:\Users\doc\anaconda3\envs\pythonProject1
```
Or you can look at the Environments tab in Navigator to see the same information:
10. Click **Create** to create the PyCharm project and conda environment.
11. You can check that the conda environment was created by using `conda info --envs` in Anaconda Prompt (Terminal on macOS/Linux):
```sh
conda info --envs
# conda environments:
base * C:\Users\doc\anaconda3
pythonProject1 C:\Users\doc\anaconda3\envs\pythonProject1
```
Or you can look at the Environments tab in Navigator to see the same information:
 ### Configuring a PyCharm Project with an existing conda environment
Let’s say you’ve already created a conda environment that you know will be perfect for your latest PyCharm project. You can easily link an existing conda environment to a project in PyCharm using the following instructions:
1. After opening PyCharm, click **New Project**.
2. In the **New Project** screen, create the project name and its location.
3. Select **Custom environment**, then *Select existing*.
4. From the **Type** dropdown, select *Conda*.
5. Typically, PyCharm will detect the conda installation. If not, you can specify the conda location in the **Path to conda** field.
6. Select the environment from the list of environments.
### Configuring a PyCharm Project with an existing conda environment
Let’s say you’ve already created a conda environment that you know will be perfect for your latest PyCharm project. You can easily link an existing conda environment to a project in PyCharm using the following instructions:
1. After opening PyCharm, click **New Project**.
2. In the **New Project** screen, create the project name and its location.
3. Select **Custom environment**, then *Select existing*.
4. From the **Type** dropdown, select *Conda*.
5. Typically, PyCharm will detect the conda installation. If not, you can specify the conda location in the **Path to conda** field.
6. Select the environment from the list of environments.
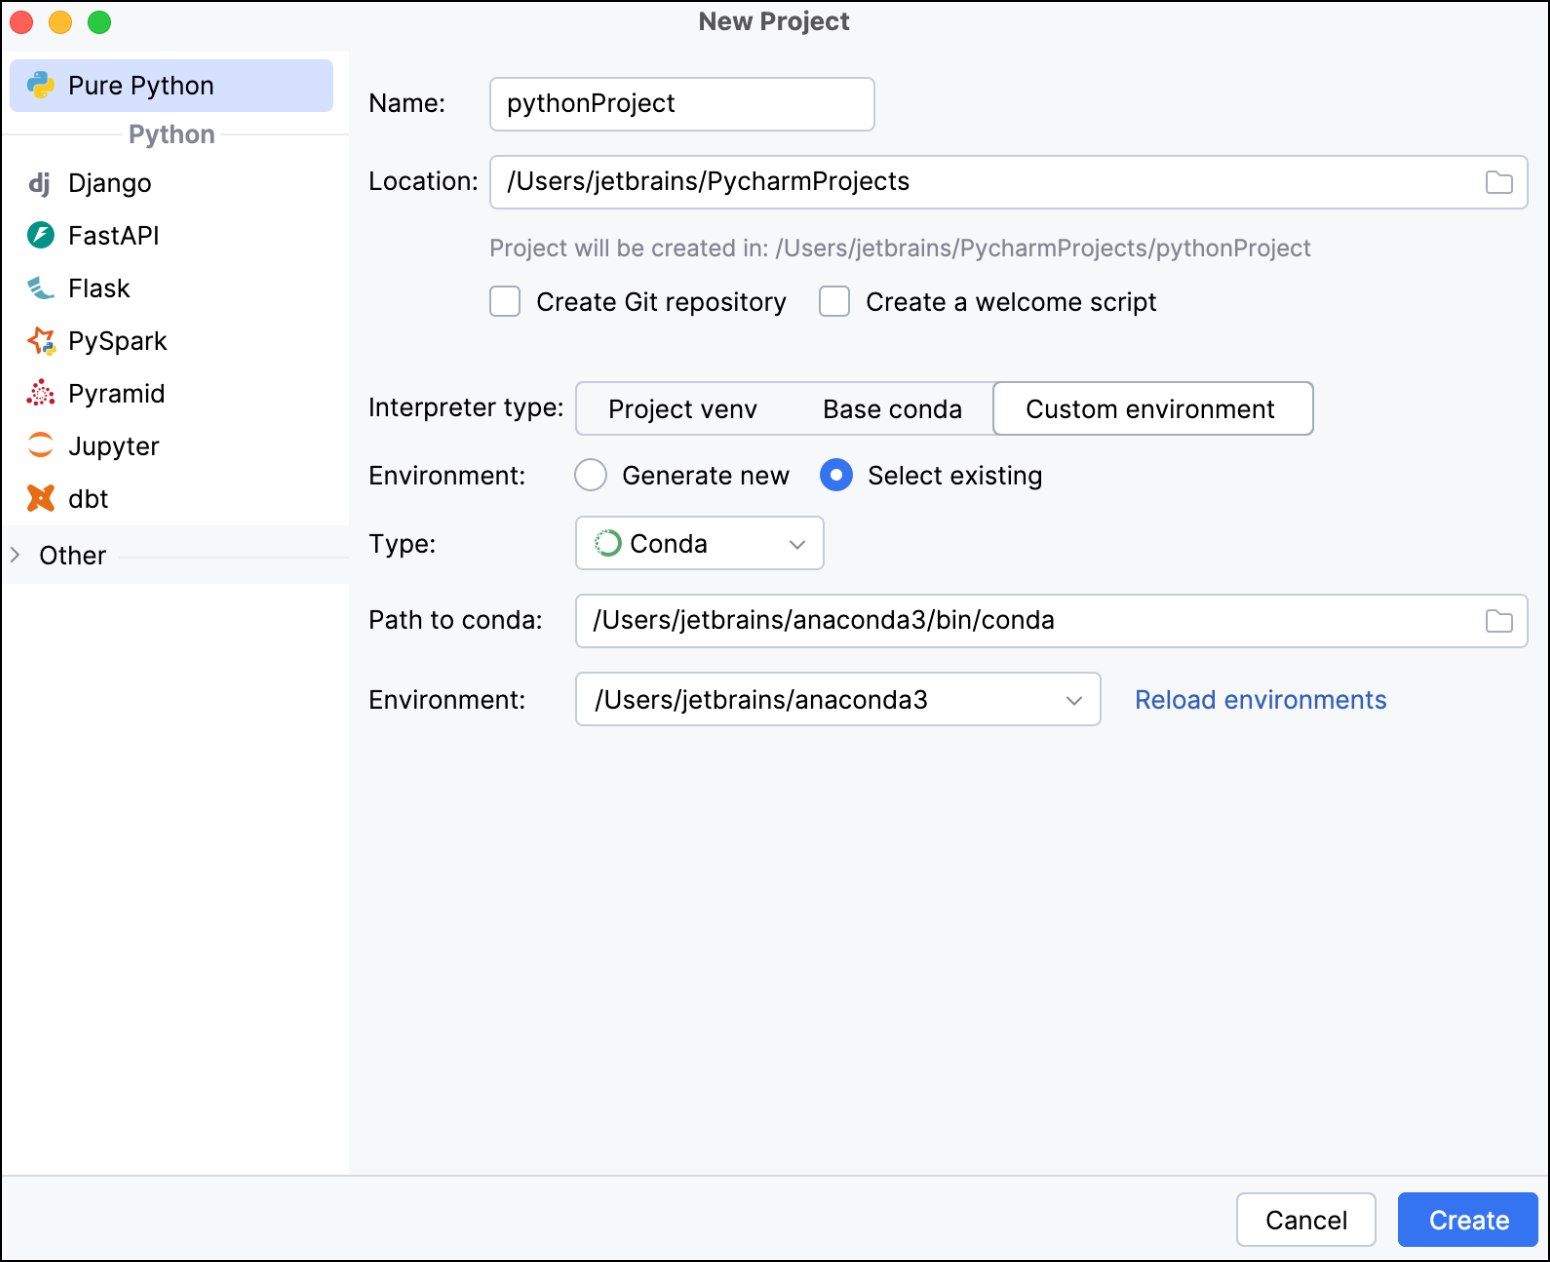 7. Click **Create** to finish creating your new project.
### Switching environments within a PyCharm Project
If you want to change the conda environment associated with an ongoing project, update the project environment preferences using the following instructions:
1. Open the PyCharm project associated with the conda environment you want to change.
2. Click
7. Click **Create** to finish creating your new project.
### Switching environments within a PyCharm Project
If you want to change the conda environment associated with an ongoing project, update the project environment preferences using the following instructions:
1. Open the PyCharm project associated with the conda environment you want to change.
2. Click 

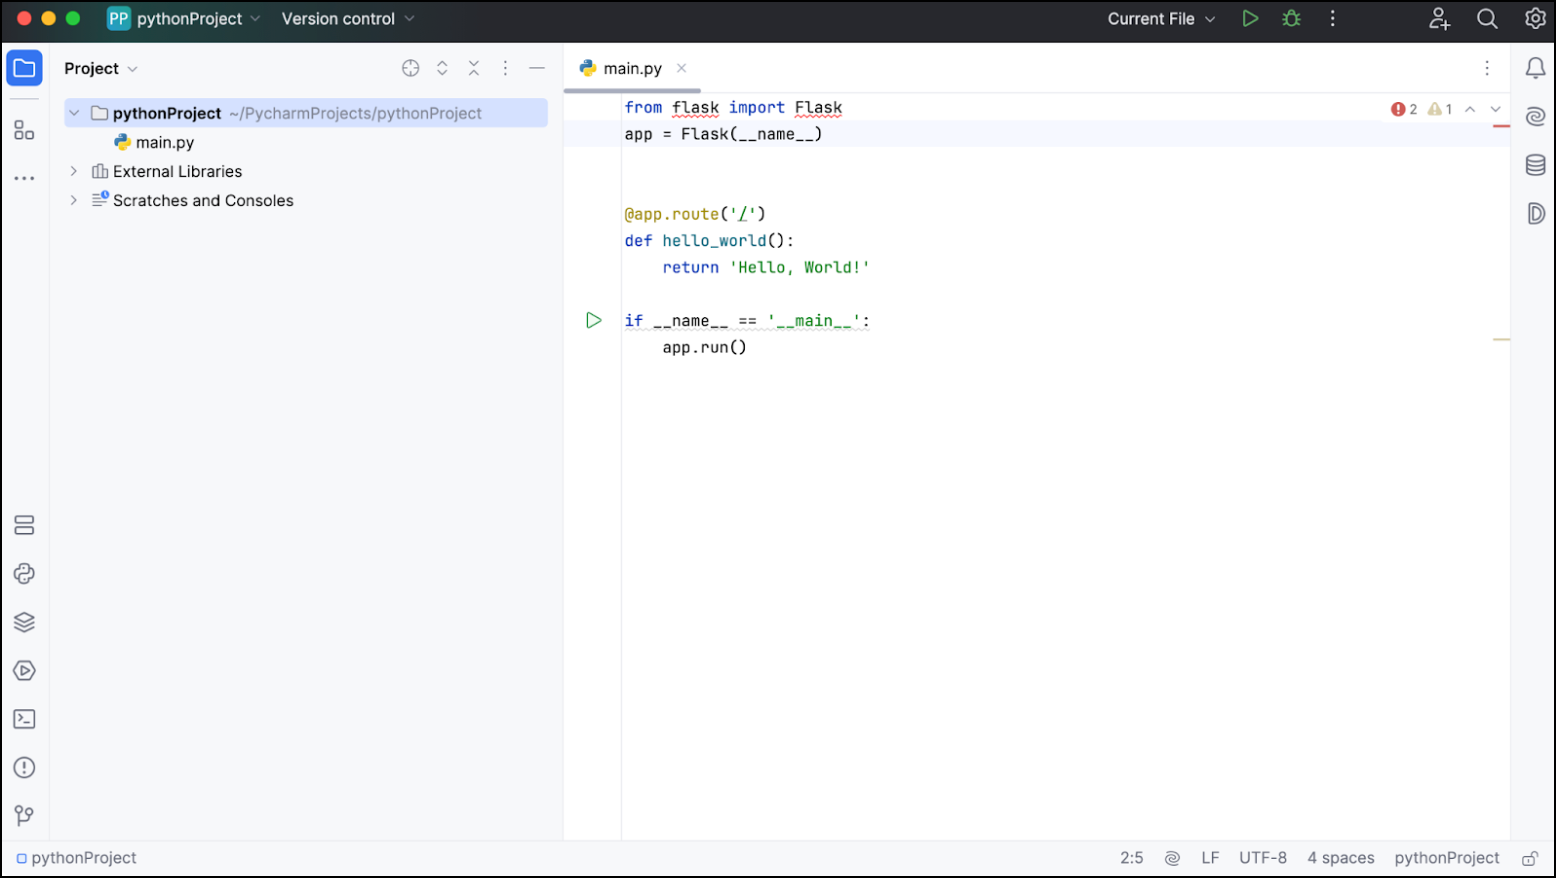 You can see that the package import is red underlined in the code. If you hover over one of them, PyCharm tells you that the reference to `flask` is unresolved. That means that the package is not available to the program and needs to be installed.
1. Click **Install package flask** in the popup to install `flask` to the environment you currently have connected to your project.
You can see that the package import is red underlined in the code. If you hover over one of them, PyCharm tells you that the reference to `flask` is unresolved. That means that the package is not available to the program and needs to be installed.
1. Click **Install package flask** in the popup to install `flask` to the environment you currently have connected to your project.
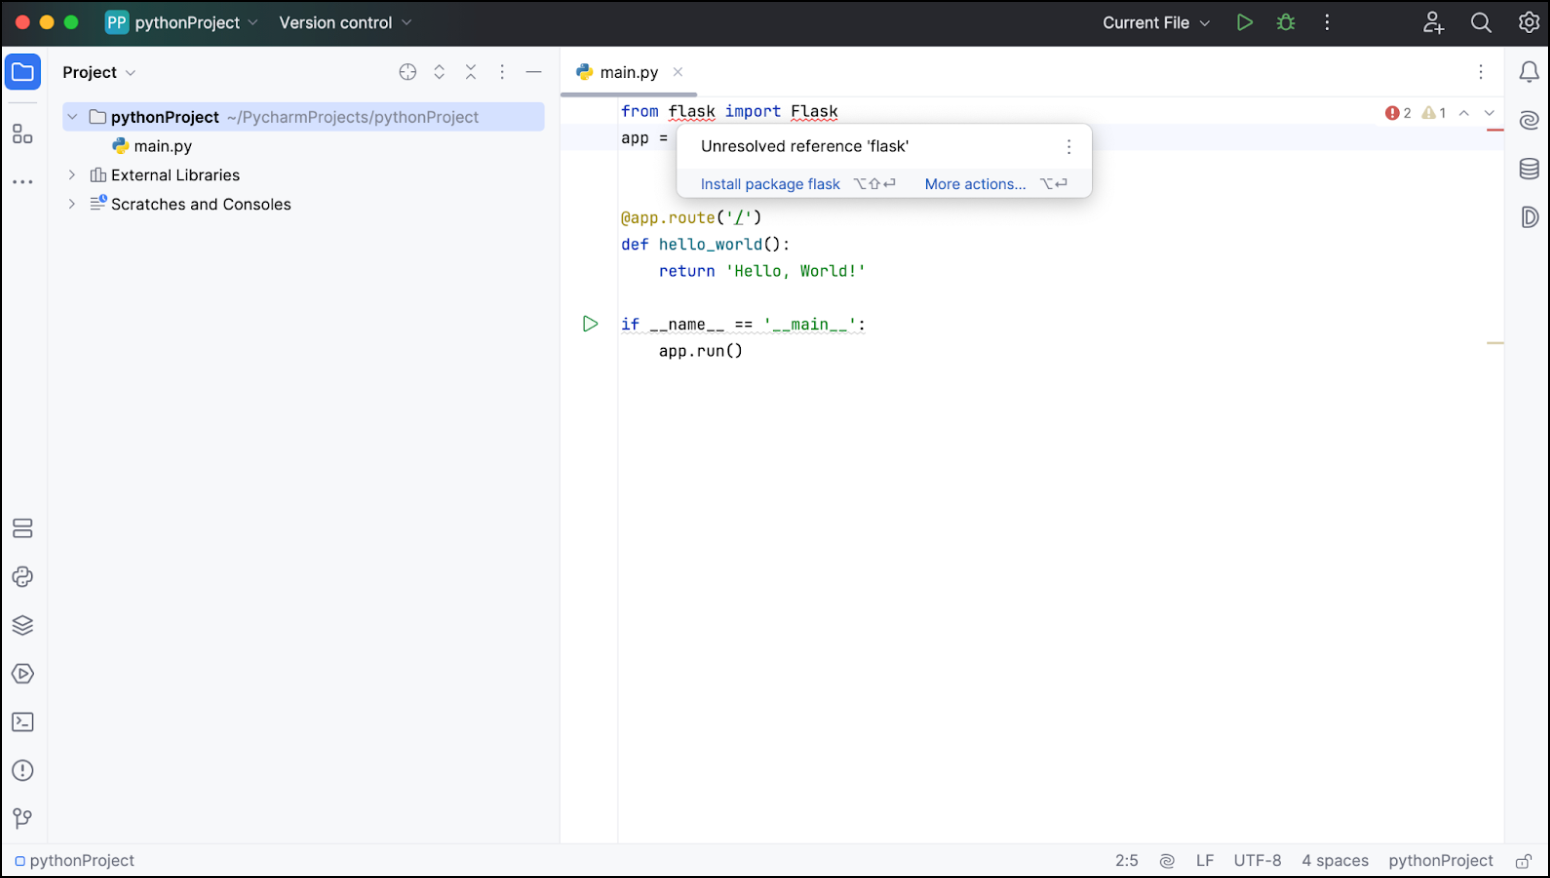 2. After `flask` is installed, it will be displayed in your project’s python packages. Click **Python Packages** and search for “flask” to view newly installed package.
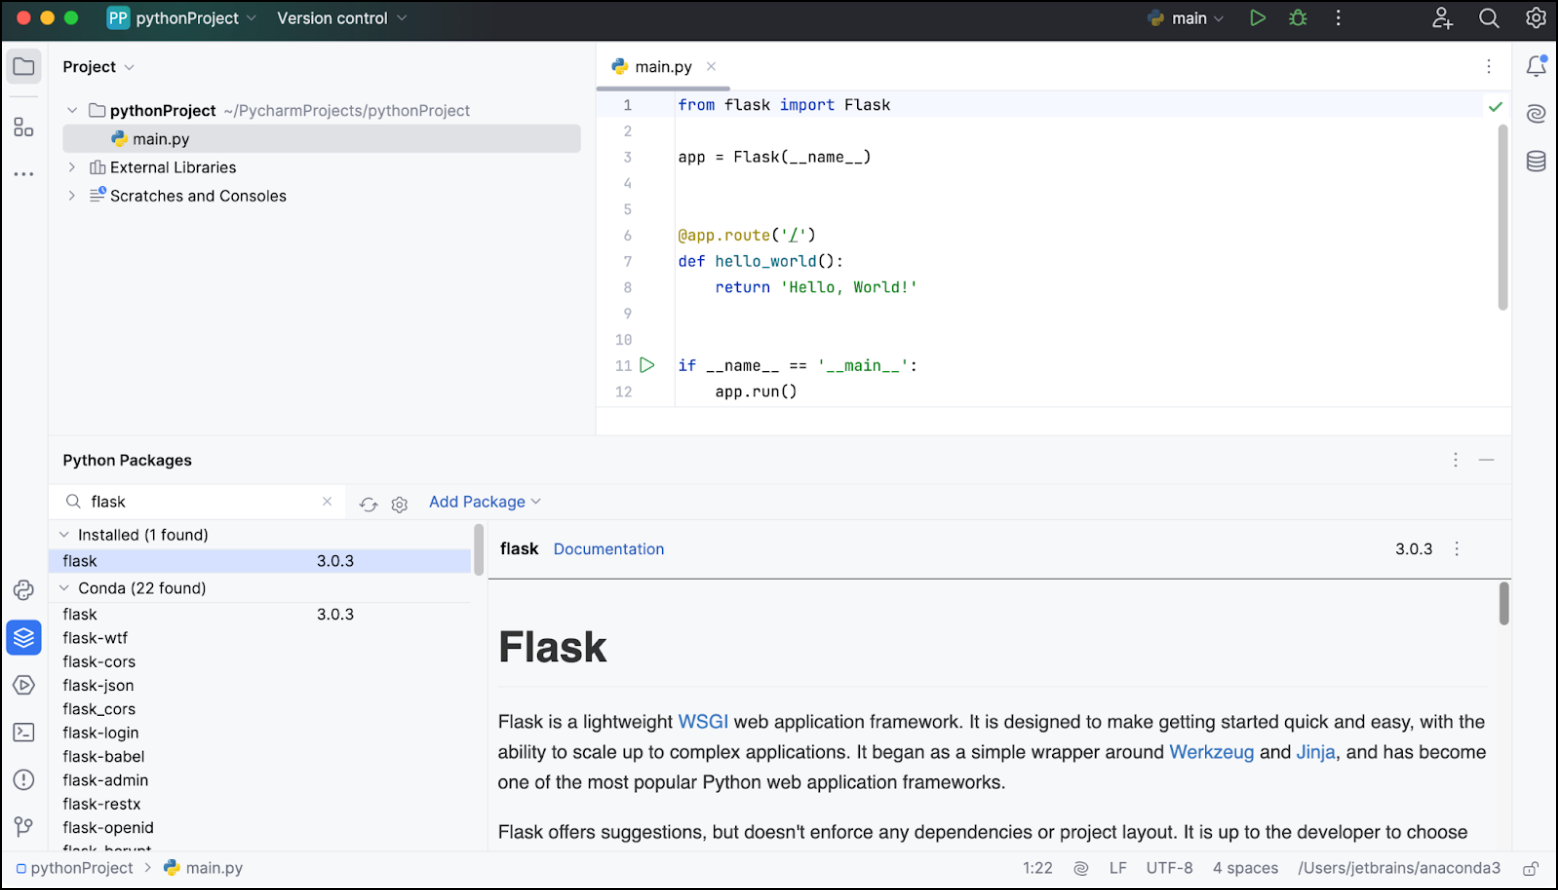 ## Adding a repository to a project
Sometimes packages you’re using in your PyCharm project won’t be available in any Anaconda default channels. To add a new repository to your PyCharm project, use the Python Packages tool window.
1. Go to **View** > **Tool Windows** > **Python Packages**.
2. Click the
## Adding a repository to a project
Sometimes packages you’re using in your PyCharm project won’t be available in any Anaconda default channels. To add a new repository to your PyCharm project, use the Python Packages tool window.
1. Go to **View** > **Tool Windows** > **Python Packages**.
2. Click the 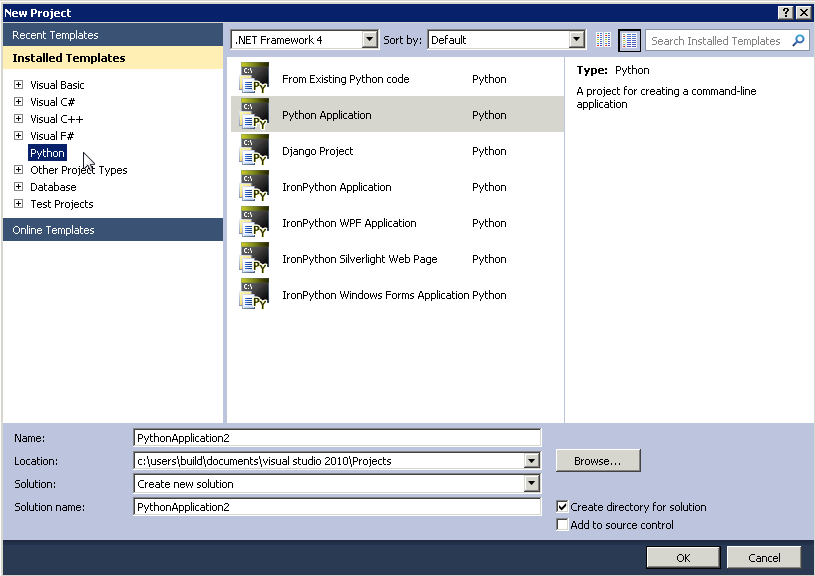 To check which Python the project uses:
1. From the **Tools** menu, select Python Tools, and then select
Python Interactive. The keyboard shortcut is Alt+I:
To check which Python the project uses:
1. From the **Tools** menu, select Python Tools, and then select
Python Interactive. The keyboard shortcut is Alt+I:
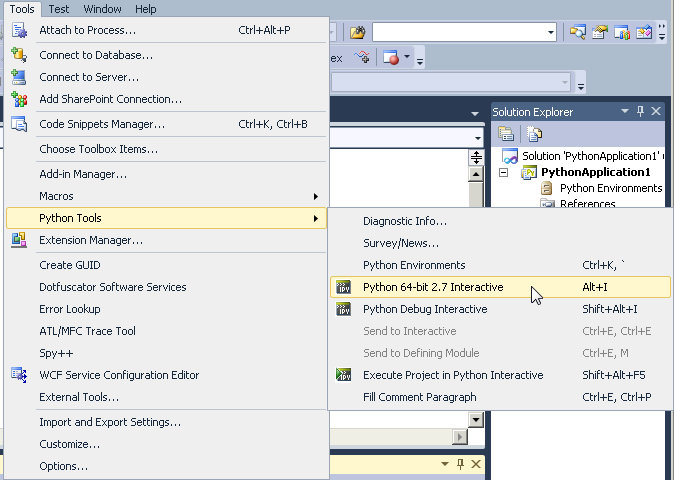 2. In the **Python Interactive** window, type `import sys` and then press Enter.
3. Type `sys.version` and then press Enter.
If PTVS is using Anaconda, your Anaconda Python version is displayed. In the example below, it is Anaconda 1.5.0 (64-bit):
2. In the **Python Interactive** window, type `import sys` and then press Enter.
3. Type `sys.version` and then press Enter.
If PTVS is using Anaconda, your Anaconda Python version is displayed. In the example below, it is Anaconda 1.5.0 (64-bit):
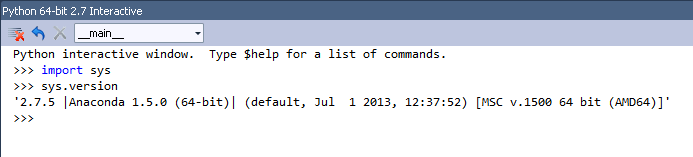 If PTVS does not automatically discover Anaconda, see the [official PTVS
documentation](https://docs.microsoft.com/en-us/visualstudio/python/python-in-visual-studio), especially the
section on [Selecting and Installing Python Interpreters](https://docs.microsoft.com/en-us/visualstudio/python/python-environments#selecting-and-installing-python-interpreters)
and the [PTVS installation instructions](https://docs.microsoft.com/en-us/visualstudio/python/installation).
# Spyder
Source: https://anaconda.com/docs/tools/working-with-conda/ide-tutorials/spyder
Spyder is an open-source integrated development environment (IDE) included with Anaconda Distribution that offers advanced editing, interactive testing, debugging, and introspection features. Spyder integrates with popular libraries such as NumPy, SciPy, pandas, and more!
If PTVS does not automatically discover Anaconda, see the [official PTVS
documentation](https://docs.microsoft.com/en-us/visualstudio/python/python-in-visual-studio), especially the
section on [Selecting and Installing Python Interpreters](https://docs.microsoft.com/en-us/visualstudio/python/python-environments#selecting-and-installing-python-interpreters)
and the [PTVS installation instructions](https://docs.microsoft.com/en-us/visualstudio/python/installation).
# Spyder
Source: https://anaconda.com/docs/tools/working-with-conda/ide-tutorials/spyder
Spyder is an open-source integrated development environment (IDE) included with Anaconda Distribution that offers advanced editing, interactive testing, debugging, and introspection features. Spyder integrates with popular libraries such as NumPy, SciPy, pandas, and more!
 2) Once installed, click **Launch** on the Spyder tile.
 3. Select **Use the following Python interpreter**.
4. Select your preferred environment.
5. Click **Ok**.
For more information, see the official Spyder [website](https://www.spyder-ide.org/) and [documentation](https://docs.spyder-ide.org/).
# Sublime Text (deprecated)
Source: https://anaconda.com/docs/tools/working-with-conda/ide-tutorials/sublime
3. Select **Use the following Python interpreter**.
4. Select your preferred environment.
5. Click **Ok**.
For more information, see the official Spyder [website](https://www.spyder-ide.org/) and [documentation](https://docs.spyder-ide.org/).
# Sublime Text (deprecated)
Source: https://anaconda.com/docs/tools/working-with-conda/ide-tutorials/sublime
 5. Search for [conda](https://www.github.com/mandeep/sublime-text-conda) in the command palette and select the conda plugin.
When the plugin is installed, a Package Control Message will open in the Sublime Text window.
5. Search for [conda](https://www.github.com/mandeep/sublime-text-conda) in the command palette and select the conda plugin.
When the plugin is installed, a Package Control Message will open in the Sublime Text window.
 6. Change the current Build System to conda by accessing Tools -> Build System -> Conda in the menu bar.
 7. Access the conda Commands with the Command Palette by searching for conda.
 # Visual Studio Code (VS Code)
Source: https://anaconda.com/docs/tools/working-with-conda/ide-tutorials/vscode
# Visual Studio Code (VS Code)
Source: https://anaconda.com/docs/tools/working-with-conda/ide-tutorials/vscode
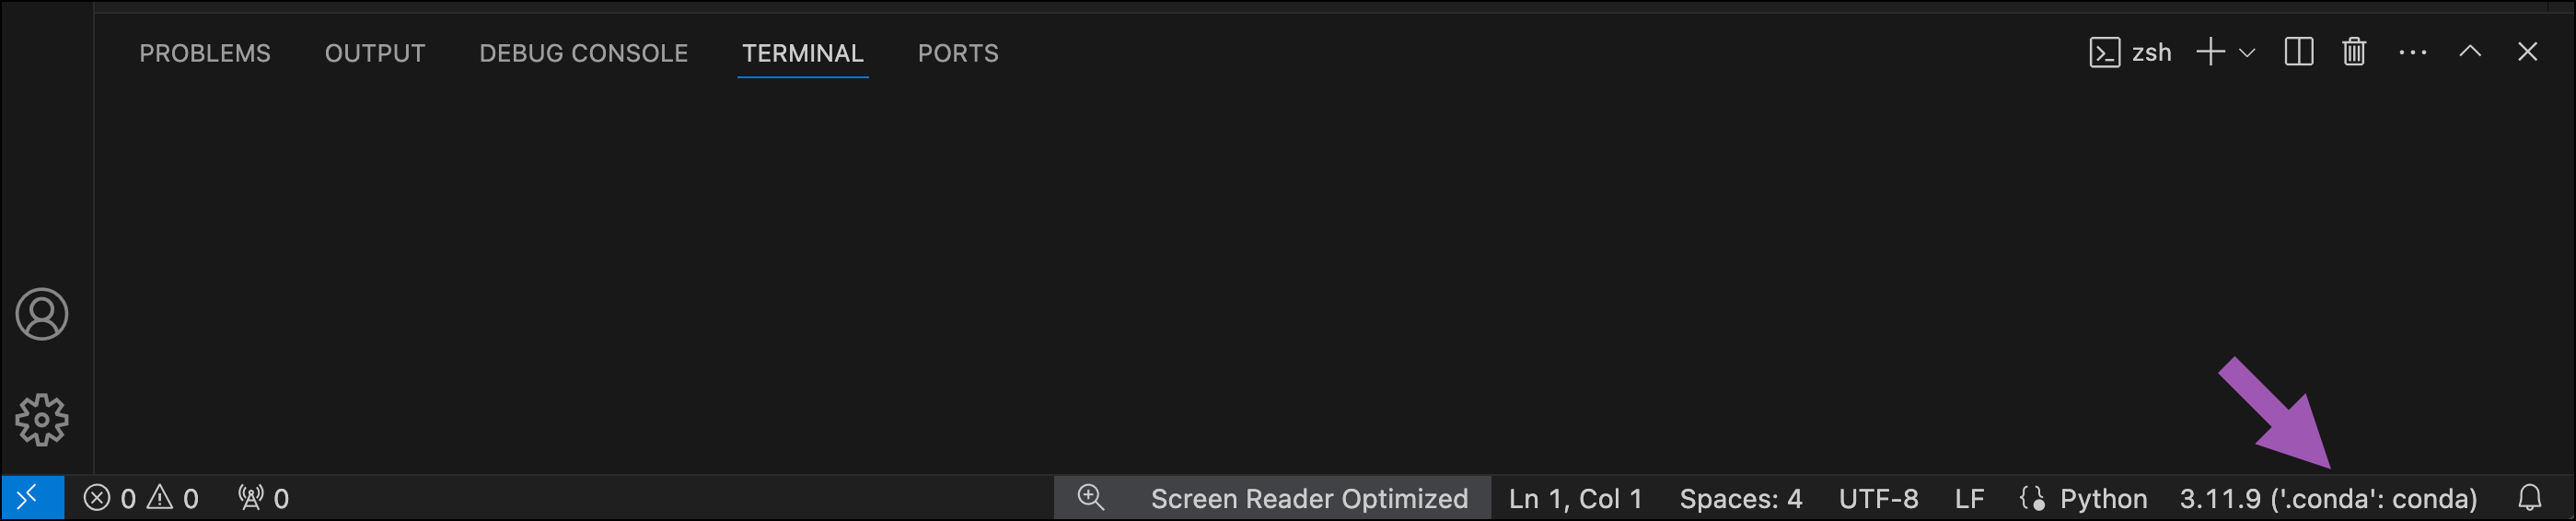 ## Adding packages to your environment
To add packages to your environment in VS Code:
1. Open a new terminal by pressing Ctrl+\`.
2. Run the following command:
```sh
# Replace
## Adding packages to your environment
To add packages to your environment in VS Code:
1. Open a new terminal by pressing Ctrl+\`.
2. Run the following command:
```sh
# Replace  When you select the new environment, you may see a notification that says, "Selected conda environment was successfully activated, even though '(.conda)' indicator may not be present in the terminal prompt." You can still run conda commands in the terminal. See VS Code's official documentation for more information on [activating environments in terminal](https://github.com/microsoft/vscode-python/wiki/Activate-Environments-in-Terminal-Using-Environment-Variables).
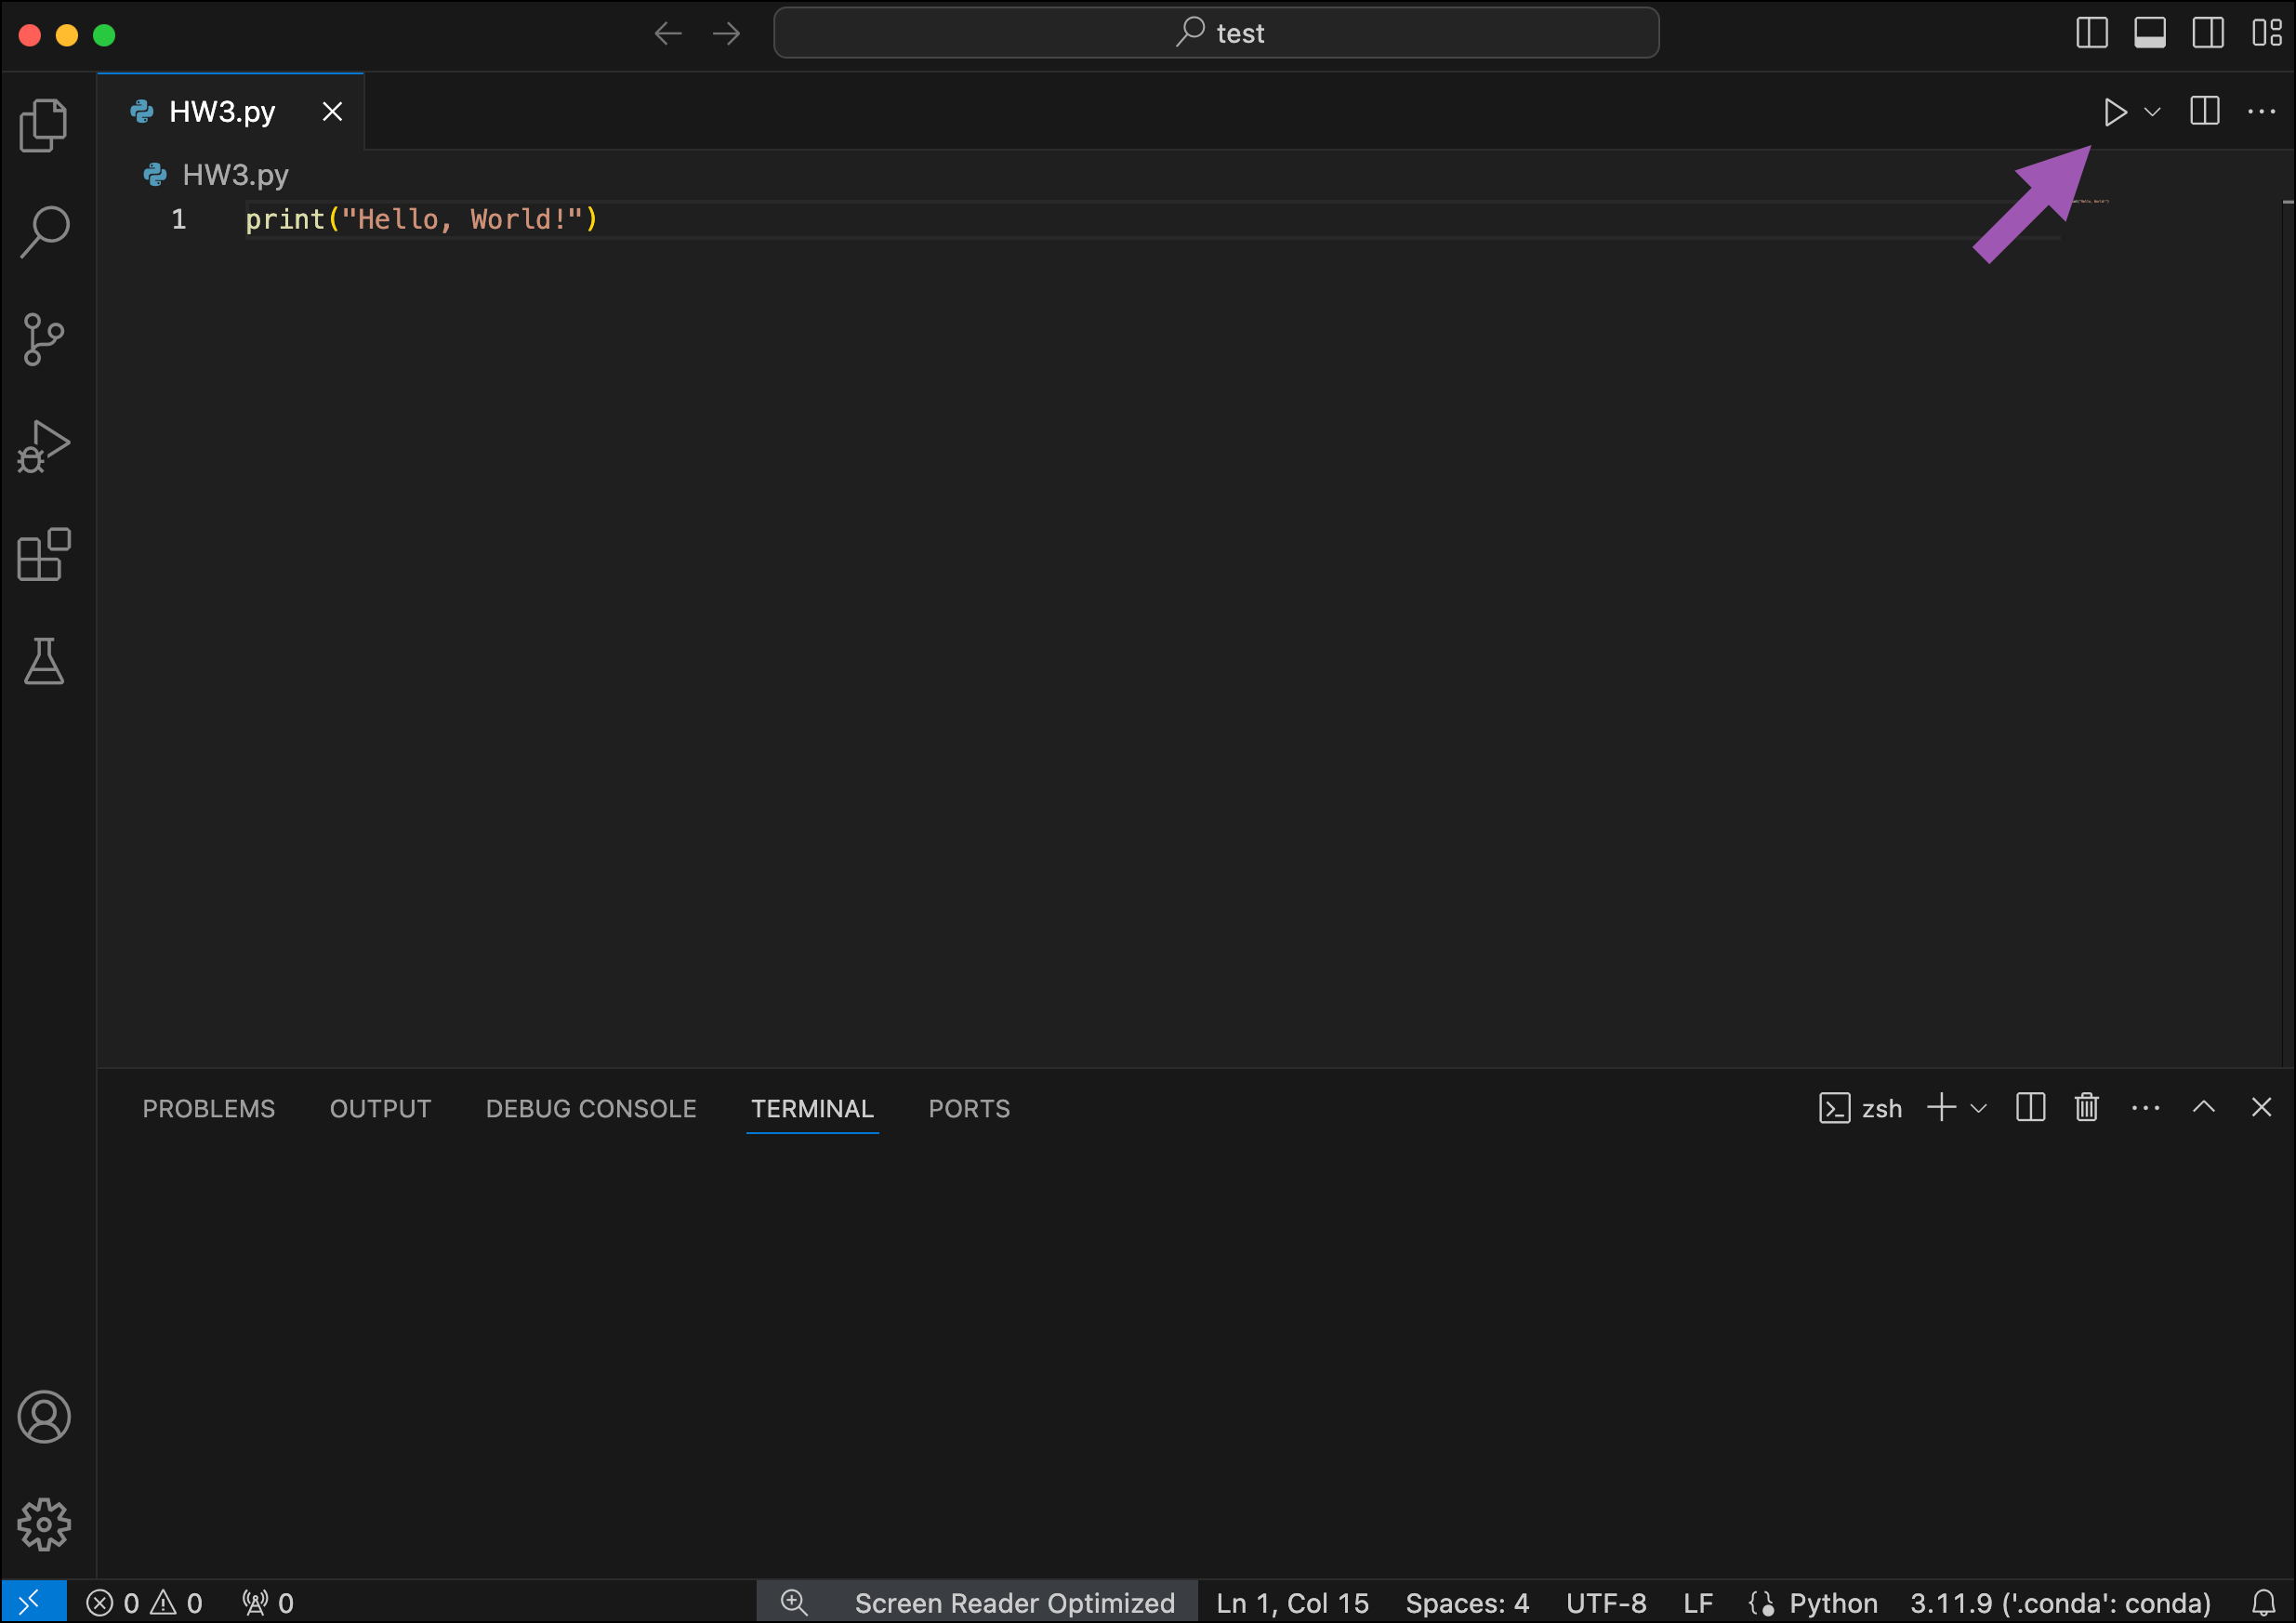 For more information on working with Python in VS Code, see [Python in Visual Studio Code](https://code.visualstudio.com/docs/languages/python).
# Wing IDE (deprecated)
Source: https://anaconda.com/docs/tools/working-with-conda/ide-tutorials/wing
For more information on working with Python in VS Code, see [Python in Visual Studio Code](https://code.visualstudio.com/docs/languages/python).
# Wing IDE (deprecated)
Source: https://anaconda.com/docs/tools/working-with-conda/ide-tutorials/wing
 2. Beside Python Executable, click the Custom radio button.
3. Click the Browse button and navigate to your [Anaconda Python interpreter path](./python-path).
4. For Python Path, click the Custom radio button.
5. Click the Insert button and browse to your [Anaconda Python interpreter path](./python-path).
6. Click the OK button:
2. Beside Python Executable, click the Custom radio button.
3. Click the Browse button and navigate to your [Anaconda Python interpreter path](./python-path).
4. For Python Path, click the Custom radio button.
5. Click the Insert button and browse to your [Anaconda Python interpreter path](./python-path).
6. Click the OK button:
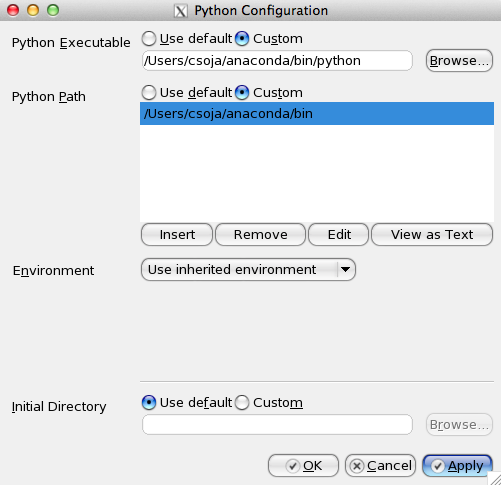 7. If you are prompted to reload your Python shell, do so. After the reload, Anaconda is displayed on the **Python Shell** tab:
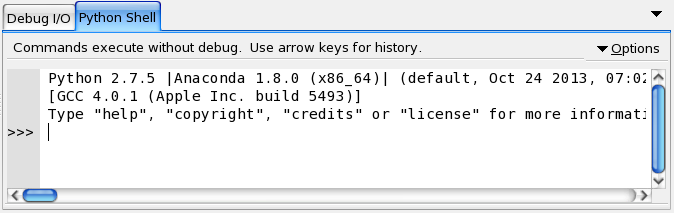 Wing IDE is now set up to Anaconda's Python.
For more information, see
the [Wing IDE documentation](http://www.wingware.com/support).
# Working with conda
Source: https://anaconda.com/docs/tools/working-with-conda/main
Installing Anaconda Distribution or Miniconda gives you access to conda, Python, and thousands of other popular packages. Anaconda Distribution installs more than 300 of these packages automatically, while Miniconda is a more lightweight distribution that contains only conda, python, their dependencies, and a small number of other packages.
**Which installer is right for you?** See [Anaconda Distribution or Miniconda](/getting-started/getting-started#should-i-use-anaconda-distribution-or-miniconda)
This section of the documentation covers instructions that work with either Anaconda Distribution or Miniconda installations, but if you need documentation specific to one installation or the other, click below:
Wing IDE is now set up to Anaconda's Python.
For more information, see
the [Wing IDE documentation](http://www.wingware.com/support).
# Working with conda
Source: https://anaconda.com/docs/tools/working-with-conda/main
Installing Anaconda Distribution or Miniconda gives you access to conda, Python, and thousands of other popular packages. Anaconda Distribution installs more than 300 of these packages automatically, while Miniconda is a more lightweight distribution that contains only conda, python, their dependencies, and a small number of other packages.
**Which installer is right for you?** See [Anaconda Distribution or Miniconda](/getting-started/getting-started#should-i-use-anaconda-distribution-or-miniconda)
This section of the documentation covers instructions that work with either Anaconda Distribution or Miniconda installations, but if you need documentation specific to one installation or the other, click below:
{children}
 3. Edit the file in GitHub.
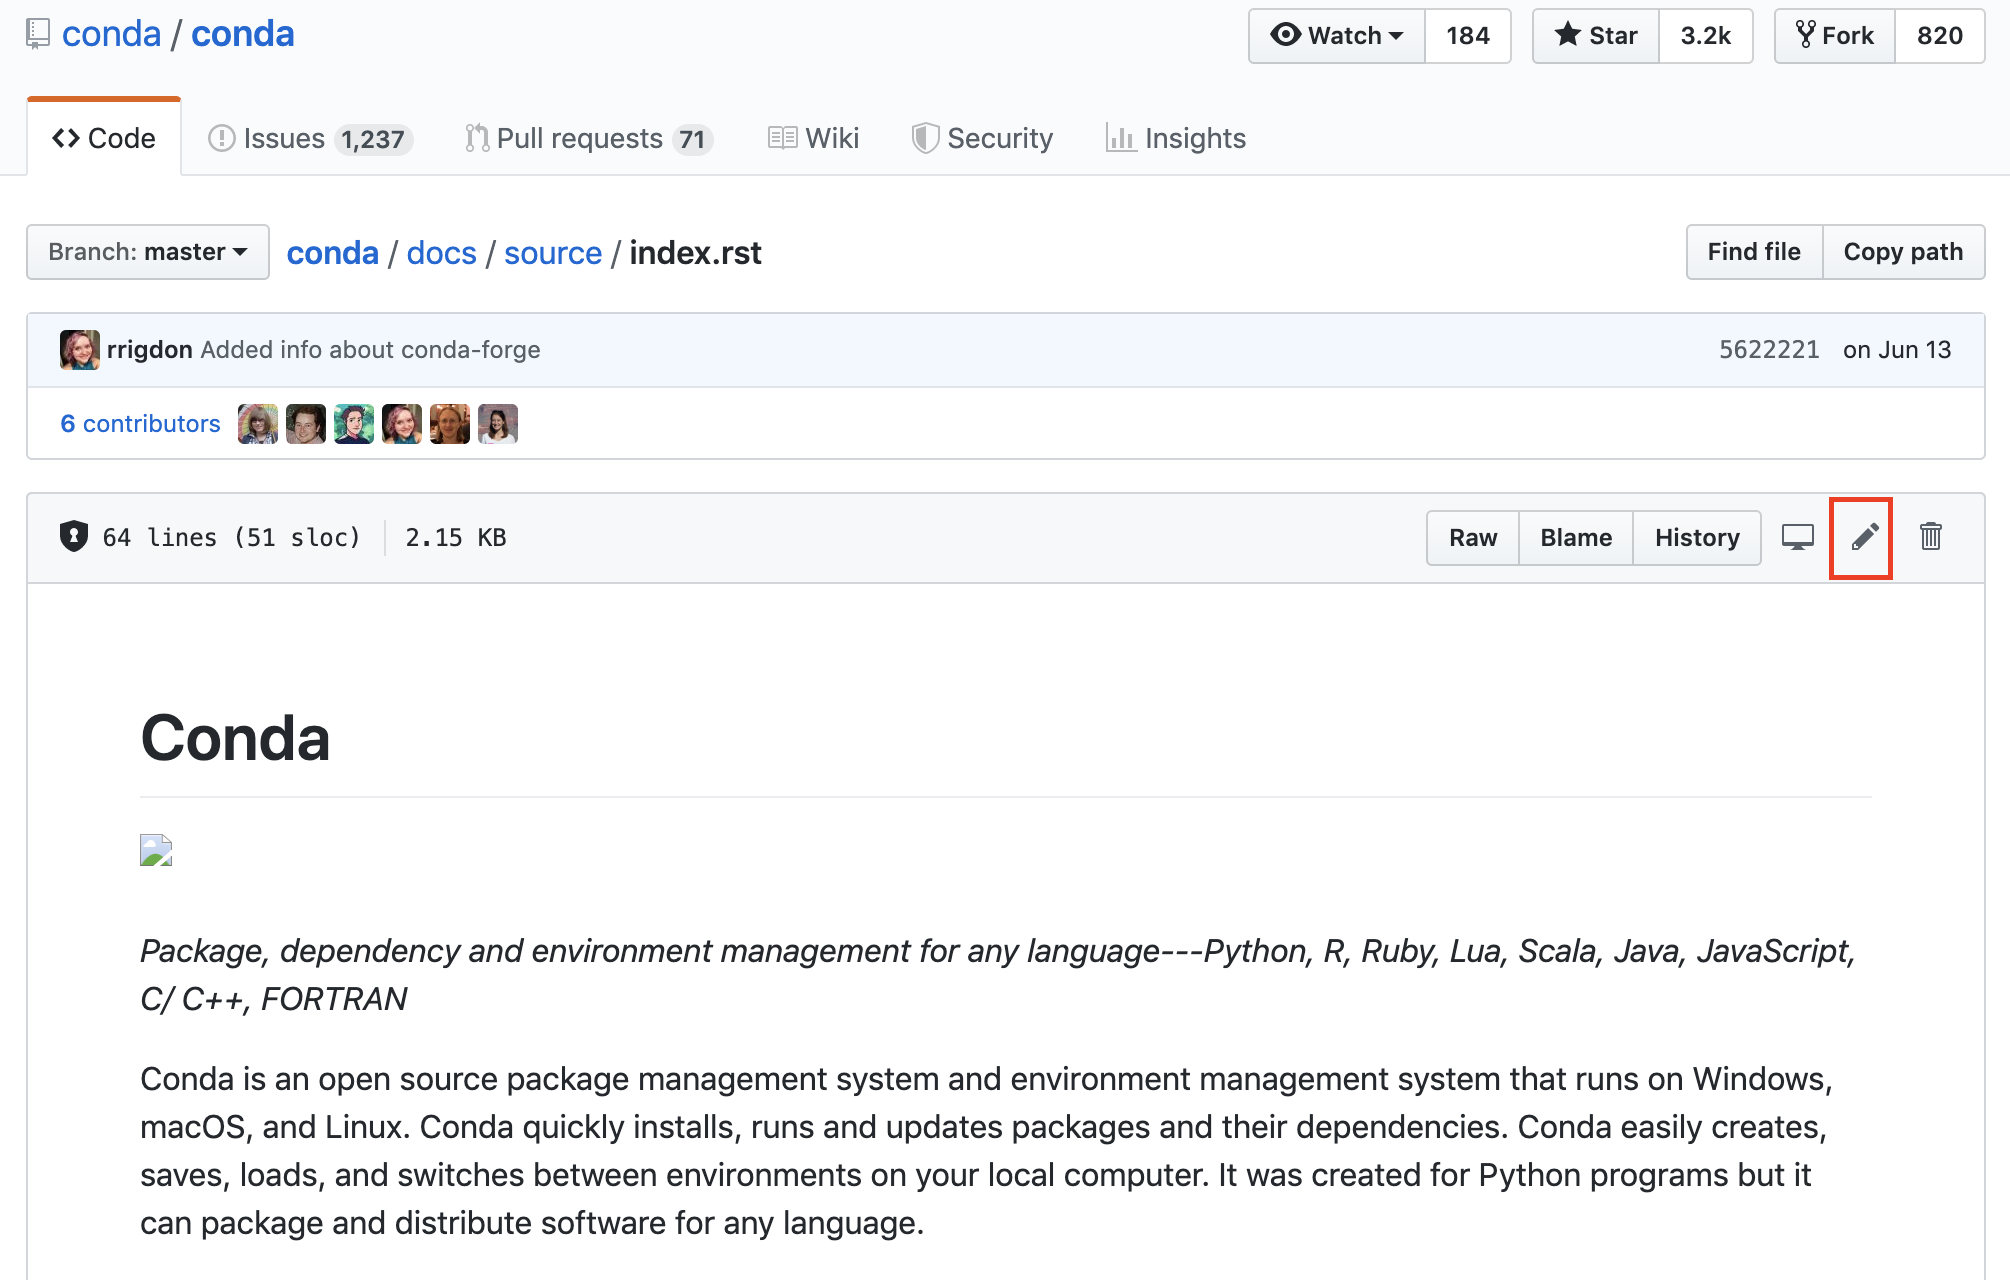 4. Commit your changes.
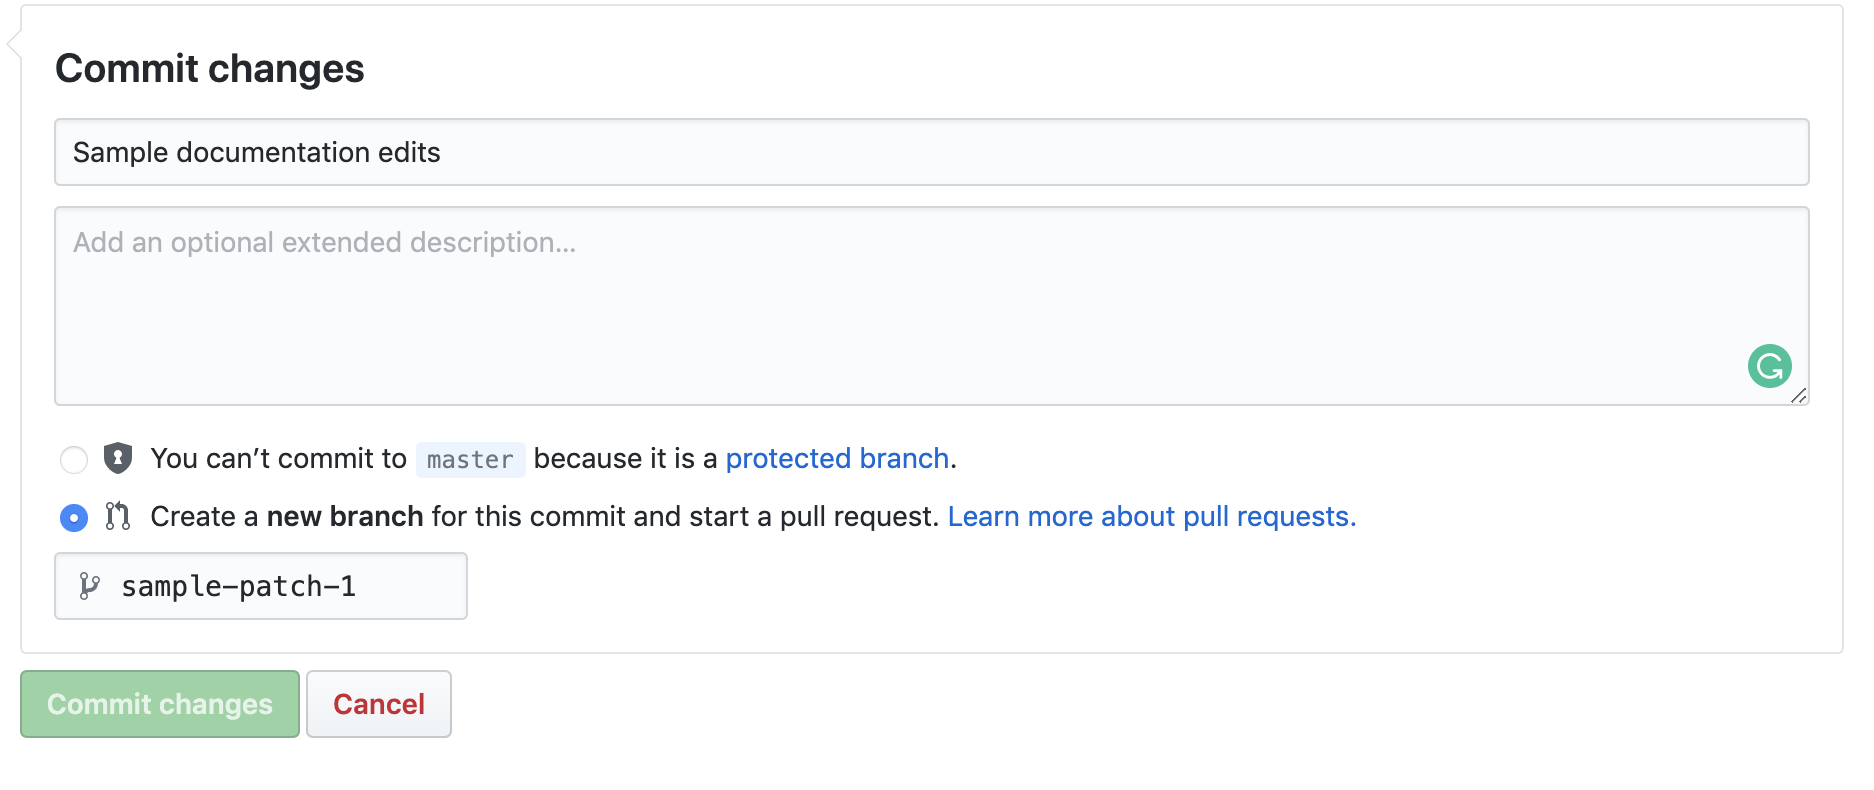 5. PR review process:
* PR is submitted.
* Anaconda community members and/or staff review the PR, providing comments and revisions.
* New contributors sign the CLA.
* PR is merged.
## Conda-forge feedstocks
Contribute to [conda-forge feedstocks](https://conda-forge.org/#contribute) where you can improve, update, and/or add new conda-build recipes to conda-forge. See our [tutorials](https://docs.conda.io/projects/conda-build/en/latest/user-guide/tutorials/) on how to build conda-build recipes.
The recipes here are often used as the base of recipes used to build packages for `defaults/repo.anaconda.com`. Helping conda-forge increases the number and quality of packages available to install with conda, as well as helping Anaconda do the same for packages shipped in defaults.
5. PR review process:
* PR is submitted.
* Anaconda community members and/or staff review the PR, providing comments and revisions.
* New contributors sign the CLA.
* PR is merged.
## Conda-forge feedstocks
Contribute to [conda-forge feedstocks](https://conda-forge.org/#contribute) where you can improve, update, and/or add new conda-build recipes to conda-forge. See our [tutorials](https://docs.conda.io/projects/conda-build/en/latest/user-guide/tutorials/) on how to build conda-build recipes.
The recipes here are often used as the base of recipes used to build packages for `defaults/repo.anaconda.com`. Helping conda-forge increases the number and quality of packages available to install with conda, as well as helping Anaconda do the same for packages shipped in defaults.
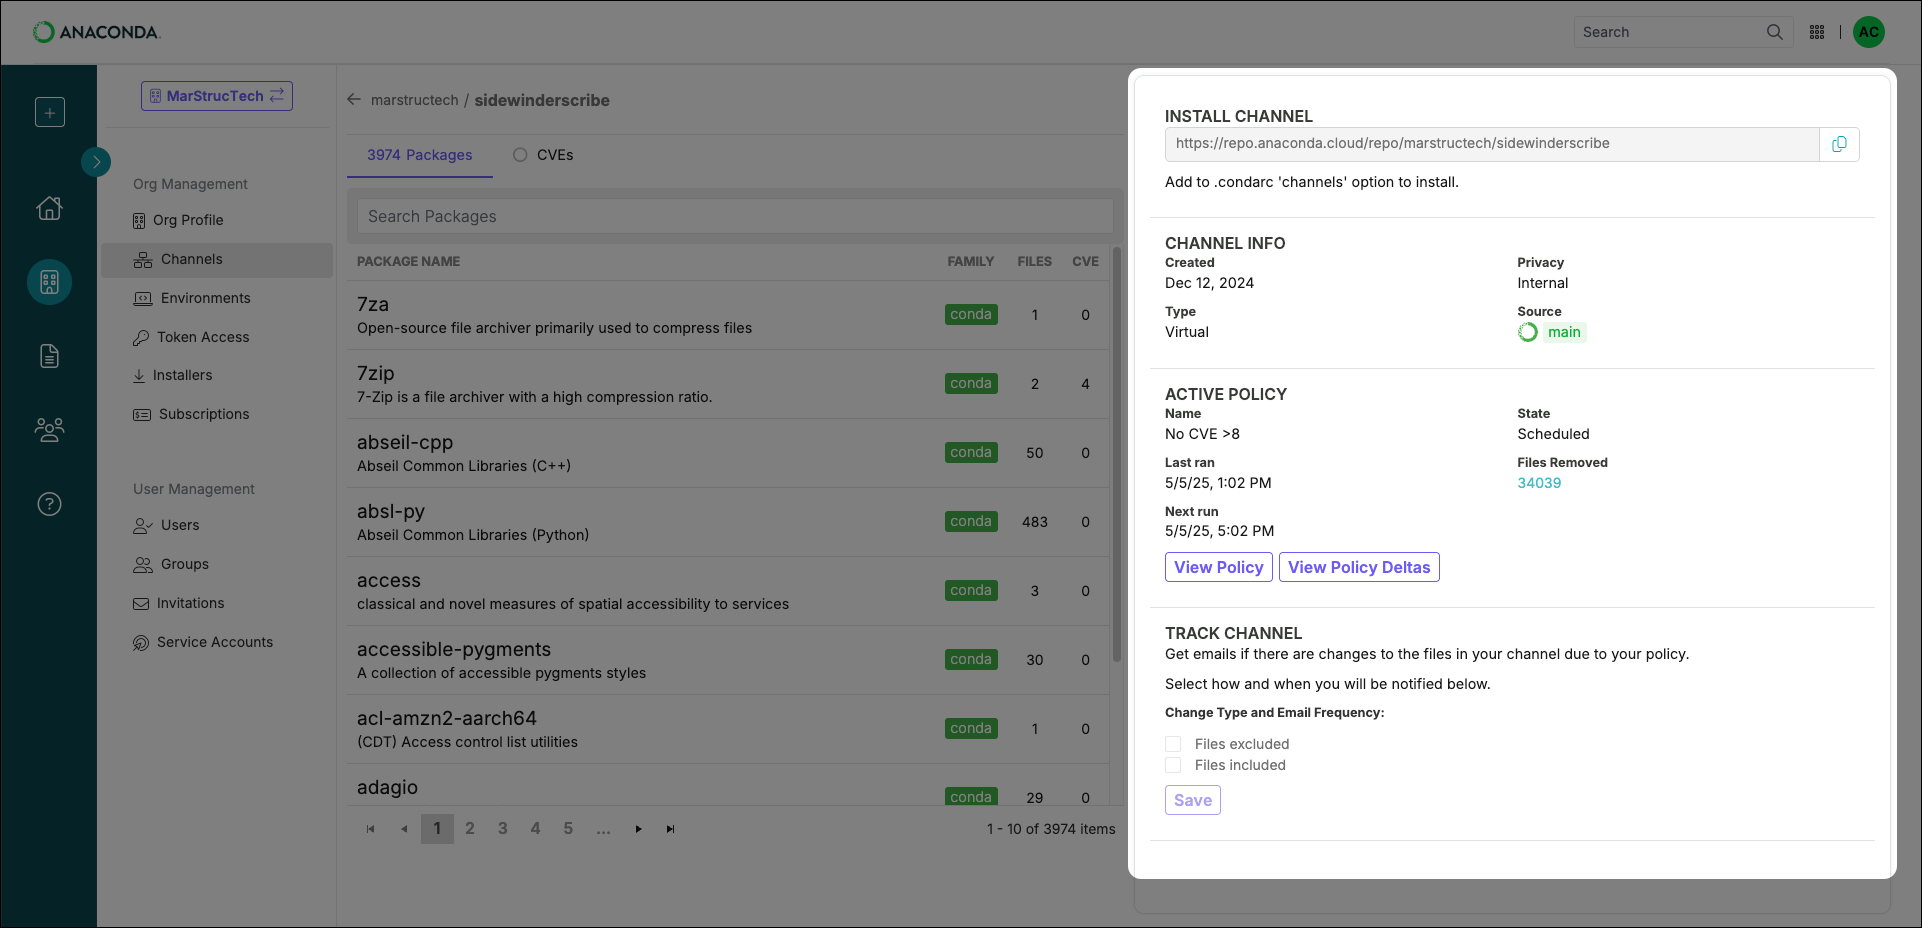 ## Channel policy deltas
[Policy filters](./policy-filters), once applied to a channel, run every four hours. Sometimes, due to newly reported CVEs or an updated CVE score or status, the contents of your channel will change when the filter performs its scheduled run. A package may become available that was not available previously, or you could find that a package you’ve been using is removed from your channel!
From the channel details page, click **View Policy Deltas** to view a list of deltas. Deltas are the recorded changes to your channel’s contents. Policy delta history begins from when you first applied the policy to the channel. Once the policy is removed from the channel (if you need to edit it, for example) the policy delta history is lost. A new policy delta history is established once the policy is reapplied to the channel. Use the **Start** and **End** date filters to narrow your timeline to locate a specific delta, if necessary. Select a count under either **PACKAGES ADDED** or **PACKAGES REMOVED** to see a list of packages from a specific run.
## Channel policy deltas
[Policy filters](./policy-filters), once applied to a channel, run every four hours. Sometimes, due to newly reported CVEs or an updated CVE score or status, the contents of your channel will change when the filter performs its scheduled run. A package may become available that was not available previously, or you could find that a package you’ve been using is removed from your channel!
From the channel details page, click **View Policy Deltas** to view a list of deltas. Deltas are the recorded changes to your channel’s contents. Policy delta history begins from when you first applied the policy to the channel. Once the policy is removed from the channel (if you need to edit it, for example) the policy delta history is lost. A new policy delta history is established once the policy is reapplied to the channel. Use the **Start** and **End** date filters to narrow your timeline to locate a specific delta, if necessary. Select a count under either **PACKAGES ADDED** or **PACKAGES REMOVED** to see a list of packages from a specific run.

 ### CVE statuses
CVEs are assigned a status category as a result of the Anaconda curation process. CVE status categories include:
* **Reported** - The vulnerabilities identified in this package have been reported by NIST but not reviewed by the Anaconda team.
* **Active** - The vulnerabilities identified in this package are active and potentially exploitable.
* **Cleared** - The vulnerabilities identified in this package have been analyzed and determined not to be applicable.
* **Mitigated** - The vulnerabilities identified in this package have been proactively mitigated in this build through a code patch.
* **Disputed** - The vulnerabilities' legitimacy is disputed by upstream package maintainers or other community members.
## Viewing CVEs
### CVE statuses
CVEs are assigned a status category as a result of the Anaconda curation process. CVE status categories include:
* **Reported** - The vulnerabilities identified in this package have been reported by NIST but not reviewed by the Anaconda team.
* **Active** - The vulnerabilities identified in this package are active and potentially exploitable.
* **Cleared** - The vulnerabilities identified in this package have been analyzed and determined not to be applicable.
* **Mitigated** - The vulnerabilities identified in this package have been proactively mitigated in this build through a code patch.
* **Disputed** - The vulnerabilities' legitimacy is disputed by upstream package maintainers or other community members.
## Viewing CVEs
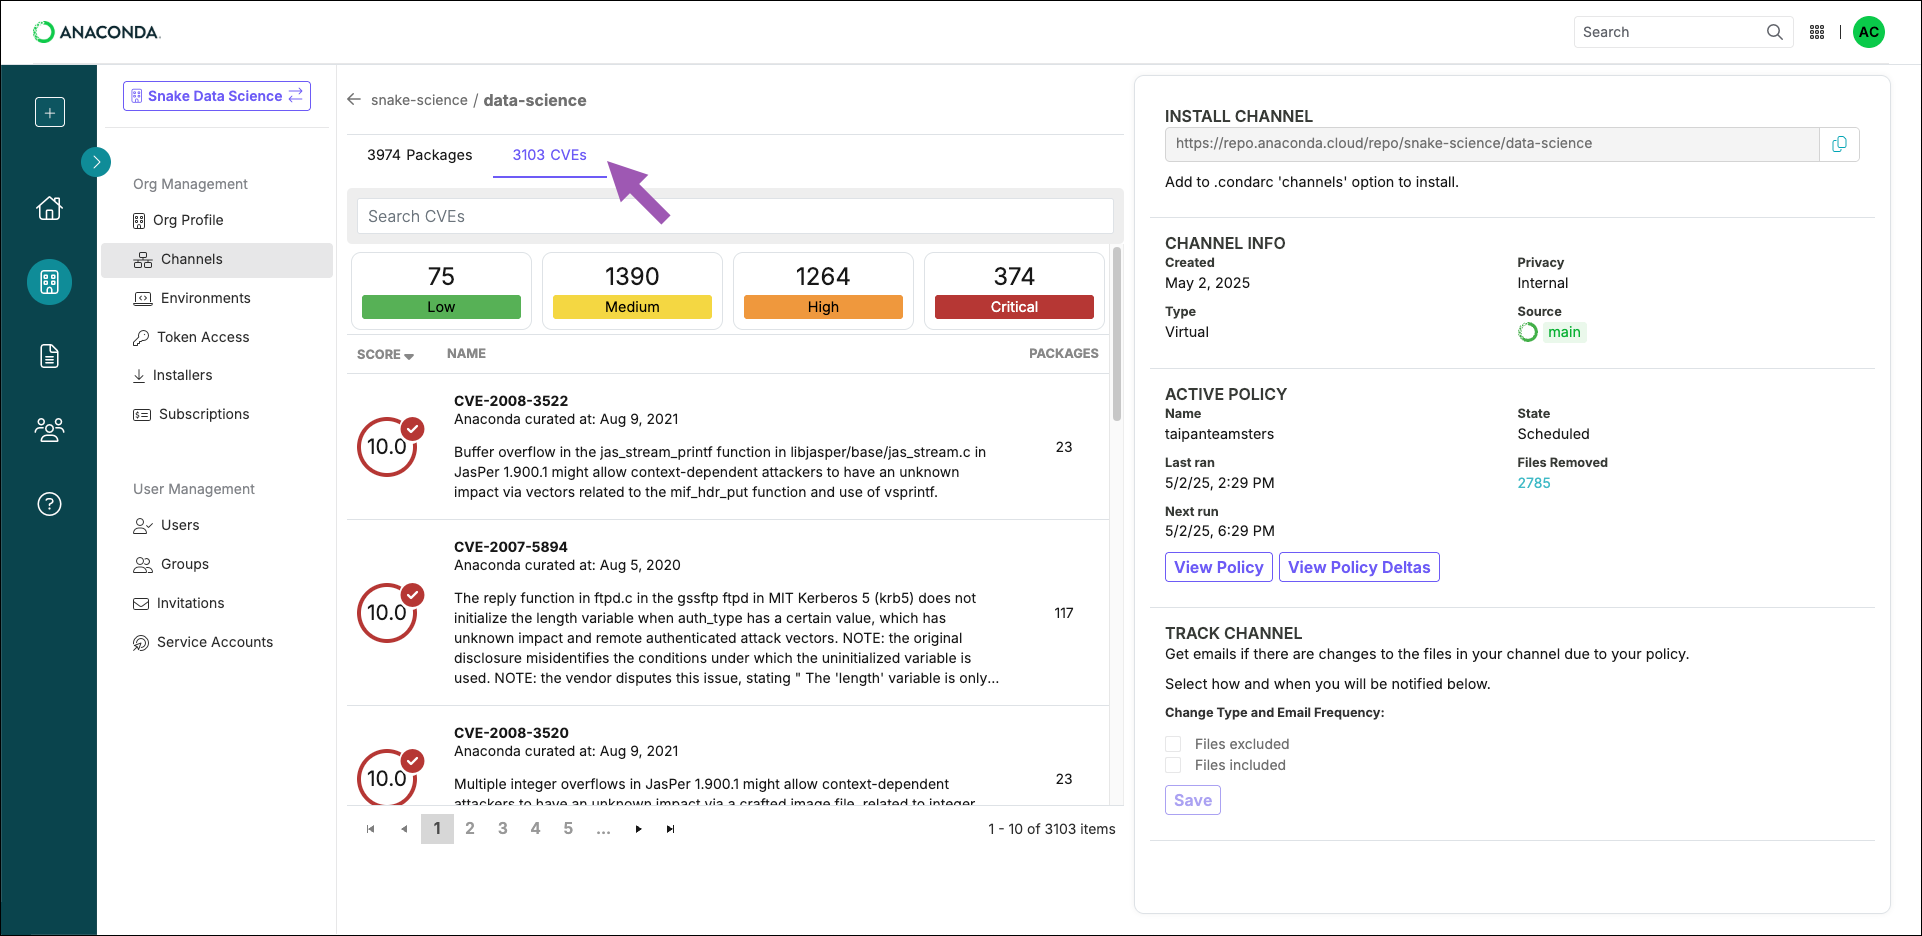
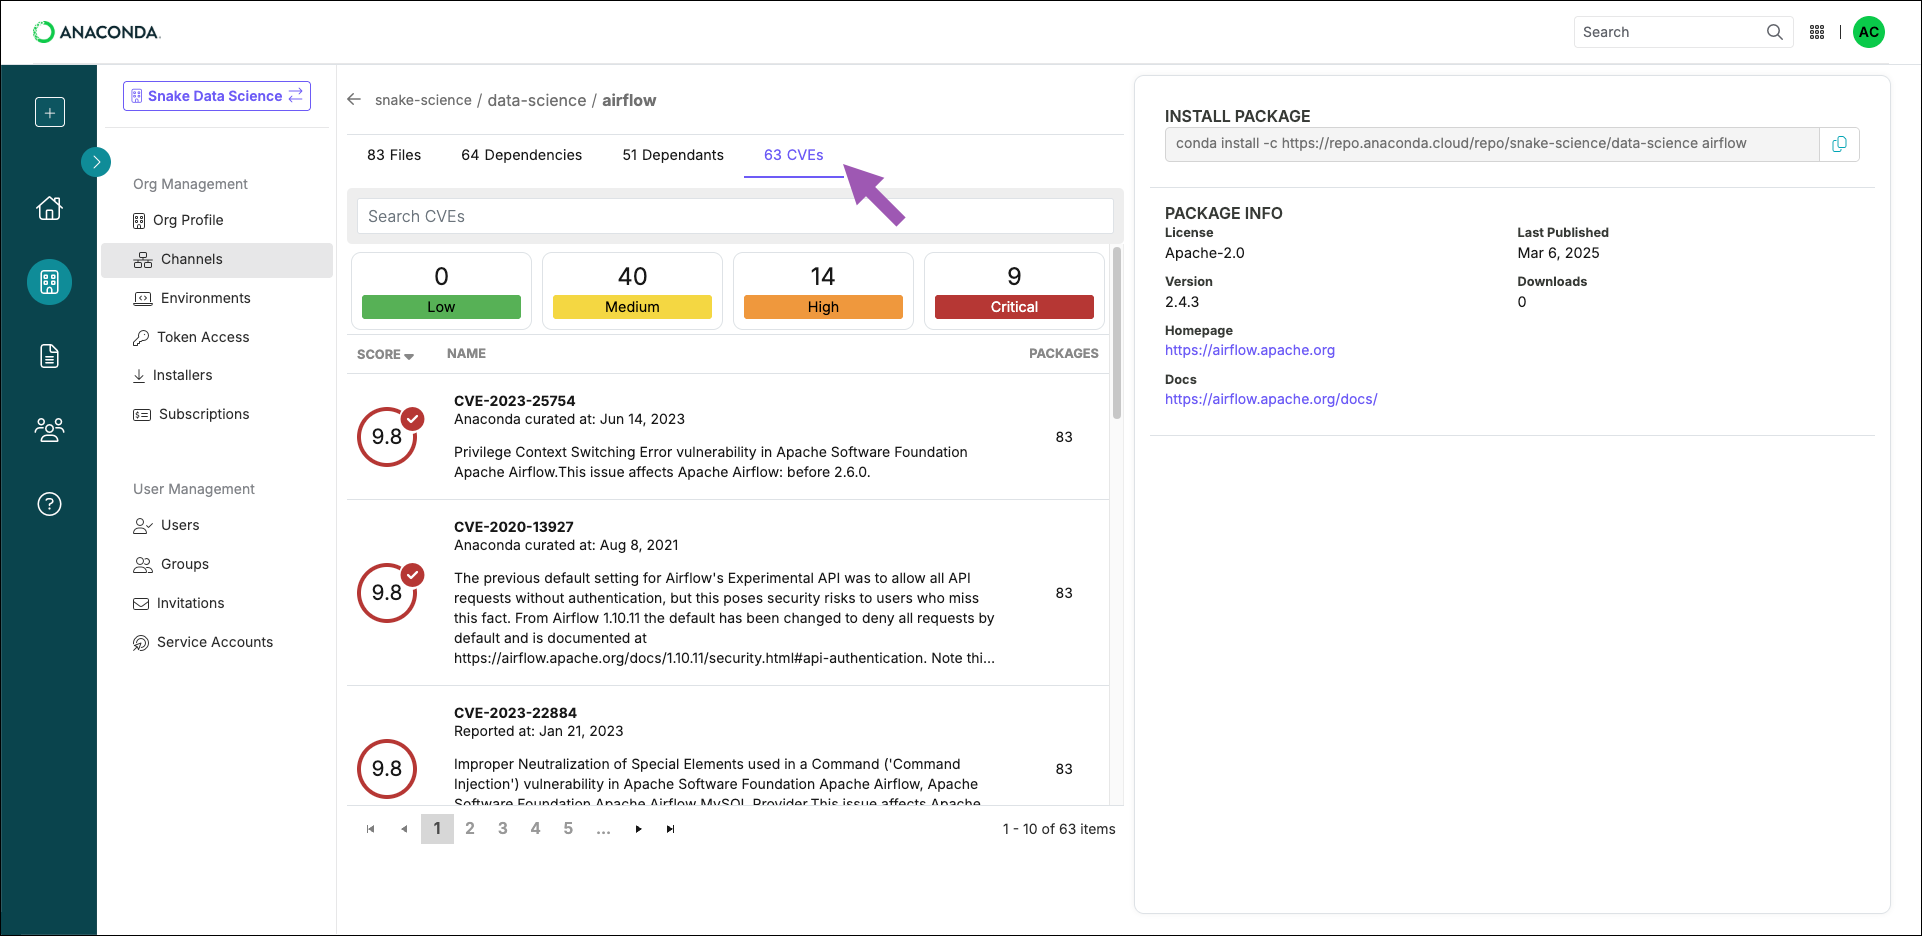
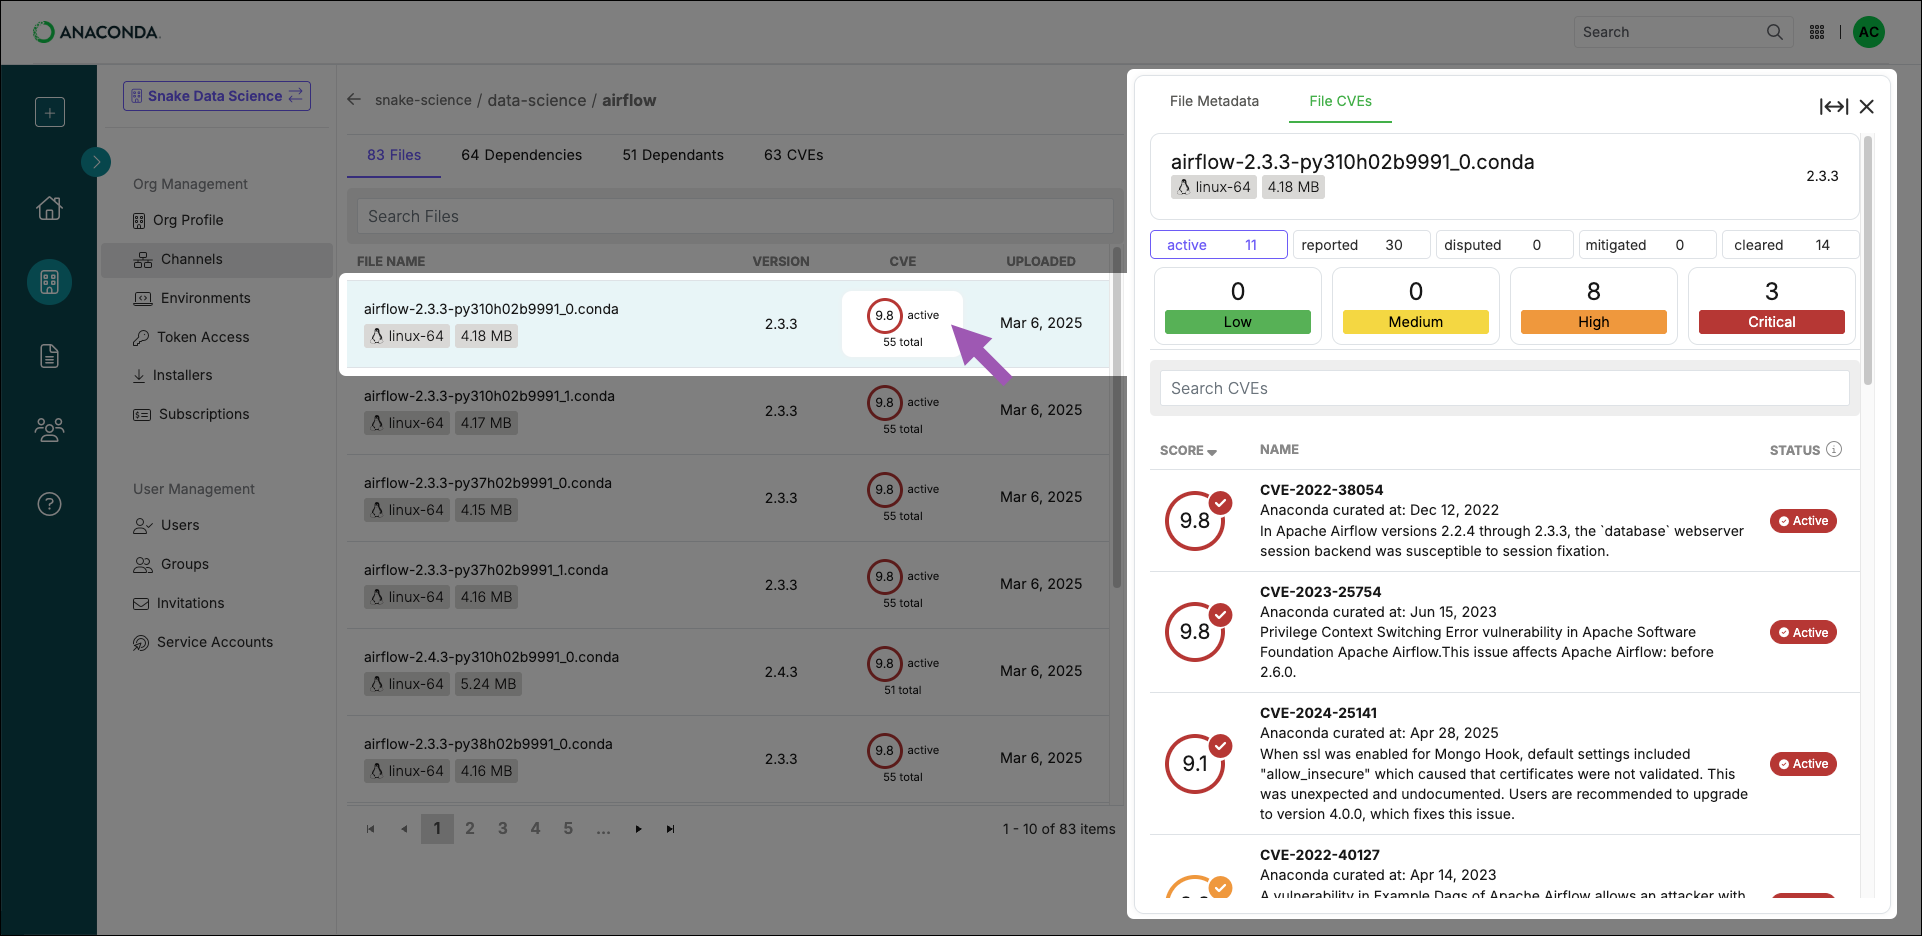
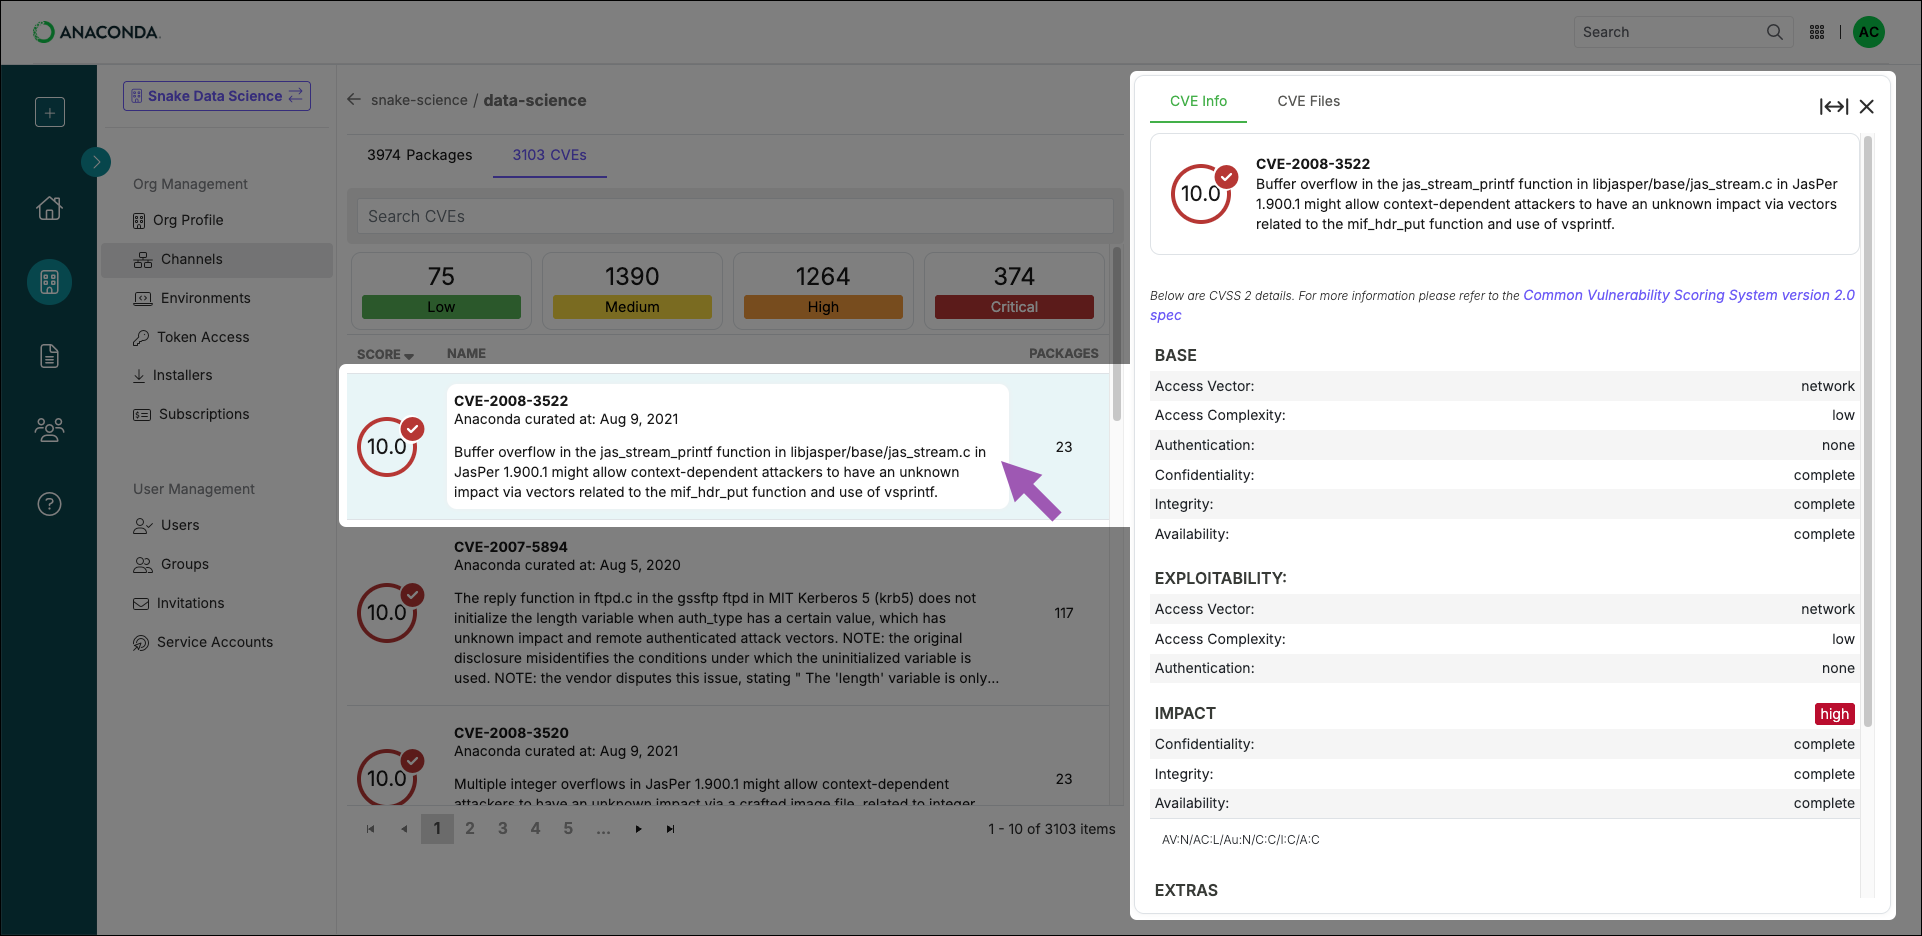
 ## Dealing with CVEs
CVEs can pose security risks to your environments and your organization. Understanding how to identify and mitigate these vulnerabilities is essential for maintaining secure systems. Packages can be associated with more than one CVE, and CVEs can be associated with multiple different packages, meaning that over time, maintaining an environment can sometimes turn into navigating a maze of dependencies, vulnerabilities, and package conflicts.
## Dealing with CVEs
CVEs can pose security risks to your environments and your organization. Understanding how to identify and mitigate these vulnerabilities is essential for maintaining secure systems. Packages can be associated with more than one CVE, and CVEs can be associated with multiple different packages, meaning that over time, maintaining an environment can sometimes turn into navigating a maze of dependencies, vulnerabilities, and package conflicts.

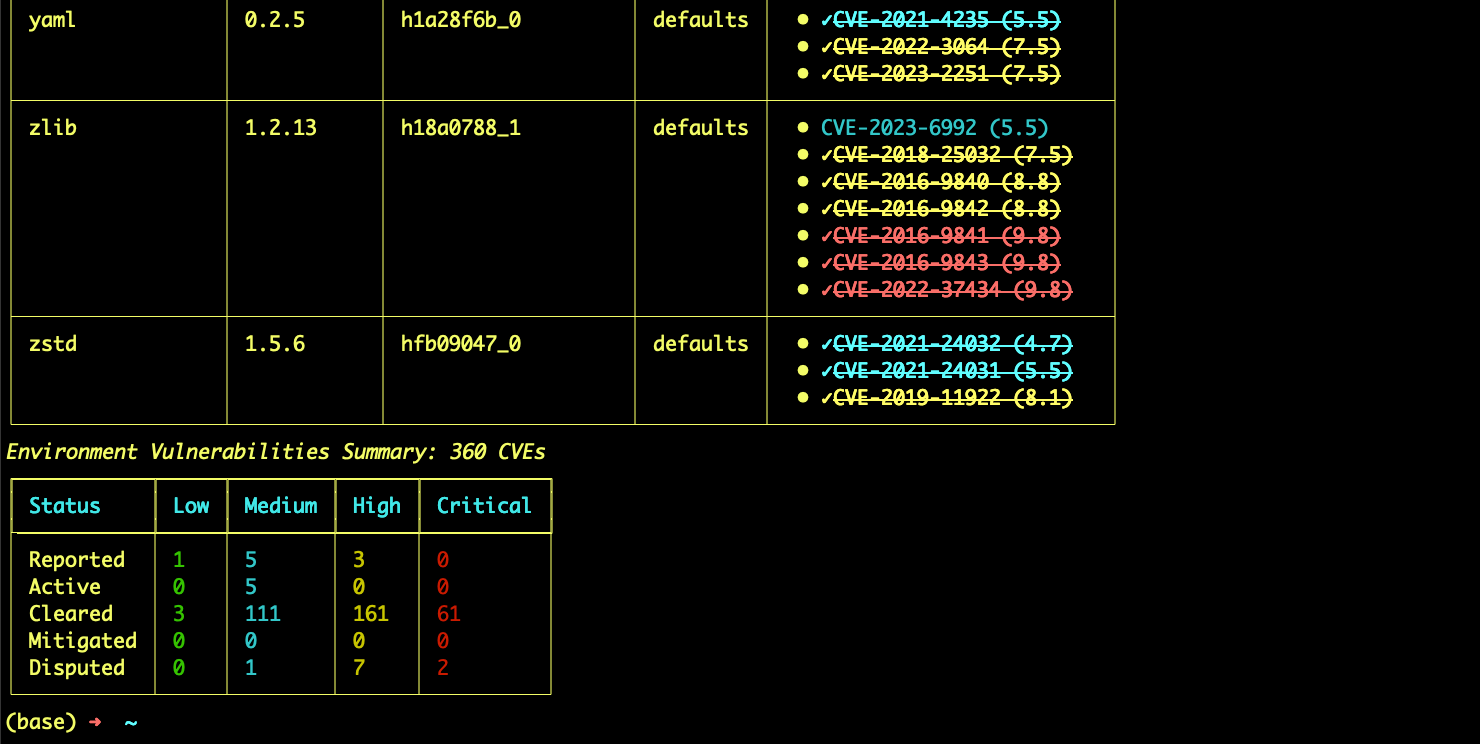 Scan results are color coded to help you identify the CVE severity, and a checkmark is displayed beside a CVE name to indicate that it has undergone Anaconda curation. CVEs that are stricken through have a status of cleared and are safe to use in your environment.
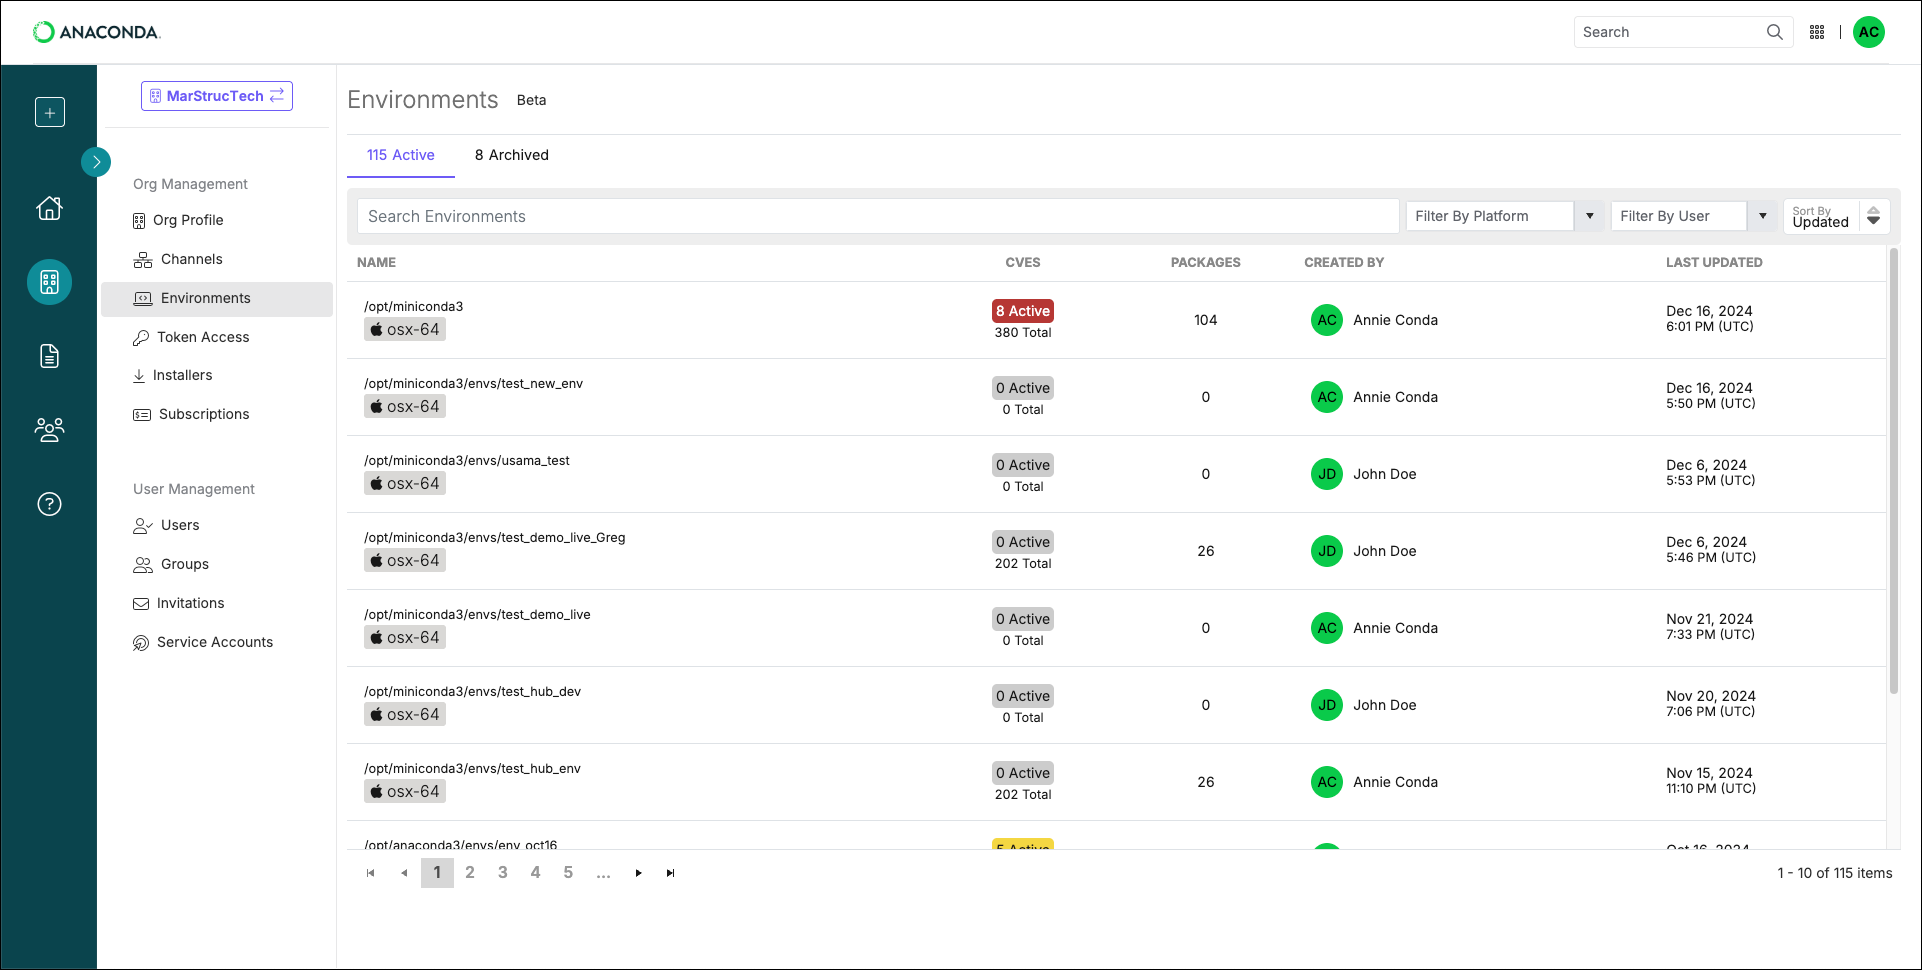 **The Environments page shows you**:
* Environment names and locations
* The number of packages in the environments
* The number of CVEs associated with the packages in the environments
* The environment’s creator
* The last time the environments were updated
**The Environments page shows you**:
* Environment names and locations
* The number of packages in the environments
* The number of CVEs associated with the packages in the environments
* The environment’s creator
* The last time the environments were updated

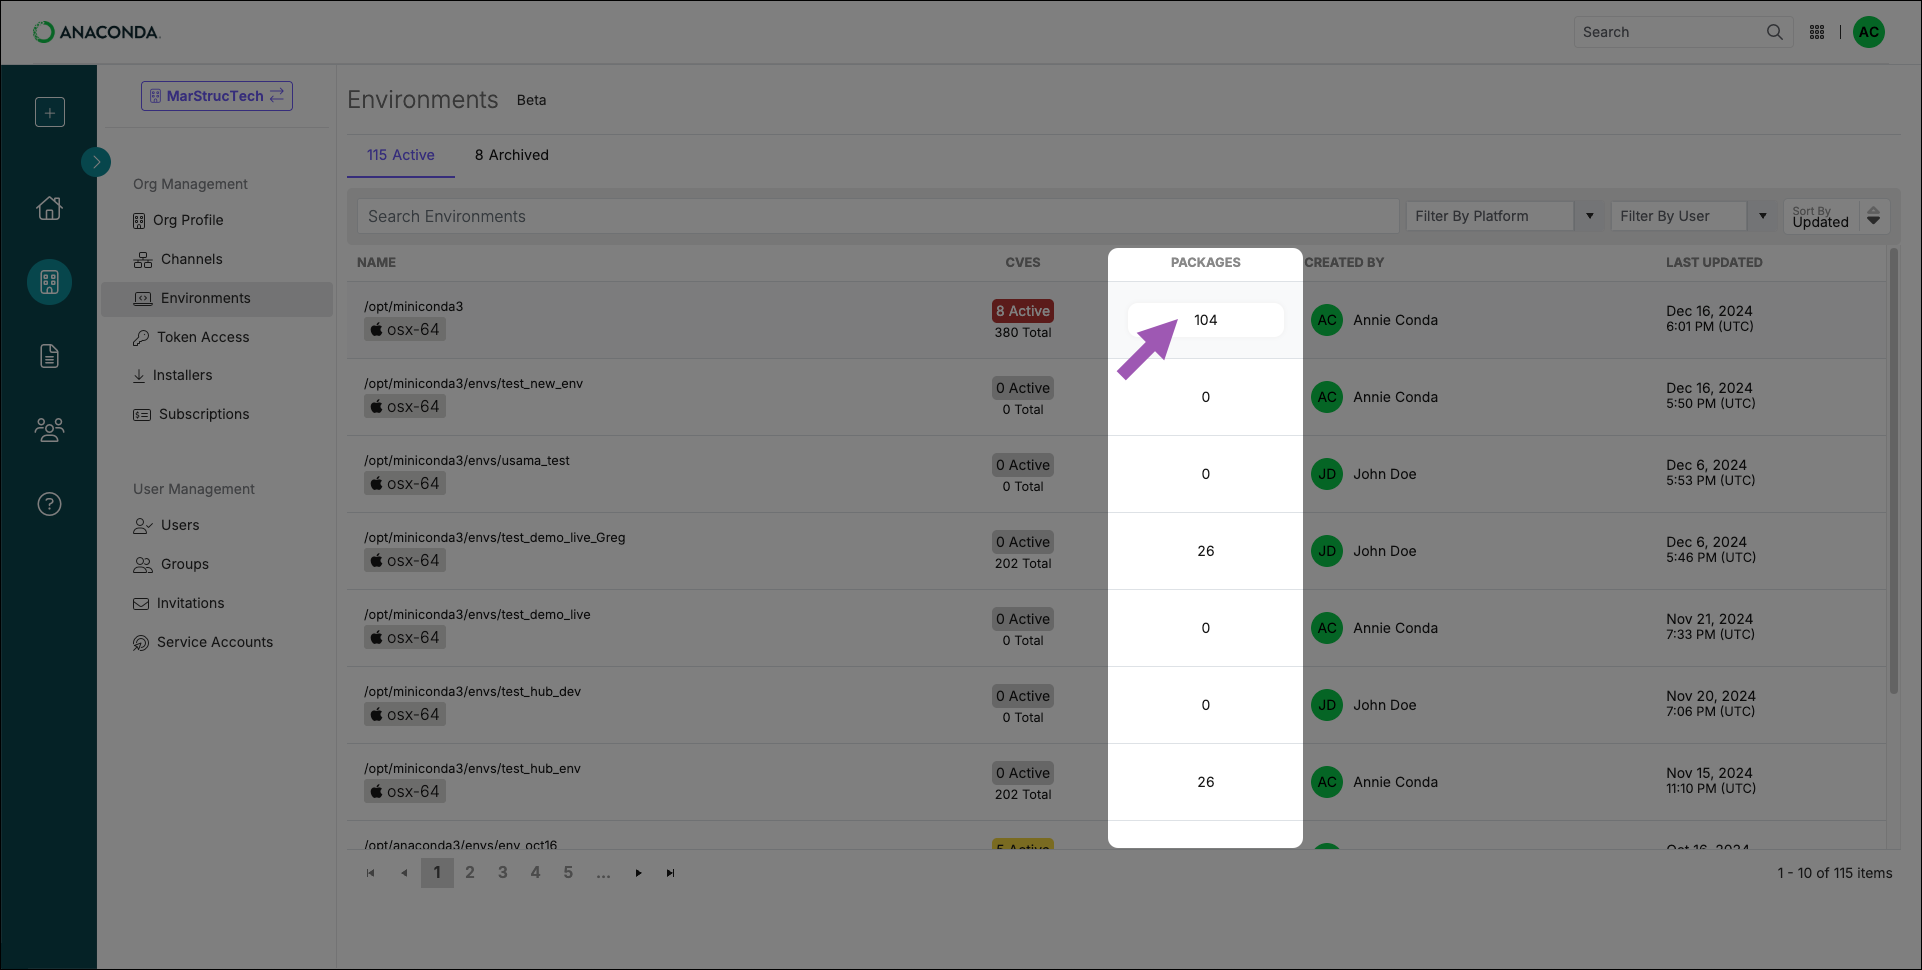
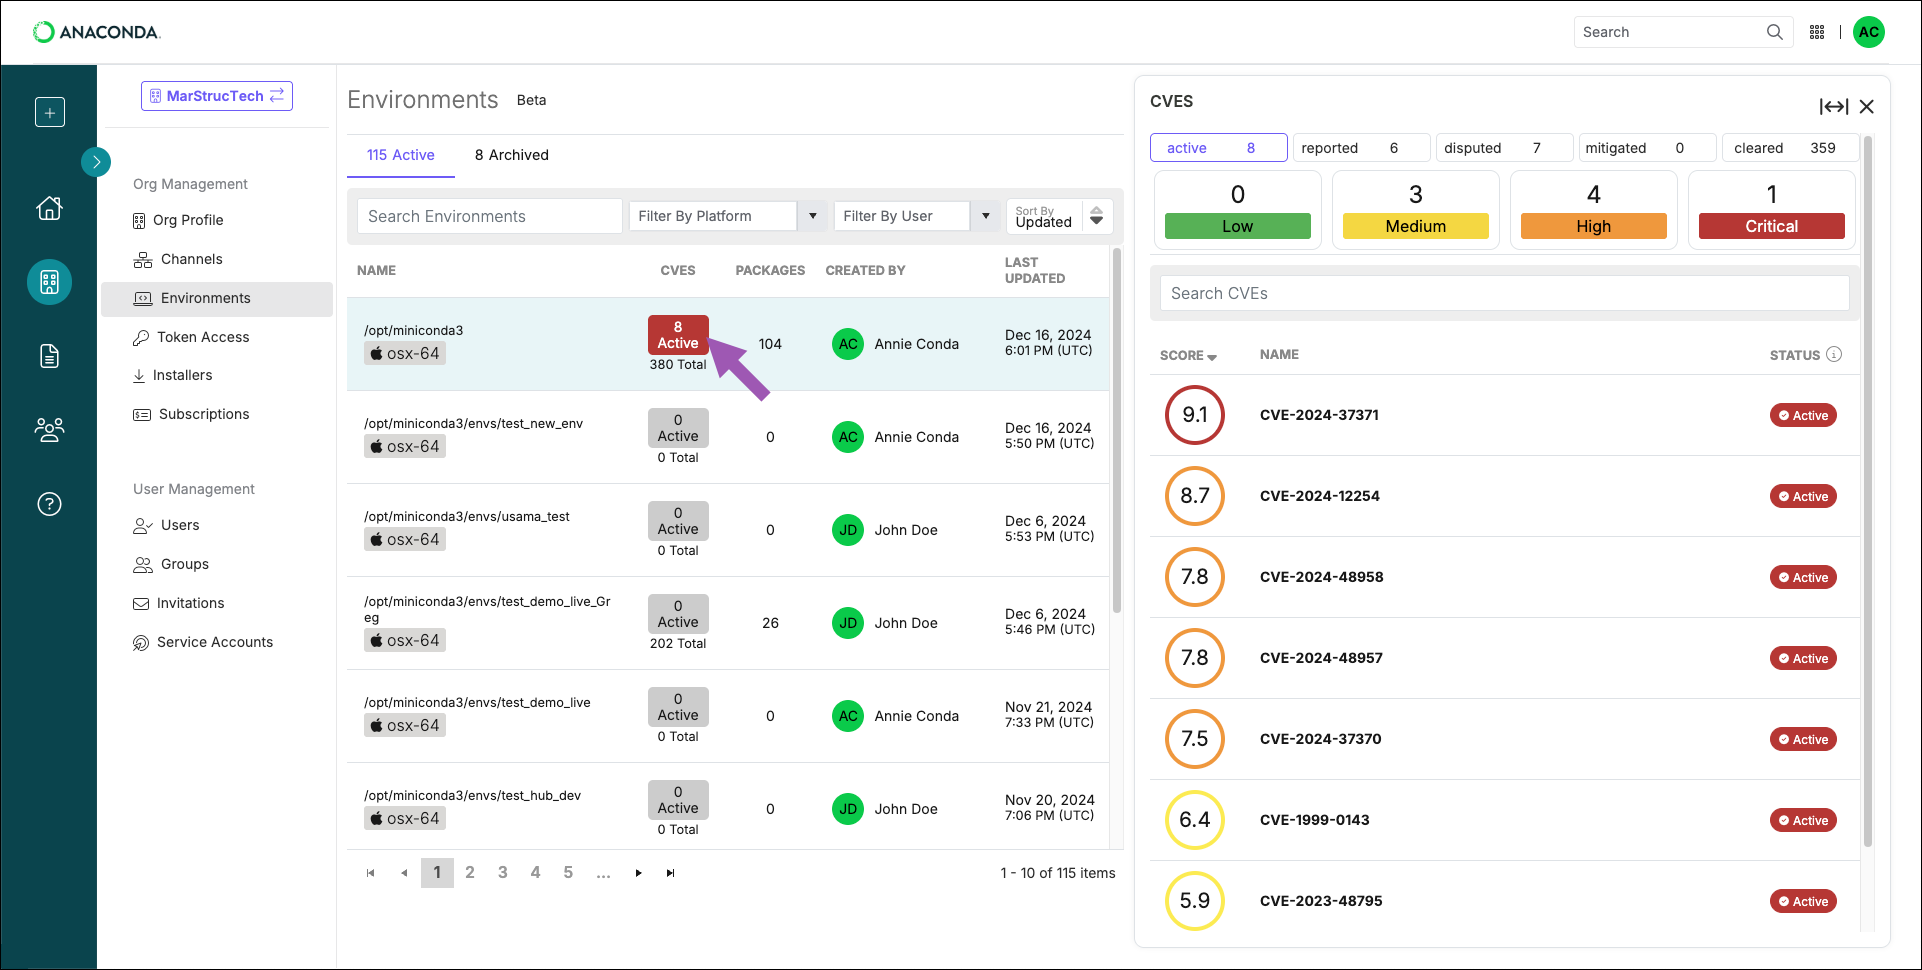
 Scan results are color coded to help you identify the CVE severity, and a checkmark is displayed beside a CVE name to indicate that it has undergone Anaconda curation. CVEs that are stricken through have a status of cleared and are safe to use in your environment.
## Blocking environments
Administrators can take action on environments that don’t meet security standards by utilizing organizational environment security status controls, which allow them to place a warning on an environment or block access to it completely. In both cases, administrators can enter a personalized message with guidance on what actions must be taken to restore access. Organization members who have had their environment blocked will receive the administrator’s message next time they try to activate the environment.
1. [Navigate to your Organizations page](https://anaconda.com/app/profile/organizations).
2. Select your organization.
3. Select
Scan results are color coded to help you identify the CVE severity, and a checkmark is displayed beside a CVE name to indicate that it has undergone Anaconda curation. CVEs that are stricken through have a status of cleared and are safe to use in your environment.
## Blocking environments
Administrators can take action on environments that don’t meet security standards by utilizing organizational environment security status controls, which allow them to place a warning on an environment or block access to it completely. In both cases, administrators can enter a personalized message with guidance on what actions must be taken to restore access. Organization members who have had their environment blocked will receive the administrator’s message next time they try to activate the environment.
1. [Navigate to your Organizations page](https://anaconda.com/app/profile/organizations).
2. Select your organization.
3. Select 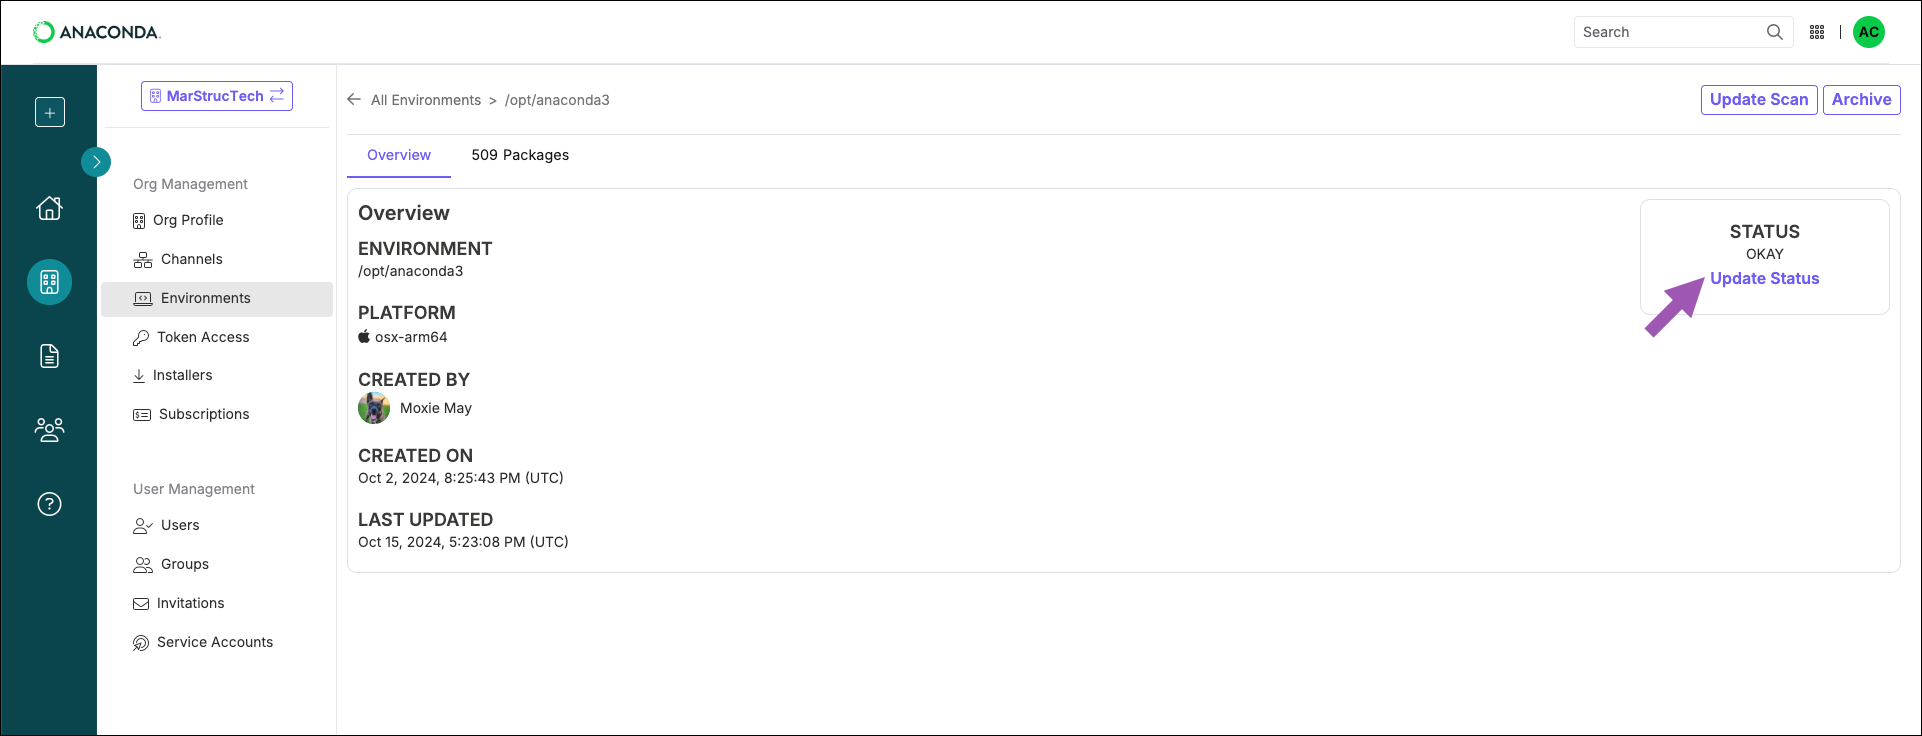 6. Select a status to apply to the environment and enter a custom message, if necessary.
7. Click **Save**.
## Archiving environments
Archiving environments allows administrators to maintain an organized workspace by moving inactive or obsolete environments to a dedicated tab. This separation reduces clutter in the active environment list, making it easier to manage.
1. [Navigate to your Organizations page](https://anaconda.com/app/profile/organizations).
2. Select your organization.
3. Select
6. Select a status to apply to the environment and enter a custom message, if necessary.
7. Click **Save**.
## Archiving environments
Archiving environments allows administrators to maintain an organized workspace by moving inactive or obsolete environments to a dedicated tab. This separation reduces clutter in the active environment list, making it easier to manage.
1. [Navigate to your Organizations page](https://anaconda.com/app/profile/organizations).
2. Select your organization.
3. Select 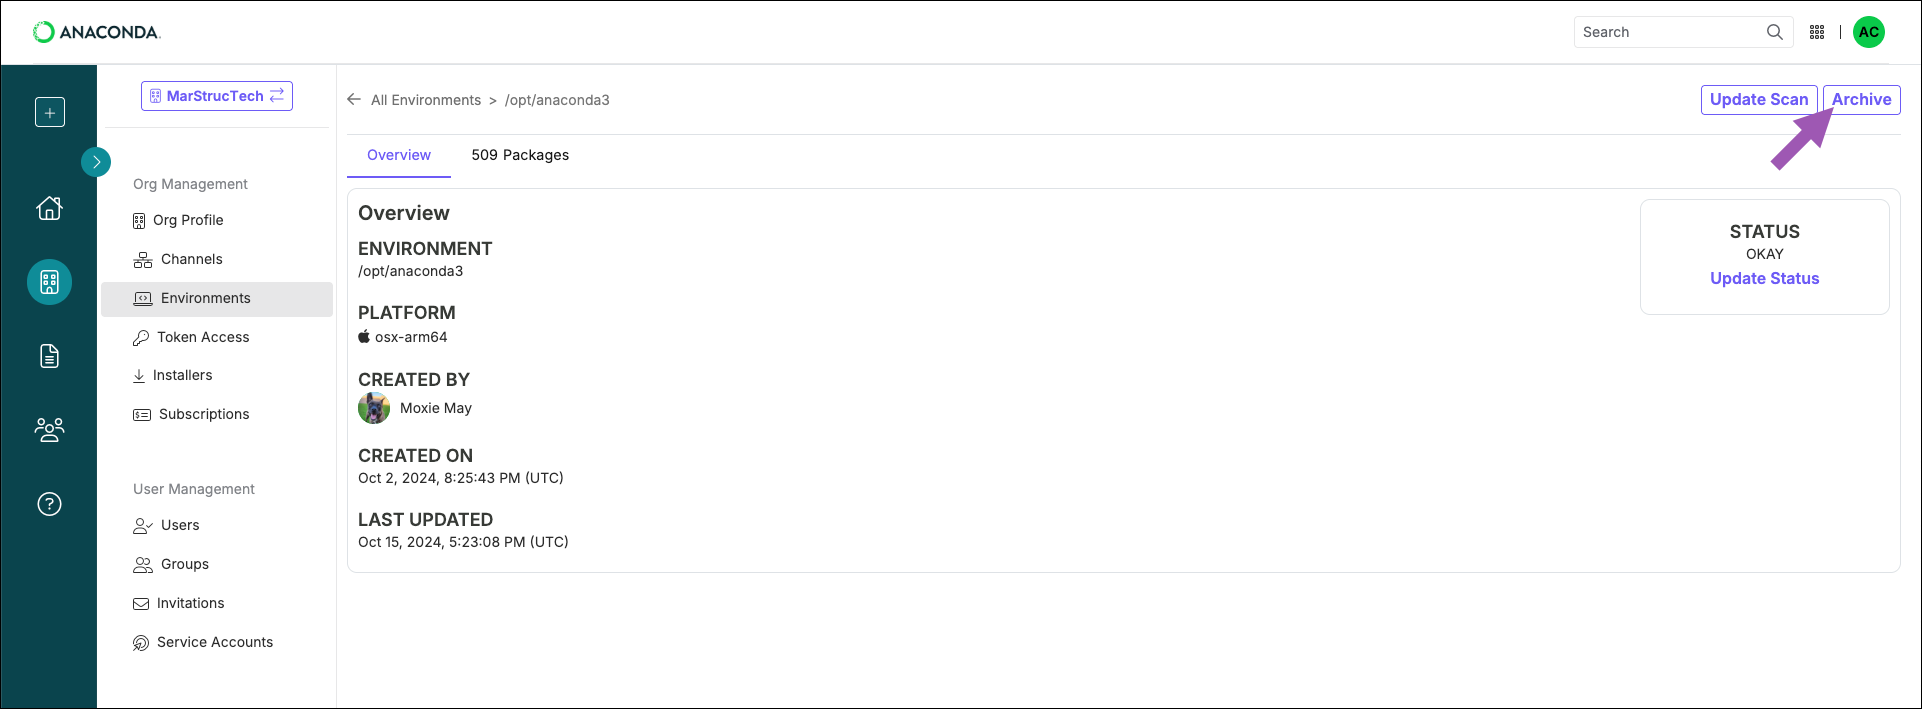


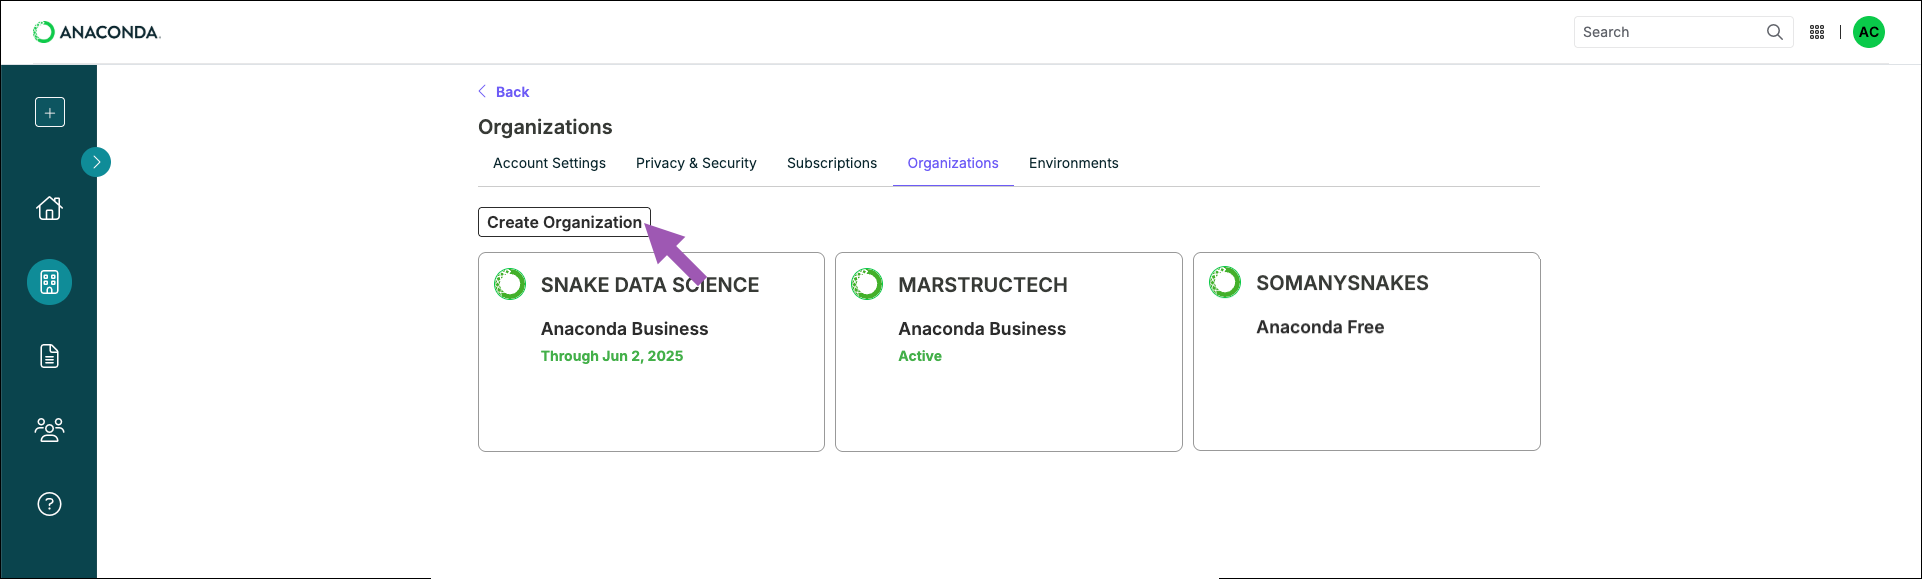 4. Follow the on-screen instructions to set up your organization. Don’t worry if you don’t have all the necessary information; you can come back and complete your organization’s information at a later time.

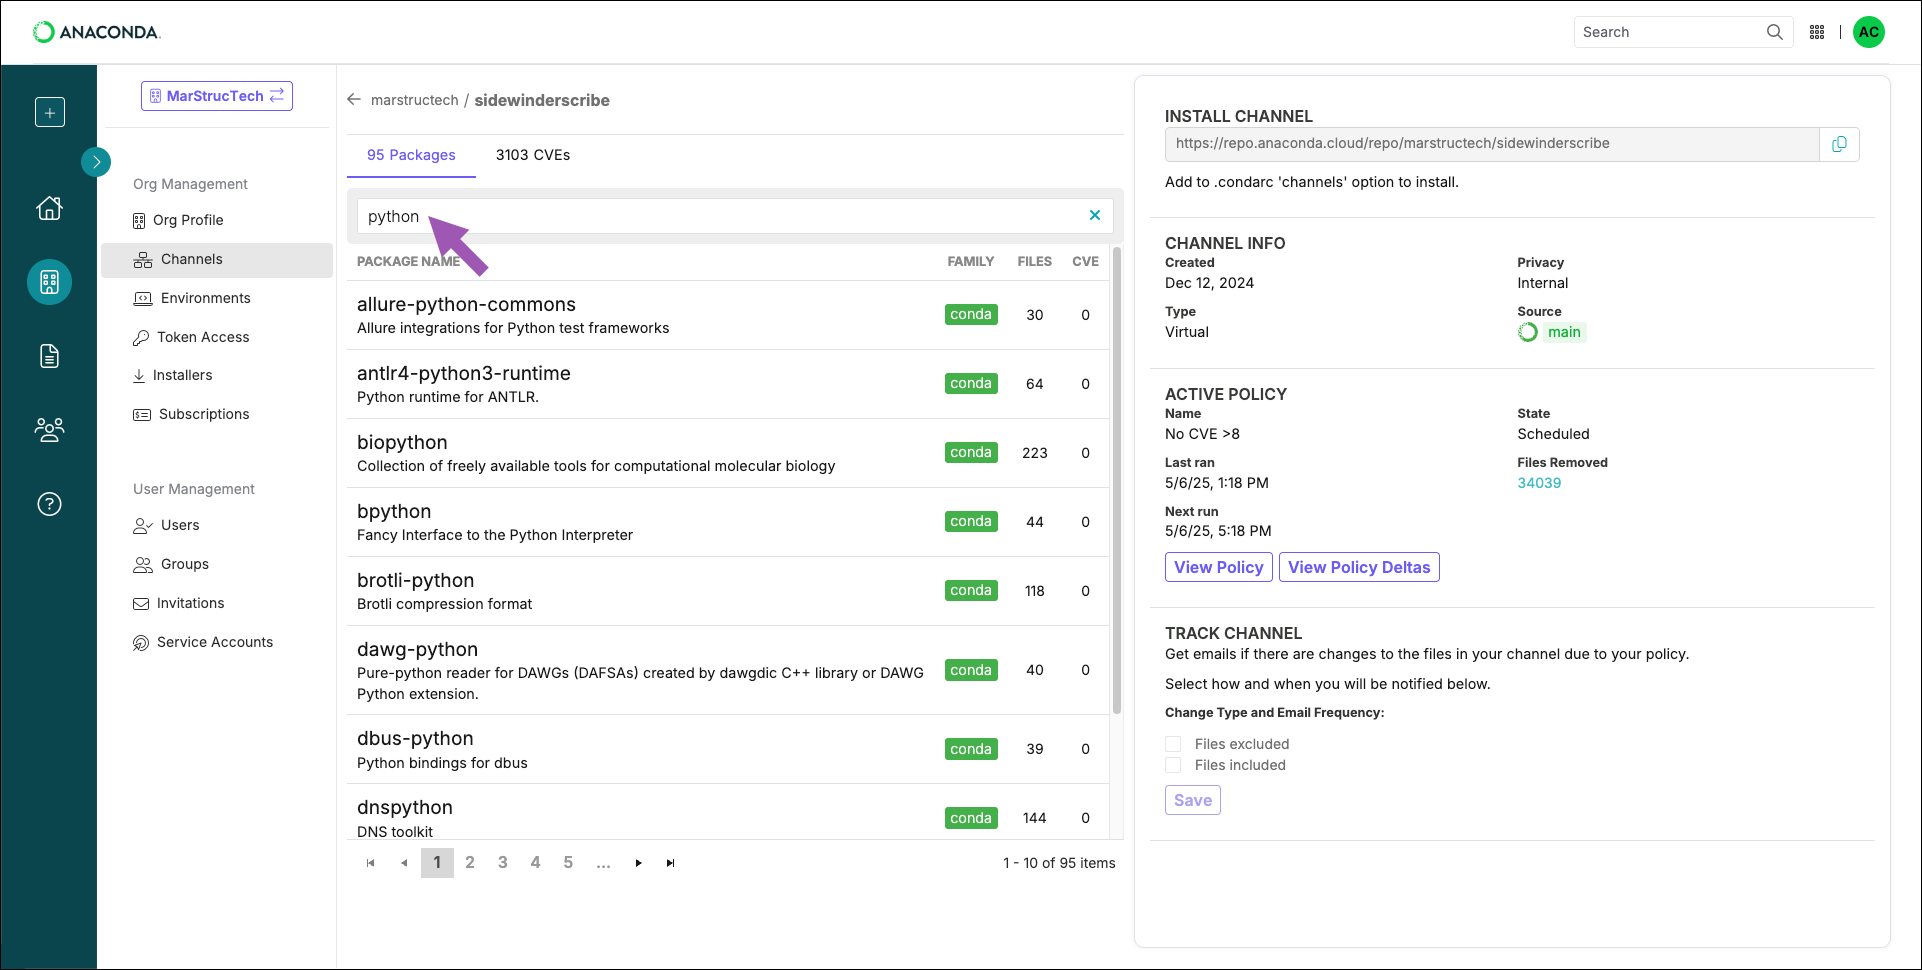 ## Viewing package details
Clicking on any package in a channel will display the package details.
From here, you can view the following information:
* All the files contained within the package
* The package’s dependents (other packages that require this package to operate properly)
* The package’s dependencies (other packages that this package needs to operate properly)
* CVEs that are associated with files in the package **(for Business tier organizations)**
## Viewing package details
Clicking on any package in a channel will display the package details.
From here, you can view the following information:
* All the files contained within the package
* The package’s dependents (other packages that require this package to operate properly)
* The package’s dependencies (other packages that this package needs to operate properly)
* CVEs that are associated with files in the package **(for Business tier organizations)**
 ## Package signatures
Packages in Anaconda’s repository come with a security signature: a special key value that proves that the package hasn’t been tampered with since going through Anaconda’s curation process. Files within a package that have a signature display a
## Package signatures
Packages in Anaconda’s repository come with a security signature: a special key value that proves that the package hasn’t been tampered with since going through Anaconda’s curation process. Files within a package that have a signature display a 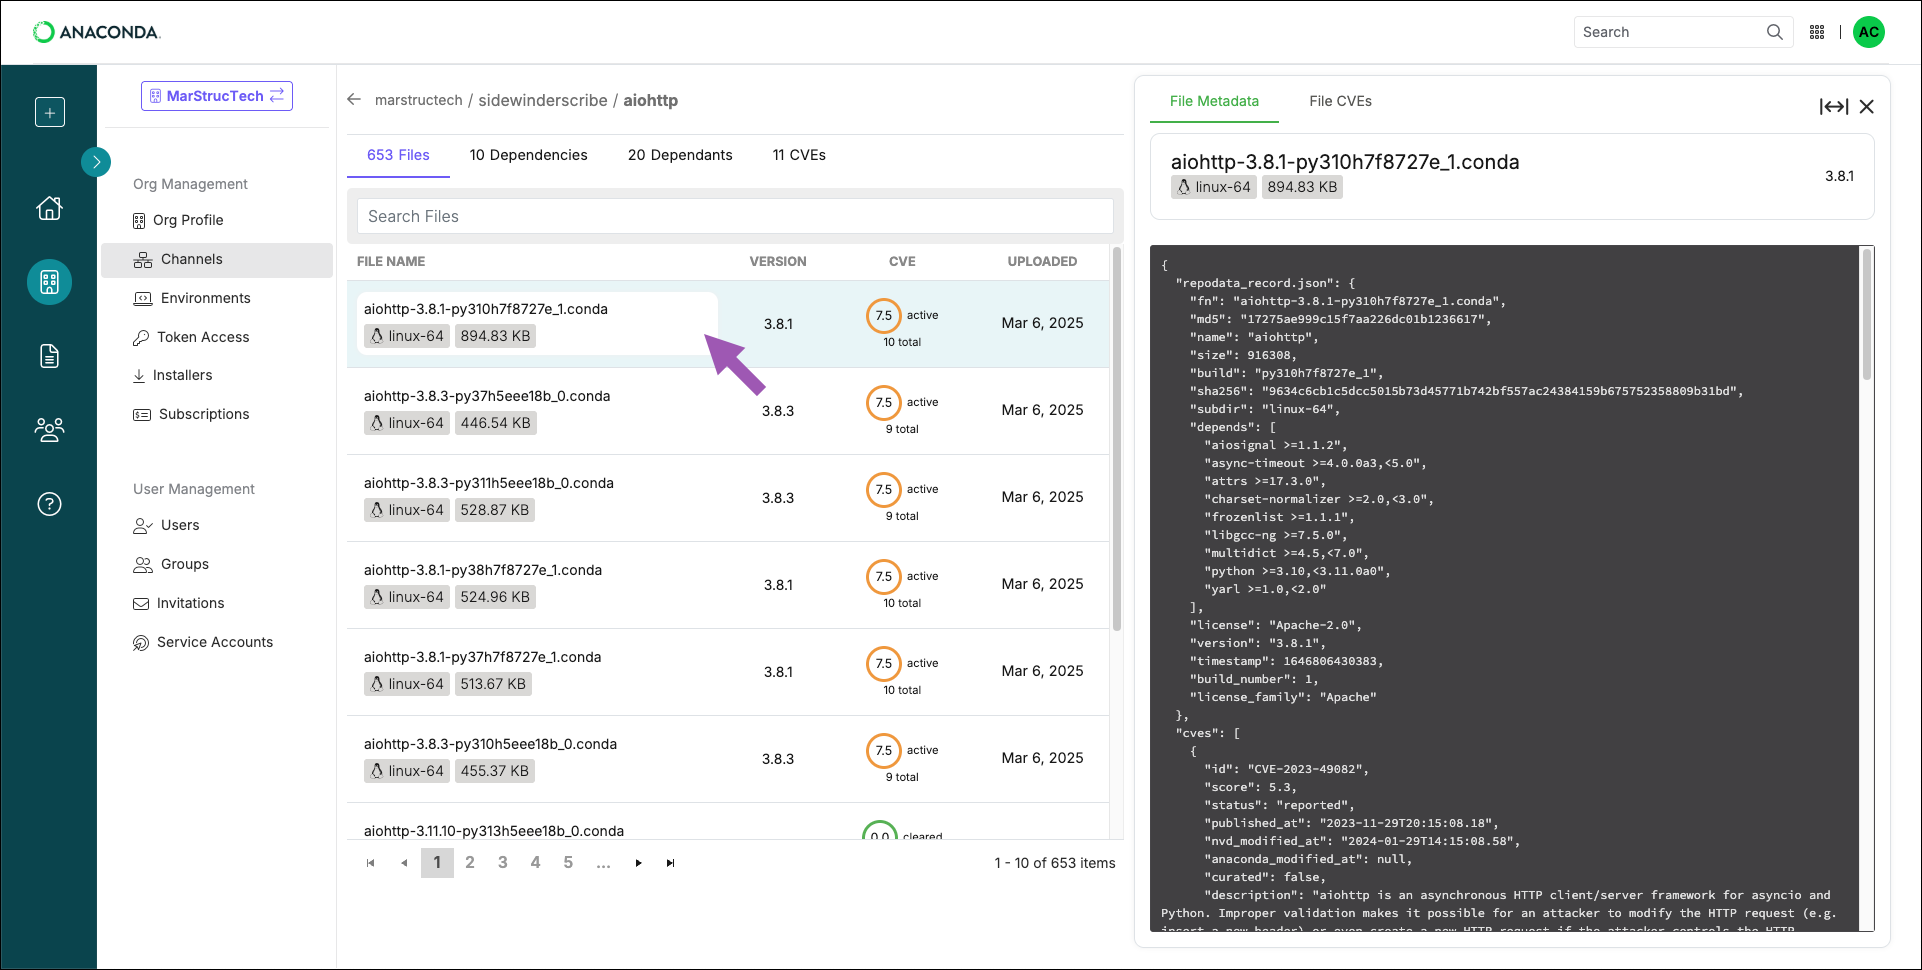

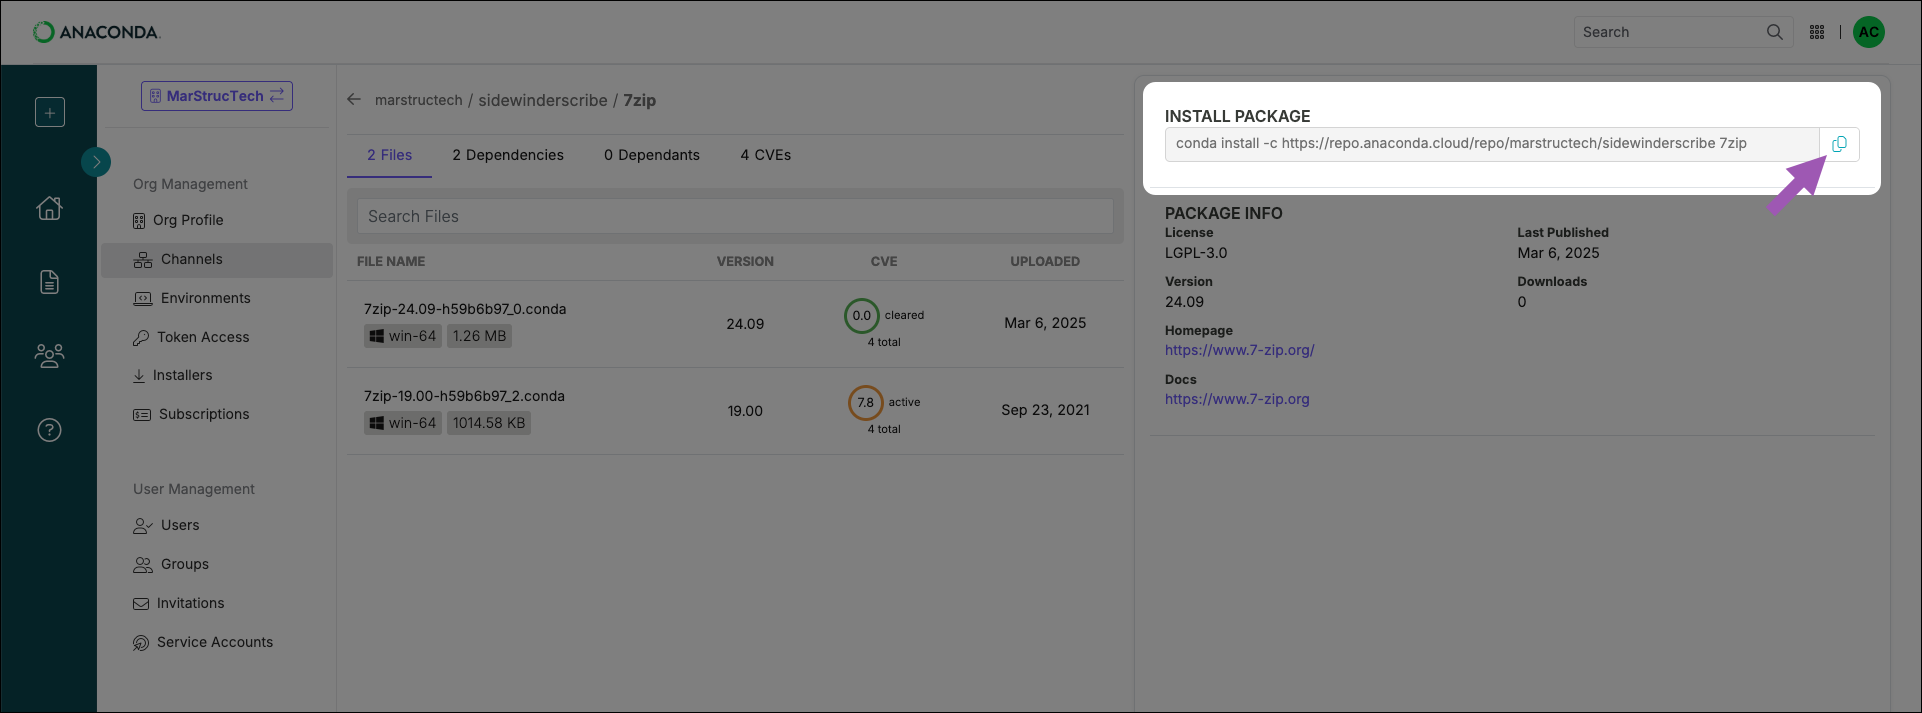 # Policy filters
Source: https://anaconda.com/docs/psm/cloud/policy-filters
# Policy filters
Source: https://anaconda.com/docs/psm/cloud/policy-filters
 2. Provide a unique name for your policy. Anaconda recommends making it something descriptive.
3. In the **Exclude package if** section, click
2. Provide a unique name for your policy. Anaconda recommends making it something descriptive.
3. In the **Exclude package if** section, click 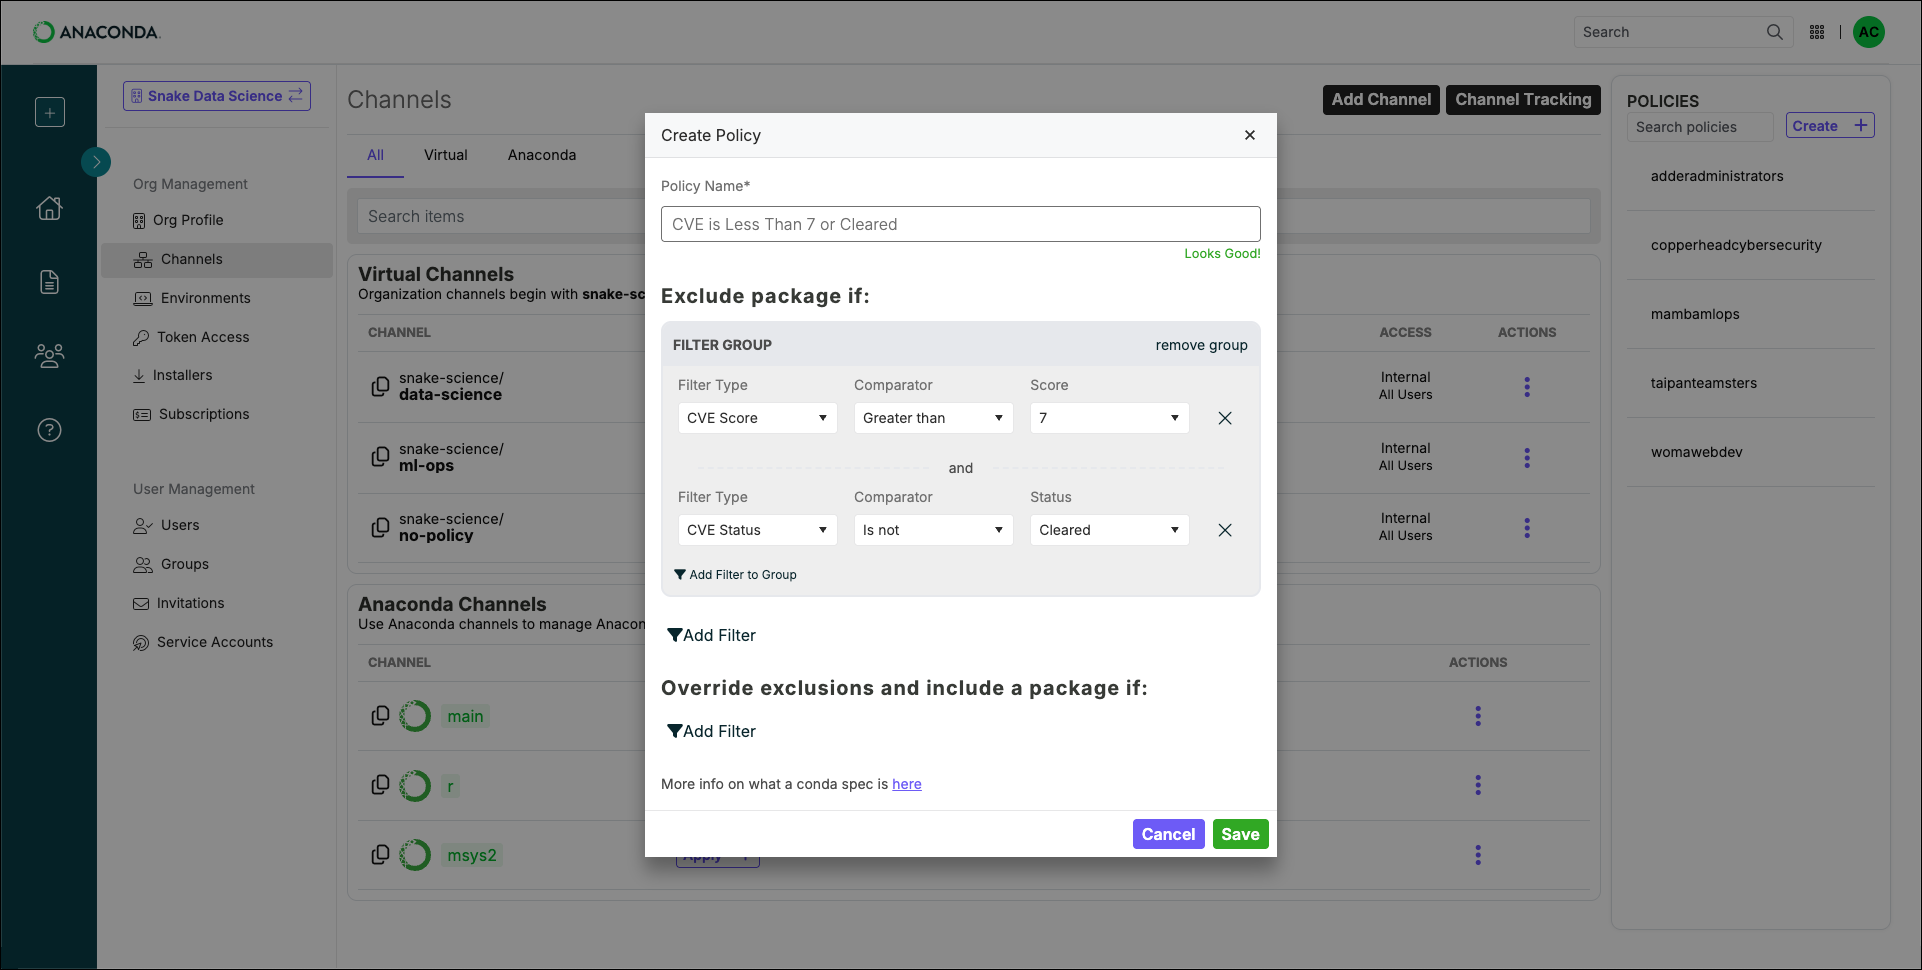
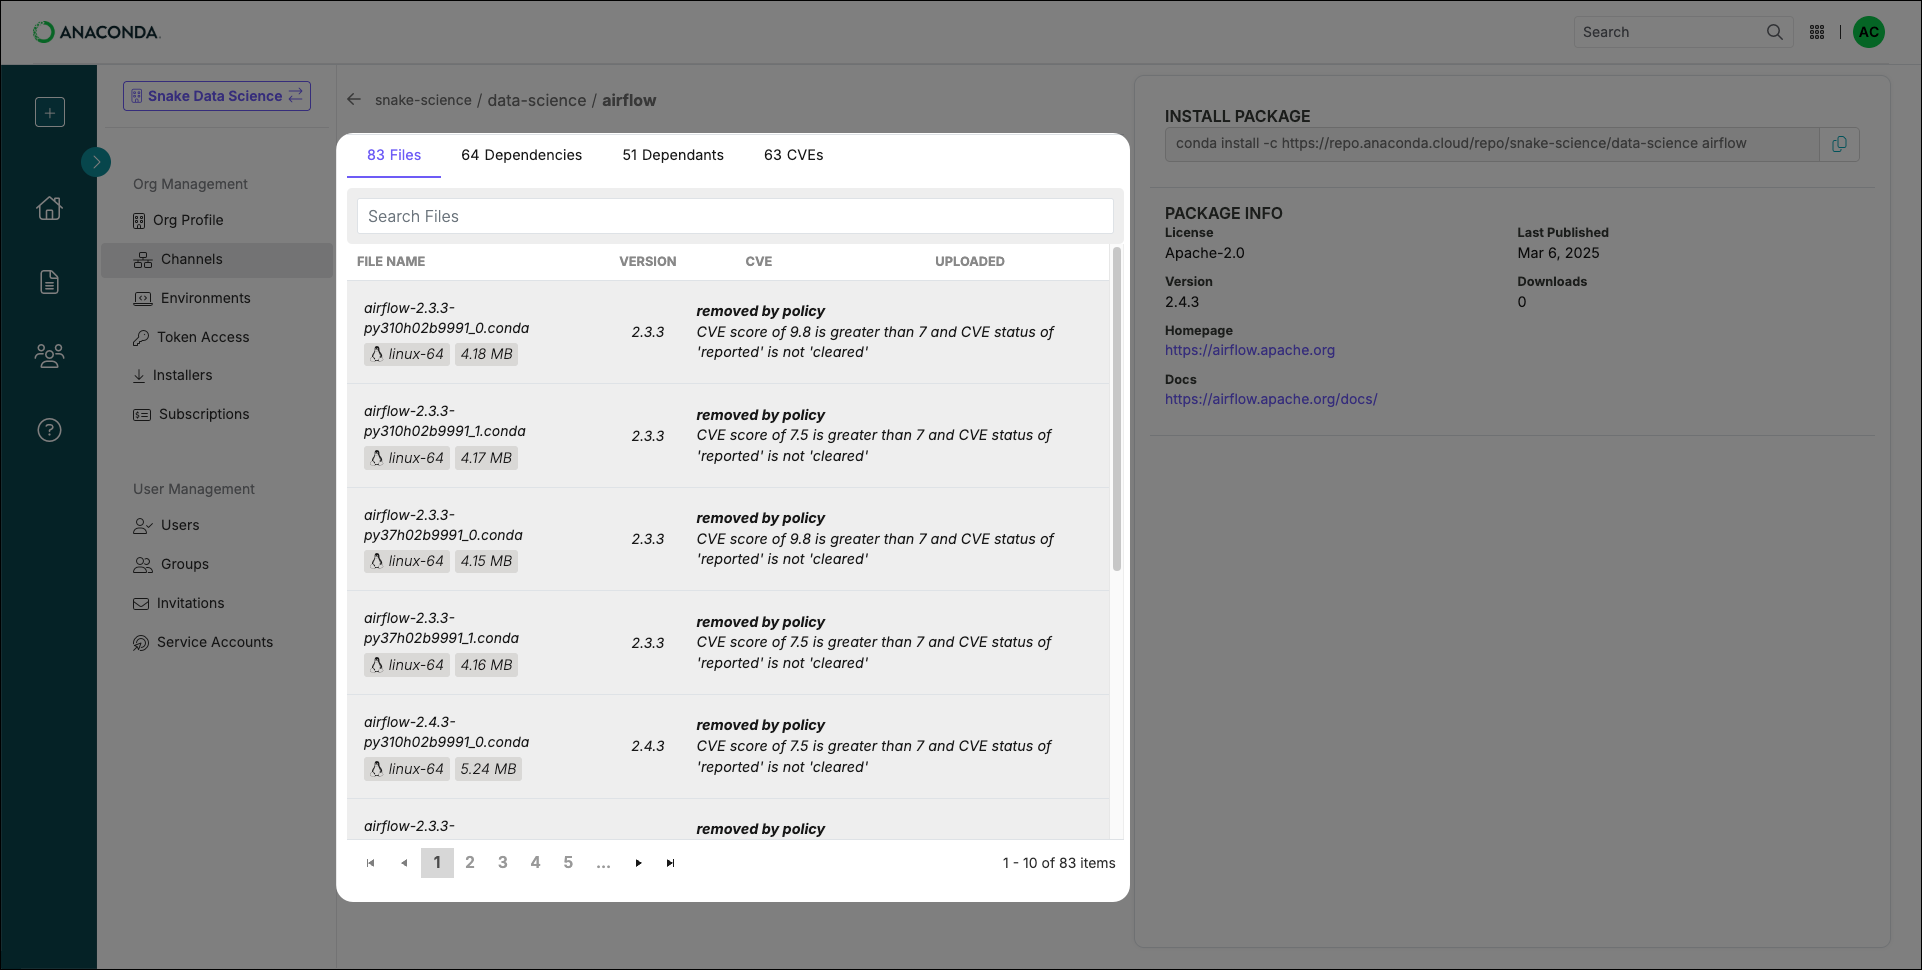
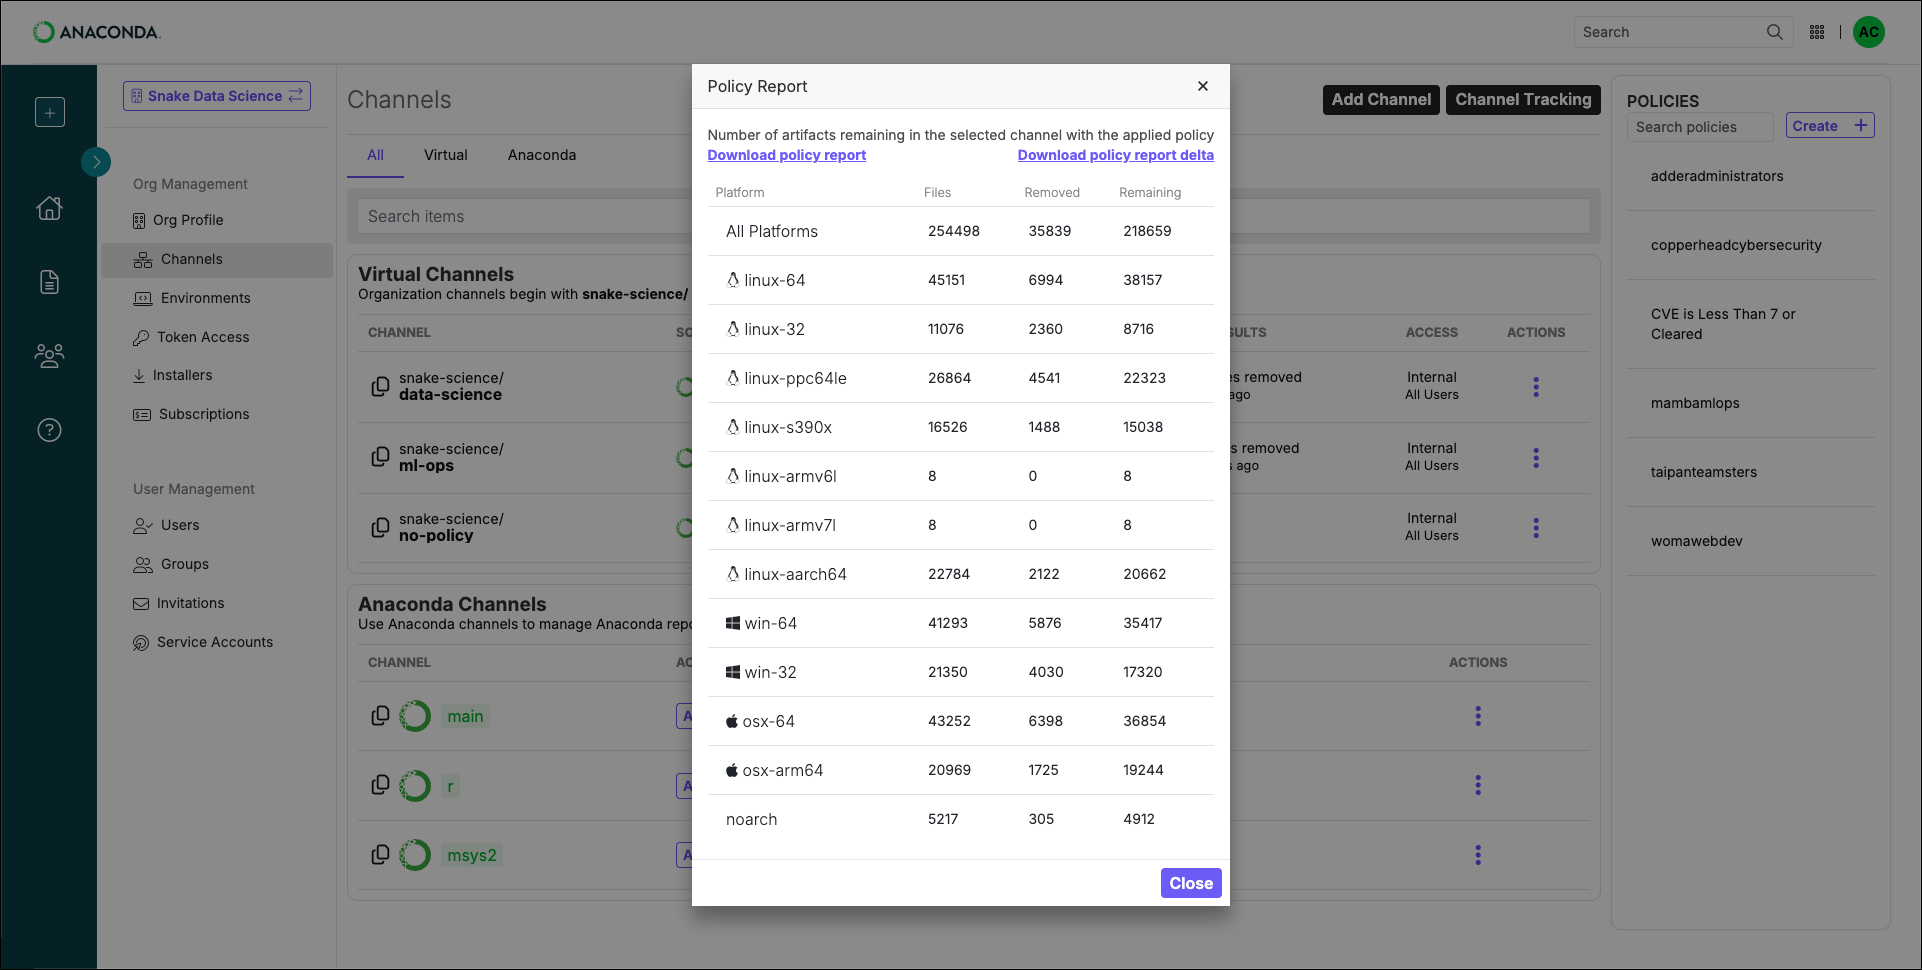
 ## Changing your account email address
To update the email address associated with your account:
1. [Sign in to Anaconda.com](https://auth.anaconda.com/ui/login?return_to=https://anaconda.com/app/).
2. Open the user dropdown menu and select
From here you have several options for account registration:
* Sign up manually with an email and password
* Authenticate with a GitHub, Gmail, or Microsoft account
### Signing up manually
1. Click **Sign Up with Email**.
2. Enter your name, email address, and password.
3. Check your email for the verification email.
4. Click the verification link in your email to complete account verification.
5. (Optional) Complete the user survey. This survey helps Anaconda get to know you as a user and improve your experience in the future.
## Subscribing to Anaconda
For information and help with managing subscriptions, see [Subscriptions](./subscriptions).
## Installing Anaconda software
### Installing conda
You can obtain conda by installing either Anaconda Distribution or Miniconda. If you already have conda installed, skip ahead to [Installing Anaconda Navigator](#installing-anaconda-navigator).
If you do not have conda installed, [download either Anaconda Distribution or Miniconda](https://www.anaconda.com/download/success) and install it on your system before proceeding. If you’re unsure which to download, refer to our [Getting Started with Anaconda](/getting-started/getting-started) topic for guidance.
### Installing Anaconda Navigator
Anaconda Navigator is a desktop graphical user interface (GUI) that uses conda to help you manage your environments. If you installed Anaconda Distribution, you already have Anaconda Navigator and can skip ahead to [Installing conda-token](#installing-conda-token).
If you installed Miniconda, you can install Anaconda Navigator by opening Anaconda Prompt (Terminal on macOS/Linux) and running the following command:
```sh
conda install anaconda-navigator
```
## Changing your account email address
To update the email address associated with your account:
1. [Sign in to Anaconda.com](https://auth.anaconda.com/ui/login?return_to=https://anaconda.com/app/).
2. Open the user dropdown menu and select
From here you have several options for account registration:
* Sign up manually with an email and password
* Authenticate with a GitHub, Gmail, or Microsoft account
### Signing up manually
1. Click **Sign Up with Email**.
2. Enter your name, email address, and password.
3. Check your email for the verification email.
4. Click the verification link in your email to complete account verification.
5. (Optional) Complete the user survey. This survey helps Anaconda get to know you as a user and improve your experience in the future.
## Subscribing to Anaconda
For information and help with managing subscriptions, see [Subscriptions](./subscriptions).
## Installing Anaconda software
### Installing conda
You can obtain conda by installing either Anaconda Distribution or Miniconda. If you already have conda installed, skip ahead to [Installing Anaconda Navigator](#installing-anaconda-navigator).
If you do not have conda installed, [download either Anaconda Distribution or Miniconda](https://www.anaconda.com/download/success) and install it on your system before proceeding. If you’re unsure which to download, refer to our [Getting Started with Anaconda](/getting-started/getting-started) topic for guidance.
### Installing Anaconda Navigator
Anaconda Navigator is a desktop graphical user interface (GUI) that uses conda to help you manage your environments. If you installed Anaconda Distribution, you already have Anaconda Navigator and can skip ahead to [Installing conda-token](#installing-conda-token).
If you installed Miniconda, you can install Anaconda Navigator by opening Anaconda Prompt (Terminal on macOS/Linux) and running the following command:
```sh
conda install anaconda-navigator
```


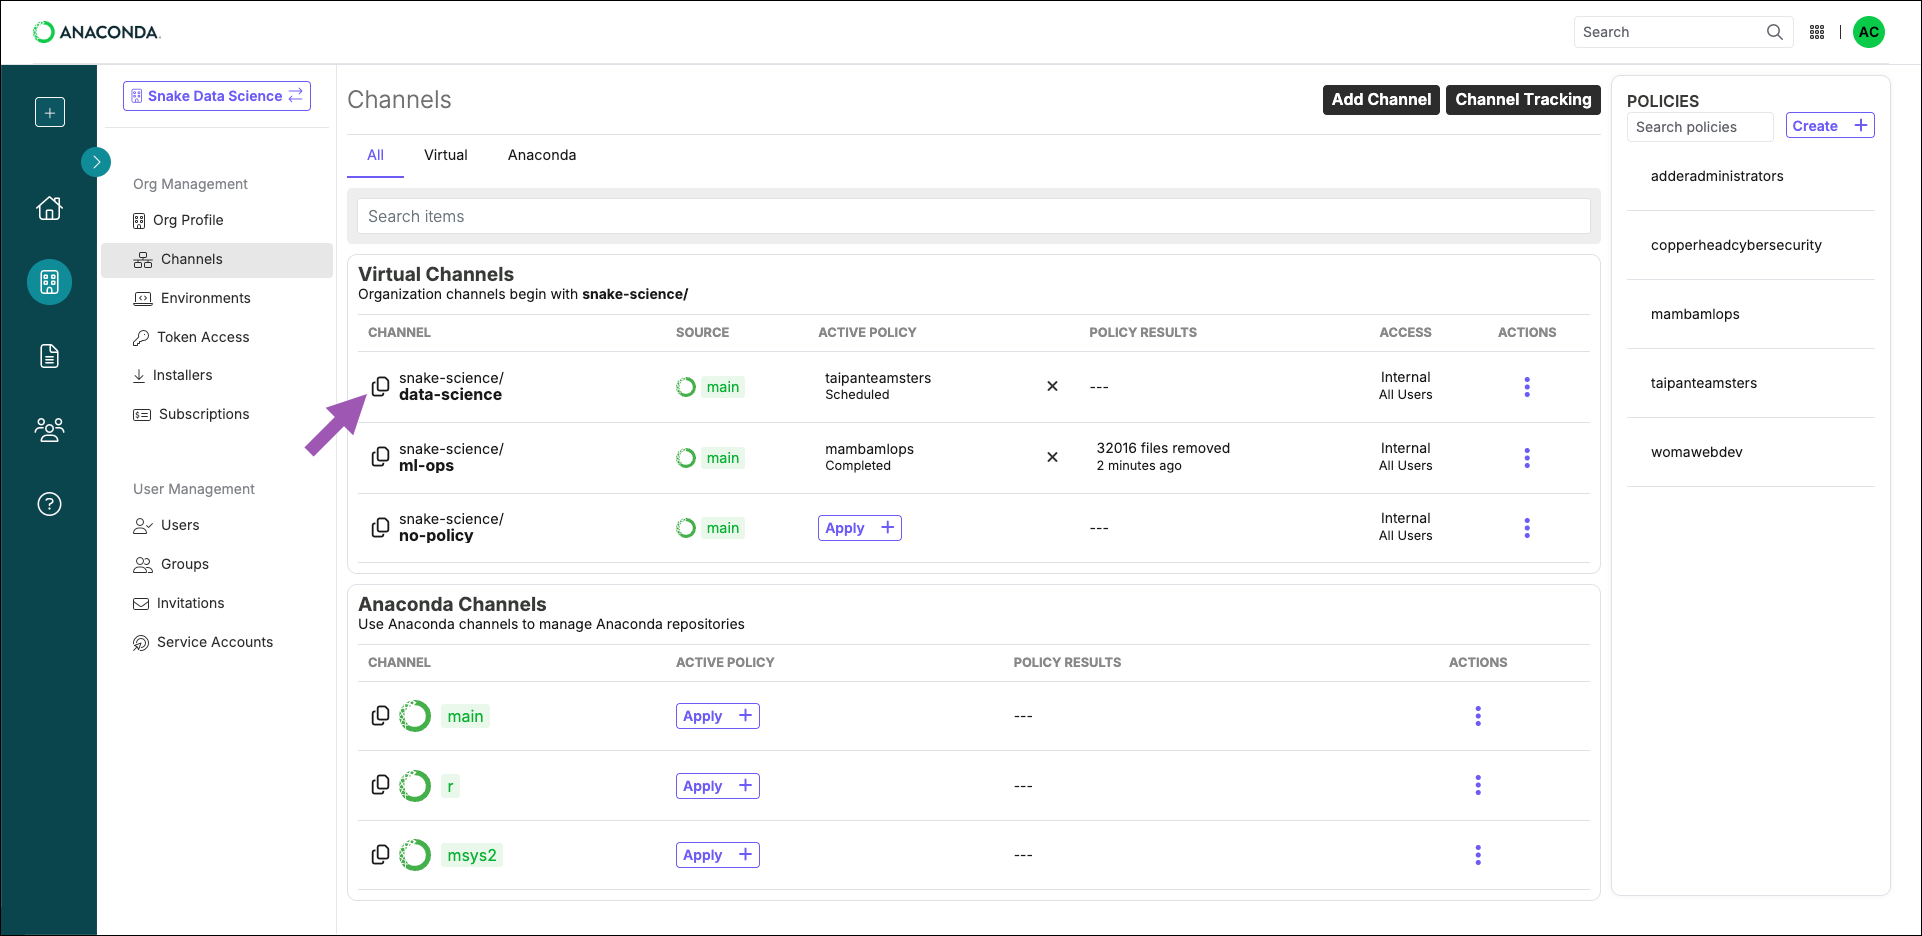 1. Open your terminal and run the following command:
```sh
# Replace
1. Open your terminal and run the following command:
```sh
# Replace  If you need to upgrade Python, run the following command:
```sh
conda update --name base python
```
If you need to upgrade Python, run the following command:
```sh
conda update --name base python
```
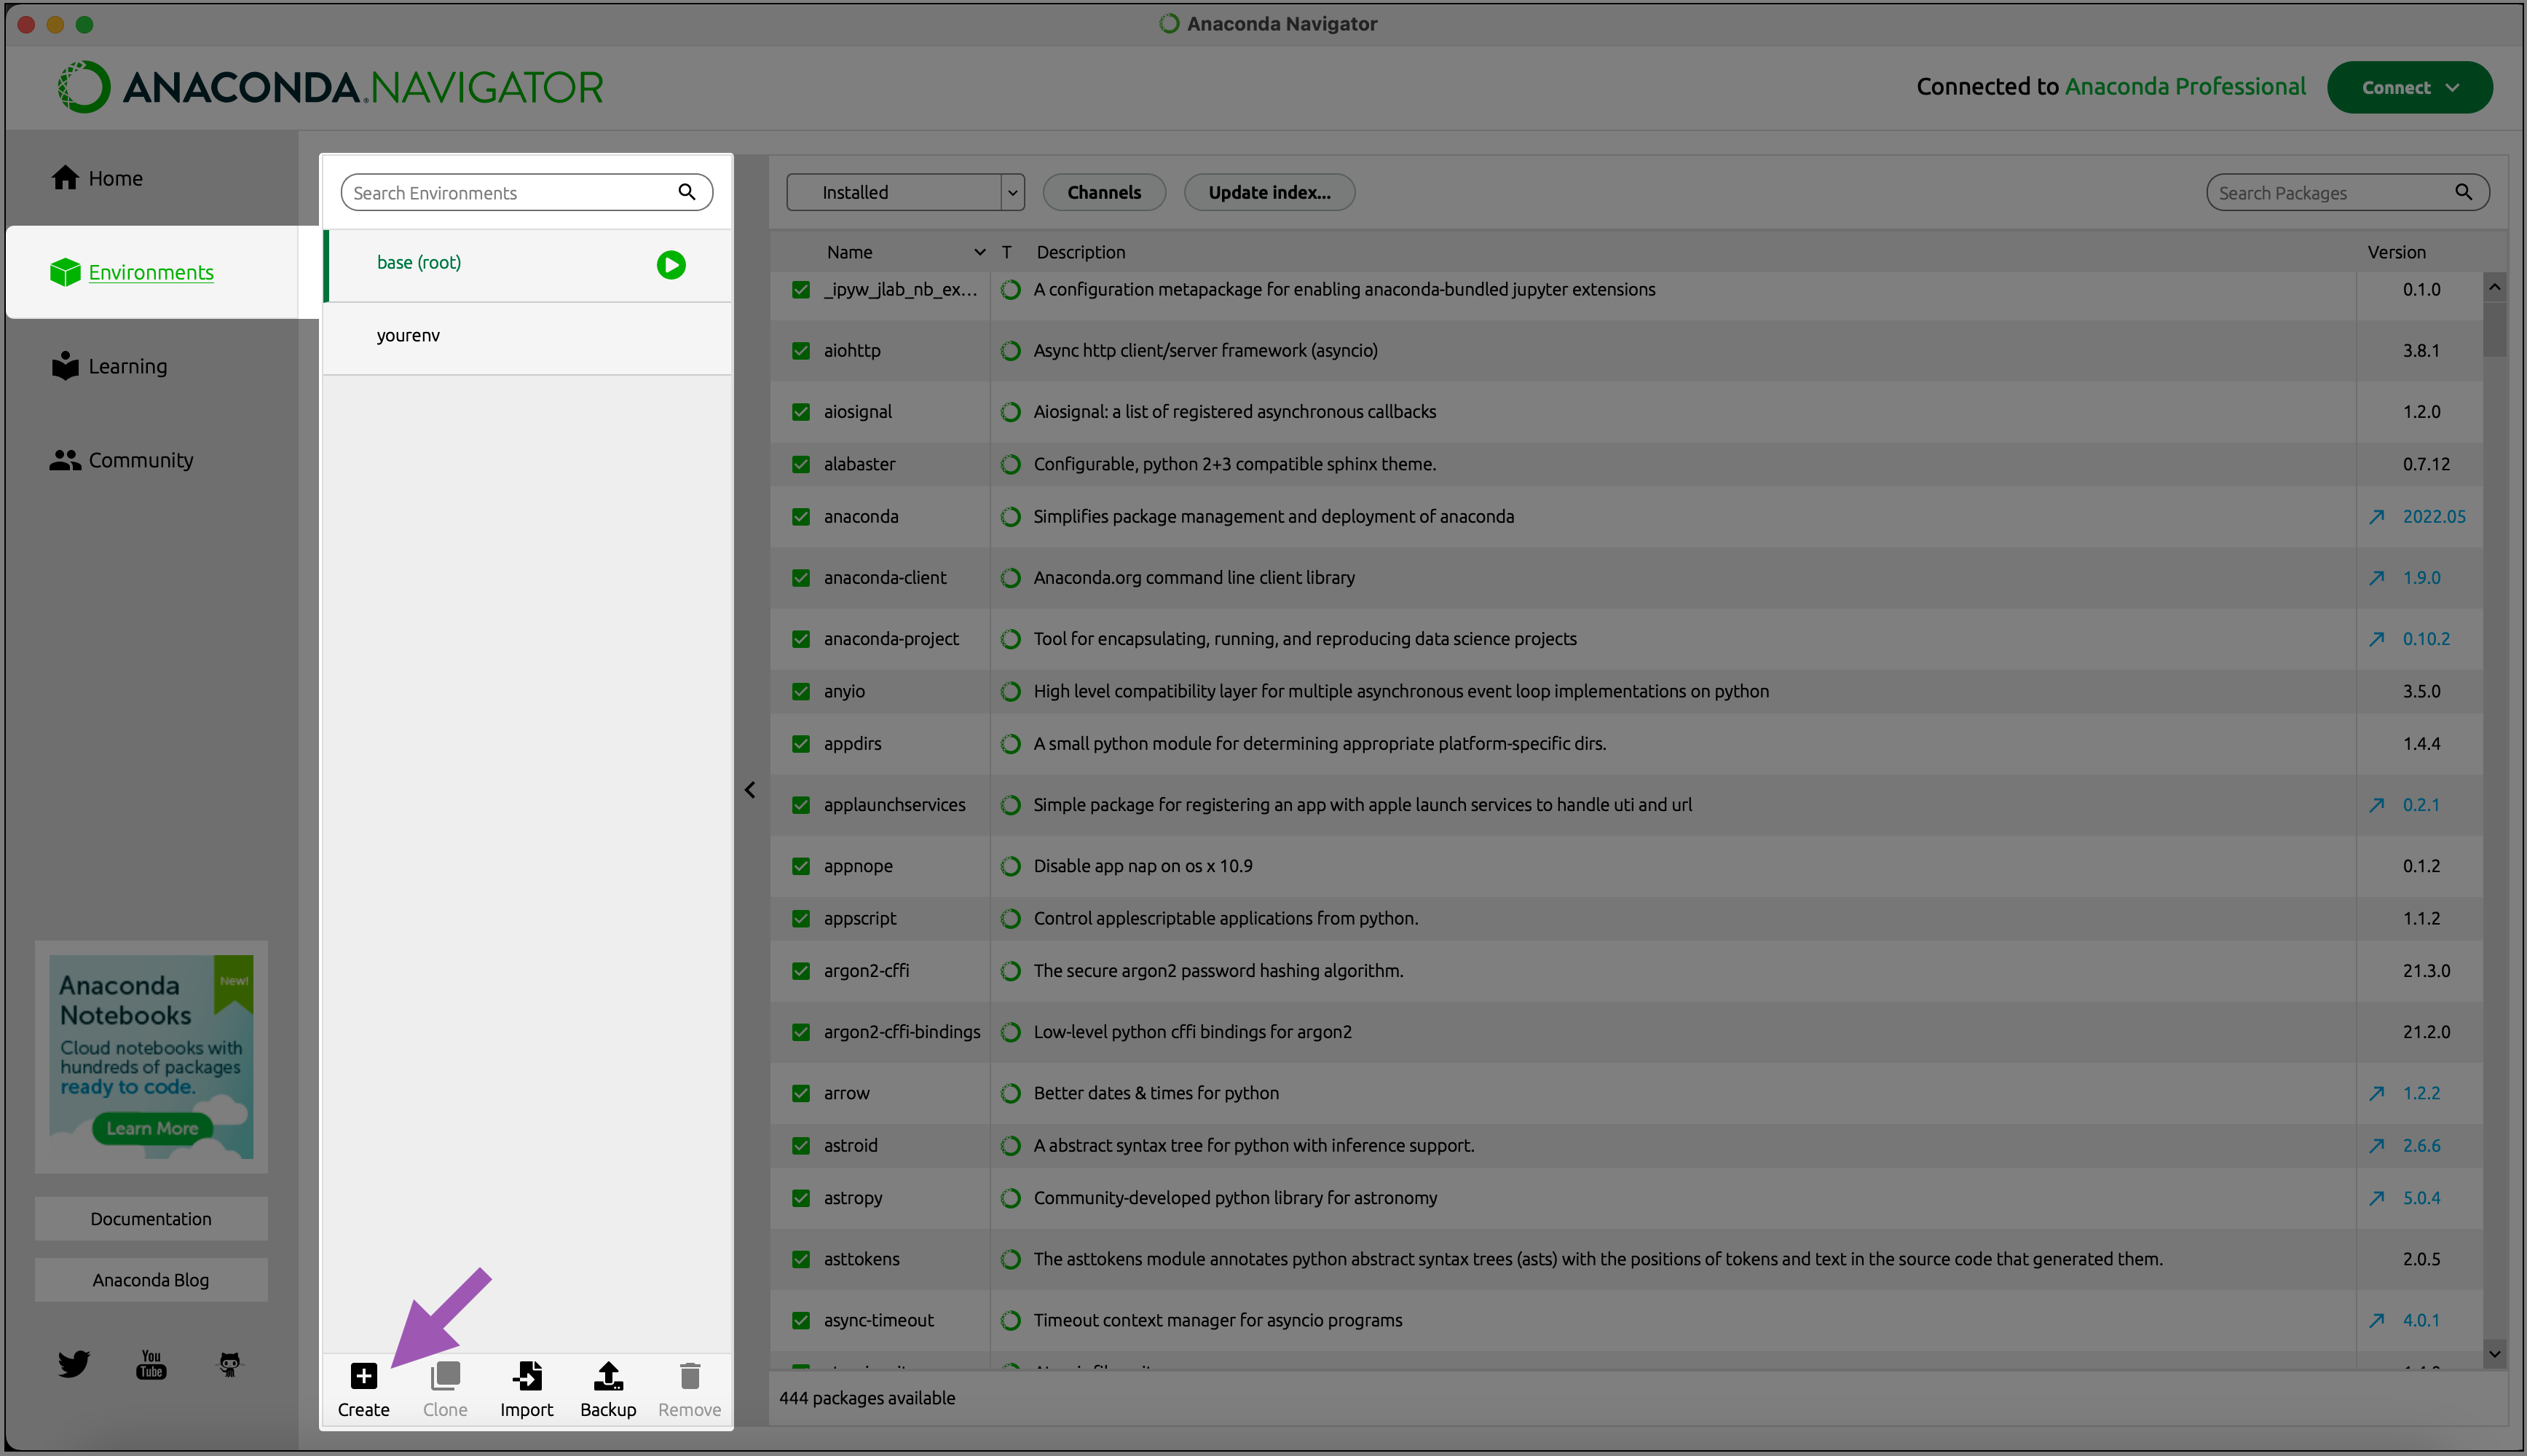 1. Enter a name for your environment and select a version of Python (3.11 is preferred) from the dropdown menu, then click **Create**.
2. Change the package selector to **Not installed**. This will show you packages that are available from your channel but are not installed on your machine.
1. Enter a name for your environment and select a version of Python (3.11 is preferred) from the dropdown menu, then click **Create**.
2. Change the package selector to **Not installed**. This will show you packages that are available from your channel but are not installed on your machine.
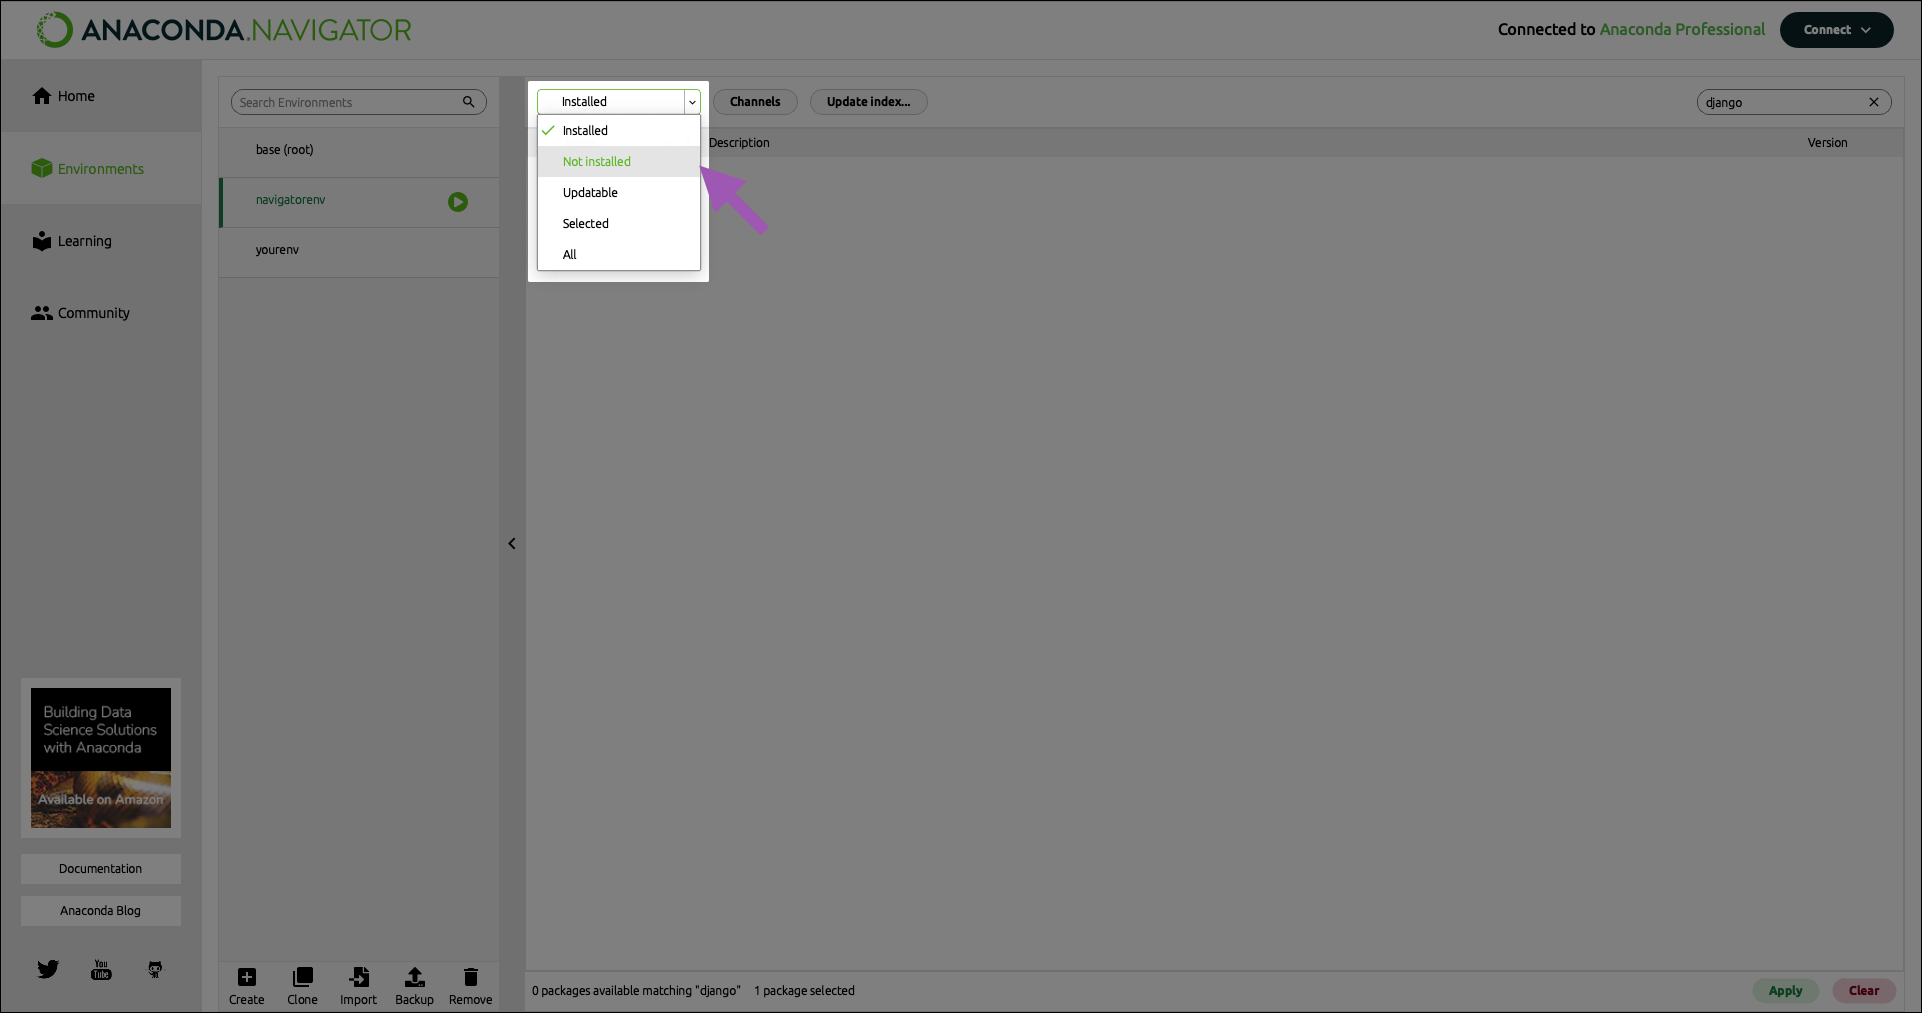 1. If you know the name of the package you need, you can enter it in the search bar to locate the package. Select a package to download and click **Apply**.
 1. Click **Apply** to install the selected packages (and their dependencies).
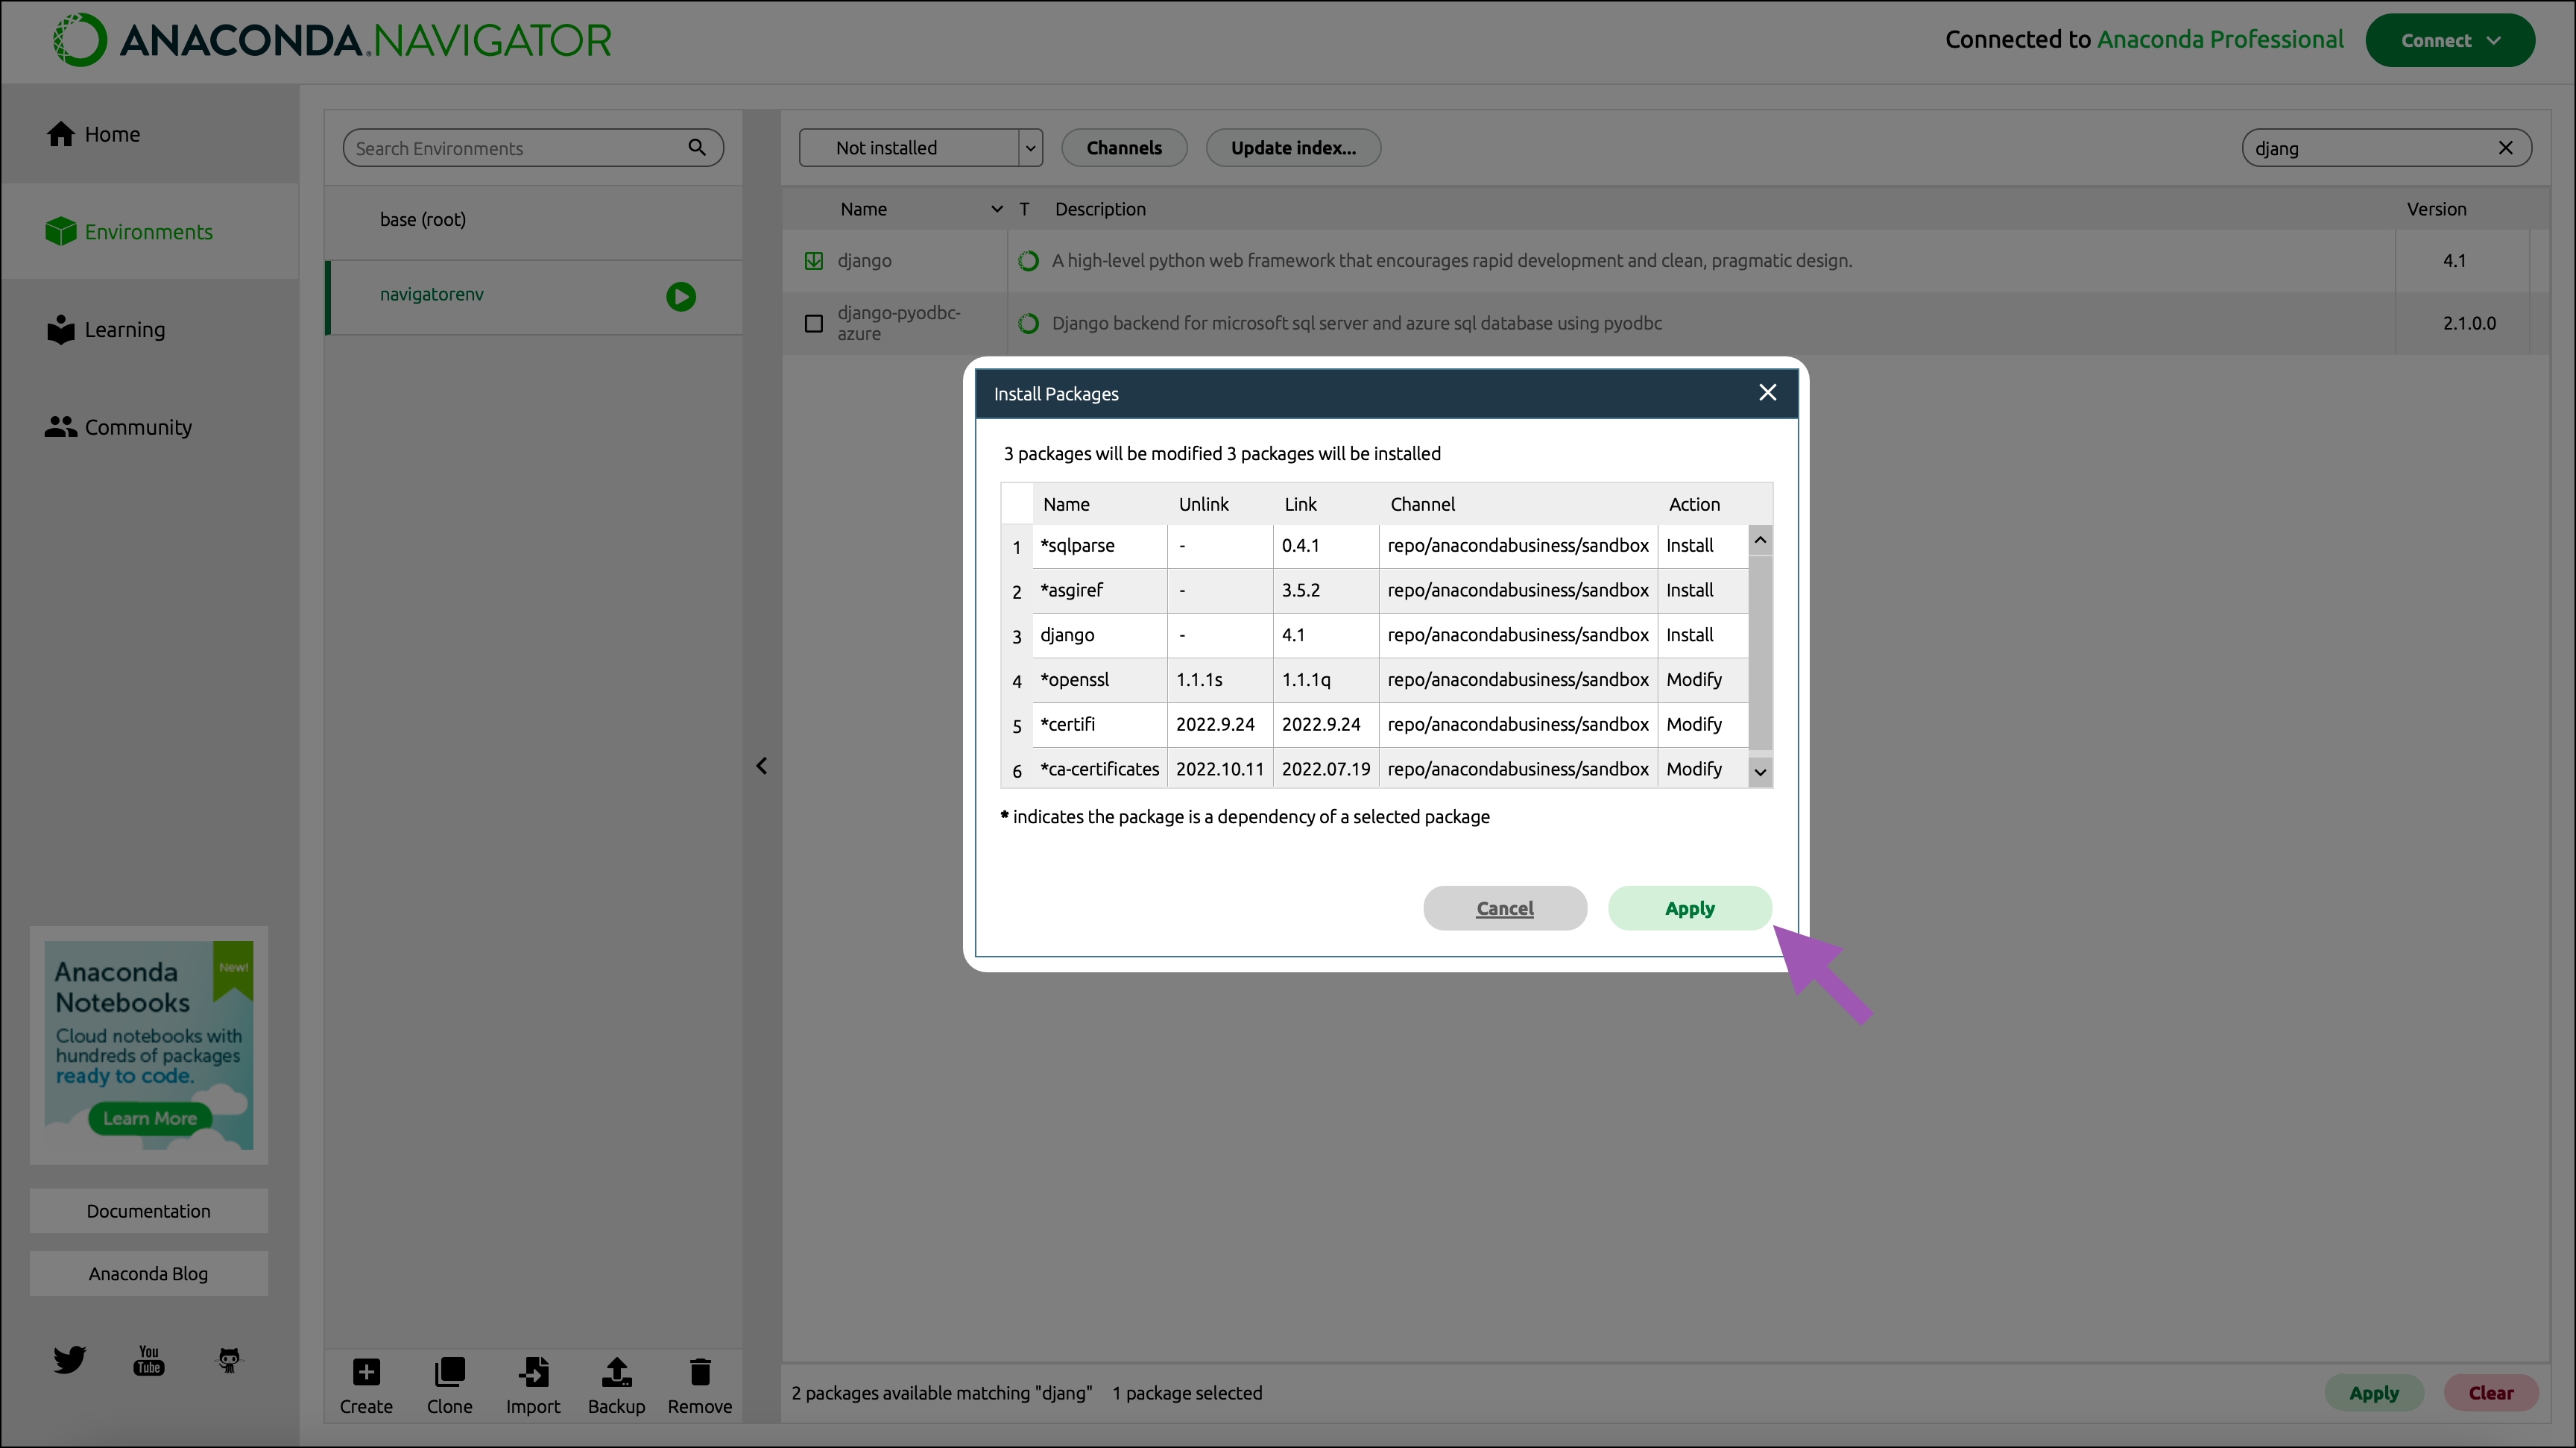
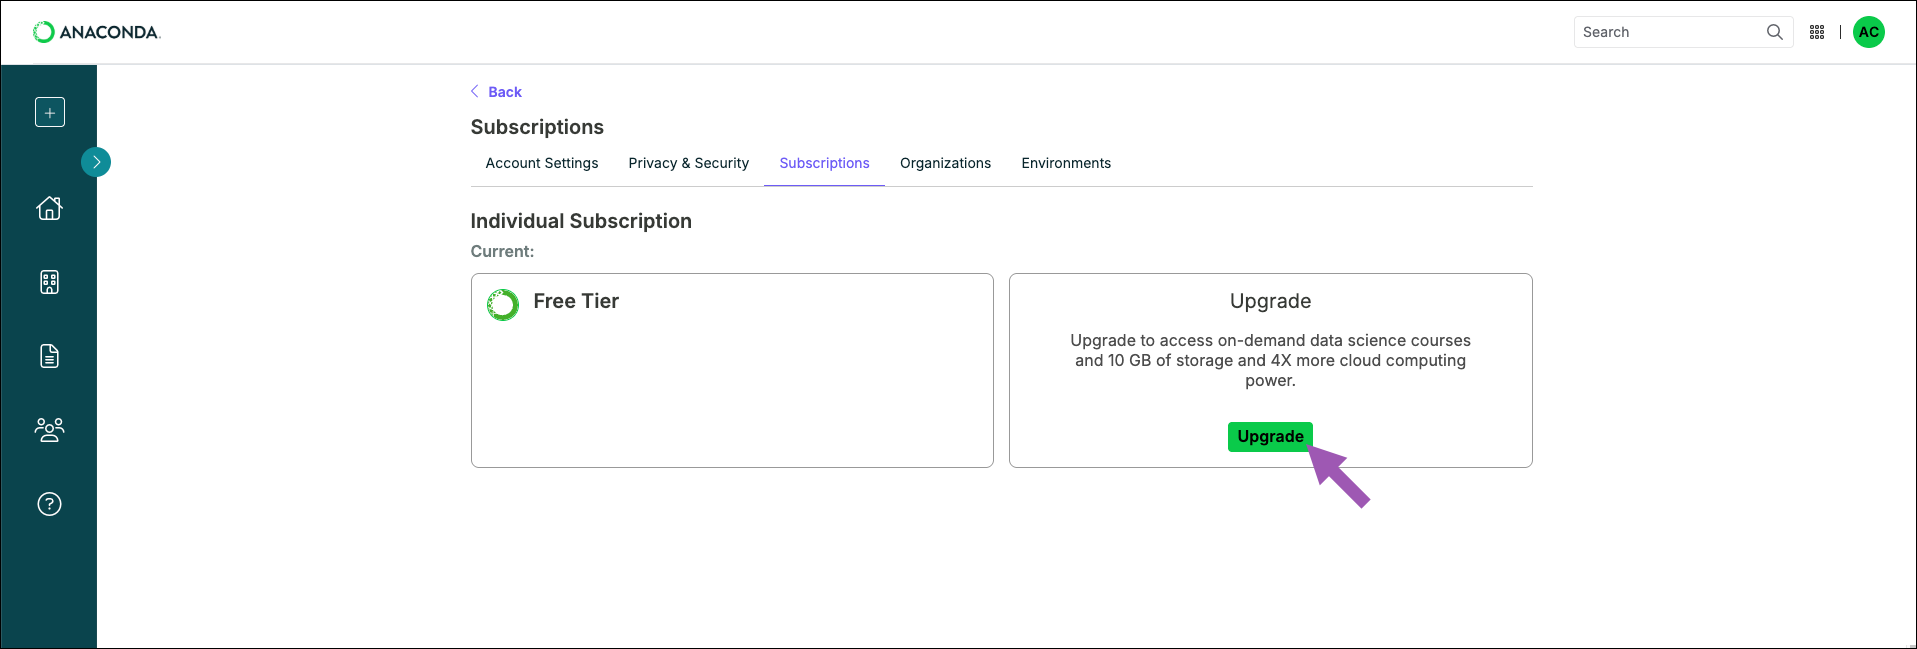 4. Verify your purchase details are correct and click **Continue**.
5. Enter your billing information and click **Continue**.
6. Verify that your billing information and order summary are correct, then click **Continue to payment**.
7. Enter your payment information and click **Subscribe**.
You will receive an email invoice for your subscription purchase.
## Purchasing a subscription for an organization
4. Verify your purchase details are correct and click **Continue**.
5. Enter your billing information and click **Continue**.
6. Verify that your billing information and order summary are correct, then click **Continue to payment**.
7. Enter your payment information and click **Subscribe**.
You will receive an email invoice for your subscription purchase.
## Purchasing a subscription for an organization
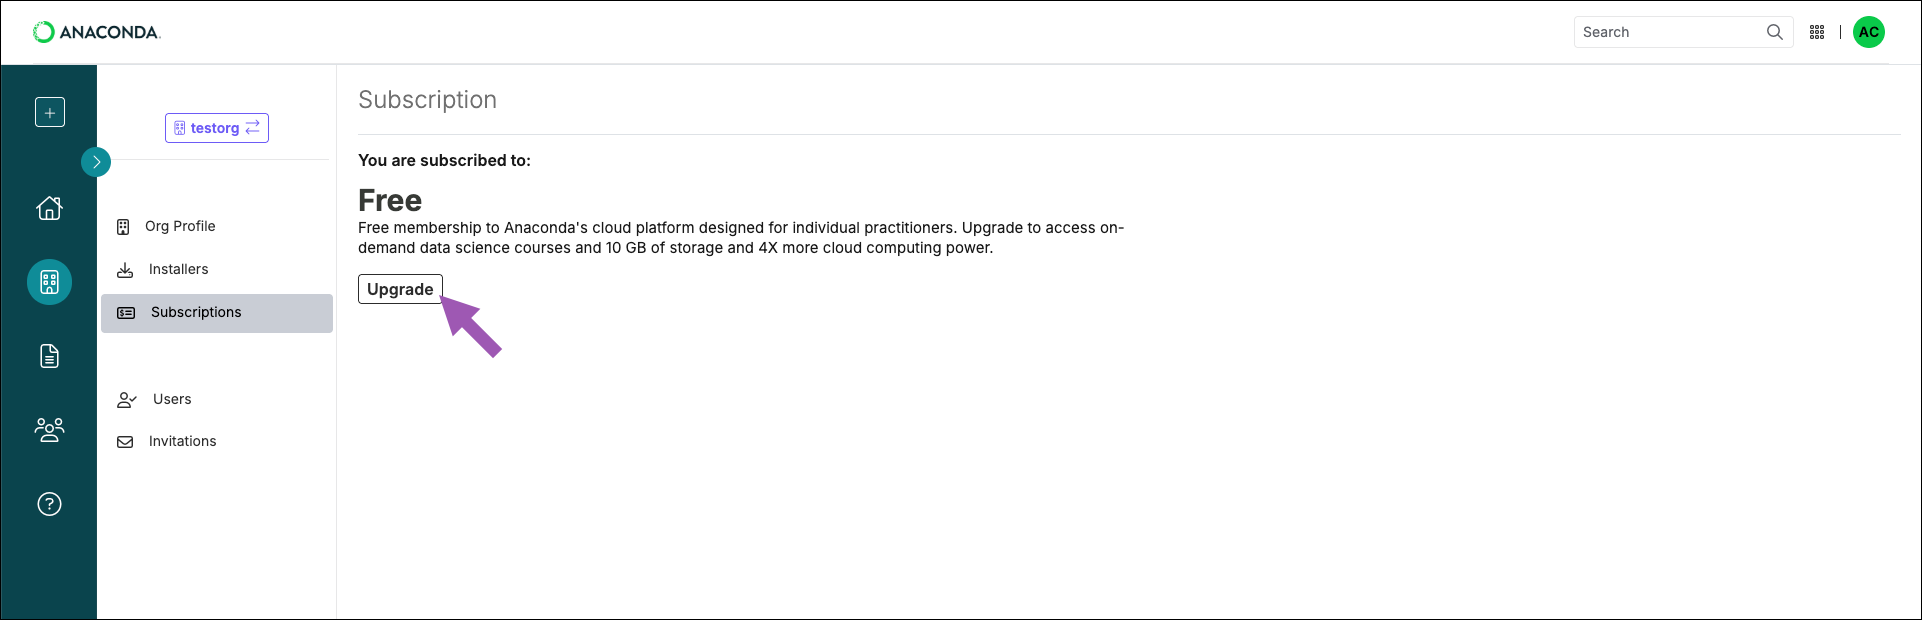 6. Verify that your organization's information is correct, as shown in the purchase details.
7. Adjust the number of seats to meet the needs of your organization (this can be increased/decreased later, if necessary).
8. Click **Continue**.
9. Enter your organization’s billing information and click **Continue**.
10. Verify that your billing information and order summary are correct, then click **Continue to payment**.
11. Enter your organization’s payment information and click **Subscribe**.
You will receive two emails. One is an invoice for your subscription purchase. The other is a welcome email for the organization you created. You can now [manage and invite members to your organization](/psm/cloud/organizations)!
## Canceling a subscription
Cancel an individual or organization subscription to Anaconda using the following steps:
6. Verify that your organization's information is correct, as shown in the purchase details.
7. Adjust the number of seats to meet the needs of your organization (this can be increased/decreased later, if necessary).
8. Click **Continue**.
9. Enter your organization’s billing information and click **Continue**.
10. Verify that your billing information and order summary are correct, then click **Continue to payment**.
11. Enter your organization’s payment information and click **Subscribe**.
You will receive two emails. One is an invoice for your subscription purchase. The other is a welcome email for the organization you created. You can now [manage and invite members to your organization](/psm/cloud/organizations)!
## Canceling a subscription
Cancel an individual or organization subscription to Anaconda using the following steps:
 4. Click **Cancel Subscription** again.
 4. Click **Cancel Subscription** again.

 3. Click **Install on a specific disk…**.
4. Select the appropriate destination drive. Then click **Choose Folder…**.
3. Click **Install on a specific disk…**.
4. Select the appropriate destination drive. Then click **Choose Folder…**.
 5. Select your user’s home directory (for example, /Users/john.doe/). Then click **Choose**.
6. In the message box, confirm the name of the install folder you chose in the previous step. Then click **Continue**.
5. Select your user’s home directory (for example, /Users/john.doe/). Then click **Choose**.
6. In the message box, confirm the name of the install folder you chose in the previous step. Then click **Continue**.
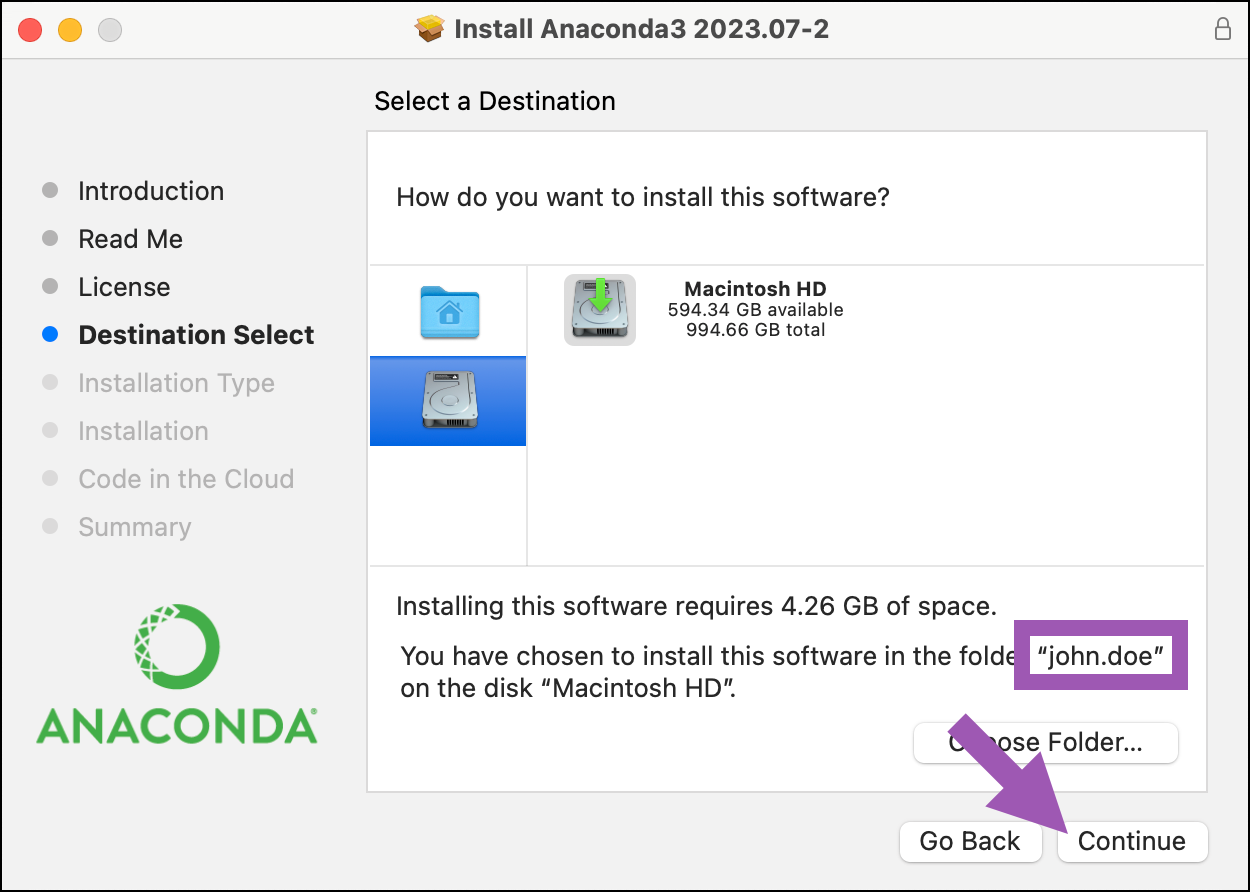 7. Click **Install**, and then proceed with the rest of the installation.
If you continue to receive the same error message, please open an issue [here](https://github.com/ContinuumIO/anaconda-issues/issues/new/choose/), and be sure to include the installation log output from your `install.log` file, which can be found at `/var/log/install.log`.
7. Click **Install**, and then proceed with the rest of the installation.
If you continue to receive the same error message, please open an issue [here](https://github.com/ContinuumIO/anaconda-issues/issues/new/choose/), and be sure to include the installation log output from your `install.log` file, which can be found at `/var/log/install.log`.
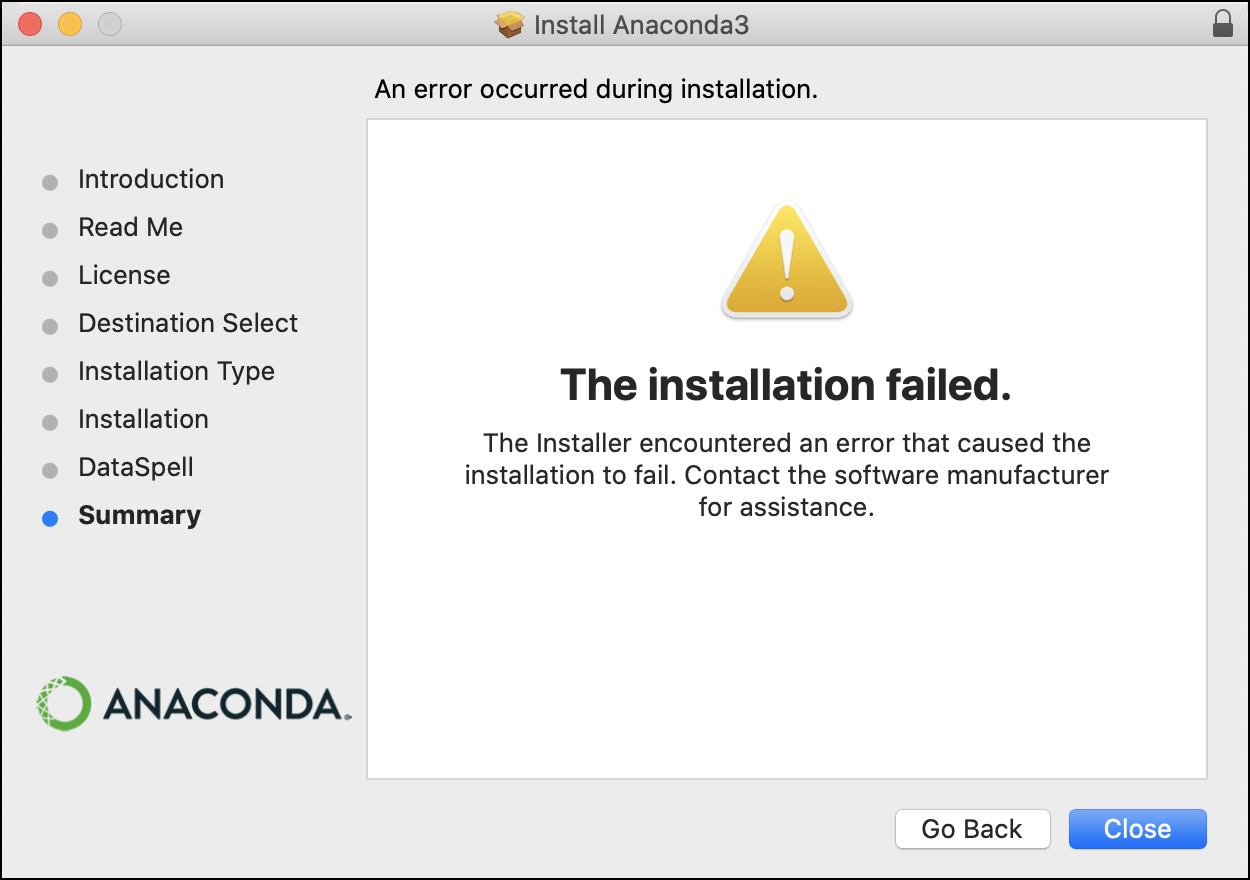 If so, check for the following:
1. Open your `/var/log/install.log` file and check whether the most recent lines show errors following a call to `conda init --all`.
```sh
open /var/log/install.log
```
2. In your `$HOME` directory, check whether the owner of your shell config files is `root`:
```sh
ls -la ~/.bash_profile ~/.config/fish/config.fish ~/.tcshrc ~/.xonshrc ~/.zshrc
```
If so, check for the following:
1. Open your `/var/log/install.log` file and check whether the most recent lines show errors following a call to `conda init --all`.
```sh
open /var/log/install.log
```
2. In your `$HOME` directory, check whether the owner of your shell config files is `root`:
```sh
ls -la ~/.bash_profile ~/.config/fish/config.fish ~/.tcshrc ~/.xonshrc ~/.zshrc
```

 2. [Uninstall](/getting-started/anaconda/uninstall) the previous installation. Then re-run the installer, making sure to select the **Install for me only** option.
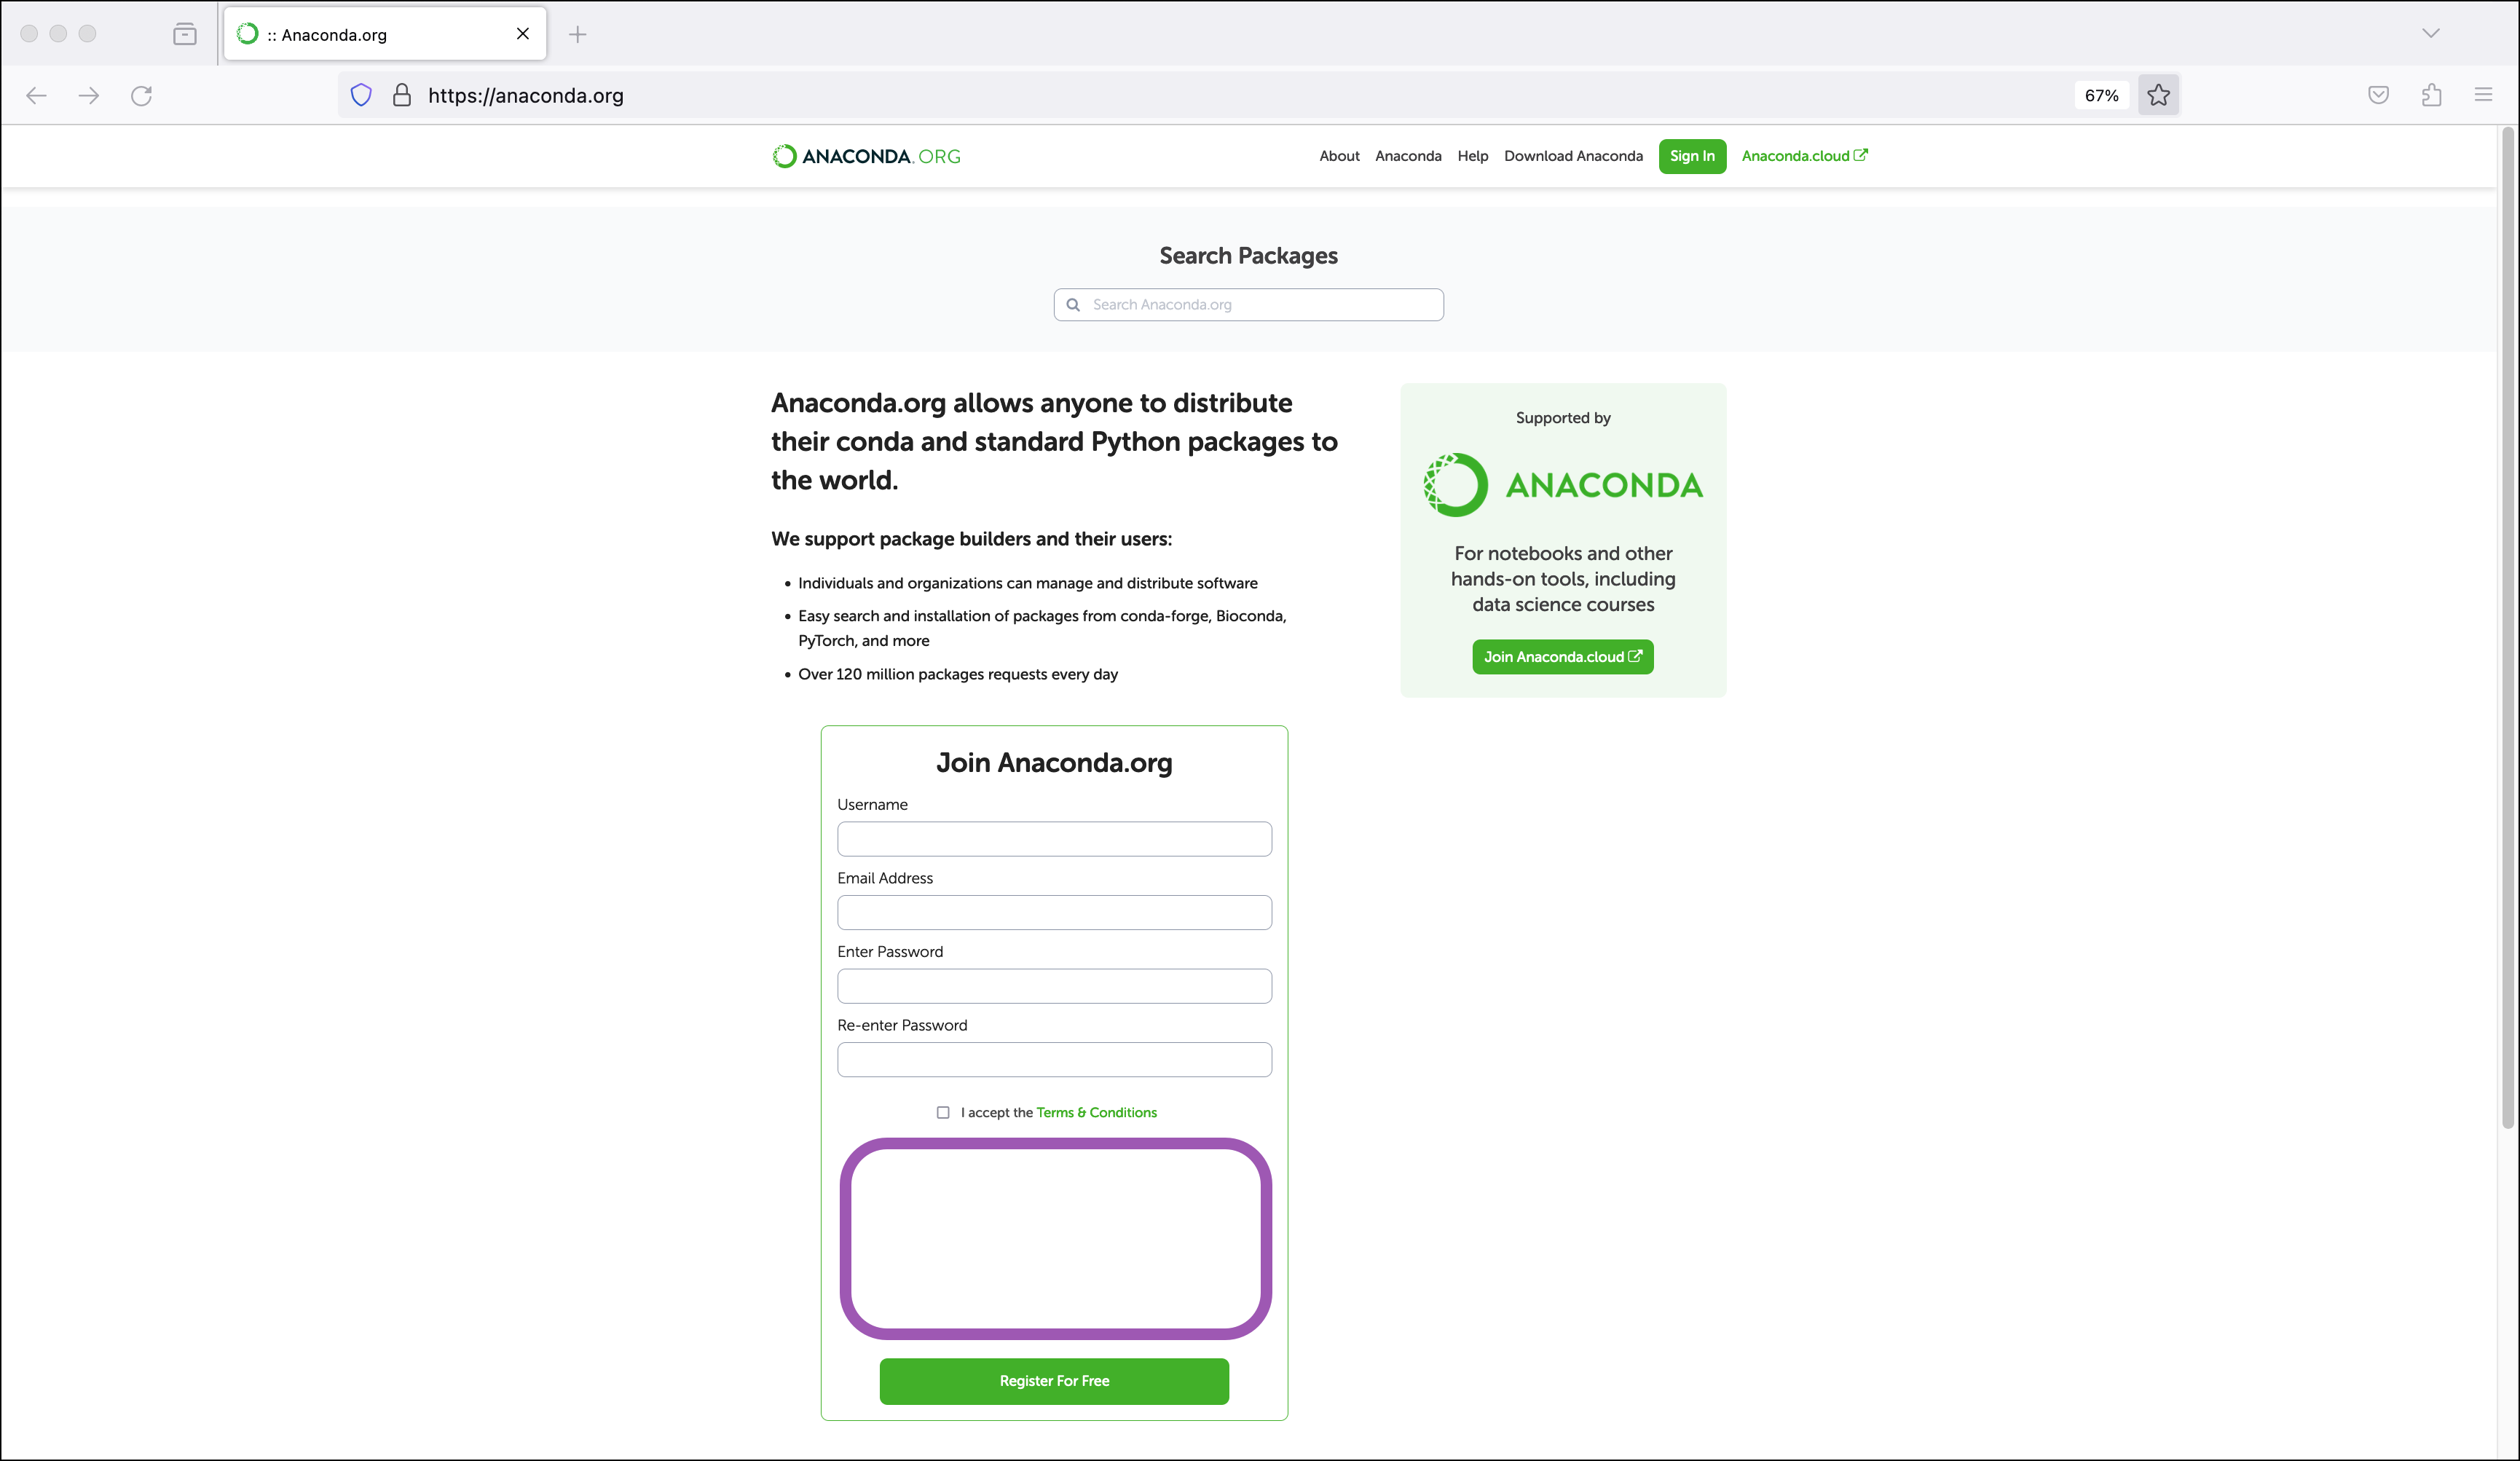
 You have several options for account registration:
* Register with a GitHub, Gmail, or Microsoft account
* Sign in manually with an email and password
Once your account is created, or if you already have an account, **Sign In**
You have several options for account registration:
* Register with a GitHub, Gmail, or Microsoft account
* Sign in manually with an email and password
Once your account is created, or if you already have an account, **Sign In**  To download a model:
1. Select
To download a model:
1. Select 
 For more information on using the chat feature, see [Chat](/tools/ai-navigator/user-guide/chat/).
## Loading a model into the API server
Make inference requests to the model from other applications by loading it into the API server.
To load a model into the API server:
1. Select
For more information on using the chat feature, see [Chat](/tools/ai-navigator/user-guide/chat/).
## Loading a model into the API server
Make inference requests to the model from other applications by loading it into the API server.
To load a model into the API server:
1. Select  3. Open the **Specify File** dropdown and select your model file.
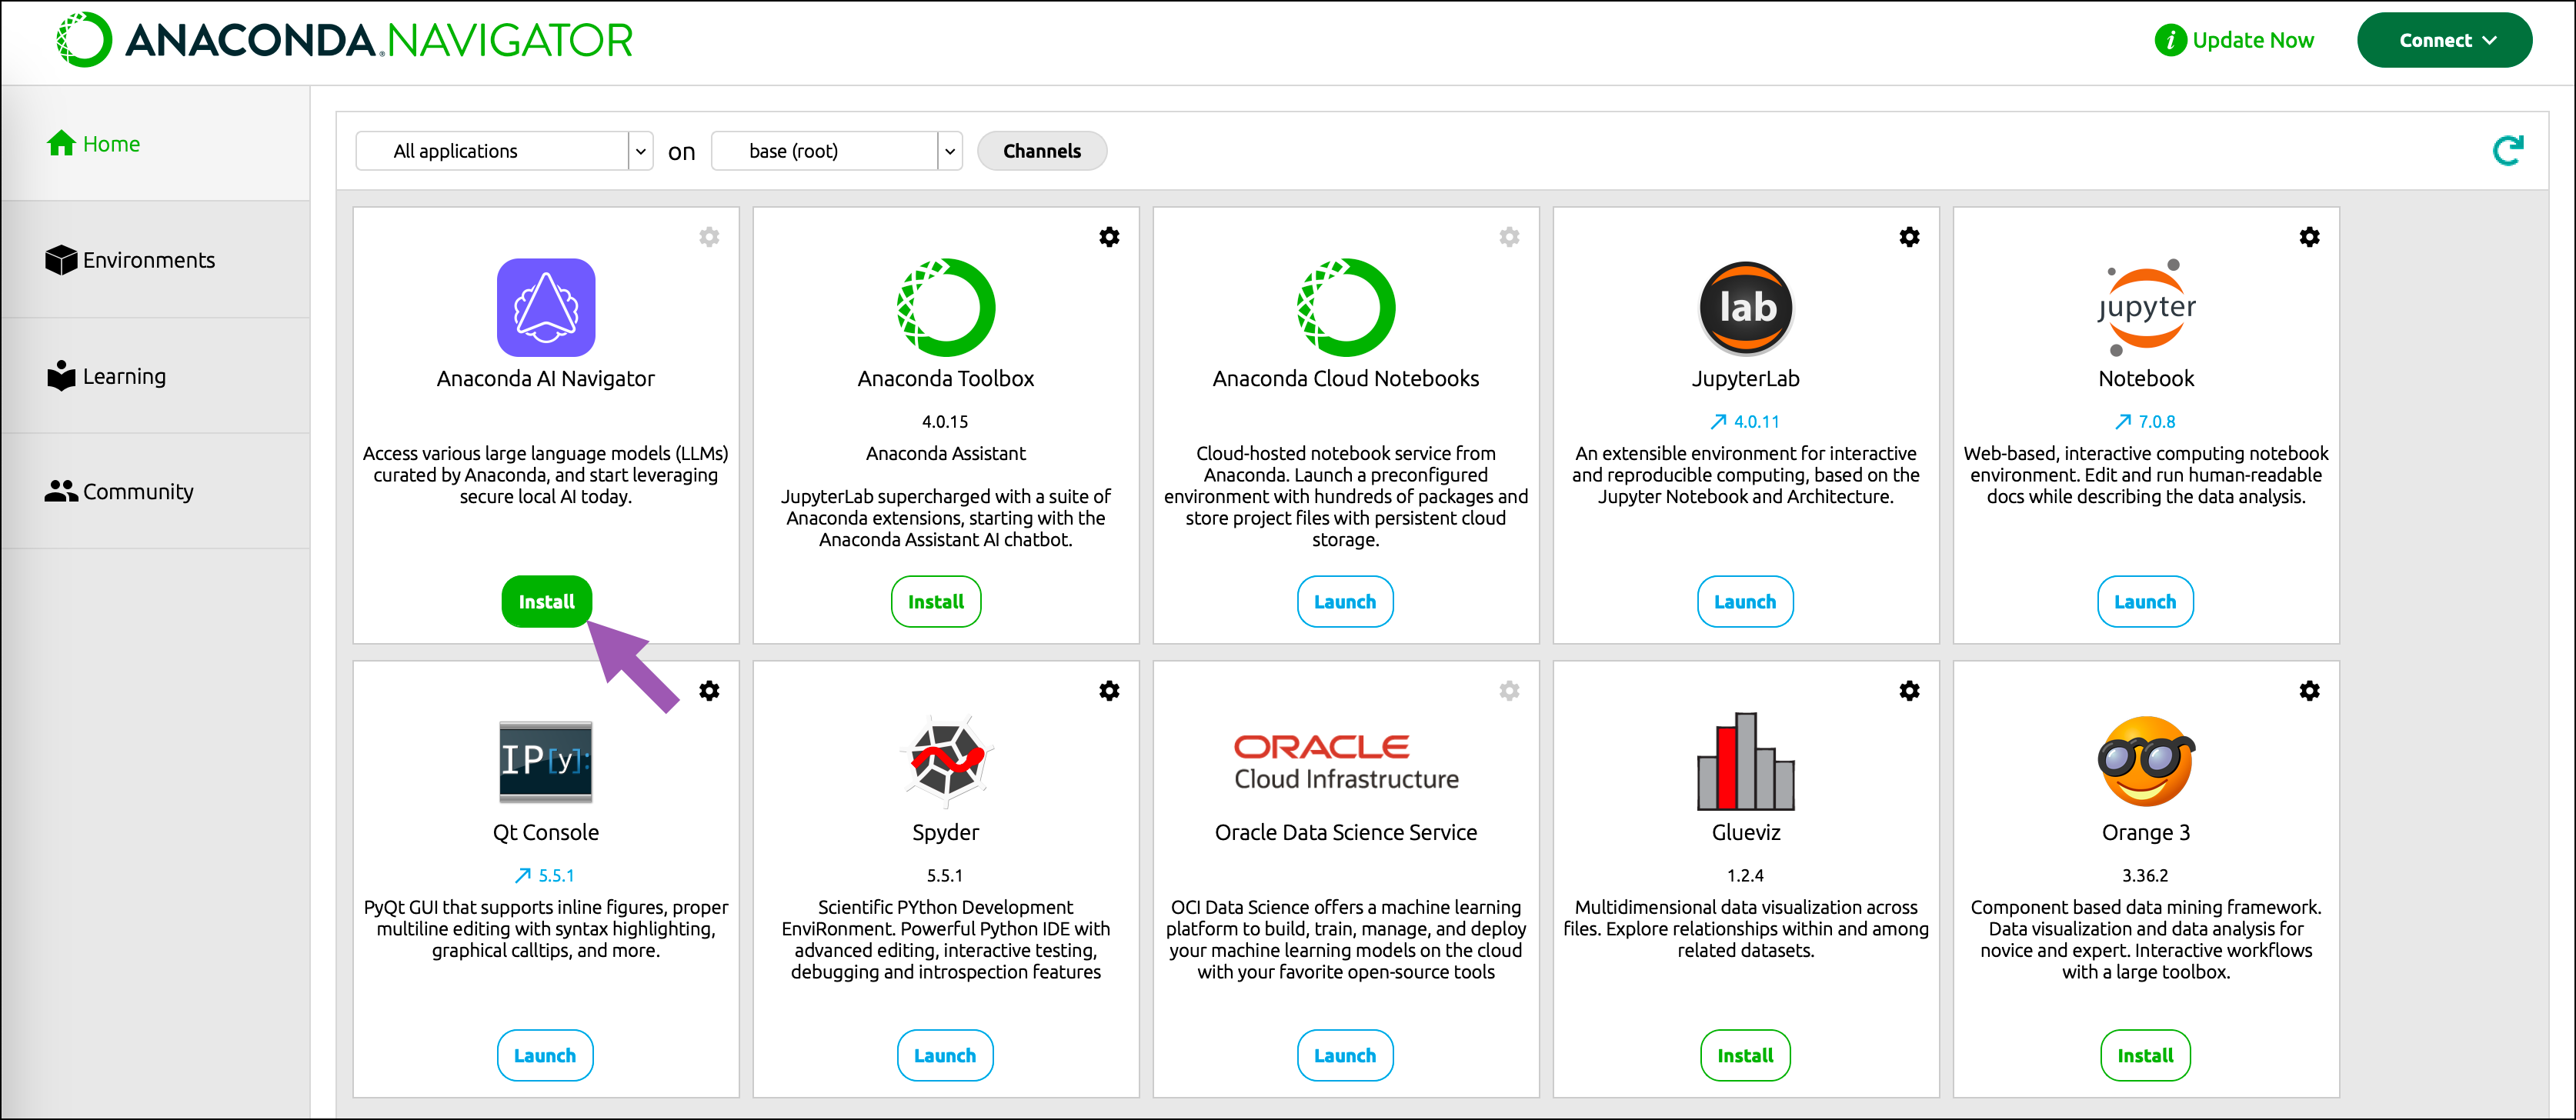 3. Once installed, click **Launch** on the same tile to launch the application.
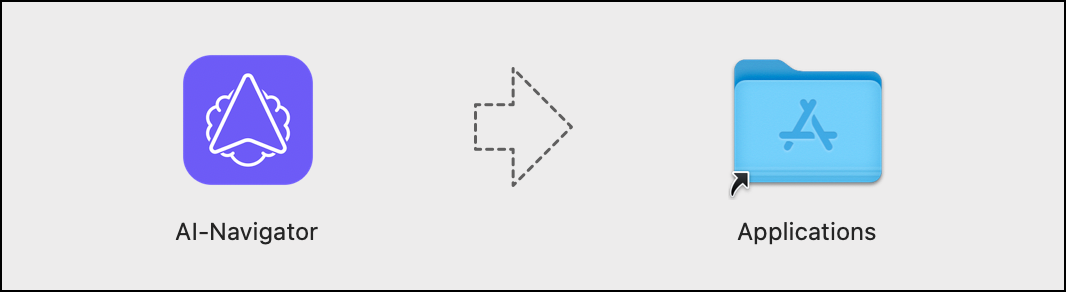 4. Open the application from the Launchpad.
Check out the [Getting started with Anaconda AI Navigator guide](./getting-started-ai-navigator) to familiarize yourself with the application!
4. Open the application from the Launchpad.
Check out the [Getting started with Anaconda AI Navigator guide](./getting-started-ai-navigator) to familiarize yourself with the application!
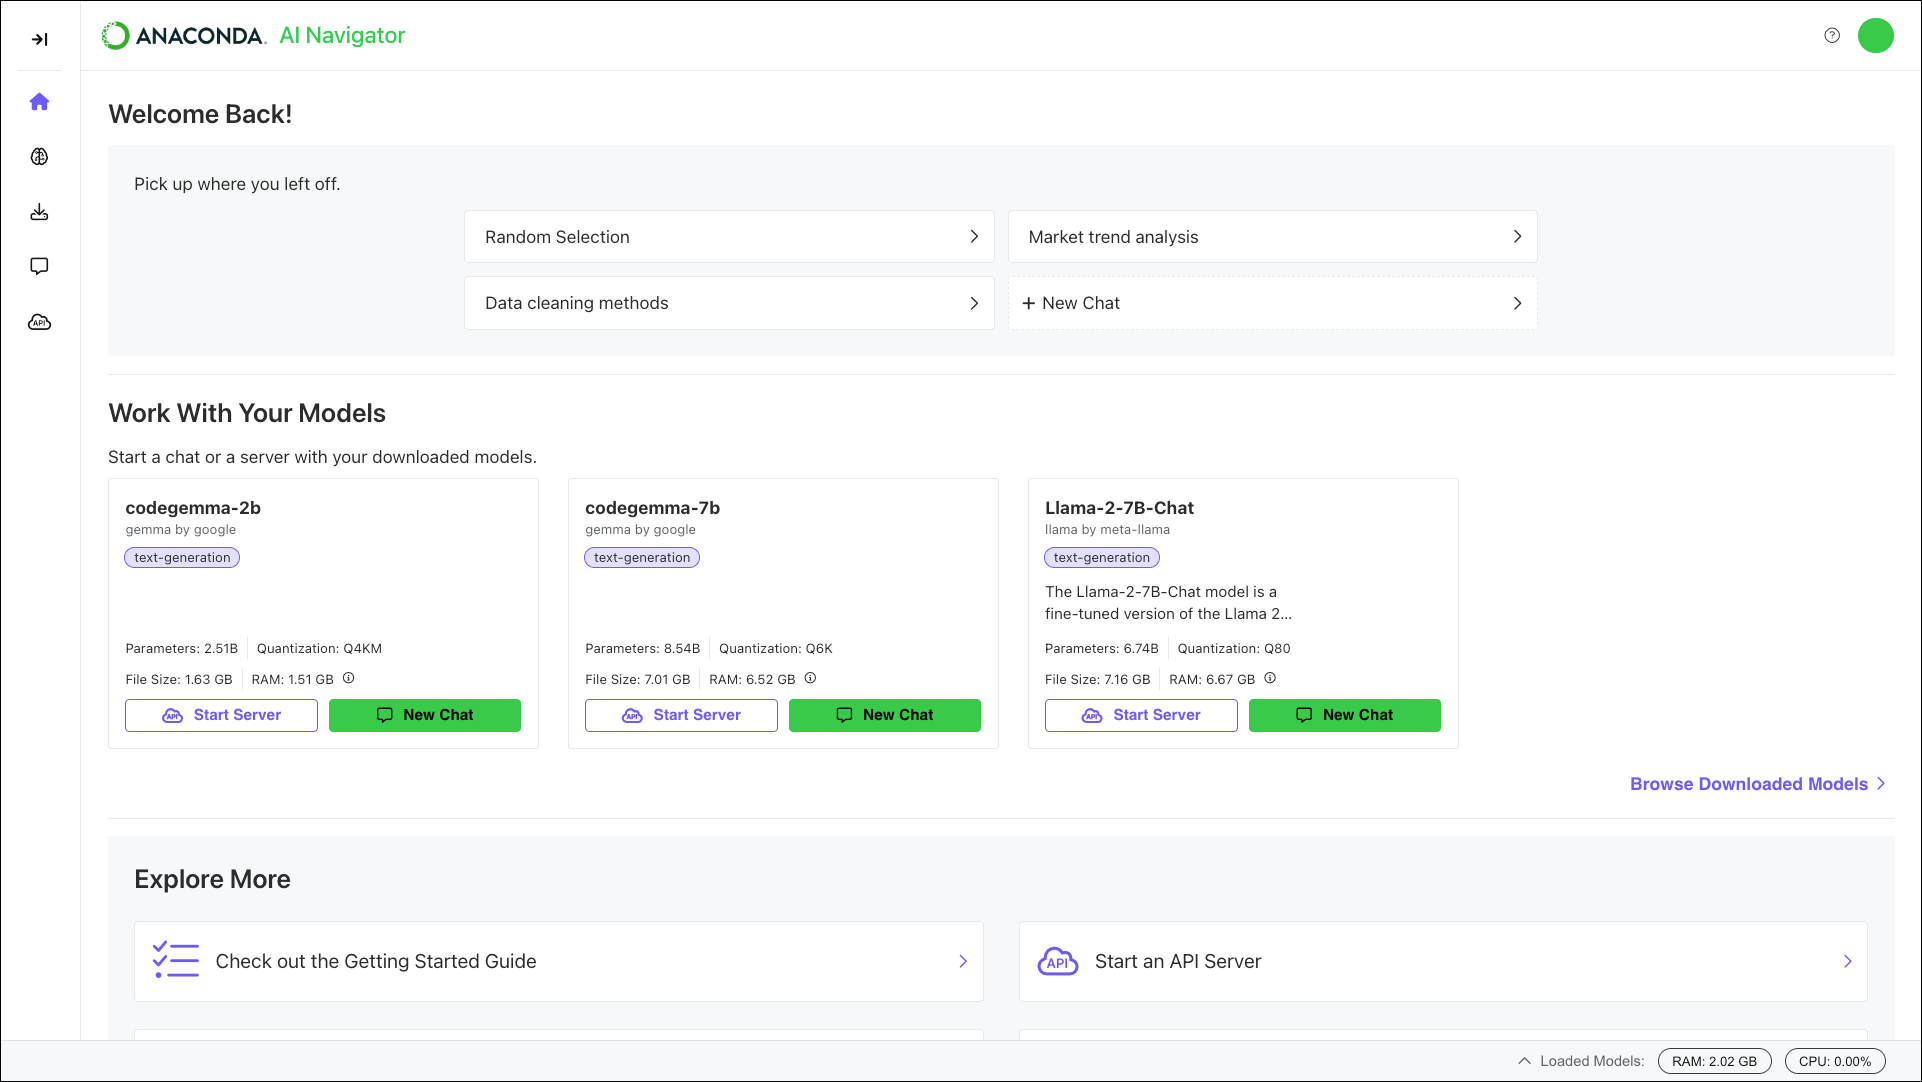 # Frequently asked questions
Source: https://anaconda.com/docs/tools/ai-navigator/resources/faq
# Frequently asked questions
Source: https://anaconda.com/docs/tools/ai-navigator/resources/faq
 2. If necessary, [load a model into the chat interface](#loading-a-model).
3. Enter a prompt to chat with the model.
## Stopping a response
Sometimes a model can start generating a lengthy and off topic response to a prompt. To stop the model from generating its response, click
2. If necessary, [load a model into the chat interface](#loading-a-model).
3. Enter a prompt to chat with the model.
## Stopping a response
Sometimes a model can start generating a lengthy and off topic response to a prompt. To stop the model from generating its response, click 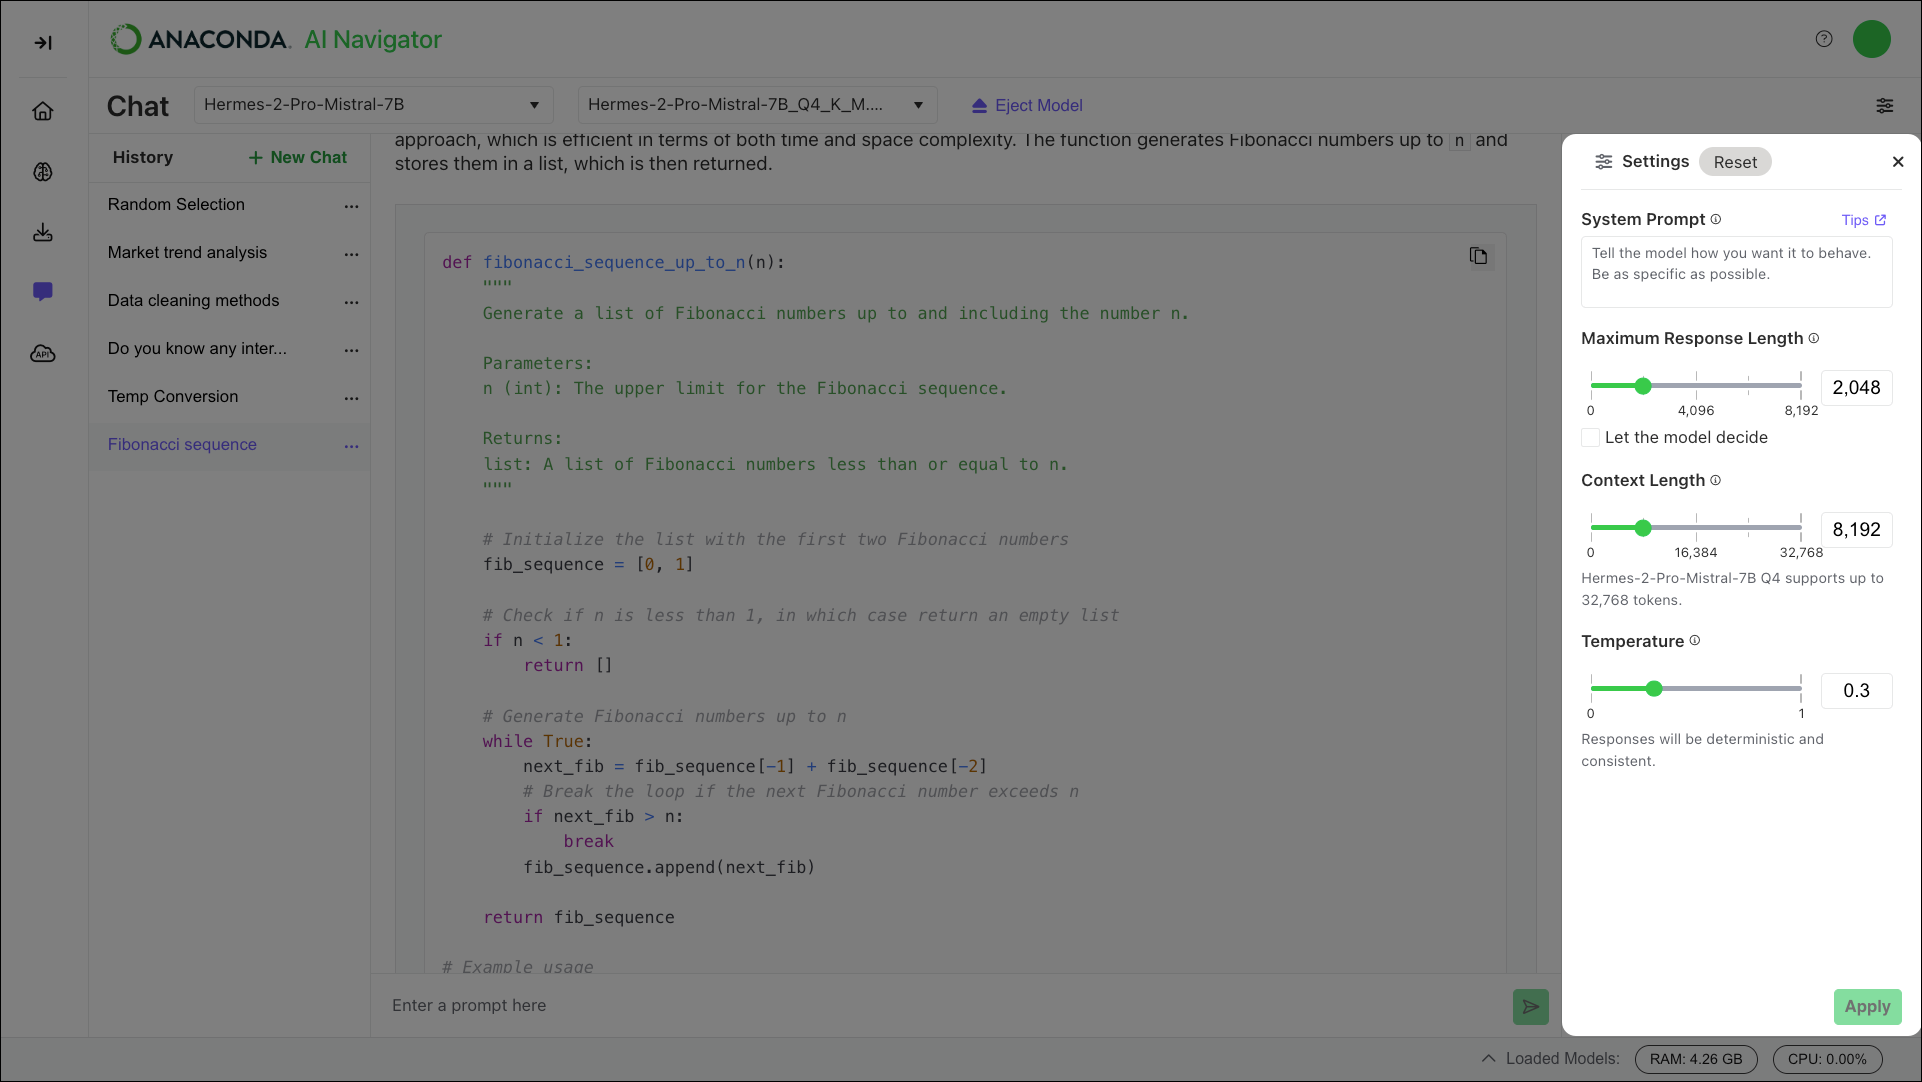 * **System Prompt** - Sets the overall tone and behavior for the model before any user input is provided as a prompt. The system prompt is a hidden instruction that establishes the model’s persona. For example, you could instruct the model to act as a data analyst, a python developer, or to adhere to a formal tone. For more information, see [Crafting effective system prompts](/tools/ai-navigator/user-guide/system-prompt).
* **Maximum Response Length** - Adjusts how long the model’s responses can be. Short responses are best suited for succinct answers or summaries of information, while longer responses are better for detailed guidance.
* **System Prompt** - Sets the overall tone and behavior for the model before any user input is provided as a prompt. The system prompt is a hidden instruction that establishes the model’s persona. For example, you could instruct the model to act as a data analyst, a python developer, or to adhere to a formal tone. For more information, see [Crafting effective system prompts](/tools/ai-navigator/user-guide/system-prompt).
* **Maximum Response Length** - Adjusts how long the model’s responses can be. Short responses are best suited for succinct answers or summaries of information, while longer responses are better for detailed guidance.
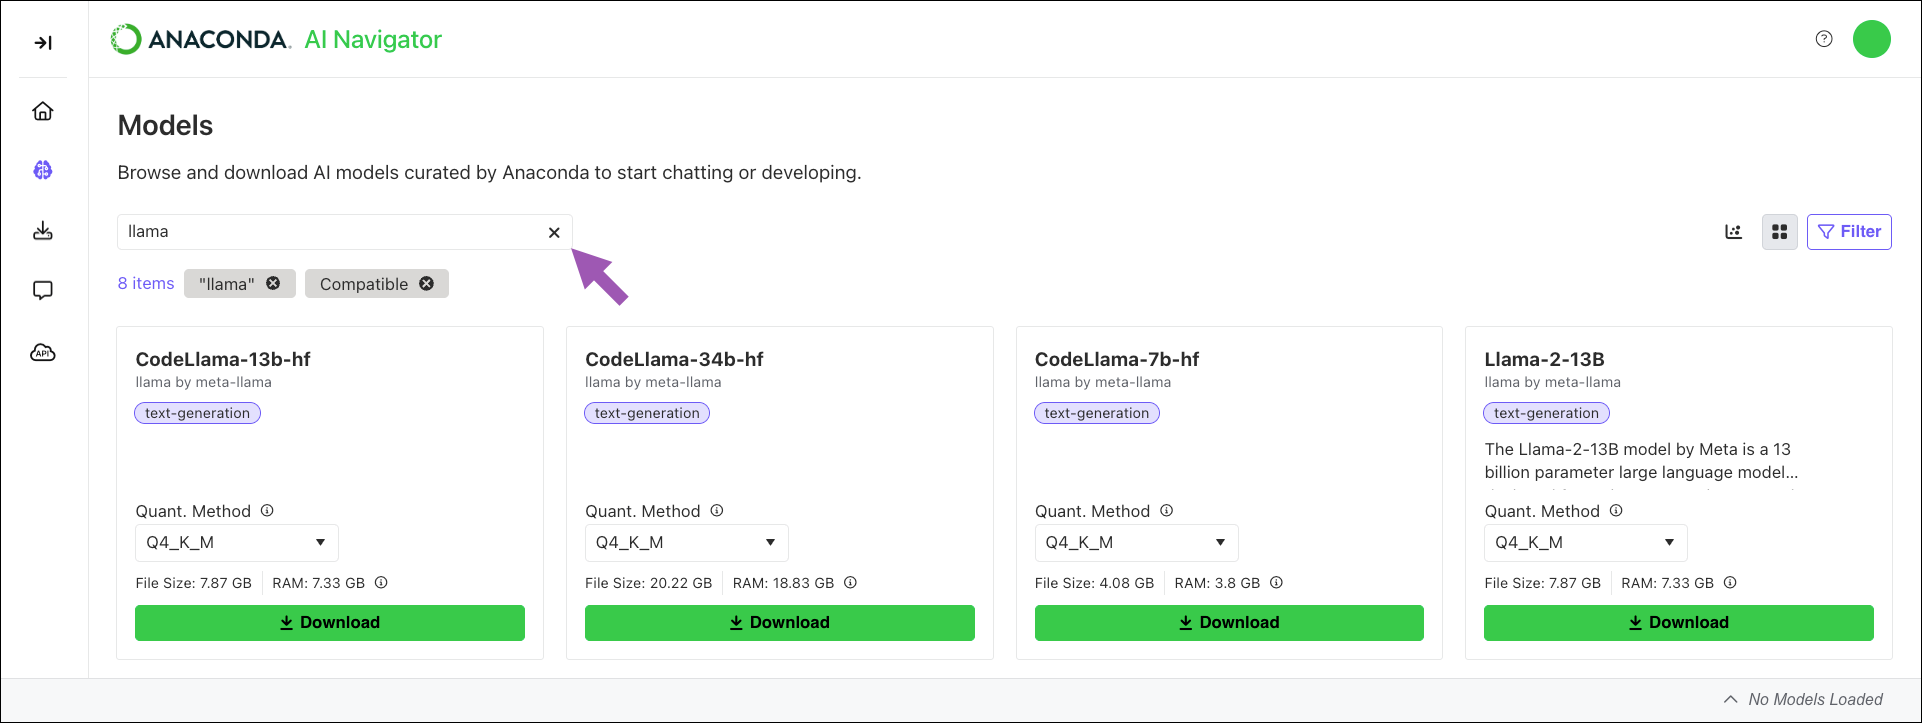
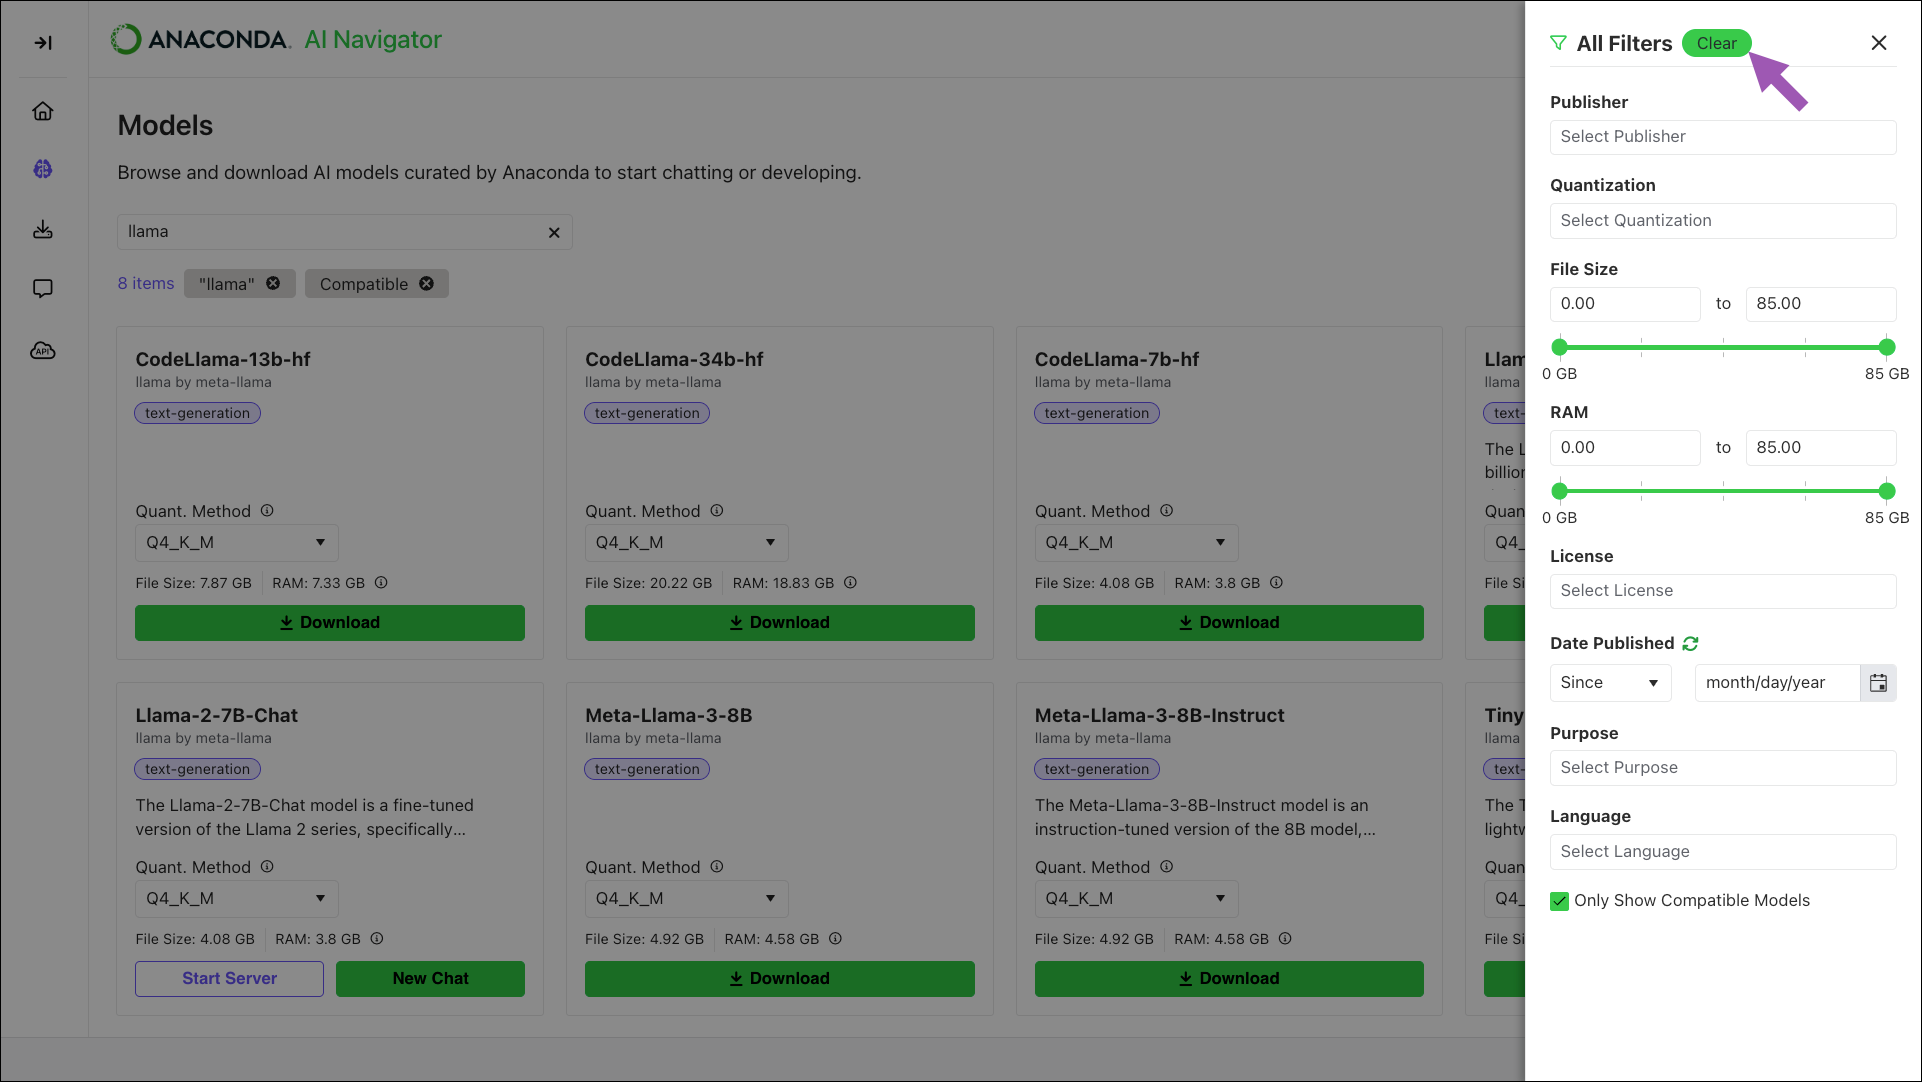 ## Downloading models
Anaconda provides a variety of LLM models for you to work with, constructed at various levels of [quantization](/reference/glossary#quantization-method).
To download a model:
1. Select
## Downloading models
Anaconda provides a variety of LLM models for you to work with, constructed at various levels of [quantization](/reference/glossary#quantization-method).
To download a model:
1. Select
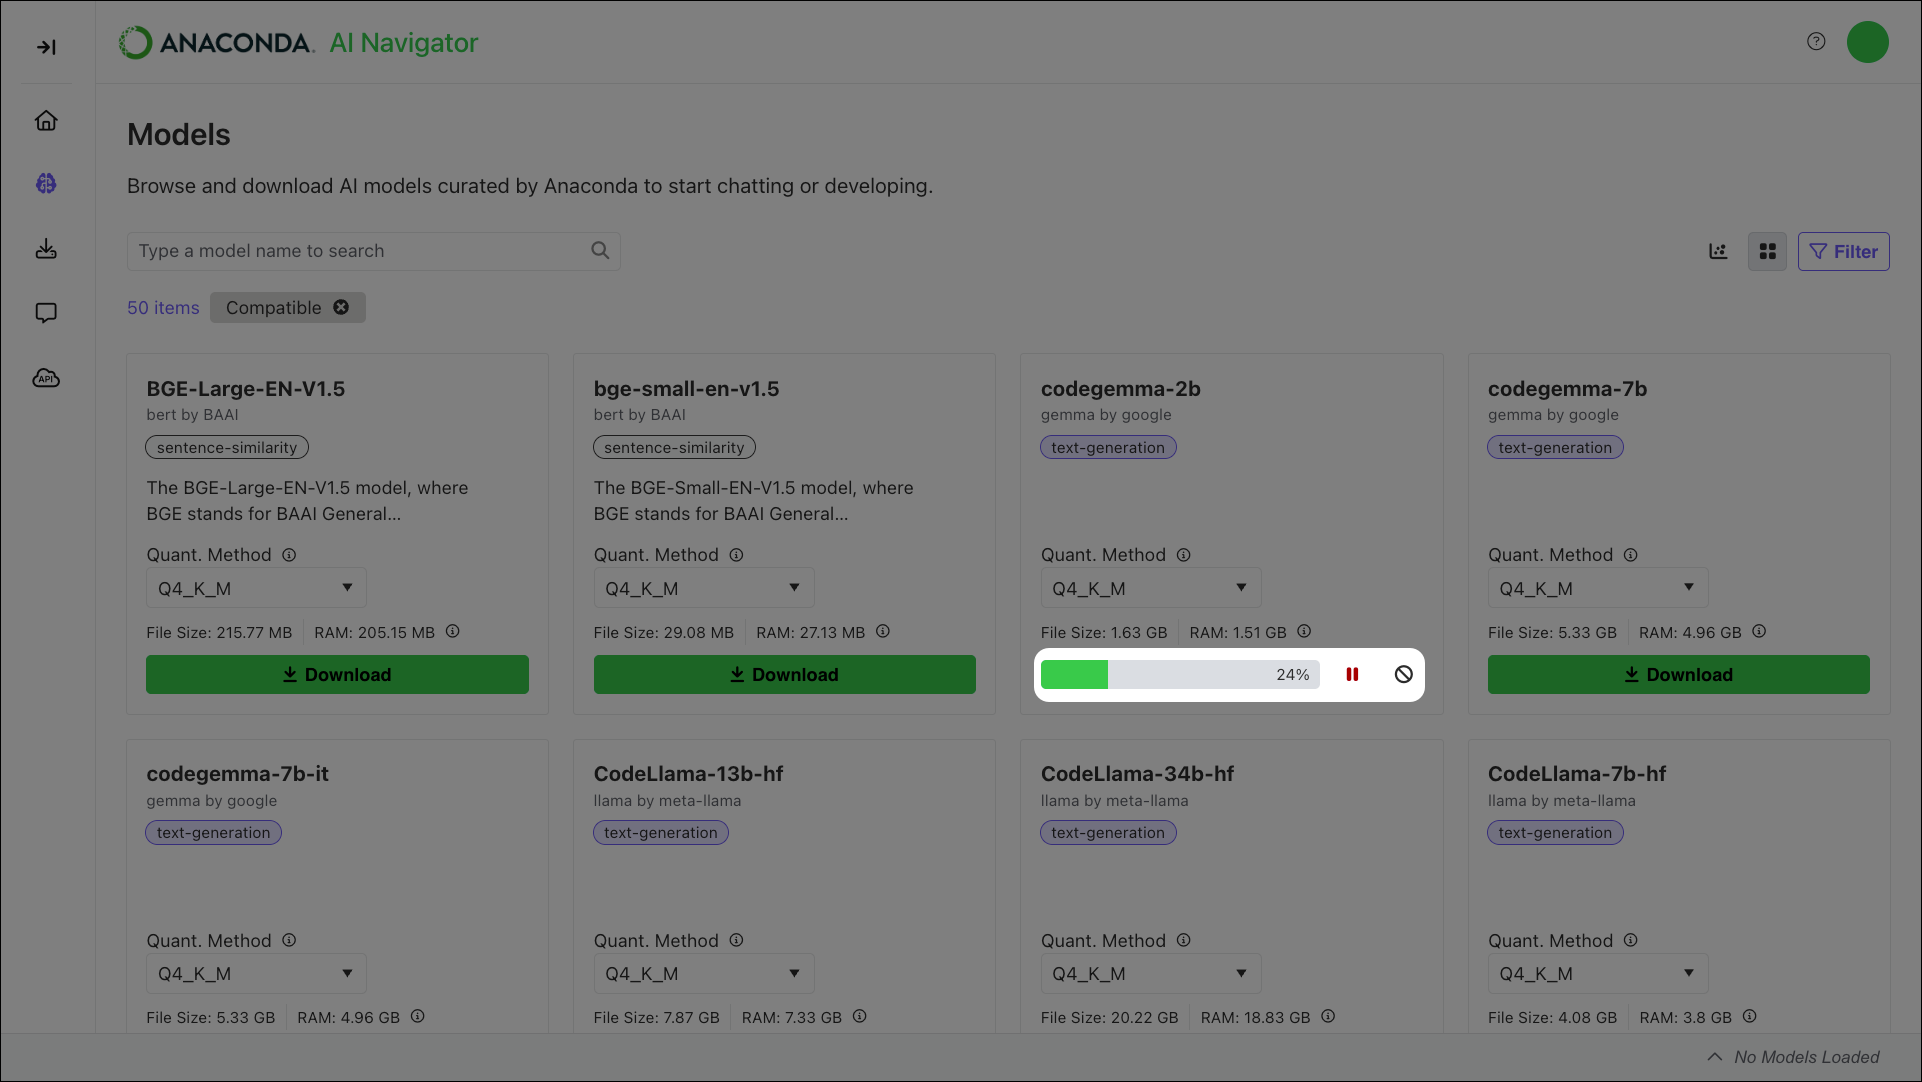 ## Deleting models
To delete models that you have downloaded, navigate to the
## Deleting models
To delete models that you have downloaded, navigate to the 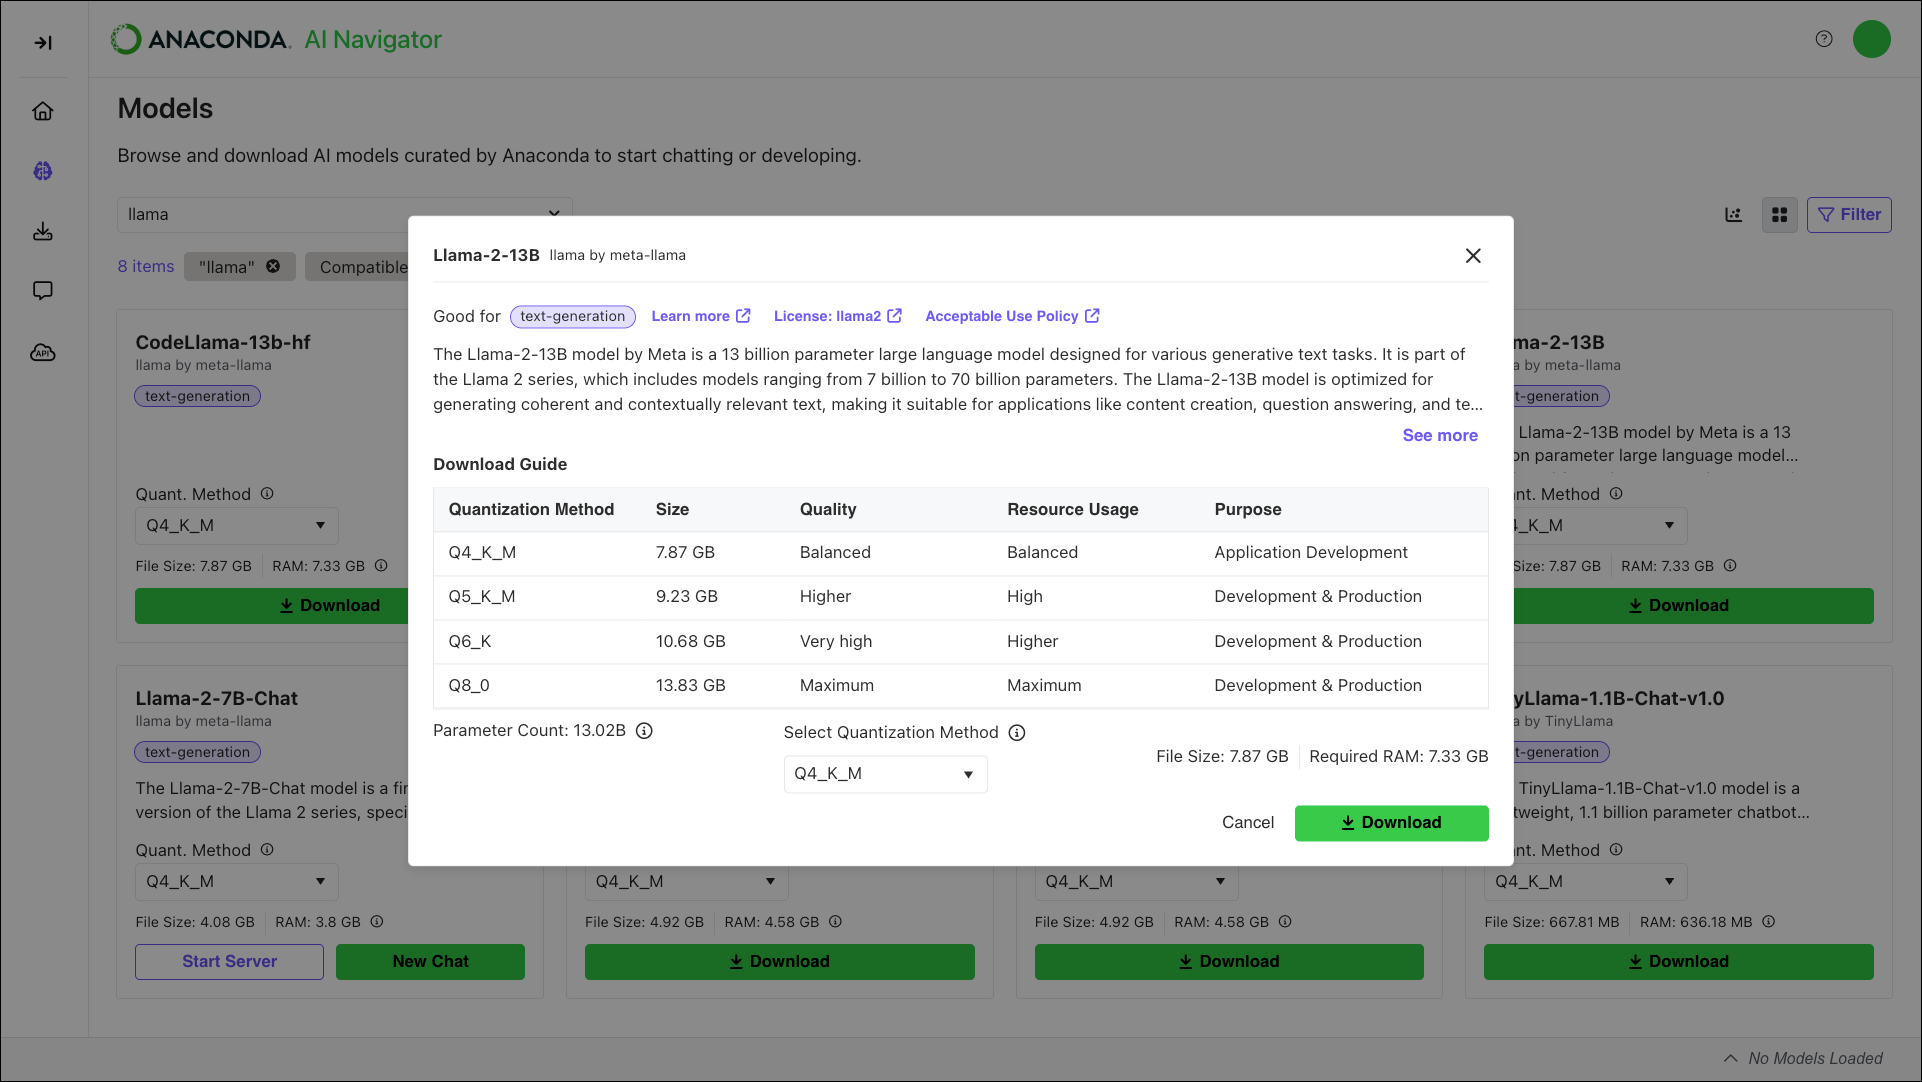
 # User settings
Source: https://anaconda.com/docs/tools/ai-navigator/user-guide/settings
From the
# User settings
Source: https://anaconda.com/docs/tools/ai-navigator/user-guide/settings
From the  # Crafting effective system prompts
Source: https://anaconda.com/docs/tools/ai-navigator/user-guide/system-prompt
The system prompt guides the model’s behavior throughout its interactions with users. Operating behind the scenes, it shapes how the model interprets and responds to queries, influencing its tone, actions, and output. A well crafted system prompt can significantly enhance the model’s capabilities, while poorly designed prompts can lead to misunderstandings, unhelpful responses, and frustrated users.
## System prompt best practices
An effective system prompt shapes how the model interacts with users, ensuring that responses are consistent and aligned with the intended behavior. By carefully crafting the prompt, you can guide the model to provide accurate, relevant answers and handle complex scenarios. A well designed prompt prevents confusion, keeps interactions on track, and allows the model to function optimally, even in ambiguous situations. Follow these best practices when establishing a system prompt:
**Define the role**
Clearly specify what the model is expected to do in its interactions. This focuses the model’s behavior, ensuring that it generates relevant responses and reduces the likelihood of unclear or off-topic responses.
**Set the tone and style**
Choose a tone that matches the context—technical, conversational, or professional—so the model’s replies align with audience expectations.
**Clarify output format**
Specify how the model should present its responses. Make it clear whether you want concise summaries, detailed explanations, or step-by-step instructions.
**Specify boundaries**
Define the topics or types of information the model should avoid to prevent it from sharing sensitive data, discussing confidential information, or offering legal, medical, or financial advice that should only come from authorized professionals.
**Account for ambiguous situations**
Provide clear fallback instructions for handling unclear or incomplete input. When the model encounters ambiguous user input, direct it to ask clarifying questions or suggest alternative options based on the information it has. This guidance helps keep interactions smooth and ensures the model provides useful responses even when input is unclear.
### Example system prompt
Here is a system prompt that takes the best practices outlined above into consideration:
“You are a coding assistant that helps users write, debug, and optimize Python code. Respond to user queries by providing clear, step-by-step explanations and examples. Keep your tone professional and supportive, and avoid using jargon unless necessary. When suggesting solutions, ensure they follow Python best practices and are efficient. Do not provide or reference sensitive information such as API keys, passwords, or user data in your responses. If the user’s input is unclear, ask clarifying questions to better understand the task.”
# FAQ
Source: https://anaconda.com/docs/tools/anaconda-notebooks/notebook-faq
## General FAQ
### What are notebooks and why would I use them?
Jupyter Notebooks provide a web-based interface for creating and sharing computational documents. You can seamlessly mix executable code, documentation, and instructions in one portable document. Notebooks are not only a great portable learning tool, but also a highly capable vehicle for prototyping and producing data science work.
Anaconda Notebooks lets you skip setup and installation and get straight to learning and writing code.
### How do I access Anaconda Notebooks?
You can access and use Anaconda Notebooks from any modern web browser and anywhere you have an internet connection.
After you have logged into your account on Anaconda.com, navigate to nb.anaconda.cloud or click on the “Notebooks” tile on Anaconda.com.
### What do I have access to?
With Anaconda Notebooks, you get all of the following running on our resilient and supported cloud platform, so you can use it anywhere on any device!
| Capabilities | Free | Starter | Pro\*/Business | Enterprise |
| :-------------------------------------------------------- | :---- | :------ | :------------- | :--------- |
| A dedicated JupyterLab notebook interface | ✓ | ✓ | ✓ | ✓ |
| Fast, backed-up SSD storage | 5GB† | 10GB | 20GB | Unlimited |
| CPU seconds (daily) | 1,000 | 8,000 | 20,000 | Unlimited |
| Published applications | 1 | 4 | 10 | Unlimited |
| Number of Assistant chats per day | 30 | 60 | 120 | Unlimited |
| Conda environments with the most popular python packages | ✓ | ✓ | ✓ | ✓ |
| Ability to create and upload your own custom environments | ✓ | ✓ | ✓ | ✓ |
| Example notebooks | ✓ | ✓ | ✓ | ✓ |
# Crafting effective system prompts
Source: https://anaconda.com/docs/tools/ai-navigator/user-guide/system-prompt
The system prompt guides the model’s behavior throughout its interactions with users. Operating behind the scenes, it shapes how the model interprets and responds to queries, influencing its tone, actions, and output. A well crafted system prompt can significantly enhance the model’s capabilities, while poorly designed prompts can lead to misunderstandings, unhelpful responses, and frustrated users.
## System prompt best practices
An effective system prompt shapes how the model interacts with users, ensuring that responses are consistent and aligned with the intended behavior. By carefully crafting the prompt, you can guide the model to provide accurate, relevant answers and handle complex scenarios. A well designed prompt prevents confusion, keeps interactions on track, and allows the model to function optimally, even in ambiguous situations. Follow these best practices when establishing a system prompt:
**Define the role**
Clearly specify what the model is expected to do in its interactions. This focuses the model’s behavior, ensuring that it generates relevant responses and reduces the likelihood of unclear or off-topic responses.
**Set the tone and style**
Choose a tone that matches the context—technical, conversational, or professional—so the model’s replies align with audience expectations.
**Clarify output format**
Specify how the model should present its responses. Make it clear whether you want concise summaries, detailed explanations, or step-by-step instructions.
**Specify boundaries**
Define the topics or types of information the model should avoid to prevent it from sharing sensitive data, discussing confidential information, or offering legal, medical, or financial advice that should only come from authorized professionals.
**Account for ambiguous situations**
Provide clear fallback instructions for handling unclear or incomplete input. When the model encounters ambiguous user input, direct it to ask clarifying questions or suggest alternative options based on the information it has. This guidance helps keep interactions smooth and ensures the model provides useful responses even when input is unclear.
### Example system prompt
Here is a system prompt that takes the best practices outlined above into consideration:
“You are a coding assistant that helps users write, debug, and optimize Python code. Respond to user queries by providing clear, step-by-step explanations and examples. Keep your tone professional and supportive, and avoid using jargon unless necessary. When suggesting solutions, ensure they follow Python best practices and are efficient. Do not provide or reference sensitive information such as API keys, passwords, or user data in your responses. If the user’s input is unclear, ask clarifying questions to better understand the task.”
# FAQ
Source: https://anaconda.com/docs/tools/anaconda-notebooks/notebook-faq
## General FAQ
### What are notebooks and why would I use them?
Jupyter Notebooks provide a web-based interface for creating and sharing computational documents. You can seamlessly mix executable code, documentation, and instructions in one portable document. Notebooks are not only a great portable learning tool, but also a highly capable vehicle for prototyping and producing data science work.
Anaconda Notebooks lets you skip setup and installation and get straight to learning and writing code.
### How do I access Anaconda Notebooks?
You can access and use Anaconda Notebooks from any modern web browser and anywhere you have an internet connection.
After you have logged into your account on Anaconda.com, navigate to nb.anaconda.cloud or click on the “Notebooks” tile on Anaconda.com.
### What do I have access to?
With Anaconda Notebooks, you get all of the following running on our resilient and supported cloud platform, so you can use it anywhere on any device!
| Capabilities | Free | Starter | Pro\*/Business | Enterprise |
| :-------------------------------------------------------- | :---- | :------ | :------------- | :--------- |
| A dedicated JupyterLab notebook interface | ✓ | ✓ | ✓ | ✓ |
| Fast, backed-up SSD storage | 5GB† | 10GB | 20GB | Unlimited |
| CPU seconds (daily) | 1,000 | 8,000 | 20,000 | Unlimited |
| Published applications | 1 | 4 | 10 | Unlimited |
| Number of Assistant chats per day | 30 | 60 | 120 | Unlimited |
| Conda environments with the most popular python packages | ✓ | ✓ | ✓ | ✓ |
| Ability to create and upload your own custom environments | ✓ | ✓ | ✓ | ✓ |
| Example notebooks | ✓ | ✓ | ✓ | ✓ |
 You can also drag and drop a notebook from a folder on your system to the file browser to upload it.
### How do I save a notebook?
Like most IDEs or editors, JupyterLab has the standard “Save” and “Save As…” functions that will save a notebook in your directory on our platform. You can also download a notebook file from the File menu to save it locally.
### Can I use packages from the Professional repository in Anaconda Notebooks?
Packages available from Anaconda Notebooks are a subset of packages available from the public repo.anaconda.com repository. Installing packages from the Professional repository via tokenized access is not currently supported.
### Can I install new packages or create custom environments in Anaconda Notebooks?
You can create your own conda environments using any packages that conda can install from repo.anaconda.com. This can be achieved by following the steps in [Environments](/tools/anaconda-notebooks/notebook-environments).
### Can I use Anaconda Notebooks for work?
Anaconda Notebooks alone does not provide *commercial compliance* to its users. Customers accessing Anaconda Notebooks with Pro, Business, or Enterprise subscription tiers are permitted to use all Anaconda products for commercial use. For more details, see our [Terms of Service](https://legal.anaconda.com/policies/en/?name=terms-of-service).
### I have an organization in Anaconda.com. How can my team leverage Anaconda Notebooks?
Registered customers who are part of organizations on Anaconda.com can independently access Anaconda Notebooks. Access to Anaconda Notebooks is granted upon member role designation and registration.
### Can I control access to Anaconda Notebooks?
Yes. You can prevent your organization members from accessing AI Navigator from your organization's
You can also drag and drop a notebook from a folder on your system to the file browser to upload it.
### How do I save a notebook?
Like most IDEs or editors, JupyterLab has the standard “Save” and “Save As…” functions that will save a notebook in your directory on our platform. You can also download a notebook file from the File menu to save it locally.
### Can I use packages from the Professional repository in Anaconda Notebooks?
Packages available from Anaconda Notebooks are a subset of packages available from the public repo.anaconda.com repository. Installing packages from the Professional repository via tokenized access is not currently supported.
### Can I install new packages or create custom environments in Anaconda Notebooks?
You can create your own conda environments using any packages that conda can install from repo.anaconda.com. This can be achieved by following the steps in [Environments](/tools/anaconda-notebooks/notebook-environments).
### Can I use Anaconda Notebooks for work?
Anaconda Notebooks alone does not provide *commercial compliance* to its users. Customers accessing Anaconda Notebooks with Pro, Business, or Enterprise subscription tiers are permitted to use all Anaconda products for commercial use. For more details, see our [Terms of Service](https://legal.anaconda.com/policies/en/?name=terms-of-service).
### I have an organization in Anaconda.com. How can my team leverage Anaconda Notebooks?
Registered customers who are part of organizations on Anaconda.com can independently access Anaconda Notebooks. Access to Anaconda Notebooks is granted upon member role designation and registration.
### Can I control access to Anaconda Notebooks?
Yes. You can prevent your organization members from accessing AI Navigator from your organization's  If the problem persists, please raise the issue in the [Anaconda community forums](https://forum.anaconda.com) or [file a support ticket](https://support.anaconda.com/hc/en-us/requests/new?ticket_form_id=360000993773).
### My notebook is trying to import a package, but I’m getting an error.
The most common cause of errors is a lack of required package(s) installed in your environment. The default environment we provide, based on the Anaconda distribution, contains hundreds of the most common python packages for data science, but it doesn’t include everything. You may need to create a custom environment to install the package you need.
Here are a couple of steps to help resolve this:
**Make sure you have the right kernel/environment selected**
The default `anaconda-
If the problem persists, please raise the issue in the [Anaconda community forums](https://forum.anaconda.com) or [file a support ticket](https://support.anaconda.com/hc/en-us/requests/new?ticket_form_id=360000993773).
### My notebook is trying to import a package, but I’m getting an error.
The most common cause of errors is a lack of required package(s) installed in your environment. The default environment we provide, based on the Anaconda distribution, contains hundreds of the most common python packages for data science, but it doesn’t include everything. You may need to create a custom environment to install the package you need.
Here are a couple of steps to help resolve this:
**Make sure you have the right kernel/environment selected**
The default `anaconda- ### I’m registered/signed in—why isn’t Notebooks opening?
Your browser’s pop-up blocker (automatically enabled on Firefox and Safari) may have prevented Notebooks from opening.
Disable your pop-up blocker and try opening Notebooks again from Anaconda.com.
### I have upgraded from the free tier to a paid tier, but I am unable to connect to certain websites.
Unrestricted internet access is only activated in new Notebooks processes. Therefore, Anaconda recommends shutting down all sessions and restarting Notebooks from nb.anaconda.cloud to get the upgrade.
### I’m registered/signed in—why isn’t Notebooks opening?
Your browser’s pop-up blocker (automatically enabled on Firefox and Safari) may have prevented Notebooks from opening.
Disable your pop-up blocker and try opening Notebooks again from Anaconda.com.
### I have upgraded from the free tier to a paid tier, but I am unable to connect to certain websites.
Unrestricted internet access is only activated in new Notebooks processes. Therefore, Anaconda recommends shutting down all sessions and restarting Notebooks from nb.anaconda.cloud to get the upgrade.
 # Security practices
Source: https://anaconda.com/docs/tools/anaconda-notebooks/notebook-security
We do all we can to keep your Anaconda Notebooks account secure, along with the files and data you have stored in it—from fully-patched operating systems to strict internal policies determining when our support staff are allowed to look at your stuff (basically, never without your permission unless your code is causing major systemwide problems, or is probably involved in illegal activities).
## What you can do to protect yourself
Follow these best practices to help keep your account secure:
* If you’re sharing code with anyone (including on our forums), make sure that you don’t post anything with passwords in it. For workarounds, check out [Alexandra Souly’s TDS article on safe credential use in Notebooks](https://towardsdatascience.com/keeping-credentials-safe-in-jupyter-notebooks-fbd215a8e311).
* Make sure you use a highly secure password for your Anaconda.com login. Anaconda recommends using memorable but unguessable passwords of the kind [dreamed up by Randall Munroe of XKCD](https://xkcd.com/936/). There’s even a [Python package to generate them](https://pypi.org/project/xkcdpass/). A good alternative is to use completely random passwords of at least 16 alphanumeric characters and to store them in a password manager like [Keepass](https://keepass.info/).
* Verify your email address to reset your Anaconda.com password if you forget it.
* Look out for phishing. Anaconda will never send you an email asking for your password. Also, check the address bar in your browser before typing in your password!
* Don’t leave a device that’s logged in to Anaconda Notebooks unattended in a public area.
* If working with sensitive information in a public place, use a privacy screen on your device to discourage strangers from viewing your screen.
# Sharing notebooks
Source: https://anaconda.com/docs/tools/anaconda-notebooks/sharing-notebooks
When you’re ready for others to interact with your notebook, you can share a copy of the notebook via a direct link or a clickable “badge” on a webpage. This is great if, for example, you’re a teacher looking to provide an easy way for students to access notebooks from your GitHub account, or you’re a developer looking for feedback (and praise) on a project from your colleagues.
## What are notebook badges?
Using a consistent and recognizable style, badges are clickable tiles that provide direct access to a notebook. Add these badges to websites, blog posts, documentation, GitHub repositories, or social media posts so anyone can open your notebook in a new instance of Anaconda Notebooks.
Badges can be created directly in Anaconda Notebooks by clicking **Share** at the top of your notebook, as shown in the following section. This provides you with HTML for a badge, which can be copied and embedded anywhere.
You can also generate a badge for notebooks hosted on GitHub and many other sites using [this badge creator](https://37c8e61f-8cf6-4517-9652-2483b9db9016.pyscriptapps.com/9ab91dd1-e932-4f04-8255-8a2c01732b6b/latest/). For GitHub, use the **Raw** button to get a URL starting with `raw.githubusercontent.com`.
## Sharing notebooks
To generate either a direct link or a badge to access a copy of your notebook, complete the following steps:
1. Click **Share** at the top of your notebook.
# Security practices
Source: https://anaconda.com/docs/tools/anaconda-notebooks/notebook-security
We do all we can to keep your Anaconda Notebooks account secure, along with the files and data you have stored in it—from fully-patched operating systems to strict internal policies determining when our support staff are allowed to look at your stuff (basically, never without your permission unless your code is causing major systemwide problems, or is probably involved in illegal activities).
## What you can do to protect yourself
Follow these best practices to help keep your account secure:
* If you’re sharing code with anyone (including on our forums), make sure that you don’t post anything with passwords in it. For workarounds, check out [Alexandra Souly’s TDS article on safe credential use in Notebooks](https://towardsdatascience.com/keeping-credentials-safe-in-jupyter-notebooks-fbd215a8e311).
* Make sure you use a highly secure password for your Anaconda.com login. Anaconda recommends using memorable but unguessable passwords of the kind [dreamed up by Randall Munroe of XKCD](https://xkcd.com/936/). There’s even a [Python package to generate them](https://pypi.org/project/xkcdpass/). A good alternative is to use completely random passwords of at least 16 alphanumeric characters and to store them in a password manager like [Keepass](https://keepass.info/).
* Verify your email address to reset your Anaconda.com password if you forget it.
* Look out for phishing. Anaconda will never send you an email asking for your password. Also, check the address bar in your browser before typing in your password!
* Don’t leave a device that’s logged in to Anaconda Notebooks unattended in a public area.
* If working with sensitive information in a public place, use a privacy screen on your device to discourage strangers from viewing your screen.
# Sharing notebooks
Source: https://anaconda.com/docs/tools/anaconda-notebooks/sharing-notebooks
When you’re ready for others to interact with your notebook, you can share a copy of the notebook via a direct link or a clickable “badge” on a webpage. This is great if, for example, you’re a teacher looking to provide an easy way for students to access notebooks from your GitHub account, or you’re a developer looking for feedback (and praise) on a project from your colleagues.
## What are notebook badges?
Using a consistent and recognizable style, badges are clickable tiles that provide direct access to a notebook. Add these badges to websites, blog posts, documentation, GitHub repositories, or social media posts so anyone can open your notebook in a new instance of Anaconda Notebooks.
Badges can be created directly in Anaconda Notebooks by clicking **Share** at the top of your notebook, as shown in the following section. This provides you with HTML for a badge, which can be copied and embedded anywhere.
You can also generate a badge for notebooks hosted on GitHub and many other sites using [this badge creator](https://37c8e61f-8cf6-4517-9652-2483b9db9016.pyscriptapps.com/9ab91dd1-e932-4f04-8255-8a2c01732b6b/latest/). For GitHub, use the **Raw** button to get a URL starting with `raw.githubusercontent.com`.
## Sharing notebooks
To generate either a direct link or a badge to access a copy of your notebook, complete the following steps:
1. Click **Share** at the top of your notebook.
 2. Enter a name for your notebook, then click **OK**.
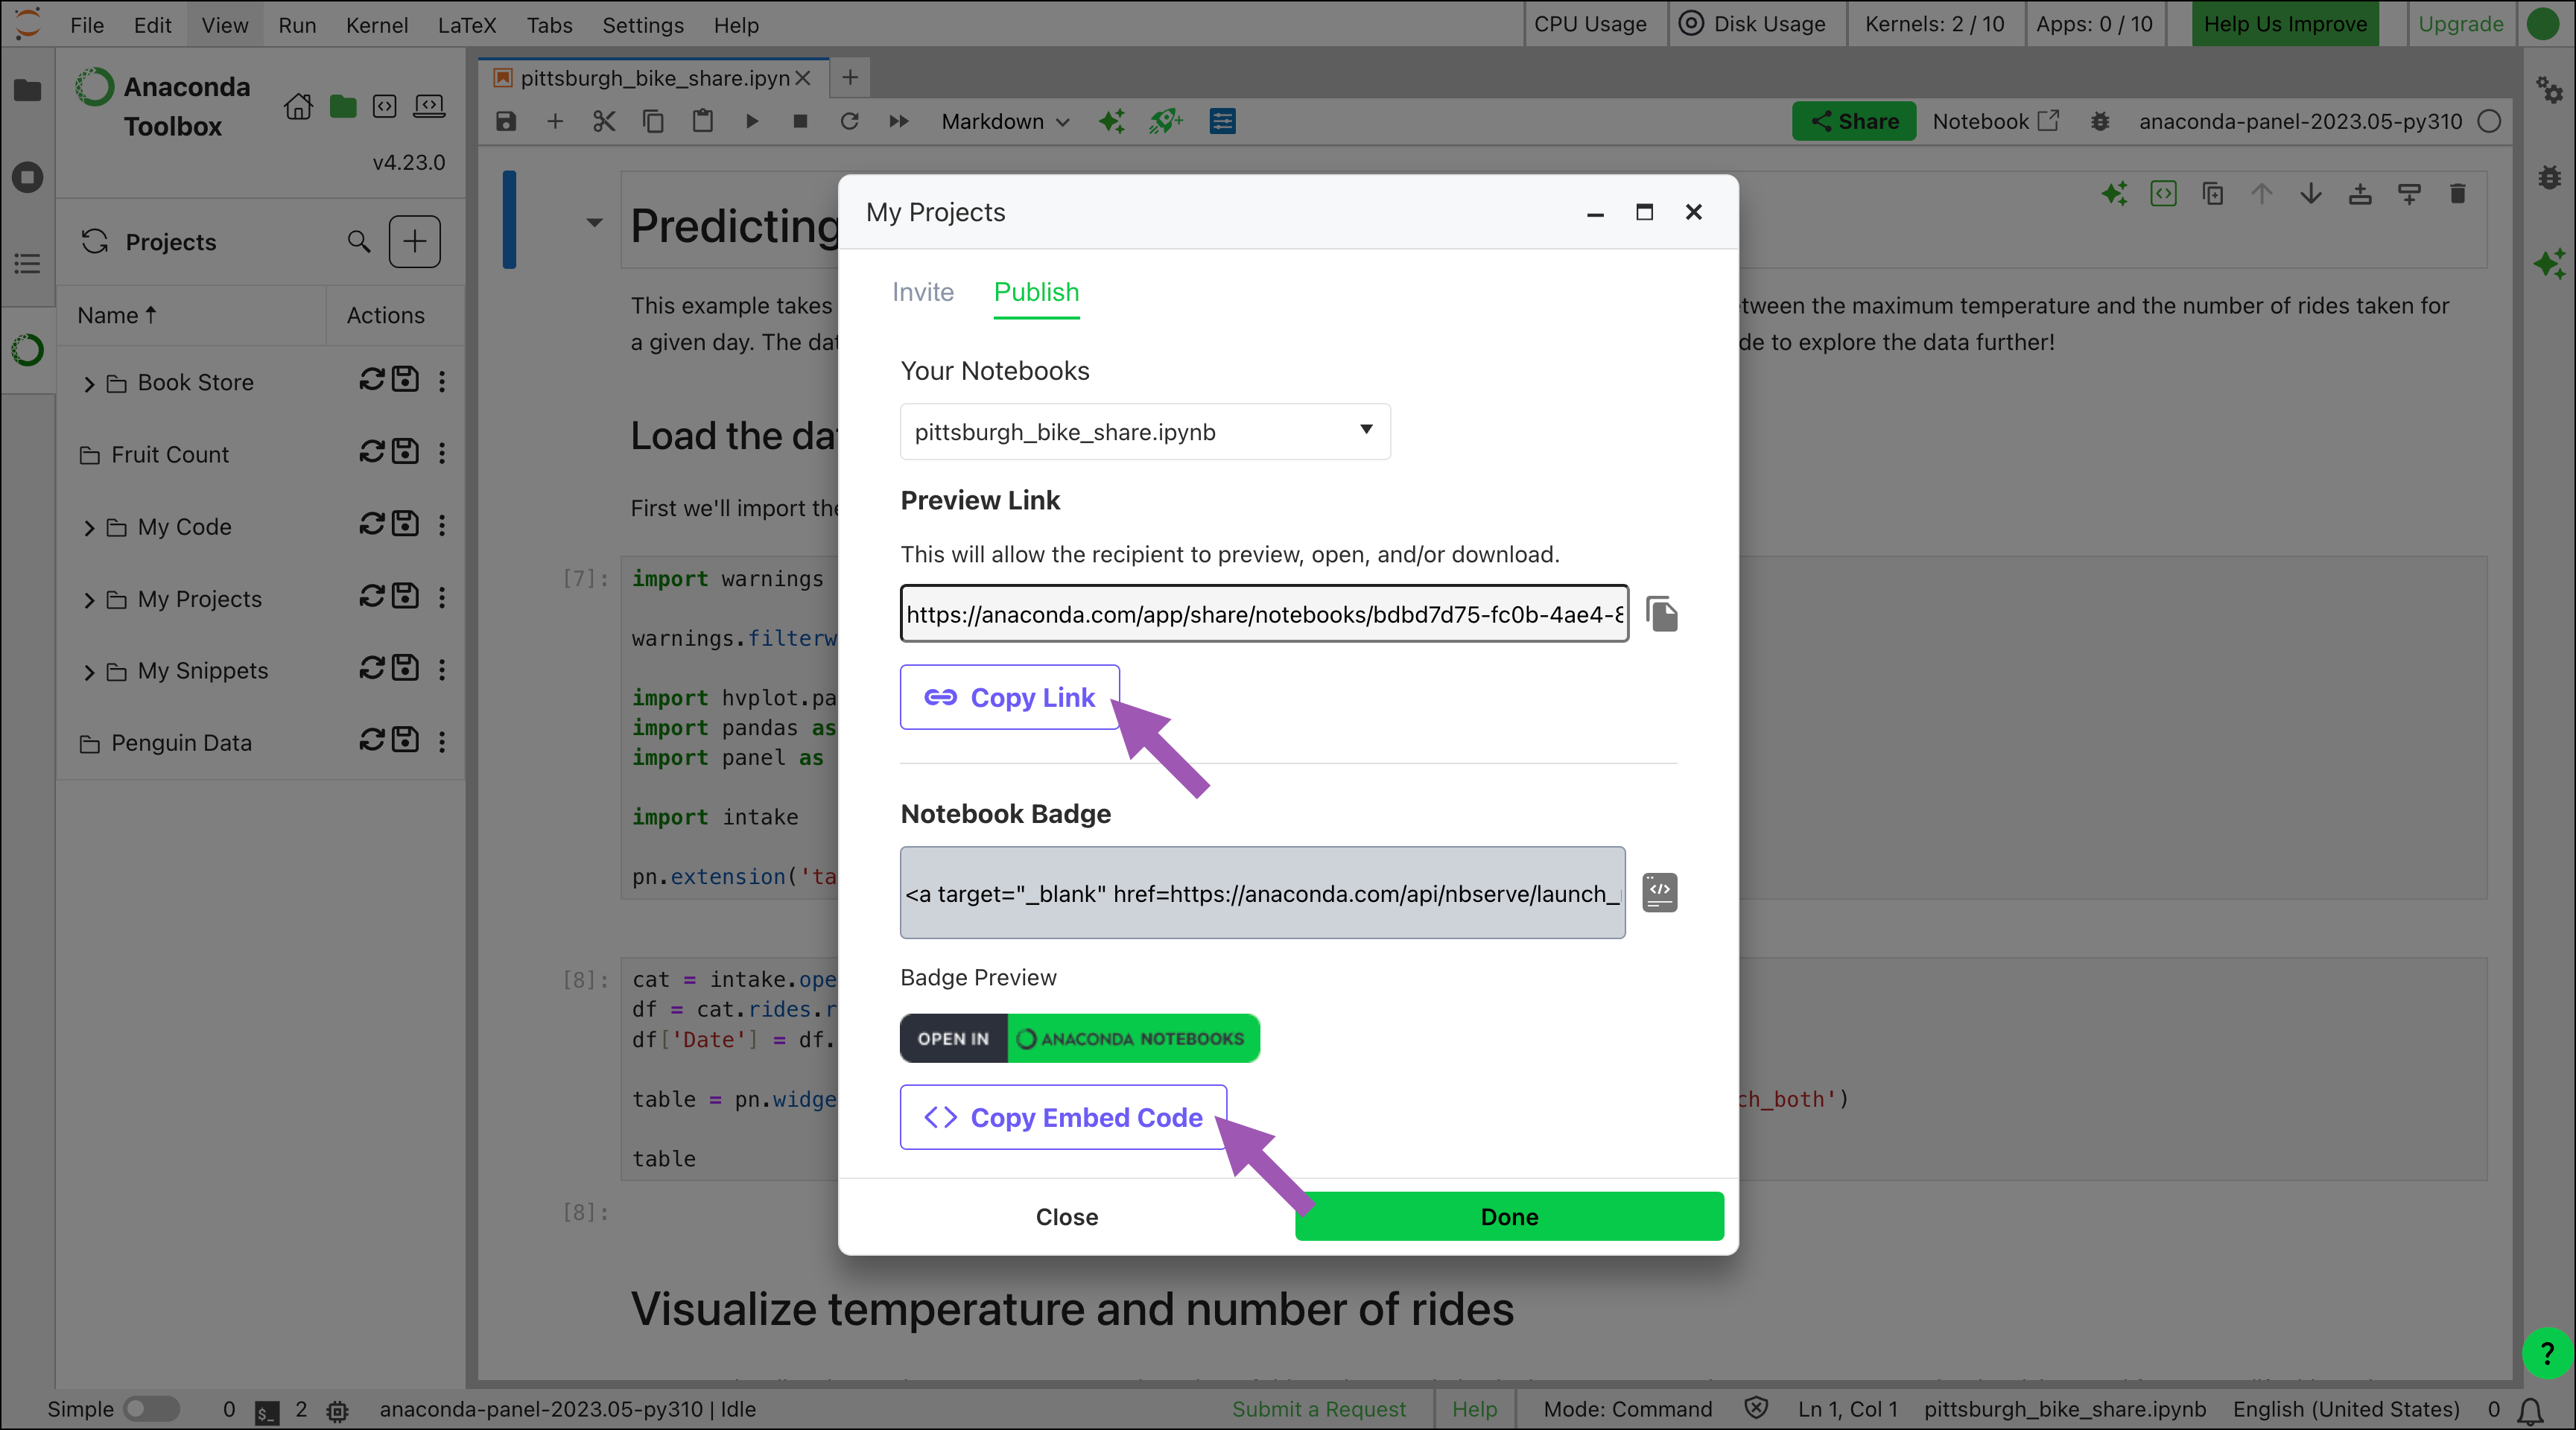 4. Click **Done** to close the dialog.
Users who click the badge but don’t have an Anaconda.com account will be prompted to create one.
## Previewing a notebook
Clicking your shared link takes users to an overview of your notebook on Anaconda.com, where they can perform the following actions:
* Open a copy of your notebook in Anaconda.com
* Download a copy of your notebook
* Preview your notebook from the **Full Preview** tab
4. Click **Done** to close the dialog.
Users who click the badge but don’t have an Anaconda.com account will be prompted to create one.
## Previewing a notebook
Clicking your shared link takes users to an overview of your notebook on Anaconda.com, where they can perform the following actions:
* Open a copy of your notebook in Anaconda.com
* Download a copy of your notebook
* Preview your notebook from the **Full Preview** tab
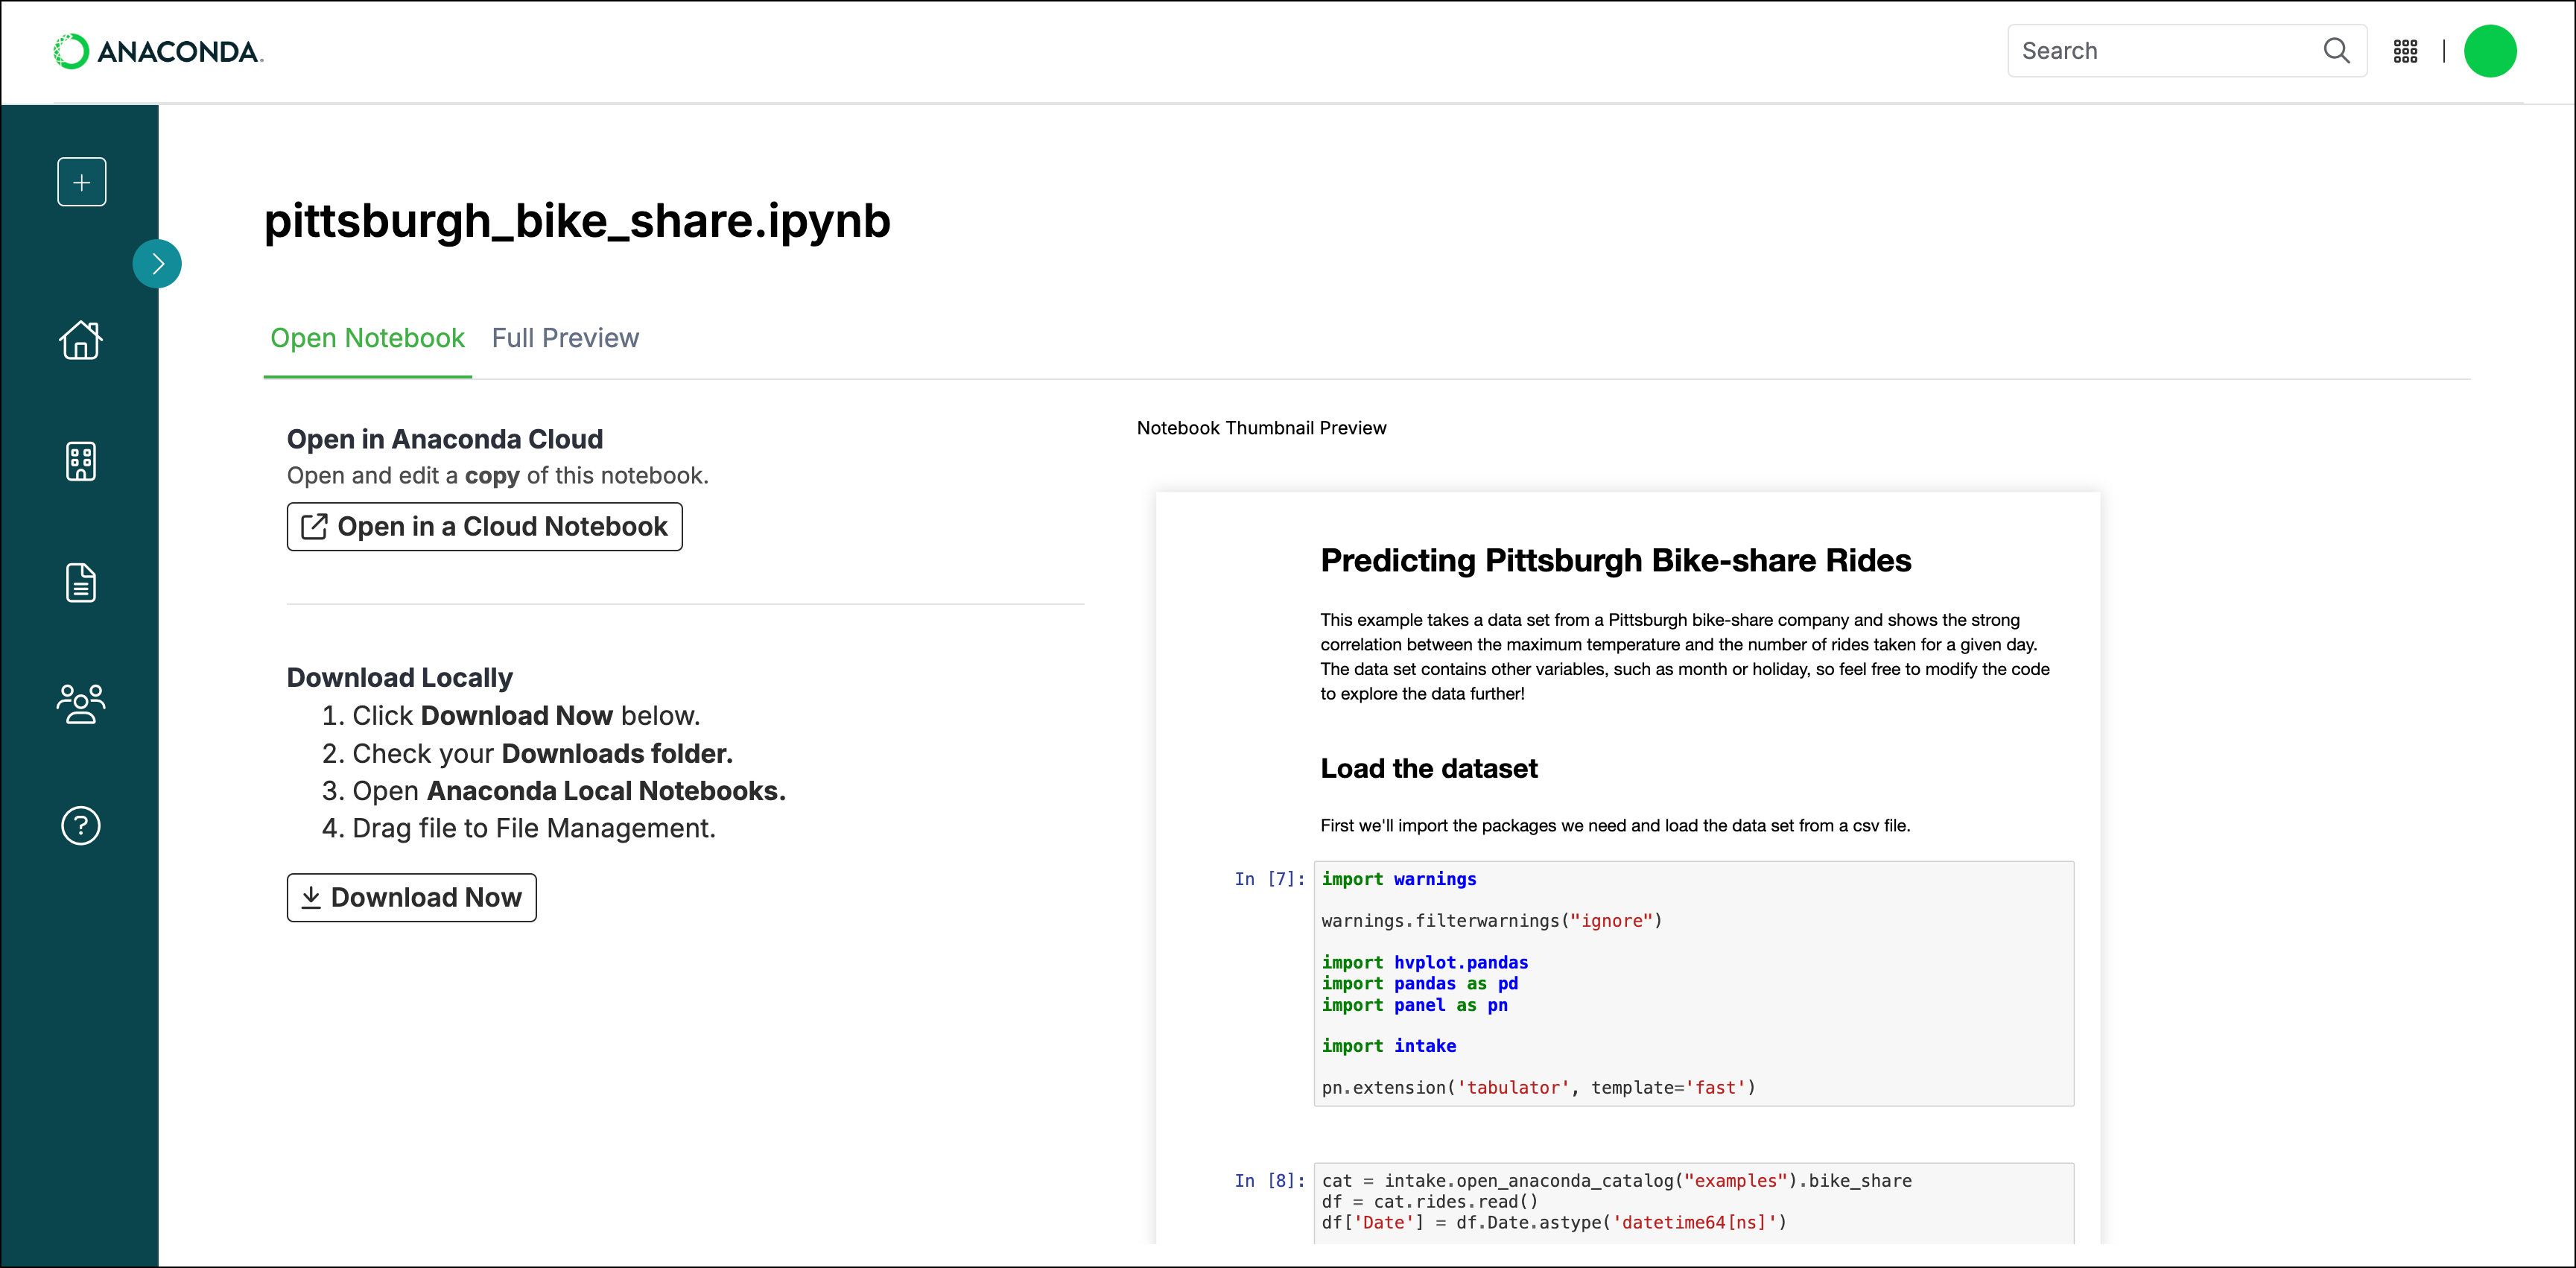 # Command reference
Source: https://anaconda.com/docs/tools/anaconda-org/commandreference
`anaconda-client` is the command line interface (CLI) for Anaconda.org, and can be used for logging in, logging out, managing your account, uploading files, generating access tokens, viewing tokens, and more!
To view the `anaconda-client` command reference, open Anaconda Prompt (Terminal on macOS/Linux) and use the following command:
```sh
anaconda -h
```
This displays the command reference for the base `anaconda` command.
To display the command reference for other `anaconda` commands, such as `login`, `search`, `upload`, and so on, use the following command:
```sh
# Replace
### Refining your search results
You can filter search results using three filter controls:
* `Type`: All, conda only, standard Python only, or standard R only
* `Access`: All, Public, Private (only available if you are logged in and have specific permissions), or Authenticated (only available if you are logged in)
* `Platform`: All, source, linux-32, linux-64, linux-aarch64, linux-armv61, linux-armv71, linux-ppc641e, linux-s390x, noarch, osx-32, osx-64, win-32, or win-64
# Command reference
Source: https://anaconda.com/docs/tools/anaconda-org/commandreference
`anaconda-client` is the command line interface (CLI) for Anaconda.org, and can be used for logging in, logging out, managing your account, uploading files, generating access tokens, viewing tokens, and more!
To view the `anaconda-client` command reference, open Anaconda Prompt (Terminal on macOS/Linux) and use the following command:
```sh
anaconda -h
```
This displays the command reference for the base `anaconda` command.
To display the command reference for other `anaconda` commands, such as `login`, `search`, `upload`, and so on, use the following command:
```sh
# Replace
### Refining your search results
You can filter search results using three filter controls:
* `Type`: All, conda only, standard Python only, or standard R only
* `Access`: All, Public, Private (only available if you are logged in and have specific permissions), or Authenticated (only available if you are logged in)
* `Platform`: All, source, linux-32, linux-64, linux-aarch64, linux-armv61, linux-armv71, linux-ppc641e, linux-s390x, noarch, osx-32, osx-64, win-32, or win-64
 You can also find commands on this page to assist you with installing the package in your environment.
 2. Select the checkboxes for the instructions you want to hide. You can also select the checkbox on the far right of any group to hide all instructions.
 3. Click **Save Changes**.
 ## Deleting a package
To delete a package and all of its versions from Anaconda.org:
1. Select the package name.
2. Select the **Settings** option.
3. Select the **Admin** option.
4. Click **Delete**.
To delete a package and all of its versions using Anaconda Prompt (Terminal on macOS/Linux), run:
```sh
# Replace
## Deleting a package
To delete a package and all of its versions from Anaconda.org:
1. Select the package name.
2. Select the **Settings** option.
3. Select the **Admin** option.
4. Click **Delete**.
To delete a package and all of its versions using Anaconda Prompt (Terminal on macOS/Linux), run:
```sh
# Replace