In this article I’m going to demonstrate how to use Snowflake Snowpark for Python to clean data, engineer the features, and train a scikit-learn model. Then I’ll build a user-defined function (UDF) using the model to make predictions directly in Snowflake over a large data set.
Setup
Snowpark for Python is currently in private preview. To request access, click here.
To begin with, I need to create a conda environment using packages from the Snowflake channel to ensure compatibility between my local Python environment and the Snowpark environment.
Since we’re going to be building a scikit-learn model and persisting it as a file, it is important to ensure the exact same version of scikit-learn is used both on my local environment and in Snowpark.
conda create -n bikeshare-snowpark python=3.8 notebook pandas matplotlib scikit-learn=1.0.2
And then finally install the Snowpark for Python package using pip.
conda activate bikeshare-snowpark
pip install snowflake_snowpark_python-0.6.0-py3-none-any.whl
Data Sets and Modeling Need
In this article, I provide a model that the director of the municipal bikeshare system can use to predict the total number of rides given forecasted weather conditions, current month, and whether today is a holiday or weekend. This model can be very useful to the director for capacity planning of the bikeshare system.
HealthyRide is the Pittsburgh bikeshare program. Data for all rides between 2016 and 2017 is available at https://healthyridepgh.com/data/. This data set has been loaded into Snowflake as `all_rides`.
Daily weather data in Pittsburgh was gathered from NOAA and loaded into the table `daily_weather`.
Prediction Goals and Feature Engineering
My goal is to build a model that can predict the number of bike rides given weather conditions.
For example, today is a weekday in May, and the forecasted maximum temperature is 80 degrees.
Preparing Training Data
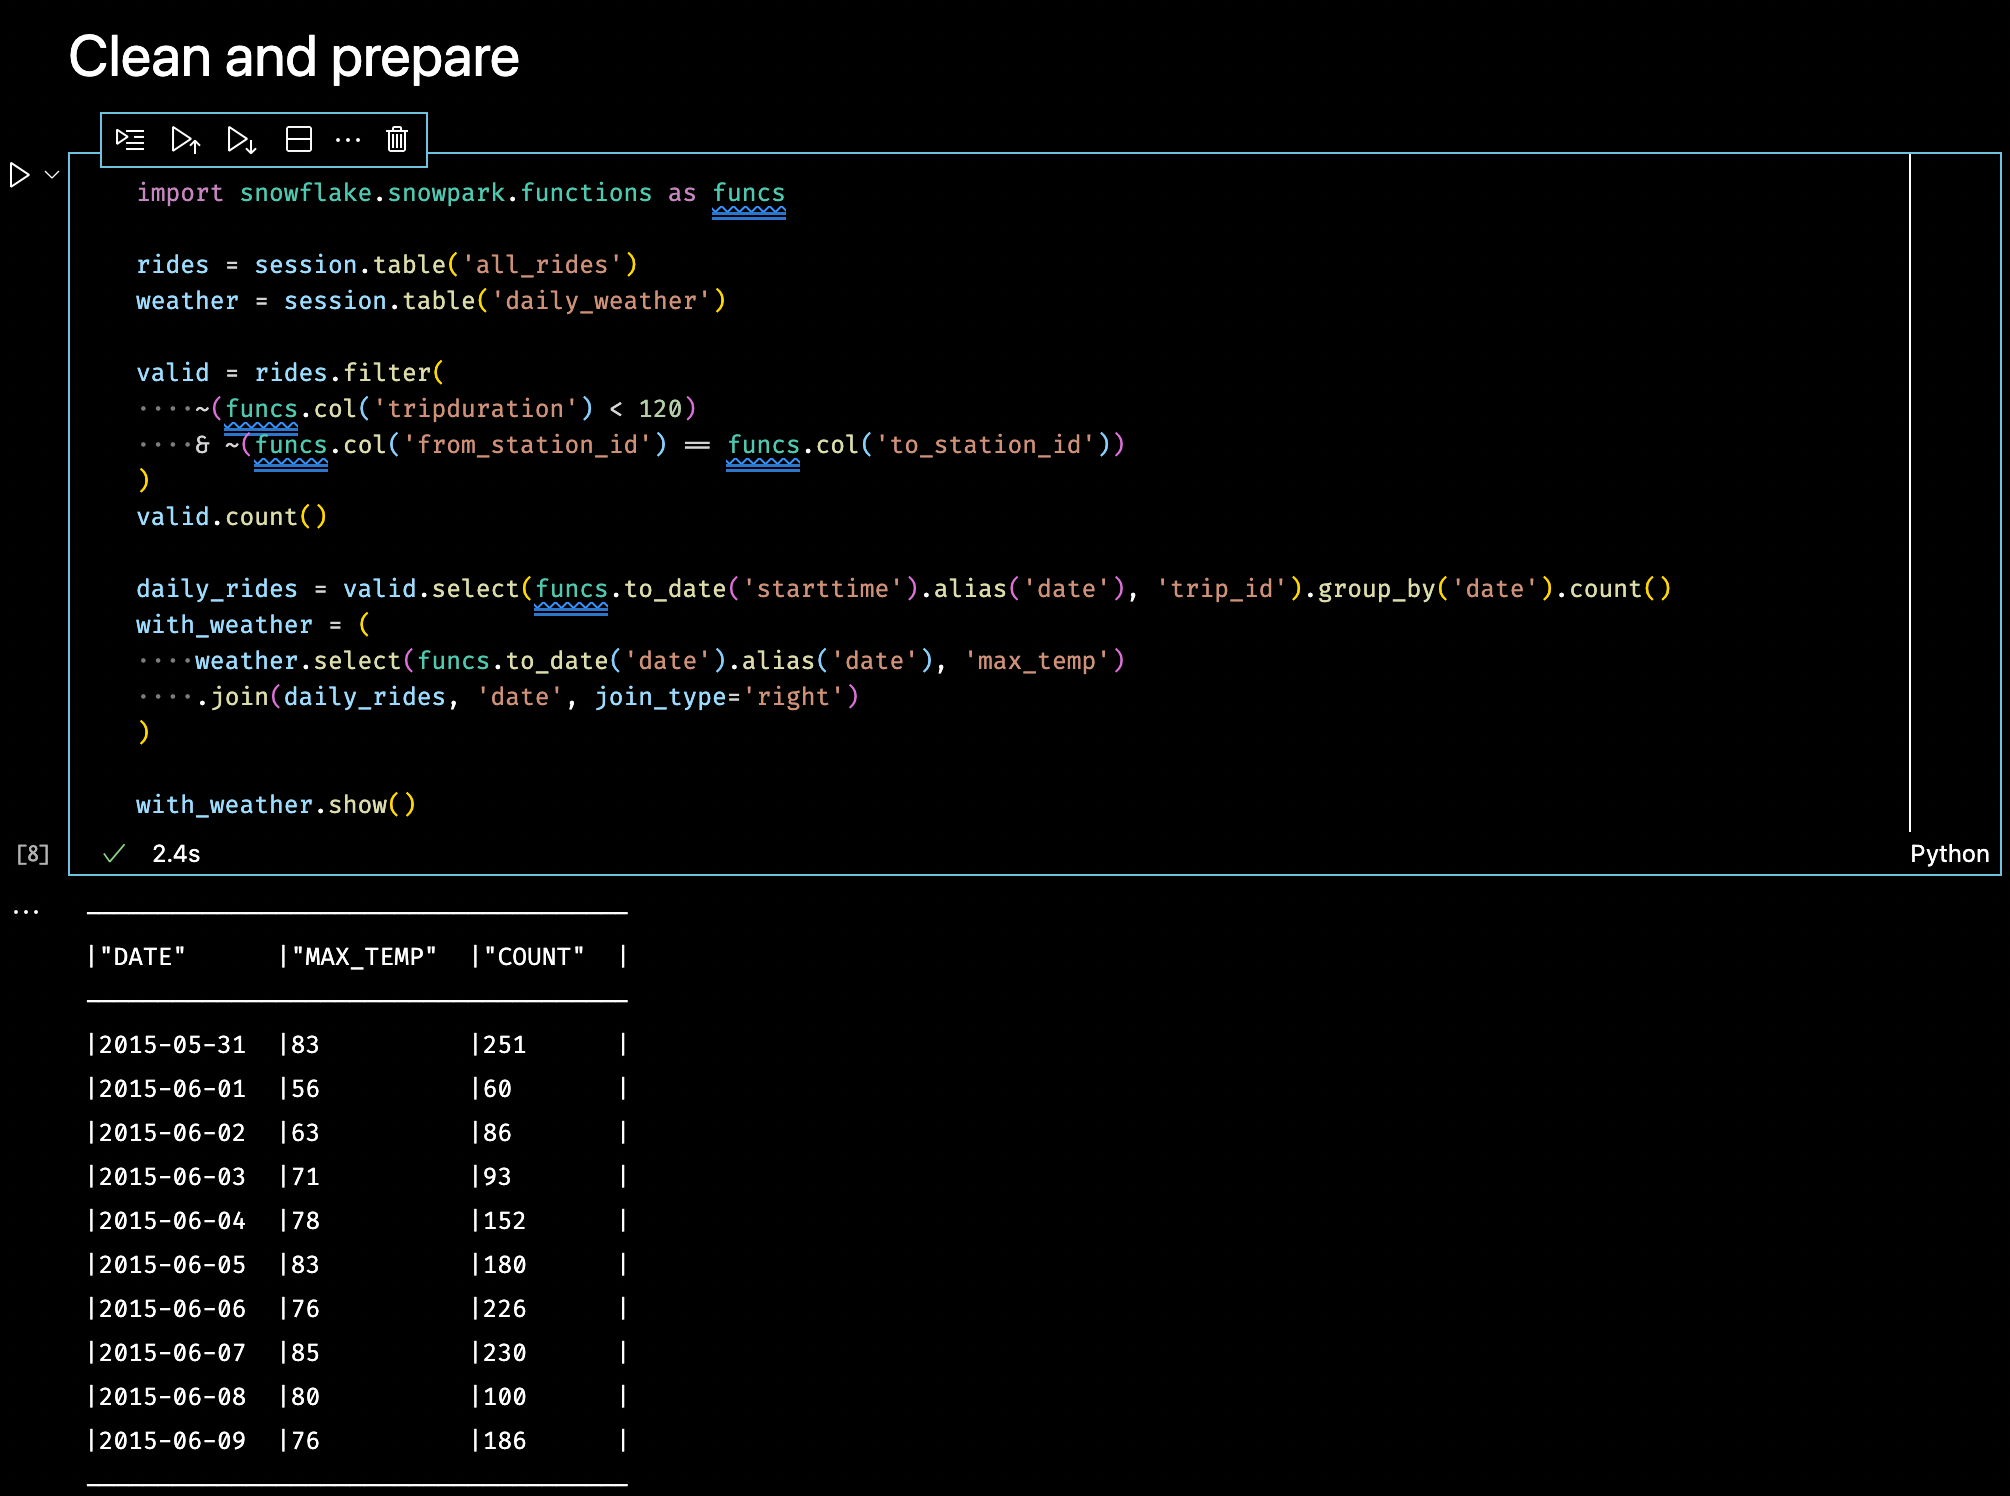
The first thing I need to do is join the bike ride and weather tables to provide a daily count of the number of rides with the maximum temperature.
Here I’m using the Snowpark DataFrame functions to:
- Clean the data for rides that were both short and where the bike was returned to the same station
- Extract the date from the portion of the start time of the ride
- Group by and count the number of valid rides per day
- Finally, join with daily weather data
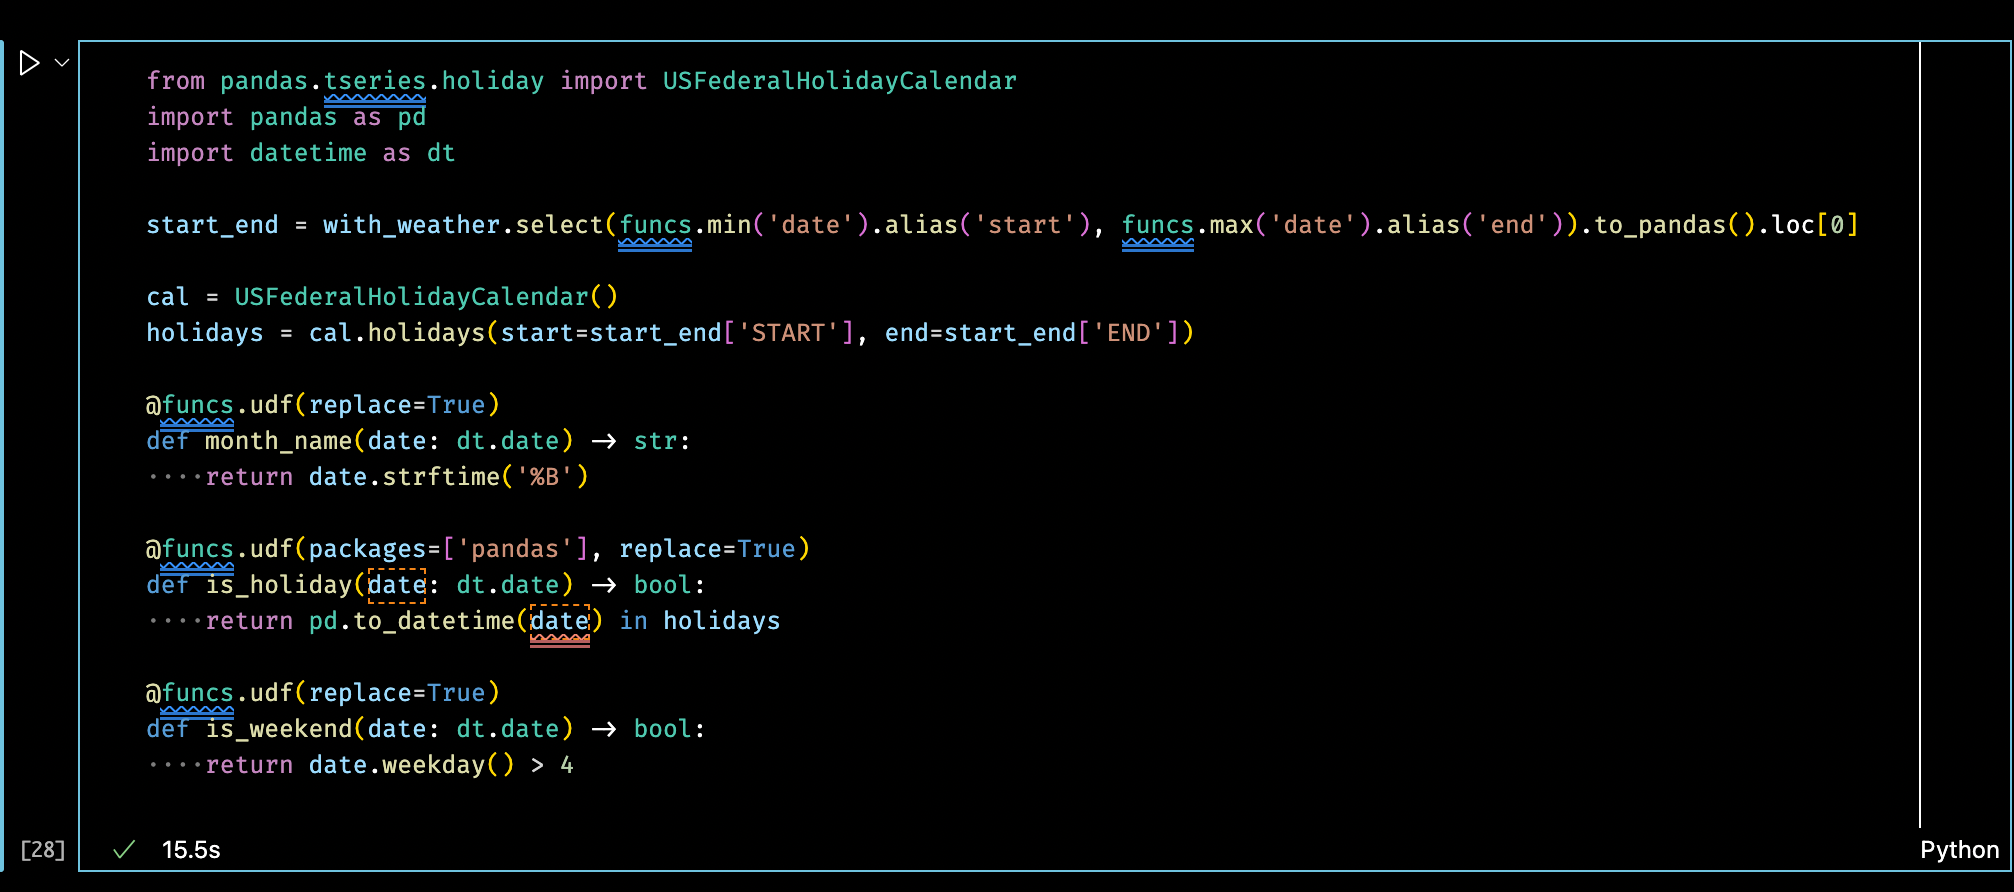
The remaining features will be engineered from the date column. I’ll use Python UDFs over each row to extract the name of the month, and Boolean values for whether the date is a weekend or a holiday.
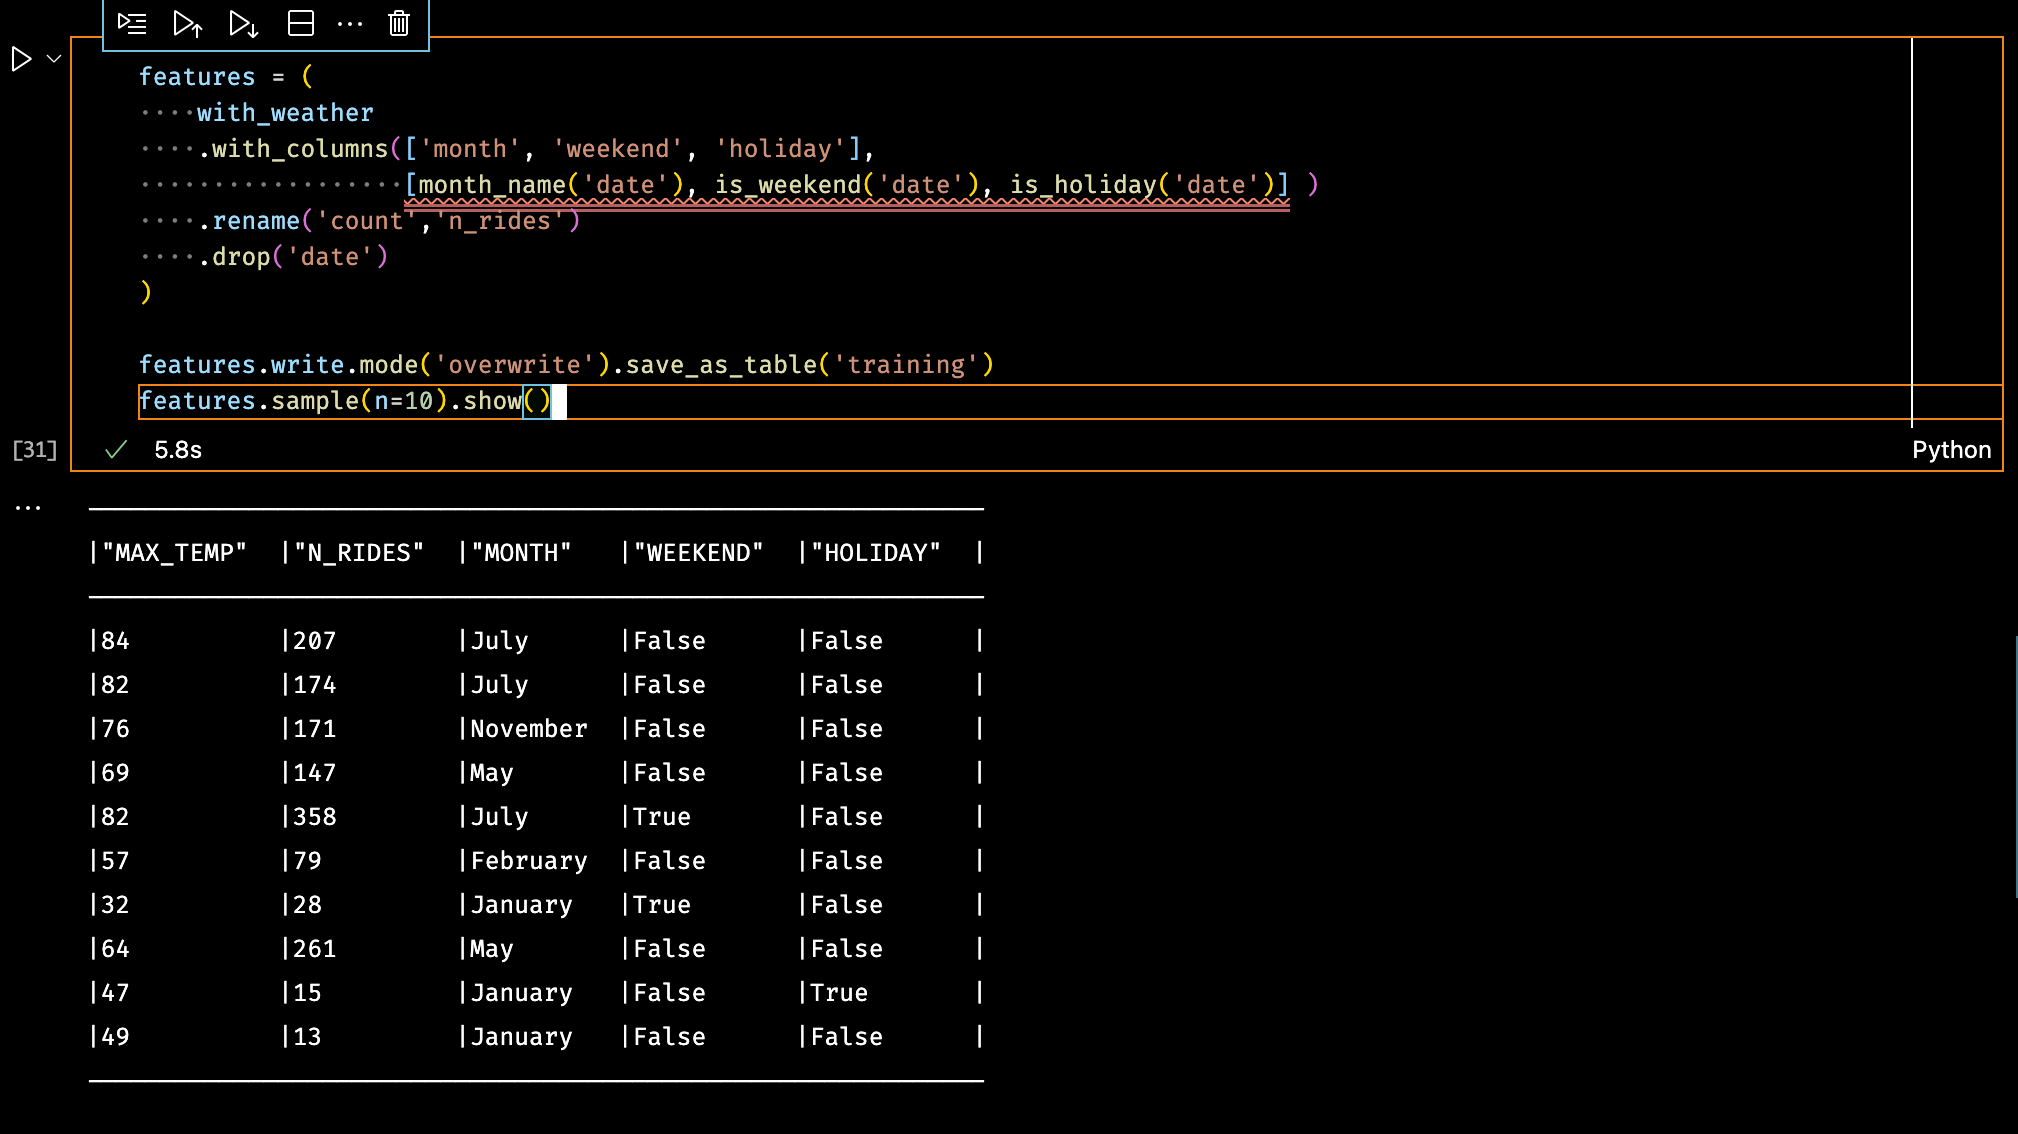
And finally the full training data set table is constructed by calling the UDFs over the `date` column and writing the result back to Snowflake.
Fitting the Model
Now that all the training data is ready and stored in a Snowflake table, I’ll take a portion of it to train the machine learning model using scikit-learn.
To do this I use the Snowpark DataFrame sample_by() function, which allows me to perform stratified sampling over the table to ensure that my training data set is an accurate representation of the full data set.
In the screenshot below, I’m using sample_by() to sample evenly over the `month` column to ensure 1/3 of the rows from every month are extracted into the Pandas DataFrame I’ll use to train the scikit-learn model.

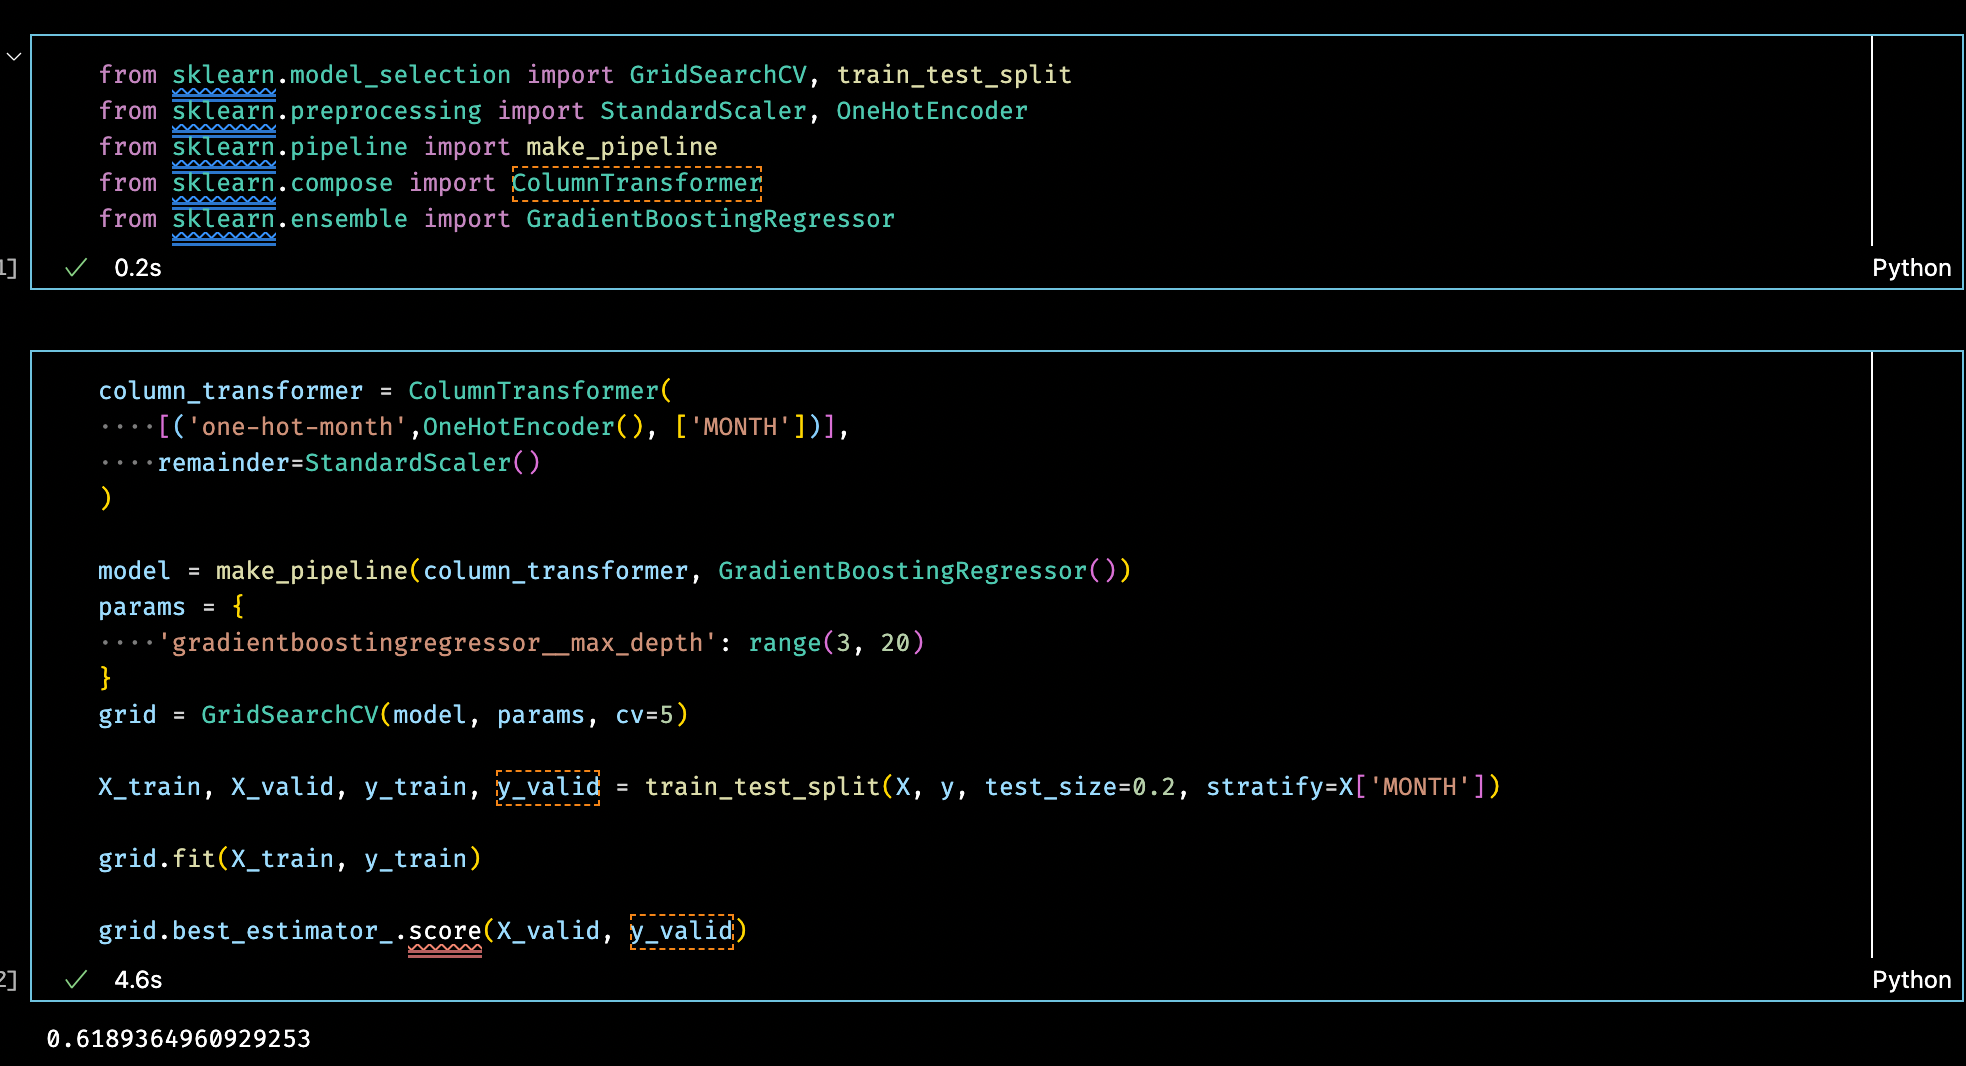
Now that I have `X` and `y` I’ll train a scikit-learn regression model to predict the number of bike rides given the maximum forecasted temperature, the month, and whether the day is a holiday or weekend.
The model needs to incorporate two preprocessing steps, first to one-hot encode the strings in the `month` column and apply the Standard Scalar to all other columns.
By applying a grid search over the max depth parameter in the Gradient Boosting Regressor, I was able to get a validation score of 0.62.
Plotting the feature importances validates my hypothesis that the maximum temperature is the largest factor in predicting the number of rides, with smaller contributions from weekday and month columns.
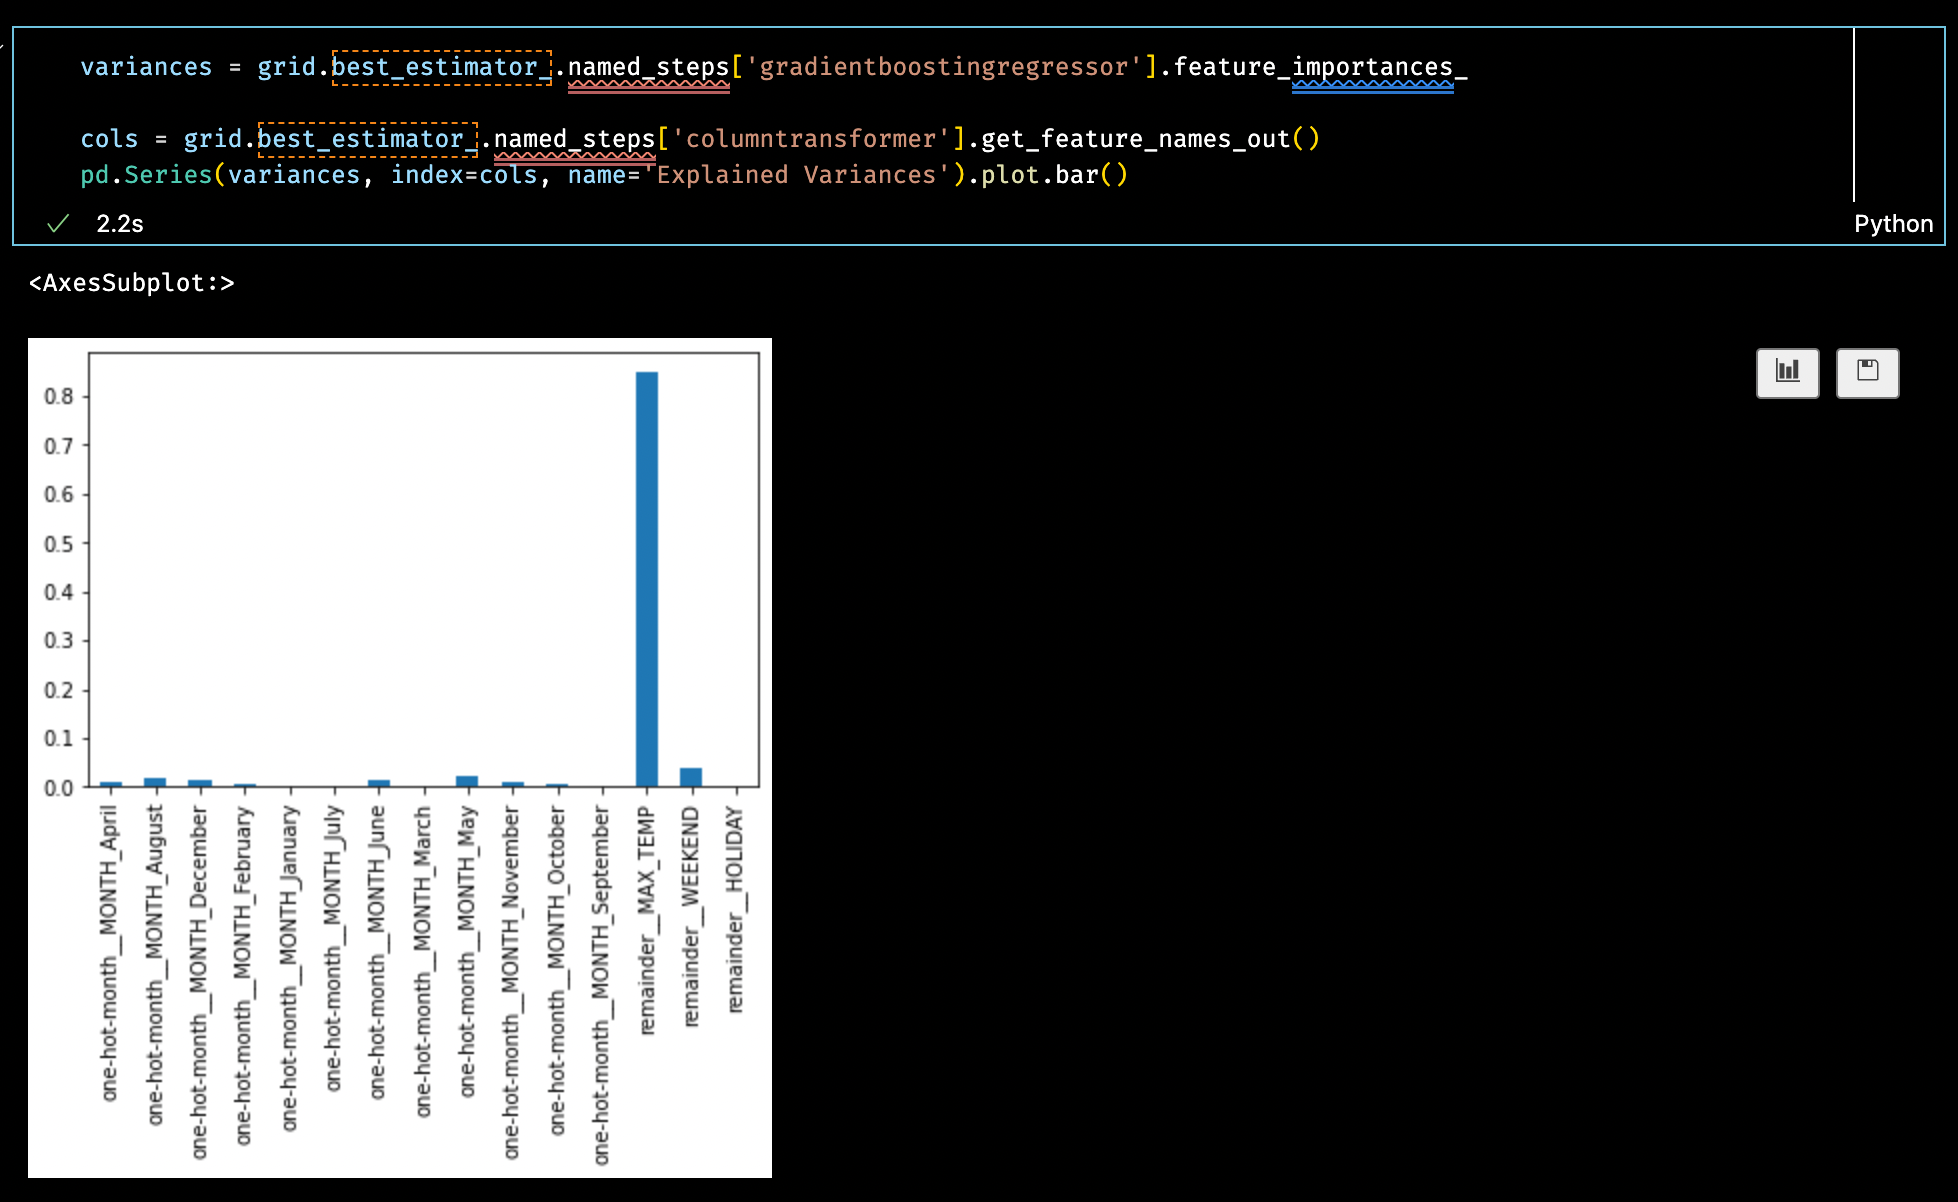
The final step is to save the optimized model to a local file. I’ll use this file in the next section to build a UDF to use the model to predict the number of rides.

Registering the Prediction UDF
Now that the model has been trained and saved, I’ll build a UDF on Snowflake so that I can use the model to predict the number of rides using the full training set I prepared earlier.
To do this I’ll use pandas_udf. The prediction function expects a DataFrame with four columns and will return a pandas Series for the predicted number of rides.
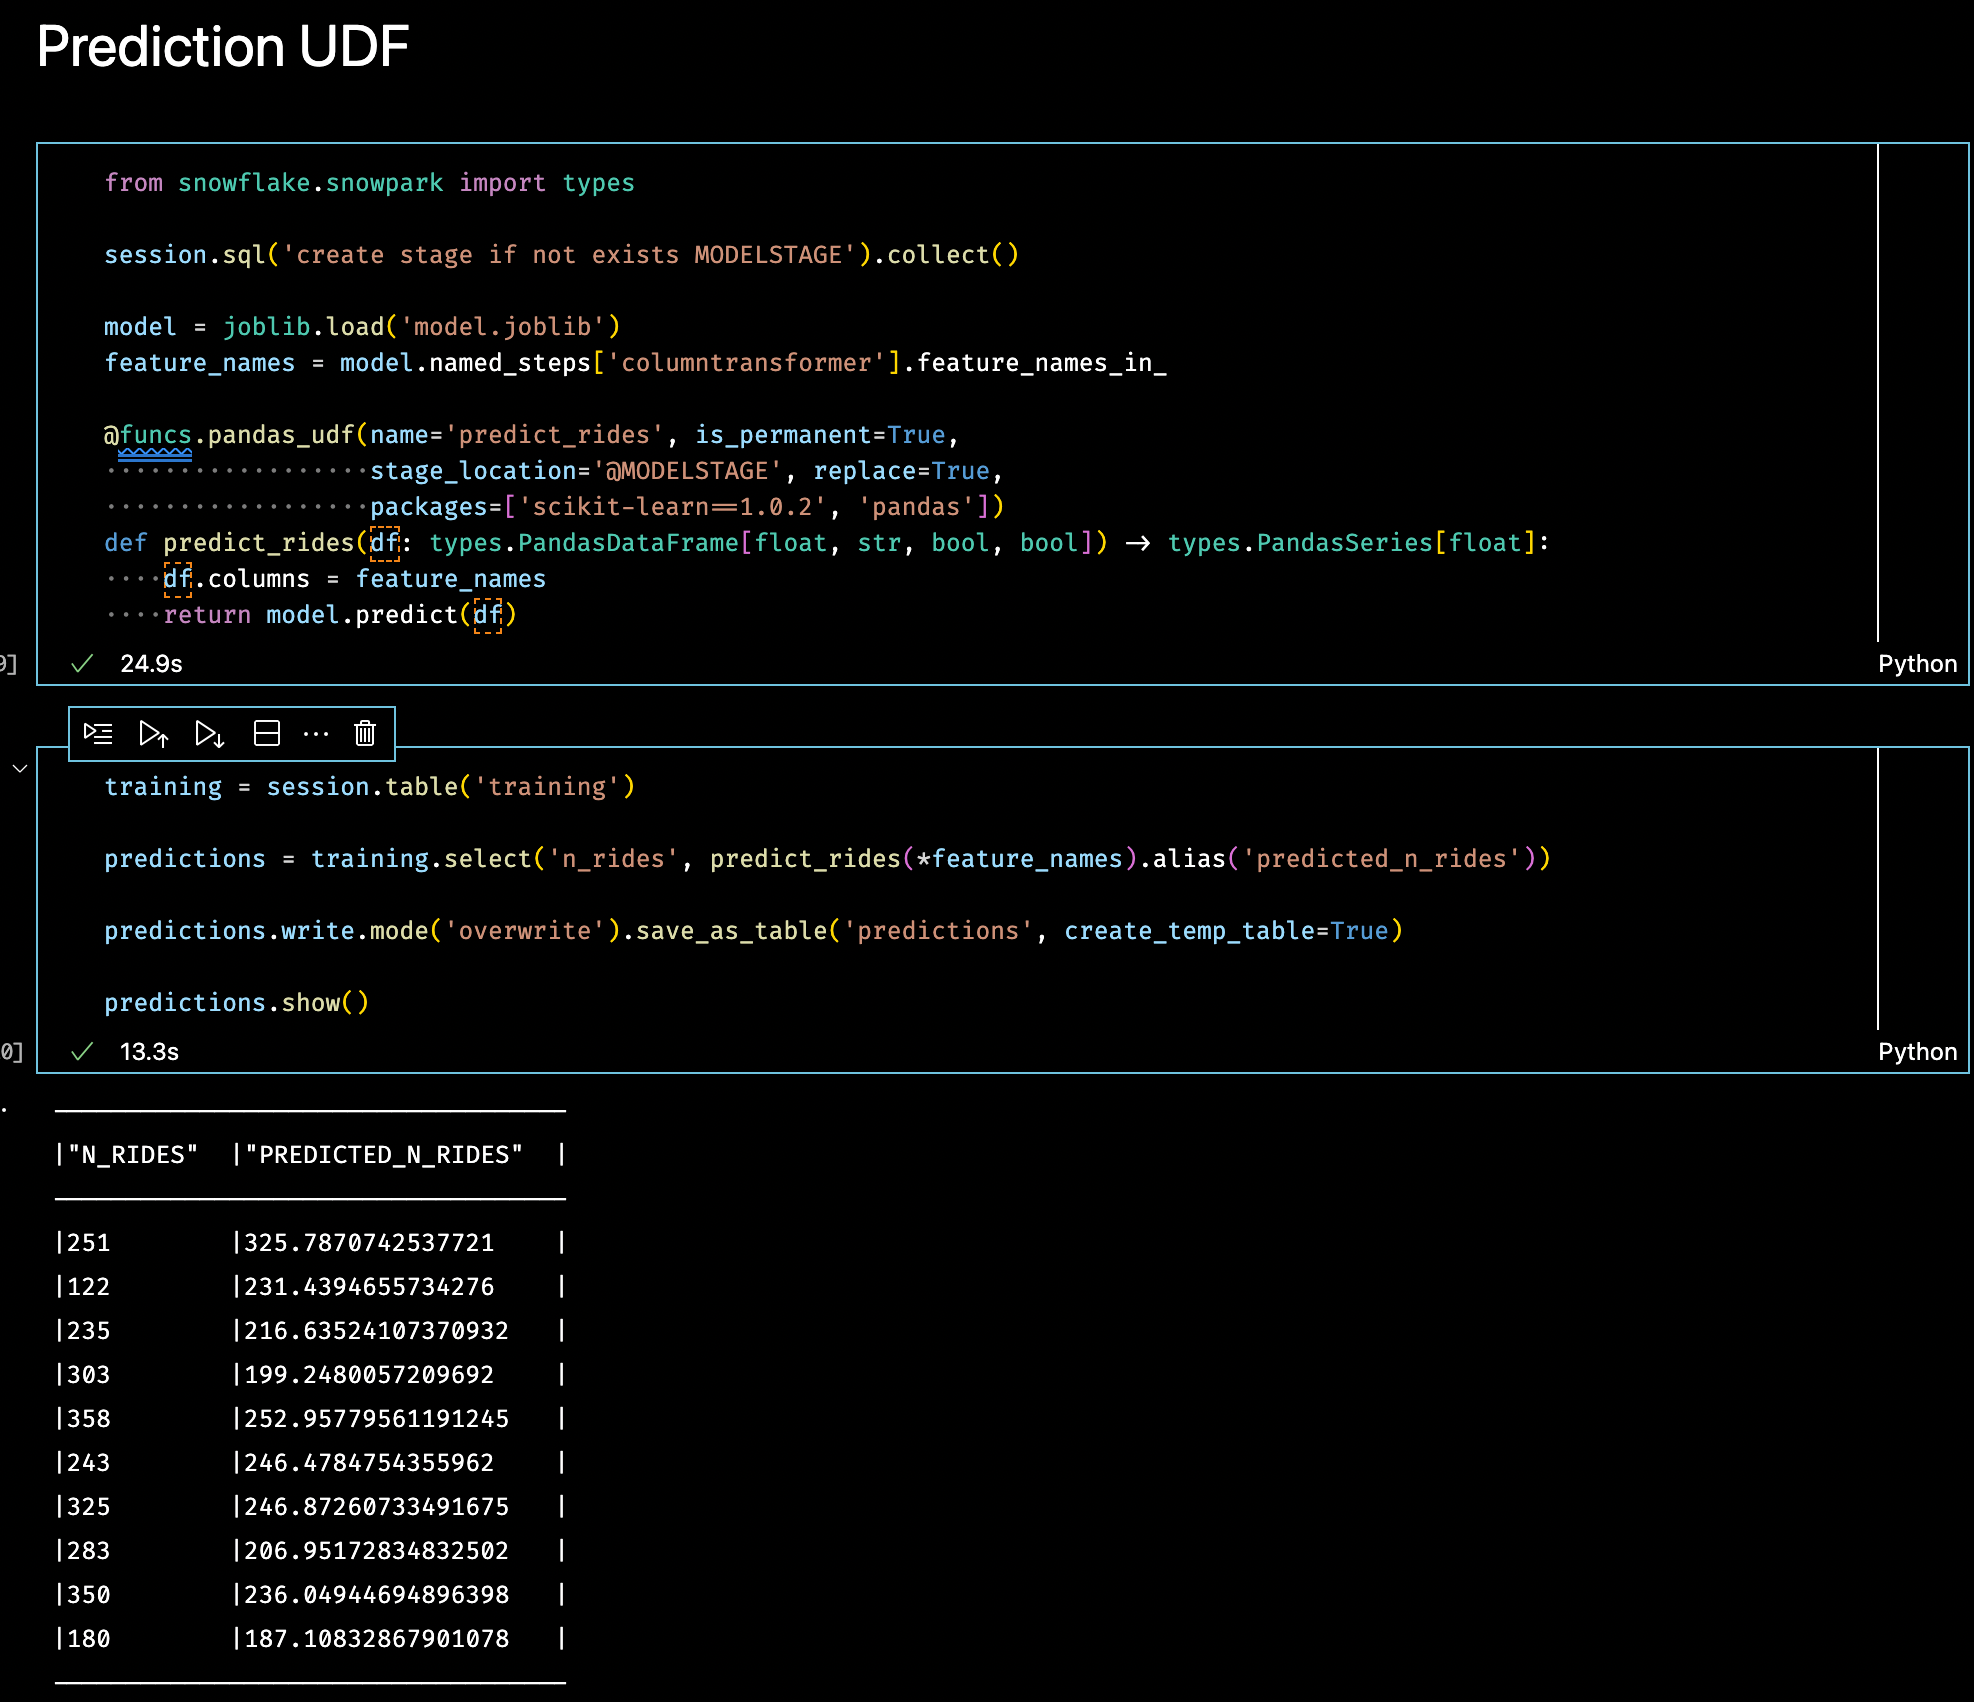
Important aspects of the permanent prediction UDF are:
- Create a stage where the uploaded code will be stored; here I’ve called it `MODELSTAGE`
- Load the model file into memory and ensure that I have the input feature names in the correct order by using the input feature names from the one-hot-encoding preprocessor
- Declare the exact version of scikit-learn as 1.0.2
- Use the Snowflake types PandasDataFrameType and PandasSeriesType as type hints to provide fine-grained typing per column
Now that the UDF has been registered, I can use the Python function to make predictions over the whole training set as Snowpark DataFrame.
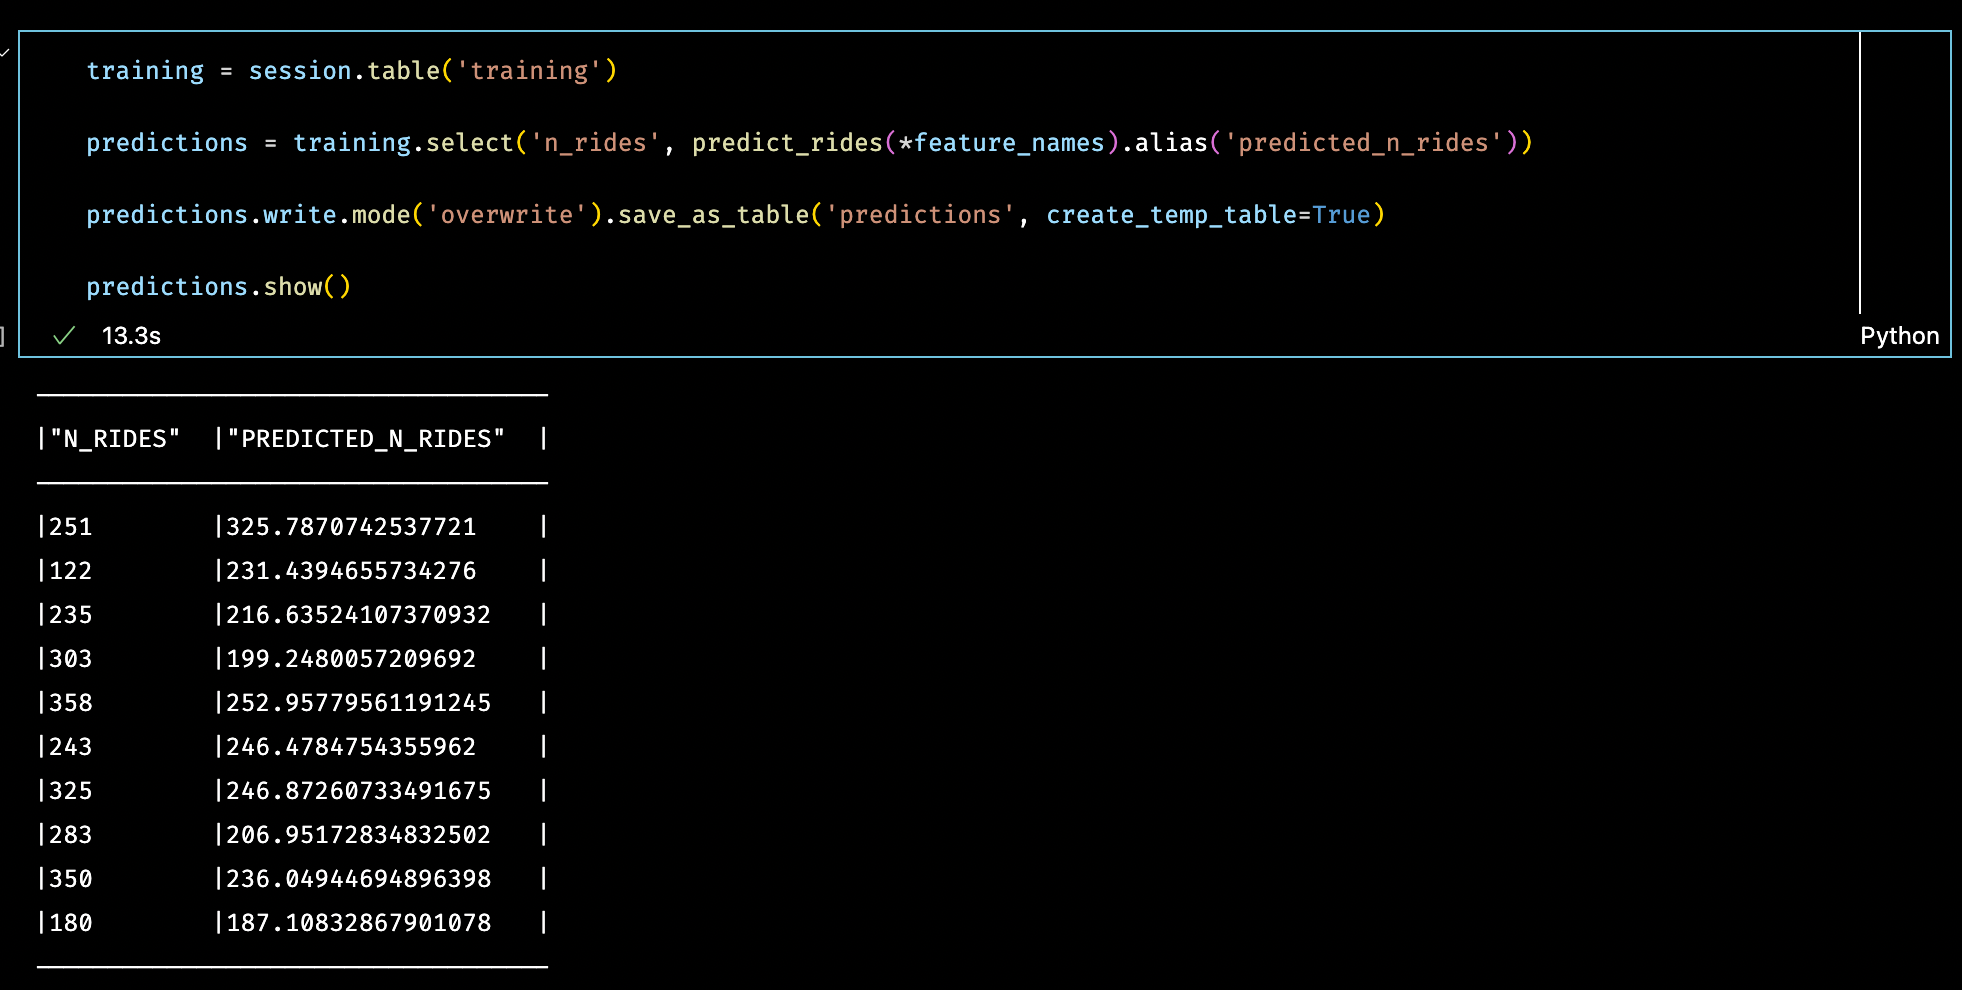
And finally, since I save the output of my prediction UDF to a new table in Snowflake, I will use the `regr_r2` to compute the r-squared score between the actual daily number of rides and the predicted number of rides from the scikit-learn regression model.

Download and Try It Yourself
The Jupyter Notebooks I used to build this demo, including ingesting data into Snowflake, are available for download from Anaconda.org.
Follow the directions above to prepare your local conda environment and request access to Snowpark for Python.
About the Author
Albert DeFusco, Anaconda
Albert DeFusco is a principal product manager, data science, at Anaconda.
